seiran01 Posted March 7, 2014 Share Posted March 7, 2014 Well ADHD got me again, so sue me, this makes kit # 29 in progress. Have started building Wingnut's Fok. D.VII (OAW) with the goal of having it done no later than April 25th. The large local contest on the 26th has the WWI theme and I plan to take all of my completed wingnuts kits to display. This one will be the Sieben Schwabben (7 Swabians), available on this wingnuts decal sheet. Lozenge decals will be Aviattic and I can tell you, boy do they look beautiful on the paper. Progress so far: lots of thin strips of masking tape and preshading of some fuselage parts. Wings are painted now in Tmaiys XF-57 Buff. Ailerons will be a slightly different shade to vary up the finished look of the fabric once the decals are on. 4 Link to comment Share on other sites More sharing options...
mammut08 Posted March 7, 2014 Share Posted March 7, 2014 Hi Seiran01, Be warned, the buff undercoat will dramatically darken the Aviattic decals. If this is what you intend, then your pre-shading will look great. If not, then you might go with a gloss white undercoat. I would also strongly suggest that you use gloss paint for your basecoat. I think the Aviattic lozenge looks fantastic, but the film can be a bit tricky. For my first try, I used Tamiya flat white with a gloss coat (Future) and I had problems with silvering. On my second try, I used Tamiya gloss white with an additional gloss coat and all went great. I think the problem is that the Aviattic film works best with a super smooth surface. Flat paint, even with a gloss coat is still bumpy. Anyway, I hope this is of some help - you've picked a great subject. Dave 1 Link to comment Share on other sites More sharing options...
seiran01 Posted March 7, 2014 Author Share Posted March 7, 2014 Thanks for the advice, Dave! I definitely plan to do a gloss coat over the paint before decals go on, I'll reconsider my base coat also (maybe will do one lower wing over Buff and if it's too dark, that can be a newer or older piece of fabric Link to comment Share on other sites More sharing options...
mammut08 Posted March 7, 2014 Share Posted March 7, 2014 You might experiment with one of the spare wingtip decals - there are several extras. I have seen Richard post elsewhere that his lozenge decals are intended for use with a white base and anything else throws off the colors from what they should be. That said, I have seen at least one build with a buff (deck tan?) undercoat and although the lozenge was darker, it did look ok. Dave 1 Link to comment Share on other sites More sharing options...
aviattic Posted March 7, 2014 Share Posted March 7, 2014 Quite right Dave - seven years of intense study and trials went into getting those colours accurate and gloss white will reflect those colours as intended - gloss anything else will alter them to the modellers personal taste and heavy pre-shading will look too "over cooked", I've seen builds using all sorts of techniques - my own preference is "simple is best"...but glossing your primer is paramount! Best wishes, guys, Richard (Aviattic) Link to comment Share on other sites More sharing options...
seiran01 Posted March 7, 2014 Author Share Posted March 7, 2014 Thanks for the input also, Richard. I was just playing around with a test wingtip (underside) and it didnt look bad over the buff color at all, but I'm going to paint a light coat of gloss white over the buff as i think i want to make this build a fairly clean one with minimum weathering. 1 Link to comment Share on other sites More sharing options...
rkranias Posted March 7, 2014 Share Posted March 7, 2014 what would Snow White say? look forward to see this as well as your plethora of WNW builds for 26 April. Link to comment Share on other sites More sharing options...
Administrators James H Posted March 7, 2014 Administrators Share Posted March 7, 2014 Now this is one I really can't wait to see done. I have this scheme in mind to do myself, so it's gonna be interesting to see you tackle this one. Link to comment Share on other sites More sharing options...
seiran01 Posted March 8, 2014 Author Share Posted March 8, 2014 I can't wait either, James. Here are more parts painted. These will be lightly weathered as i painted the green too heavily over the fuselage parts. 3 Link to comment Share on other sites More sharing options...
Dave J Posted March 9, 2014 Share Posted March 9, 2014 Off to a cracking start Mikey! 1 Link to comment Share on other sites More sharing options...
seiran01 Posted March 9, 2014 Author Share Posted March 9, 2014 Little update, the cowl and stabilizer parts have been painted with tamiya XF-9 (Hull Red), with a bit of red added in to the mix. Instructions call for plain XF9 which looked too brown to me. Most of yesterday was spent playing with my Hasegawa Shiden-Kai 3 Link to comment Share on other sites More sharing options...
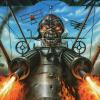
seiran01 Posted March 13, 2014 Author Share Posted March 13, 2014 Not as much progress this week as I had hoped but the basic painting of the engine is mostly complete as well as the ammo and spent ammo bins. I didn't even see the ejector pin marks in the spent ammo bin until i looked at the zoomed in photo, so these will be cleaned up as well as some touch-up aluminum painting on the feed chutes. Engine was painted completely in Tamiya semi-gloss black and then masked to spray Alclad dull aluminum. I put some Tamiya panel line accent into the recesses which is really just a super-thin enamel. The wavy shading effect you see half way up the crankcase is a result of the accent soaking in to the paint instead of staying in the recesses. Not the effect I wanted, but i kind of like it! Will use some other sort of wash when I go to dirty up the engine a bit. 1 Link to comment Share on other sites More sharing options...
seiran01 Posted March 25, 2014 Author Share Posted March 25, 2014 Alright, engine is complete! I may have slightly overdone the AK oil stains and engine grime but hey, I wanted it dirty! 4 Link to comment Share on other sites More sharing options...
Paulster Posted March 26, 2014 Share Posted March 26, 2014 Looks like it could start right up! Link to comment Share on other sites More sharing options...
seiran01 Posted April 7, 2014 Author Share Posted April 7, 2014 Question for those in the know, need your input on this! As this is an OAW-built D.VII, would it be more appropriate to use the Albatros logo instead of the Fokker logo, if i were to make a display base for this? I have the 1:1 scale decals for both companies from wingnut and they're so nice that they deserve to be used in a nice display. Progress: Well the lower wing is 3/4 decalled with the Aviattic sheet and I absolutely love how this has turned out so far! I am, however, VERY disappointed in myself - I made a very amateur mistake and didn't put a clear gloss coat on the wing before decalling. The top wing looks perfect, however if you look at the photo of the bottom wing, the wing at the bottom of the photo is the underside of the completed wing. Air bubble city, and this all happened in the process of applying the topside decals. It actually looks significantly better than it did, now that I've put a ton of microsol on the underside and stabbed the decal with an x-acto several hundred times. Won't be a contest winner but it'll show up on the contest table anyway with any and all other WNW kits i can finish. 2 Link to comment Share on other sites More sharing options...
Drdave Posted April 7, 2014 Share Posted April 7, 2014 Give it the hair dryer treatment then rubdown with a Q tip. It does work. Link to comment Share on other sites More sharing options...
rkranias Posted April 7, 2014 Share Posted April 7, 2014 sorry to hear about your faux pas Mike. may the WNW Gods be with you on repair! Link to comment Share on other sites More sharing options...
mammut08 Posted April 7, 2014 Share Posted April 7, 2014 Mike, Take a deep breath and do not despair, try making slices lengthwise through each bubble and then you might run some solviset into the incisions. Don't touch the decals after for a few hours. This should settle things down nicely. Conversely, you might run some future into the incisions and se if that will fix things up. Dave Link to comment Share on other sites More sharing options...
seiran01 Posted April 7, 2014 Author Share Posted April 7, 2014 Thank you guys, I did another stab/slice/microsol session last night before going to bed and I'm hoping that it will have helped smooth the decal out more by the time I get home tonight. Will see about trying a hair dryer from there - do i need to do anything first such as wet the decal or just hit it with the heat and hope not to overdo it? Link to comment Share on other sites More sharing options...
Drdave Posted April 7, 2014 Share Posted April 7, 2014 Heat then rub. Link to comment Share on other sites More sharing options...
seiran01 Posted April 10, 2014 Author Share Posted April 10, 2014 Alrighty, minus a final clear coat, wings are DONE! I'm very pleased with how these turned out, even with the lower wing underside goof. I hit it with a few more applications of microsol and it helped a bit more. Good as it's going to get. Now to just to the darn interior! One thing I did find with the Aviattic decals - i found the stretched a little as i went along with the setting solution and as a result there are one or two wing ribs that dont line up to the tapes and one or two areas where the lozenge from the next decal over mashes and gives the effect of a very dark green rib tape. This said, I have no complaints whatsoever with the product, it's simply a learning curve for me and I will absolutely be using their decals again! Last photo is just to compare the decals (over a weathered tamiya Buff base instead of the recommended white) to the wingnut kit lozenge colors. 3 Link to comment Share on other sites More sharing options...
aviattic Posted April 12, 2014 Share Posted April 12, 2014 Great looking Fokker coming along nicely.... Have just released a new (and final) raft of 1/32 Fokker wing sets with coloured rib tapes - all on website next week. As we've gone along small tweaks and improvements have been made - the decals are now divided into more pieces, so that any slight stretching is compensated for as apply. But I must repeat, the instructions make it quite clear to use a glossed surface for best adhesion and colour representation. If you should encounter any problems (and not many have..) using Aviattic products please just let me know and I'll send another set - simple! Best wishes, Richard Link to comment Share on other sites More sharing options...
Administrators JeroenPeters Posted April 13, 2014 Administrators Share Posted April 13, 2014 That looks tight! I see you painted the spars between the wings. Be careful. This is a pretty tight fit! (At least on mine..) Nice work. Link to comment Share on other sites More sharing options...
seiran01 Posted April 13, 2014 Author Share Posted April 13, 2014 Thanks very much, Richard, Jeroen, and anyone else i may have missed thanking earlier.Richard, yes, on your decals, i failed to follow instructions, so nothing here is meant to imply anything about less than stellar quality of your decal sets - I will absolutely be buying more from you when i do more kits with lozenge. Lots of progress this weekend so far and I expect to have the fuselage ready to paint today! 1 Link to comment Share on other sites More sharing options...
seiran01 Posted April 13, 2014 Author Share Posted April 13, 2014 2 Link to comment Share on other sites More sharing options...

Recommended Posts
Create an account or sign in to comment
You need to be a member in order to leave a comment
Create an account
Sign up for a new account in our community. It's easy!
Register a new accountSign in
Already have an account? Sign in here.
Sign In Now