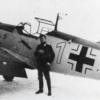
JG26 Posted February 20, 2015 Share Posted February 20, 2015 Throwing my hat in the ring for an Eduard 109 Emil, still a virgin in '32 scale....This is the one - Dan M 3 Link to comment Share on other sites More sharing options...
russh1 Posted February 20, 2015 Share Posted February 20, 2015 ok dan, now I see where you are going with the box you bought am looking forward to seeing the paint progression of this rh Link to comment Share on other sites More sharing options...
repeater Posted February 20, 2015 Share Posted February 20, 2015 Excellent choice Dan. Link to comment Share on other sites More sharing options...
BevanBrooks Posted February 20, 2015 Share Posted February 20, 2015 Pulling up a chair for this one........ Cheers Bevan Link to comment Share on other sites More sharing options...
Dave J Posted February 20, 2015 Share Posted February 20, 2015 Sweet scheme! What Kargeo book is that from? Link to comment Share on other sites More sharing options...
JG26 Posted February 21, 2015 Author Share Posted February 21, 2015 Hey Dave, Kagero's "Units - JG51 Mölders". I've got the "JG53 "Pik A's" one as well, thers a good E1 in there too.... Dan M Link to comment Share on other sites More sharing options...
Members Mikester Posted February 21, 2015 Members Share Posted February 21, 2015 Good choice, Dan! The cowl gives some people fits, just take your time and do plenty of dry fitting and it's no big deal. Link to comment Share on other sites More sharing options...
JG26 Posted February 21, 2015 Author Share Posted February 21, 2015 Righto, will do. I've built a couple of their 1:48 109's (E1&7) & am currently doing a 190A8. I'm hoping it should build up similar. Definitely not wise to stray from the instructions... Dan M Link to comment Share on other sites More sharing options...
Dave J Posted February 21, 2015 Share Posted February 21, 2015 Yes the cowl can be a pain from what I heard. But I have a little cheat that I will post up once I'm at my laptop from the E7 build that I did a few years back Link to comment Share on other sites More sharing options...
Dave J Posted February 21, 2015 Share Posted February 21, 2015 So here's my trick... Get yourself some strene strips and cut off four pieces about 10mm and then glue them on the lower part on the fuse.. Then your cowl has a good base to keep everything flush.. Works well with the fuse joints too 3 Link to comment Share on other sites More sharing options...
JG26 Posted February 21, 2015 Author Share Posted February 21, 2015 Excellent. Will take advice on board! Dan M Link to comment Share on other sites More sharing options...
russh1 Posted February 21, 2015 Share Posted February 21, 2015 well that's a great heads up Dan Link to comment Share on other sites More sharing options...
JG26 Posted March 14, 2015 Author Share Posted March 14, 2015 Greetings all, Officially kicked off my group build today at "Rieser's" (sure you know him...) staffell hanger today. Quite productive, the 2 fuselage sides are cleaned up ready to start with the cockpit & re-ad a few rivets lost through the sprue cutoff marks. Will be juggling the remainder of the Meng A7V build & working on the Emil over the next few weeks. At least, that's the plan at this stage....... 3 Link to comment Share on other sites More sharing options...
BevanBrooks Posted March 16, 2015 Share Posted March 16, 2015 Greetings all, Officially kicked off my group build today at "Rieser's" (sure you know him...) staffell hanger today. Quite productive, the 2 fuselage sides are cleaned up ready to start with the cockpit & re-ad a few rivets lost through the sprue cutoff marks. Will be juggling the remainder of the Meng A7V build & working on the Emil over the next few weeks. At least, that's the plan at this stage....... Yep recognise those tables and carpet.......great start 1 Link to comment Share on other sites More sharing options...
JG26 Posted March 22, 2015 Author Share Posted March 22, 2015 Greetings all 1940 GBer's, Since it's been a rainy weekend here in Brisbane, painting the A7V was off the cards, so I started to tackle some of the annoying jobs for the GB Emil. Fuselage halves joined (there is still a line there as per specs), filled, rescribed & re-rivetted. Little bit hard to tell from the pic....quite time consuming! Ed's annoying front cowl join - also filled, rescribed & re-rivitted. Also reduced the "Step" on the back of cowl to wing section join, by adding a thin strip of evergreen. May not be 100% perfect, but I think it looks O.K. And of course, the reference & decals arrived!!!!!! That's it for now. Regards, Dan M 2 Link to comment Share on other sites More sharing options...
rieser Posted March 27, 2015 Share Posted March 27, 2015 "a little bit, every day..." Good to see Dan. I'll drop my E-1 over for your fix-it treatment... 1 Link to comment Share on other sites More sharing options...
JG26 Posted March 28, 2015 Author Share Posted March 28, 2015 Greeting all 1940 GB'ers, Little bit more progress on the Ed Emil, cockpit 95% done, just have to try to fit it without breaking anything.....hmmmmmmm..... All Eduard OOTB, with the exception of chopping the oxygen cylinder holder down a little to make it a more accurate height. not worrying about adding much detail to this one. Should still look pretty busy when she's all together. RLM 02 mix applied with Tamiya XF57/22 (Buff,RLM Grey 60/40), Details picked out woth Vallejo's. Weathering with MIG oils, chipping with silver & lead pencils. The Eduard photoetch knob handles were flat, so I built up the knobs with canopy glue then painted. The painted dashboards & side switch panels supplied by Ed are much too blue, and are printed quite out of register - I repainted all the surrounds & dial outers a more "greyer" shade of RLM66 with Vallejo "Basalt Grey+Black". I then added canopy glue to all the dials for a bit of a shine. That concludes another not-so-exciting episode, see you next post! All comments good/bad welcome. P.S - Ralph, not a chance, and don't worry- I will keep pestering you to persevere with that Ed Emil! Regards, Dan 3 Link to comment Share on other sites More sharing options...
kahunaminor Posted March 28, 2015 Share Posted March 28, 2015 None too shabby that at all! Regards, Link to comment Share on other sites More sharing options...
rkranias Posted March 28, 2015 Share Posted March 28, 2015 nice looking pit. Link to comment Share on other sites More sharing options...
Paulster Posted March 29, 2015 Share Posted March 29, 2015 Yes indeed, nice job on the "office". Link to comment Share on other sites More sharing options...
Dave J Posted March 29, 2015 Share Posted March 29, 2015 Very nice looking Pit! Link to comment Share on other sites More sharing options...
JG26 Posted April 5, 2015 Author Share Posted April 5, 2015 Greetings all, Anoher quick update pic on the Wigger Emil - Main build complete, primer on. I ended up modifing a few little things - I ended up drilling out a couple of small in/outlets on the fuselage, and also added the radio wire in socket to the rear fuselage. The cowling section fitment turned out ok in the end (thanks for the tips regarding the cowl alignment gents, it worked!) but the rear wing to fuselage join was a bit of a pest - I was warned about that.....(Bevan, Ralph, Jamie etc etc!) anyhow, all fixed now. I also added a final touch to the cockpit before she's all done up.....A few 1940's aerial maps of the U.K in the map holder for the good Hauptmann. I printed out some actual luftwaffe maps off the net & soaked the paper in water to peel the paper layers off - it makes it a more "scale paper" size rather than manilla folder thickness! Thats it for now, if the weather holds out, RLM 65 on this week! Regards, Dan M 3 Link to comment Share on other sites More sharing options...
BevanBrooks Posted April 5, 2015 Share Posted April 5, 2015 Looks like I'll be playing catch up for a while! Coming together very nicely. Nice touch with the maps and other small details, that's what sets some models apart from the rest. Nice! Bevan Ps hope the primer didn't fill up the rivet detail too much! Link to comment Share on other sites More sharing options...
rieser Posted April 6, 2015 Share Posted April 6, 2015 Good stuff Dan. Interested in your print-and-peel technique (for the Revell He111 interior embellishment perhaps...). 1 Link to comment Share on other sites More sharing options...
Dave J Posted April 6, 2015 Share Posted April 6, 2015 Very Nice! Interested to hear more about the Map too! Maybe you need to Post a How to in the Hints and Tips area! 1 Link to comment Share on other sites More sharing options...

Recommended Posts
Create an account or sign in to comment
You need to be a member in order to leave a comment
Create an account
Sign up for a new account in our community. It's easy!
Register a new accountSign in
Already have an account? Sign in here.
Sign In Now