
James H
-
Posts
3,247 -
Joined
-
Last visited
Content Type
Profiles
Forums
Events
Gallery
Everything posted by James H
-
Quite a few changes from the G.1. Not sure I'd be good with all that dark wood, but I wouldn't have a choice WNW have done it again
-
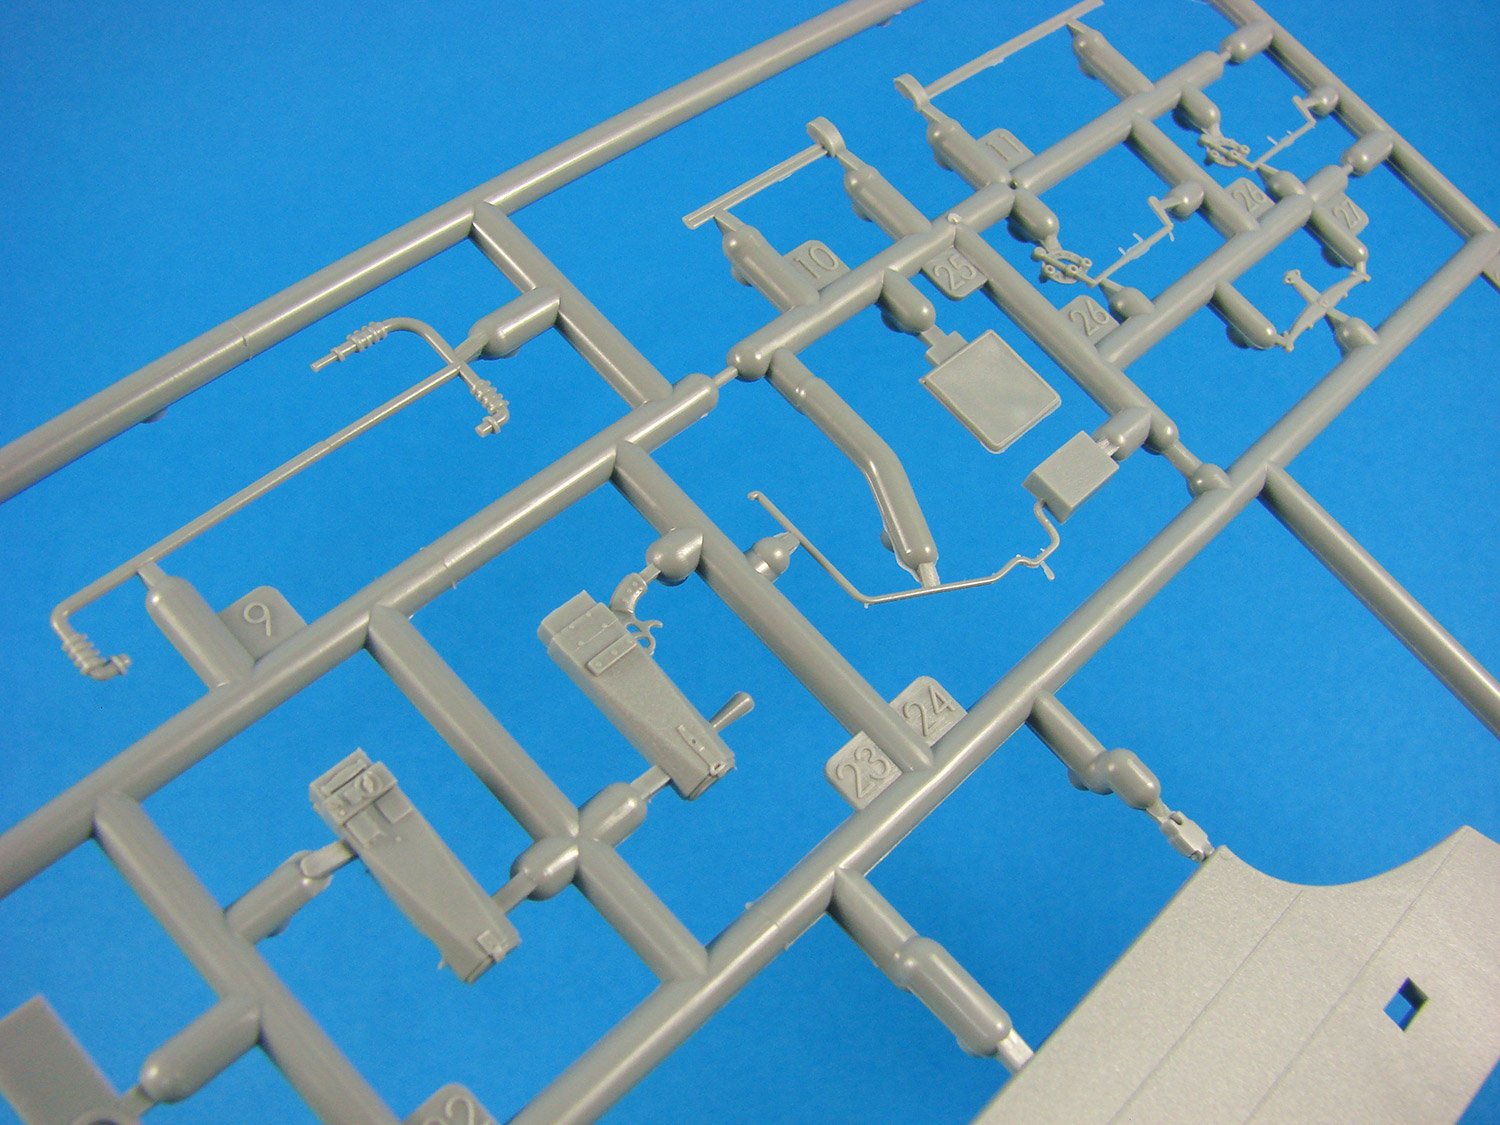
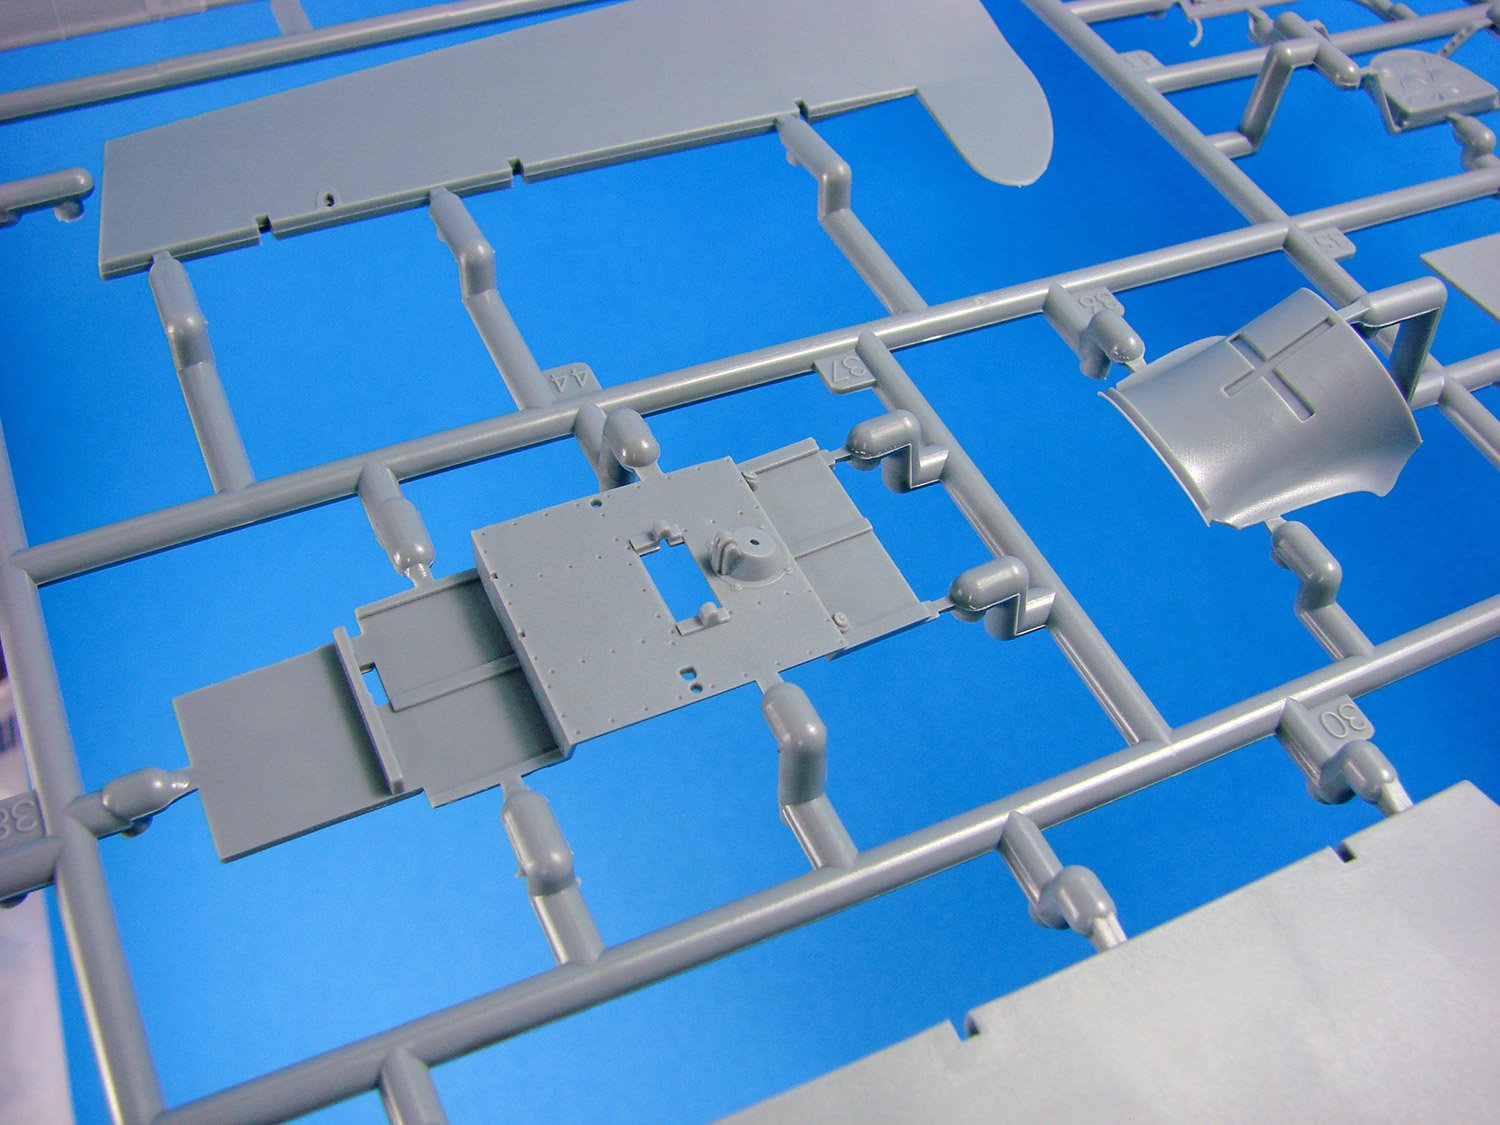
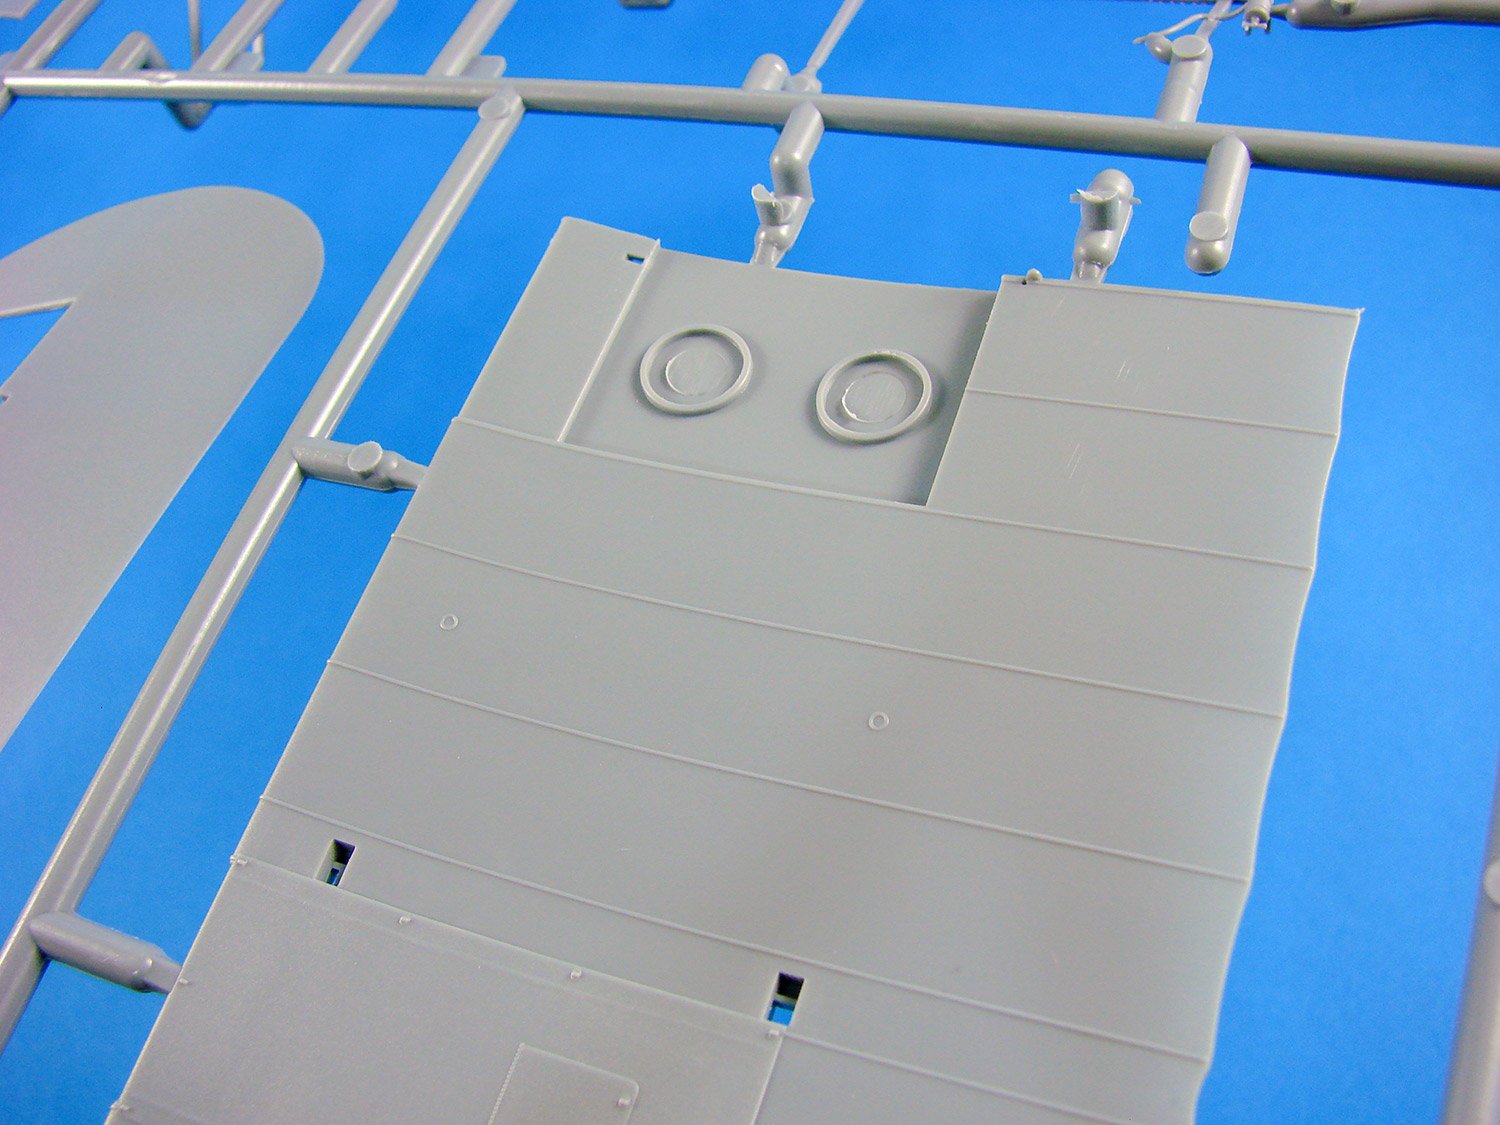
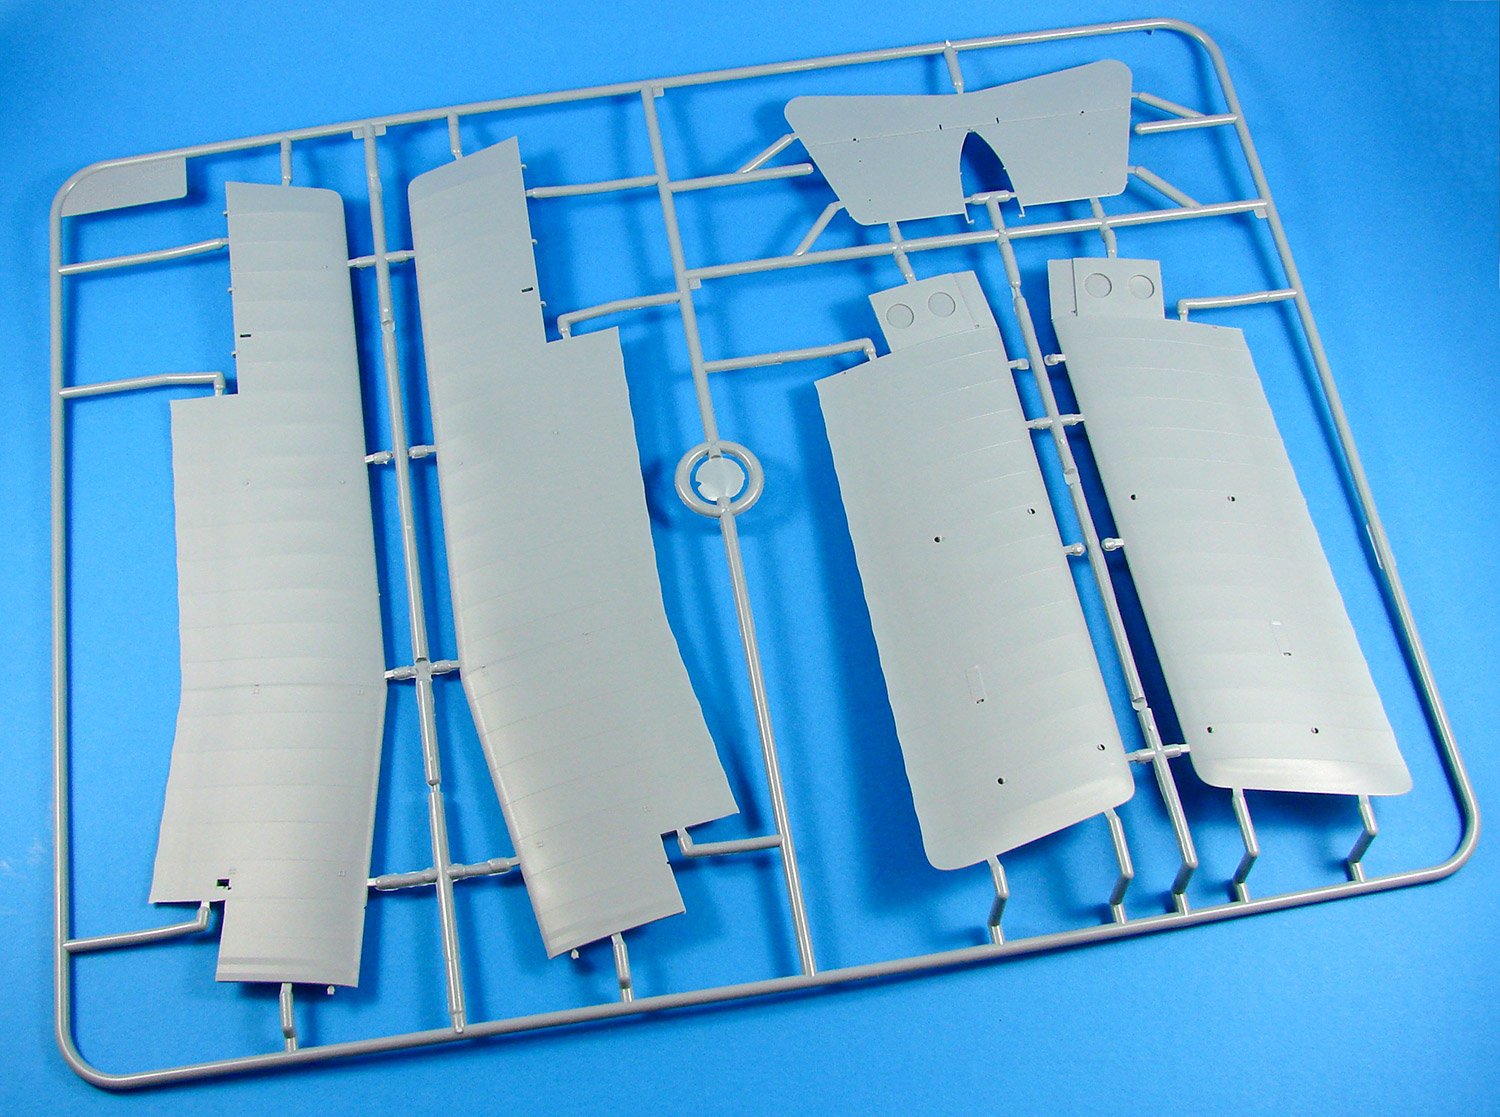
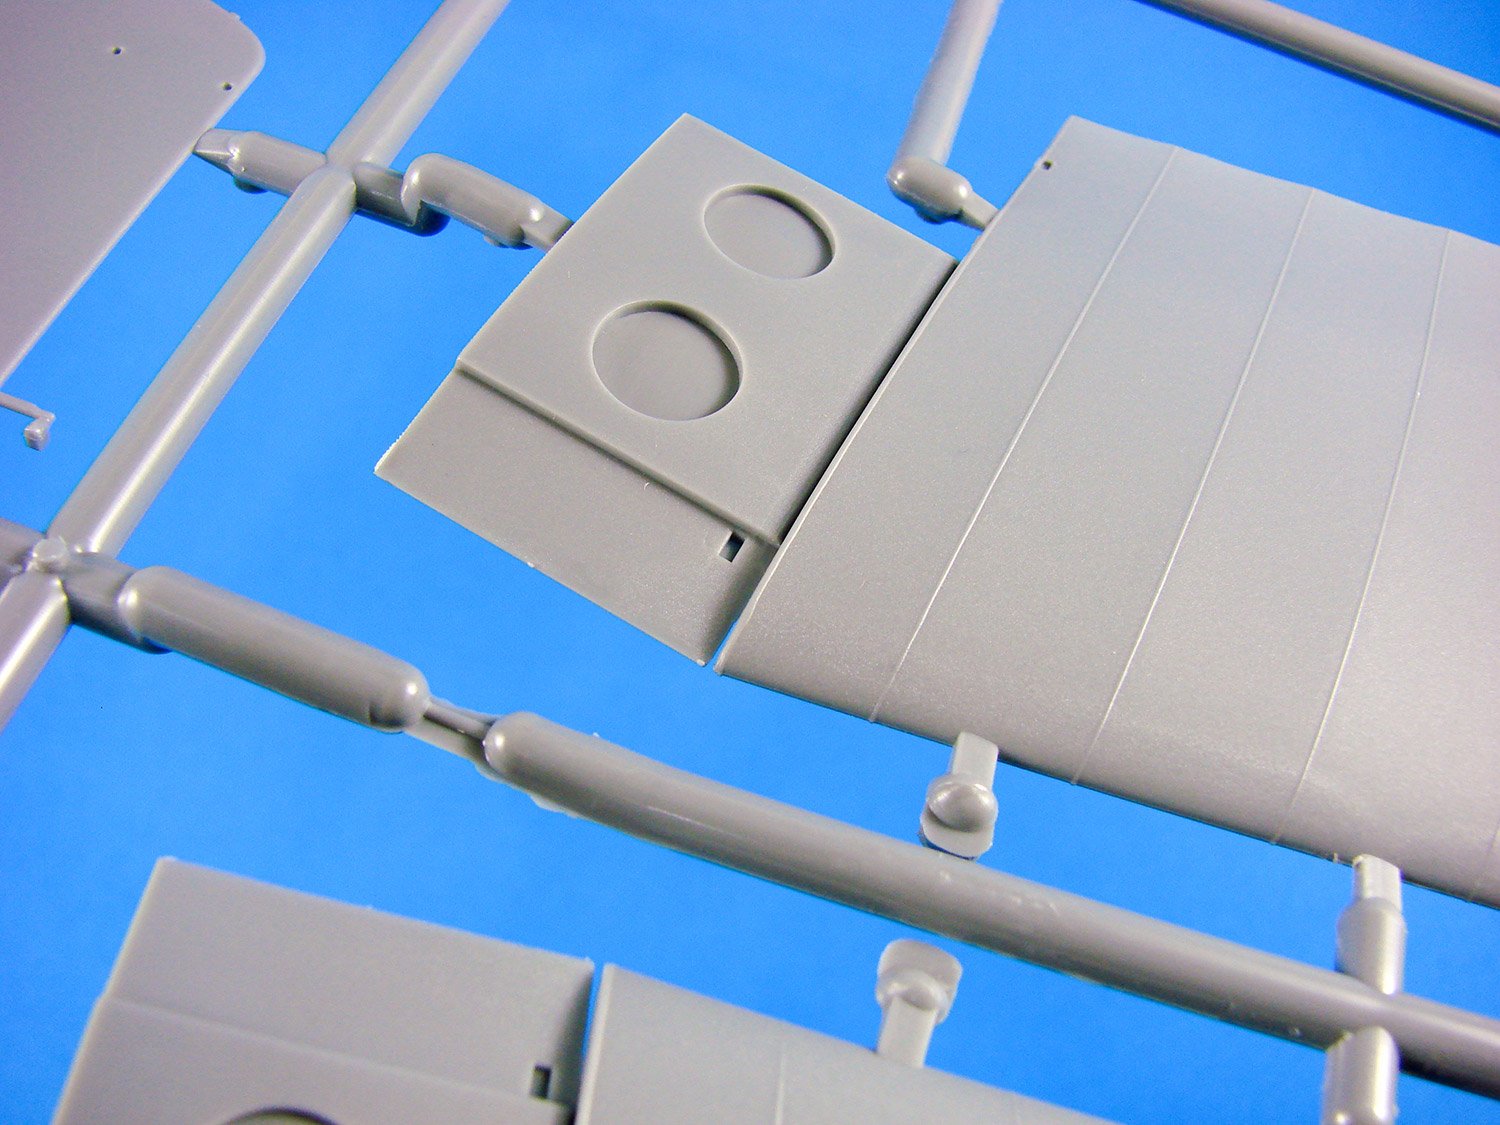
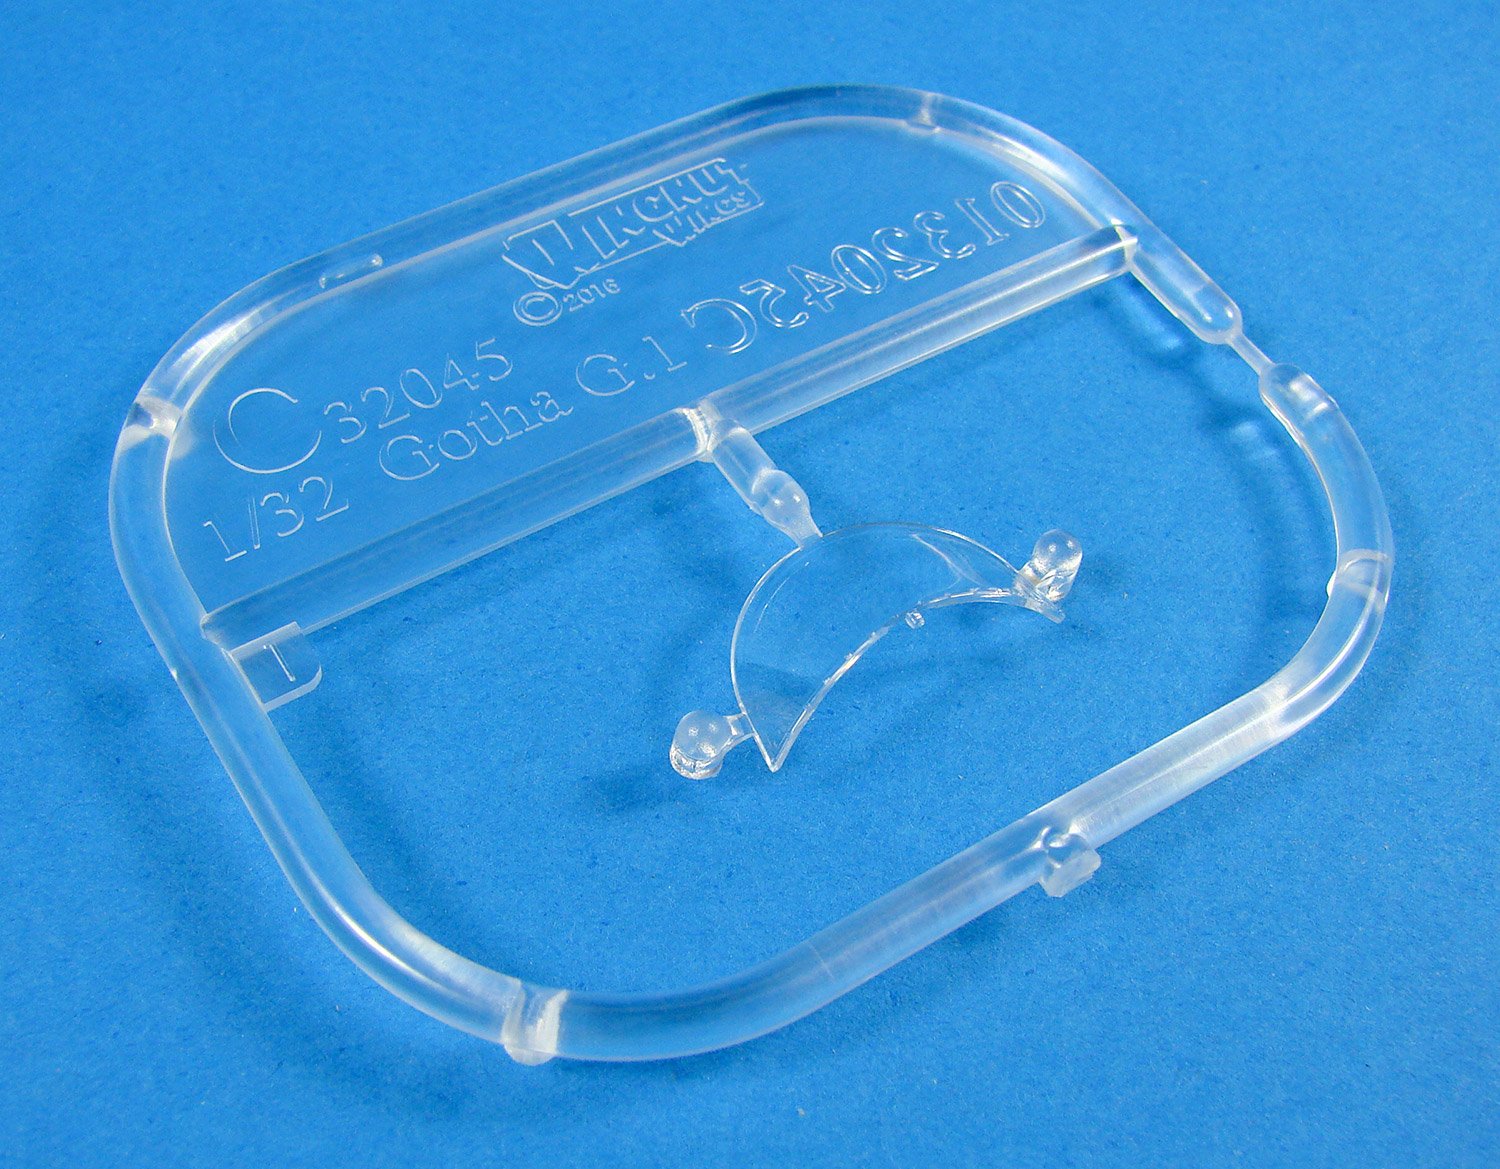
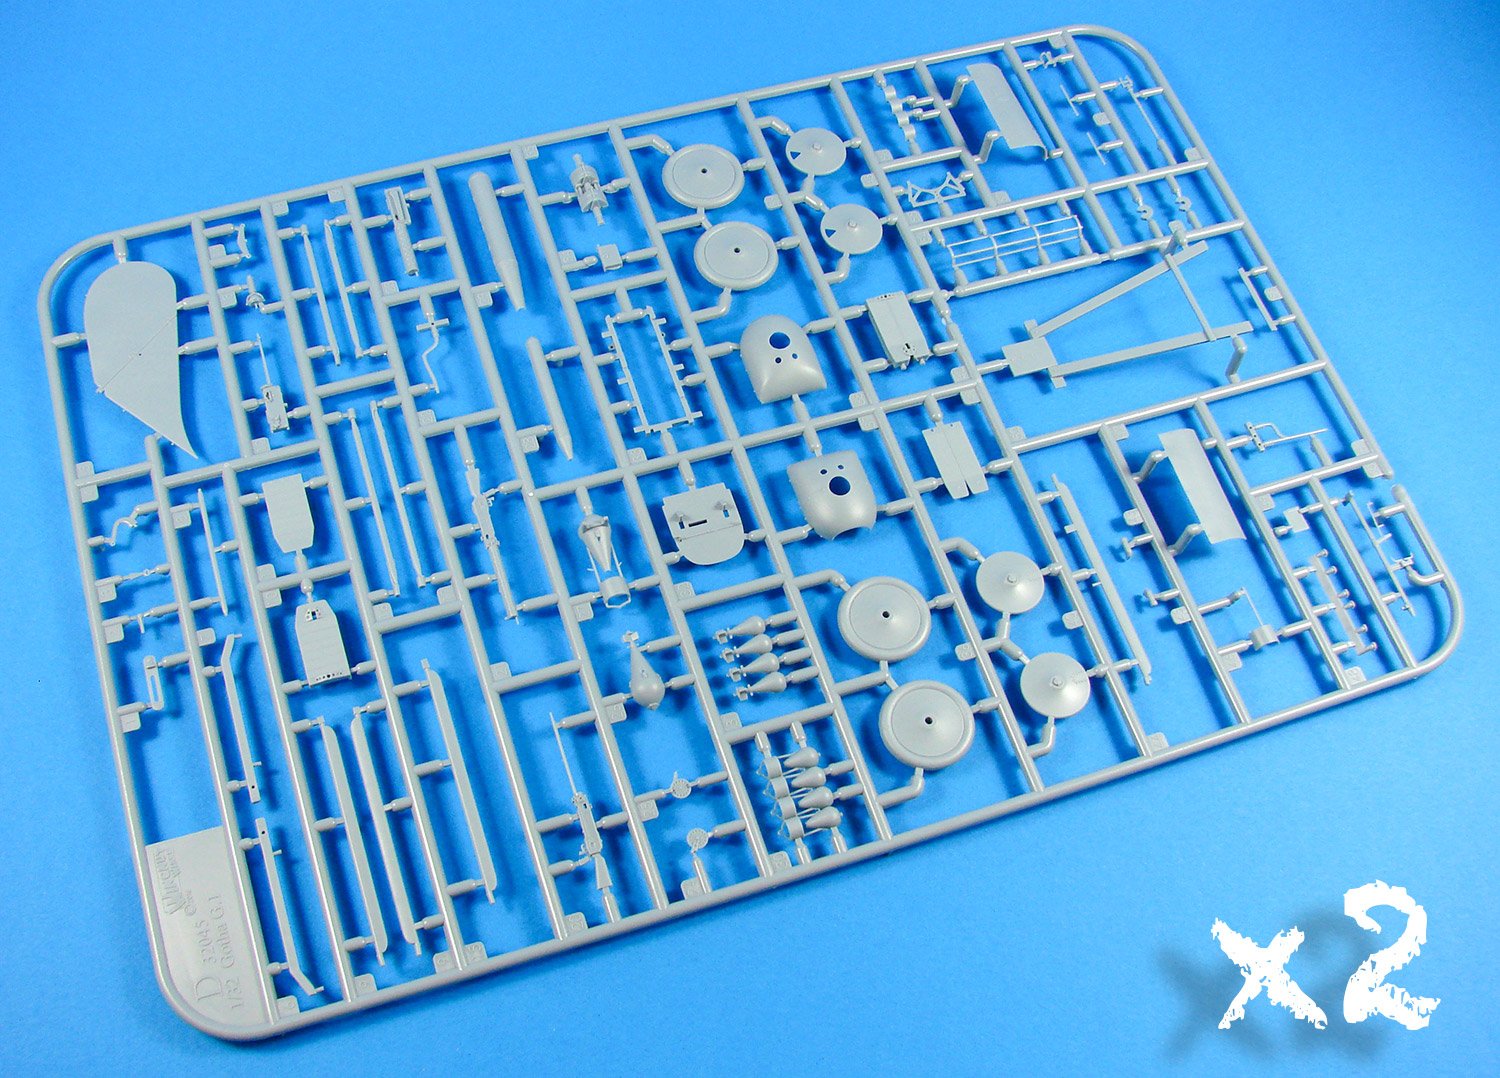
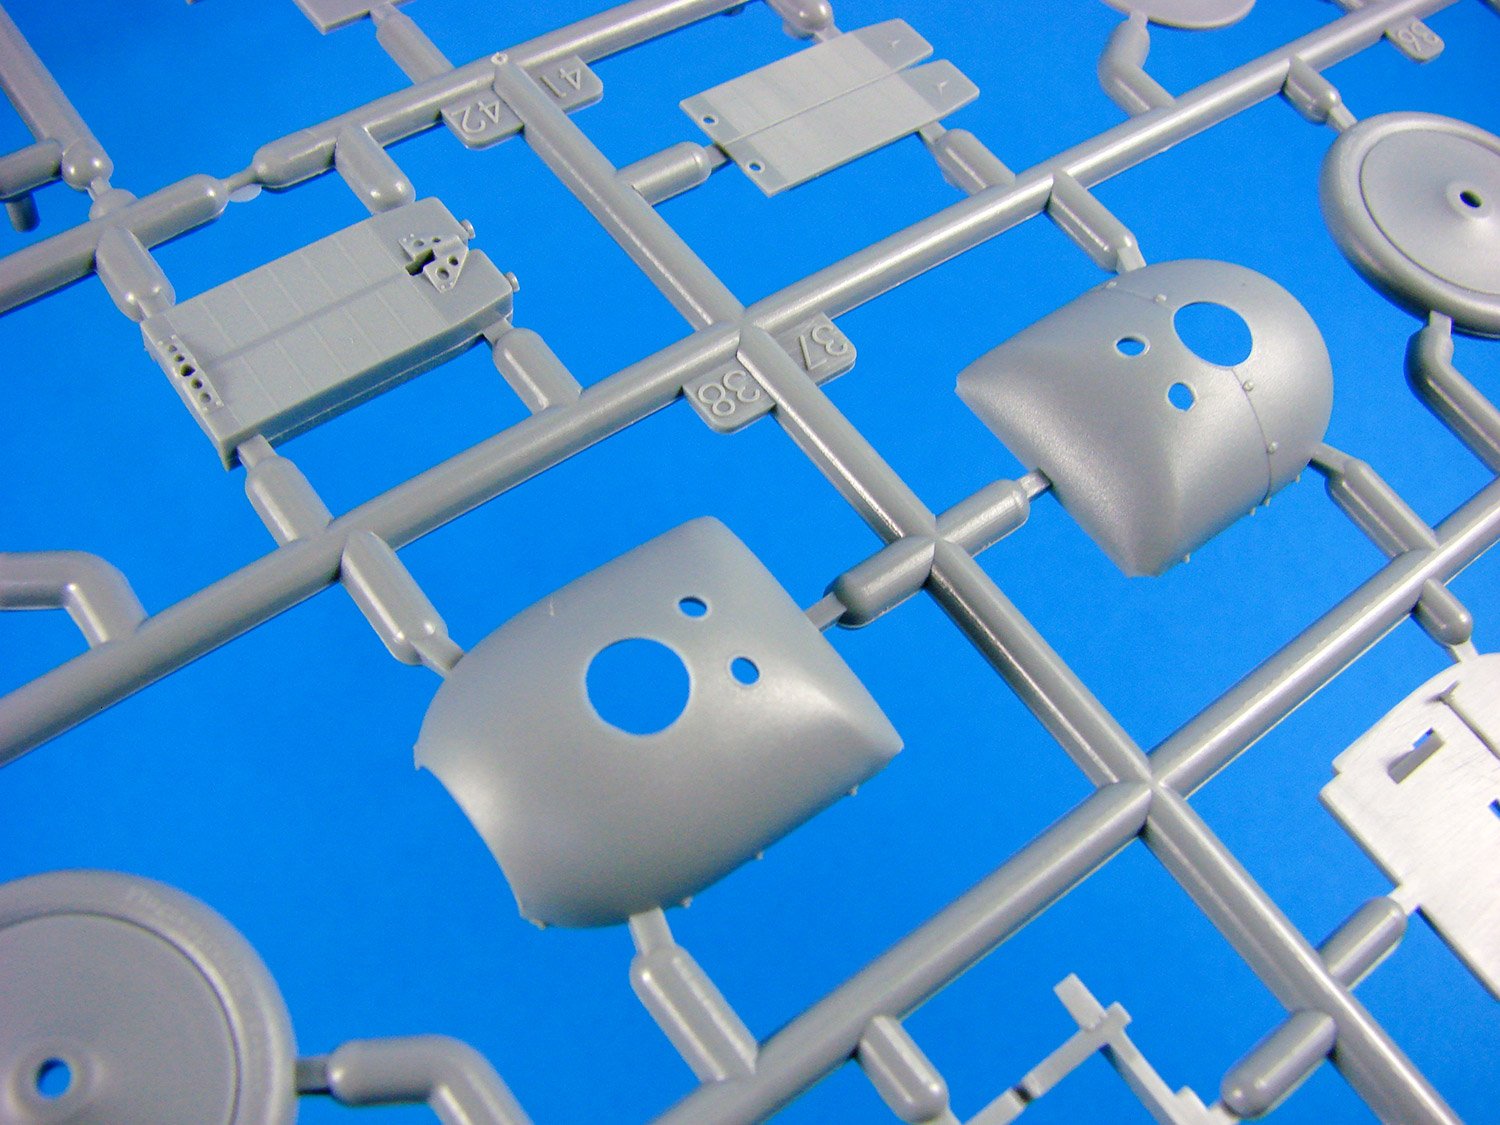
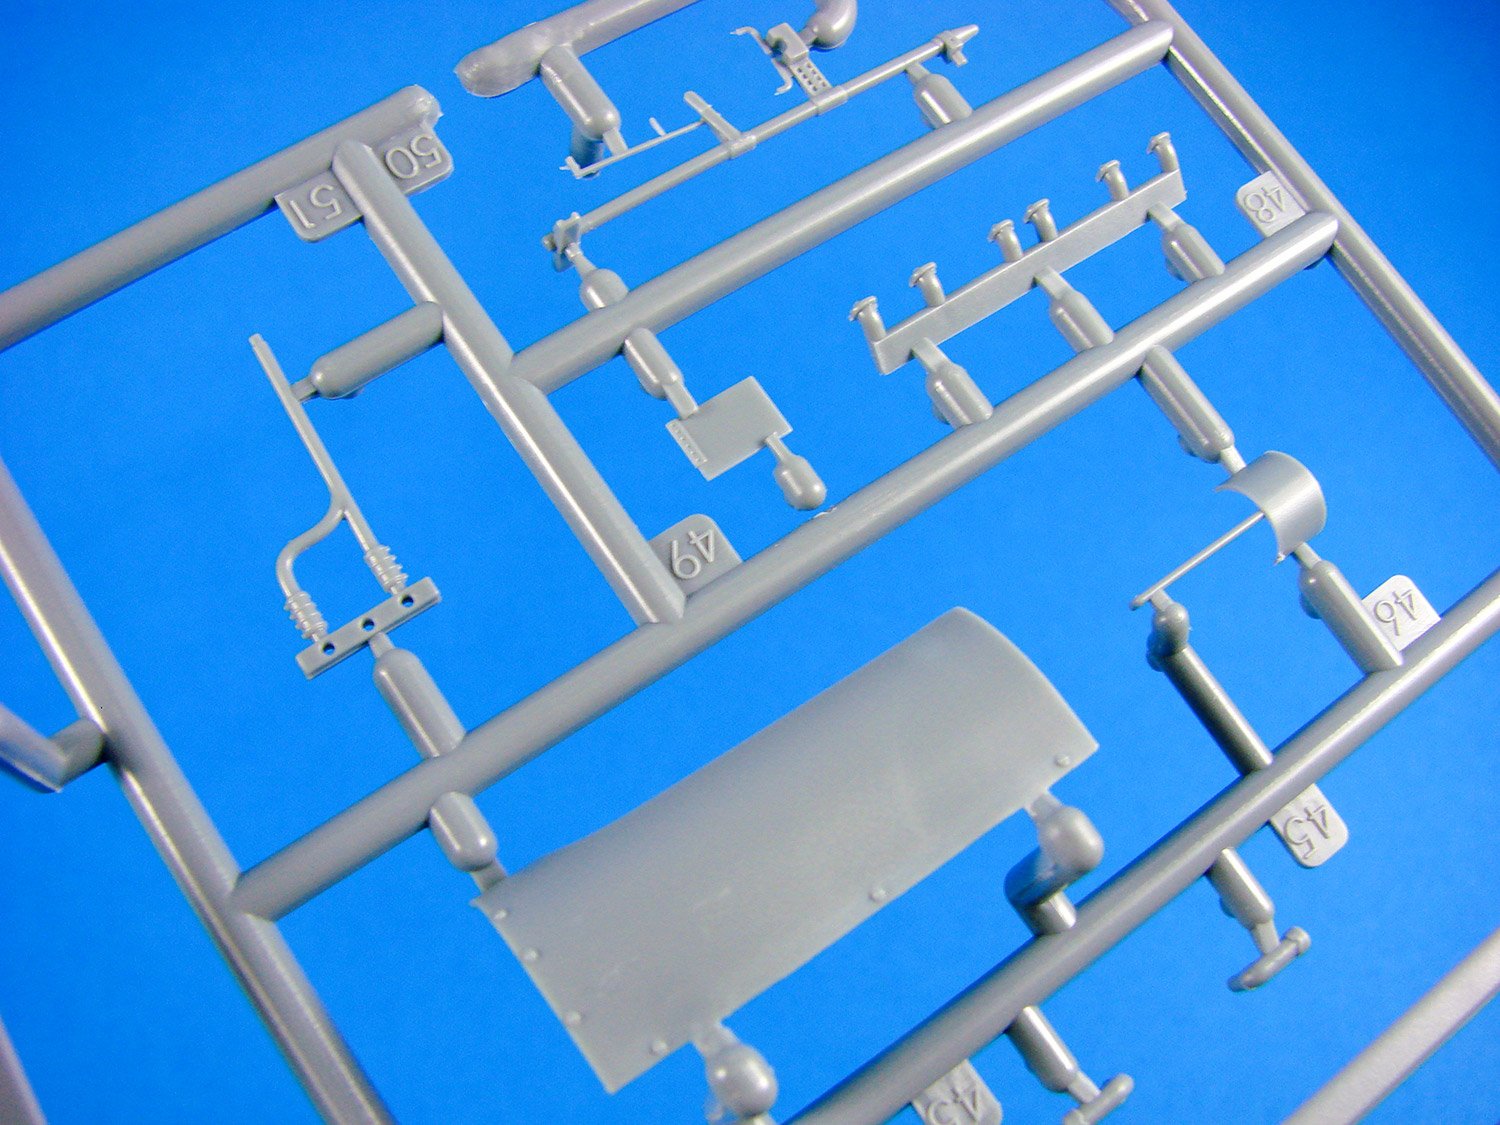
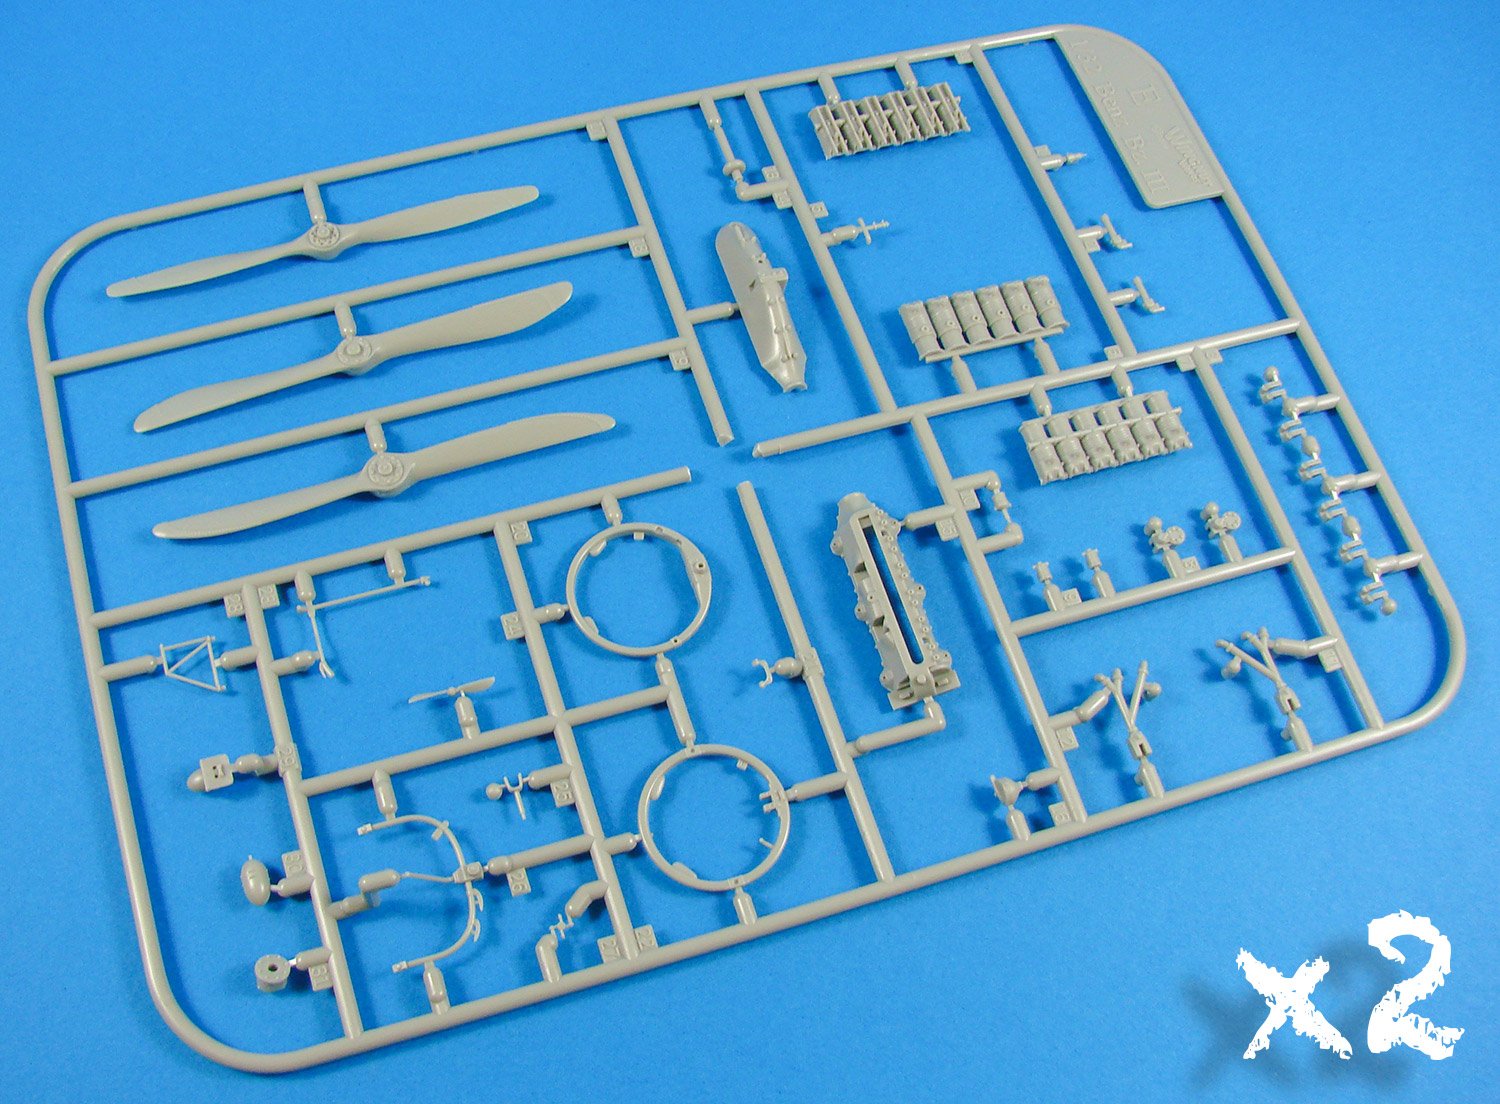
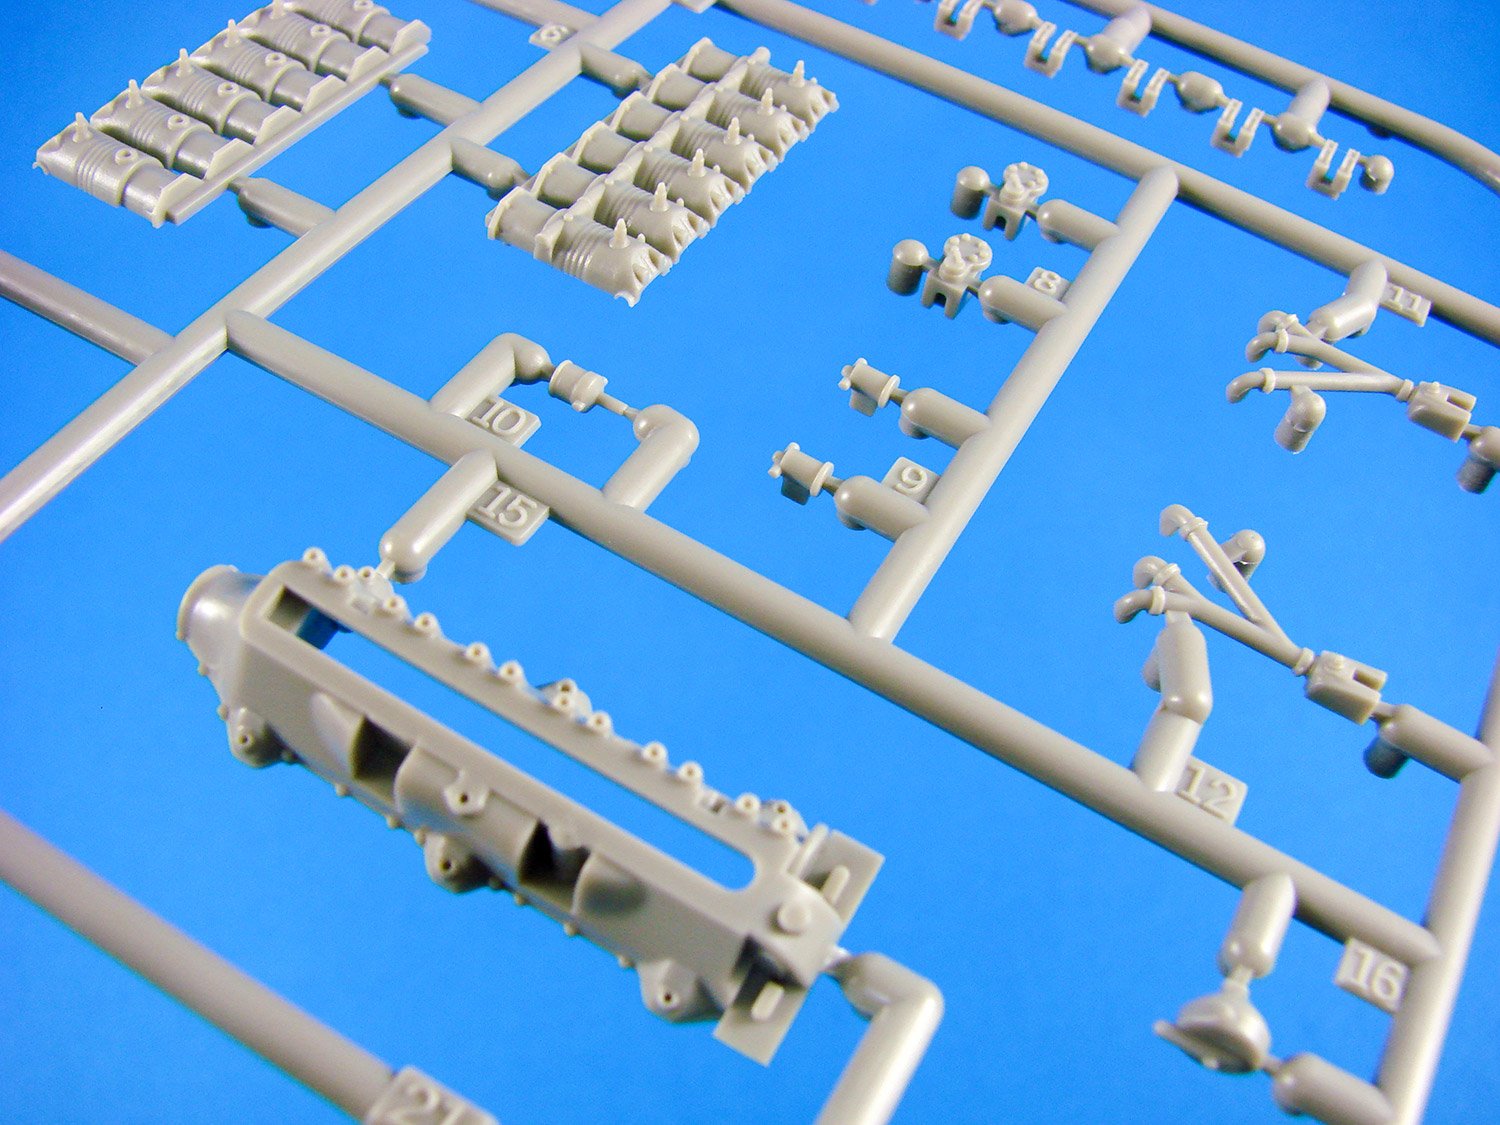
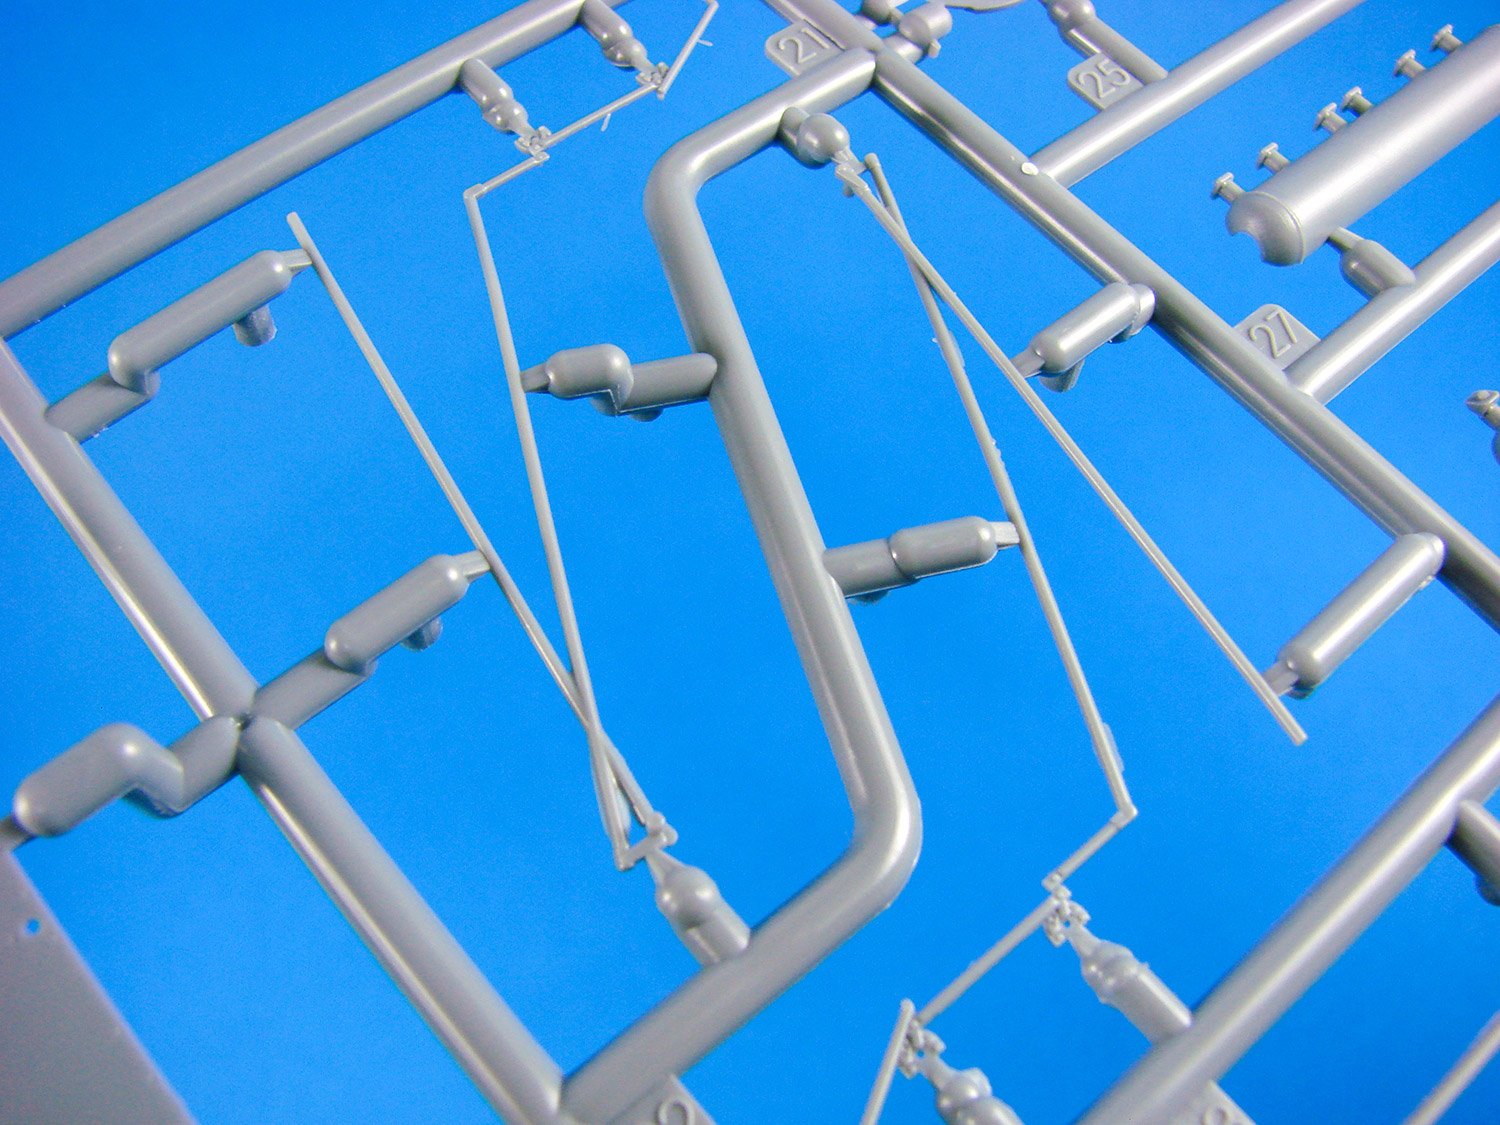
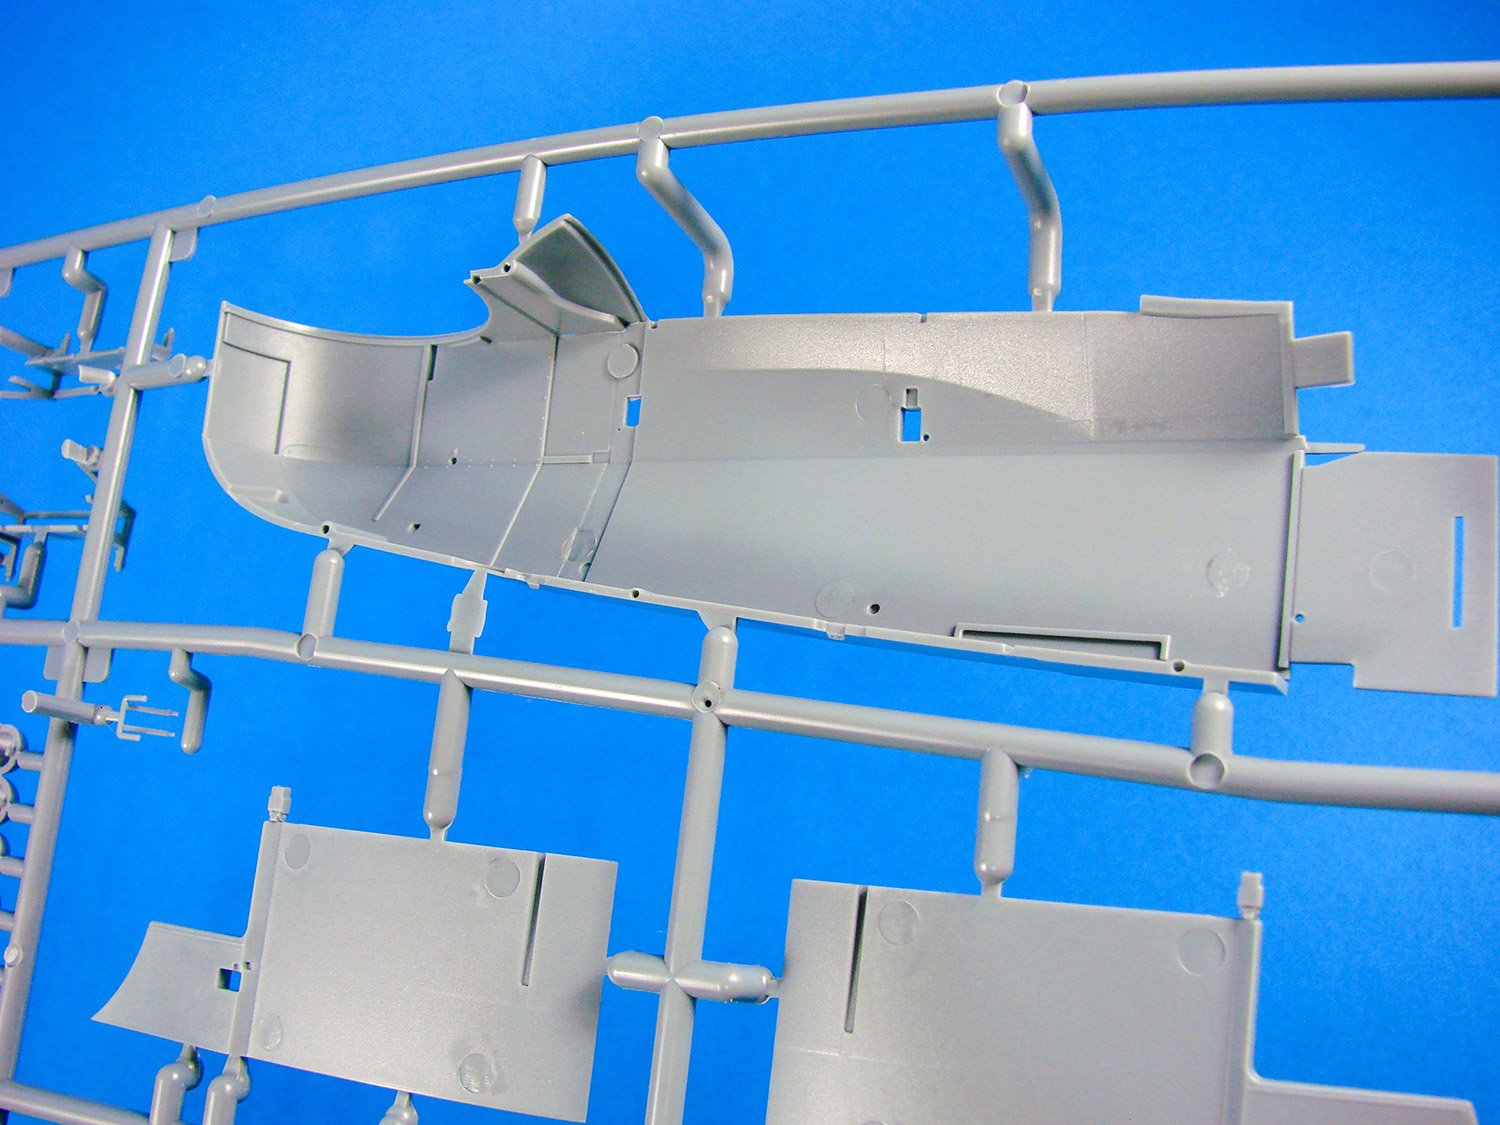
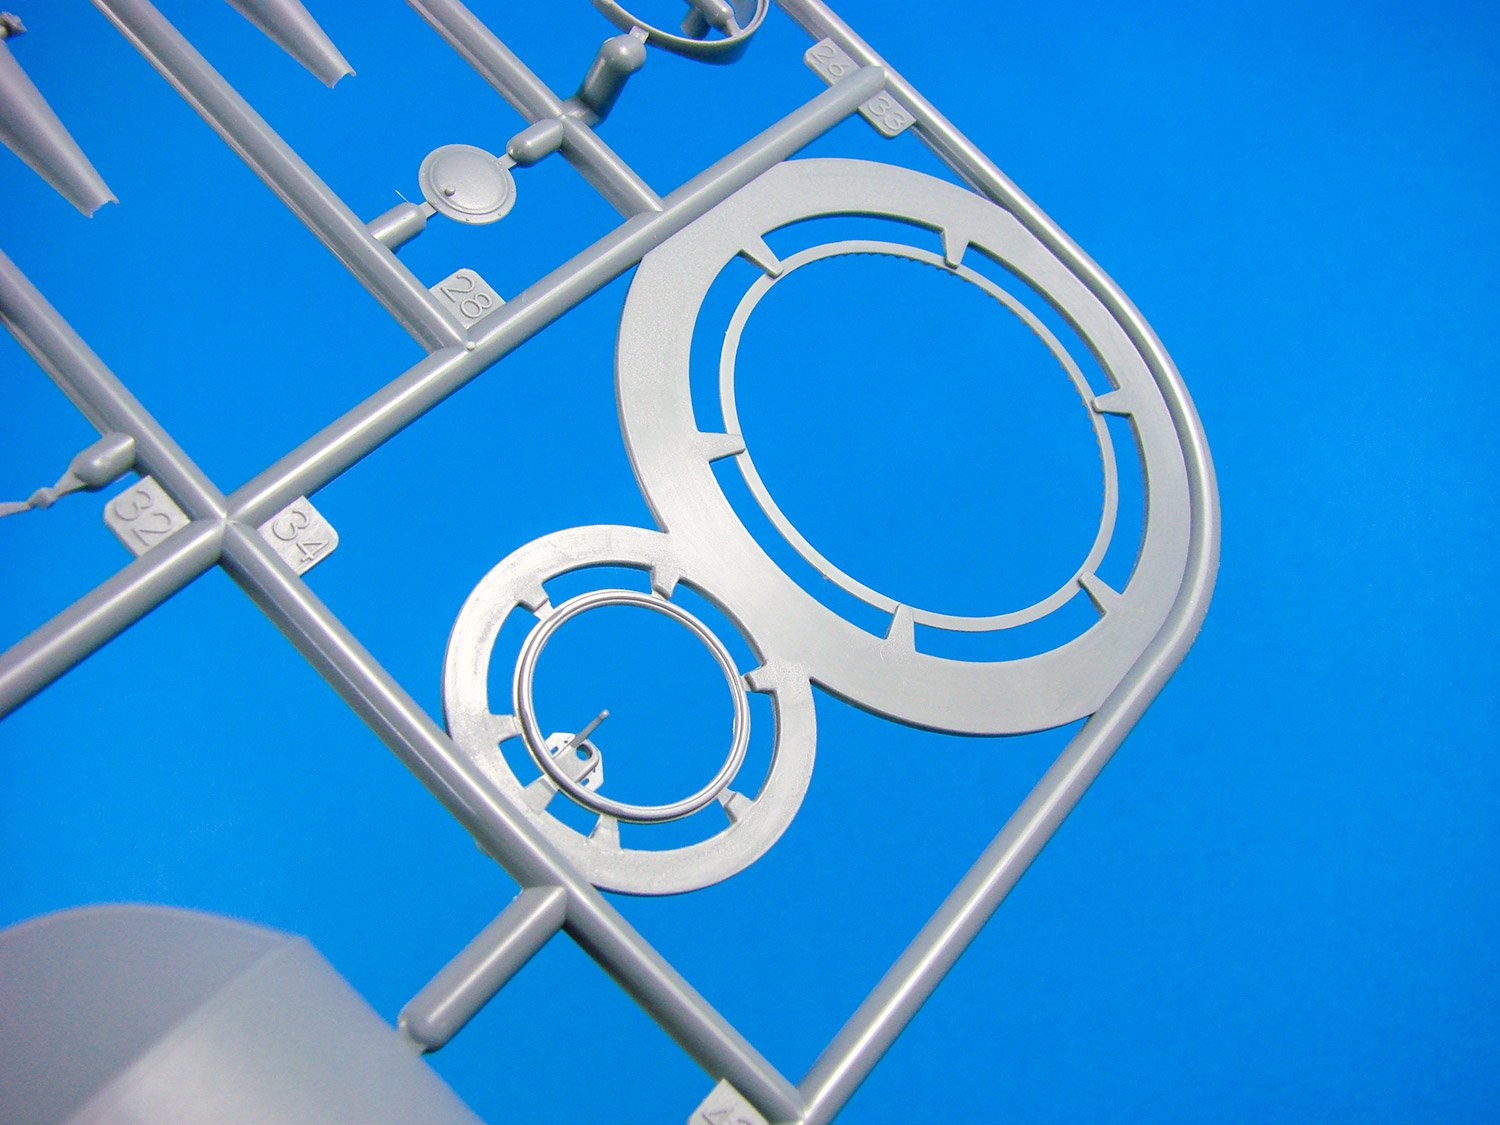
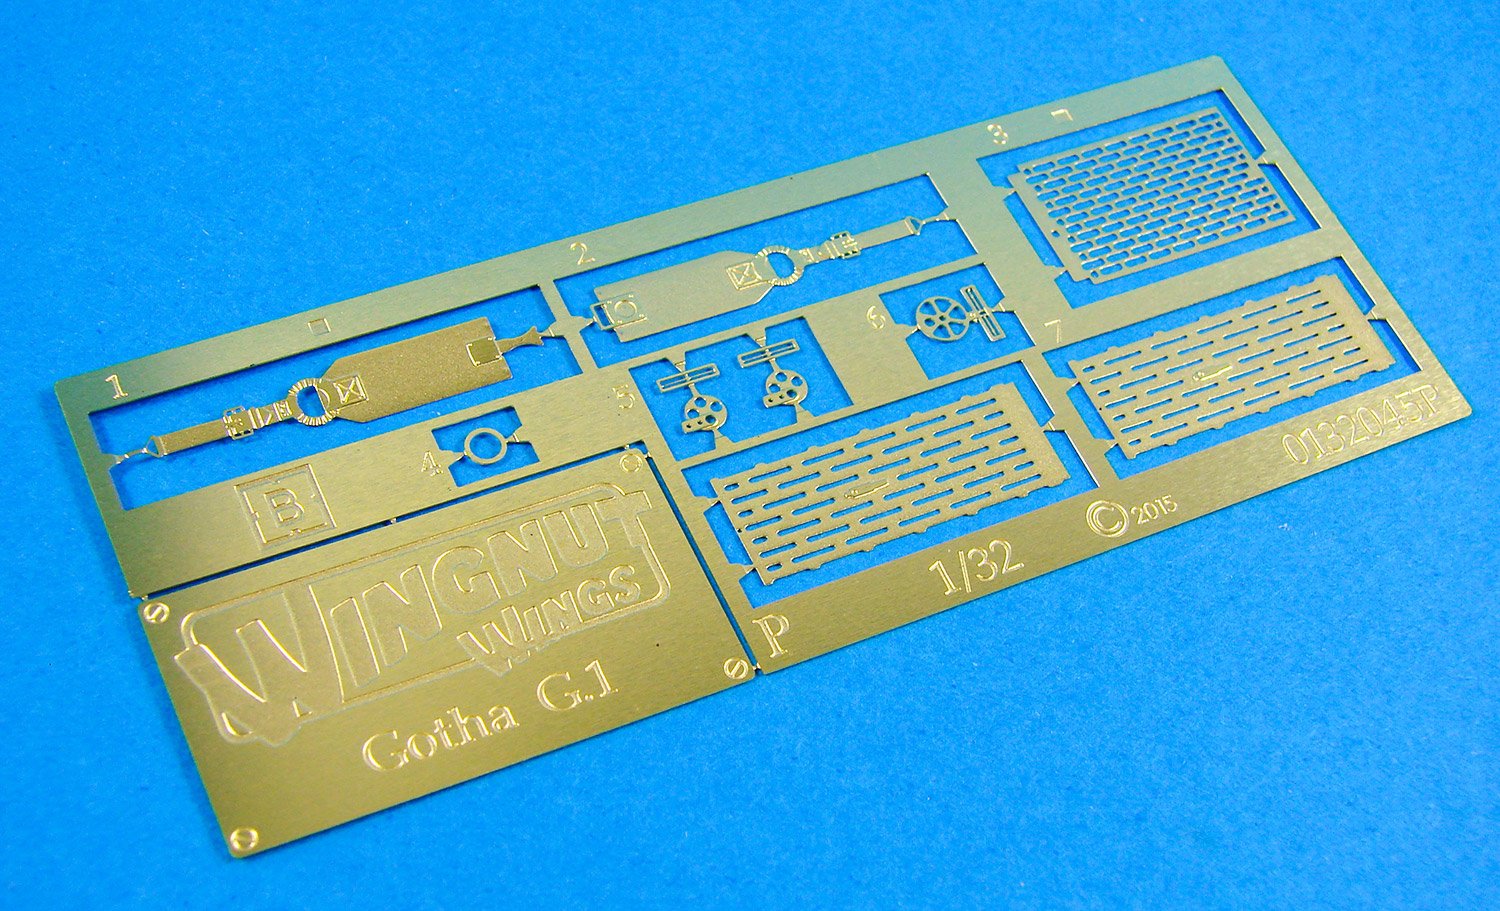
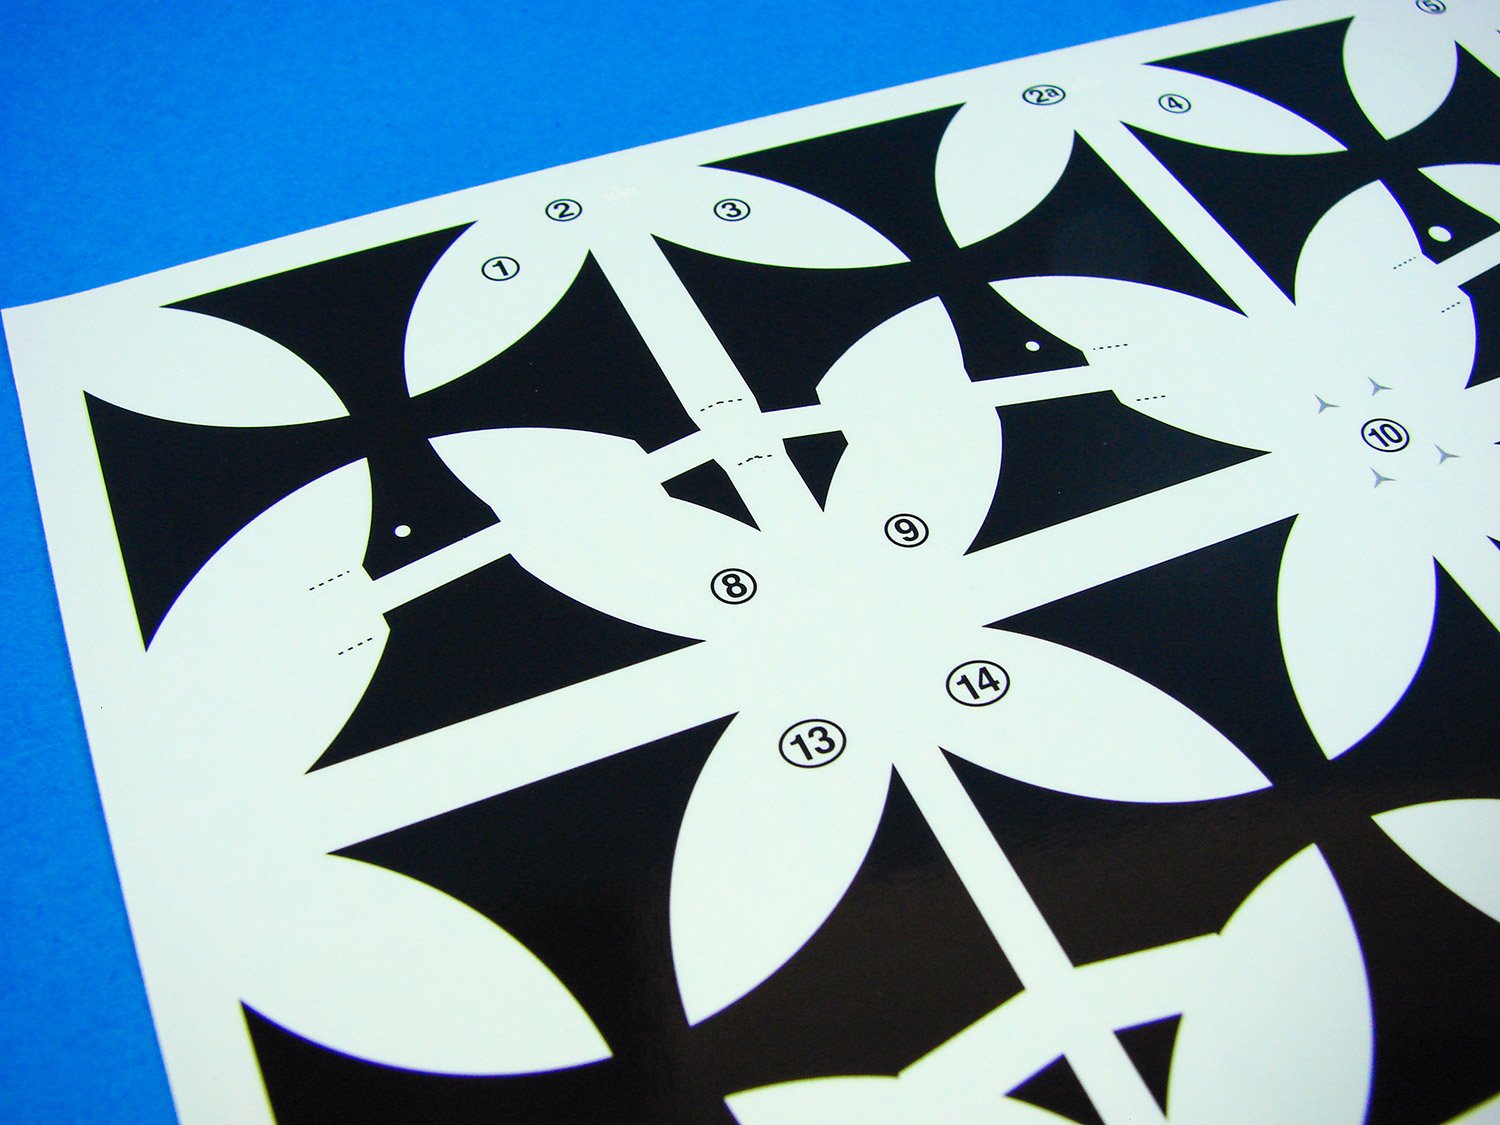
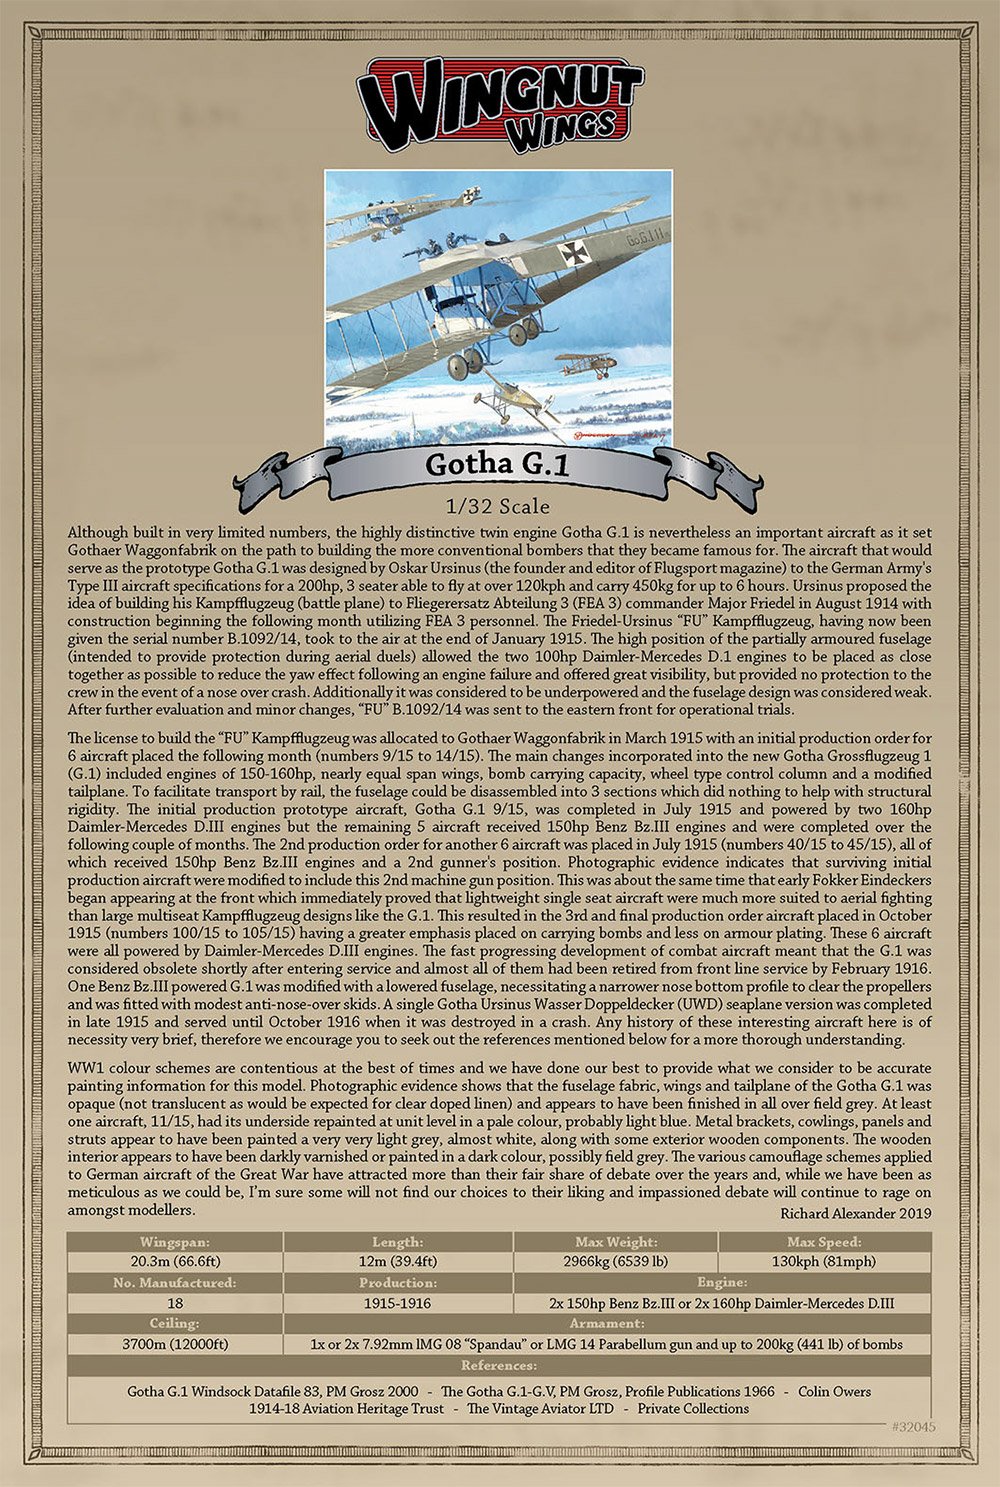
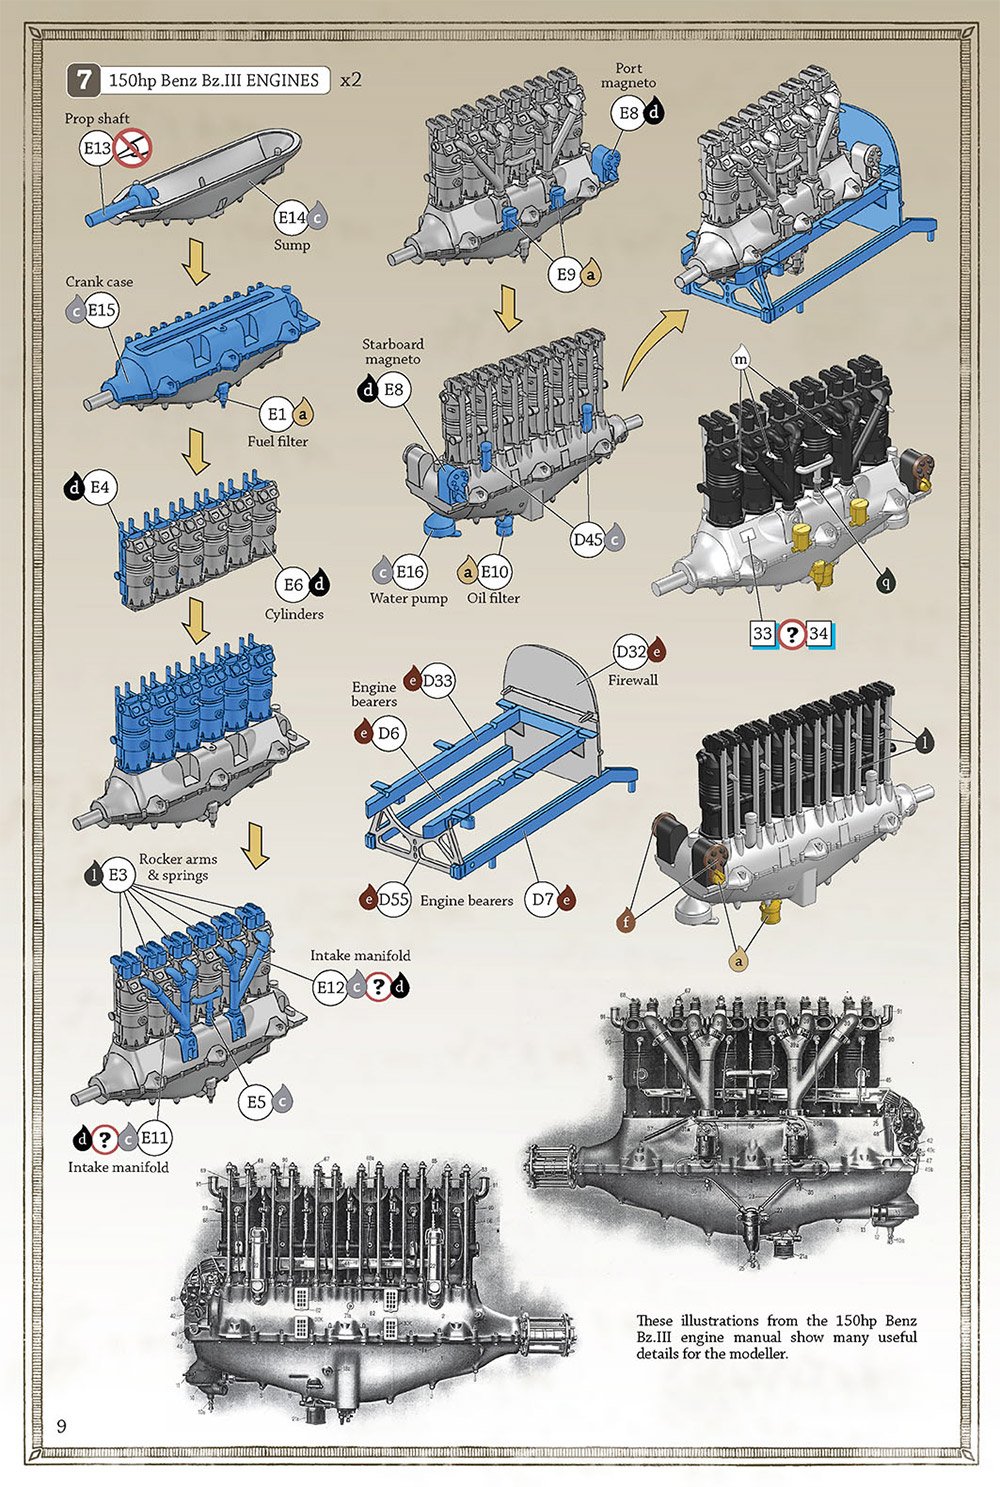
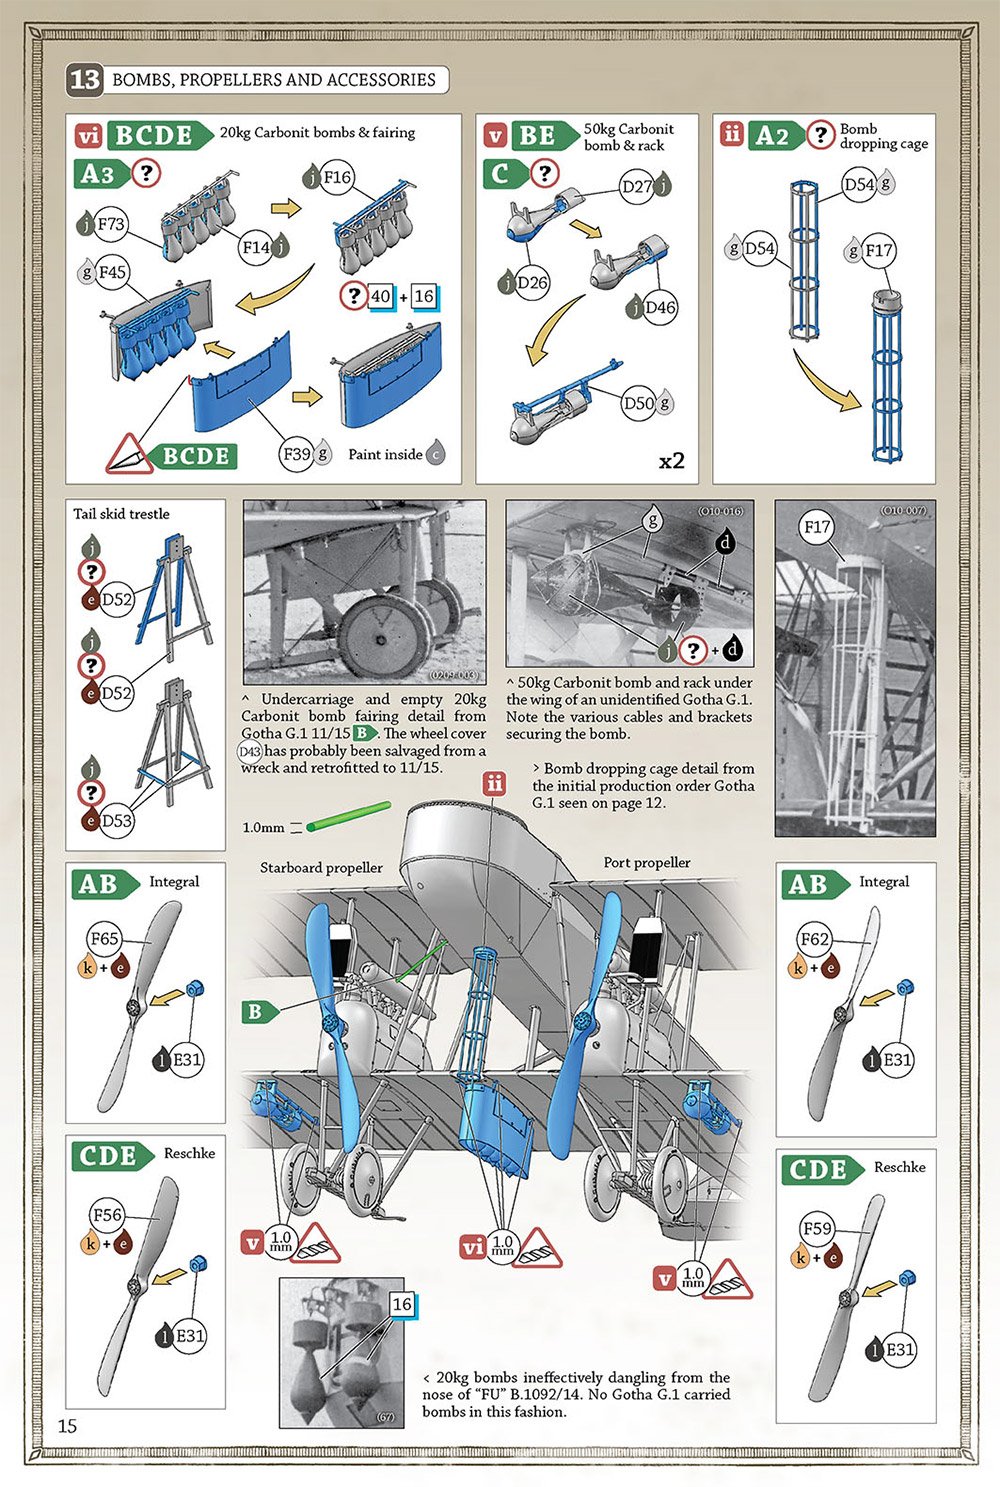
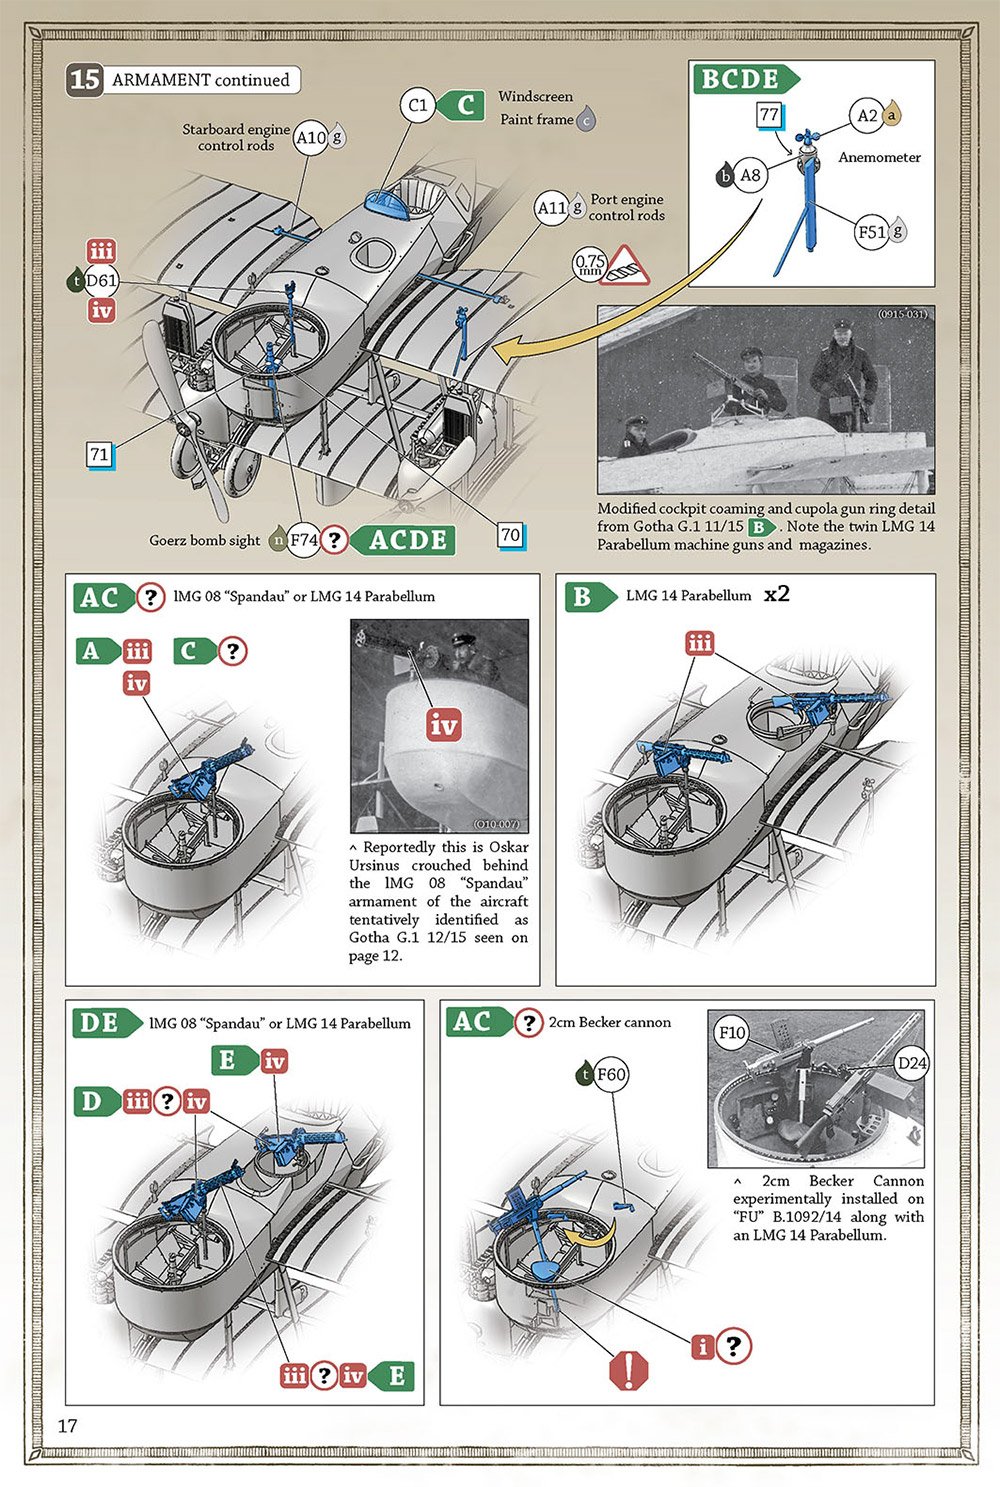
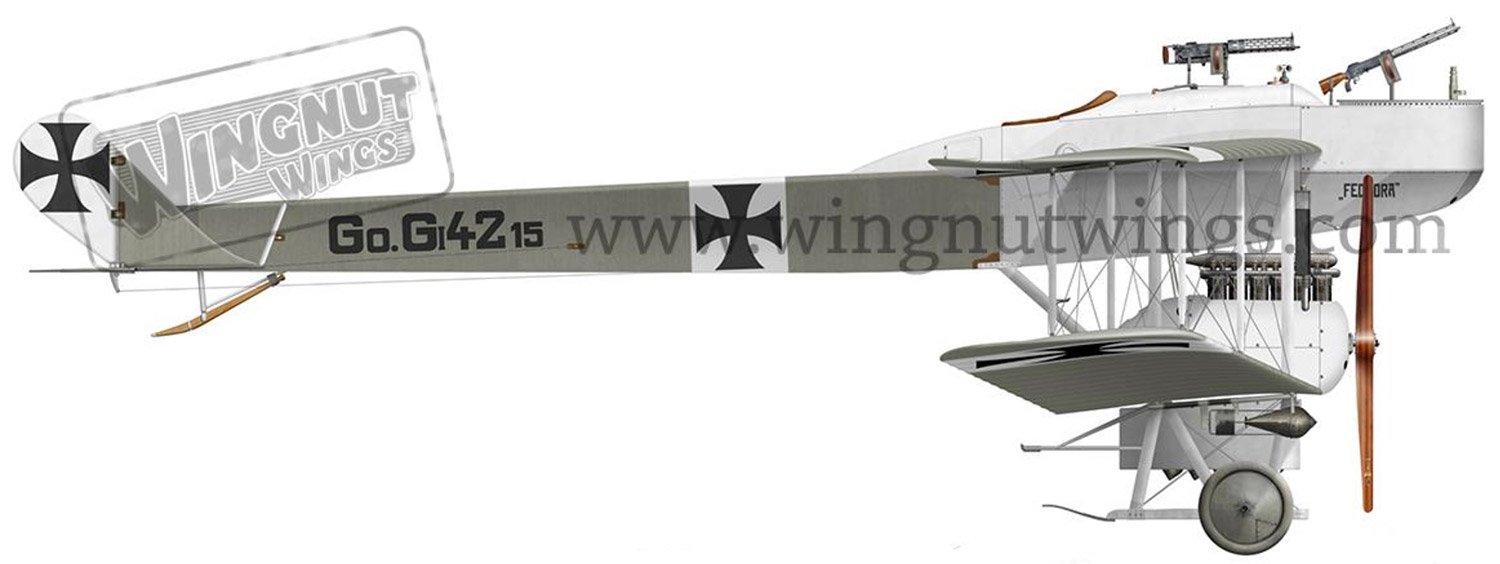
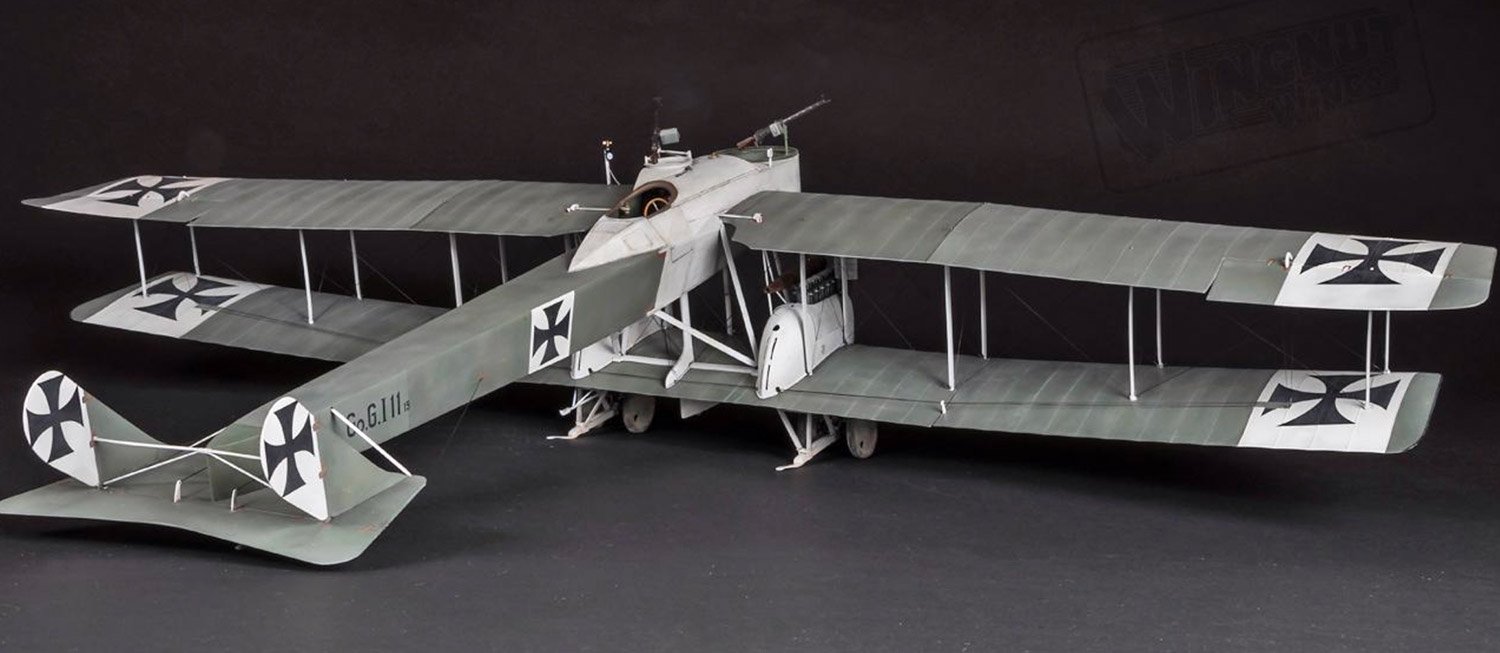
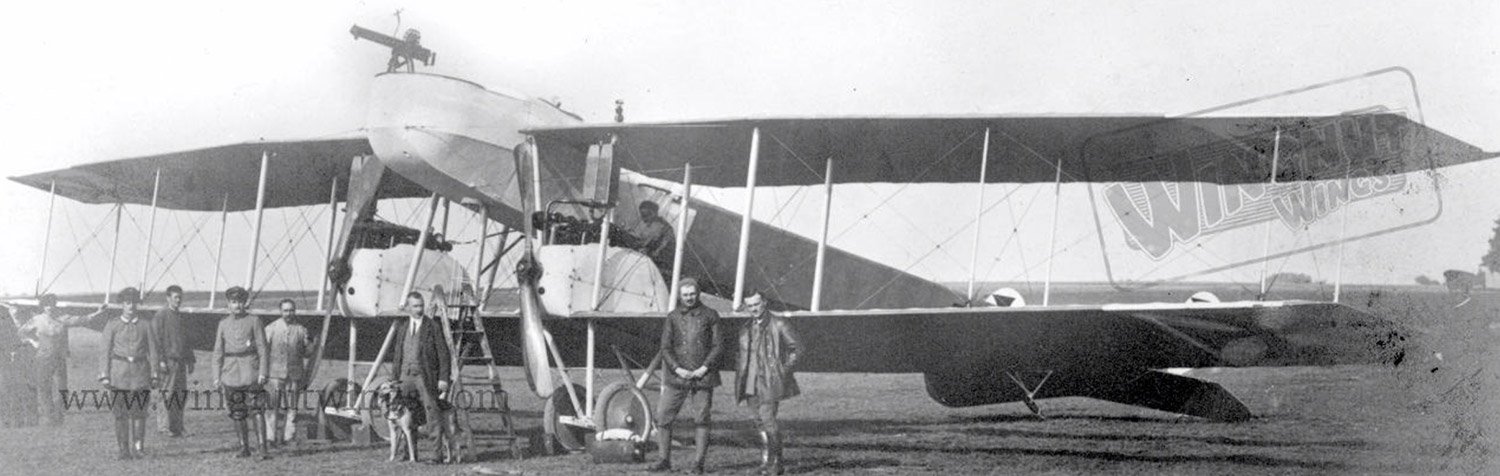
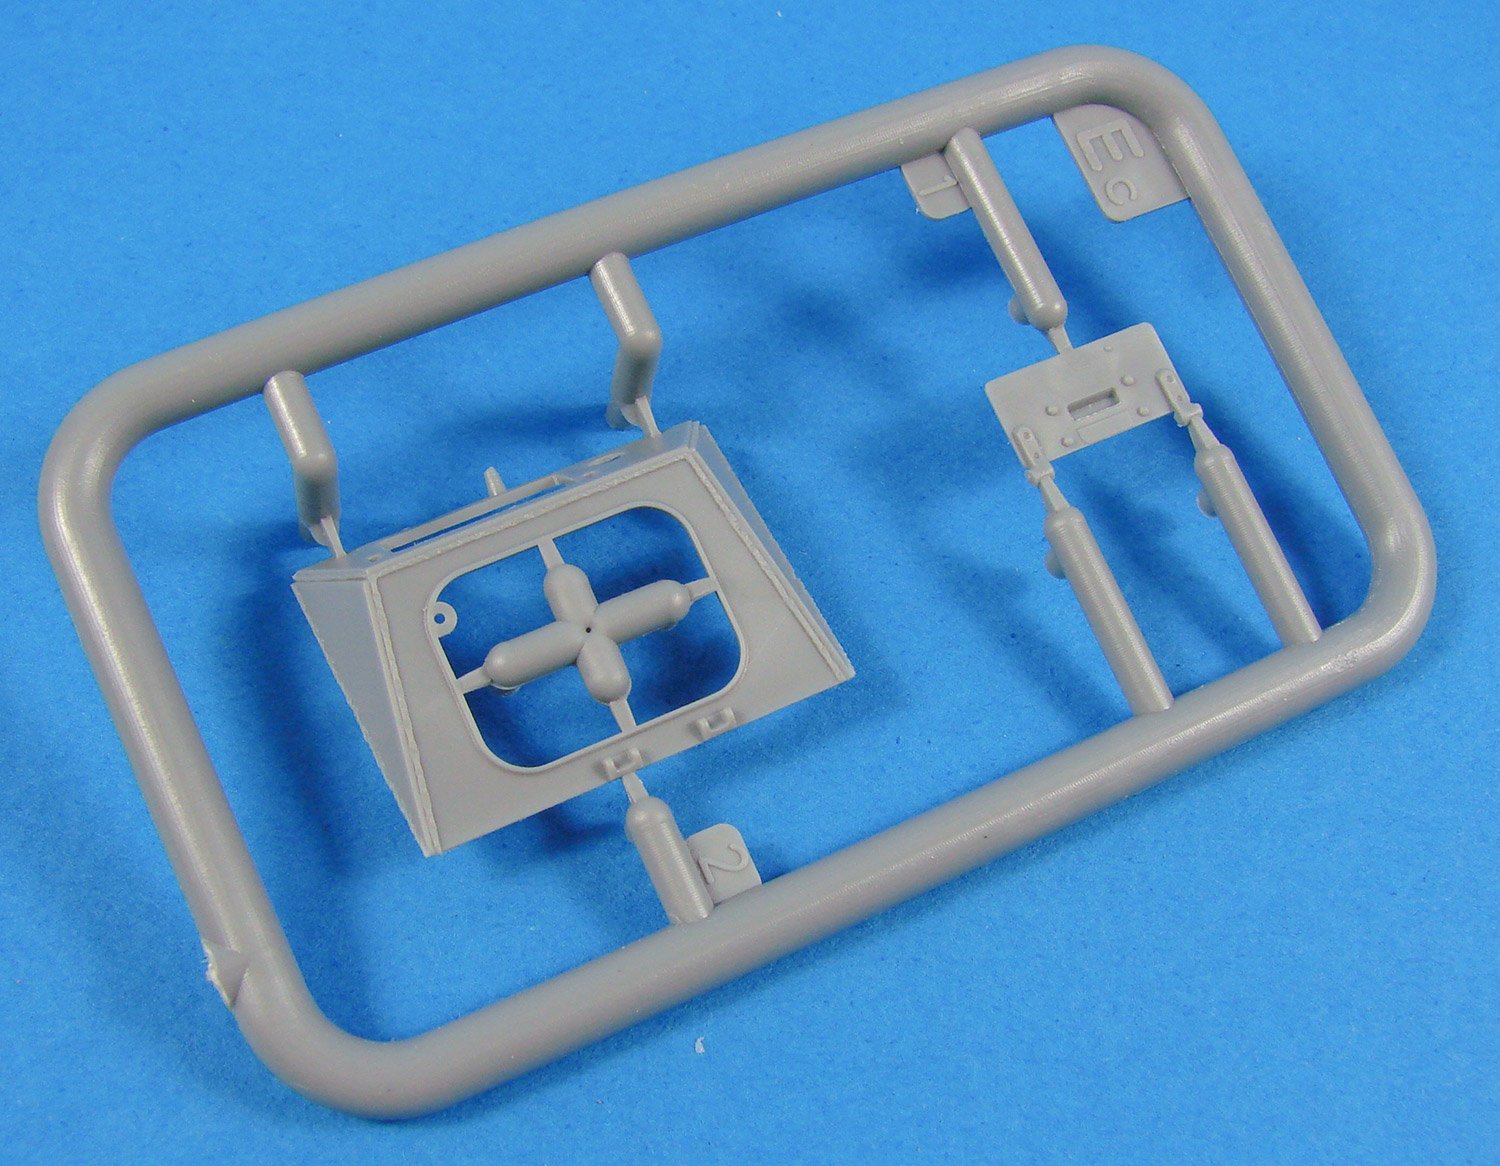
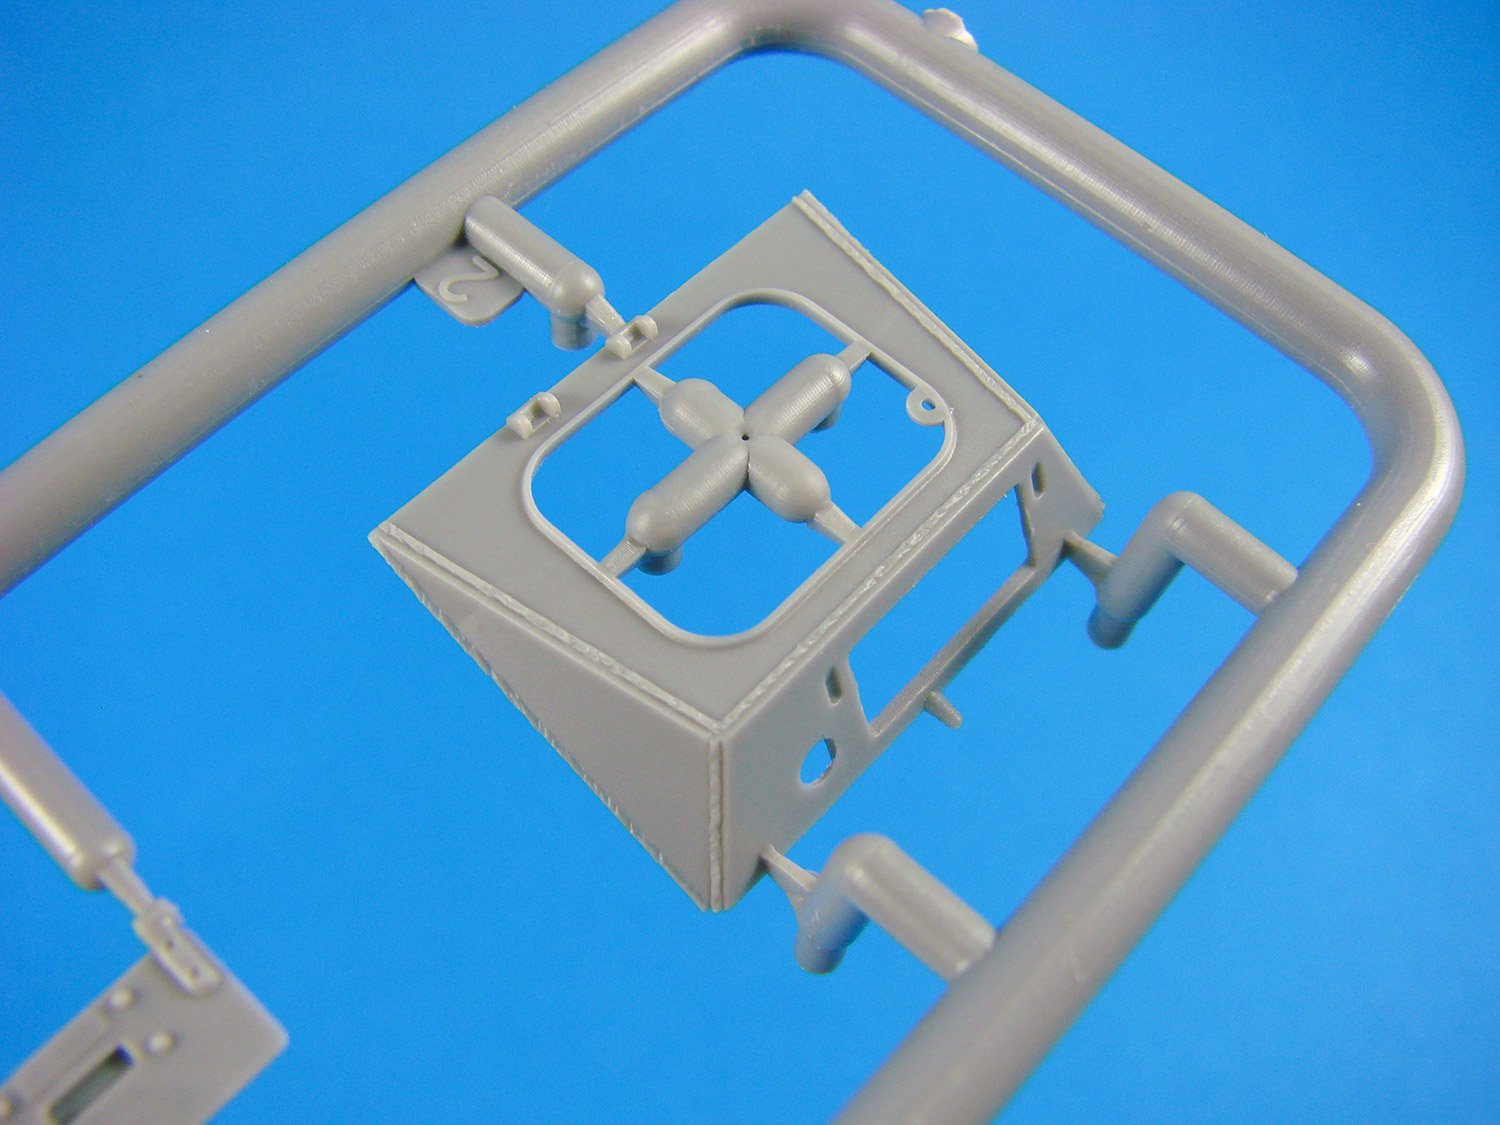
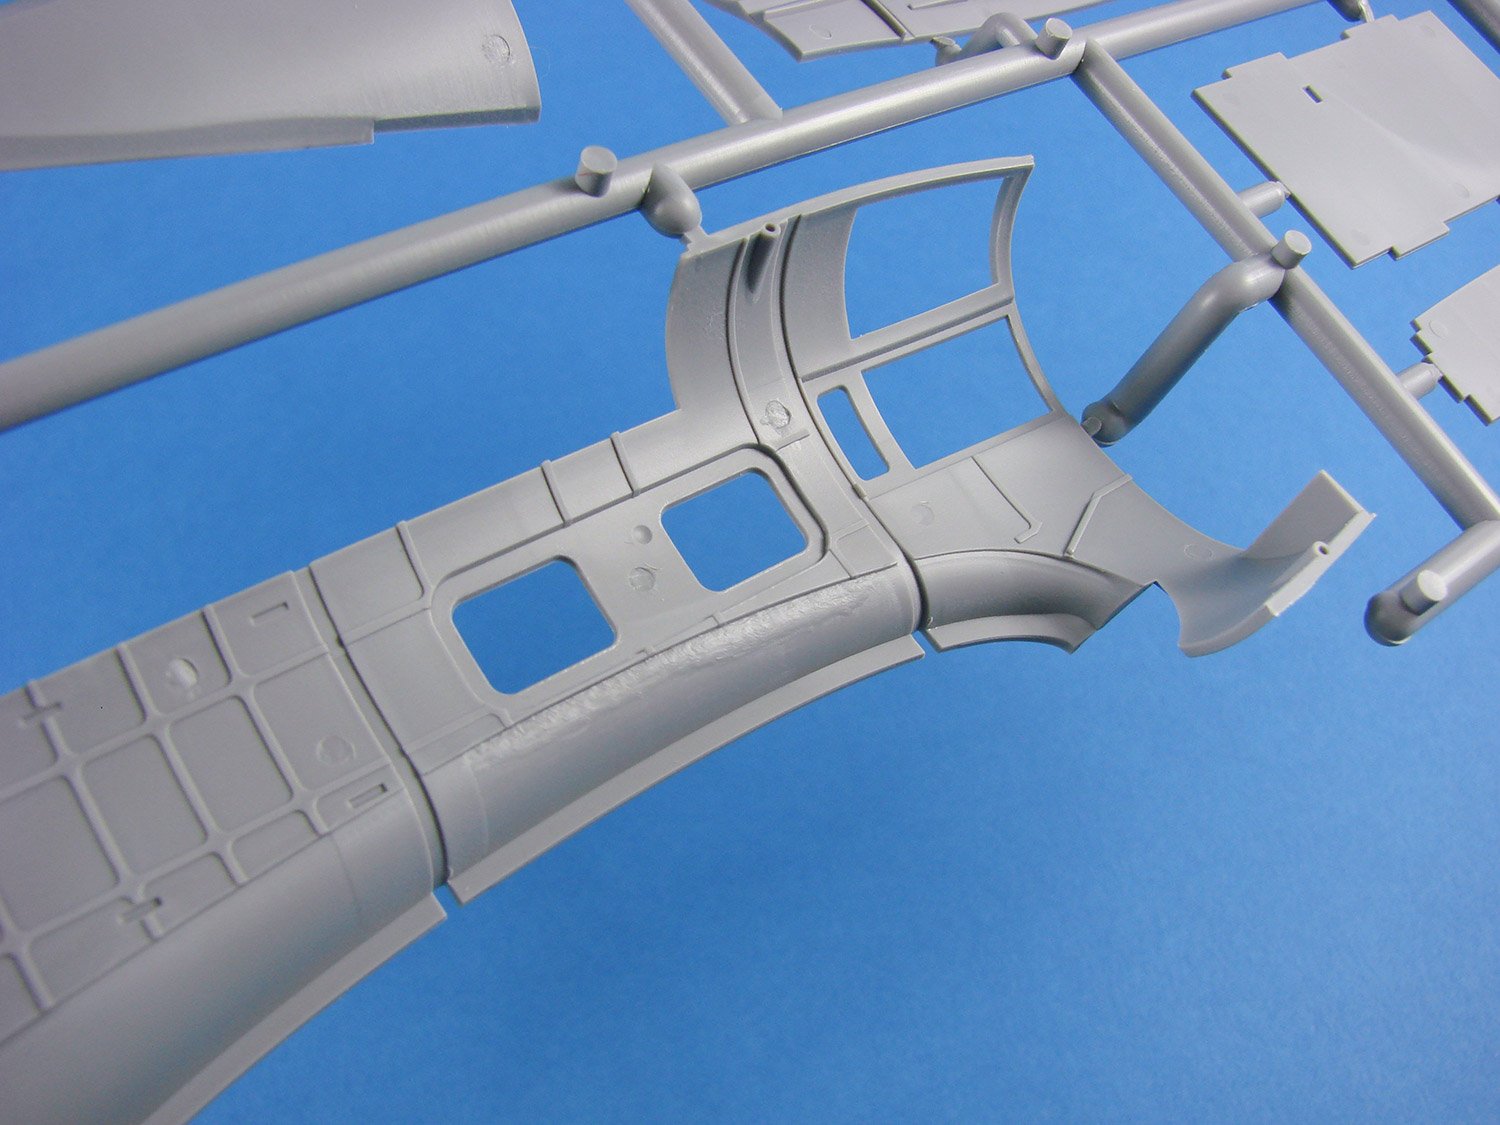
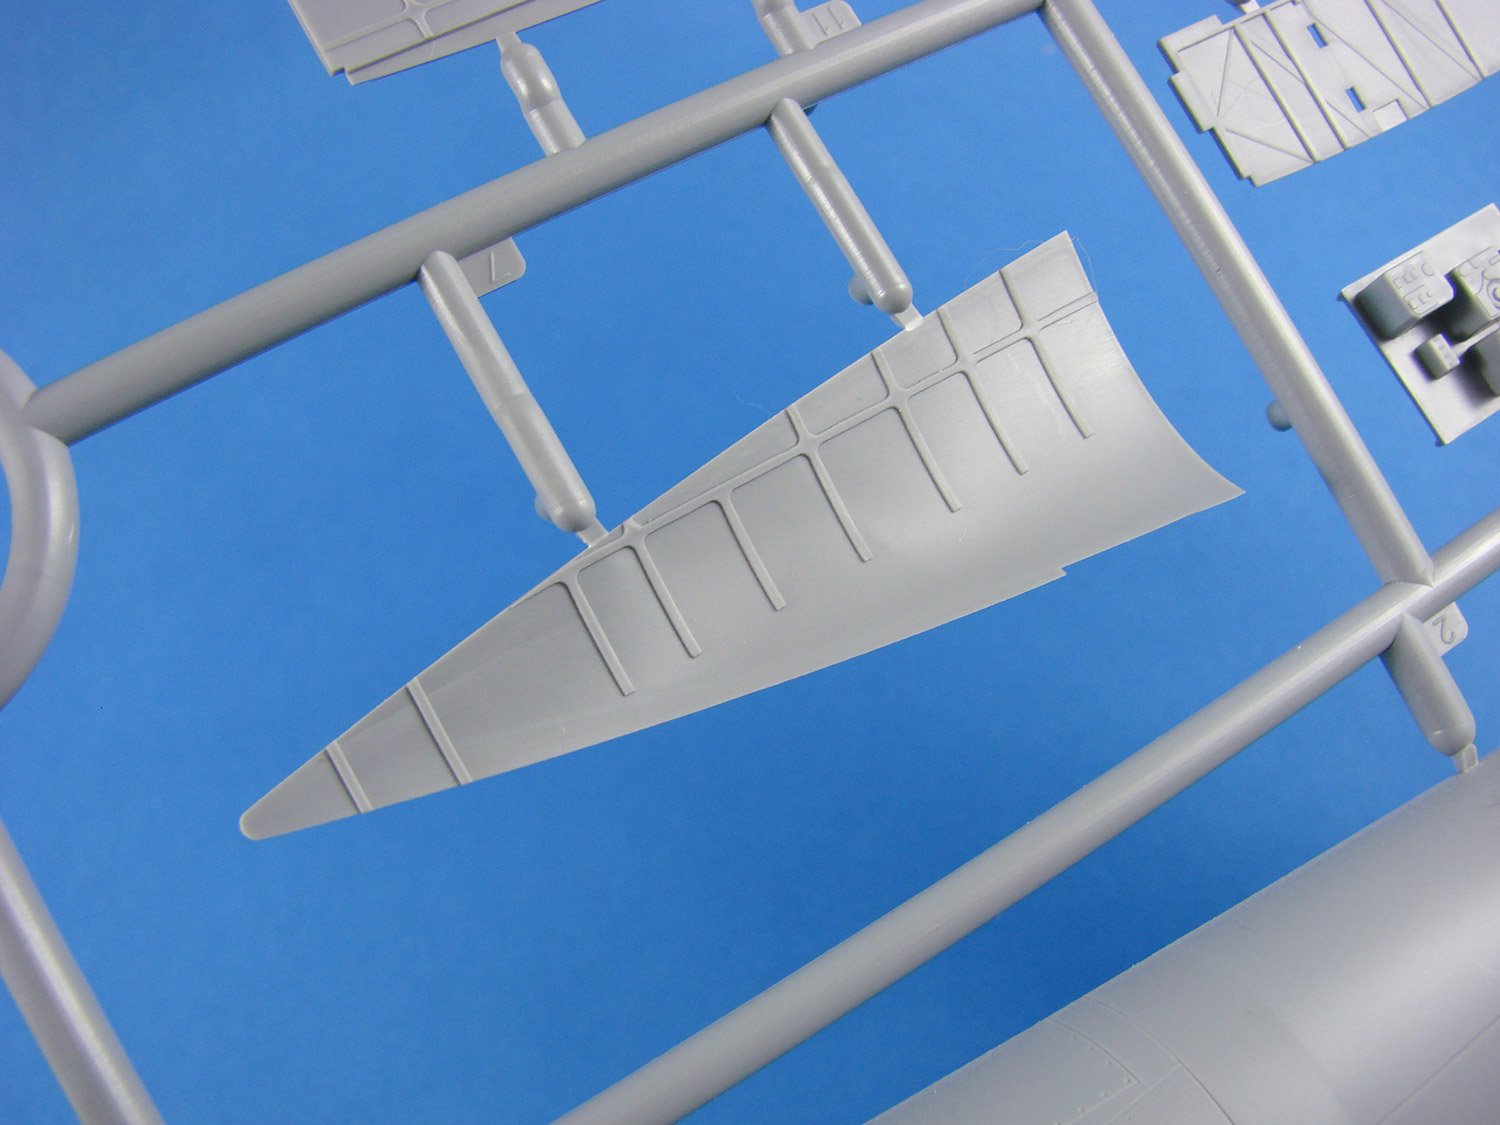
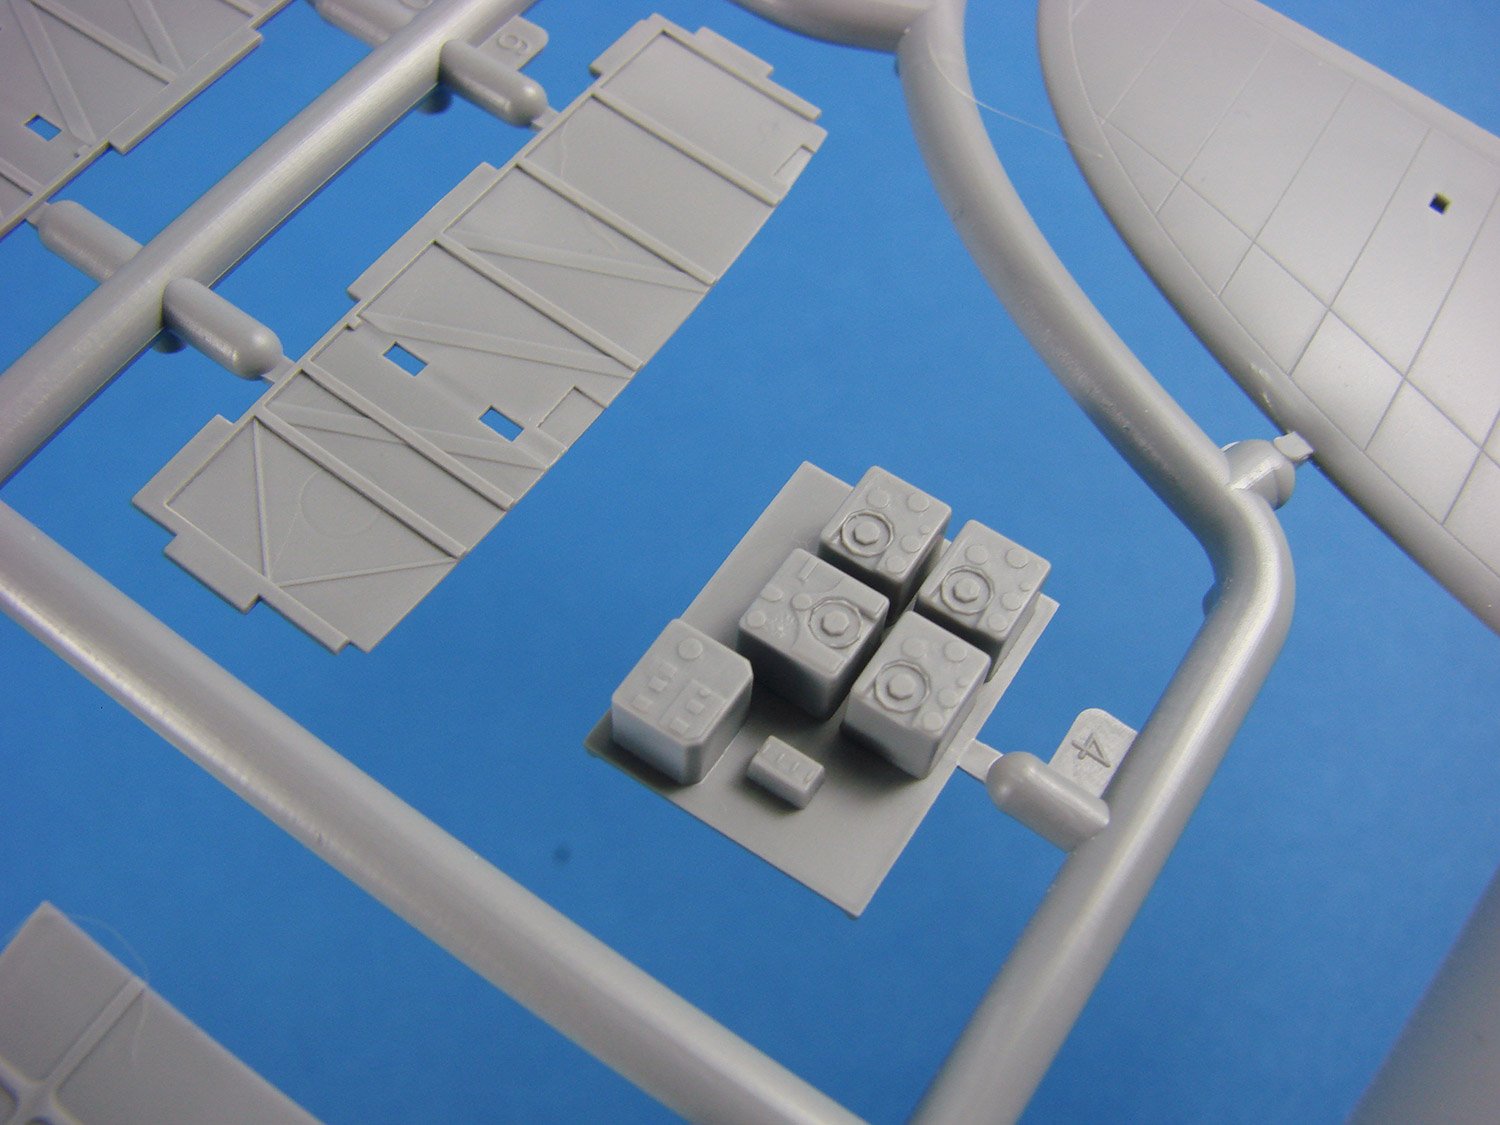
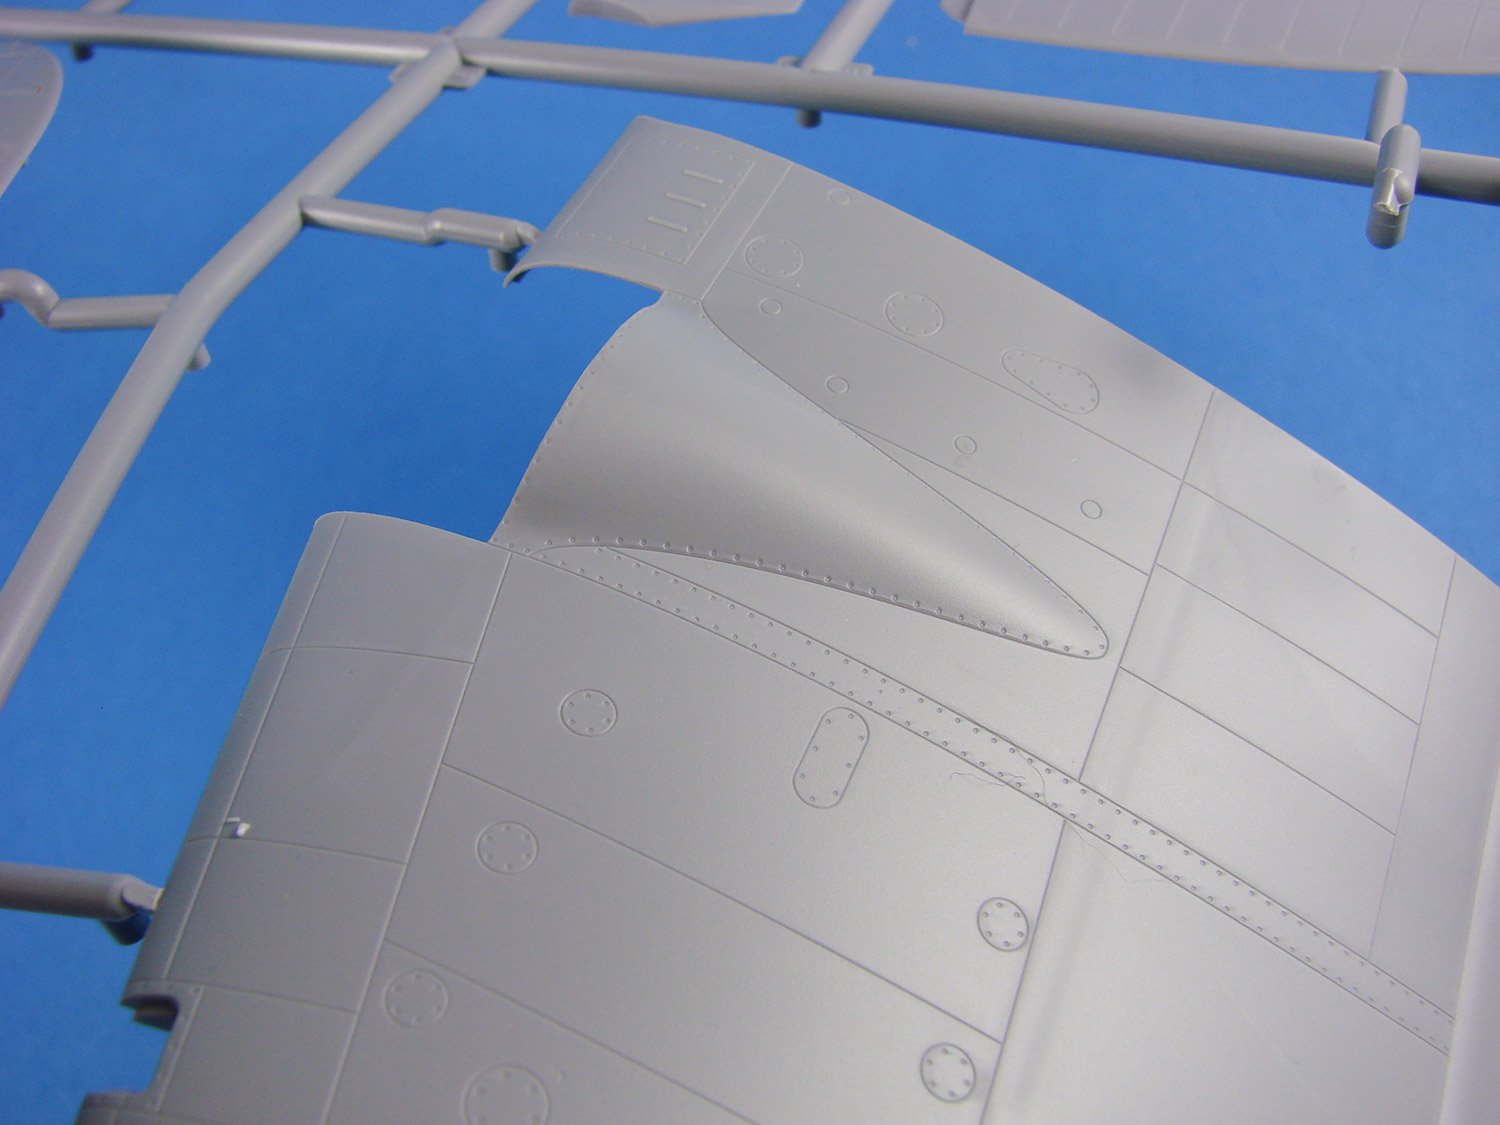
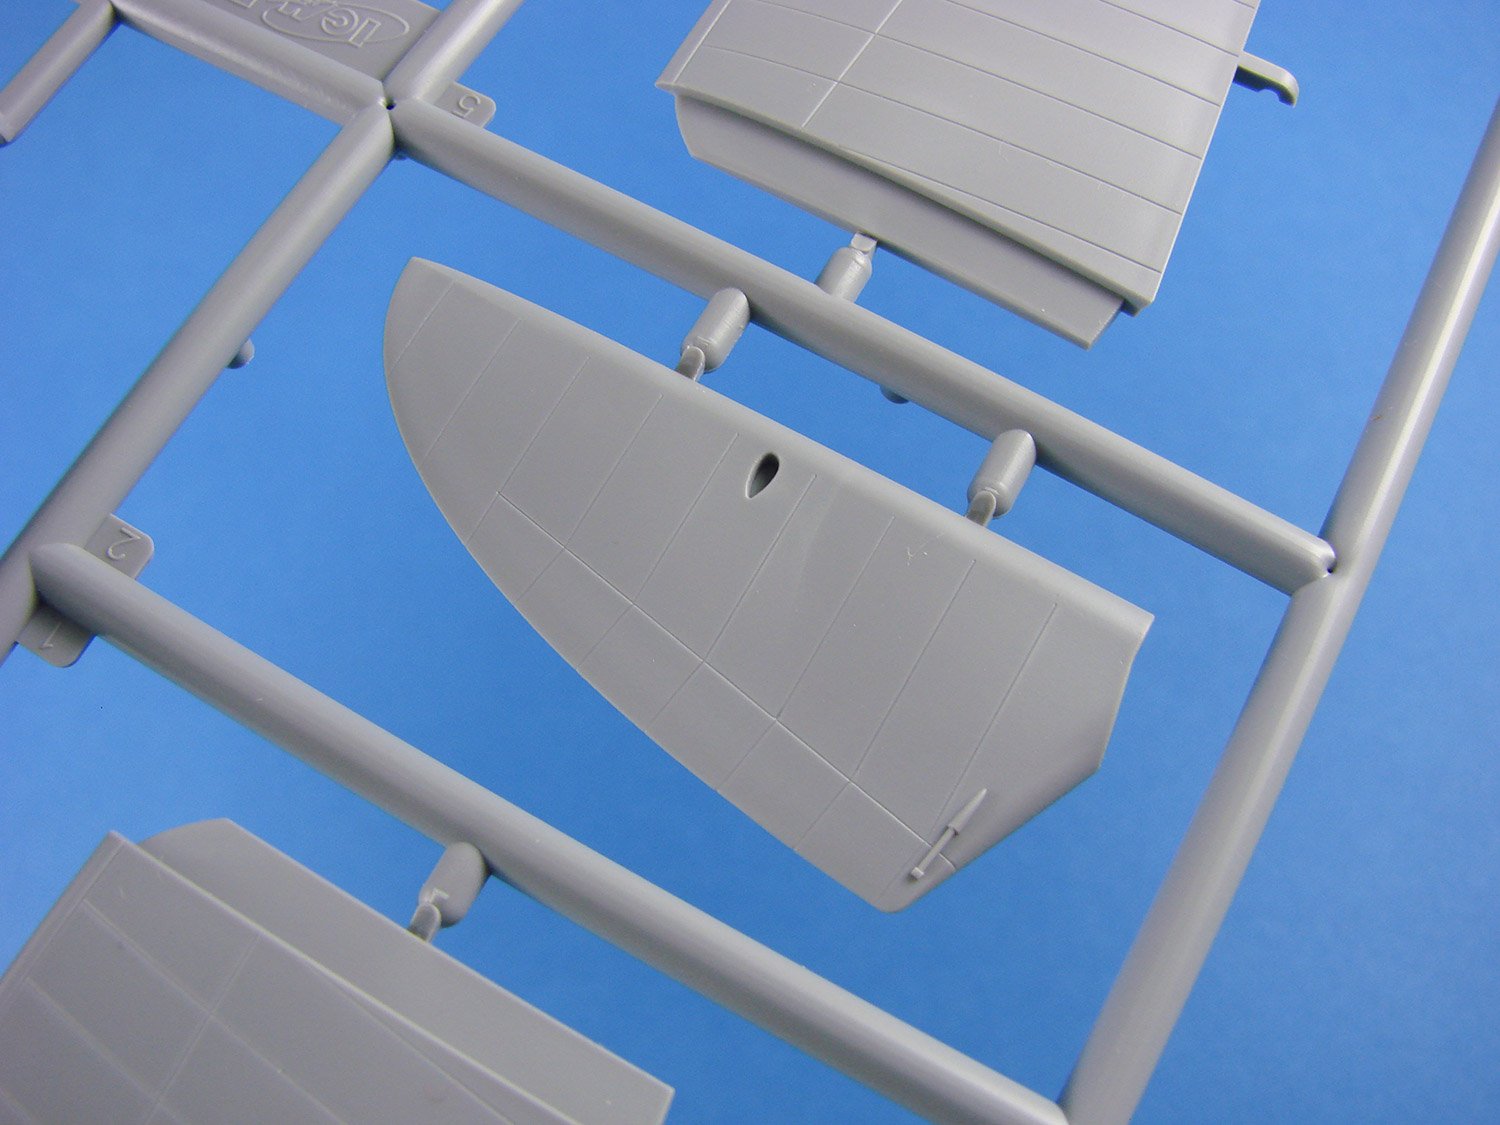
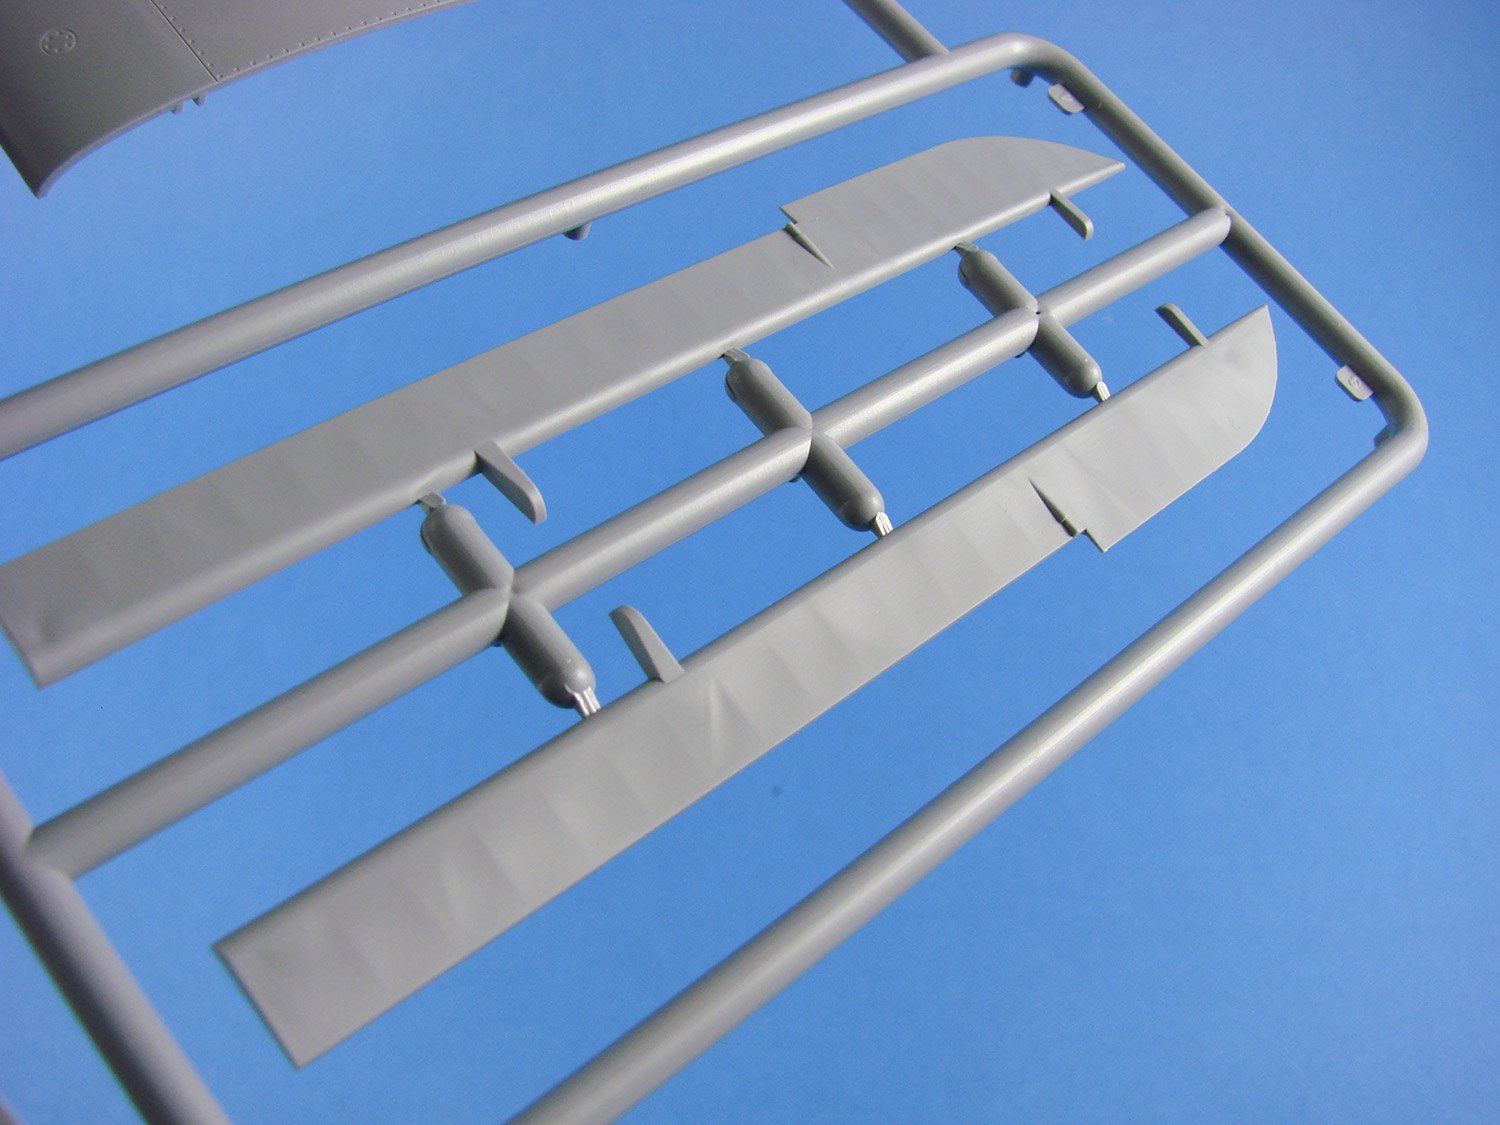
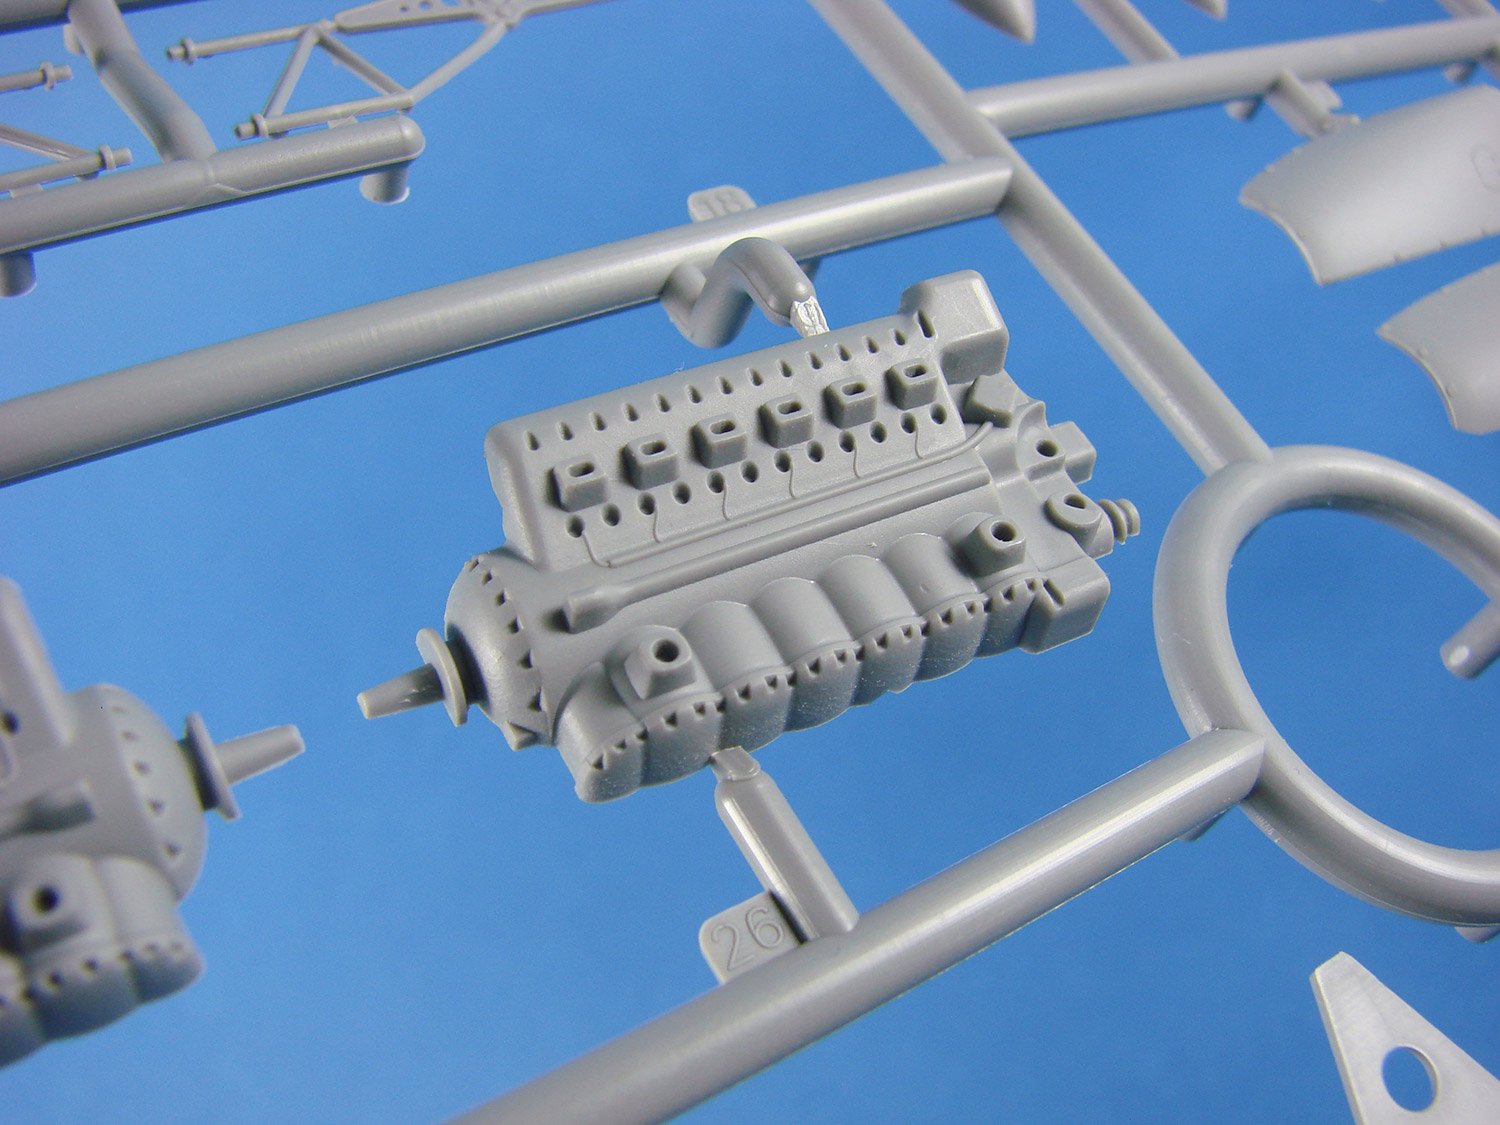
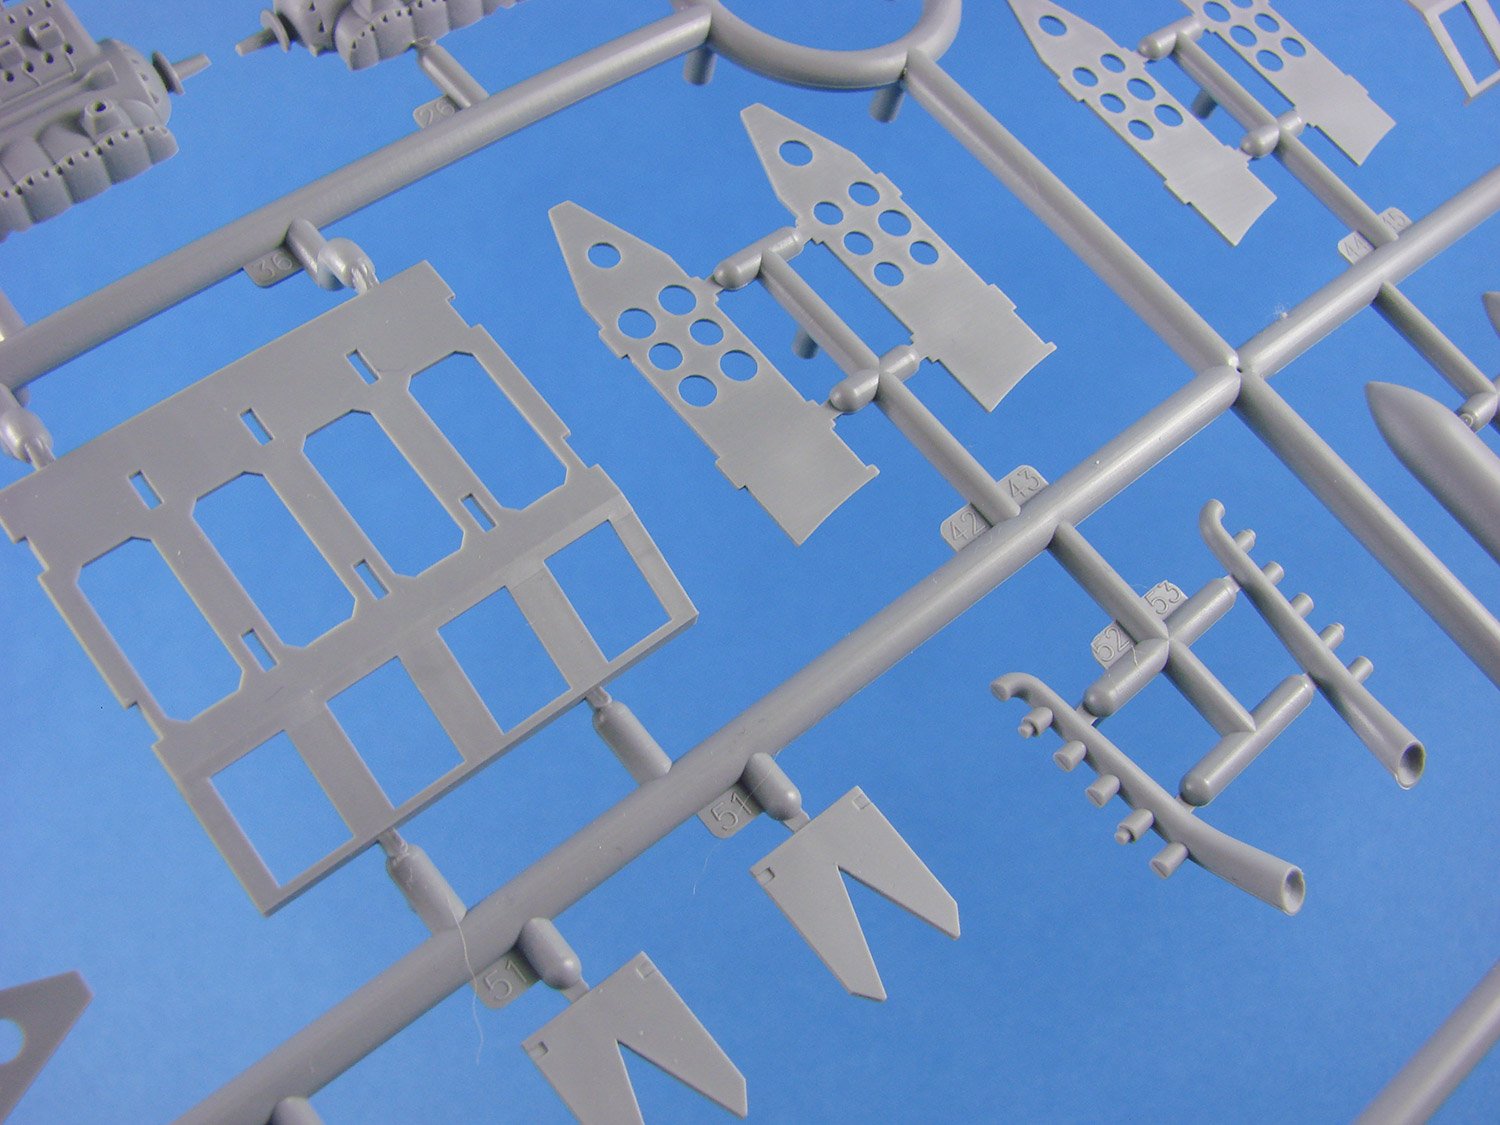
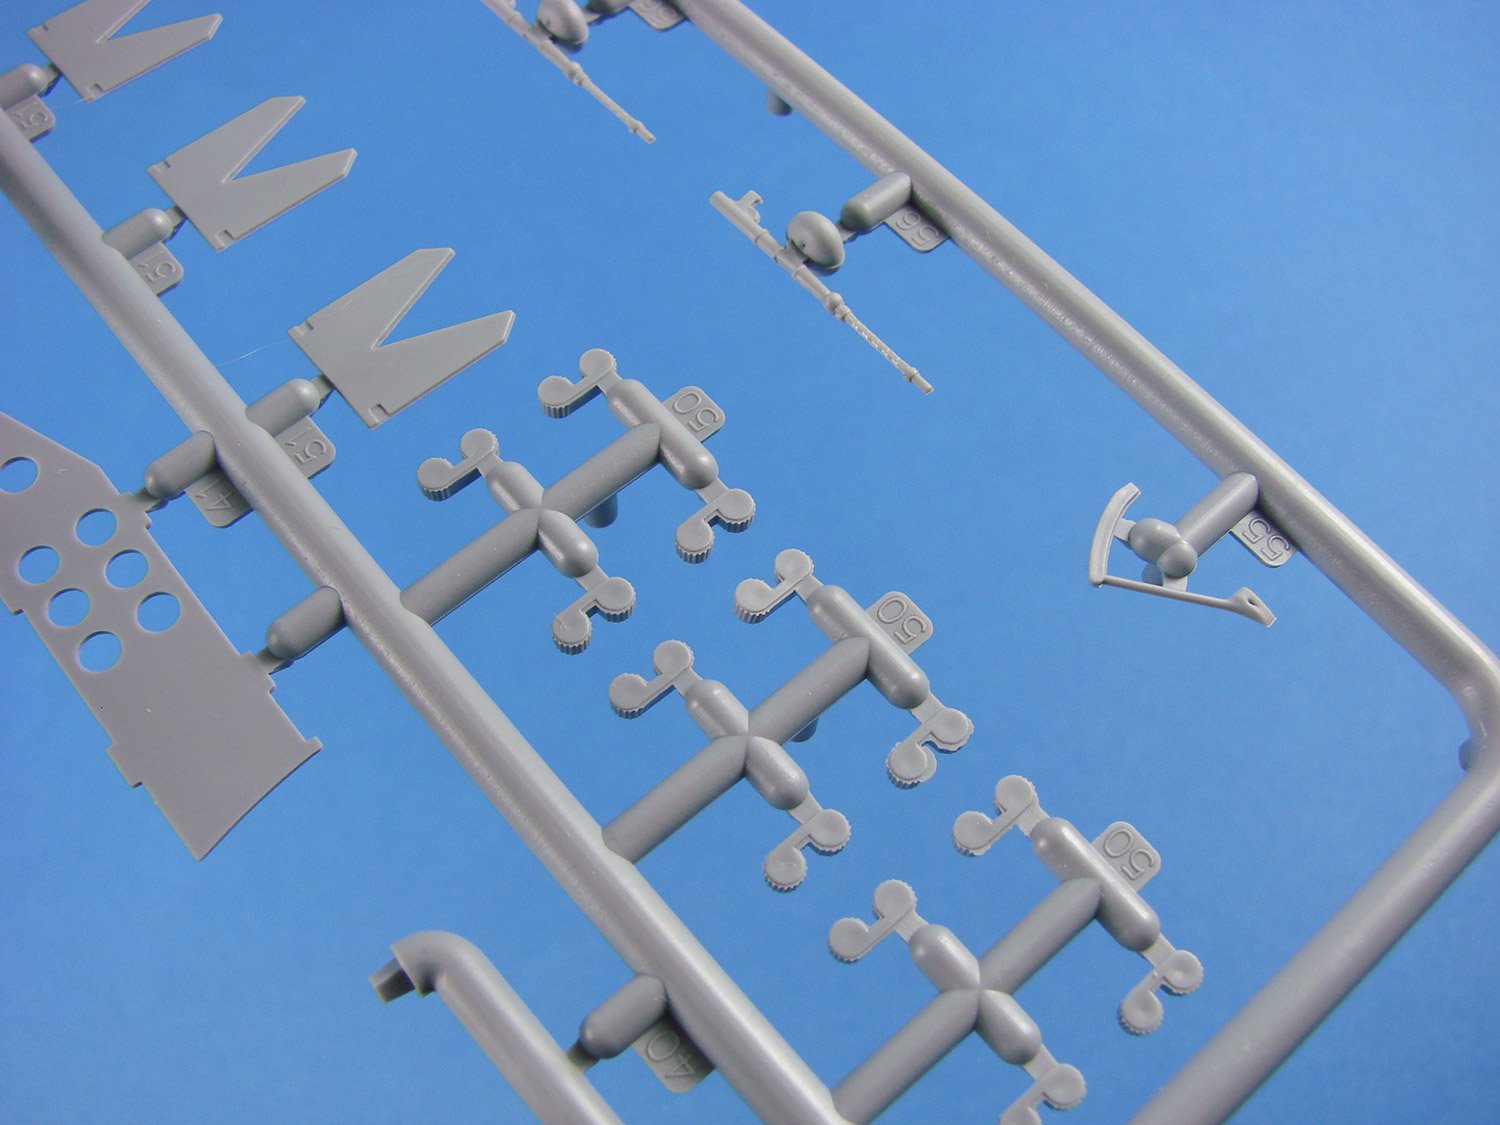
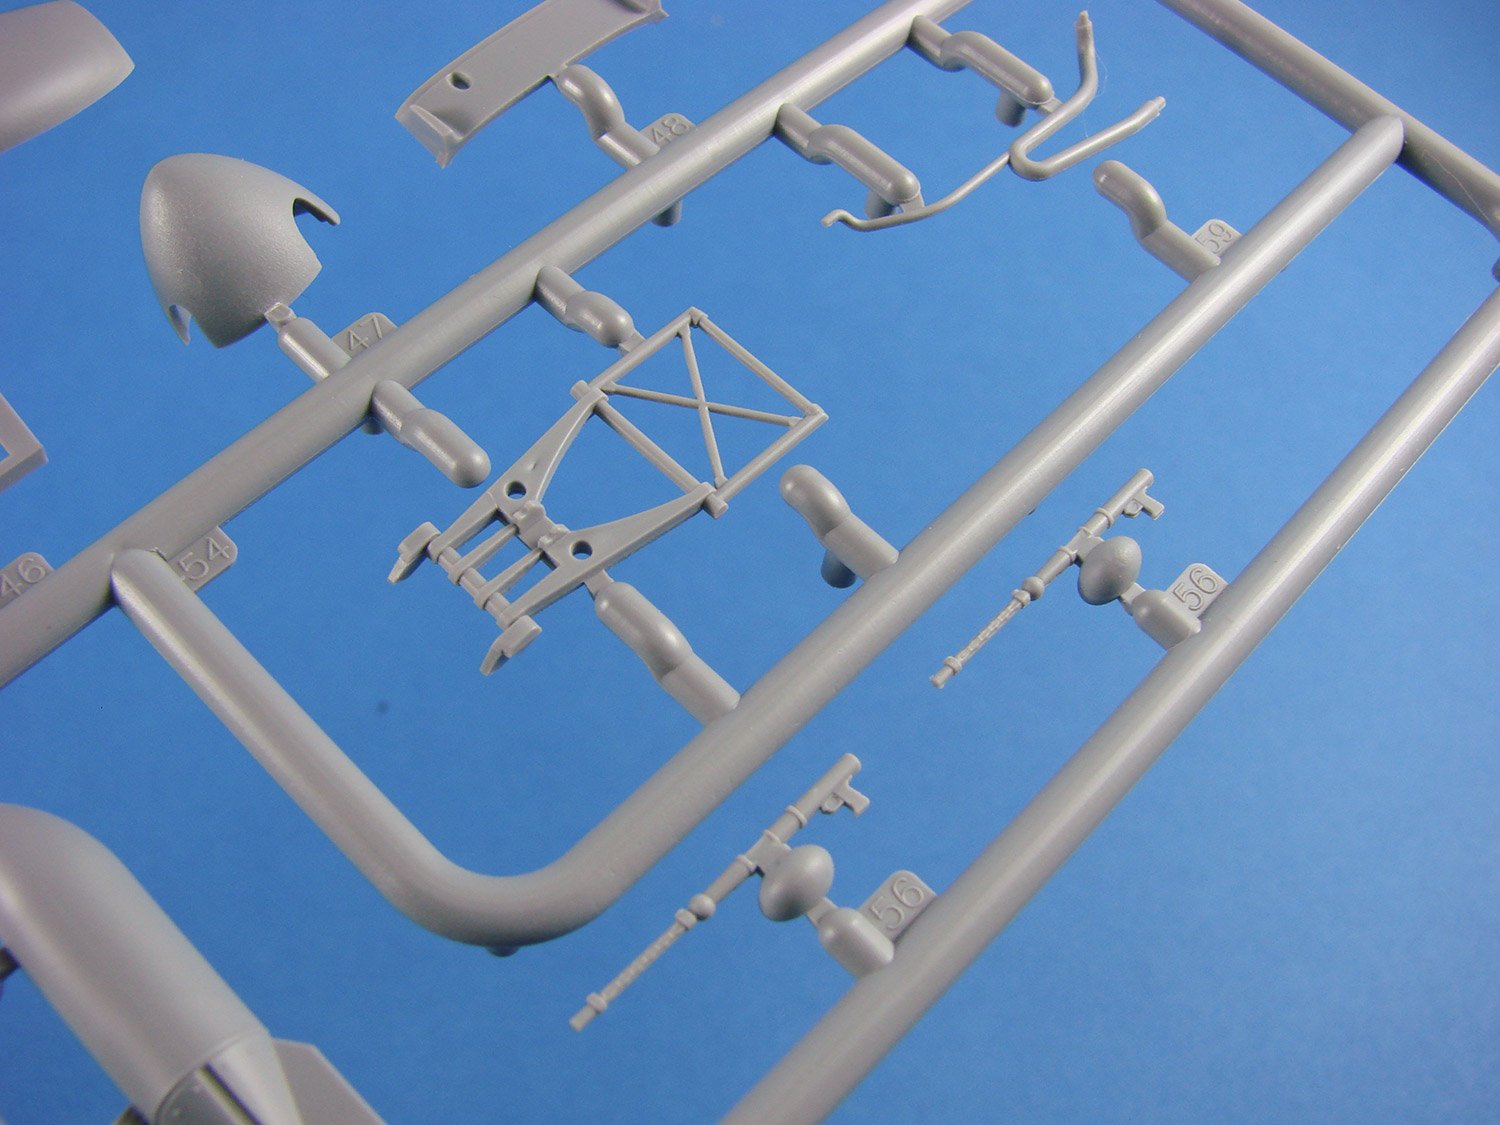
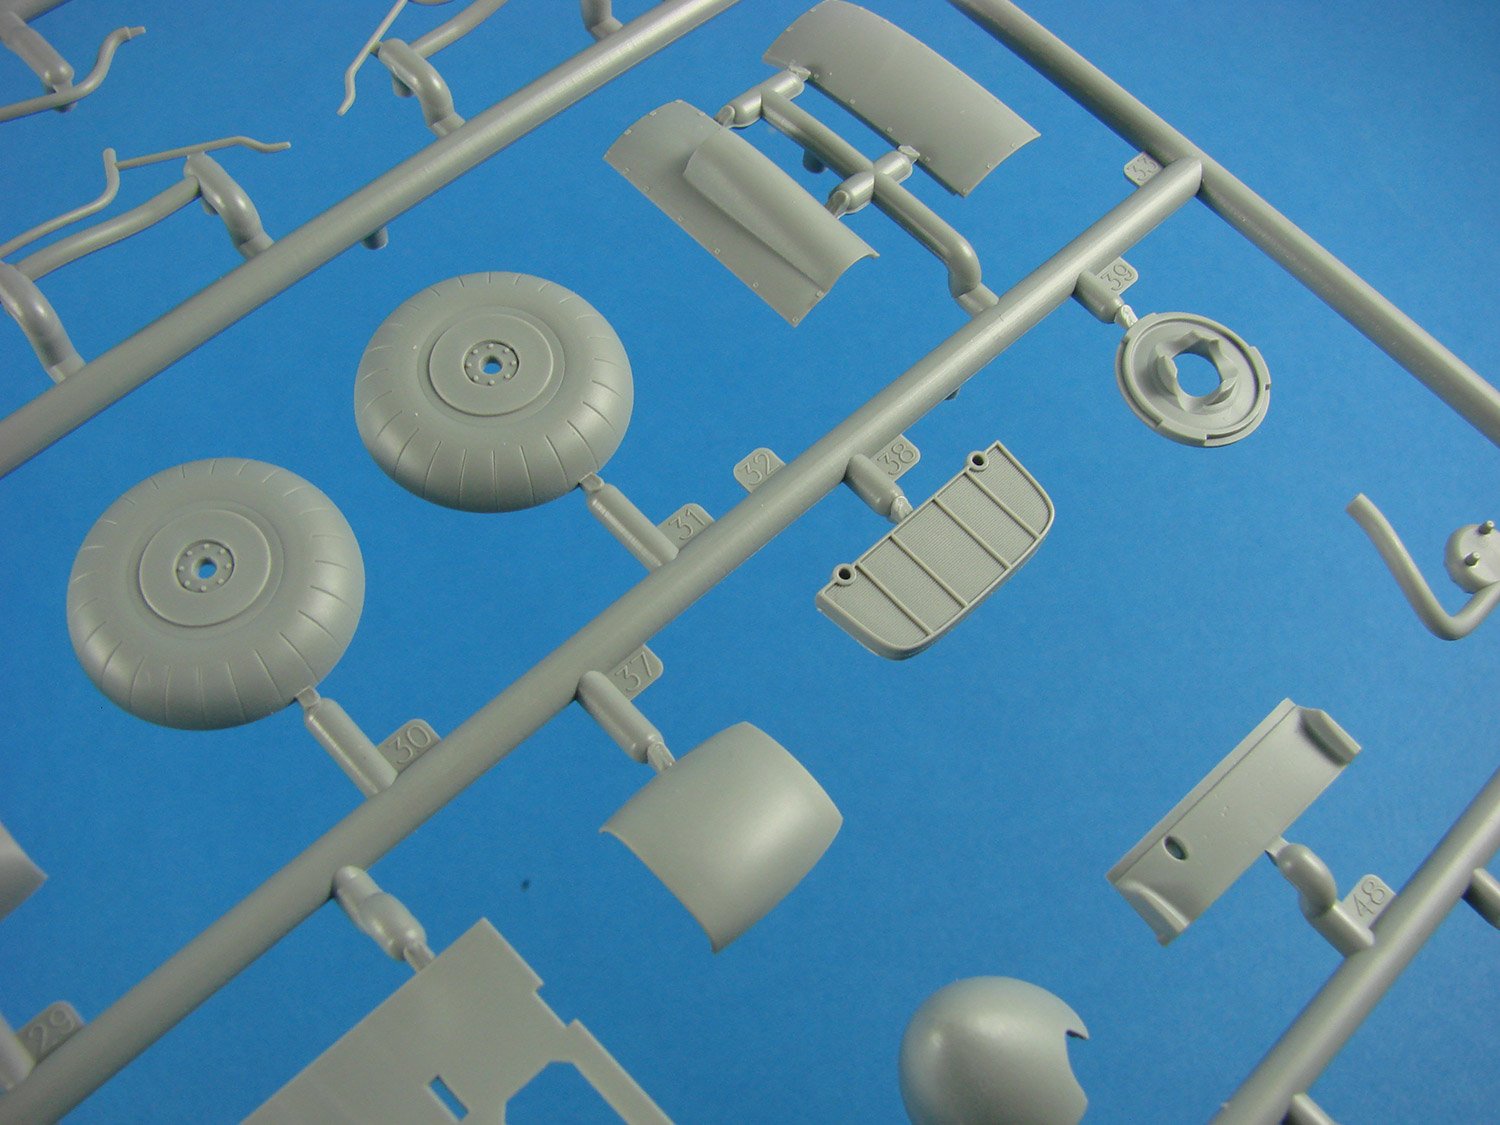
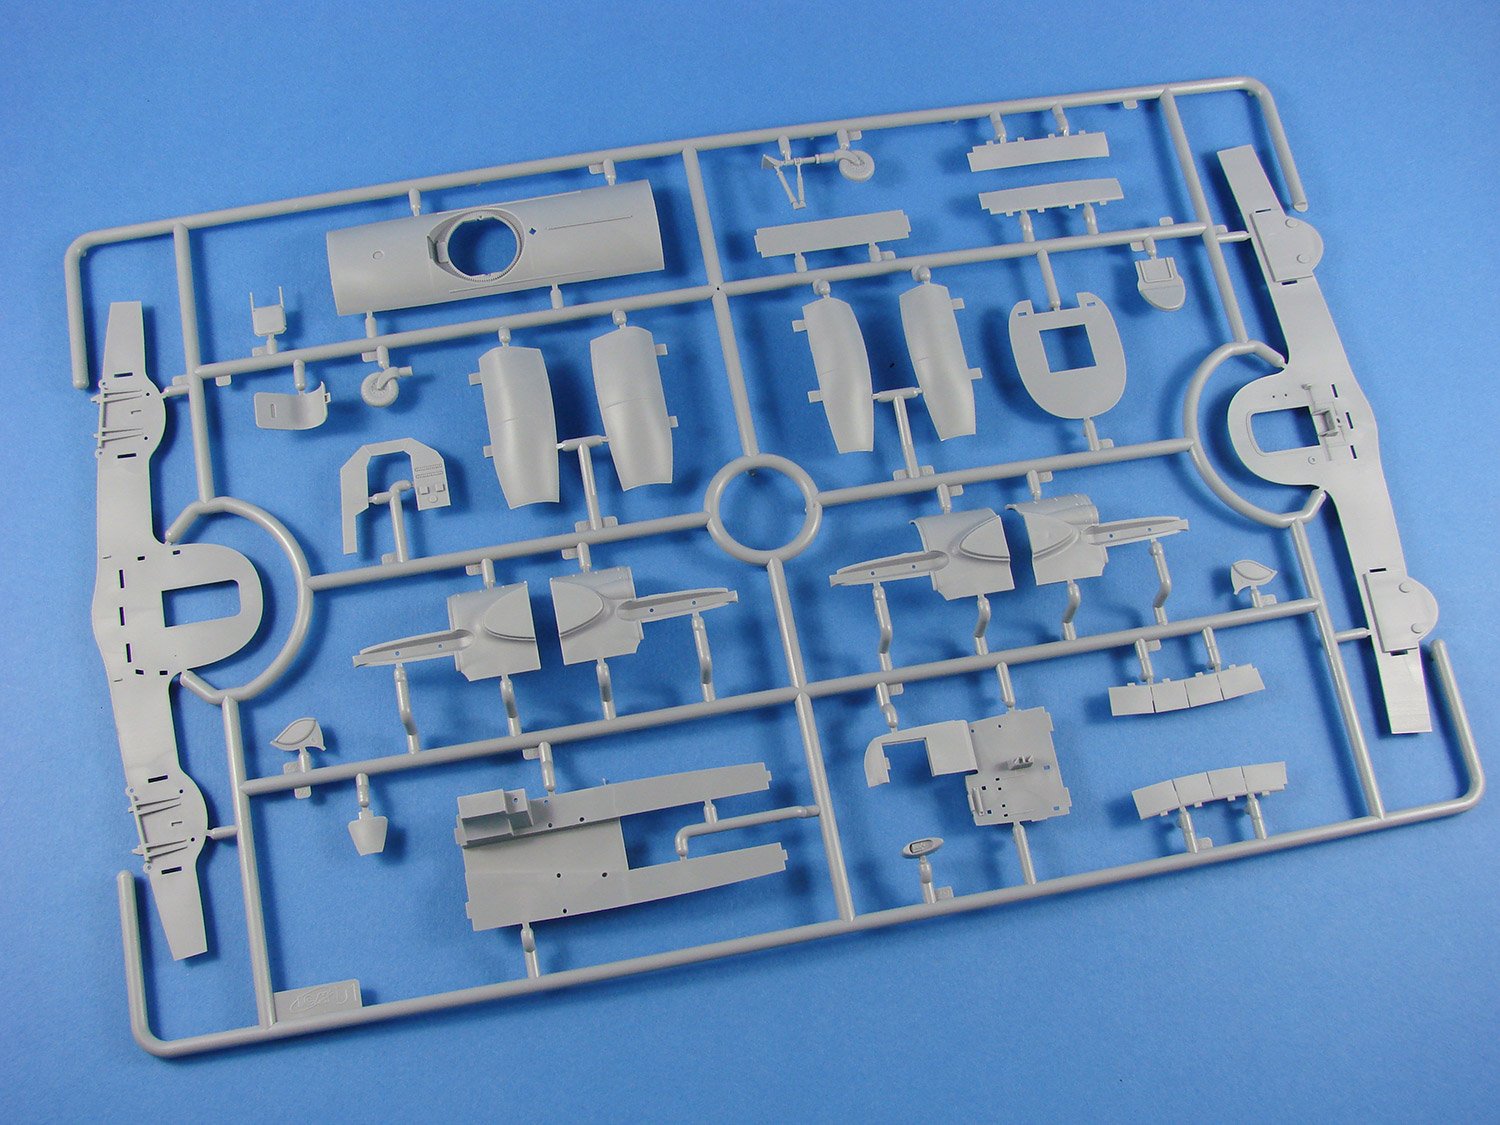
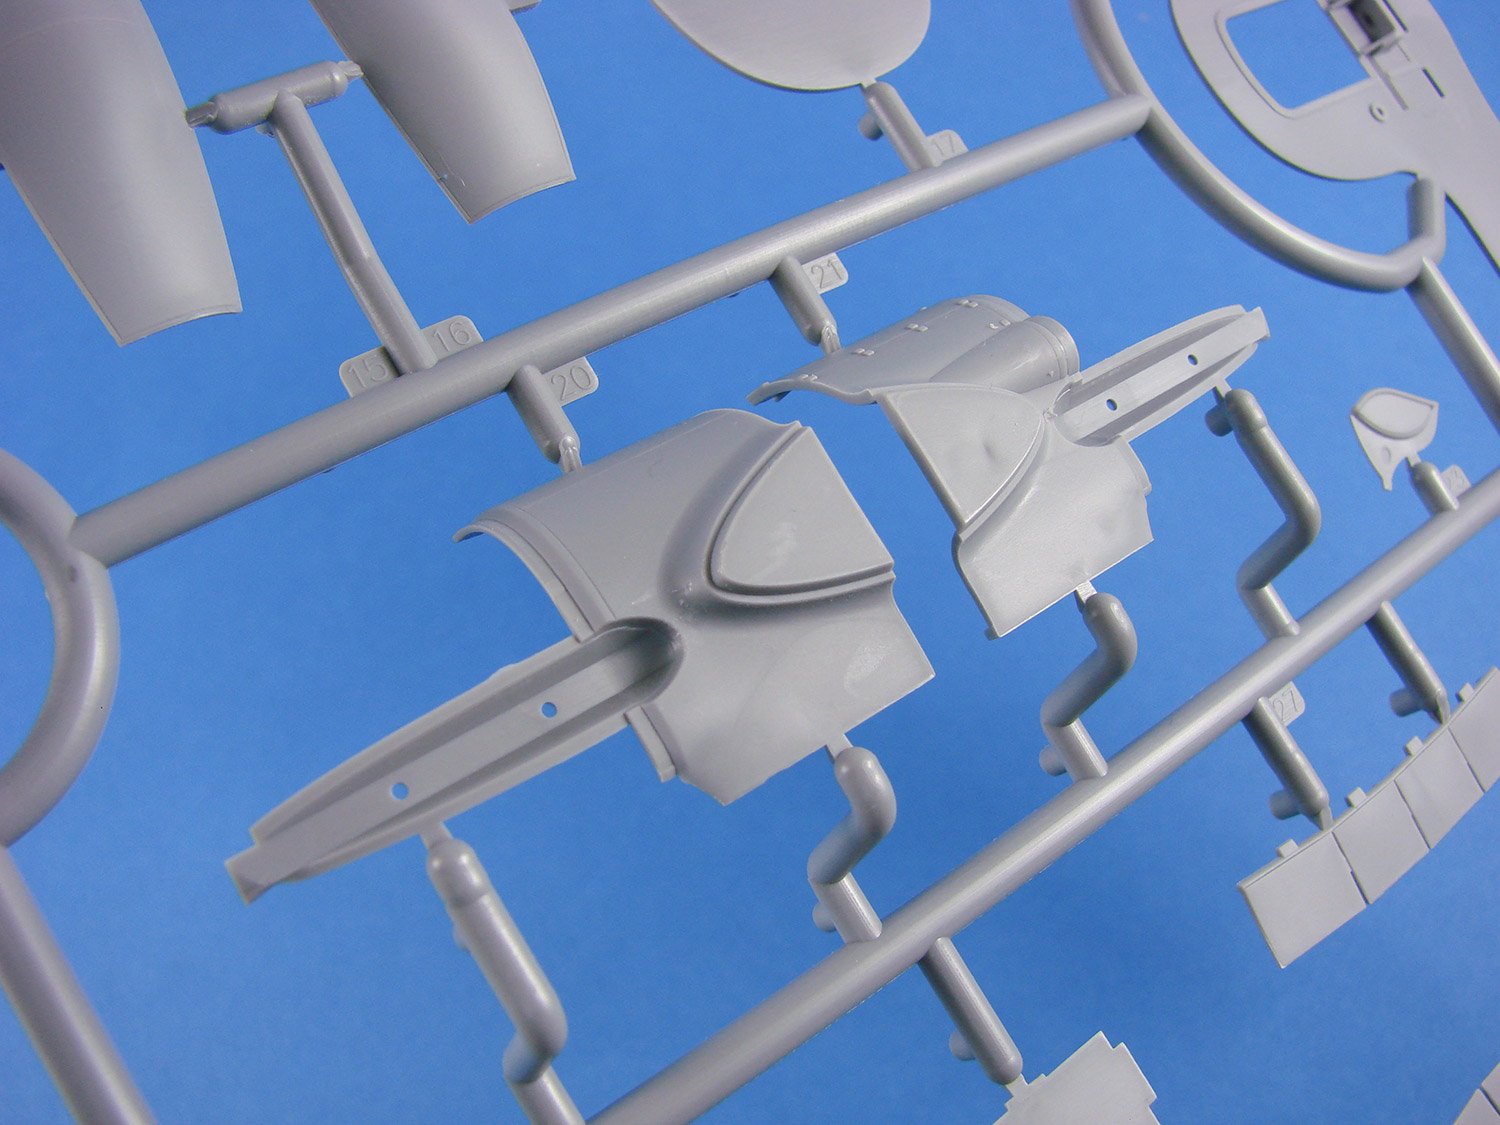
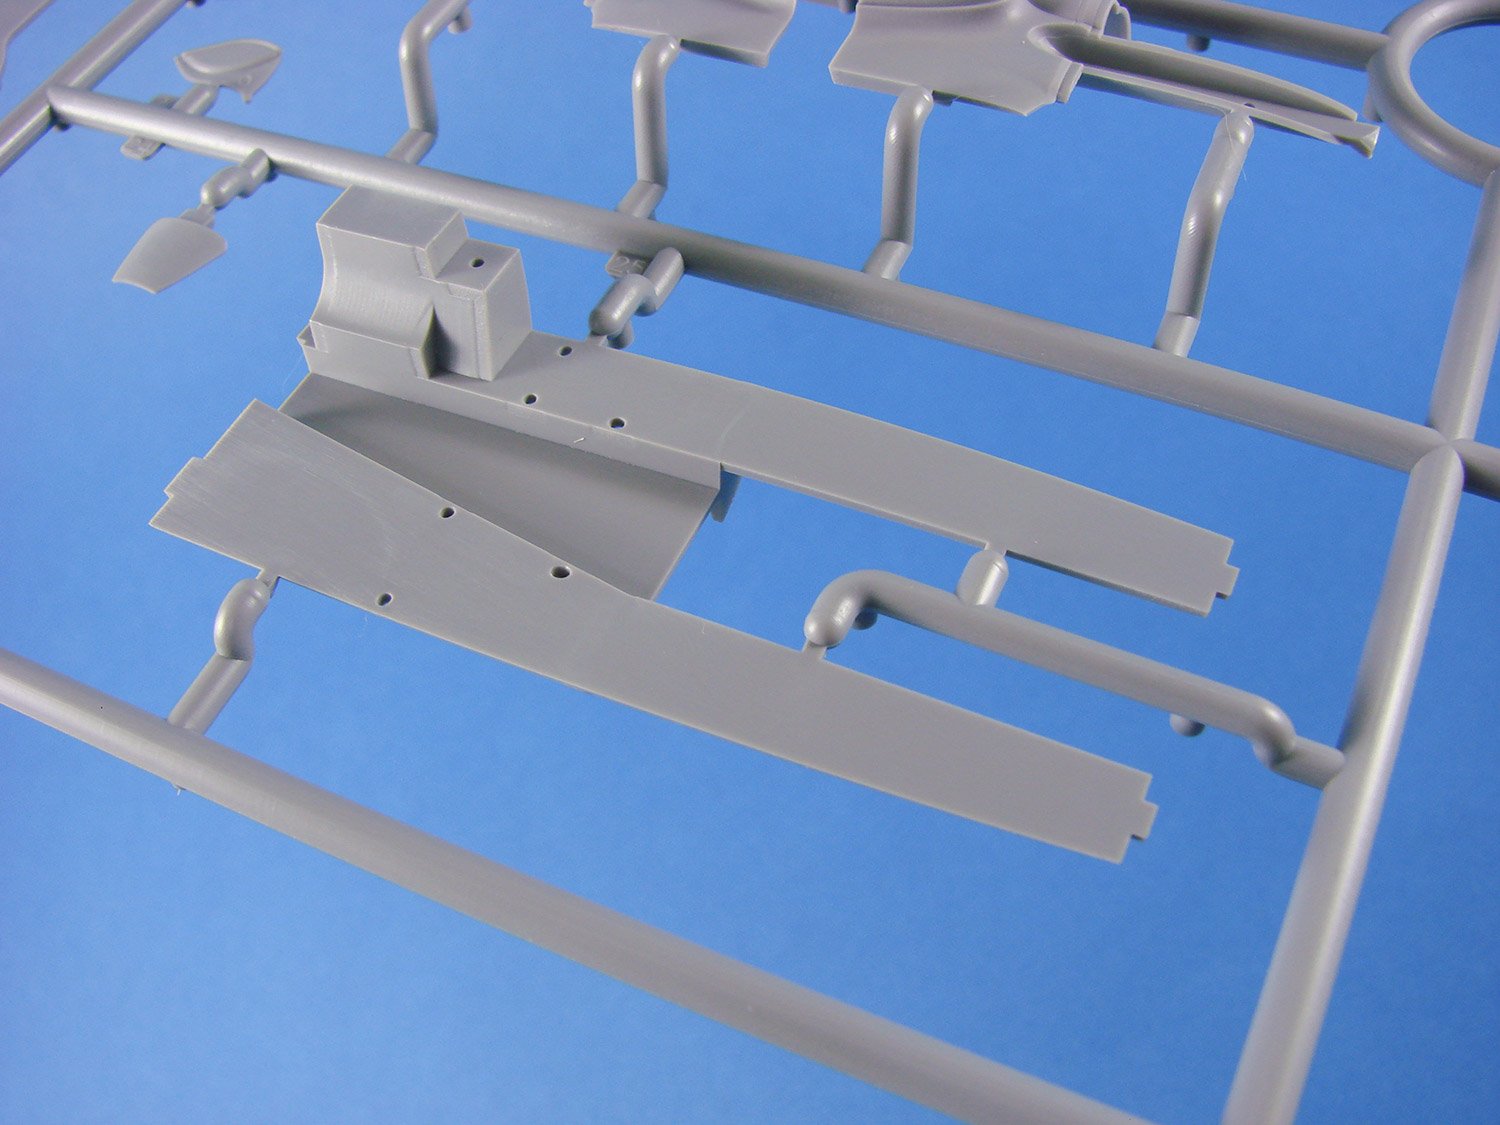
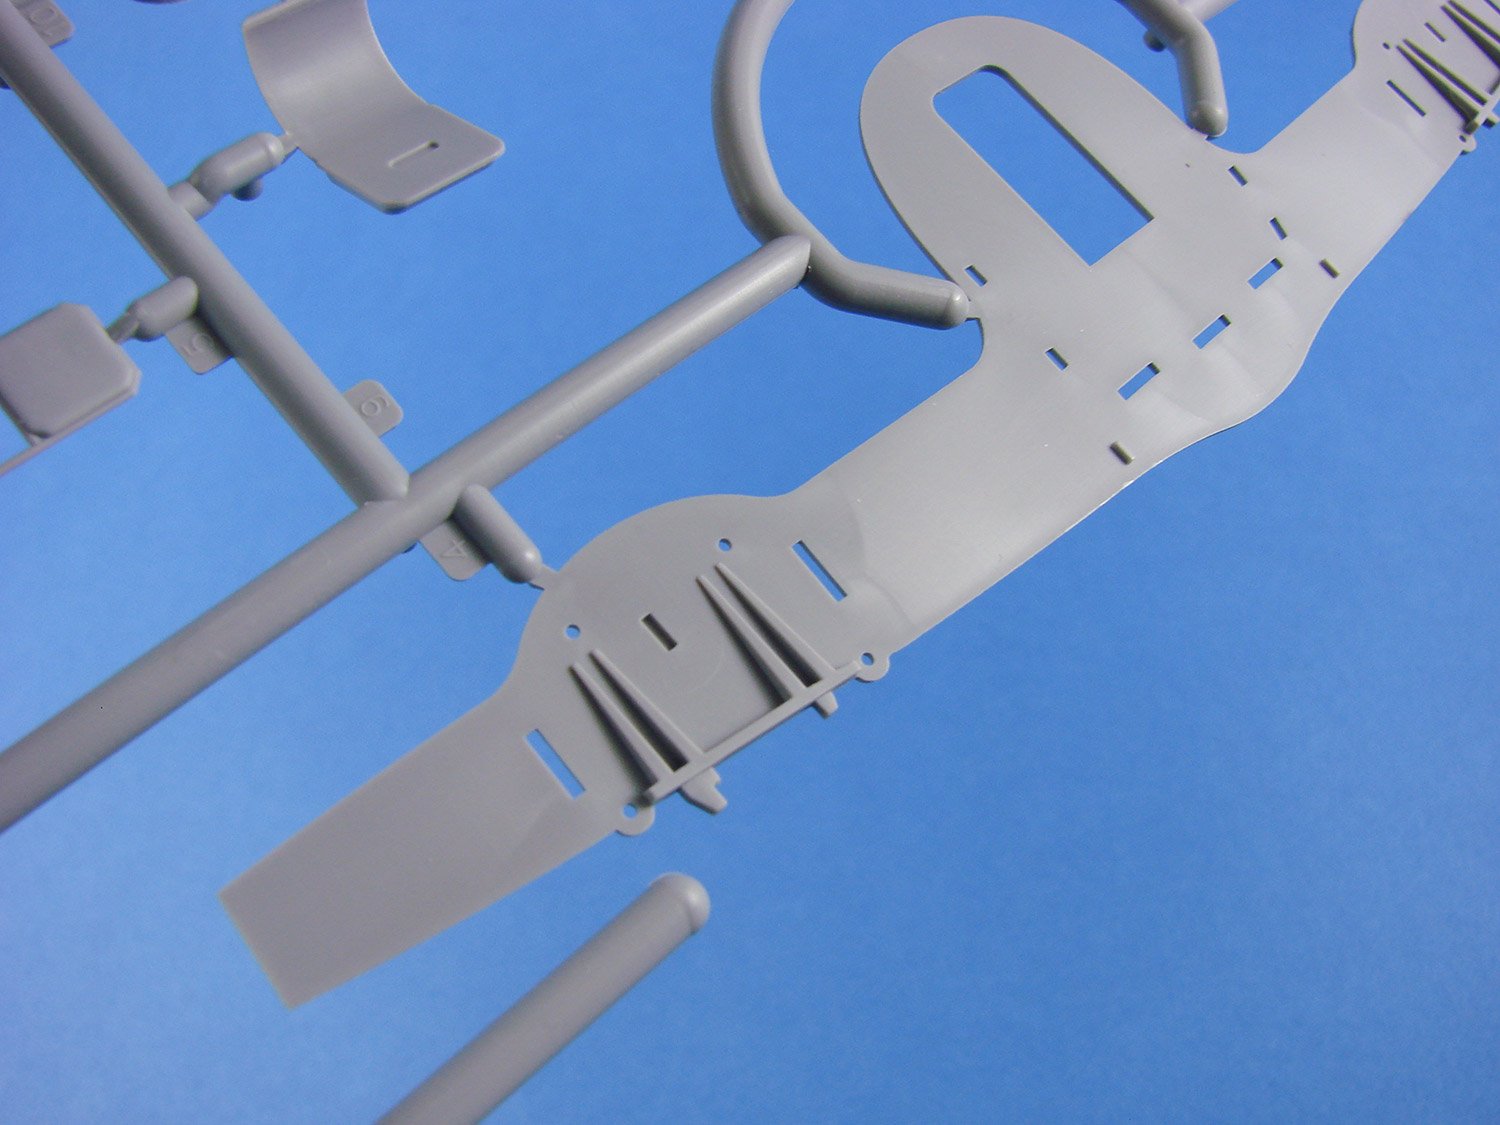
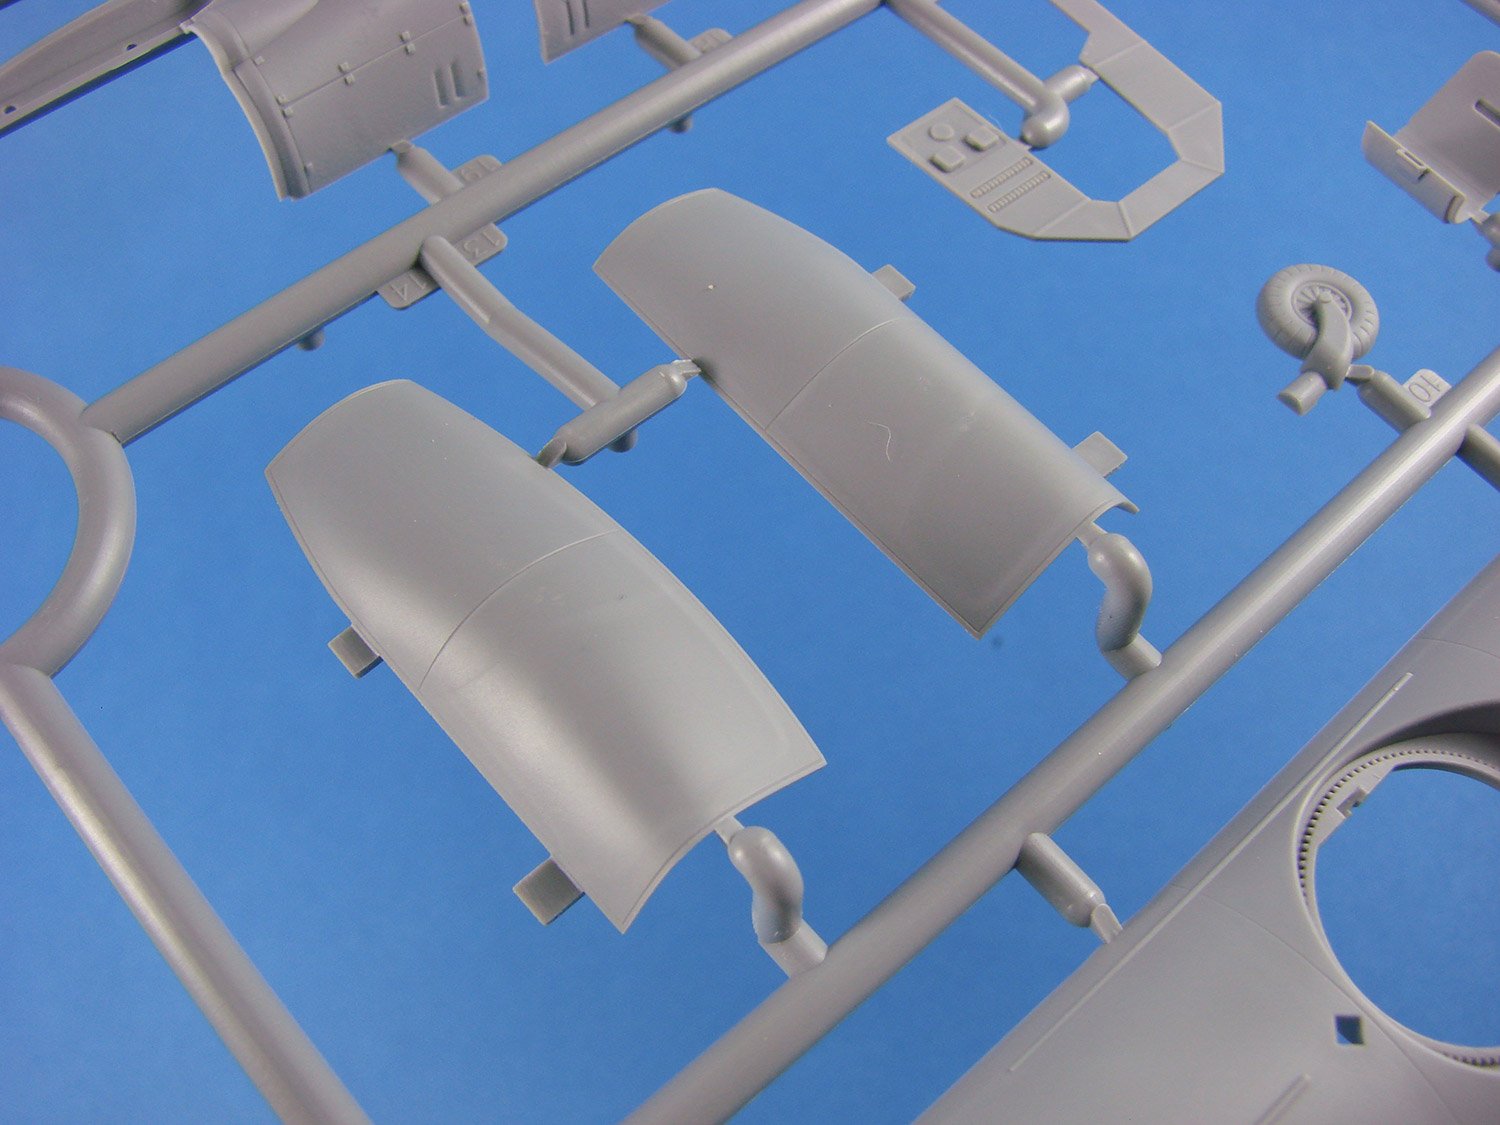
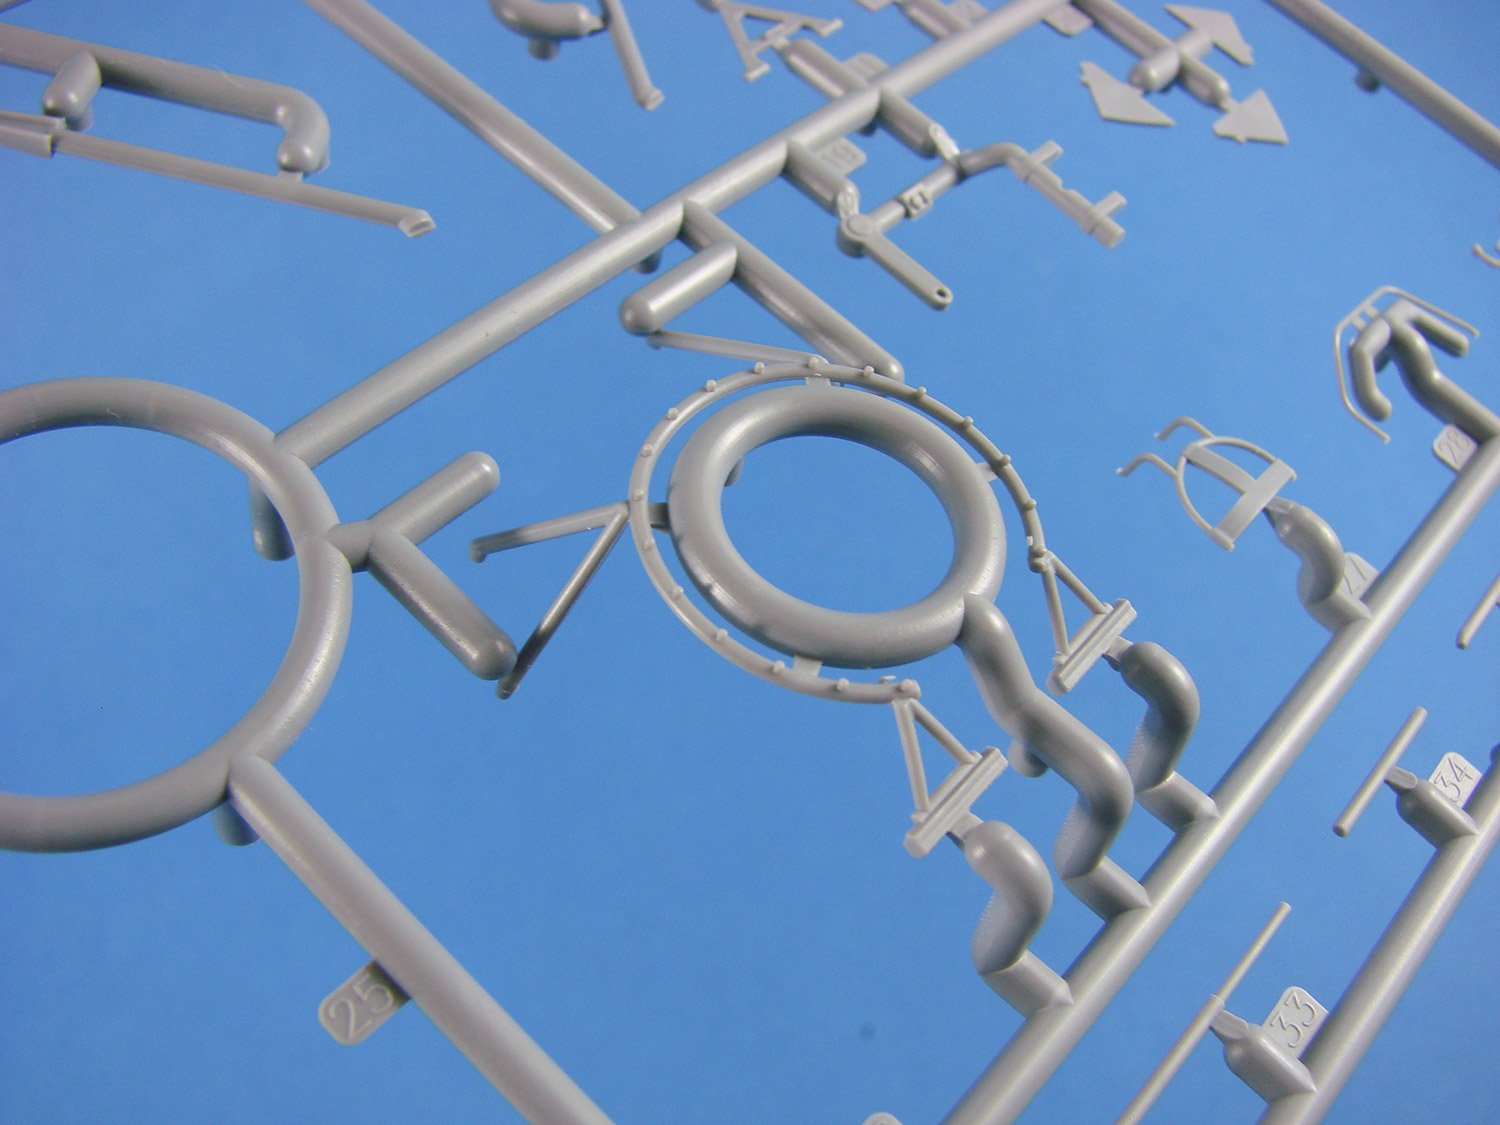
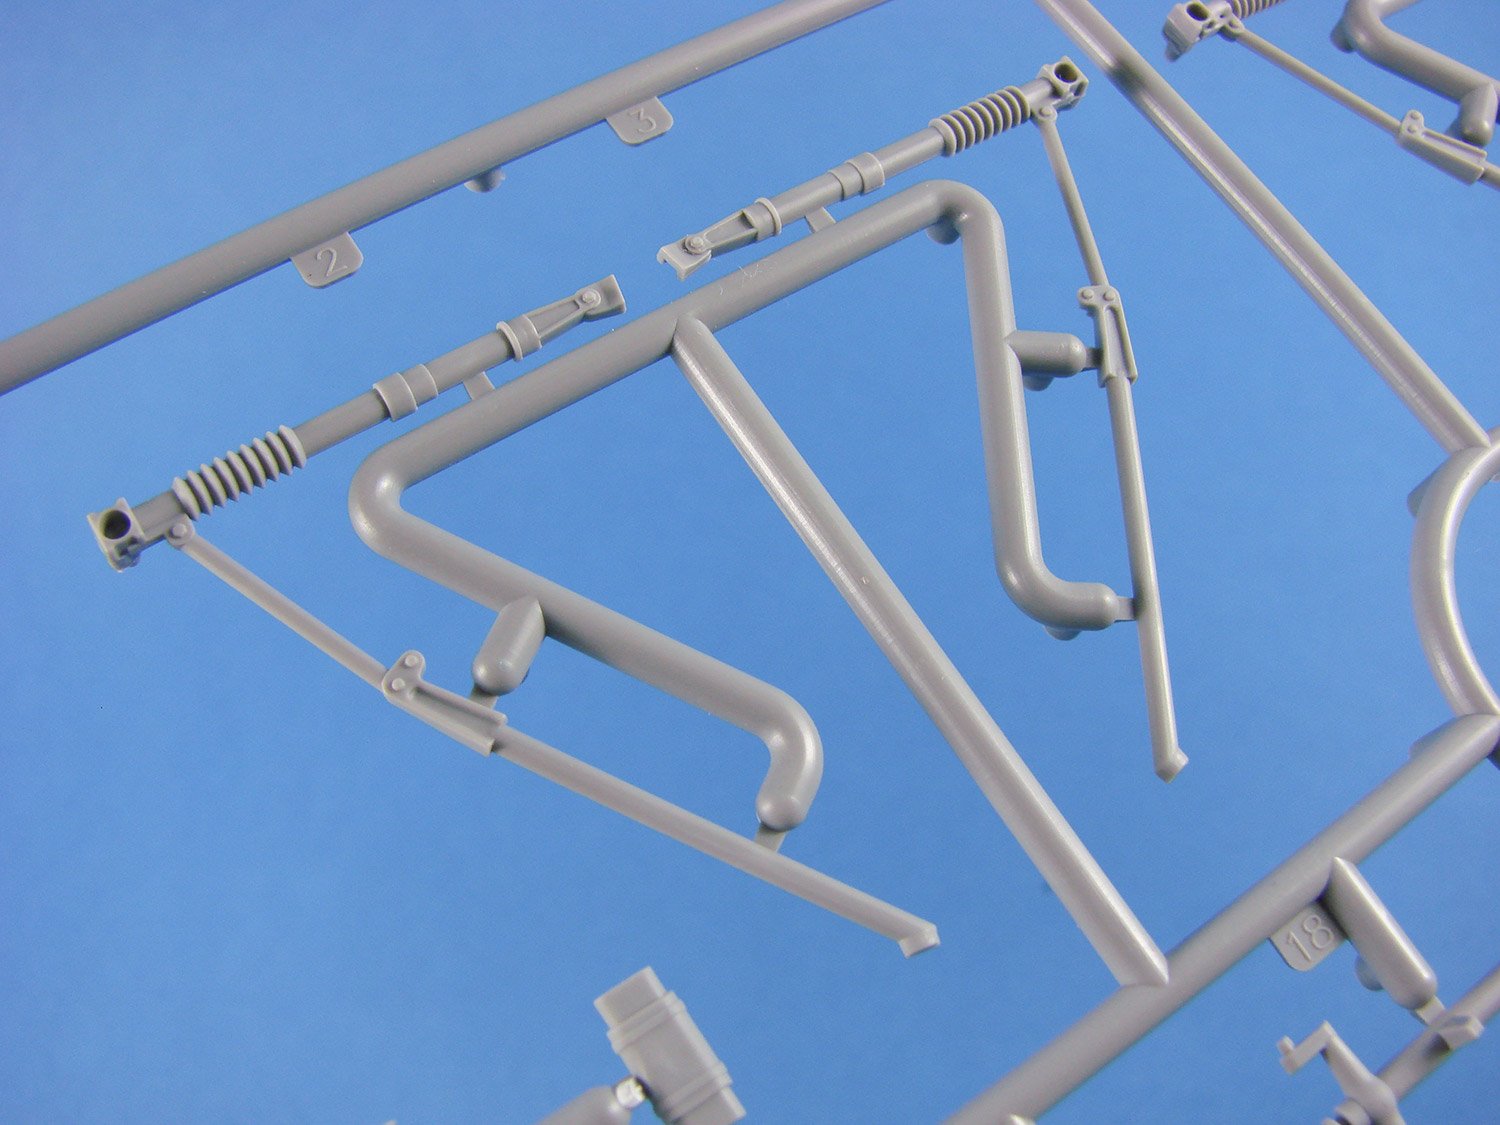
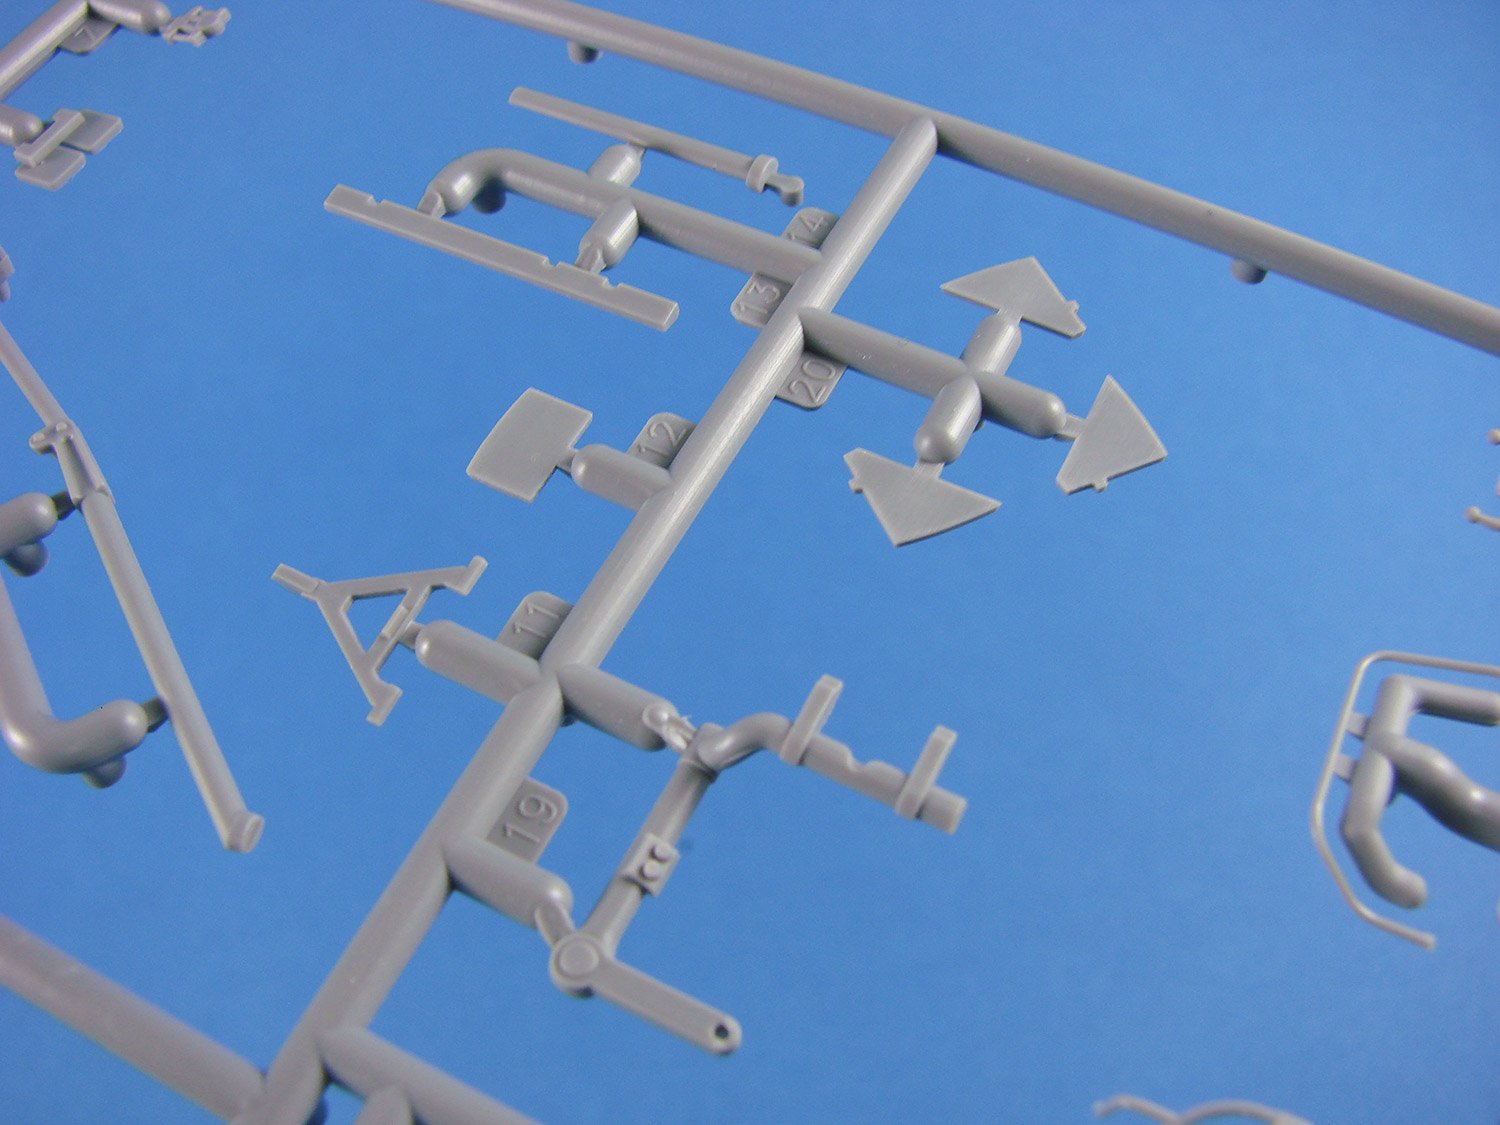
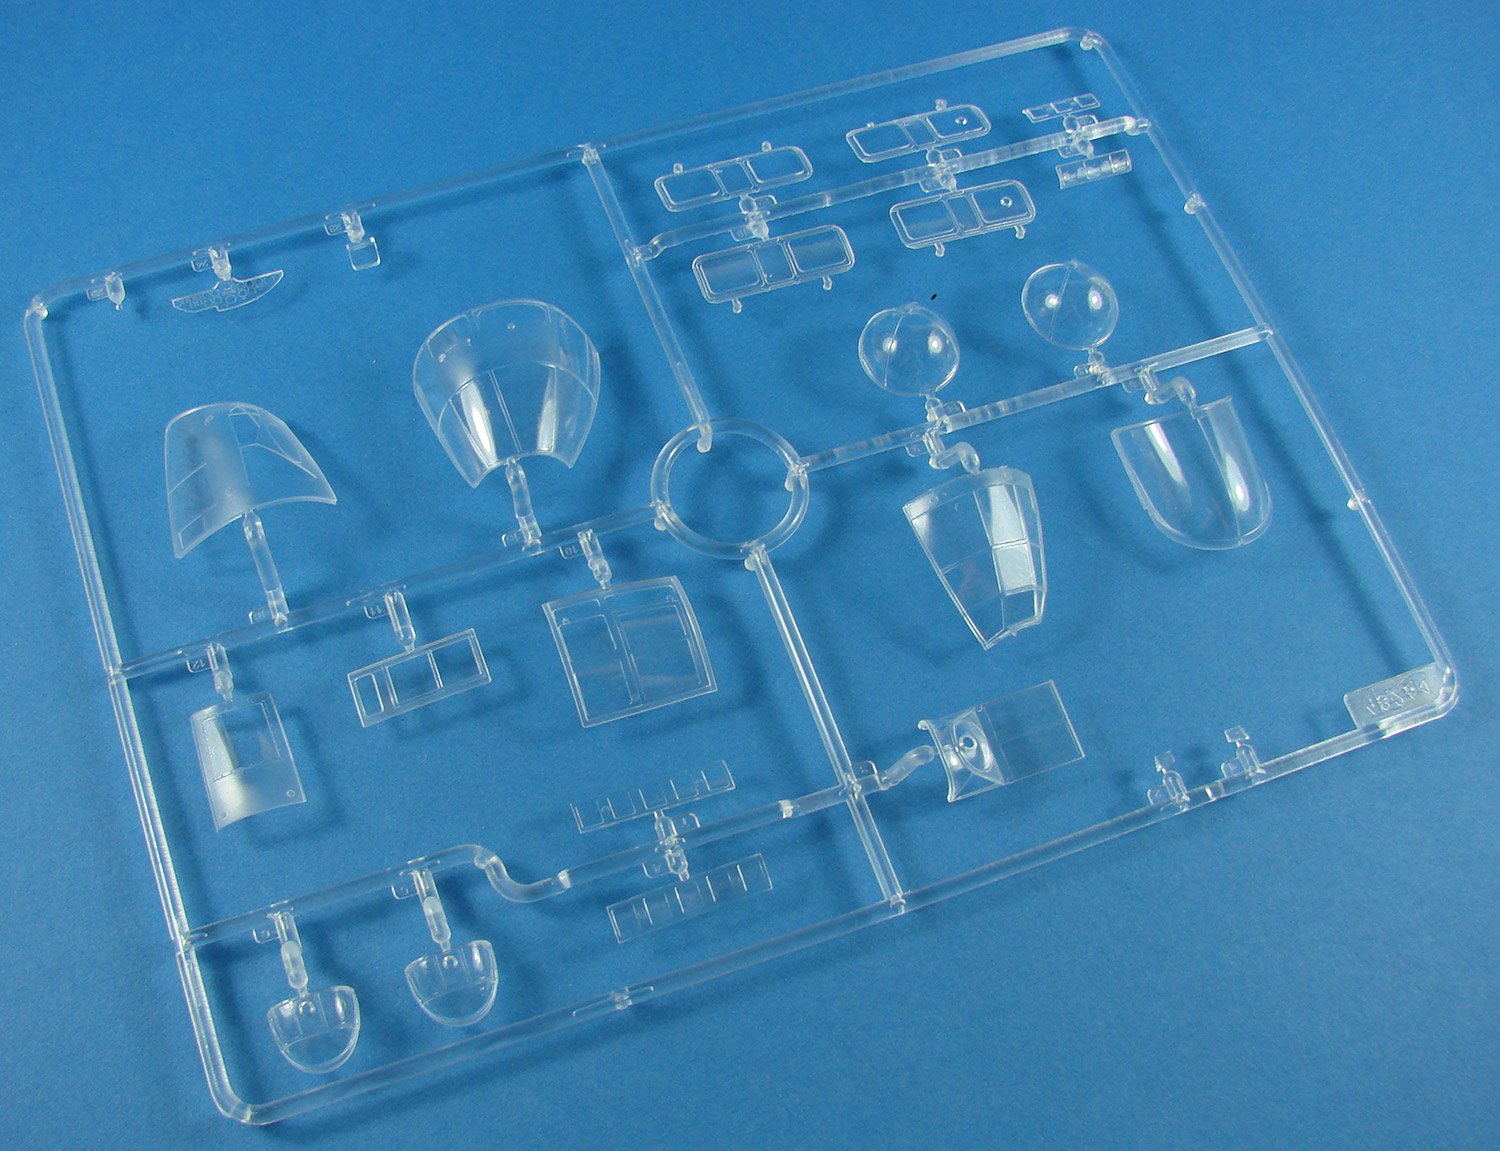
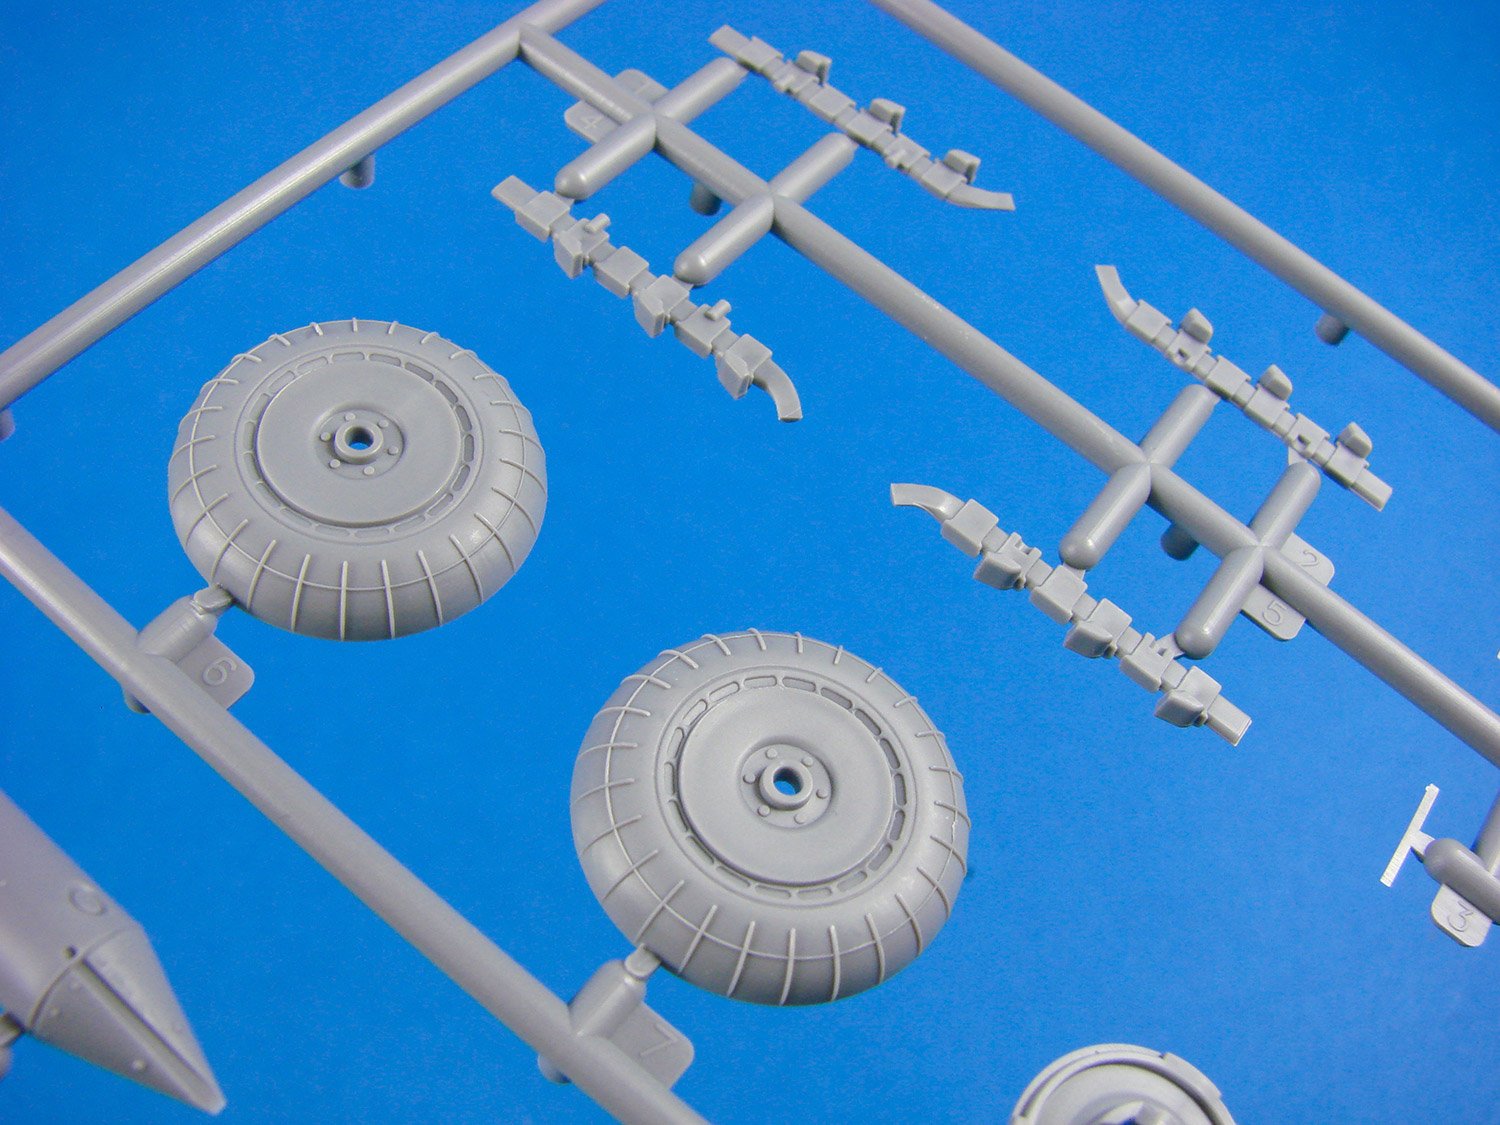
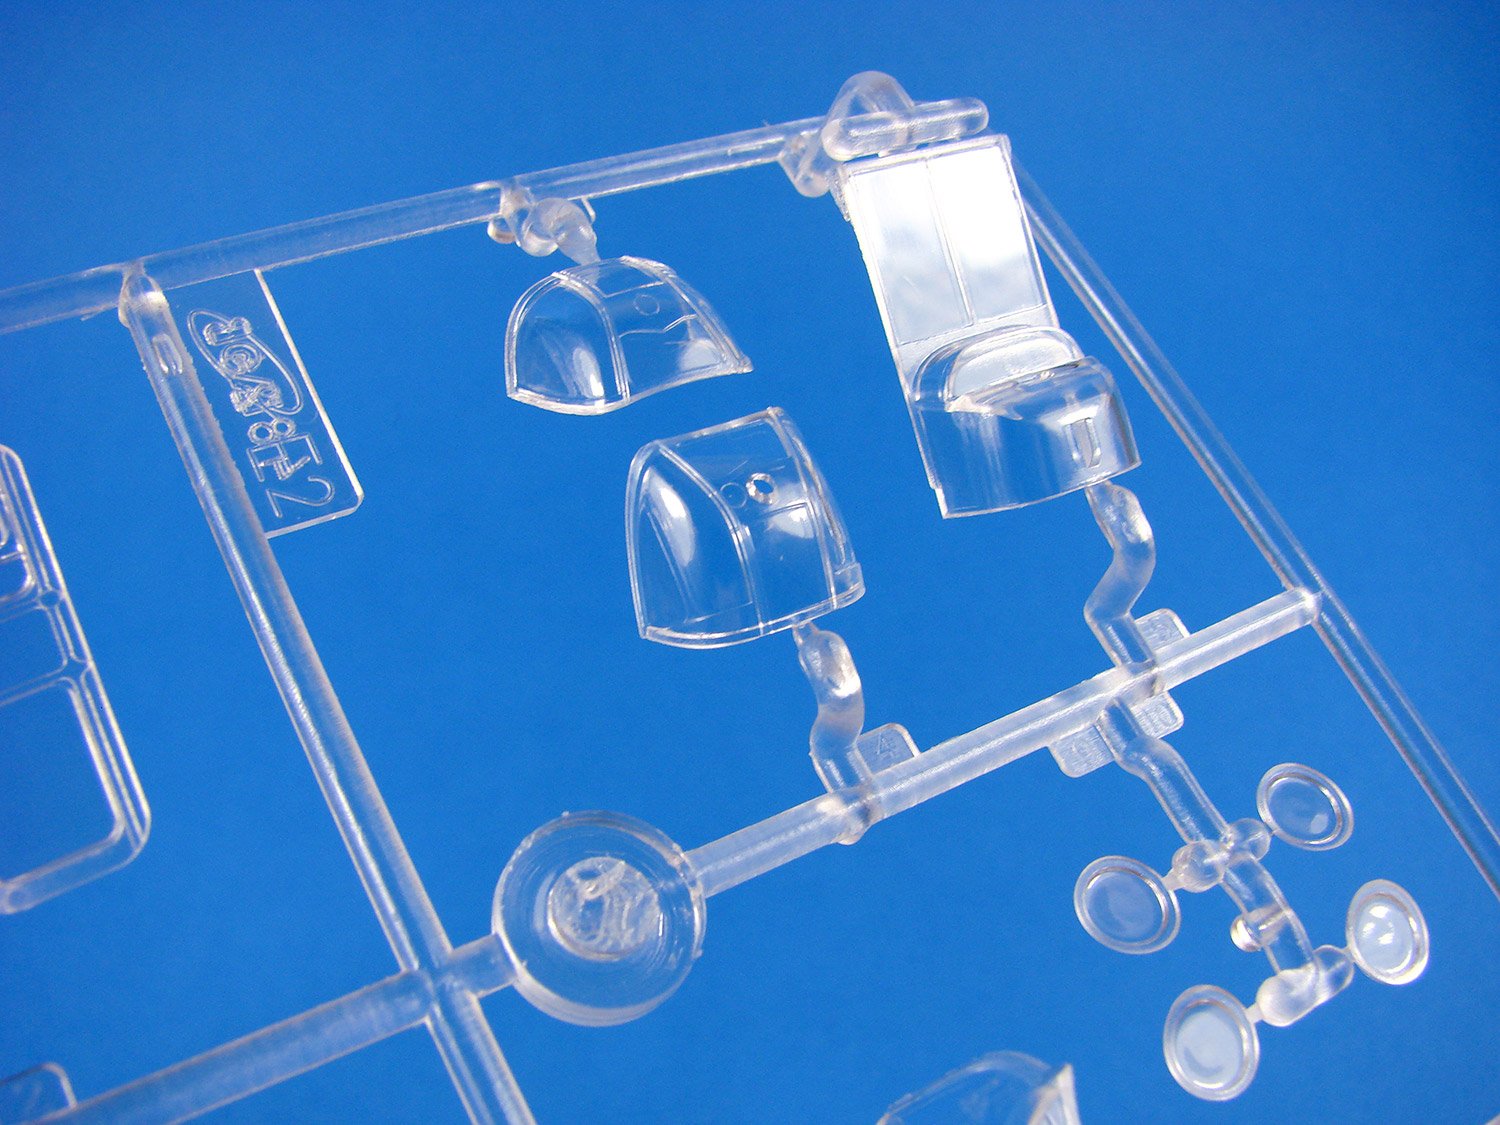
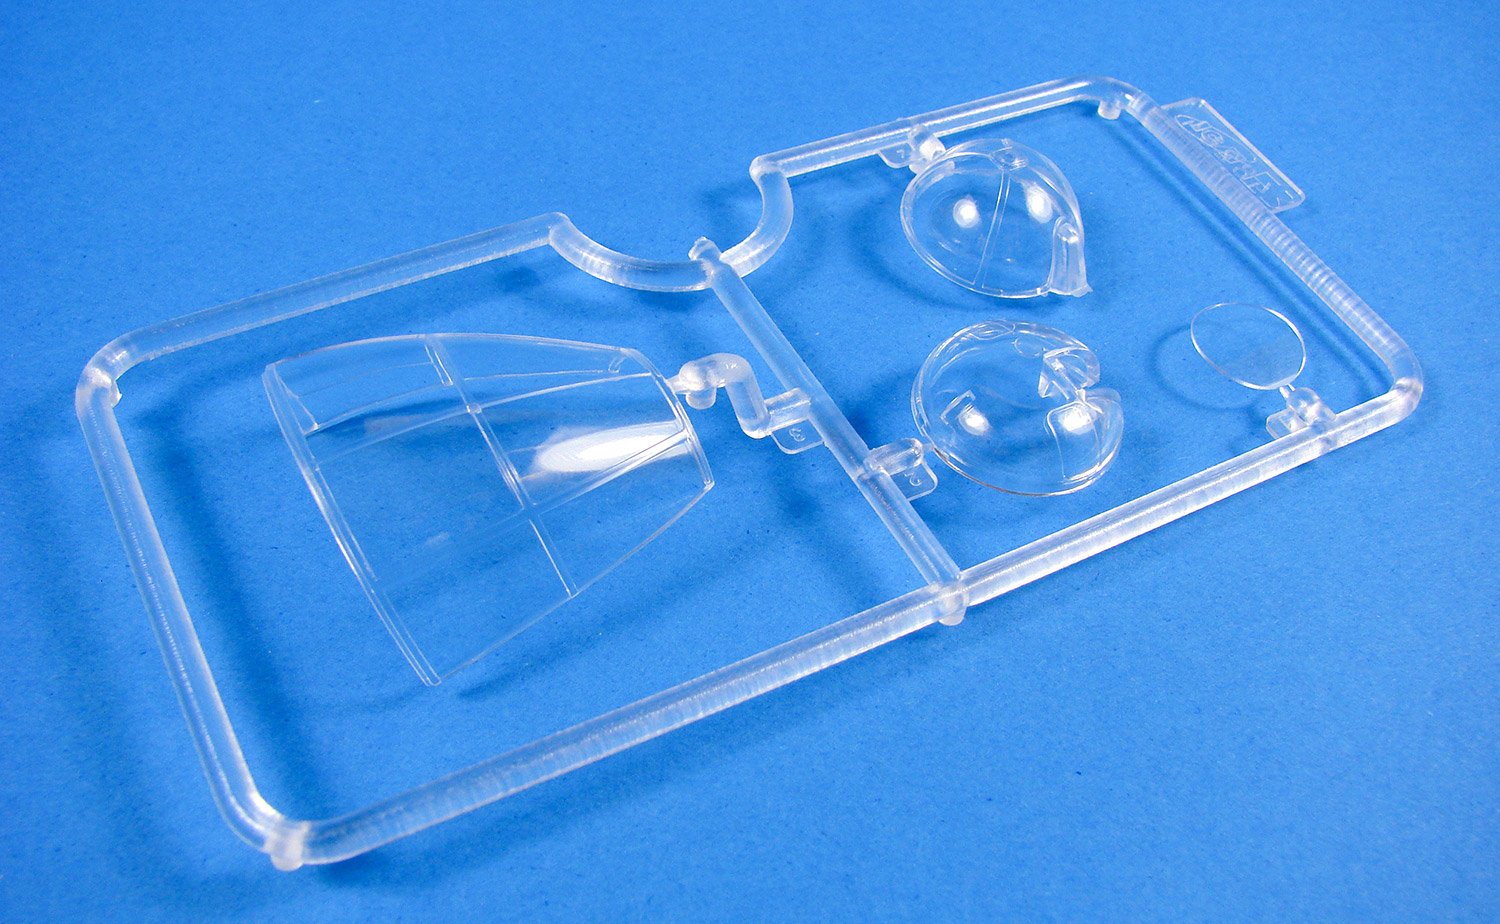
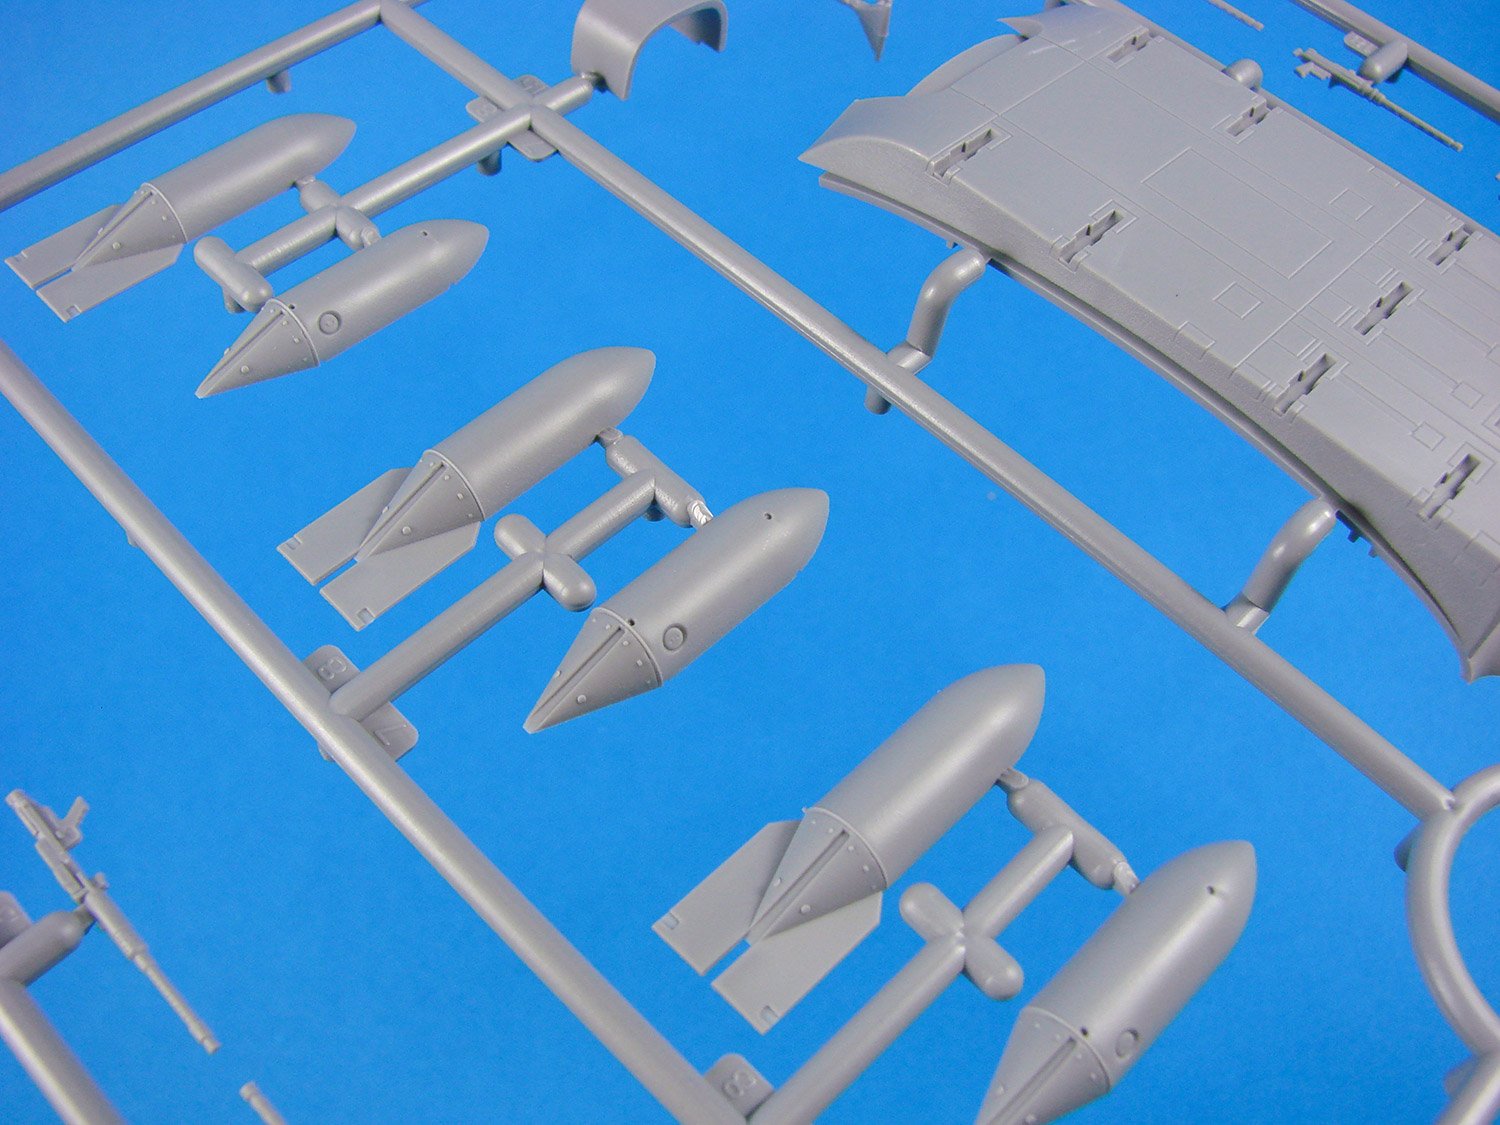
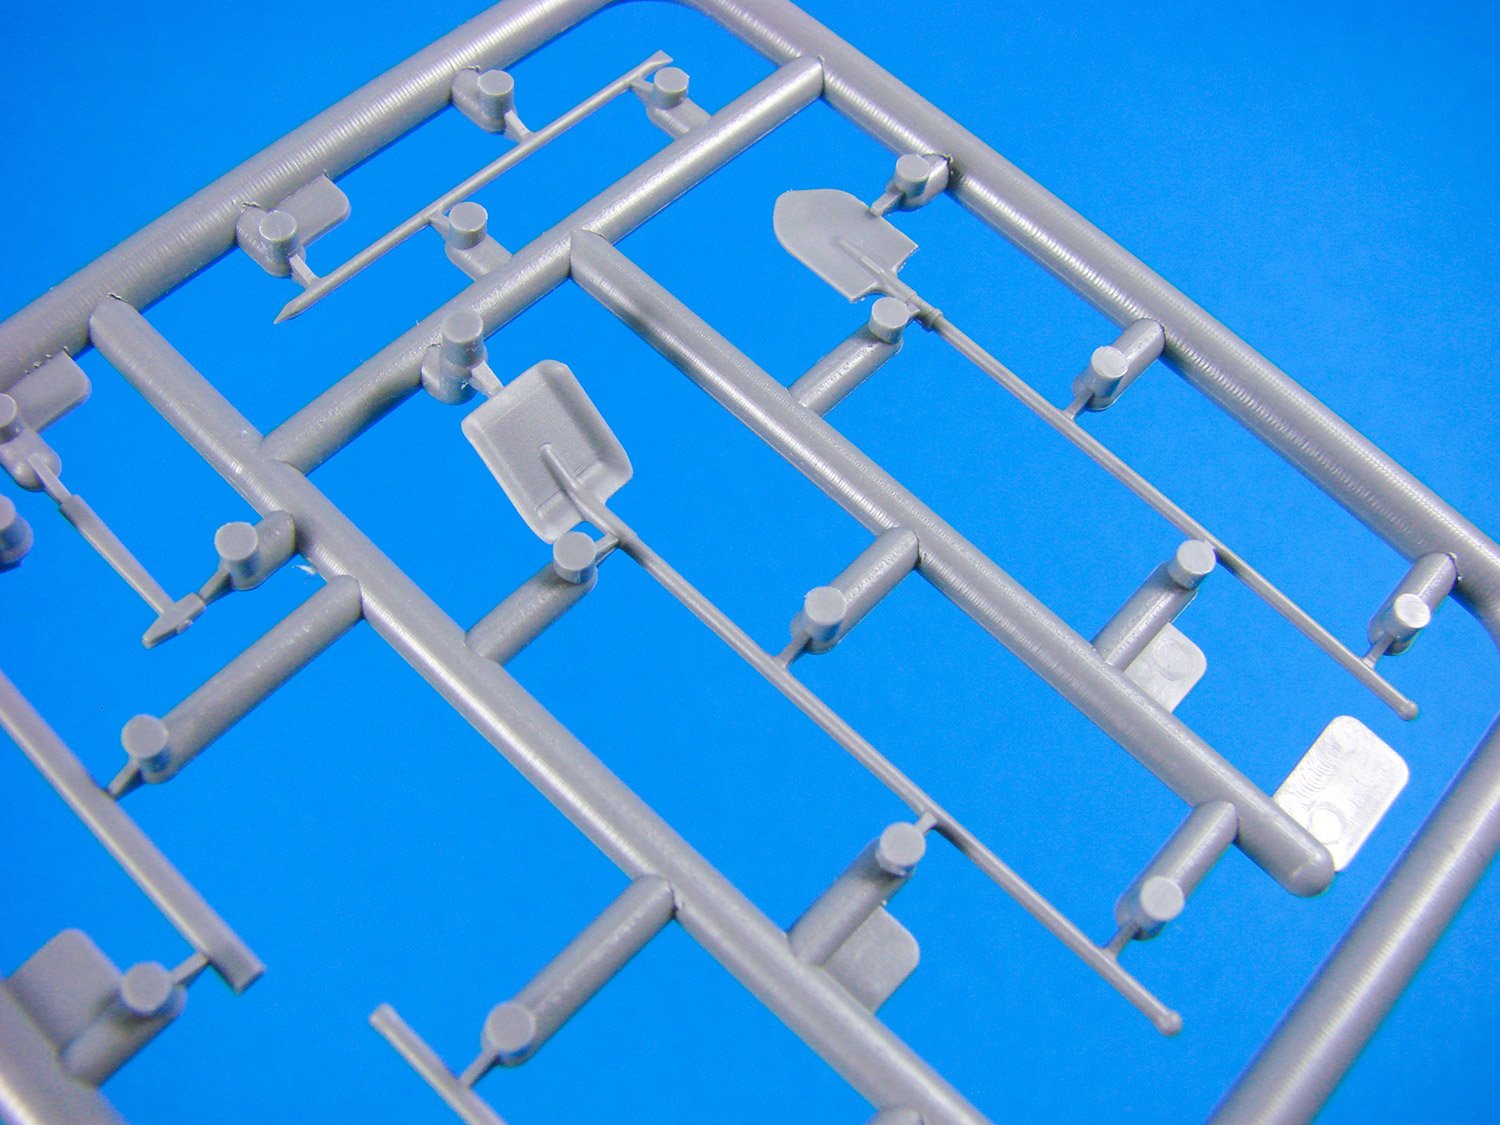
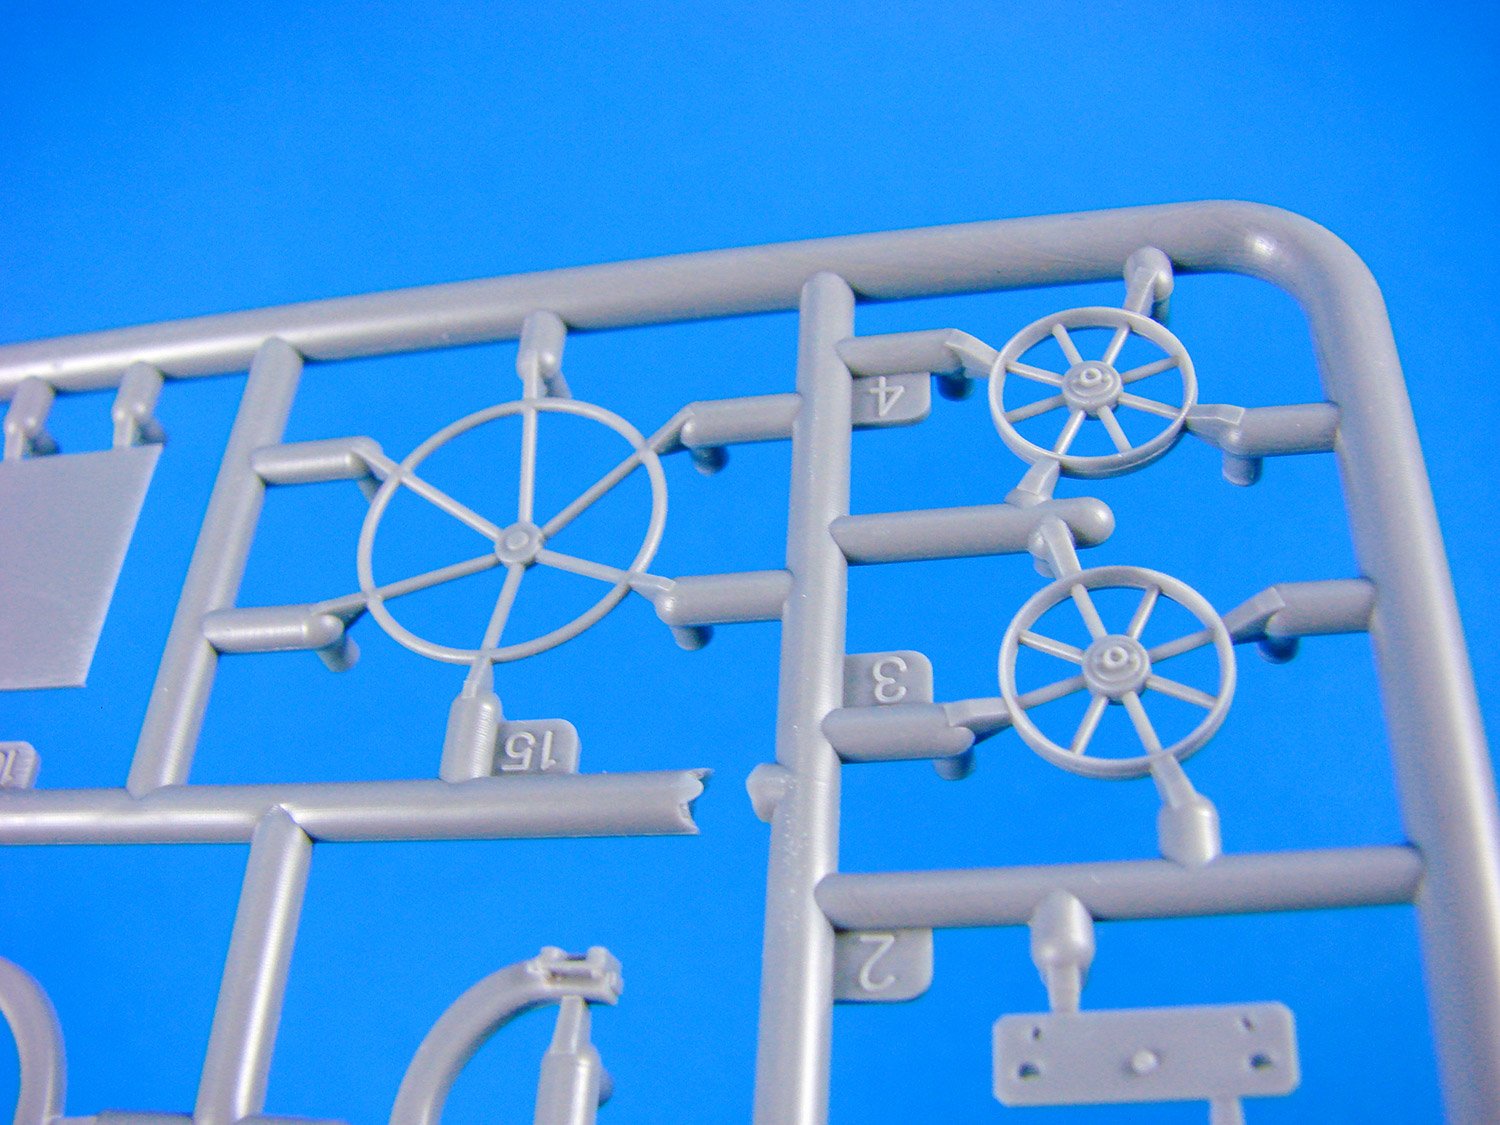
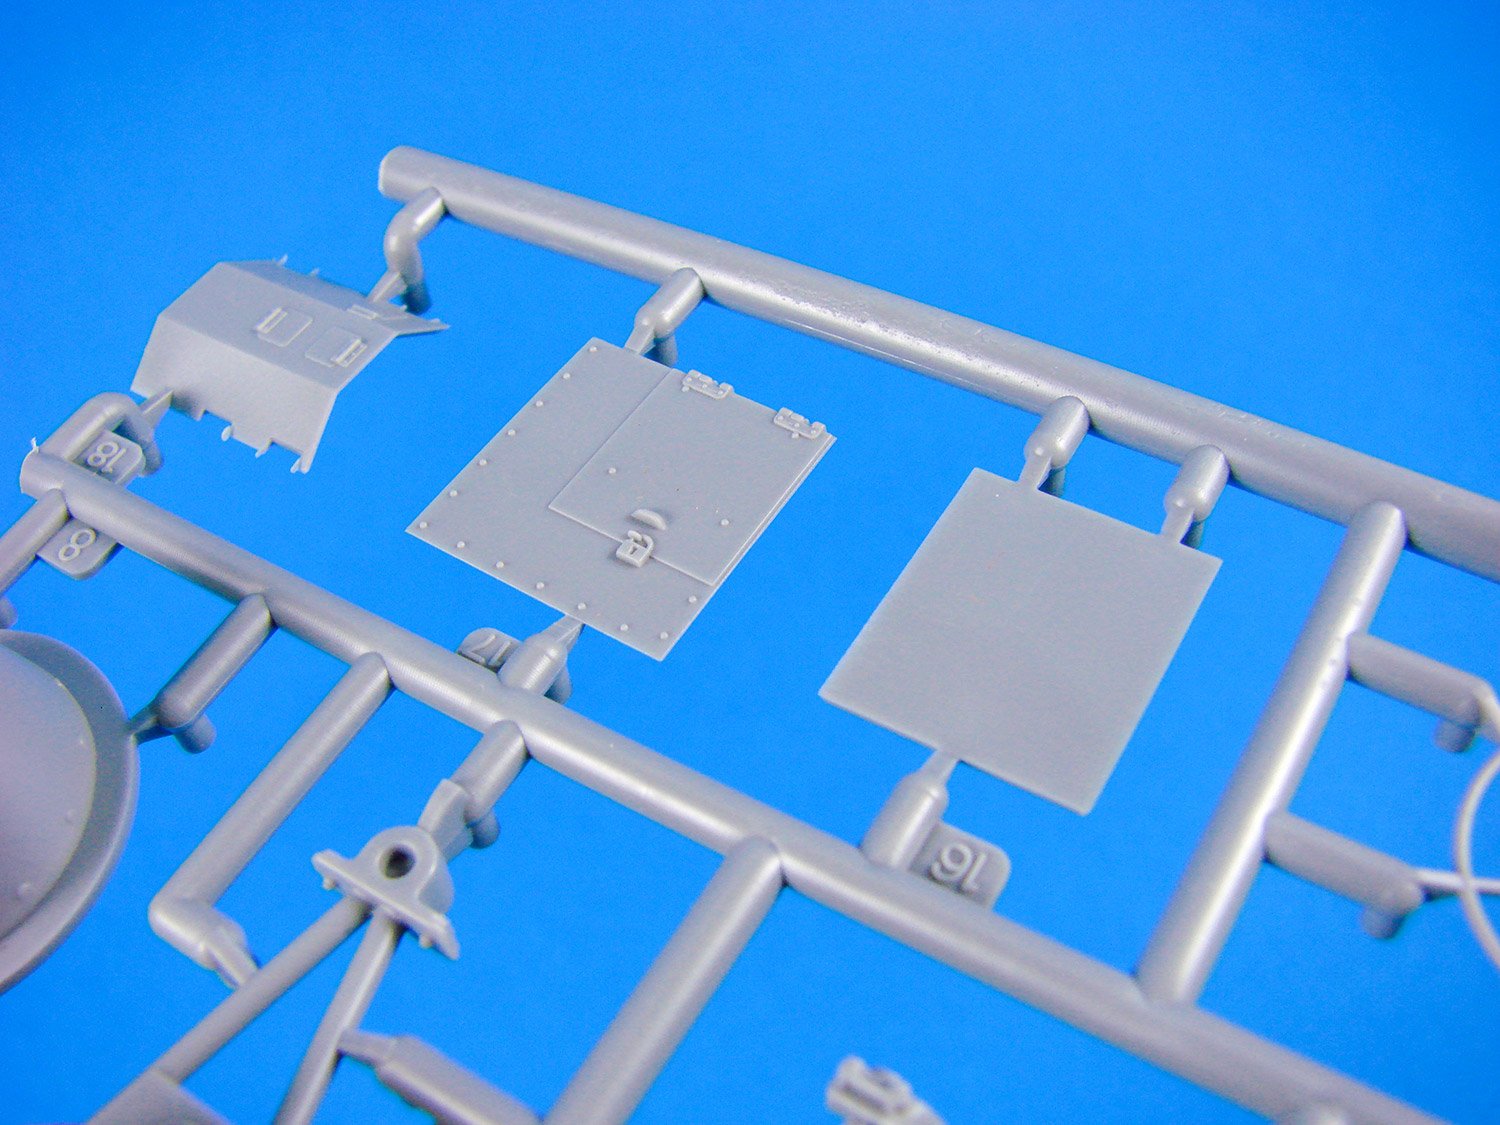
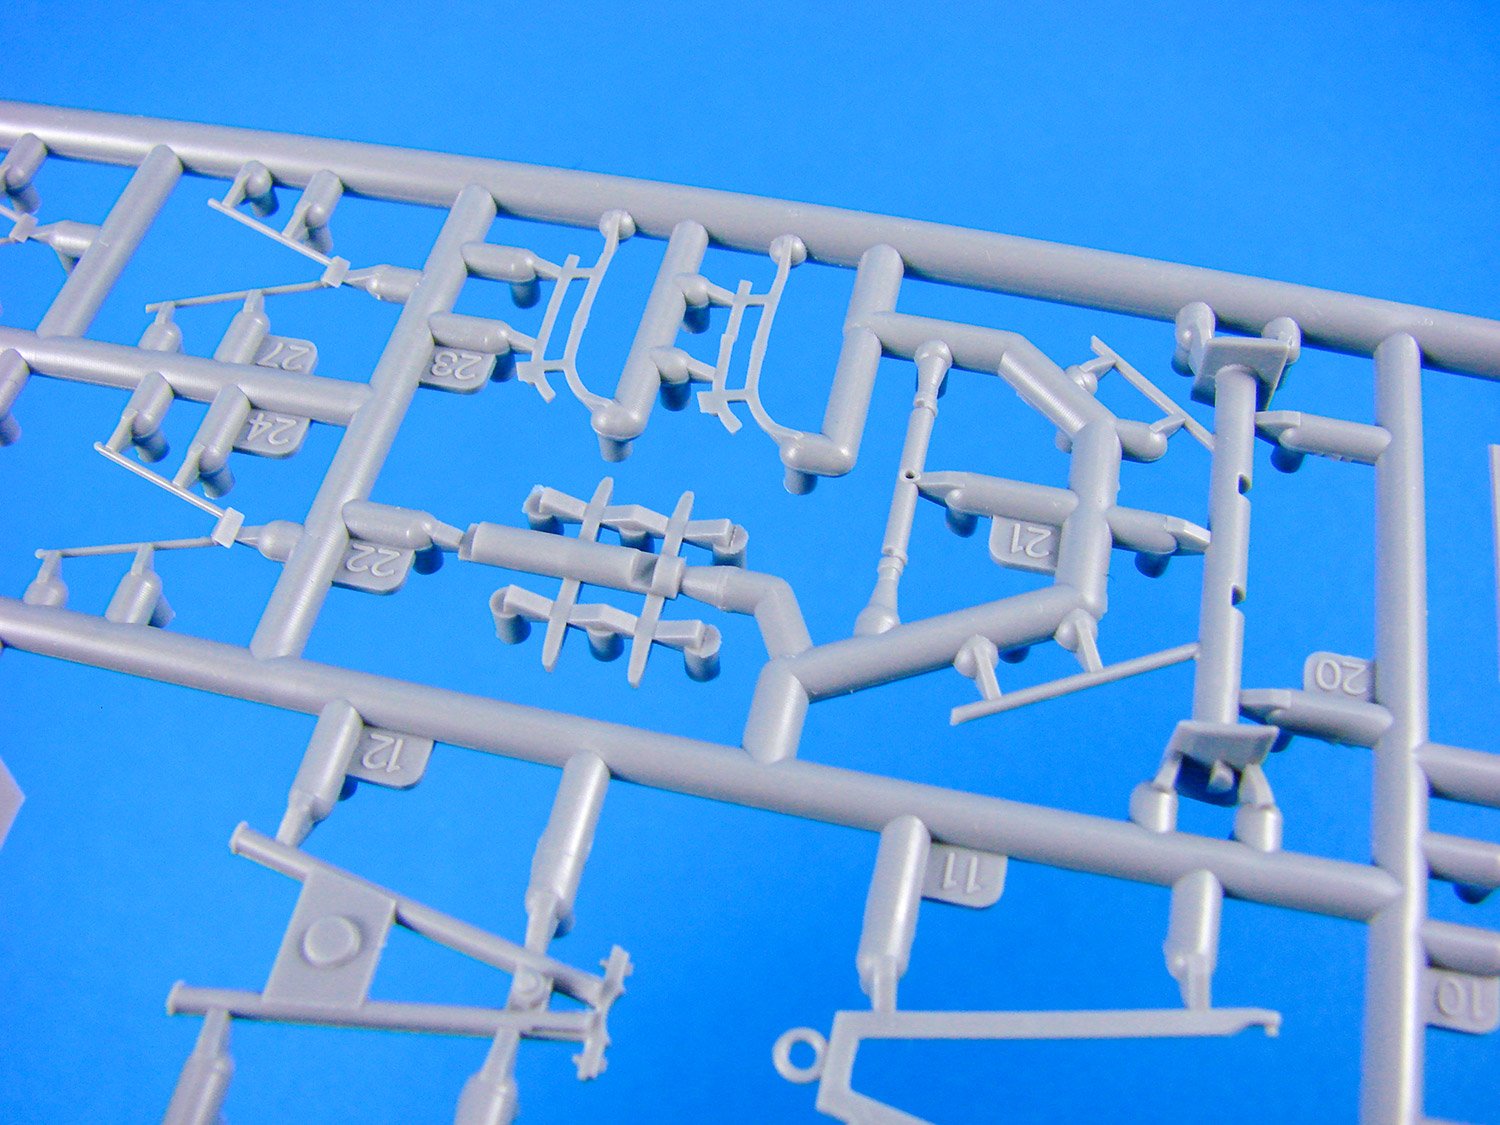
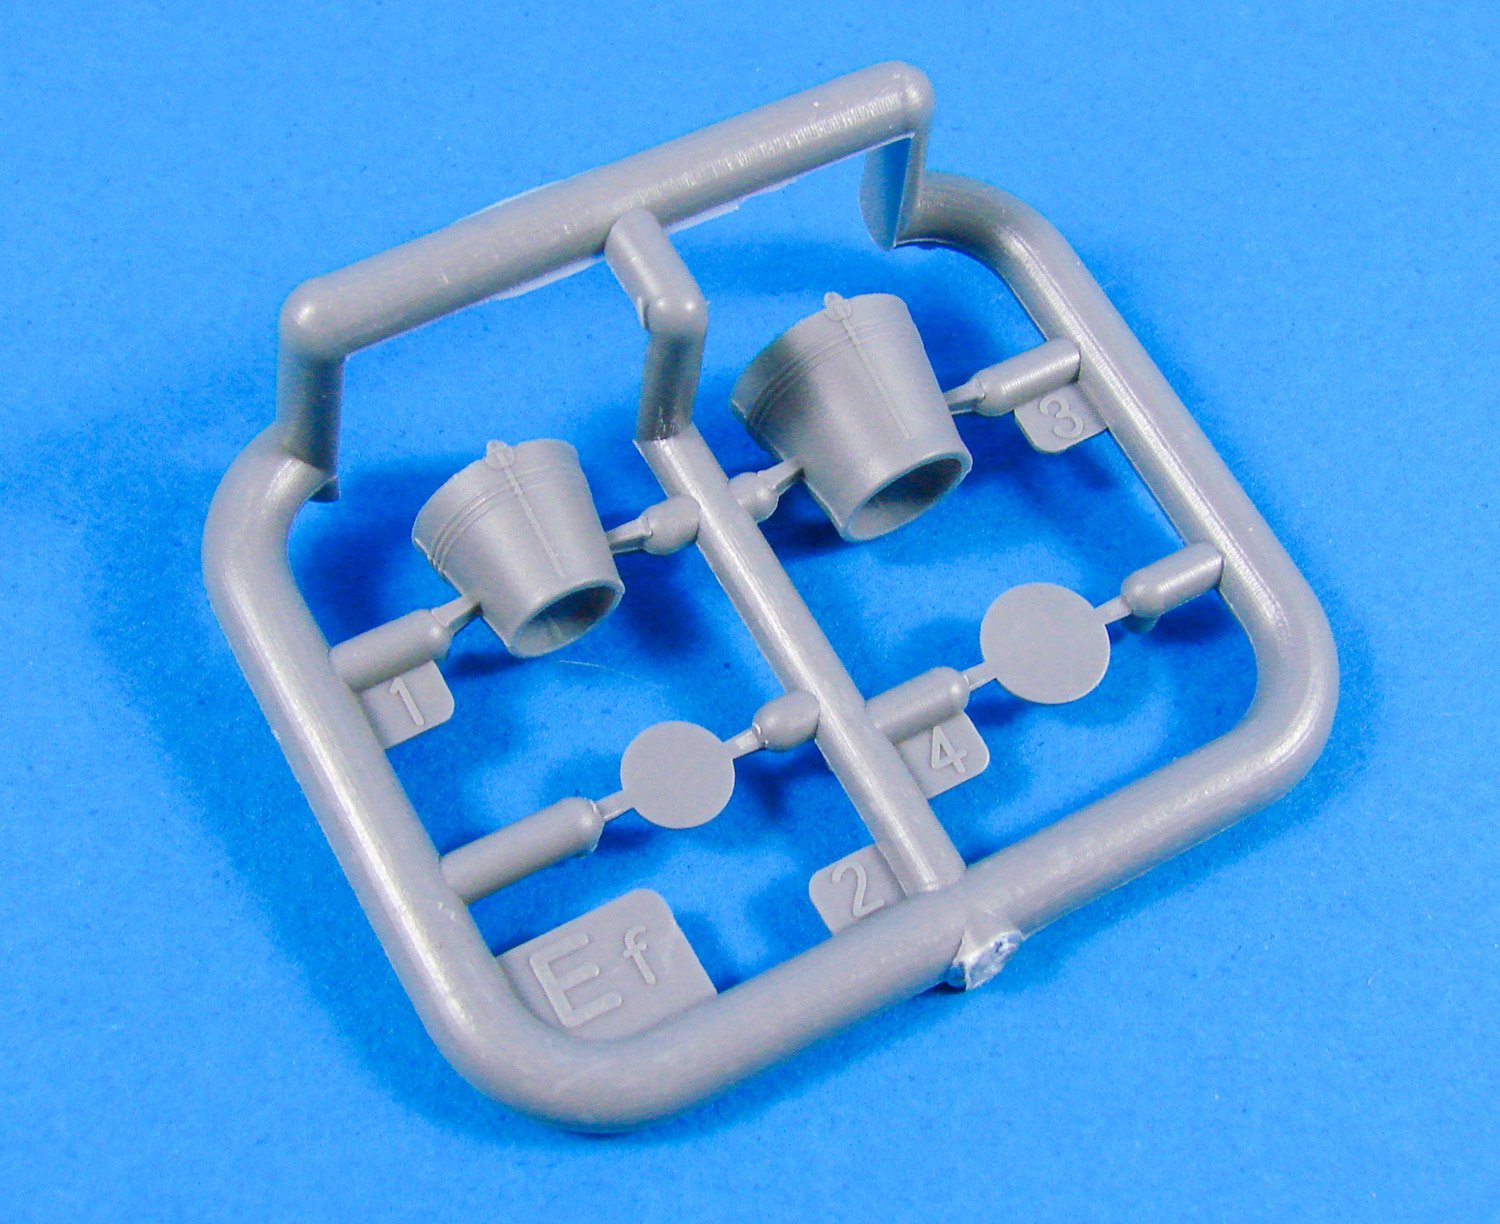
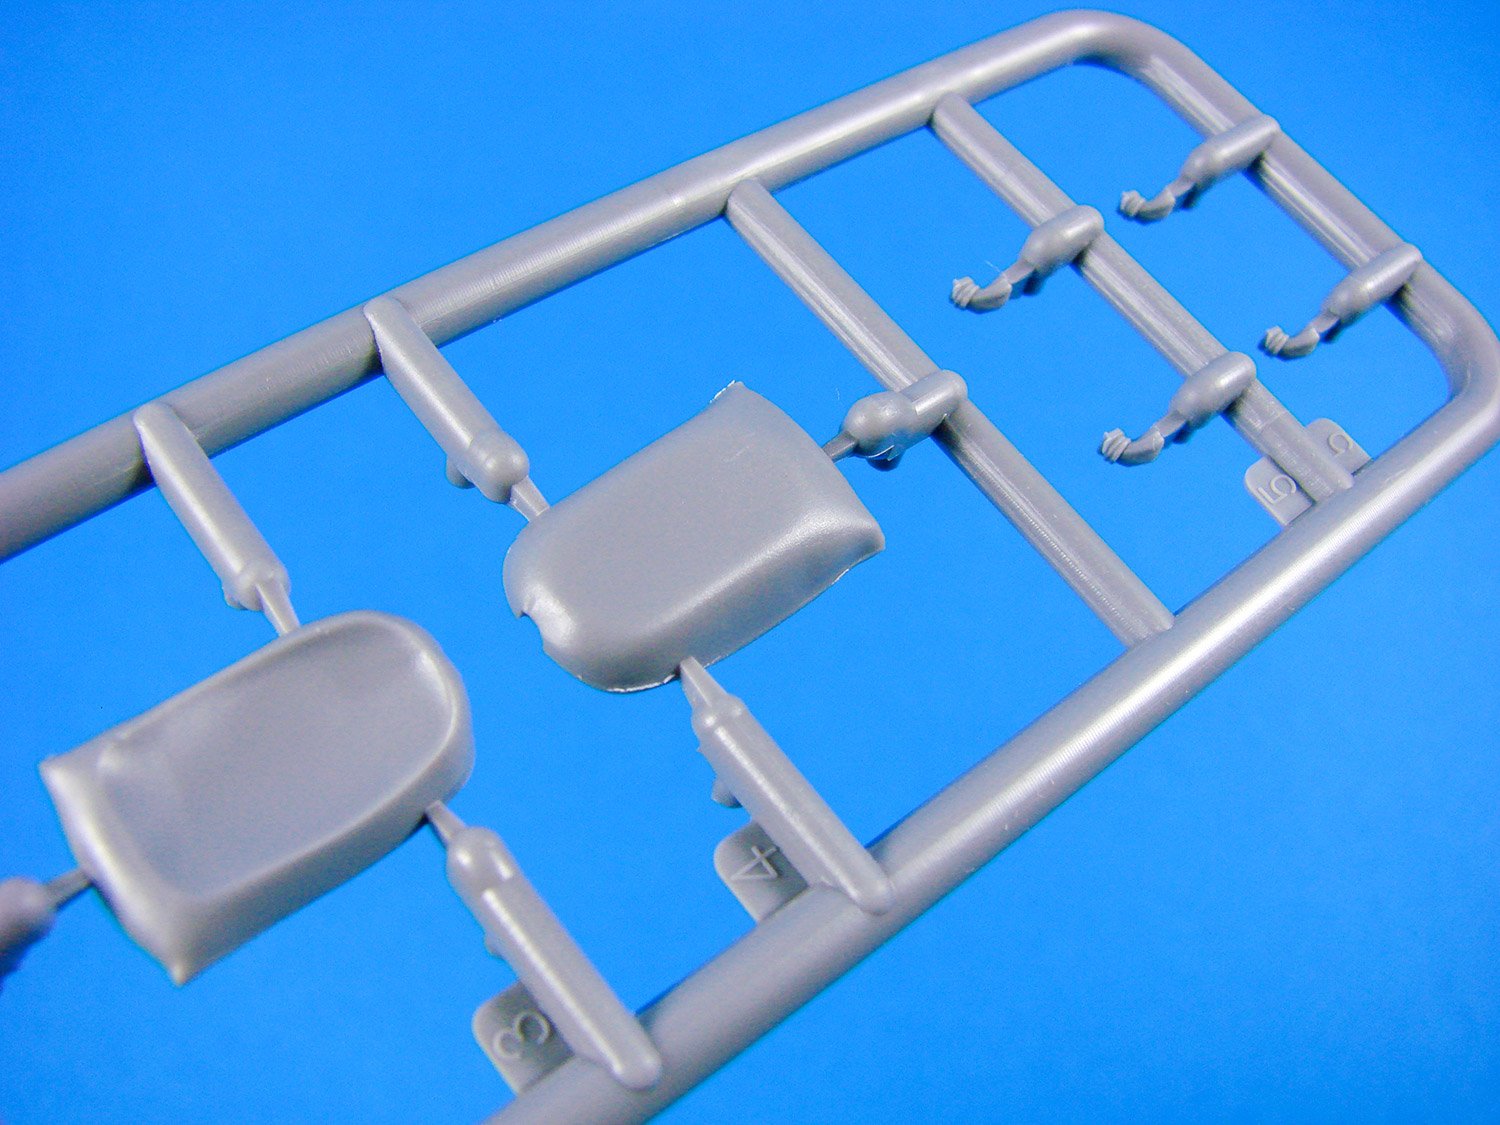
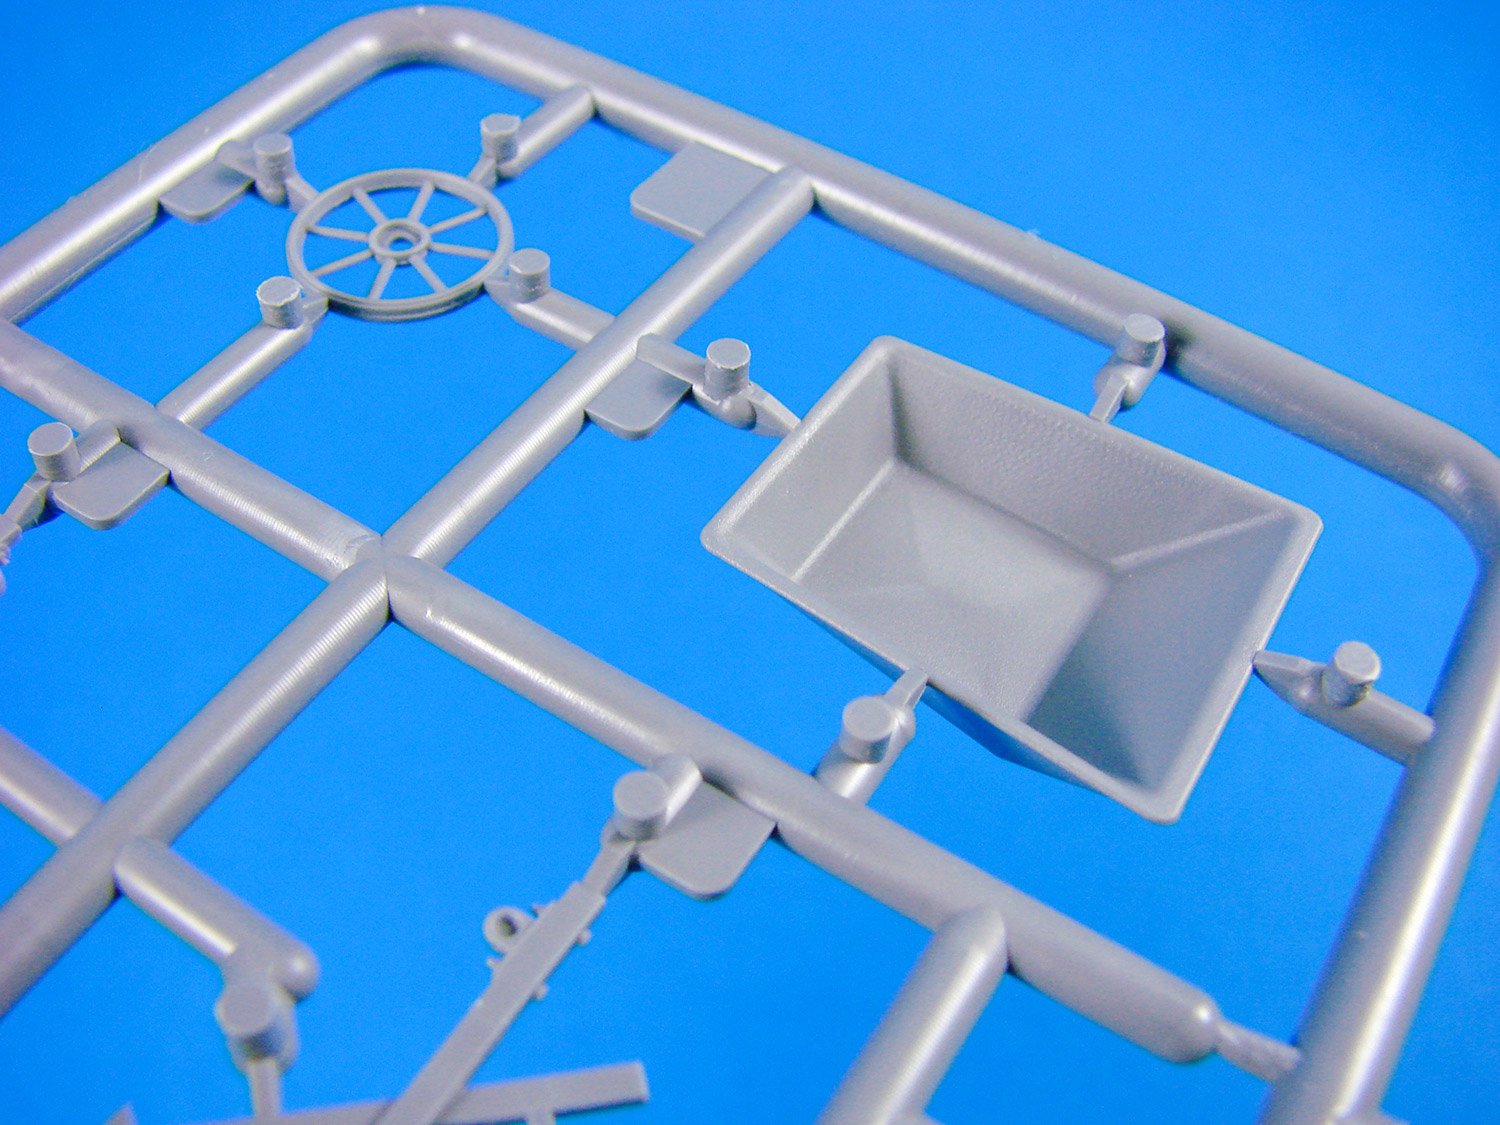
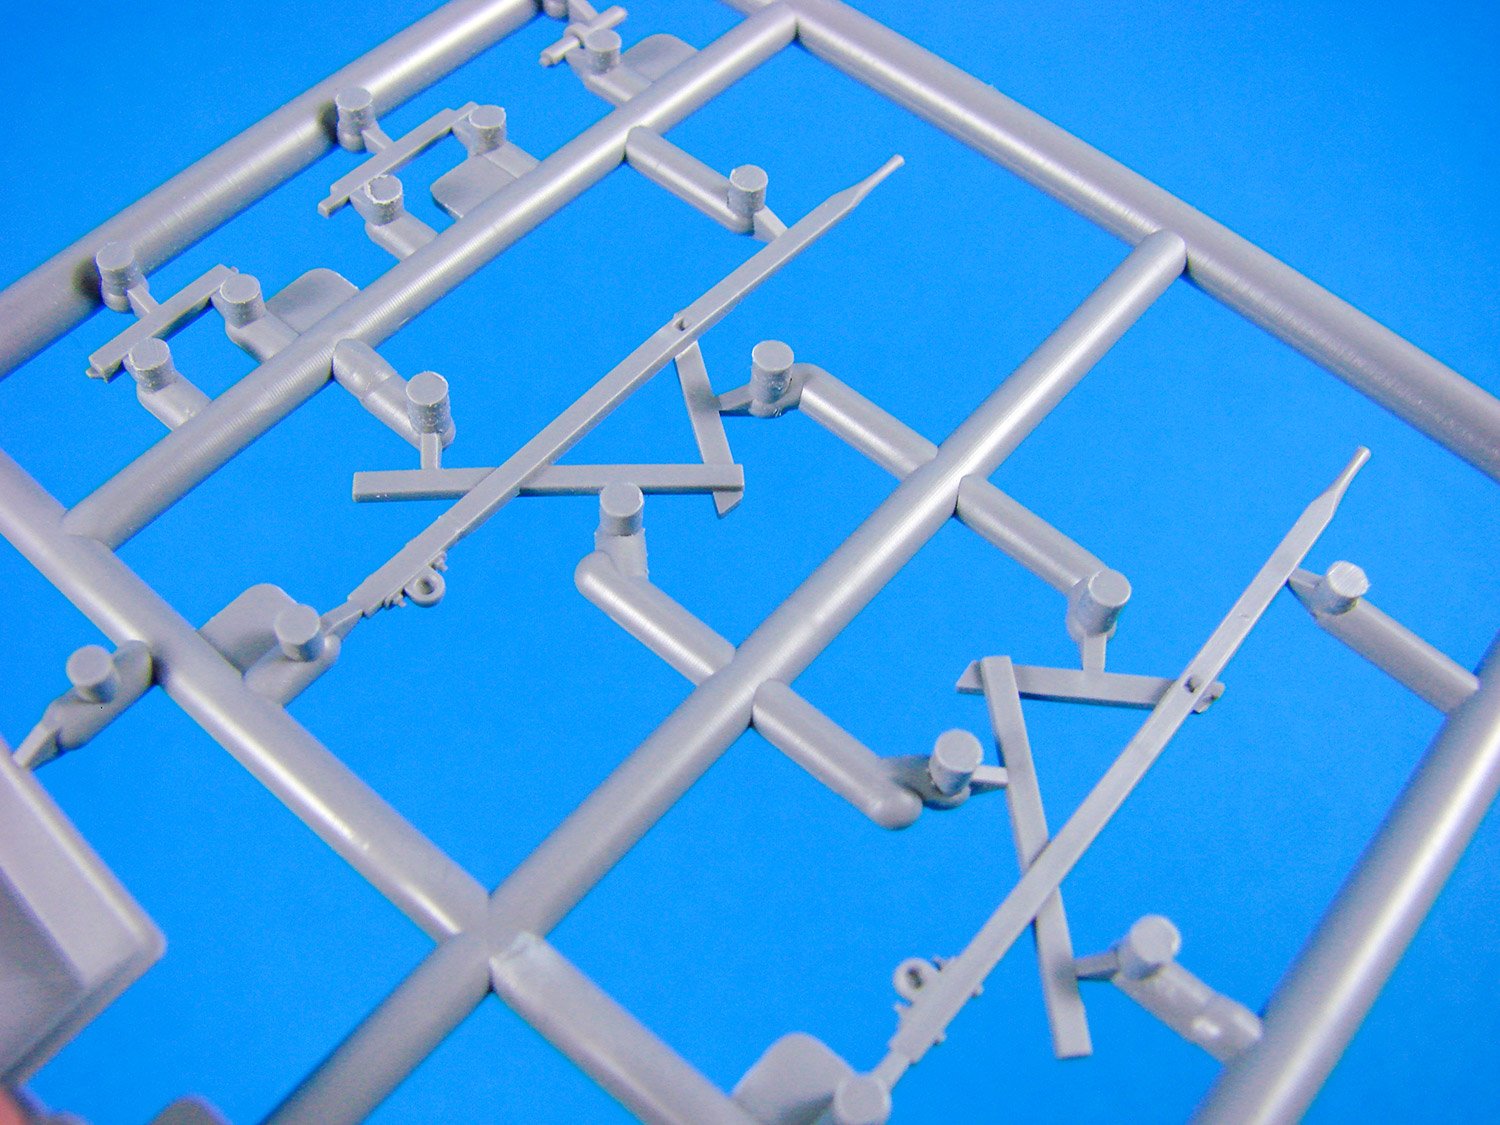
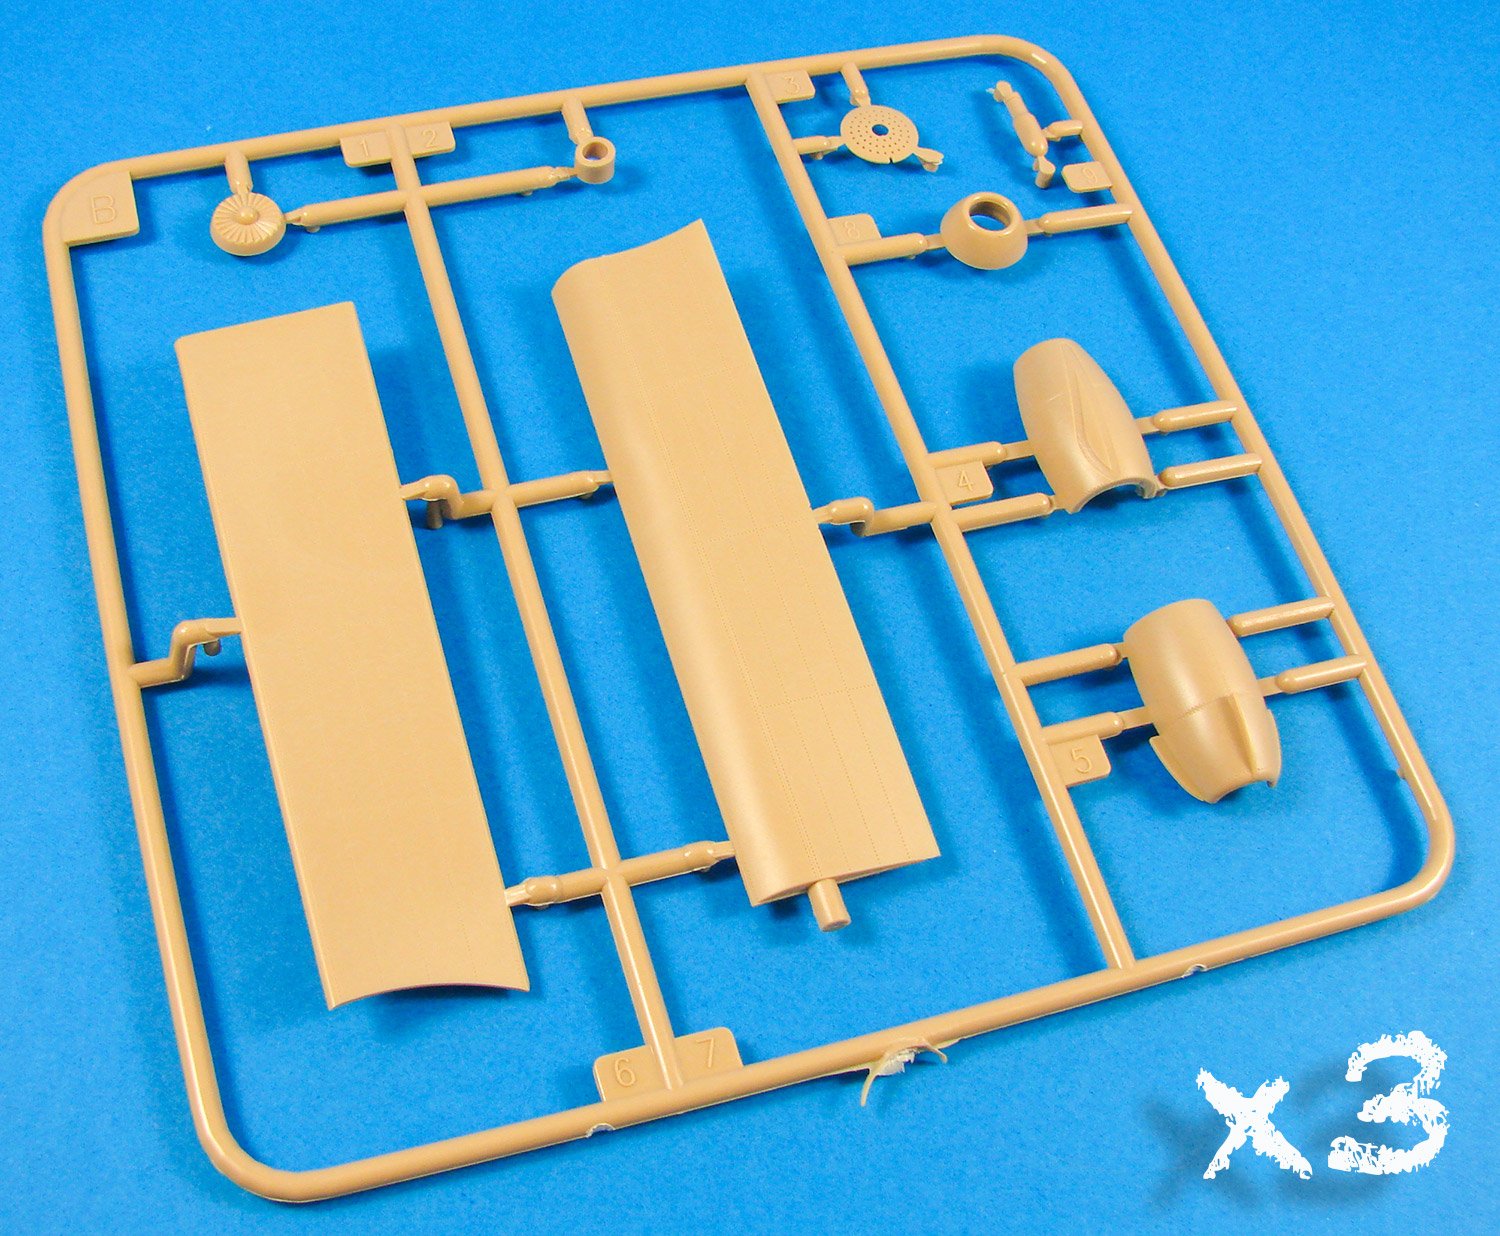
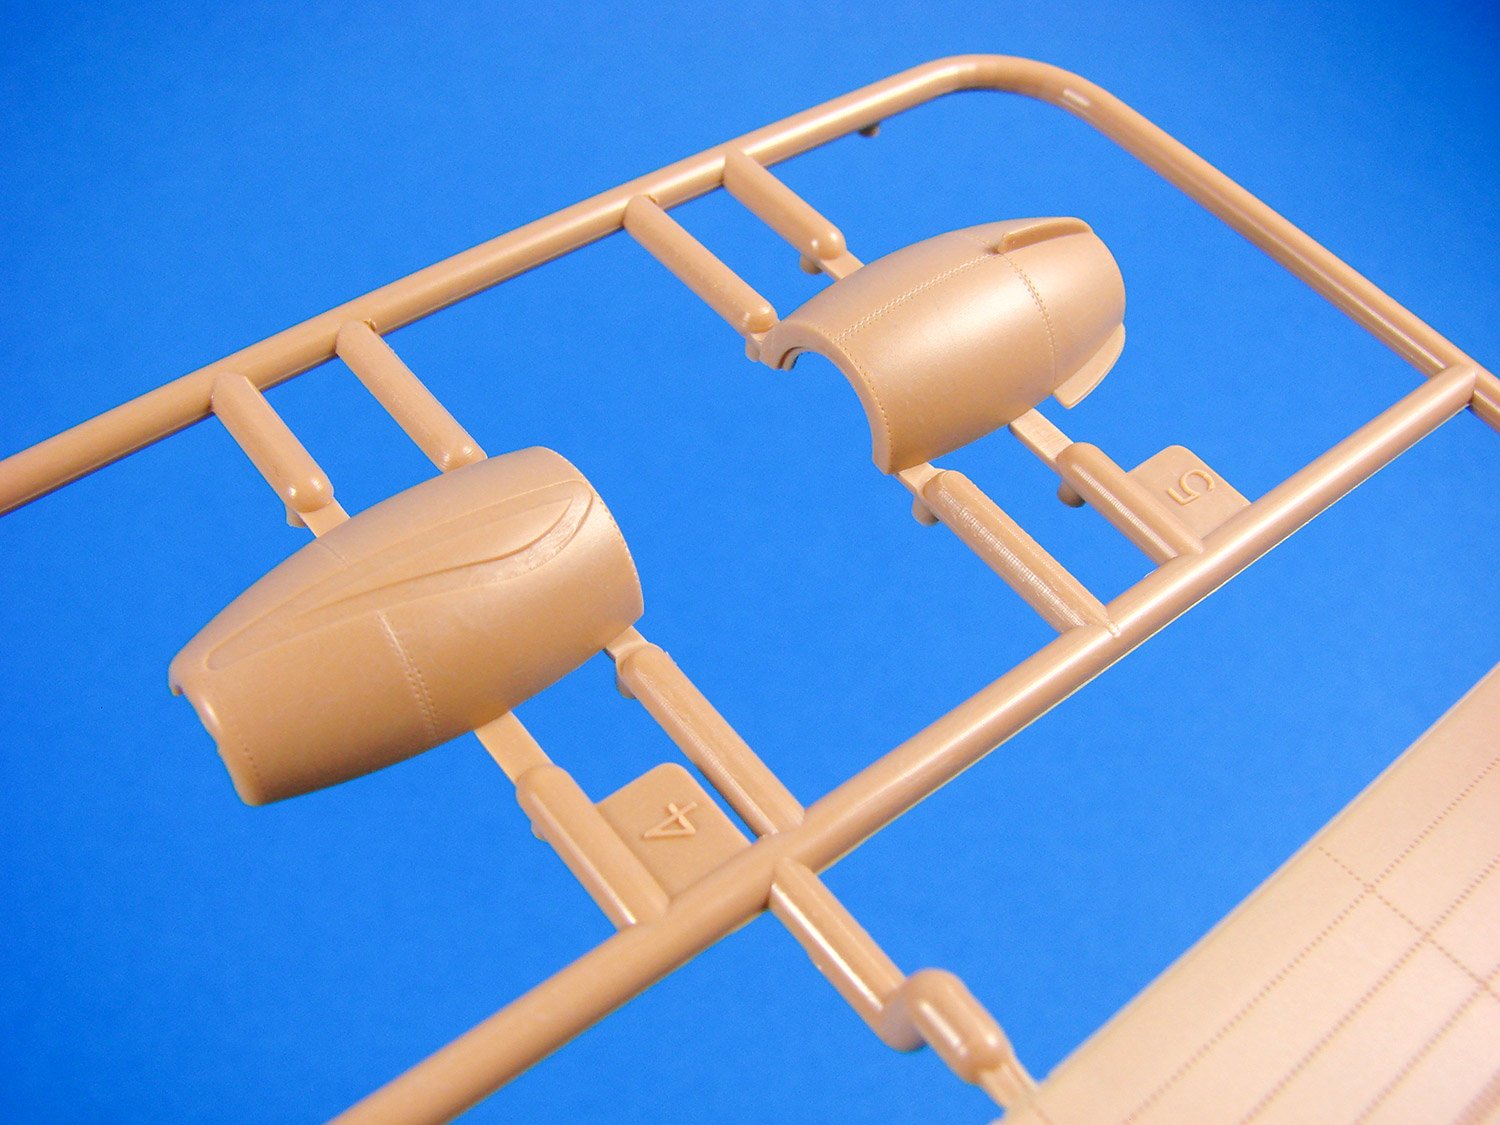
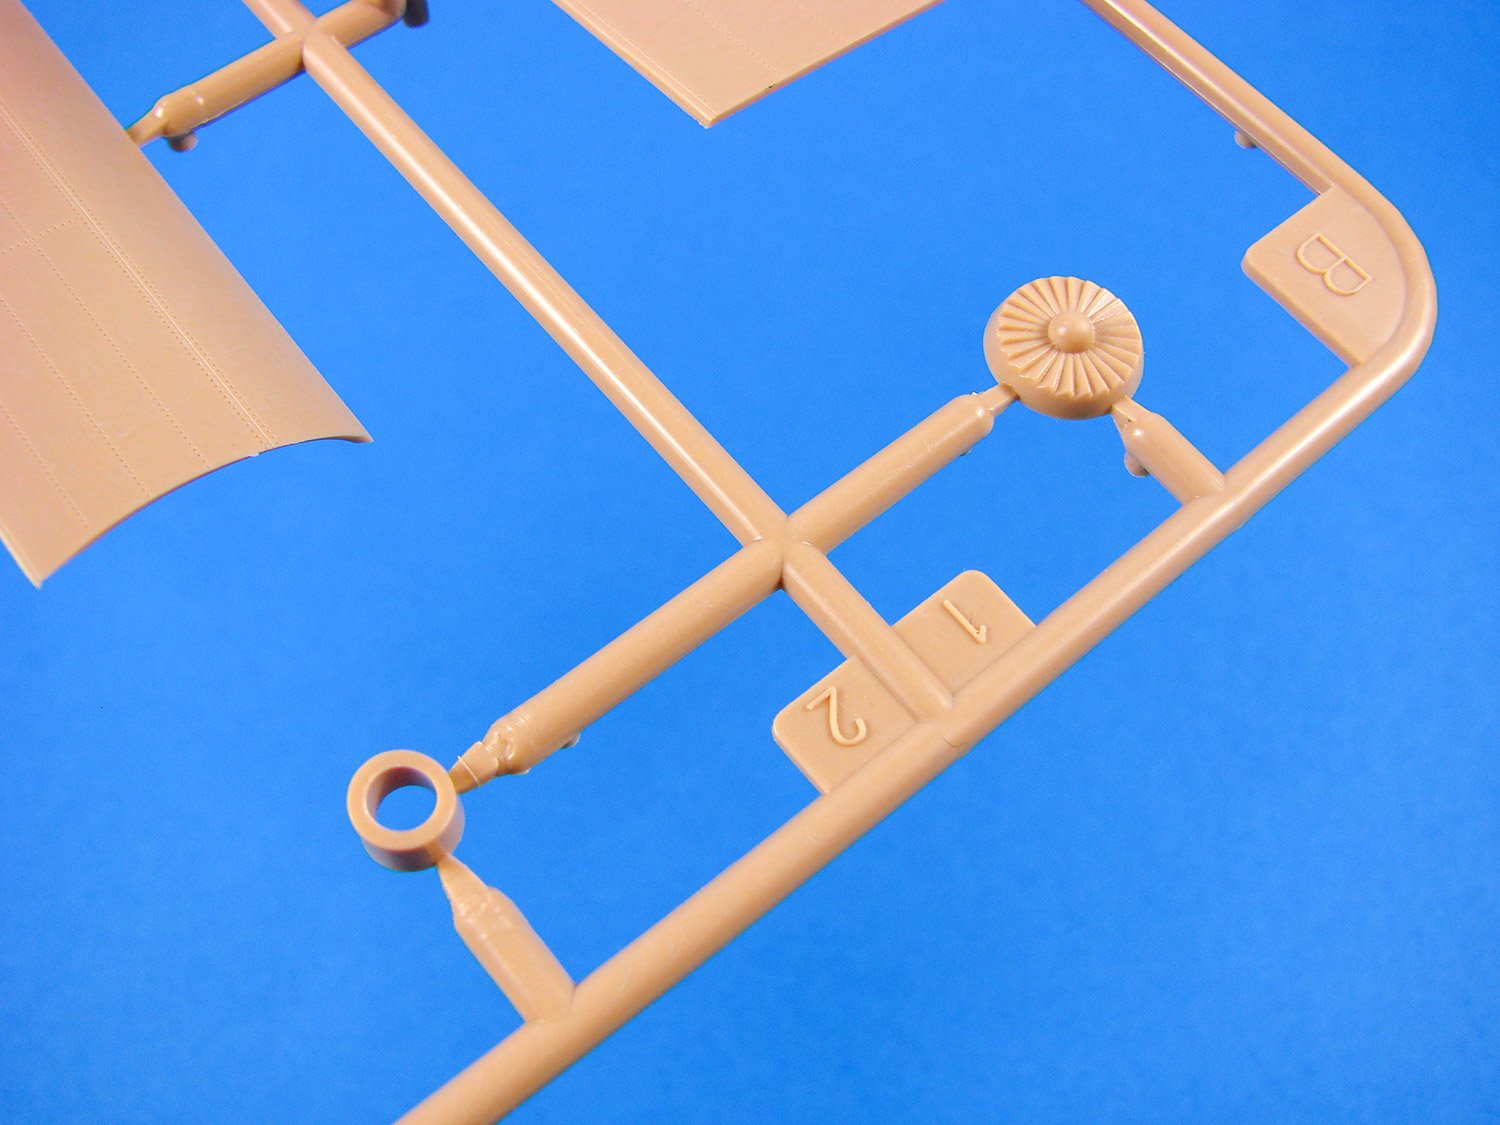
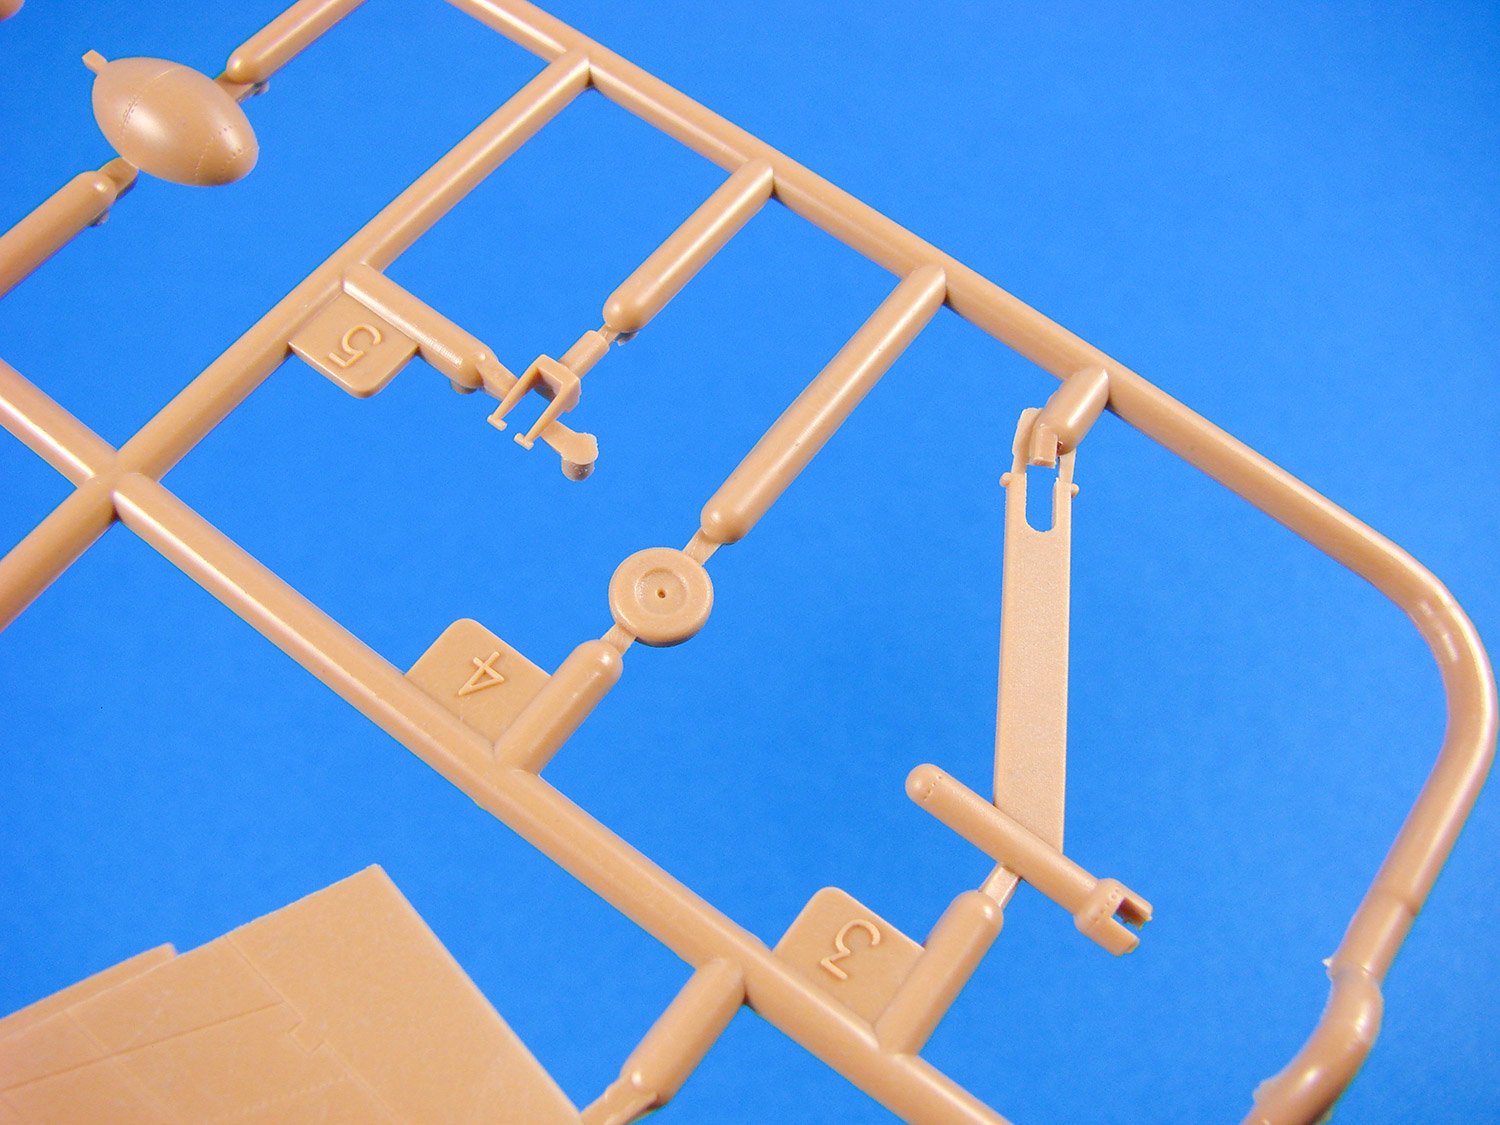
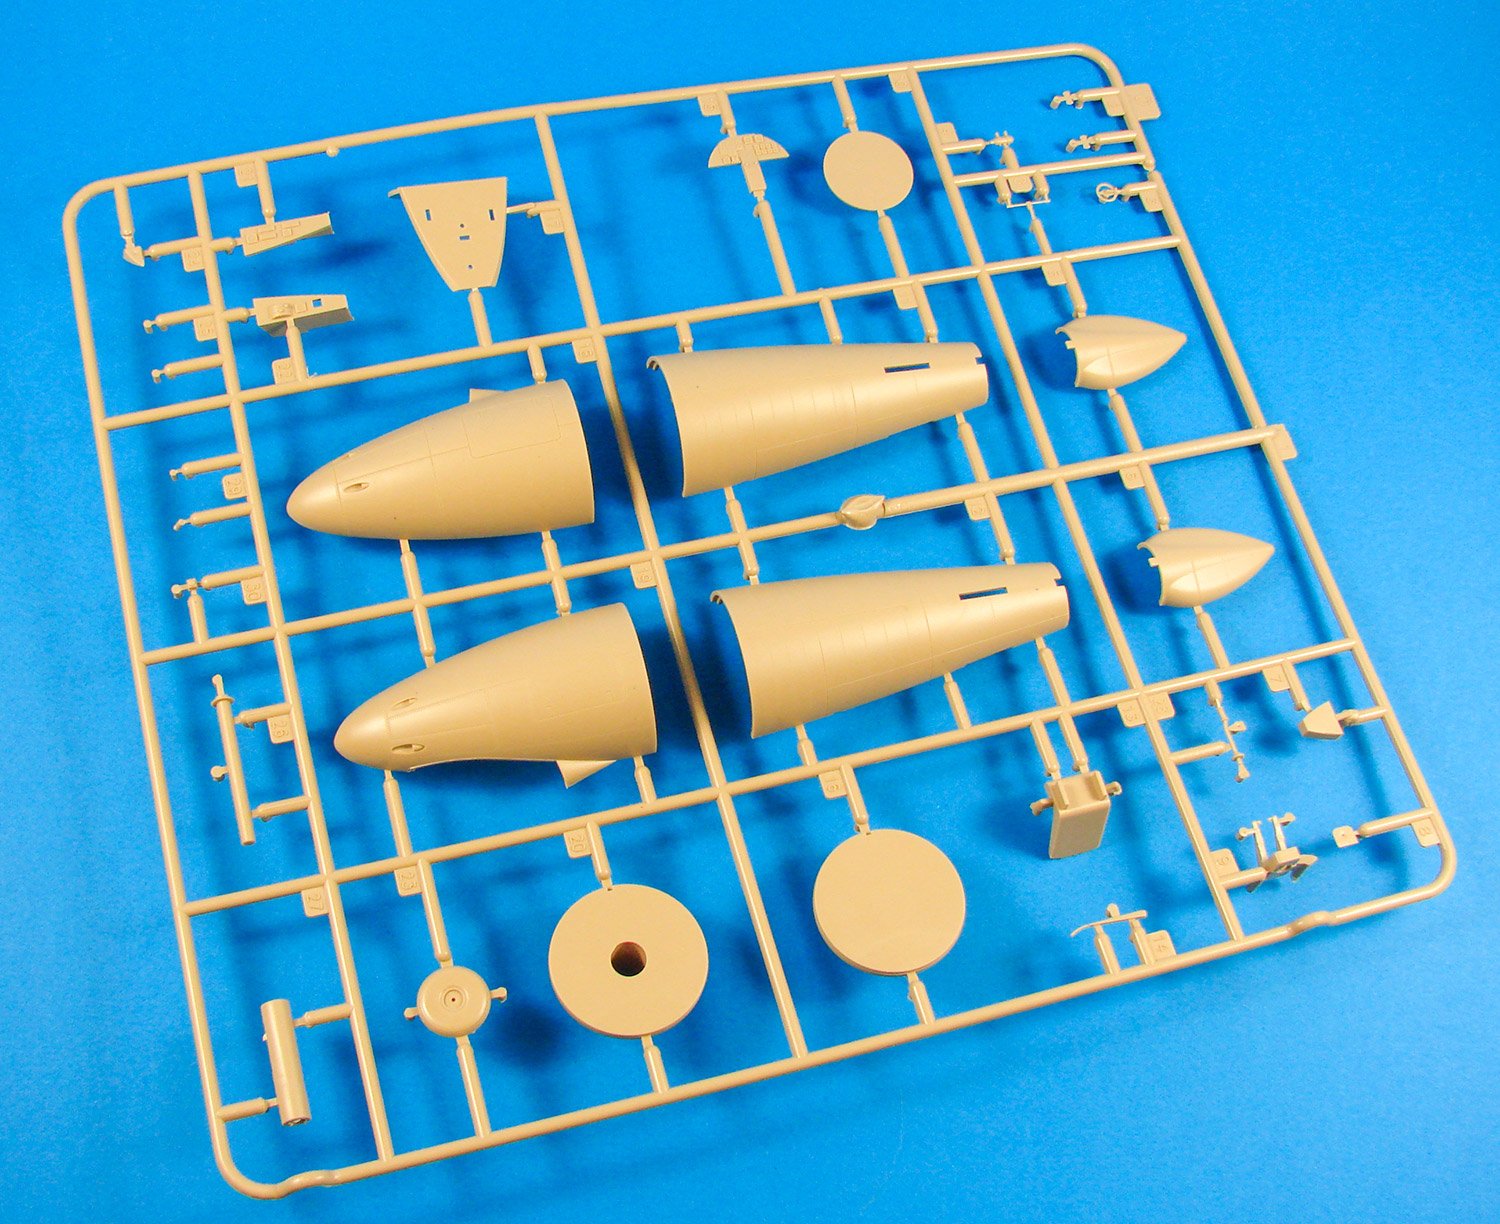
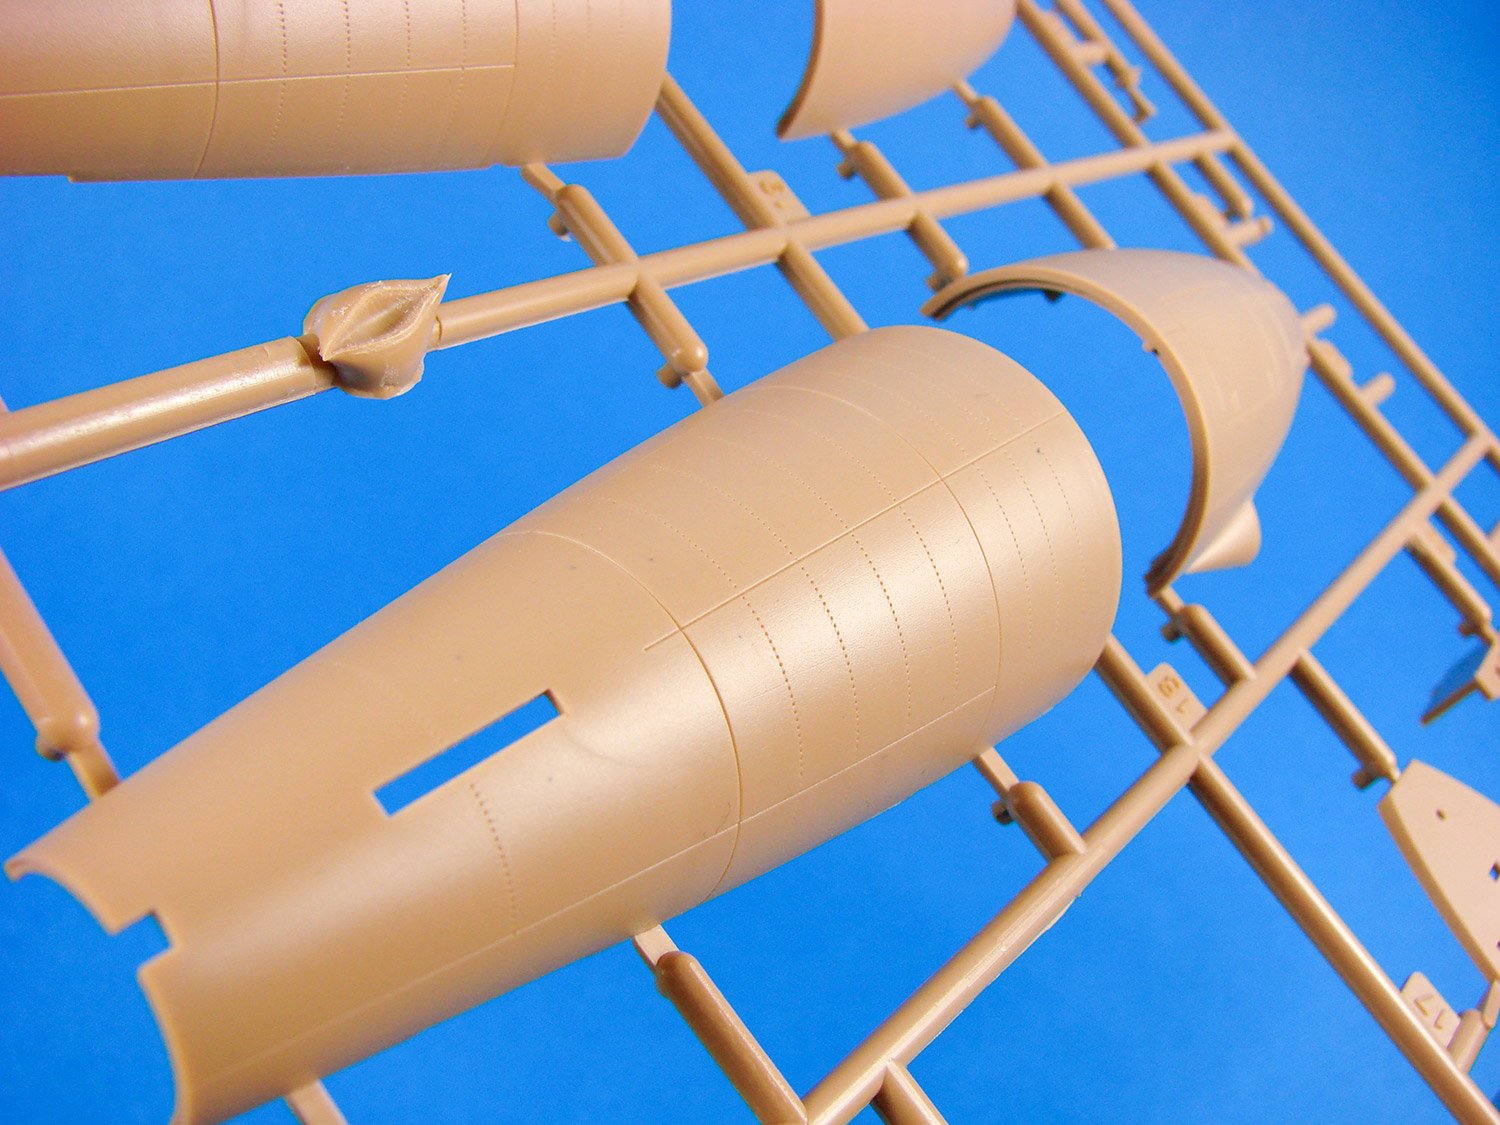
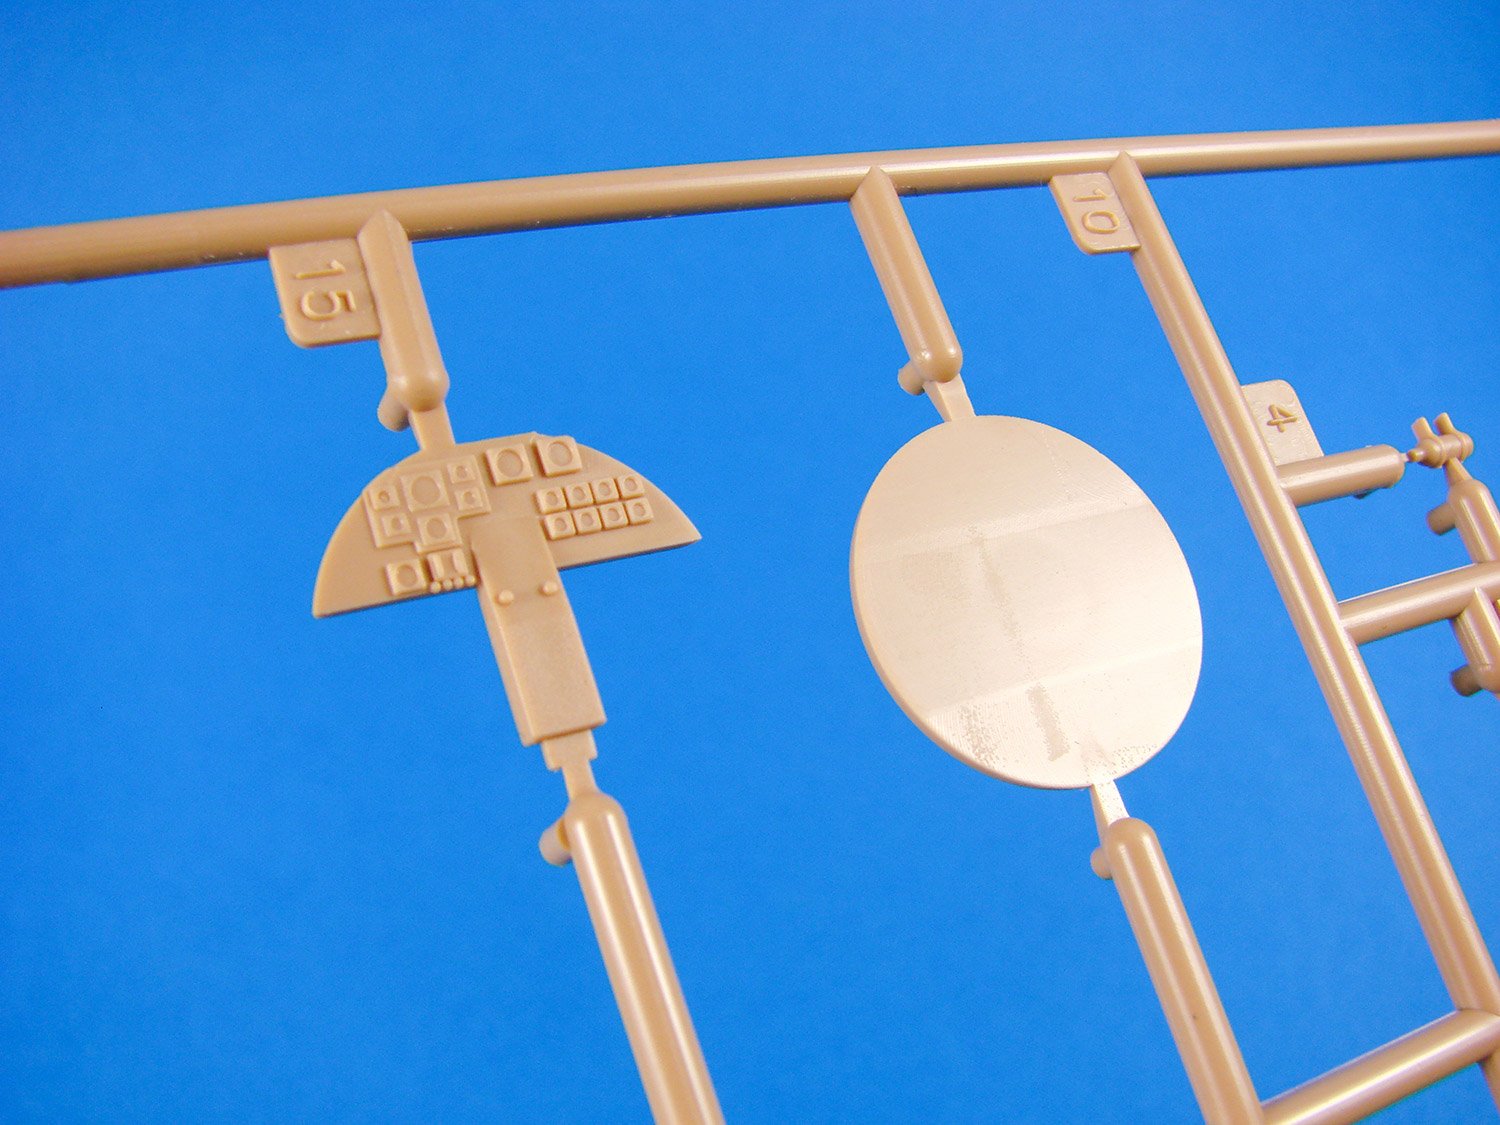
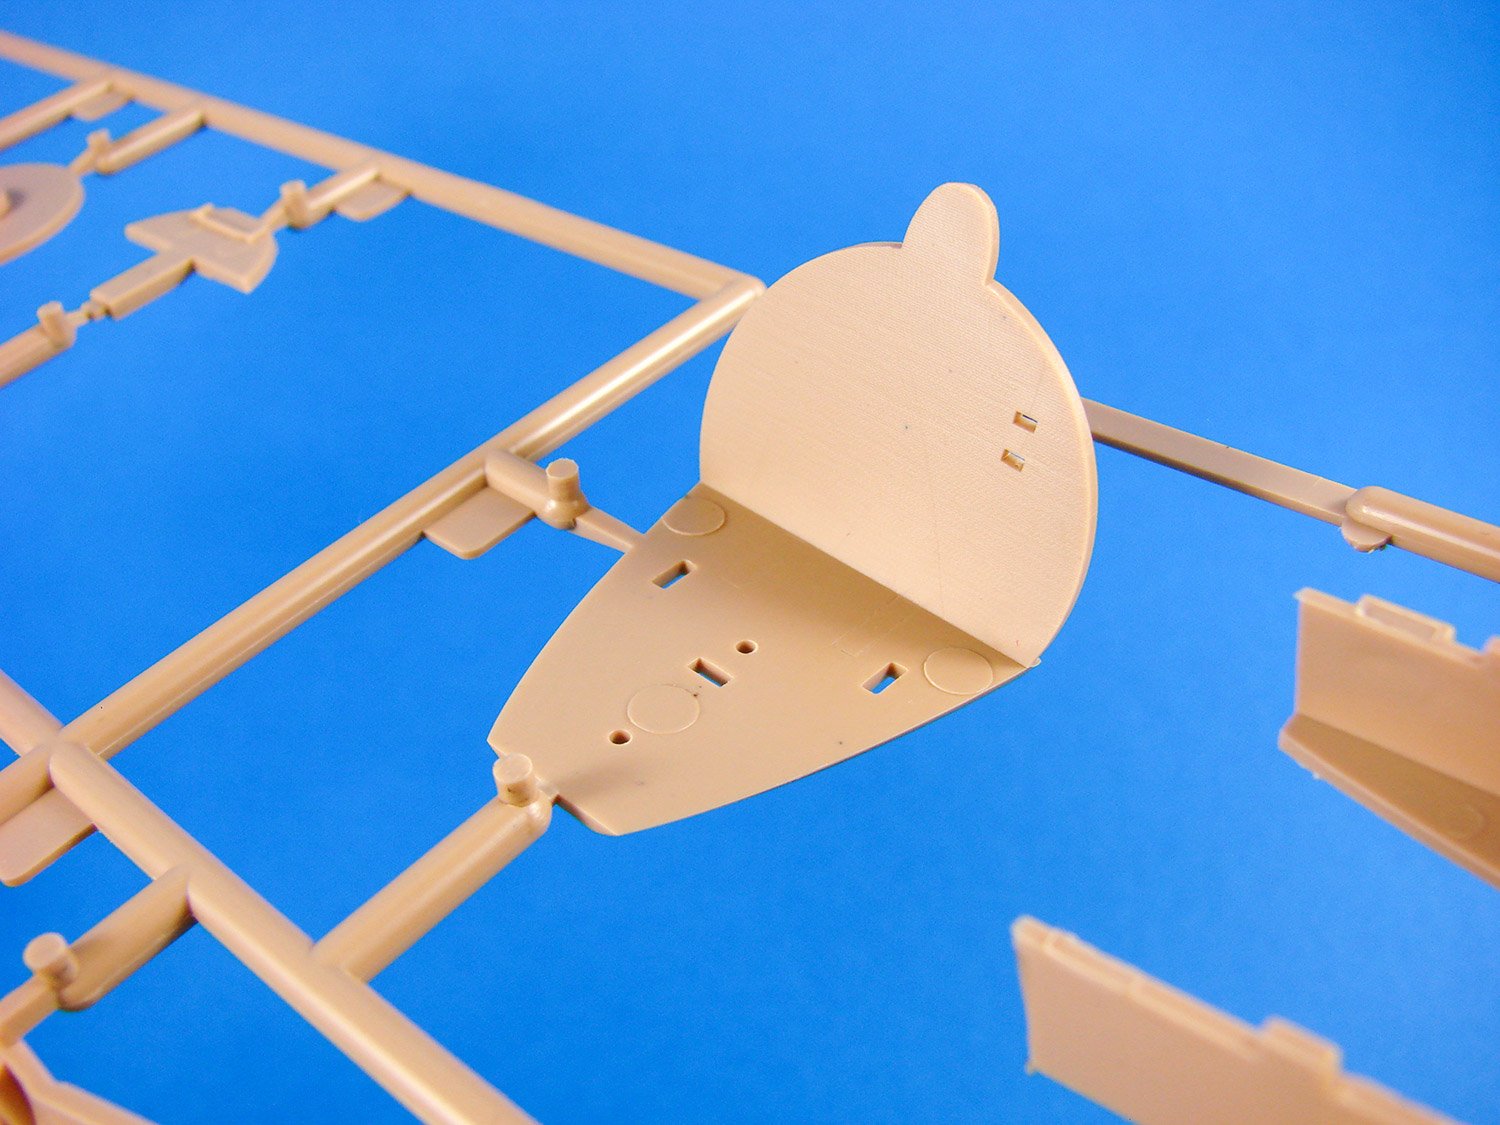
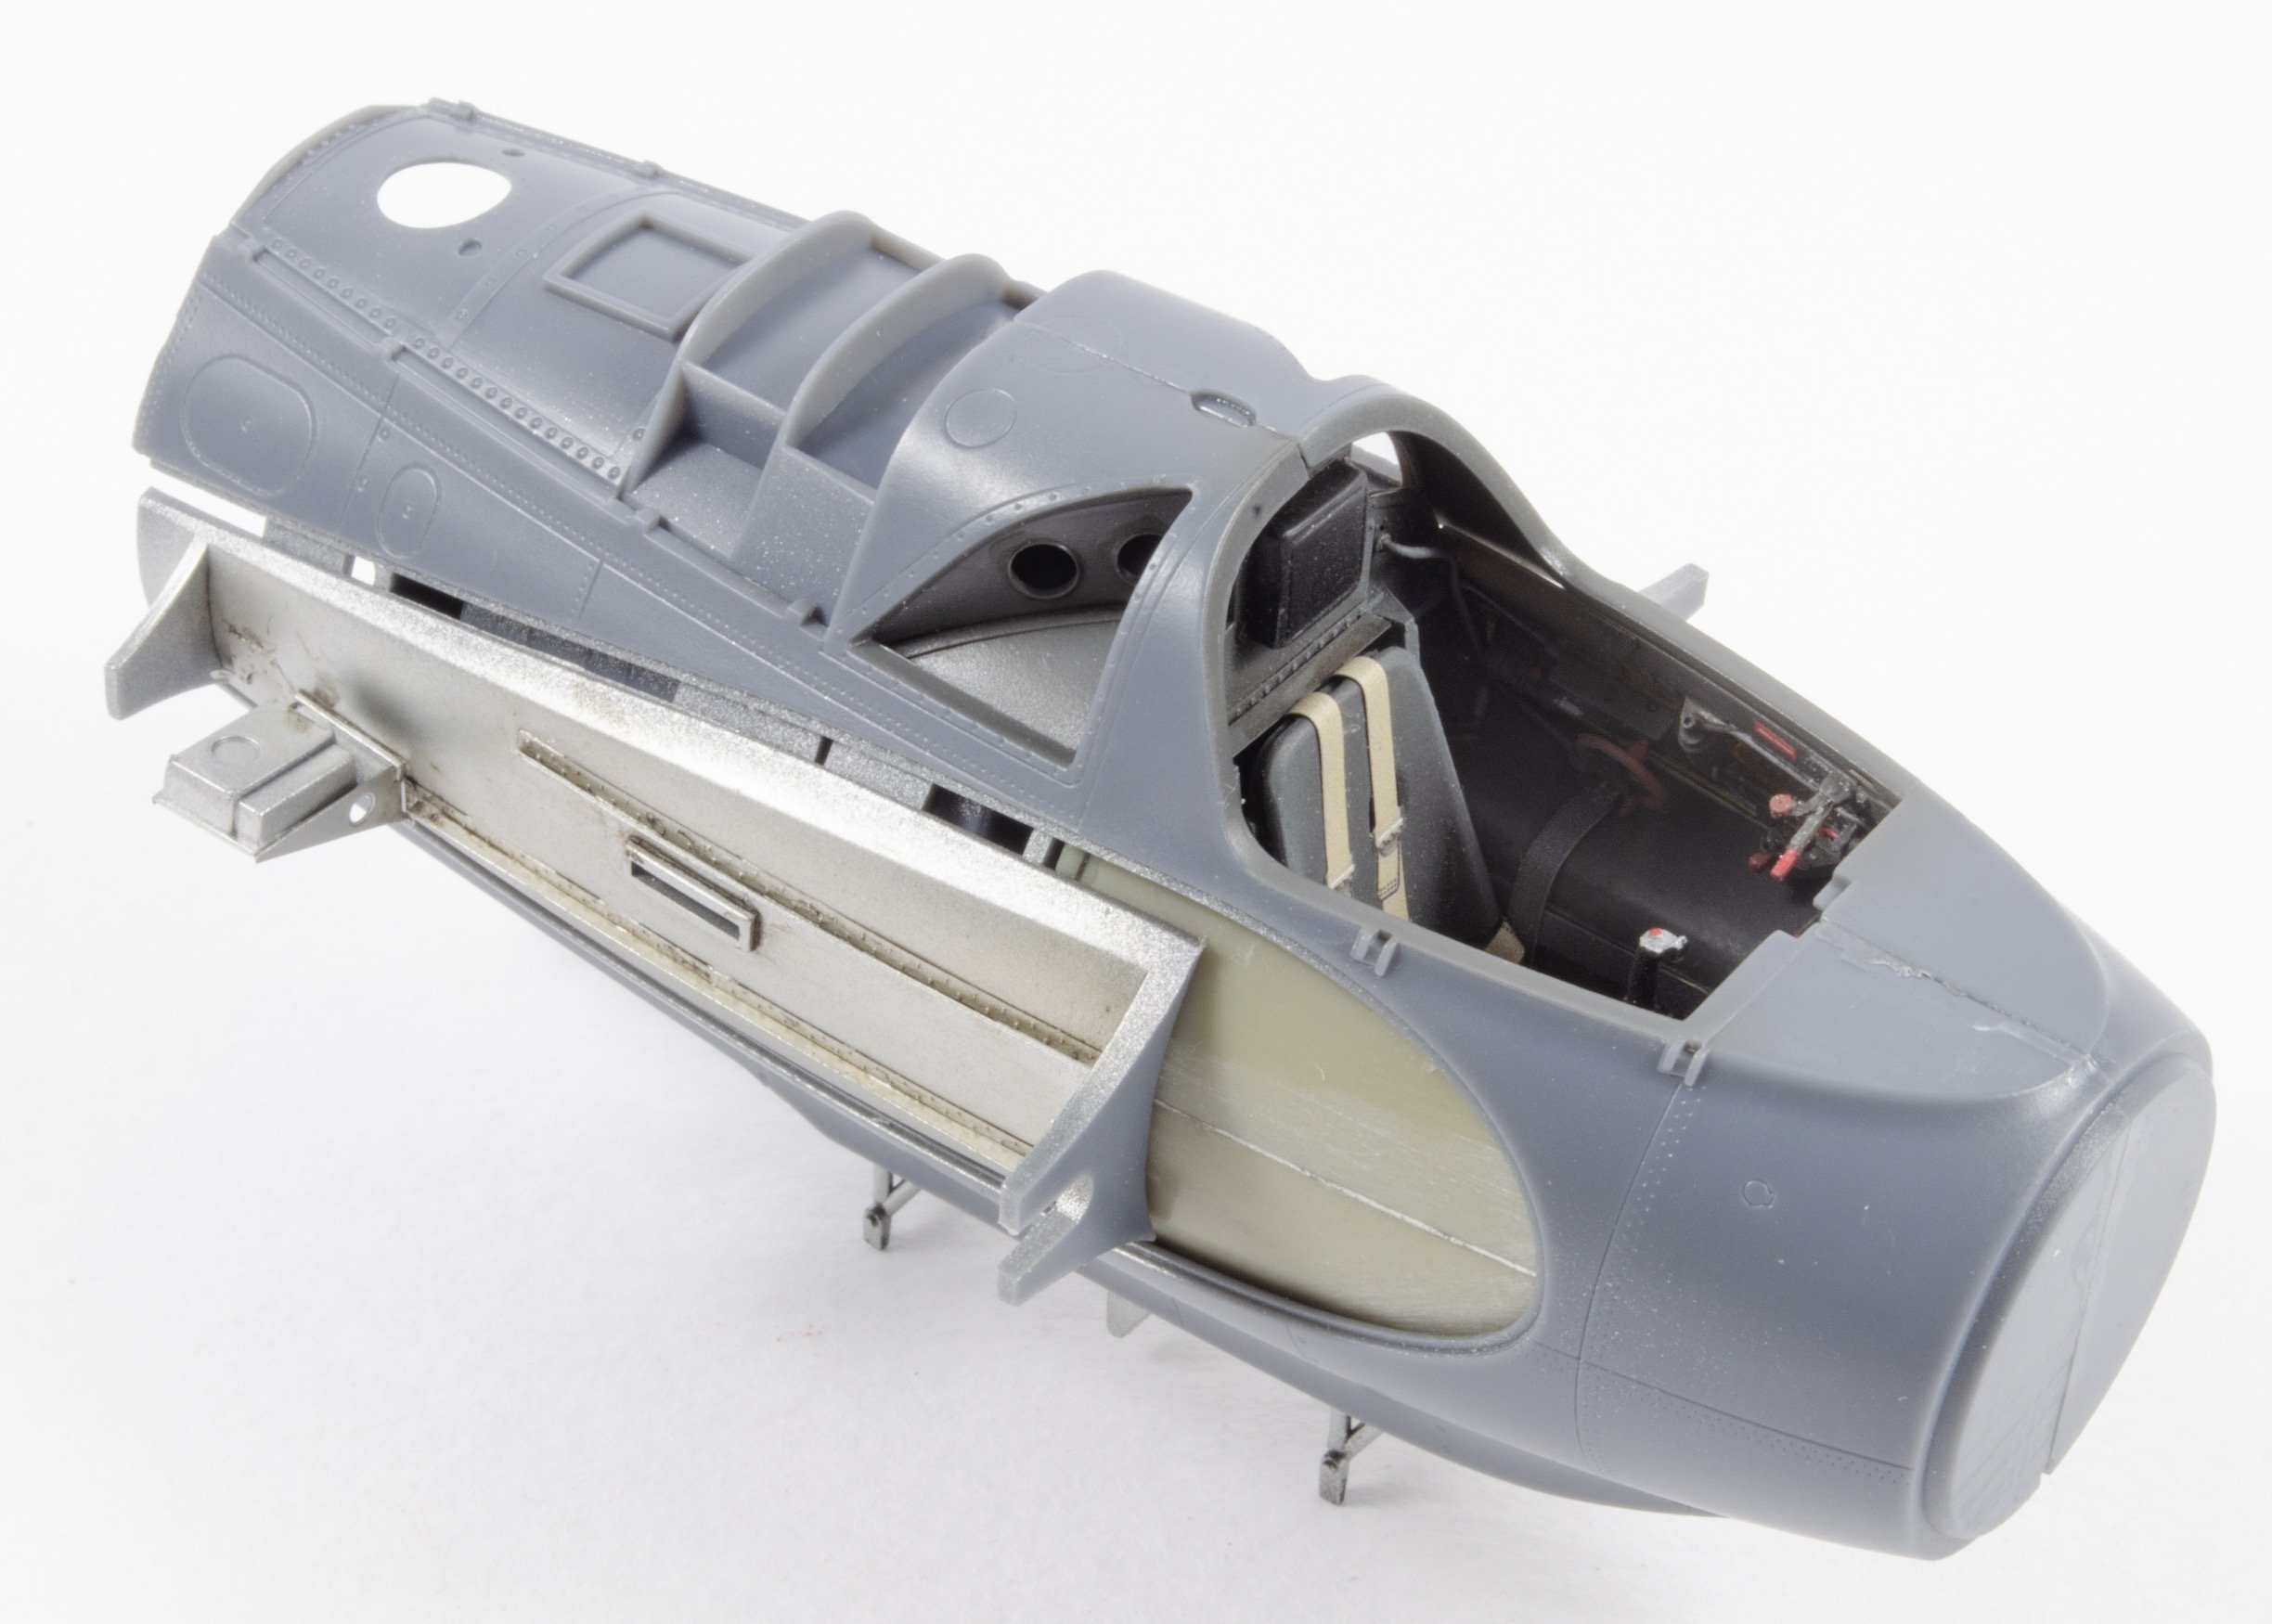
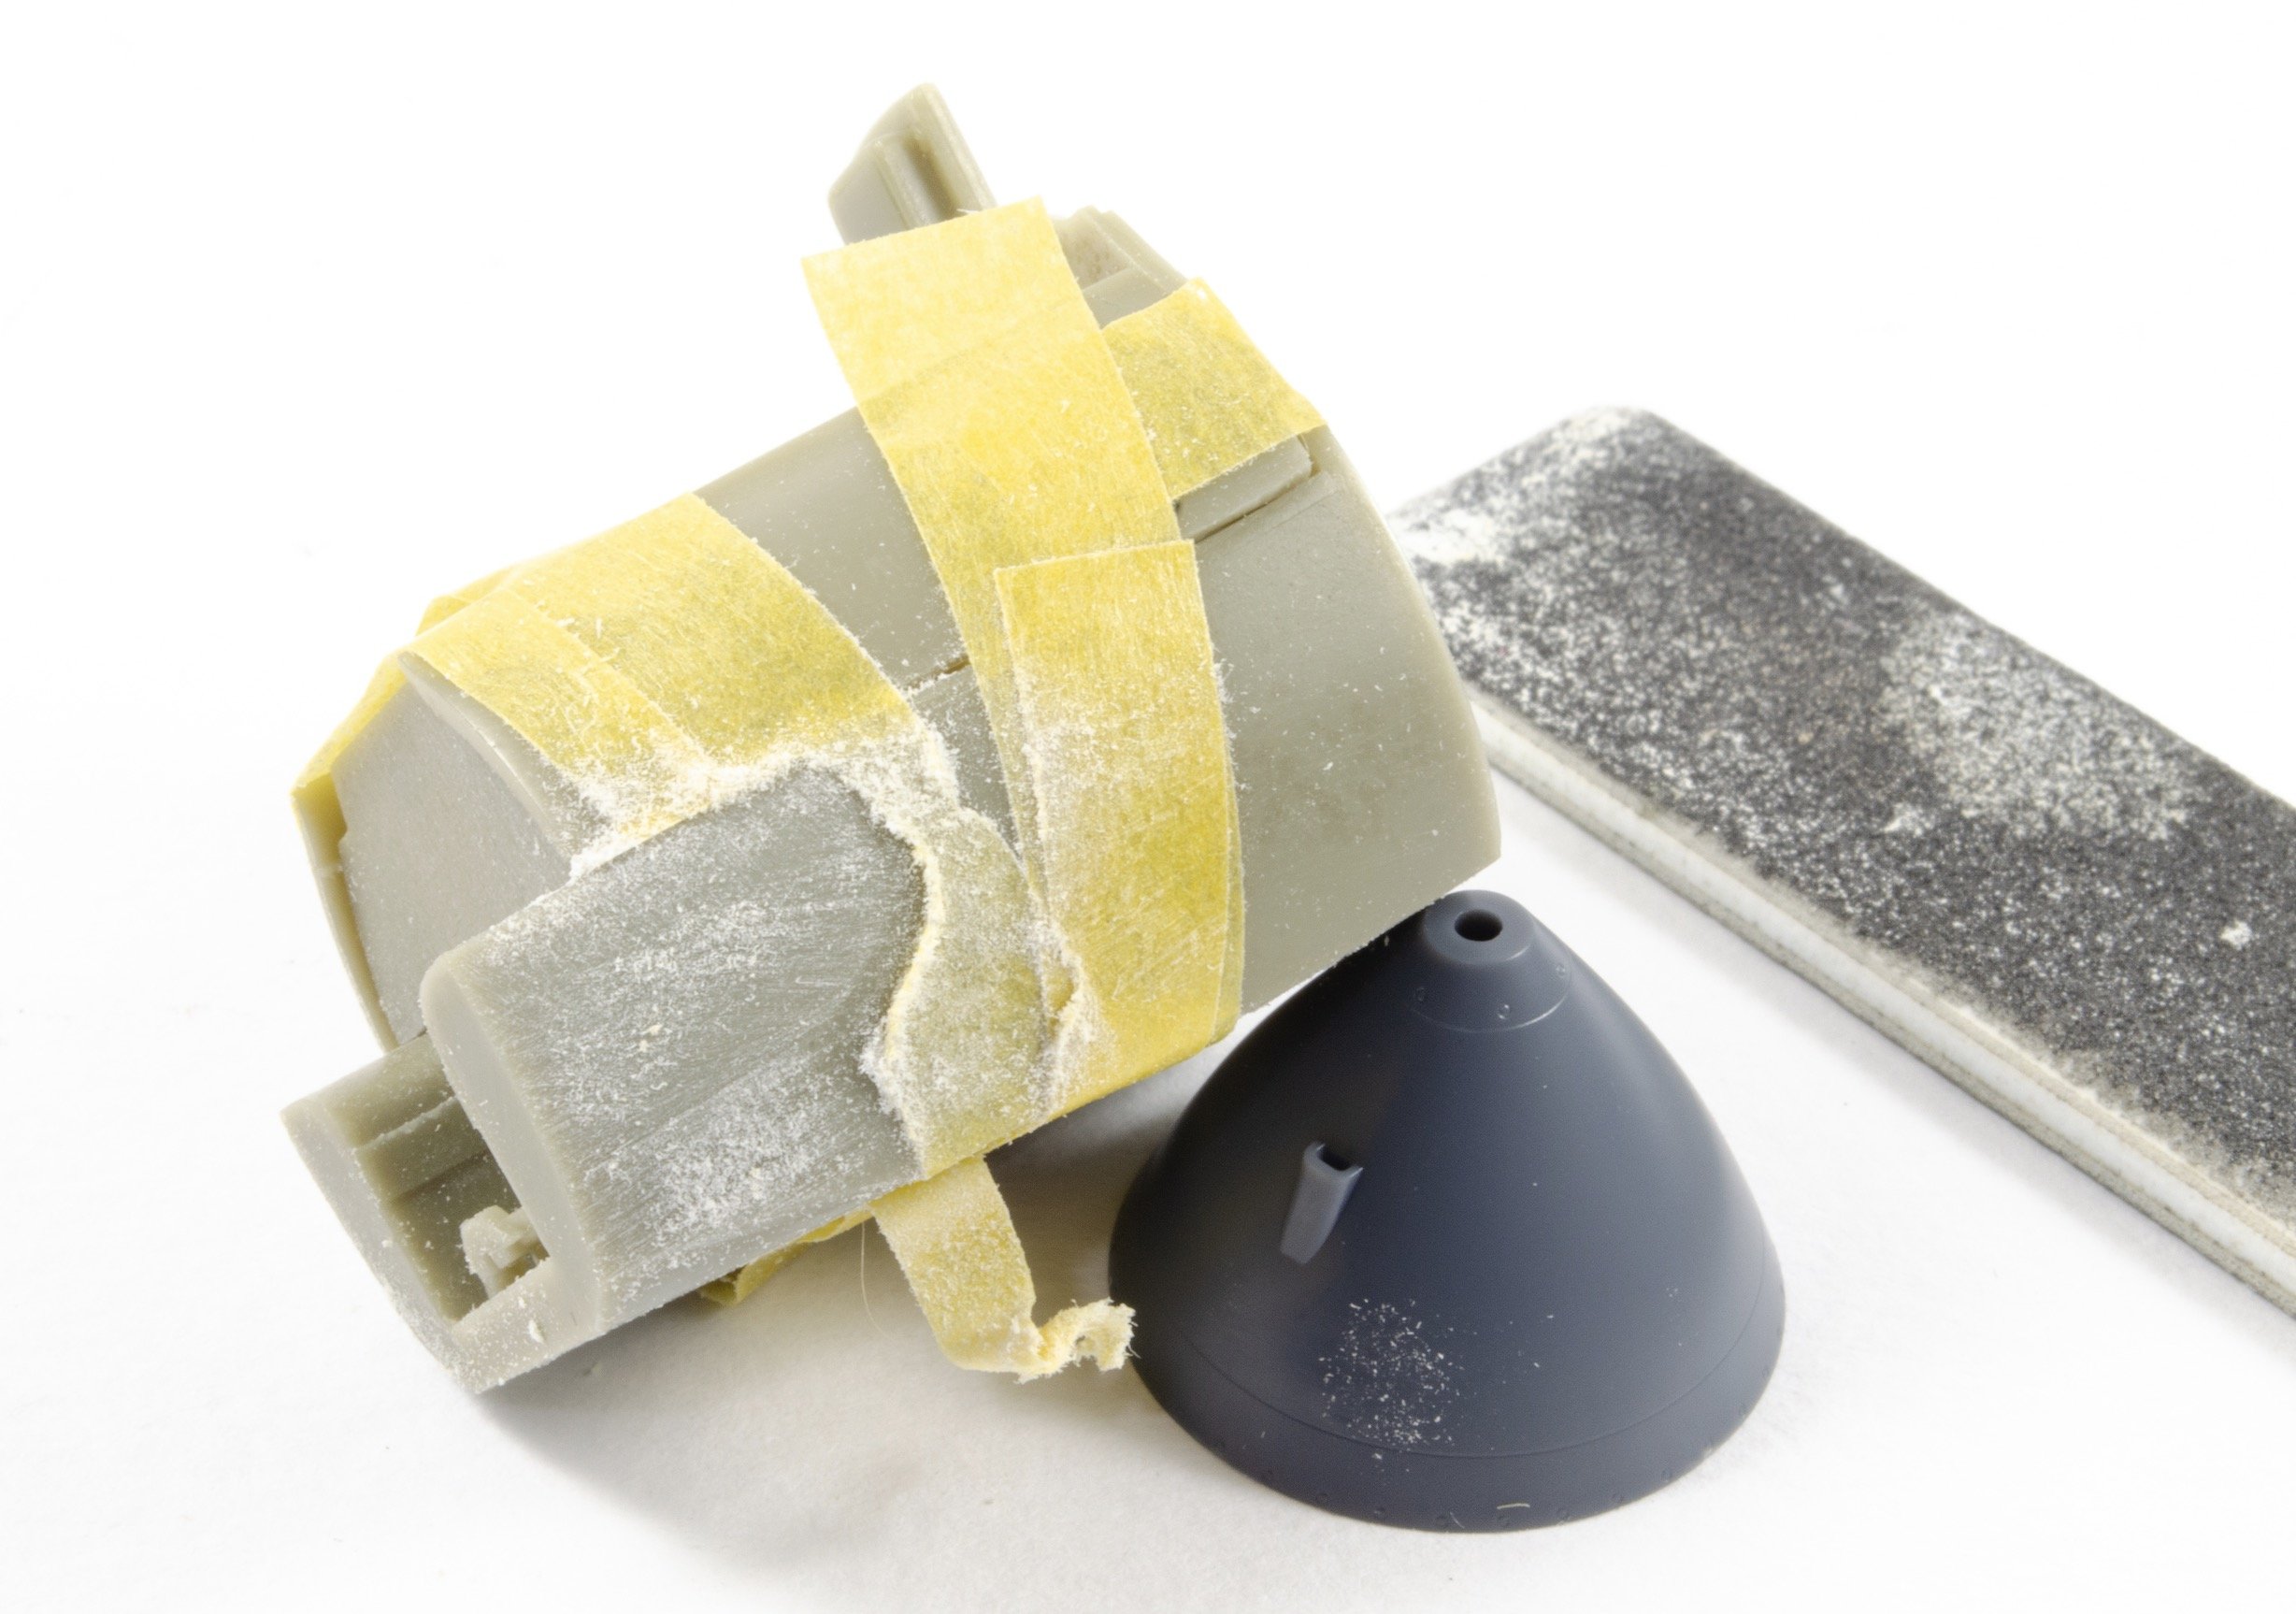
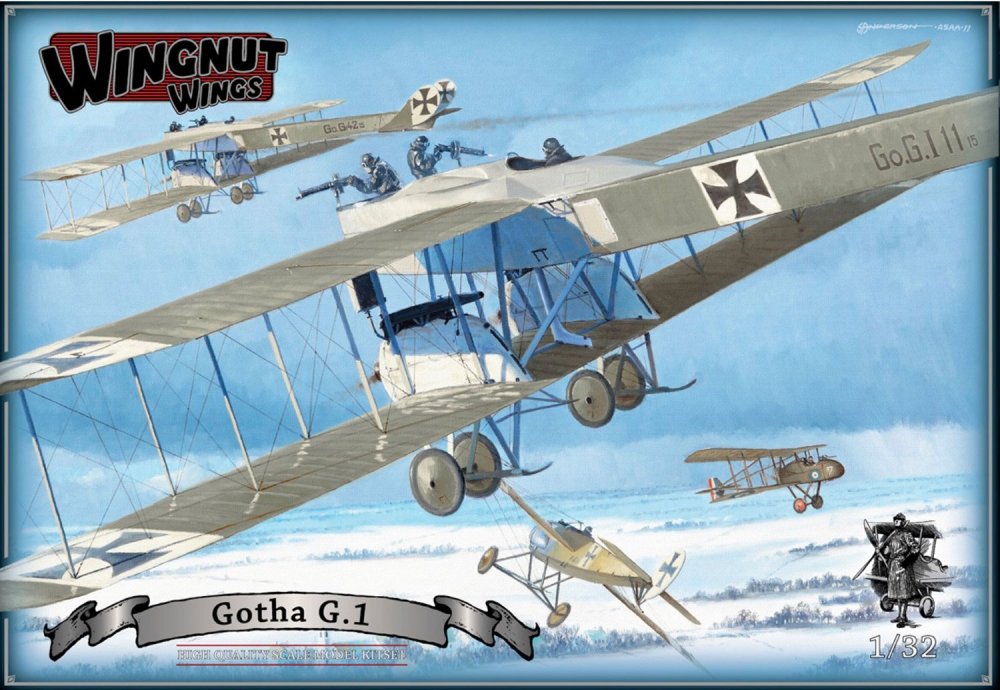
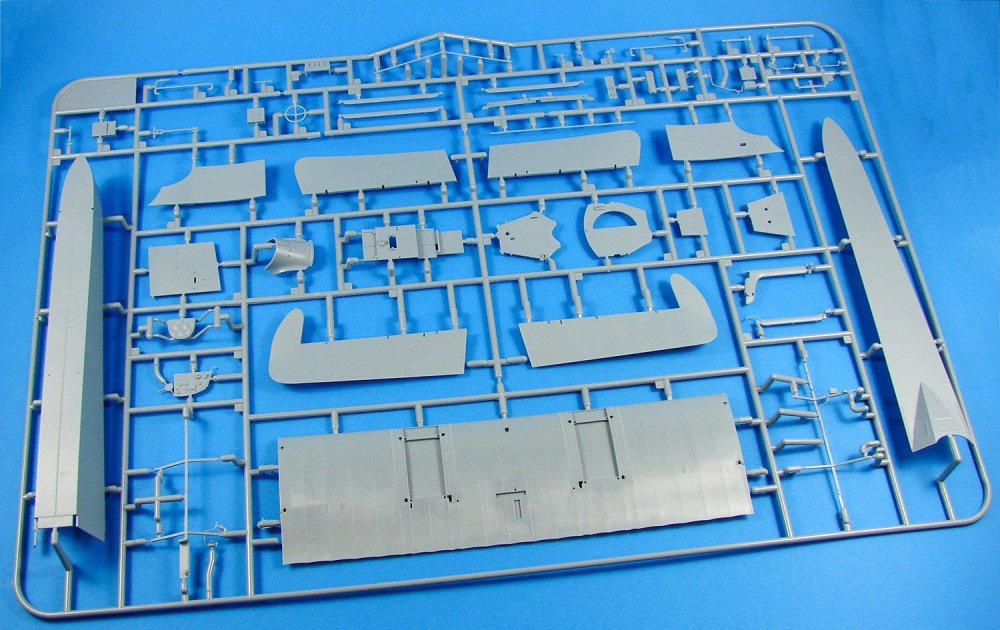
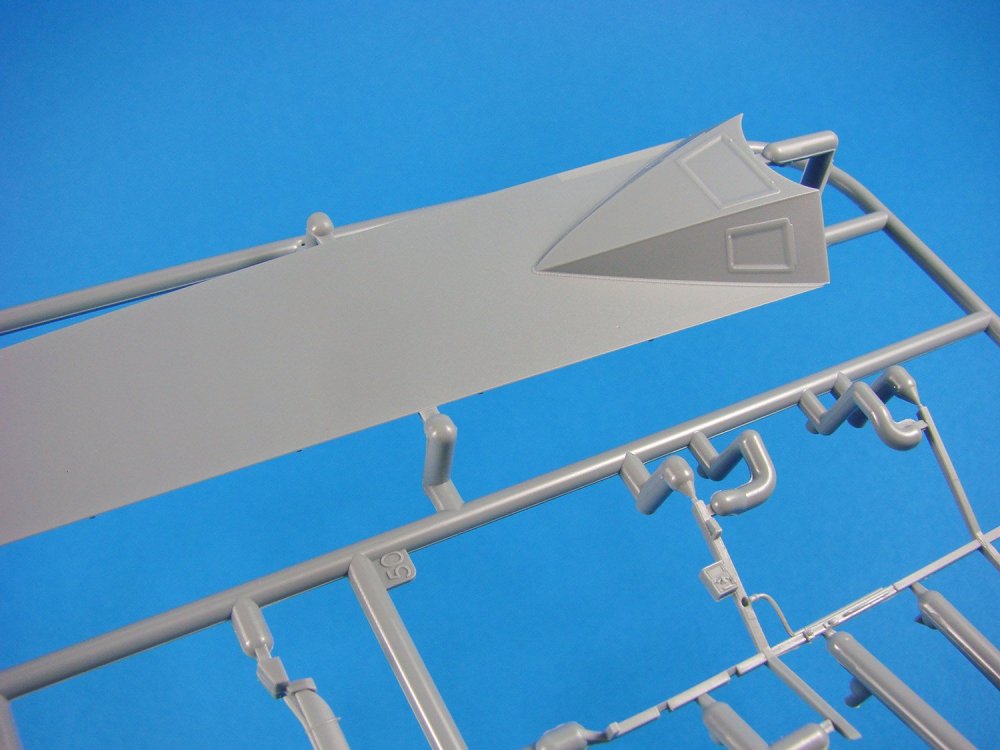
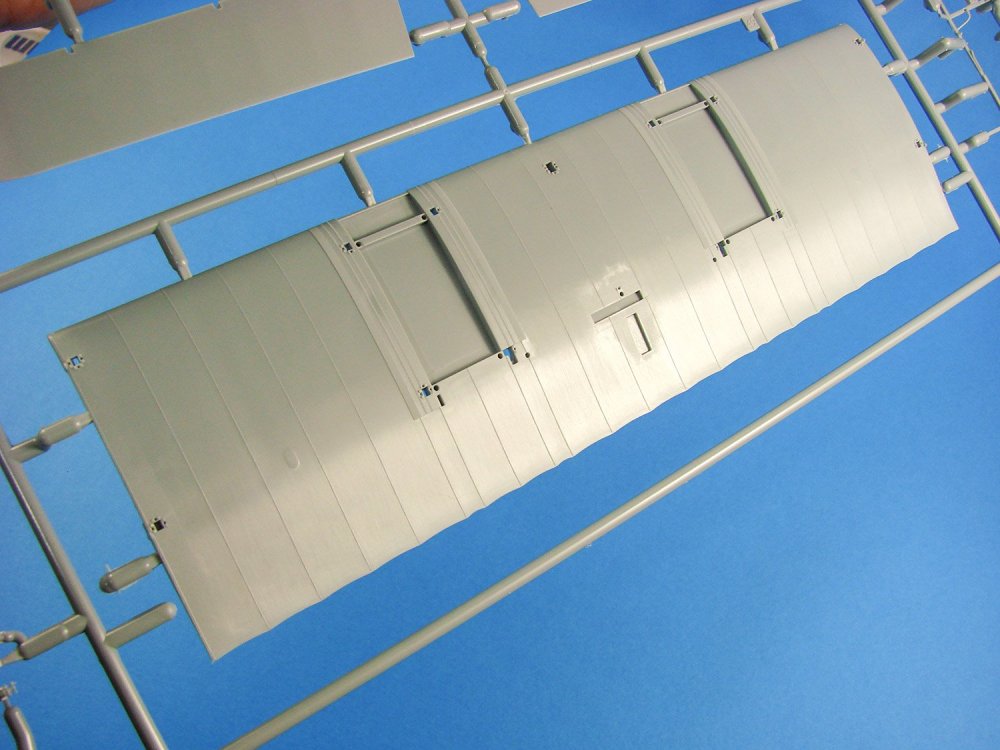
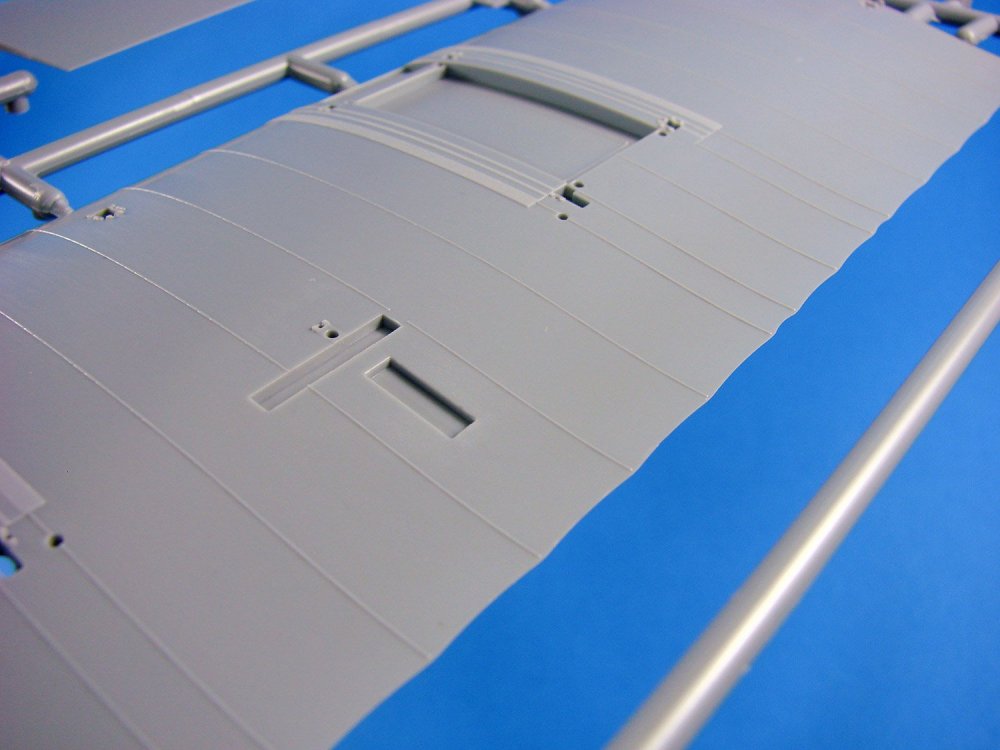
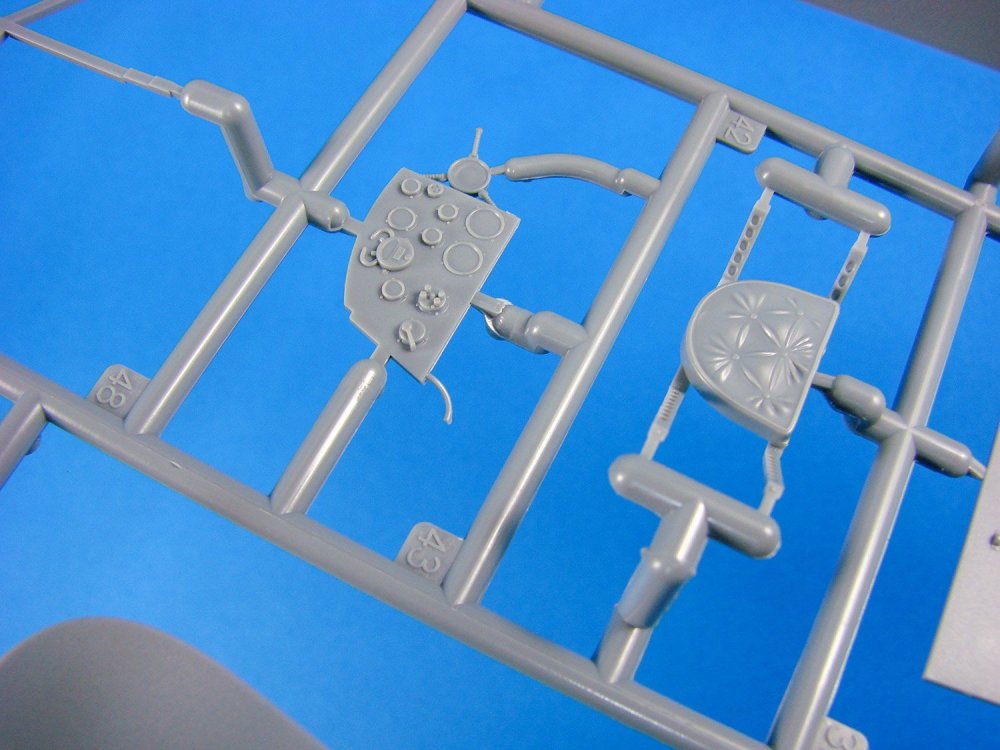
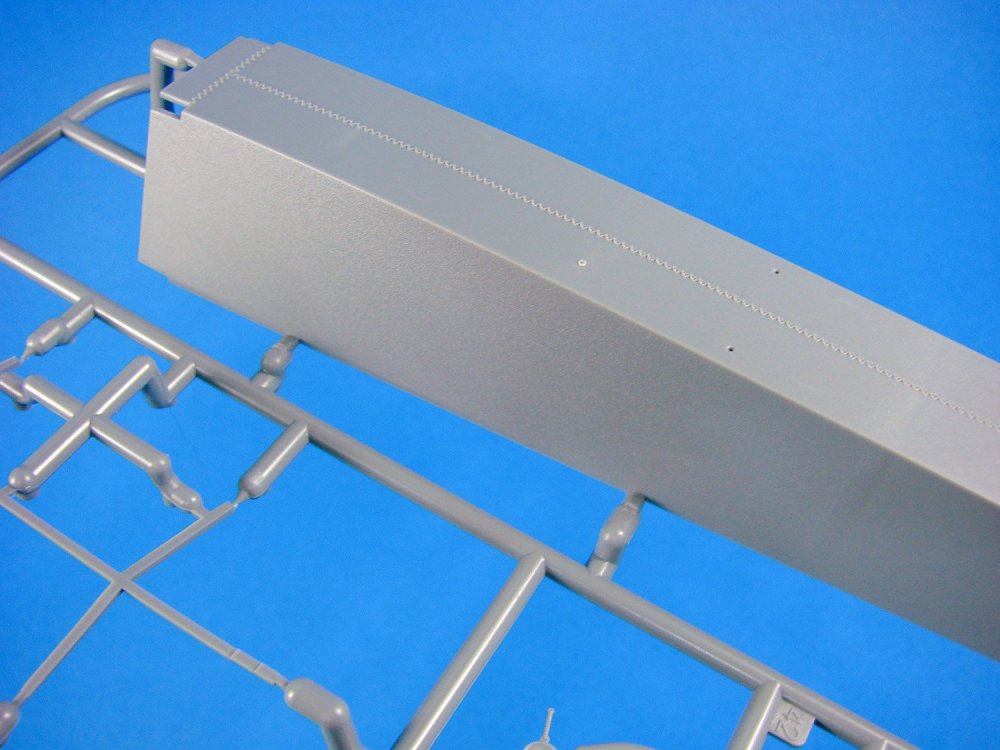
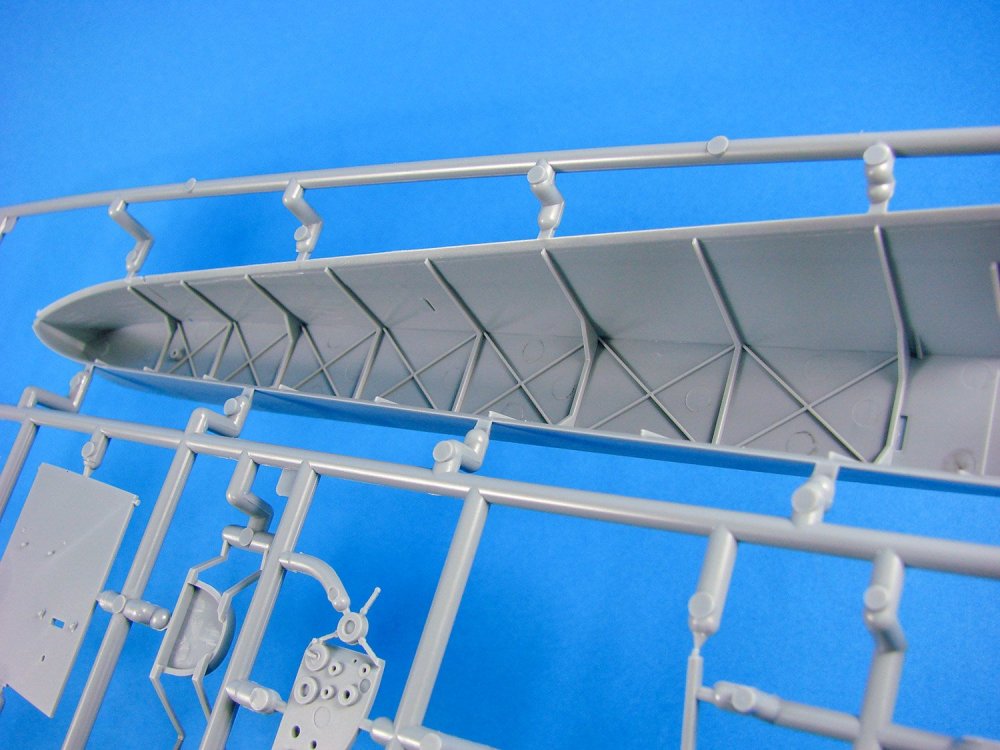
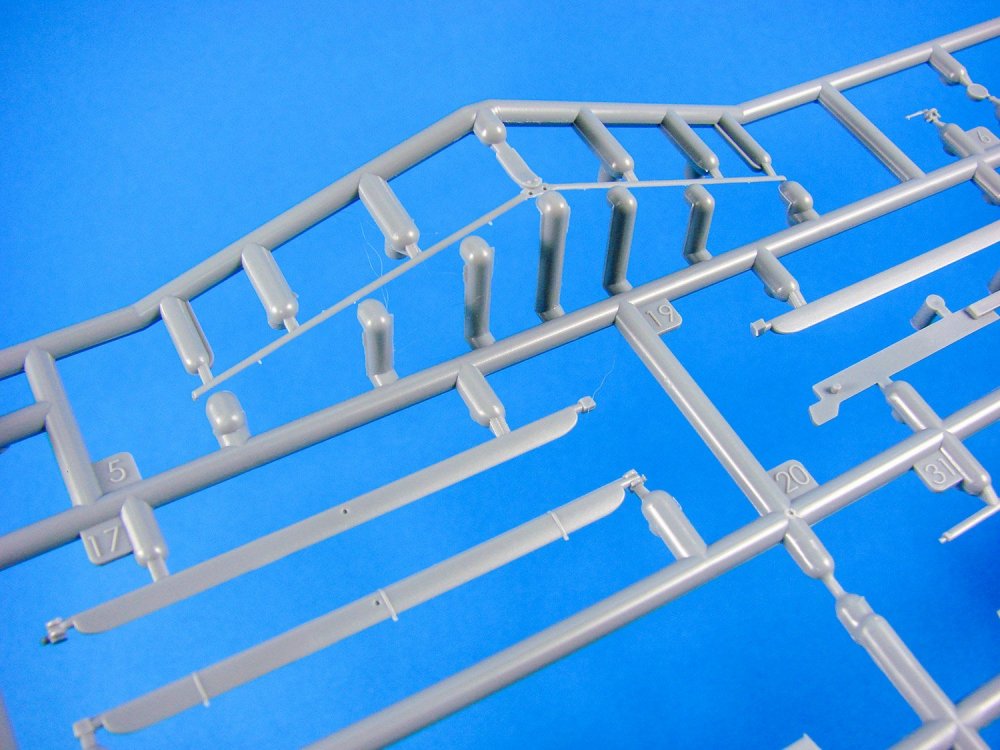
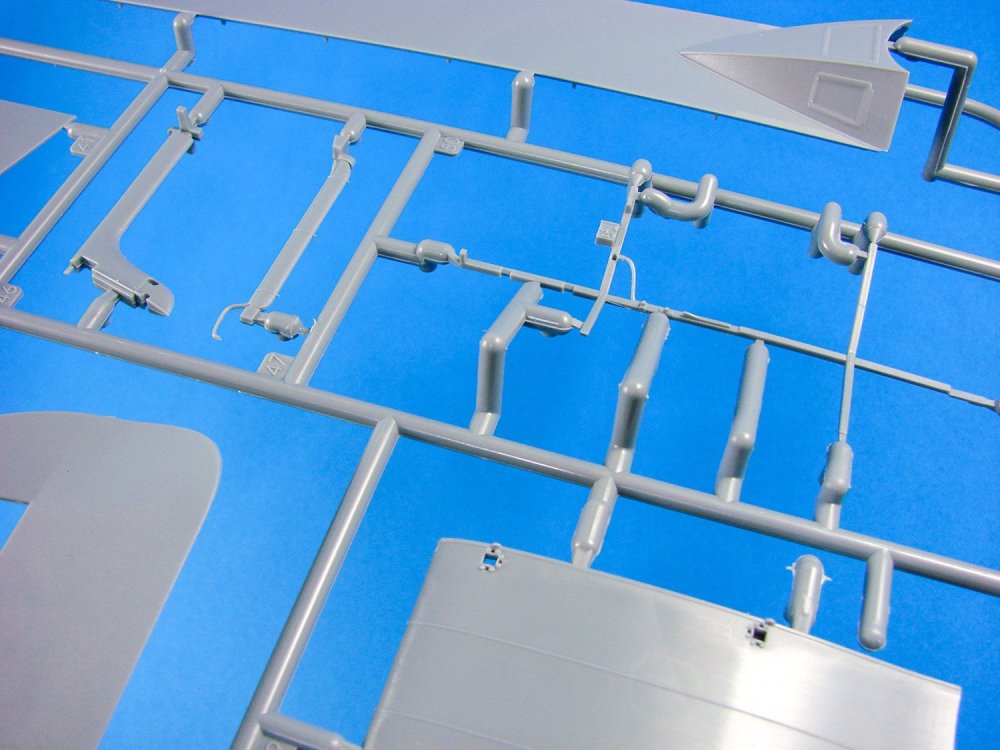
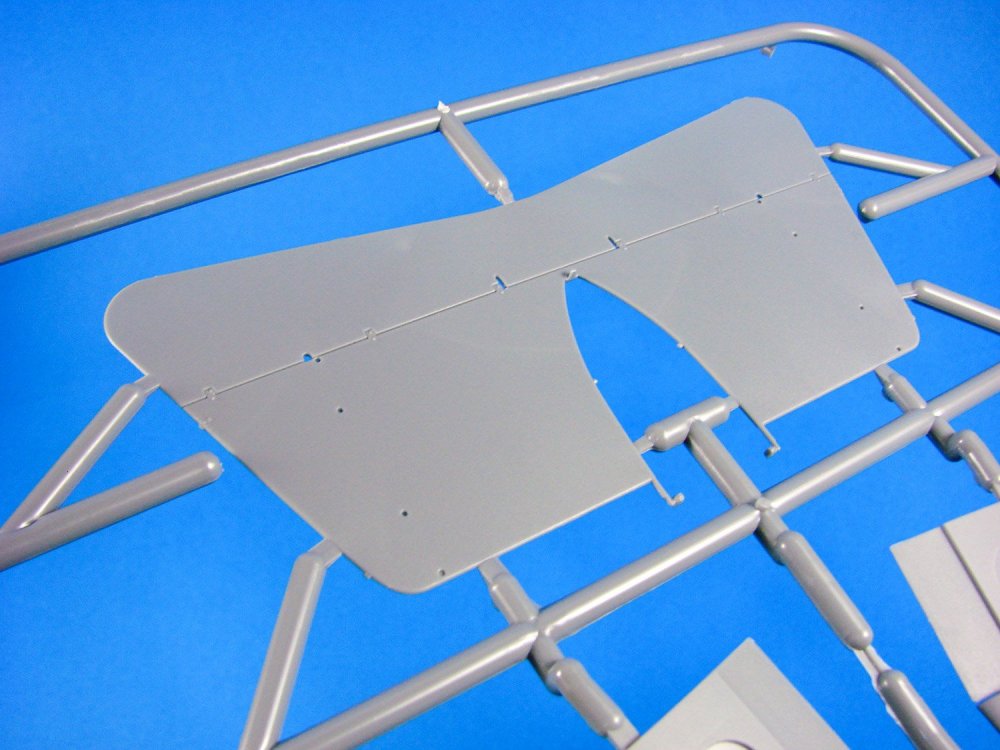
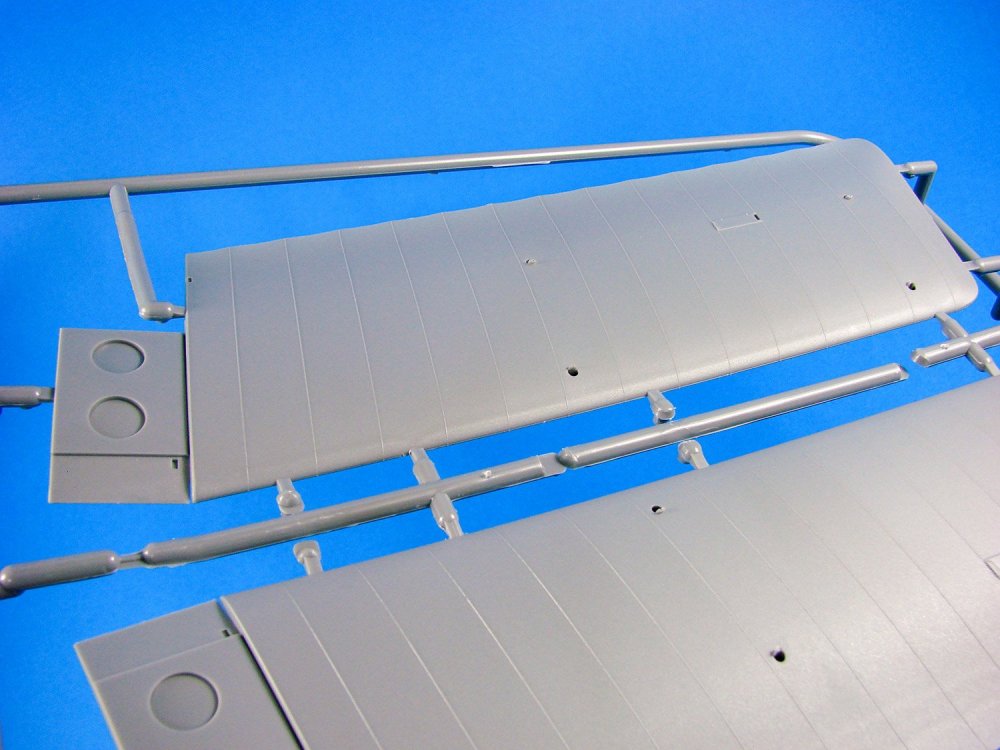
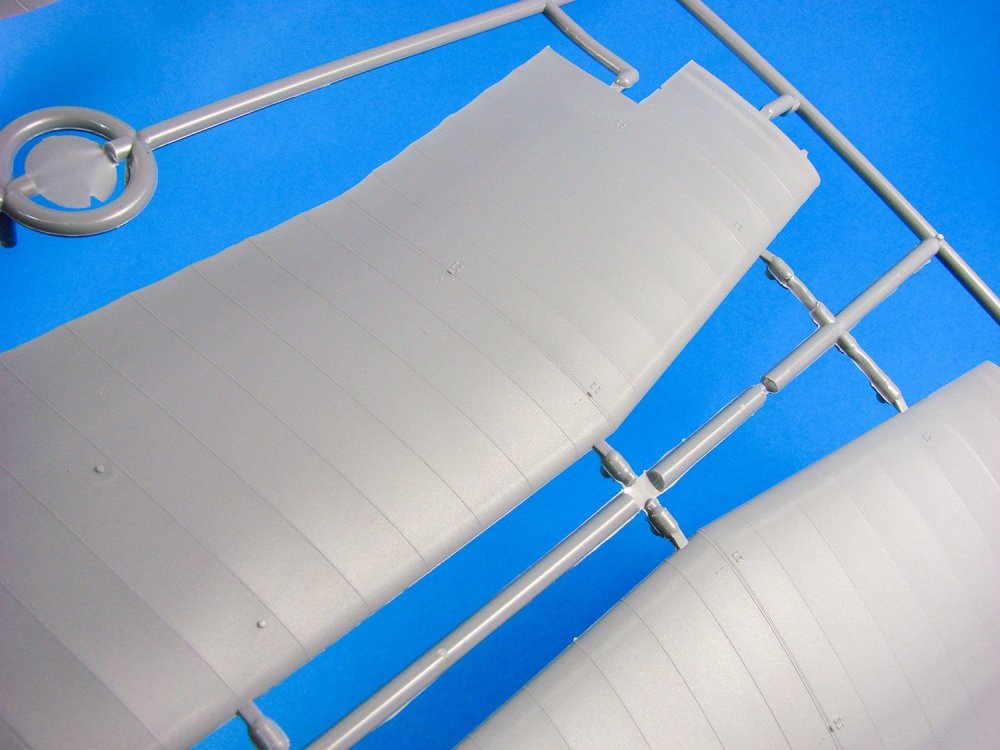
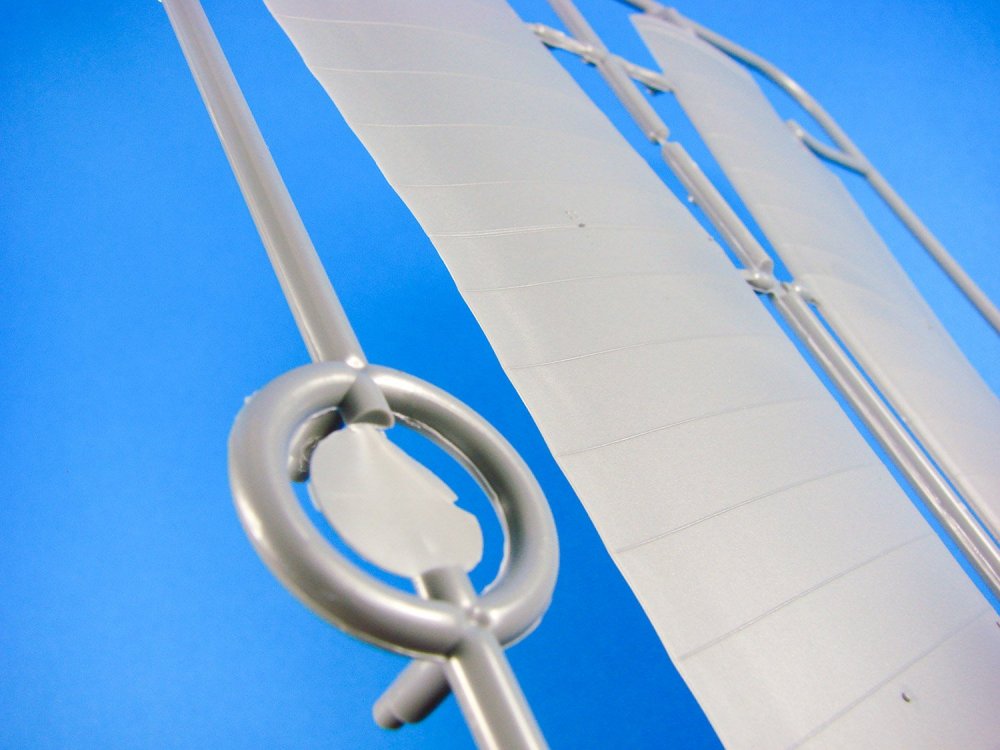
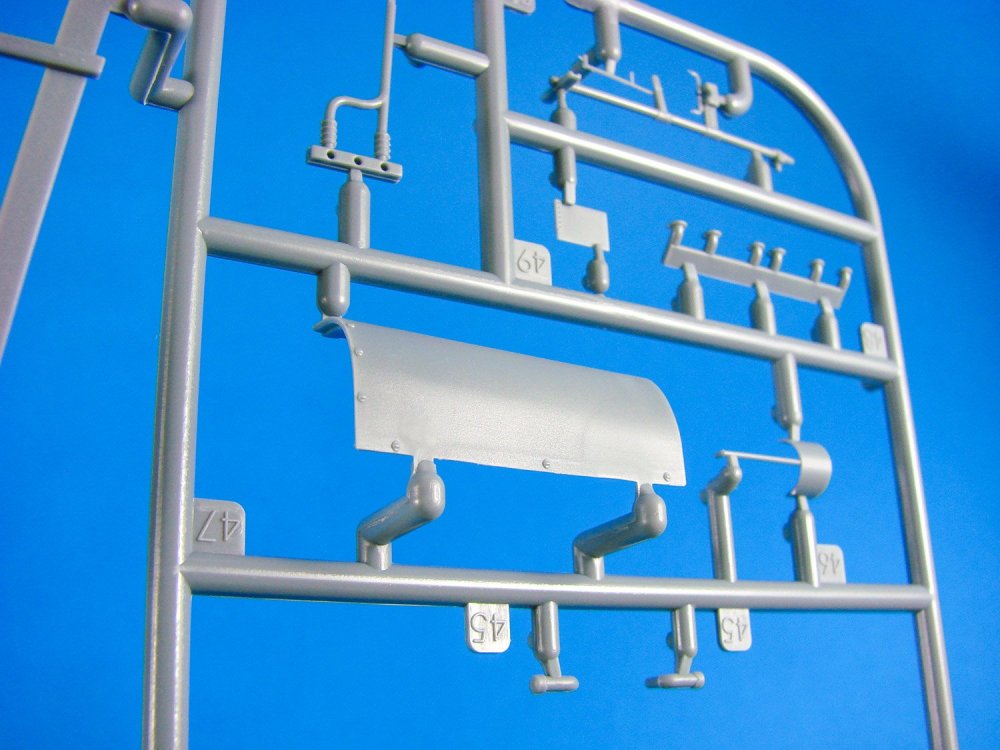
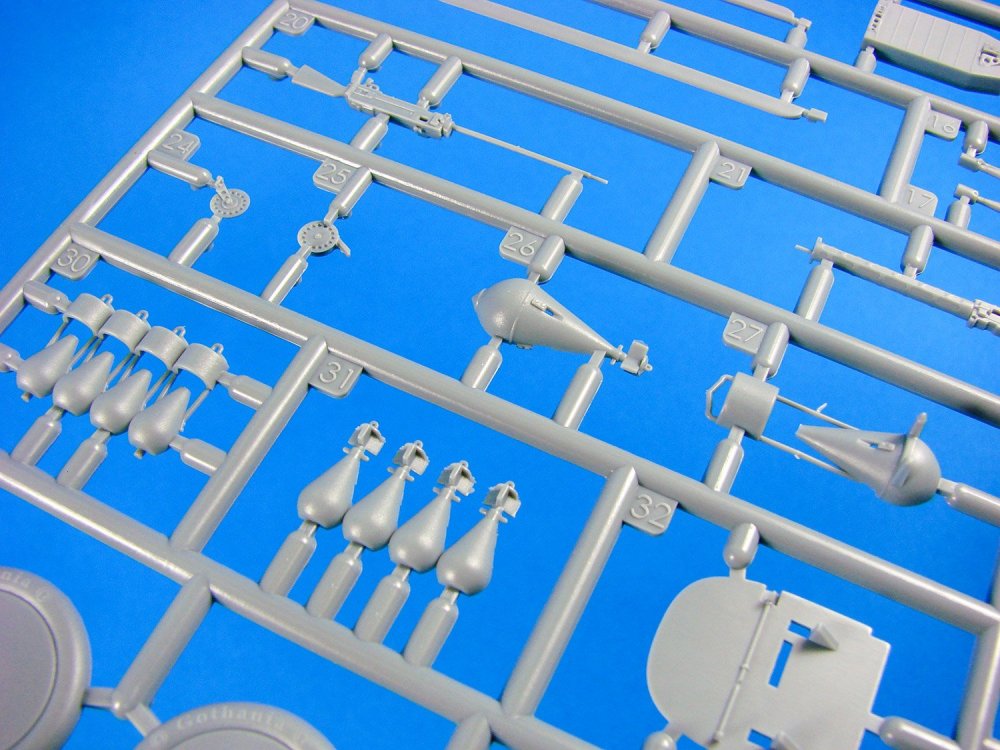
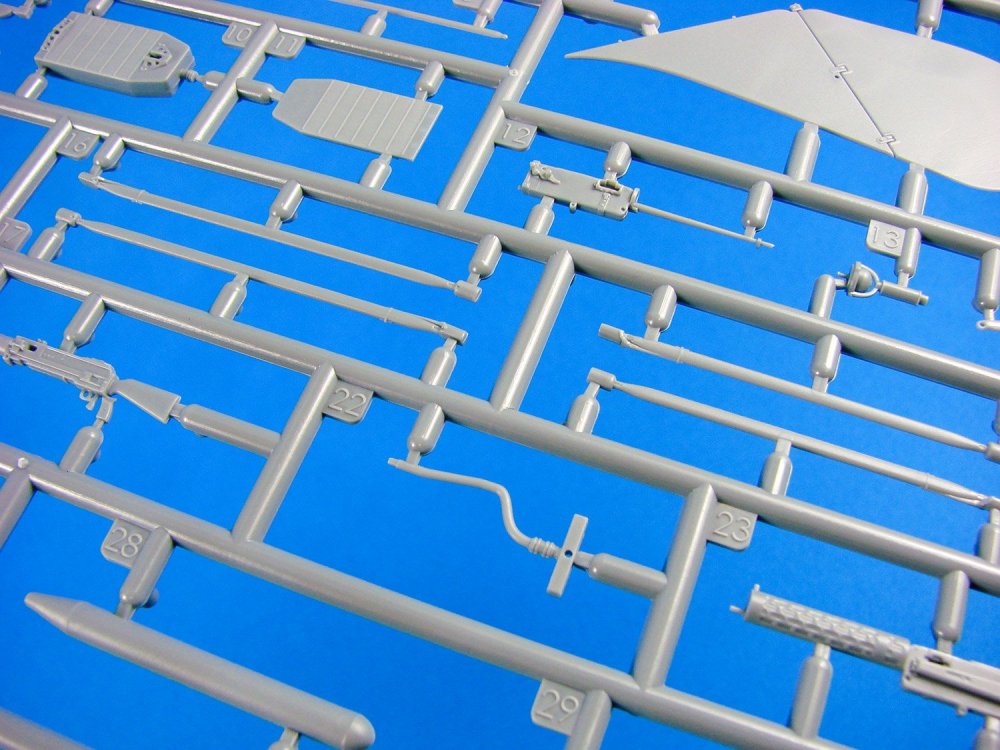
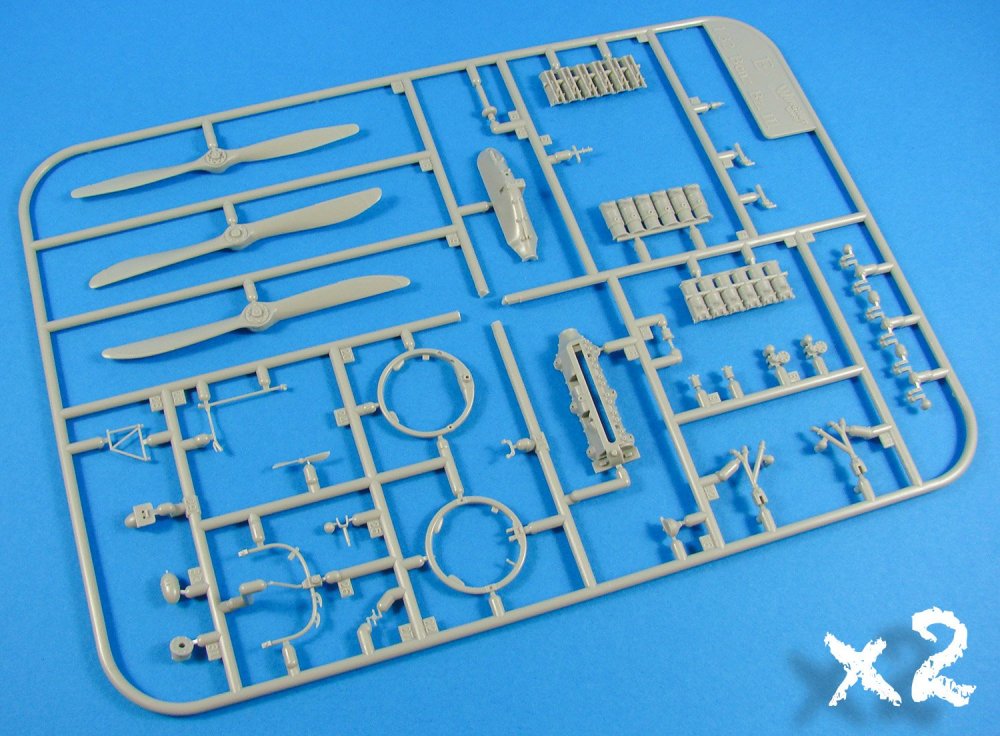
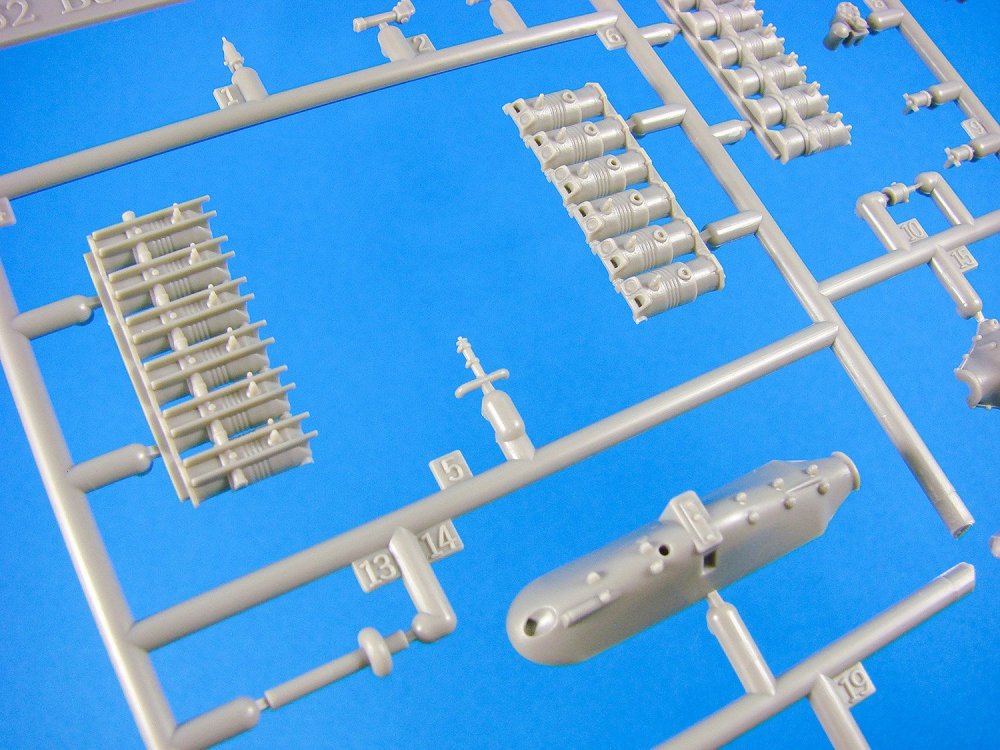
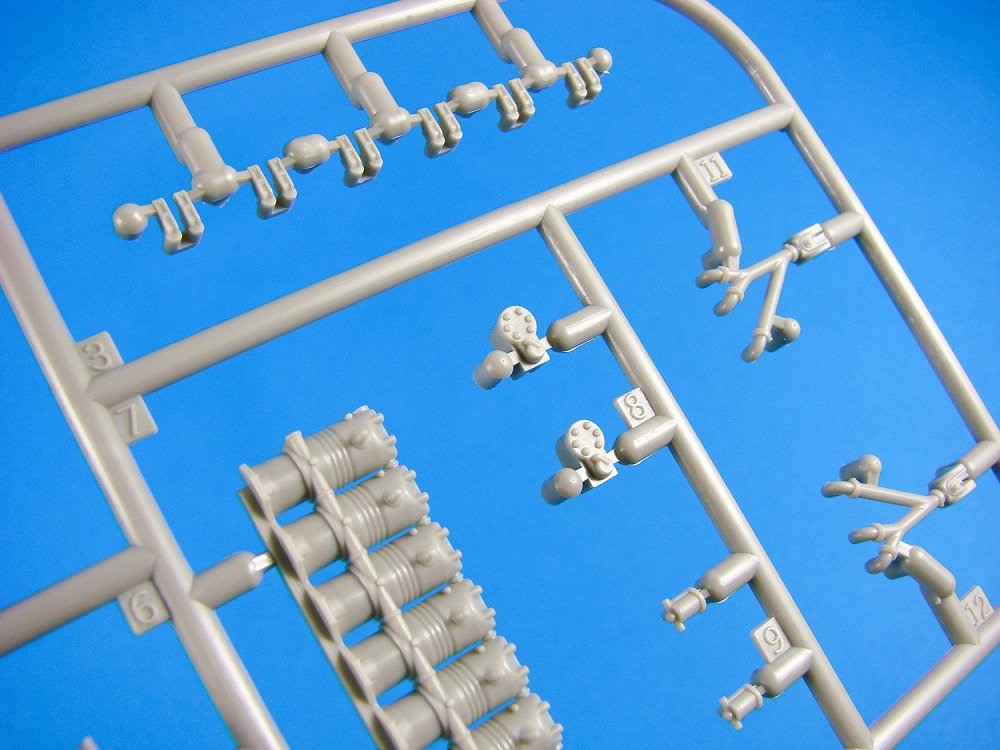
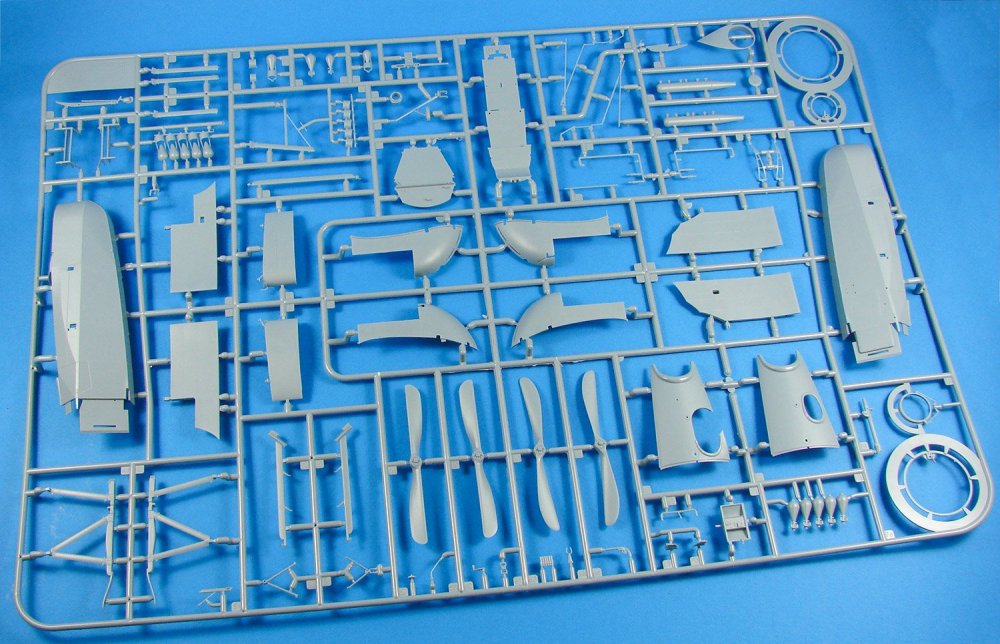
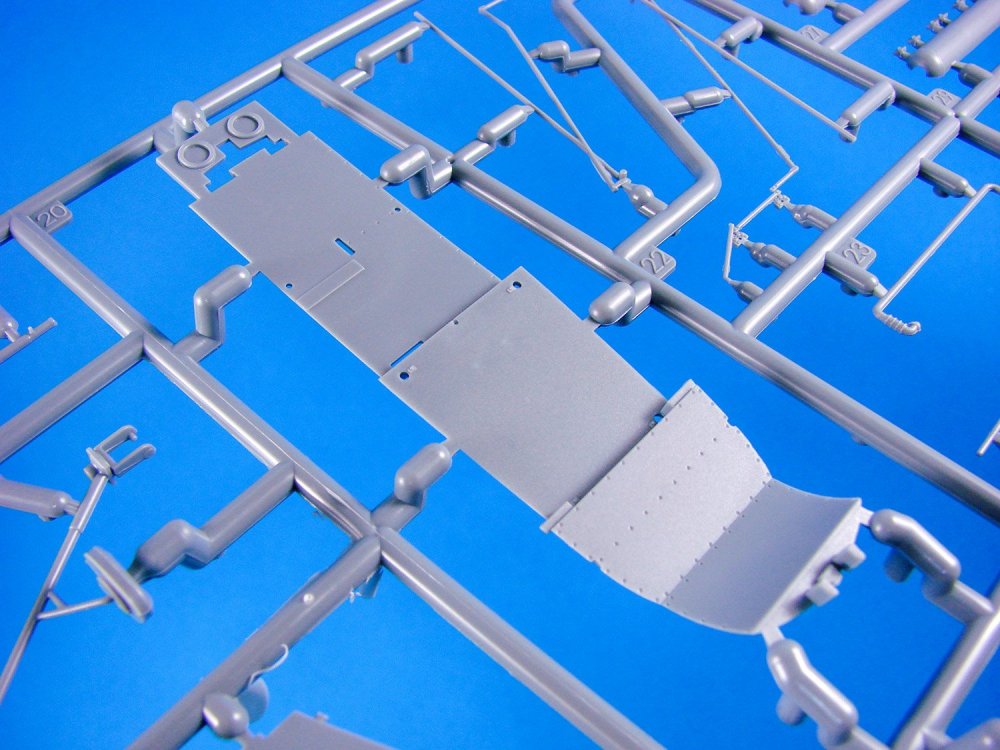
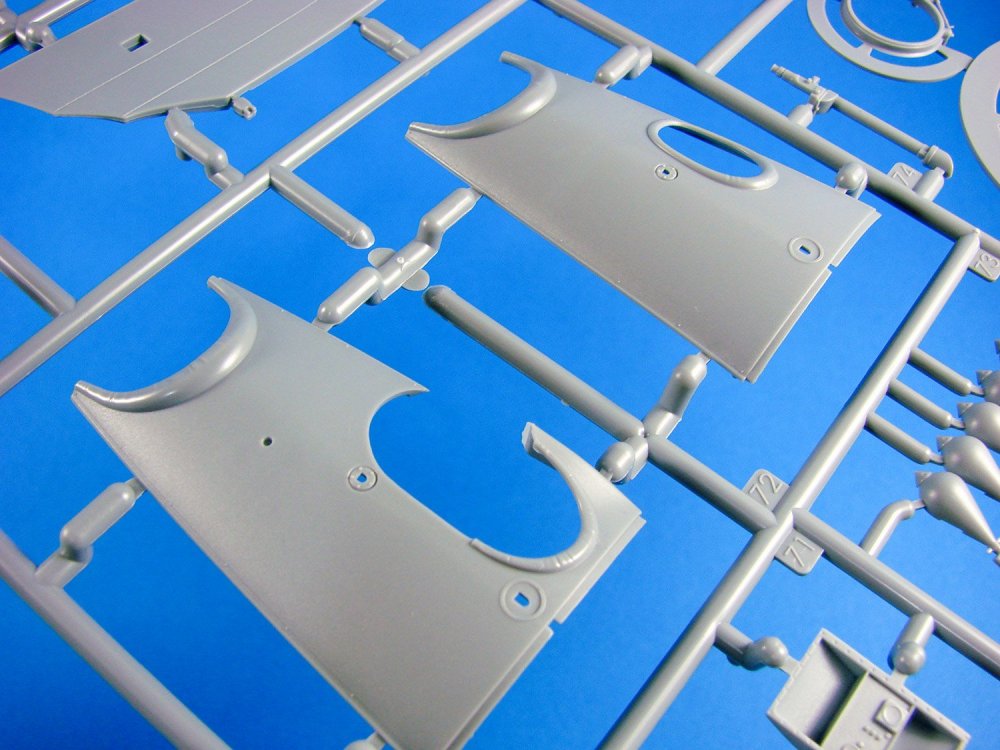
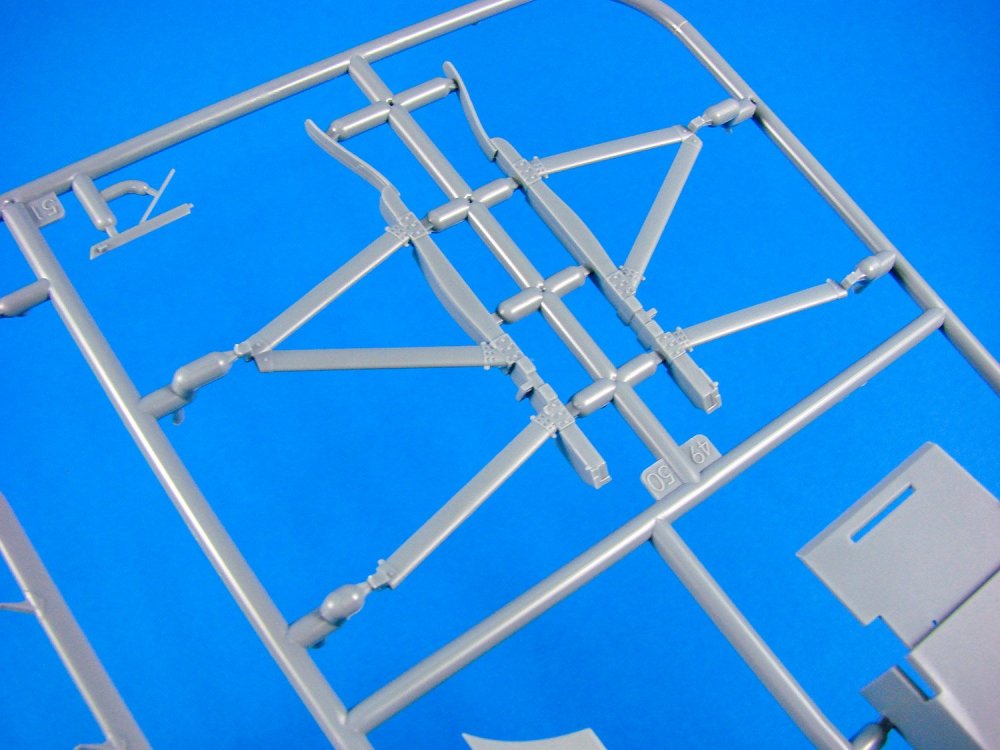
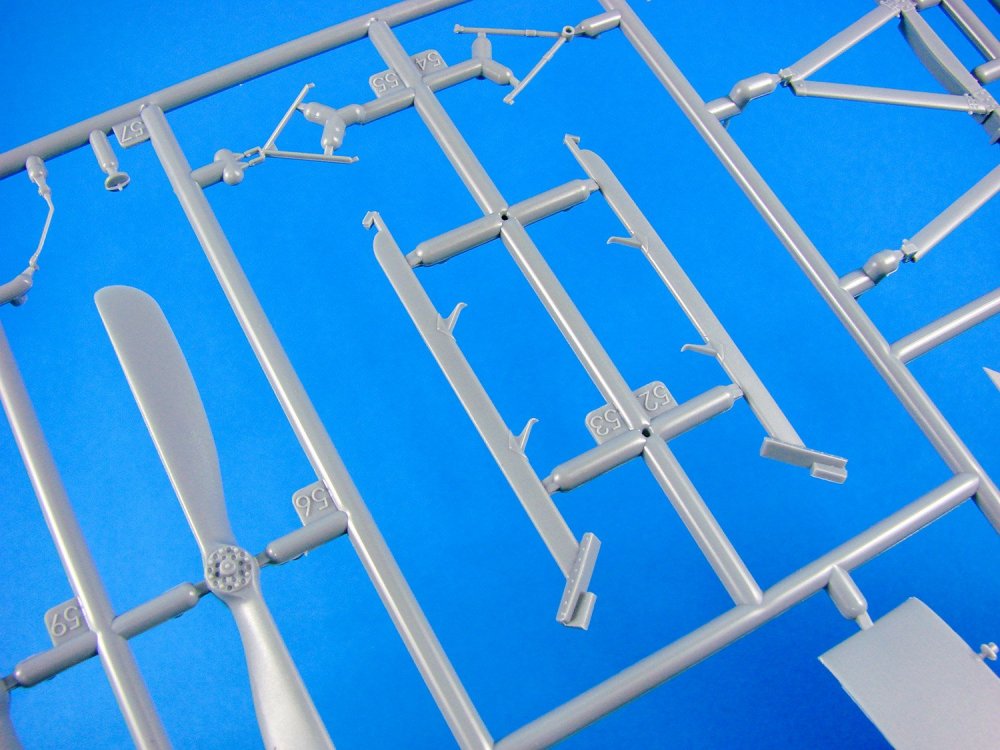
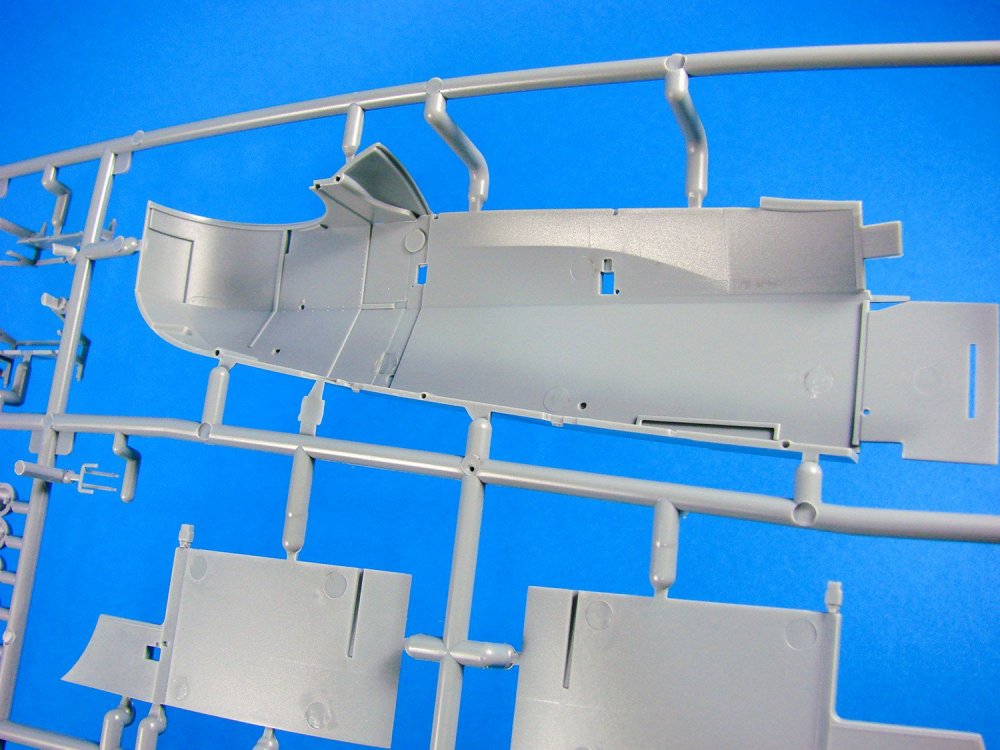
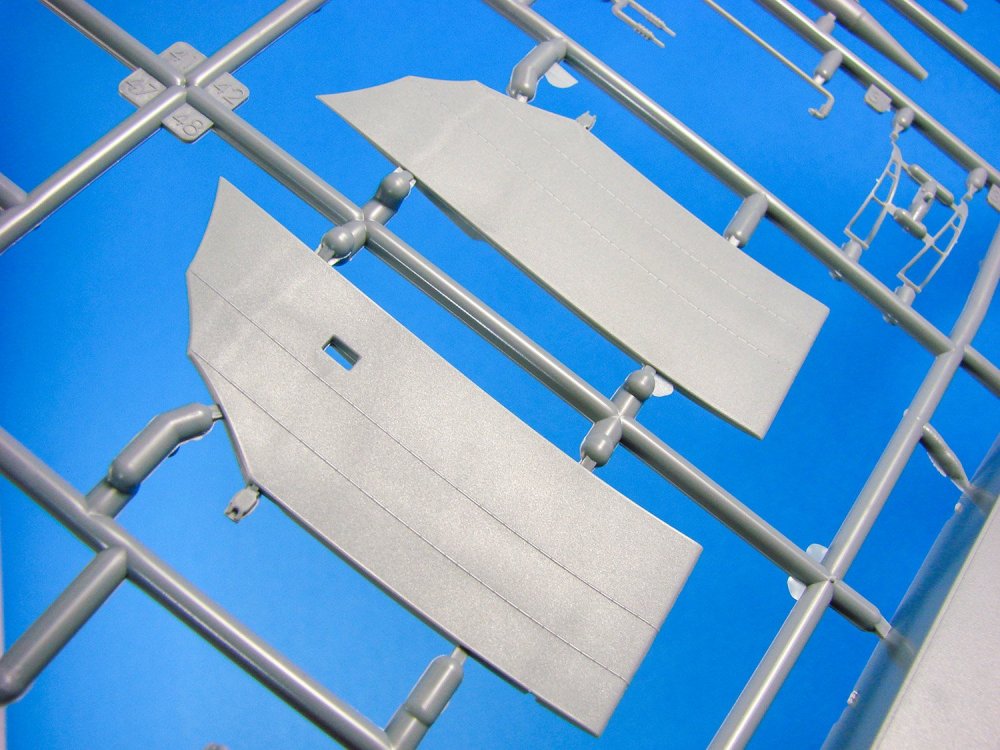
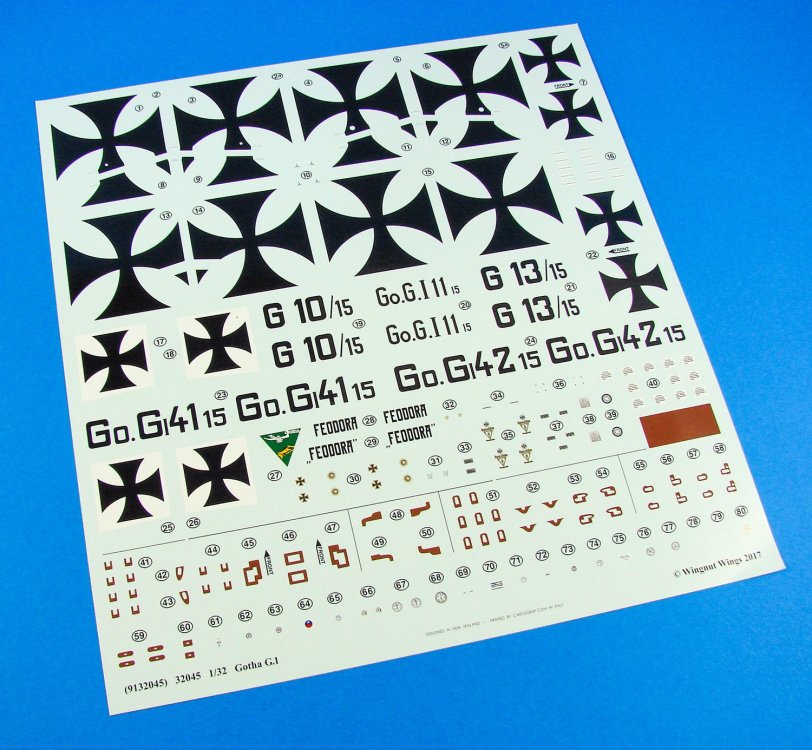
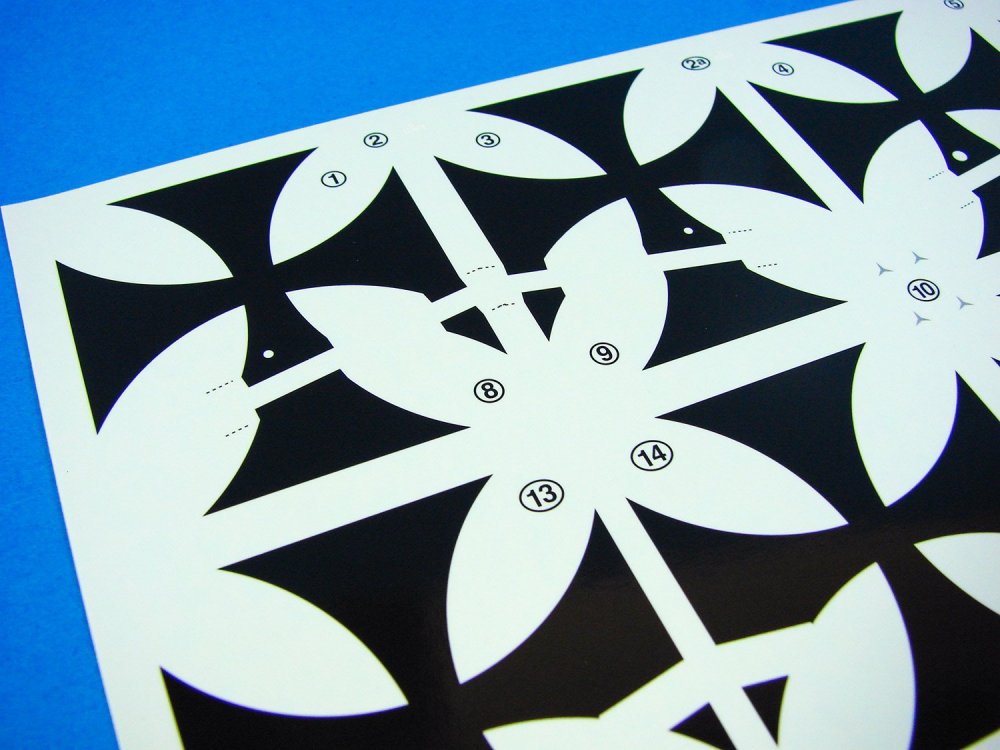
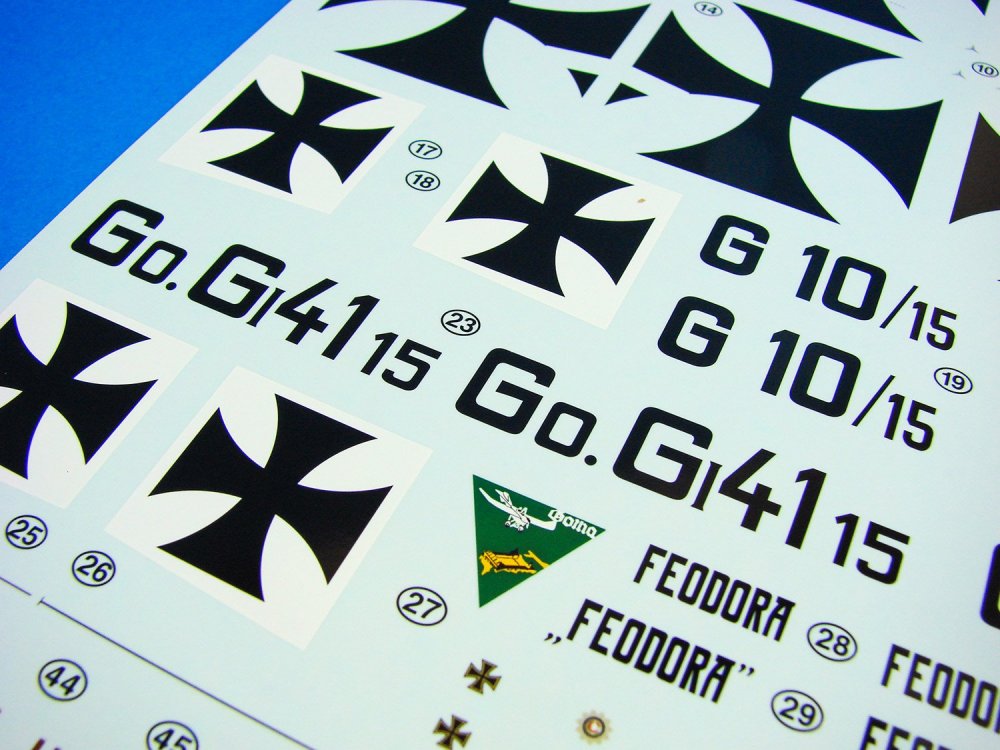
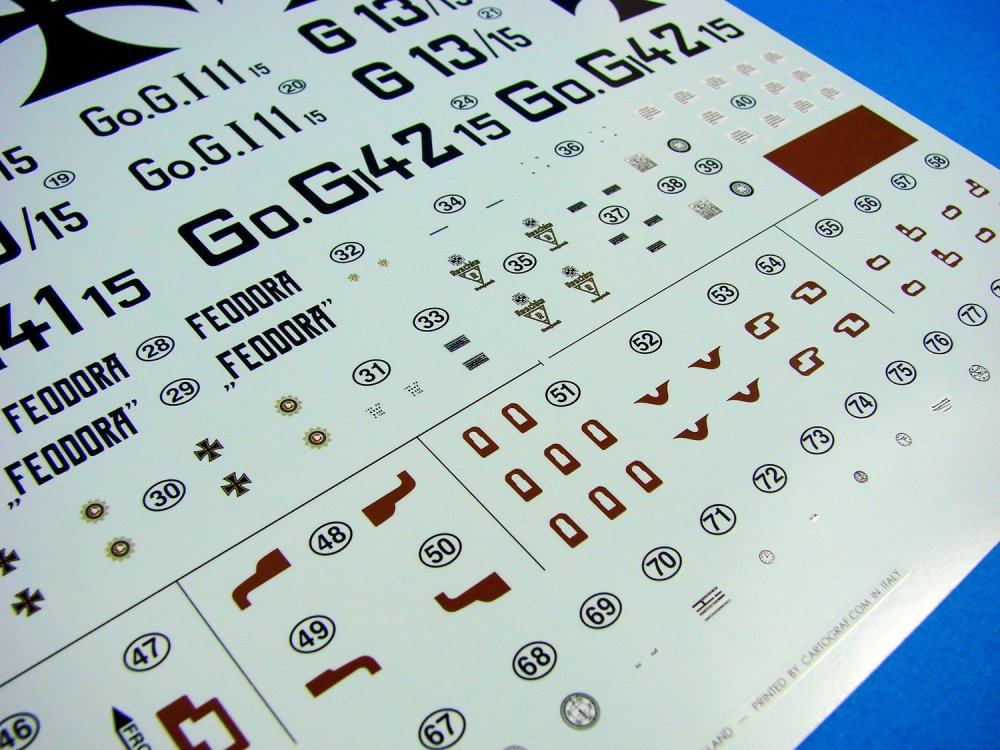
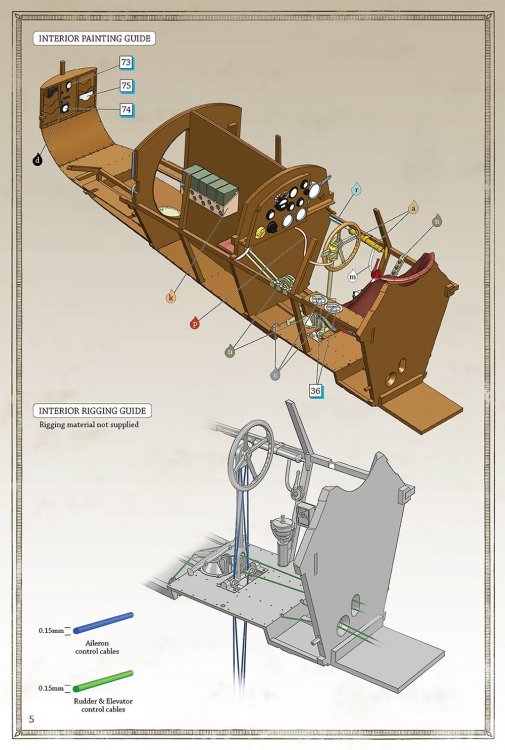
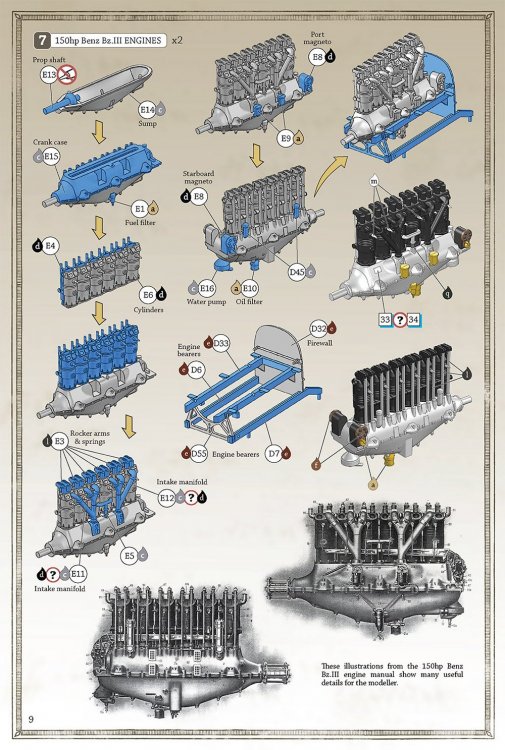
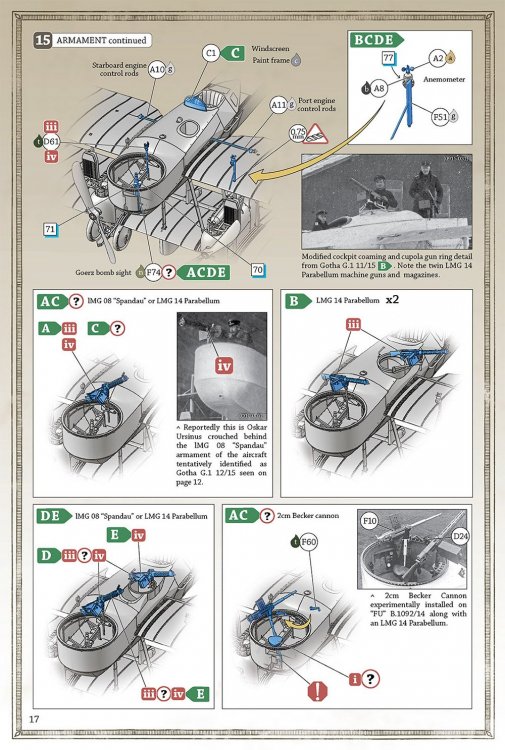
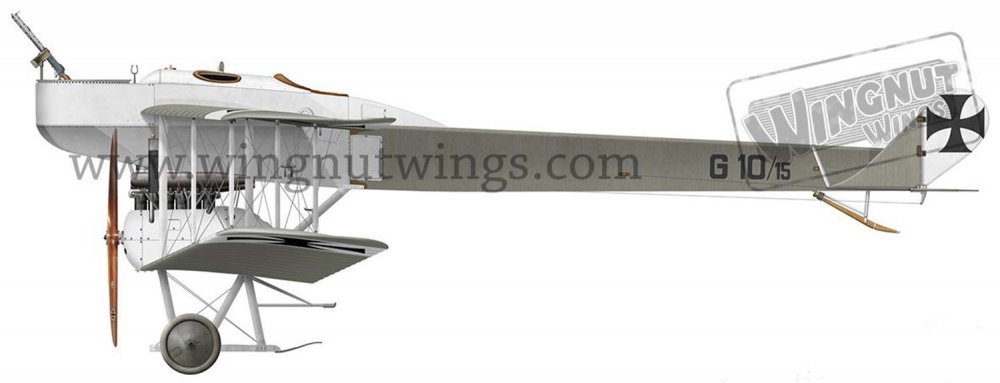
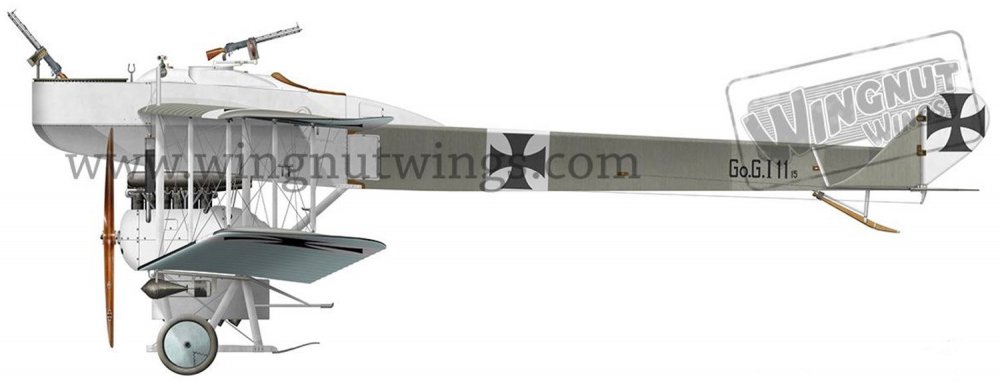
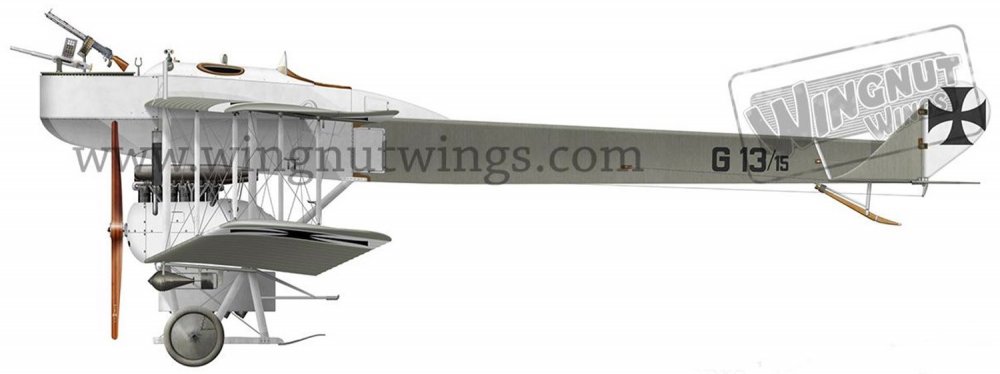
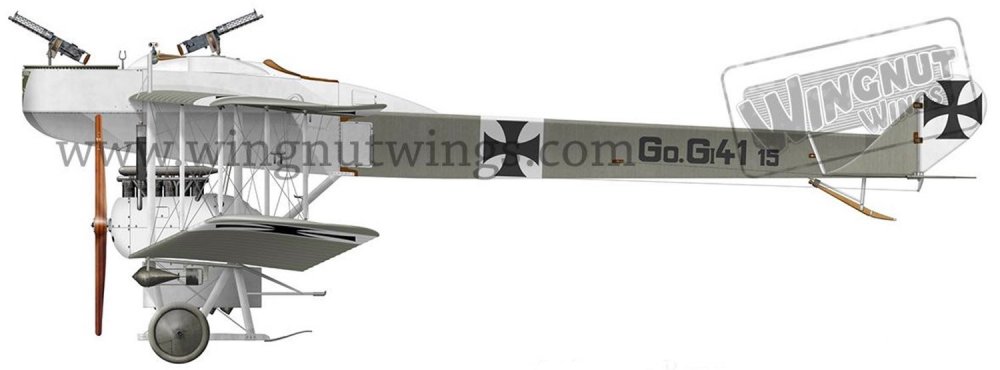
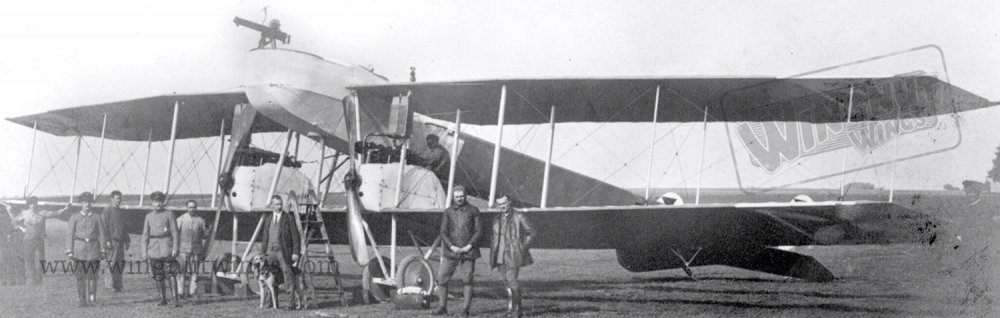
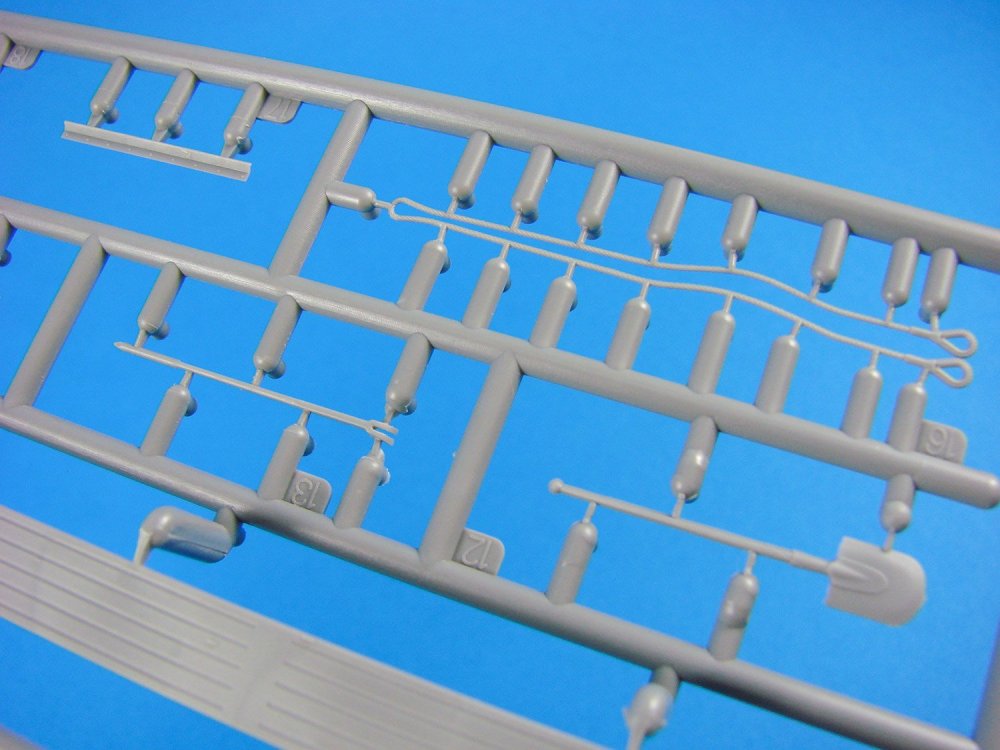
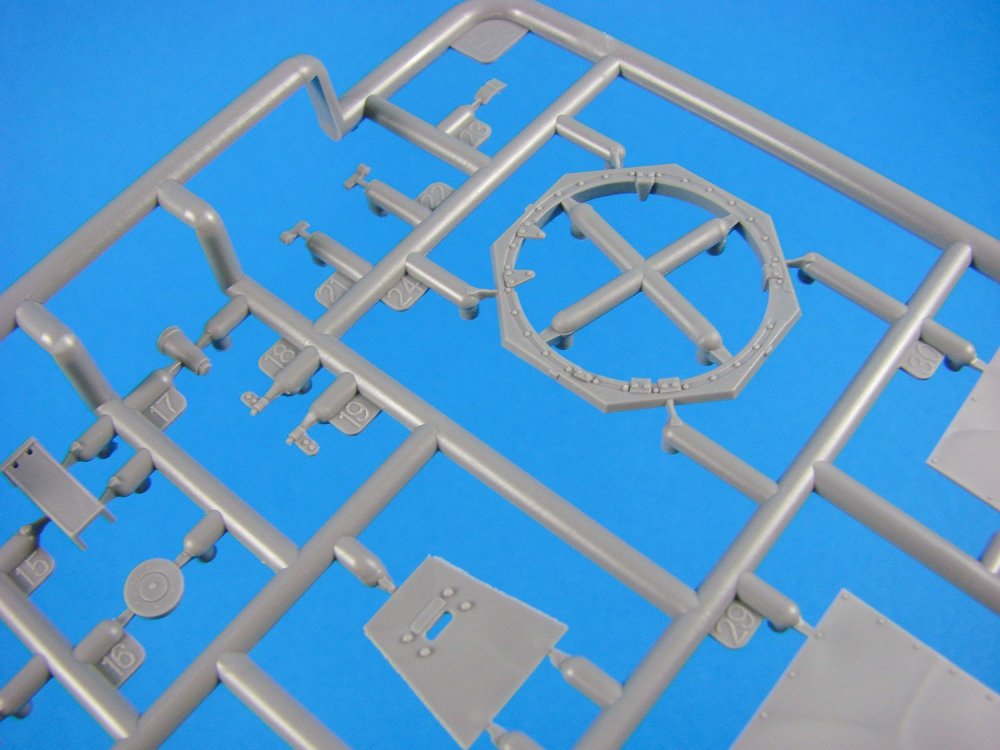
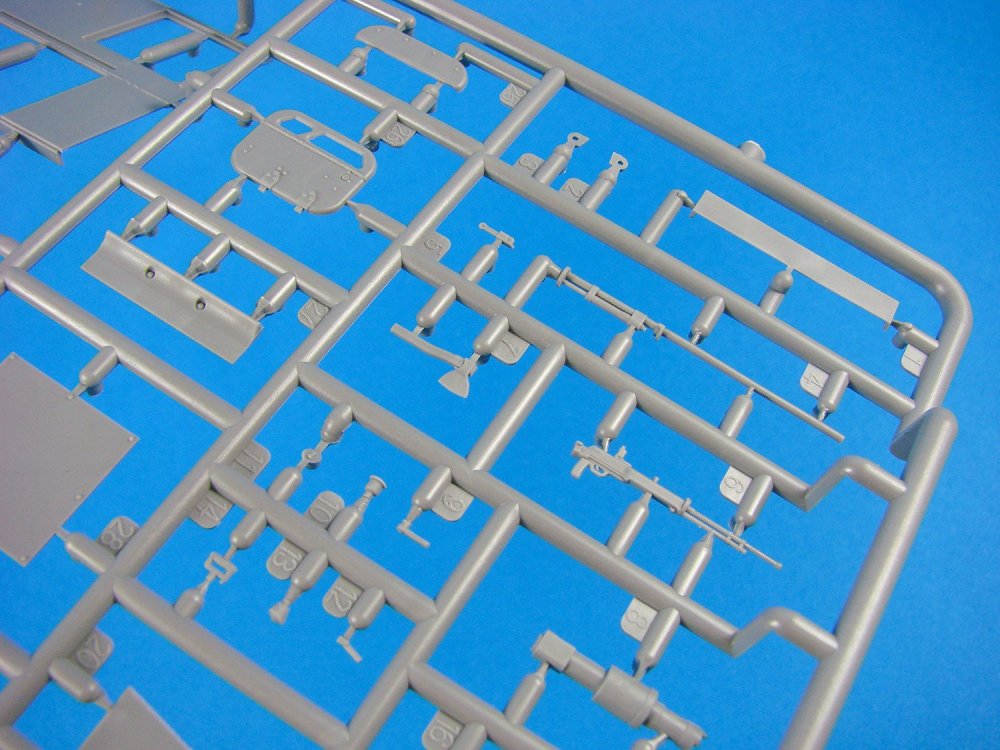
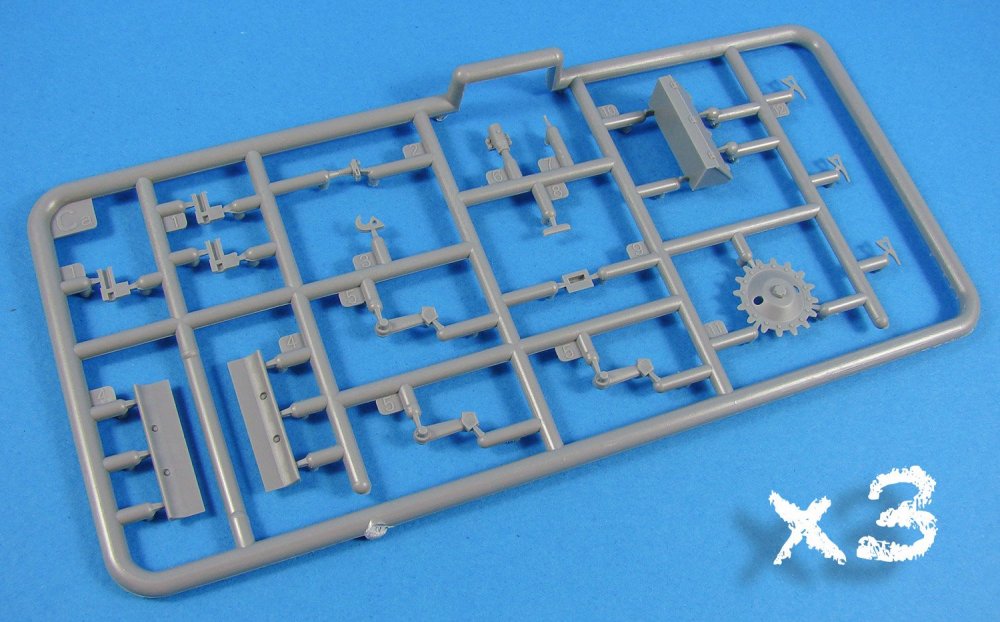
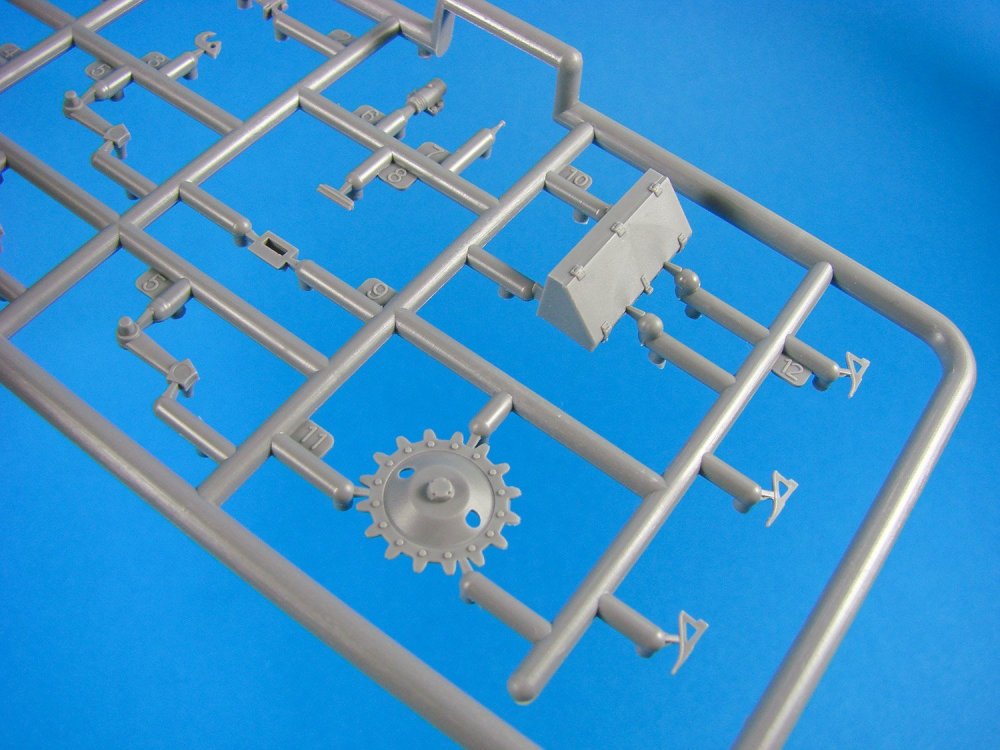
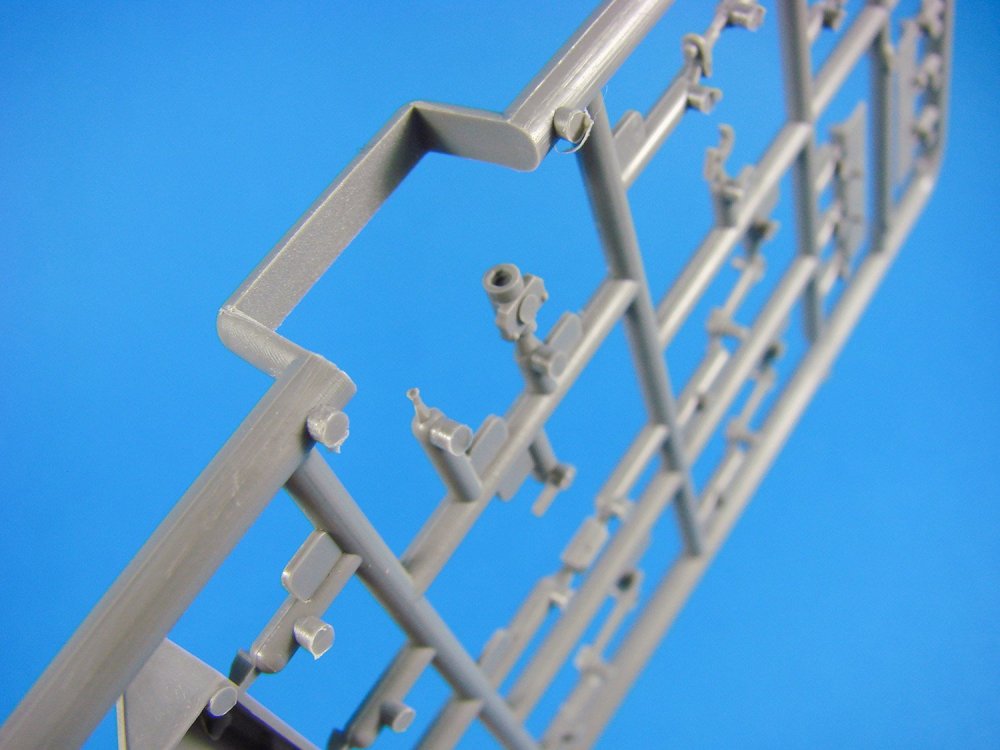
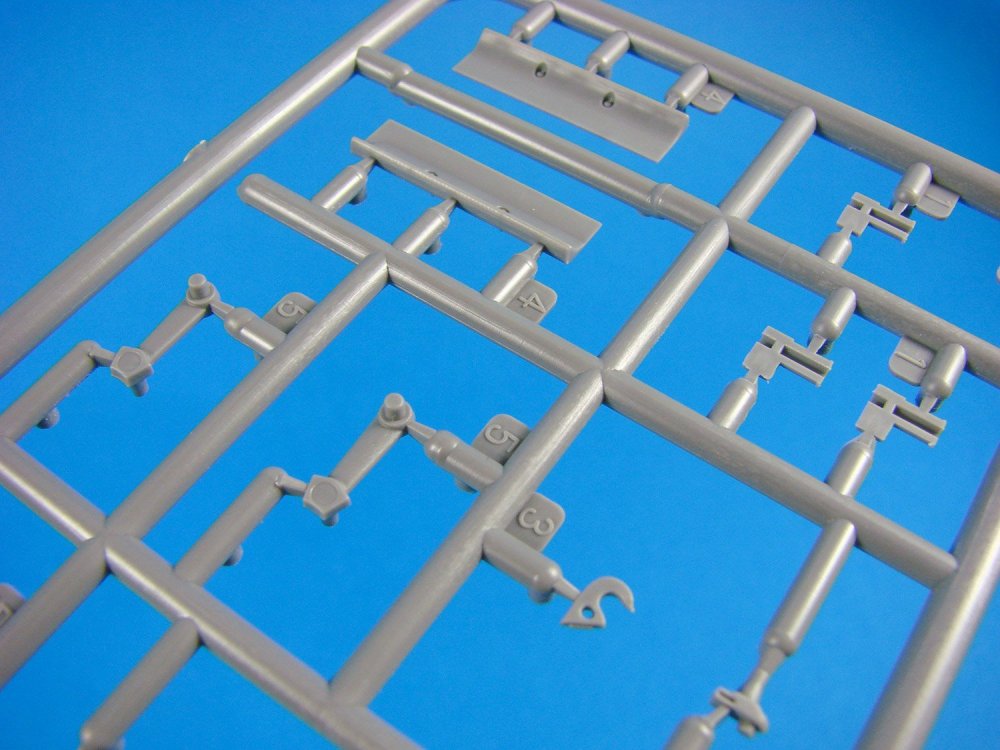
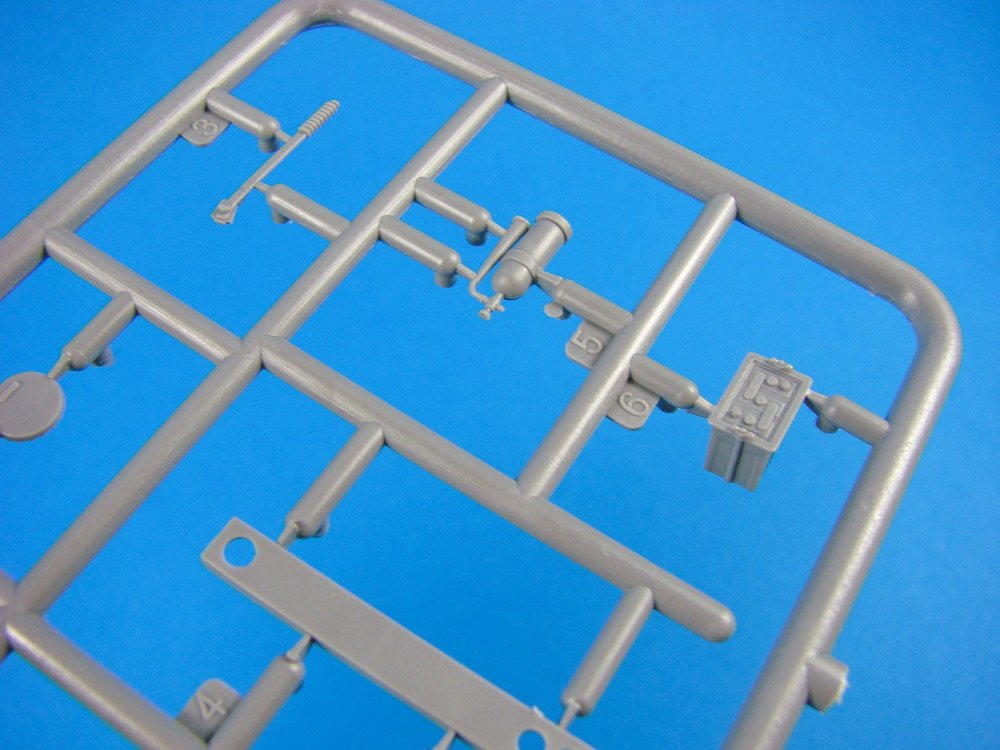
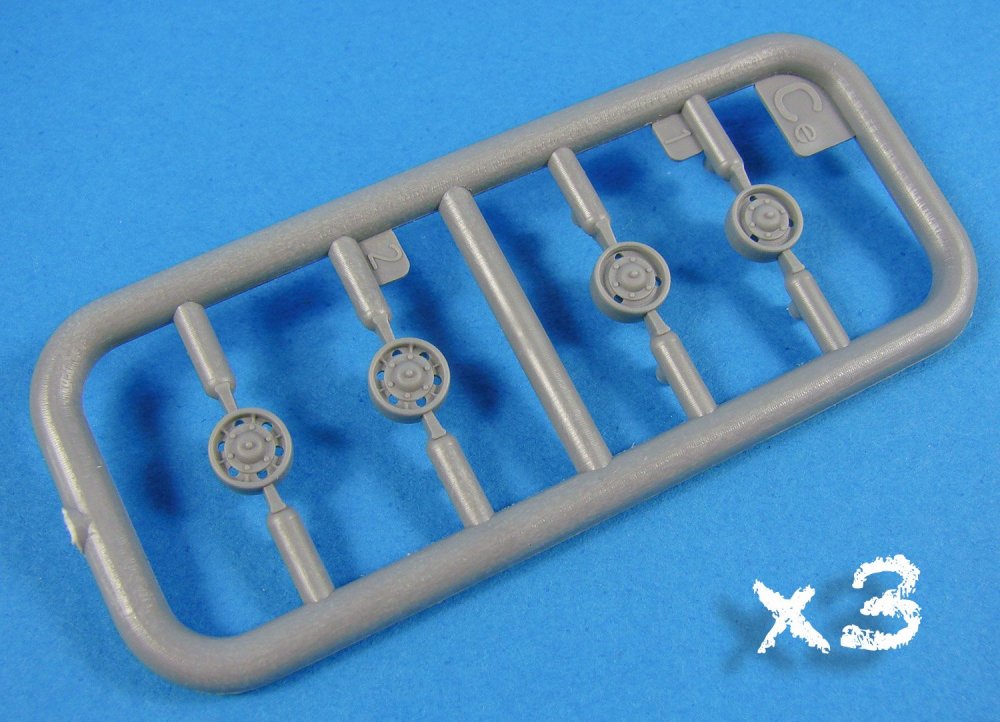
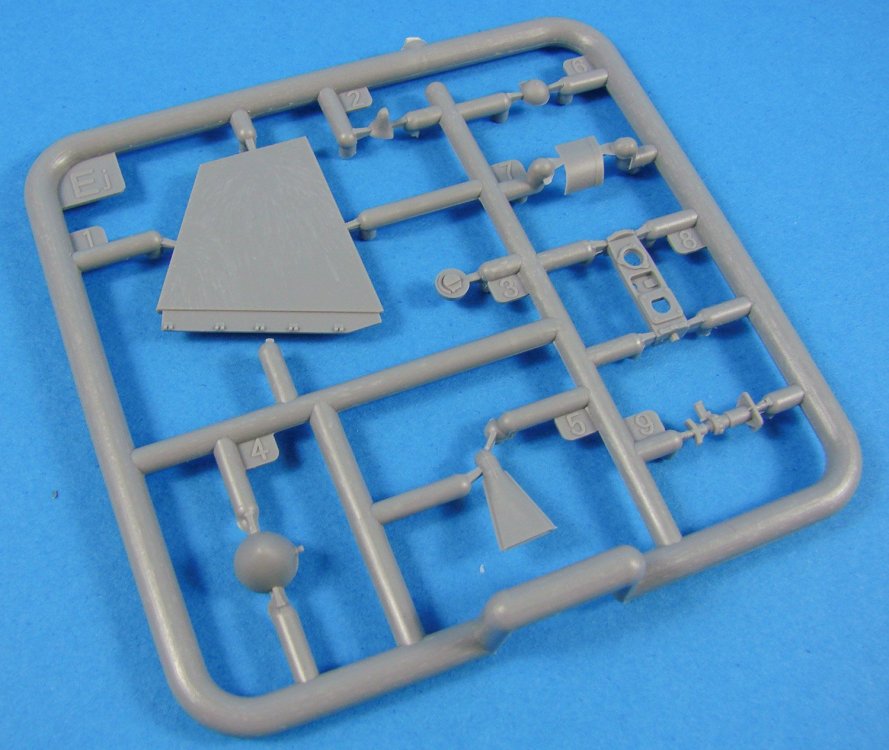
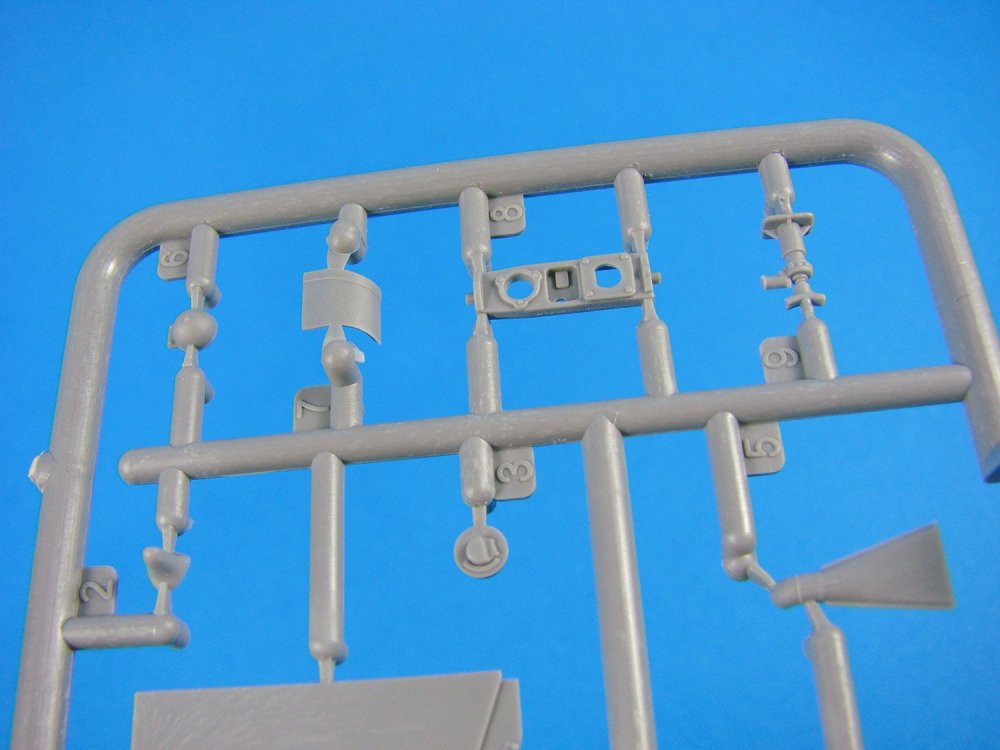
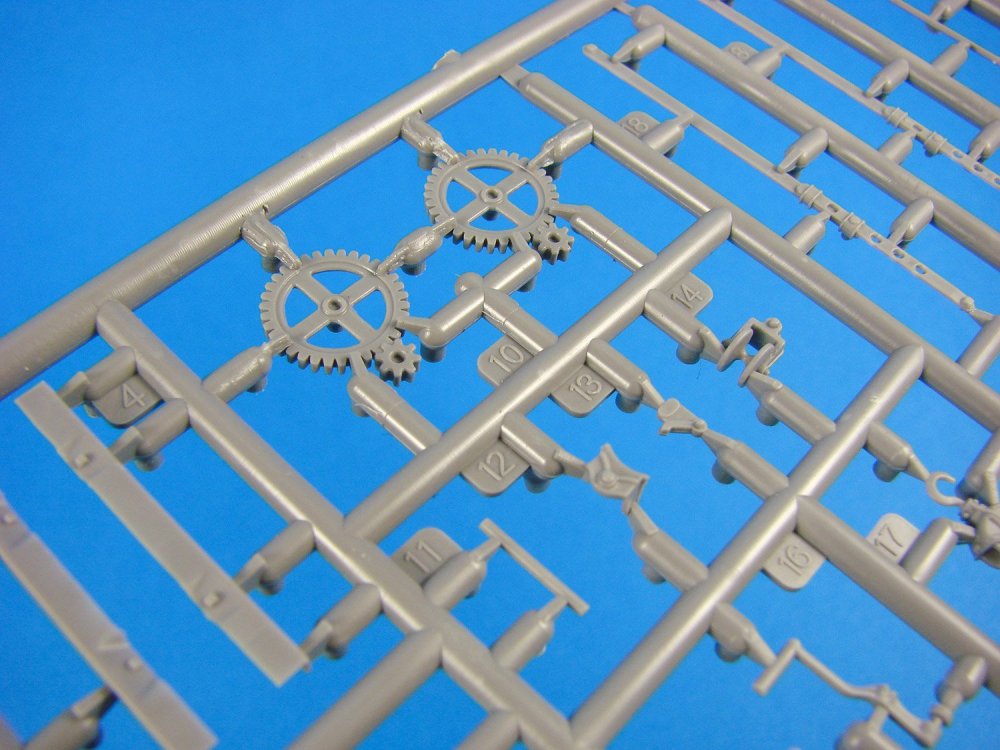
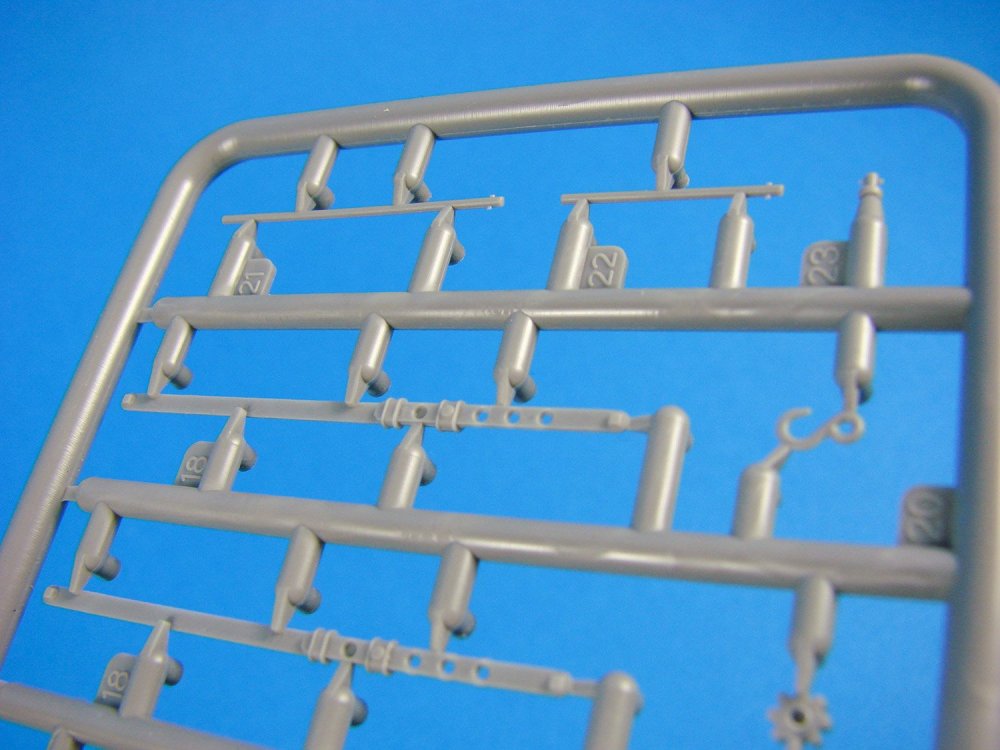
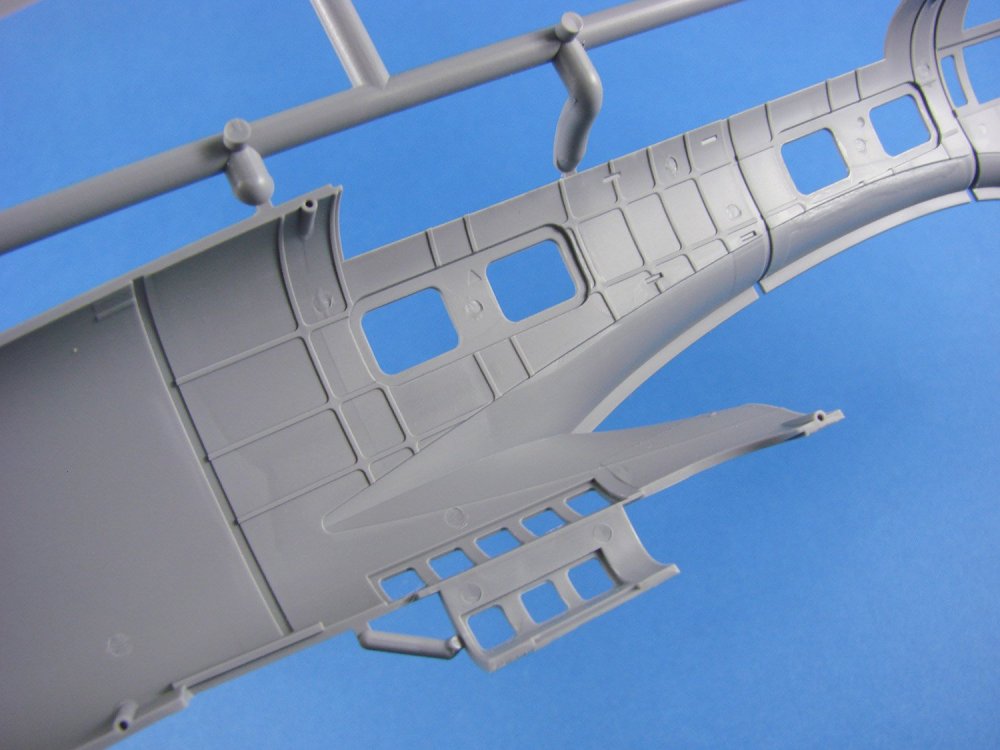
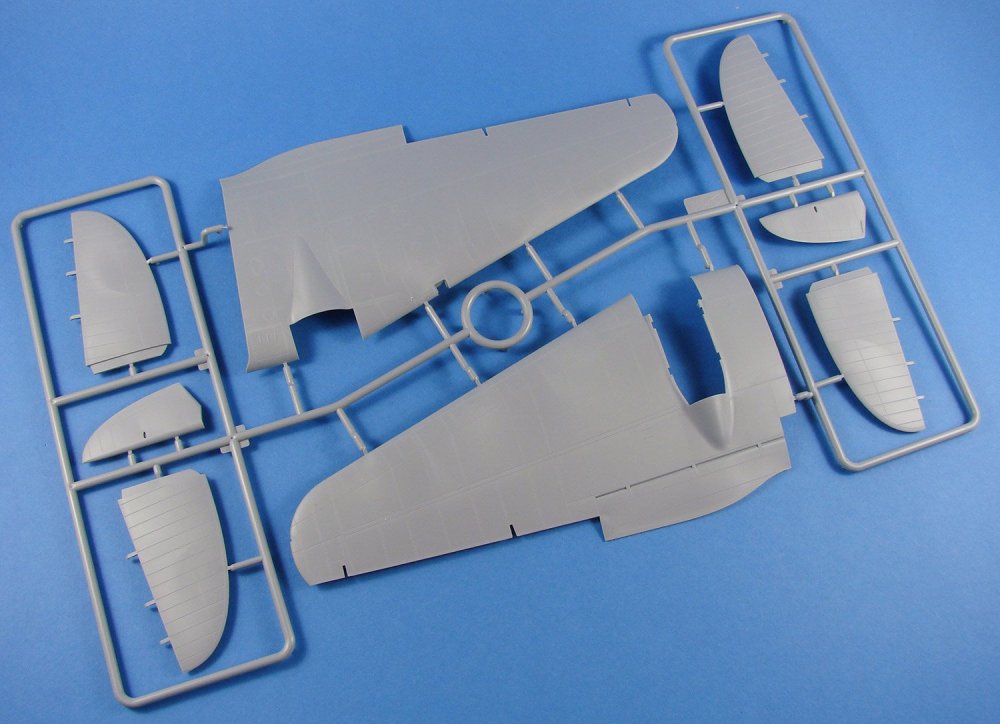
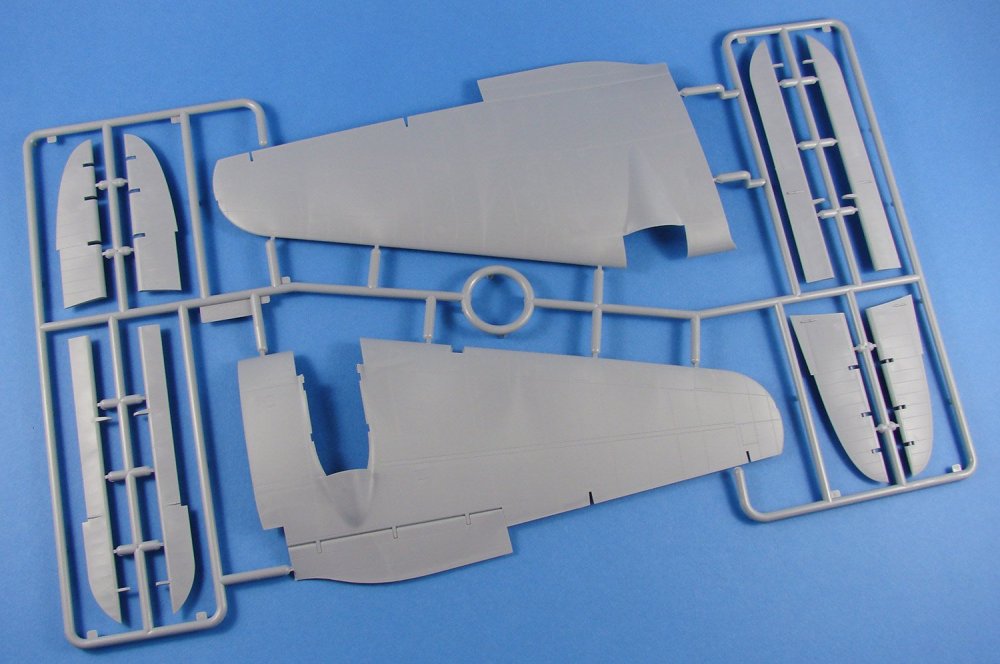
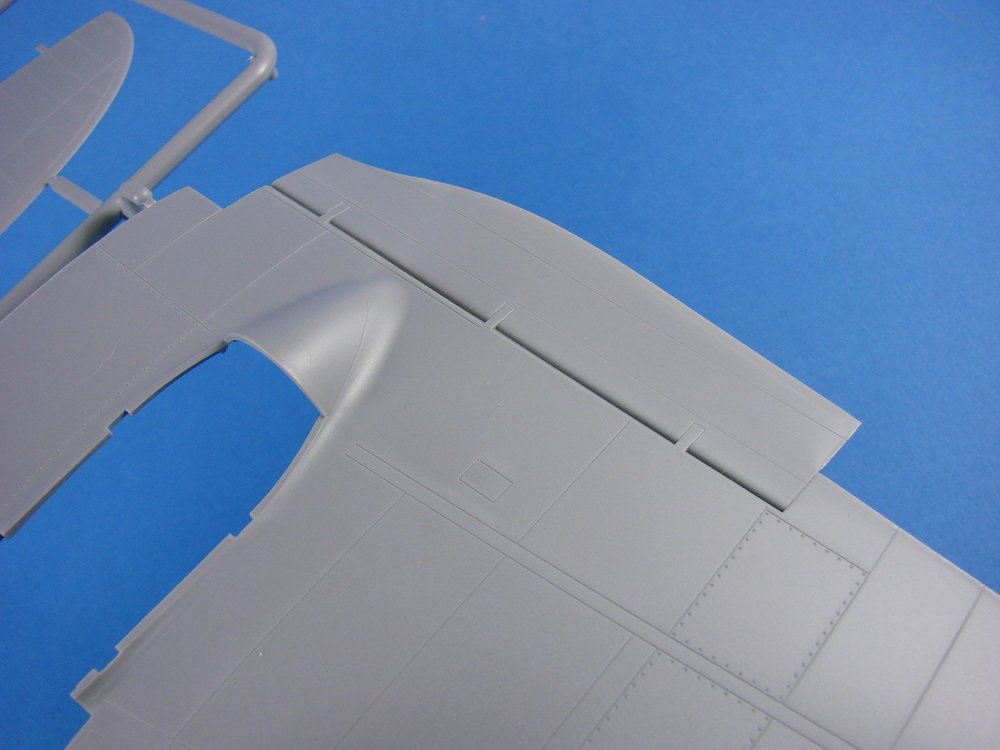
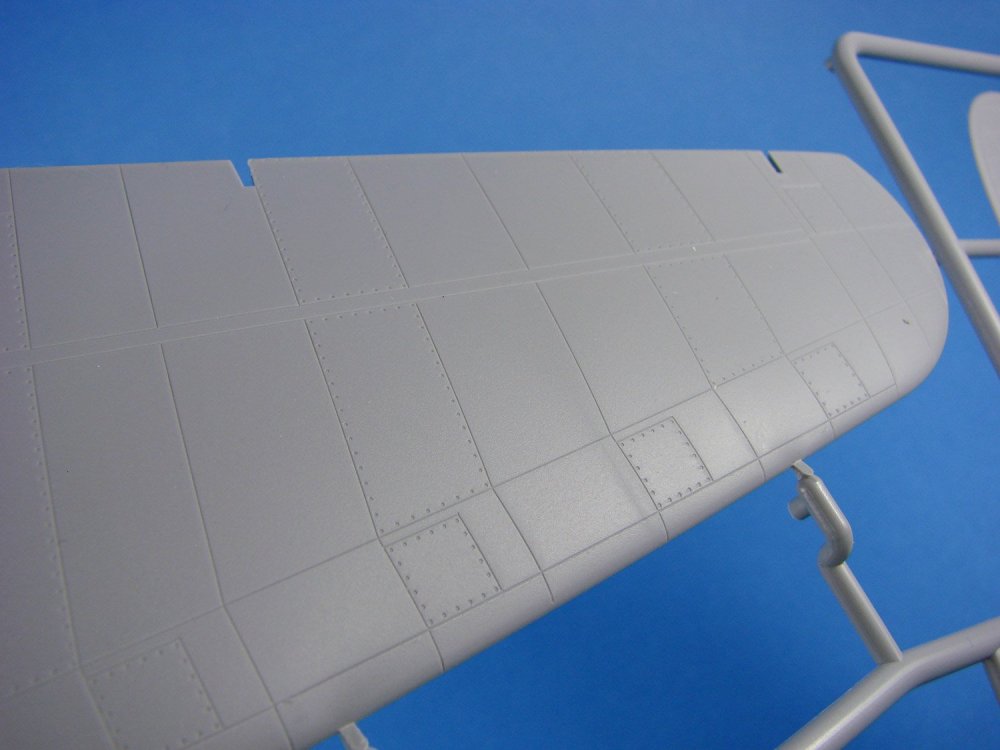
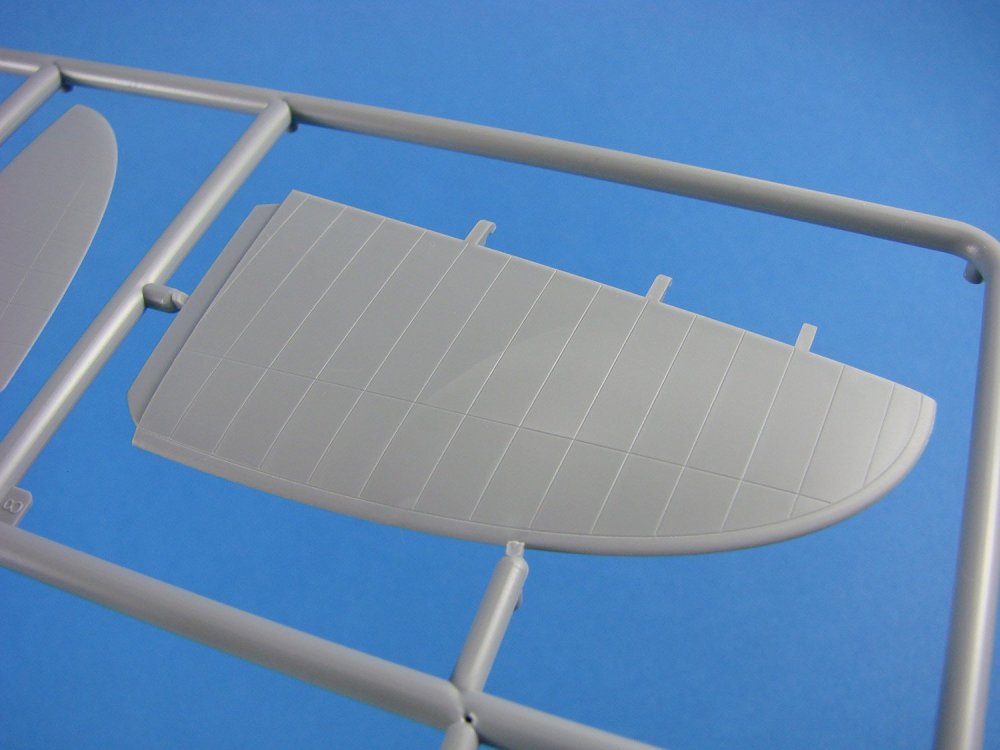
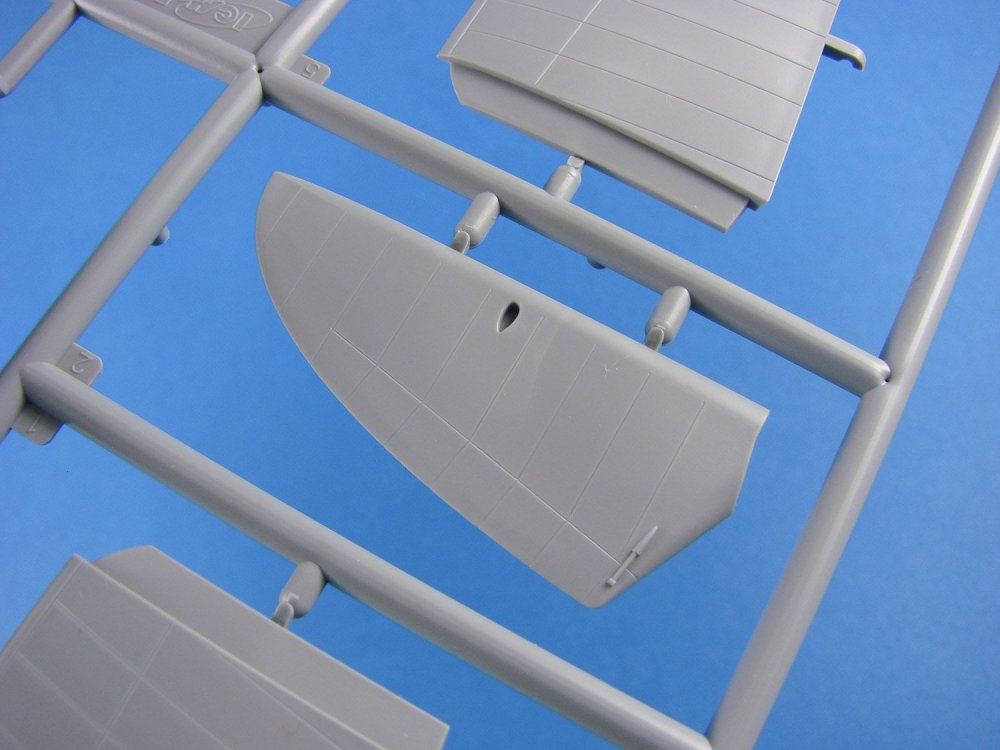
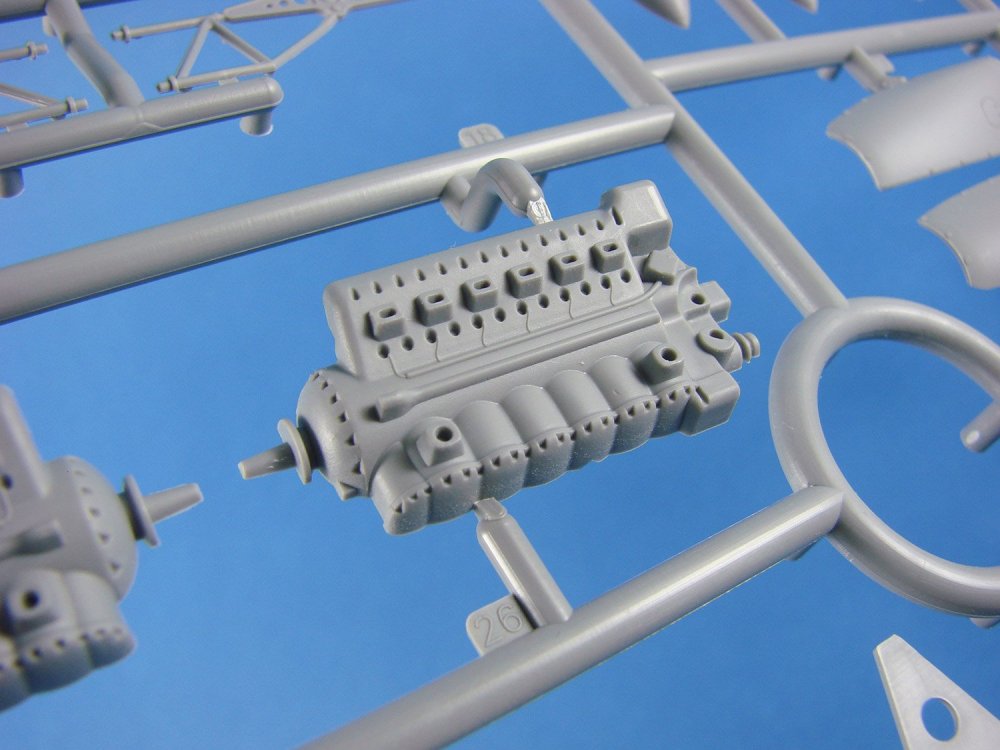
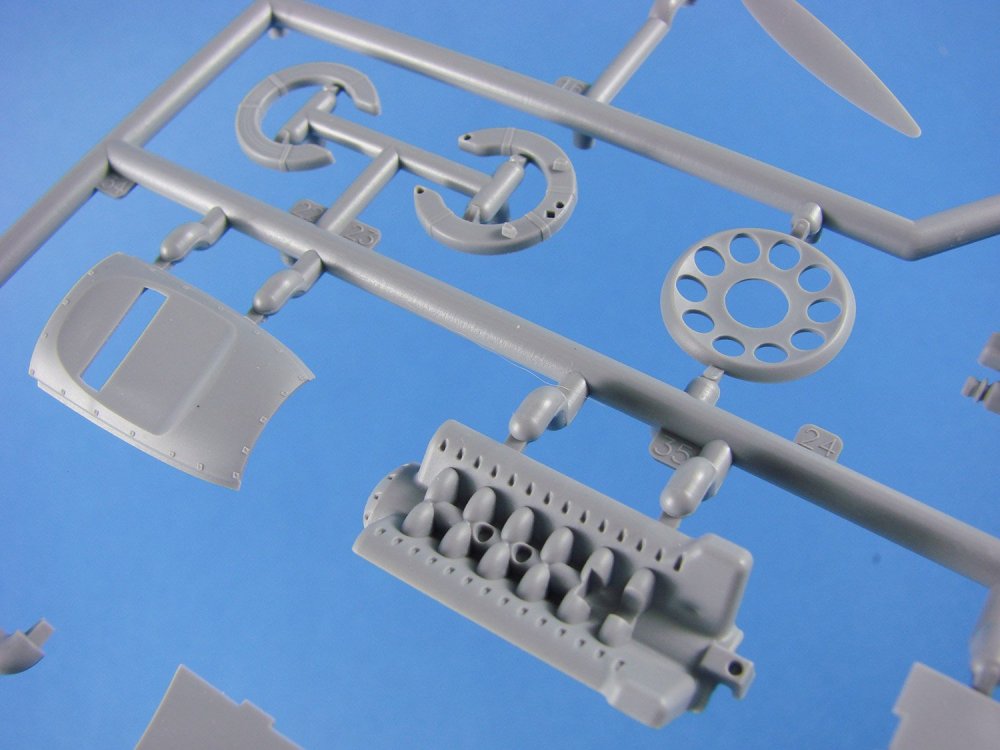
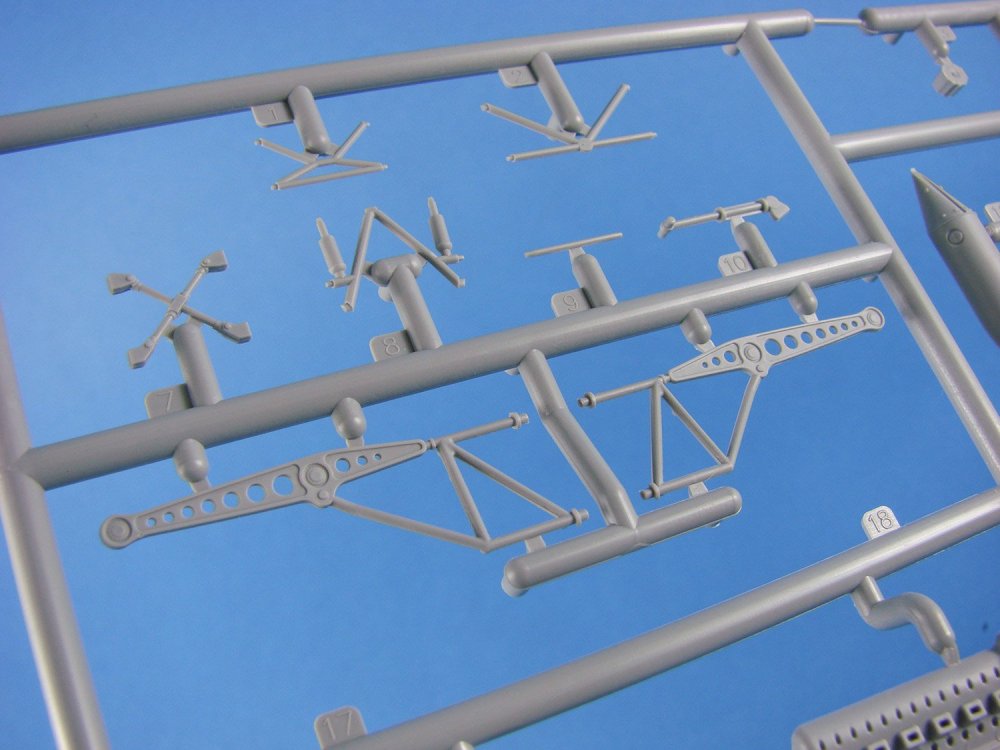
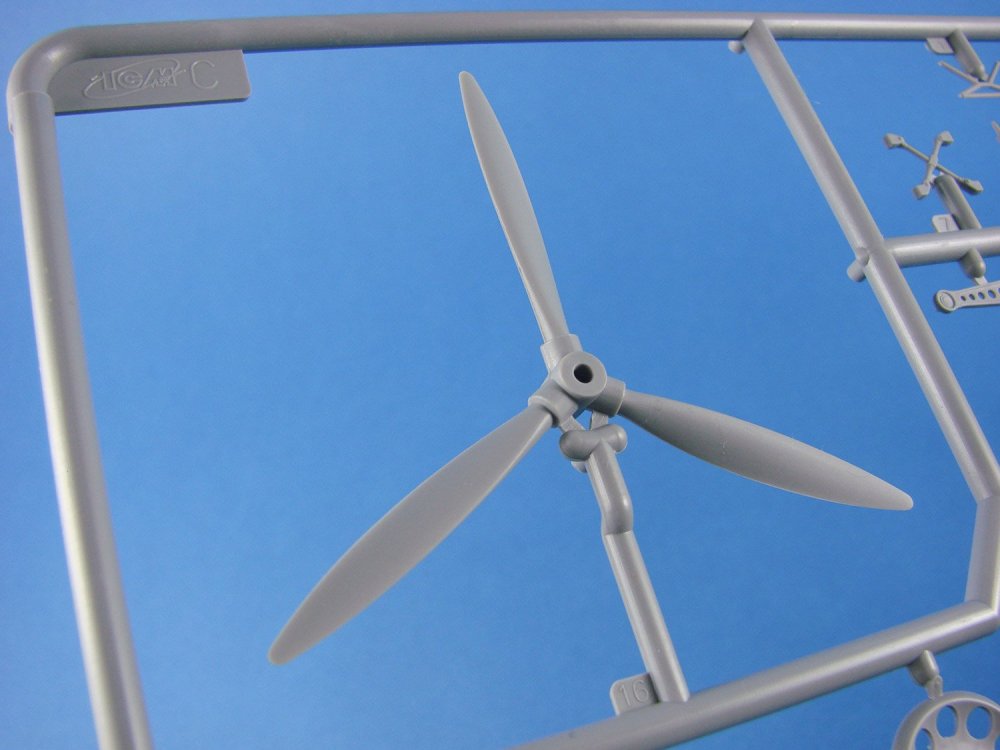
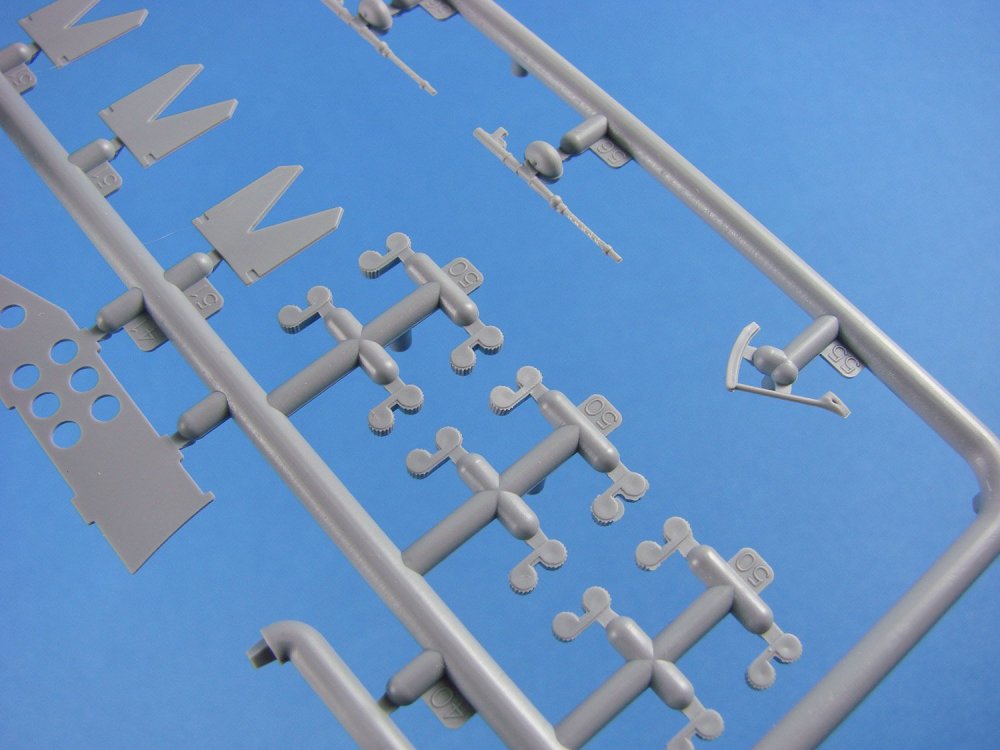
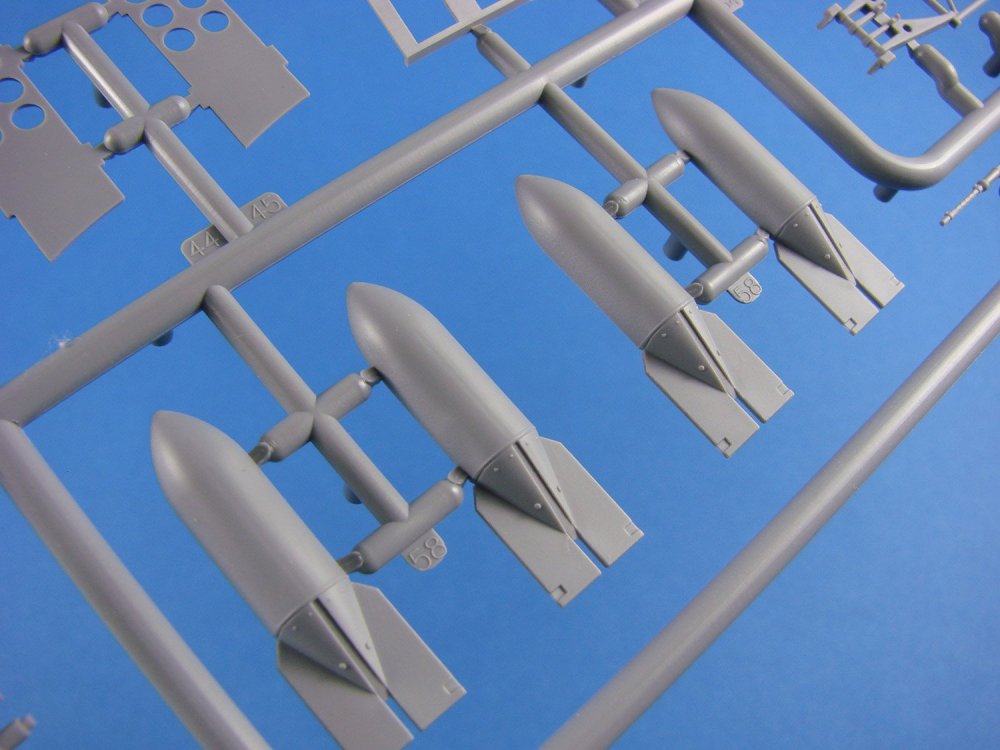
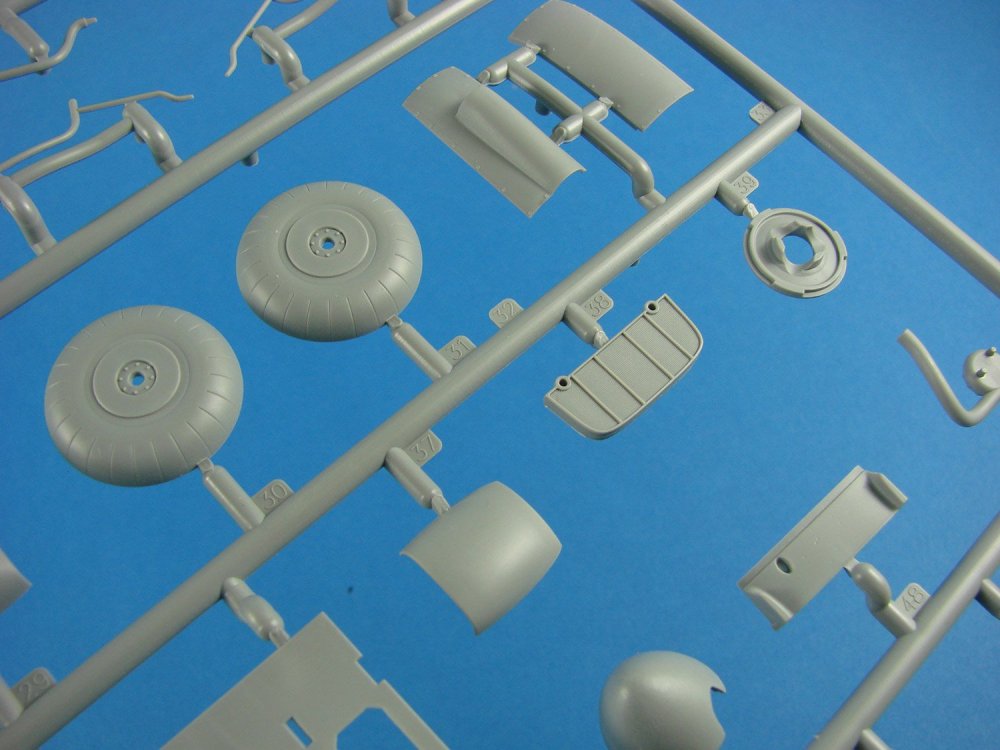
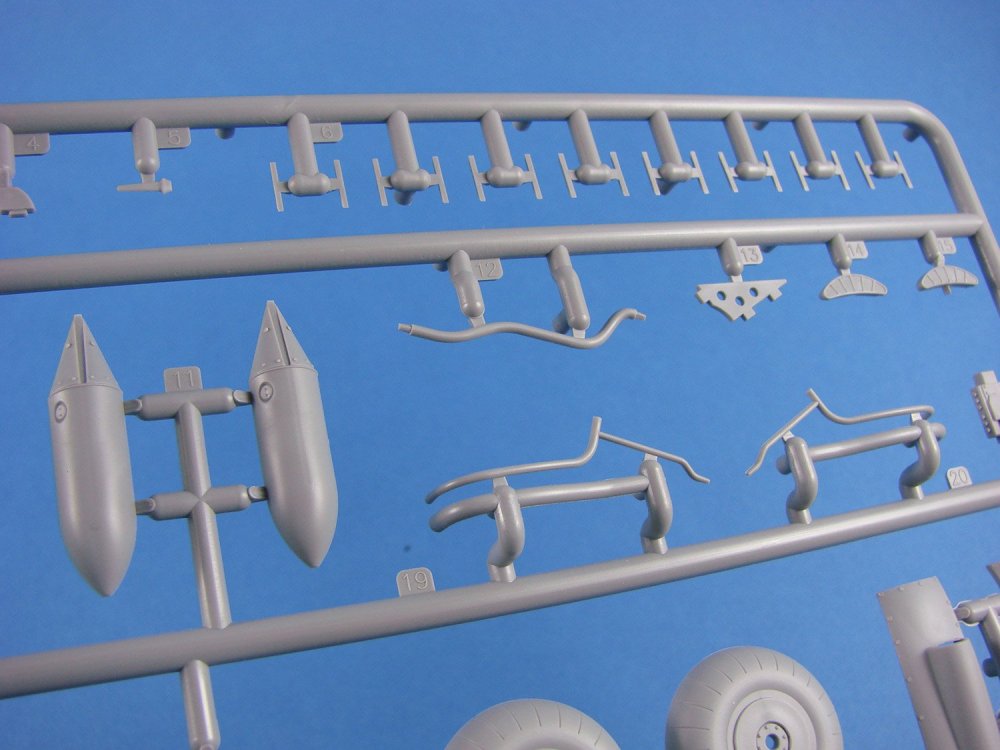
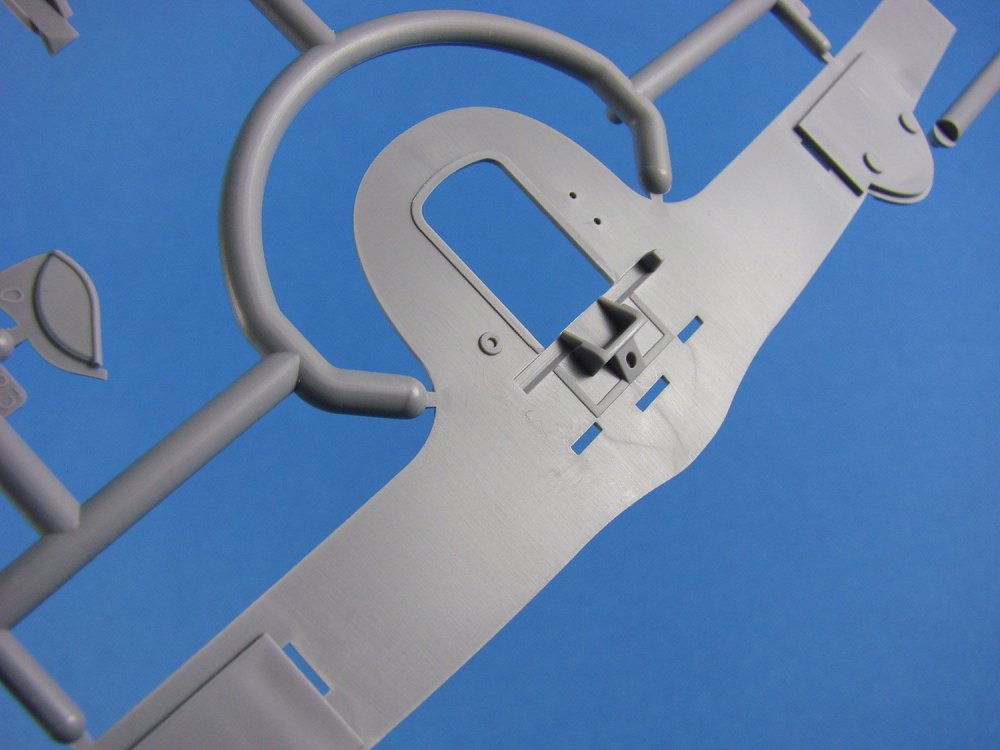
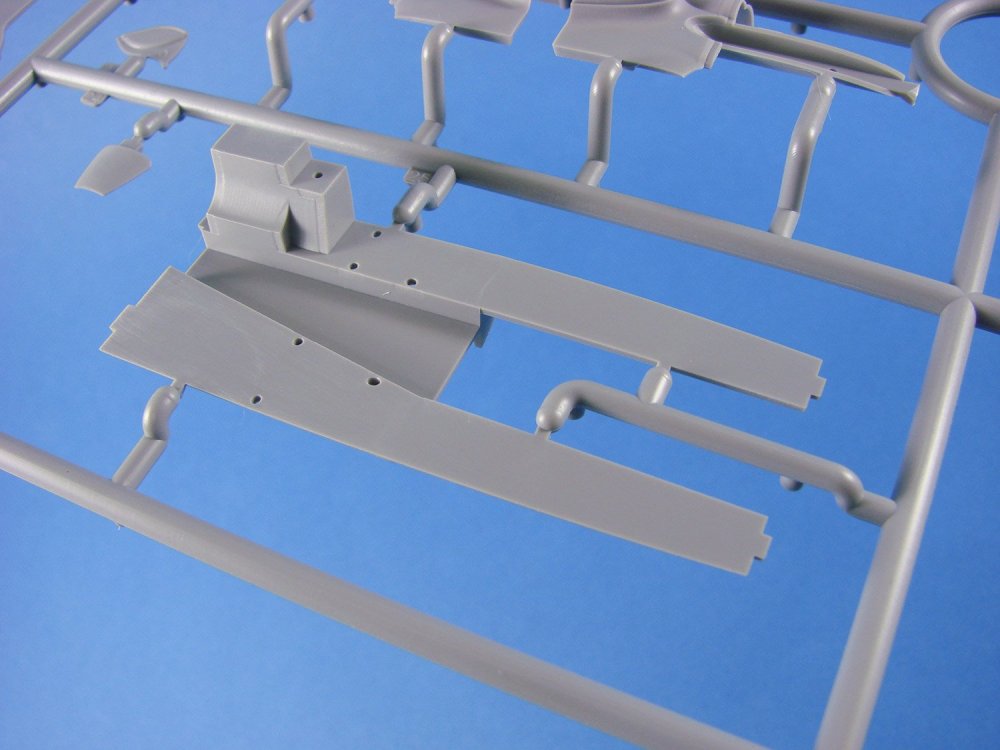
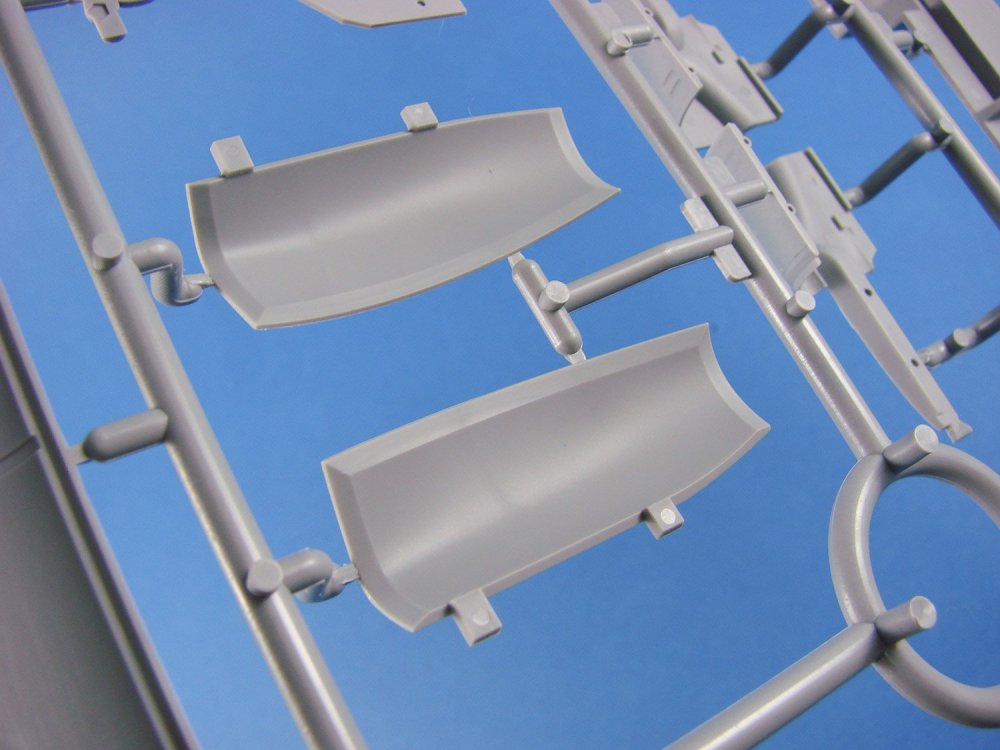
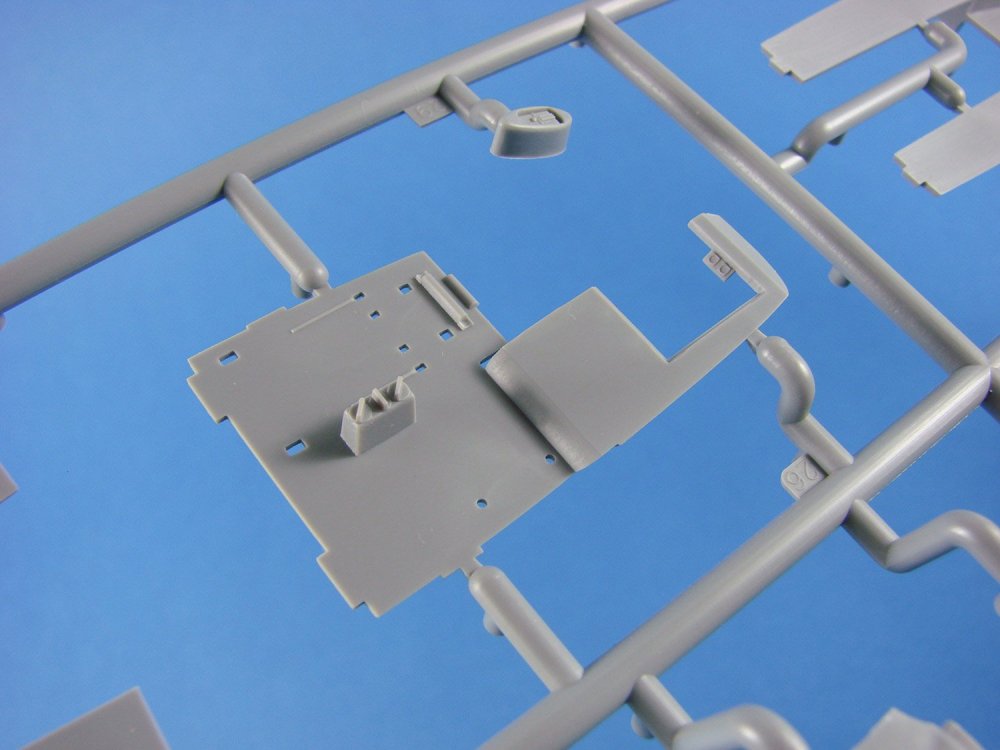
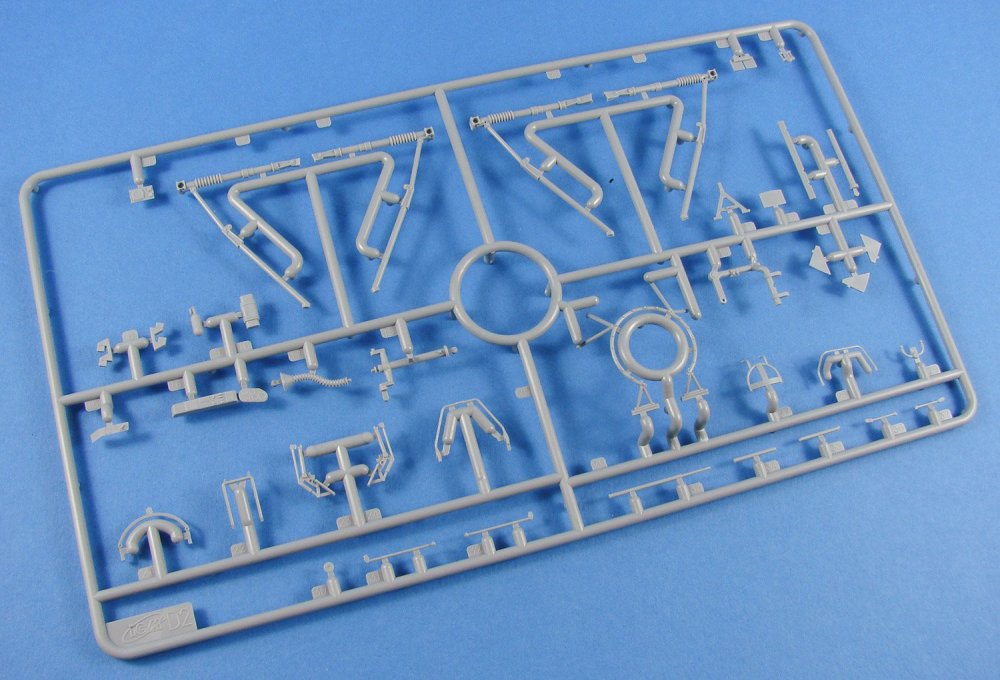
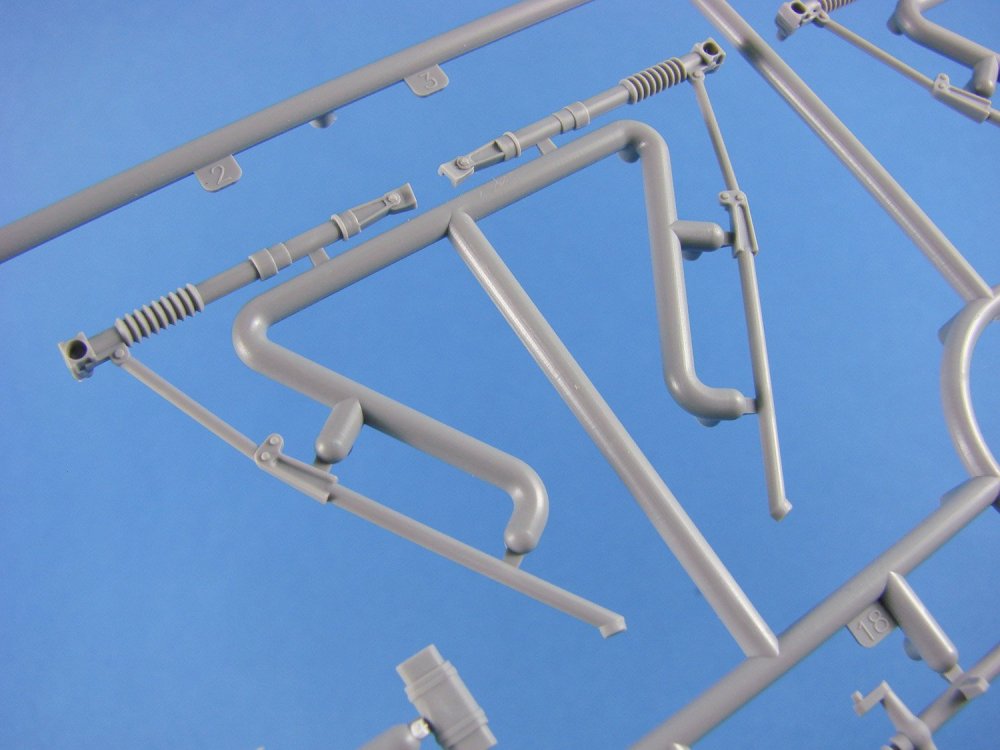
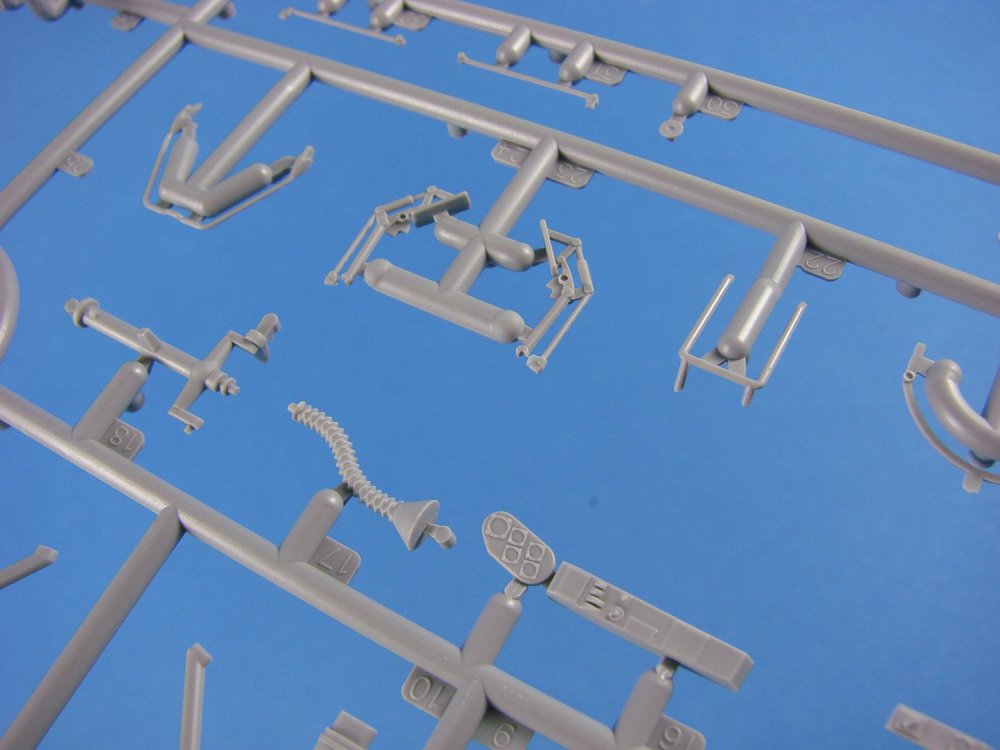
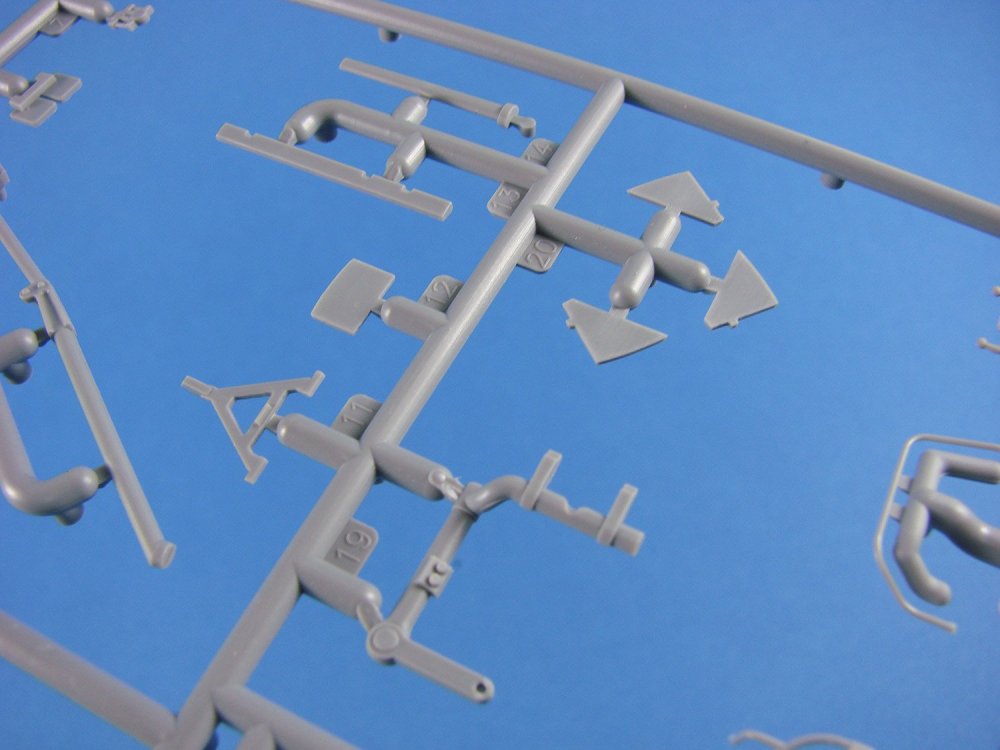
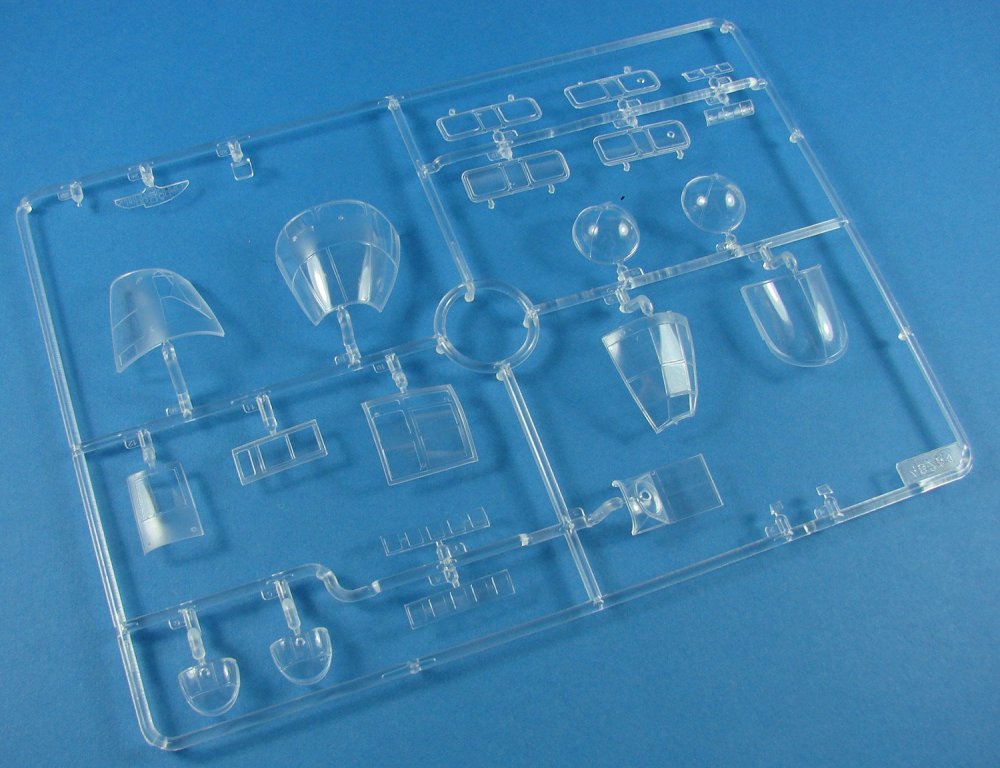
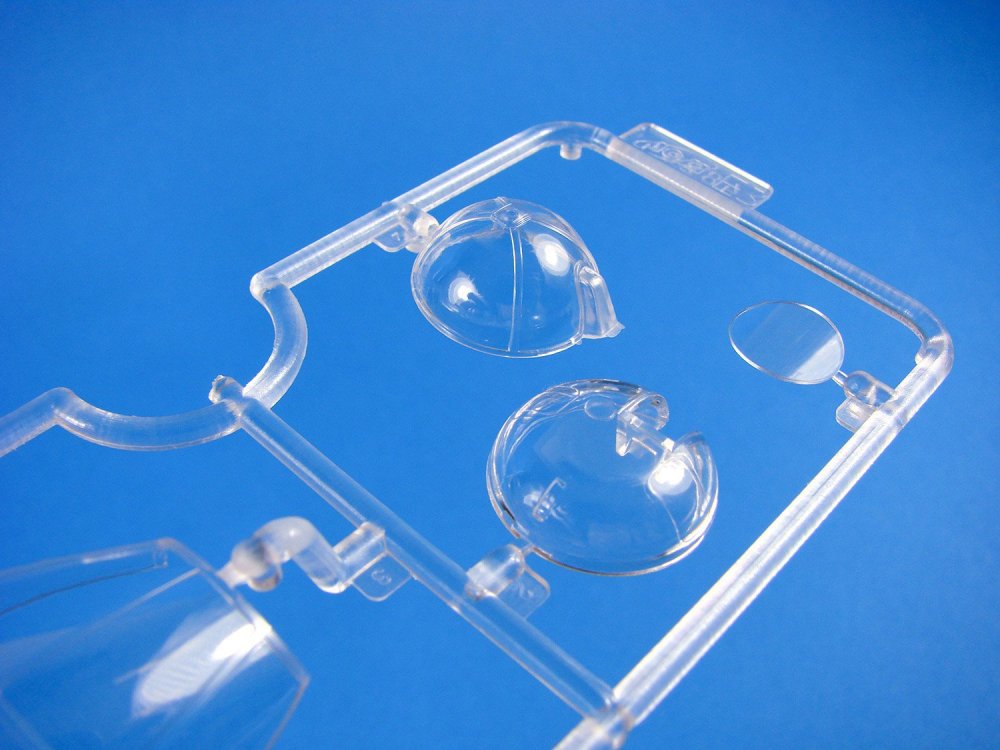
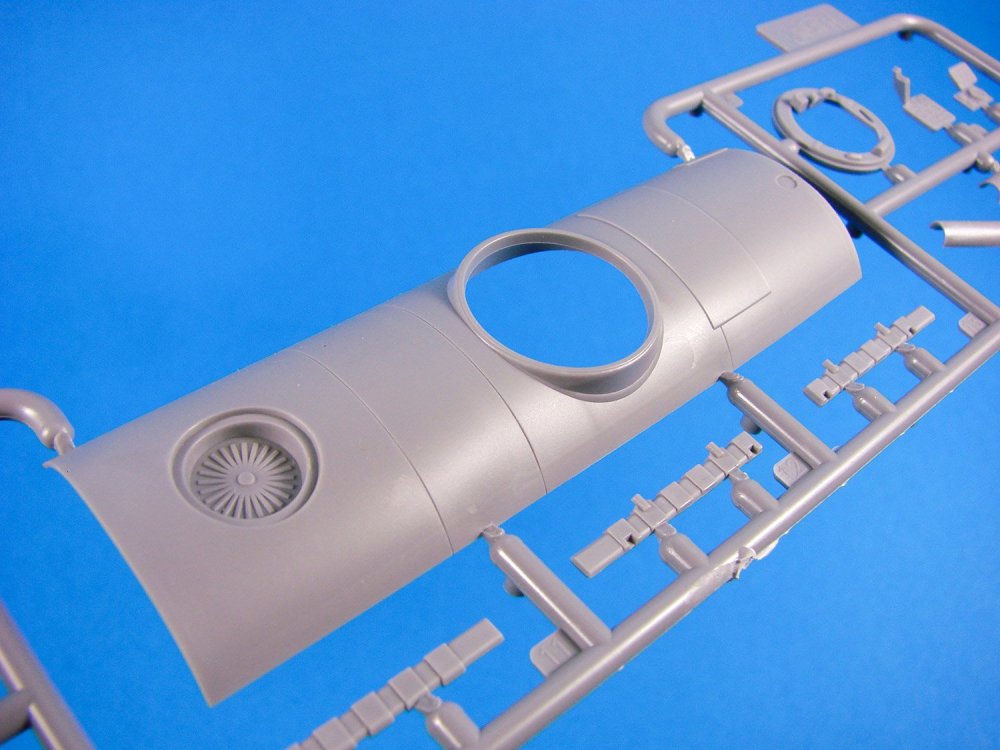
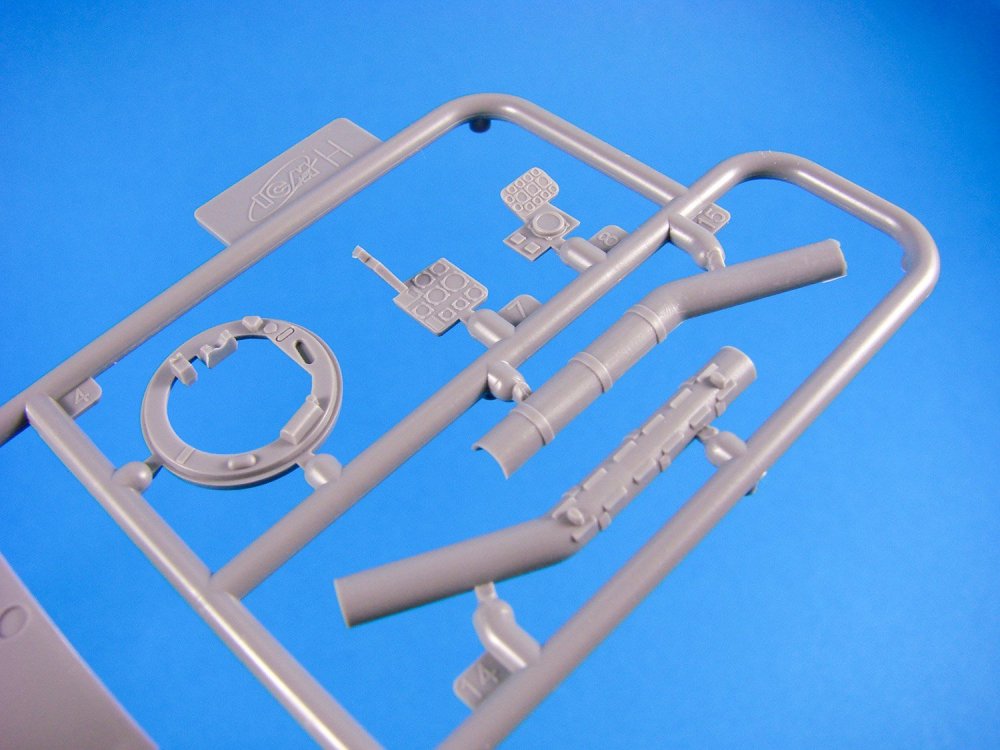
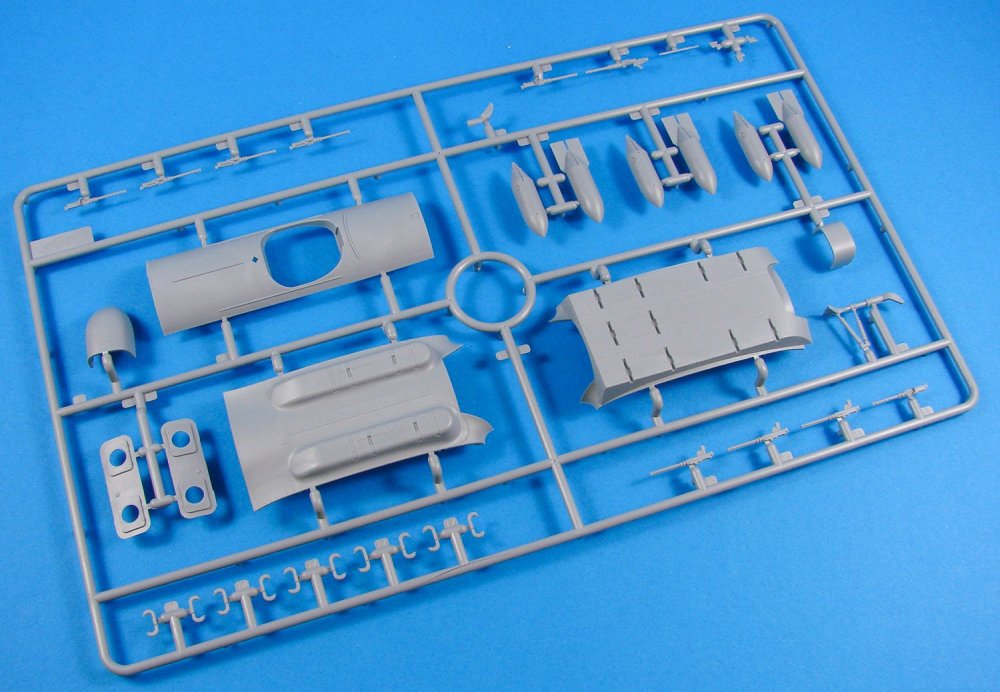
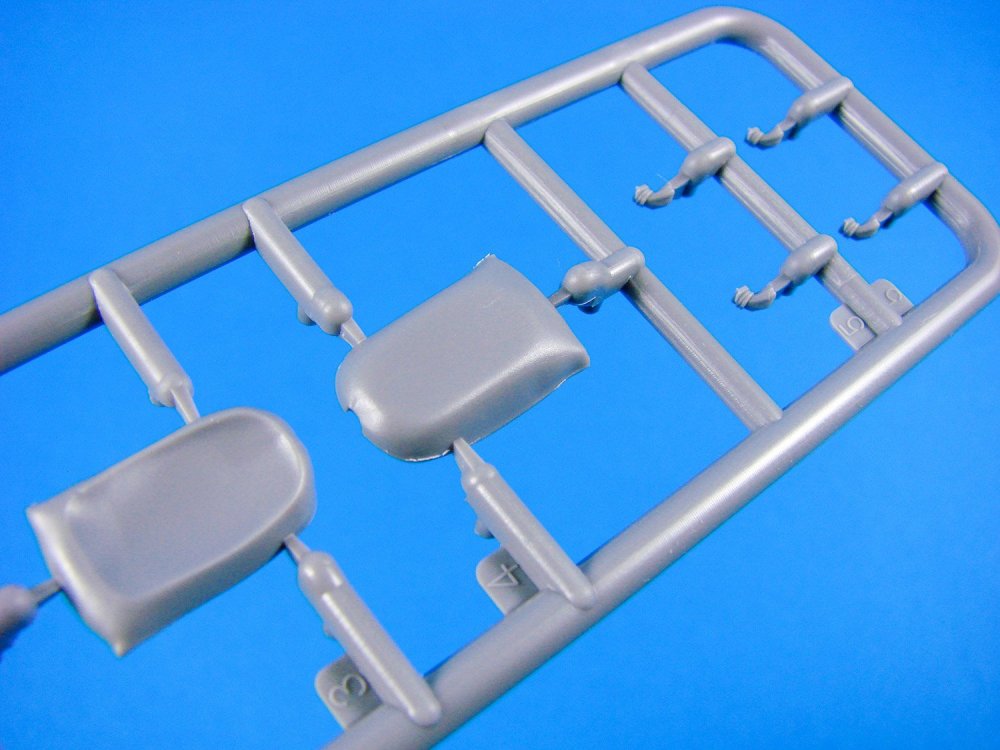
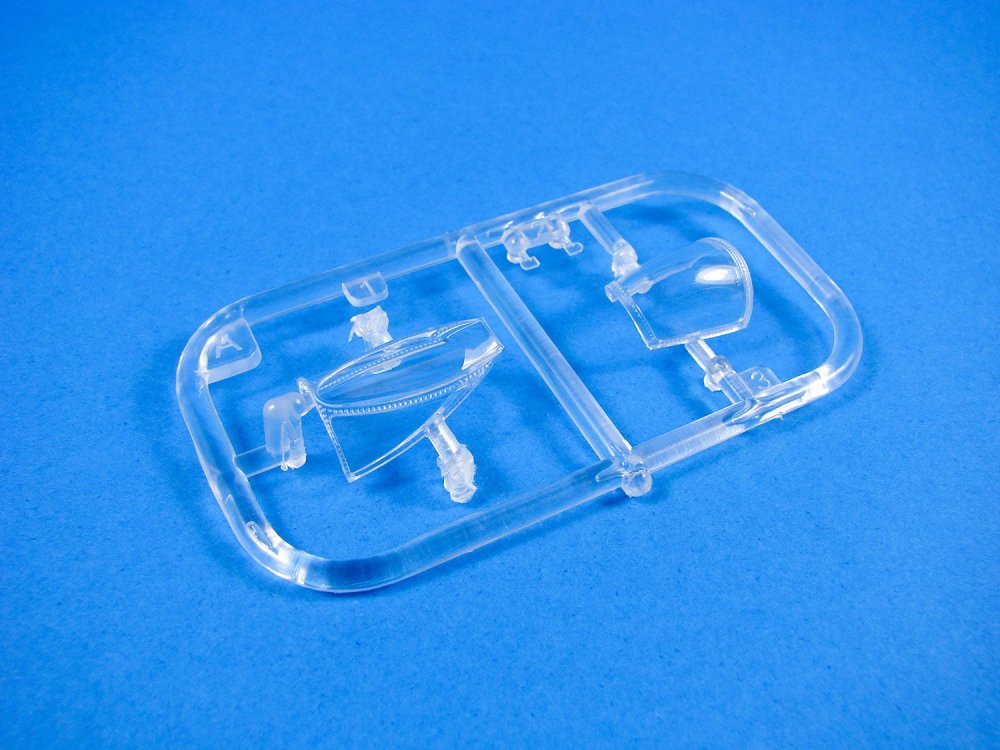
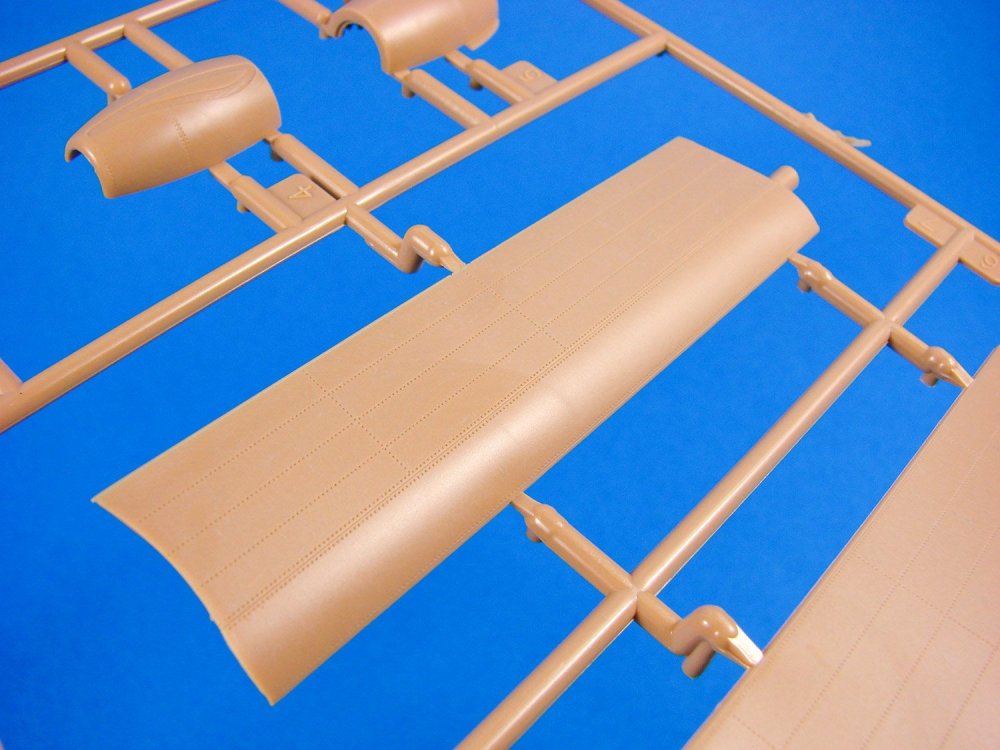
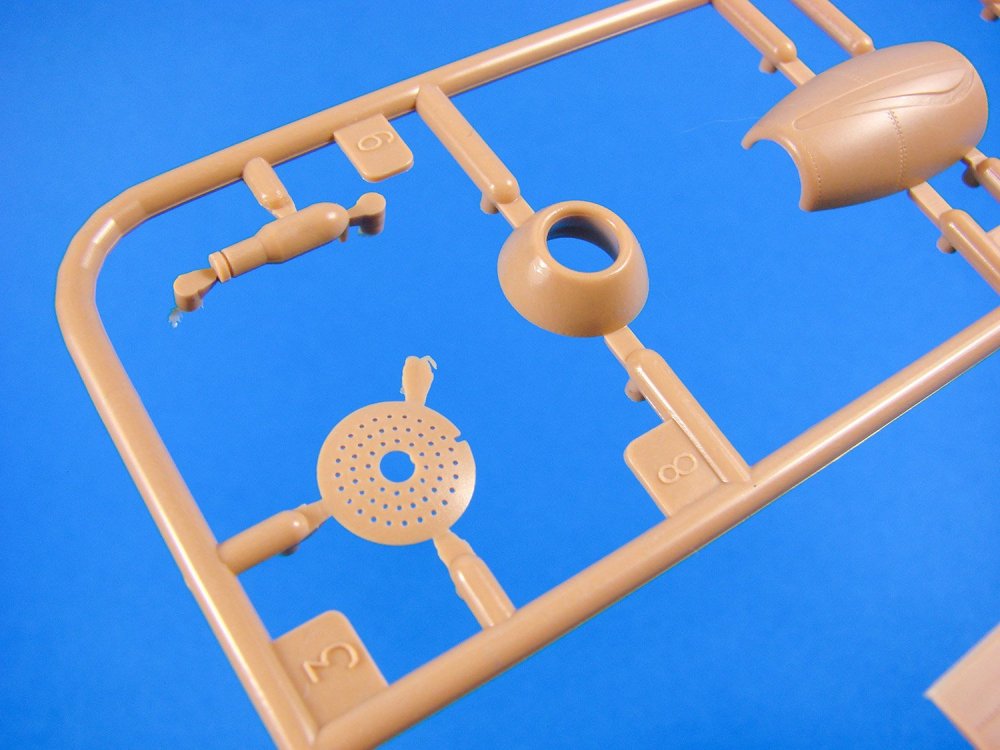
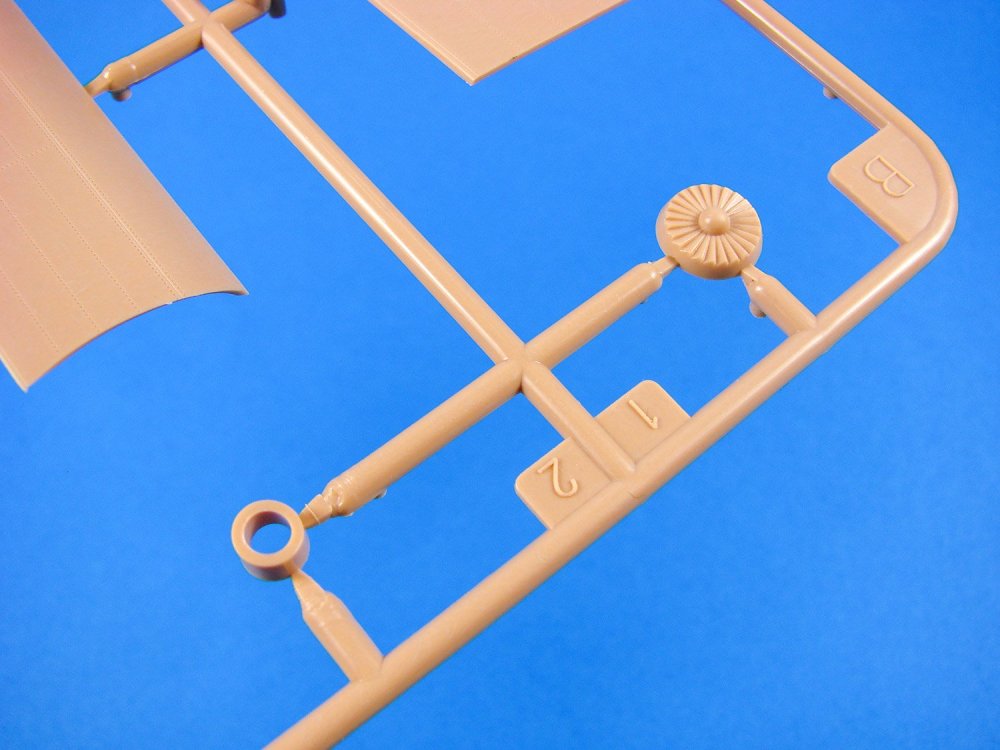
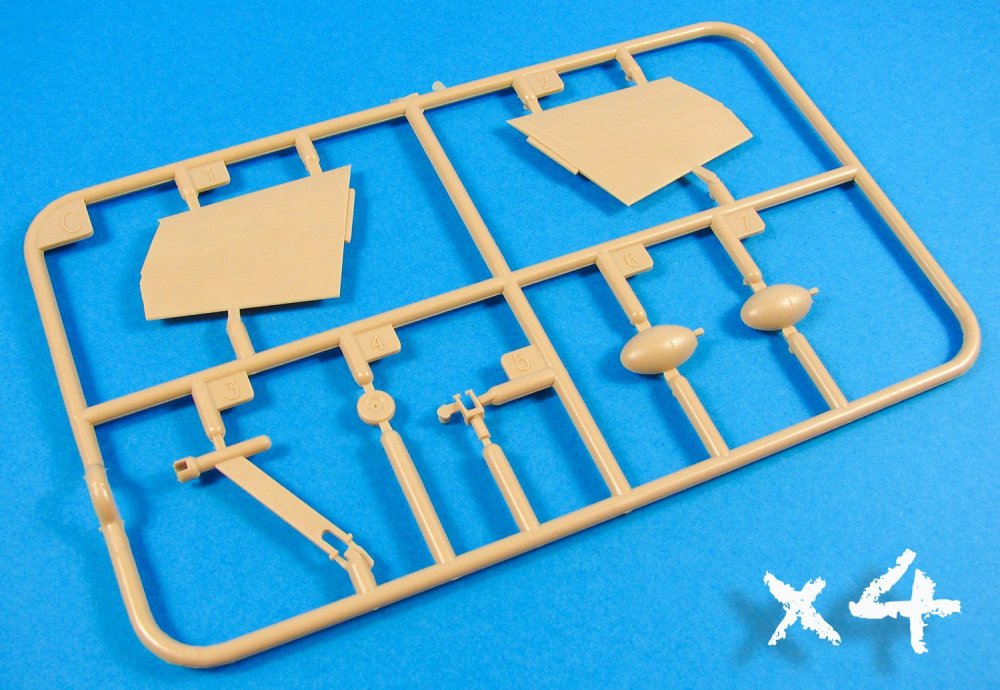
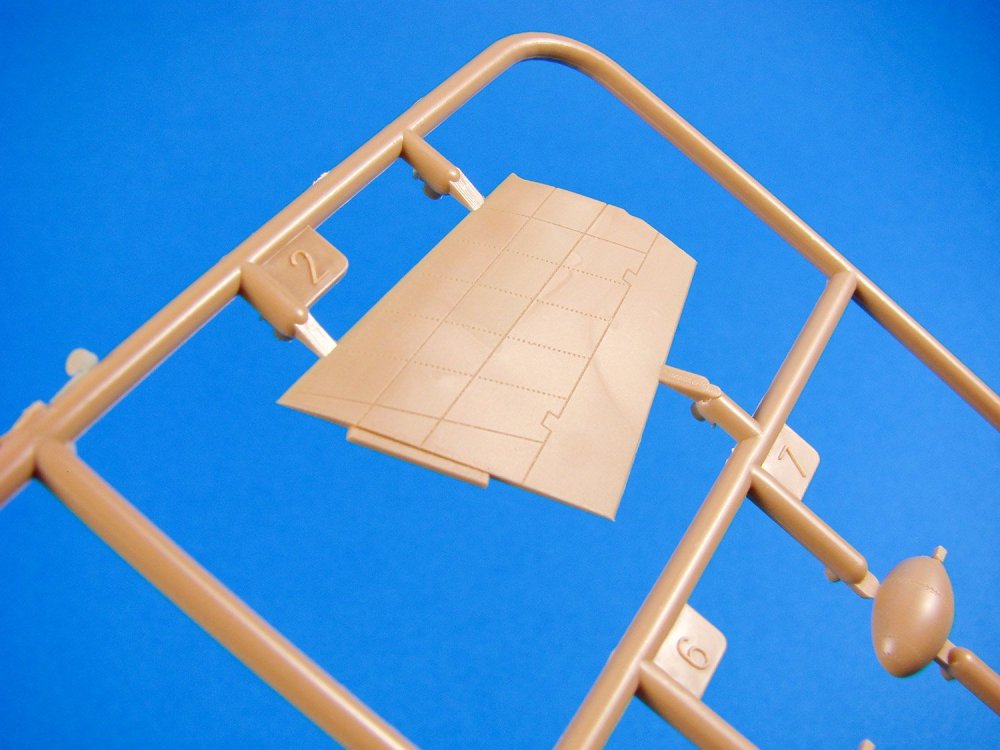
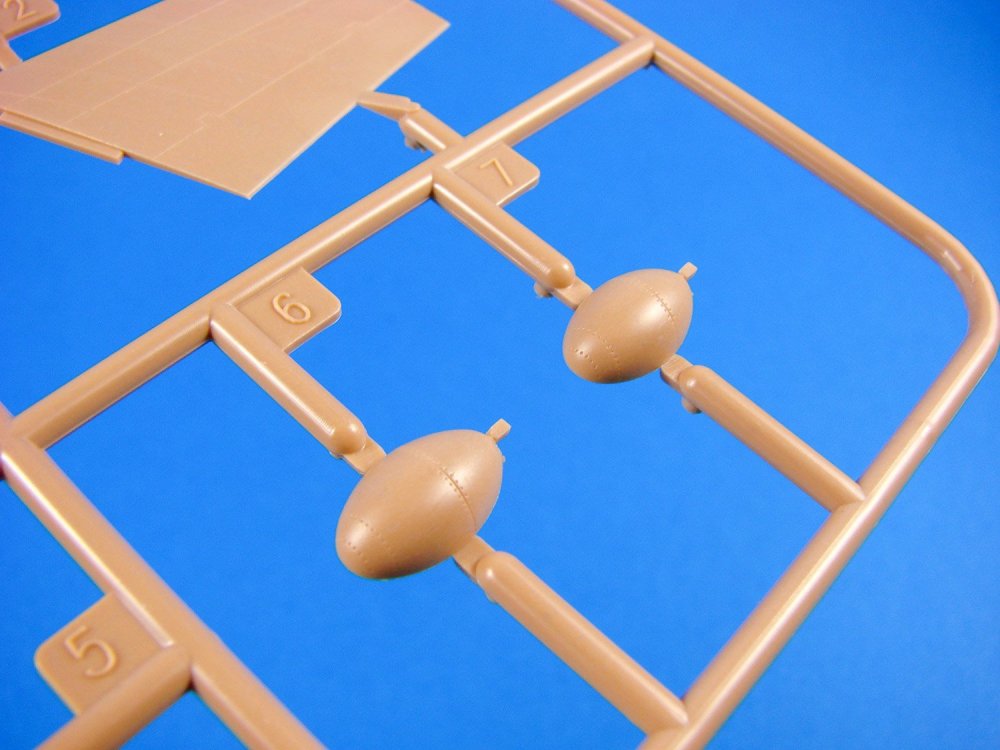
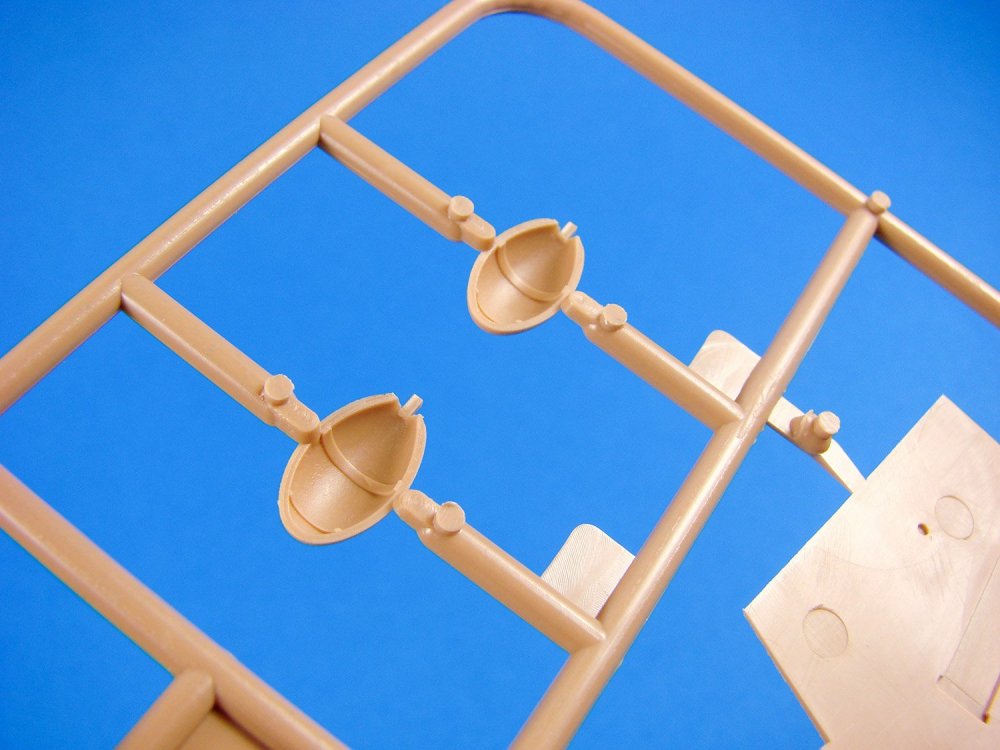
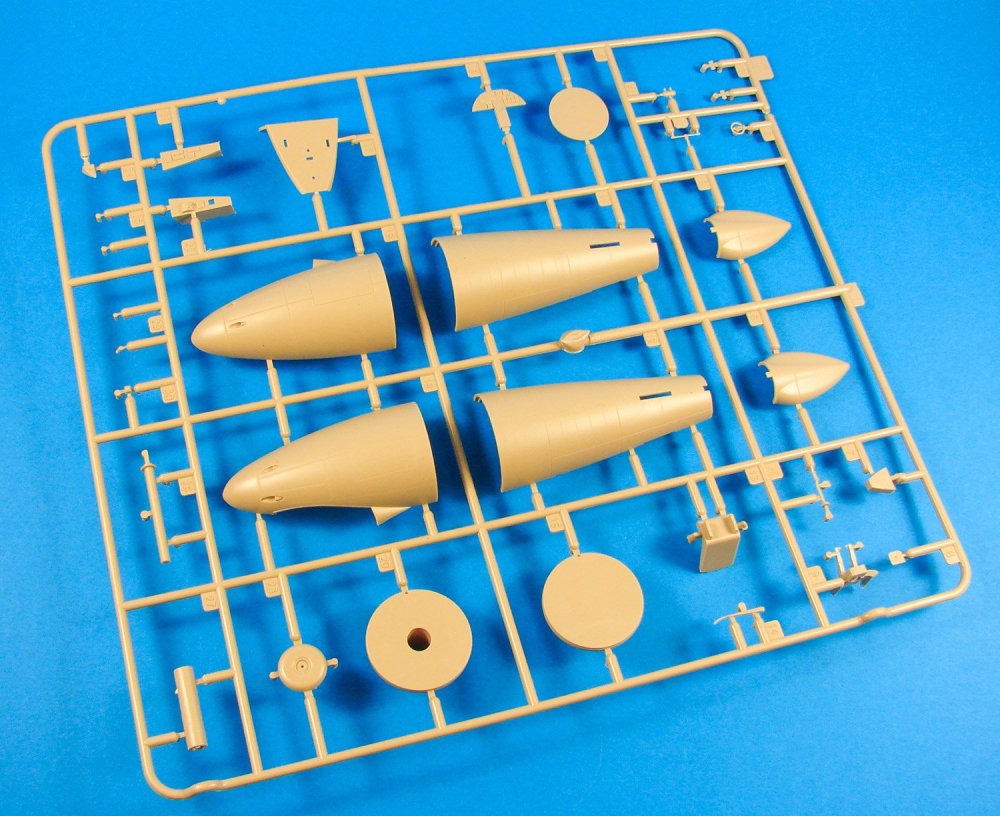
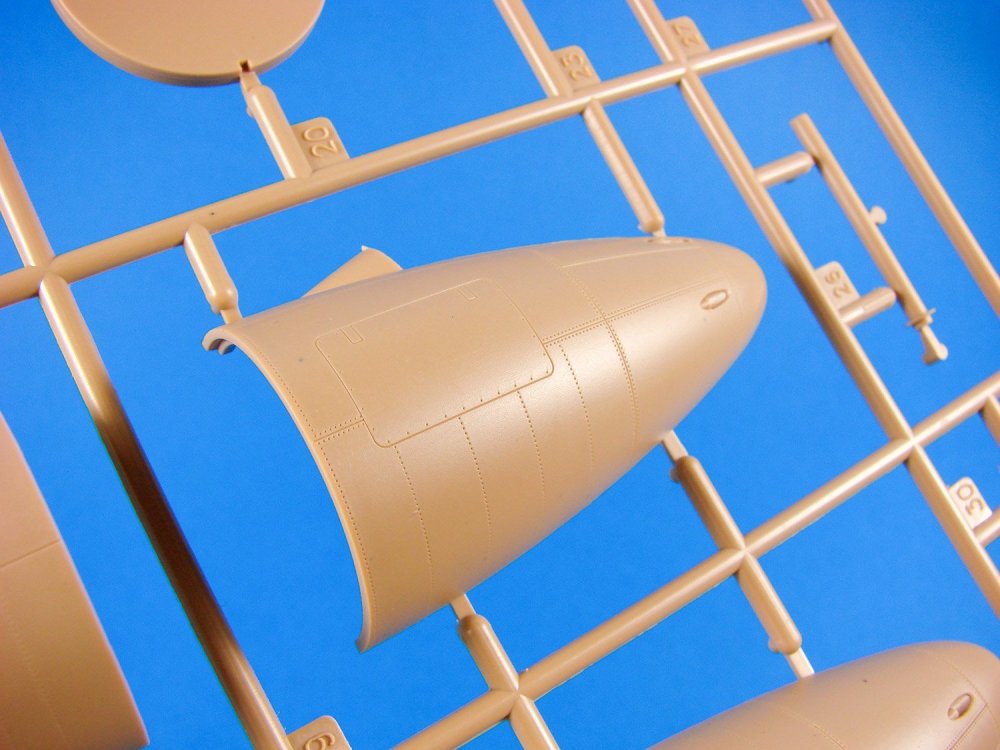
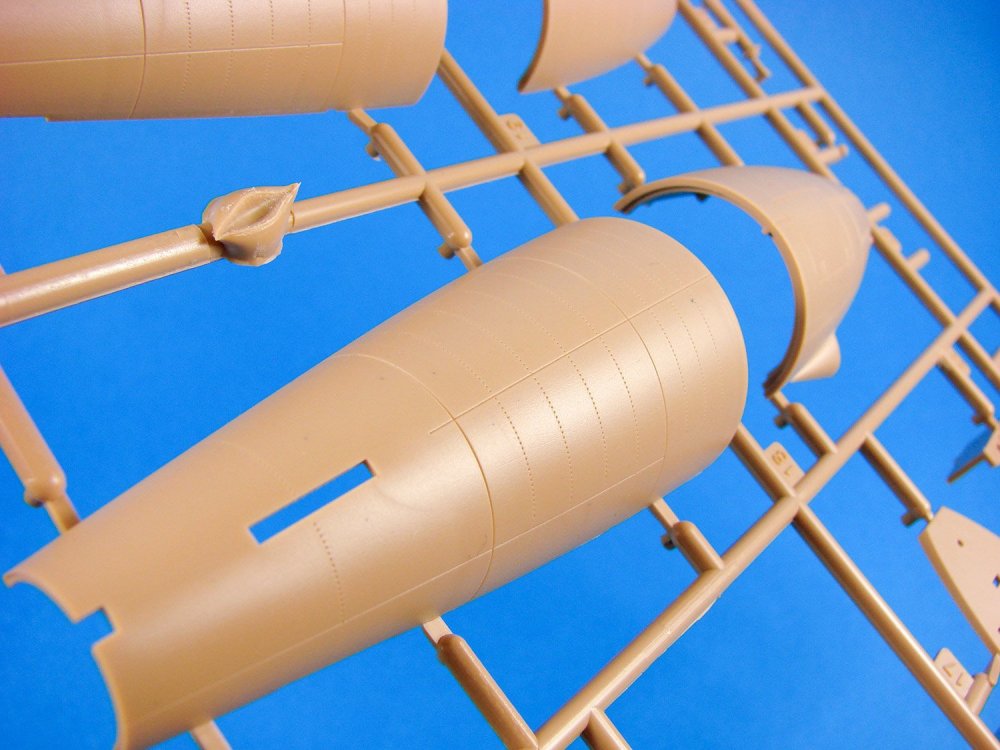
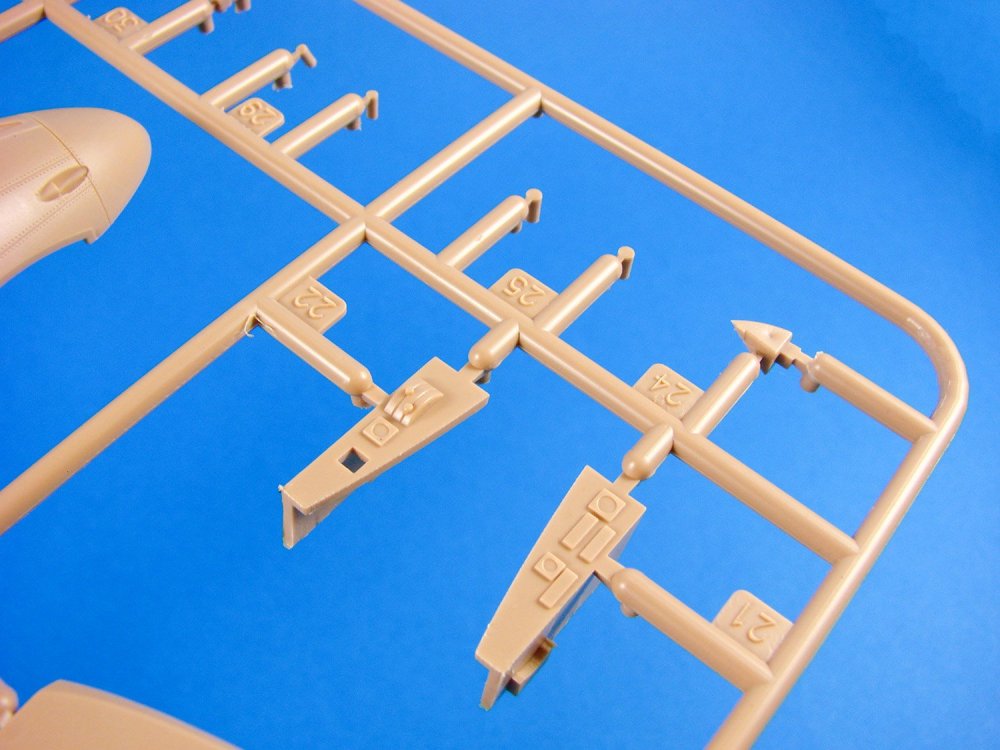
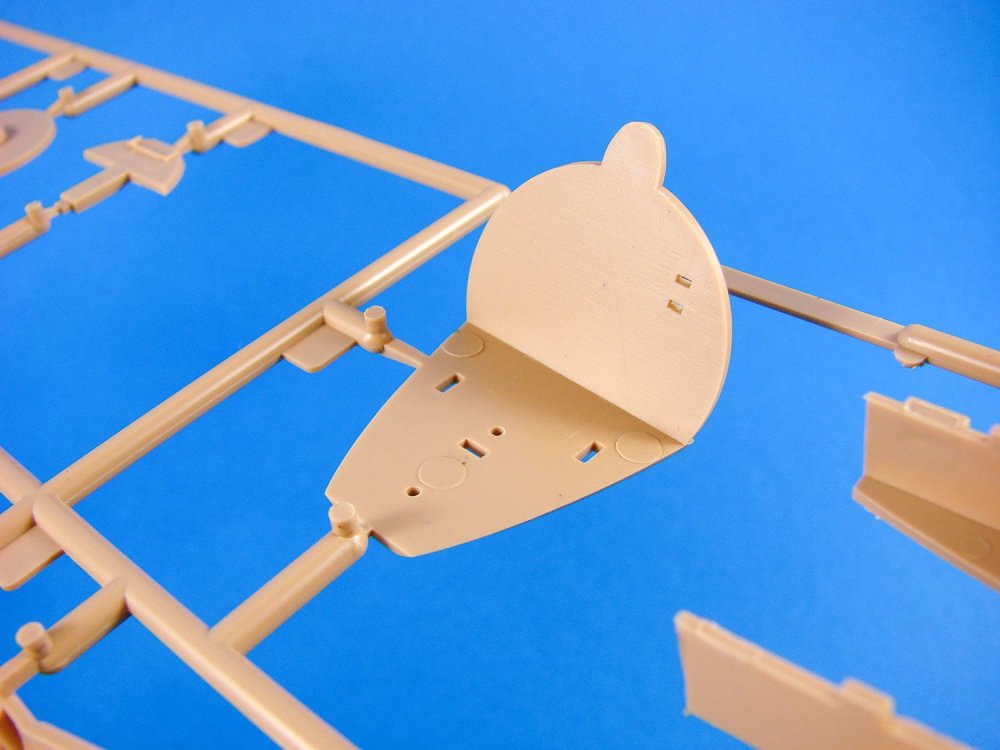
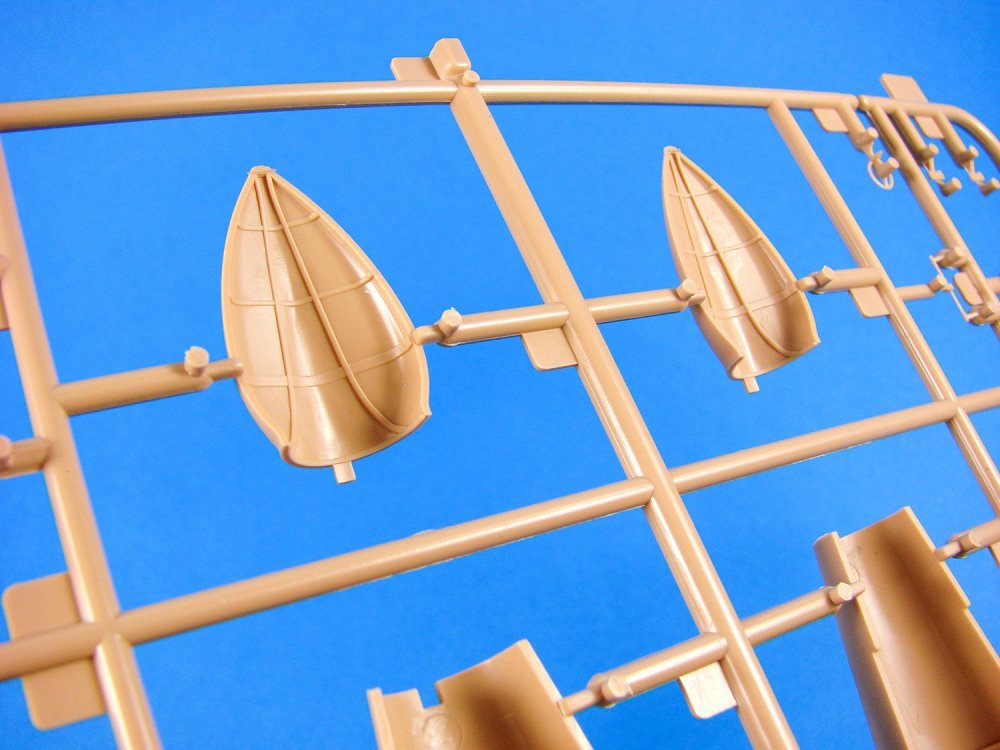
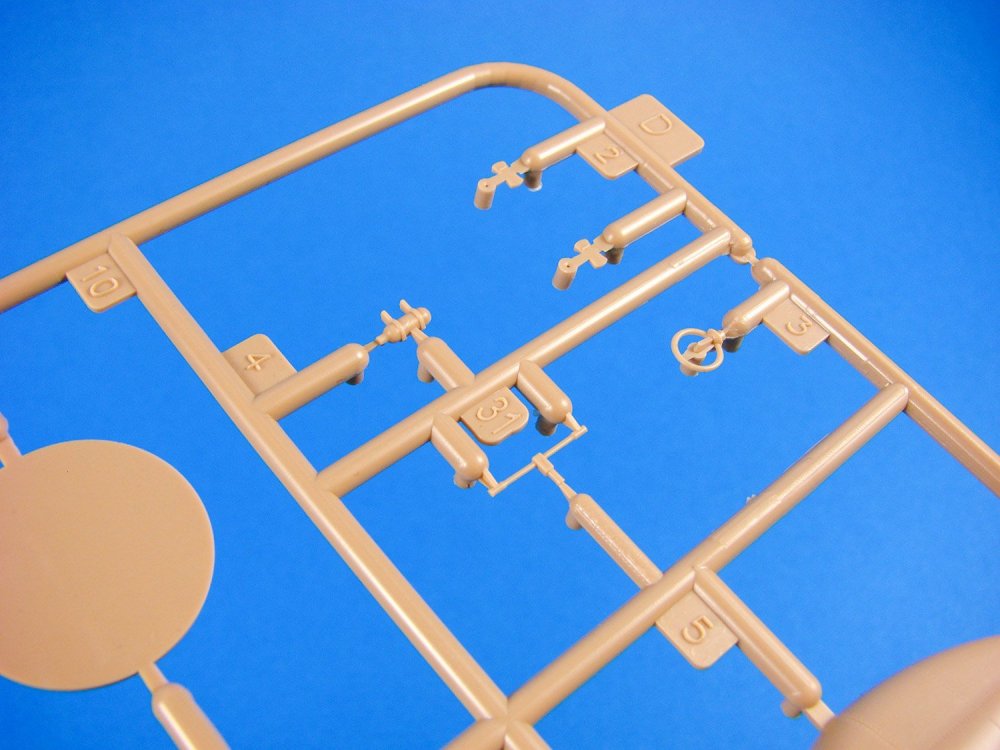
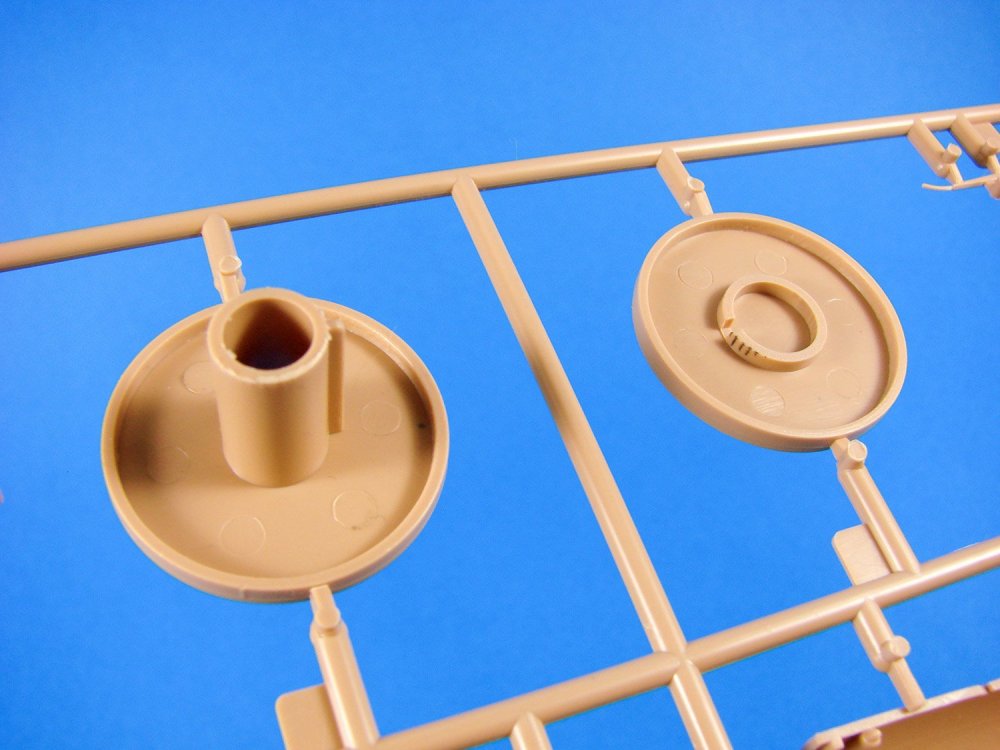
1:32 Gotha G.1 Wingnut Wings Catalogue # 32045 Available from Wingnut Wings for $199.00 plus shipping The Gotha G.I was a heavy bomber used by the Luftstreitkräfte (Imperial German Air Service) during World War I. In mid-1914, Oskar Ursinus, the founder and editor of the German flying magazine Flugsport, began designing a large twin-engine seaplane of unconventional configuration. While most biplane designs have the fuselage attached to the lower wing, Ursinus had a snub-nosed fuselage attached to the upper wing, and twin engine nacelles mounted on the lower one. Apart from the aerodynamic benefits claimed by Ursinus, the aircraft's unorthodox layout provided excellent views for the three crewmen and broad fields of fire for the gunner. The design also matched the specifications that the Idflieg had issued in March that year for a "Type III" large military aircraft, and the construction of a prototype was ordered. The prototype first flew on 30 January. However, the aircraft was difficult to fly, lacking in structural integrity, dangerous to the crew in the event of a crash landing, and underpowered. Despite its shortcomings, it was sent to the Russian front in early 1915. With the design proved under service conditions, the Idflieg issued a contract on 1 April for series production to Gothaer Waggonfabrik AG, which acquired a license from Ursinus, who held the patent to the design. Gothaer chief engineer Hans Burkhard simplified and refined the design, which was originally known as the Gotha-Ursinus-Heeresflugzeug (Gotha Ursinus Army Aircraft), or "GUH," later known as the Gotha G.I or Gotha-Ursinus G.I. The first production aircraft was completed on 27 July 1915. These aircraft were powered by two 150 hp Benz Bz.III engines. Gothaer Waggonfabrik built 18 G.I aircraft in three batches of six before production ceased at the end of the year. The final batch was powered by 160 hp Mercedes D.III engines and featured an extra defensive machine gun and nearly double the armour of previous examples. Photos courtesy of Wingnut Wings A single example of the UWD, or Ursinus-Wasser-Doppeldecker floatplane version of the G.I was also built, ordered by the Navy in April 1915, and delivered in February 1916. It was used operationally until 2 October when it was written off after a hard landing. Today, little is known about the G.Is service history. Idflieg records show only small numbers ever in service on the front at any one time. By the time it reached the front, the Gotha G.I was already an easy target for faster and more manoeuvrable fighters, and the few pilot recollections that have survived are largely unfavourable to the type. The UWD seaplane is known to have participated in a successful air-raid on Dover sometime in 1916, bombing Langton Fort and the Shoulder of Mutton battery, but the exact date is not now known. The kit Well, this was certainly a surprise when announced. I don’t think I could recall a single person who said that a G.1 was going to be available to build in this scale! Not only that, but the Gotha UWD which is quite different in many ways. The latter will soon be reviewed by Jeroen Peters on the Large Scale Modeller forum. I also wasn’t expecting the box to drop through my metaphorical letter box either, so this was definitely a summer surprise. Now I had to beat the hot weather and give this my best. The G.1 was a large aircraft, so it’s no surprise (this time) that WNW needed to use one of their larger sized boxes to fit it all in. Whilst the box isn’t ram-packed full to the brim, some of those sprues are almost the entire footprint of the box. The Steve Anderson artwork depicts two G.1 aircraft (over 10% of their entire production!) being defended from a roving Airco DH2, by a solitary Fokker Eindecker. Steve’s art is always an event with WNW releases, and this beautifully atmospheric image captures the strange and ungainly lines of the G.1, in all its, er, beauty! For WNW, the G.1 and Gotha UWD represent a milestone in their company history. The following text is from their emailshot to customers before kit release: “We are pleased to announce that our 10th anniversary celebration release models, 32045 Gotha G.1 & 32053 Gotha UWD (our 68th and 69th releases) are now available for pre-order from shop.wingnutwings.com with shipping hopefully from late April or early May 2019. Pre-order deposit payment in full with 100% refund available upon request up to 26 April 2019 (NZ time). They should also be available from your regular preferred Wingnut Wings supplier. The extraordinary Gotha G.1 design of 1915 was the first in a line of famous twin engine bombers built by Gotha in the First World War. The high position of the partially armour-plated fuselage offered great visibility and effective fire positions for the gunner(s) but very little protection to the 3-man crew in the event of a nose over crash. The G.1 was initially conceived as a heavily armed fighter but was very quickly re-assigned to bombing duties and began the famous association of Gotha with First World War bombers.” Kit specifics for this particular G.1 release are: 349 high-quality injection moulded plastic parts. 9 photo-etched metal detail parts. 2x Benz 150hp Bz.III engines. 63cm wingspan. 20kg & 50kg Carbonit bombs, optional propellers, LMG 08 ‘Spandau’, LMG 14 ‘Parabellum’ & 2cm Becker cannon armament and mountings. 20kg Carbonit bomb dropping cage or underwing fairing. 28 page fully illustrated instruction manual. High-quality Cartograf decals included for 5 colour schemes Under that large lid, there are EIGHT sprues of grey styrene, all individually wrapped, plus a small fret of PE parts that’s tucked in with the single decal sheet for this release. WNW’s typically beautiful instruction manual completes the ensemble. Sprue A This is one of the two largest sprues in this release, with some serious moulding to be seen. It is also common to the G.1 and UWD versions. WNW has designed the rear fuselage to be separate to the nose section containing the crew. Here we see the rear fuselage in two sections (lower 3-sided section, and upper deck). Externally, detail is sparse, of necessity. There are some lacing details on the lower section, and a cockpit rear fairing section on the upper deck. However, internally we have more details with fuselage formers and what look like to be bracing cable detail. There some ejector pin marks in this area, but I can’t see anyone modelling this so any internal detail will be seen. If you do wish to, removing the marks won’t be too difficult with a fibreglass scratch pen or a small section of plasticard to hide them. Two sets of ailerons are moulded here, but we will only use one of them. The larger, balanced option is for the UWD seaplane version. All other parts on this sprue will be used with this G.1 release. The span of this model has caused WNW to break down the wing into sensible-sized sections, with the lower wing centre section being found here. This is where the two Benz 150hp Bz.III engines will be mounted in their nacelles. Through more necessity, these wing panels are moulded as single pieces due to how thin these wings were, so no upper/lower sections to glue together. This also allows for the superbly-moulded and super-thin wing trailing edges as seen in these photos. A delicately scalloped trailing edge depicts the wire which would have been pulled tight between the ribs due to the doped fabric. Rib detail/cap strips are also nicely represented. Also of note are the plugs in the underside wing-joint areas. These are, of course, designed to fit into the sockets that are moulded to the lower wing panels on Sprue B. There are some forward fuselage and cockpit parts included on this sprue, such as the pilot’s seat and cushion, control column and separate wheel, cockpit floor, internal walls (fuel tank wall, bulkheads etc.), map/document case, commander’s seat, magazines, inner wall frames, engine controls, fuel tank pressurising pump, super-detailed instrument board with rear face detail, etc. Decals are supplied for the individual instruments, as is standard with WNW kits. No crappy raised moulded details to negotiate here. Other parts include the struts which support the forward nose section from the lower wing centre-section, fuel gauge (alternative mounting positions), modified upper wing inner trailing edges, and a tail strut support. Sprue B Another sprue which is common to the G.1 and UWD. The remaining wing panels are moulded here, with the same level of finesse as seen on the lower wing panel with beautifully thin trailing edges. You can see on the lower wing panels the sockets which allow these to fit to the lower section, and the angle of the tab which creates that characteristic appearance of the G.1. With the upper wing panels, you can of course see the separate aileron provision, but also how the inboard trailing edge is separate, to accommodate the initial design and the modified version which allowed for better downward vision for the crew. WNW have provided the stabiliser as a single part, incorporating the elevator. I know some modellers would want to give the elevators some deflection, as can be seen in a few of the period images within the manual. With some care, I don’t think that would be too difficult. Sprue C This clear sprue has just one single part, and that’s the windscreen. Only one machine has this fitted, and you’ll need to open up a small hole to fit this part. Part clarity is excellent as always. To further protect this part, the sprue is also wrapped in an adhesive film that only tacks to the plastic. Sprue D (x2) We have our first sprue, or two of, which is specific to the G.1 release. There are many parts here that relate to the engine mounting and other engine errata, such as the radiators (single and paired core options) and their own mounts. Of note are the options for the forward nacelle cowls. One of these is specific to the very early machine on Scheme A. As this model also sits on wheels and not floats, this is where you will find some undercarriage parts, such as the wheels with their separate outward hubs. Other parts include the interplane struts, machine guns, tail plane struts and control horns, dual fin/rudder, Carbonit bombs and racks, two-part bomb dropping cage, and also some ground equipment too in the shape of the tail skid trestle. Sprue E (x2) Of these two sprues, only half of them will be used, and those are the engine parts (the gun rings, propellers etc aren’t used on the G.1). As with all WNW kits, the engines themselves are little works of art, being highly detailed and really calling out for the very best of the modeller’s skill to bring them to life. Cylinders are moulded separate to the crankcase, with separate magnetos, water pump, oil filter, intake manifold and rocker arms/springs completing the ensemble. Sprue F Our last sprue is also specific to this G.1 release, and again is another full box size moulding. A number of cockpit-related parts are moulded here, including the fuselage floor, bomb cage hatch, commander’s instrument board and document shelf, optional racks for internal 20kg Carbonit bombs. Parts for the G.1-specific forward fuselage are also moulded here, including the side panels, coaming, optional cupola etc. To fit the latter, you will need to modify the standard part, carefully. Two propeller options are included here (Integral and Reschke), and you’ll also find the parts for the engine nacelle bodies. An option to mount Carbonit bombs externally is also included, and these were mounted within a fairing, moulded here. Other parts include more undercarriage struts, pulpit gun ring, engine control rods, cooling water pipes, tail skid, 2cm Becker cannon. Photo Etch Parts are included here for the pilot lap belts and there are options for the neater and more realistic cooling jackets for the machine guns, plus their reticules. A name plate for the display base of your model, is also included. Decals The schemes for thee G.1 are very similar in many respects, and all five schemes are included on this single Cartograf-printed sheet. Crosses are supplied for the upper and lower sides of both wings, and scheme-dependent crosses for the fuselage, and of course the specific serials. Stencils and instrument decals are supplied. Printing is excellent, being nice and thin with minimal carrier film and a nice glossy finish. Colours are also solid. The five schemes supplied are: Gotha G.1 10/15, Fliegerersatz Abteilung 7 Sonderstaffel S.1, 1915 Gotha G.1 11/15, Fliegerersatz Abteilung 7 Sonderstaffel S.1, 1915 & 1916 Gotha G.1 13/15, Feld Fliegerabteilung 37, 1915 Gotha G.1 41/15, Kagohl 1, 1915 Gotha G.1 42/15 “Feodora”, Fliegerersatz Abteilung 3?, 1916 Instructions WNW’s instruction manuals are always an event, with their shaded assembly illustrations which clearly depict newly added parts, and colour illustrations designed to give the modeller an idea of what the finished and painted assemblies should look like. Annotation is clear and easy to follow, with paint codes supplied for Tamiya and Humbrol colours. FS codes are also supplied. Period images are also supplied showing details and whole airframes. One note here is that it’s clear from the rigging illustration that this model is veryinvolved in that area. It’s actually suggested you dispense with turnbuckles on this and simply do dot-to-dotrig with elastic cord. The last pages of this 28-page manual are given over to Ronny Bar’s excellent profile work and contain some history of the machine, as well as colour call-outs and clear decal position information. Conclusion A very unexpected surprise, but a very welcome one! When you consider the G.IV they released, it does make sense to visit thee subject that got them into bomber production. This large model is certainly odd to look at and it’s hardly surprising that only 20 were built, but it is an important subject, and one that WNW have managed to make very attractive with the sheer detail levels they’ve included. With a 63cm wingspan, this is no shrinking violet either, so you’ll need some space to display it, but should you give it a go, then you really won’t be disappointed. Totally stunning! Now, as WNW like esoteric and will venture outside their comfort zone, I’d like to ask where my Pou du Ciel is! My sincere thanks to Wingnut Wings for the review sample seen in this article. To purchase directly, click the link at the top of this article.


-

Ryefield Model German Staff Car Type 82E
James H replied to JeroenPeters's topic in Armour/AFV Reviews
What a great little kit. Love that the main body is a single part. You starting this soon?- 11 replies
-
- 2
-

-
- rfm
- ryefield model
- (and 1 more)
-
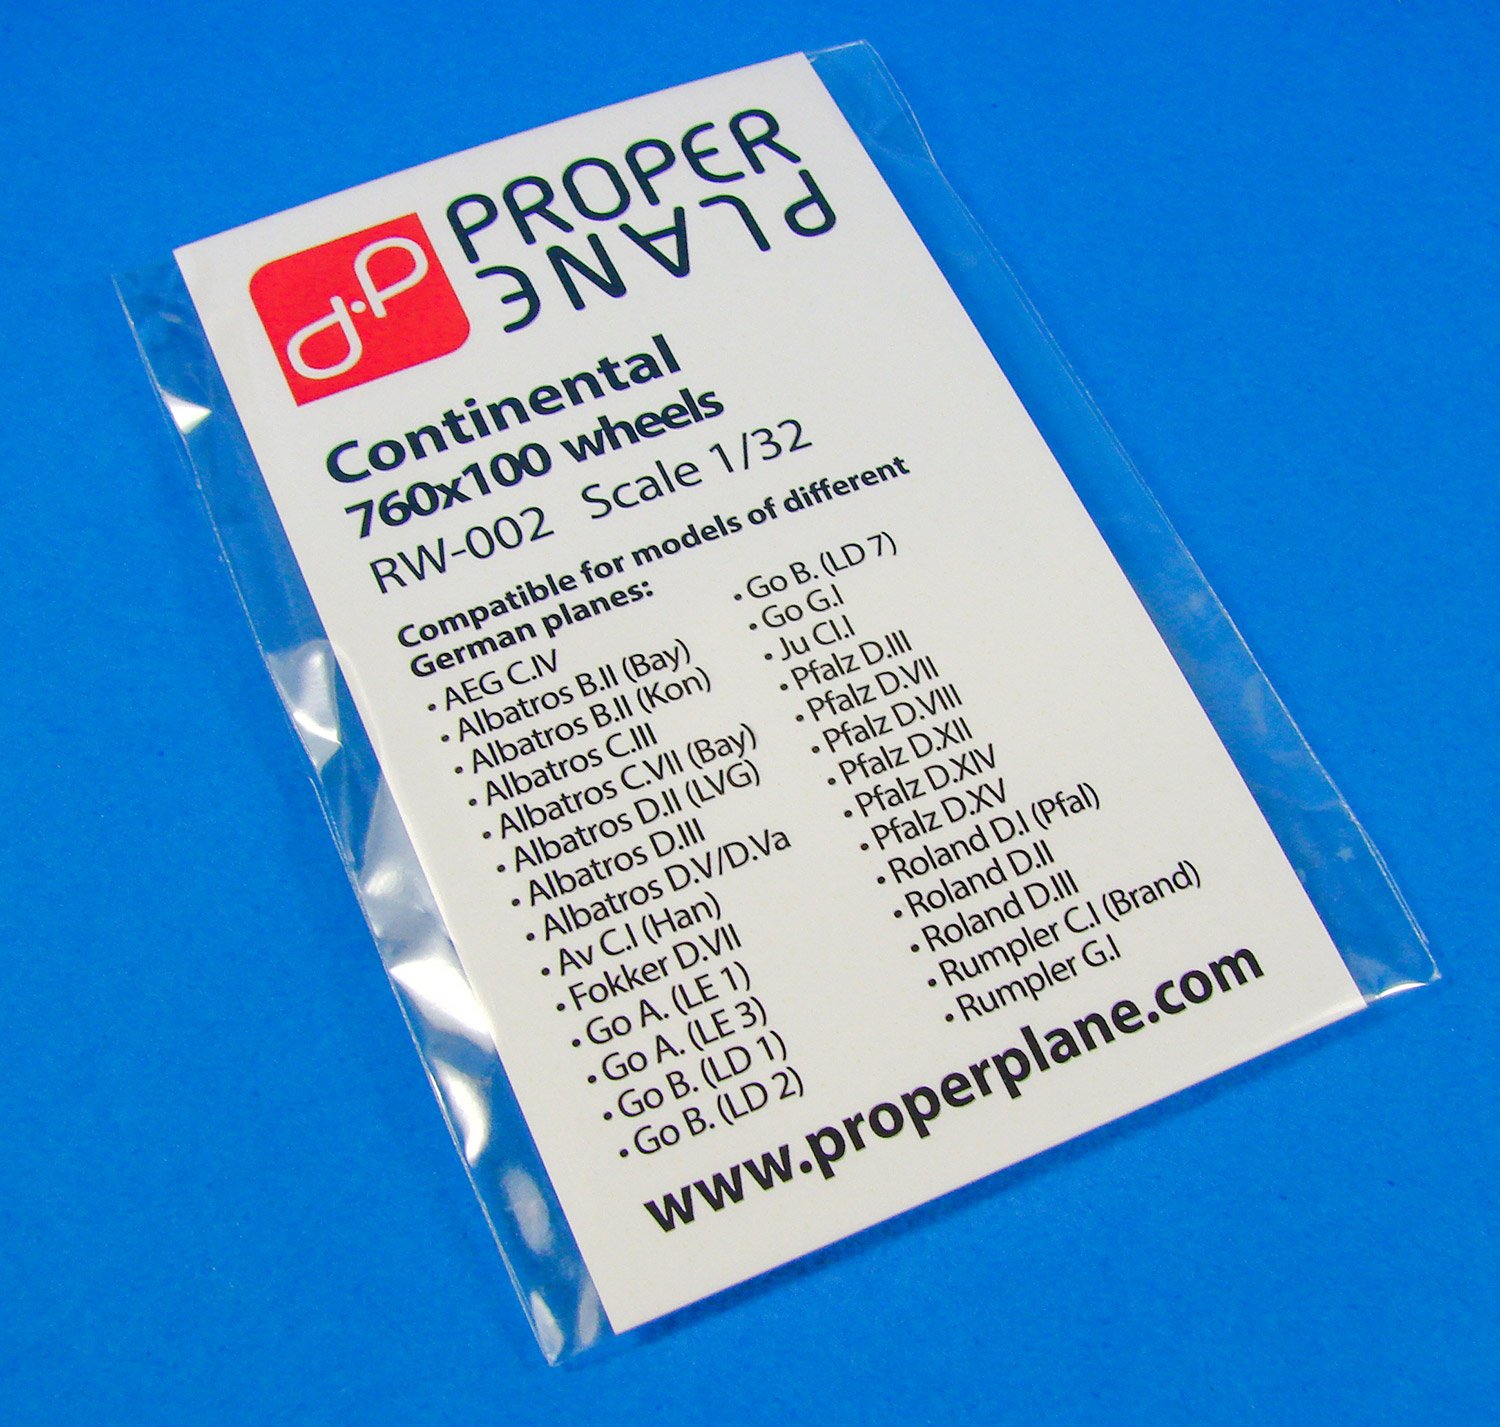
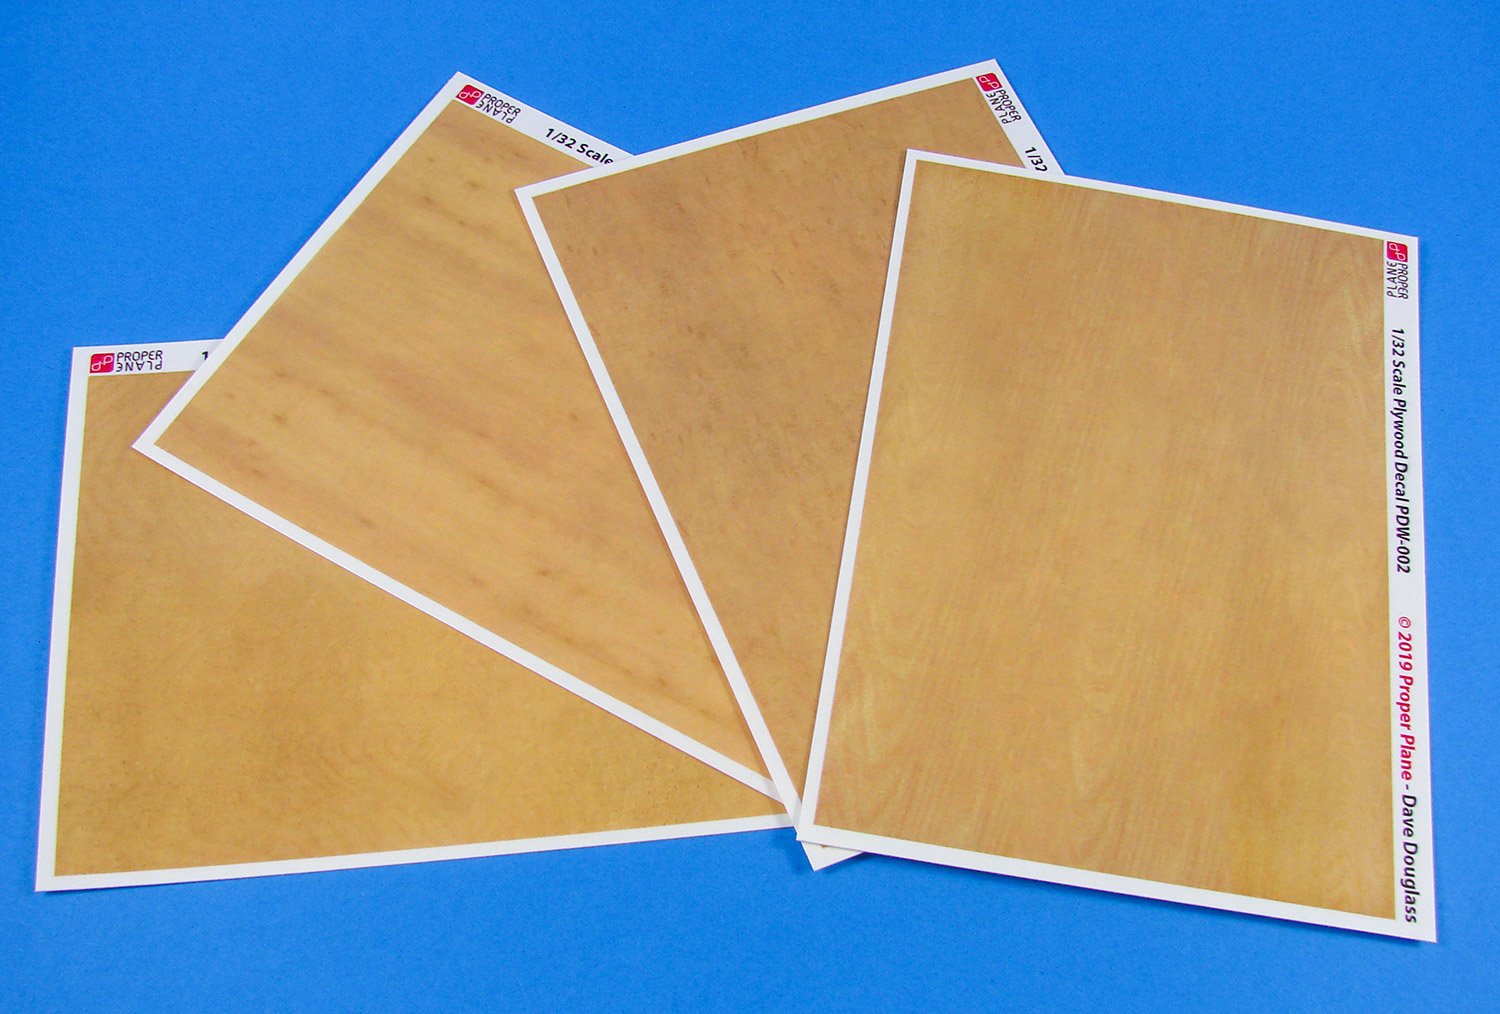
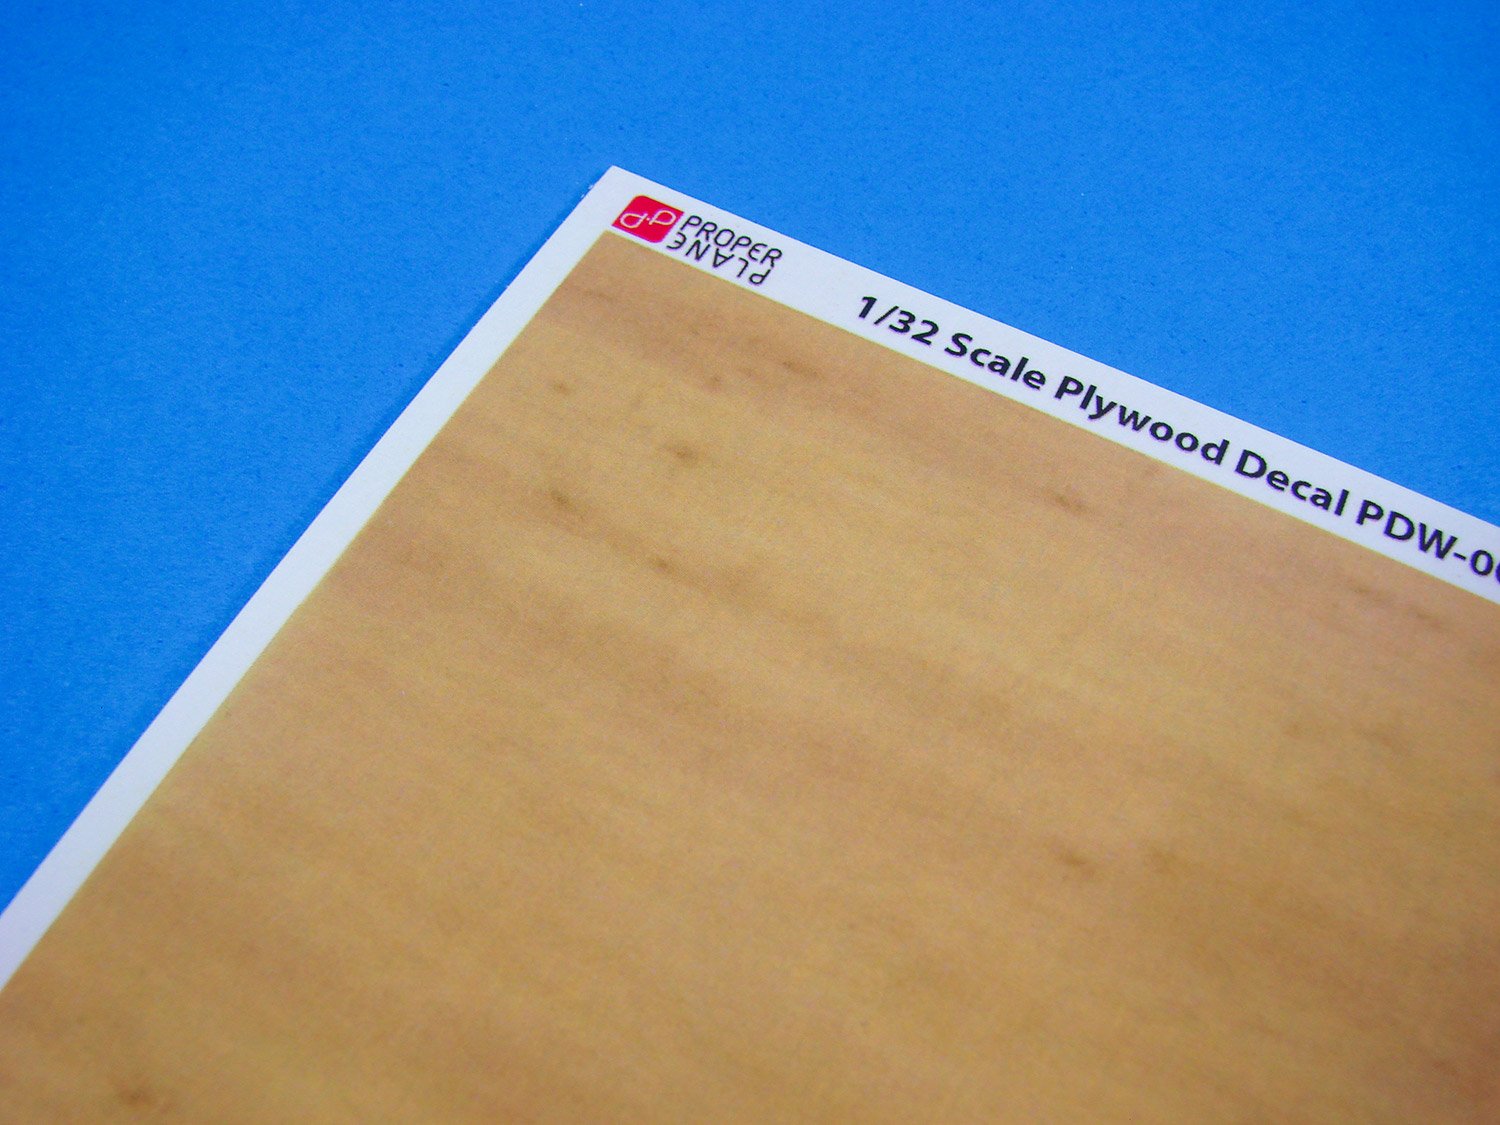
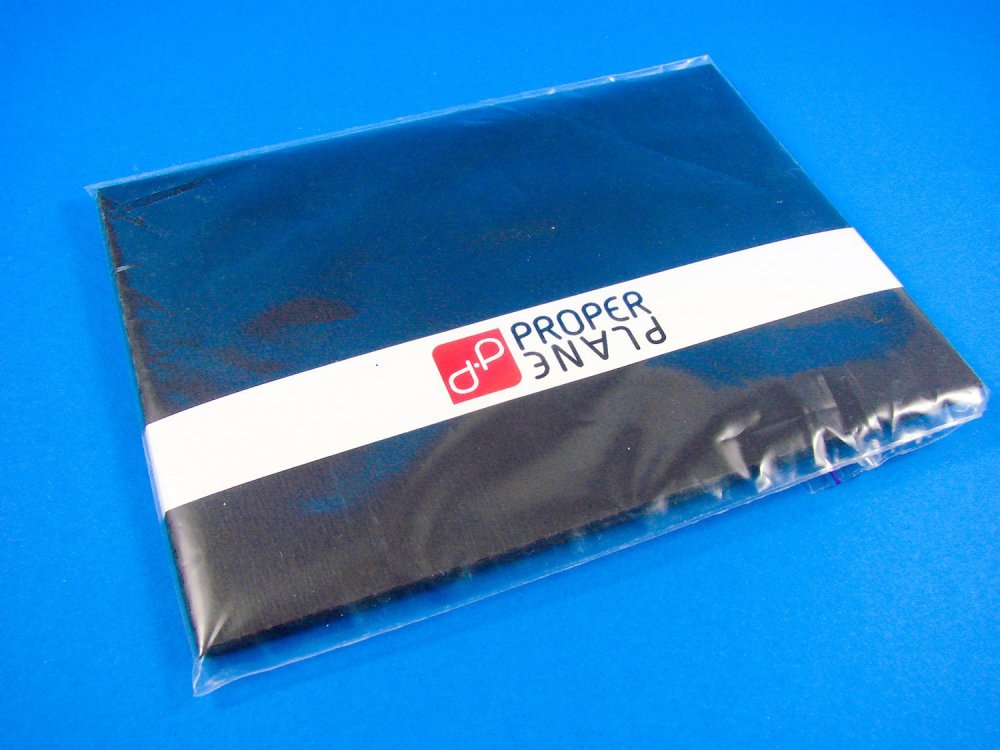
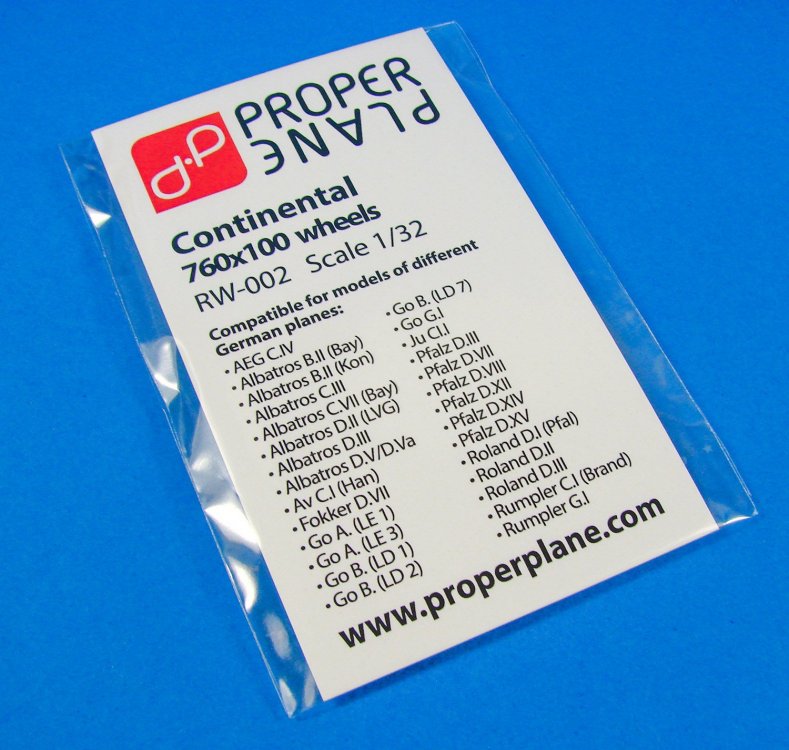
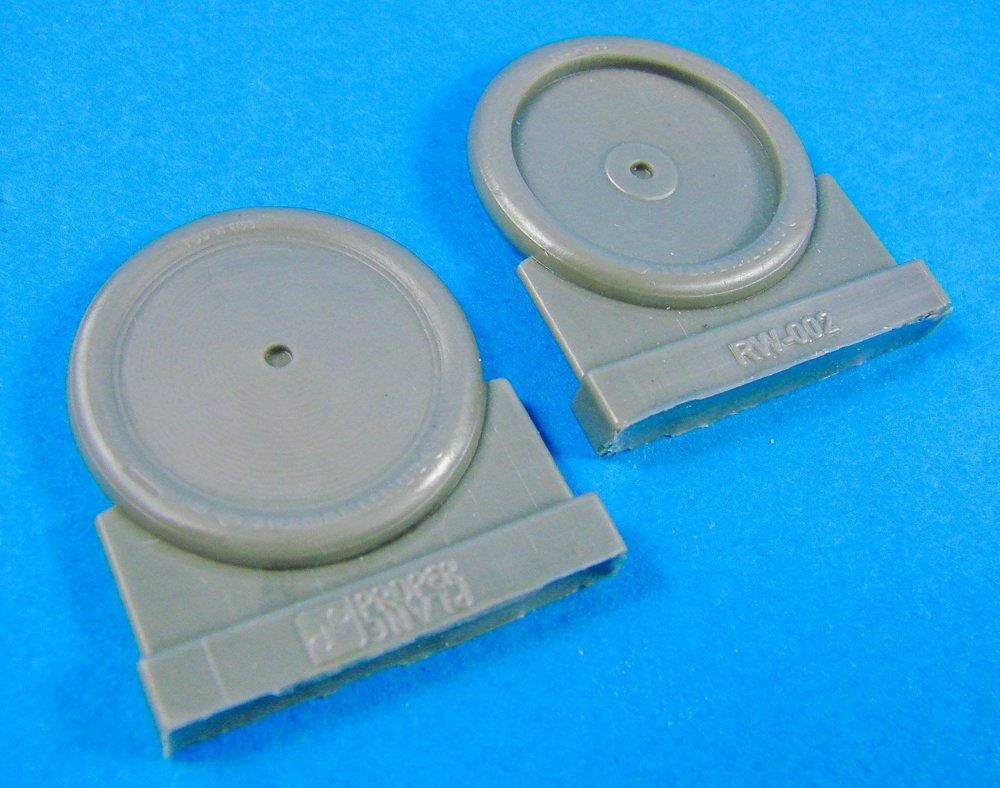
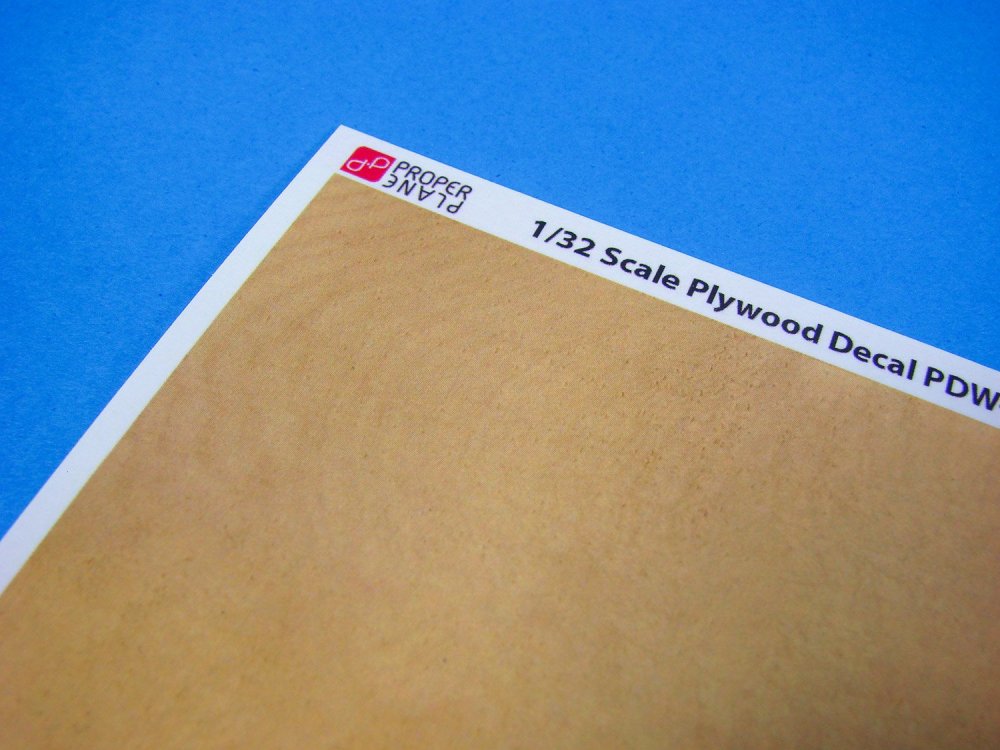
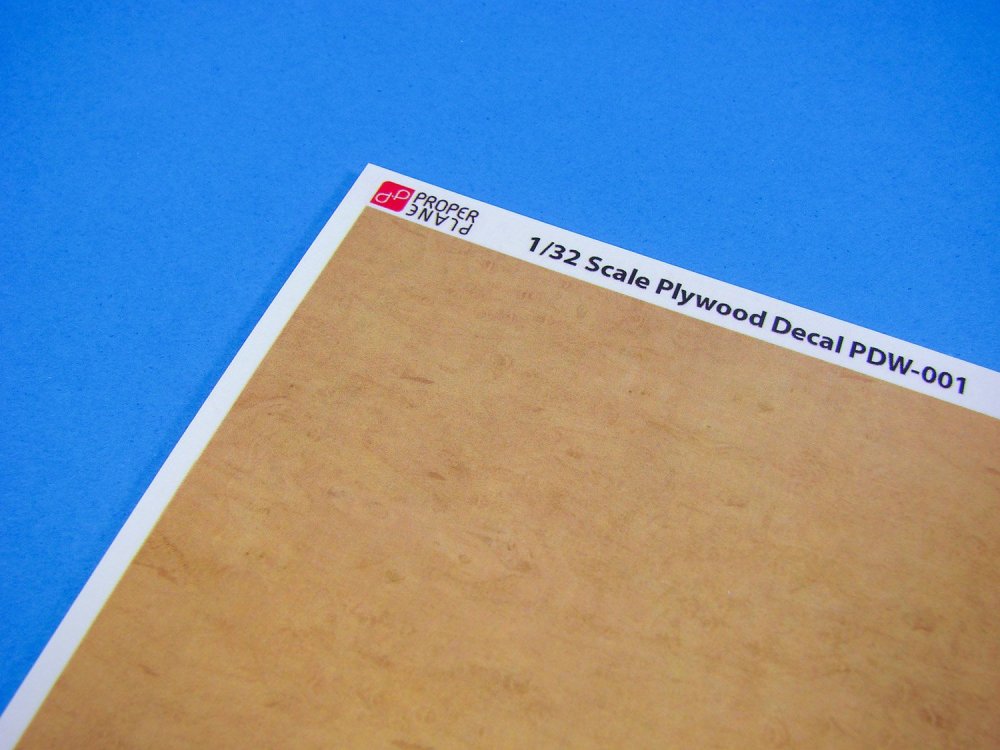
Resin Continental 760x100 wheels and plywood decals Proper Plane Catalogue #’s wheels (RW-002), decals (PDW-1234) Price: $15.00USD per set Proper Plane is carving itself a very nice niche in the world of WW1 aviation modelling. We are used to seeing their superb hand-carved wooden, laminated propellers, such as reviewed HERE, but now they have turned their attention to the resin wheel replacements, possibilities of plywood decals. Continental 760x100 wheels This particular set is a direct replacement for kit wheels, and not just for WNW kits, as is obvious from the list of aircraft that this product is compatible with. As well as a rake of subjects that Wingnut Wings has chosen to release, there are obviously ones which they haven’t tackled, such as the Albatros D.III which is a Roden kit. Here is a list of compatible machines onto which this set will fit… The set itself comprises just two resin wheels in light grey resin, each on its own casting block and secured to it by means of a thin resin web which will be easy to remove and clean-up. The wheels are cast with the inward facing hub, meaning you will still need to use the kit’s outer hub plastic parts, and these of course can differ from aircraft to aircraft. The ridged tread on the outer wheel is clearly evident, and of course the ‘CONTINENTAL’name is present on the wheel, as well as the wheel’s size. This set is a perfect drop fit replacement for your standard styrene parts and minimal effort is required to press them into service. A lovely little addition to your next project! Plywood decals Our next new release from Proper Plane are a set of four different plywood decal sheets. These are presented in a very neat little cardboard wallet with the company logo emblazoned across the black material. Opening the little tab, we now have four different styles of plywood grain decal, each sheet being 105mm x 148mm, so not too large. The decals are designed by Dave Douglass, who has researched Albatros types and is au fait with exactly what the ply should look like. Each set contains 4 different grain types, typically seen on these machines, and they are also printed onto a clear base, meaning that you will need to add a suitable base colour to your model first, and any shading as you see fit. From this, you can make the ply look as pale or as rich as you deem fit for your model. Of course, you can also add a clear yellow/orange mix over the decals once applied, to add to their warmth. These decals are suitable for both 1:32 and 1:48 types. I don’t know if there is a plan to make a set suitable for 1:72. My sincere thanks to Proper Plane for the review samples seen here. To purchase directly, click the link at the top of this article.


-
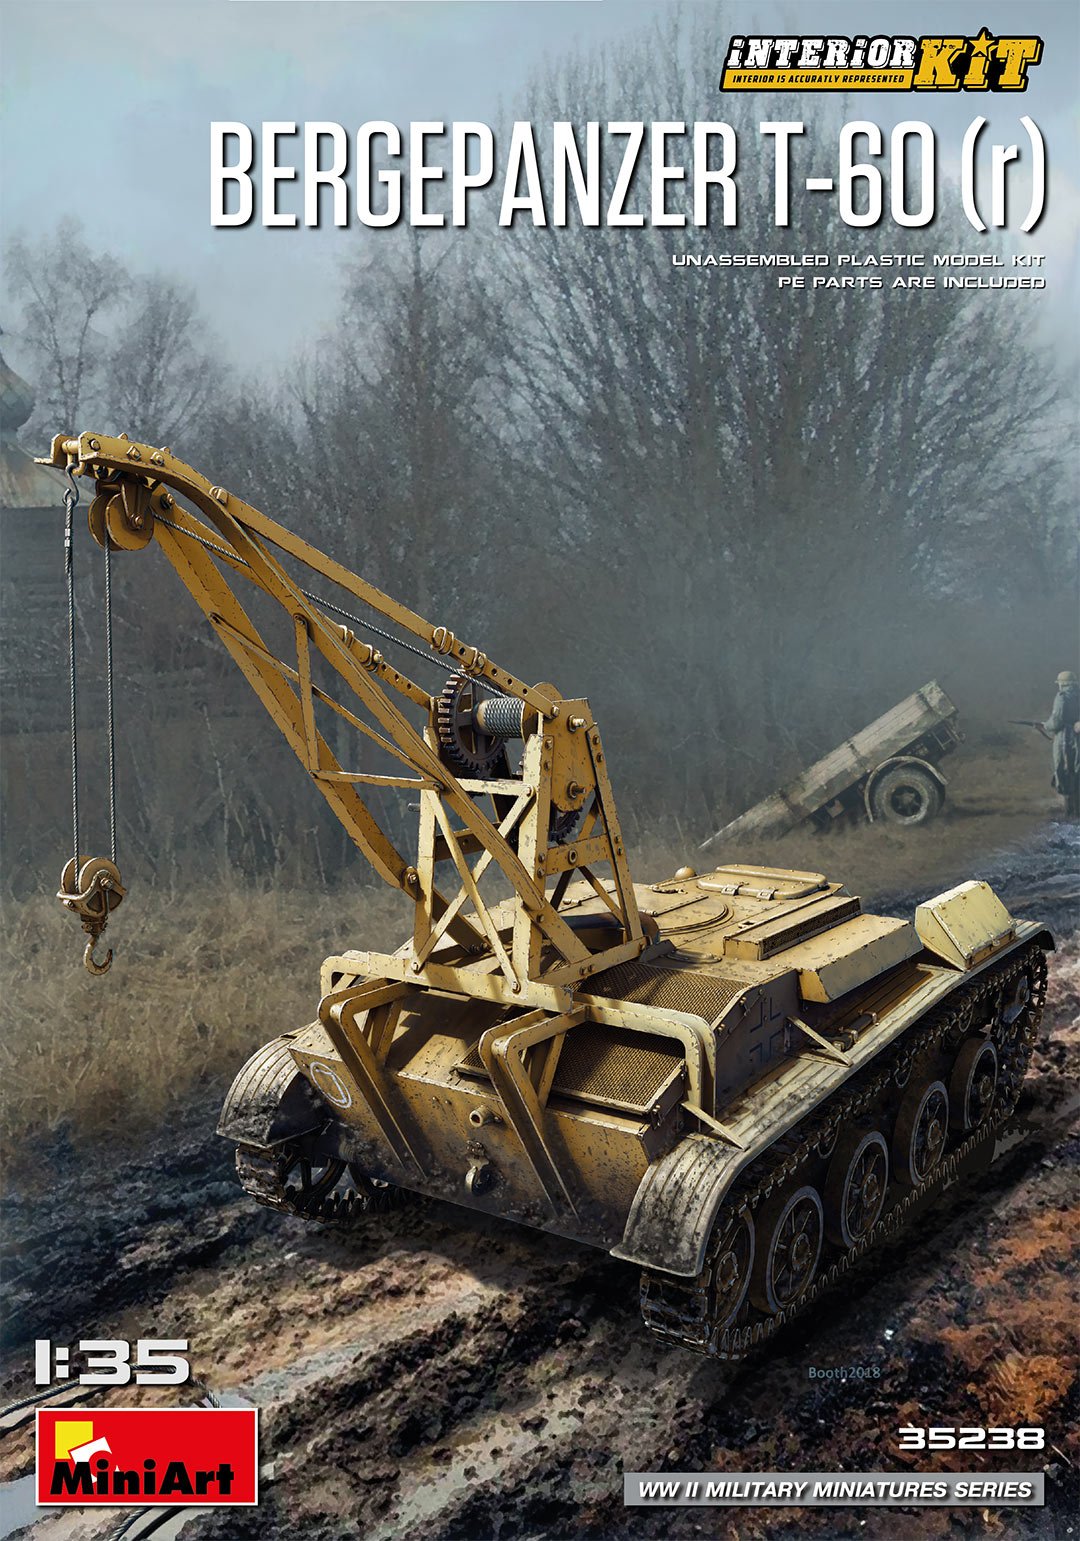
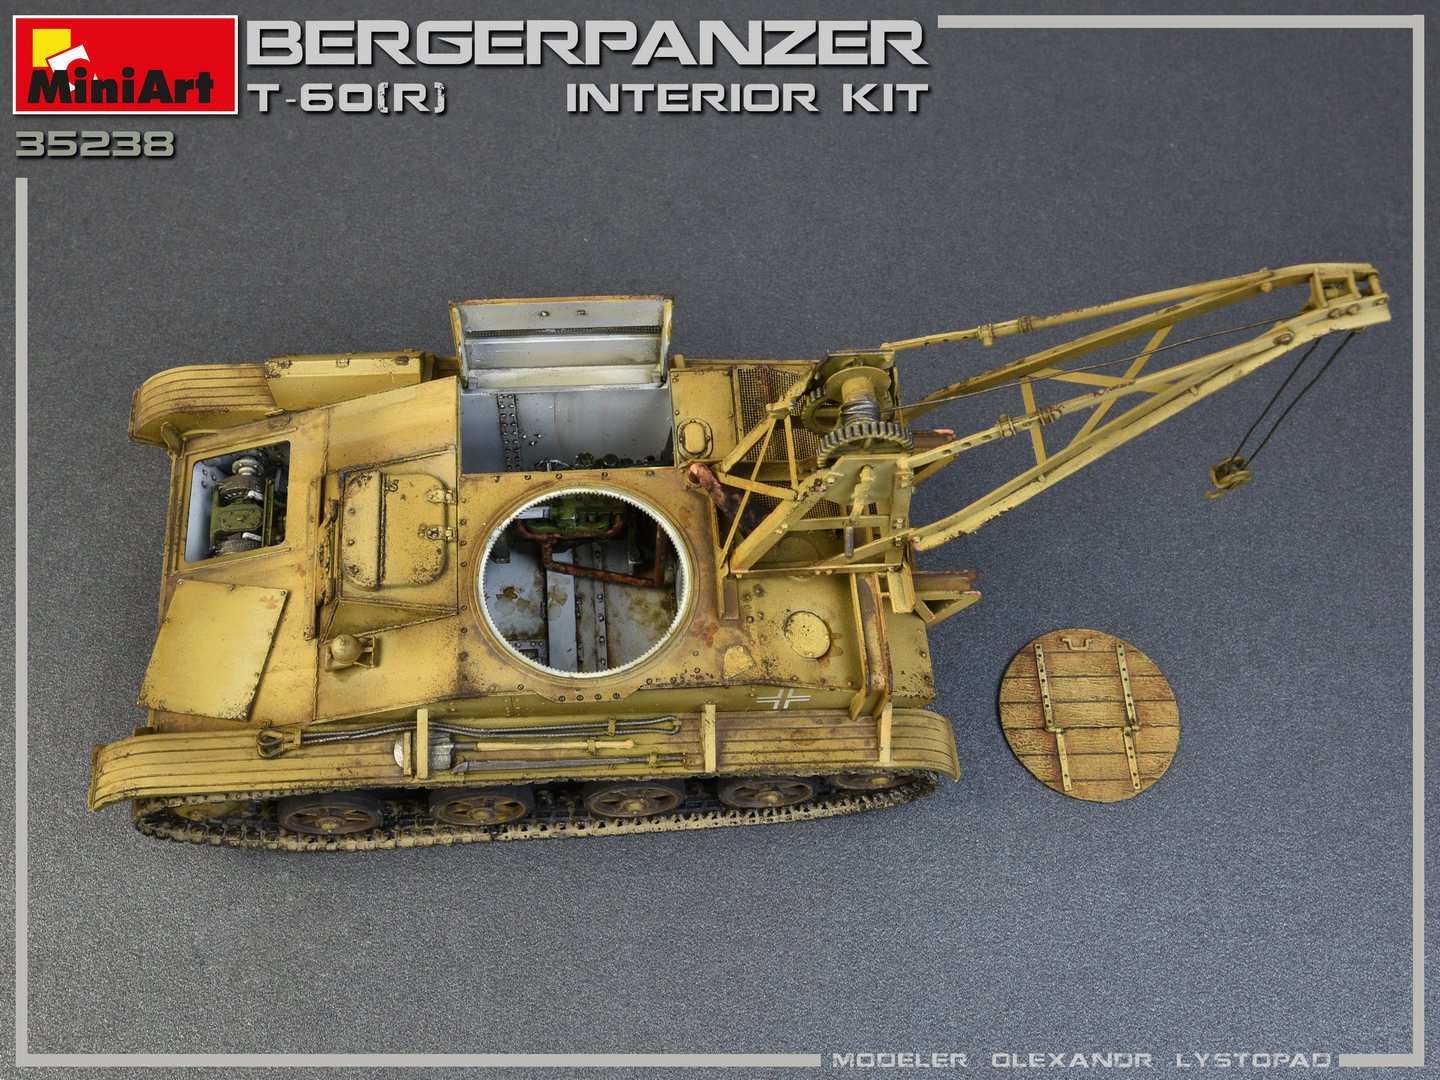
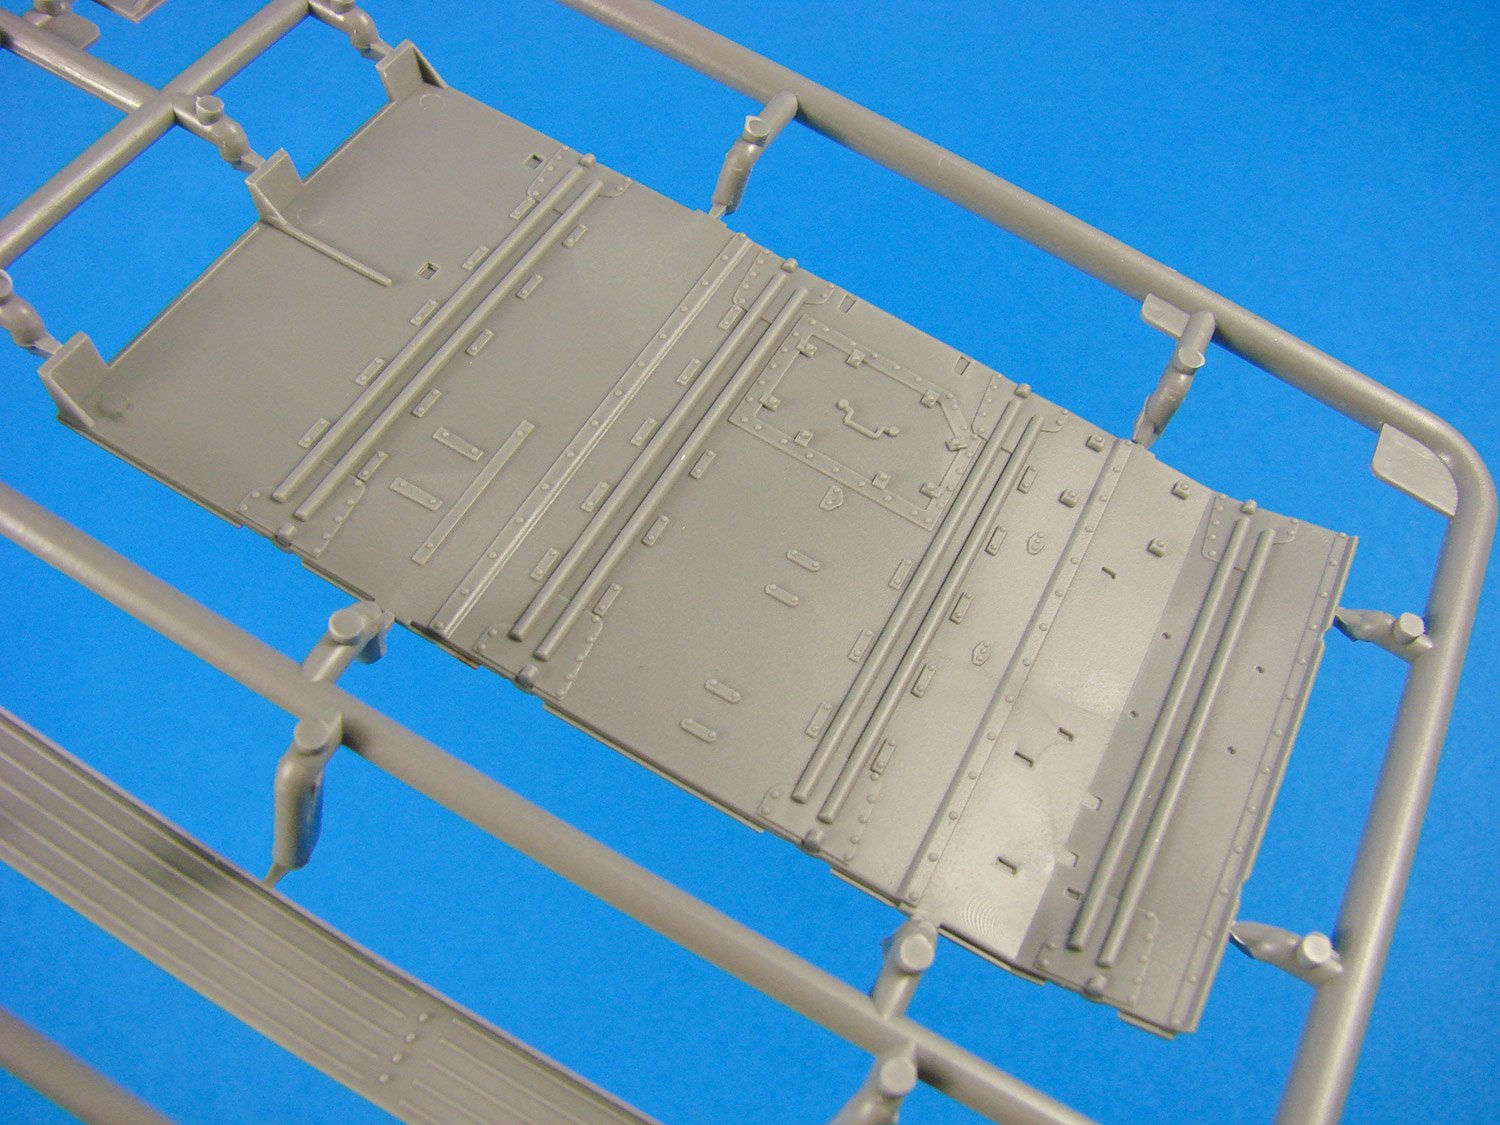
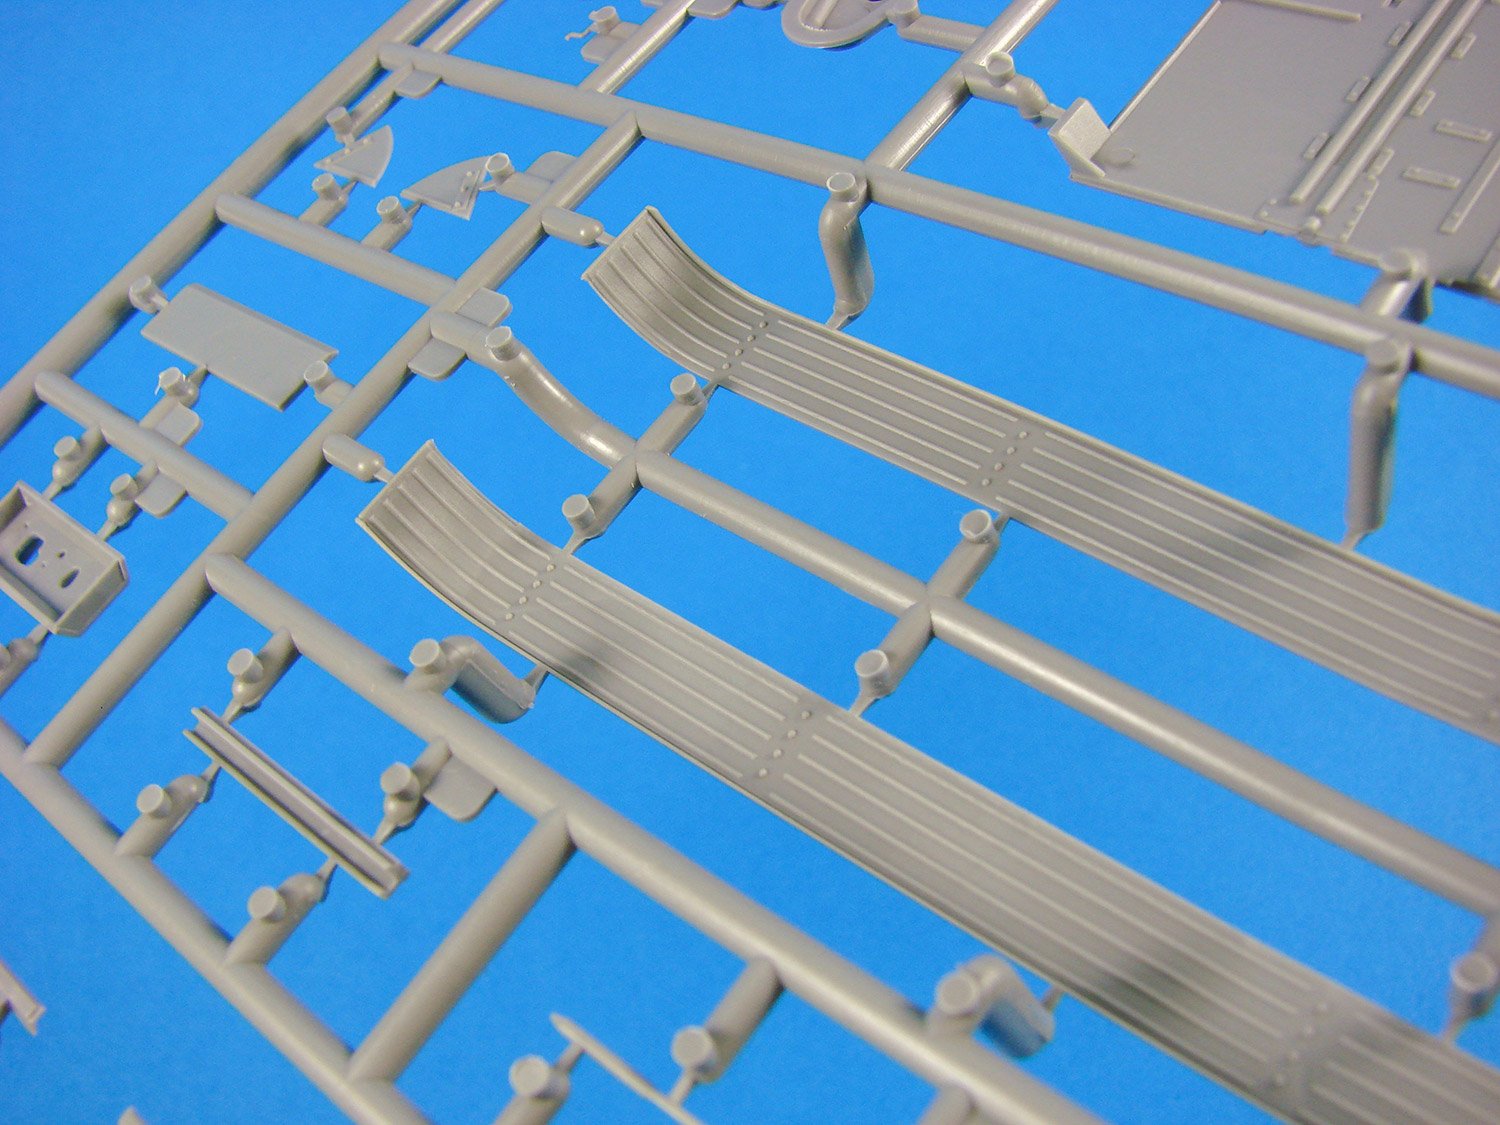
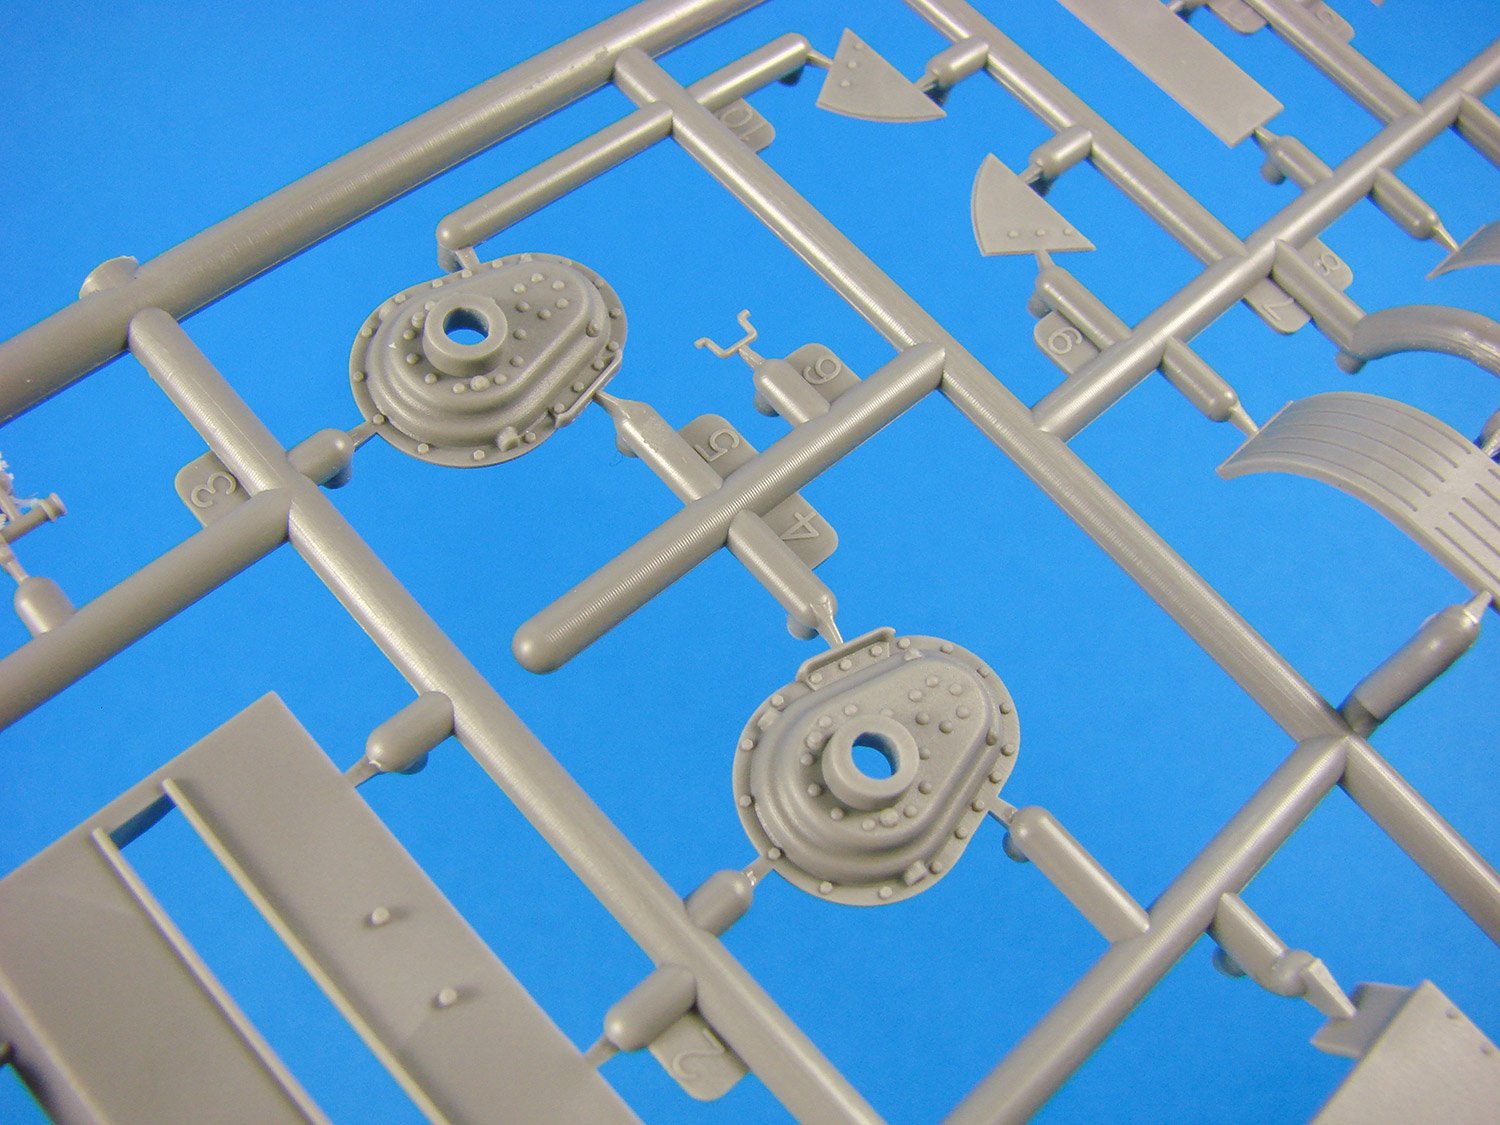
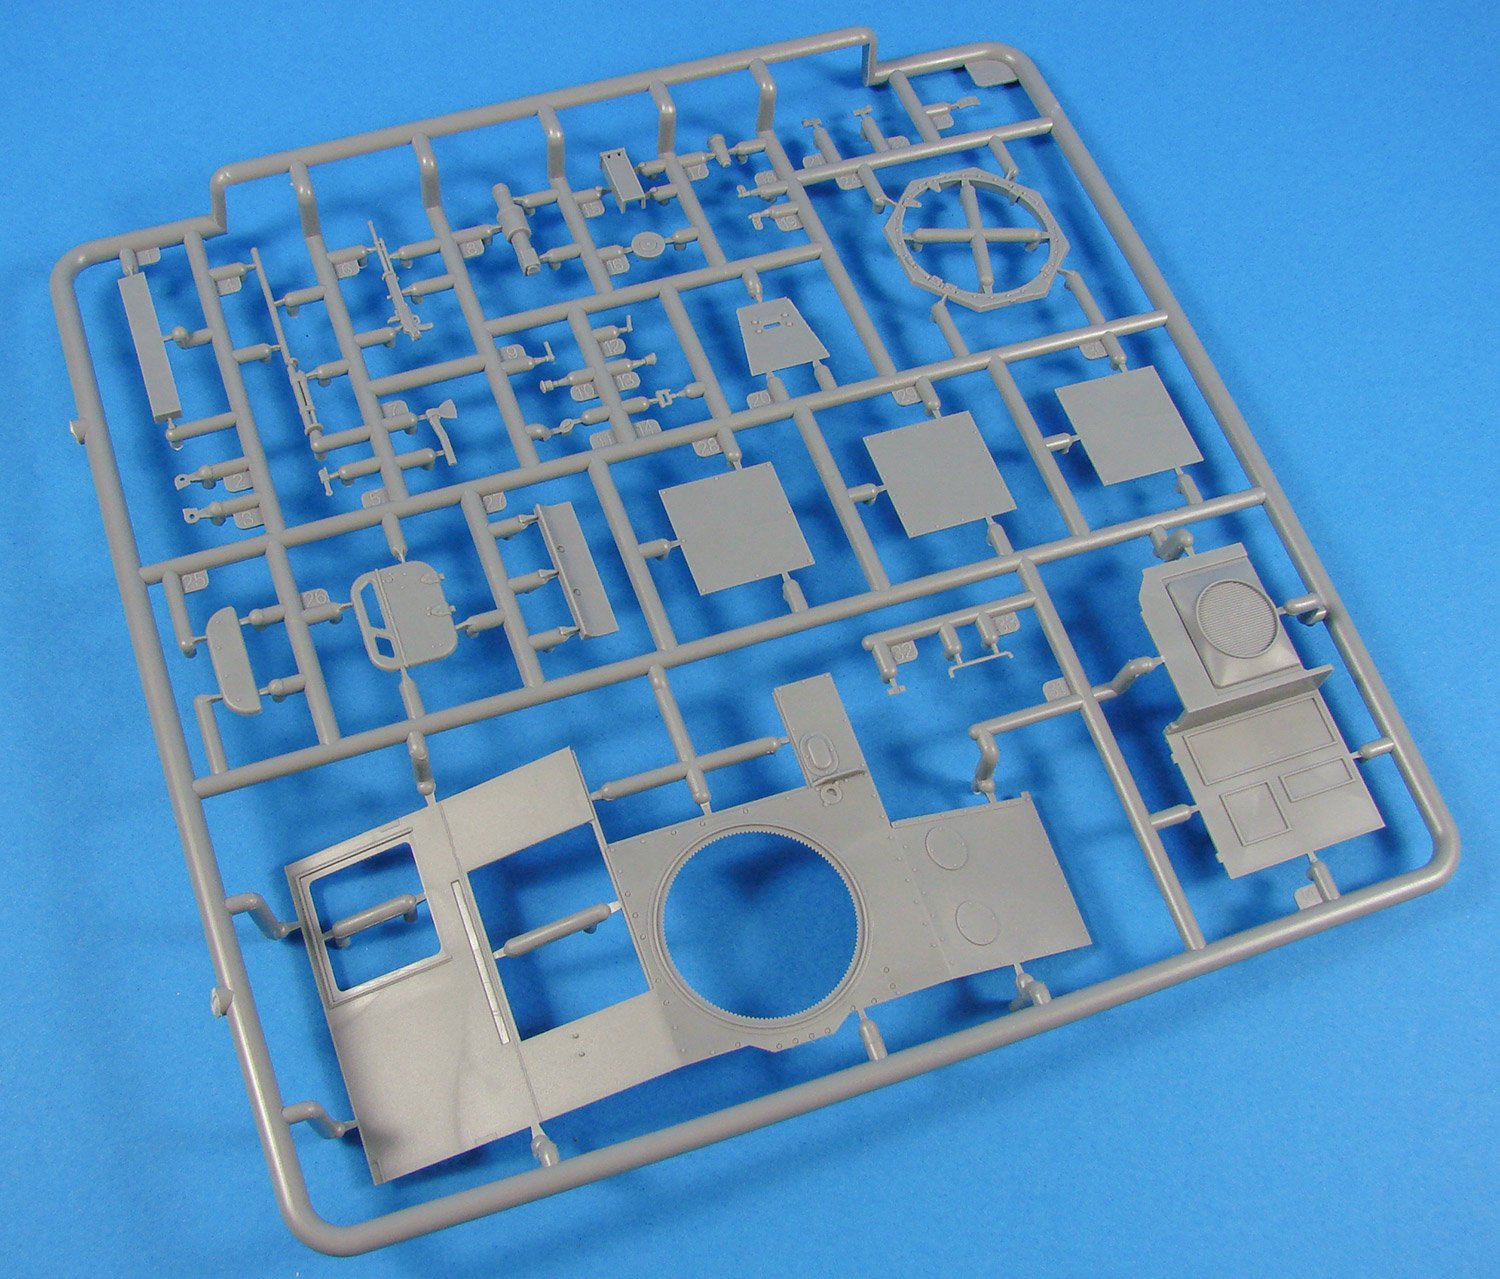
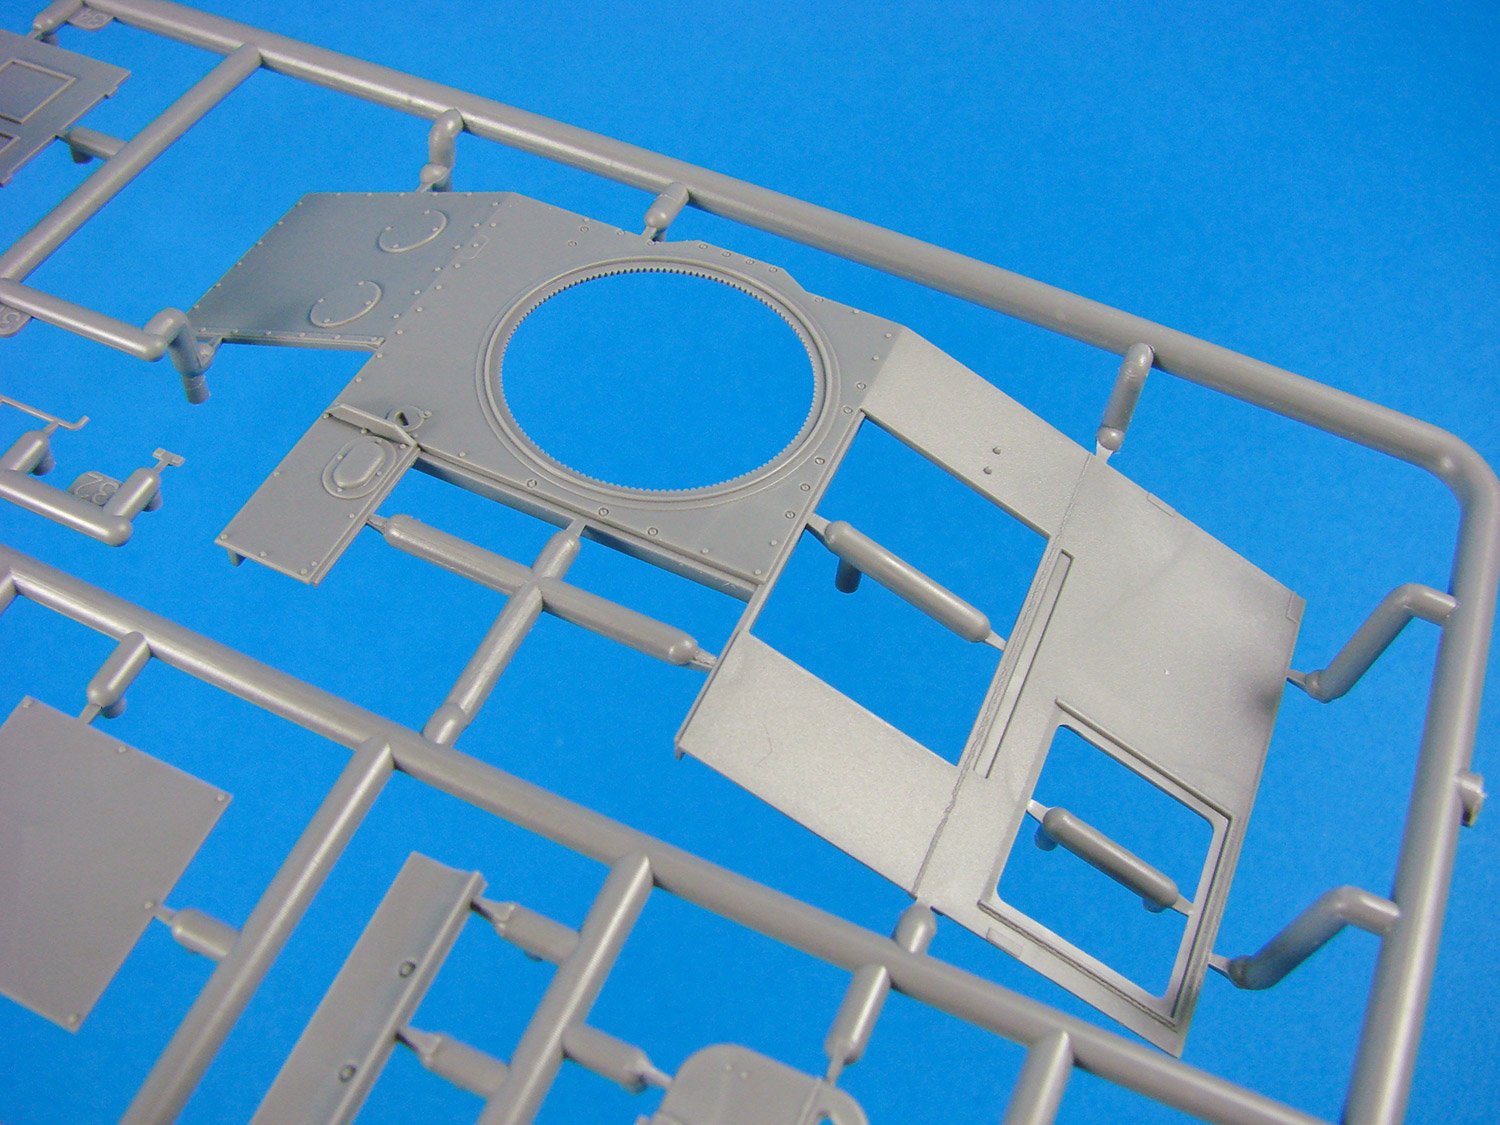
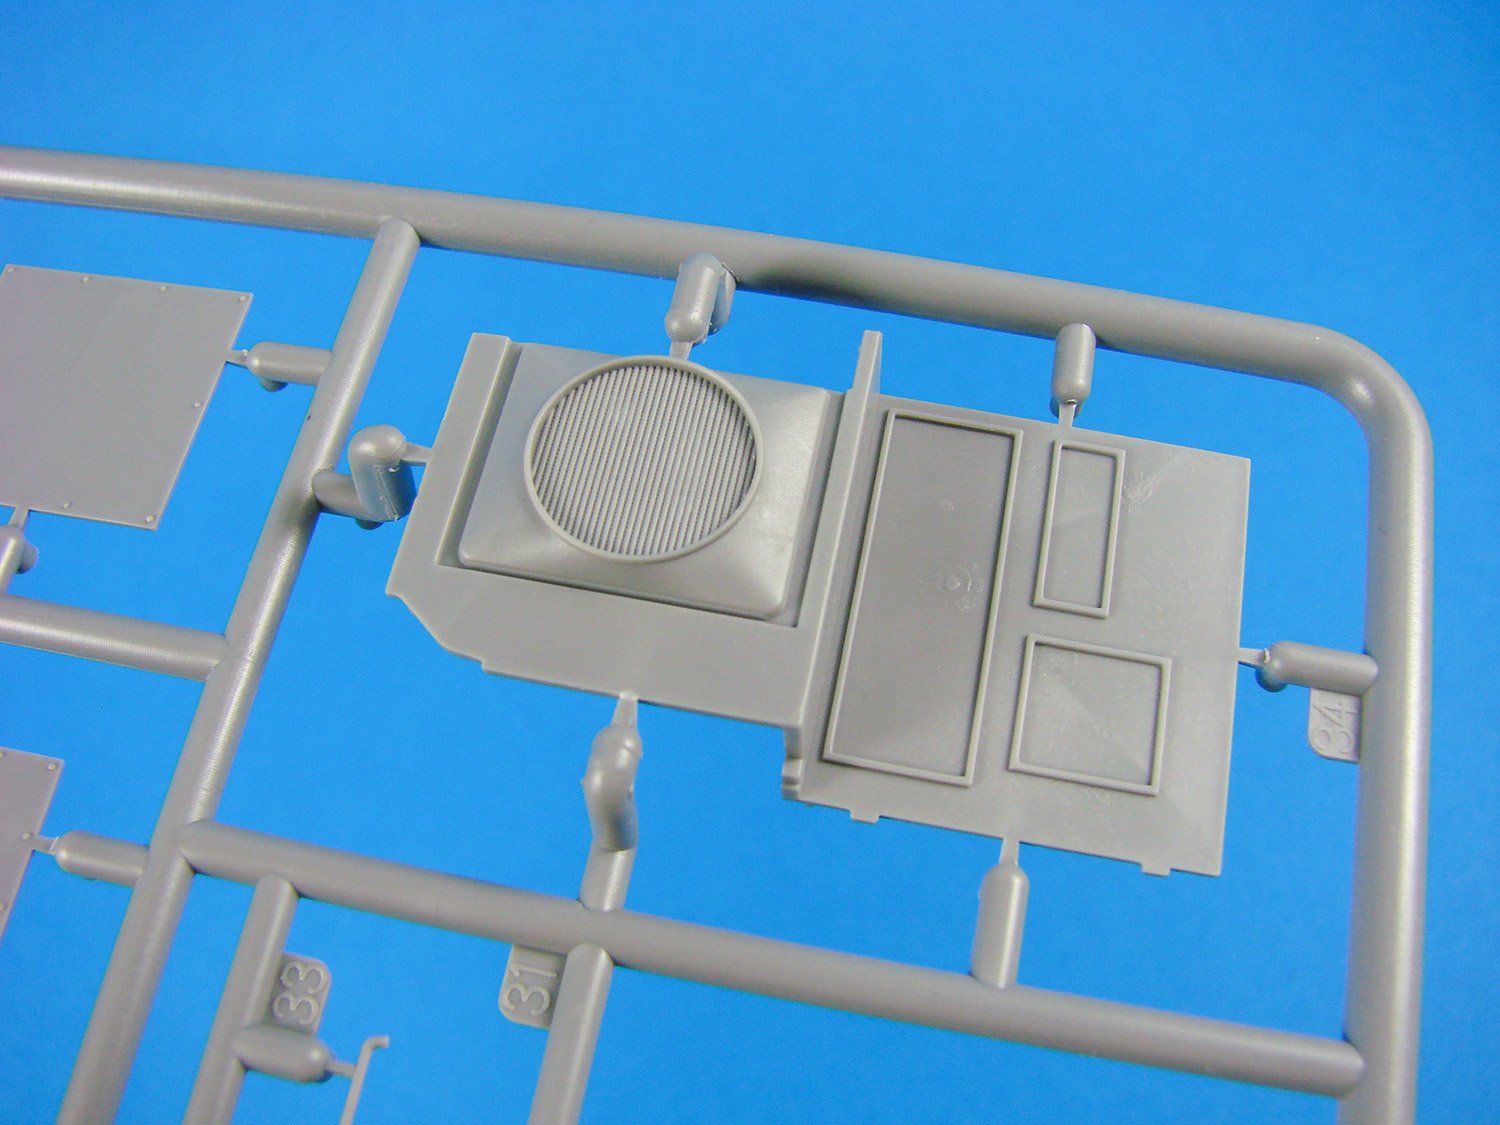
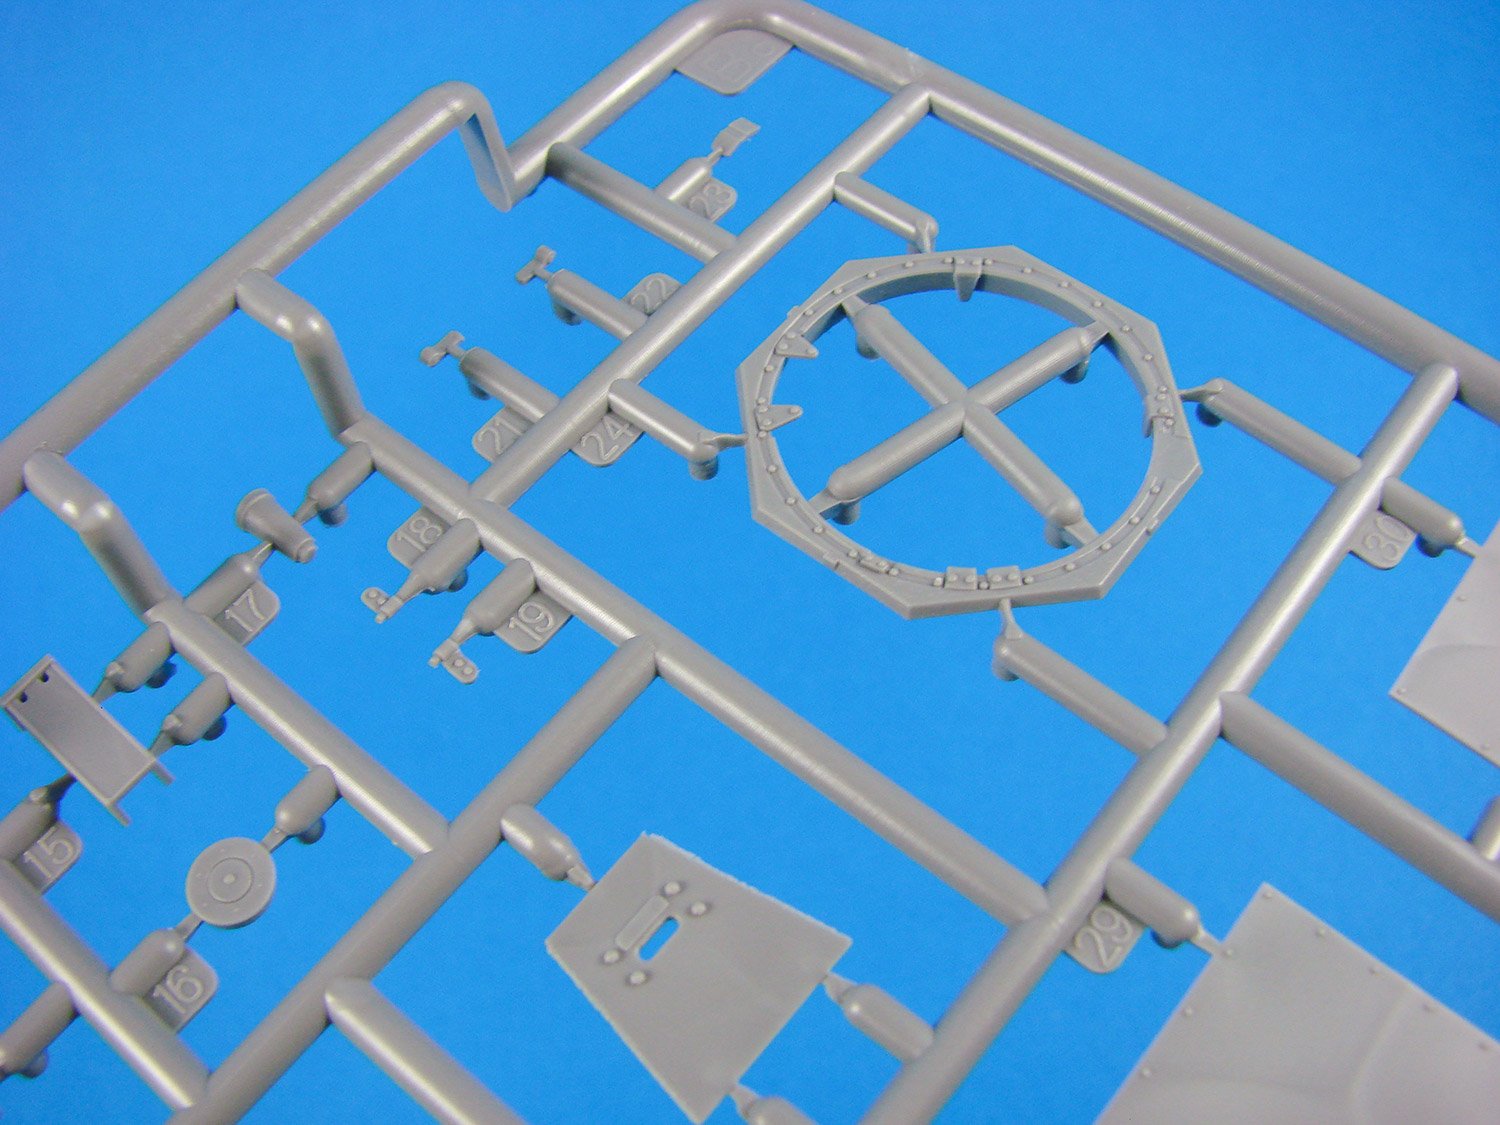
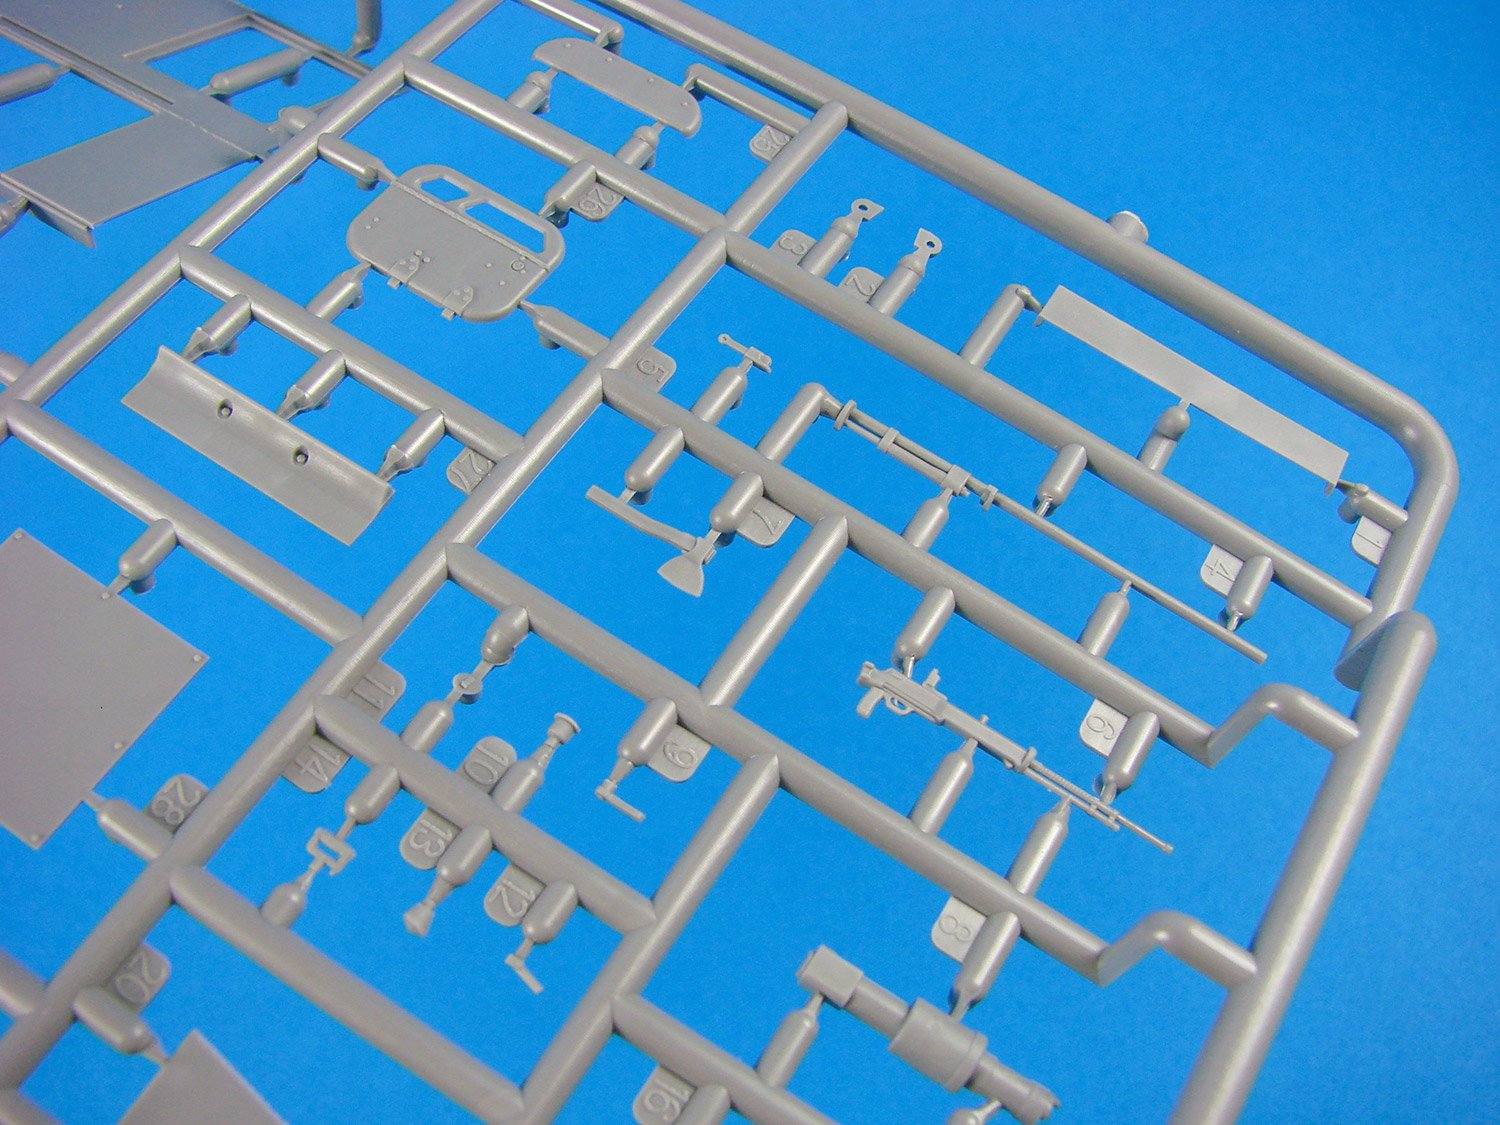
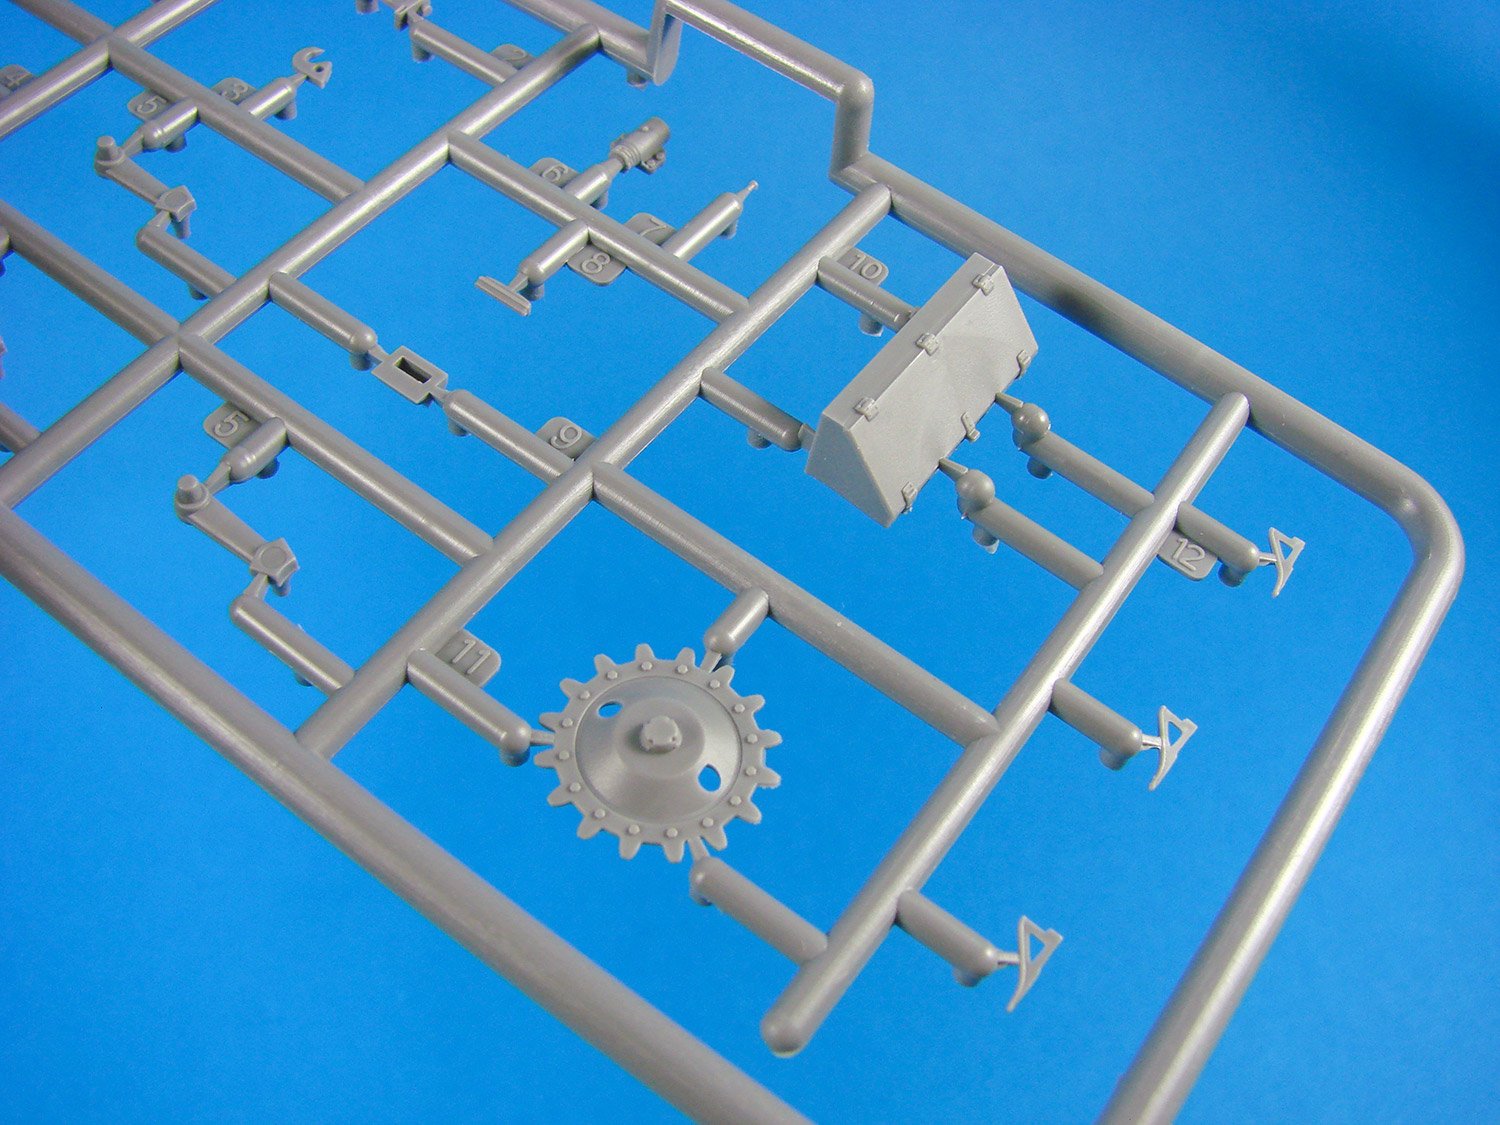
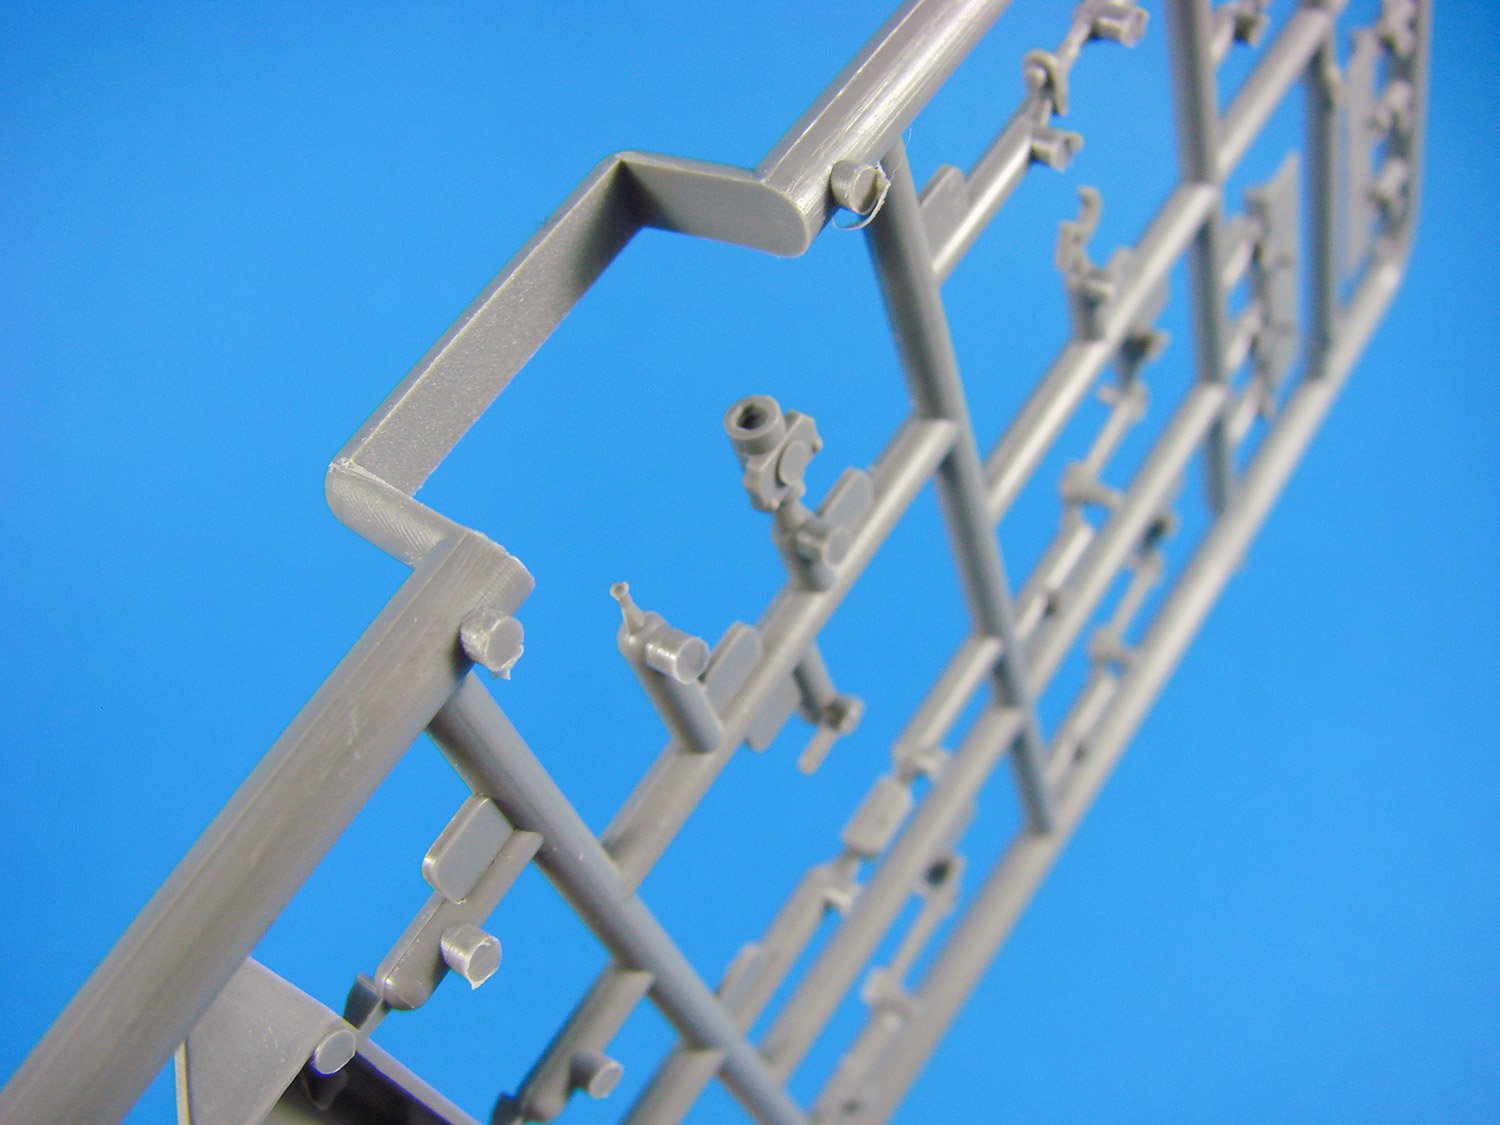
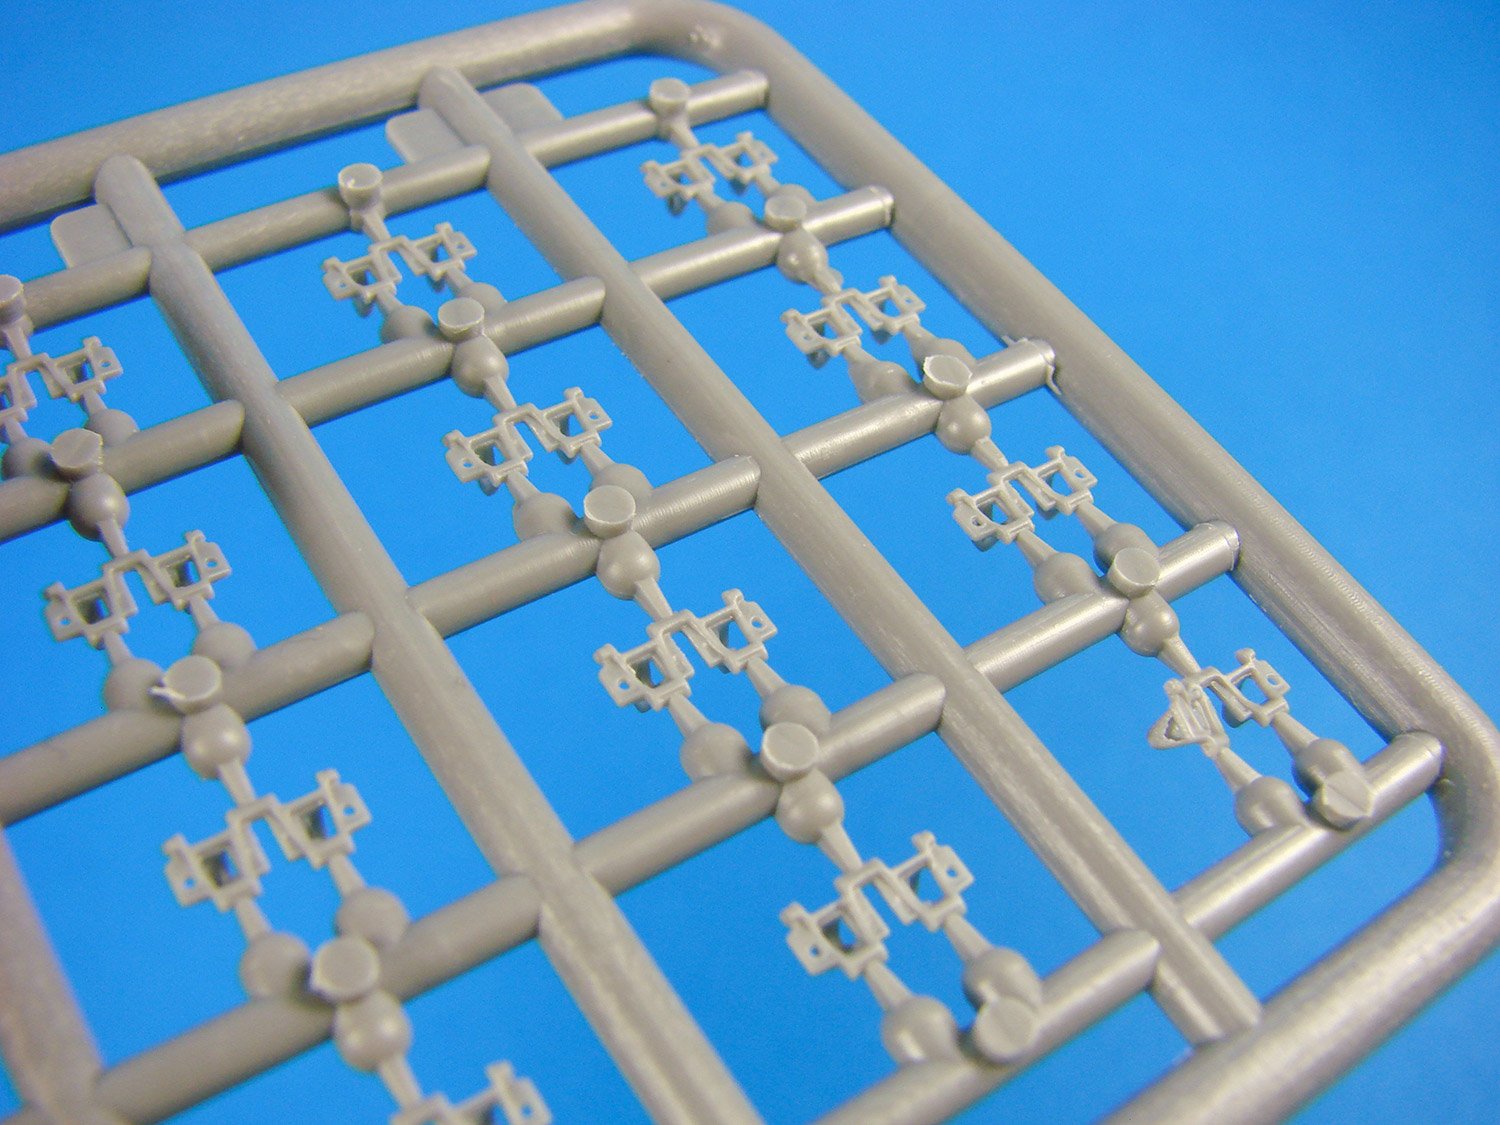
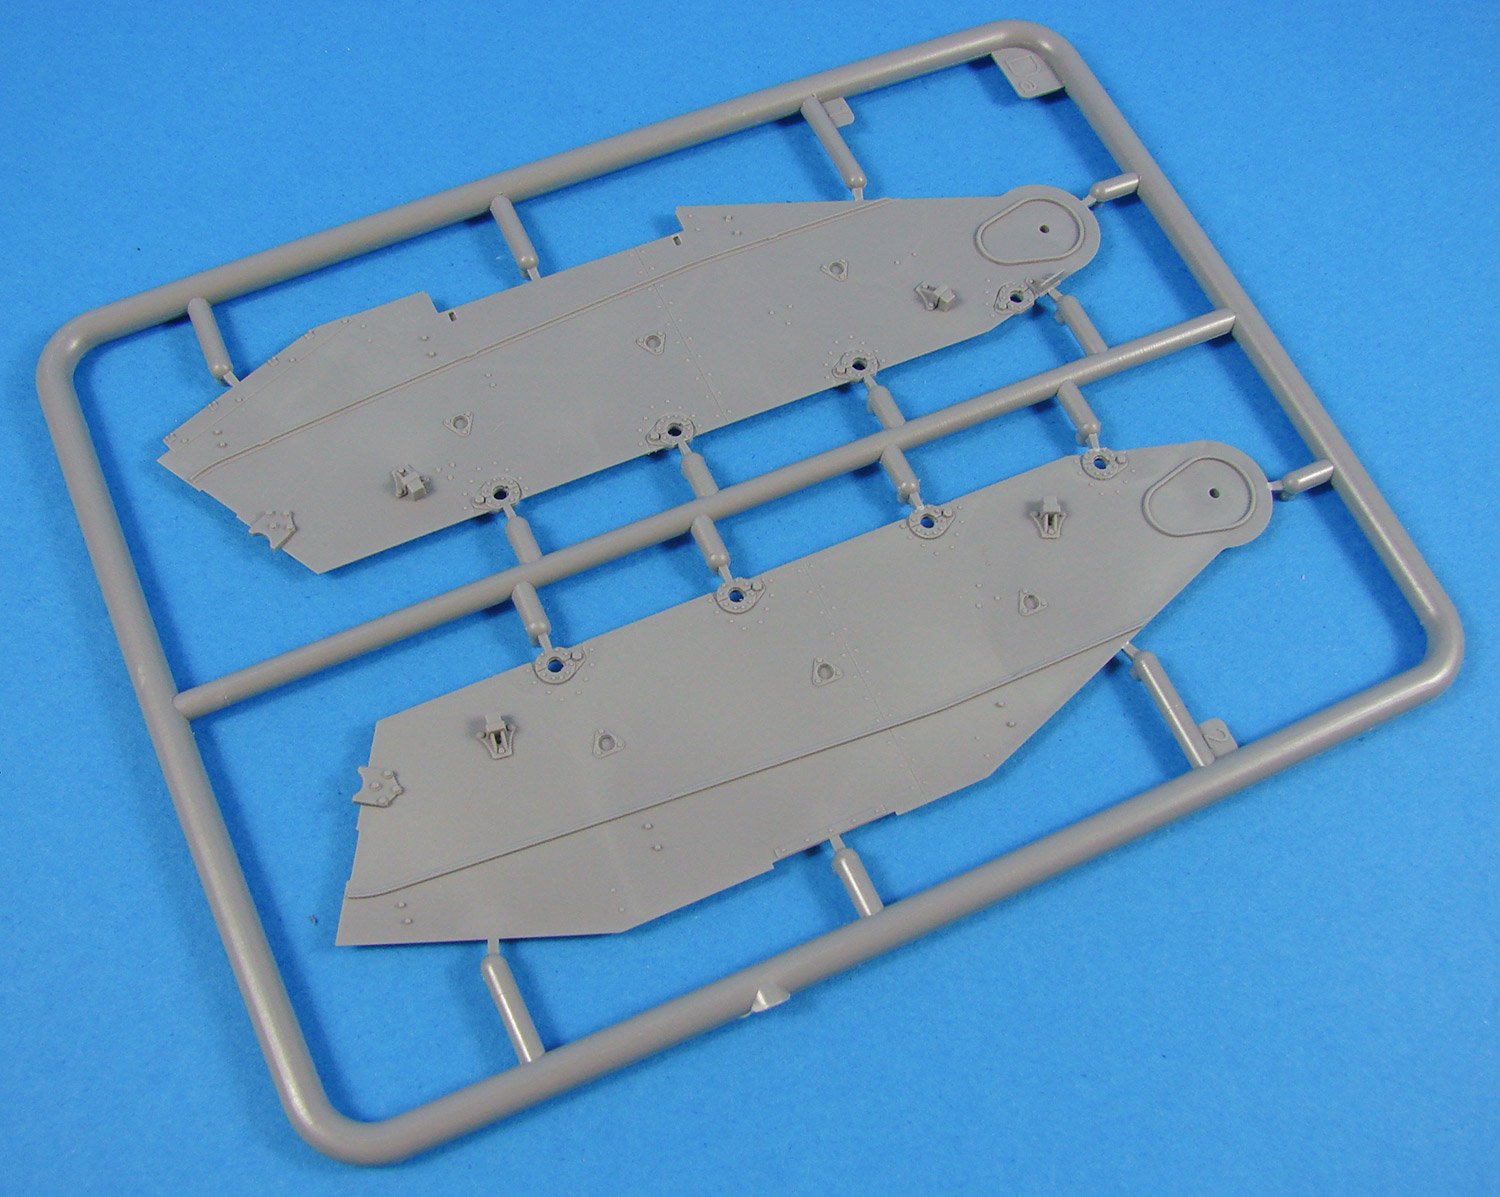
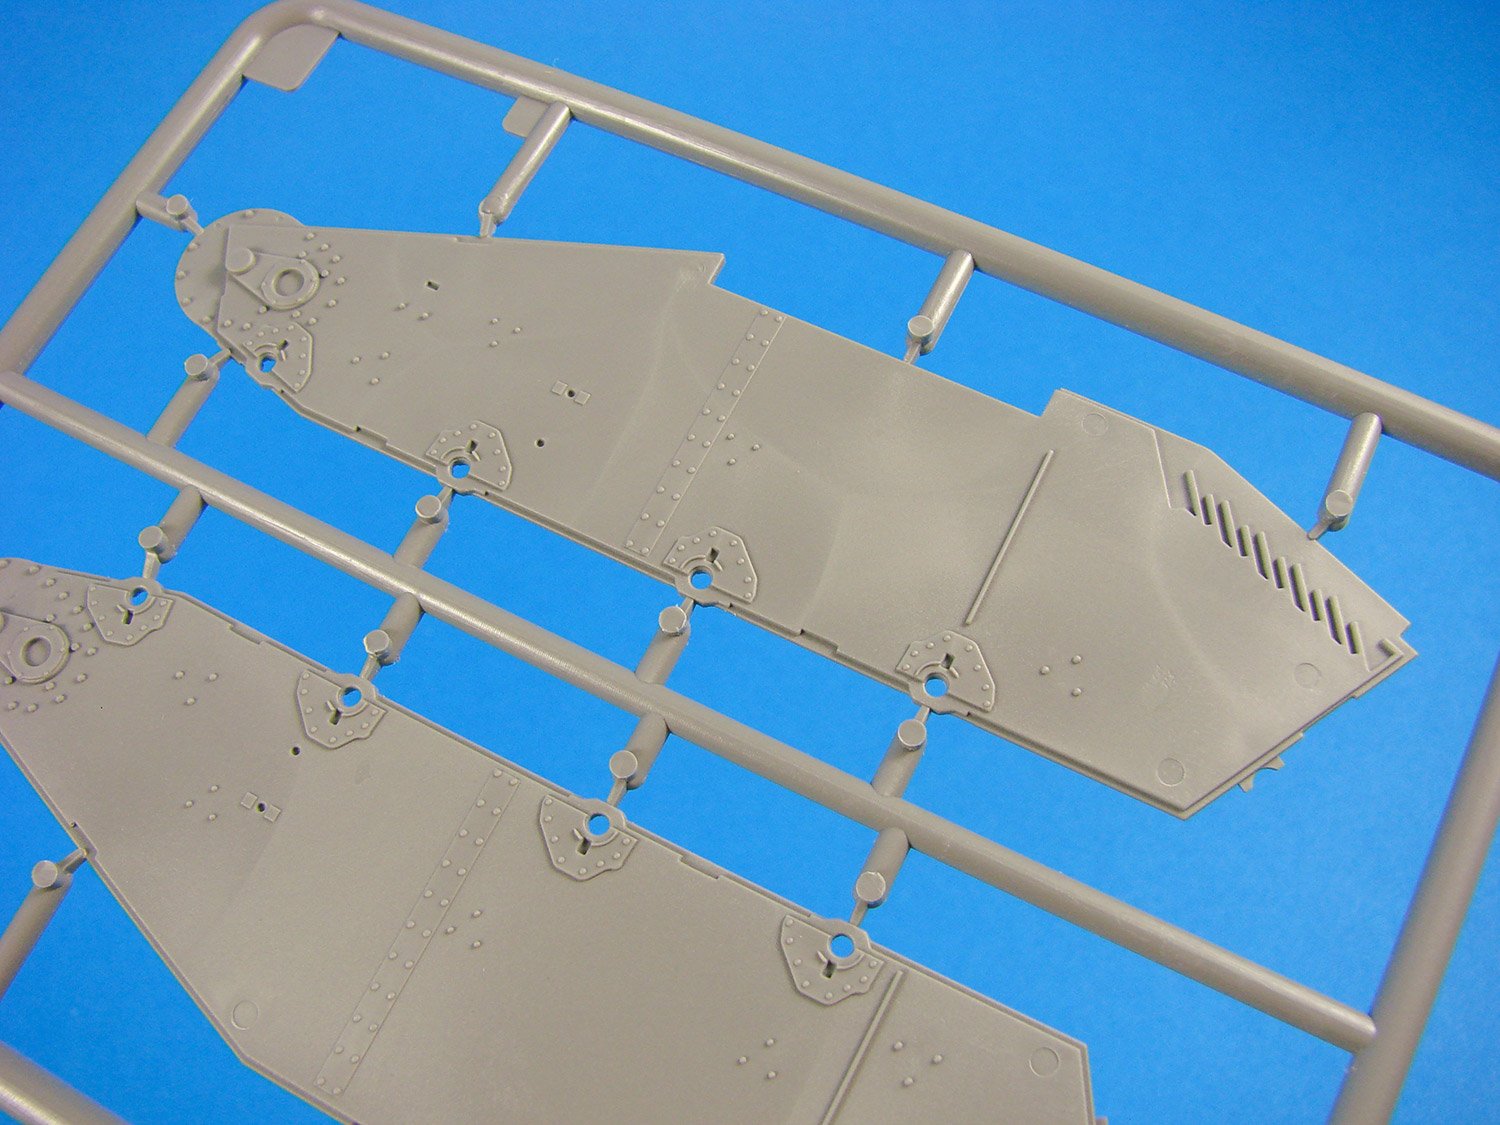
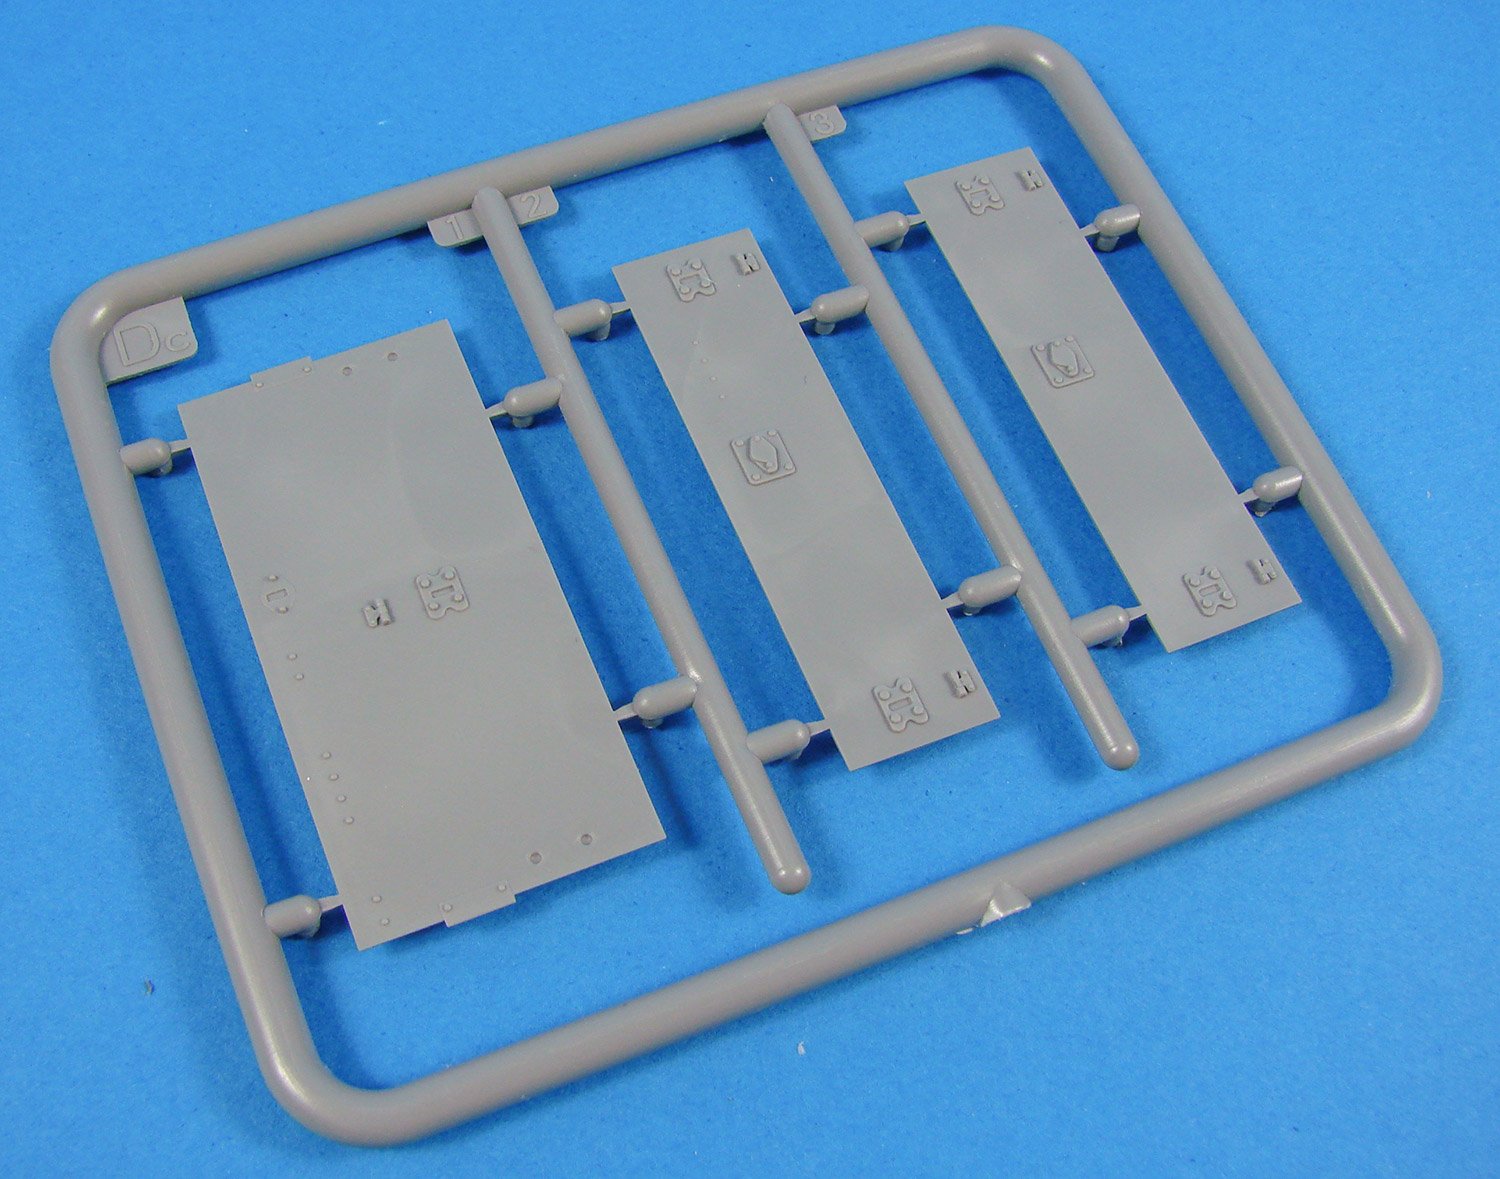
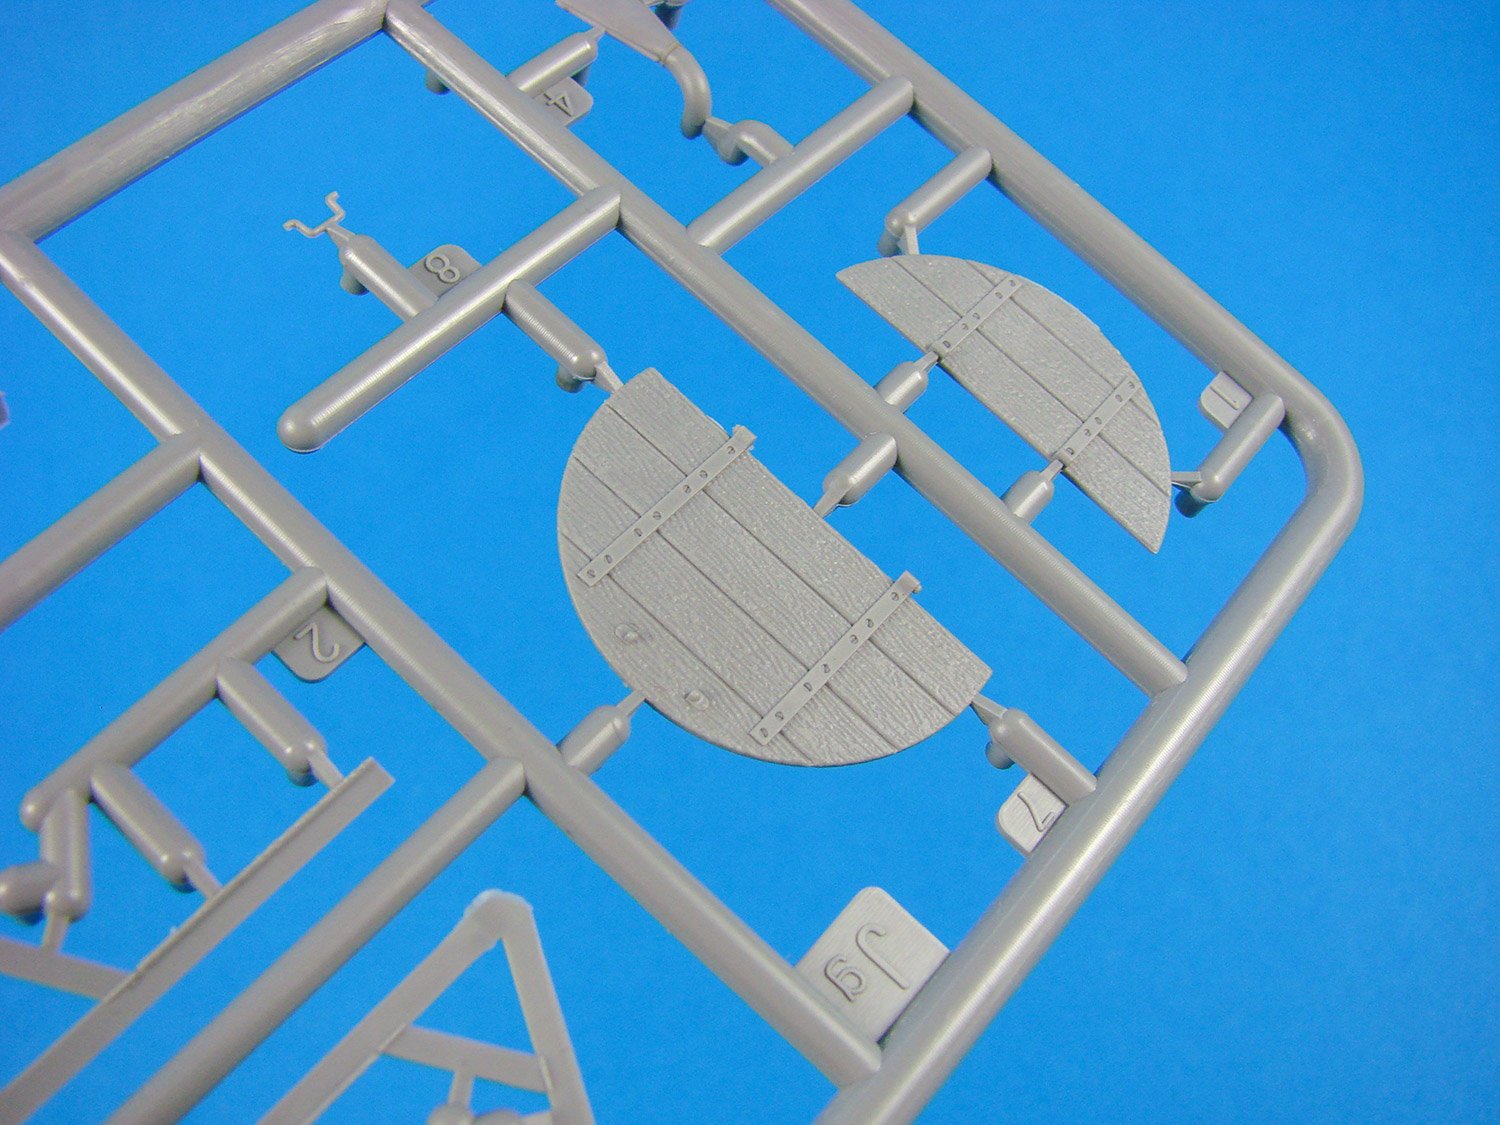
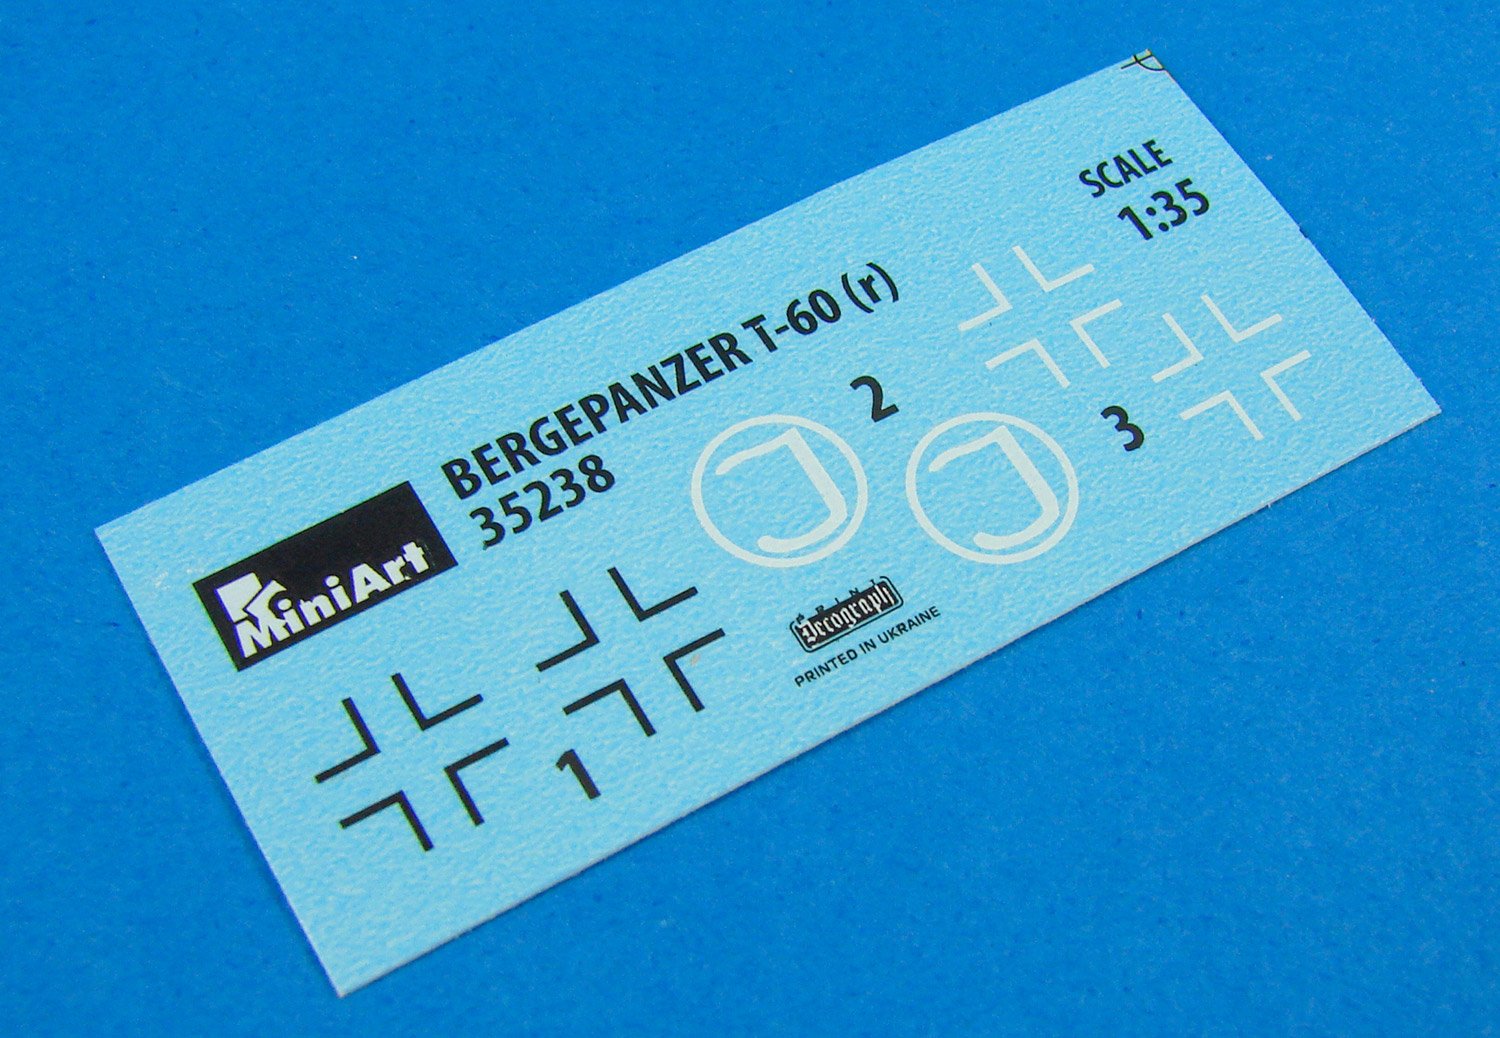
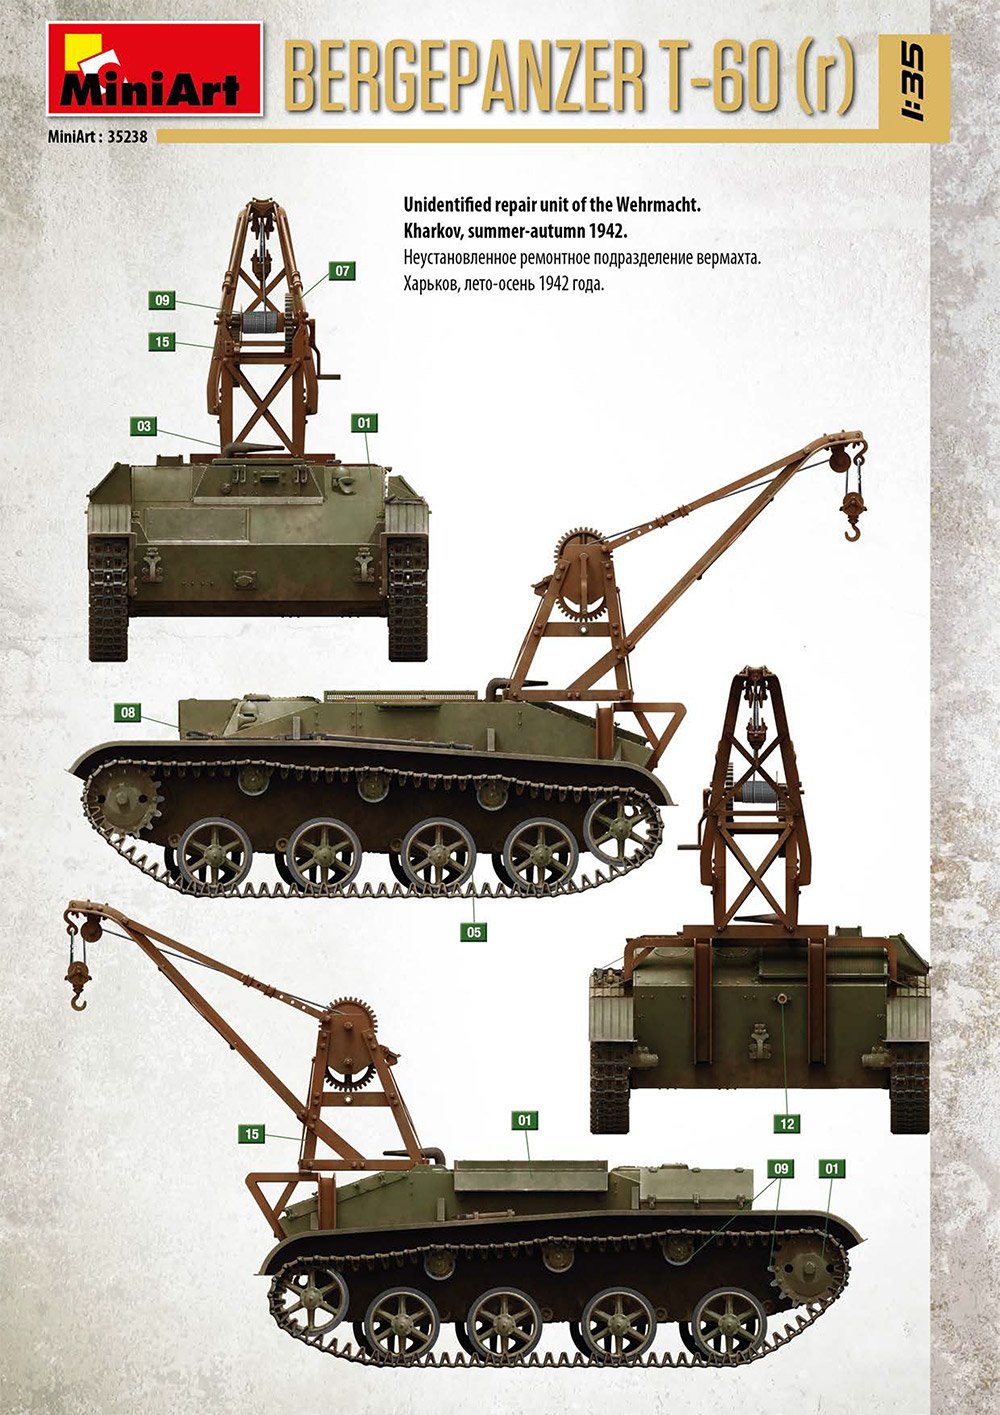
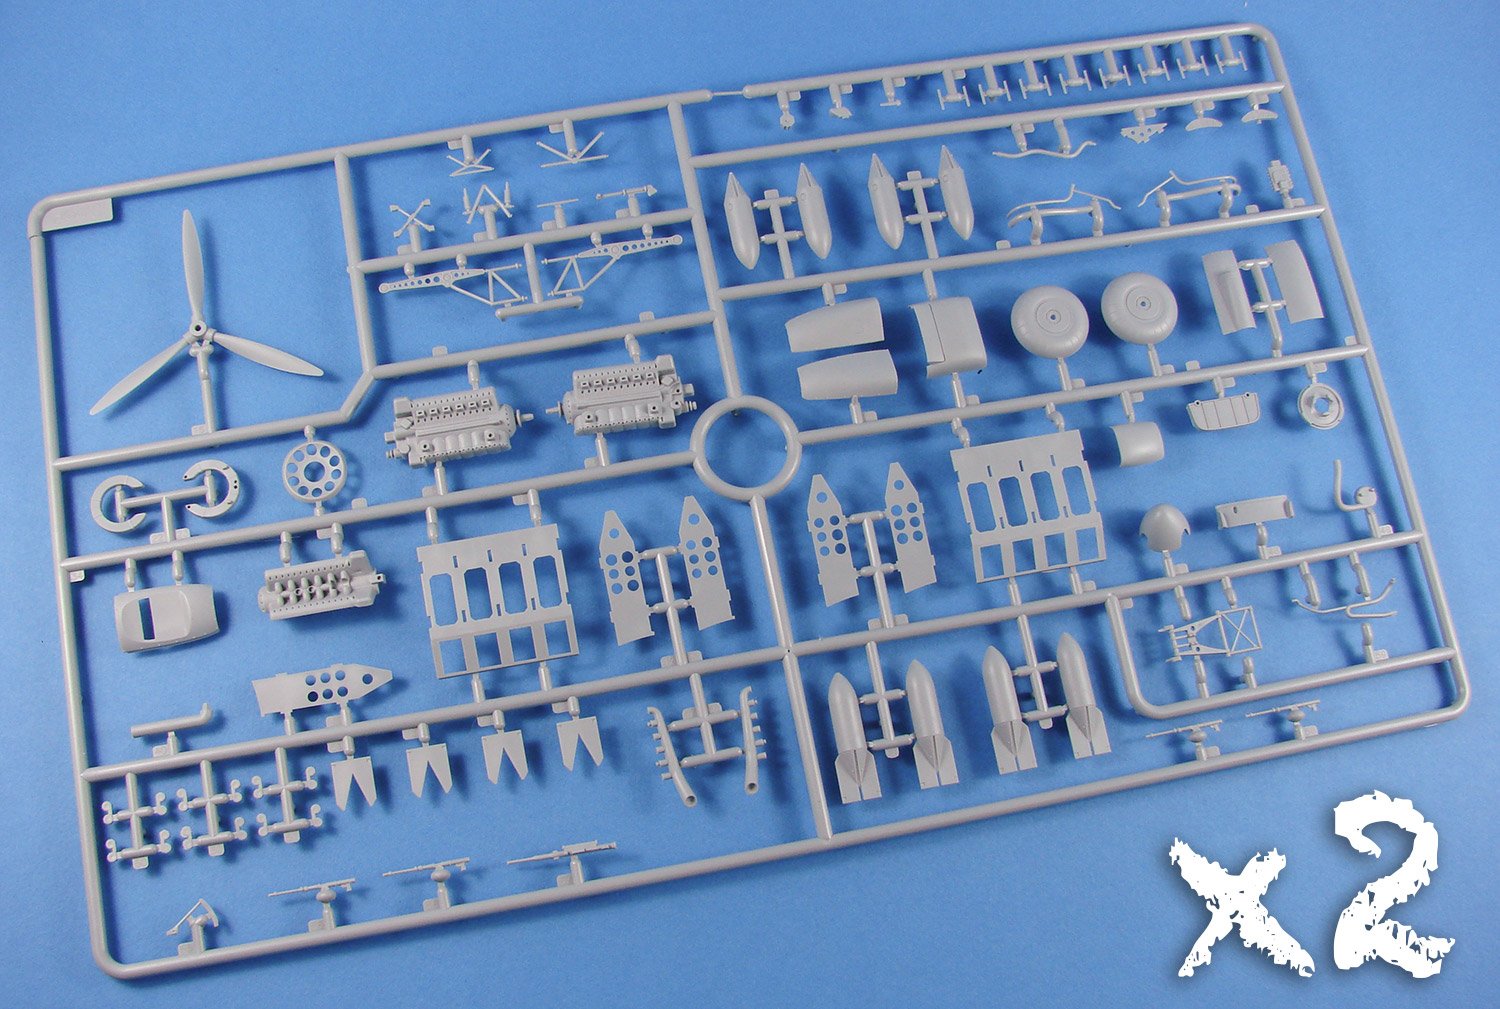
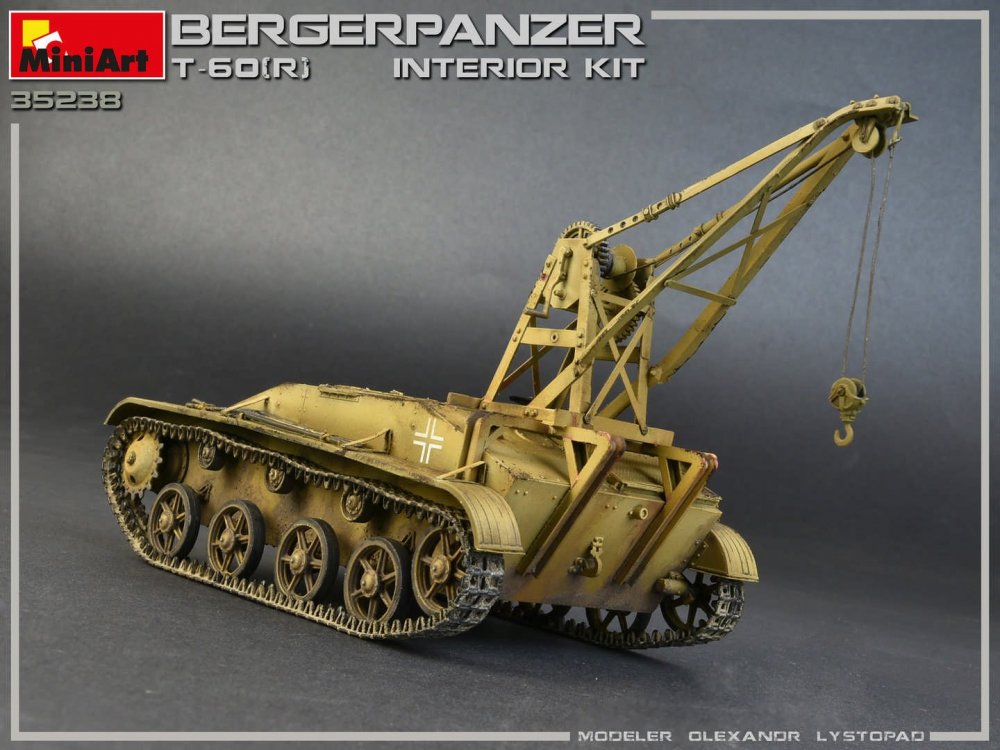
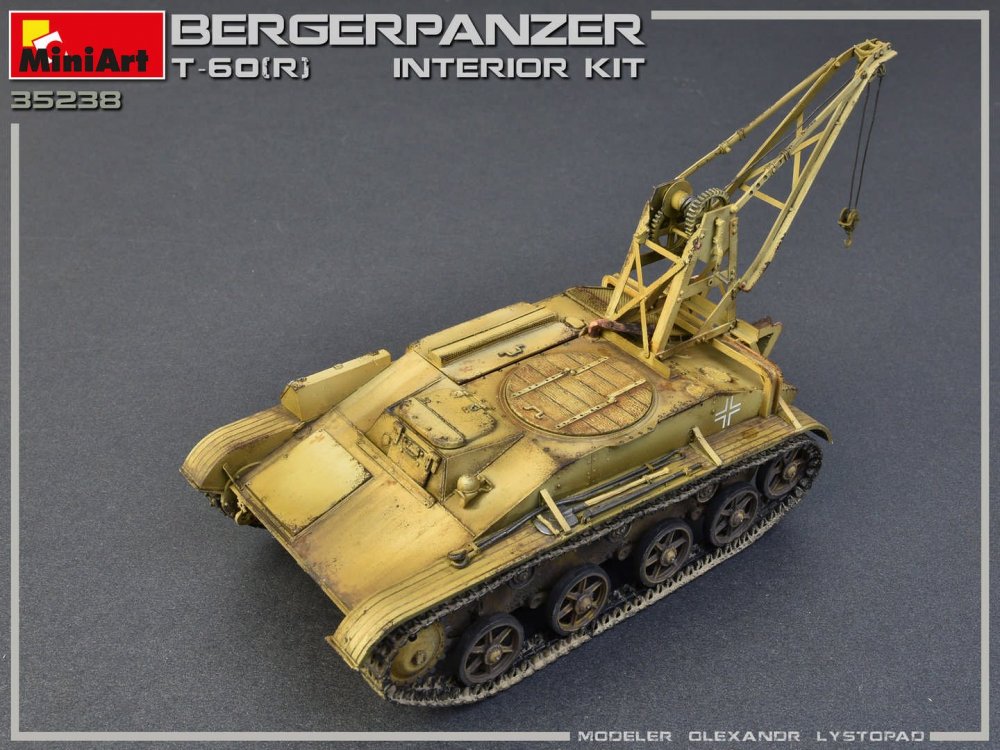
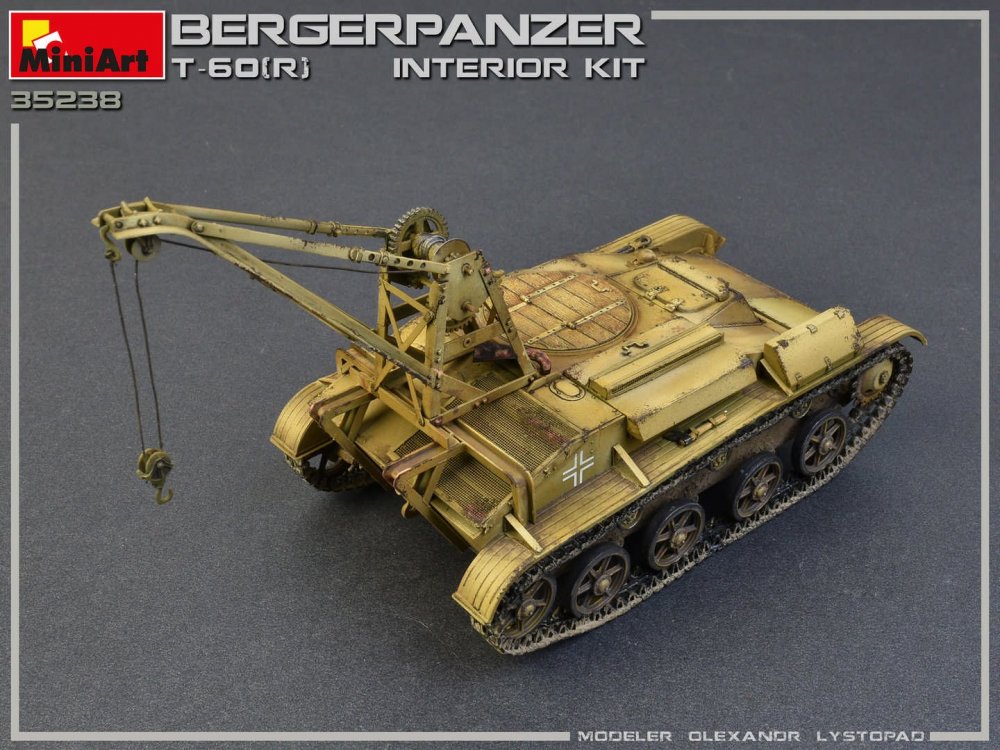
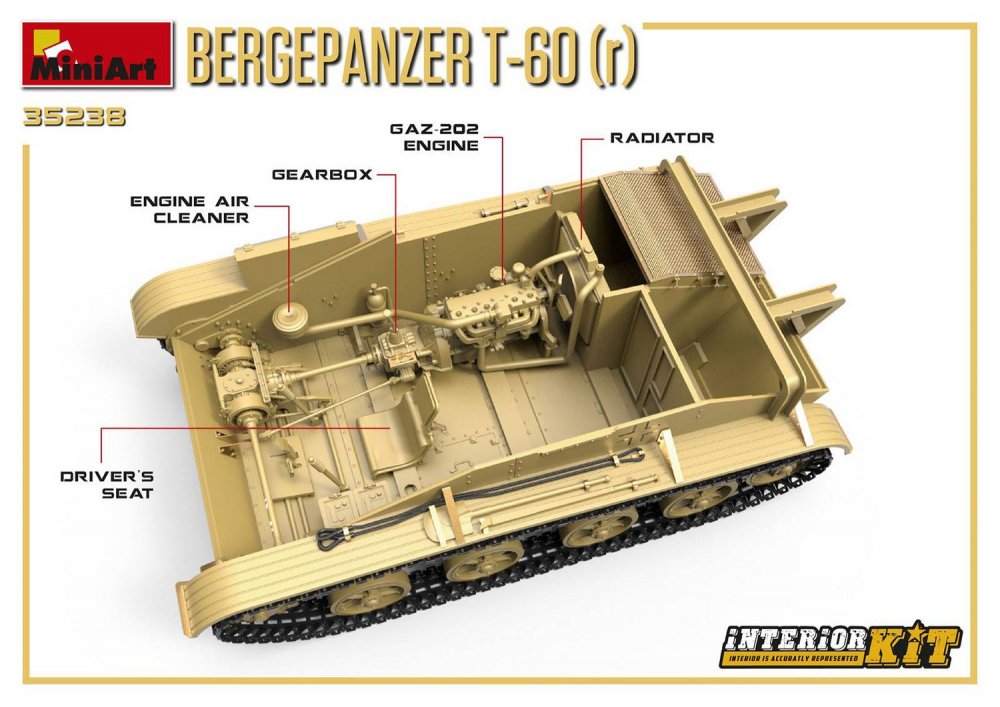
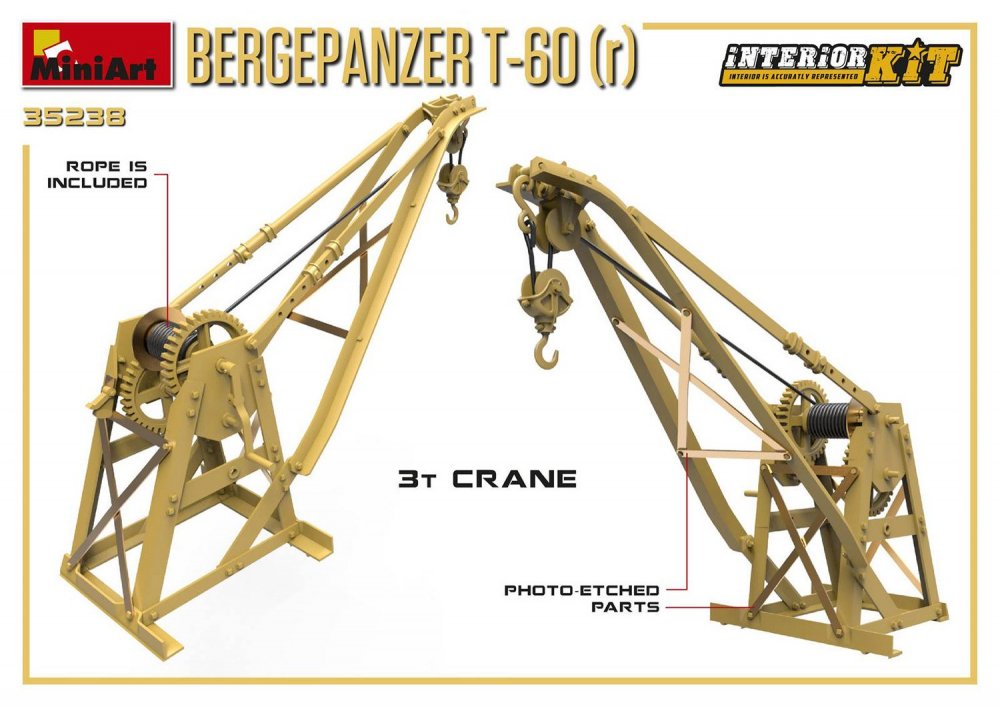
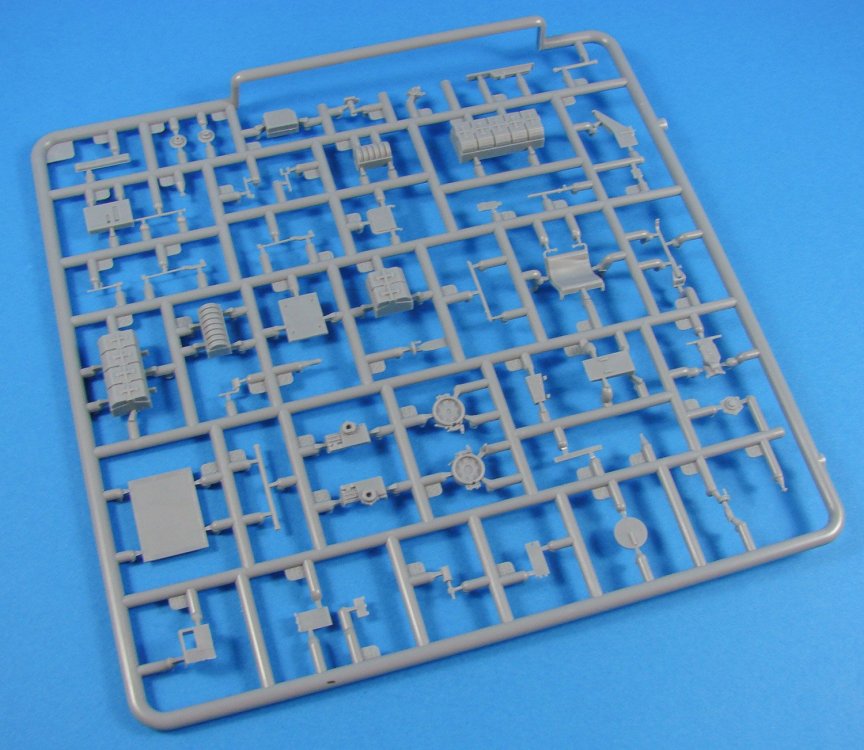
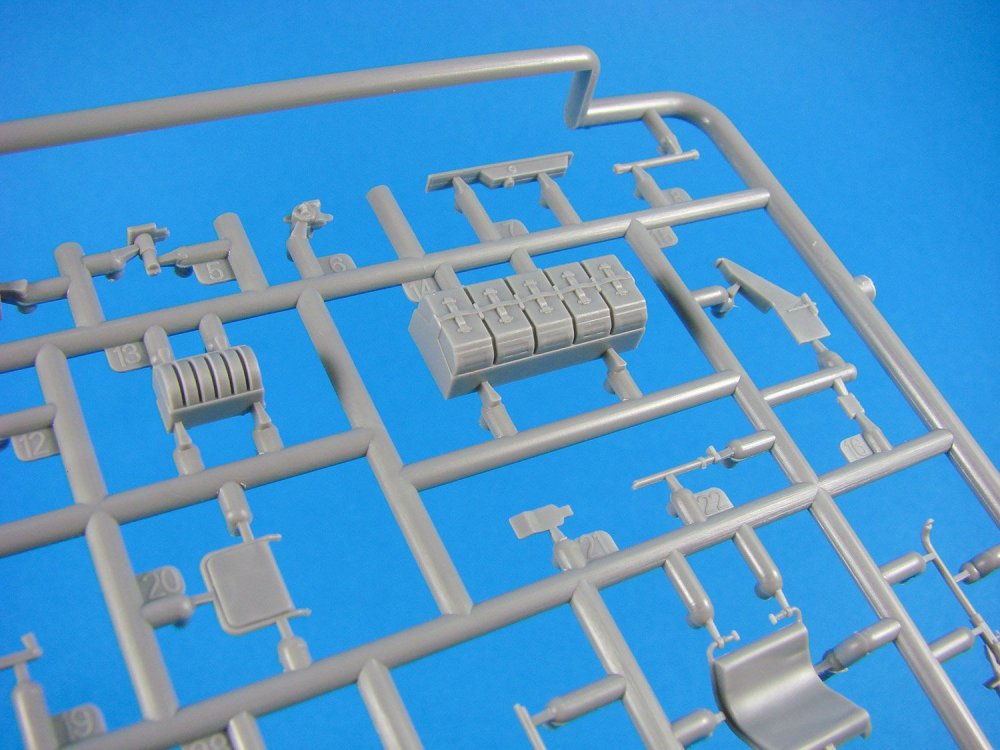
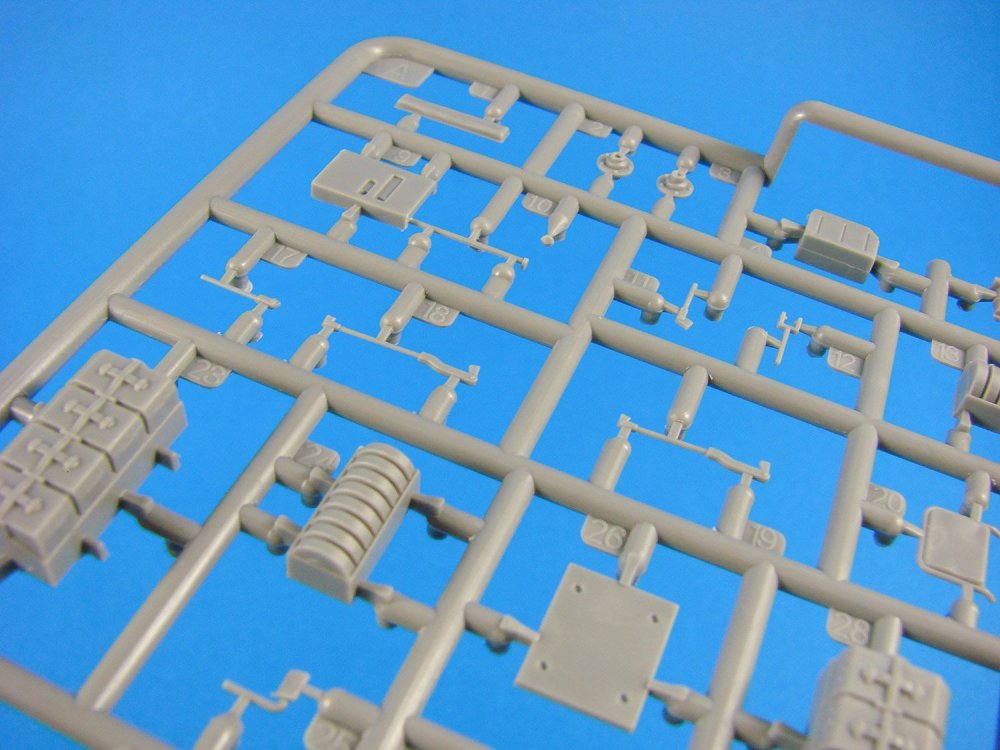
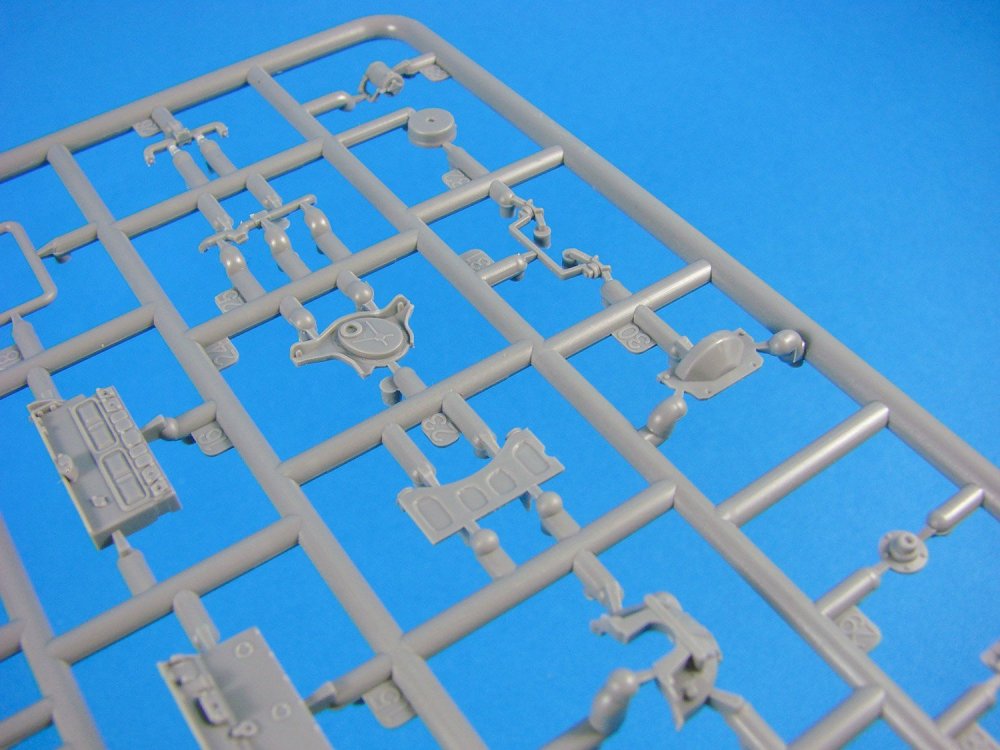
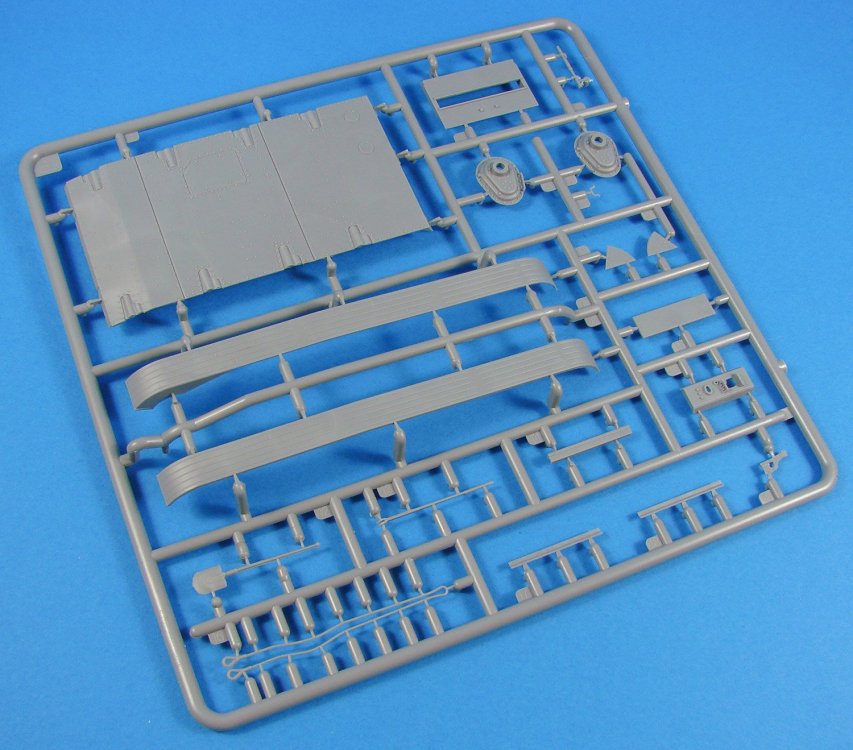
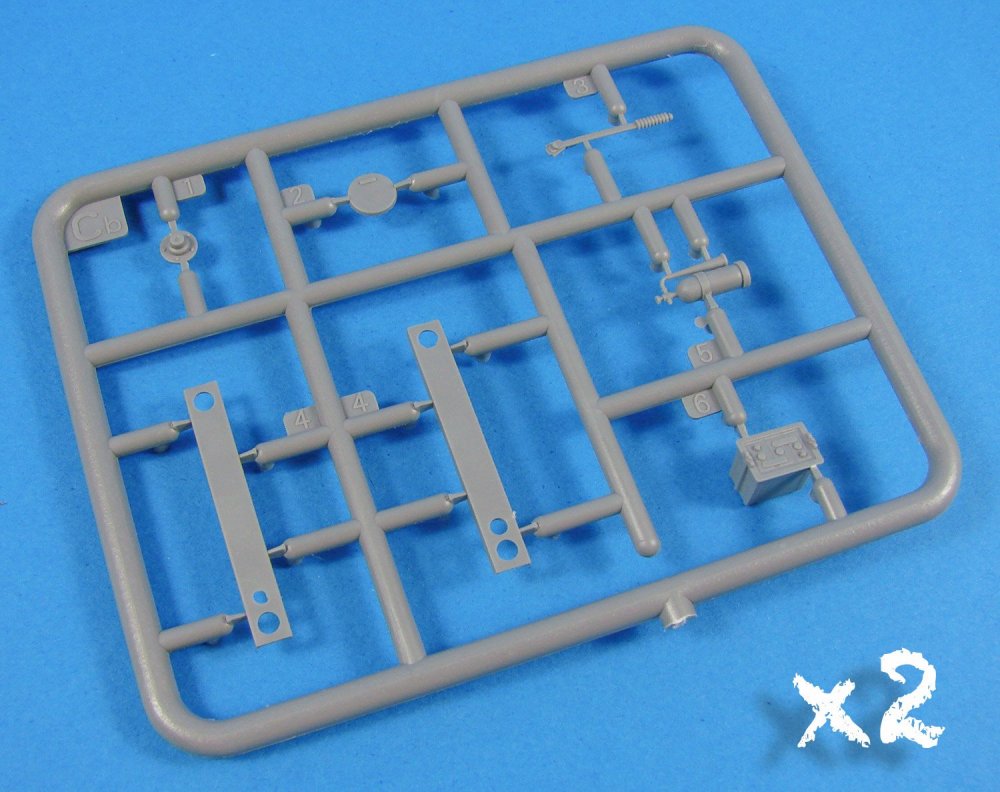
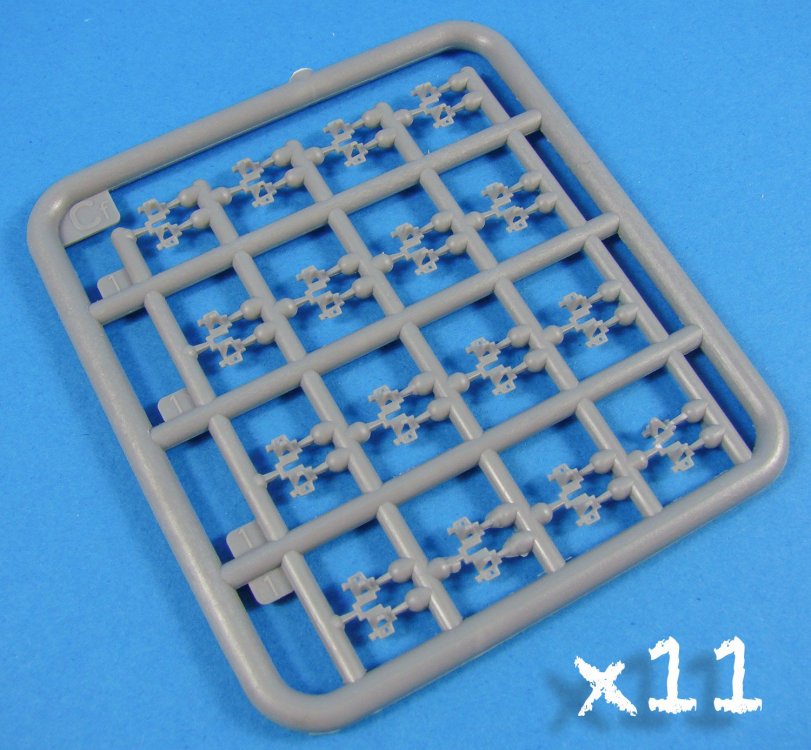
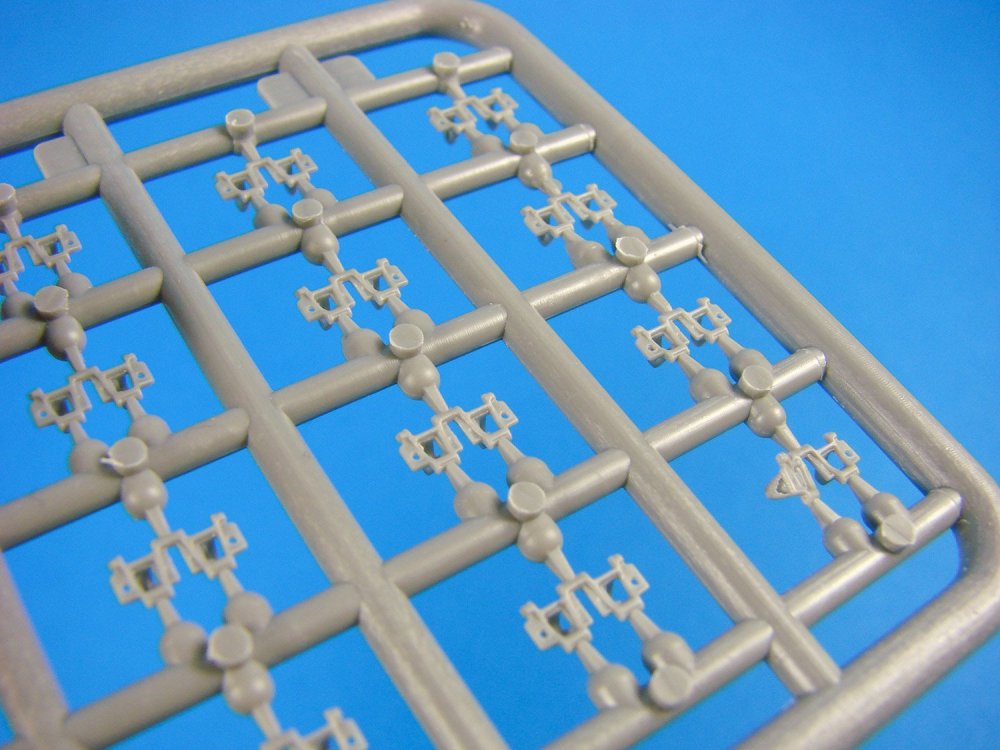
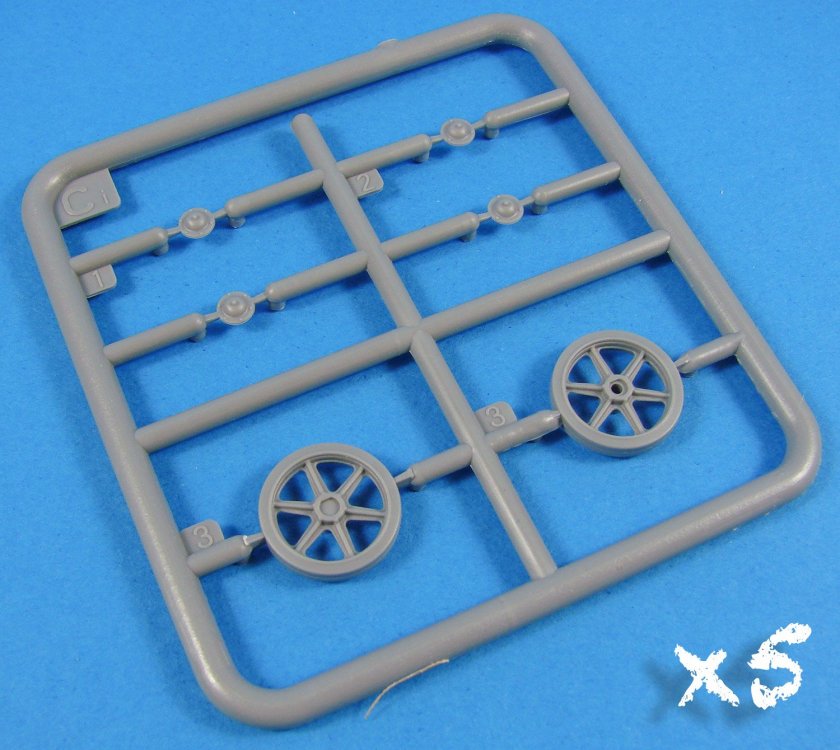
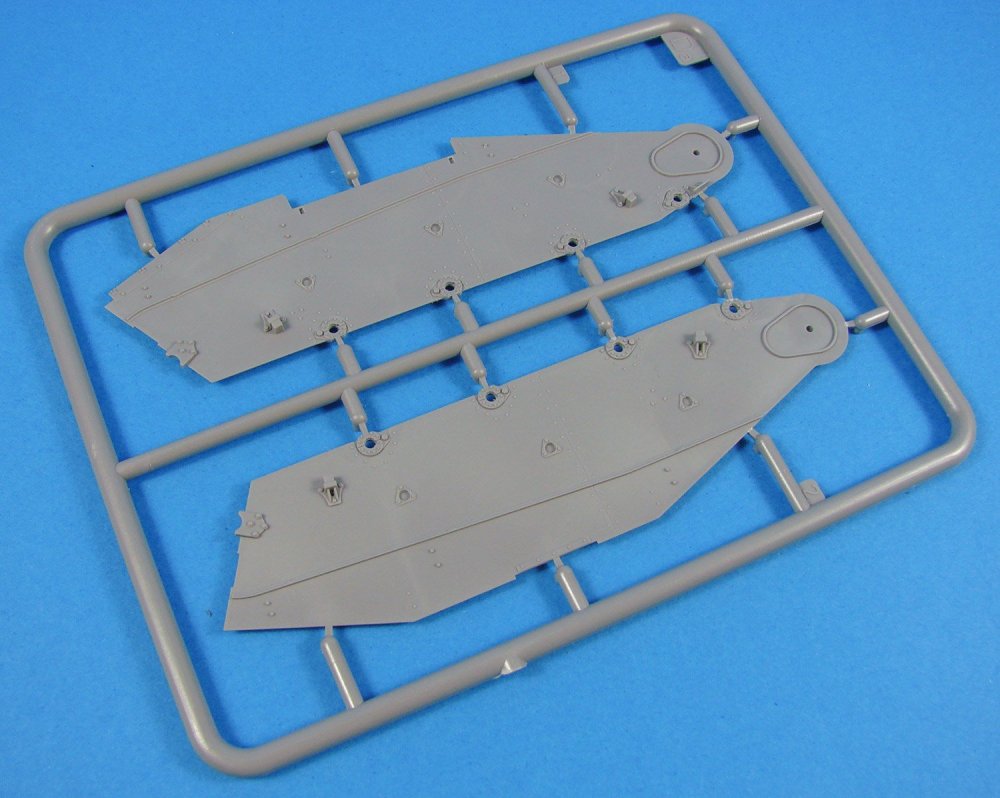
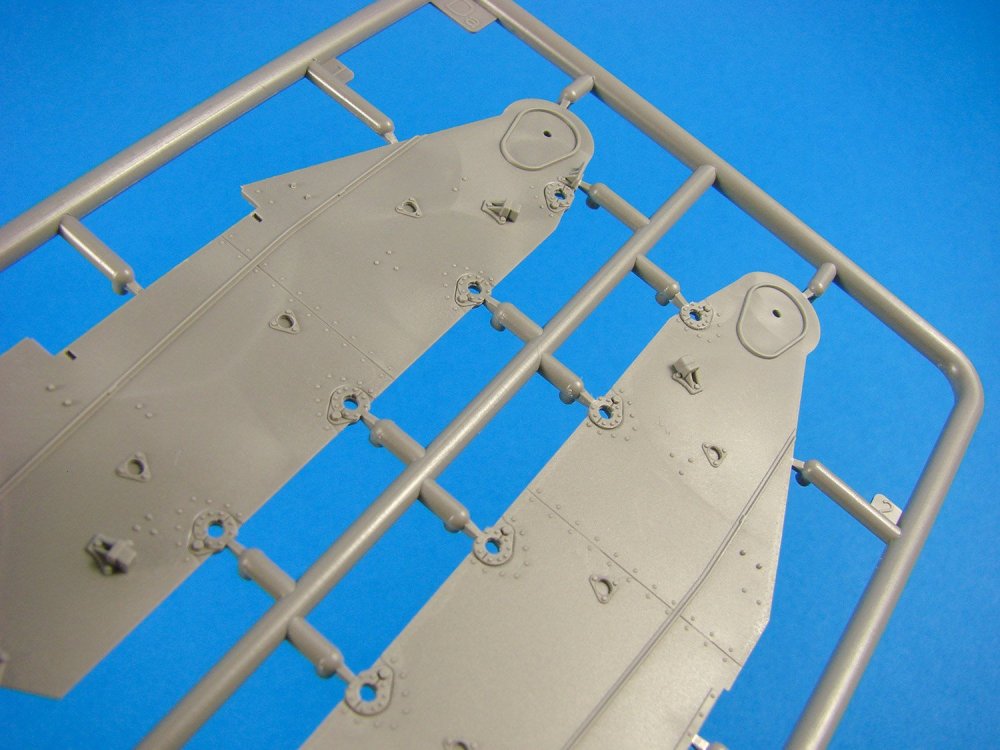
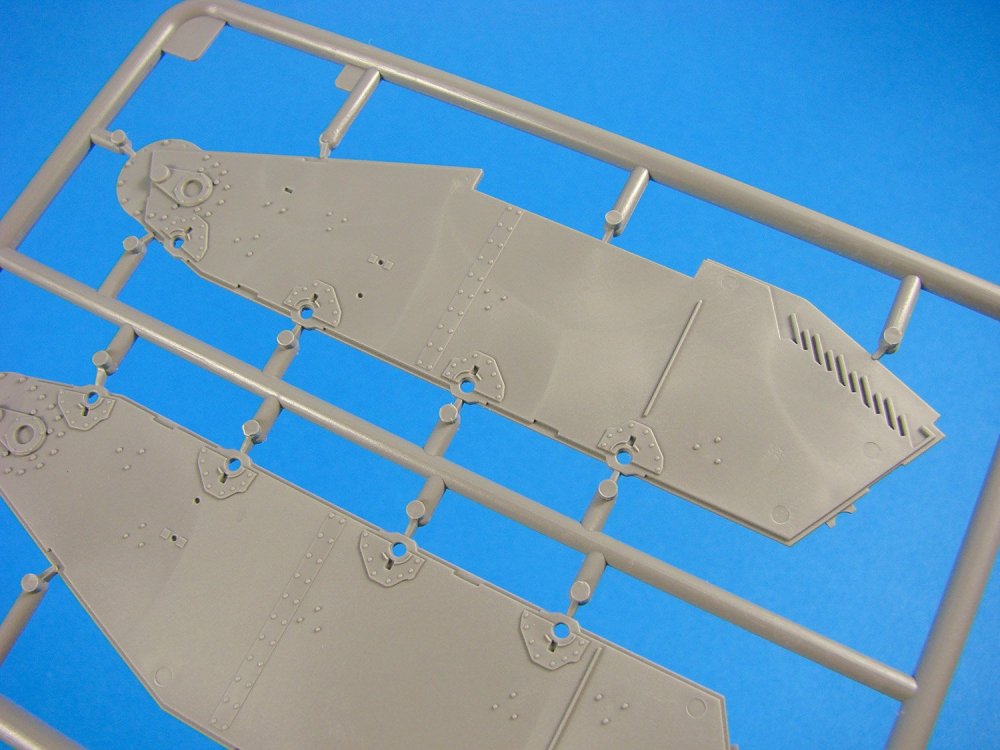
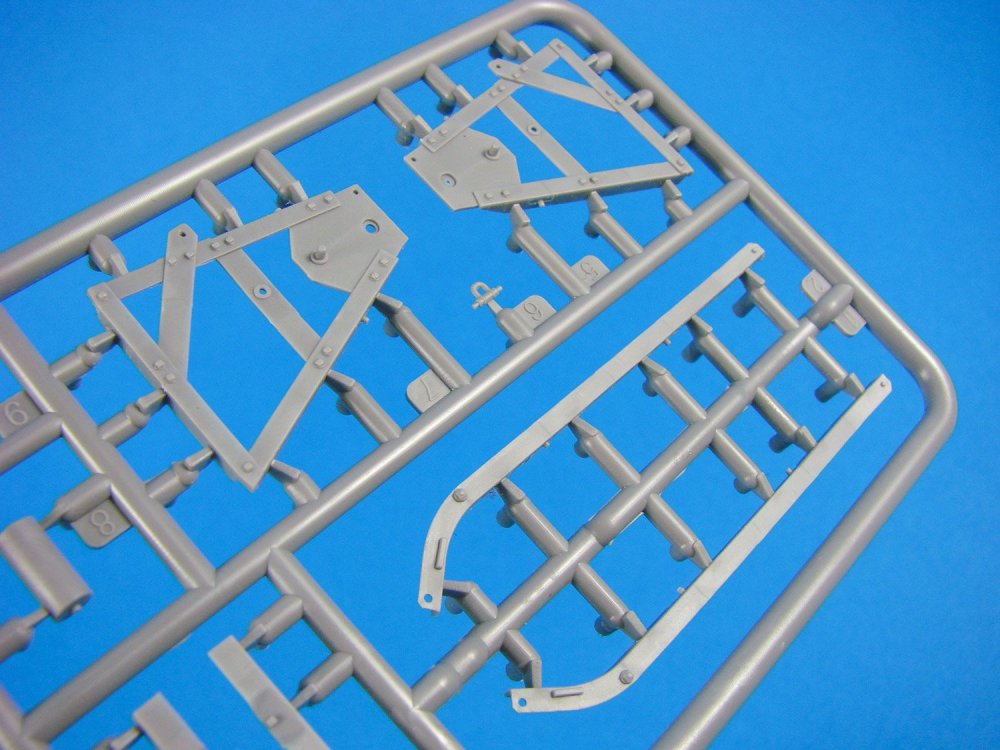
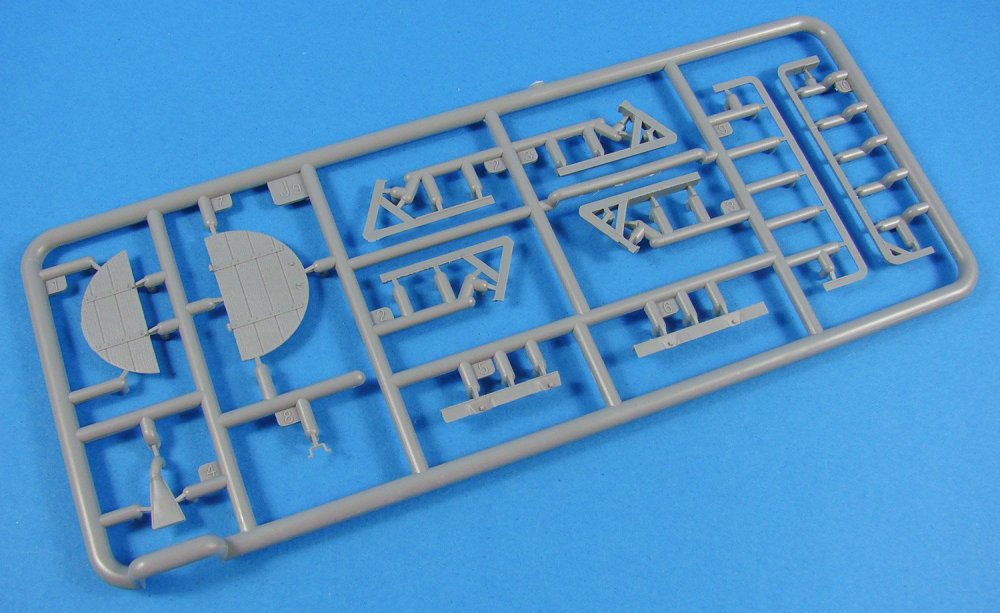
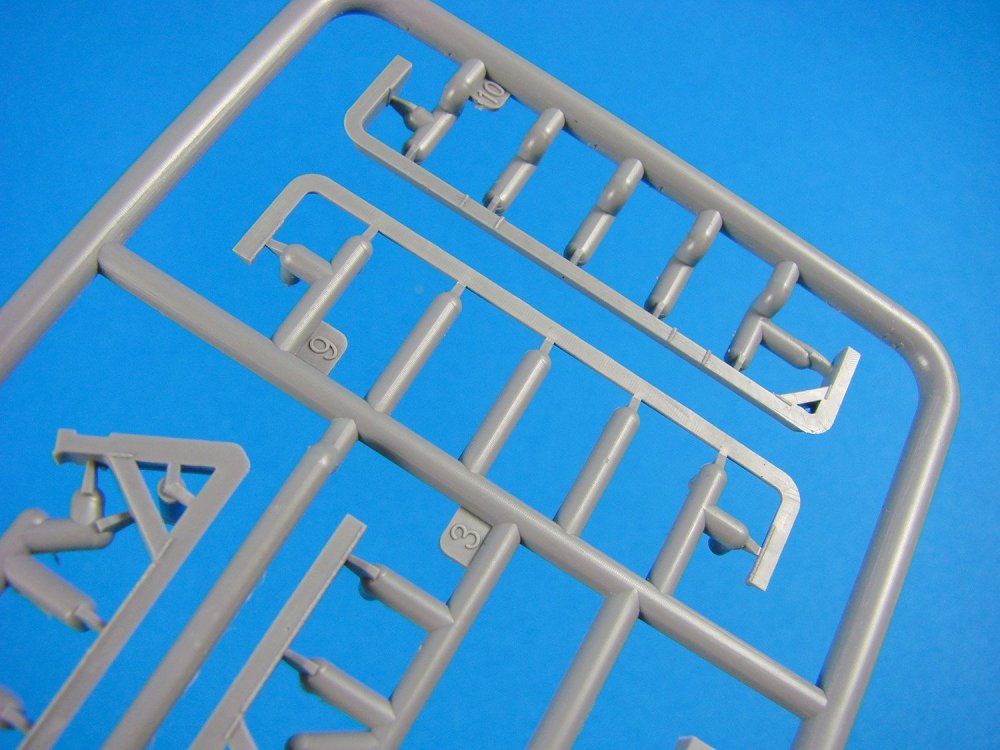
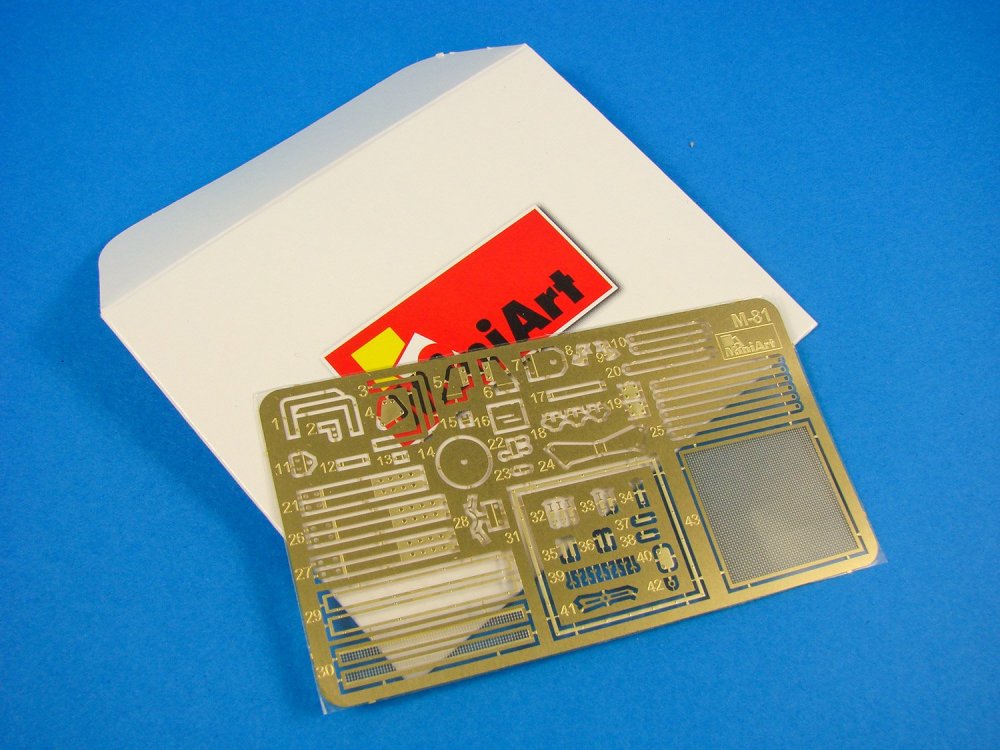
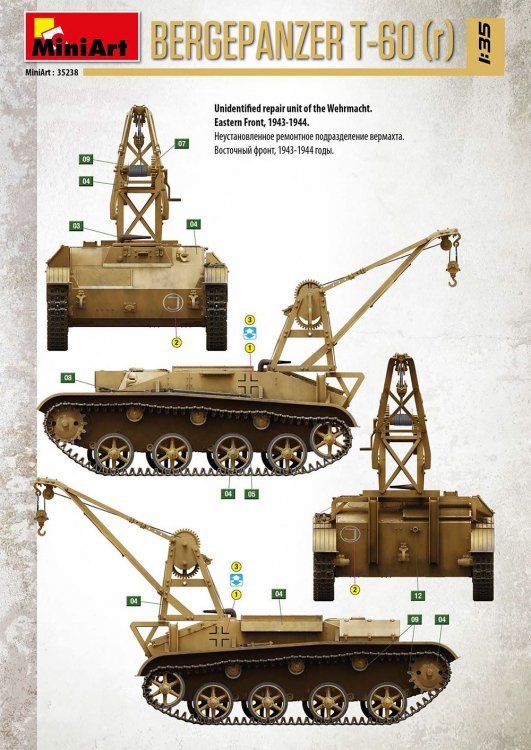
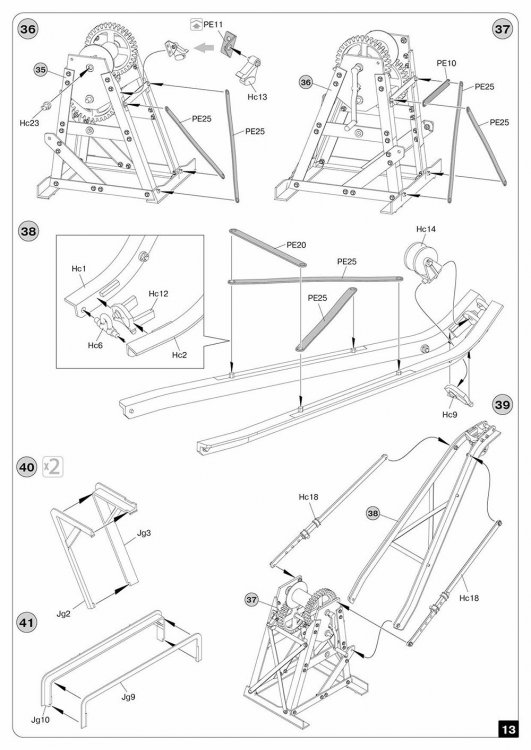
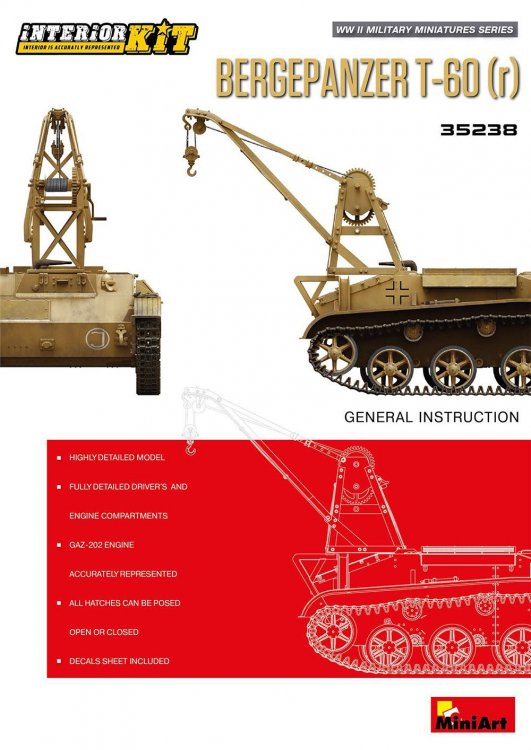
1:35 Bergepanzer T-60(r) MiniArt Catalogue # 35238 The kit MiniArt’s Bergepanzer T-60(r) is the TENTH incarnation of this kit in only 2 years, and it another of their ‘Interior Kits’ which are proving very popular these days, with many contemporary companies also choosing this busy approach to new releases. It’s also packed into a surprisingly small box that is crammed full of styrene. You’ll need to be careful taking everything out if you intend on putting it all back in again afterwards. There are a total of TWENTY-SIX sprues in this release, all moulded in light grey styrene. No clear parts are needed. The plastic is also supplemented by a single PE fret, length of rope, a small decal sheet, and the beautifully produced 16-page, glossy instruction manual. This Bergepanzer is of course based on the chassis of the T-60, and of course contains no upper turret. This is instead replaced by the crane and winch assembly that was used for vehicle recovery and repair. I’ll now look at the sprues, with a brief description of what is on offer, and any observations of mine. Note that the unusual sprue nomenclature is due to the multiple versions of this vehicle and is designed to make things at least easy to follow as you proceed through construction. Models of this type tend to start with the interior being built upon the hull floor section and is no different. The highly detailed floor section is dripping in detail that will look great with washing and weathering. Onto this is initially added the forward axle and drive unit, supported by a chunky mounting. The driver’s seat and pedals are then added to the mix, followed by the disc brake units. The driver’s compartment is fully detailed with thee various levers to control direction and turn for each track unit. Of course, you also need a fully detailed engine and gearbox, and the parts supplied are beautifully detailed and will help to create a faithful replica of the GAZ-202 6-cylinder engine. Everything has been replicated internally, such as the battery packs, fire extinguisher, clean air system etc. As well as the many styrene parts that build this area up, there is a smattering of PE for levers etc. All interior walls are equally as detailed as the hull floor, and with the same levels of detail in both styrene and PE. Perhaps one of the most tedious tasks will be to remove and clean the individual track links, and there are 86 required per side. These are also working tracks and just click together with no need for separate pins etc. Thee swing arms appear to be able to be positioned, so if you want to pose on a rough terrain, you’ll need to balance how to do this. It’s no surprise that the crane/winch is a new feature for this kit, and these homebrew-style adaptations look to have been nicely captured by MiniArt, with a small amount of PE also thrown into the mix for things like cross members and brackets. Sprue A Sprue Ab Sprue Ba Sprue Bc Sprue Ca (x3) Sprue Cb (x2) Sprue Ce (x3) Sprue Cf (x11) Sprue Ci (x5) Sprue Da Sprue Dc Sprue Ec Sprue Ej Sprue Hc Sprue Jg Photo Etch (PEa) and rope The small PE sheet is packaged into its own little wallet to protect it from the rigours of being in a box so full of plastic! (Not actually true as MiniArt do this as standard!) A 1/2m length of cord is also supplied to replicate the rope. Decals This very small decal sheet which is printed by Print Decograph (in-house?),and it’s very nicely printed, in that the inks are thin, solid and there is minimal carrier film. Register isn’t important here as the few markings are either white or black. The only combination is the company logo! Instructions MiniArt’s instructions are always straightforward, being defined by line drawing constructional sequences and clear parts and paint ID throughout. The project is broken down into forty-three stages, with paint references given for Vallejo, Mr. Color, Life Color, Tamiya, Testors, AK, Revell, Mission Models ands Humbrol paints. The last two pages are taken over with colour images of the two schemes provided. Conclusion With Takom’s own Bergepanther set, it’s nice to see MiniArt apply the same magic to the T-60 chassis and provide modellers with even more opportunities, especially when it comes to diorama work. The kit is relatively inexpensive and will provide many hours of building and painting enjoyment. Detail is excellent and thee kit superbly engineered. Moulding quality is to the high standards we expect from MiniArt, with little to no flash anywhere, and minimal seams to clean up. My sincere thanks to MiniArt for shipping this out for us to take a look at. MiniArt kits are available at most good online retailers.


-
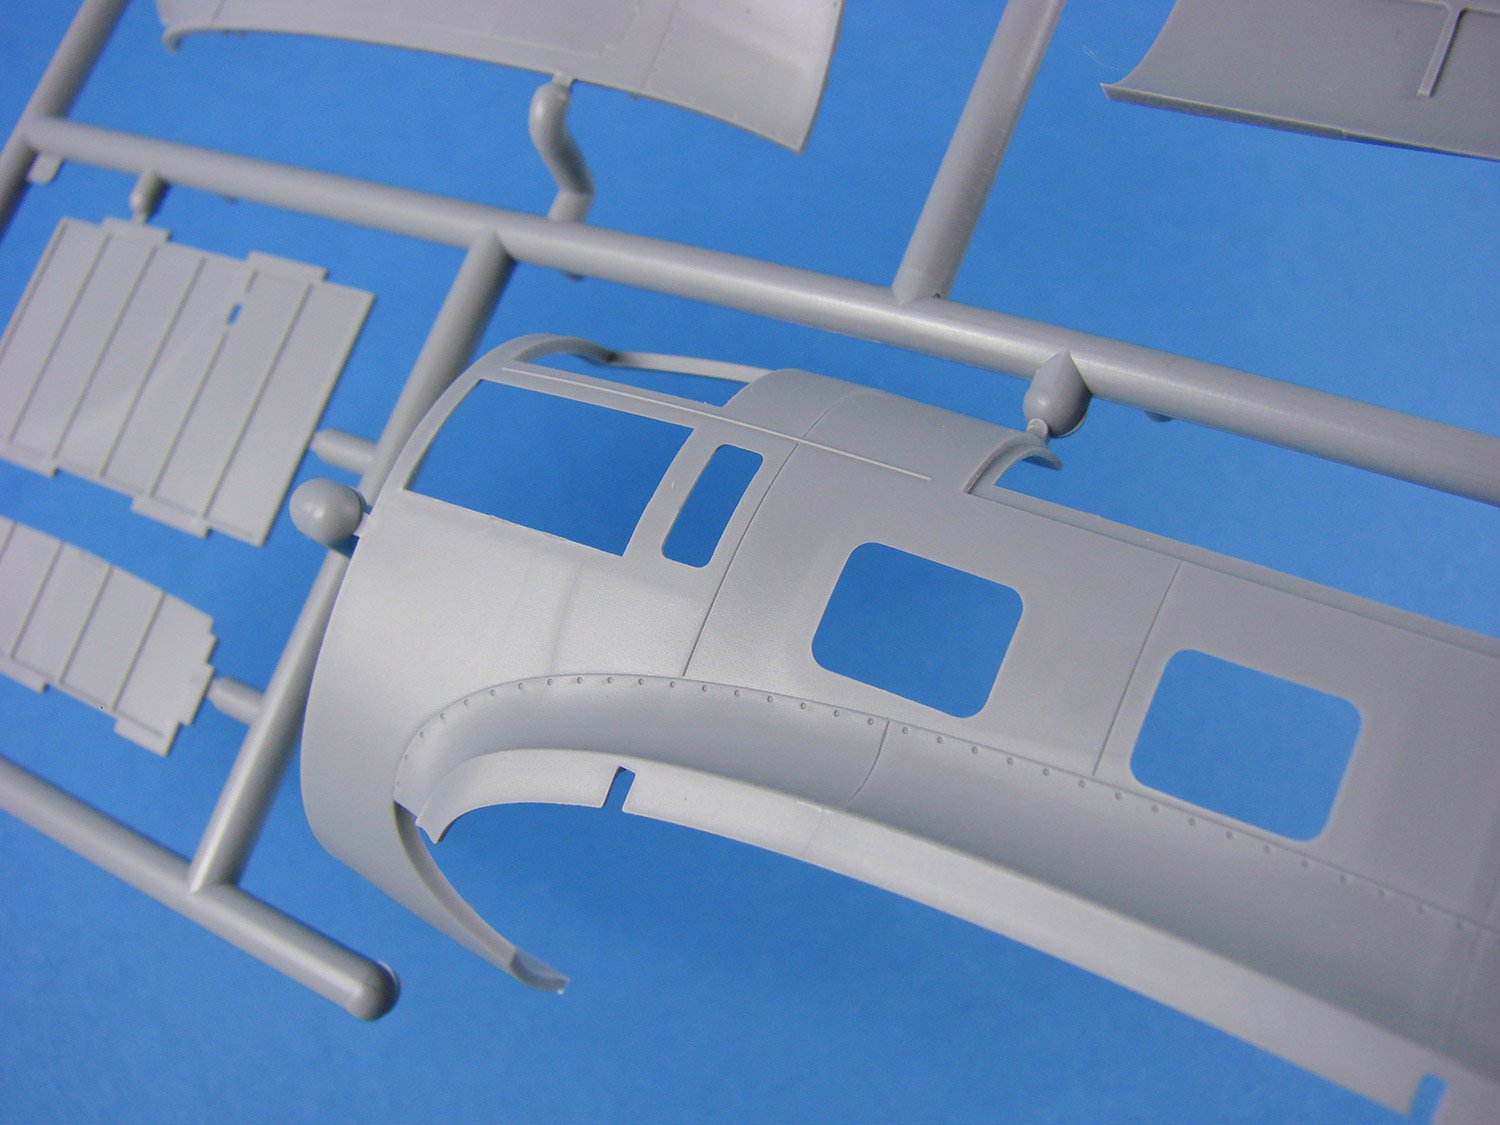
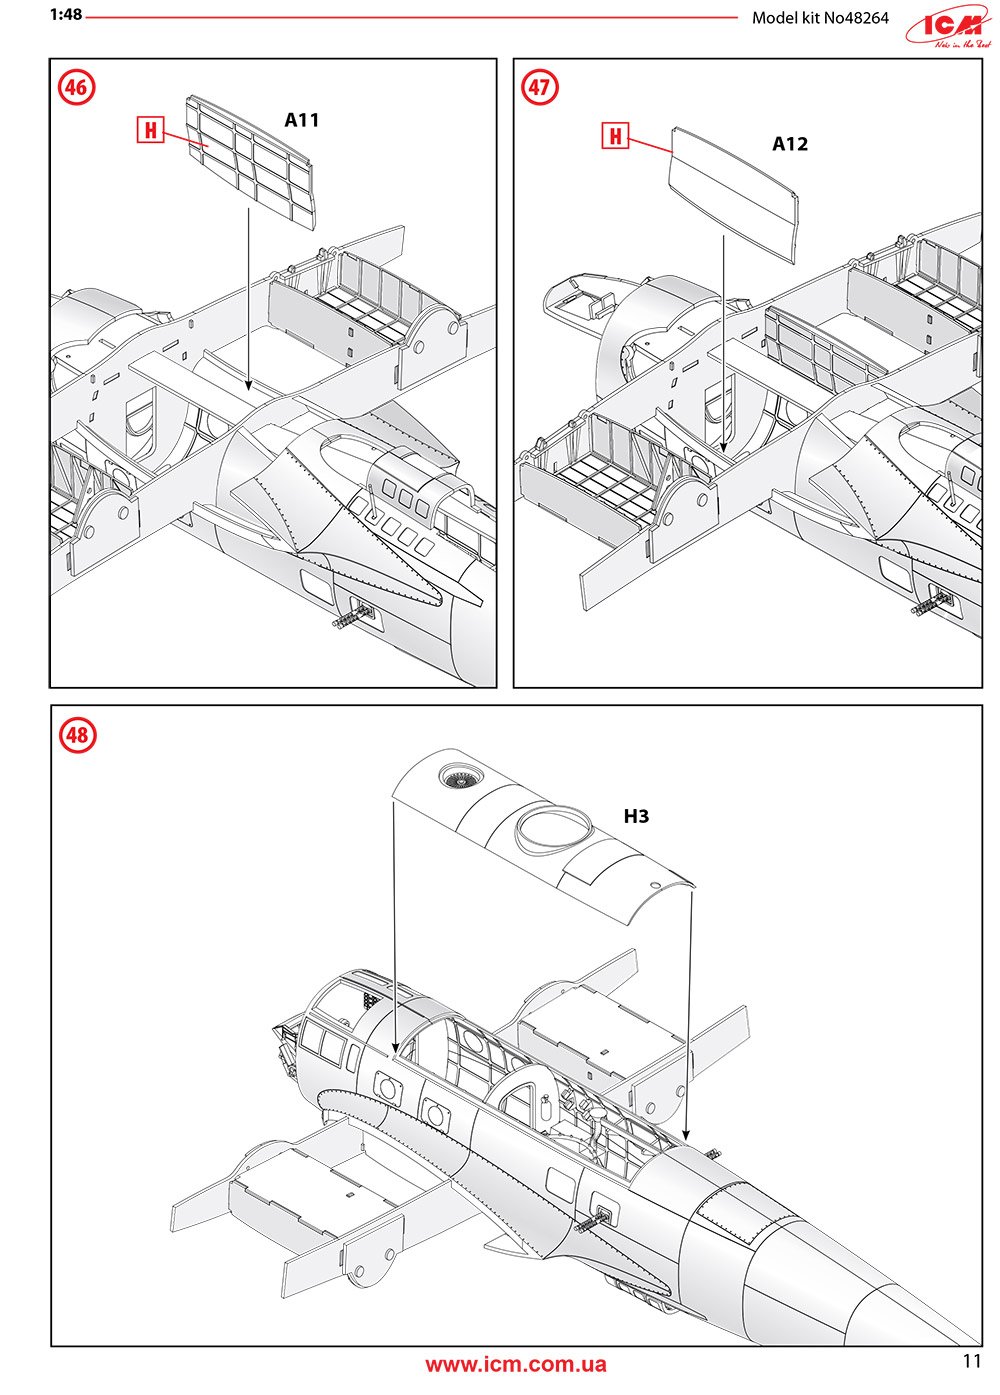
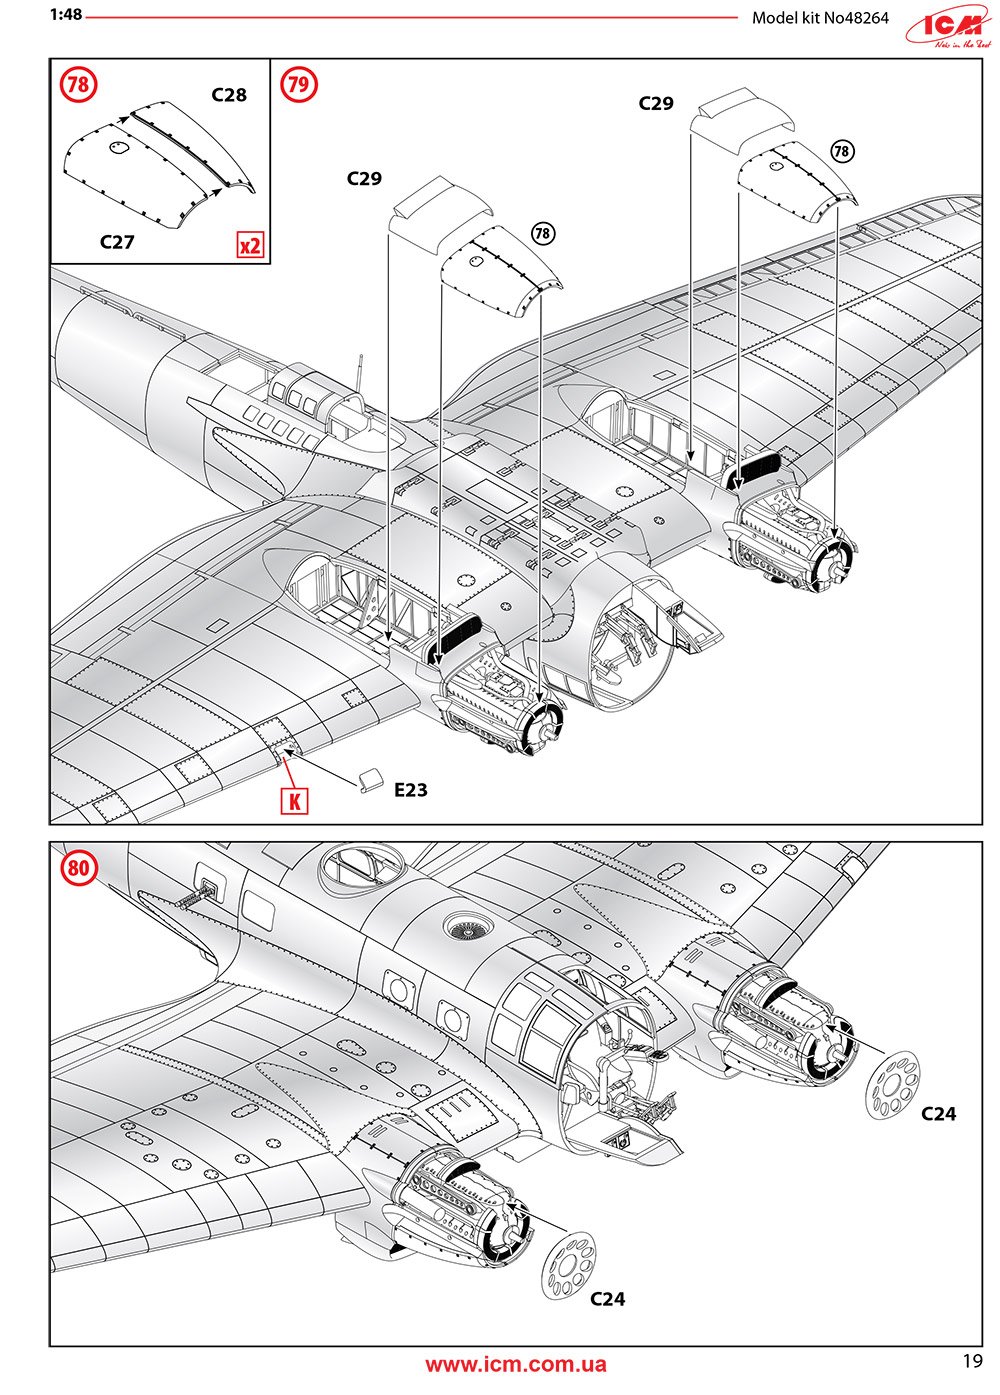
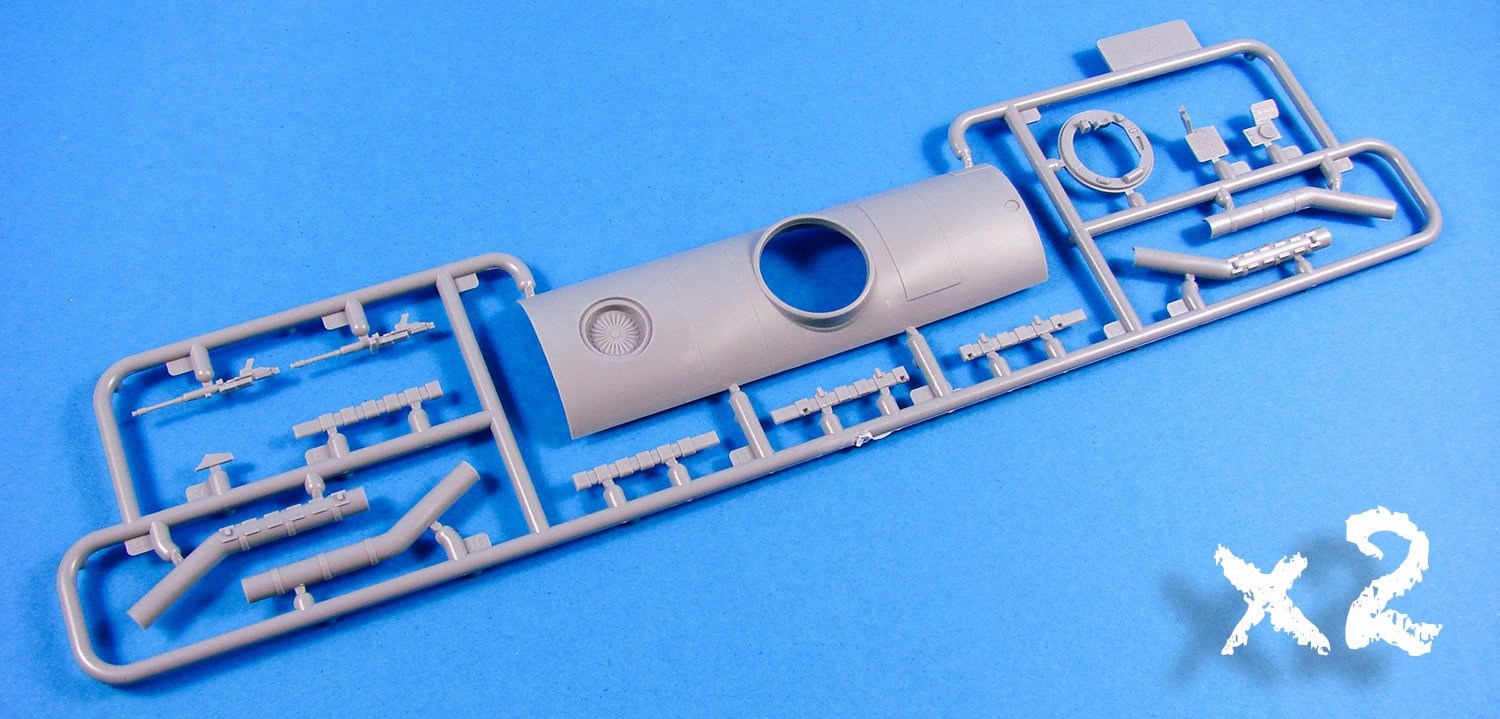
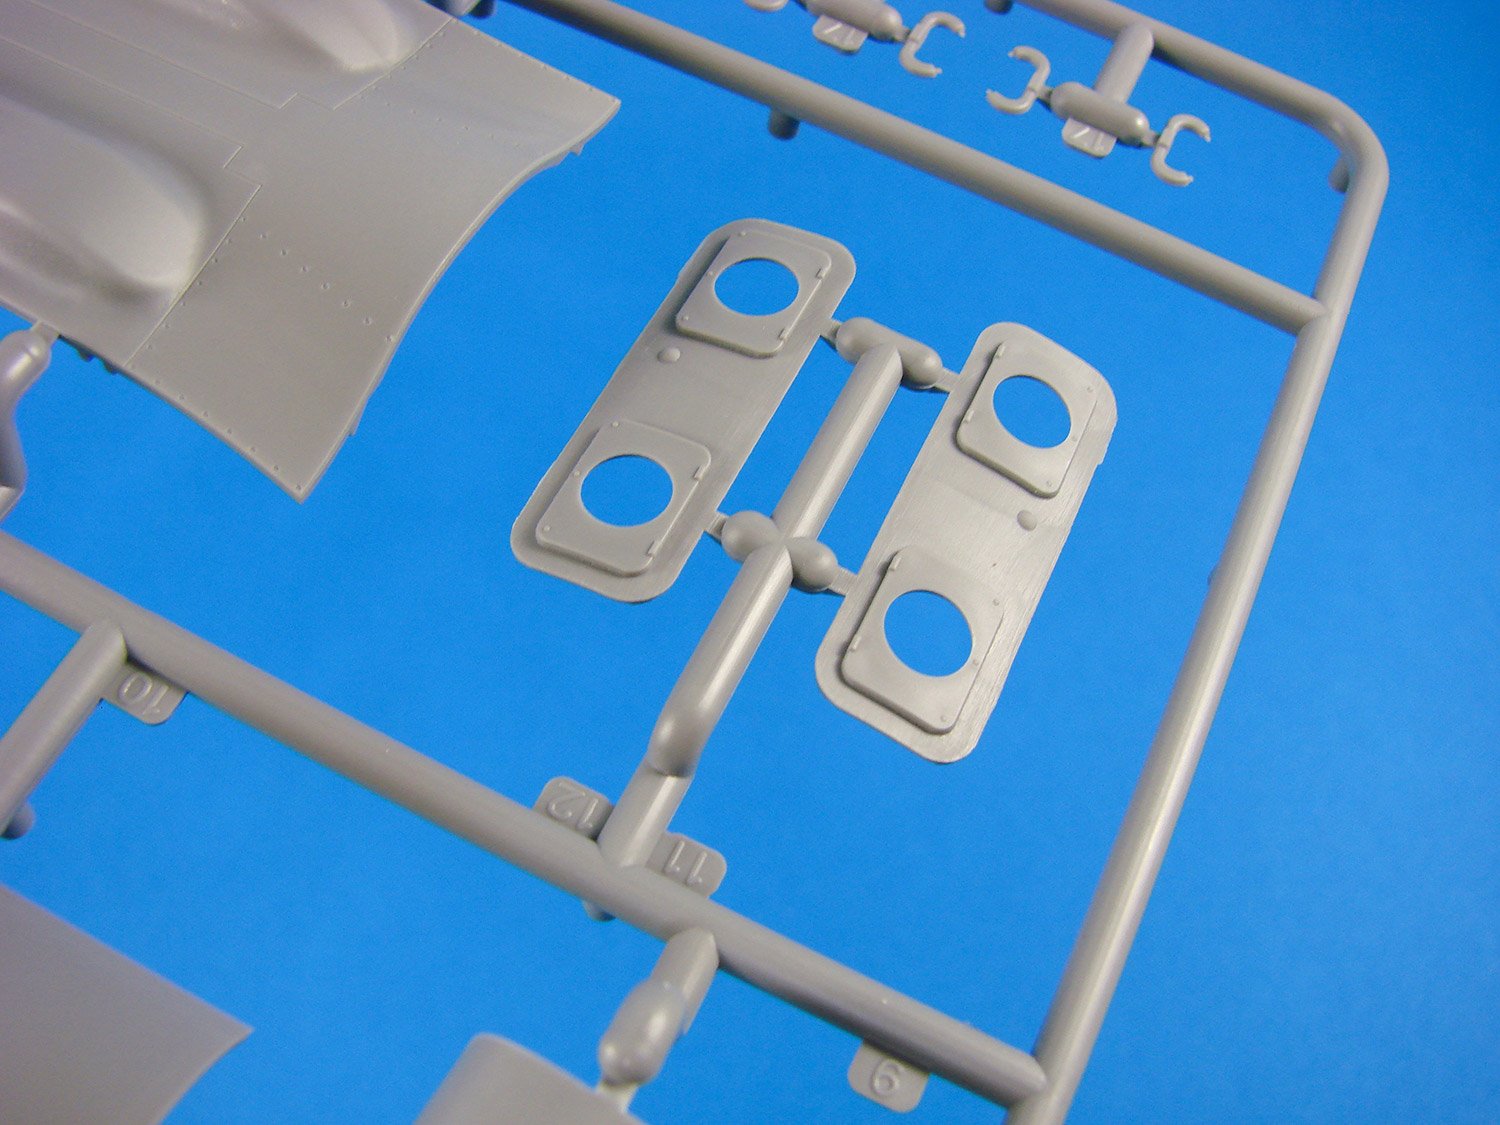
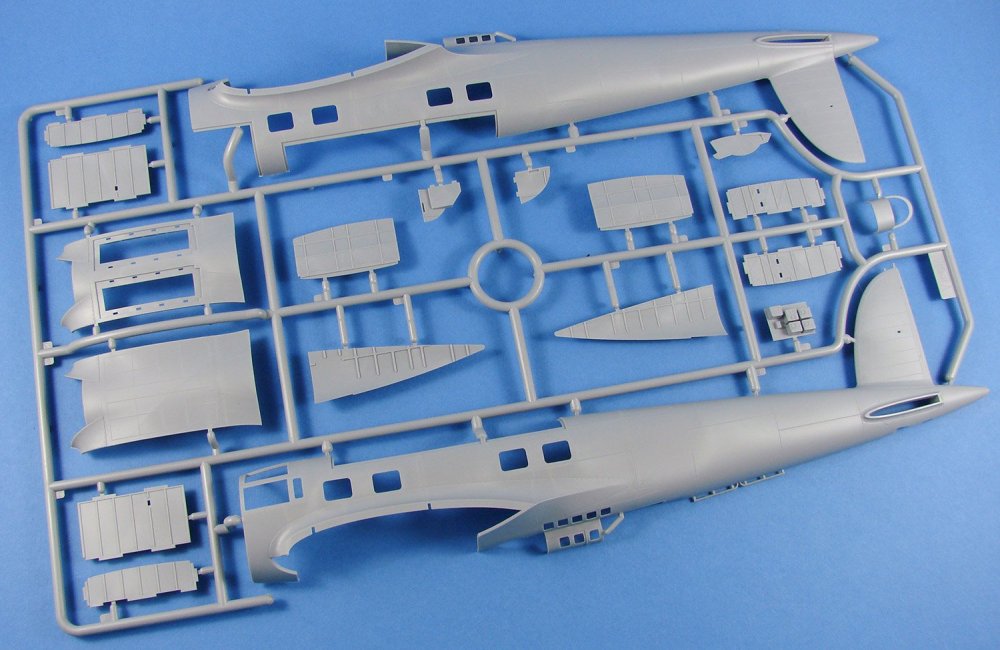
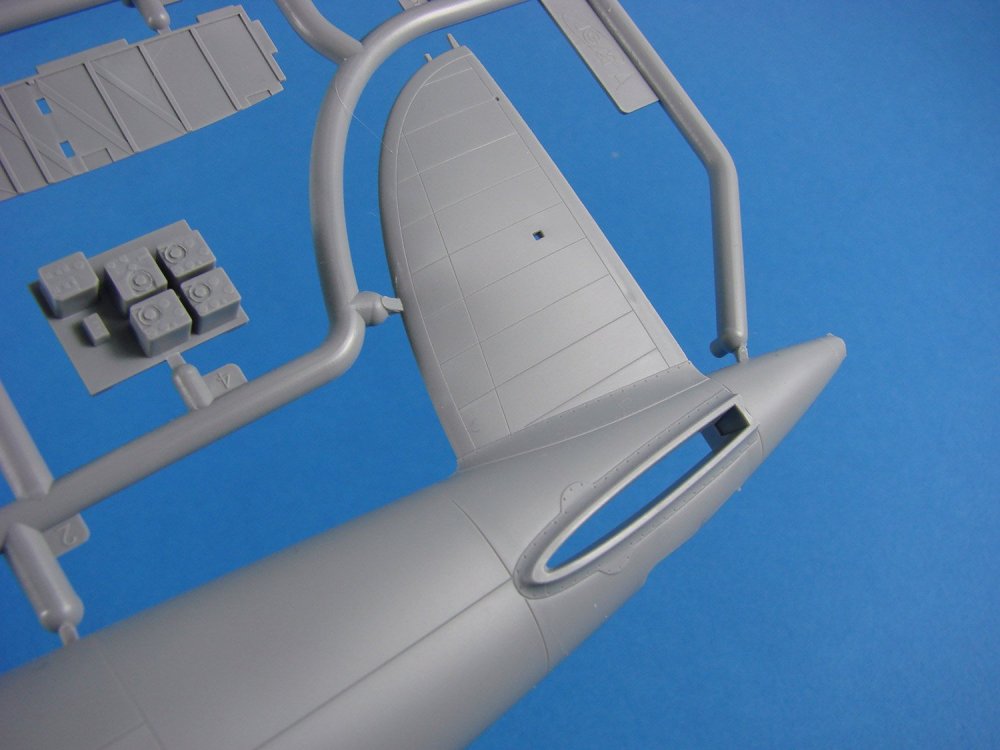
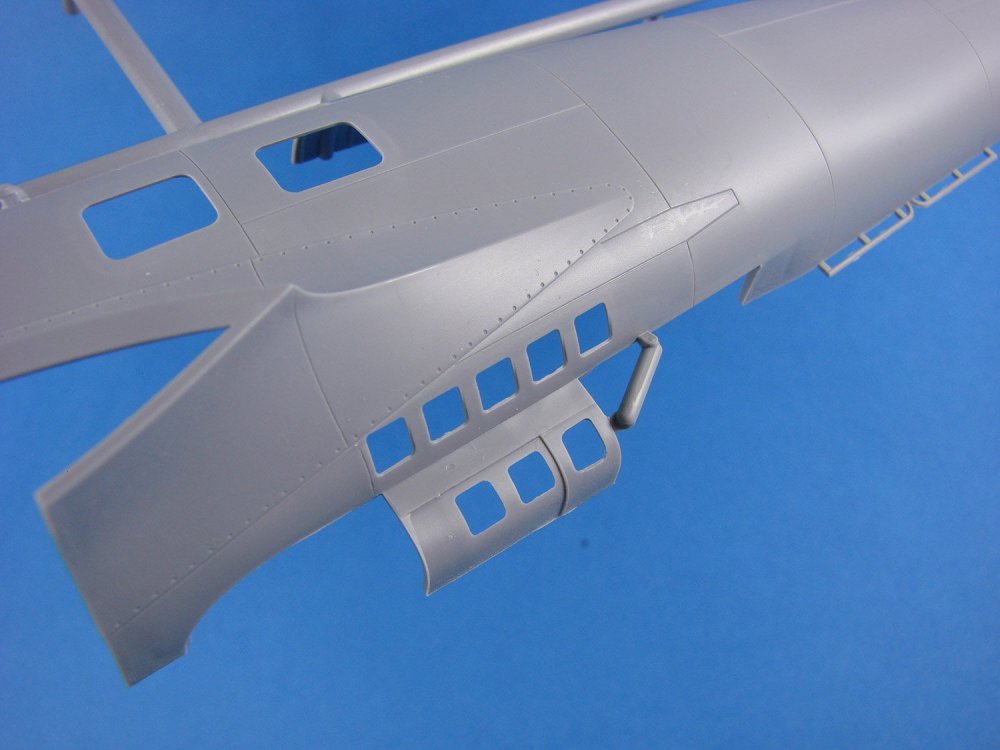
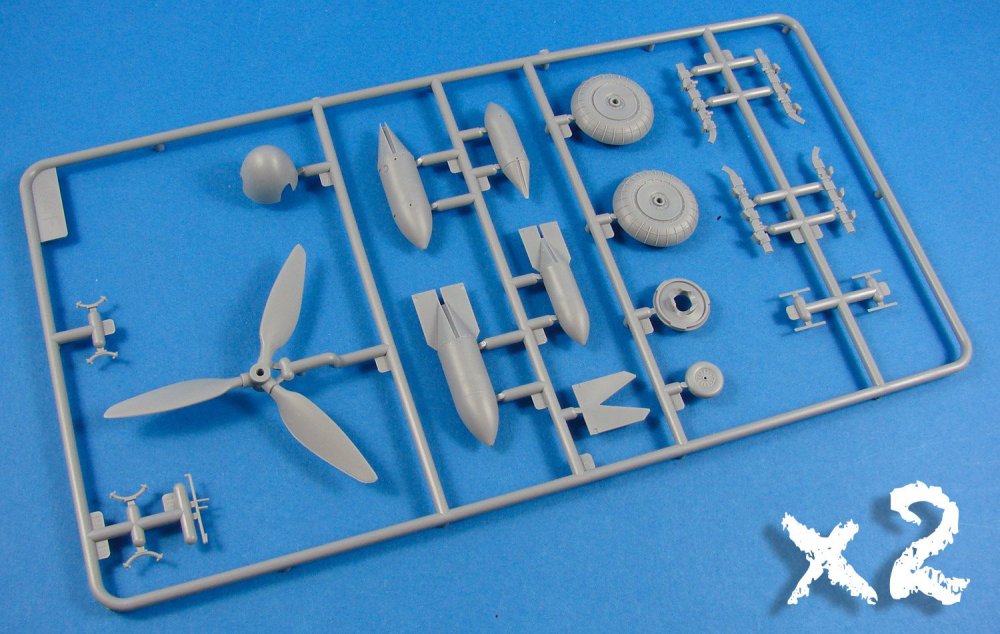
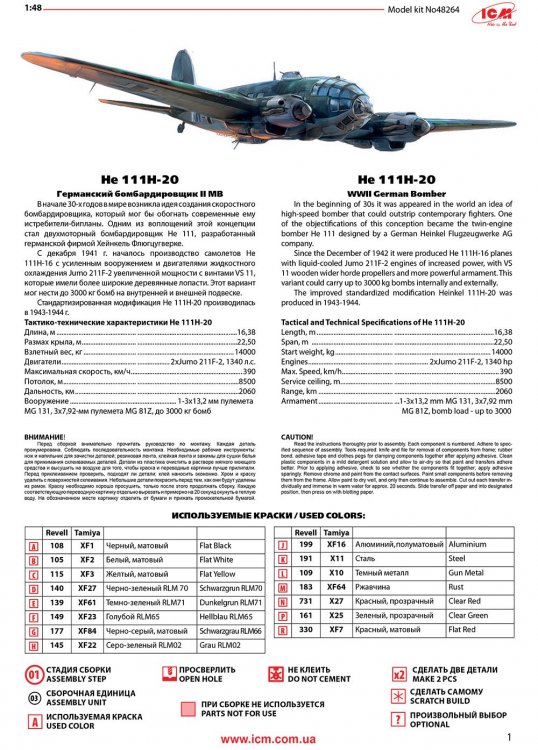
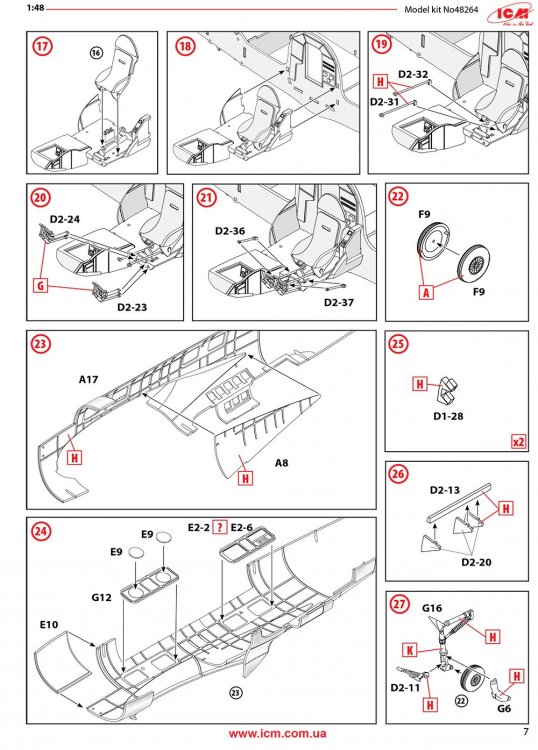
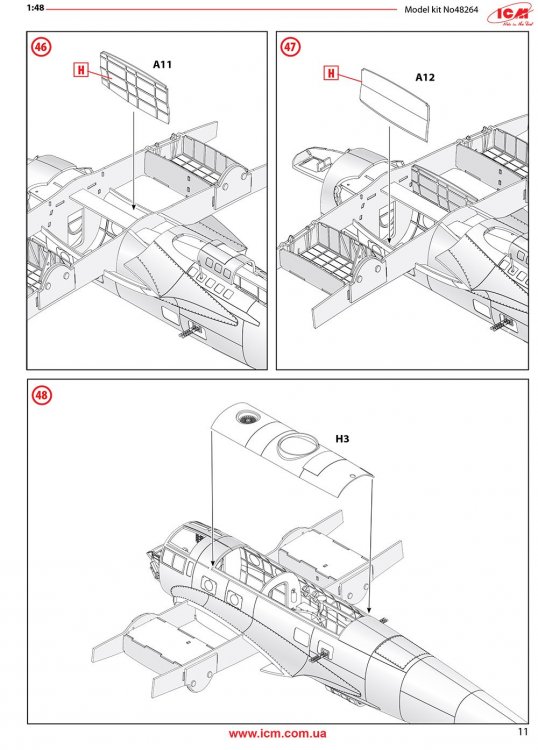
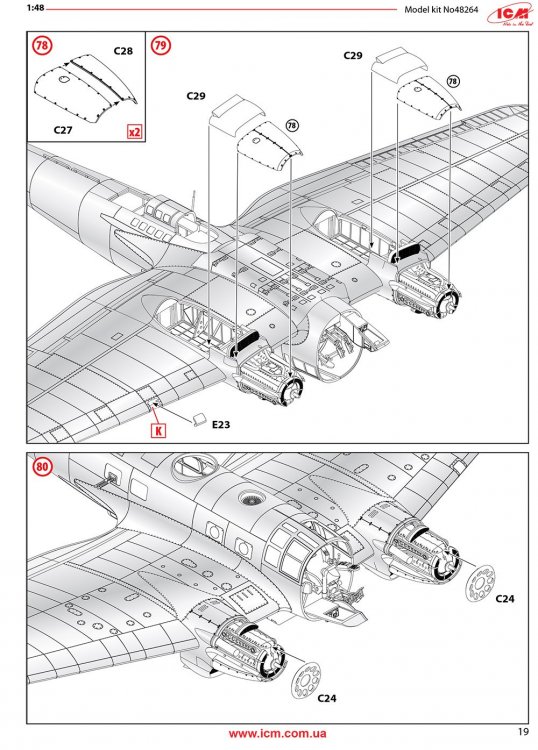
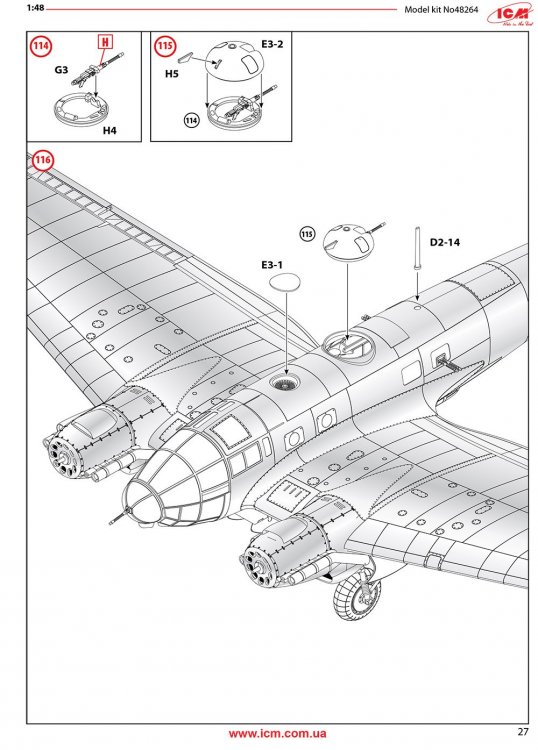
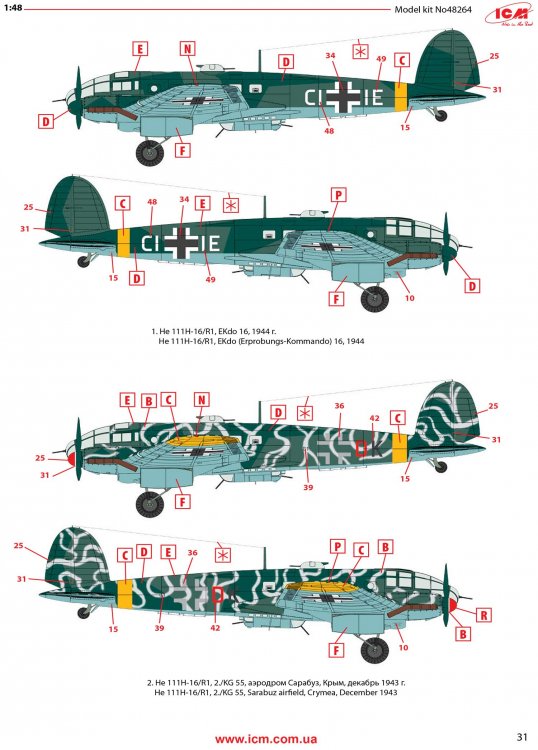
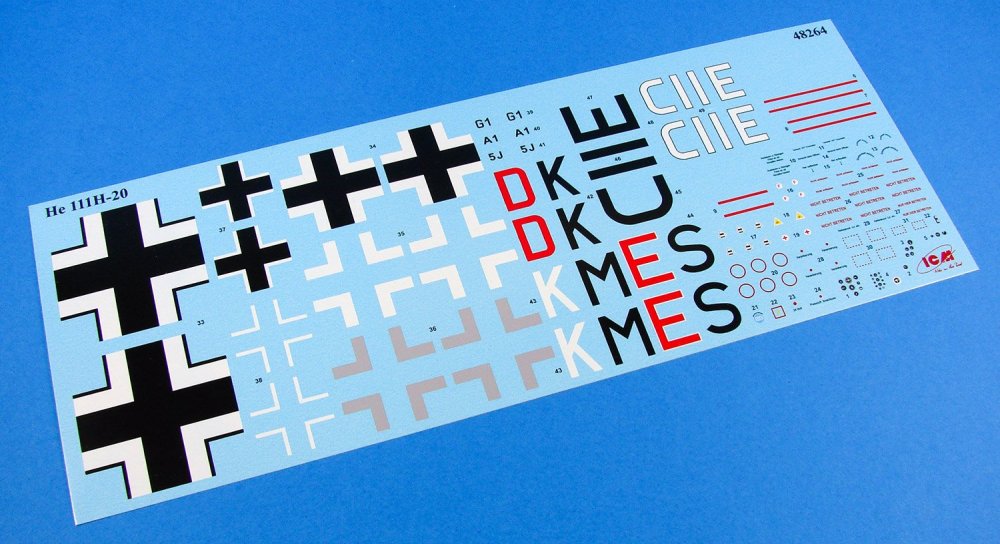
1/48 Heinkel He 111H-20 ICM Catalogue # 48264 The Heinkel He 111 was a German aircraft designed by Siegfried and Walter Günter at Heinkel Flugzeugwerke in 1934. Through development it was described as a wolf in sheep's clothing because the project masqueraded the machine as civilian transport, though from conception the Heinkel was intended to provide the nascent Luftwaffe with a fast, medium bomber. Perhaps the best-recognised German bomber due to the distinctive, extensively glazed greenhouse nose of later versions, the Heinkel He 111 was the most numerous Luftwaffe bomber during the early stages of World War II. The bomber fared well until the Battle of Britain, when its weak defensive armament was exposed. Nevertheless, it proved capable of sustaining heavy damage and remaining airborne. As the war progressed, the He 111 was used in a variety of roles on every front in the European theatre. It was used as a strategic bomber during the Battle of Britain, a torpedo bomber in the Atlantic and Arctic, and a medium bomber and a transport aircraft on the Western, Eastern, Mediterranean, Middle Eastern, and North African Front theatres. The He 111 was constantly upgraded and modified but became obsolete during the latter part of the war. The German Bomber B project was not realised, which forced the Luftwaffe to continue operating the He 111 in combat roles until the end of the war. Manufacture of the He 111 ceased in September 1944, at which point piston-engine bomber production was largely halted in favour of fighter aircraft. With the German bomber force virtually defunct, the He 111 was used for logistics. The H variant of the He 111 series was more widely produced and saw more action during World War II than any other Heinkel variant. Owing to the uncertainty surrounding the delivery and availability of the DB 601 engines, Heinkel switched to 820 kW (1,100 hp) Junkers Jumo 211 powerplants, whose somewhat greater size and weight were regarded as unimportant considerations in a twin-engine design. When the Jumo was fitted to the P model, it became the He 111H. German-built He 111s remained in service in Spain after the end of the Second World War, being supplemented by Spanish licence-built CASA 2.111s from 1950. The last two German-built aircraft remained in service until at least 1958. The H-6 variant (the subject of this review) was a torpedo bomber and could carry two LT F5b torpedoes externally. It was powered by Jumo 211F-1 engines, had six MG 15s and one MG FF cannon in forward gondola. The kit Until the last few years, 1/48 Heinkel He 111 kits had been few and far between. In fact, before the initial ICM He 111H-3 version which was released towards the end of 2017, the last was another re-boxing of the old Monogram kit that dates back to 1994, and seen subsequently under Revell, Hasegawa, and Revellogram labels. It seemed that almost every other German twin had seen some release or other, apart from another Heinkel. Well, when ICM announced that they were to give us a newly-tooled He 111H-3, it was fair to say that many Luftwaffe fans were extremely pleased. The breakdown of the model also invited future versions to be released, and this is exactly what ICM haver done. There are currently 4 H-versions of this model released, with another slated for this year. ICM has a reputation for accurate model kits, with plenty of detail inside as well as refined external details. Their Ju 88 kits have seen numerous version releases, both with ICM themselves, and also with Revell and Special Hobby. No one can accuse ICM’s newer kits of having flimsy boxes, as per one German manufacturer. This one comes in a sturdy corrugated cardboard box with a locking tab, and with a separate, glossy product lid sat snugly over this. Box art depicts a France-based machine flying relatively low over the French countryside, towards dusk, with one box edge showing a couple of the FOUR schemes that can be built from this top-turreted version. Once you cut through the clear disc tabs, remove the lid and open the box, you will find SEVEN sprues of medium-grey styrene and ONE of clear, tightly packed into a single clear sleeve. Normally I don’t like this approach, but there was pretty much no way these were going to rub over each other. The clear sprue was also packed into a separate sleeve within this main one. As you will imagine, several sprues are actually common to the previous releases. There are a total of FOURTEEN sprues with three of these being clear. All are separately bagged. Sprue A Our first sprue brings us two of the main parts; namely the fuselage halves. It’s impossible to ignore these, so I’ll look at them first. These are very similar to how Revell went about their 1/32 kit, in that the upper forward fuselage is a separate piece, that can of course be an indication of other variants coming our way. Externally, detail is superb and very refined, with evenly and neatly recessed, narrow panel lines and a slightly proud wing root fairing with rivet fasteners. Elsewhere, however, no rivets are depicted. I quite like the difference that a riveted surface creates with a finished project, so will add these myself with a beading tool. The rudder is moulded separately, as is the belly. The two parts options are provided on this sprue are NOT for use on this version. Perhaps one thing that I’m not keen on are the aerial arrangement runners that are moulded to one of the lower fuselage halves. This makes removing seams a far more difficult task. Easy to fix though: slice off the detail and fit it later when seams are gone. Only a niggle really. Internally, I think ICM have made a very reasonable job of recreating the structural elements of this aircraft, with such detail extending from the nose, back to just aft of the belly gondola. There are some ejector pin marks though, but these are generally shallow enough to simply rub them away with a fibreglass pen, or other lightly abrasive tool. You will note that due to moulding limitations, ICM has had to produce a wing root insert to glue into position within the fuselage, and you might want to blend this in to the surrounding detail. This is the same solution that HK Models used on their 1/32 B-17 Fortress kits. Similar inserts exist for the lower bomb bay walls, but these sit primarily between the two main spar and bulkhead parts that form the basis of the construction. Note also the port and starboard wheel well walls, as well as the ceiling for this area. Fore and aft walls are moulded to the main spars. These walls will provide basic constructional elements and could/should be enhanced further by the modeller, with a little plasticard and wire. I’m not going to really criticise this due to the price of the kit, and the area providing a far more than adequate basis for detailing further. Other parts on this sprue are for the lower gondola, cockpit sidewalls, and radio equipment wall. Sprue B1 & B2 Both of these have the wing upper and lower panels as their main components, moulded with integral landing flaps. I would quite have liked to have seen these separate, and it will take some work for the modeller to achieve. However, the ailerons are separate items, moulded as halves on one of these sprues. As per the fuselage, external wing detail is very refined, with superbly thin and even panel lines and port access details. No rivets here again, except for key lines and those around fuel tank panels and upper nacelle fairings. Internally, positive channels are moulded for the main wing spars, creating what looks to be a very sturdy and unambiguous assembly. Going back to the ailerons, these have very subtle rib and fabric details, and shouldn’t need any toning down. Other flying and control surfaces are moulded here also. These are the stabiliser, elevators and rudder, moulded as traditional halves. These of course exhibit the same finesse as seen generally on external surfaces. Sprue C (x2) Where there are generally multiples of specific components, then these are the sprues on which you will find them. This model is equipped with two complete Junkers Jumo 211 A-3 engines, comprising of almost 20 parts each. I really am very impressed with the detail on these, and they certainly convincing against my reference material, including personal photographs of the 211. As with the wheel bays, just a little lead wiring should be all that’s needed to bring these to life. Unusually, the prop shafts are moulded into the main engine halves, instead of having a separate, captive pin that will allow the props to rotate. As the bombs on the H-20 are carried externally, there is no requirement for fitting the internal bomb bay pods, and these must be left out. Five of the eight SC500 bombs are to be mounted on the belly exterior of this version, and these are very nicely recreated here . Note the propellers too. These will be more spares for your spares box as thee H-20 used a different version which is supplied on a supplemental sprue. Other parts on this sprue include the numerous engine cowl parts, and the forward cowl ring with its characteristic lightening holes. The wheels on this sprue aren't to be used though. Parts on another sprue will fulfil that role. Sprue D1 This particular sprue contains those two chunky main spars, complete with integral fuselage bulkheads and moulded bulkhead and main gear bay details. Note also other internal bulkheads, and for the cockpit itself. ICM has designed a rather tidy main cockpit, that is generally spread over both this sprue and D2, and should look great as it is, out of box. No doubt that Eduard will still be able to persuade us to invest further though. Decals are provided for enhancing the cockpit further, and these are clearly labelled on the instructions sheet. Internal parts on this sprue include the rear cockpit wall, cockpit floor, multi-part pilot seat with head armour, ammunition racks etc. A number of other parts here, such as the upper fuselage deck with moulded cupola gun traverse gearing, splayed bomb bay door option, closed bomb bay doors, and tail wheel that is moulded in situ with strut, are NOT to be used with this version and are all either redundant or replaced with different parts. Unusually, the interior of the undercarriage doors are devoid of detail, and this will need addressing. Sprue D2 Someone at ICM had the foresight to include most of this kit’s more fragile and smaller parts on this sprue, meaning you can safely stash this to one side during the course of building. On here you will find the undercarriage struts and braces, ammunition rack components, rudder pedals and linkages, smaller cockpit components, control yoke and torsion tube, bomb aimer/co-pilot seat, MG mounts, etc. Sprue E This last sprue of generic He 111 parts contains all of the clear components. A whole raft of parts here are exclusive to the previous versions and will NOT be used on this build. These include side windows, half of the glazed nose, the gondola access/gun mount position, and also the redundant upper sliding gunner windshield. Where the varying items have sections that aren’t a part of a window etc. then these are frosted. Framing is pretty good, and this shouldn’t be too difficult to mask up for airbrushing. Even easier if Eduard release masks for this kit. In a previous release, I thought there was a little waviness in the clear parts, but this release seems perfectly ok. The He 111’s famous glazed nose is comprised of three parts. Care will definitely be needed in assembling these. Note that the instrument panel is moulded here too. I’ve never seen the point of clear IPs, but that might only be my mileage. Instrument decals are supplied for this and other cockpit areas, but you may choose to punch out the individual dials and apply them separately. It certainly makes for a cleaner finish. Sprue E2 This new, clear sprue contains thirteen parts. such as the side windows, and gondola glazing, and small circular side windows that fit in the forward fuselage section that would've once been occupied by the bomb bay. Sprue E3 Another new sprue that contains just four clean parts. Two of these are upper turret options, the dipole cover, and a section of new forward glazed nose. Sprue G This is another sprue which is new to this H-20 release and it contains two belly options for this version. Neither of these seem specific to a particular scheme, and it appears that the modeller can choose which he/she thinks most suitable for their own particular build. Other parts to be found here are the blanking panels for the forward ex-bomb bay areas (complete with portholes for the new clear parts), weapons and separate ammo saddles, and the new tail wheel strut assembly. Sprue F (x2) These identical sprues contain the new props and spinners, and the two-part exhausts that won't be used on this version. More bombs are found here but they seem to be redundant for this version despite the instructions not showing them as shaded out. You'll certainly have plenty of bombs in your spares box! Wheels are included here. The ribbing does look a little heavy, and they also aren't weighted. Perhaps Eduard to the rescue? Sprue H (x2) The last sprue in this kit is also another new one which contains those all-important changes to the H-20 airframe. these include the new spine with the turret position and dipole, turret parts, armament and shrouded exhausts. Decals One decal sheet is included, and there is no indication of where it is printed. I am assuming this is a homebrew ICM product. Printing is fairly thin and carrier film is minimal. Everything also appears to be in full register. No swastikas are included. A full set of stencils is included, along with the markings for the FOUR machines. These are: He 111H-16/R1, EKdo 16, 1944 He 111H-16/R1, 2./KG 55, Sarabuz airfield, Crimea, December 1943 He 111H-20, 4./KG 53, Poland, June 22, 1944 He 111H-20, 8./KG 4, Berlin-Gatow airfield, April 1945 Instructions I quite like ICM’s approach to the assembly manual, with the result being totally clean in approach and fuss-free. Starting with a history of the type, plus a colour chart for both Revell and Tamiya paints, a full parts plan is then printed, and then 118 constructional sequences. Assembly illustration is very clear, with colour annotation and selective use of shading to make some drawings clearer, such as where the 3D could mess with your mind! The last pages are taken over with a stencil drawing and four colour profiles for the supplied schemes. Decal placement and paint application is clear. Conclusion This appears to be a pretty accurate-looking kit with all the right curves in all the right places, and also a very intuitive and interesting assembly sequence. The quality of this kit really is excellent, and ICM are setting new standards, outside of their Asian counterparts. This is also a kit with serious value for money, coming in at around £40. Plenty of buildability and one of those kits that really excites me. Hopefully, I’ll make a start very soon. My sincere thanks to ICM Model Kits for the review kit seen here.


-
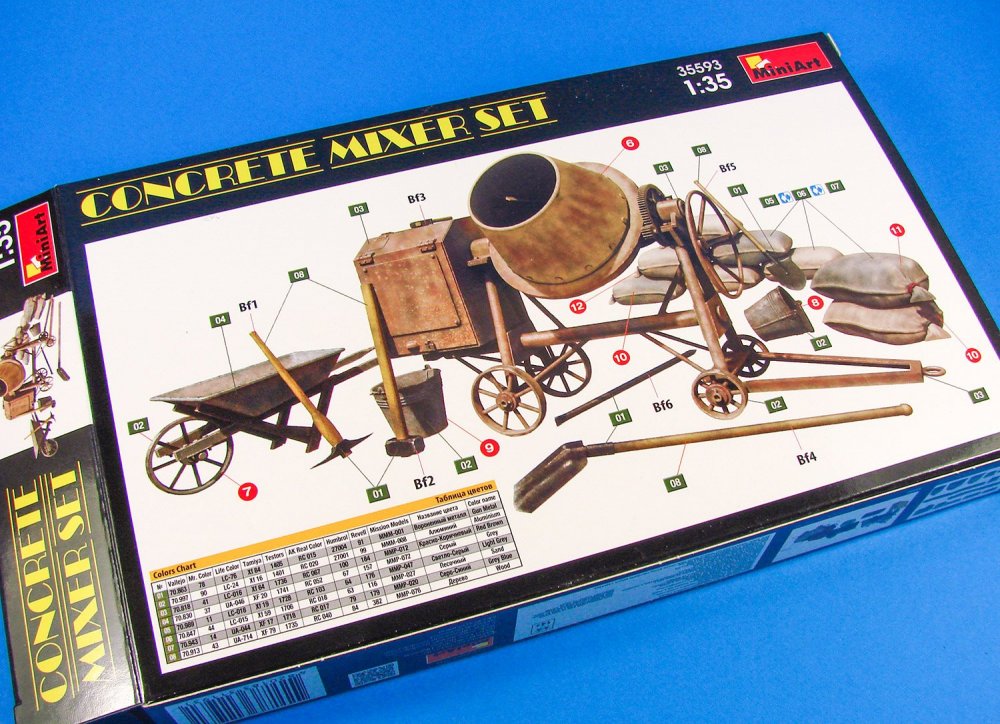
miniart 1:35 Concrete Mixer Set
James H posted a topic in LSM-Related Reviews (military figures etc)
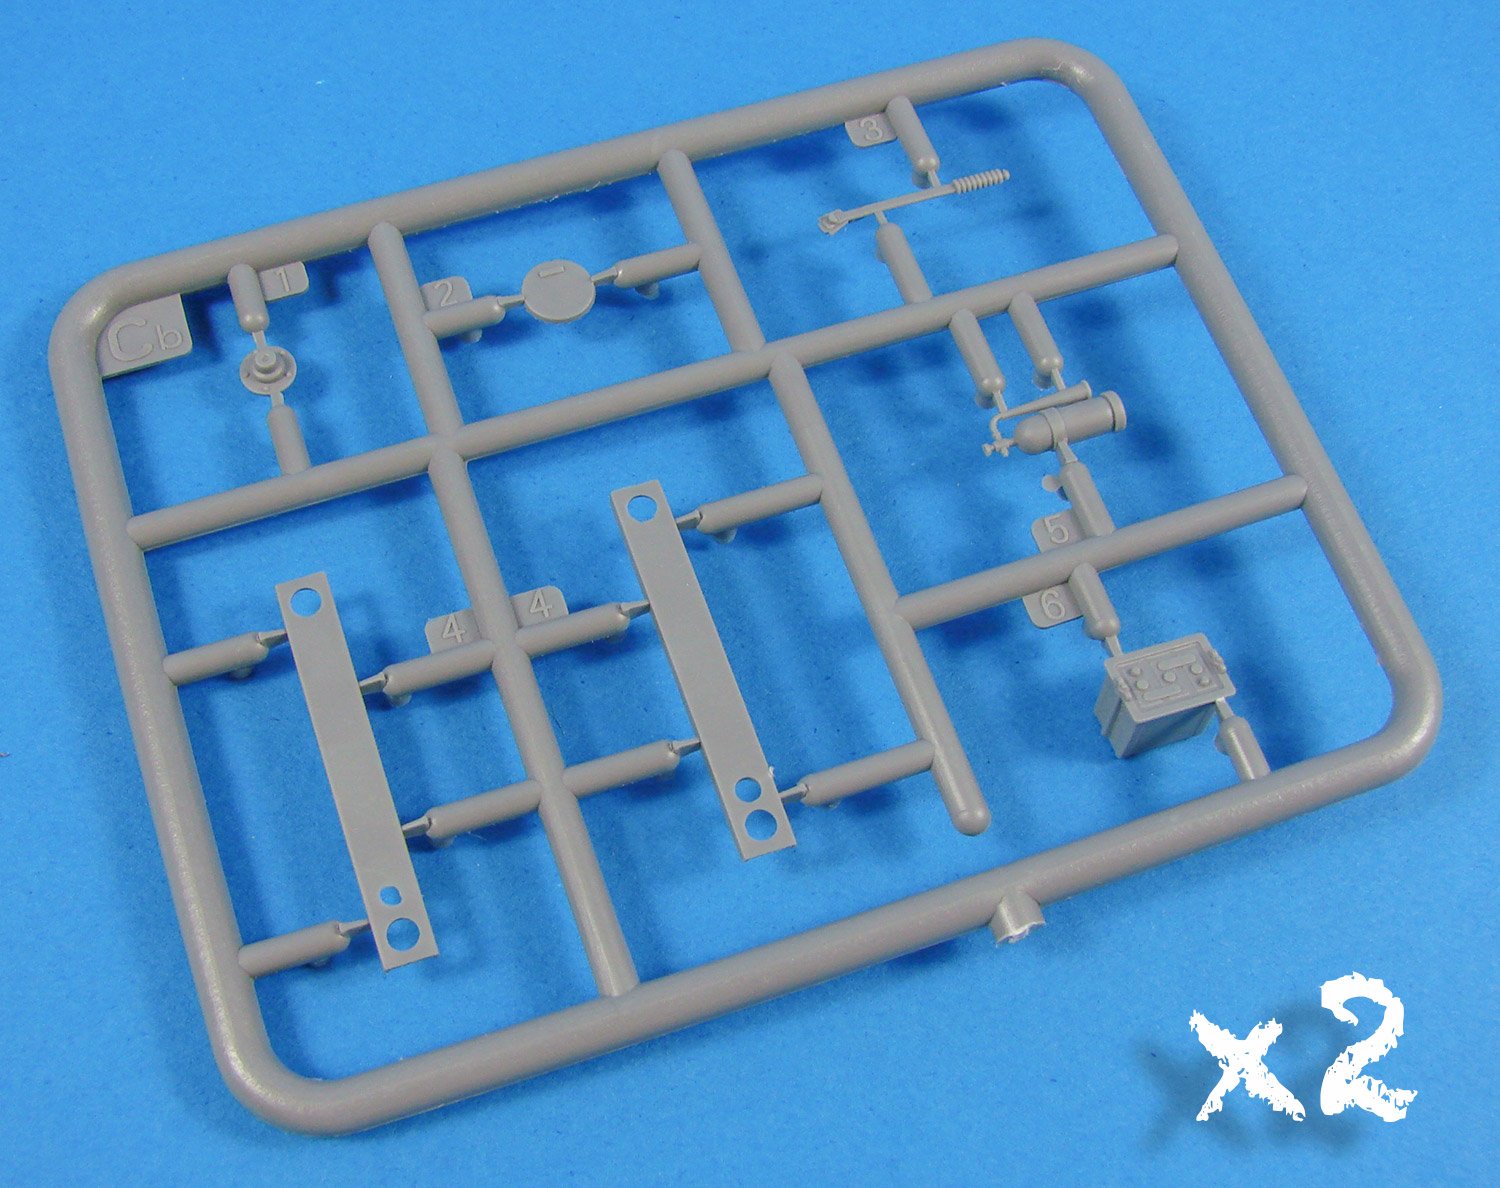
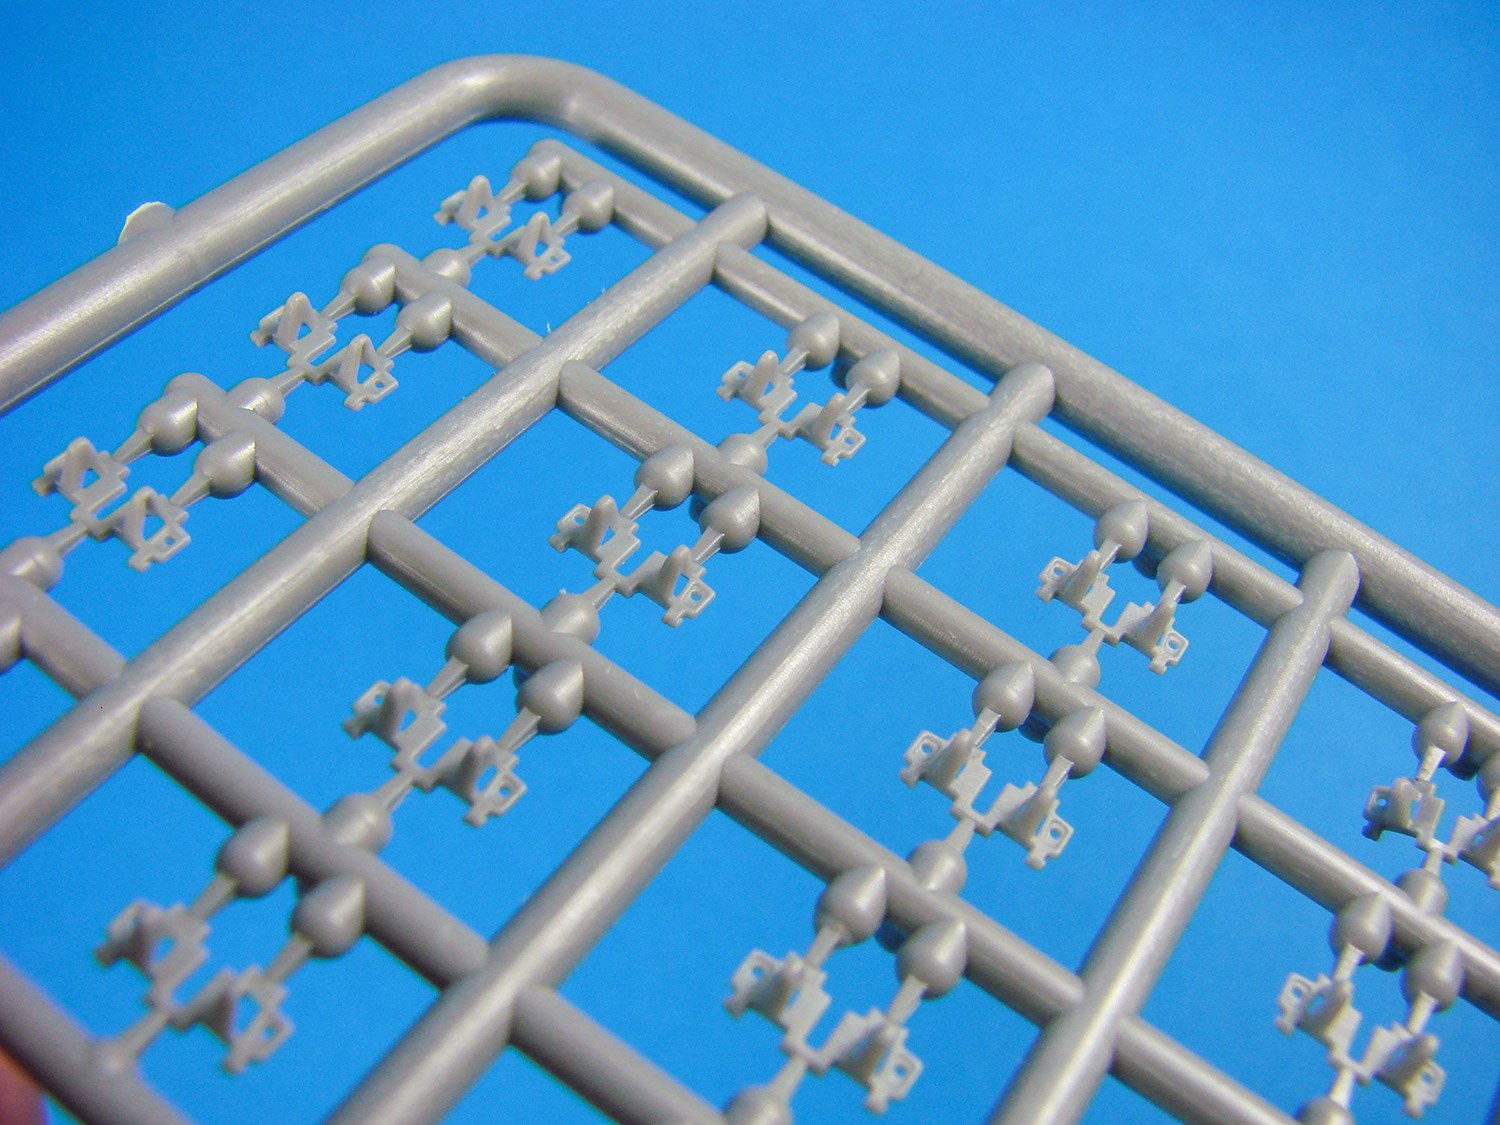
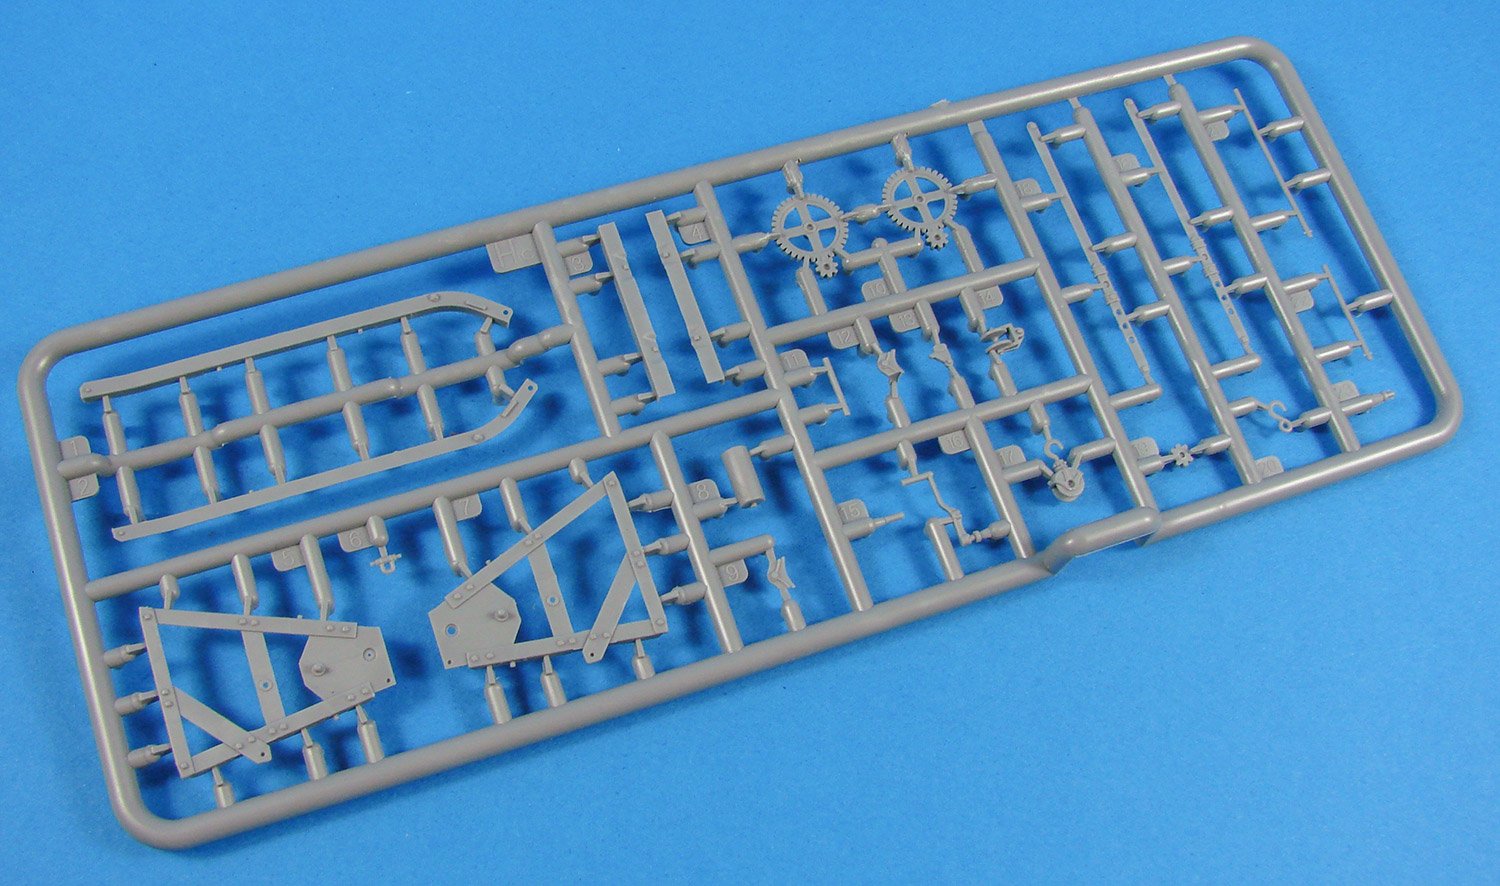
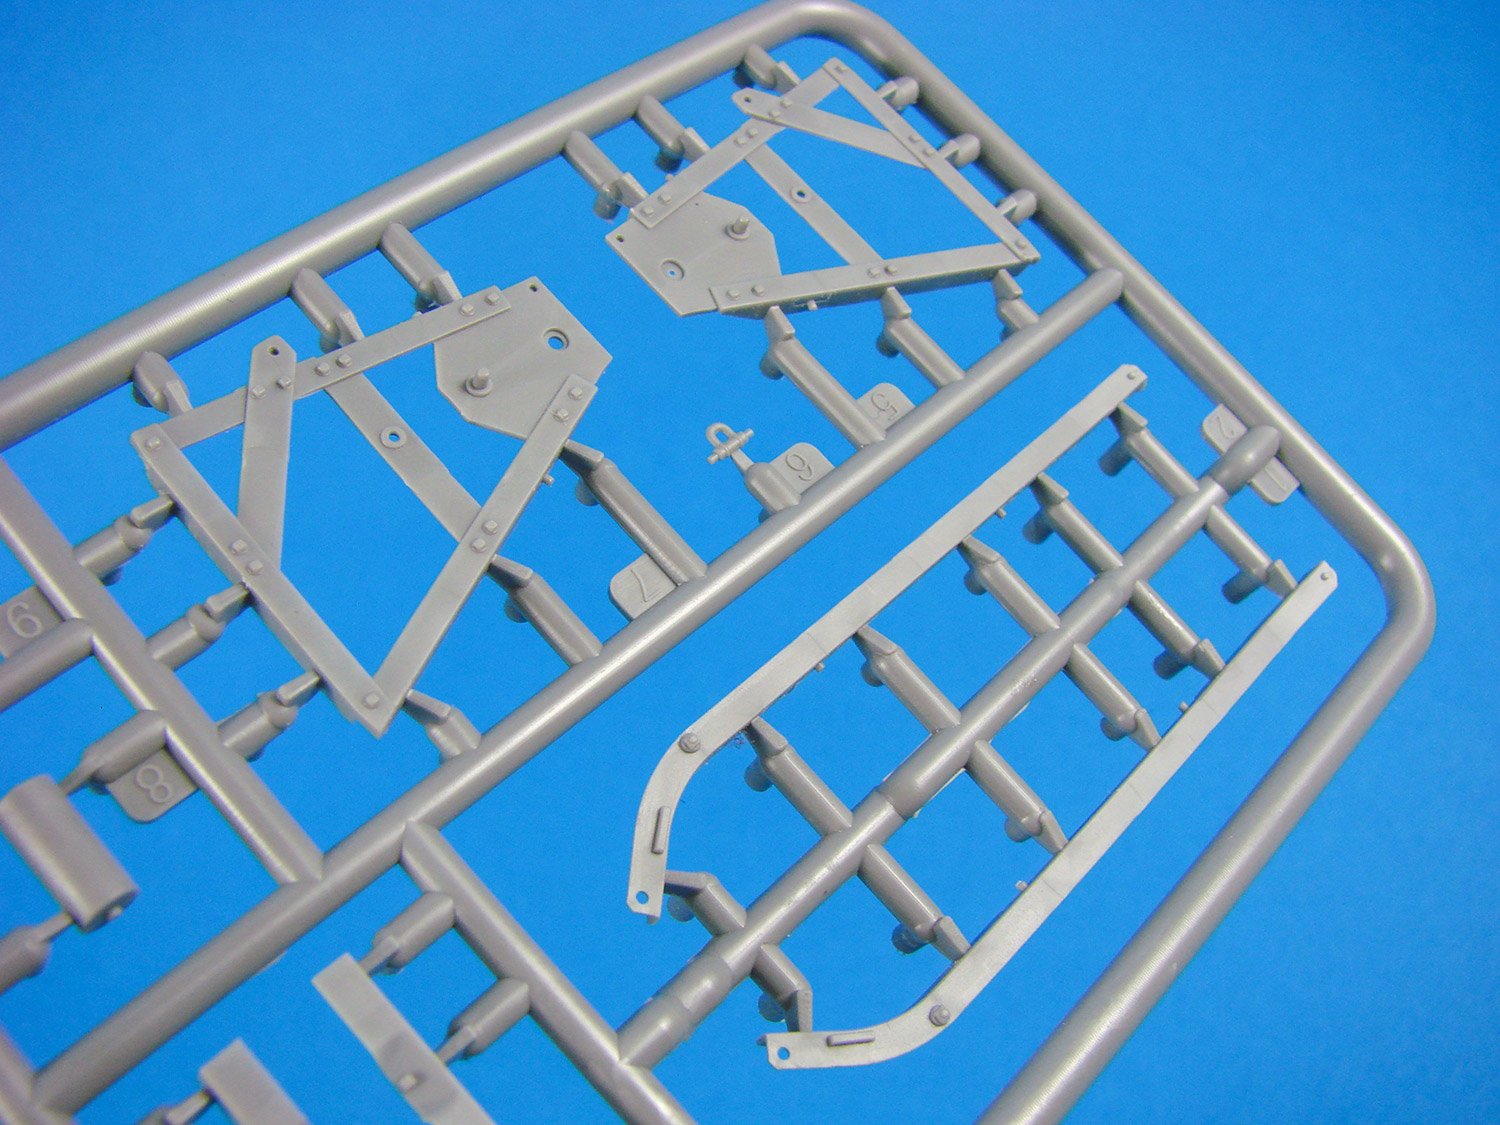
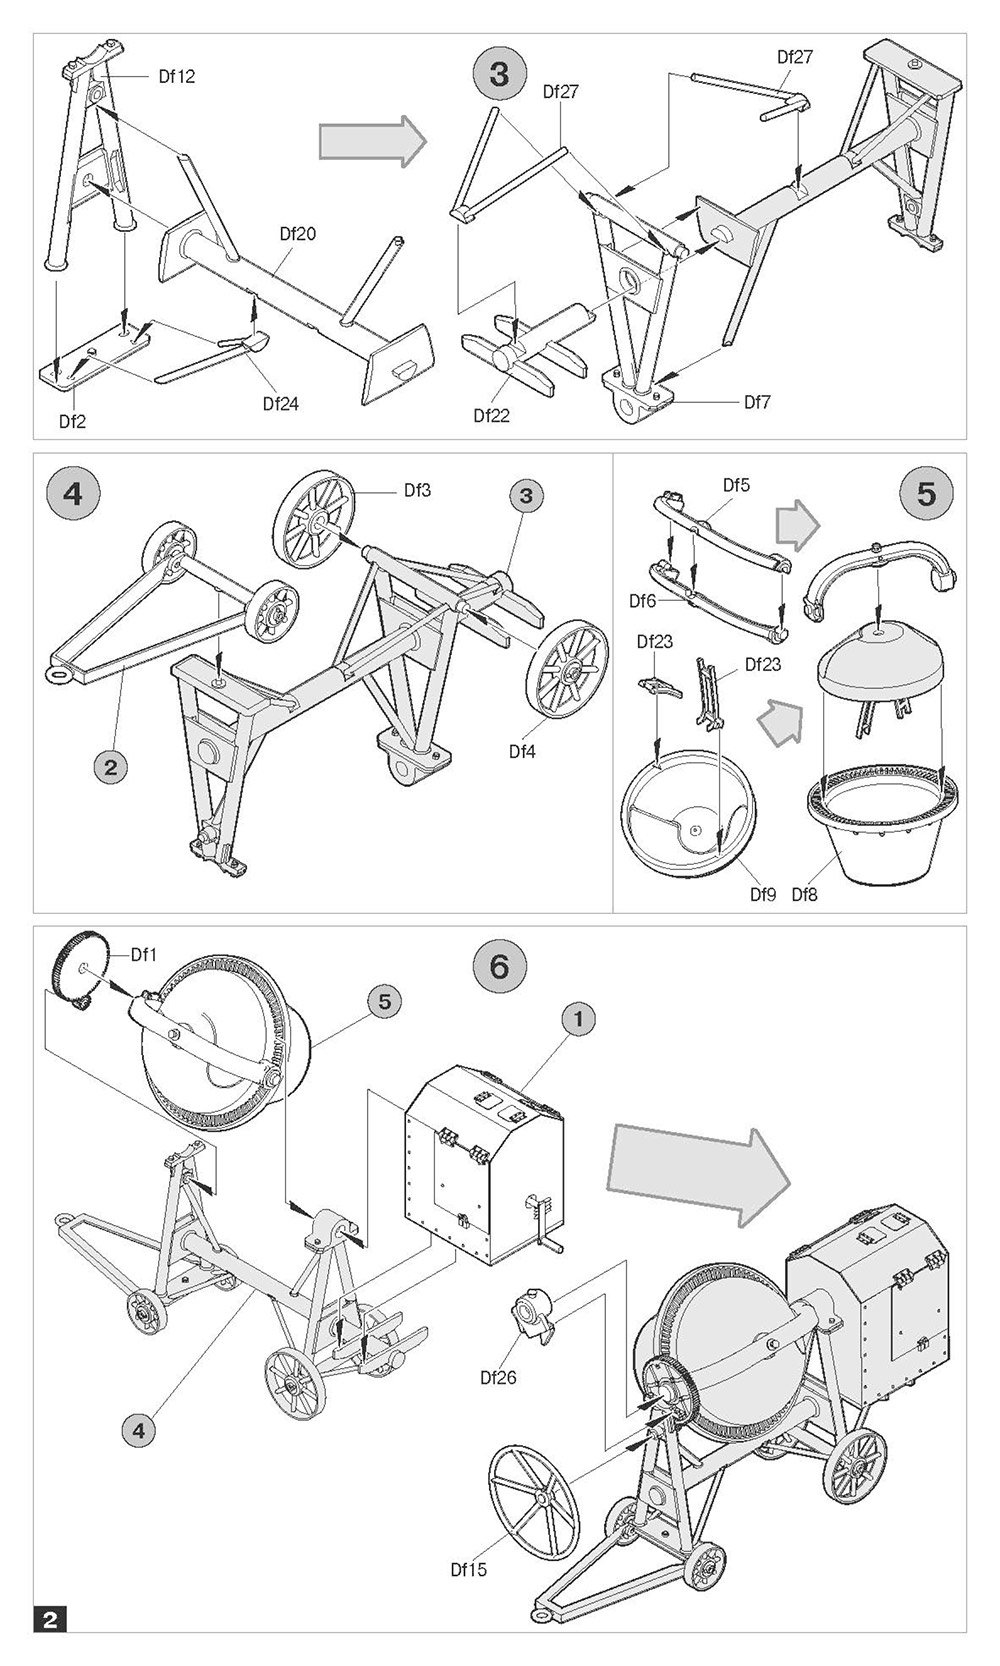
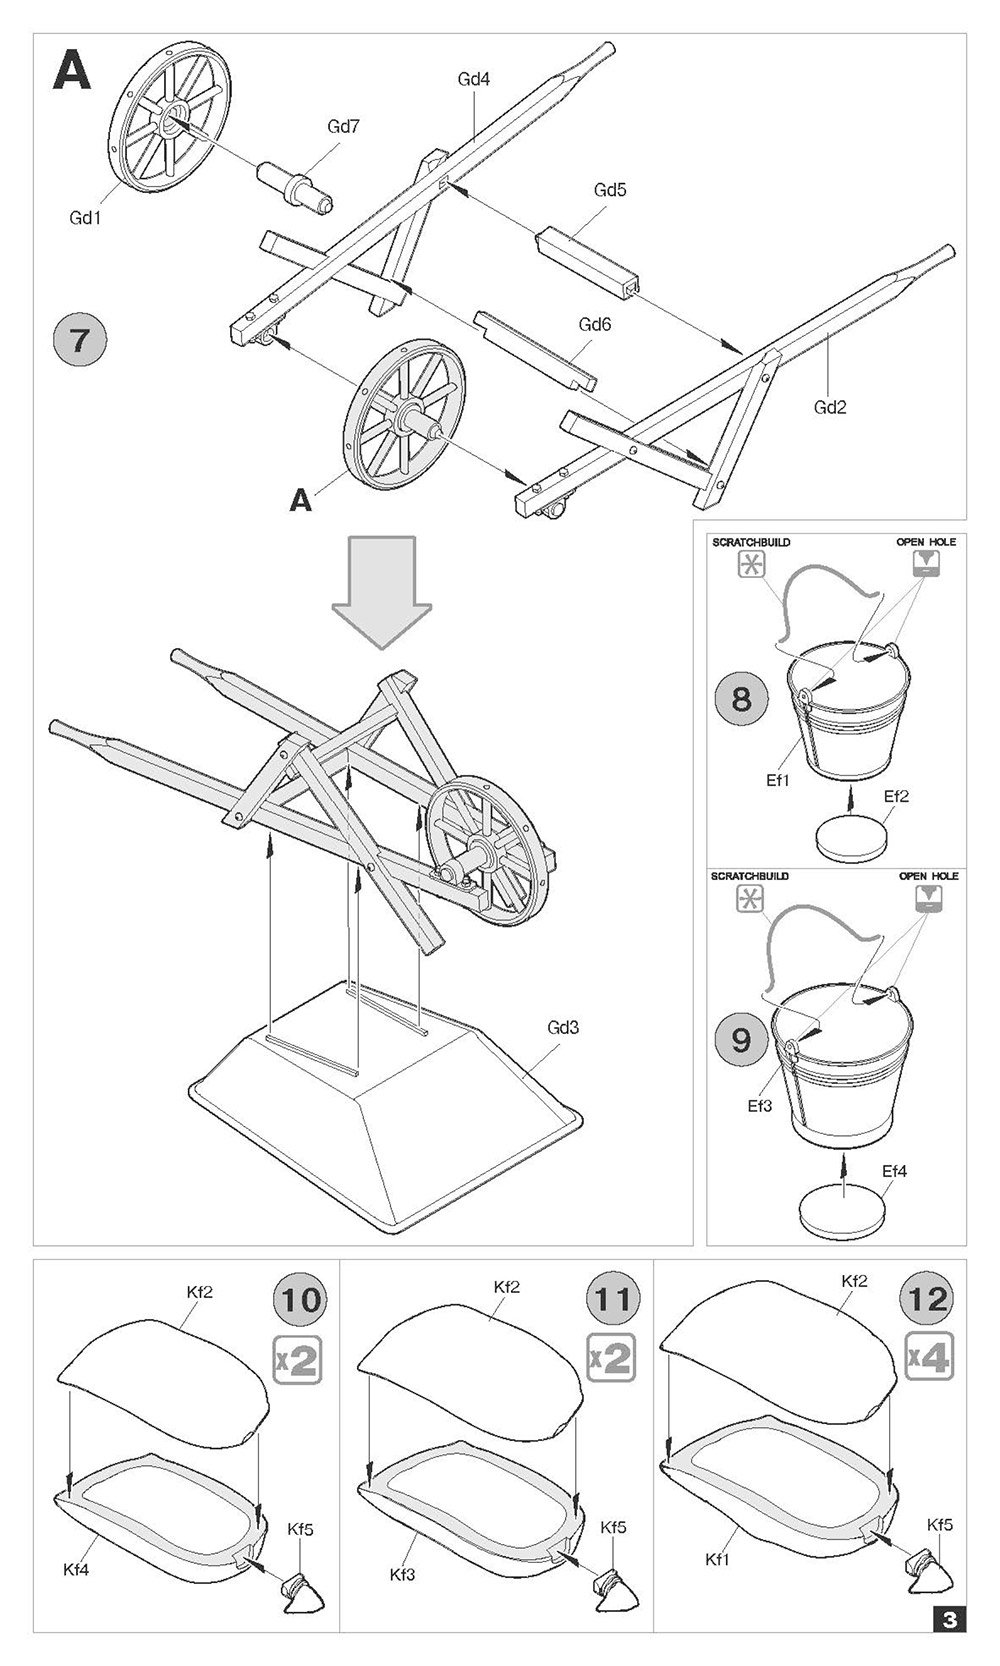
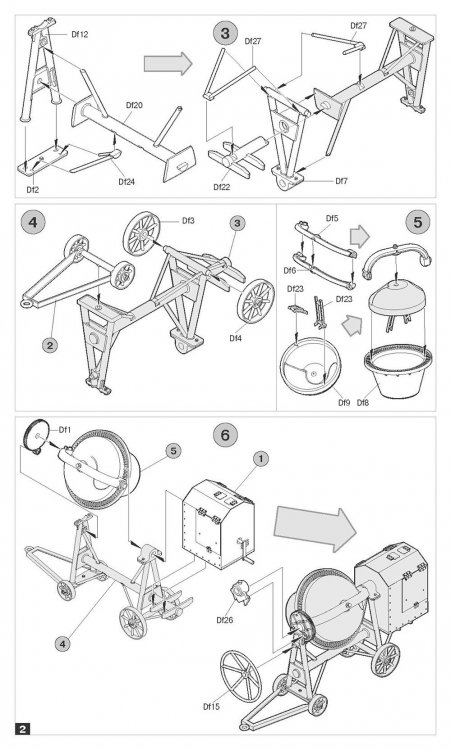
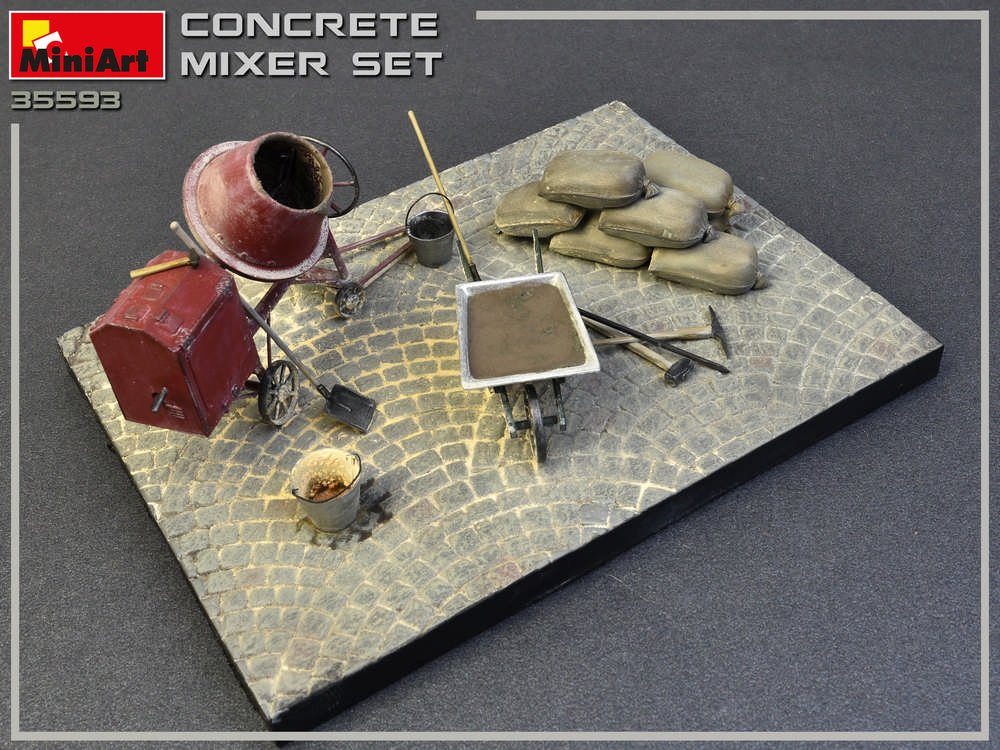
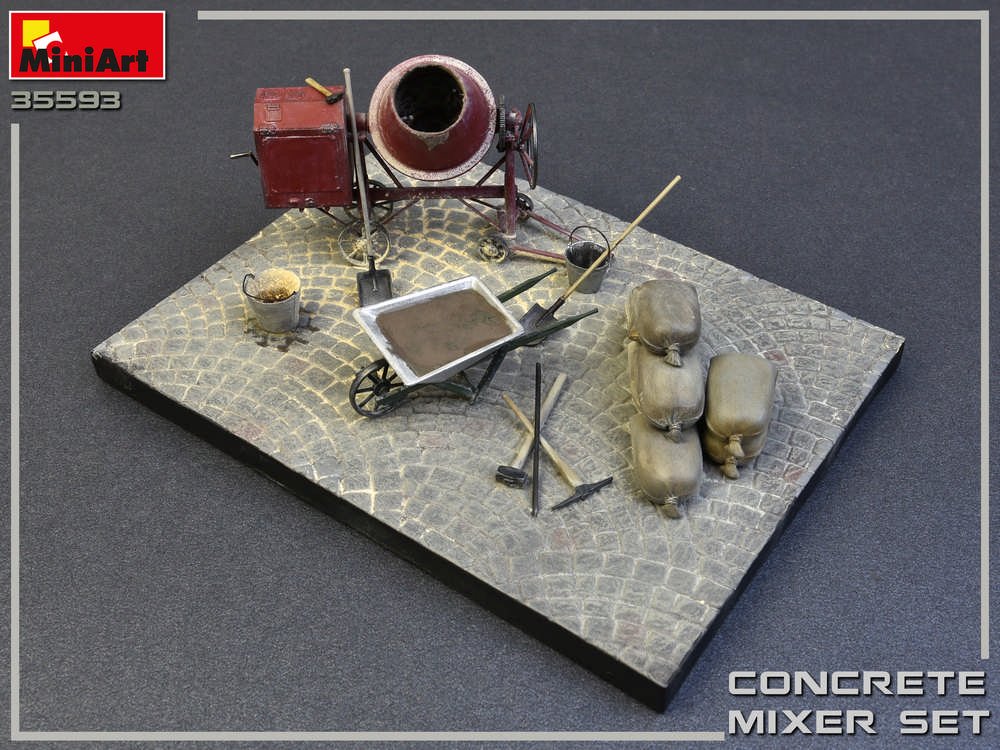
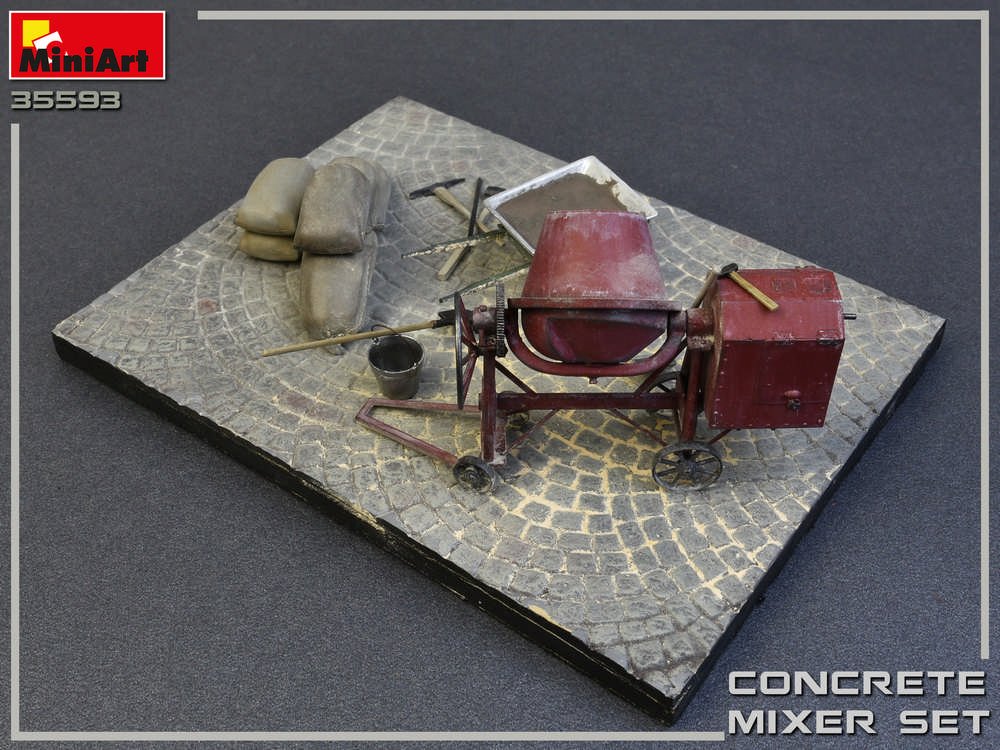
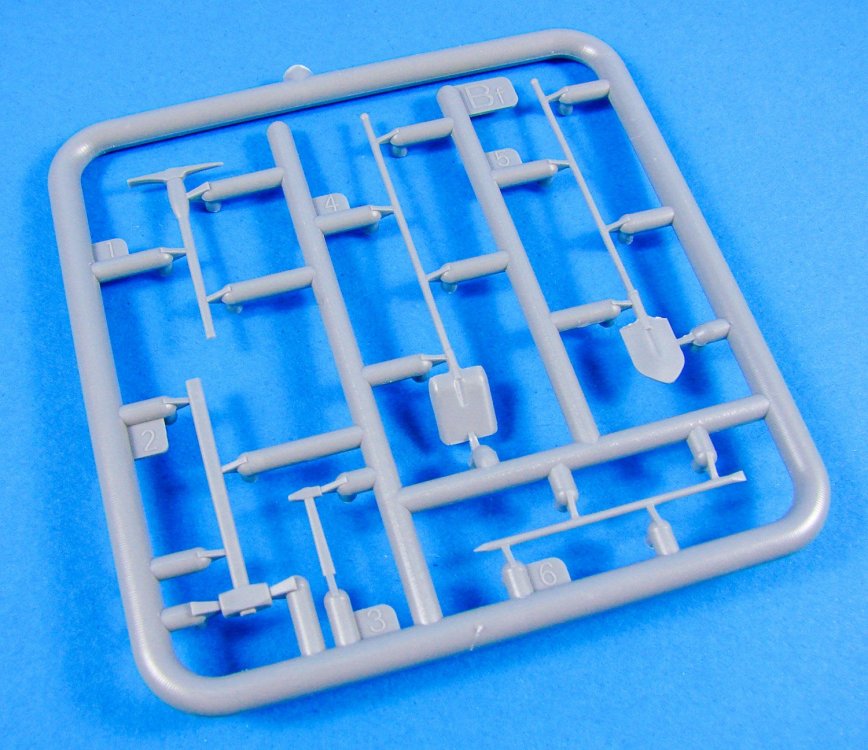
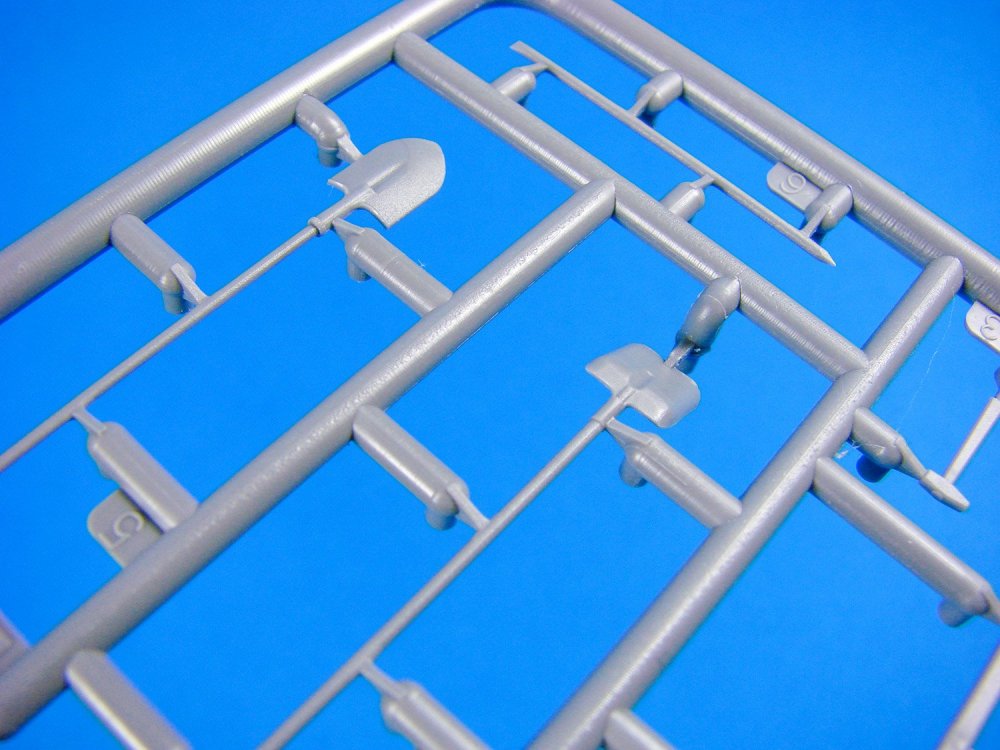
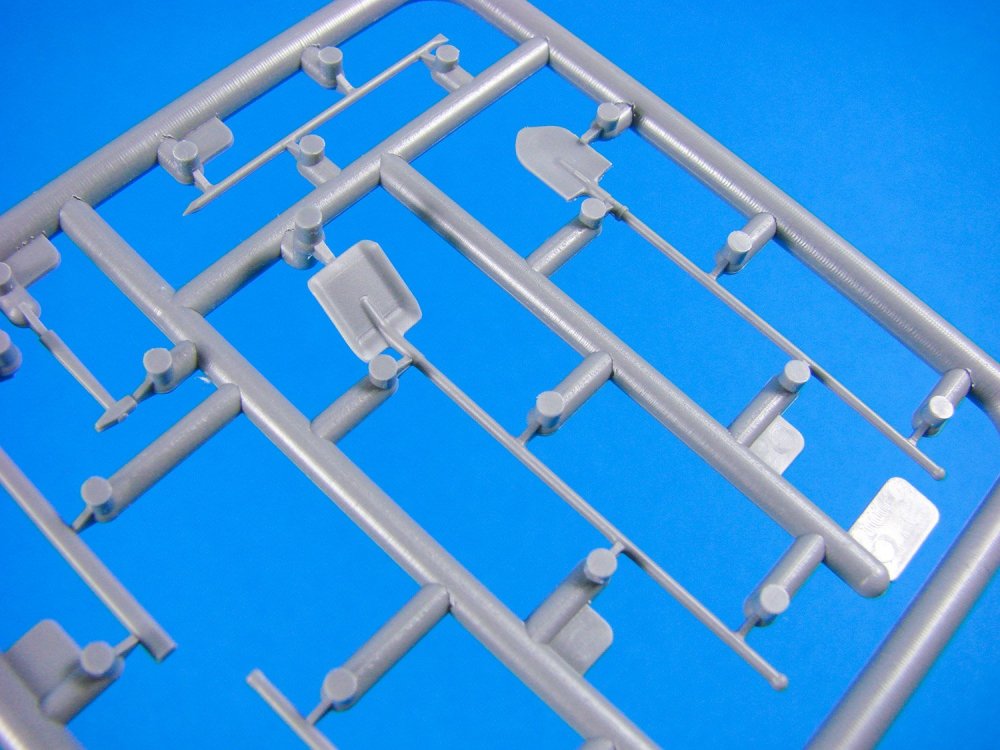
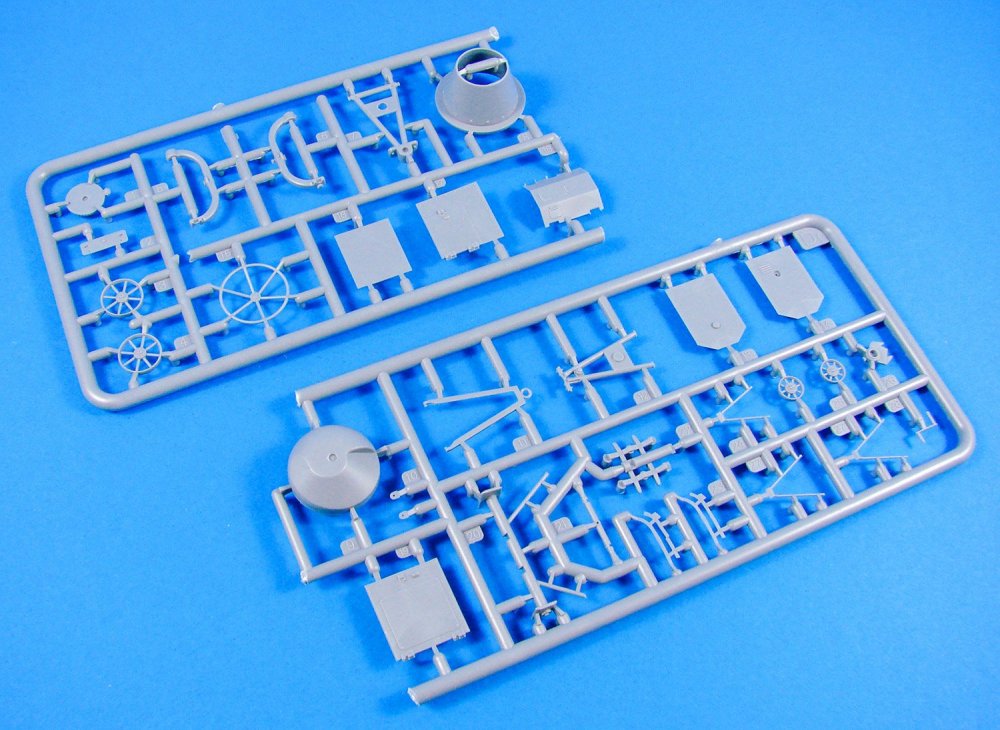
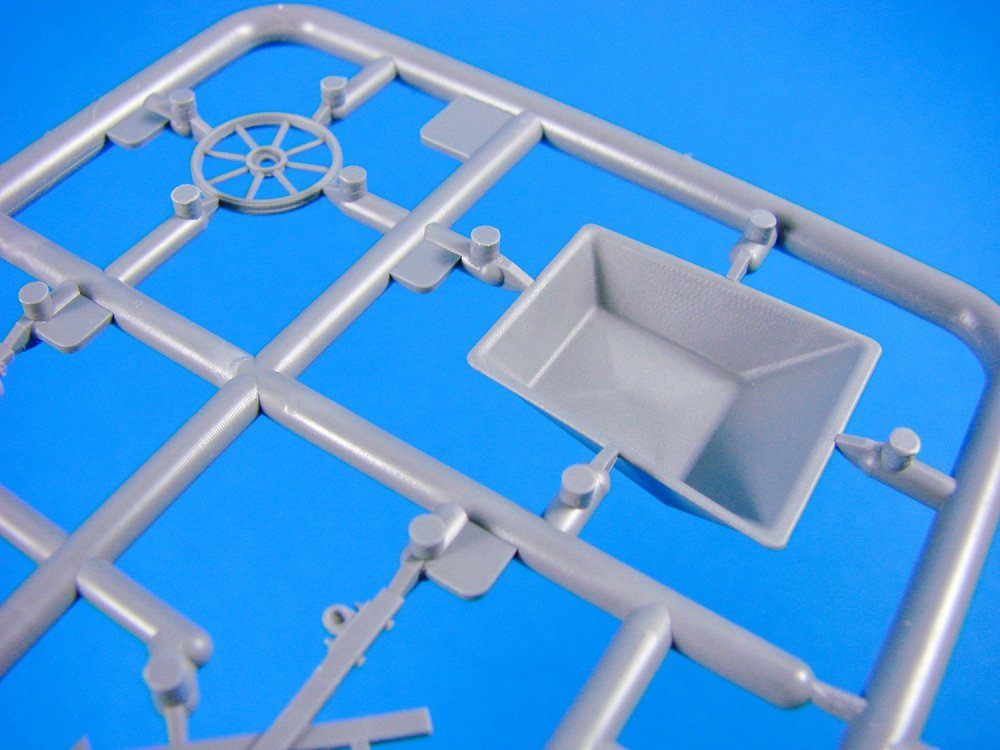
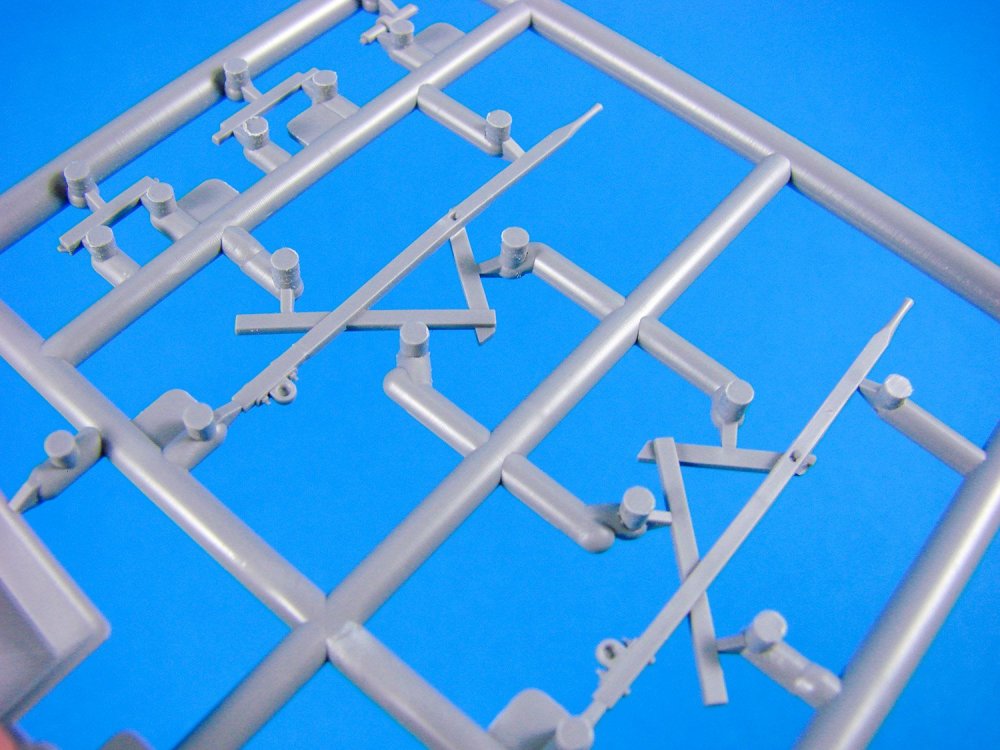
1:35 Concrete Mixer Set MiniArt Catalogue # 35593 Concrete. Since Roman times, there’s sure been a lot of it laid down, without a doubt. During WW1 & WW2 however, concrete laying really took off in use for fortification construction and the Germans were the real master of this. All over once-occupied Europe, from Poland to the Channel Islands, the remains of fortifications stand as silent sentinels to a more sinister and dark age that is still within living memory. Should you have wanted to lay this stuff down in smaller, less industrial quantities, then the principle was the same, and indeed remains pretty much unchanged today. You need a rotating mixer! Of course, some tools would be useful for it you needed to remove old concrete or rubble before you laid the wet stuff. MiniArt to the rescue with what I think is possibly the only mainstream, injection-moulded solution to your 1:35 concrete mixing problems. The kit This new release is packaged into the same size boxes as many of MiniArt’s smaller diorama accessory sets, with a nice, glossy finish and an end-opening box-flap. The front of the box shows the various contents in a situation setting whilst the rear shows each component with a suggested painting chart with colours that are represented with Vallejo, Mr Color, Lifecolor, Tamiya, Testors, AK Real Color, Humbrol, Revell, and Mission Models codes. I’m pretty sure you could fathom these yourself though, although the suggestions are useful. Inside the box, SIX sprues of light grey styrene are packed into various clear sleeves so as to minimise any possibility of damage. One of these sprues (Df) was quite long and has been carefully split into two parts so it would comfortably fit into the packaging. The strange sprue nomenclature possibly means that some of the parts here are generic to other sets, and it’s just the inclusion of the concrete mixer that gives this set its overall remit. Sprue Bf What we have here are some hand tools. No assembly is required, and all you’ll need to do is to snip them from the sprue and clean them up, ready for paint. Tools moulded here include a pickaxe, lump hammer, stone hammer, crowbar, shovel and spade. Details really are very nice, and these deserve some good wood and metal replication to show those details. Sprue Df The star of the show and the raison d'êtreof this whole set, this two-part sprue contains the concrete/cement mixer. Covering six constructional sequences, the agricultural-looking mixer looks every bit a period piece of construction equipment. I can’t tell whether this would be engine-powered within the case, via the side crank handle, or if the drum is manually turned with the box unit containing a gearing mechanism. The box has no internal detail, so it’s all pretty academic really. You can see from the instructions the detail that has gone into this particular item, and there is a fair amount of construction to complete it. In all, there are thirty-three parts involved in the construction of this unit, and the details really are excellent! Sprue Ef Not just one bucket, but two, and in different sizes. The bodies of these are moulded as single parts but with separate bases. No handles are included as you will make these from lengths of fine wire. Holes will need to be drilled in the handle mounts, to accommodate the wire. Sprue Gd Moving those sand and cement bags and tools around, plus mixed concrete/cement, calls for simple help, in the form of a wheelbarrow. This rustic-looking contraption consists of two wooden side frames that hold the wheel at the front and whose beams form the handles at the rear. The wheel is wooden-spoked with a metal hoop around its circumference. Spacers add rigidity to the frame. A single-moulded part forms the barrow container, and this just sits atop the frame. Sprue Kf (x2) These identical sprues hold all the parts for the sand/cement bags. Each is constructed from halves, and with a separate tied bag end that plugs into the top of them. In fact, the seams on these could probably double as the stitched seam if you allowed enough plastic to goop out when you glue, and then leave a trail of it afterwards. These bags are also designed to be stacked, should you wish. There are four in total. To enhance the parts further, you could add some texture with a cloth after brushing some thin cement onto their surfaces. Instructions A four-page, black and white instruction sheet is included with three of these taken over with construction of the set. Remember, the tools themselves need no assembly, only paint to complete. Illustrations are by means of line drawings with shading used where appropriate. Everything is very, very easy to follow. Conclusion Another fabulous set from MiniArt! Pretty soon, with the aid of these guys, there will be no diorama that will be difficult for a modeller to create, from tools, crates etc. These sets are superbly made, easy to assembly, highly detailed and also very reasonably priced. My sincere thanks to MiniArt for the sample seen in this review.


-
dambuster Hong Kong Models 1/32 Avro Lancaster Dambuster
James H replied to JeroenPeters's topic in Aircraft Reviews
I'll be starting this shortly but not taken a real look yet, so this is very useful. especially with the Upkeep mine info. Nice to see this in a review online already! I'll add link to Scalemates. -
Ho229 at the Udvar-Hazy Center
James H replied to JeroenPeters's topic in LSM 1/35 and Larger Work In Progress
No, dammit. You're still Aitor's bitch. -
Ho229 at the Udvar-Hazy Center
James H replied to JeroenPeters's topic in LSM 1/35 and Larger Work In Progress
You're Aitor's bitch. Can't wait to see your interpretation. -
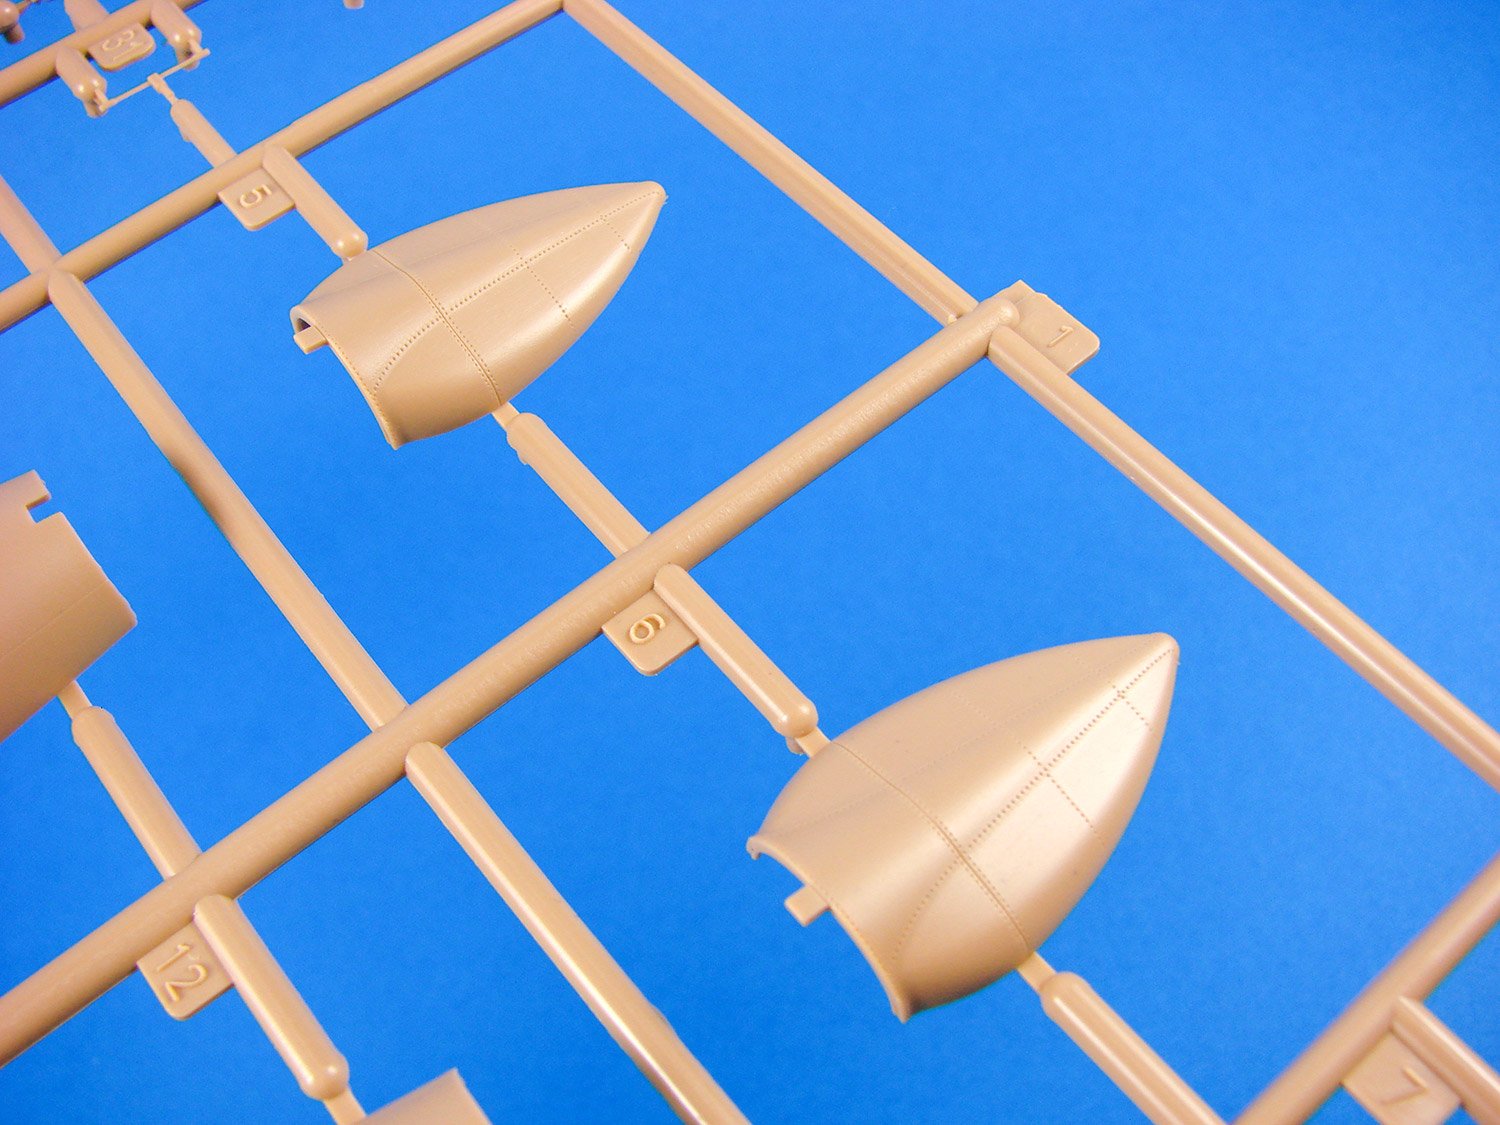
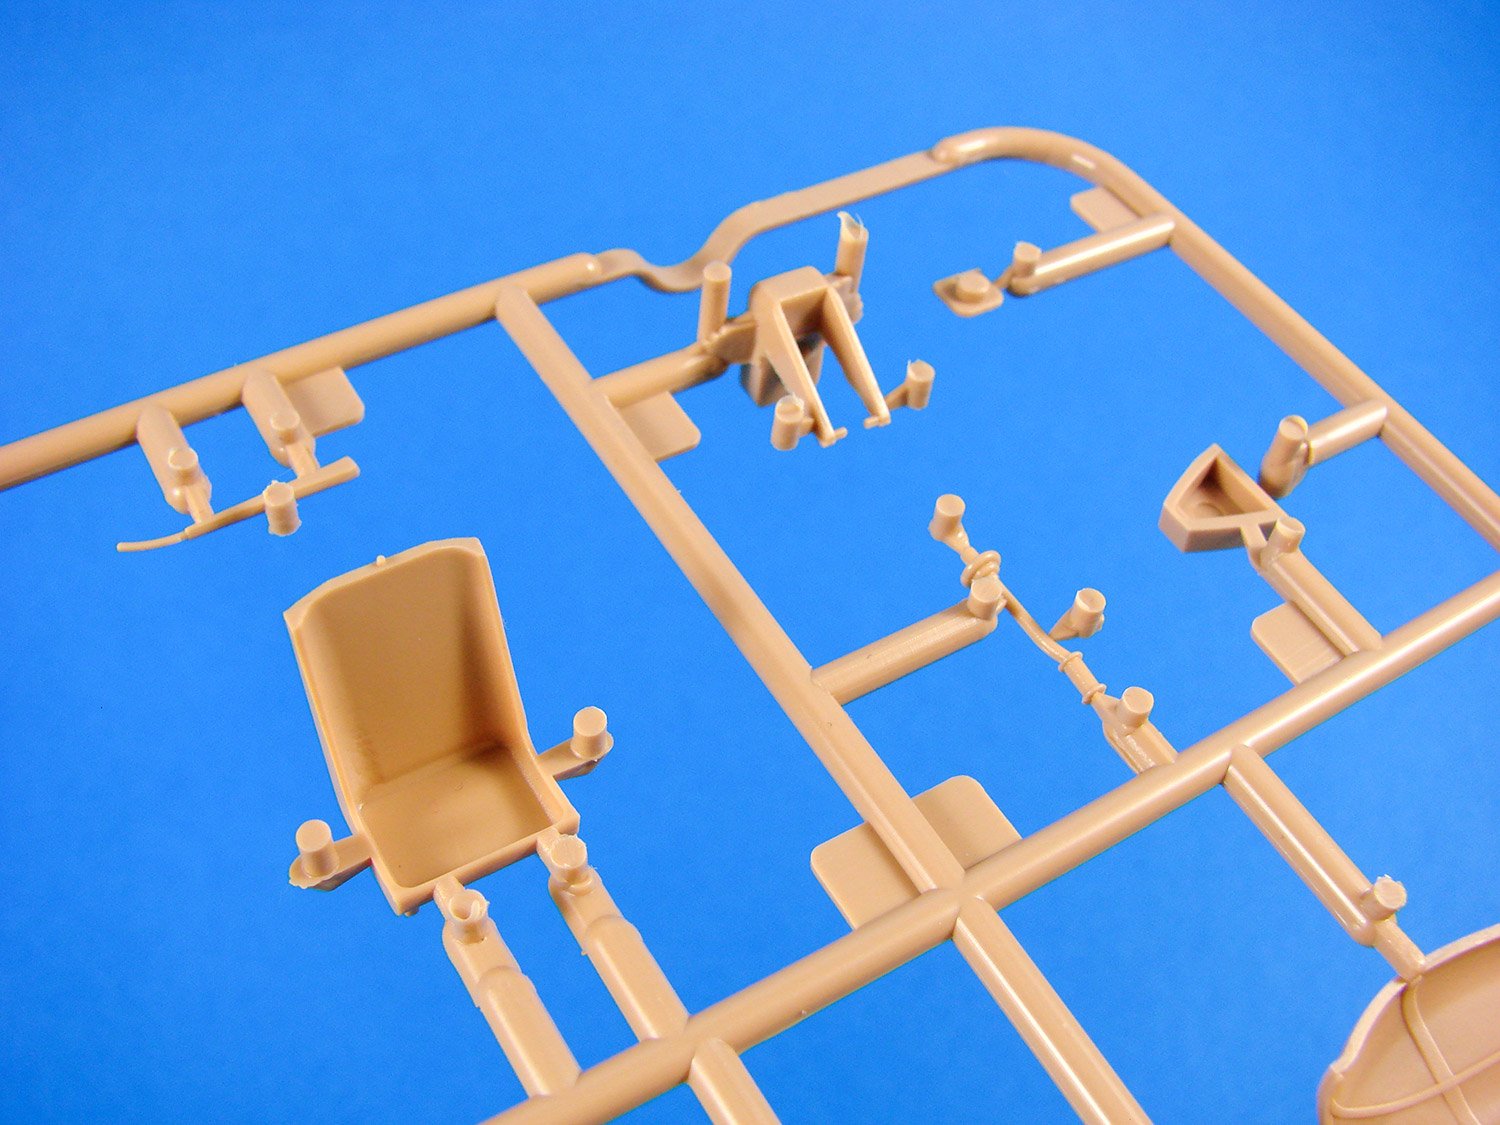
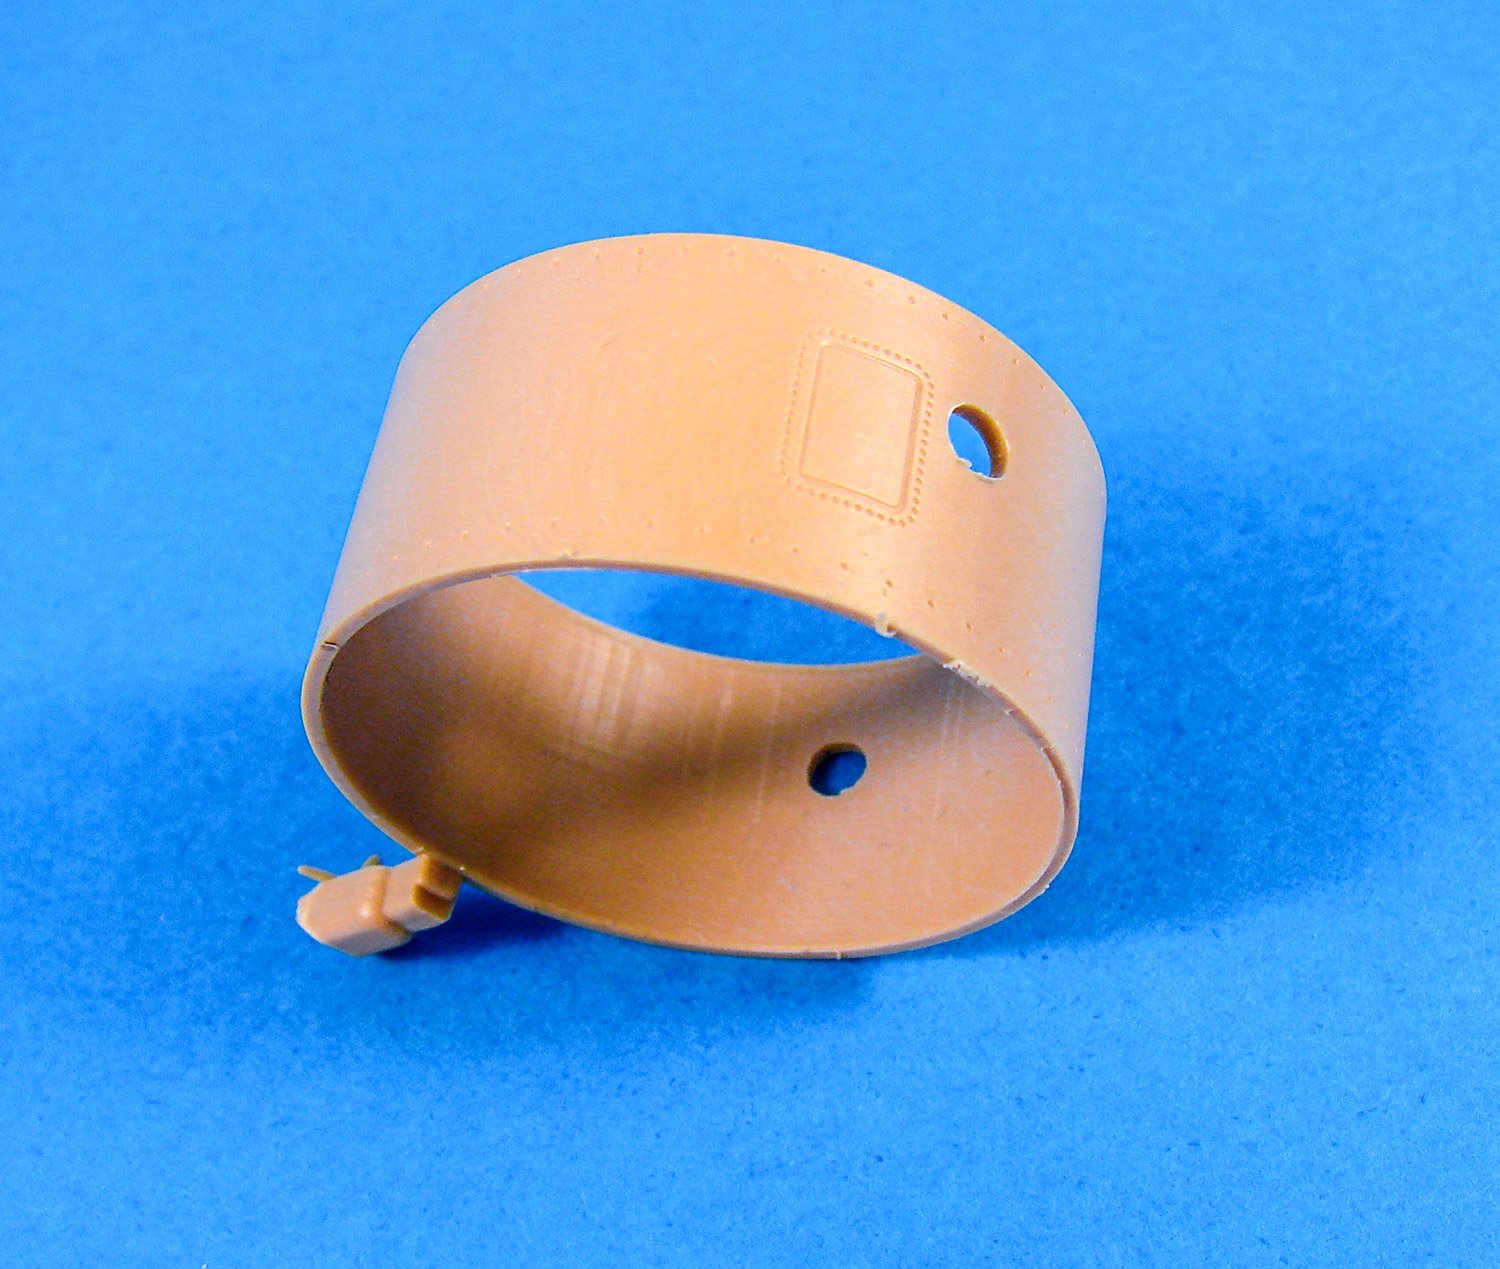
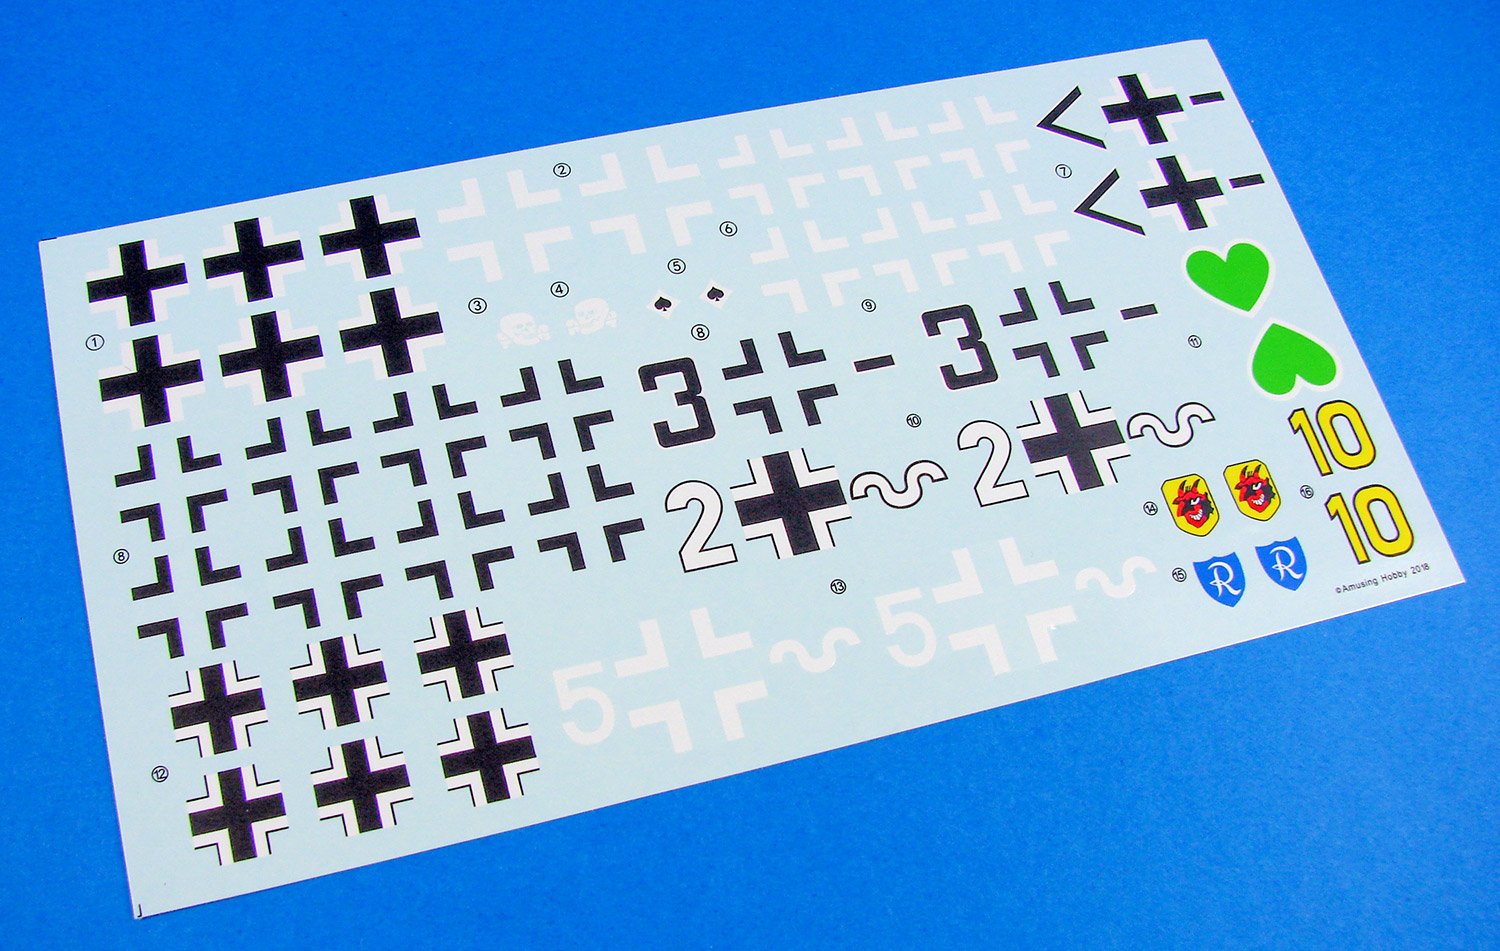
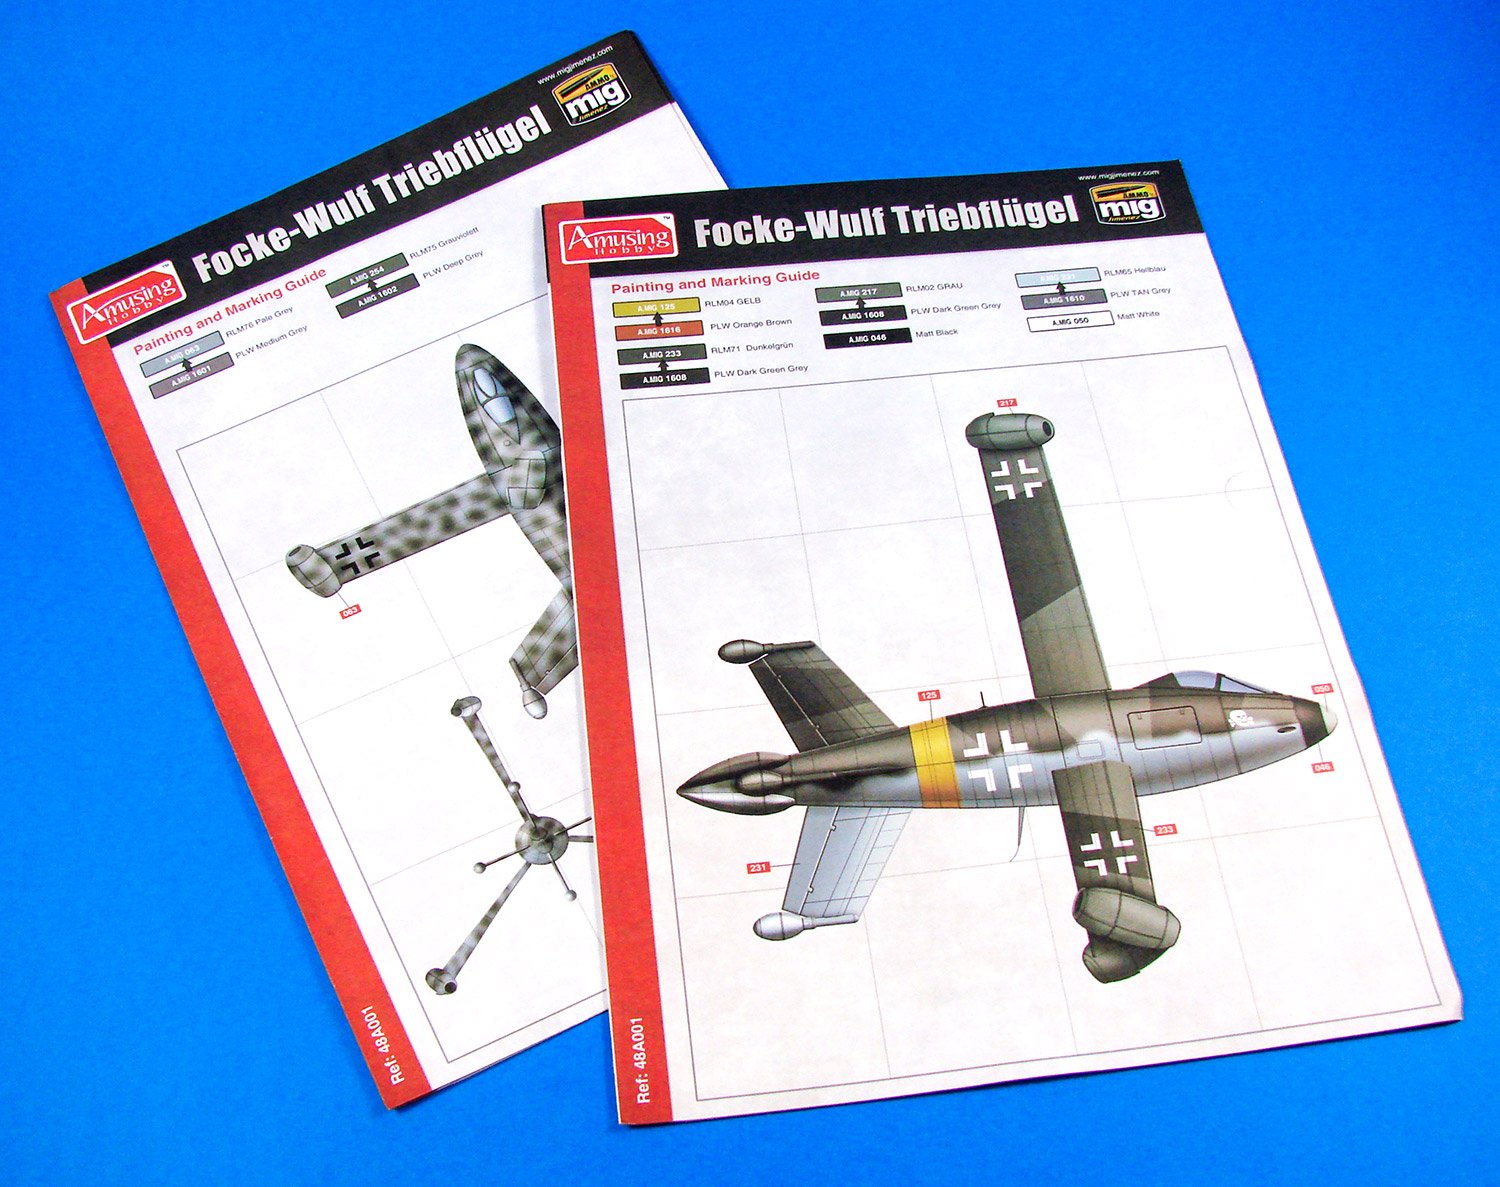
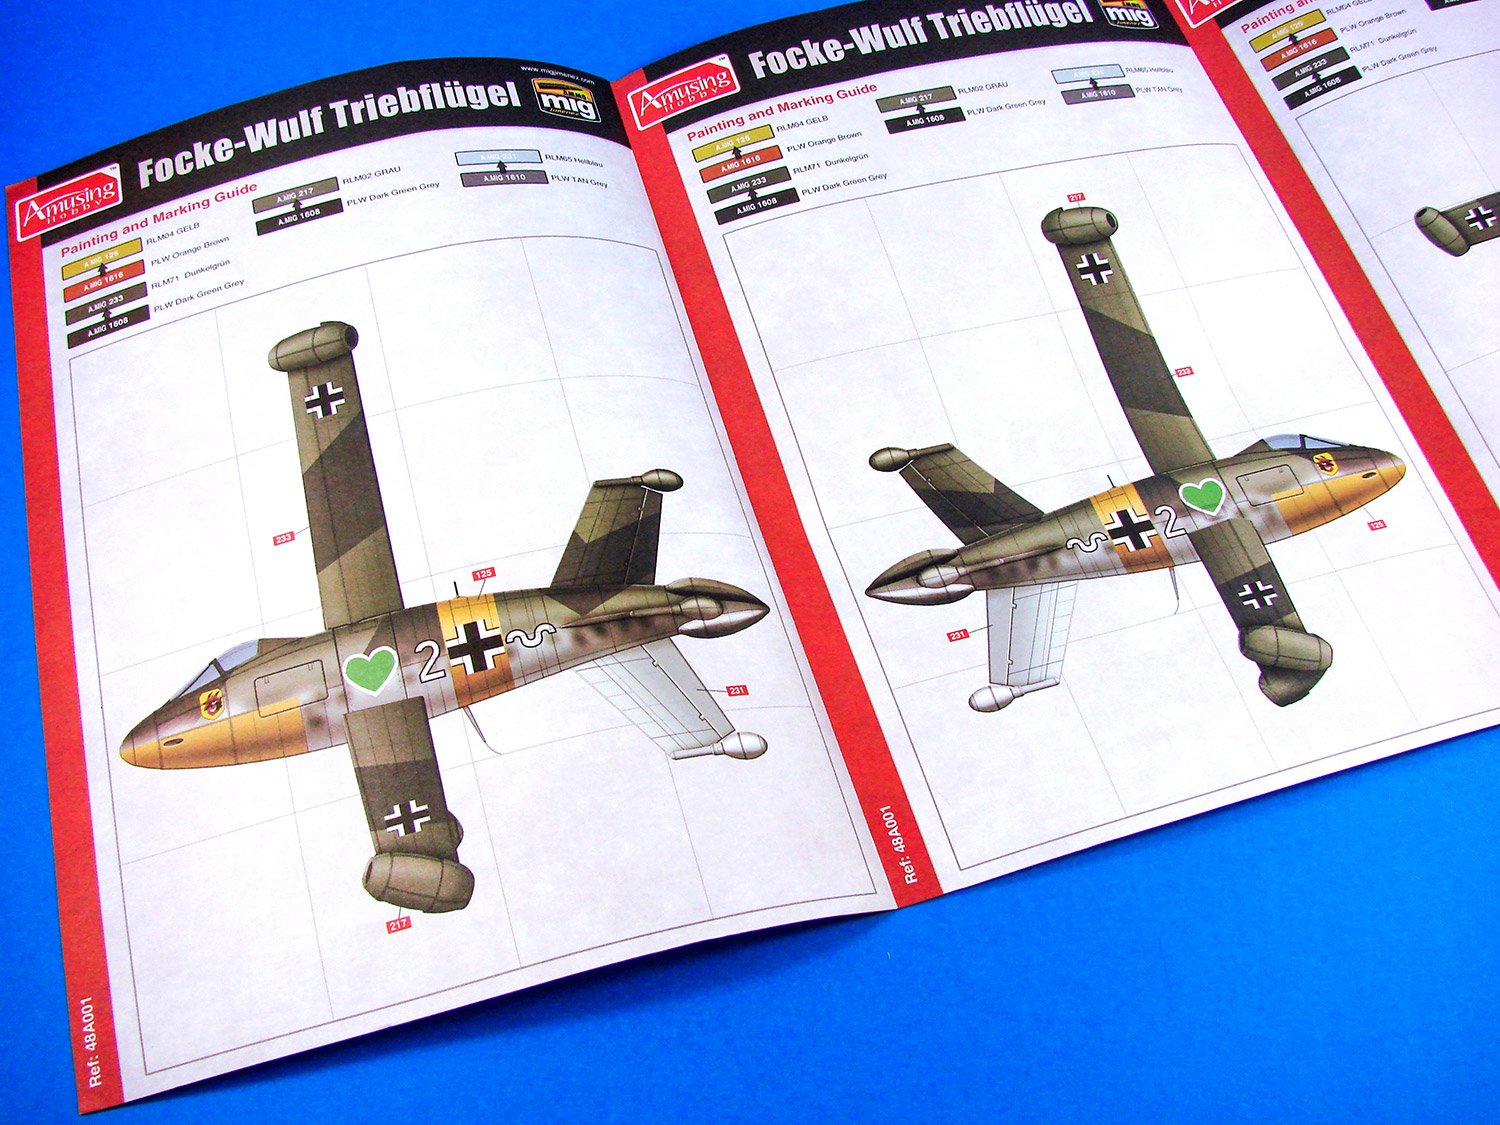
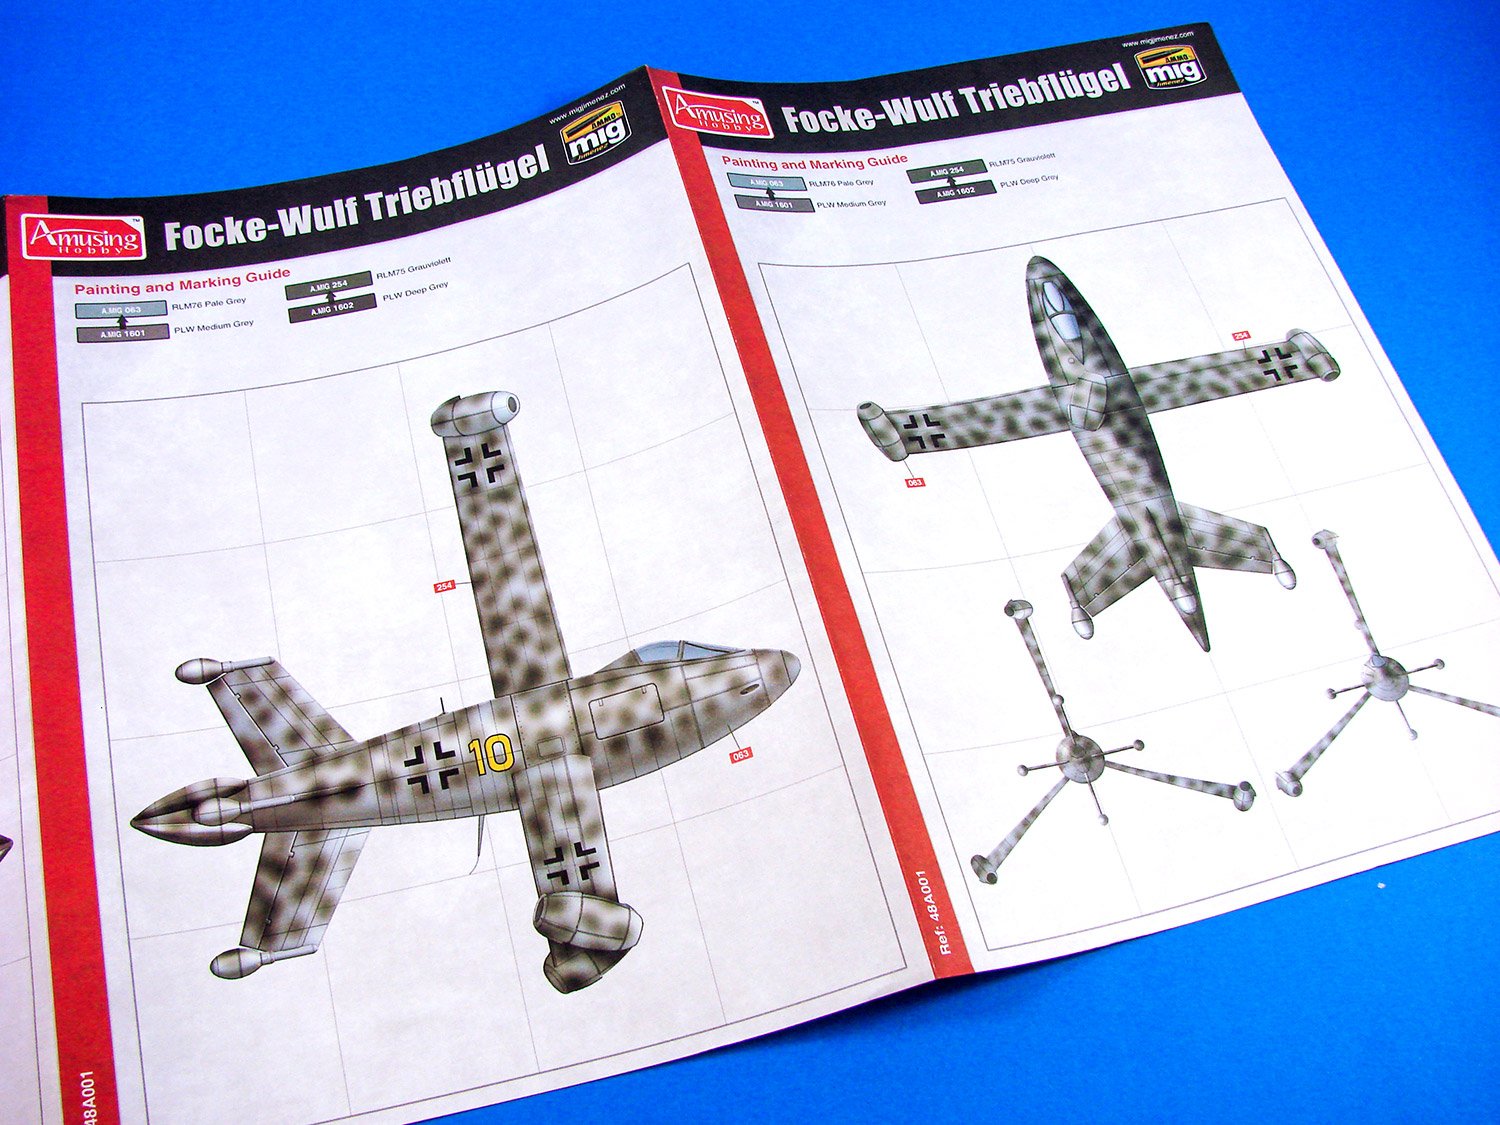
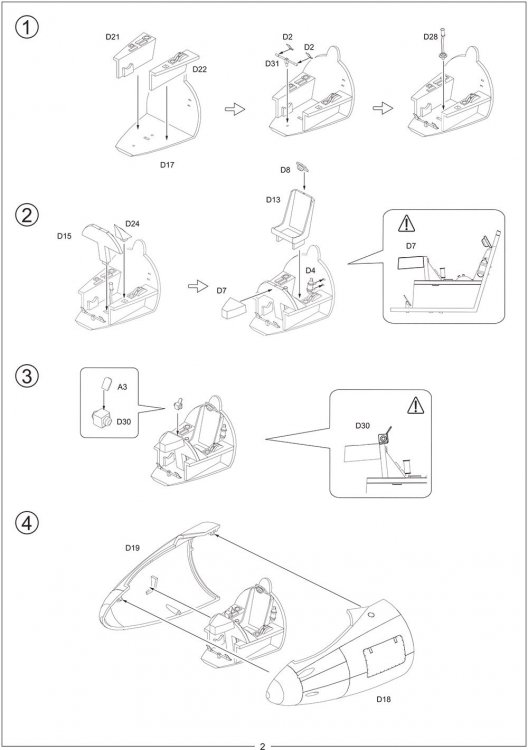
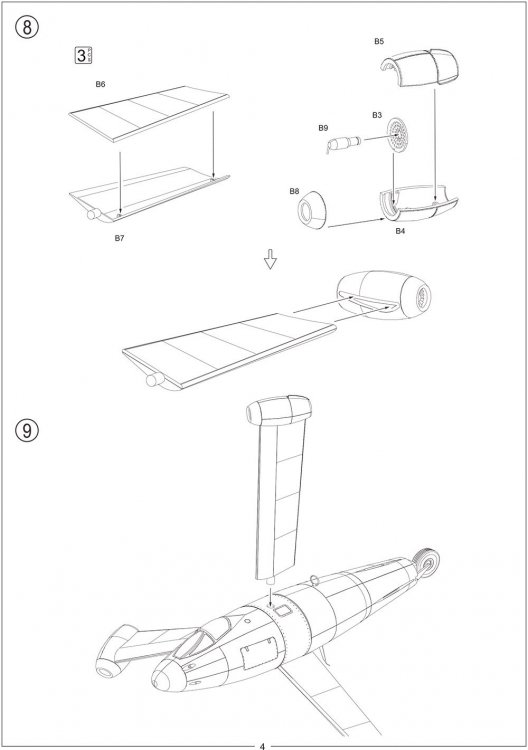
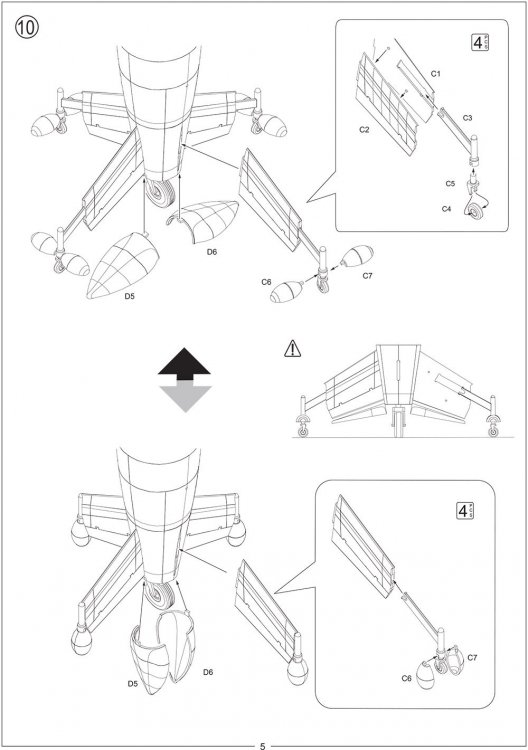
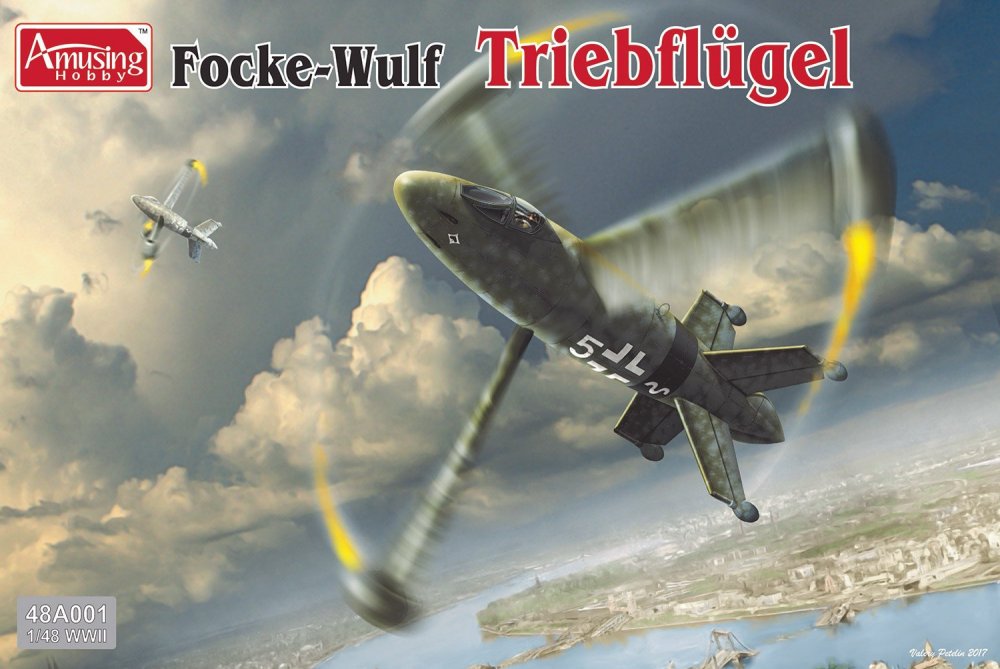
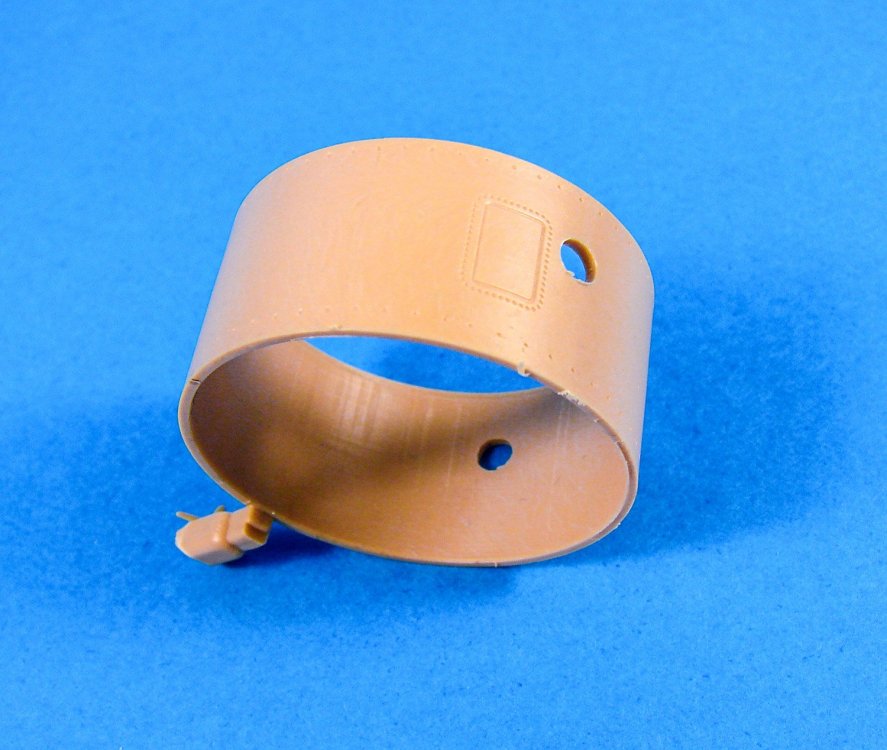
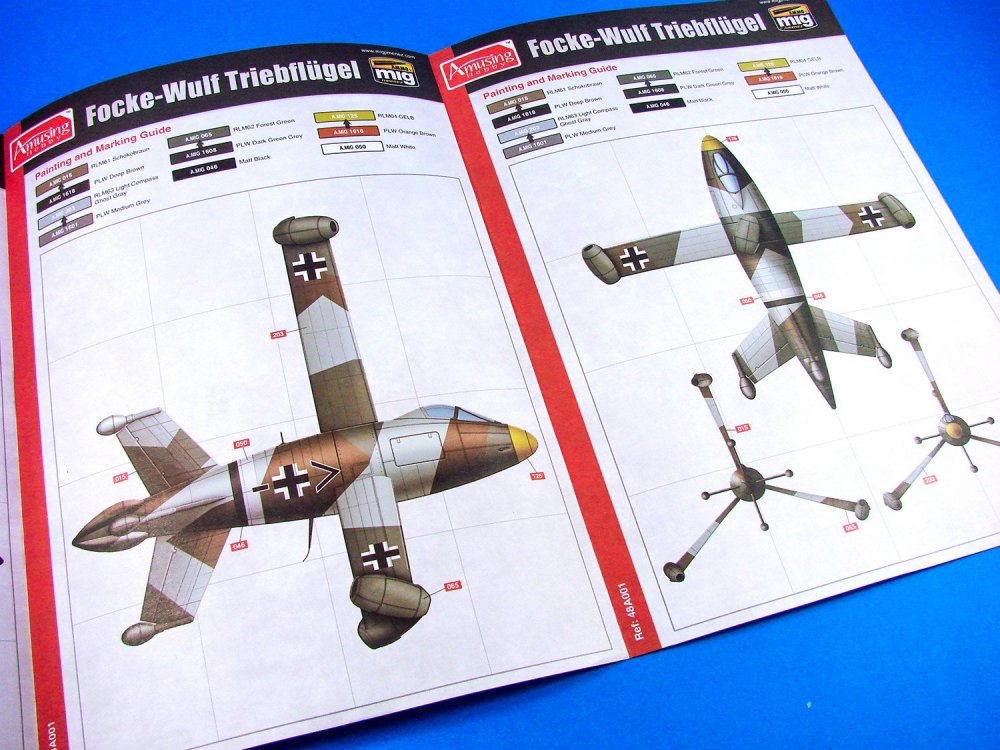
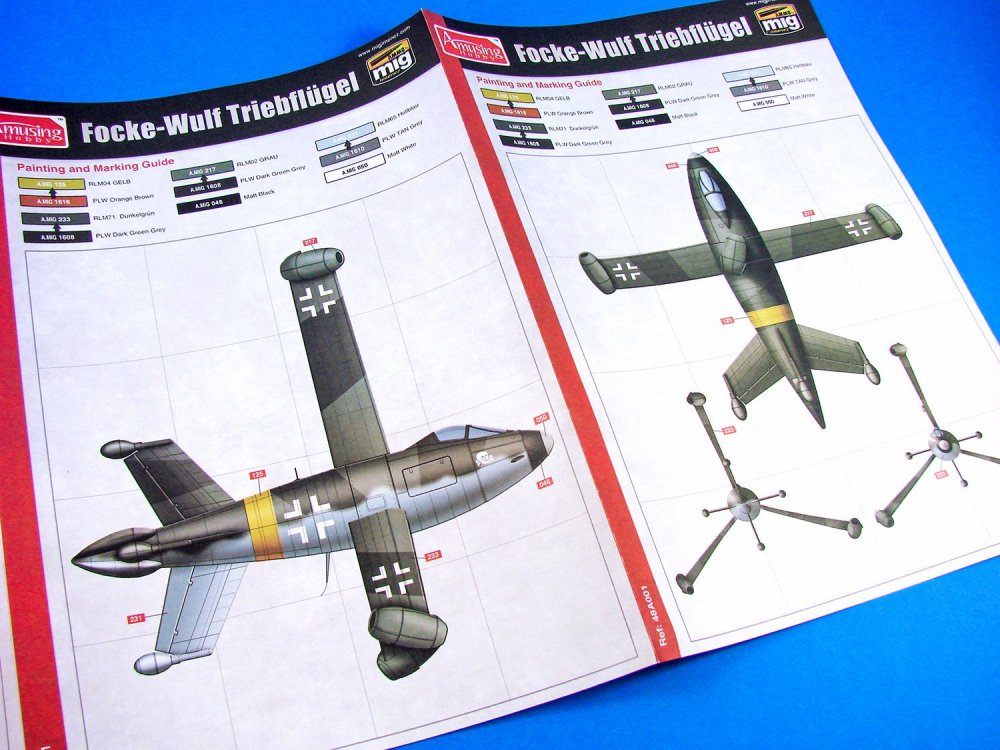
1:48 Focke-Wulf Triebflügel WWII German VTOL Fighter Amusing Hobby Catalogue # 48A001 The Focke-Wulf Triebflügel, or Triebflügeljäger, literally meaning "thrust-wing hunter", was a German concept for an aircraft designed in 1944, during the final phase of World War 2 as a defence against the ever-increasing Allied bombing raids on central Germany. It was a vertical take-off and landing tail-sitter interceptor design for local defence of important factories or areas which had small or no airfields. The Triebflügel had only reached wind-tunnel testing when the Allied forces reached the production facilities. No complete prototype was ever built. The design was particularly unusual. It had no wings, and all lift and thrust were to be provided by a rotor/propeller assembly, a third of the way down the side of the craft. When the aircraft was sitting on its tail in the vertical position, the rotors would have functioned similarly to a helicopter. When flying horizontally, they would function more like a giant propeller. The three rotor blades were mounted on a ring assembly supported by bearings, allowing free rotation around the fuselage. At the end of each was a ramjet. To start the rotors spinning, simple rockets would have been used. As the speed increased, the flow of air would have been sufficient for the ramjets to work and the rockets would expire. The pitch of the blades could be varied with the effect of changing the speed and the lift produced. Fuel would be carried in fuselage tanks and piped through the centre support ring and along the rotors to the jets. A cruciform empennage at the rear of the fuselage comprised four tailplanes, fitted with moving ailerons that would also have functioned as combined rudders and elevators. The tailplane would have provided a means for the pilot to control a tendency of the fuselage to rotate in the same direction as the rotor, caused by the friction of the rotor ring, as well as controlling flight in pitch, roll and yaw. A single large and sprung wheel in the extreme end of the fuselage provided the main undercarriage. Four small castor wheels on extensible struts were placed at the end of each tailplane to steady the aircraft on the ground and allow it to be moved. The main and outrigger wheels were covered by streamlined clamshell doors when in flight. When taking off, the rotors would be angled to give life in a similar manner to a helicopter. Once the aircraft had attained sufficient altitude the pilot would tilt it over into level flight. The rotors continued spinning in level flight maintaining 220 rpm at the aircraft's maximum forward speed. Forward flight required a slight nose-up pitch to provide some upward lit as well as primarily forward thrust. Consequently, the four cannon in the forward fuselage would have been angled slightly downward in relation to the centreline of the fuselage. To land, the craft had to slow its speed and pitch the fuselage until the craft was vertical. Power could then be reduced, and it would descend until the landing gear rested on the ground. This would have been tricky and a probably dangerous manoeuvre, given that the pilot would be seated facing upward and the ground would be behind his head at this stage. The kit This is Amusing Hobby’s first ever aircraft release in any scale, and it’s not only an unusual subject, but extremely welcome for those of us that like something a little esoteric. This is the first injection plastic kit of this subject in this scale, as far as I can see. In the past we have had 1:48 resin kits from the likes of Arba, Planet Models and Reheat, all of varying quality and standards. A new-tool kit of modern tool standards is definitely an exciting addition. The kit itself comes in a relatively small box with an artwork showing two Triebflügel in flight, and apparently not long from take-off due to the angle of the machines. This kit has bubbling on the back burner for a little while now, as is evident from the artwork which is dated 2017. Lifting the lid reveals EIGHT sprues of tan-coloured styrene and a single clear sprue. Although the sprues aren’t generally bagged separately, they are packaged with multiples in the same sleeve. It’s evident from the outset that this isn’t a complicated model and could be a nice, quick project. A decal sheet is included, as is a short instruction manual. No PE is included in this release. Whilst the cockpit opening is quite small and you won’t be able to see too much in there, no seatbelts are supplied, so I do suggest you source some aftermarket solution. Sprue A Our first sprue contains the four clear parts on this release. Two of these are for the canopy (windscreen and hood), plus the gunsight reflector. Two of these are provided, so you have a spare. The canopy can be posed either open or closed, and framing looks well-defined, therefore easy to mask the transparency before painting. No masks are supplied, so you may have to look towards an Eduard release for those. Clarity on all parts is also excellent. Sprue B (x3) These three sprues cater to the rotors and jet engines for the aircraft, with one of each on each sprue. The rotor foils themselves are very simple in construction, being built from an upper and lower panel. Surface detail is exquisite and very, very fine. Each jet engine comprises a fan, intake vane, 2-part main body shell and a forward cowl. The main body is recessed to neatly accept the rotor tip. There are two other parts on here which aren’t on the instructions. One is a small ring and the other, a compete impellor face. Sprue C (x4) Where the Triebflügel has three rotors, for stability, it has four fins that create the cruciform appearance of the rear fuselage. Each fin is supplied as halves, and within this, fits a gear support leg that can be positioned to suit either a gear-down or in-flight scenario. A gear fork and wheel then fit to the end of this. Clamshell gear covers are also supplied. When on the ground, these fold back 90 degrees out of the way of the ground. Sprue D This is the largest of the sprues and contains all of the parts for the fuselage, cockpit and central landing gear. Building commences with the cockpit which is built into the separate nose section. The office comprises an integral floor and rear bulkhead, onto which sit the consoles, rudder pedals and pedal bar, control stick, pilot seat, instrument panel and rear coaming. A gunsight is also provided. There are no seatbelts with this kit, so you’ll need to source some. Whilst fuselage detail is superb, there isn’t any sidewall detail within. It might be a good idea to add a little styrene or spare colour PE components to make it a little busier there, especially as the canopy can be posed open. Four gun muzzle tubes also fit to the exterior. The fuselage itself is split into three sections; nose, rotating ring assembly, and the rear fuselage/tail unit. There are two discs on this sprue which fit to a separate rotor mounting unit, which will then allow it to be positioned by the modeller. The rear unit consists of halves into which a bulkhead is fitted, and then the central landing gear wheel. None of the wheels are weighted, so you might want to fix that. Again, a clamshell unit is supplied which would have enveloped the main wheel when in flight. They thought of everything! The last parts here are a whip aerial and a DF loop. All details across these parts is very good, with perhaps just the pilot seat letting it down a little. I think I’ll make a few changes here. Externally, detail consists of delicate panel lines and access ports, plus some very subtle riveting. I really do like this one. Miscellaneous One part was originally moulded to the exterior of another sprue but has been removed for safety. This slide-moulded part forms the rotating fuselage ring into which the rotors and their jet engines will plug. Just a minimum of clean-up is required here. Decals A single decal sheet is provided in this release, covering four scheme subjects. No instrument or stencils are supplied; this is a pure scheme sheet. There is nothing on this sheet to suggest where they are printed, but overall quality looks very good, with minimal carrier film, solid colour, and perfect registration. You can have a good rummage through the various markings and come up with something quite unique due to the variety of national insignia. No swastikas are included (surprise, surprise!), so if you want to add them, you’ll need to look through your spares box. Instruction Manual and scheme sheets This eight-page manual is all that’s needed to cover such a simple assembly job. Construction is shown over 10 stages spanning just 4 pages. Everything is perfectly clear to understand. I can’t see any problems arising. The four schemes are included as two separate fold-out sheets with all profiles supplied. Colour references are supplied for AMMO paints. AMMO have worked in conjunction with Amusing Hobby on this release. Conclusion For a first foray into aircraft, Amusing Hobby has sort of stuck to their leftfield approach to subject matter, and again, a machine which we’ve been crying out for in injection-moulded plastic. The model is superbly and simply engineered with a very passable cockpit (albeit, sand seatbelts), exquisite surface detail, and excellent moulding standards. It also looks very easy to assemble and shouldn’t provide the modeller with any issues, if their test shot imagery is anything to go by! As this aircraft never existed, you can also play around with the supplied schemes, or create something even more esoteric. In all, a lovely looking kit that I can’t wait to dive into! Watch out for my build in a forthcoming issue of Model Airplane International magazine. My sincere thanks to Amusing Hobby and Kai for sending this kit out for review. Available very soon from your favourite model retailer!


-
hk models Lancaster B Mk.I, R5868, PO-S (S-Sugar)
James H replied to James H's topic in LSM 1/35 and Larger Work In Progress
It still shows them on the website. What makes you think they removed them? It makes no sense. It would require the fret to be re-designed for the sake of changing that. -
It's real shit. These vets are going fast.
-
Takom 1/35 V2 Rocket
James H replied to JeroenPeters's topic in LSM 1/35 and Larger Work In Progress
His balls are already well weathered. -
Me 163B 'Komet', 'White 13' (re-titled!)
James H replied to James H's topic in LSM 1/35 and Larger Work In Progress
See, Aires is a piece of piss. It's only our levels of patience that vary.
- 18 replies
-
- 10
-
-
Looks stunning!
- 4 replies
-
- 1
-
-
- proper plane
- woodgrain
- (and 1 more)
-
Takom 1/35 V2 Rocket
James H replied to JeroenPeters's topic in LSM 1/35 and Larger Work In Progress
Hell, that came on quick! I hated the scheme you showed but you made it look great! -
If ever you struggle to get on the forum, the best way to see if it's a problem local to you, or a global issue, try this site: https://downforeveryoneorjustme.com
-
Me 163B 'Komet', 'White 13' (re-titled!)
James H replied to James H's topic in LSM 1/35 and Larger Work In Progress
Setting those parts back won't make the wing sit any deeper into the fuse. that is determined by either/or the depth of the plastic edge around the wing root and the depth of the the recess into which it sits. I found it easier to reduce the depth of the plastic around the wing fillet. You will also need to slightly remove plastic from the edges of the wing connection stubs on parts C11 and C12. -
Me 163B 'Komet', 'White 13' (re-titled!)
James H replied to James H's topic in LSM 1/35 and Larger Work In Progress
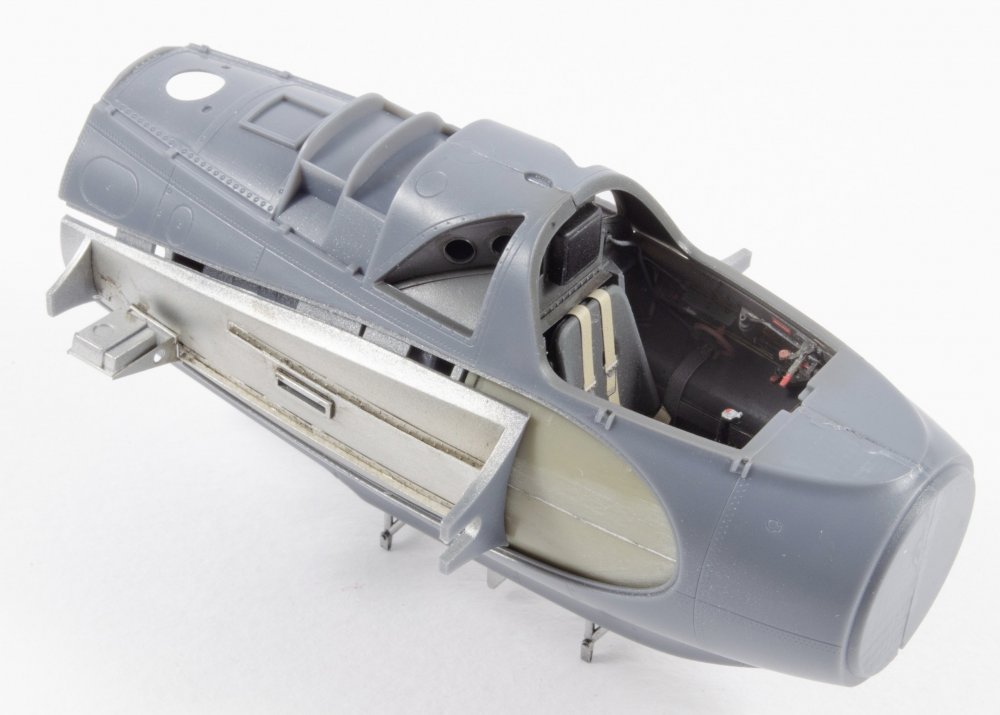
As with most things Aires, some remedial work is needed to make the resin parts fit as they should. Their resin pit is actually very nice, but is slightly too wide at the front. I assembled this with a few bits of tape and did some sanding with a coarse sanding stick. Only took about 10 mins of work to fix, and here's the result.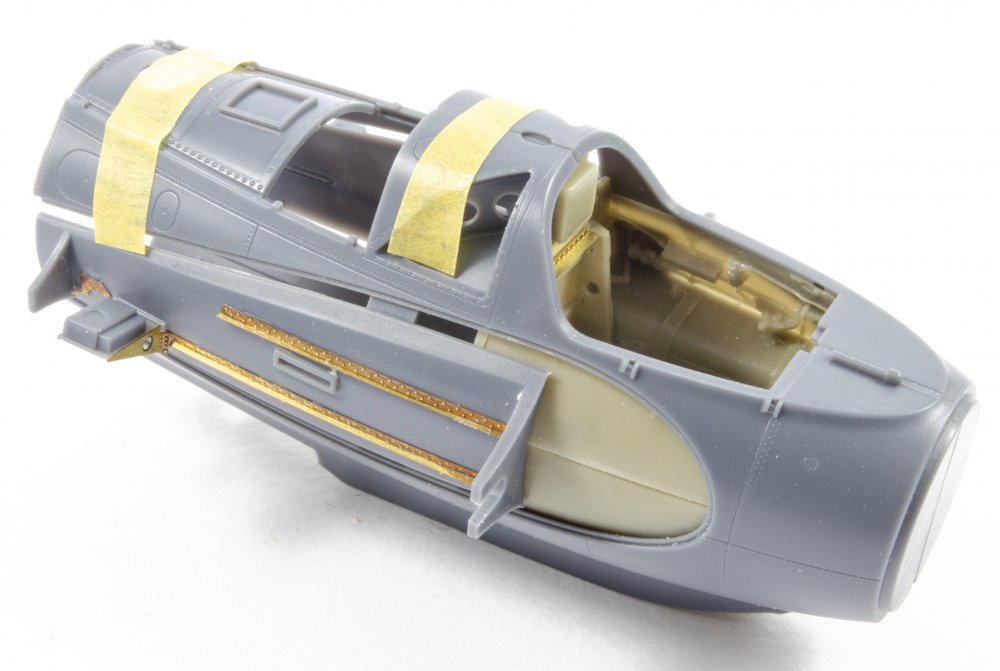

-
Me 163B 'Komet', 'White 13' (re-titled!)
James H replied to James H's topic in LSM 1/35 and Larger Work In Progress
This is true, but the protruding ridge is he best part of 0.5-0.7mm. In real terms, that is 16-22mm which is way too much I know there will be metal thickness, but the edge in 1:32 needs almost eliminating (0.2mm or less) to not look exaggerated. -
Me 163B 'Komet', 'White 13' (re-titled!)
James H replied to James H's topic in LSM 1/35 and Larger Work In Progress
Just fiddly engineering in places, but it's still a nice kit. I altered the wing connection to the fuse so the root recessed further into the fuse. I found it stood a little proud. -
Me 163B 'Komet', 'White 13' (re-titled!)
James H replied to James H's topic in LSM 1/35 and Larger Work In Progress
I actually built this for Tamiya Magazine about 5yrs ago, in a wood/metal ensemble. Certainly a quirkymodel to build. -
Me 163B 'Komet', 'White 13' (re-titled!)
James H replied to James H's topic in LSM 1/35 and Larger Work In Progress
After some soul-searching, I've decided to go with a Luftwaffe machine, simply because I want to display the model with its engine, guns and ammunition. The British evaluation machine wouldn't allow that, so from now, she'll be painted like this: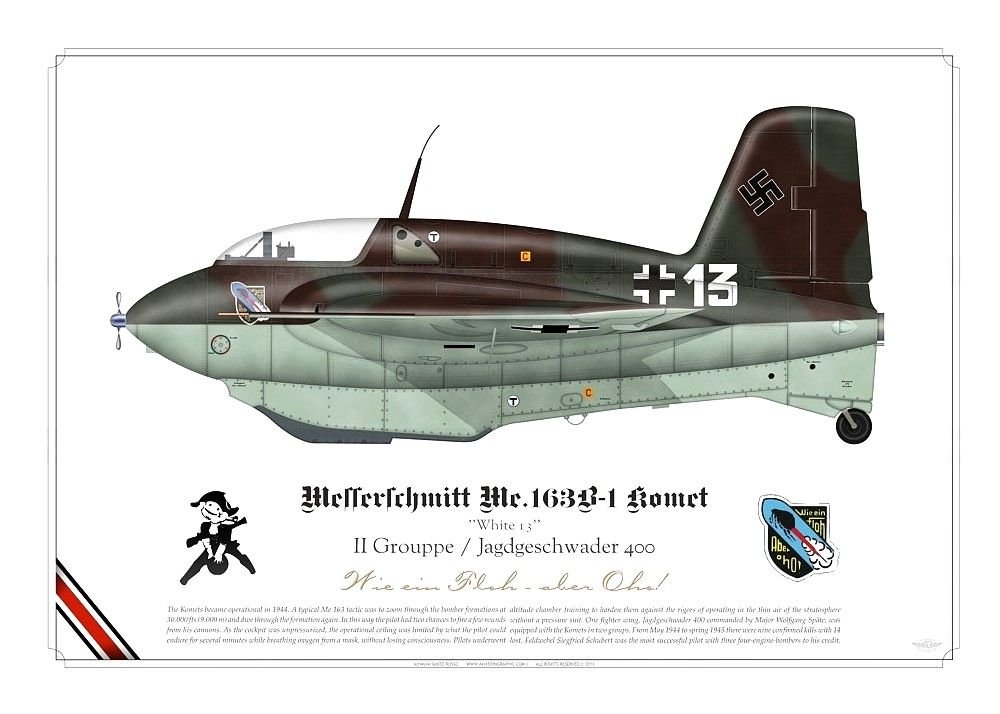
-
Low pressure, work closely and I always draw the needle a little further back to allow a wetter flow.