


Landlubber Mike
-
Posts
850 -
Joined
-
Last visited
Content Type
Profiles
Forums
Events
Gallery
Posts posted by Landlubber Mike
-
-
Really nice job Chris! Congratulations on a beautiful build!
-
 2
2
-
-
Interestingly, I just got an email from Hannants listing about three dozen Mastercasters products as limited availability.
-
3
-
-
Another beauty John. Great job!
-
3
-
-
5 hours ago, DocRob said:
I have a Pontos set reserved, lets see how it works out, as it's sometimes a bit complicated to get stuff to my place. After USS Arizona, I'm not that much concerned about the complexity of the brass. I like the addition of turned brass parts and that's why I haven't considered Eduard's PE.
I had my eyes onto the 1/72 Revell kit as well, with the GLS stuff. I decided it's too big for me and I hope the plastic is a bit more up modern standards with the 1/144 kit. I also have no idea, about how well the GLS PE is designed. I learned from my Arizona build, the worse the plastic, the better should be the PE.Cheers Rob
Good luck, hope it works out for the Pontos set. I think it's a little nicer and more comprehensive than the Eduard set as you mentioned (I think you get a wooden deck as well as the turned brass parts). I believe the 1/144 Revell kit is actually pretty nice on its own - it's just that you can't properly replicate certain ship items like railings, etc. using injection molding. It's been a while since I looked into it, but I think there is someone on Shapeways who is 3D printing various Flower Class details - though seemed pretty pricey. In the end, probably more cost effective to go with Pontos.
The GLS set is interesting. There are a lot of white metal parts (which some look like they have been replaced with resin/printed parts). The PE looks very good, but it's very thick/heavy. They recommend soldering the pieces together, which for me at least raises the difficulty quite a few levels since I've never soldered before. A guy on MSW was building the 1/72 with the GLS set, and it took him a few attempts but then the soldered detail items started looking pretty good. The 1/72 Revell kit is pretty rough, and it might be a re-pop of the old Matchbox kit. I believe it's recommended that you sand all the hull plates down, which is quite labor intensive given how big the hull is! You pretty much just use the hull as a base to add all the GLS stuff. I think I'm going to need to be in a particular frame of mind to want to tackle that kit.
All that being said, these are really cool ships to model. Very cool design, the camo schemes are really interesting, and these were pretty beaten up so you can have fun weathering them. I'm probably a few years away from building them, but I've been thinking of doing the 1/144 in a diorama, and the 1/72 as just a regular static build (way too big for a diorama). I'm probably going to try and build US versions in each scale - like the Saucy and the Tenacity - but it's hard finding the slight modifications that different ships had. I did manage to find online the old Matchbox instructions, which allowed you to build the Saucy. If I remember correctly, there were only a few different parts that you had to swap out and these I think have been carried down in the Revell kits so it might just be a matter of figuring out how to do the numbering and other decal-type items.
-
3
-
-
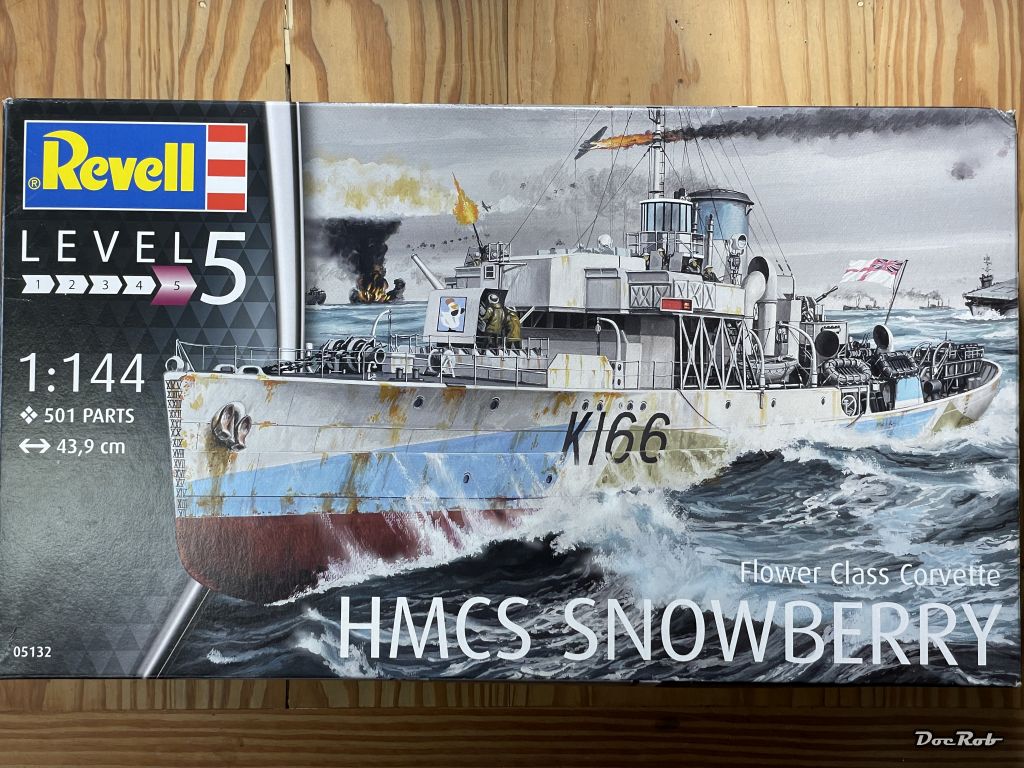
On 3/25/2023 at 7:06 AM, DocRob said:
My actual USS Arizona build could not prevent me, from digging deeper into maritime objects, albeit in a bit larger scale.
Today, I received the 1/144 Flower Class Corvette from Revell. I got it for a great price and now I'm waiting to lay my hand onto the dedicated Pontos set, which will be more than four times the price of the kit .
.
I built the 1/72 Matchbox kit, when it came out and made it a RC ship. By then, I was a poor modeler and I always had the idea in the back of my head, to build another one.
Last week, I read somewhere about a Flower Class Corvette build, that the fascination of these vessels lay in their style and size, like they are taken out from a Tintin comic and I thought, bang, right, that's exactly the feeling, juvenile hunger for adventures.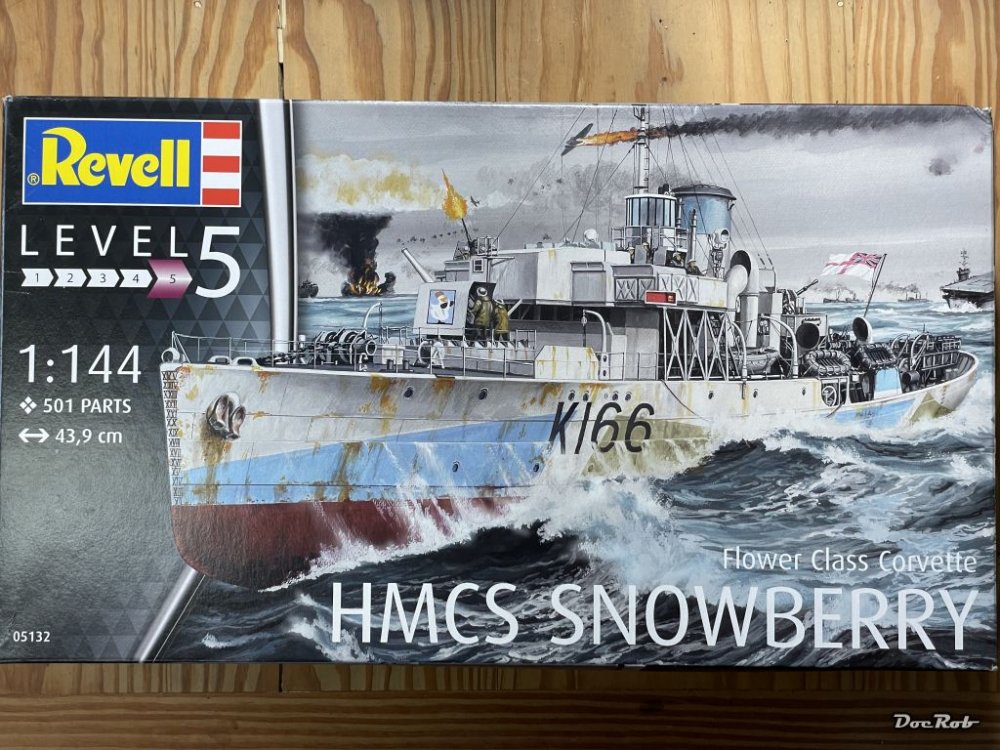
Cheers Rob
Rob, nice score! Interestingly, this was one of the first two plastic kits I bought from a fellow modeler on MSW to get back into the hobby. I really love the subject, but wanted to get my skills up before tackling it. It's a nice kit, but the Pontos set is insane - definitely try to find it as the added detail from that set is amazing.
Very cool that you built the Matchbox 1/72 kit. I also have the 1/72 Revell kit on the shelf with all the Great Little Ships upgrades. Now that I'm definitely waiting to improve my skills for that as the GLS stuff is pretty amazing, though I think learning to solder the bigger, heavier pieces of PE is a must.
-
5
-
-
Great work Rob - love the subtle weathering.
-
1
-
 1
1
-
-
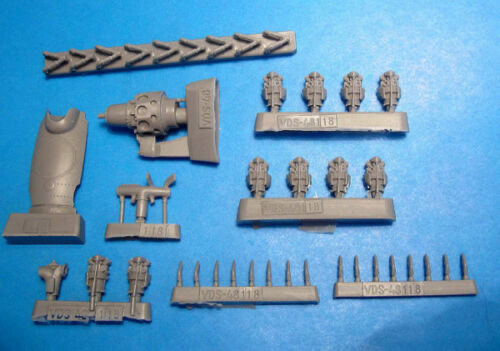
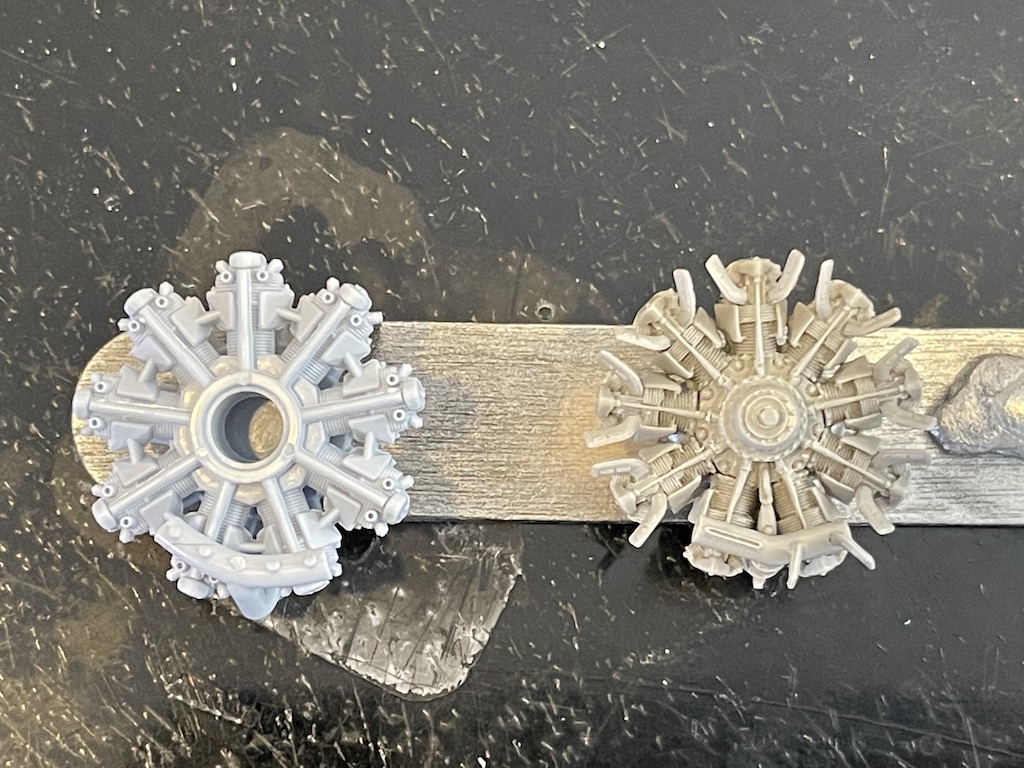
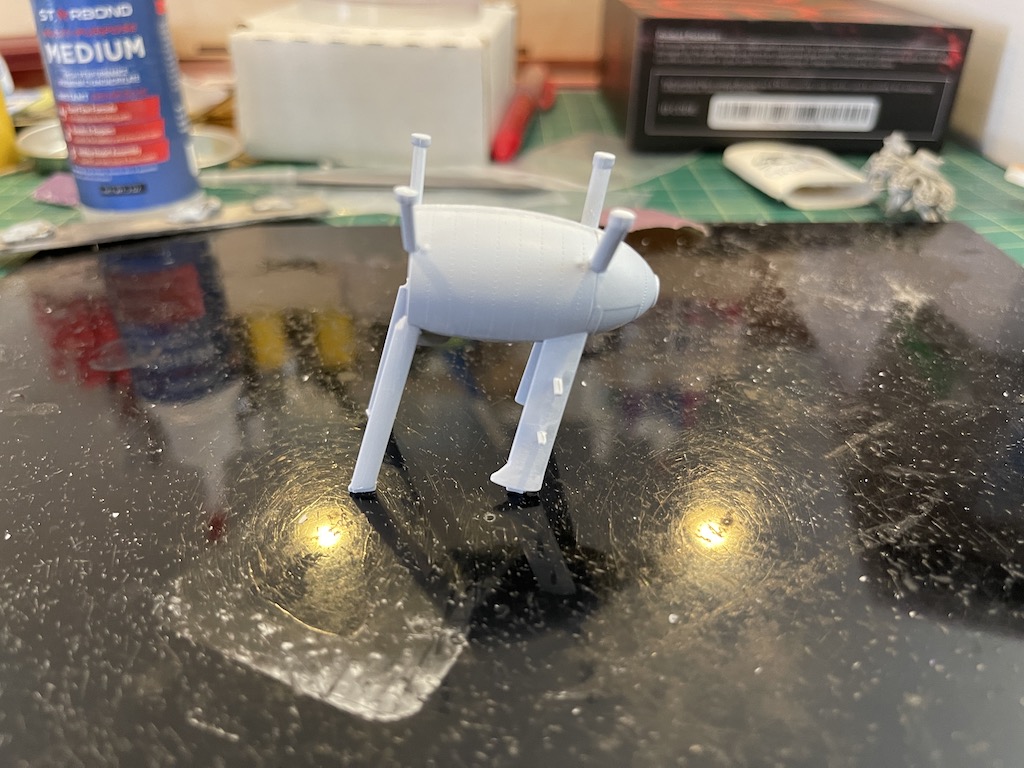
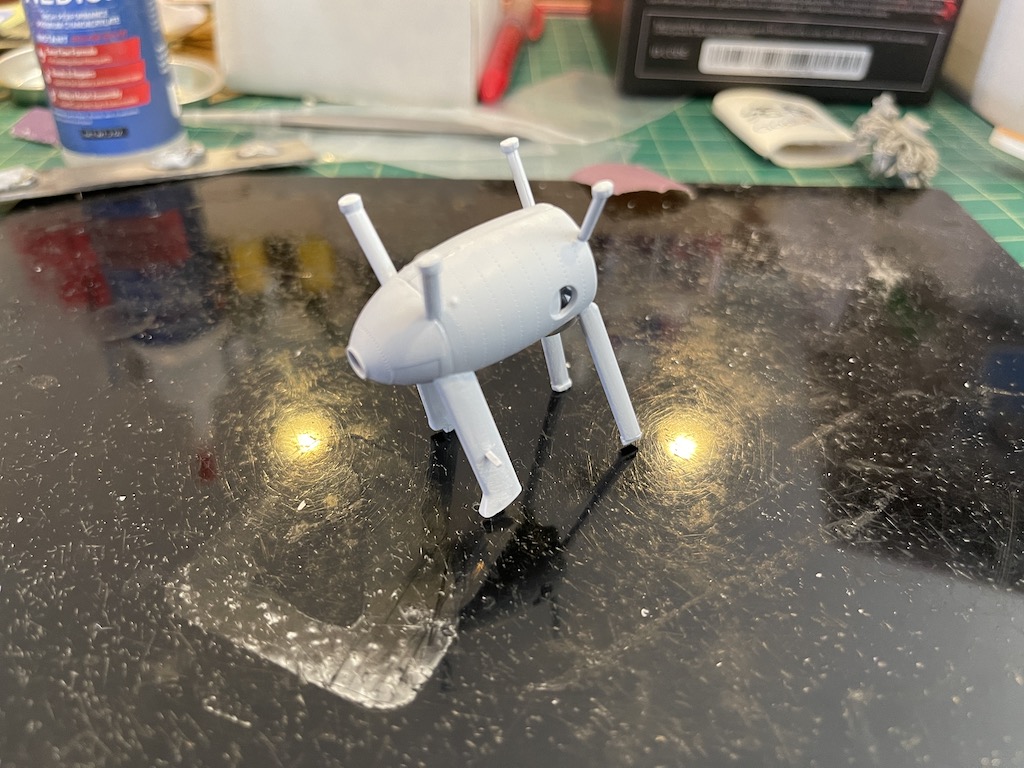
Taking a break from putting the finishing touches on the interior, I decided to spend some time on the engine. The kit engine is quite nice, but I picked up an engine that Vector makes specifically for this kit (VDS 48-118). Very detailed kit as you can see below.
Note: the Vector set includes a replacement bottom part for the engine housing. If you are building this kit with the Vector engine in the order in the instructions, you might miss this as the engine housing is built first on page 10, and the engine isn't built until page 15 of the instructions. This part is important as the Vector engine has a different shape to the underside than the kit part which is a little simplified. As part of the Vector set, you also have to trim off part of the pair of pipes that come down off the part containing the front pairs of legs.
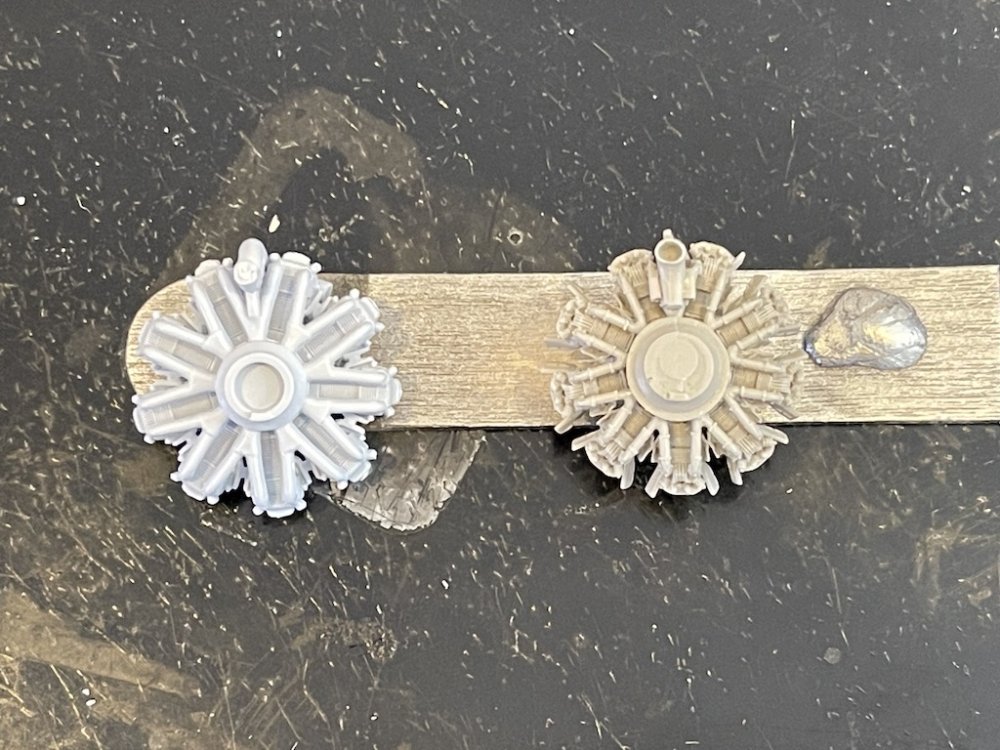
My one pet peeve about this and other resin engines I've built (Aires, CMK) is that the propeller rod does not fit the kit propeller (way too narrow). Why can't they make the rod to fit the propeller?? Now I have to figure out how to make everything fit. 🤬
The engine took a few evenings to put together as I didn't want to rush gluing the cylinders in and having them out of line. In case you are deciding whether to buy the Vector set, as you can see in the picture below, the kit engine (left, dry fitted) is quite nice, but the Vector engine (right) really takes things up a couple of notches. I need to do a little filling and cleaning up, but otherwise, I'm really pleased with how the engine came out.

Here is the engine mount, where you can barely make out the Vector bottom piece in the second picture. I dry fitted the back pair of legs at the moment, as I want to button up the fuselage and test fit the engine mount before finalizing the mount. There's also an opening in the mount that you can see in the second picture. The kit provides two different parts that one can include on the side of the mount. I just need to pick one of them, since I'm building a different Walrus than the three included in the kit.


Interestingly (to me at least), the Walrus Pegasus engine/mount was pointed with an offset of 3 degrees to the left. The kit is designed this way, so kudos to Airfix.
Thanks for looking in!
-
9
-
-
1 hour ago, npb748r said:
not a brilliant picture but you can see the effect of painting the backplate white.

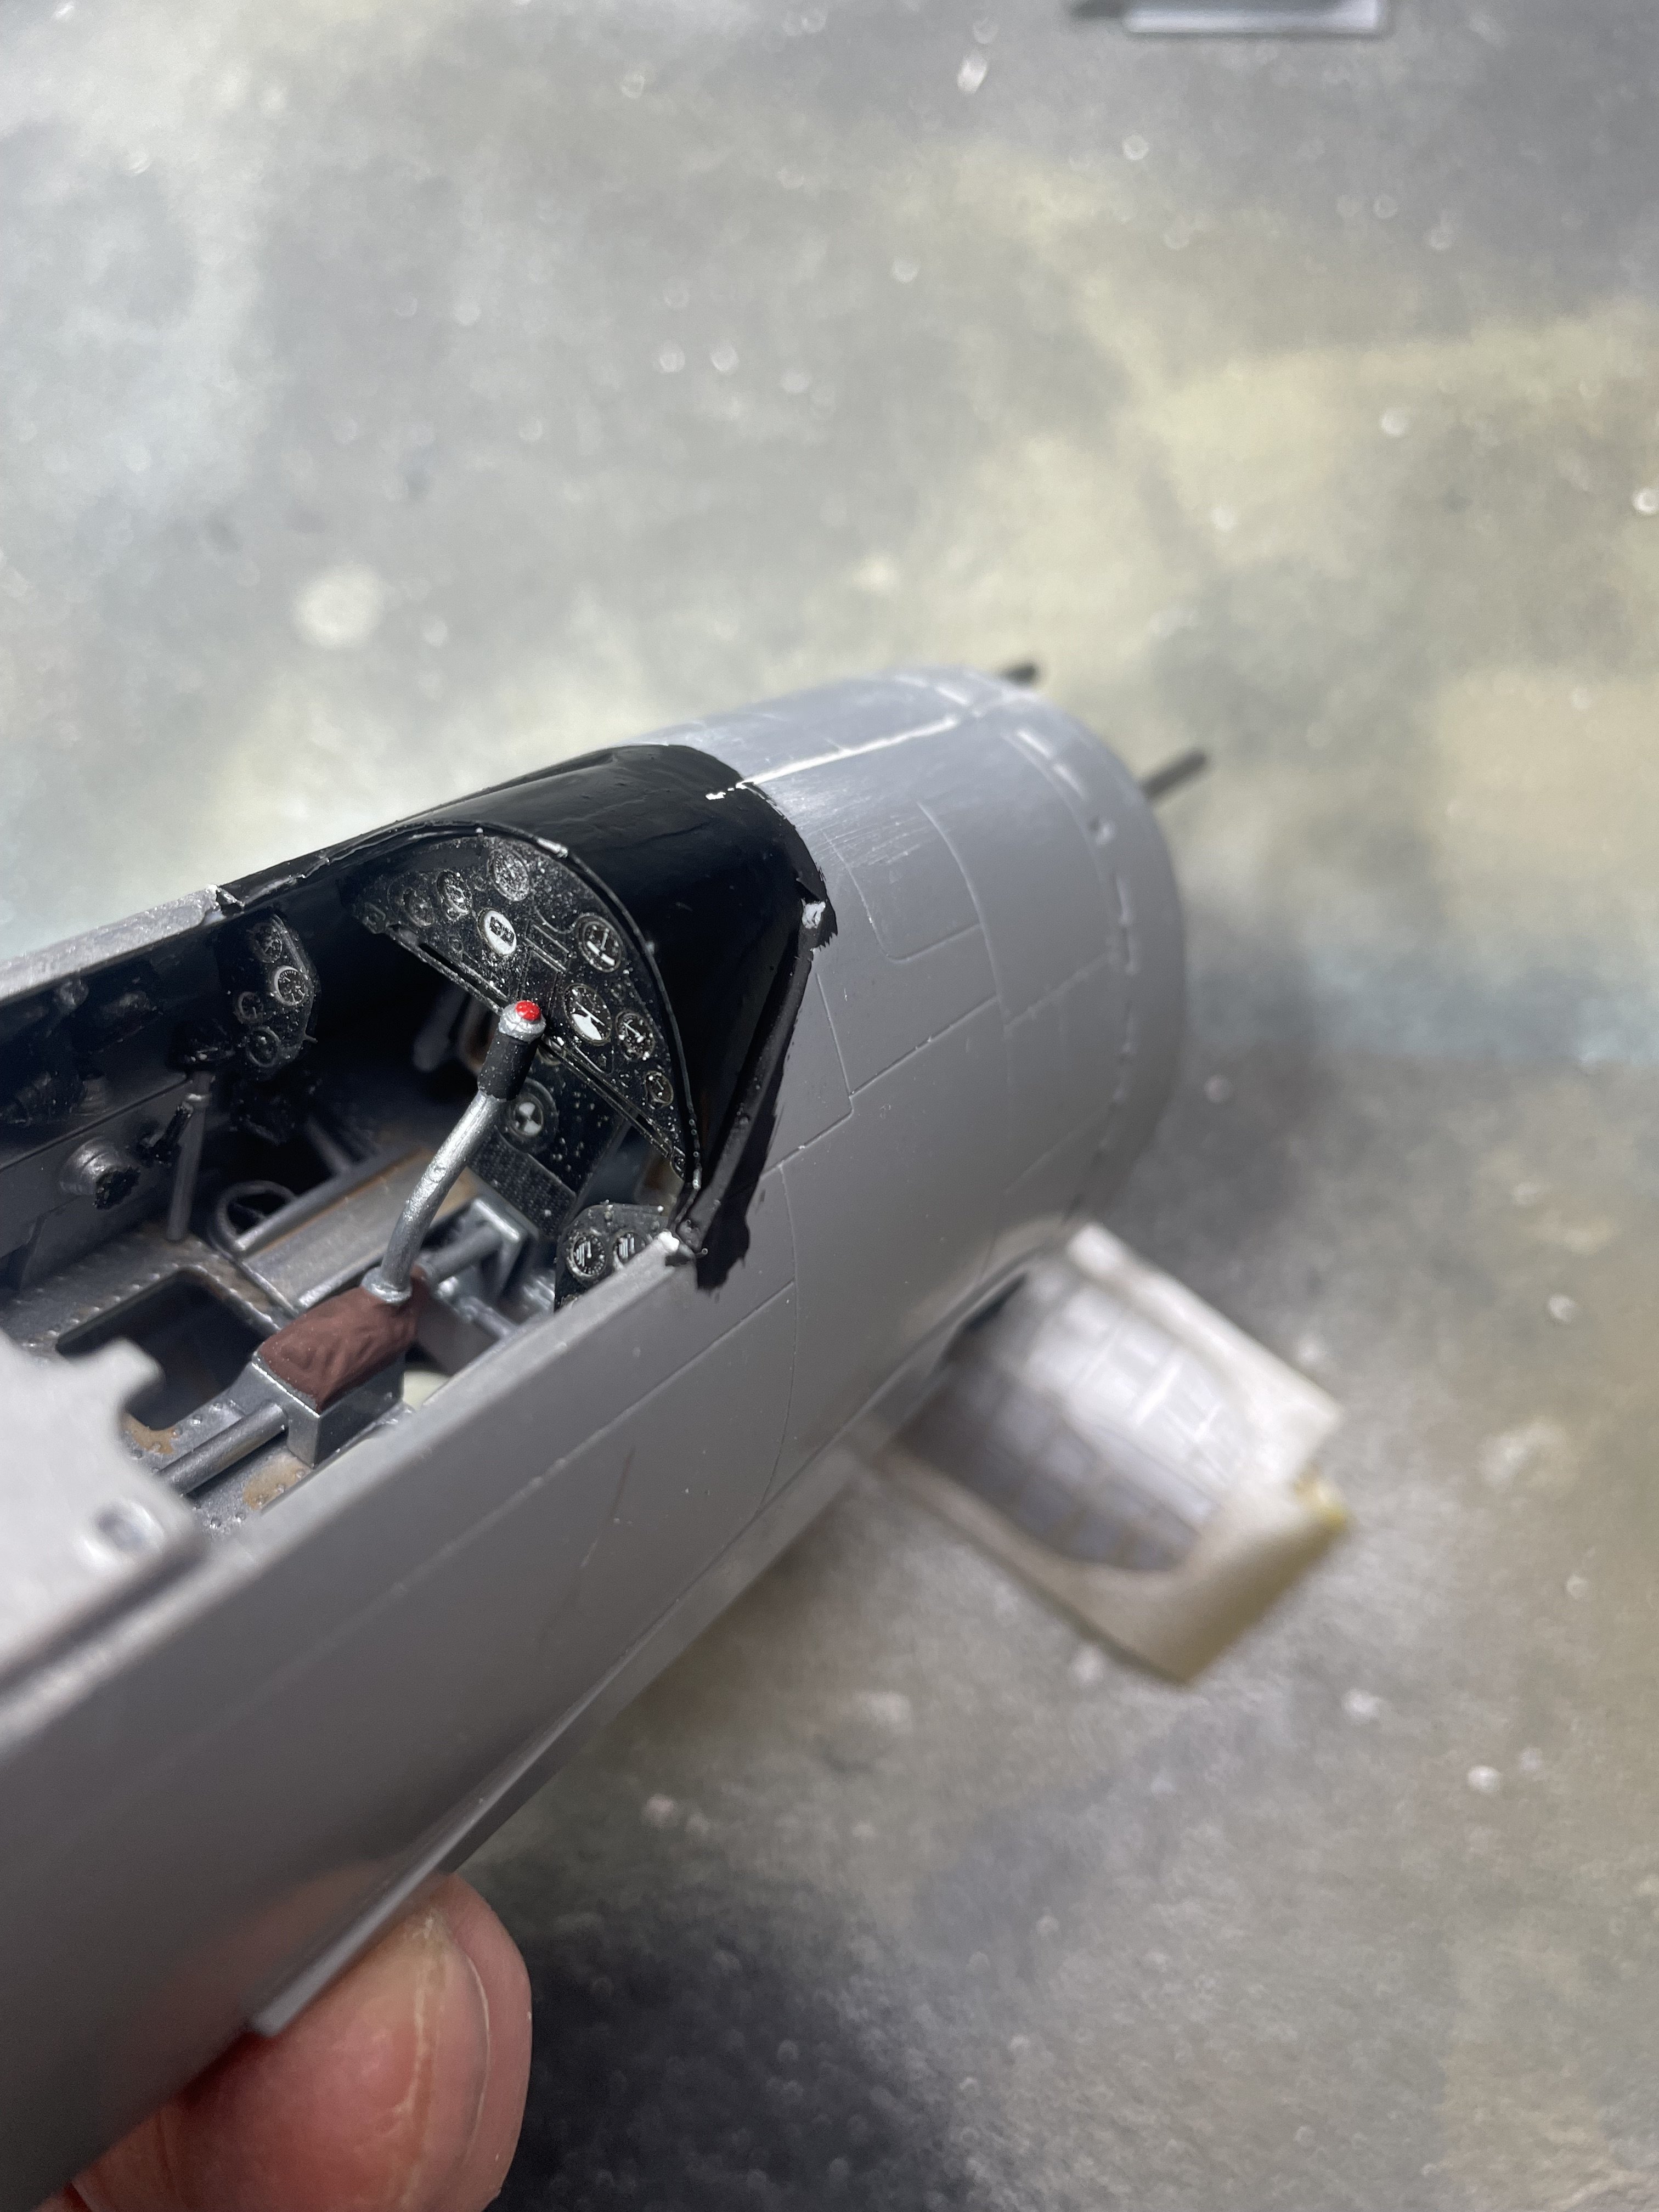
Oh wow, that looks fantastic! I'll paint mine the same way. Thanks for the pictures. Did you install the three IP panels after putting the fuselage halves together? I was thinking of doing it that way, rather than the kit approach of adding them to the fuselage halves and then putting the halves together.
1 hour ago, npb748r said:The engine and panels is much bigger than the fuselage by almost the width of the plastic of the panel in some places. I'm going to live with it and pretend it's not there !
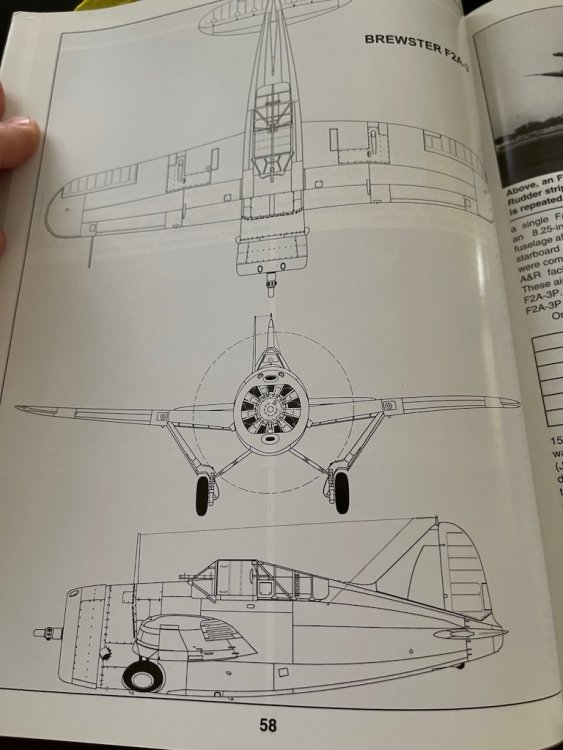
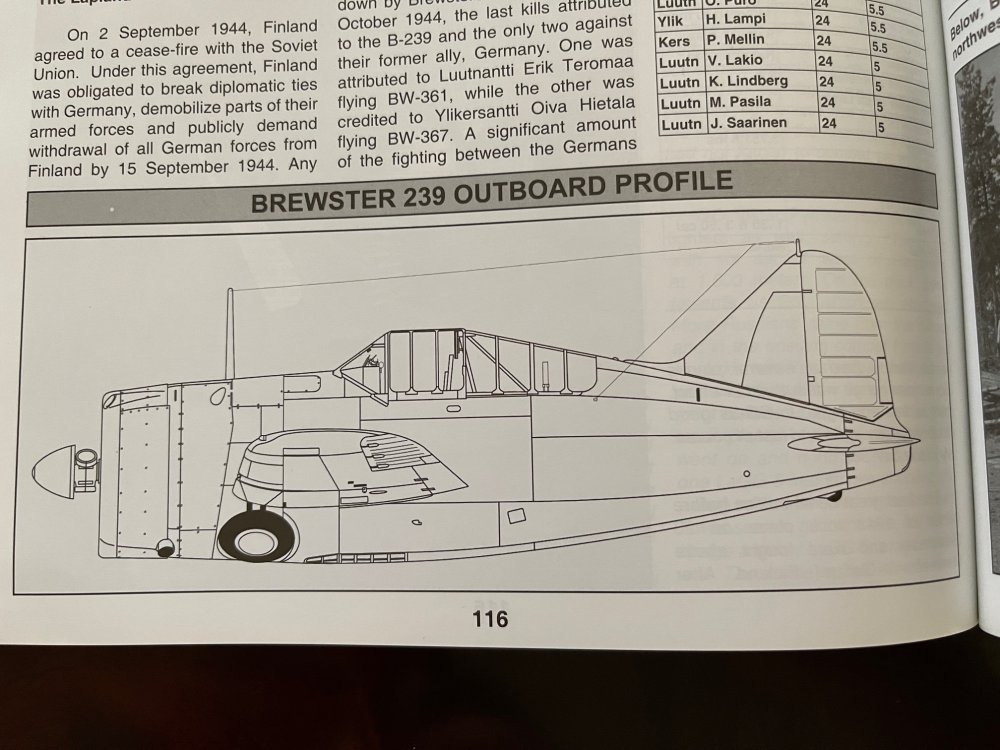
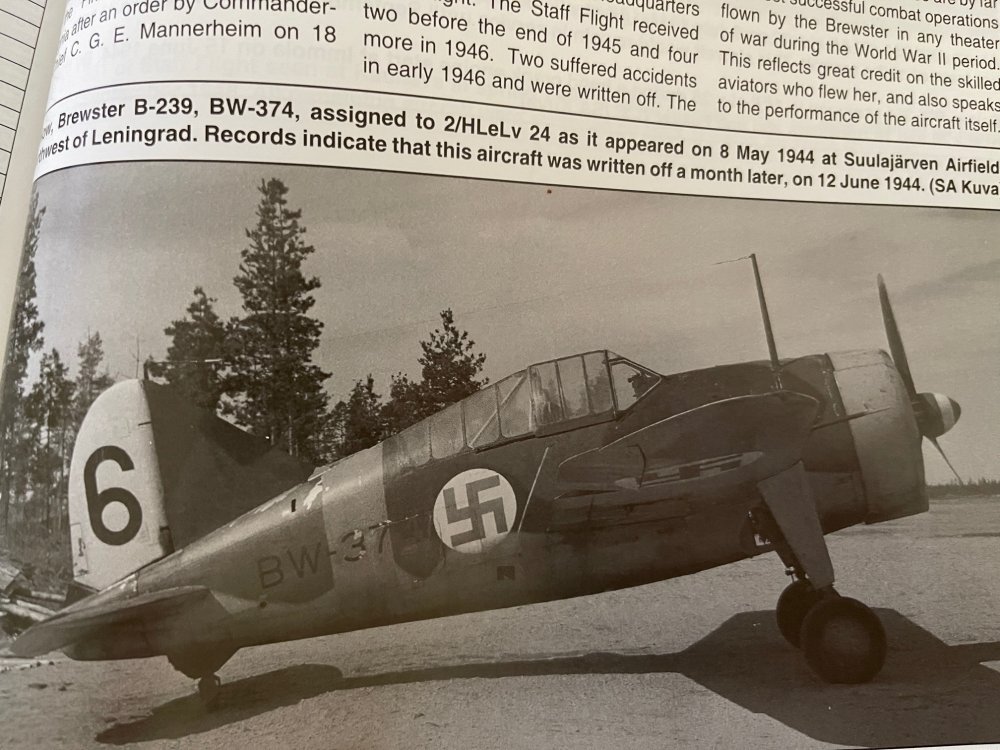
I'm probably not completely following you, but I think the engine and cowl area is supposed to be wider than where the fuselage halves end - in part, because I believe the aft part of the cowl is supposed to fit over the end of the fuselage halves rounded end, and line up close to what looks like the dotted lines along the halves. I think that the fuselage of the Buffalo generally stayed fairly consistent over time across the later variants, except to lengthen/widen the cowl and nose as the engines got bigger (looks like the B-239 reoriented the exhausts downward from along the sides of the cowl).
Here are some pictures from Naval Fighters Number 104. You can see the cowl is wider by about what you are describing, but maybe your kit is even wider than expected. First is of the F2A-3, the second two are of my variant, the B-239. Let me know if you are building a different variant and would like to see pictures. You can see that the bulge with the F2A-3 is considerably wider than the B-239, which is probably to be expected as the F2A-3 had a Wright 1820-40 Cylone of 1100HP, while the B-239 had a Wright 1820-G5 Cyclone of 950HP.
-
3
-
-
Thanks for passing that along Neil. Now that you mention it, I remember having an odd fit issue with the tail on my 1/48 build. I think I ended up sanding the main fuselage halves and then using filler here and there to make the transition to the tail seamless. I had done exactly what you did and put the tail halves together first, then tried adding it to the fuselage. I was pretty miffed, and I just tried to do the best I could with what I had. Thankfully, it's not a very obvious or eye drawing part section of the plane.
One question for you if you don't mind - to do the cockpit instrument panels using that film part and then the PE on top, did you first paint the plastic background piece white or silver before putting the film on top? I had painted the background black, but when i test fit the film on top it seemed way too dark and you couldn't see the dials.
-
2
-
-
Wow, that is really nice Hubert thanks for posting the pictures. Unfortunately the ignition harness is the wrong style (horseshoe versus circular for my engine) or I would have went for that one. I ended up ordering the PrintScale engine which I should hopefully receive soon.
Speaking of Vector, I have spent the last two nights putting together a Vector Pegasus engine for my Walrus. Must be nice to just take the engine out of the box and you're ready to go!
-
1
-
-
Beautiful work Peter, wow! Glad you got the decals to behave. Looks really fantastic, great job!
-
1
-
-
That Frank Drebin line always cracks me up!
-
3
-
 2
2
-
-
Looks really sharp John! Well done!!
-
2
-
-
Thanks Peter! I was going to build just the plane and not include it in a diorama, but after coming across that picture, I don't think I can pass up the opportunity. It tells a cool story, and has just enough details in the picture to make it interesting - at least to me!
I'm itching to start working on it, but I really need to make some progress on the Walrus and Albatross to make the GB deadline. This time of year for me is usually pretty busy and modelling time is sparse 😬
-
1
-
-
Agree with Rob - at a minimum, go for upgraded brass barrels. If your kit doesn't come with PE railings, I'd get some of those as well. If it were me, I'd probably also look into adding pre-cut wooden decks and maybe some additional PE aftermarket like I used in my Shimakaze build (linked in my signature) or you see on Rob's current build.
PE (and now resin) aftermarket sets make a huge difference (and is almost a must for 1/700 in my opinion), but it all depends on what you want to get out of your build. The PE set for my Shimakaze build added at least double, and probably triple, the build time when you factor in adding all the details to guns, torpedo launchers, deck items, platforms, the bridge, etc. You can get comprehensive sets that have almost all of the upgraded detail you need, or you can add aftermarket a la carte as you need it. But, ship PE takes a certain level of discipline/masochism
")
-
5
-
-
2 hours ago, BlrwestSiR said:
Mike, I'm hoping it's all I need. Oddly enough, there's been a bunch of AM released recently for the kit. Aerocraft does a resin canopy and brass gear and Reskit is doing burner cans.
You can never have too much aftermarket...just saying!
-
2
-
1
-
-
Nice! Looking forward to seeing this one come alive. You probably went a little too light on the aftermarket though 😉
-
3
-
3
-
-
Looking really great Rob. Your work with the PE is pristine and it shows.
On Eduard's new decals, I heard of people having issues with them. Not exactly sure if people figured out a foolproof way to remove the carrier film.
-
2
-
1
-
-
2 hours ago, Martinnfb said:
Hi Mike, what a great choice of marking and super fast progress.., Regarding the wings, nothing is needed just proper preparation, I sanded the mating surface flat and glue them to the fuselage half beforehand. really , no drama there. Now, I am trying to figure out how to secure the undercarriage
Thanks Martin! Good to know on the wings. For the undercarriage, I believe I used CA - glued the pieces in, let it set, then flooded the non-visible area with more CA for added strength. The attachment points are a bit weak, at least they were on the 1/48 kit. Come to think of it, I might have also used some epoxy for the LG, but can't recall.
-
3
-
-
Oh I saw that one - looks like a sweet kit!
-
5
-
-
1 hour ago, Clunkmeister said:
Some people are leaders
Some are followers
Some need pictures drawn with Crayola to
Can you tell my wife that? 🤔
-
5
-
-
Thanks Ernie - as if there should be any debate!
-
4
-
-
21 hours ago, npb748r said:
Hi Mike, I thought of doing similar but because of that window in the belly of the plane anything that goes into the fuselage will be seen. I'm still scratching my head how best to approach this minor problem, interweb searching is underway as others must have dealt with this, we can't be the first builders of this kit. I'm guessing that the cockpit floor in the real plane is the main wing spar, otherwise I have no idea how the wings stayed on the aircraft ! Regarding the underwing lights, my instructions show both remain in place, I'm also off to hunt down some photos of RAF buffalo's. I've just glued the fuselage together, starting at the front and worked backwards. Not the prettiest of joins and filler required but most of the bigger gap is now at the back and underneath of the plane. It's almost as if the fuselage halves are banana shaped but your trick of installing the sub-components on one side first worked a treat - thank you.
neil
Neil, just remembered that our resident experts @Clunkmeister and @Martinnfb are building our kits. Ernie and Martin, did you guys do anything special to attach the wings on your Buffalos? Neil and I are getting close to that stage on our builds and are a bit disappointed in the kits' lack of anchor points for the wings.
-
3
-
-
On 3/11/2023 at 2:48 PM, CANicoll said:
And no more arguments about leaving the toilet seat up or down, or which side the TP unrolls from. Bonus!!
Chris
There is only one logical way to hang the TP roll!
-
4
-


"nuther 109 next
in LSM 1/35 and Larger Work In Progress
Posted
I vote for the bottom one, just to selfishly learn how to apply winter camo") Actually, all of them are quite cool looking. I'm sure whatever you pick will turn out stellar as always.
Actually, all of them are quite cool looking. I'm sure whatever you pick will turn out stellar as always.