


Landlubber Mike
-
Posts
854 -
Joined
-
Last visited
Content Type
Profiles
Forums
Events
Gallery
Posts posted by Landlubber Mike
-
-
Looks great Dave!
Do you guys have a good source in the US for Flory washes? I tried buying them from Hannants and was unable to.
-
 3
3
-
-
18 minutes ago, FullArmor said:
visited this museum today. Here is some detailed pictures.
Oh wow, thank you very much! Really appreciate it!
-
 1
1
-
-
Peter, hope you end up liking the Vallejo paints. I really like them. I would note that it seems like I go through the paint quicker out of the airbrush than other airbrush paints, including Vallejo Air. Not sure if I'm spraying too much, it just seems to empty the cup quicker.
Vallejo generates strong opinions on both sides. People don't like their primers much, but I think they are fine for interiors or other areas where you won't be taping. The adhesion on things like PE are not great. I had taped some of the cockpit on one of my prior builds and the tape pulled off the paint and primer off the IP. So, you just have to be aware of that. Mr. Color makes a Mr. Metal Etch Primer in a spray can that some spray on the PE fret before detaching the parts. I've started using it on my current 1/700 ship builds to see if it helps, but too early to give judgment there.
Another knock is that the Air paints can clog your airbrush. I've found that to be true - I think the Air paints have a tendency to leave a very fine residue that you have to scrub out. Using their thinner and flow improver help avoid this, as well as I'll shoot a little lacquer thinner to thoroughly clean the airbrush after. The Metal Colors do not have this issue. They have never come anywhere close to clogging (they spray like silk, better than any other paints I have used) and clean very easily.
-
2
-
-
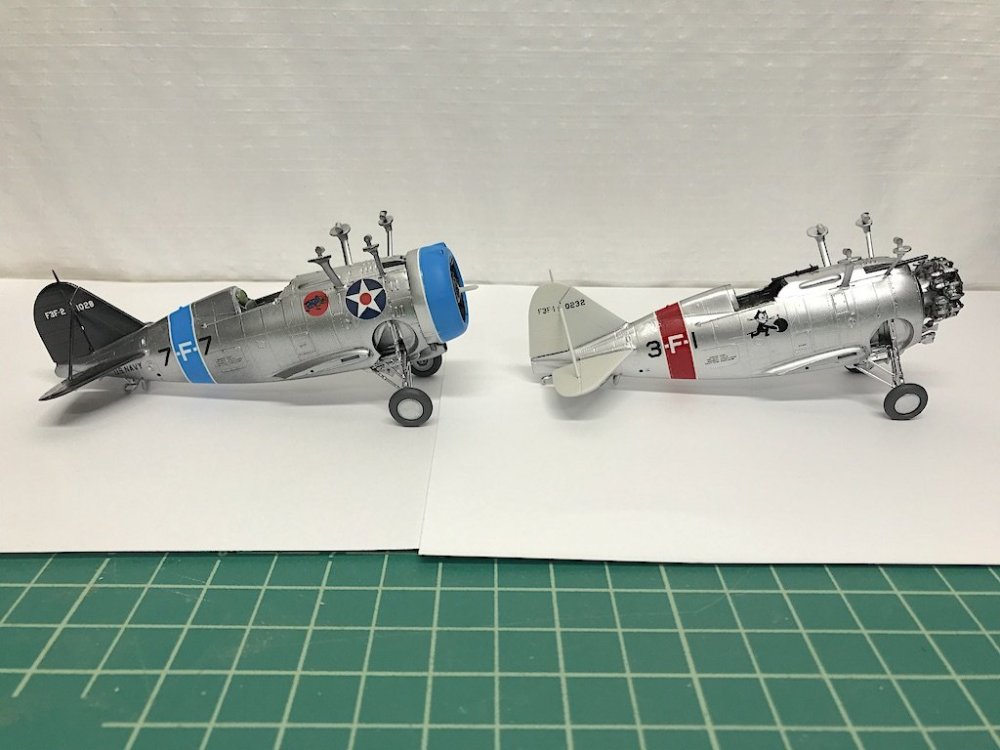
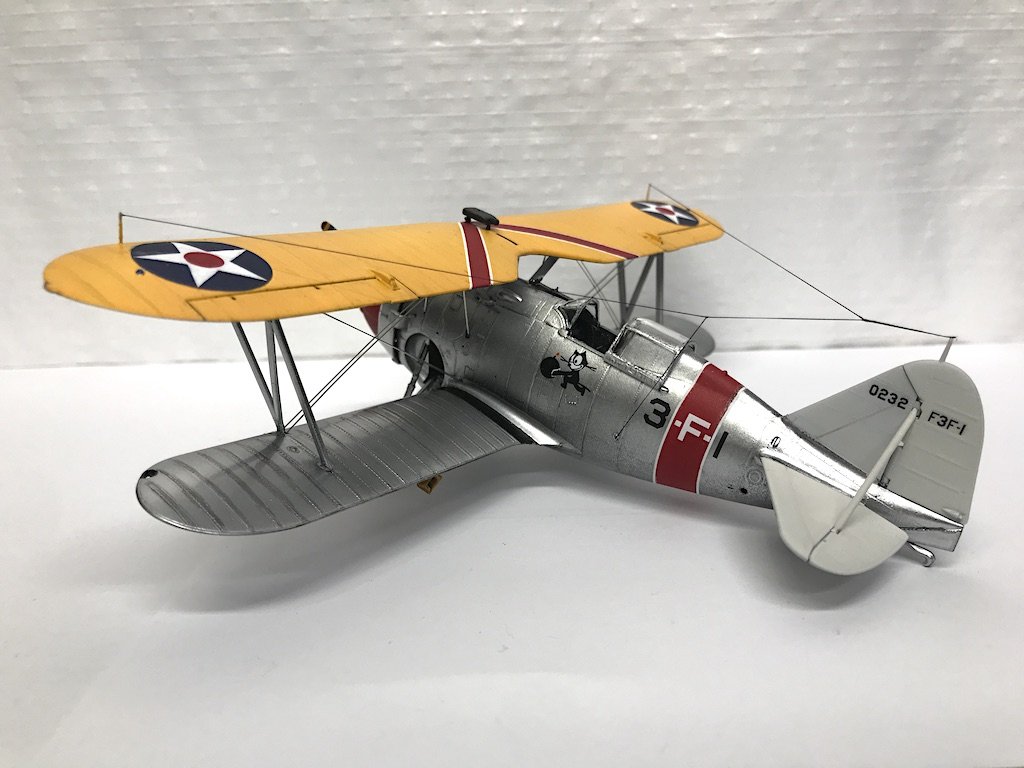
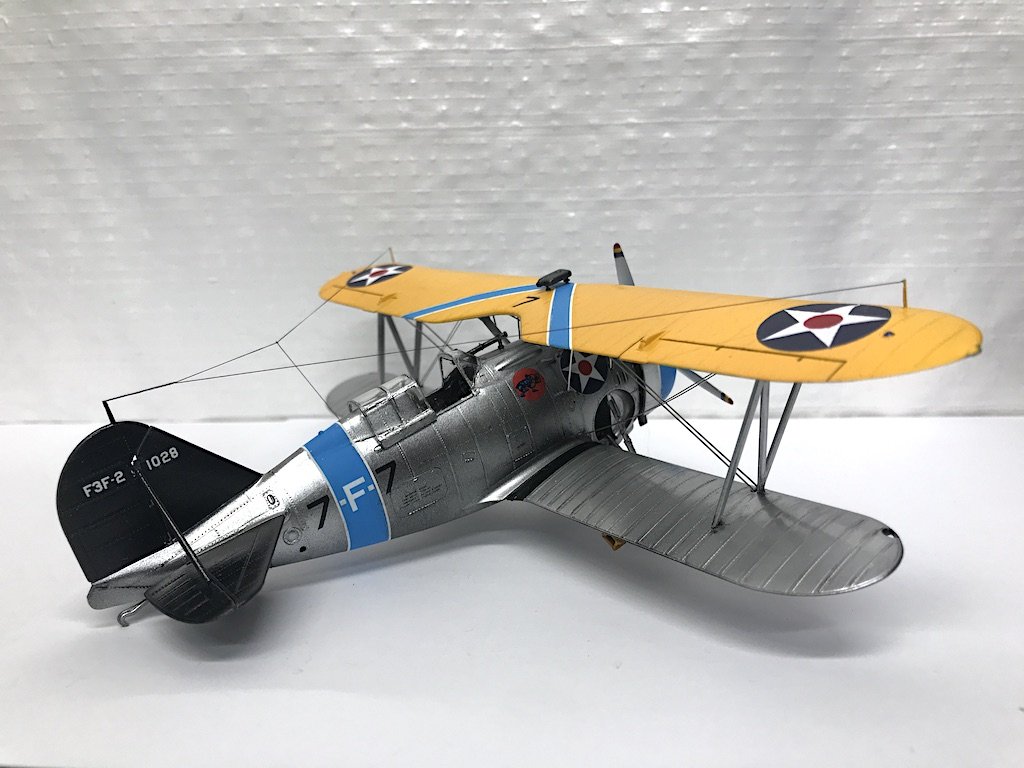
Peter in case it helps, here are the F3Fs I built a year or two ago using Vallejo Metal Color - I believe I used Aluminum, White Aluminum, and Duralinum (for engines, body, cockpit etc.).


-
3
-
1
-
-
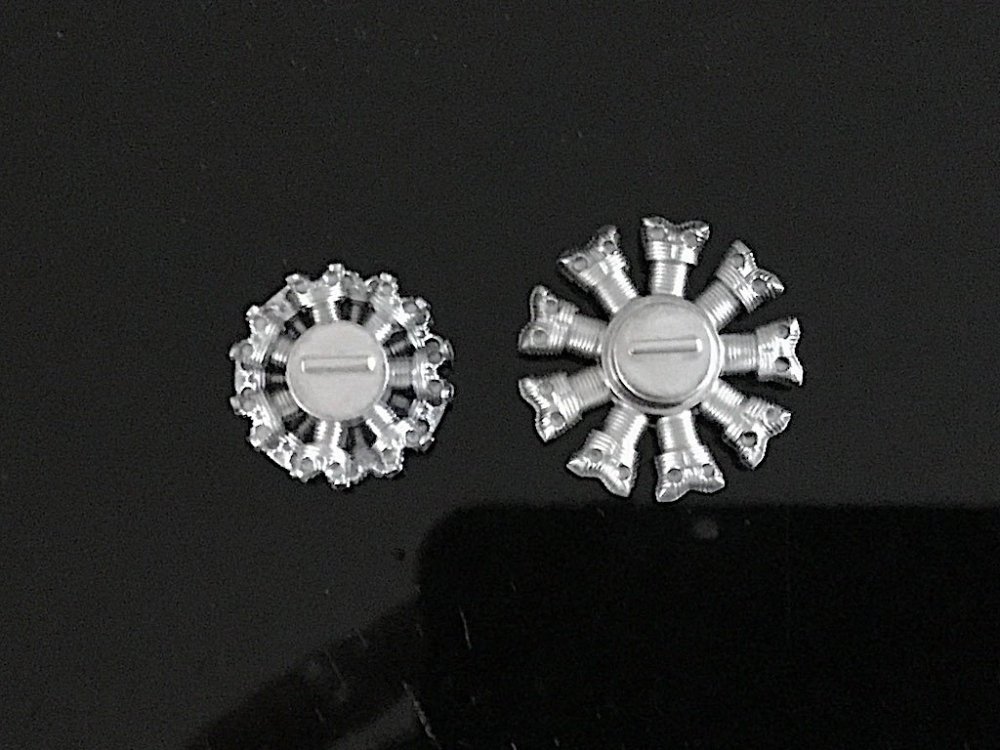
Hi Peter, I've used Vallejo's Metal Color line on a number of models and really like them. Unlike other Vallejo products like their Air series, I find that you don't need to thin the Metal Color line at all. They spray really, really smoothly out of the airbrush and clean up super easily. Just make sure you spray light coats or sometimes you end up with problem spots. What's nice about not needing thinner is that with the design of the bottles, you can pour back any extra paint from the airbrush cup when done.
Vallejo recommends spraying their Metal Color line using their Gloss Black primer. The primer goes down nicely, but I do thin it a bit. I don't see why you can't use another gloss black undercoat if you have a preferred black primer. I know that some people use Mr. Color GX-2 as an undercoat for spraying other brand metallics.
Unfortunately, I don't have much experience with other metallics. I used Alclad once or twice and found it to be pretty good. I also just picked up some Mr. Color metallics to try them out on a GX-2 base. Those were very hard to source though. Vallejo also has a Liquid Metal series for colors like Silver and Gold, but I haven't tried those out yet.
Ultimately, as much as I really love using Mr. Color paints, I'd like to move more towards acrylics just for ease of cleanup and to avoid the fumes. I will always use Mr. Surfacer as a primer (as well as Vallejo Gloss Black for their Metal Colors), but am looking to go more to Vallejo. I have bought a few books from Vallejo showing how master modelers are using Vallejo products to help me get up to speed on how their products can be used.
-
4
-
-
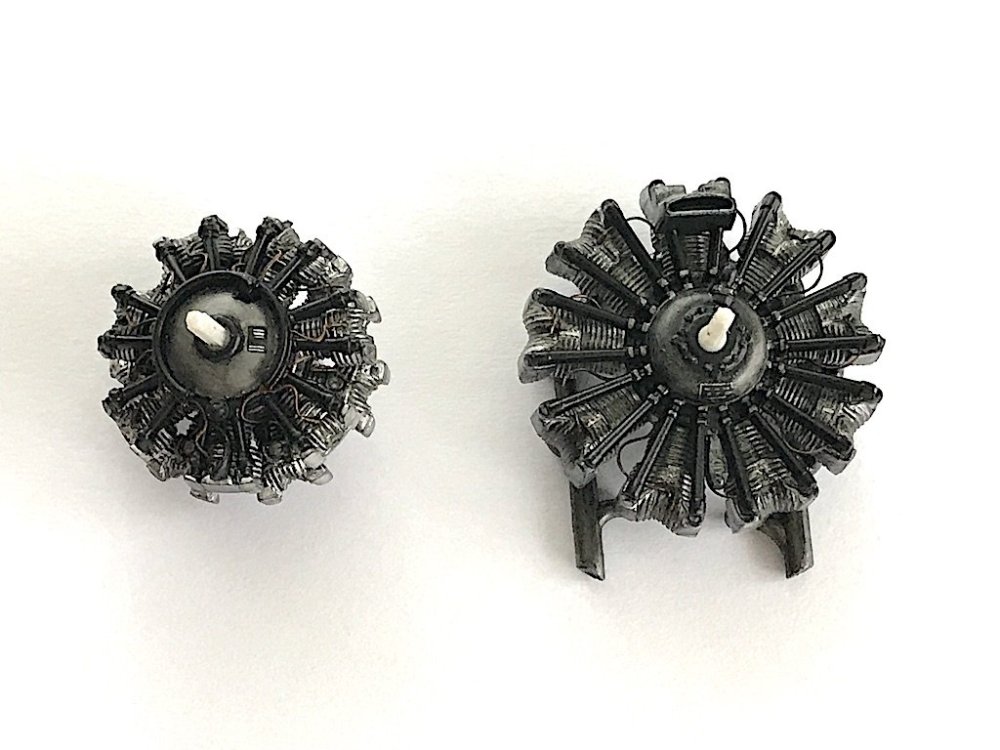
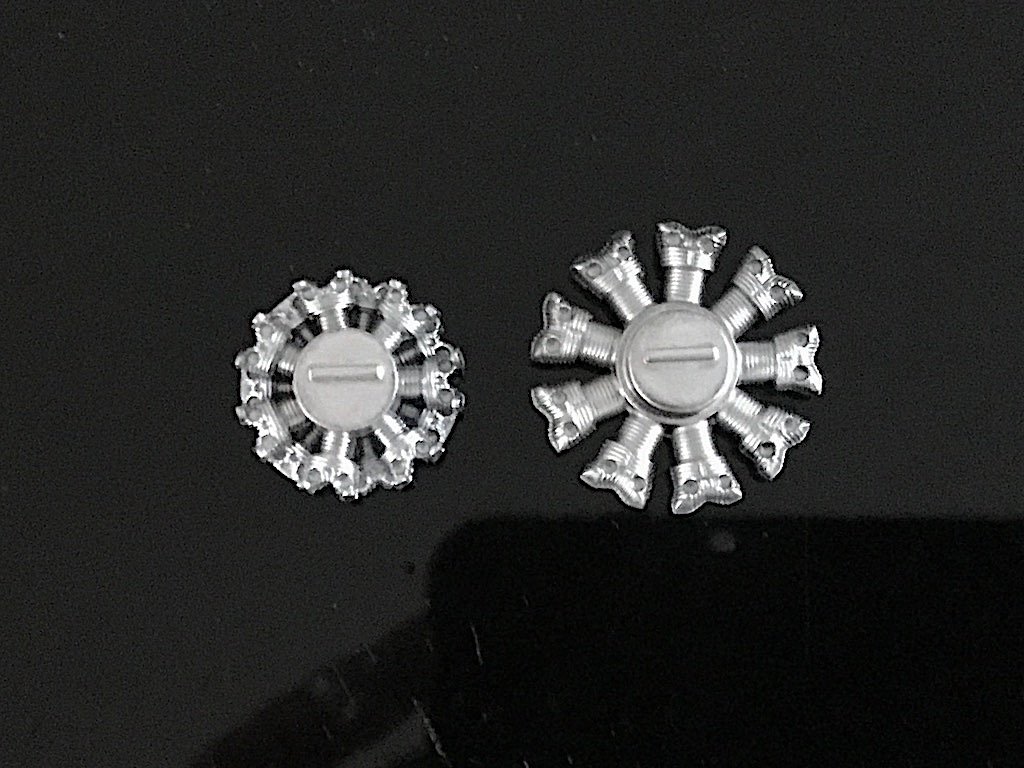
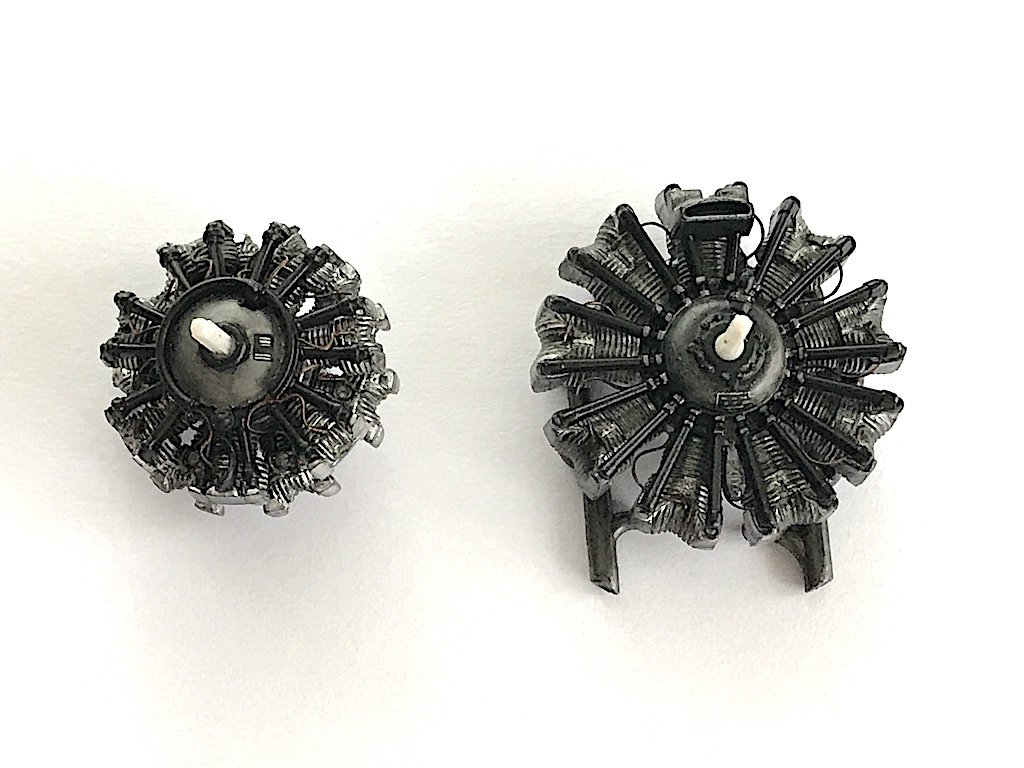
Running out of superlatives here Rob - but amazing work! Love the work on the engines. I need to look into the AK wax products.
-
4
-
1
-
-
Wow, really nice man! Love the variety - your figure painting skills in particular are very impressive.
-
2
-
-
Wow, looking good Peter! I bet this is a nice change of pace from the kit that shall not be named
")
-
4
-
-
Great to see you back at the bench Peter! Nice start! Impressive details in the cockpit!
-
4
-
-
Wow, great work Rob. The decal work is fantastic!
Nice pickup of the Rexx exhausts. Not that the kit parts are terrible, but man, those aftermarket exhausts are really nice!
-
3
-
1
-
-
So sorry to hear this Peter, but I certainly can understand. This is supposed to be a hobby and thus fun, so if not fun, what's the point? Maybe as others have said, let the kit sit for a while, and then come back and force it to submit to your great modeling skills. You might end up with a lot of satisfaction at the end turning a not-so-good kit into a fantastic model. If anything, maybe I can finish my JRS-1 quickly and we can move up our planned buddy build.
-
4
-
-
Wow Martin, that's looking insanely good!! Great job!
-
2
-
1
-
-
57 minutes ago, Jeff said:
Mike , you and Peter are exhibiting the true art of modelling. Your attention to details, problem solving and excellent skills with repair work are making this kit and the Songbird kit looking great. And the final result will be a model to be proud of. I’m looking forward to the next episode…
JeffThanks Jeff! I probably mentioned this before, but when I got back into modeling about a decade ago, I decided to build wooden ships as I thought I would be bored with plastic models insert tab a into slot b and paint -- at least that was what I remembered from building models as a kid. It was only in the last few years that I saw some plastic builds on MSW that I realized how far the hobby had come with aftermarket, better kits, airbrushes, paints, washes, etc. I tend to like the subjects in the plastic world a lot better than 17th-18th century wooden ships, so I've pretty much moved over to the plastic world.
At some point I'll pick the wooden builds up again, but I'm having a blast with these plastic kits. I complain about fit, but I think I secretly enjoy trying to puzzle solve.
-
3
-
-
Hmm, image doesn't show either. Probably a security setting on my Mac.
-
2
-
-
I'm sure you'll get it all figured out Peter. Stay strong my friend!
-
4
-
-
Unfortunately no - shows that there is a picture, but just a question mark.

-
1
-
-
For some reason I can't view your build pictures. I can see the other ones you included though. Any ideas why? I always learn a lot from your builds.
-
1
-
-
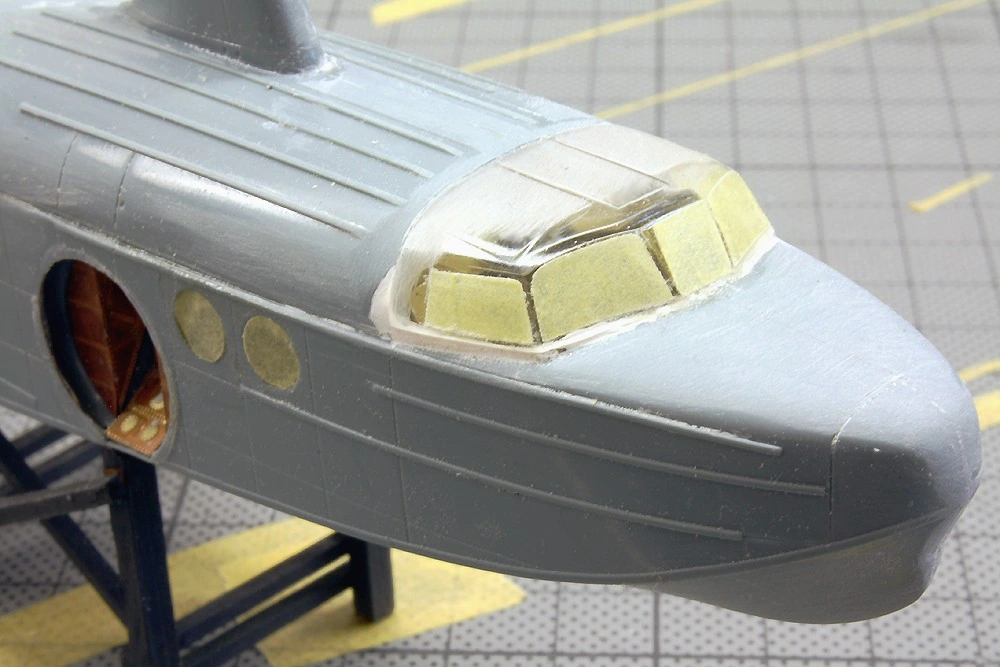
Thanks for the kind words Peter. It might have been fun to open the plane up some, but the wacky windows were a problem. I ended up needing to cut a couple out of clear plastic, and it's not as easy as cutting normal styrene even using the Dspiae circle cutter. I probably had to cut at least five to get one decent one. I didn't feel like replacing all 20'ish windows as that would have really tested my patience.
I think adding material to the bulkheads helped a lot. I ended up having to remove some of the material with the final assembly, but the bulkheads really helped with the positioning and stability.
Good luck with the Songbird!
-
5
-
-
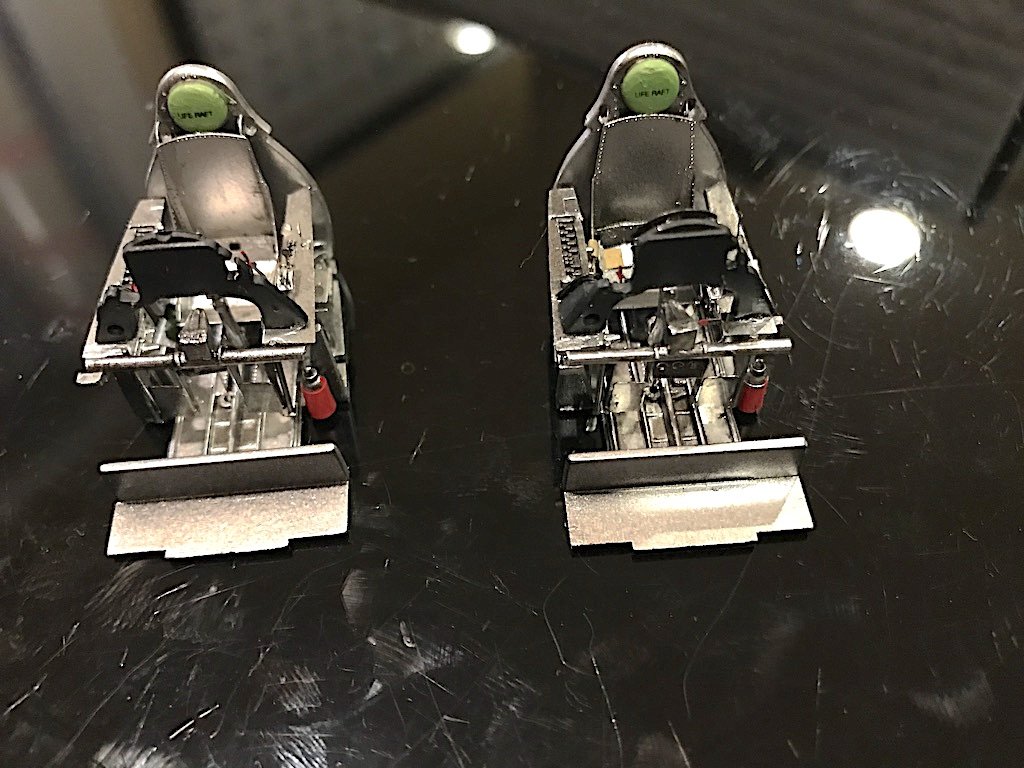
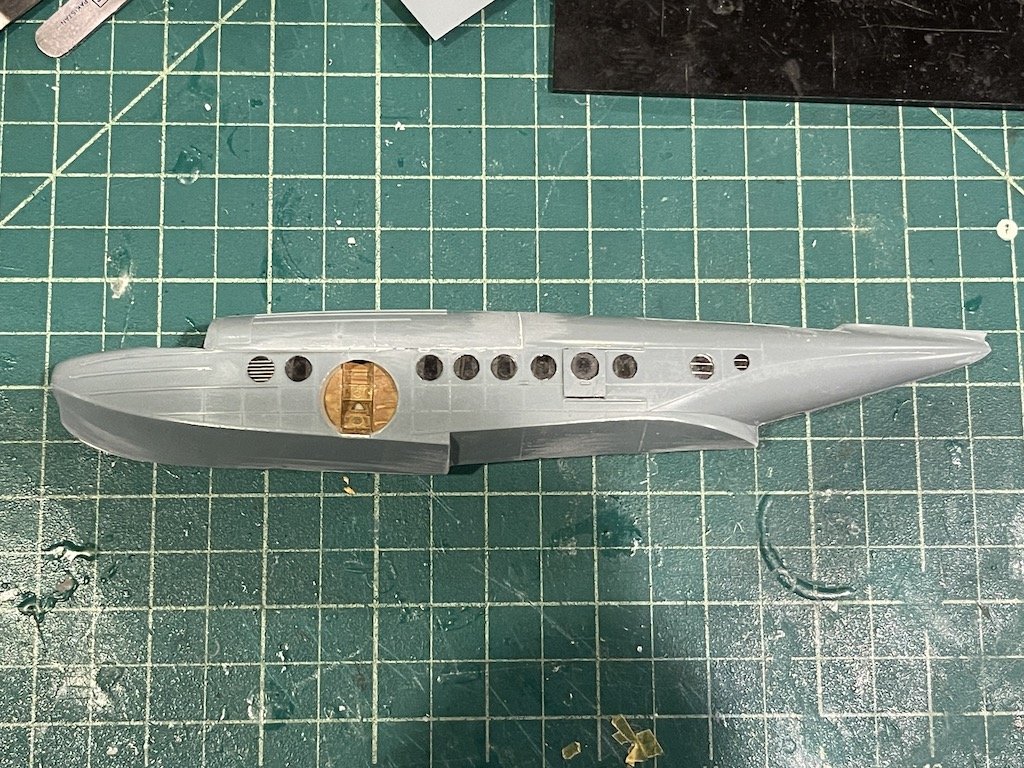
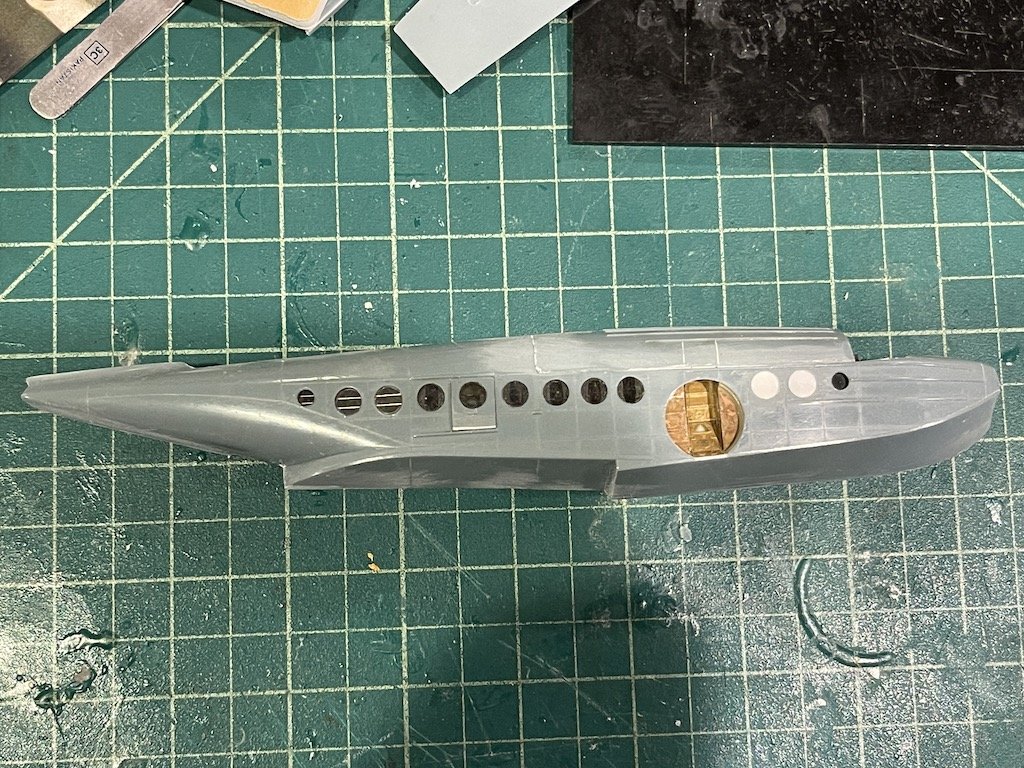
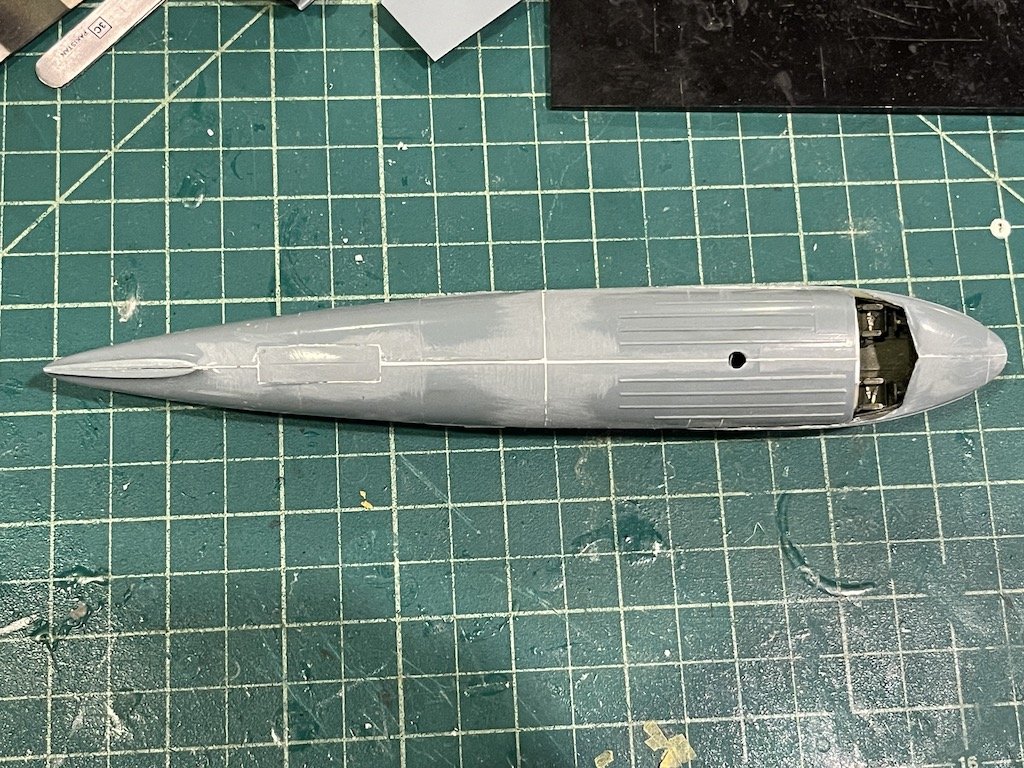
Made some good progress on the JRS-1 the last few days. First, installed all the interior components - bulkheads, cockpit, seats, windows, window frames, curtains, etc. Given that you can't see much of any of the details from the outside, I didn't bother trying to make everything look pristine.
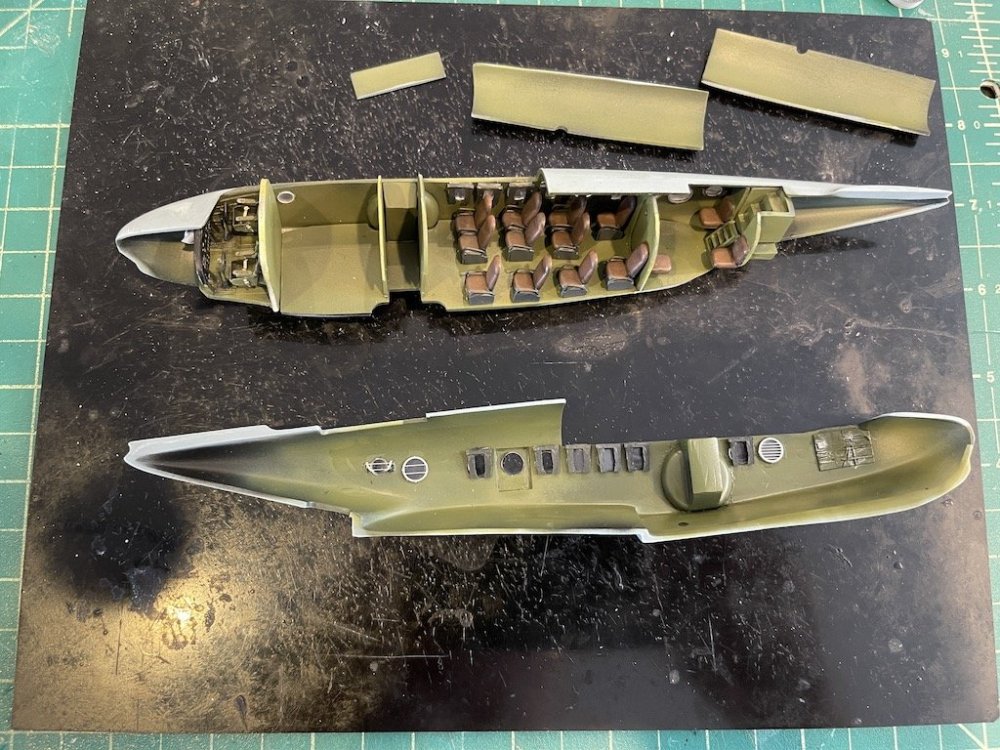
Then managed to get the fuselage buttoned up. Surprisingly, very little filler or plastic strips needed, though the canopy is going to require plenty.


The top was a pain because you had to insert the rectangular piece in between the fuselage halves (you could cut this in half and model it as open), as well as the two forward top fuselage halves. Not exactly easy to do, but eventually got there.
Thanks for looking in!
-
9
-
-
Hey Peter, not sure how I missed your earlier post of the IP - looks great! As for the overall build so far, it's looking really fantastic if you ask me. Interesting how the shape of your Songbird is very close to my JRS-1, including the shape and misfit of the canopy part.
I'm actually at the same point in my build. As much of a pain as it might seem like it will be, I believe Kevin is right in how to approach it. Take a look here at a JRS-1 posted on Scalemates. Exactly the approach Kevin suggested. I'm planning to lay down some plastic strip first, maybe a touch over what I need, and then just sand and test fit until the cockpit sits neatly on top.
-
5
-
-
I loved the show as a kid. Looking forward to seeing this come alive!
I watched the trailer you posted, and was struck by how great the ships looked back then. Compared to the CGI today, the show certainly held it's own, if not, might even look better.
-
3
-
1
-
-
11 hours ago, Peterpools said:
Mike
Good call for sure and might just go the CA route at the corners and see what happens.

I ended up installing the windows tonight. I ended up using CA. Didnt really get any fogging. I did get fogging when I tried to use CA debonder on a window where a little CA got on it. Good luck with your windows! I'm so glad that part of the build is done!
-
4
-
-
Sounds like your Songbird has a similar window install as this kit. The windows have a chamfer where the exterior is smaller than the interior opening. The clear part windows have a small step, so you insert them from the inside smaller end first so that the larger end sits on the chamfered edge. At least that's the theory, but the concept is difficult to execute at this scale and where the parts aren't exactly perfect. The window openings were all sorts of sizes and some with a touch of flash, and the clear parts don't seem to be particularly crisp. I cut out one of the small and one of the larger windows and test fit them into the various openings to have a good fit when I went to install them.
One thing I've considered is adding a tiny drop of CA to the inside edges for a bit of strength, but the clear parts actually look quite clear after dipping in Future so I don't know if I want to take that chance. Instead, I have some Testor flat clear that I might paint along the inside edge to help add as an extra adhesive.
I didn't feel like dealing with the windows last night, so instead cut out the control surfaces from the wing, and put together the wing tips, floats and seat for the wing. Figured that would be a relaxing exercise, though there were fit issues with those parts as well. At some point, I think I just need to work on a Tamiya kit for something more relaxing!
-
4
-
-
Thanks Peter!
Any tips on how to glue in the small windows? The windows install from the inside, so before closing up the fuselage I need to add the 20 windows. I'll probably add the masks as well before buttoning up the fuselage, as I'm a little nervous about accidentally popping a window out, which would really be a problem once the fuselage is together. I was going to use PVA glue like Gator's Glue, but I'm wondering if that will be strong enough.
-
3
-


By Your Command...Finished!
in The Great Twins Group Build.
Posted
Came out great!! Nice job!