The Great LSM Twins Group Build ends July 3, 2024
×


Fran
-
Posts
2,126 -
Joined
-
Last visited
Content Type
Profiles
Forums
Events
Gallery
Everything posted by Fran
-
Thanks Eli!!! When and where we can order it?
-
My first jet model related thing was 1:48 Zotz decals Saab J35F J Draken... Love it and i still have it... need to get it on a model! I have several Zotz decals... In fact, never used any... they are just to gourgeous to be use actually. But i need to sort that out and i will start with this new !-20 decal sheet for sure!
-
Wow!! cant wait for it!!
-
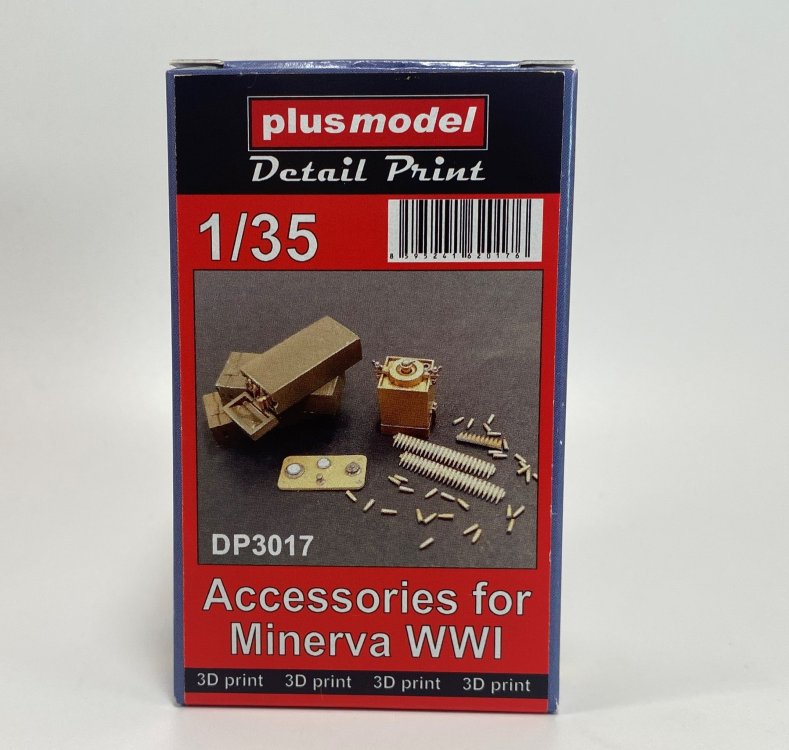
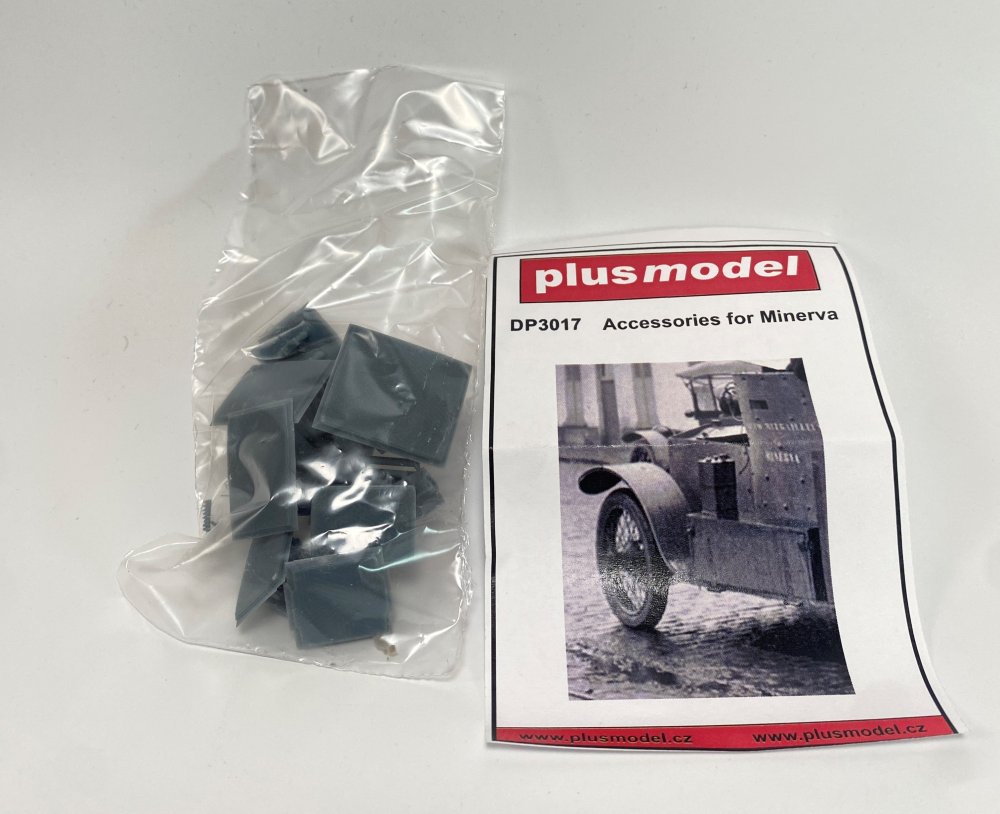
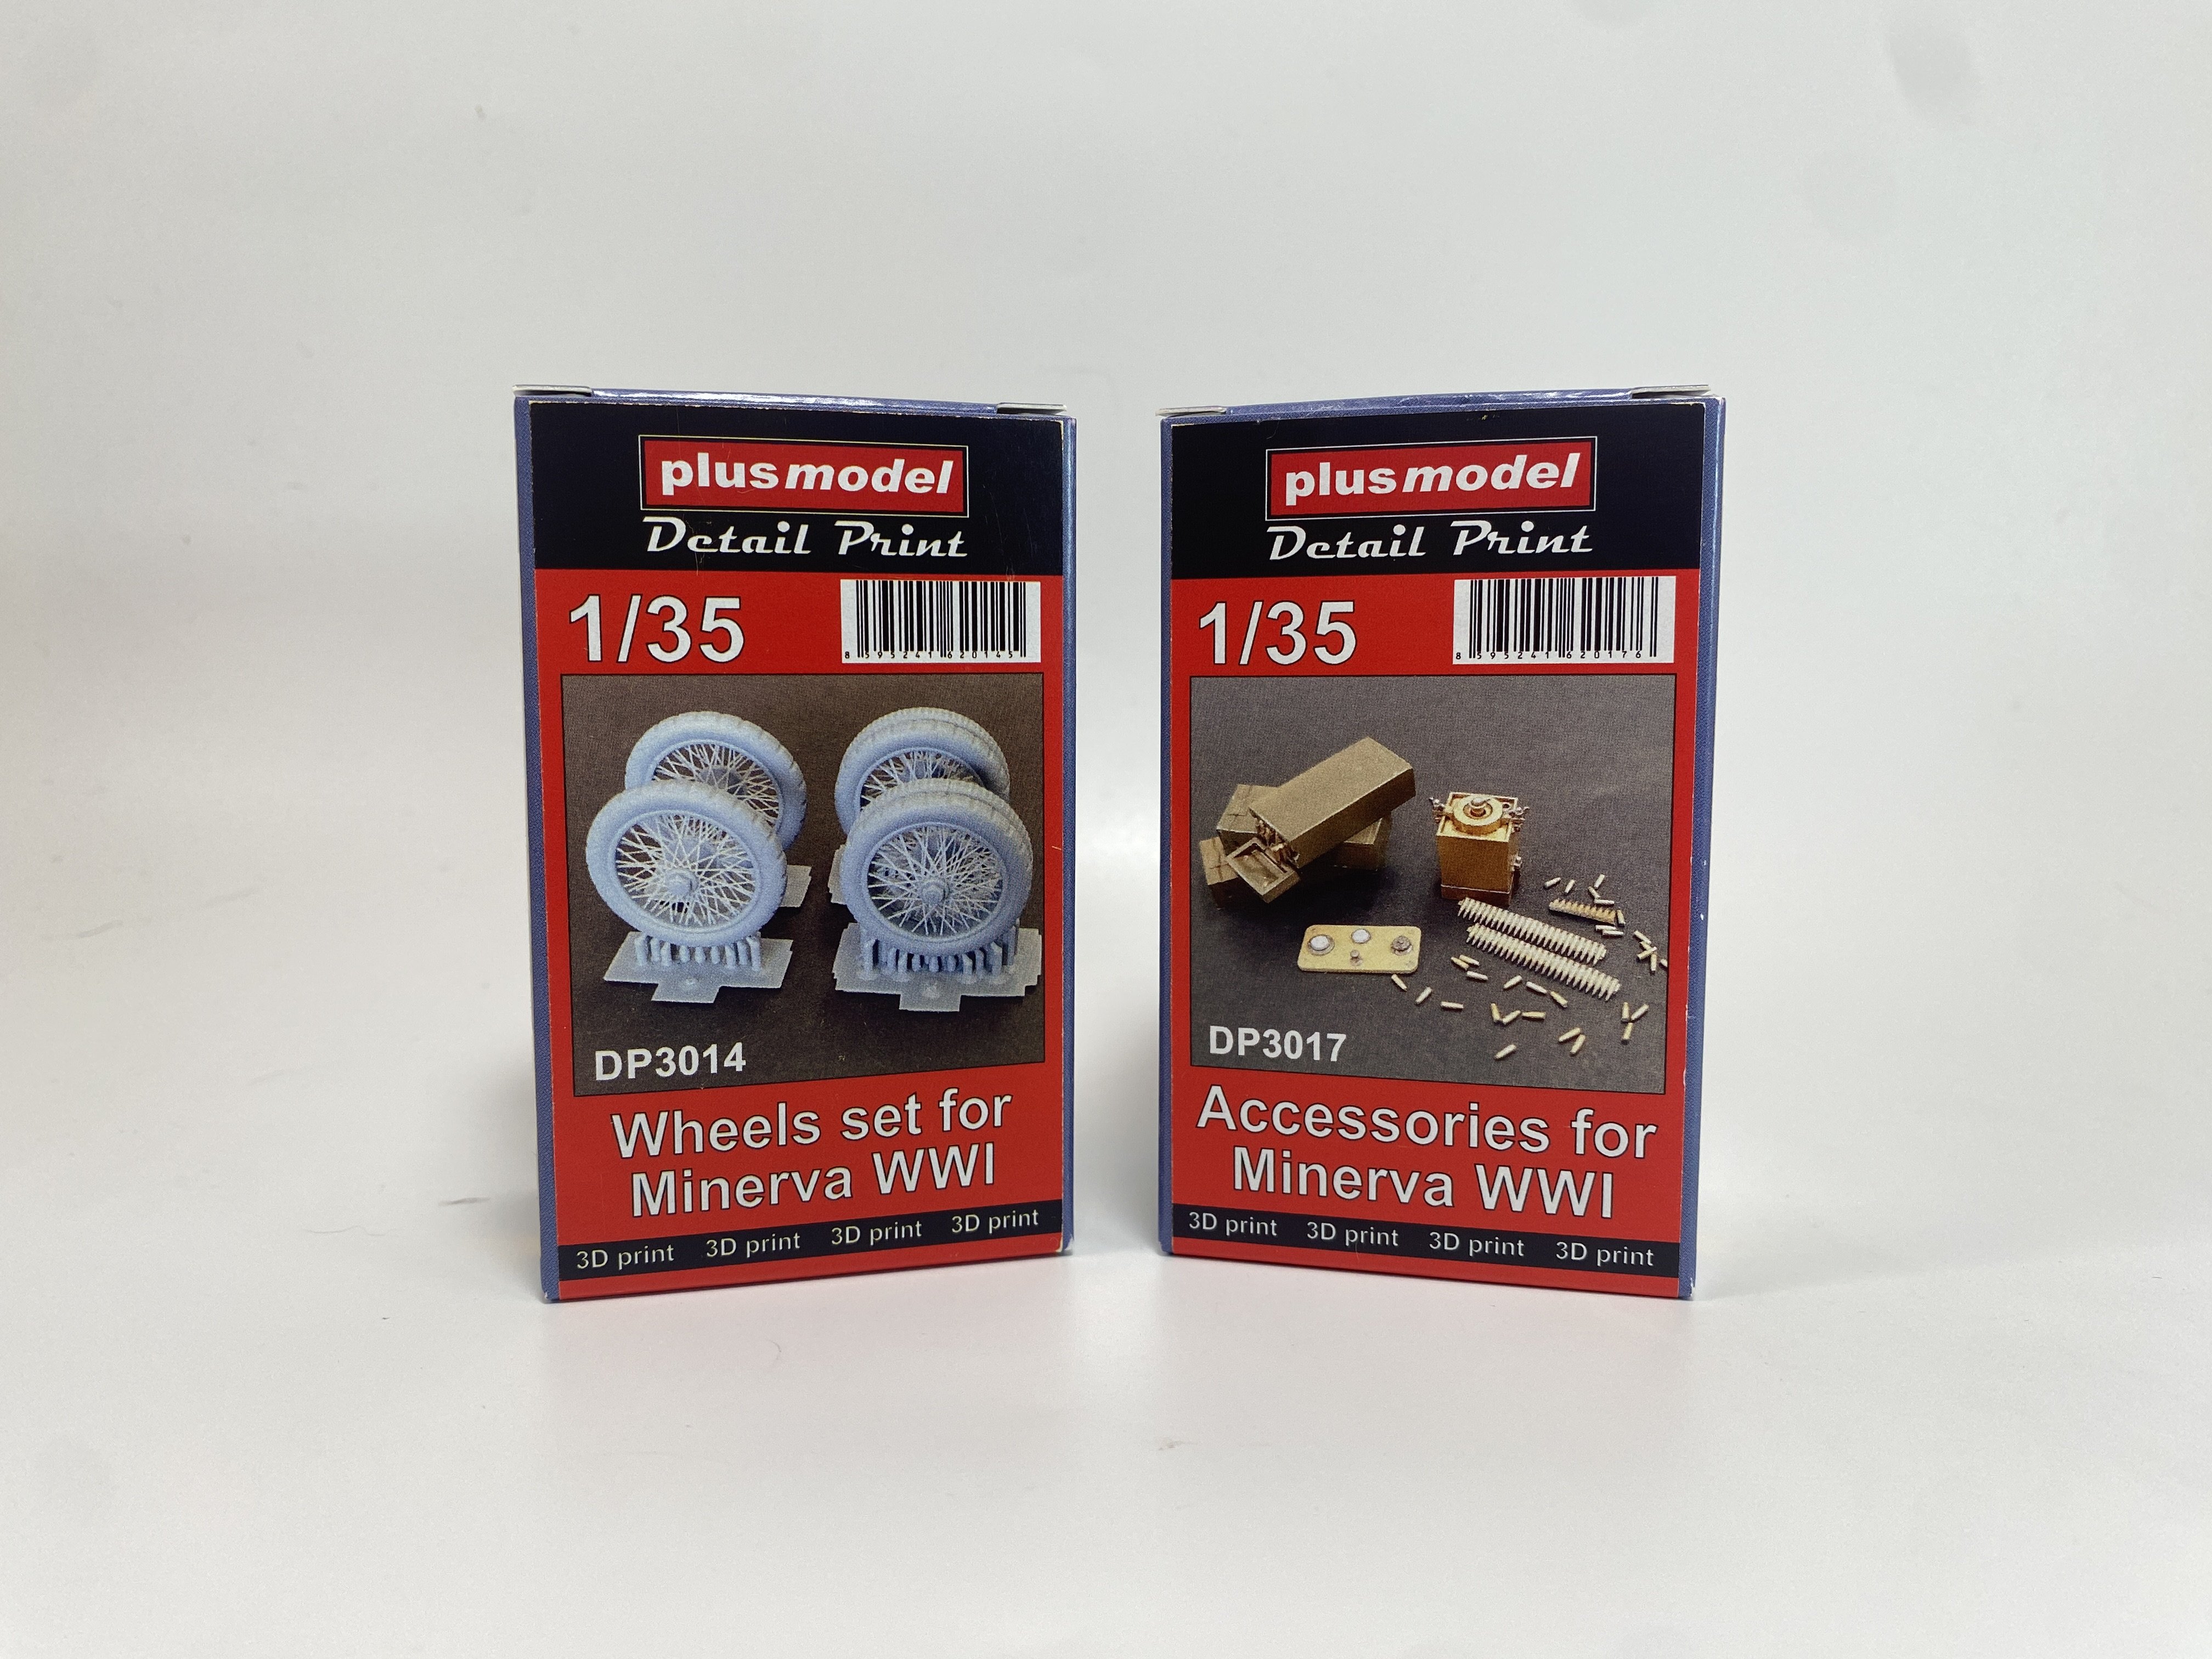
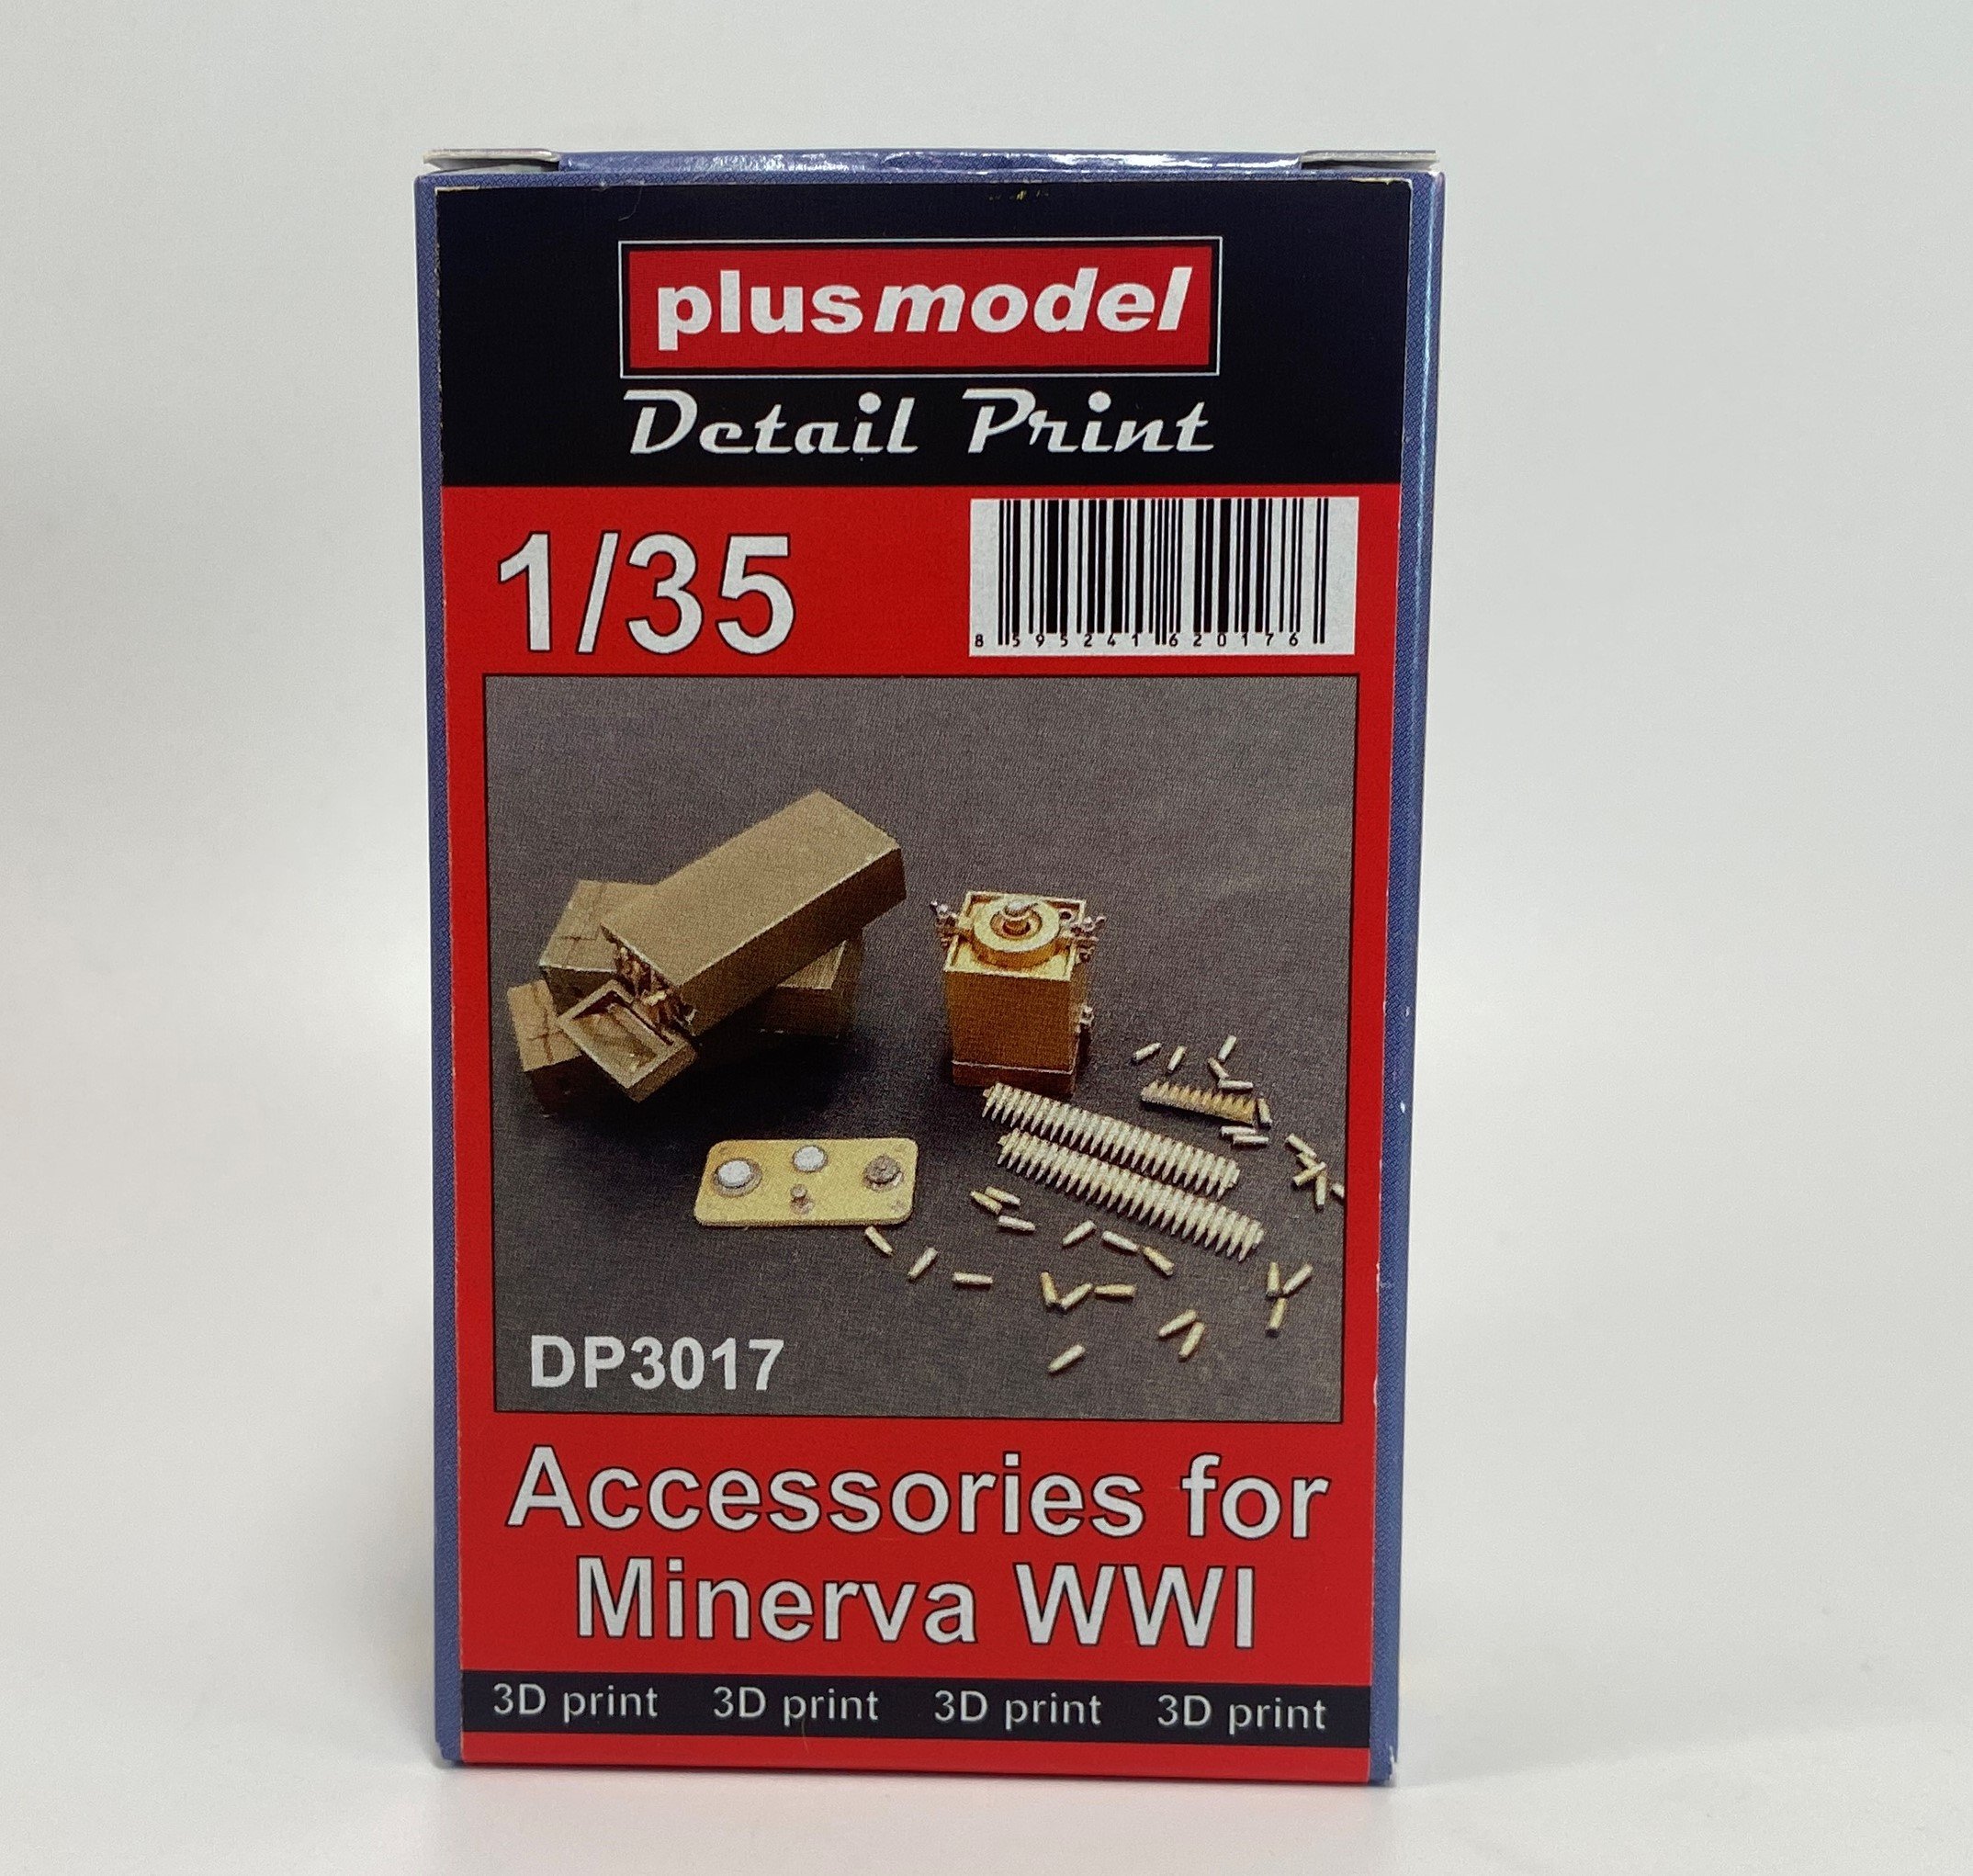
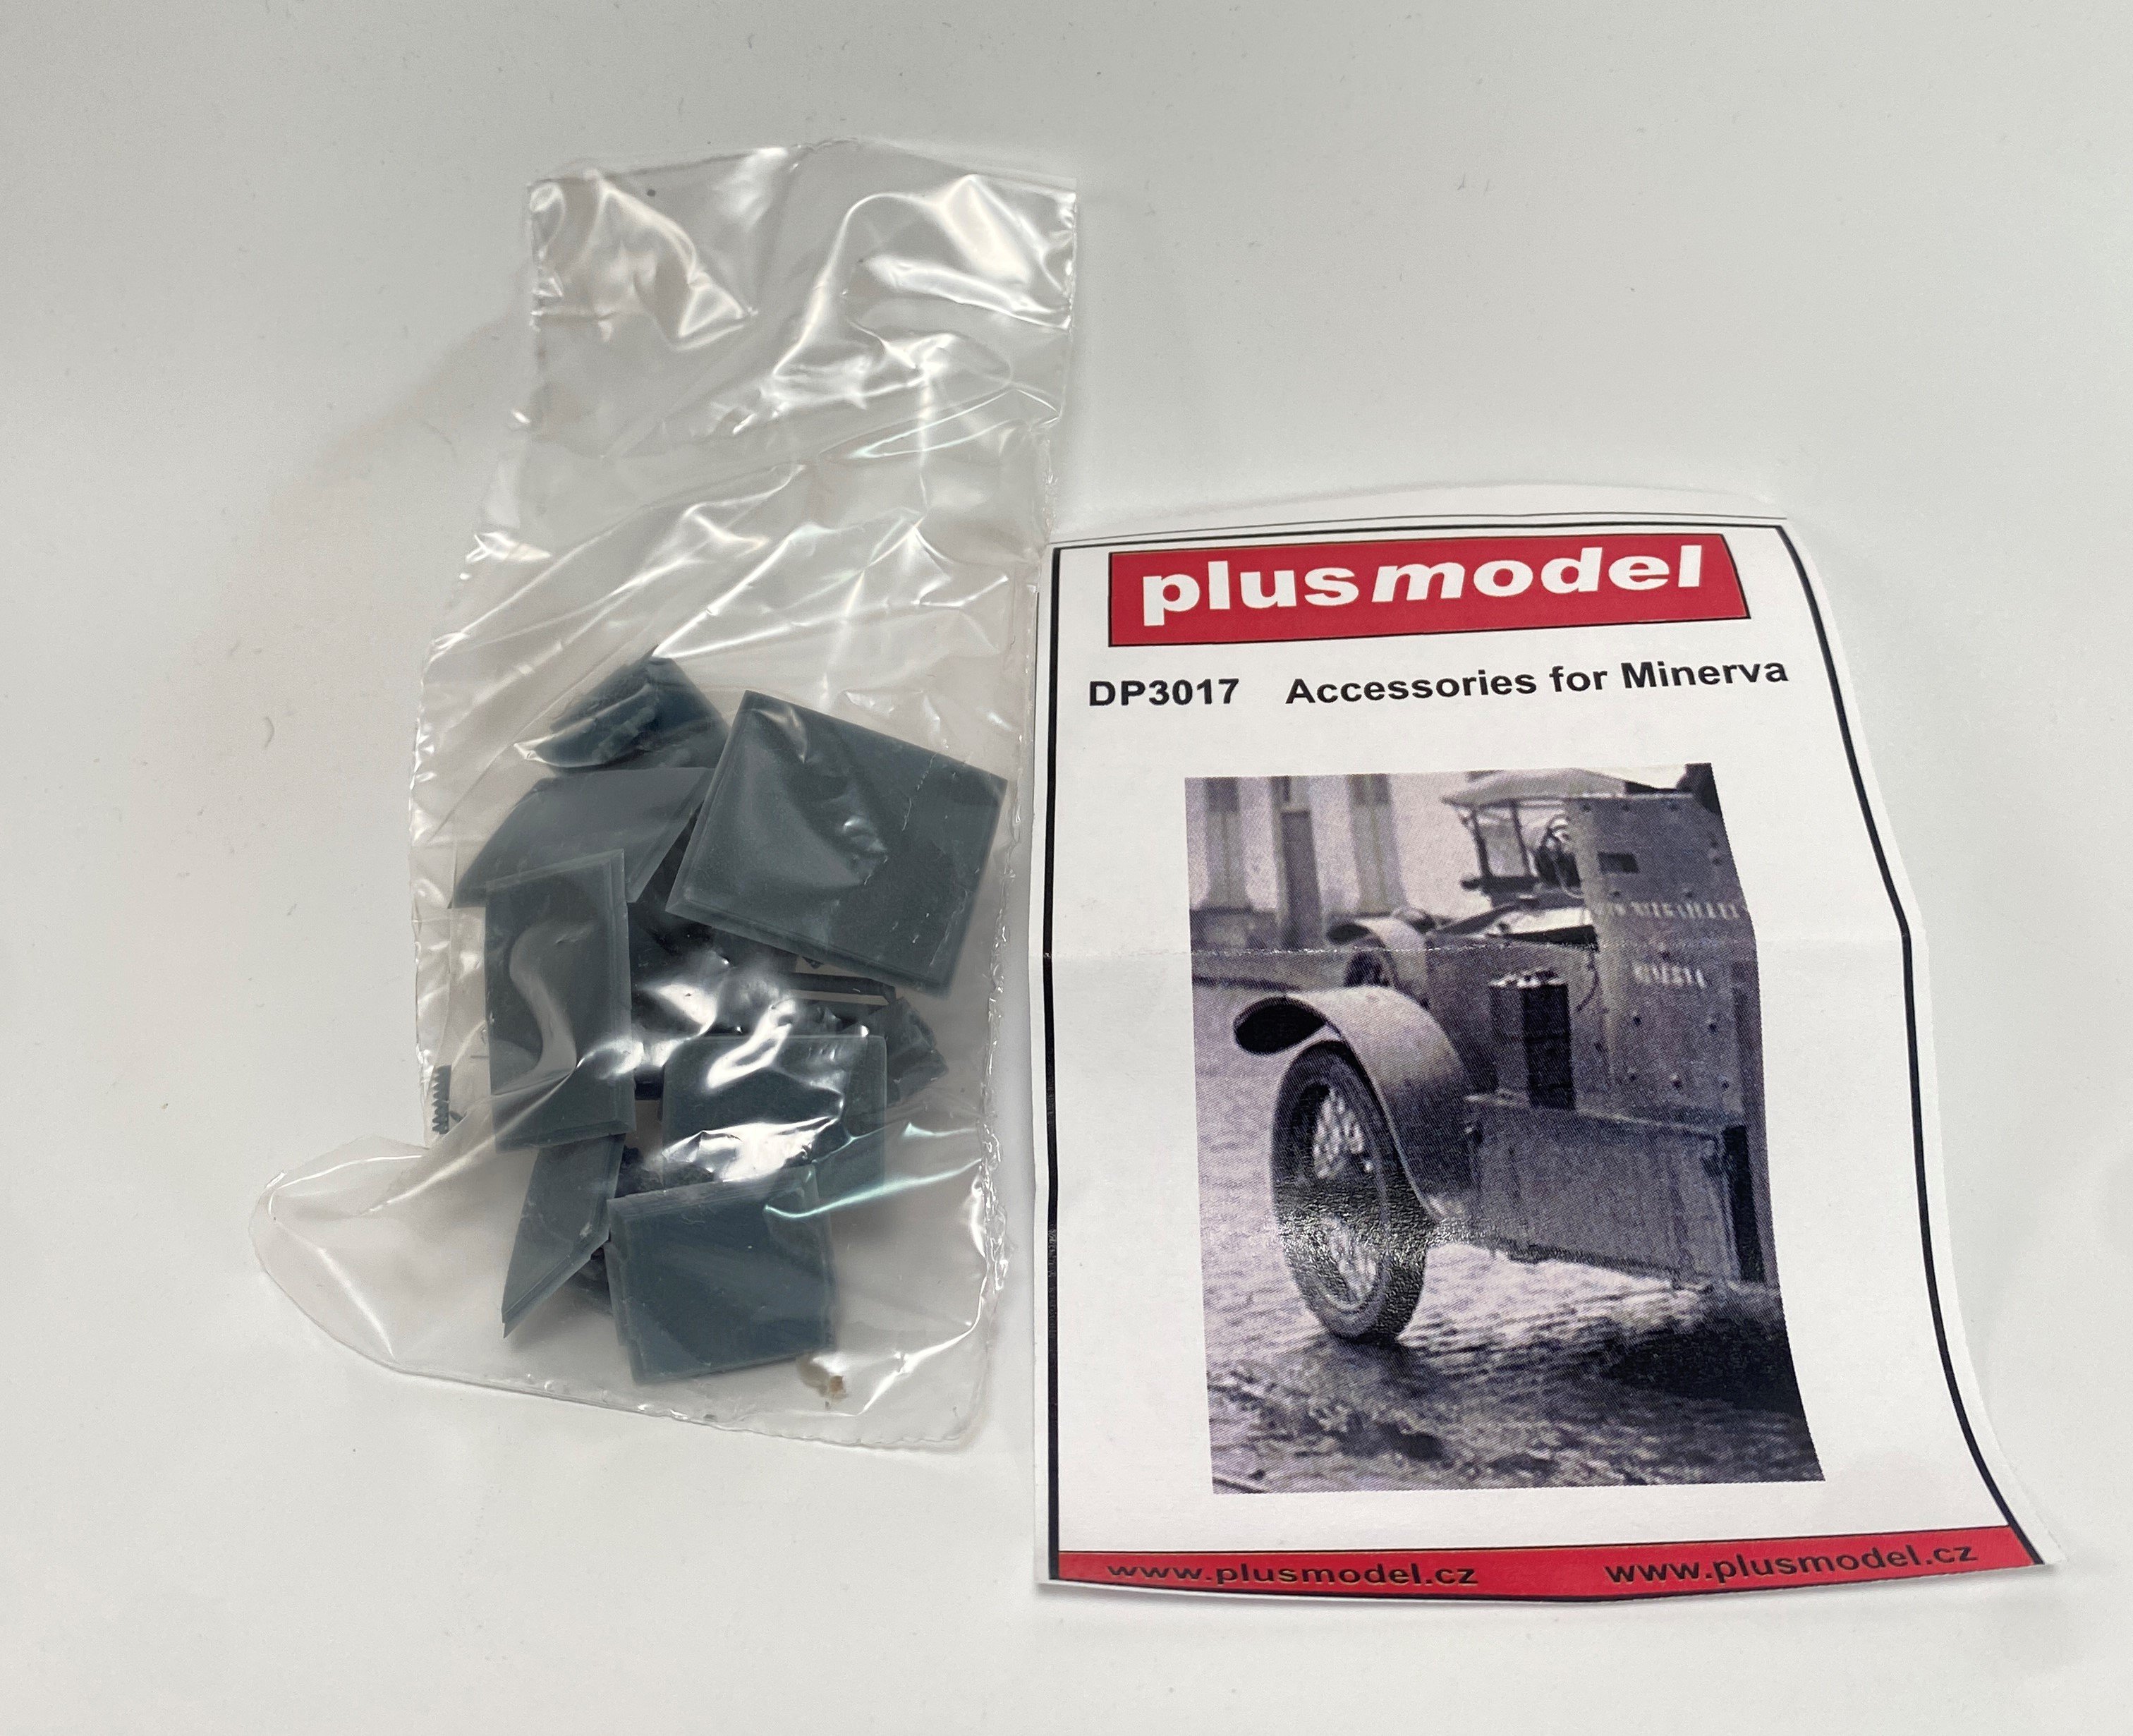
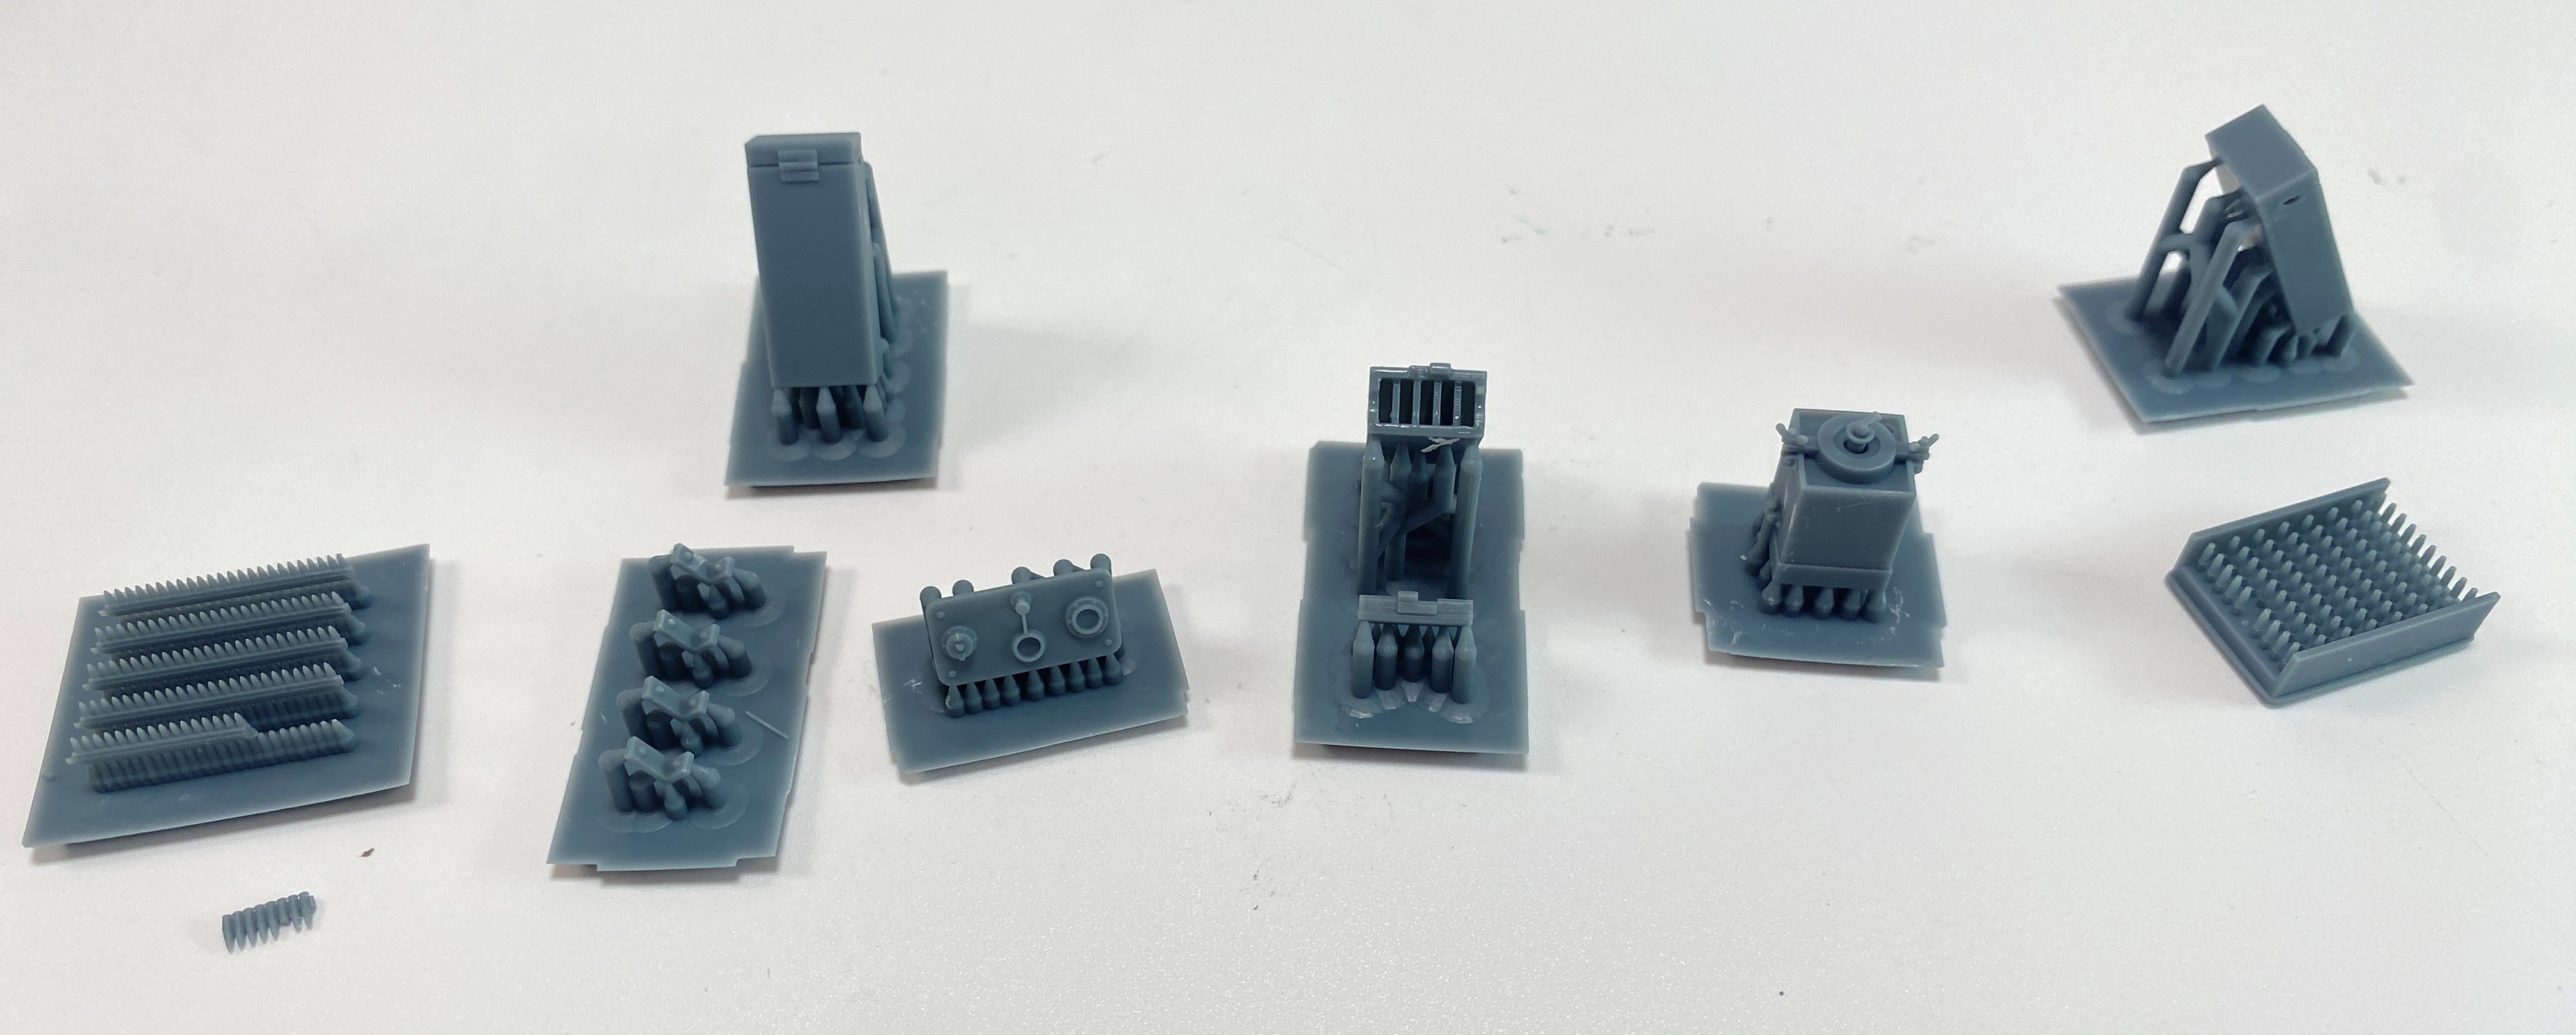
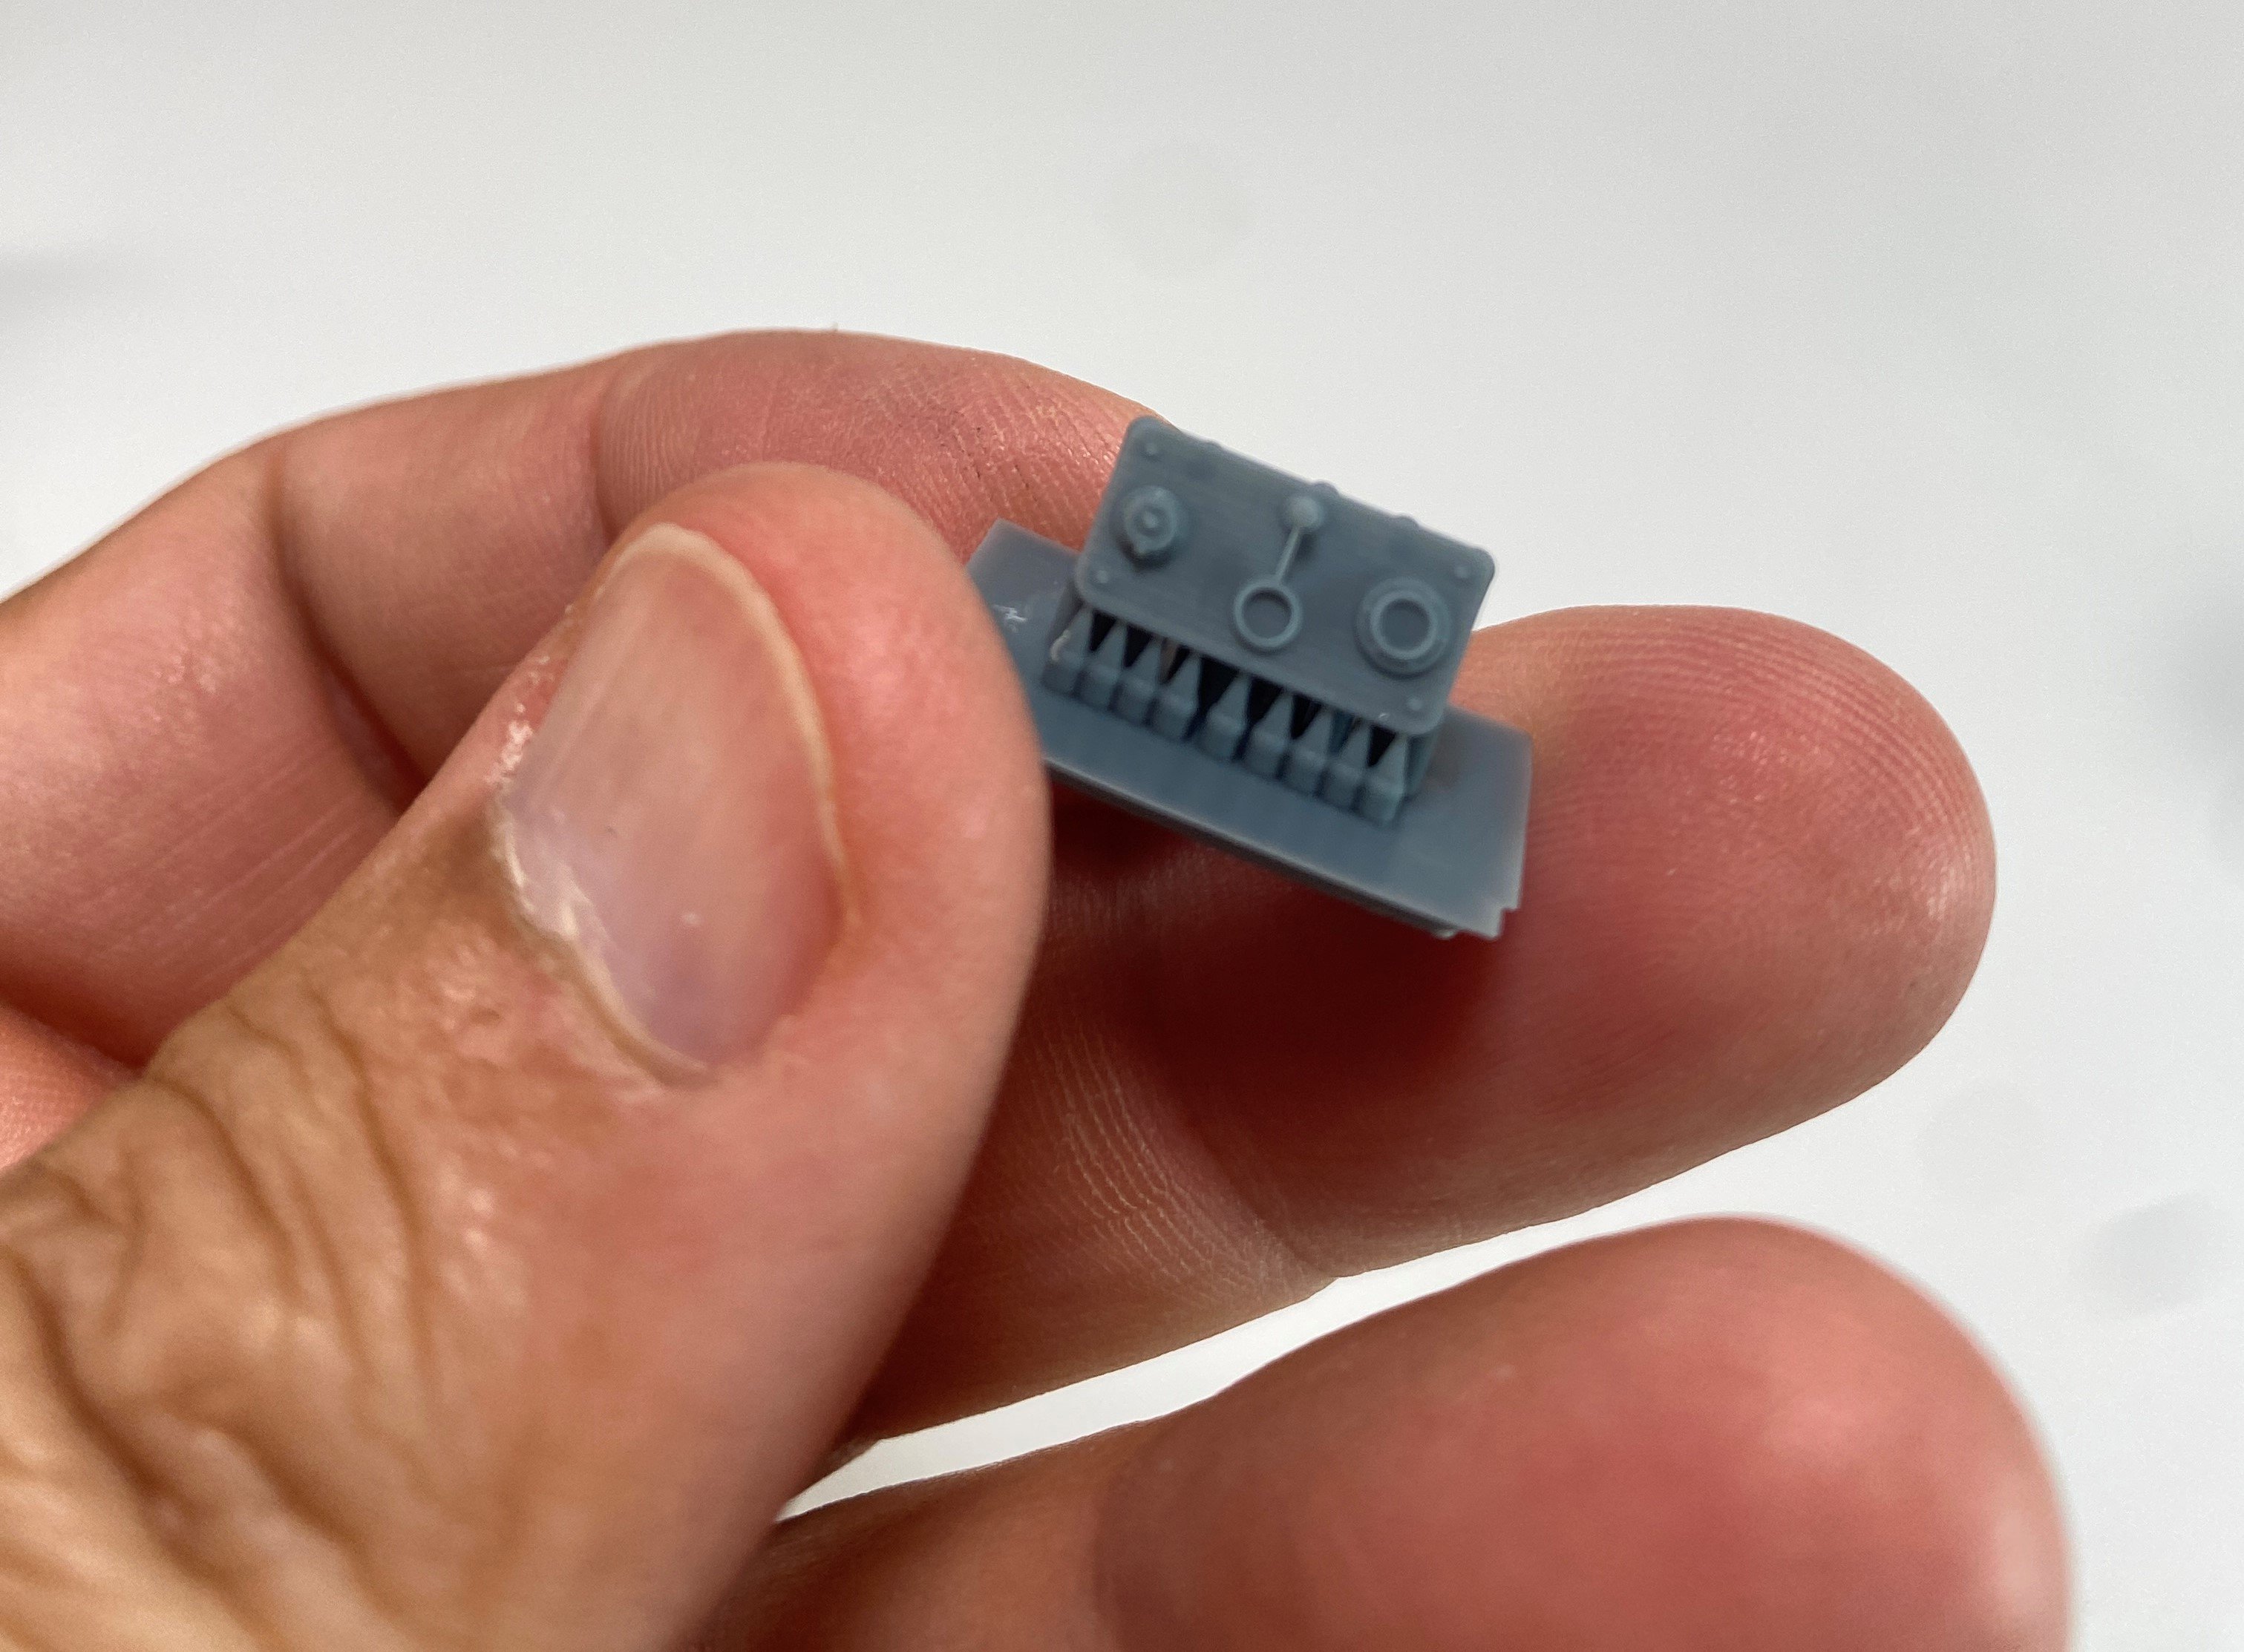
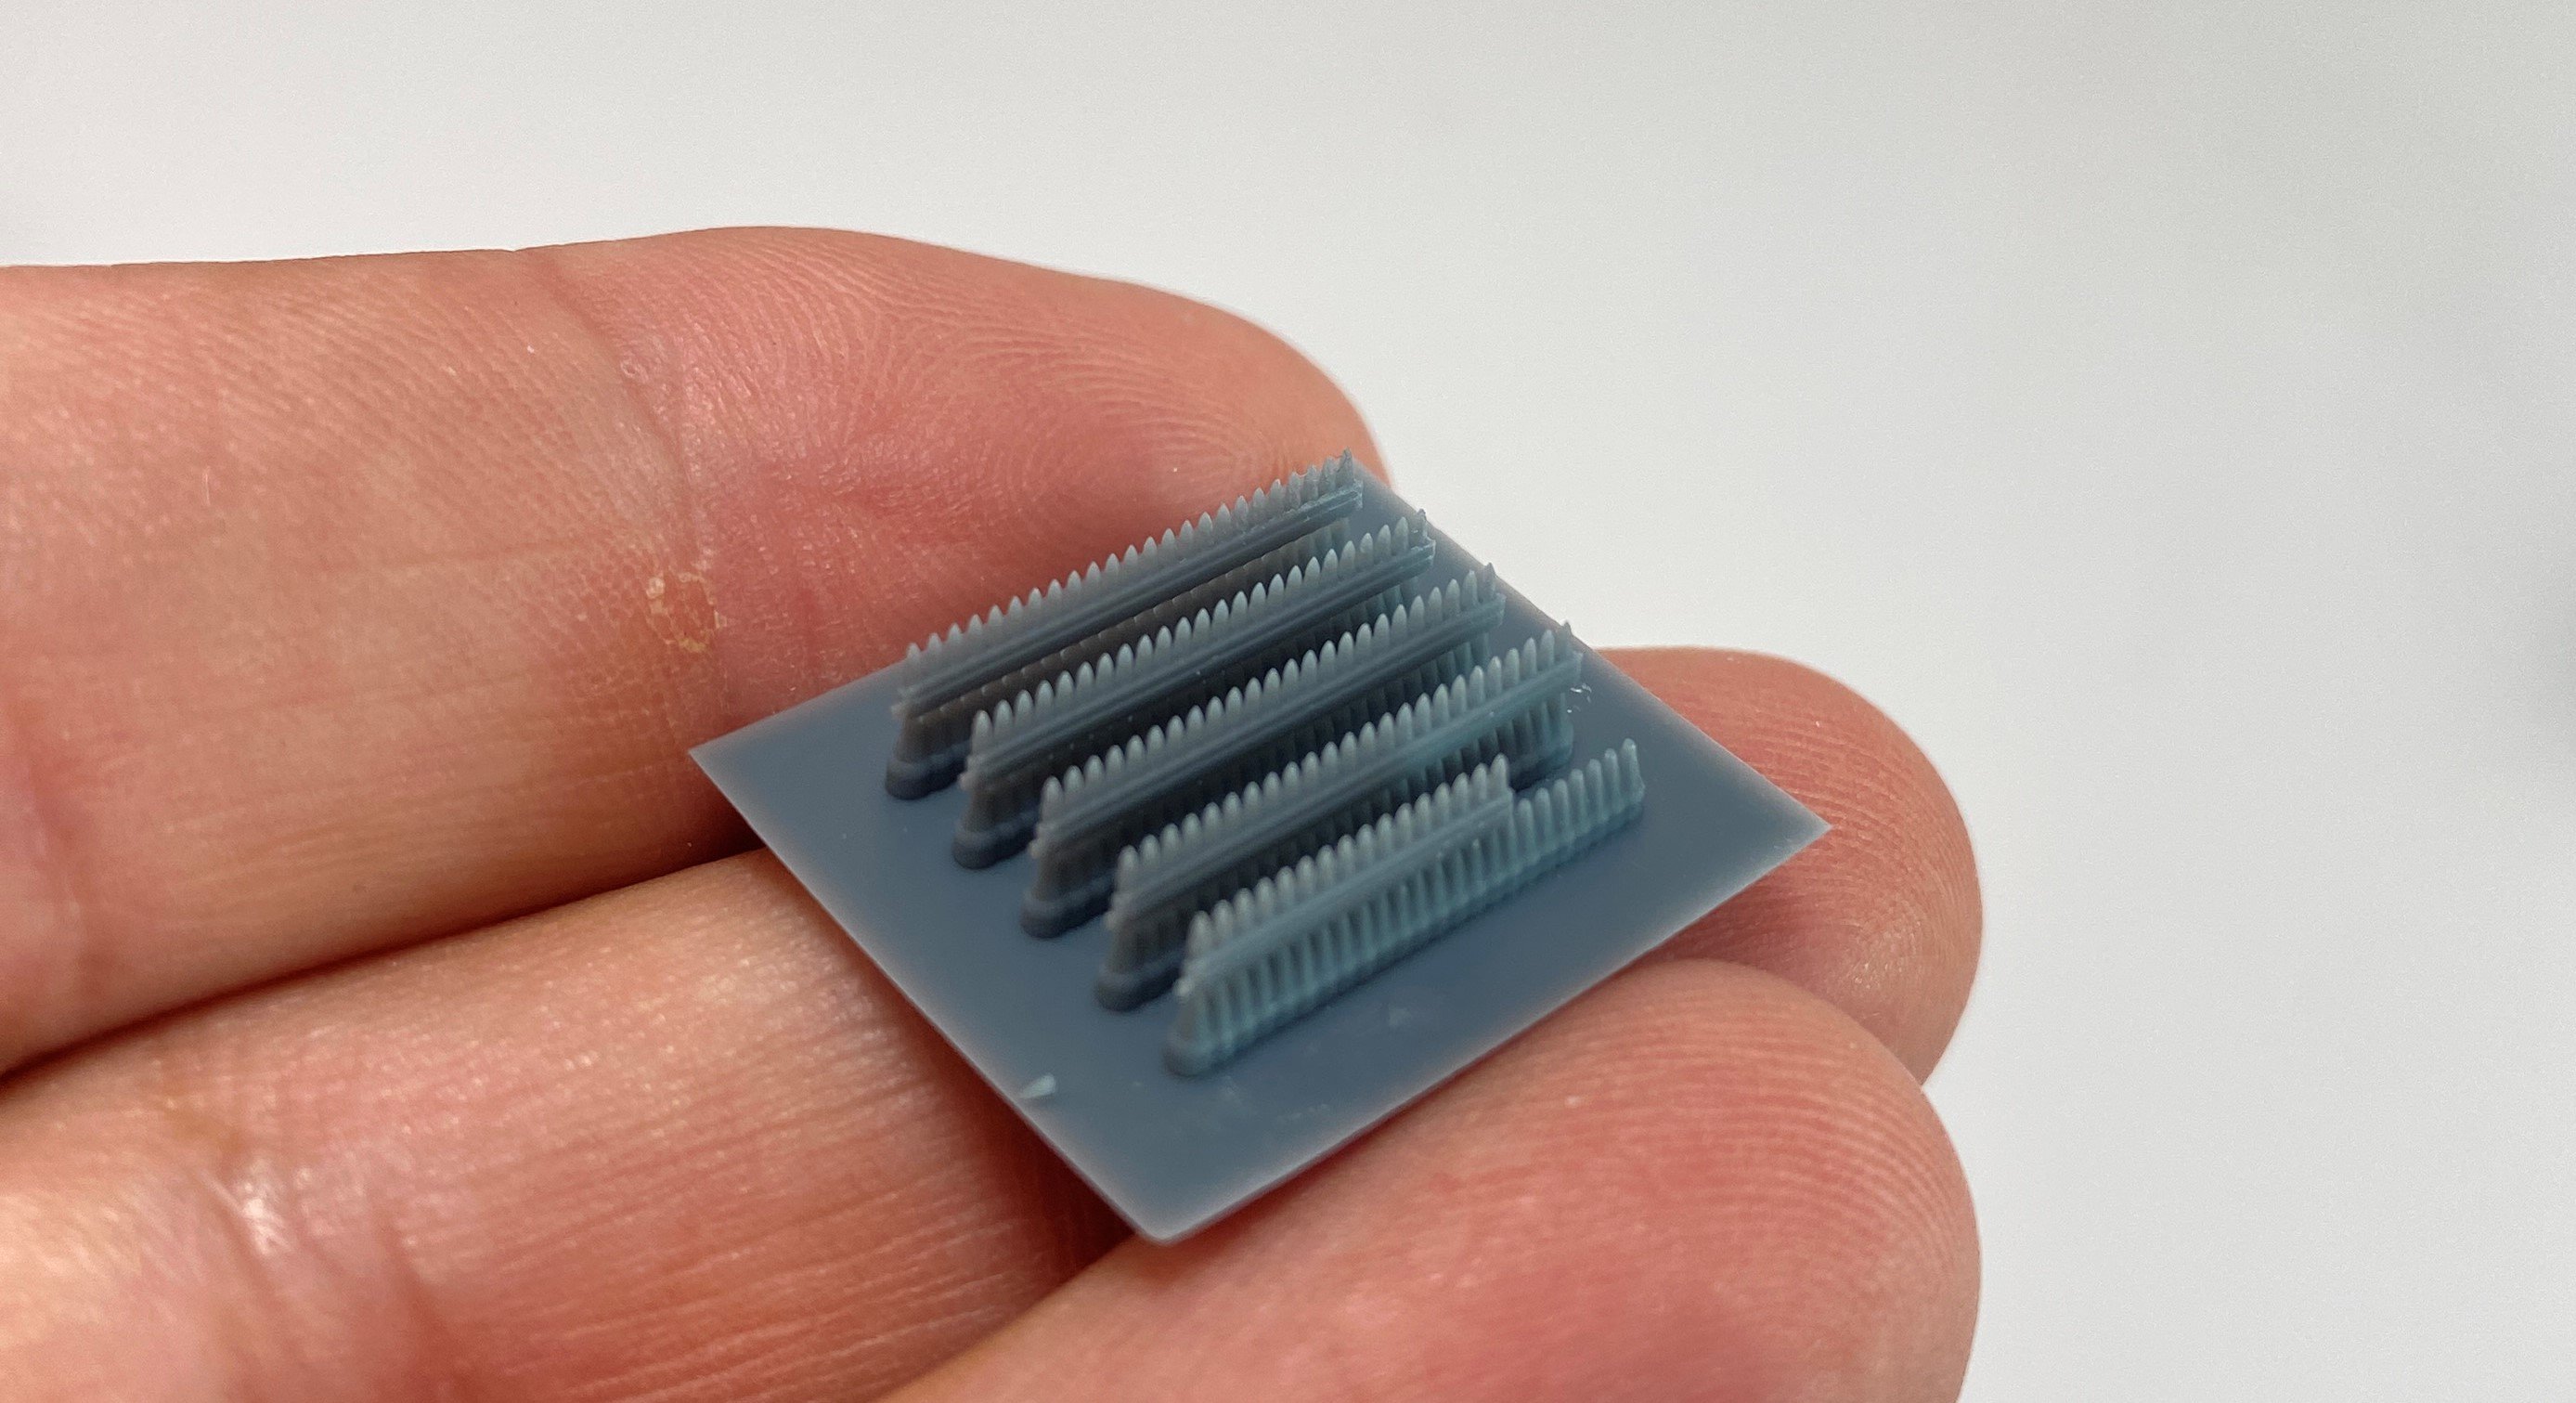
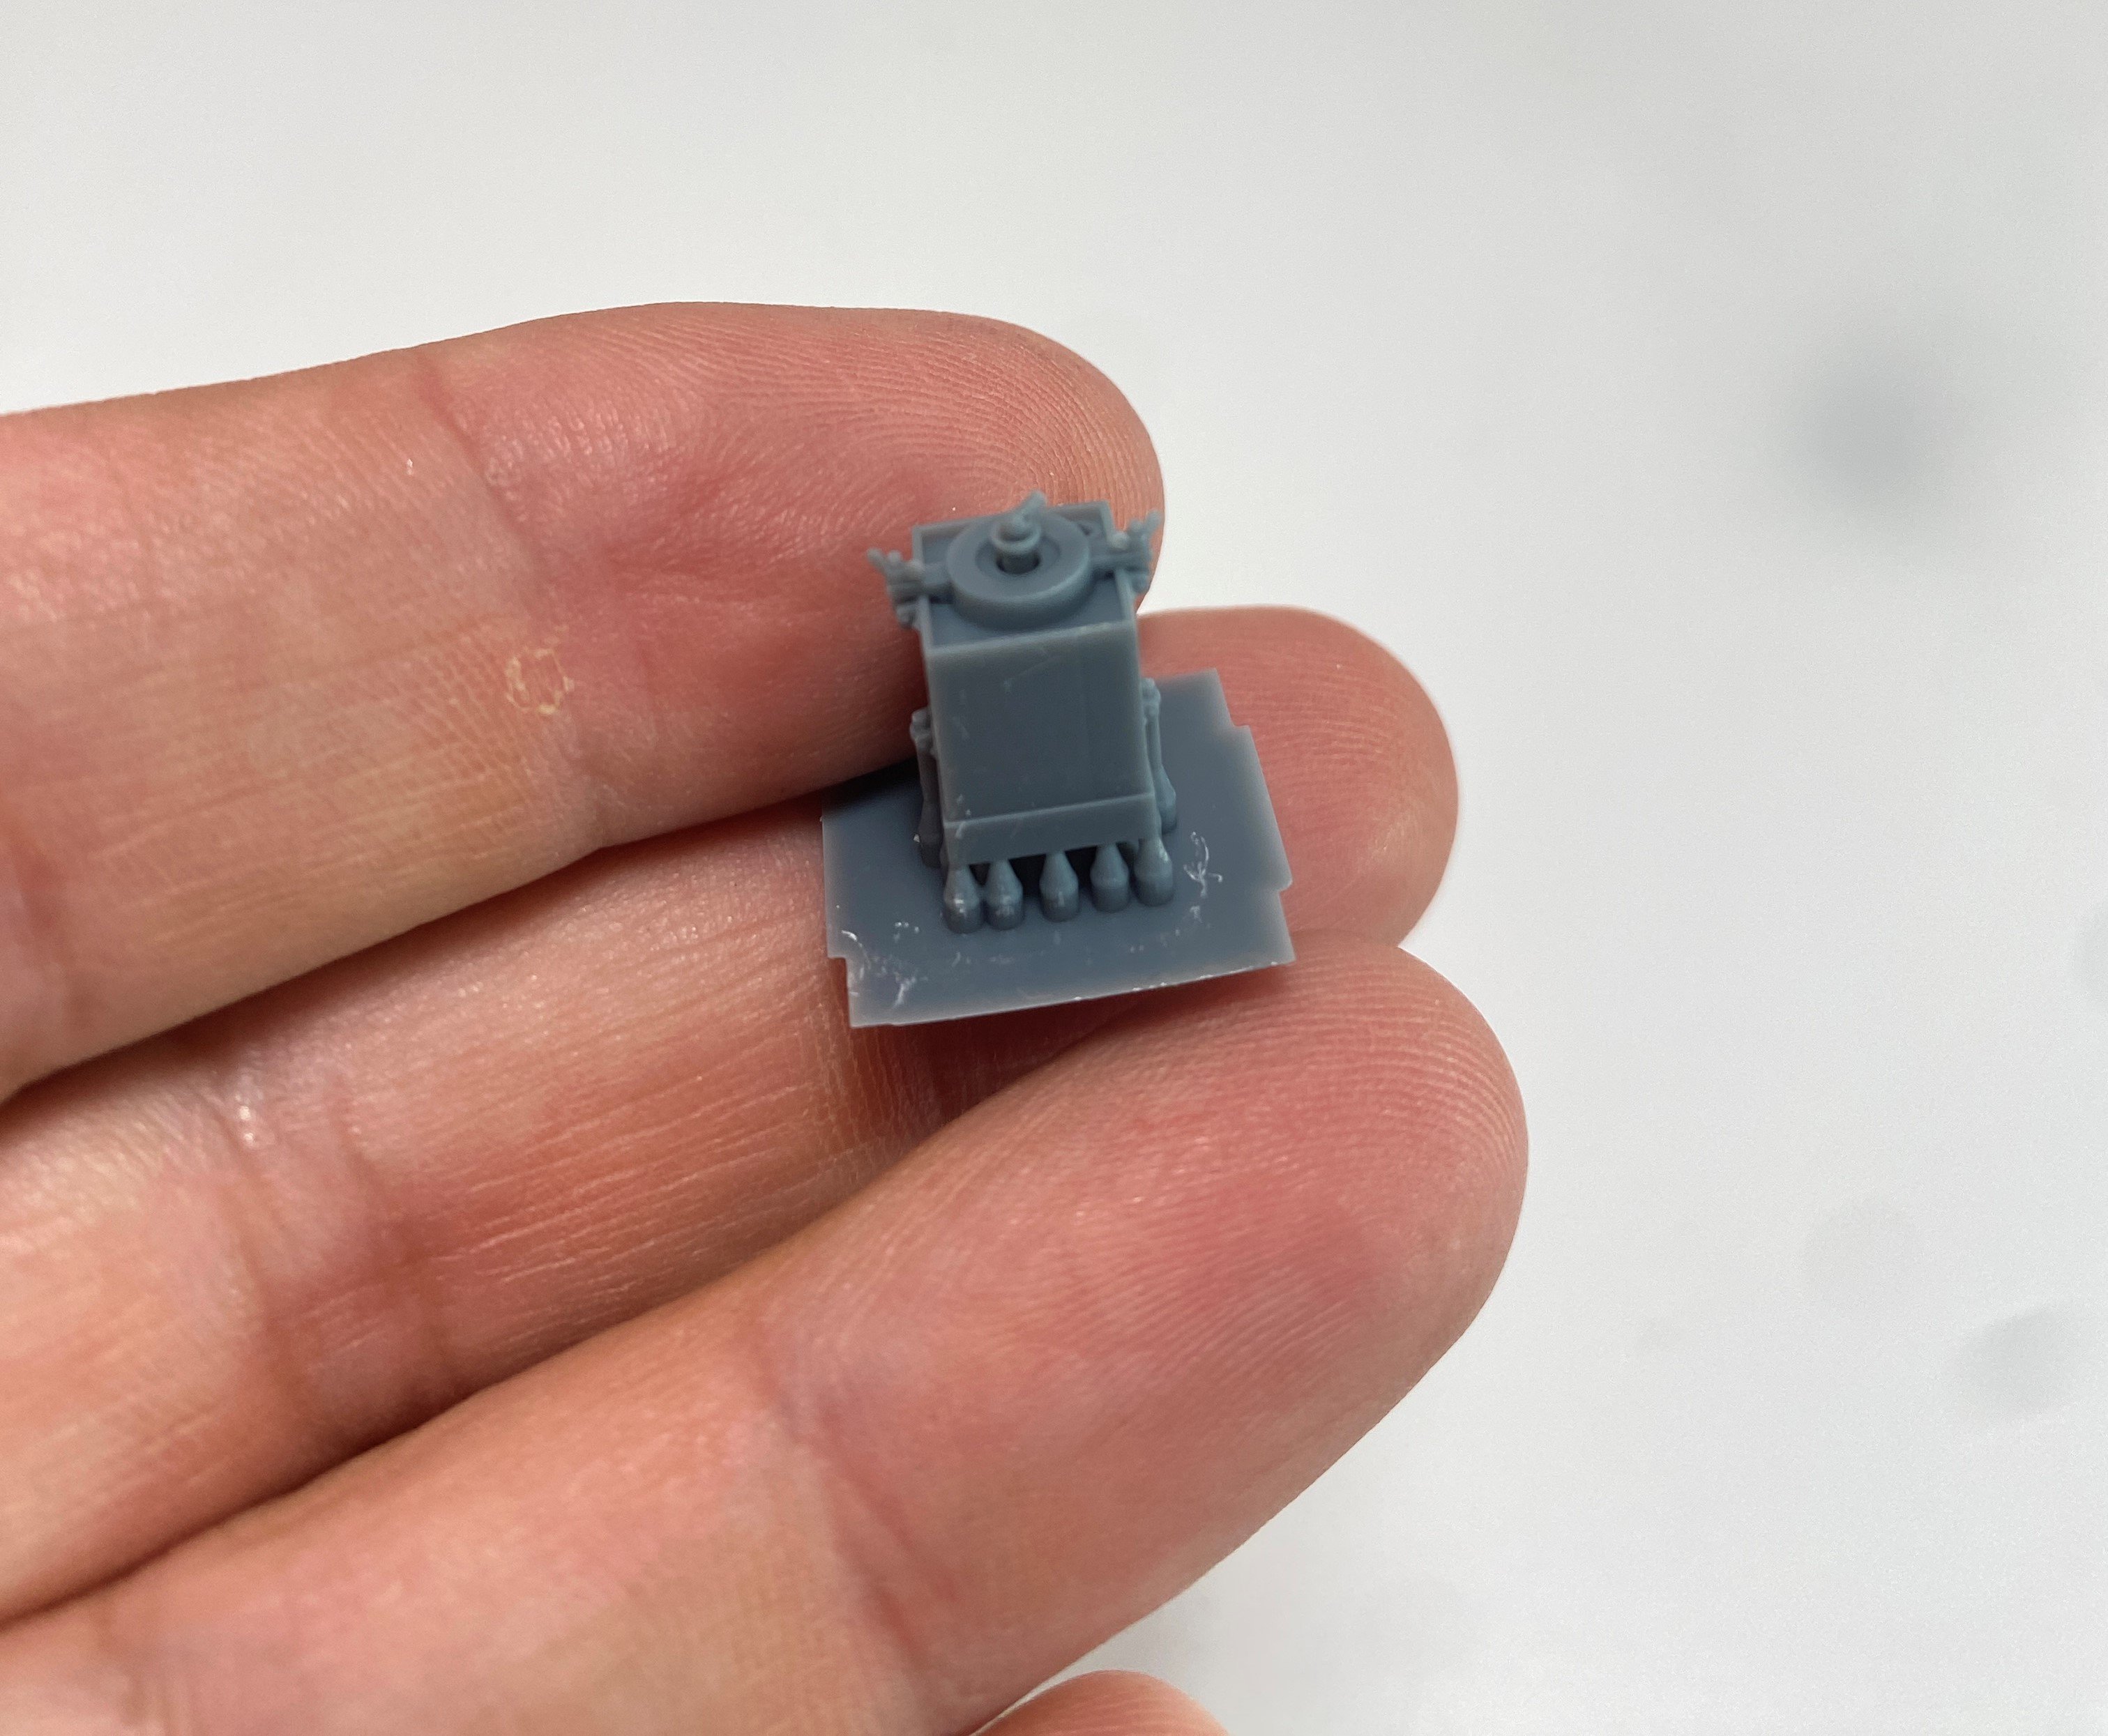
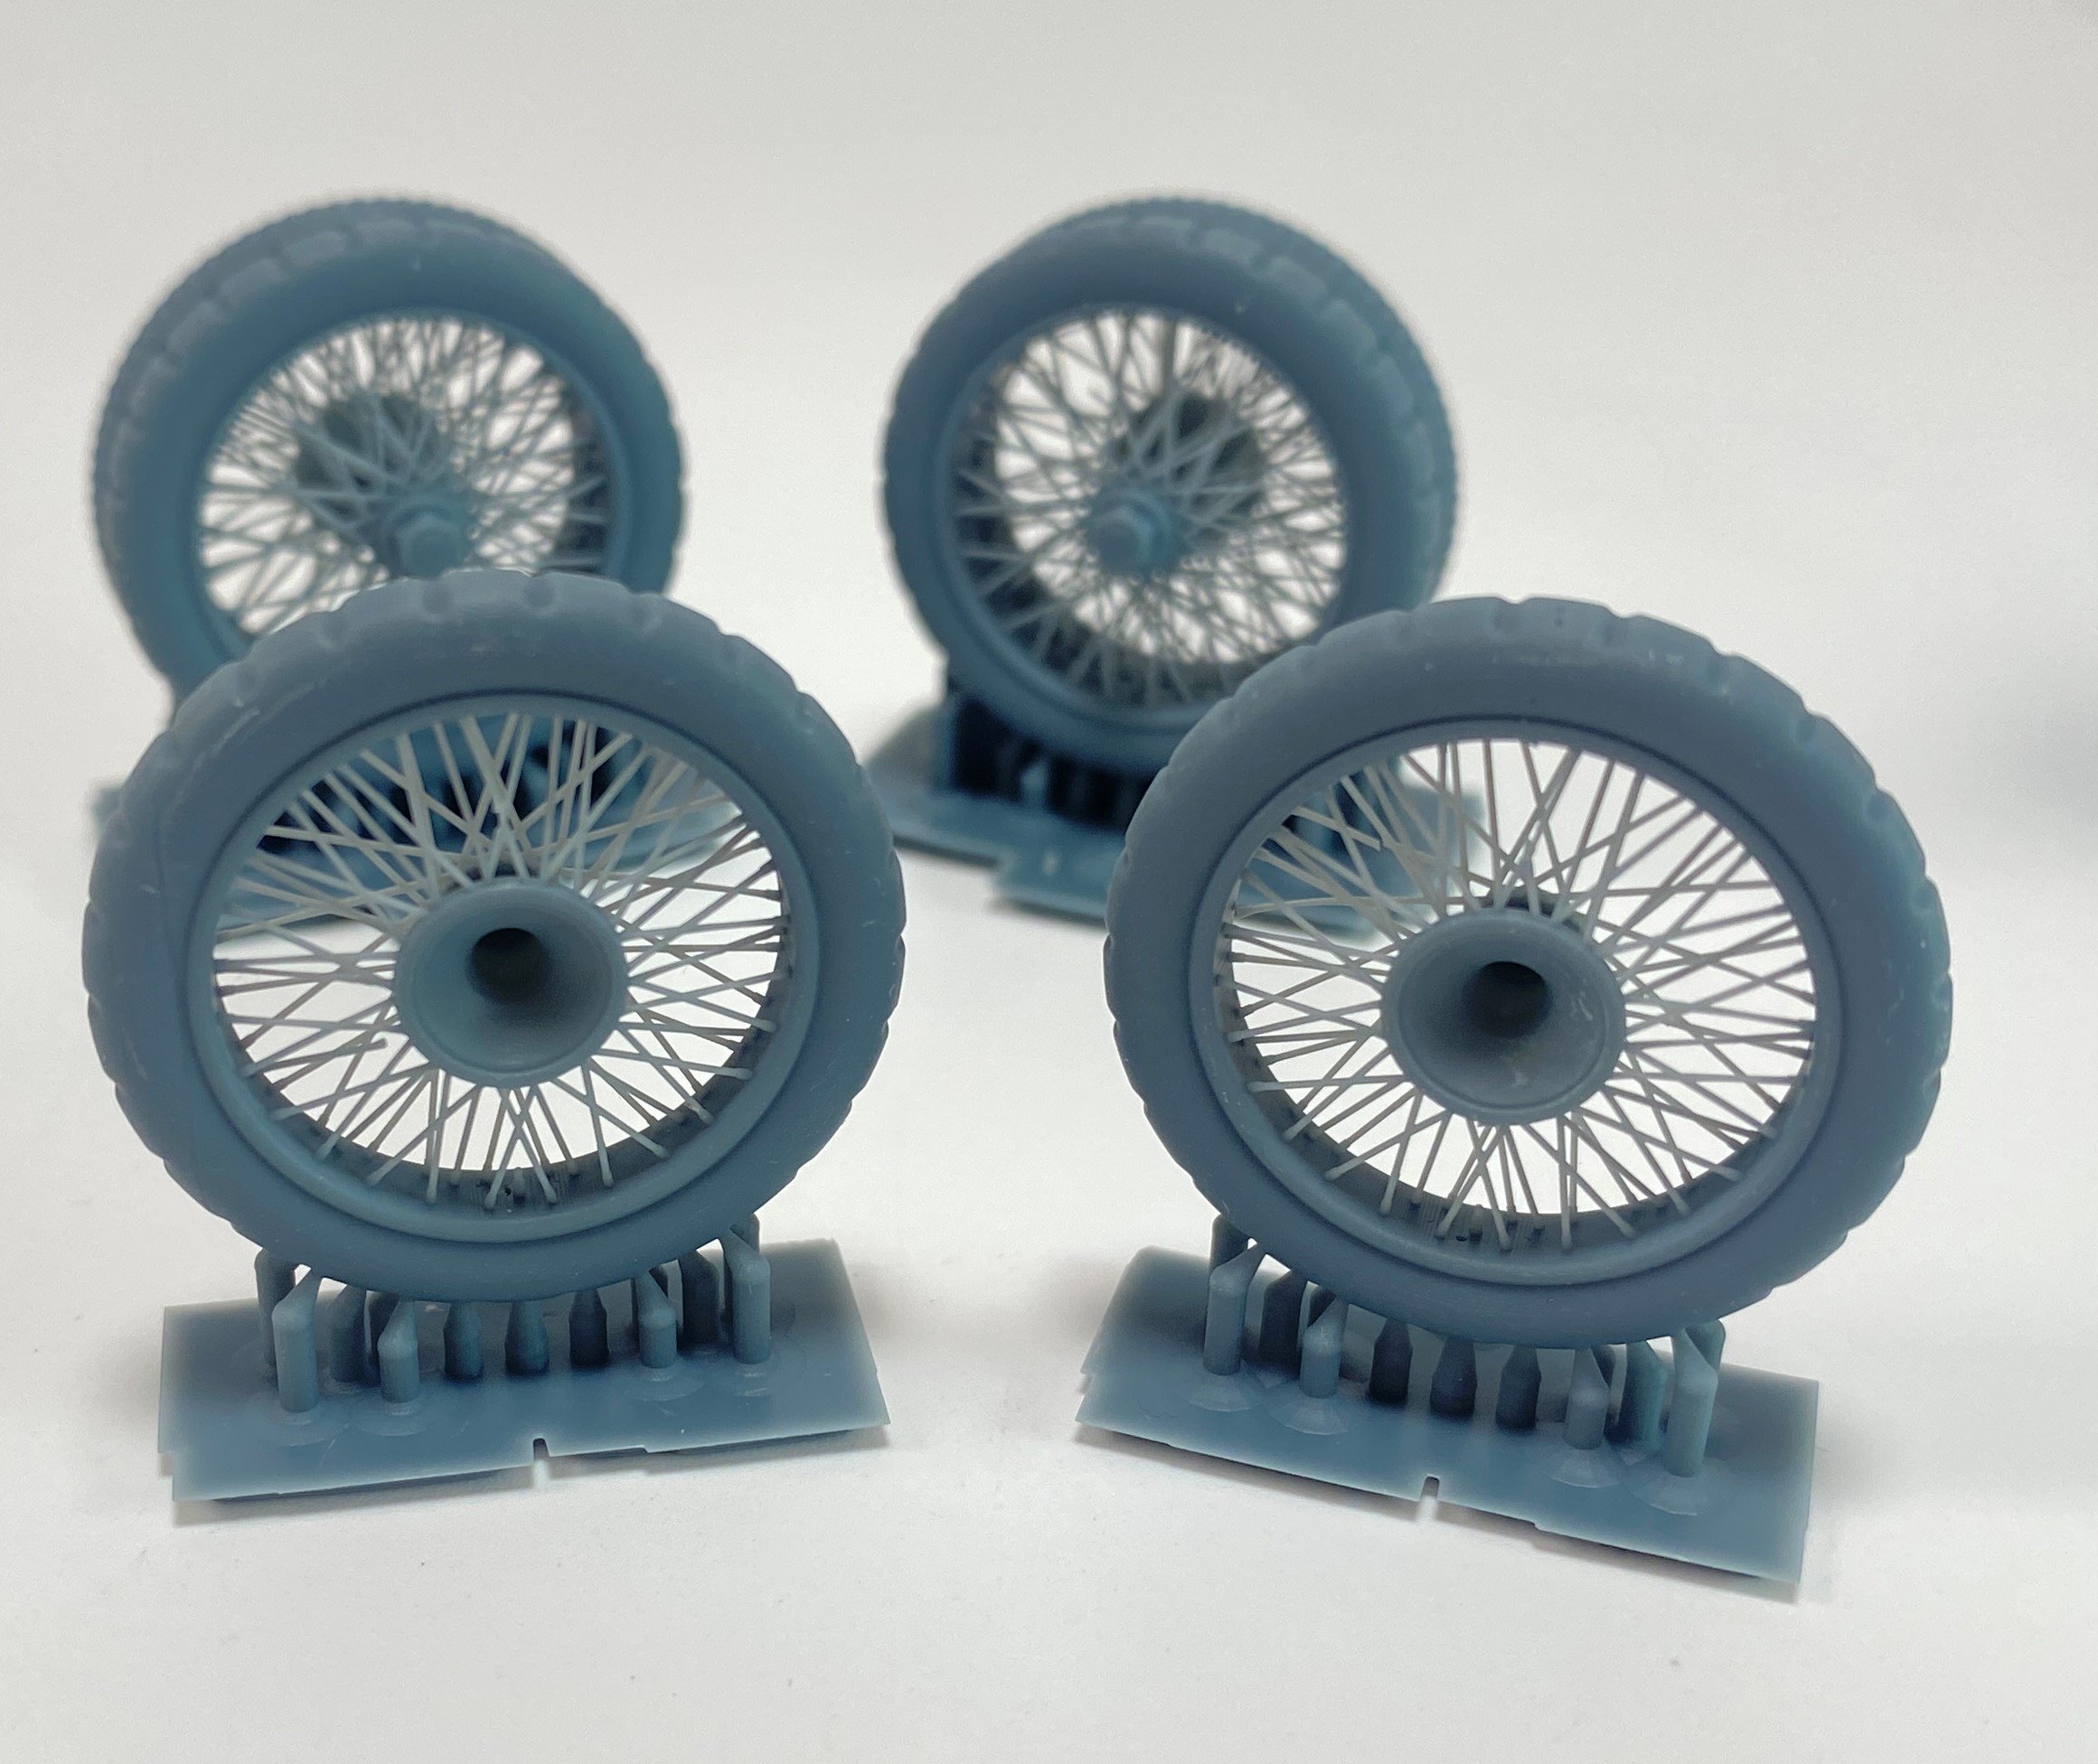
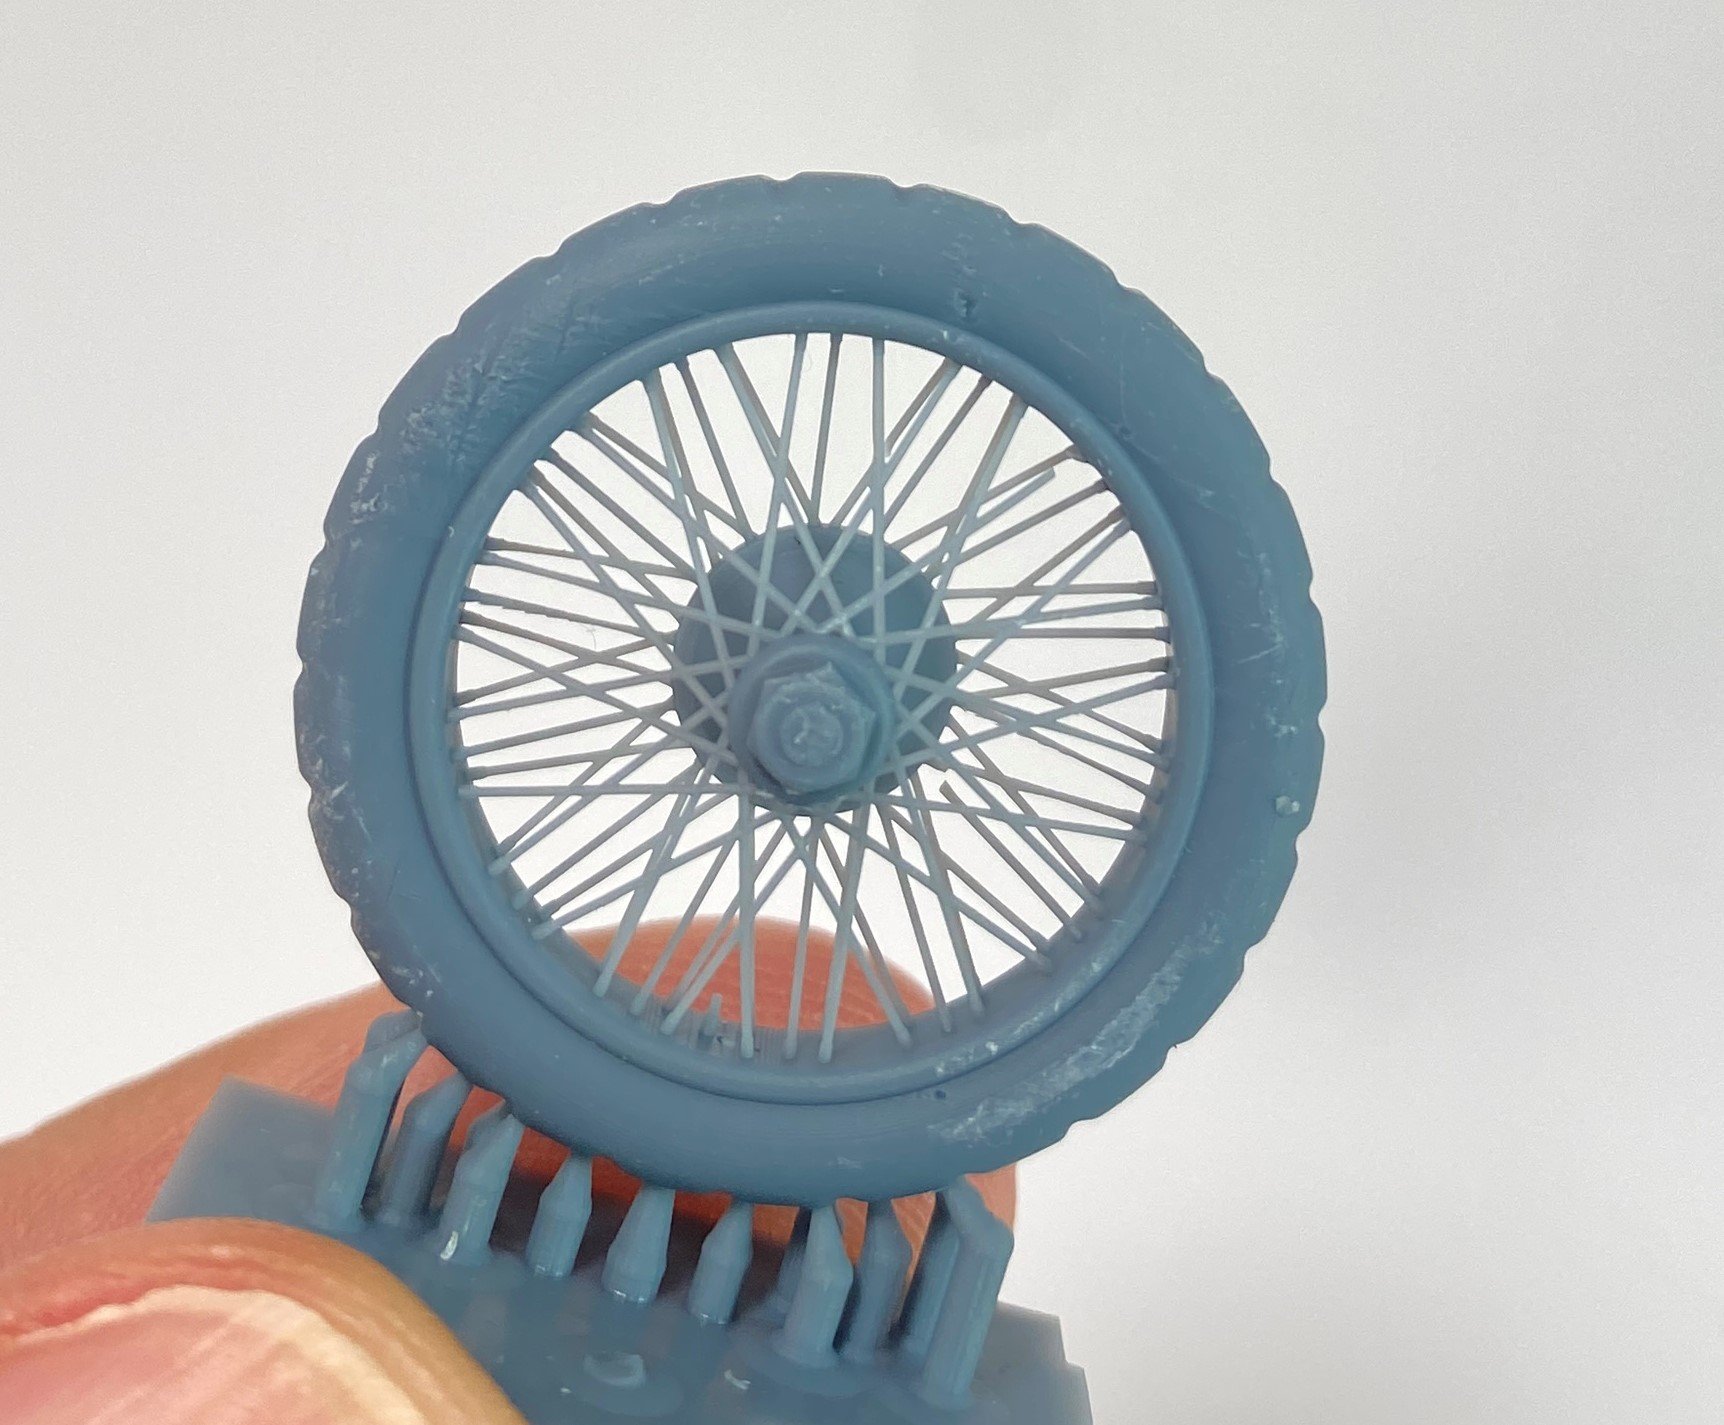
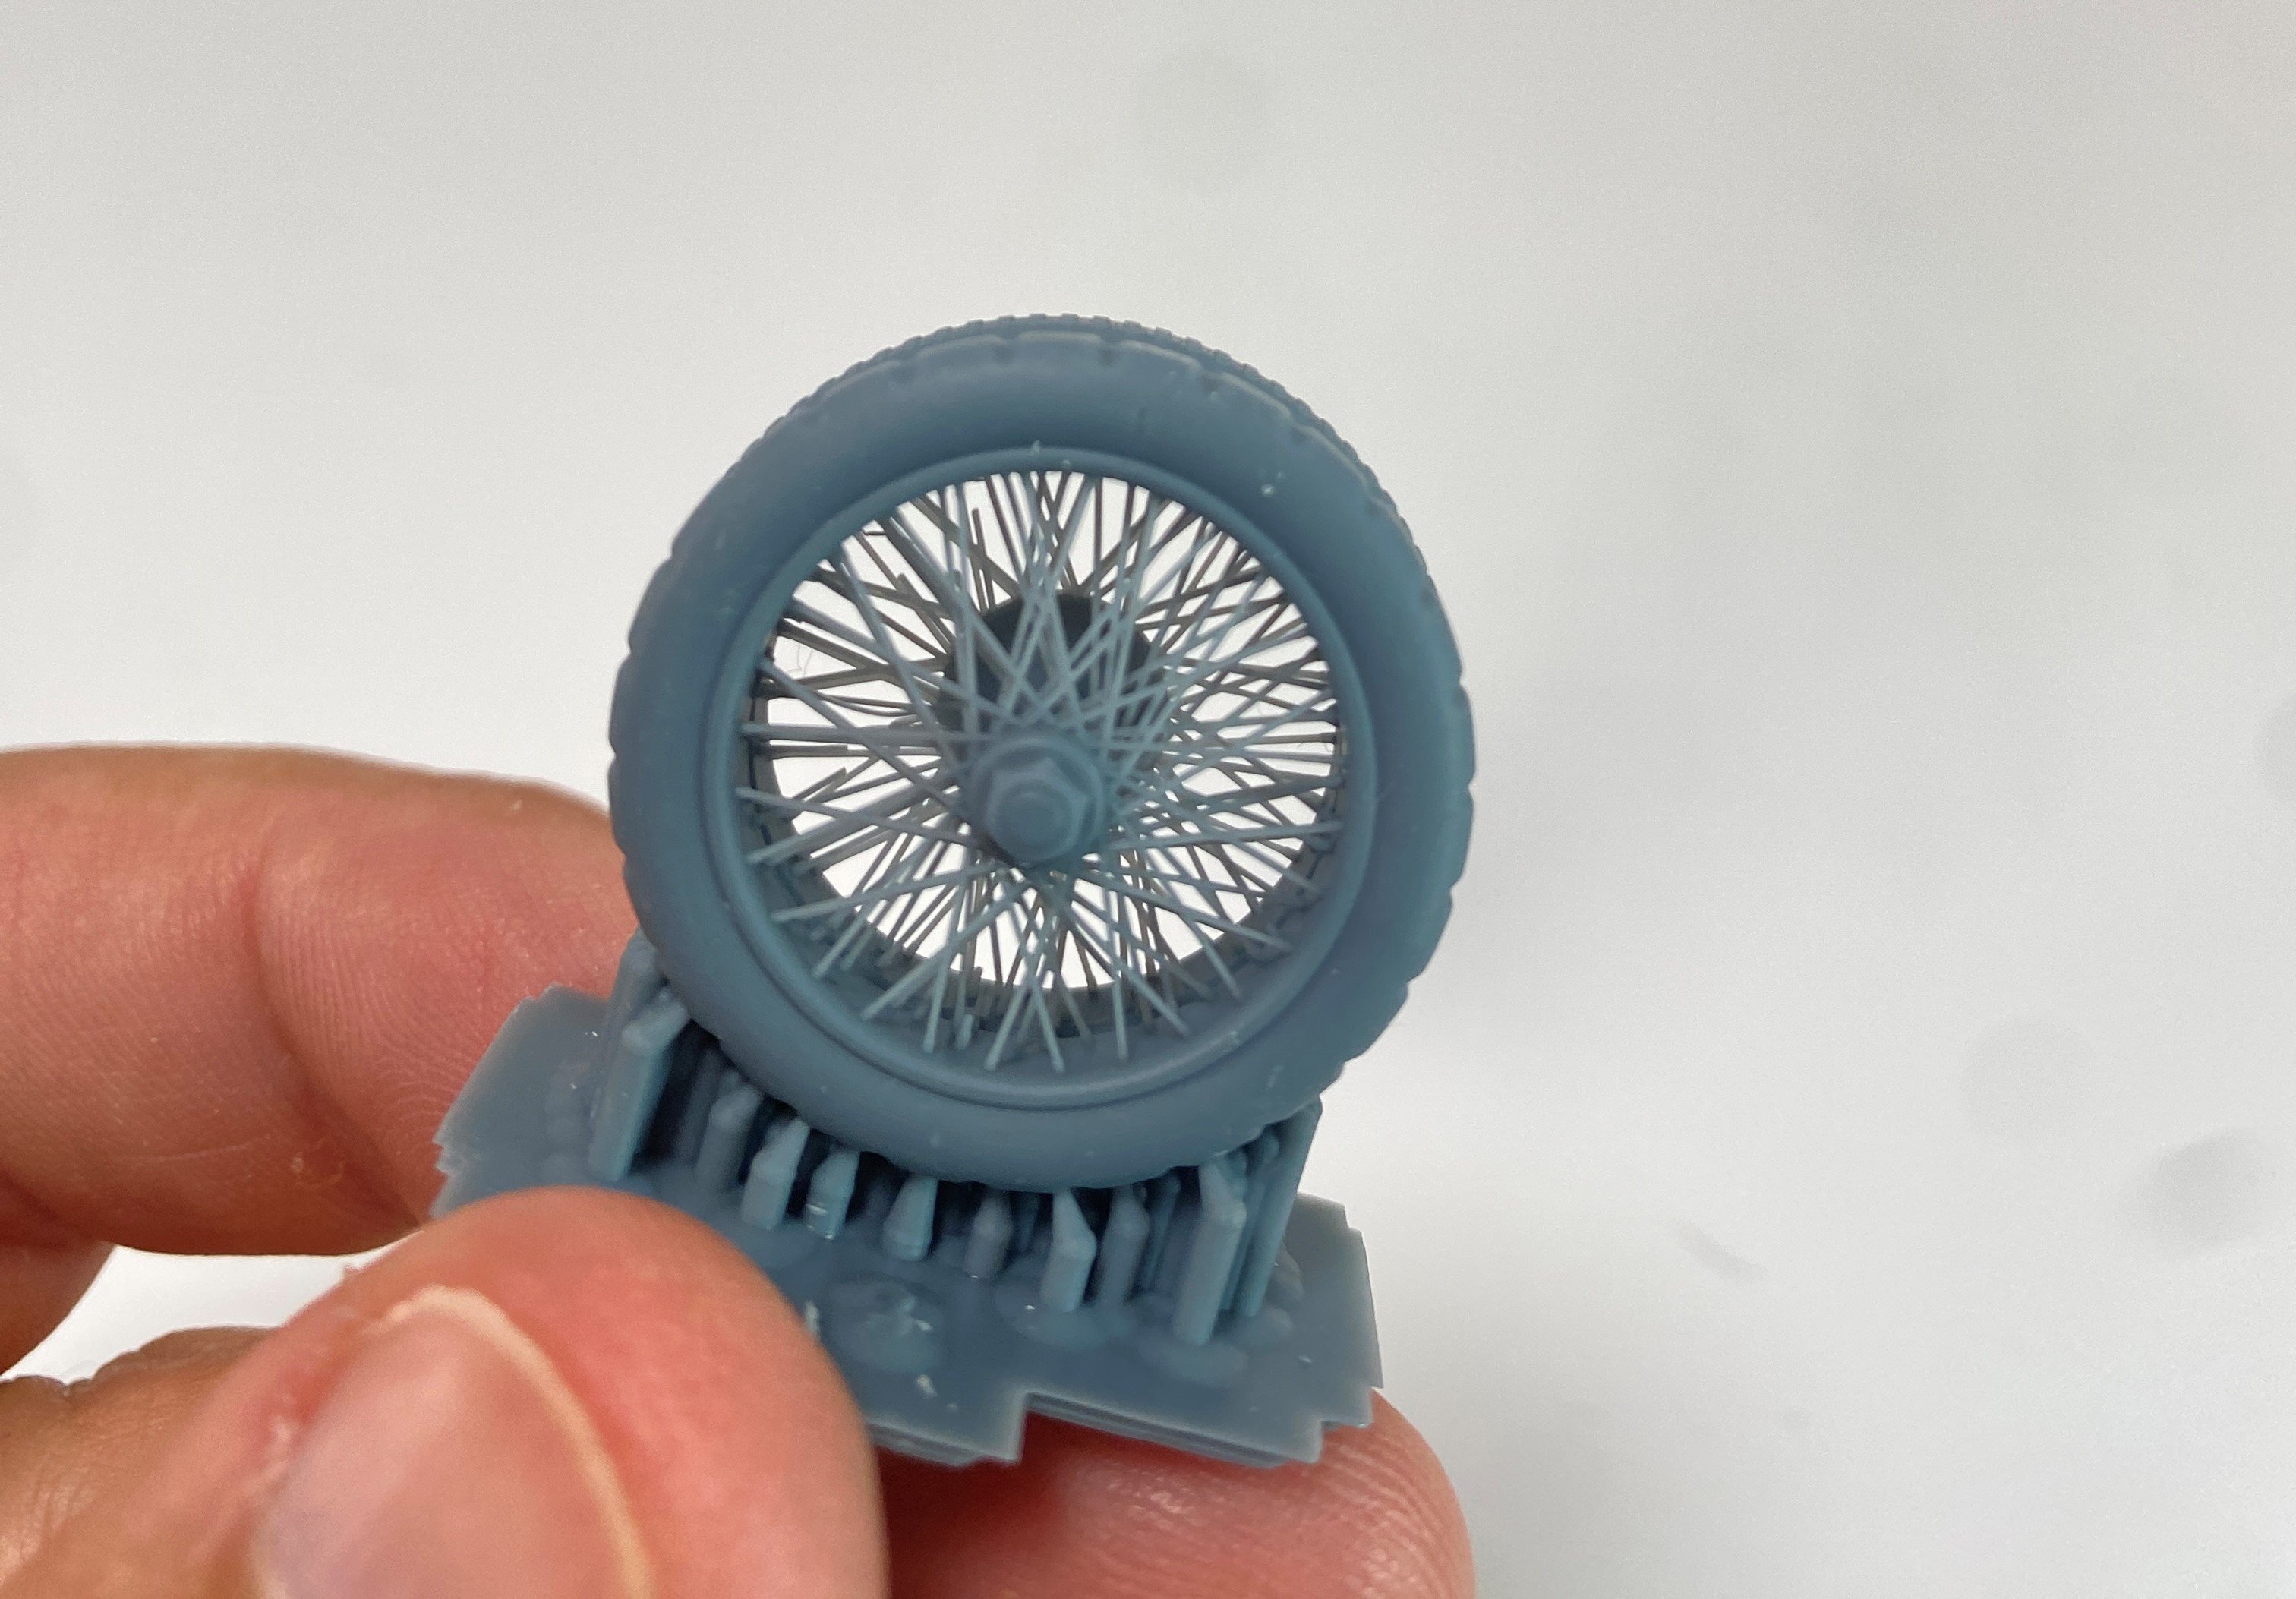
 PLUSMODEL Details Sets for 1:35 Minerva Armoured Car Available from Plusmodel for the prices indicated below on the text These kid of sets from Plusmodel are new for me but a perfect logical step from Plusmodel. So, today we have two detail sets for the Copper State Model 1:35 Minerva Armoured car. Theses sets are both 3D print technology, all of the items very well packaged, with the all the parts coming inside of a bubble bag. The first one is Wheels Set (4 resin 3d pieces) Catalogue n.º DP3014 Price tag: 16,40€ – directly from Plusmodel. Minerva wheels are spoked wheels, and in the kit it is possible to see the limitation of plastic injection, as the spokes of the wheels are clearly out of scale. Before 3D printing, this type of spoke wheels was only possible to improve through real wire and some of the wheels that were handmade reached quite high values. Now with 3D printing, it is possible, with a print with great precision, to obtain these wheels, which are a masterpiece of detail and precision with the spokes of the wheels with thickness to scale (I dare to say that they must have 1mm in diameter or even less). The tires have the rubber detail perfectly defined and clear. A very simple addition (change the kit wheels) at a very reasonable cost and with clearly superior detail. * Accessories (10 resin 3D prints pieces) Catalogue n.º DP3017 Price tag: 11,13€ directly from Plusmodel. The second set gives a range of options that not all are specifically for detailing the vehicle in replacement of original parts, but new parts. So you get 22 individual parts and 80 empty cartridges. Of these 22 pieces, 12 are cartridge belts, an acetylene generator, 3 ammunition boxes (two close, one open), dashboard, acetylene generator and 80 empty cartridges. Zero instructions, only a small picture.… I was expecting more but I believe that the Minerva Instructions will help were to put part of this detail set, namely the acetylene generator because the dashboard will be easy to get it in the right place. Conclusion These two set will force me to buy the CSM Minerva because these pieces really deserved to be build and be include in the 1:35 Minerva. Despite the absence of instruction on the second set (I believe that the small picture show the generator, on the left side of the armour car, and the dashboard is easy to know where), the quality of both sets is of the highest level. The wheels are one of the best things I saw in 3D. Top noch Plusmodel, WELL DONE! Very Highly recommended With my sincere thanks to Plusmodel. To purchase directly, click this link. Francisco Guedes


-
Plusmodel 1:35 Diorama Accessories
Fran posted a topic in LSM-Related Reviews (military figures etc)
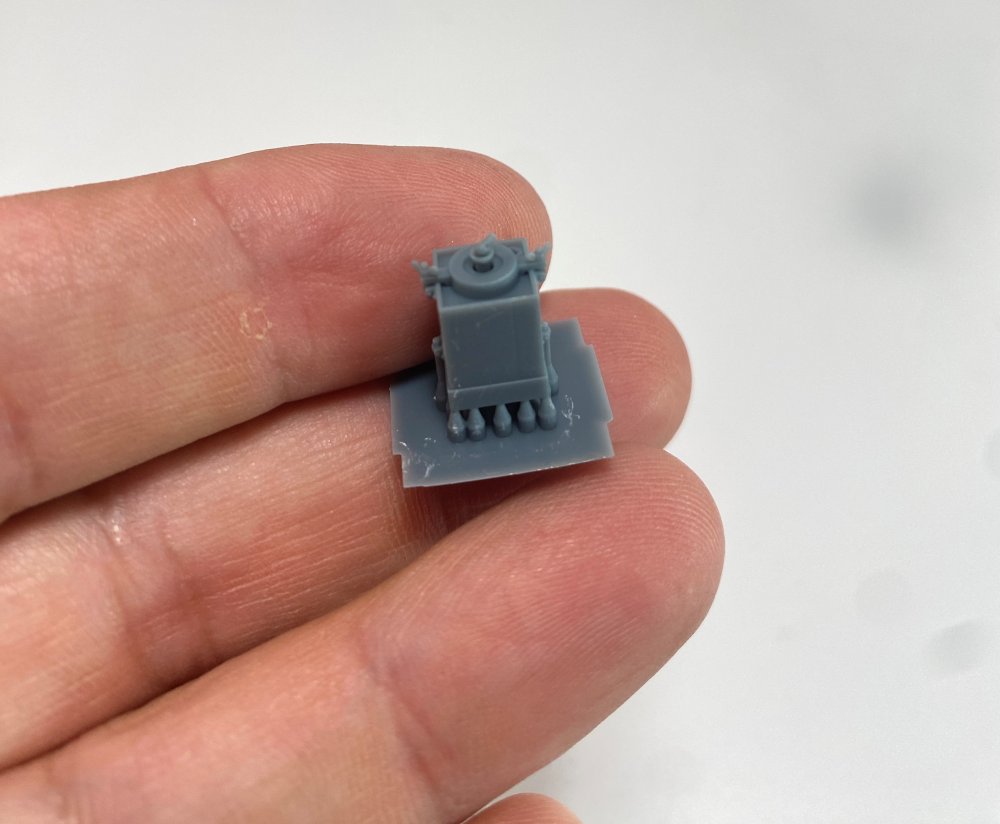
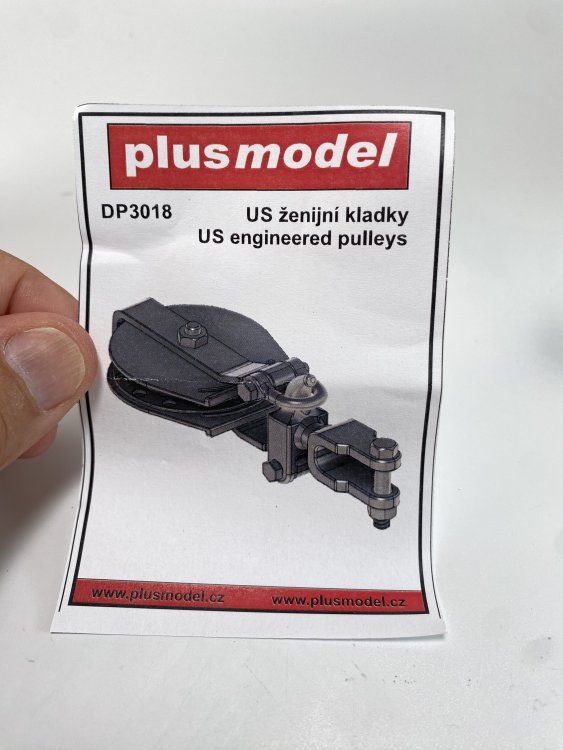
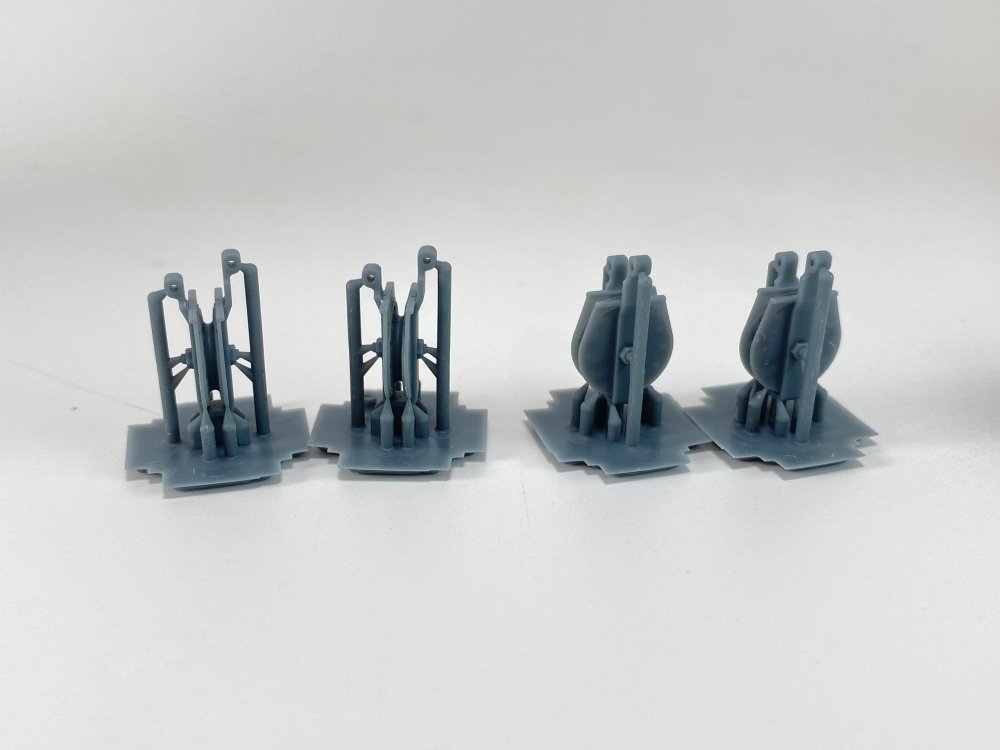
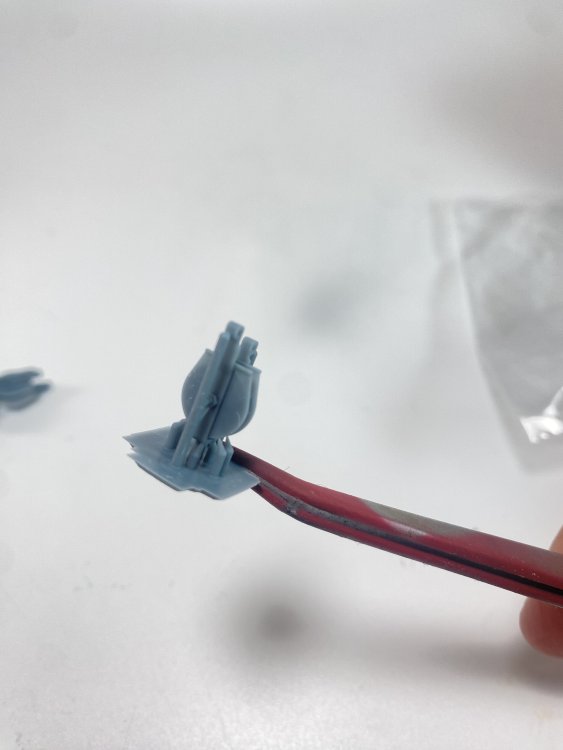
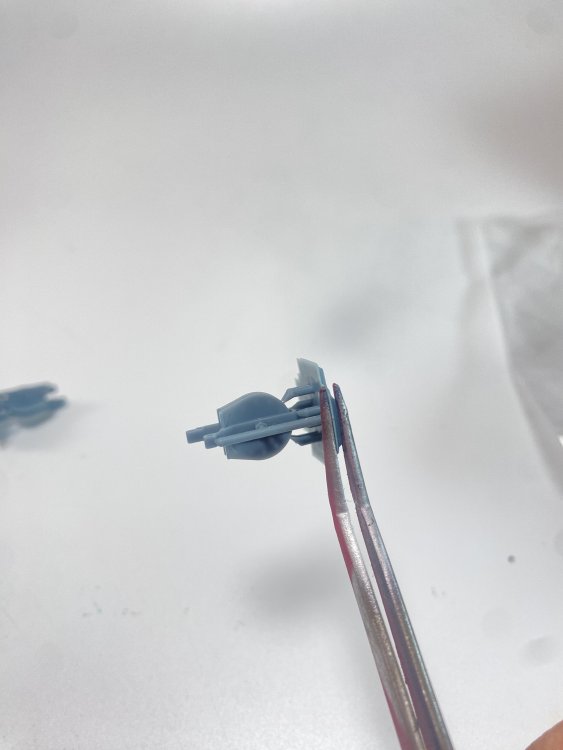
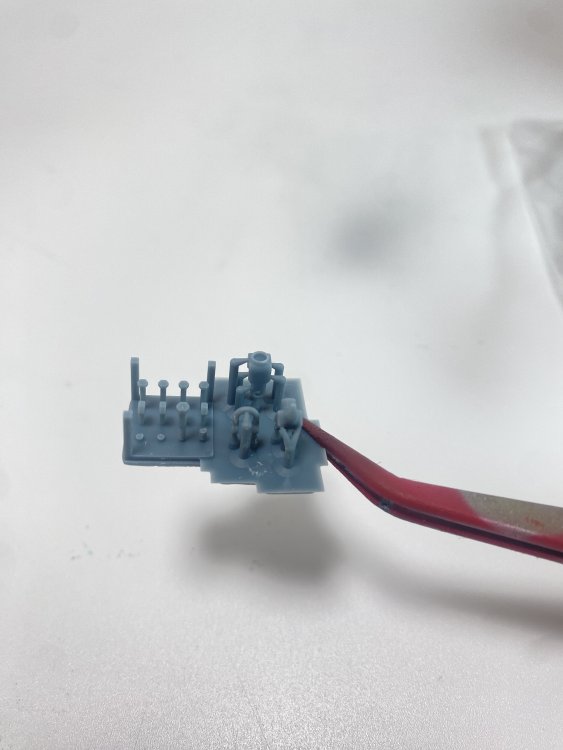
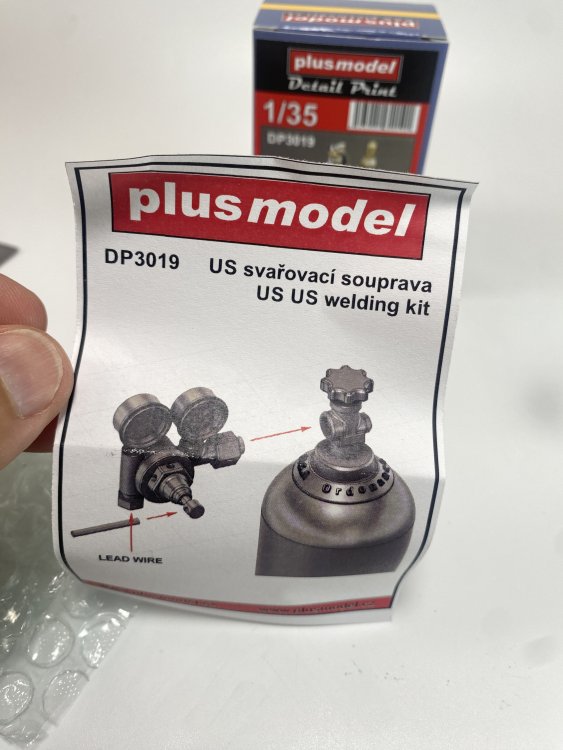
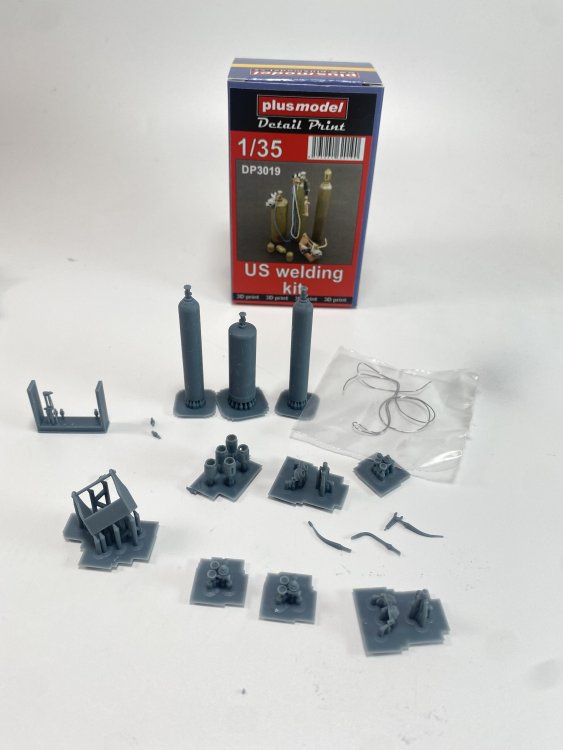
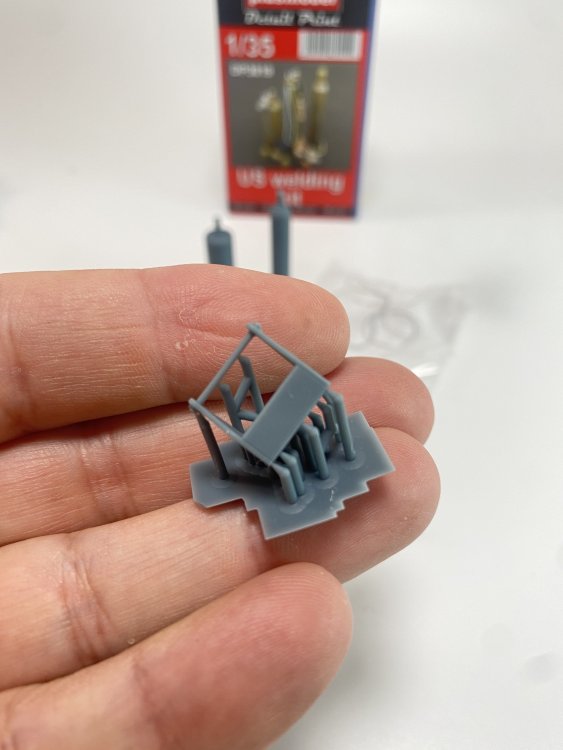
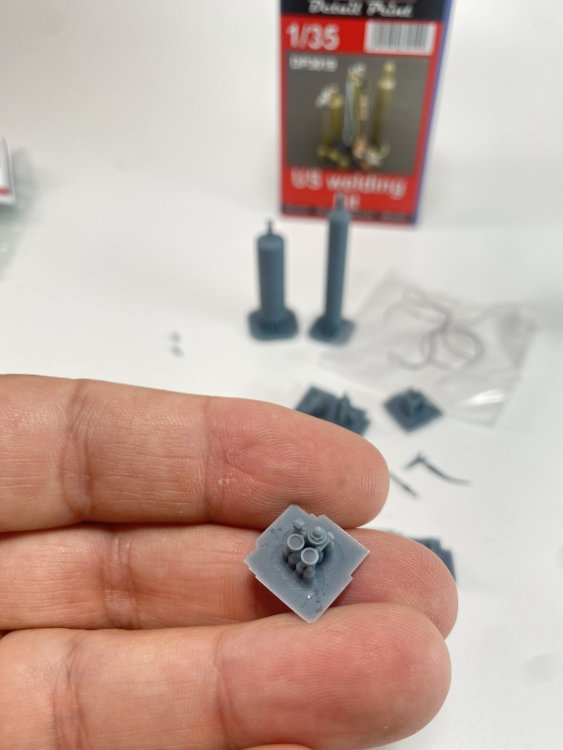
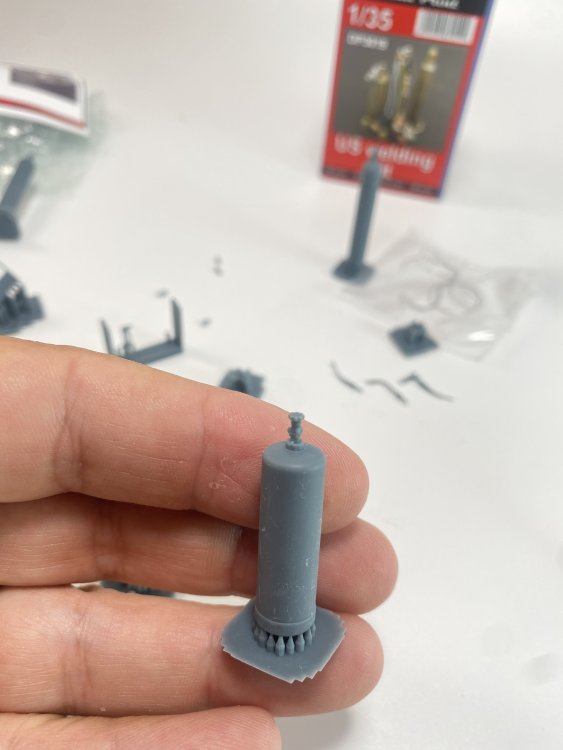
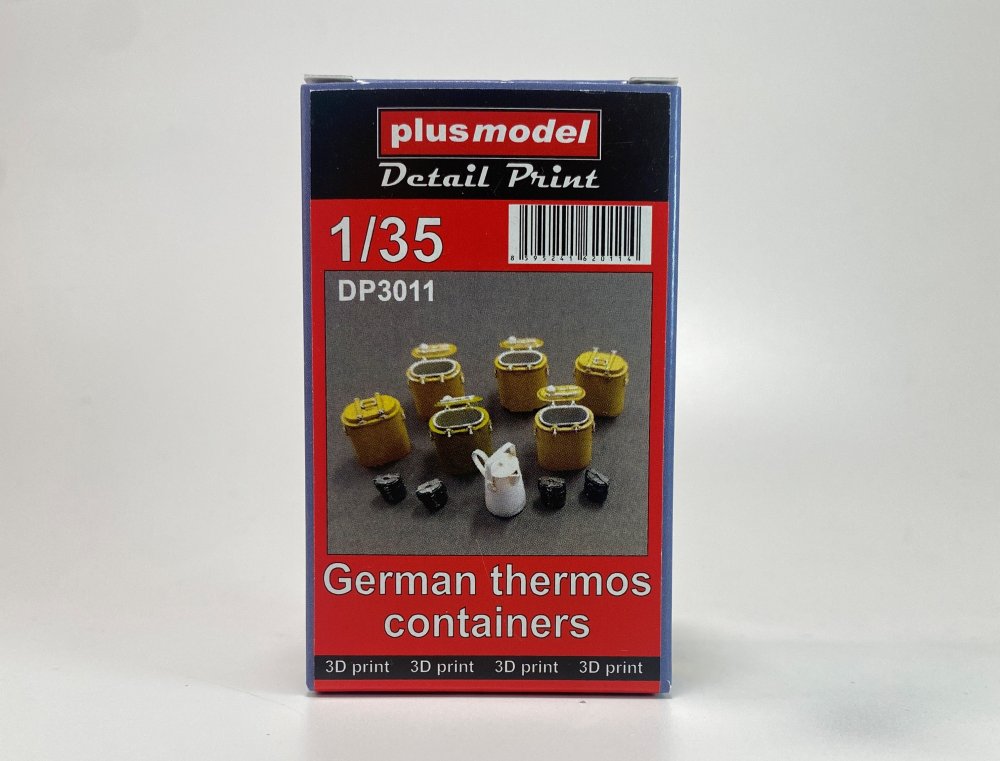
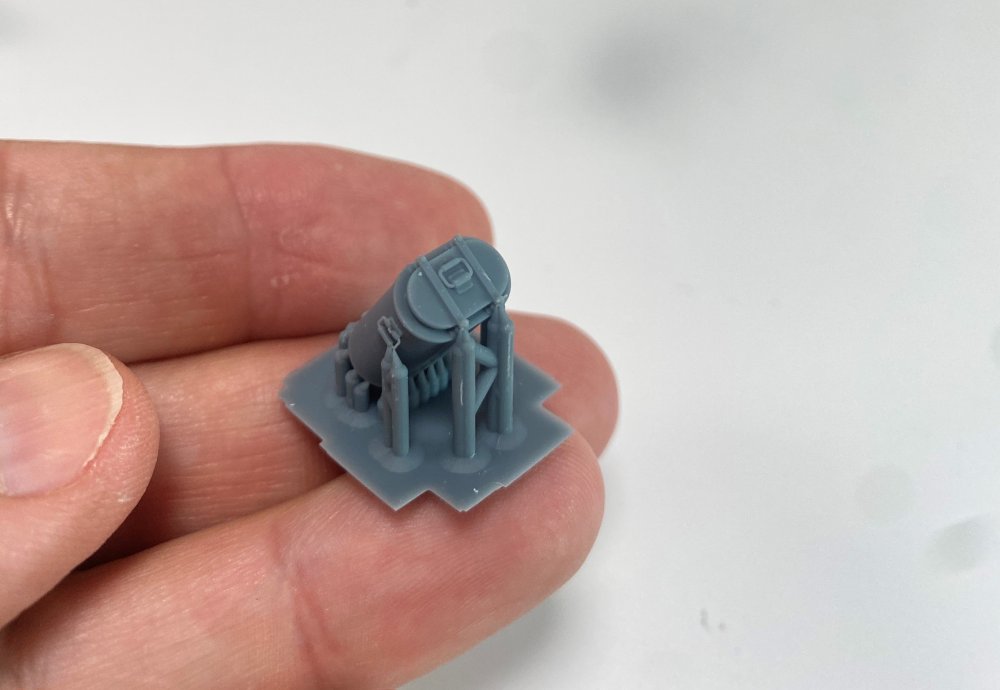
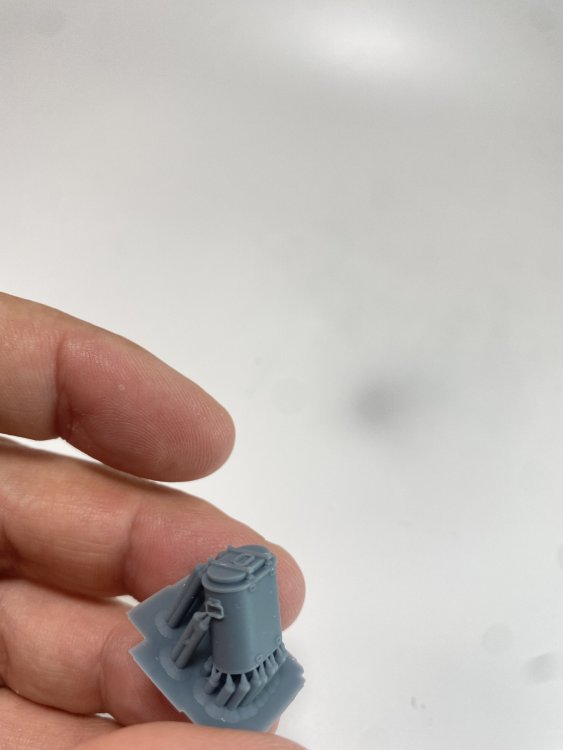
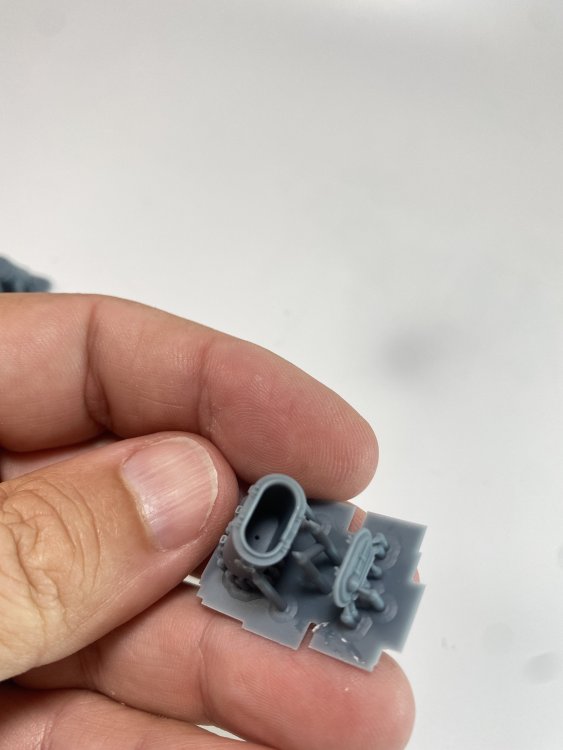
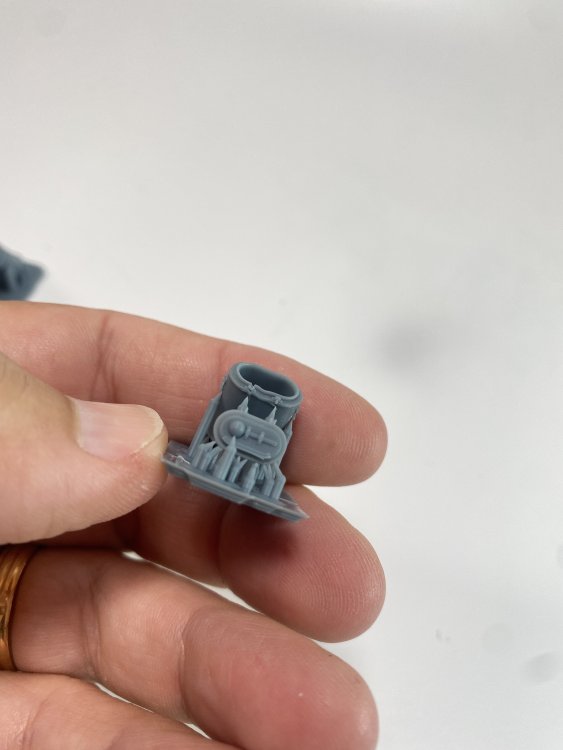
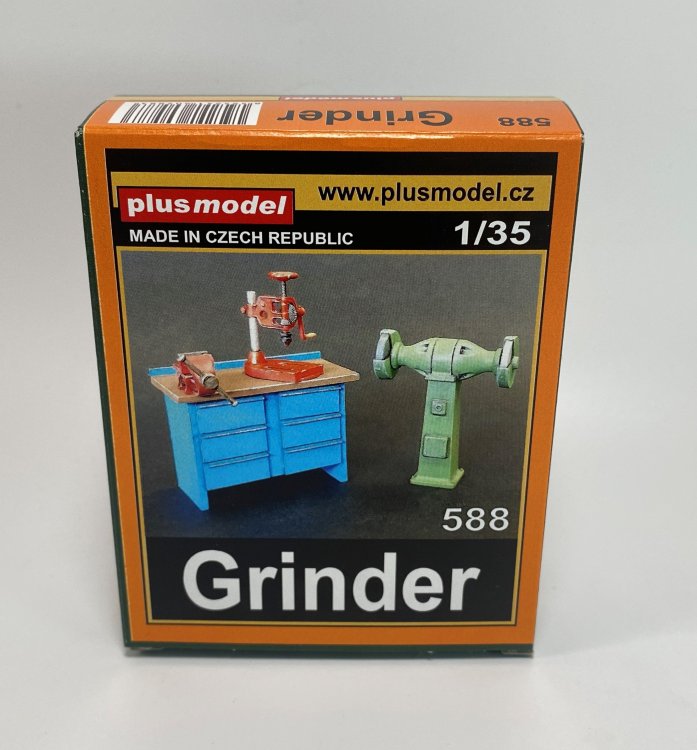
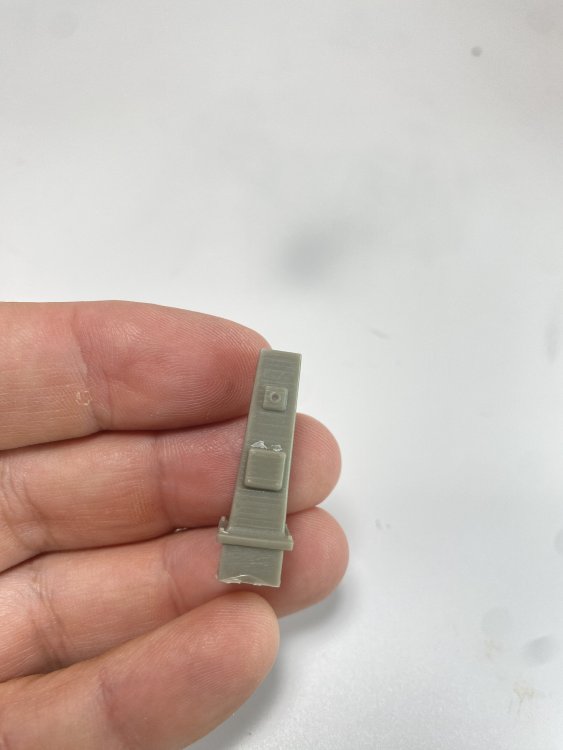
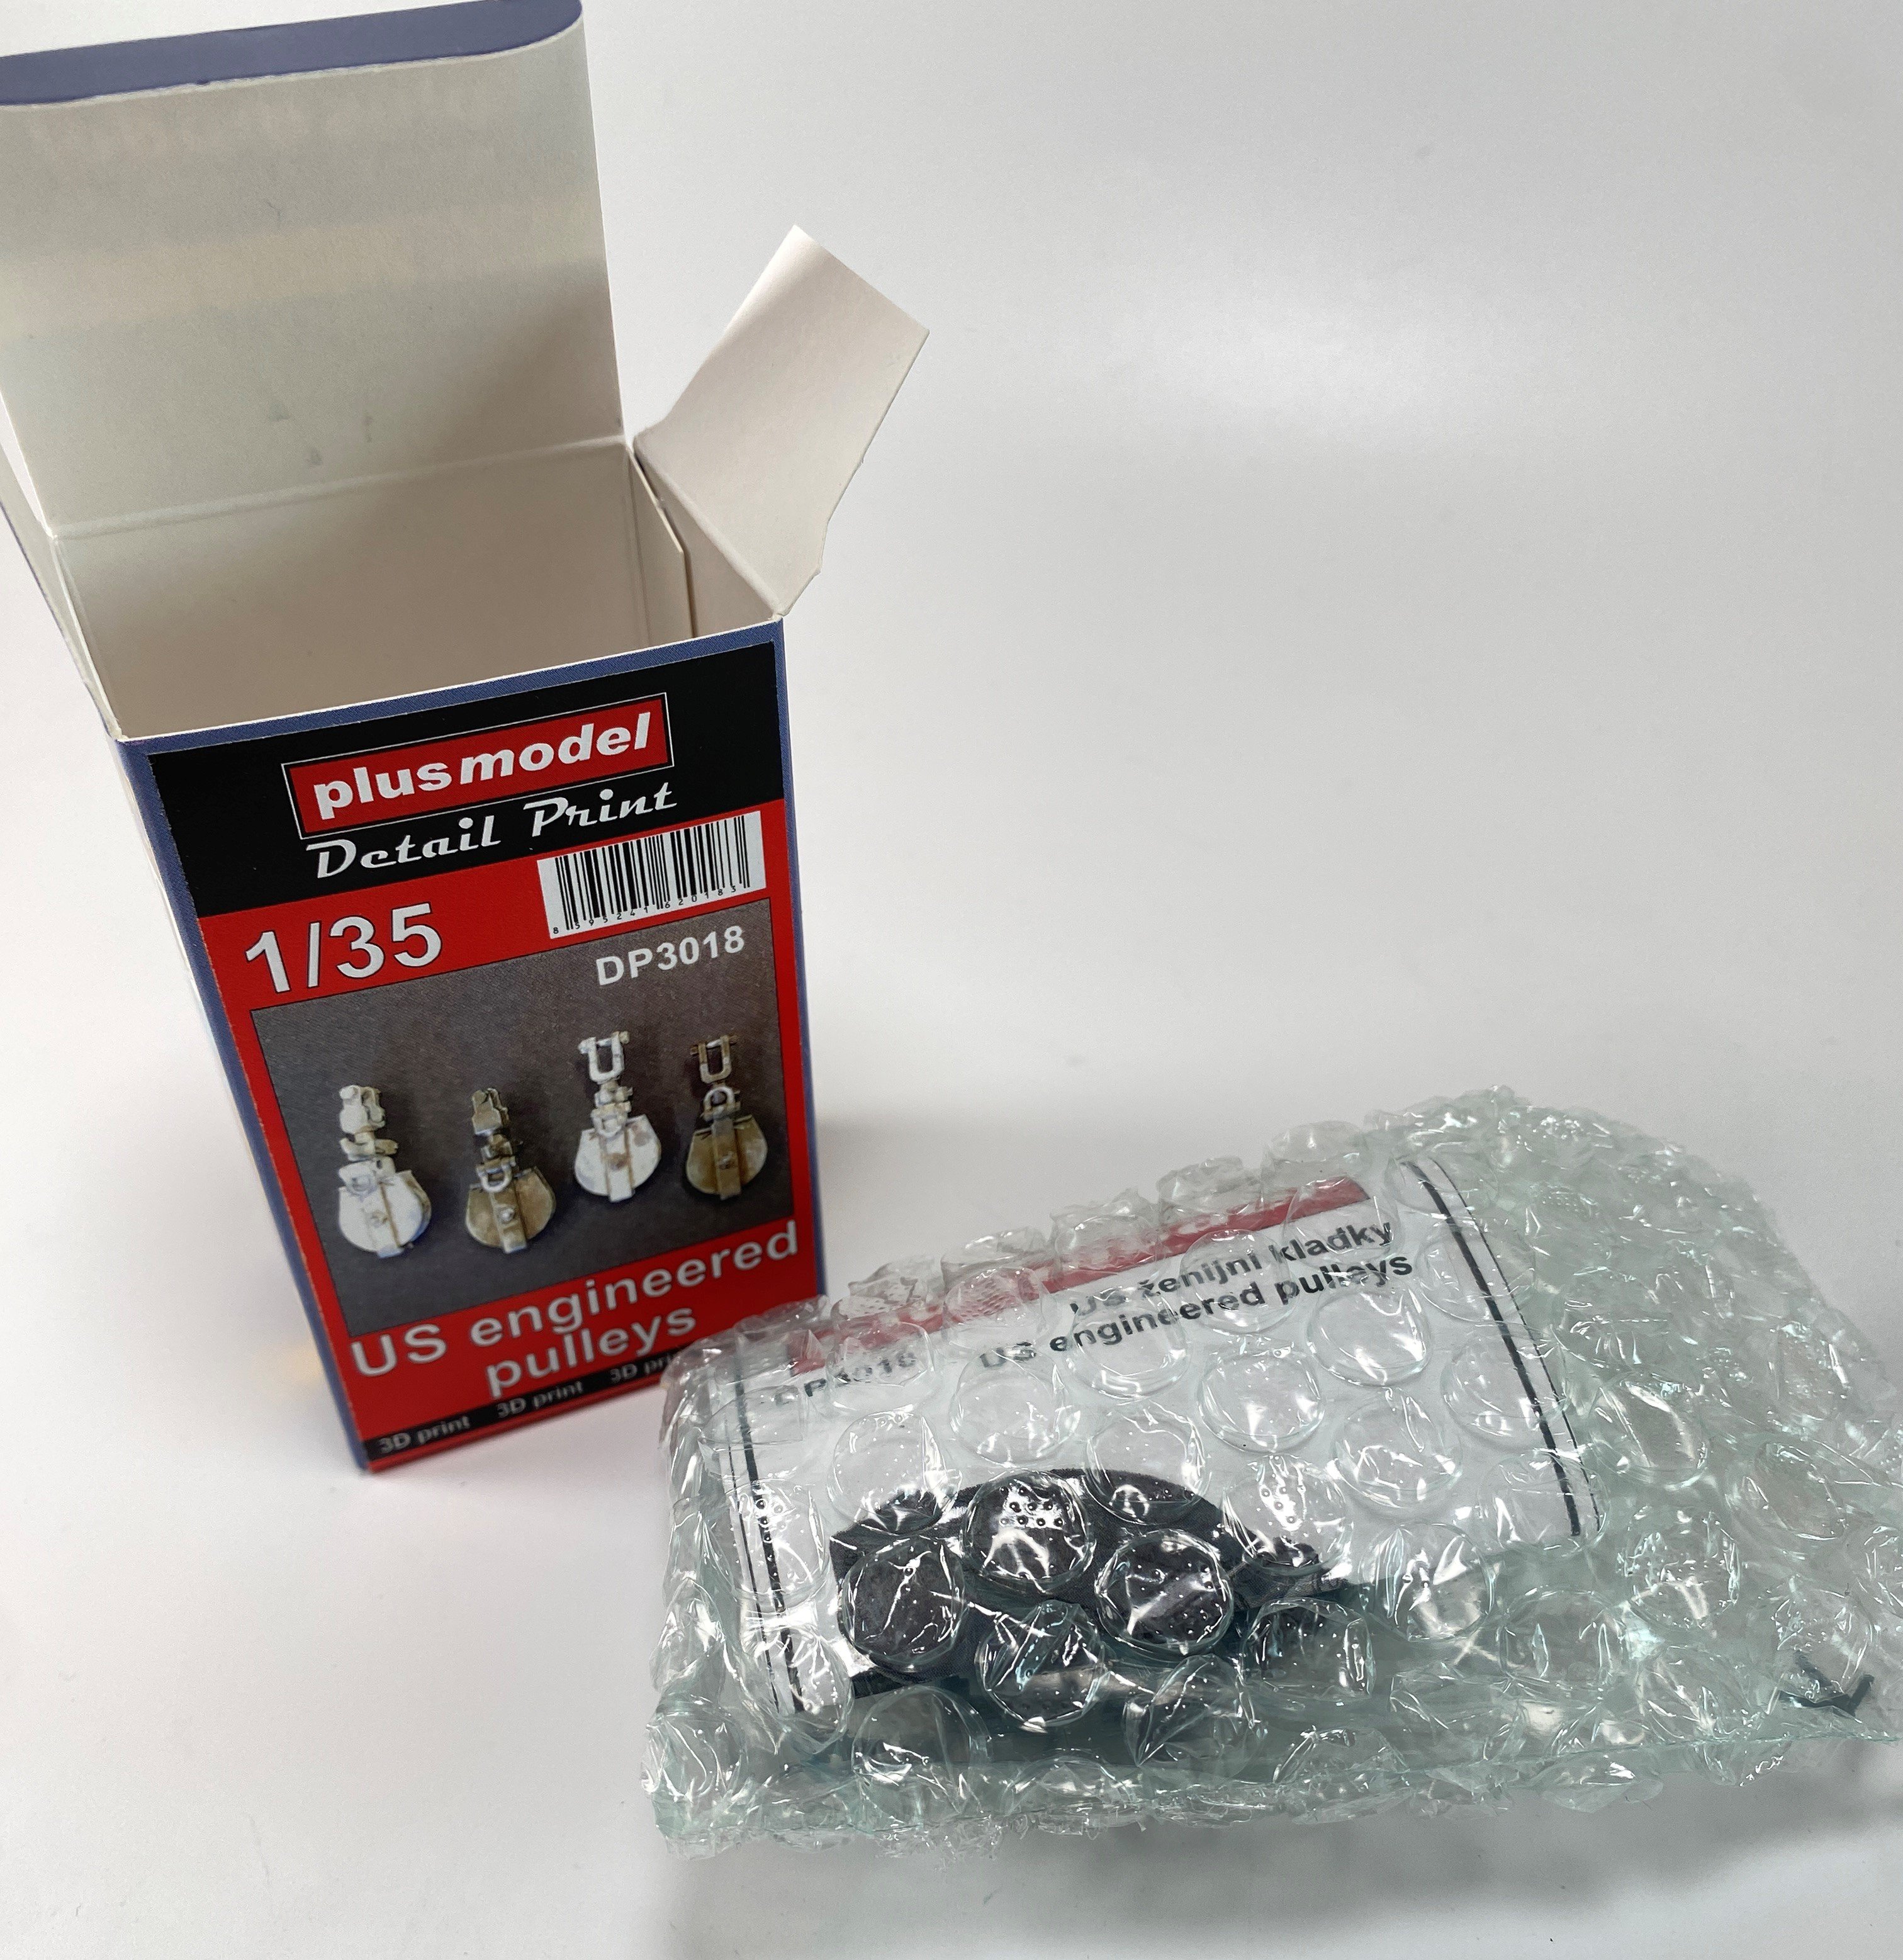
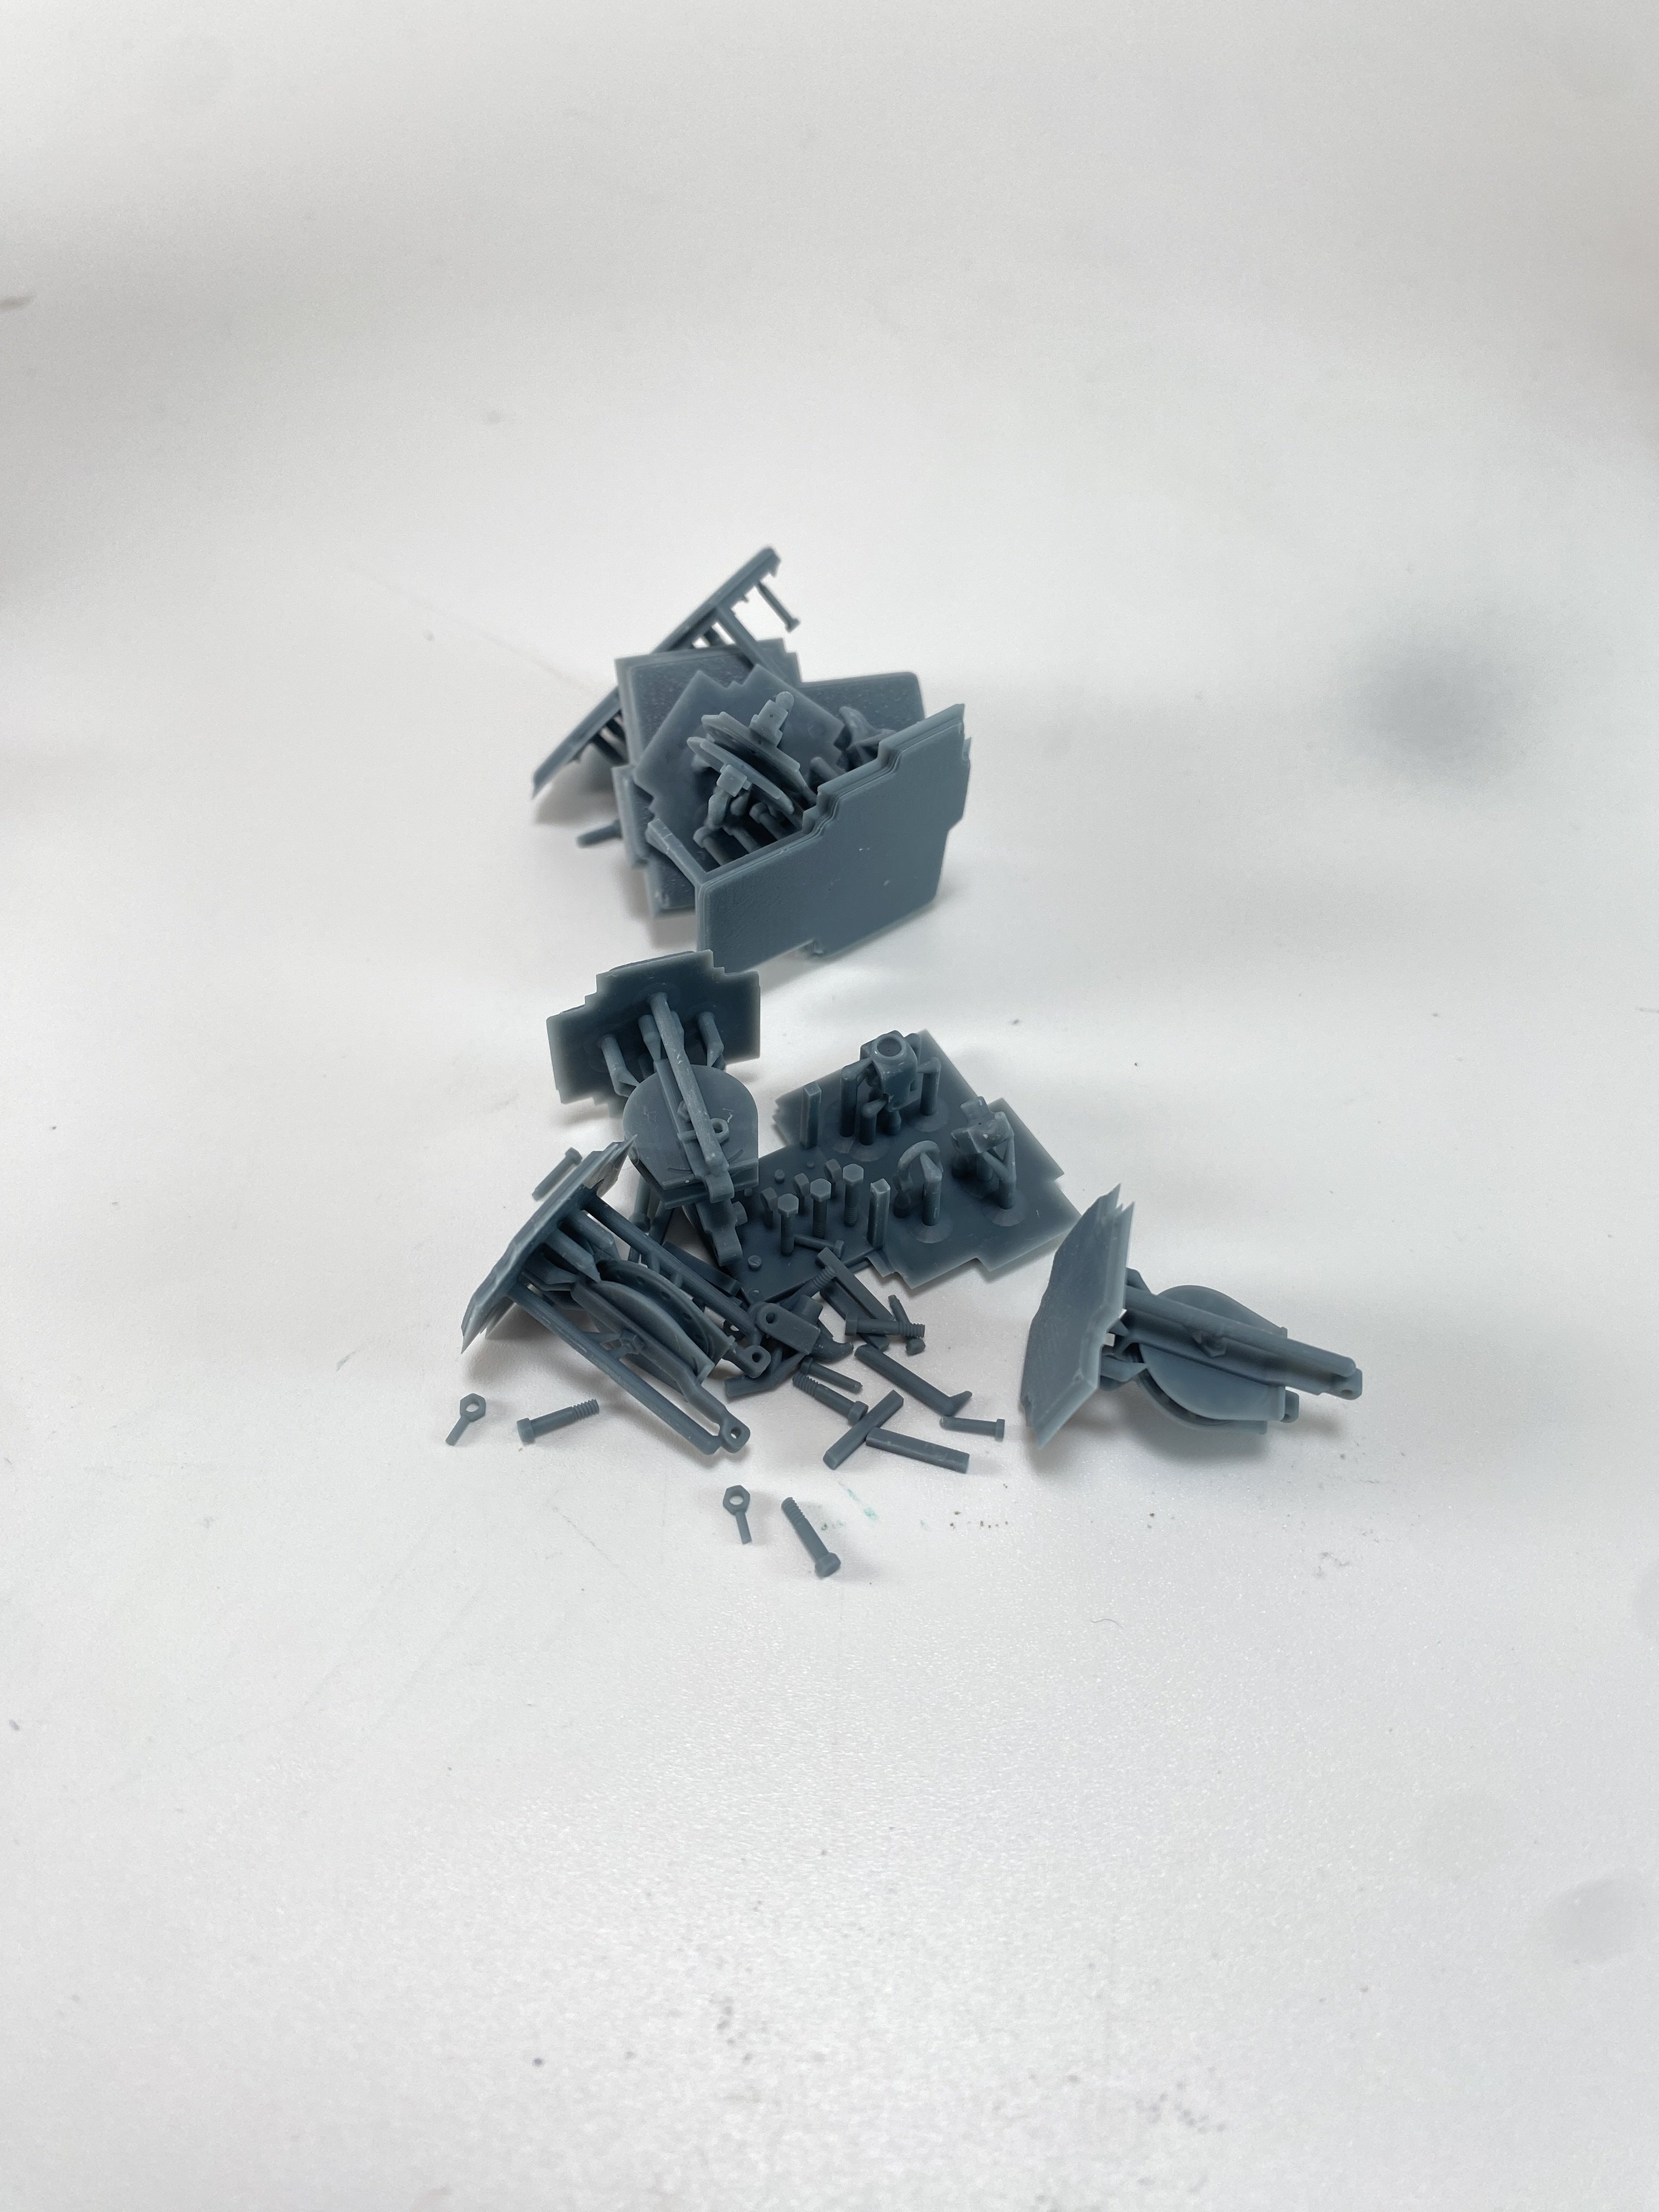
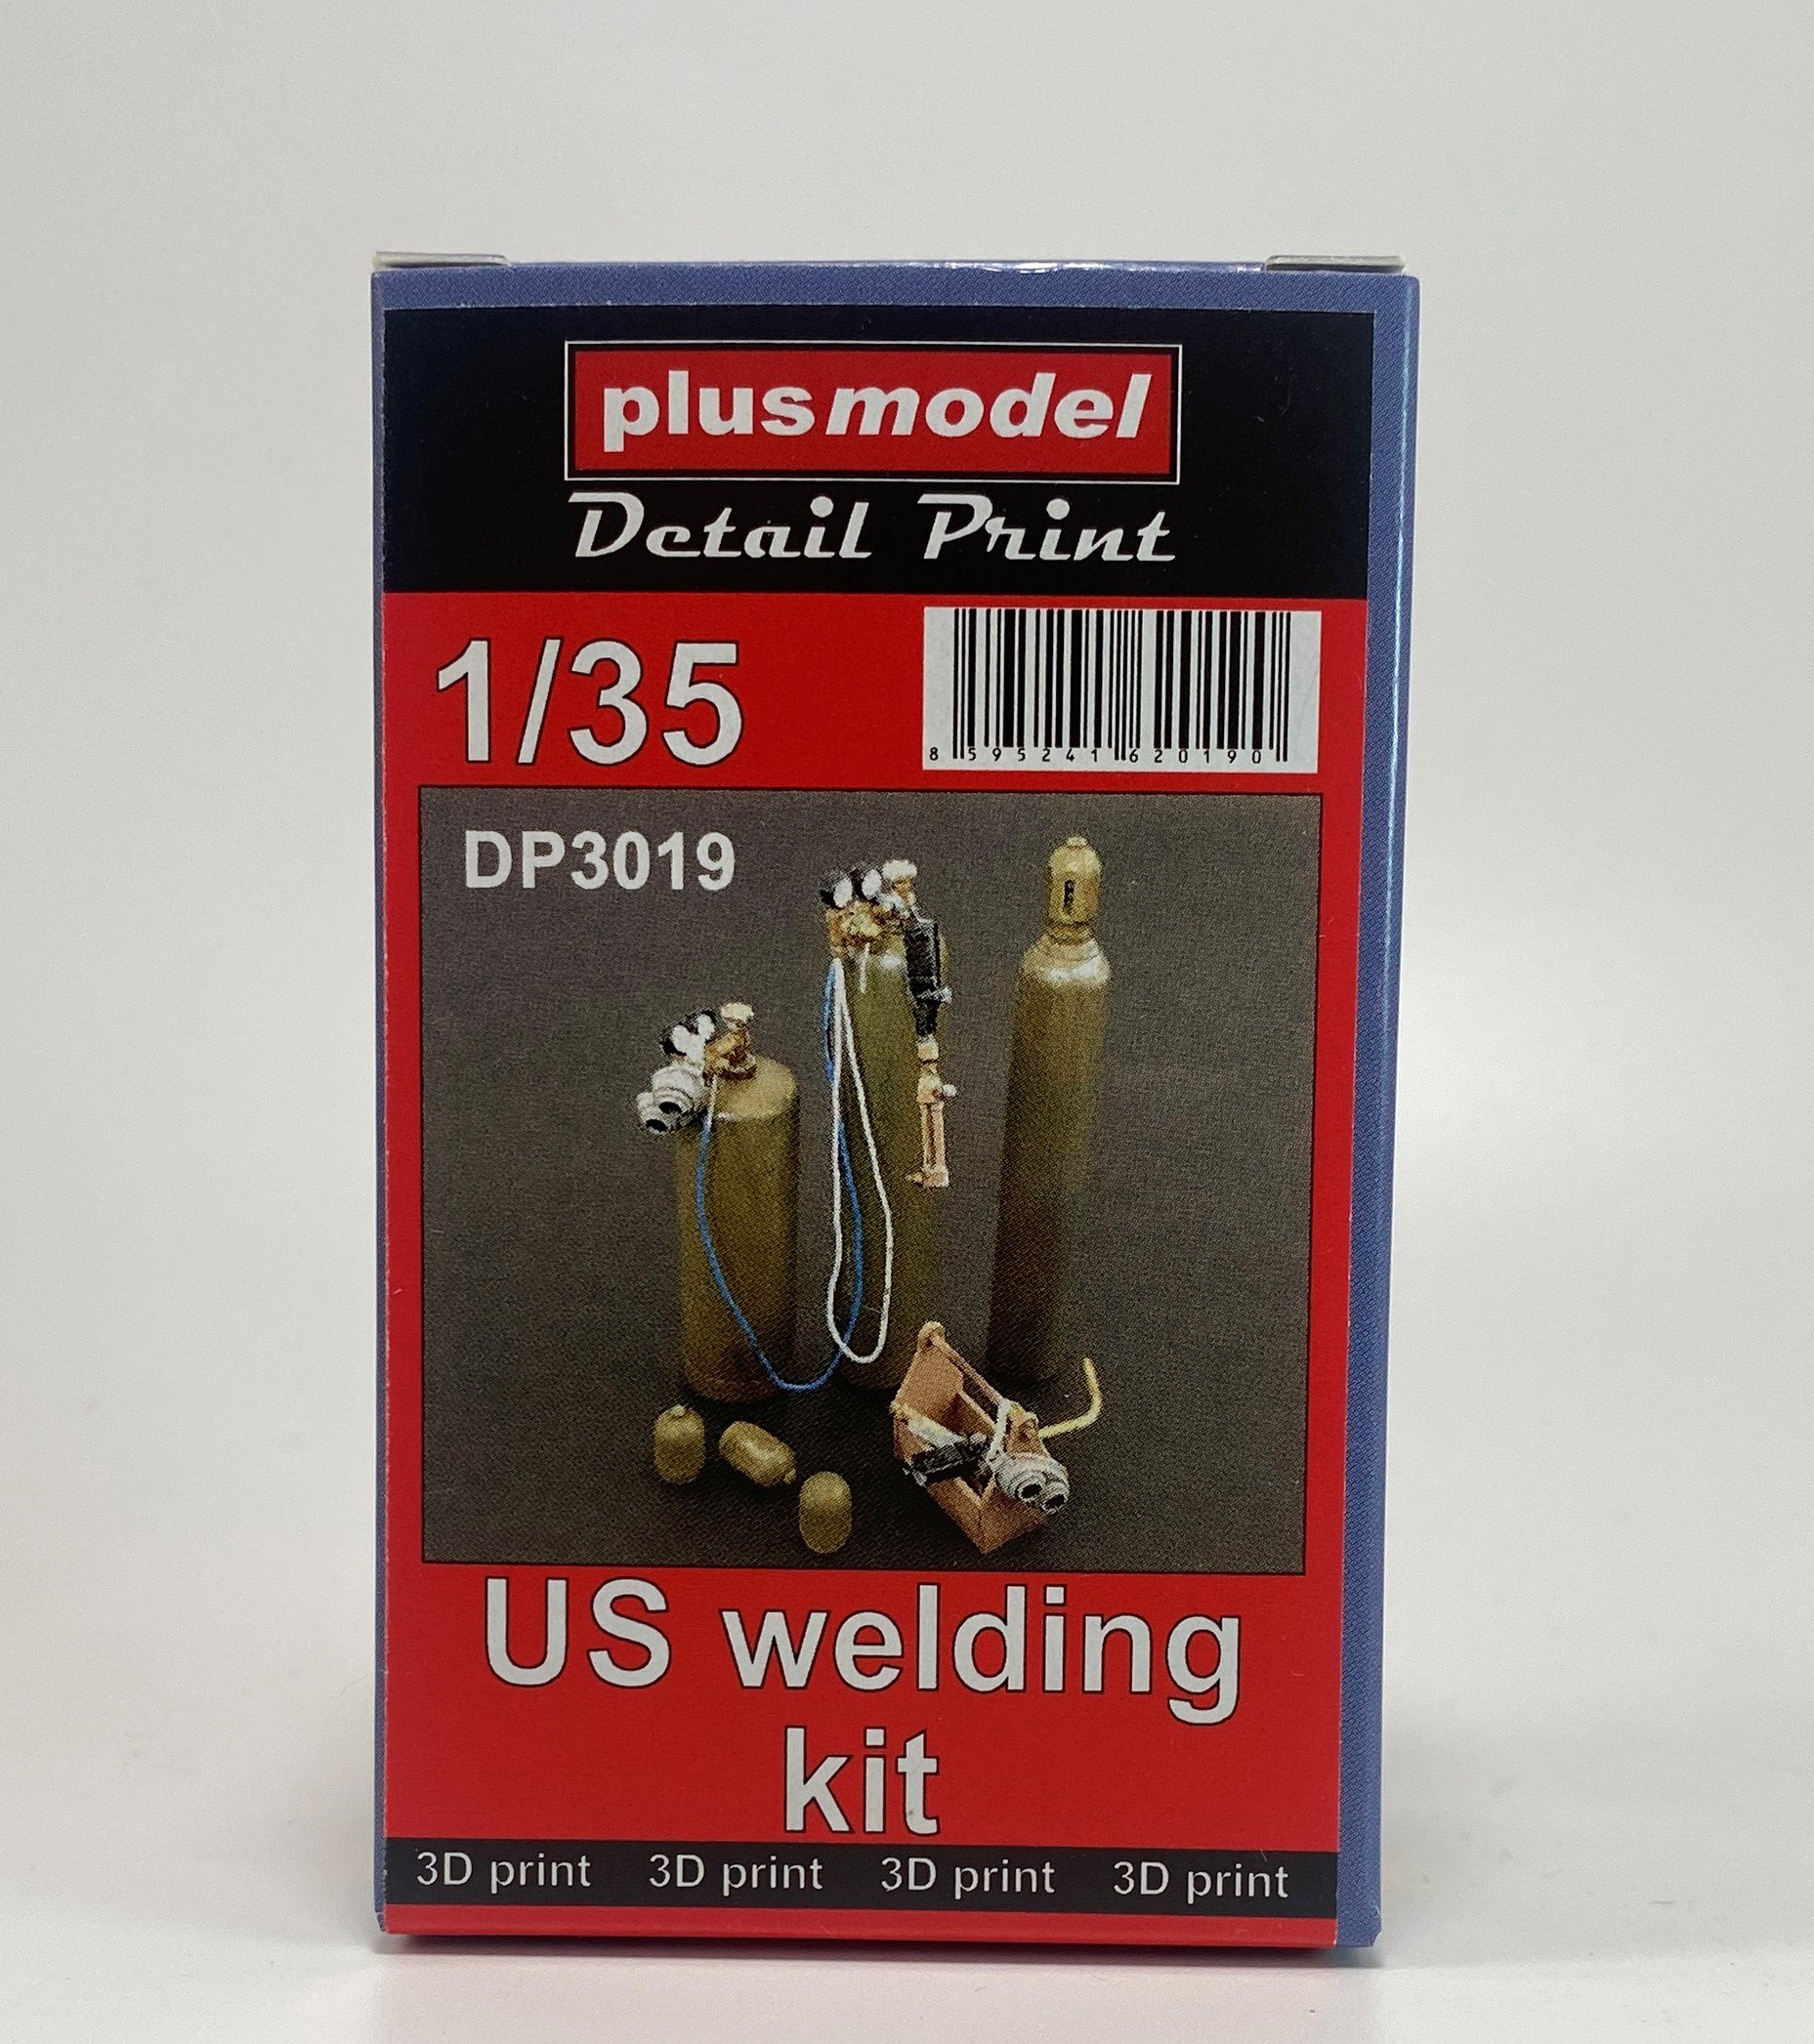
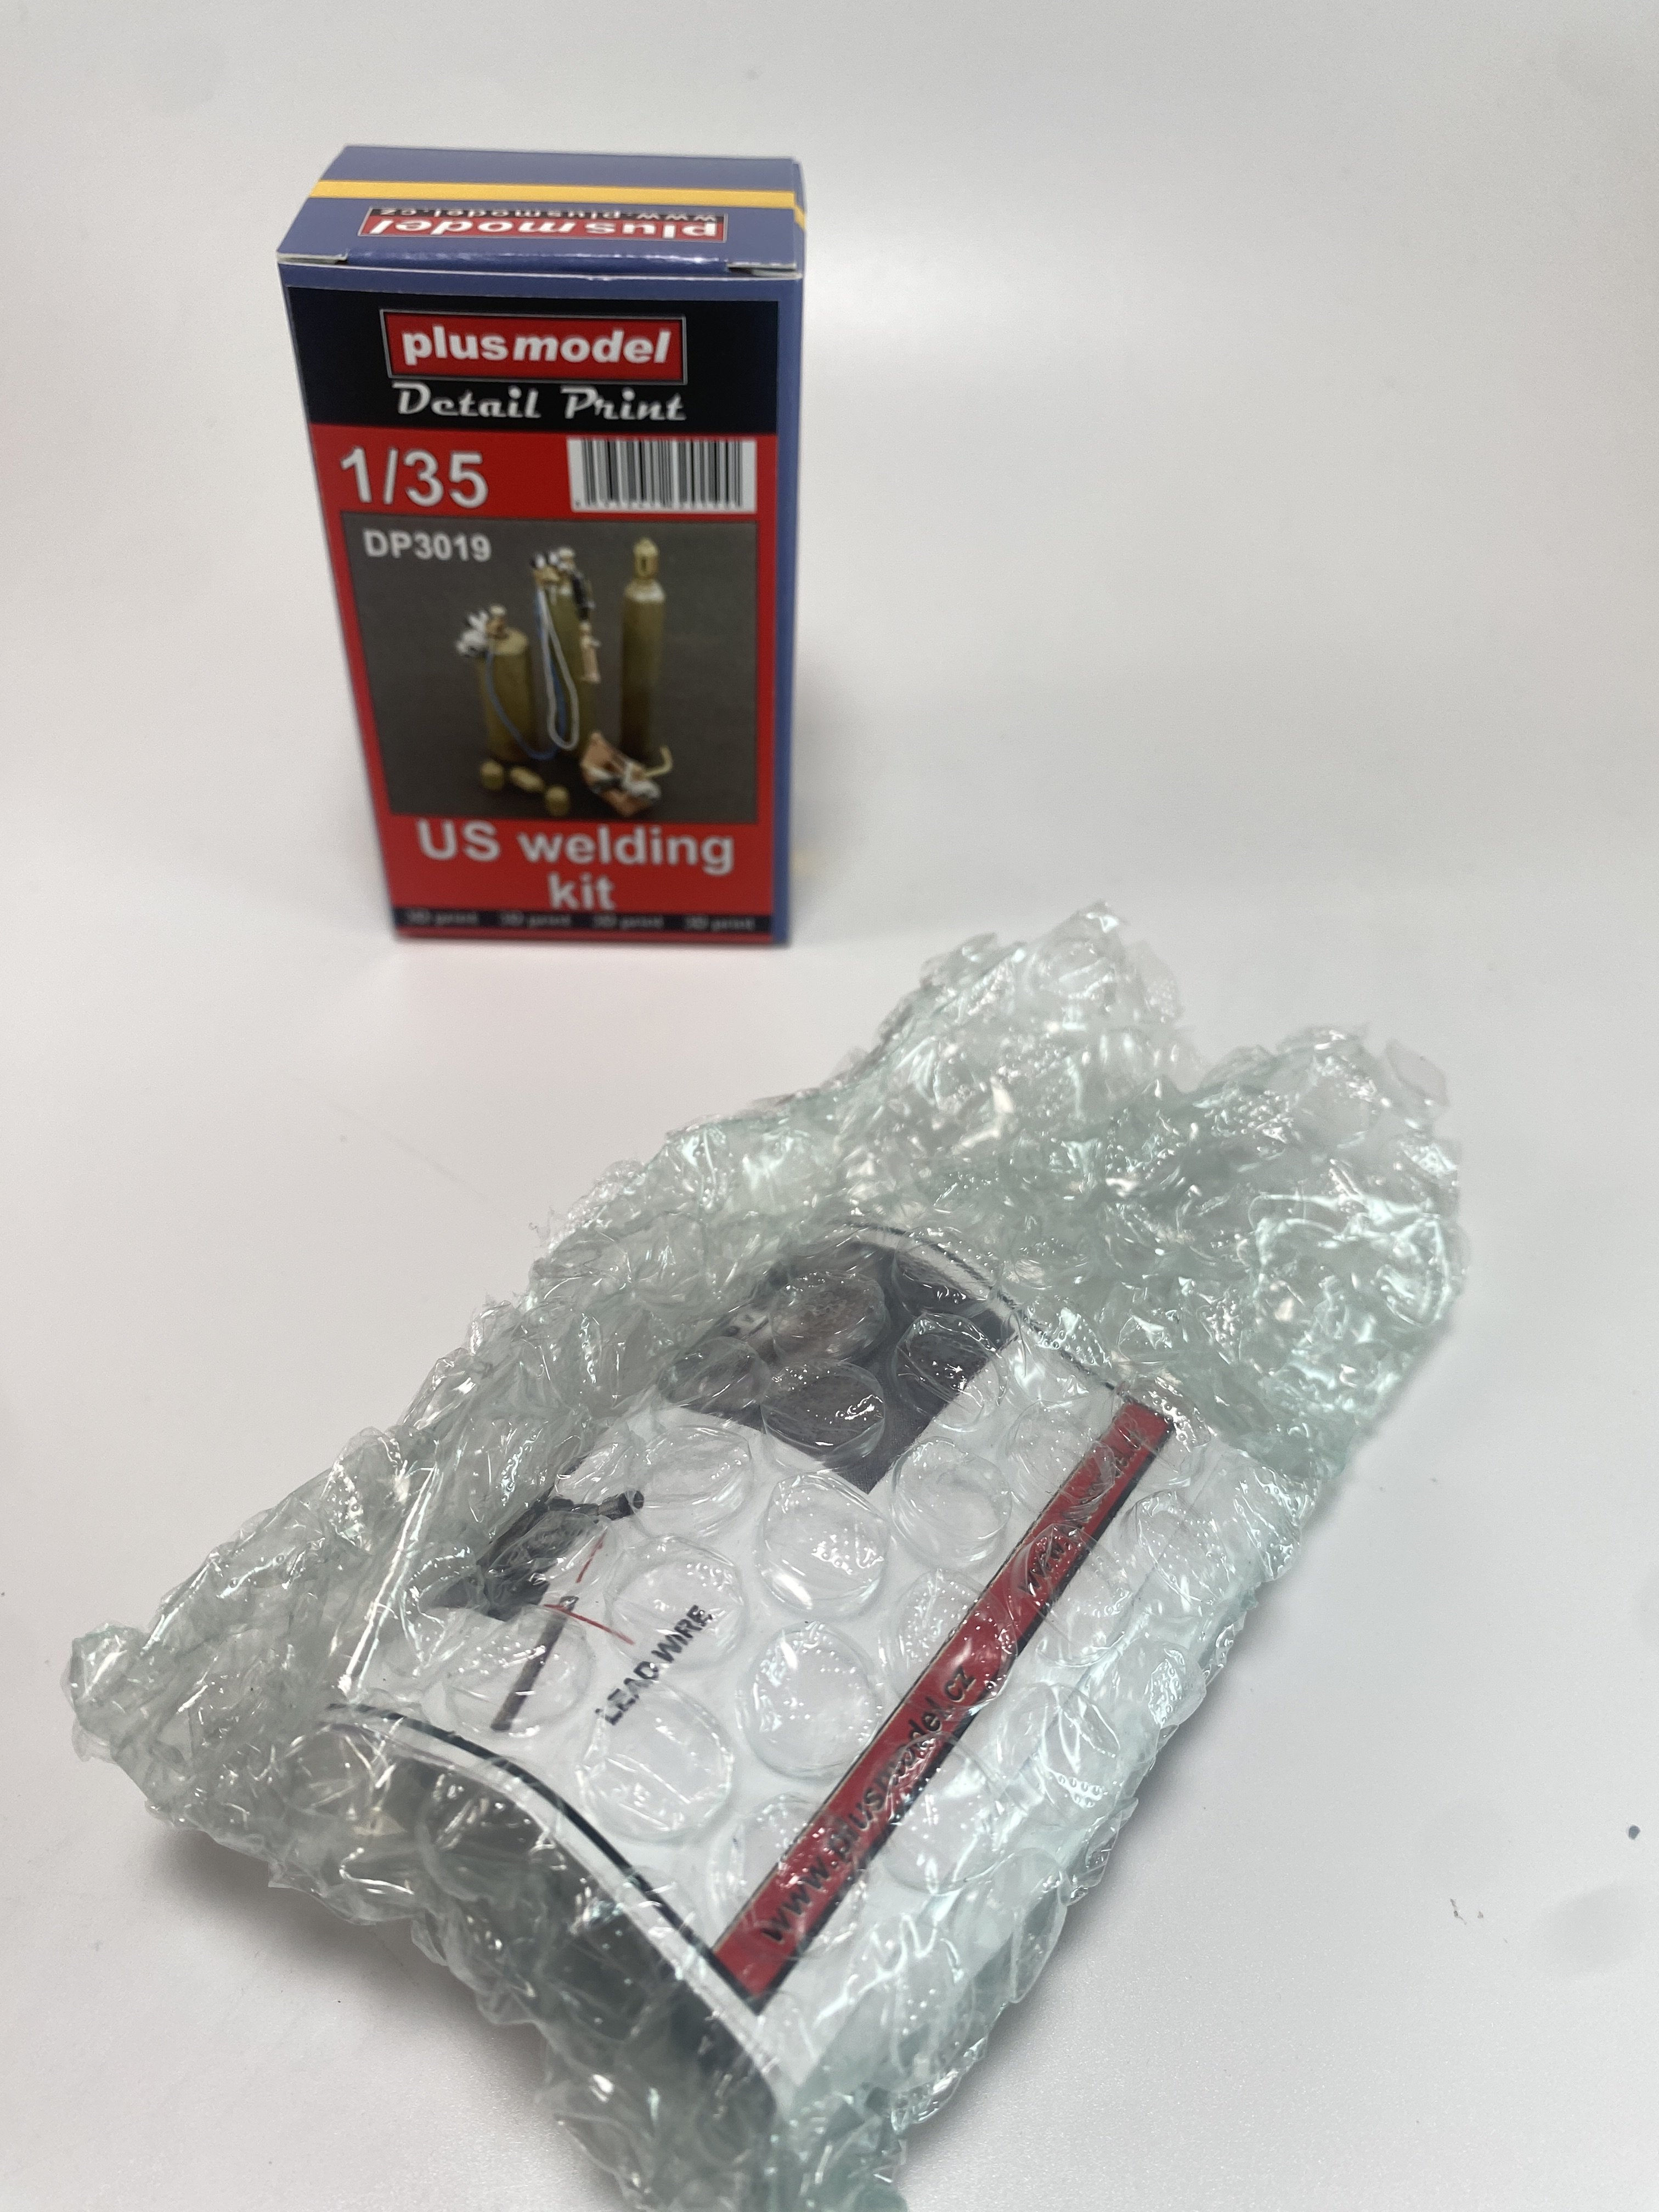
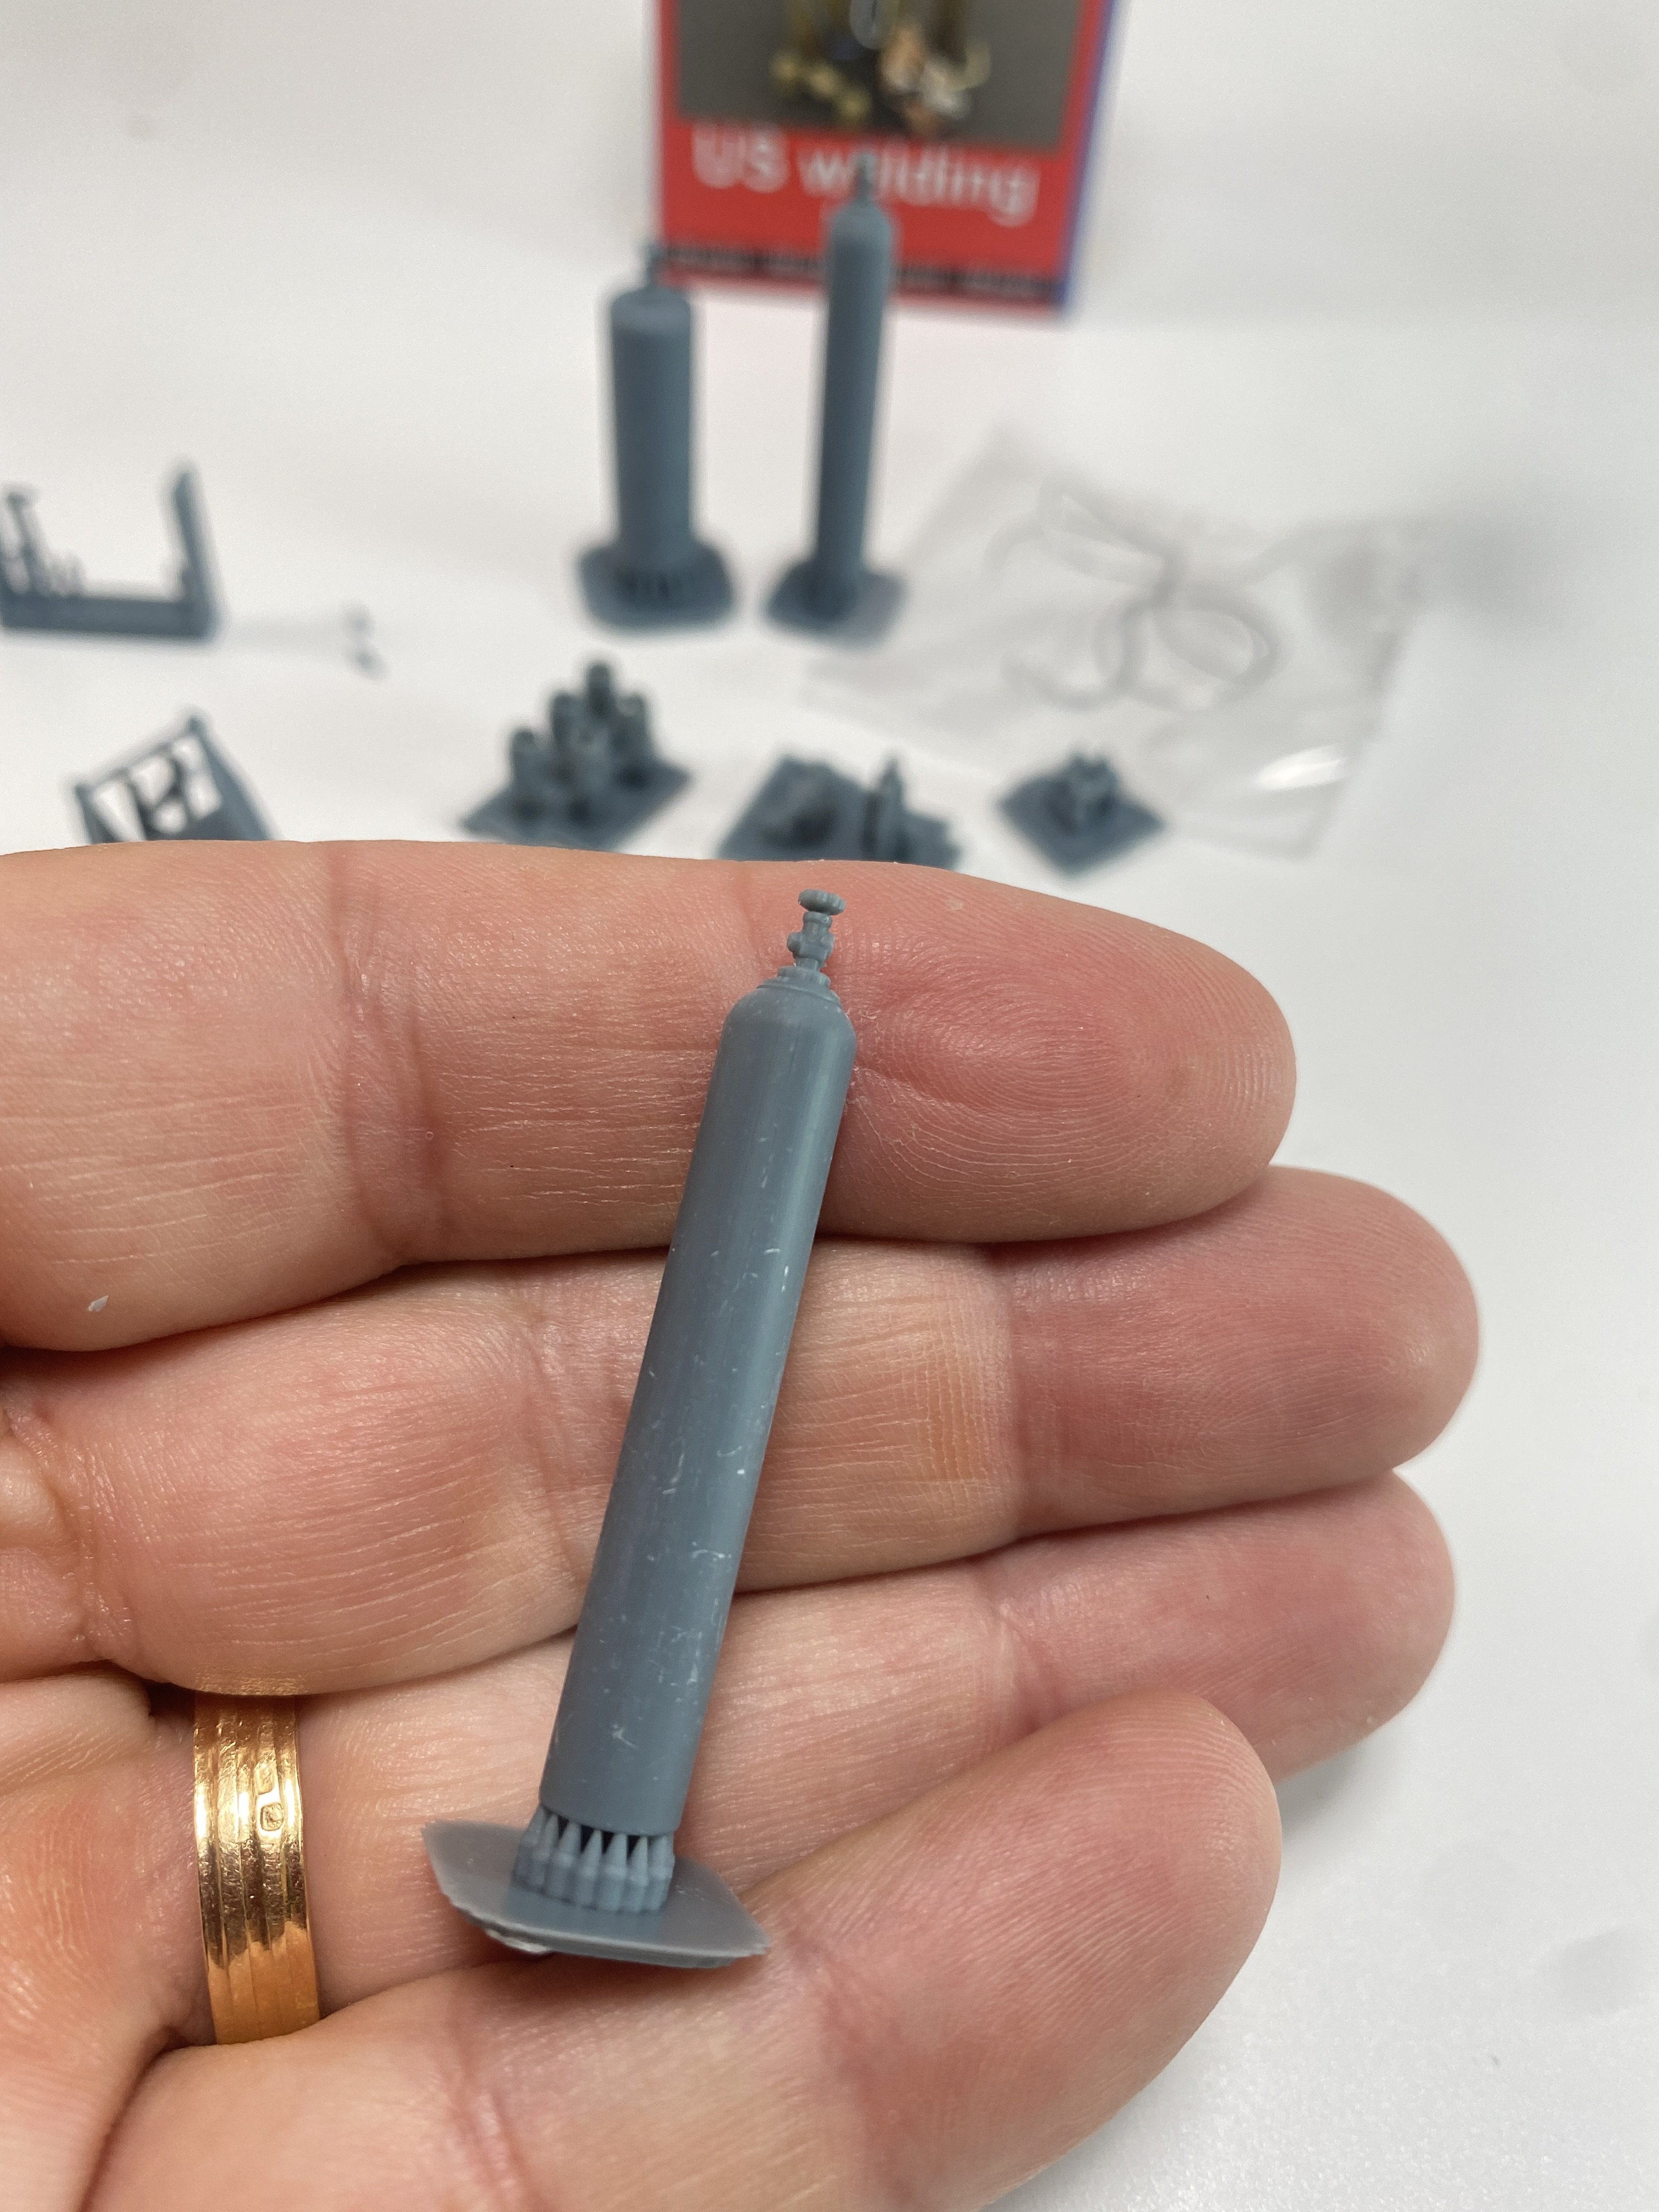
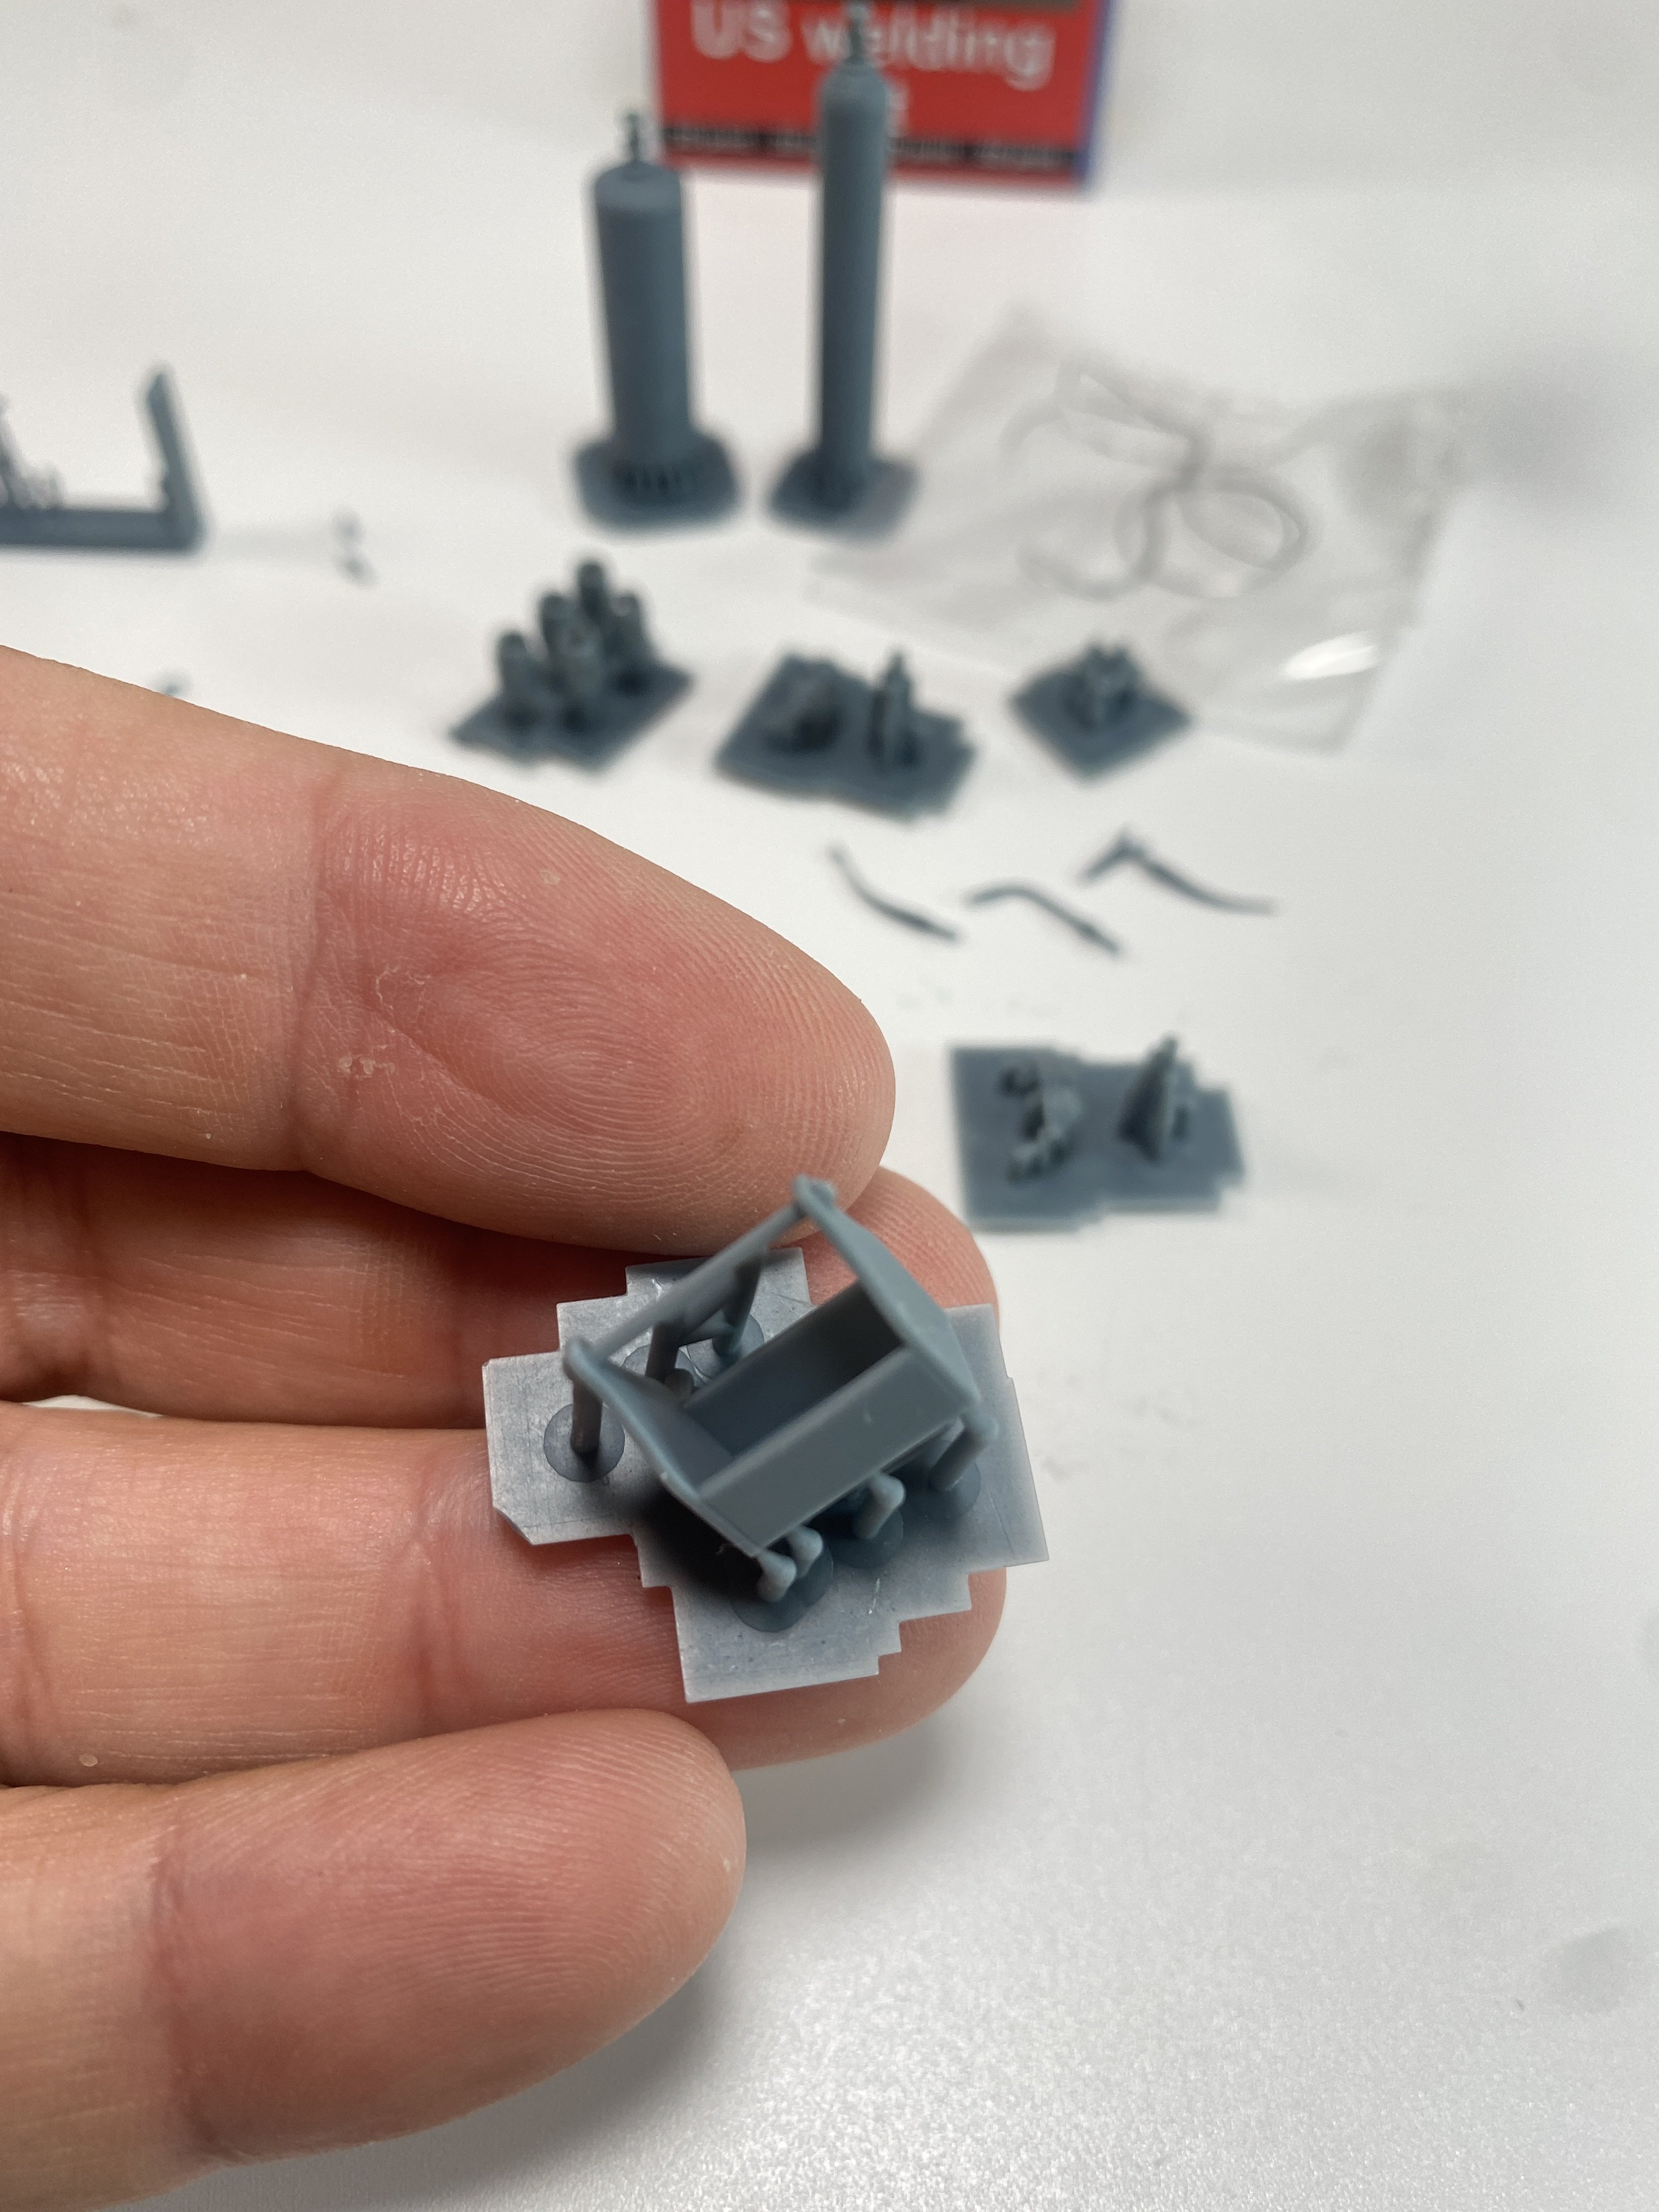
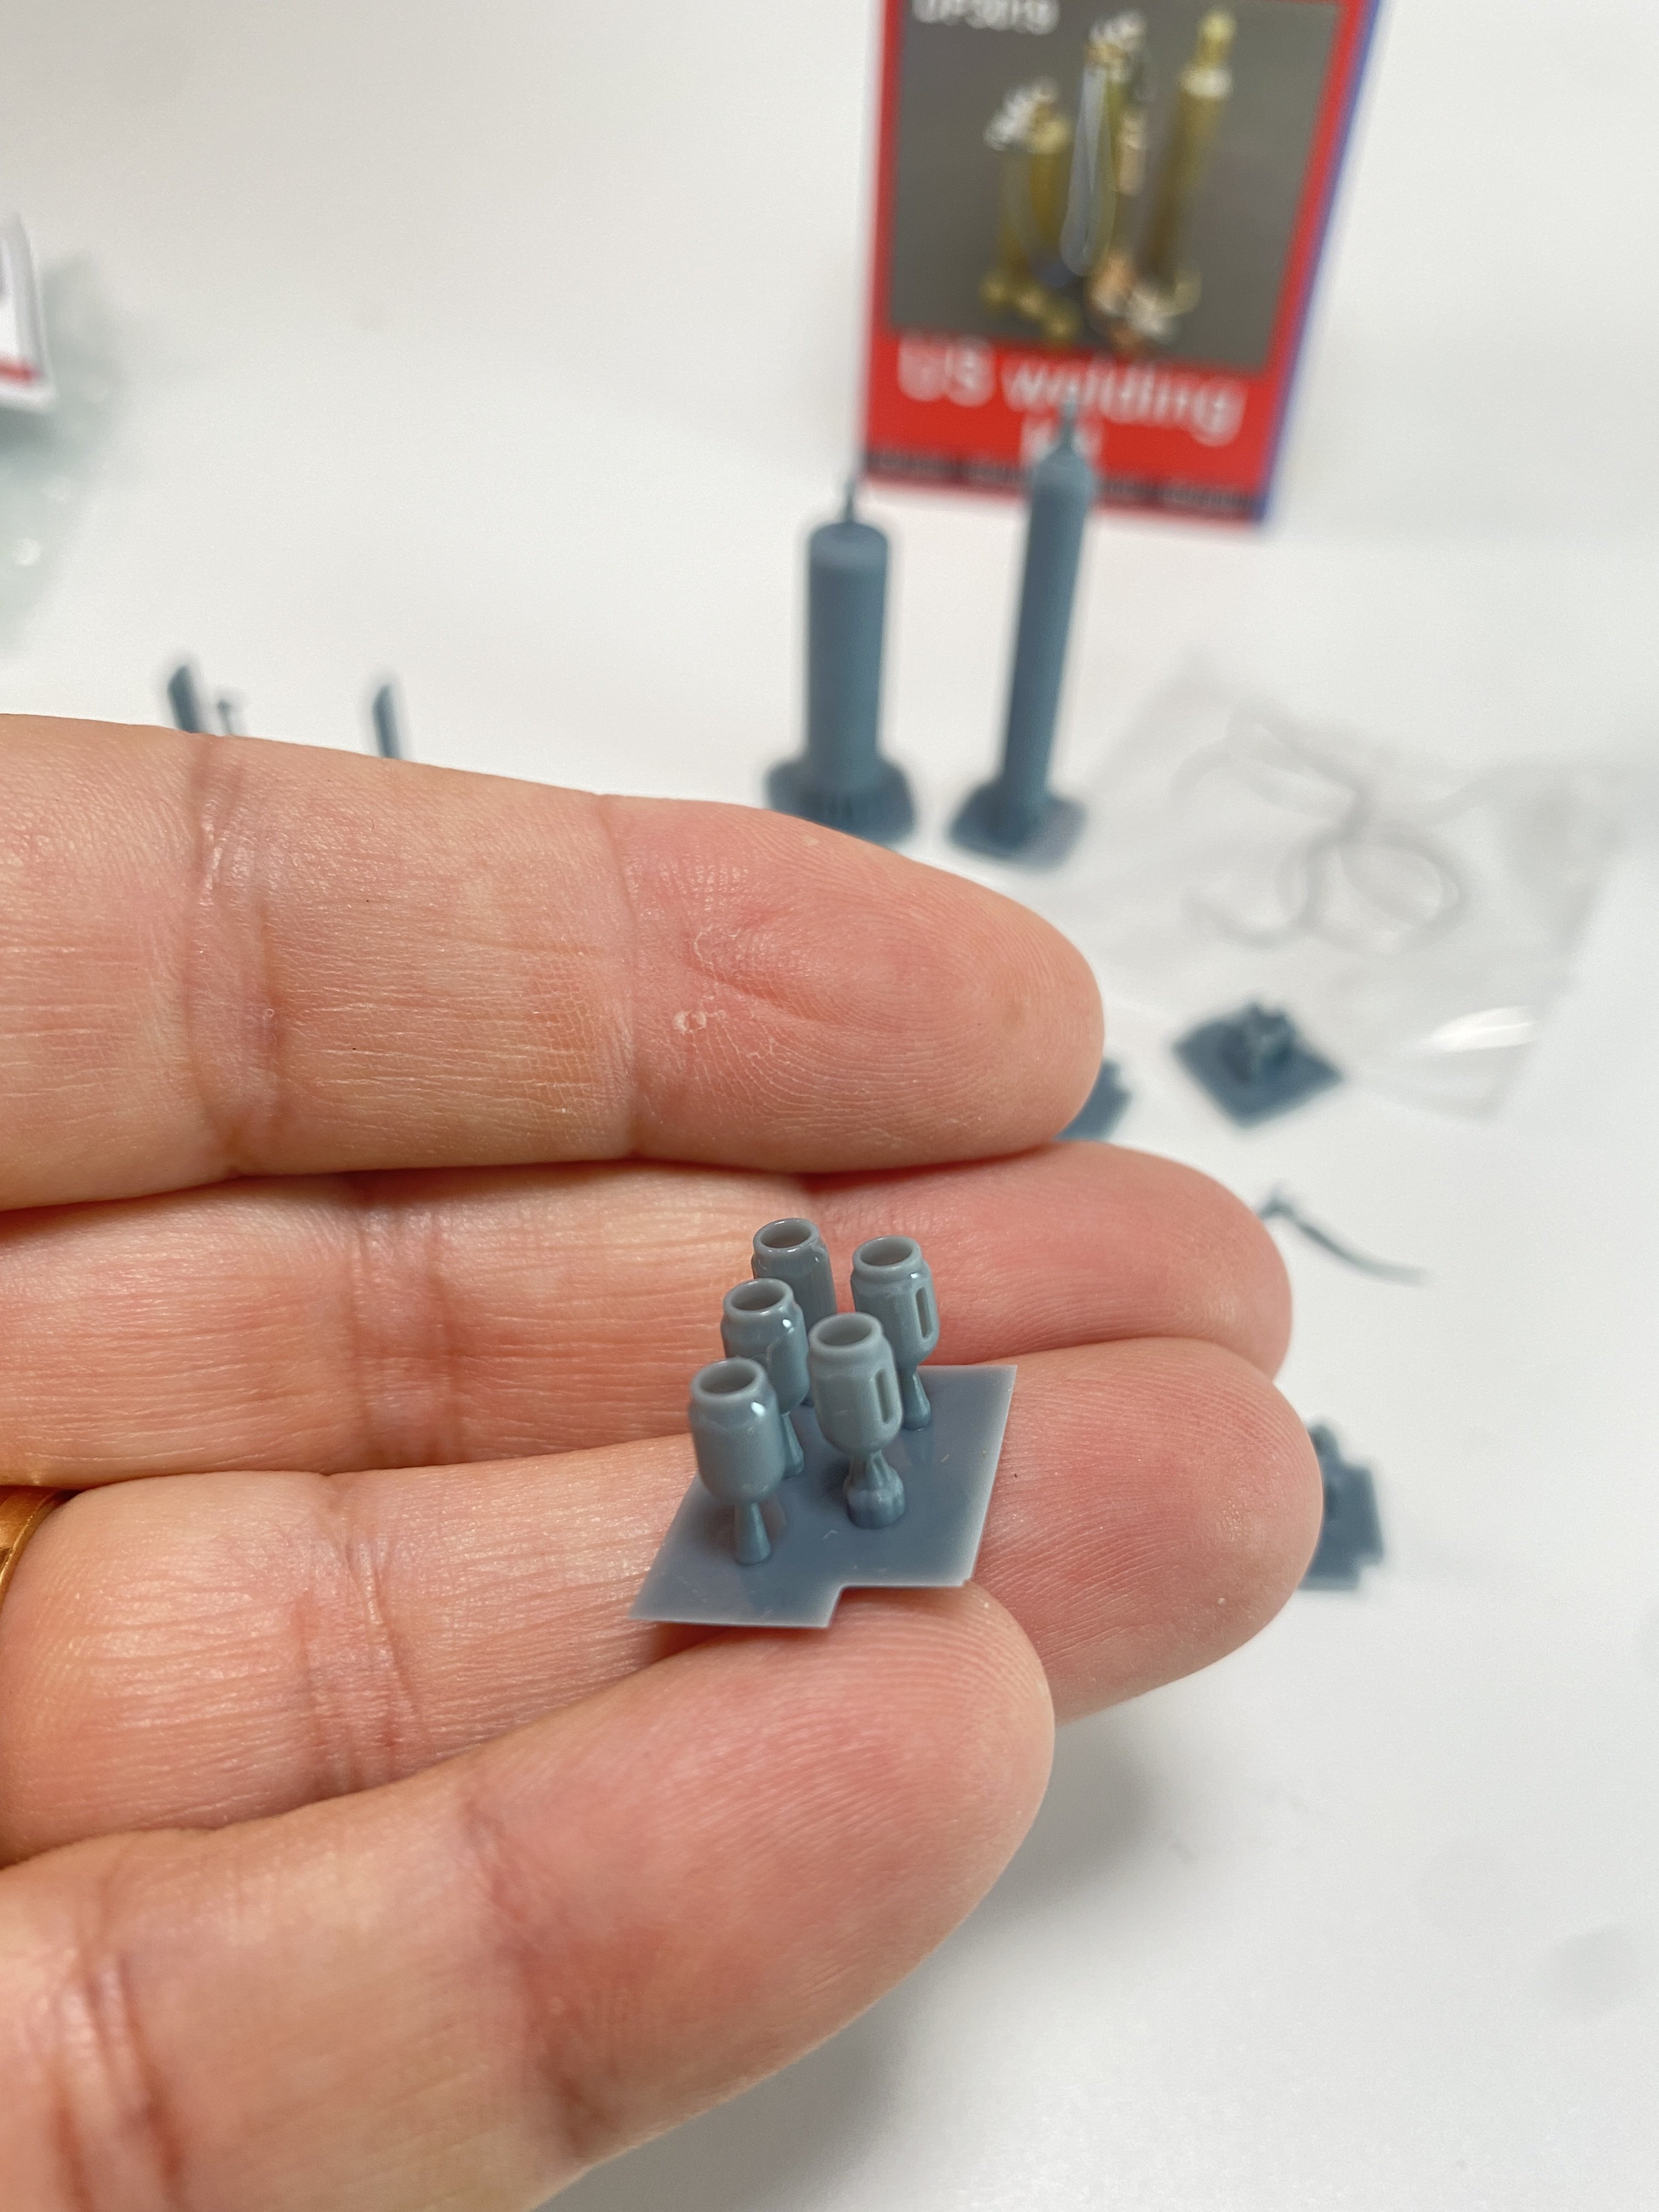
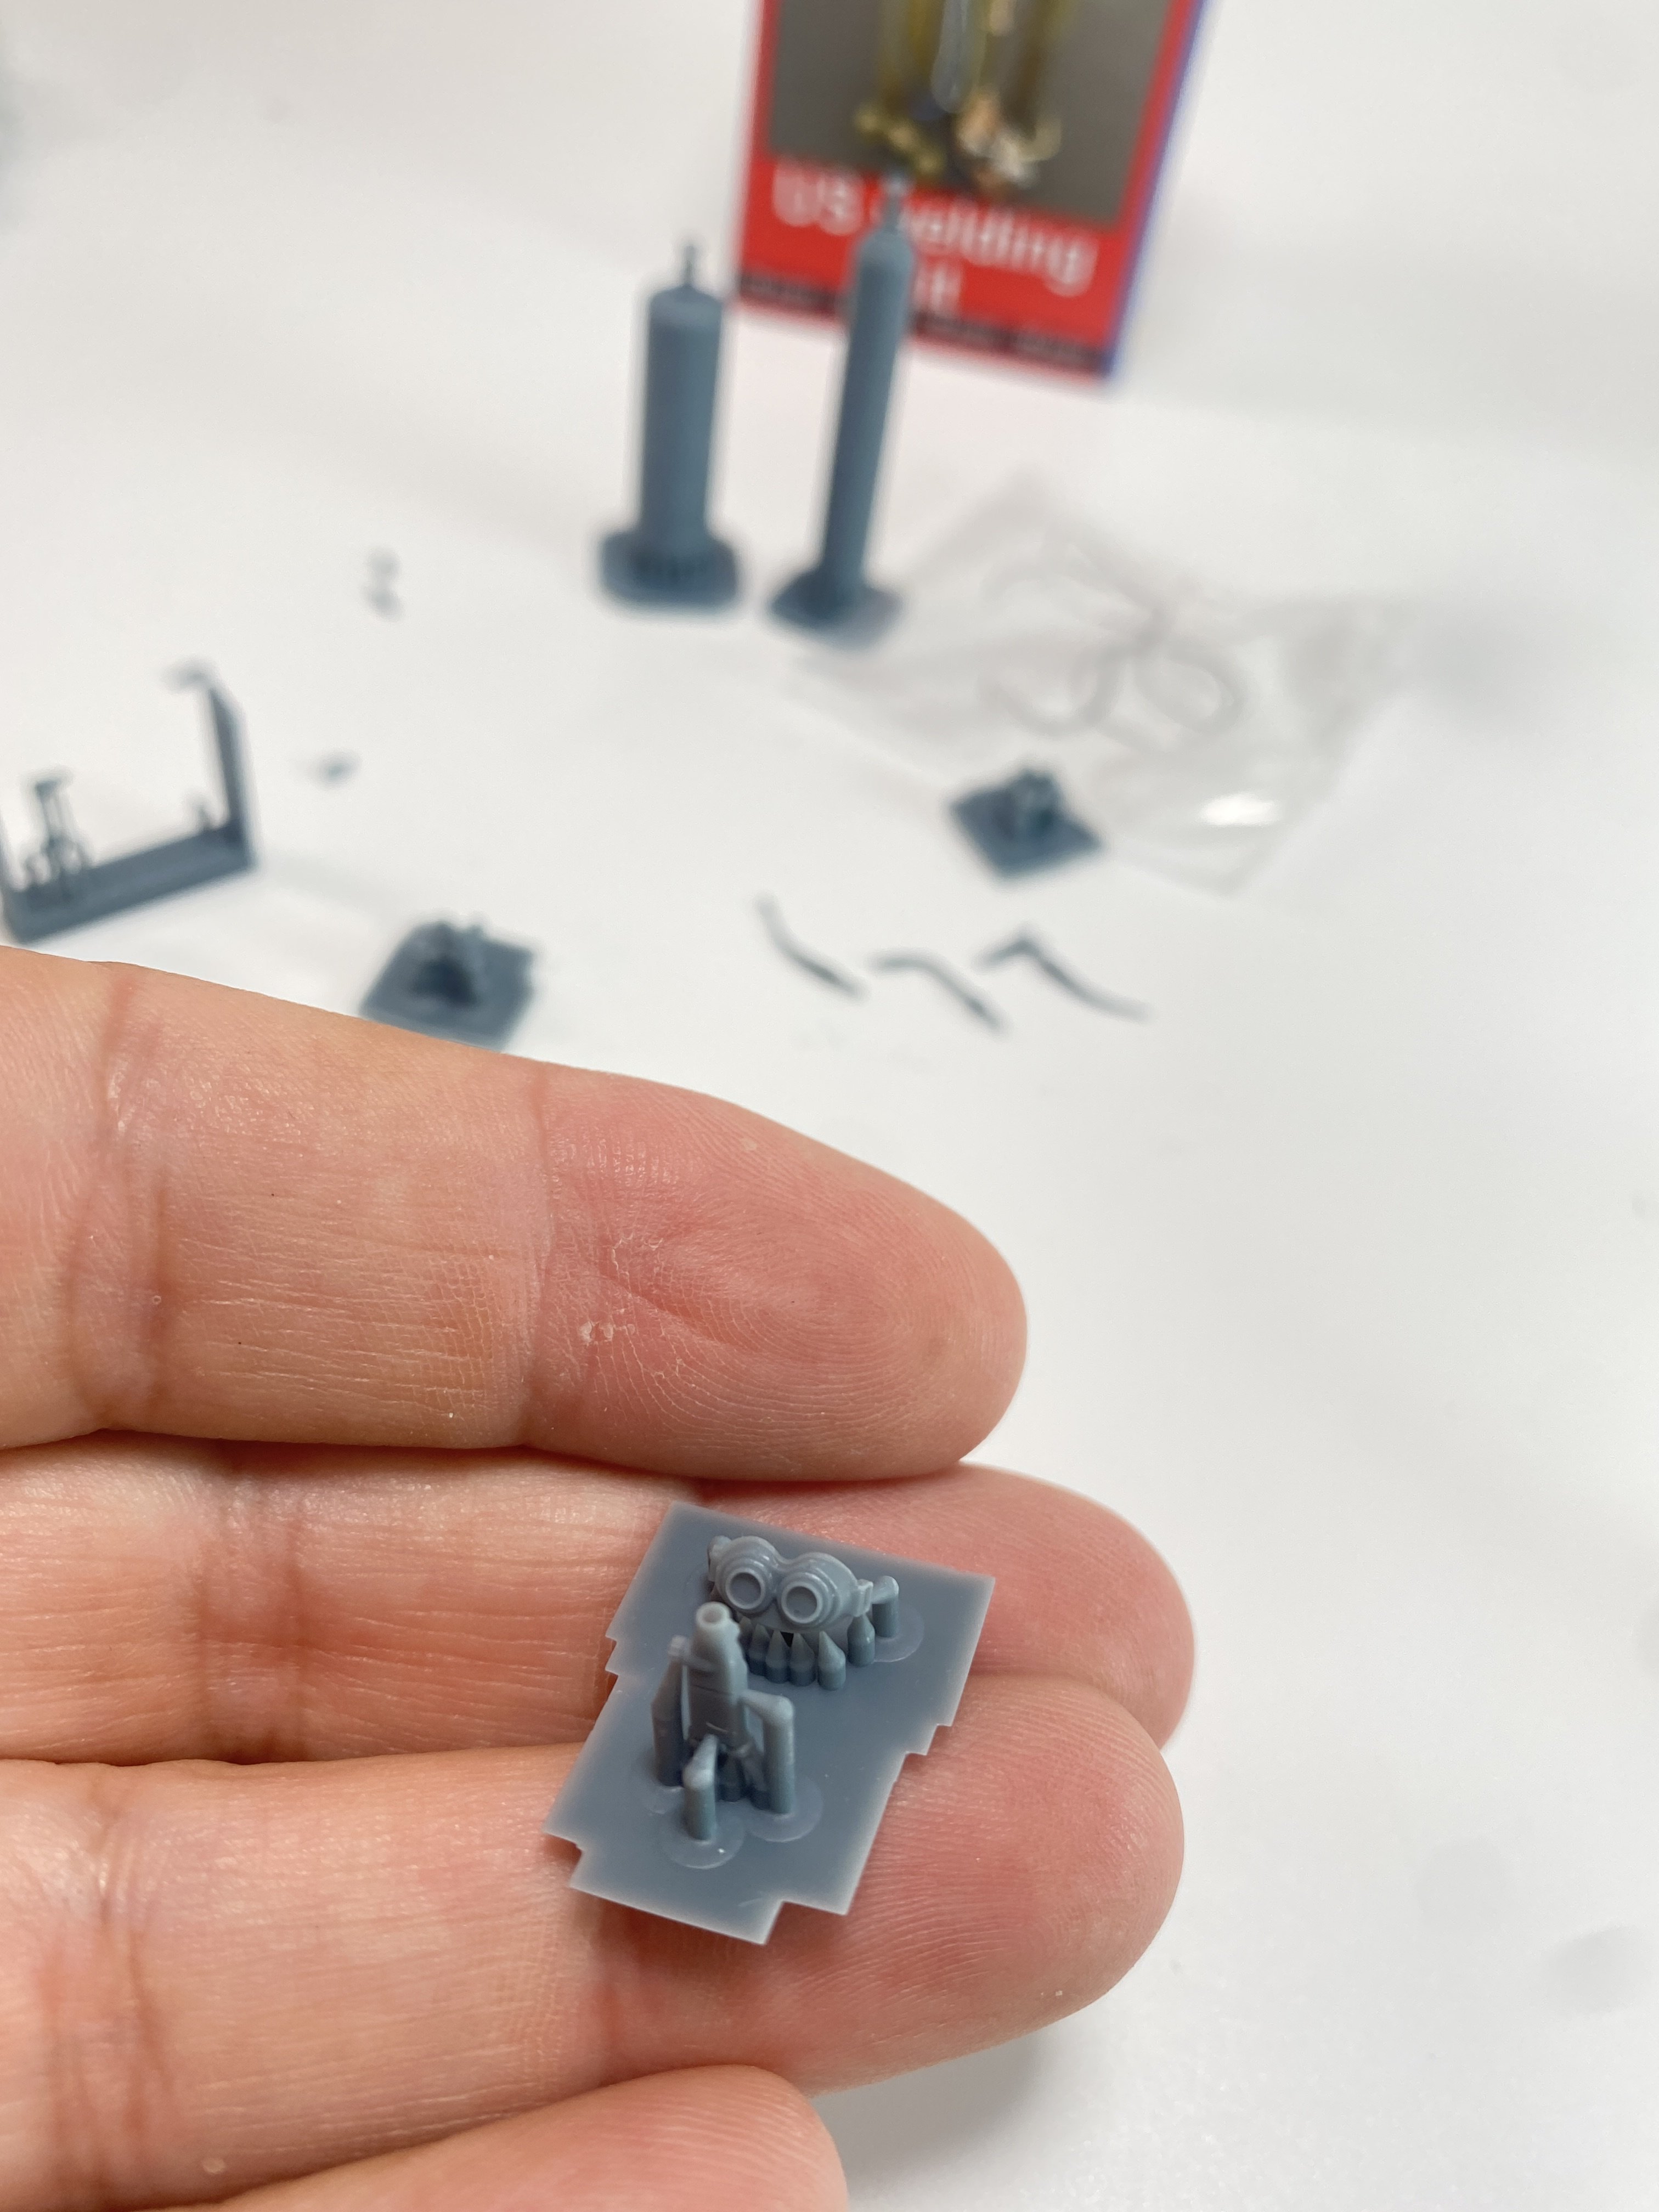
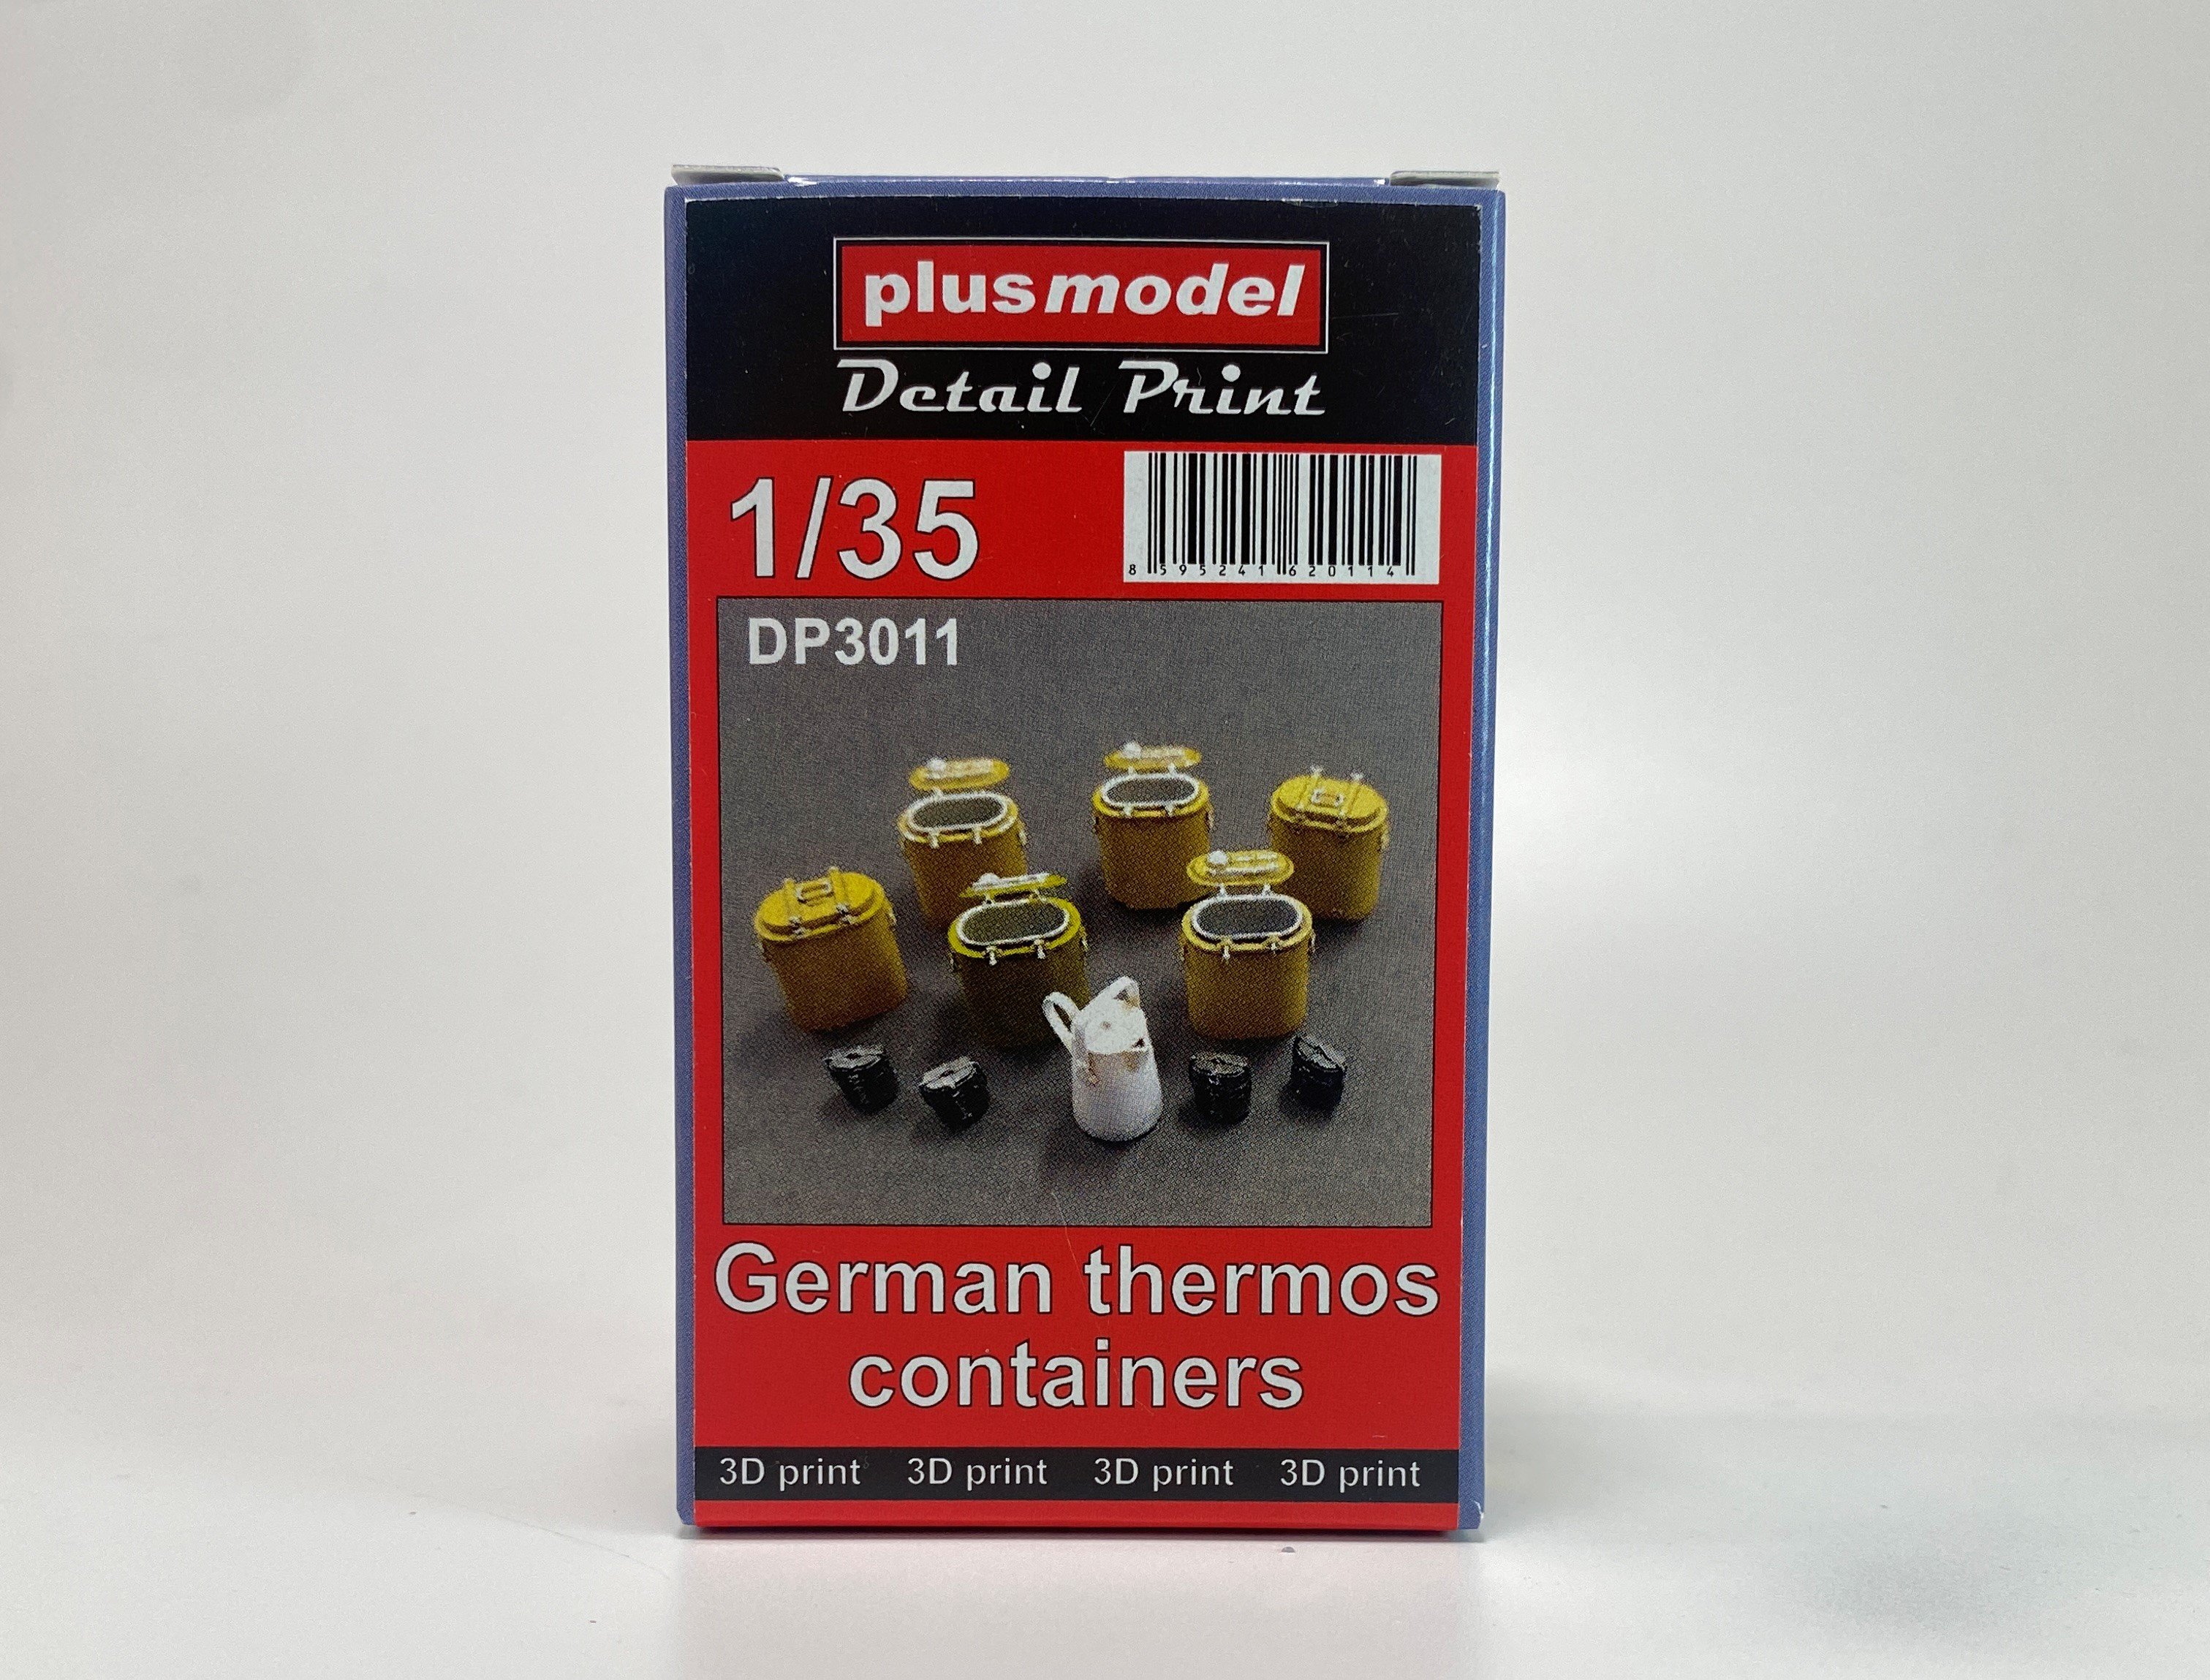
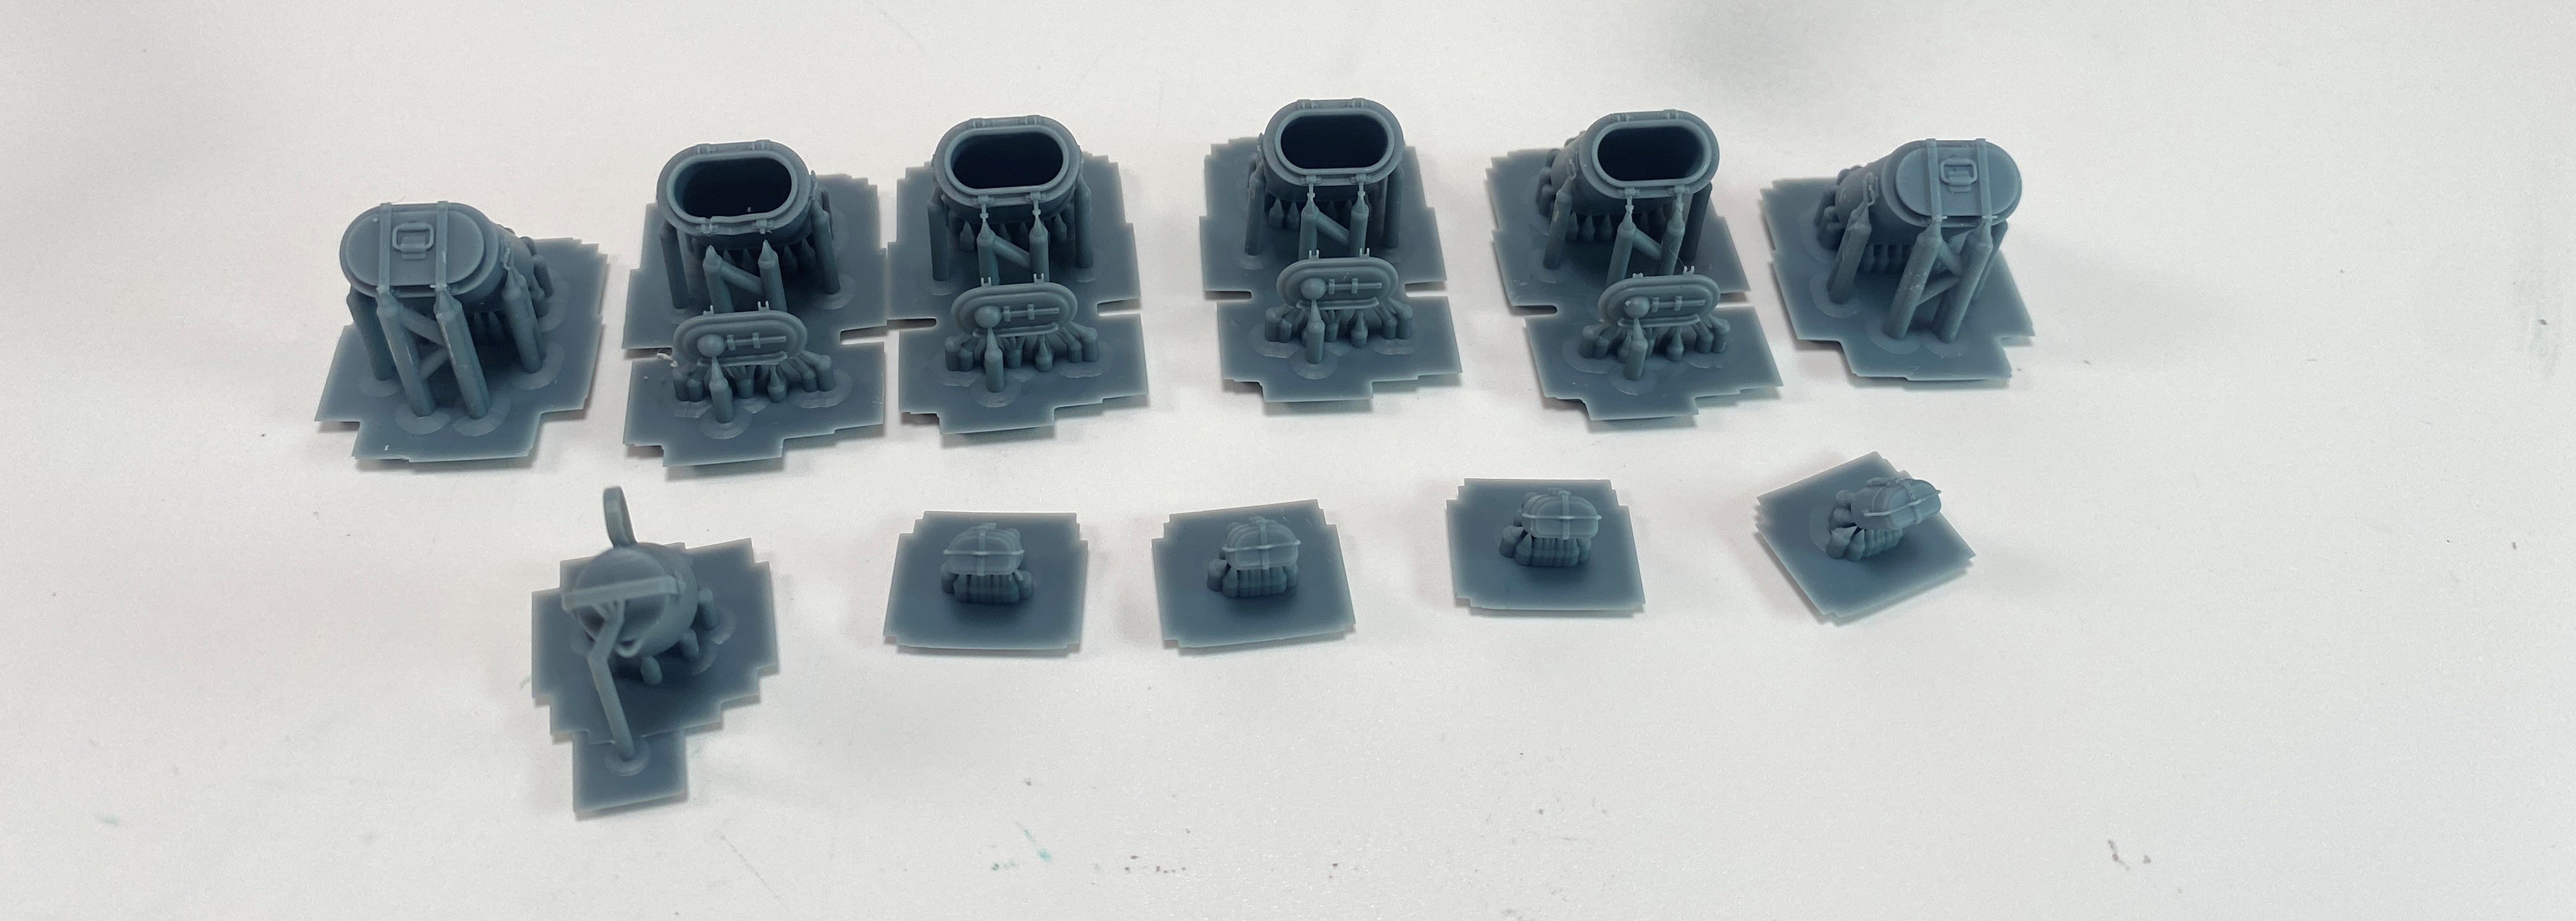
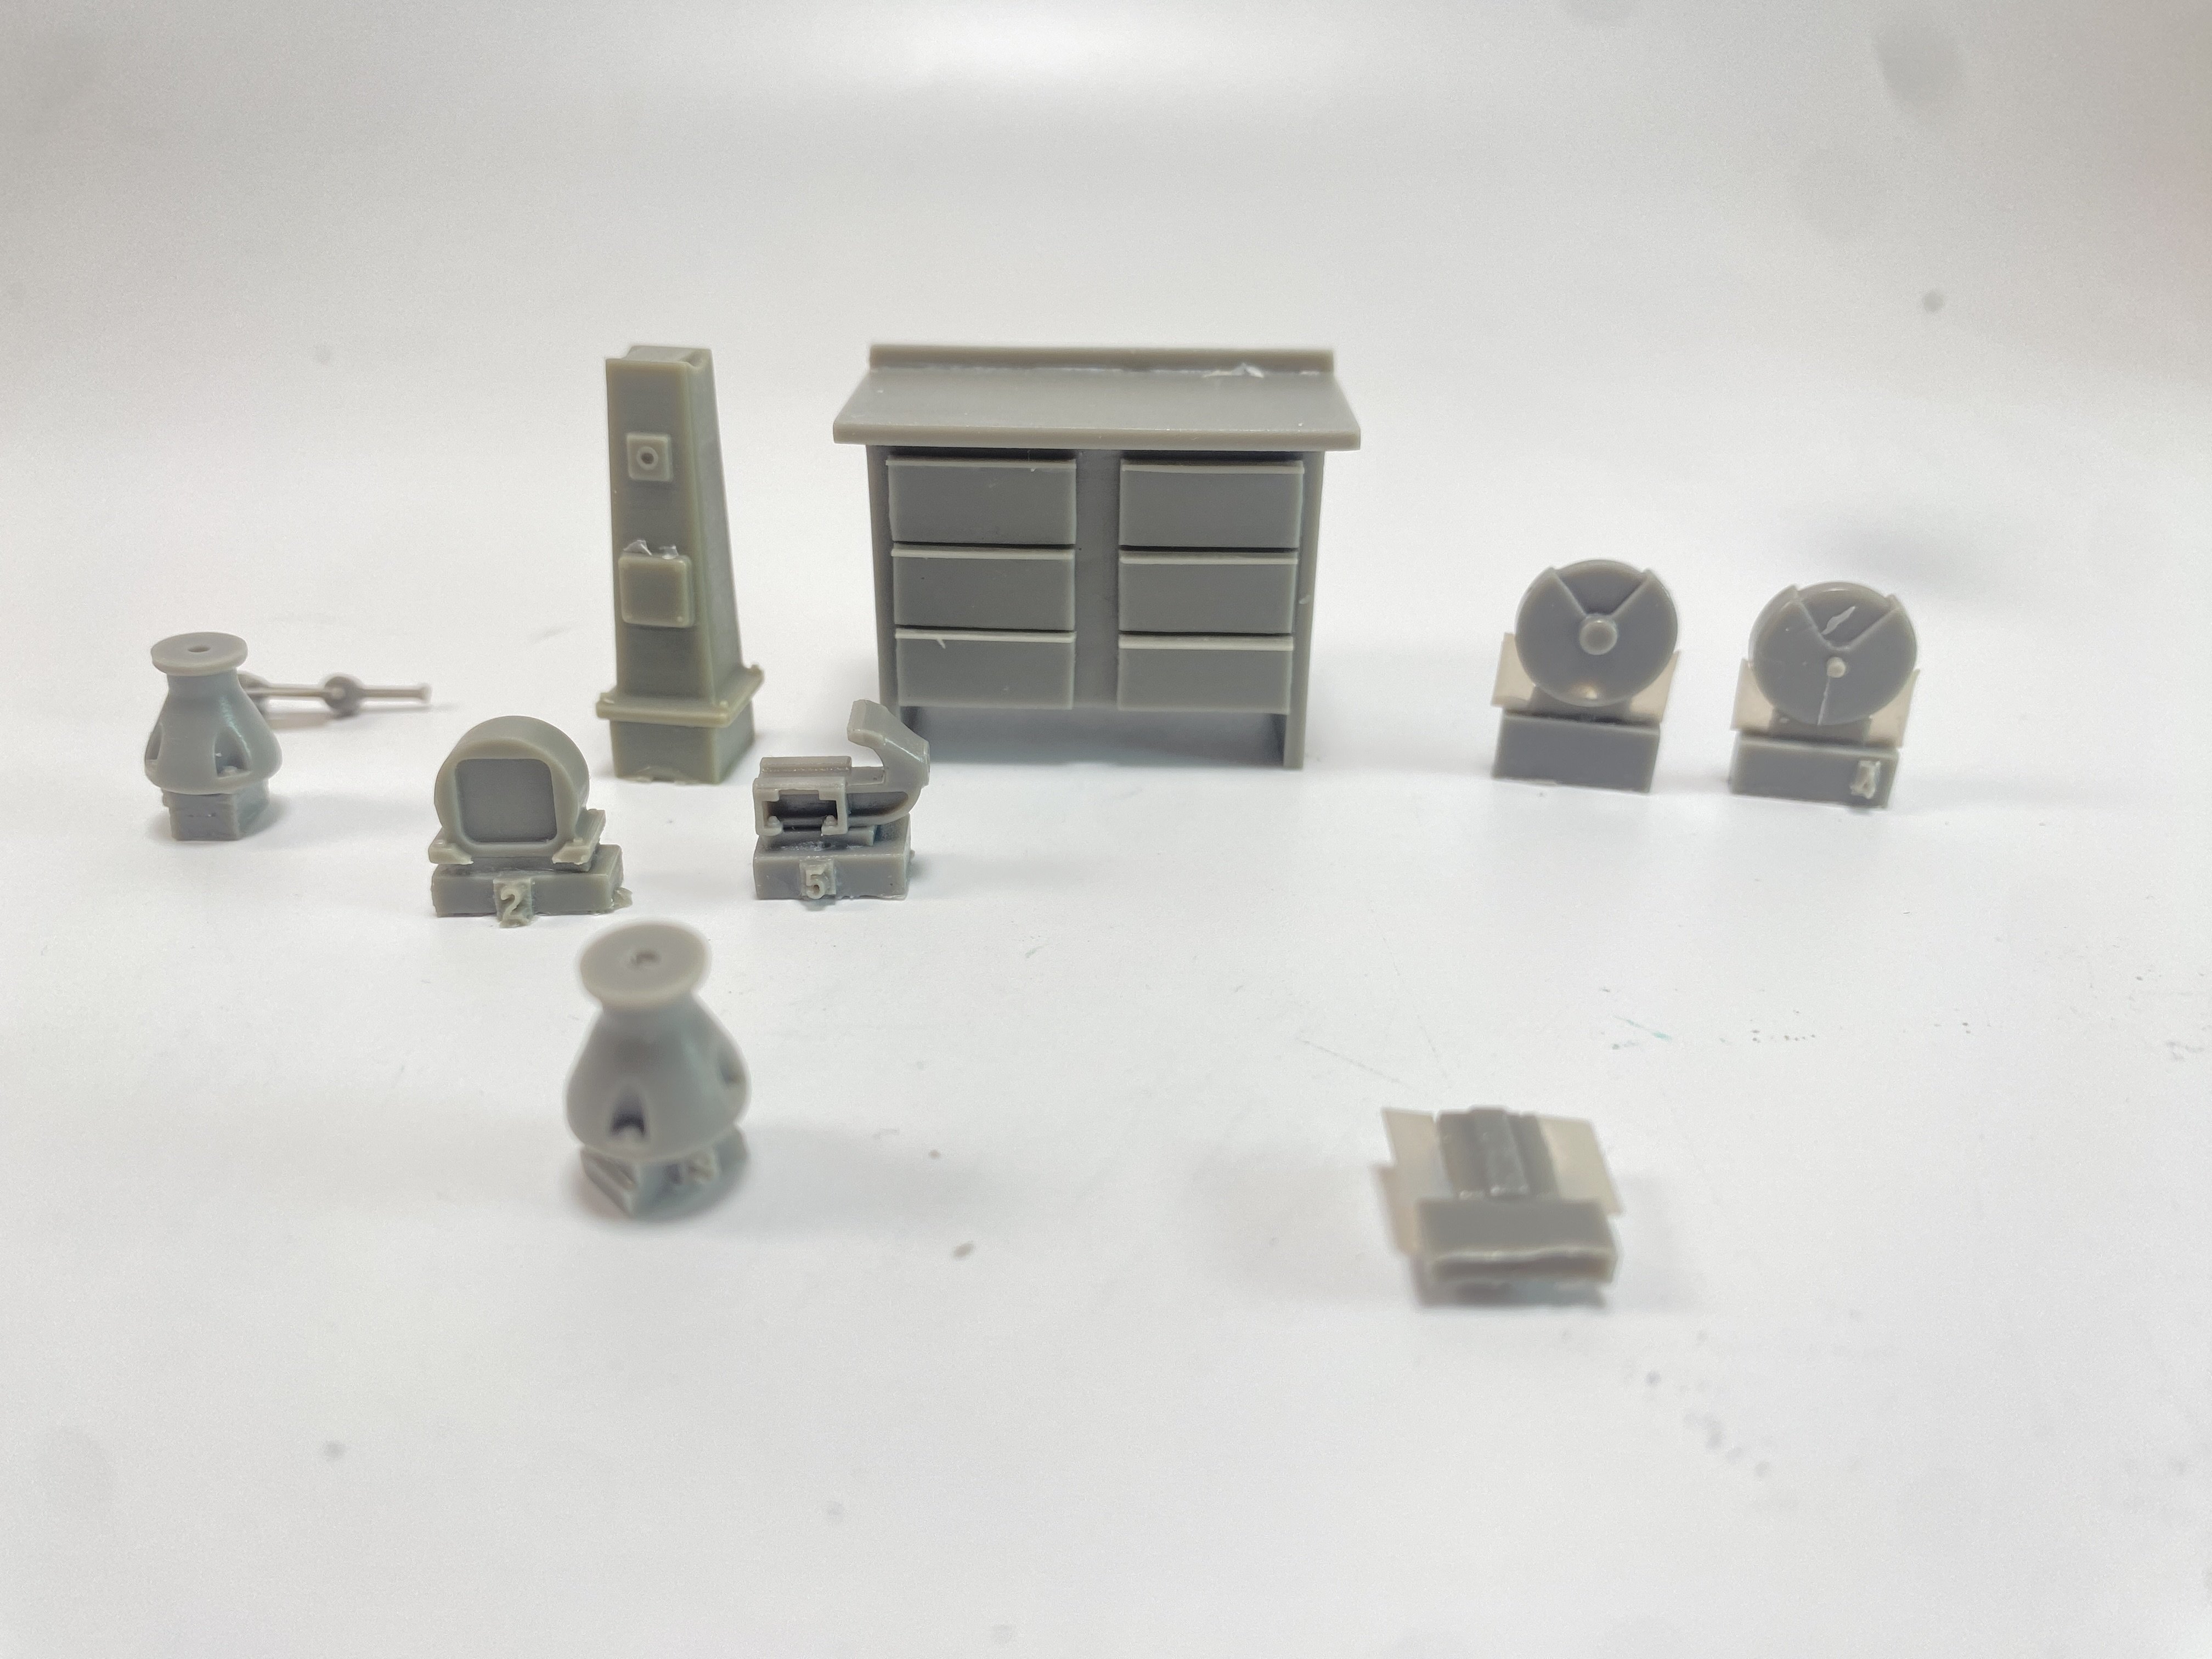
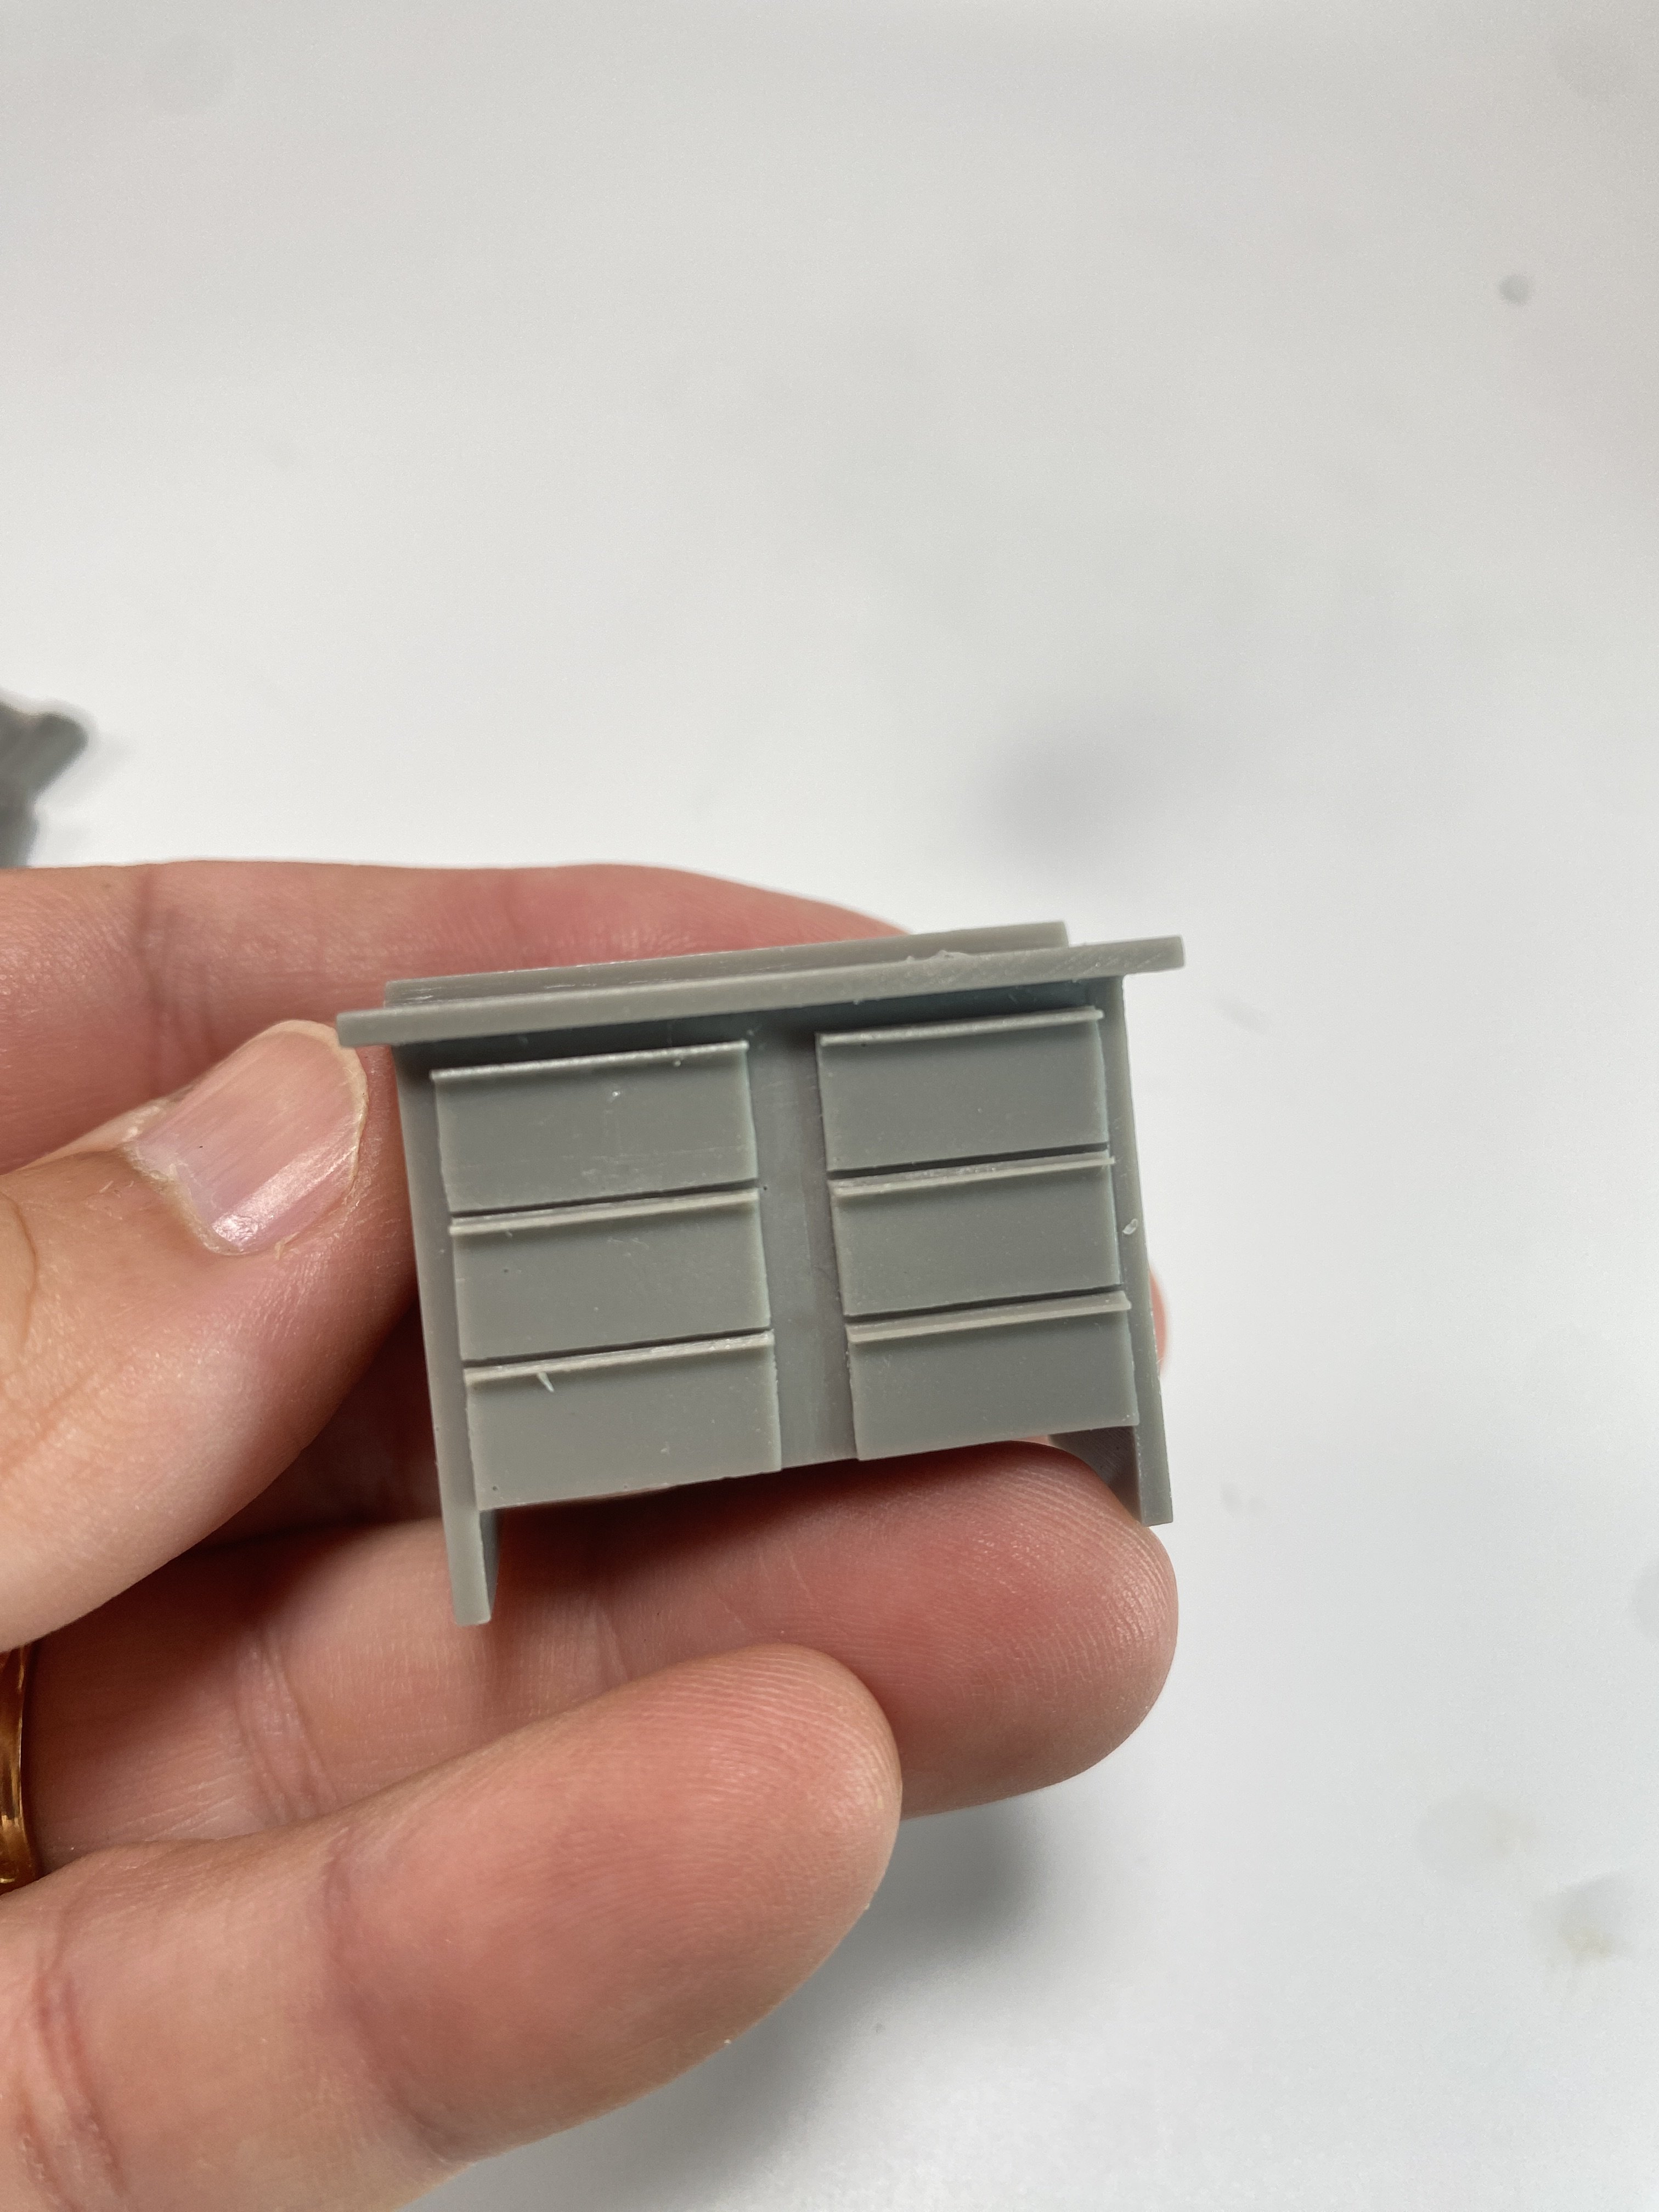
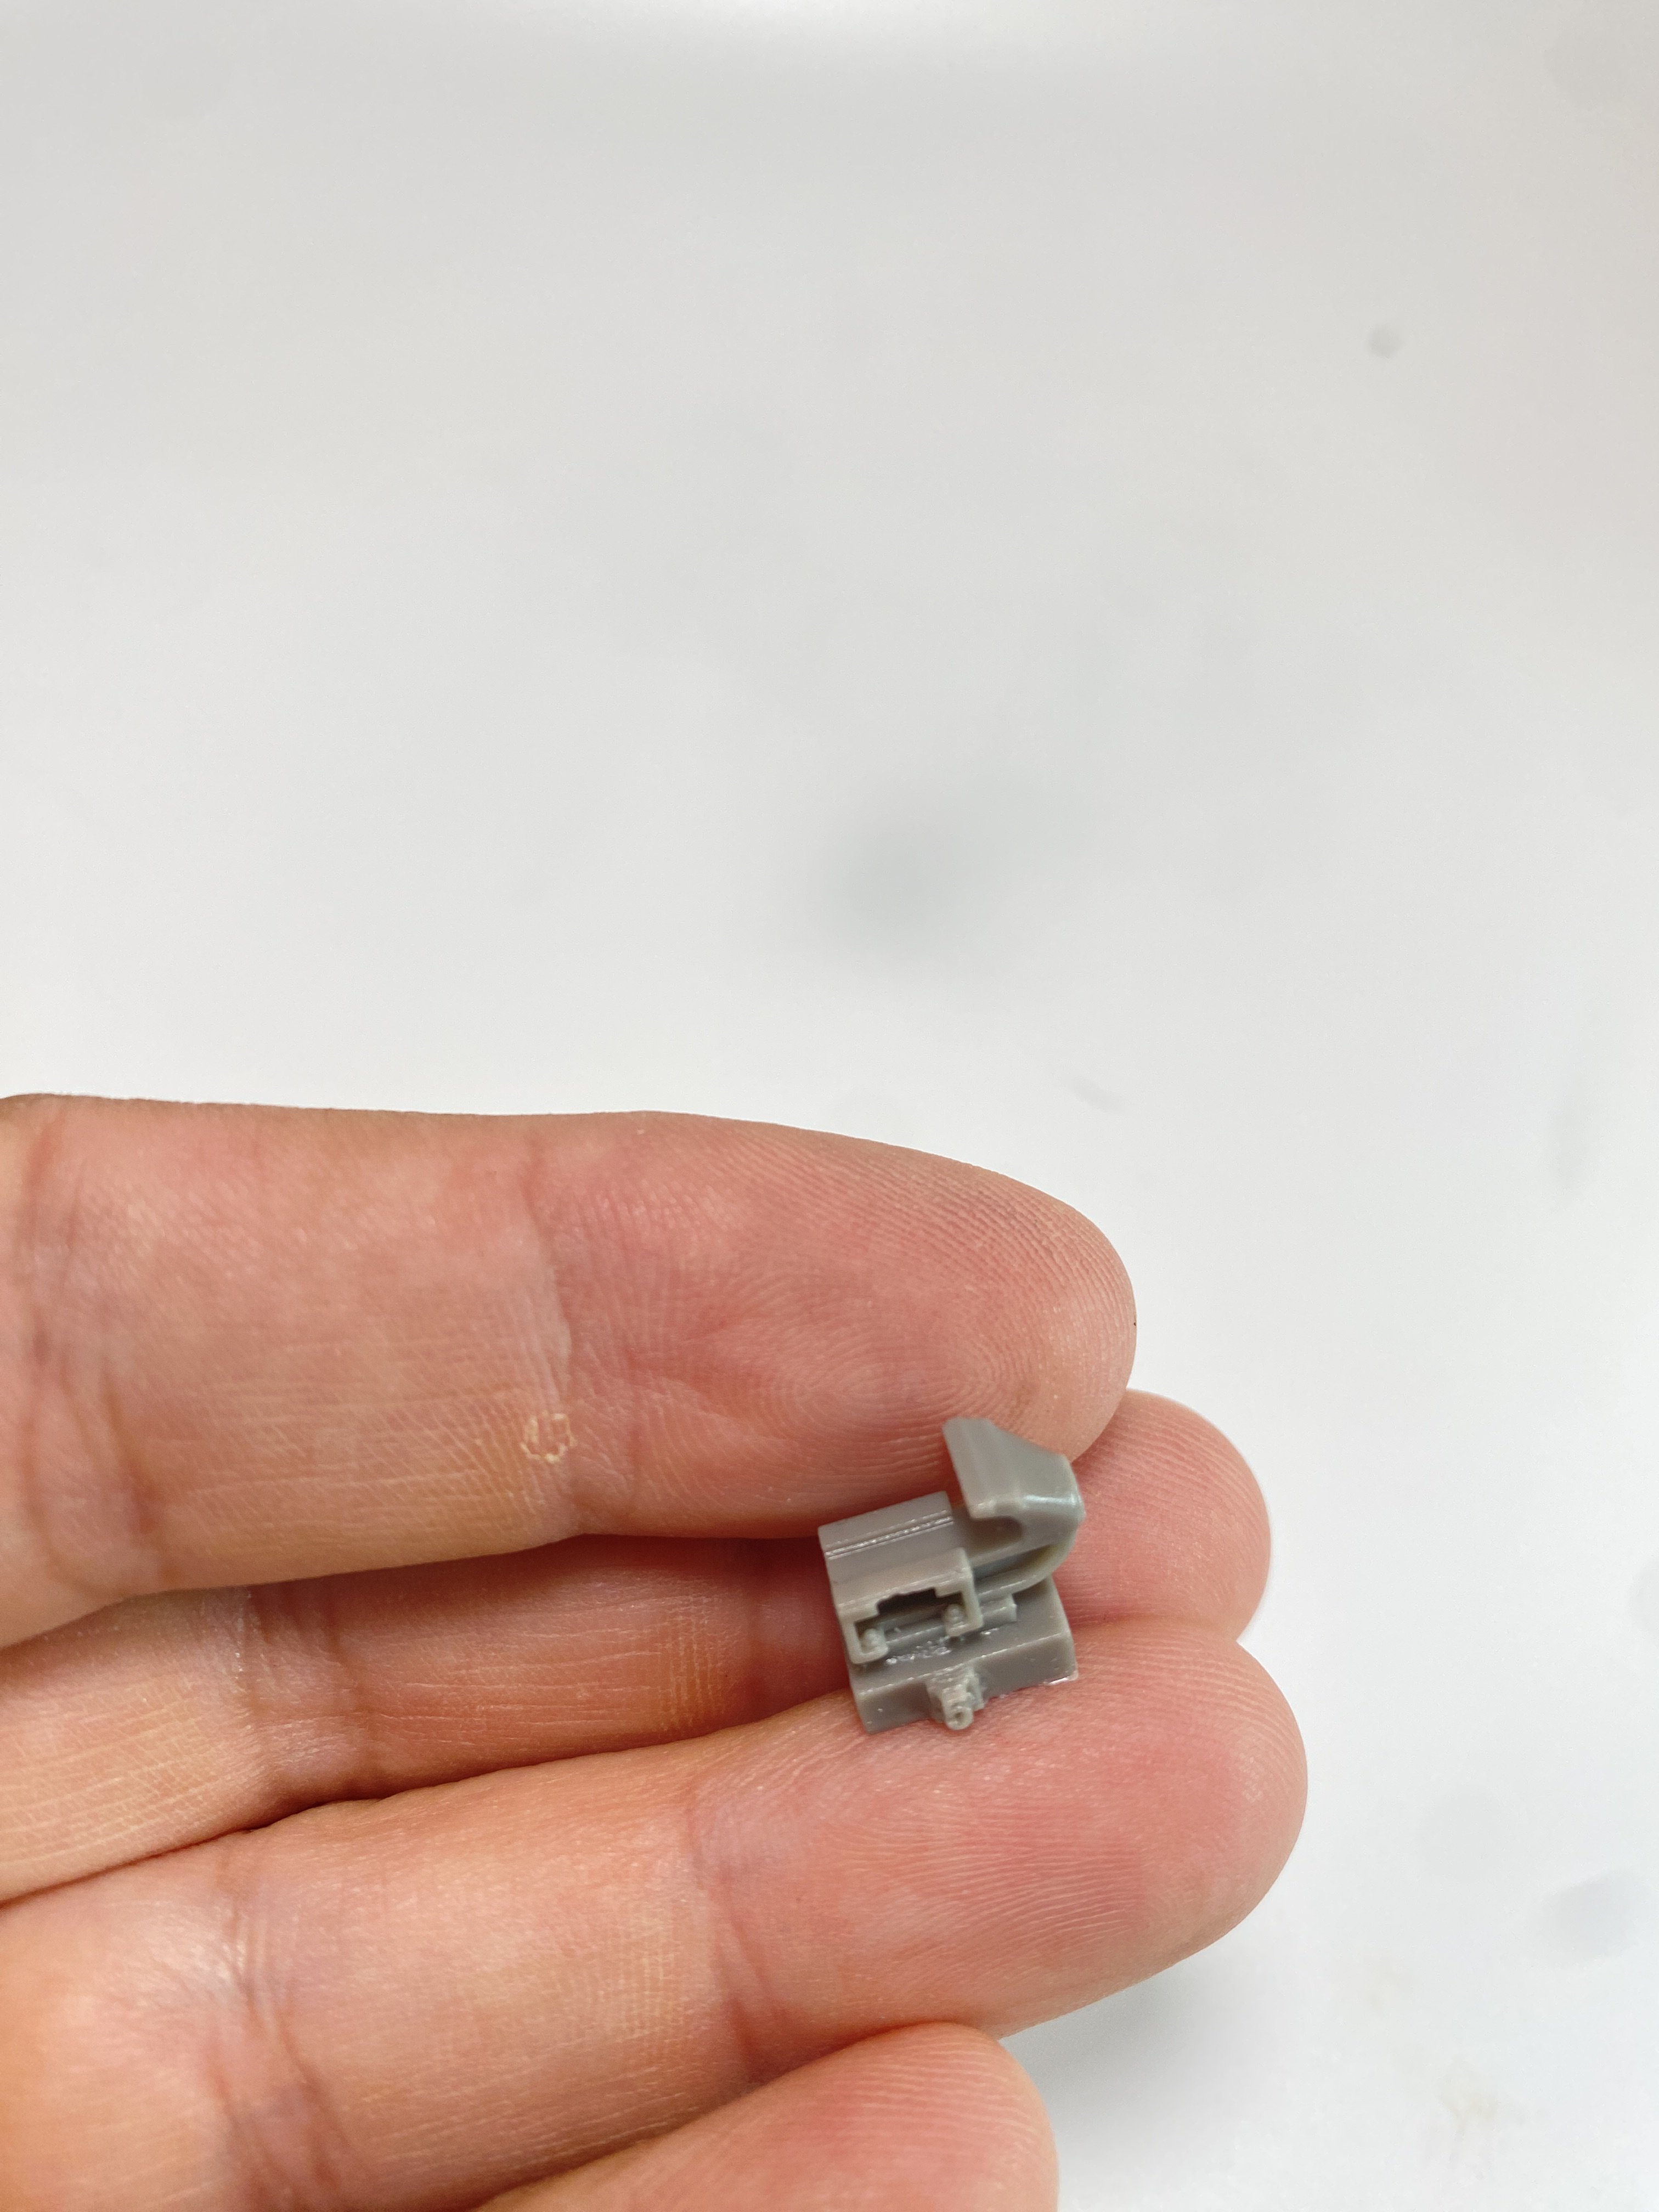
PLUSMODEL Diorama Accessories Sets Available from Plusmodel for the prices indicated below on the text Continuing in reviewing Plusmodel new item, this time we got two details sets from the new line, Detail Print series and one accessories detail set in resin. Plus Model always set a originality way in their sets and these ones are no exception. All sets are in 1:35. The new line comes in a small and modern look box. The box art still have the full build set as box art. The “Grinder” comes in the traditional box way. All of the items very well packaged, with the all the parts coming inside of a bubble bag. Starting with the resin accessories detail set we get the “grinder” Grinder (10 resin parts and 3 resin 3d pieces) Catalogue n.º 588 Price tag: 16,82€ – directly from Plusmodel. This is a very welcome addition in 1:35 to ll of those who want to make a diorama with a workshop or something similar. The box brings everything you saw on the boxart. So a full workbench in a single piece is there. The drill and respectic arm is very well detailed and is in full 3D. The workbench vise is separate so it can be placed on the table anywhere or used separately. The double-ended file machine is made of 6 pieces in resin. All the pieces have enormous detail, being quite delicate, namely the 3D pieces. The resin blocks look quite easy to remove, only patience will be needed. * US Welding kit (10 resin 3D prints pieces) Catalogue n.º DP3019 Price tag: 13,07€ directly from Plusmodel. These 10 pieces in 3D are very well printed, with no distortion and nice detail. Its gives two weldings kits and extra large botlle. A wire is also in the box to be the hose. They are printed is in dark grey with no flash or printing lines. All parts are beautiful printed with fantastic detail. And the surface detail is fantastic. The resin 3D block are very easy to remove (some can be remove by hand) and are in perfect place to be removed without damage ant detail. ** German thermos Containers (10 resin 3D prints pieces) Catalogue n.º DP3011 Price tag: 10,41€ – directly from Plusmodel. The quality printing here stand also with very high quality. So there is 4 open container and 2 close ones. The ones that have a cap in open position, are totally hollow , so you can had “water” on it… Would be a good an extra realism on it. The resin blocks are not so easy to remove that the welding kit set, ans part of them are in the container body, so care and lots of patience should be necessary to reduce the work of removing the connections marks and keep the surface detail. Four small containers are also in the set and an old kettle. This old kettle is very delicated but is a beauty and it will add extra detail to your work, US Engineered Pulleys WWII (Resin 3D prints pieces) Catalogue n.º DP3018 Price tag: 9,92€ – directly from Plusmodel. Finally, a set with four engineer pulleys of the US Army. Well, are only four but it is a quite complex building with lots of parts, namely many screws and nuts. It’s not an easy build because you don’t get any instructions but a full image of it. So this set can`t be for a novice modeler at all but expert modeler (or a high intermediate modeler) The detail, once again is impressing and everything and these can by use almost in every diorama with US recovery vehicle or in a workshop. Conclusion These four sets of accessories for dioramas translate once again well Plusmodel philosophy: originality, quality and versatility. The quality is of the highest level, now with their new line using 3D Printing technology. Some of these set are not for novice modeler (and the Engineered Pulleys for experience modeler) and an intermediate modeler can make something very good out of these sets. And the detail that will be add to the diorama will be well worth. Very Highly recommended With my sincere thanks to Plusmodel for these review sample. To purchase directly, click this link. Francisco Guedes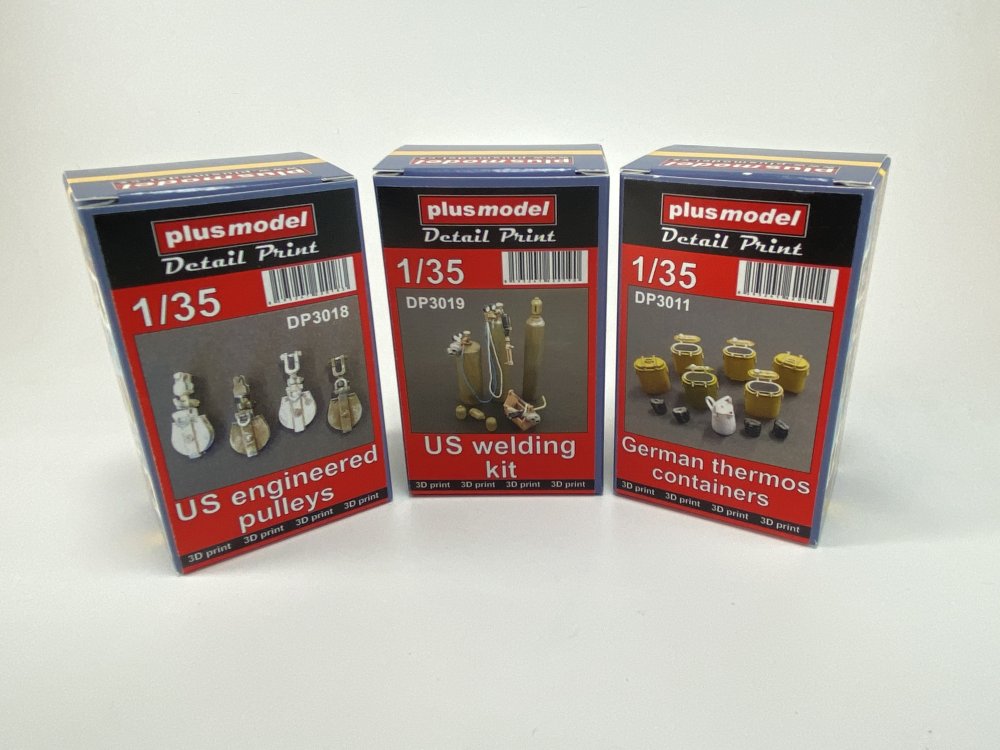


-
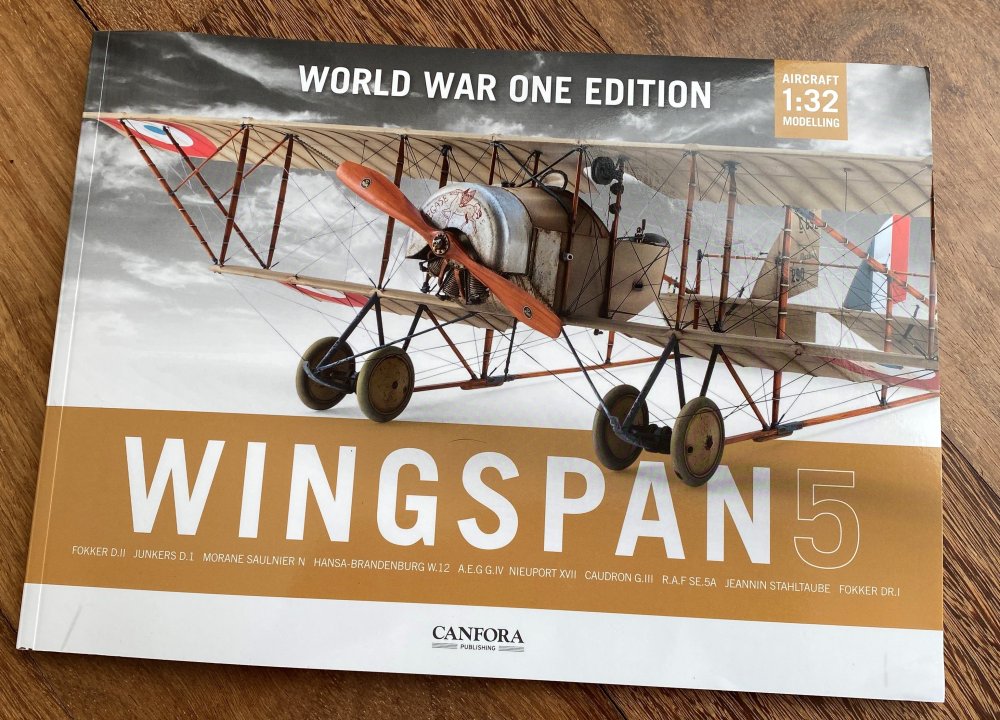
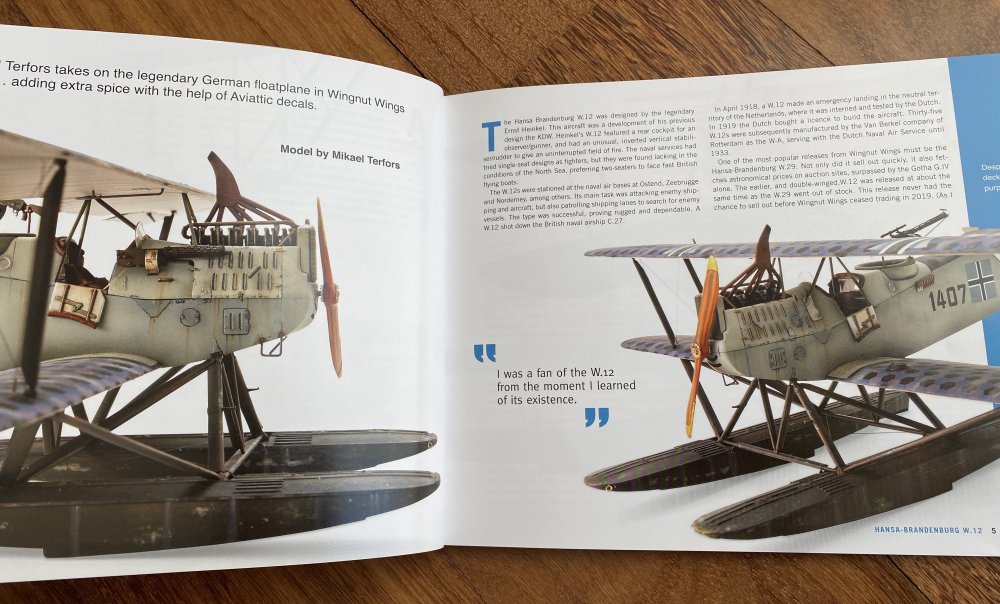
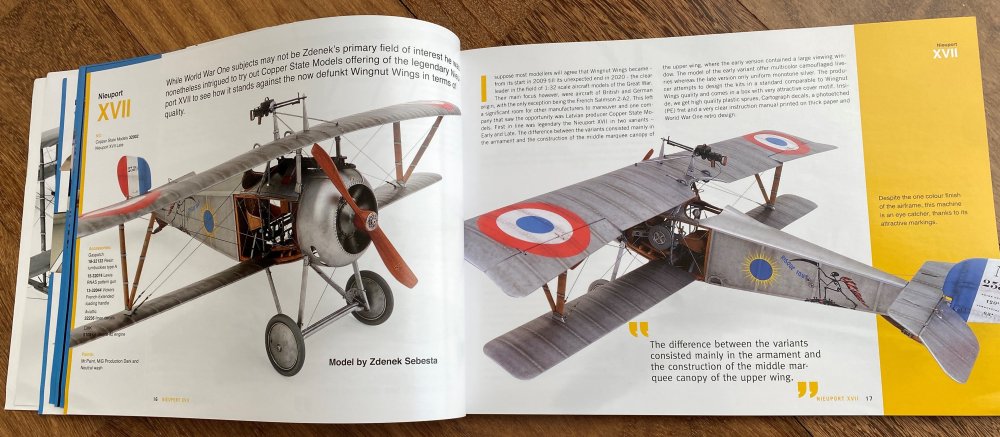
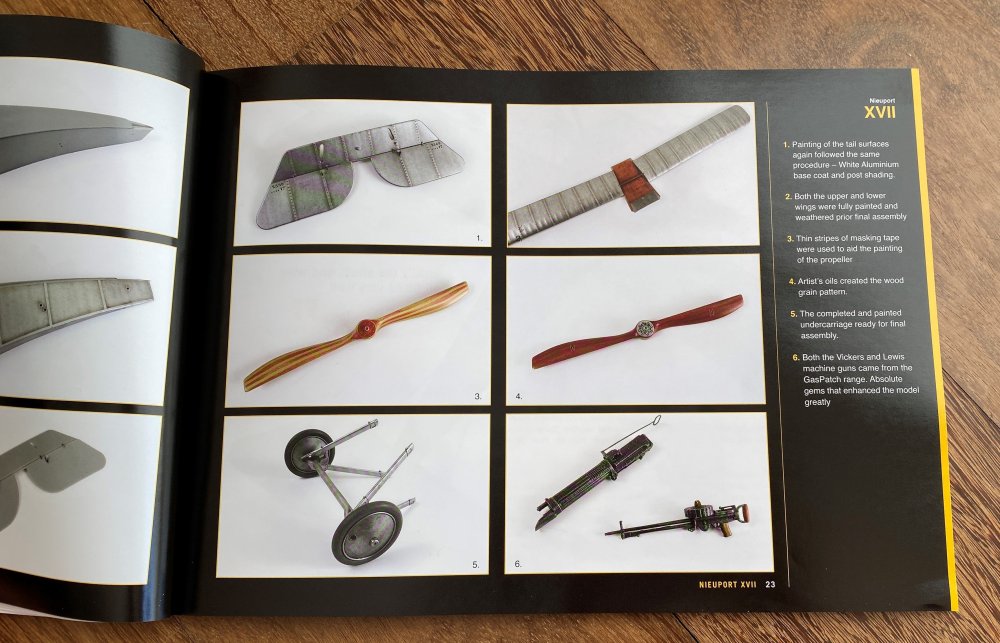
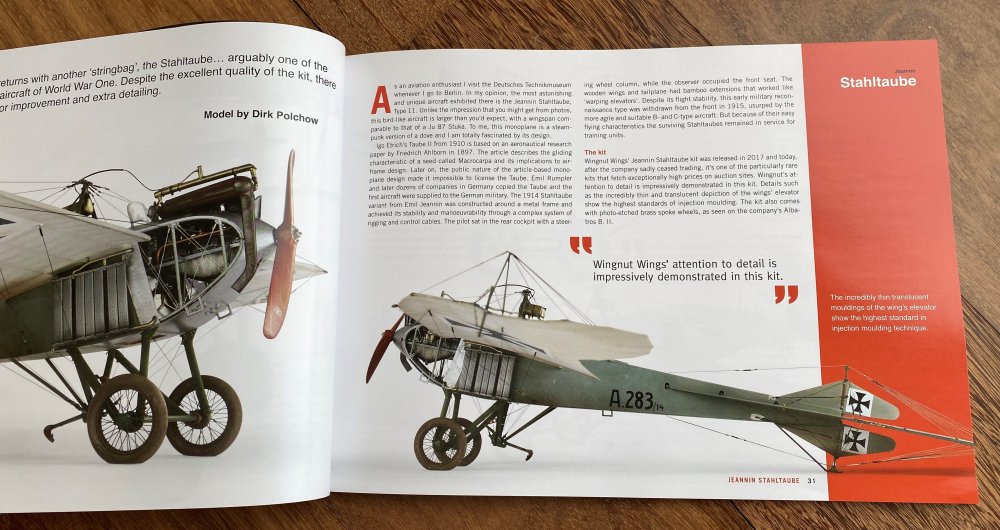
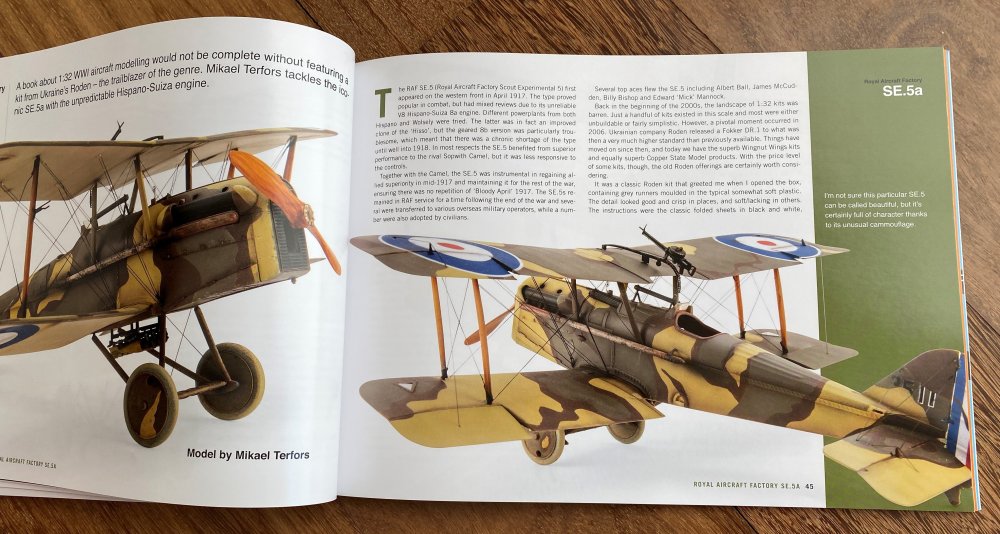
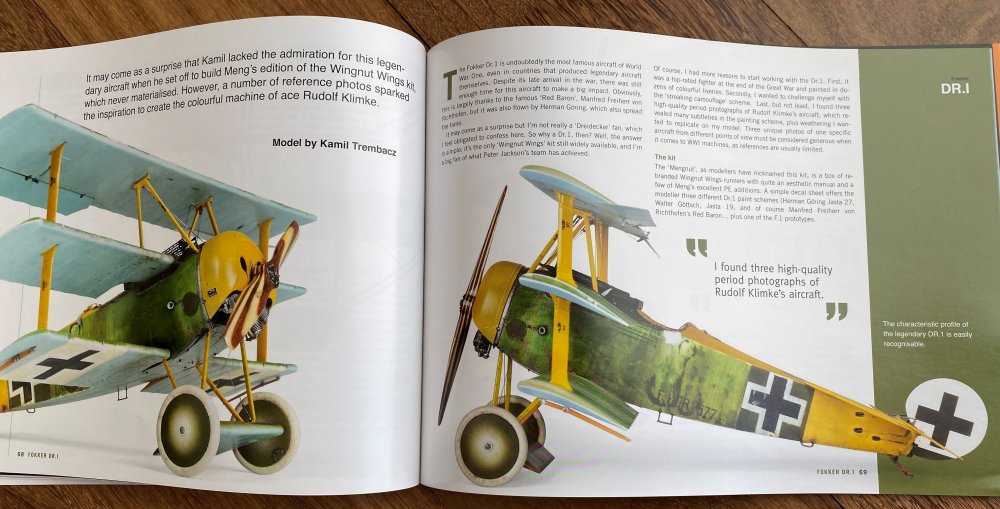
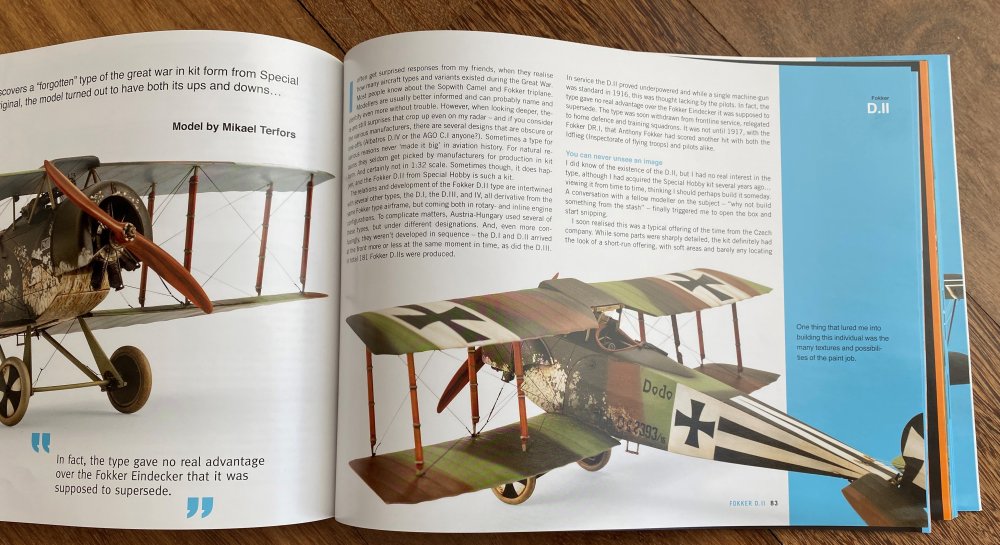
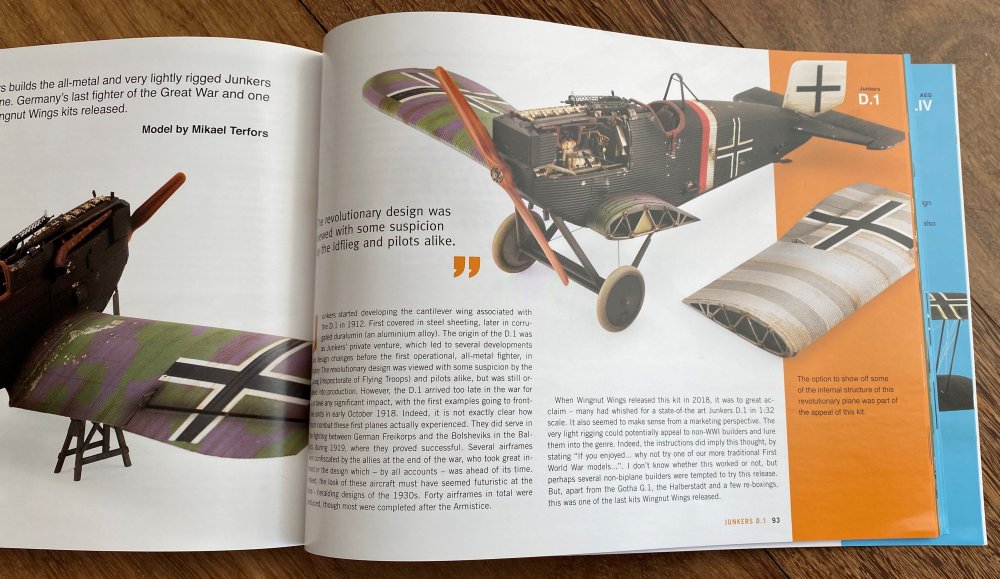
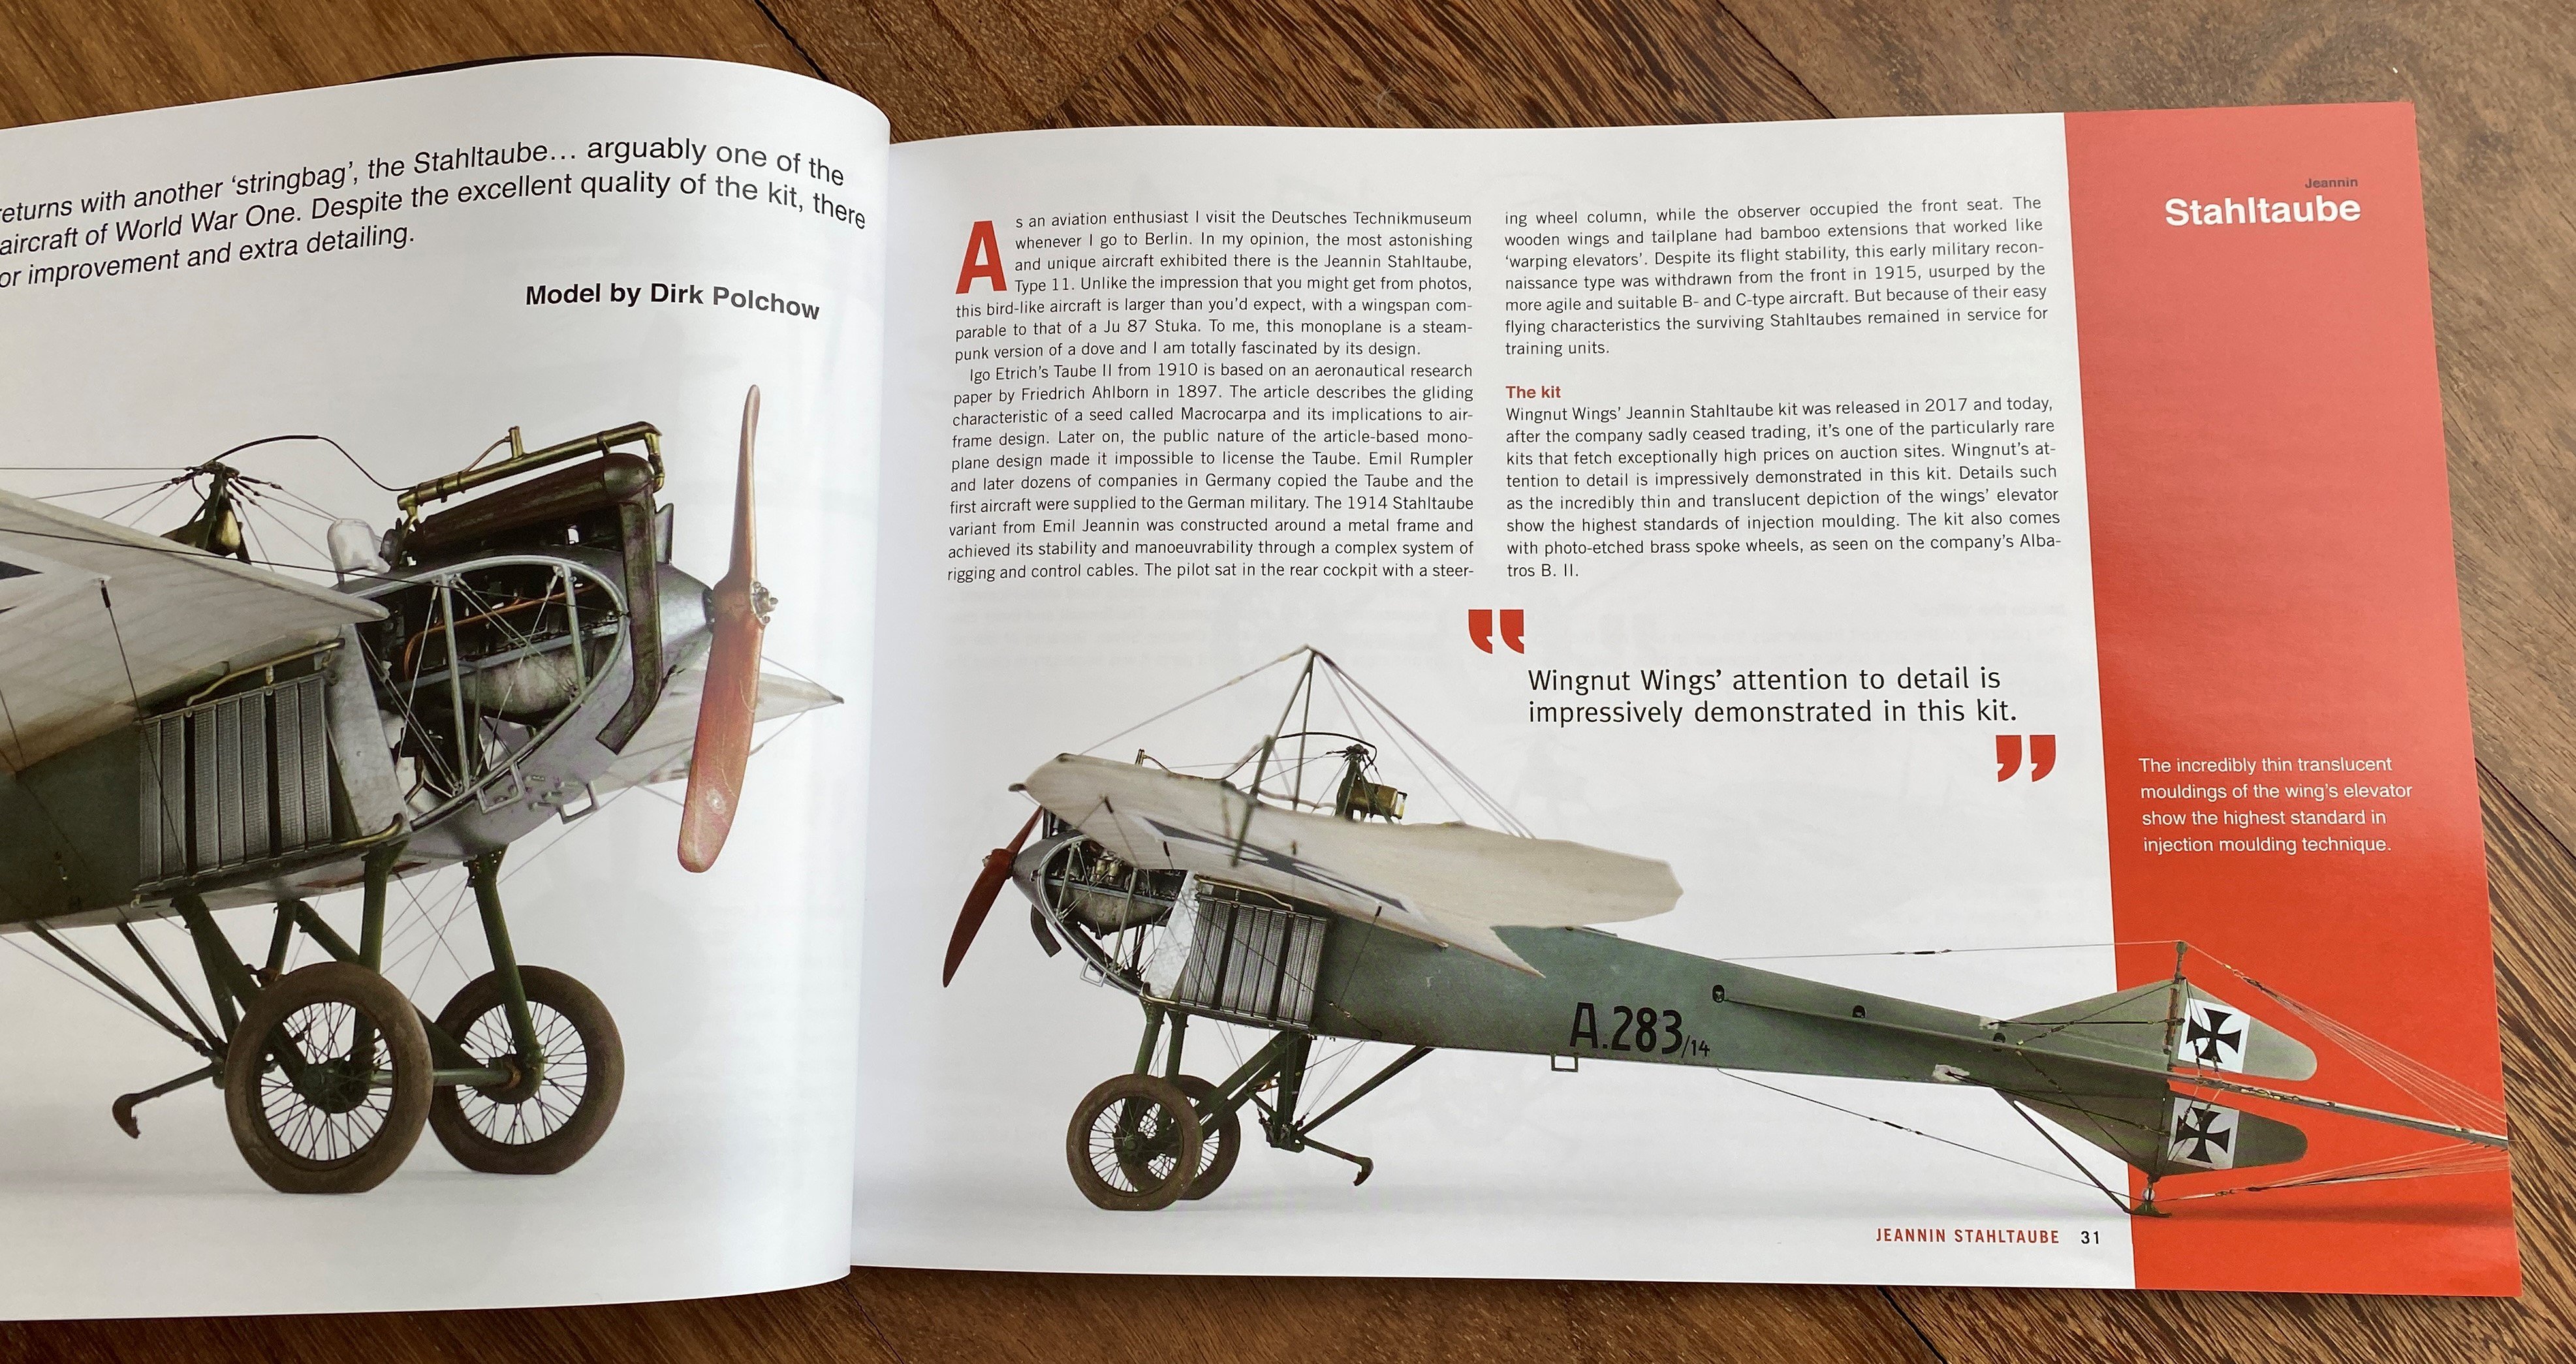
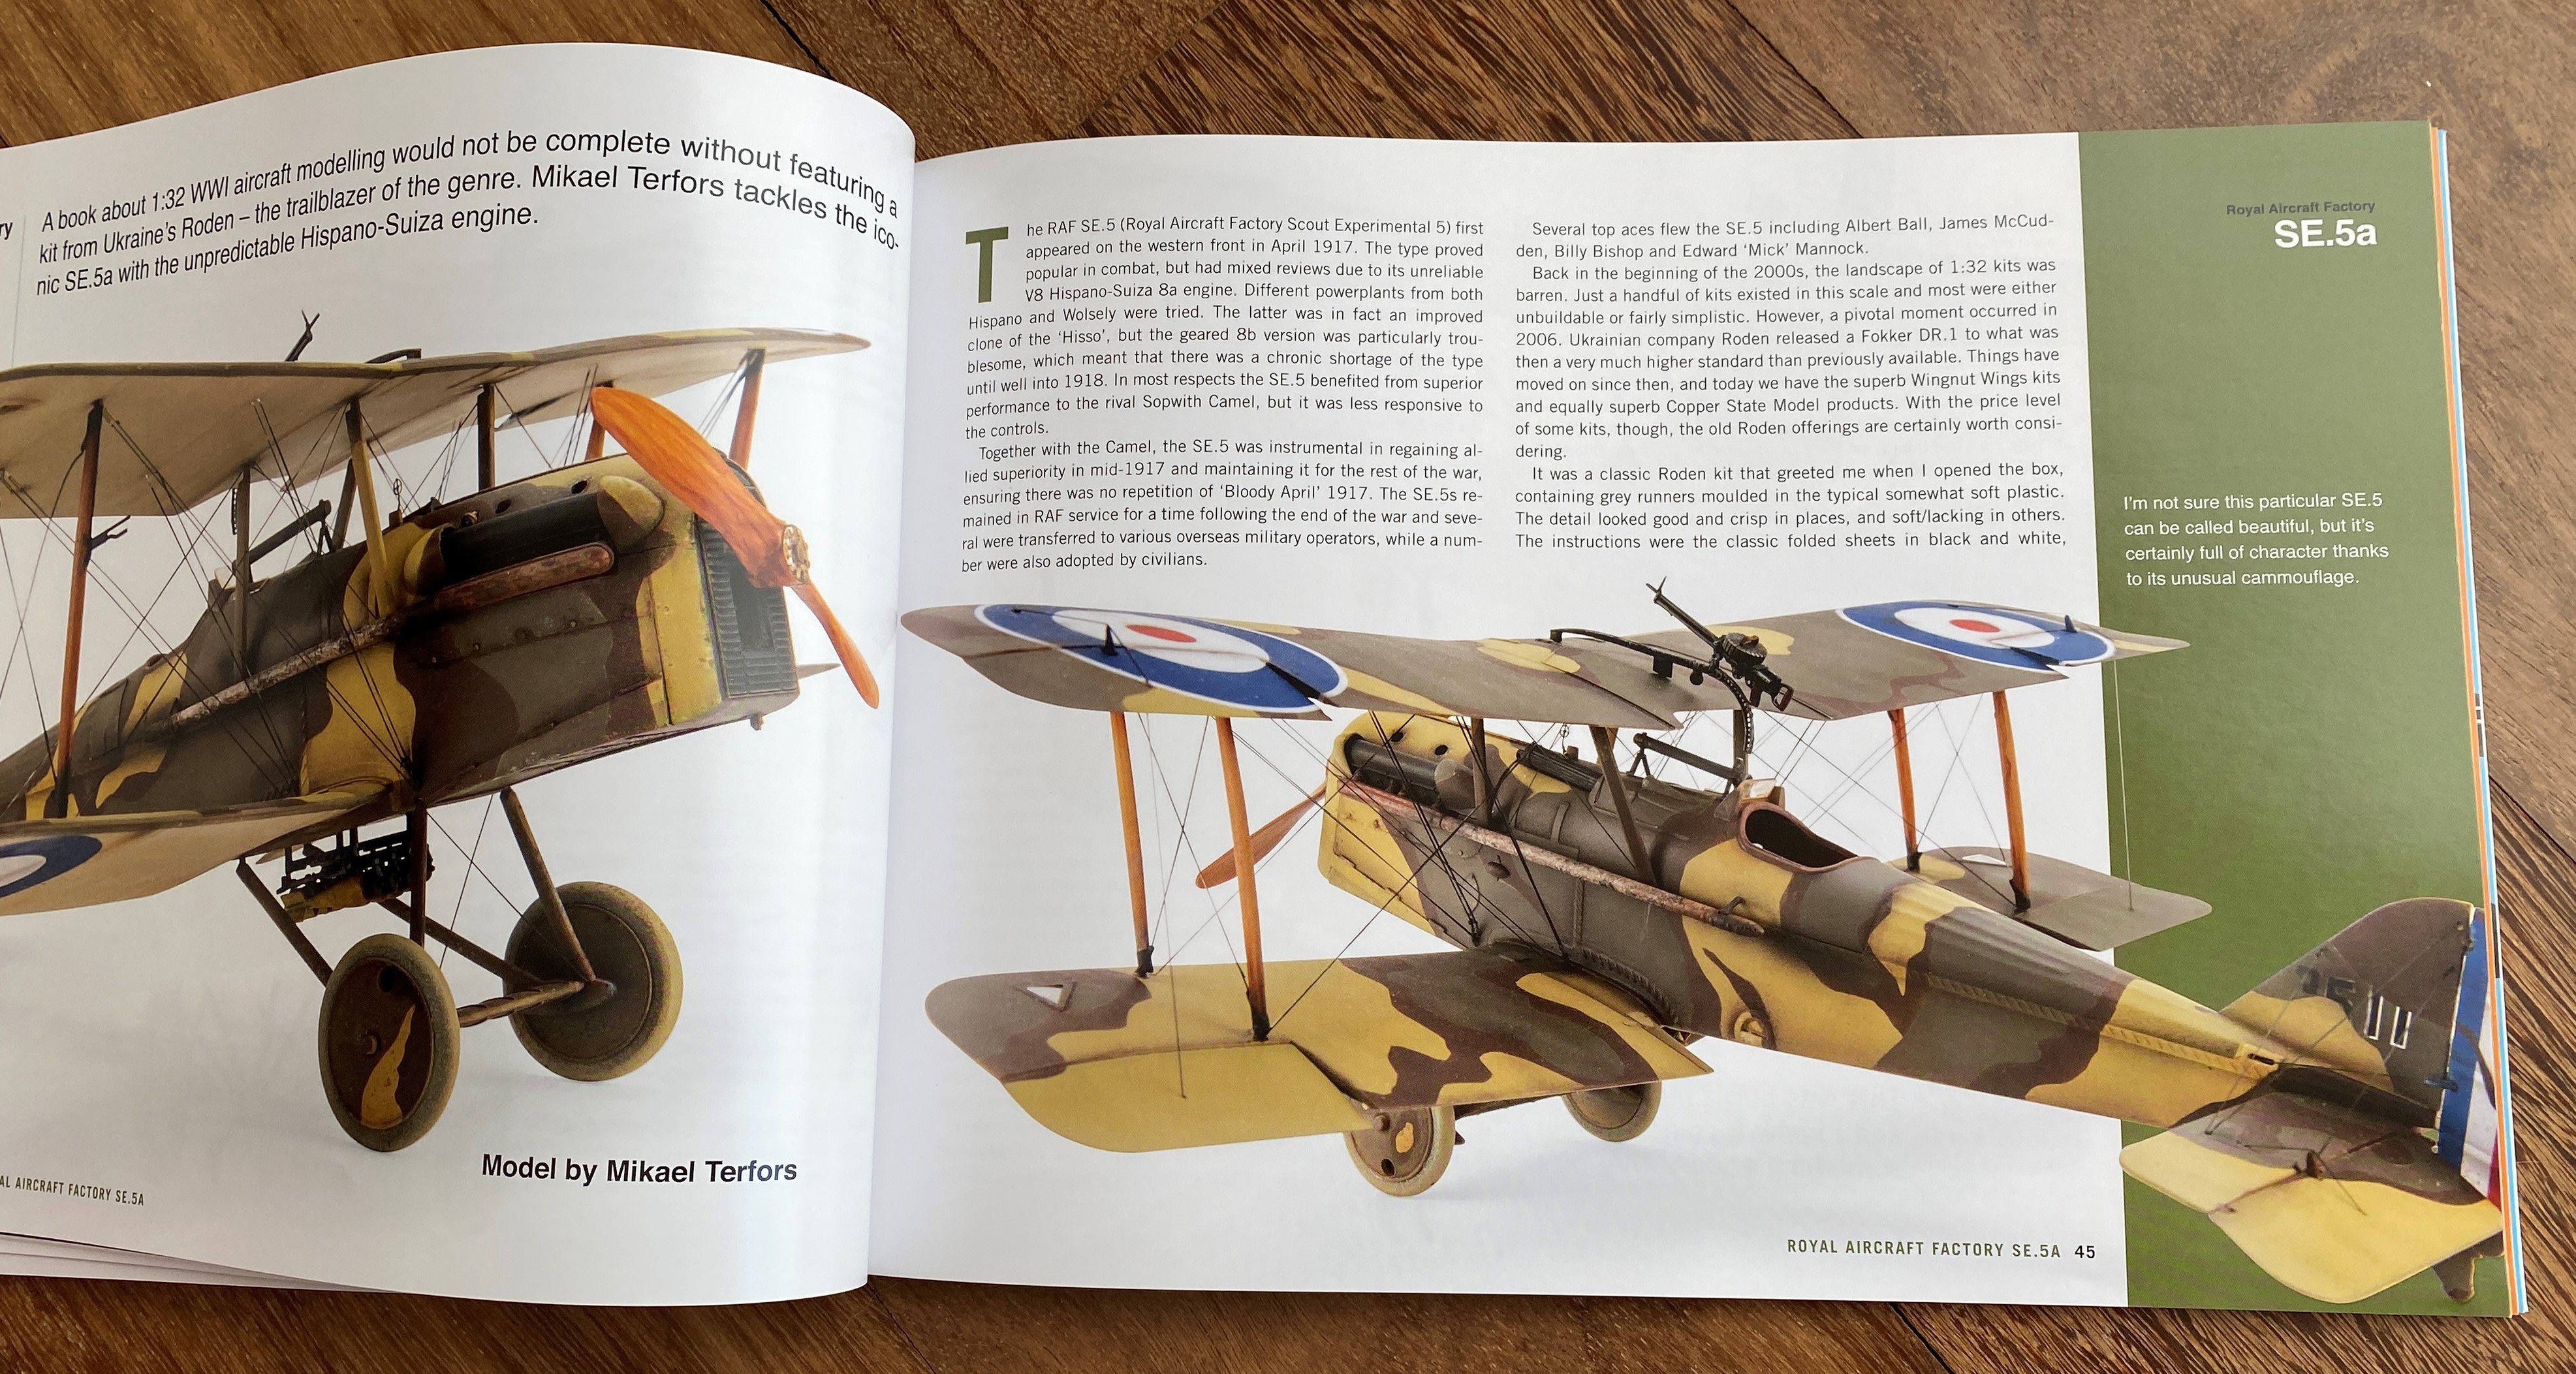
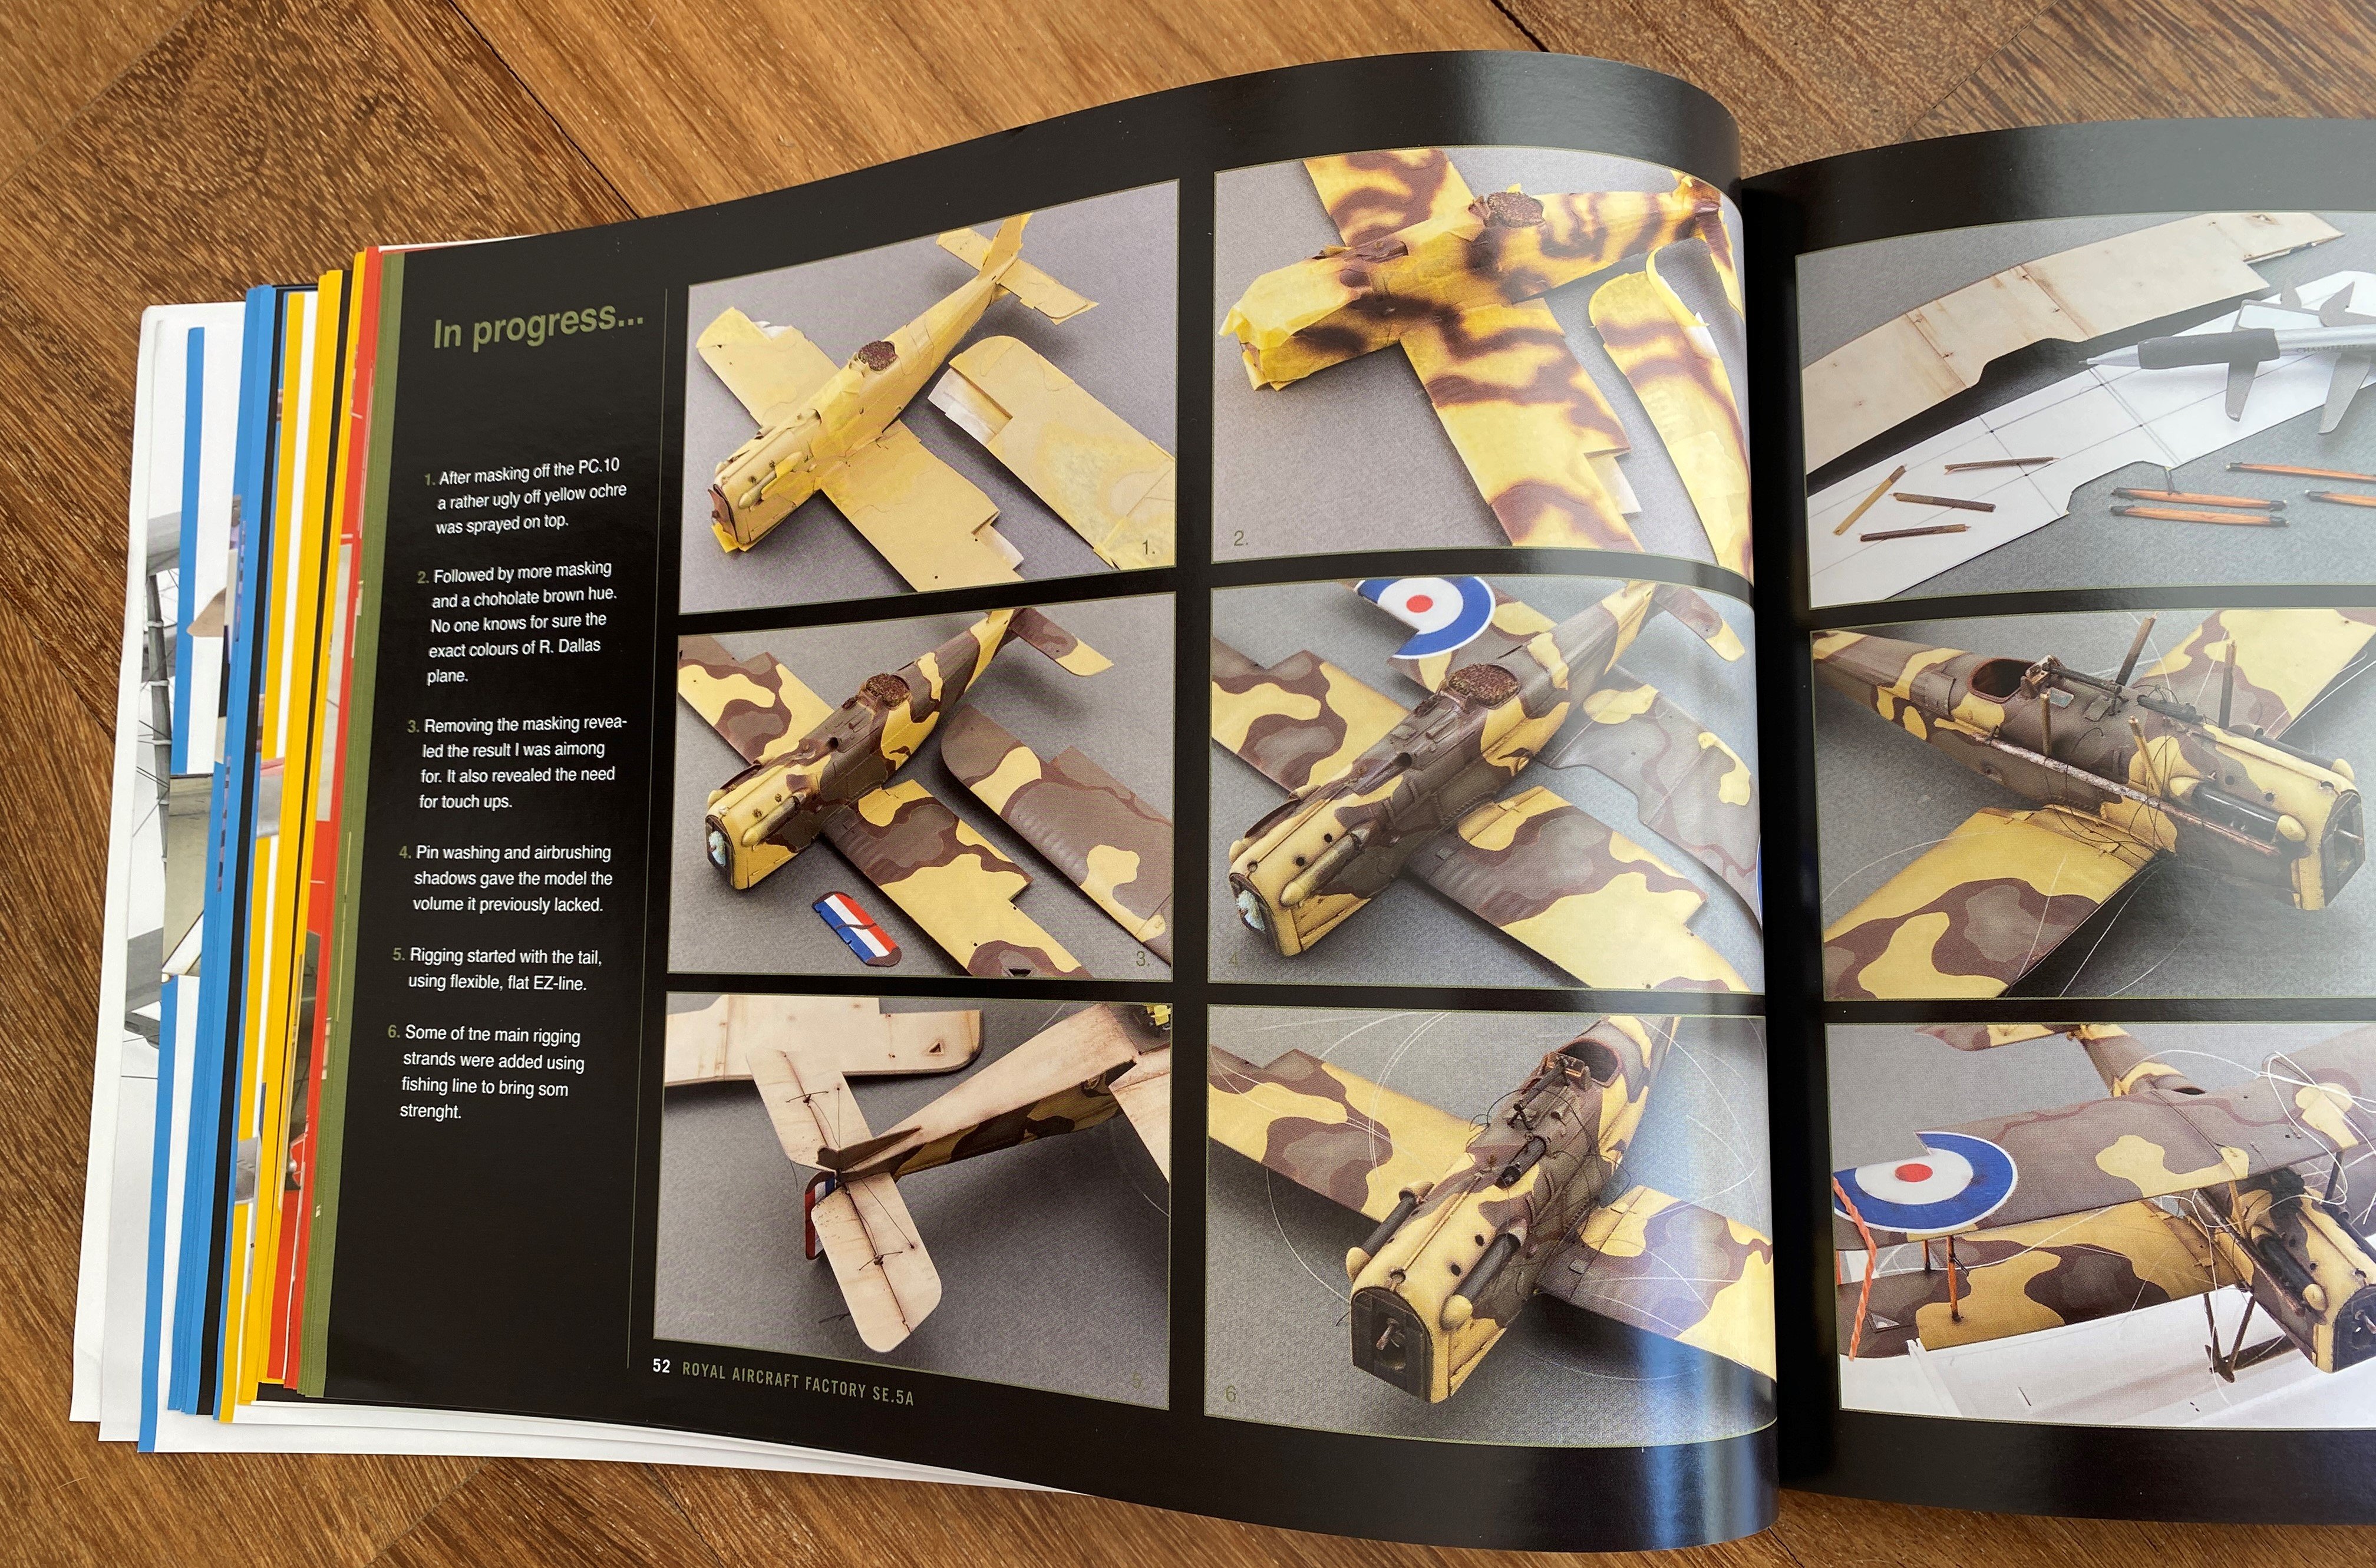
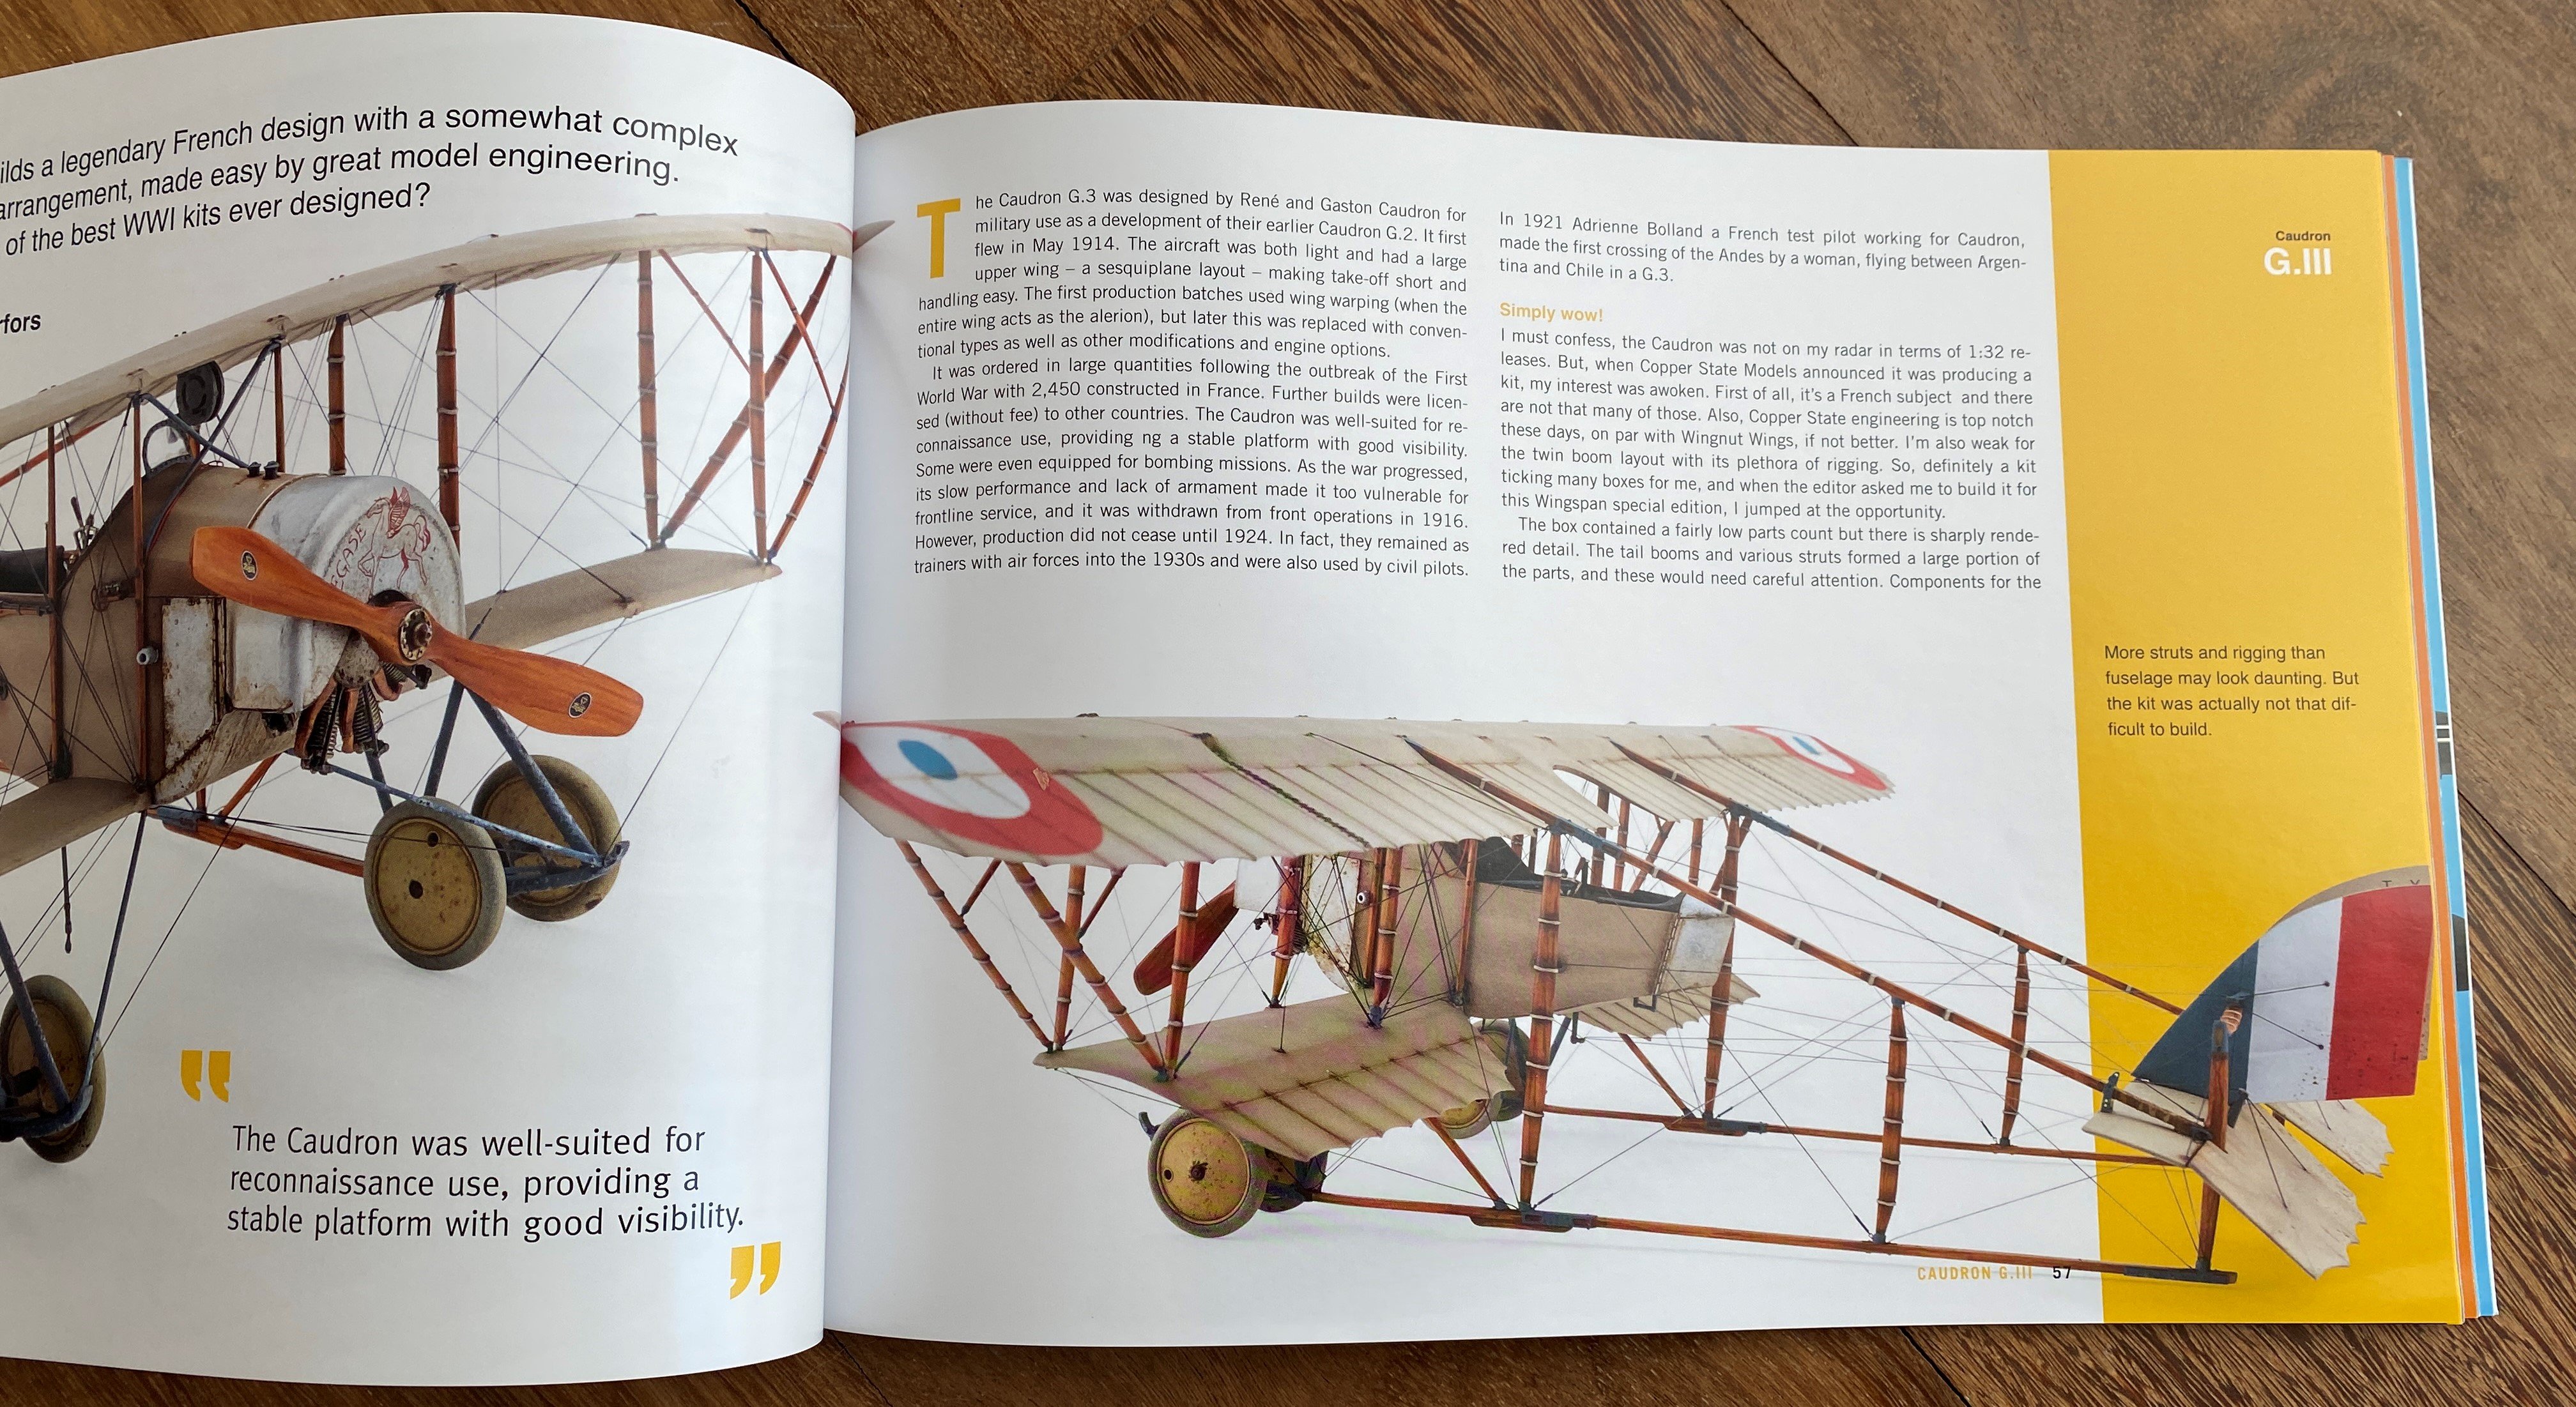
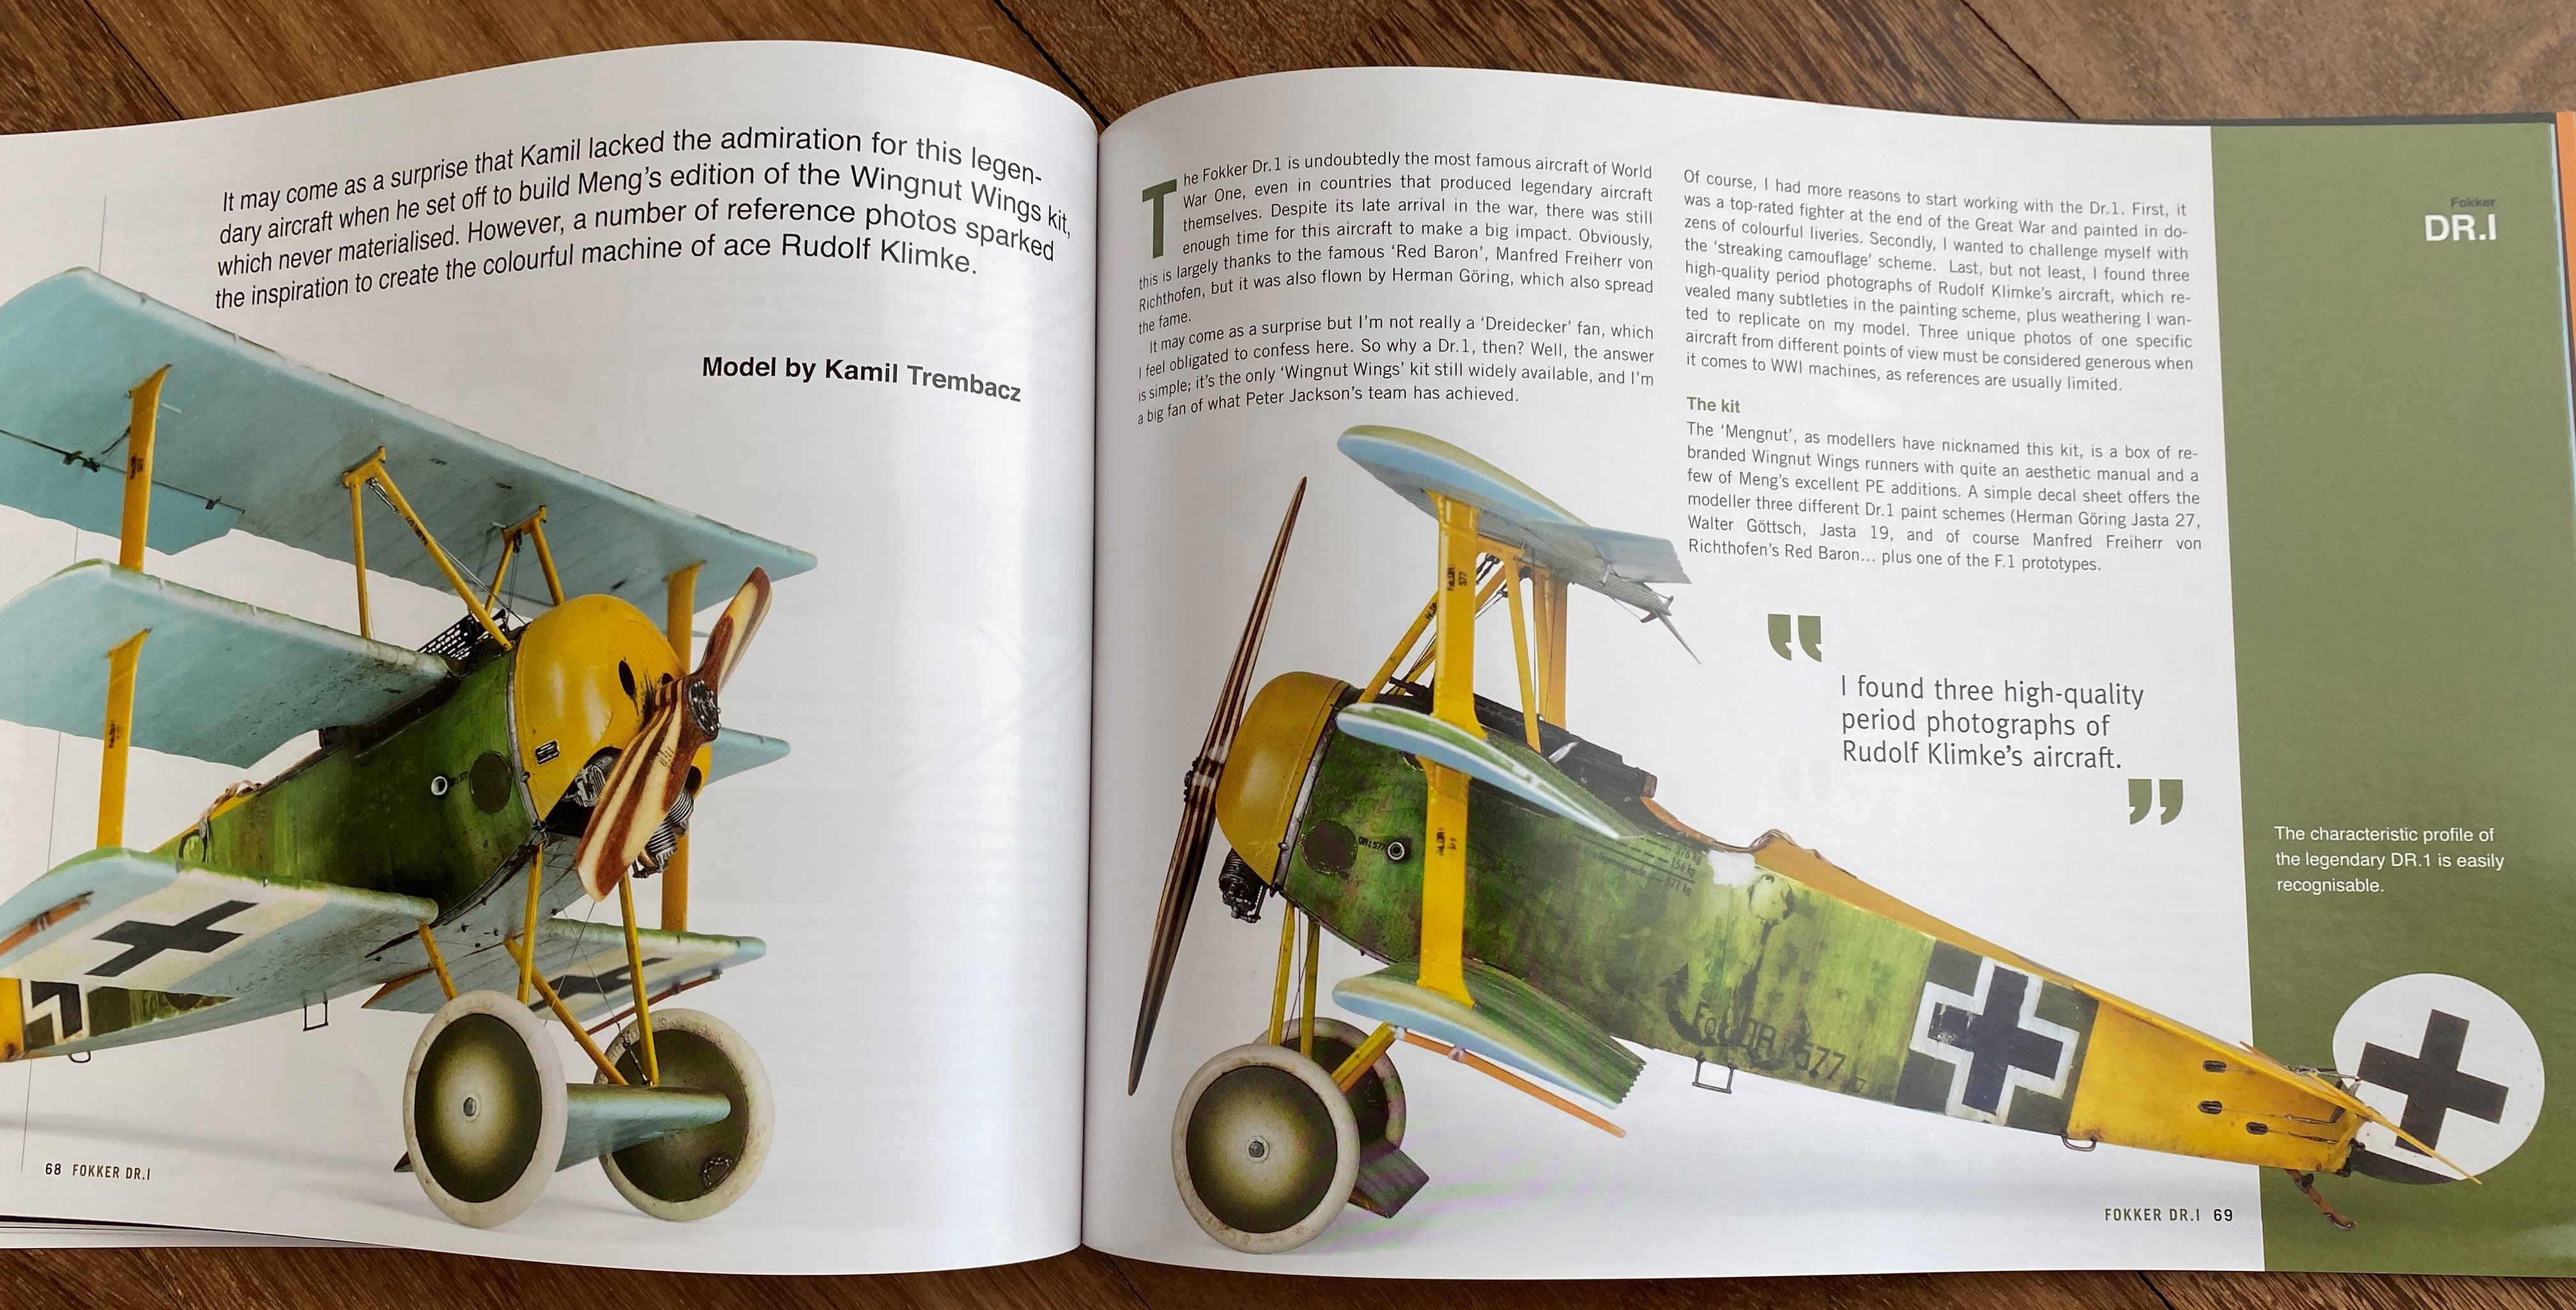
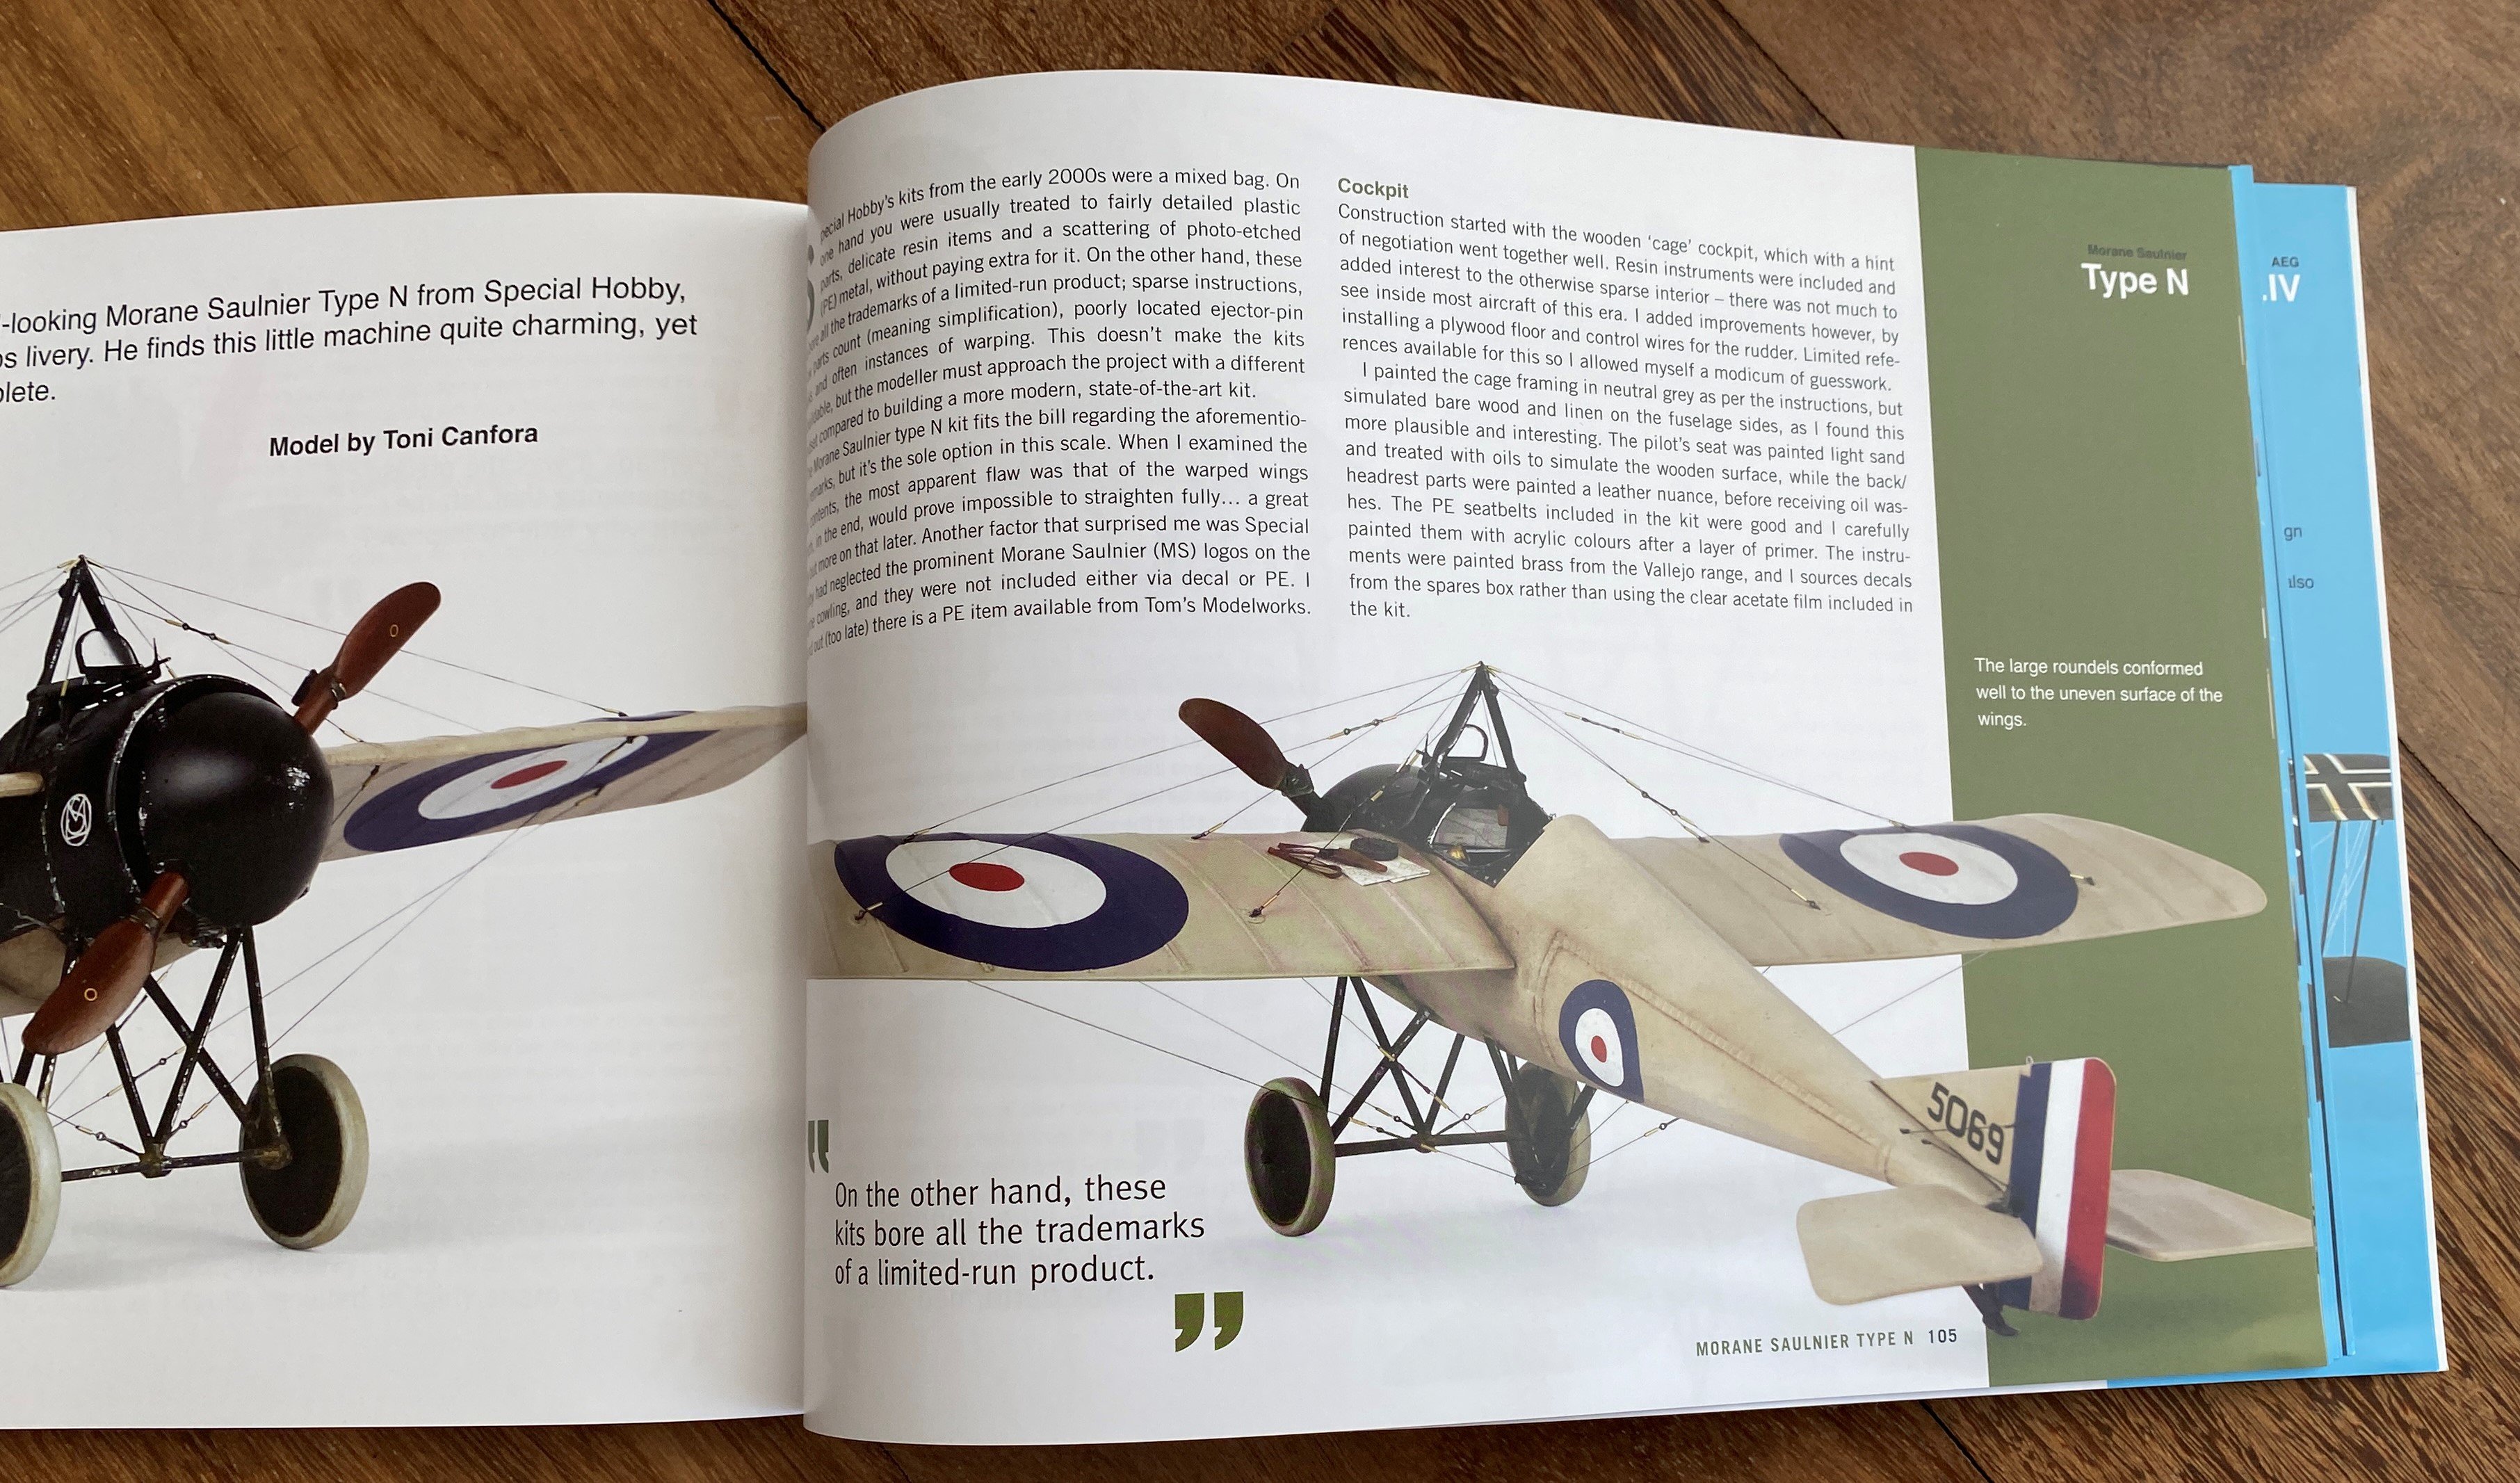
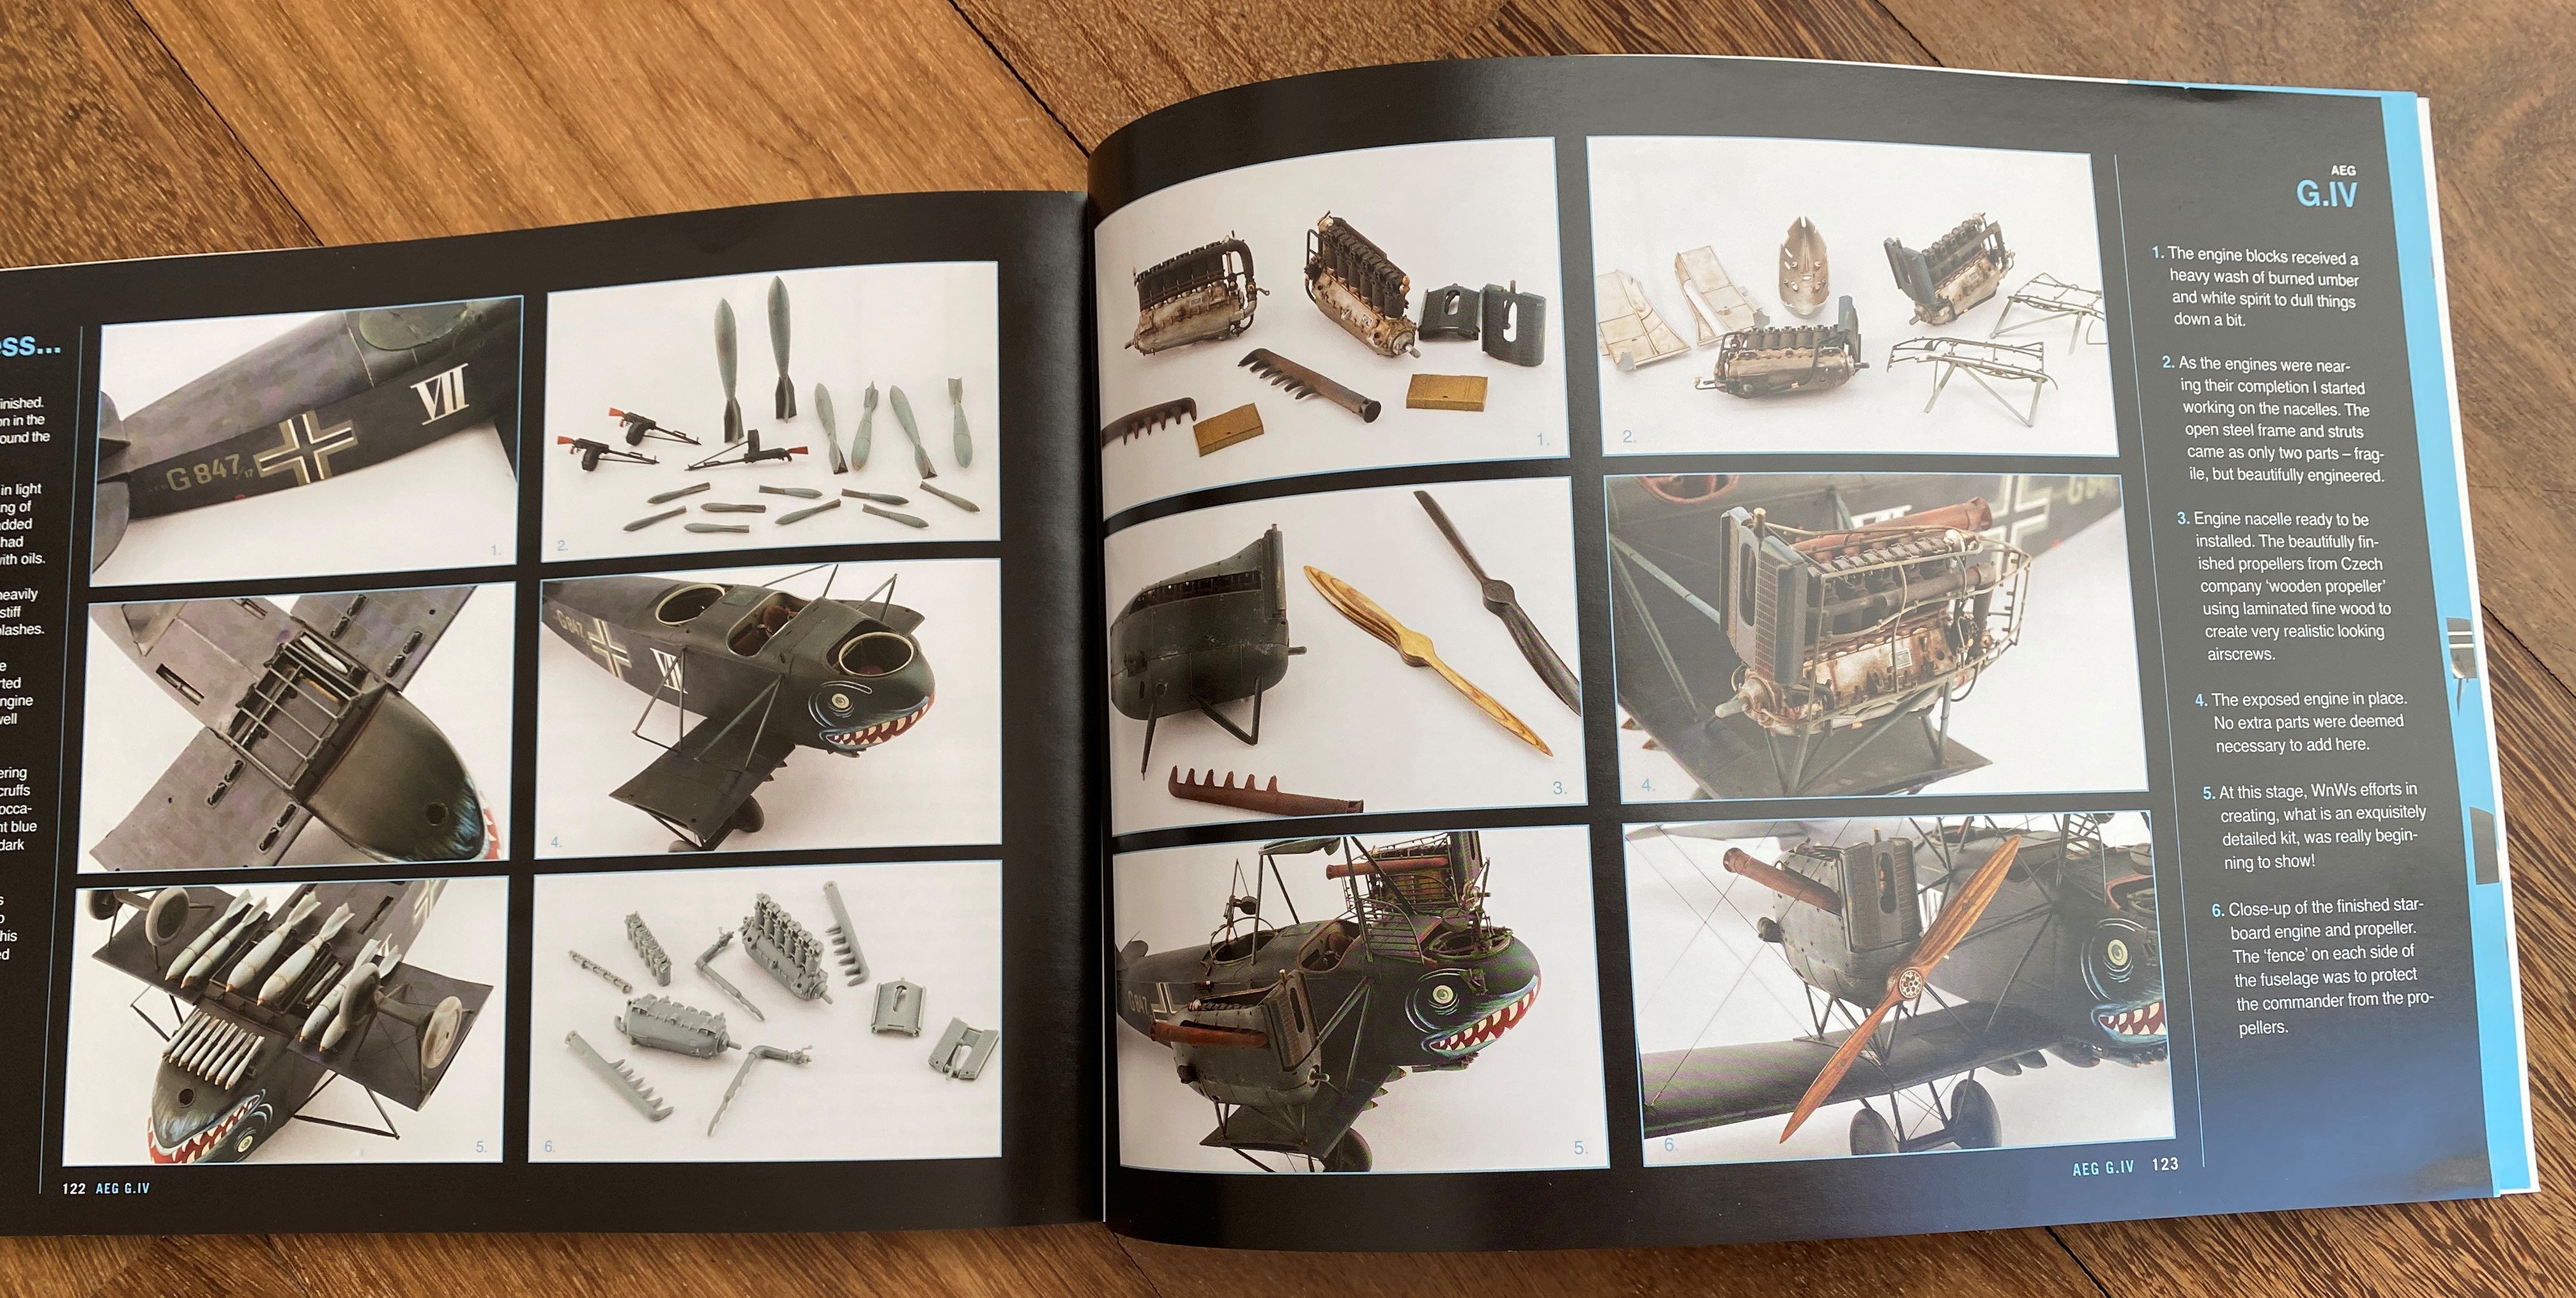
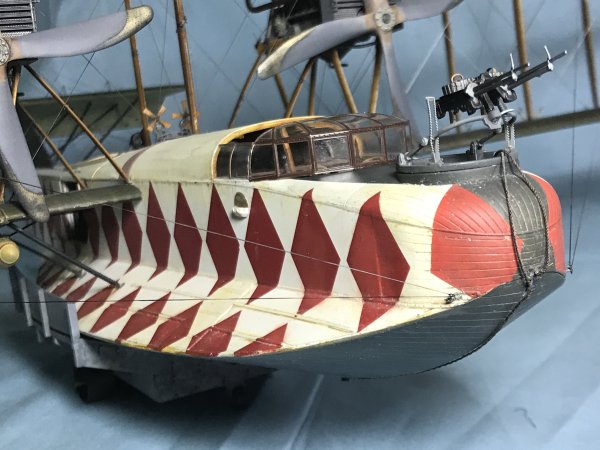
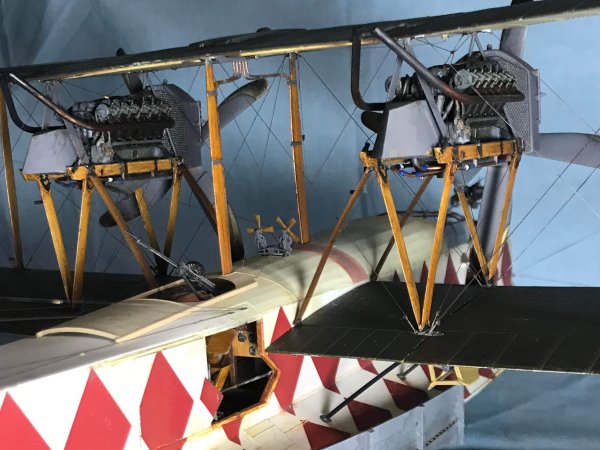
WINGSPAN 5 1:32 Aircraft Modelling Several authors Publisher: Canfora – Graphic Design & Publishing 128 pages Landscape format (A4 size with softcover) 10 full features build Price tag: 27 euros [ Canfora Publishing has several book of Aircraft, AFV and diorama modelling as historic book. Now Canfora release the 5 volume of this series, with a special edition. It`s a special edition because it`s a edition totally dedicated to World War One!! And of course at a 1:32. In the cover page, is spectacular 1:32 Copper State Models Caudron G.III. The whole structure between the various items is identical in approach to the subject, but with five different modellers with distinctive styles. So, this book is not a FAQ or a pure SBS as full-page close-ups are combined with step-by-step but an informative and mojo up to modeler. Canfora decided to keep the format, being quite different for other books, in landscape. In wining time you don’t chance. The works are inspirational and can effective have a positive effect in modeler motivation. All the builds are flawless and simply amazing, specially being WWI. All features have a small side table, with main information: the model kit used, the aftermarkets, and paints brands (and not the references). Also every single work has a color label to identify all articles, to a quick search. The first build is Hansa Brandenburg W.12. This iconic model from Wingnut Wings was build by Mikael Terfors. This particularly model is one of most wanted model kits from the deceased model company Wingnut Wing, alongside the W.29. In every build, is given an information of which accessories were use. In this cause, the aftermarket used were Aviattic German Naval Hex printed linen “faded” (ATT32113) and EZ-line 0,15 Monoline 0.14 Despite not being a step by step book, the author, in the text, describes what he did, what colors he used and techniques he used. Although not mentioned, the author used HGW wood decals in the interior. The second build is 1:32 CSM Nieuport XVII made by the great modeler Zdenek Sebesta. Several AM itens were used and the author decided to cut the front part of the fuselage in a quite easy operation. I`m really impressed with the linen effect obtain with the help of Aviattic 32226 Linen Decal… Need to source a couple of decal sheets. The next one is one of my favourite model kits from WingNut Wings, the Jeanin Stahltaube. The model was made by Dirk Polchow Lots of information about the building and painting process, but I would highlight all the tips to paint that daunting cowling in silver. It`s all there to make your work much easier. Last but not the least, the author gives several interesting thoughts and tips of the very complex rigging despite being a monoplane. Mikael Terfors back with a 1:32 Roden Royal Aircraft Factory SE. 5a. Yes a 1:32 Roden SE5a. The build is outstating and Mike really took the best of Roden model with lots of work that he kindly shows on the progress chapter and in the long text showing all the work. Mikael Terfors keeps the pace and brings a full build of the 1:32 Copper State Model Caudron G.III. And what a beautiful work, outstanding really. All the work is very well explain by the author and all the info to make a great work with this model kit is all there. It`s up to the modeler`s capacity. The iconic Fokker Dr.I must be in any WWI modelling publication. Kamil Trembacz builds the one from Meng (that is actually the ex-WnW mold) with the Rudolf Klimbe markings. I love to see that the streakings on the wings and fuselage are made with oils and are not decals (this has step by step pictures). Really nice work. In fact, this build has 3 “in-progress” pages with some complete step-by-step build parts. The guest editor Mikael Terfours was quite busy in the book and I`m quite glad that he did beause he is a truly marvelous WWI modeller. Next one he tackle the 1:32 Special Hobby Fokker D.II, making a full scratch cockpit and getting around all the challenges that this particular model has. All is explain by the author by pictures or text. Was quite a demaning build but the result is in fact outstanding. Back to wingnut Wing, the guest Editor tackles the Junkers D. 1 and to make it a little more interesting, he did it some fuselage damage and explain how he did it. Now, enter in scene the Editor Toni Canfora with a 1:32 Special Hobby Morane Saulnier Type N that made a very good work with this very difficult model kit. The detail put on it is very good and you must love the Webley pistol, map and spare drum magazine on the top of the wing, just beside the cockpit. And finaly, the 1:32 Wingnut Wings Allgemeine Elektricitäts-Gesellschaft (AEG) IV by Mikael Terfors, one of my favourite WWI airplane. Conclusion It's a display of beautiful works, with tips and some photos of WIP with spectacular photographs of fantastic models. Several techniques are presented throughout the several builds, it is told how to do, with several pictures of the step to take and to achieved that goal. Also show up the use several aftermarkets items on the builds Every single work is top quality, the best you can see in magazines and modelling books This Wingspan is, probably, the best 1:32 Aircraft modelling book on market. This publication has a fantastic color registration and print quality, with some excellent model photography reproduced on 128 glossy pages. Very Highly Recommend Thanks to Canfora Publishing for the review sample.


- 1 reply
-
- 1
-

-
Announcement of a Zotz A-20 decal release?
Fran replied to Clunkmeister's topic in Modelling Discussion
Fantastic news Eli. It´s great to see you back! Blessings, please stay safe and take it easy. Looking forward for the upcoming decals -
Announcement of a Zotz A-20 decal release?
Fran replied to Clunkmeister's topic in Modelling Discussion
Any news about this? -
Great great work Ernie! Also love the base!!!
-
Wingnut Wings Felixstowe Curtiss flying boat
Fran commented on Clunkmeister's gallery album in Gallery of COMPLETED Aircraft models
 Fantastic build Ernie!!!!
 -
-
Wheels and Wings hobbies... Were they open back in 2001? I went to Toronto in 2001, with friends and i went to a hobbystore...Back them I was quite shy, so I went, Iwas marvelous with all the models... (this is prior to the massive use of internet and web shopping)... So I didnt talk with the Owner/employer.. but I was fascinated and I bought a 1:48 hasegawa Ki-84 Skelaton version and the brand new Accurate Miniature 1:48 Il-2 Shturmovik ... I dont know if it was WheelsWings hobbies or other store, but checking google earth I could bet that was Wings and Wheels
-
Love it!! Good work!
-
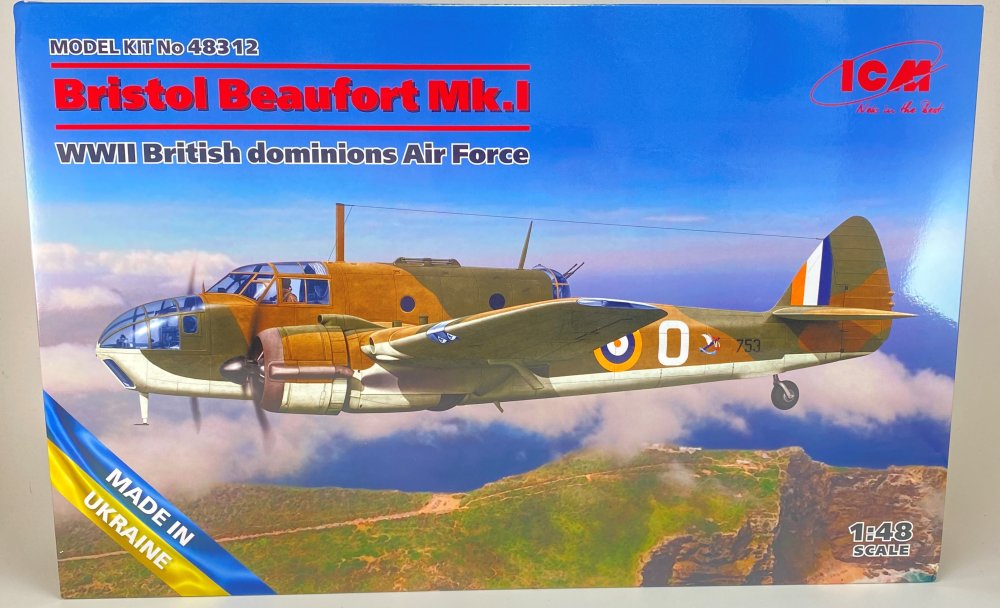
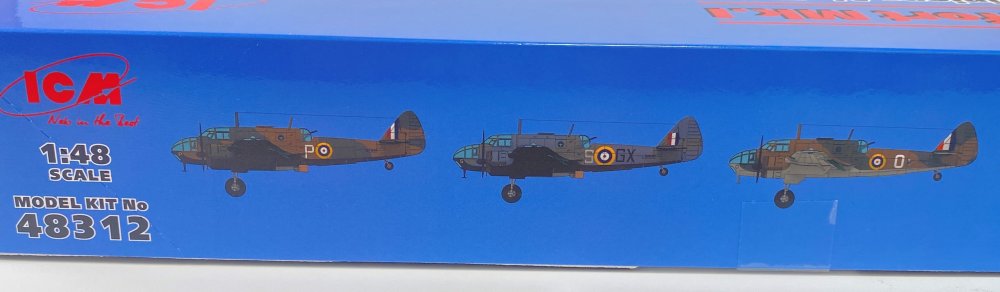
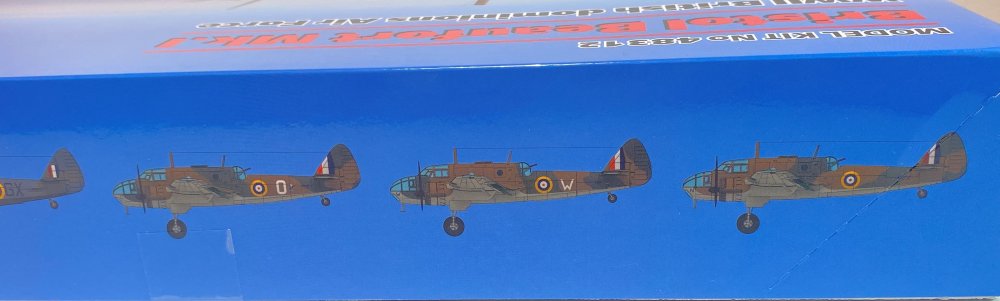
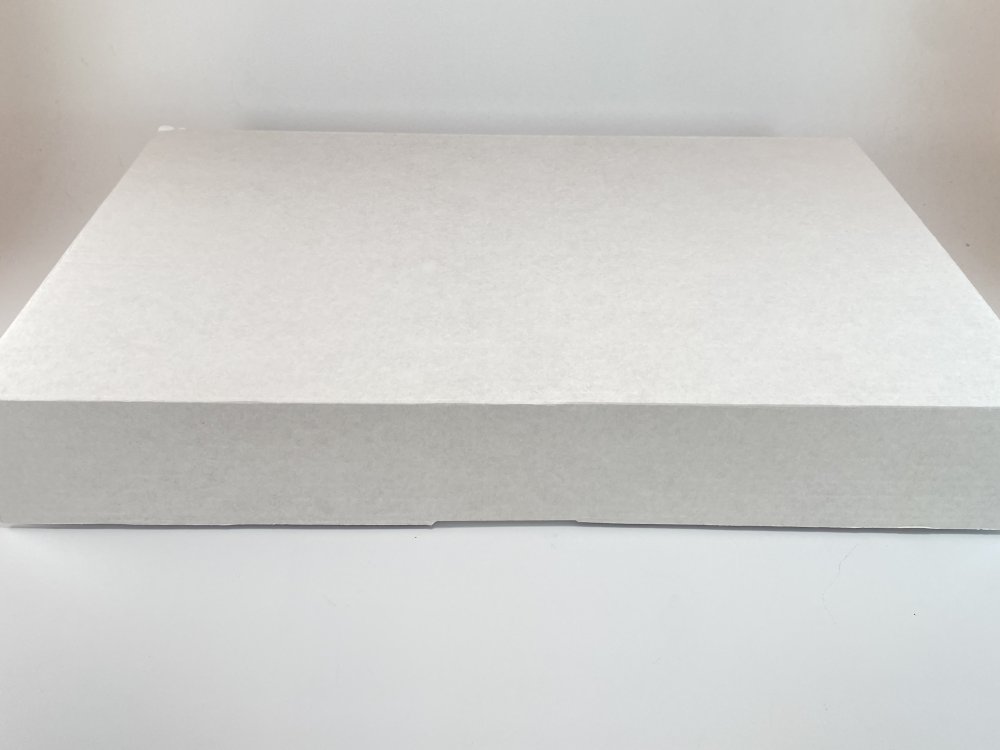
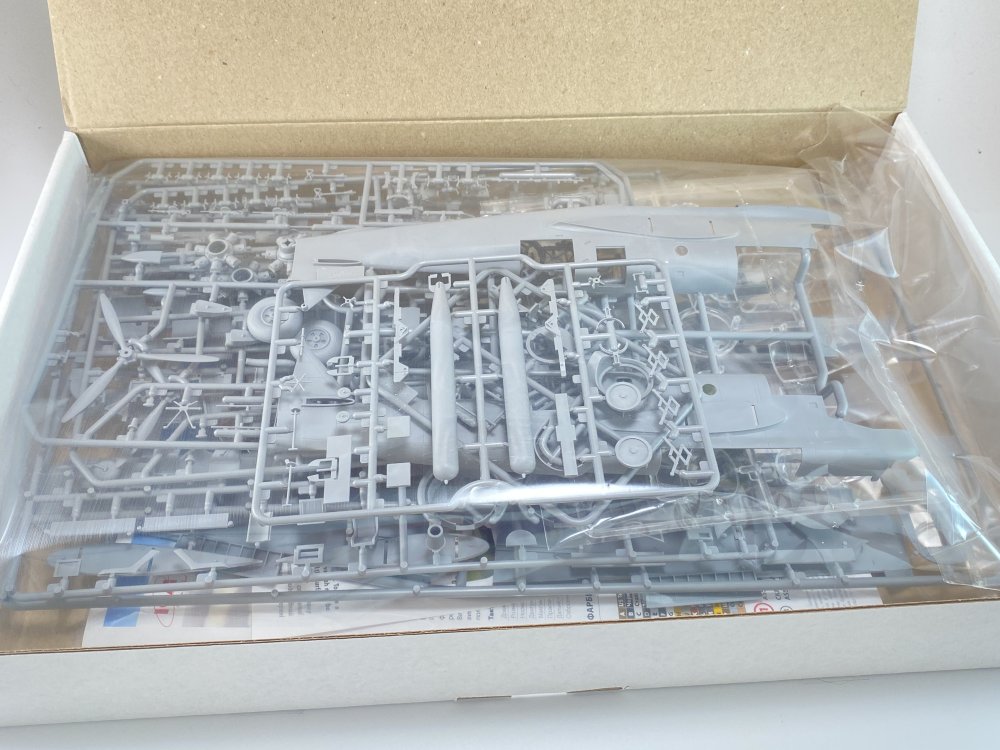
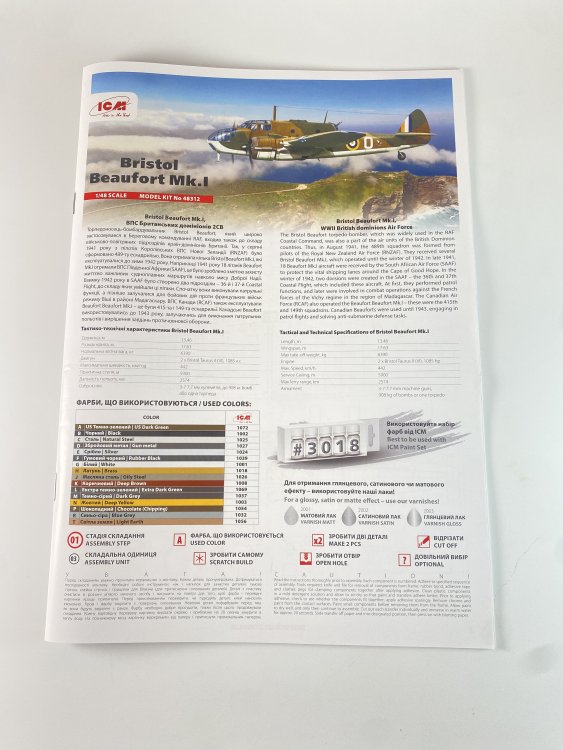
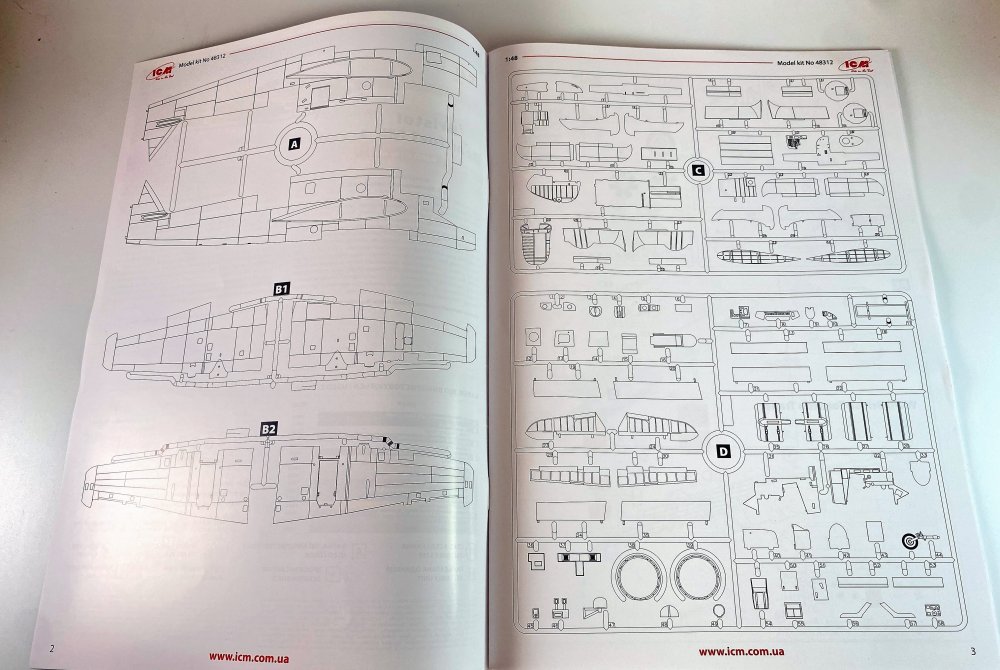
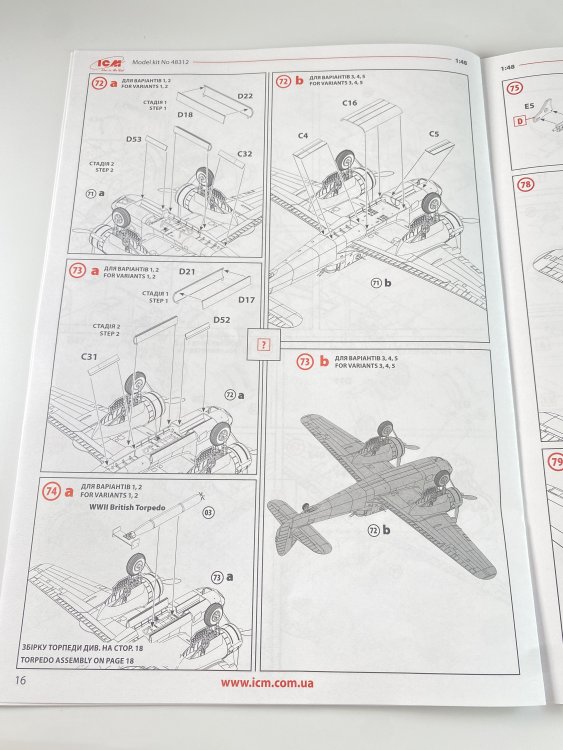
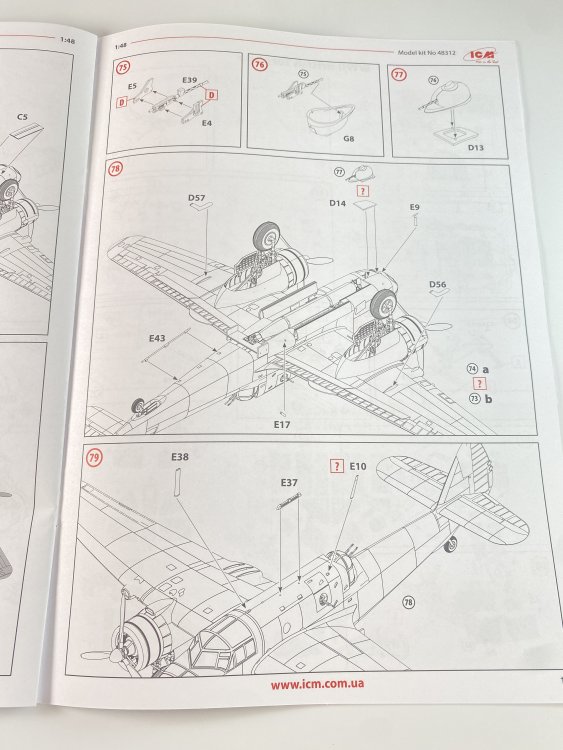
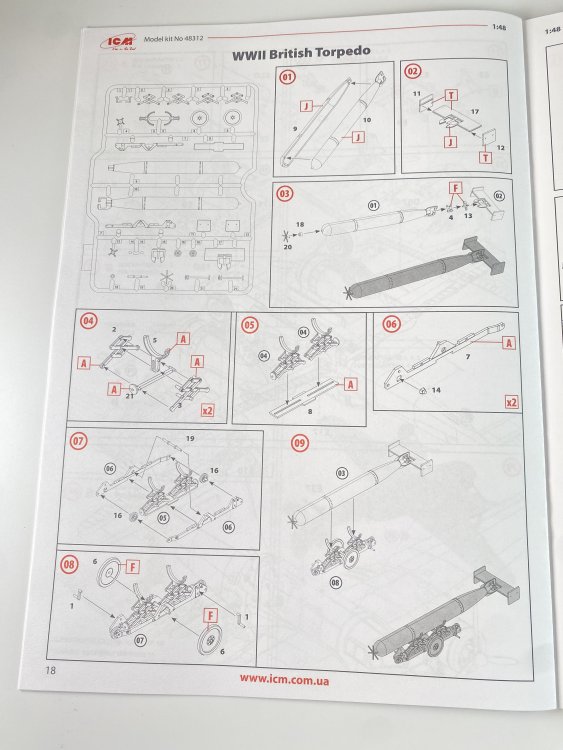
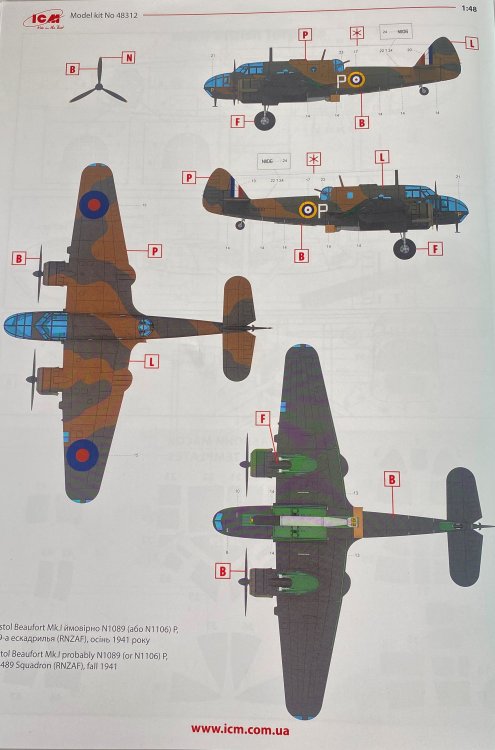
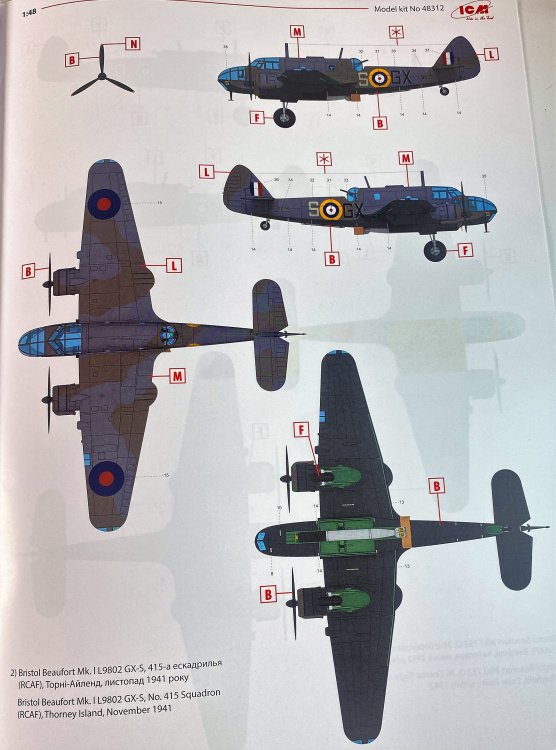
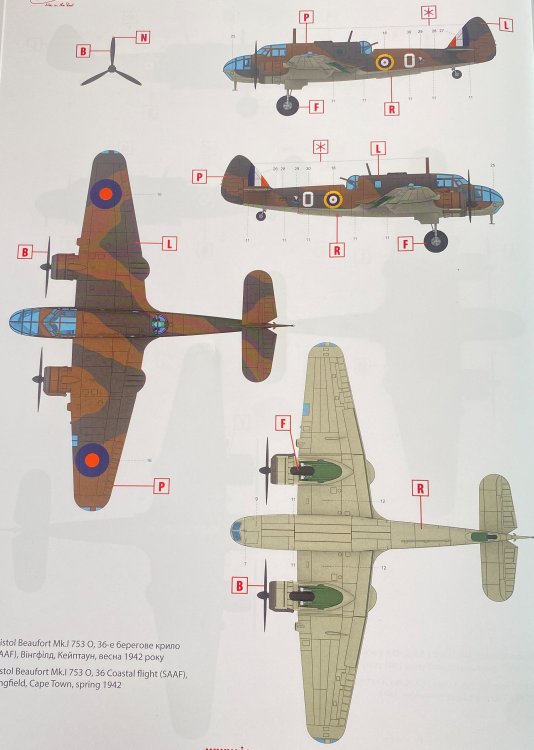
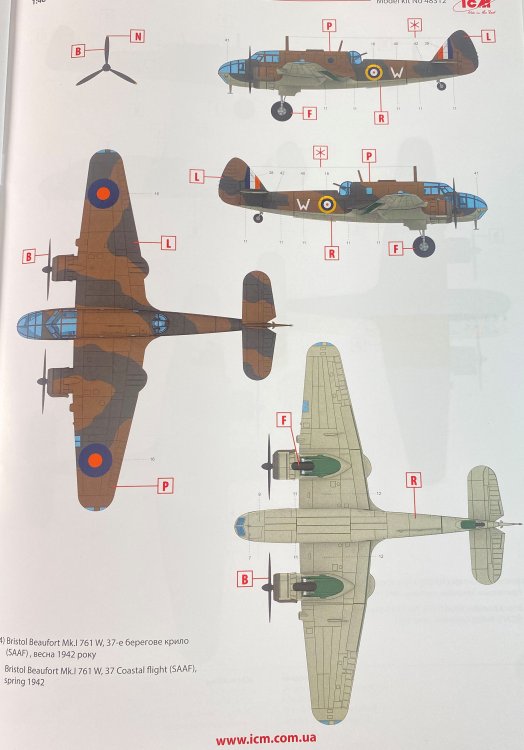
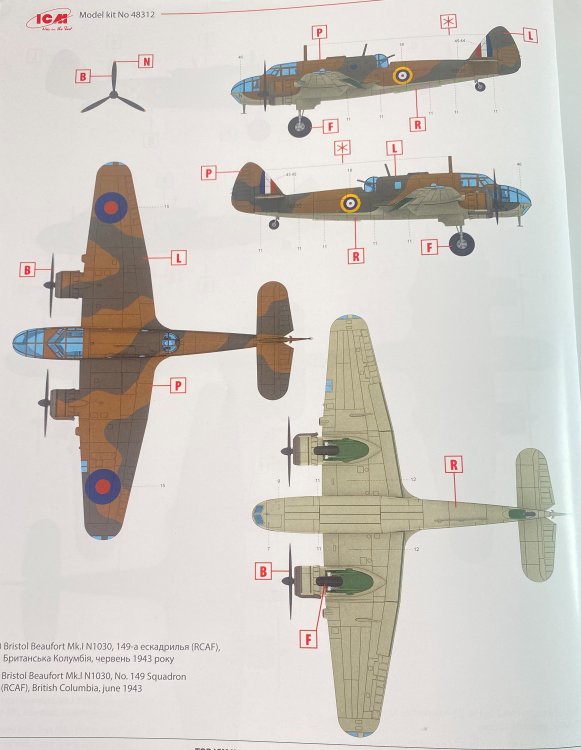
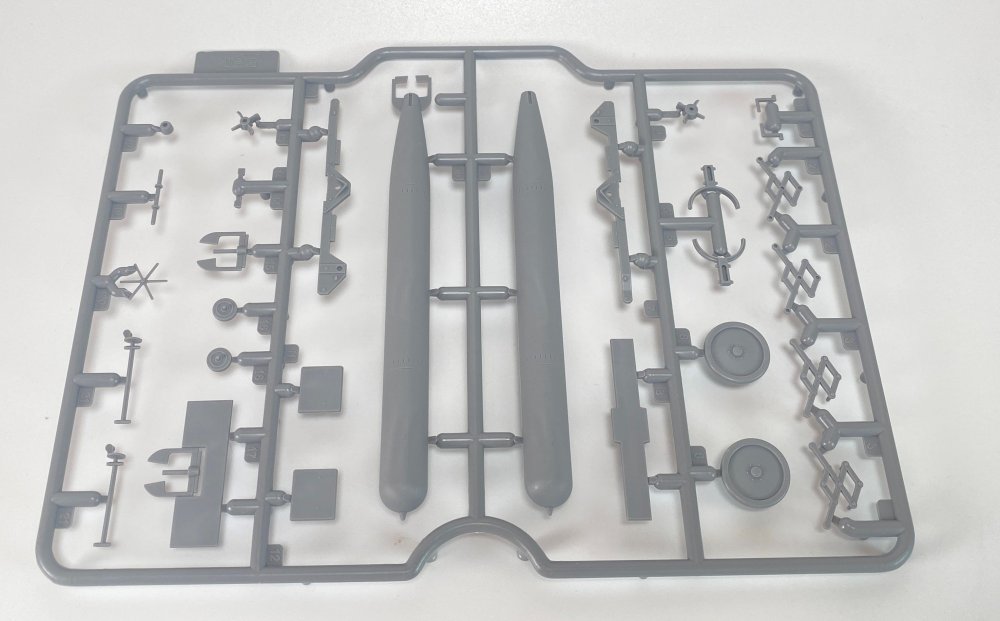
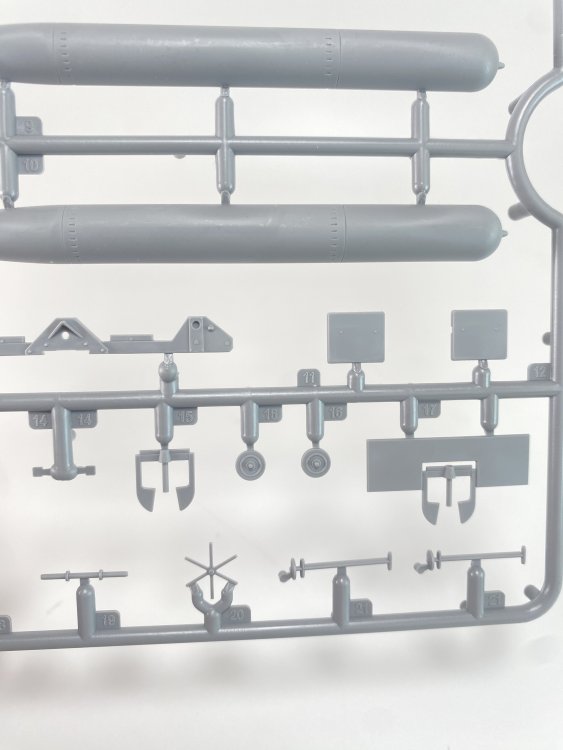
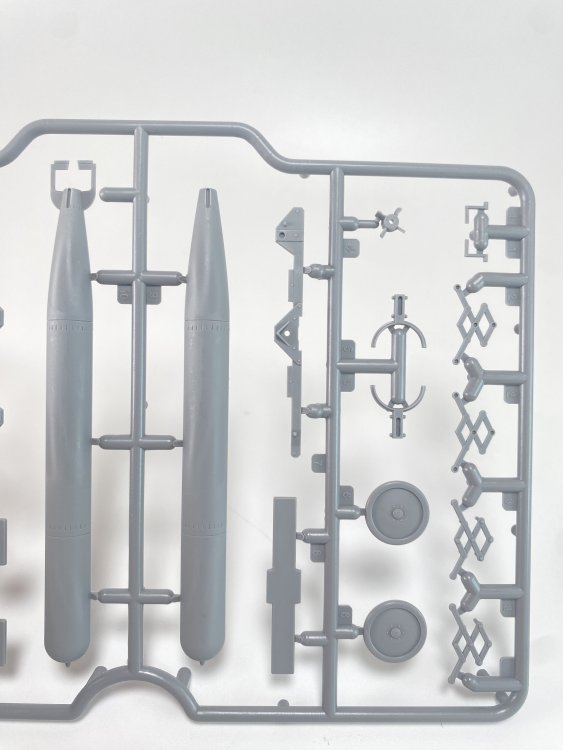
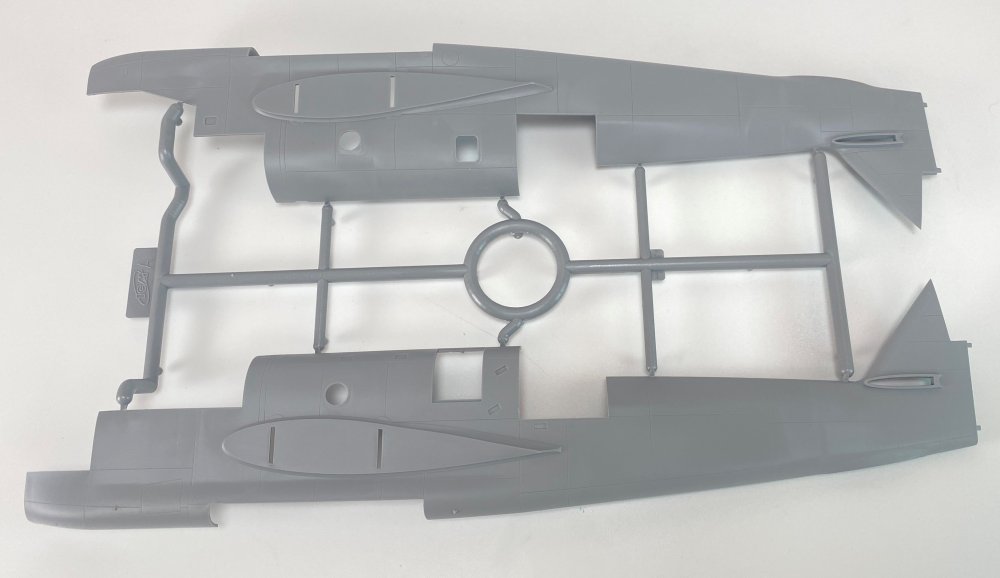
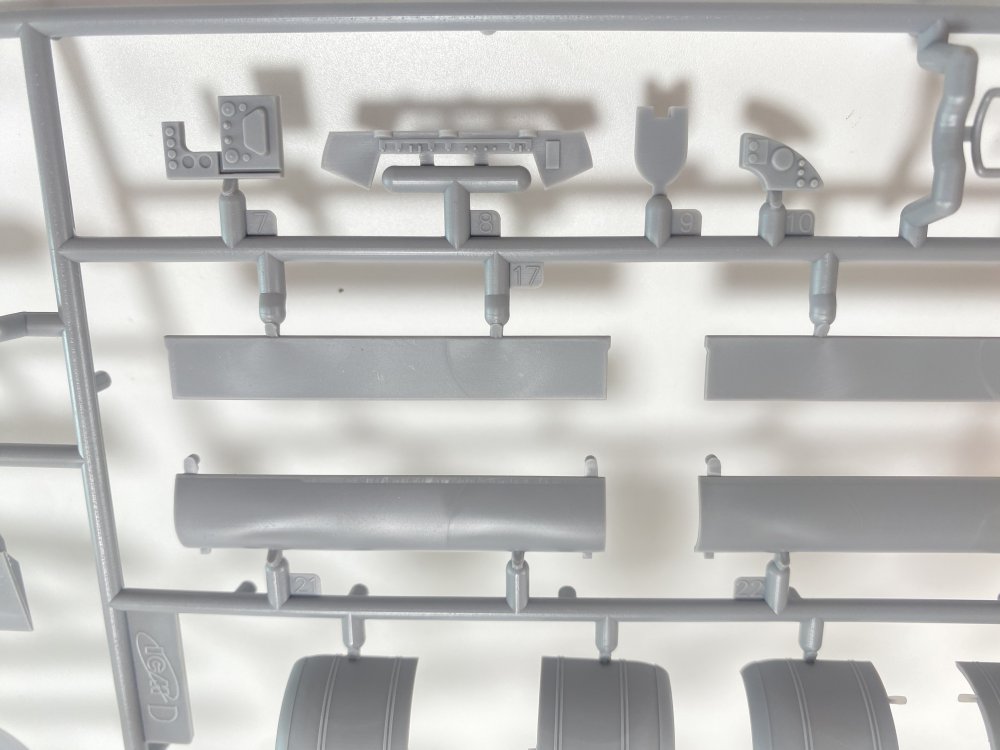
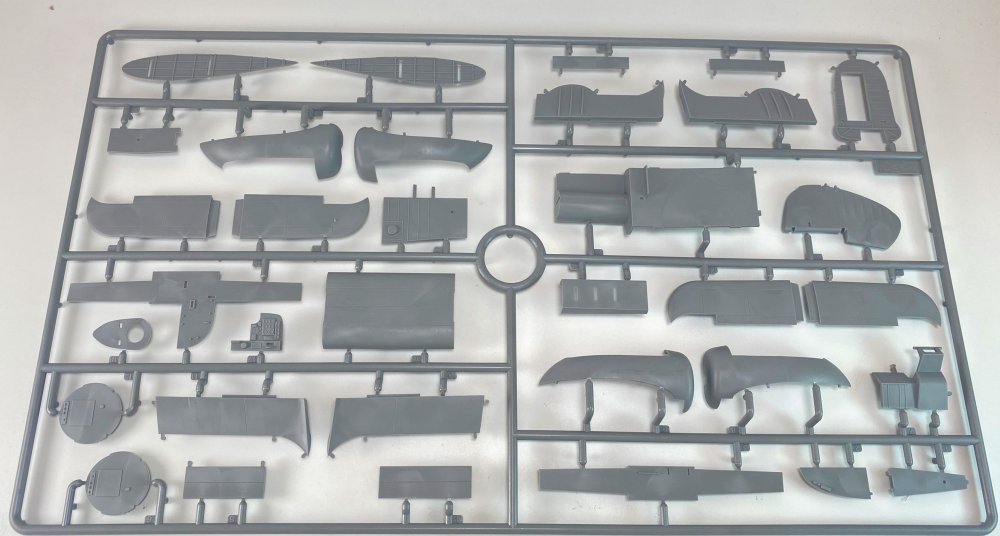
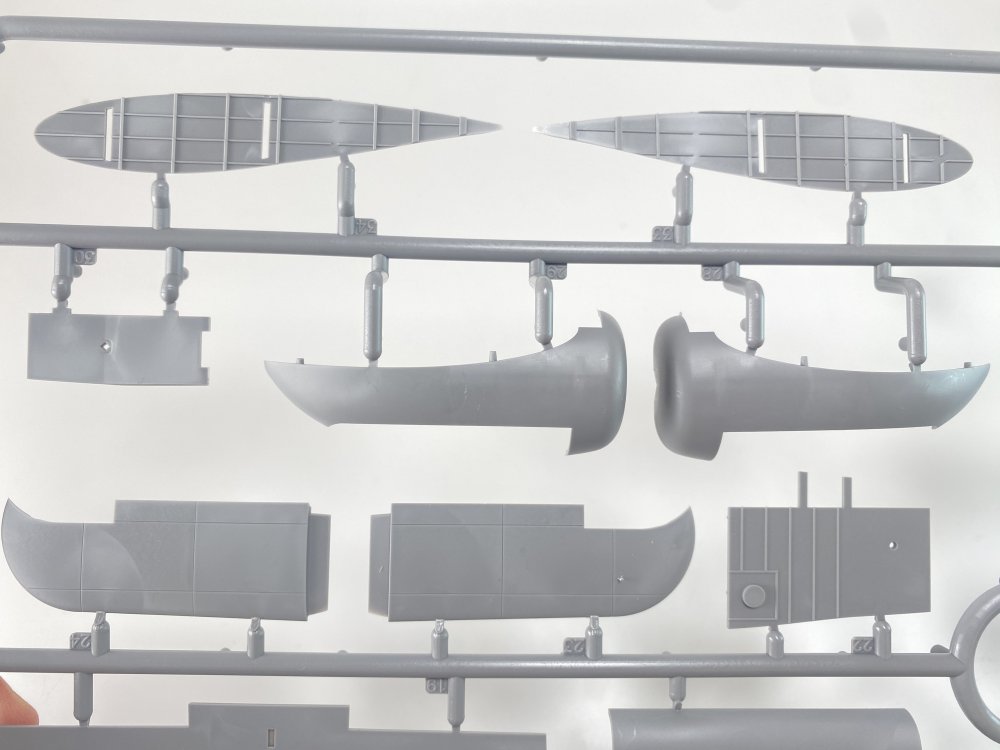
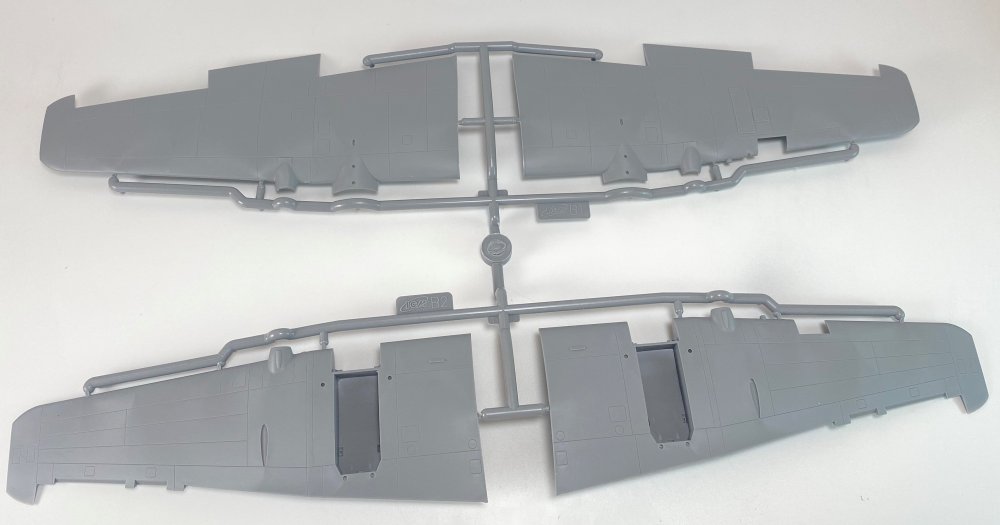
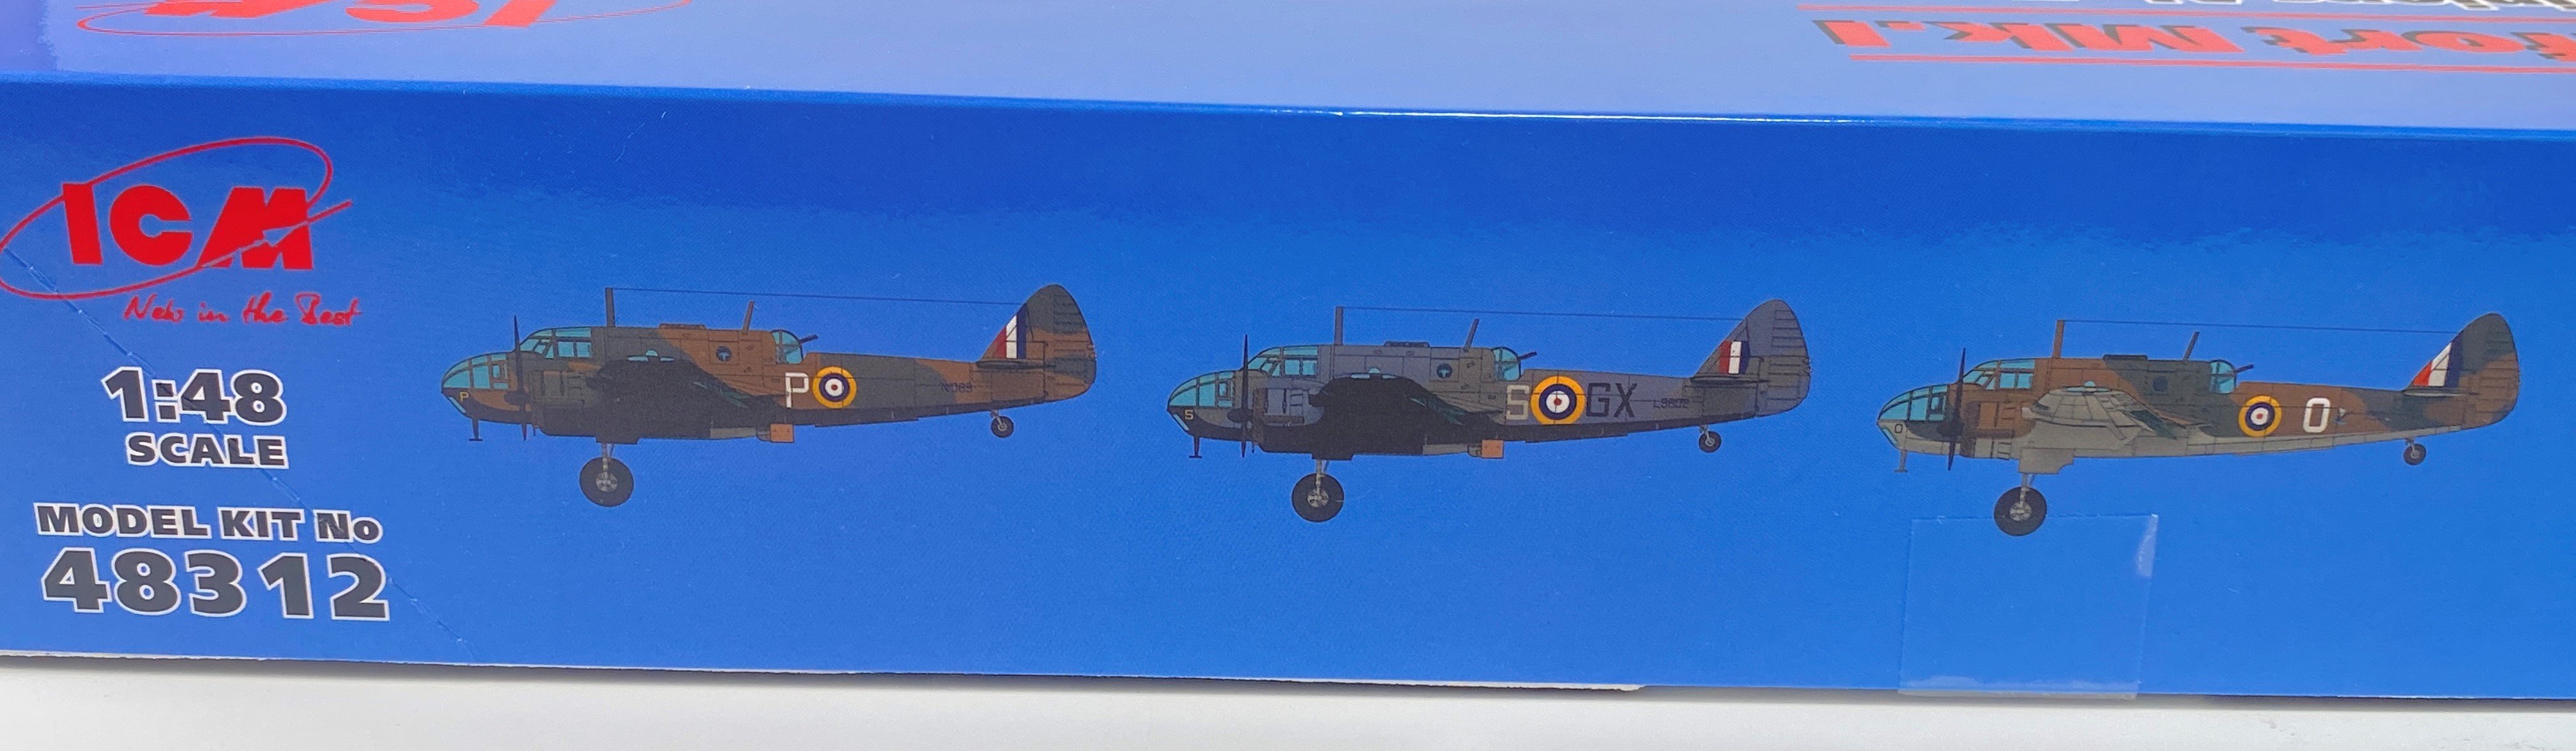
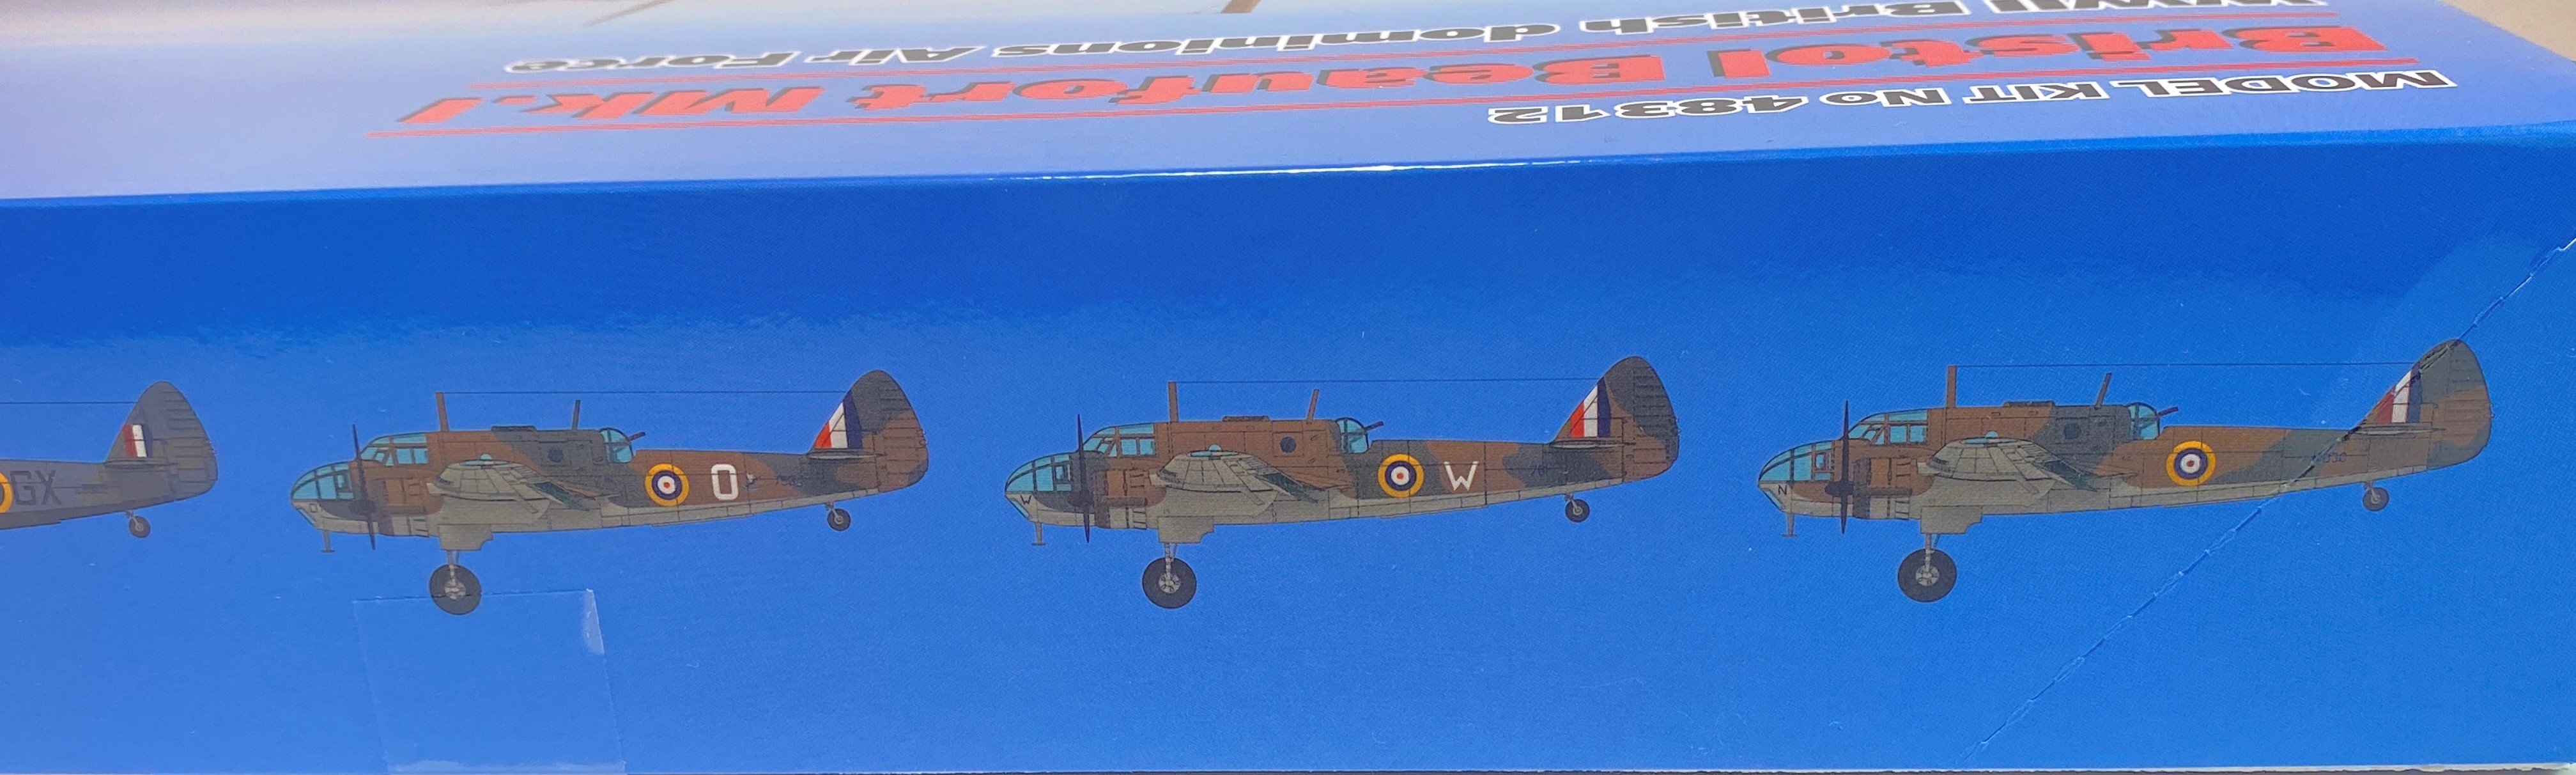
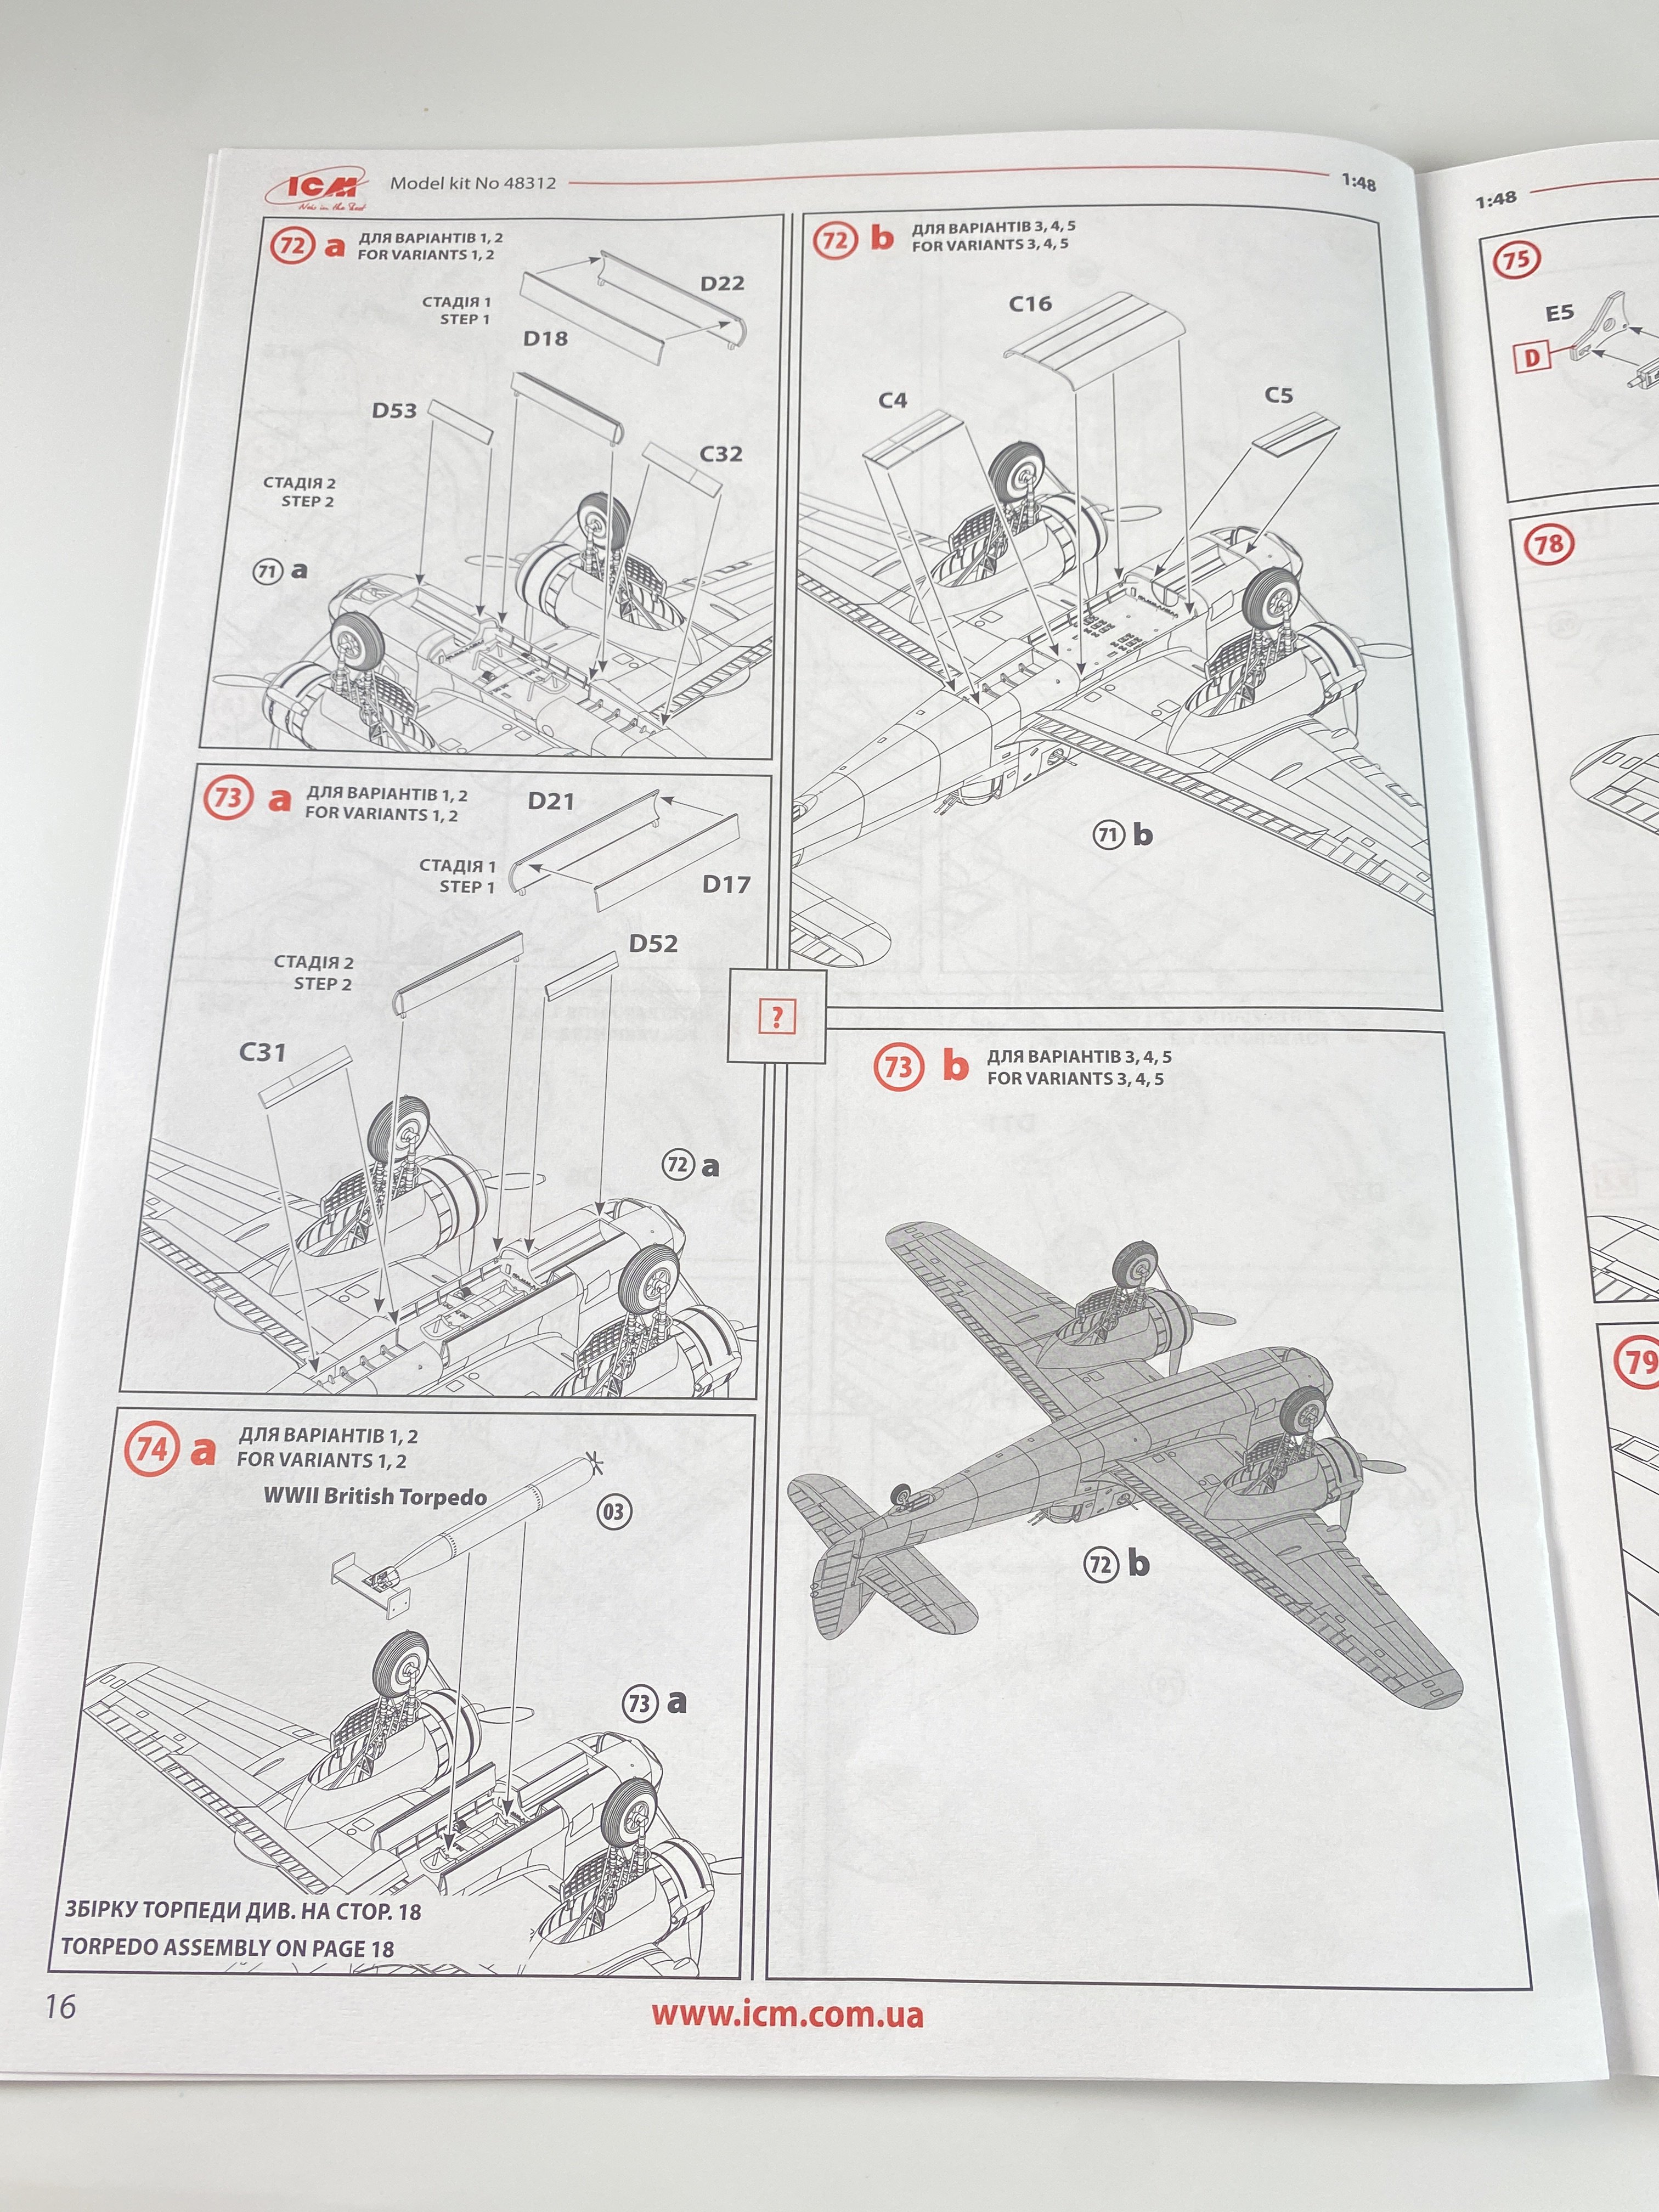
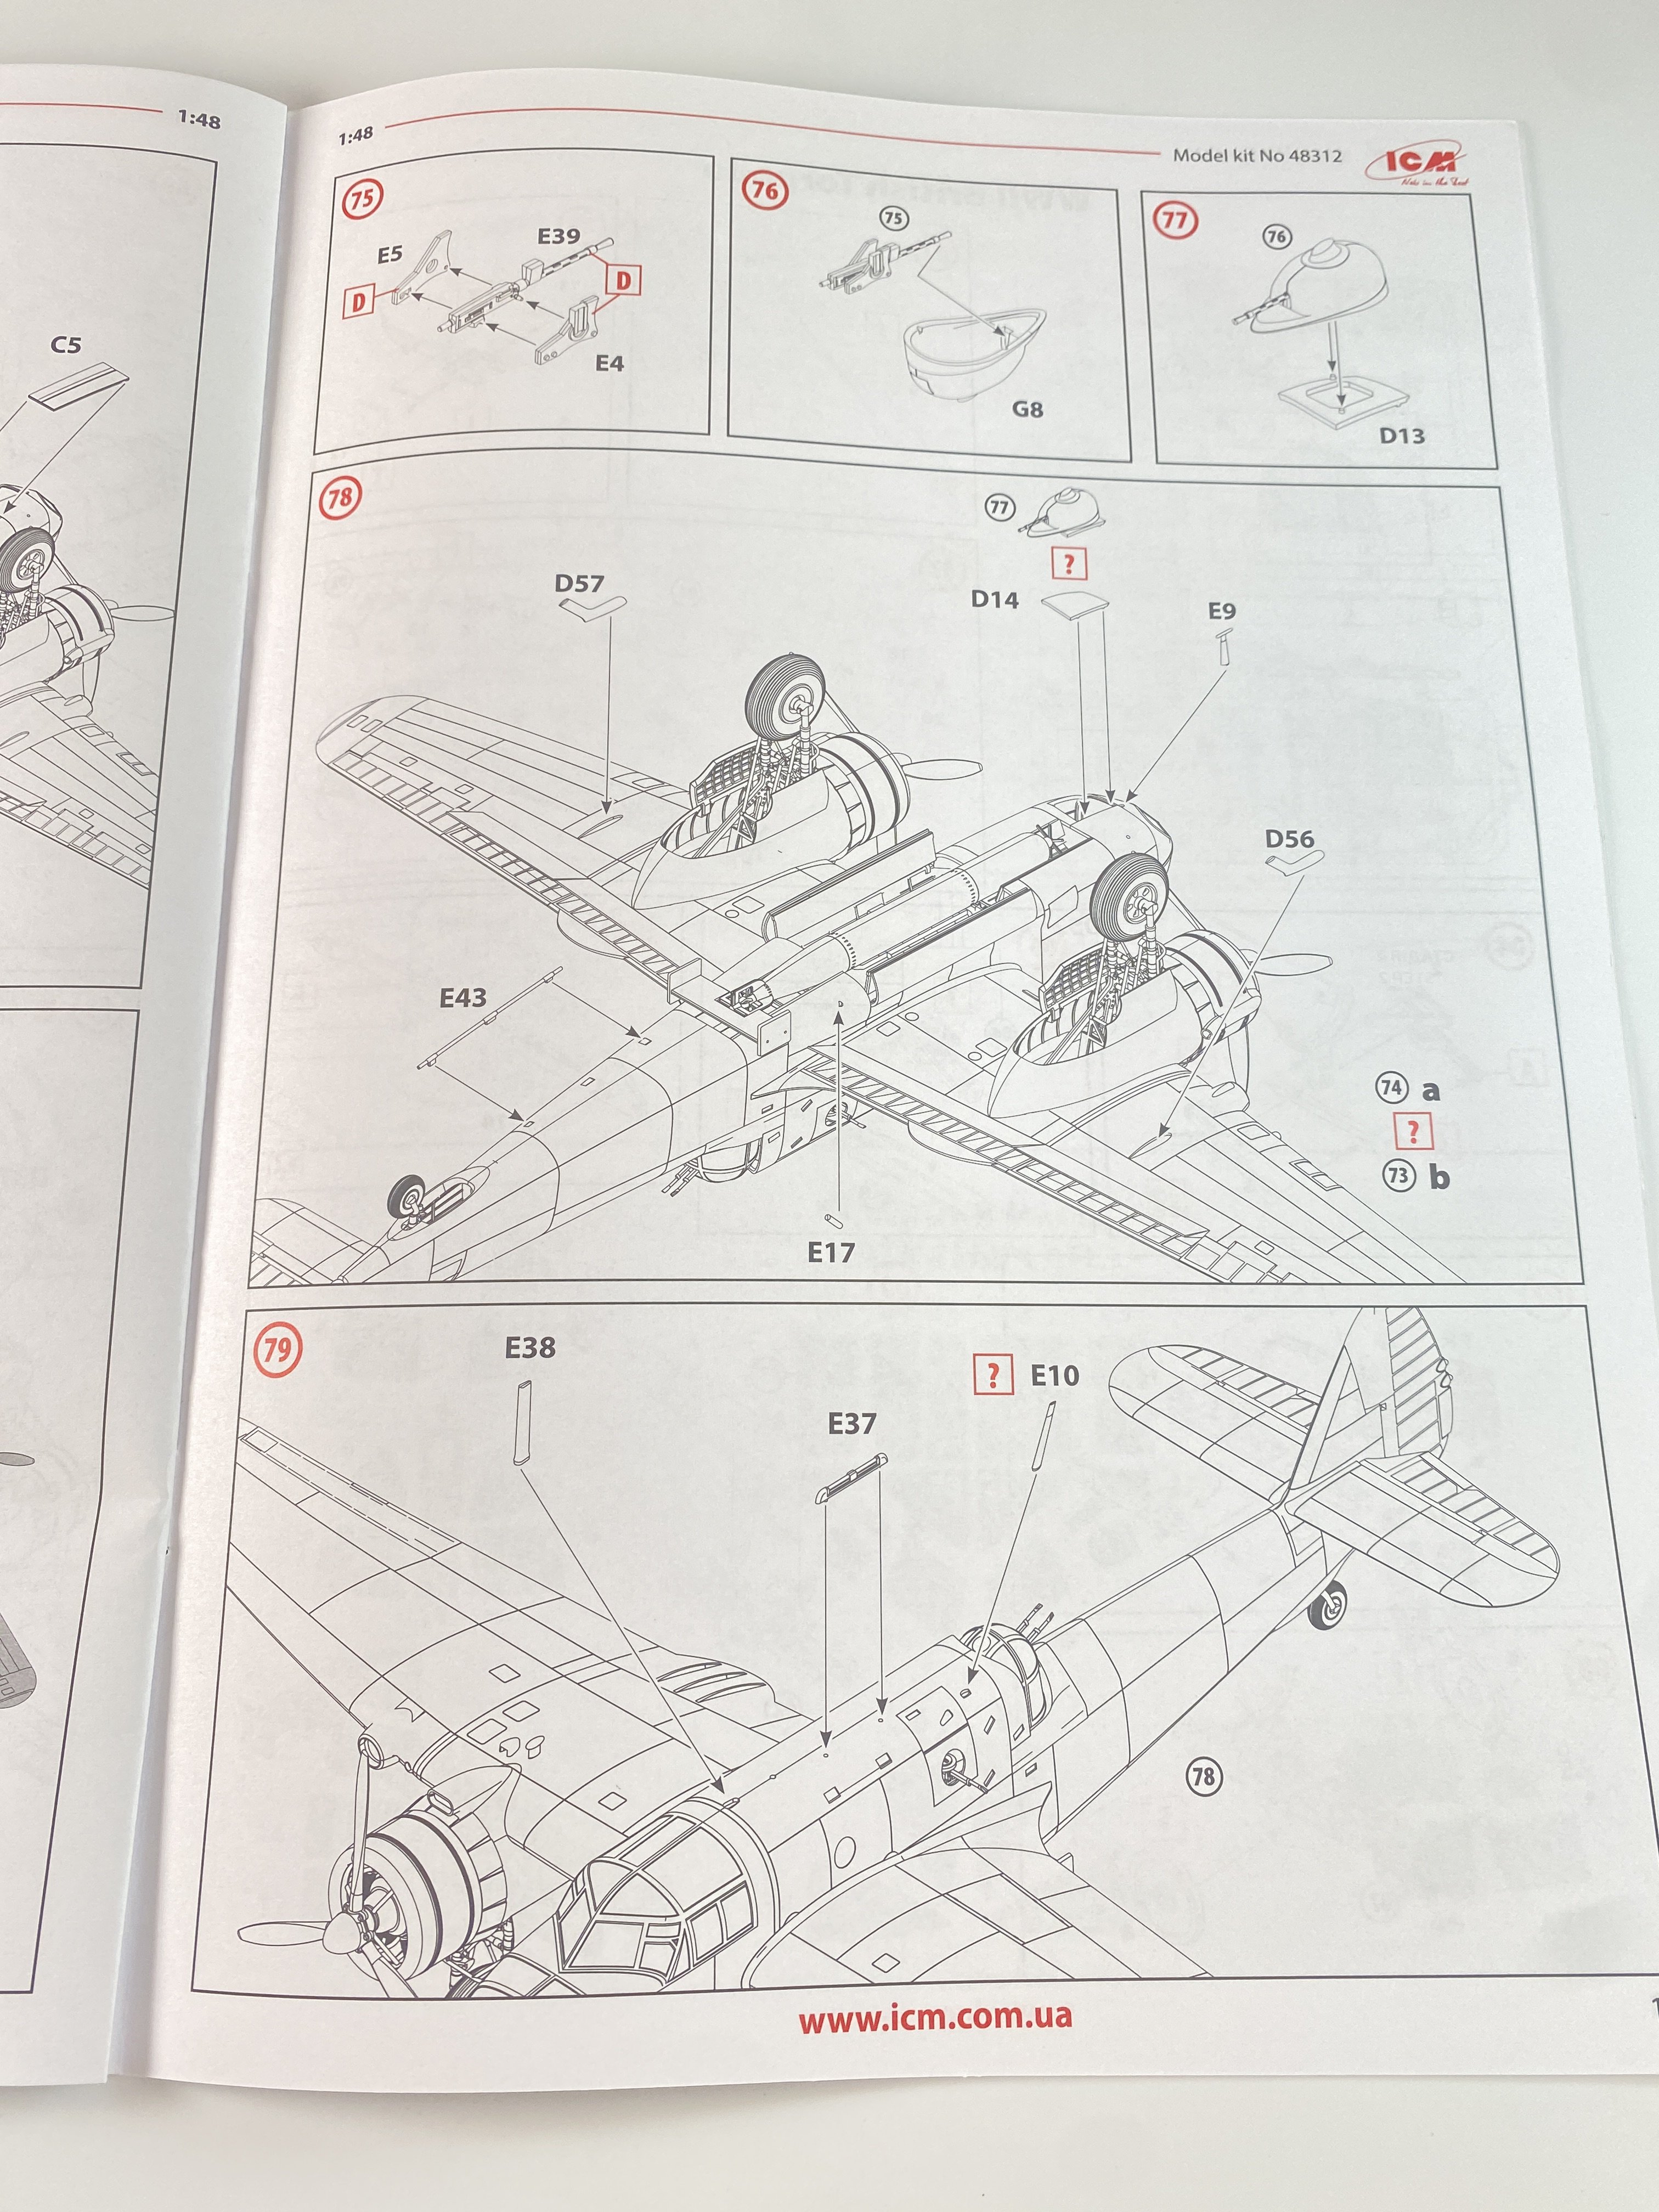
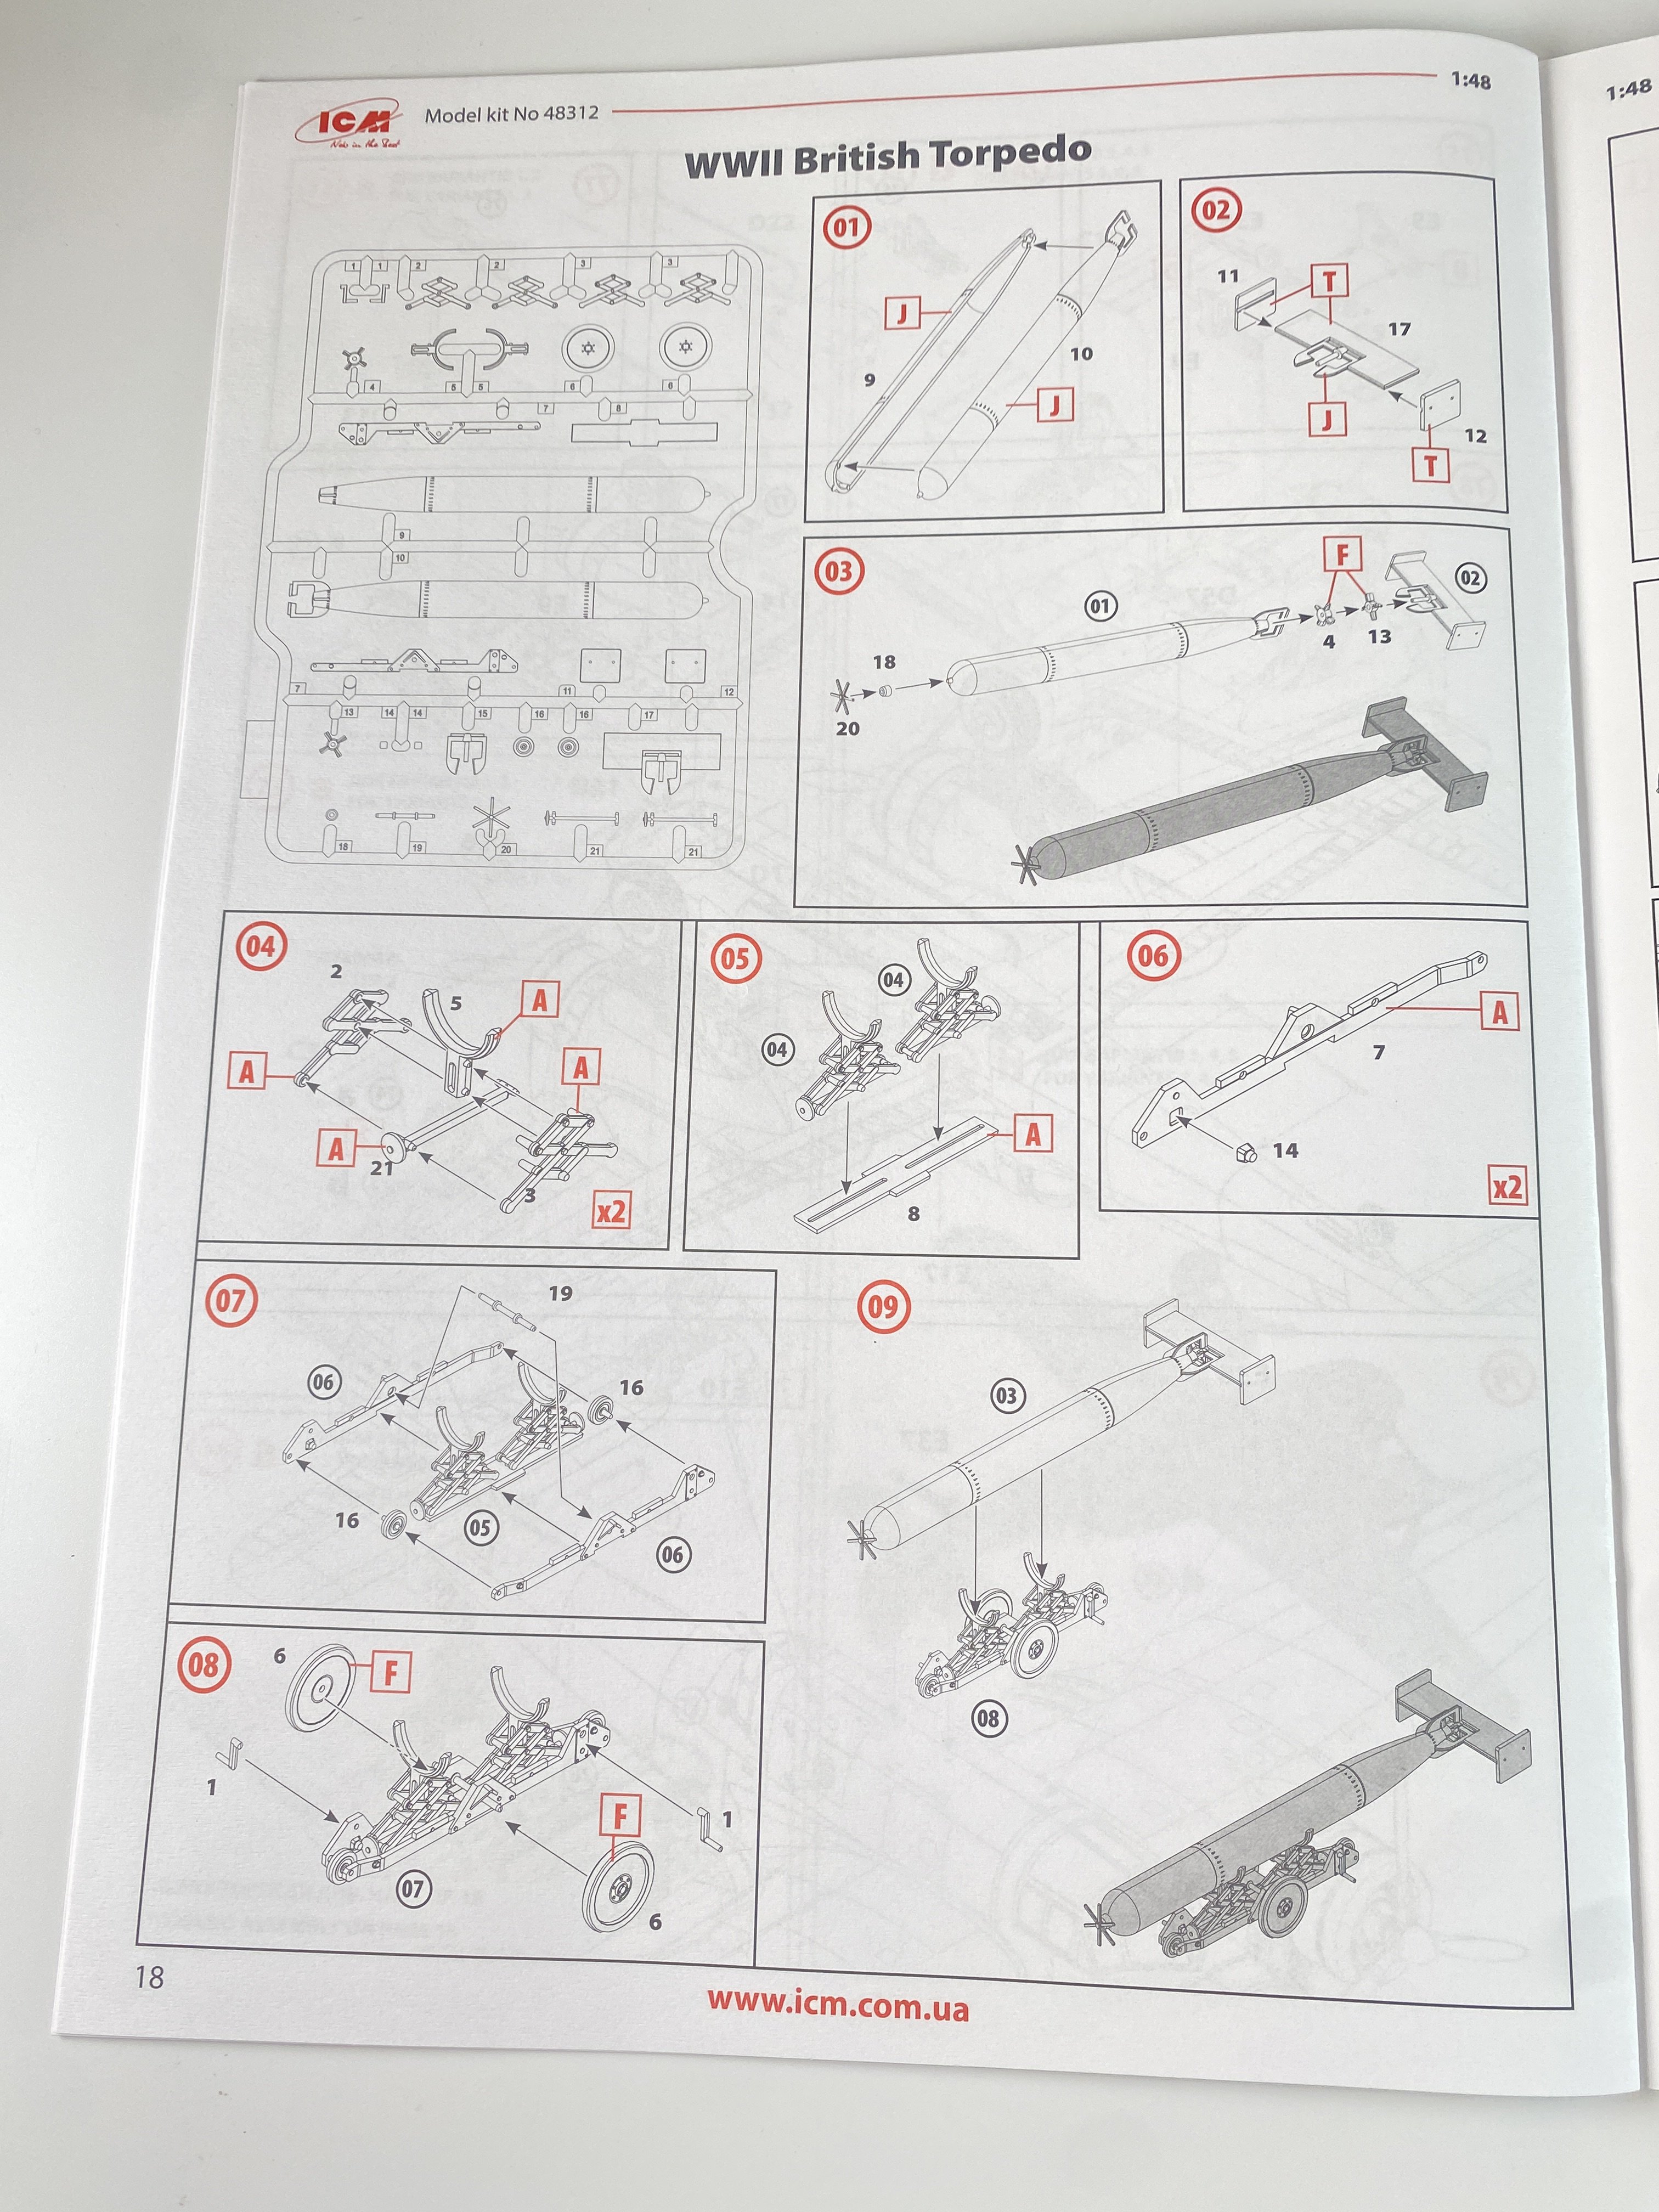
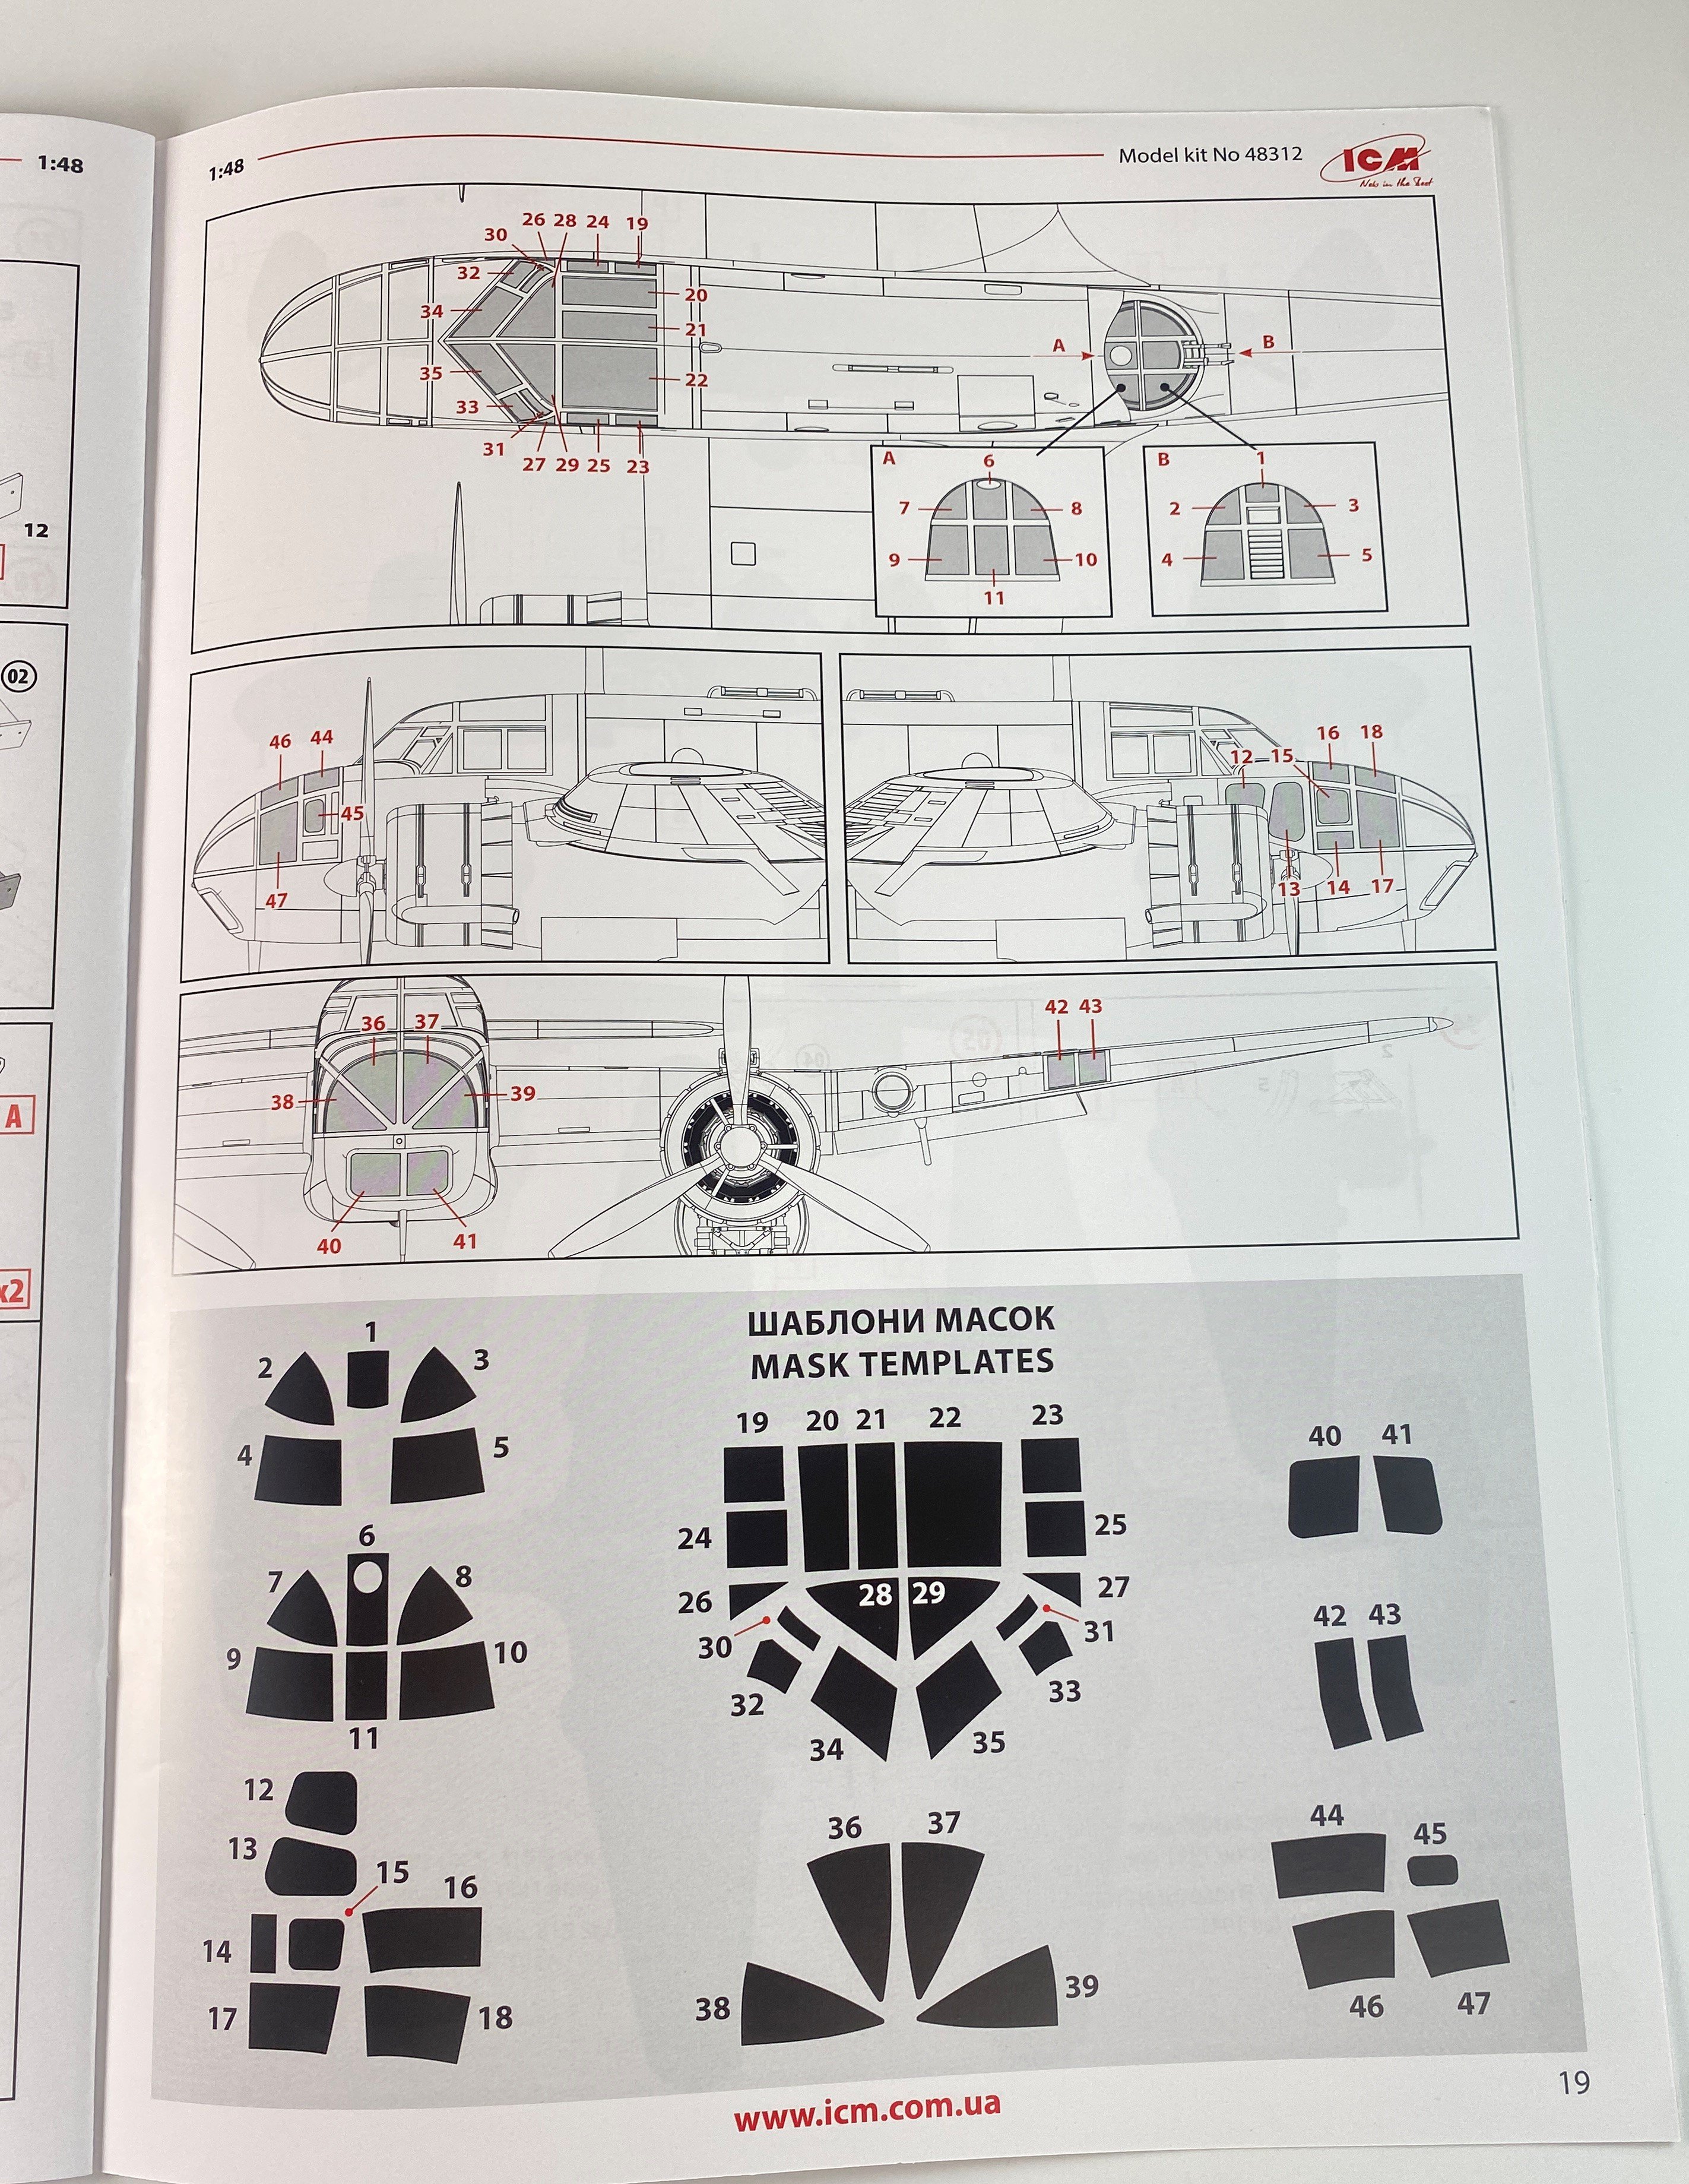
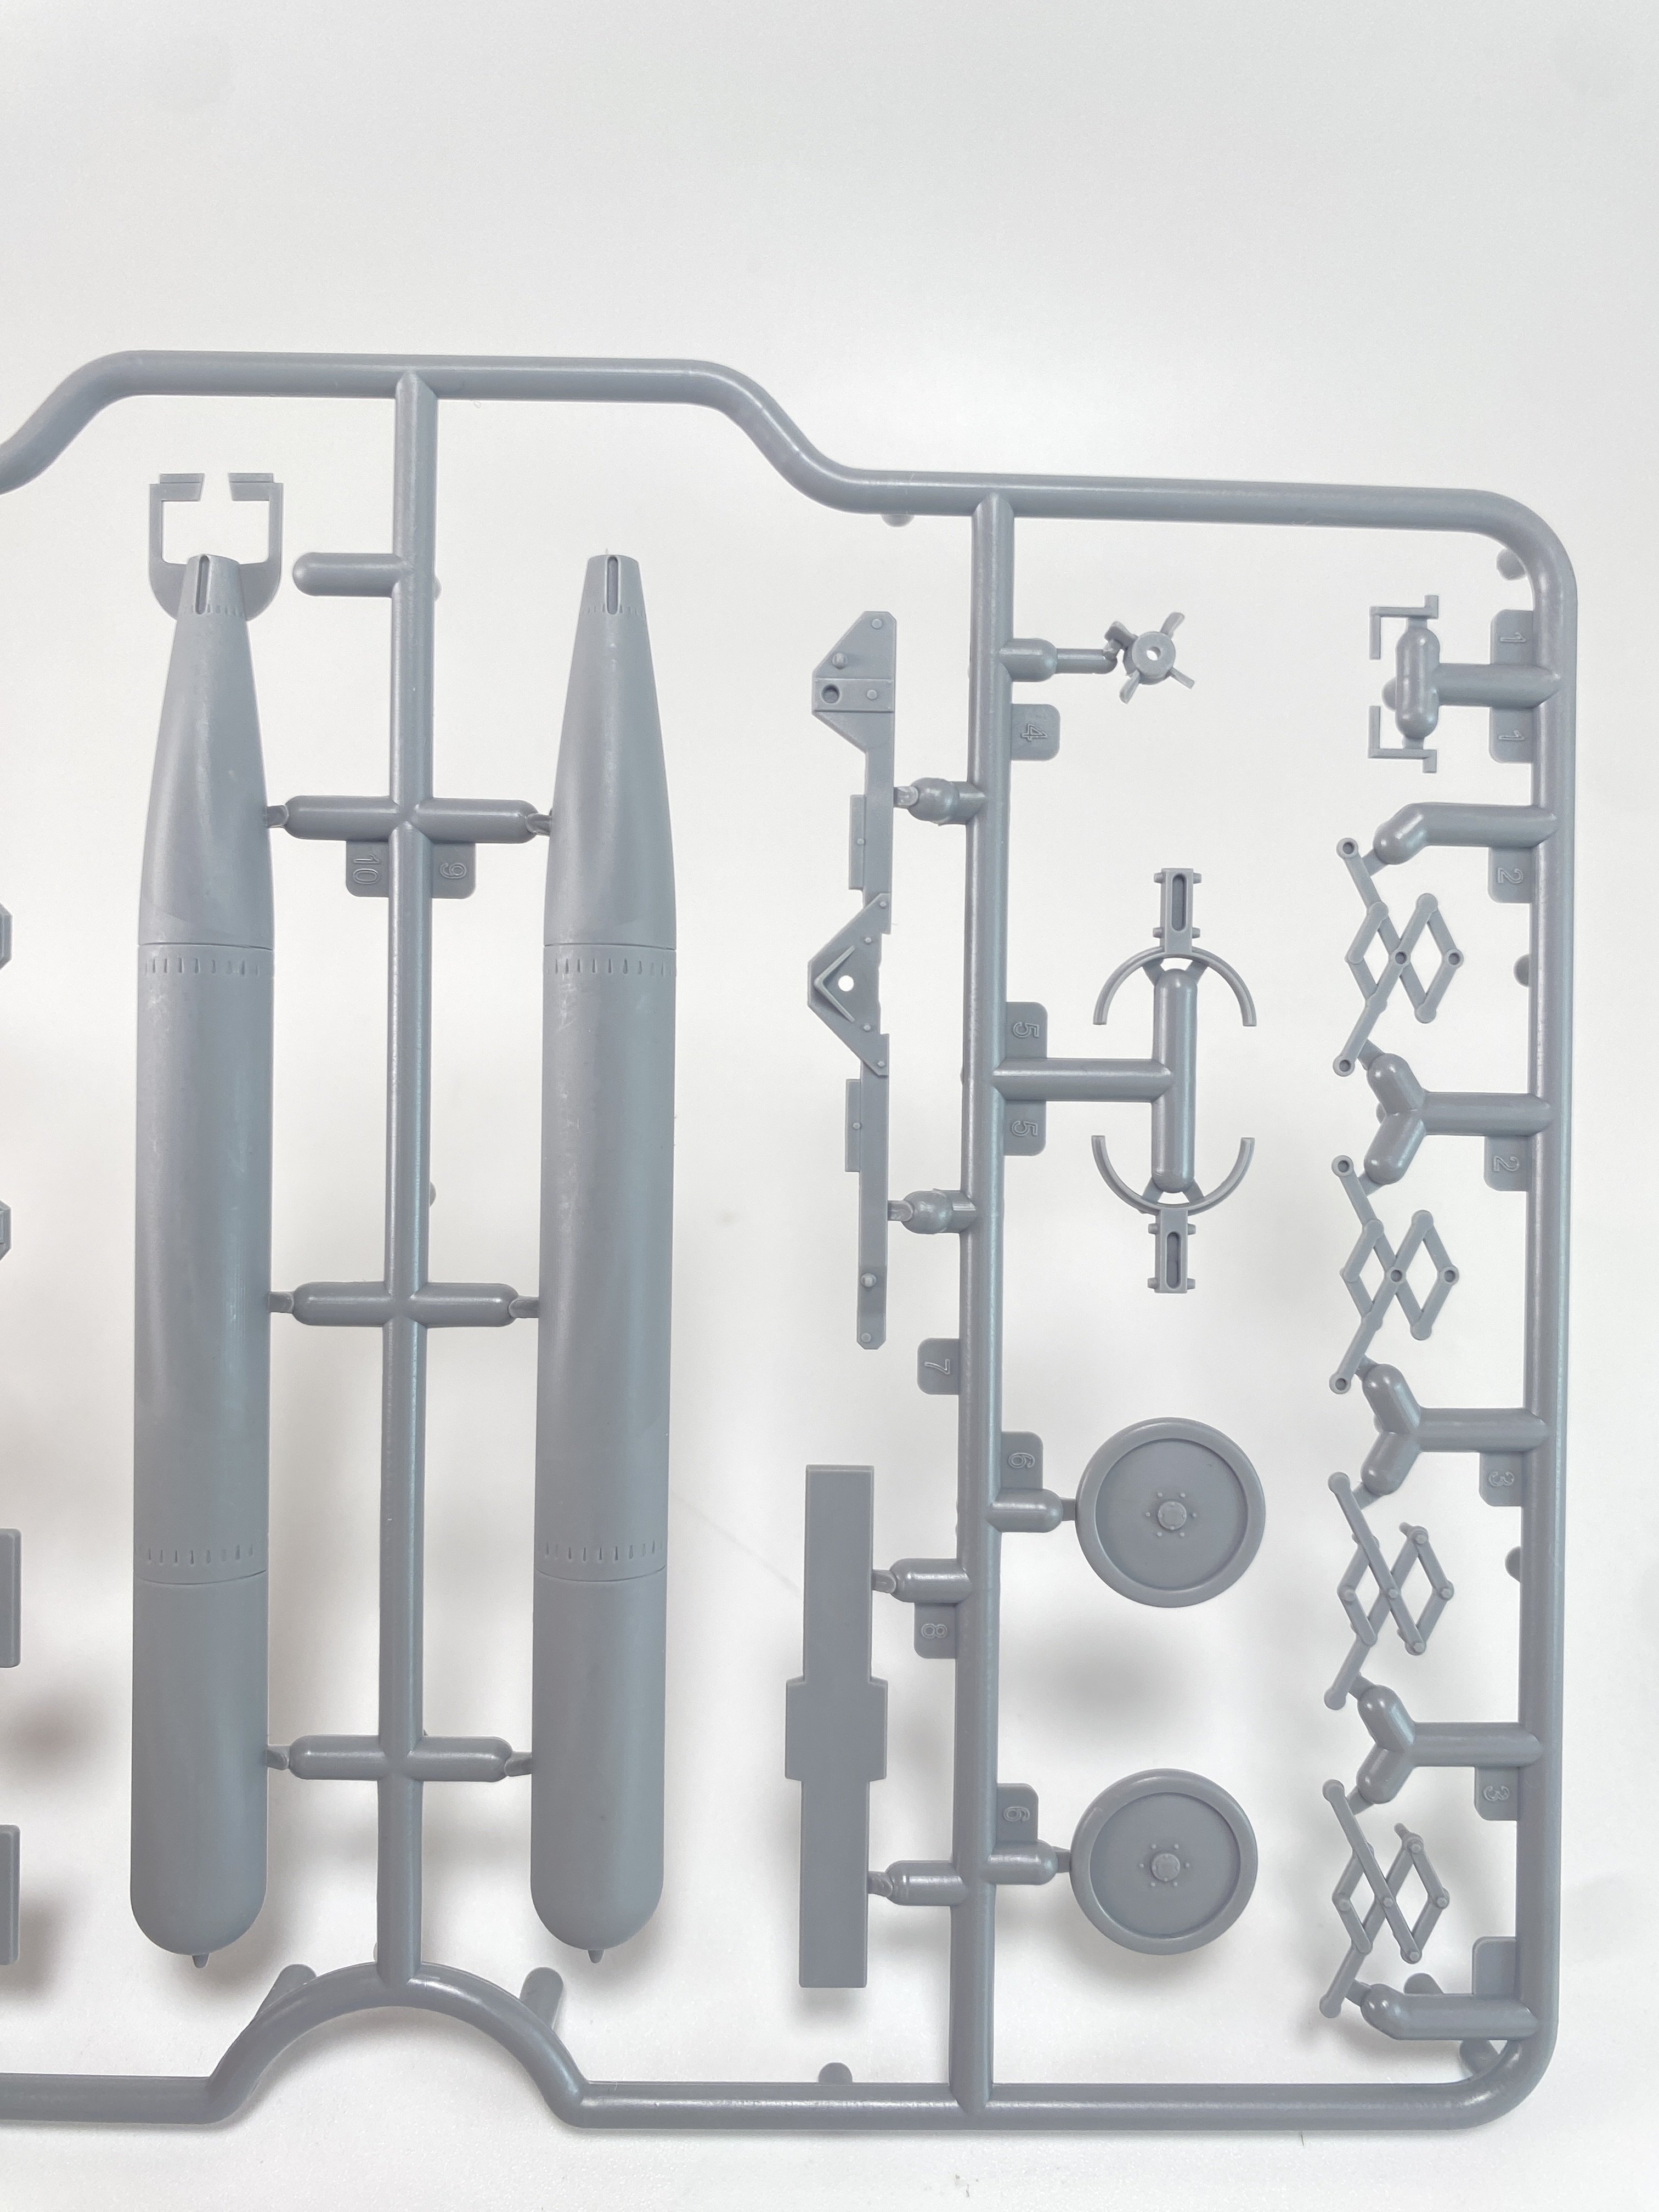
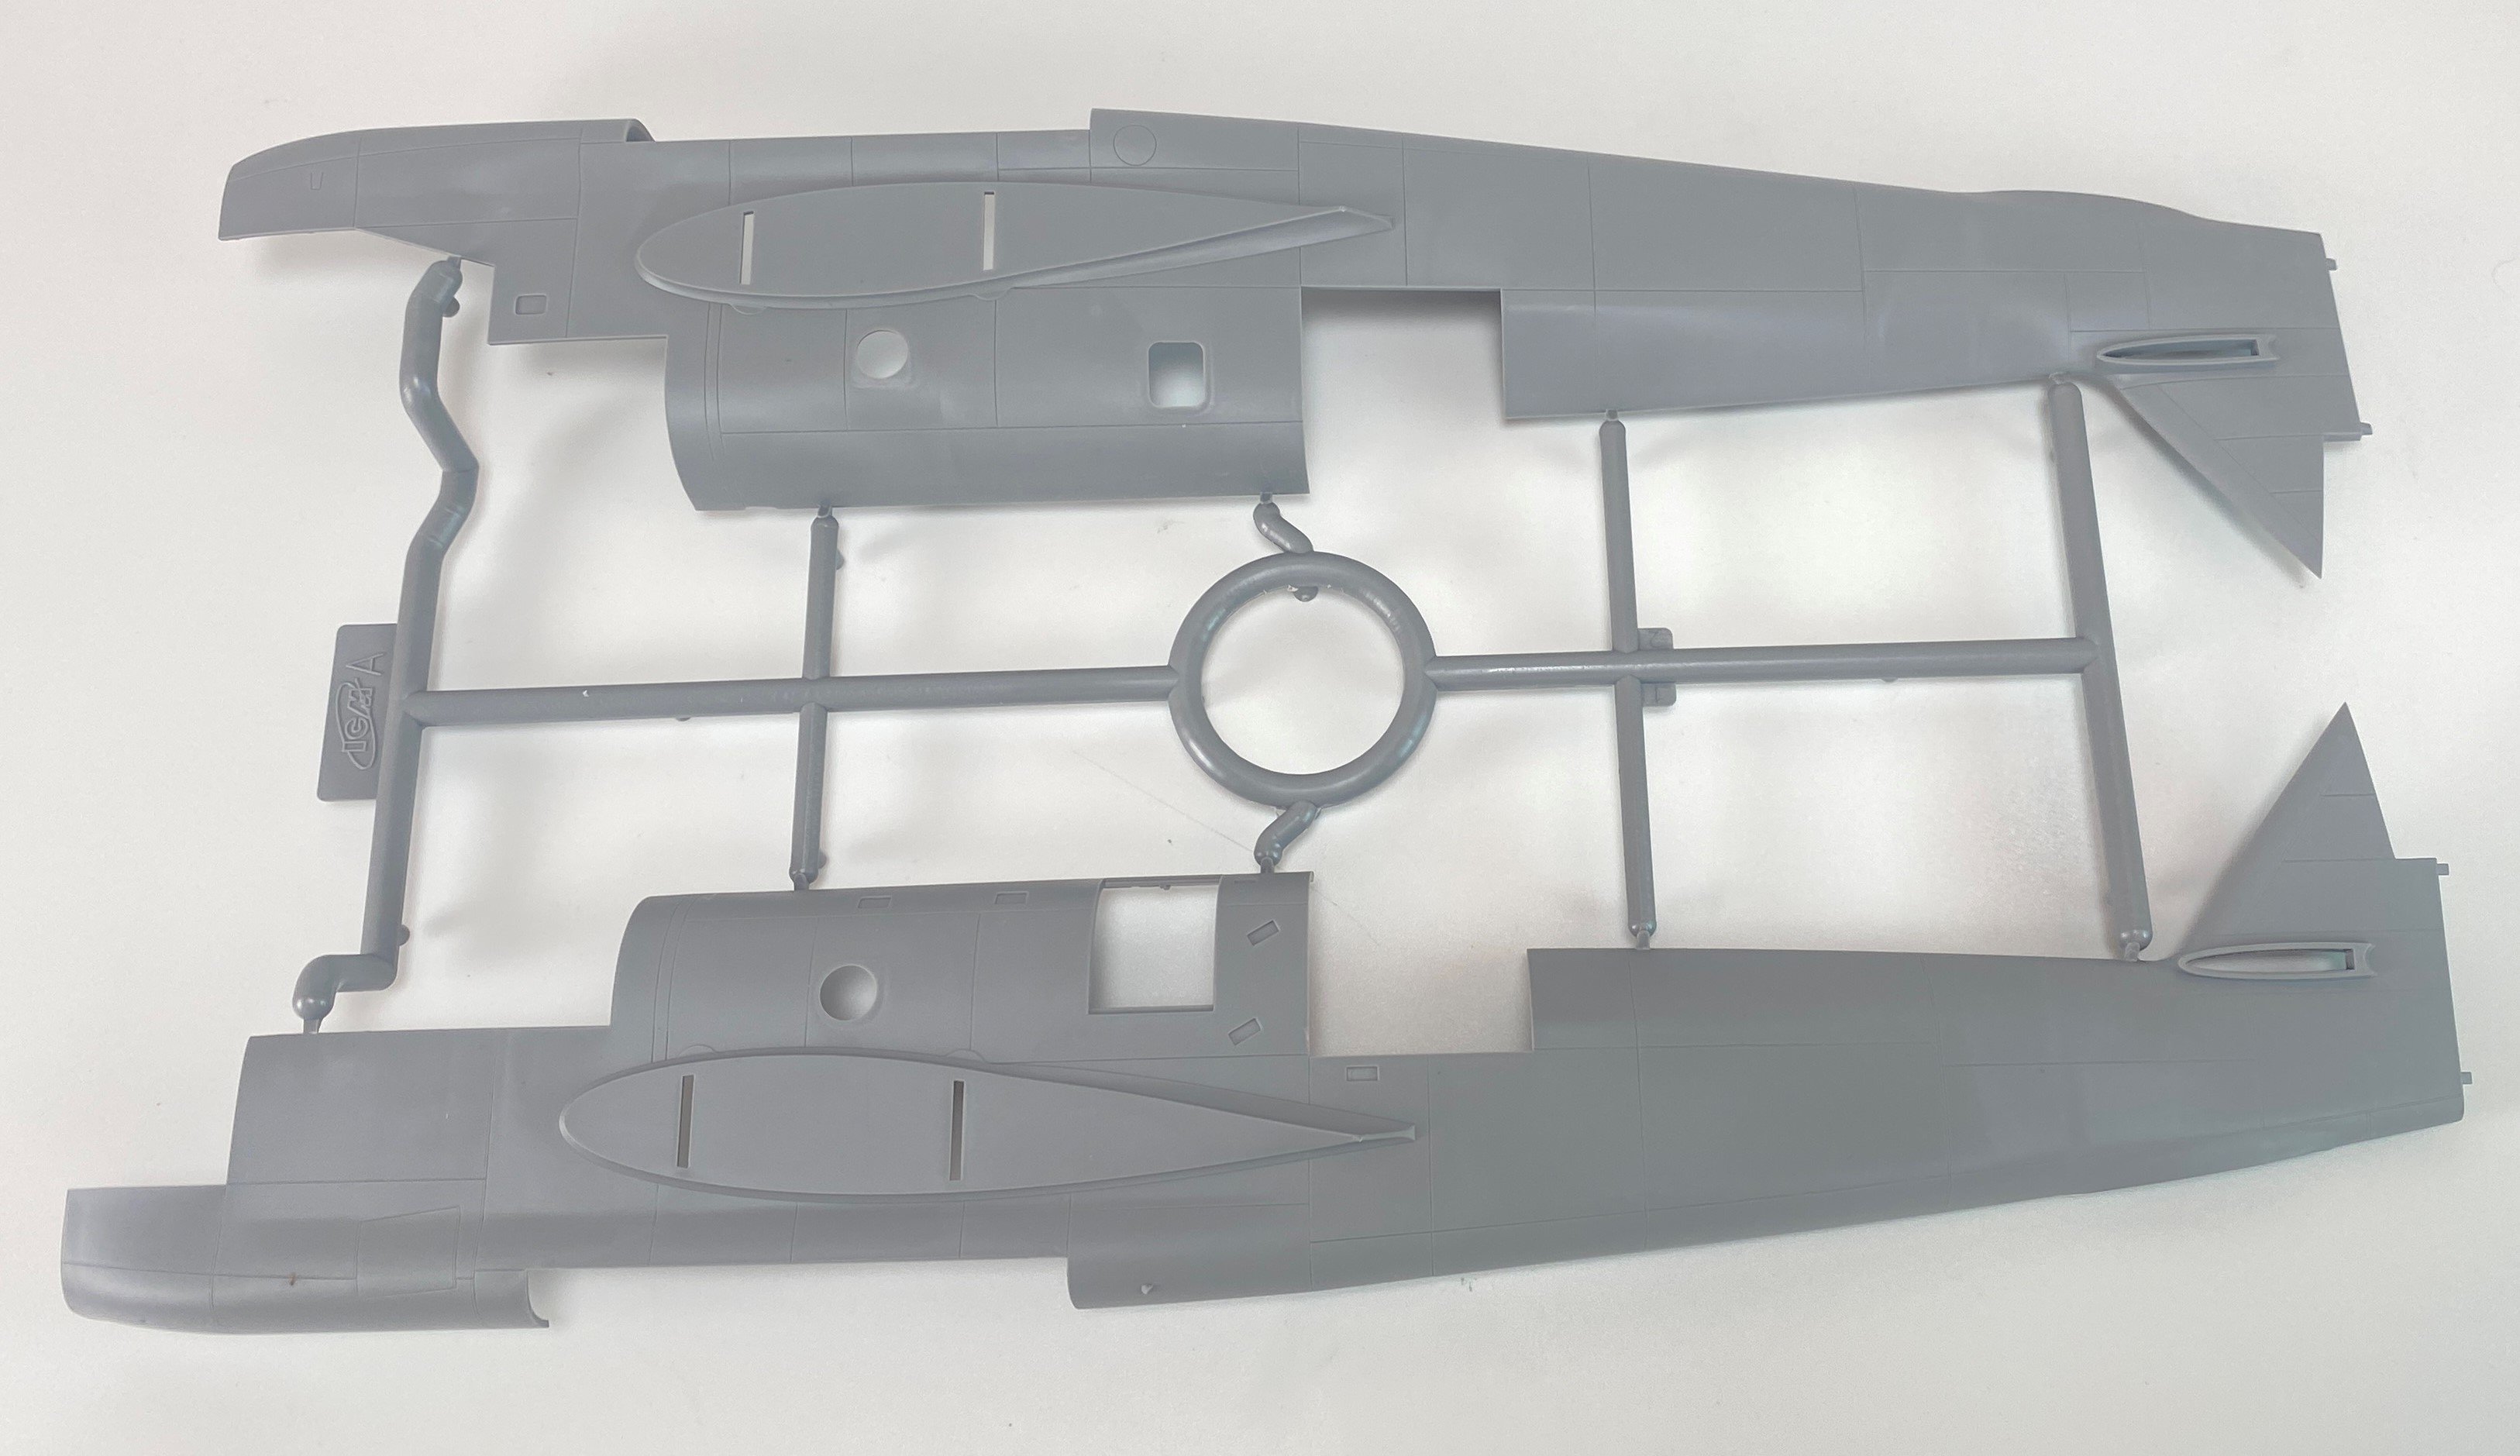
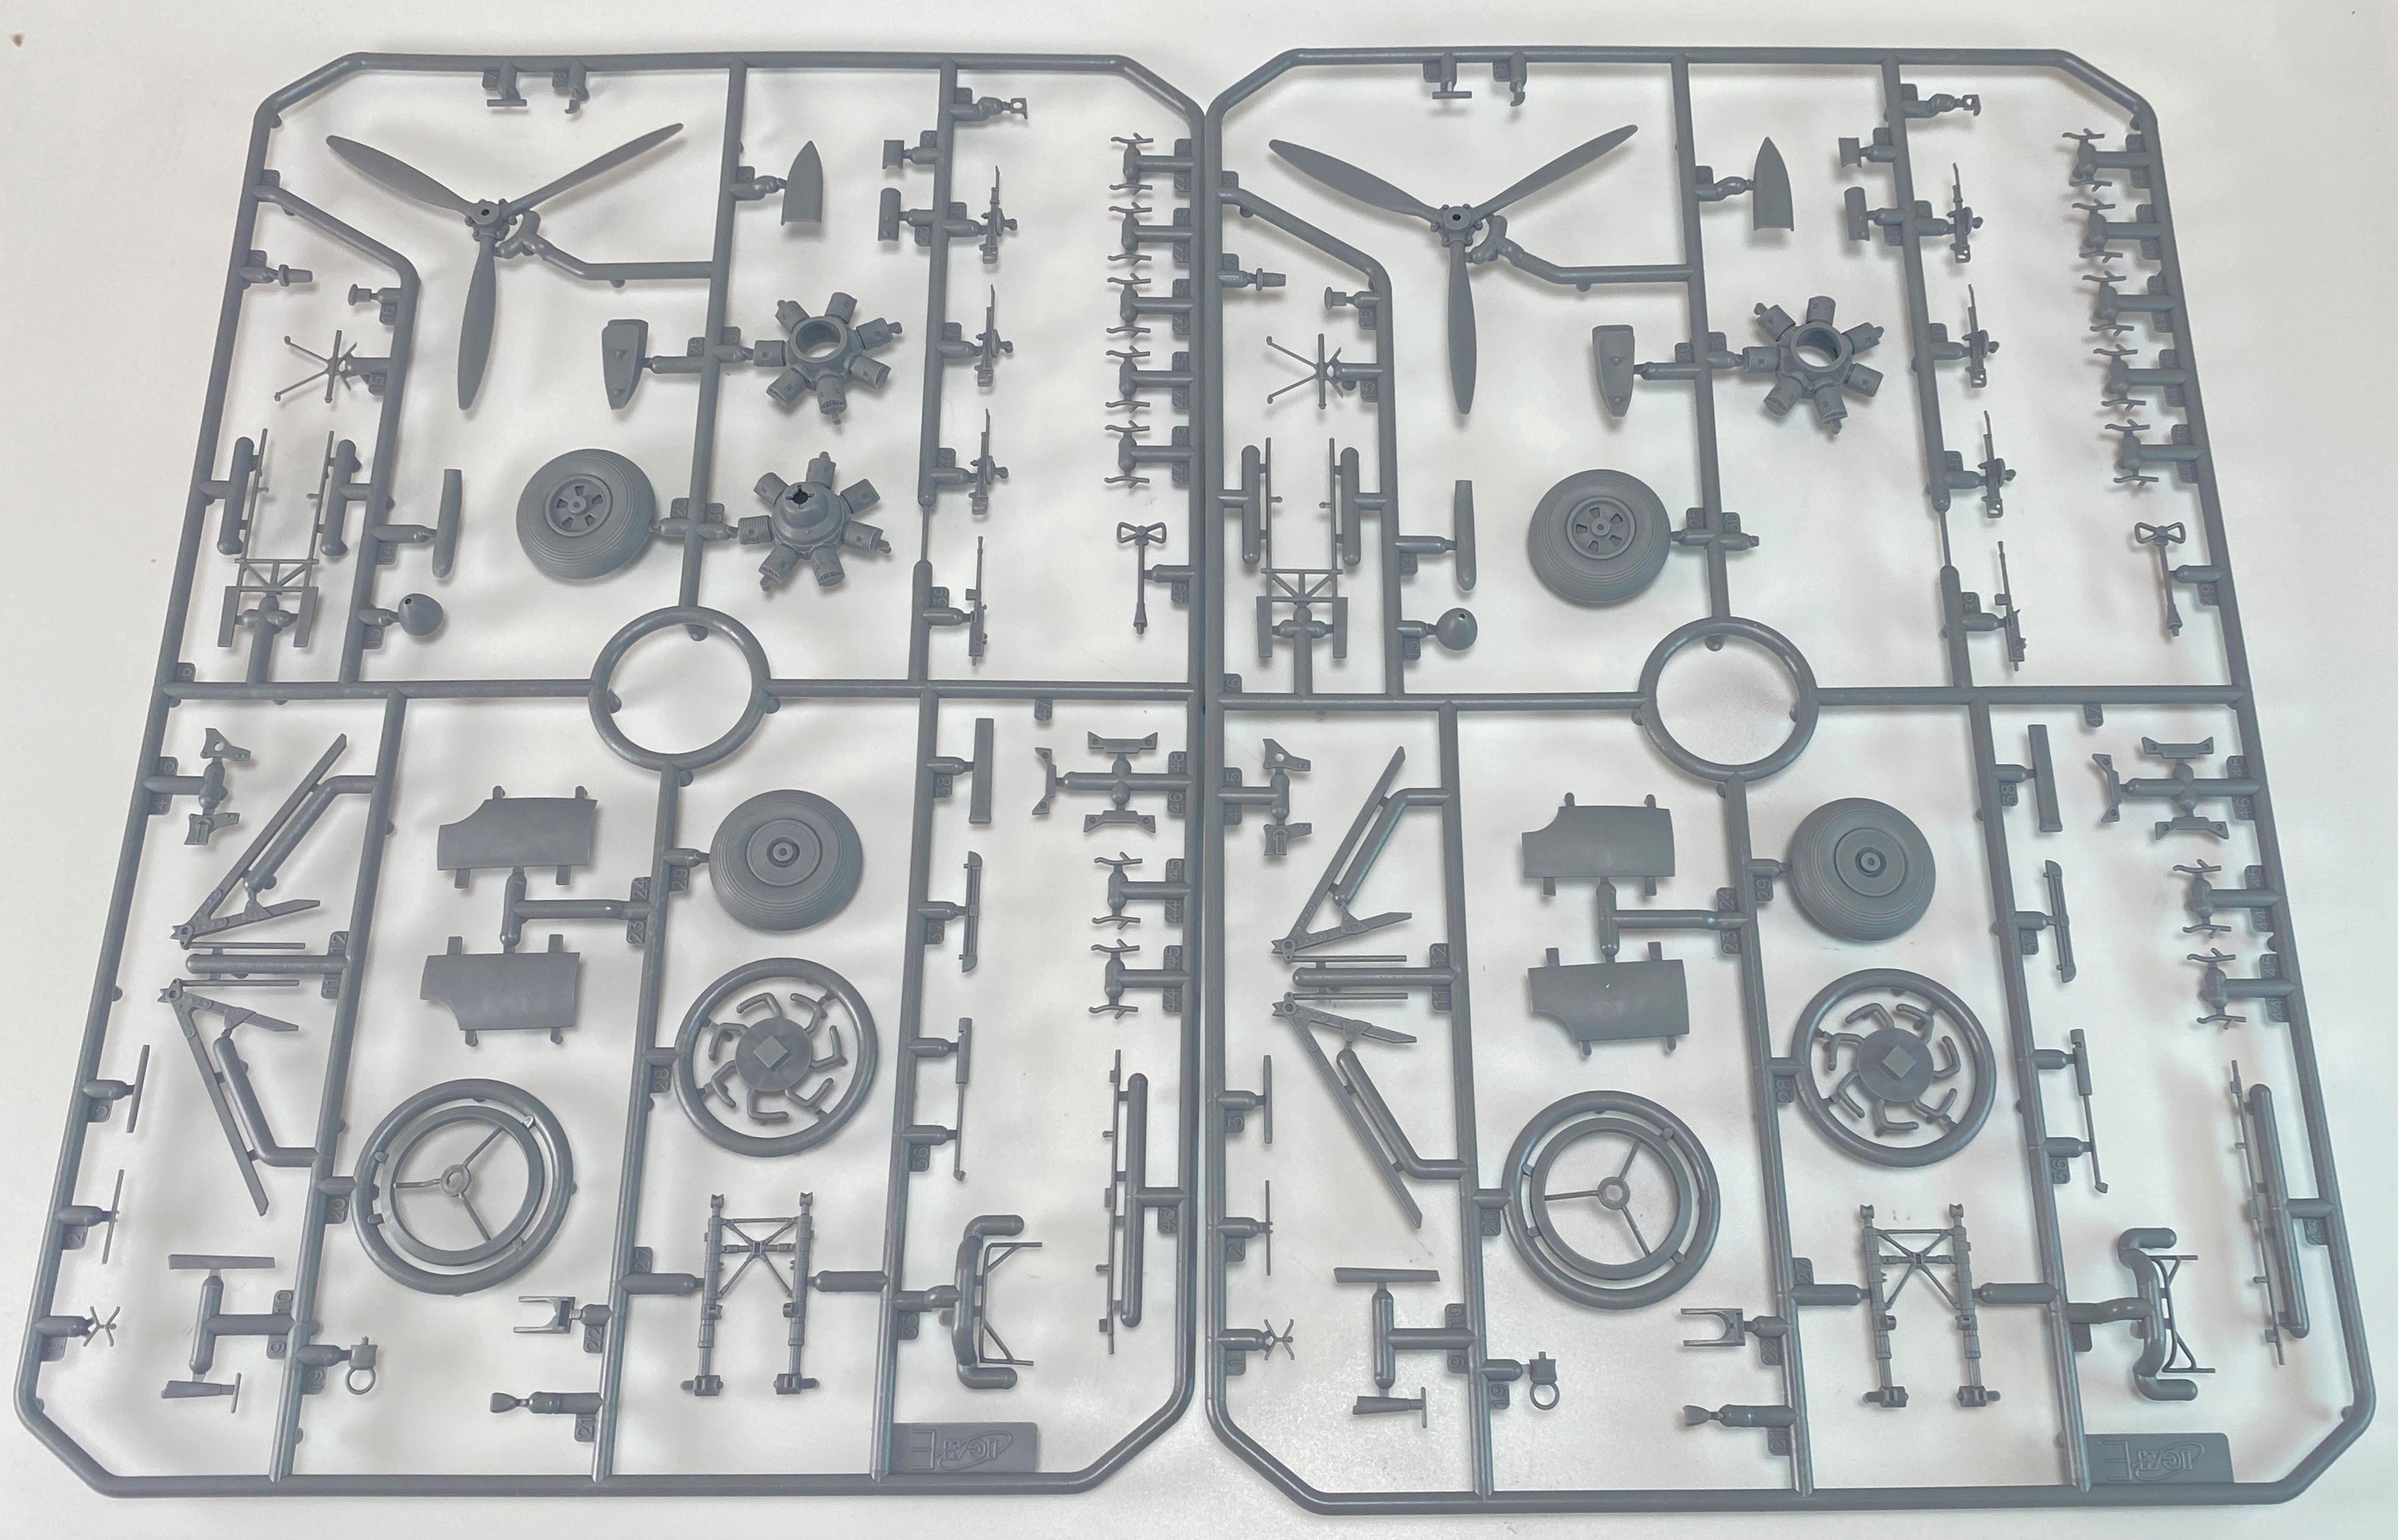
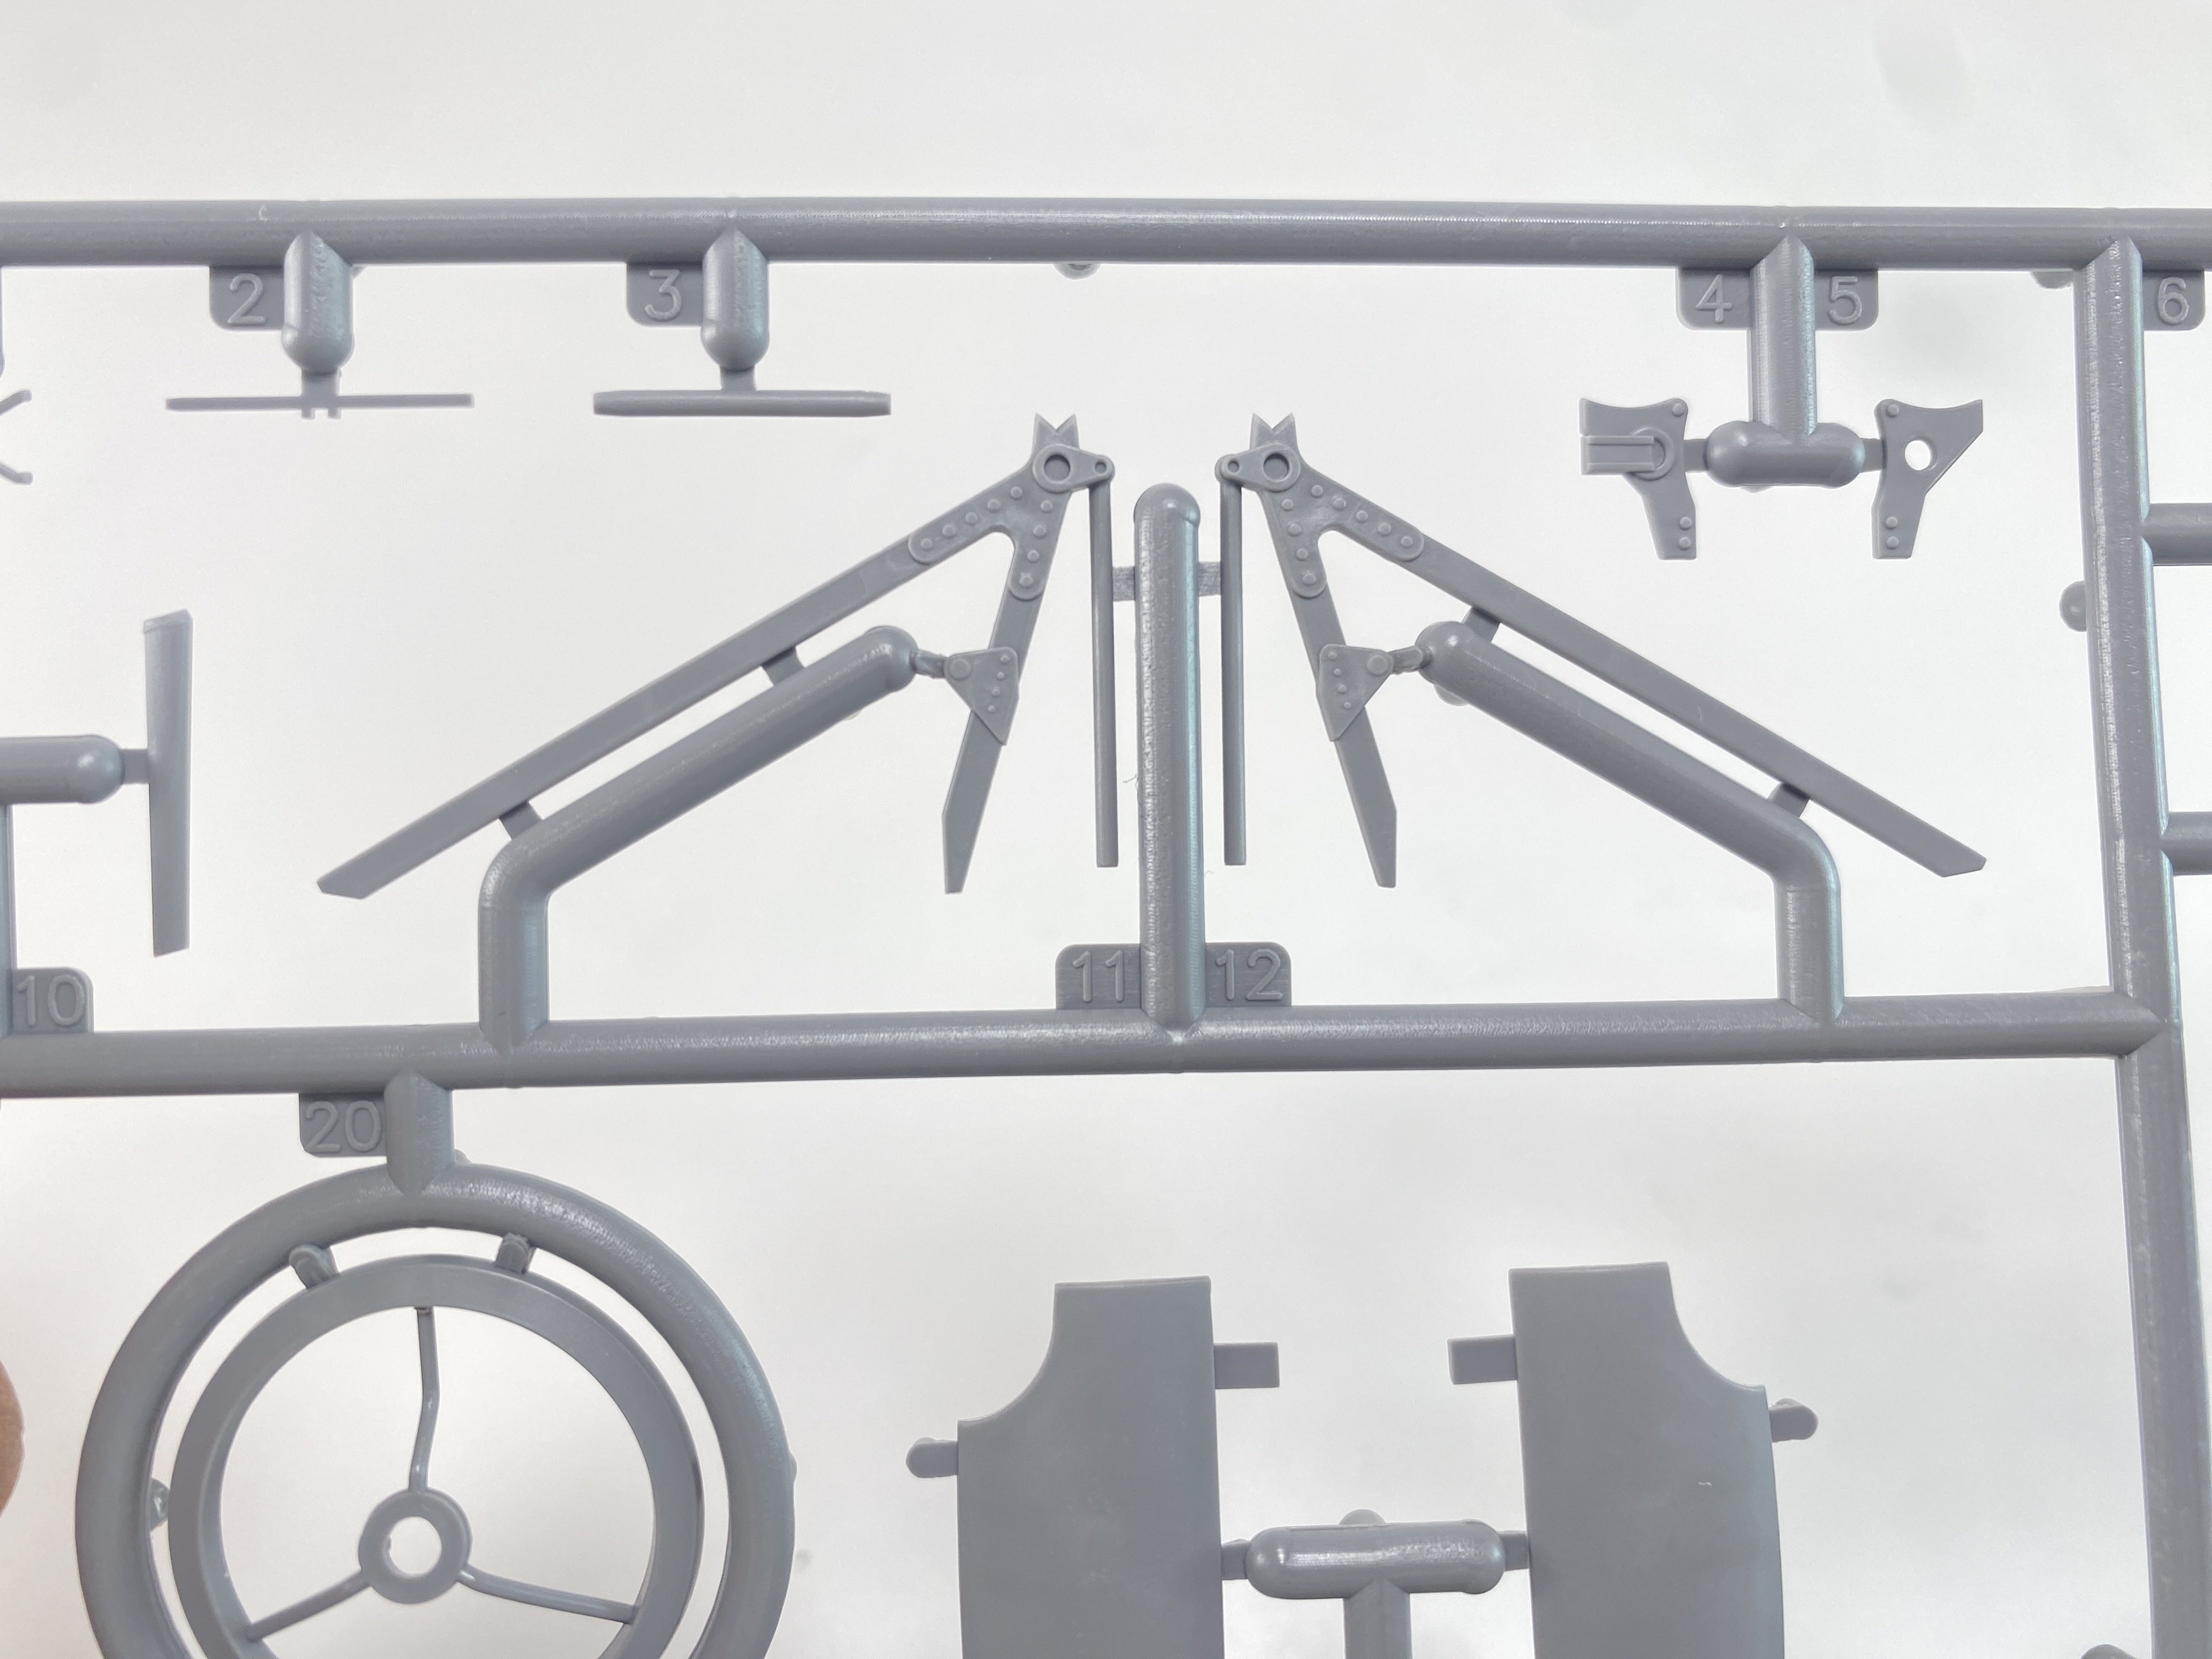
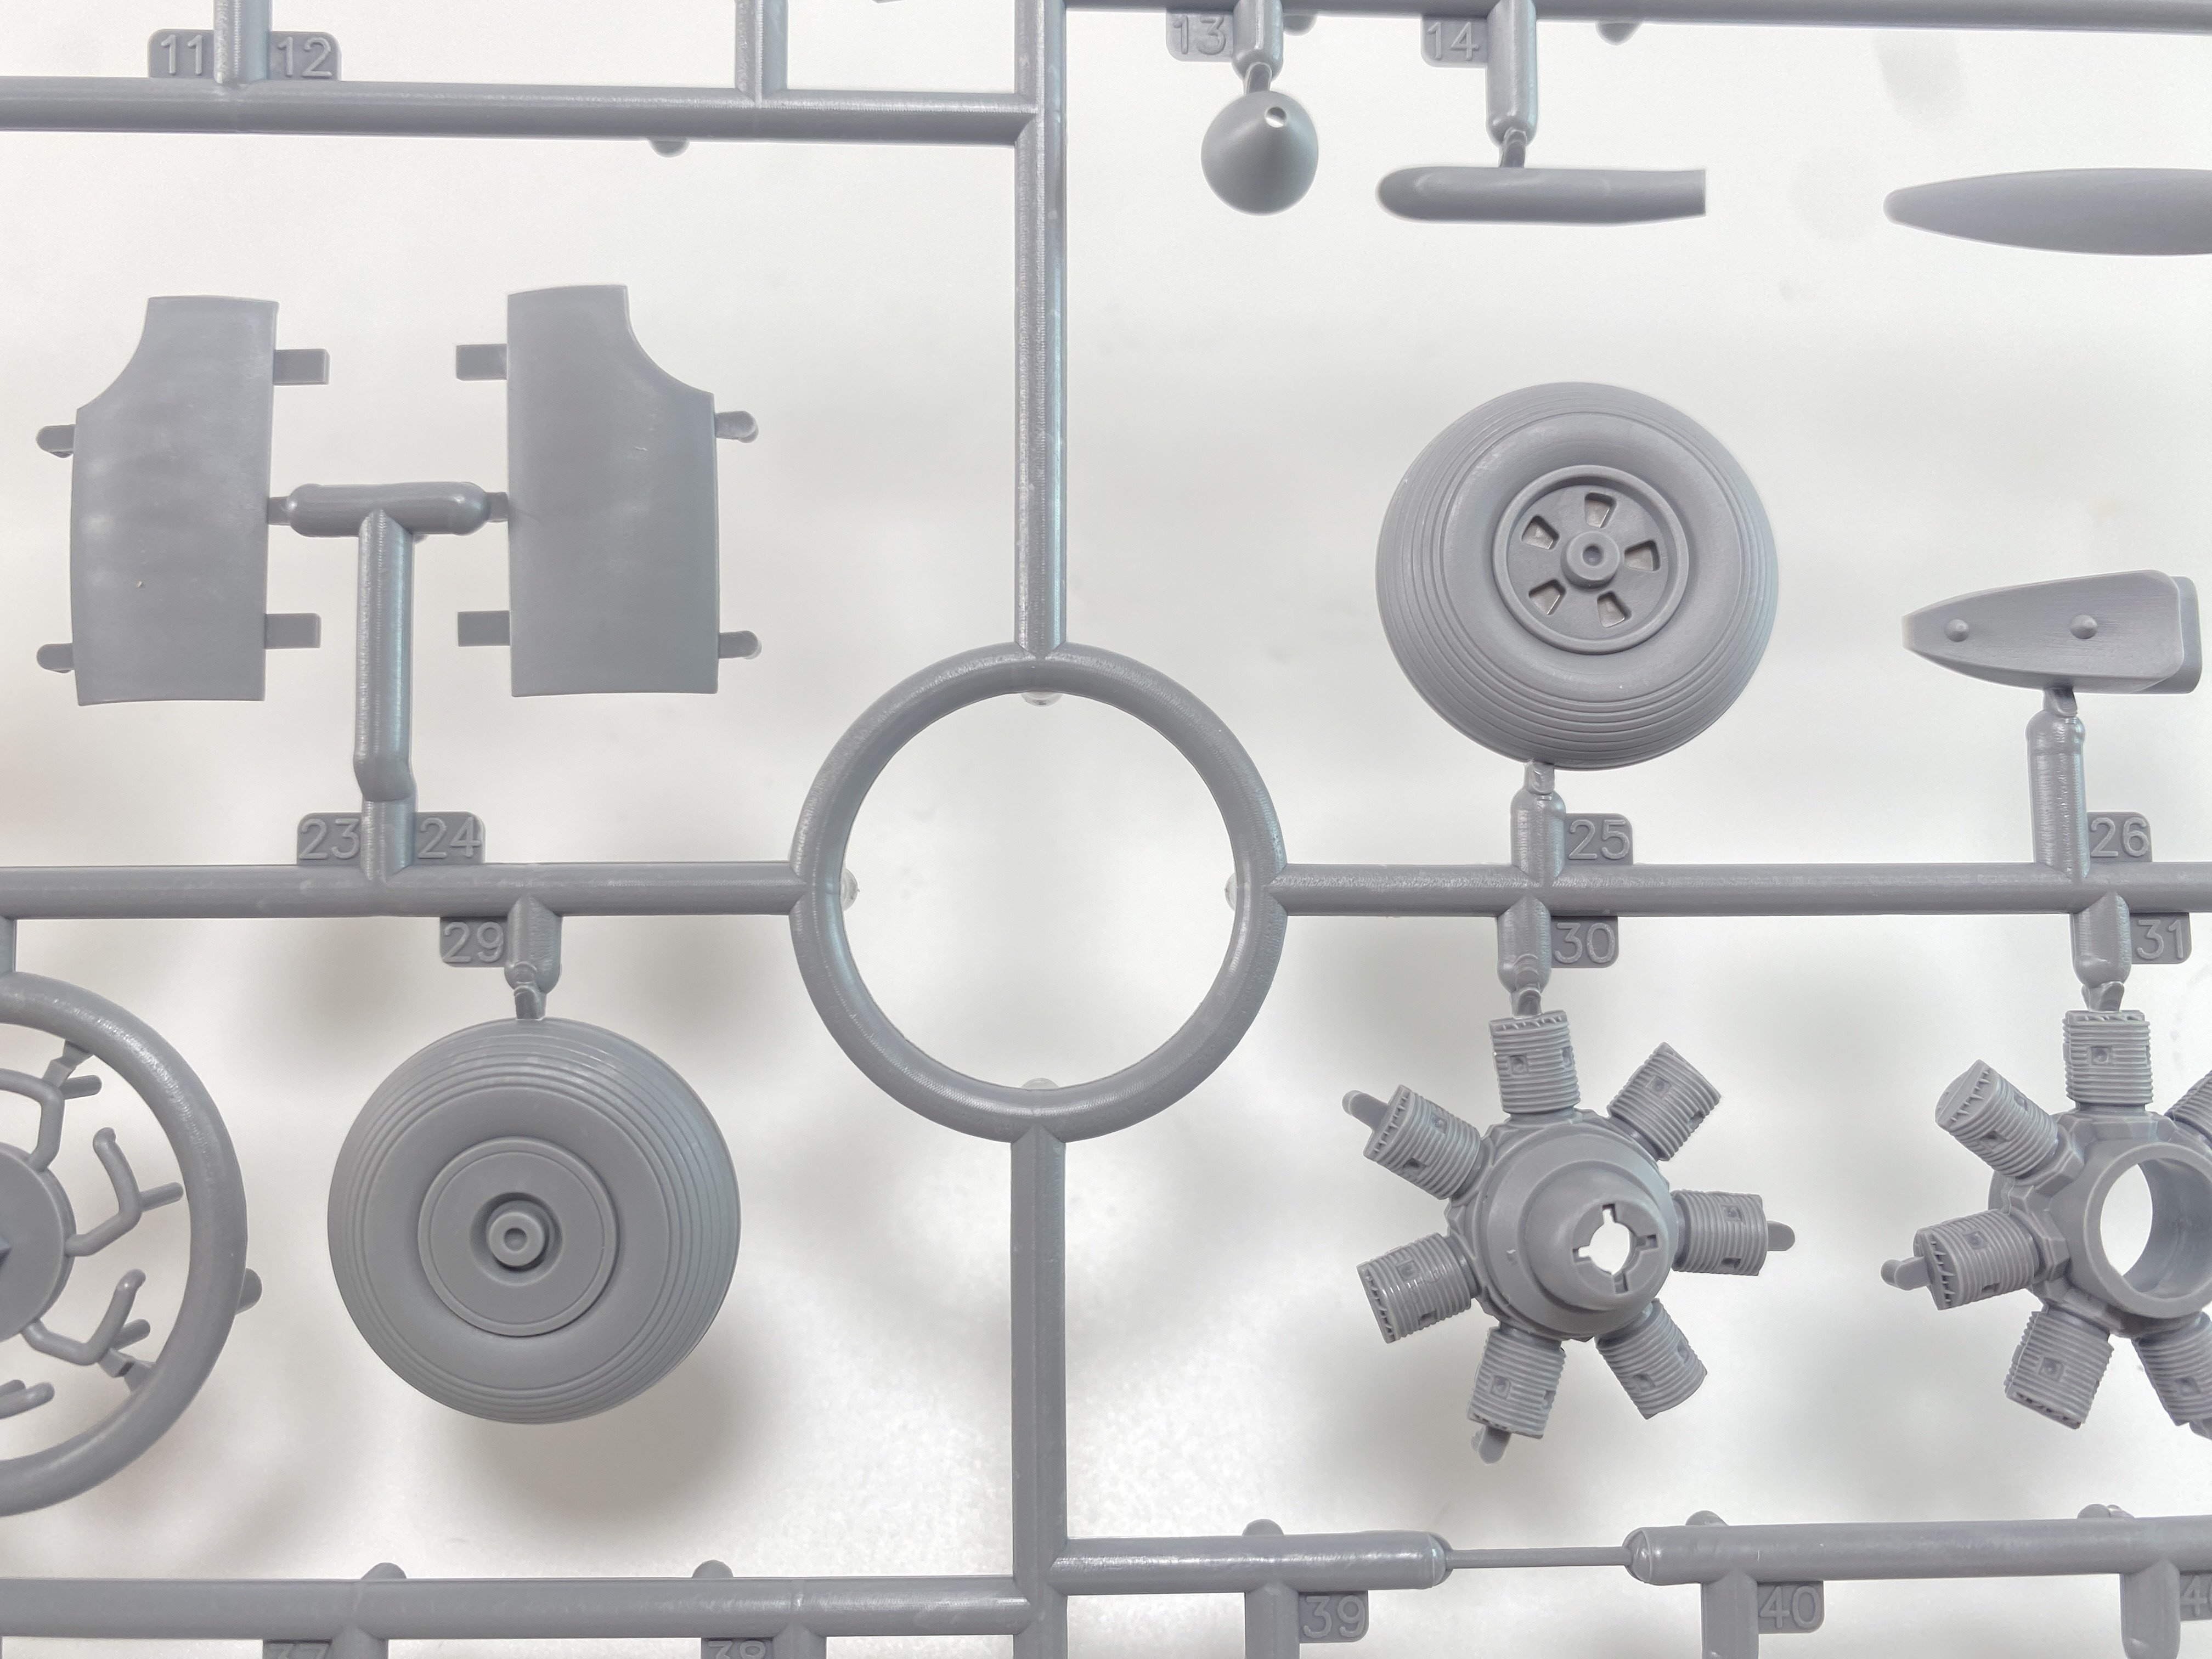
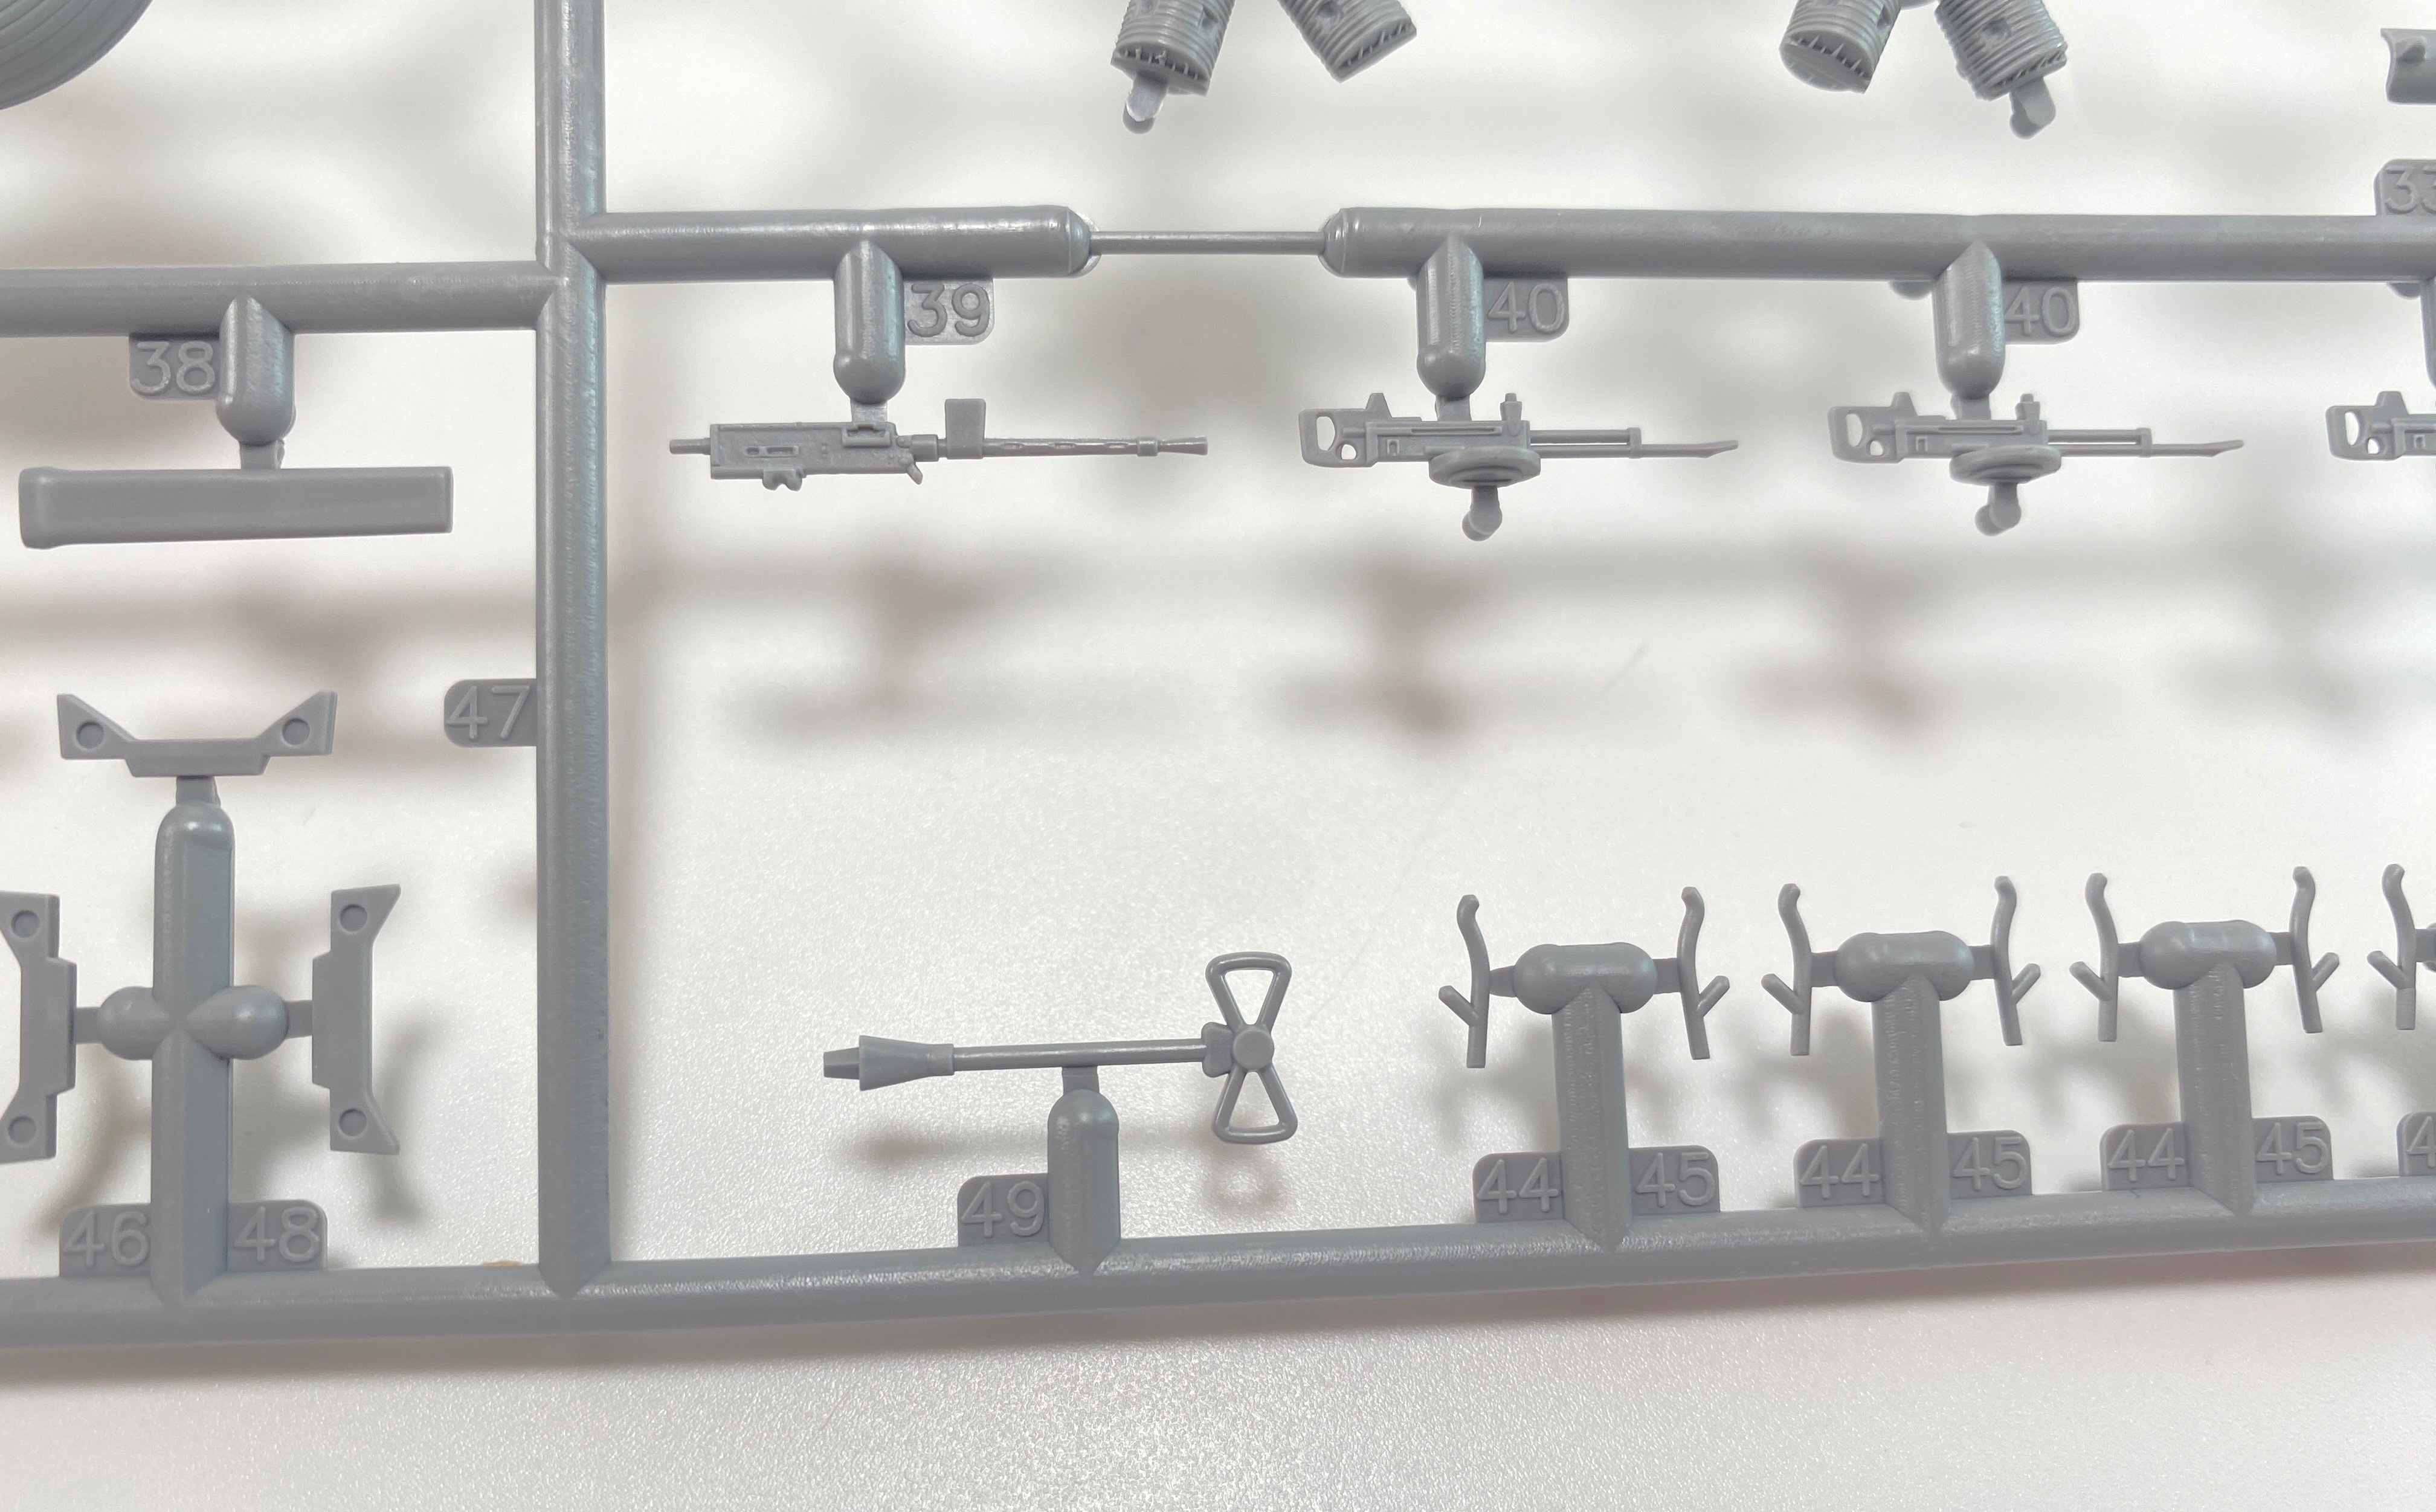
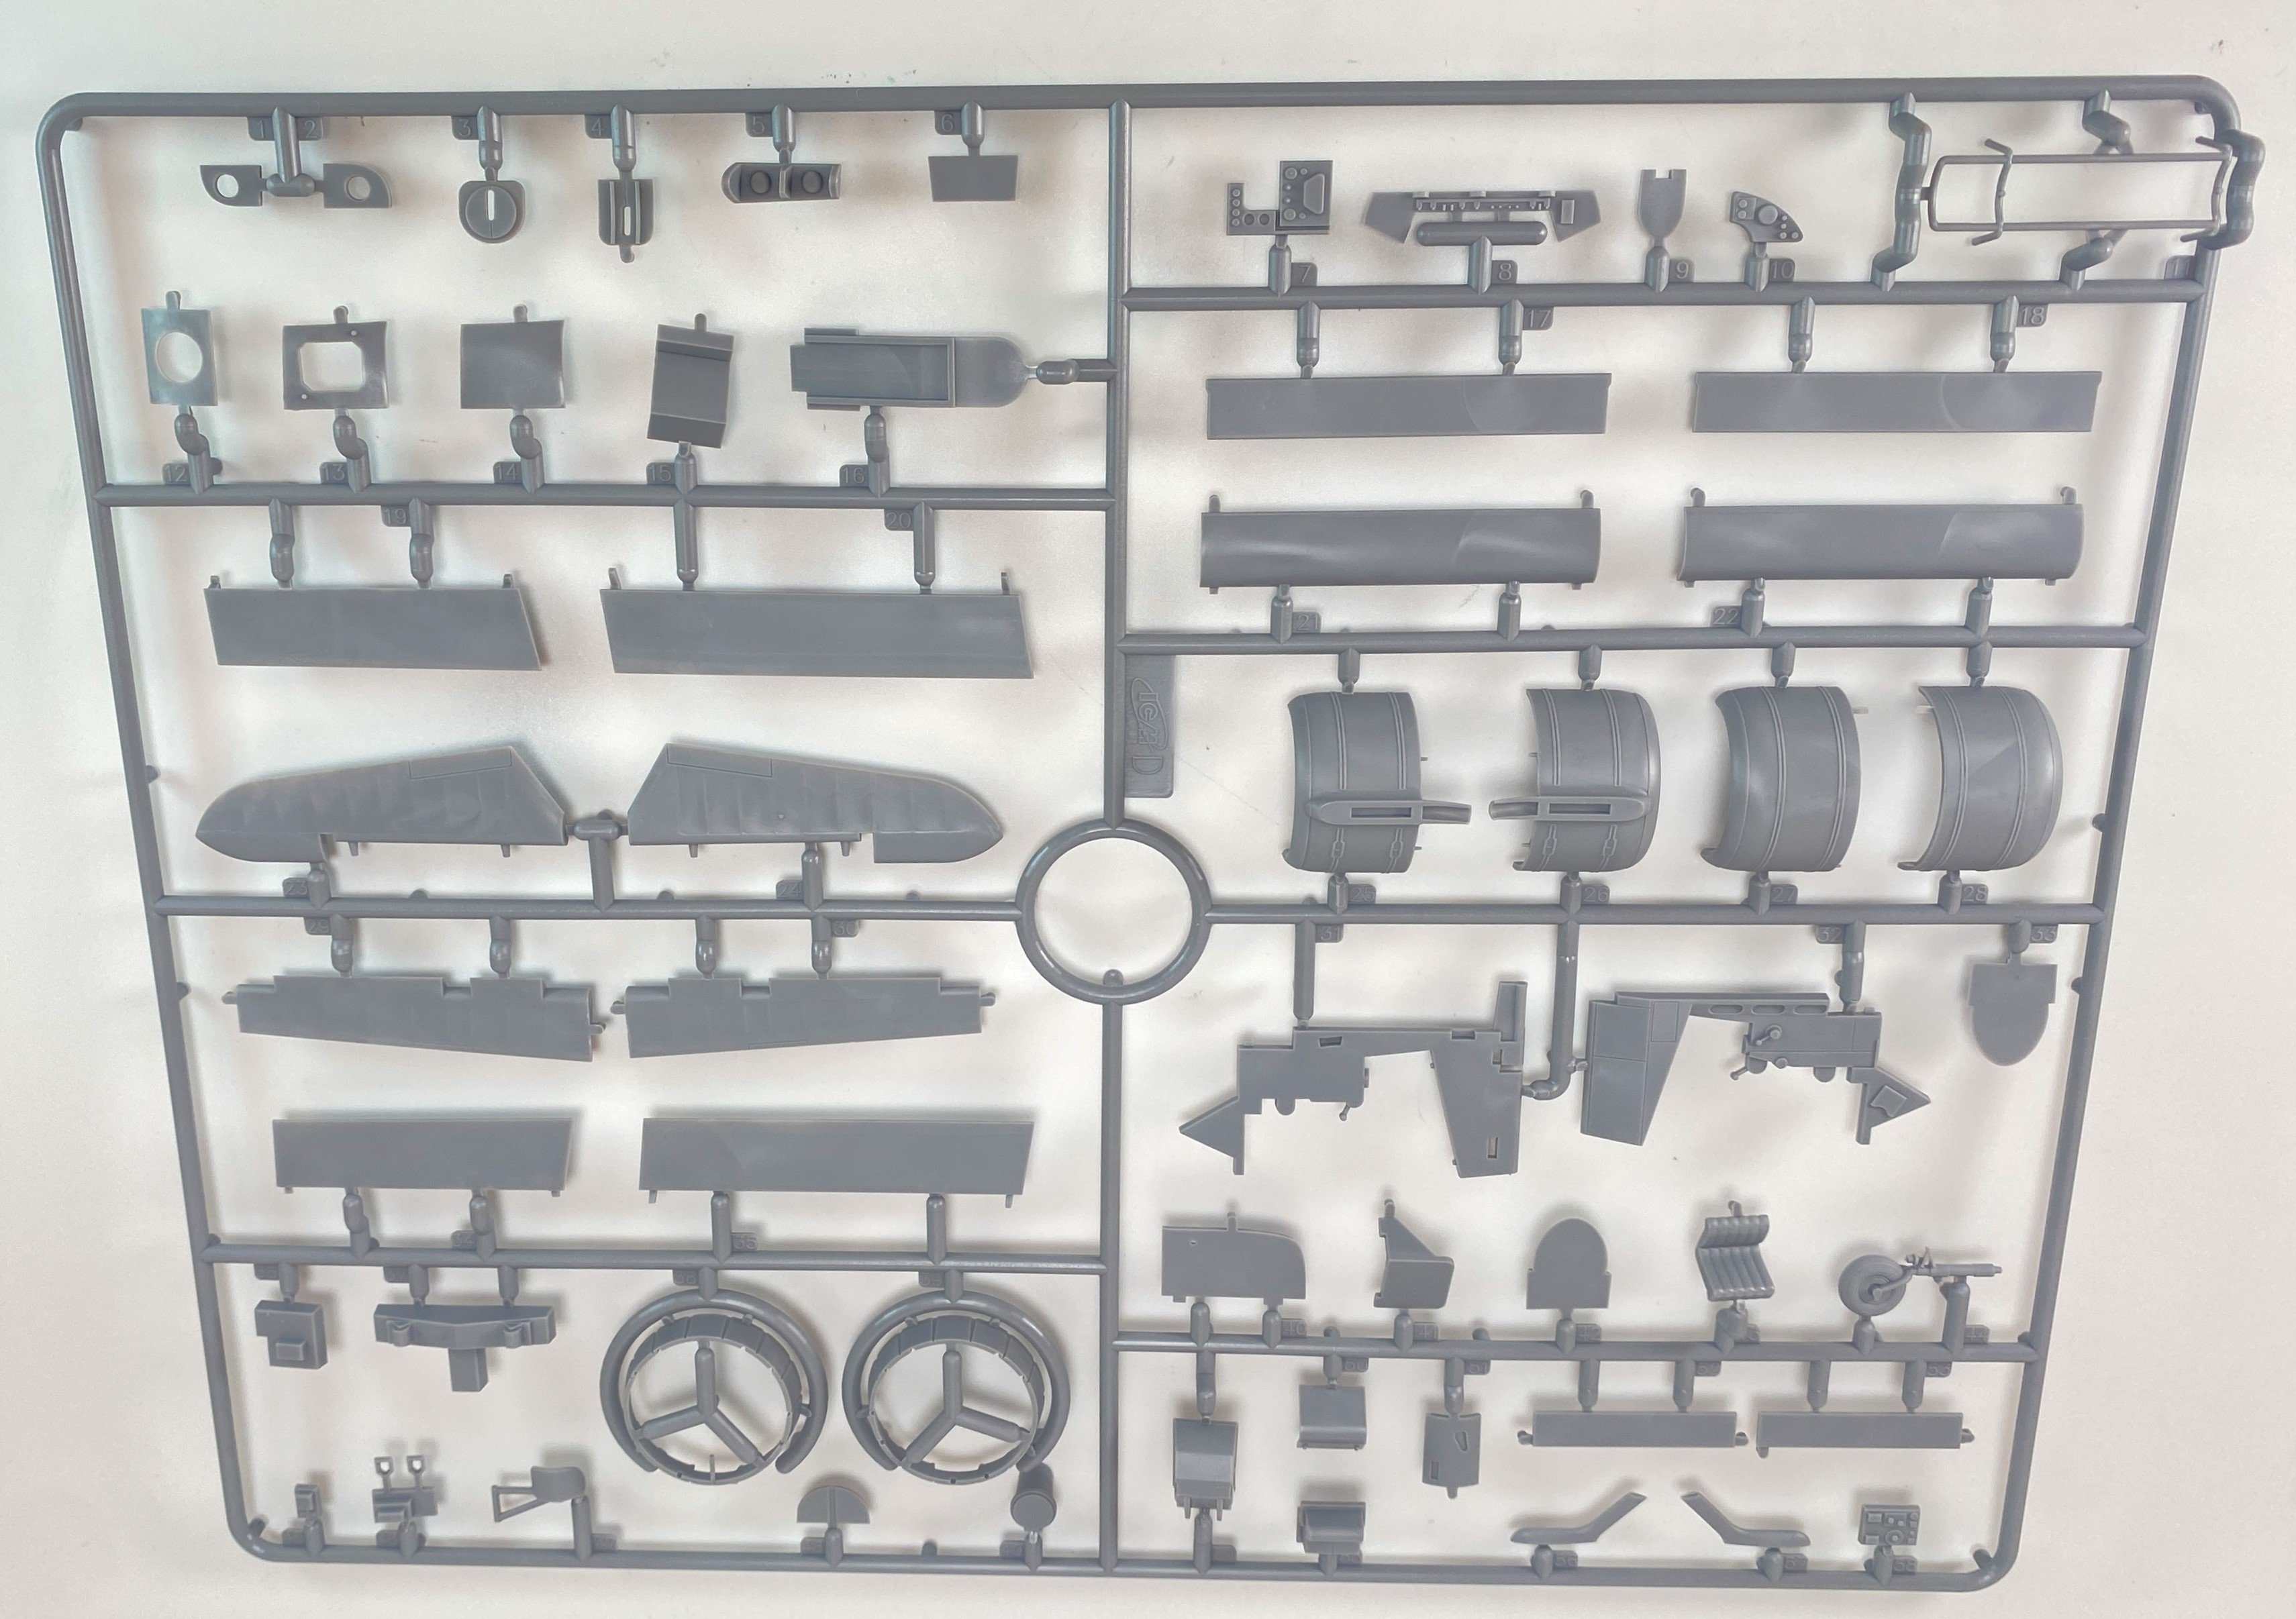
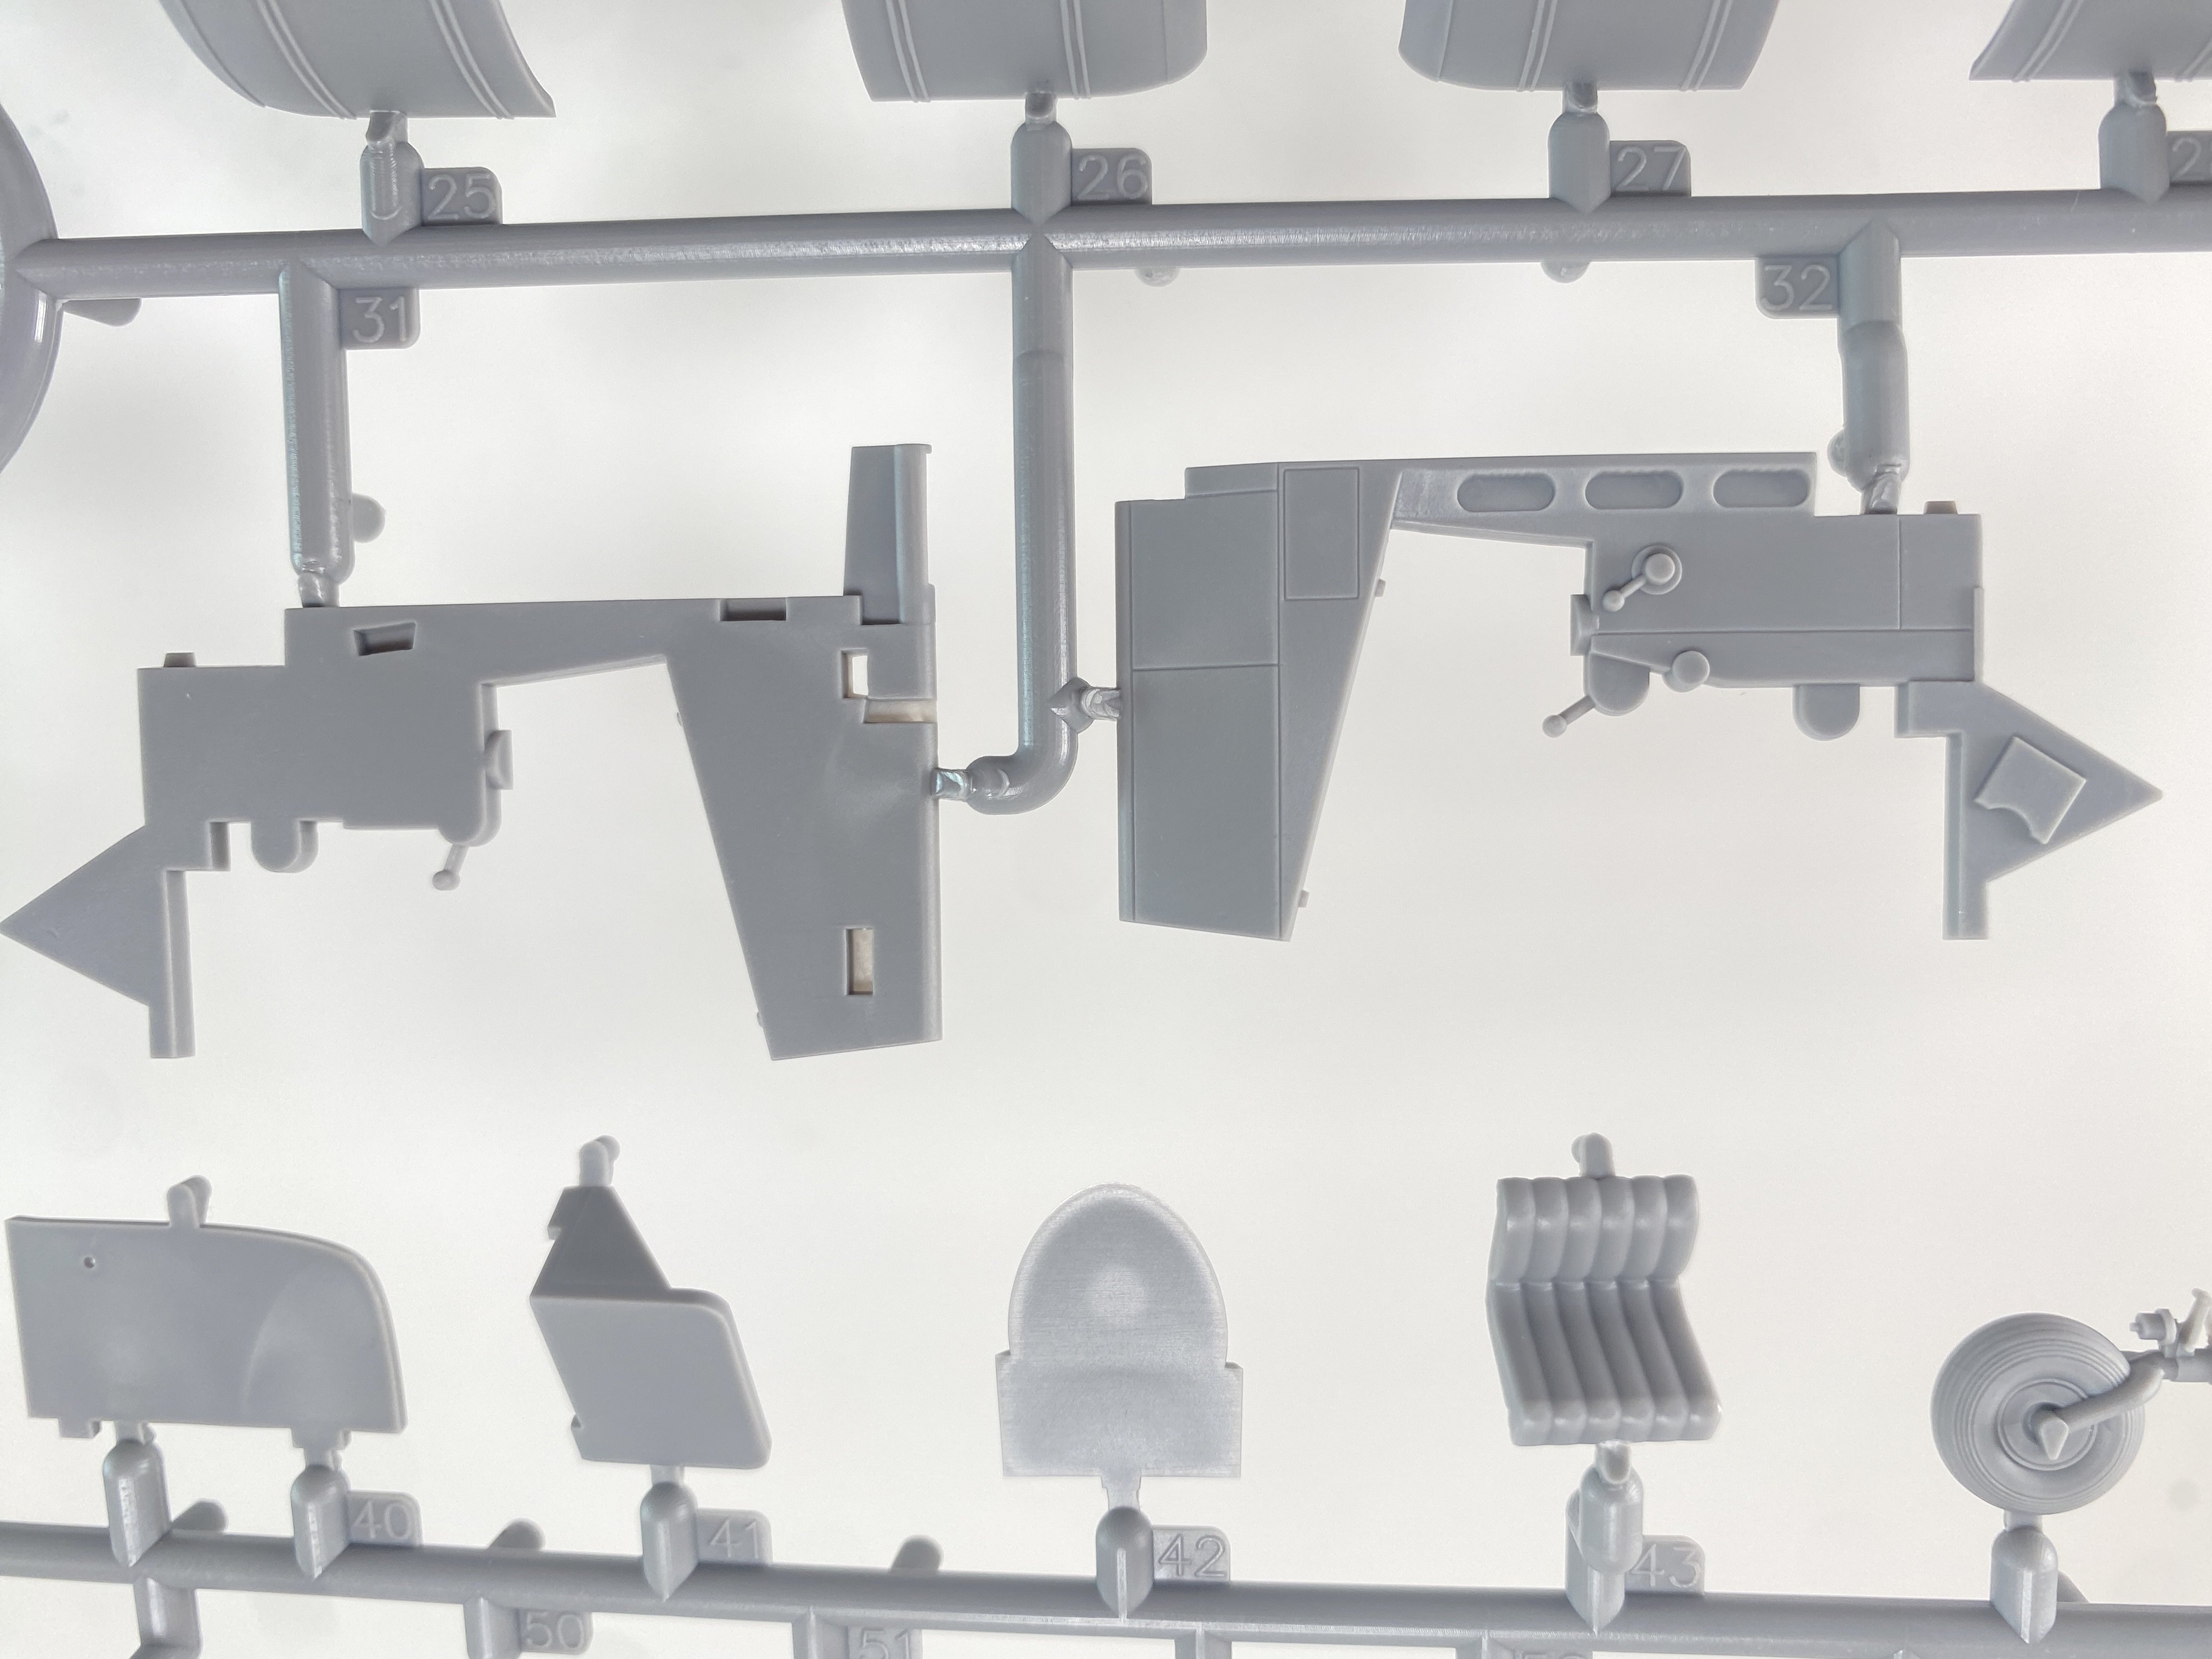
1:48 BRISTOL BEAUFORT Mk. I “WWII British Dominions Air Force” ICM Catalogue n.º 48132 € 54,20 – in Art Scale Kit In 1935 the Air Ministry had issued two specifications, M.15/35 and G.24/35, which detailed requirements for a torpedo-bomber and a general reconnaissance/ bomber respectively. The latter was required to replace the Avro Anson in service for this role and. as mentioned in the Bristol Blenheim entry, was to be met by the Bristol Type 149 which was built in Canada as the Bolingbroke. To meet the first requirement, for a torpedo-bomber, Bristol began by considering an adaptation of the Blenheim, identifying its design as the Type 150. This proposal, which was concerned primarily with a change in fuselage design to provide accommodation for a torpedo and the installation of more powerful engines, was submitted to the Air Ministry in November 1935. After sending off these details of the Type 150, the Bristol design team came to the conclusion that it would be possible to meet both of the Air Ministry's specifications by a single aircraft evolved from the Blenheim, and immediately prepared a new design outline, the Type 152. By comparison with the Blenheim Mk IV, the new design was increased slightly in length to allow for the carriage of a torpedo in a semi-exposed position, provided a navigation station, and seated pilot and navigator side-by-side. Behind them were radio and camera positions which would be manned by a gunner/camera/radio operator. The Type 152 was more attractive to the Air Ministry, but it was considered that a crew of four was essential, and the accommodation was redesigned to this end. The resulting high roofline, which continued unbroken to the dorsal turret, became a distinguishing feature of this new aircraft, built to Air Ministry Specification 10/36, and subsequently named Beaufort. Detail design was initiated immediately, but early analysis and estimates showed that the intended powerplant of two Bristol Perseus engines would provide insufficient power to cater for the increase of almost 25 per cent in gross weight without a serious loss of performance. Instead, the newly developed twin-row Taurus sleeve-valve engine was selected for the Beaufort, the only concern being whether it would be cleared for production in time to coincide with the construction of the new airframe. The initial contract, for 78 aircraft, was placed in August 1936, but the first prototype did not fly until just over two years later, on 15 October 1938. There had been a number of reasons for this long period of labour, one being overheating problems with the powerplant, and another the need to disperse the Blenheim production line to shadow factories before the Beaufort could be built. Test flying of the prototype revealed a number of shortcomings, leading to the provision of doors to enclose the main landing gear units when retracted, repositioning of the engine exhausts, and an increase to two machine-guns in the dorsal turret. These and other items, added to continuing teething problems with the new engine, delayed the entry into service of the Beaufort Mk Is, these first equipping No. 22 Squadron of Coastal Command in January 1940. It was this unit, which on the night of 15-16 April 1940, began the Beaufort's operational career by laying mines in enemy coastal waters, but in the following month all in-service aircraft were grounded until engine modifications could be carried out. Earlier, the Australian government had shown interest in the Beaufort, and following the visit of a British Air Mission in early 1939, it was decided that railway and industrial workshops could be adapted to produce these aircraft, resulting in the establishment of two final assembly plants (at Fishermen's Bend, Melbourne, and at Mascot, Sydney) with the production backing of railways workshops at Chullora, Islington and Newport. Twenty sets of airframe parts and the eighth Bristol built Beaufort Mk I (L4448, which became A9-1001) was imported for trials, but at an early stage the Australians decided they did not want the Taurus powerplant. Accordingly, they had obtained a licence from Pratt & Whitney to build the Twin Wasp (already being licence built by the Commonwealth Aircraft Corporation in Australia), and these were to power all Australian-built Beauforts, which eventually totalled 700. As from May 1941, several notable long distance flights were carried out by this experimental prototype and all expectations were exceeded. The first DAP Beaufort was tested in August 1941, and was one of a batch of 180 ordered by the RAF for use in the Far East. Australian production began in 1940, the first Australian Beaufort Mk V making its initial flight in May 1941. Apart from the change in engines, these were generally similar to their British counterparts except for an increase in fin area to improve stability with the powerful Twin Wasp engine. In fact, engine and propeller changes accounted for most of the different variants produced by the Australian factories. These included the Beaufort V (50) and Beaufort VA (30), both with licence-built Twin Wasp S3C4-G engines; Beaufort VI (40 with Curtiss propellers) and Beaufort VII (60 with Hamilton propellers), all 100 being powered by imported SlC3-G Twin Wasps due to insufficient licence production; and the Beaufort VIII with licence-built S3C4-Gs. This last mark was the definitive production version, of which 520 were built, and had additional fuel tankage, Loran navigation system and variations in armament, with production ending in August 1944. Some 46 of the last production batch were subsequently converted to serve as unarmed transports; designated Beaufort IX, this variant had the dorsal turret removed and the resulting aperture faired in. The powerplant rating of all the Australian versions was 1,200 hp (895 kW). The Beaufort was used extensively by the Royal Australian Air Force in the Pacific theatre, serving from the summer of 1942 until the end of World War II. The early trials of the Australian Beaufort V with Twin Wasp engines induced the Air Ministry to specify this powerplant for the next contract, and a prototype with these American engines was flown in November 1940. The first production Beaufort Mk II flew in September 1941, and by comparison with the Beaufort Mk I revealed much improved take-off performance. However, because of a shortage of Twin Wasps in the UK, only 164 production Mk IIs were built before Mk Is with improved Taurus XII engines were reintroduced on the line. In addition to the powerplant change, this version had structural strengthening, a changed gun turret, and ASV radar with Yagi aerials. When production of this version ended in 1944, well over 1,200 Beauforts had been built in Britain. The final two Beaufort designations, Mk III and Mk IV, related respectively to a version with Rolls-Royce Merlin XX engines of which none were built, and a version with two 1,250 hp (932 kW) Taurus XX engines of which only a prototype was built. Beauforts were the standard torpedo-bomber in service with Coastal Command during 1940-43, equipping Nos. 22, 42, 86, 217, 415 and 489 Squadrons in home waters, and Nos. 39, 47 and 213 in the Middle East. They were to acquit themselves well until superseded by the Beaufighter, involved in many of the early and bloody attacks against the German battle cruisers Gneisenau and Scharnhorst, and the heavy cruiser Prinz Eugen, three vessels that often seemed to be invincible, at least to aircraft carrying conventional weapons.- - Historical entry by - http://www.pilotfriend.com/photo_albums/timeline/ww2/Bristol%20Beaufort.htm Now a little history in video: https://www.youtube.com/watch?v=sEEtbTBmuPE Let`s take a look at the ICM Bristol Beaufort. I confess that it is the first time I see this particularly kit in flesh, even thought this is a rebox of the original release last year. ICM boxes are quite sturdy, as the art design is just a cover top for a top-opening box, quite sturdy and resistance. It is a nice solution, and I believe probably a lower cost one. Inside of the box, eight gray plastic sprue and one large clear part sprue. The gray plastic is easy to work with no being to brittle or not to soft. The Fuselage has all the internal ribbing, in the cockpit area and tail wheel bay. One very good thing that you see in all latest models is the internal frame fro the fuselage clear that it will assure you a good and sturdy fit. A few injection marks but probably only one will be visible, and in fact is very soft so no problem in removing it. The wings. The come in two halfs, as usual. The surface detail is limited to panel lines that are very well defined and clean and a few raised panels. The wheels pit as no detail at all, being that reserved to the gondola halves, that have some internal detail. Inside the wings, in the fuselage connection theres the ICM usual connection strudy system to help the modellers in having a quite easy fit between fuselage and wings. All these big parts have connections points and I was curious to see how it all fit and I give I a go… All dryfit and very good fit even without a single glue. The wings jugs are essential In sprue C, we have some cockpit detail, engine – Wheels bay gondolas, flaps, tail fin and wings jigs, rudder. The wings jigs have internal detail as they work also give interior detail with nacelles fuselage. Some cockpit and internal floors and a nice engraved and raised detail instrument panel. If you do not want to spend more money, with this detail instrument and the instruments bezels in decal in box, with a little work you could get a very good result. Sprue D Keeping all the main parts in this sprue that give the tailwheel, several interior parts with very nice detail for pilot cockpit and radio compartment, tail wings, engine bonnet, all with nice and clean surface detail. Unfortunally, it takes a lot of surgery to get the engine open to show their full detail and the cooling flaps are also close. Sprue E (x2) So, now a duplicate sprue as it deals with engine, wheels, propeller, landing gear and defensive armament. All the parts are very delicated and with a very good detail. I`m in fact impressed with the detail that ICM can get from injection modeling. The wheels are in two halfs.. I really don’t like wheels in two halves but I got to give to ICM… Thse are a very good looking wheels with very good rims detail. The Taurus Engine. ICM gives us two well-detailed banks of cylinders with a circular collector ring attached to the centre by three stators, plus a complex system of tubes installed around the circumference in between the cylinders. The detail of the engine straight from the box is very good and that why I think that a engine bay open would be a great option. Sprue F Constains the parts from the turret with inner carriage. Sprue extra: WWII British Torpedo Trailer Well, this is a kit itself. You don’t get only a detail torpedo but you also get the trailer. Very good addiction to help with a diorama. Very nice touch ICM. The clear parts All the clear parts, and there are quite a few, are made with very good frame detail and they are in fact clear. The decal sheet One single almost A5 size sheet, with all the markings, insignias, instruments and several stencils. The colour and pigmentation looks quite good. I think that they are ICM productions and they usually work well. Options given: 1. Bristol Beaufort Mk. I N1089 or N1106 P, No.489 Sqn. RNZAF, Fall, 1941 2. Bristol Beaufort Mk. I L9802 GX-S, No.415 Sqn. RCAF, Thorney Island, November 1941 3. Bristol Beaufort Mk. I 753 O, 36 Coastal Flight SAAF, Wingfield, Capetown, Spring 1942 4. Bristol Beaufort Mk. I 761 W, 27 Coastal Flight SAAF, Spring 1942 5. Bristol Beaufort Mk. I N1030, No.149 Sqn. RCAF, British Columbia, June 1943 Instructions: It’s a booklet with 23 pages each the first 3 and the last 3 are in glossy paper and the remains one in normal paper. I do like the touch of glossy paper but for workbench (to take notes, to risk parts) I prefer the normal mate paper. A very short historical note is given. The drawings are quite easy to understand and very comphenensive, so it will be easy to follow even to the novice modeler. The colour indication of the interior parts could be a more clear one with a little more color indications. About the colour to use, ICM give a table chart only with ICM colors, which is comprehensive as they launch their own colours… It would be nice to have the British Standard Colors indication. For the experience modeler, that lack of info is not a problem but for the others modelers that don’t have another colour manufacture reference or British Standard Colors, must get ICM colours. I think that is the ICM goal. I have no idea how those colour work however so I cant help with that. A final really nice touch: masking template. While not a masking set, it`s an easy systm to get your canopy masked, better than make your own masking using the clear parts as guide with all the danger of ruin the clear parts. Conclusion: Well, what a really nice kit. As you can see, the cleaning parts are reduce to minimum, the fit (at least the dryfit of the main parts) is excellent and the surface detail is quite good and damn, its really looks like a Beaufort. Ther`s a lots of decals options in the market today if you don’t want a British dominions marking. So you can get a really nice model straight from the box with the well-known high current ICM quality, even without any extra parts (resin or PE) So, just go and get one and built it! You will enjoy. My sincere thanks to ICM for the review sample. You can get your ICM model kit on Art Scale Kit - https://www.artscale.eu/


-
She is beautifull!! Congratulations!!!
-
Announcement of a Zotz A-20 decal release?
Fran replied to Clunkmeister's topic in Modelling Discussion
oh boy, I want!! how can we get from? Only Hannants? -
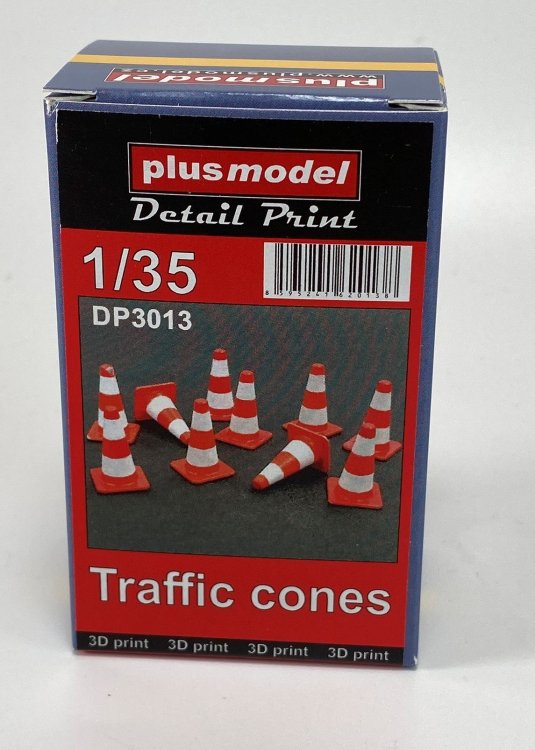
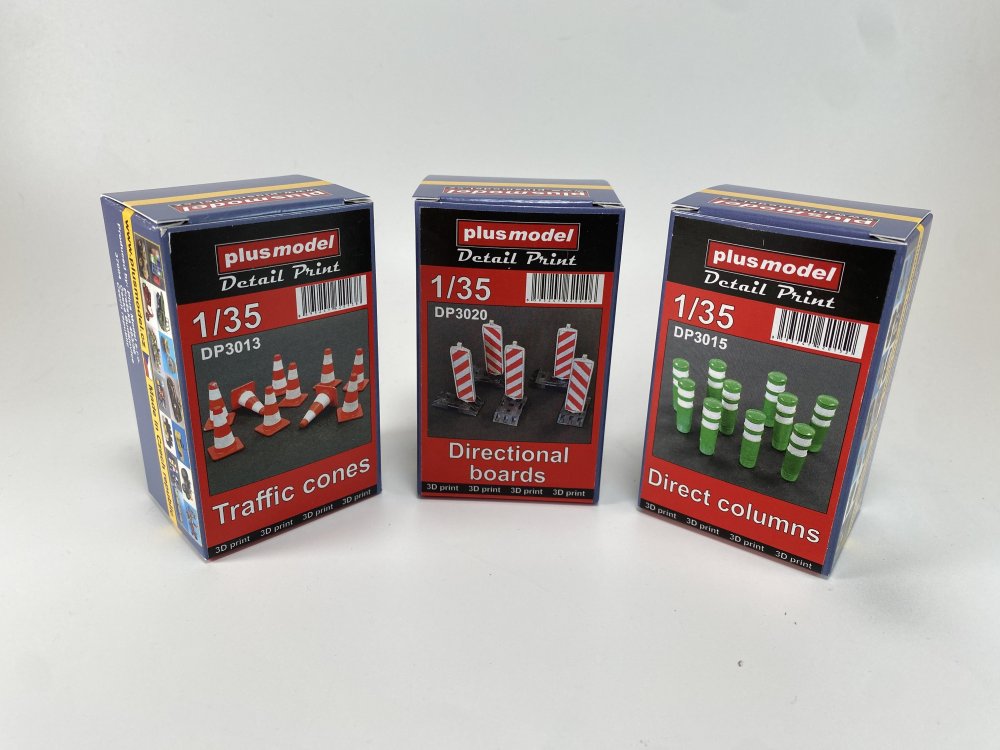
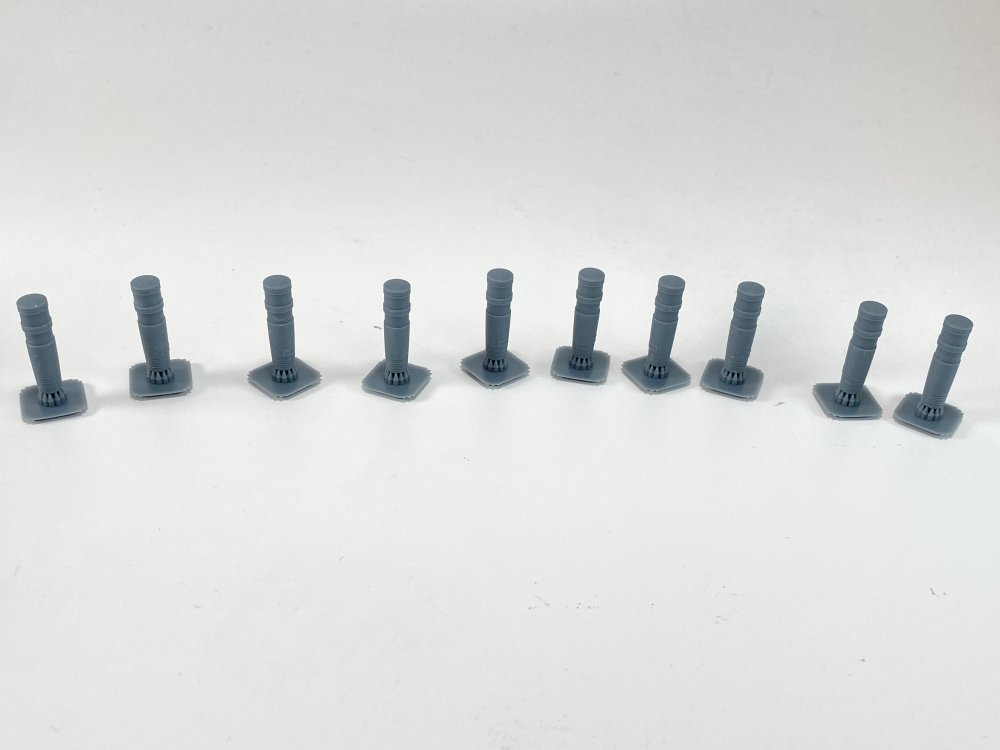
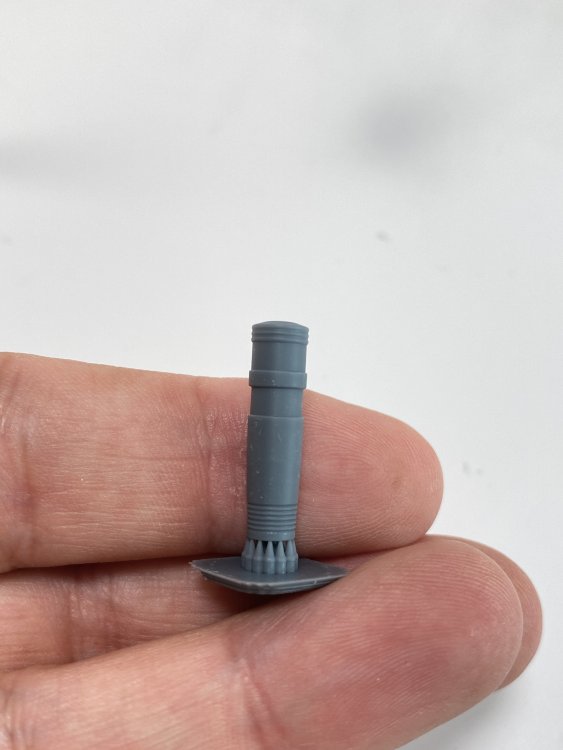
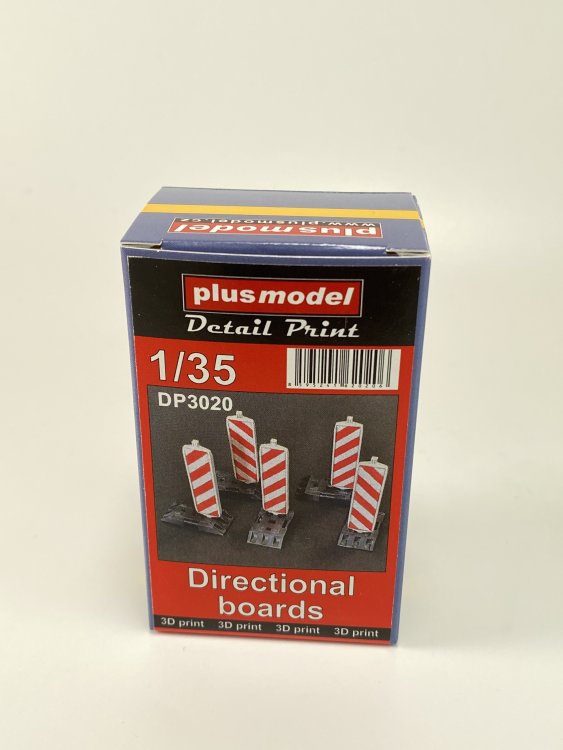
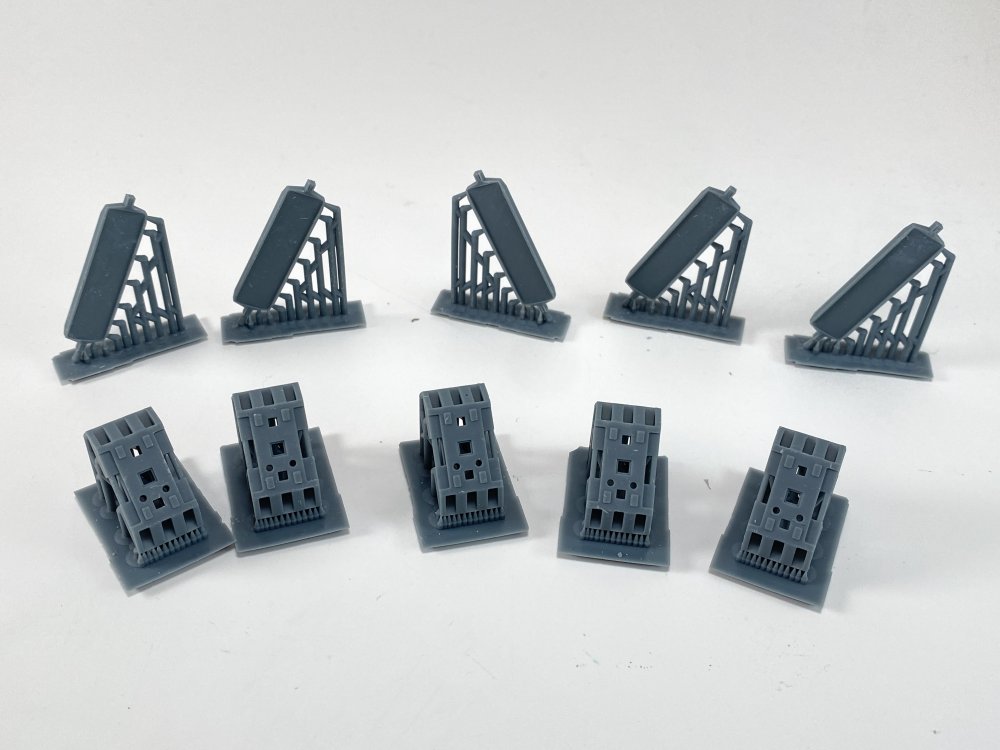
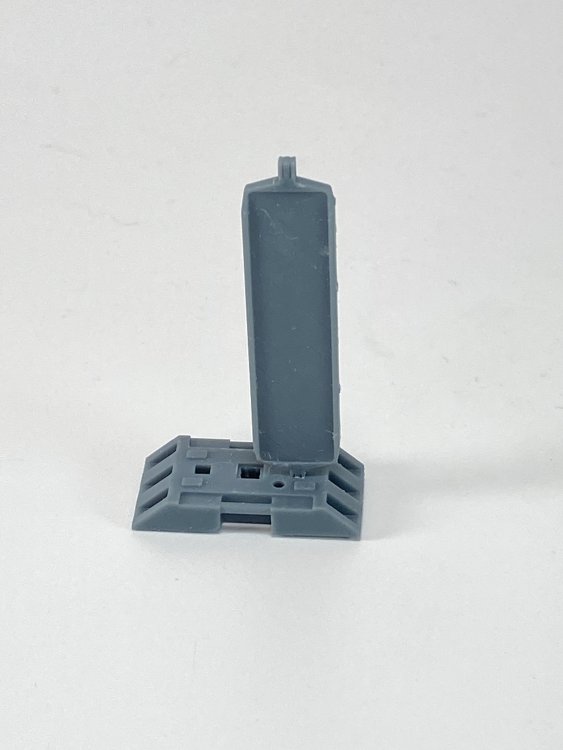
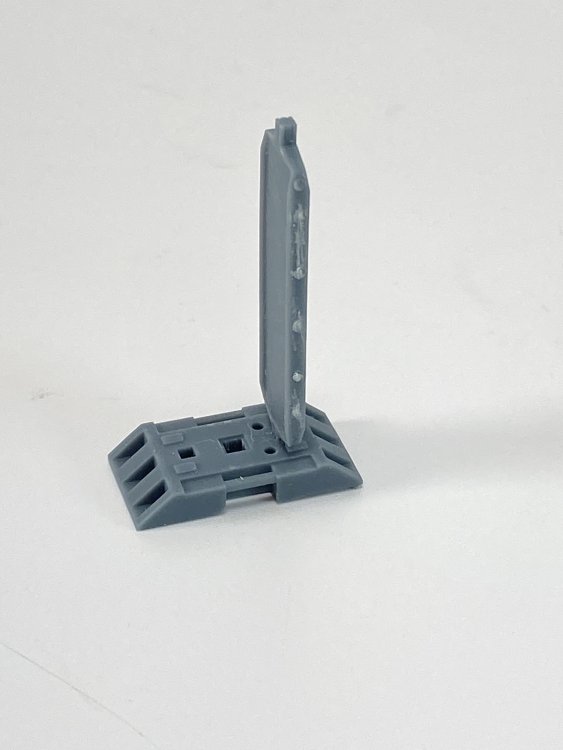
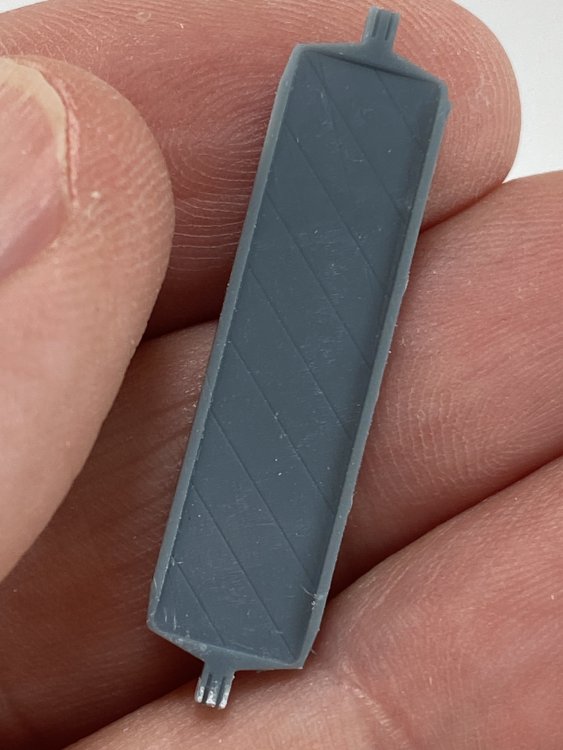
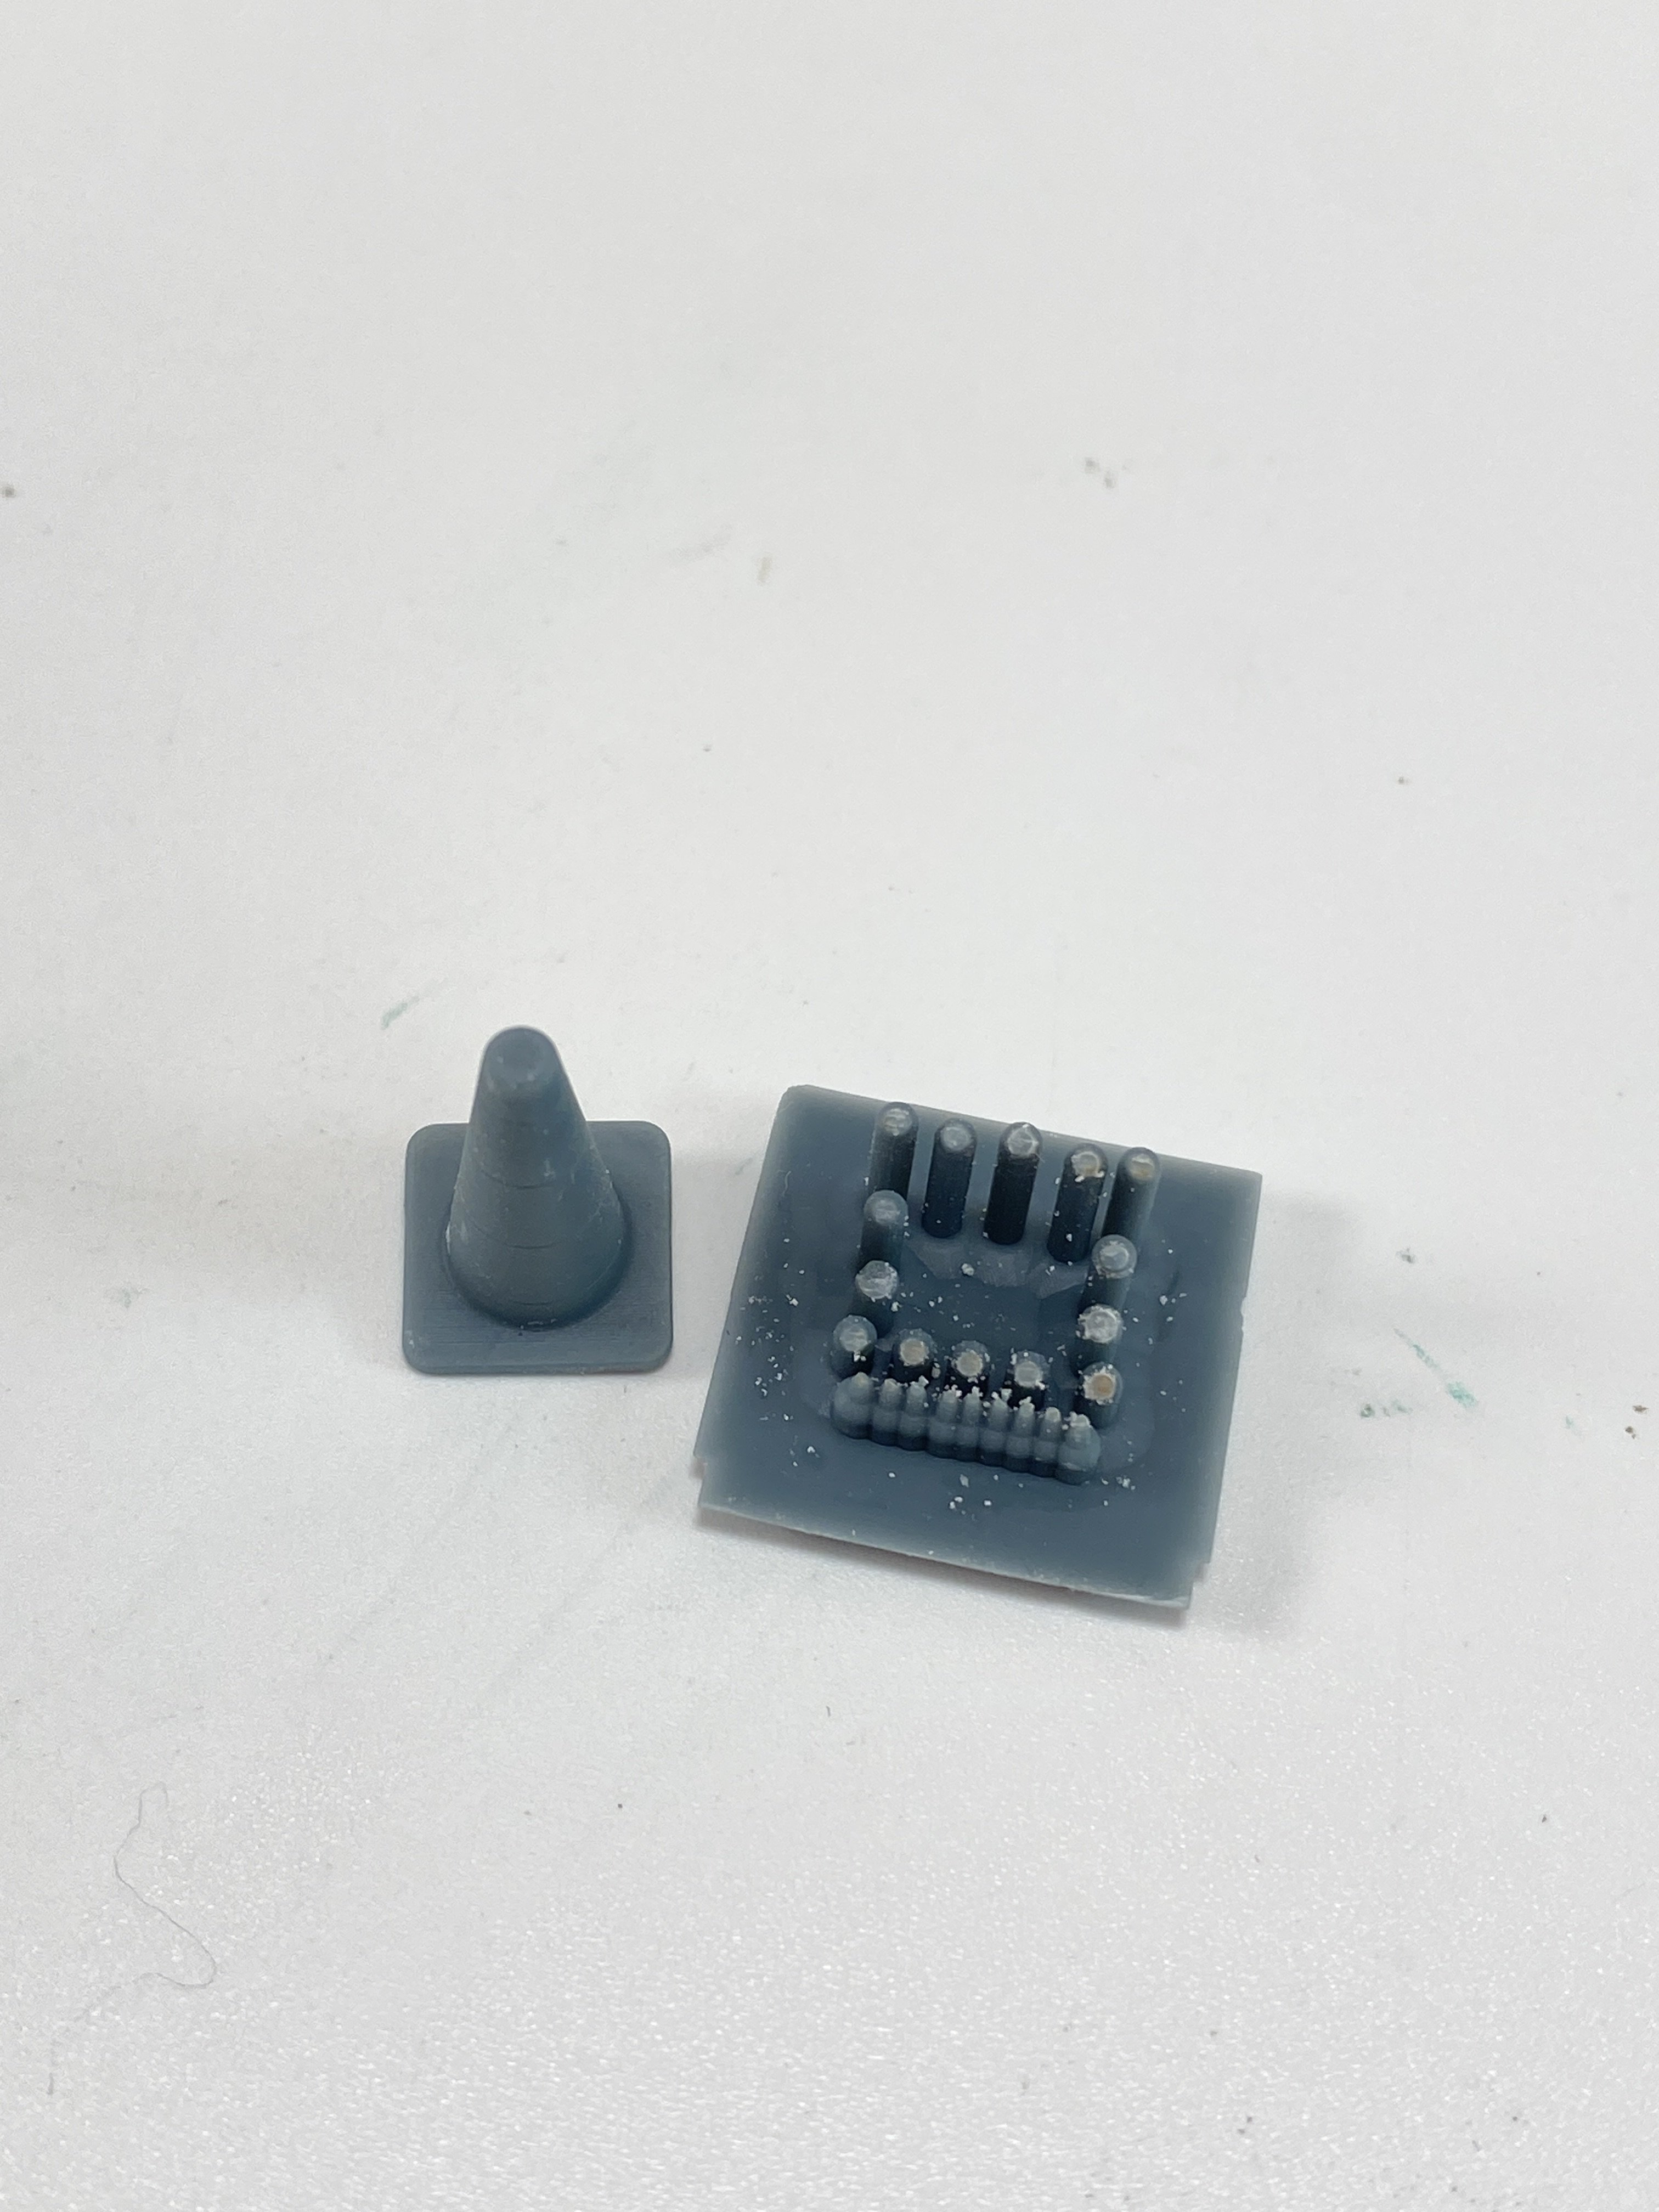
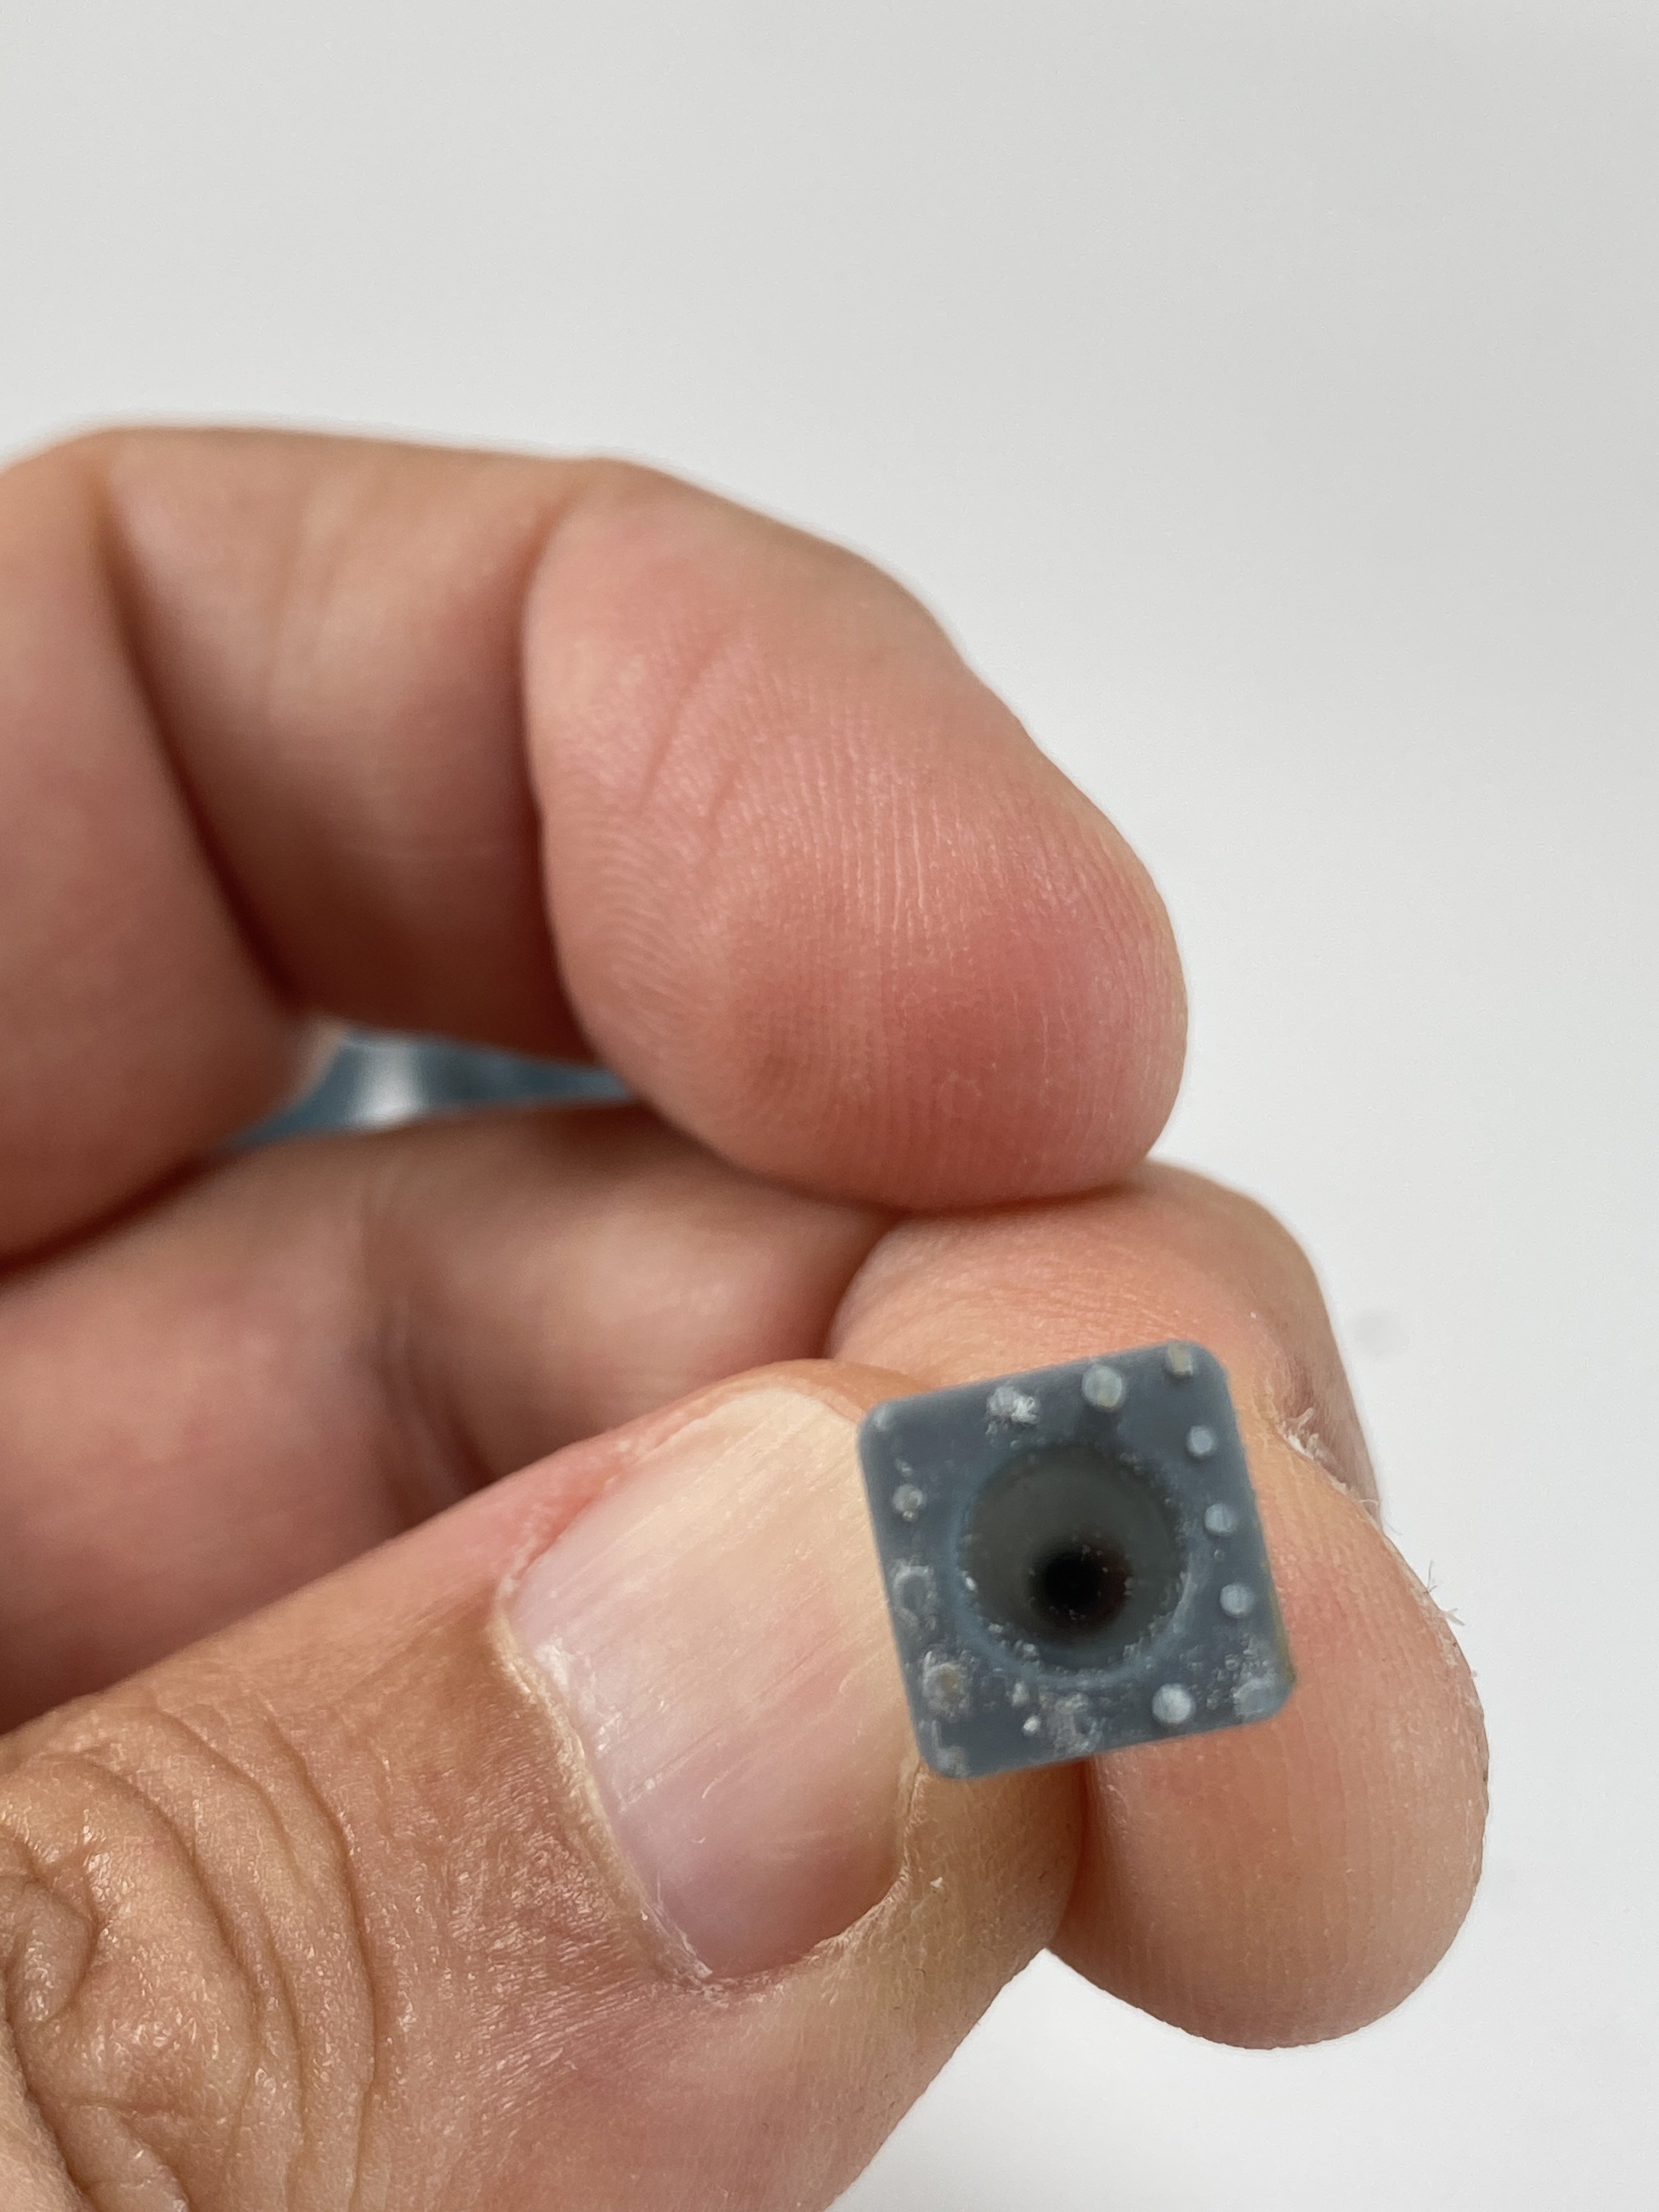
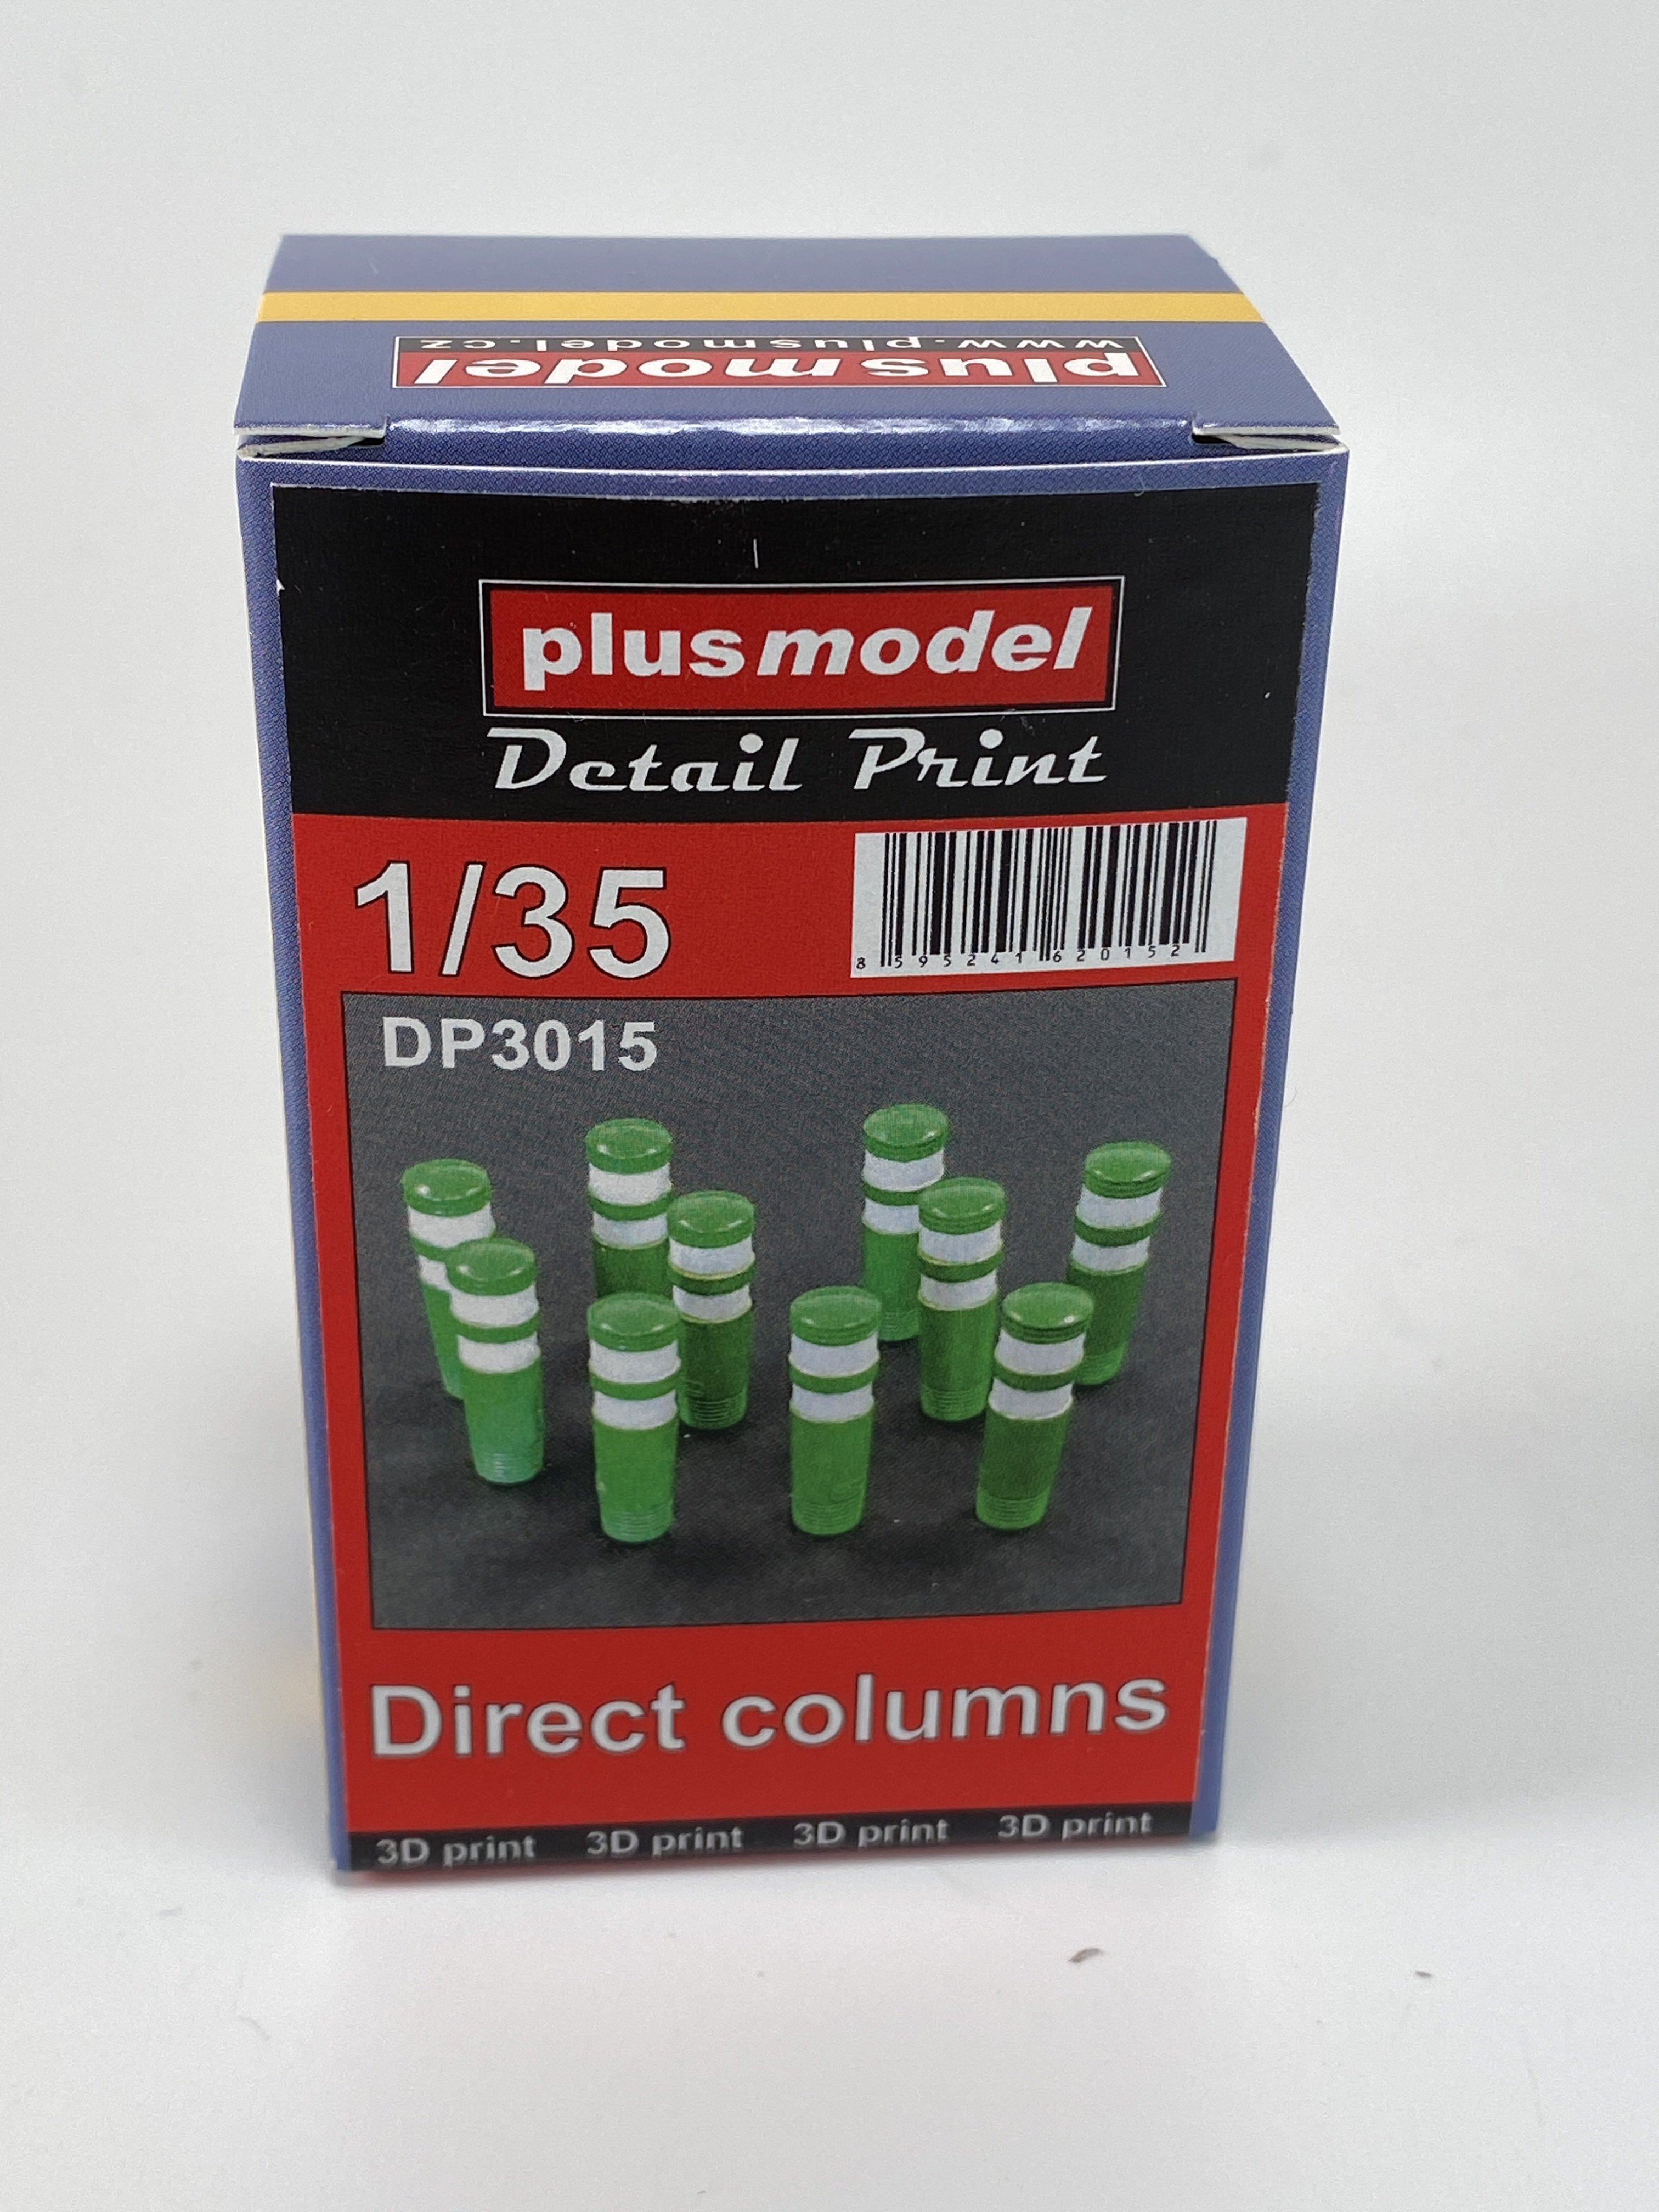
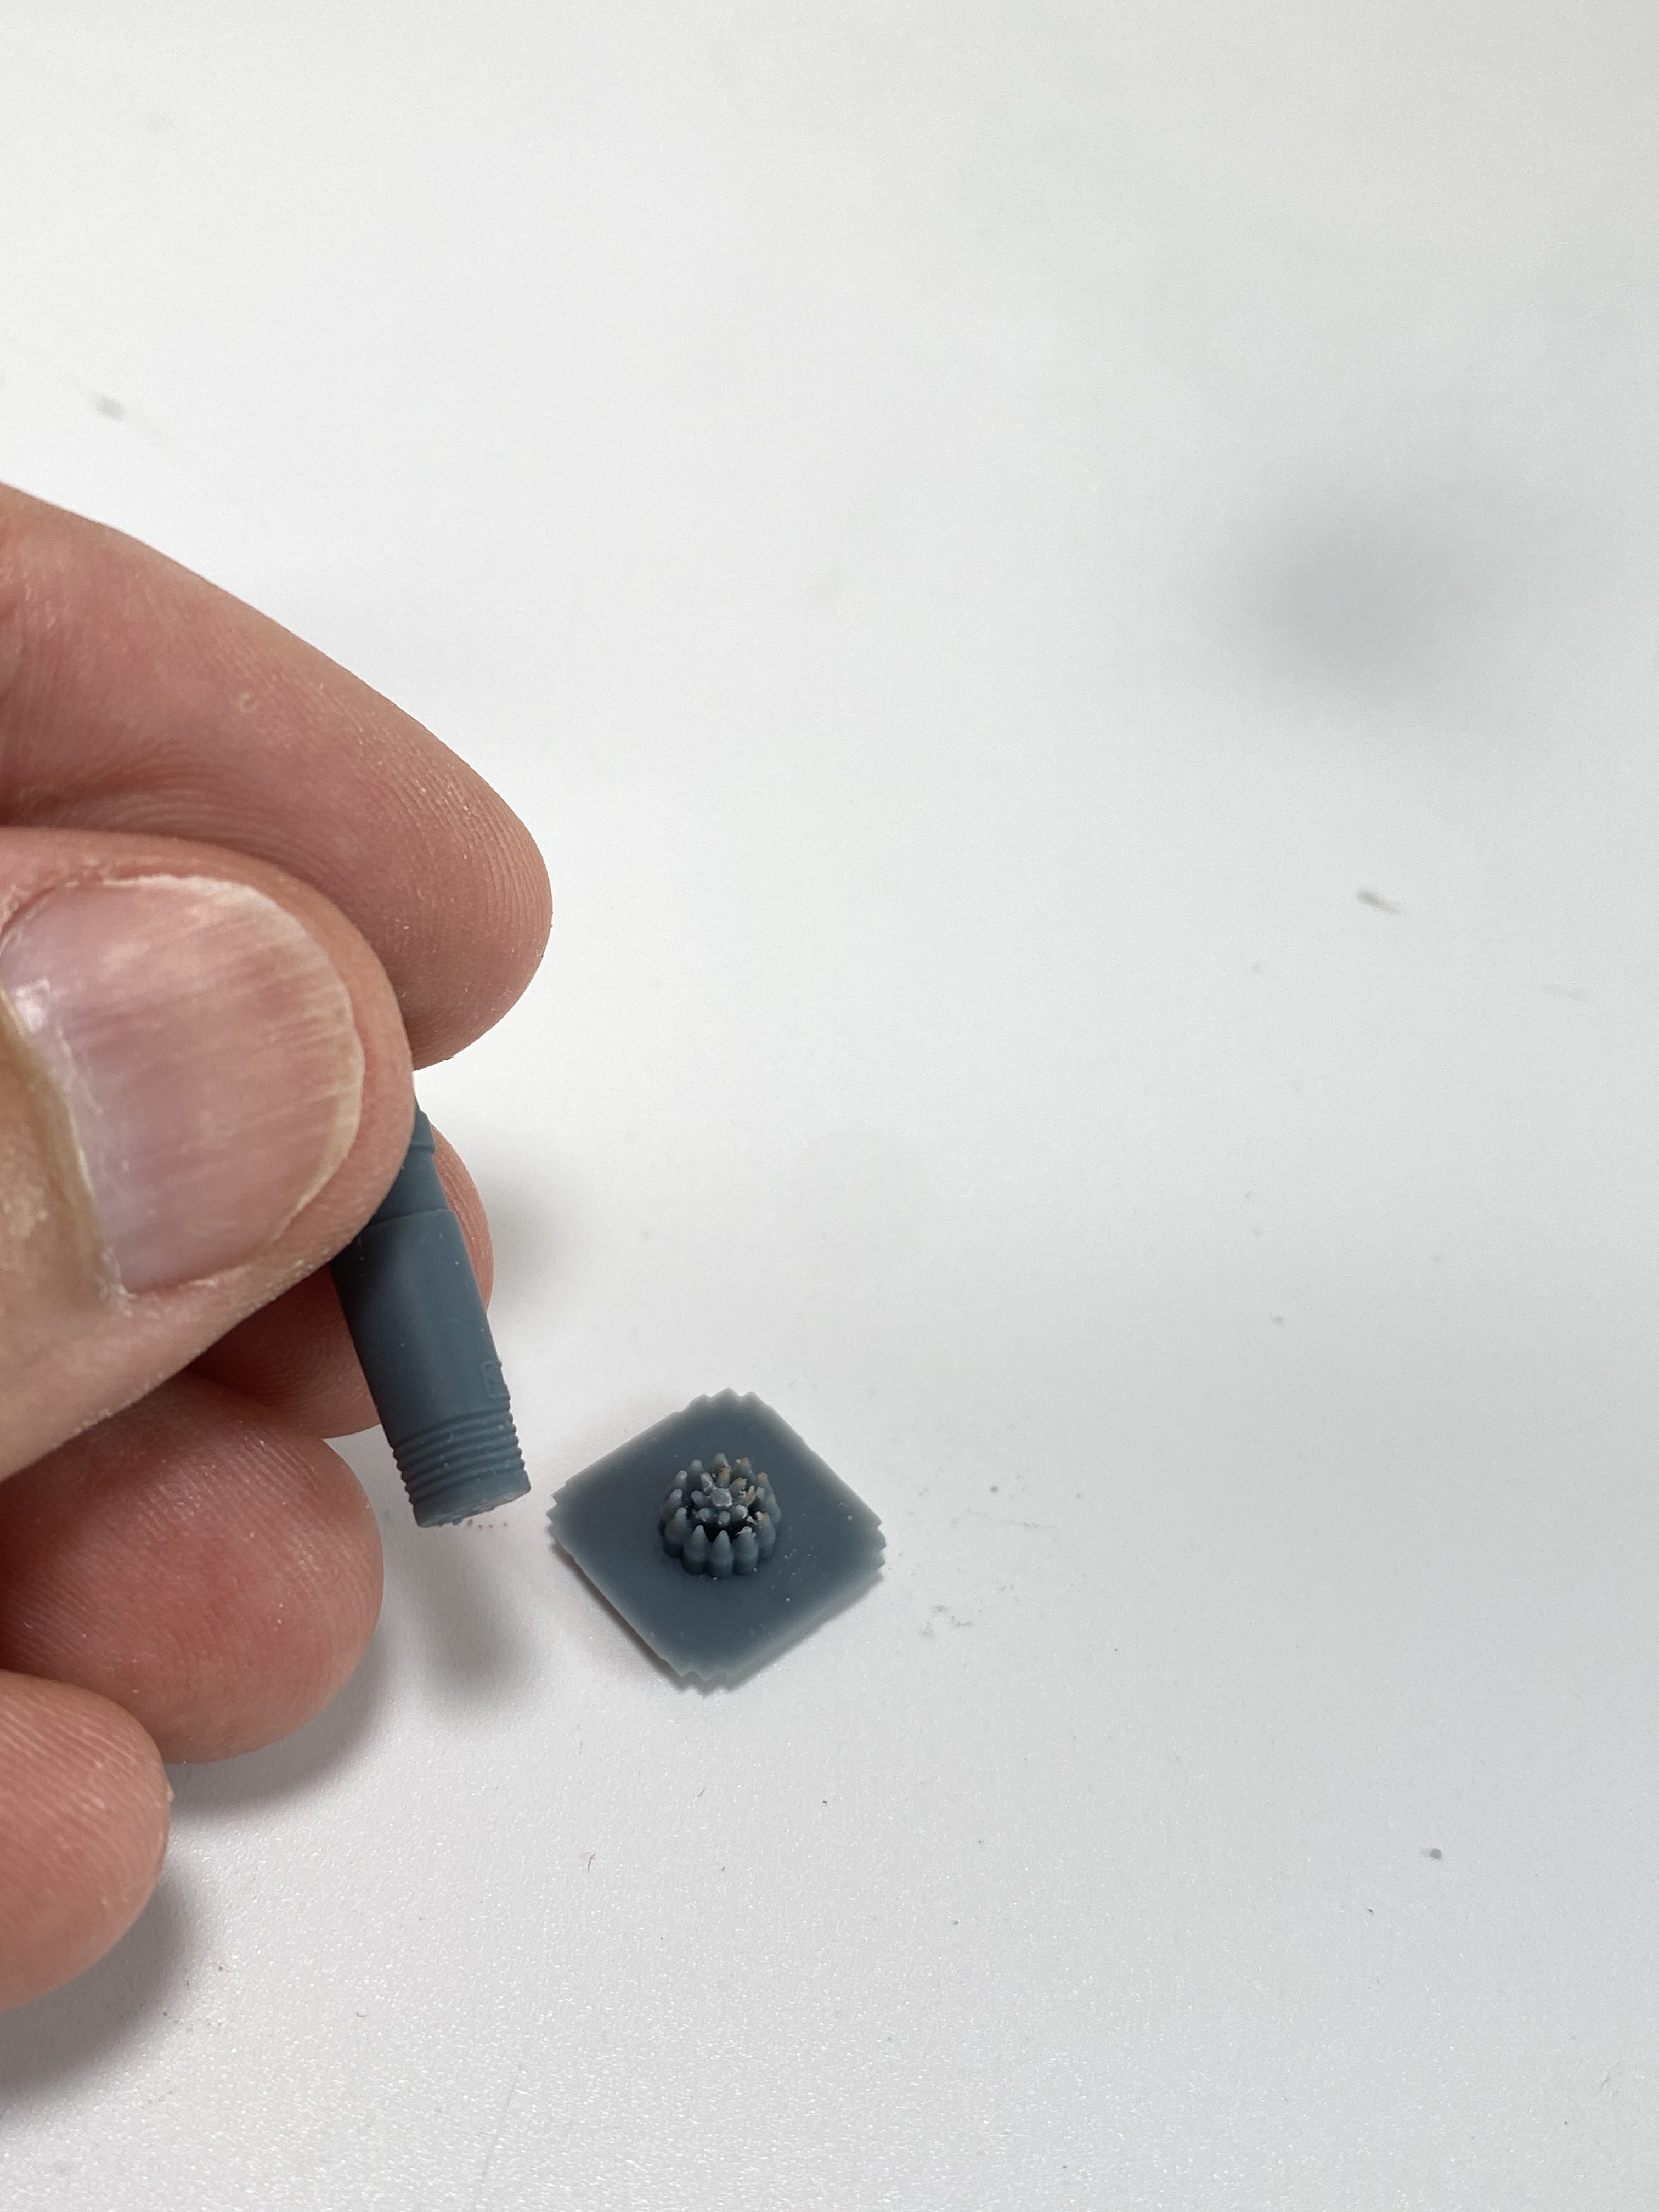
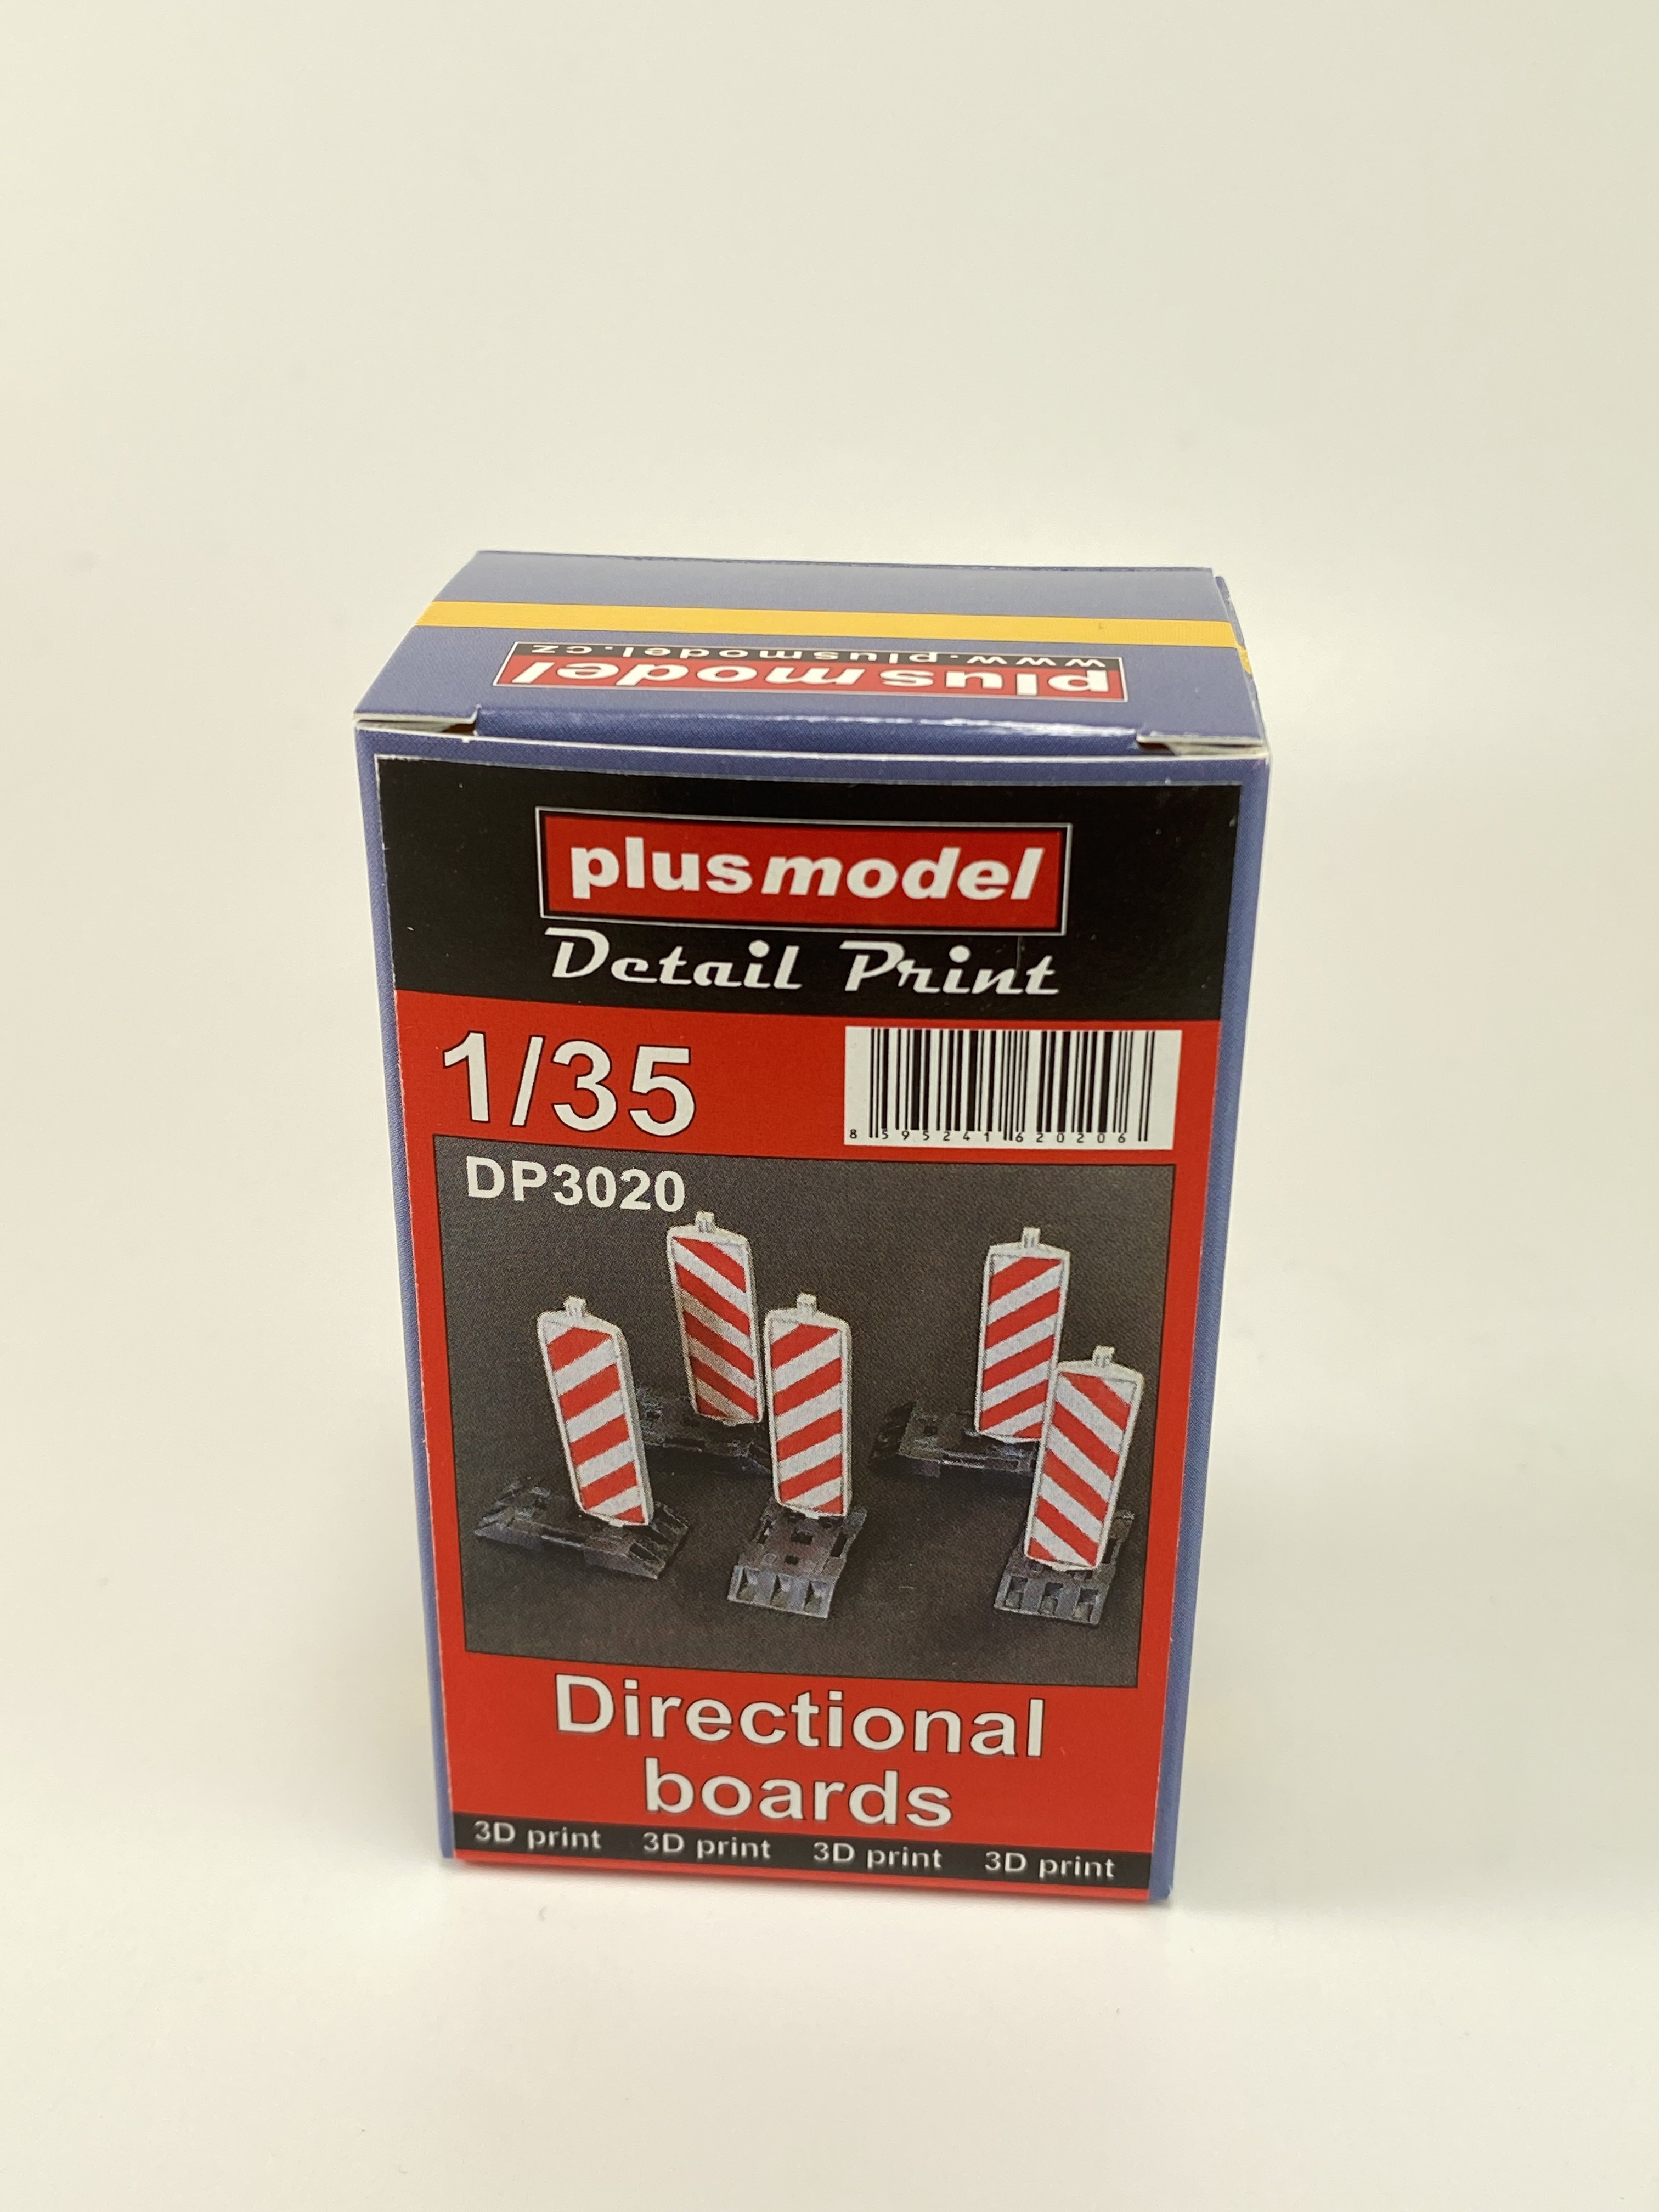
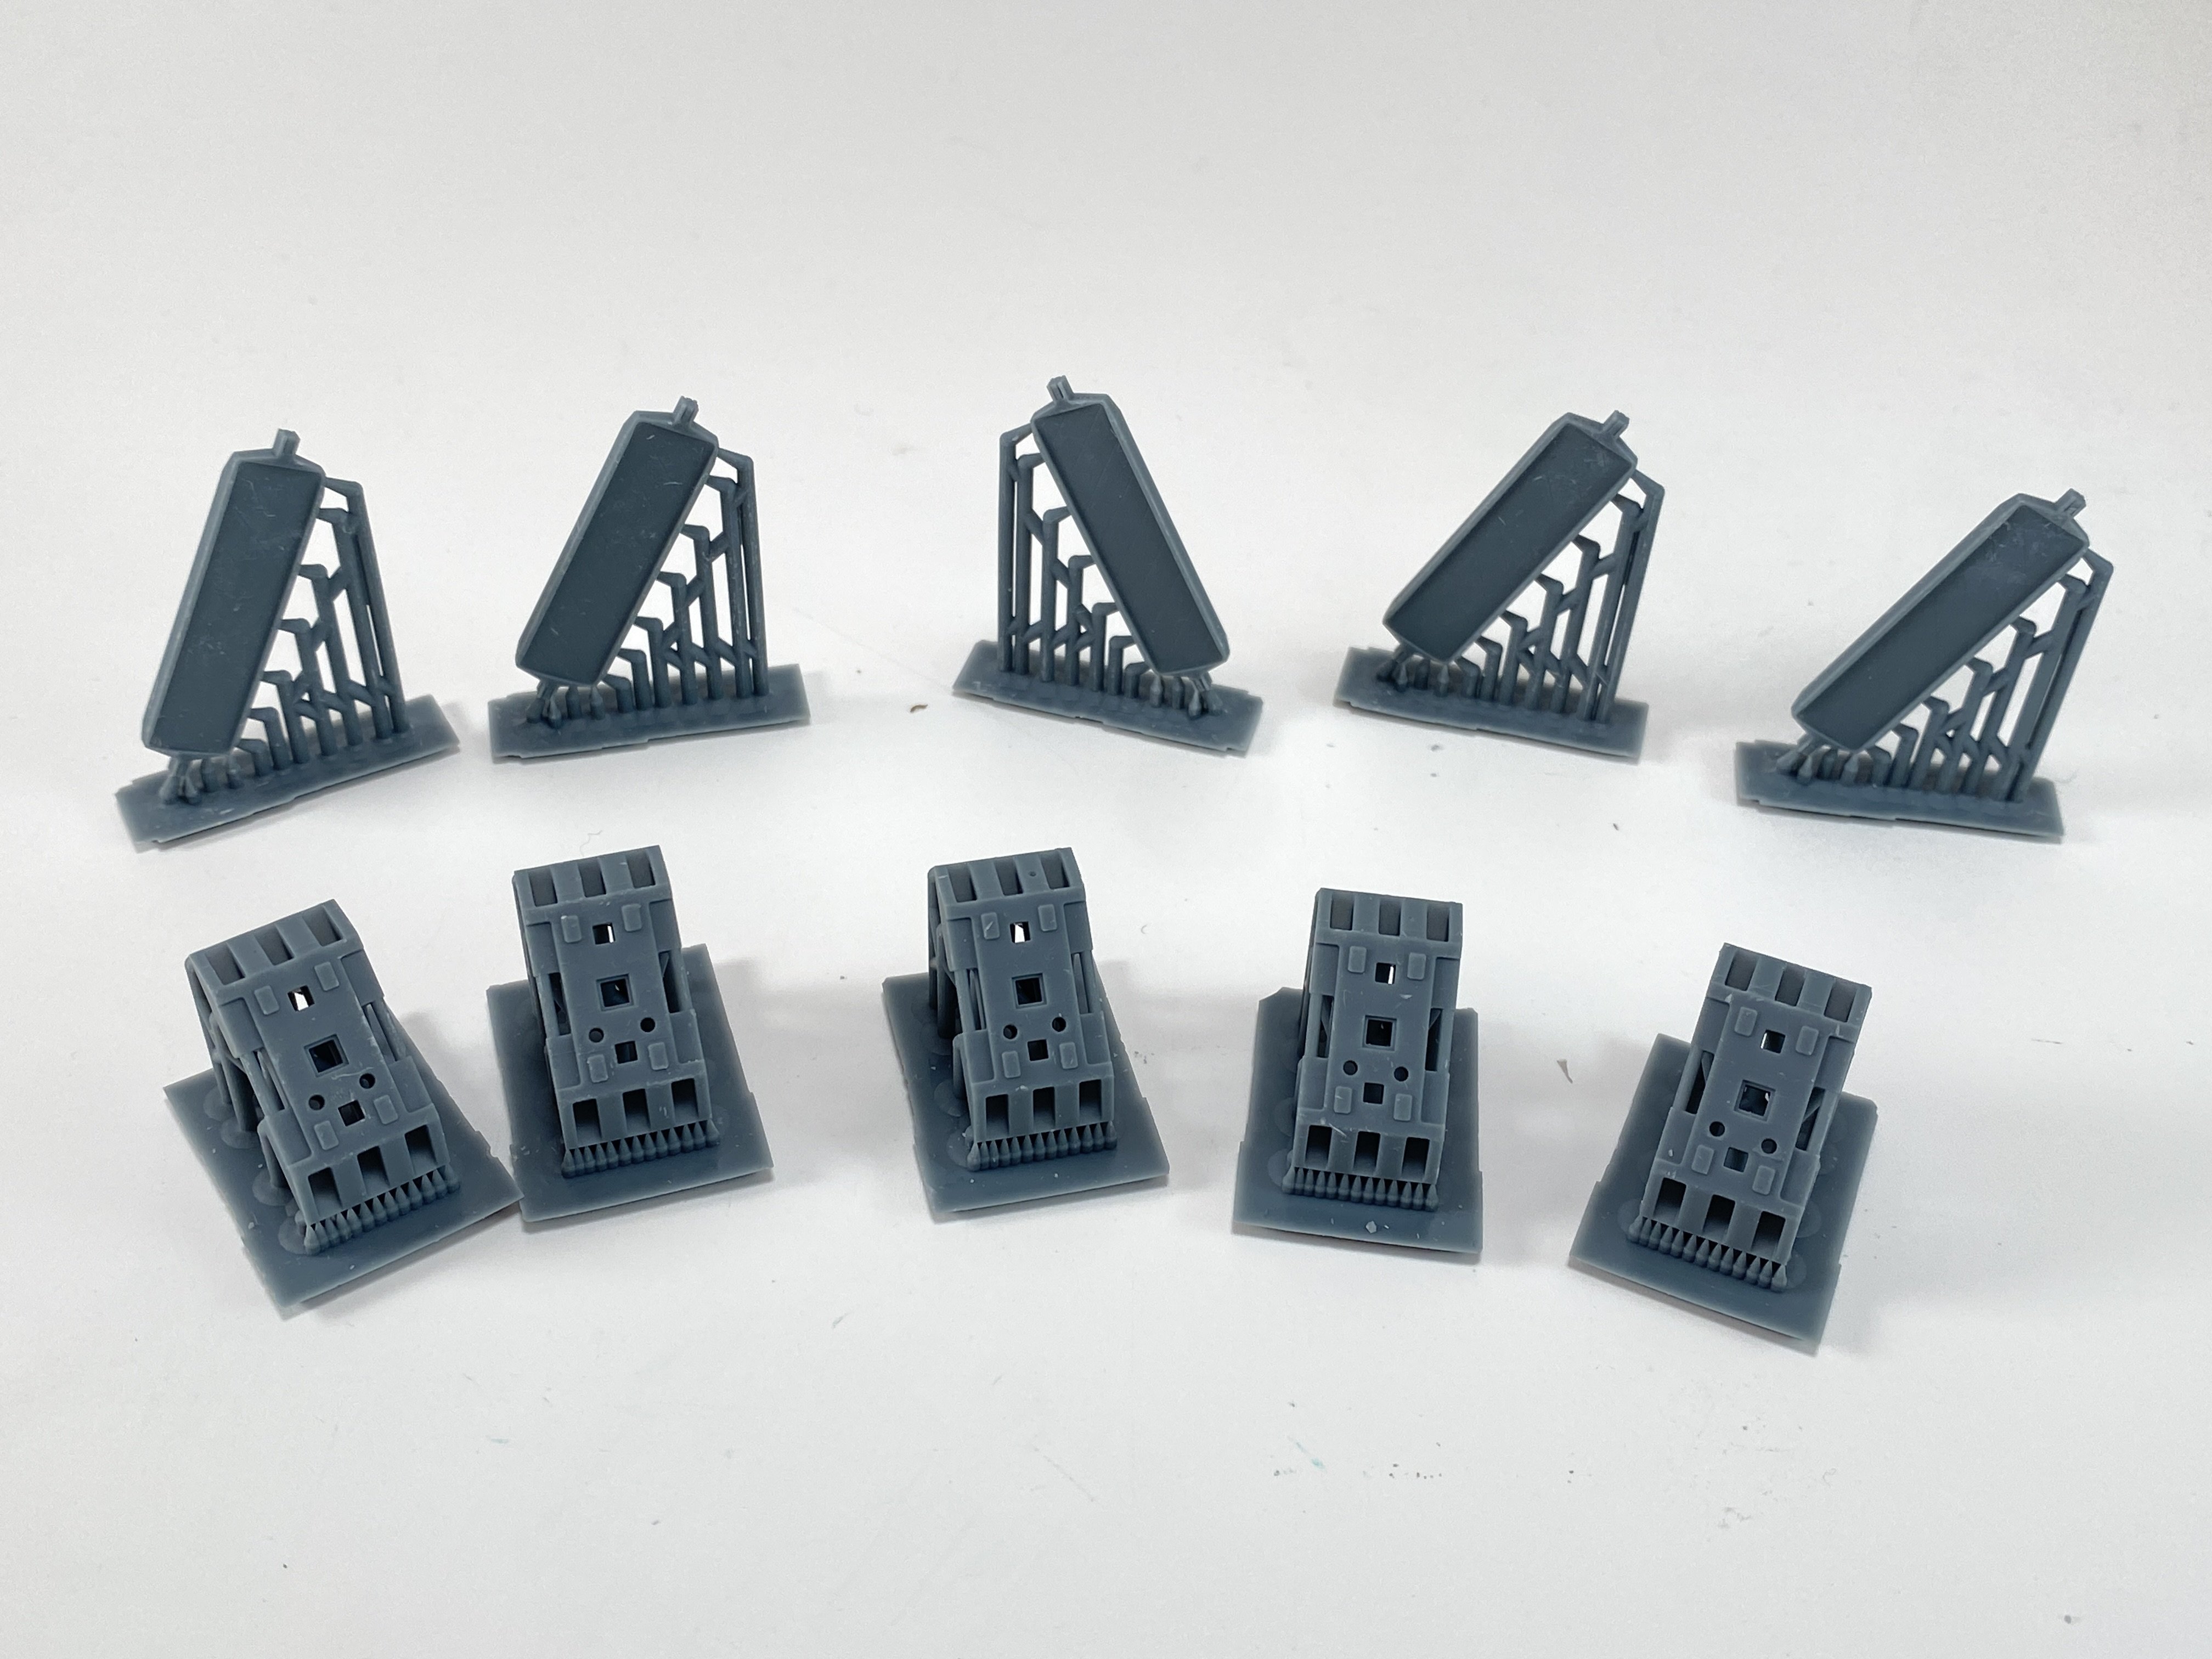
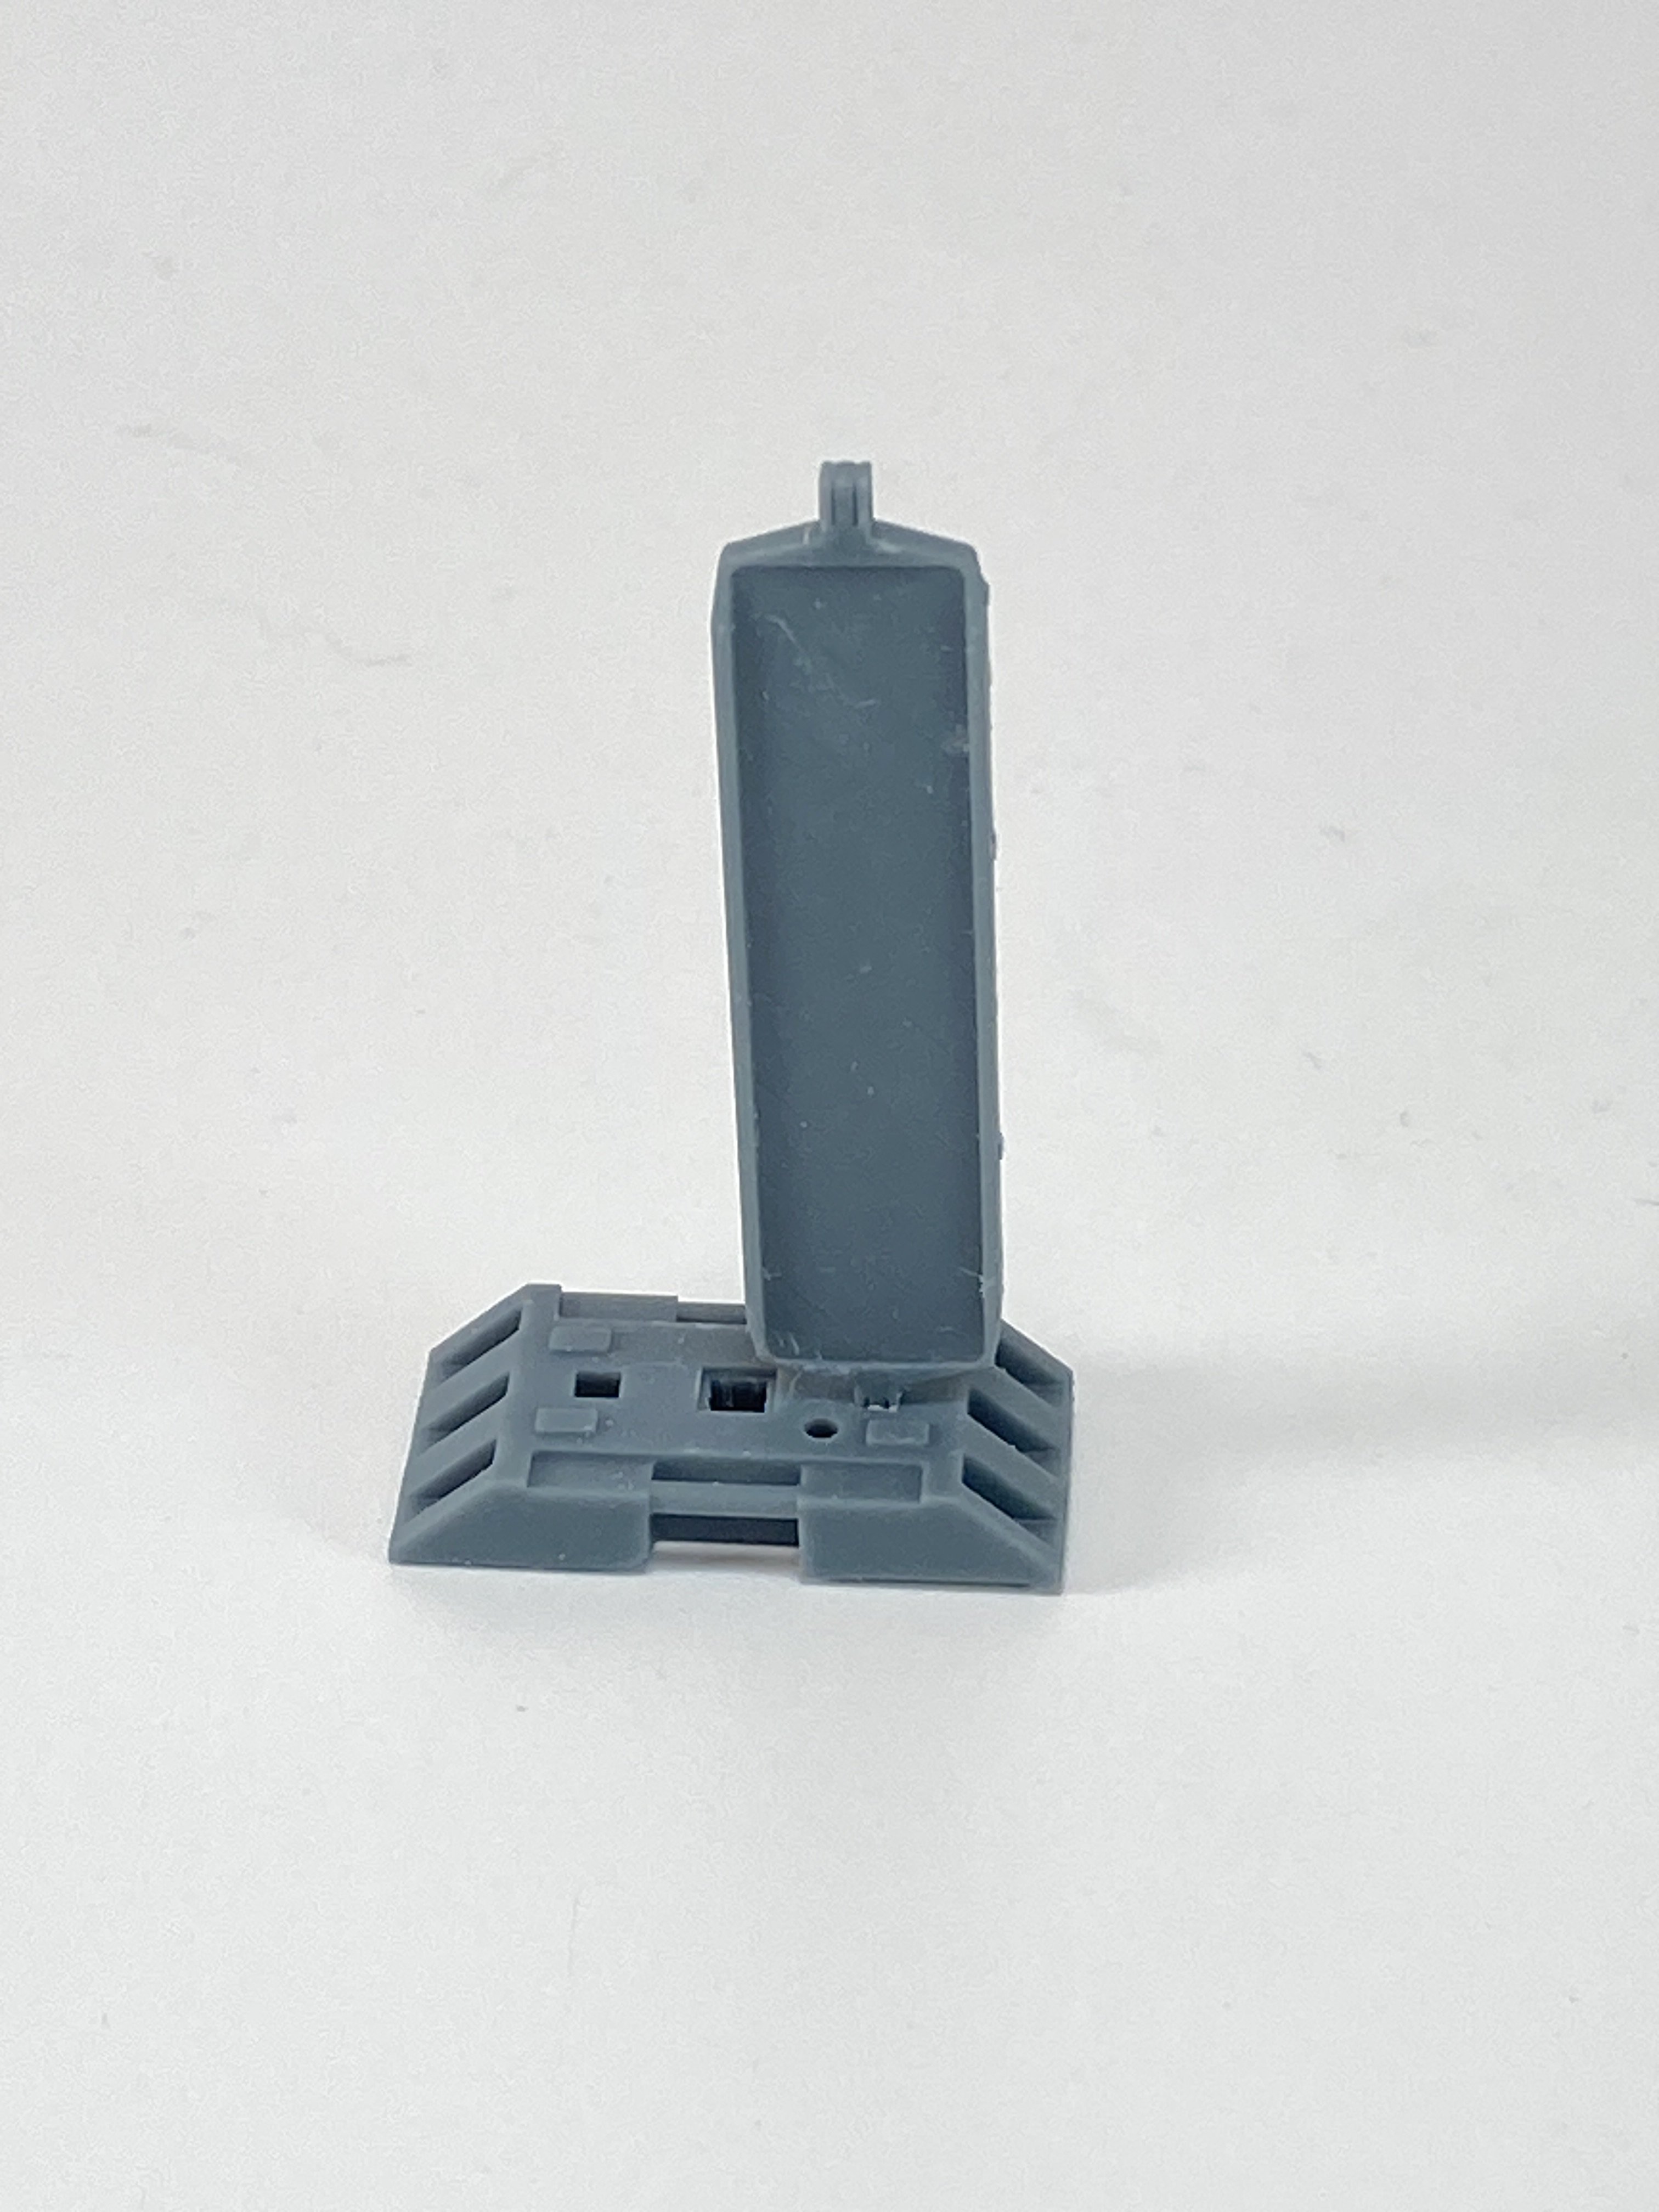
PLUSMODEL Diorama Modern Accessories Sets Available from Plusmodel for the prices indicated below on the text At Large Scale Modeller we just received Plusmodel new line, Detail Print series. So first ones that we are reviewing is some modern diorama stuff. Plus Model came again with very original stuff bringing quality and originality to your work, All sets are in 1:35 and they come in a new, more modern look box. The box art still have the full build set as box art. All of the items very well packaged, with the all the parts coming inside of a bubble bag. Traffic Cones (10 resin 3D prints pieces) Catalogue n.º DP3013 Price tag: 8,23€) – directly from Plusmodel. The set is a quite simple and effective one if you can paint it properly. It´s not hard to paint too. The quality of the print is very good and it’s quite easy to cut the part. The cones are hollow and you can easy make a hole in the top to make it more realistic. * Direct Columns (10 resin 3D prints pieces) Catalogue n.º DP3013 Price tag: 9,92€ directly from Plusmodel. These 10 pieces are very well printed, with no distortion, and quite some nice a subtle surface detail, that give it a very good realism and makes it easier to paint. Directional Boards (10 resin 3D prints pieces) Catalogue n.º DP3020 Price tag: 13,07€) – directly from Plusmodel. The quality printing here stand also with very high quality, with subtle detail to give you some guilines to paint thered and white There is 10 pieces but you can only make 5 directional columns. And these are, in fact, directional, so you can put them in the positions that you want. Conclusion: These three sets of accessories for dioramas translate once again well Plusmodel philosophy: originality, quality and versatility. The quality is of the highest level, now with their new line using 3D Printing technology. These are simple but effective sets to enhance a modern/city or sci-fi diorama. Very Highly recommended With my sincere thanks to Plusmodel for this review sample. To purchase directly, click this link.


- 1 reply
-
- 3
-

-
-
Congrats to the winners!!! Well deserved!
-
LSM Modelling News 2023 merged Fran and Artful69’s threads
Fran replied to Fran's topic in Modelling Discussion
Limited Edition Hong Kong Models 1:32 B-17 G "Rose of York".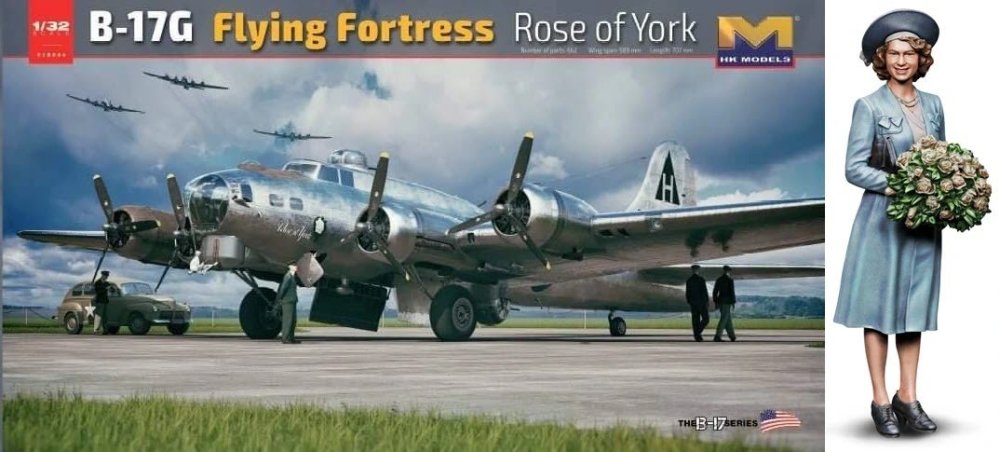

-
Happy Birthday Martin!!!! Have a good one!
-
love it!
-
for civil car colour you should take a look at https://www.firescalemodeler.com/
-
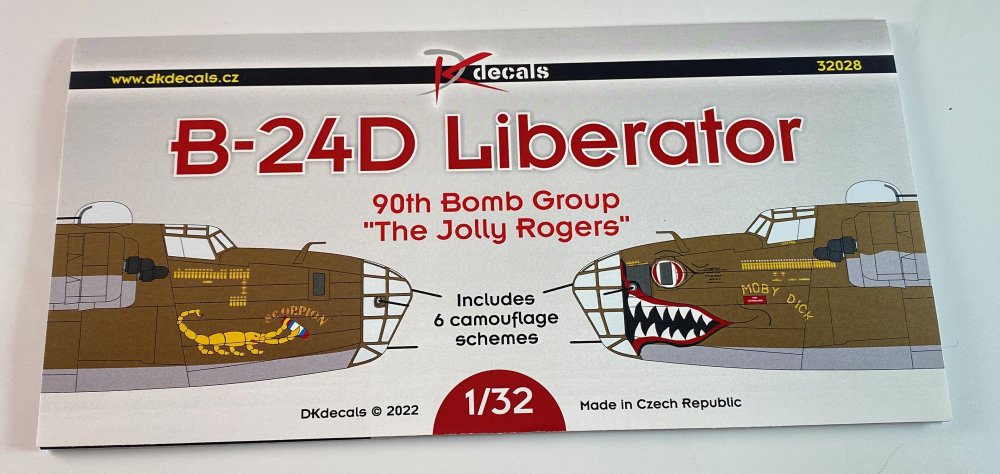
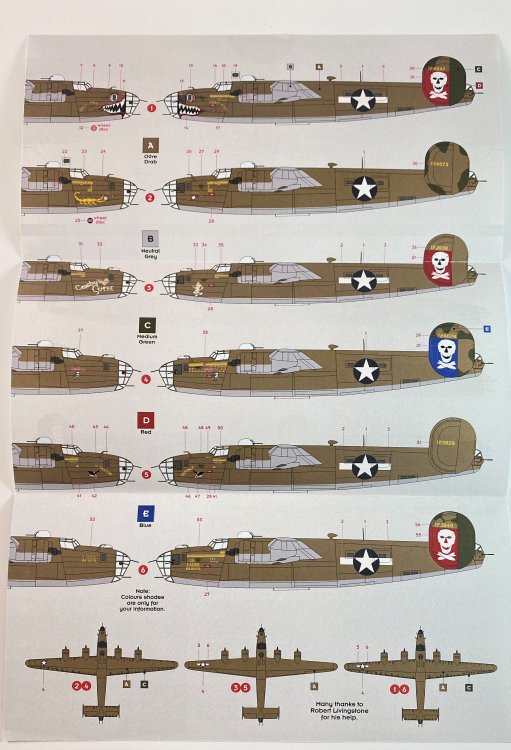
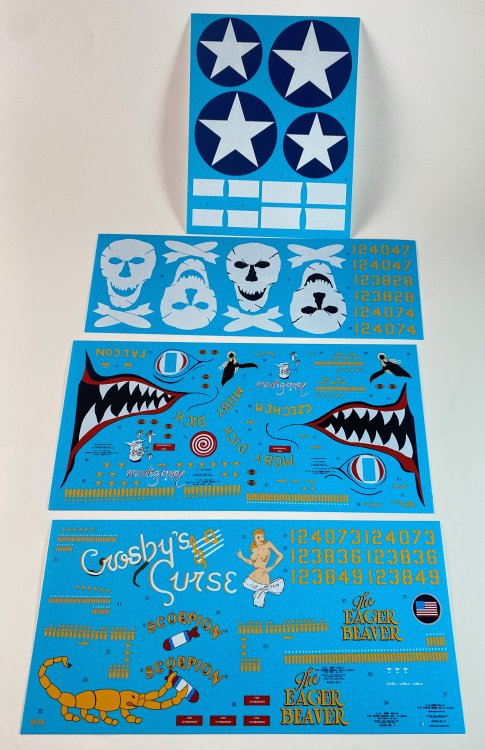
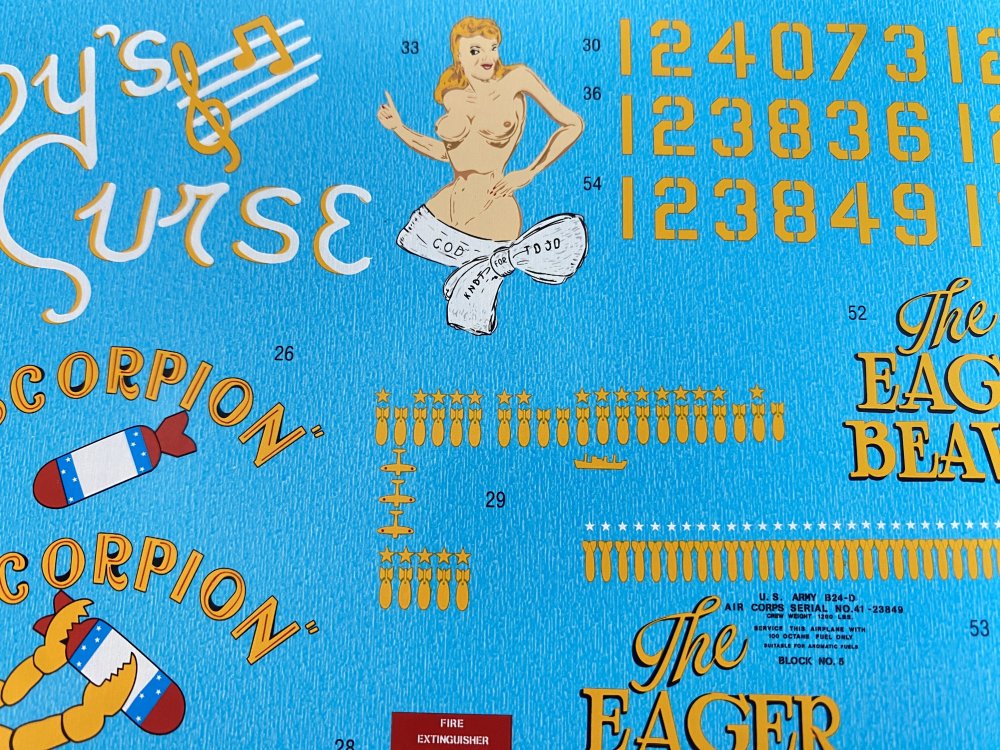
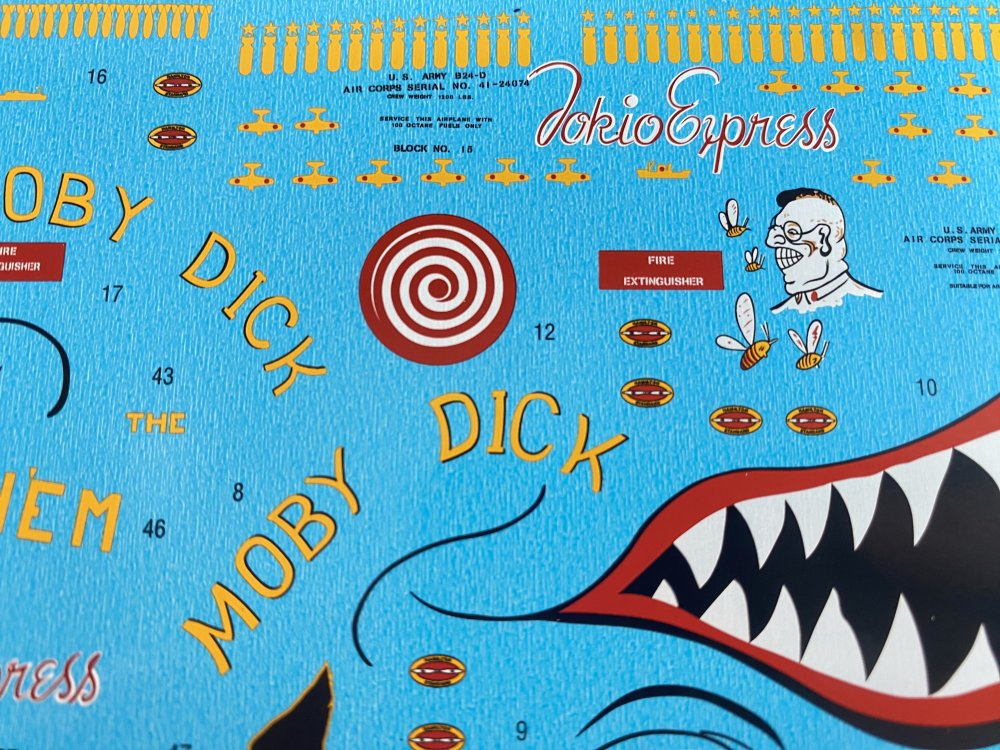
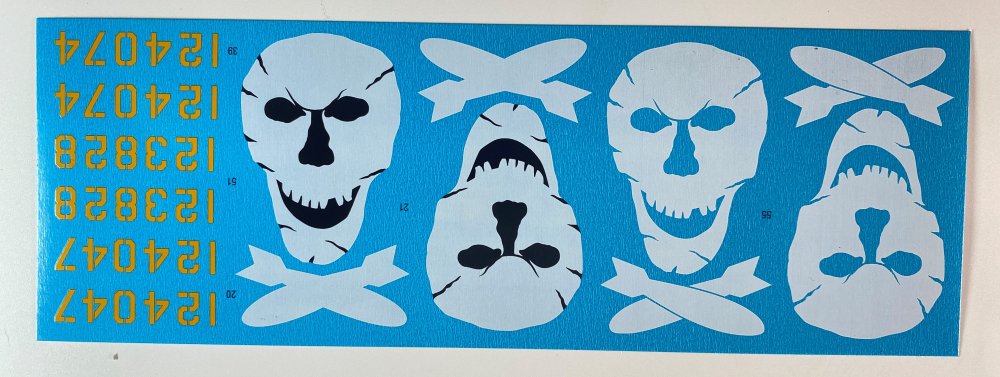
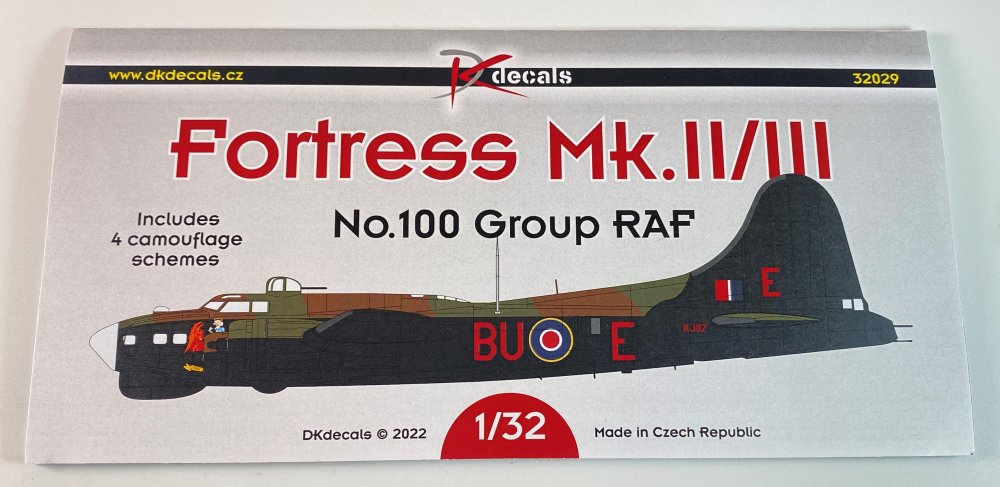
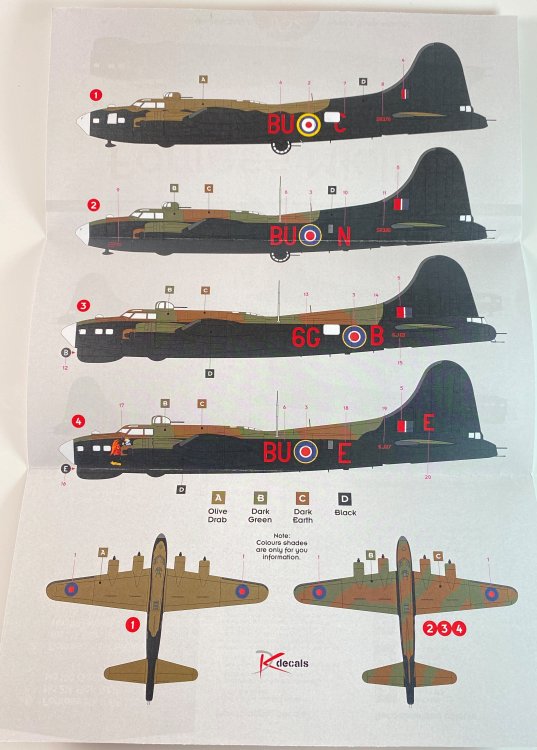
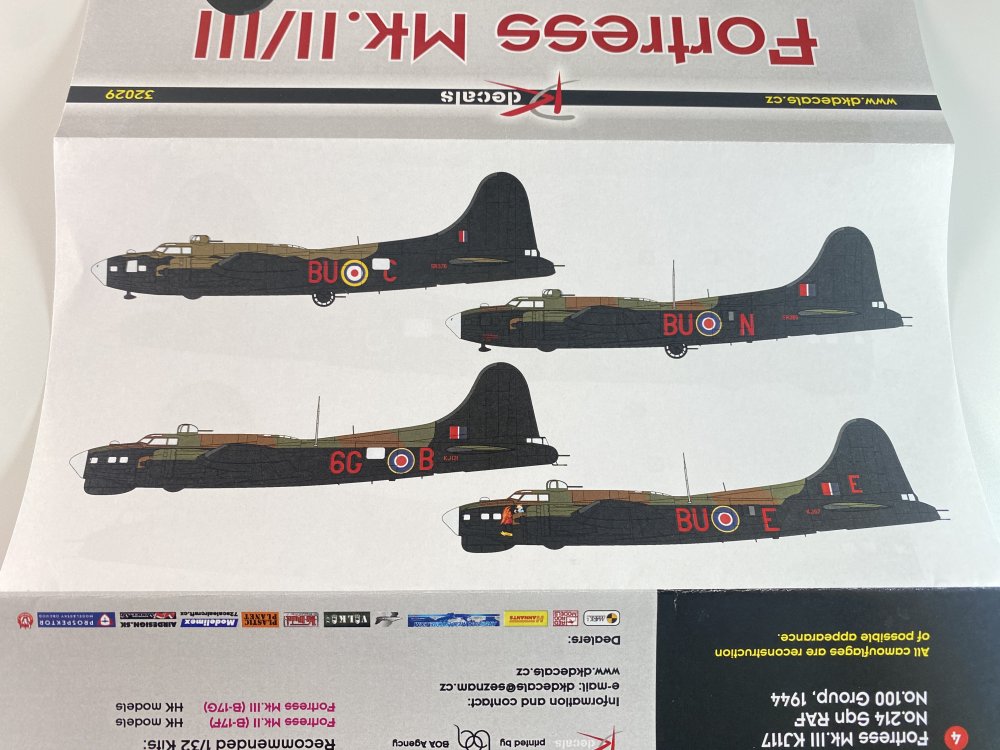
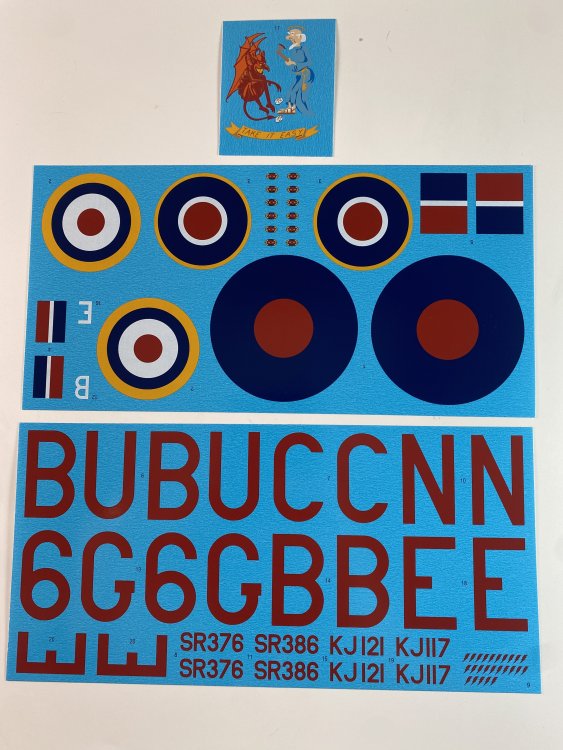
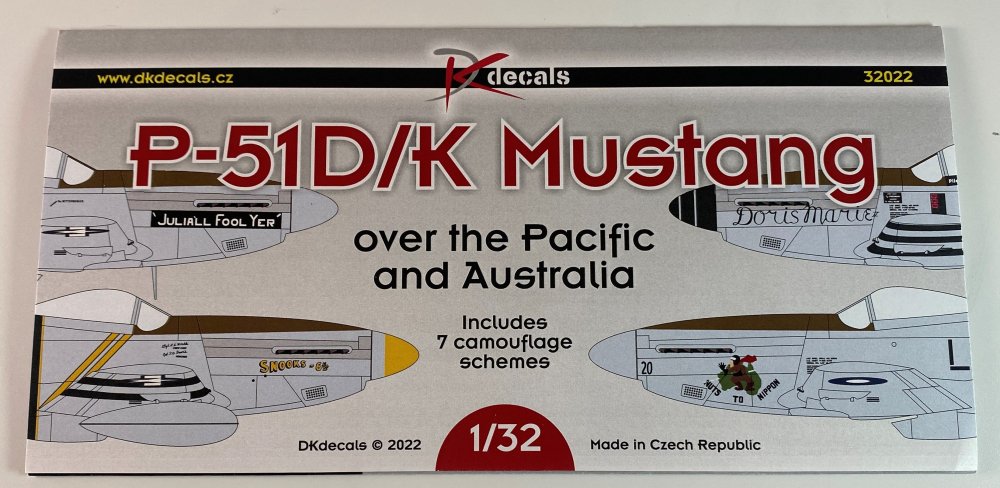
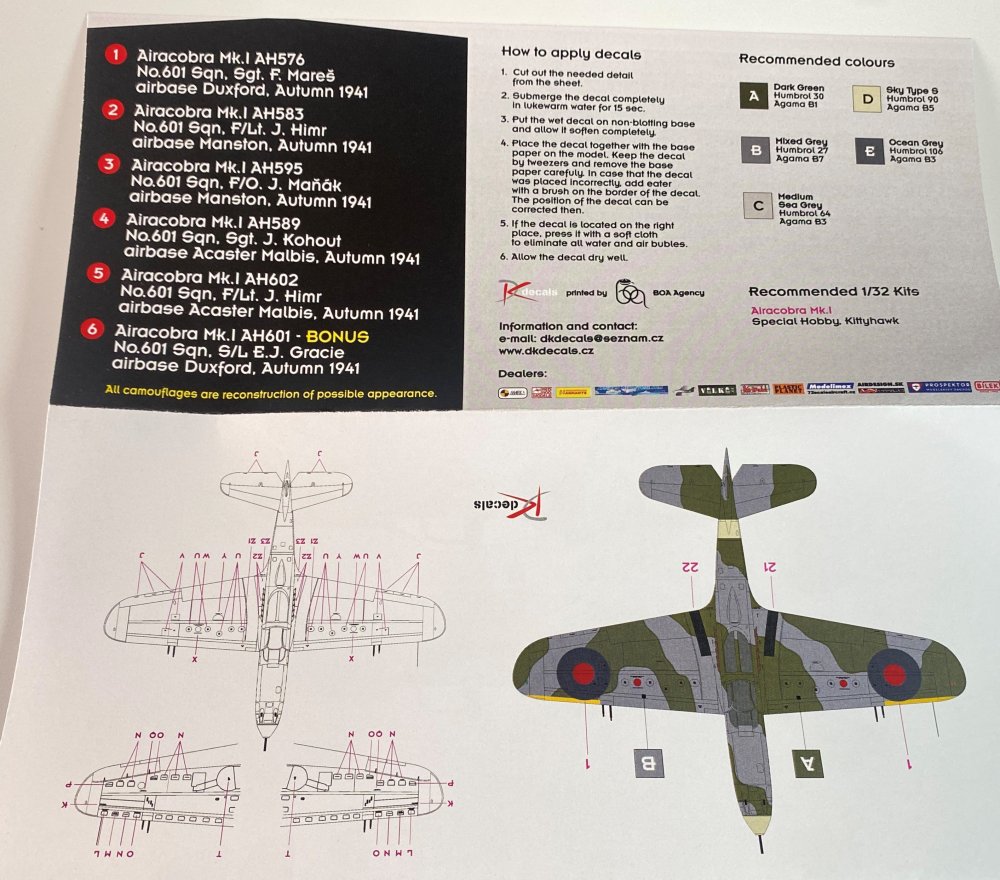
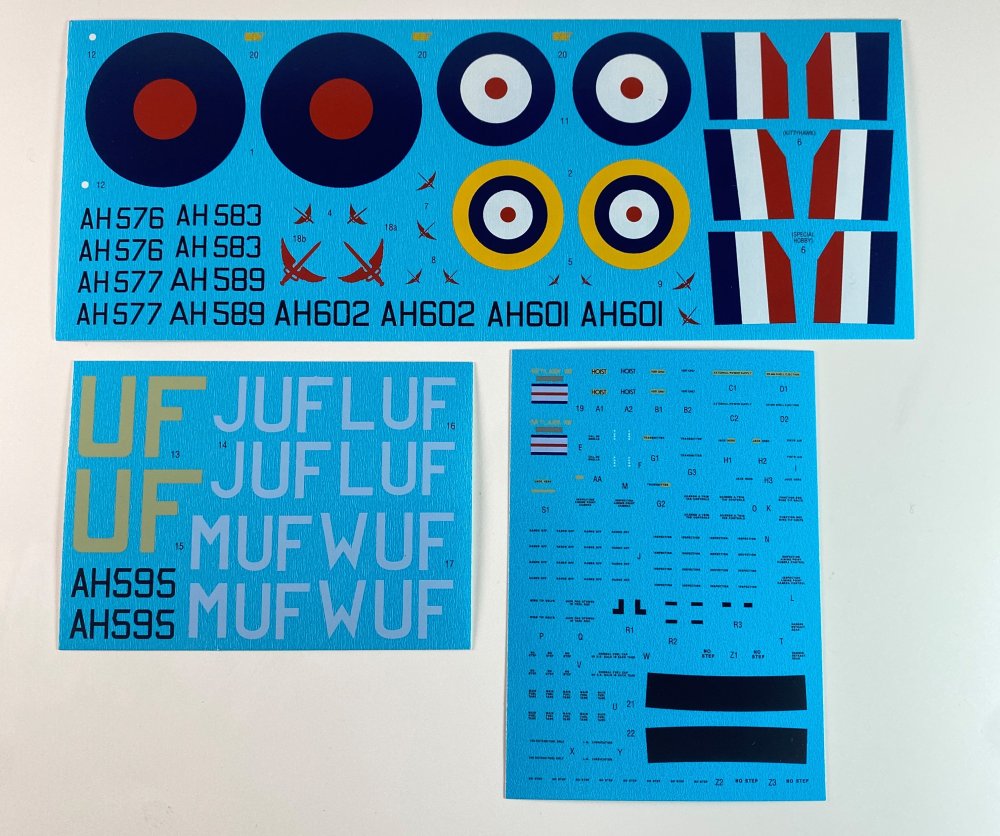
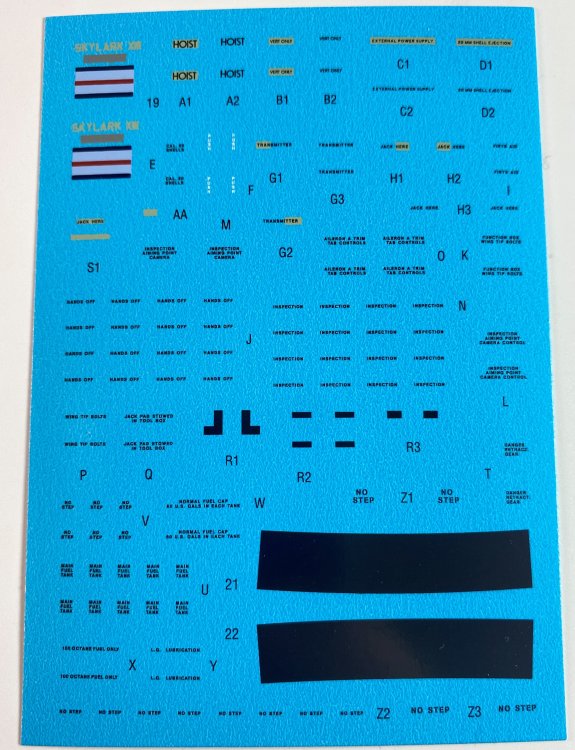
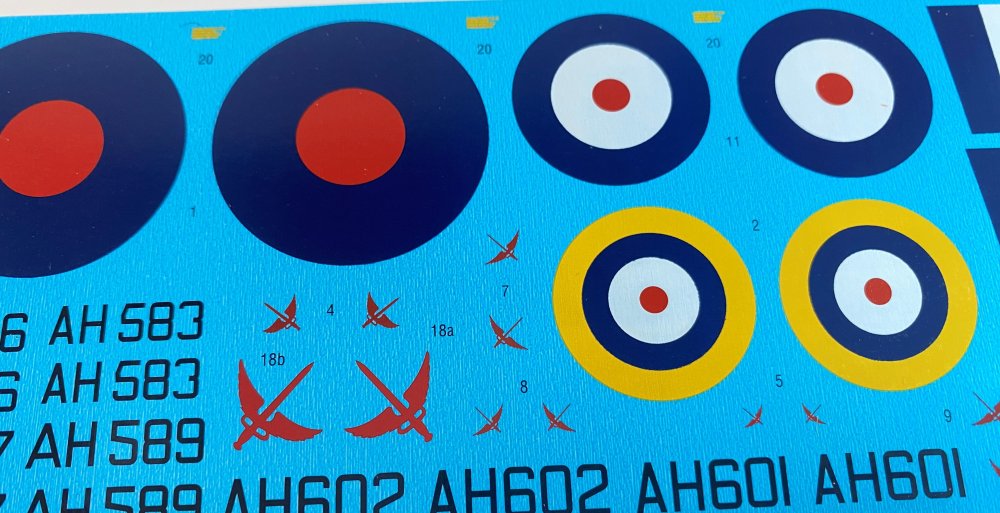
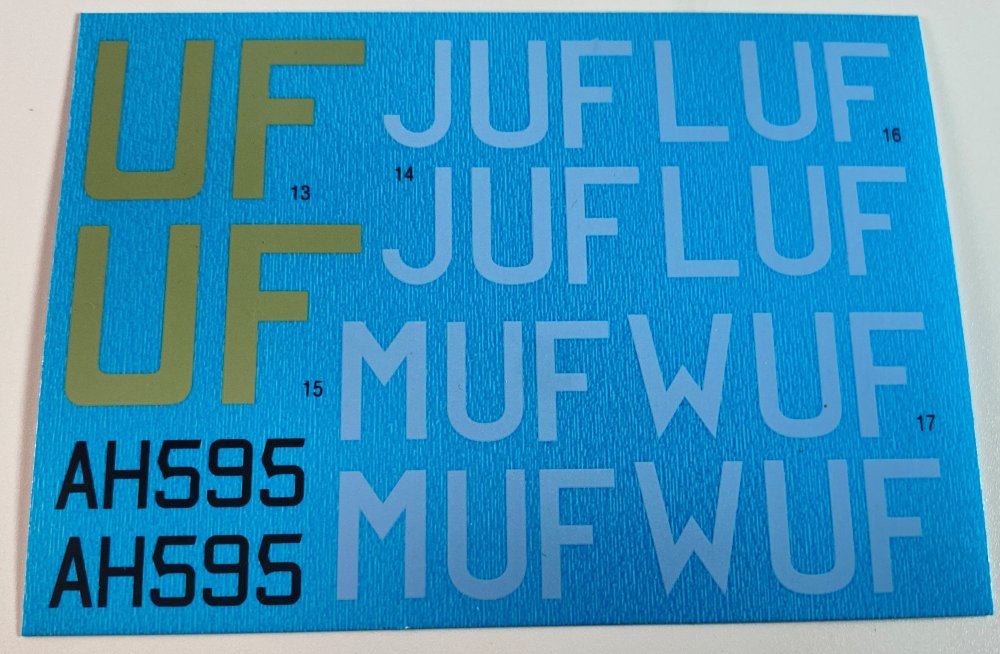
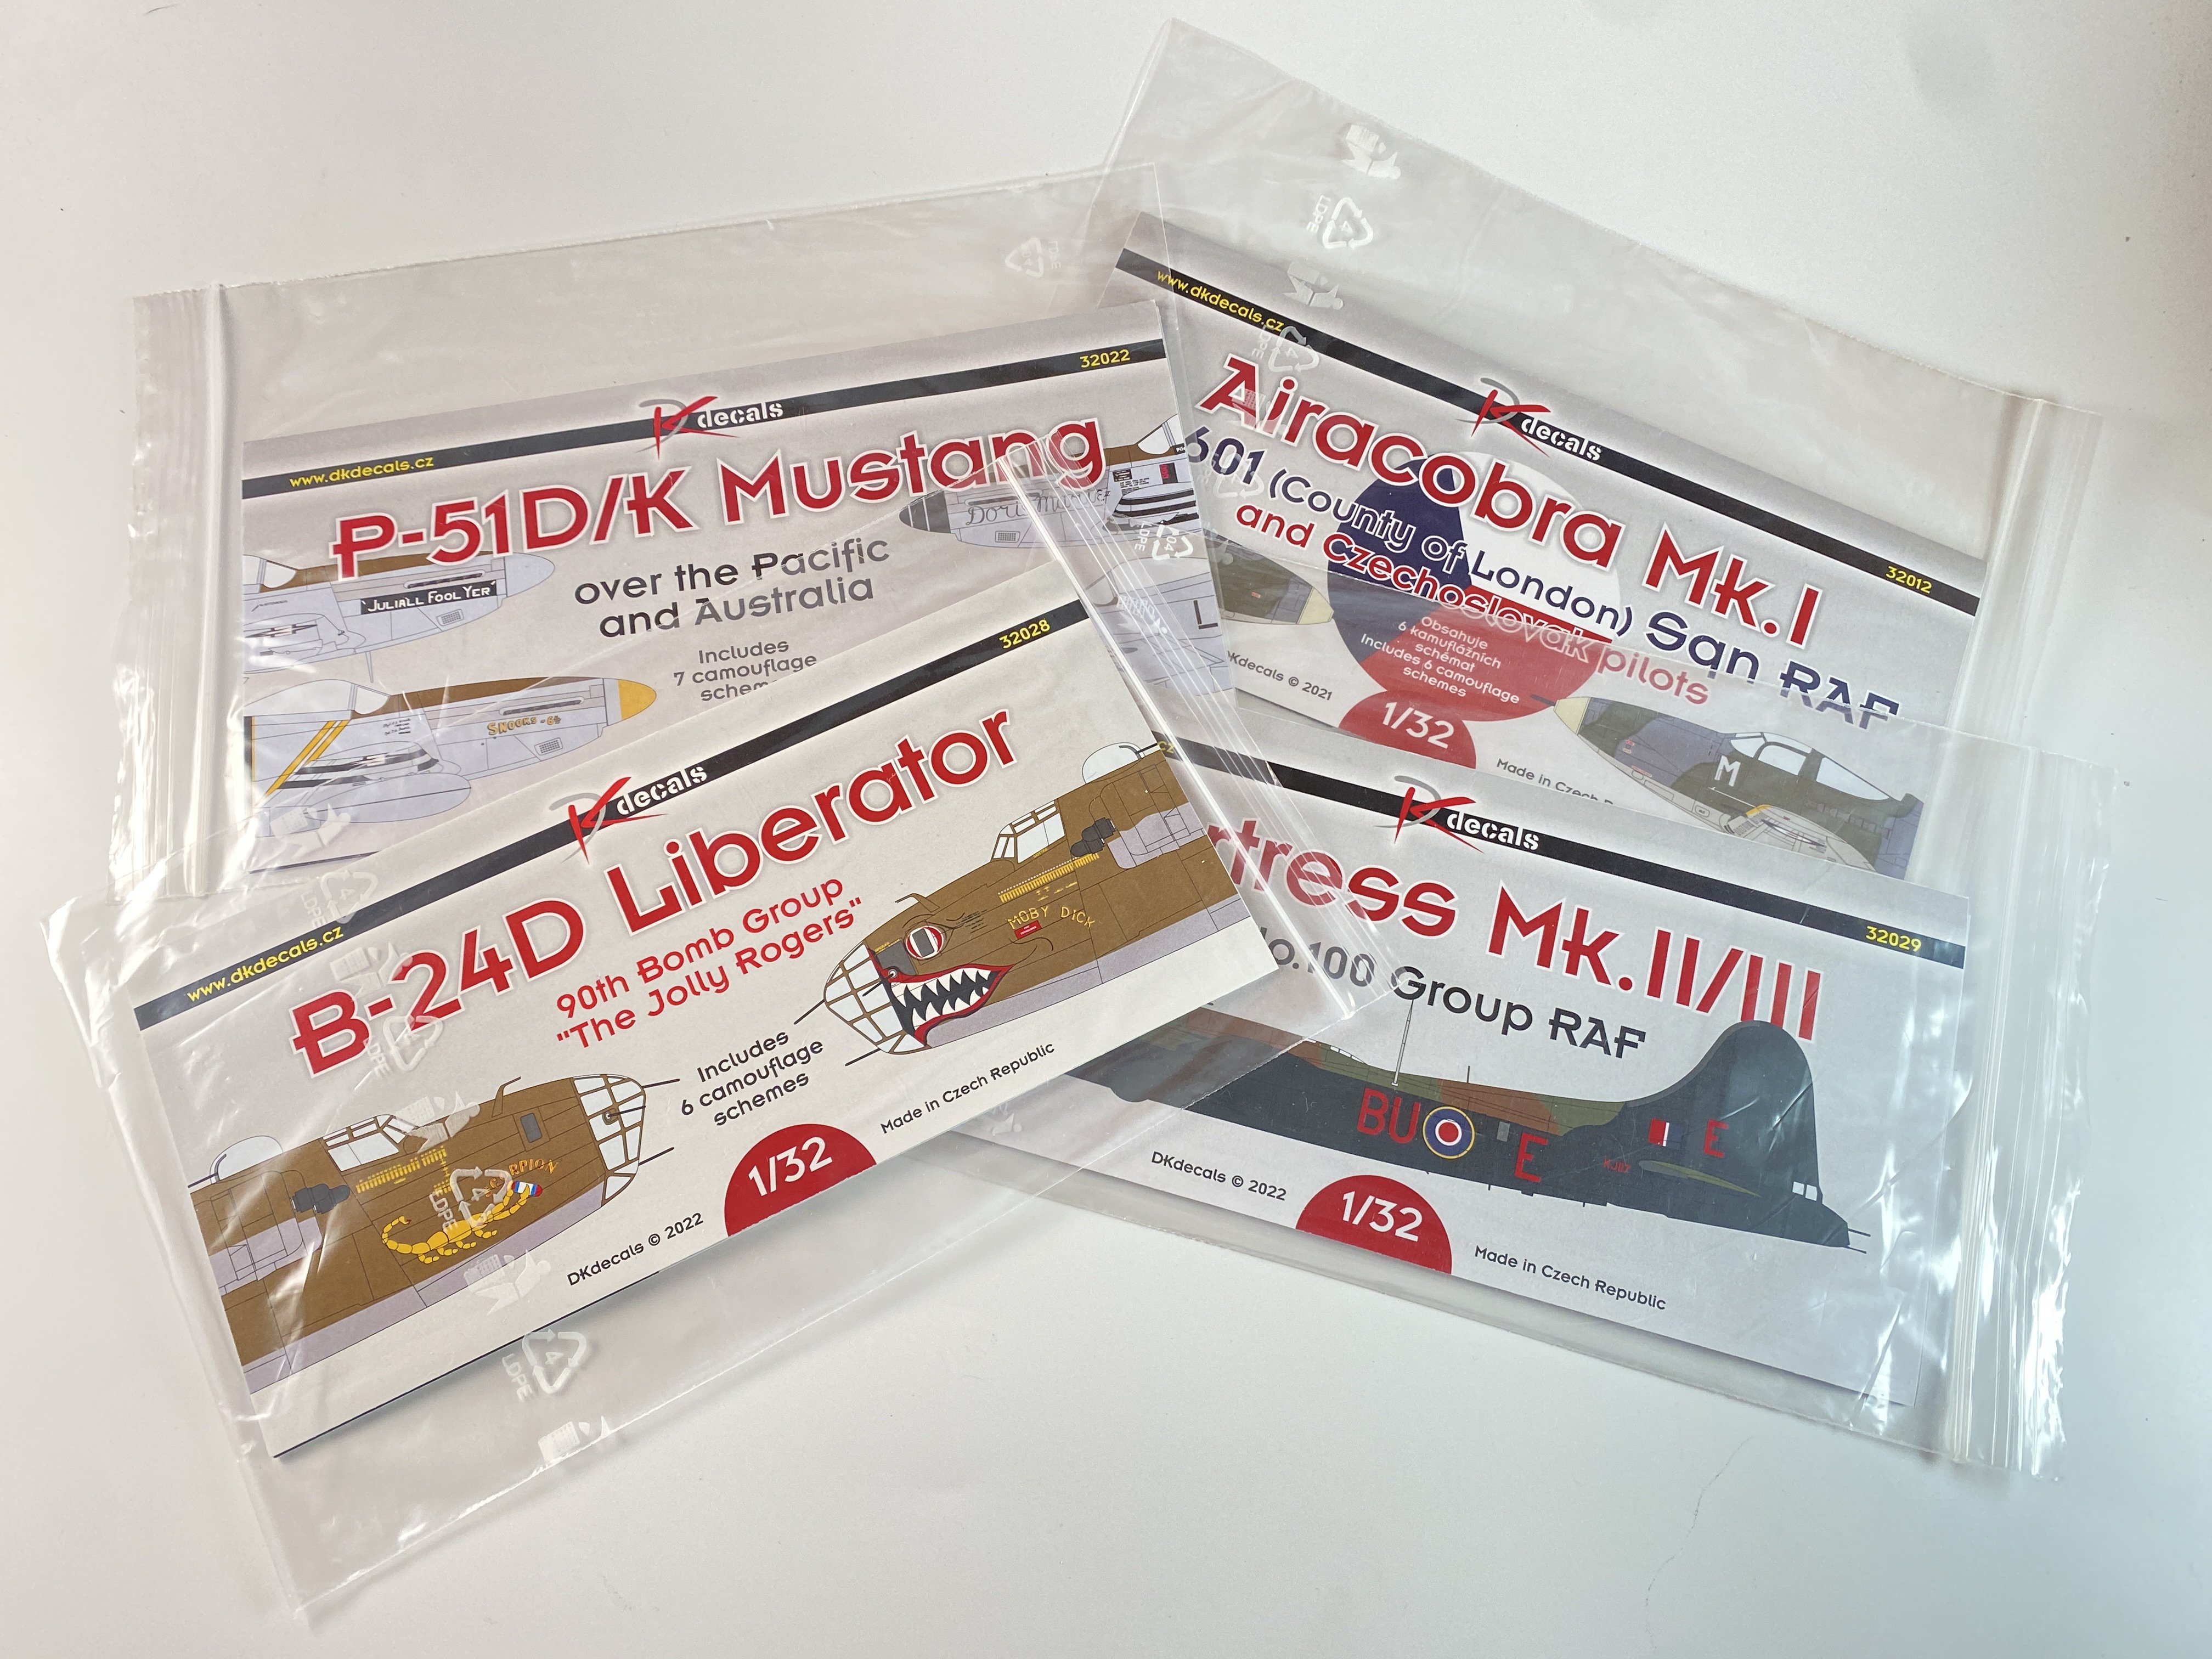
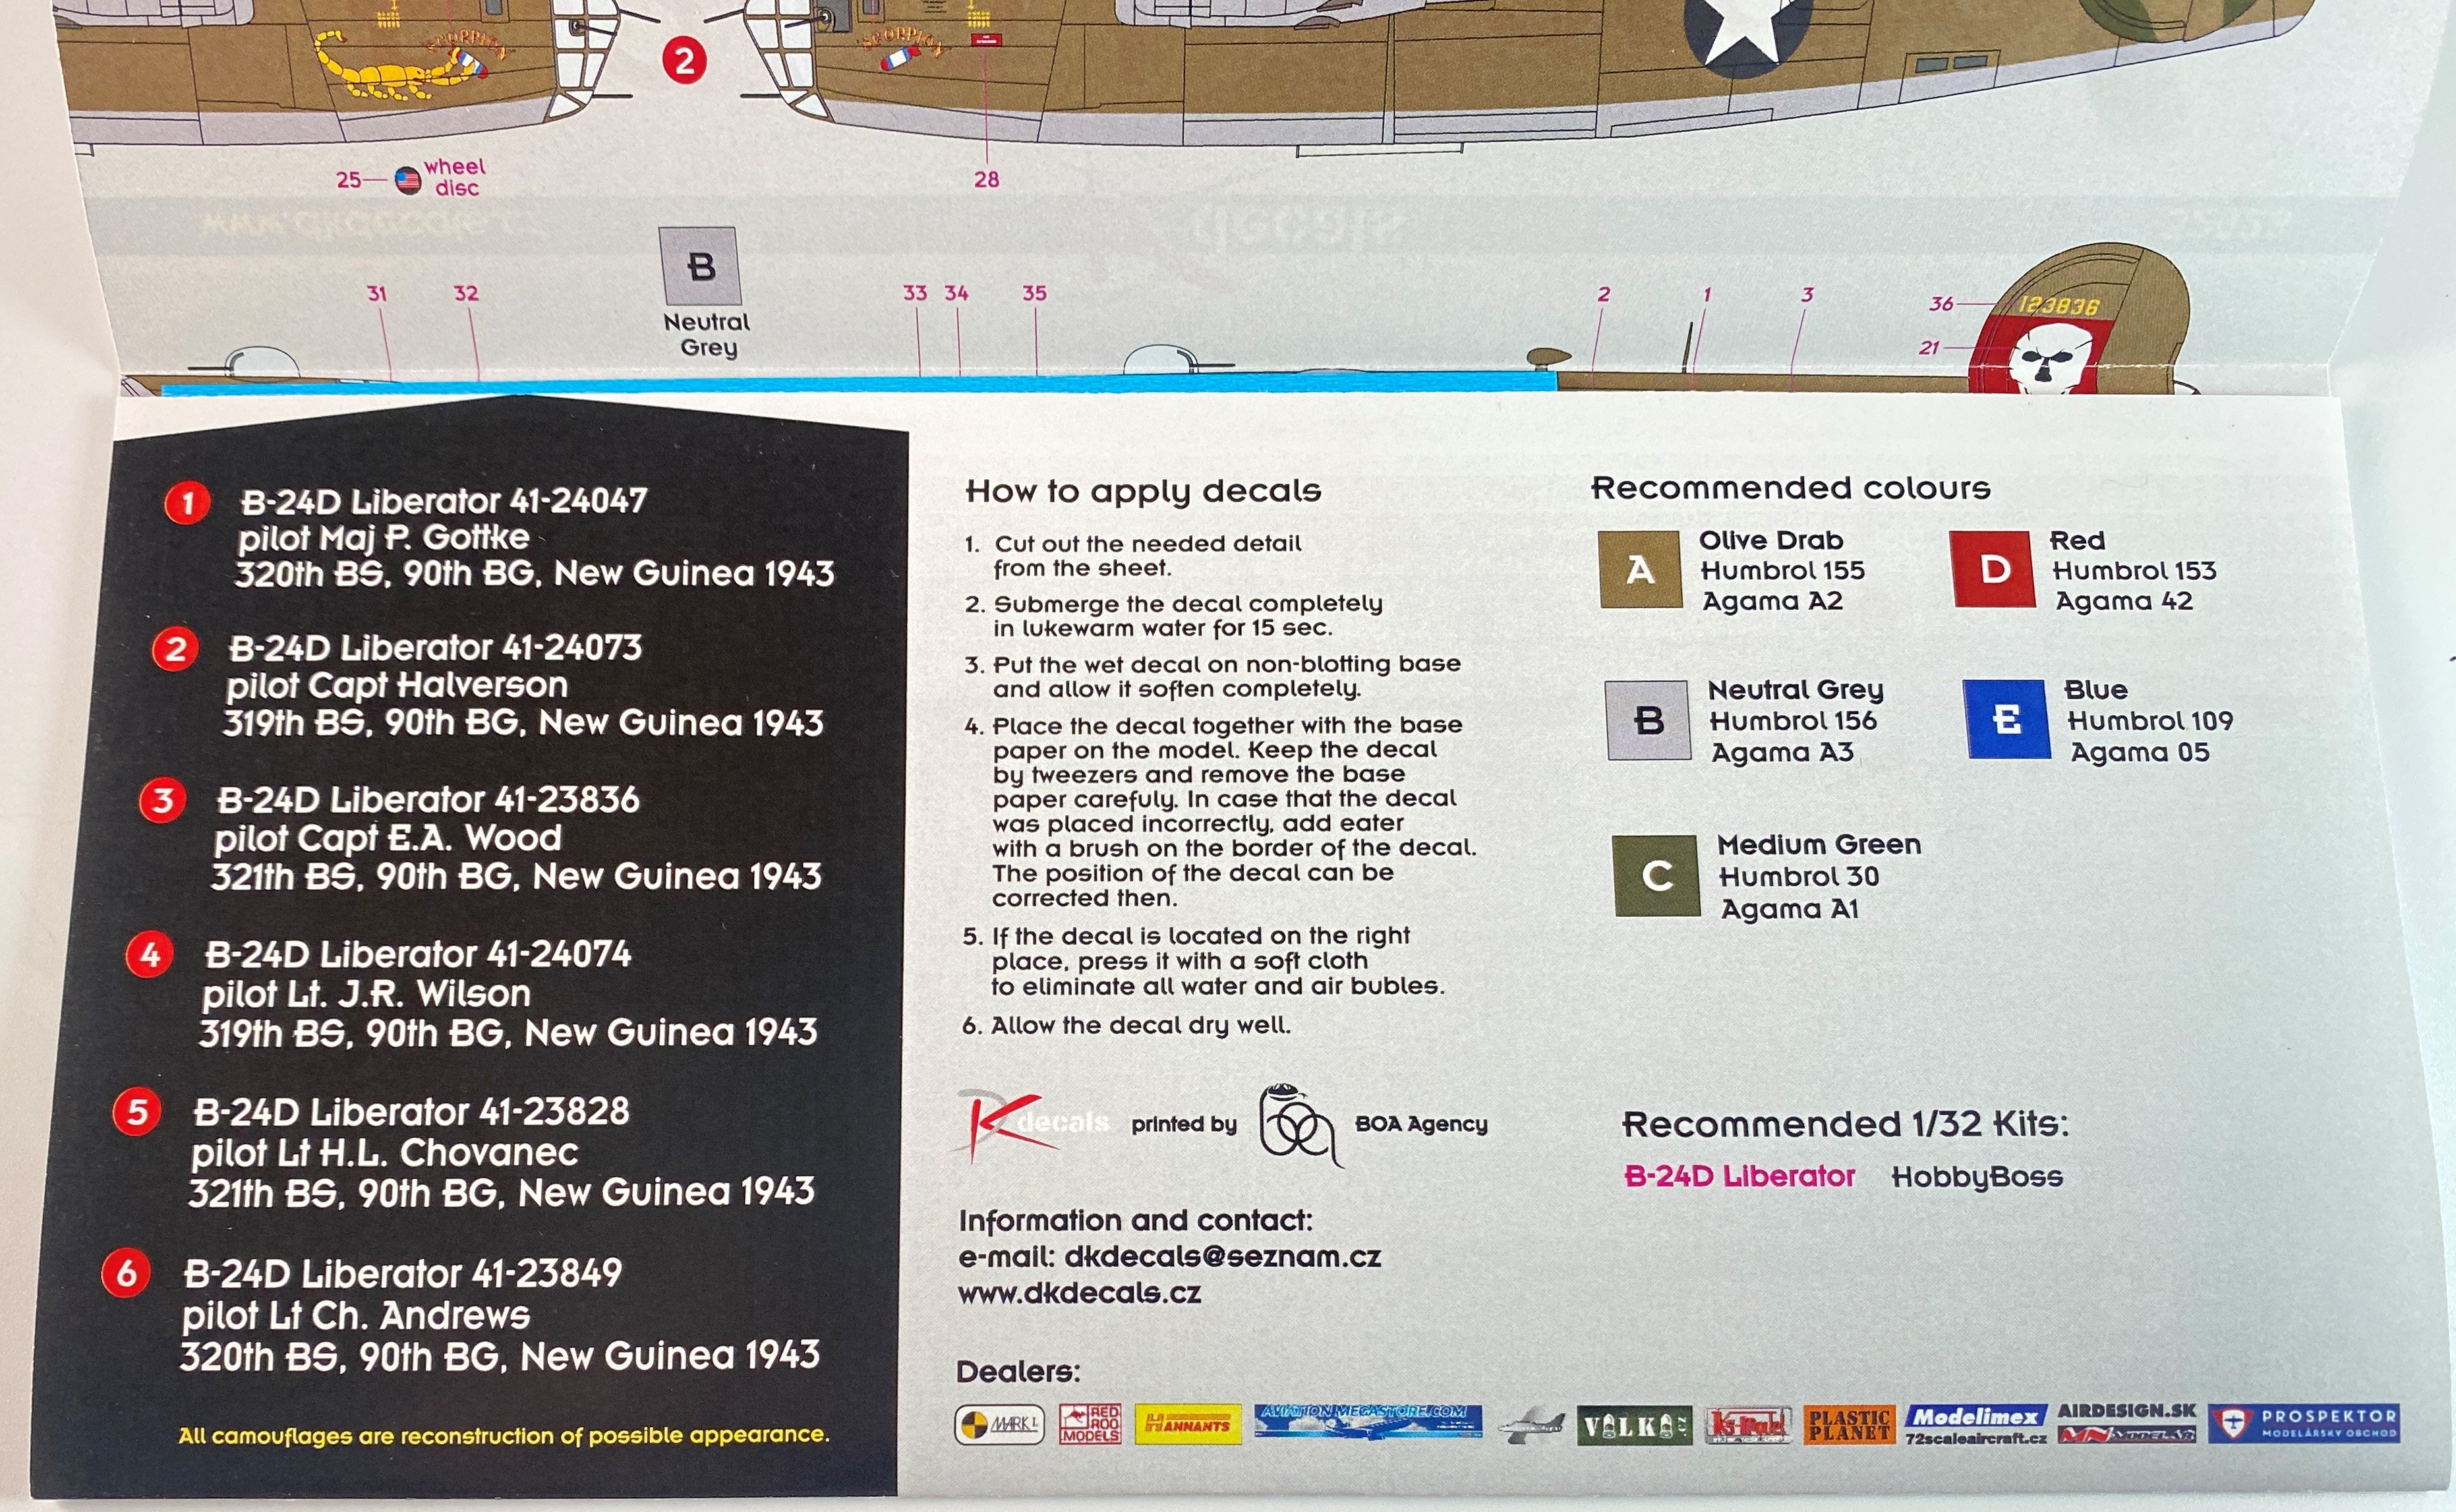
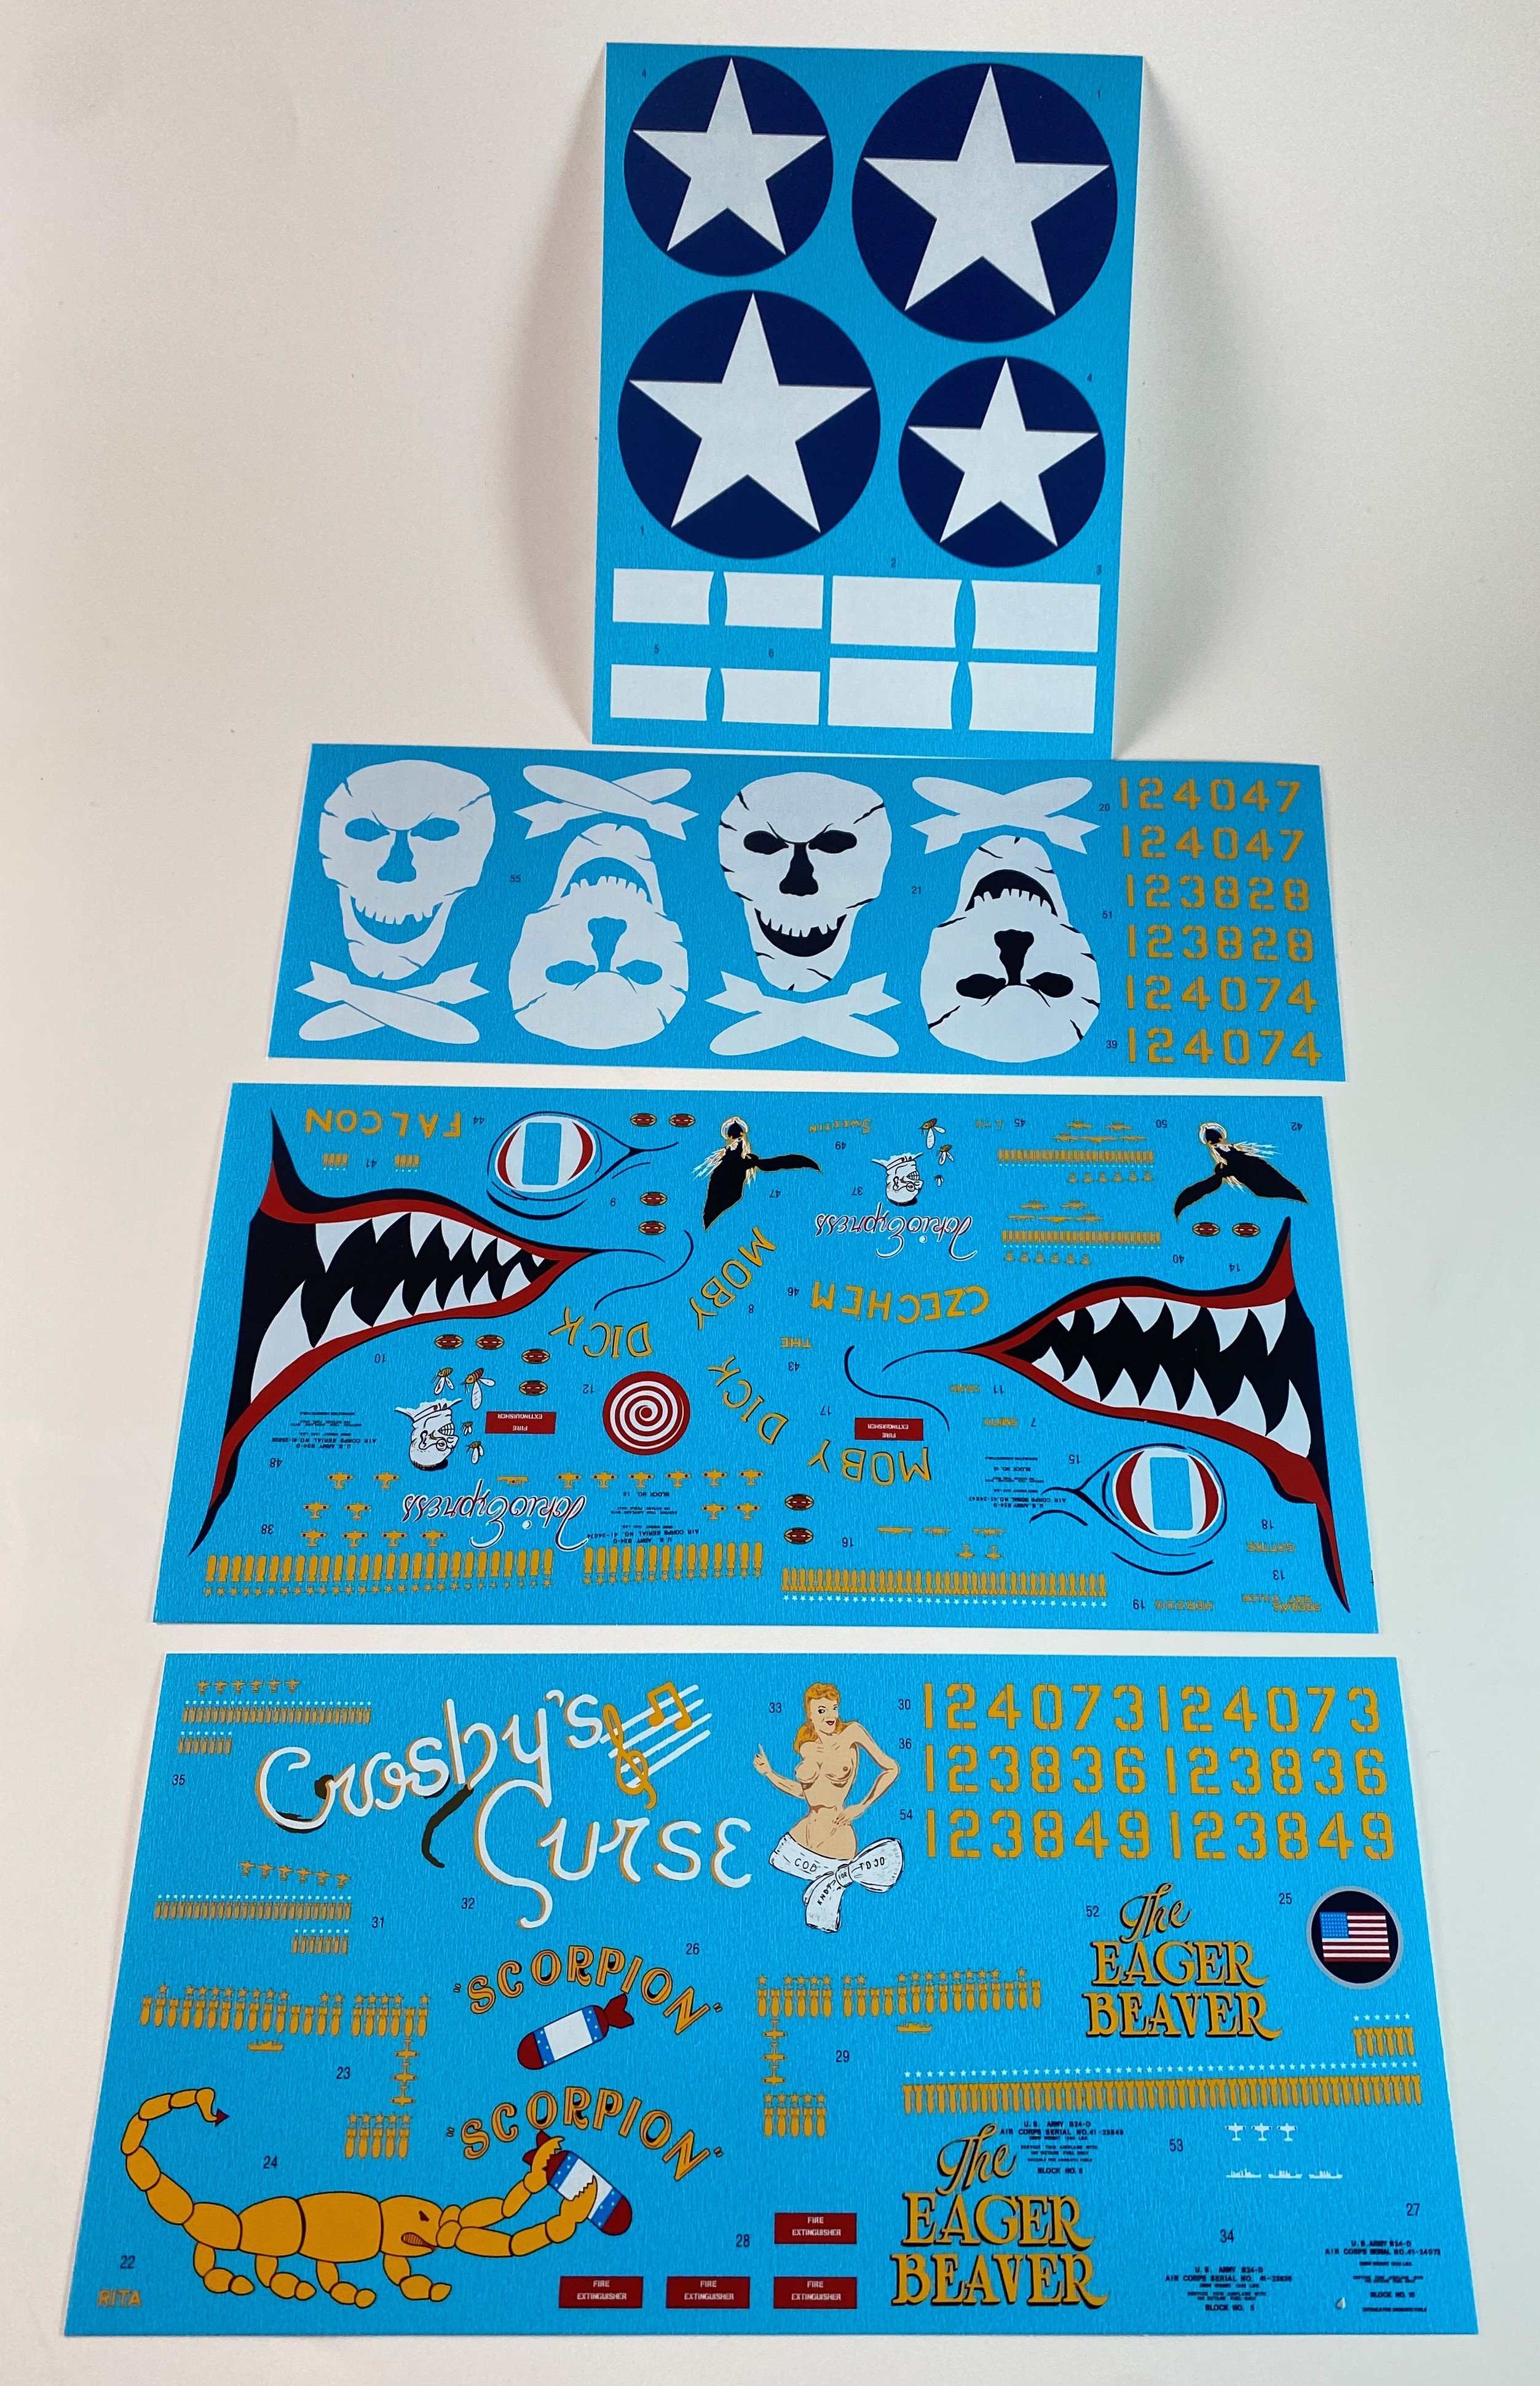
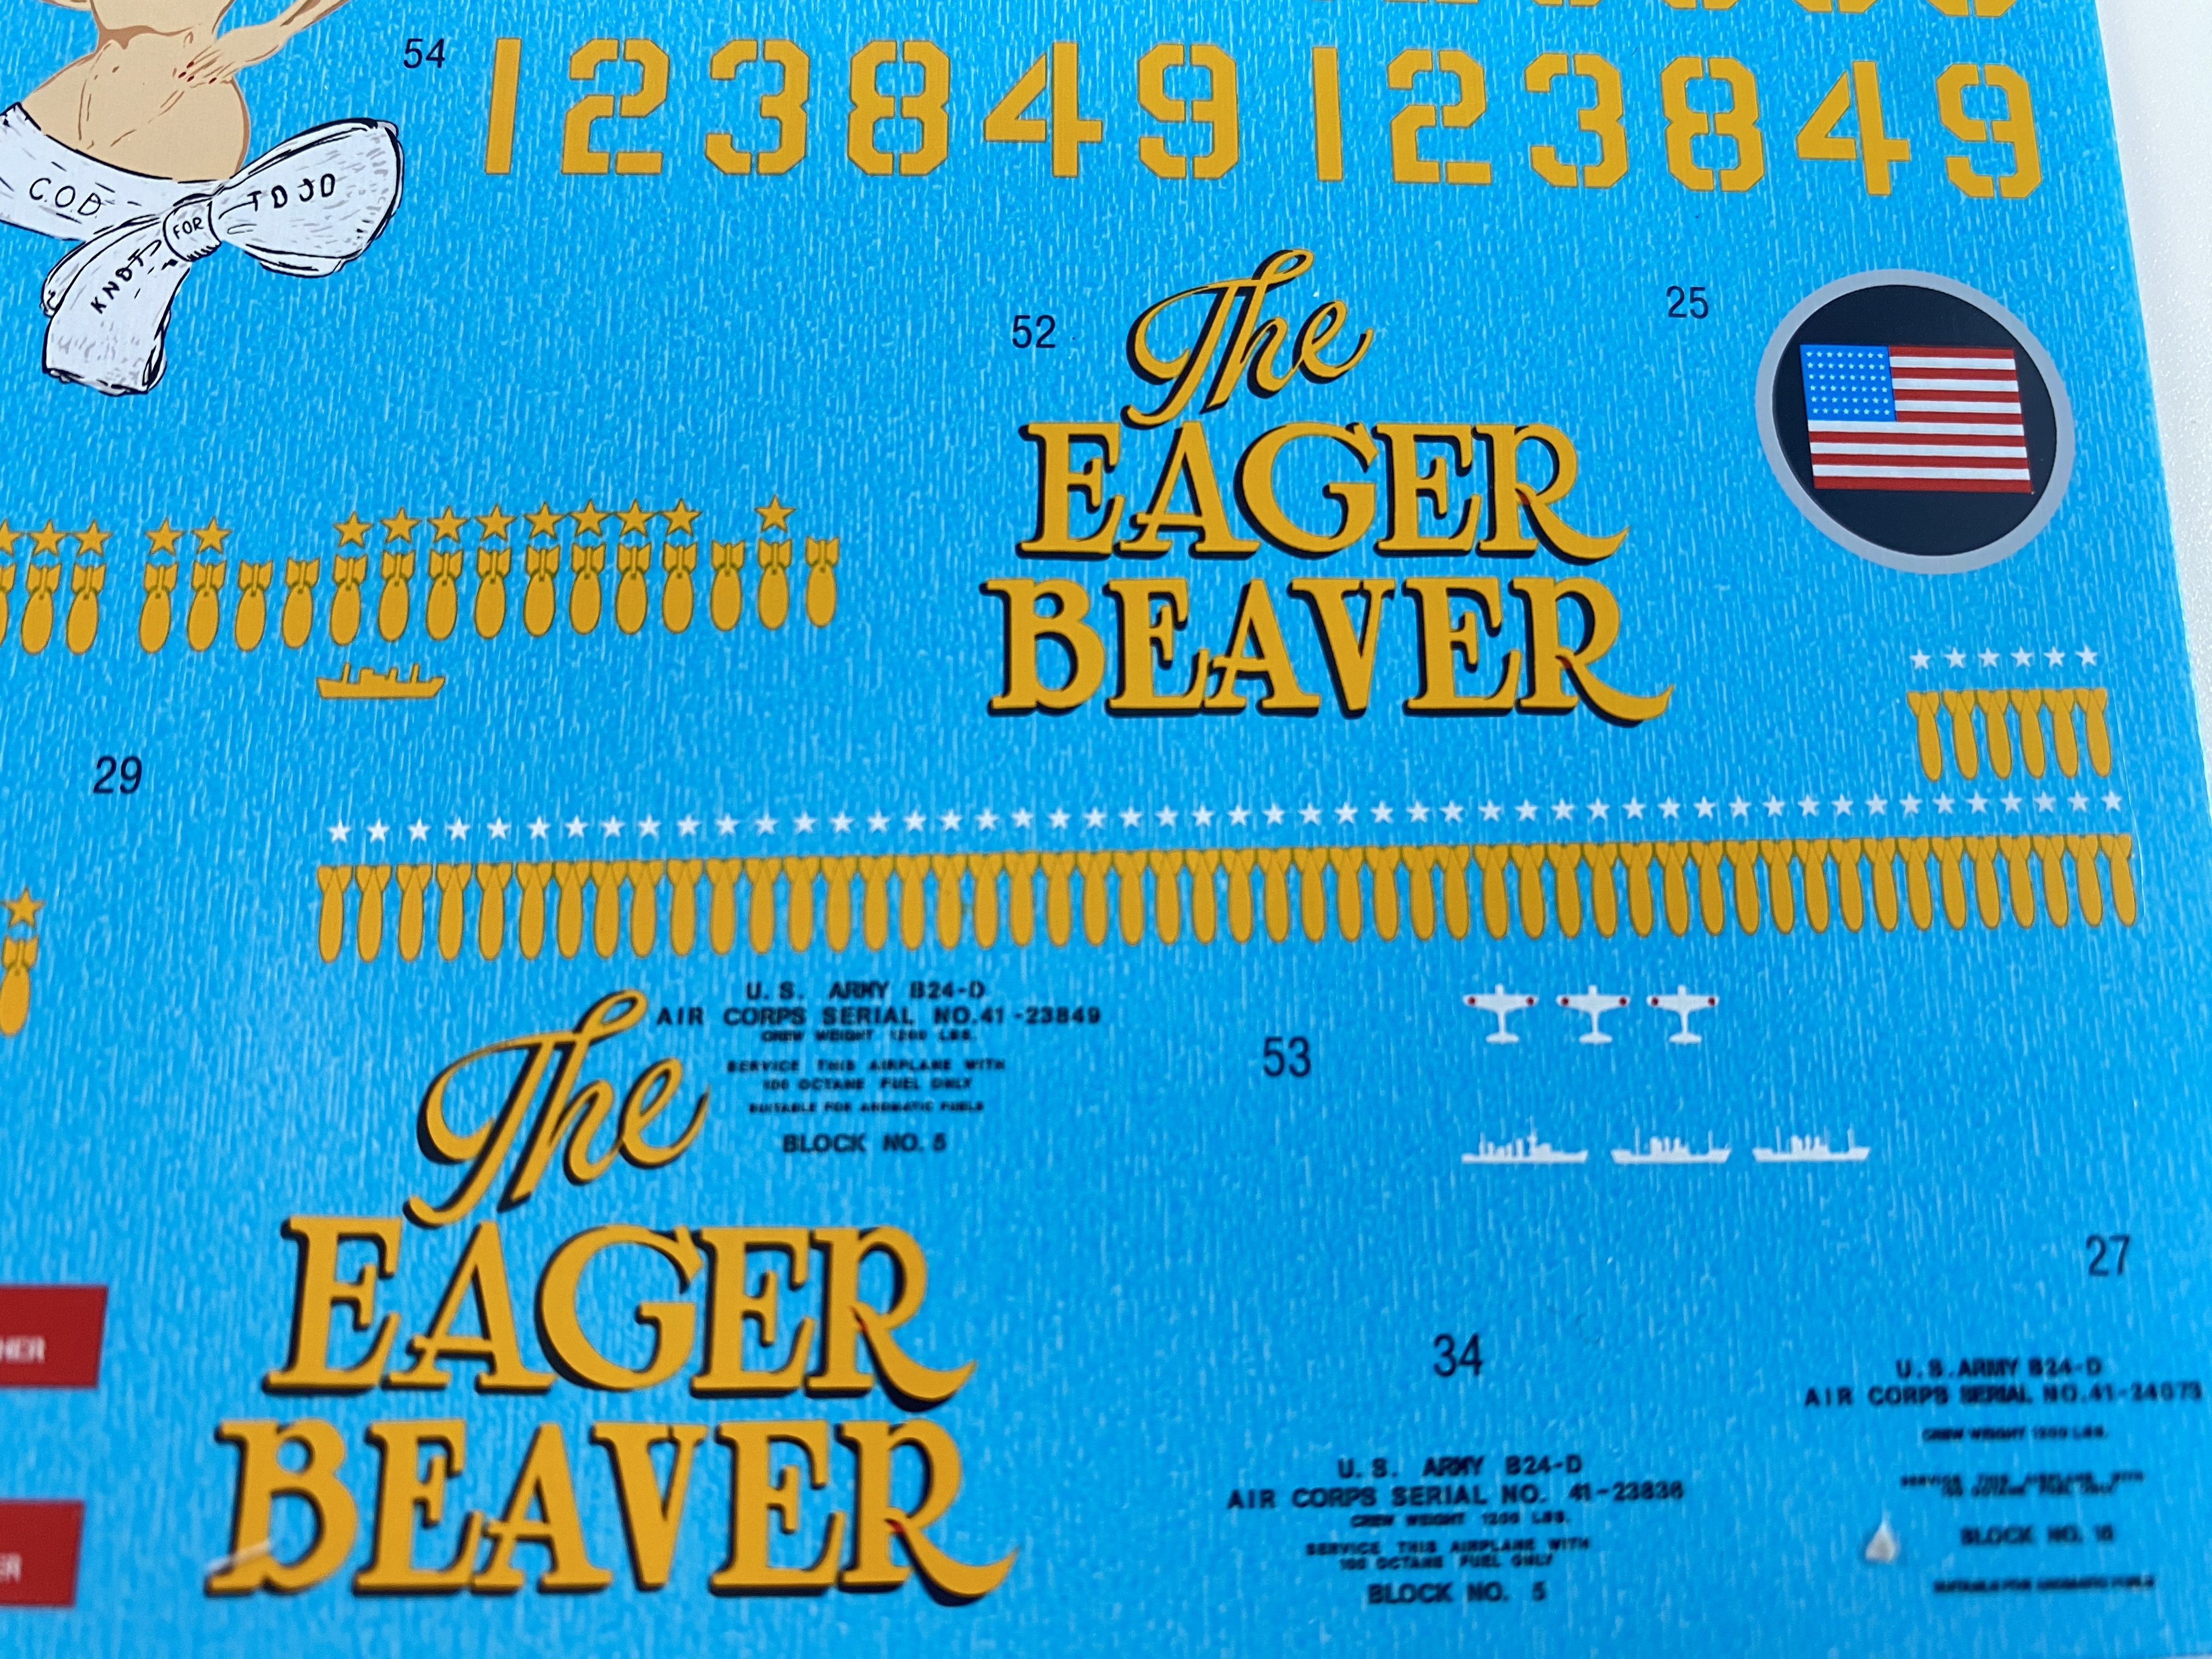
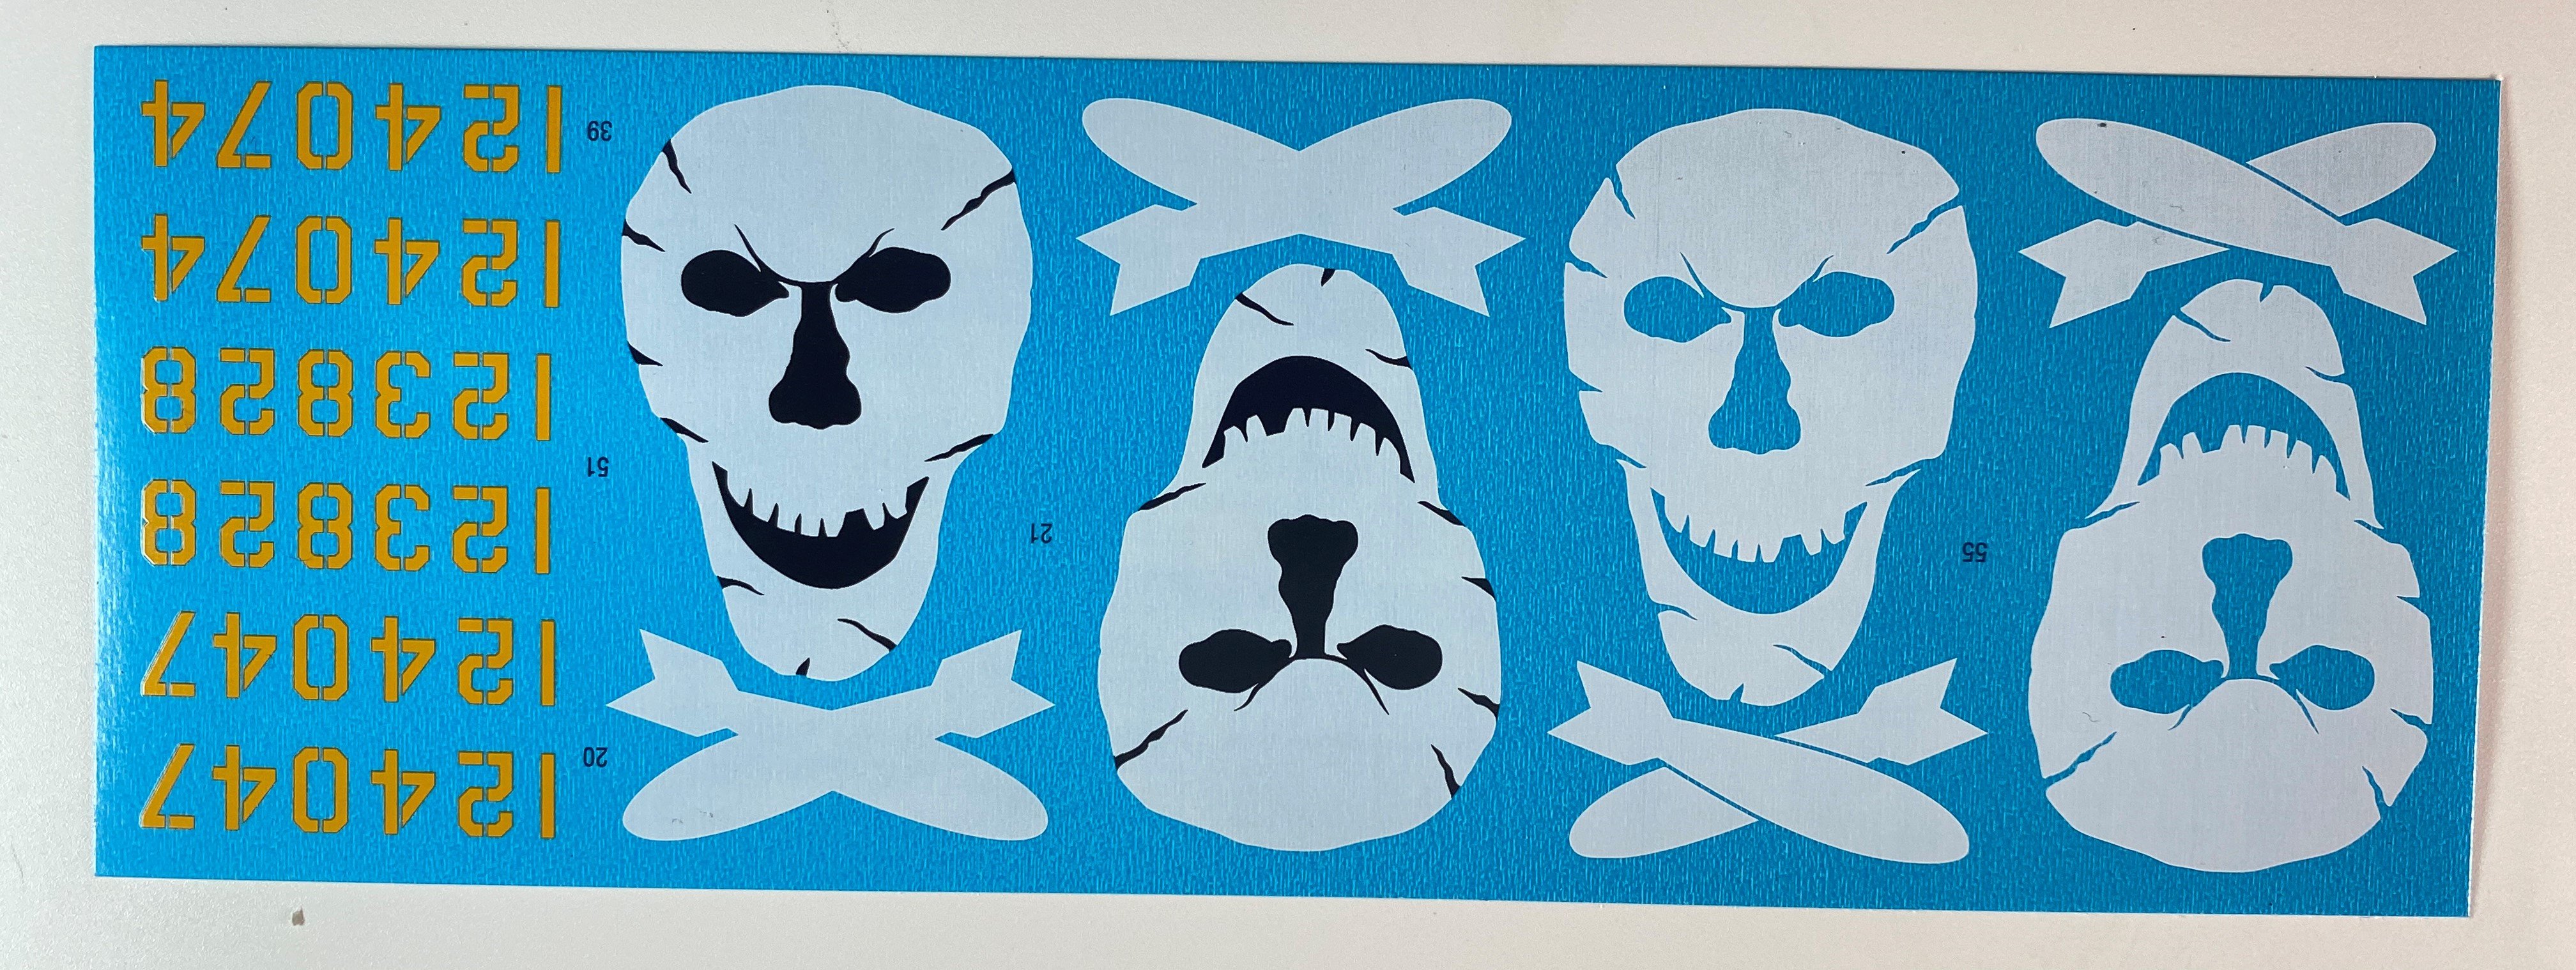
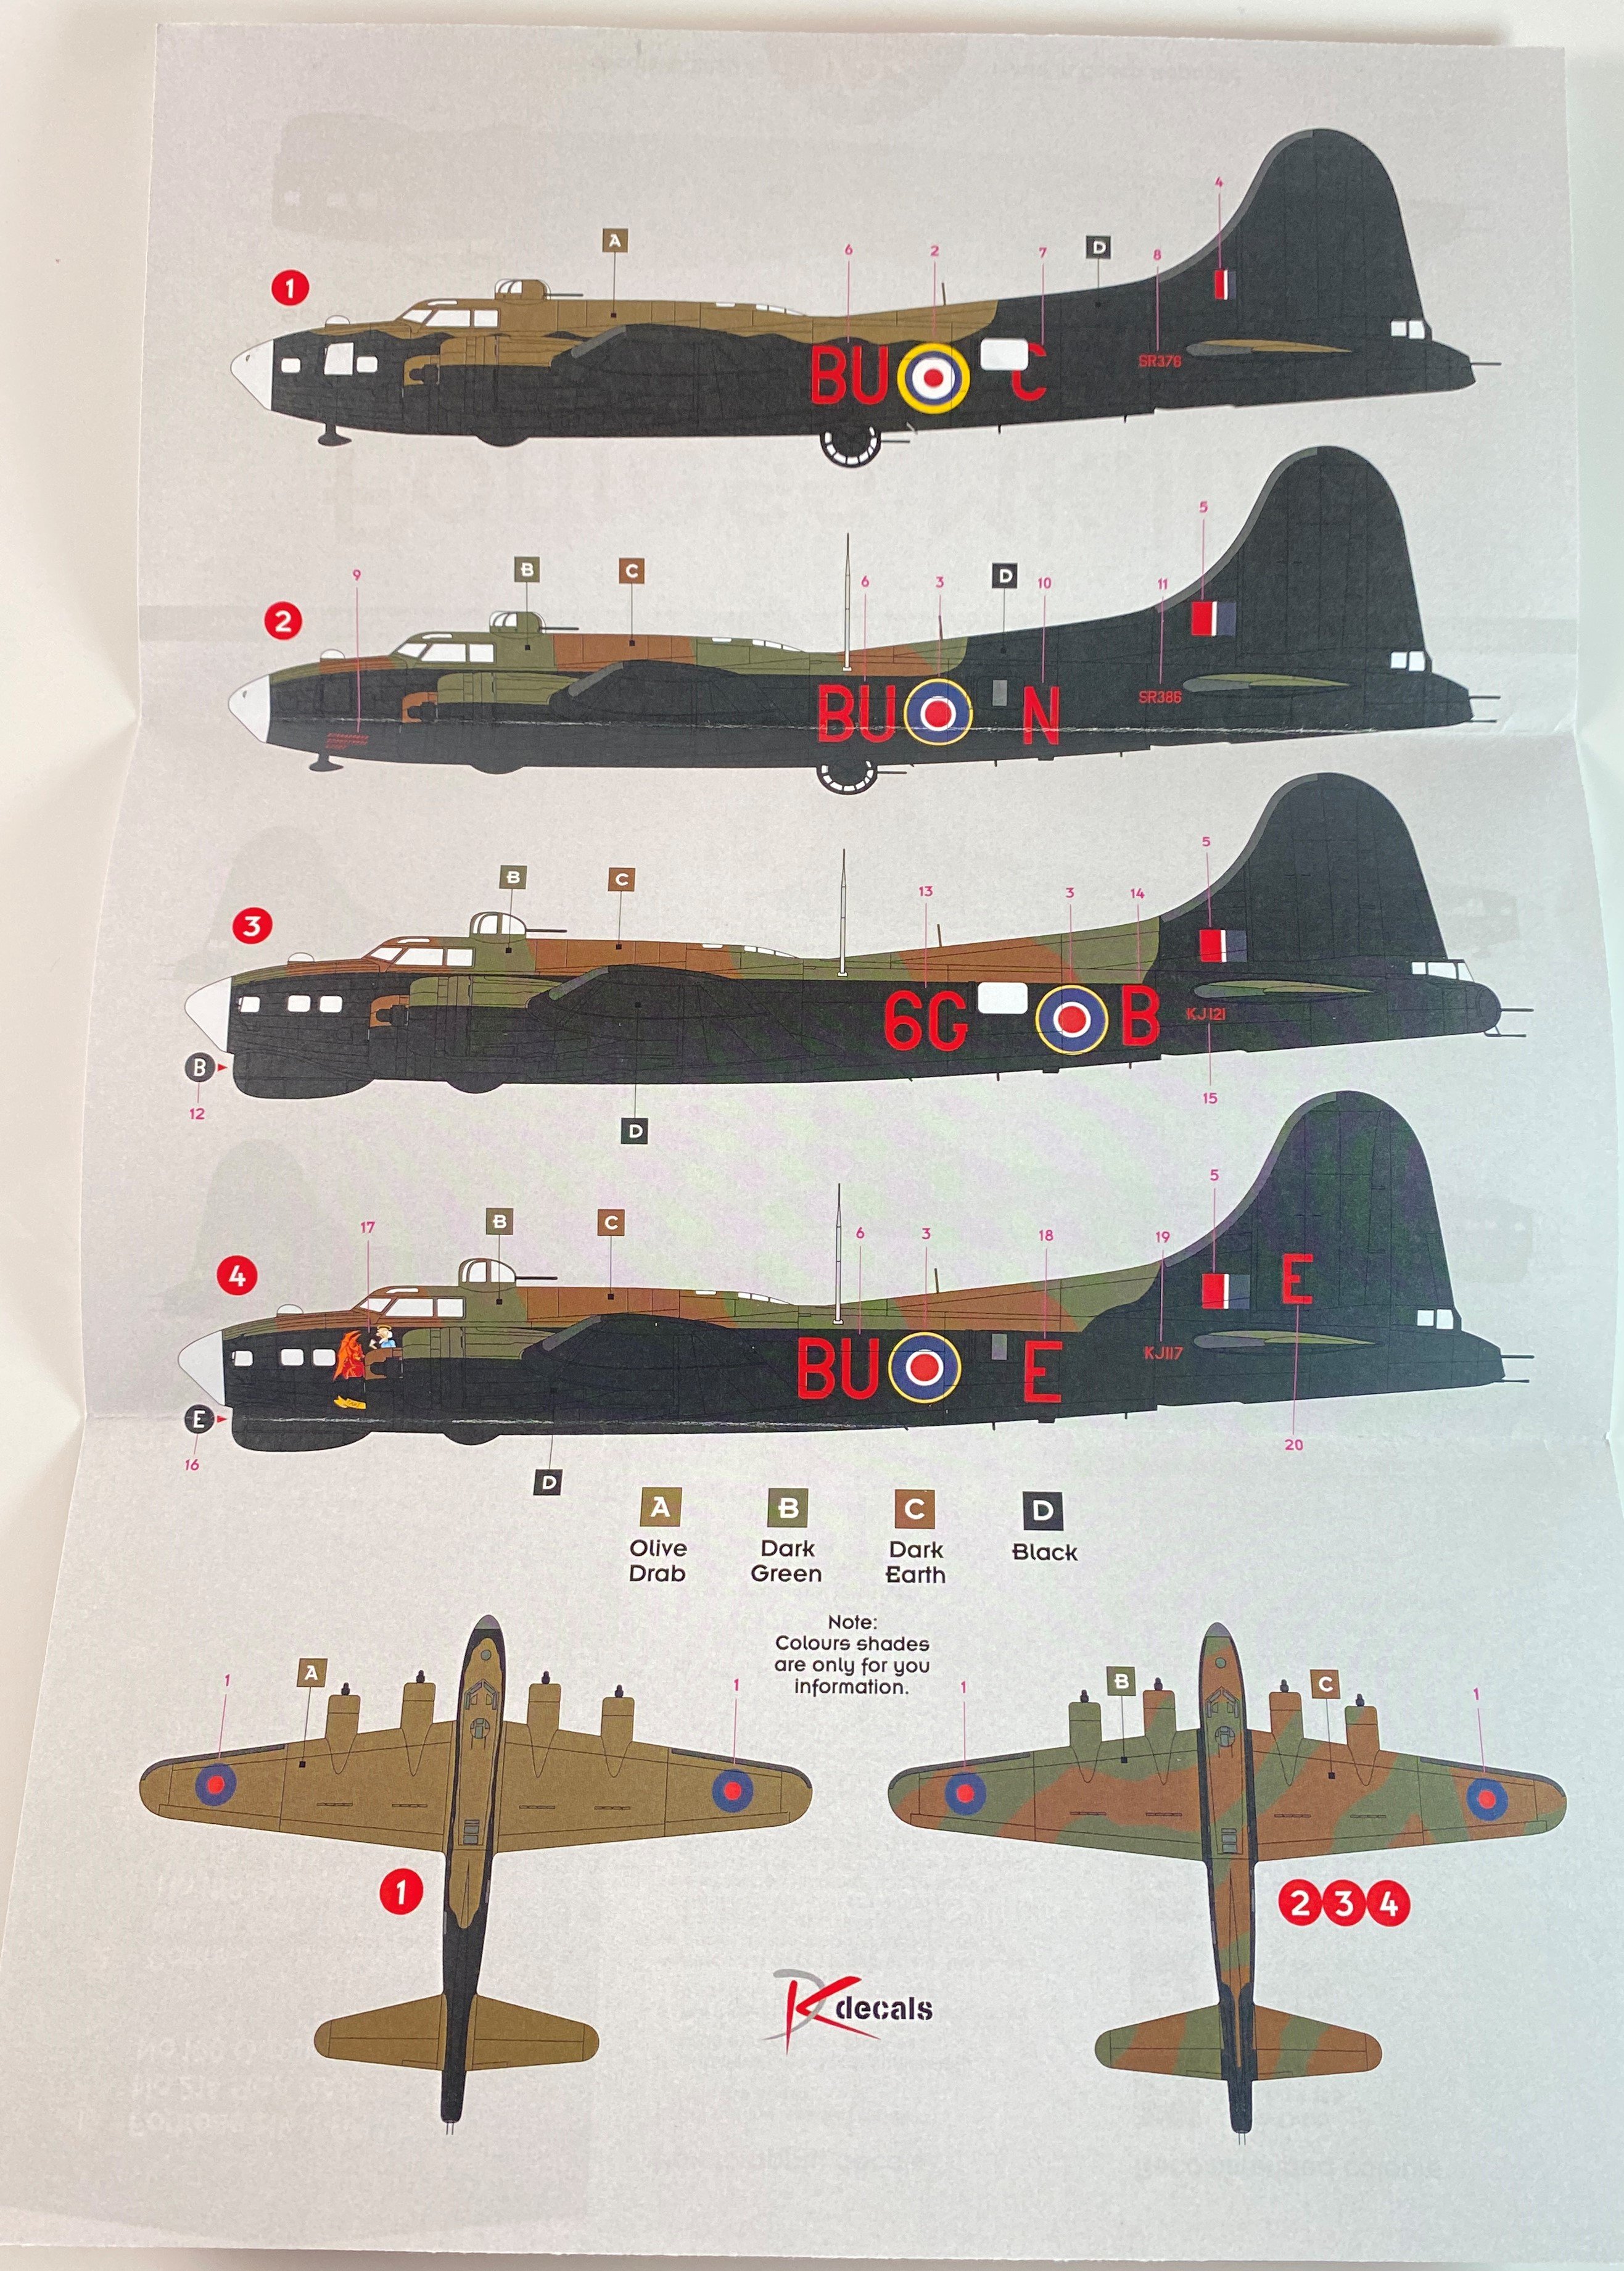
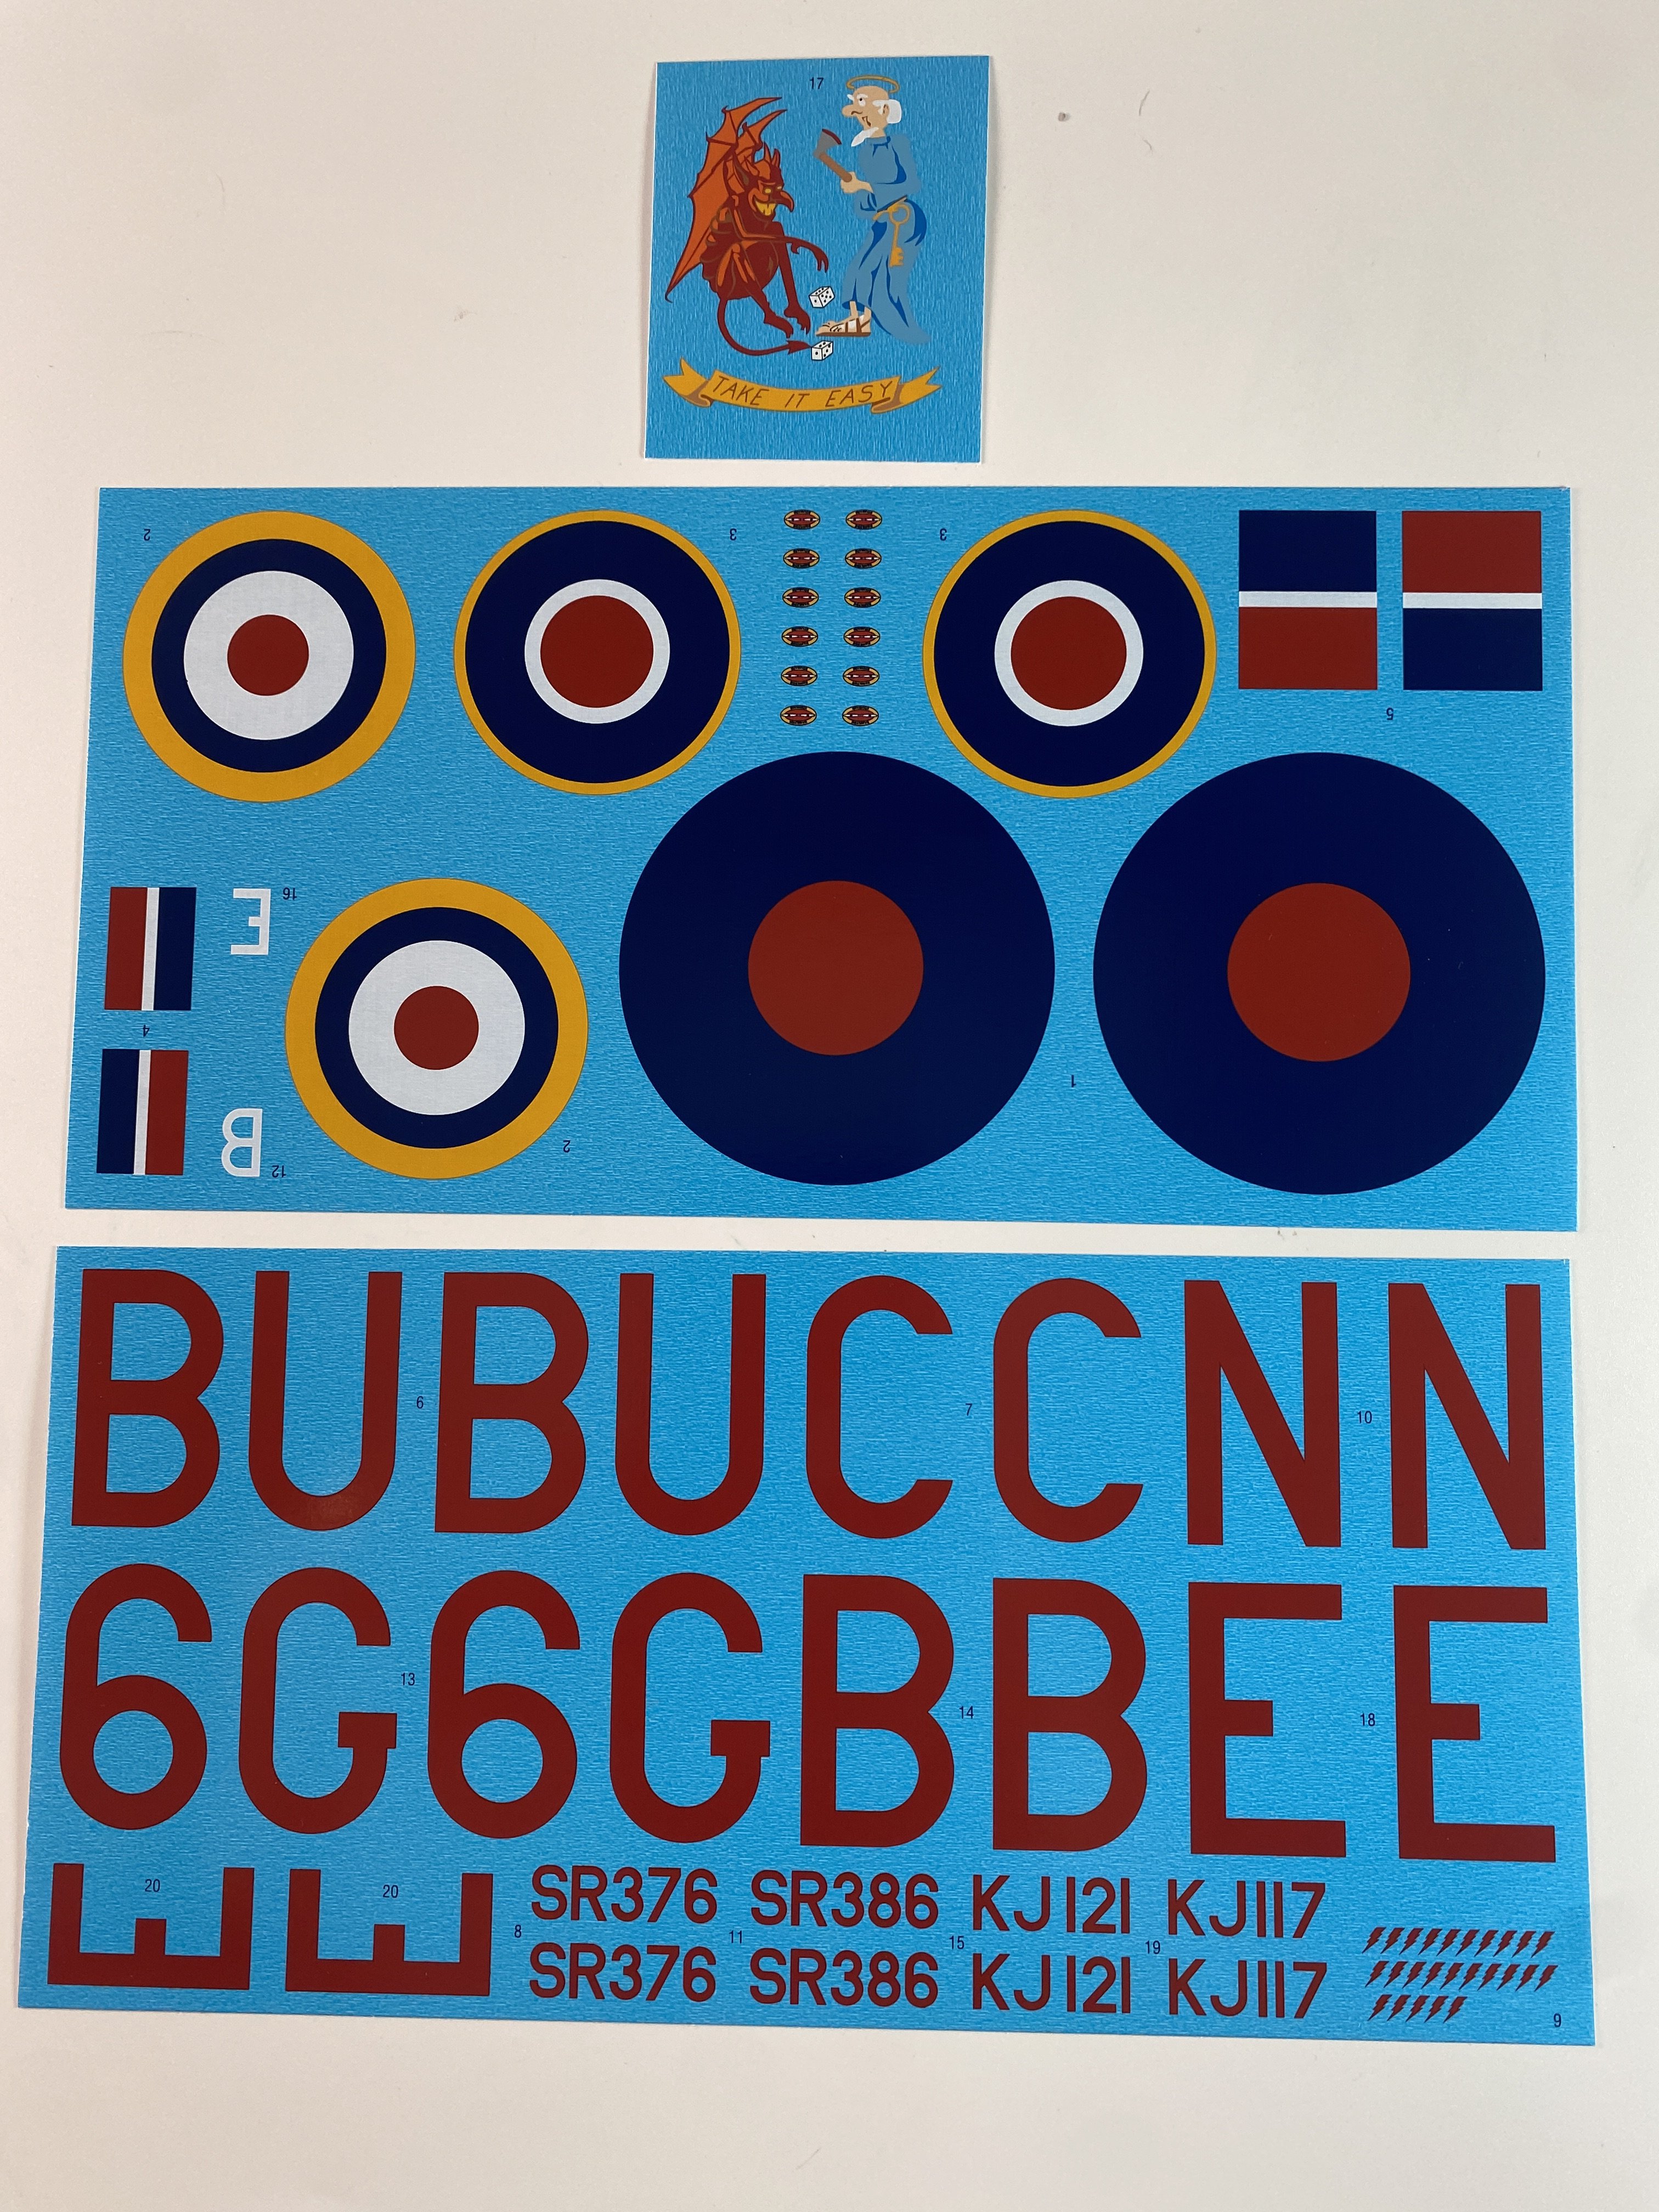
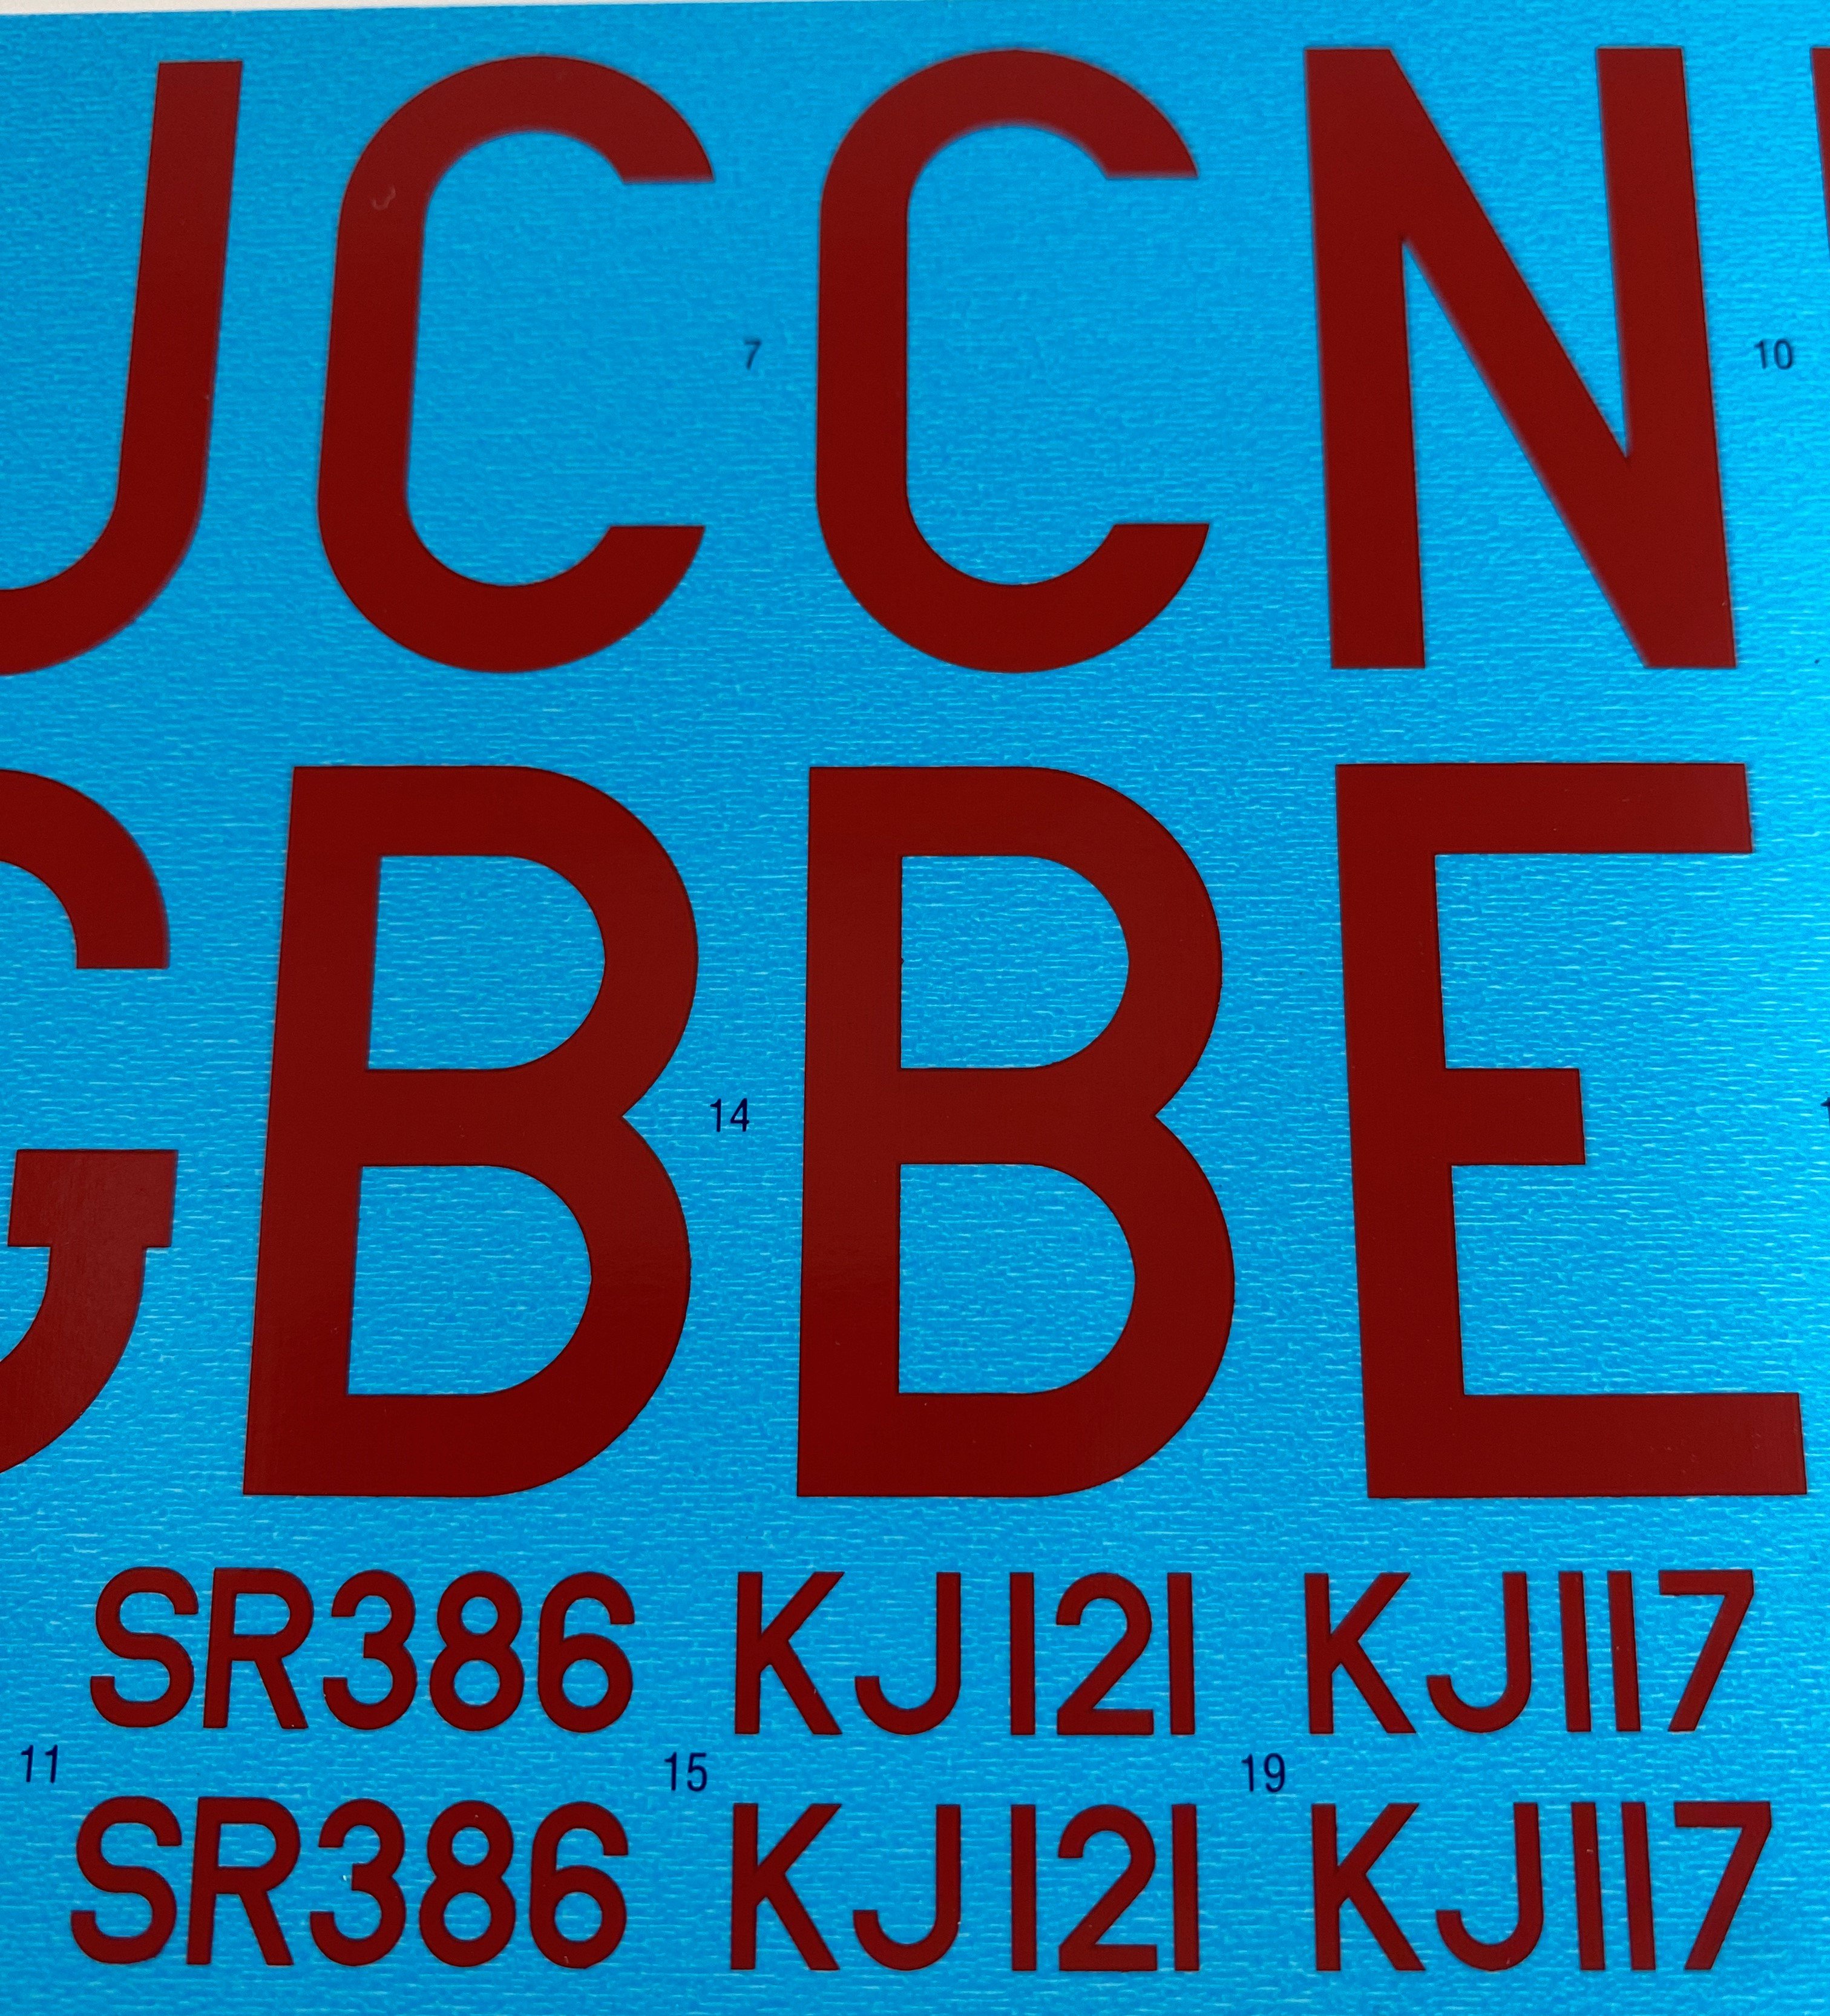
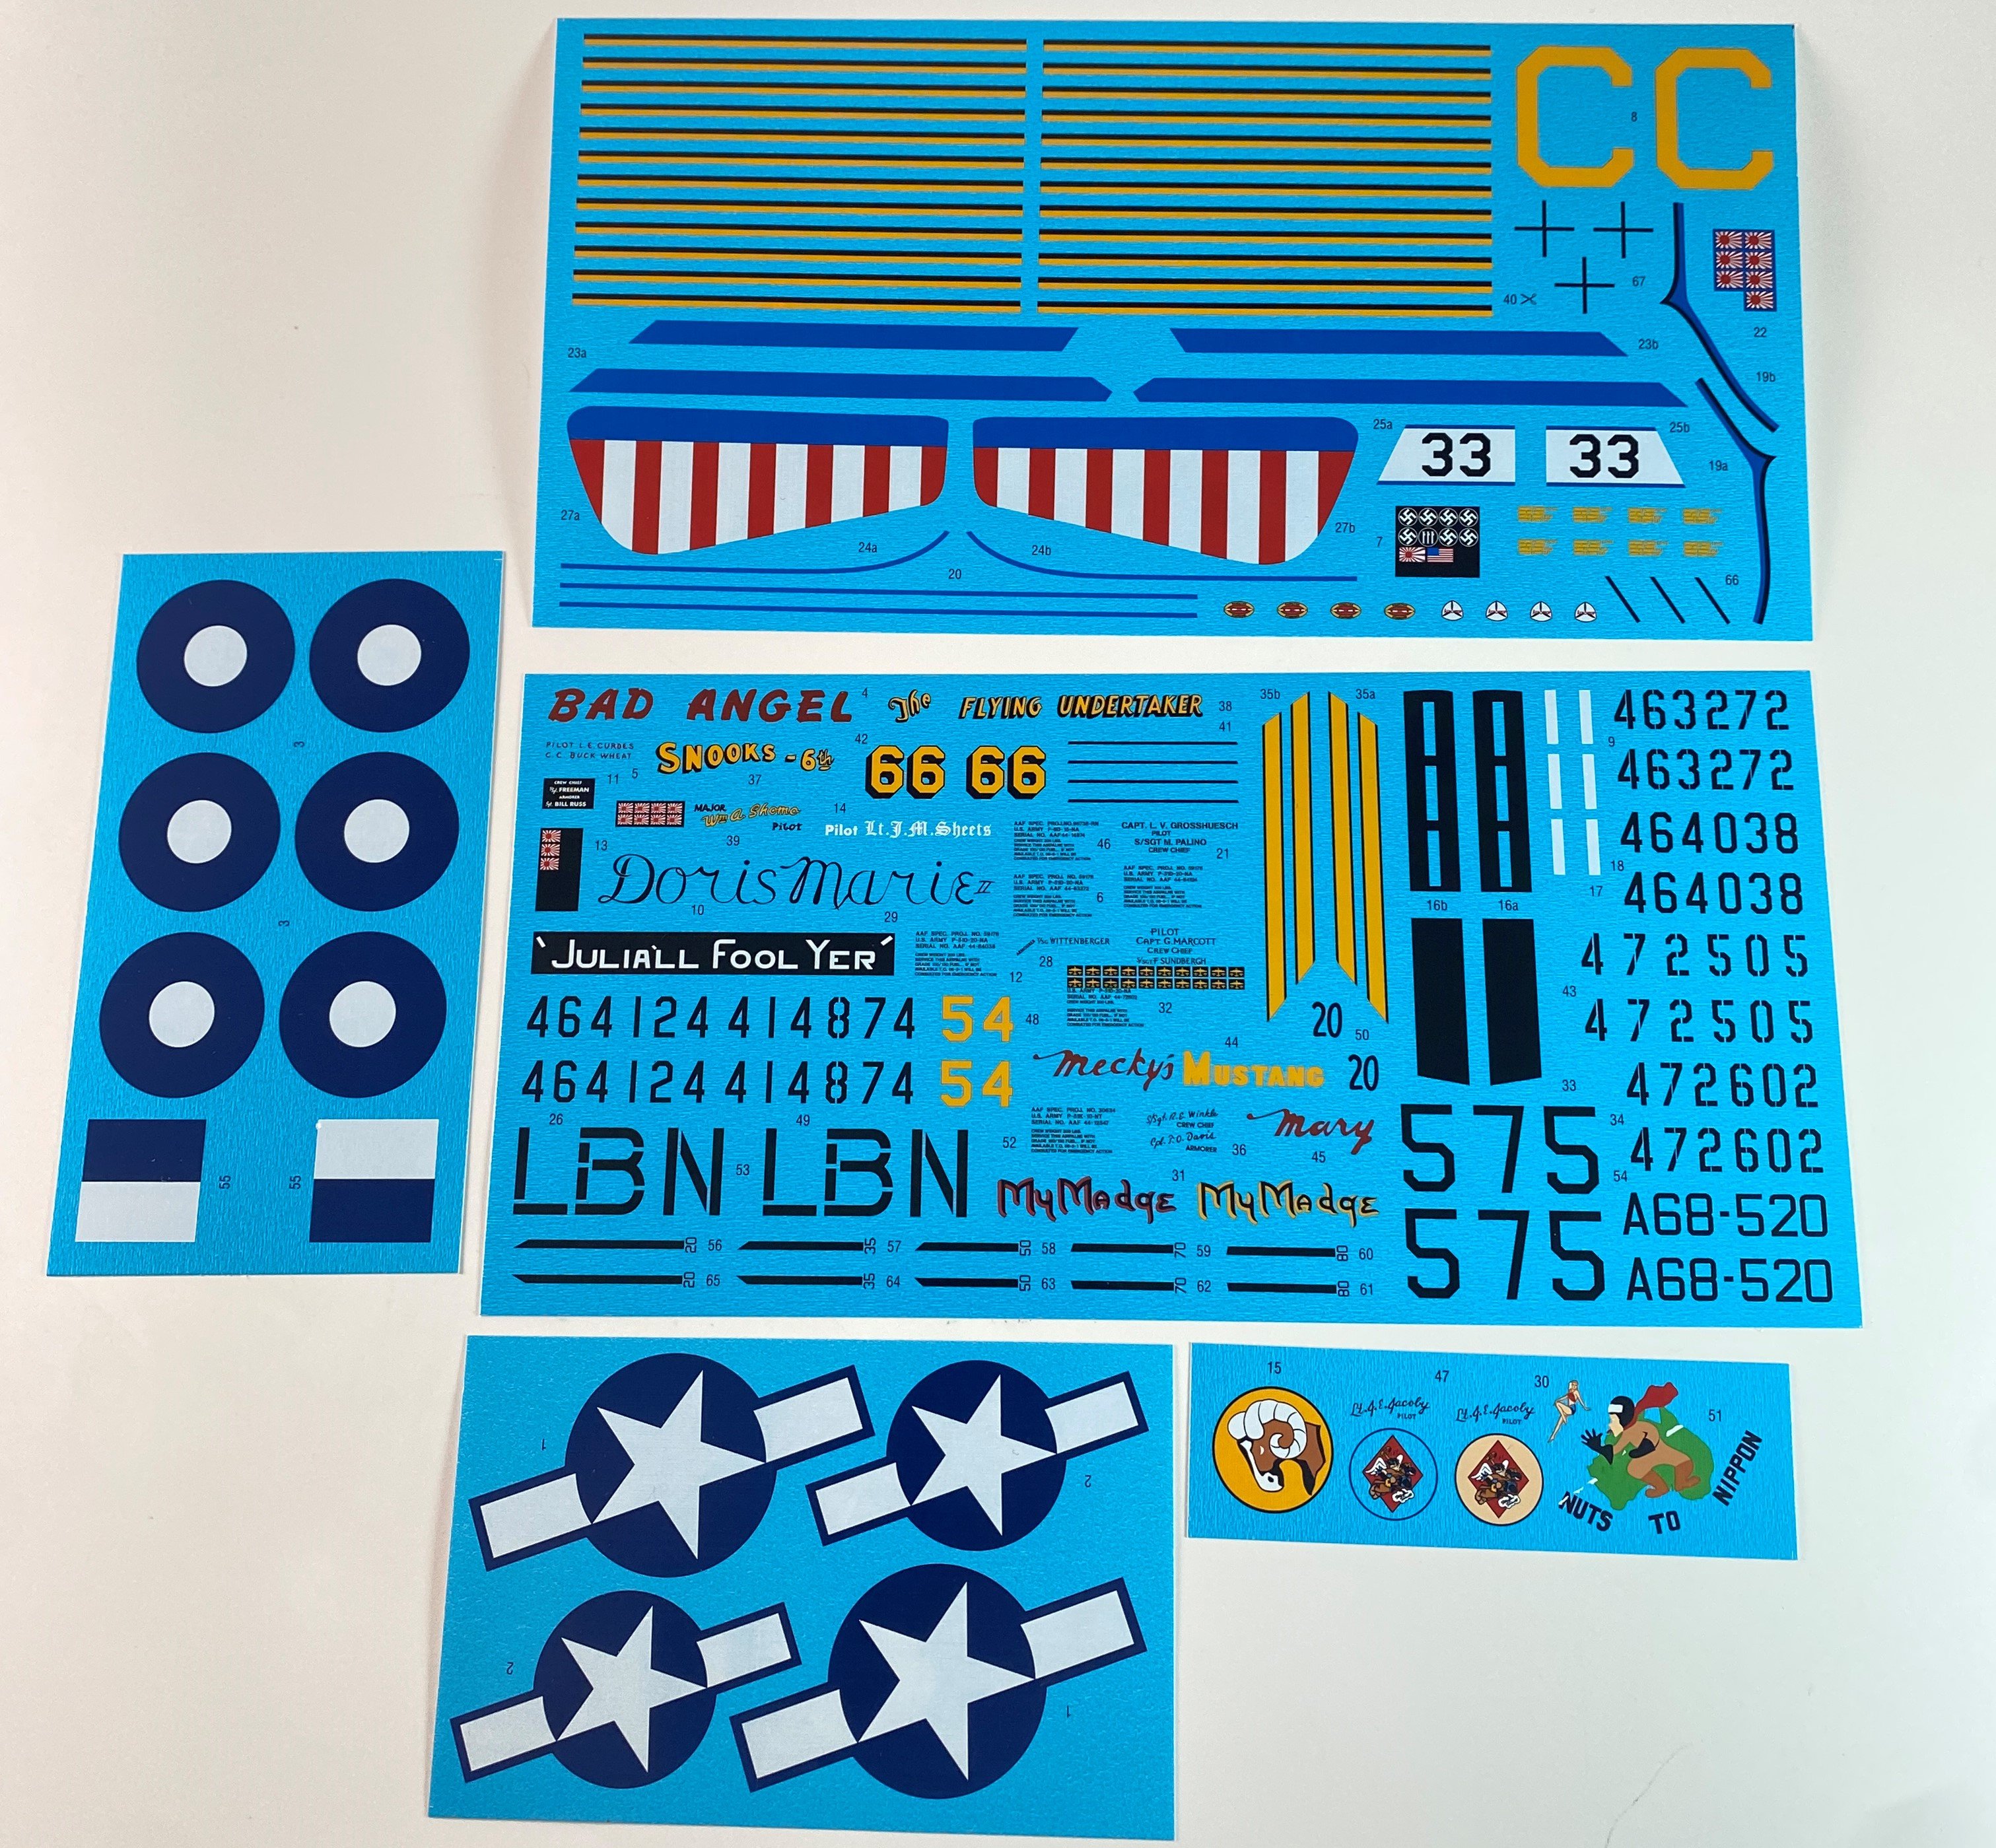
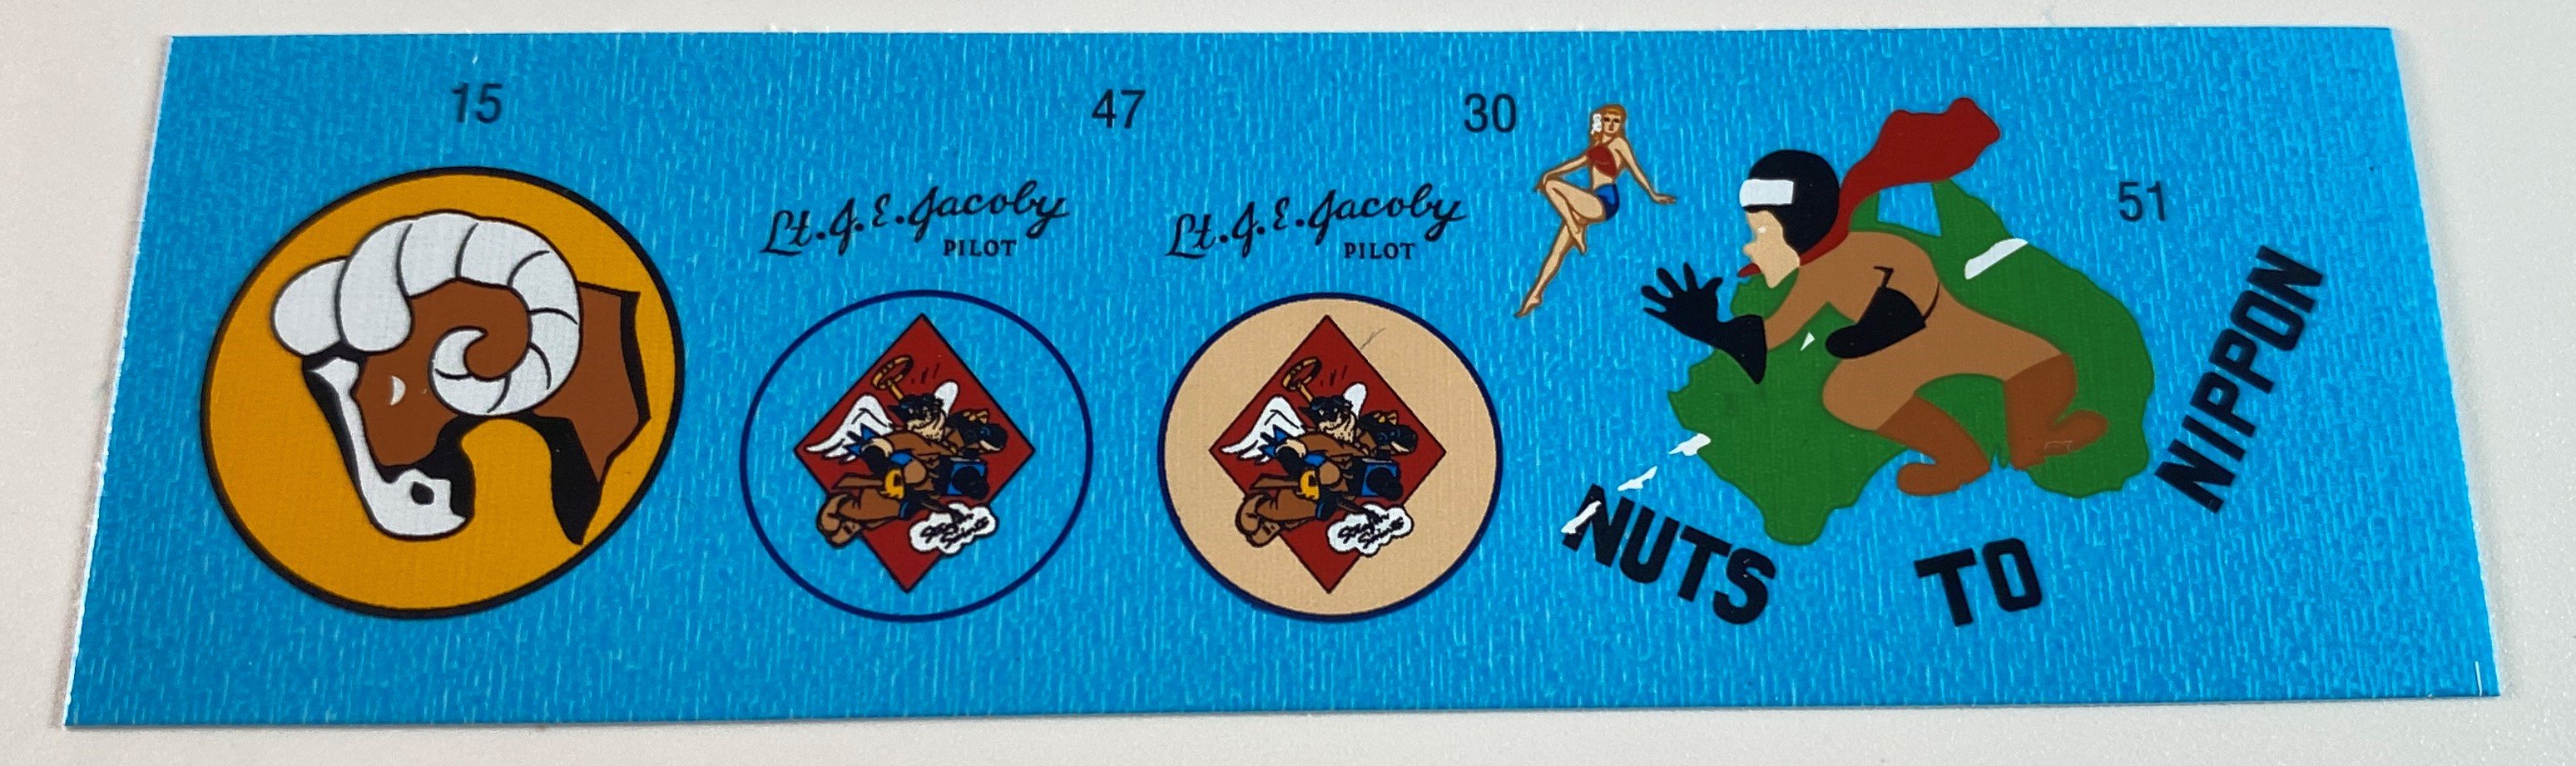
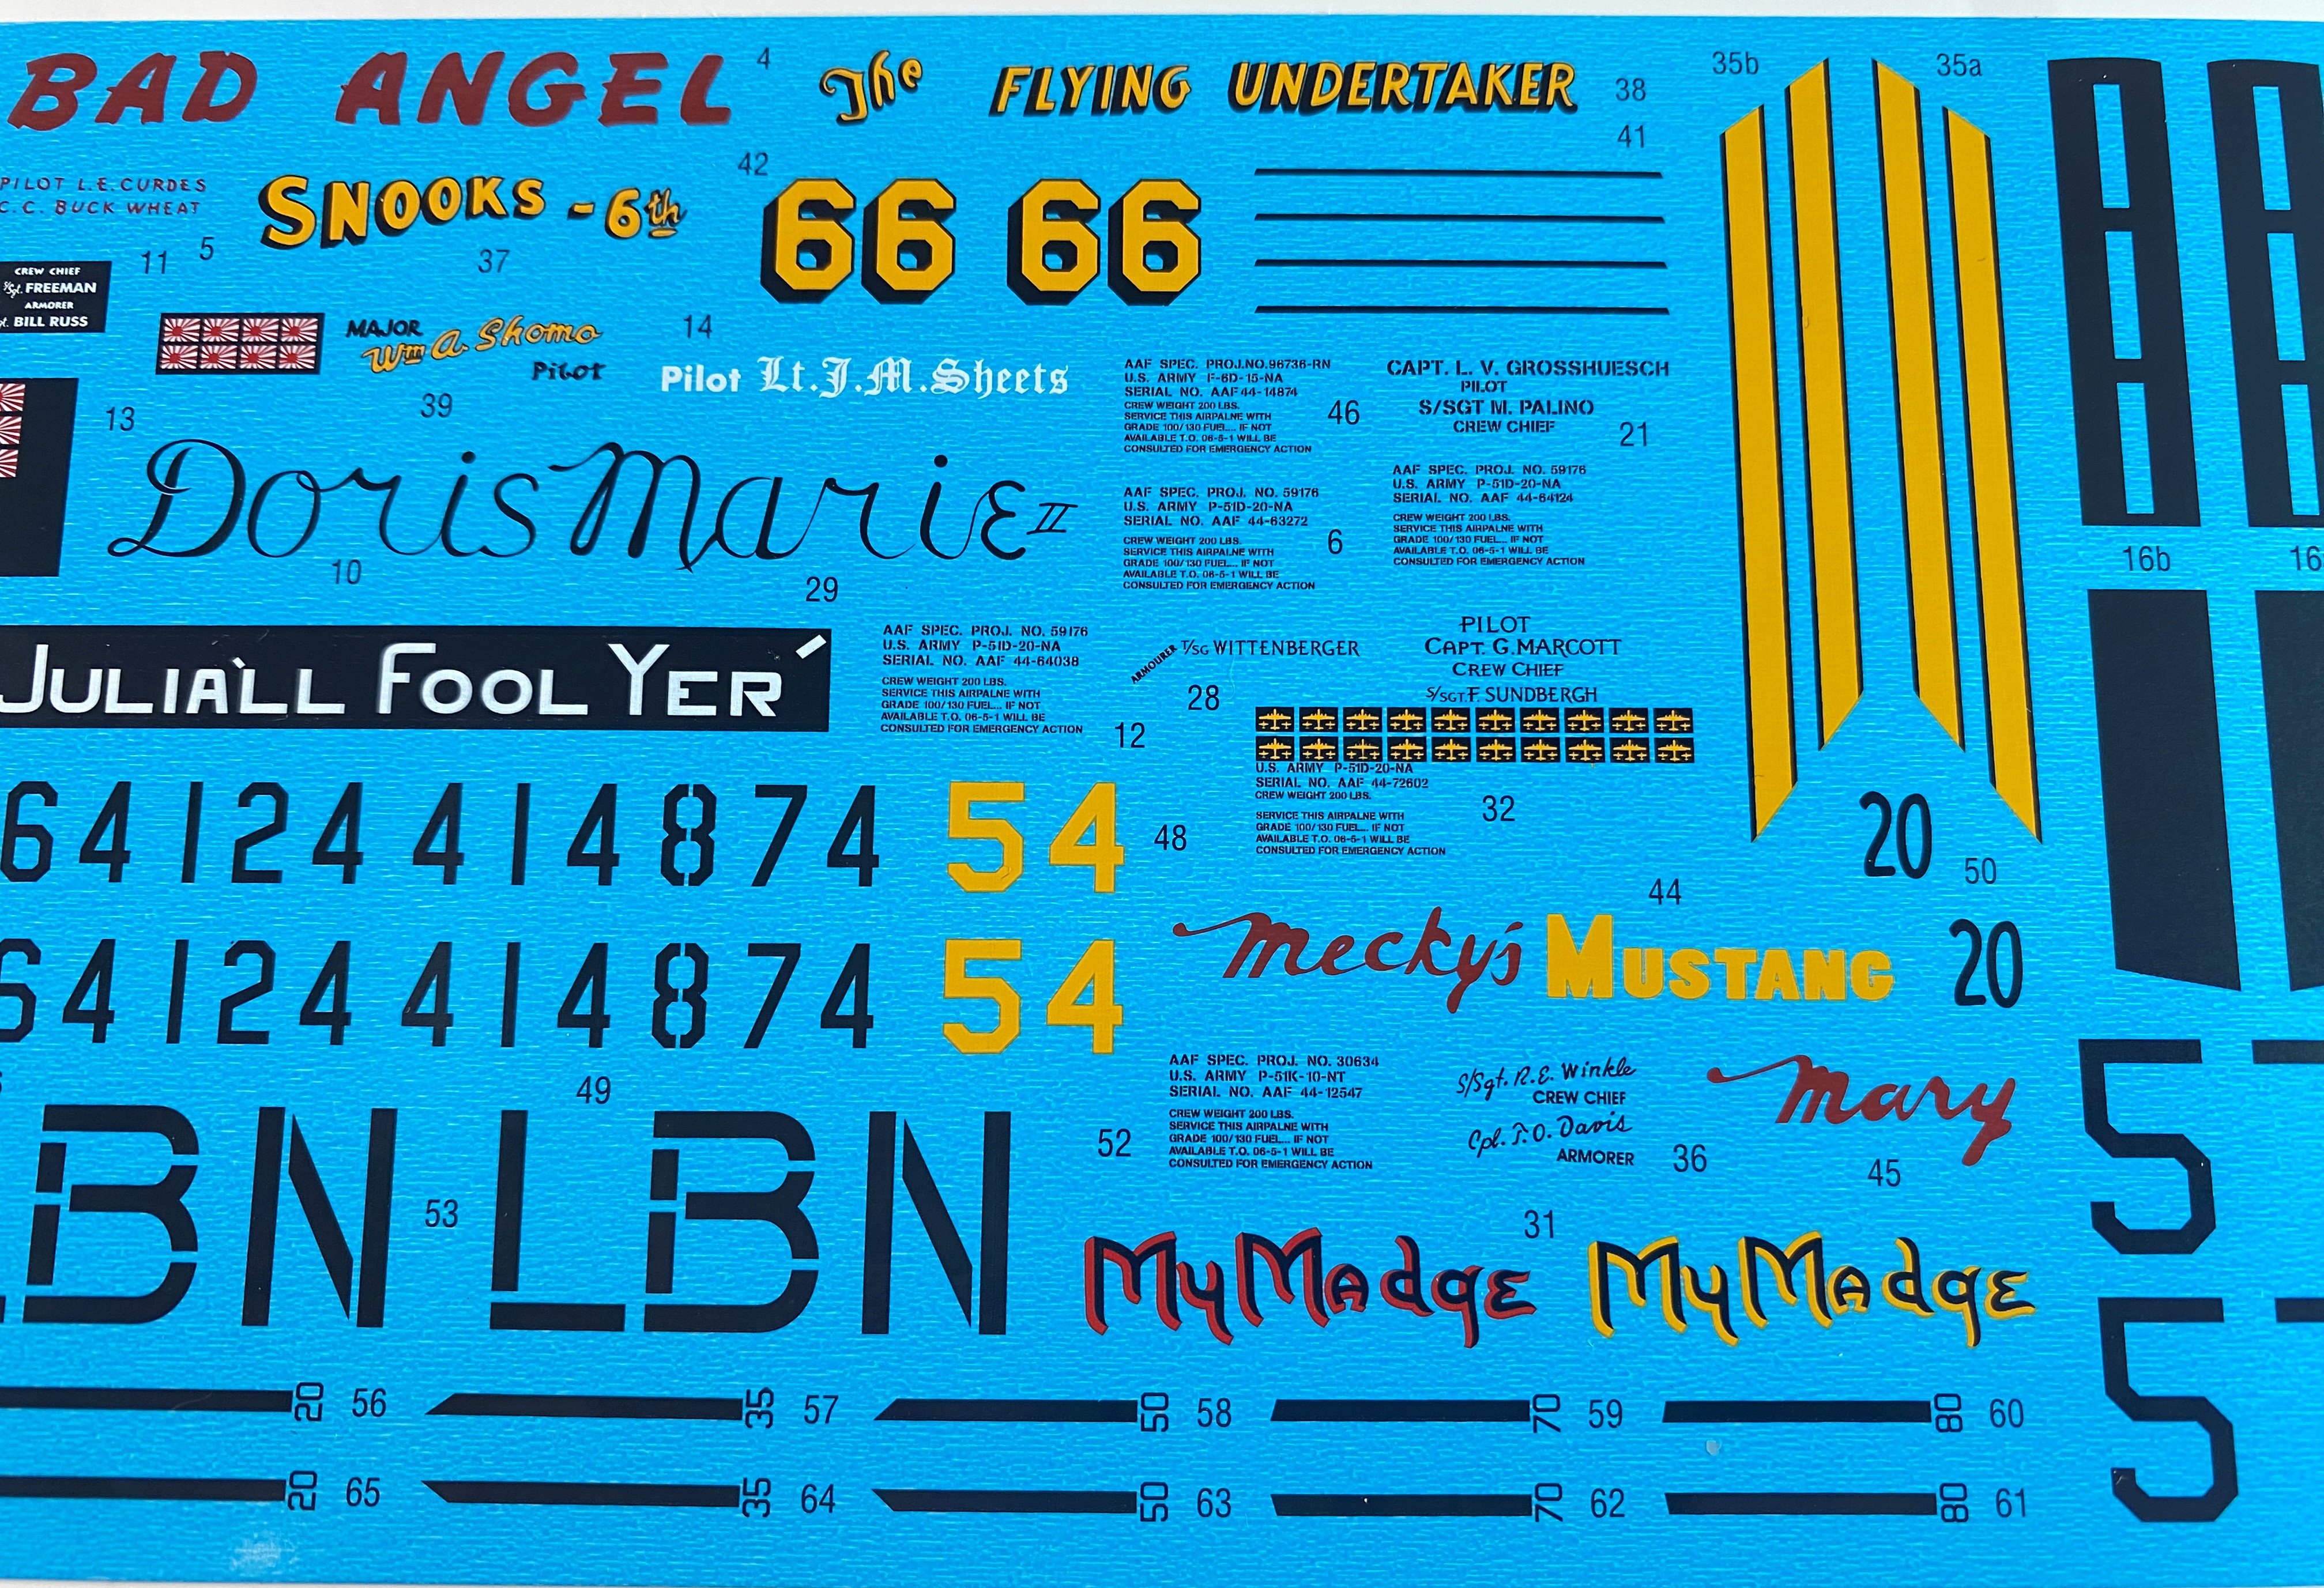
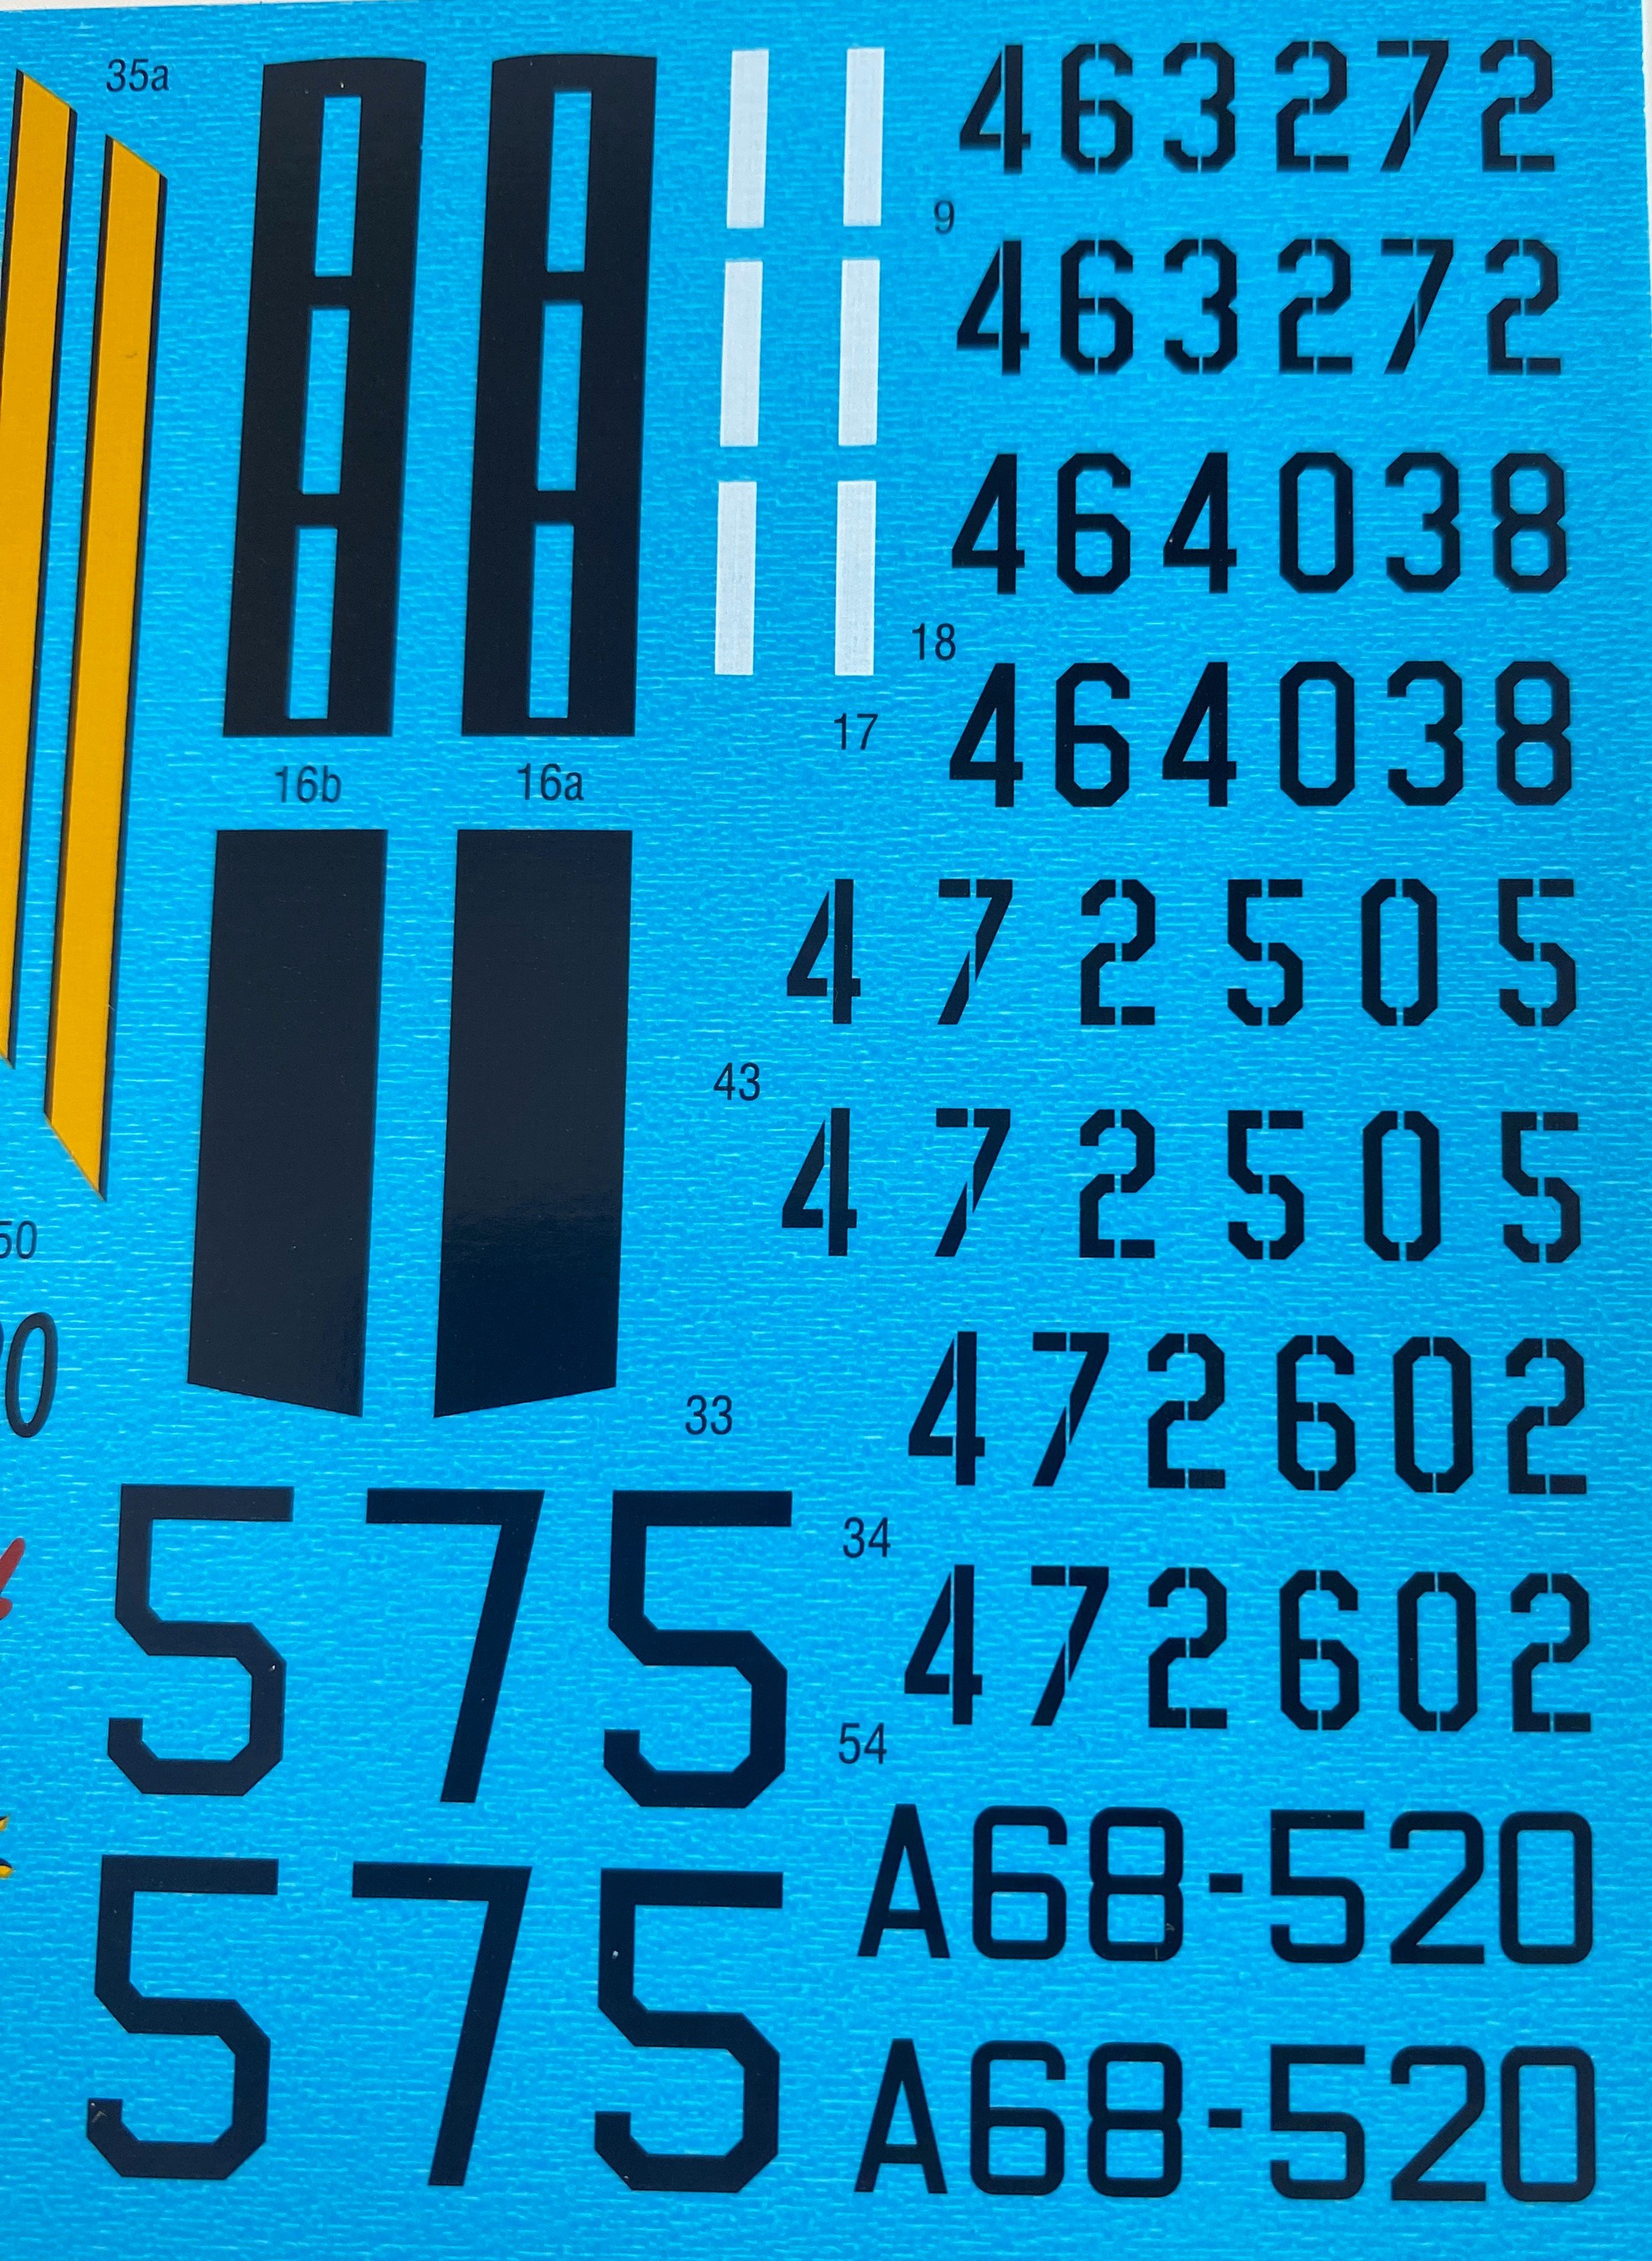
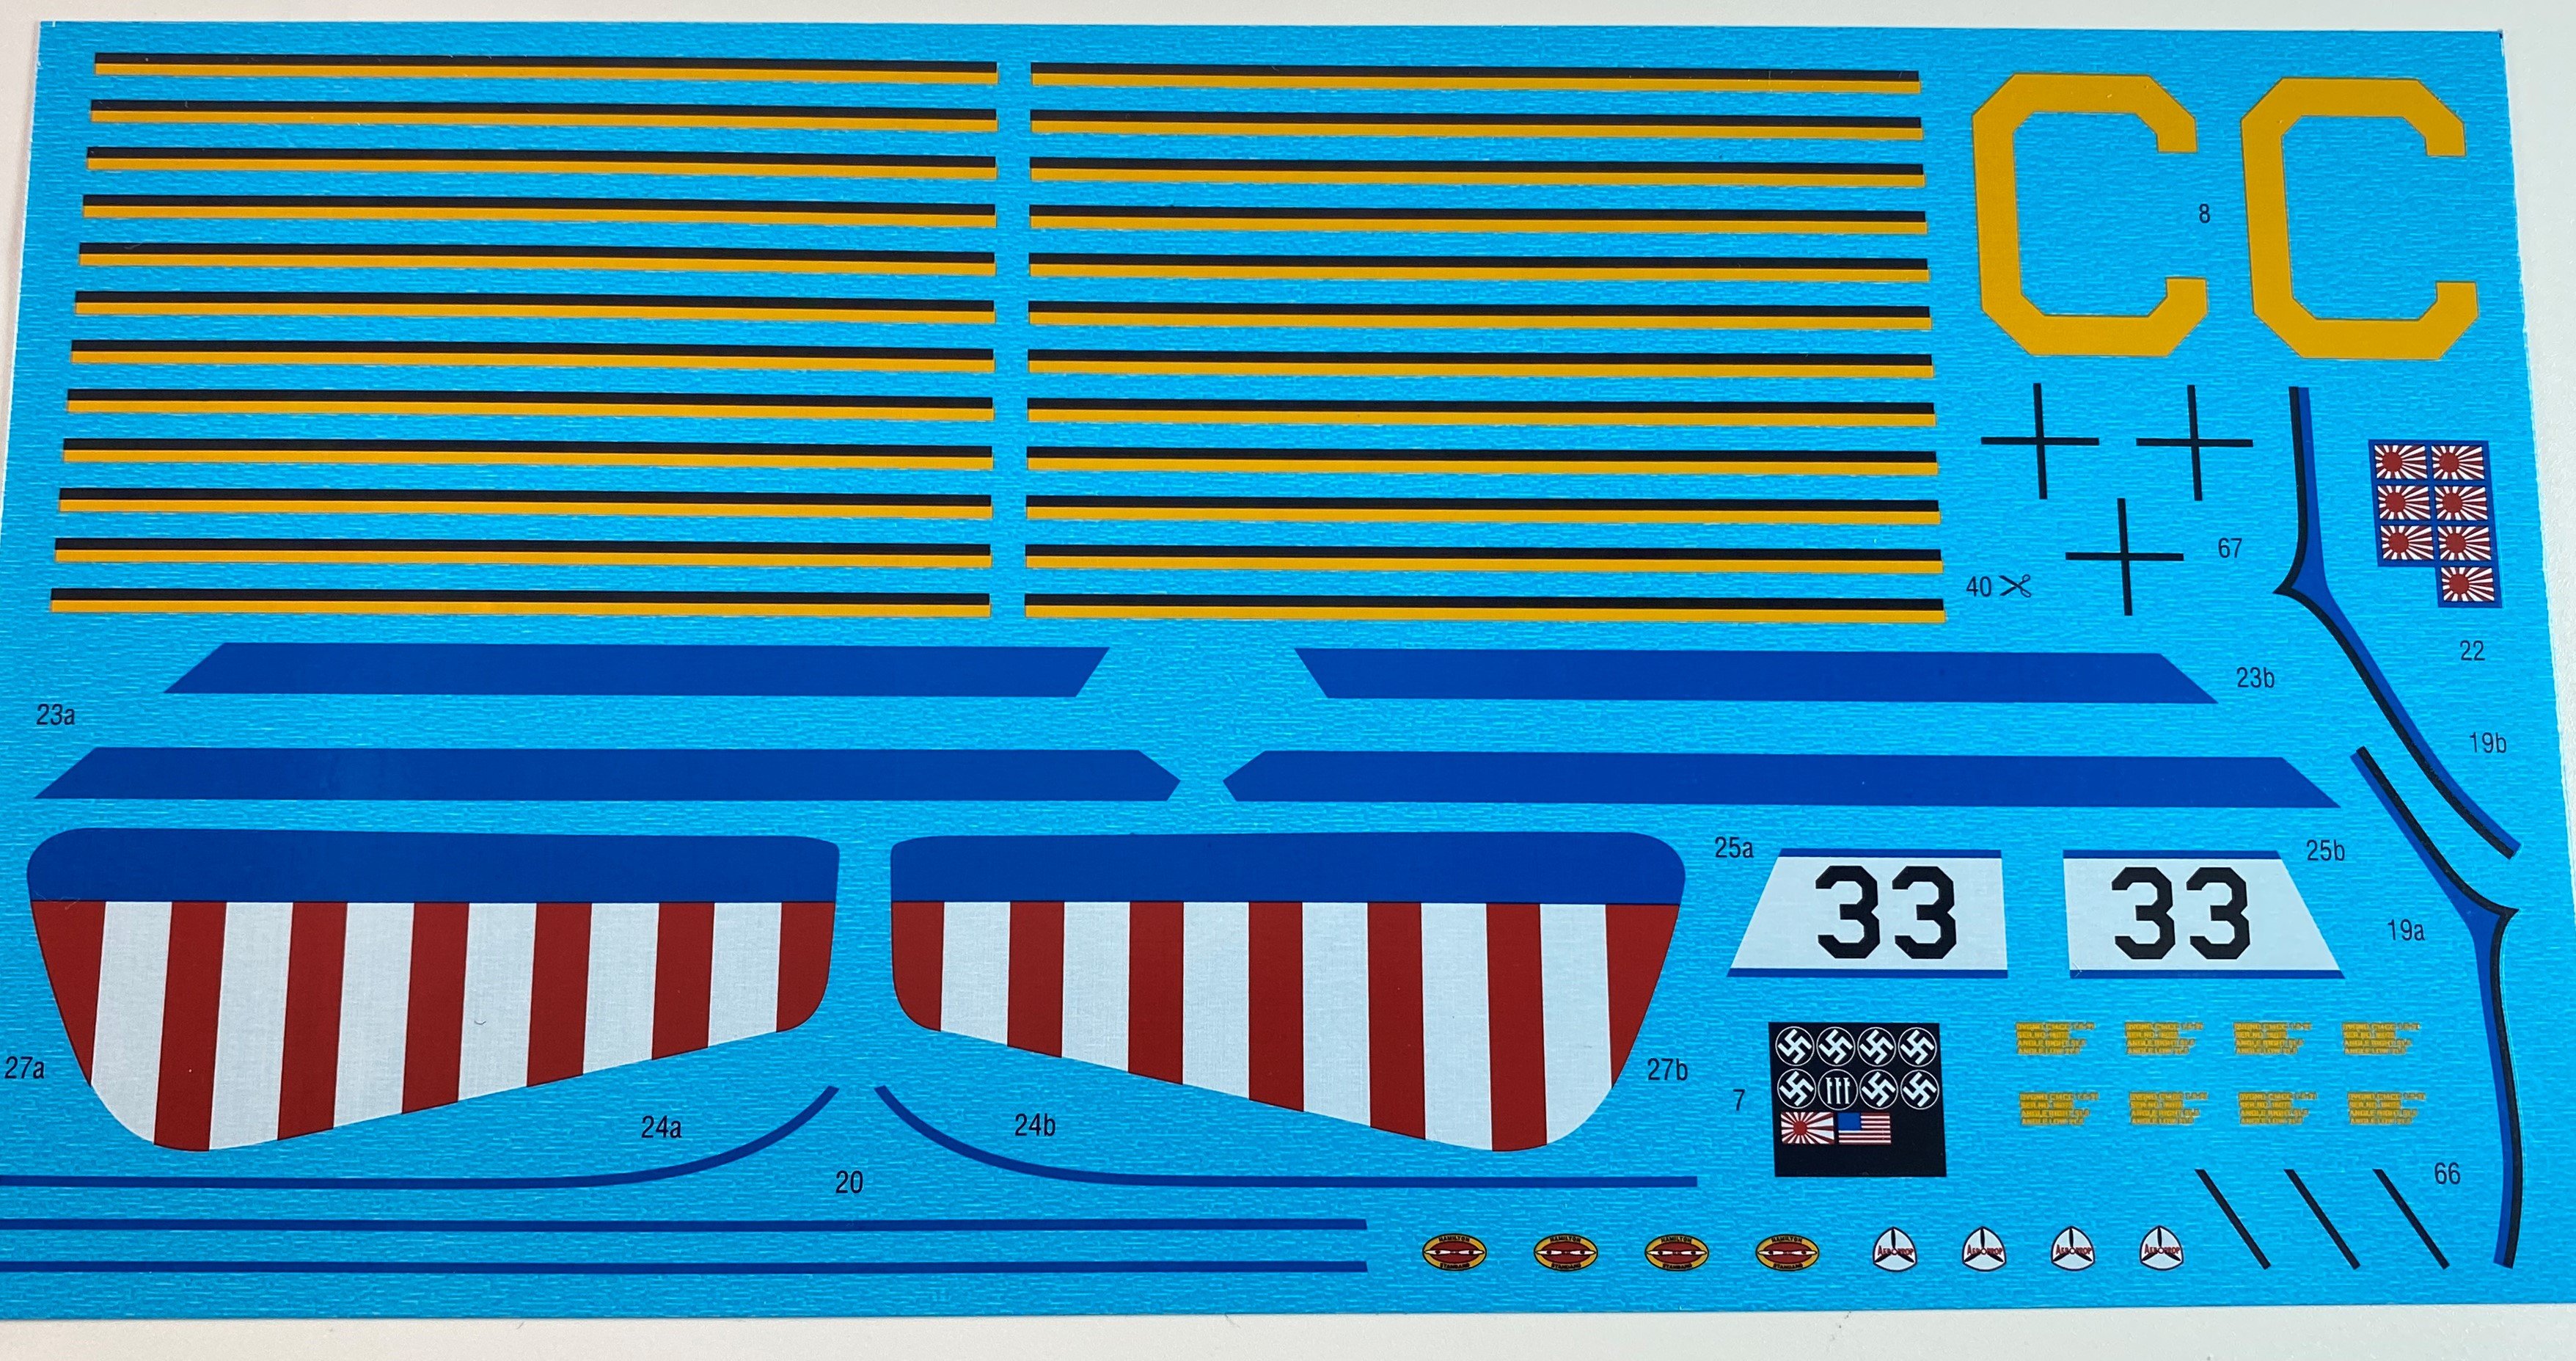
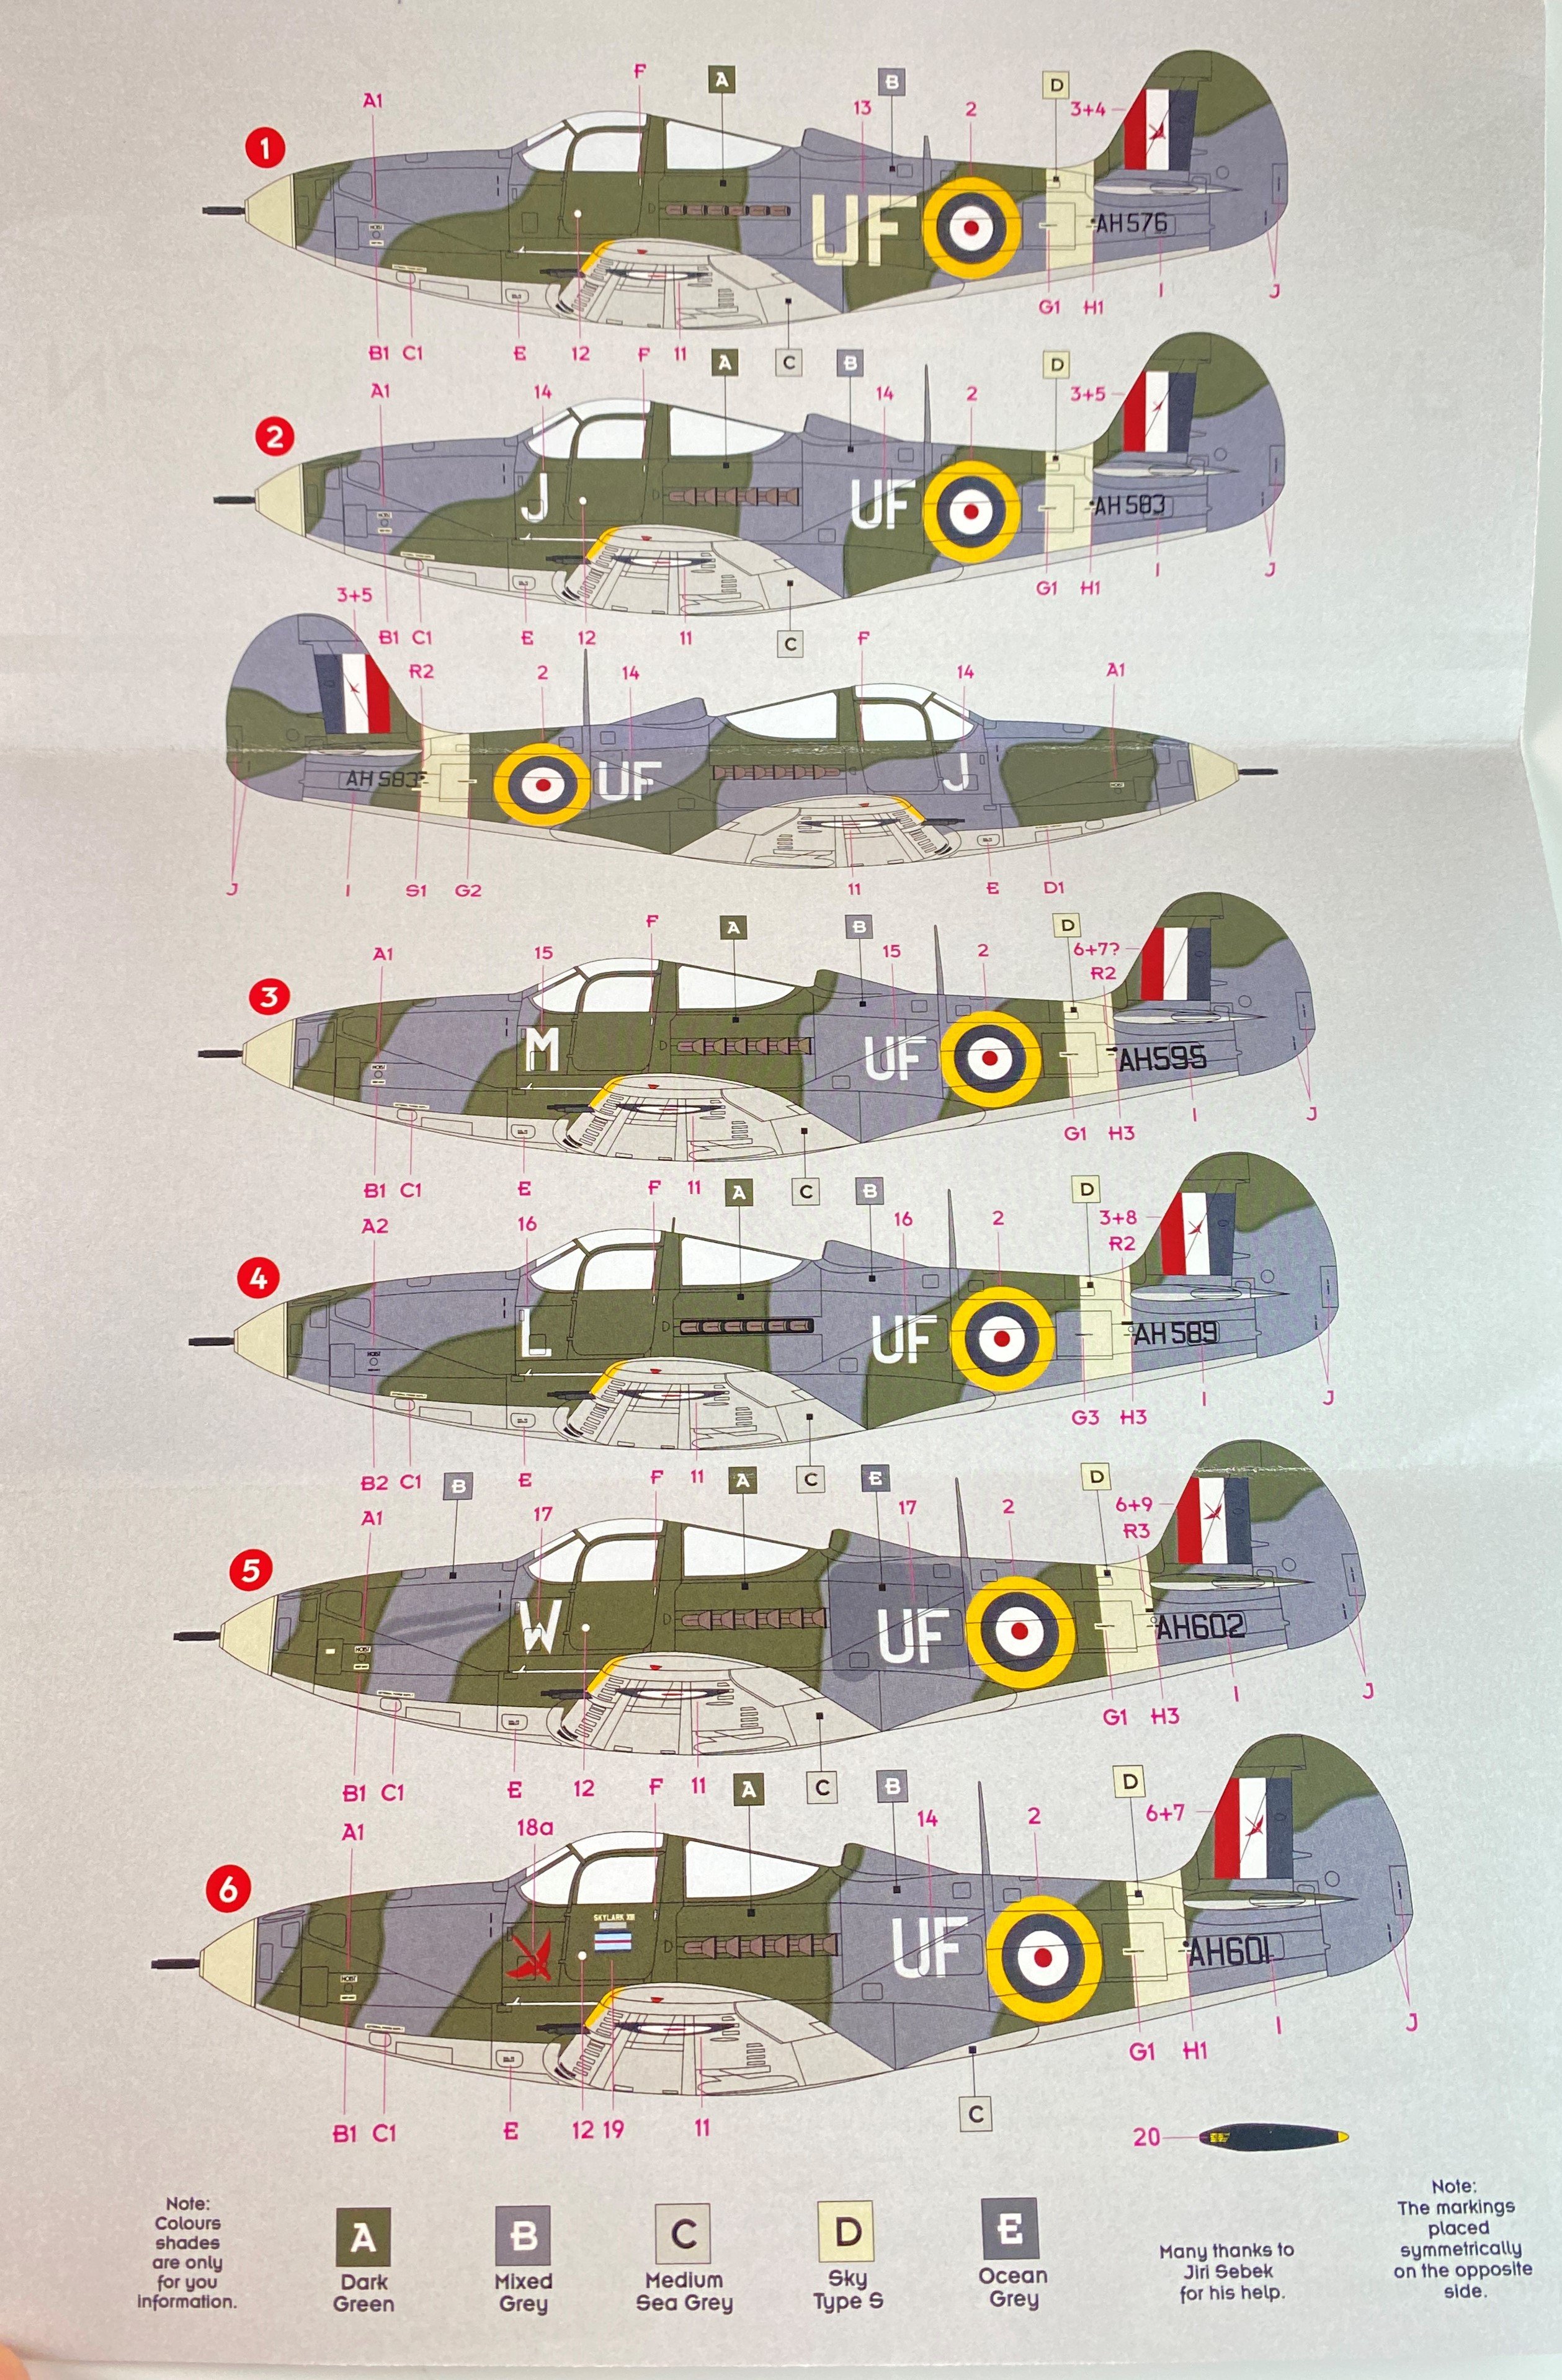
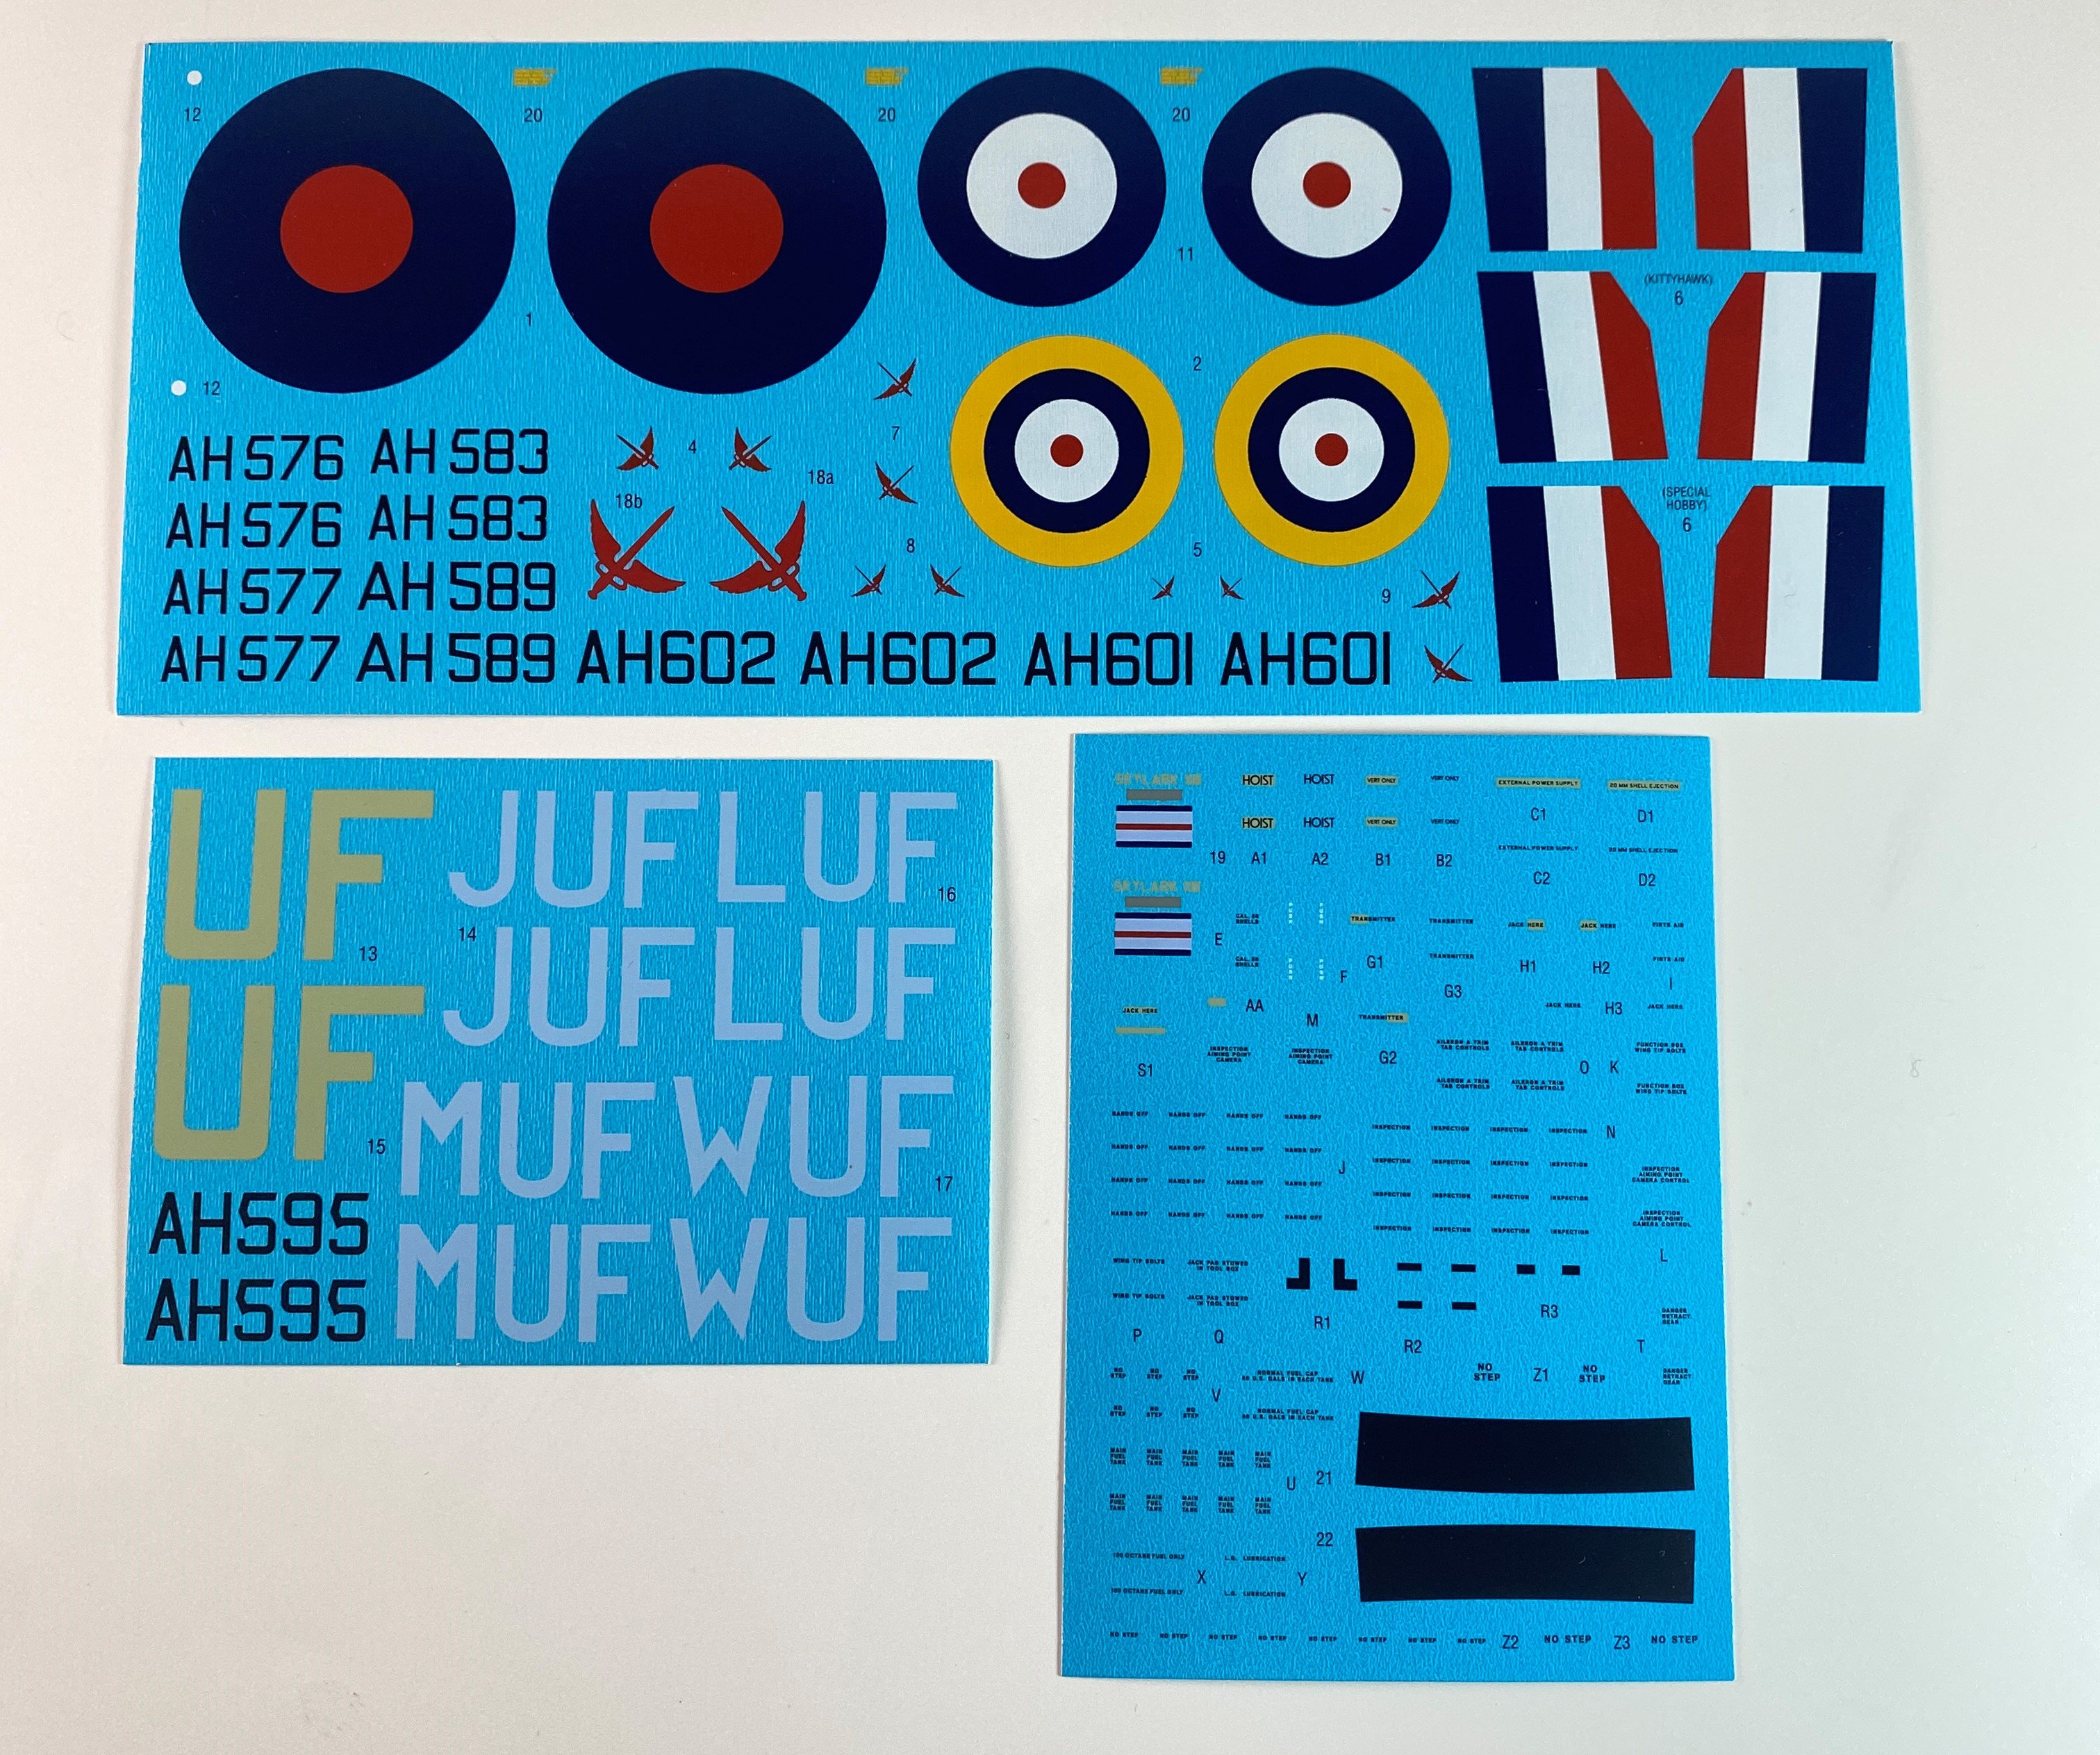
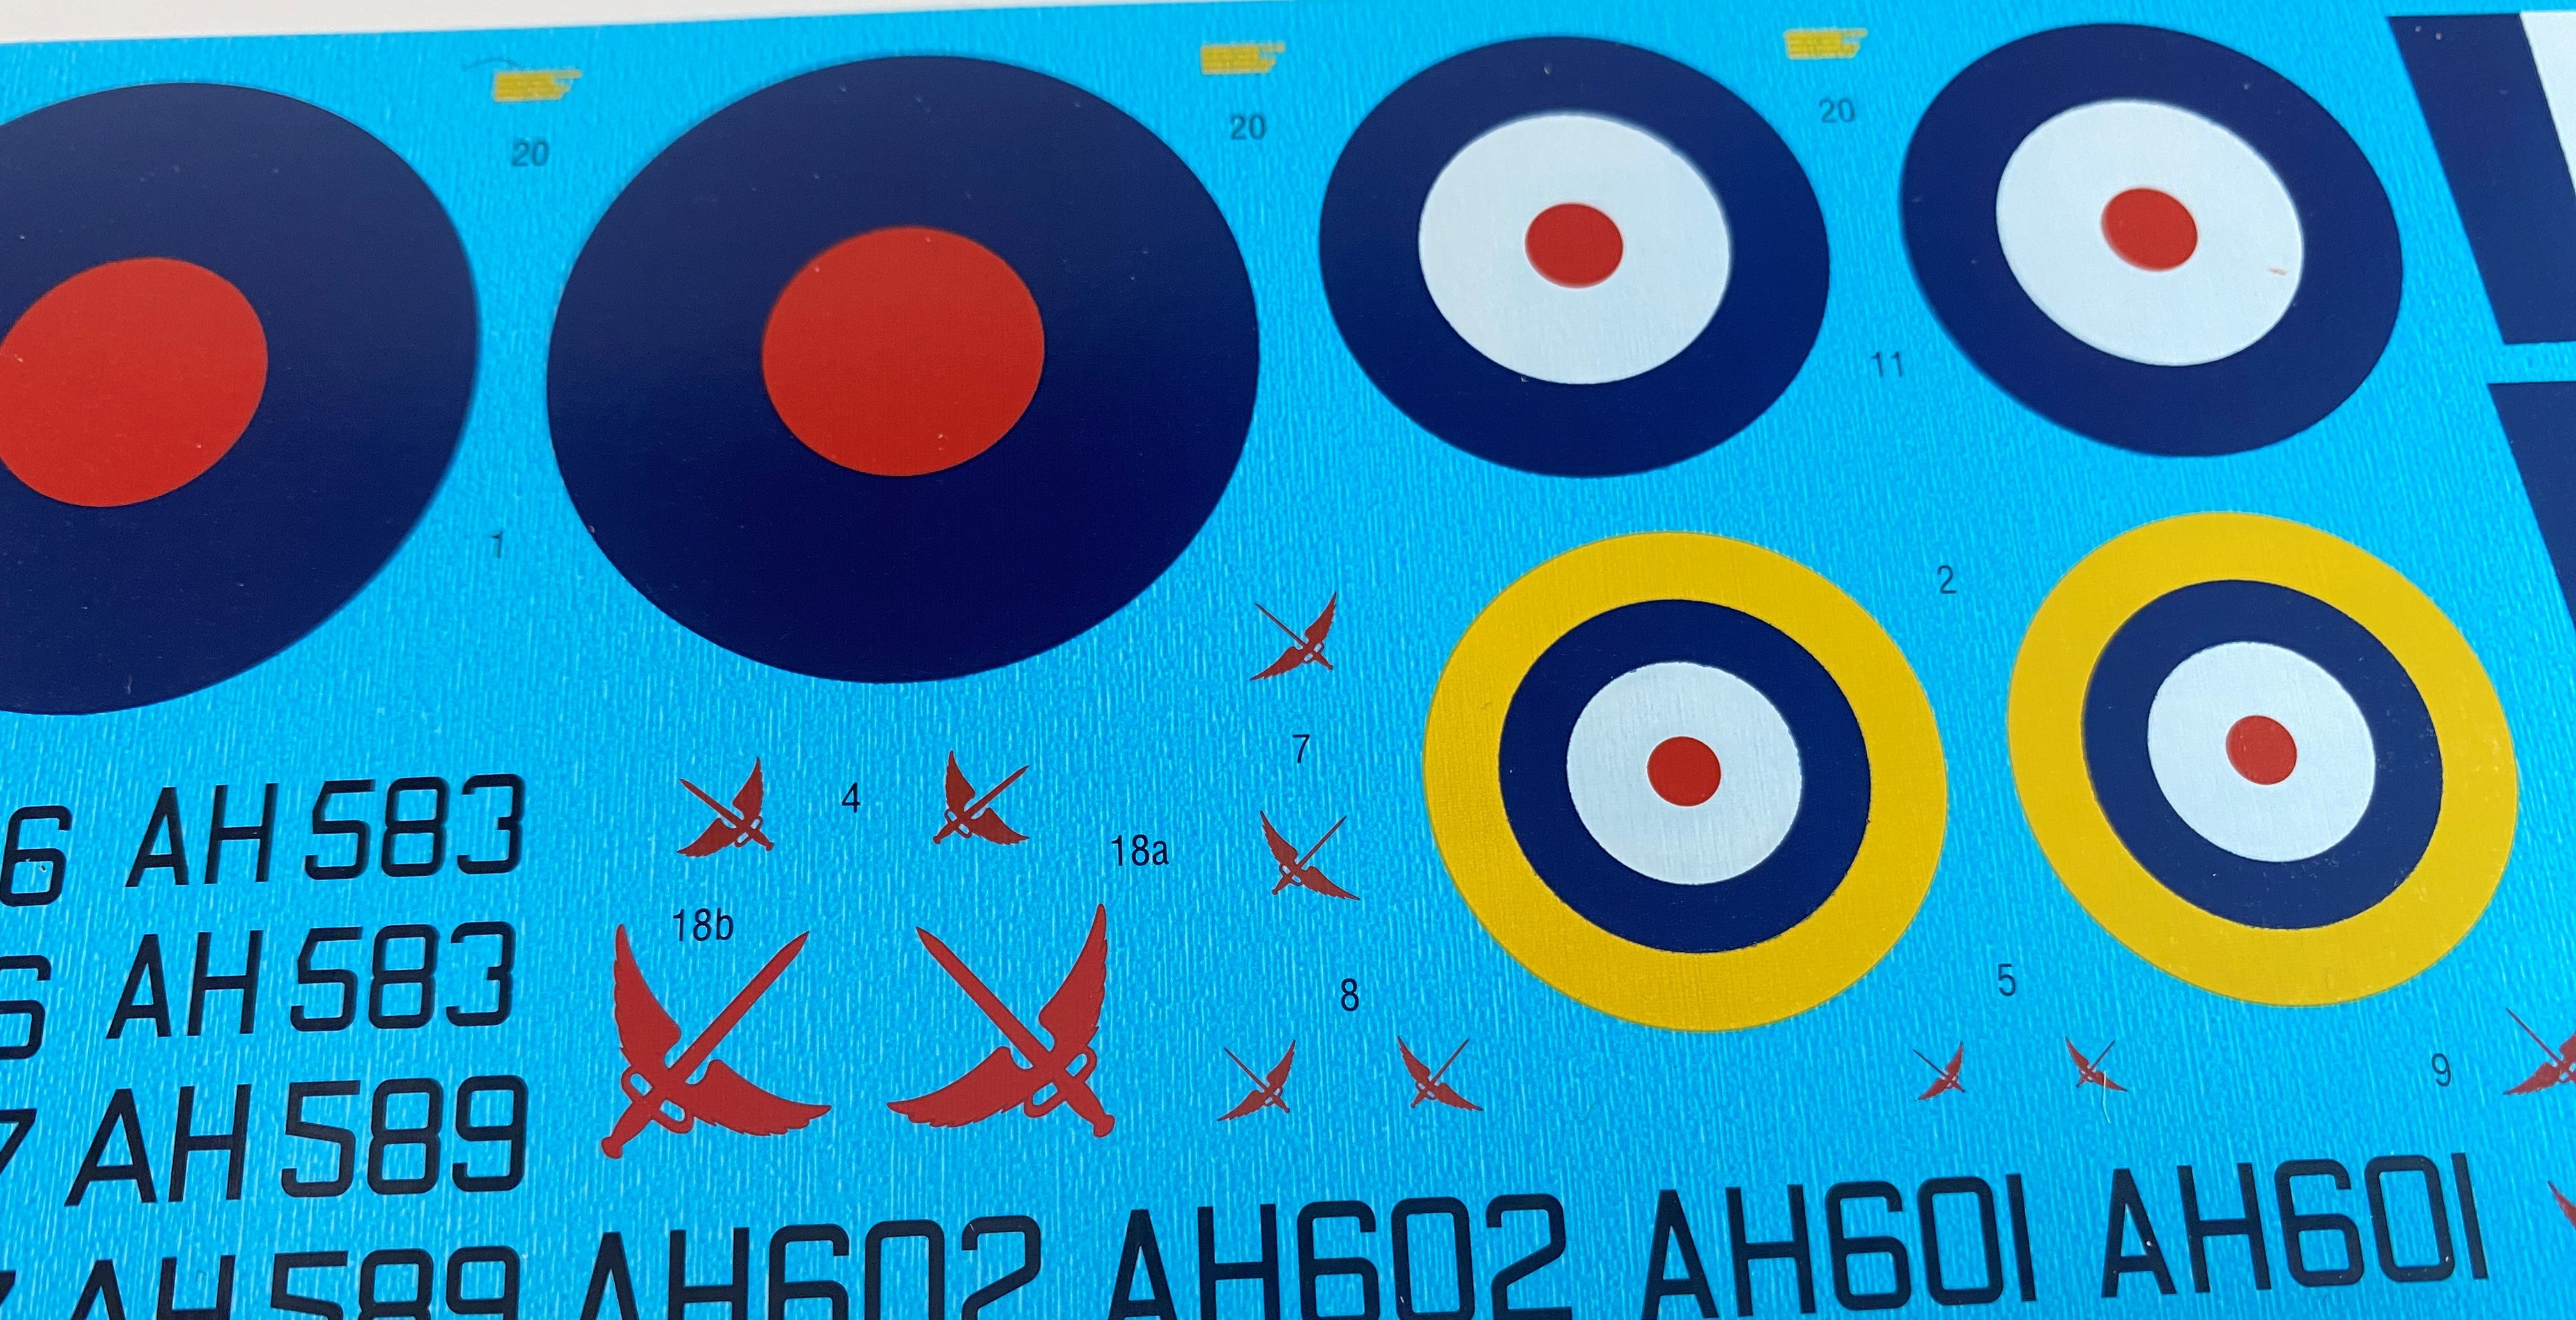
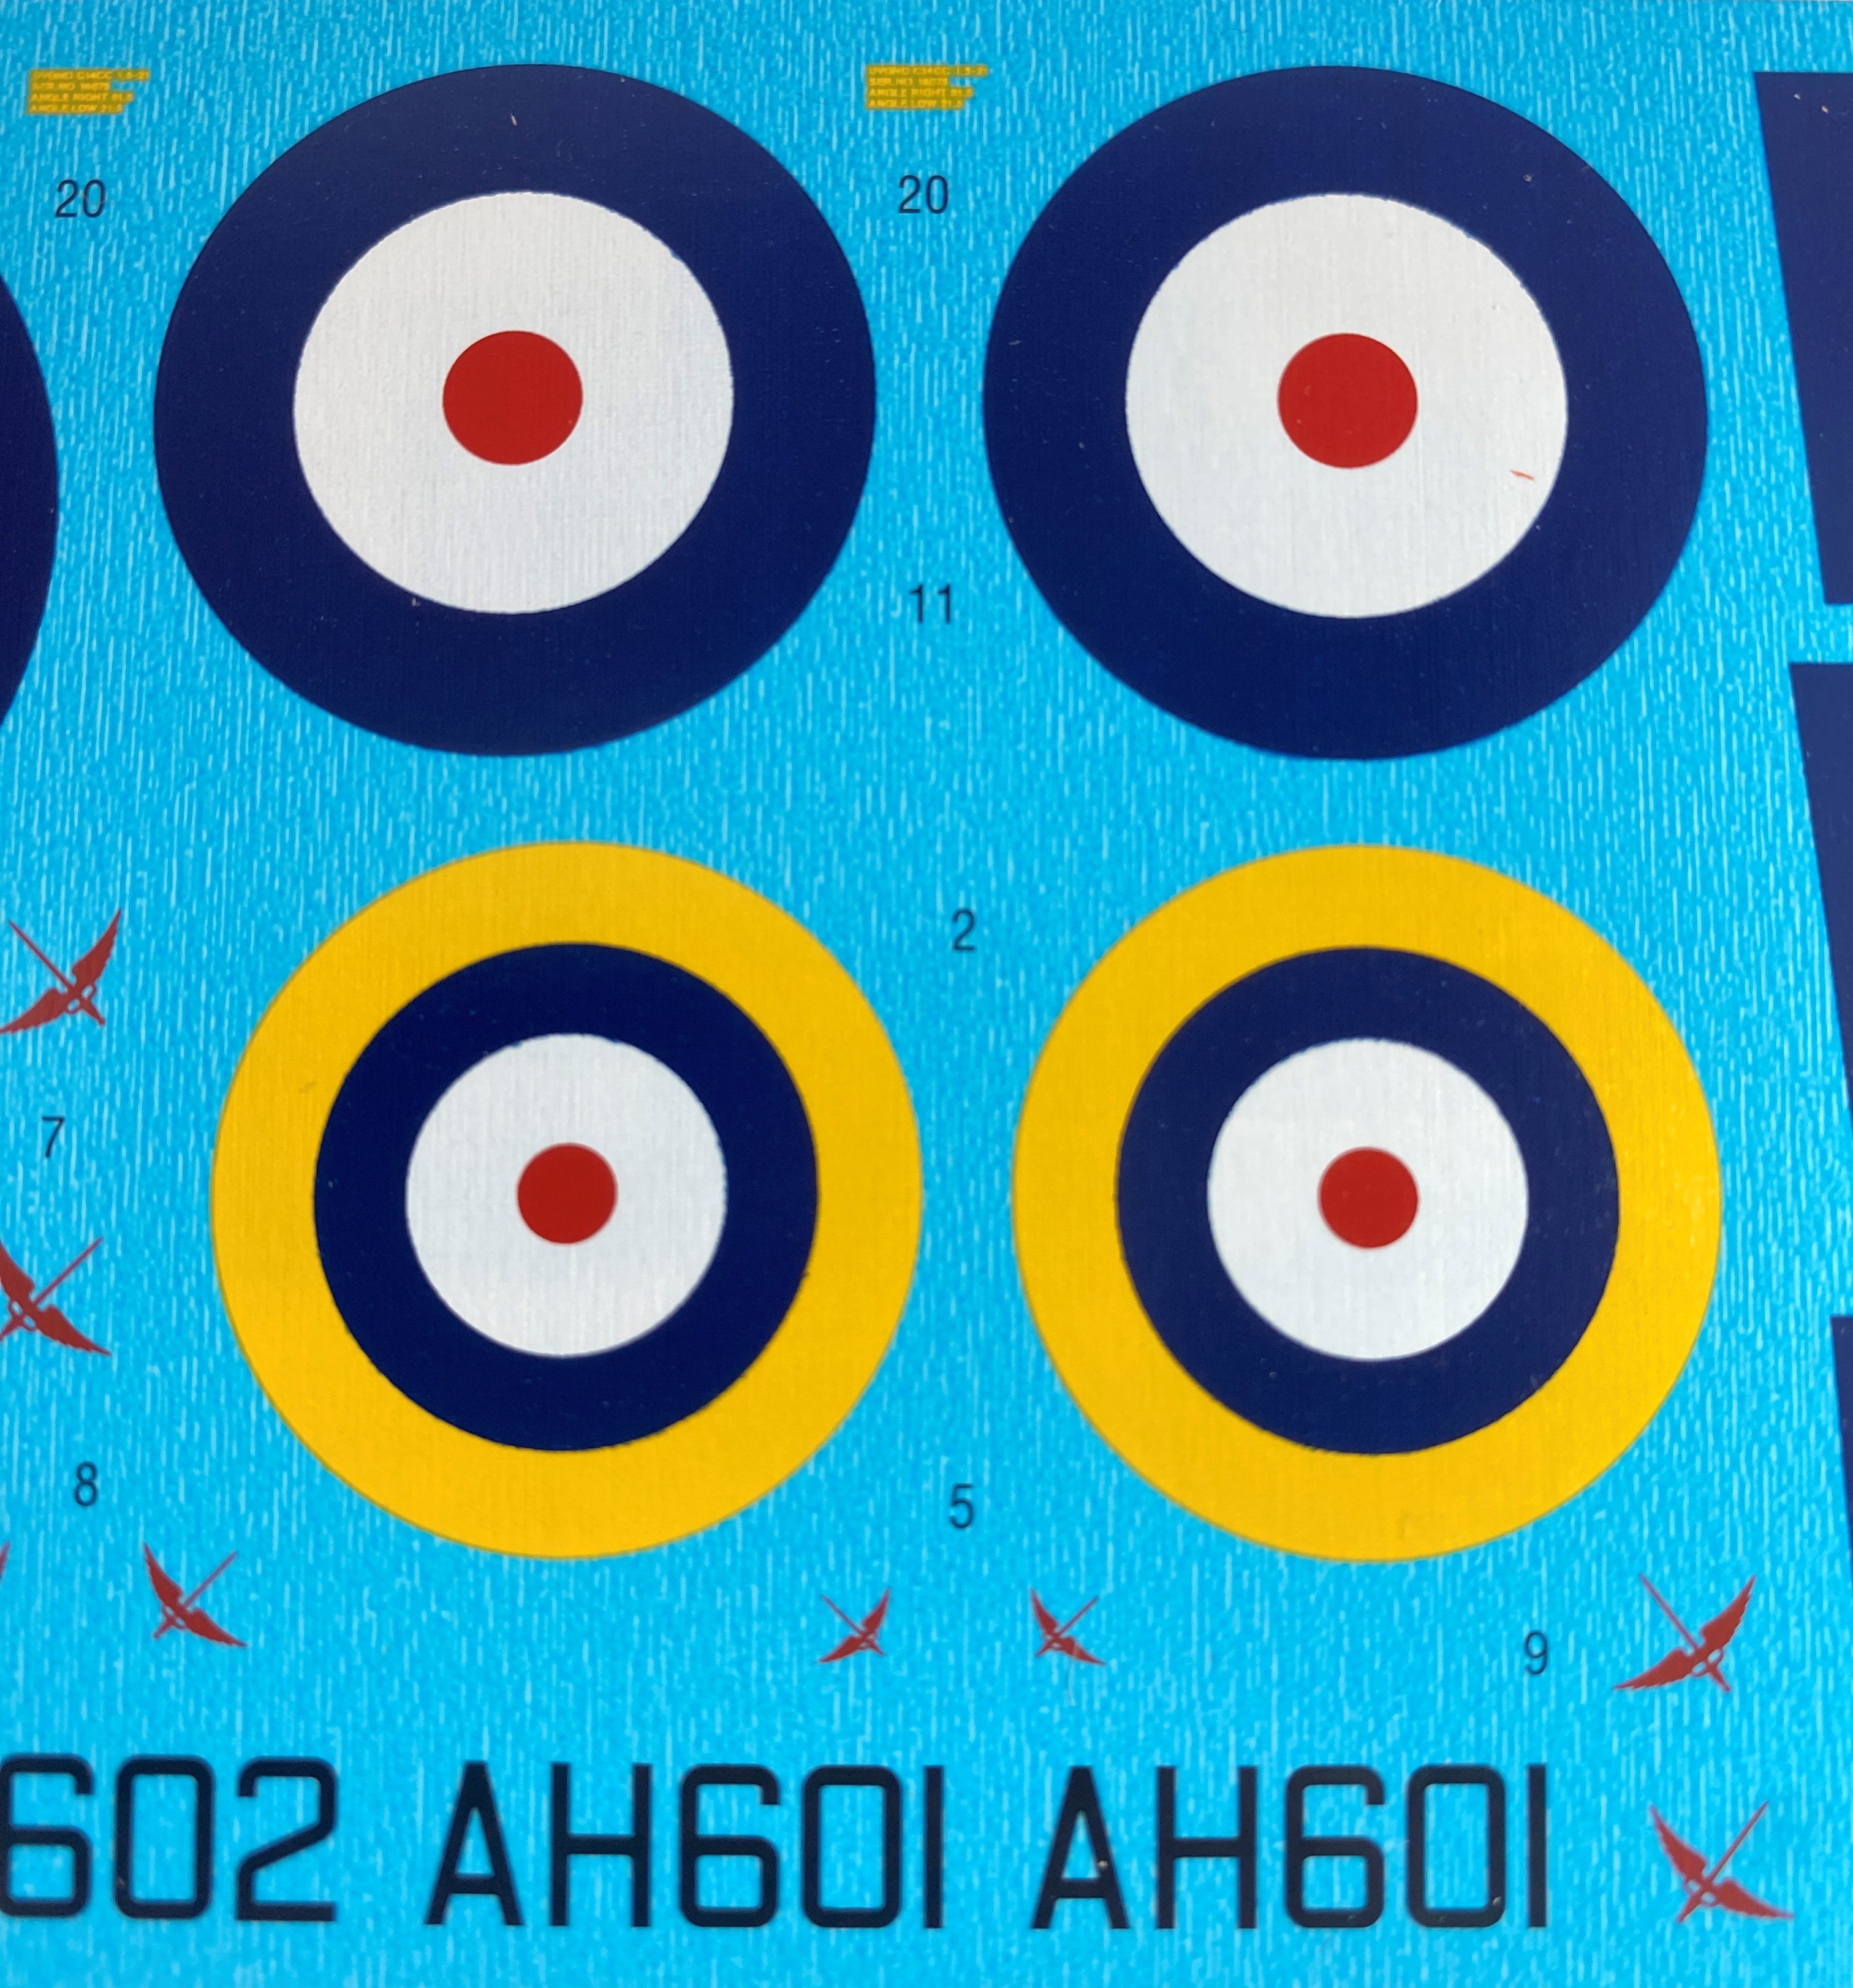
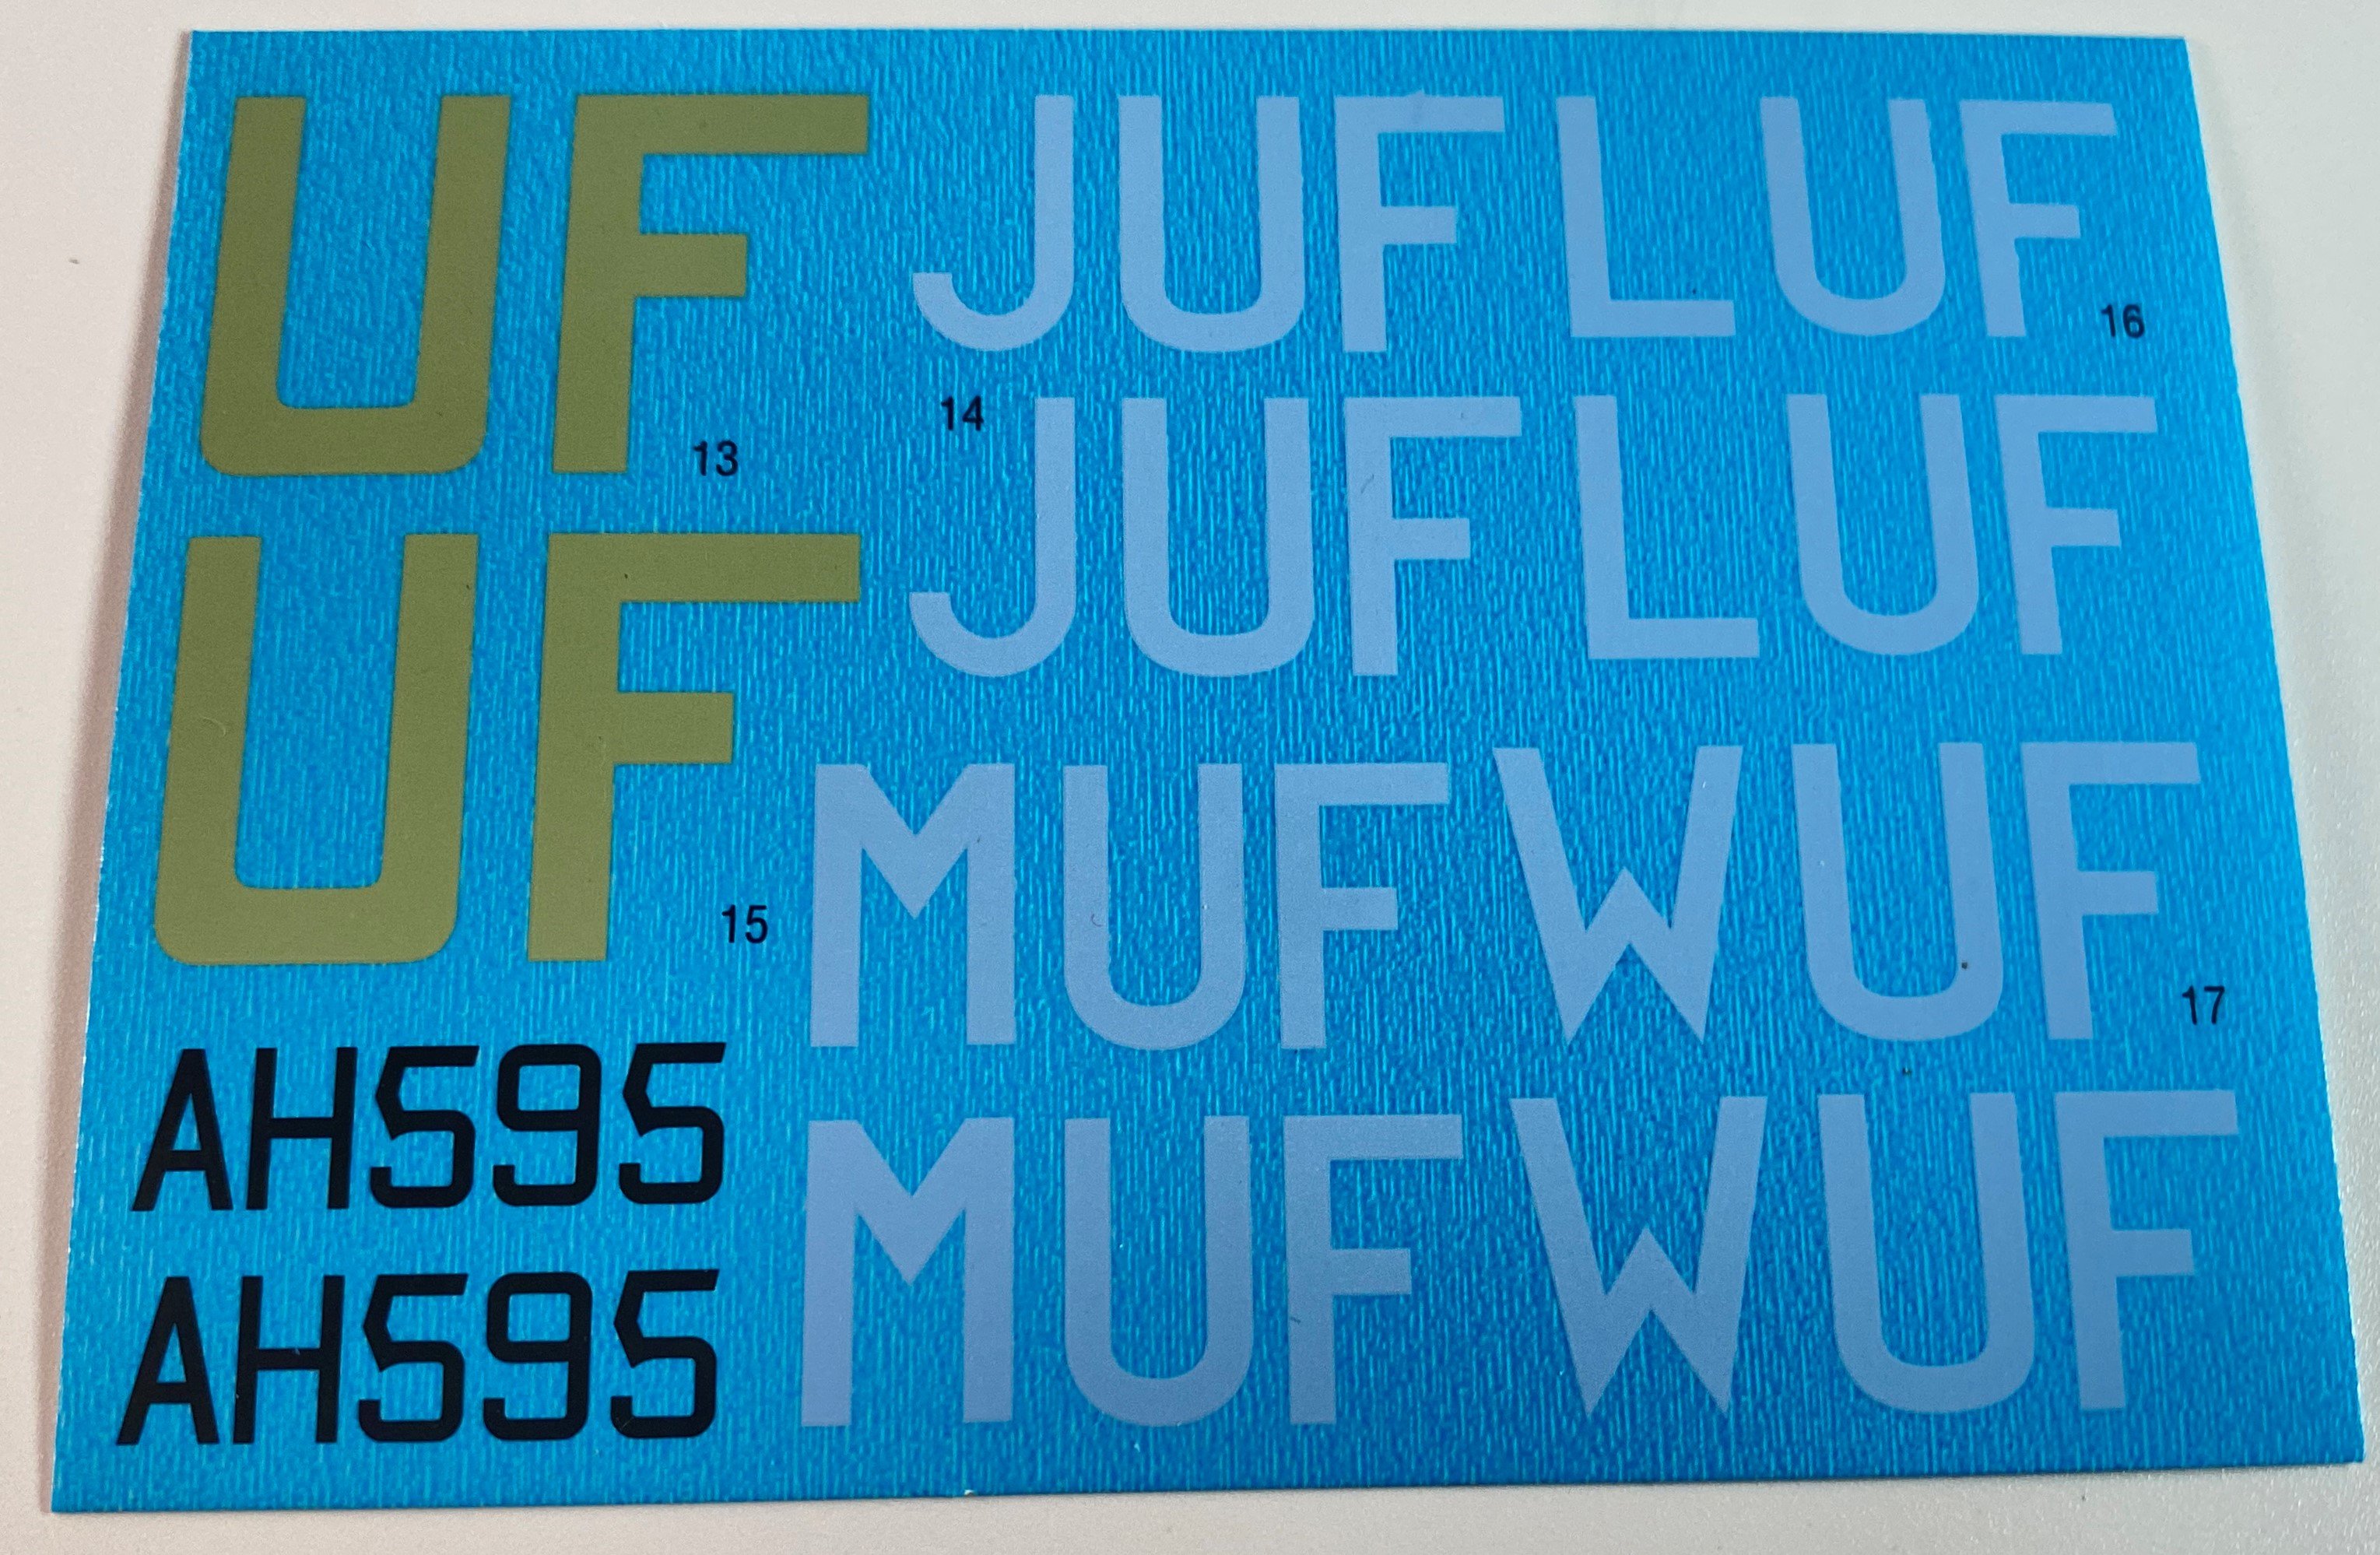
1:32 DK Decals Several Sheets B-24, B-17, P-51 and Airacobra I was very lucky in review the 1:32 A-20G decal sheet from DK decals (you can check it here) DK decals is a decal company with quite some reputation and many sheets already release and several ones coming in 2023. Here, we will see four sheets. All sets came in a ziplog bag, small A5 size sheet with profile and color guide. Starting with the Airacobra, this set is about the Airacobra in service in the 601 Sqn (County of London) of the Royal Air Force and Czechoslovak pilots. So, inside there are 3 sheets, one with insignias, other with letters and other small one with a full set of stencils. It given six options: 1. Airacobra Mk. I AH576, 601 Sqn, Sgt. F. Mares, airbase Duxford, Autumn 1941; 2. Airacobra Mk. I AH583, 601 Sqn, F/Lt J. Himr, airbase Manston, Autumn 1941 3. Airacobra Mk. I AH595, 601 Sqn, F/O . Manak, airbase Manston, Autmn 1941 4. Airacobra Mk. I AH589, 601 Sqn, Sgt. J. Kohout airbse Acaster Malbis, Autumn 1941; 5. Airacobra Mk. I AH602, 601 Sqn, F/Lt J. Himr, airbase Acaster Malbis, Autumn 1941; 6. Airacobra Mk. I AH601, 601 Sqn, S/L E.J. Grace, airbase Duxford, Autumn 1941 Passing to the P-51 D/K Mustang. This set is for 1:32 P-51 with 7 schemes in service over the Pacific and Australia. Inside, you get 6 (yes SIX) decals sheets, one small wit the nose art, other with RAAF insignia, another with USAF insignia and the first large on with all the letters and names and reference numbers and the second large one with tail stripes (white and red), bars, and some stencils. The schemes options are: 1. P-51 D Mustang 44-63272 (Lt. L.E: Curdes, 4th FS, 3rd ACG Philippines, 1945 2. P-51 D Mustang 44-64038 (Lt. T. Sheets, 460th FS, 348th FG le Shim 1945 3. P-51 D Mustang 44-64124 (Capt. L. V. Grosshuesh, 38th FS, 35th FG Okinawa, 1945 4. P-51 D Mustang 44-72602 (Capt. G. Marcott, 458th FS, 506th FG Iwo Jima 1945 5. P-51 D Mustang 44-72502, Maj. W. Shomo, 82nd TRS, 71st TRG, Philippines, 1945 6. F-6D Mustang, 44-14874 (Lt. J.E. Jacoby, 82nd TRS, 71st TRG, Philippines, 1945 7. P-51K Mustang A68-520 (44-12557) n.º 84 Sqn RAAF, Australia 1945. Next, B-24D Liberator This set is for 1:32 B-24 (the only game in town, in injection plastic, is the Hobbyboss one) with 7 schemes in service of 90th Bomb Group “The Jolly Rogers” Inside, you get 4 decals sheets, two big ones with the nose arts, letters and some numbers. Another a little smaller, with the two types of skull (four skulls) and more numbers. The smallest one you got four insignas and white bands. The schemes options are: 1. B-24 D Liberator 41-24047, pilot Maj. P. Gottke, 320th BS 90th BG, New Guinea, 1943. 2. B-24 D Liberator 41-24073 pilot Capt Halverson, 319th BS, 90th BG, New Guinea, 1943 3. B-24 D Liberator 41-23836, pilot Capt E.A. Wood, 321th BS, 90th BG, New Guinea, 1943 4. B-24 D Liberator 41-24074, pilot Lt. J.R. Wilson, 319th BS, 90th BG, New Guinea, 1943 5. B-24 D Liberator 41-23828, pilot Lt. H.L. Chovanec, 321th BS, 90th BG, New Guinea, 1943 6. B-24 D Liberator 41-23849, pilot Lt. Ch. Andrews, 320th BS,90th BG, New Guinea 1943. And, finally, last but not the least, 1:32 Fortress Mk I/III (the mighty B-17) This set is the one with the less sheets, only three. Two big ones with insignia and letters and small one with a nose art. The schemes options are: 1. Fortress Mk. II SR376, 214 Sqn RAF, n.º 100 Group, 1944; 2. Fortress Mk. II SR386, 214 Sqn RAF, n.º 100 Group, 1944; 3. Fortress Mk. III SR223, 214 Sqn RAF, n.º 100 Group, 1944; 4. Fortress Mk. III KJ117, 214 Sqn RAF, n.º 100 Group, 1944; Analyzing the decal sheets, the color registration is great and a very good definition of the details. The decals have a thin film, in fact looking very thin and delicate. These are printed by BOA Agency. The instructions are in fact general and applicable to all decals, it is always important to remember the general principles of decal application. In this case, there is no specific rule for applying these decals. The profiles draws contains lots of information, with side view (both side) and top view with precise decal indication. Conclusion: DK Decals gives modeler some great options in 1:32. I really love the B-24 and the RAF B-17! It´s really unusual schemes but it would look great!! The color densifications and pigment looks quite good and I relay need to try one of these in some future work. The guidelines given about decal location are very good. My thanks to DK Decals for producing these fantastic decals and the possibility of reviewed them. Francisco Guedes


-
Sincere condolences Ron. Terrible news, so sorry.
-
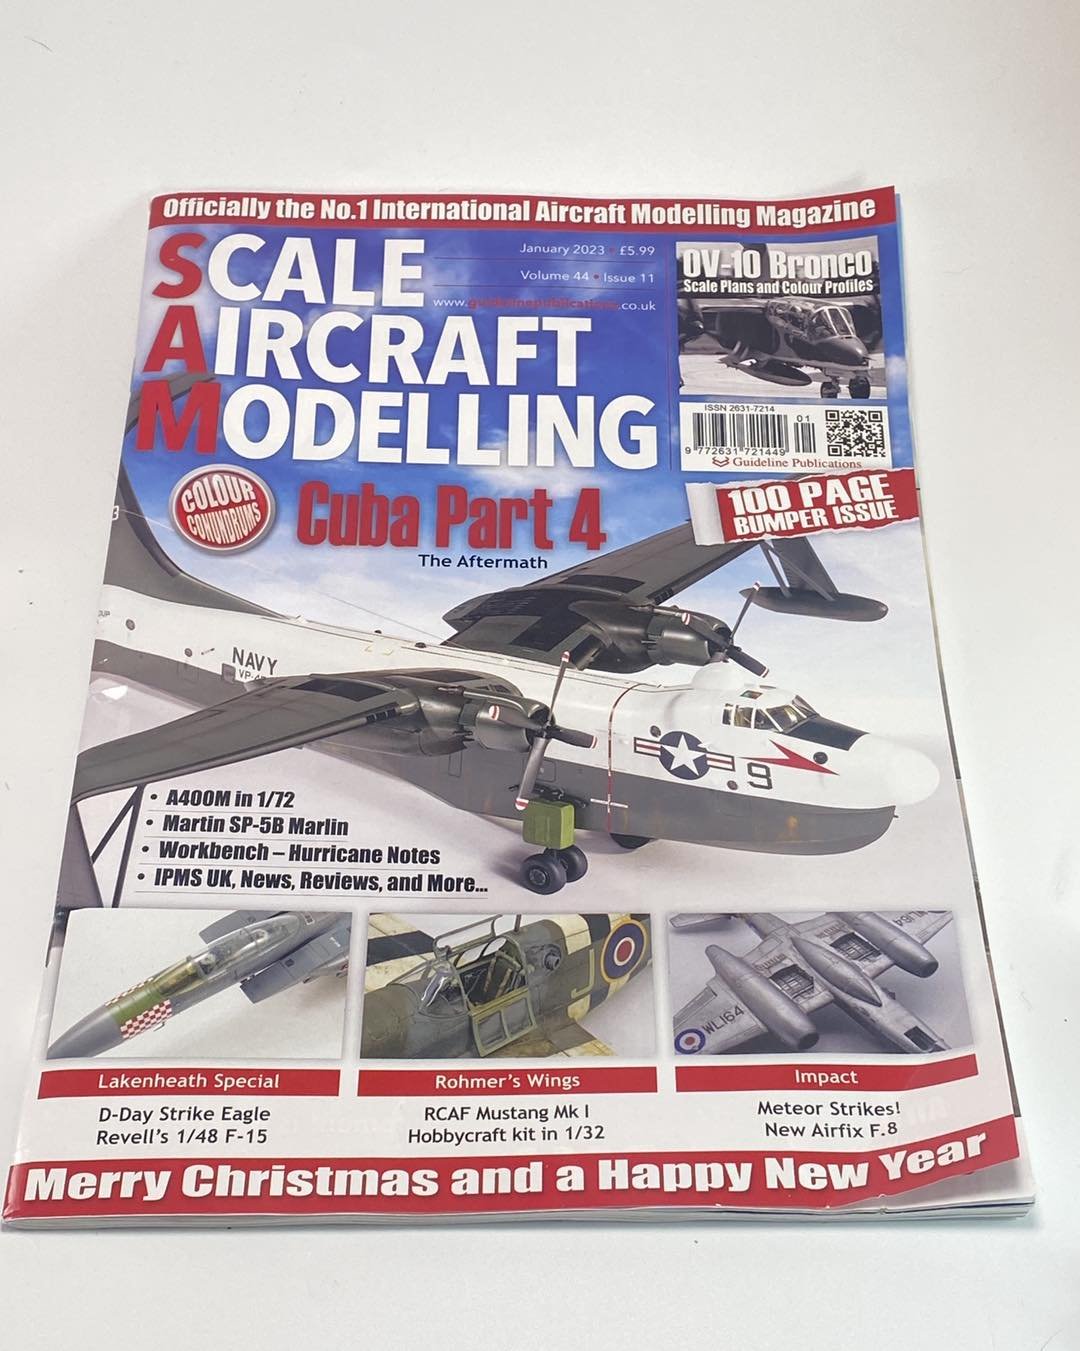
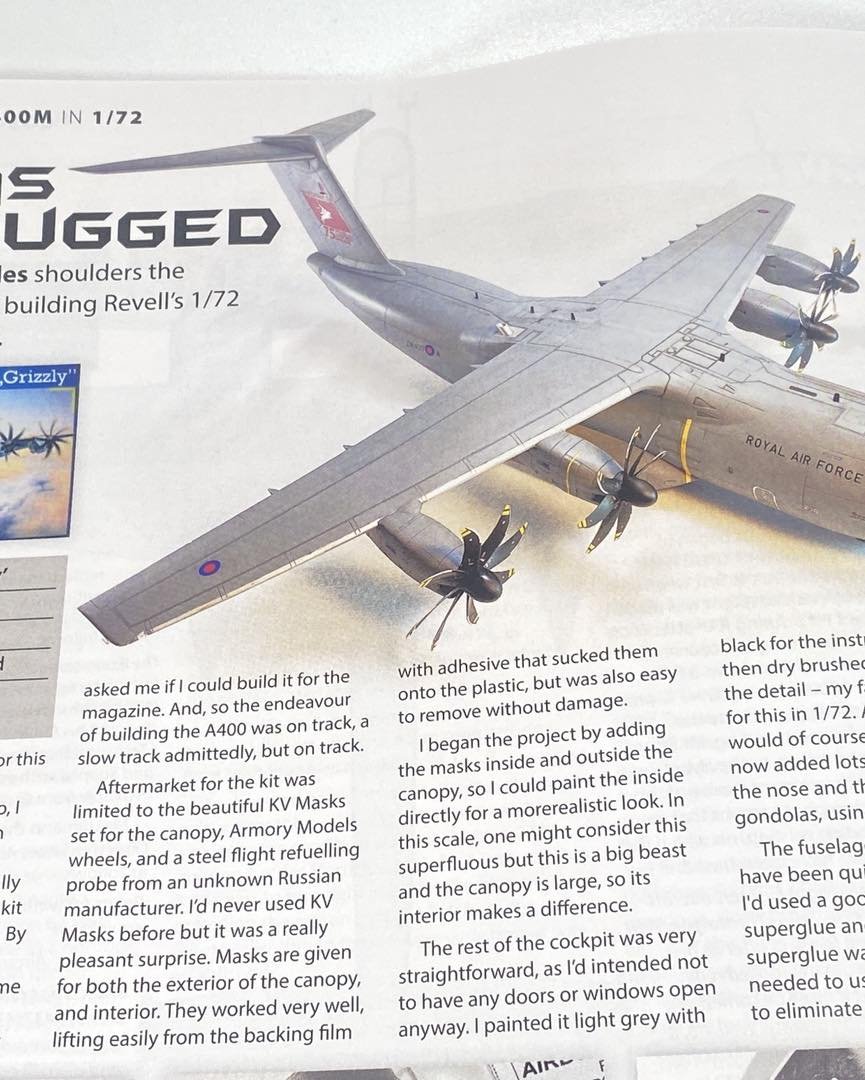
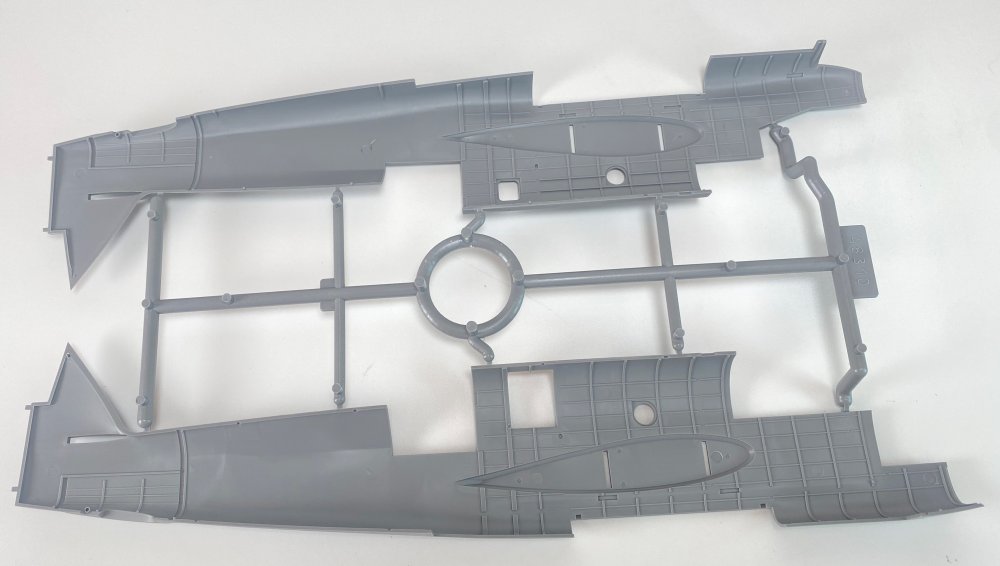
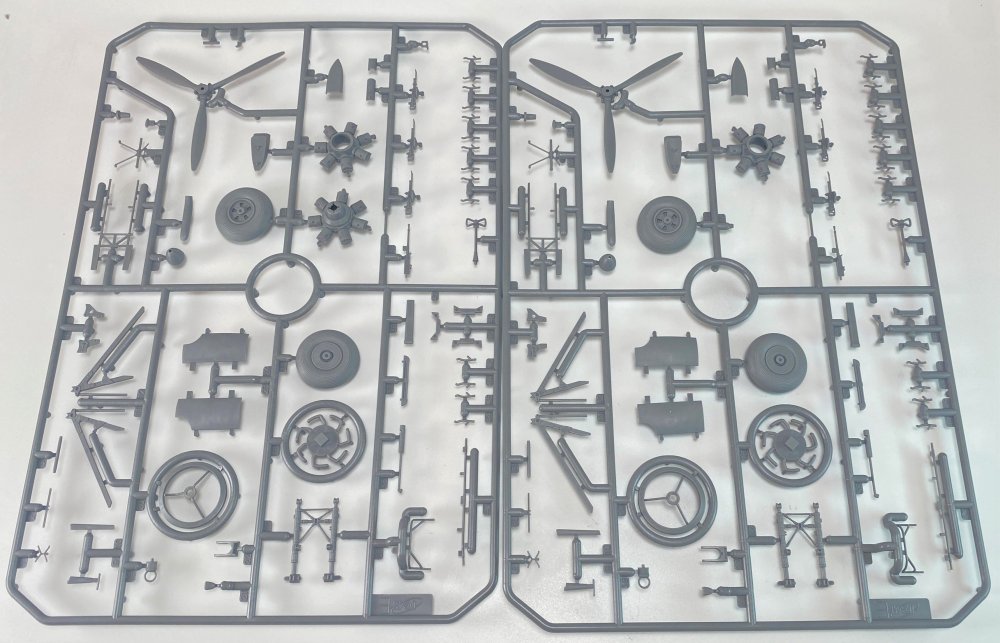
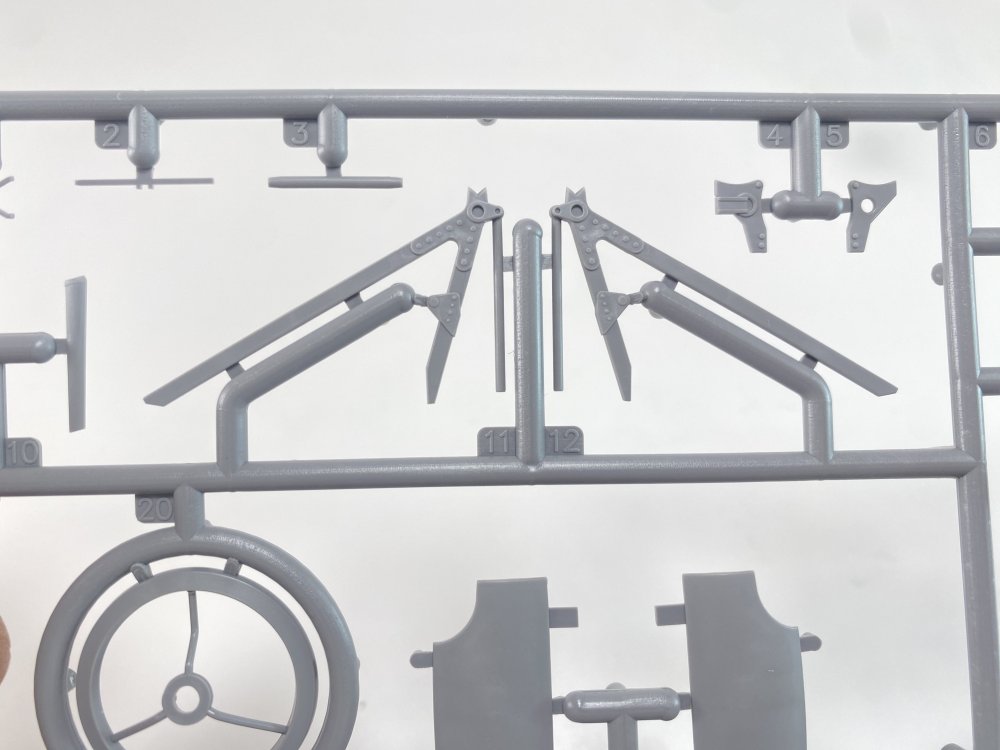
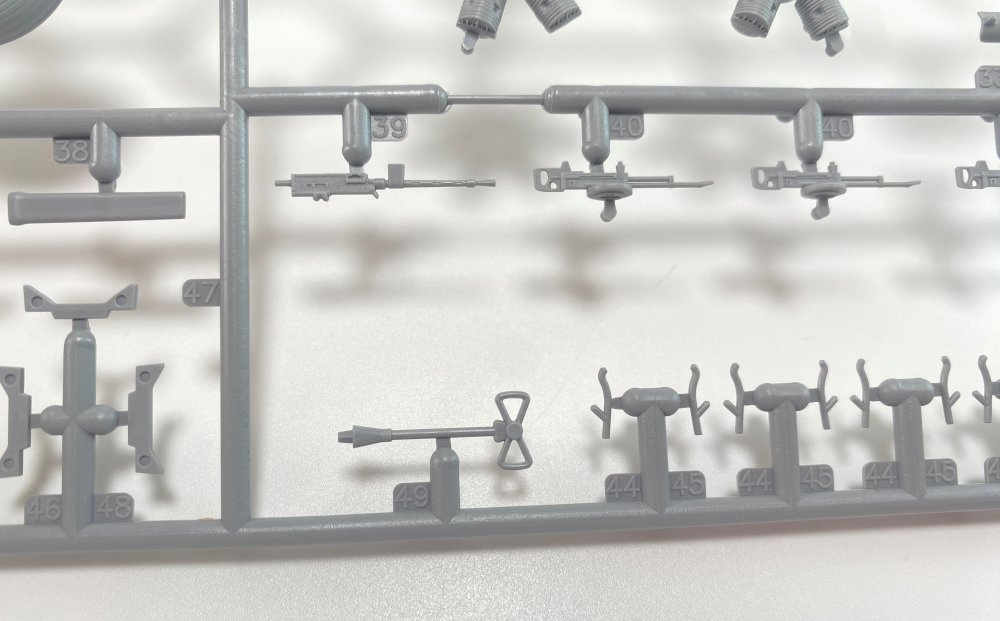
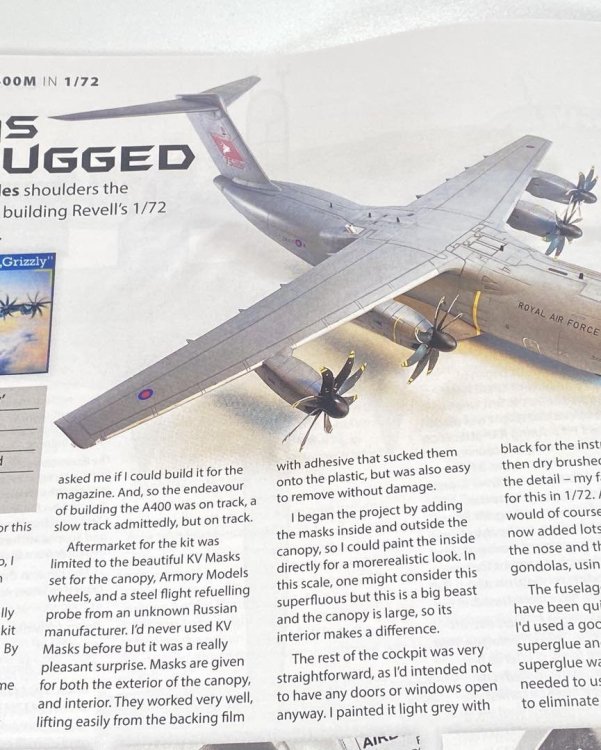
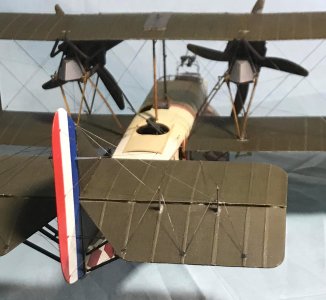
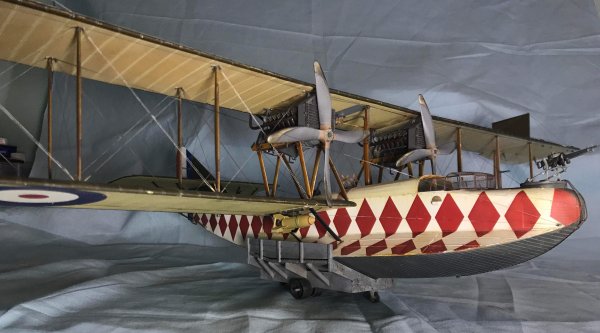
Hi Guys! @KevinM asked for some pictures of this beast so here it goes. This kit always was on my wishlist. At Telford in 2019, I saw one in 2nd hand in a very very bad shape box with a price tag of 12£. So I got it... and then the SAM editor pass by me and challenge me to do a mag article (it came out on SAM Publications, January 2023 - I`m a ver slow builder... . I used Babibi Decals and KV mask! The model itself is not a easy job... specially on the engines and undercarriage (very very weak - Currently, the landing gear is broken). It`s a beast in 1:72... Any question, just shoot!
.thumb.JPG.770b195cc5c439a4ff2e3a8d3f8ac68a.JPG)
.thumb.JPG.ebb26bff71779be67269dfa18ef34b6d.JPG)
.thumb.JPG.3b2457361b73050d0bba48240a54103a.JPG)
.thumb.JPG.f7e053152a9752a1795fd0a6a37bb46e.JPG)

-
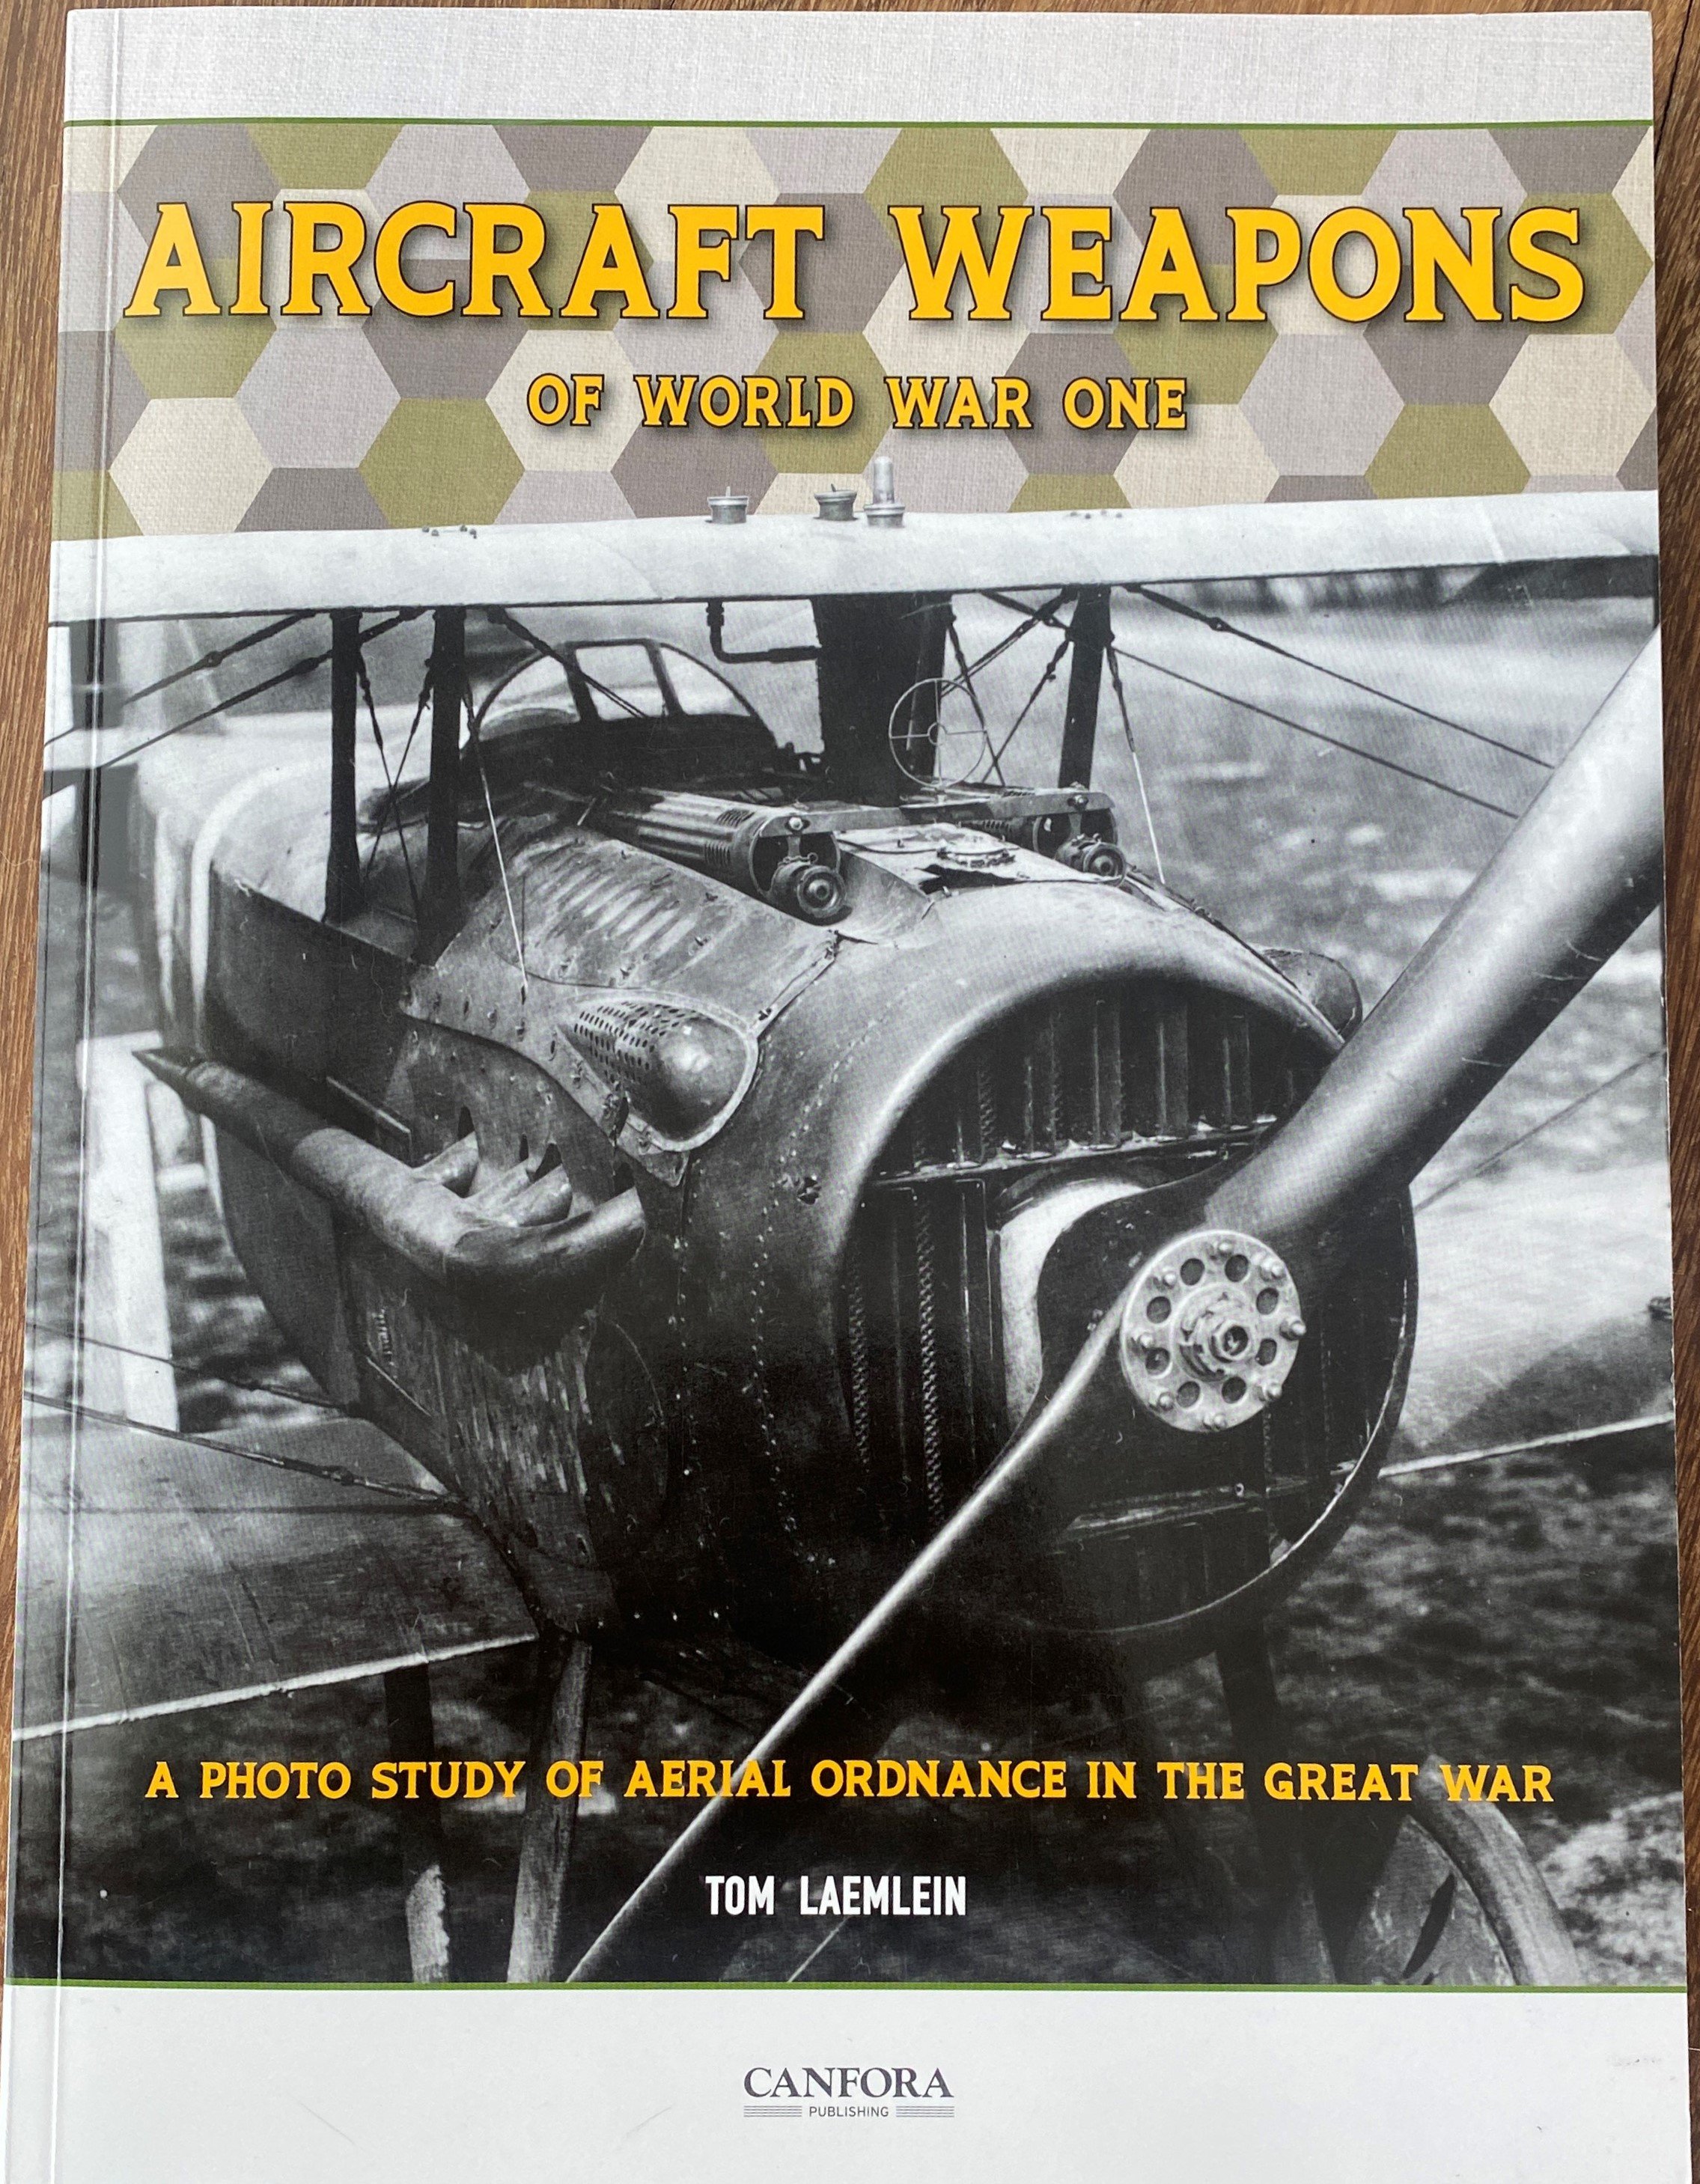
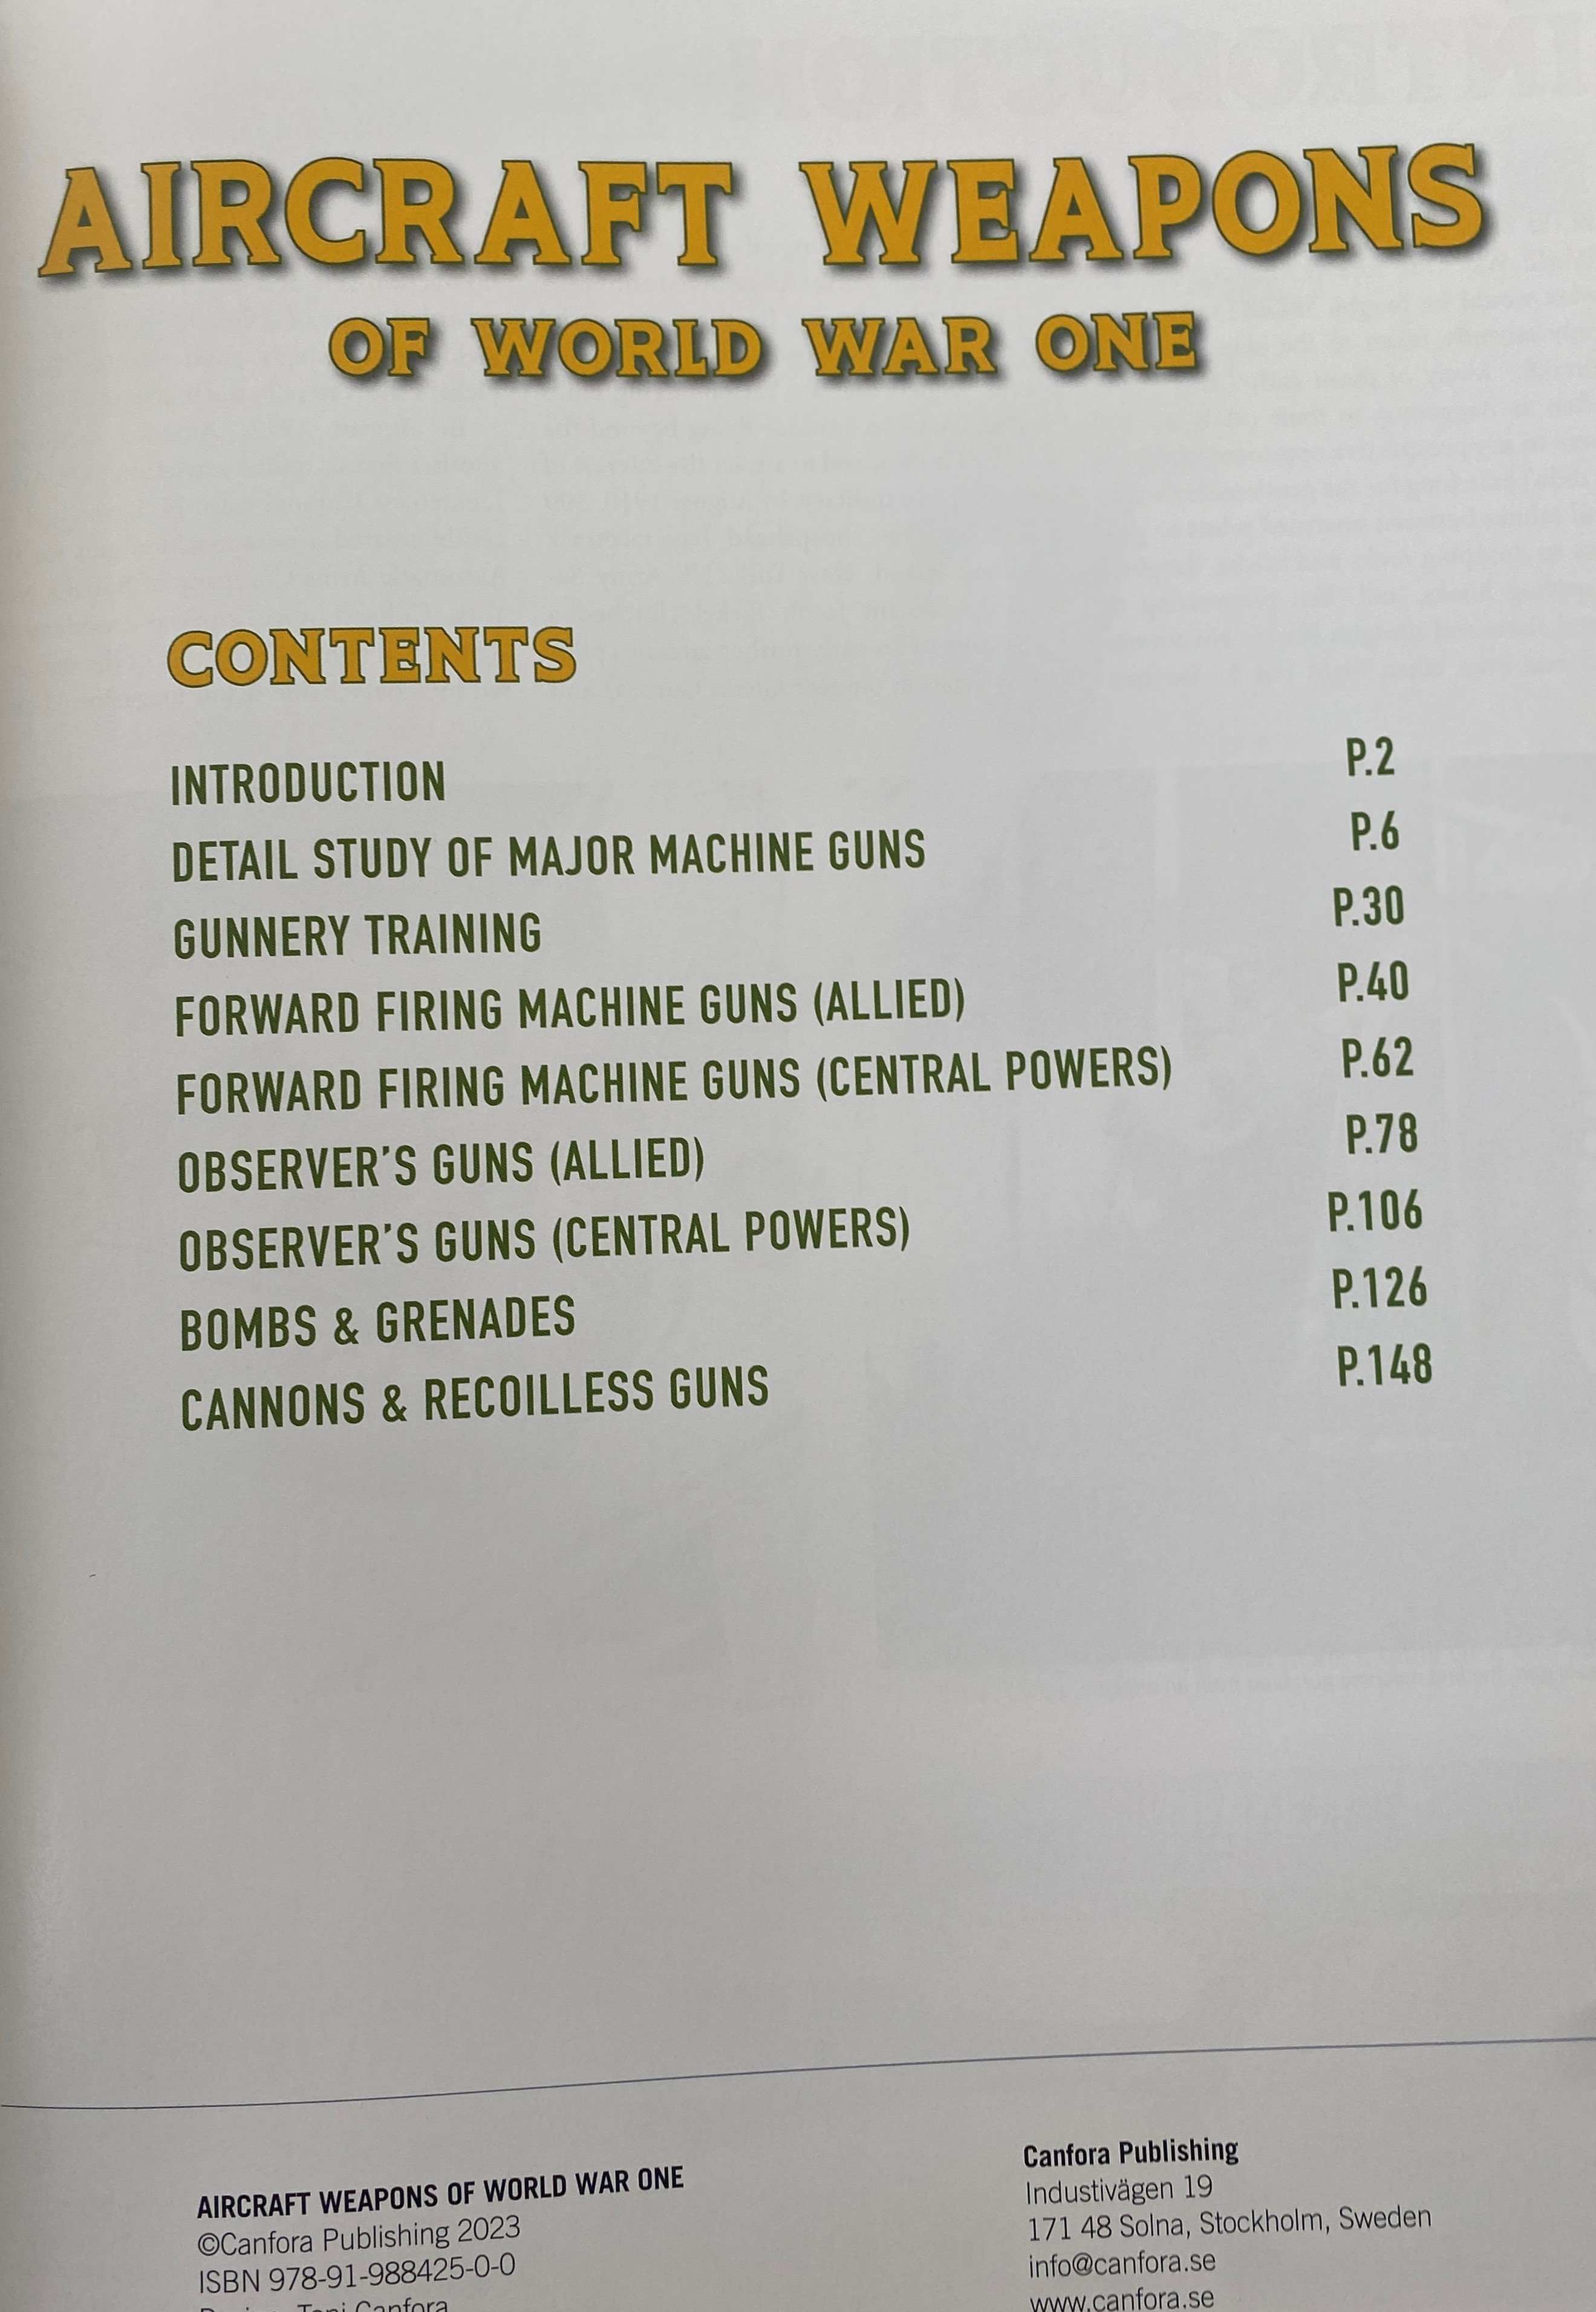
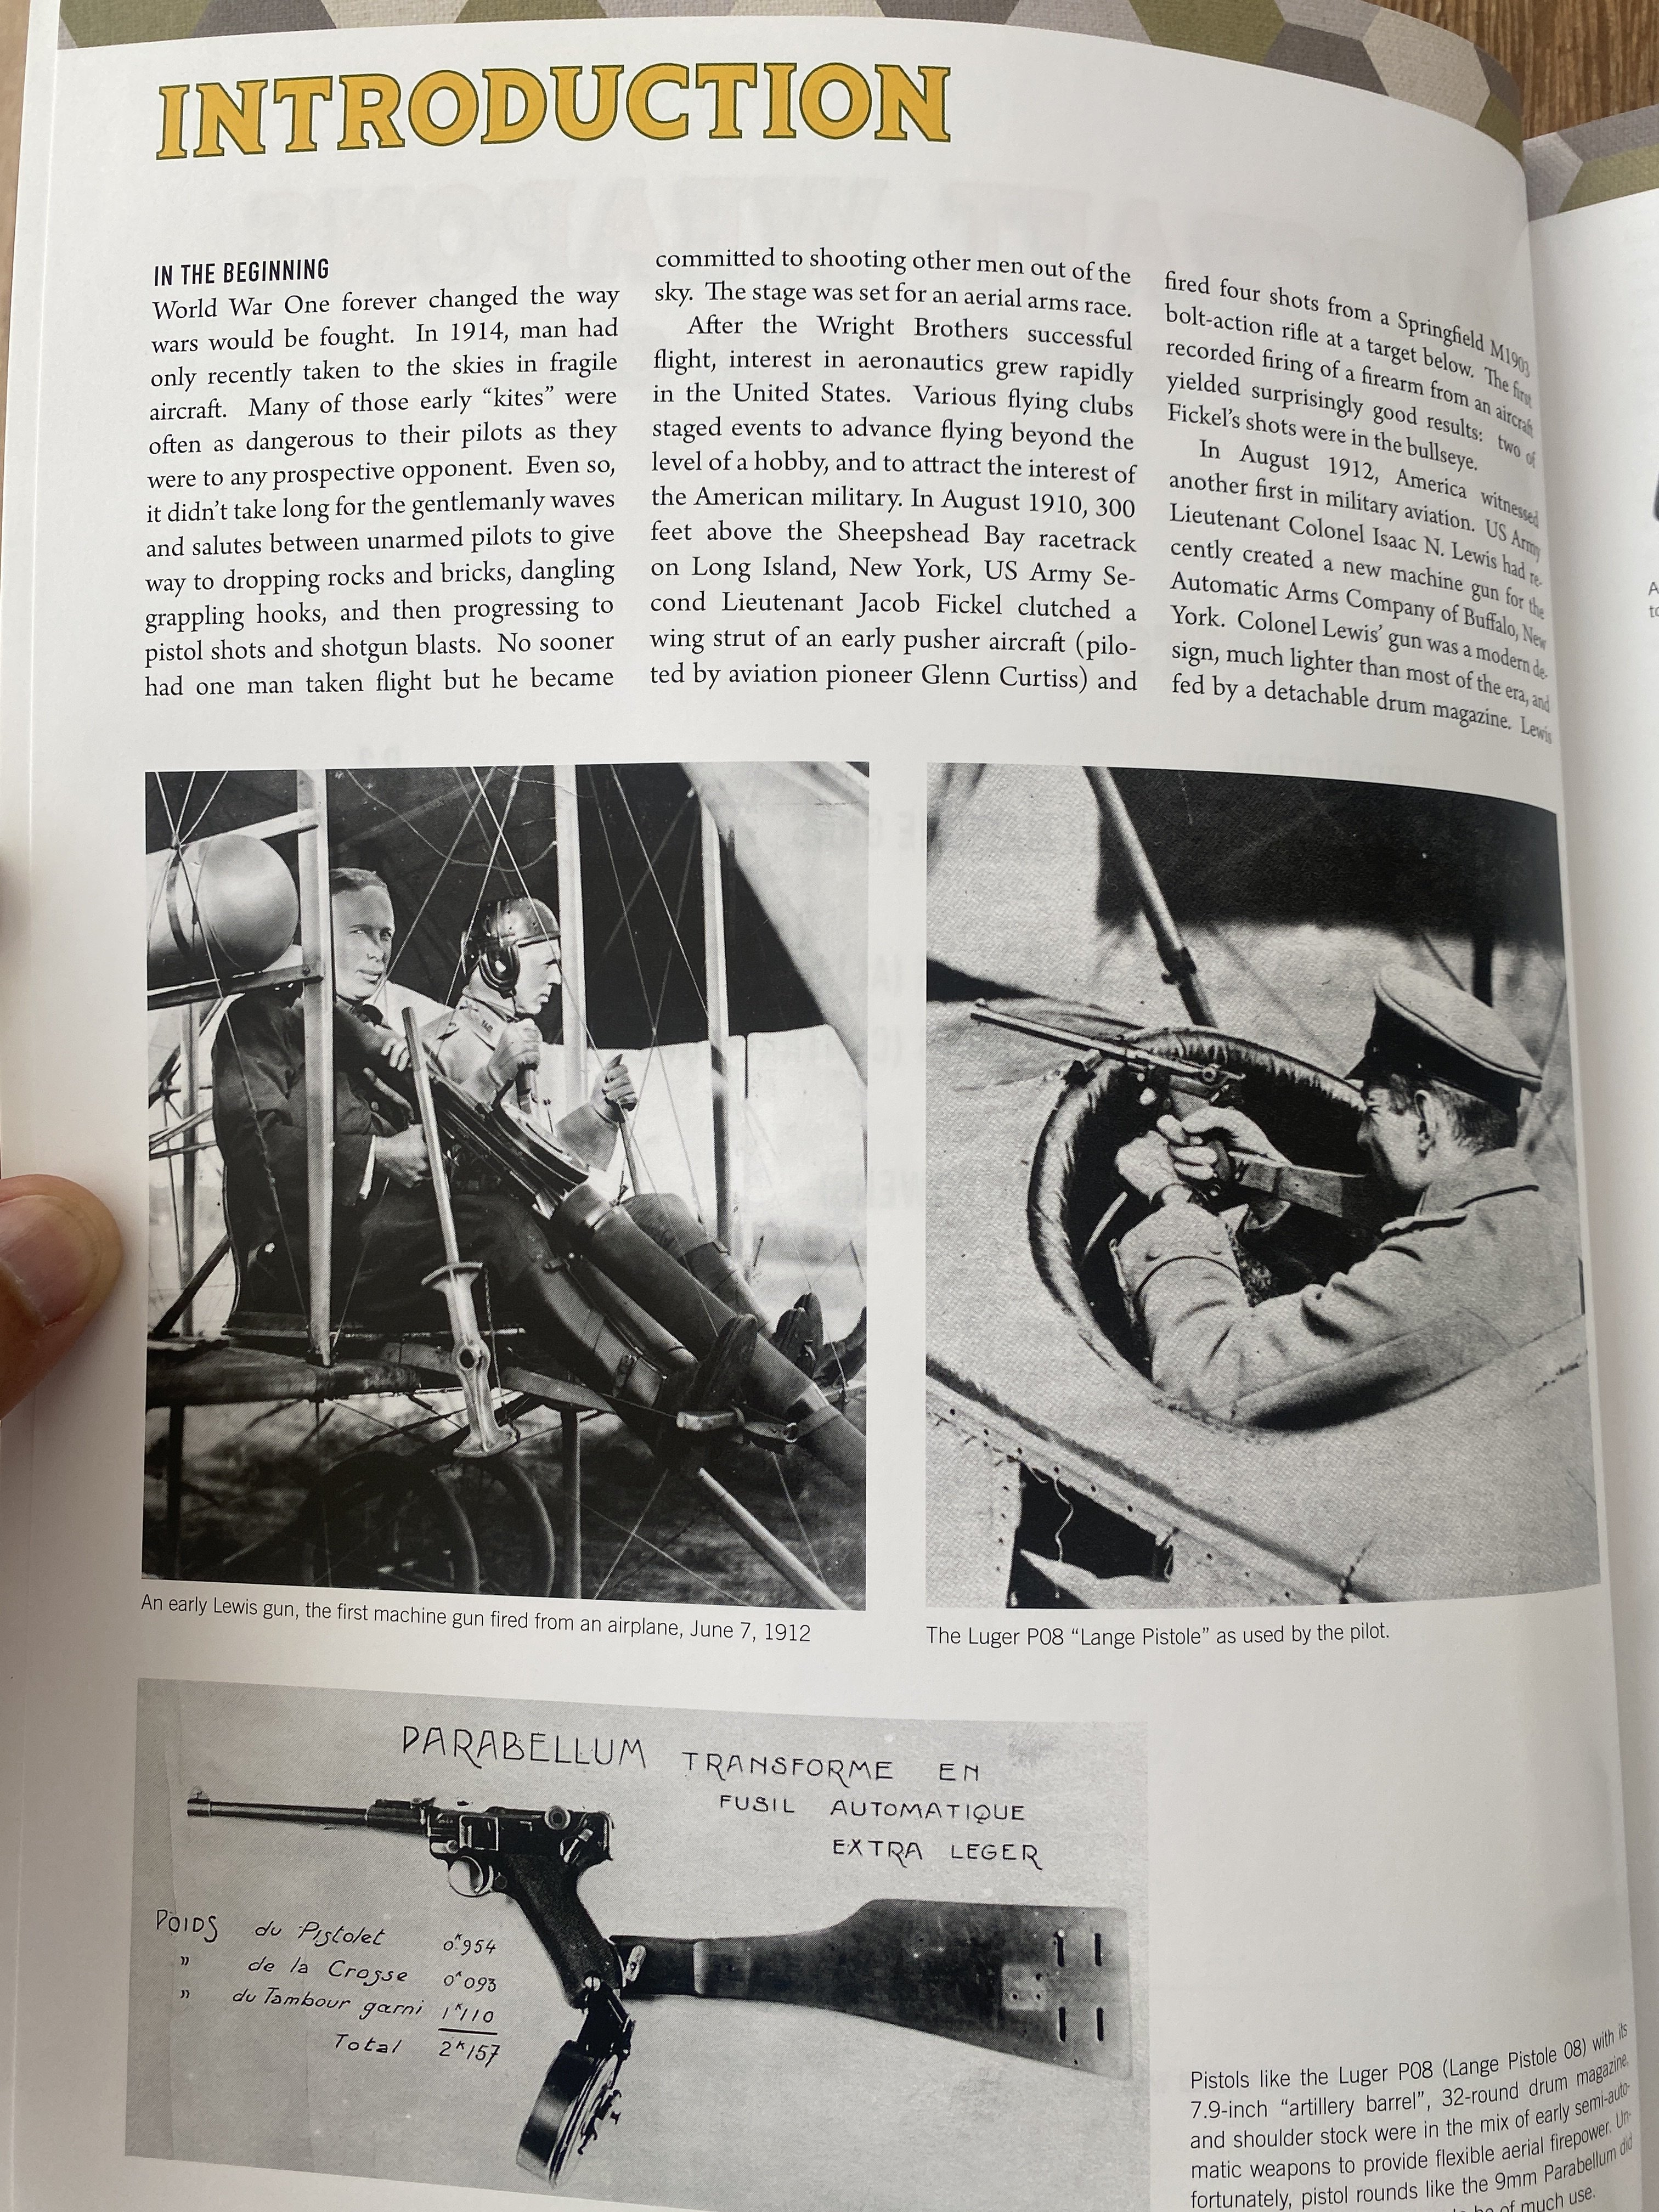
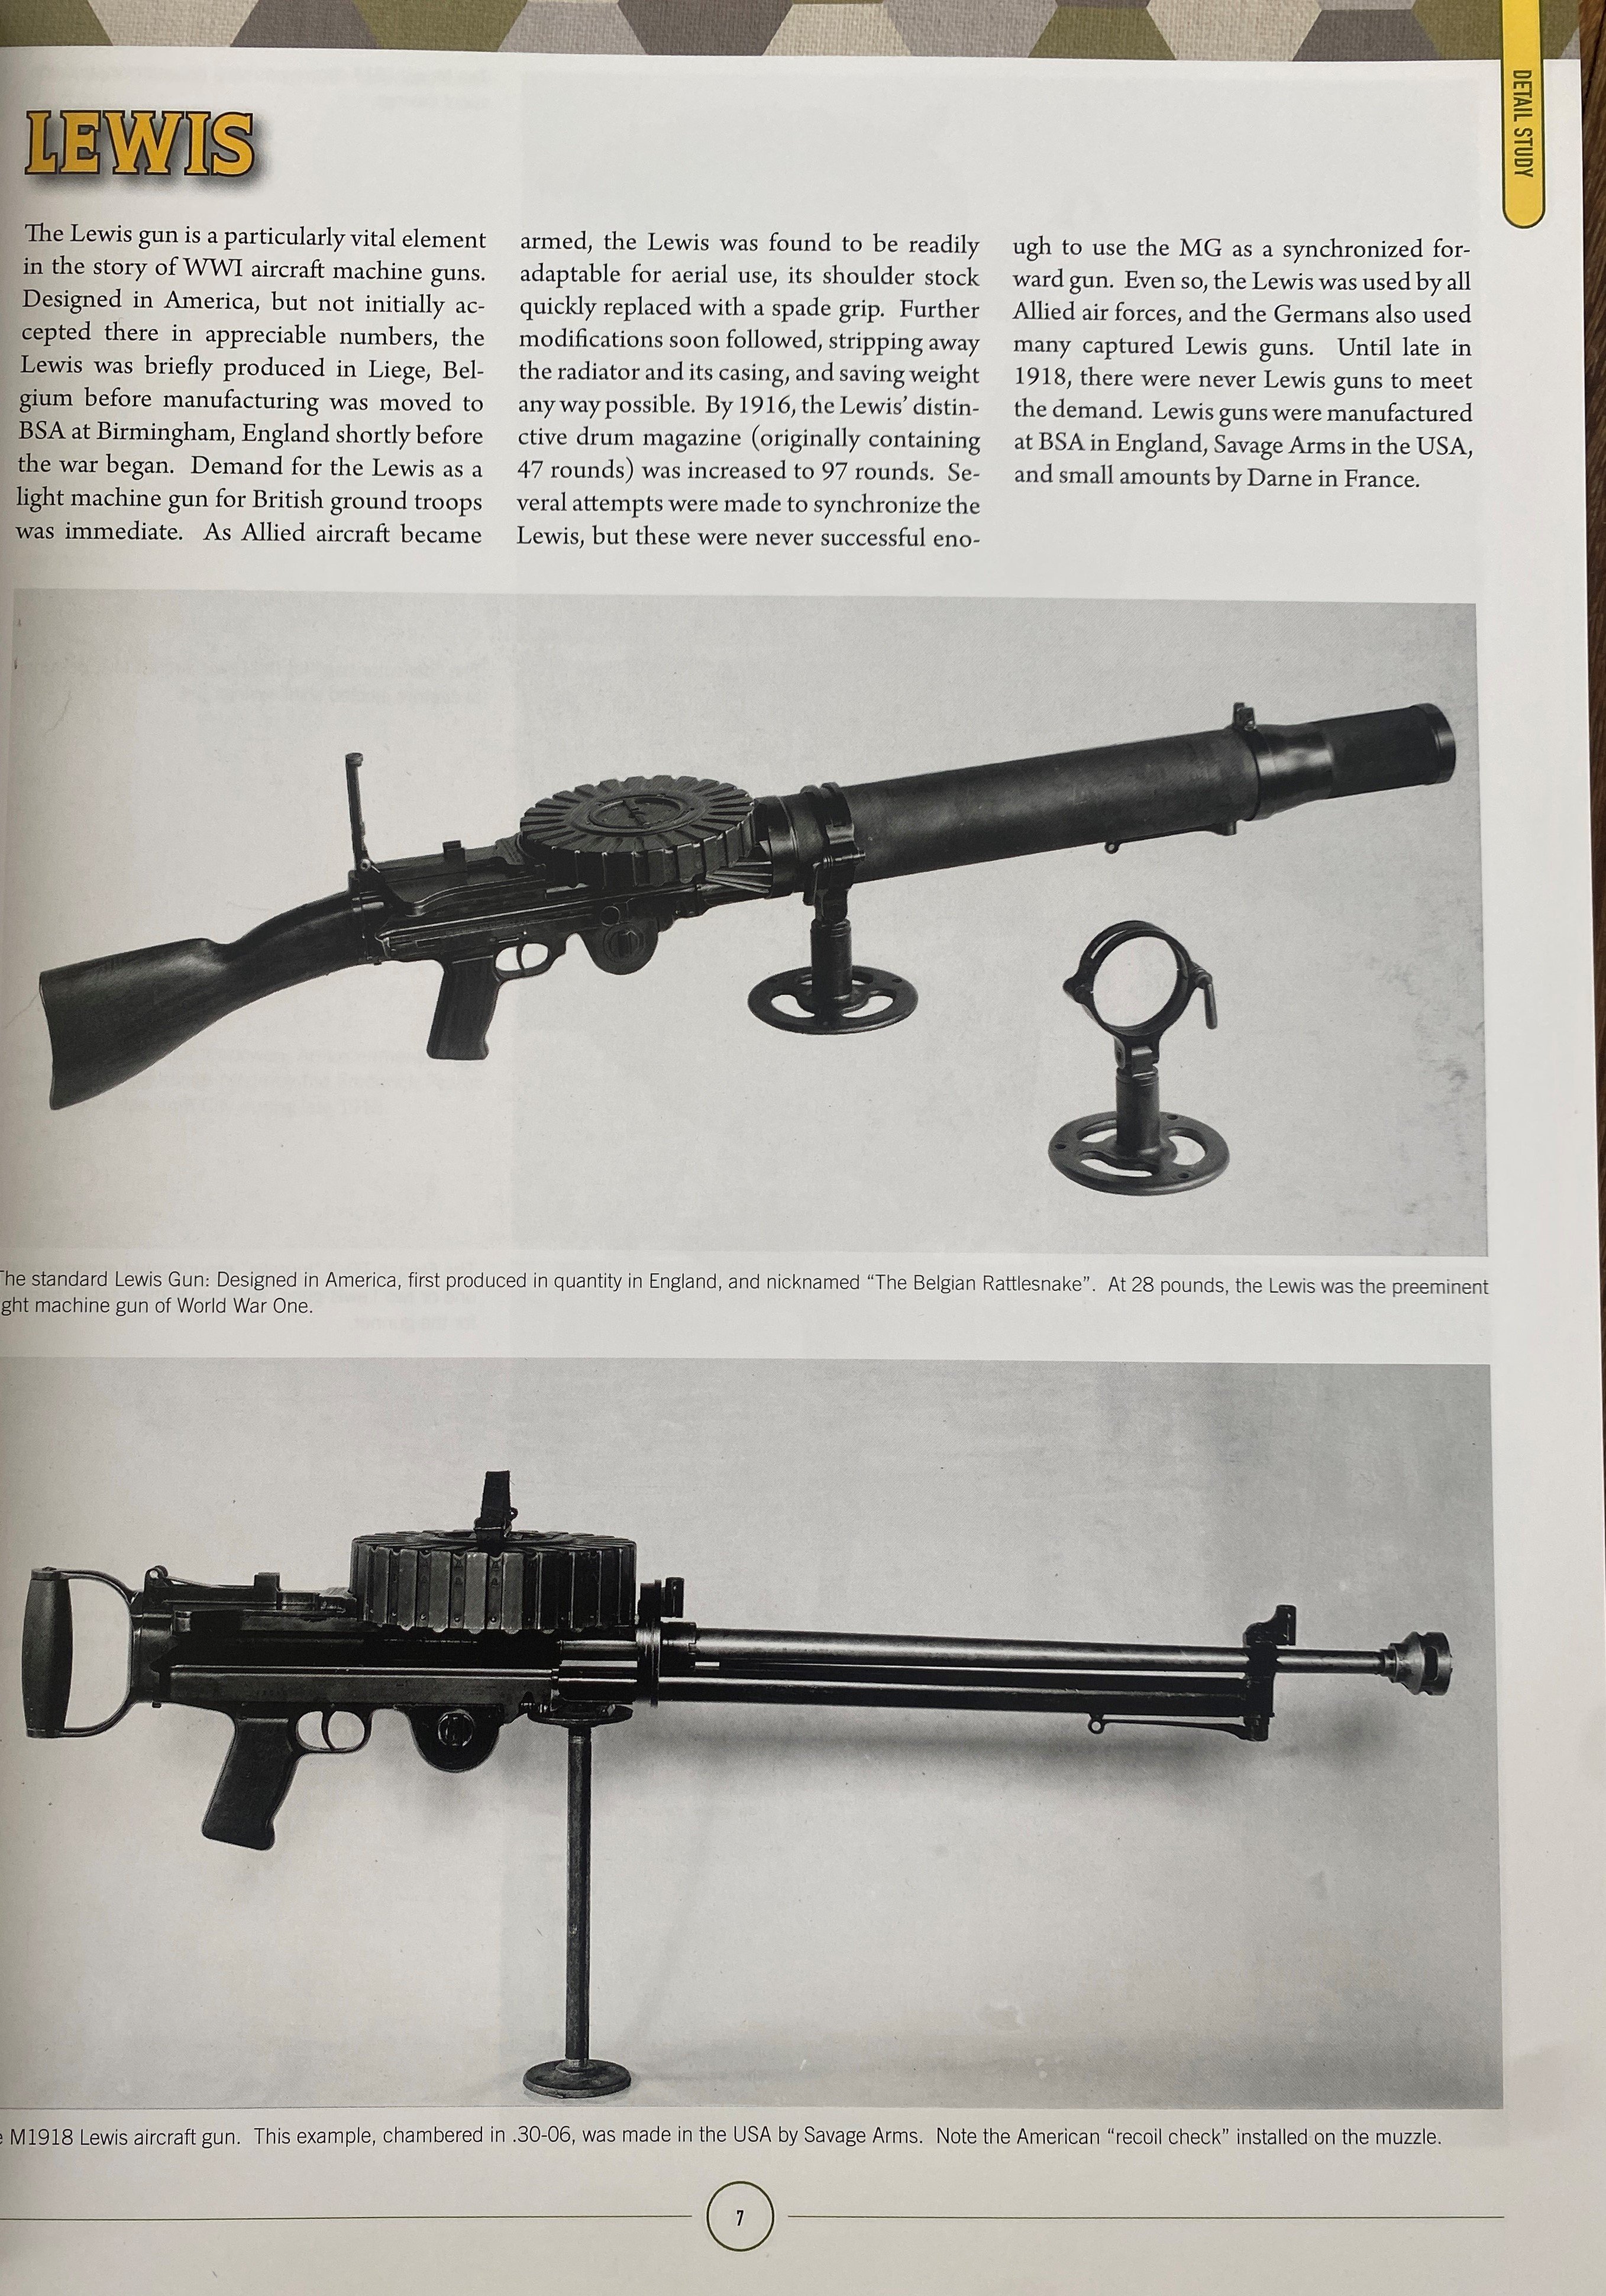
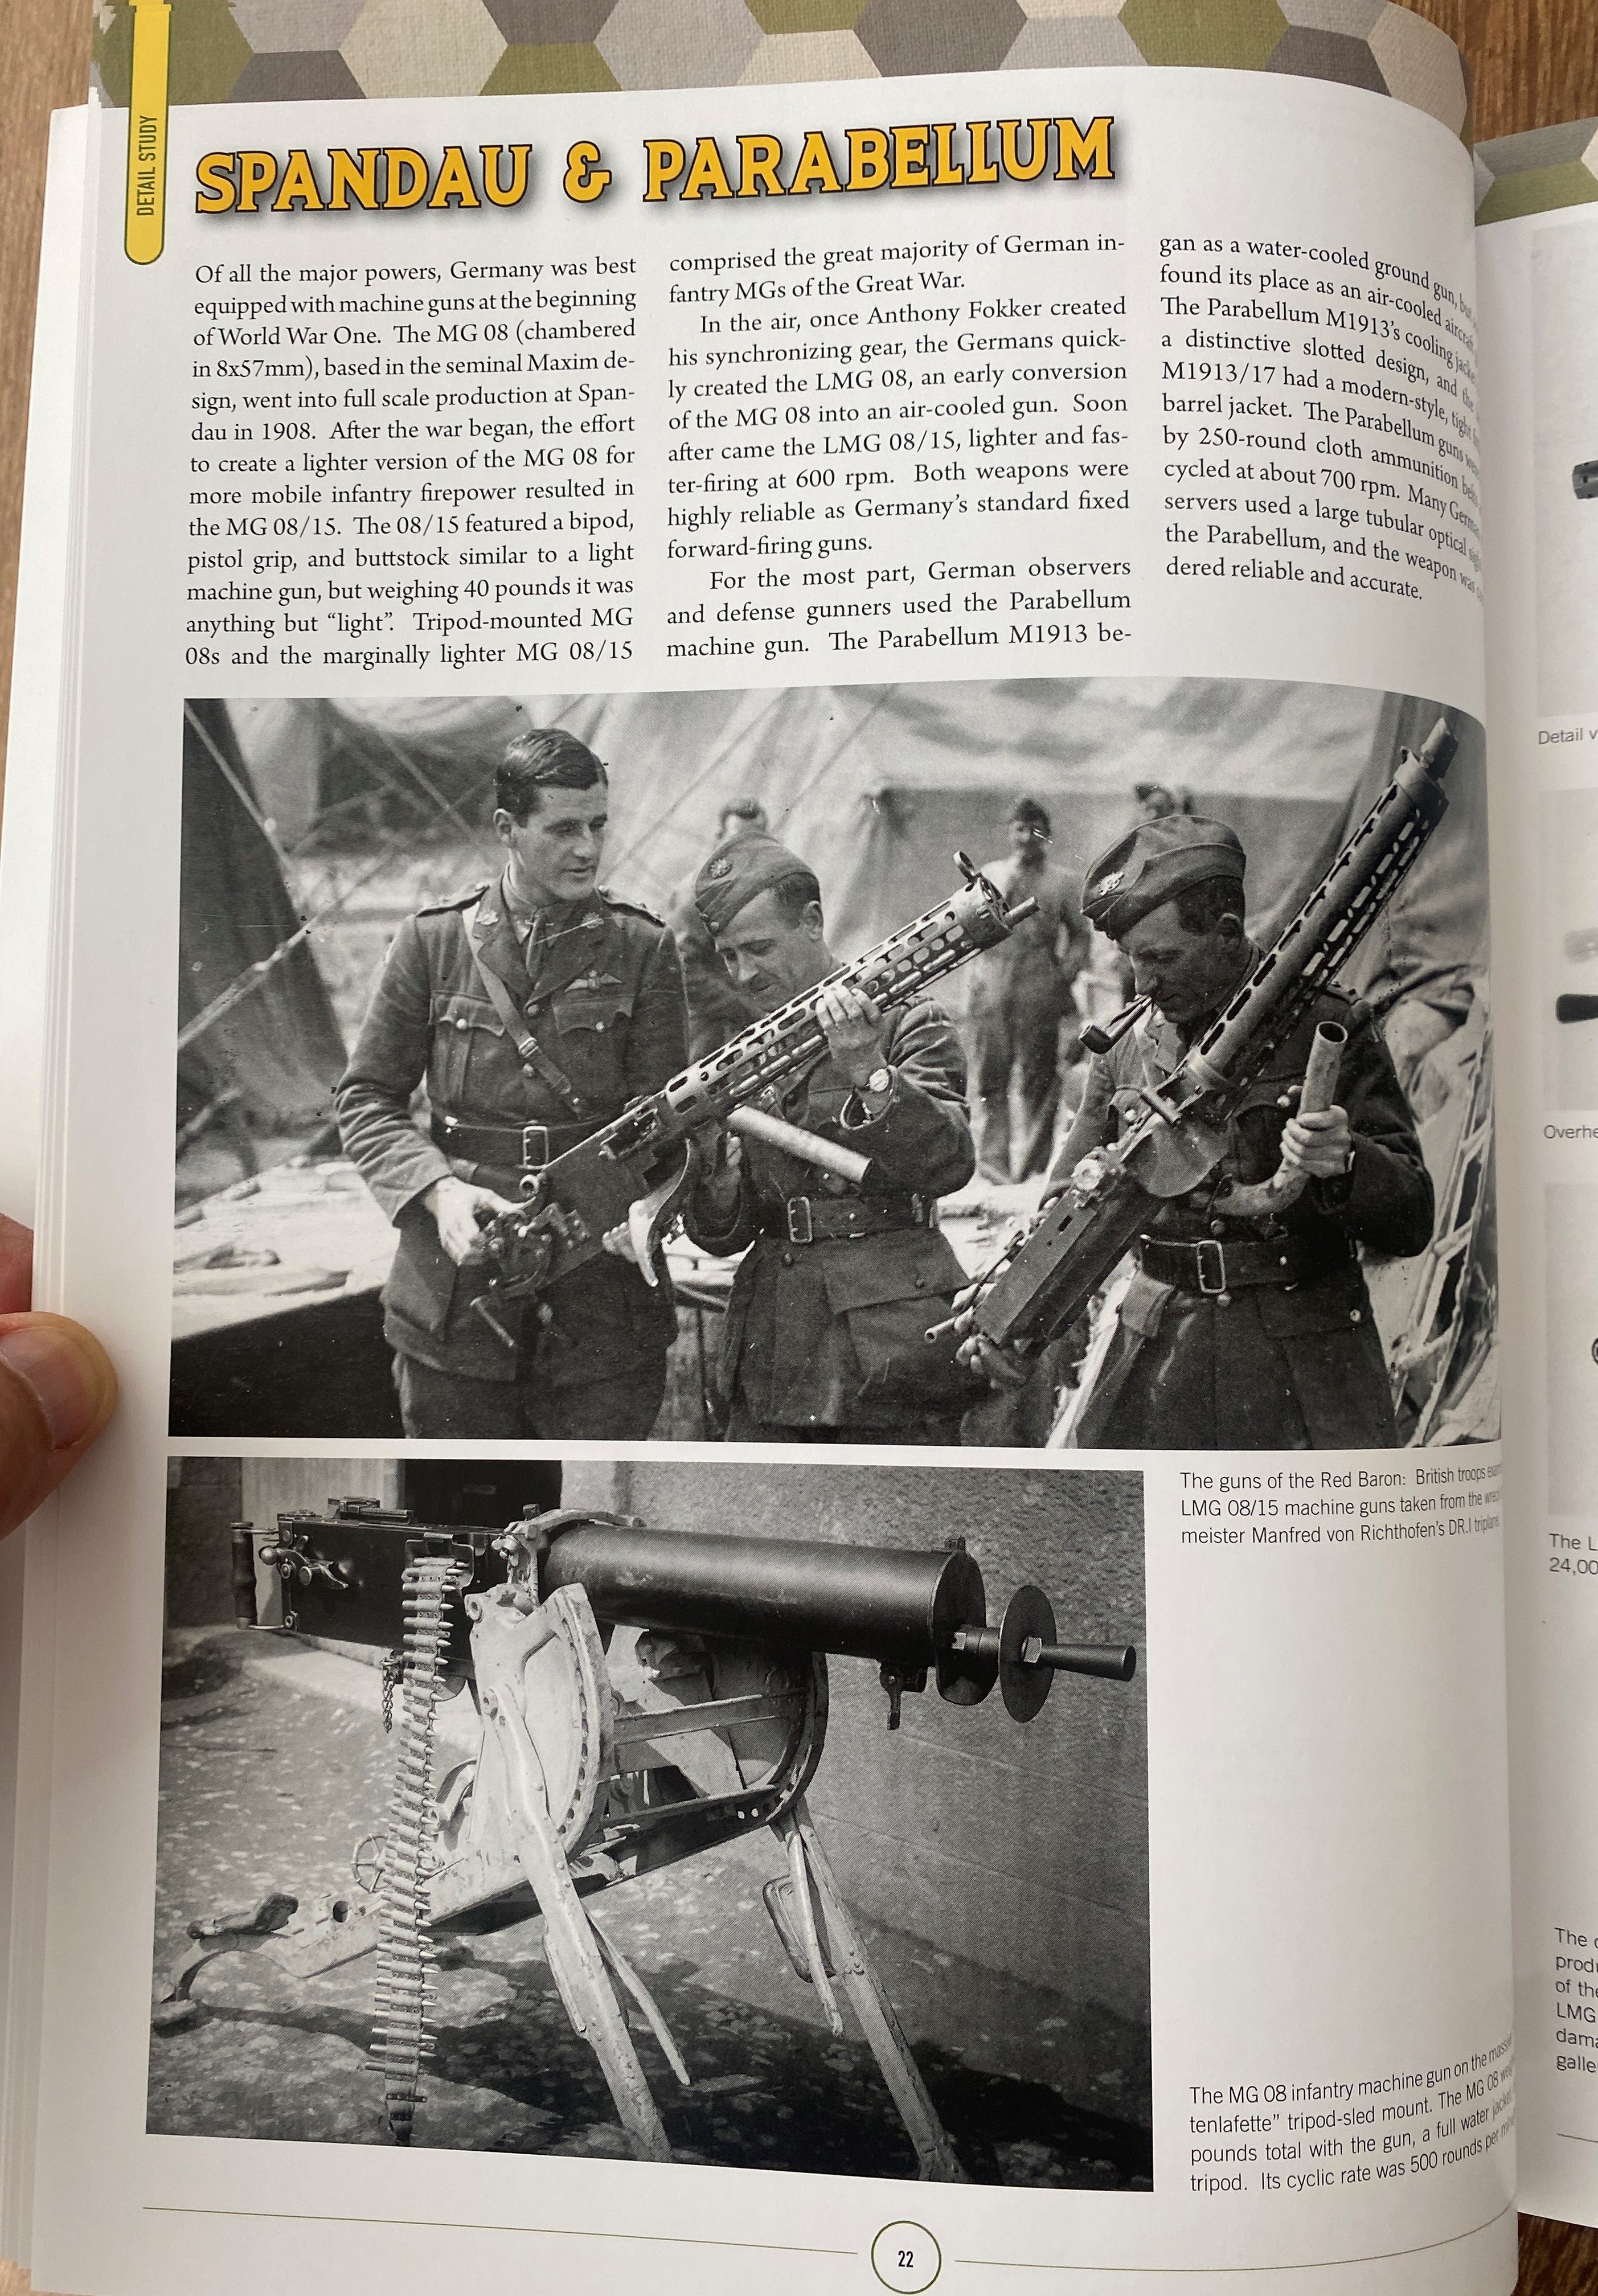
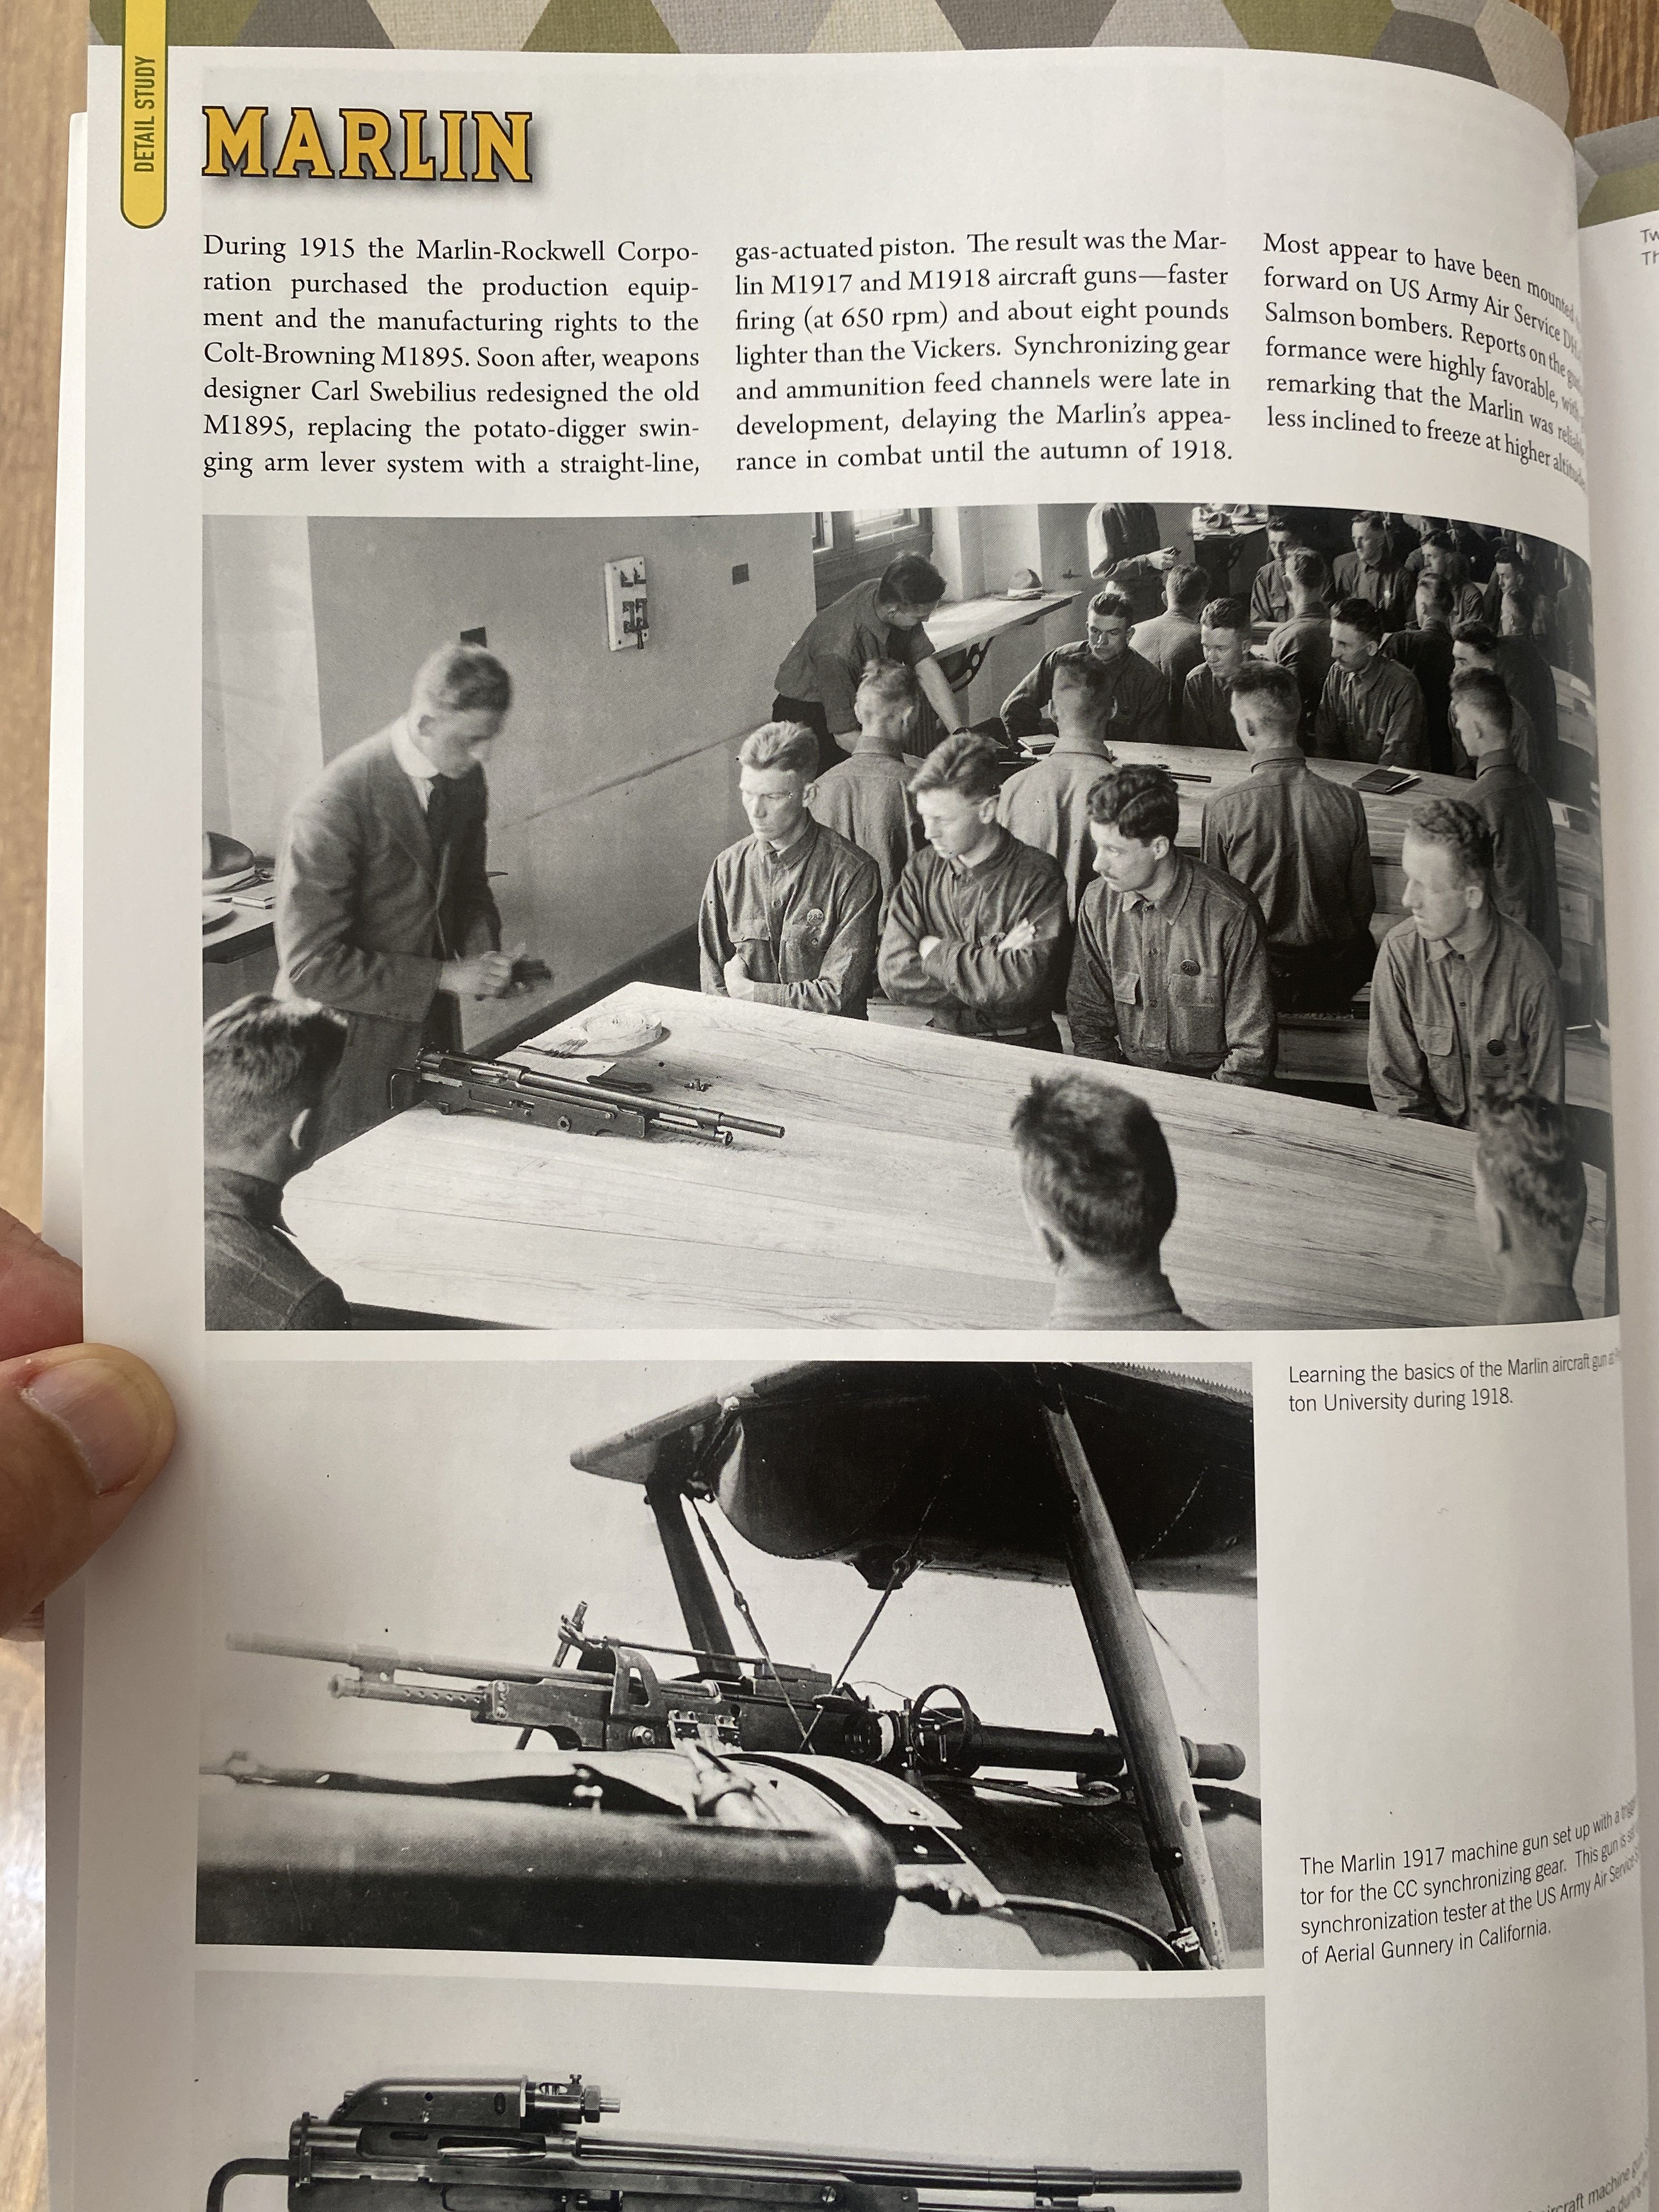
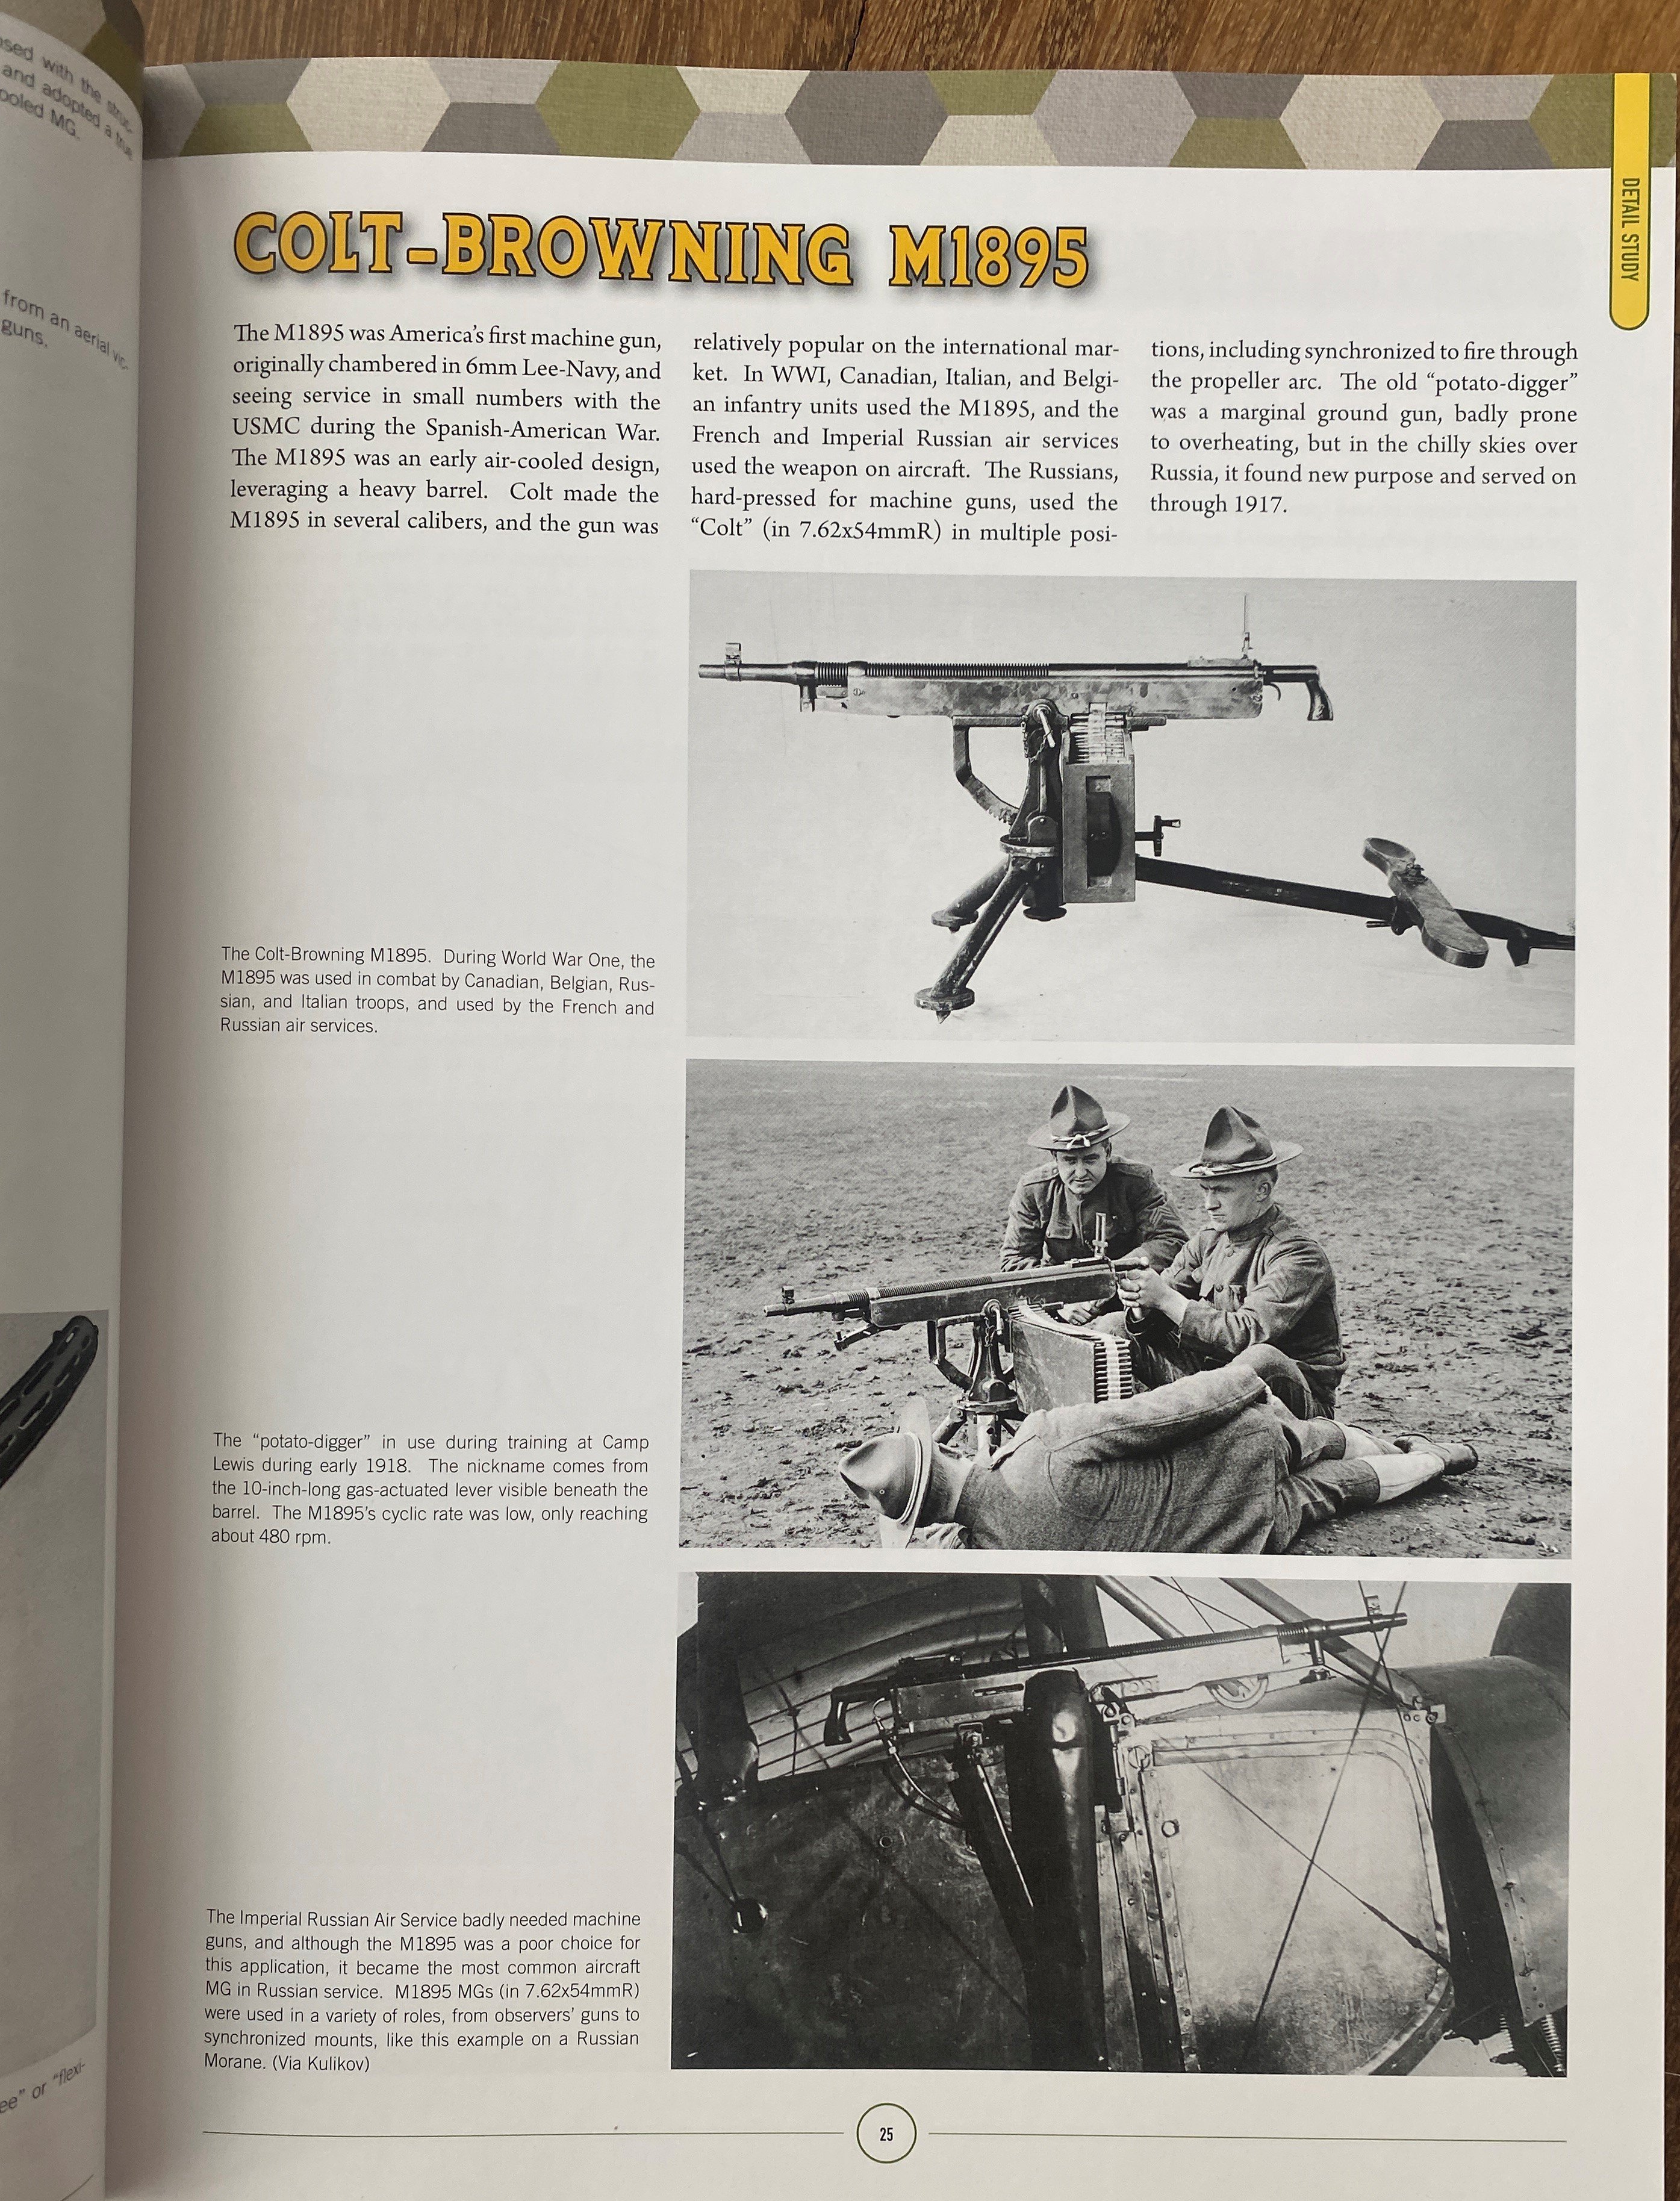
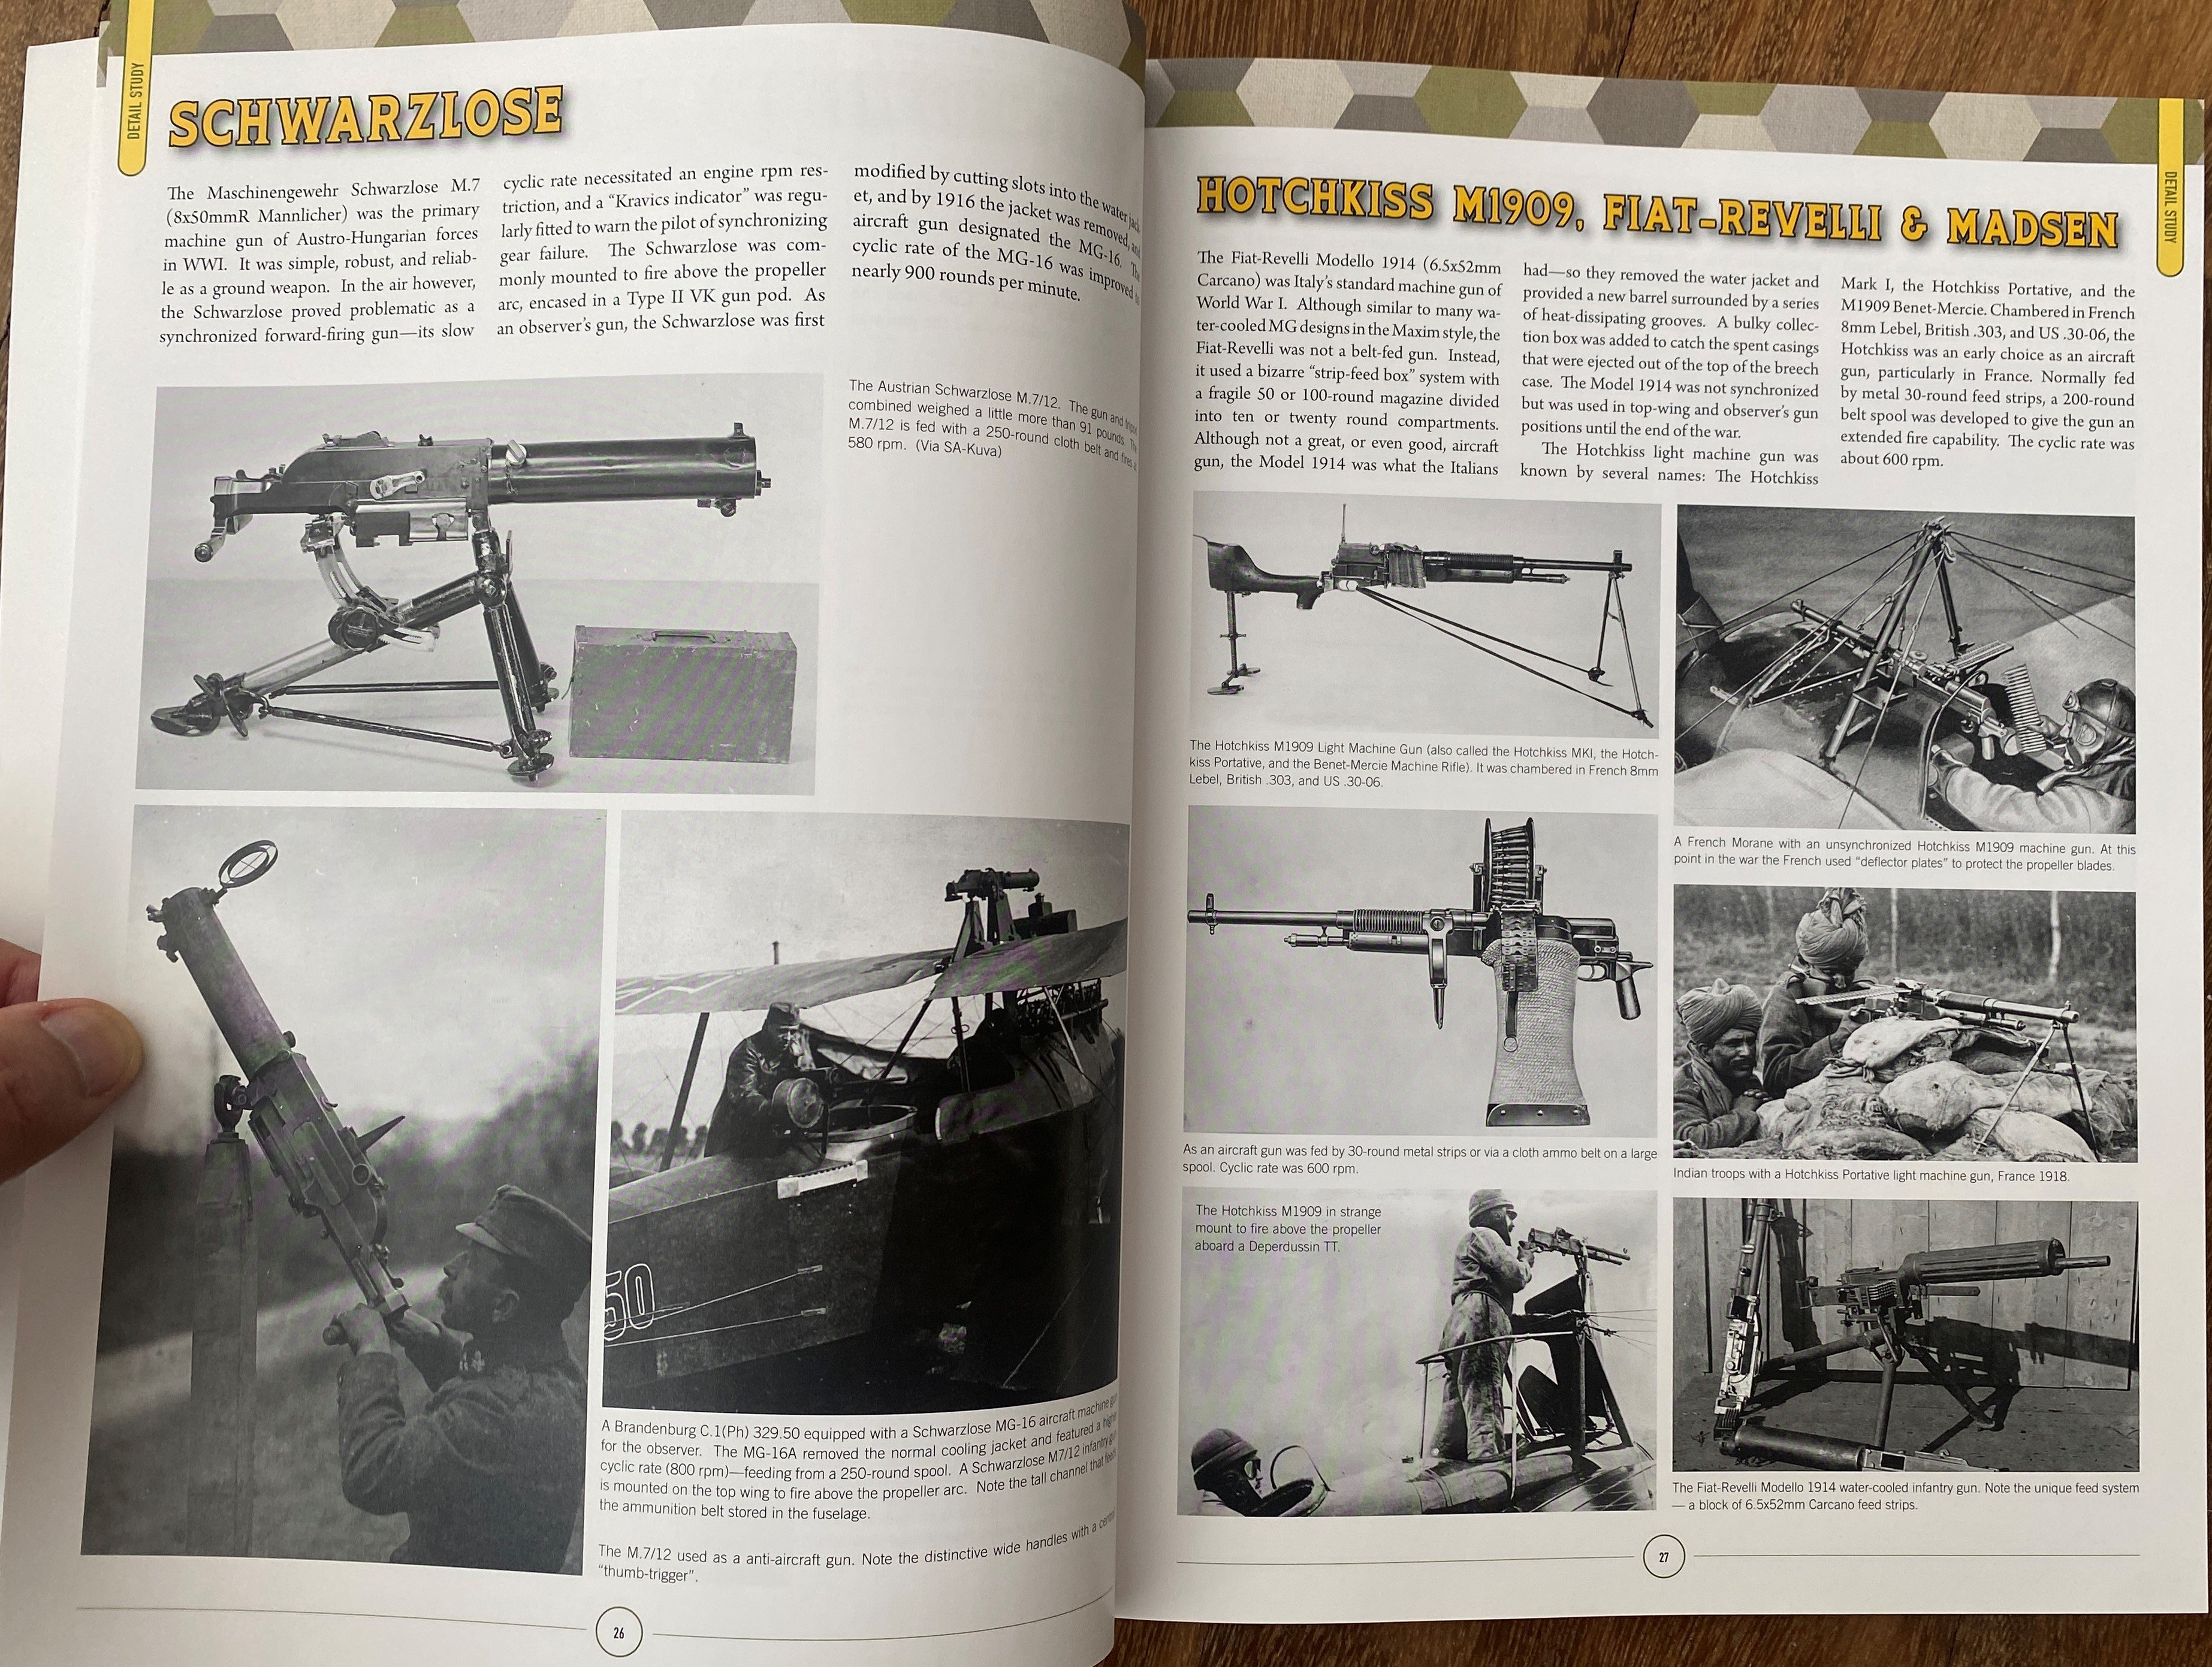
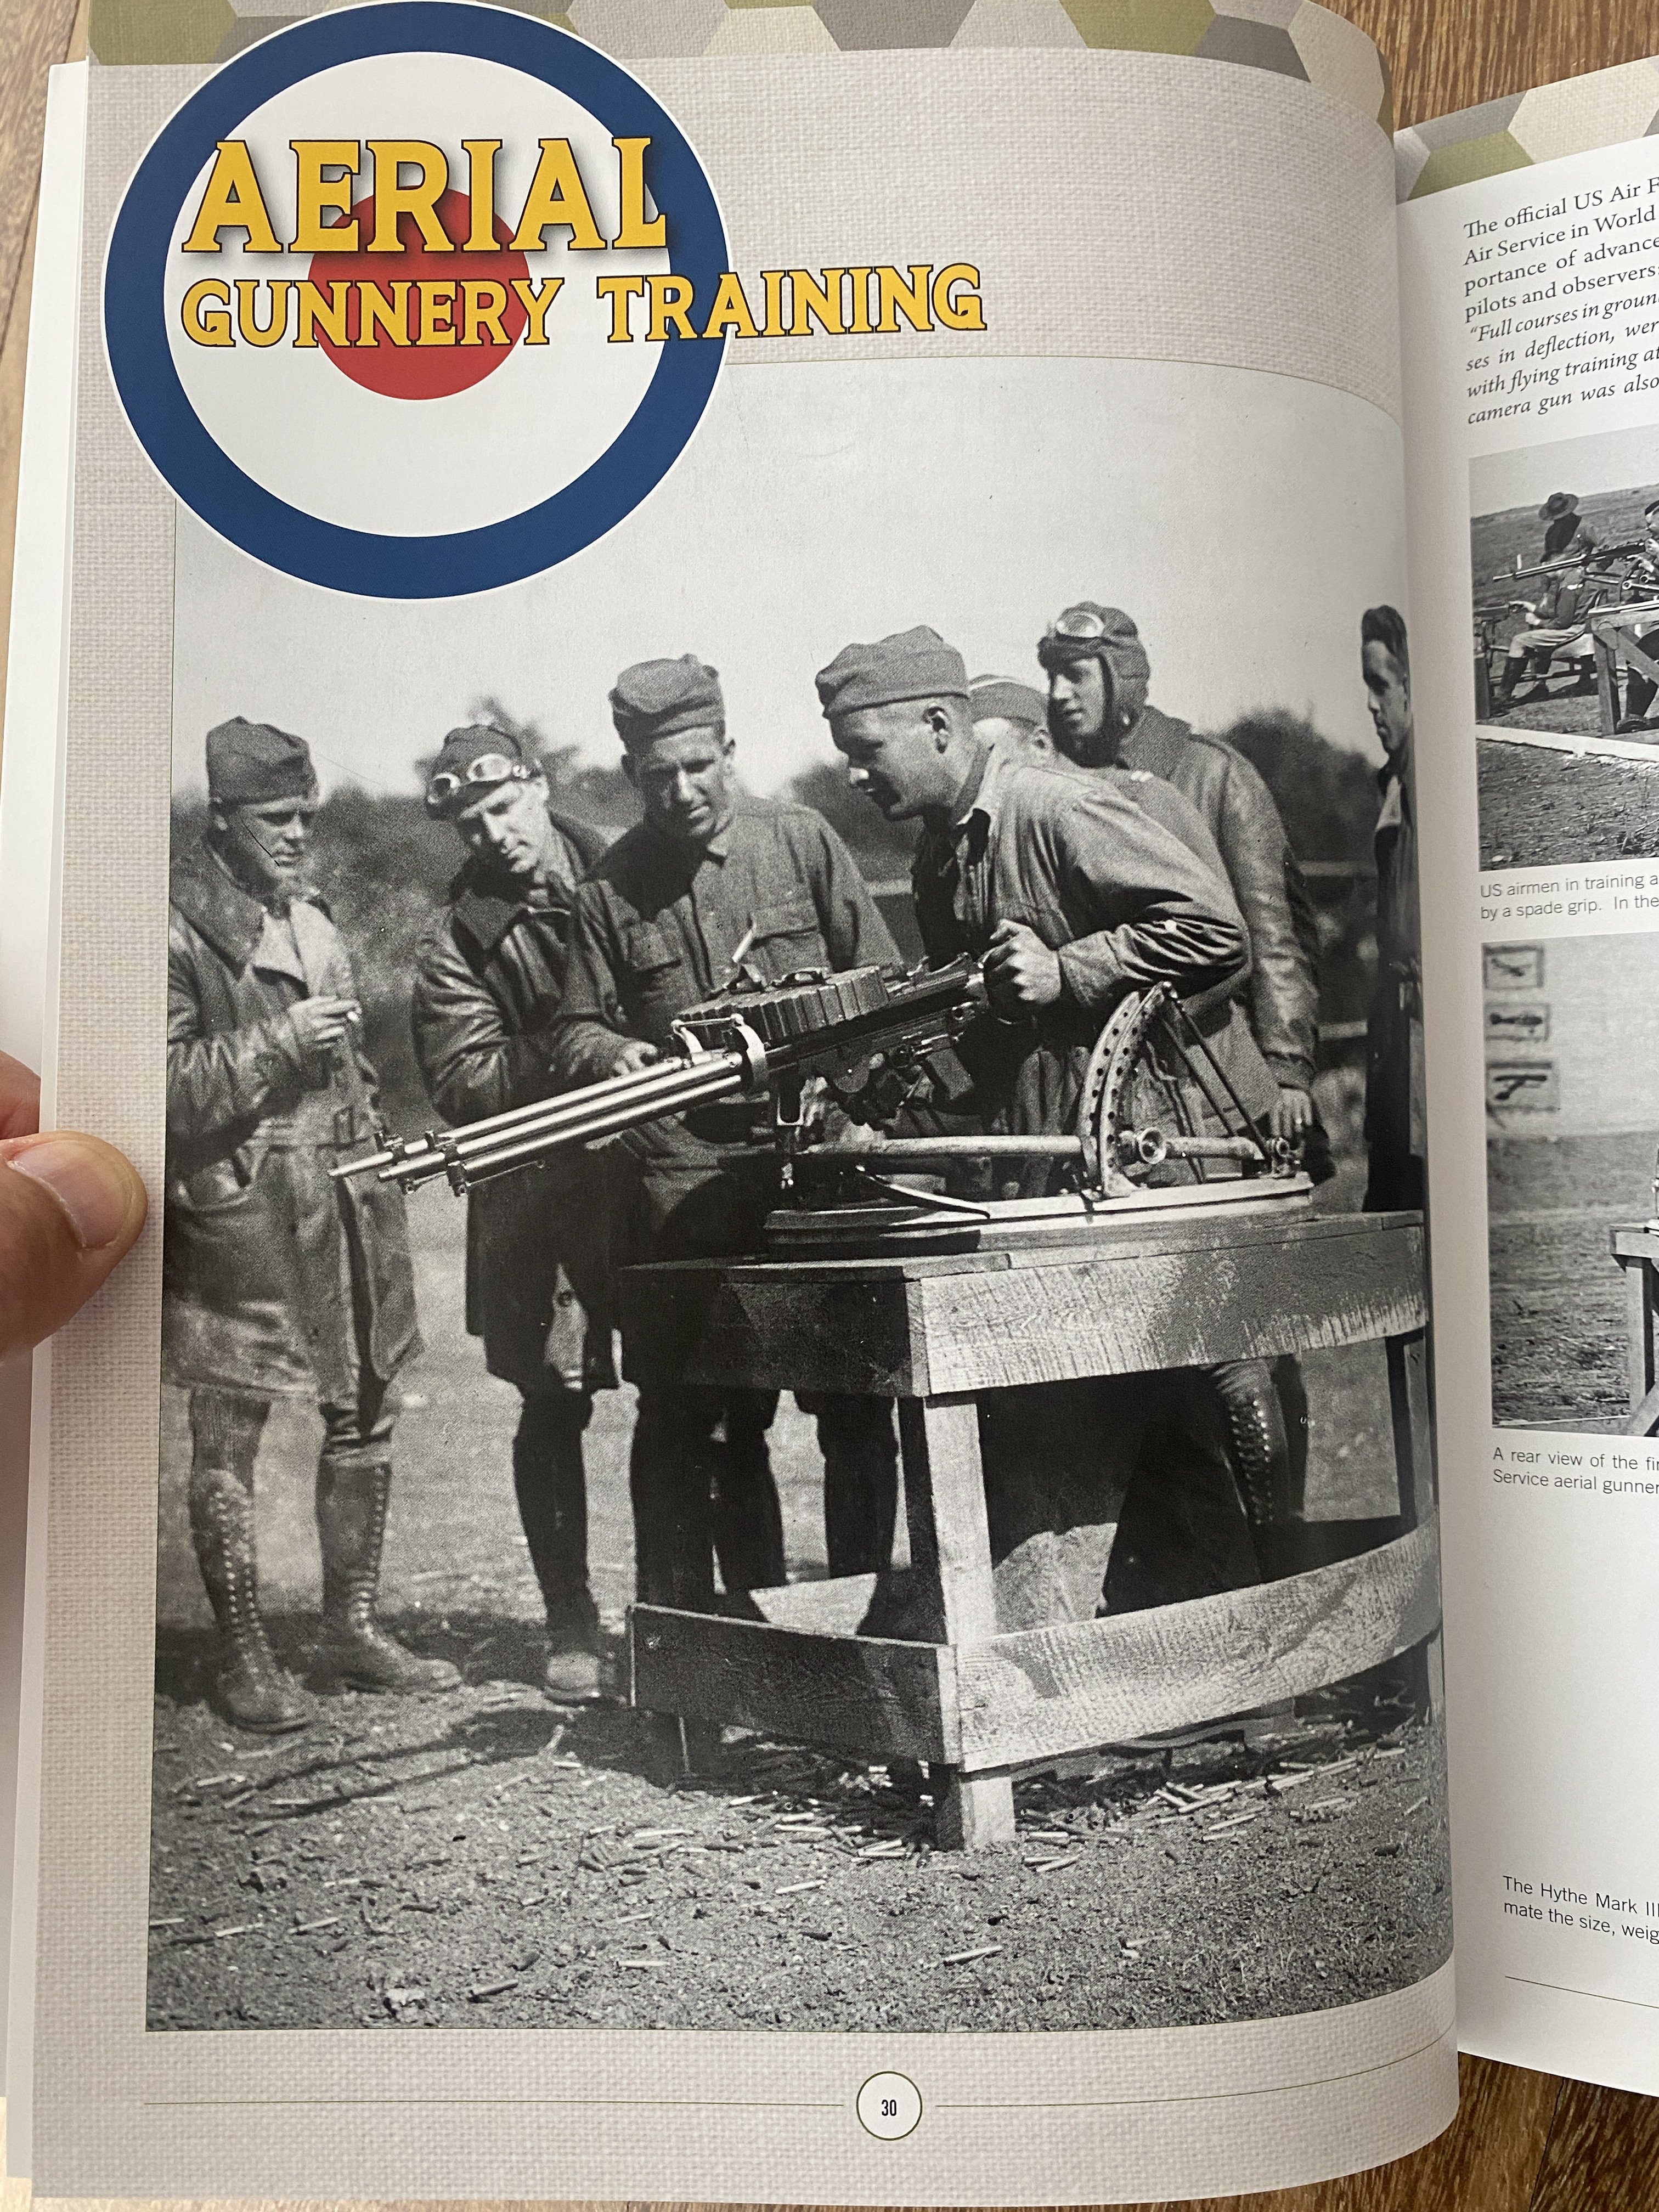
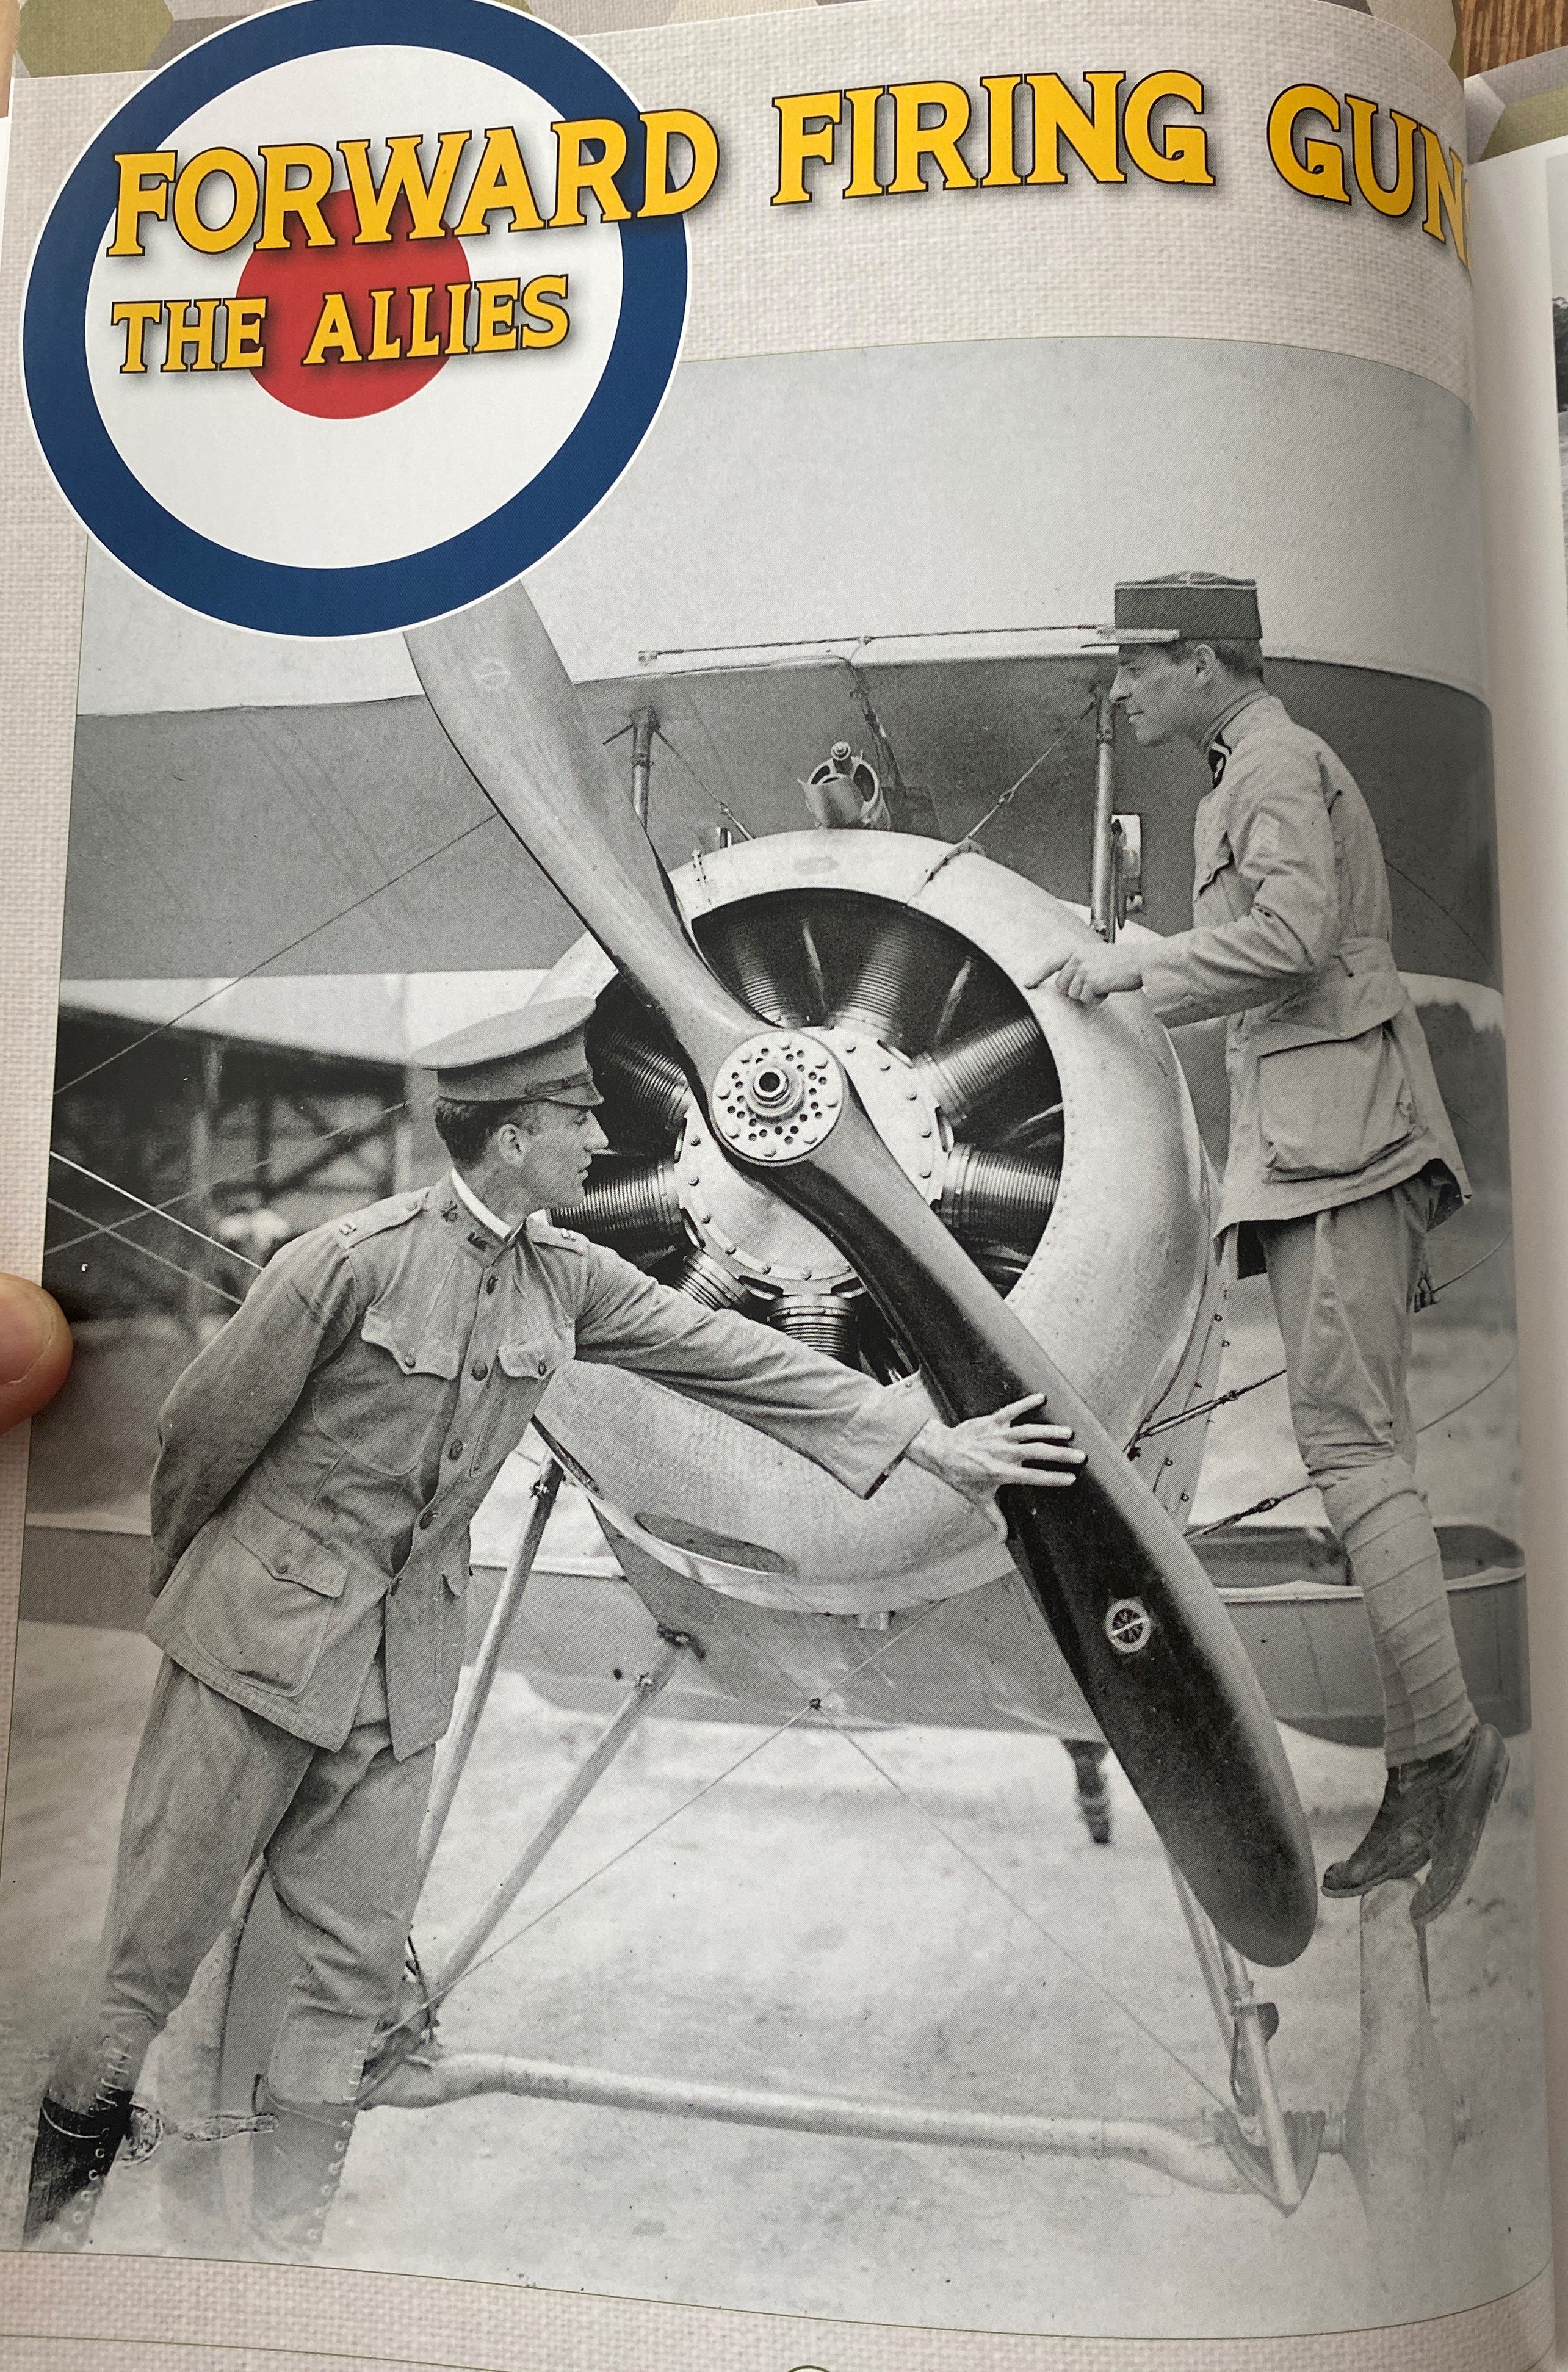
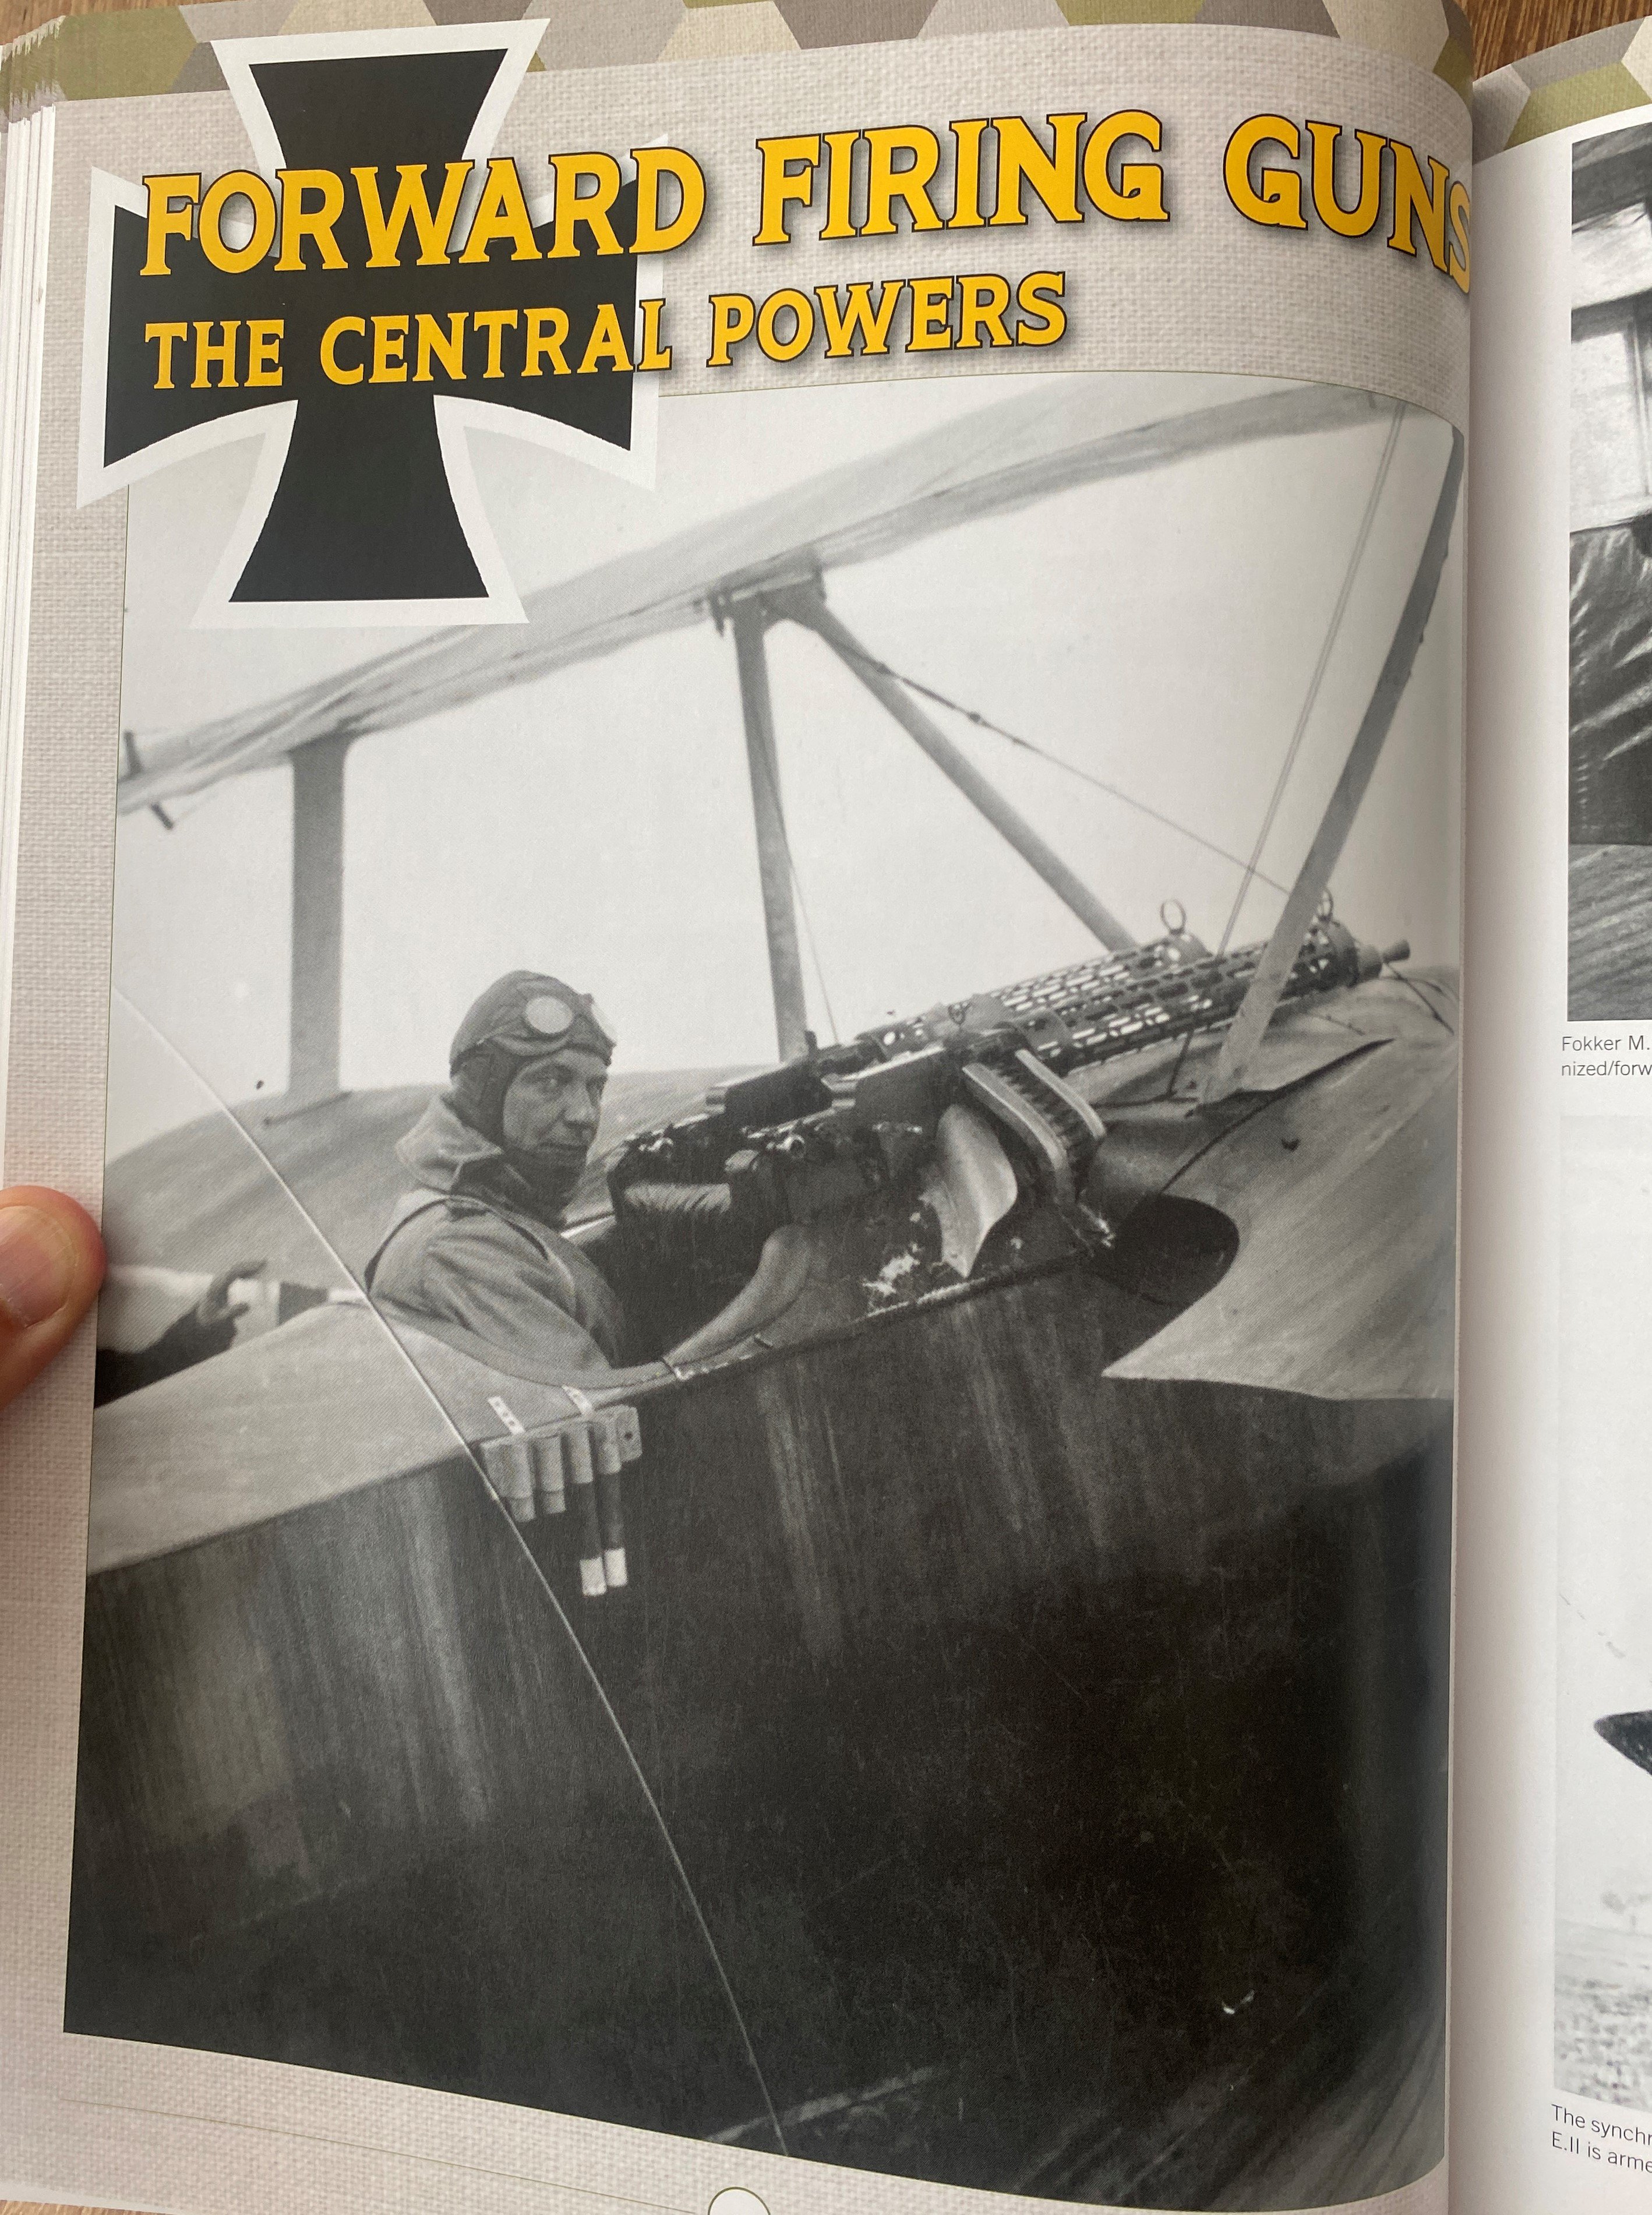
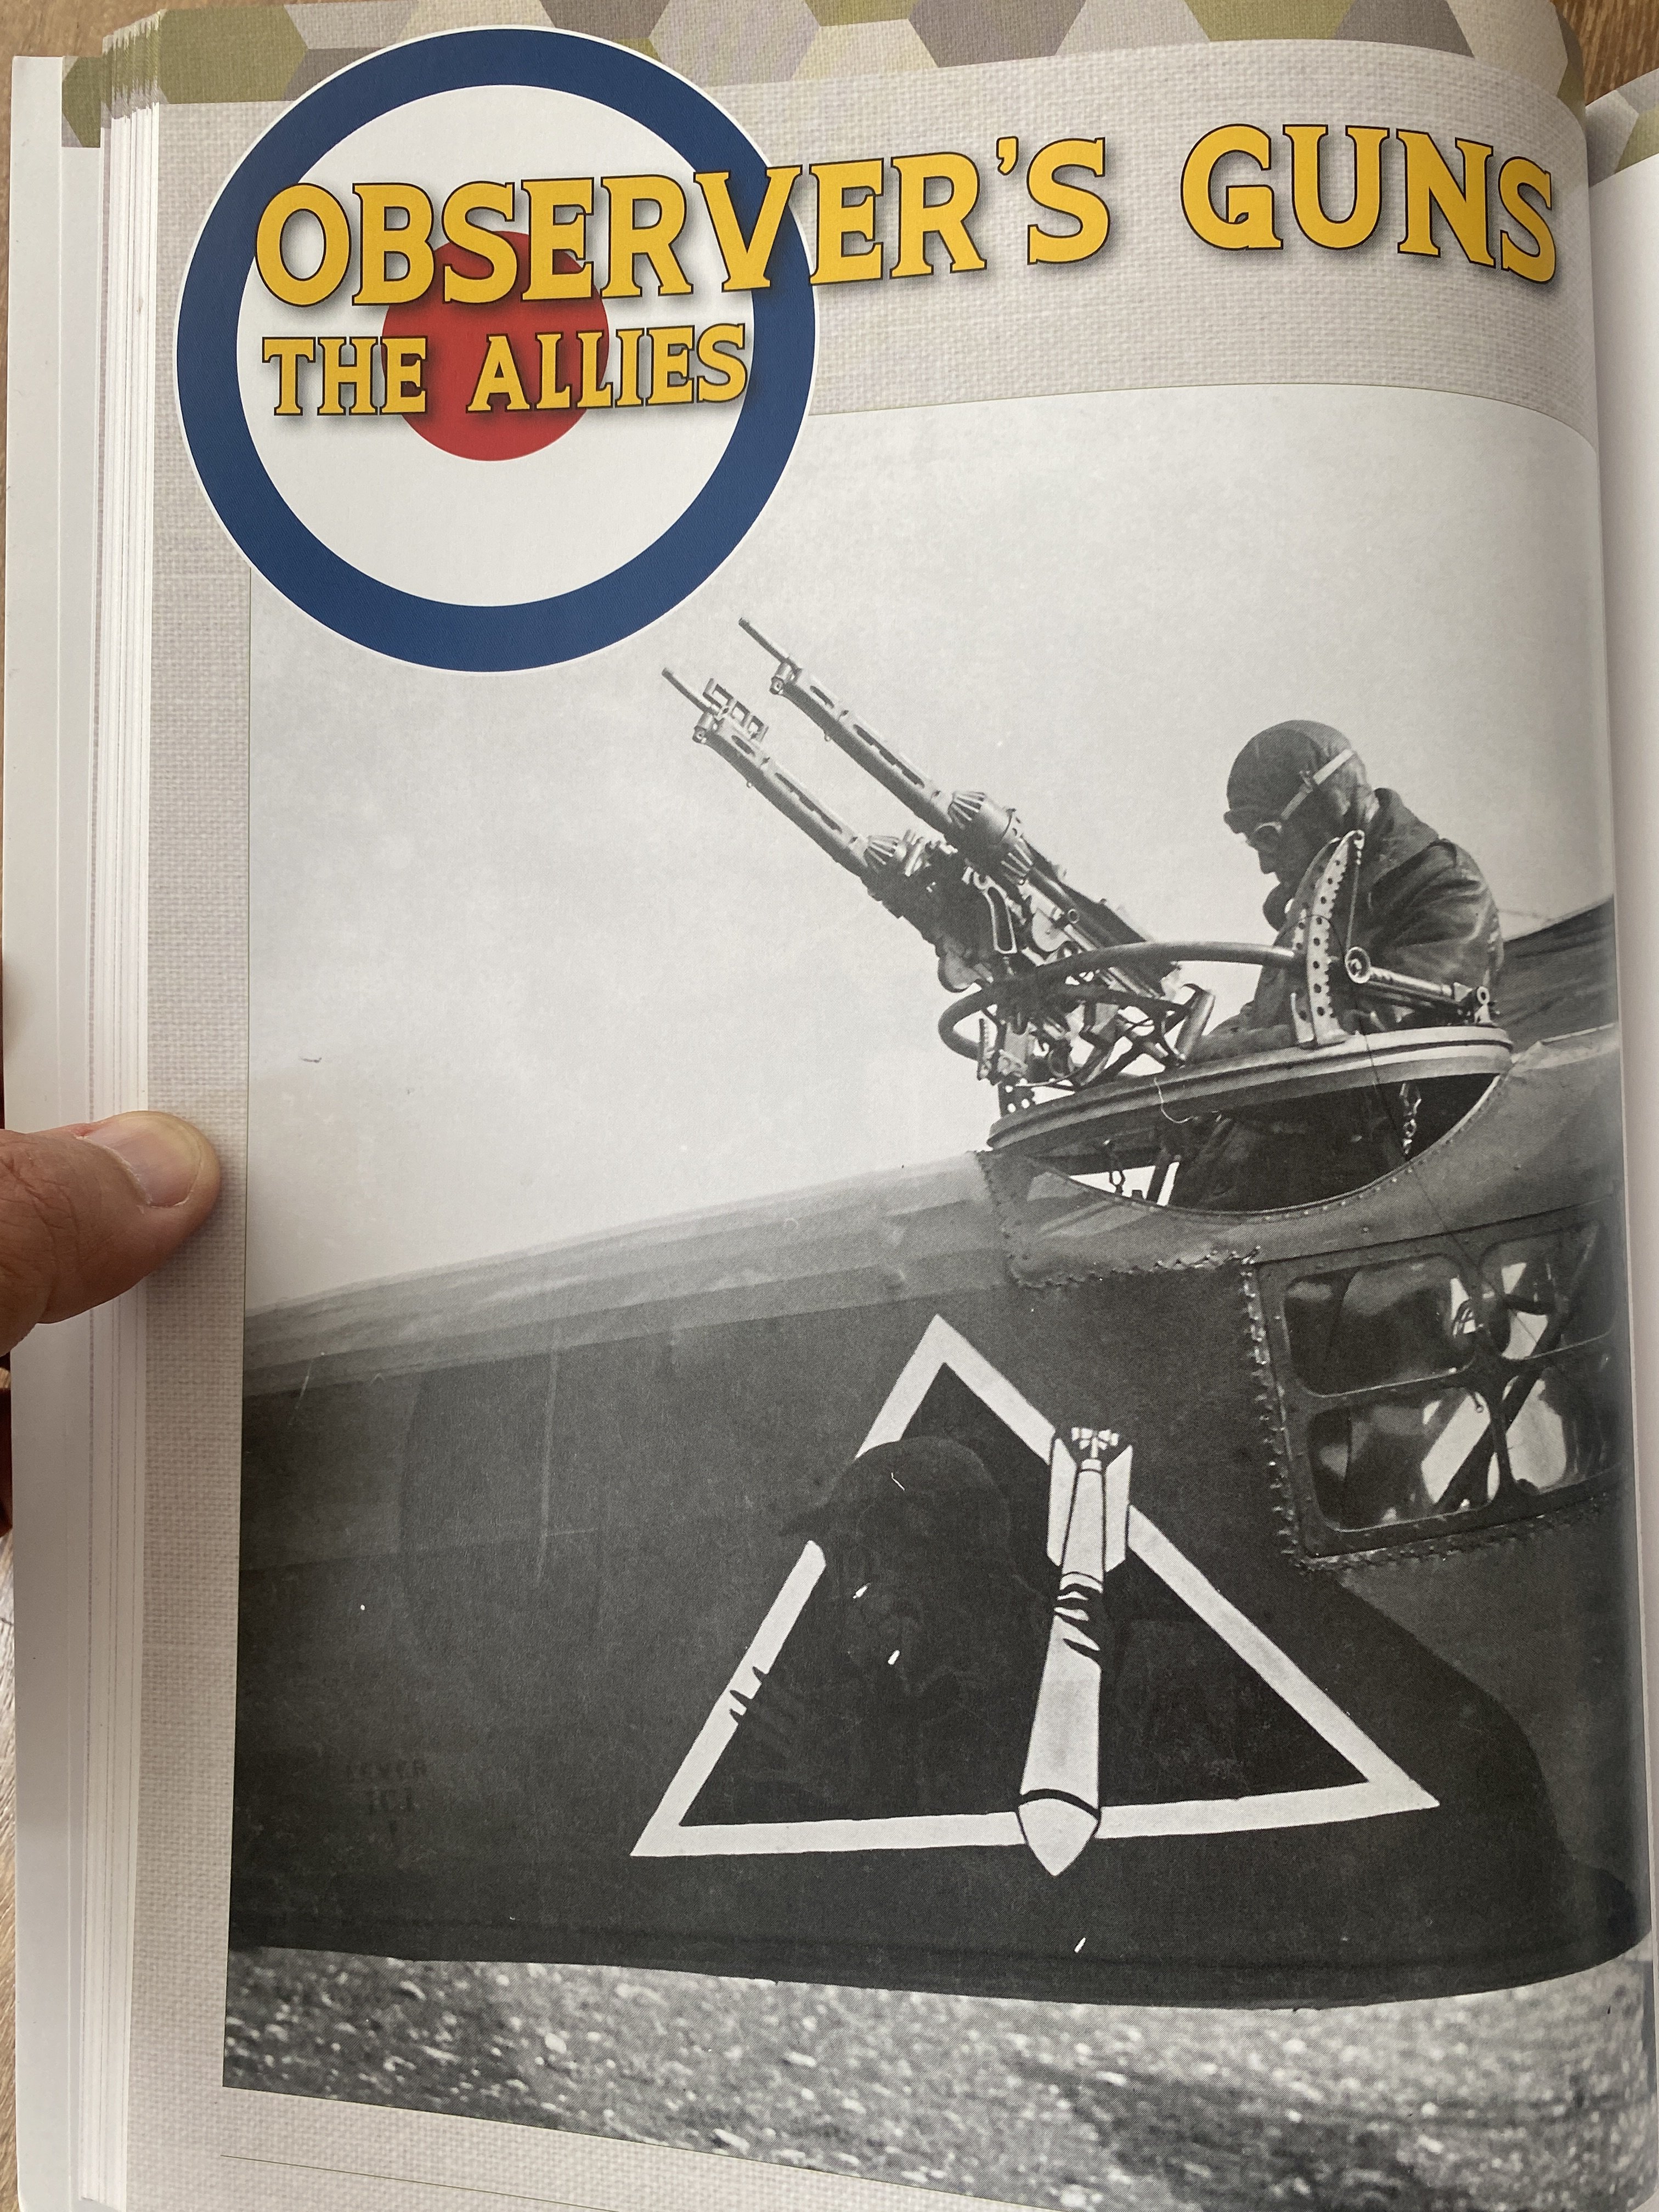
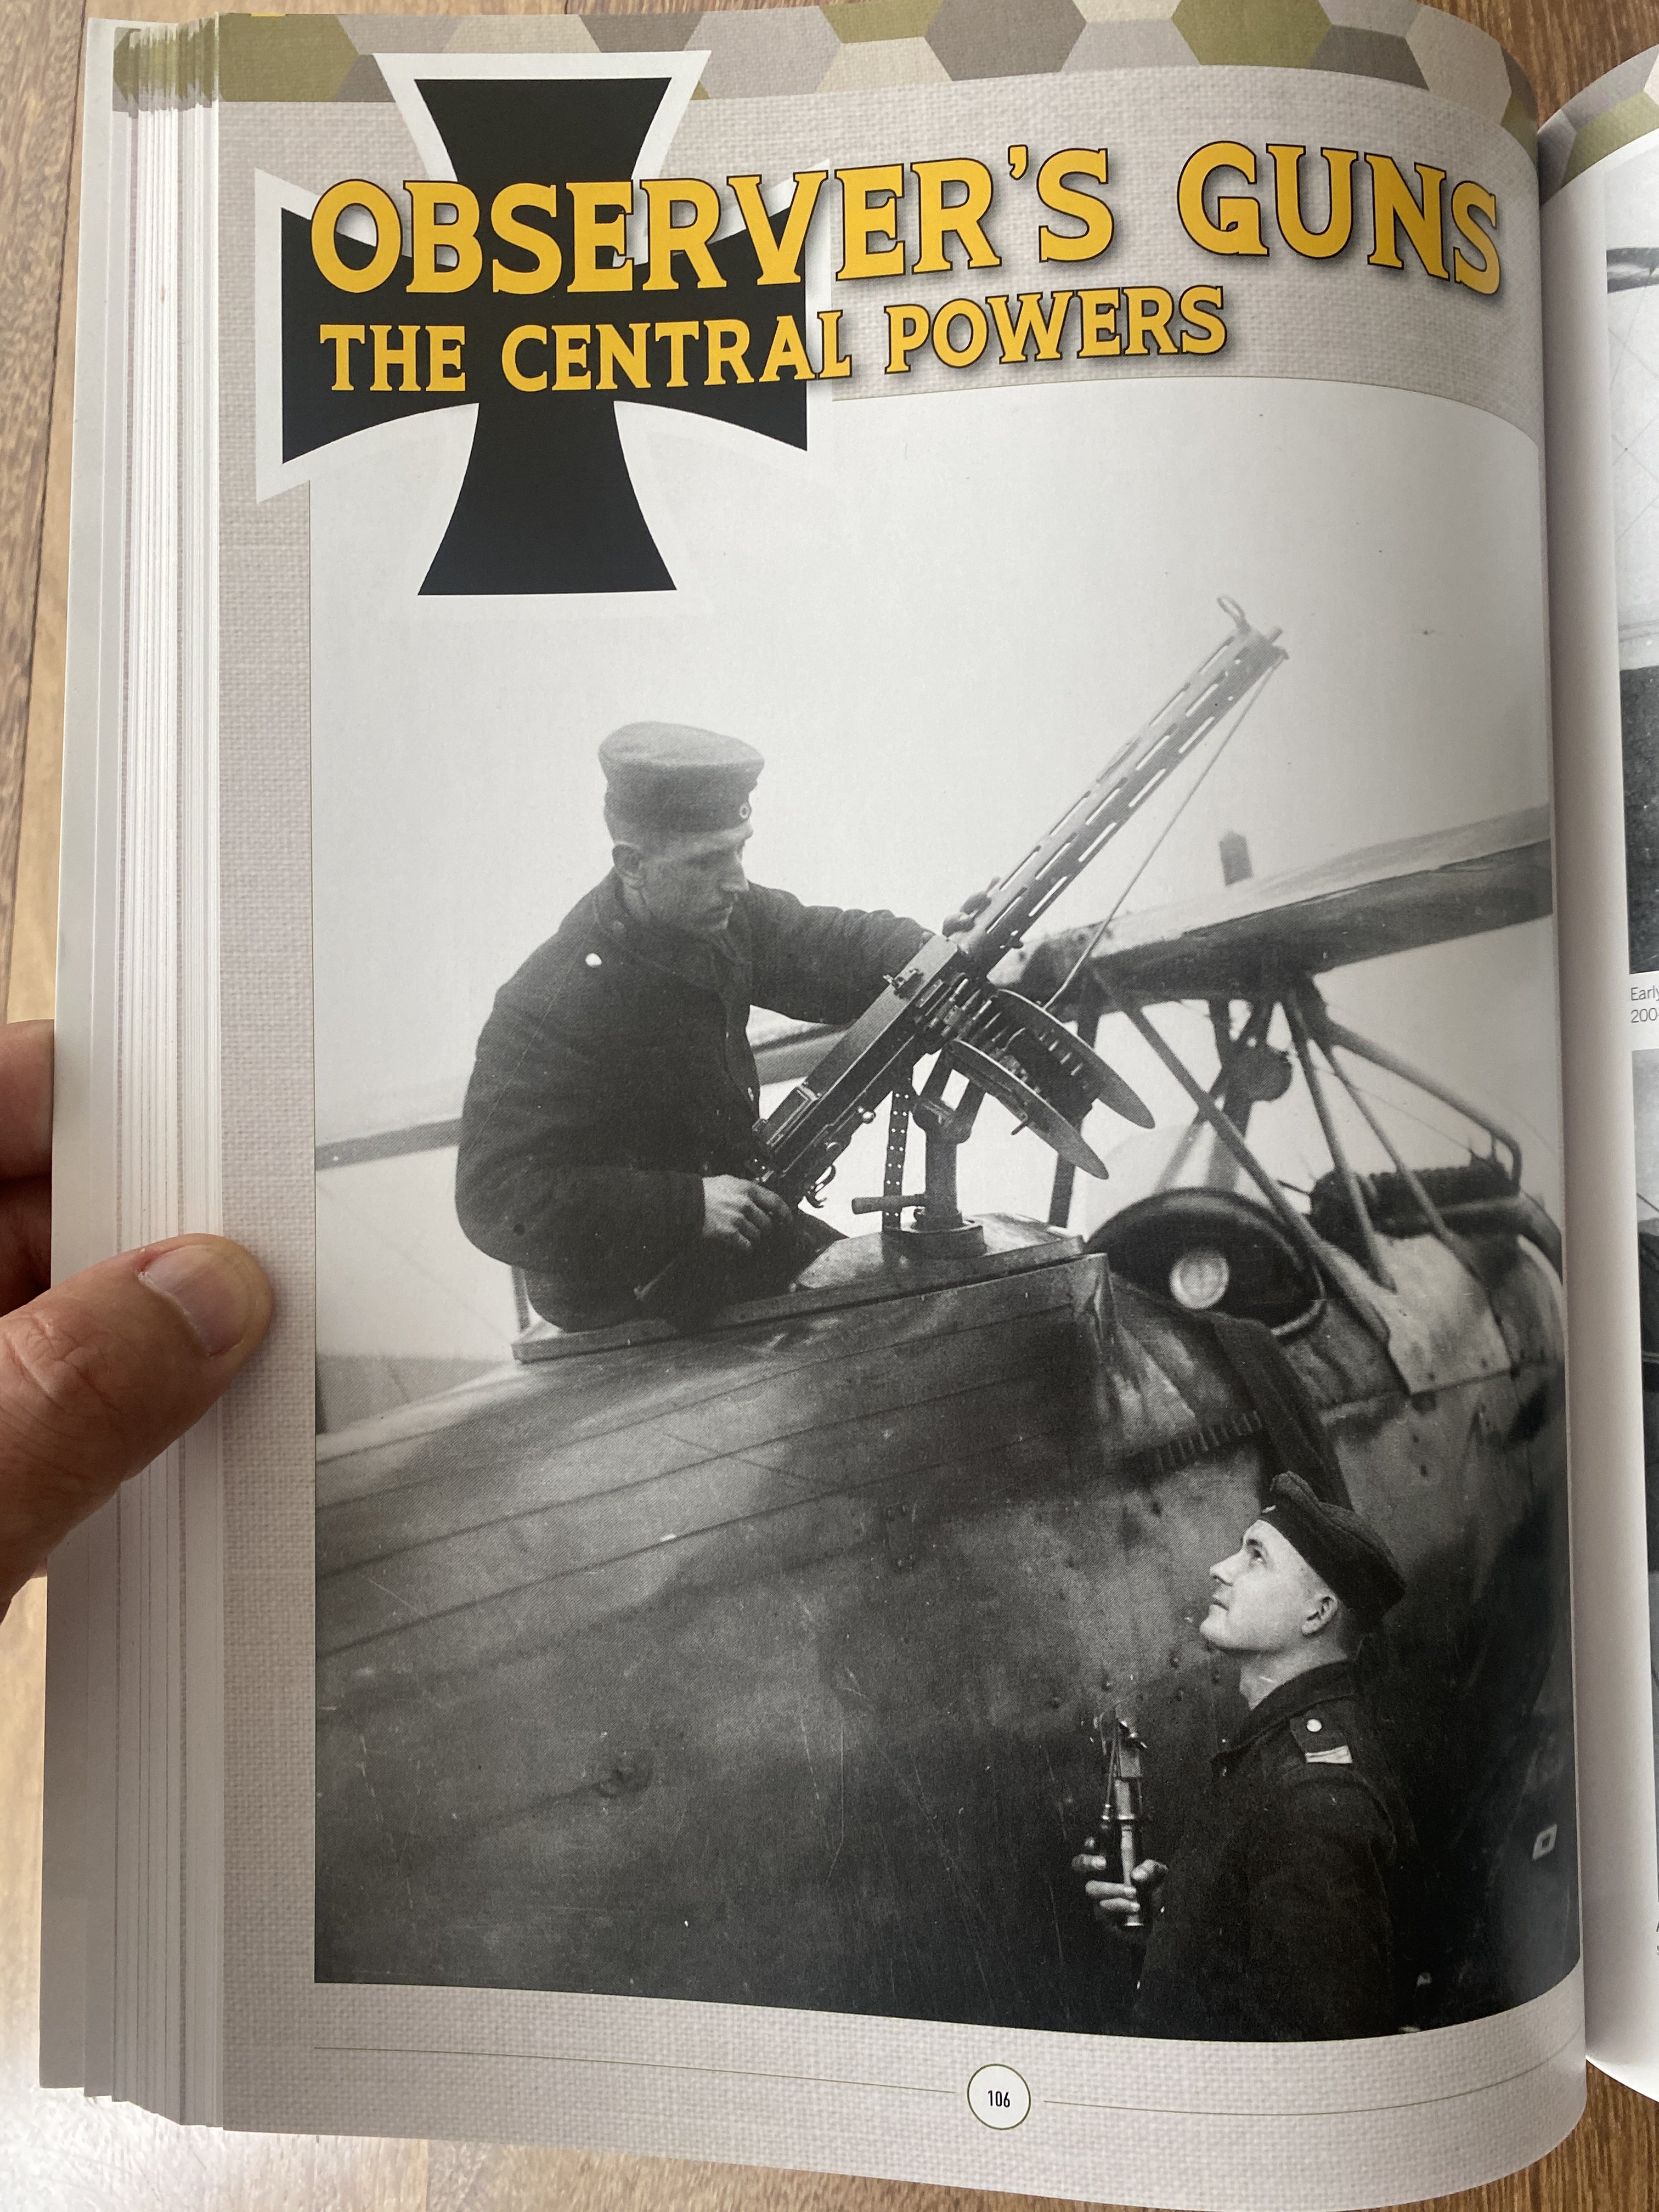
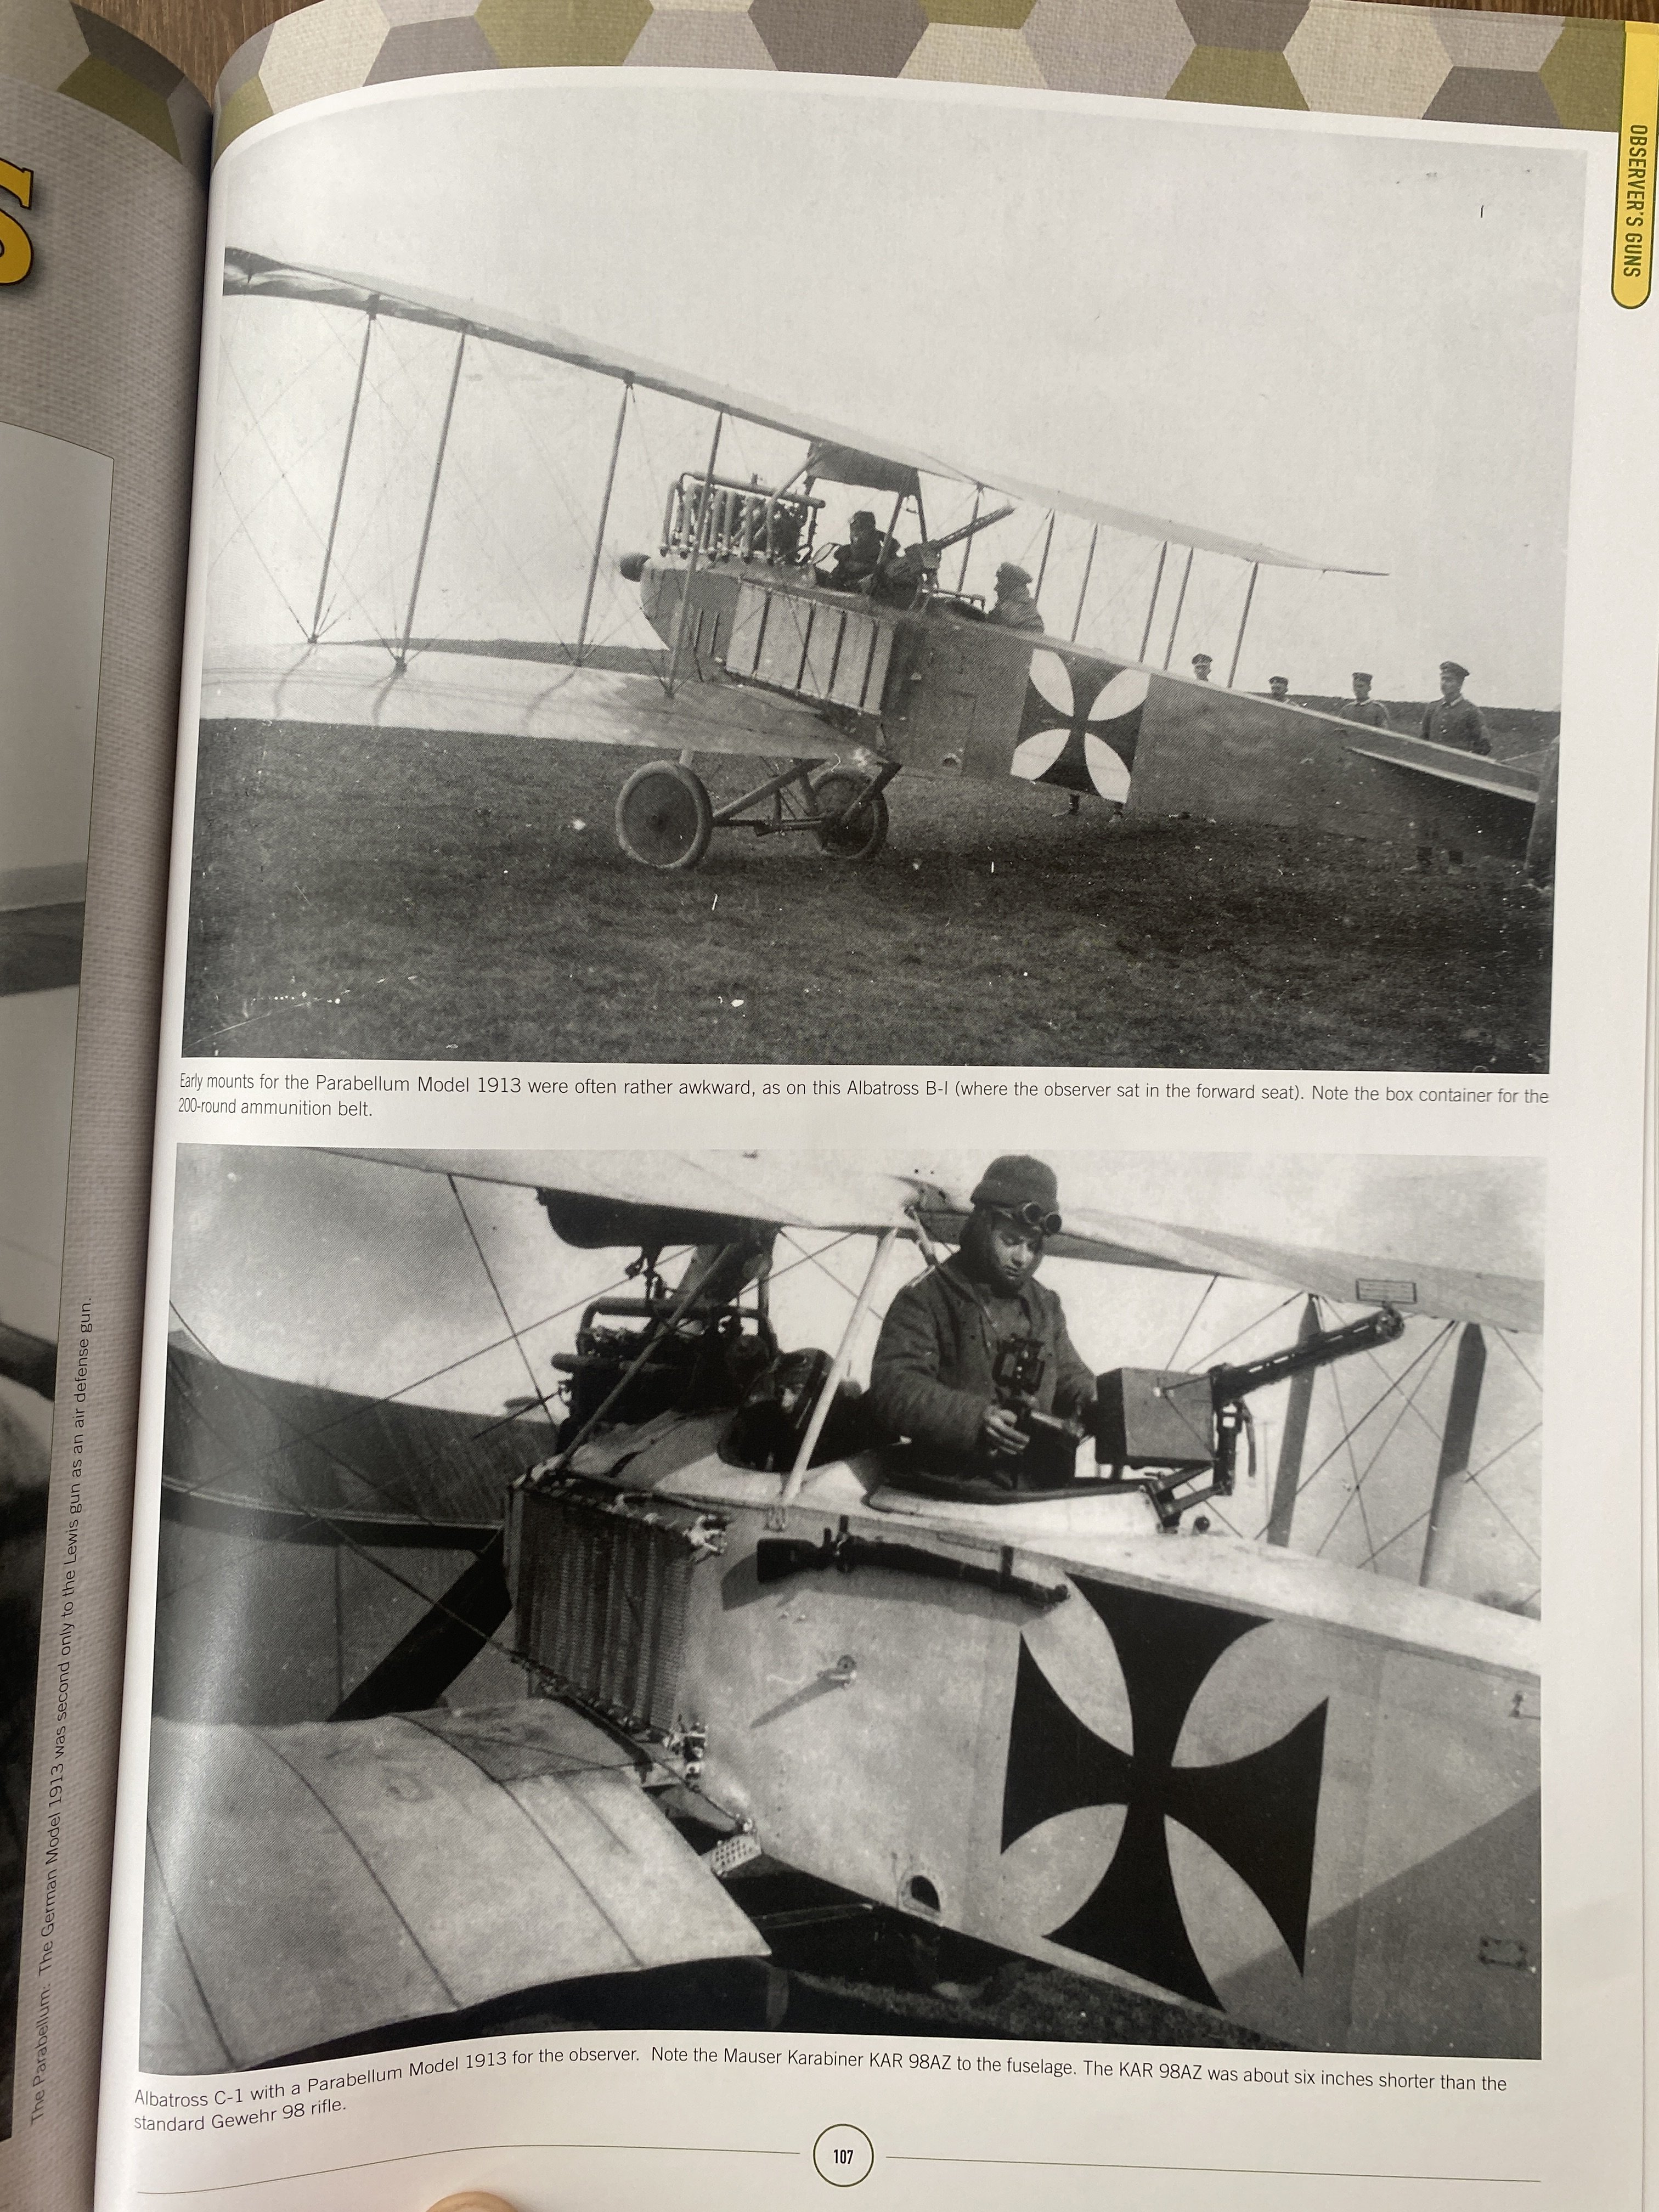
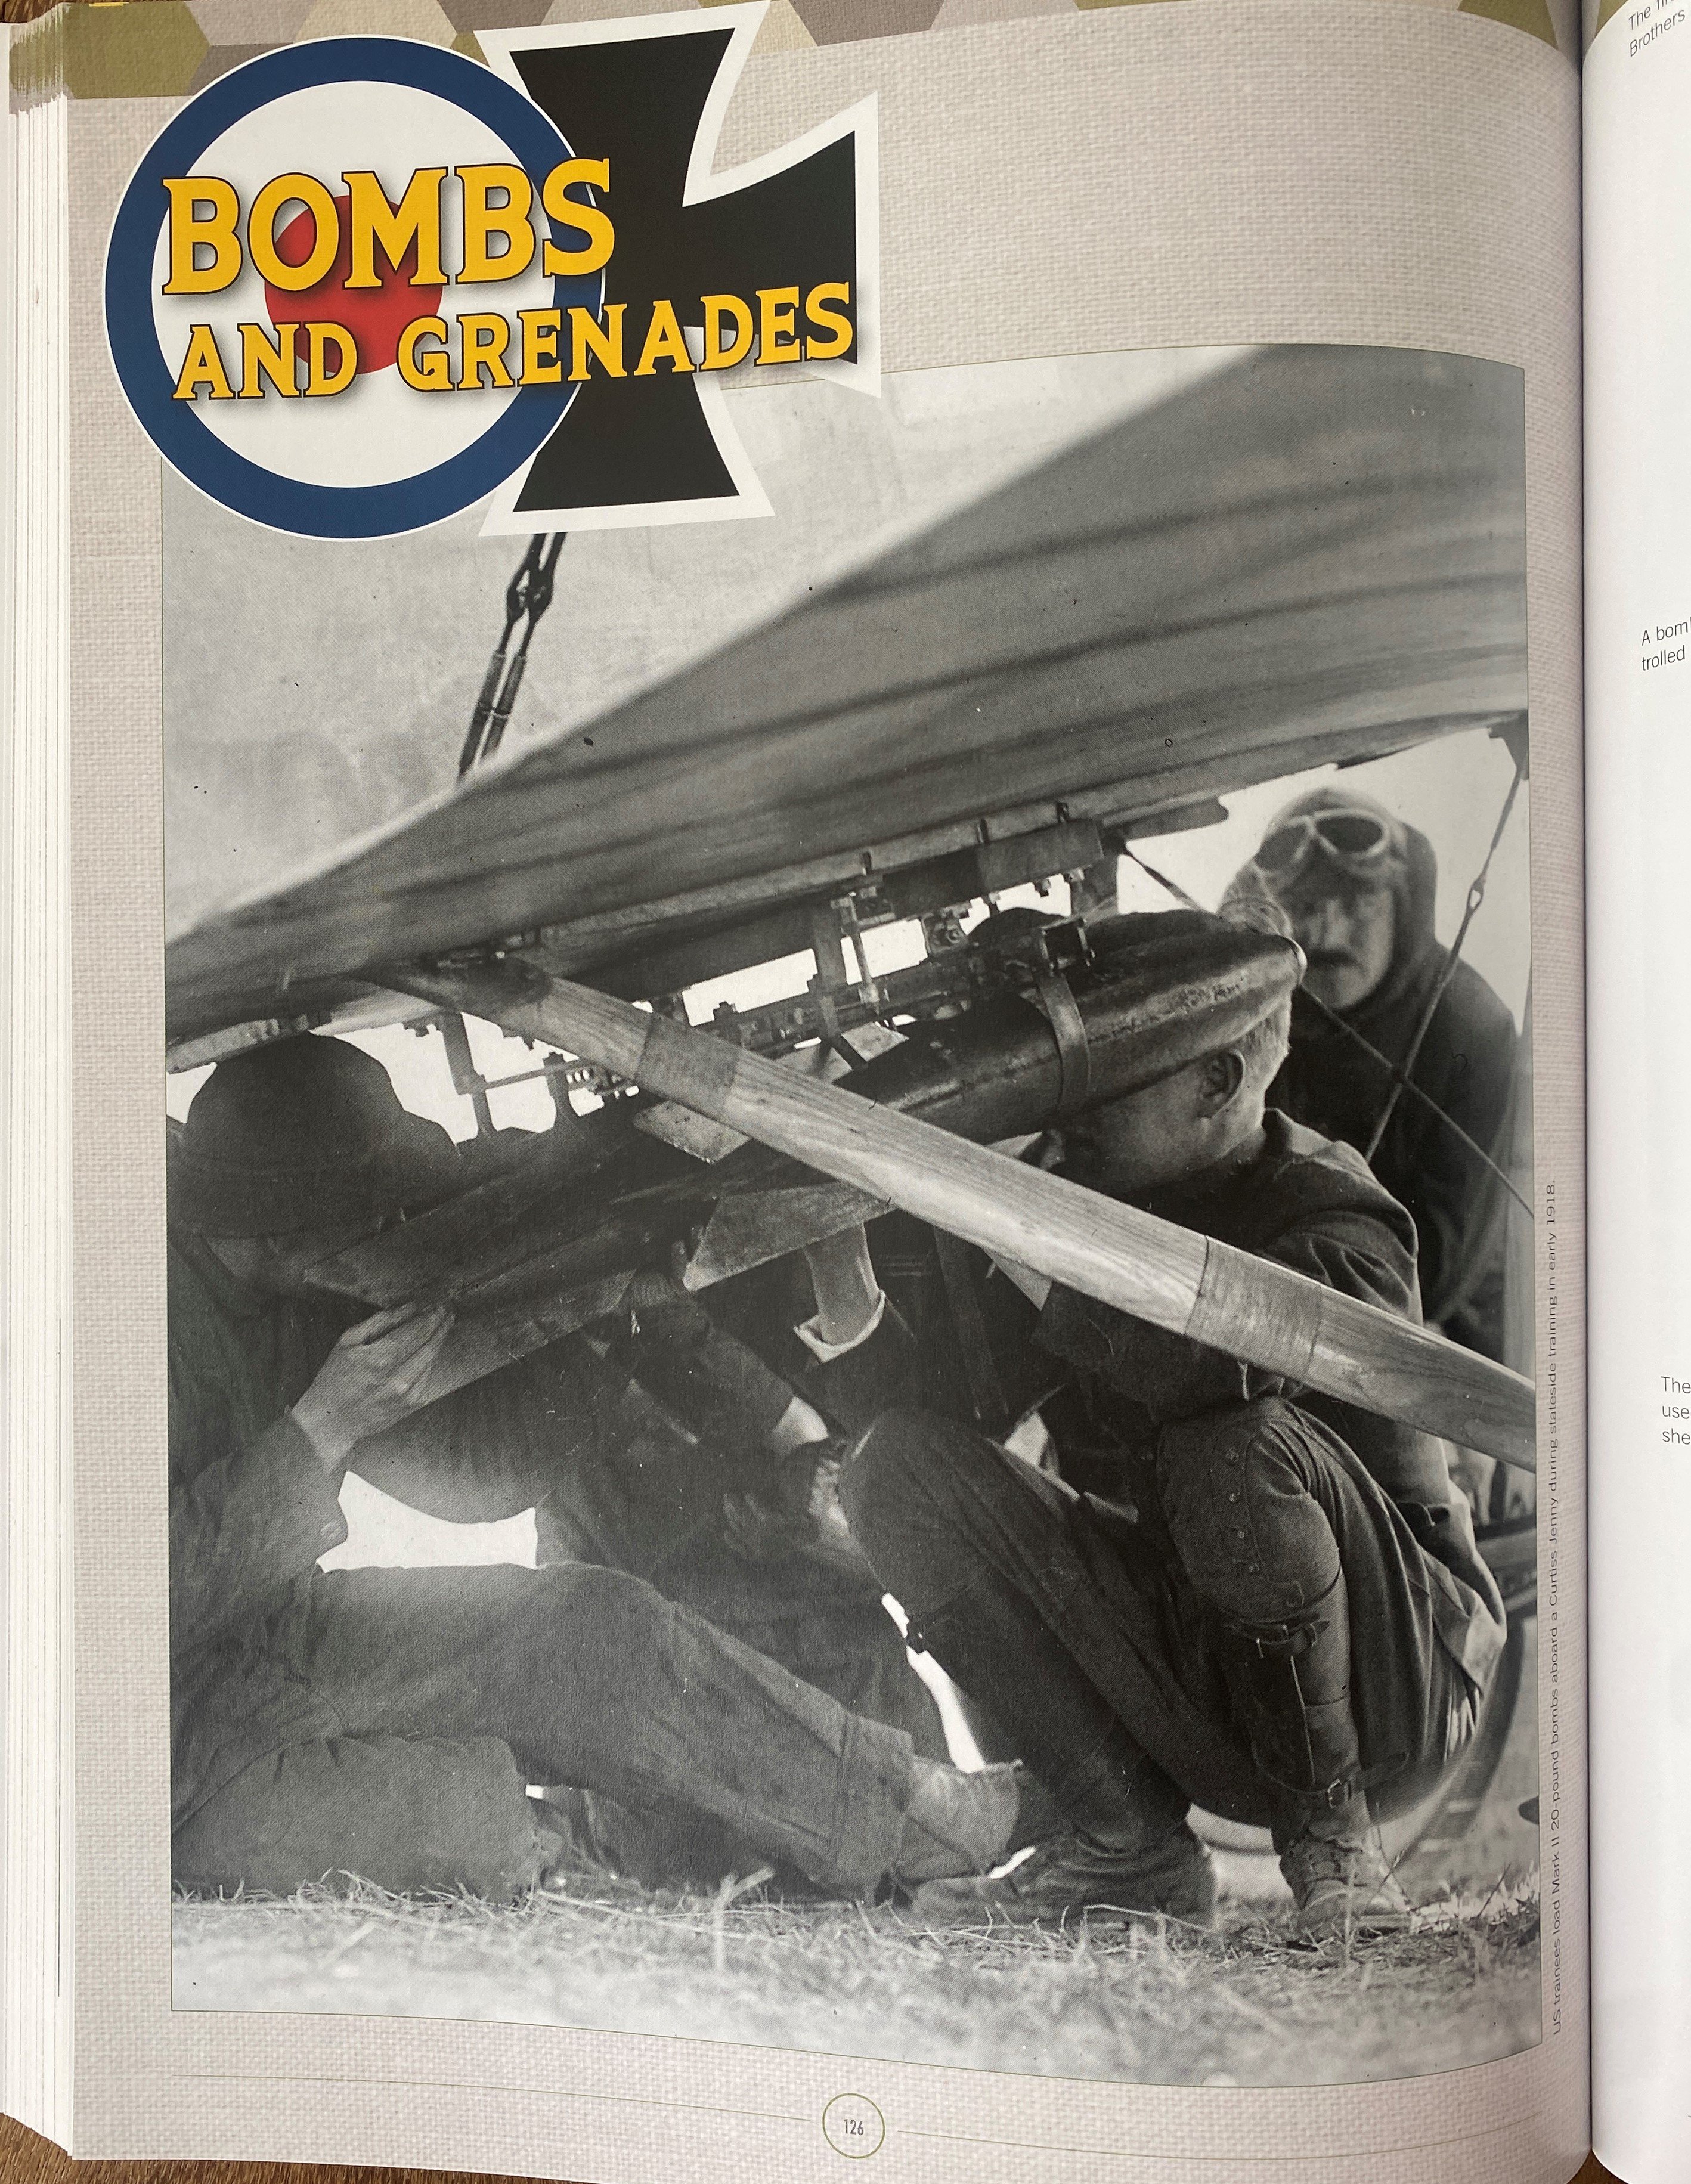
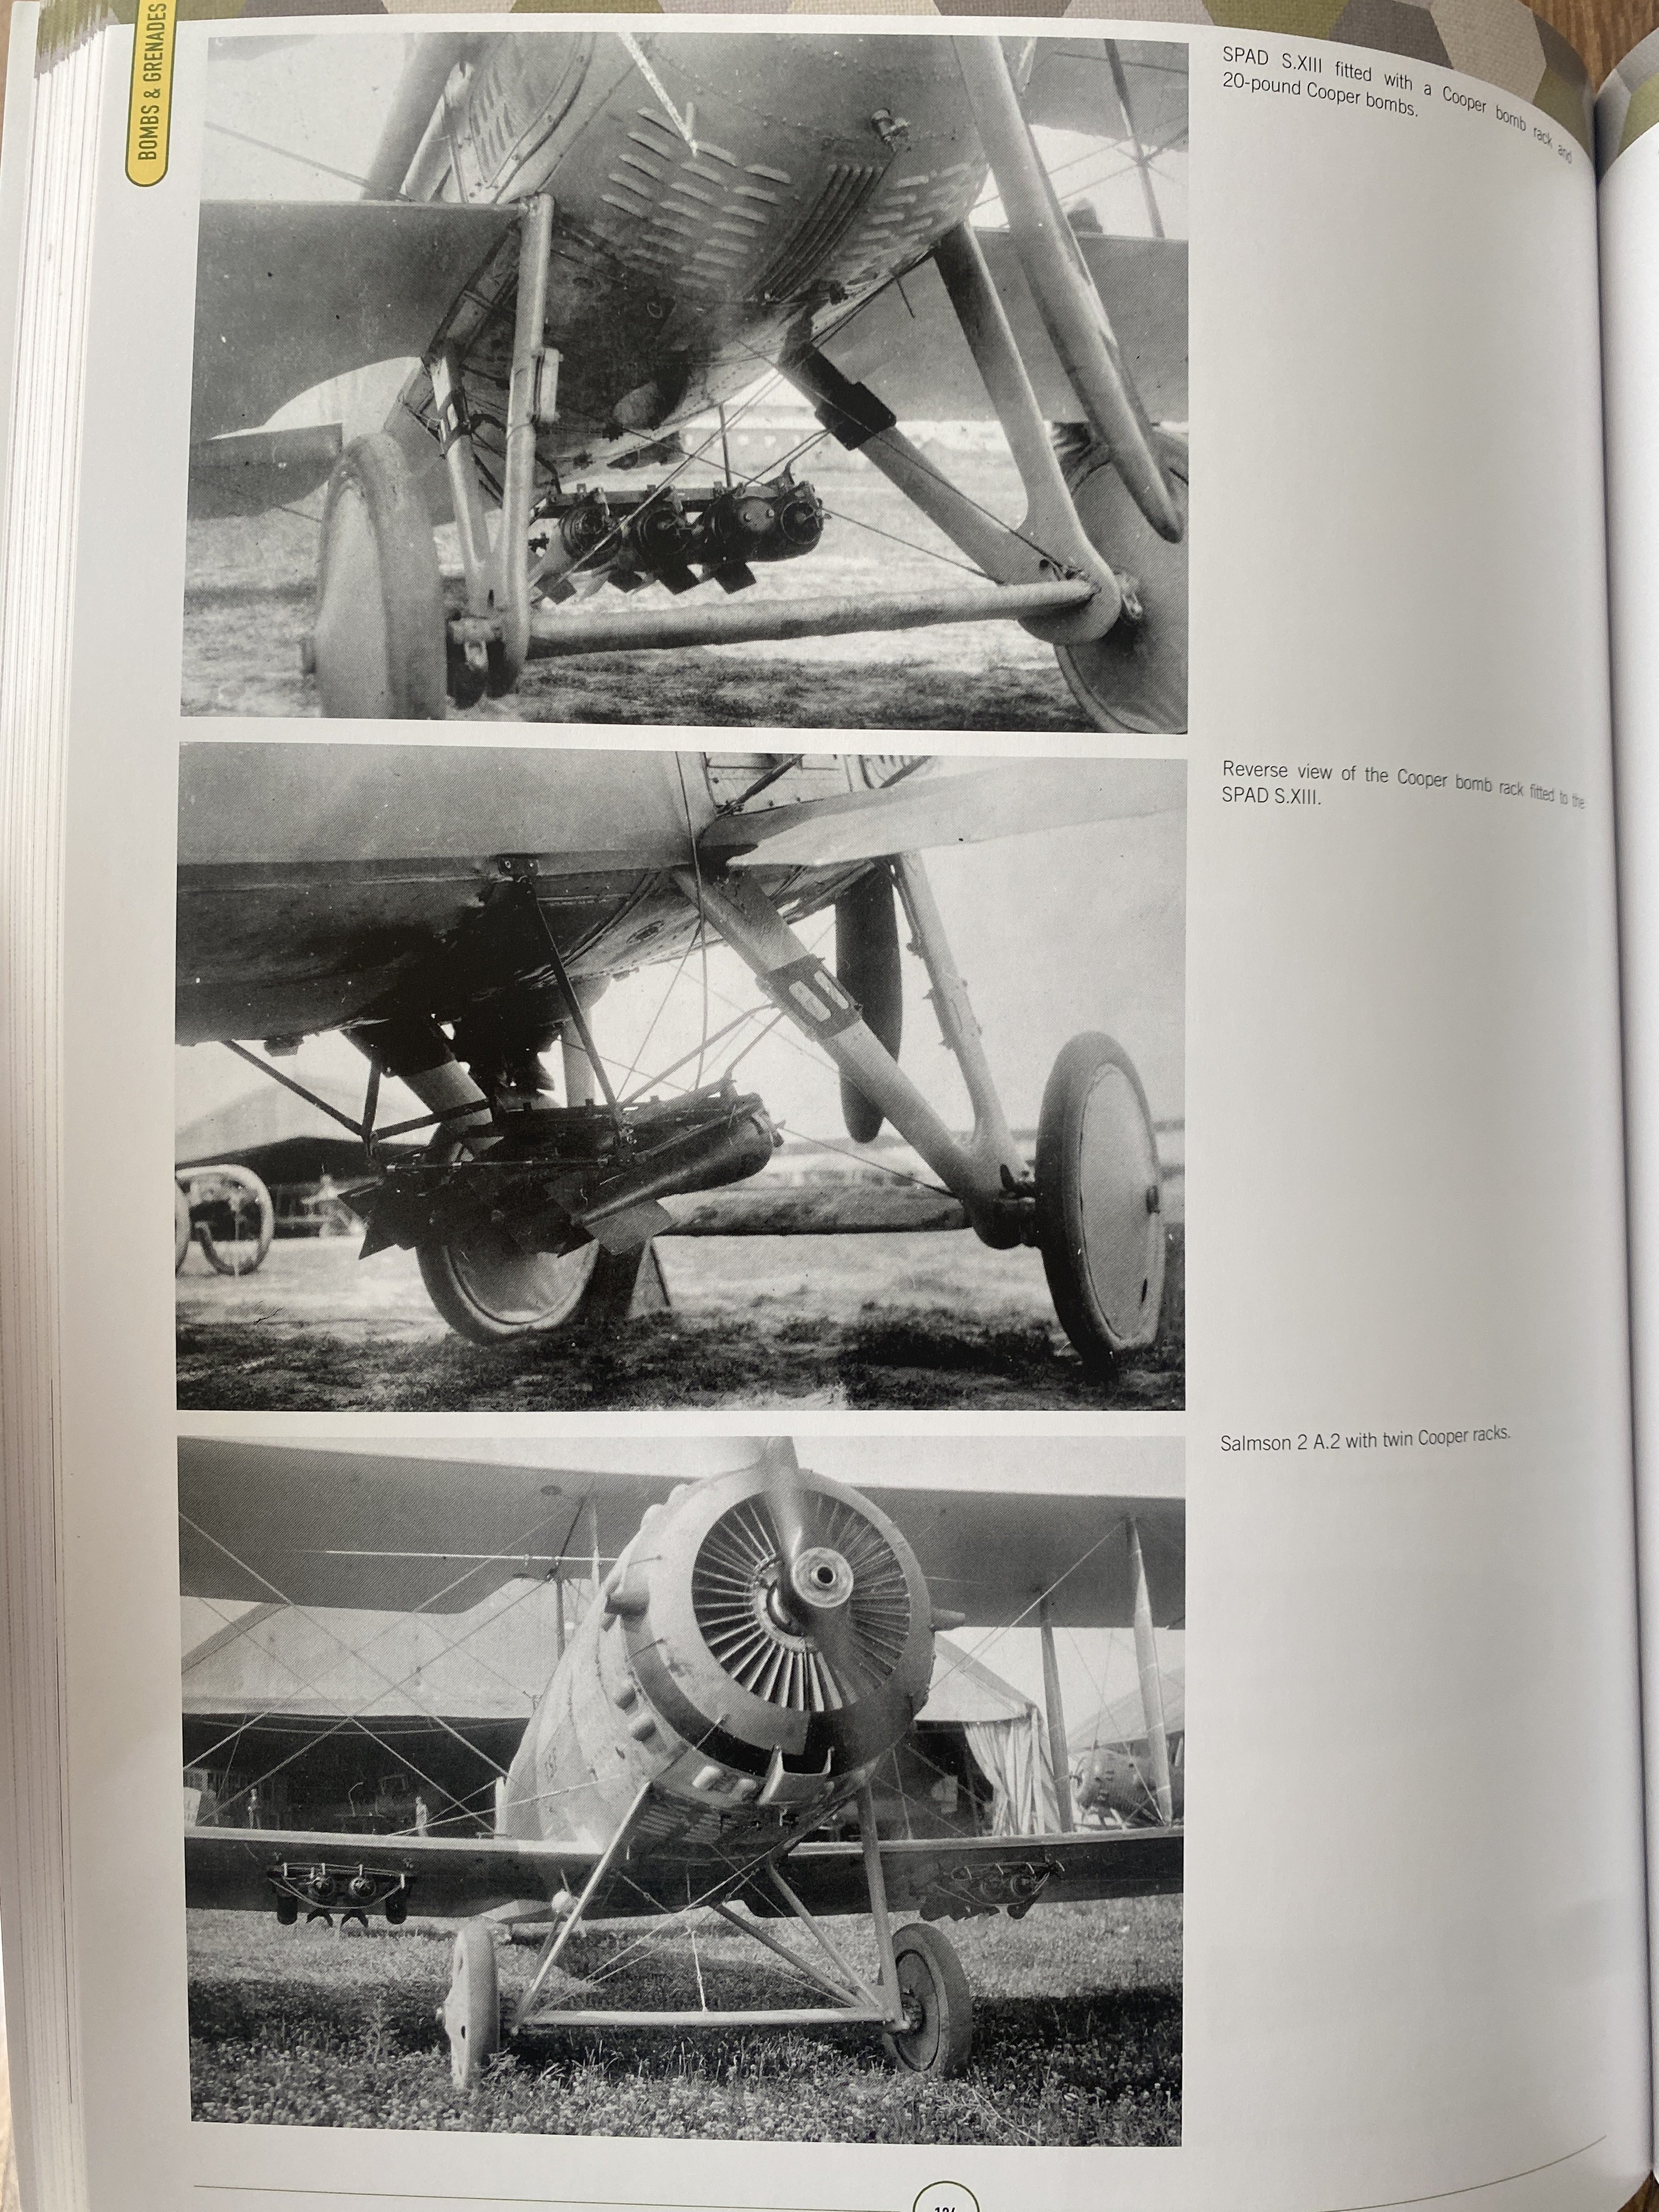
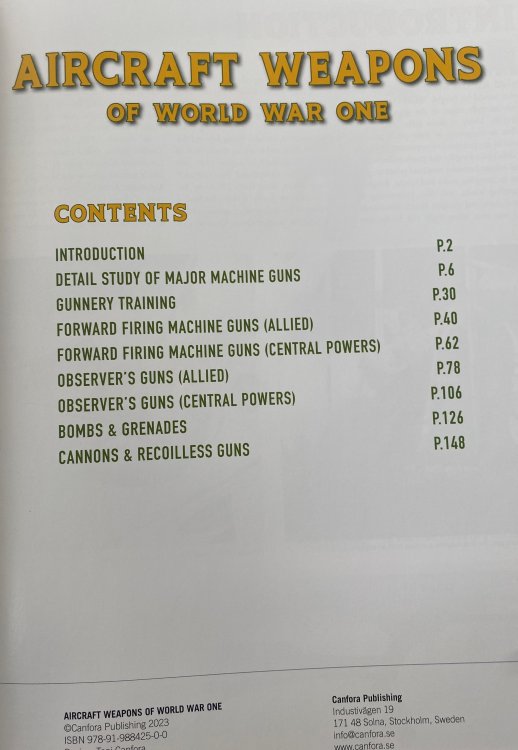
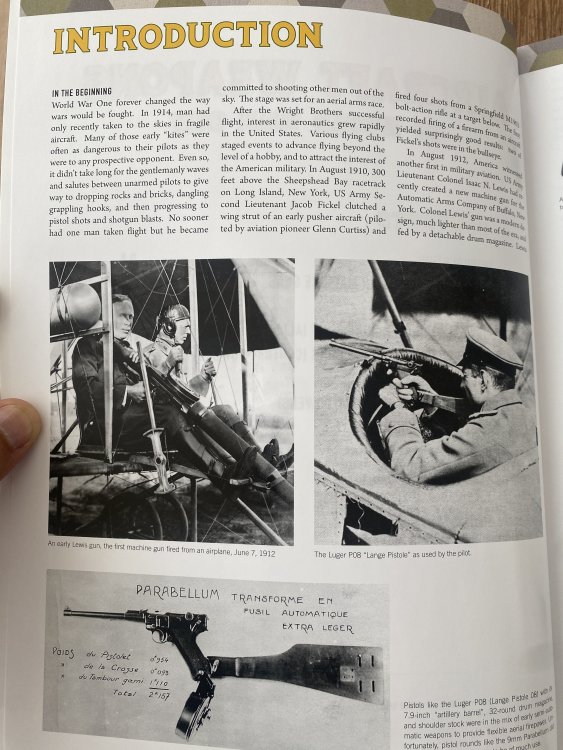
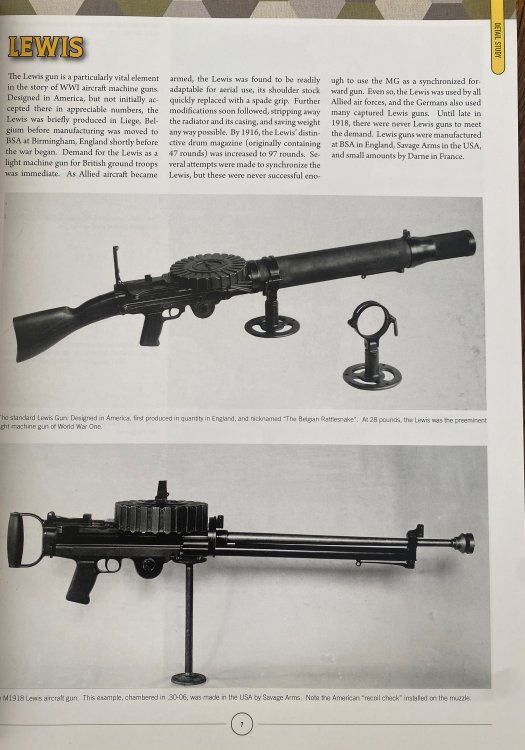
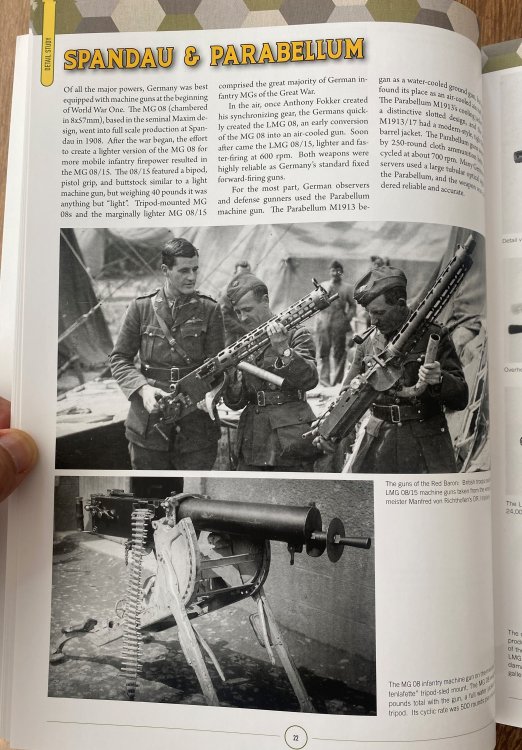
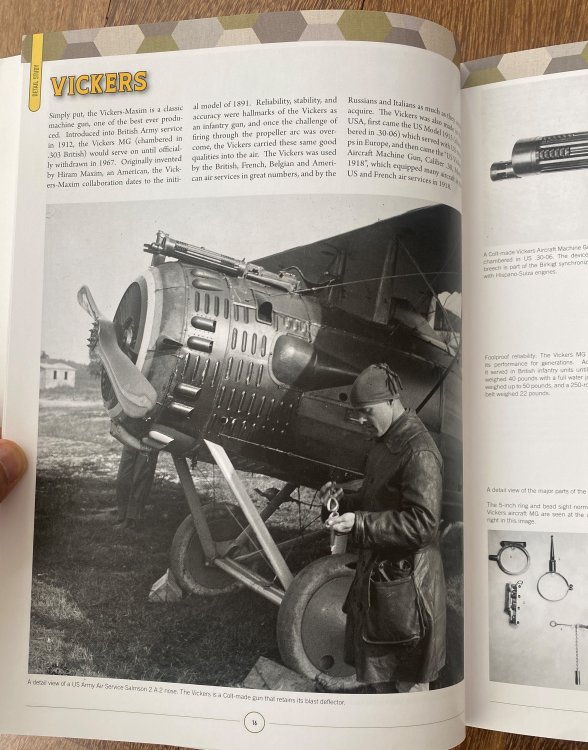
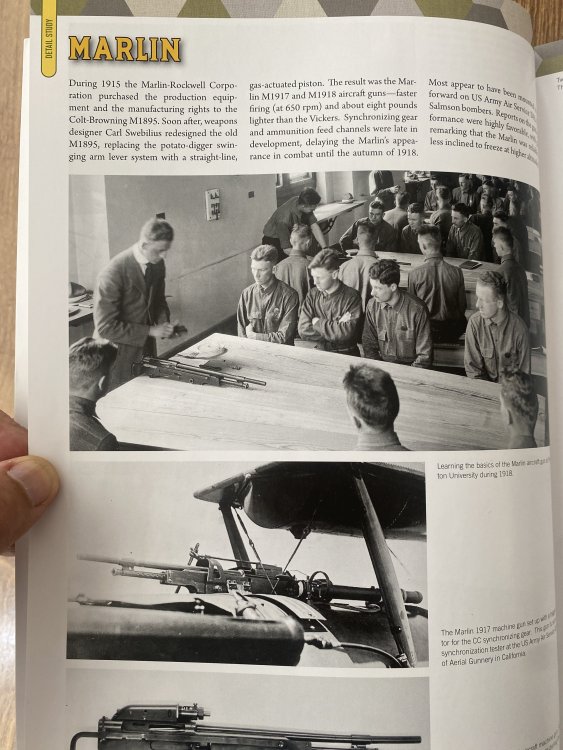
Aircraft Weapons Of World War One Canfora Publishing (Grafisk Form & Förlag) Author: Tom Laemlein ISBN: 978-91-988425-0-0 Price tag: 33€ (plus shipping) Canfora Publishing is working in full speed with a new book hitting the shelfs. And, once again, a very specific subject but a very welcome one to all World War One modeller. Aircraft weapons! Canfora Publishing is quite well known by their high quality standards books and this one at the first sigh, is not, at all, off route. It’s a soft cover, A4 size in with 160 pages, full of rare pictures and I mean full so it´s much more than just a weapon (gun) book. The inside paper is glossy/satin finish with high quality definition, giving a killer quality overlook to the book. The first thing I notice is the definition of the pictures! It looks like that they were took a few year (because they are white and black) but not 100 years ago. The clarity and definition are fantastic and you can see a lot of details, and that work is top notch, made by Toni Canfora. Bloody Fantastic. It`s divided in several chapters: - Introduction - Detail Study of major machine guns - Gunnery training - Forward firing machine guns (allied) - Forward firing machine guns (central powers) - Observer`s Guns (allied) - Observer`s Guns (central powers) - Bombs & grenades - Cannons & recoilless guns The detailed study is subdivided into sub-chapters, where the various machine guns of the epic are conducted in depth, namely, “Lewis”, “Vickers”, “Marlin”, “Spandau & Parabellum”, “Colt-Browning M1895”, “Schwarzlose , “Hotchkiss M1909”, “Fiat-Revelli & Madsen” In fact, there`s a quite deep study (at least for me) of several type of machine brands of the list of manufactures. There`s not a lot of text (but it´s enough and with good information) but it`s a lots of fantastic pictures with lots of close up of the machine guns where you can see the details. After the detail study chapters, all other are what the name says: The weapons on training and then on the specifics guns on the specific aircraft styles. At the very end of this book, a homage is paid to Henri Farre. Well Done!! Conclusion Another killer publication from Canfora Publishing and an awesome work by Tom Laemlein to give us the reader some interesinting pics and history. Beside the paper quality and printer definition, the content of this book is a quite inspirations one to all the World War I modellers as It`s a very good photographic book with detail history of guns included and the respective WWI Airplanes. The quality of the pics, their rarity (at least for me) and the side note text make this book a fantastic reading and a mojo inspiration. VERY Highly Recommend Francisco Guedes Our thanks to the Toni Canfora and Canfora Publishing for this review sample and all the support on LSM. To purchase this directly, click THIS link. If you found this review helpful and decide to purchase this product, please tell them you read about it at Large Scale Modeller! Disclaimer: all photos all in low quality to preserve and prevent all copyright.


.JPG.c7065c7070d98c0f8bcd51cd0b904ba4.JPG)
.JPG.6acffec1632f7886d3f41f1d00a59538.JPG)
.JPG.5b59655f1e8614f826c0c8e4894d1048.JPG)
.JPG.710112c56f98cf18ce66fc3d6a9312dd.JPG)