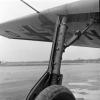
BevanBrooks Posted August 10, 2013 Share Posted August 10, 2013 Hi guy's. I finished Blue 8 a wile ago now and thought I'd share some photos. She was painted with Gunze acrylics and weathered with oils, pastels and coloured pencils. Final flat coat is Testors Dullcoat. Apart from brass tubing gun barrels and scratching the outboard cannon fairings, I built it oob. I did spend a lot of time aligning the cowling to the fuselage and luckily didn't need any filler. Phew!! Decals are from Eagle Cals. Sorry for the furryish photos.........don't know what's going on there they seem fine on HS. I have done a little more with the weathering since these were taken and finished the antenna lead in wire to the fuselage. Hope you enjoy the pics cheers Bevan 6 Link to comment Share on other sites More sharing options...
Artful69 Posted August 10, 2013 Share Posted August 10, 2013 ... one of the nicest 109s I have ever seen ... Er ... you mean 190's! ... Notice it's name??? "*boom* *boom* *boom* Errrrrrrrrrrrr - ika!" Link to comment Share on other sites More sharing options...
harvey boyer Posted August 10, 2013 Share Posted August 10, 2013 Very well done, Sir !..............Harv Link to comment Share on other sites More sharing options...
Chris S Posted August 11, 2013 Share Posted August 11, 2013 Beautiful job I love the weathering . Chris. Link to comment Share on other sites More sharing options...
Daywalker Posted August 11, 2013 Share Posted August 11, 2013 Now that has to be one of the nicest 190s I have ever seen, what a beautiful finish, Fantastic scheme also. Very well done and thanks indeed for sharing ;-) Martin. Agreed! Love your weathering style, looks good and used. Did you use oils to get that subtle marbled look? I like it VERY much. Link to comment Share on other sites More sharing options...
Dave J Posted August 11, 2013 Share Posted August 11, 2013 Thats beautiful! Hope your thinking of joining into the Focke Wulf Gb too! 1 Link to comment Share on other sites More sharing options...
Members Mikester Posted August 11, 2013 Members Share Posted August 11, 2013 Really, really well done! Link to comment Share on other sites More sharing options...
BevanBrooks Posted August 12, 2013 Author Share Posted August 12, 2013 Agreed! Love your weathering style, looks good and used. Did you use oils to get that subtle marbled look? I like it VERY much. Hi Daywalker glad you like it. Yes I did use oils (white) but only on the fuselage spine, from the wing root to the outer cannon covers, rear canopy section and mg cover and the cowling ..... I think! Link to comment Share on other sites More sharing options...
BevanBrooks Posted August 12, 2013 Author Share Posted August 12, 2013 Thats beautiful! Hope your thinking of joining into the Focke Wulf Gb too! Hi Dave, thanks. Yep thinking about it got a D9 in the stash, hardest part is deciding on a scheme! 1 Link to comment Share on other sites More sharing options...
Dave J Posted August 12, 2013 Share Posted August 12, 2013 Tell me about it Bevan! Took me three days to come to my final scheme! Link to comment Share on other sites More sharing options...
NOVAModeler Posted August 13, 2013 Share Posted August 13, 2013 Lovely work! Love the weathering Link to comment Share on other sites More sharing options...
mikec Posted August 18, 2013 Share Posted August 18, 2013 . . . Greetings Brevan; Another excellent example of a Luftwaffe aircraft .......... Very nice....... the weathering is lovely.......... . It does not get much better than this ....................... . Mike . . . Link to comment Share on other sites More sharing options...
BradG Posted August 22, 2013 Share Posted August 22, 2013 Supurb. Link to comment Share on other sites More sharing options...
Matt_ Posted August 24, 2013 Share Posted August 24, 2013 Like most everyone else, I am very impressed by the weathering... How did you apply the oil paint..? As a filter, dot filter... any info welcomed.. Matt Link to comment Share on other sites More sharing options...
BevanBrooks Posted August 25, 2013 Author Share Posted August 25, 2013 First of all thanks to everybody for your kind comments, appreciated. Matt, the oil paint was firstly added as a wash/filter using black and burnt umber and dabbed off rather than wiped in the direction of the airflow to get a more random effect. I re cleared it and added pin washes. final use of oils was over the flat coat, dot filter using white. Only the second time using this method so I was a little nervous as I had it looking pretty good and didn't want to ruin it. This was used over the MG cover, engine cowling, rear canopy section, fuselage spine and from the wing roots out to the cannon covers. Hope this helps cheers Bevan Link to comment Share on other sites More sharing options...
Matt_ Posted August 30, 2013 Share Posted August 30, 2013 Certainly does help... Damn good effect for 2nd attempt,,, Matt Link to comment Share on other sites More sharing options...
Simon W. Atack Posted September 13, 2013 Share Posted September 13, 2013 That is a stunning '190 model. A lot of hard work and skill paying off! Brilliant! Link to comment Share on other sites More sharing options...
One-Oh-Four Posted September 13, 2013 Share Posted September 13, 2013 Wow, that looks really good! Congrats on a beautiful model! Link to comment Share on other sites More sharing options...
nmayhew Posted September 14, 2013 Share Posted September 14, 2013 Bevan Thanks for bringing your work here - looks fantastic One suggestion / observation: the decals look super bright and sharp compared to the subdued feel of the rest of the plane, and therefore a little out of step Brilliant mottle though - wish I could pull effects like that off myself Many thanks again Nick Link to comment Share on other sites More sharing options...
Wingco57 Posted September 20, 2013 Share Posted September 20, 2013 Did you apply the mottle freehand? Cees Link to comment Share on other sites More sharing options...
BevanBrooks Posted September 20, 2013 Author Share Posted September 20, 2013 Did you apply the mottle freehand? Cees Hi Wingco57, yes I did apply it freehand. I usually rub any overspray off with 3000 pads lightly though! 1 Link to comment Share on other sites More sharing options...
ScaleModelFanatic Posted September 30, 2013 Share Posted September 30, 2013 My first post on the forum and must say that is a beautiful and superbly built FW 190, the cammo and weathering is magnificent. Fred Link to comment Share on other sites More sharing options...
Grant Posted October 6, 2013 Share Posted October 6, 2013 Gorgeous FW190! Love it , congratulations - you must be very proud of it, deservedly so. Link to comment Share on other sites More sharing options...
Plastic surgeon Posted October 7, 2013 Share Posted October 7, 2013 Very nice build! Yep.....very nice indeed!!! Link to comment Share on other sites More sharing options...
kahunaminor Posted October 15, 2013 Share Posted October 15, 2013 Great stuff Bevan! Thanks for posting. Regards, Kent Link to comment Share on other sites More sharing options...

Recommended Posts
Create an account or sign in to comment
You need to be a member in order to leave a comment
Create an account
Sign up for a new account in our community. It's easy!
Register a new accountSign in
Already have an account? Sign in here.
Sign In Now