krow113 Posted October 15, 2019 Author Share Posted October 15, 2019 Pretty amazing they would put their logo , in focus , on blurry pics! Getting less and less surprised at how absolutely stupid things can get. I actually did some work on The Gotha today , unblurry pics in a short while. 1 Link to comment Share on other sites More sharing options...
krow113 Posted October 29, 2019 Author Share Posted October 29, 2019 Re-ignited: https://www.britmodeller.com/forums/index.php?/topic/235016614-a-gotha/page/14/ I would put more here but cant get around the Pukebucket damage to the thread. 1 Link to comment Share on other sites More sharing options...
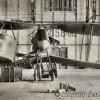
krow113 Posted December 23, 2019 Author Share Posted December 23, 2019 I have tried with the photo hosting agent to get the pics sorted here to NO avail. You can see the work to date an other forums: Des' WW1 aircraft forum , and Britmodeller. As my year winds down ,and final Christmas gifts are finished an picked up , delivered , I look to the modelling situation and find a small number of seemingly abandoned projects. Never abandoned , but set aside for future consideration , the work never leaves my mind. Guys here are looking like they want to get on with things rather than have go's at each other. A Gotha is poised for some killer work , which will begin the day after Christmas. A clear paln is in place , easily 50% of the work is done , there are components for the work all over my shop , including the jig , holding the top wing for the work needed there: Larger components poised for work: Recent work : First up will be the painting of the undersides and lining up the masks for the 5 color handpainted polygonal night camo; Gratuitous magpie shots: Thanks for looking and please look at the work as suggested on the other forums. 8 1 Link to comment Share on other sites More sharing options...
GazzaS Posted December 25, 2019 Share Posted December 25, 2019 That engine detail is unreal! Merry Christmas! 3 Link to comment Share on other sites More sharing options...
DocRob Posted December 25, 2019 Share Posted December 25, 2019 4 hours ago, GazzaS said: That engine detail is unreal! Merry Christmas! Gaz is right, the Gotha is looking great, but the engine is something else. Cheers Rob 3 Link to comment Share on other sites More sharing options...
krow113 Posted December 26, 2019 Author Share Posted December 26, 2019 Thanks boys! Work re-commences with the major seam created by the top wing cementing. DB worked too well as some glue oozed into the strut mounting holes , easily cleared away with a drill: Strongly recommend a jig or holder of some sort: I decided masks to help alleviate paint build up on the rigging 'balls' were in order. Working on those and dealing with Boxing Day customers... 2 Link to comment Share on other sites More sharing options...
Administrators Clunkmeister Posted December 28, 2019 Administrators Share Posted December 28, 2019 Moved to this section at the request of the OP, y’all. 3 Link to comment Share on other sites More sharing options...
TJTX Posted December 28, 2019 Share Posted December 28, 2019 Ok, that paint work and engine detailing is absolutely incredible!!!! The skill on this forum is mind boggling. 4 Link to comment Share on other sites More sharing options...
Administrators Clunkmeister Posted December 28, 2019 Administrators Share Posted December 28, 2019 3 minutes ago, TJTX said: Ok, that paint work and engine detailing is absolutely incredible!!!! The skill on this forum is mind boggling. Yeah it is, Tony. 3 Link to comment Share on other sites More sharing options...
krow113 Posted December 28, 2019 Author Share Posted December 28, 2019 We can but try... 7 1 Link to comment Share on other sites More sharing options...
Bomber_County Posted December 28, 2019 Share Posted December 28, 2019 Steve, great build but those engines are sublime. Loved the wood finish as well...... 2 Link to comment Share on other sites More sharing options...
Daniel_Roxy Posted December 28, 2019 Share Posted December 28, 2019 This is all absolutely stunning. The detailing on the engines is amazing. Can't wait to see more 2 Link to comment Share on other sites More sharing options...
krow113 Posted December 28, 2019 Author Share Posted December 28, 2019 Phil , GD32 - Thanks for lookin'! One thing I do is go back and add to posts as the work progress'. I'll do that here with the underside paint work. Starting with ivory acrylic primer: Balls masked: Royal blue: I like it 'speckly' like that , not too fine a spray. How a jig works: Almost straight white to begin knocking them down: A custom light blue mix gets us almost there : 3 Link to comment Share on other sites More sharing options...
krow113 Posted December 31, 2019 Author Share Posted December 31, 2019 Marathon proprietary pink rib tape decal application results in a nice coloring underside: 2 1 Link to comment Share on other sites More sharing options...
krow113 Posted January 4, 2020 Author Share Posted January 4, 2020 Yeah , I'll take these: Masked and painted with masks developed 4 or 5 years ago..... Sealing with the 50/50 Future/IPA mix shows its worth as not a single rib tape was pulled off. Masks were kept damp and only the very edge pressed home with a burnishing tool. 3 1 Link to comment Share on other sites More sharing options...
krow113 Posted January 7, 2020 Author Share Posted January 7, 2020 And the wee masks for the balls get used with gunmetal paint: The undersides are now all based and sealed. Looking at the weathering and detail treatments now. 3 Link to comment Share on other sites More sharing options...
krow113 Posted January 19, 2020 Author Share Posted January 19, 2020 A light tan wash denudes the blue a little and begins to tie the colors together: A big difference from just a brush on and quick wipe off! Taking my time picking the colors... 5 Link to comment Share on other sites More sharing options...
krow113 Posted January 19, 2020 Author Share Posted January 19, 2020 Even moving slowly , taking notes , checking continuously , trying to think of all possibilities I can still bugger it up. Specifically all of the nice work on the wing center section underside. A marathon exam , procedure and finish got me to the point of tying the 3 piece wing section together with some engine grime and oil splatters. I'll see about wheel splatter next , hopefully I can seal it all up today and get the assy turned right side up! 4 1 Link to comment Share on other sites More sharing options...
DocRob Posted January 20, 2020 Share Posted January 20, 2020 Great stains and grime, a shame that it will show only on a mirror. Cheers Rob 2 Link to comment Share on other sites More sharing options...
krow113 Posted January 20, 2020 Author Share Posted January 20, 2020 Thanks. I guess that not being too concerned about what can be seen in the end is the sign of someone who enjoys modelling. Talk amongst yourselves.... 3 Link to comment Share on other sites More sharing options...
krow113 Posted January 21, 2020 Author Share Posted January 21, 2020 The futility continues as I work towards finishing the underside: Proposed bomb load proves to be unworkeable as soon as placement was done: Solved by a center rack: 1 Link to comment Share on other sites More sharing options...
krow113 Posted January 21, 2020 Author Share Posted January 21, 2020 Still working out the underside bomb rack area. I pencilled in some panel lines , completely spurious , but I felt the plywood undersection would be in a few pieces. I also added some p/e gauge bezels for the inevitable rack mounts: 2 Link to comment Share on other sites More sharing options...
Axeman Posted January 21, 2020 Share Posted January 21, 2020 Looking great. As everyone has said, the engines are amazing. 1 Link to comment Share on other sites More sharing options...
krow113 Posted January 22, 2020 Author Share Posted January 22, 2020 Thanks Aman. Some parts get finished: 2 Link to comment Share on other sites More sharing options...
krow113 Posted January 22, 2020 Author Share Posted January 22, 2020 Custom decals try-out: 4 Link to comment Share on other sites More sharing options...

Recommended Posts
Create an account or sign in to comment
You need to be a member in order to leave a comment
Create an account
Sign up for a new account in our community. It's easy!
Register a new accountSign in
Already have an account? Sign in here.
Sign In Now