

mywifehatesmodels
-
Posts
134 -
Joined
-
Last visited
Content Type
Profiles
Forums
Events
Gallery
Posts posted by mywifehatesmodels
-
-
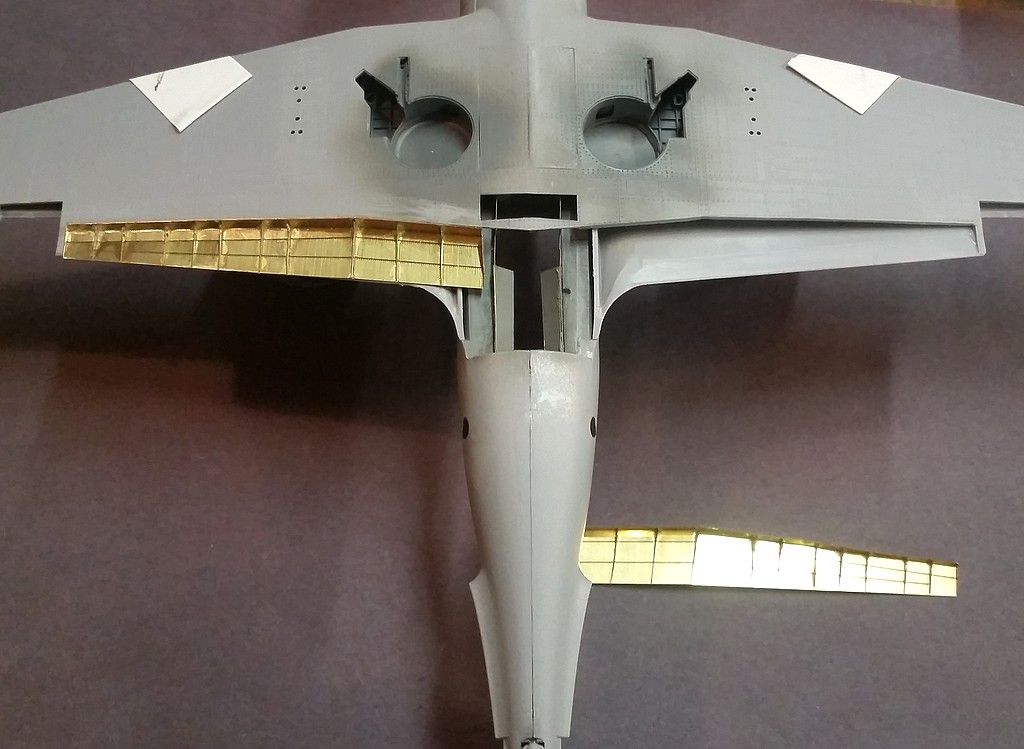
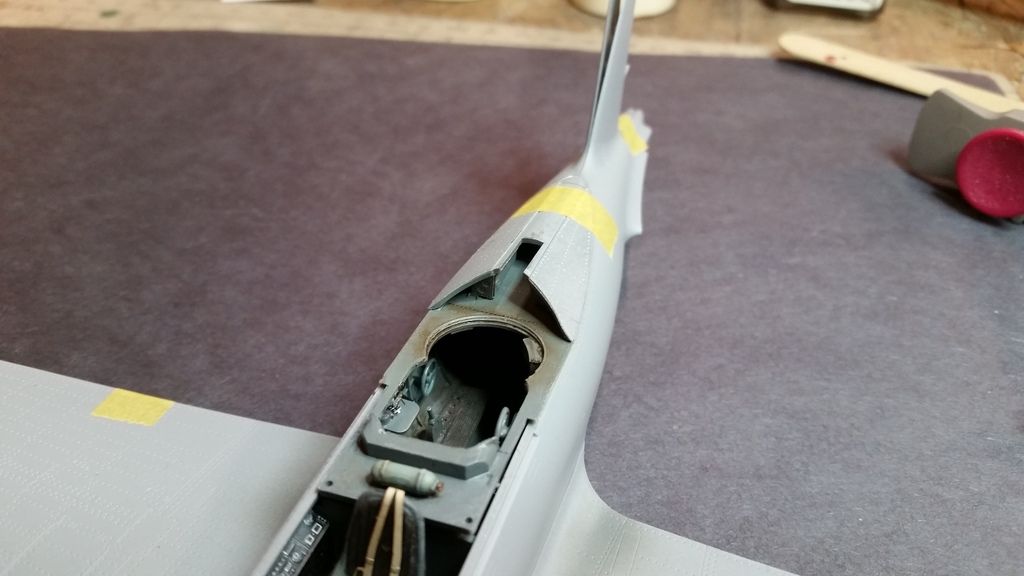
I was able to get the flap bays both installed and primed/painted. I had to replace one rib, but they turned out better than expected. Now I need to proceed at getting everything else ready and figure out what the paint scheme is going to be!
Thanks,
John
-
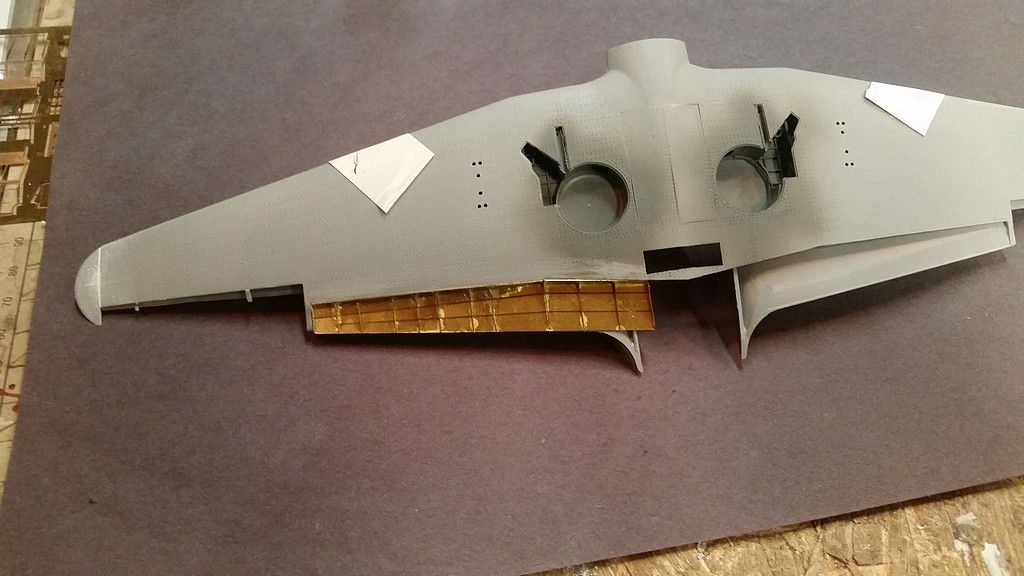
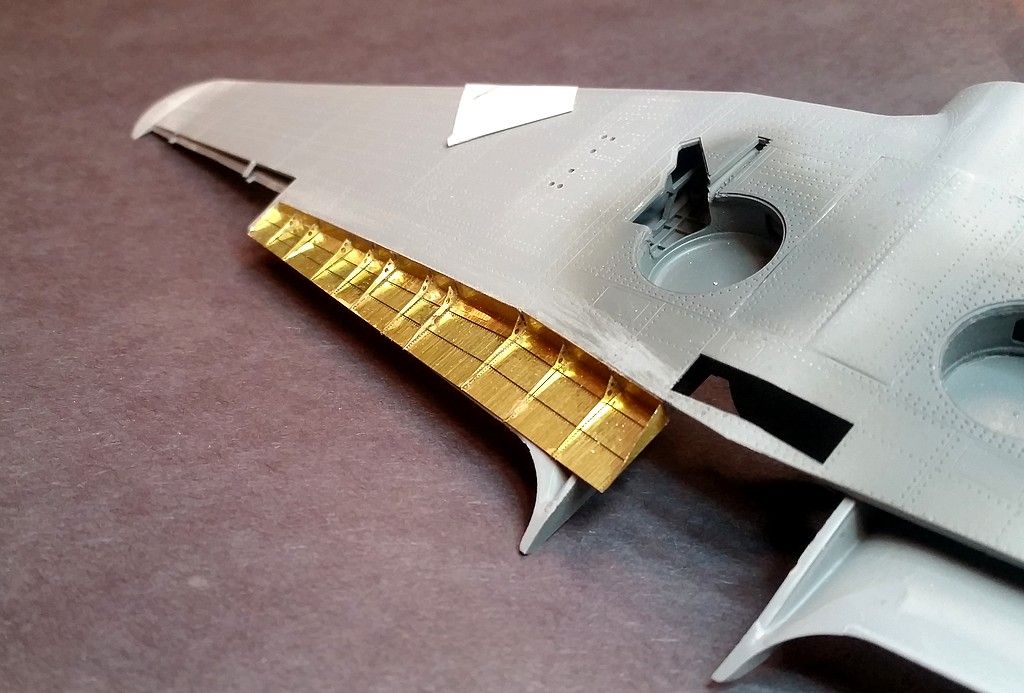
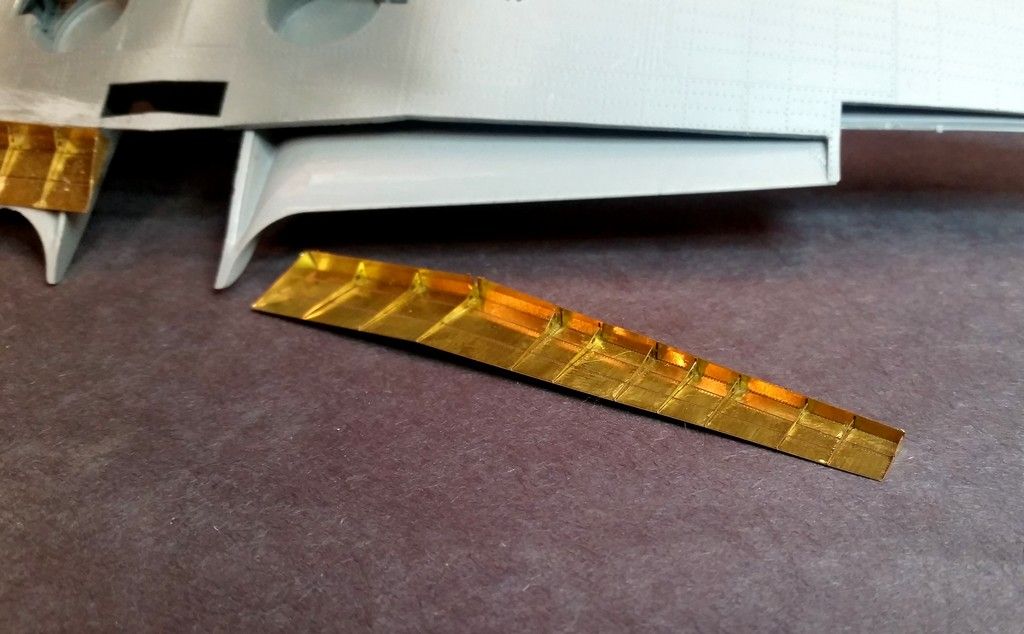
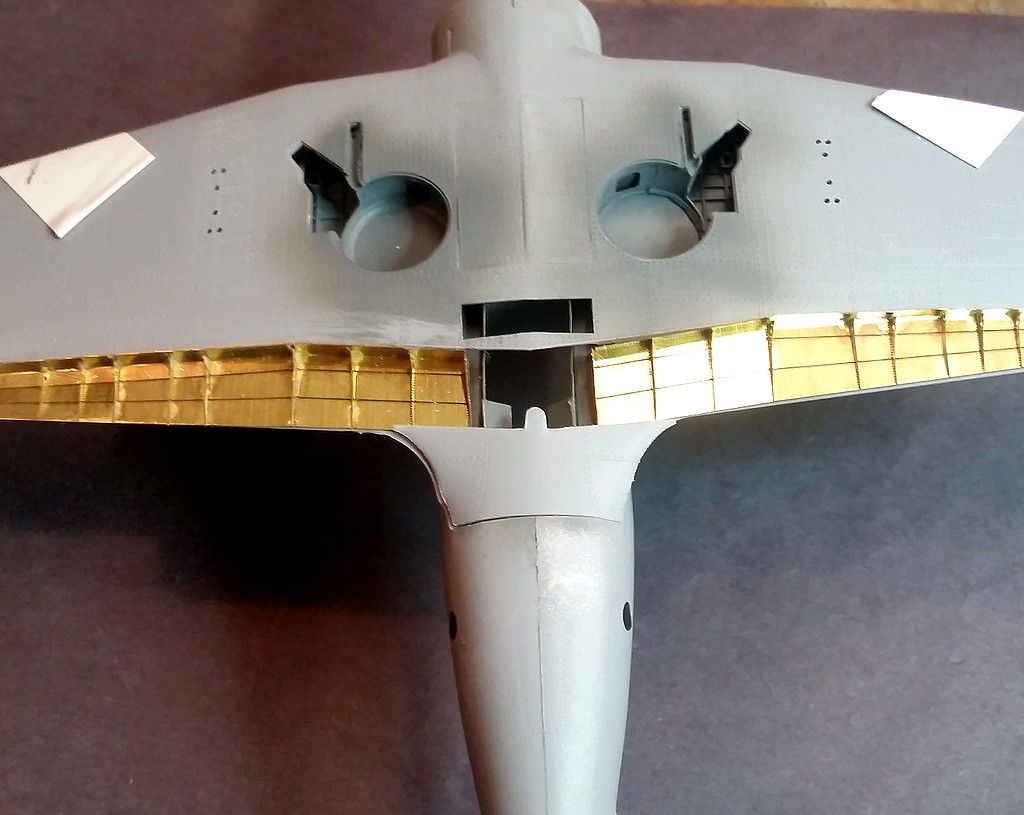
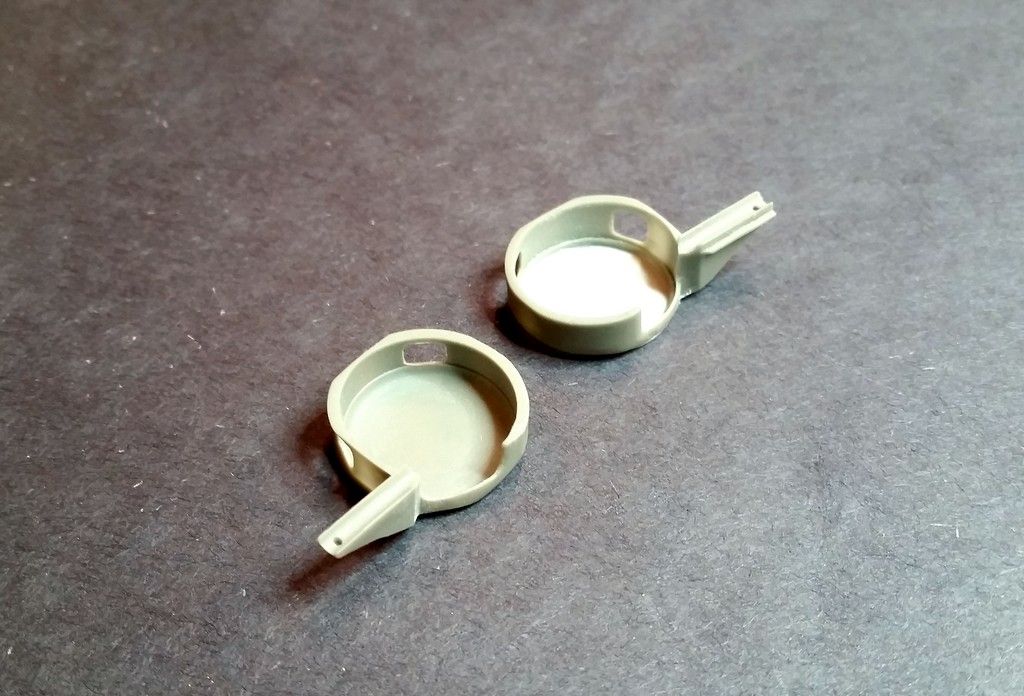
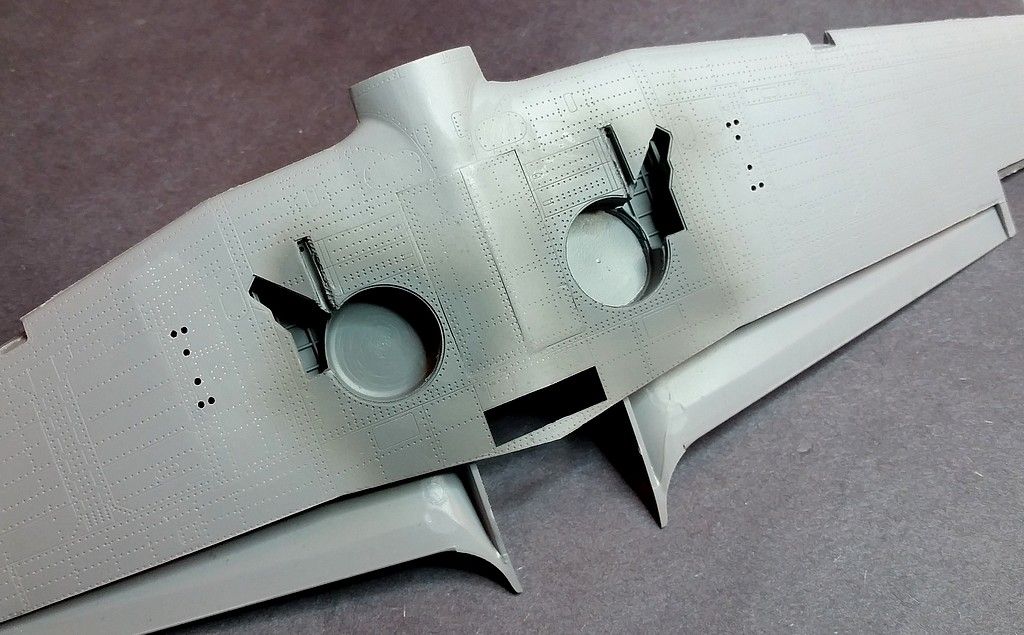
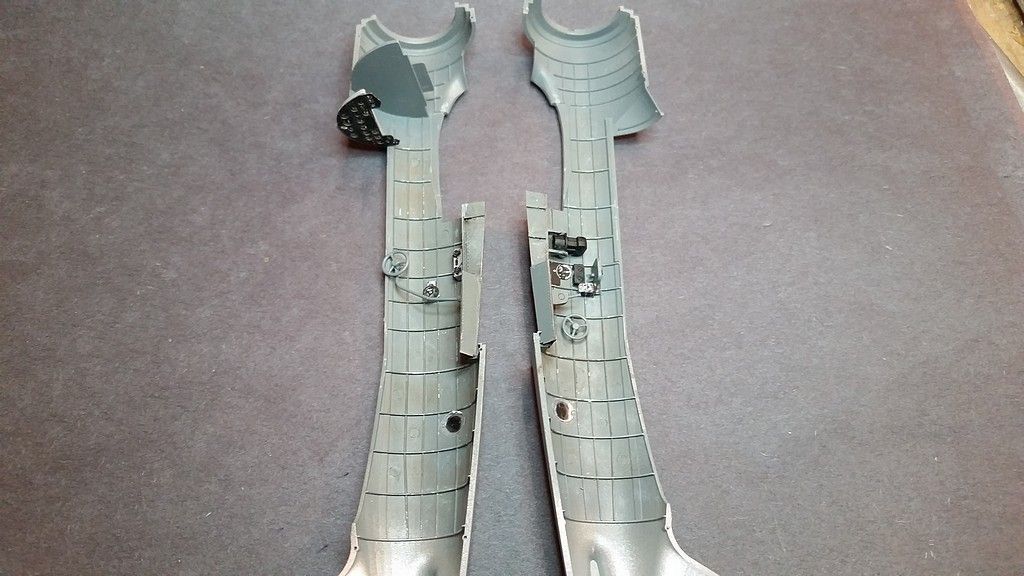
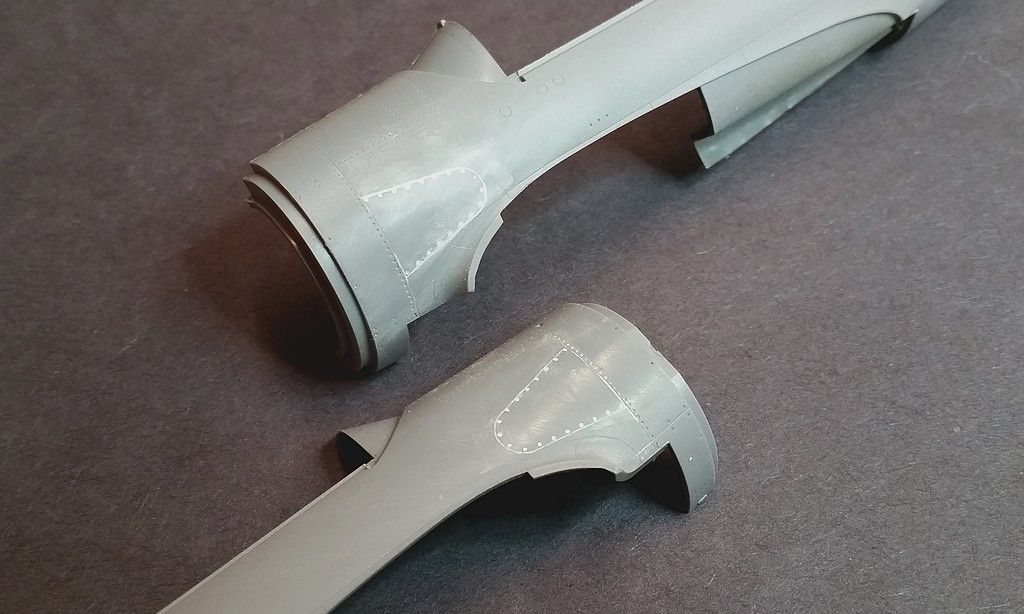
Today I managed to get the flap bays completed. I started with the starboard side. It was a little rough to start, with several of the ribs popping off while trying to twist them into position. There's plenty of glue staining on this one, but I'm hoping that a priming/painting will cover most of it. The port side, which isn't glued into place yet, is much better. Having learned some tricks from the first side, I was able to keep it a lot cleaner. The fit into the fuselage is perfect, with one exception. You need to cut a notch for the flap bay out of the wing root area. I've outlined that in a photo, below.
Tomorrow, I hope to finish installing the port bay and prime/paint them. So far, so good!

John
-
Thanks, Bevan!
Here's some more, from the last couple days.
 [/url]
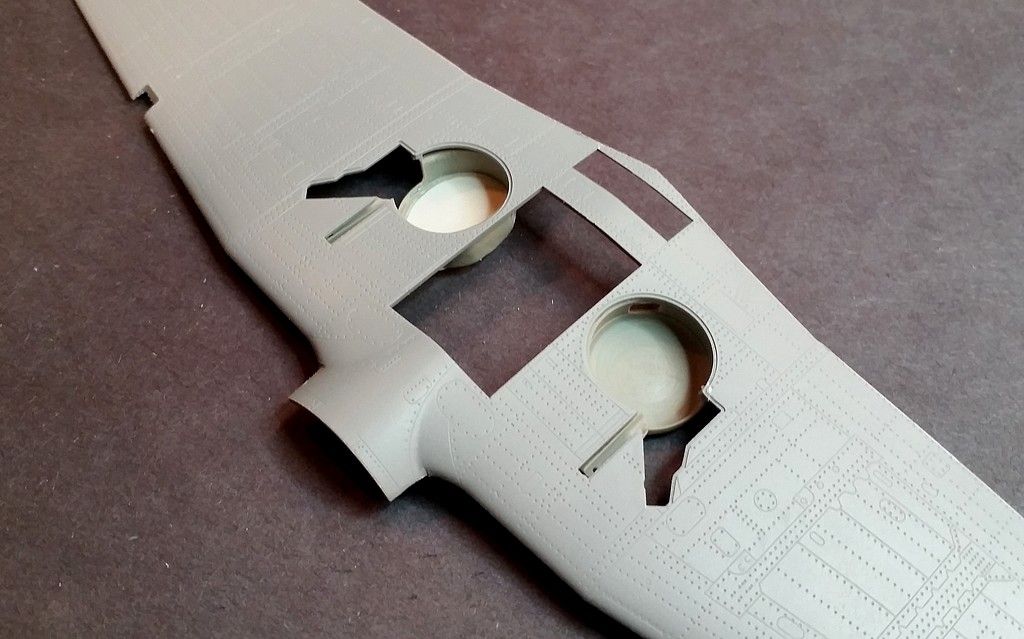
Ready to start on the flaps, now. It's making me nervous!
Cover me! I'm goin' in!
 ...and could somebody hold my beer?!
John
-
Thanks, Bevan!
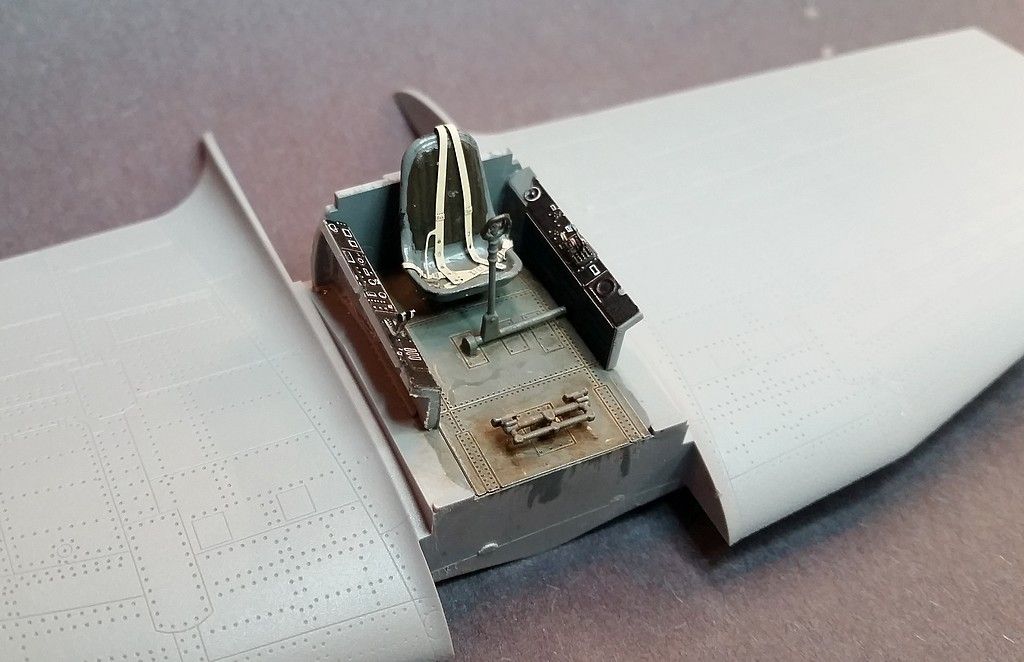
I managed to get most of the cockpit done over the weekend. Still plenty to do, but I'm almost ready to button it up!
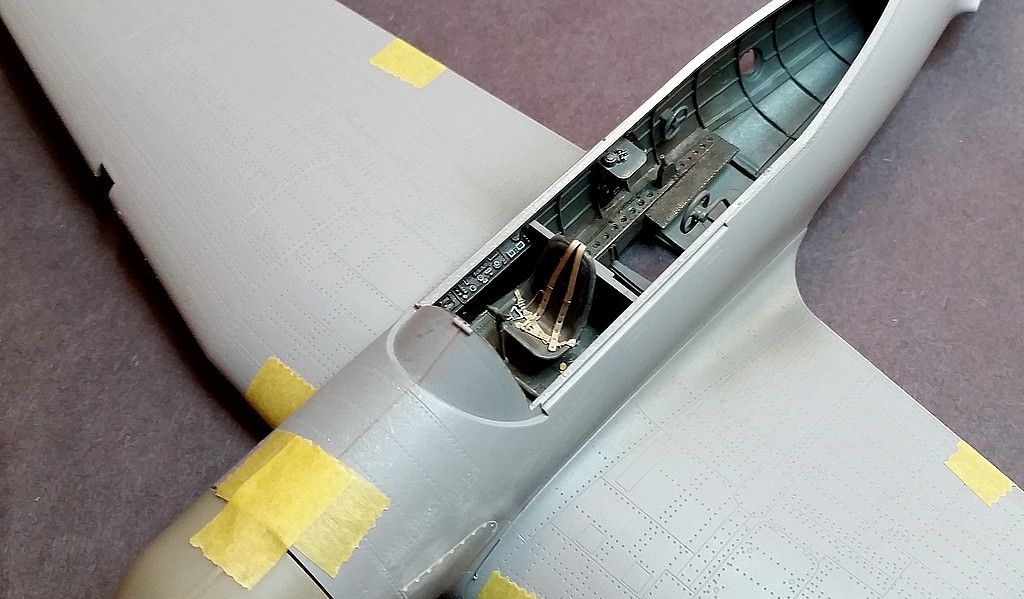
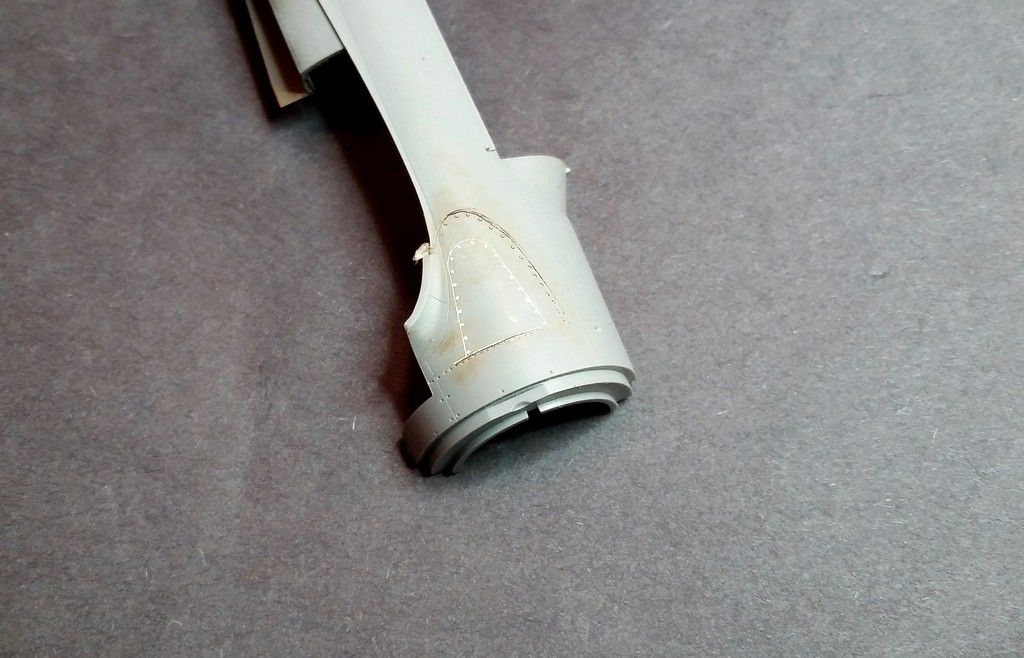
Also, the M-888B conversion requires that you fill in the access panels on the forward fuselage, then scribe a different one, on the starboard side, only. I haven't scribed it yet, but it's almost ready.
Cheers,
John
-
Speechless!

-
 1
1
-
-
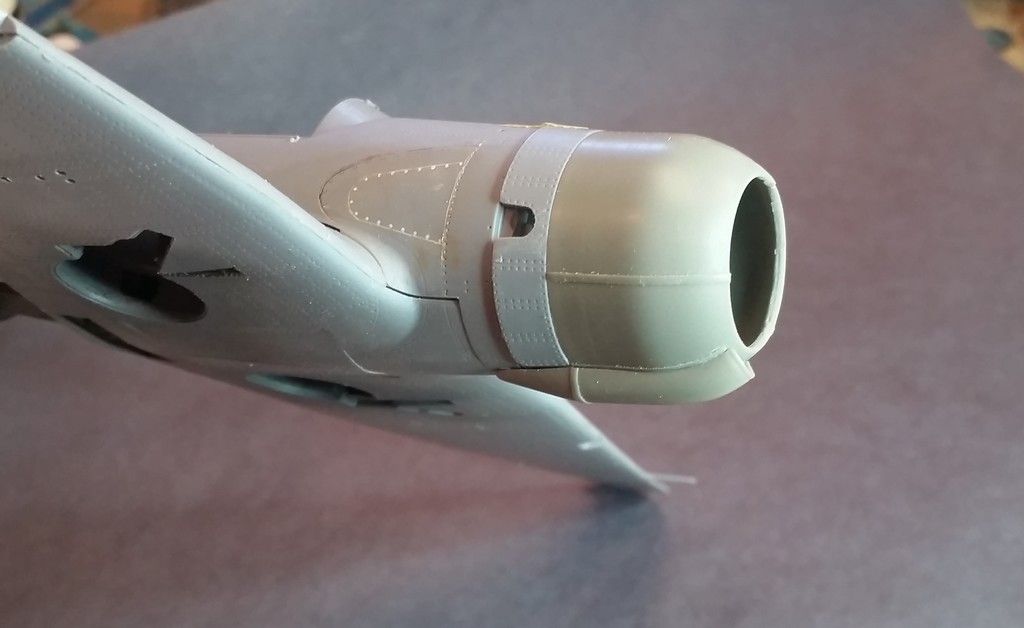
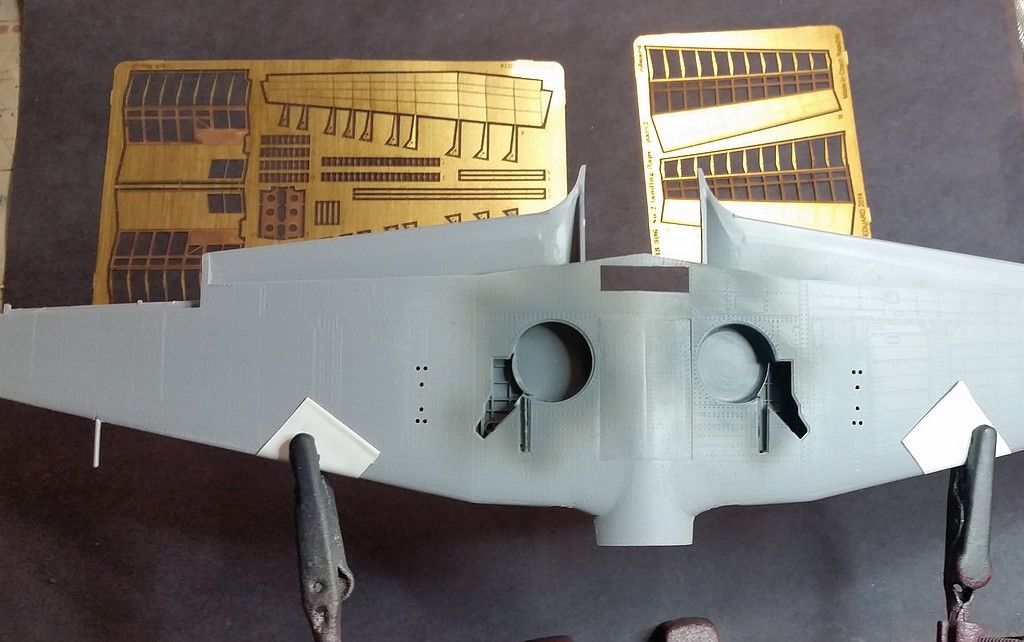
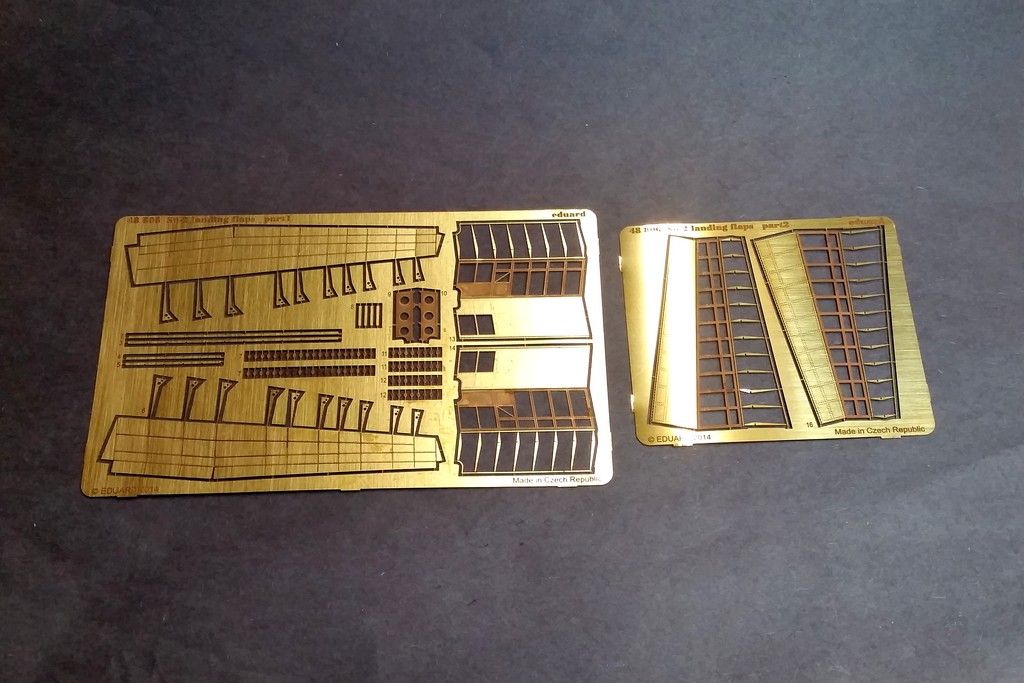
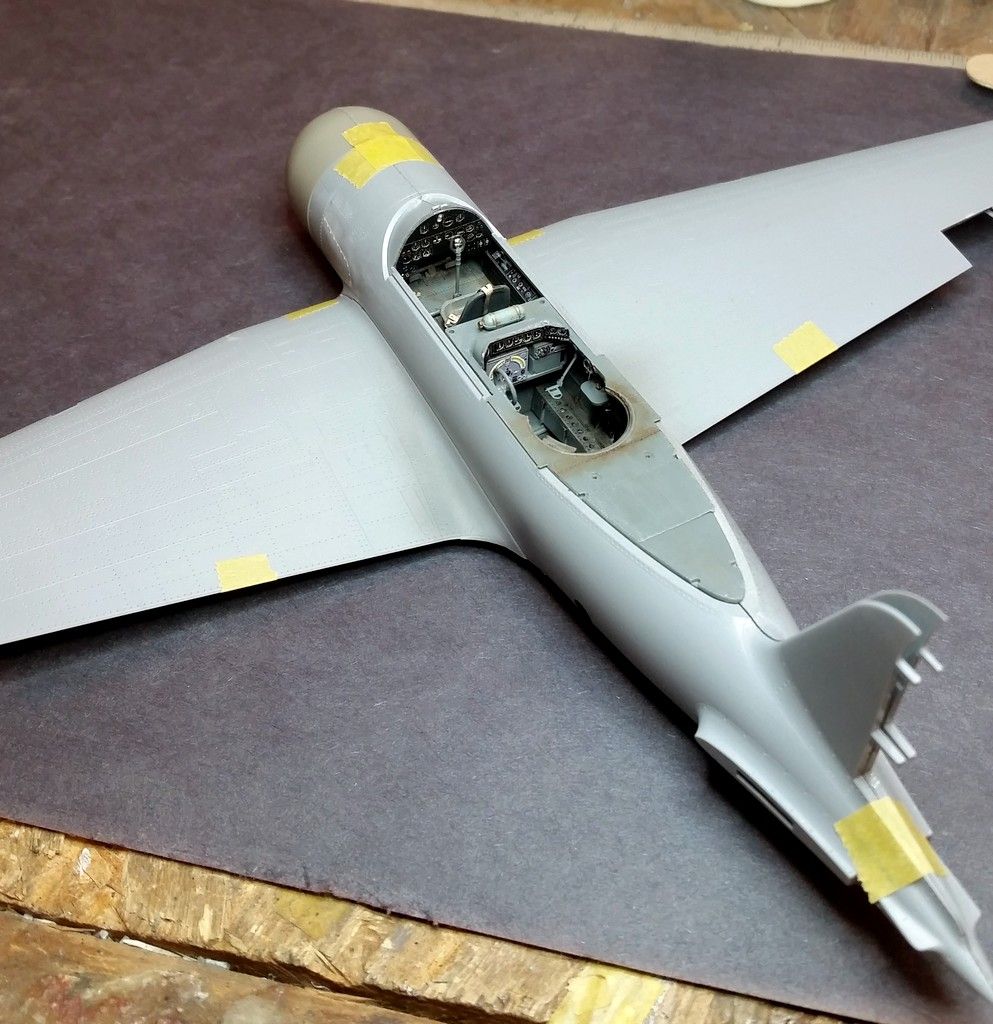
The last couple weeks have been crazy busy and there's been some changes made in the build plan for this one. So, I wasn't really able to get back to it until a couple days ago. In short, the Eduard PE sets are very time consuming, but I'm making progress, at least (finally!). Also, the decision has been made to use the later M-88B engine/cowl, as there seems to be more cool schemes available for that option. However, we haven't decided on exactly which scheme, yet. Soon, hopefully, as I always find myself more motivated and I have a mental image of what it's going to look like when completed.
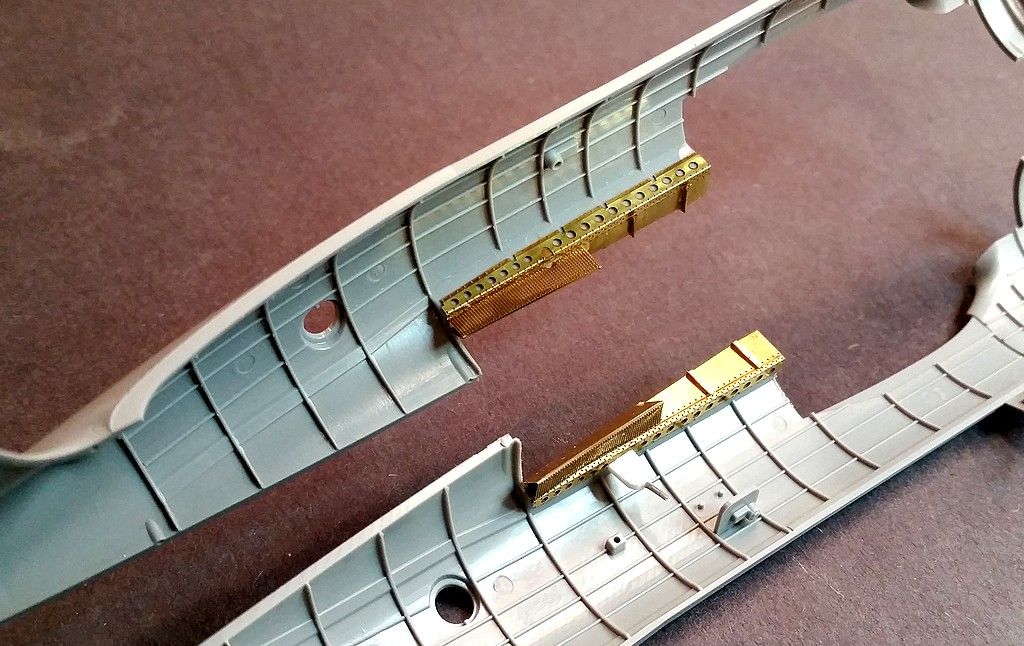

This is only really the beginning of the interior. Still a LOT to be done, but I'm taking it slowly. The PE flap set is also going to be used on this one and it's a huge undertaking. Given that, as well as the design of this kit, I'm trying to carefully plot out, in my mind, exactly the best way to assemble it all. I'll try to keep the thread updated and maintain my motivation!
Thanks for looking and for your support,
John
-
1
-
-
I think your work is quite inspirational John....The physics of light when combined with photography, and the way in which our eyes and brain compartmentalize and define such information is complex, and really trip modelers who do not take the time to really think about what they are looking at...and why things look the way they do.
You have nailed this John, and I take a bow (not to low or my bloody back will go again...) and applaud your abilities Sir!
Dennis,
I'm glad you like the build and find it inspirational. The color scheme is one thing that I was worried about, going into this project. There's not much solid proof of anything in that regard and with so many "experts" around, it's sometimes intimidating to take on something like this, for fear of being torn apart for my decisions. I had to stick to my gut feelings on it and try to see my vision to it's conclusion, even if it doesn't match what some others may see. In the end, this one is for ME and that's what really matters, I guess. I've given up on trying to please others and life is easier that way. If I were building it for someone else, then it would be a different story. However, in any case, the response to this build has been very positive and I greatly appreciate that. In fact, I'm actually surprised by how much people seem to like it. Apparently they "get it". My vision, that is. But, who knows? Maybe the next one will be a disaster?

Thanks again,
John
-
I'll second what Mr. Hatch said. Best 88 pit I've ever seen. Spectacular work, Jeroen!
John
-
Thanks, guys!
I'm going to be referring back to Jim's build of the E variant, quite often, me thinks. If I recall, it was pretty much complete, minus paint? If Jim can provide any further information (ahem, or a build update!
 ), that would be great, too.
I heard back from Pastor John, yesterday. The lower windows on the nose are not provided in the set, so I'll be cutting my own. His reasoning for doing things this way, was to make the resin casting of the nose a simpler process, as it was already complex enough, which I can completely understand and to avoid yet another vac sheet for such small parts that would also be more problematic. There are probably at least a couple ways to skin this cat, but I haven't reached that point yet. So, I'll figure it out later.
As for the radar assembly, it comes as part of the AIMS conversion for the 88H-1, but can be purchases separately, which is the route I'll most likely take, as the thought of trying to assemble the entire thing from scratch makes me more than a bit nervous! So, I still have a shopping list to work through, but I also have time to get everything else together, as I won't likely be able to really dig into this for at least another month.
John
-
Thanks, George!
How did I do the Rubik's Cube? I took it apart and put it back together with all the sides matching. True story.
John
-
Okay, I don't want George to think I'm all talk and no show, or that I'm too scared to start this project.
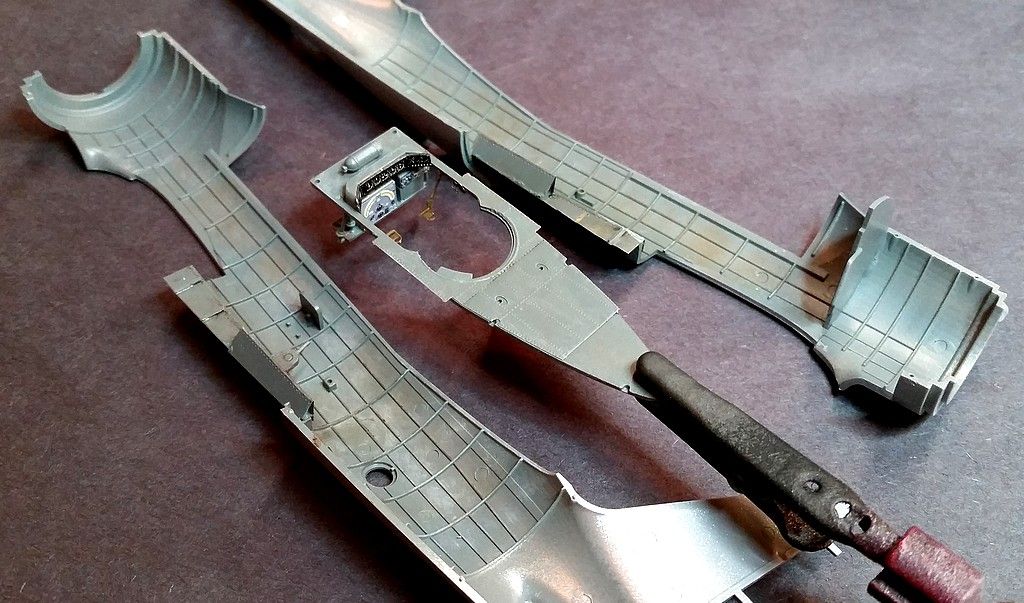
Actually, I'm still waiting for parts to arrive for my other build before I can start it (there's been a delay). So, I've started taking notes on everything for this one and I'm going to outline some of my observations and intentions at this time. I'll start with the nose/cockpit tub.For the time being, I would recommend that anyone, who wants to know more about this conversion set, look up Jim Hatch's review of it on this site. Jim gave a fantastic overview of what's included, before it was even released to the public and that was one of the things that had me hooked from the beginning (okay, the fact that it's a 1/32 scale Ju 188 may have had something to do with it, too. I mean, how cool is that?
 ). The one thing that stands out about this set is that the cockpit/nose area of this plane is a single resin casting. It's actually quite amazing to think that such a piece could be cast in one piece for a conversion like this and they (I think it was MDC who cast this part) did an amazing job. There are a couple of catches with this, however. The first of which is that the starboard instrument panel is molded into the tub.
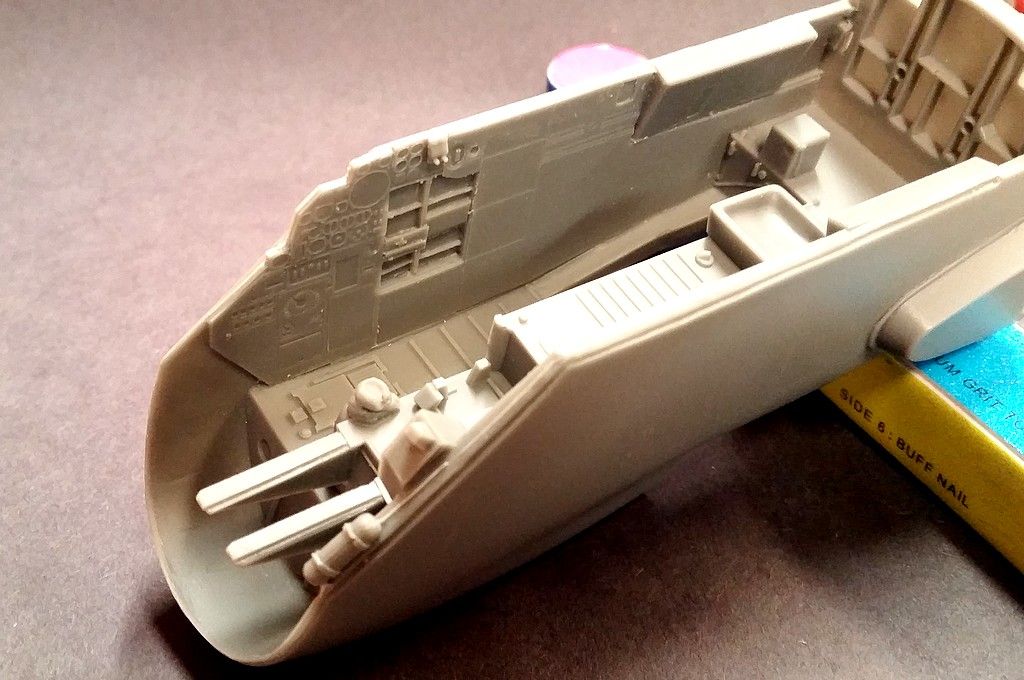
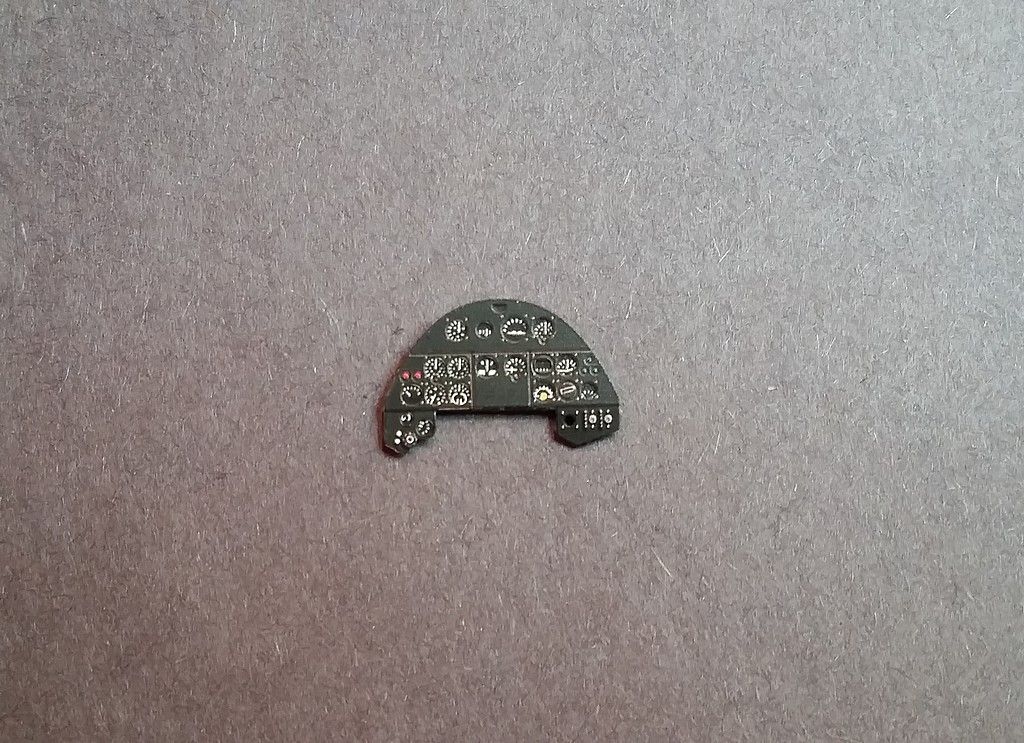
The detail in this area seems to be adequate. However, my biggest concern is whether or not I can successfully add decals and paint into the confines of this area without screwing it up. So, I'm starting to lean towards the idea of building part of the panel from scratch, outside of the model, then putting it in later. This will give me more room to work on it and I also want to upgrade things a bit. I think I'm going to get some instruments and bezels from Airscale and try that route. Of course, the whole process is going to take a lot of test fitting, since there are plenty of other cockpit parts that I will need to leave room for, but I'm no stranger to that routine.
The next area of concern is going to be the lower windows in the forward part of the nose. Being that the sub-variants of the 188 were different in this area, the window areas are outlined and need to be cut out for the specific version you're modelling. For the D, which I intend to build, I will need to cut out all four window spaces and install the windows, accordingly. I don't see the window parts included on the vac part sheets. I'm awaiting clarification on this from Pastor John at this time, but installing my own clear sheet shouldn't be too much trouble, either. So, we'll see what happens next in that area.
Beyond those points, I haven't come across anything else that looks out of the ordinary. In fact, the tub, floor and other various details, being molded in one shot, will keep the parts count down and, in 1/32 scale is certainly large enough to still allow easy access to this area. This avoids a lot of "jigsaw puzzle" feeling that I had when assembling the 1/48 scale DML kit. The next step will be to start working on cutting out the canopy parts and getting them worked into shape. As with the smaller scale model, this will likely be a case of assembling as many parts as possible before gluing anything together, checking for fit along the way. With the holiday quickly approaching, my time at the bench is becoming steadily reduced, but I'm going to try to pick away at some of these things when possible. I won't be able to get the Airscale parts for another week or two, anyway (and I'm going to have to change back over to my friend's 1/48 Su-2 build, once those parts arrive), but I will try to use what time I have to at least get something moving here.
Cheers,
John
-
Found it, Rog!
The slat fix is on page 2, but here's the WIP thread link: http://forum.largescaleplanes.com/index.php?showtopic=41371
John
-
1
-
-
I paid for most of my college by driving a taxi cab while I wasn't in class. Maybe that's where it comes from?
John
-
Rog,
I haven't used the engine set, or seen it in a WIP yet (but would have to do some searching for a bit to see if someone else has done it). Are you going to display the engine, opened up?
The gap on the belly really wasn't a big issue, but I just thought I would point it out.
As for the slats, I know I cut mine and glued the rear portion to the wing and blended it in, using the forward remainder to represent the slats. That trick is out there, as I robbed it from someone else. However, it's most likely outlined in my build thread over at LSP. I can dig it up for you, if need be.
When you get your build started and get to the painting/weathering phase, I'm sure you will get plenty of input from people, especially those that use/have used the same kind of paint. But, don't let it intimidate you. You'll be just fine, I'm sure.
John
-
Fair enough, George!

I'll post something with a little more substance, later today.
John
-
Rog,
It looks like you have pretty much everything you're going to need, and then some. For a CA applicator, the skewers should work pretty well for most spots. I would also recommend using a needle or straight pin for the really small applications. As the dried CA starts to build on the tip, it will allow you to get a little more control over how big of a drop you want to use. The beauty of it is that you can just scrape off the old glue if you feel it's getting too chunky at the tip and start over. This is much harder to do with wood, or even plastic applicators. Once you start playing and practicing with CA and applicators, you'll get a feel for what works. I'm lucky(?) in that I also have hypodermic needles around which come in very handy as applicators of CA, decal setting solution and the like. But, I realize that not everyone has access to these. I have a prescription medication that requires me to take an injection once per week. So, all the syringes are put in a bin on my hobby bench when I'm finished (and the vac plastic containers that they come in also make for great paint/glue mixing trays, so I keep those, too!). The only down side to the syringe is that, once you use it for CA, it's pretty much useless as a syringe afterwards. But, that's what I use as an applicator in most instances and I have enough of them around to keep me in steady supply.
With regards to you posting your build and your comments about the process: First of all, I didn't think your comments came across as arrogant, at all. In fact, you make a very good point that's given me a moment of pause. That is regarding what I post about the processes I use while building something, especially when it's anything more involved than "glue part A to part B". Now, this could also come across as ME being arrogant, but that's certainly not my intention, either. The thought process, when I'm posting a WIP thread, is that most of the people reading it probably already know how to do it and I'm afraid of boring them, or that it might appear as if I'm assuming they don't know how this stuff is done and I don't want to appear as though I'm patronizing them, either. It's more the former, however. I pretty much assume that everyone reading it is a better modeler than I am. From time to time I need a reminder, I guess, of what "AssU..Me" means, again.
So, with that being said, if you're ever reading one of my posts and want more details on how I did, or am going to do something, don't be afraid to ask! I want to help people as much as possible and give back to the community for everything I have taken from it. I use (rip off?) people's techniques all the time....because I admire their work. I hope that's viewed by them as flattery, because I view them as some of the best modellers on the planet and aspire to become as good as they are. But, in the end, I think we're all in it together and that's one of the things I love about this forum is that there doesn't seem to be any arrogance, at all.So, Rog, feel free to post away, with whatever you're comfortable with. I'm sure everyone here will cheer you on and help out if necessary. Also, don't sell yourself short. You may find that people are actually learning something from it, too. I can honestly say that, after posting models/builds on several forums over the years, there are a couple that I am still hesitant to post on, for all the same reasons you have stated above. But, this forum is different. That's why I'm spending time here (and also LSP, my other favorite). If there is criticism, it's constructive and helping, sharing, or learning always come before someone's ego. That's the way it should be.
I've built the Eduard 109. If I could offer one word of advice, before starting, it would be to watch out for the fit of the nose, especially if you're planning to glue the cowl in place. It will likely take some dry-fitting and omission of some of the parts underneath the cowl panels (possibly even sanding some of them down) to get it to fit right. I also recall a gap to be filled on the belly, where the wing bottom meets the fuselage at the rear. I believe most, if not all, of the people who have built this kit have had to deal with these issues. So, if you get to that point and are thinking "what did I do?", it's not you! Now, mine also has some twist in the left wing. That was all on ME!!!!

Cheers,
John
-
1
-
-
Looking great, Mike.
Glad to see the other half of this comparison coming together.
John
-
1
-
-
I've noticed that some Europeans really take offense at being called "dude". Growing up in California this was (and still is) a staple of my vocabulary. Once they figure it out that's it just our version of "mate" they usually relax but it's funny how things work.
Dude has become universal, pretty much throughout the U.S. What used to be considered a surfer slang word is now normal vocabulary around the country. Even my teenage daughters use it and they were born and raised in rural Minnesota (as was I).
Now, "Mate" is someone you are either having sex with, or a term taken from a low budget pirate movie.
I kid, of course. I've spent plenty of time around Aussies, so I'm used to it.John
-
1
-
-
I'll be watching this one, got a La 5n in the stash. Be good for an insight to their kits.
Cheers Bevan
I built one or two of their early armor kits, which did not impress me in the least. However, I built their Bf 109F kit a while back and was quite impressed. The instructions can be a little frustrating in translation, but if you are paying close attention it will start to make sense. If there's one thing I really don't like about their kits, it would be the decals. Kind of thick and frosty, so I 'll likely be painting whatever markings we decide on. Reviews of this kit seem to be very favorable, overall.
Thanks!
John
-
1
-
-
Thanks, everyone.
Freak'n crazy good scheme choice there and at your pace we'll be singing your praises before Chistmas ........or not too soon after ha ha!
Please proceed...........
Cheers BevanBevan,
For this one, I'm going to have to take things a bit slower. I still have another build for a friend to do first and I haven't even started it yet. Also, this one is going to be pretty complex and I want to be sure to get it right, so I'm going to have to slow down a bit. When I did the 1/48 version, with the Eduard PE set, the cockpit took two weeks of pretty steady work. This one makes that look like a small set of Legos!
John
-
1
-
-
Just want to stress that I'm not upset about it. In fact, I also started a thread over at the GD forum of LSP, regarding the same discussion. It's been very humorous and a lot of fun.
John
-
Great work on a great kit. Built one years ago, but keep hoping someone will scale it up. I would be in heaven if they did!
John
-
1
-
-
Uh oh! I may have a lot of apologies to make, then. LOL!
-
Thanks, guys. I'm very anxious to start this one!
Oh boy!!

I'm going to bring this up here. However, I've seen it on various forums, before. In the U.S., the rolling of eyes is usually a sign of disapproval and, as seen above, could be viewed as a sarcastic response. It's actually viewed as an immature action by many. I remember when I first arrived in San Antonio, Texas, on my way to basic military training at Lackland Air Force Base. We hadn't even made it to the base yet, but were still at the airport when myself and one other kid, who were in charge of checking our group in with the sergeant at the check-in desk, who was supposed to tell us where to go to find the bus that would take us to the base, reported as we were supposed to. During that process, the female sergeant tore into us, immediately, letting us know who was in charge (it surely wasn't either of us!
). During this "dressing down", my partner rolled his eyes at her. WRONG thing to do! She proceeded to verbally tear him apart, for five straight minutes. It was at that point that I learned to never, under any circumstances, roll your eyes at anyone. I was also to learn, through an even more venomous exchange, later on, to never leave one of the buttons on your uniform pocket undone (because "the enemy could put a bomb in there"... and no, I'm not making this up!). If ever I wanted to roll my eyes, it was at that moment, but I knew better. But, anyway, that's another story.I've seen several Europeans use the "rolling eyes" emoticon when, under the specific context of things, it didn't mean what I thought it meant. I think that this is probably the case here, but just wanted to point it out to avoid any possible confusion in the future. Or, maybe Jeroen just isn't so crazy about this thread. If that's the case, then I appreciate his honesty, but I don't think that's what he meant!
Thanks again,
John


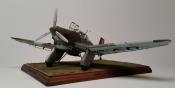
Bf 110D of II./NJG3 (1/32 Dragon)
in LSM 1/35 and Larger Work In Progress
Posted
Thanks for the comments, guys. I just came back from a modeling hiatus of several months and saw your posts. Much appreciated!
I built the Revell G about 20 years ago. Not a bad kit for it's age, but it just really shows it's age, if you know what I mean. I would drive myself crazy trying to build it up to anywhere near today's standards (industry, as well as my own). I keep holding on to hope that there will be a new tool kit of the G coming. Hopefully soon!
That's one area where the instructions are really poor, for sure. I got them in without too much trouble. Even though I'm pretty sure they're not "correct", I don't have anything to really go on that would show what "correct" really is! I'll have to go find your build. I really liked this kit and enjoy seeing it being built. I don't think it gets enough recognition for how good of a kit it really is, overall.
Thanks again,
John