

Bombardier
-
Posts
4 -
Joined
-
Last visited
Recent Profile Visitors
1,528 profile views

-
WNW Bristol F2.B Fighter
Bombardier replied to Bombardier's topic in LSM 1/35 and Larger Work In Progress
Thanks everybody. I do have a short update. There has not been a lot of time for hobbies as of late. However, I have been able to close up the fuselage, install the firewall, begin the engine, and start to paint the fuselage. I took the advice to remove the bracing wires from the exterior of the cockpit frame, and sure enough, it was a struggle to close the assembly even without those. After lots of scraping of paint, and even thinning down the frames just a little in the pilot's area. I suspect, that the paint an oil wash in between the frames and the cockpit floor casting was just enough to keep the whole assembly from closing. Very tight tolerances indeed! I still have a ways to go in detailing/weathering the engine, and modulating the paint on the fuselage. I have made three different shades of PC-10, one made according the paint instructions, one heavy toward the brown, and one heavy to the green. I will be using them to create some depth to the look of the fuselage and wings. -
WNW Bristol F2.B Fighter
Bombardier replied to Bombardier's topic in LSM 1/35 and Larger Work In Progress
Thanks for the feedback, Cees, George, and Fran. George, I will use your suggestion for recessing the wires to gain the clearance. I appreciate the help! -
WNW Bristol F2.B Fighter
Bombardier replied to Bombardier's topic in LSM 1/35 and Larger Work In Progress
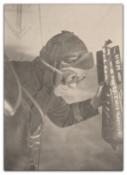
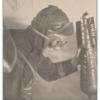
Thanks everybody for the comments and suggestions. I have had little time to work on the build, all that life stuff... However, I did have one afternoon in which I made some good progress on the cockpit. I also did some chipping on the pilot's Vicker's and associated metal framing, plus some dirty washes elsewhere. One thing I am not too happy is the PE work. While I am rather proud of how the seat belts turned out, I feel like the brass was just too thick. Perhaps annealing may help in the future? One bit of praise for the PE, I found that after washing in a bath of white vinegar, and a rinse with distilled water that I had no problems with paint adhesion. I also got a little something special from Germany to go with this build. This is an absolutely outstanding figure from Martin Hille of Kellerkind Miniaturen, -
Hello Everybody, This is my first attempt with a WNW kit! In fact, this project contains a number of firsts for me. First serious aircraft model, first use of weathering on a model, first use of an airbrush, and I am sure a few more. I have been slowly collecting WNW kits, and have finally decided to put one on the work bench. The only way to learn is to do it right? So I have chosen the Bristol F2.b Fighter as my first exercise in these great models. You can see in the photo, my usual modeling subjects, wooden boats. I have made a decent start on the cockpit of the Bristol. Wood grain was done with Tamiya buff as a base coat, with an oil wash in the middle, and Tamiya clear yellow on top. A natural sponge was used to apply the oil wash. The pilot's floor board was done with the help of a superb wood grain decal from Uschi van der Rosten. Some weathering has been done already, with the help of some dark wash on the pilot's seat, fuel tank, and the observer's floor area. It should be noted that the missing instrument decal in the middle of the instrument panel has been lost due to my mishandling. That blank white space will remain as a reminder of my mistake. As I stated before this is all new to me, so let me know what you think!