


rkranias
-
Posts
1,743 -
Joined
-
Last visited
Content Type
Profiles
Forums
Events
Gallery
Posts posted by rkranias
-
-
1:32 Kits
Open box, sprues bagged unless noted.
LEM KITS
1:32 Me.P1101
Limited 24 of 73 run all resin kit.
Printed instructions included
EXTRAS
- Kramer X-4 Ruhrstahl Guided Missiles set of 4
- Main Gear Barracuda BF109K resin wheels to replace rubber wheels. Landing gear legs from HAS Bf109 better detailed than the Lem Kit offering. Almost identical to kit set with exception of mounting area. A little engineering required.
- Nose wheel (plastic) from my spares.
- 25g Liquid Gravity ballast. Instructions call for 20g ballast.
USD$100HASEGAWA
1:32 Fi156C “Storch” #ST8-40 *see after market
Box opened. Sprues bagged and unstarted.
USD$25HOBBY BOSS
1:32 Spitfire Mk.Vb Trop #83206 *see after market
Fuselage cut off sprues and fondledBagged and unstarted.
USD$20 KIT
ICM
1:32 Gloster Gladiator Mk.I. #32040 *see after market
Box opened. Sprues bagged and unstarted.
USD$45SPECIAL HOBBY
1:32 Hawker Tempest Mk.II “Hi Tech” #32054 *see after market
Box opened. Sprues bagged and unstarted.
USD$80 KIT1:32 After Market
HPH
Spitfire Mk.Vb Correction Set AP32006R
For Hobby Boss Mk.Vb
Complete
USD$25
Eduard
Spitfire Mk.Vb Interior 32705
For Hobby Boss Mk.Vb
USD$20
Spitfire Mk.Vb Exterior 32303
For Hobby Boss Mk.Vb
USD$20
Fi156C Storch Cockpit 32044
For Hasegawa Fi156C
Fi156C Storch Masks JX016
For Hasegawa Fi156C
Gloster Gladiator Mk.I IP and PE 32966
For ICM Gladiator Mk.I
USD$20
Gloster Gladidator Mk.I Masks JX250
For ICM Gladiator Mk.I
USD$5
Quick Boost
Gloster Gladiator Mk.I Exhaust 32260
For ICM Gladiator Mk.I
USD$ 4
Gloster Gladiator Mk.I Air Intakes 32261
For ICM Gladiator Mk.I
USD$3
Gloster Gladiator Mk.I Carburetor Intake Type B
For ICM Gladiator Mk.I
USD$3
Gloster Gladiator Mk.I Correct Compass 32269
For ICM Gladiator Mk.I
USD$3
Gloster Gladiator Mk.I Navigation Lights 32268
For ICM Gladiator Mk.I
USD$4
Master Detail
Bf109 Tail Surfaces 32021
For Hasegawa Bf109
USD$7
Master Model
Armament Set 32062
For Bf109G
USD$4
Maketar Masks
Insignia, canopy, wheels masks 32124
For Special Hobby Tempest Mk.II
USD$7
YAHU
IP 3237
For Hasegawa Fi156C
USD$6
ICM
Gloster Gladiator Mk.I Foreign Service Decals D32004
For ICM Gladiator Mk.I
USD$5
1:48 Kits
PROMODELER
1:48 Ju88C6 Nightfighter #5970 Box opened.
All parts bagged/unopened. USD$20
TAMIYA1:48 P47D “Bubbletop” #61090-3000 Following parts have been removed: 108 Gal Paper Tank D2 & D3 Curtiss Paddle Blade G5 & G6 Curtiss Prop Hub B7 Otherwise kit is complete and bagged You can build complete aircraft using kit supplied Hamilton Standard prop. USD$20
1:48 Ki84 “Frank” Prop Action #61501-1900 Long discontinued battery powered motor with kit Box sealed USD$20
HASEGAWA
1:48 After Market
ICARUS
HAF Jets Part I - A7E only 48002
For A7
USD$5
PayPal G&S Only
Will combine shipping
CONUS only
Stored in climate controlled room
Ship from Maryland
PM me with zip for ship estimate-
 1
1
-
-
Happy to catch this one Peter. Great fixes, even the repeats
") , on this. I have this kit and been mulling it over to bring it to the bench after my He100. I've always liked this aircraft. Of course, I have all the AM stuff available.
, on this. I have this kit and been mulling it over to bring it to the bench after my He100. I've always liked this aircraft. Of course, I have all the AM stuff available.
SH has the gift of supplying plenty of angst with their builds.
I agree on those instructions. When I built SH Tempest the landing gear and wheel well assembly instructions drove me batty. I ended up replacing several landing gear parts with aluminum slide fit tubes. I'll keep a close attention to those instructions and test-fit, test-fit, test-fit.
You build is coming along beautifully.
Keep 'em coming! (😉)
-
3
-
-
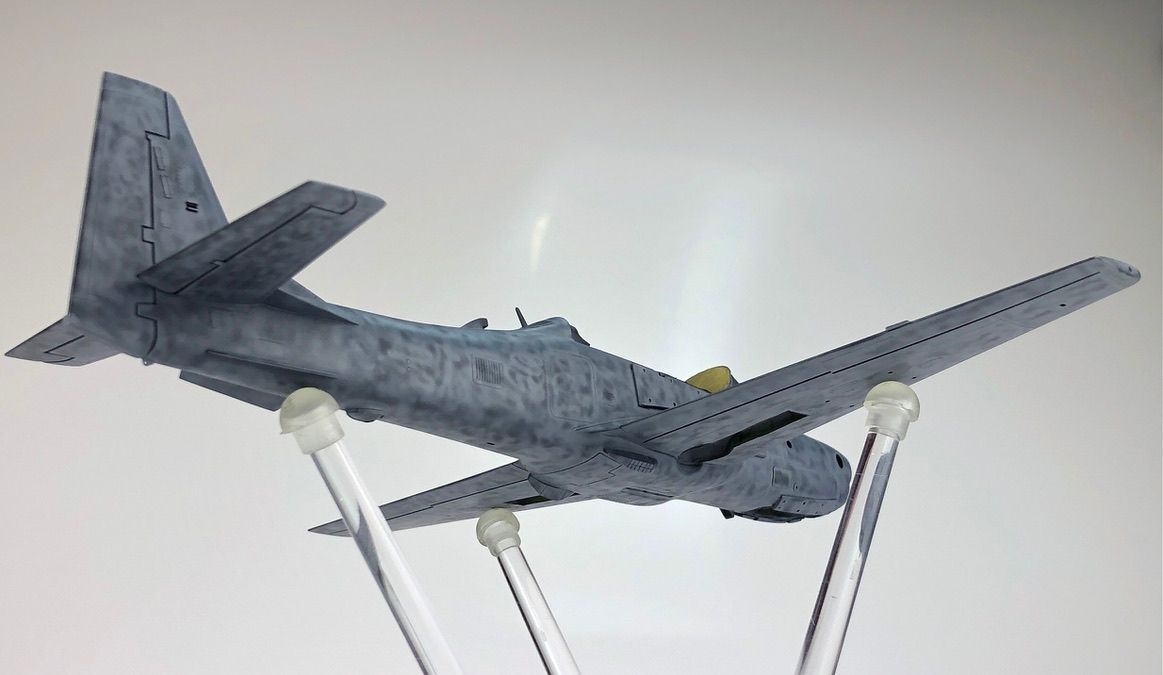
Finished. Clearly one of the longest most challenging builds I have ever done. Happy to have this off my bench. I started this build in 2016. Several trips to SOD. 5.5 years later...here we are.
")
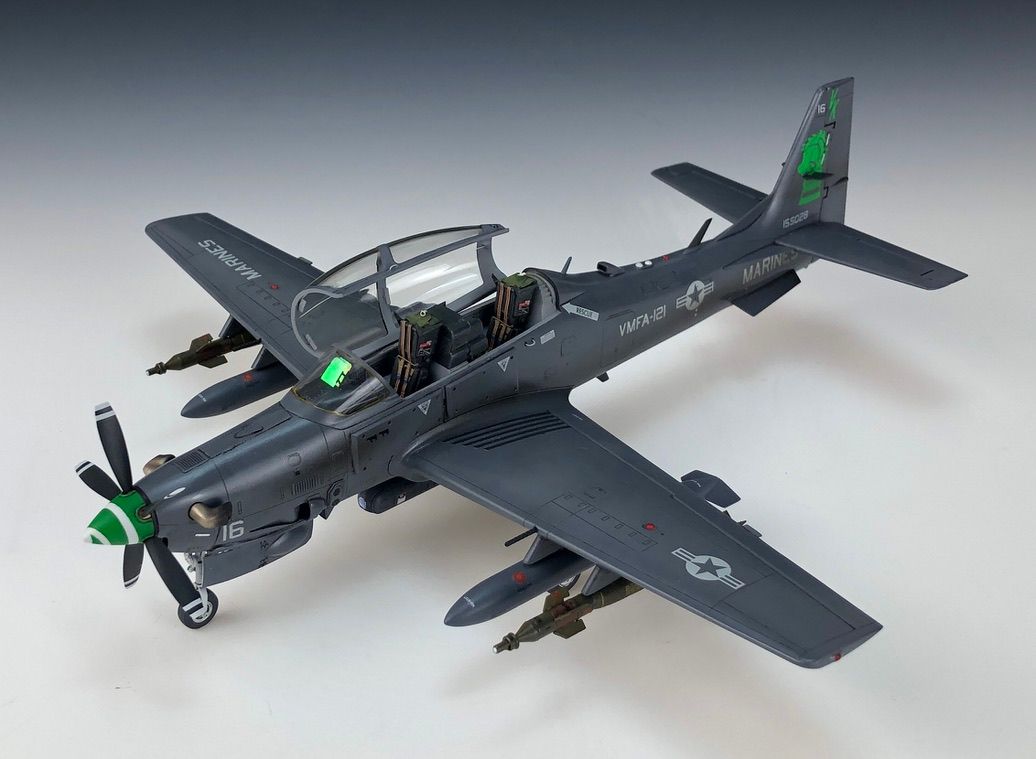
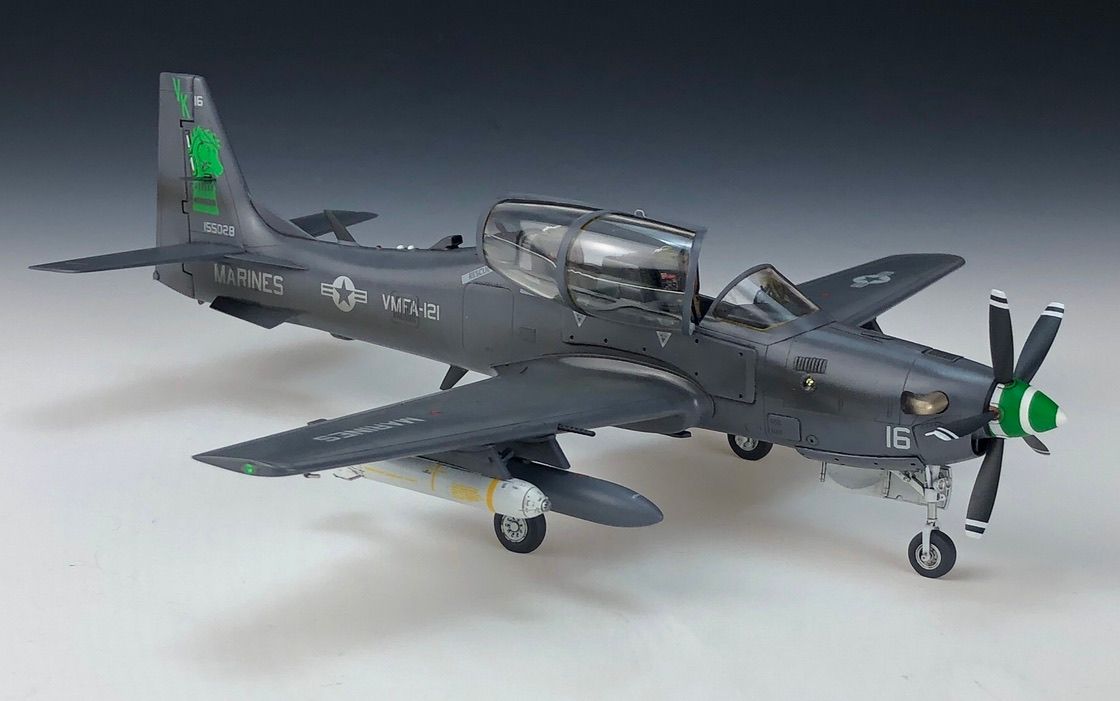
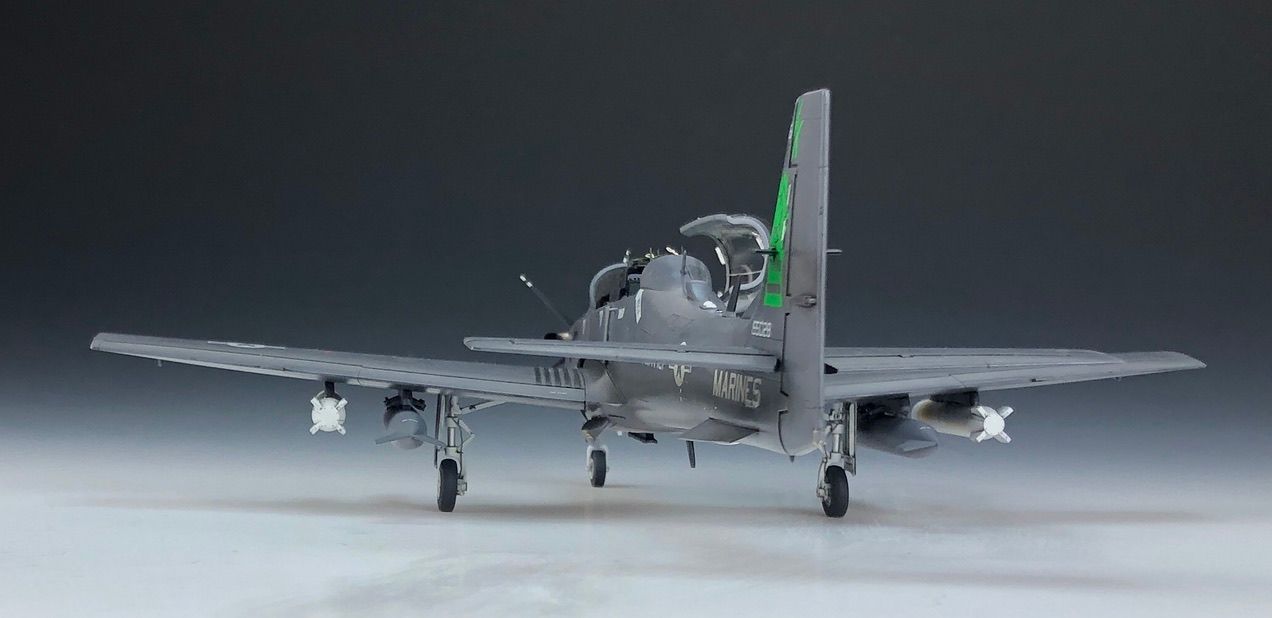
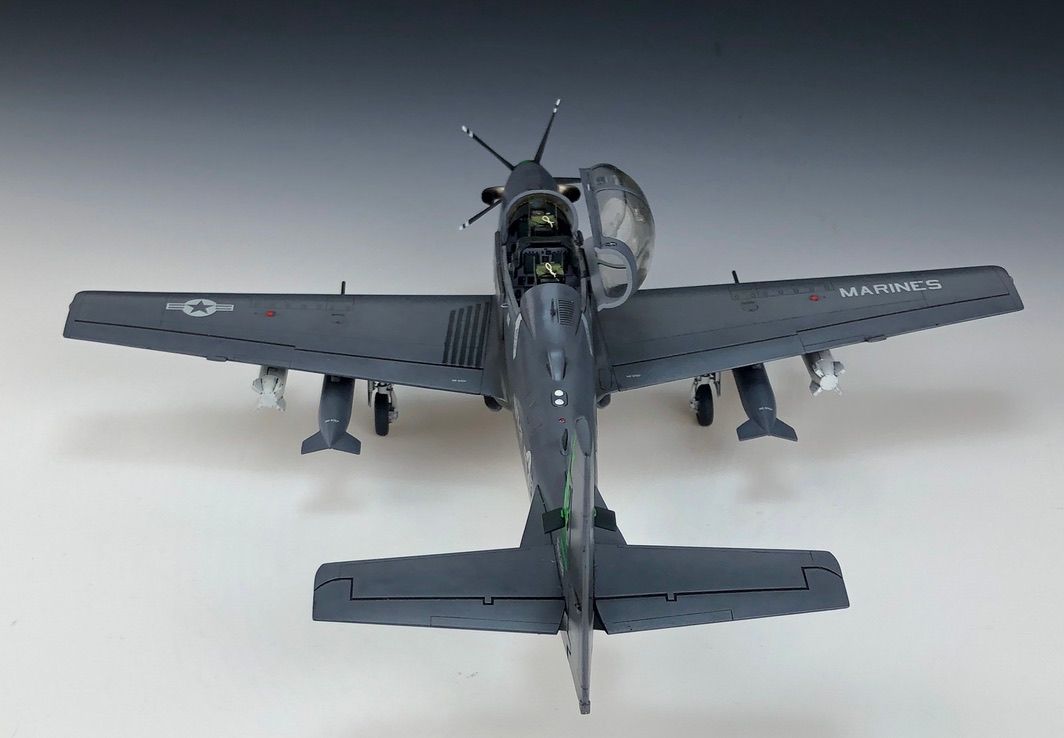
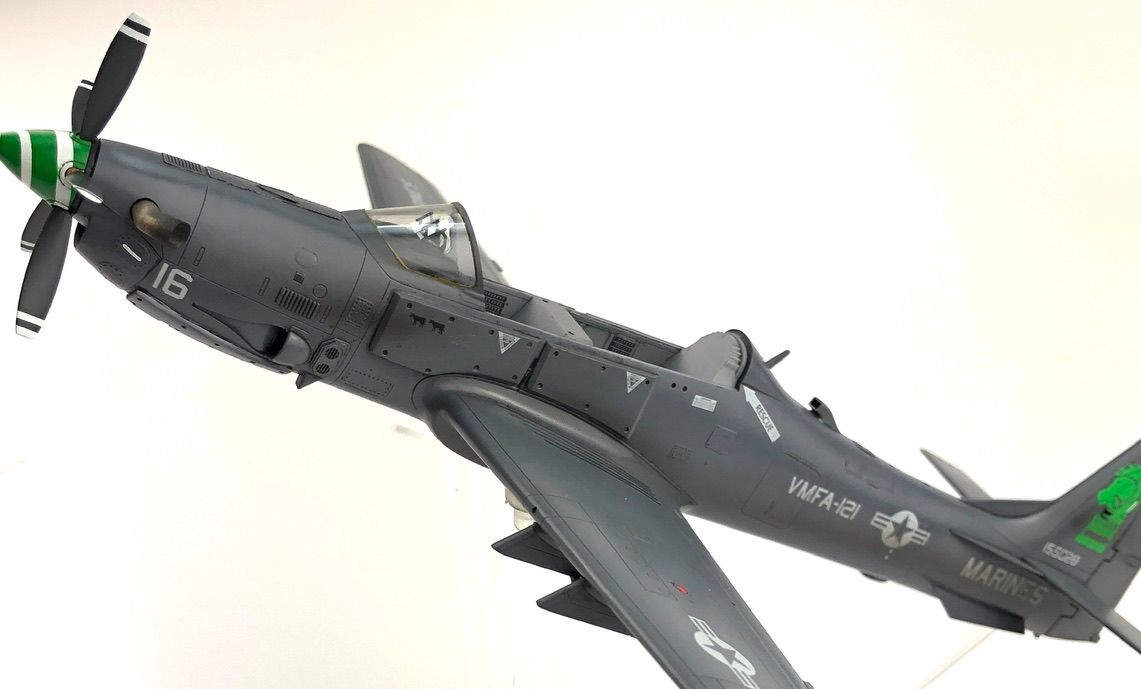
USMC A29 VMFA 121 "Have Gun Will Travel"
This aircraft represents a USMC livery VMFA 121 Green Knights. This is a fictional livery. I wanted to do a USMC scheme and the VMFA 121 is perfect as one of this squadrons role is close air support.
Hobby Boss 1:48 EMB 314 Super Tucano
- AVM A-29 Super Tucano conversion set
- Eduard 48820 Exterior
- Eduard FE690 Interior
- Eduard EX436 Mask
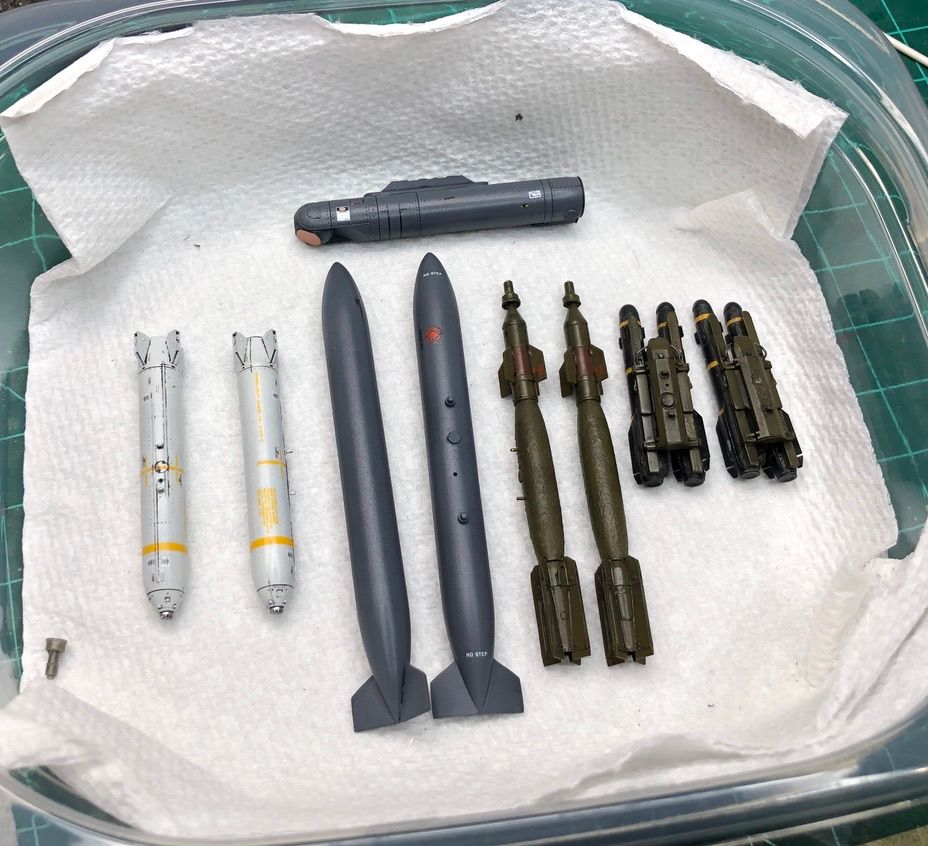
- Eduard 648155 GBU12 Paveway II (magnets installed and will use for future 1:48 modern aircraft ordnance)
- Eduard AGM114 Hellfire Missiles (magnets installed and will use for future 1:48 modern aircraft ordnance)
- Eduard 648548 LANTRIN Pod (magnets installed and will use for future 1:48 modern aircraft ordnance)
- Eduard 648168 Mk.20 Rockeye II (magnets installed and will use for future 1:48 modern aircraft ordnance)
- QuickBoost 48614 Gun Barrels
- QuickBoost 48612 Exhaust
- ResKit RS48313 Wheel Set
- Archer 88003 Resin Decals
- Gunze 305 Grey
- Gunze 69 Off White
- Gunze 66 Bright Green
- Tamiya XF69 NATO Black
- Tamiya X22 Clear
- Tamiya XF86 Flat Clear
- Tamiya X19 Smoke Clear
- Valleijo Model Color 70870 Medium Grey (interior)
- Valleijo Panzer Aces 70306 Rubber Gray
- Alclad 104 Pale Burnt Metal
- Alclad 110 Copper
- MOTLOW Chrome
- MIG Panel Line Wash
- MAW 48014 Decals Hornets Part III for VMFA Green Knights tail art and flare dispenser.
- FCM 48047 Super Tucano decals for a few stencils
- Decal spares for all low vis markings
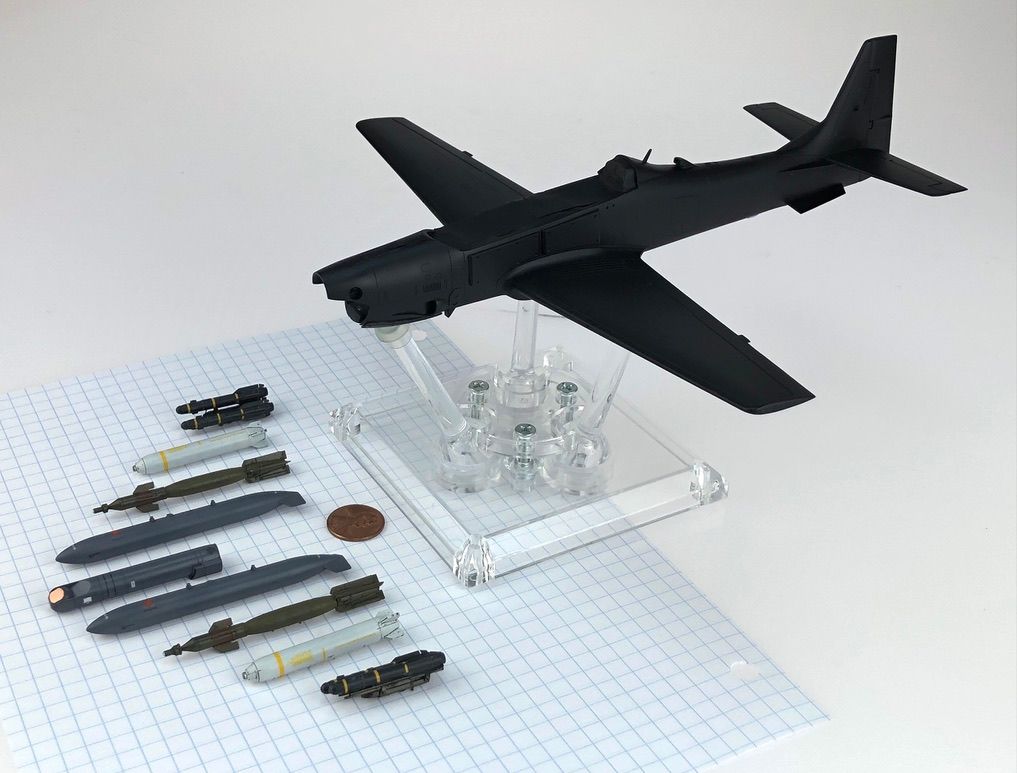
A29 Super Tucano with LANTIRN Pod and AGM114 Hellfire missiles and GBU12 Paveway II bombs load-out
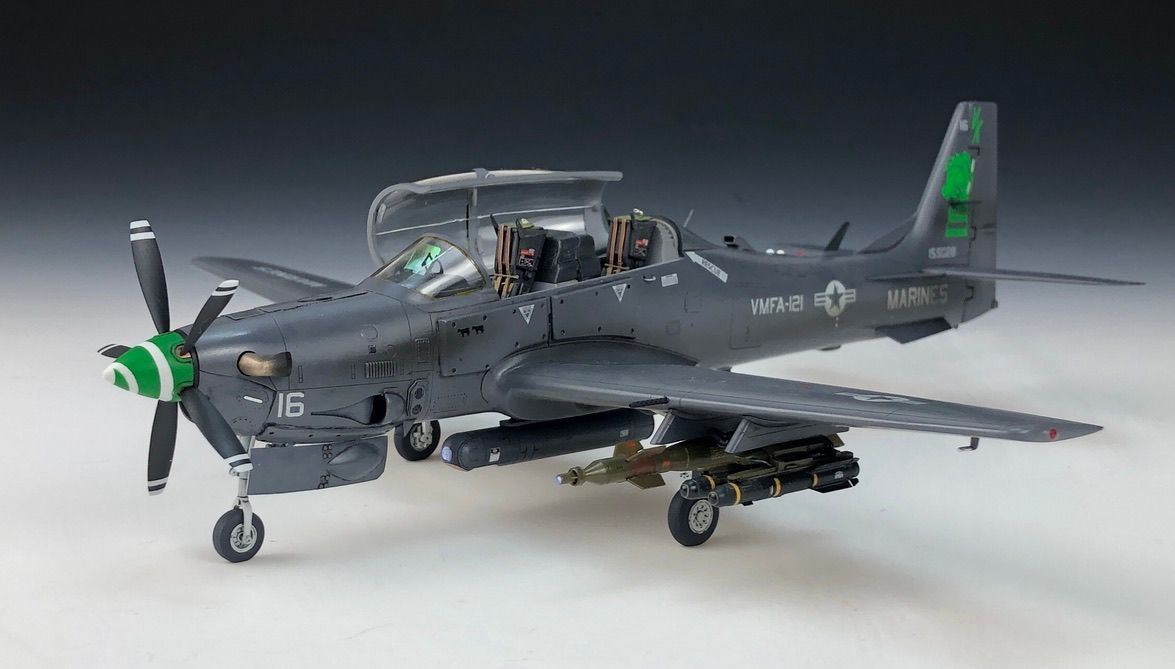

A29 Super Tucano with LANTIRN Pod and AGM114 Hellfire missiles and external fuel tanks

A29 Super Tucano with LANTIRN Pod, GBU12 Paveway II bombs and external fuel tanks


A29 Super Tucano with Mk.20 Rockeye II cluster bombs and external fuel tanks
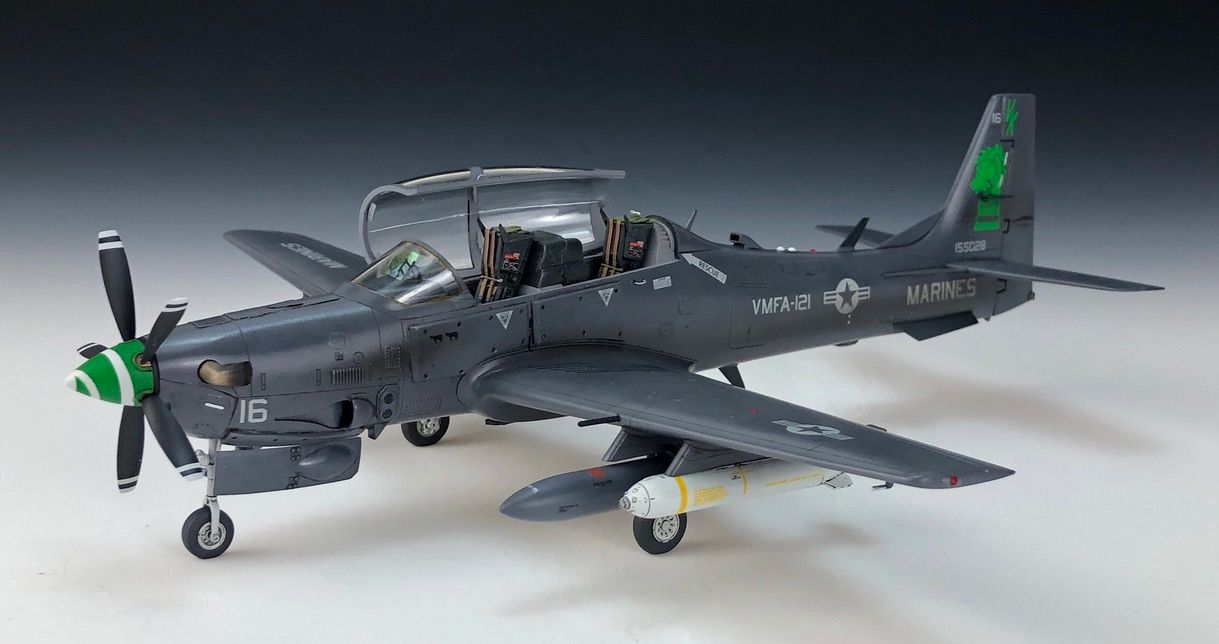
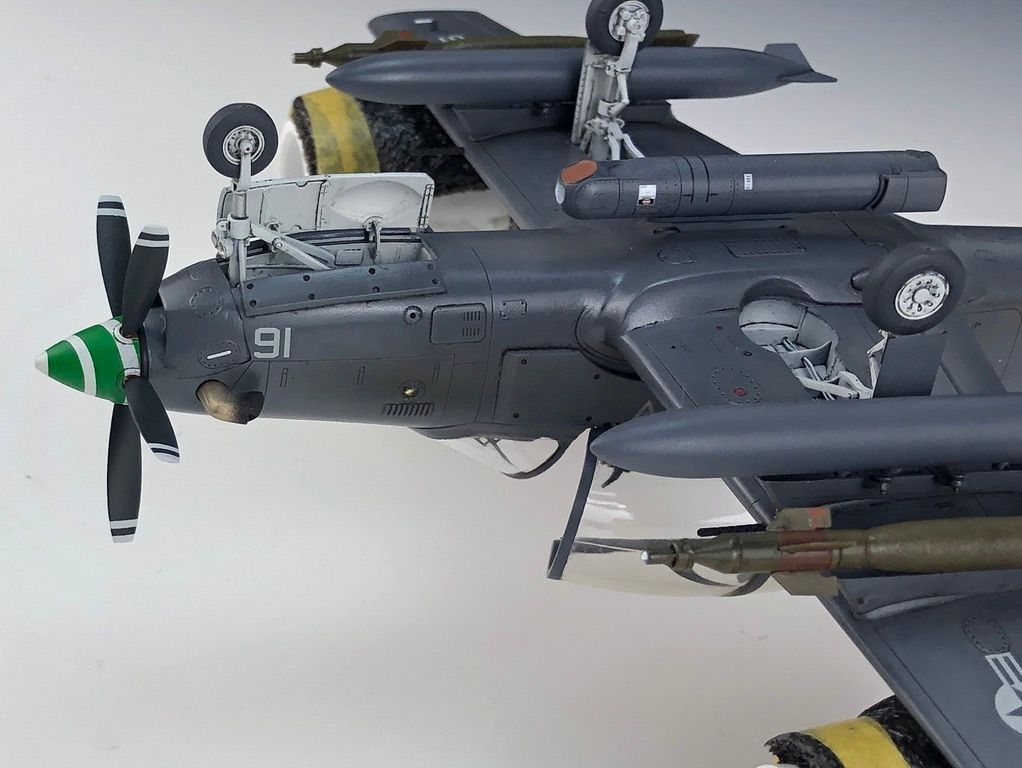
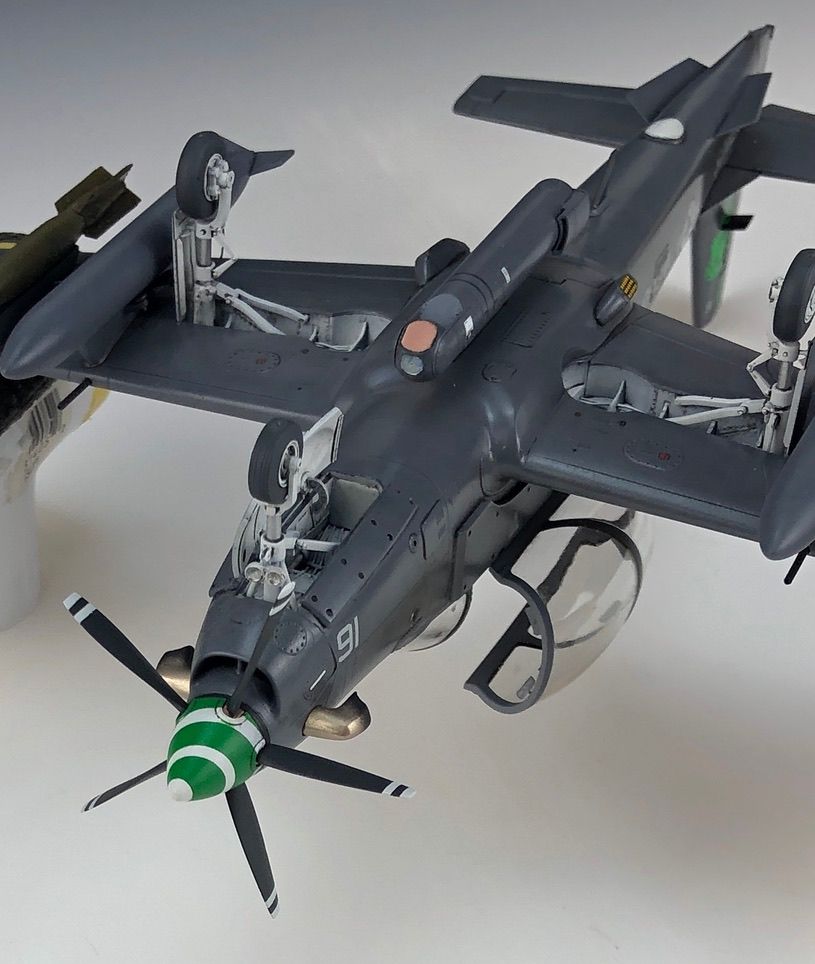
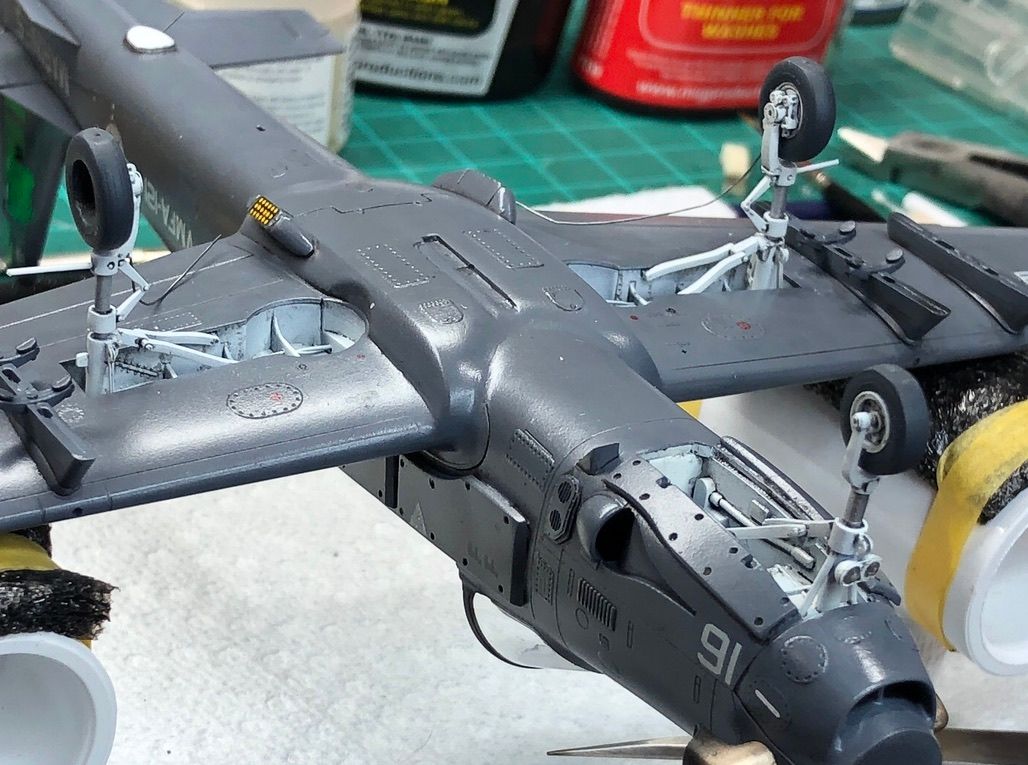
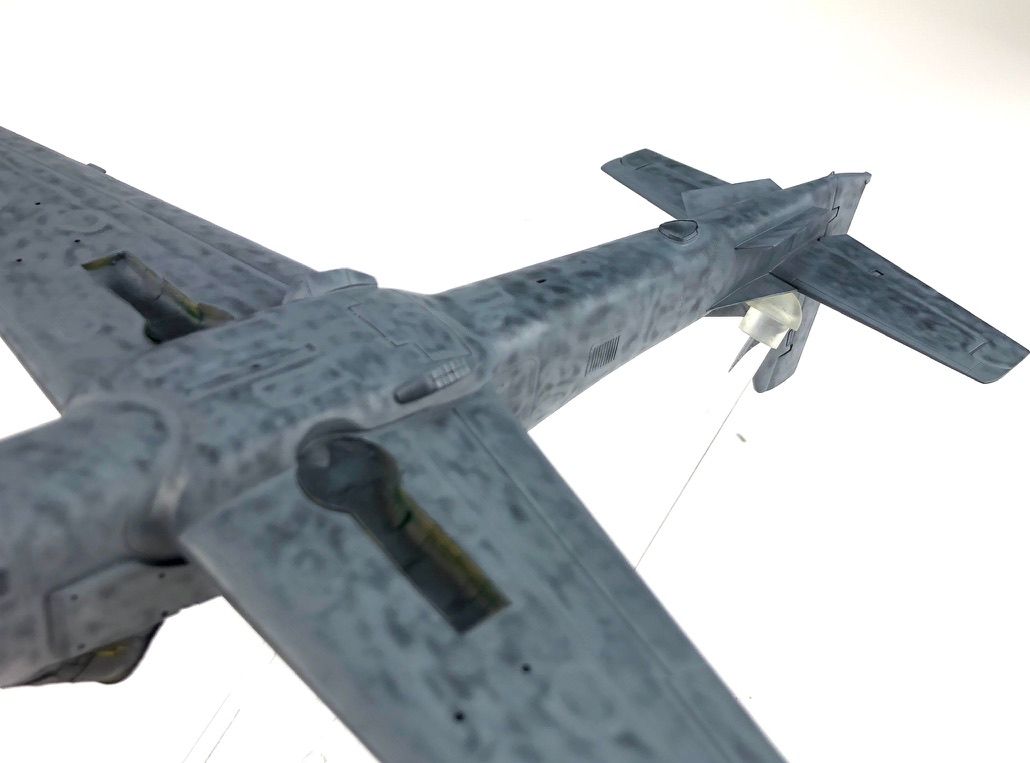
Lang gear represents 9 pieces of resin (wheels) and over 40 photo etch bits (leg and door detail) and a little wire.
-
3
-
The Baker brothers have arrived. Lego jig for canopy placement. Mirrors installed.
Time to wrap this up.
Each Martin Baker Mk.8 seats are enhanced with almost a dozen...wait for it. PE parts.

I love any opportunity to use my kids' Legos as jigs.

Mirrors installed and the MDC (Minature Detonation Cord) is extra fine white EZ line.

-
Because I have not played around enough with PE on this build.


5 pieces of PE used for front landing gear door. The .5mm styrene rod are mount pins for the door which needed extended because the armor belt depth made the kit mount pins useless.
Almost 40 parts: PE, resin, wire, styrene rod and assorted Acrylic, CA and Epoxy glues the landing gear is done.
Once again I dove into the PE rabbit hole.
I'm very happy with the added detail. That detail comes at a cost...time.
Look closely the landing lights on front wheel were made using Motlow Chrome paint. Then a drop of UV cure acrylic glue for each lens gives an nice effect.
-
2
-
-
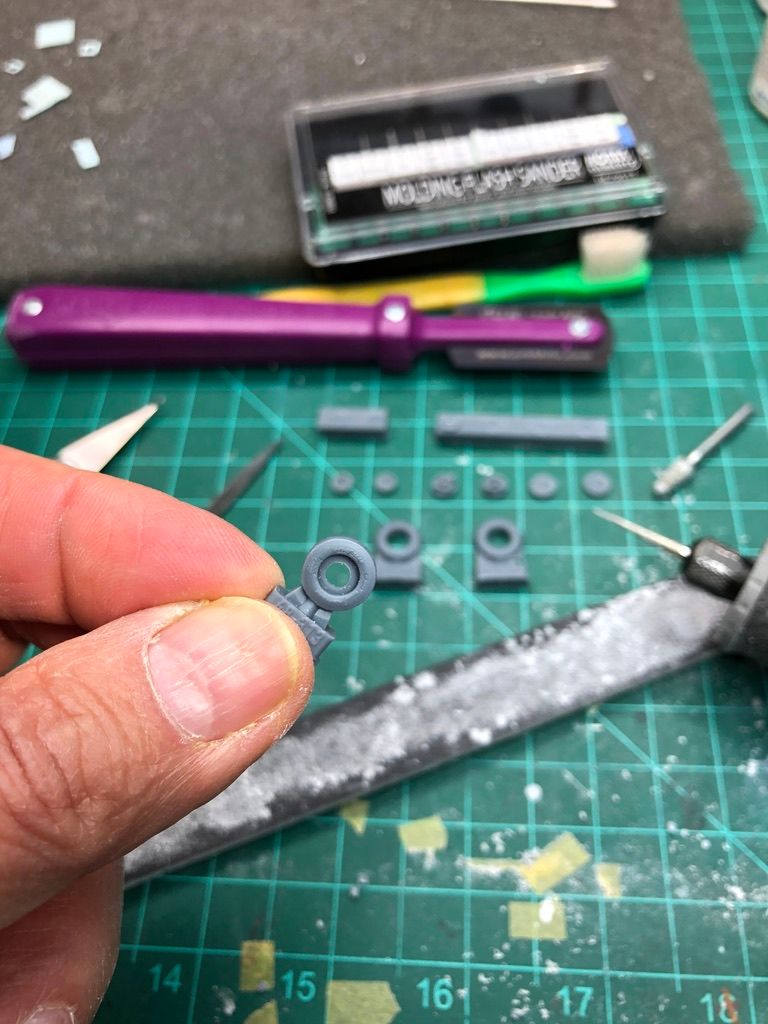
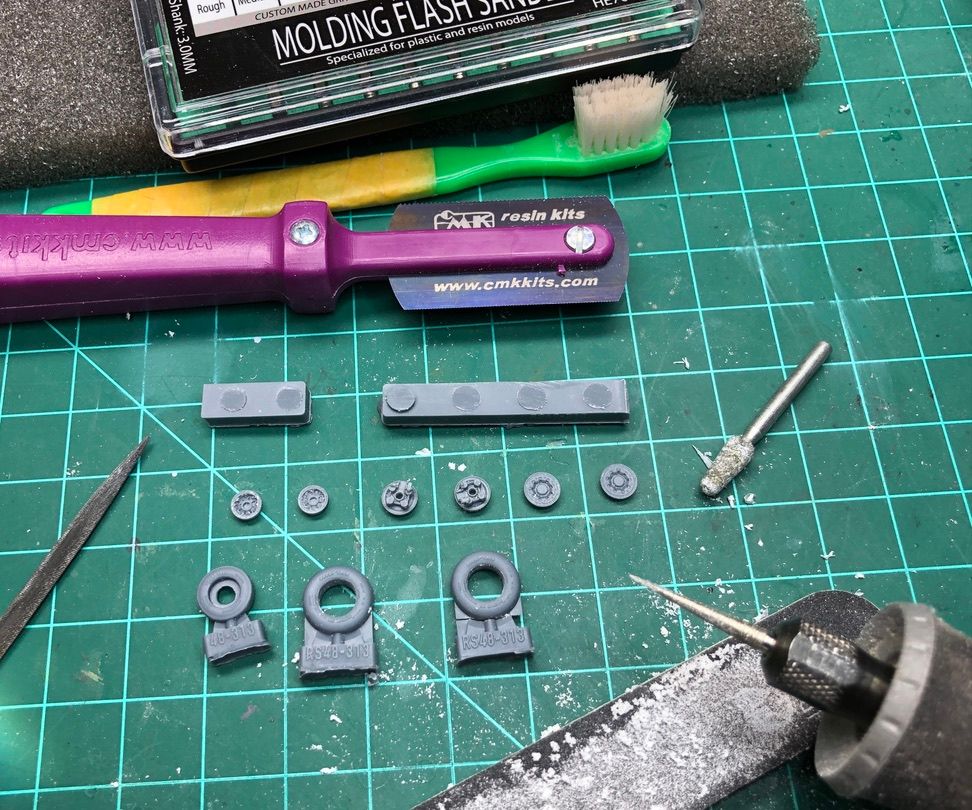
Not sure which drove me batty the most. The 10+ PE pieces for each main gear leg only to find the main gear leg won't fit with the added PE pieces or the 9 piece ResKit wheel set fitting the hubs into the tire.

The landing gear legs glued with epoxy after full cure the fun begins with the wheels.
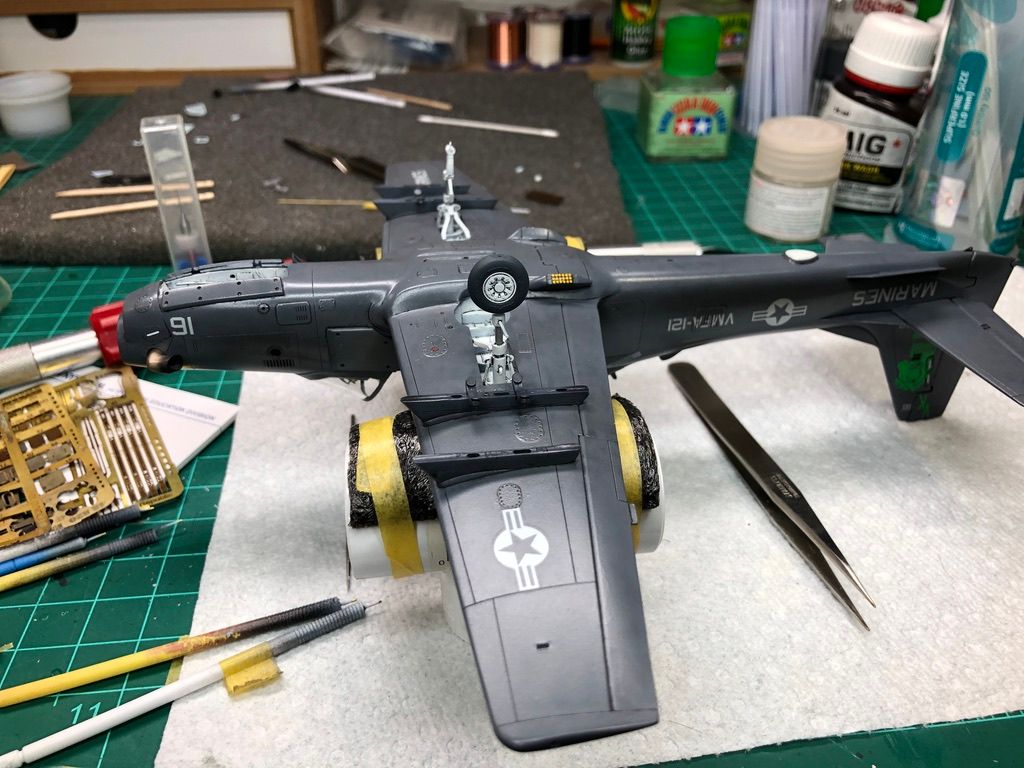
Main gear dry fitted with resin wheel also dry fitted. You can see the flare dispenser treated with decals from MAW Decals Hornets Part III.
After main gear glue cure I epoxied the wheels to the legs. I used 5 minute cure Epoxy. After about 3 minutes when the epoxy thickened I gently set the aircraft on the table to adjust the "weighted area" to sit properly on the surface. The brake lines will be trimmed and fitted later.

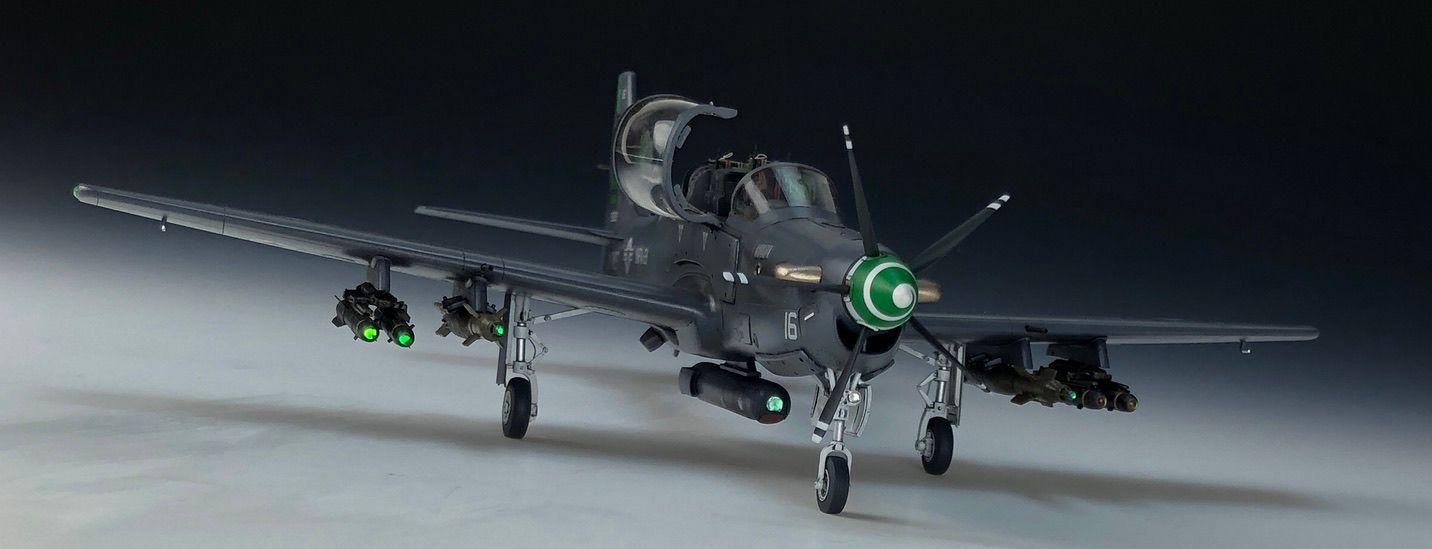
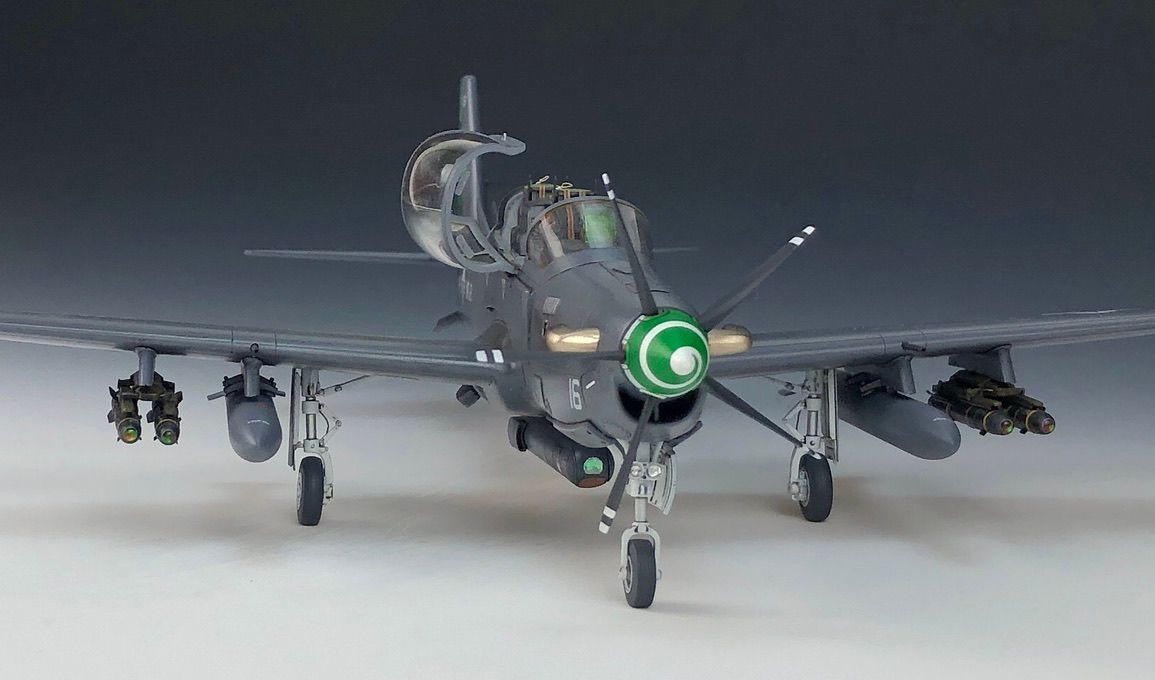
After full epoxy cure I set the aircraft on her legs. Then I played with the ordnance load-outs. This load-out shows the FLIR, External fuel and and AGM114 Hellfire missiles.
All are magnet mounts. I can swap out with GBU 12's and Rockeye Mk.20's. Fun times!
The main gear hubs have yet o be attached.
-
2
-
-
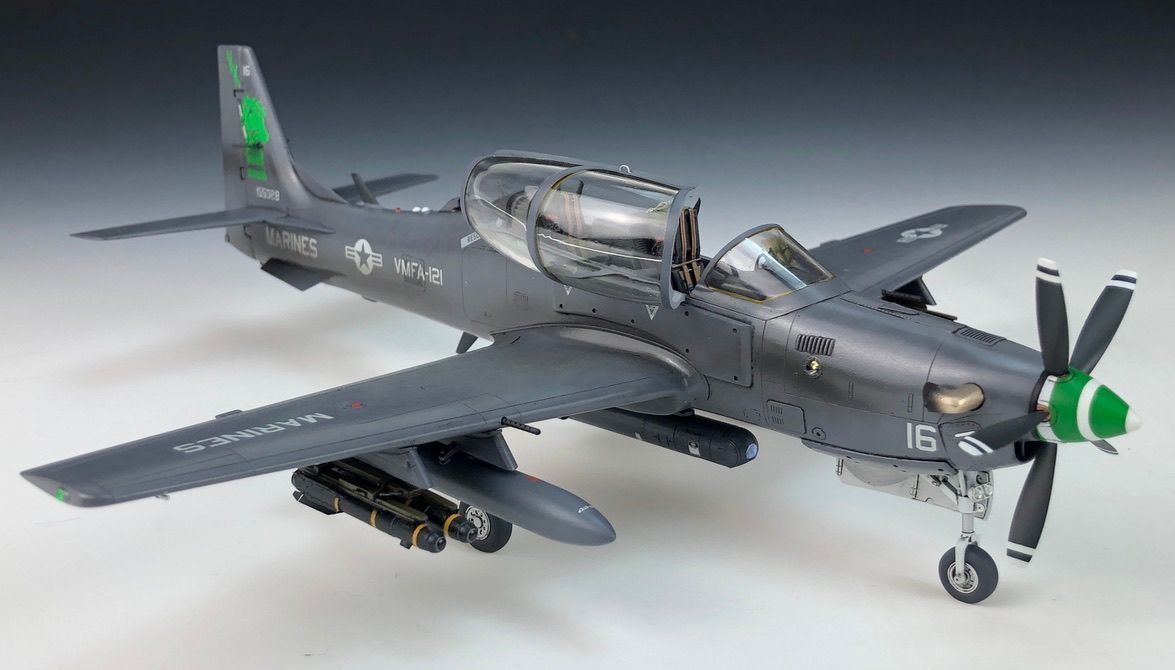
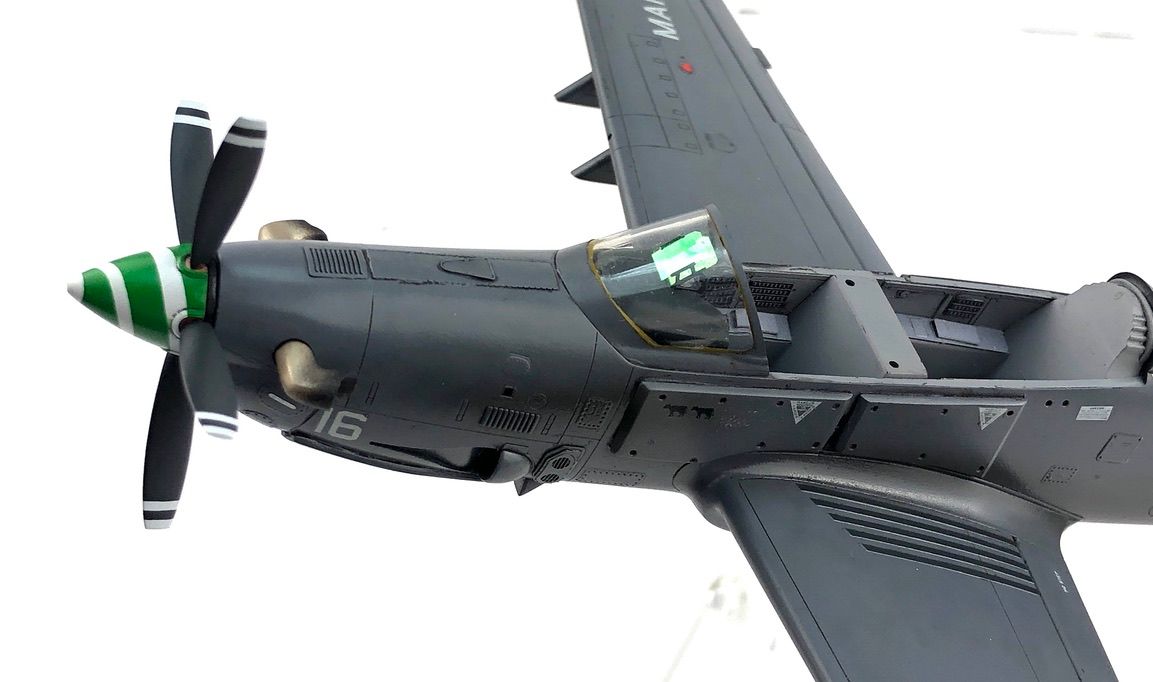
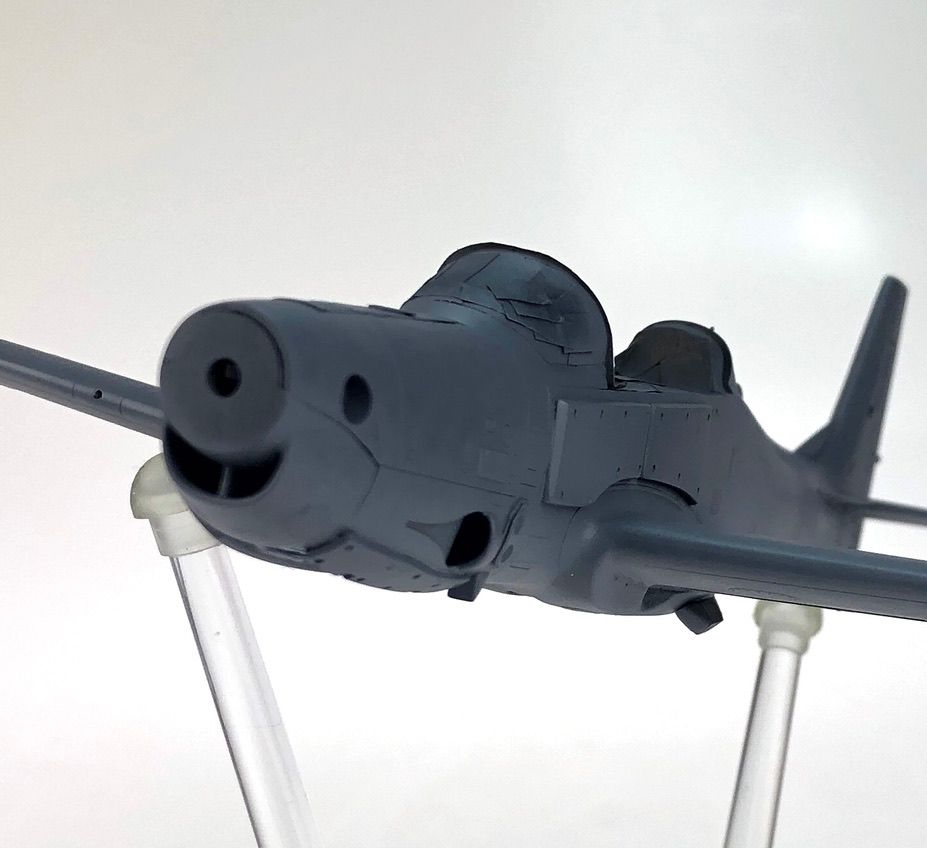
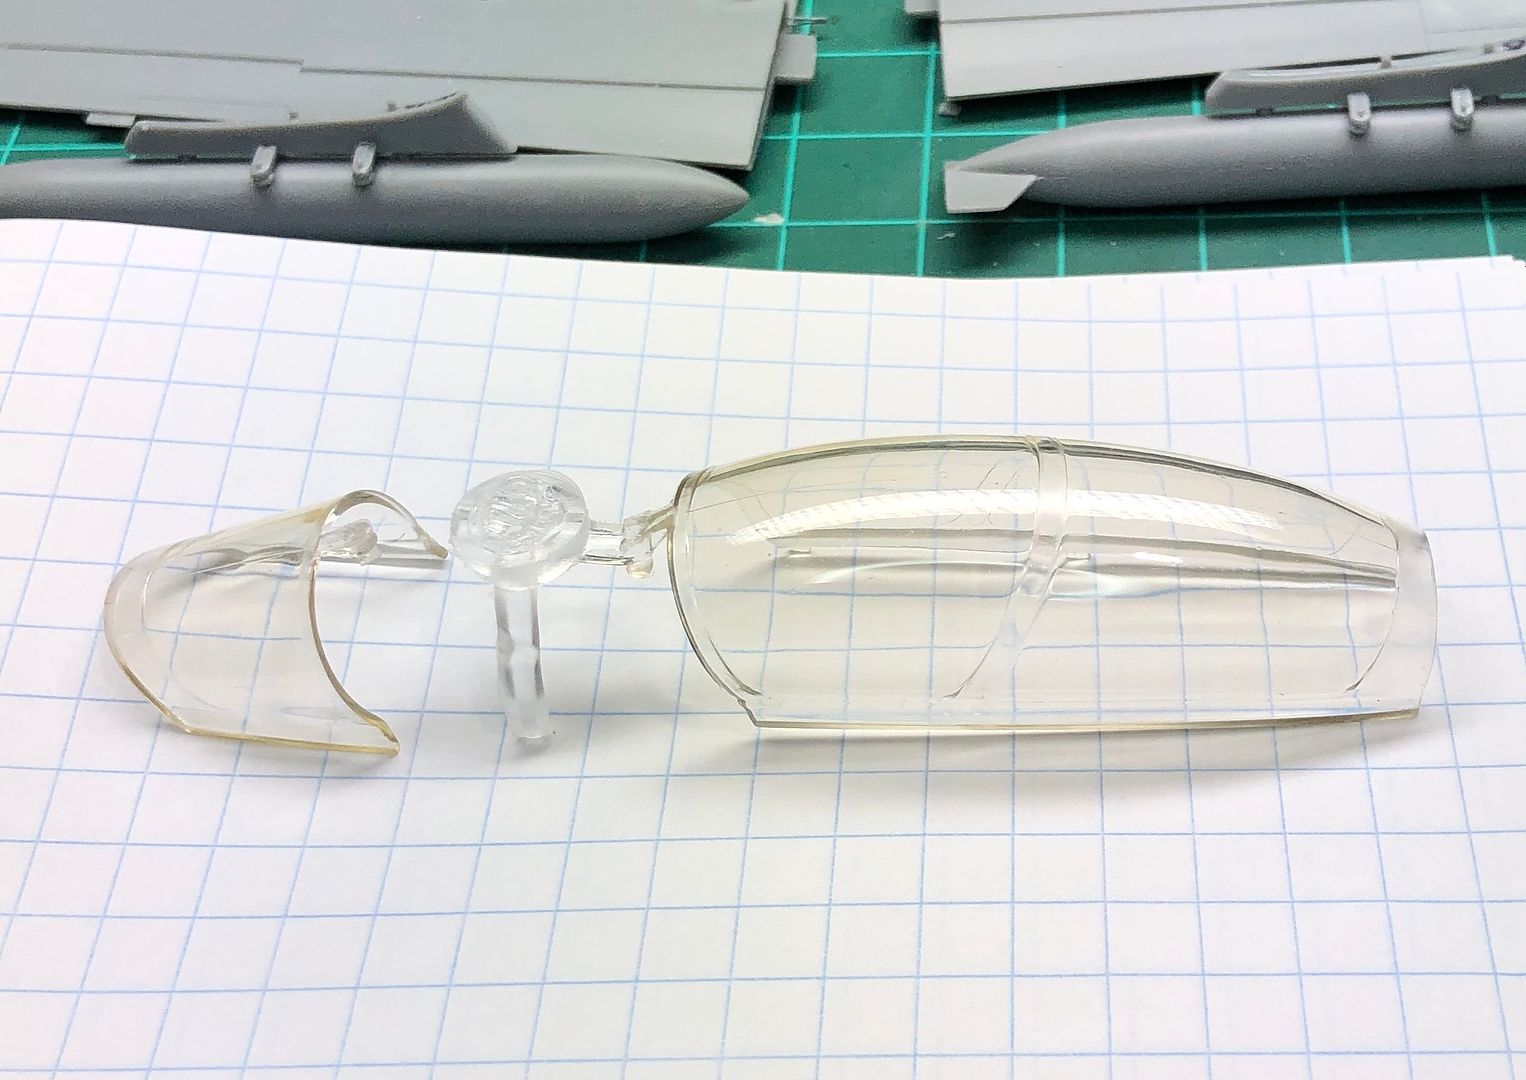
One of my favorite parts of a build is removing the canopy masking. Happy no bleed on the windscreen. Really pleased with the HUD film on the gun sight reflectors.
Exhaust pipes painted ALCLAD Pale Burnt Metal and Jet Exhaust. The exhaust staining is peculiar on this aircraft. Exhaust stain created using thinned Tamiya X19 Smoke. Then sealed with Tamiya Flat Clear varnish and Mr Leveling Thinner brew 1:1 .


-
2
-
-
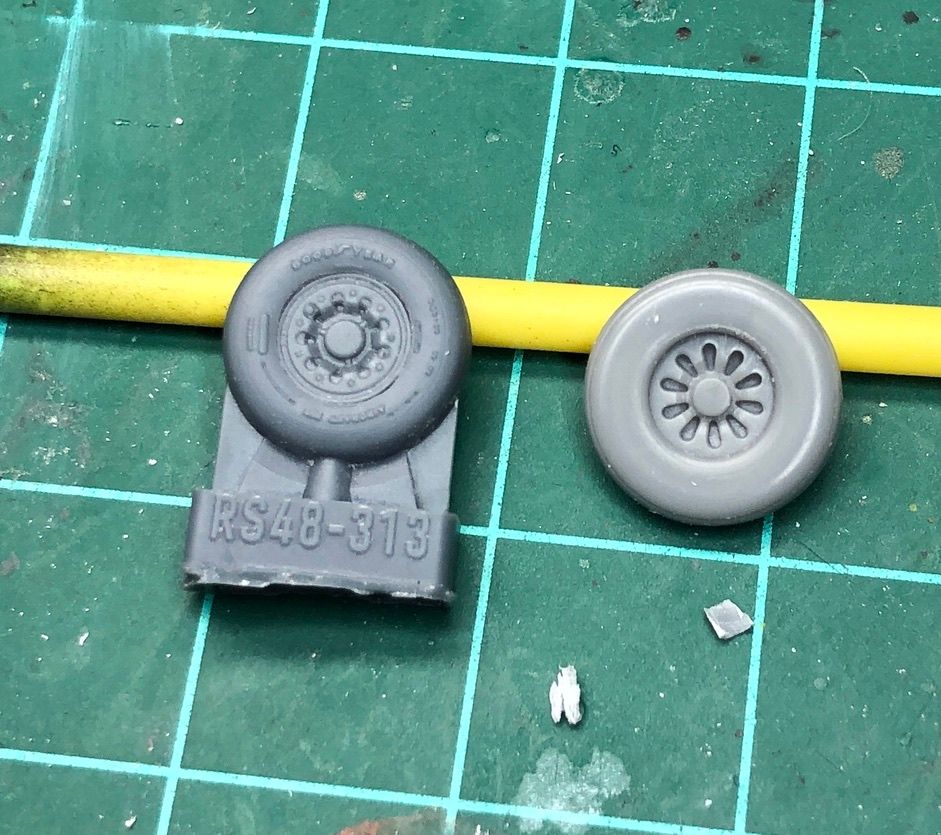
Nothing says "what a swell time!" more than cutting resin stuff. I love ResKit details. I just loathe the cutting, sanding and drilling.The A29 wheel set is superb. Detail compared to the kit offering is measurable. The cutting and prep is a bummer.

-
1
-
-
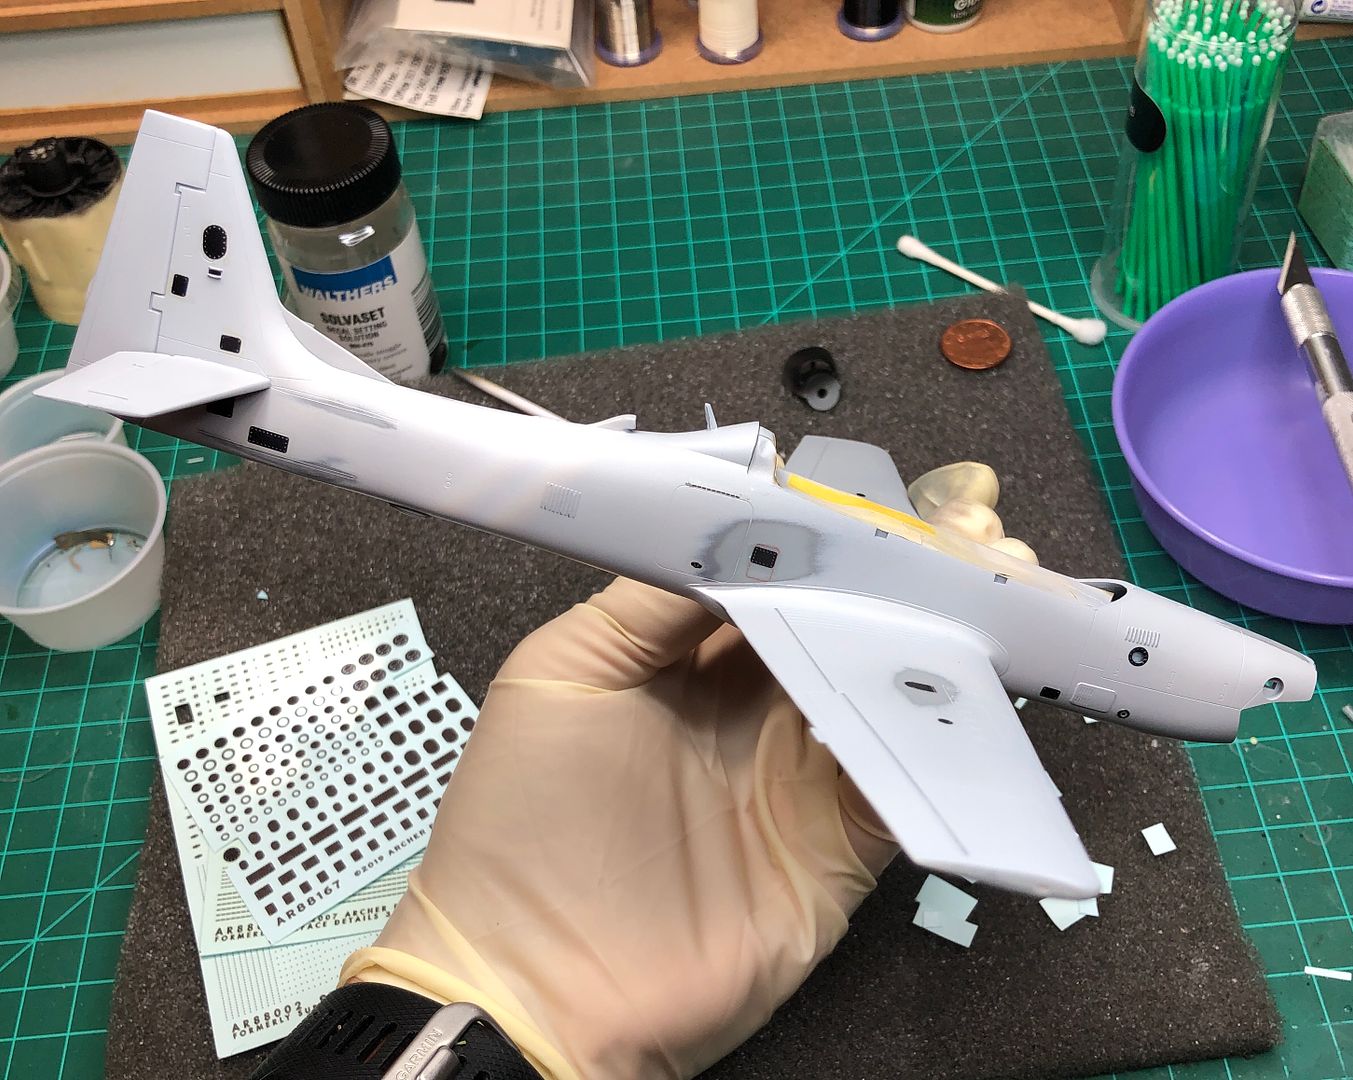
After a coat of varnish the decal application begins. I cobbled decals from various LoVis offerings for F35, F18. Also used some stencils from the FCM 48047 Super Tucano decal sheet. Tail "splash of green" yields a nice contrast when paired with the prop boss.


After mounting the pylons I had a little fun with my magnet mount ordnance options. Lots of mix n match in this birds future. AGM 114's and Rockeye Mk.20's. Cenetr mount is LANTIRN Pod. All are Eduard products.
-
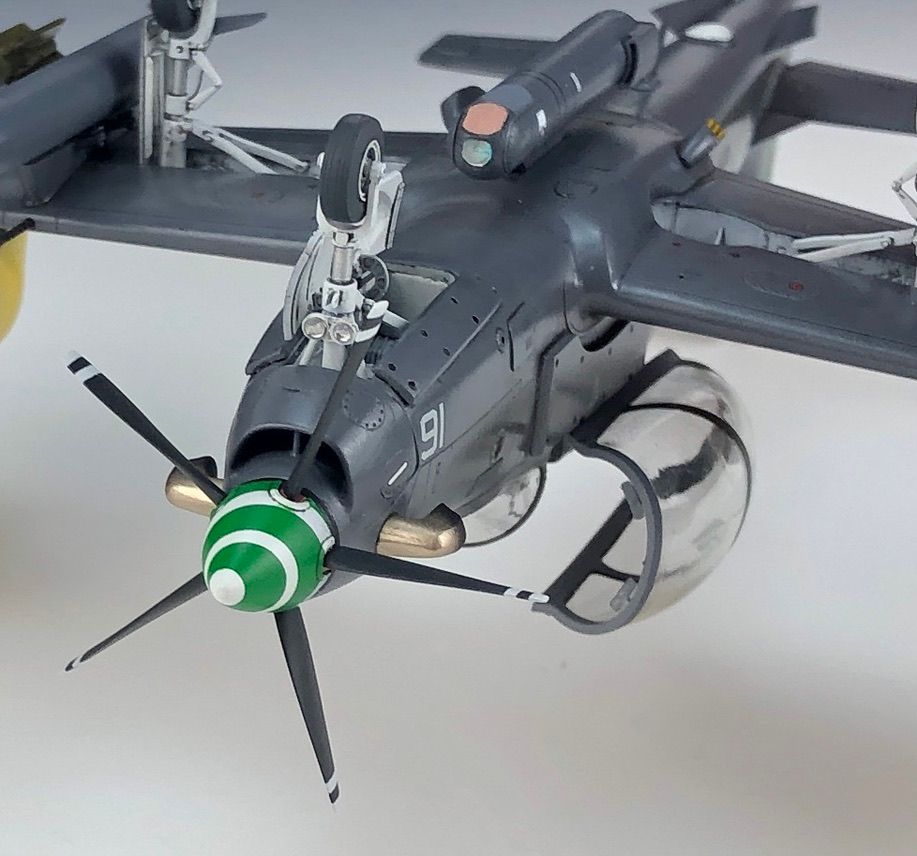
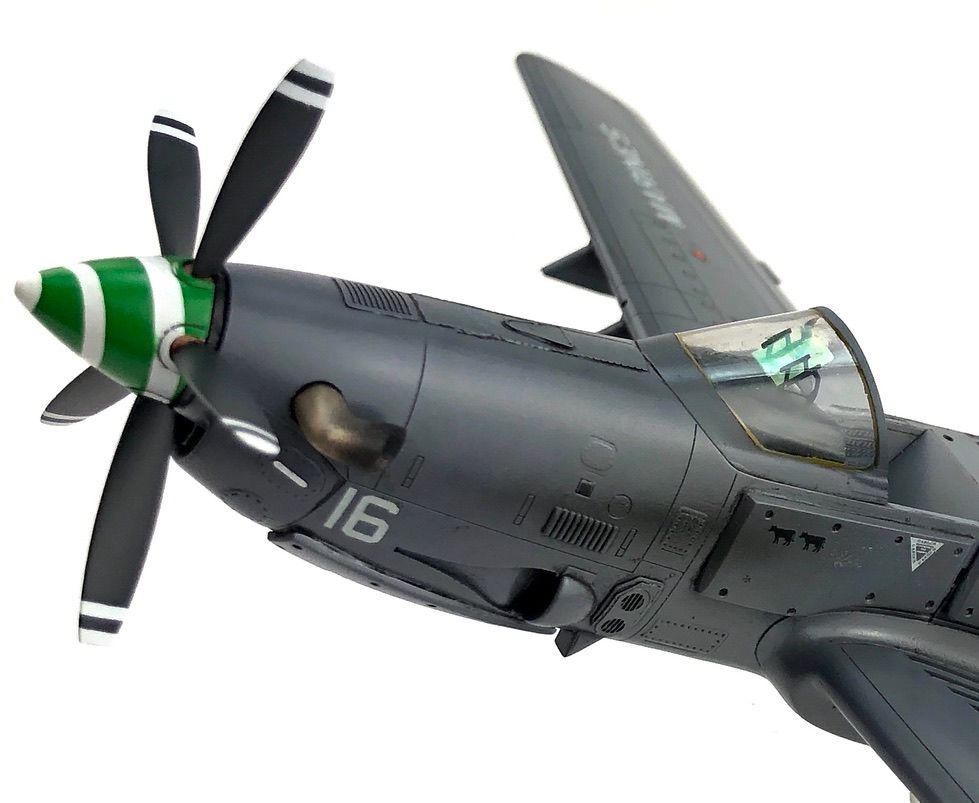
On to the prop boss and blades. Going to give the prop boss a spiral finish.
.jpeg)
Prop Boss got a base of Gunze 69 Off White over Gunze Mr. Primer Surfacer 1200 gray. The white base is to give the bright green some visual punch. Then I cut spiral tape and secured in place.
.jpeg)
Gunze 66 Bright Green applied. Why the green prop boss? This A29 will be a VMFA-121 Green Knights livery.
.jpeg)
After paint dry the spiral tape removed. Some very minor cleaning will be needed.
Those double stripe prop tips!

I knew going in this might be difficult. Decals were out of the question. Then I had an epiphany. After an overall Gunze Mr. Surfacer 1500 black I hit the tips with Gunze Mr Surfacer 1200 gray. This will help the white show up and limit the number of coats.
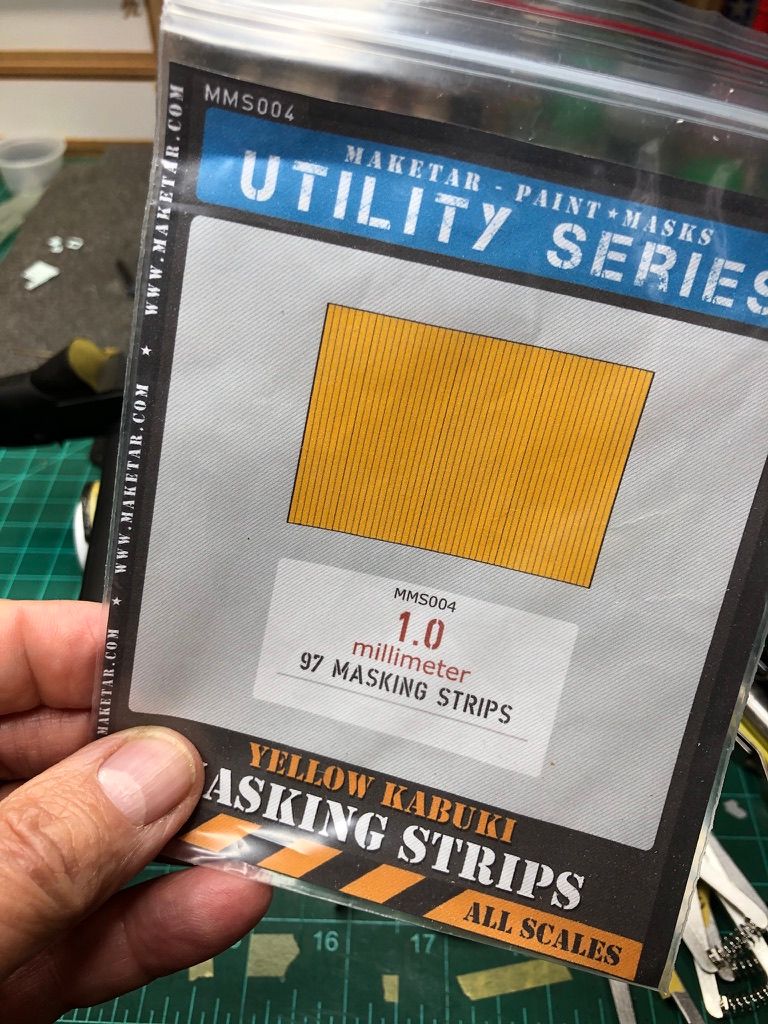
Maketar Utility Mask Series in 1mm strips are a beautiful thing.
.jpeg)
I cut 3 short strips of 1mm strip tape about 6mm long and carefully removed keeping all three strips intact. Slide an xacto blade and lift the three strips up at same together.
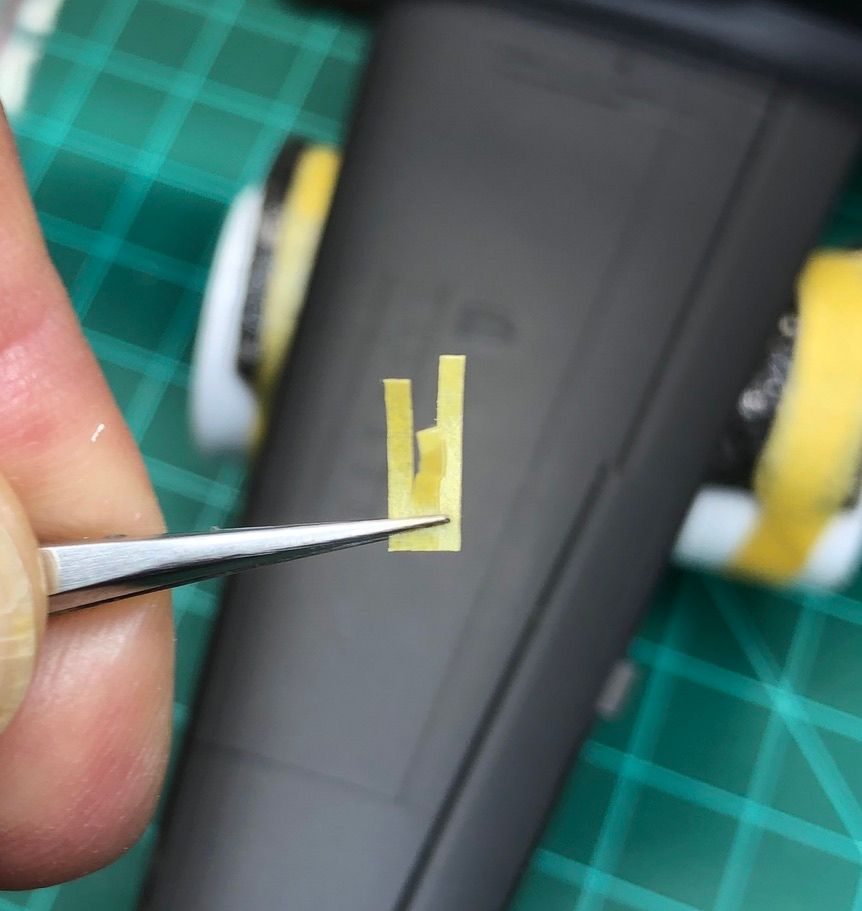
After tape is applied on prop blade you carefully peel back the center strip. Now you have equal stripe spacing.
.jpeg)
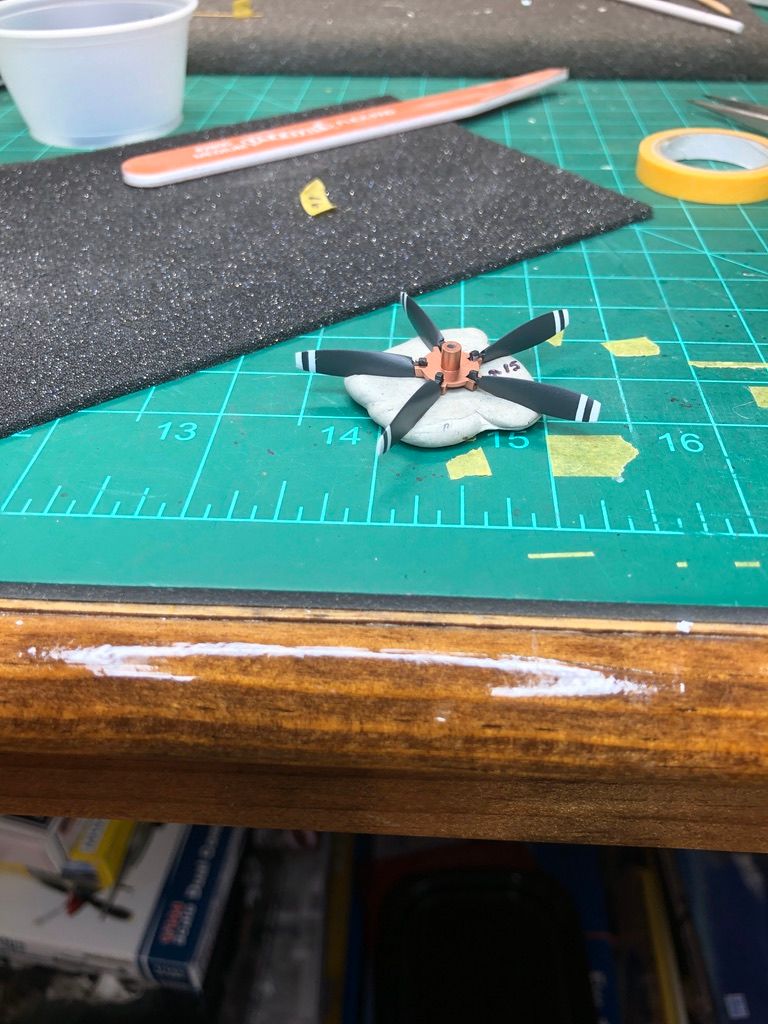
Masking method applied on the prop blade. Do one side at a time. You'll be surprised how easy this is. Just a little time consuming. Now apply some Gunze Mr. Surfacer 1500 Black followed by MRP 77 NATO black. Masks removed shows good equal spacing.
.jpeg)
Laid out all prop blades with prop boss. I'm happy with results.
Prop assembly was figitey at best. I used putty and gently pushed the frontplate into putty. Then locate attach points for blade and carefully push into putty.
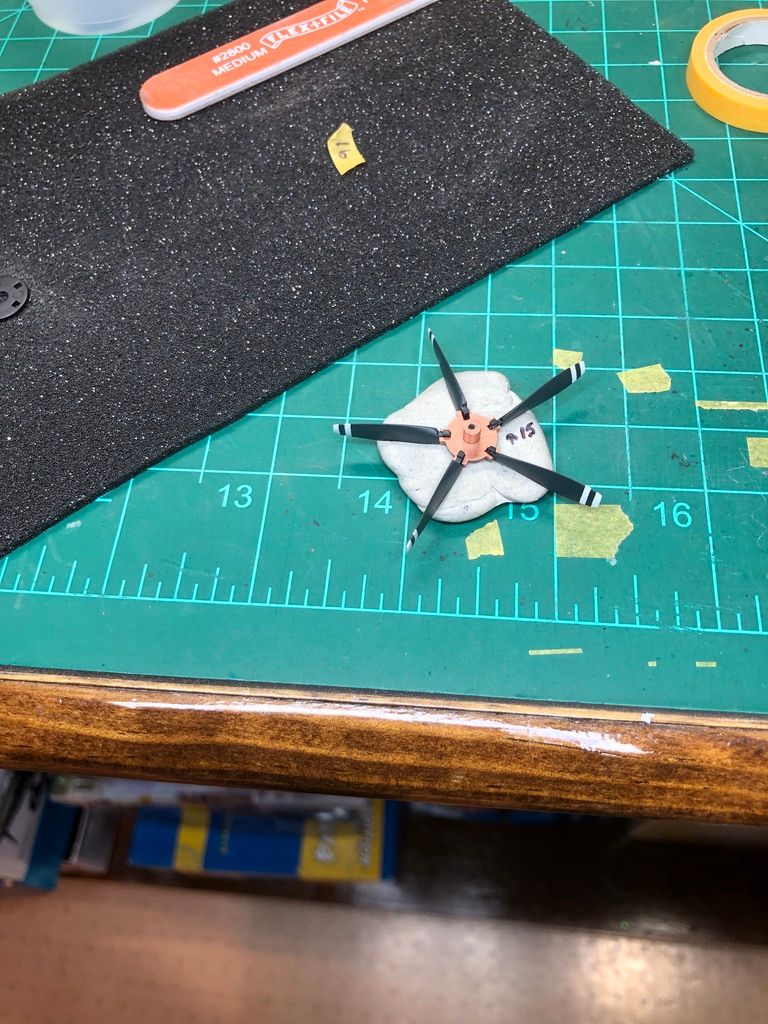
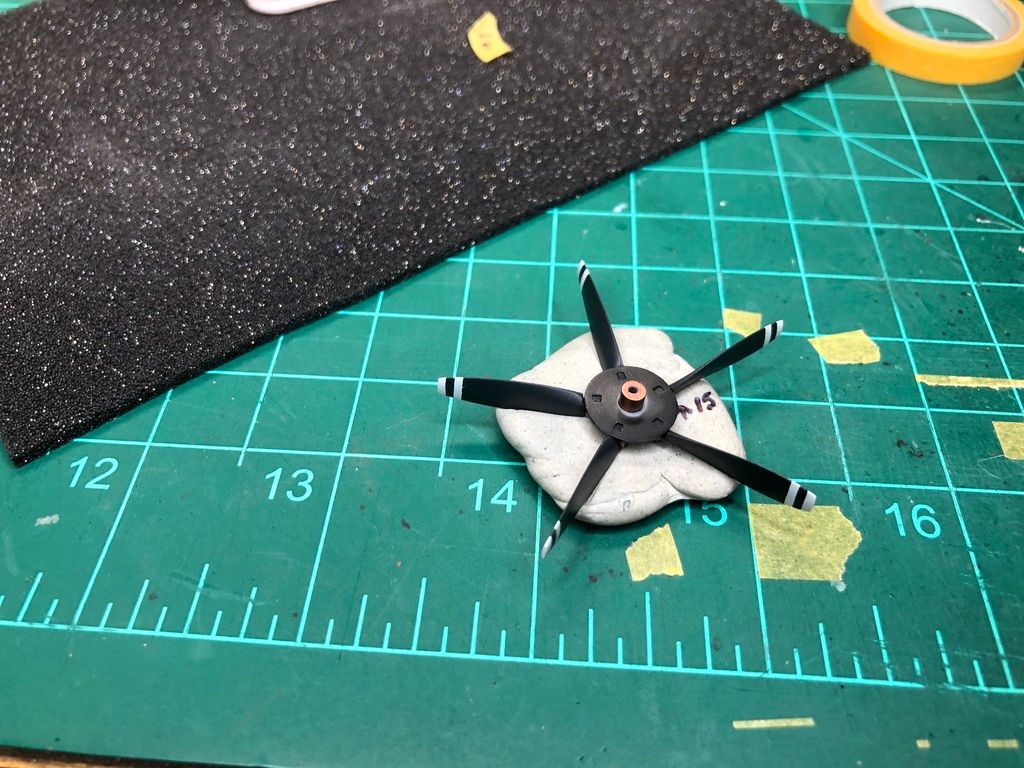
Carefully aligning each prop to the backplate into correct position with the prop blades. A touch of glue (TET) secured each prop blade.
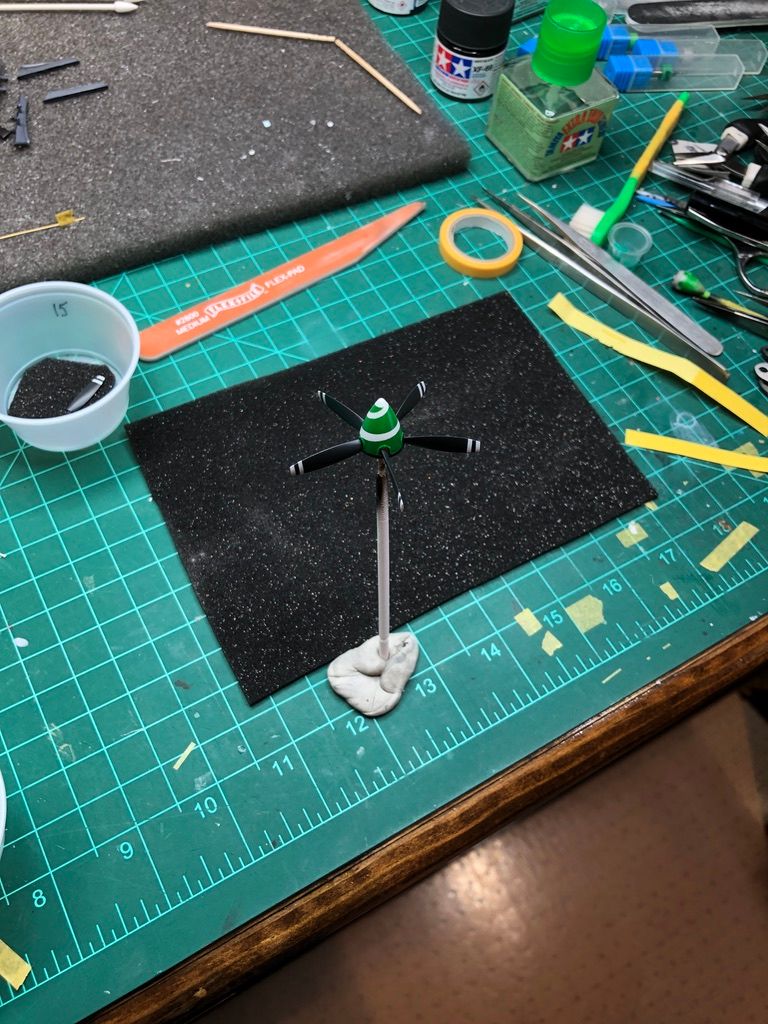
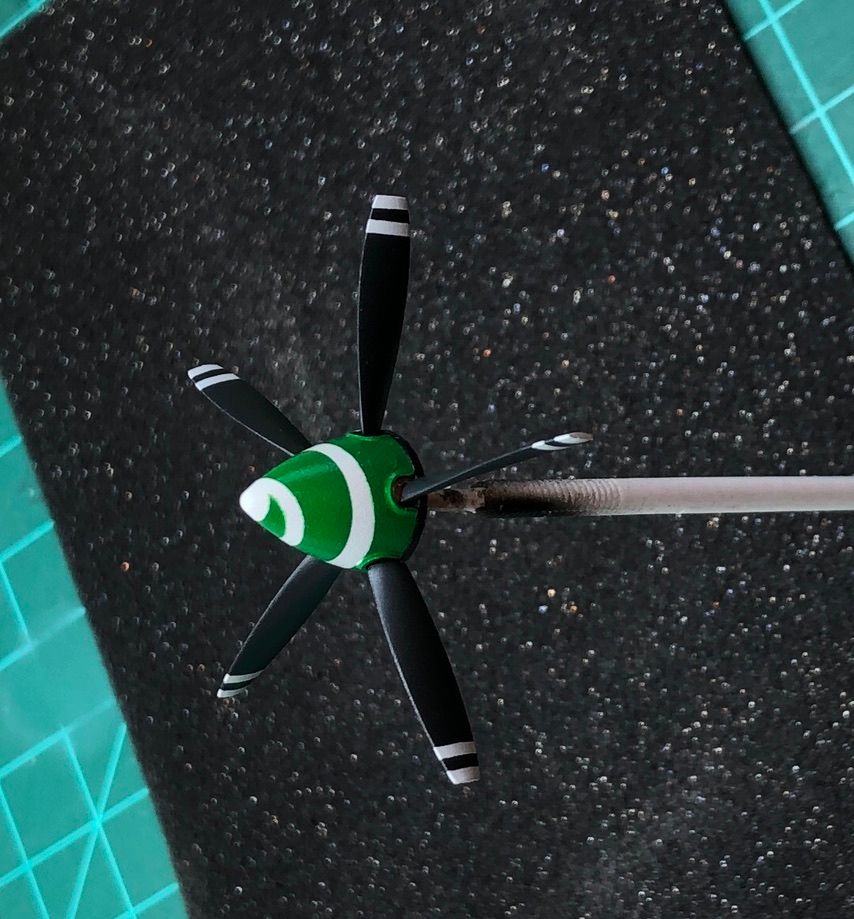
Prop boss secured. I like the look and will be a great contrast to the overall Gunze 305 Dark Gray FS36118 finish.
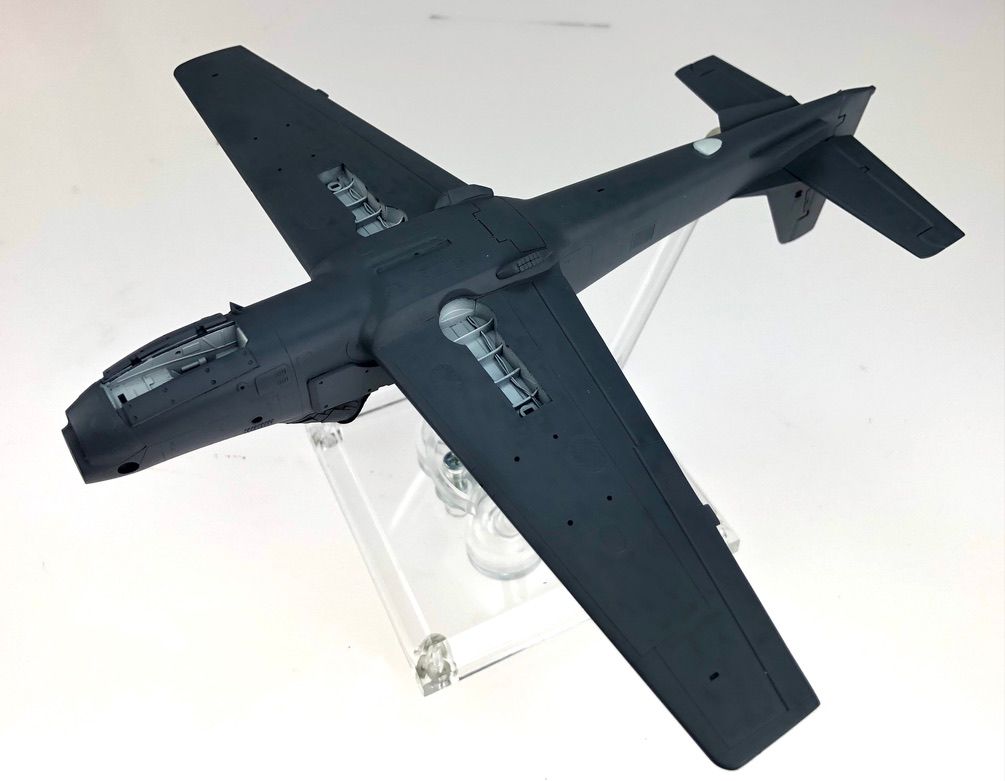
Marbling blended with Gunze 305 Gray FS36118. This will be the overall color. Photograph (iPhone) does not show the color modulation very well. Masks removed.
.jpeg)
.jpeg)

.jpeg)
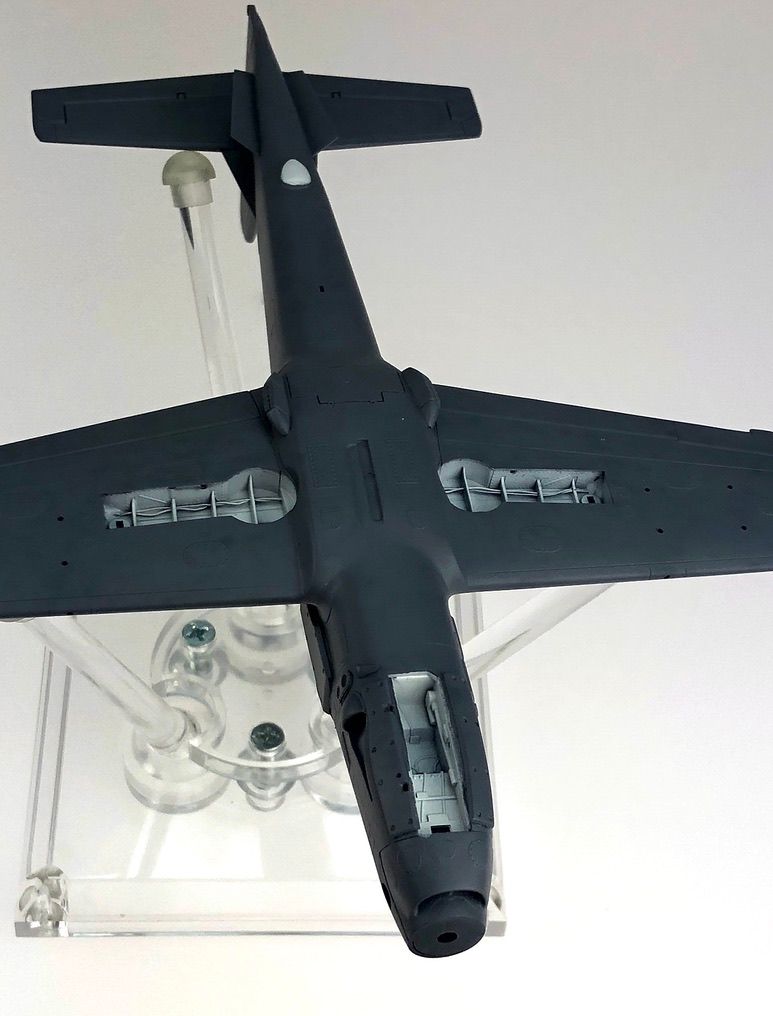
Masks removed from wing walk area.
Masks removed from wheel wells and DME antenna dome (Distance Measuring Equipment). Minor touch ups needed.


Prop test fitted. I like the "color burst" on this. There will be another splash of "green" on this bird.
-
3
-
-
Final masking ready to paint.The starboard side has wing walk strips and should be sanded smooth.
 You can see the starboard wing walk strips have been removed. A little sanding and scribing. Very EZ.
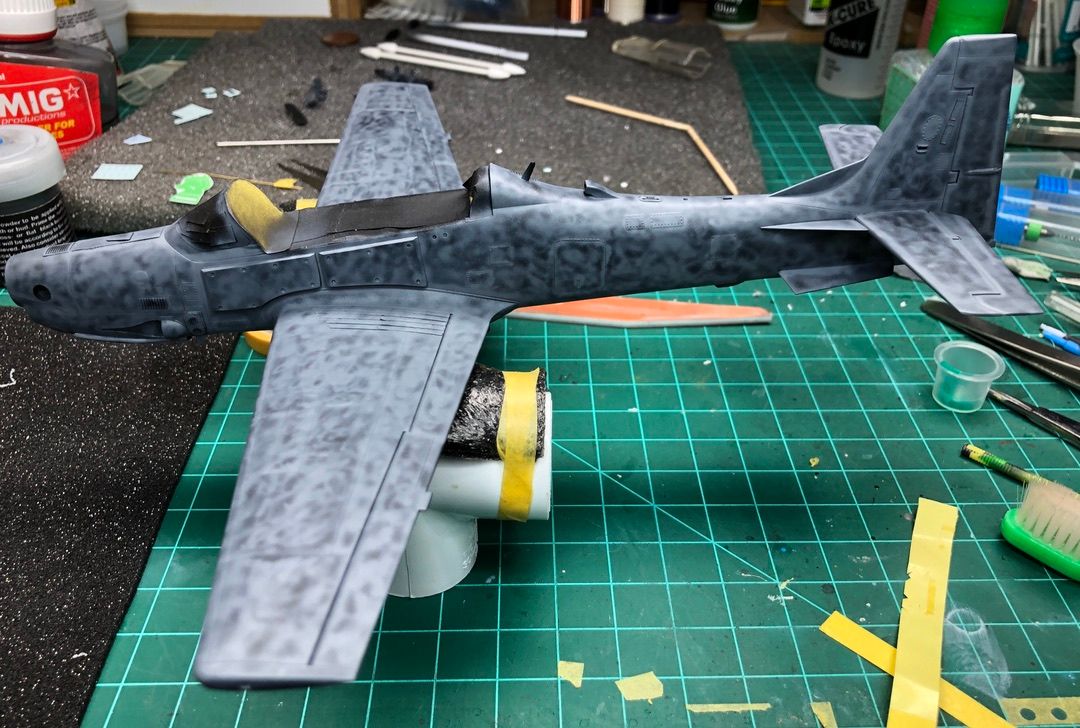
.jpeg) Wing walk area got a shot of MRP 77 NATO Black after full cure the raised strips are masked with 1.5mm strips. A coat of Gunze Mr. Surfacer 1500 Black over NATO black.Now ready to start applying overall Gunze 305 Dark Gray FS36118 finish. Laying down some paint. Marbling done. Trigger finger angry at me.
Wing walk area got a shot of MRP 77 NATO Black after full cure the raised strips are masked with 1.5mm strips. A coat of Gunze Mr. Surfacer 1500 Black over NATO black.Now ready to start applying overall Gunze 305 Dark Gray FS36118 finish. Laying down some paint. Marbling done. Trigger finger angry at me.Of course I find some hidden seams. Will address then blend later.

Marbling blended with Gunze 305 Gray FS36118. This will be the overall color. Photograph (iPhone) does not show the color modulation very well.
Masks removed from wing walk area.
Masks removed from wheel wells and DME antenna dome (Distance Measuring Equipment). Minor touch ups needed.
-
3
-
-
Took a nice long 3.4 mile walk on Rock Creek trail this morning with our Chocolate Labrador Boba. Afterwards a little bench time on the A29 with good company.Yup, he’s taking his post walk nap.
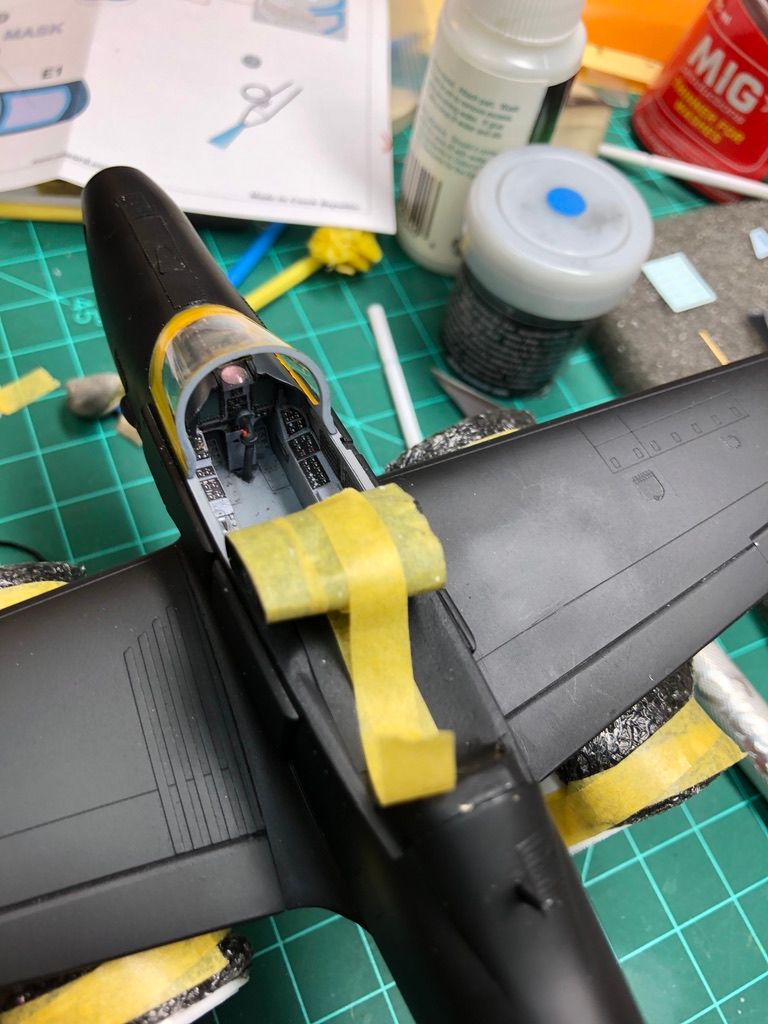
_(edited)_F39CED7A-CBD1-4406-9517-FF5B4A93A119_1_105_c.jpeg) Windscreen masked and glued in place. Almost ready for painting…finally.
Windscreen masked and glued in place. Almost ready for painting…finally.-
1
-
-
GUNSIGHT BLUES
Long ago I test fitted, test fitted and adjusted the IP comb so the photoetch gunsight would fit and not touch the windscreen. After applying the HUD film the fit was a fail as the windscreen touched the gunsight. Have no idea what happened.
That said, I had to carefully remove the HUD film and re-work the IP, IP comb and other angst causing adjustments. Finally got the fit correct.
Mask inside/outside windscreen paint then glue windscreen and hopefully begin painting.
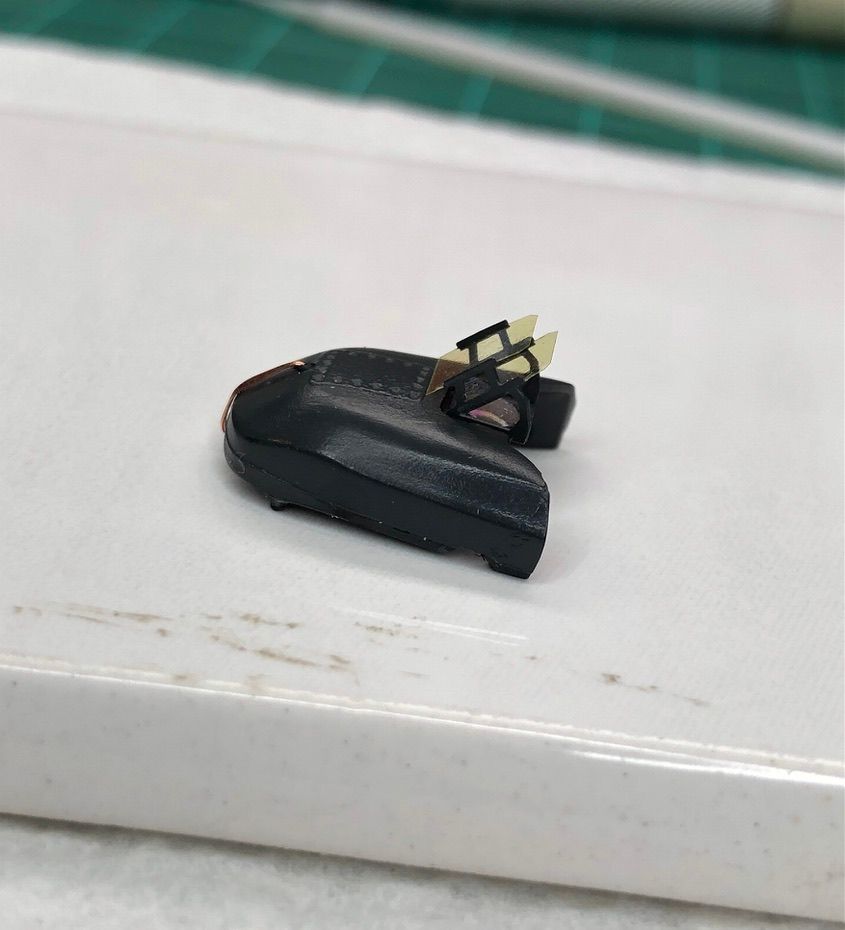
Using the Eduard film as a template, I cut the HUD "reflector glass" film to fit the PE.
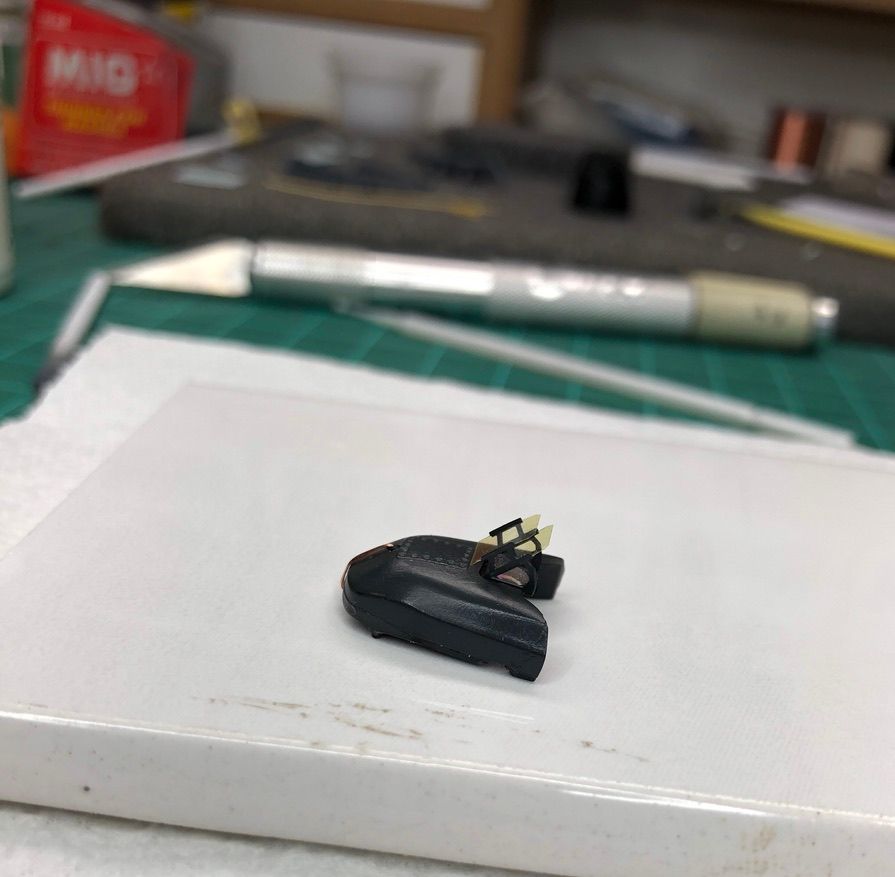
HUD film secured with Future. The "lens" was created before attaching the HUD film. A silver decal cut to match the circumfrence on the pe part is positioned. After cure, acrylic glue was carefully placed over the silver decal and cured with UV light.
Dryfit along with IP and Baker Bang Seat. Pardon the dust.
With windscreen dryfit.
-
1
-
-
9 minutes ago, Peterpools said:
Rick
The prep work looks perfect and I fully understand your reasons for deciding to replace the Eduard PE panels with the Archer's Resin Decal Panels - nothing like peace of mind and they do look mighty good. I have to admit I've never seen them used before and from your update, they apply much differently then the Quinta Resin Decals I use. Any hints and tips would be greatly appreciated.
This worked for me.
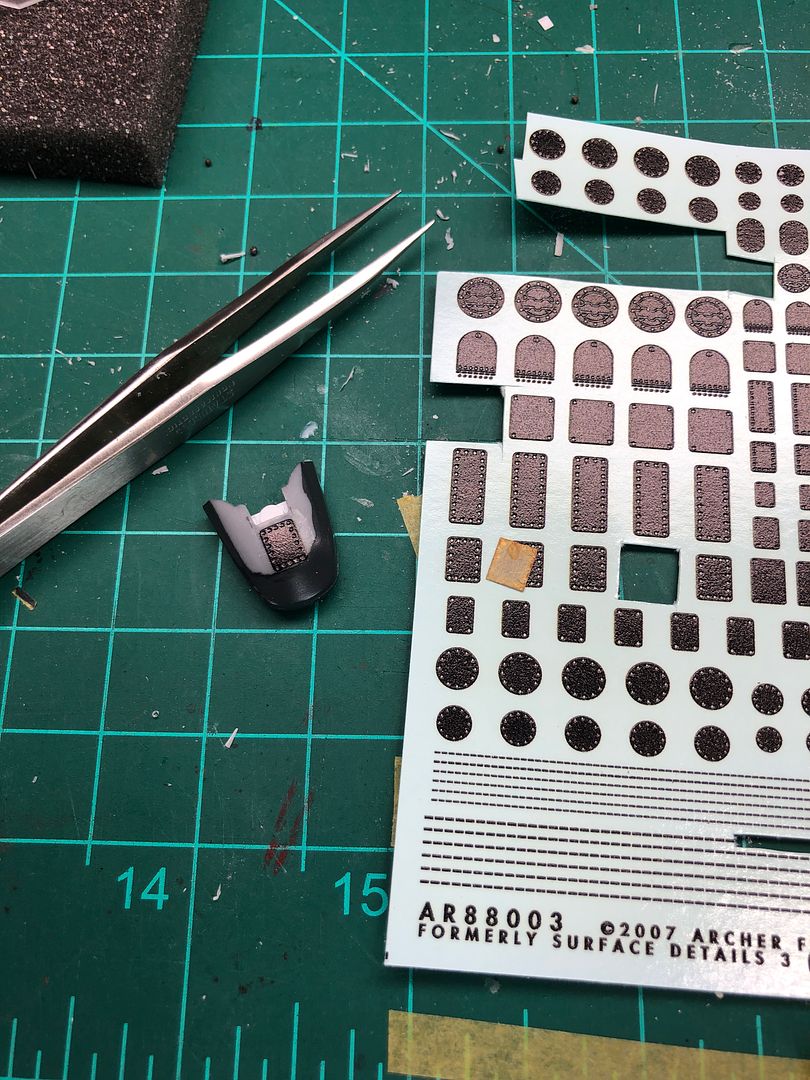
Archer resin decals are applied like a decal. Be sure not to cut close to the resin. Leave as much carrier film as you can. Use decal softener for the carrier film to meld to surface. After full cure give a shot of lacquer based varnish the film will blend even better.
KEEP YOUR WATER HOT! This will help the resin piece conform to any curve. If the water is warm or cool the resin will curl away from surface.
-
Before painting I'd have some fun and give full display of the accordance for my A29. All magnet mount so combinations are plenty.
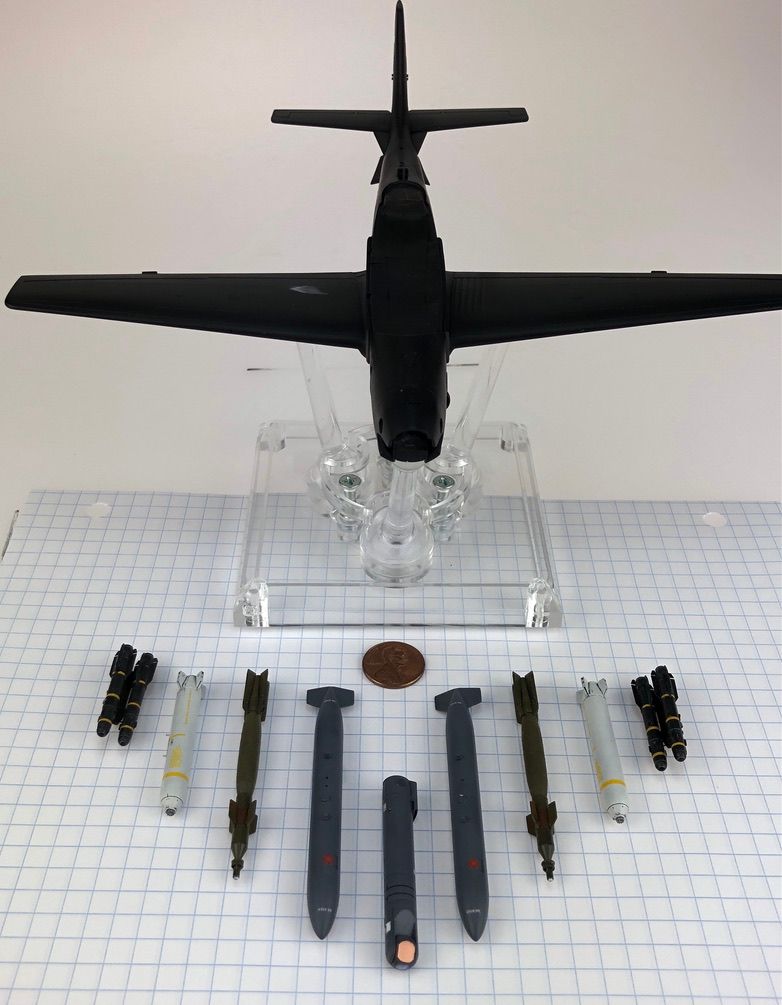
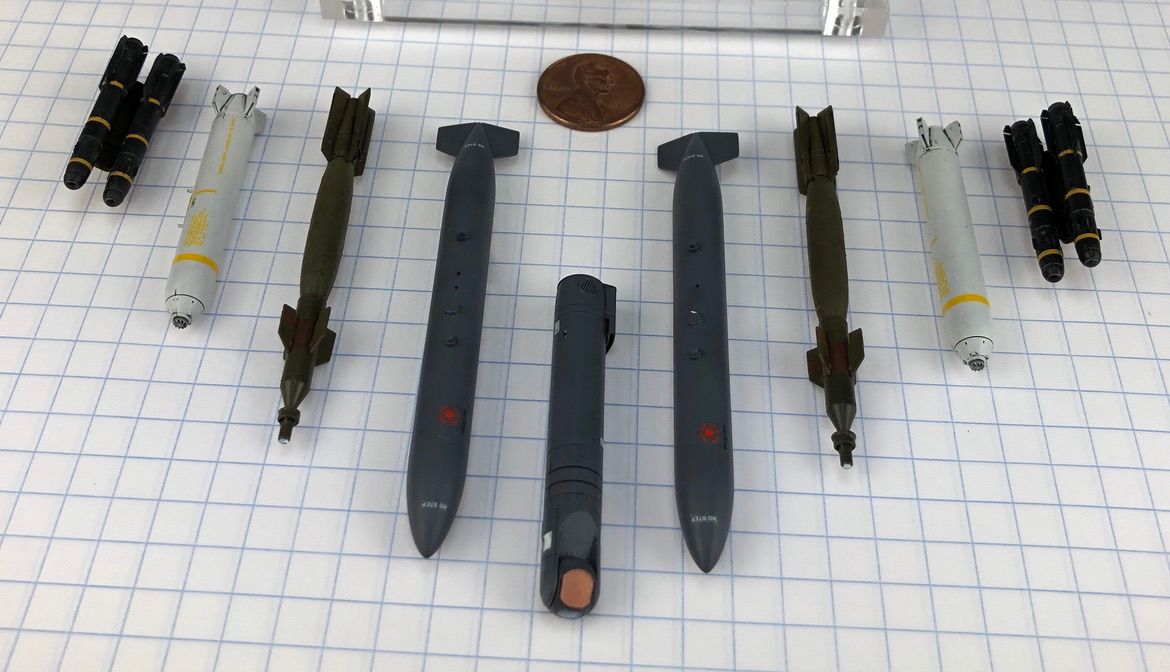
Left to center:
AGM 114 Hellfire misssles x2
Mk.20 Rockeye II
GBU 12
External fuel tank
LANTIRN - Low Altitude Navigation Targeting Infrared Night
Only 2 hard points each wing and center hard point.
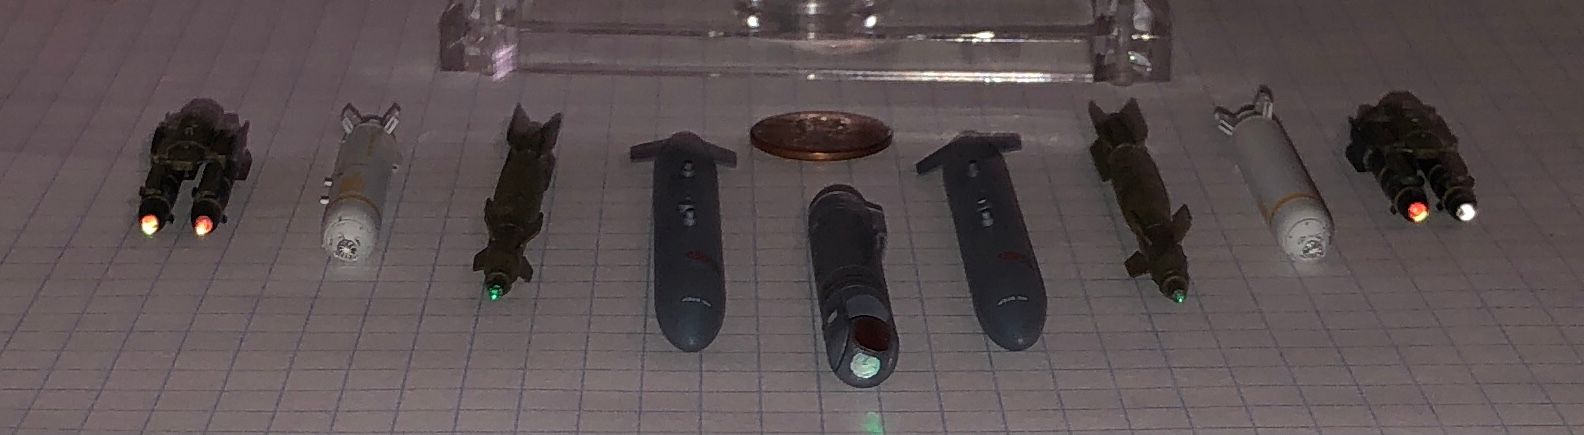
Really anxious to see if the HUD Film shows up when model is on the table.
-
1
-
-
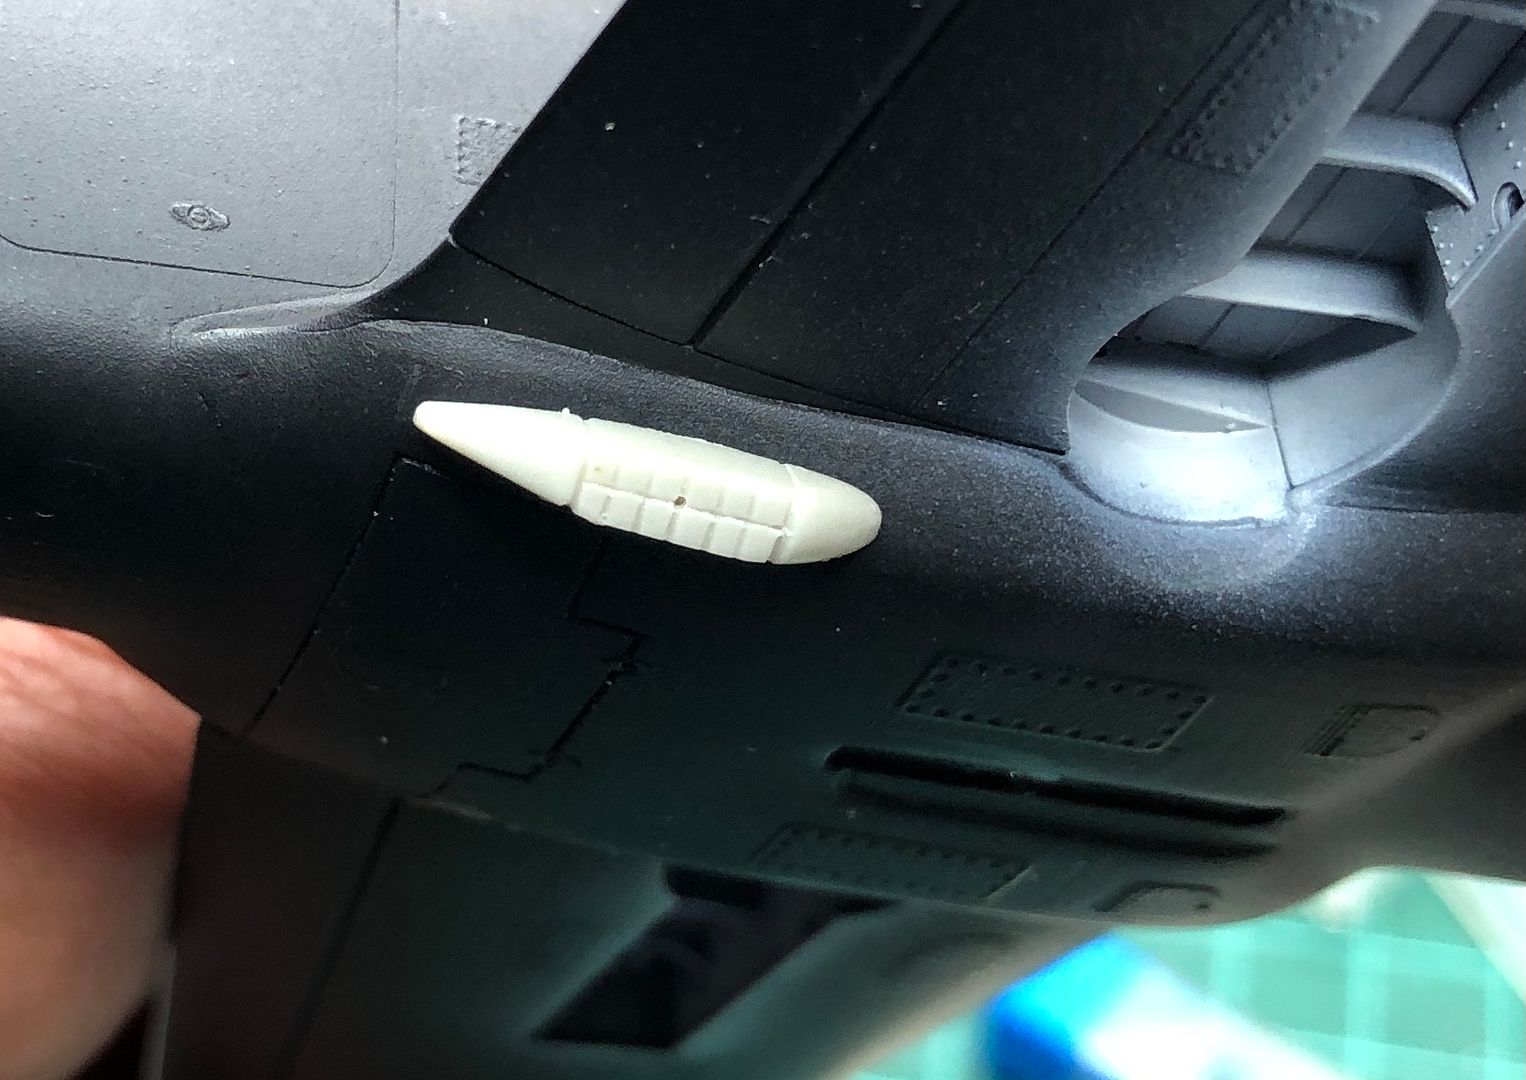
Armor belts (AVM Resin upgrade set) added.
Black primer applied to the armor belts. Getting closer to painting.
At first I thought the armor belts were clunky looking. After seeing pics of real thing...my Prime Directive is activated, FICE.

Chaff/Flare dispenser test fitted using 5mm wire as locator pin. These will need some work.
-
1
-
-
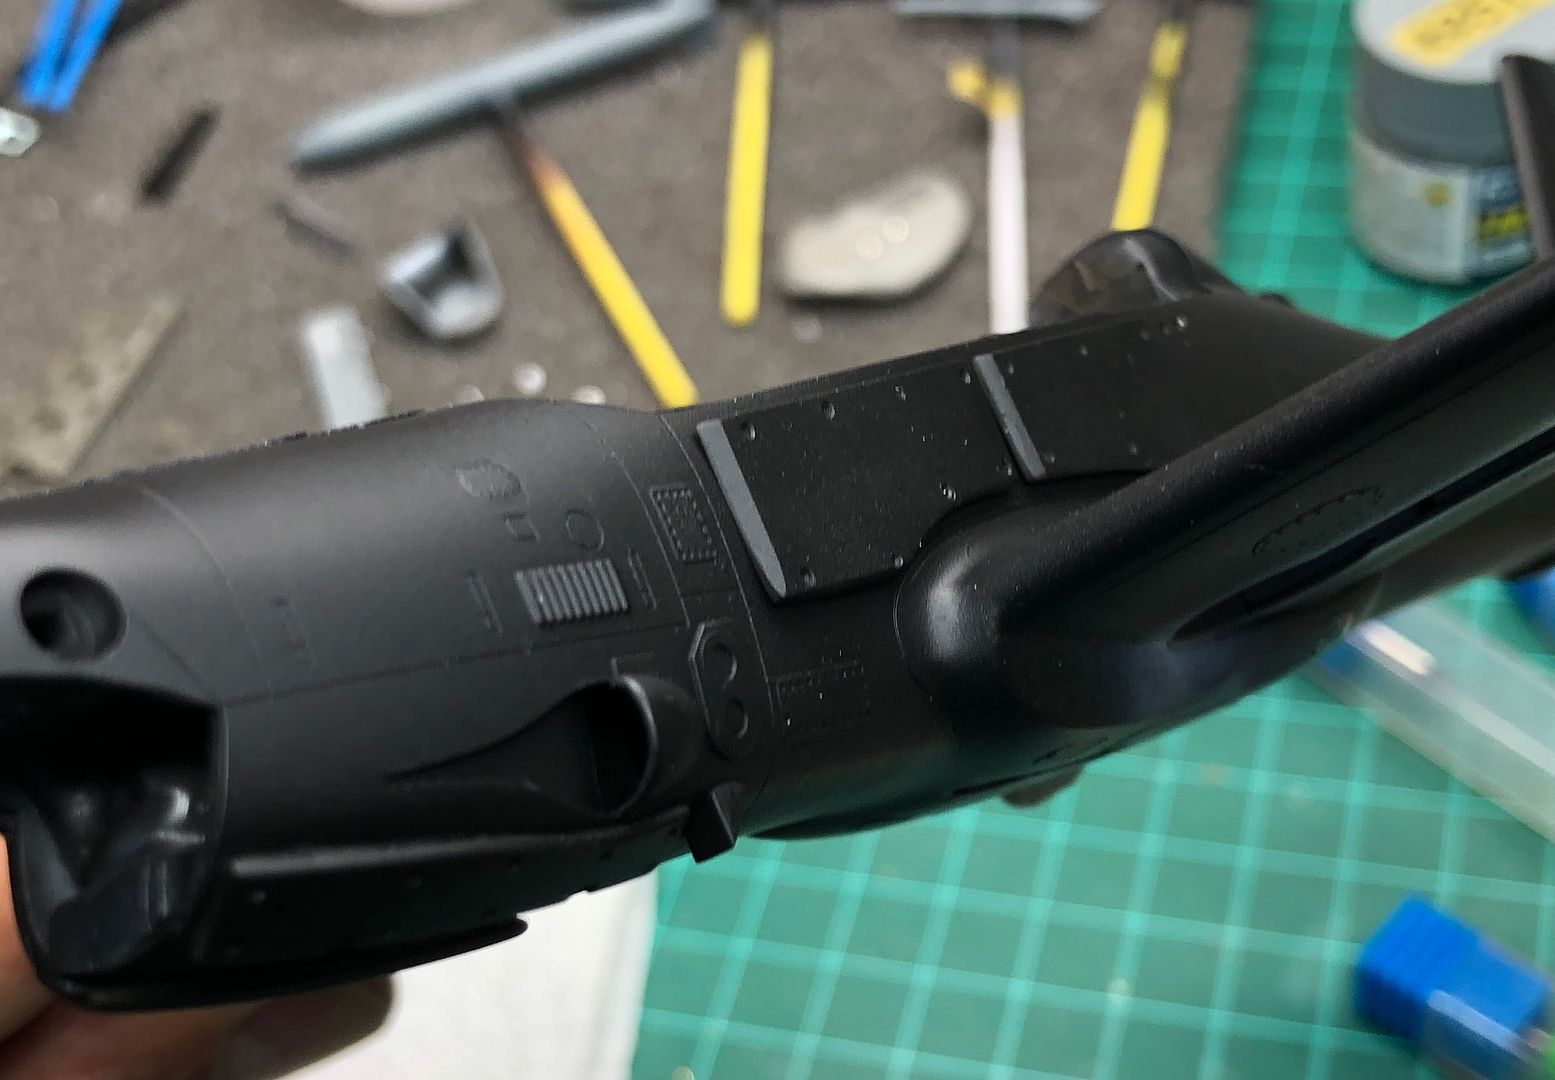
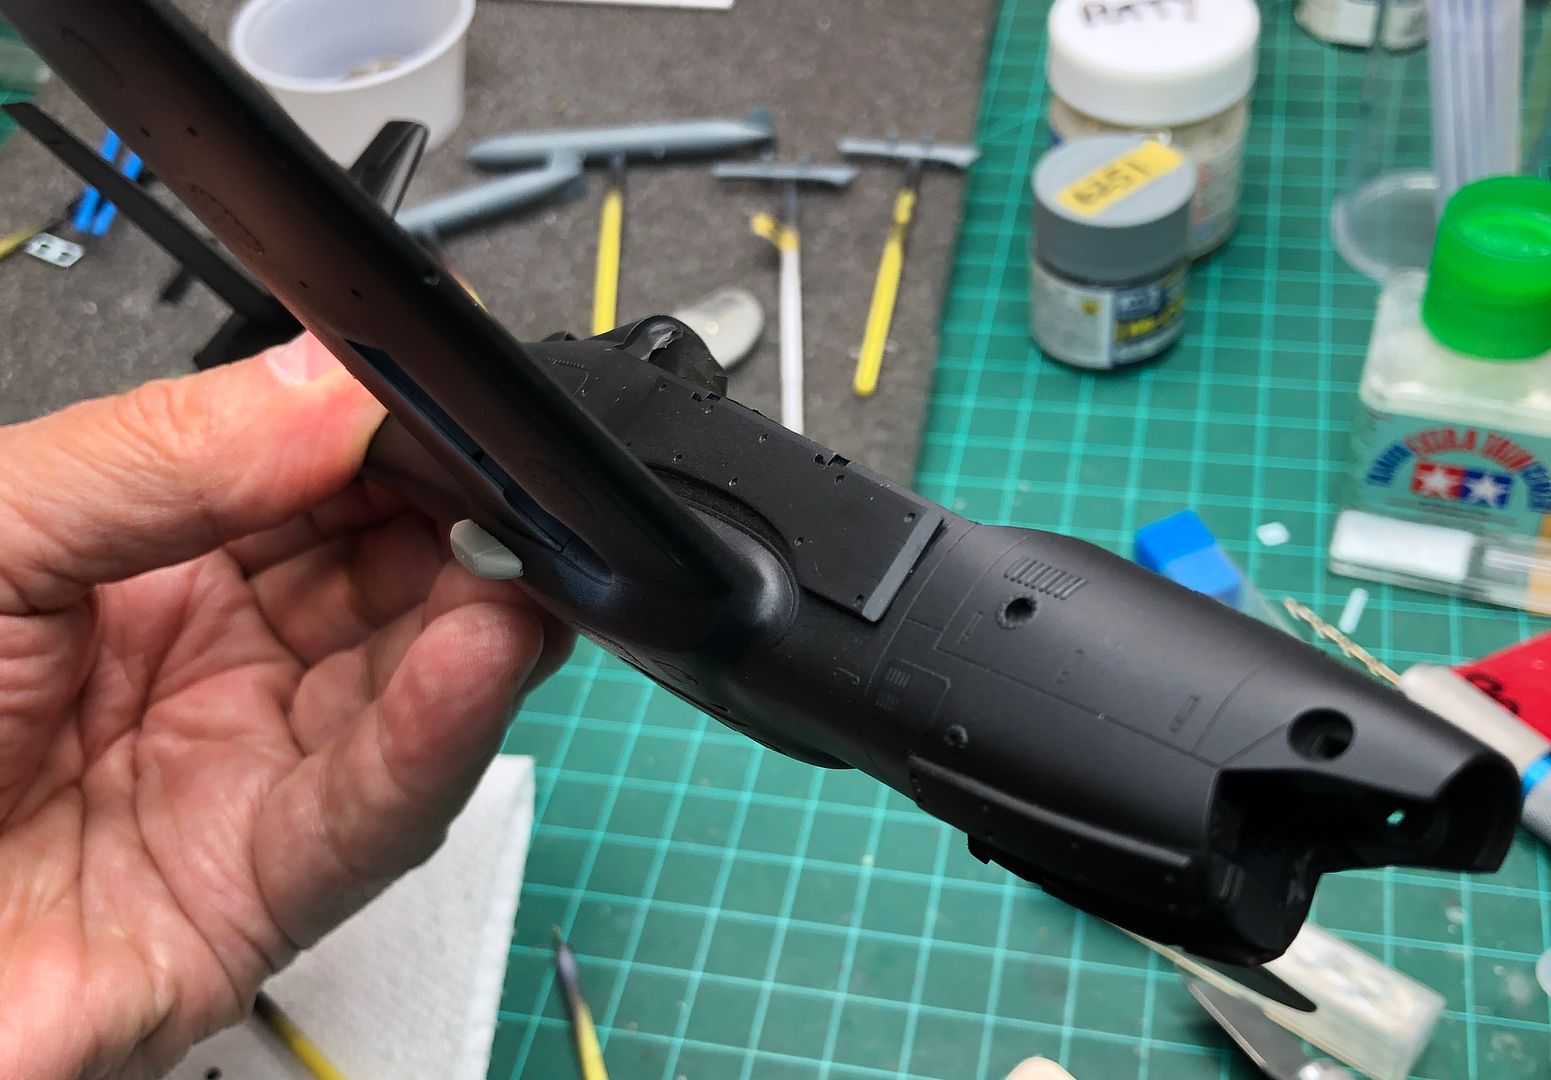
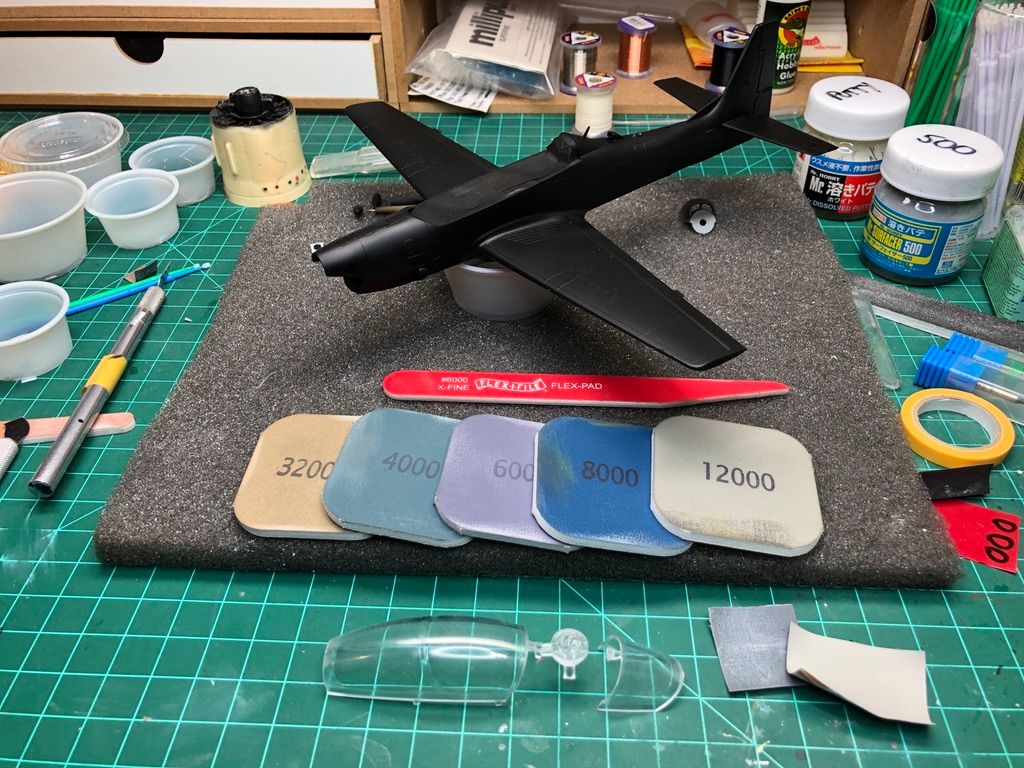
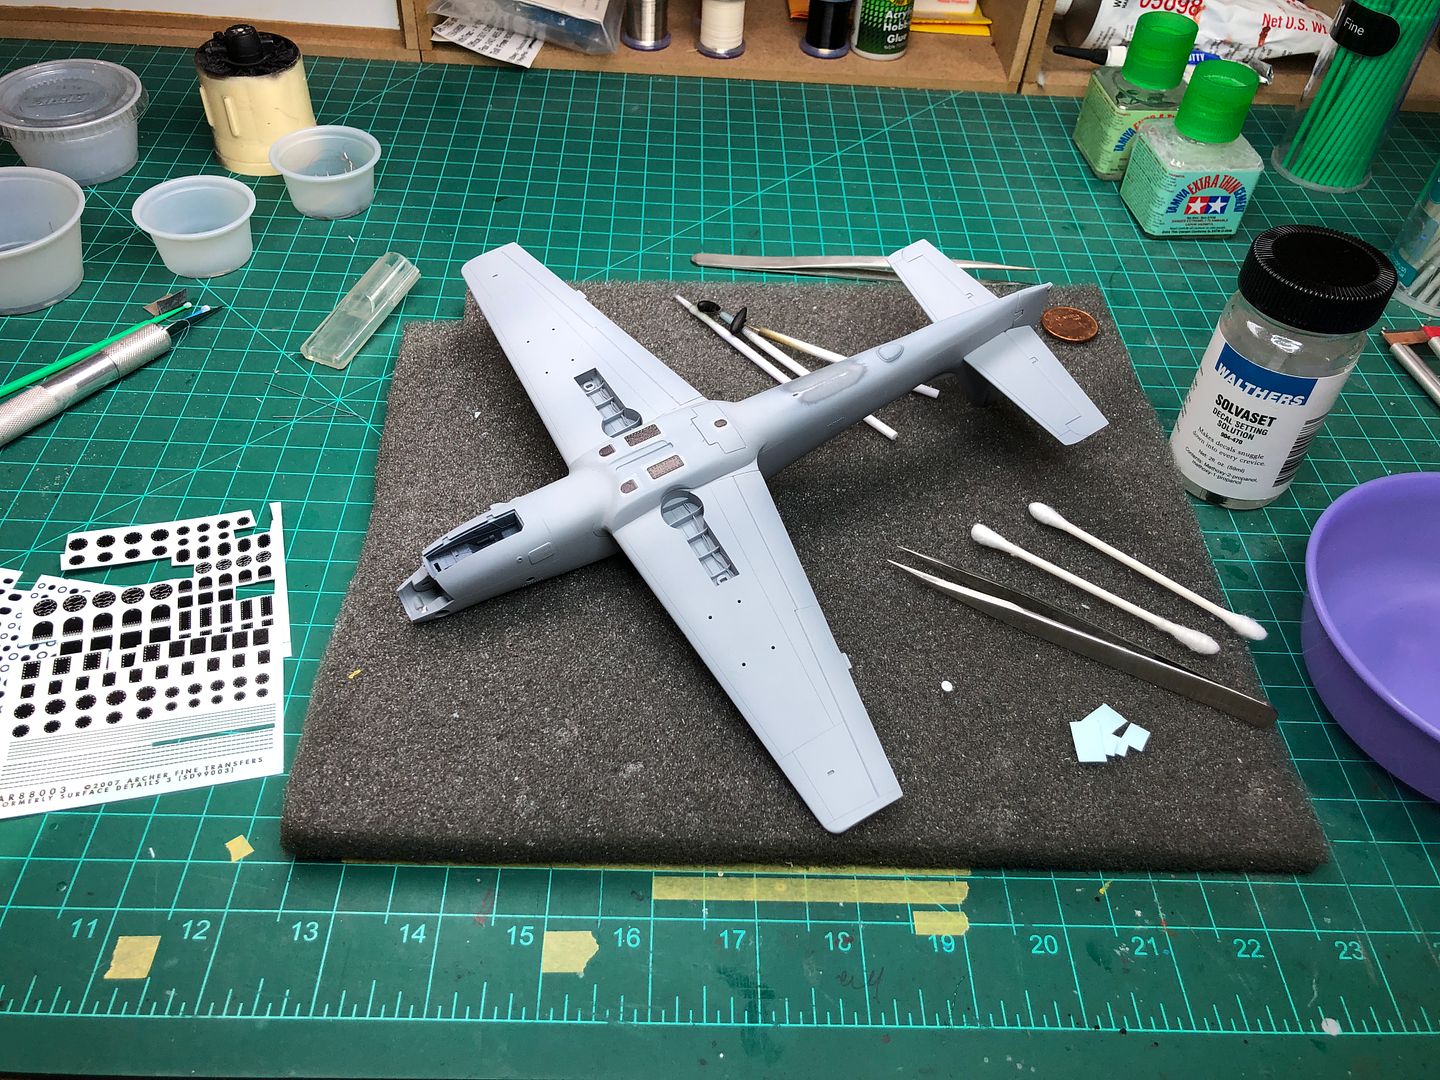
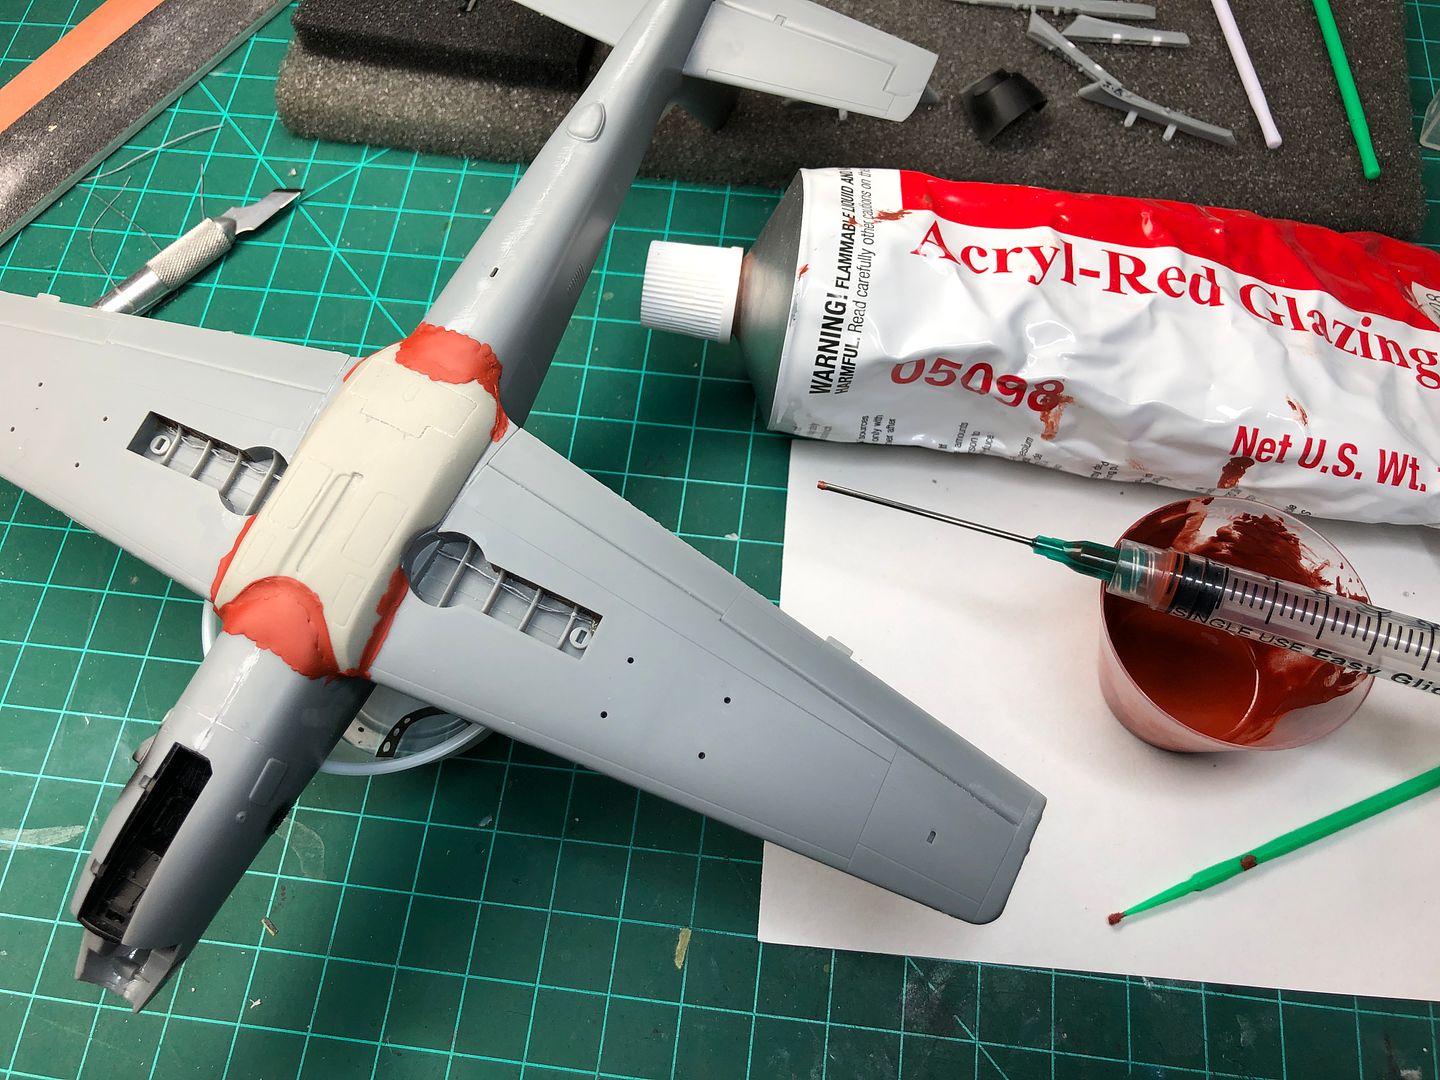
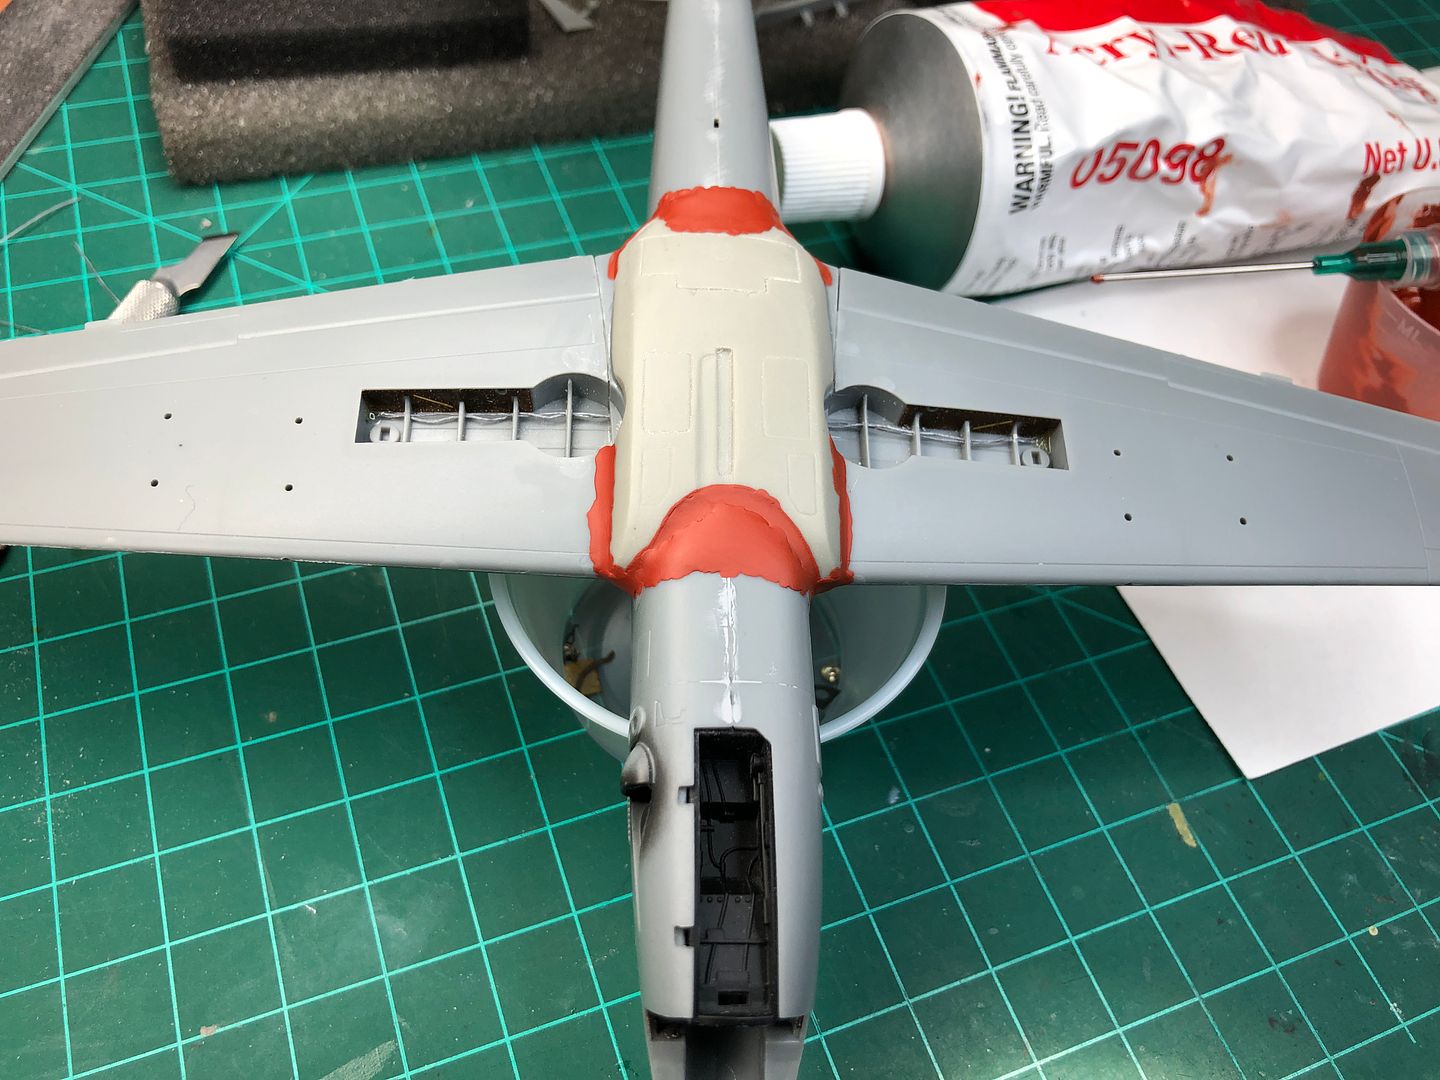
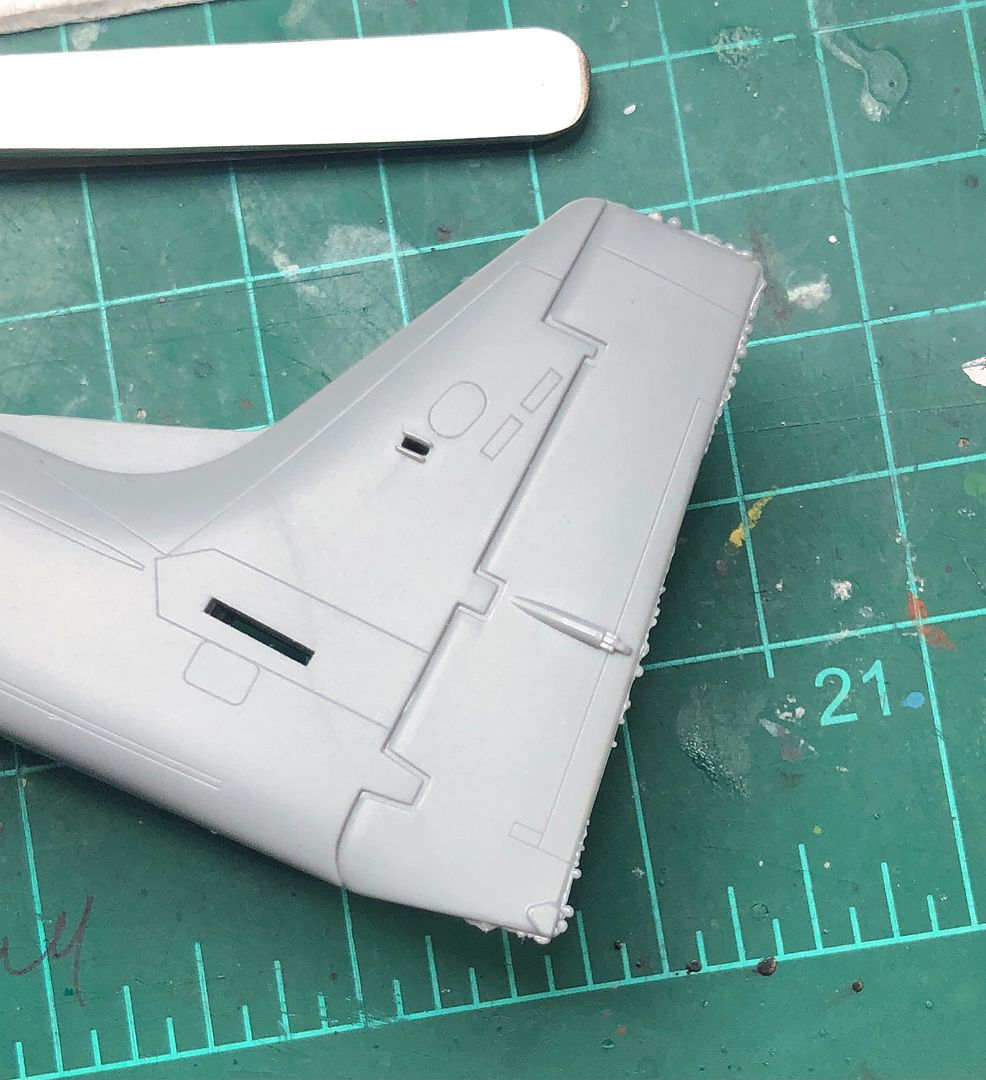
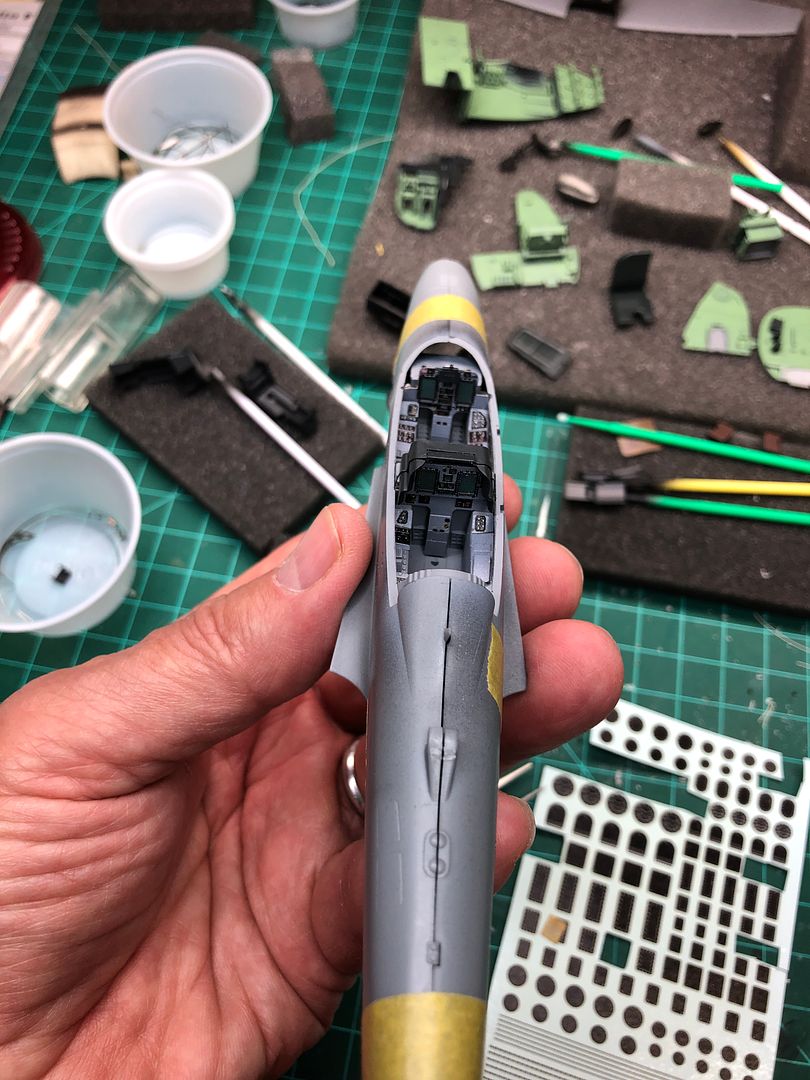
Primer base Gunze 1500 Black. A few seams appeared and I dealt with them straight away.
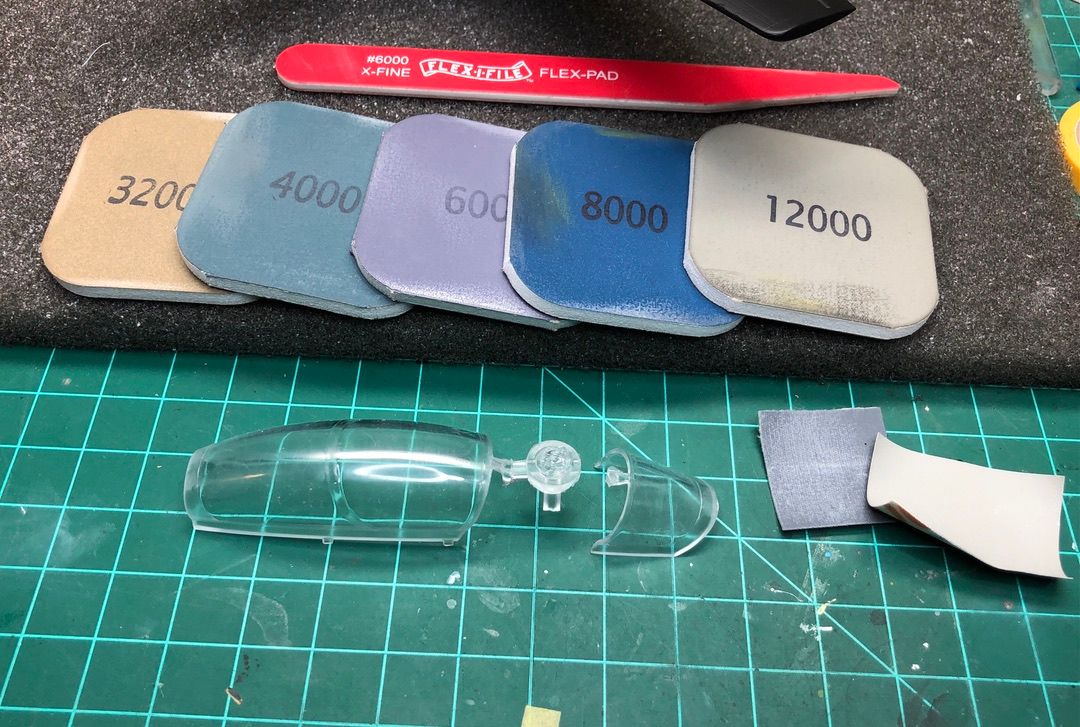
Gave the canopy seam some love. As in removal. Starting with 3200 grit sanding sponge and progressing to 12000 grit I polished off the seam on the canopy and windscreen.
Will tint with Tamiya Smoke/Orange clear brew.
-
2
-
-
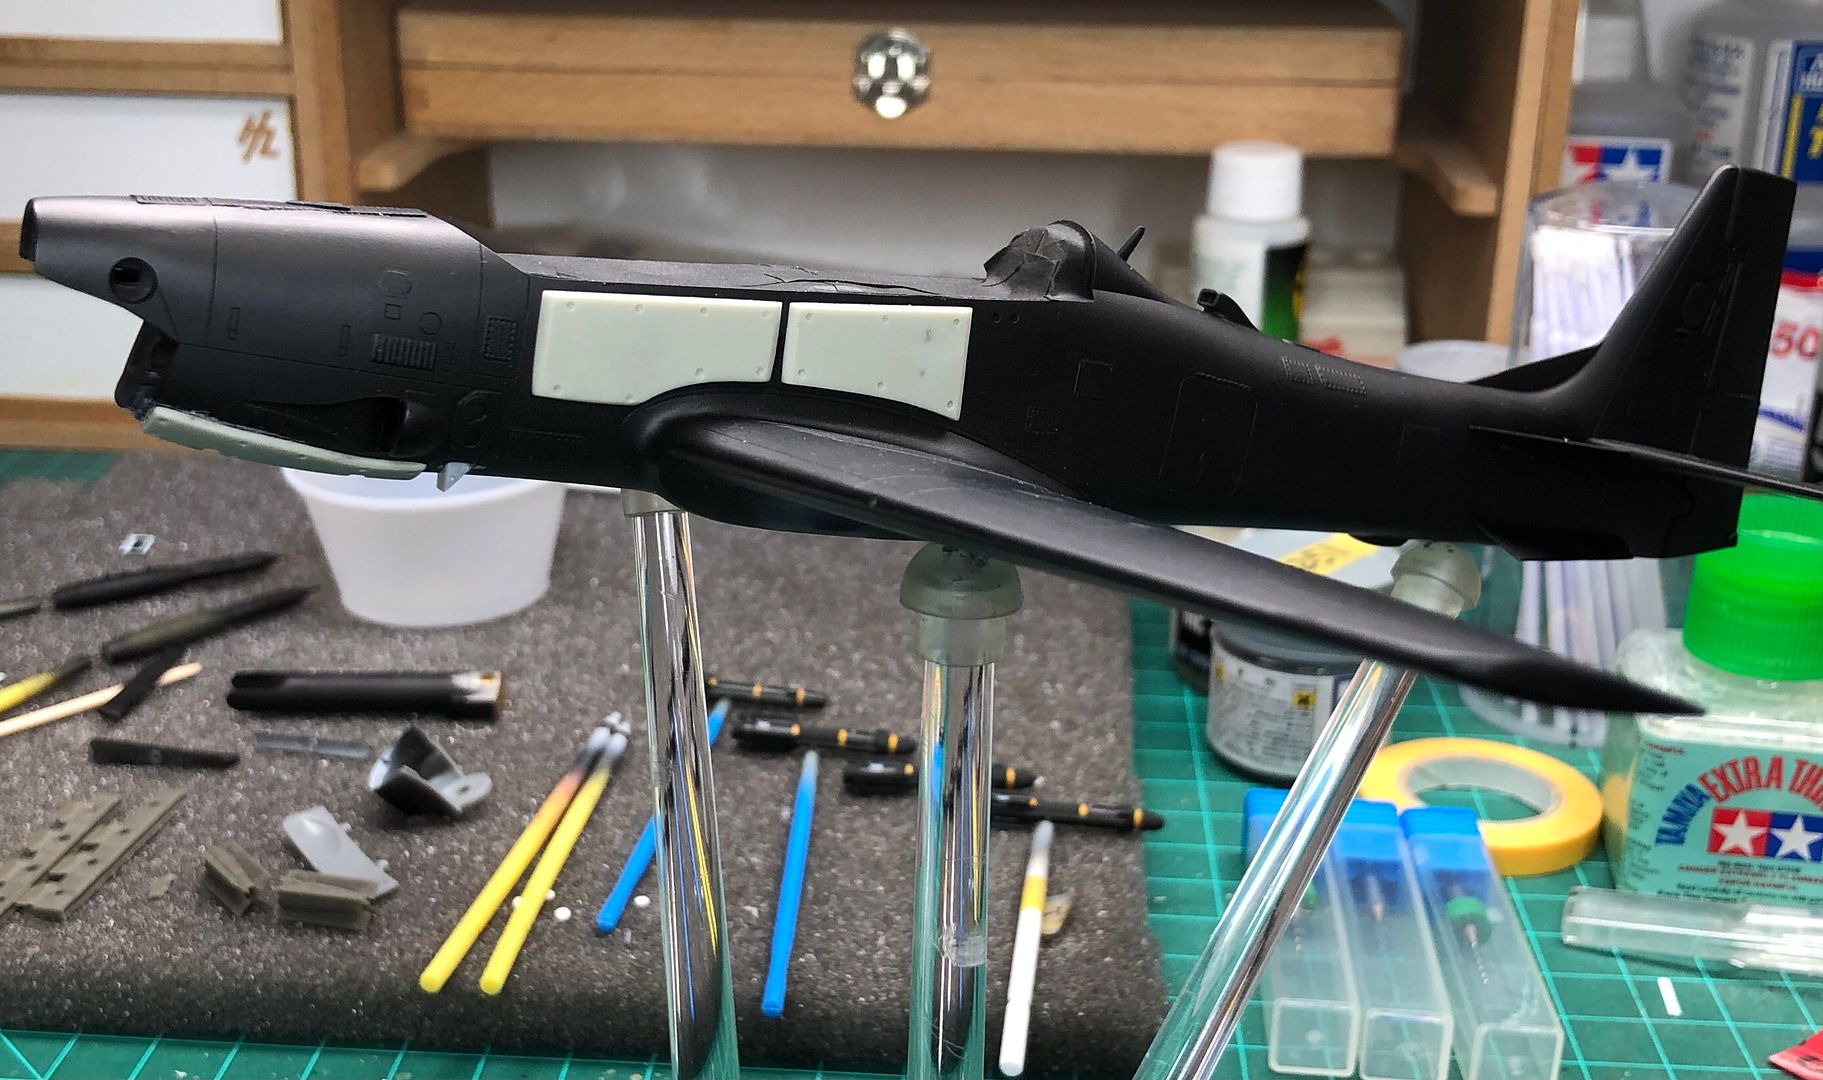
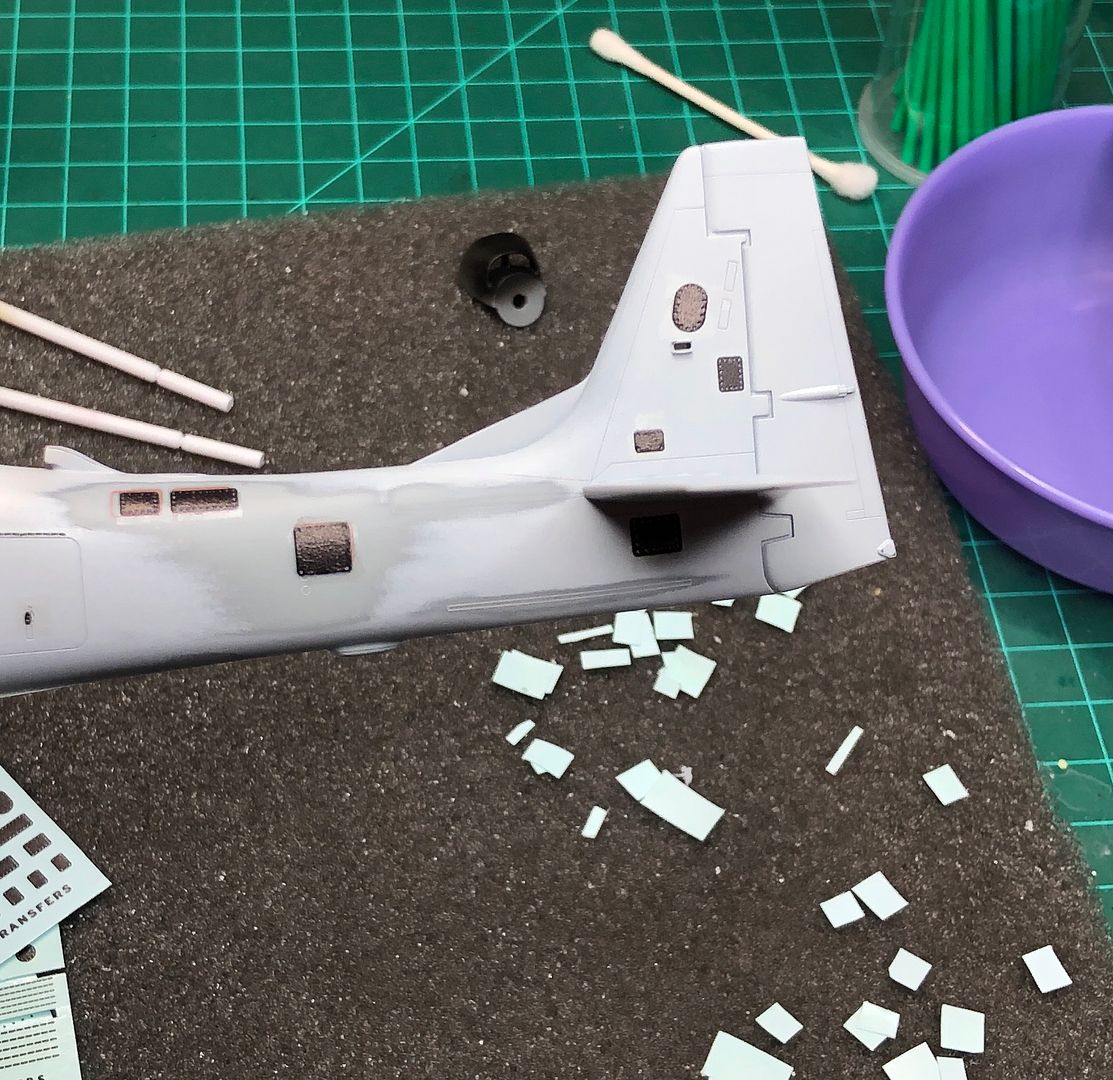
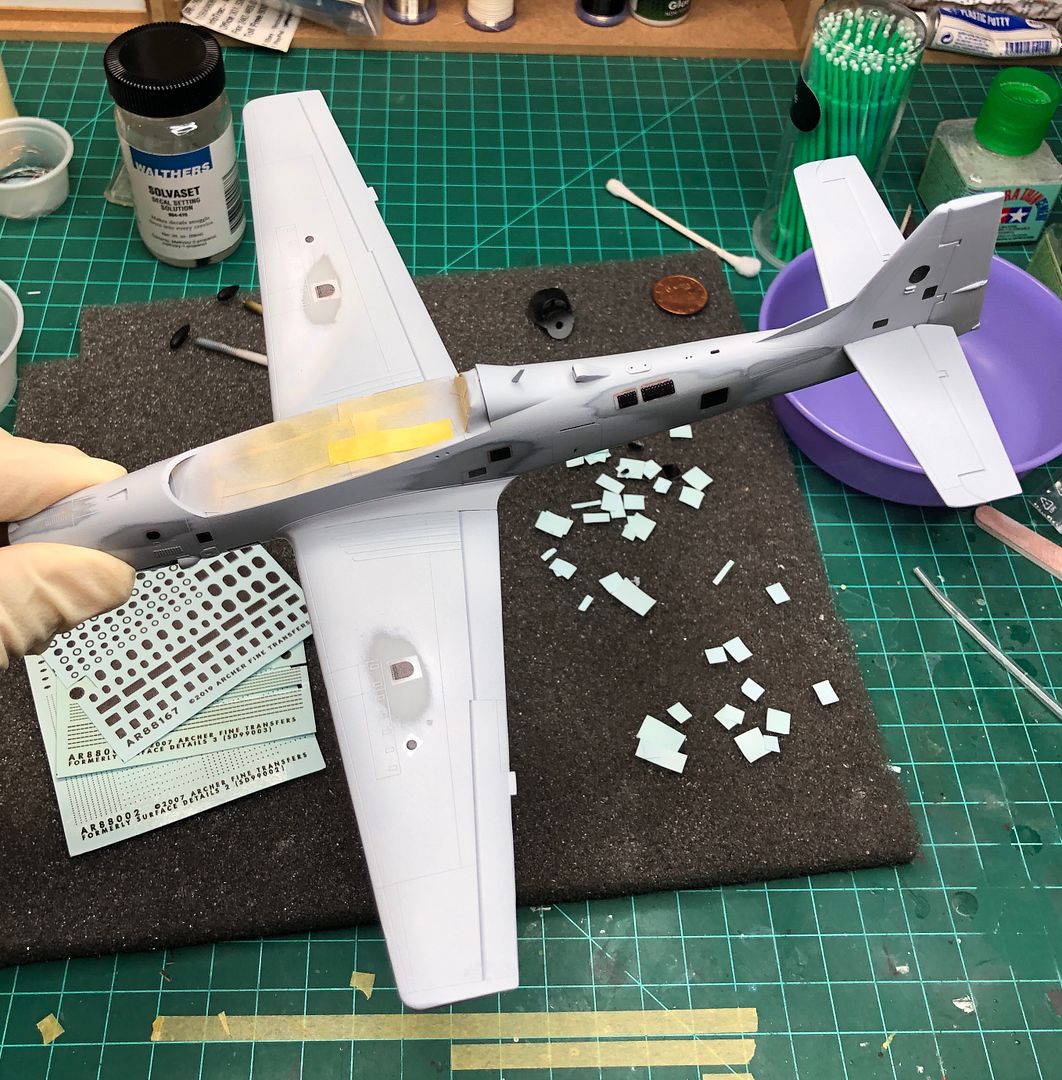
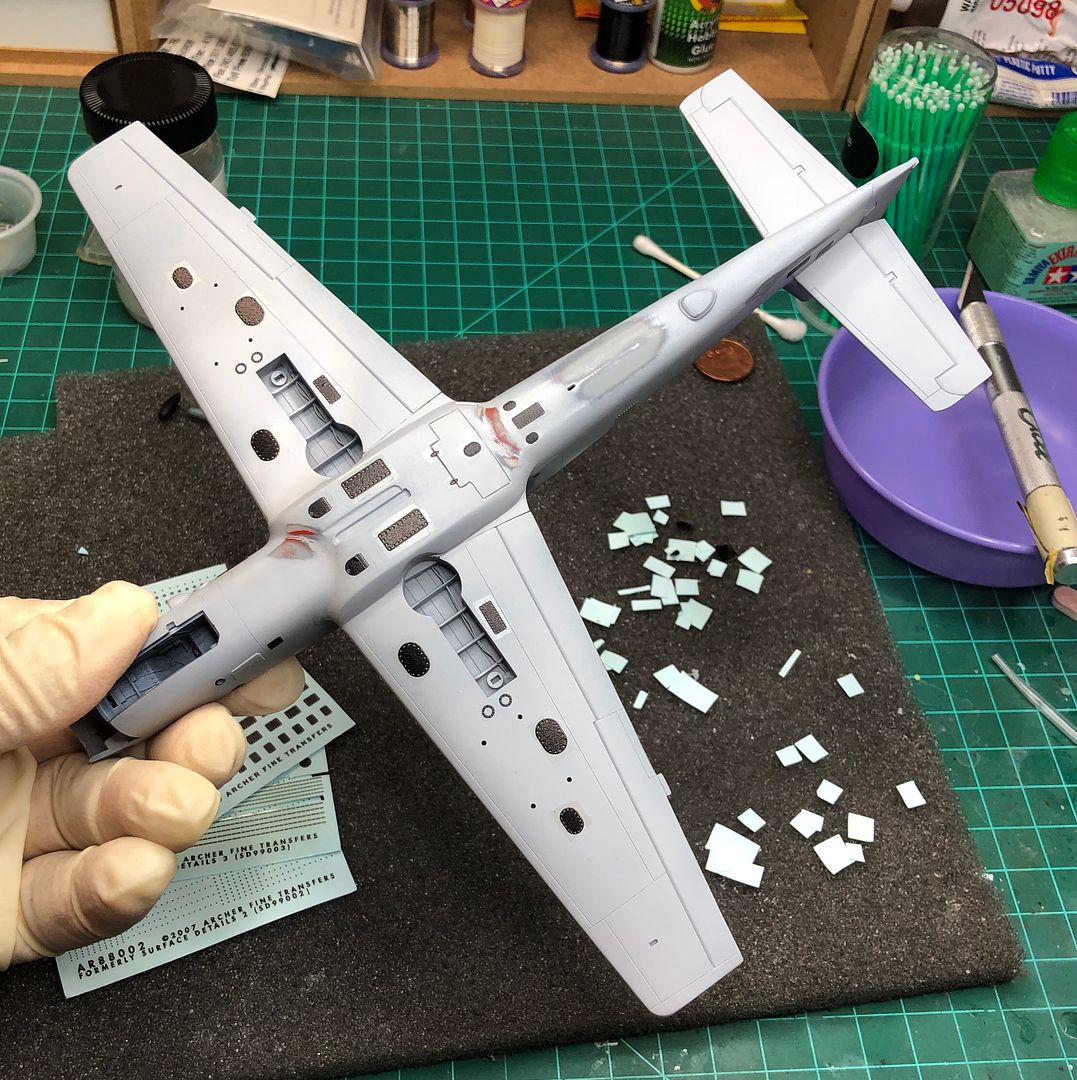
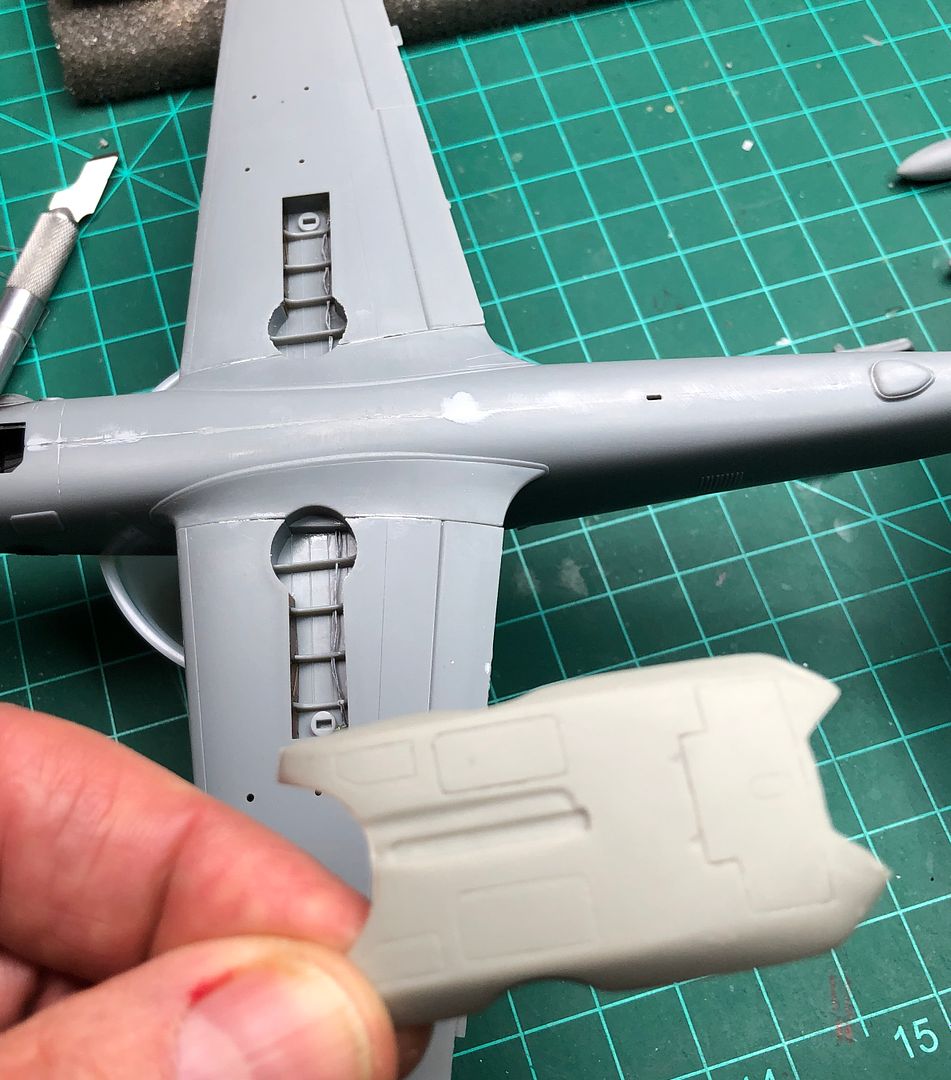
And it begins. After looking at the Eduard PE offering for the Super Tucano I felt the access panels were slightly clunky looking and plentiful. My biggest fear that one of the nearly 30 PE pieces would fall of from my clumsy handling long after the painting process.
I'm going in for Archer Decals. Will be using a mix of mostly 1:48 and a few 1:32 access panels.
Woody gave me some very much appreciated great coaching tips on applying these.
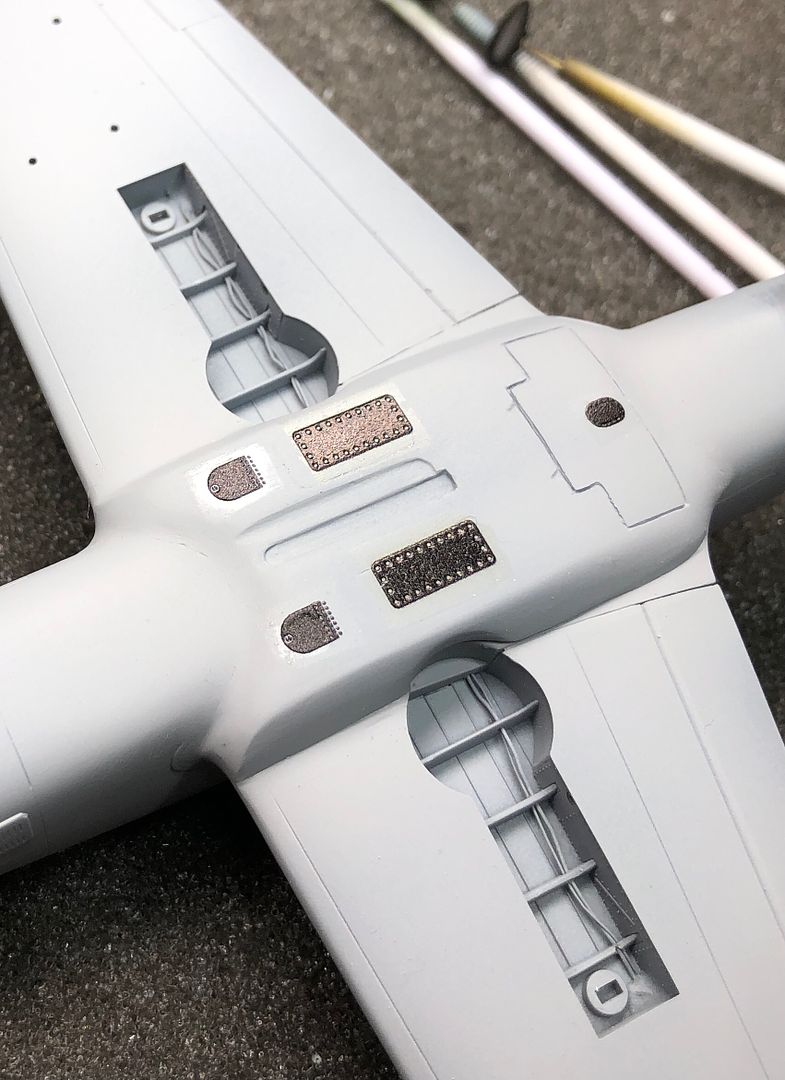
Over 40 Archer resin decals applied. I tried to match size with the Eduard PE pieces and came pretty close. For me, I had to keep the water hot or the large resin pieces curled. Also, do not trim the carrier film close to resin decal the carrier film is needed to allow the resin decal to nest on the surface properly. Walthers decal setting solution was used, the film snuggled in quite nice. After a day cure I hit all the decals with light coat of MLT, thanks for the tip Woody, and the film just blended in.
A few PE pieces to be annealed and glued into place then hit with primer.
.JPG)
 w
w
-
2
-
-
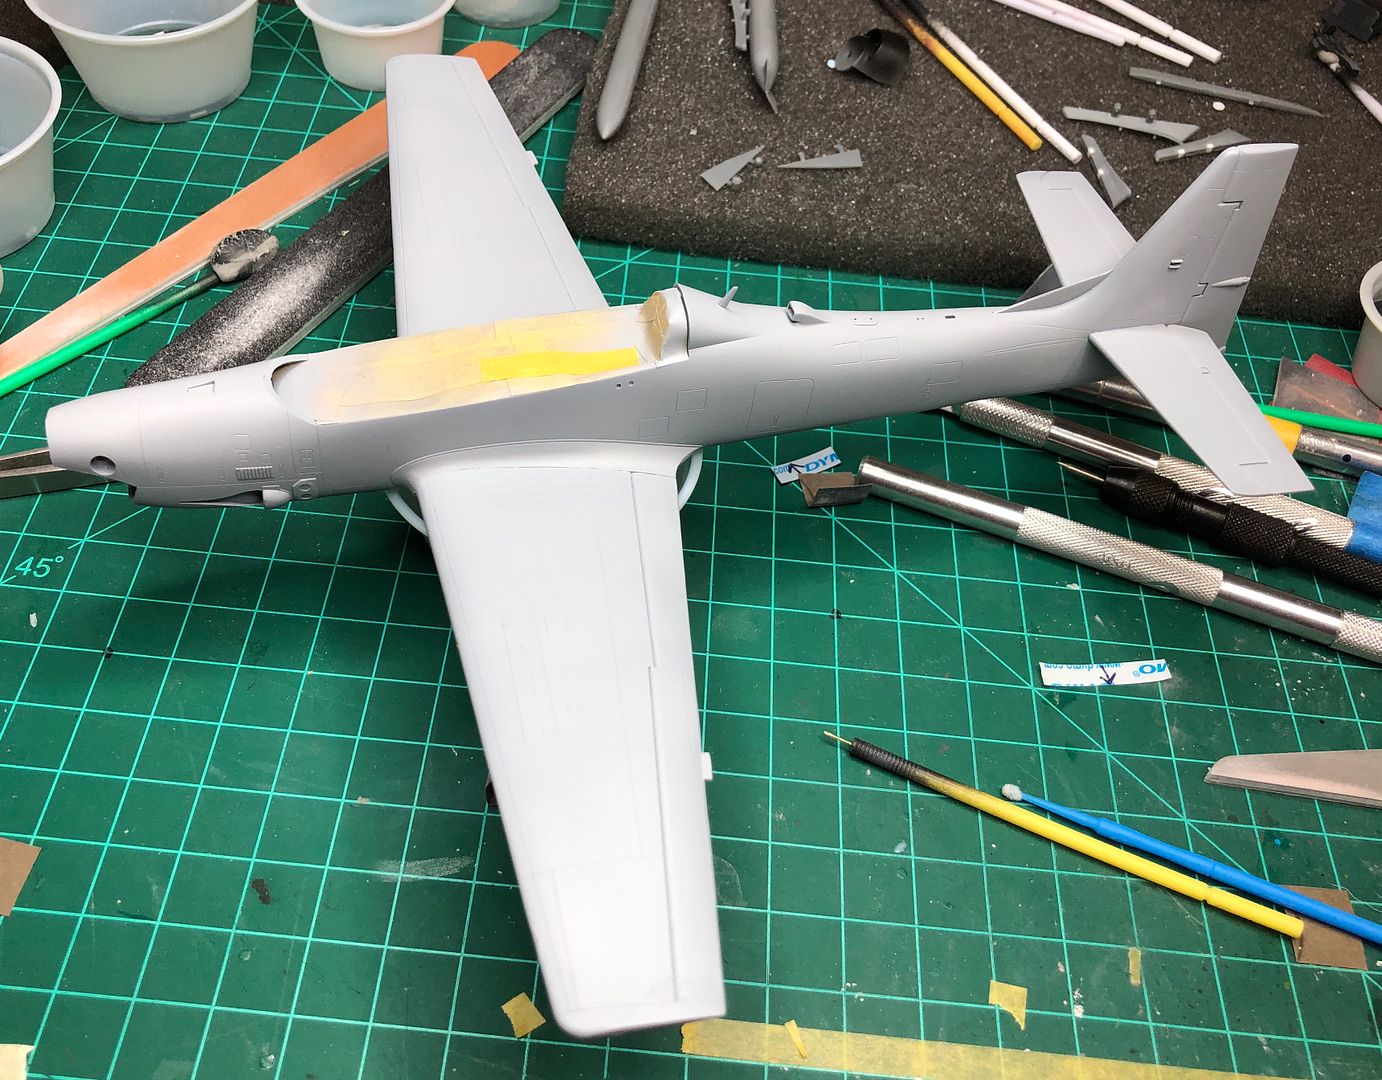
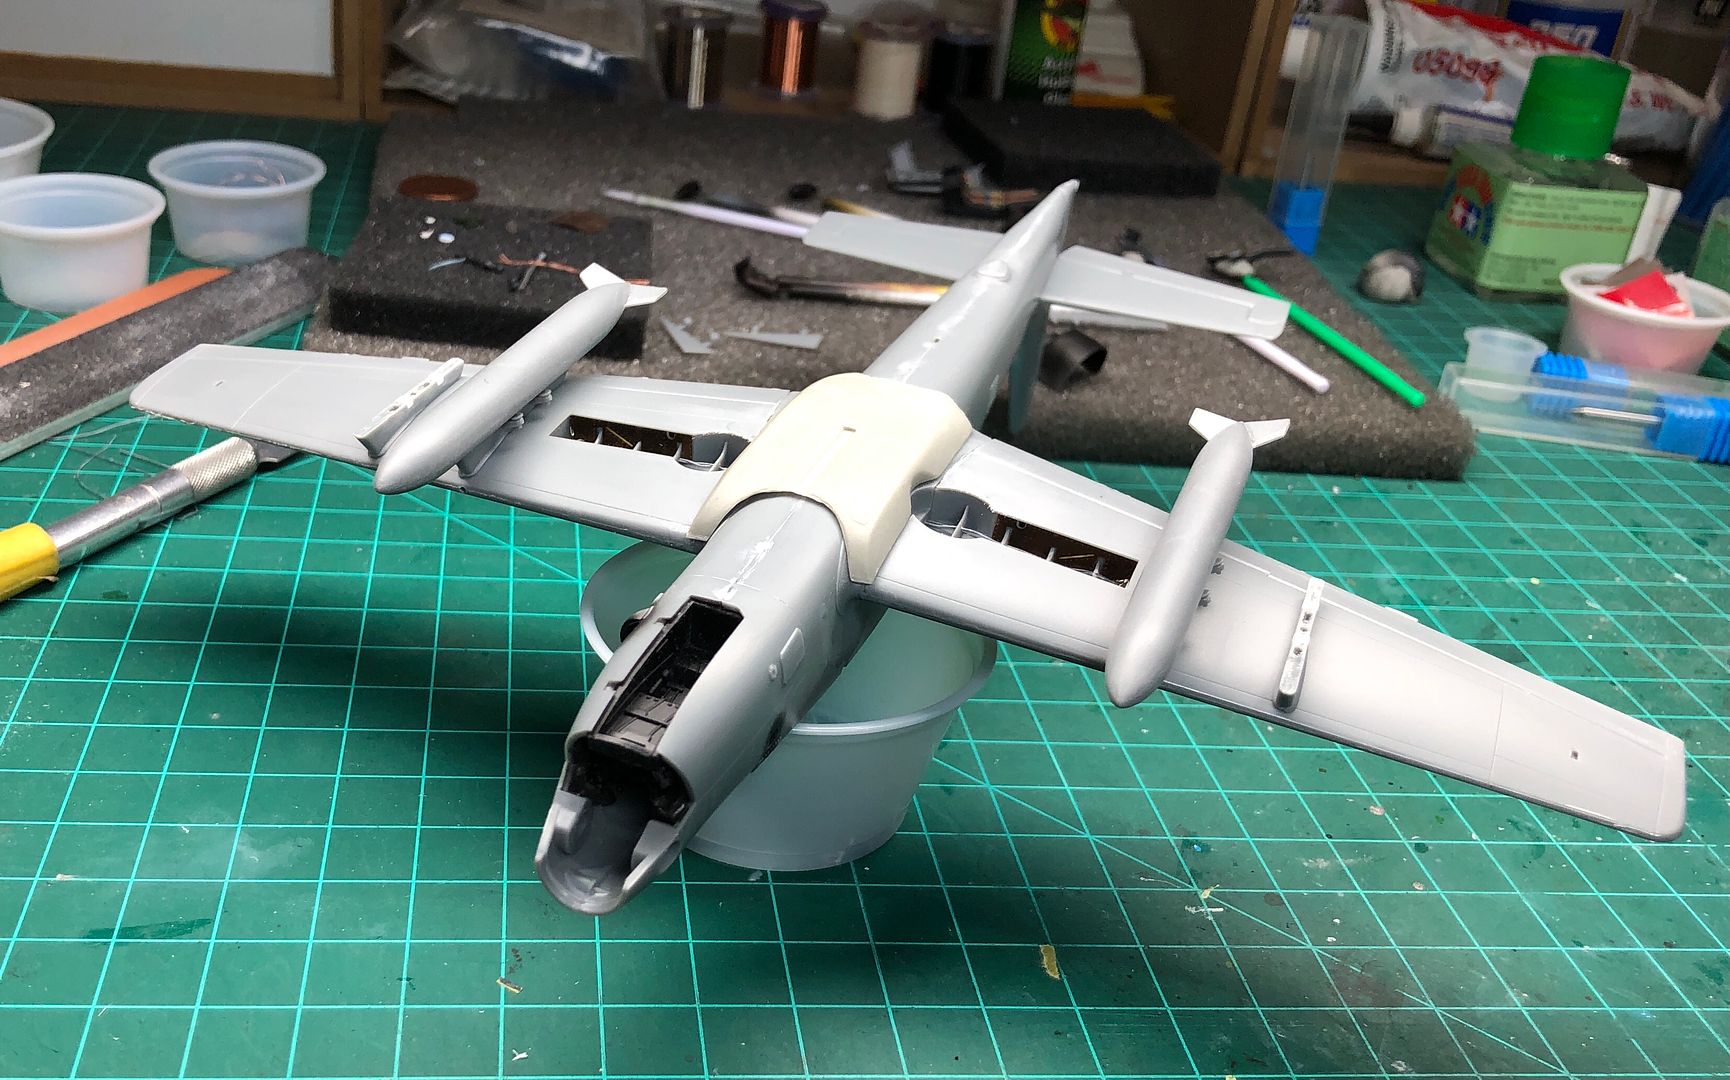
Belly box is epoxied and after a few days cure 3M Acryl Glazing thinned with MLT is used to fill the gaps.
Sanding for what seems to be an eternity.
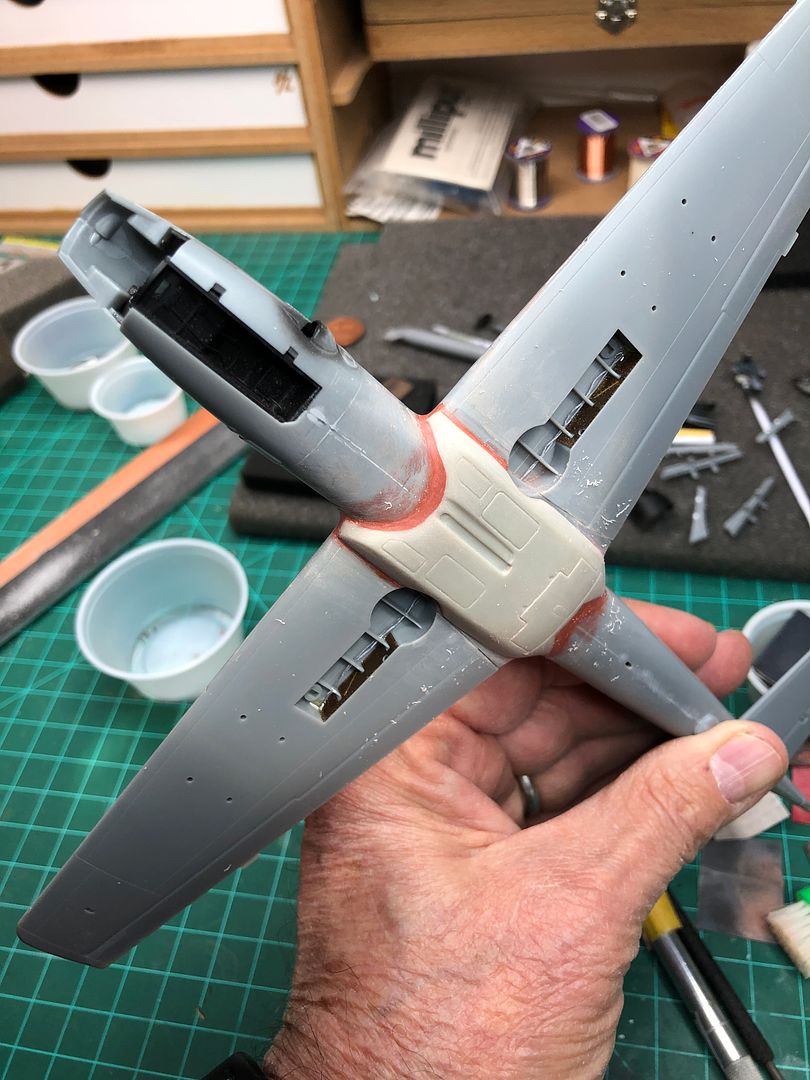
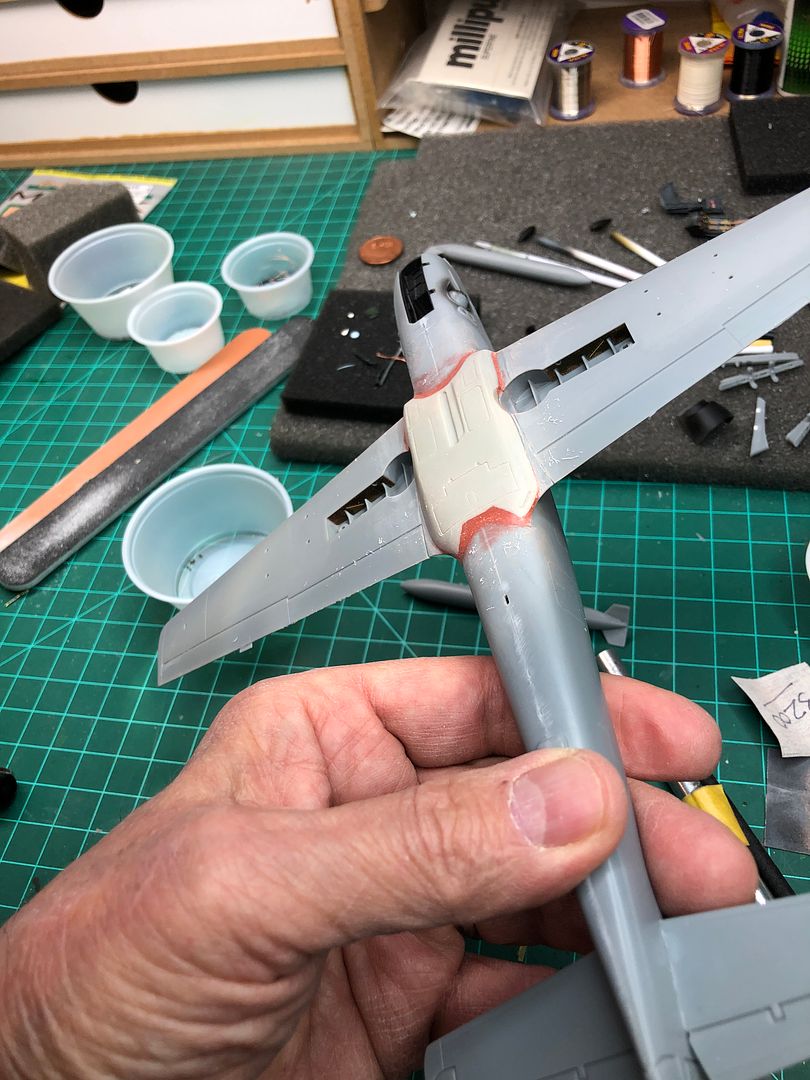
Primer is applied to discover any surface imperfections.
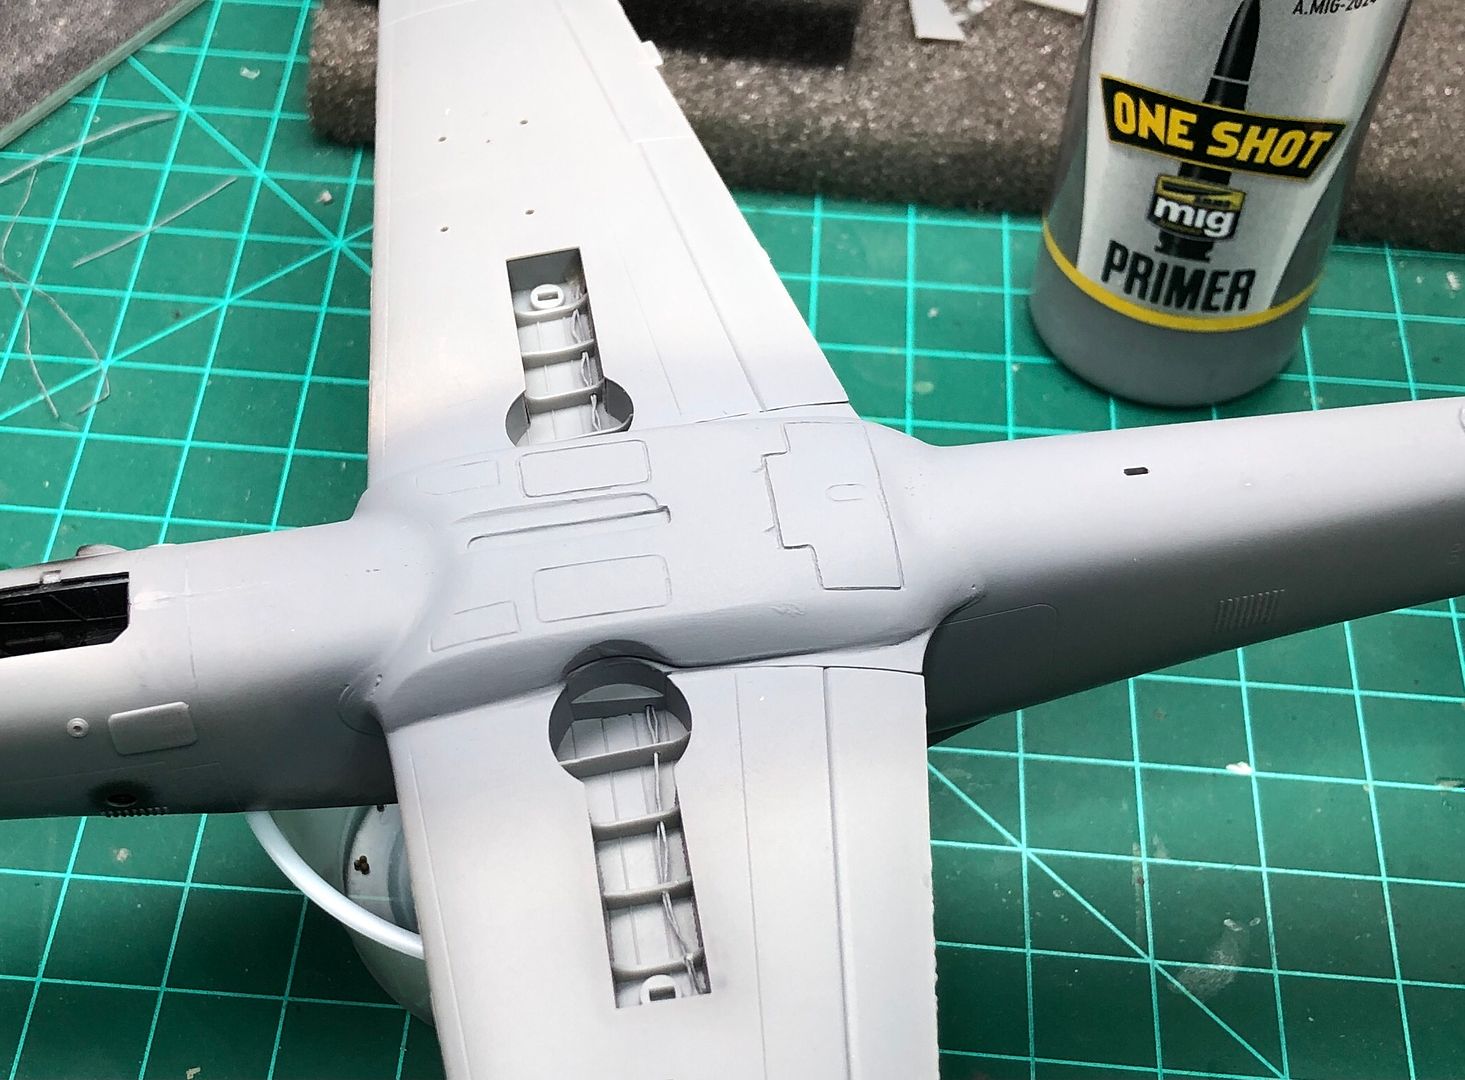
After sanding all seams and filling access panels on belly box (speed brake is left alone) a final shot of primer is applied. Archer resin decals will be used throughout to replace all access panels throughout the aircraft.
Overall primer complete.
-
3
-
-
43 minutes ago, Peterpools said:
Rick
Glad to see the Super Tucano back on the bench again and underway. Incredible work on the loads -
37 minutes ago, Peterpools said:Rick
Some mighty nice work: details look so good. Nice to see the Super Tucano assembled and moving down the line.
Thanks Peter!
-
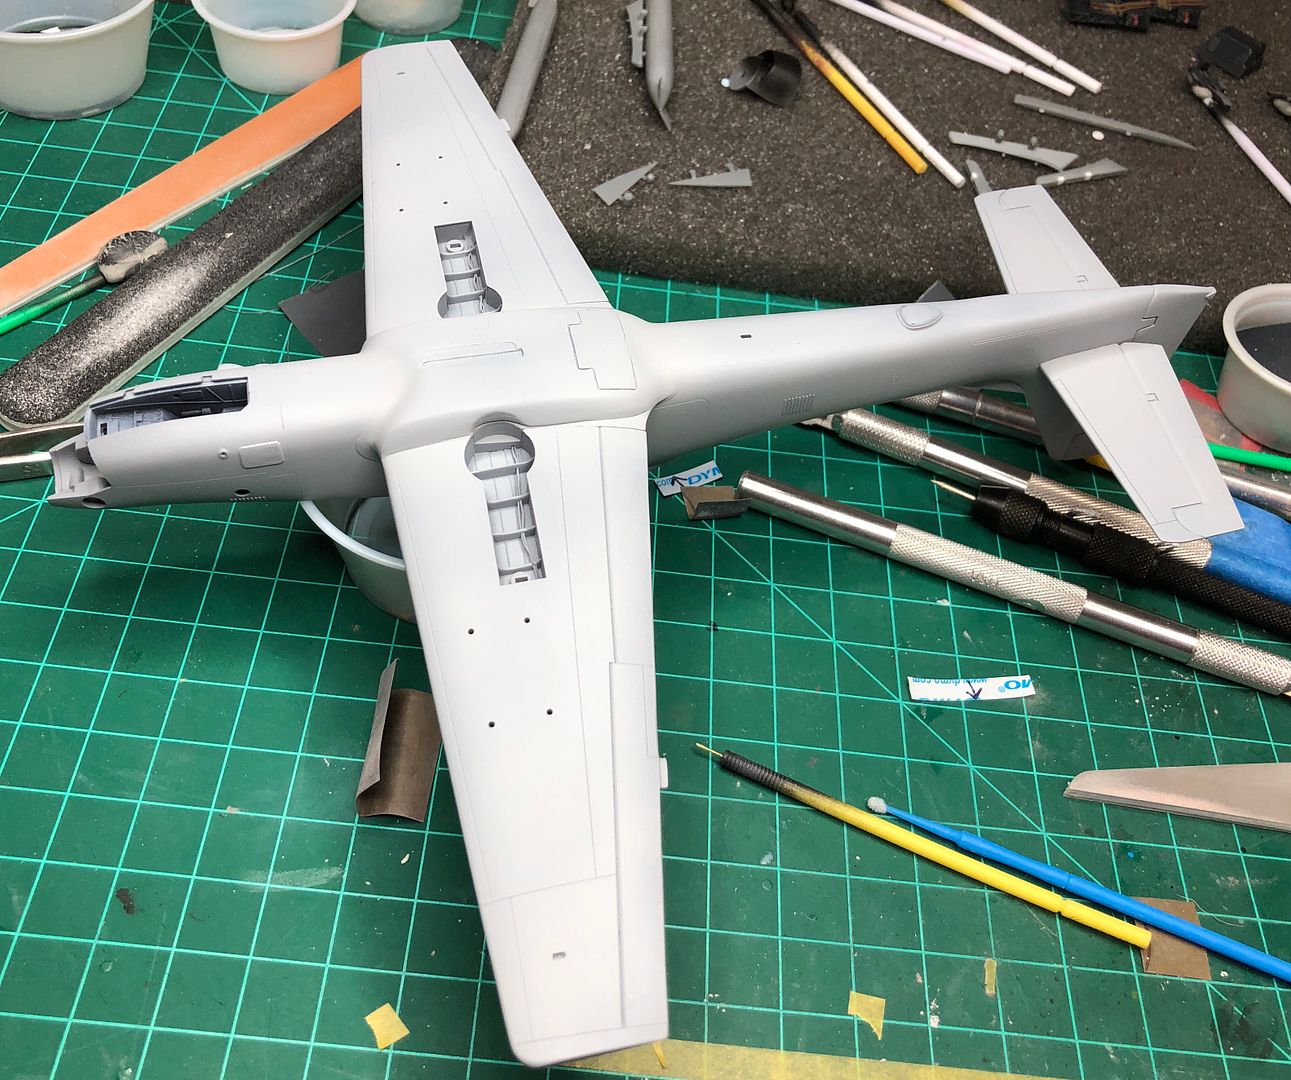
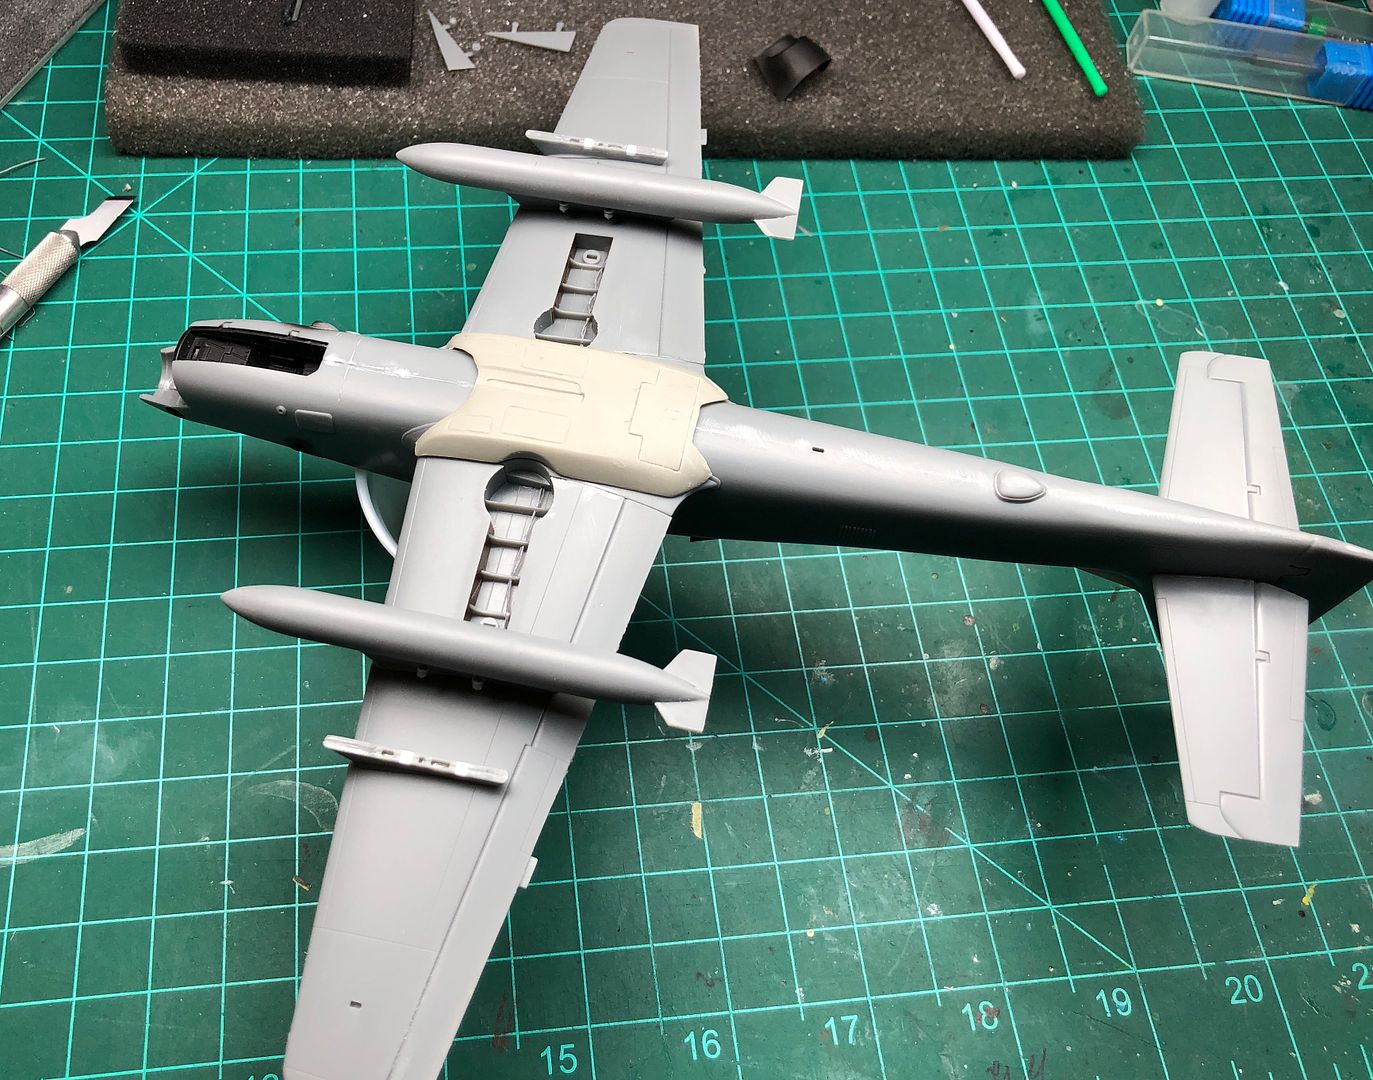
Fuel tanks buttoned up. I added about 40g of tungsten putty in the nose area before buttoning up the fuselage.
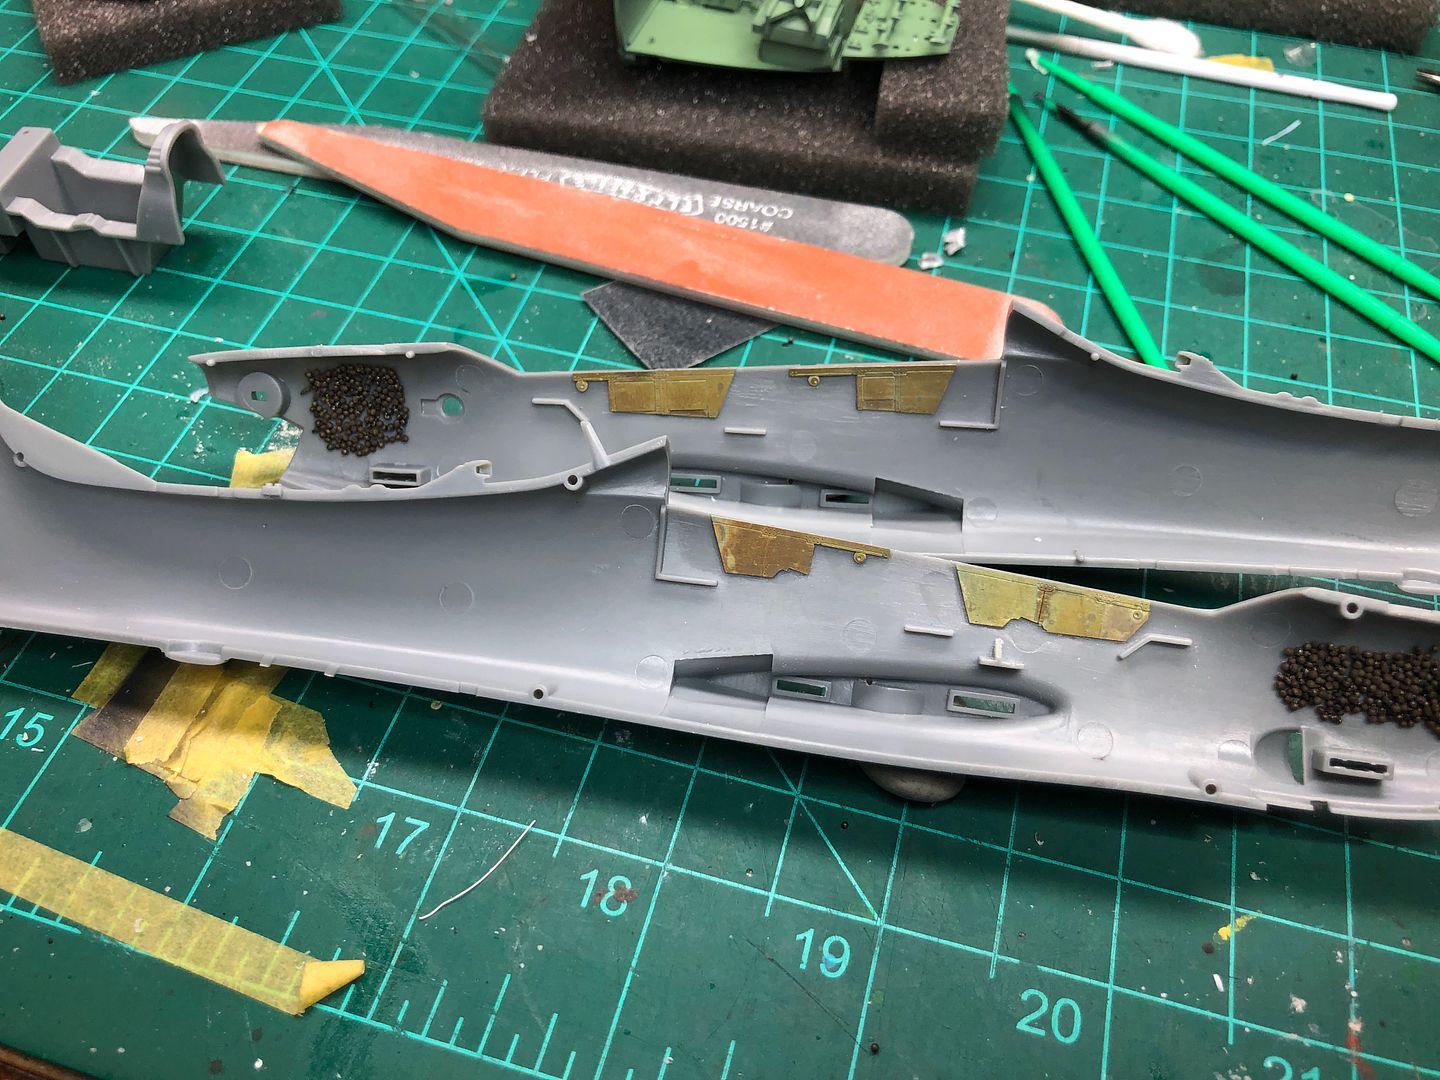
Eduard PE and bake lines added to wheel wells.
.JPG)
Always love a good weld.
Stabilizer surface controls sanded to correct shape.
_IMG_3781.JPG)
Wings and stabilizers secured.

AVM resin "Belly Box", fuel tanks and wing racks "pylons" cleaned up.

Test fit yields some putty, sand, repeat in my future. Stabilizers secured.
-
2
-
-
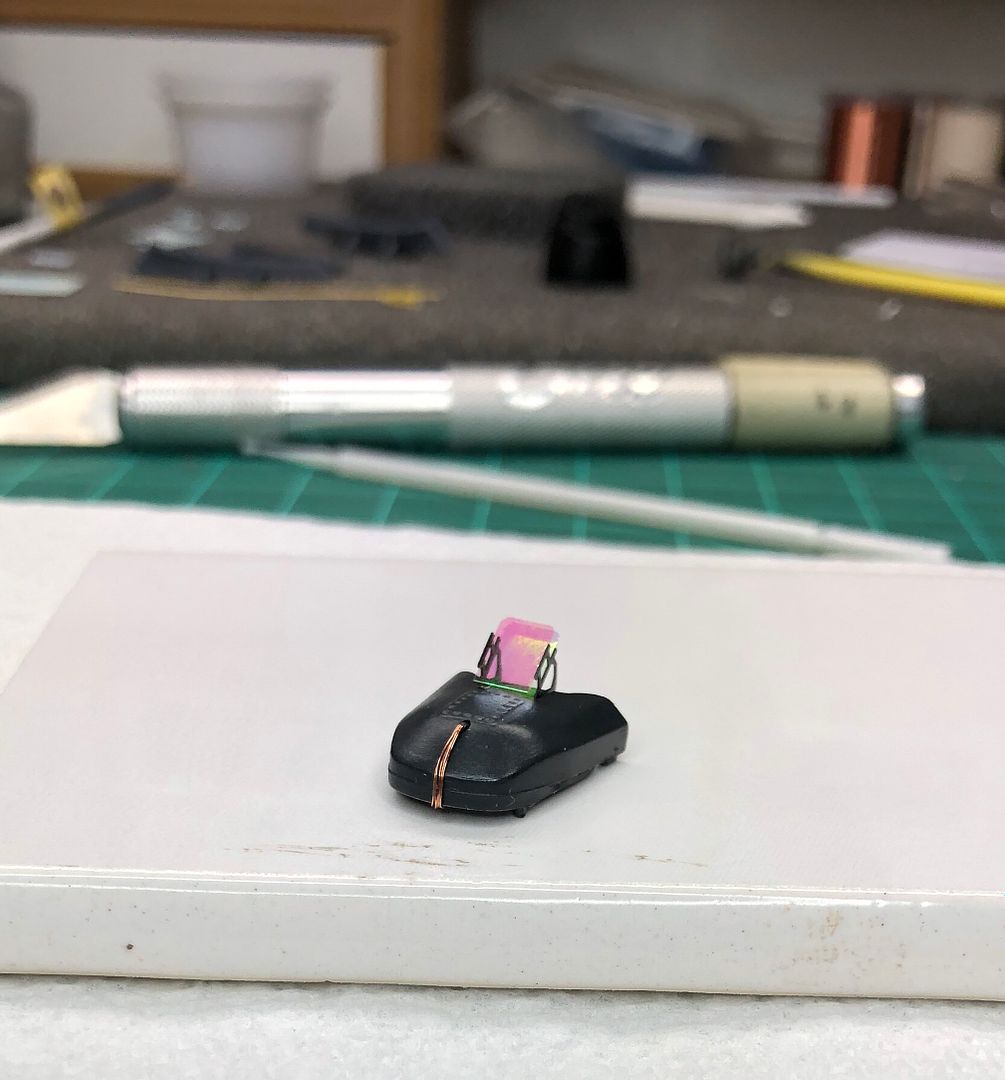
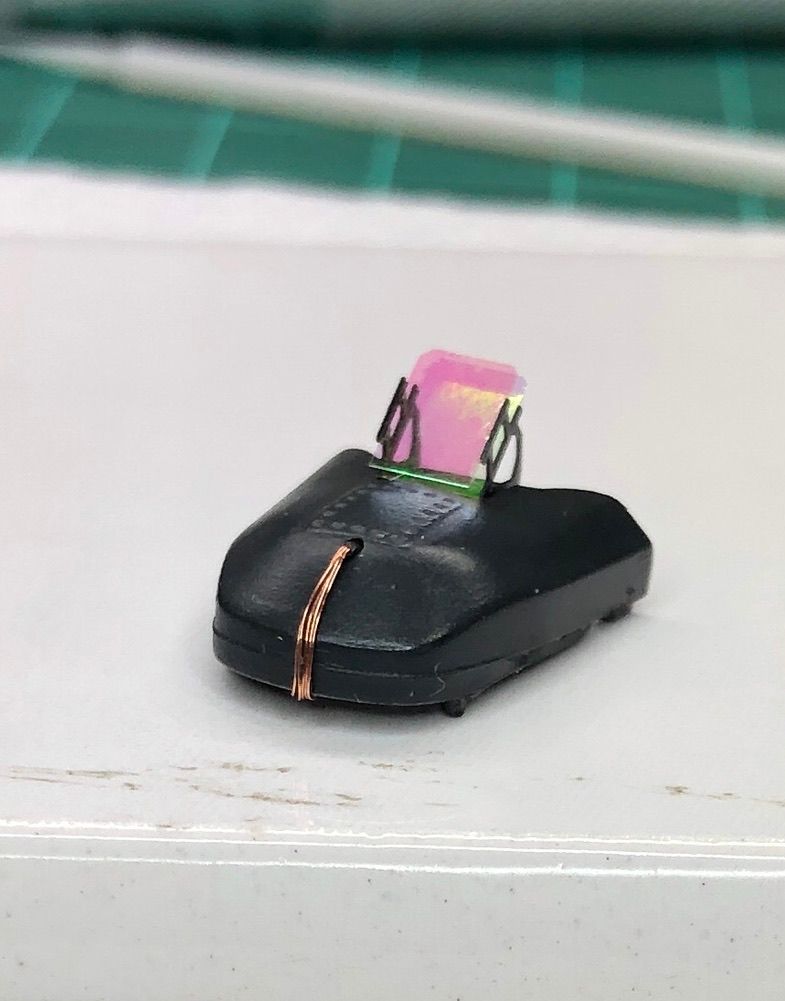
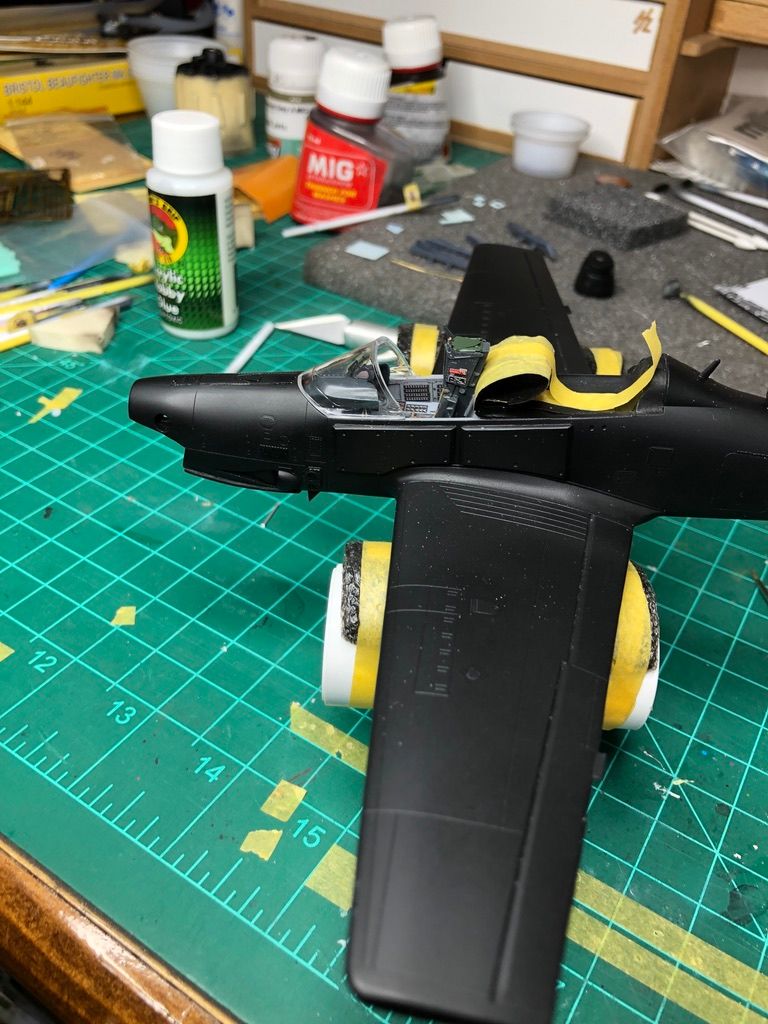
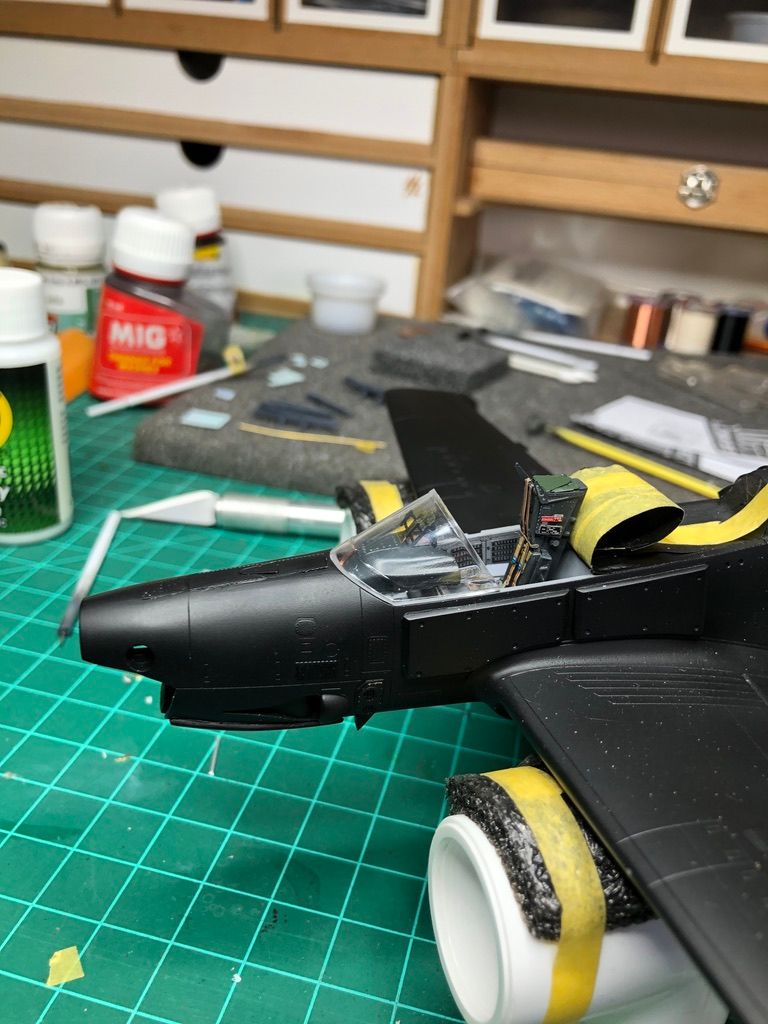
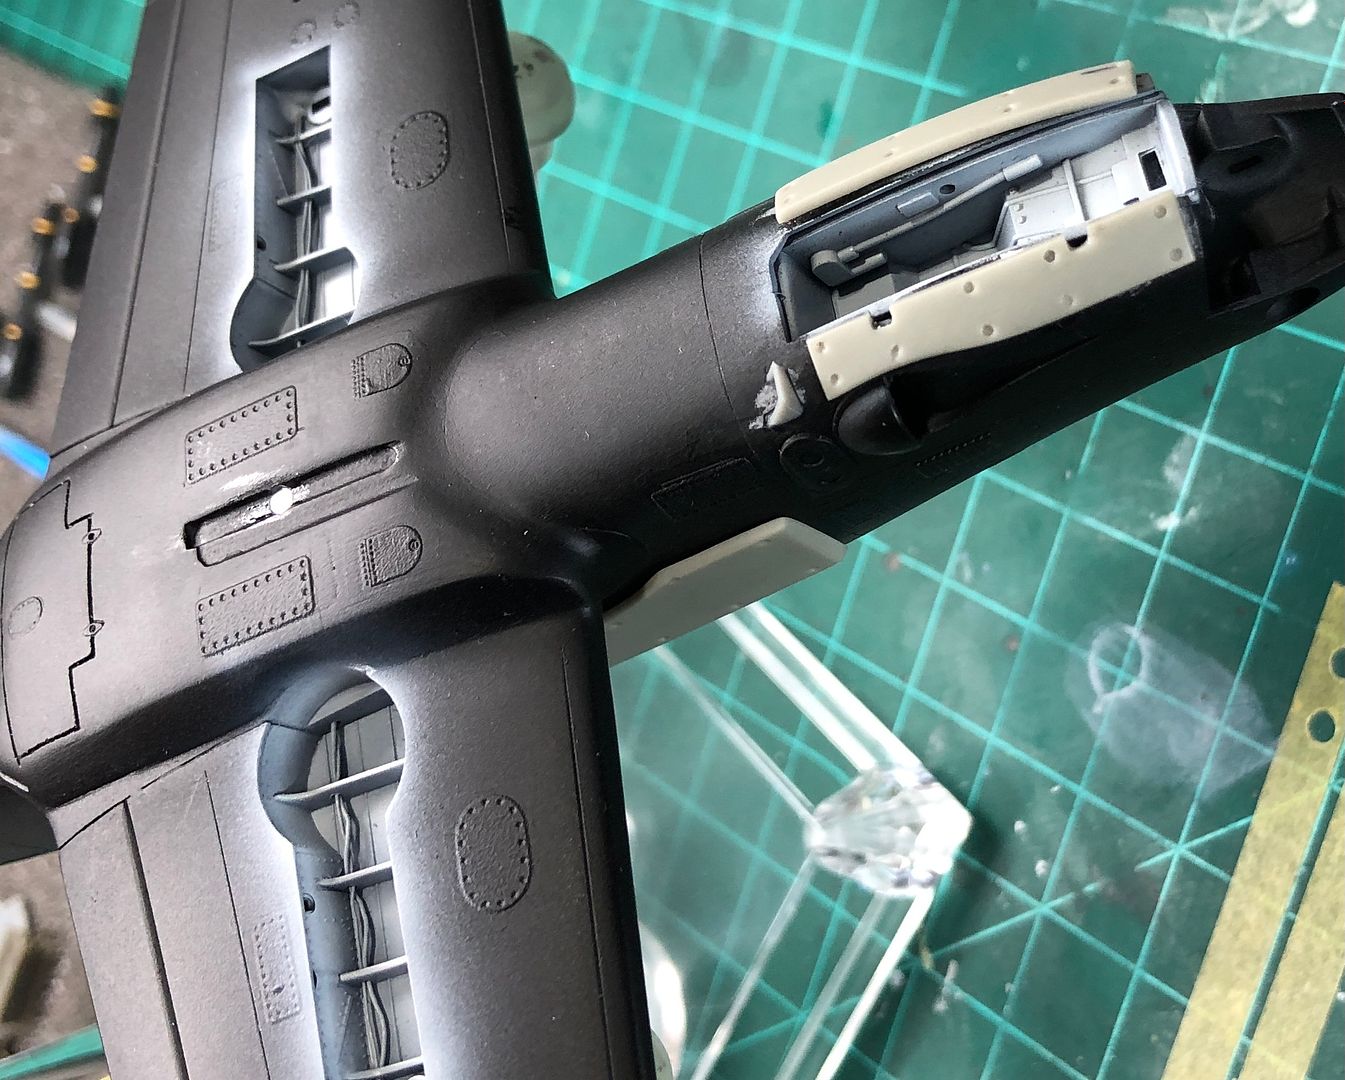
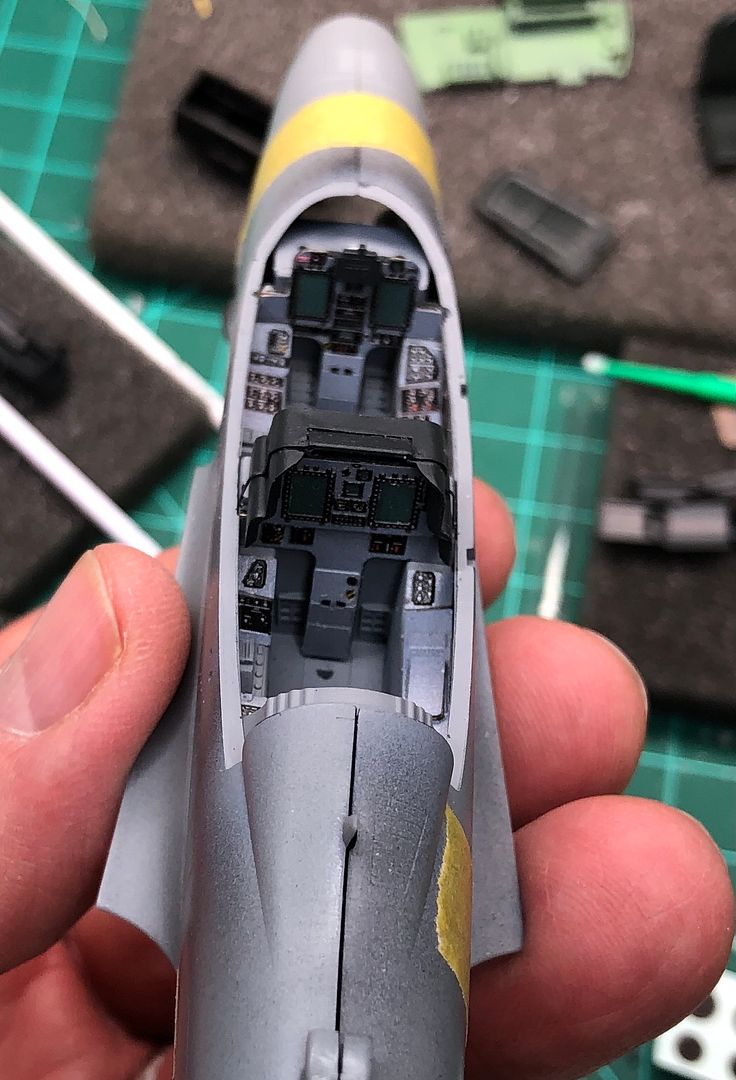
Starting off with the cockpit the Martin Baker Mk.8 seats get some PE love.
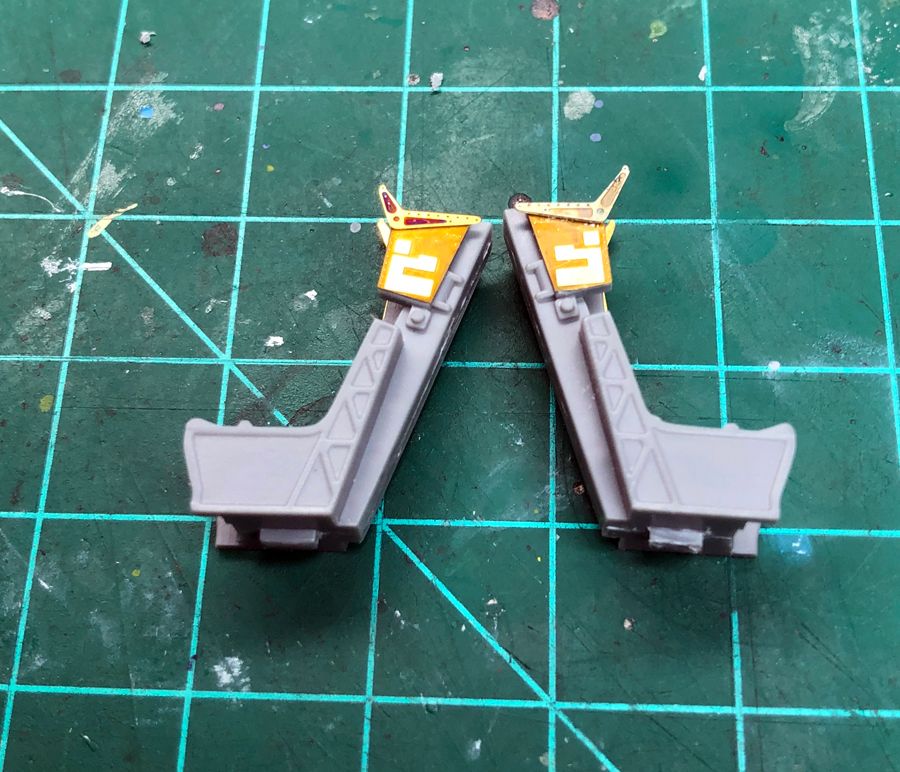
Each seat has 4 PE parts.
Parachute packs test fitted to top back of seats. Rear seat IP dashboard coam gets some annealed PE attention.
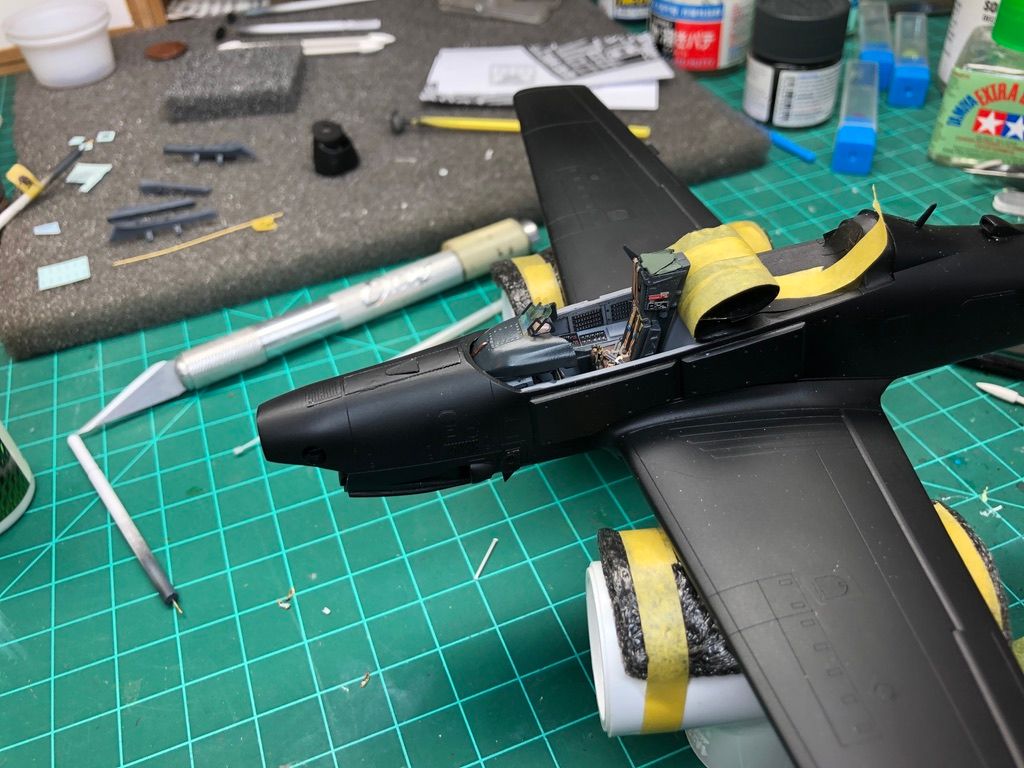
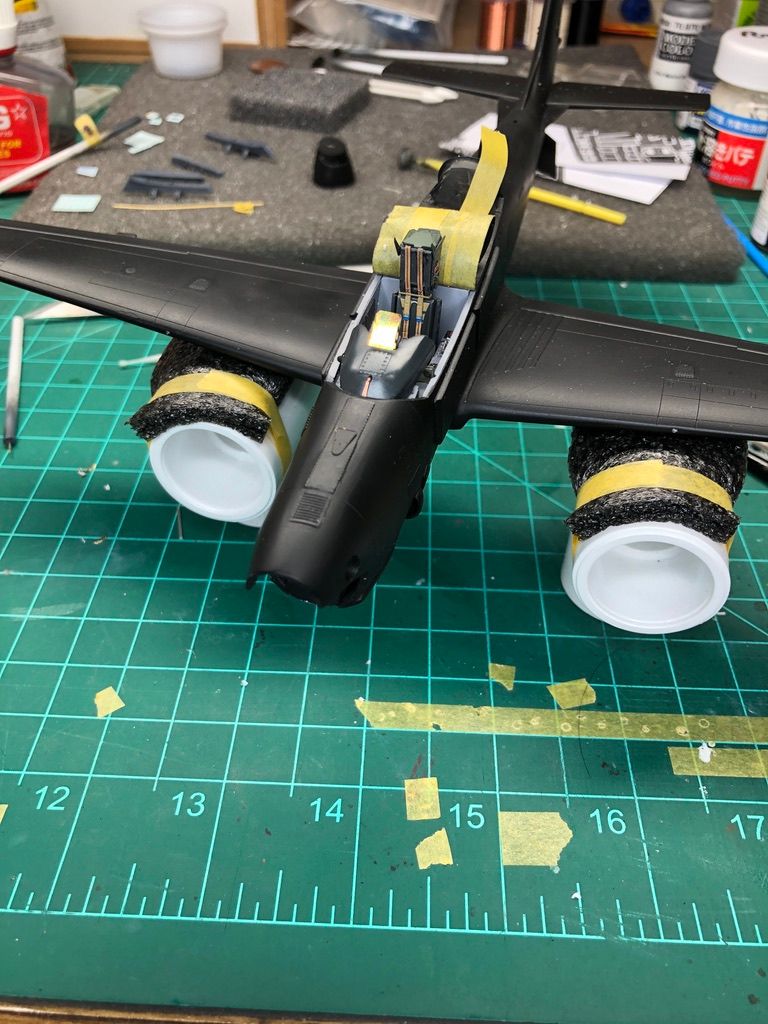
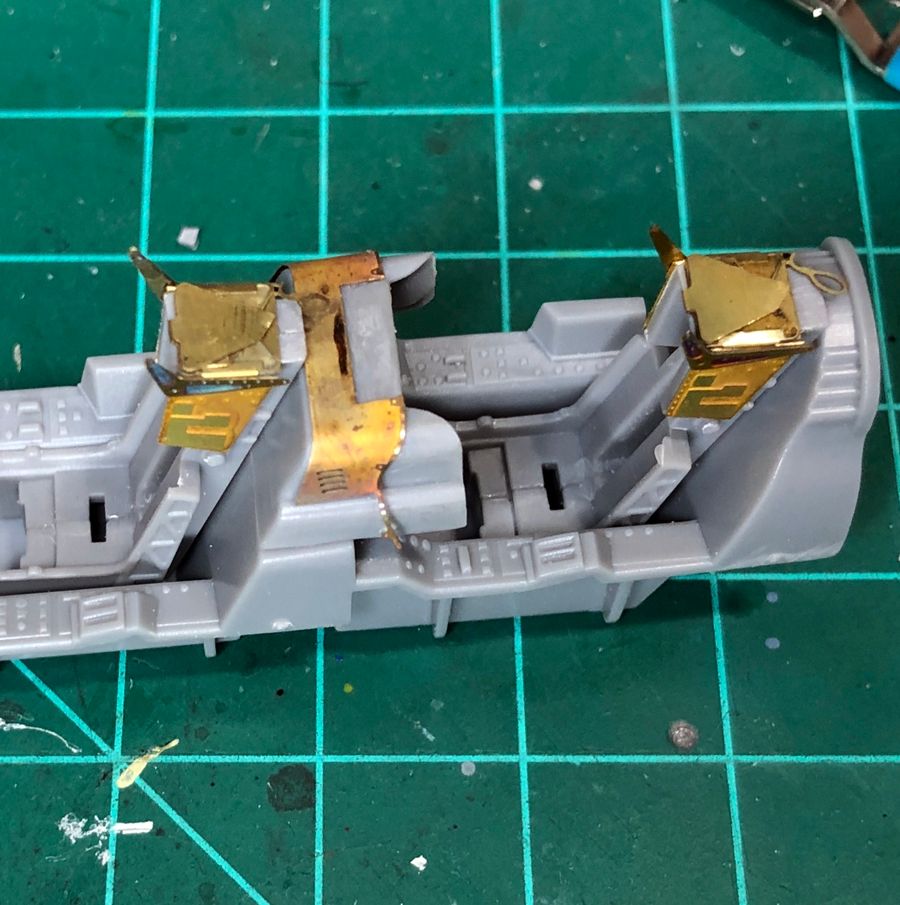
Cockpit sidewalls added.
_IMG_3080.JPG)
Test fit with pit tub and rear IP coam. Looks good.
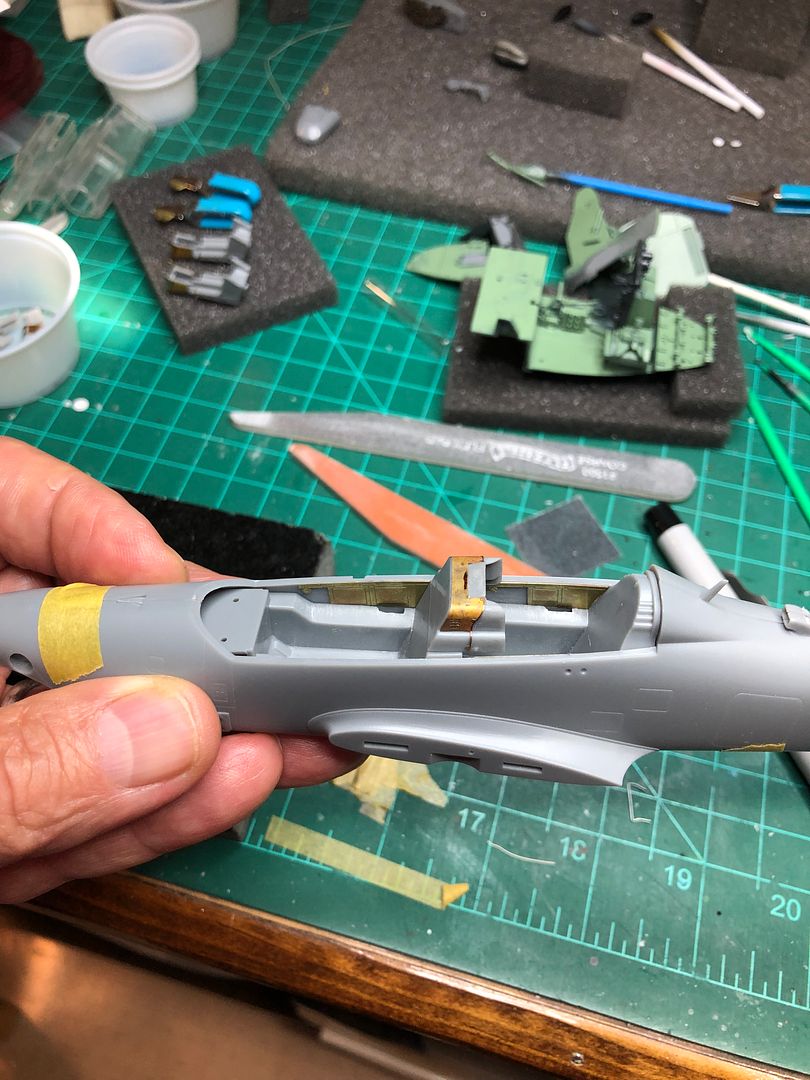
The Eduard PE gunsight looks awesome and the angst begins when it sits too high obstructing the fit of the windscreen. I tried the kit supplied PE gunsight...same results.
So, time for some scratch building. First had to reduce the top of dash coam so the gunsight will sit low enough. Then with plastic card A mount is secured.
_IMG_3096.JPG)
Plastic card as viewed from inside dash coam.
_IMG_3098.JPG)
Test fit, looks good.
_IMG_3107.JPG)
Reducing top of dash coam I lost the access panel detail. Eduard PE look like the best solution. Meh, I just did not feel comfortable using PE for this tight spot. So i opted for Archer resin decals. I was pleased with the results and the security.
Test fit cockpit details. Lots of Eduard detail.
That huge canopy looks tinted.
_IMG_3776.JPG)
The seam was removed on the canopy frame. Tamiya clears X19 Smoke with a touch of X26 Orange highly thinned with MLT. A few passes then after full cure a dip in Future.
Some reference pics did show a faint seam on the canopy glazing. After getting my hands on a close up image of the canopy the seam is actually a wire with no seam on the windscreen.
I will correct this.
-
1
-
-
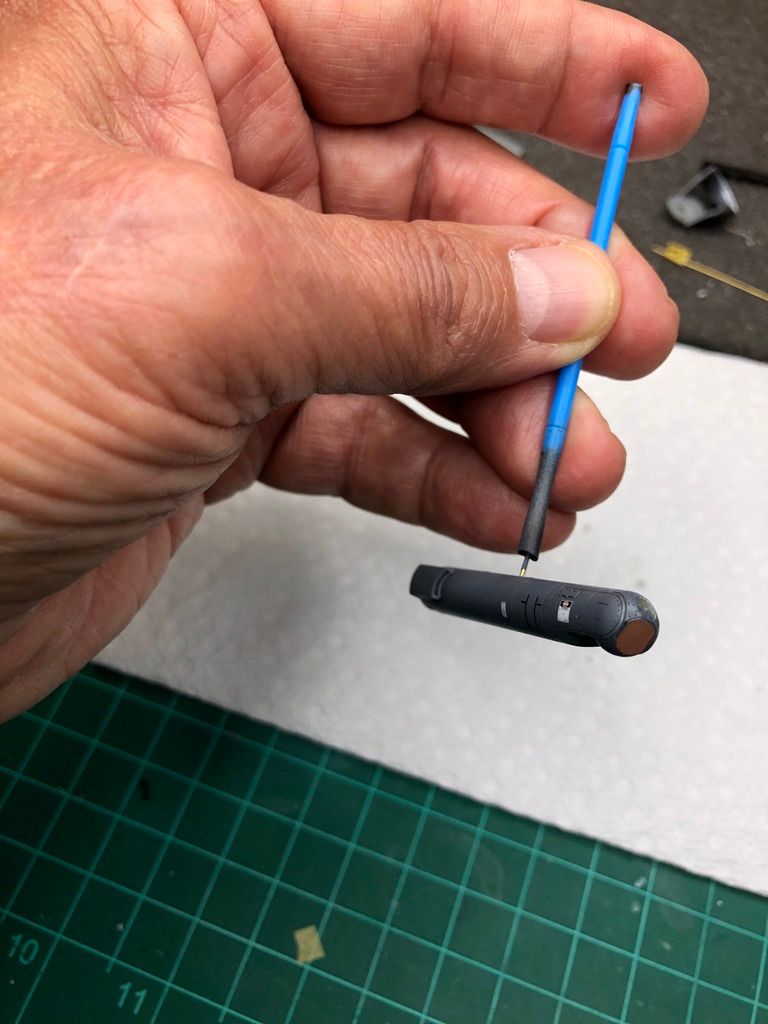
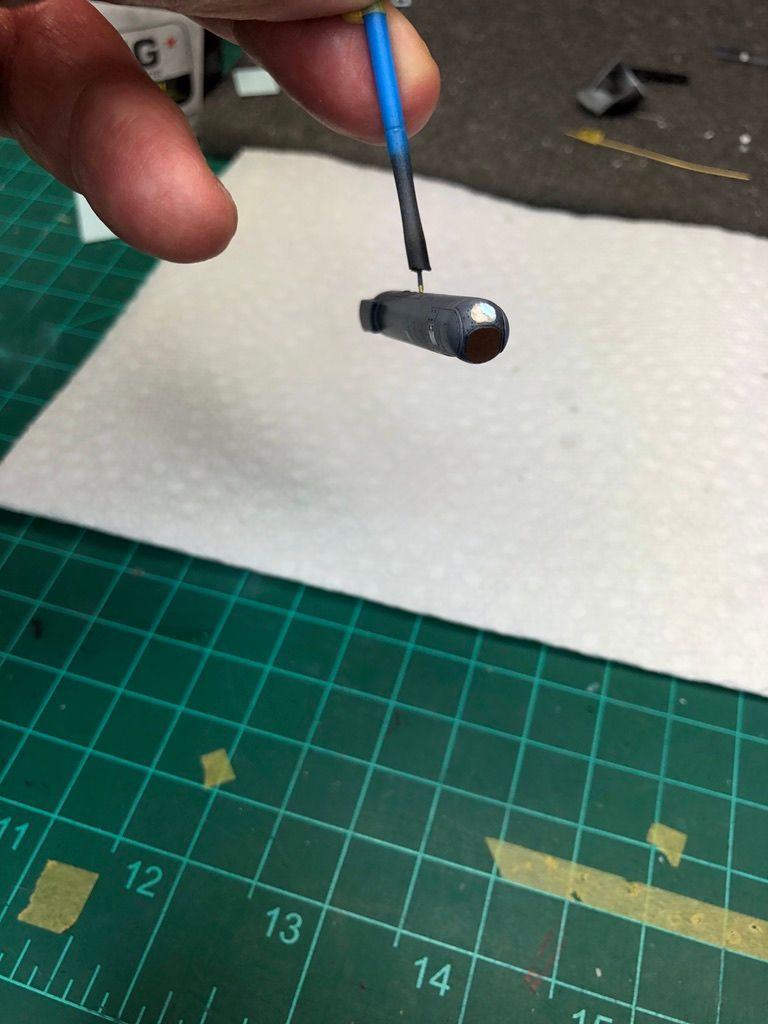
Ordnance, fuel tanks and FLIR complete! This represents more time than I spent on the A29 kit to date. Each has mini magnets for easy load out configuration.
Over 80 decals and over 50 pe parts. Fun times! I lost count how many colorful metaphors and "WTFFF-are you kidding me!" moments.
-
2
-
-
LANTIRN Pod (Eduard 648548) completed. Painted overall Gunze 305 Dark Grey (FS36118) I'm considering this color for overall on aircraft in lieu of my original plan of 3 color camo.
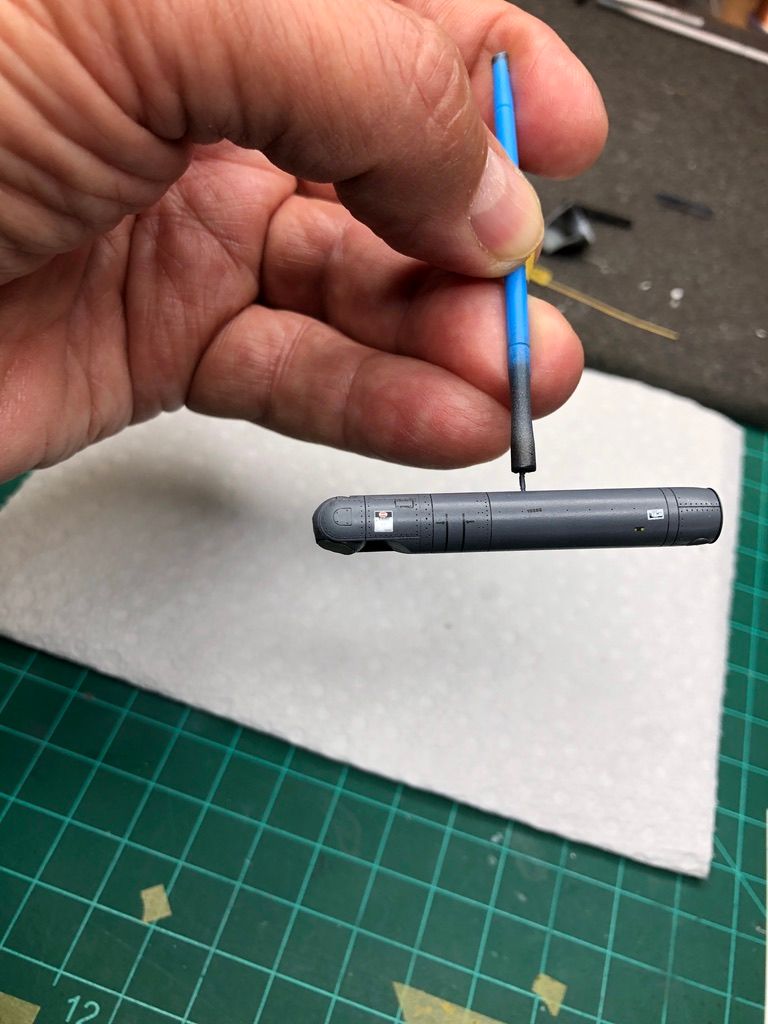
I cut a piece of HUD film to place over the laser seeker lens. The silver base mask not the cleanest so I'll try a panel line wash around the lens. Further, I placed the HUD film wrong side up so the effect is "less". Then, I carefully spread Acrylic UV glue and gave it a shot of UV light to cure. Not the effect I was hoping for due to incorrect placement of the HUD film.
FICE!
-
2
-
")


Price Drop - LEM KITS, Tamiya, Hasegawa, Hobby Boss, ICM, Special Hobby, ProModeler. AM stuff.
in Buy, sell, swap, seek
Posted
All sold have been removed.
Rick