


Fran
-
Posts
2,133 -
Joined
-
Last visited
Content Type
Profiles
Forums
Events
Gallery
Posts posted by Fran
-
-
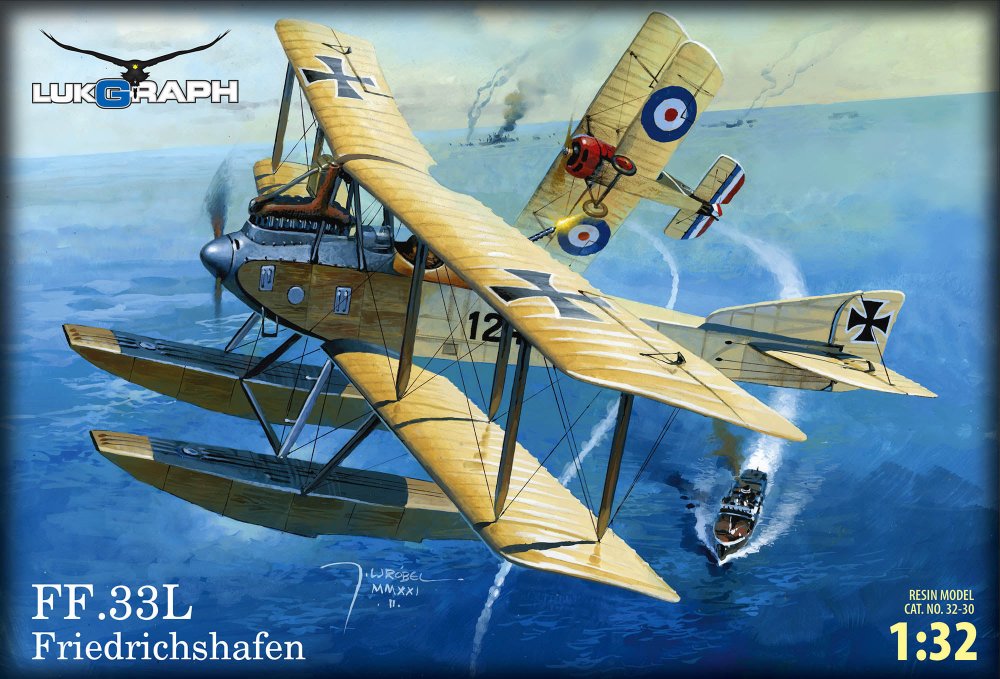
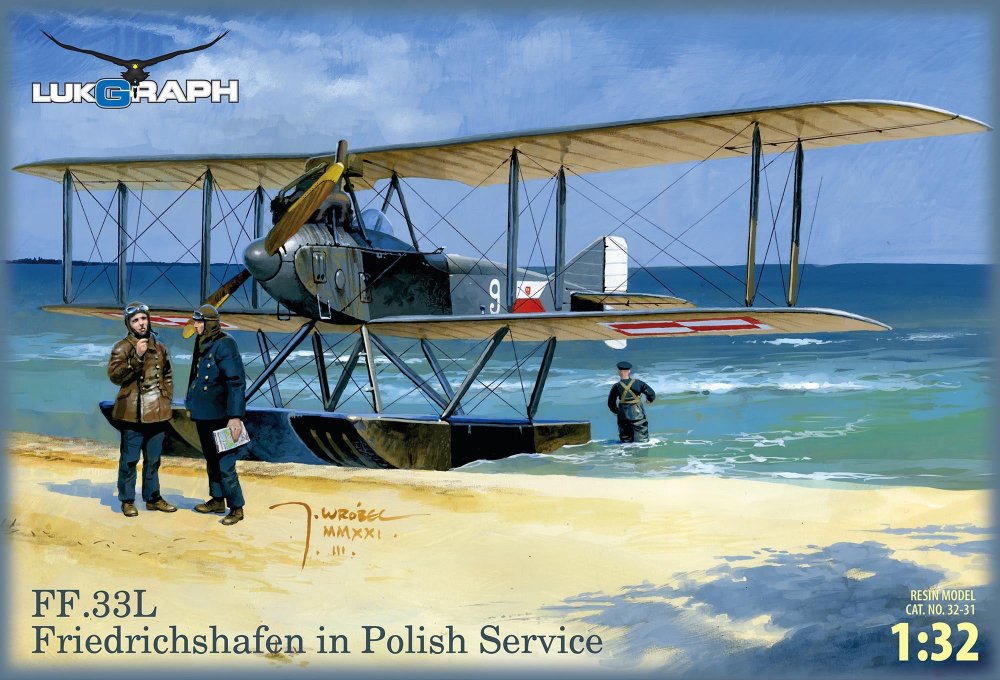
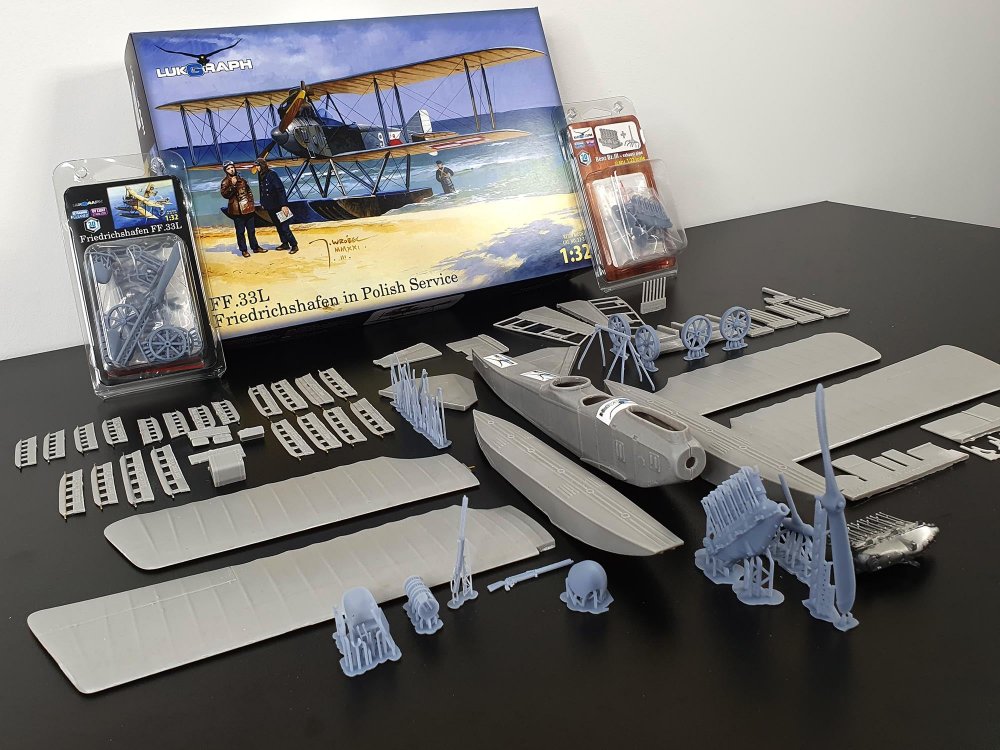
AND its ON PRE-ORDER!!!!
Friedrichschafen FF. 33L

-
 8
8
-
 1
1
-
-
1:48
B-25 C/B Mitchell
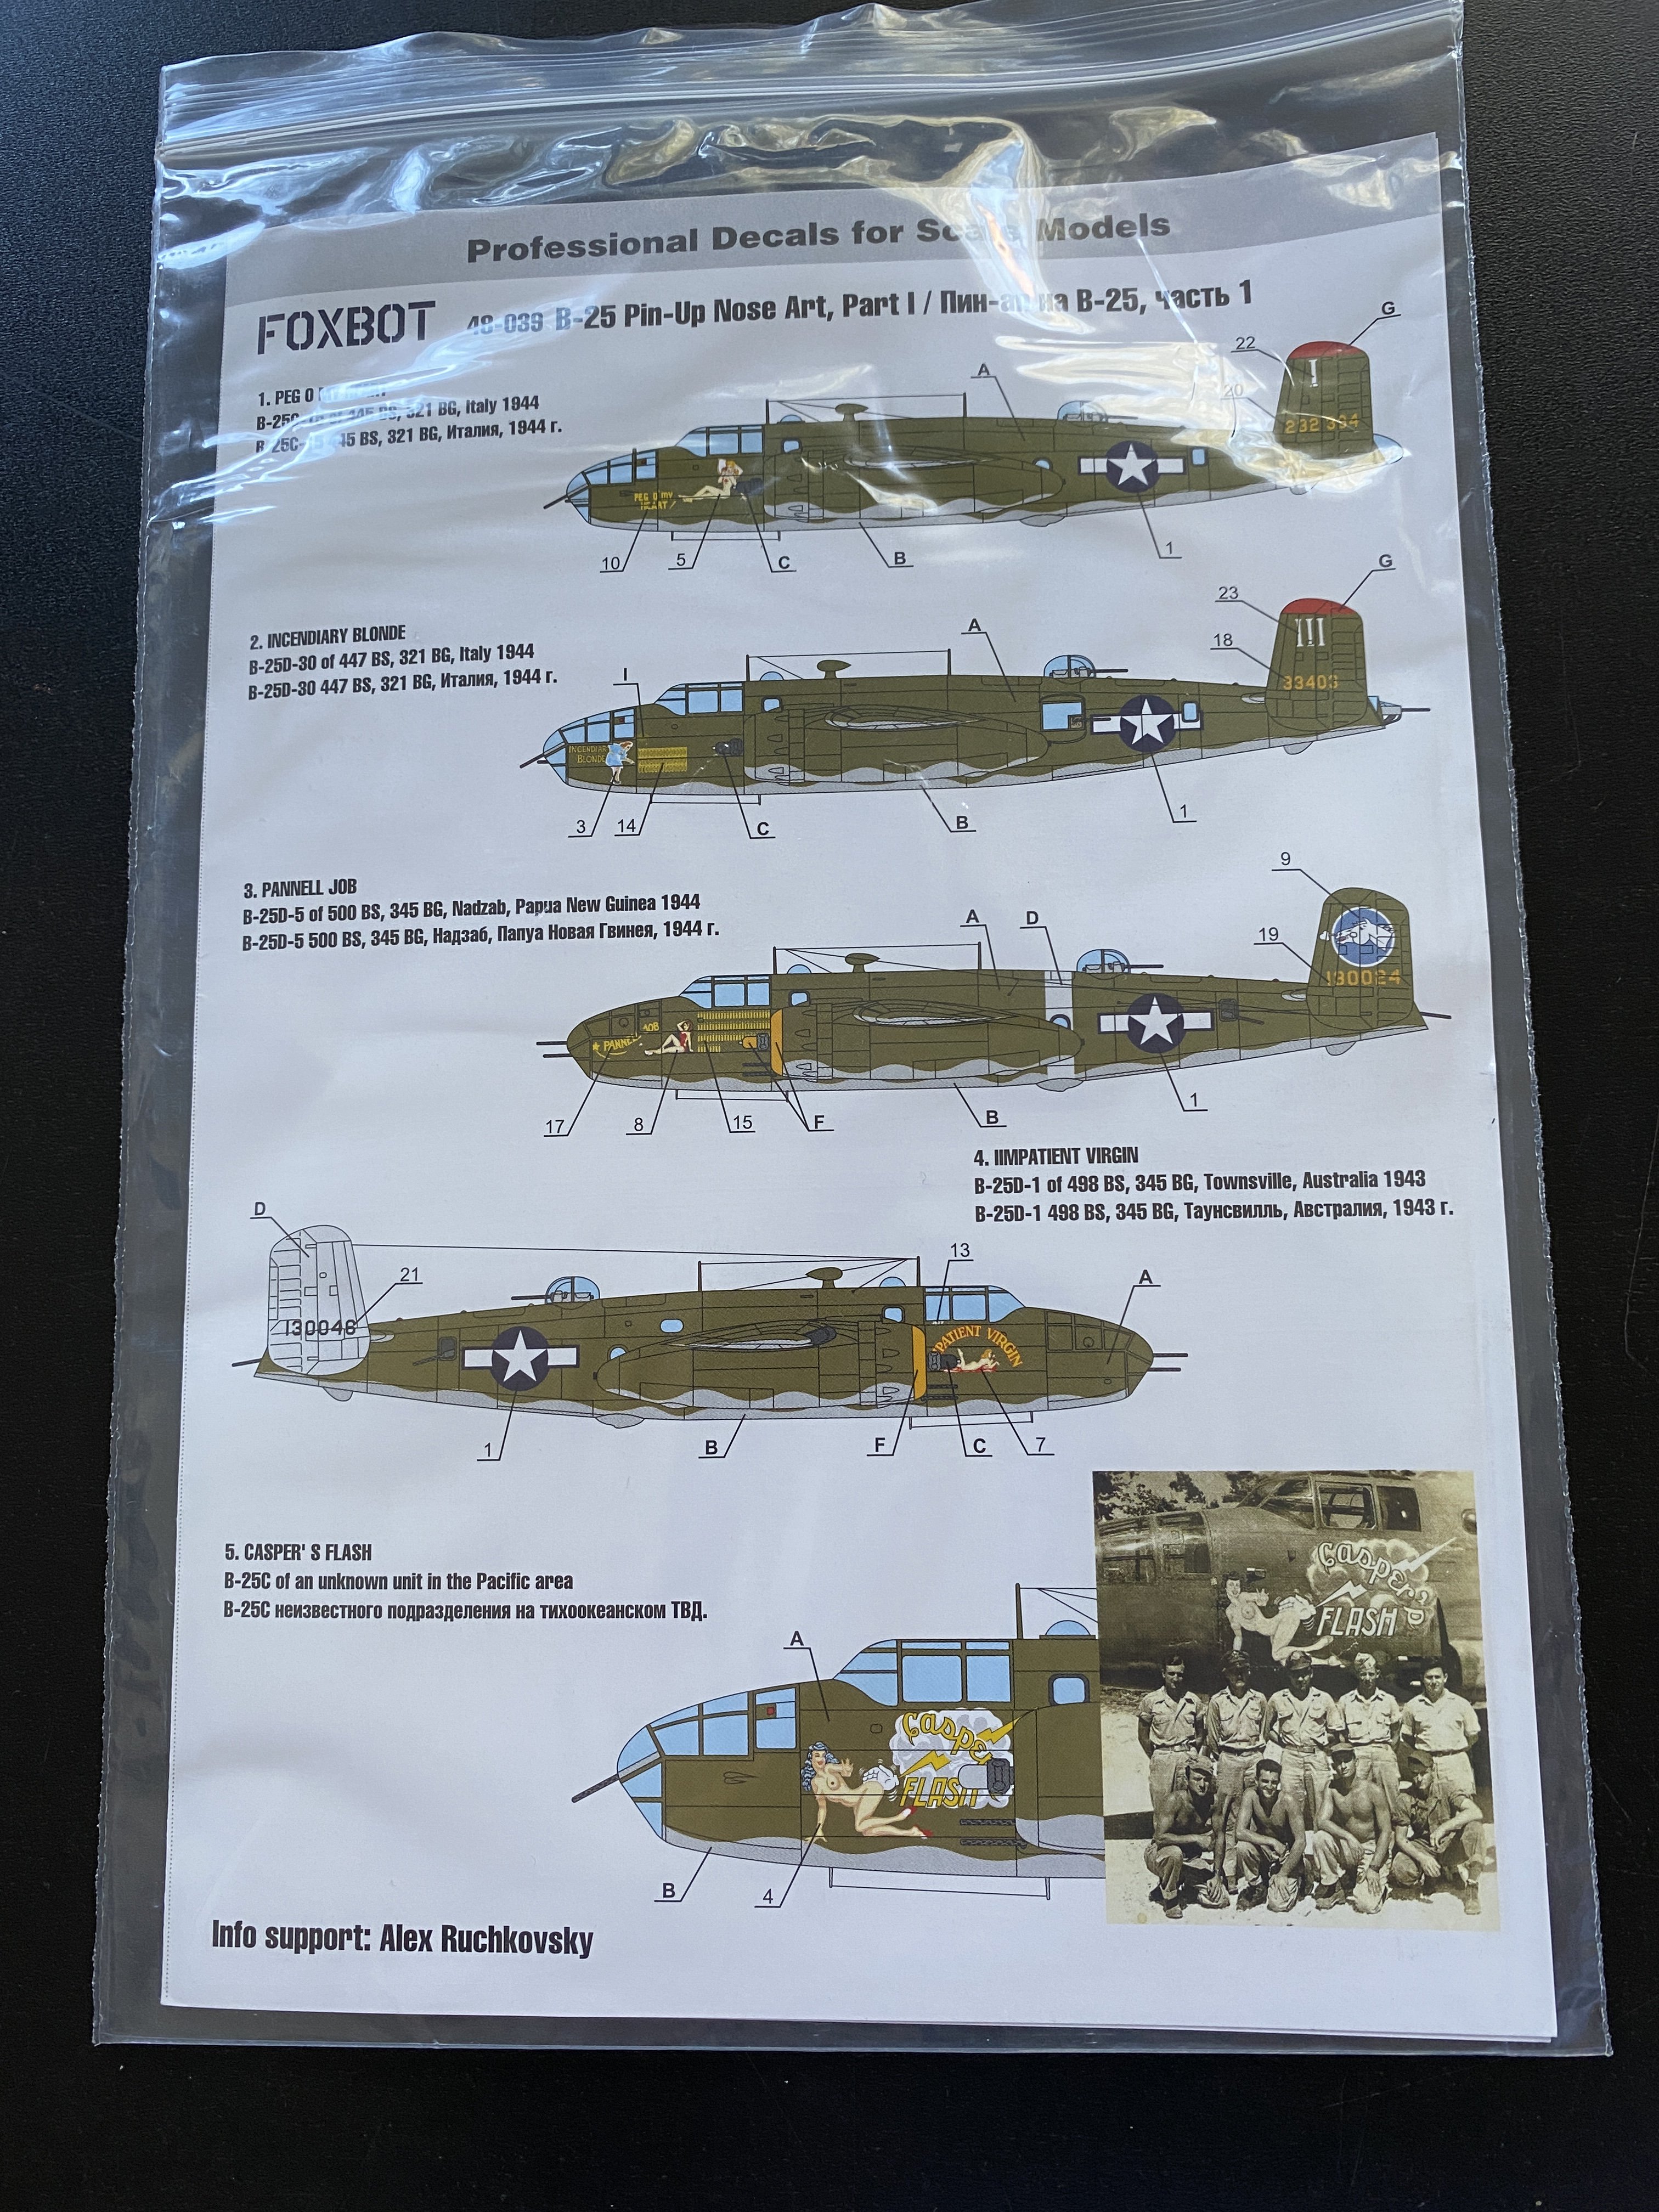
“Pin-up Nose Art and Stencils Part 1
By Foxbot Decals
(16,66£)
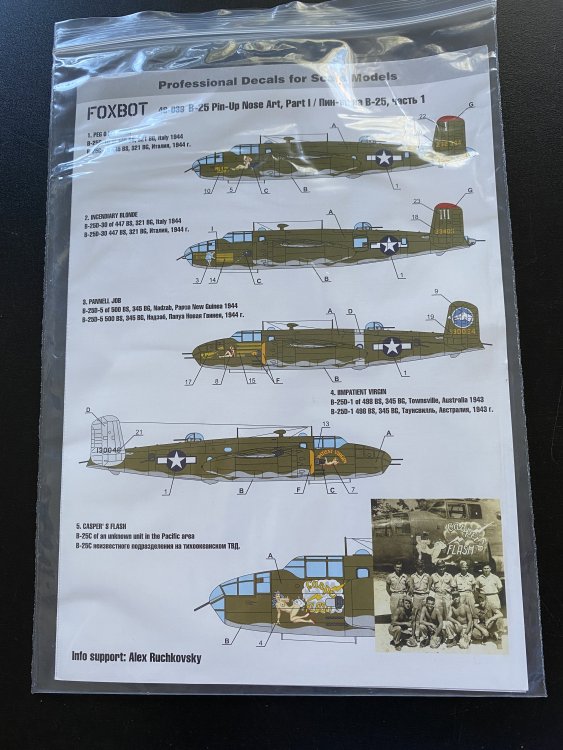
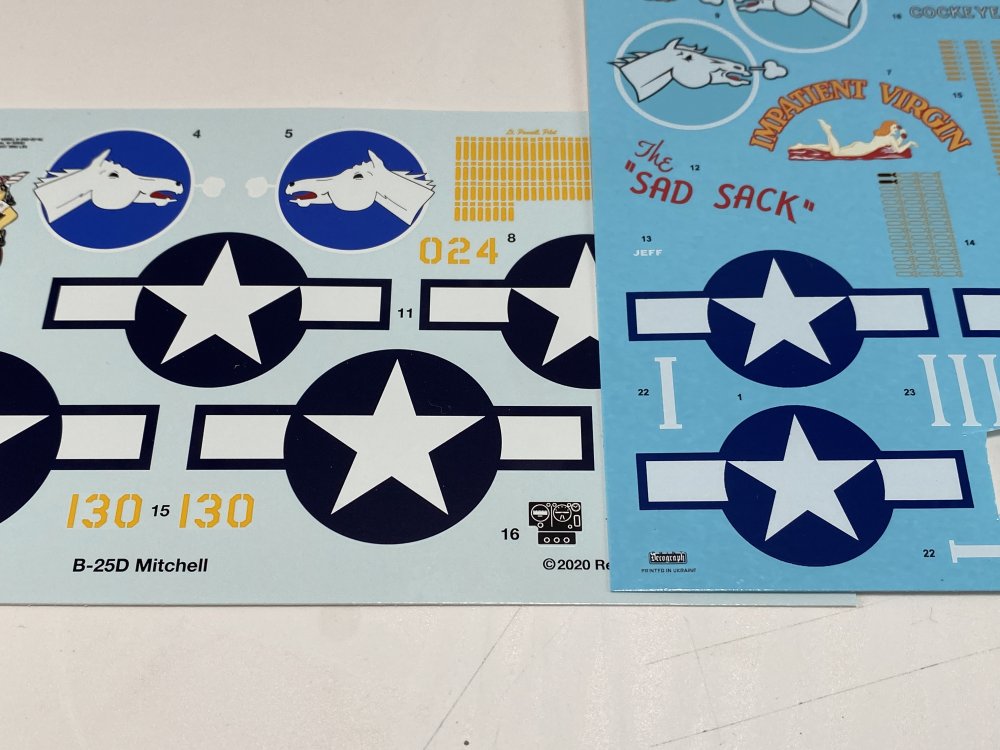
Foxbot is a new name for me that I discovered a few month ago when I was looking for decals for the B-25.
I had never seen and found any reviews regarding the quality of the decals, and their behavior.
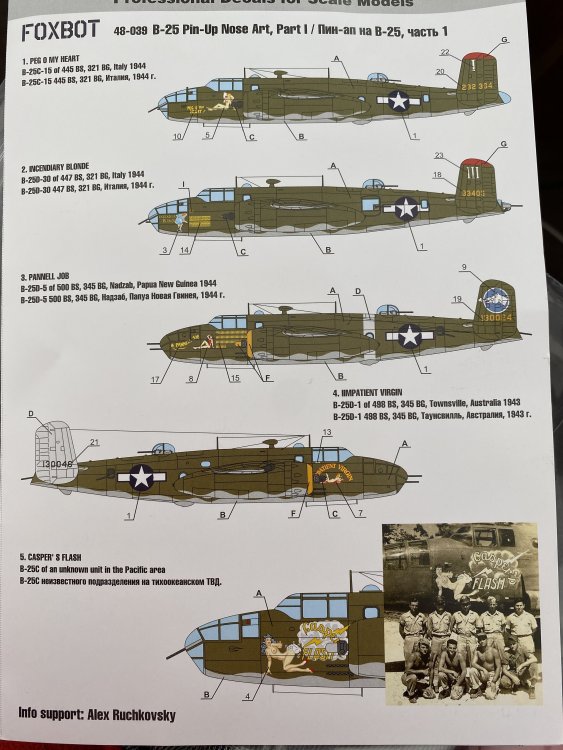
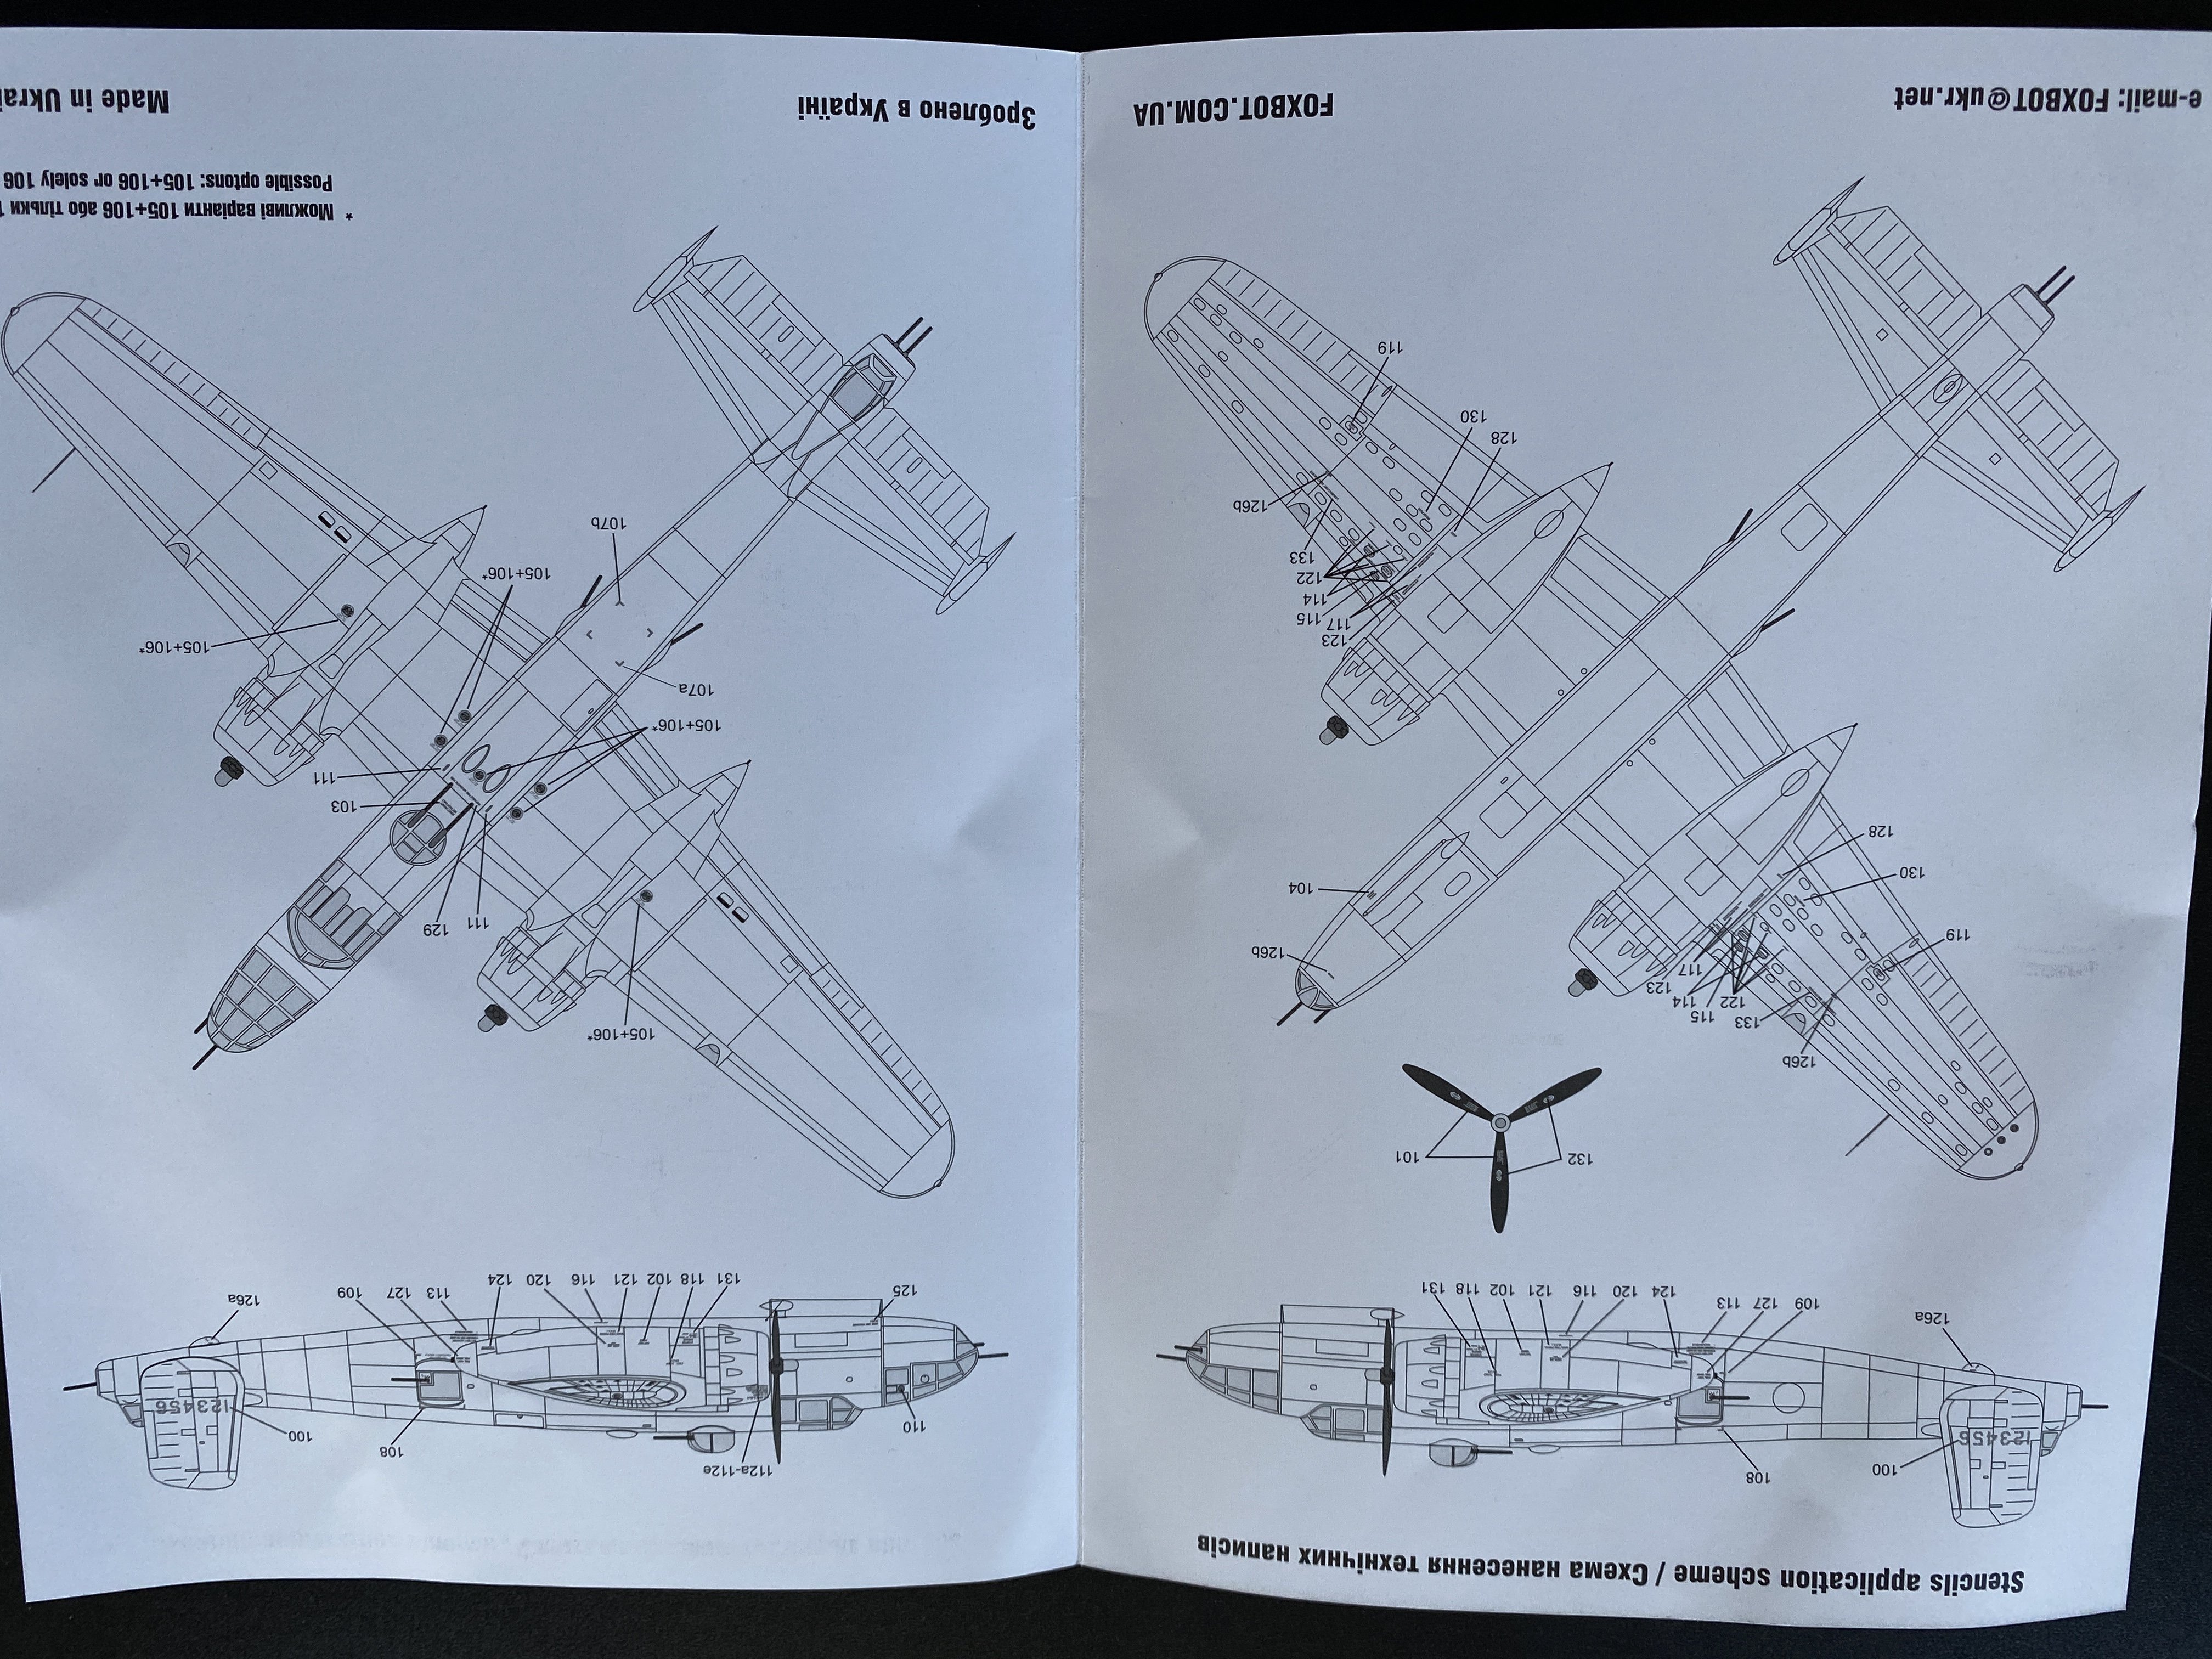
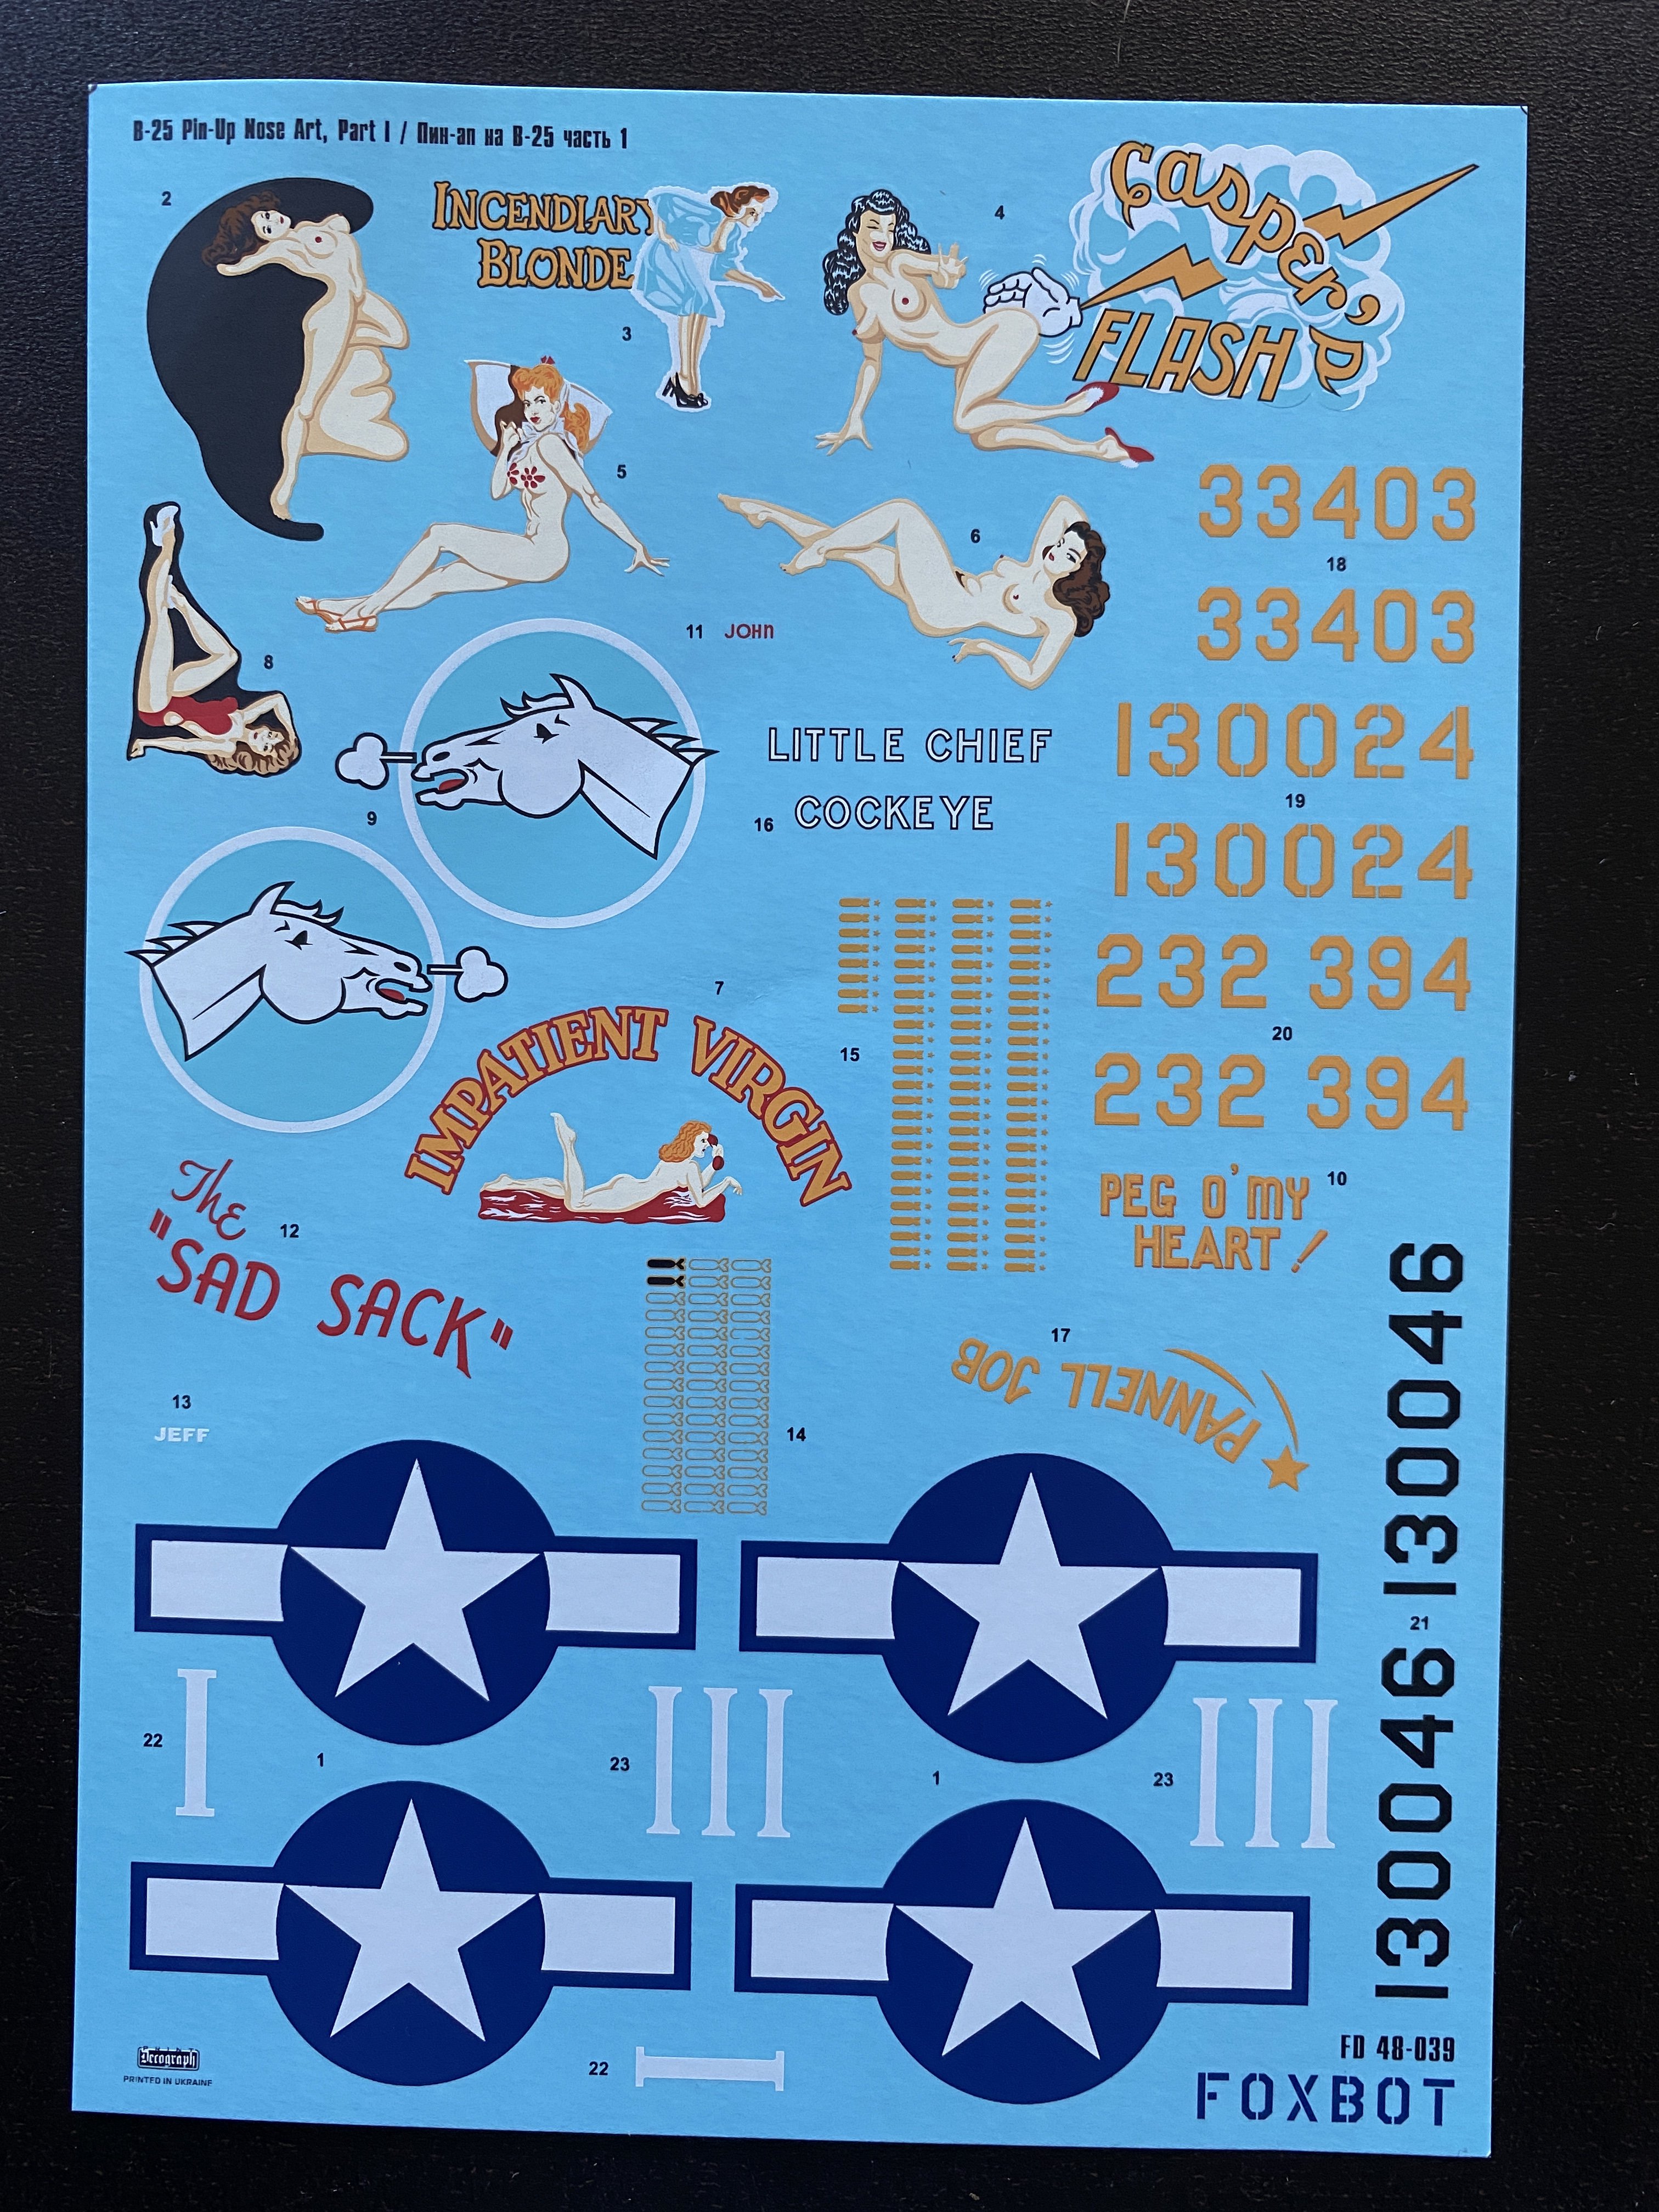
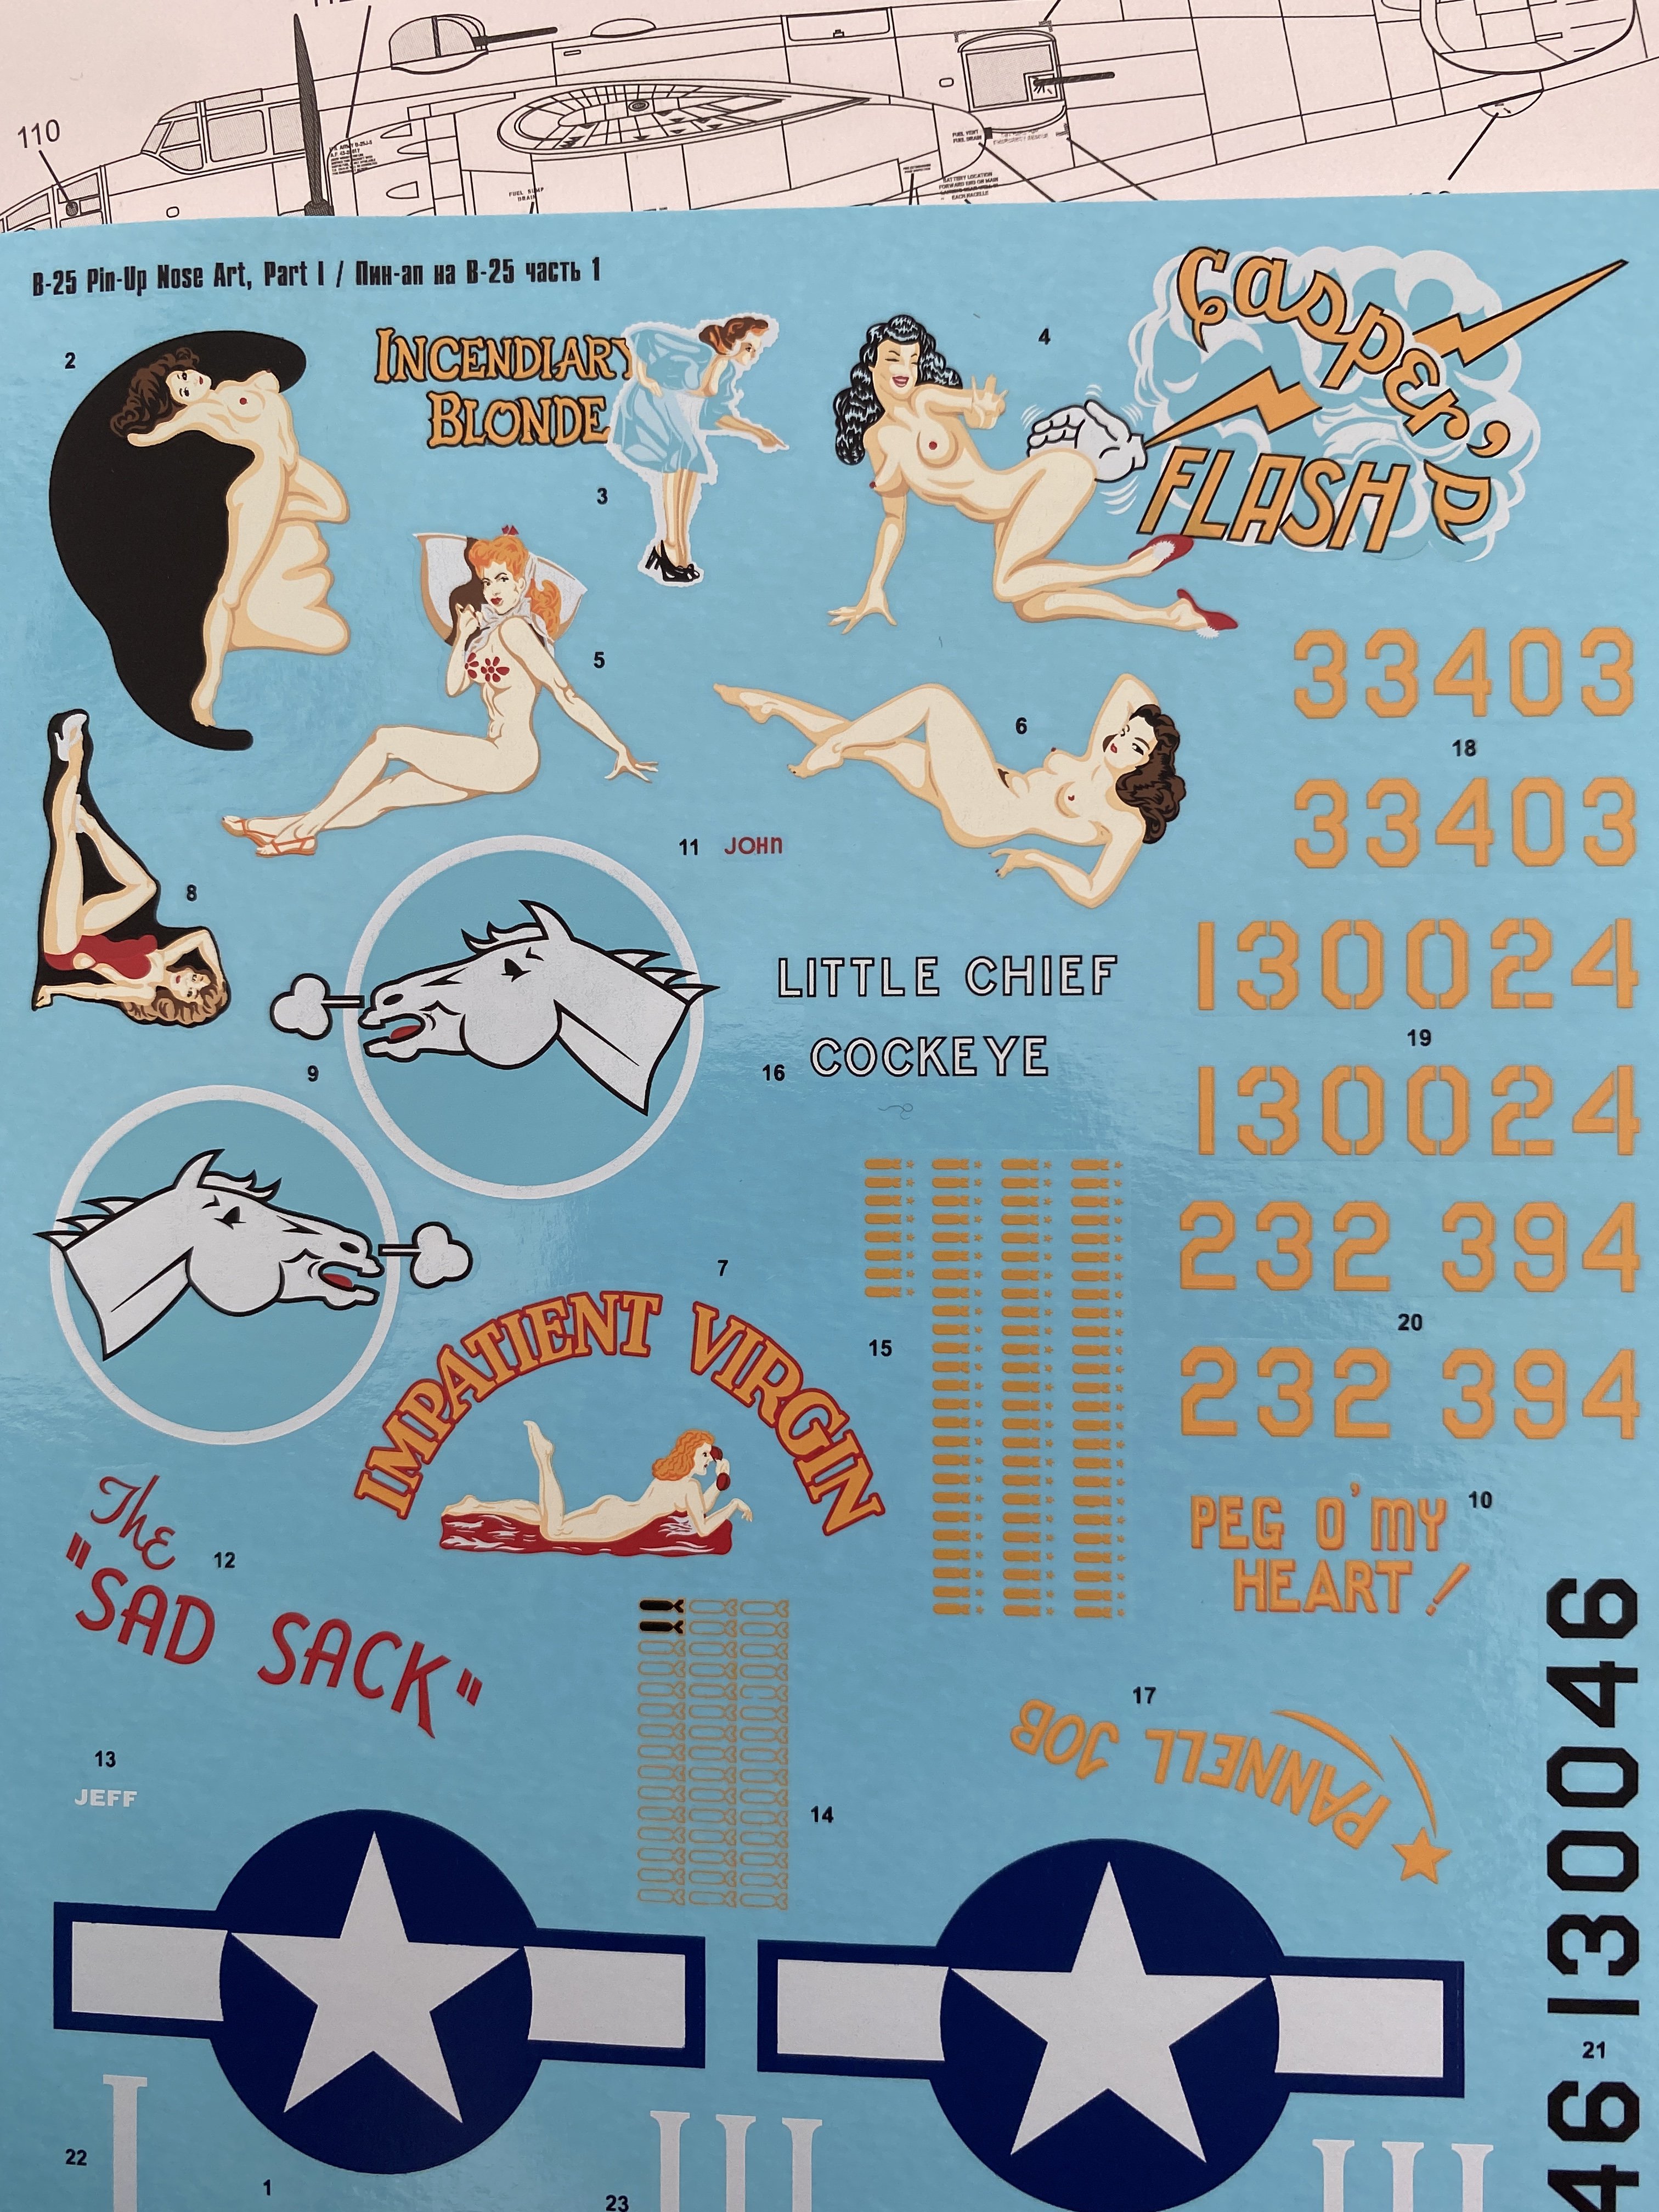
First of all, the decals comes in the usual plastic zip-log bag, with two decals sheets and color profiles and decal locations very clear and precise.


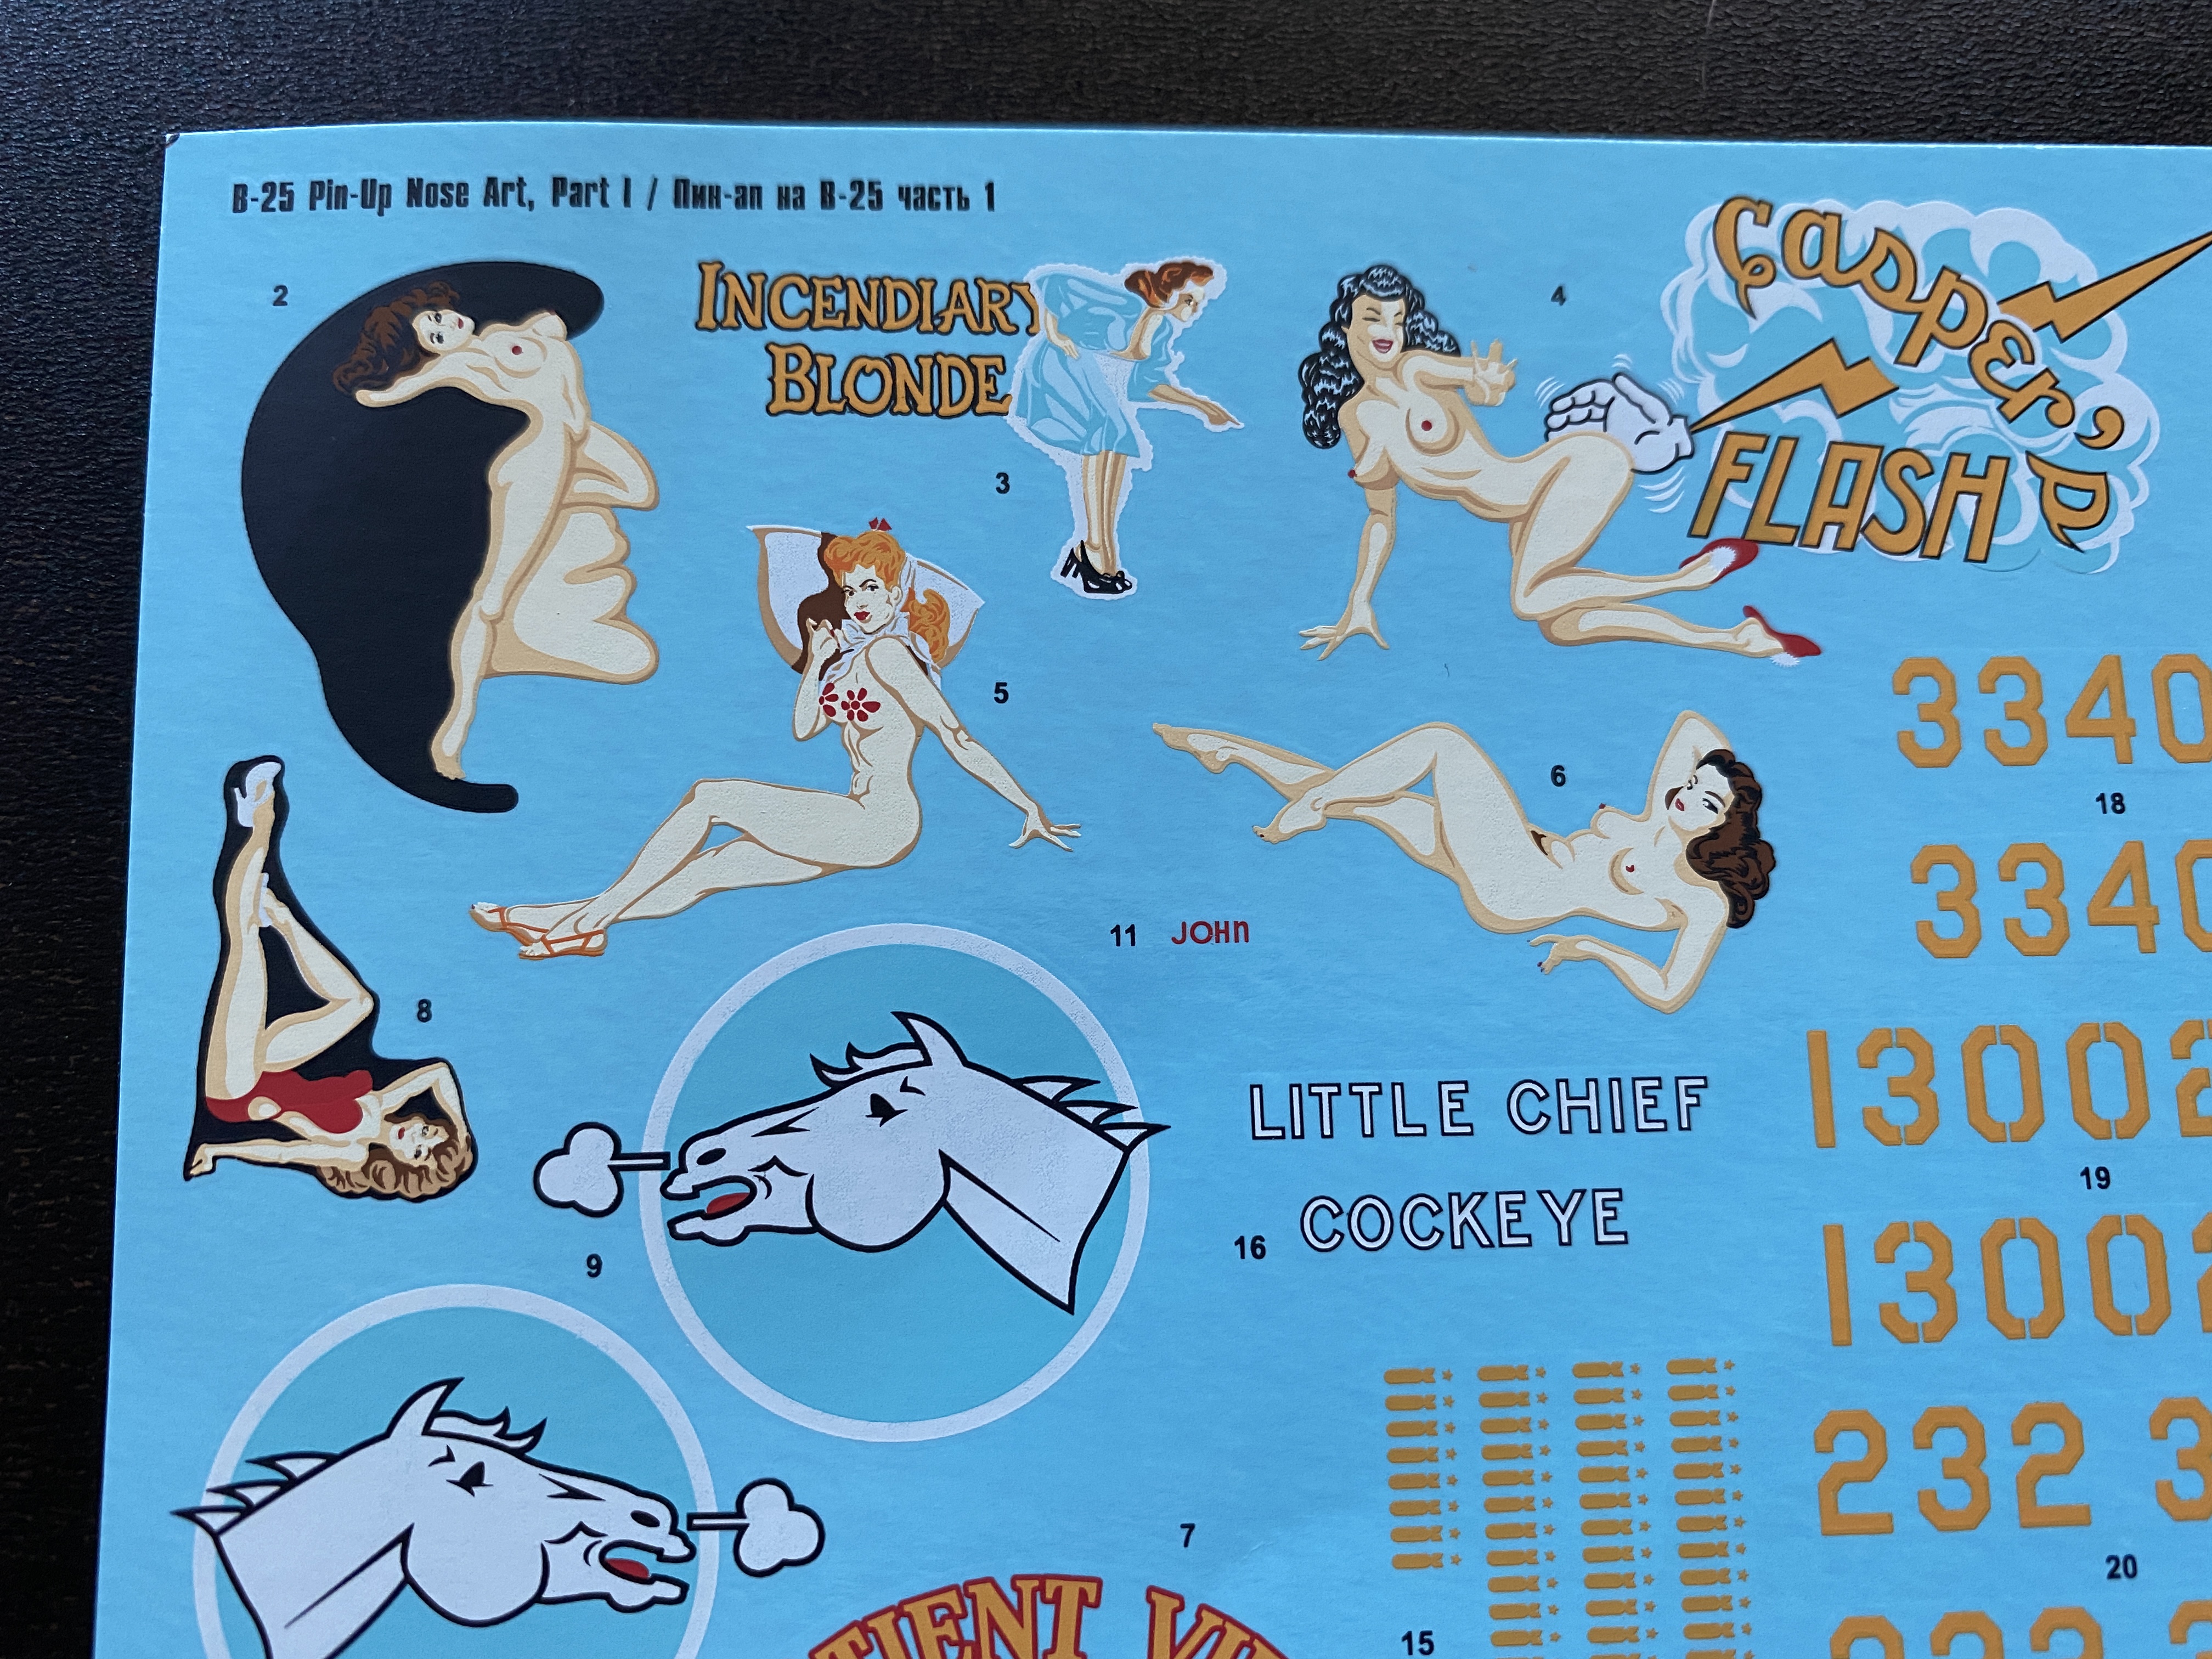
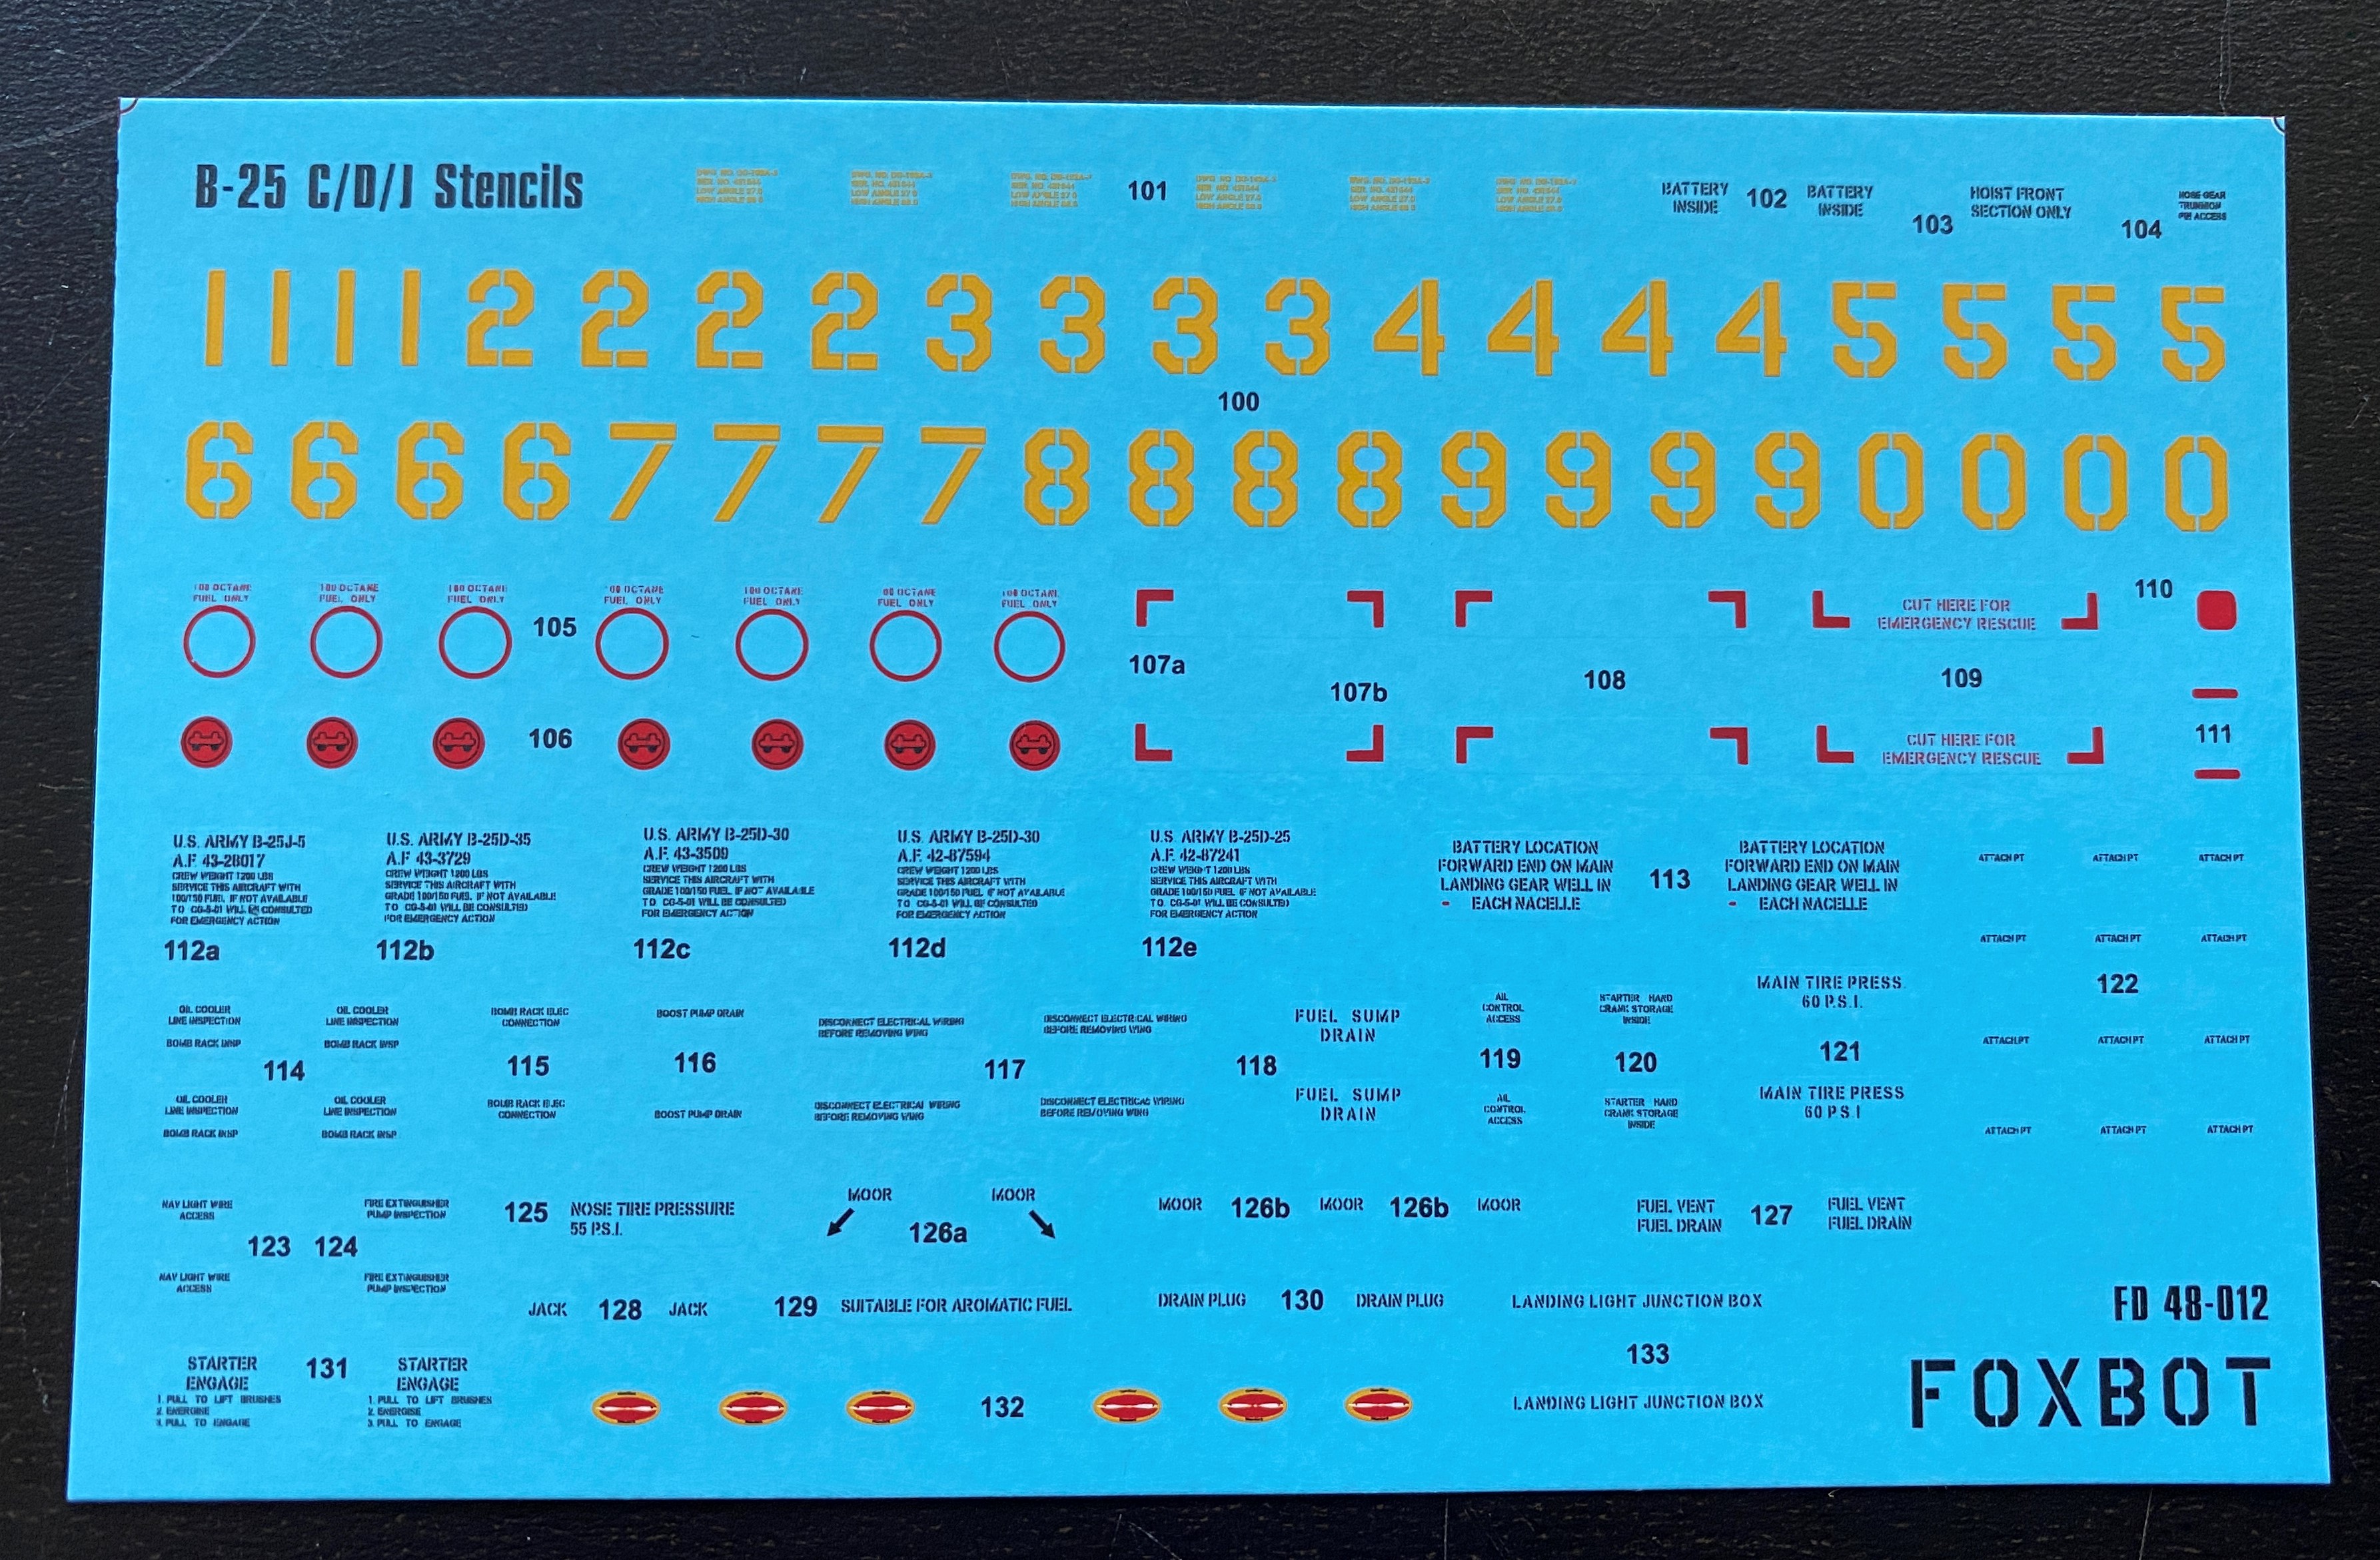
My set came with the decals insignas, nose-art and stencils.
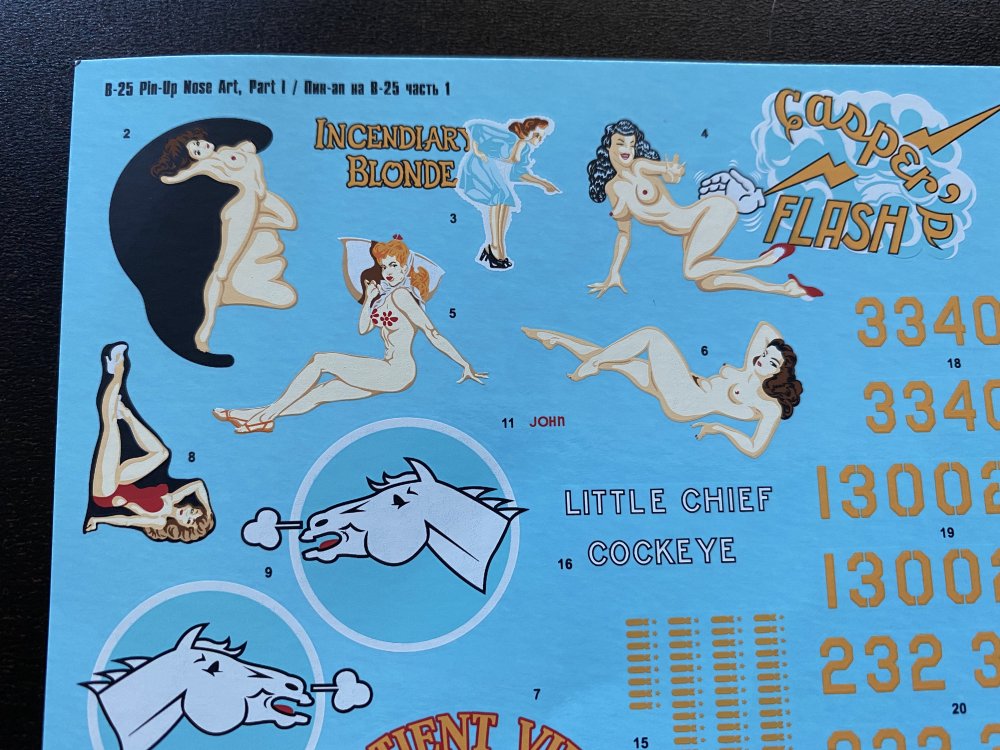
Analyzing the decal sheets, the color registration is great and the definition of the details is very very good.
The decals have a thin film, in fact looking very thin and delicate.
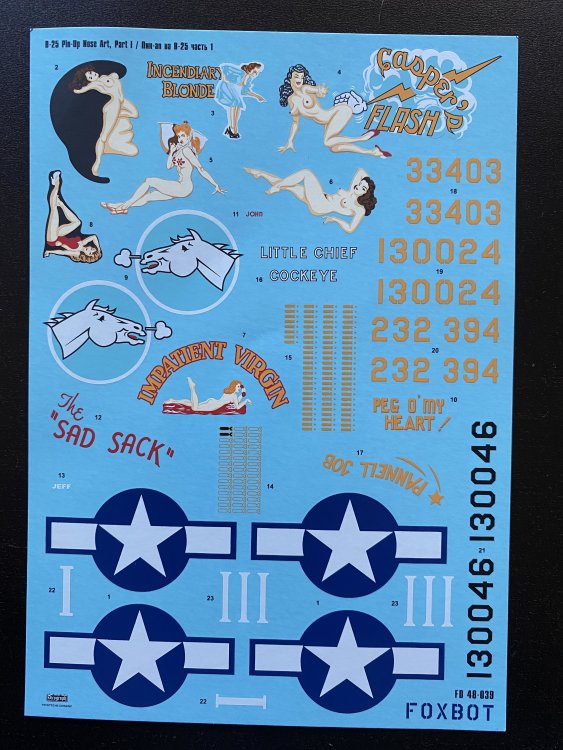
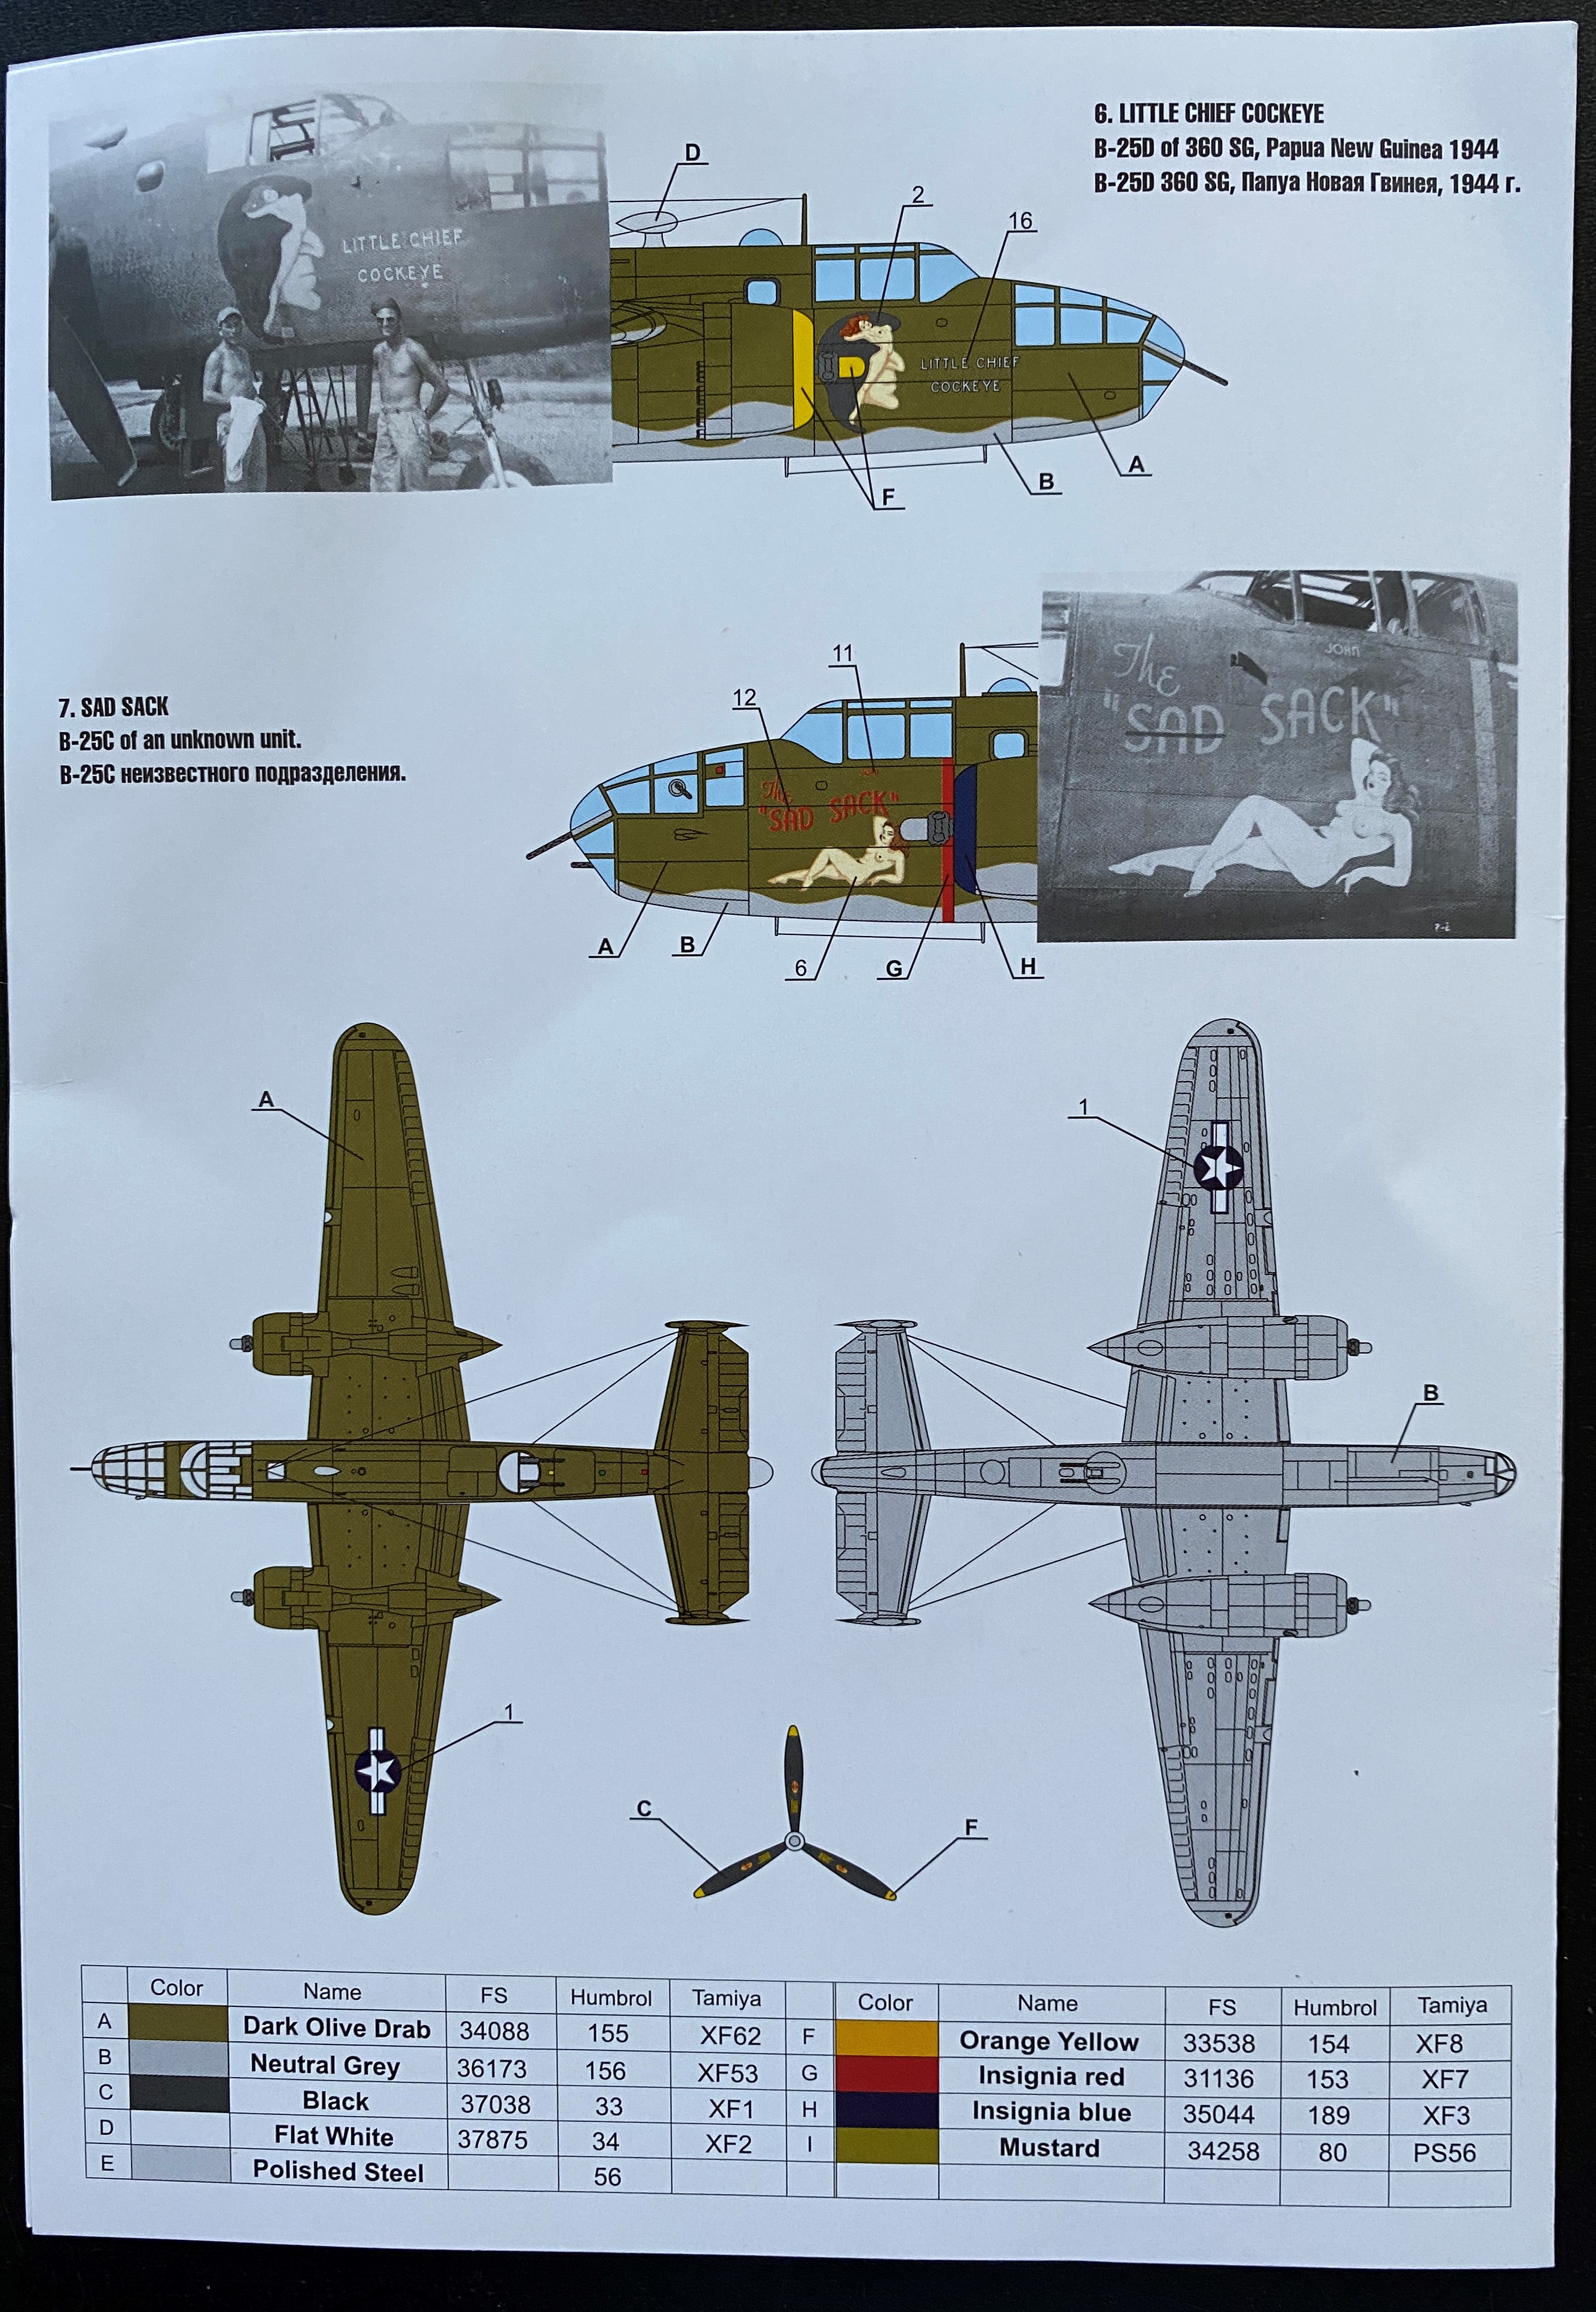
As you can see, the nose arts are very well defined and will undoubtedly give a more colorful look to your B-25.
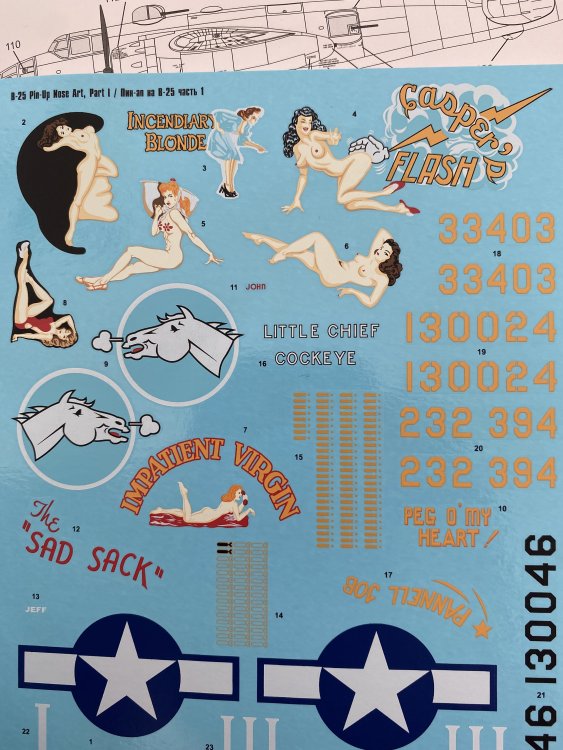
There´s a lot of sexy nose art within this decals sheet.
The options are:
1 – “Peg o My Heart” – B-25 C-15 of 445 BS, 321 BG , Italy, 1944
2 – “Incendiary Blonde” – B-25D-30 of 447 BS, 321, BG , Italy 1944
3 – “Pannel Job” – B-25D-5 of 500BS, 345 BG, Nadzab, Papua New Guinea, 1944
4 – “Impatience Virgin” – B-25D-1 of 498 BS, 345 BG, Townsville, Australia 1943
5 – “Caper`s Flash” – B-25 C of an unknown unit in the Pacific Area.
6 – “Little Chief Cockeye” - B-25D of 360 SG, Papua New Guinea, 1944
7 – “Sad Sack” – B-25C of an unknown unit.
In the stencil sheets gives a full set for one more with very good letter definition. Even 1:48 you can read the letters. Also give numbers from 0 to 9 so you can make any B-25 registral numbers.

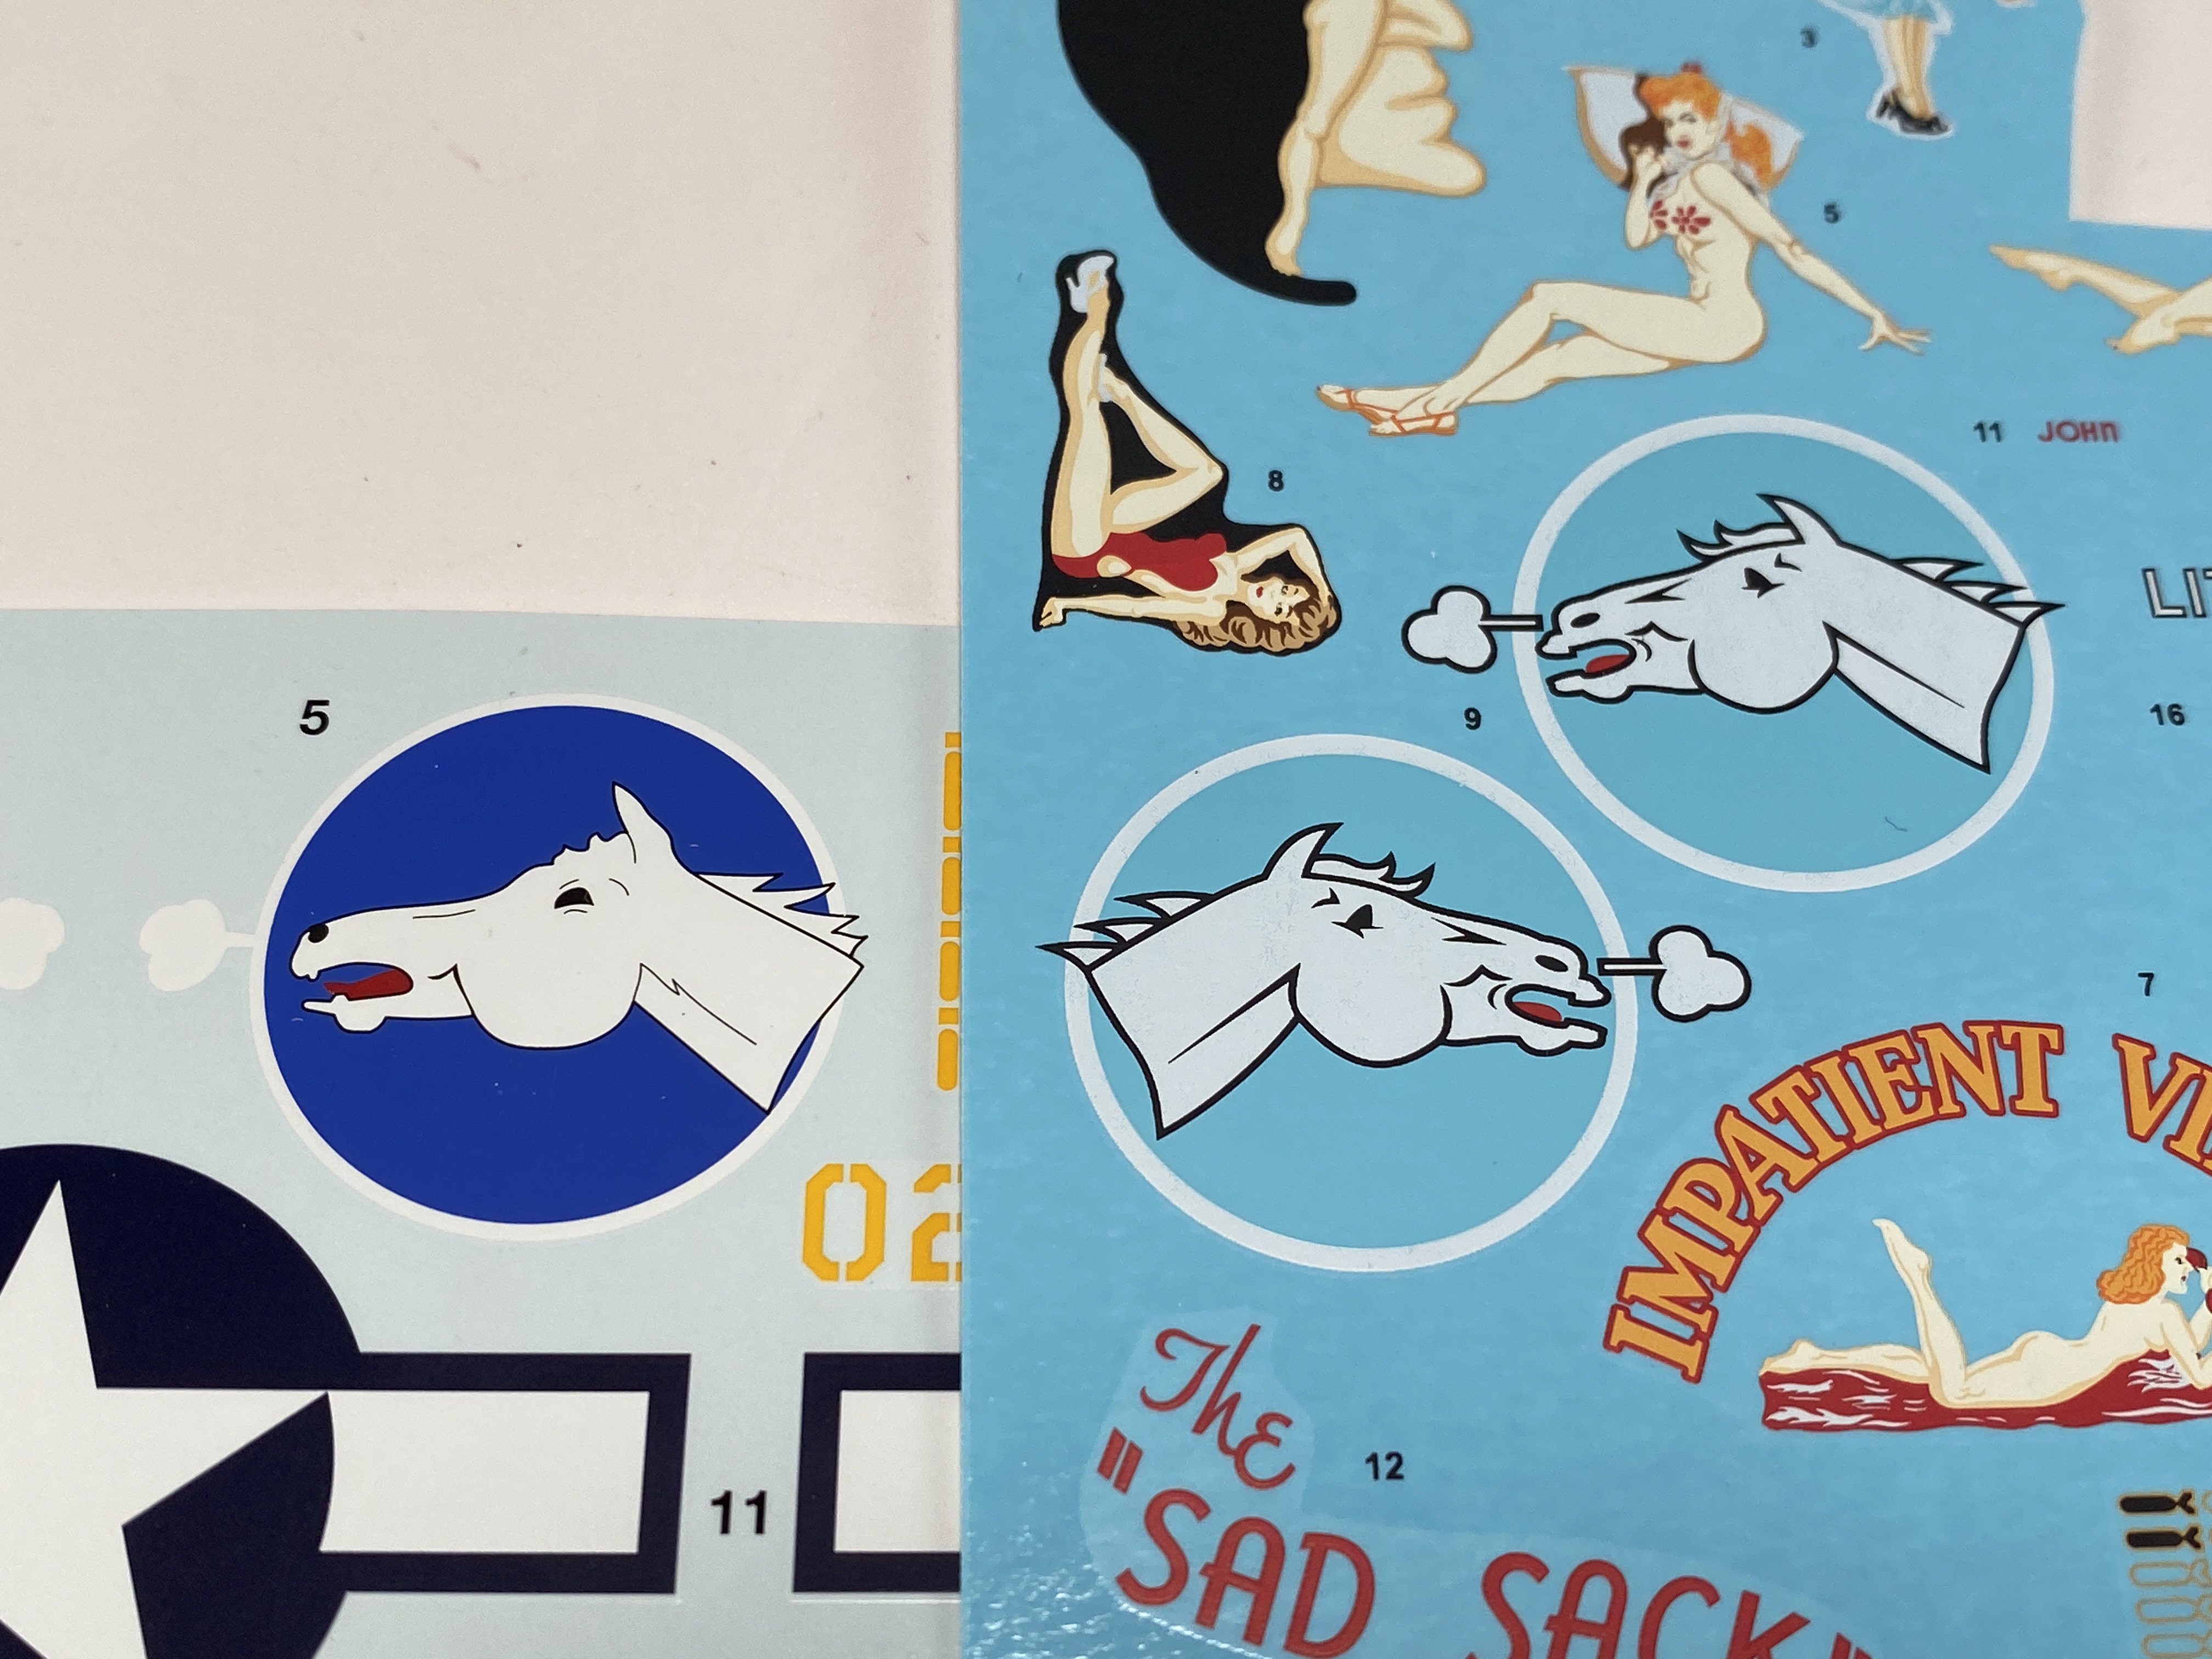
Comparing with the decals of the "new" Revell 1:48 B-25D:

Conclusion:
Well, Foxbot decals is a very good surprise for me with several very colorful and sexy nose art options.
The colors and the fineness of the decals are noteworthy for their quality and they settle very well with Micro Set and Micro Sol, as I`m try them as I`m doing a B-25.
My thanks to FOXBOT for producing these fantastic decals and for the review sample.
You can get FoxBot decals at Hannants.co.uk.
Francisco Guedes
-
3
-
-
On 3/6/2021 at 4:40 PM, Landlubber Mike said:
Holy cow Frank, amazing work! I didn't realize such a model existed. I came close to bidding on a Pro Modeler Catalina, but I might instead keep my eyes out for one of these. Talk about an epic build of a really cool subject!
Nice that the wings are truncated too - this subject at 1/32 must be a monster, especially with the full wings included. I just noticed that HpH has a full Catalina also, but I think I'd go with the cutaway.
I review it when it came out!
")
https://forum.largescalemodeller.com/topic/3371-132-pby-5a-catalina-cutaway-limited-edition/
-
2
-
1
-
-
Outstanding work!!
I will be wachting tis closely as I have my cutaway Cat on my stash!! She is the Queen of Stash!!
-
4
-
-
6 minutes ago, ScottsGT said:
Yep, but not too bad of a price. They are showing up on Hannants as well, but for some reason it won't let me add them on the reorder even though is says you can. Well, that was from my ipad. Let me try it from my PC right quick.
Nope. Not even from my PC.
yes true.... but you can get the wrong impression of the infinitive box content with Brett`s unboxing video...
-
2
-
-
The only thing that i think that it could be miss leading is the fact that Brett`s review samples came with lots of adds-on (resin goodies and PE) that are not on the "simple" box... I think that those sets from HpH are aftermarkets.
-
3
-
-
Well, Looks like Infinity 1:32 Helldiver is reality very soon!!
-
4
-
1
-
-
Thanks for your feedback.
This book is a really how-to to every single modeler, to the novice one to the experience one in painting figures.
Its all there, and despite being a AK book, the author shows the produts used, regardless the brand.
This book will be my starting point to paint figures!
Fran
-
1
-
-
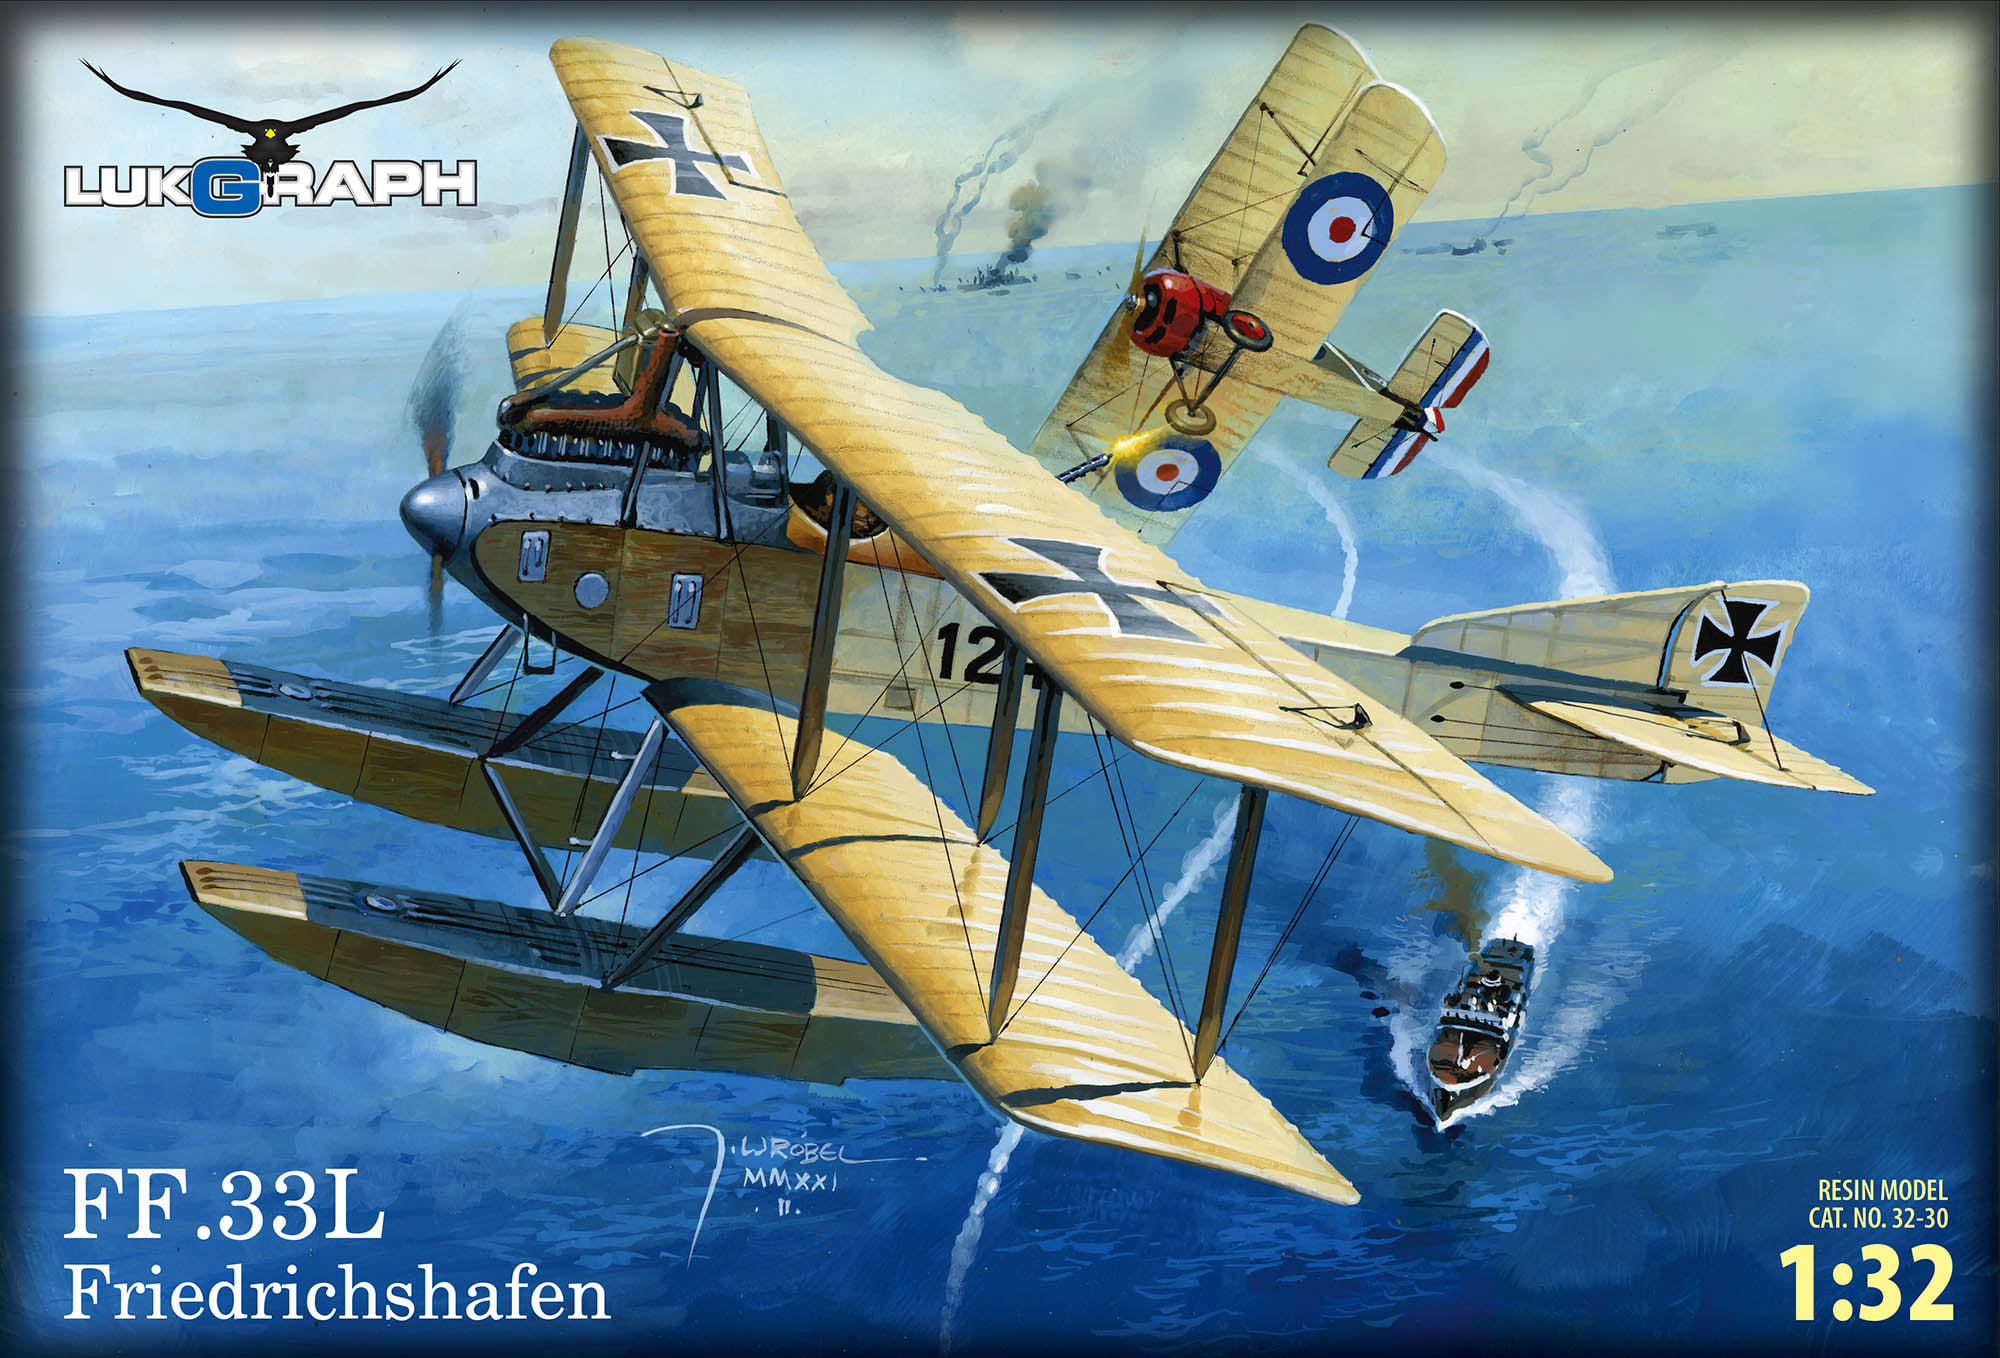
2 hours ago, HubertB said:
A reminder that the Lukgraph Friedrichshafen FF33L, a WWI seaplane is due soon. And the RWD 14b is even closer.
And Lukgraph have announced a DH 90 Dragonfly
 . A little brother for the Dragon Rapide, wow !
All 3 above are 1/32, of course.
Hubert
Yes, very good news from Lukgraph!
-
4
-
-
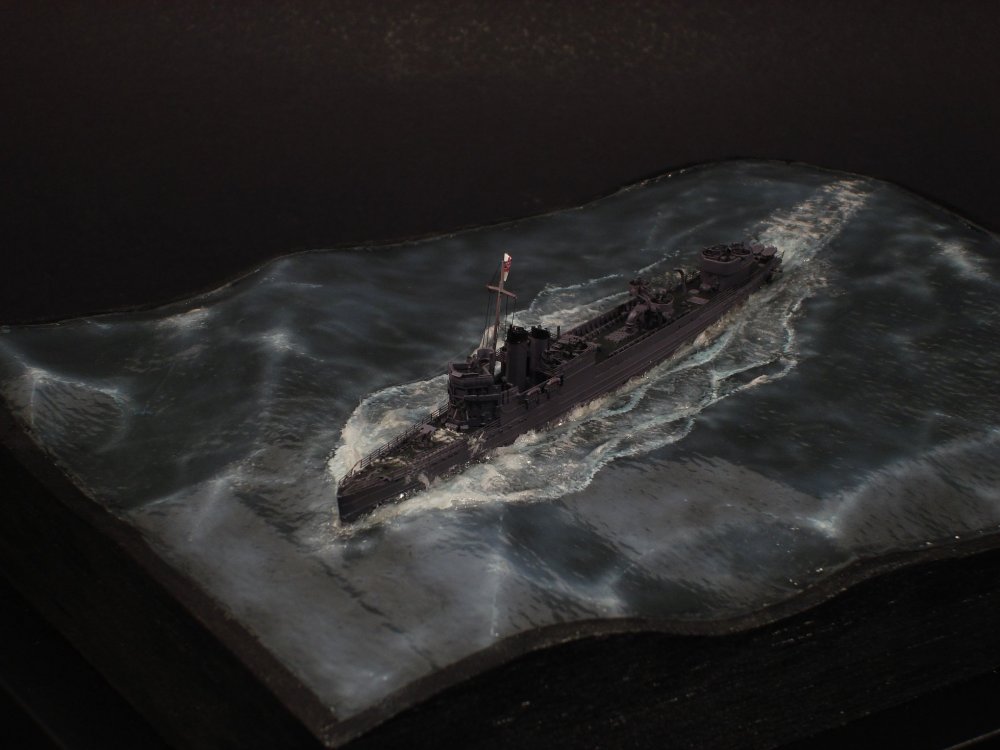
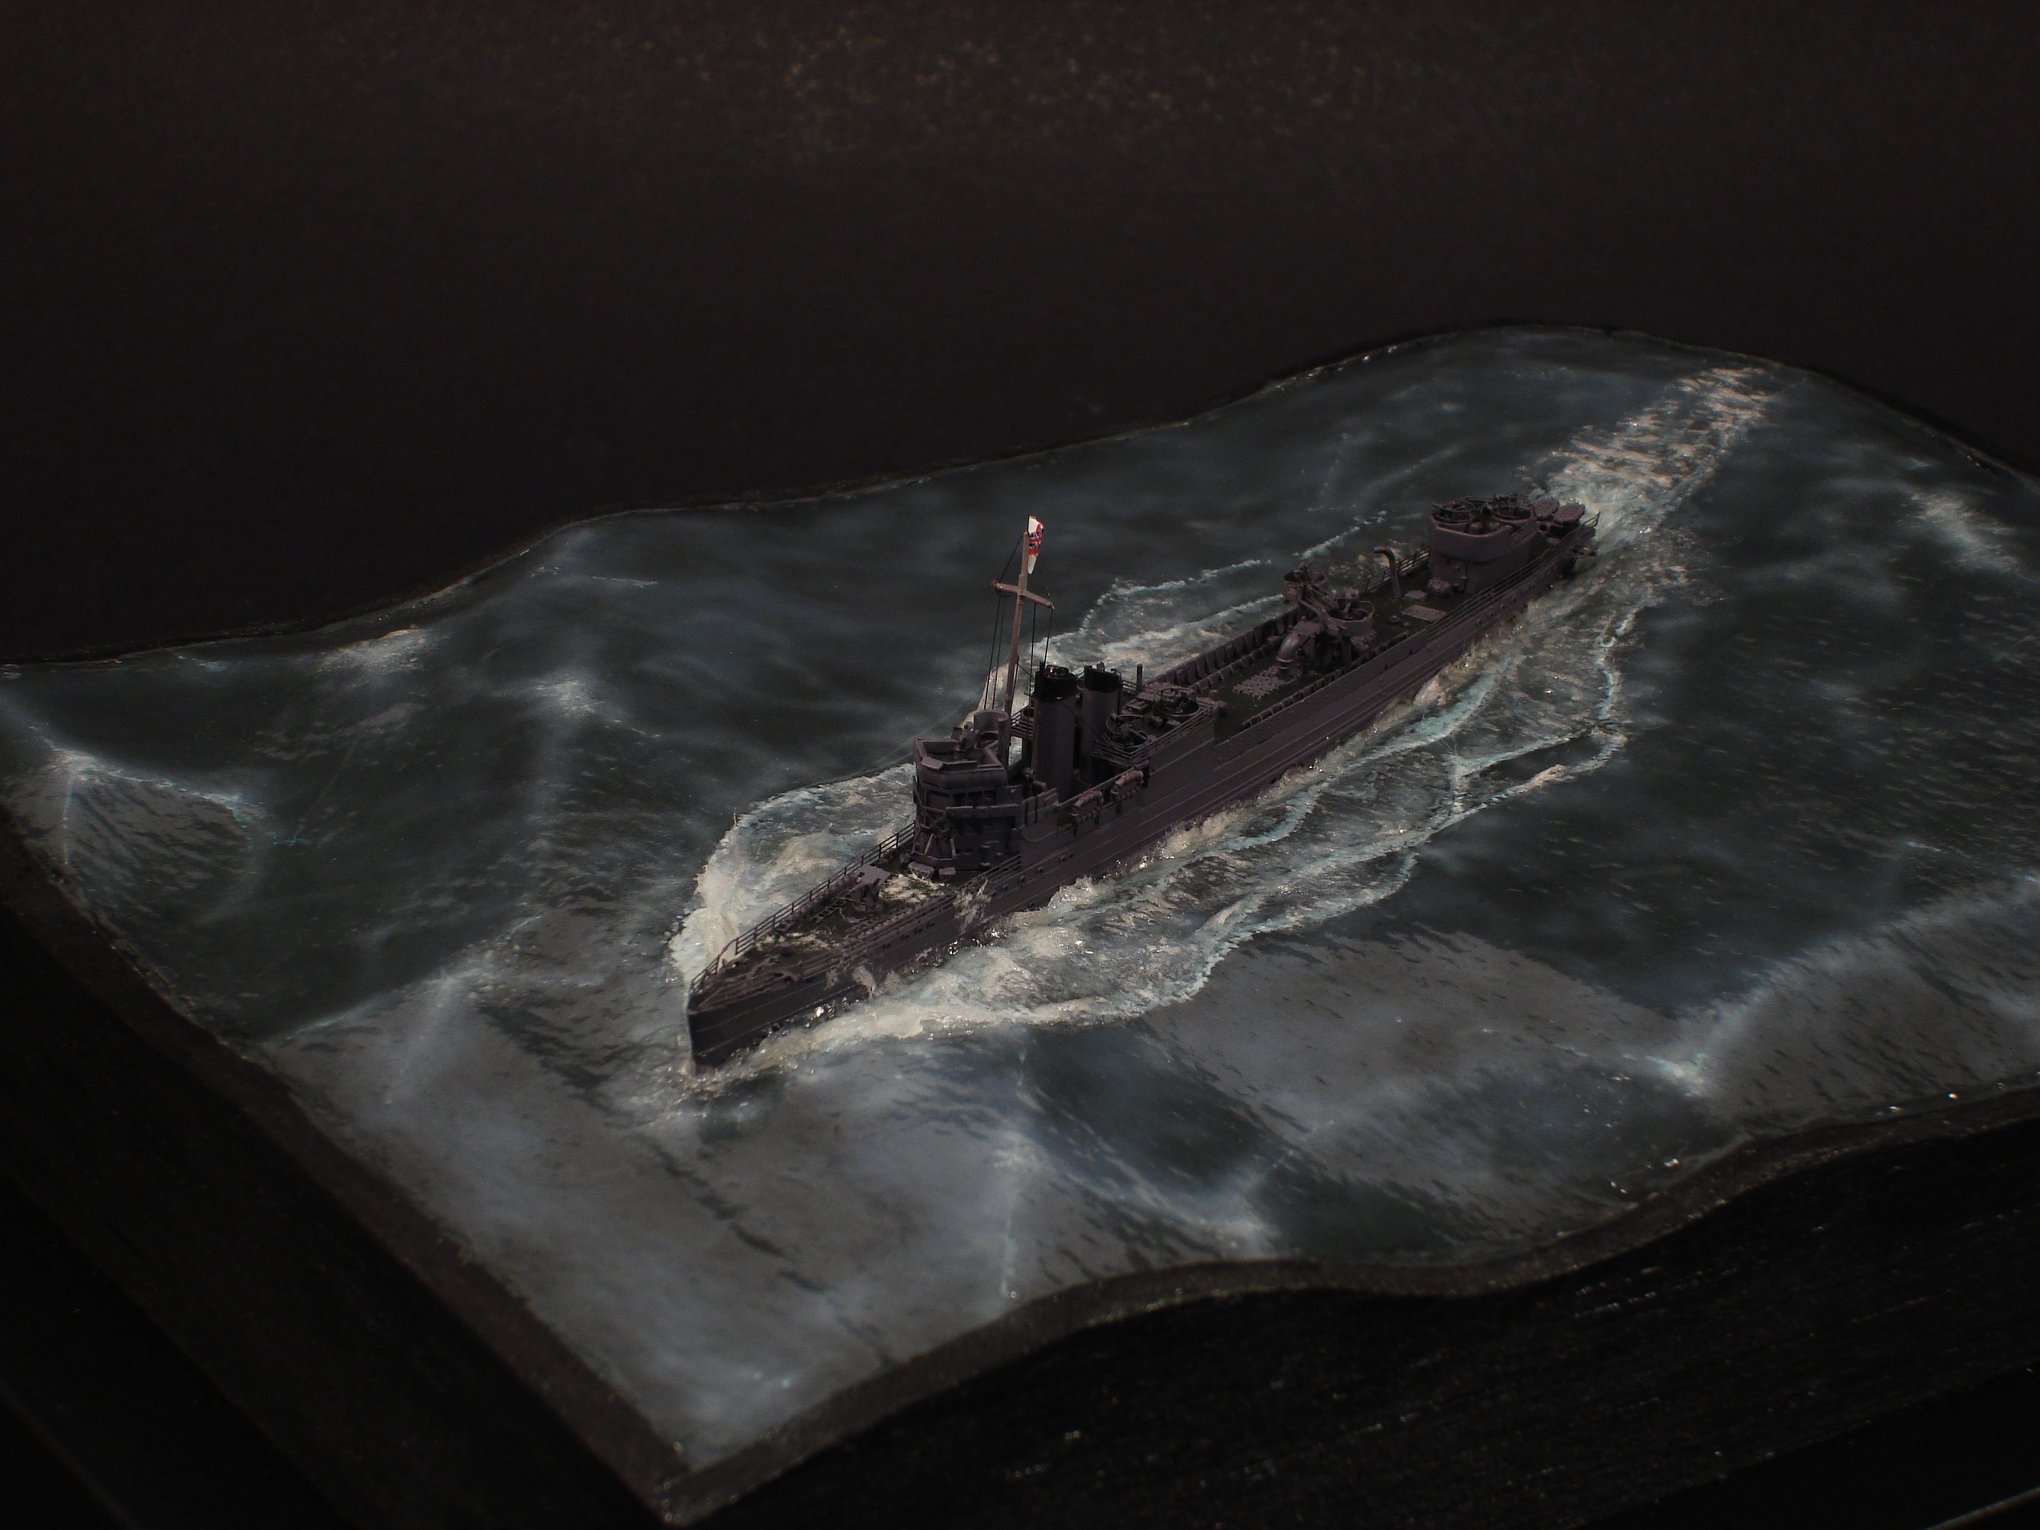
This is mine.
The water and base was made by my good friend José Brito.

-
7
-
-
Total Respect!!! Great work in such a small scale.. I made the Flyhawk 1/700 Campbelttown and was quite a challenge and I have a few to make one day!
-
4
-
-
F.A.Q.
Figure Painting Techniques
By
Kiril Kanaev

(Ak-Interactive)
Kiril Kanaev is a master modeler with worldwide recognition in the figure modelling and painting.
I was very surprised and excited by the launch of this book, first by the author itself (one of the best figure painter in the world) and then for the type fo book: a F.A.Q. where compiled everything about painting figures.
I had expectation that this book would cover the art of painting figures completely or almost entirely.
We will see.
The book is huge. It has 487 pages, in satin paper with excellent coloring.
The English version was translate by Chris Medding, David Grummit and Rick Lawler, so we can be sure of a smooth and unblemished text.
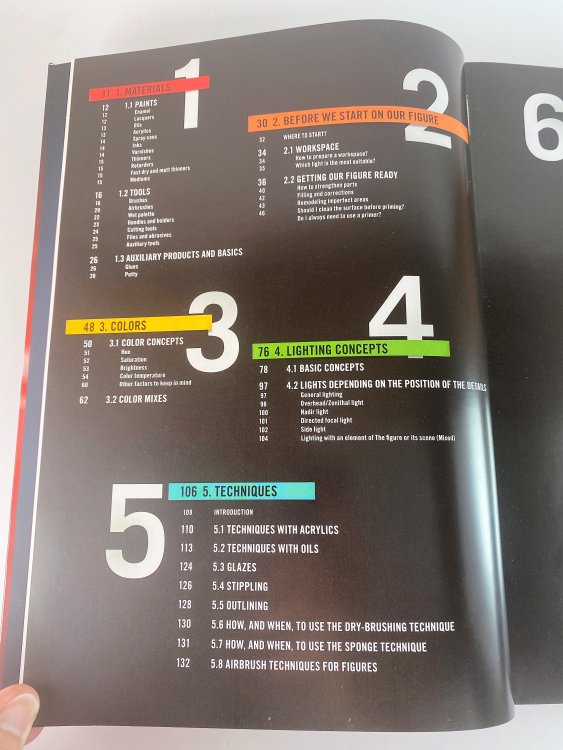
Looking at the index, we can see the why of the book being so big.
1. Materials
1.1 Paints
1.2 Tools
1.3 Auxiliary products & basics2. Before we Start on our figure
2.1 Workspace
2.2 Getting our figure ready3. Colors
3.1 Color concepts
3.2 Color mixes4. Lighting concepts
4.1 Basic concepts
4.2 Lights depending on the position of the details5. Techniques
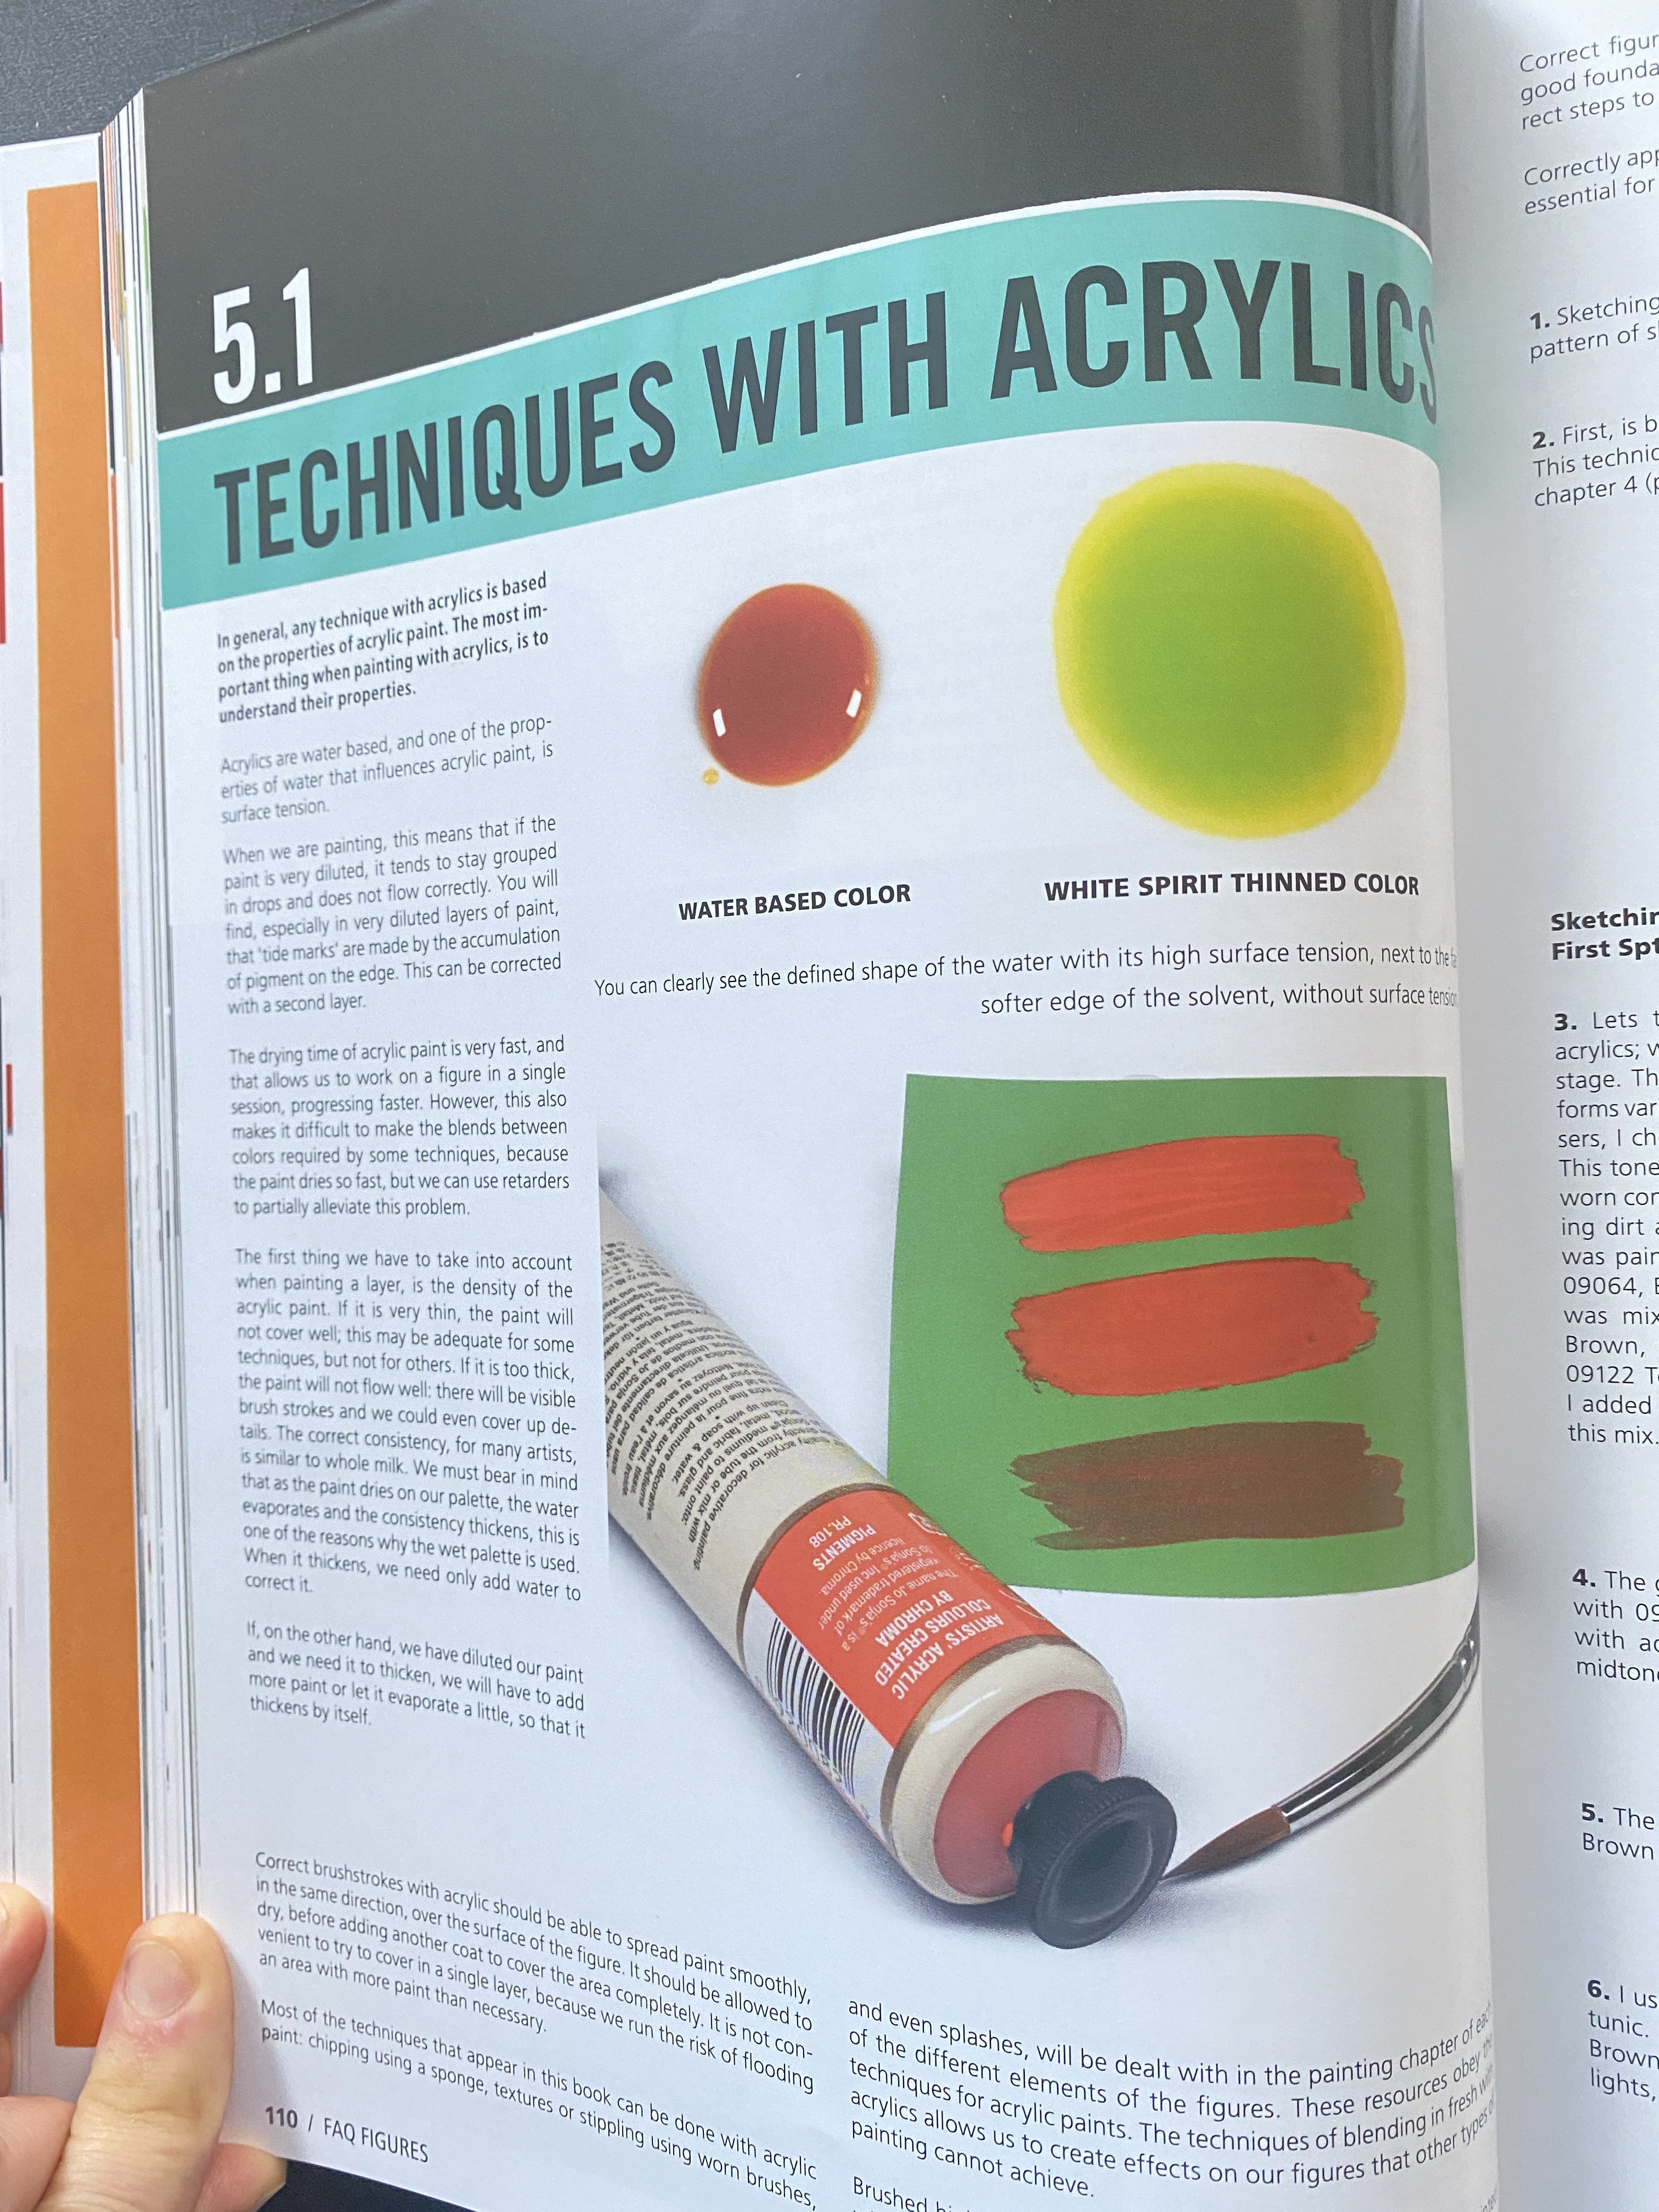
5.1 Techniques with acrylics
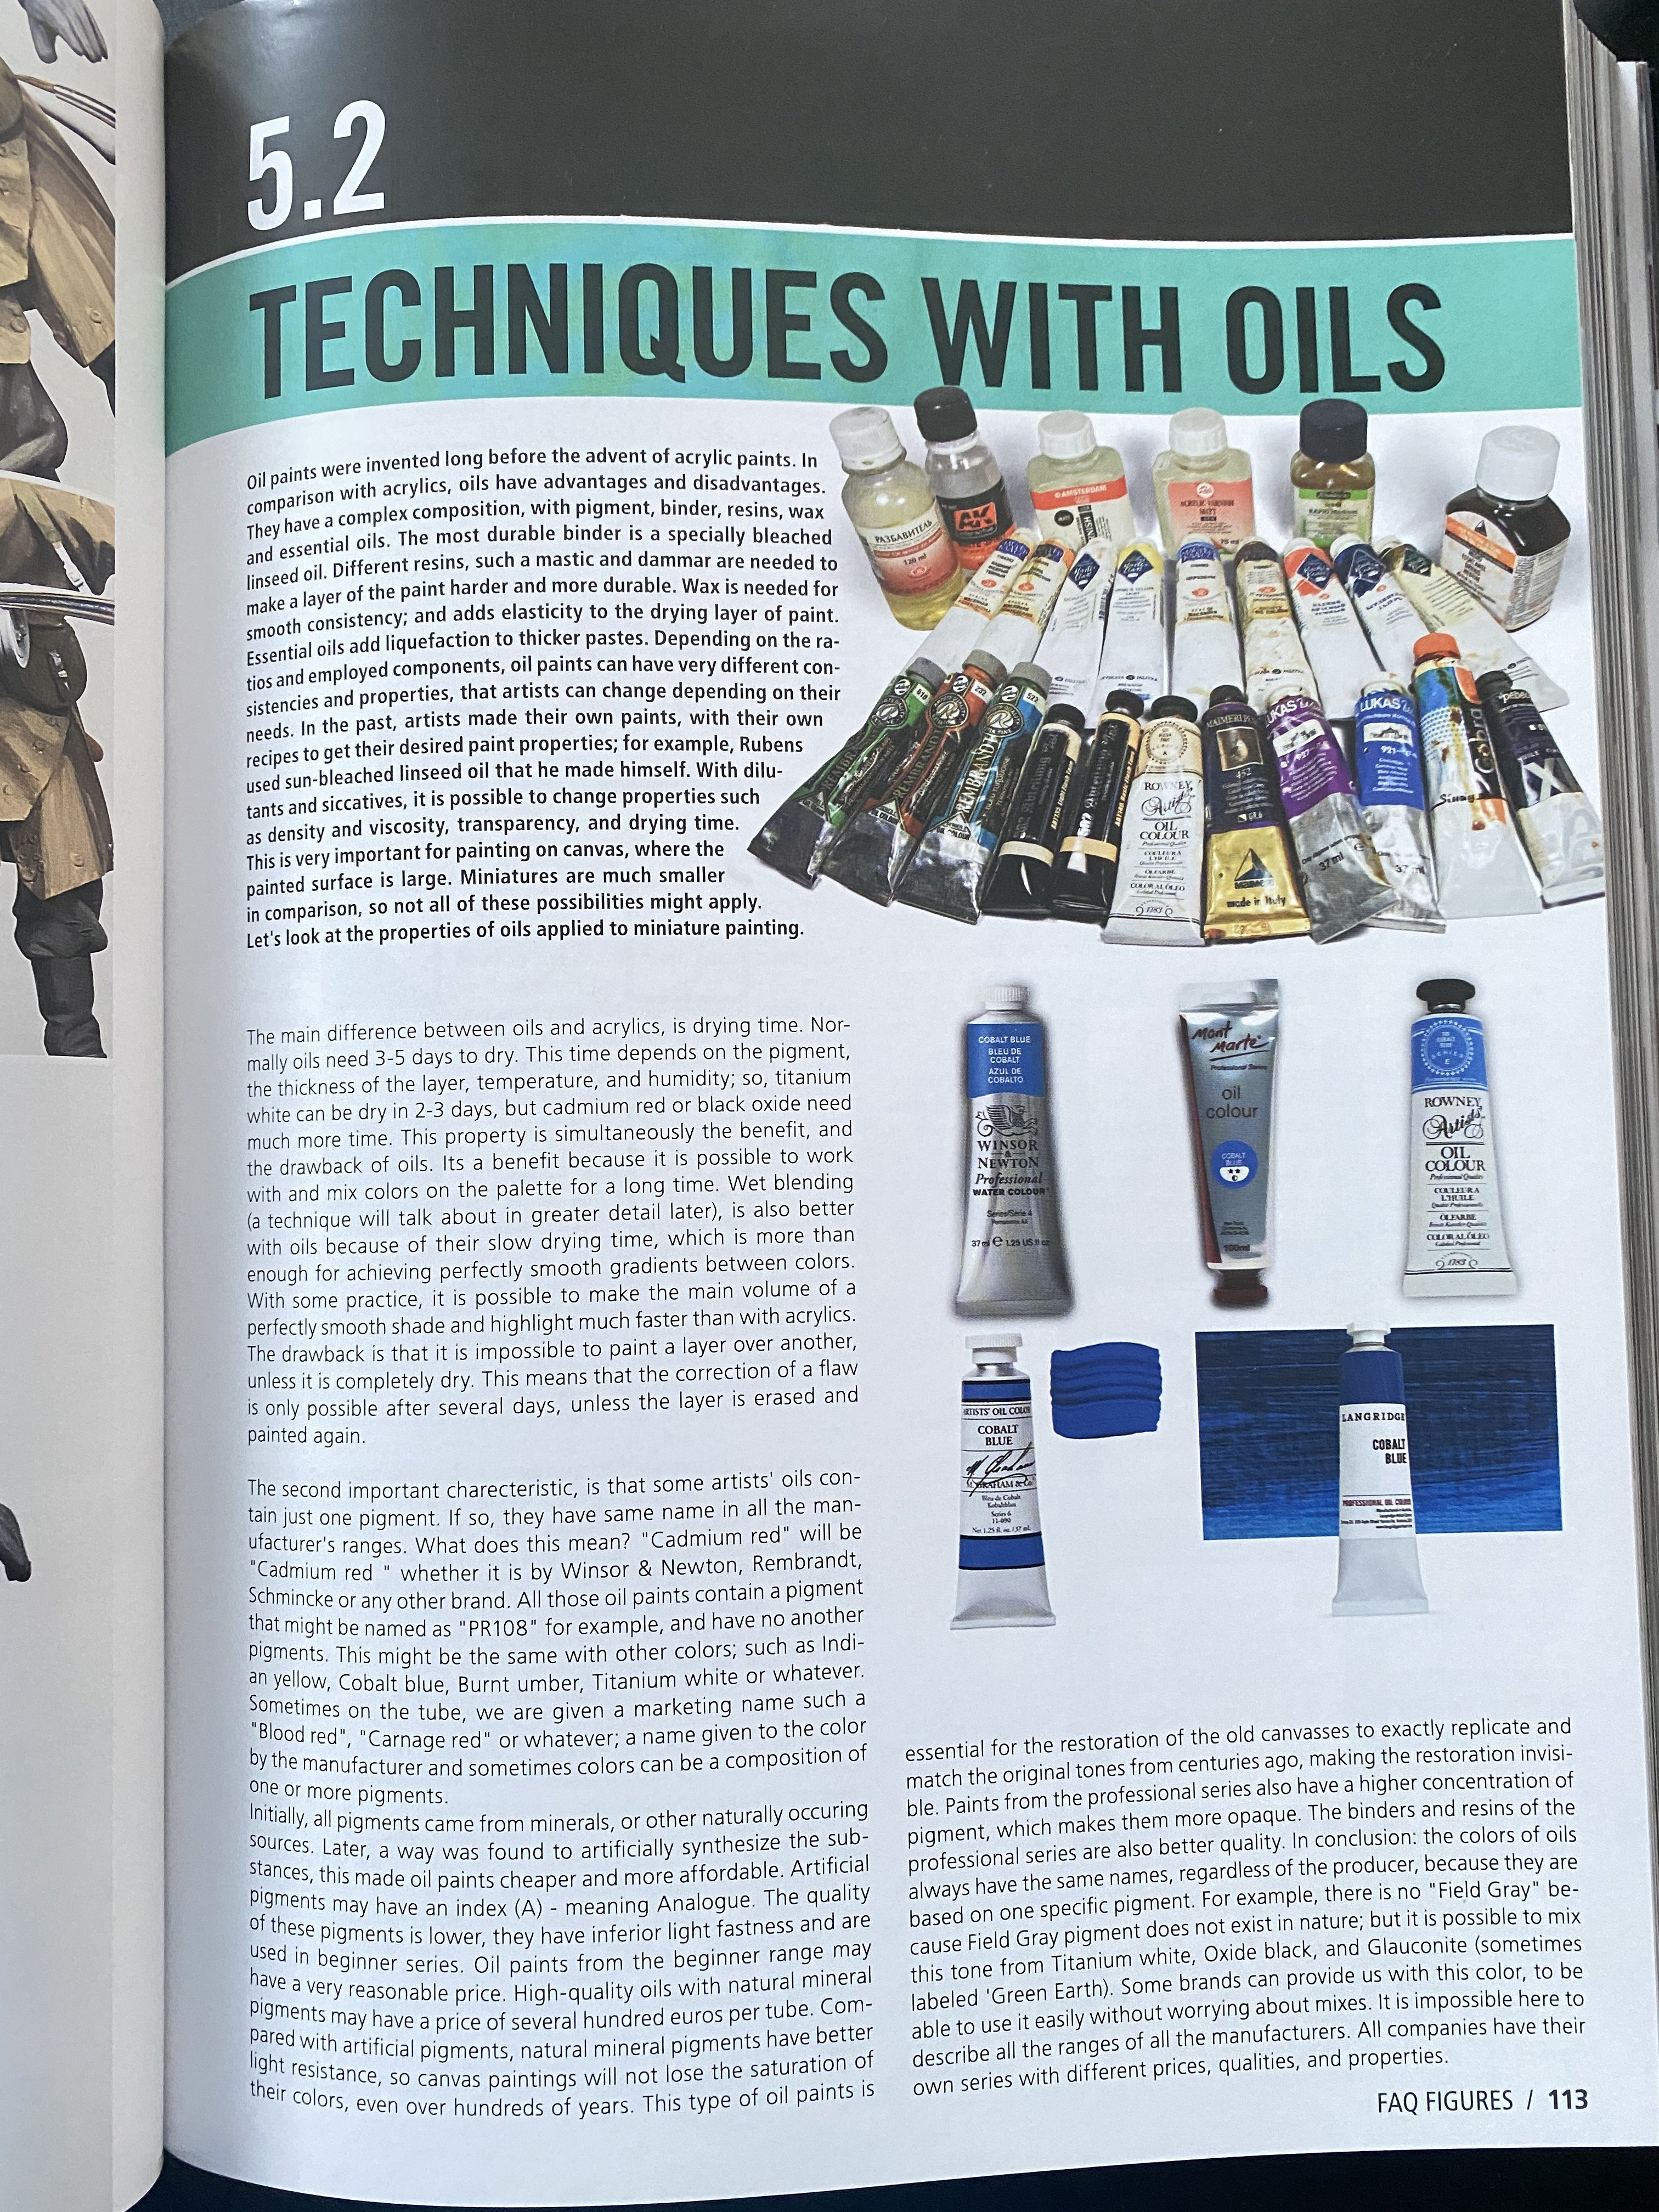
5.2 Techniques with oils
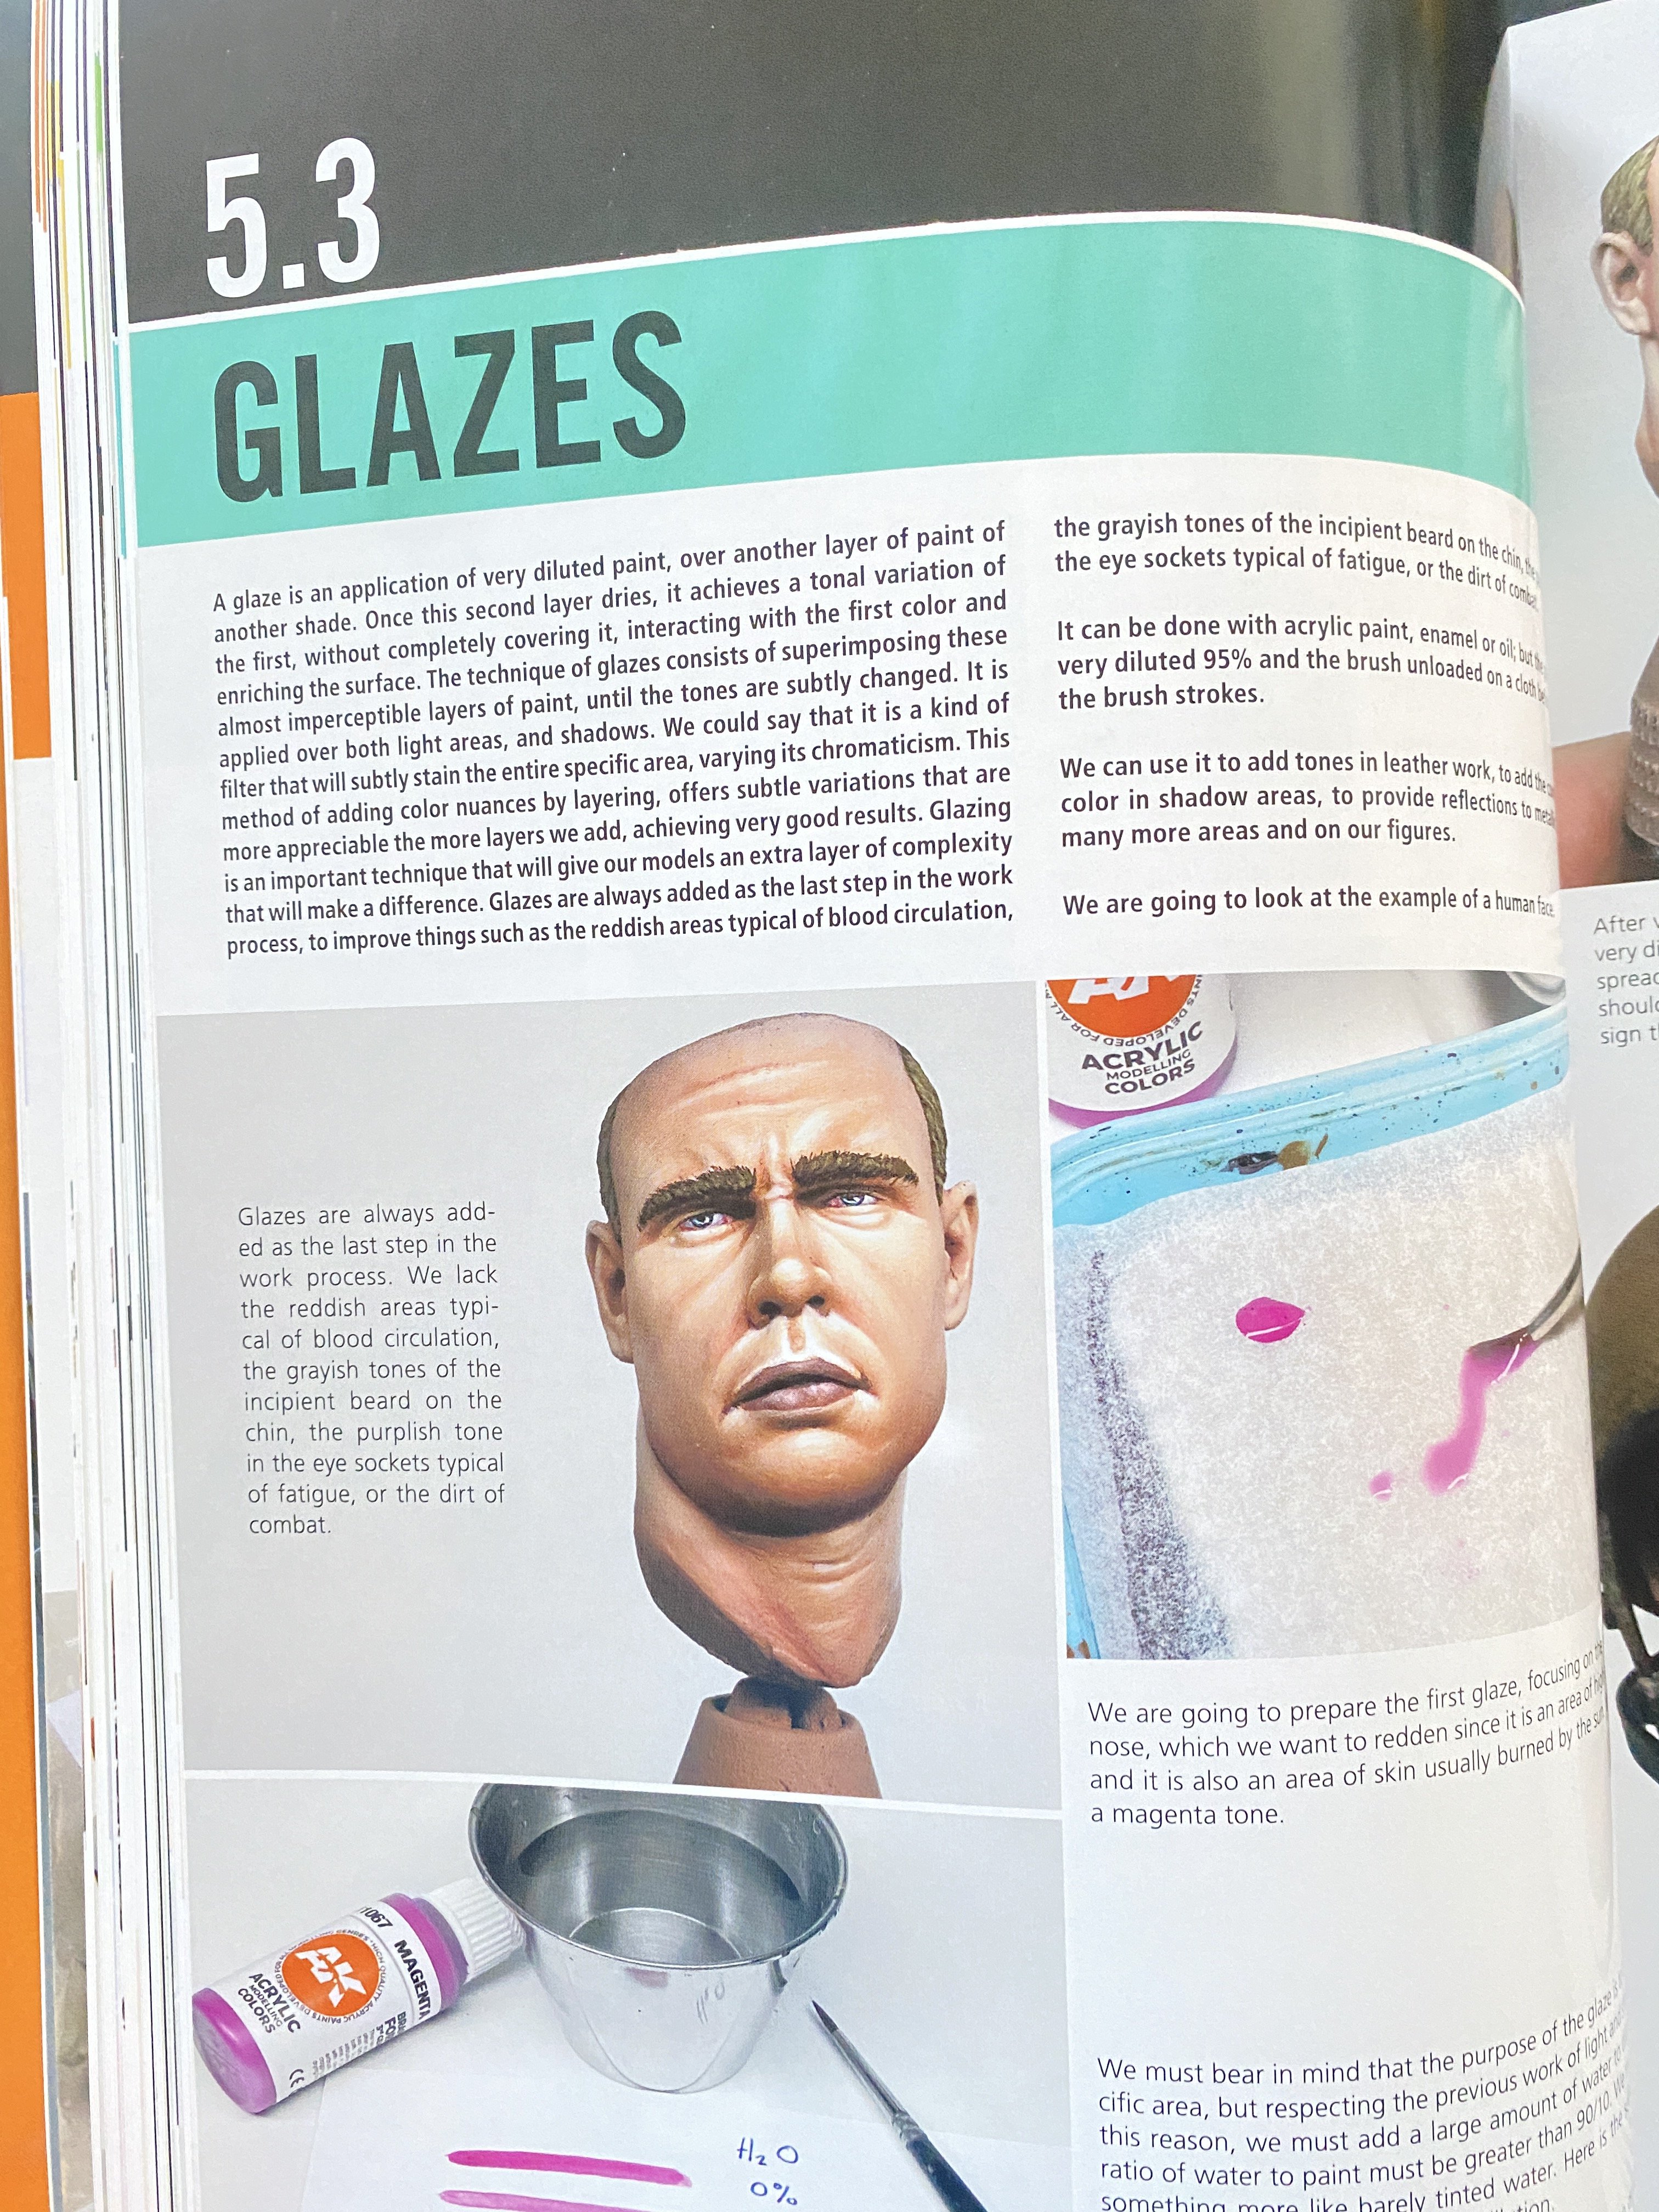
5.3 Glazes
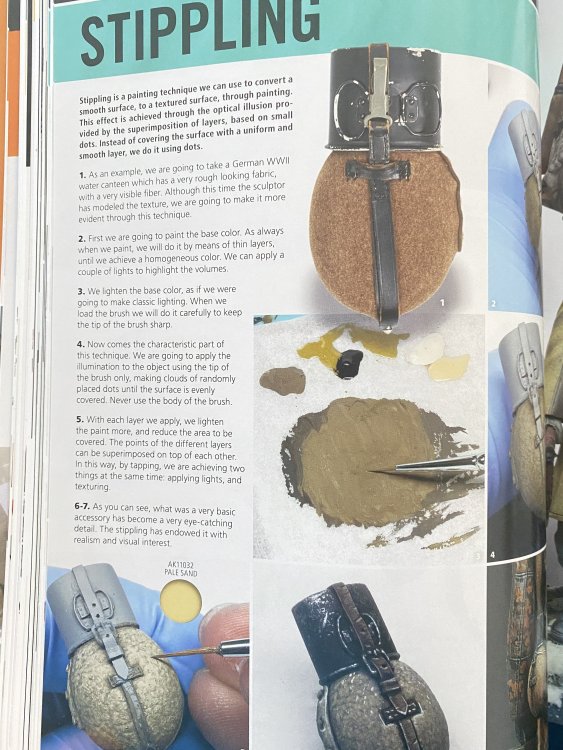
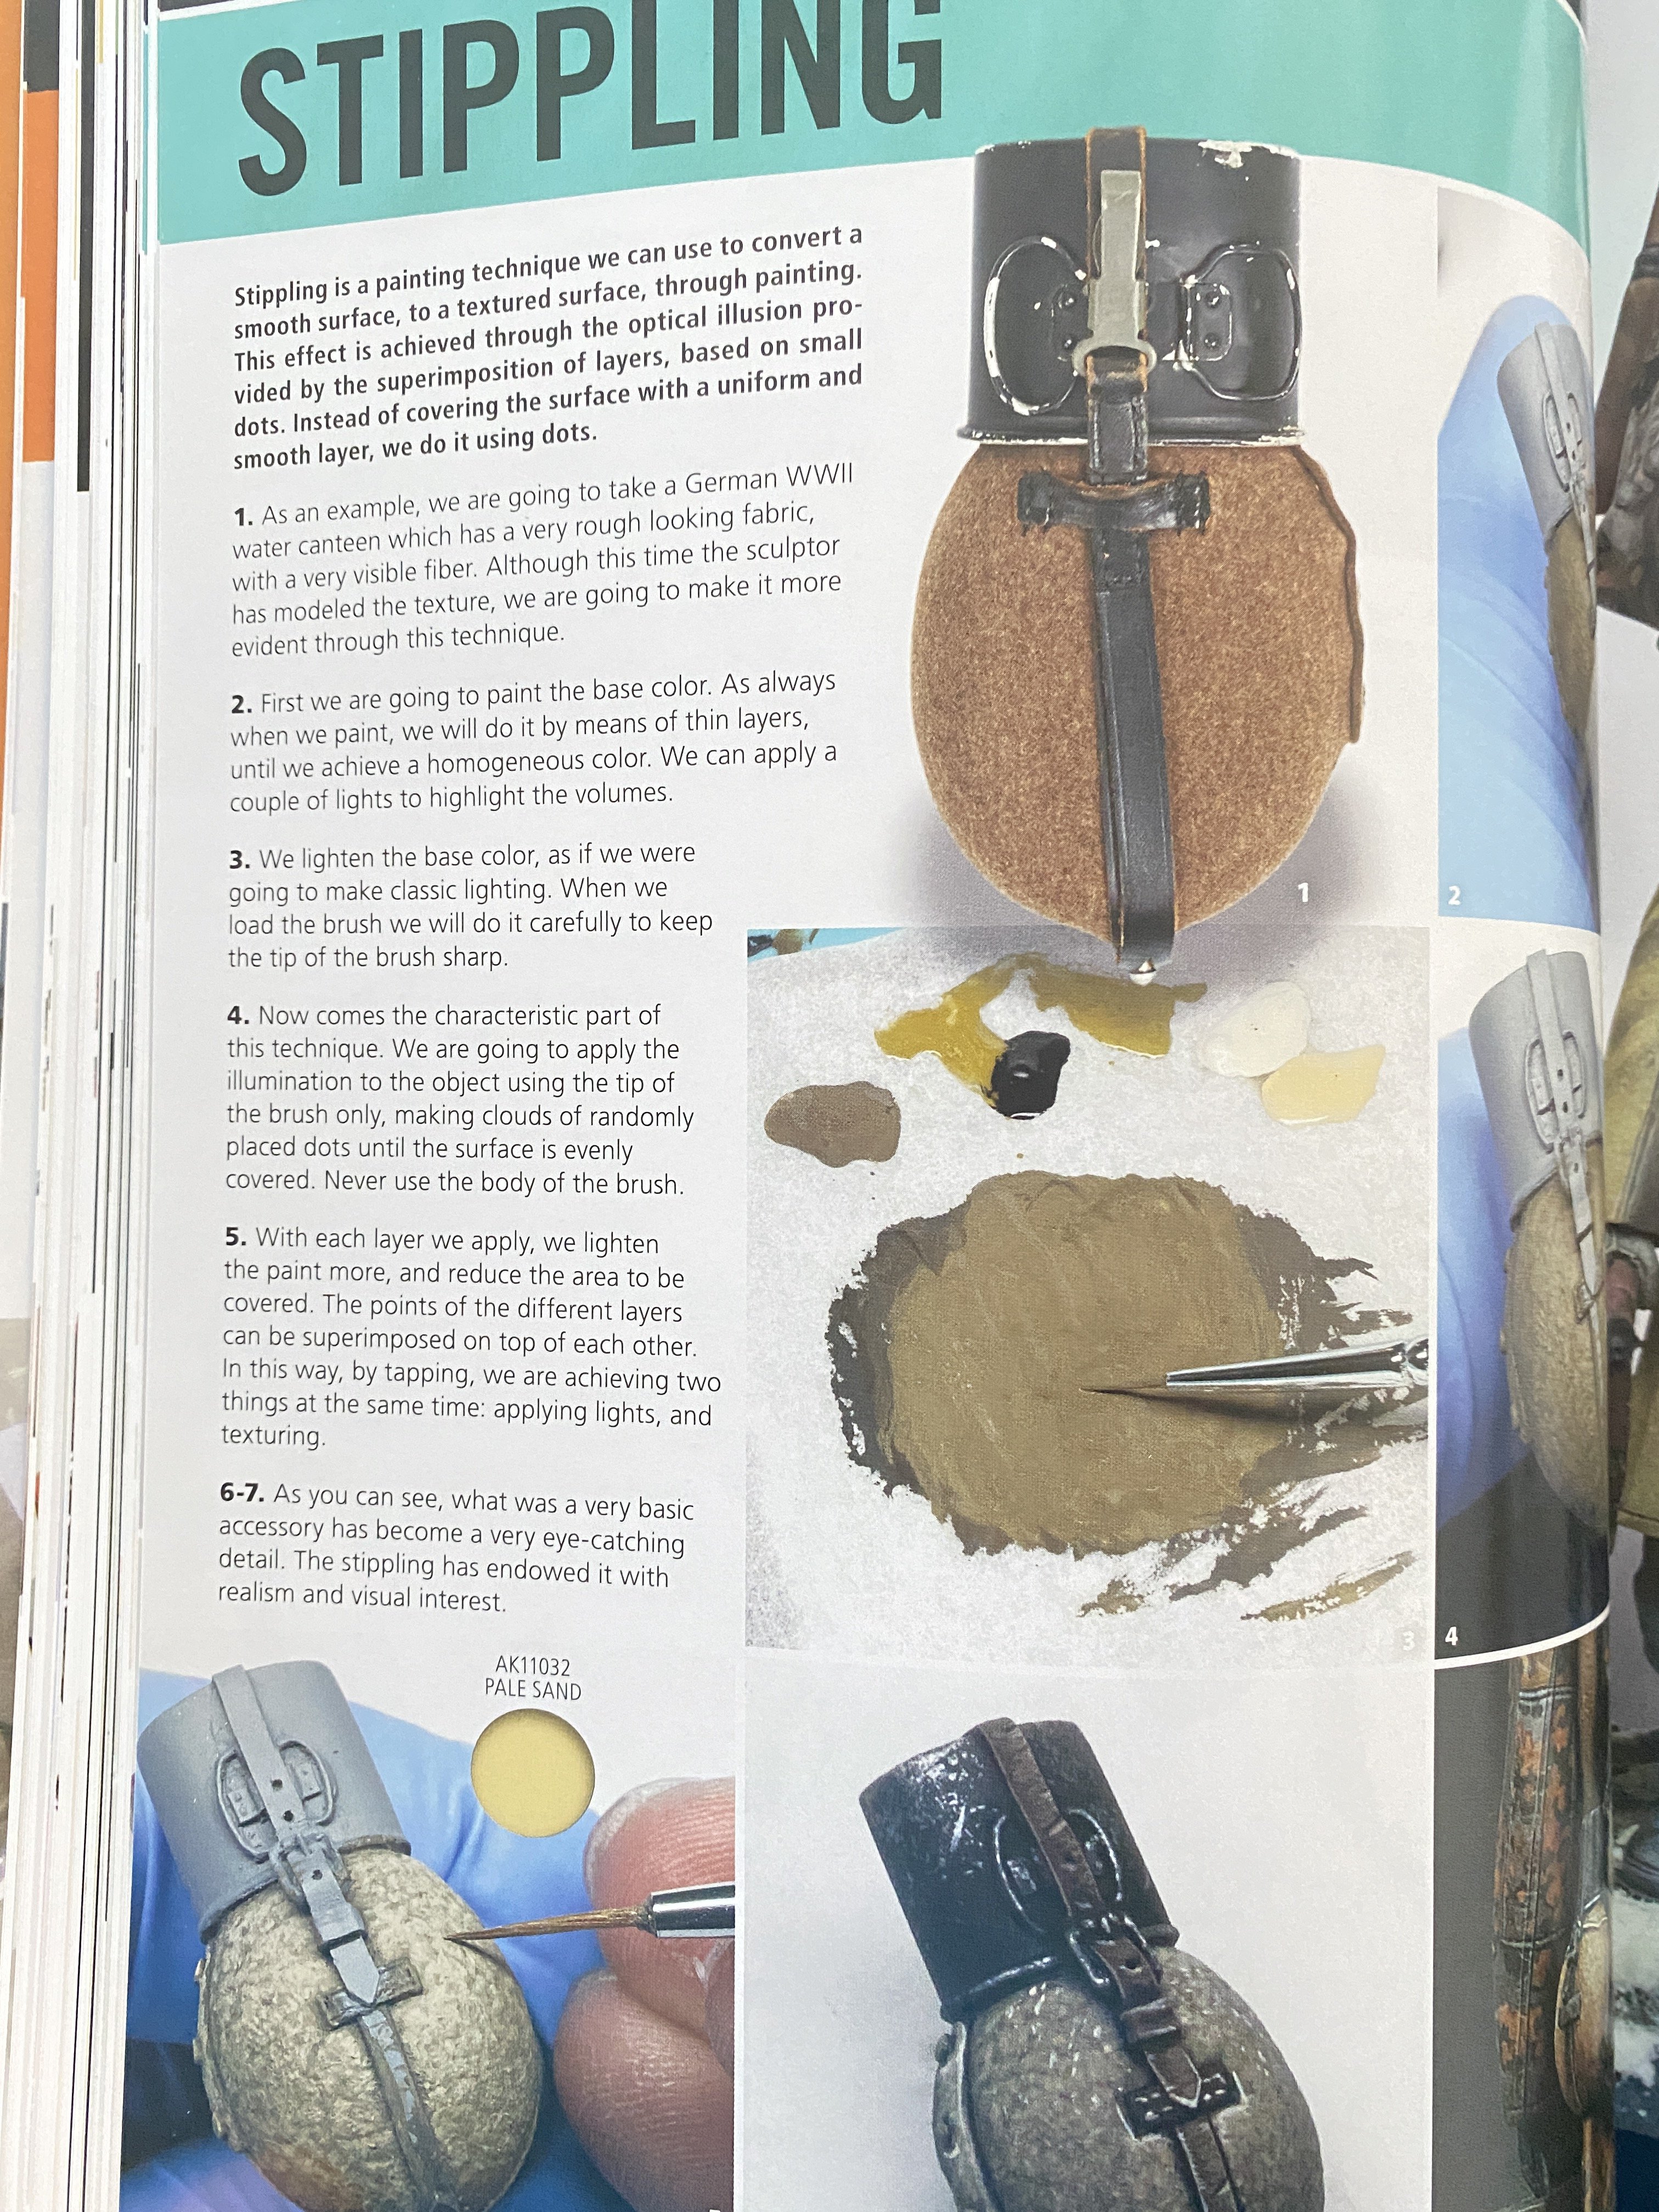
5.4 Stippling
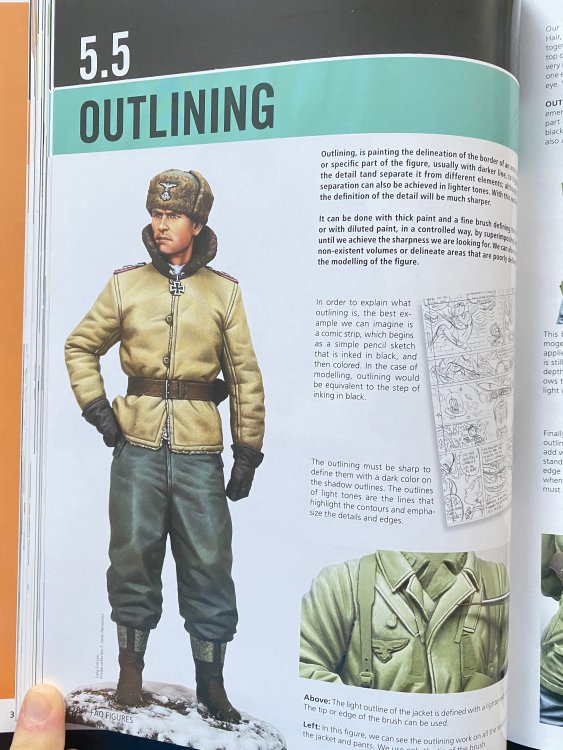
5.5 Outlining
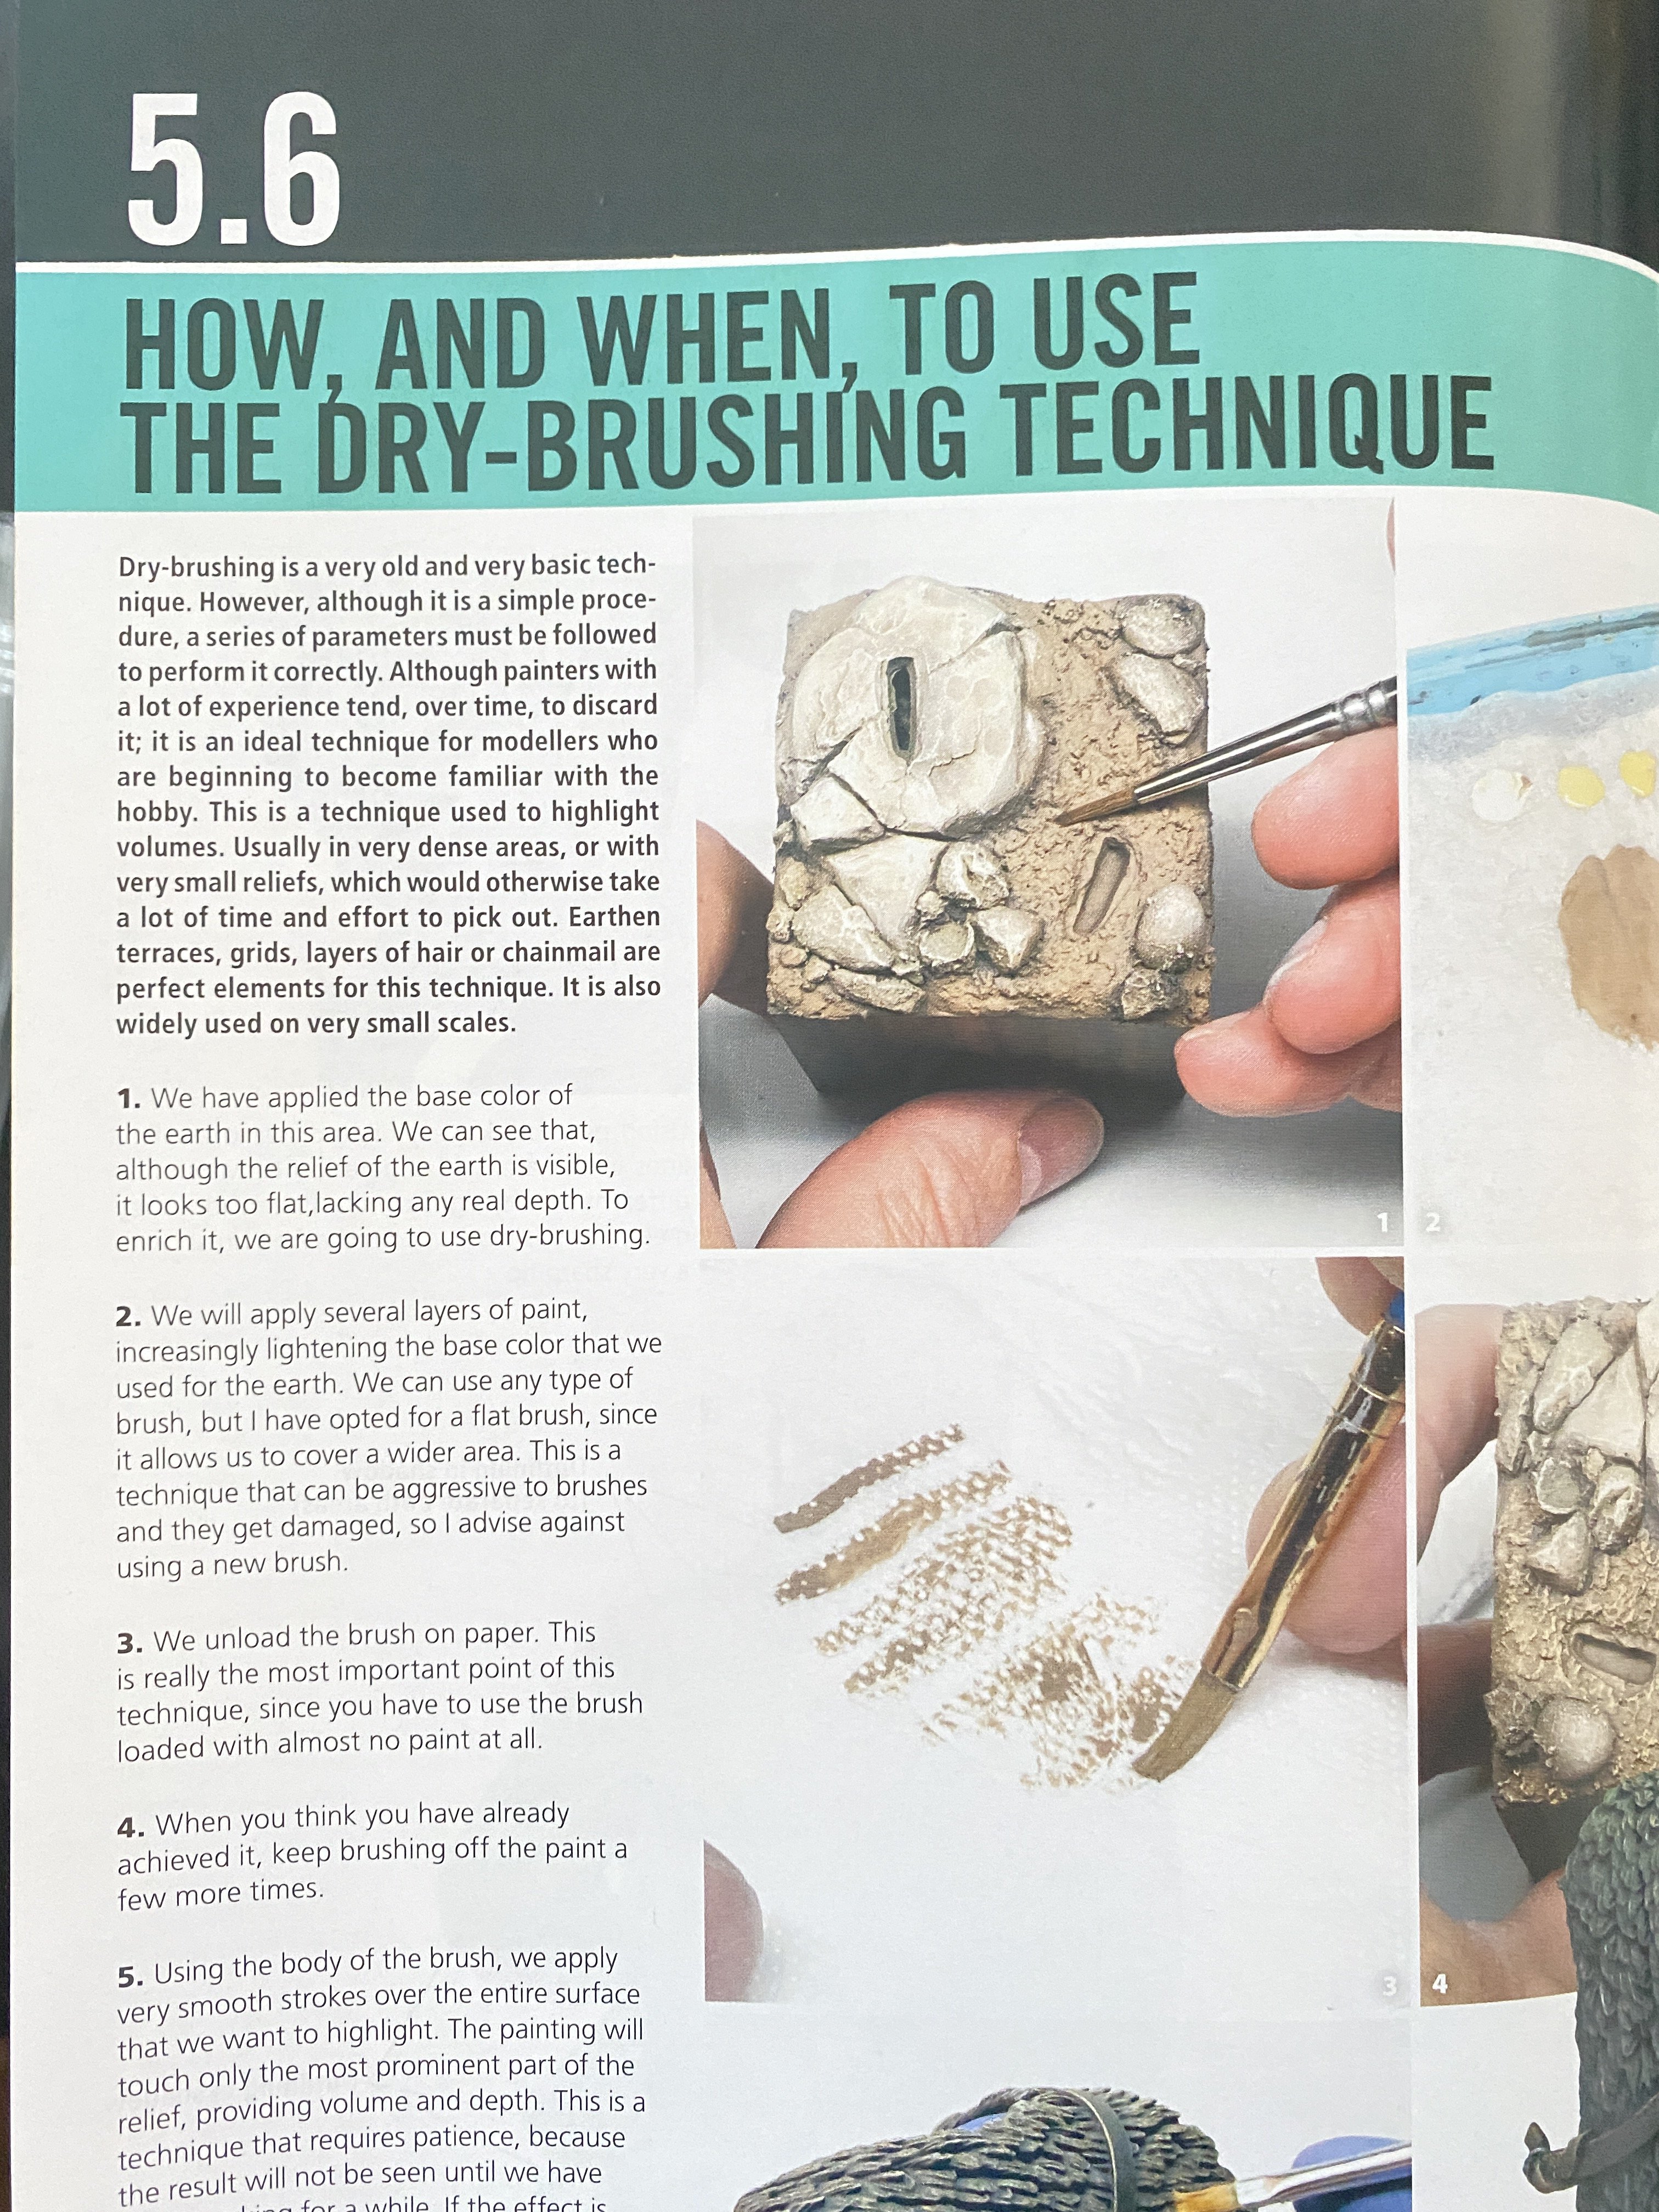
5.6 How, and when, to use the dry-brushing technique
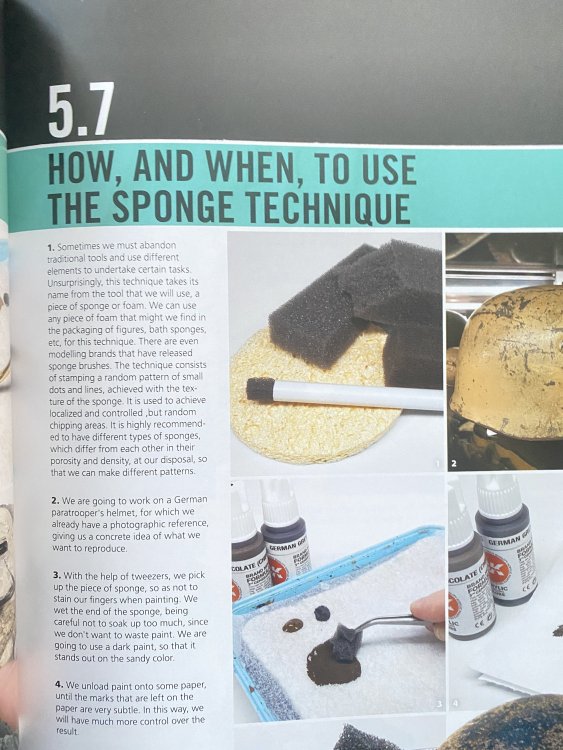
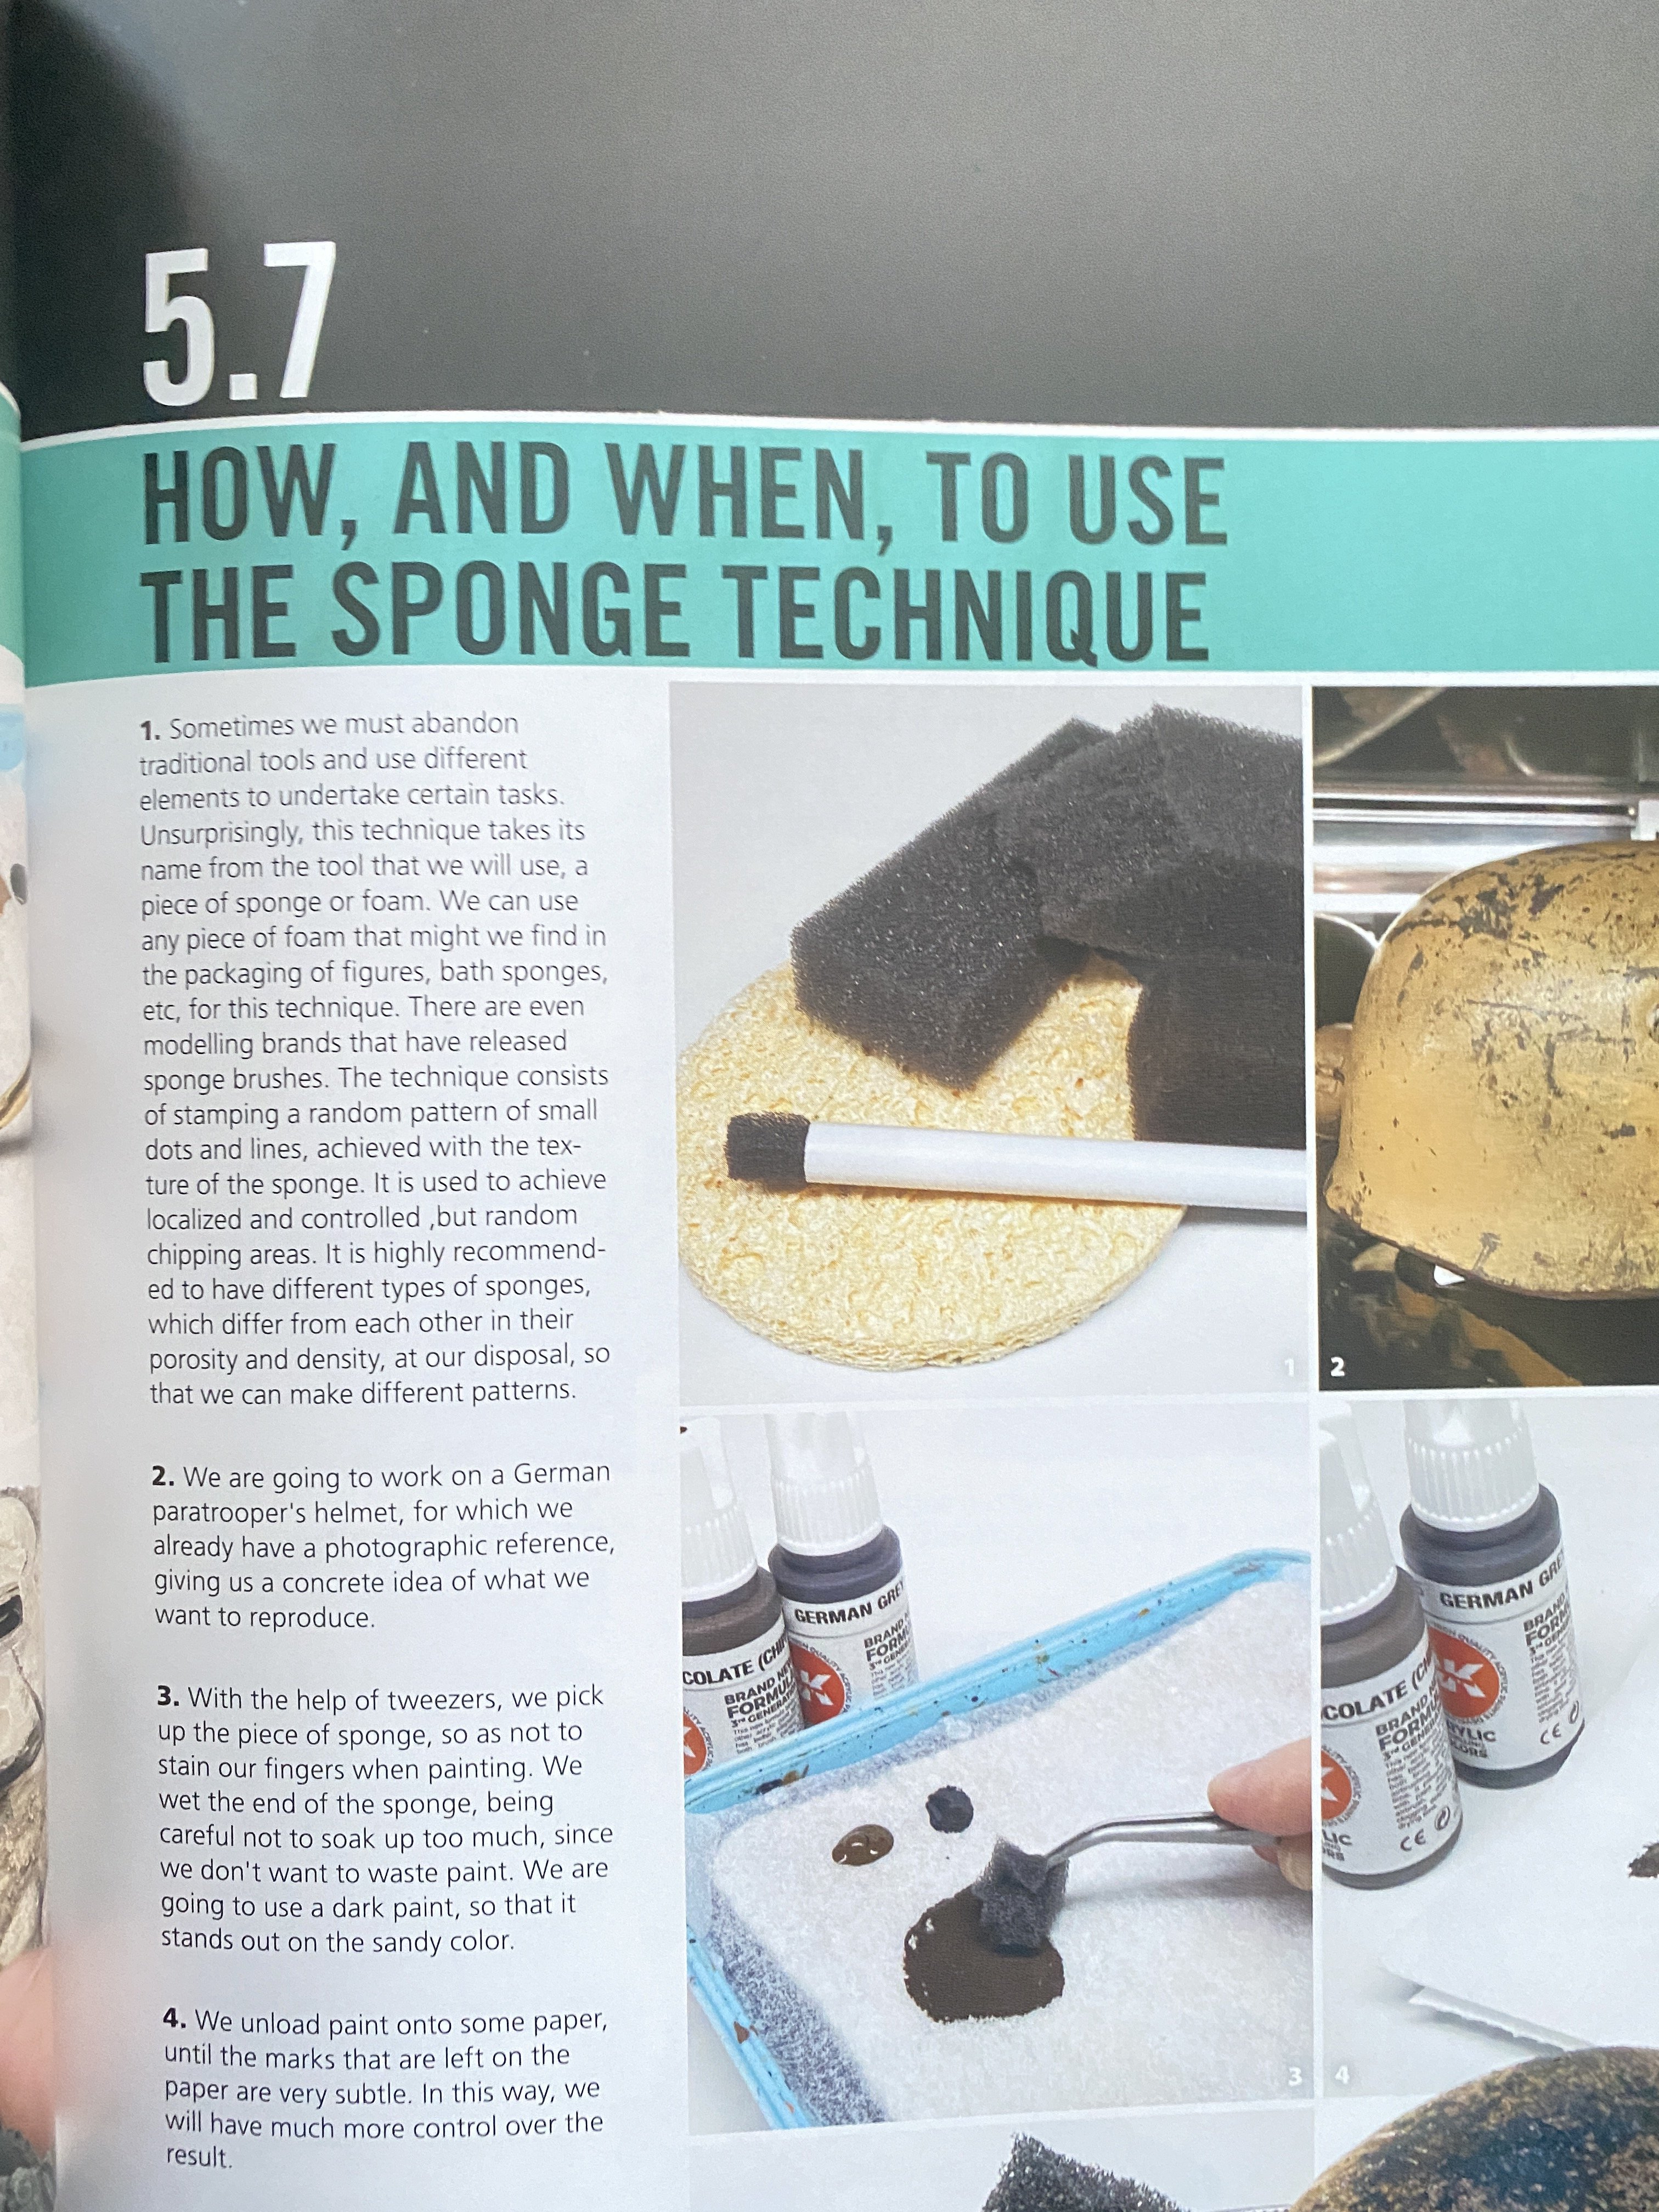
5.7 How, and when, to use the sponge technique
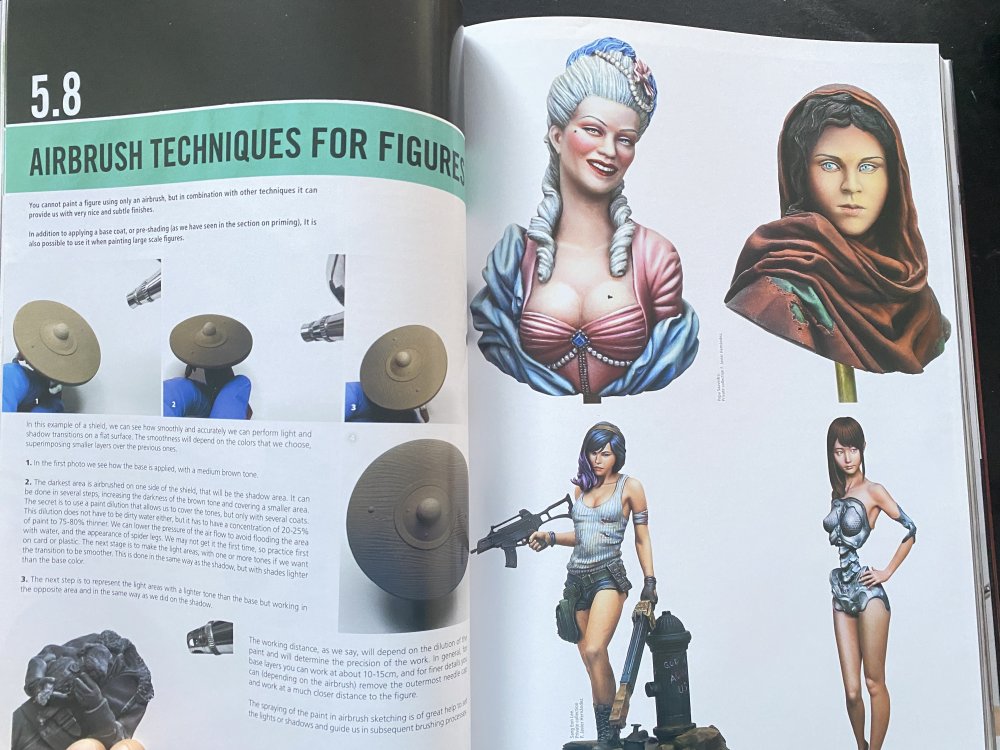
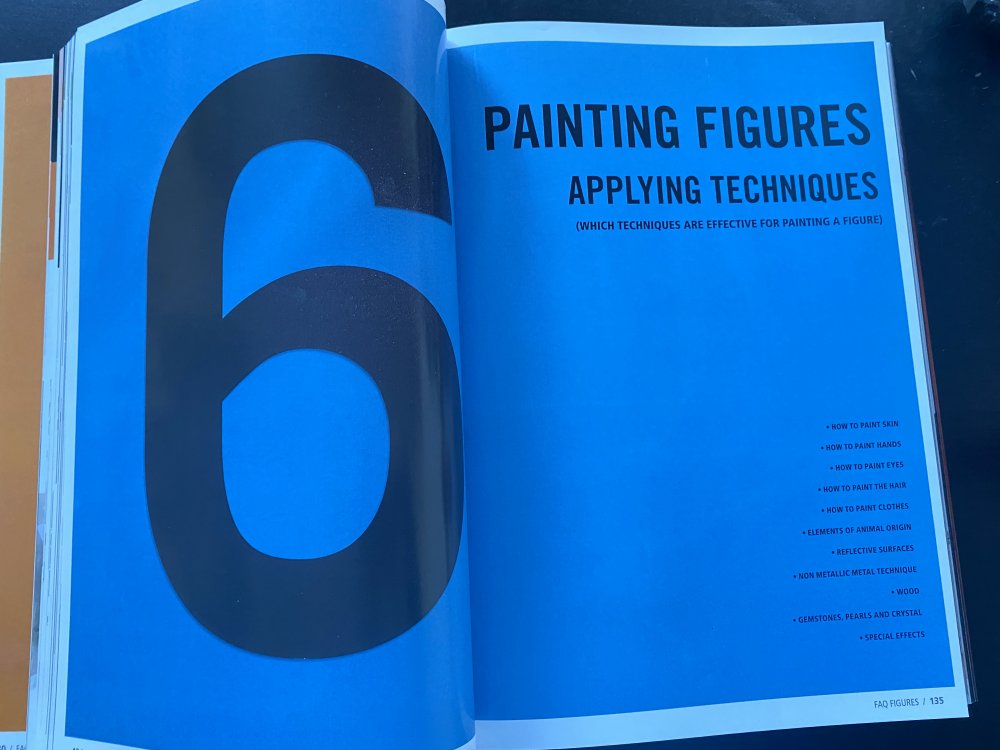
5.8 Airbrush techniques for figures6. Painting figures. Applying techniques
6.1 How to paint skin
6.2 How to paint hands
6.3 How to paint eyes
6.4 How to paint the hair
6.5 How to paint clothes
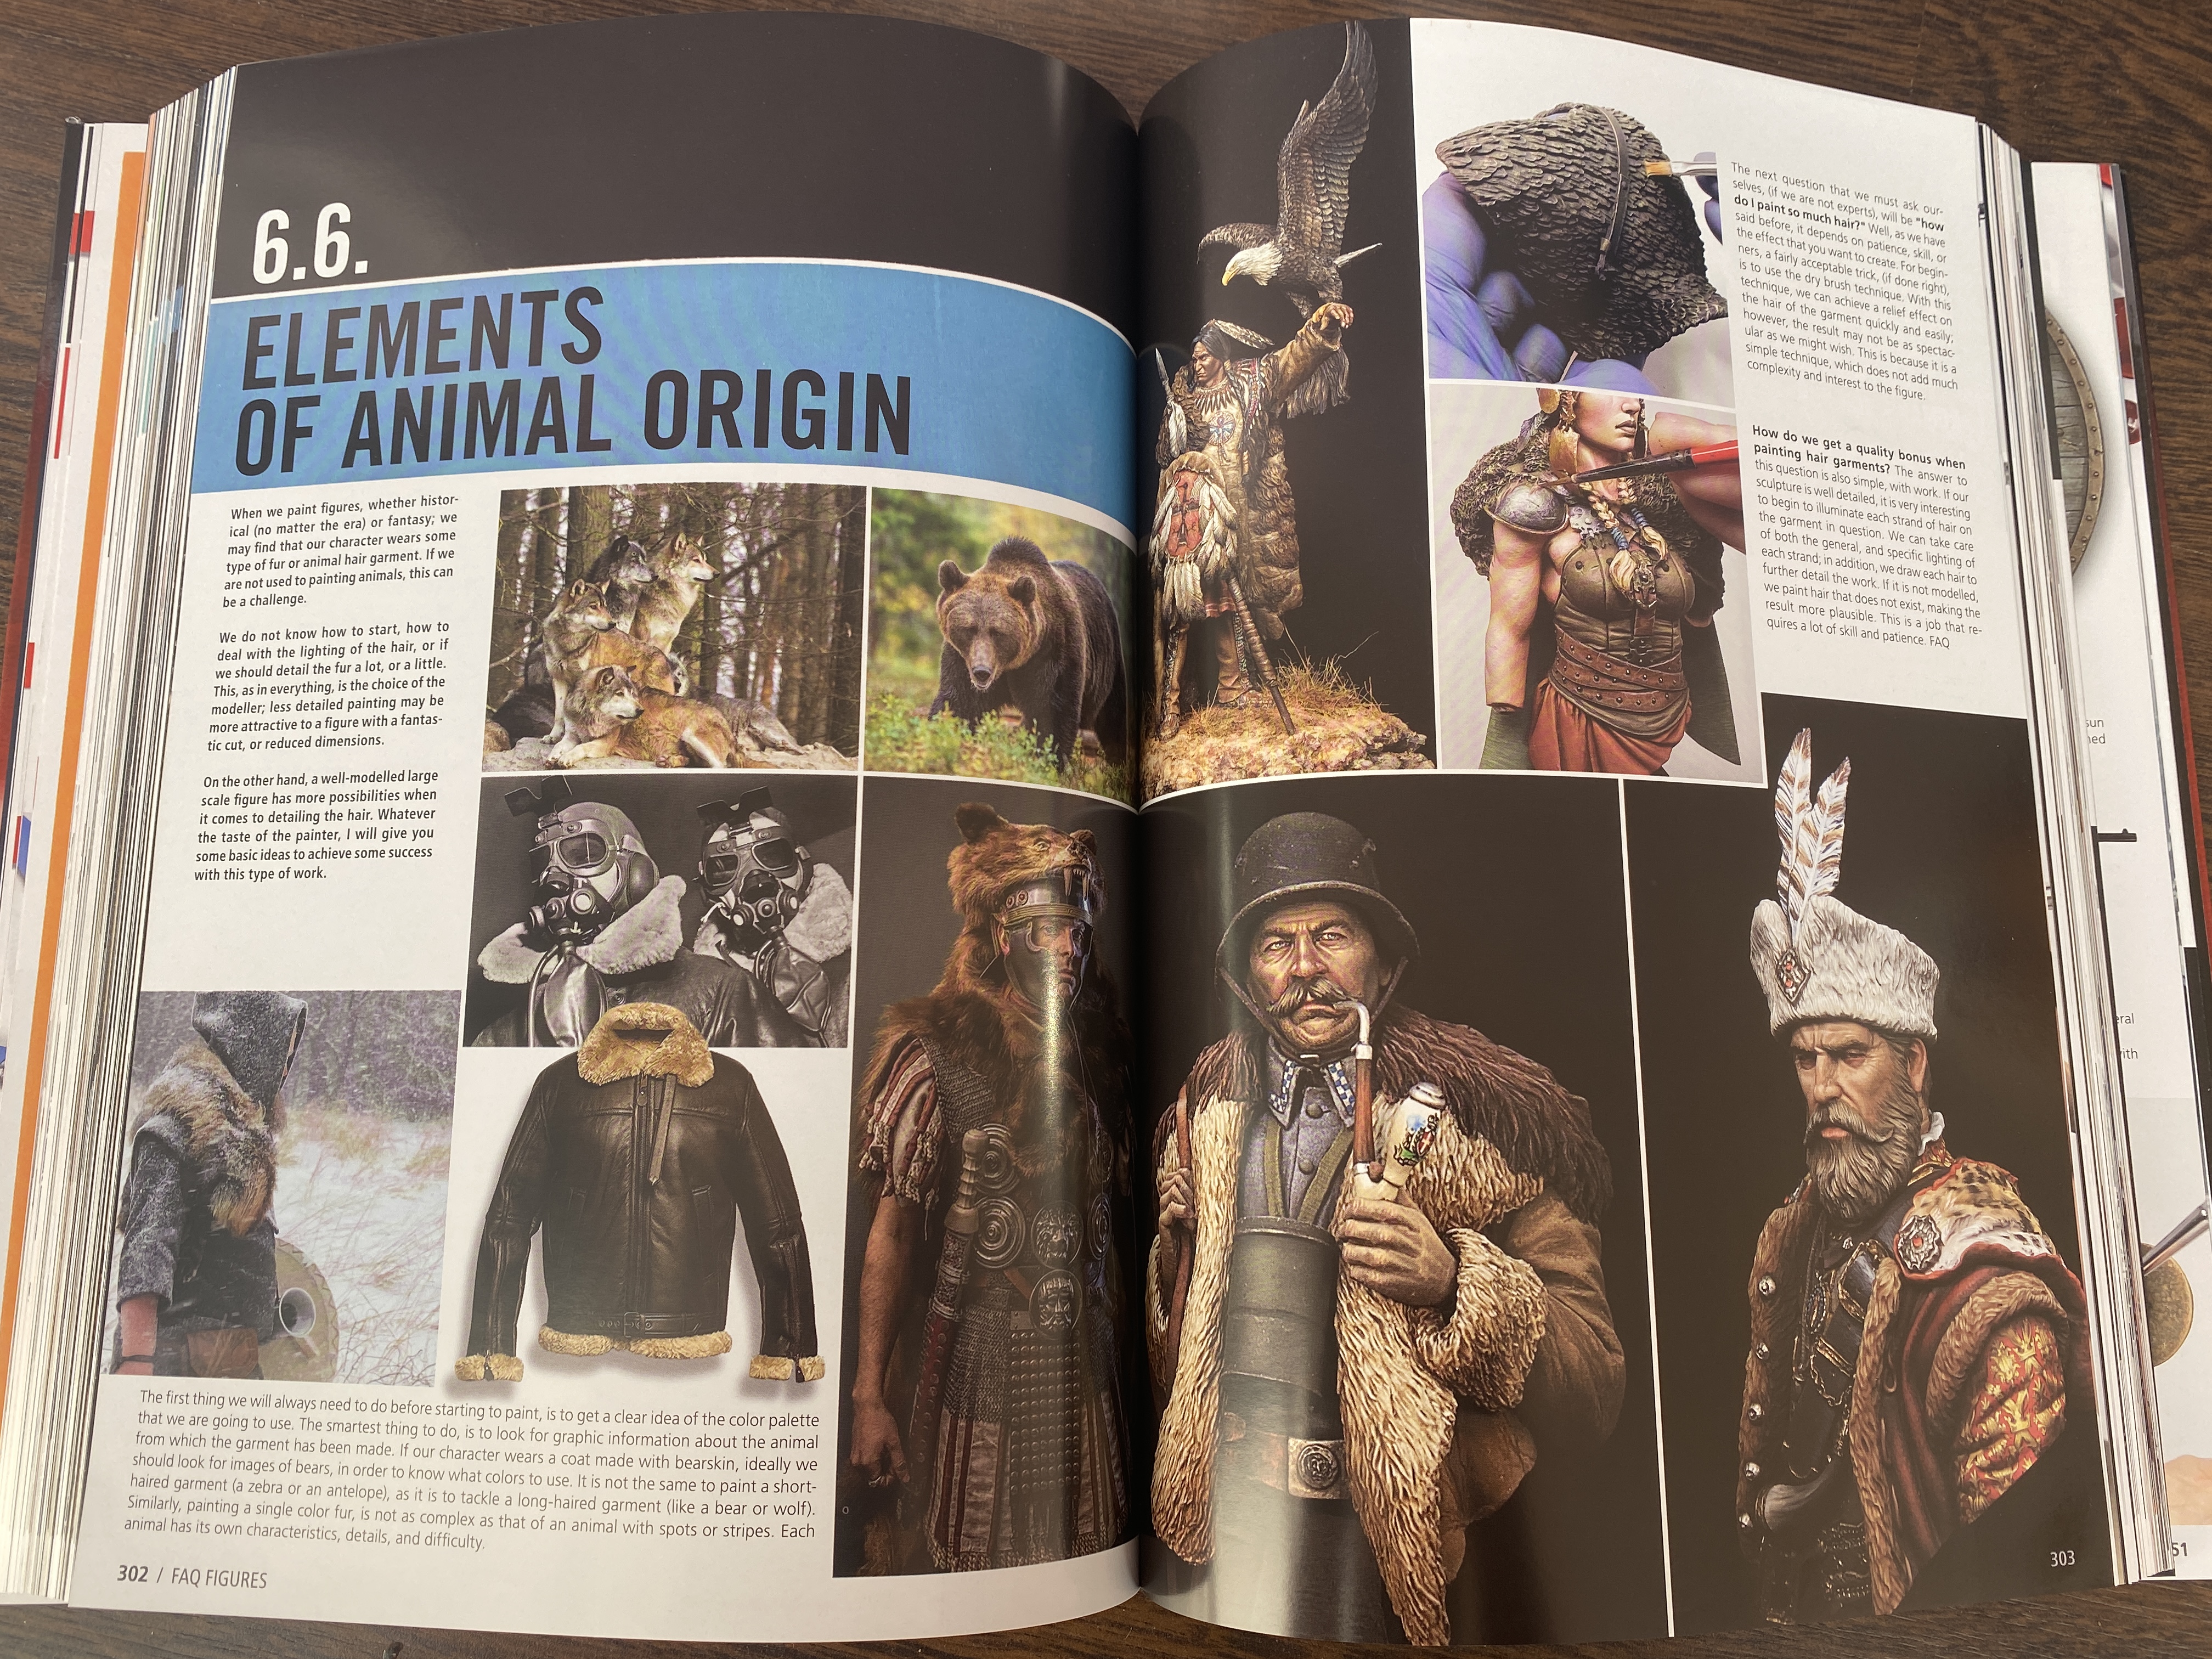
6.6 Elements of animal origin
6.7 Reflective surfaces
6.8 Non metallic metal technique
6.9 Wood
6.10 Gemstones, pearls and crystal
6.11 Special effects
Despite being a modeler for over thirty years now, I never painted a figure, although in recent times, I has already started one but I haven't finished it yet. Thus, the materials chapter is basically aimed at beginners but each type of paint and varnish has on the part of the author a brief explanation of the paints, their use and their features.

Still being a model maker with “some” experience, I found the information provided very useful.
The same can be said about the use of brushes and their conservation.
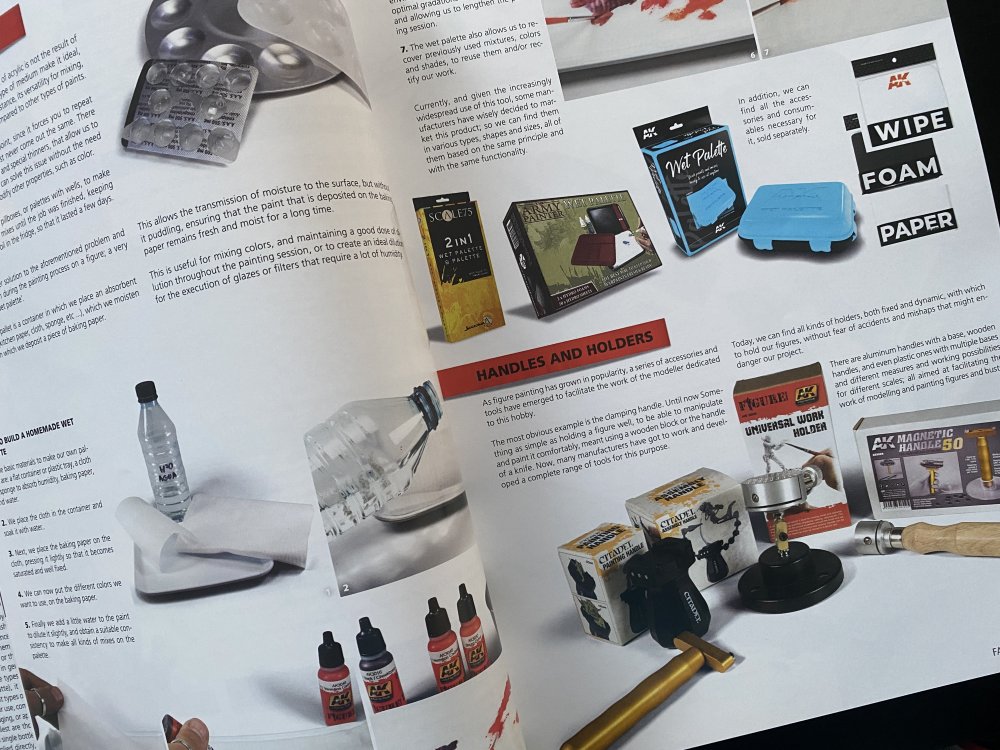
In this chapter the author leaves nothing behind, talking about compressors, airbrushes, wetpallet, holder and other tools
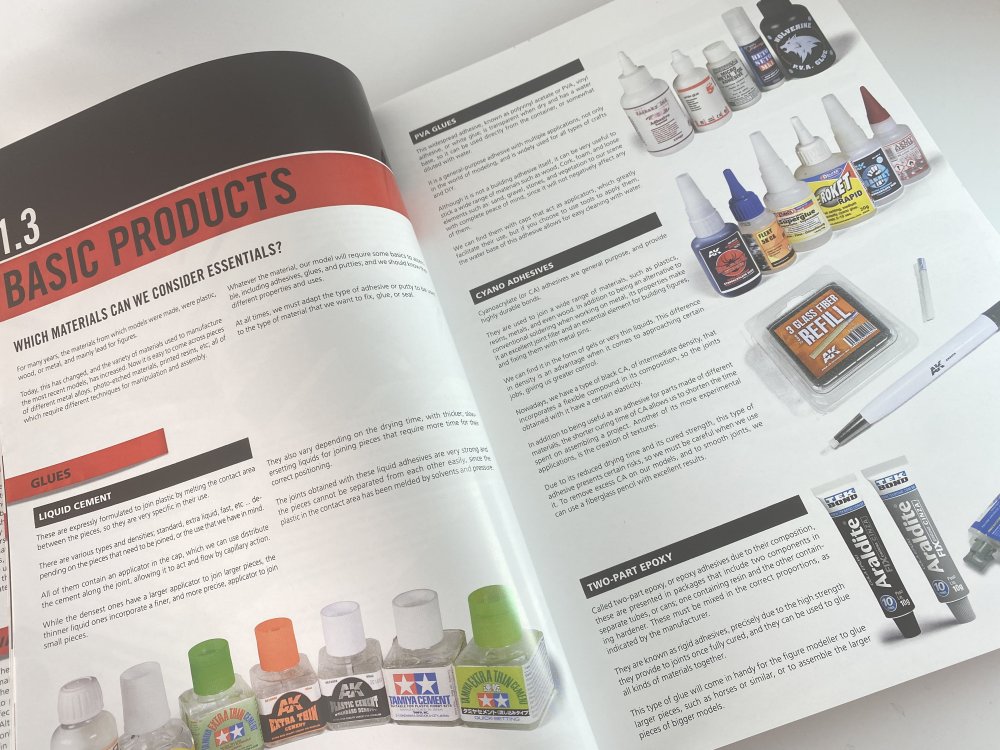
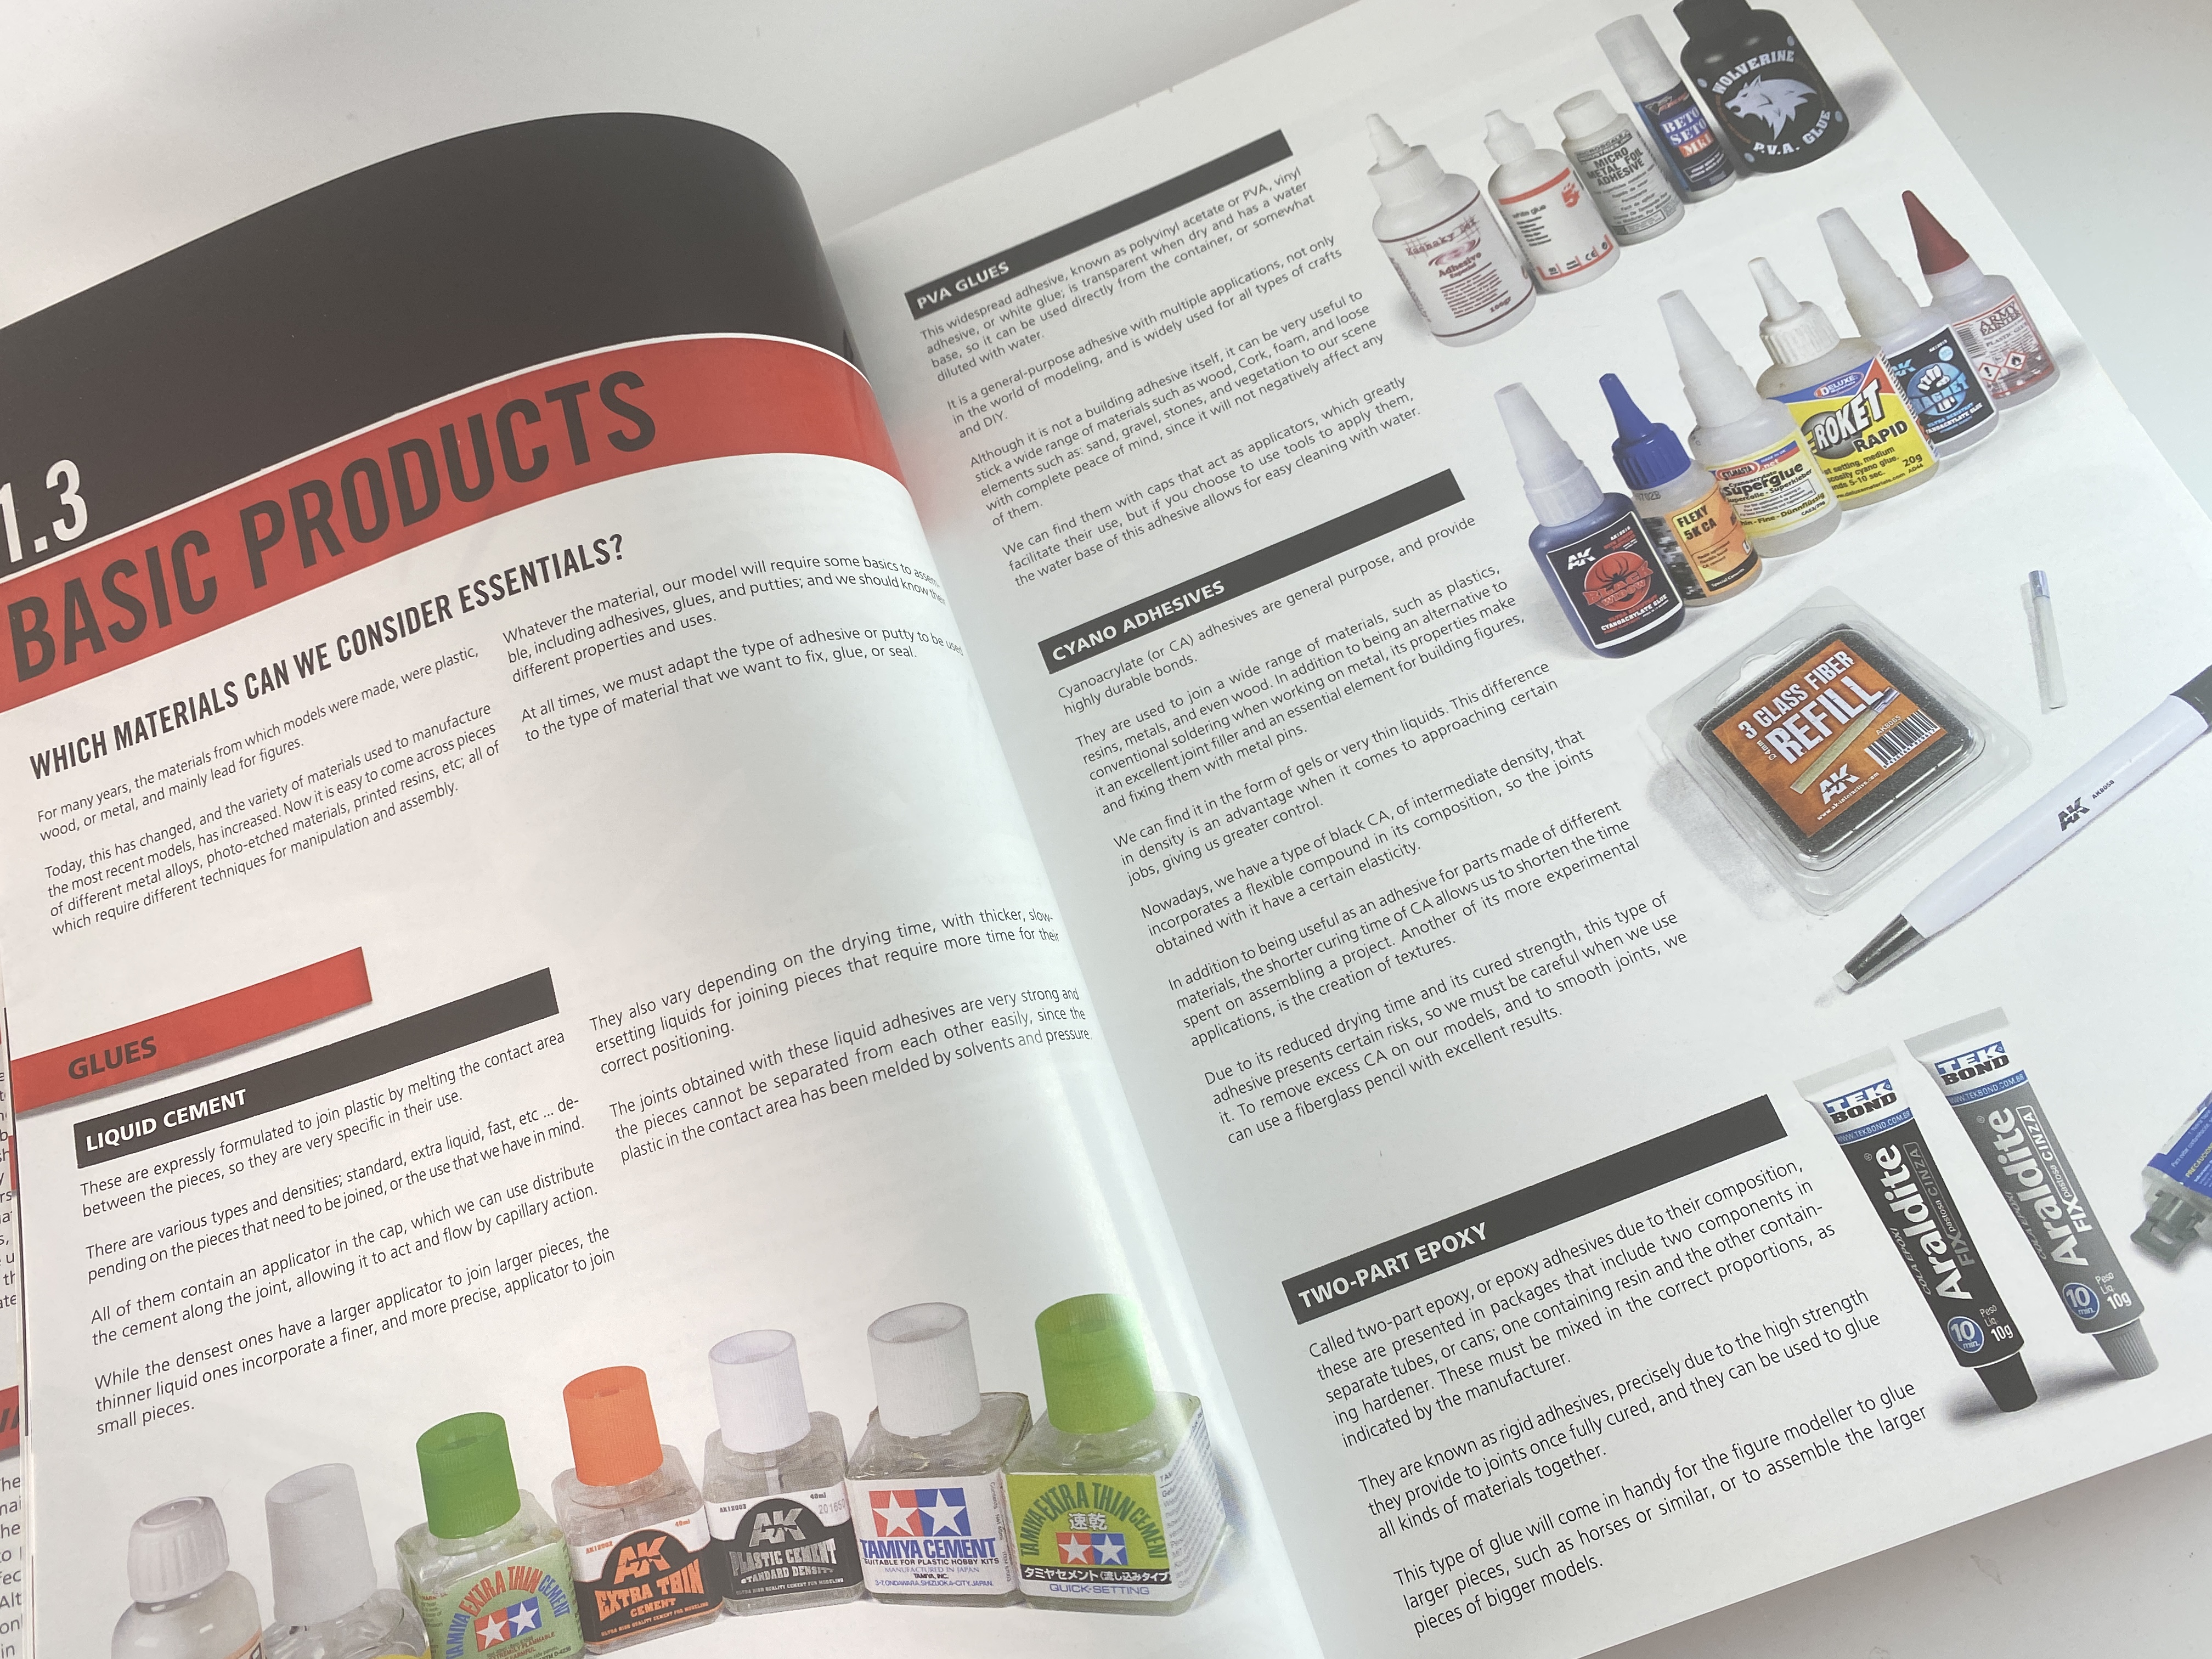
Keep this record in chapter 1.3, looking at the applications and advantages of various types of glue, putty and others
After going through the basic but very complete notions of the chapter, we have not yet entered the figure painting directly, but we continue with the preliminaries.
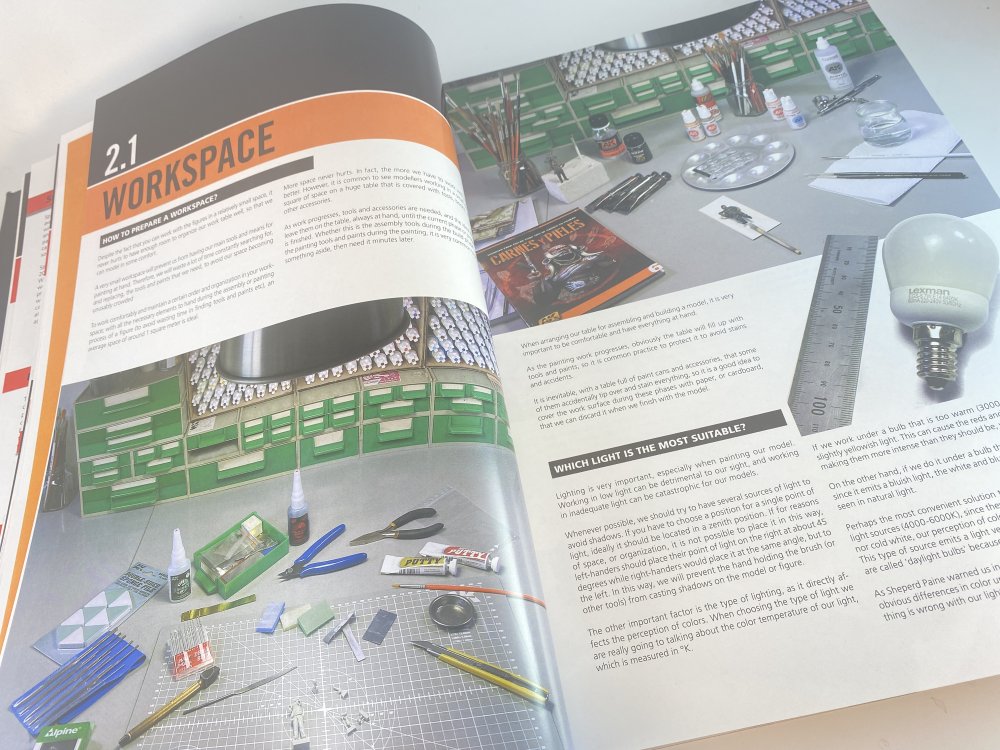
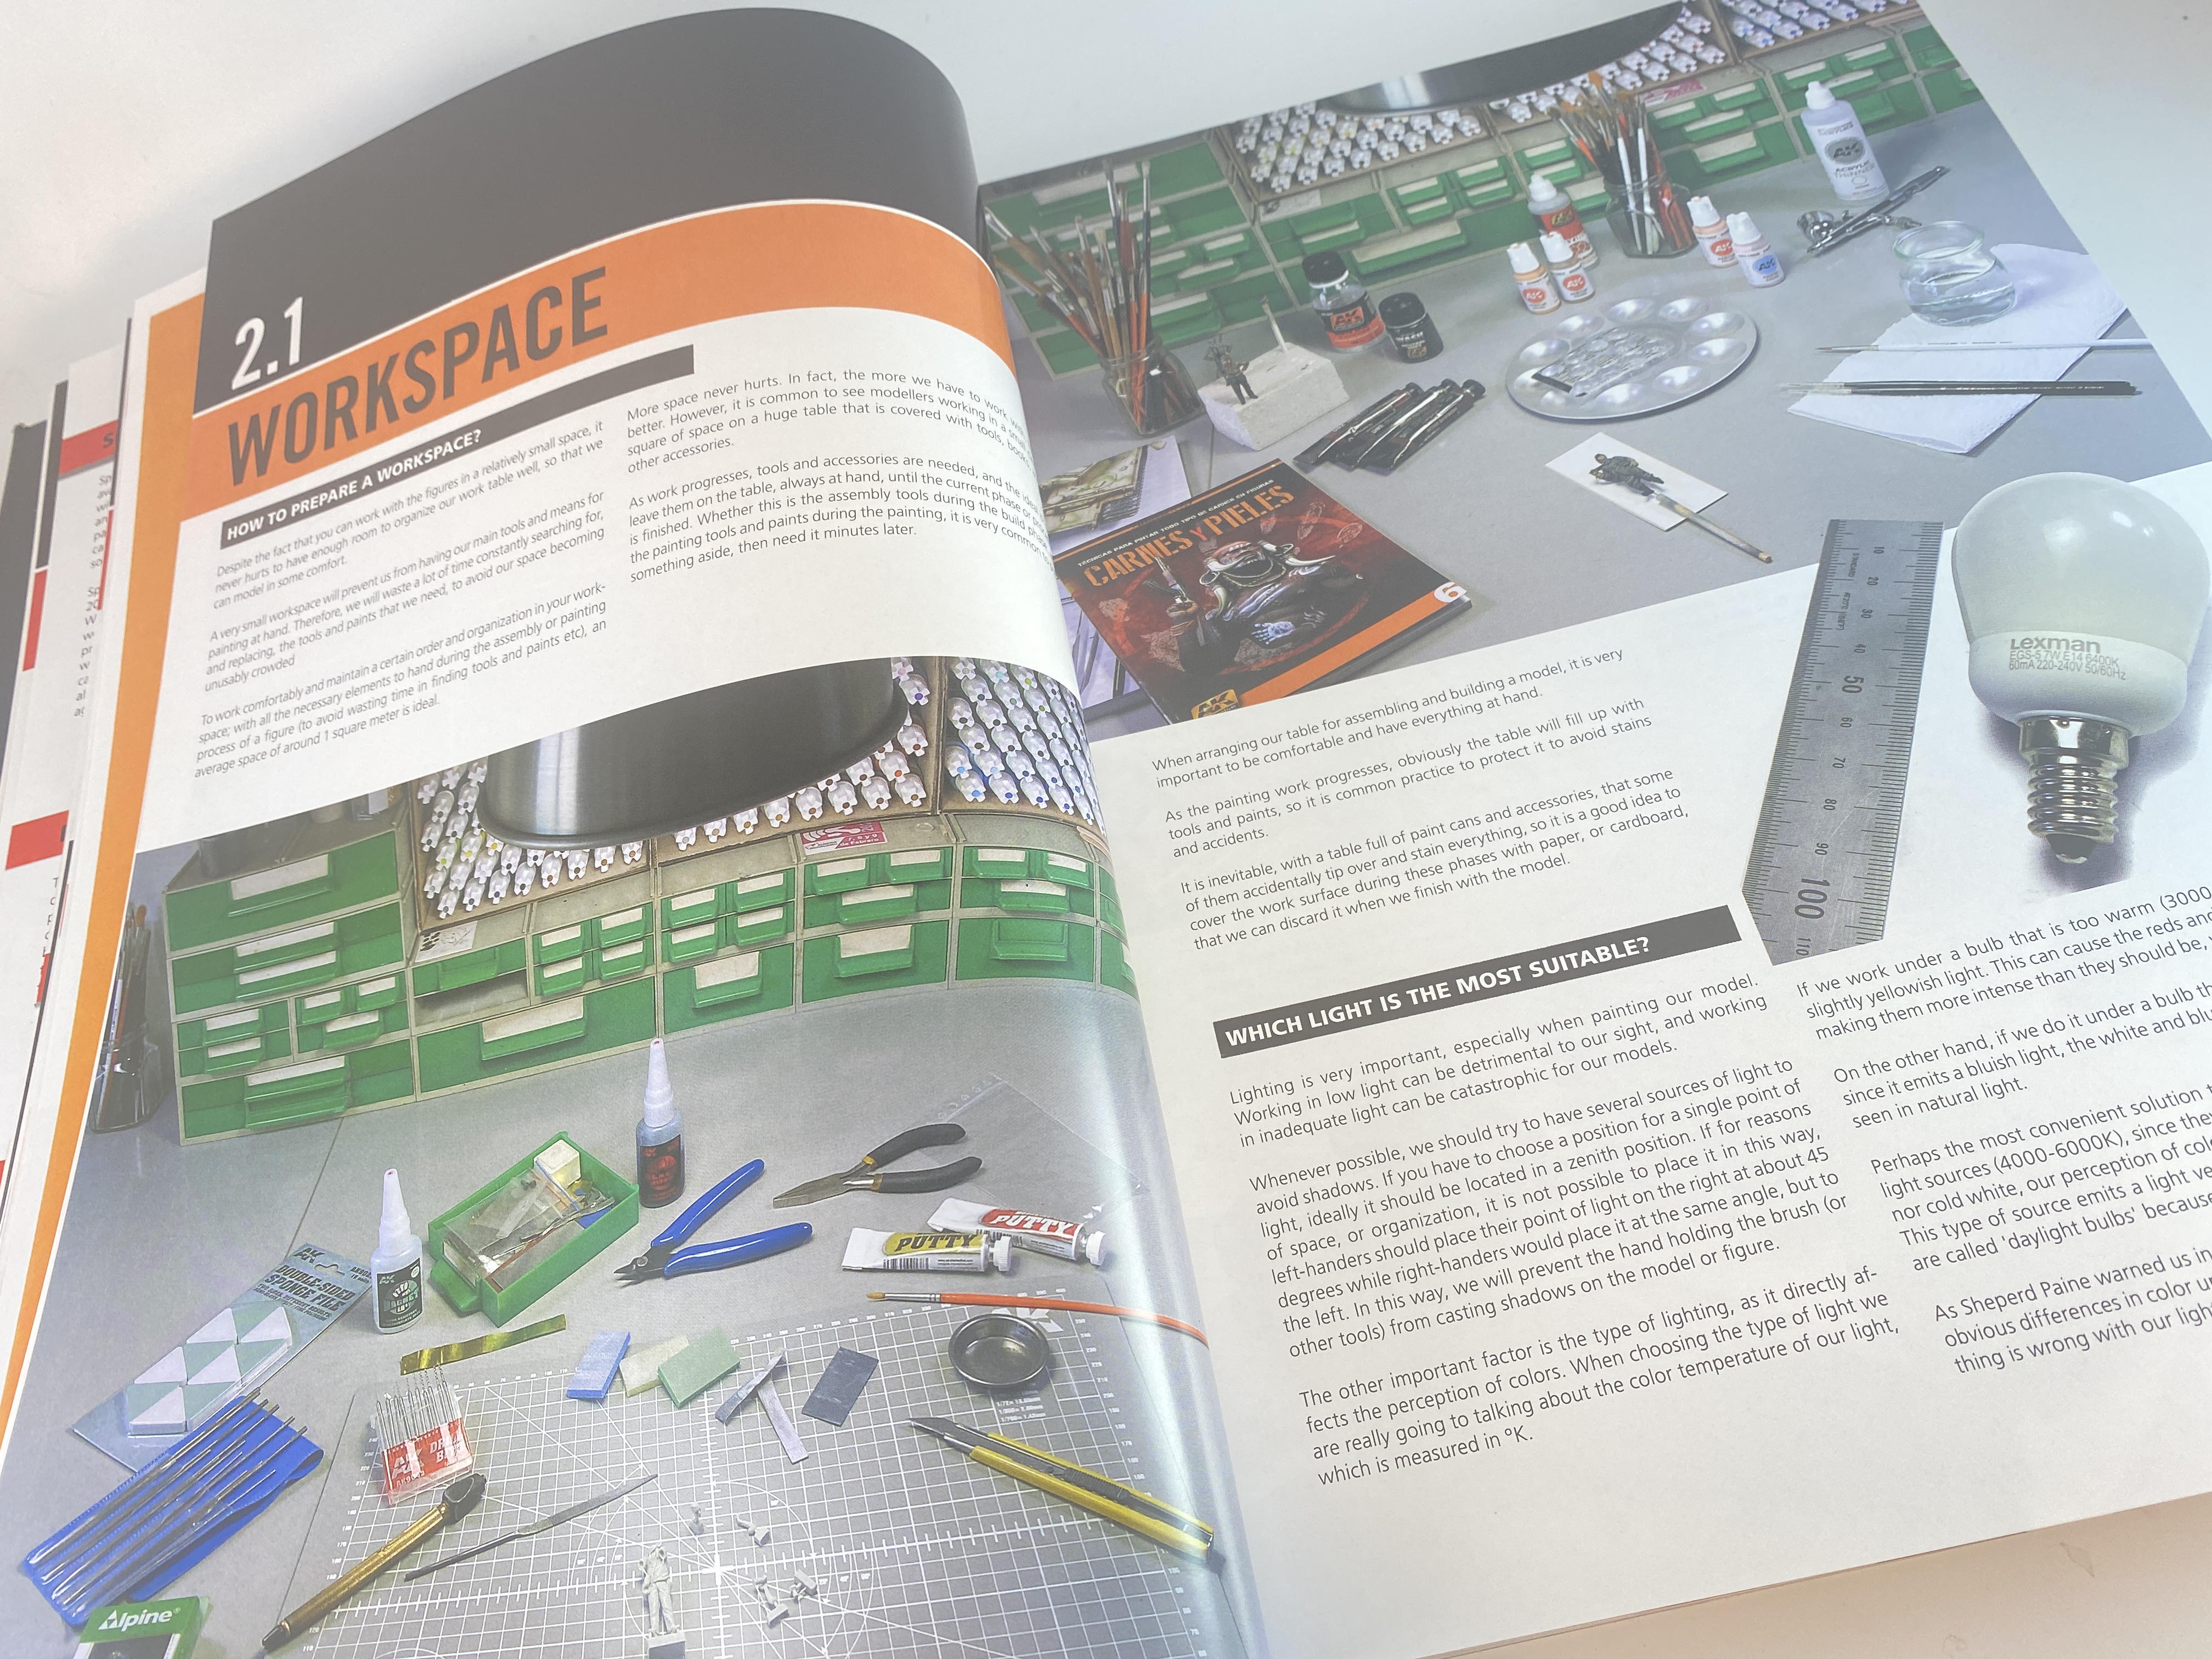
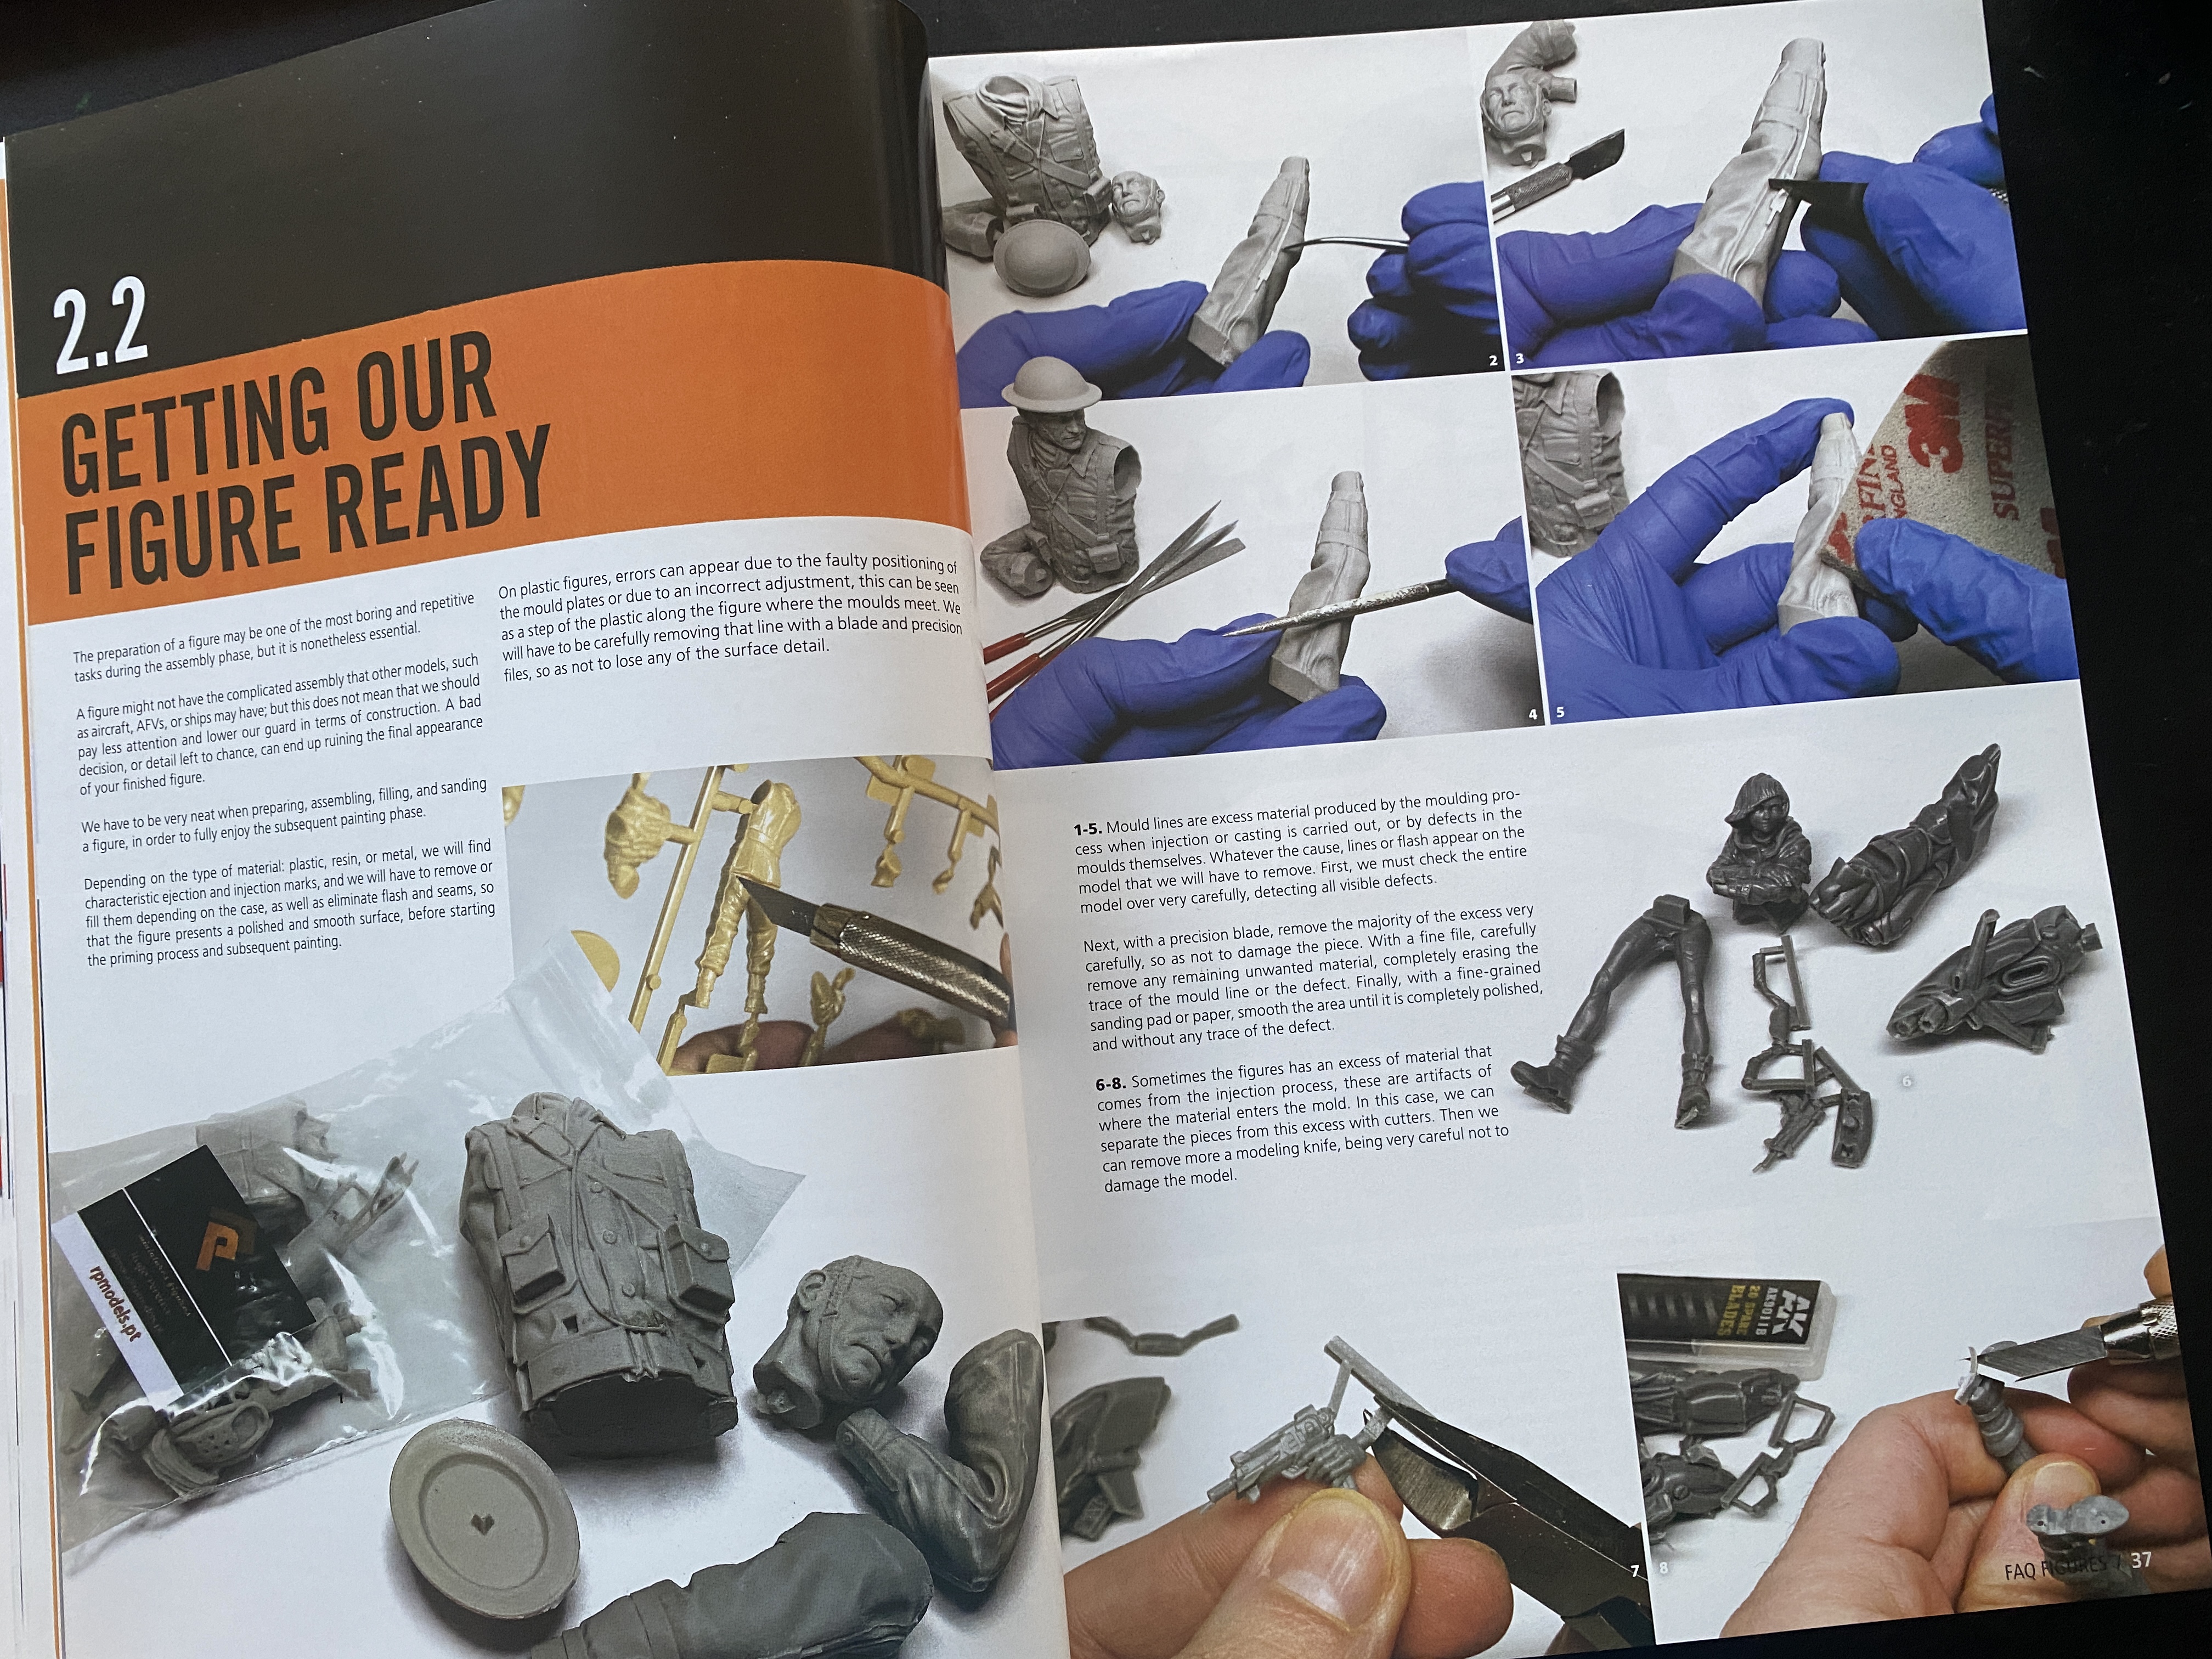
The choice of the figure, moving to workspace (2.1) (what`s the best light to paint model figures) and the preparation of the figure, chapter 2.2 .. Here it is very important the steps presented in order to obtain a figure without defects and perfectly built with reinforcement of the limbs and placement on the base.

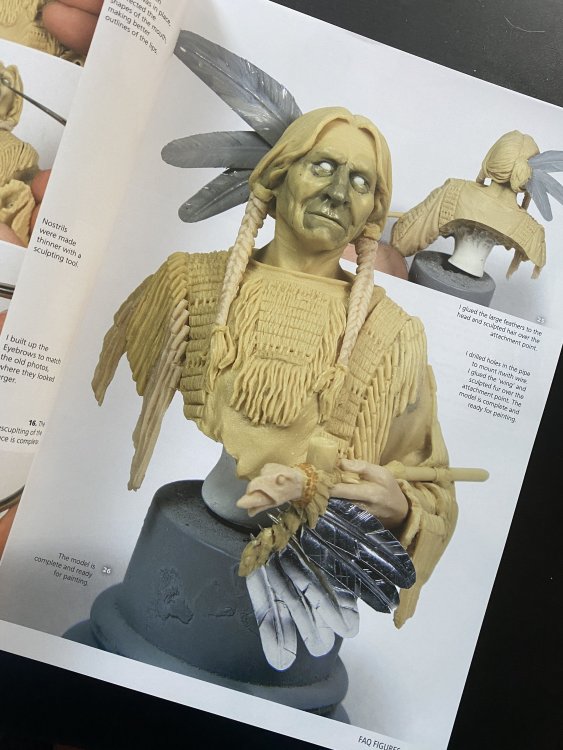
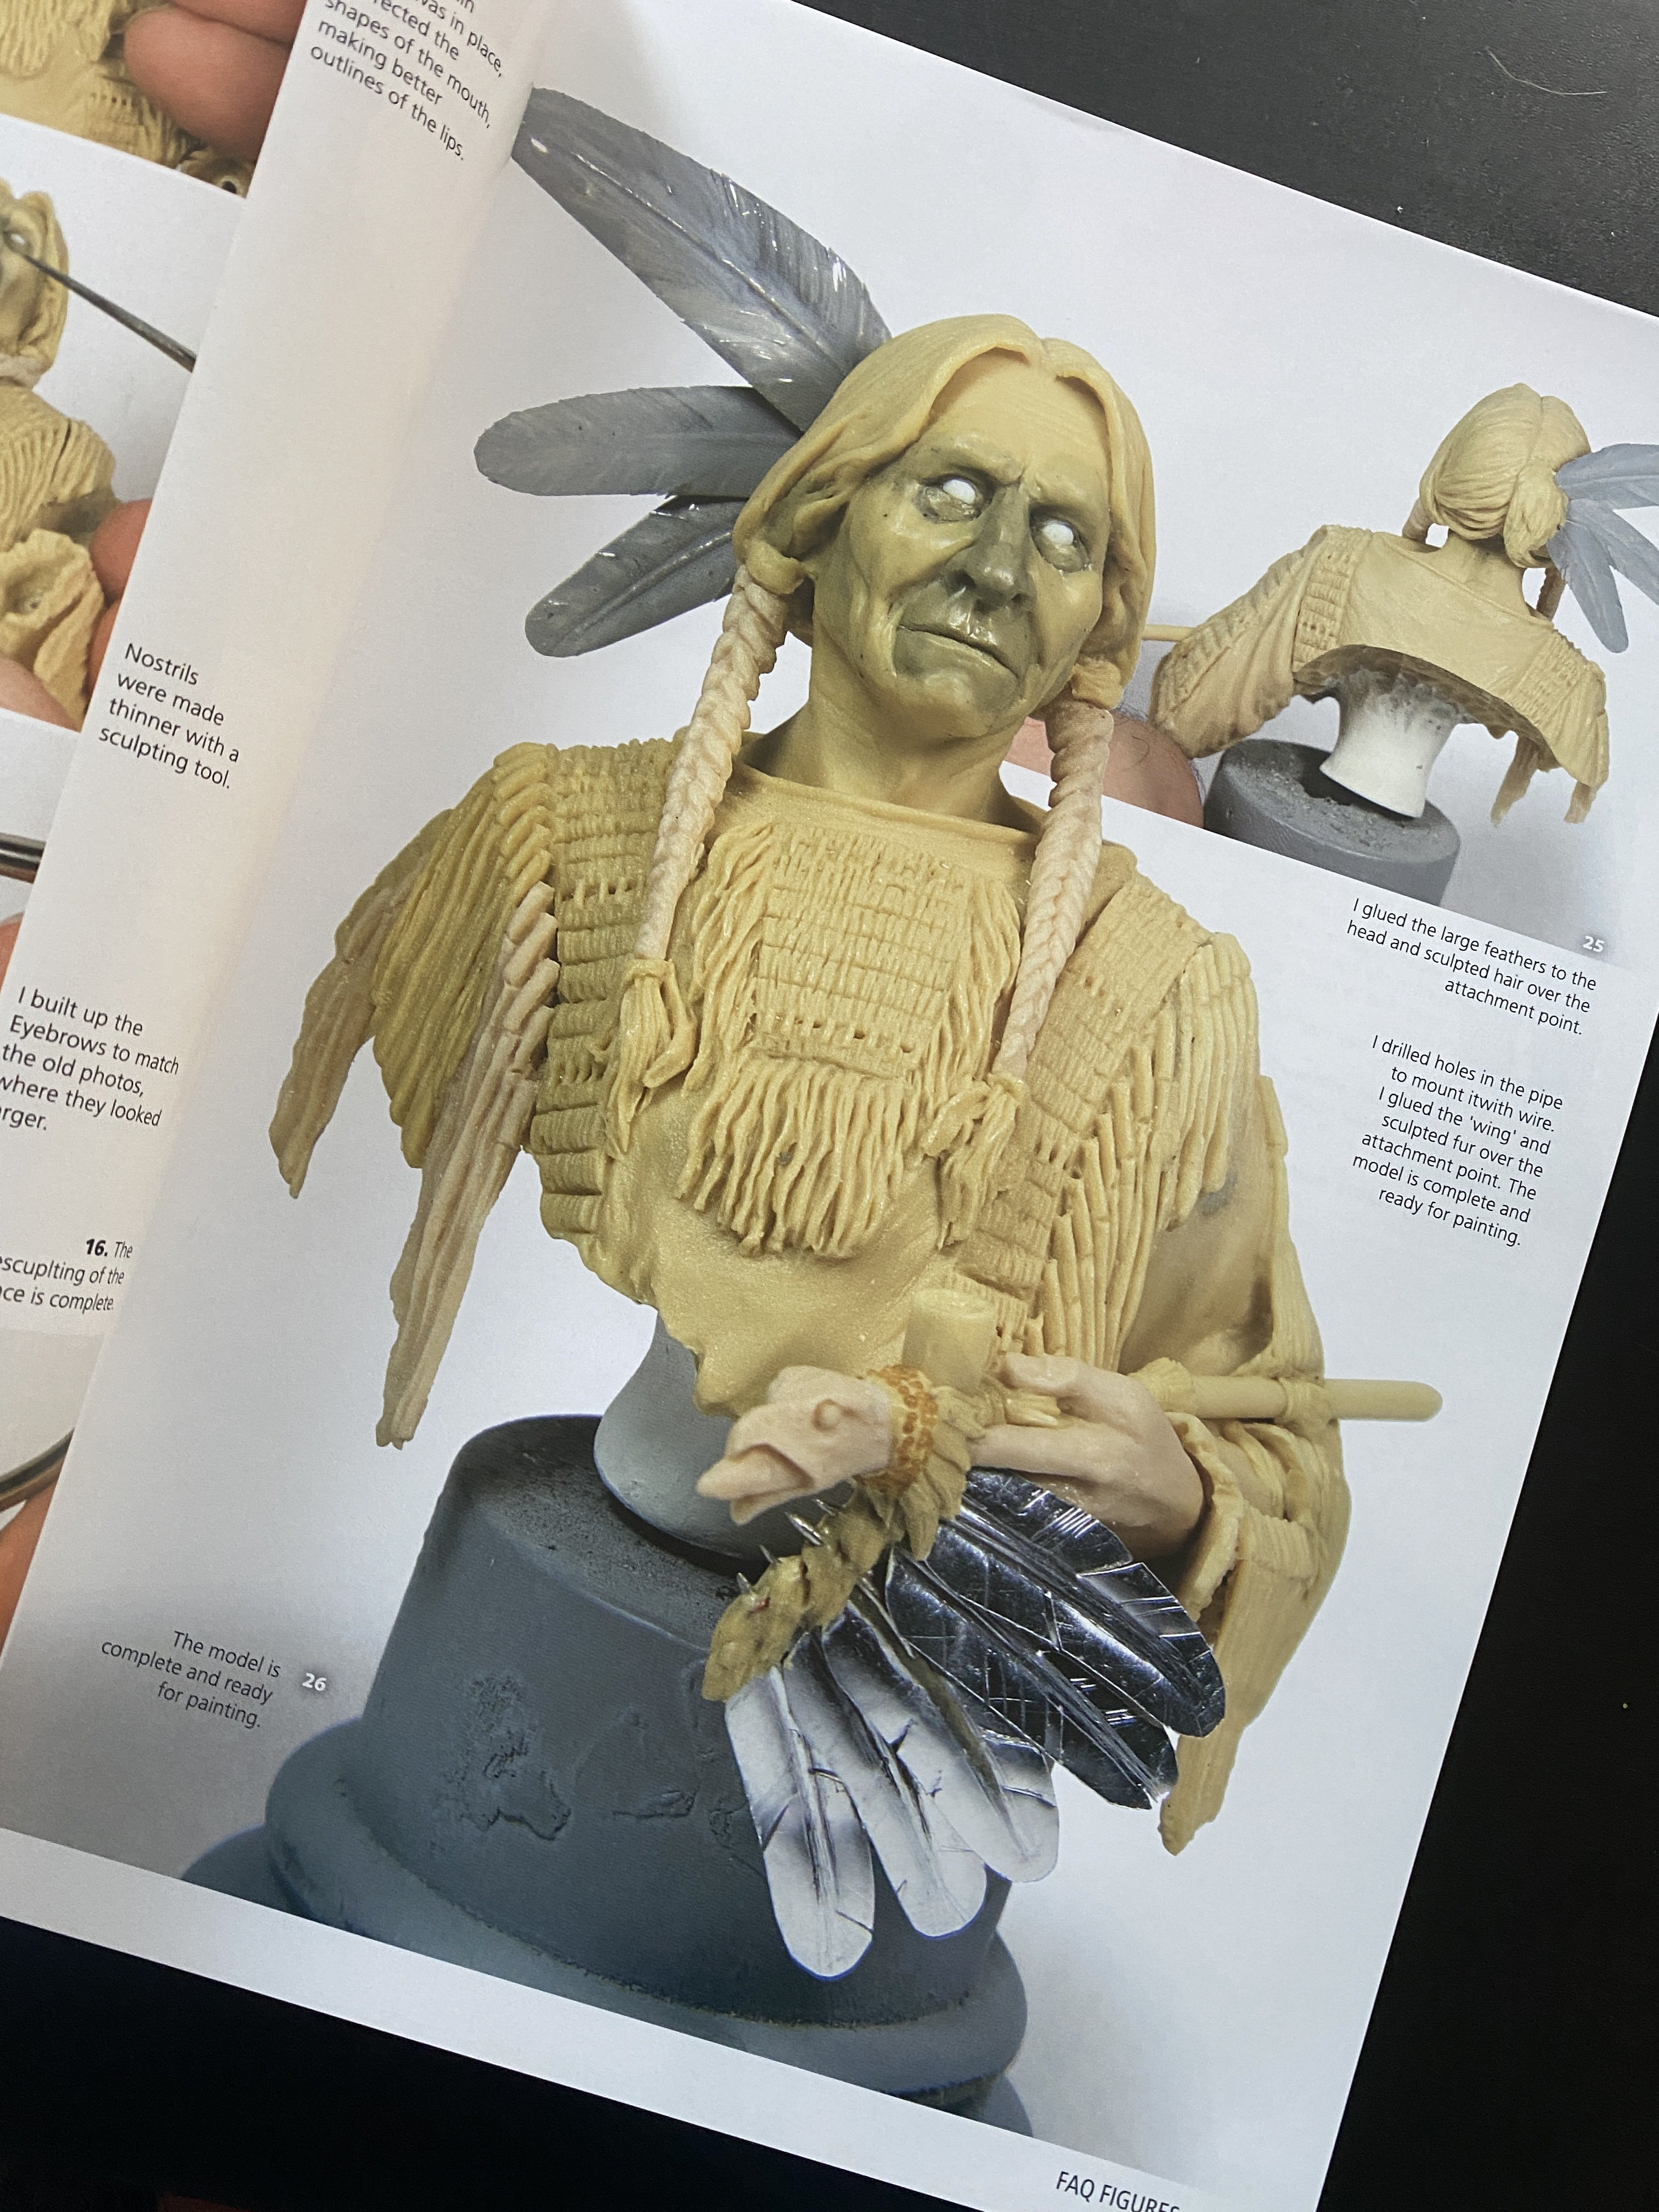
The filling and putty section caught my special attention, with an excellent job of “reconstructing” the face of an “Apache” figure. It got a much more expressive face.

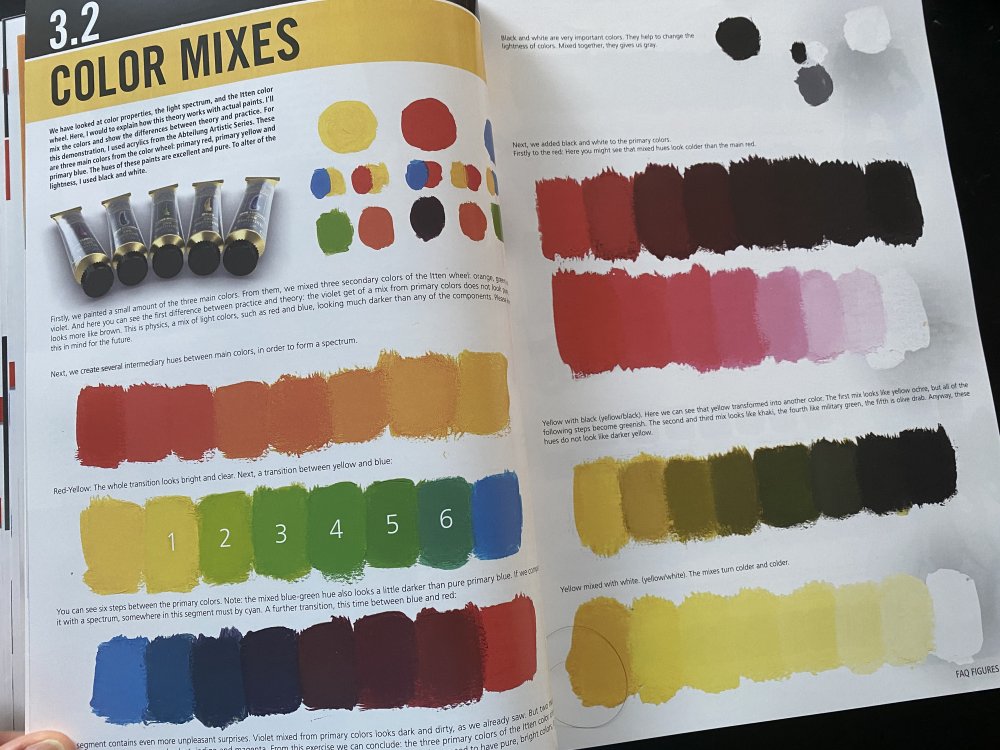
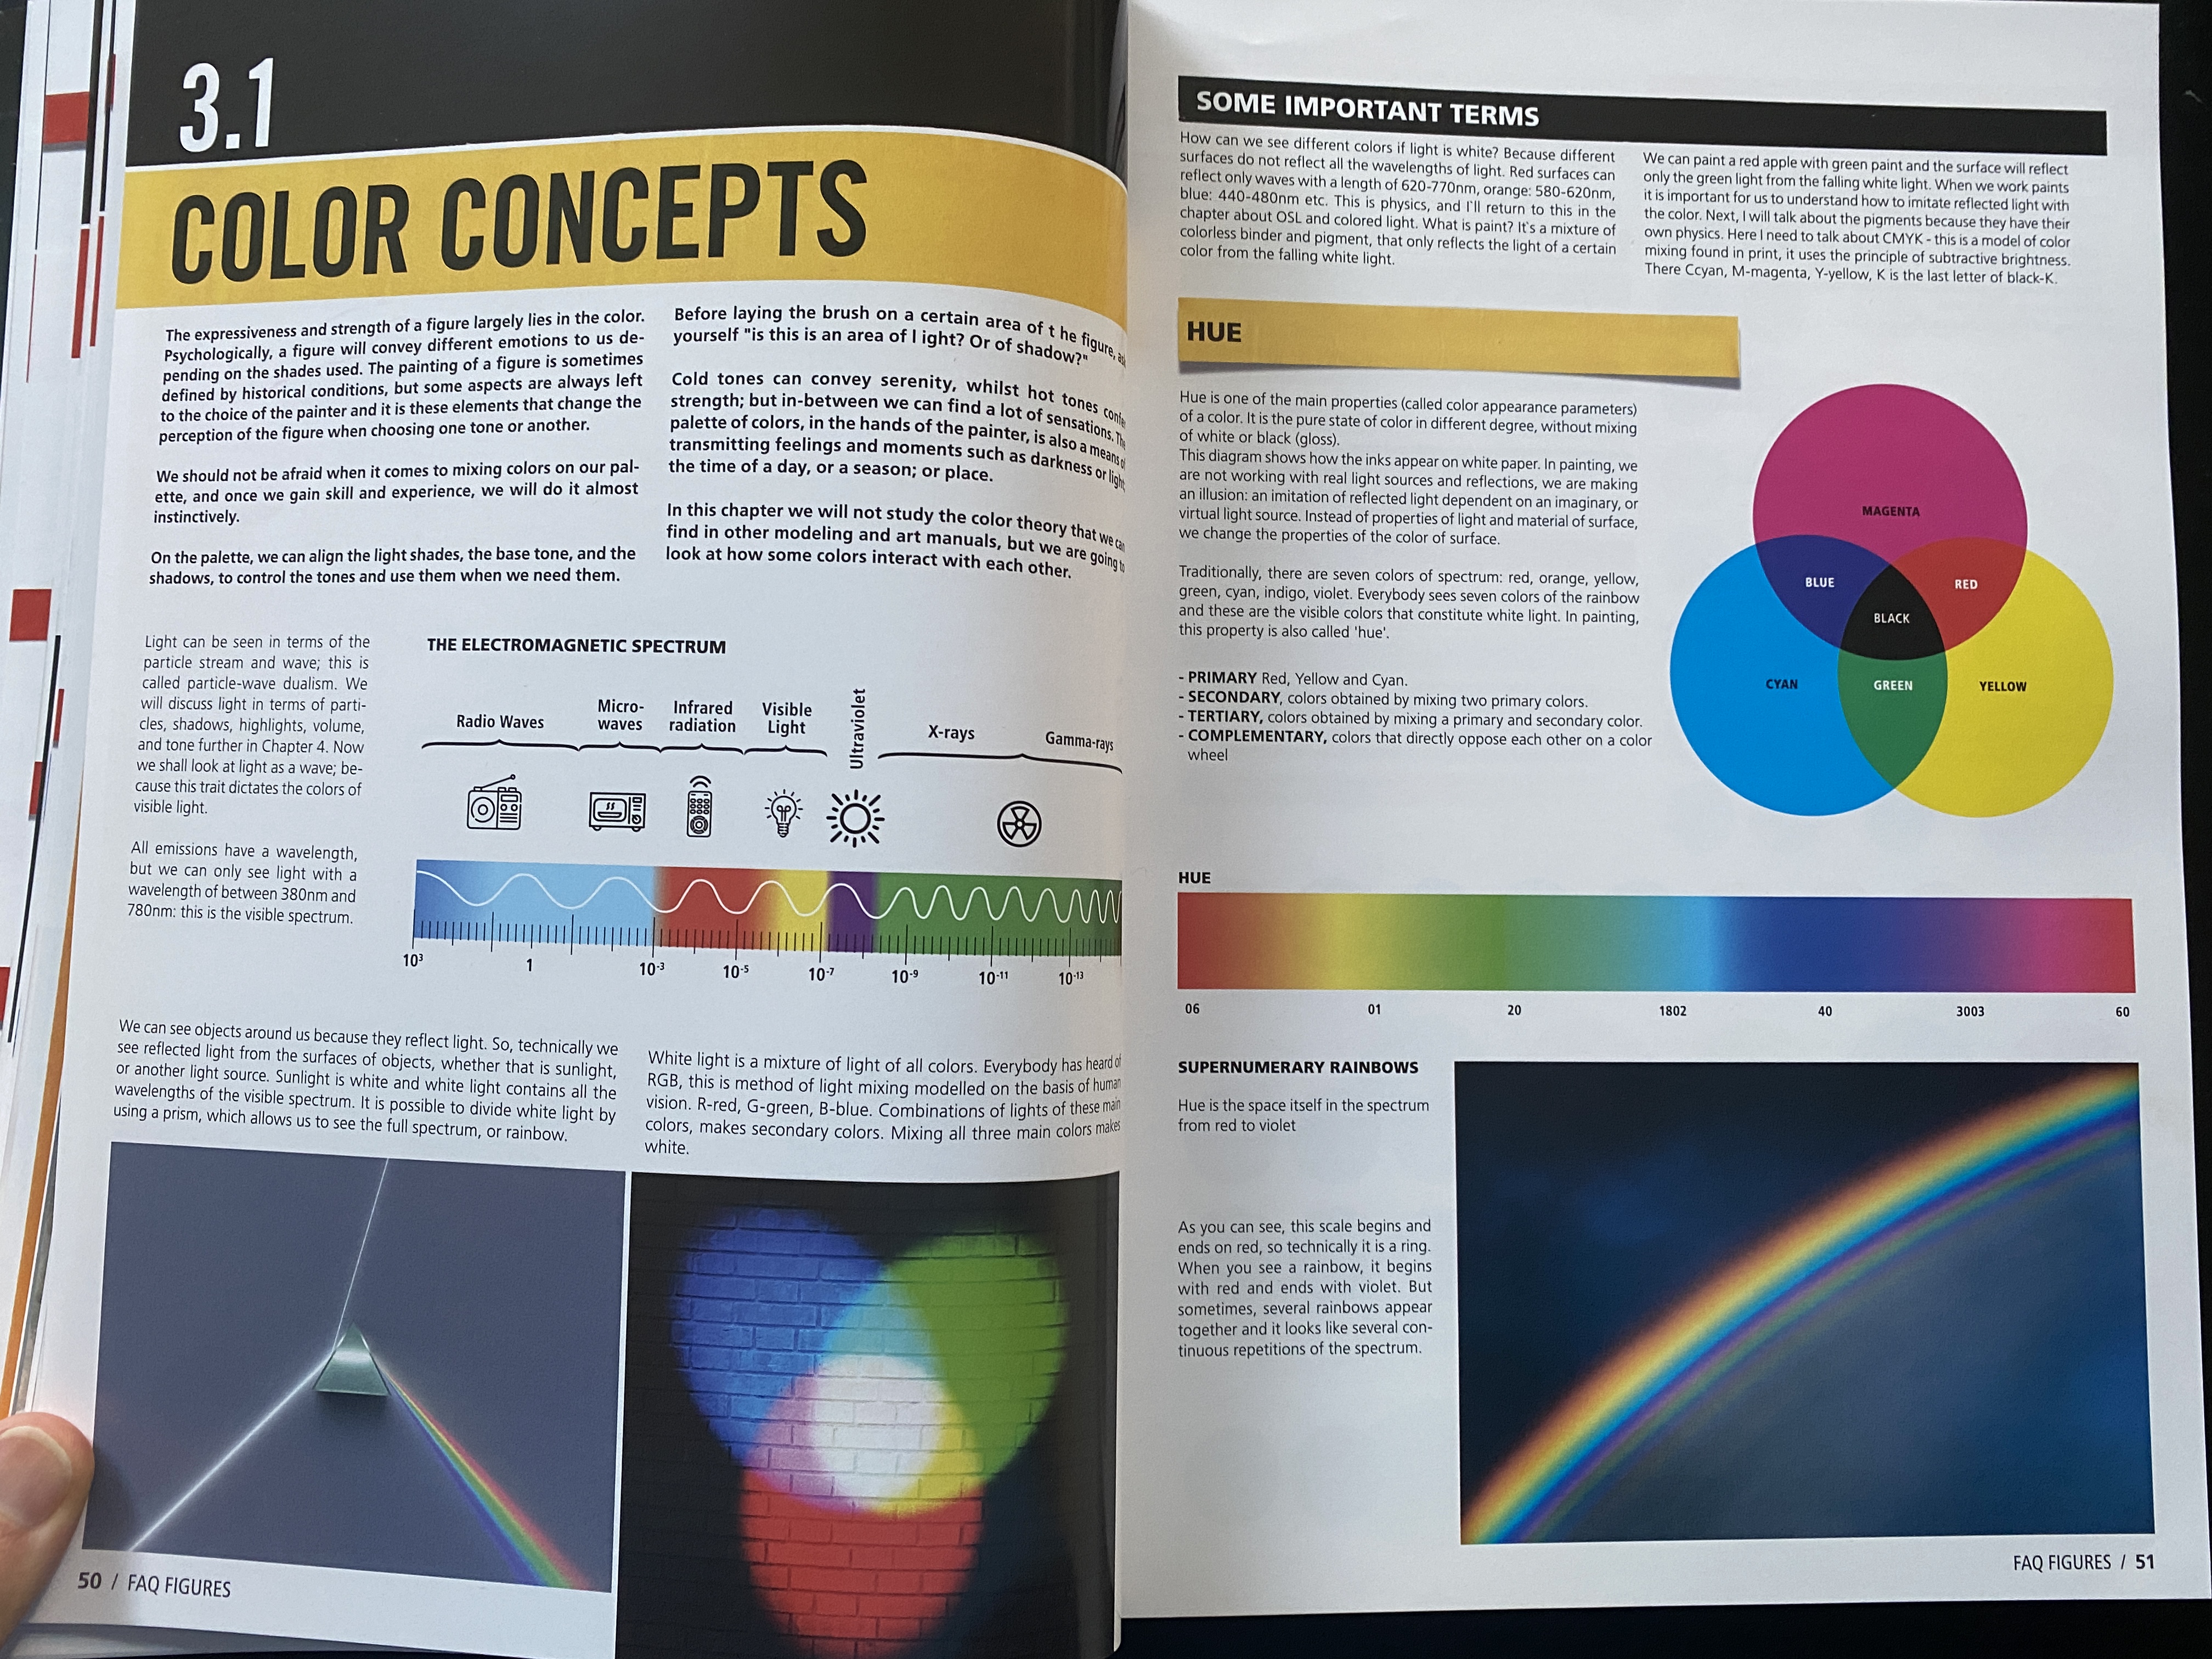
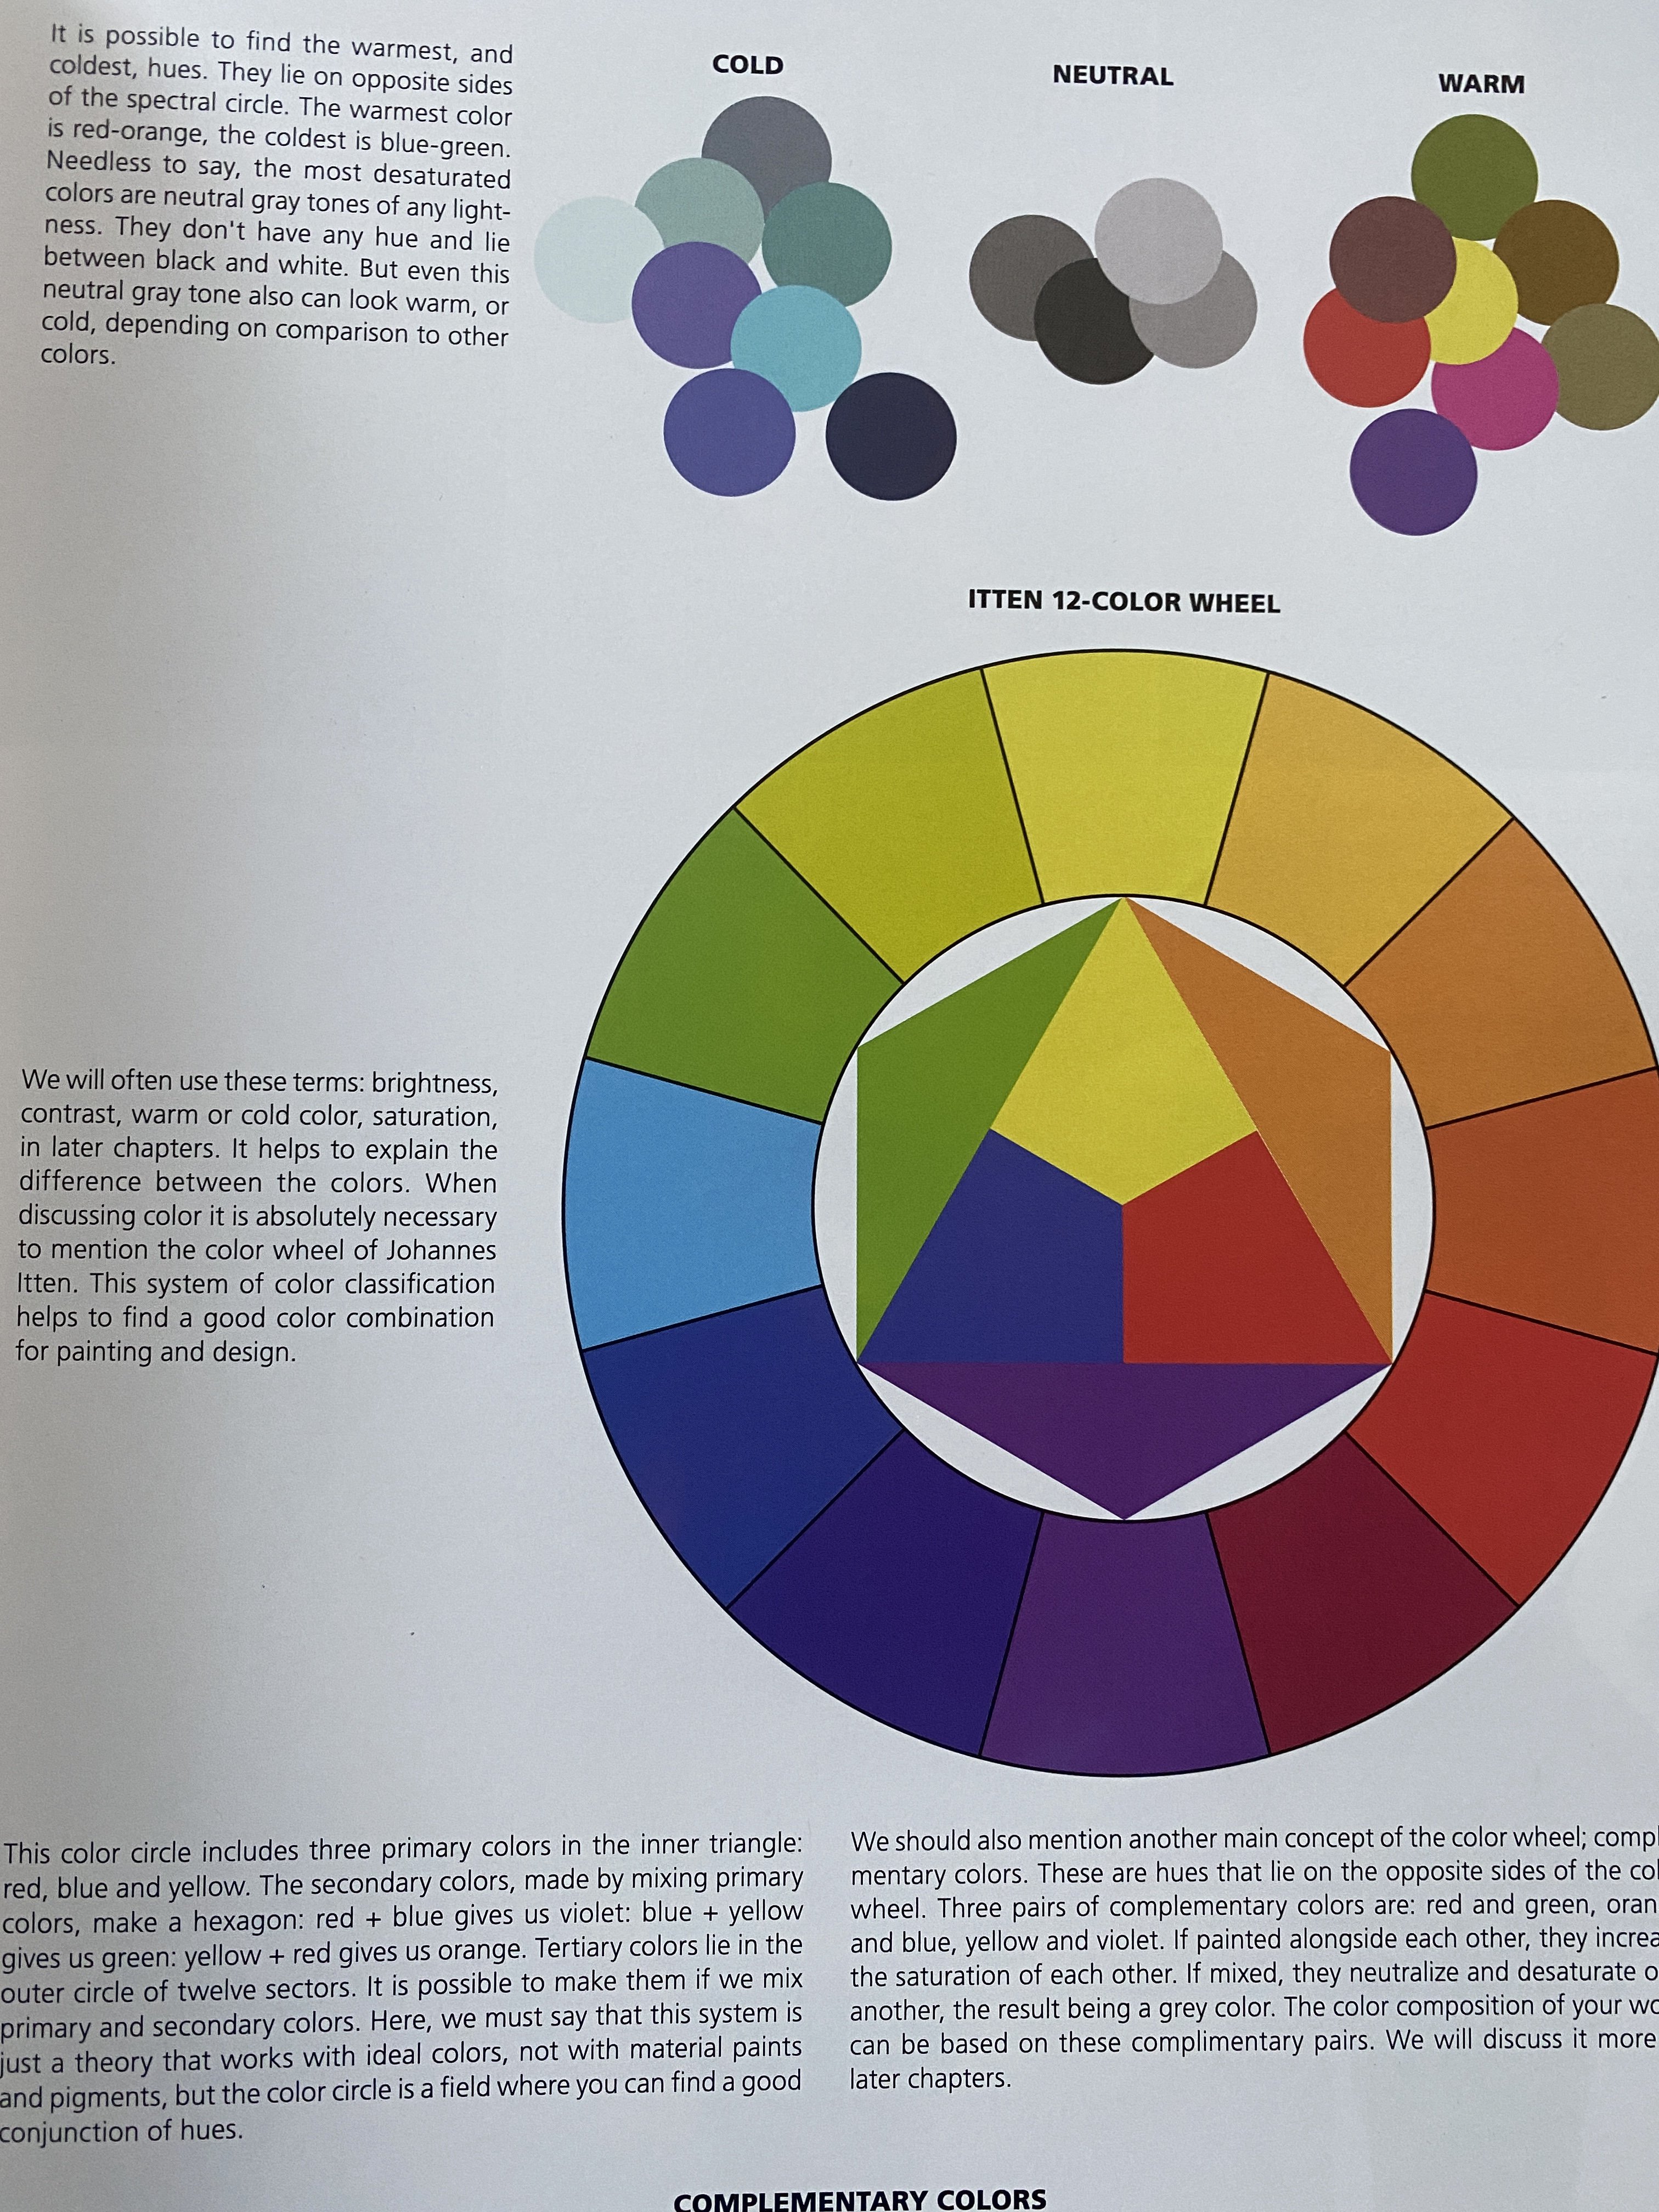
Chapter 3.1 (color concepts) gives the notion of the study of color. I do not say elementary notions because it is more than that, at least for me, as it is very composed in the different aspects of color: HUE (pure state of the color), Brightness, Saturation, color temperature and its implications in the figures, with clear examples and graphics.
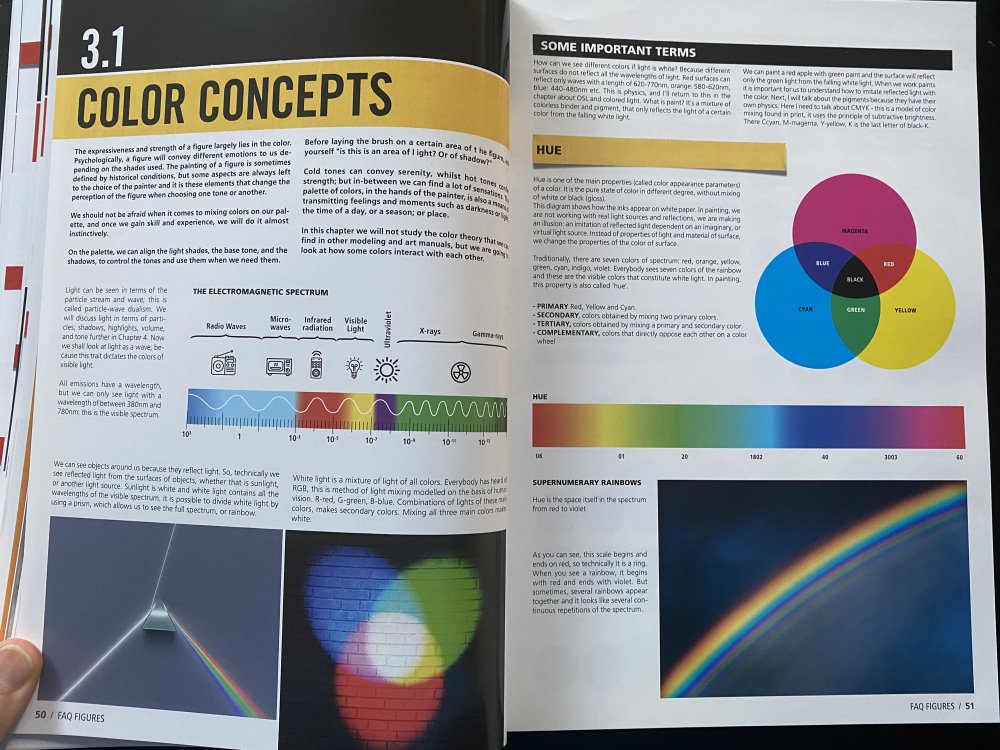
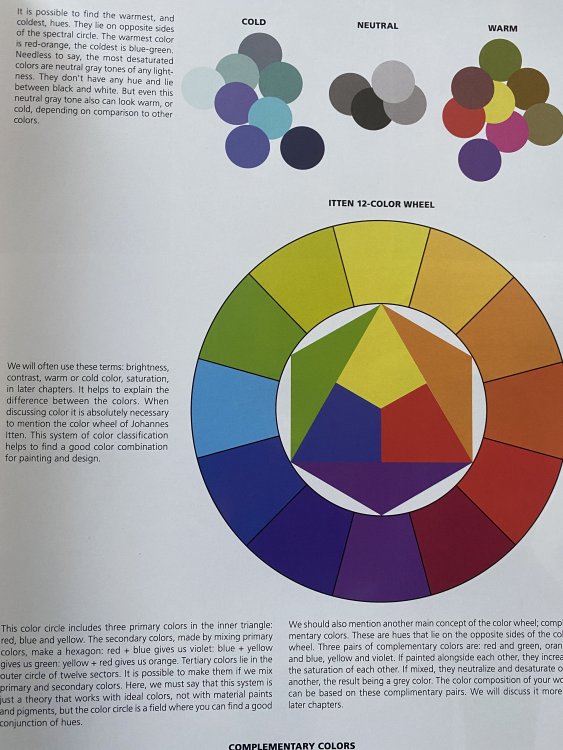
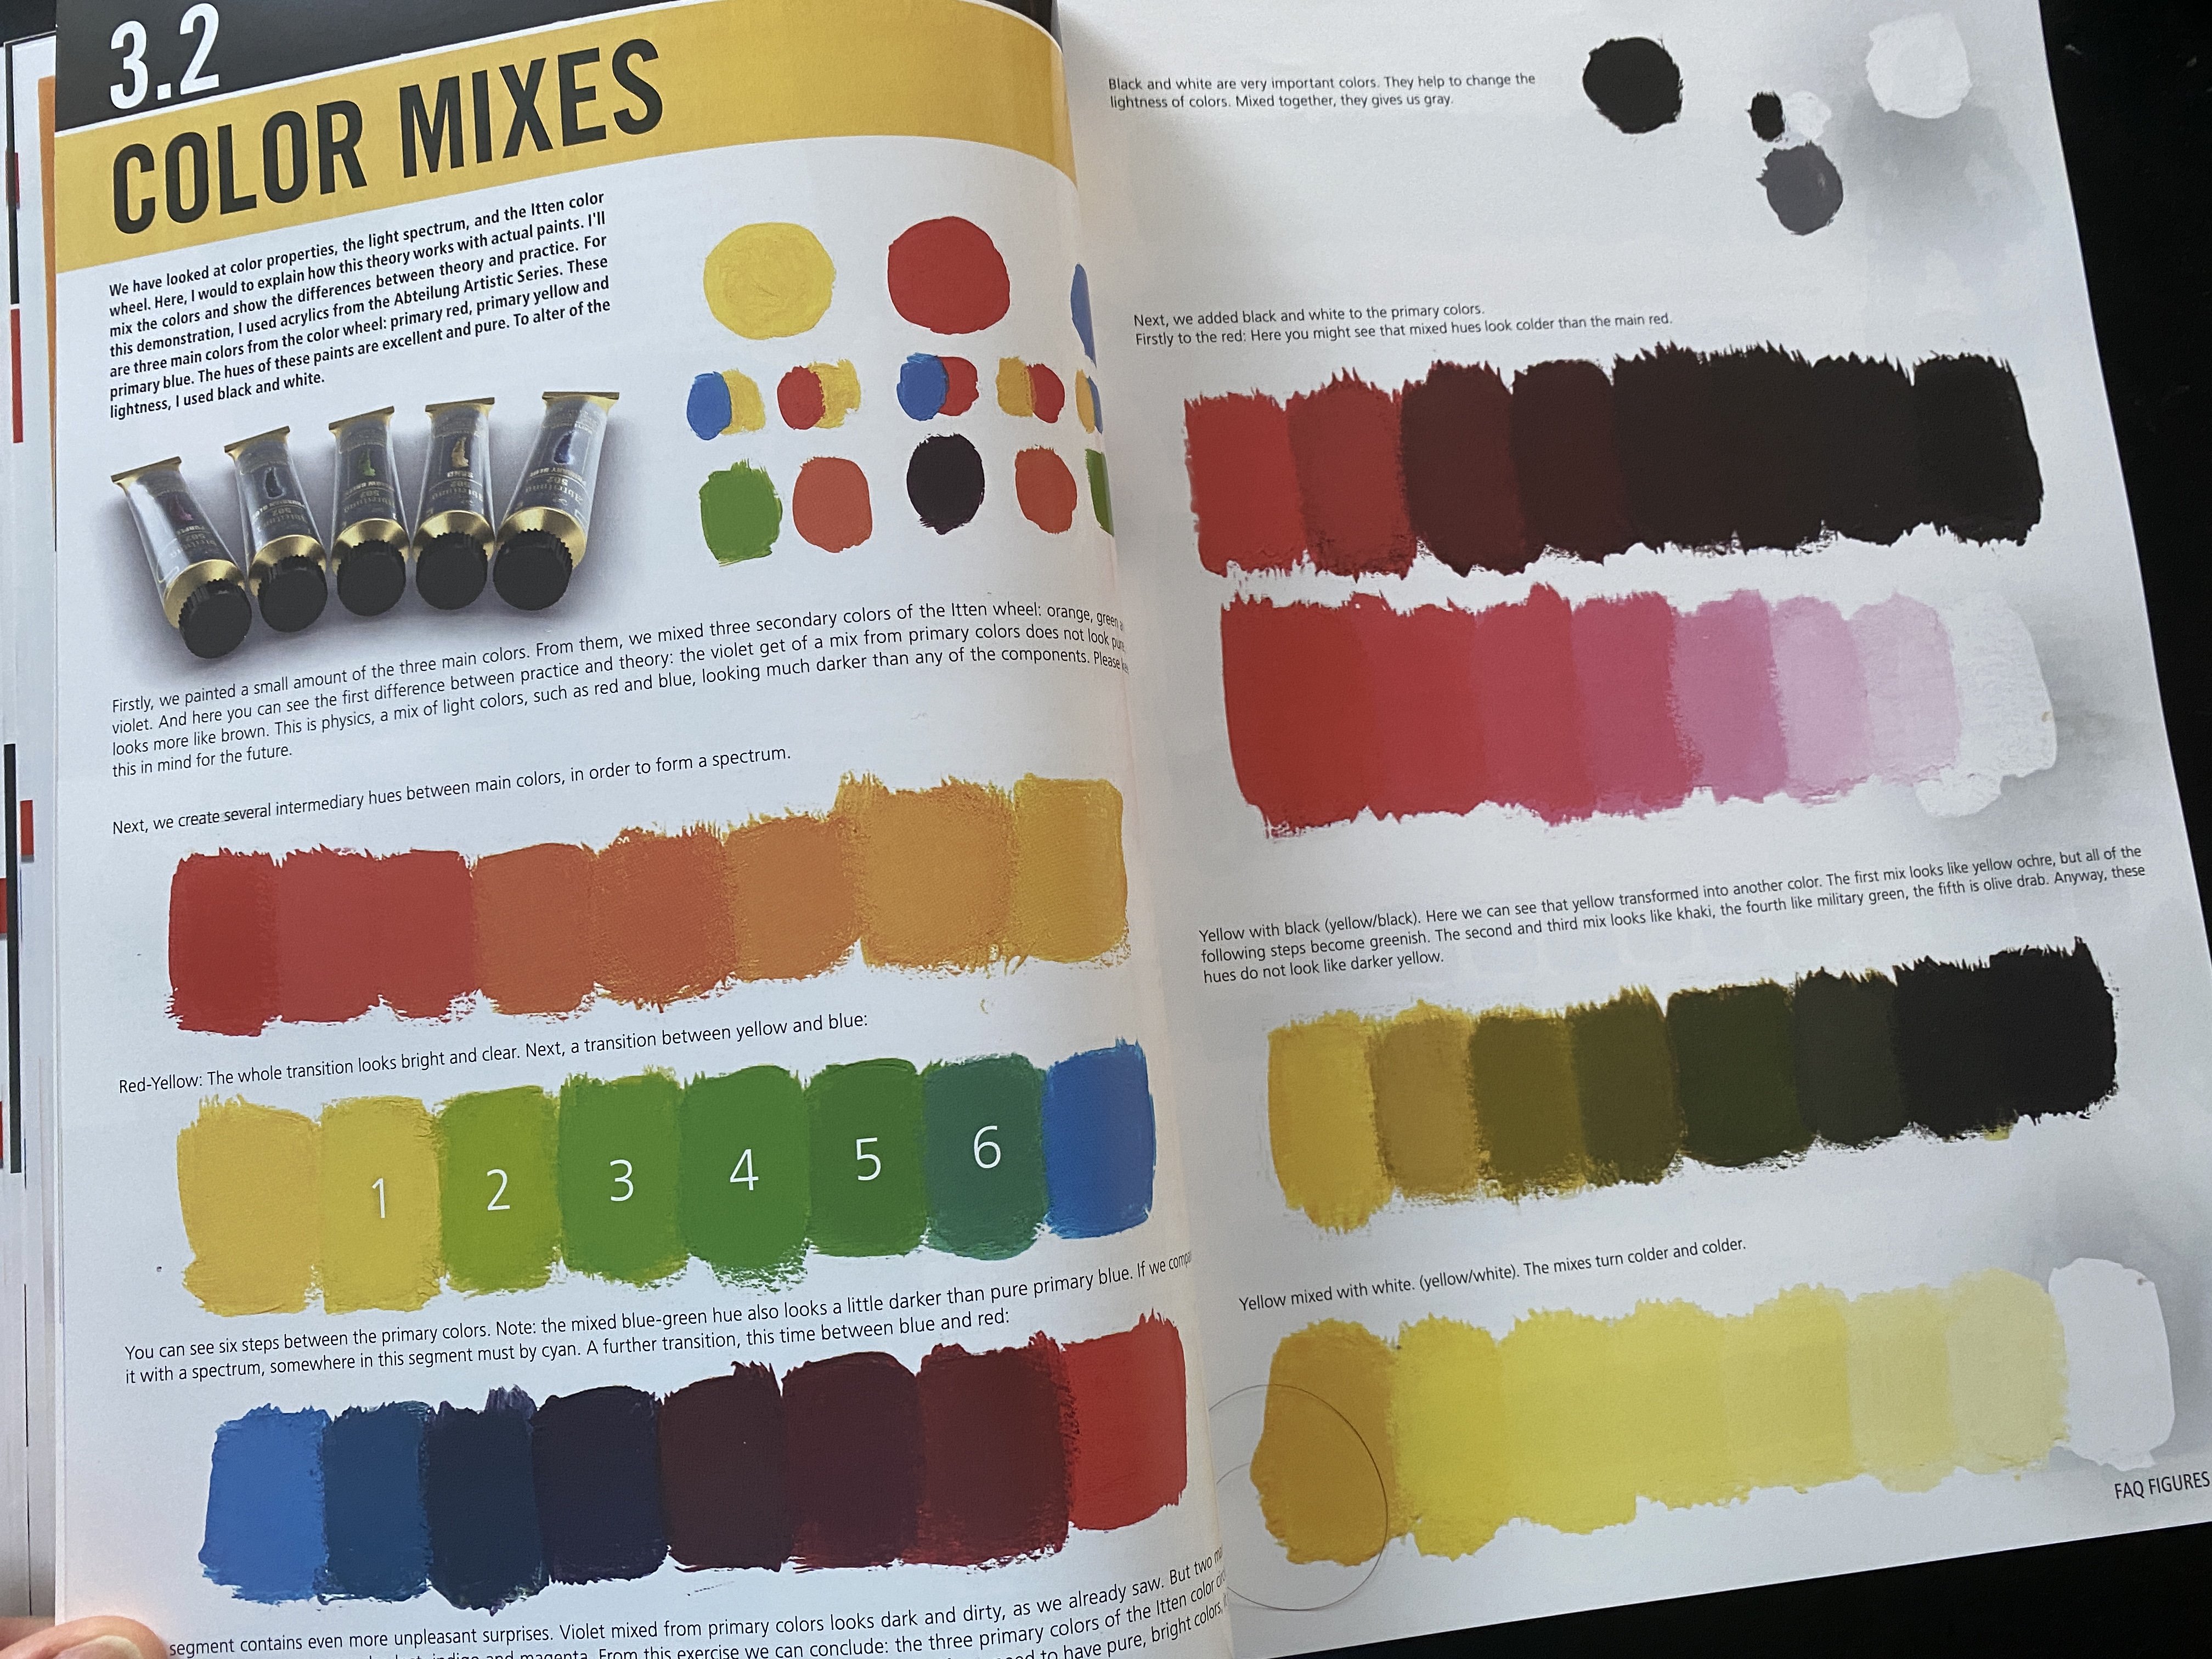
It is very educational and in fact gives us notions about the behavior of color. And to complete this color theory, the author presents chapter 3.2 (color mixes) where he demonstrates in practice, the behaviors of color showing various mixes based on primary colors.
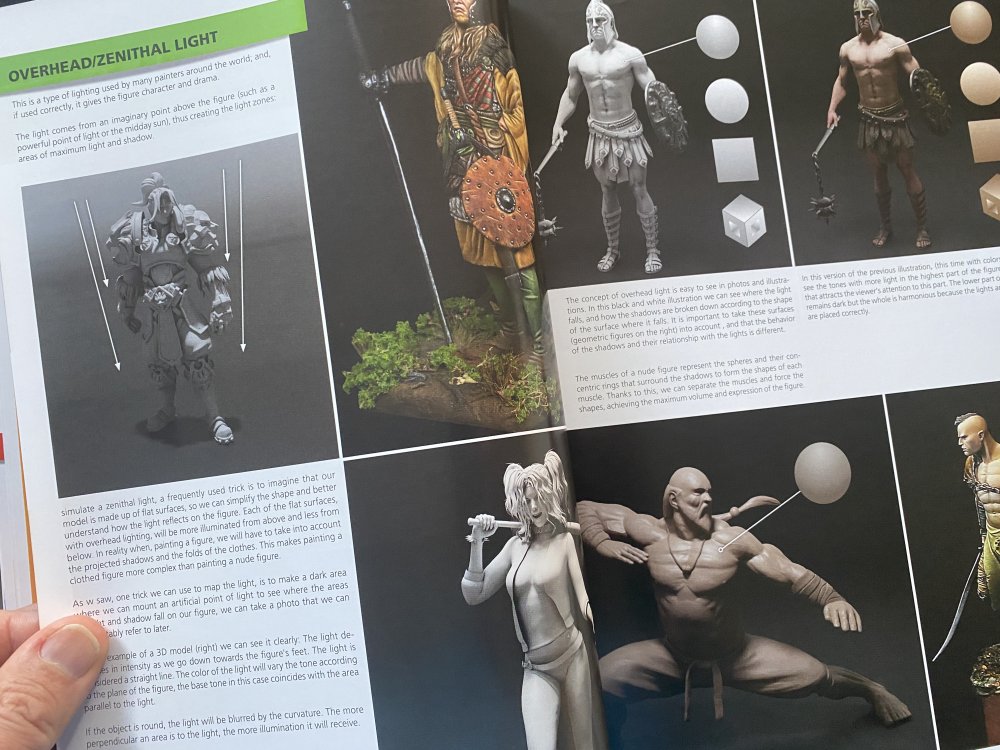
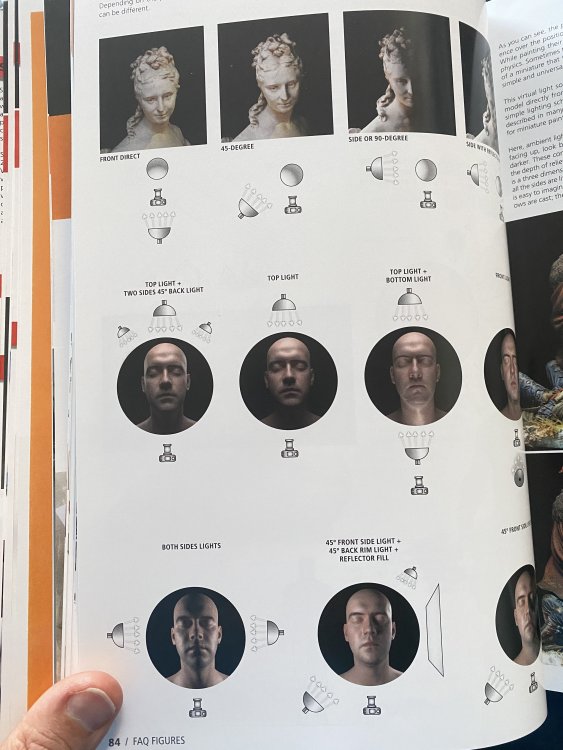
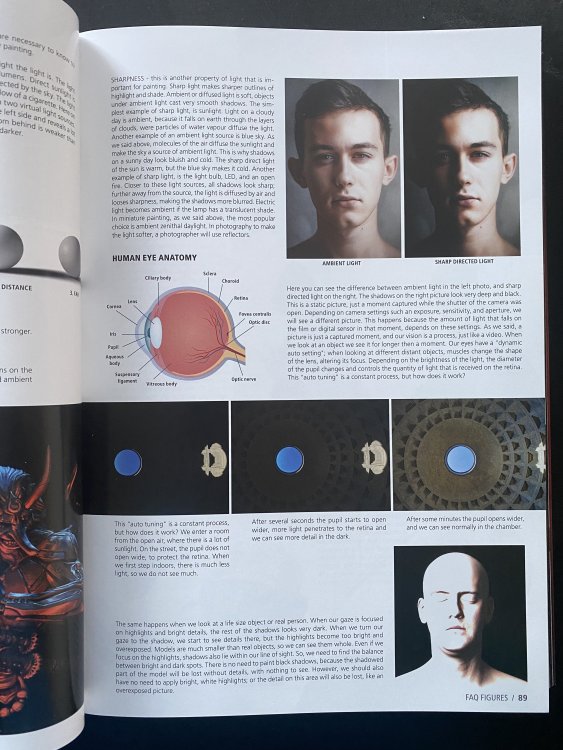
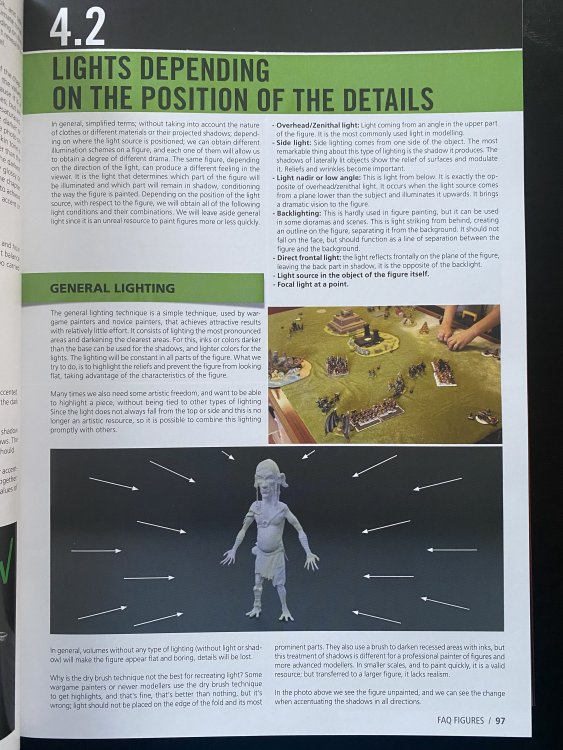
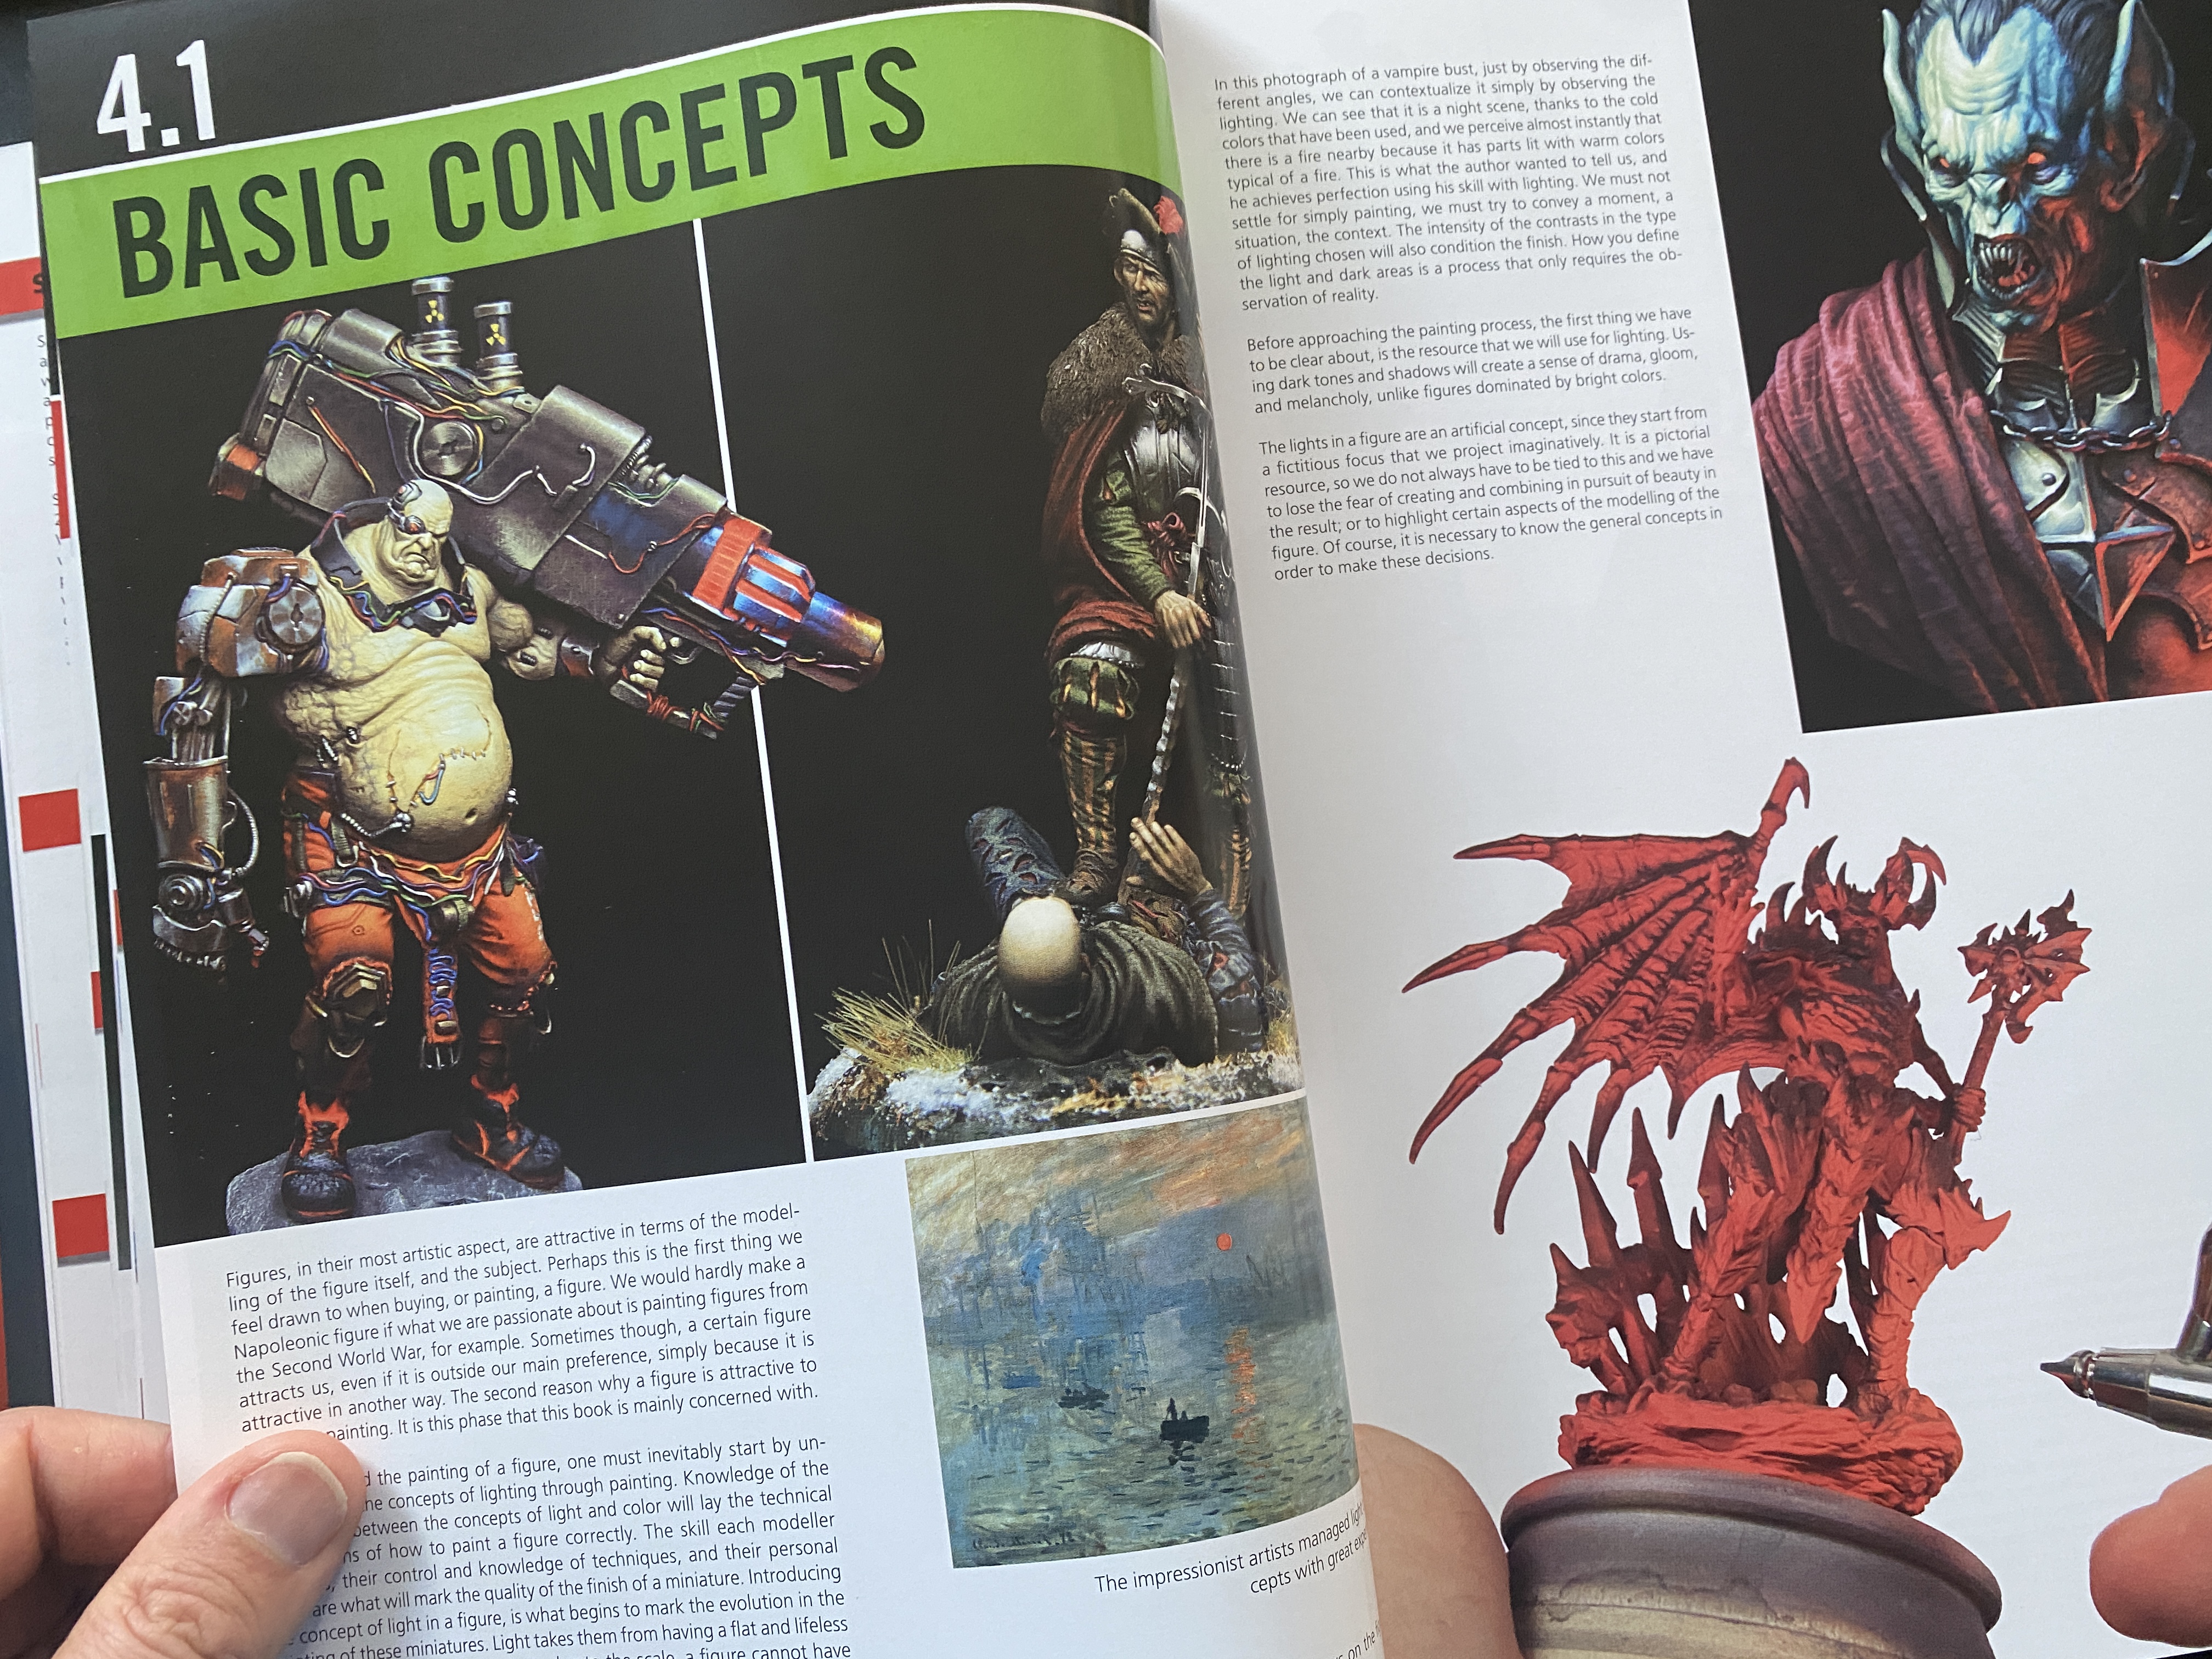
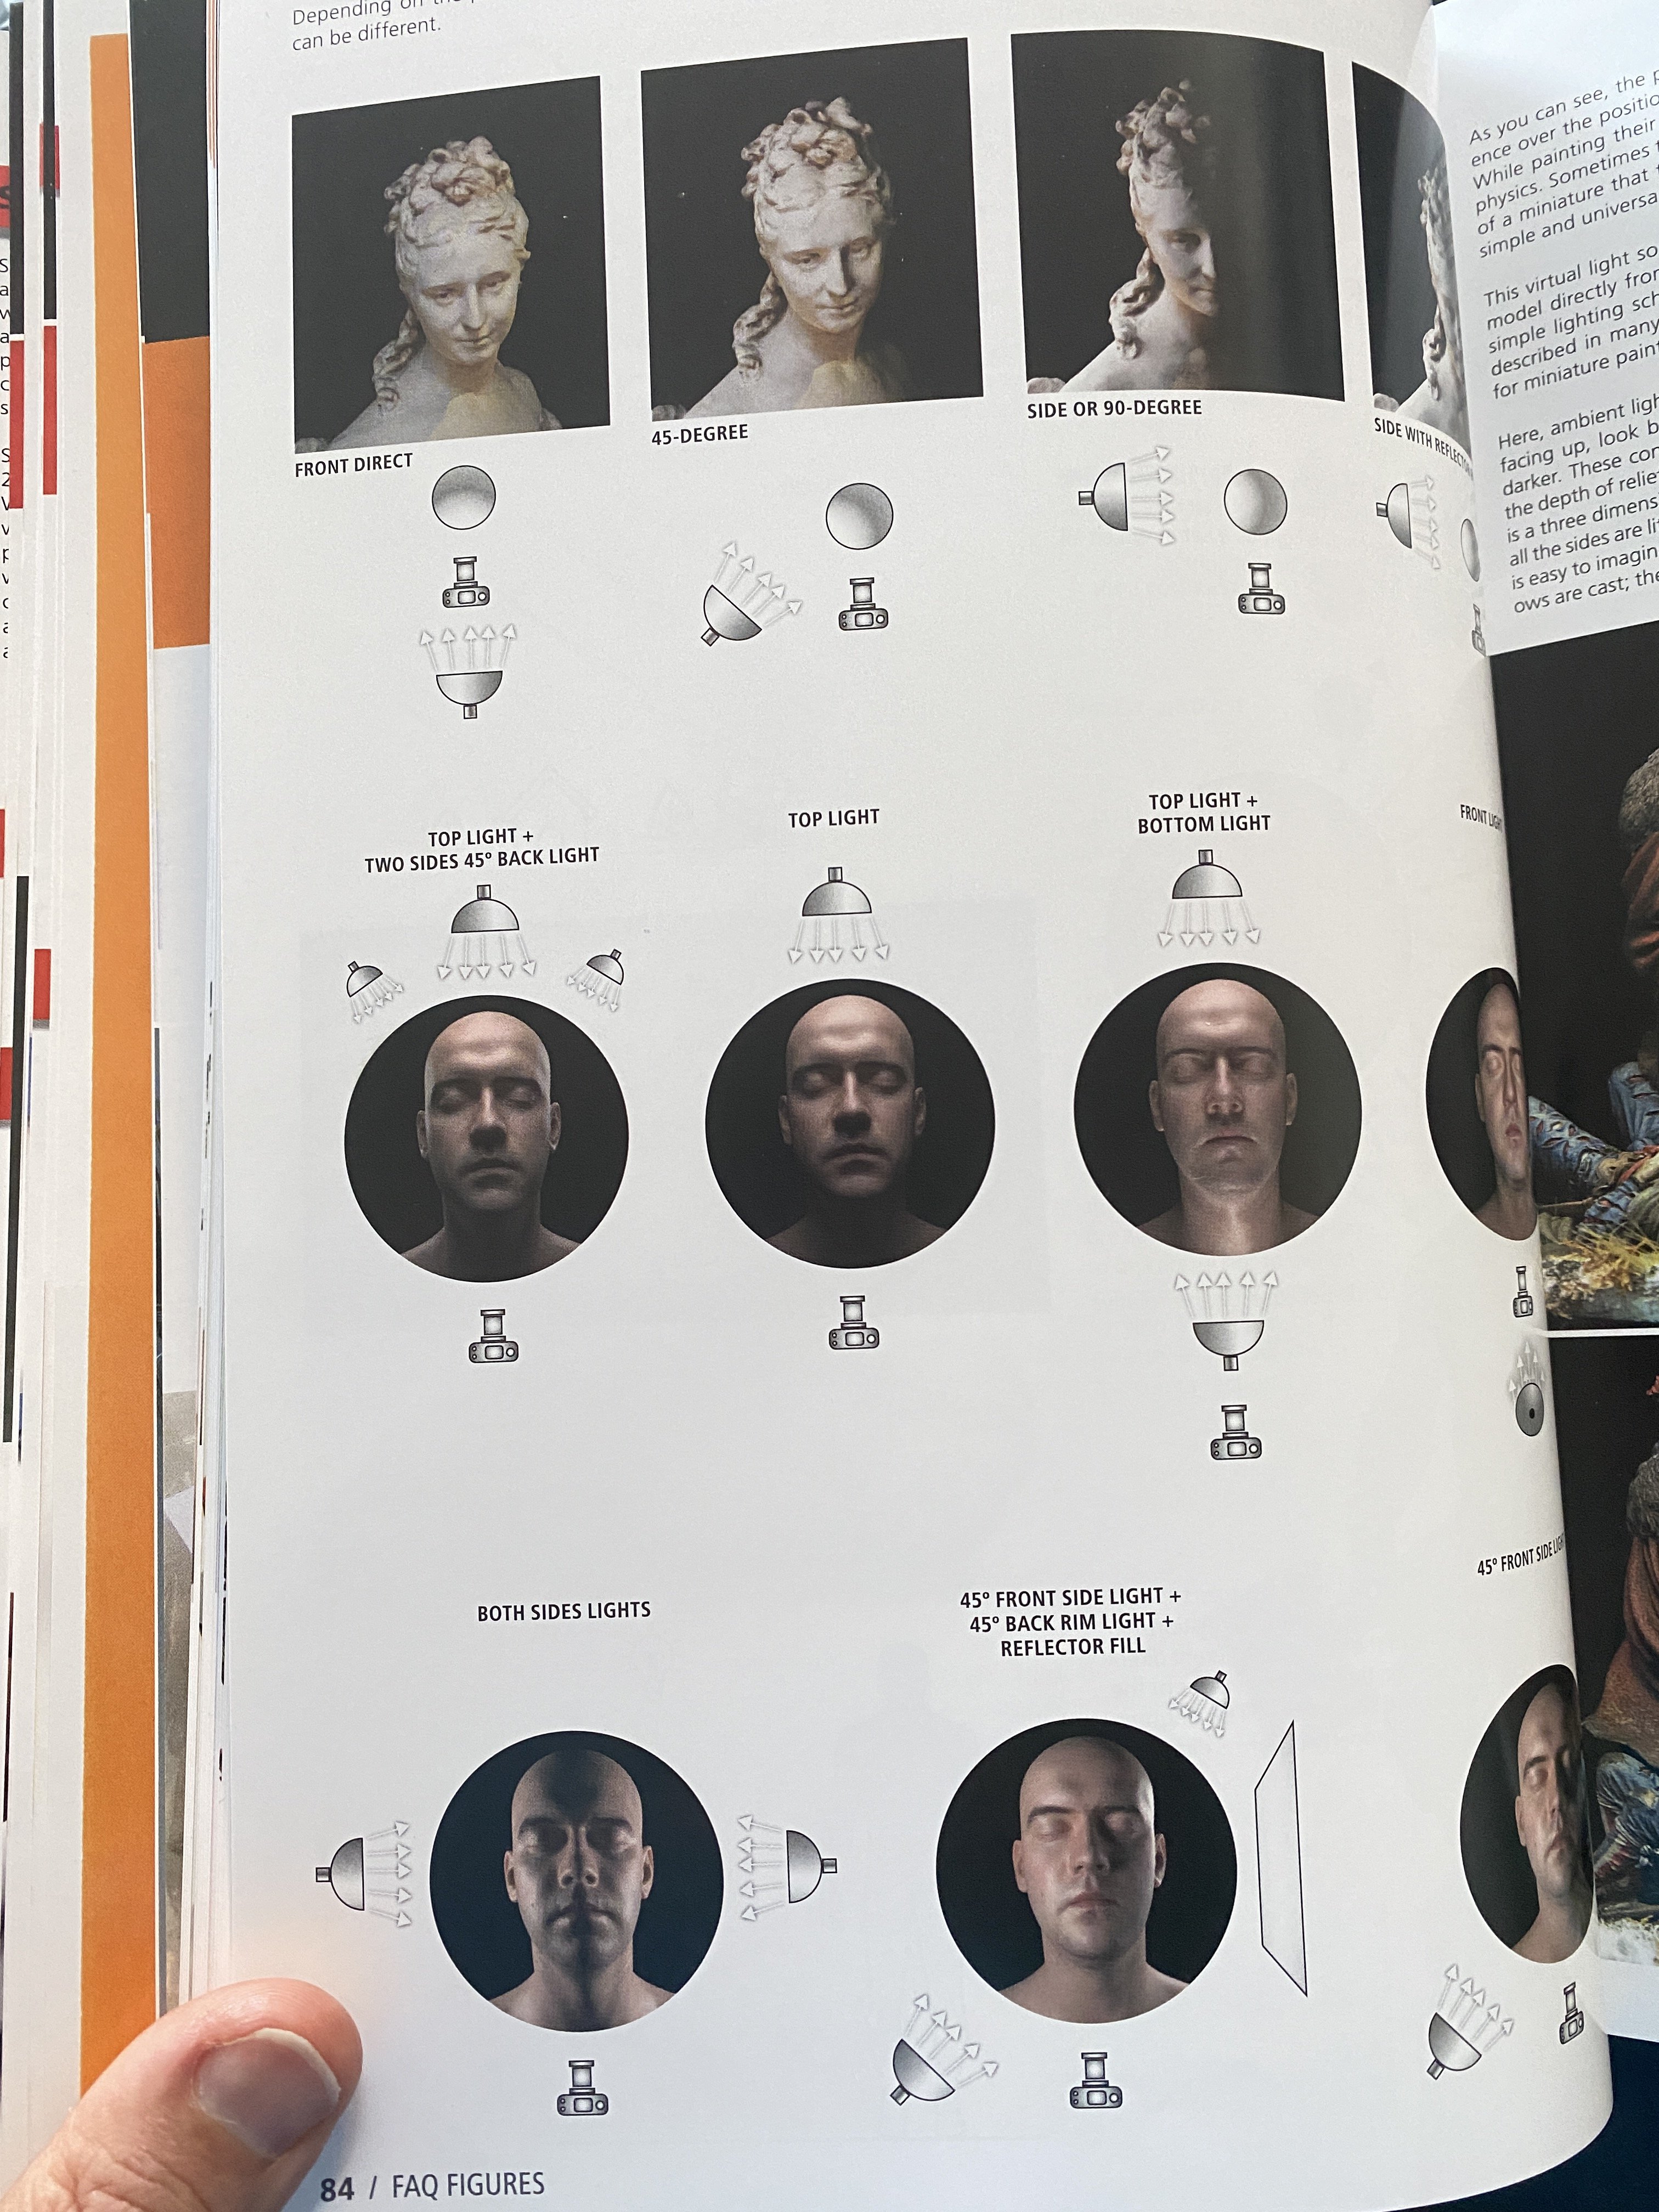
After the color teachings, chapter 4.1 and 4.2 presents the basic concepts of lights and shadows and the effects of light on the figures and their dimensions. What is called “zenital light”, the lights and shadows created from a point of light, depending on their angle of incidence. This "personal definition" is highly reductive compared to the explanations and study carried out by the author

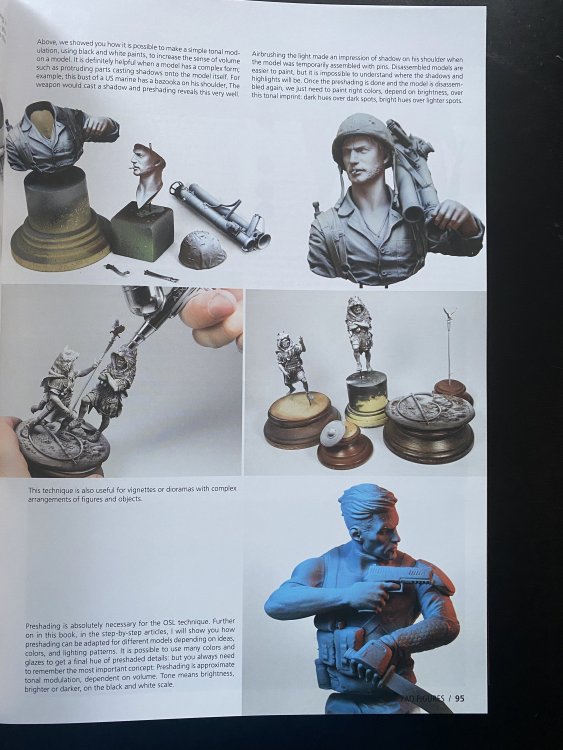
Check the pics:

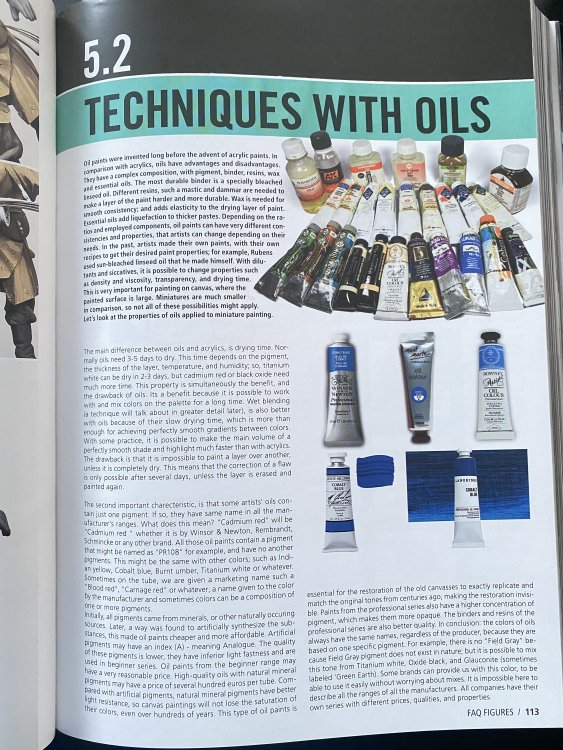
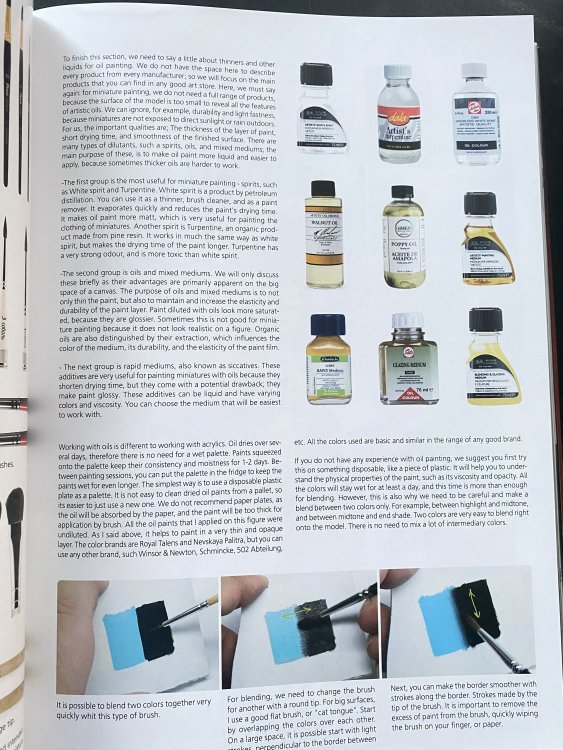
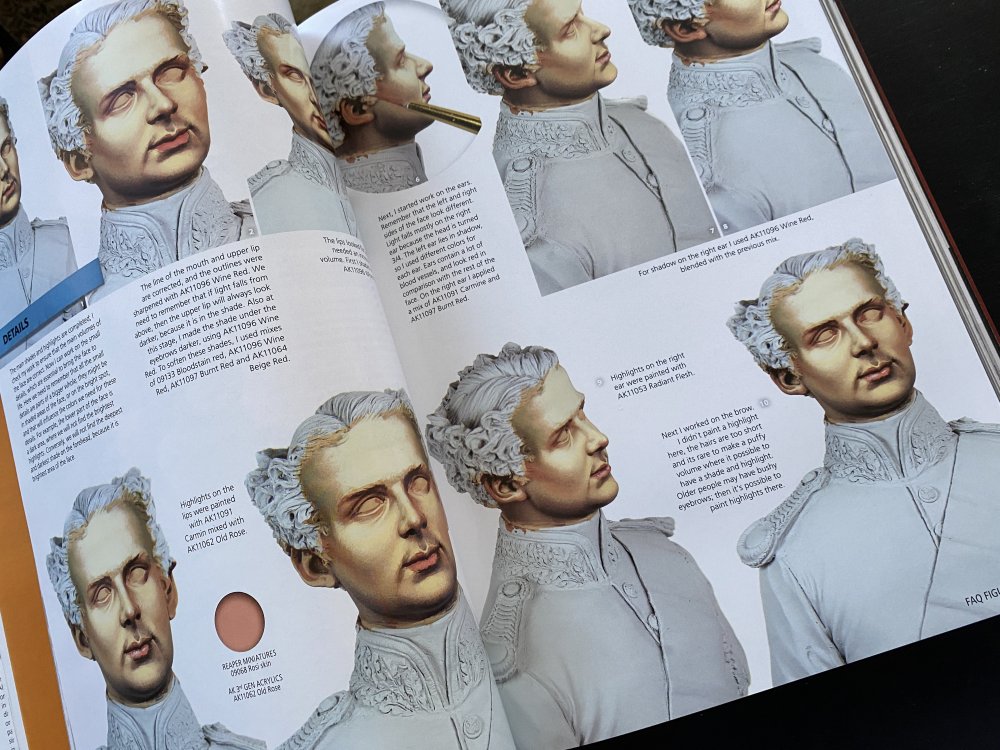
We go into chapter 5: Techniques.
I am not going to describe here what all the techniques presented consist of because it did not make sense or explain in any way what Kiril does and exemplifies in a masterful way.

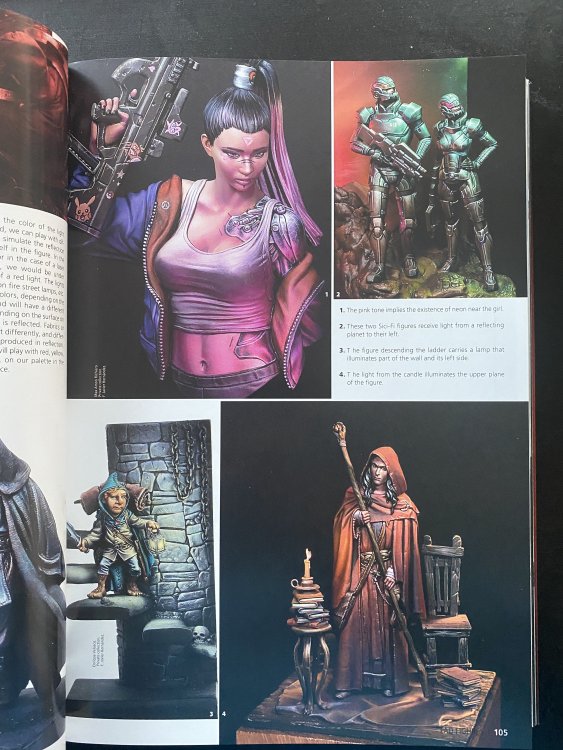
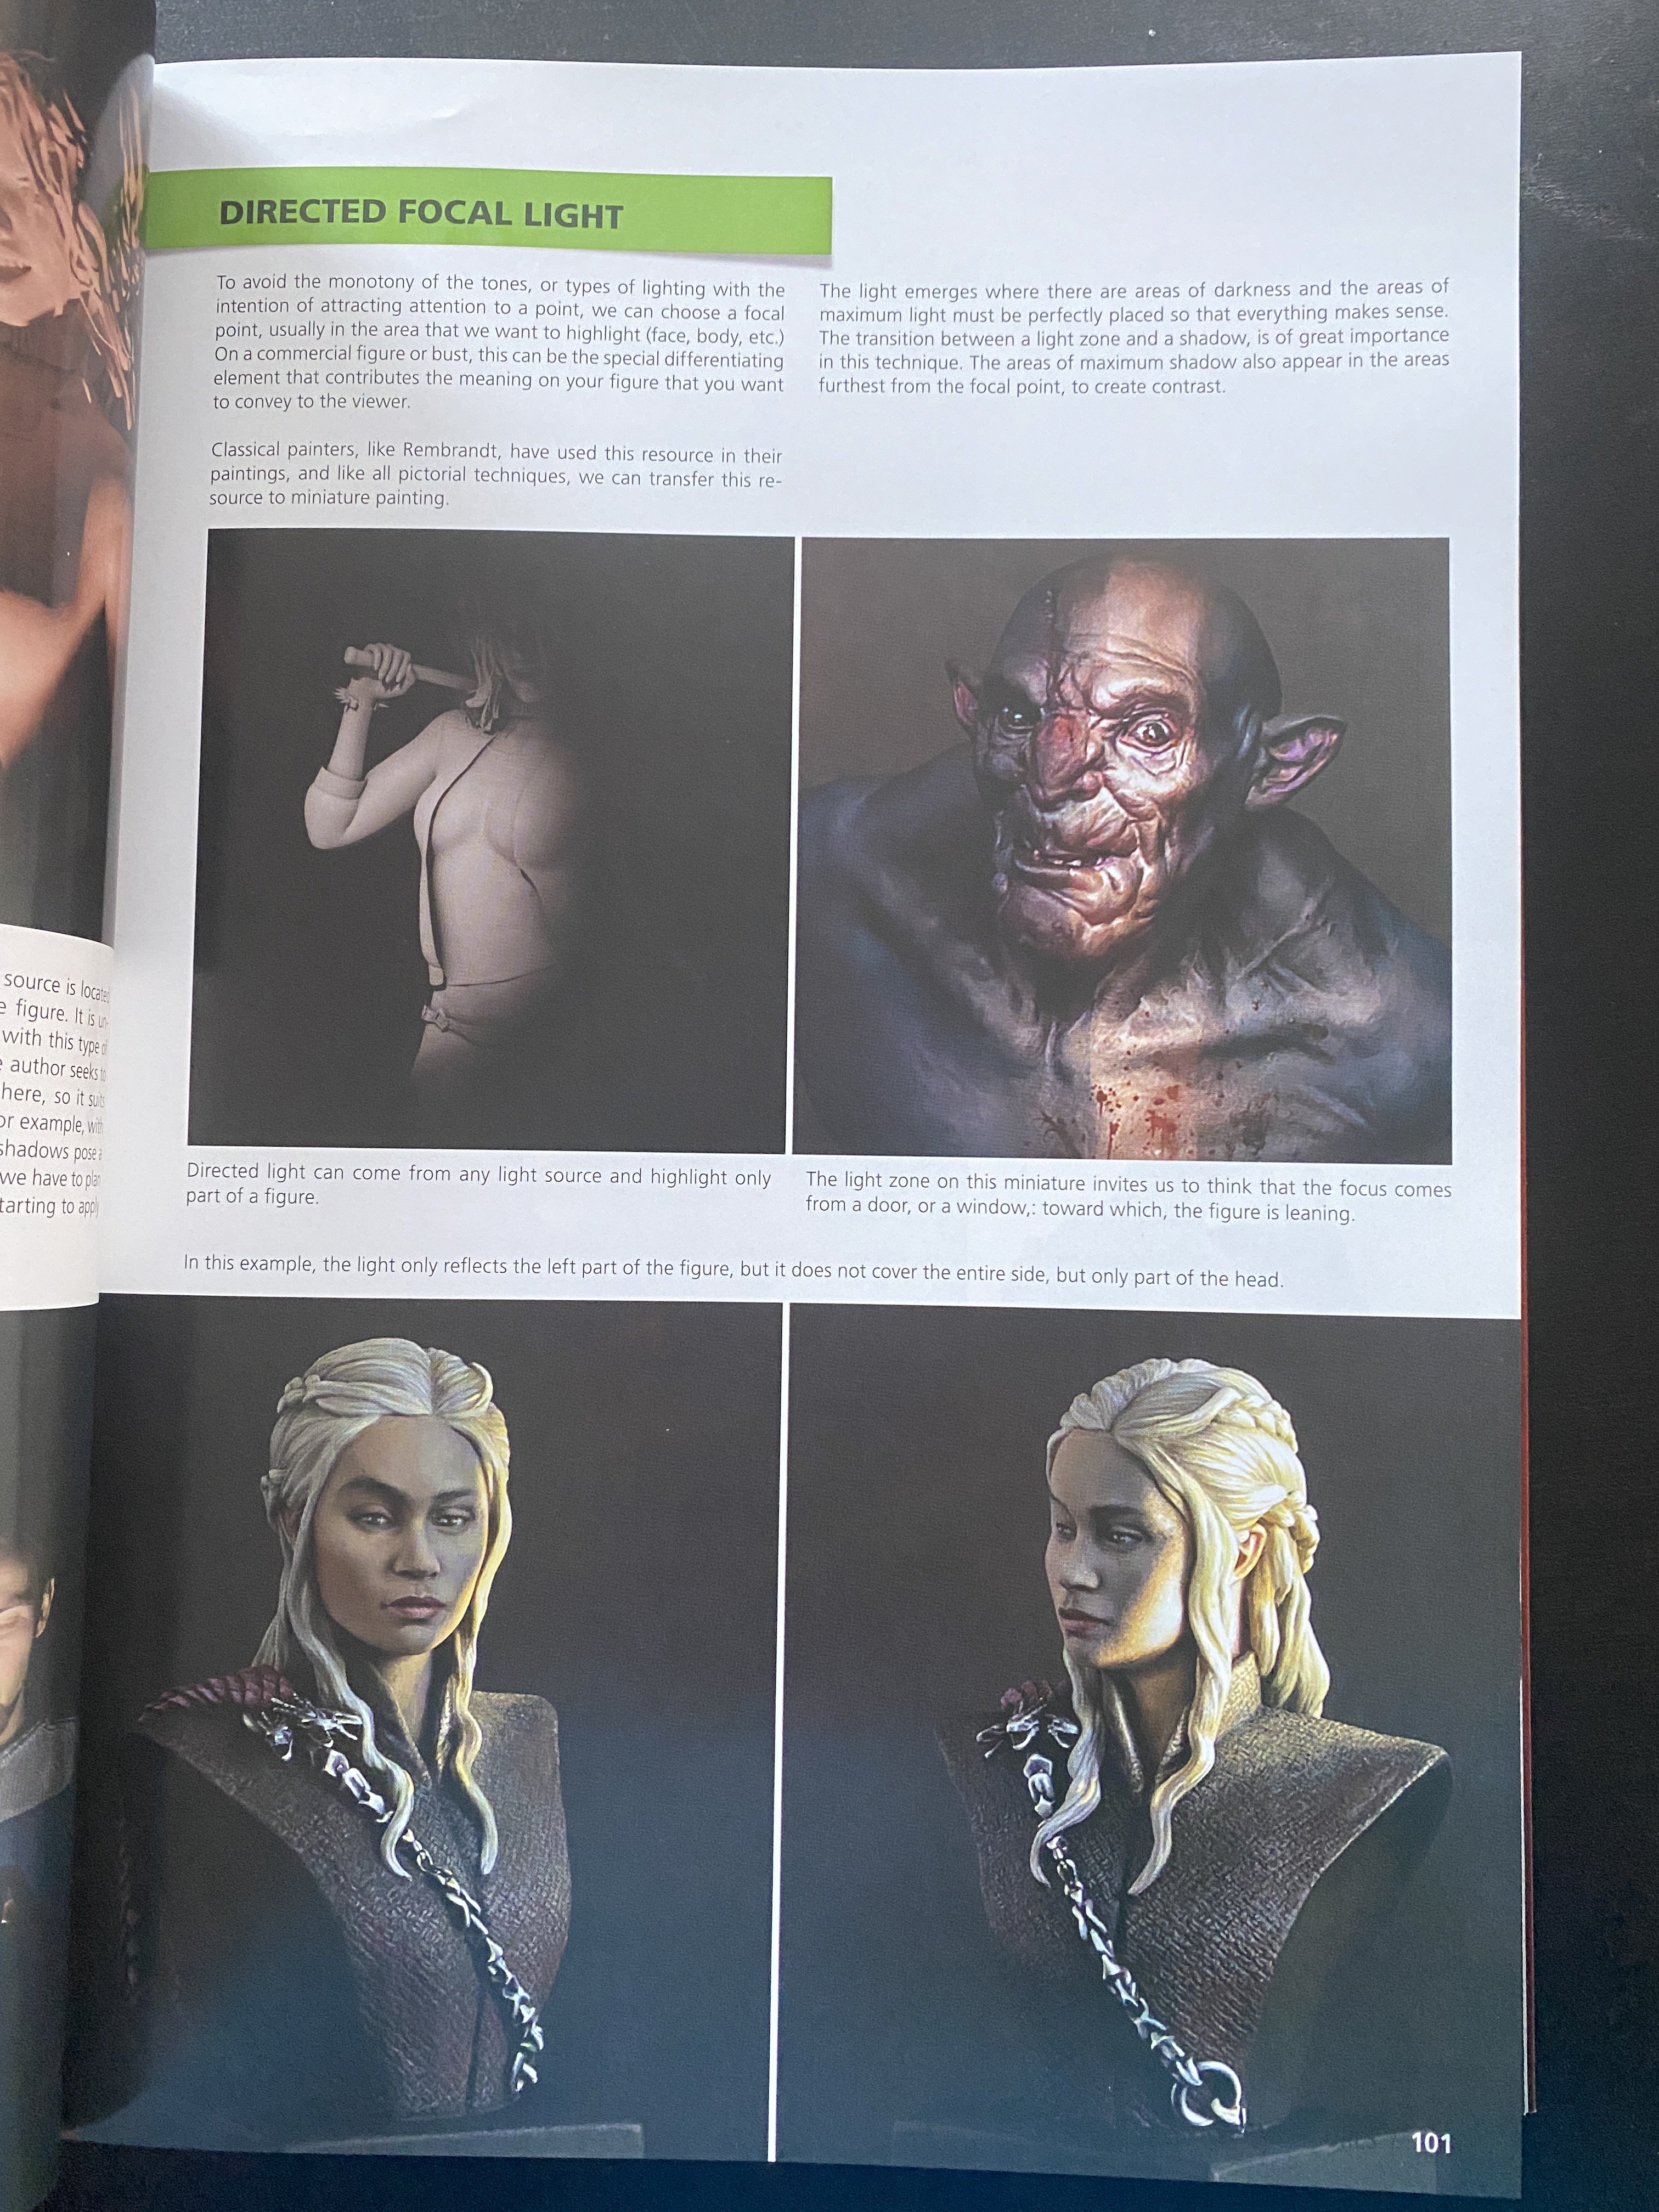
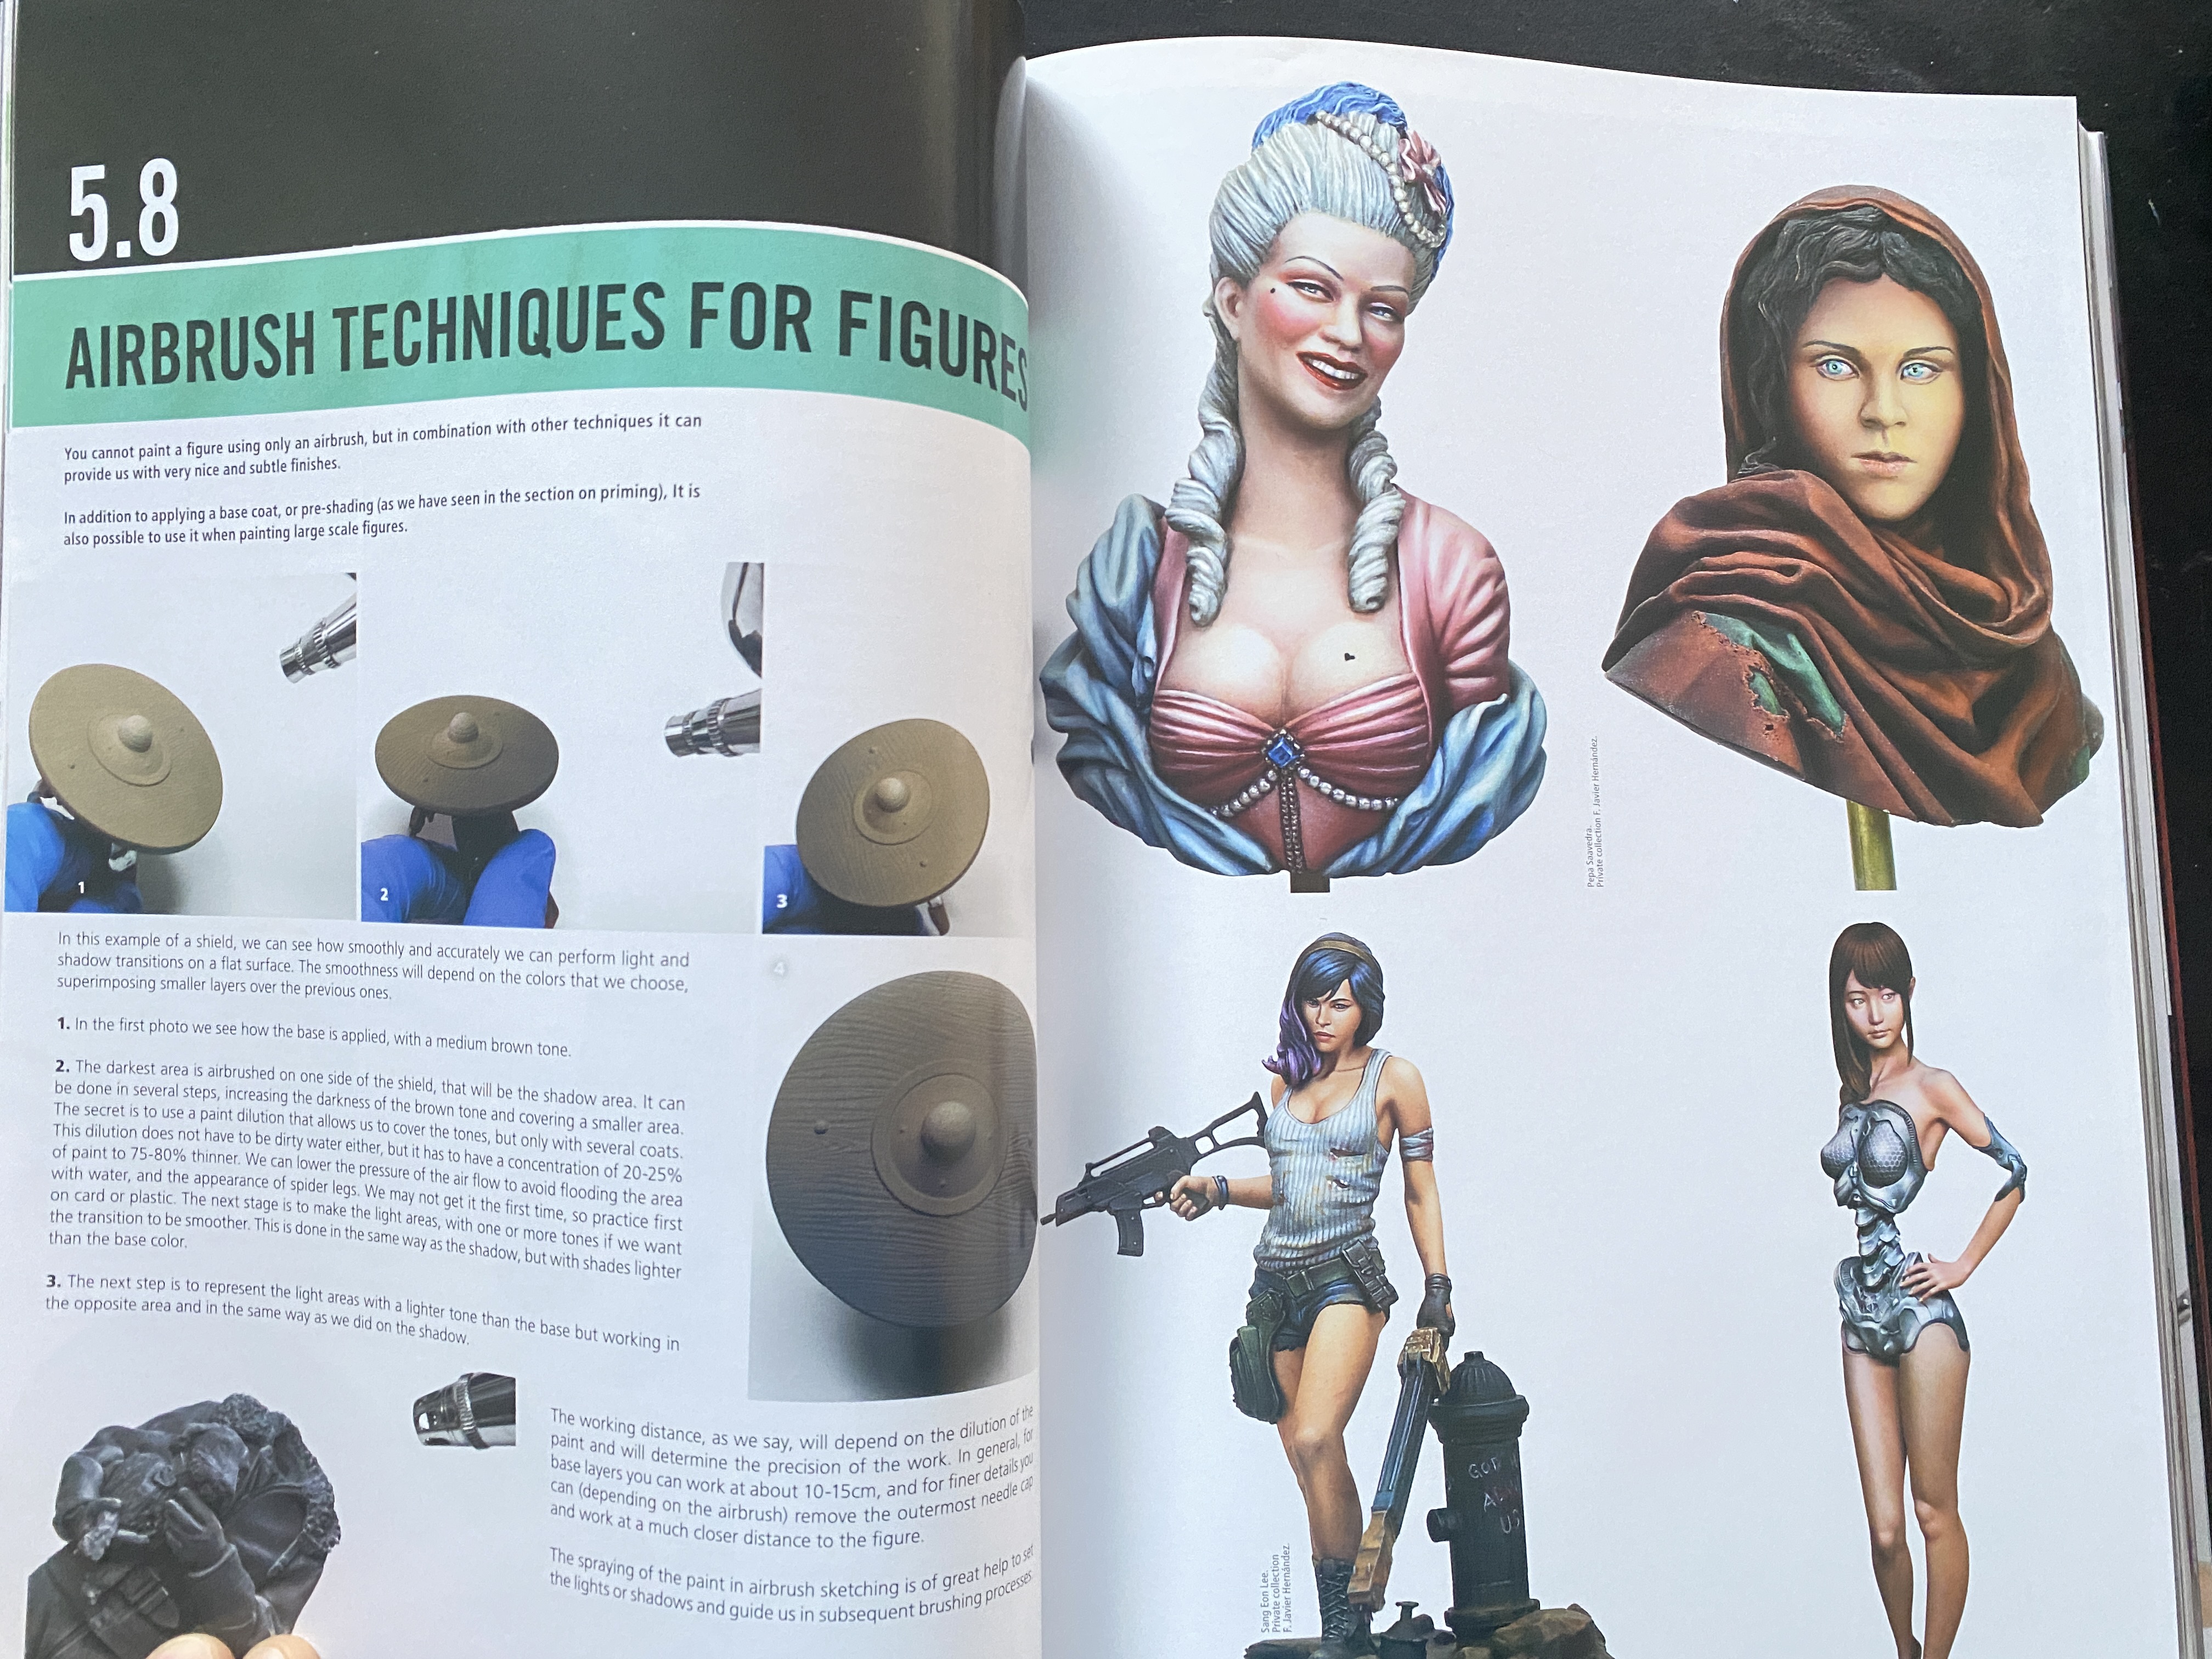
Its not only brush painting techniques but also with sponge and airbrush, so I leave you photographs with the different techniques that allow you to check the method of step-by-step used as well as the quality of the photos accompanied with the explanatory text.


The Author could almost stop here ... but no ...In Chapter 6 and sub-chapters the author applies the techniques he explained in the previous chapter to several specific situations, taking the development of techniques even further, to the absolut perfection.
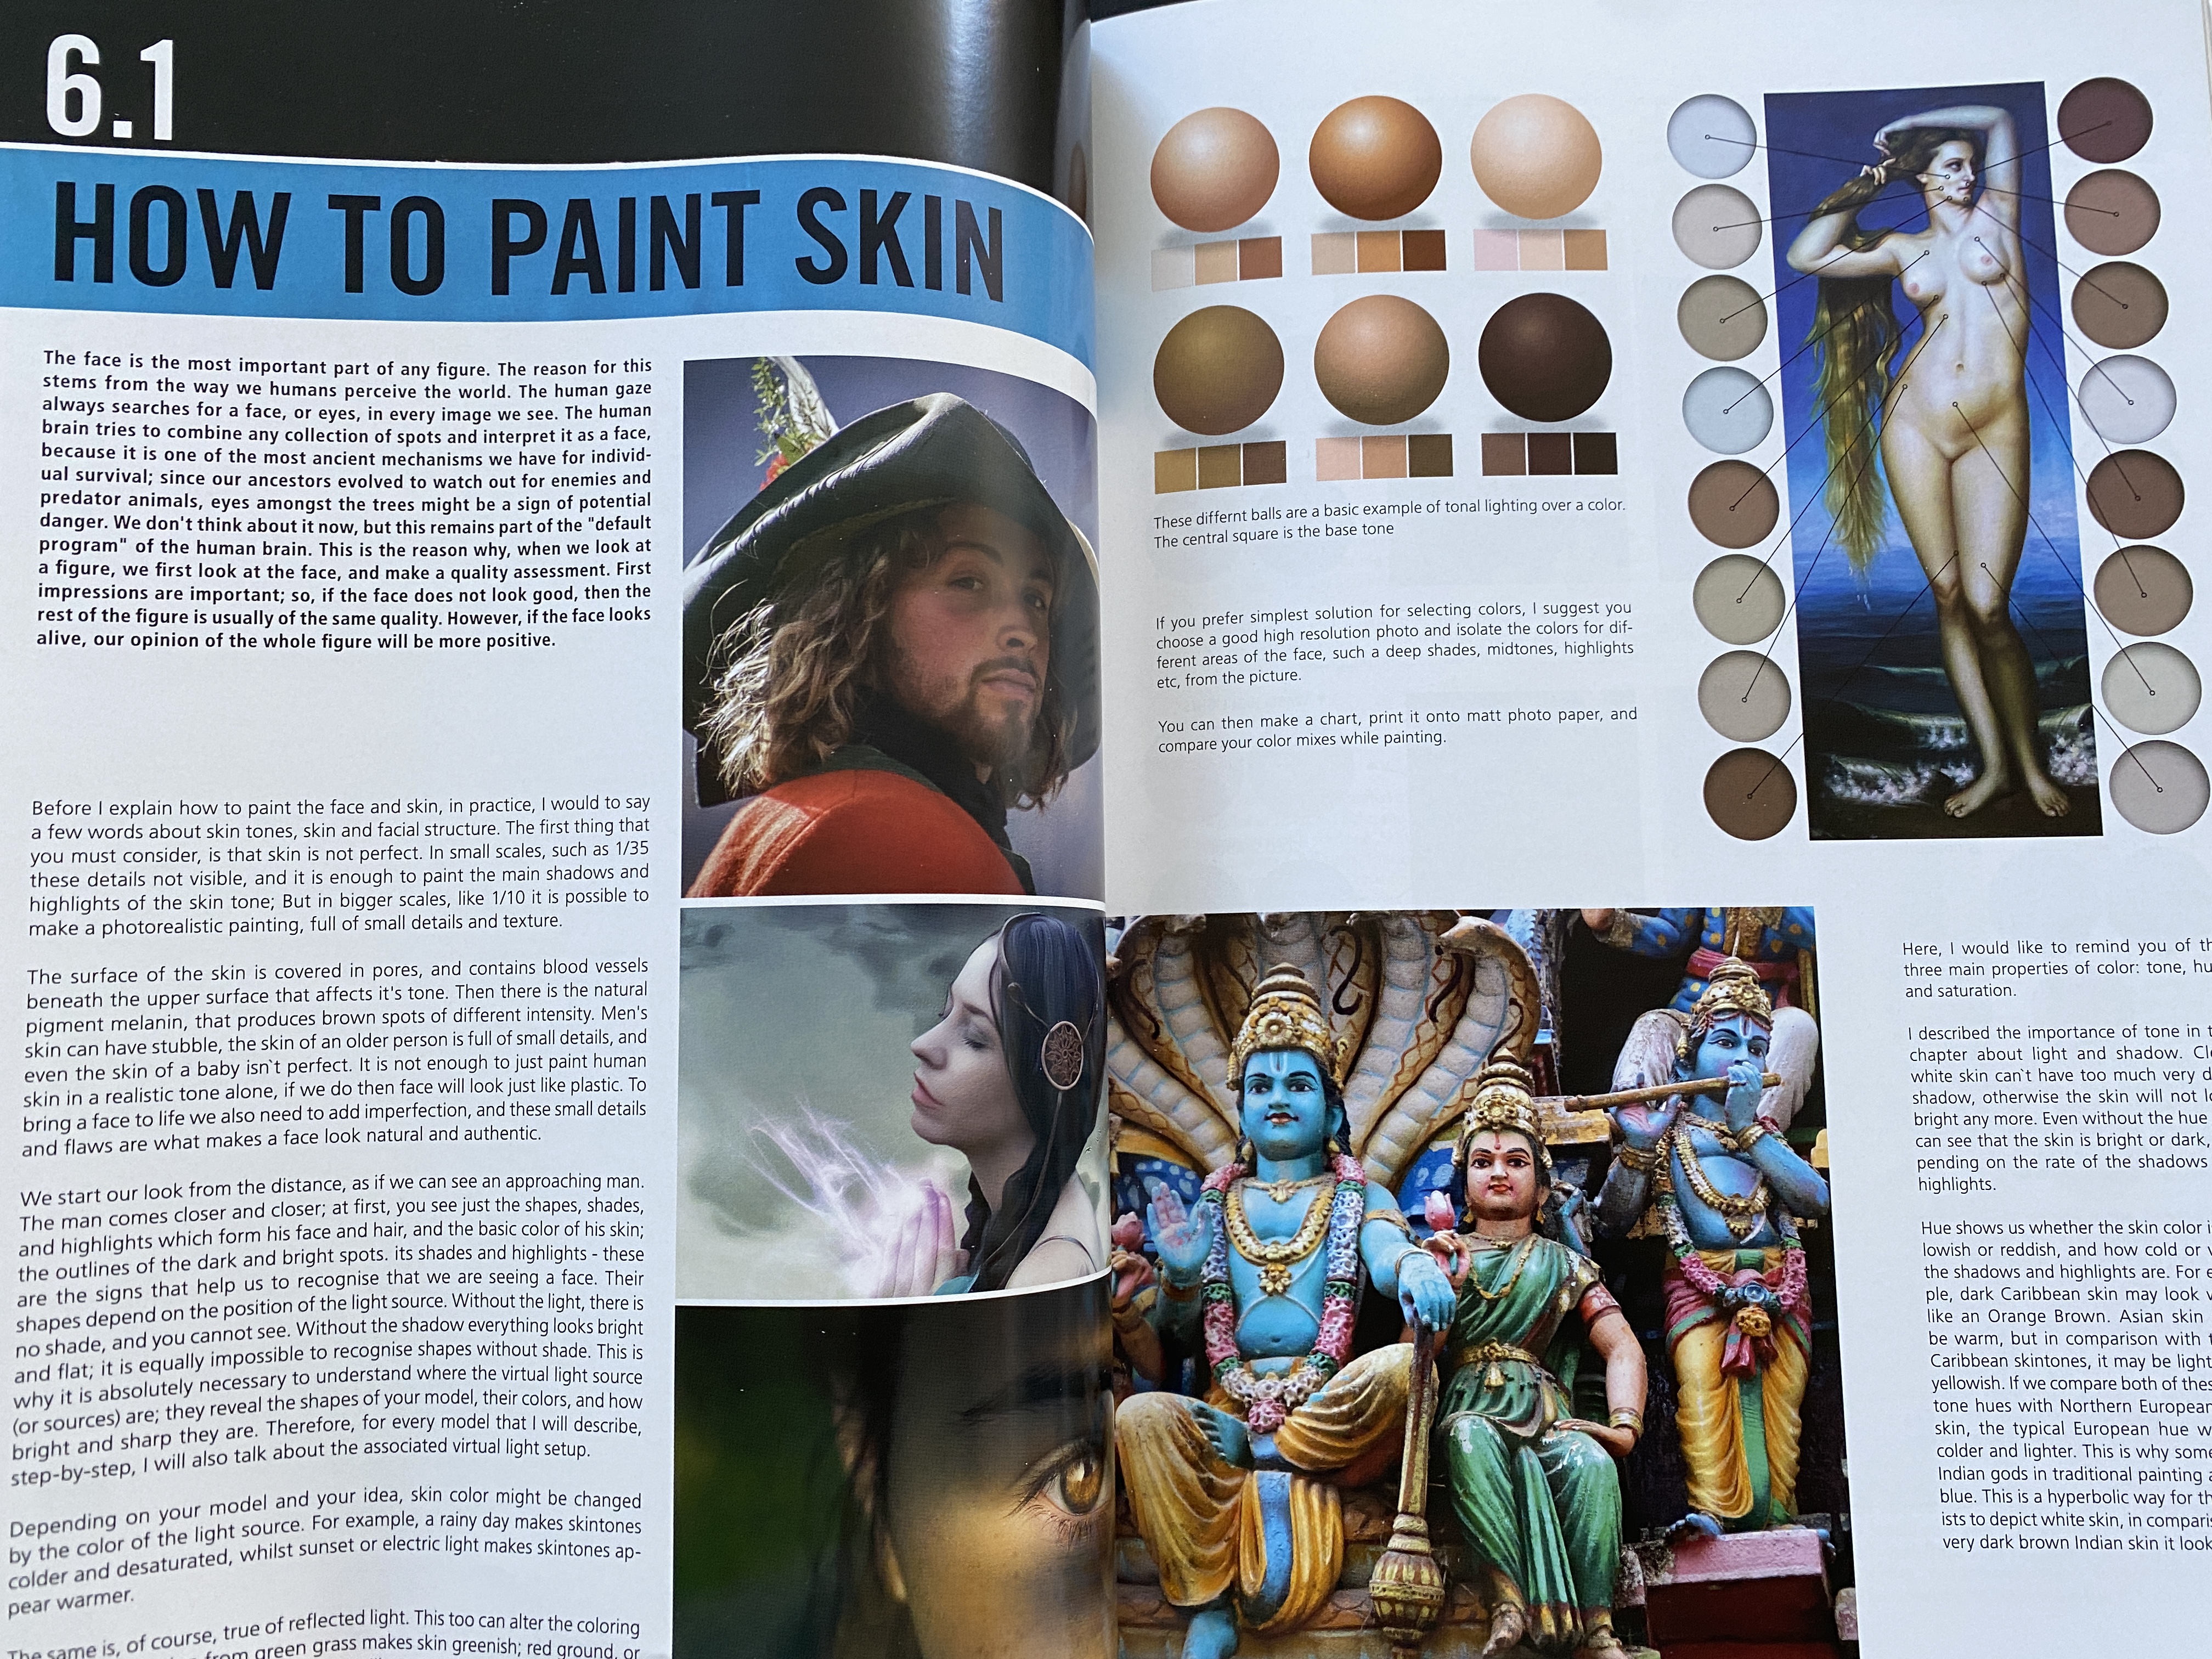
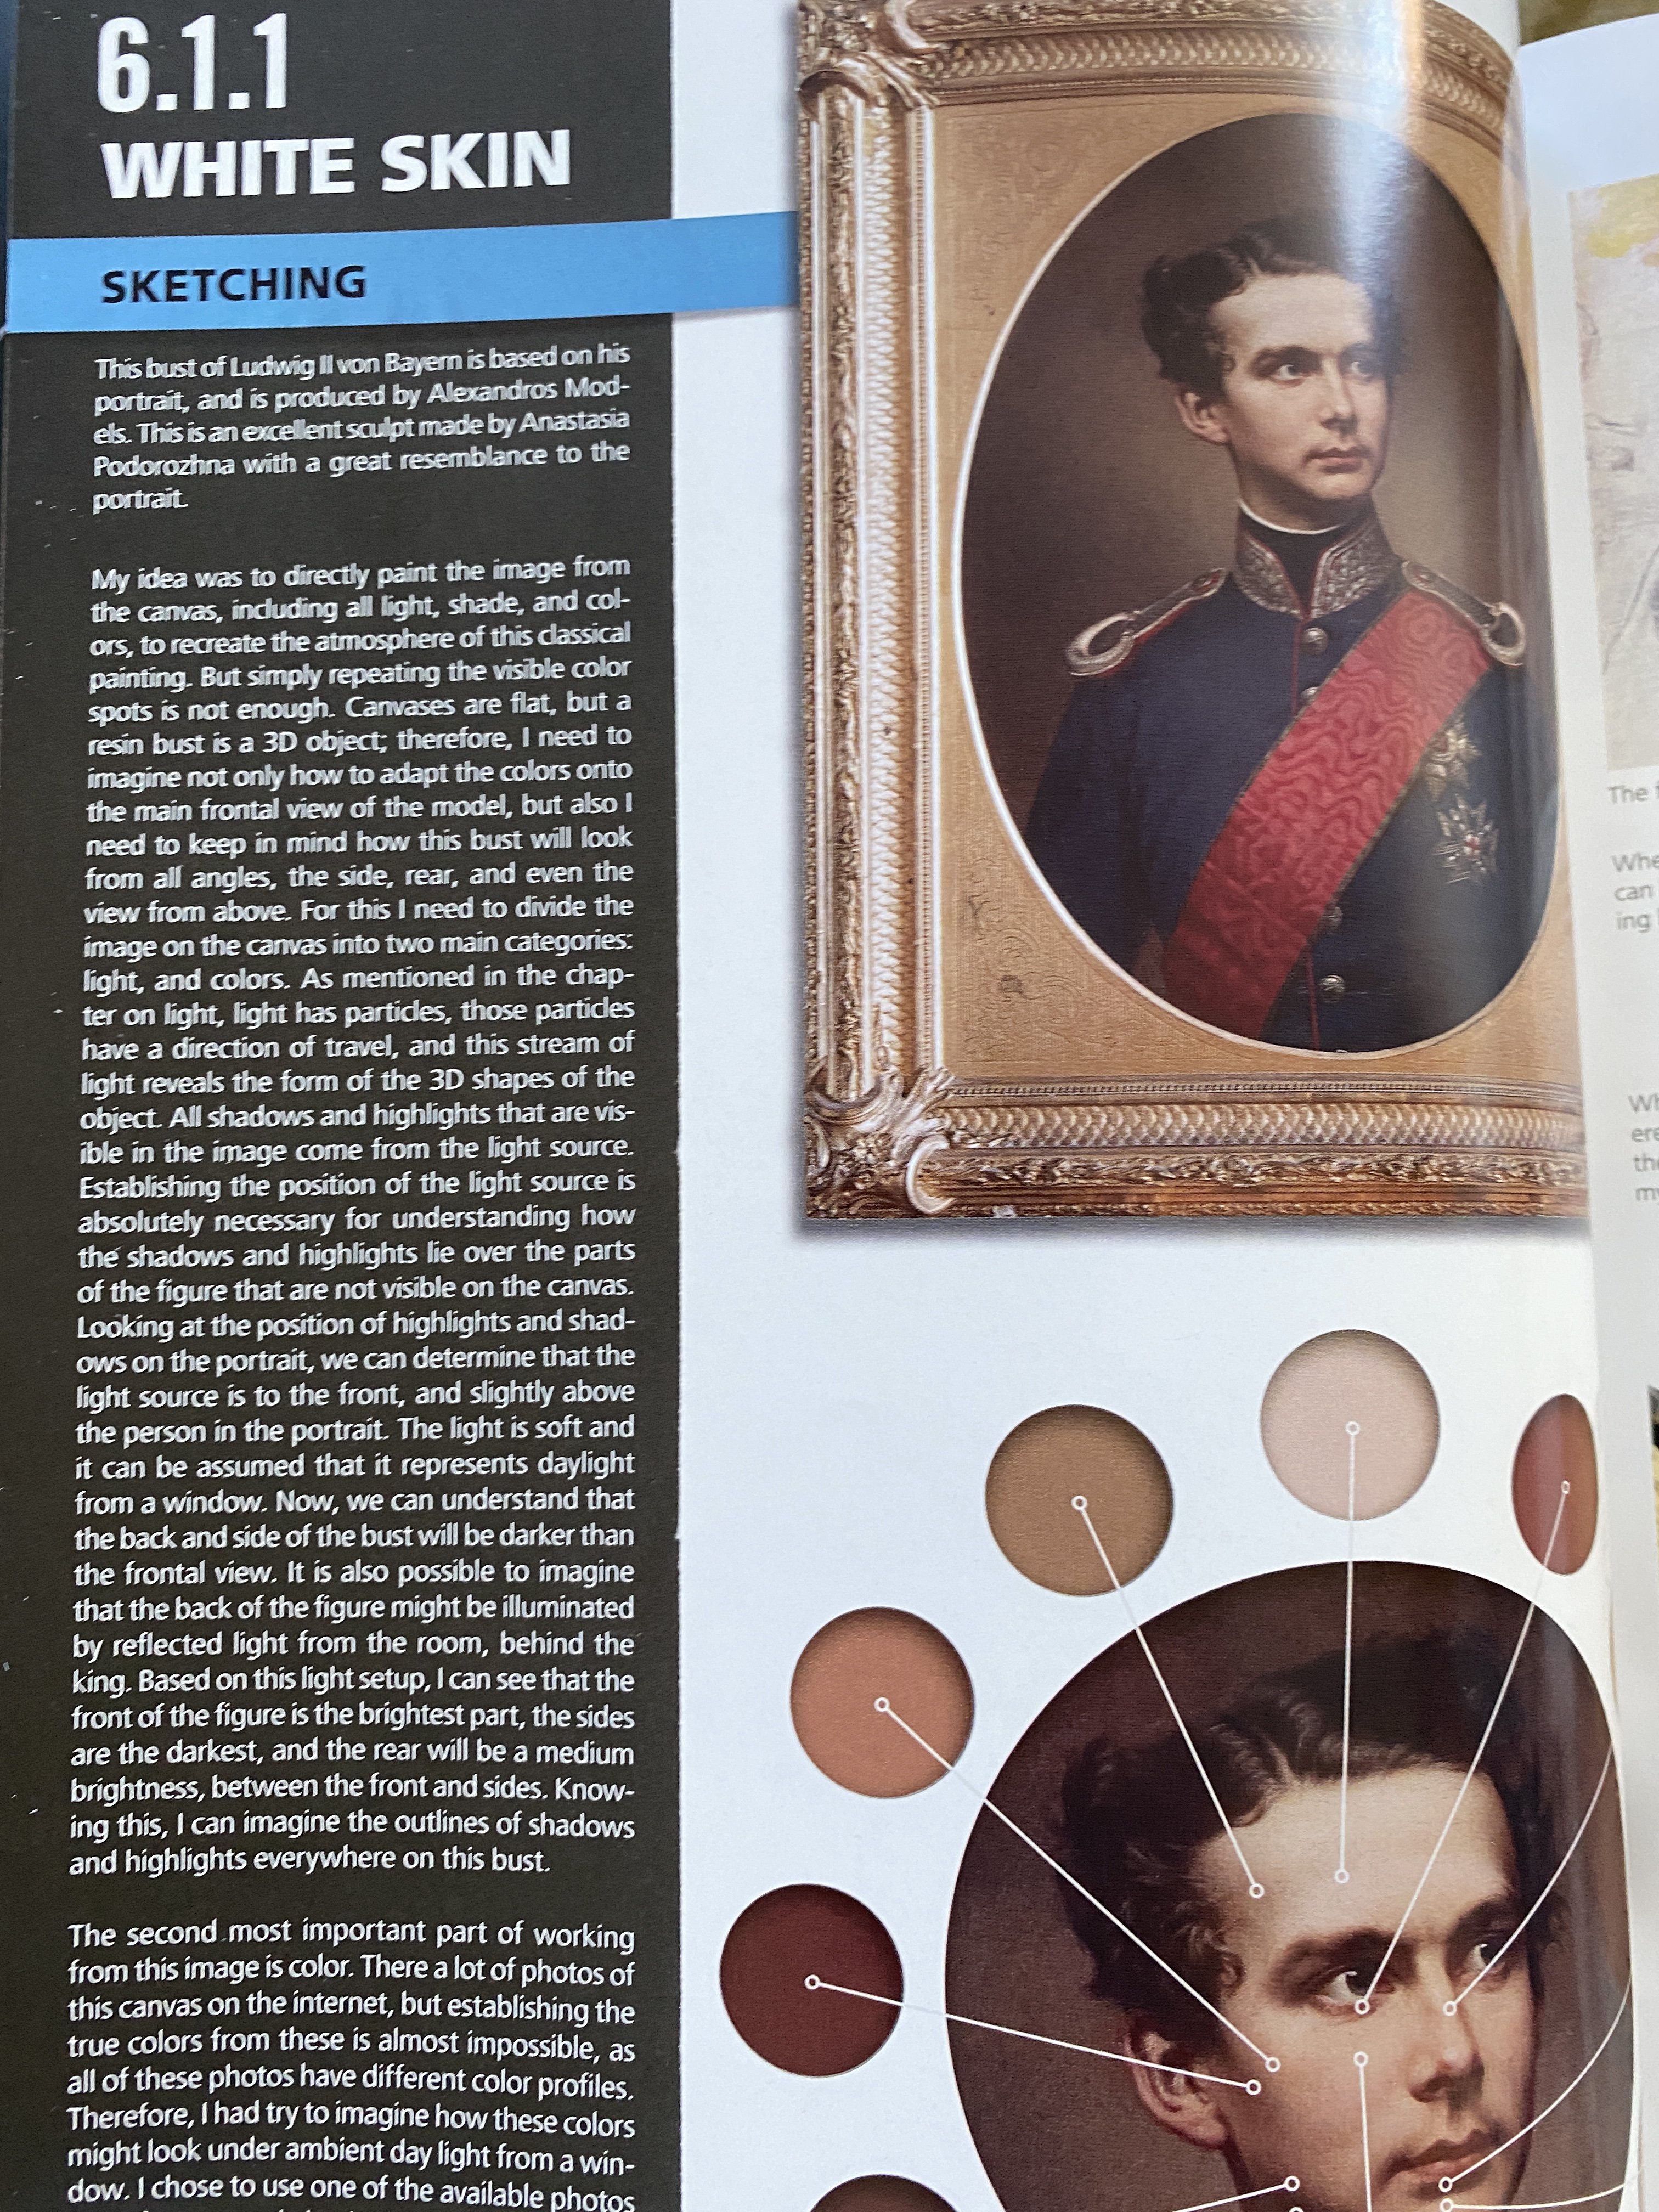
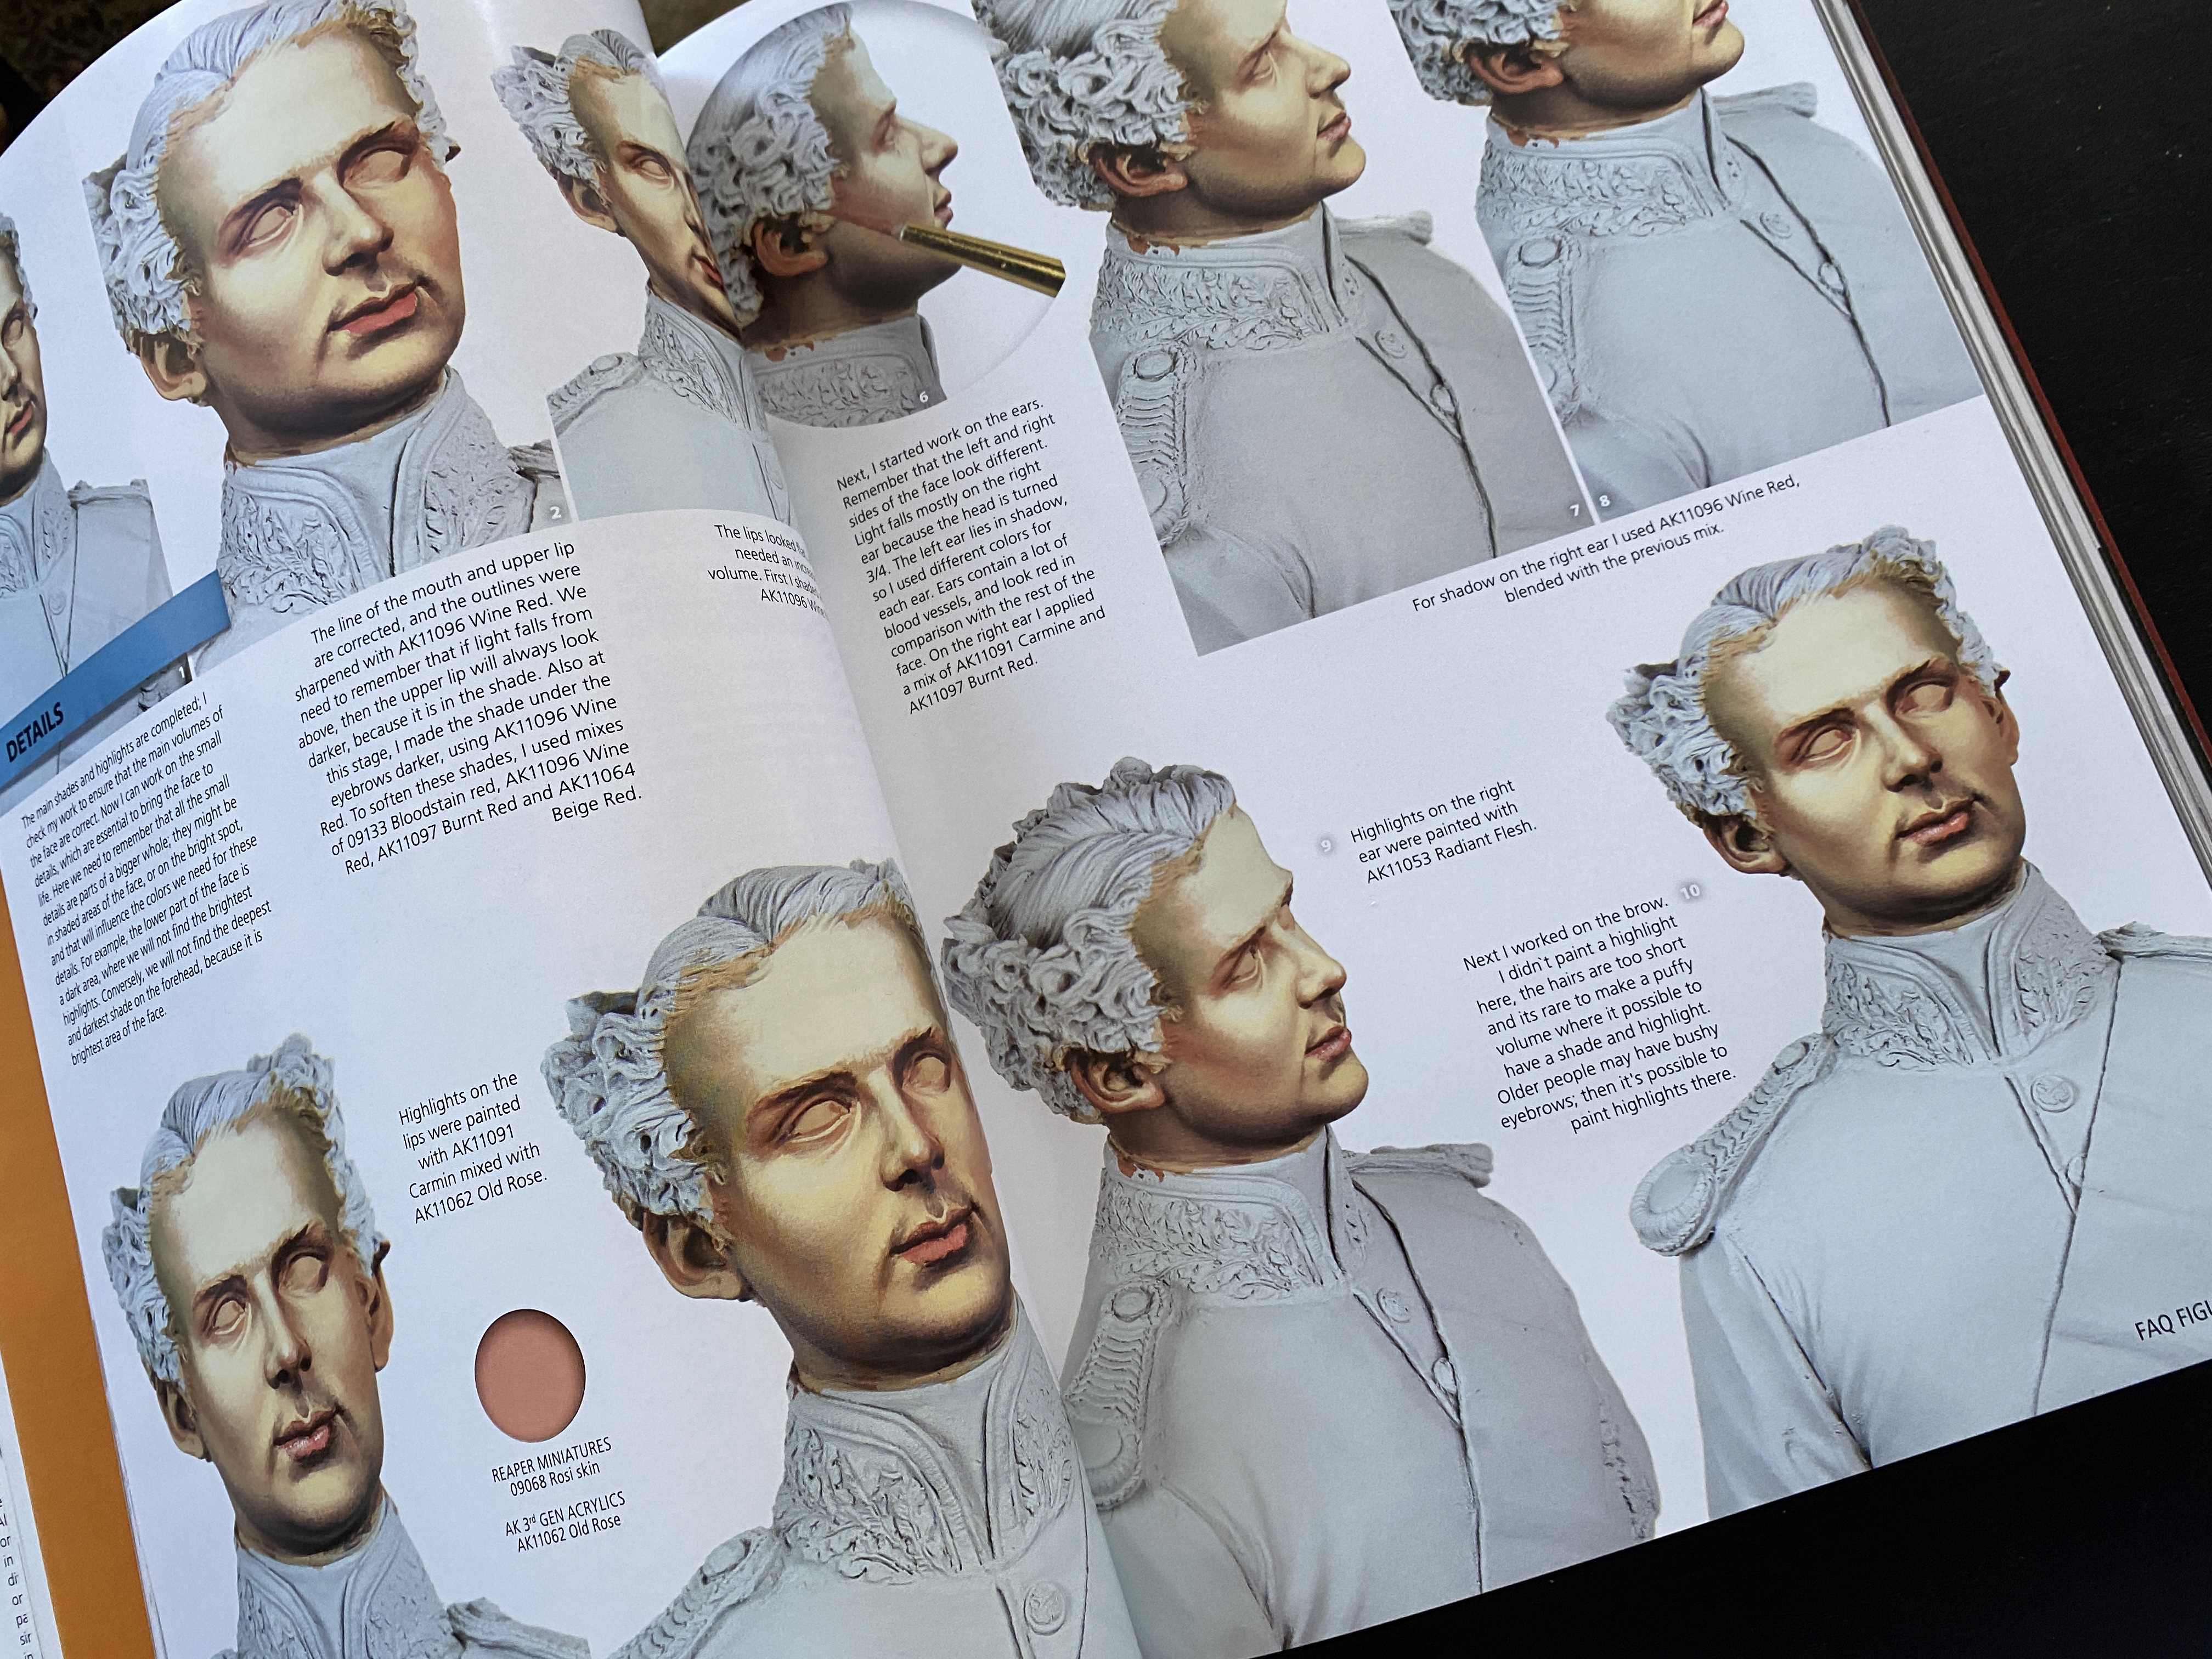
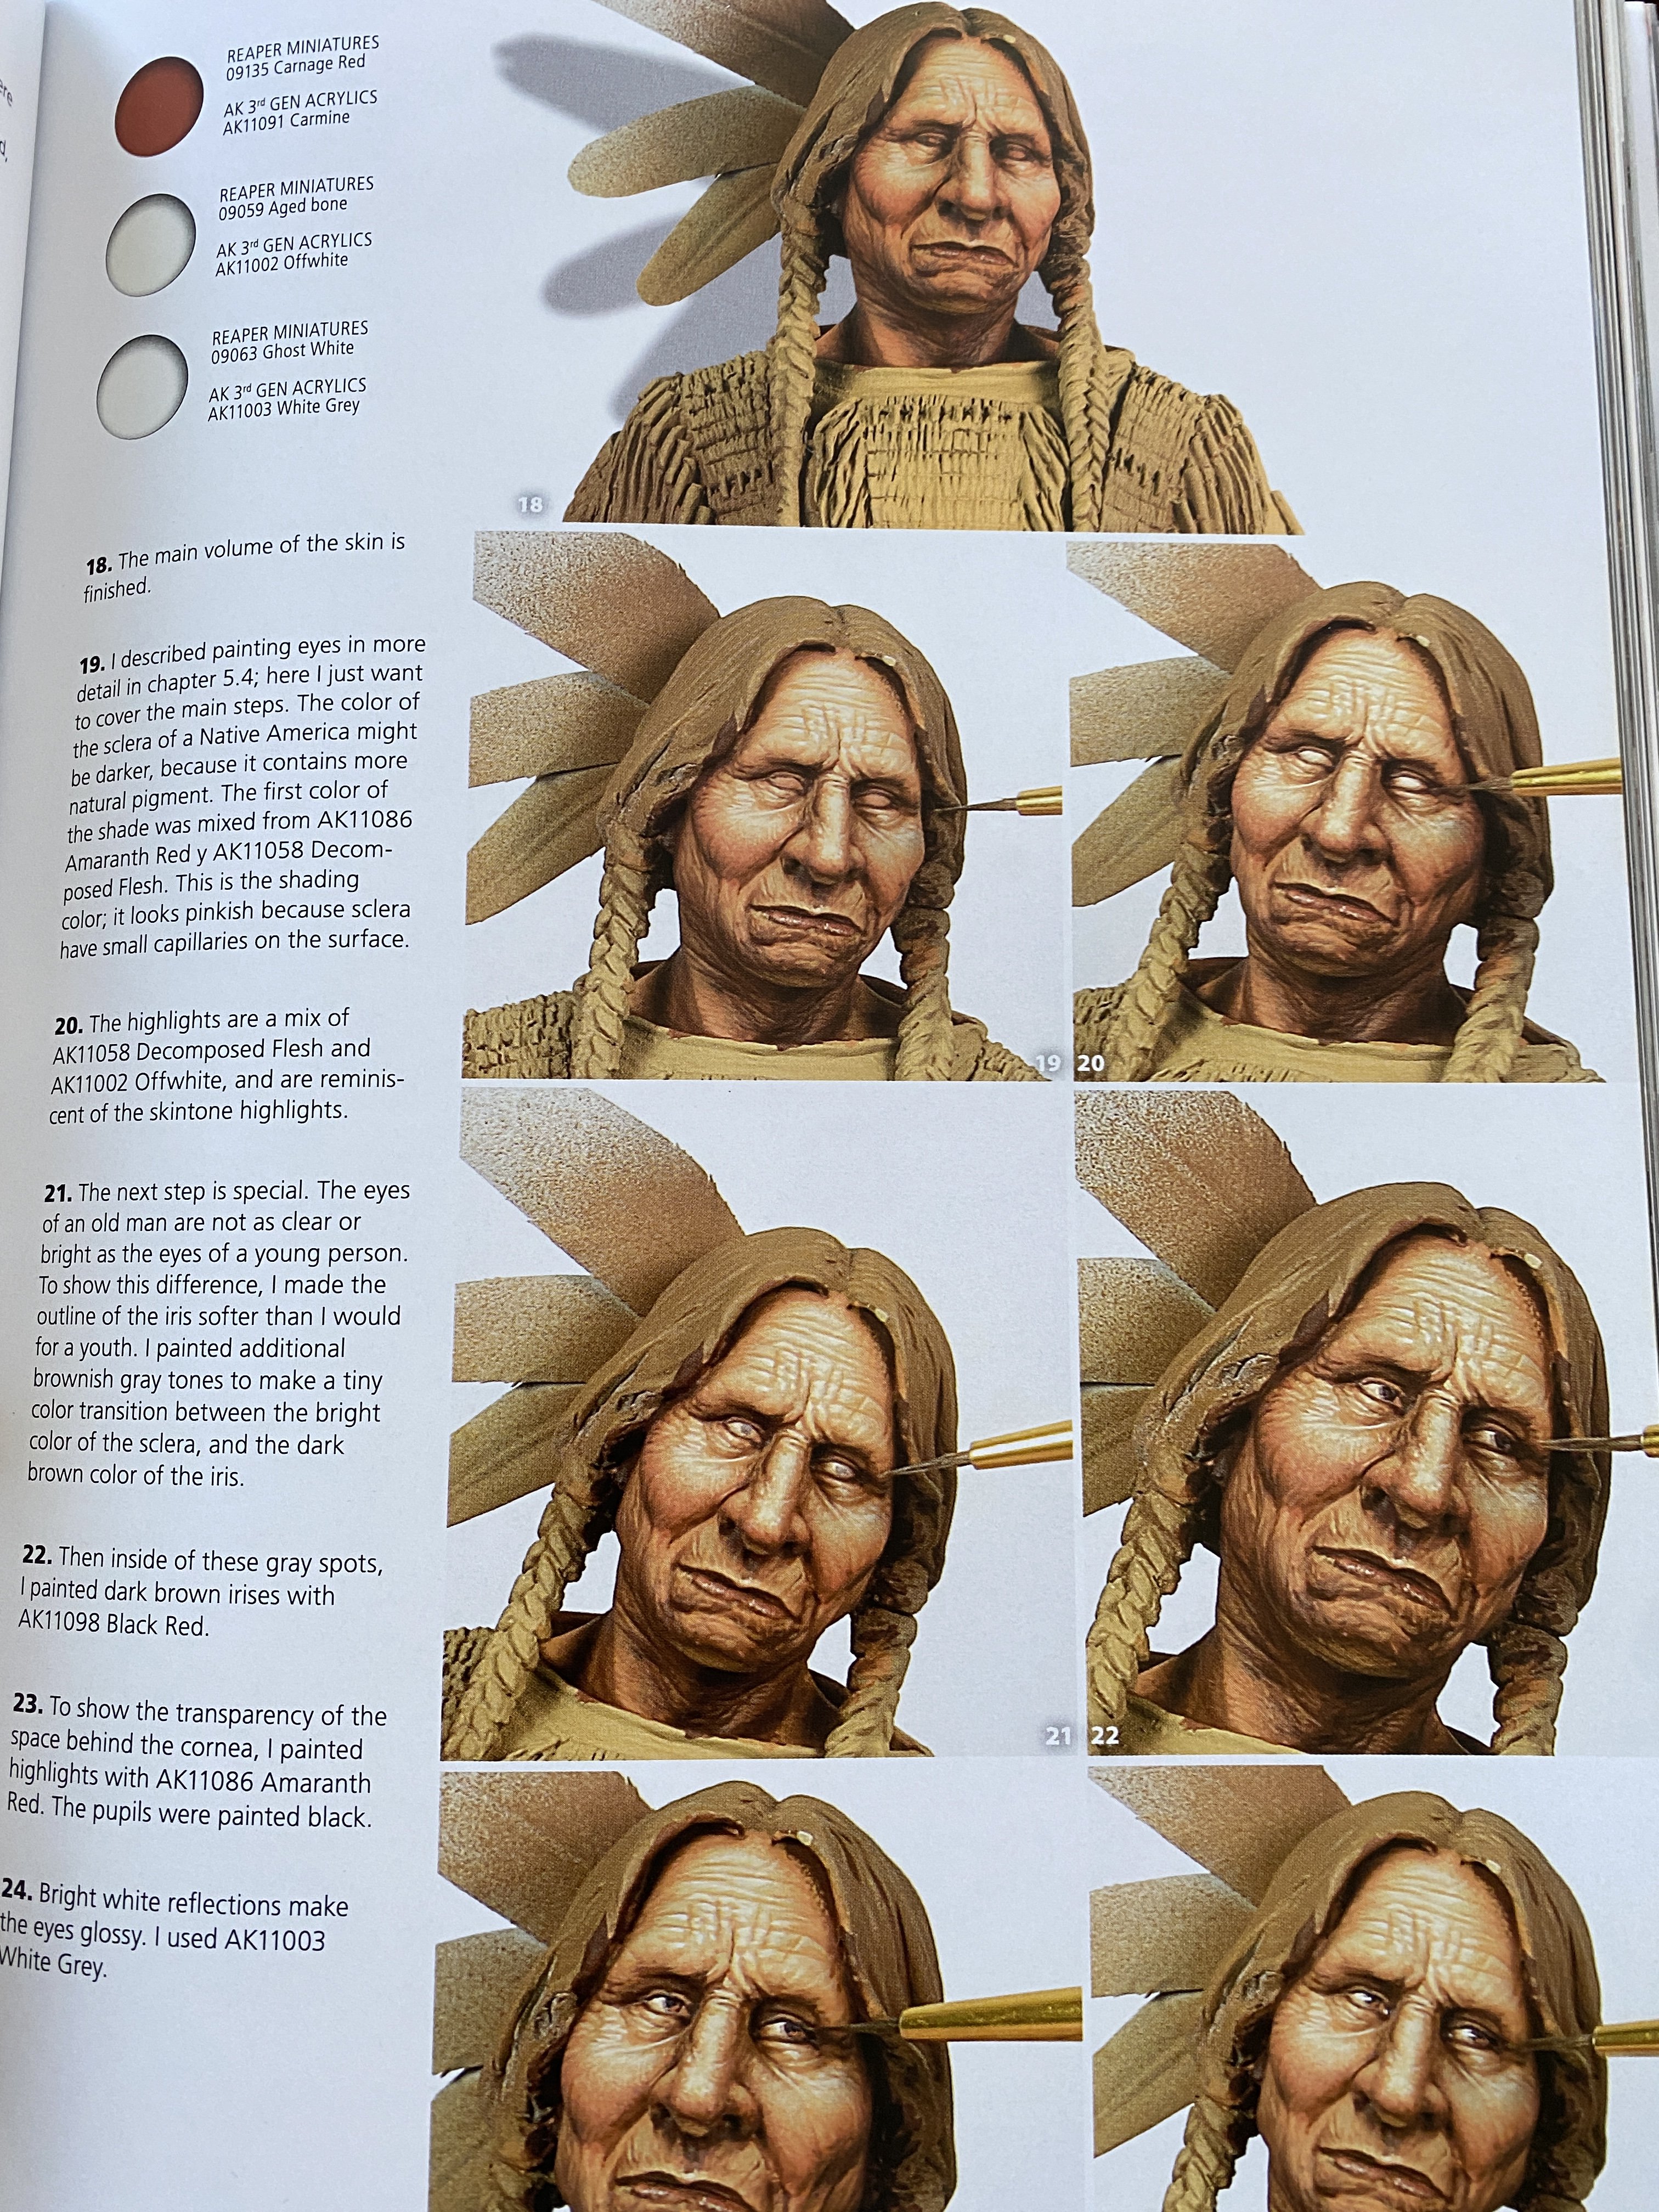
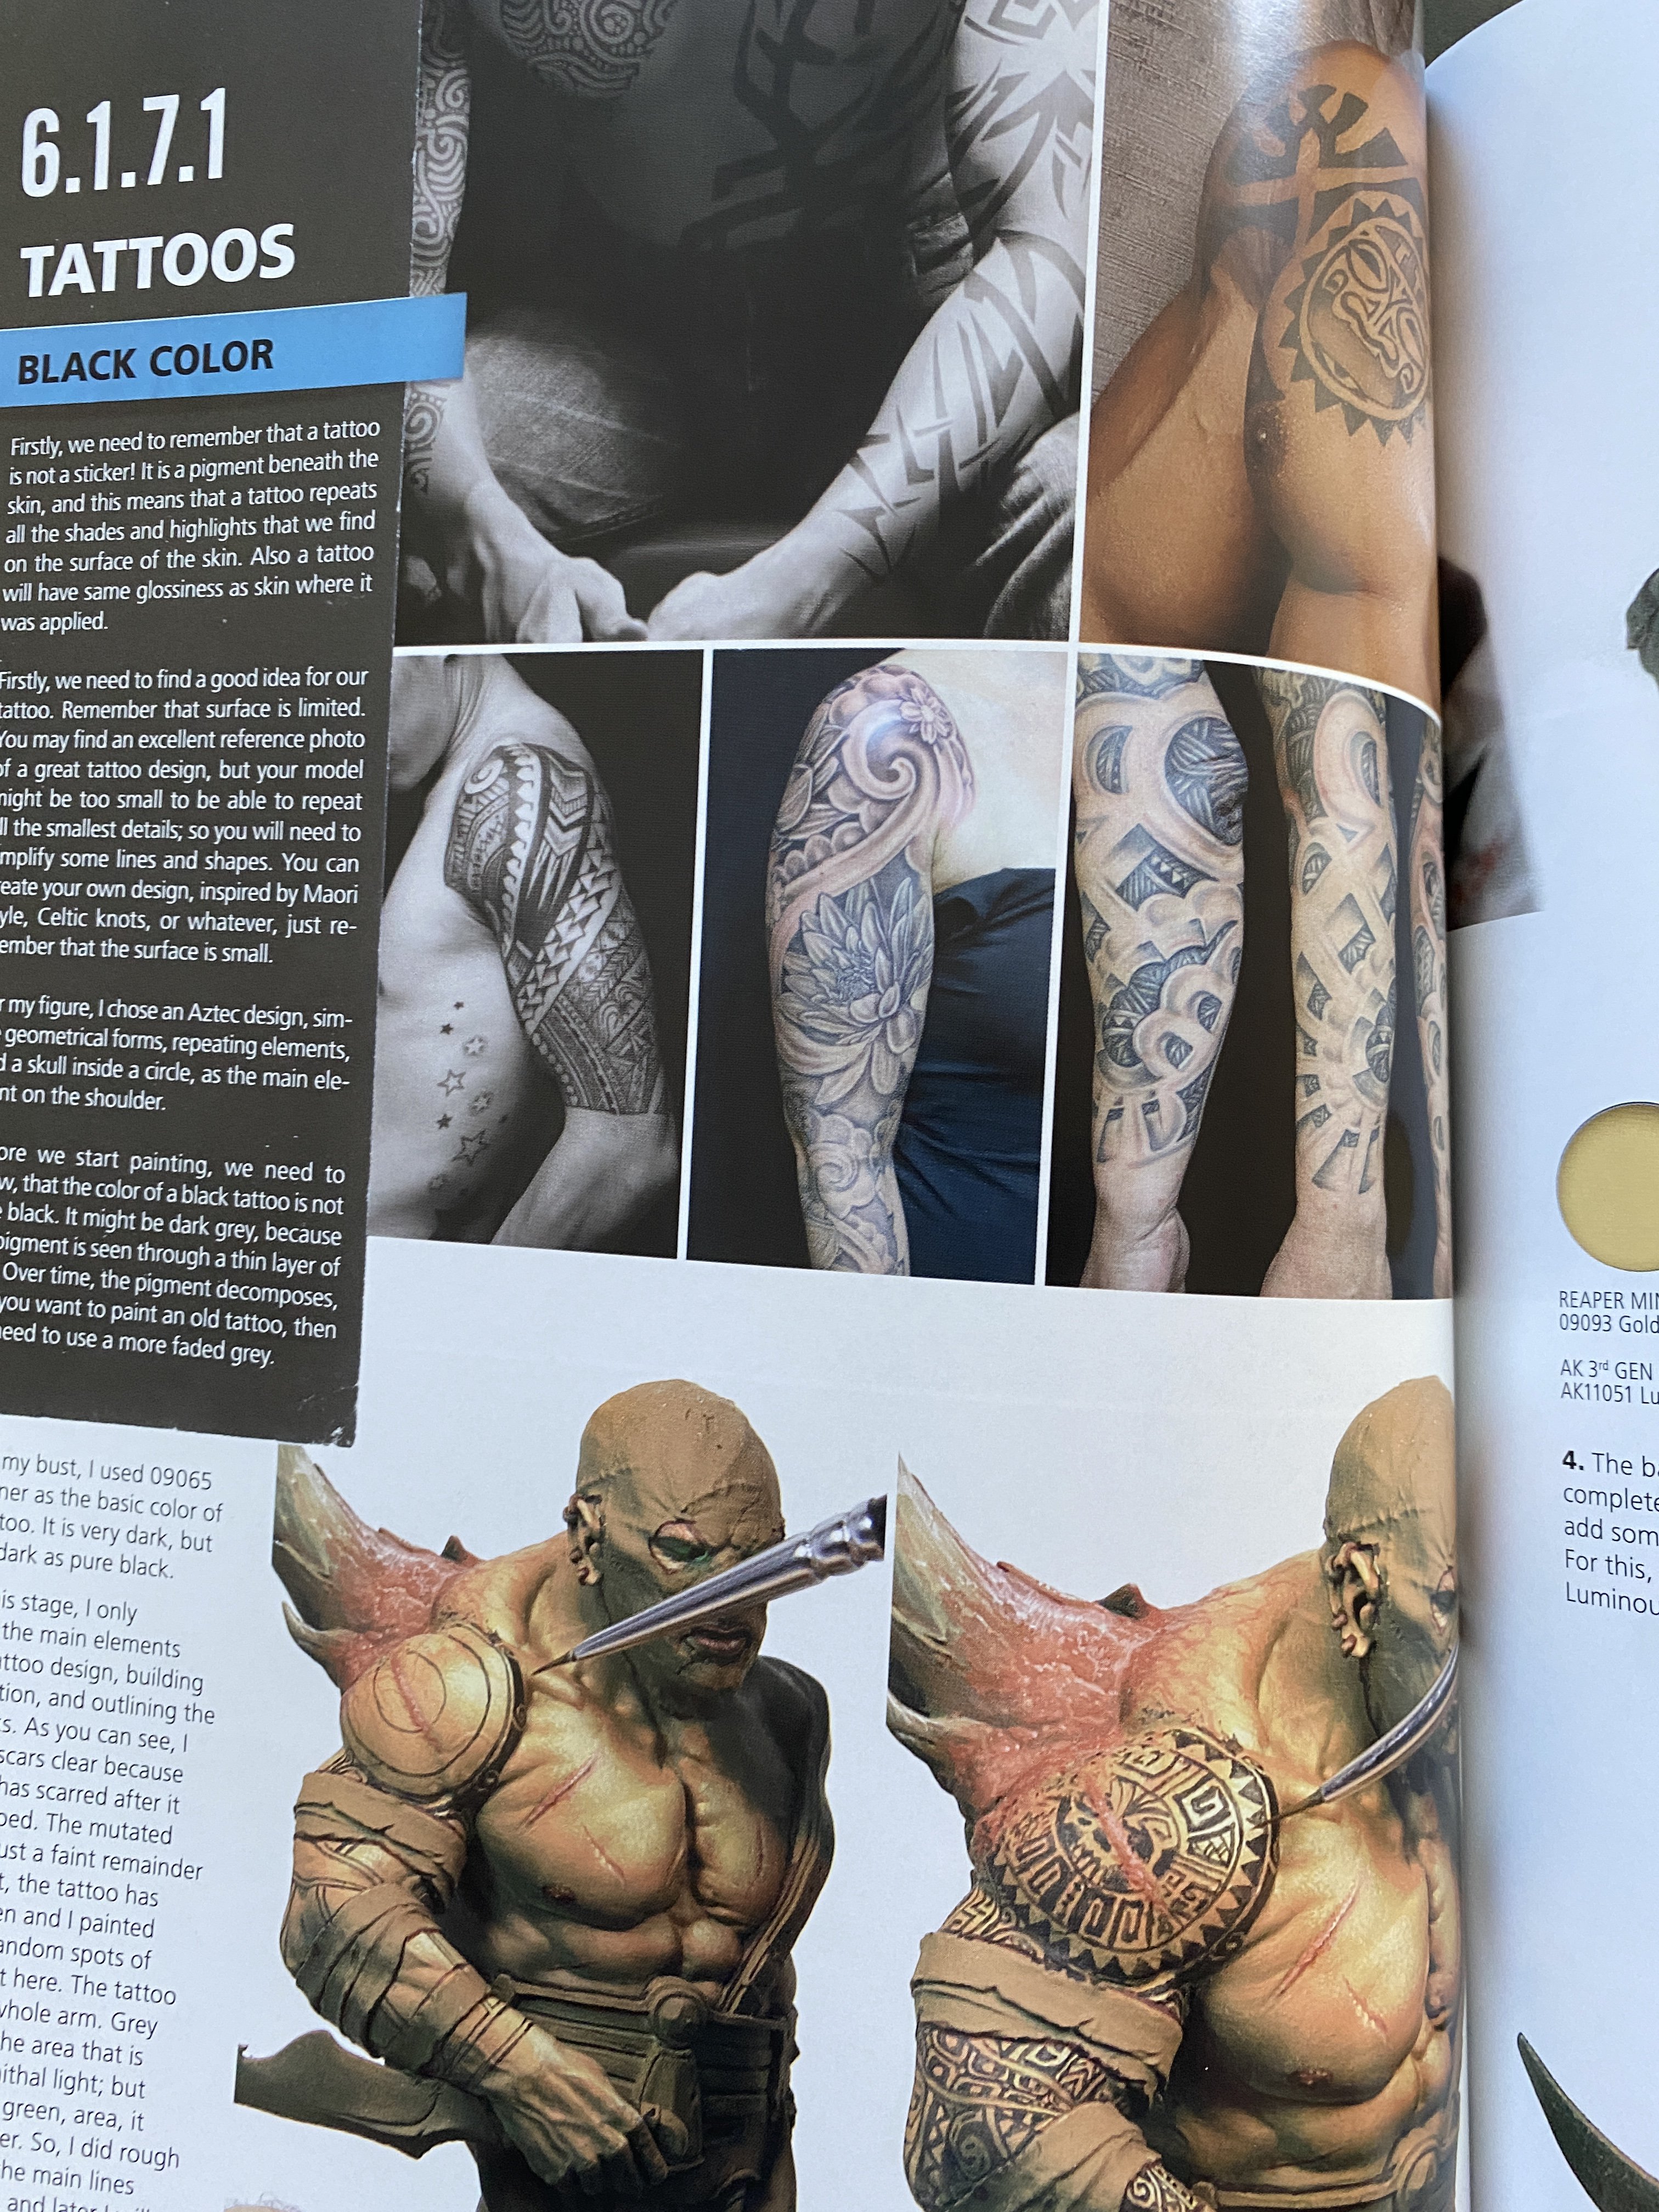
Thus chapter 6 begins with skin painting giving special emphasis to the face, be it white skin, black skin, sioux skin, dark skin and even scars. The top noch: tatoos!

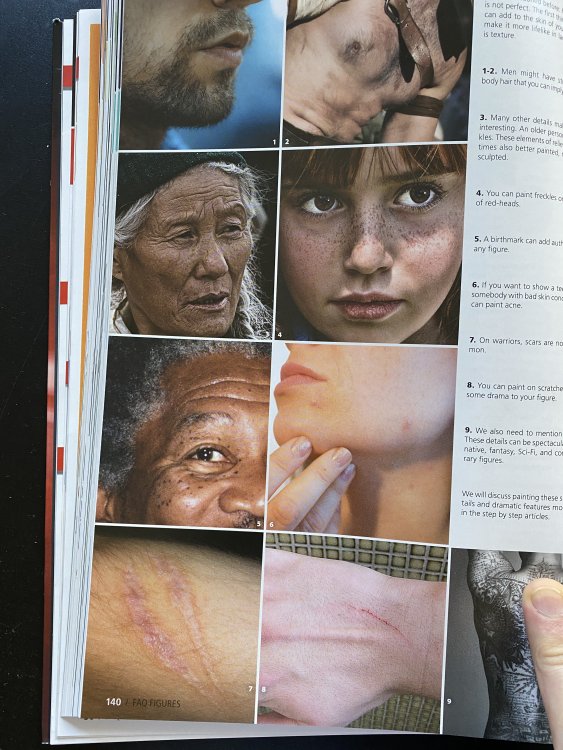


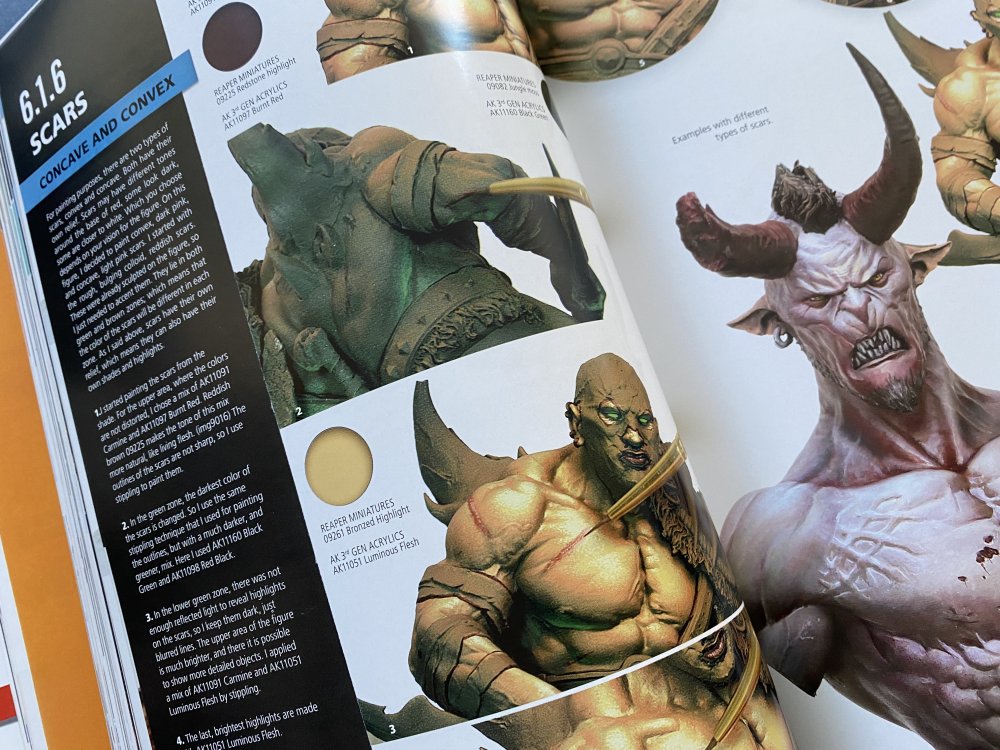
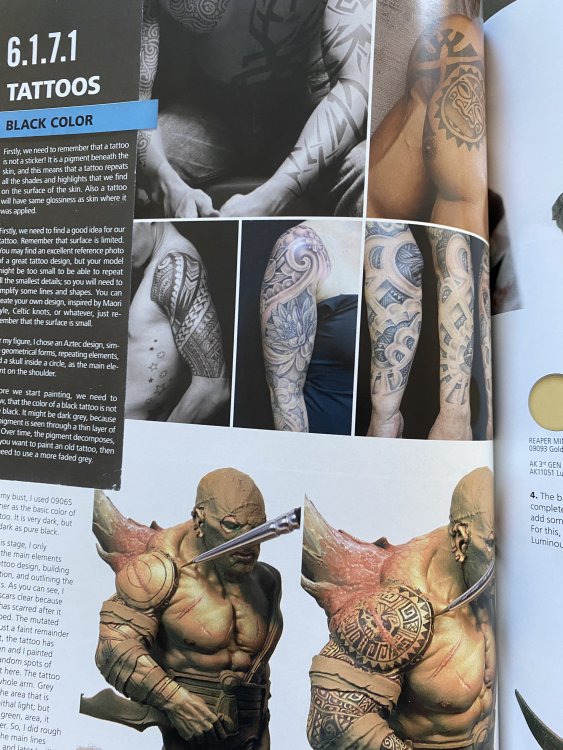
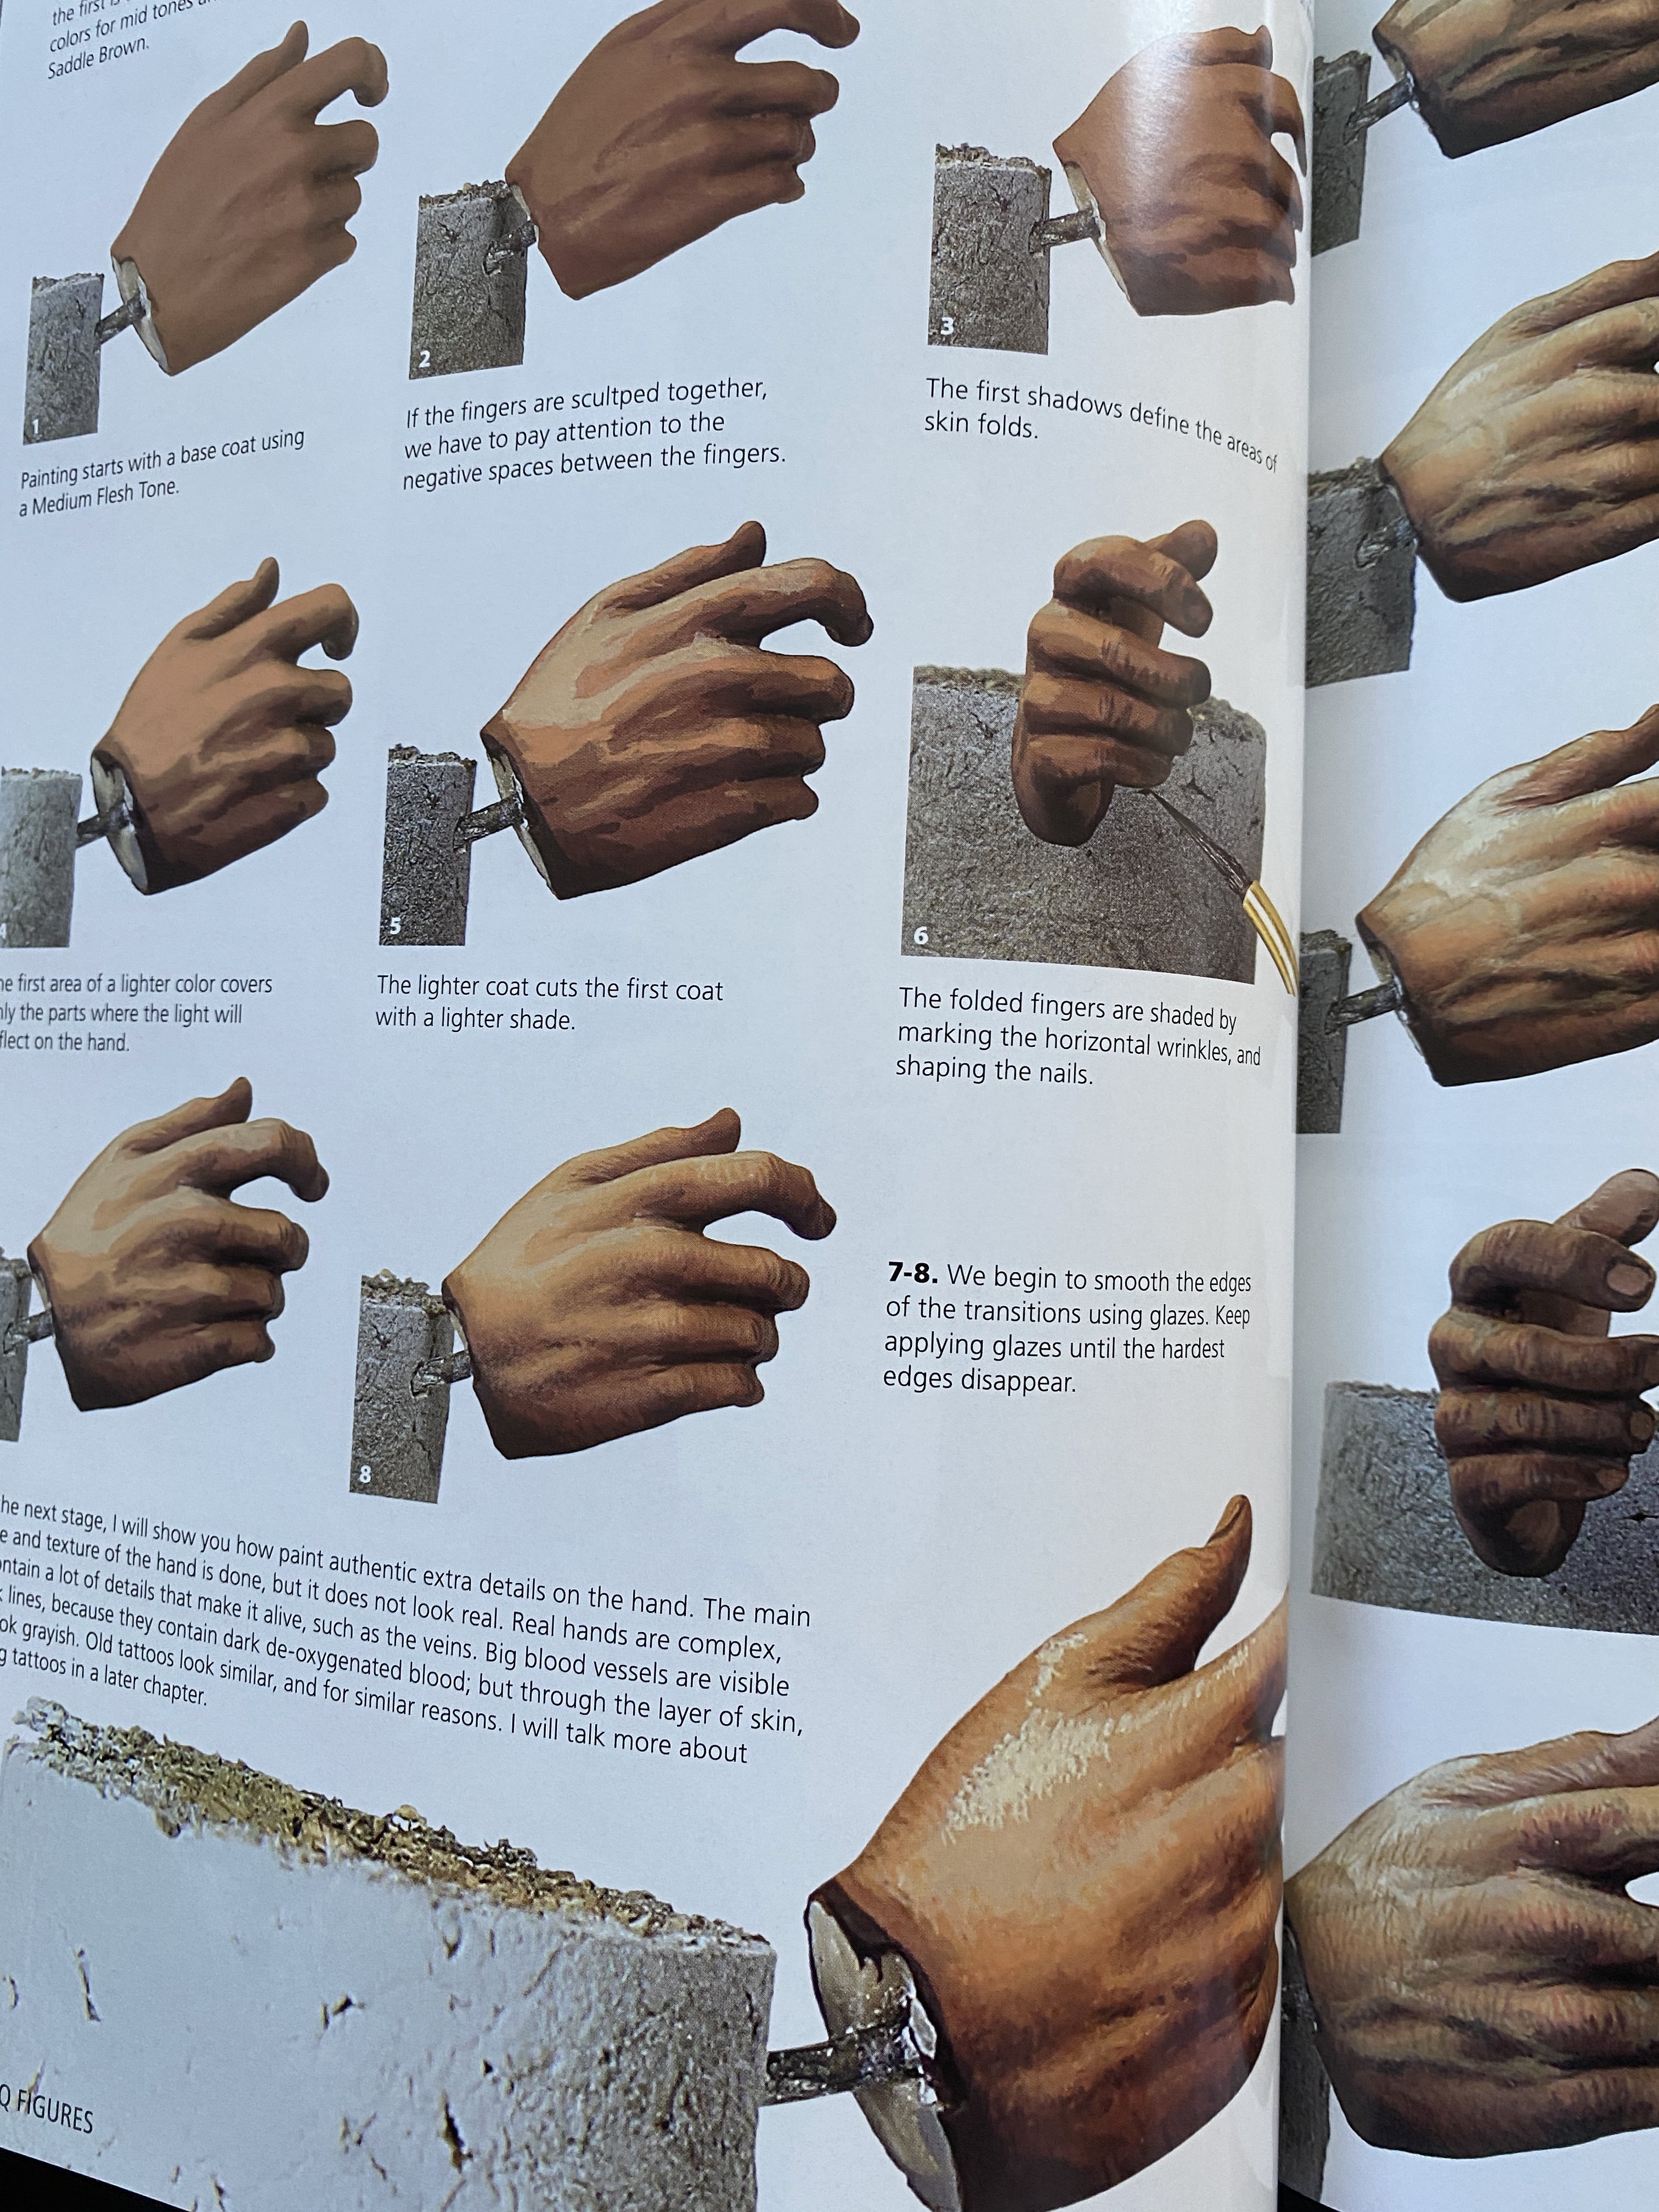
As you can see in the photos, the presentation of the techniques is the same with a very explicit step-by-step.
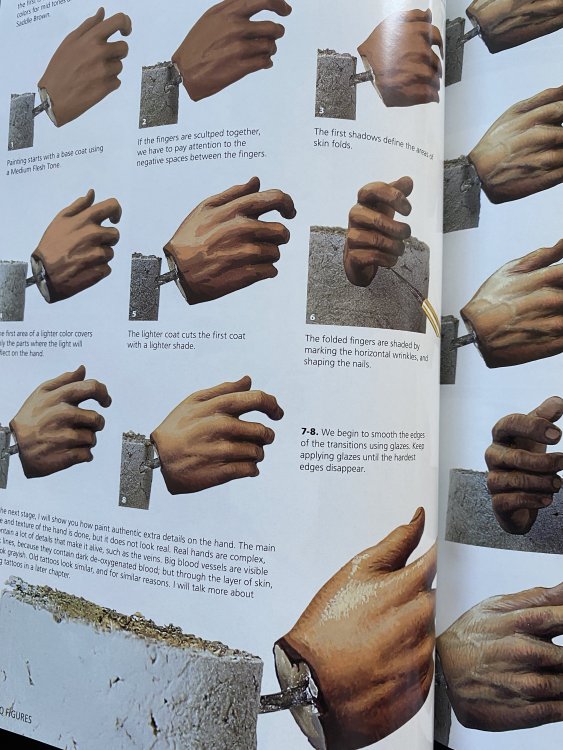
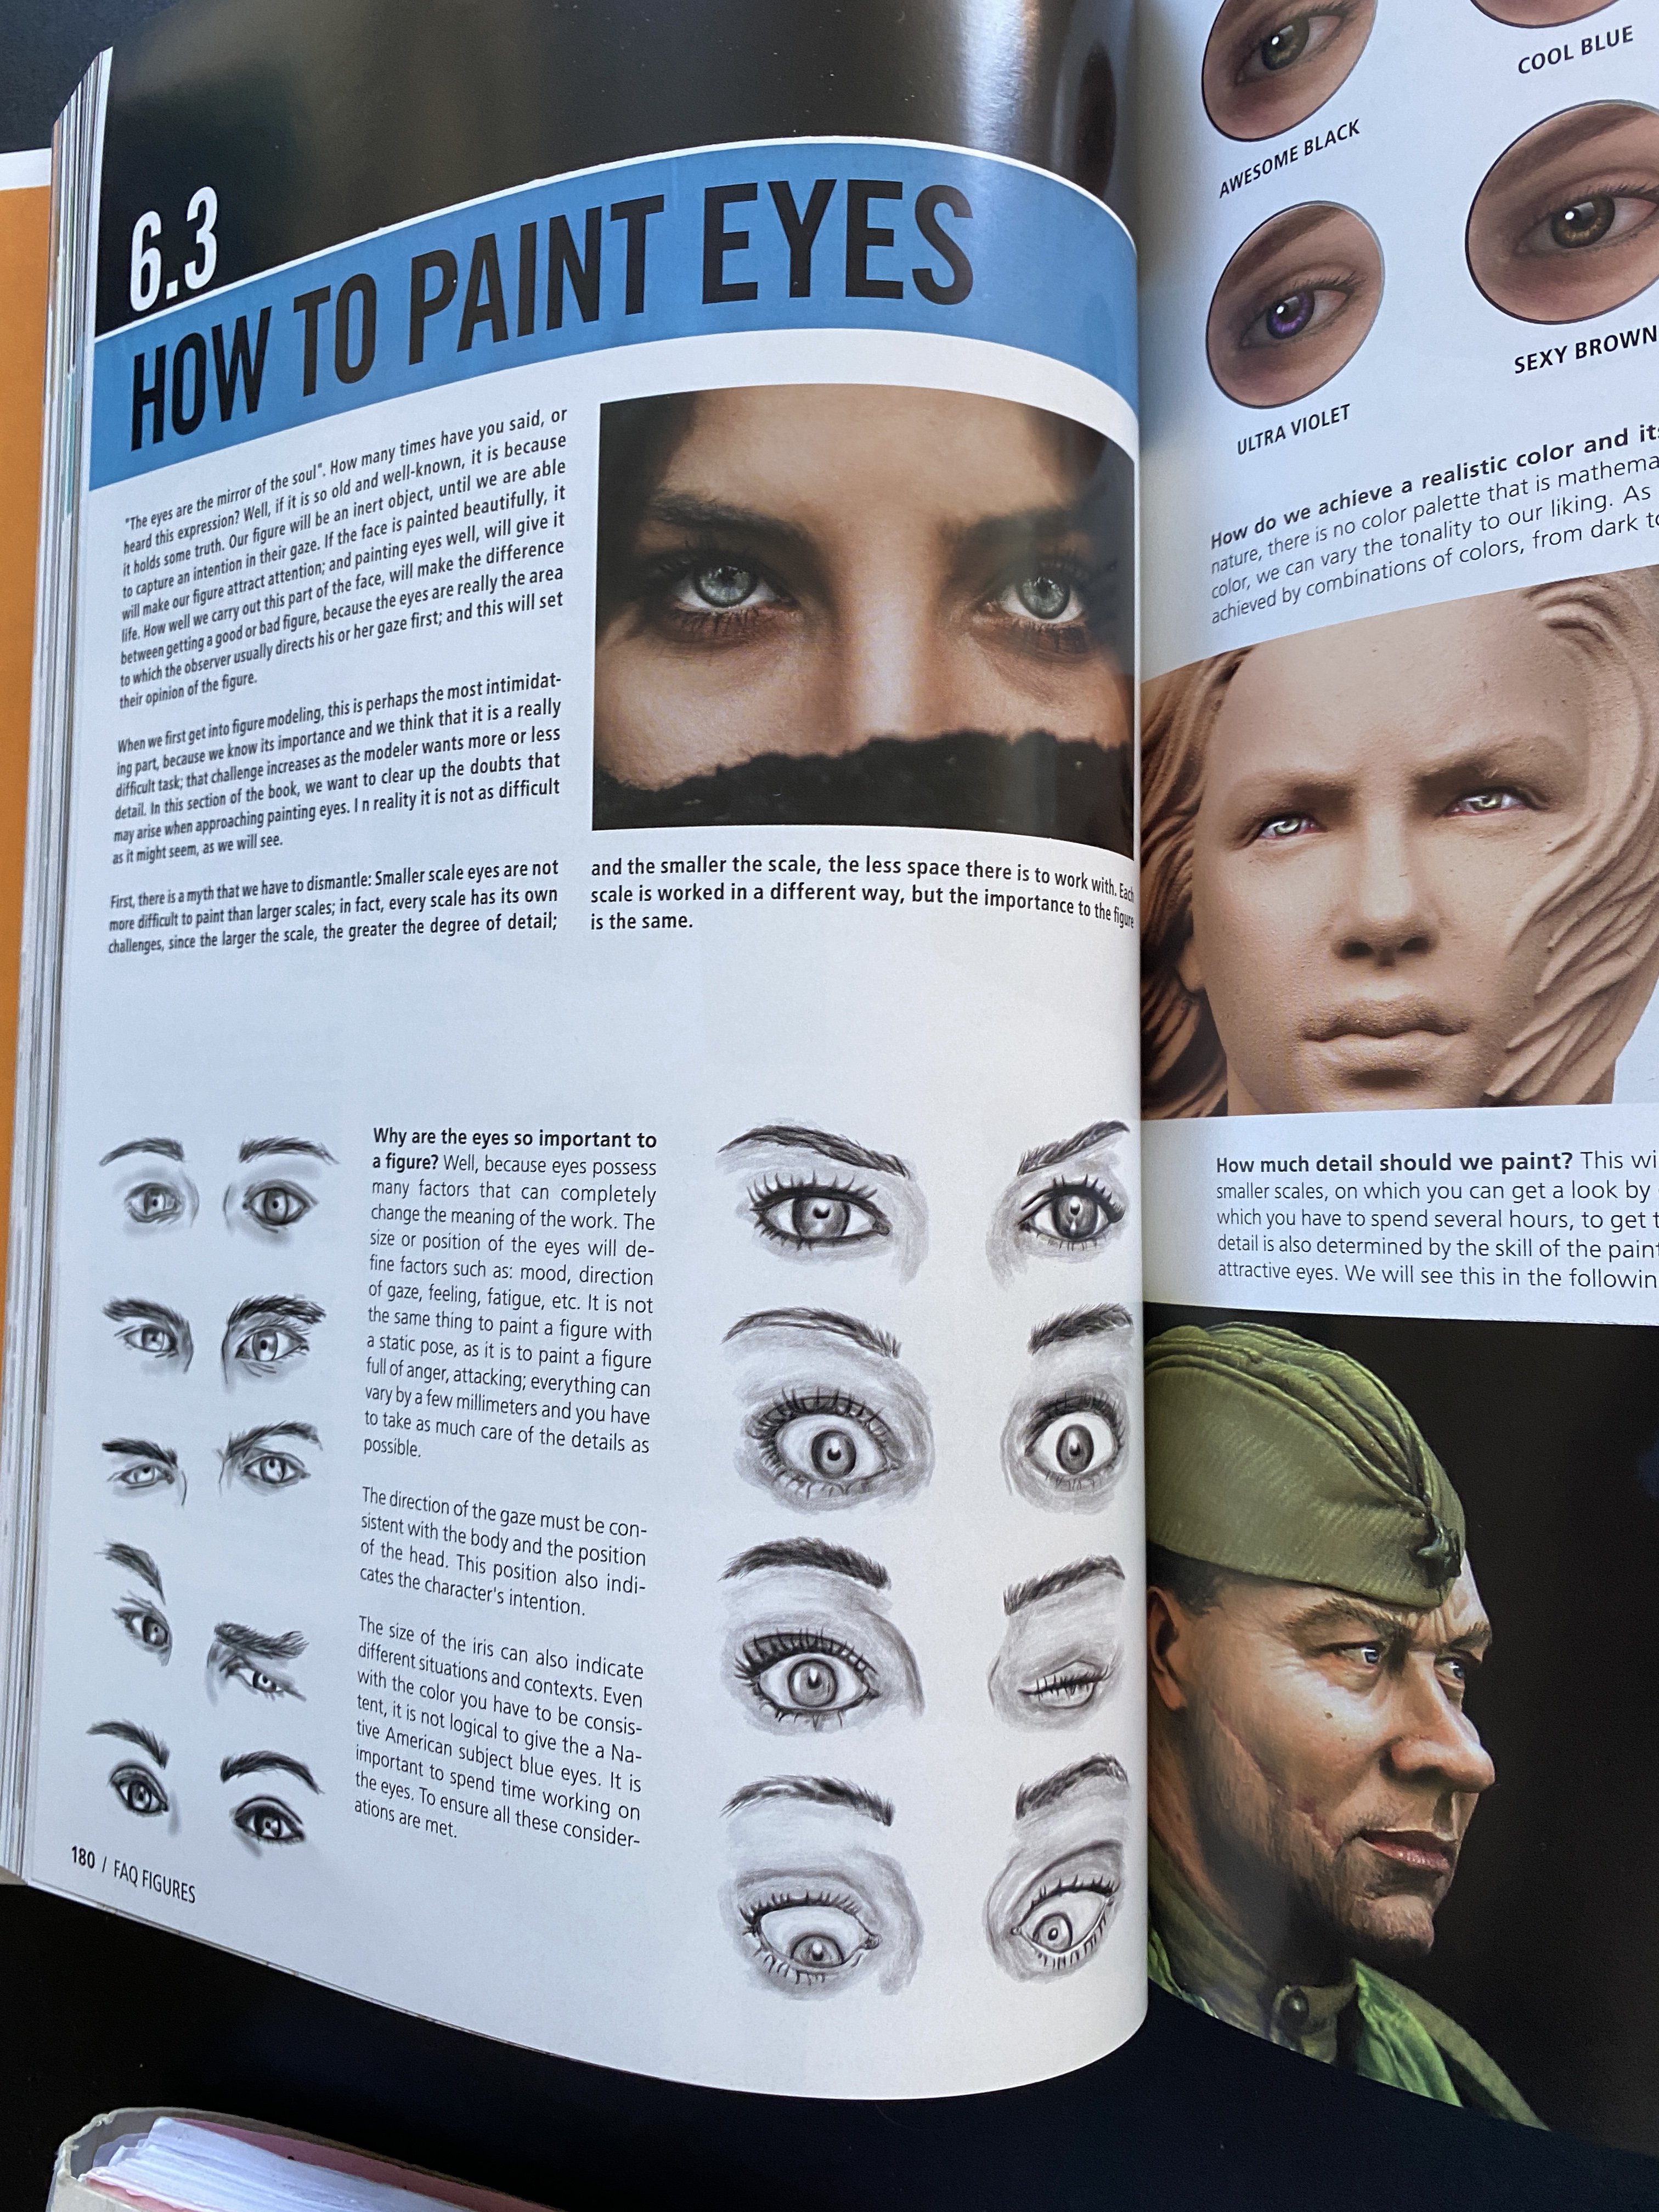
After going through the painting of the hands, chapter 6.3 is dedicated to one of the most complex and difficult points. At least for me: painting the eyes.

Like its was not not enough to explain how to paint the eyes, we still have several types of eyes and how to paint them .. Insane !! Madly insane and wonderful ...
Finish the painting of the body elements with the hair.
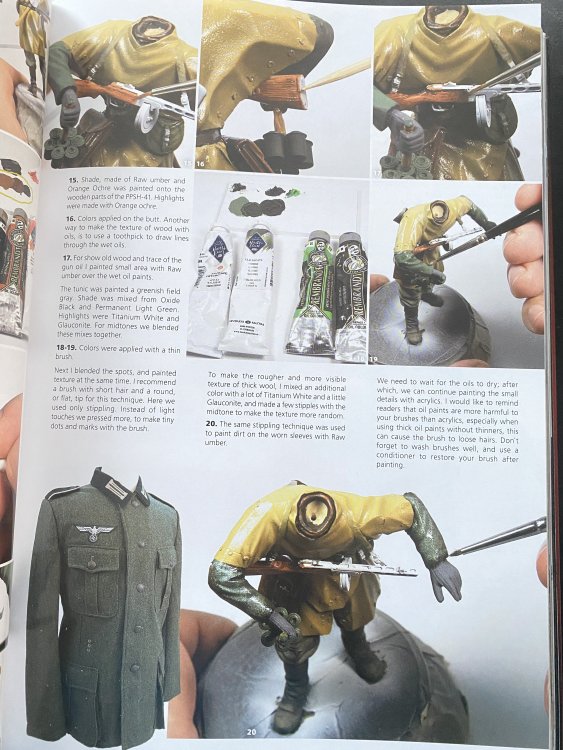
In chapter 6.5, a new phase of painting begins: clothes.
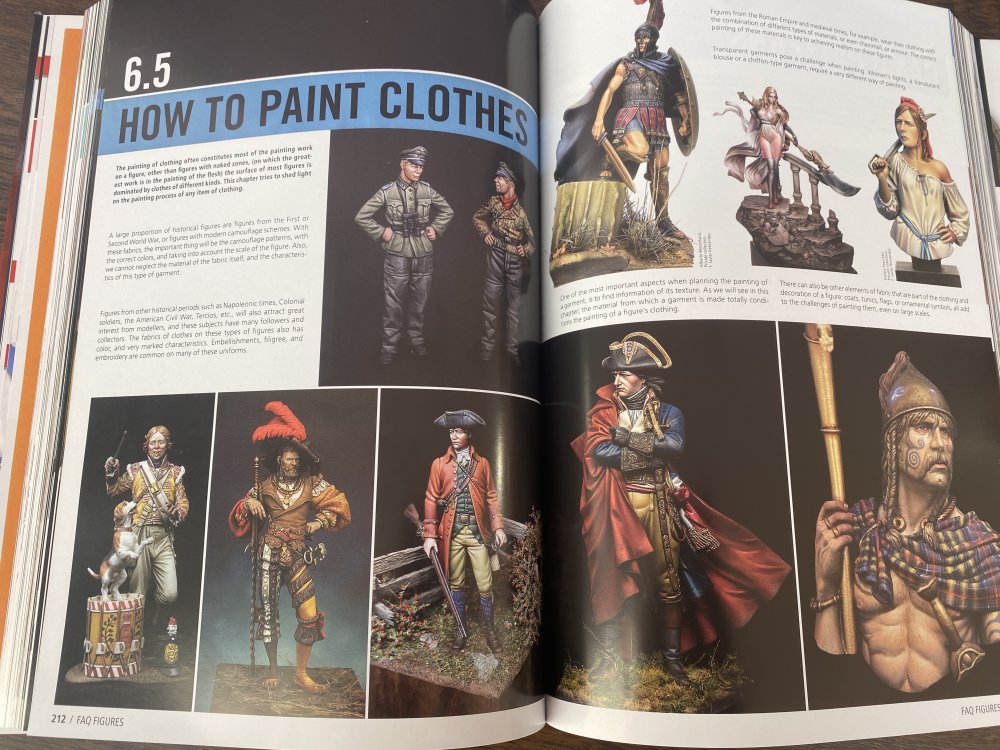
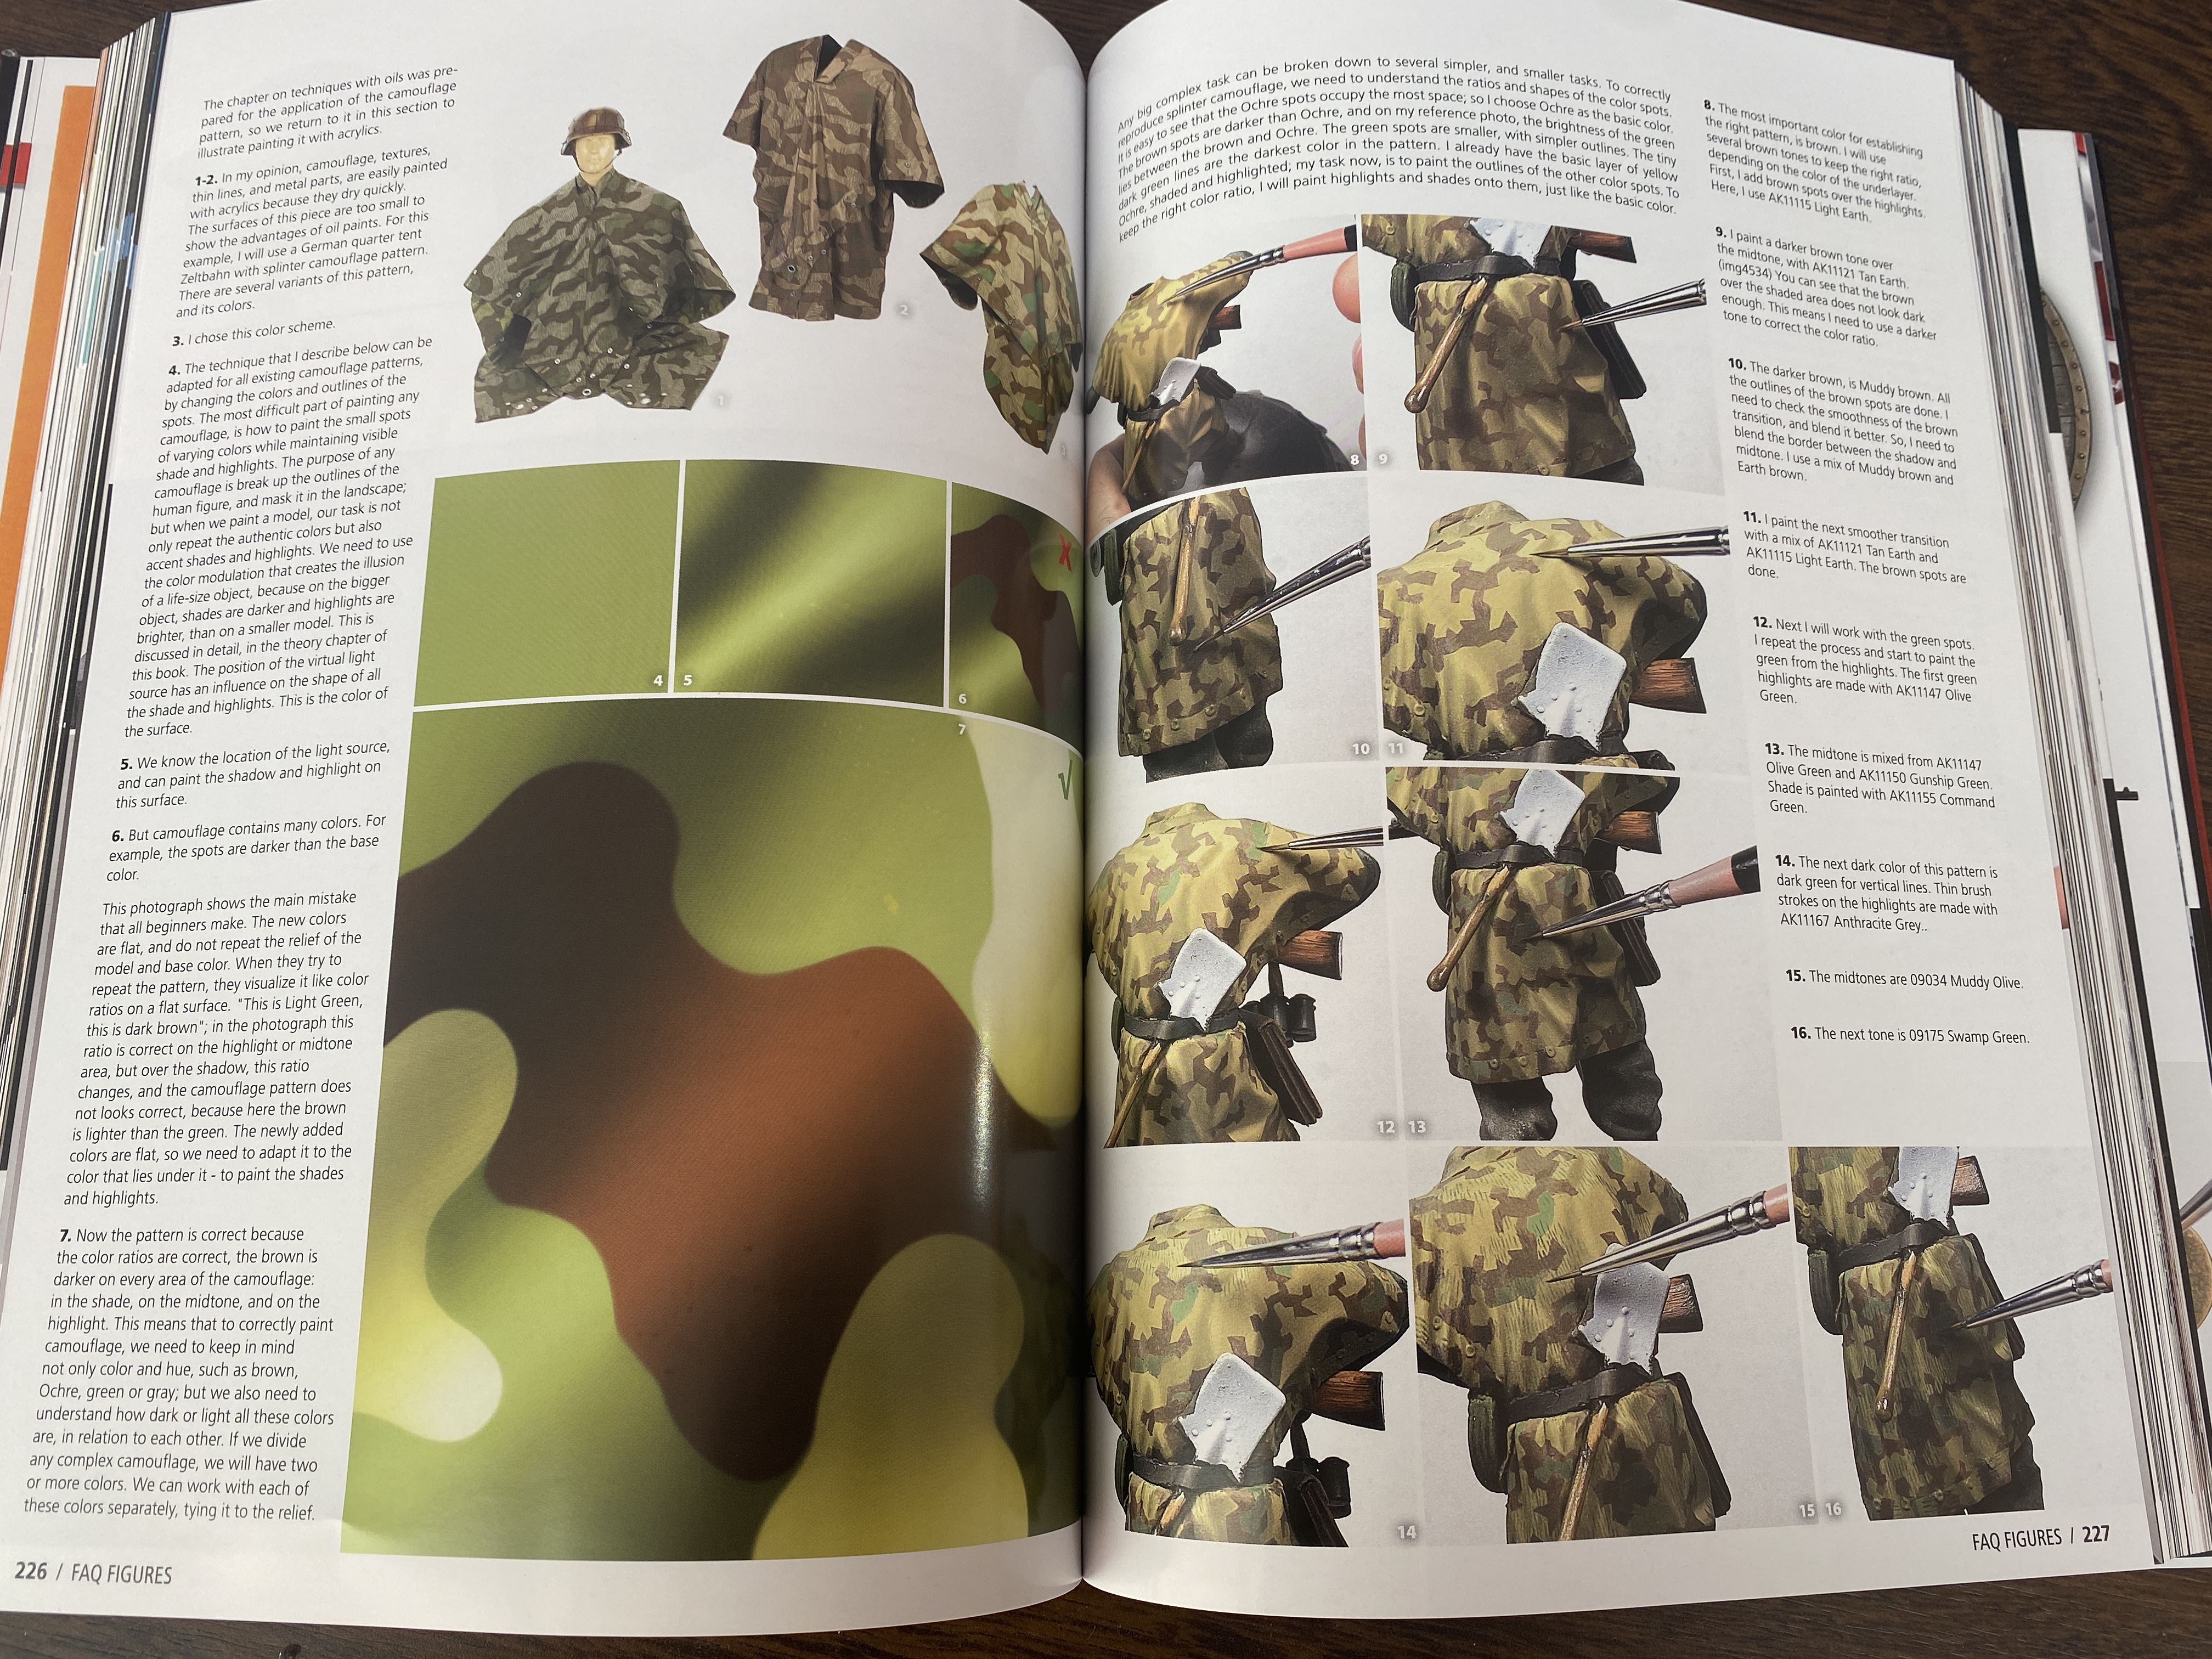
Once again, we cannot expect it to be a simple chapter. The author dedicates shows camouflaged clothing, with step-by-step techniques and used coulor. As for these clothing styles, it is an excellent source of information by it own but the nex thingwas totally unexpected for me.

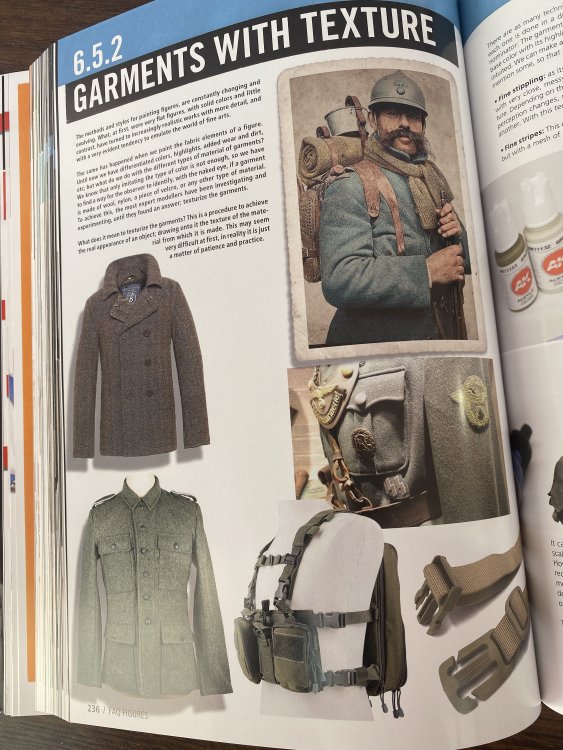
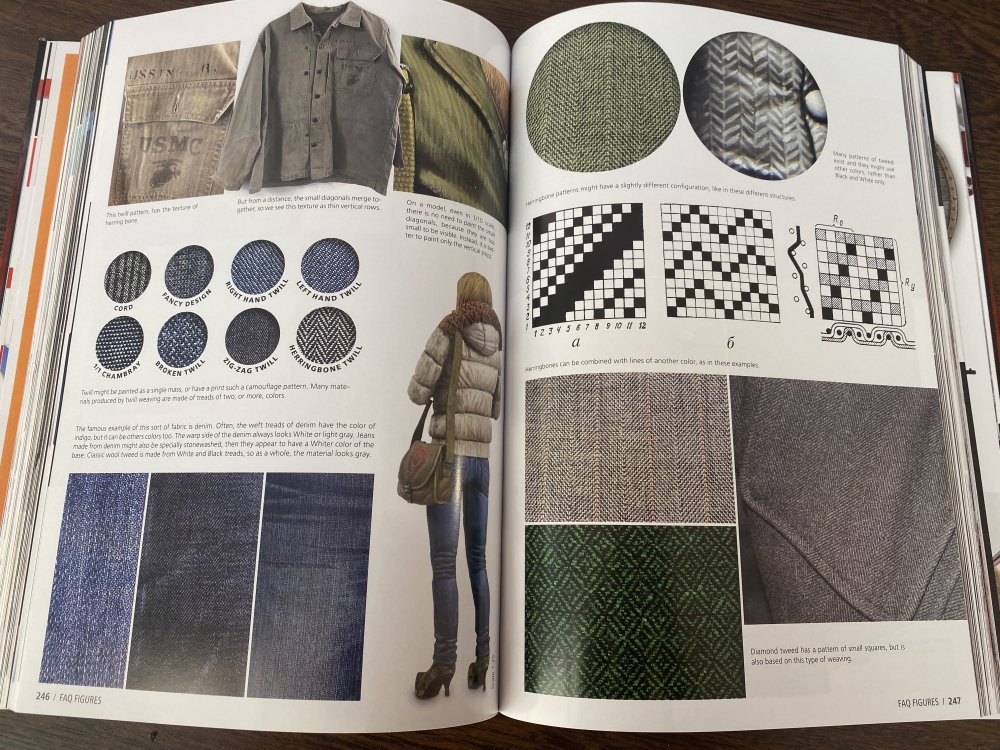
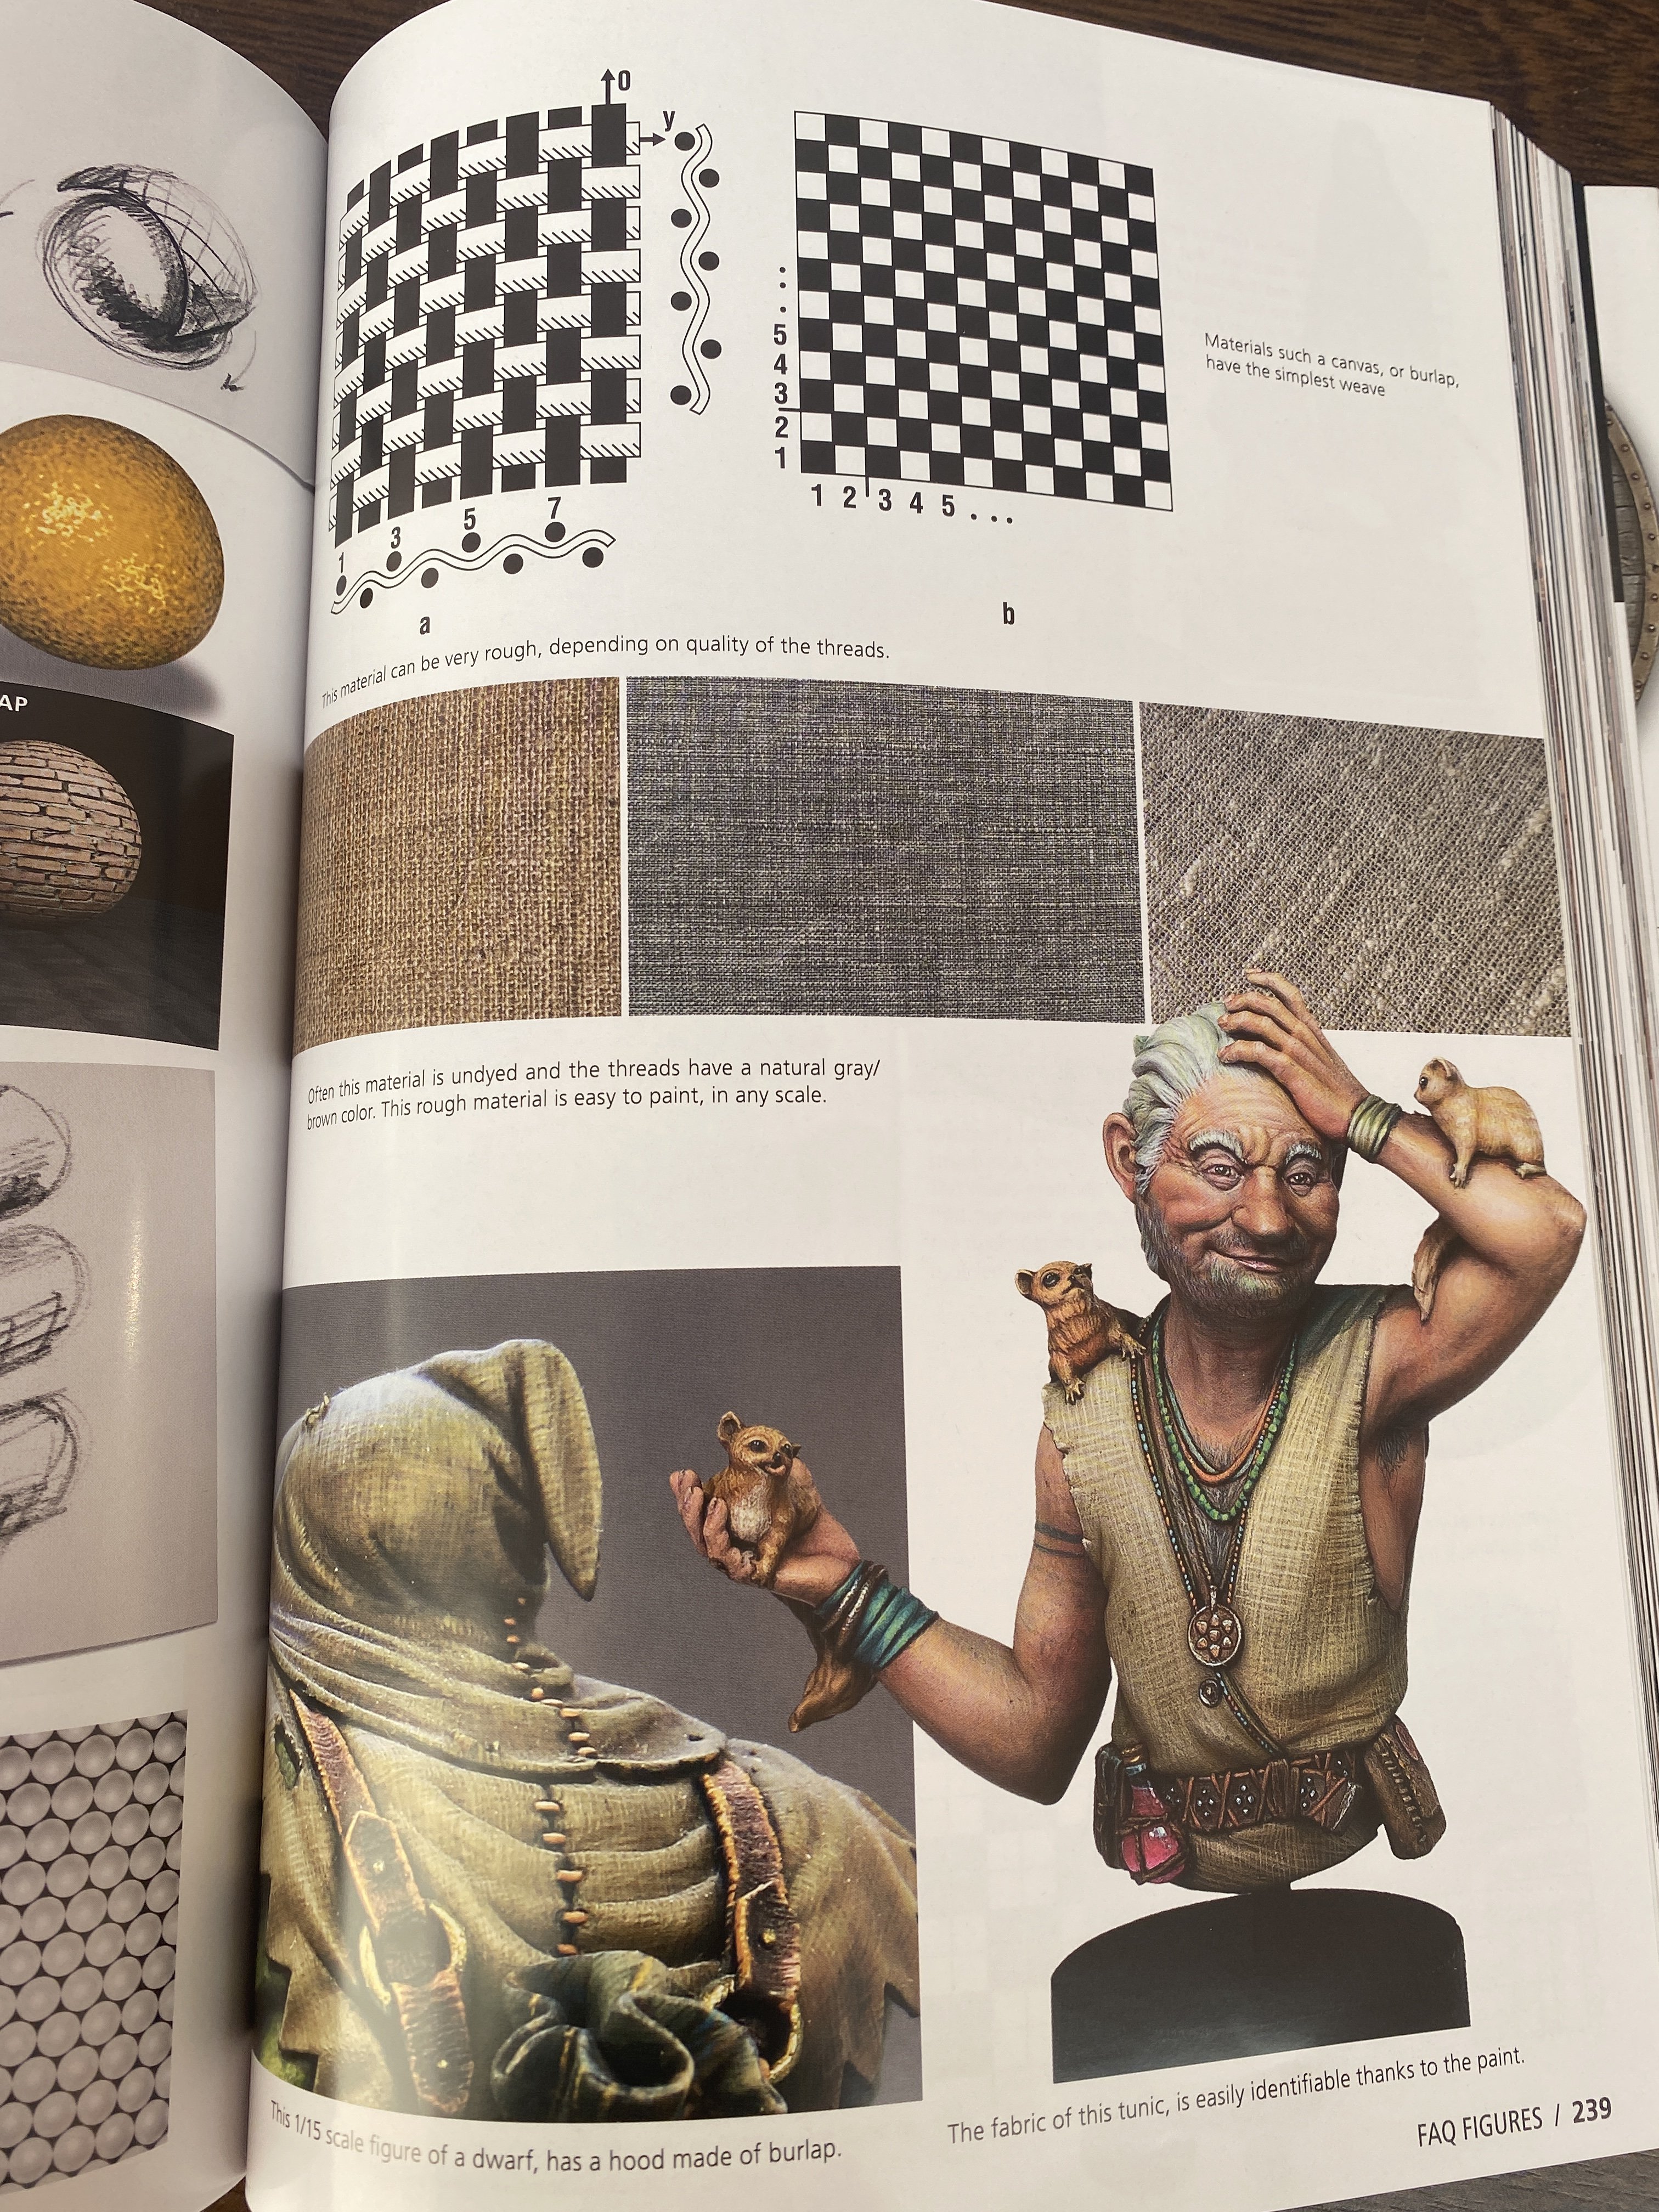
Paint clothes with textures?? The chapter 6.5.2. with the study of each fabric and how to achieve, through painting, the effect of the same and extends from pages 236 to 285.


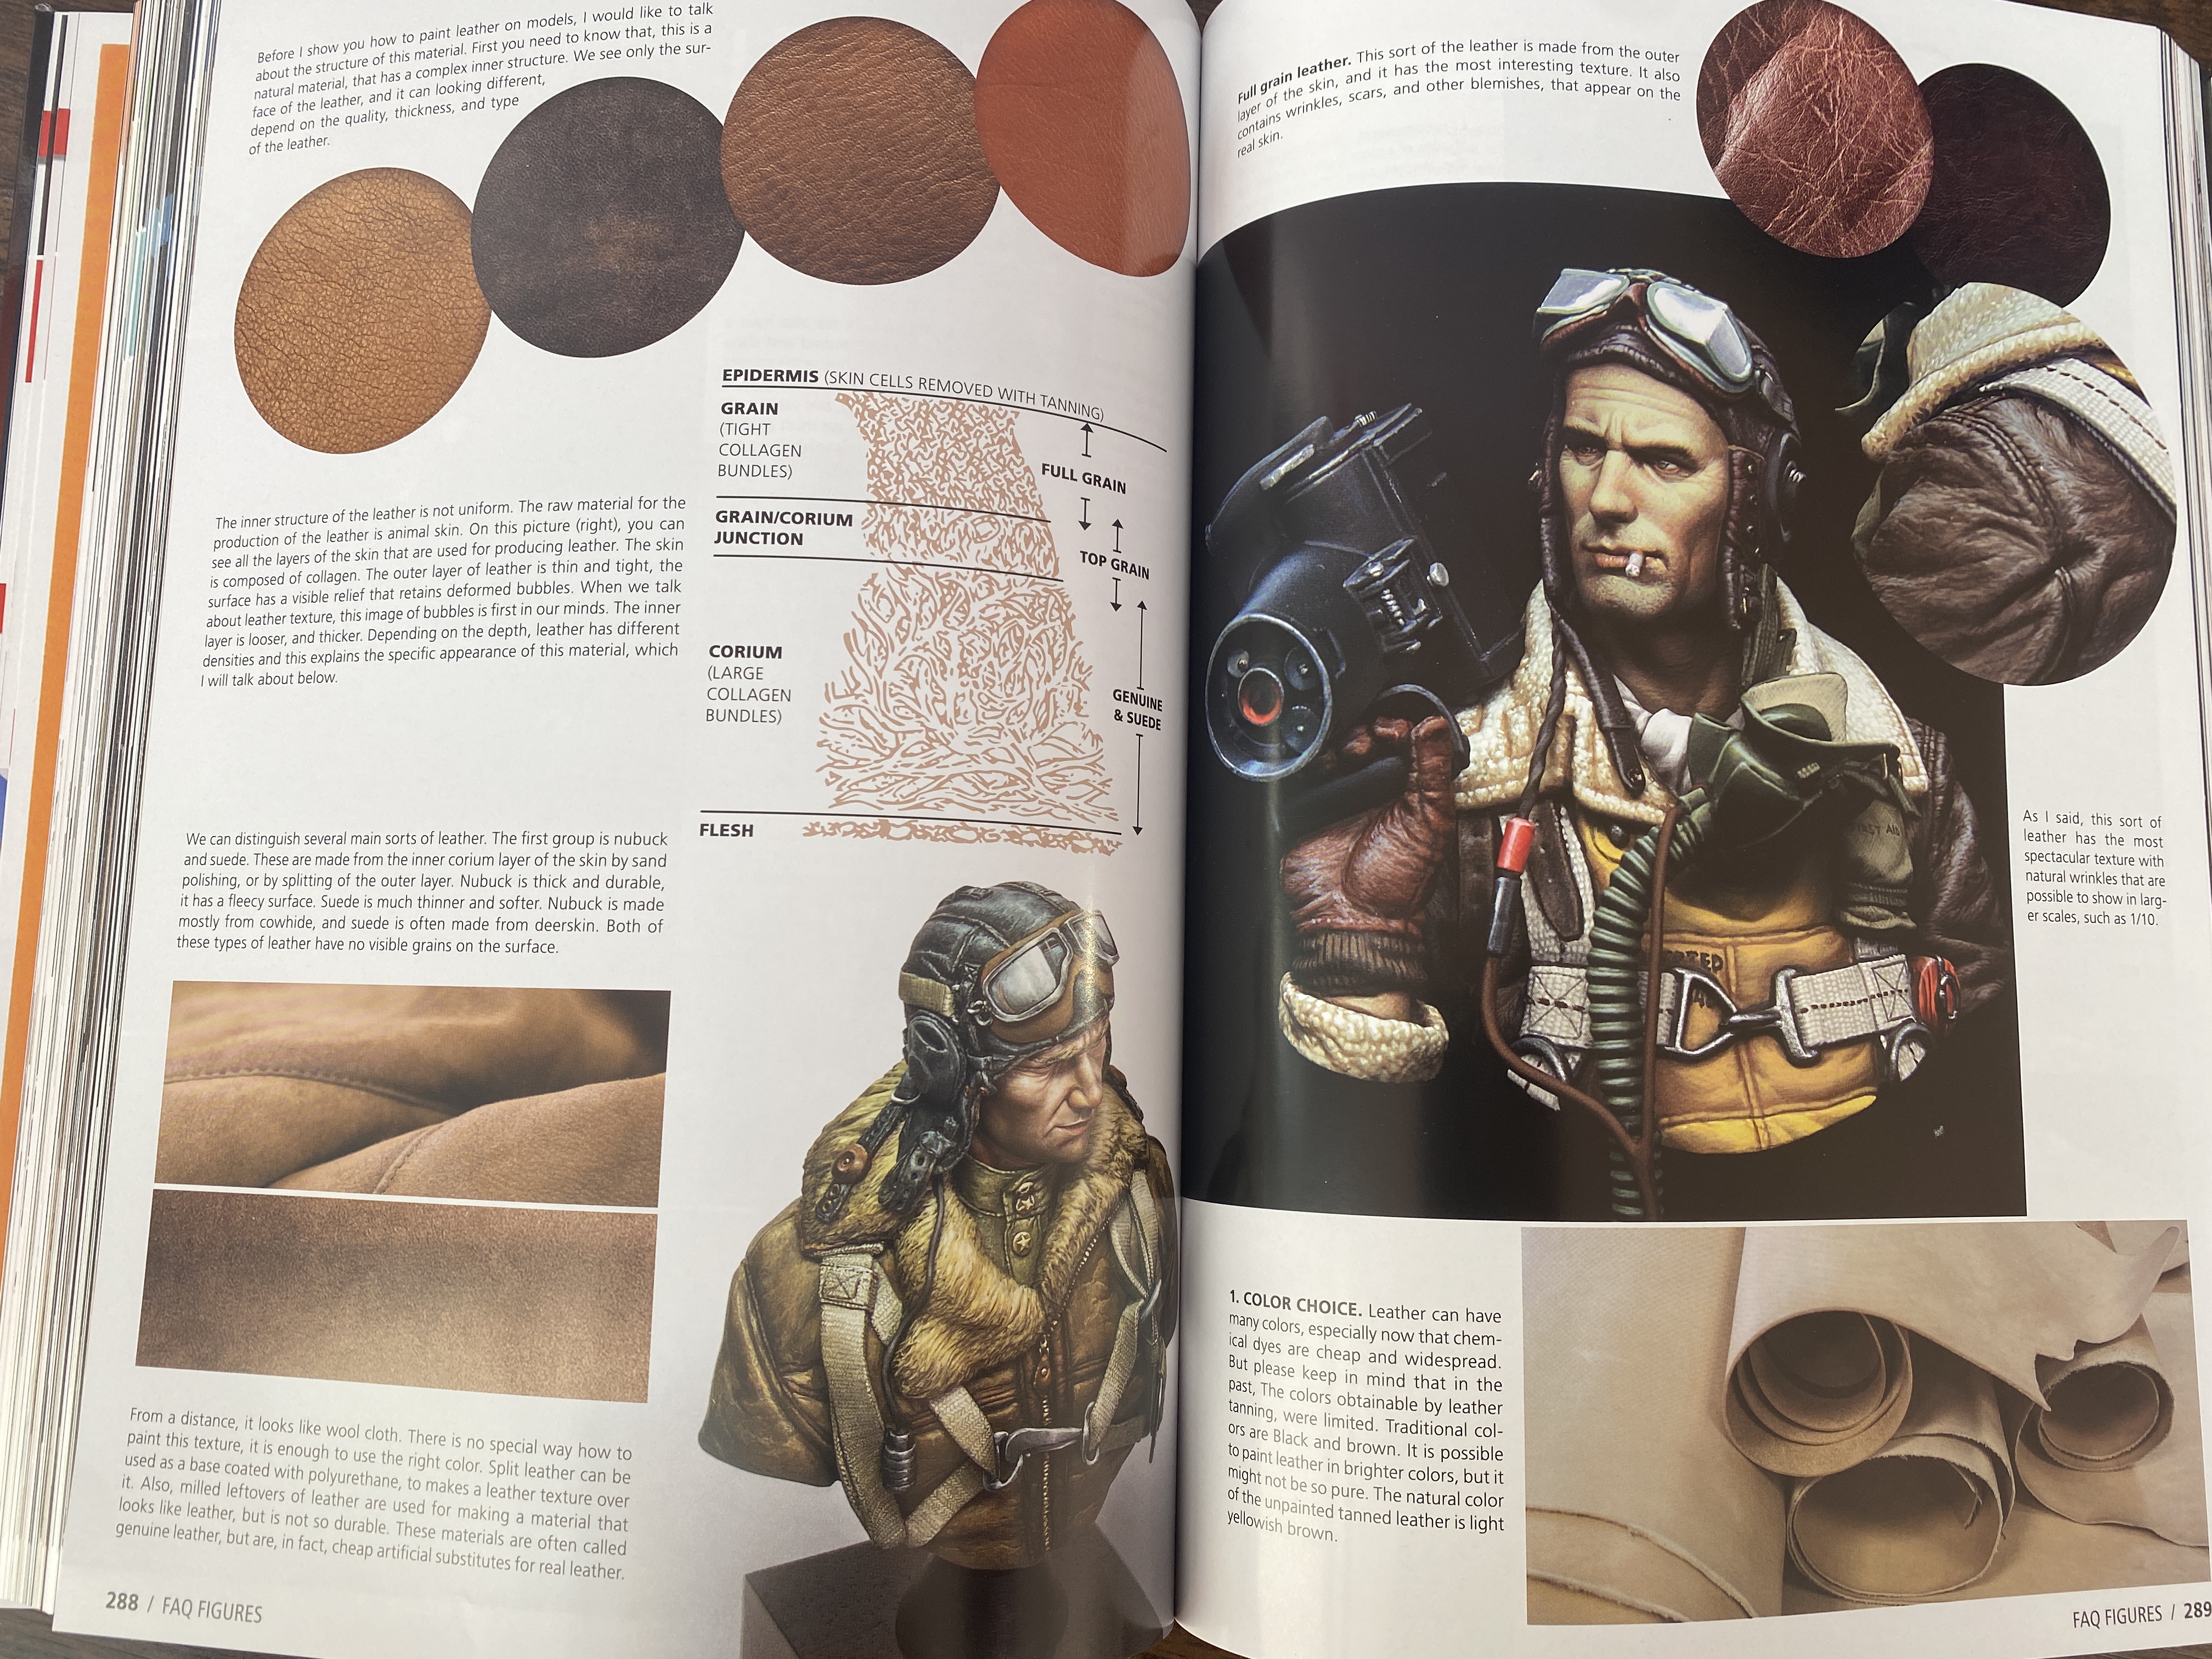
We drop the textures, move on to synthetic and animal skin. The attention to detail is impressive, to say the least ... I no longer have words and as such I leave you with some images.

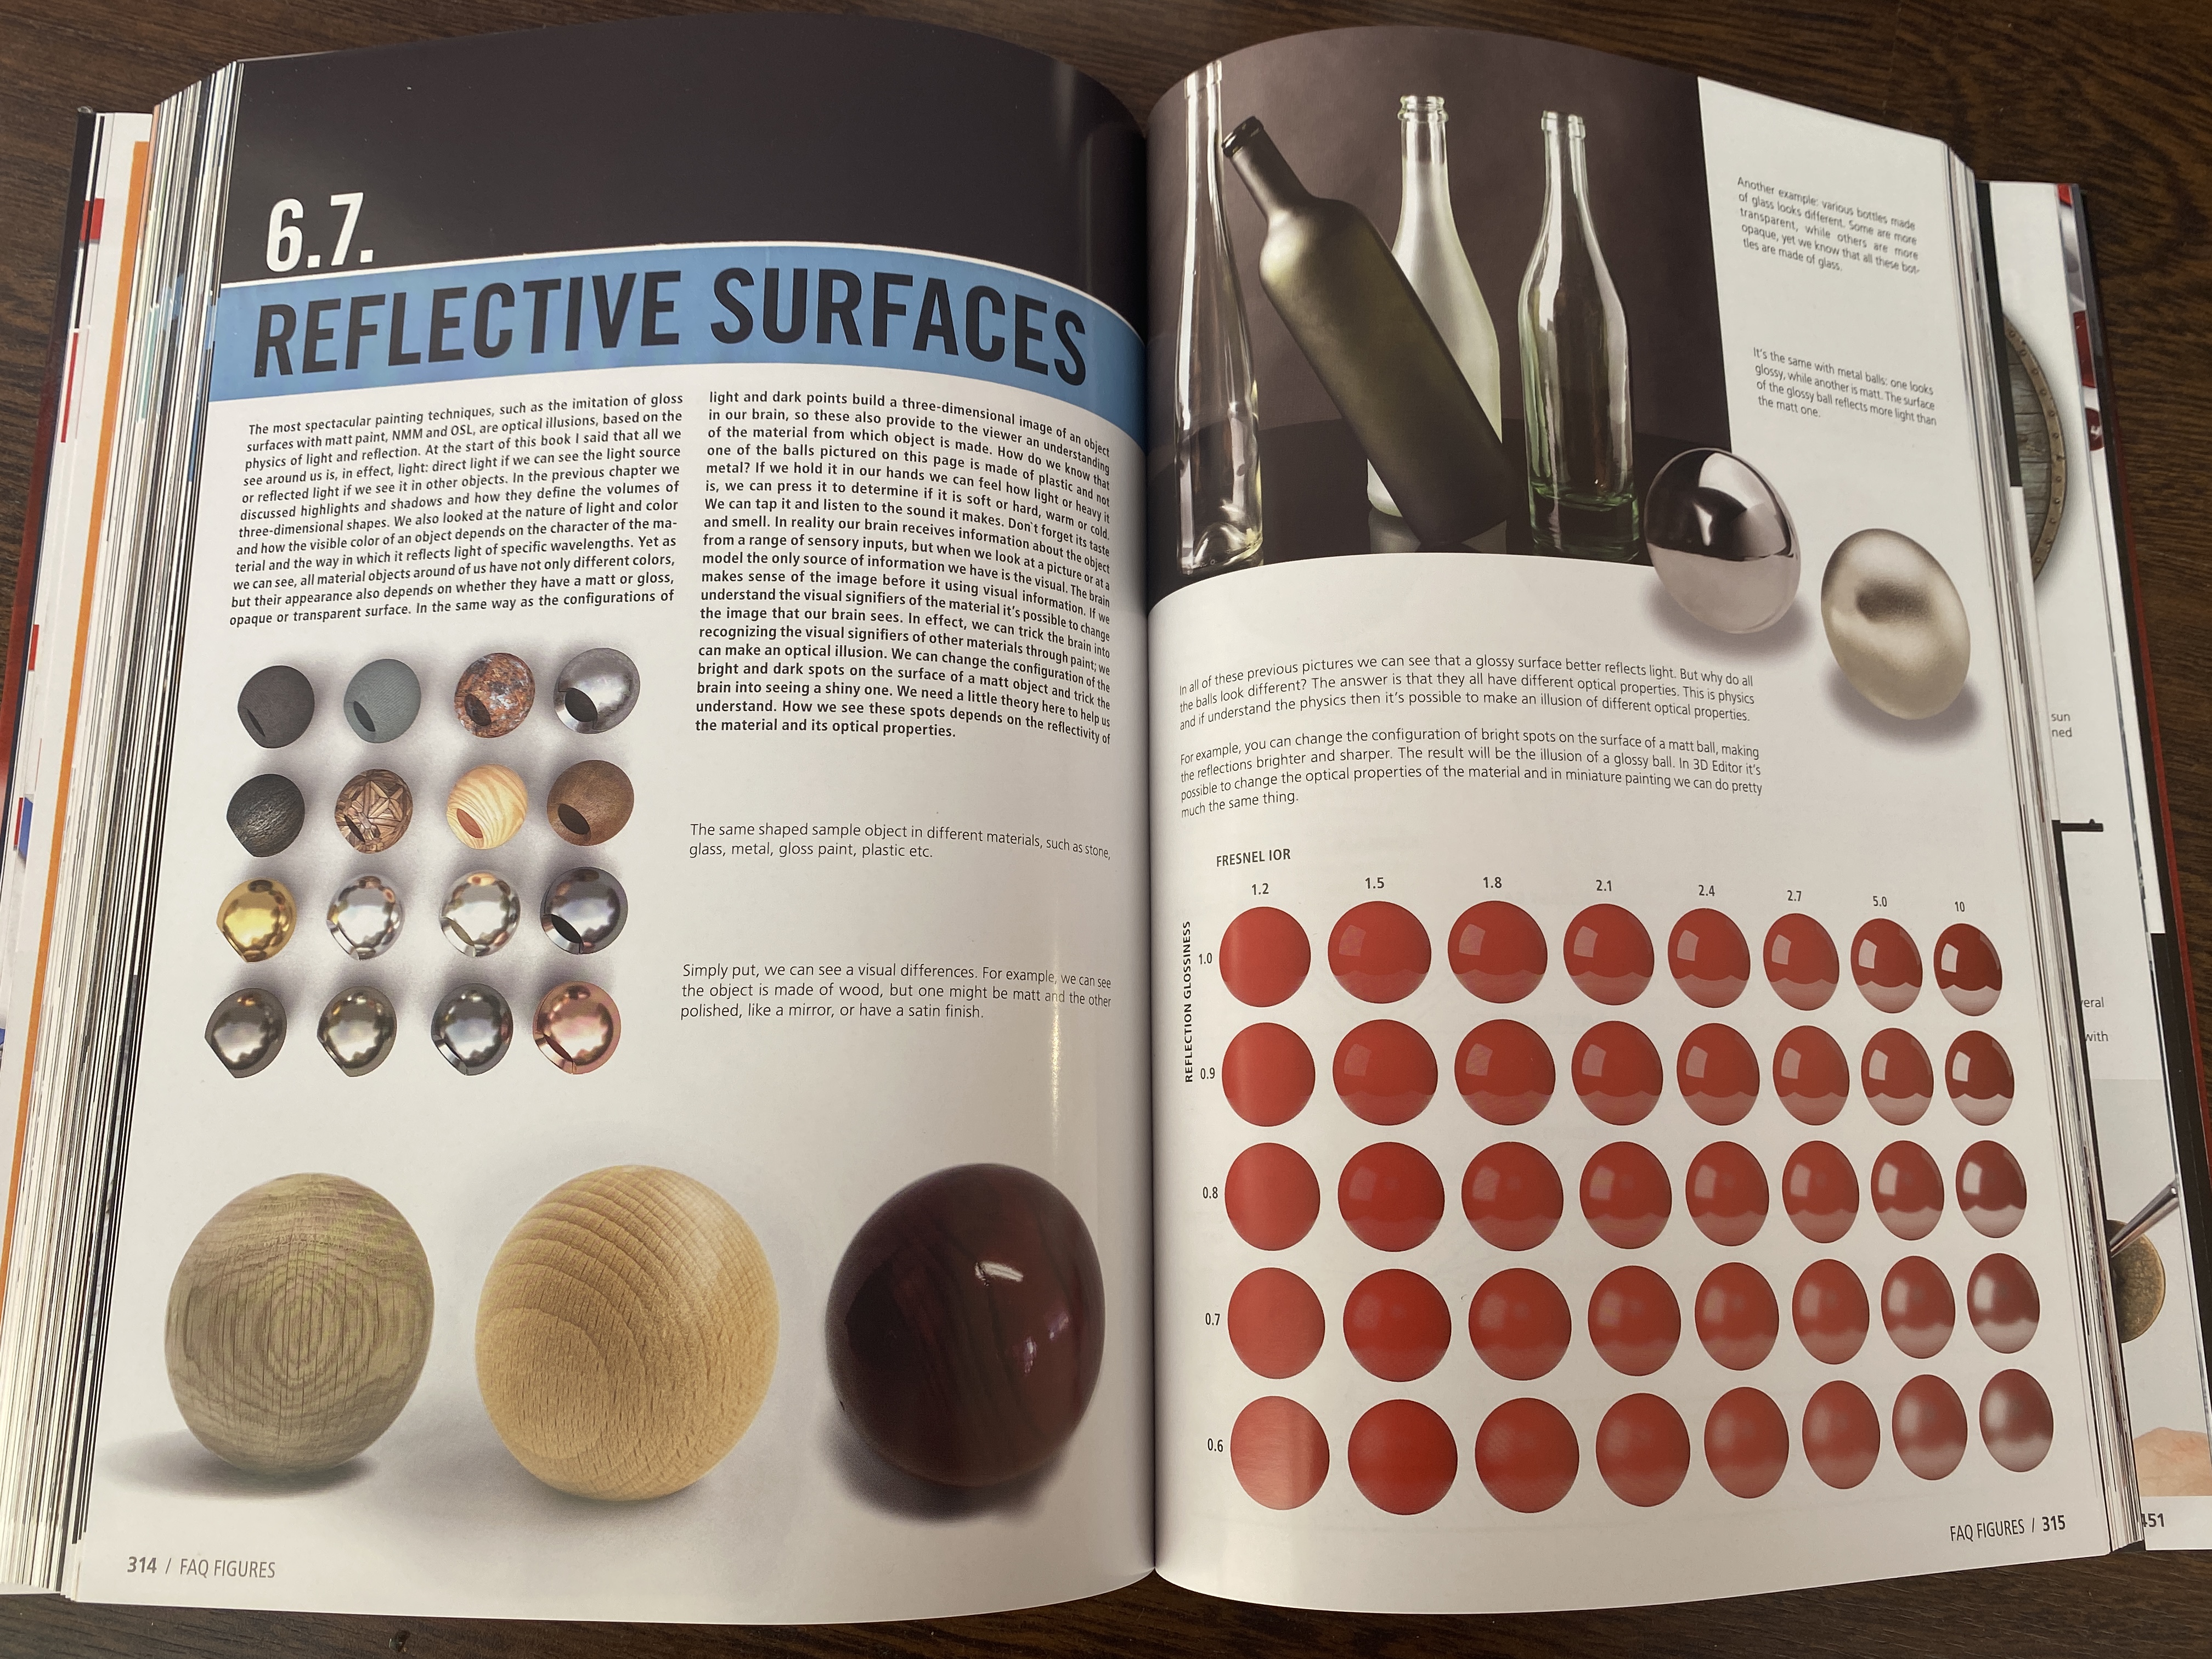
The next chapter was one of the chapters that most intrigued me: Reflectives surfaces.
A long explanation is given about the reflective surfaces and their understanding of the nature and behavior of the reflective surfaces in the light.

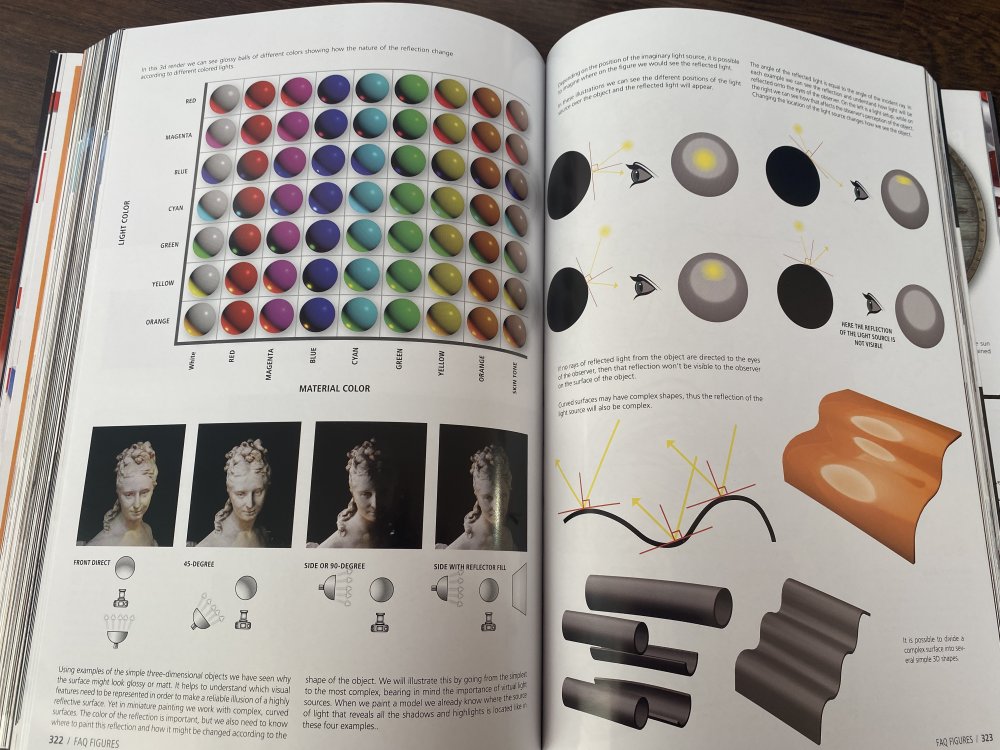
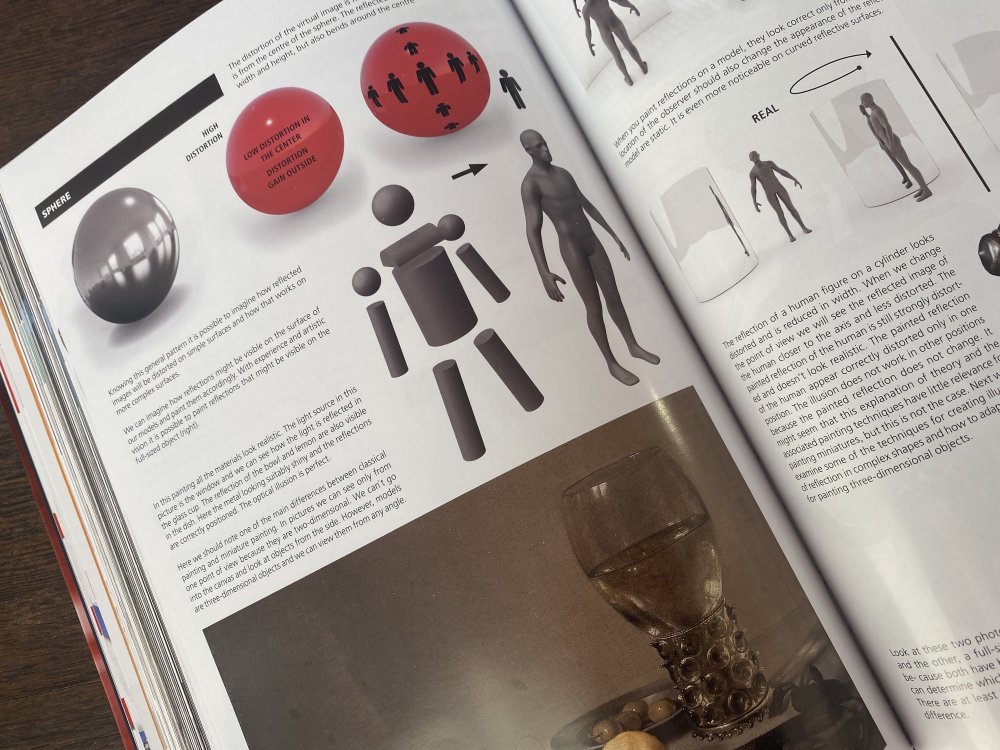
After the theoretical explanation, since simples shapes (flat, sphere) to more complex ones (full helmet), we move on to the practice and the different techniques used by the author for different finishing, always with enormous success.
I think that with practical explanation and with a lot of practice we can get an acceptable result (at least, I hope so).
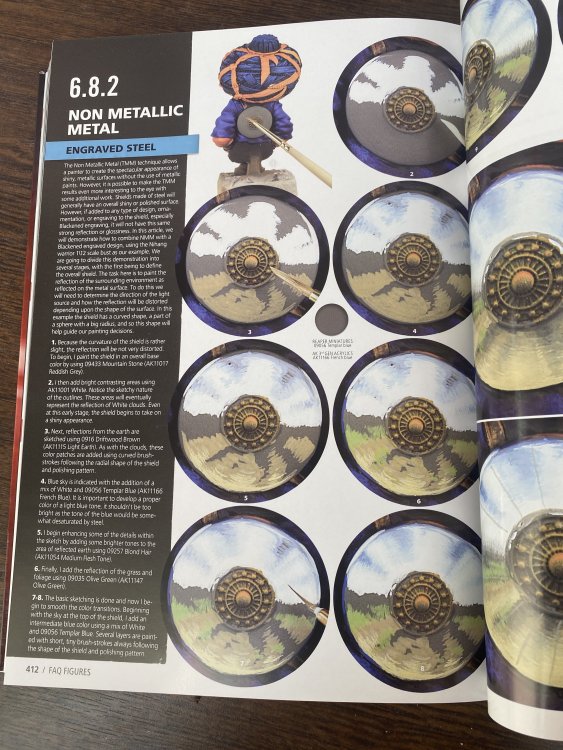
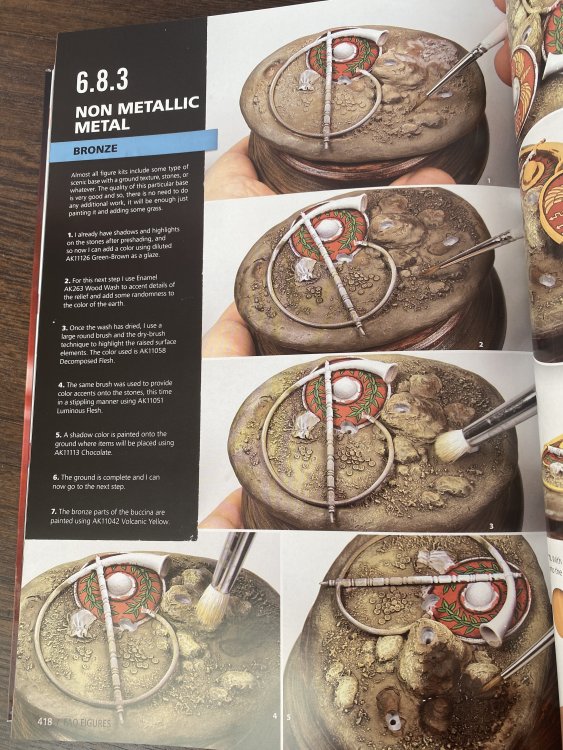
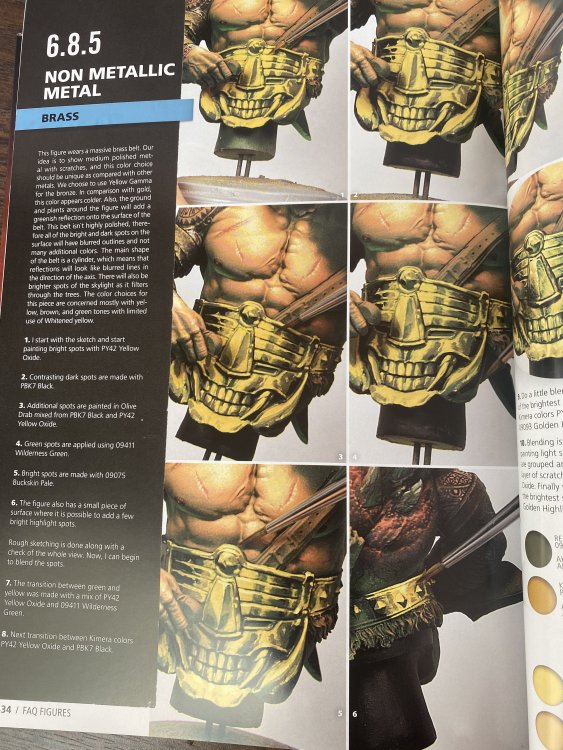
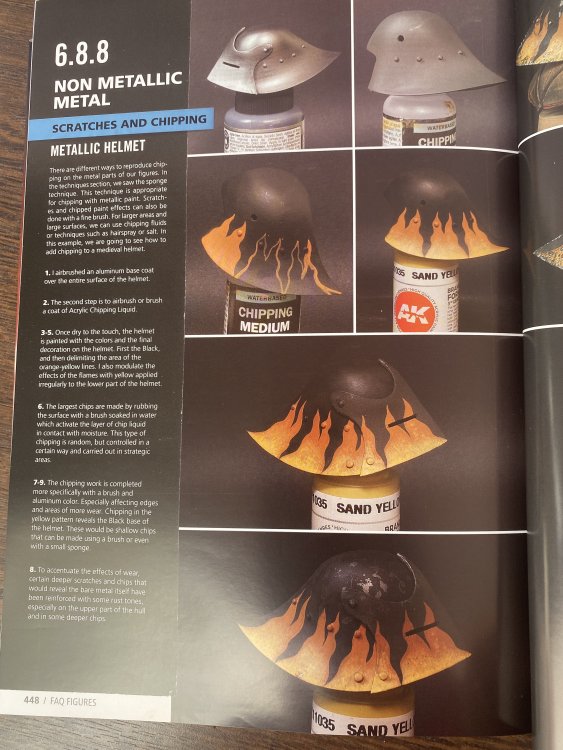
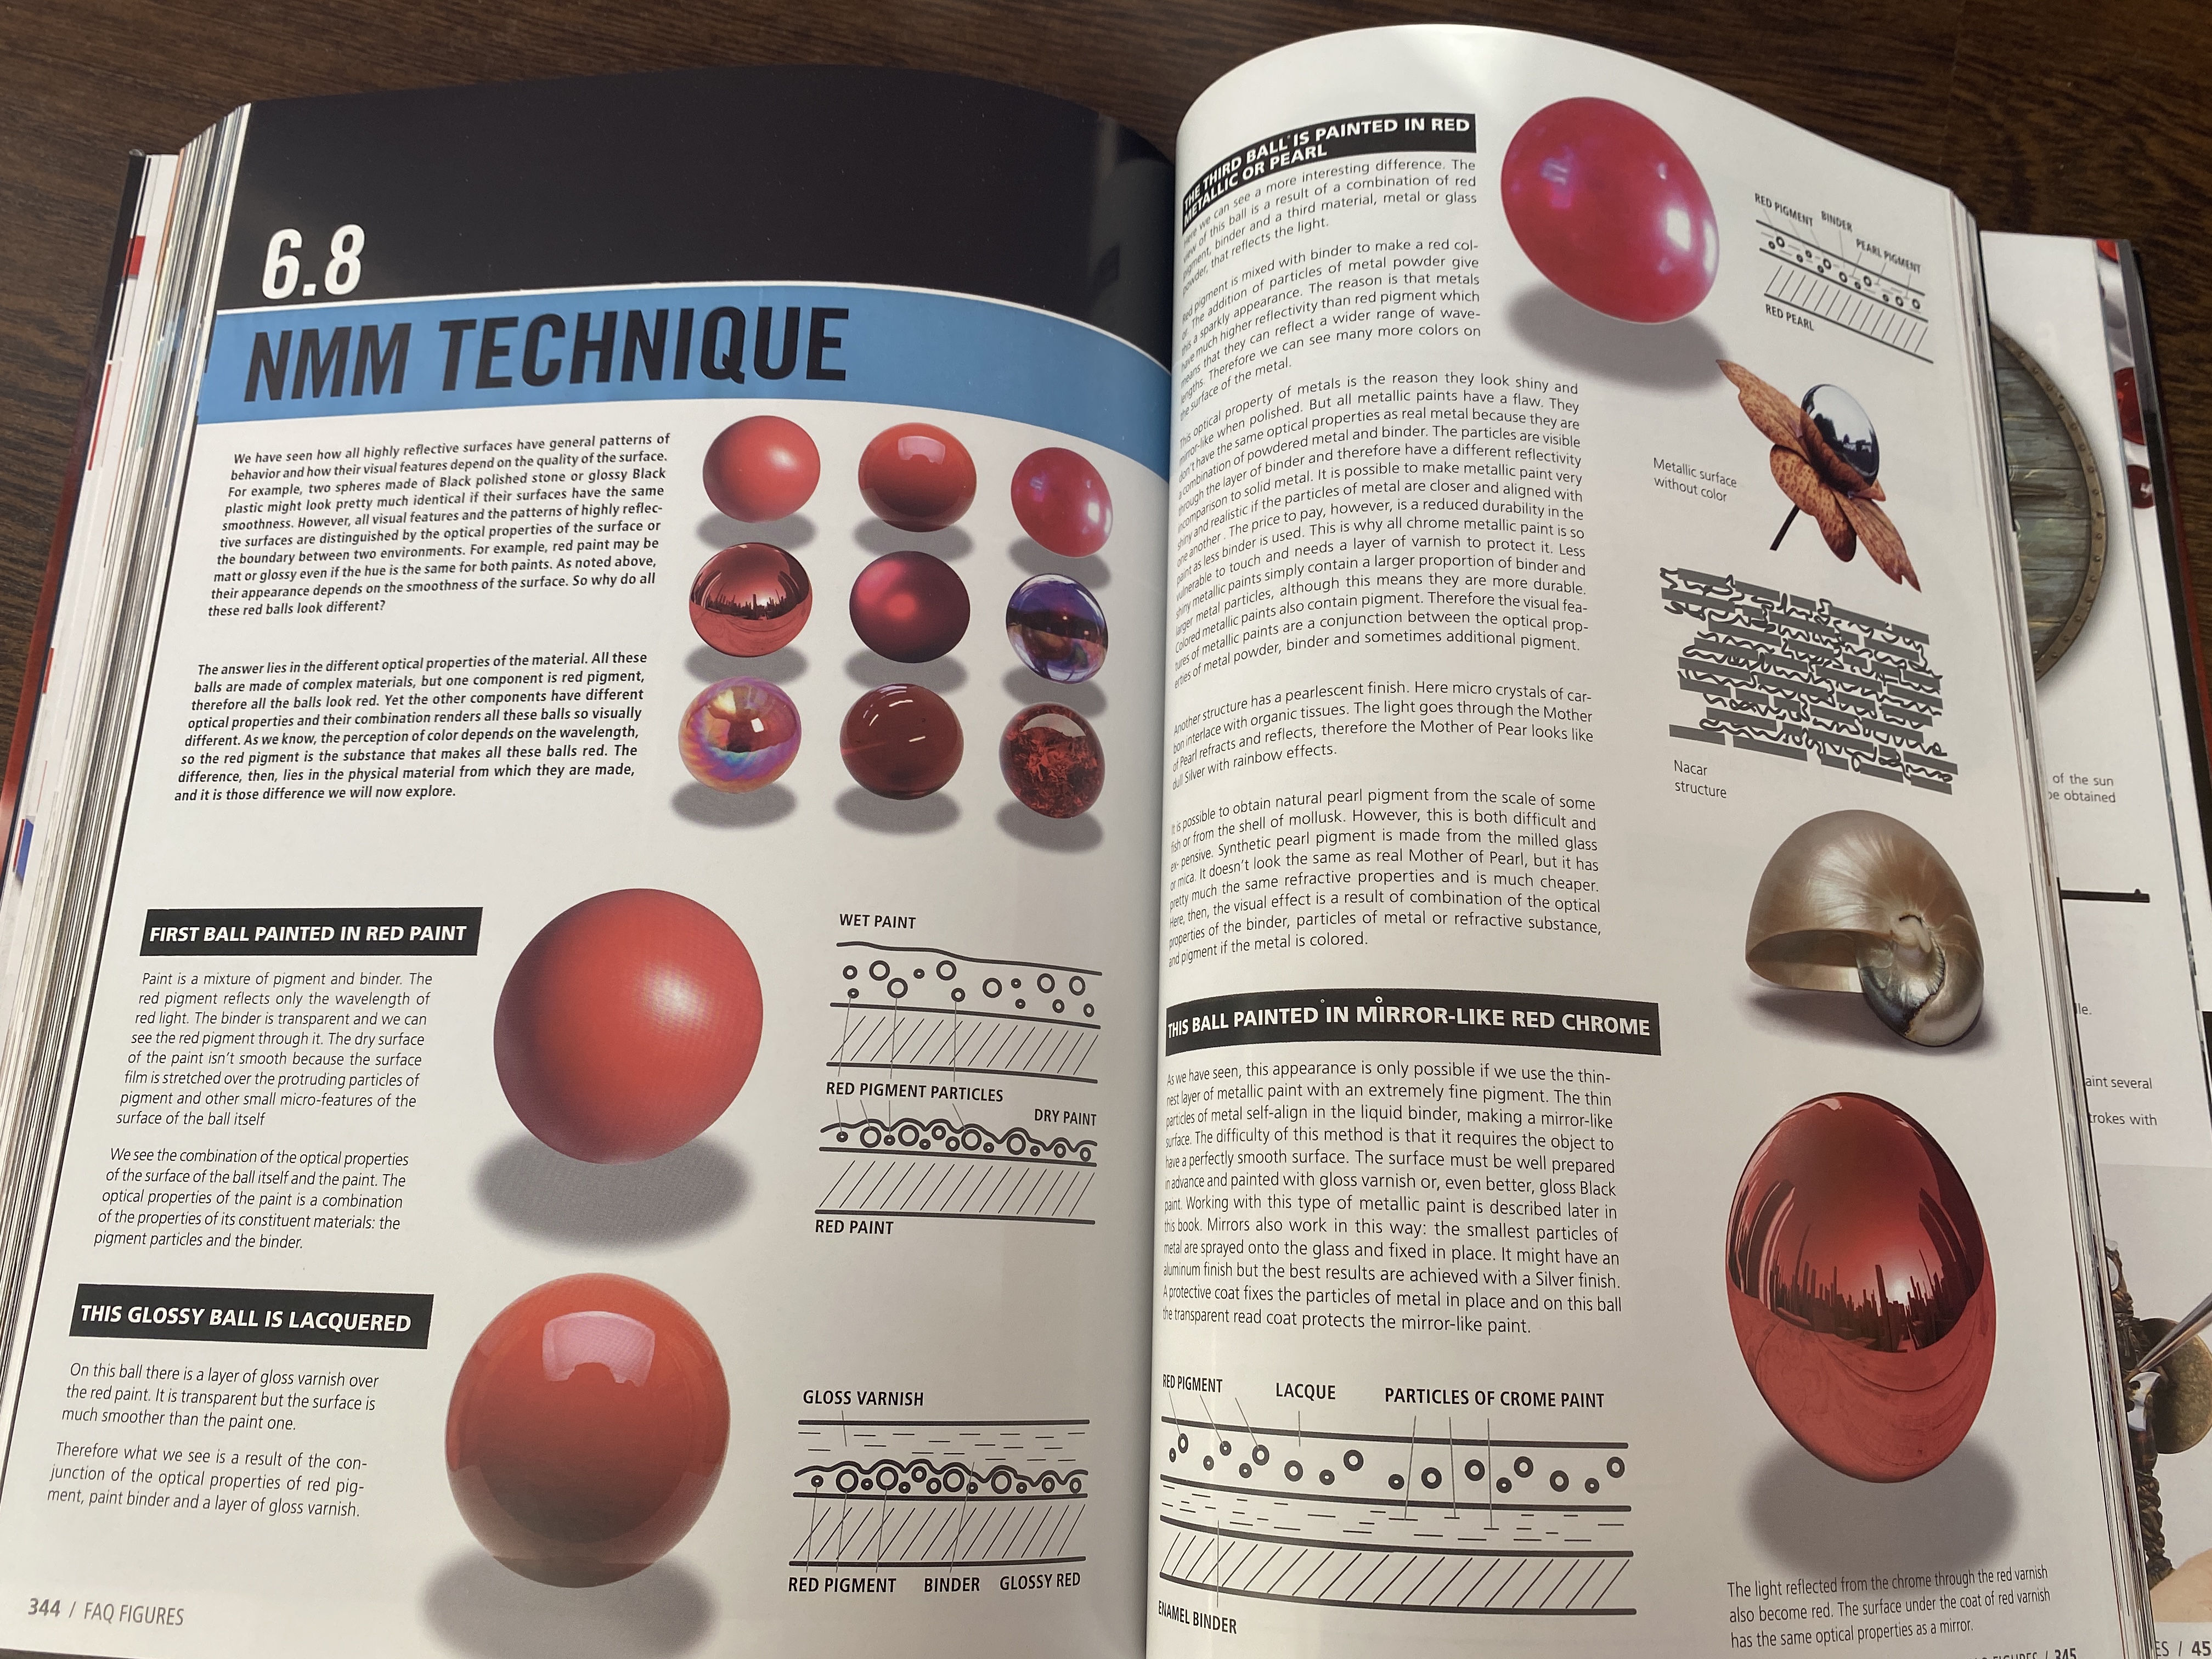
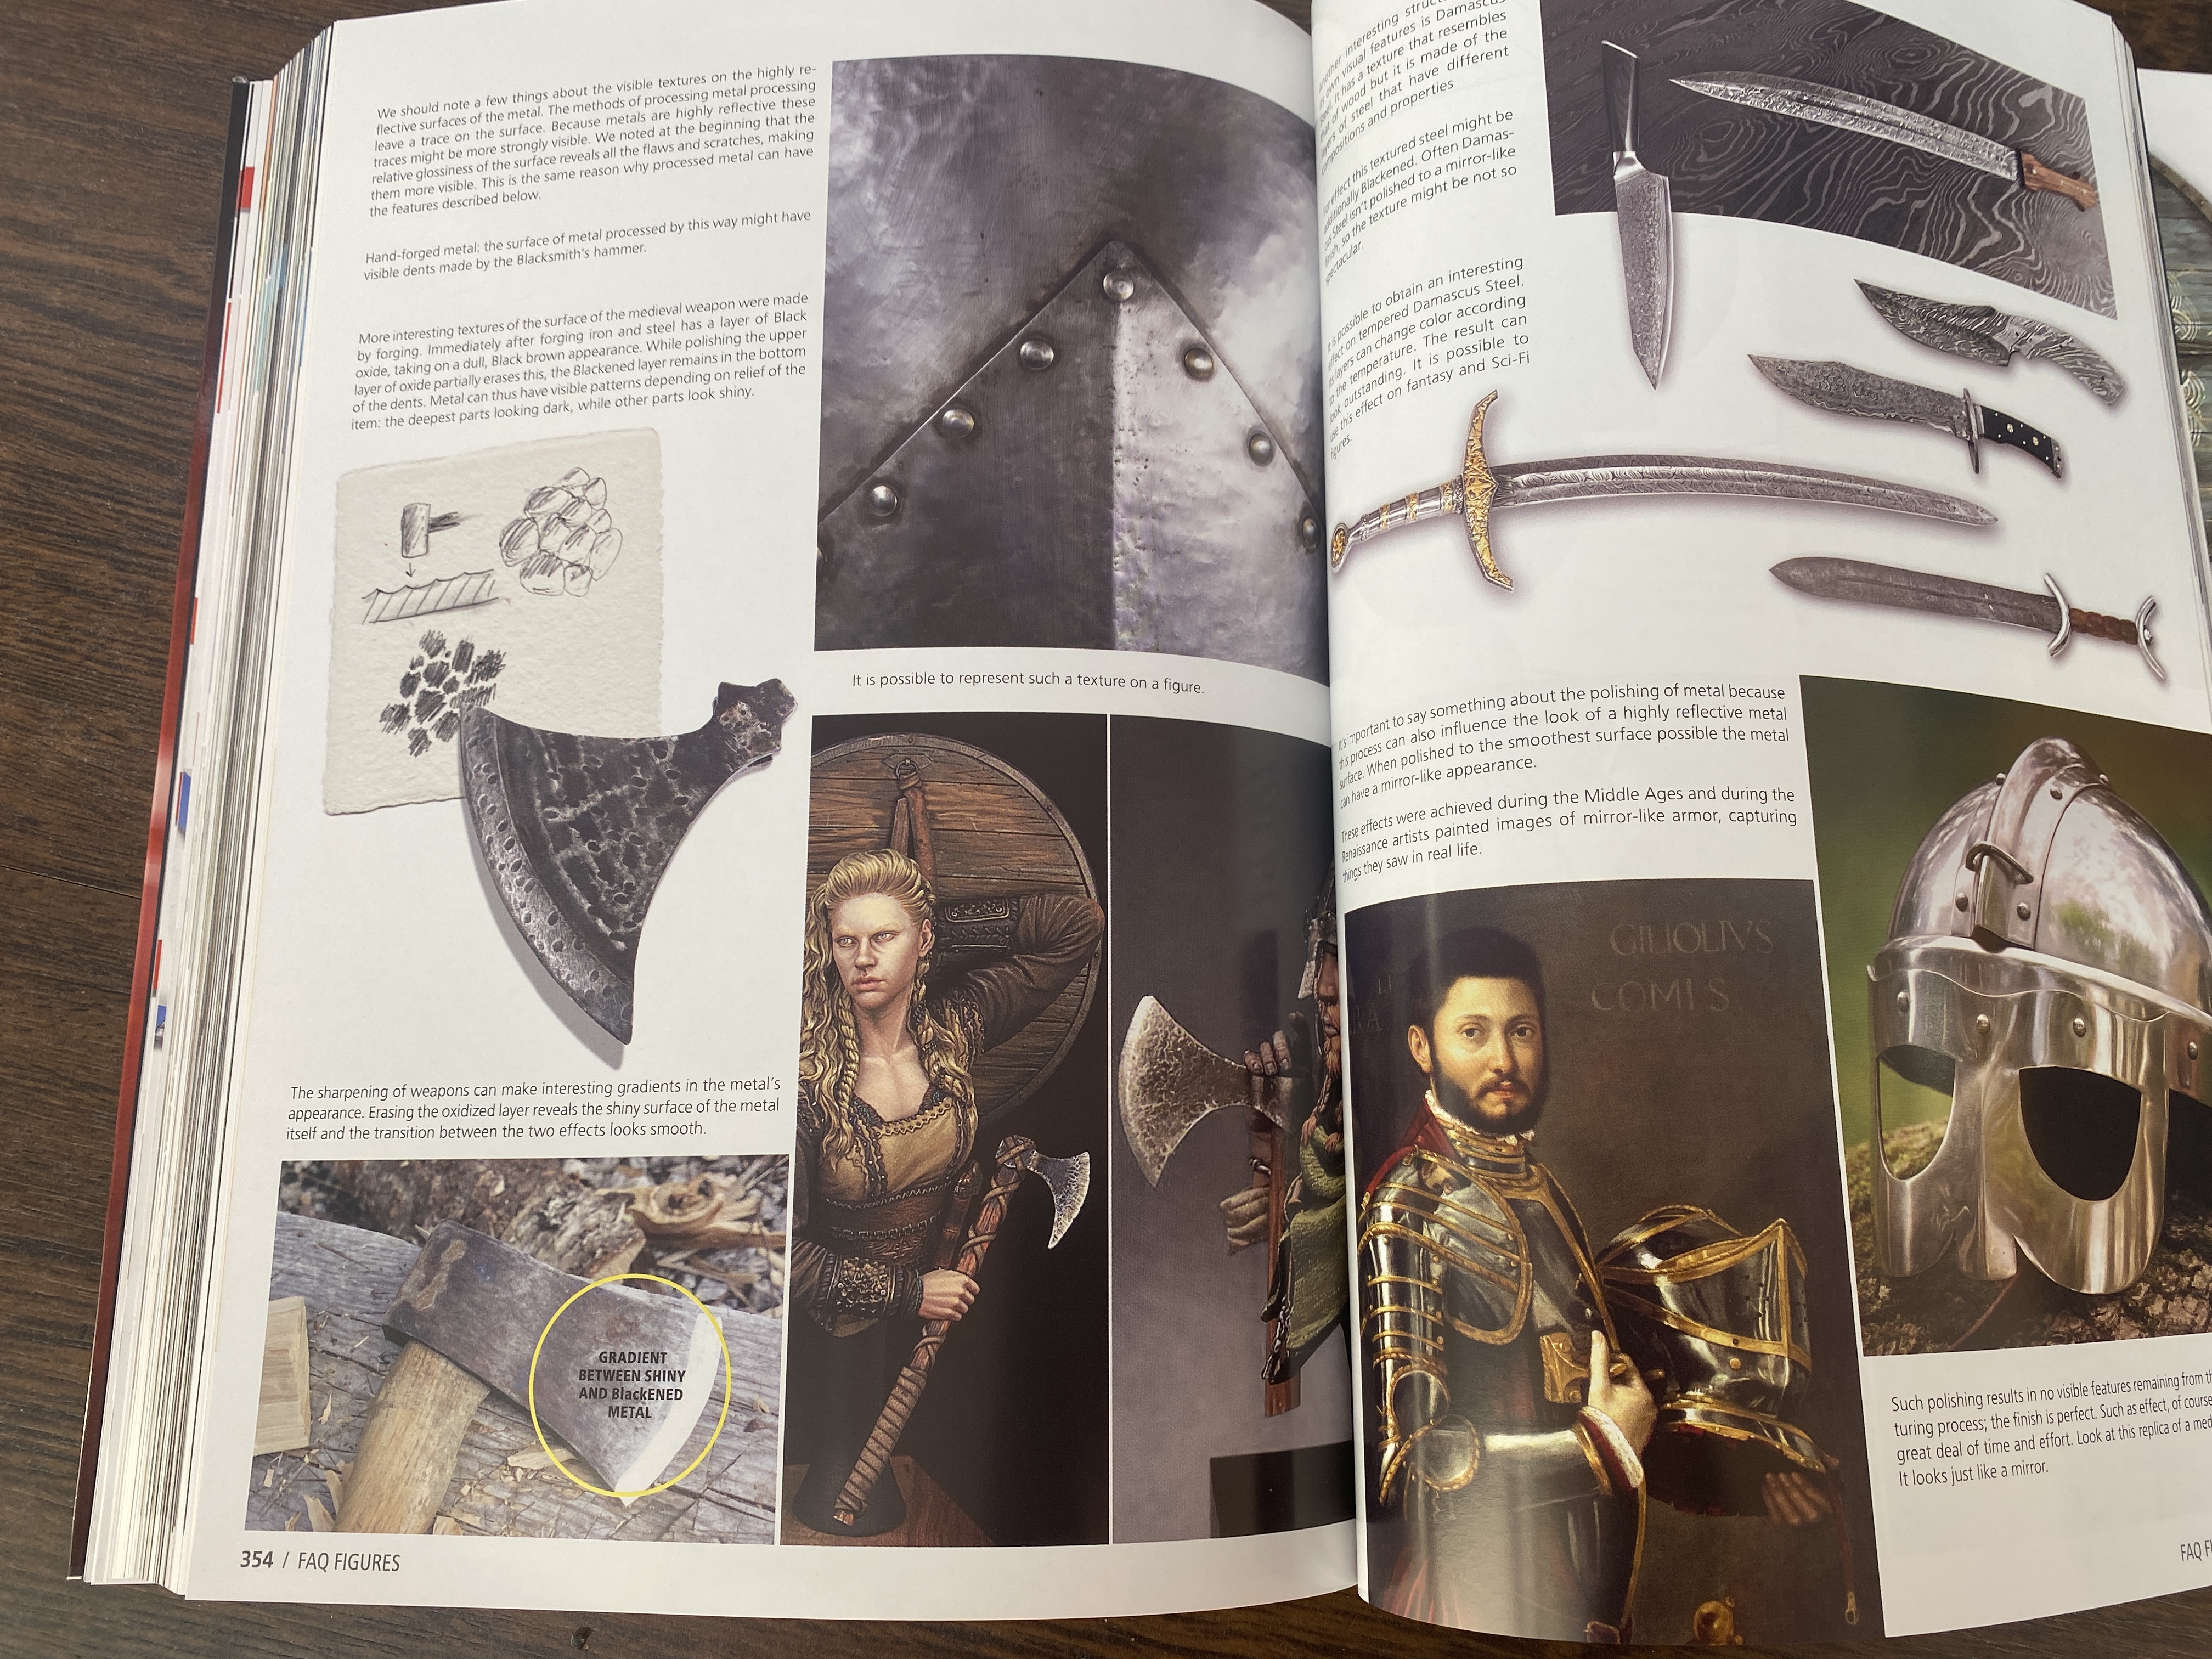
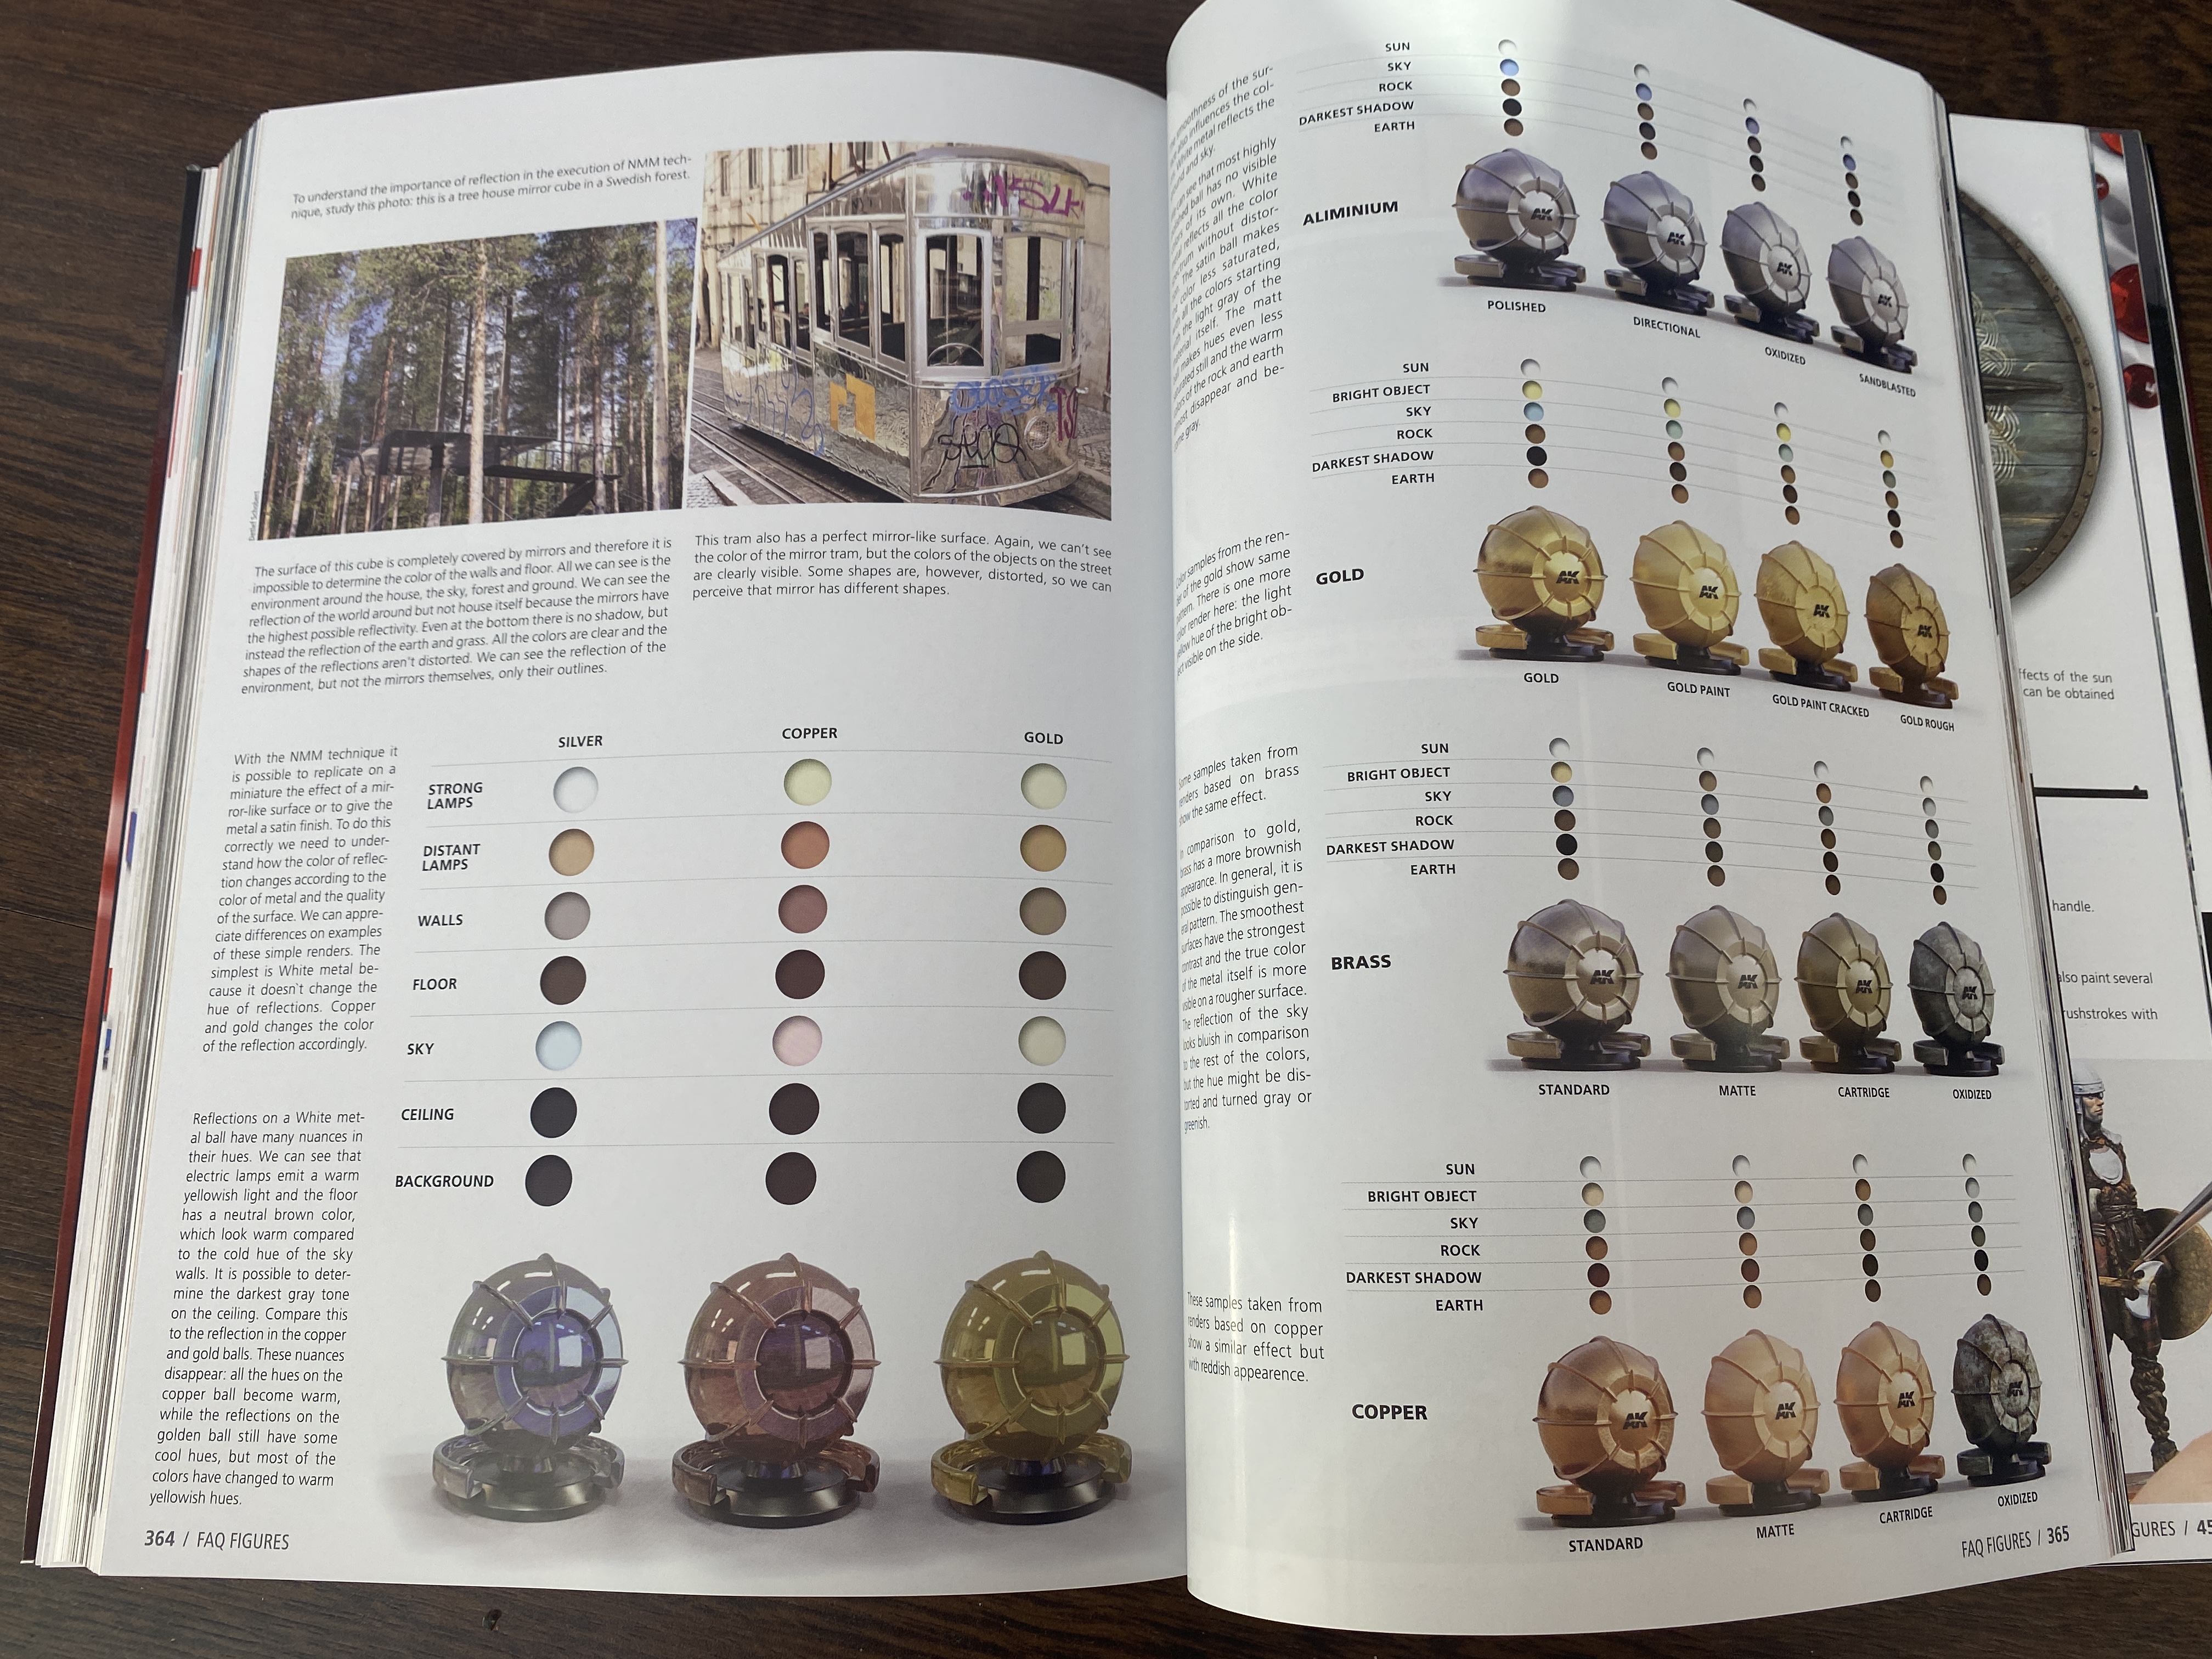
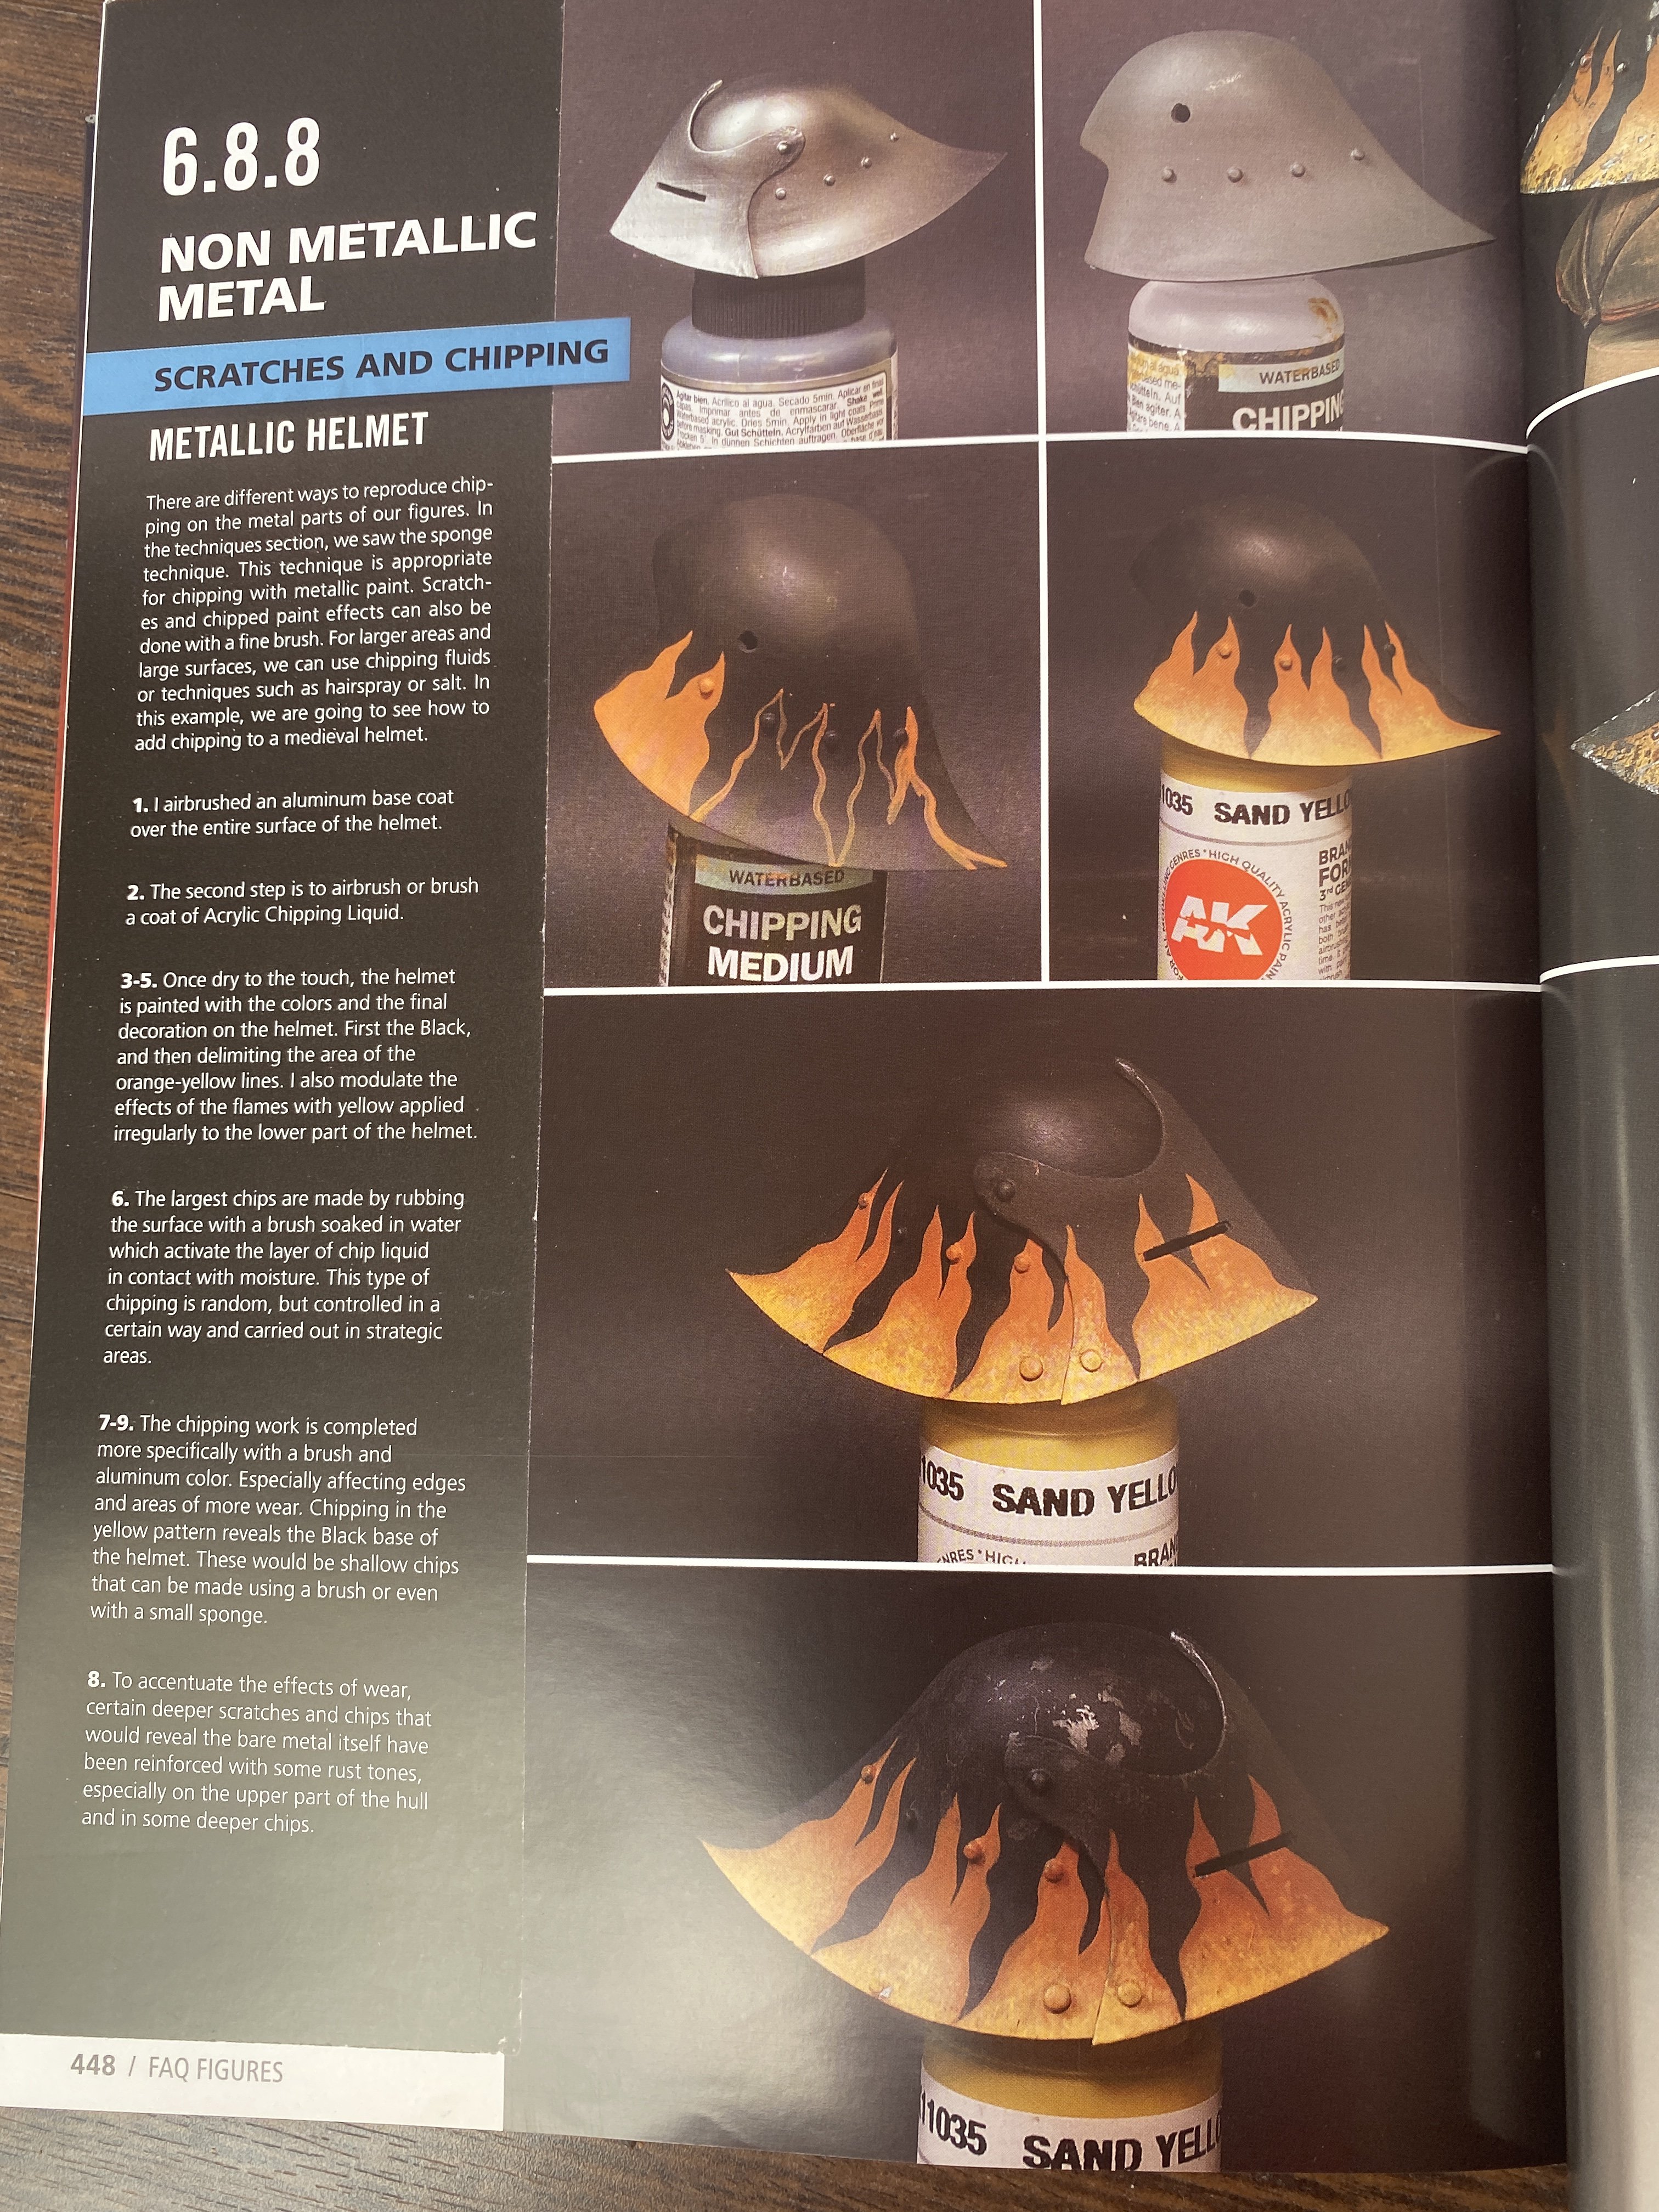
The chapter 6.8 is also a brand new world for me… Non Metallic Metal Techinique, but makes perfect sense… reflected surface based on the different optical properties of the material.
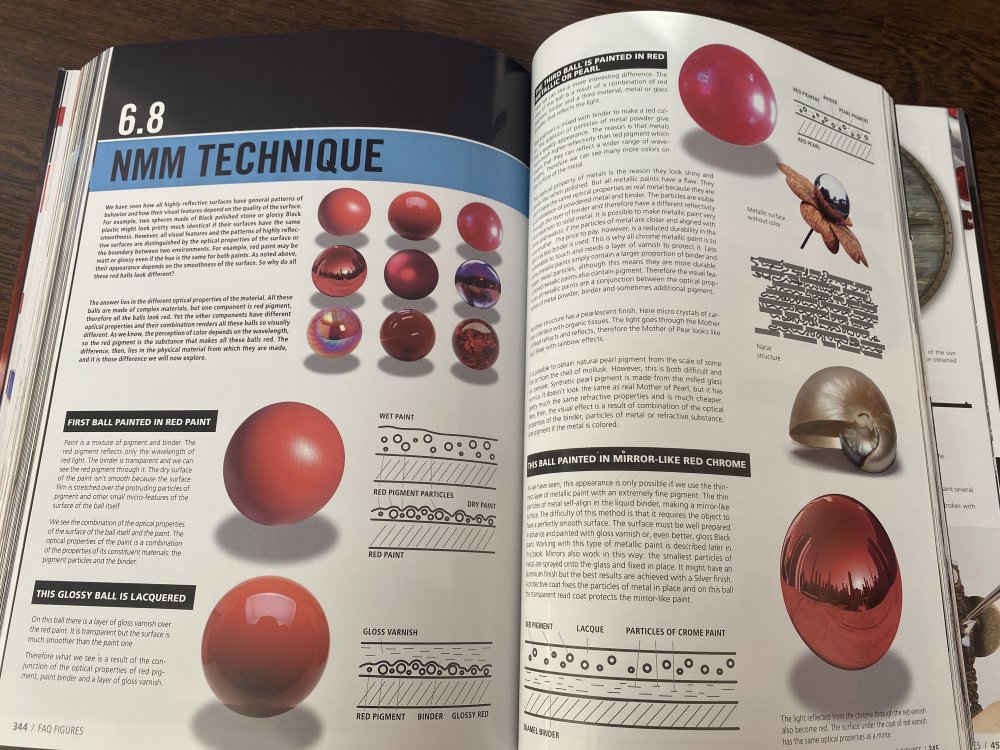
Through pages 344 to 387 the author puts down all his knowledge and experience explain all the theorist with all views and surface nature in order to get the final solution on getting the perfect tone, color and aspect that they are looking for.


After the long explanation, comes the specific situations of NMM like the steel color ( 6.8.1), with a step-by-step of painting a steel armor or engraved steel (6.8.2) with a painted shield, bronze (6.8.3), cooper (6.8.4), brass (6.8.5), golden (6.8.6), chainmail (6.7.7) scratches and chipping oin mtellic helmet (6.8.8).

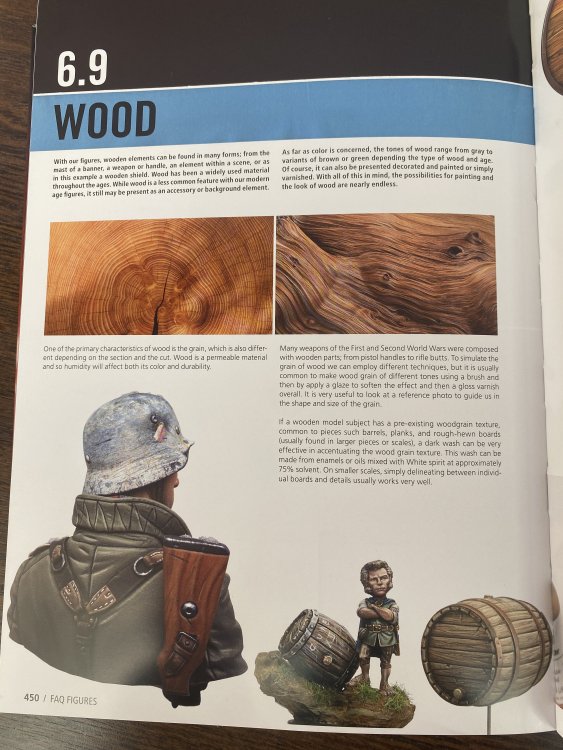
A new chapter: wood.
Right here I am a little more comfortable due to my experience with WWI airplanes and the frequent need to paint wood ... However, the technique presented and the results obtained are surprising. Totally different from the technique that I use. To experience soon!!
Another chapter that was very curious was chapter 6.10 - Gemstones, pearls and crystal. Mainly how to paint glass, or rather how to simulate painted glass.
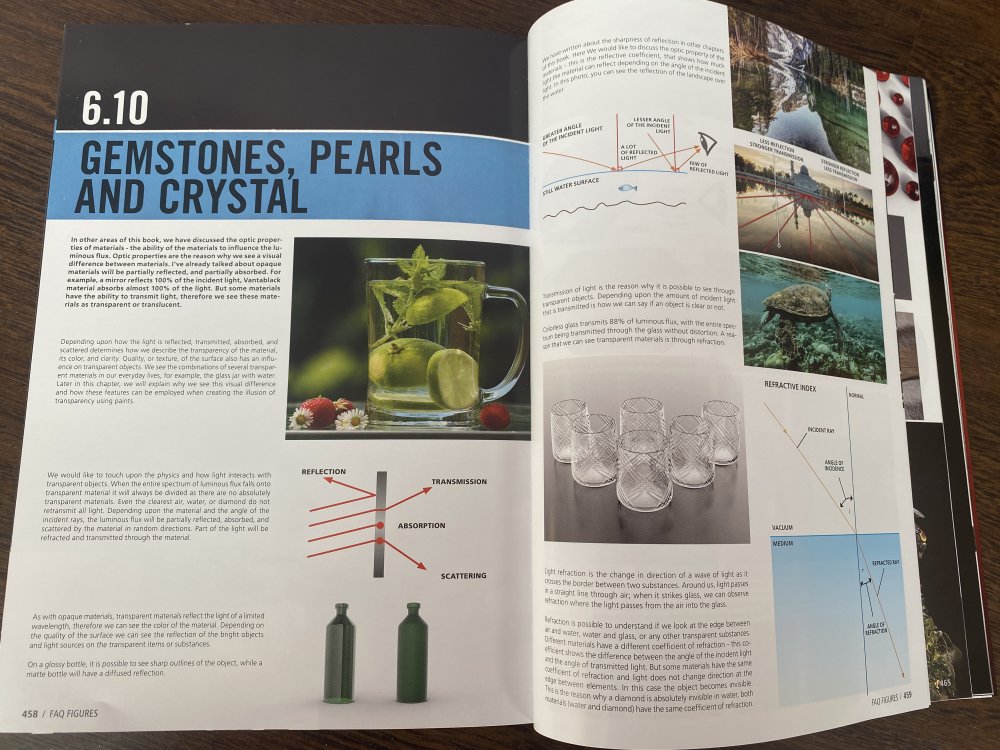
Once again, the theoretical description is very important and very illuminating and in the next sub-chapter, we have the practice of how to paint a glass bottle.
Or rather how to simulate the glass by painting two solid resin bottles.
The final chapter:
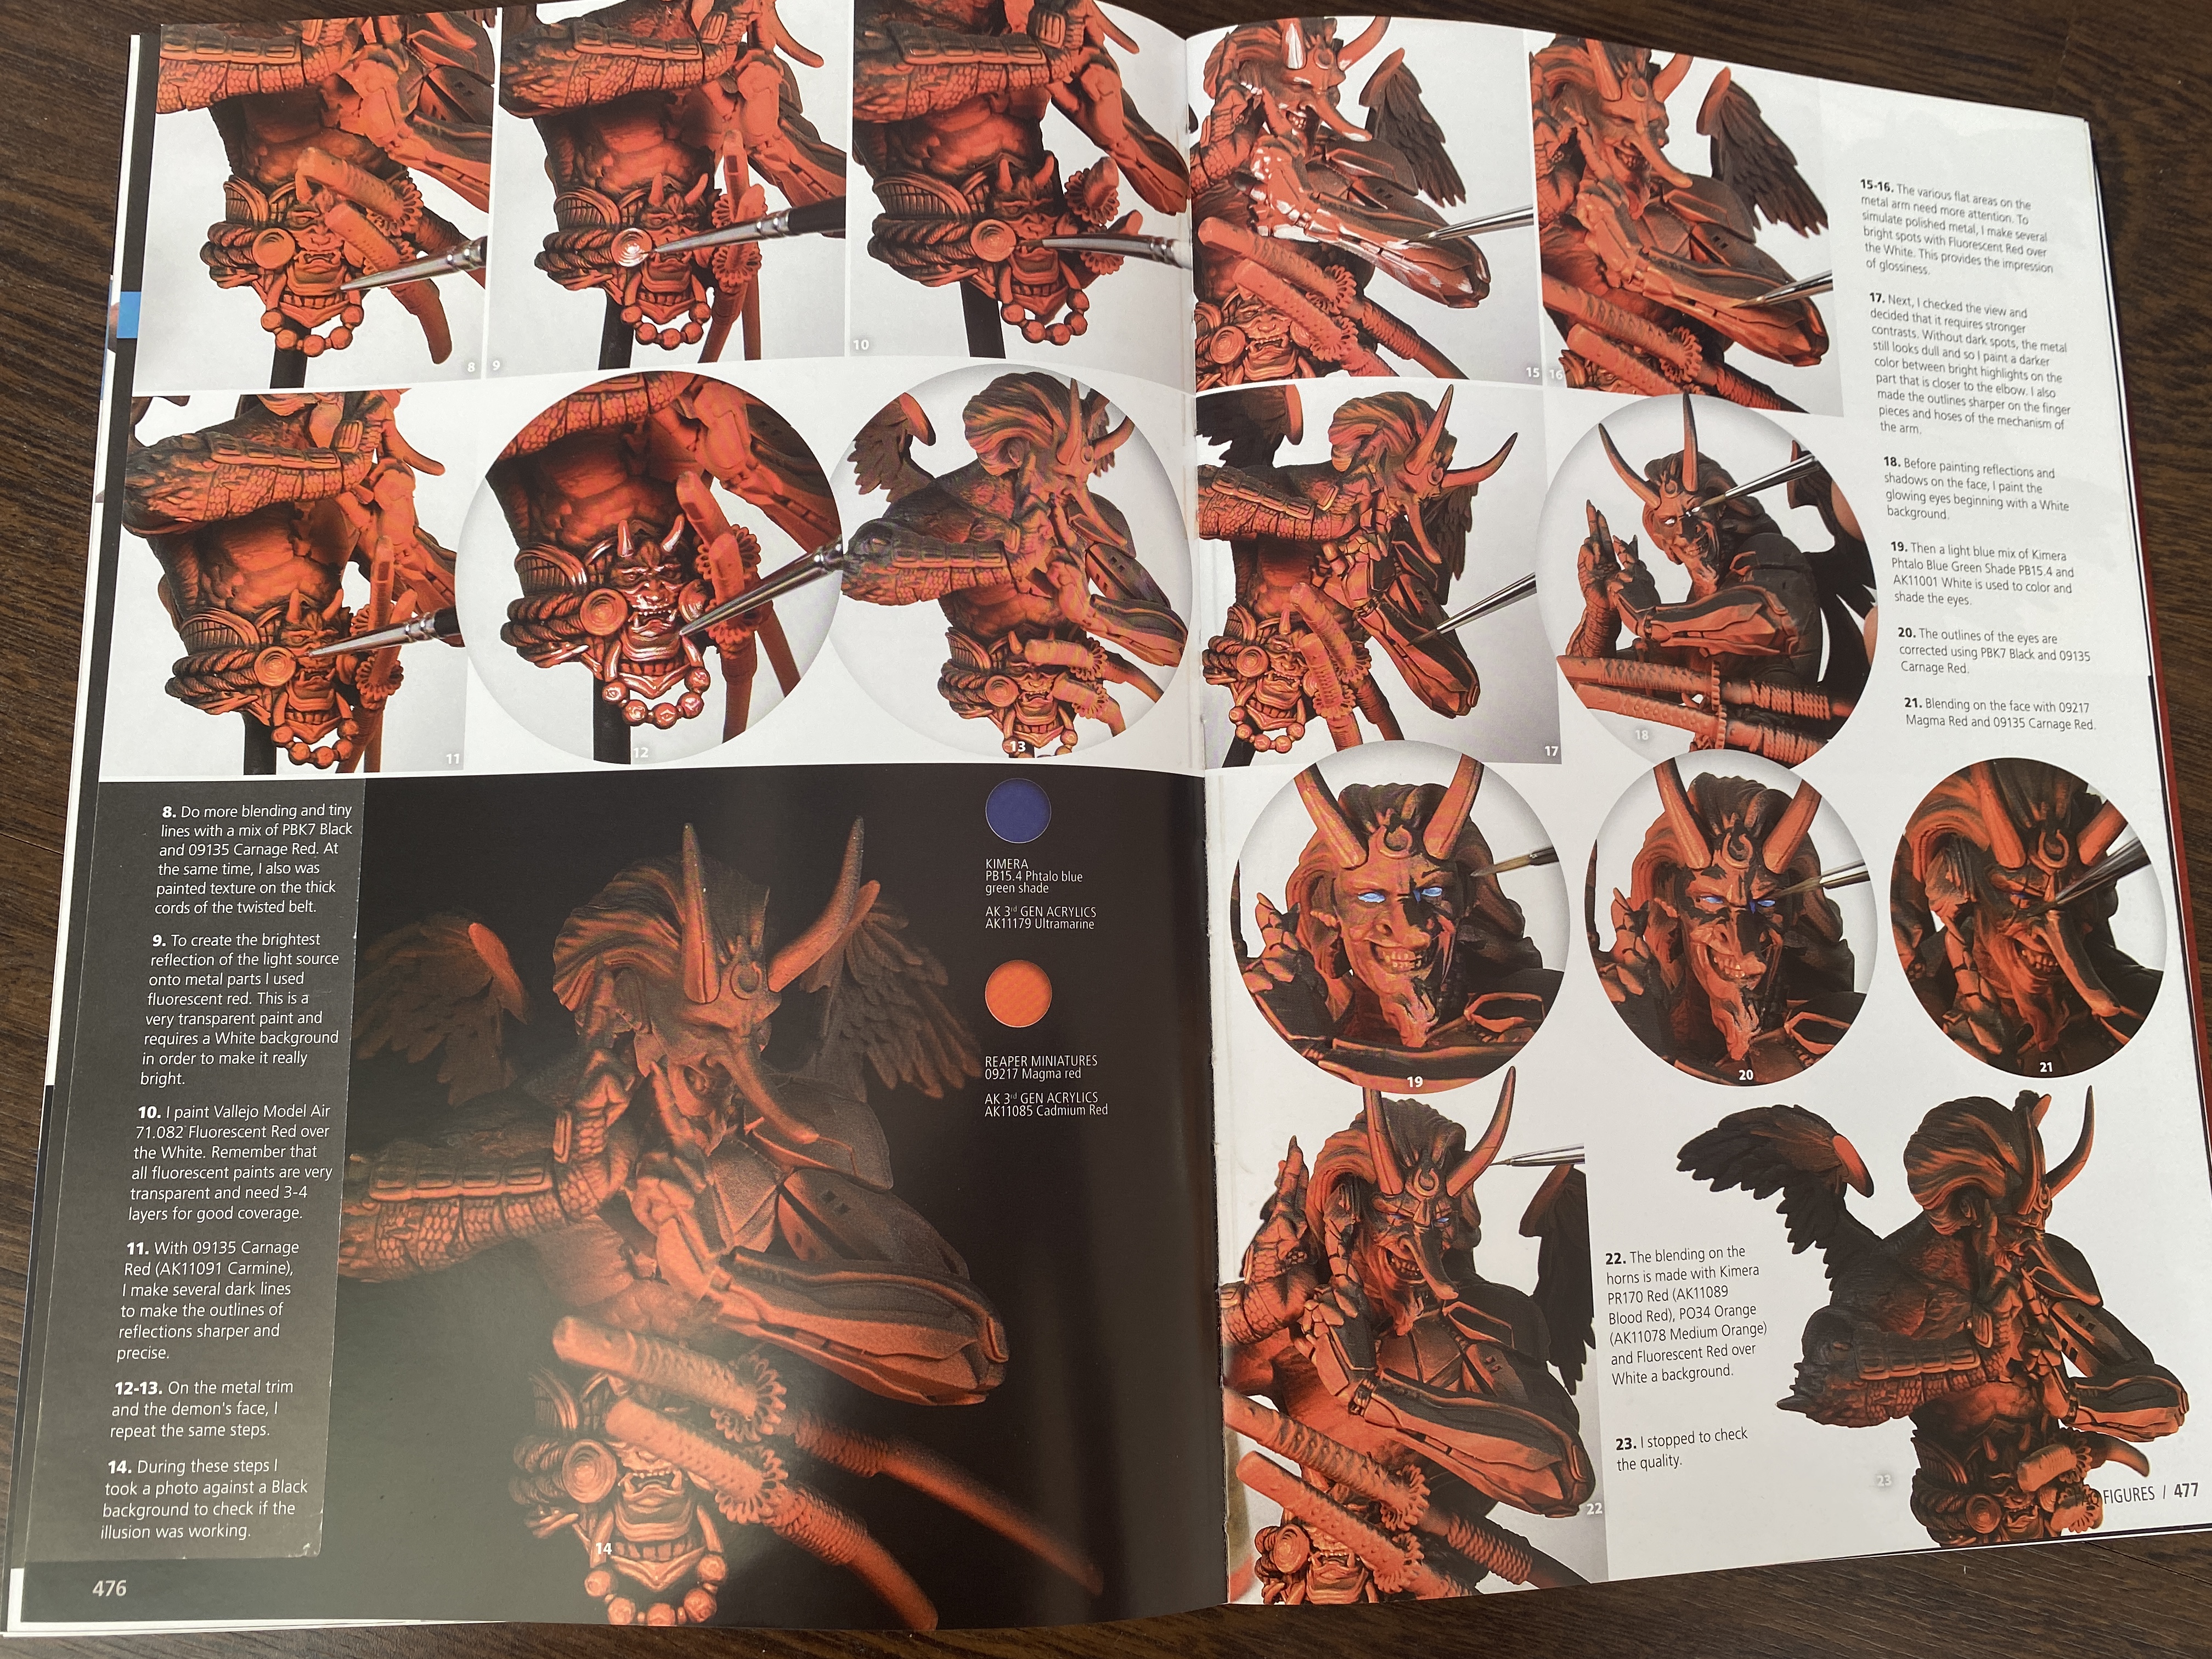
6.11 Special Effects
Here the author covers a very interesting technique: OLE (Object Source Light). In other words, that painting technique that allows the observer to erect the figure in the way that his painter intends, giving illuminated or specific light point with the smoking figure in which the light point will be a fireplace.
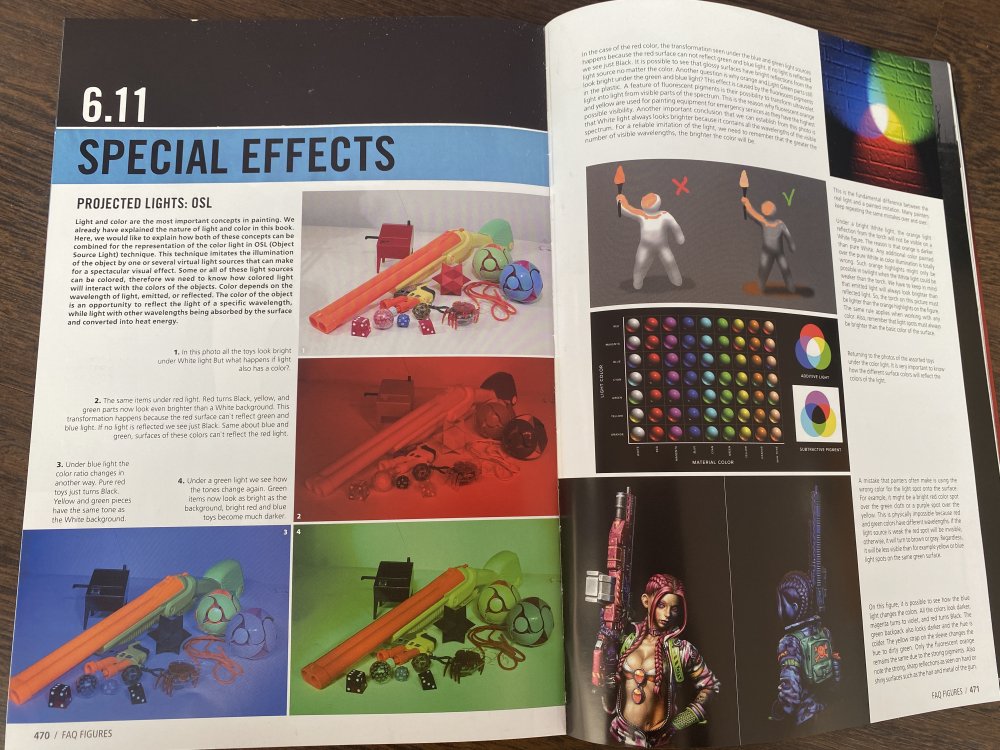
This chapter is subdivided in two: artificial point of light (with the example of a devil) and double illumination.
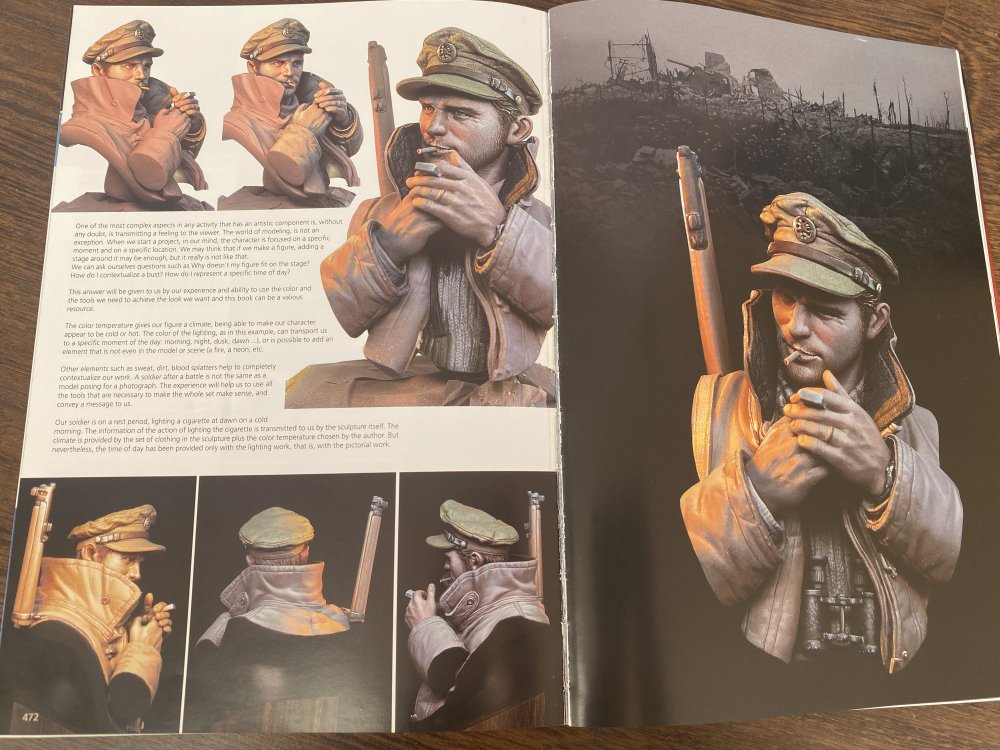

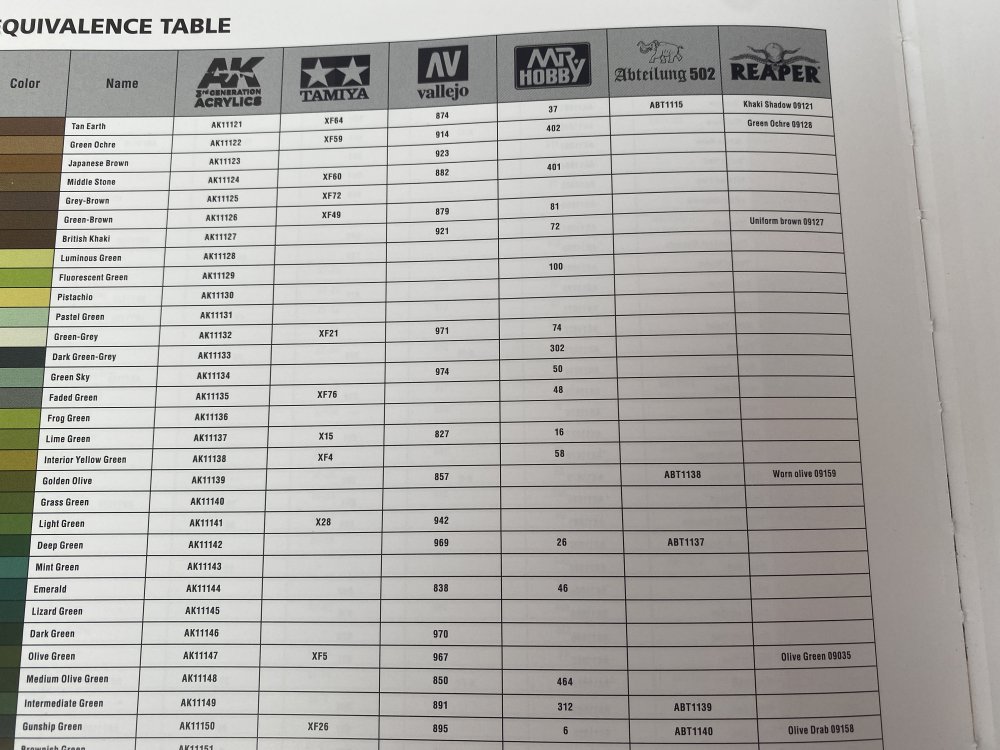
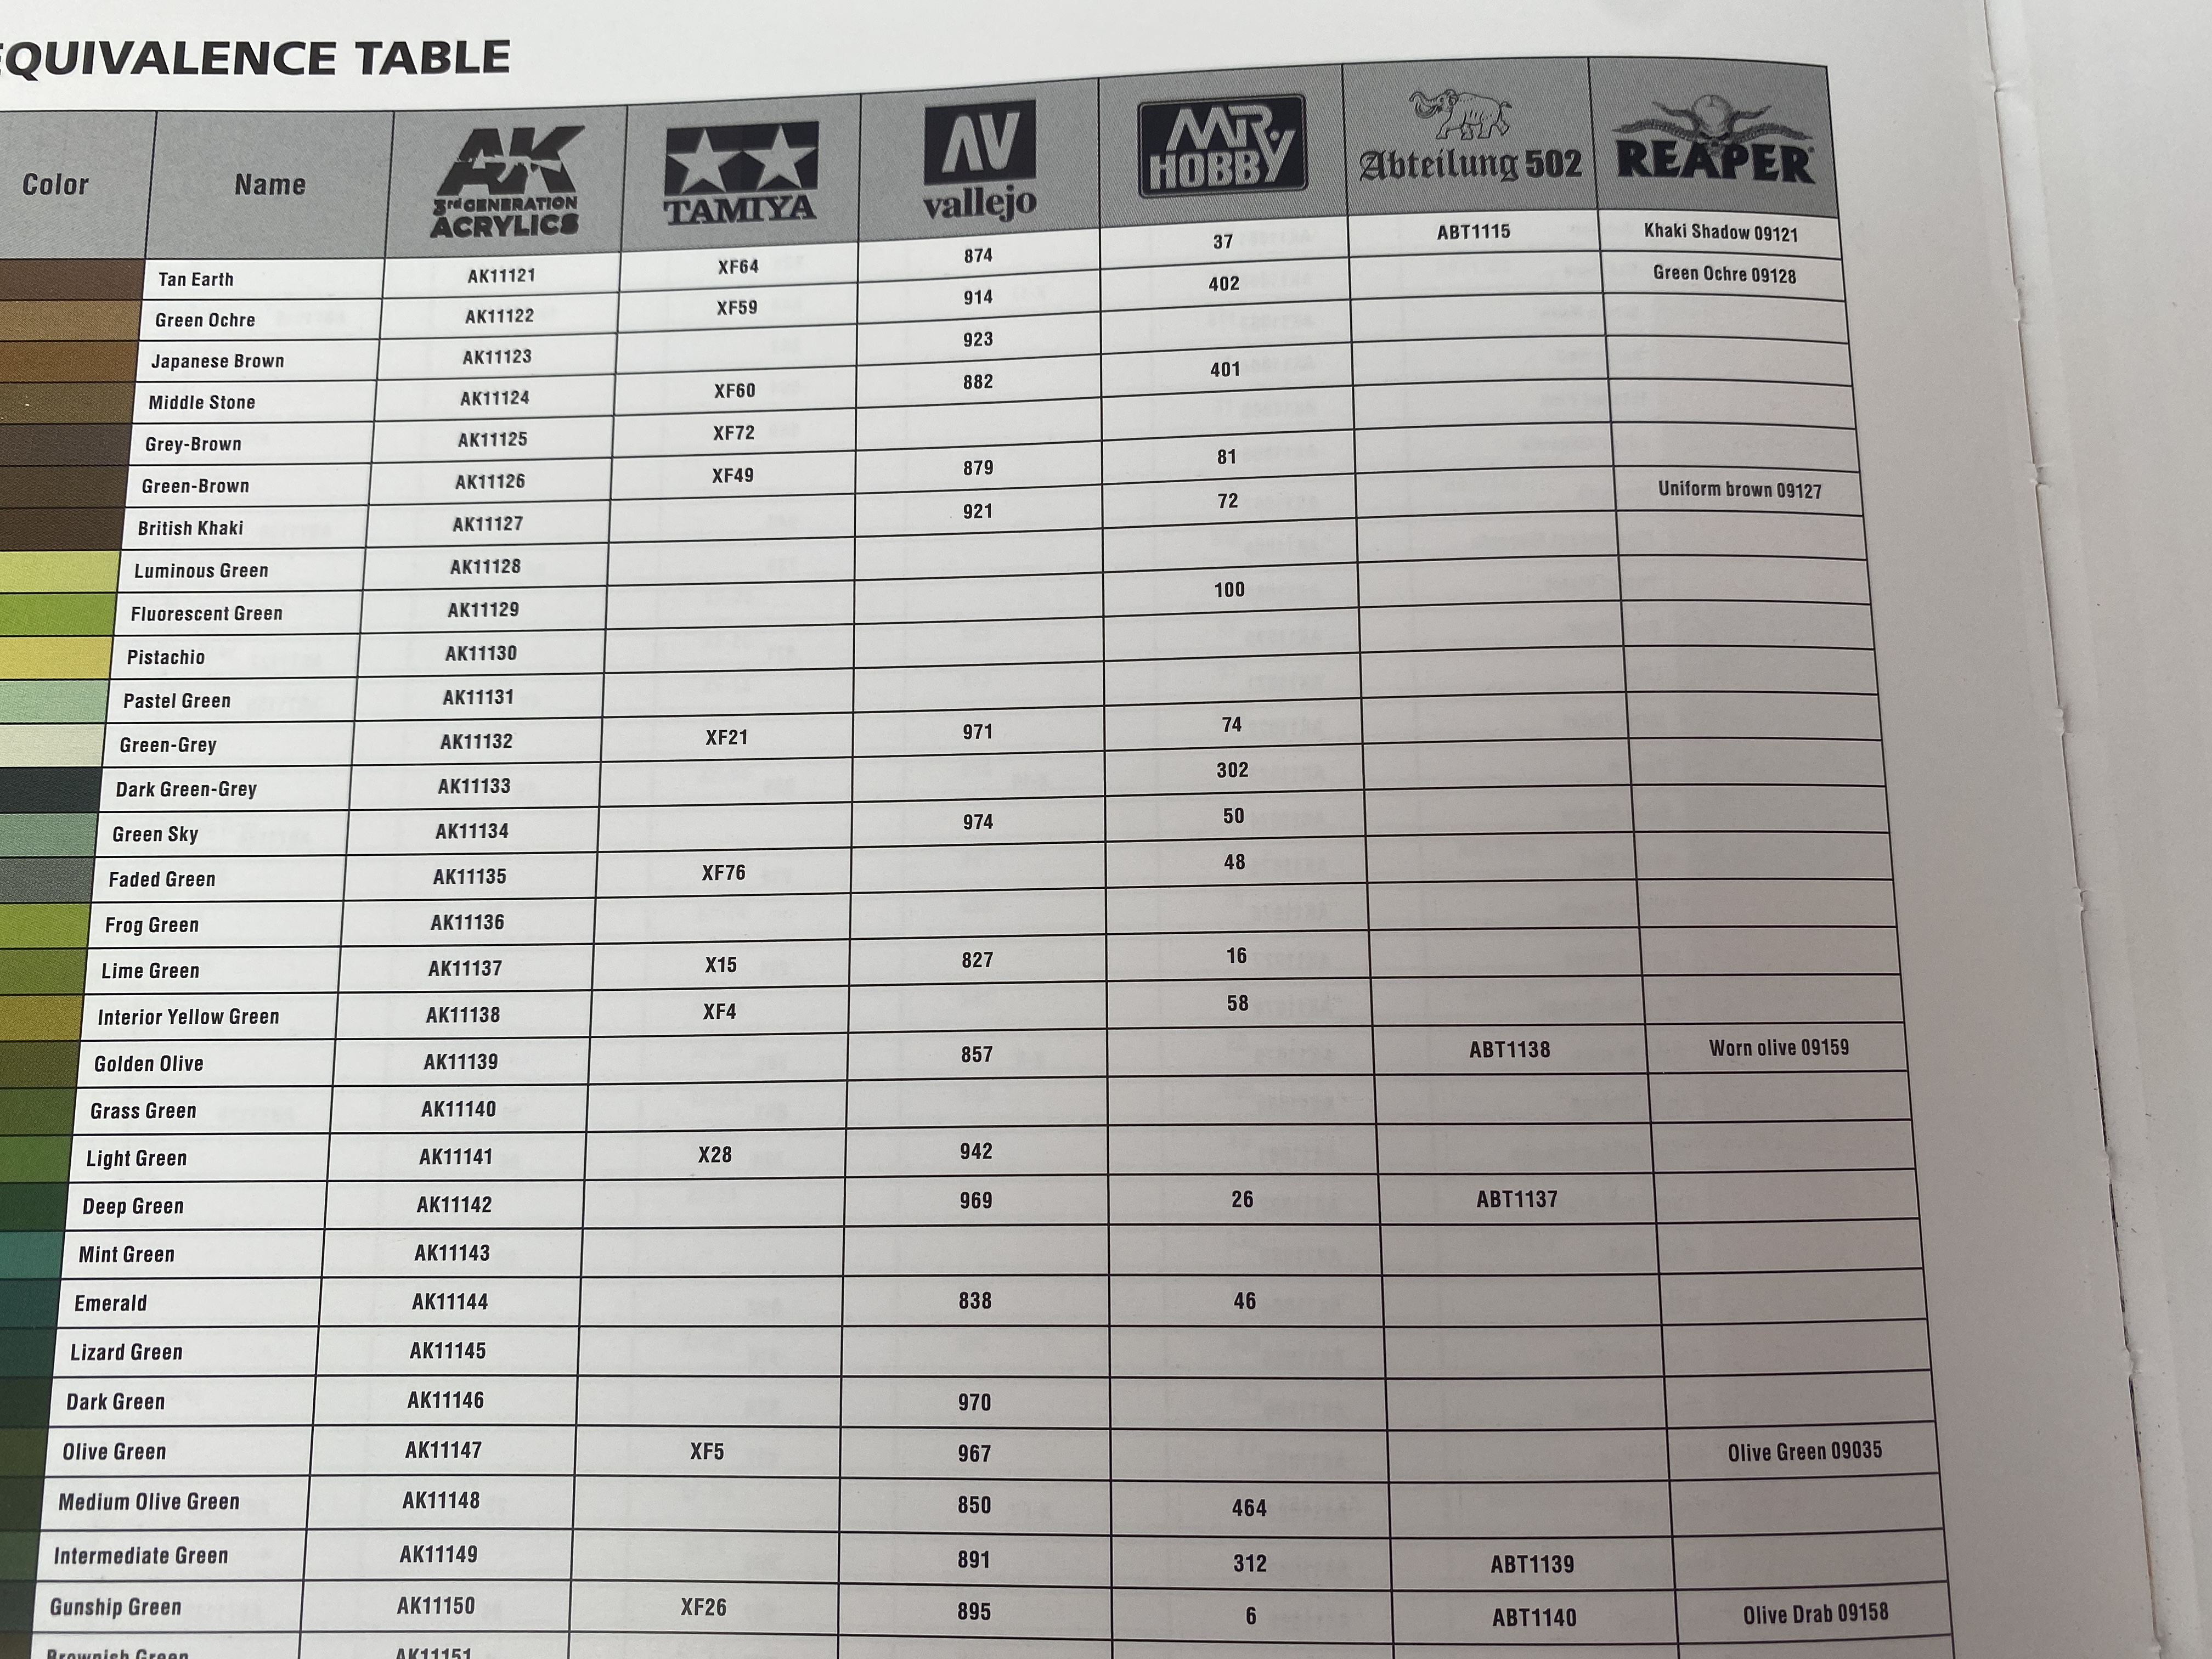
To finish and unlike a gallery (which, in fact, here didn't make sense with the huge amount of photos throughout the book) we have a very useful reference table.
CONCLUSION
Well, what a long review and I was not exhaustive ... This book has a lot of information that is impossible to summarize it in a way worthy of the book itself.
it is a real must-have not only for model makers but for all model makers because there are techniques here that are universally used in all areas of model making.
Its information is very well compiled and structured, allowing access to it in a very easy way, not only for reading but for the immense step-by-step that the author presents us throughout the book.
So I can only say that this book is highly recommended to all modelers!
My truly thanks to Fernando Vallejo and Ak-interactive for the review sample.

-
5
-
-
Harv
You're in our hearts and prays.
You will get be well in no time.
Fran
-
2
-
-
Awesome to see you back and int the way of full recovery!!
-
7
-
-
you`re not a kit collector but a modeller!!

... I have 250 and counting....
-
4
-
 2
2
-
-
4 hours ago, BlrwestSiR said:
Meng has announced a 1/24 Fokker Triplane.
https://aeroscale.net/news/large-scale-fokker-triplane
I wonder if this is an upscaled version of their 1/32 kit?
Hum...

I think that Meng were tooling this for Wingnut Wings, for a never-released 1/24 scale series of WW1 aircraft... as far I know... So this could well be a former never seeing WnW model kit...
-
7
-
-
I have to do a master degree soon, as Im going to rescribe a 1:48 B-29.
I have been using Dymo tape and some Scale Modelling Aircraft rule with some templates and a chinese (unbrand) scriber.
Now, I got Hasegawa tools (several templates) and a scriber.
I got them at a good price at www.sealmodel.com
Fran
-
1
-
-
Love it I really like the Stuka!!
-
2
-
-
and great price also with the 10% voucher!!
-
1
-
-
wow!!! What an outstanding work!!!
-
3
-
-
-
Congrats!! Awesome!! So beautifull!!
-
2
-
1
-
-
15 hours ago, Bomber_County said:
I swear we get more excited sometimes about the AM than the host kit......

eheeheh!! True!!!
-
3
-
2
-
-
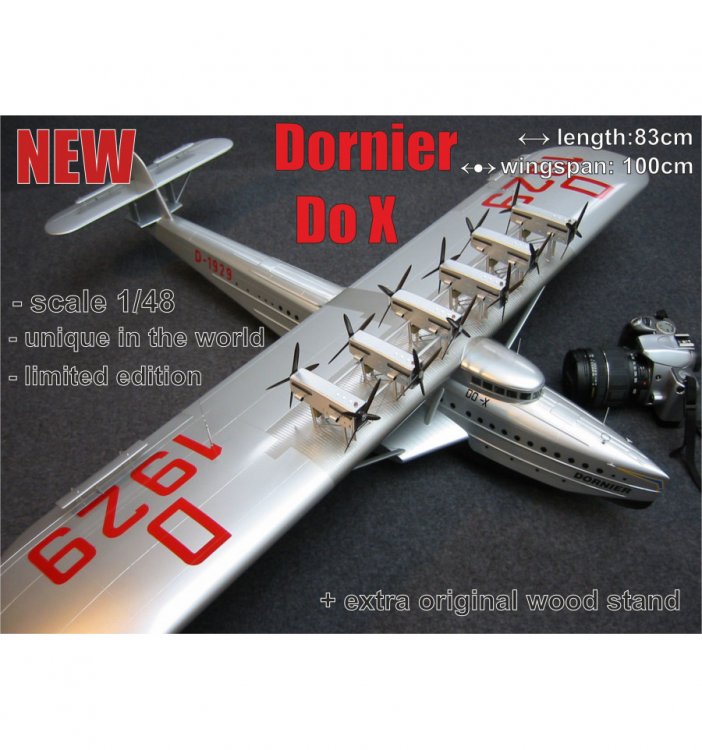
Well, I didnt see this coming...
1:48 Dornier Do X by... Hph Models!!!
http://shop.hphmodels.cz/en/model-kits-in-scale-148/213-dornier-do-x.html
.thumb.jpg.1f40b61b4e953ecf63146f63b230ae10.jpg)
-
4
-


.jpg.8cff2b01f6f4b08b3c15e9c514e407f0.jpg)
Large Scale (Size Matters?) In Less Than 1/35th?
in F.A.Q.'s
Posted
Like James said!!
Our theme:
Home of serious modellers, in any scale, on a large scale.