

JaseGill
-
Posts
194 -
Joined
-
Last visited
Content Type
Profiles
Forums
Events
Gallery
Posts posted by JaseGill
-
-
Nice.
Getting that trolley and the Schlepper for the Meng Komet. Figures looks great too.
Is it Christmas yet?
-
Great review Jim.
As you know I have one waiting for me when I get home in December. Going to have to be the Raspberry Ripple one for me as Im ex Boscombe Down
Cant wait to see it in the flesh now I bet yours is done and dusted before Im home though
-
Cracking Jim. Love it.
-
Outstanding.
Love this jet and weathered like that its even better. -
Very nice review. Right down my boulevard so will order this
-
Its stalled a bit as Im doing the Italeri F104A as NASA 818, pics to follow
Once thats done I'll be straight back to the F86D methinks -
Cracking review Jim.
Should be a great build if the F86D is anything to go by and some of those schemes are very attractive too
Cant wait to see this built. -
Hi Andy.
Nothing. Not a jot sadly so its still on hold.
J.
-
Sabre Models 1:35 German Railway Schwerer Plattformwagen Type SSys
SBM 35A02
Available from many online-stores around £36.99

The Kit and Contents
This comes in a sturdy cardboard box and whilst the artwork is subdued its detailed and shows that this is large enough to take a decent sized armour piece.
Sabre Models are totally new to me and Ive not heard of them before I saw this kit advertised. I don't know why but I have always liked the look of Rail Car Models. Im not so taken by the trains but the choices for weathering and load that these offer is something that really gets my attention. I can see this with a tank on it, an aircraft or aircraft parts or even just dumped and weathered up at the side of a railway sidings covered in undergrowth. The options are limitless.
The contents in the box are:
14 Grey Plastic Sprues,
1 Small decal sheet,
1 User Manual - Construction of the car itself,
1 Instructions for the rails and sleepers that has the colour chart on the back of it.
The Sprues.
There are quite a number of sprues here, though most are duplicates and in a couple of cases quadruplicates. They are very crisply cast and have no sign of flash. The flat beds themselves, which in reality are wooden, are really well cast and show a very convincing wood effect. I reckon this will build up really nicely.
Sprue A (x2)
This sprue contains the wooden pallets and some of the larger parts of the bogies and the side panels.


Sprue B (x4)
This contains the remainder of the metallic car parts themselves.

Sprue Y1 (x4)on the left and Sprue Y2 (x2) on the right.
Sprue Y1 included the wheels and the axles for those wheels.
Sprue Y2 is mostly parts of the buffers and ancillary parts of the car itself.

Rail and Sleeper Sprue (x2) Unnumbered.
These include the sleepers and the rails on which the car rides.

Instructions.
The instruction are really well done. They remind me of Trumpeter instructions and I wonder if Sabre Models use the same suppliers. There are no colour callouts on these instructions at all, these are kept for the markings and decal sheets.


The Colour Callout Sheet.
This is printed very nicely on the rear of the rail instructions. All colours are marked as Hobby Color and Gunze Sangyo Mr. Color so you will need a conversion chart if like me you don't use these suppliers paints. As there are no colours in the main instructions the modeller will need to refer back and forth between this and the instructions as the build progresses.

Decal Sheet.
The decal sheet is small and looks to be very good quality. I cant read german so how accurate they are I do not know but they look the part.

Conclusion.
In conclusion this is a really nice little kit. It'll give the modeller the chance to exercise those weathering muscles and to have a go at replicating the metallic parts of the railcar and the wooden slatted bed itself. I cant wait to build it and come up with a few ideas as to where to place it and what to place upon it. If nothing else it'll be an interesting addition to any collection.
Highly Recommended to all.
-
 1
1
-
-
Kitty Hawk P-39Q/N Aircobra
KH32013
Available from many online-stores around £53.99

The Bell P-39 Airacobra was one of the principal American fighter aircraft in service when the United States enteredWorld War II. The P-39 was used with great success by the Soviet Air Force, which scored the highest number of individual kills attributed to any U.S. fighter type. Other major users of the type included the Free French, theRoyal Air Force, the United States Army Air Forces, and the Italian Co-Belligerent Air Force.
Designed by Bell Aircraft, it had an innovative layout, with the engine installed in the center fuselage, behind the pilot, and driving a tractor propeller via a long shaft. It was also the first fighter fitted with a tricycle undercarriage. Although its mid-engine placement was innovative, the P-39 design was handicapped by the absence of an efficient turbo-supercharger, limiting it to low-altitude work. As such it was rejected by the RAF for use over western Europe and passed over to the USSR where performance at high altitude was less important.
Together with the derivative P-63 Kingcobra, the P-39 was one of the most successful fixed-wing aircraft manufactured by Bell.
The above taken from Wikipedia at https://en.wikipedia.org/wiki/Bell_P-39_Airacobra
The Kit and Contents.
The kit comes in a sturdy box, with some great artwork on the front and sides showing the various painting and markings options. The box isnt particularly large or particularly stuffed with parts and there is some room inside for the parts to move about.
The breakdown of the parts in the box is:
8 Standard Grey Plastic Parts,
1 Clear Plastic Parts,
1 PE Fret,
2 decal sheets (one large one small),
1 Set of Instructions with attached painting guides.
All the sprues are individually bagged and there are two sprues attached to each other for the grey plastic parts. The plastis seems to be up to the usual Kitty Hawk standard and there is no sign of flash on any of the parts. The clear parts are very clear and come in a protective cardboard box as well as the usual bag. The decals look to be very well printed, in register and there are some really nice schemes included in the kit, more of that later. The small PE fret is a couple of what looks like intake grills and the pilots harness straps.
The build is pretty standard in that it starts with cockpit interior, the fuselage and then wings, undercarriage and weapons. Whats different is the location of the engine which is behind the pilot seat and there is a full engine included here in the kit.
The usual limitations of plastic are there in the cockpit and some of the smaller parts. The engine looks good and the maybe the engine cover panels themselves could be a little thinner in etch but Im sure the usual suspects will create some update sets for this kit.
The Sprues.
The 9 sprues are as follows:
Sprues A and B:
These sprues are joined and they consist of the wings, some undercarriage pieces and the control surfaces for the wings.

Sprues C and D:
These sprues are joined and consist of cockpit and fuselage interior pieces.

Sprue E and F:
These sprues are joined and cosist of the Fuselage sides, panels and the the propellor and its spinner (of which there is a choice of two).


Sprue G and H:
These sprues are joined and they consist of more fuselage interior parts included the engine and its parts. They also include the horizontal tail surfaces and some of the other exterior appendages including bombs.


Sprue GP the 'Glass Parts':
This sprue is the Cockpit Glass and the side widows for the car style doors. It also includes the anti-collision and wing marker lights.

The small PE Fret:
This fret has two intake grilles along with the majoirty which consists of the harness straps for the pilots seat.

The Decal Sheets:
There are two decal sheets. The larger has all of the national and airframe markings along with stencilling. A second smaller decal sheet contains the Artwork shown on some of the schemes along with the cockpit decals for all of the various panels within the cockpit.


The Instructions:
The Instructions are really clear, well printed and include colour callouts for Gunze Sangyo Mr Color and in some cases RLM which was a surprise to me as none of these aircraft have German Markings. I cant speak to the accuracy of the marking as yet, Ive yet to do any research on these but all of the choices are very colourful and interesting. I can see myself wanting to do a couple of these. The French and Russian ones are particularly attractive to me.


The Painting Guidance:
As mentioned above there are some great schemes here. The one I do recognise is Snooks 2nd, the only US marking option here. Again all colour callouts are for Gunze Sangyo Mr. Color and RLM (?) so you'll need conversion charts if like me you use other paint manufacturers.
The Choice of colourings are:
P-39Q-5-BE "Snooks 2nd", 71st TRS 82nd TRG 5th Air Force USAAF,

P39Q GC III/6 "Travail", Armee de L'Air, La France Combattante,

P39Q-5-BE, 1st AE, 30th GvIAP, 6th IAK. Co of 1st AE 1st.Lt.A.P.Filatov, 1945,

P39Q, 1st AE, 213th GvIAP, Co of 1st AE assistant 1st.Lt.M.I.Orlov, Germany, Summer 1945.

P39N-1-BE, 9 Gruppo, 4 Stormo, Italian Co-Belligerent AF, June 1944.

Conclusion:
This is yet another welcome large scale release from Kitty Hawk. The kits just seem to get better and better and with the included engine and schemes I think it will fly off the shelf. Granted the aftermarket will probably release plenty updates for this but one can, I believe, build a great representation of an important and often ignored WWII aircraft type.
Highly Recommended to all.
-
3
-
-
Bronco Airspeed A.S.51 Horsa Glider Mk.1
Available from many online-stores around £109.99

The Horsa was a troop carrying glider of World War 2 built by Airspeed, a company associated with small trainers and sports aircraft. Designated the AS51 the Horsa was built to a 1940 specification for a 25 seater glider for use by Airborne forces. An order for 400 aircraft was placed February 1941, with fuyll production beginning in February 1942. By this time orders had reached 2345 aircraft. Much of the production was sub-contracted to furniture manufacturers who built the glider in sections and which were transported to Airspeed for final assembly. The Horsa was used by both British and American Airborne Forces in all operations from 1942 to the end of the war. It was also used to carry jeeps and small artillery pieces. The Horsa Mk 1had a wingspan of 27m and a length of 20m, loaded weight was 7,000k. it was normally towed by a four engine bomber such as a Short Stirling or Handley-Page Halifax due to the weight. But the smaller C47 Dakota was often used in large operations as not enough bombers where available.
The Kit and Contents.
This kit is BIG, the large, packed box screams size. From the thick cardboard box itself, the very well illustrated box top and the large cardboard protective packaging everything is on a big scale with this kit. The contents consist of:
18 regular grey sprues,
3 clear sprues,
1 heavy nose weight in its own protective box,
1 small etched fret,
1 set of self adhesive vinyl window masks,
1 sheet of decals,
A really nice piece of artwork that matches the box art (a nice touch I think).
There is a lot of plastic here, it took me over an hour to photo it all, and it all looks well cast with no noticeable flash. There are some prominent pin marks from the moulding pins on some of the larger pieces but they do seem to be in places where they will either be covered by other parts and most looks easy to deal with where they are not.
The kit looks to have a decently detailed cockpit (moulded in seat harnesses) though I'm sure the aftermarket people will be out with some updates soon.
There is also what looks like a very detailed hold space along with a large port side cargo door that can be posed either open or closed along with a smaller what looks like personnel entry door at the rear. The fuselage looks to be built as per the real thing with an inner tube of supports, bracing and floor/roof components. Added to this are the troop seats (again moulded strap detail) and some smaller internal detail parts.
The skin of the fuselage comes in large sections and wraps around this tubular core. I imagine the modeller will need to be very careful with this approach as the slightest misaligning of parts will result in a bigger misalignment in the next stages. Onto this the wings and tailpieces fit, along with the pose-able control surfaces as does the large undercarriage. I wonder how strong the undercarriage needs to be to ensure this stays on its wheels but the kit parts seem very sturdy.
All external panels are smooth and Ive seen some criticism for this as some period pictures show noticeable deformation around the frame of the aircraft. I can see both sides of this and personally I'd rather it wasn't there and do some work myself to reproduce it if I see it necessary at the time. There are plenty period photo's around should the modeller wish to replicate this.
The painting guidance and decals exist for 3 versions of the aircraft. Two UK RAF and one US D-Day airframe, there doesn't seem to be any guidance on differences in the build or fit of the aircraft depending on the theatre. Guidance is in the instructions for the width of the painted on invasion stripes in 1/35th scale, which I think is a great feature.
The Sprues
The 18 sprues are as follows.
Sprue A (x1)
This sprue contains the Tail parts of the aircraft including the fuselage sides for the tail, the pose-able rudder and the support struts for the horizontal tail surfaces themselves.

Sprue B (x1)
This sprue contains the upper fuselage and wing spar parts along with some of the outer body panels.

Sprue C (x1)
This sprue contains the majority of the cockpit parts along with some internal bracing for the wing structures.

Sprue D (x1)
This sprue contains the bulkheads for the inner fuselage parts.

Sprue E (x1)
This sprue contains the horizontal tail surfaces and pose-able control surfaces for the tail parts.

Sprue F (x1)
This sprue contains some more internal bracing for the wings, outer fuselage skin parts and some undercarriage parts.

Sprue G (x2)
These contain further cockpit and fuselage pieces along with some of the troop seats.

Sprue Ha (x1) and Hb (x1)
These are the wings. Large mouldings of both wings split in the usual upper/lower piece manner.

Sprue J (x1)
This contains more internal bulkheads and some further fuselage pieces.

Sprue K (x1)
This contains more floor pieces along with parts for the large port side cargo door.

Sprue L (x1)
This contains the large wing control surfaces.

Sprue Ma (x1)
This is the bracing for the Undercarriage.

Sprue Mb (x1)
This is the large, one piece cockpit canopy structure. Its very clear and looks to be free from defects and anomalies.

Sprue Mc (x1) and Sprue Md (x1)
This is the side windows for the fuselage sides.
A further, very small bubble window and smaller side window.

Sprue N (x1) & Sprue P(x2)
Sprue N is further bulkheads and some side panels for the fuselage.
Sprues P are further parts for the interior including parts for the cargo seats.

Etch Fret P (x1)
This small fret has some straps for the pilots cockpit and some small bracing for the cargo seats in the rear of the aircraft.

The Window Masking and Decal Sheet
The Window masking is for the main canopy itself and the various windows on the side of the fuselage. These are laser cut vinyl and are self adhesive. I can see these being a big part of the build given the size and prominence of the cockpit windows themselves.

The Decal sheet looks well produces, in good register and seems to have all the necessary markings and national insignia.
The schemes are:
RZ108 of RAF 'Operation Overlord', France, 6th June 1944.
PW773 of RAF 'Operation Mallard', Normandy, France, 6th June 1944.
RF141 of USAAF 'Operation Overlord', Normandy, France, 6th June 1944.

The Instructions Sheet.
This is really well printed on glossy paper. Its illustrated really well and they are really clear and easily readable. They are black and white, except for the external colour scheme and in english. All paint guidance is given in MR. Hobby, Hobby Color, Humbrol and Tamiya.


The Schemes that are presented on the decal sheet are all presented on the last 3 pages of the Instruction Sheet.


The Nose weight.
There is a nose weight included. This is very hefty and comes in its own cardboard box to protect the other parts from it rattling about in the main box itself.

Conclusion.
I think this kit will fly off the shelves. Bronco and a few other manufacturers, Tamiya included, have already released a number of Airborne figures, vehicles and small artillery pieces that will look great with this kit in a diorama. The only figures that may be difficult to source at this time are the pilots but Im sure someone will remedy that soon enough.
The only quandary I have is how to build this, either as a Bronco loading up with personnel and equipment, or as a crashed example with the pieces of the fuselage scattered in a field and the occupants escaping from the site. One thing that will drive this for most I am sure is space to keep and Display it. At almost a metre in wingspan and almost as long in the fuselage this will be difficult to find space for even once you have discarded that box. For those completely without space issues can you imagine this being 'towed' behind the upcoming 1/32 Lancaster that has been announced recently by HKM? That really would be something to see.
Overall I'd say really highly recommended, especially if like me you like the idea of mixed aircraft, armour and personnel dioramas. One last bonus us the artwork supplied below, its a really nice touch and would look good in a decent frame.

-
1
-
-
Great looking kit.
The original never flew, and as Jim notes however someone in the US has built one and flown it.
It had an issue on landing which damaged the spinner and prop but it did fly and it flew well apparently.
https://www.facebook.com/TheBugatti100pProject/videos/843683509042123/
This looks like a stunning kit. very nice
J.-
2
-
-
Thanks Steve.
I will keep trying, promise
J.
-
Steve,
Thanks. I really need the encouragement.
For the decals I really like the Texas ANG one with the red in it so thanks for the offer but I think I'll stick to that.Now to fix that bloody nose and the malformed underside piece. Hope you got one after this was fixed?
J. -
Well,
You may have noticed Ive lost my mojo a bit on this one. Other, more interesting stuff keeps popping up and whilst Im keen to get it done Im just not into it as much as I think I ought to be. May need to take a break from this one.
Anyway, cockpit interior is mostly done and looks good. The photo's don't really do it justice, probably because Im yet to weather it too. The Etch is really nice, goes together really convincingly and although there are a few items that seem too small to handle the handling later in the build it all looks good so far. Yet to fit the joystick, this will go in when I put the seat in I guess. So a couple of pictures anyway.


One dissapointing thing can be seen in the next few pictures. Whilst I was warned that the fuselage is overly complicated (it is) I didnt expect the fit issues around the nose intake. Also the bottom filler panel over the landing gear is deformed. There is a whole section missing and miscast that I think is going to need one hell of a lot of filler to make it anything at all acceptable. Maybe its because this was a pre-release this is the problem. I really hope its a one off. Add to that the gaps in the intake ring on the nose (usually an issue with some kits Ive seen) and the fact that the nose cone was warped and cracked and you could say Im not having a great time on the forward fuselage of this kit. The pics show the full story.


The nose section of this alone is going to take some serious filler, love, care and attention not to mention a hell of a lot of sanding and rescribing to look any good.
Wish me luck, and if you have some spare enthusiasm I could to with that tooThanks for now.
J.
-
Jim,
Yup, going back to some of the other decals when I can be arse
I'll take more photo's with some scale help Jeroen. SoonJ.
-
Hello All,
Well I have completed another one of the Bandai Star Wars kits.
This time its the R2-D2 kit that comes in a 2 droid set of R2-D2 and R5-D4.
He builds in no time and shouldnt need paint. That said for the Chrome parts I used Alclad Chrome (sprayed over the coloured plastic) and for the dome of the head I used Alclad Duralumin as the silver plastci in both cases looks a bot toy like.
He comes our really well and I can really recommend these kits, theyre a change, really easy, very accurate it seems and come with all sorts of extra's. He has arms and actuators as seen in the various films but I chose to leave him in his standard state.
Eventually I intend to weather him and C3-PO up and place them on a sand base doing them as if they have just climbed out the Escape Capsule at the start of Star Wars A New Hope.
Enough words, time for pictures.


And here he is with his companion

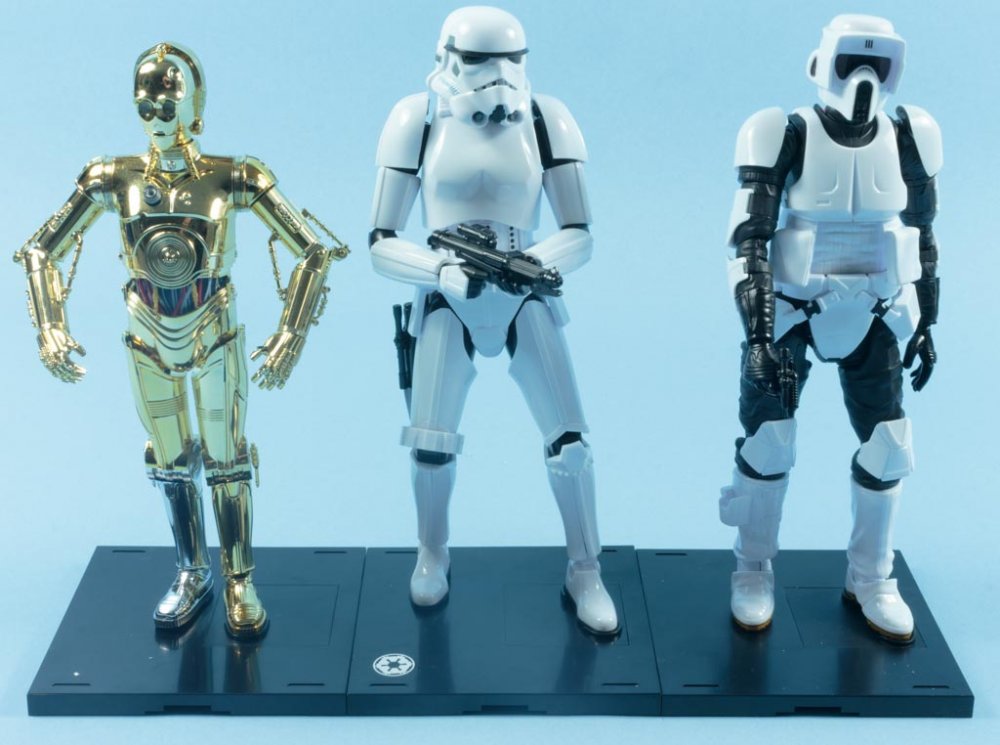
And finally with the other figures built so far.

-
3
-
-
Eduard Update Set 32835
F-86D Interior Self Adhesive
for 1/32 Kittyhawk kit
Available from many online-stores or Direct from Eduard for around £13

Ive already reviewed the two Seat sets (Seat itself and Interior here:
http://forum.largescalemodeller.com/topic/3884-eduard-f-86d-ejection-seat-for-kittyhawk-kit/
http://forum.largescalemodeller.com/topic/3885-eduard-f-86d-seatbelts-fabric-for-kittyhawk-kit/
Ive also built this and started a Build log of the whole kit here:
http://forum.largescalemodeller.com/topic/3905-132-kitty-hawk-f-86d-build/
My intention is to review as I build to make it more interesting for you, the reader, and for me. I really enjoy doing the reviews of these updates and doing build logs but doing a lot of one or the other can get a bit dull I think so trying the reviews as I build idea just for fun.
This update is for the Eduard interior, which basically covers the cockpit and canopy other than the Ejector Seat and its belts. I remember (sounding old now) when Eduard Interior sets were all of the interior and covered the whole cockpit. Im not sure if I miss that or give Eduard kudos for allowing the modeller exactly how much they way to update (and spend). I will leave that to you to decide.
The update set itself consists of two etched frets, the Coloured Etch and the standard brass etch. As usual the coloured etch covers the cockpit elements of the instrument panel and the various side consoles in the aircraft. The brass more deals with areas you will more than likely paint anyway, the cockpit rails, some small details and the canopy details too. Its a really nice mix and whilst some dont really get the coloured frets I like them. The multipart nature means you get depth to the etch itself and also still allows the modeller to add those little extras like gloss coat on instrument faces and washes that should make the detail pop.
Enough of my words, time for some pictures of what you get for your hard earned cash:


As you can see there is some really nice detail here. One thing worth of mention is the 'Self Adhesive' side of things. The coloured etch is on a self adhesive backing that should make it easier for the modeller to attach to the kit parts. I say should as I often do some remedial work in adding a little CA glue here and there to ensure that it not only sticks, but will stay there more permanently in the long term. This isn't necessarily required, I just do it for piece of mind, that may say more about me than the etch itself.
Where I can say it helps immeasurably is that there are less cases of what I call 'Etch Ping' when one removes the etch from the fret. So many times have I made that last cut on that smallest of pieces that the action of cutting pings the part into the ether, never to be seen after its eaten by the carpet monster. This happens a lot less with this adhesive backing, to the point that I even now fold masking tape behind small parts when I cut them off normal etch to try and make sure the 'ping' doesn't occur.
Sometimes I look at the really small parts and wonder if its worth the bother. In most cases I say it is, and once you've done a whole cockpit with Eduard it really shows, its just that some of the smaller parts really do make one wonder now and then. This isn't an attack on Eduard as they have done a really great job across all of their releases, I just wonder if we sometimes expect too much of such small parts in the search for accuracy. Something maybe for a greater debate not a review.
The instructions are up to Eduard's usual impeccable standard and make sense to the viewer as soon as you see them.


Conclusion
As in all things Eduard I think they are to be congratulated here on these sets. They really help the modeller create a more realistic and pleasing to the eye model. Some will always want to paint the detail, me I have a foot in both camps. That said when I see a set like this I really just want to get on with the building of the kit and enjoying that rather than all the small intricacies of cockpit interiors.
I really look forward now to getting on with the build of the Interior/Cockpit phase. Keep an eye on the build log for an update.
So, as you may guess this set is Highly Recommended and I must thank Eduard (and Jim for sending them on from Eduard) for the review samples.
-
Hi Steve,
Thanks, much appreciated, I may take you up on that offer.
Ive been doing some test fits of the fuselage, and yes its damn complicated isn't it.
A bit of test, trim, test and trim again seems in order. I hope I can do it justice
J. -
I love the Scout Trooper so far, my favourite.
Its between these and the F-86D, such difficult choices especially with the Eduard etch review to do for the F-86D too
-
Thanks guys. Not sure this one will be a fast build as I have so much going on at the moment but your comments really keep the motivation going...
Next is the review of the Interior & Cockpit Eduard etch before doing that bit next.
I want to do review and build in parallel really for a bit of a change and to keep the motivation up to keep going on. Lots of Star Wars kits crying out for attention doesnt help either.
1st world modeller problems
Not sure on the scheme yet, thinking I may do one of the Red trainer schemes.
Im going to try to stay away from serious weathering on this one... That said I don't want it perfectly polished either. Quandries.I just noticed in pic 2 I've broken one of the struts on the seat... Needs a fix before the pit methinks
-
Hello again,
Well after putting up all of the pictures Ive taken so far of the Banda Kits I've built I figured I should show the final one so far.
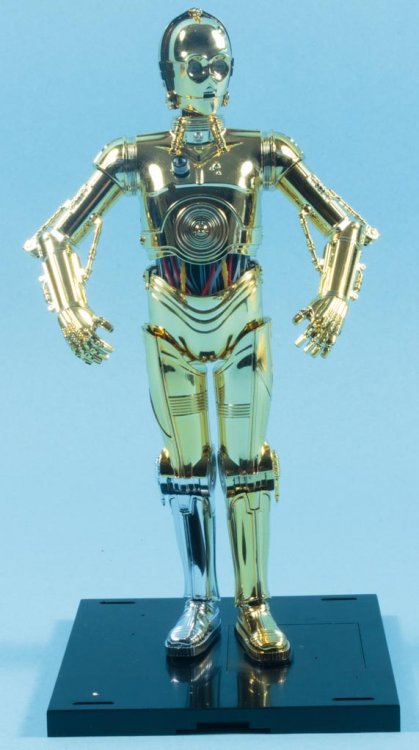
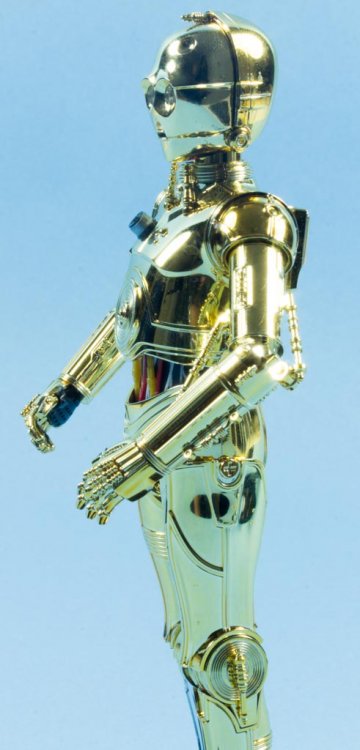
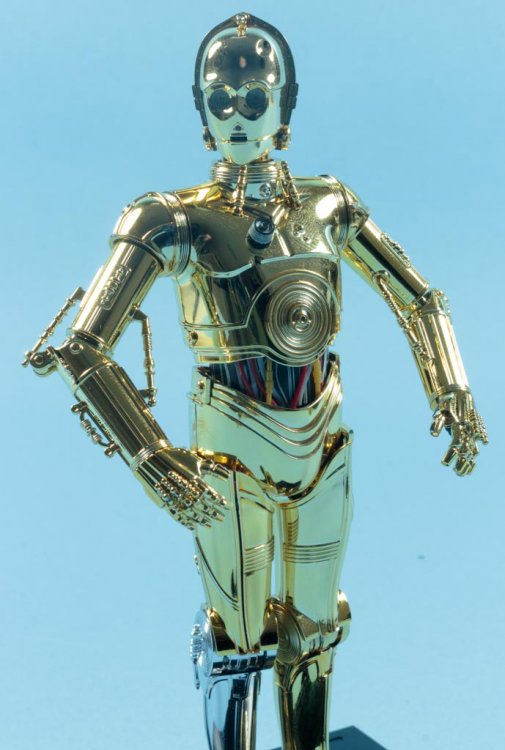
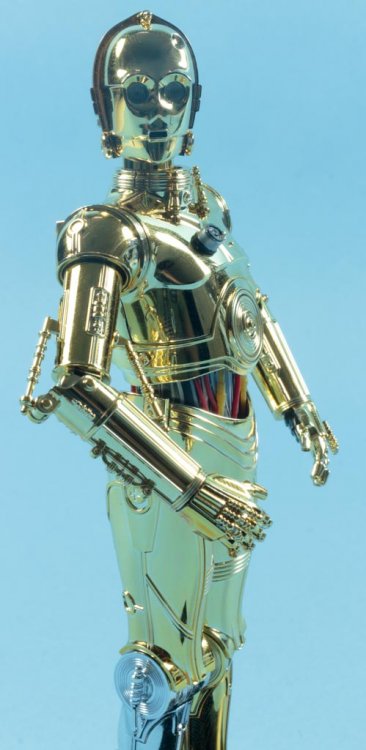
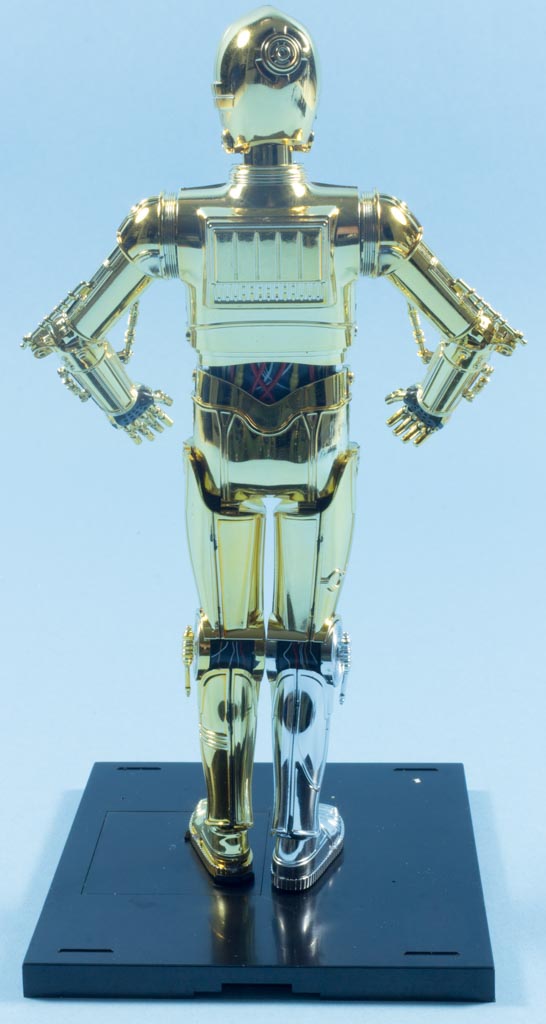
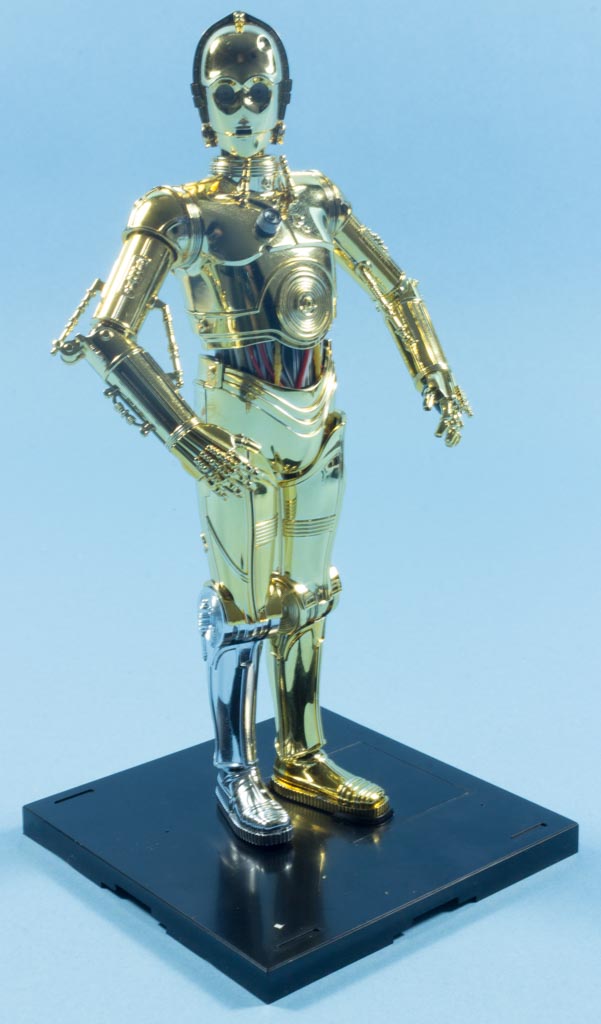
I still have the R2-D2 and R4-D4 to do as well as Darth Vader in the figures so far, I guess I will do R2-D2 to go with this guy next.So, as the others he bascially falls together. A little less complicated than the Scout Trooper and Stormtrooper as there are less optional fittings here. There are 2 sorts of arms that allow either poseable arms or the fixed arms you see here. The poseable ones look less realistic so I opted for the fixed ones and they're in the classic C3-PO pose anyway. He does have 2 head choices one with dent one without (I chose dent) and theres the ability to have his 'eye' hanging out on a stalk too like in return of the Jedi.
The stomach and back of the legs have decals for most of the wiring and theyre pretty good with some setting solution. This one has no paint at all on it so far other than the black lock he has on his chest which in photo's shows a silver border and centre which Ive painted here with Vallejo acrylics. Again you need to be careful removing parts from the sprue so as not to damage the gold plating too much, that said most of the sprue stubs are in areas not generally on view. He also has a silver leg which I used here for a bit of variation, this is seen in some scenes in the movies. I will dull him down a bit and weather him as I'd like to show him, along with R2-D2 as if on Tatooine after they crash down in the desert after escaping the Empire at the start of Star Wars: A New Hope.
The gold is pretty difficult to photograph well but I think they came out OK. Enjoy.


And one last one with the team so far
-
1
-
-
Hi all,
After the review I did of the Kitty Hawk F-86D Sabre Dog review I did here: http://forum.largescalemodeller.com/topic/3528-132-kitty-hawk-f-86d-sabre-dog/ and the Ejection Seat here http://forum.largescalemodeller.com/topic/3884-eduard-f-86d-ejection-seat-for-kittyhawk-kit/ and the Seatbelts here http://forum.largescalemodeller.com/topic/3885-eduard-f-86d-seatbelts-fabric-for-kittyhawk-kit/ I figured it was only sensible to actually start the build.So far its just the Seat I have done to tie the two reviews together but once I get to the Eduard Cockpit and Interior review I will start that part of the kit too, its only a couple pictures so far.
I build it as per the Eduard and Kitty Hawk instructions, nothing difficult, you just need to be careful aligning everything and making sure you check and double check before you remove any kit parts. Essentially the seat update is the seat sides, some fittings on the seat and it has seatbelts. I however used the Fabric Seatbelt set my first use of these. They went together relatively easy but I didn't realise they had to come off the card backing until the 1st cut. Once that was understood though everything else just fell together with some care taken to thread the belts through the various buckles.
The seat was painted as per kit instructions and then washed with some light blue Ammo Wash and a darker wash of grey Paynes oil paint. It was then lightly dry brushed with a later of lightened base coat before being sealed with flat vallejo varnish. The straps were then fitted as per Eduard instructions and the two remove before flight lanyard fitted too, the upper one being attached by a very think length of solder to the seat back.
I think it looks ok so far so cant wait to move on to the cockpit and rest of the kit.


-
2
-
-
Hi all,
Well after building the 1/12 Scout Trooper I figured I should try one of the others.
So, out came the 1/12 Stormtrooper. Same sort of build as the Scout Trooper, very fast, looks very good and all one would do once the pose was finalised is maybe glue and fill the gaps in the joints for the arms and legs. I might get round to that eventually. The only paint on him is across the nose where there is a grey area, the decal looked wrong so I painted it with vallejo blue/grey.
A nice feature is the poseability for now and the fact that he has multiple (3) weapons all of which can be interchanged and the smallest pistol and blaster can also be placed in the black holster on his leg. You can even choose whether he is left or right handed. Very cool.
I hope you like the pictures. Cheer for now...


-
1
-


Special Hobby 1/32 Greek Buckeye - Finished
in LSM 1/32 and Larger Aircraft Ready for Inspection
Posted
Gepard,
Thanks.
Good news on the RBF
I didnt use salt technique to give a carrier feel to it, I just used it as a means of weathering the paing and given a worn, weathered and faded look and feel.
Ive used it for all sorta, naval and non-naval subjects