

DocRob
-
Posts
7,138 -
Joined
-
Last visited
Content Type
Profiles
Forums
Events
Gallery
Posts posted by DocRob
-
-
8 hours ago, PanzerWomble said:
...some inspo pics from Shuttleworth
Thanks for the pics PW, this is the one I´m planning to build with the fitting AIMS decals. Your pictures show the differences of surface colors and grades of shininess, depending of the base materials in a very good way, Very helpful. I will try the AIMS flat wire PE rigging as a first.
11 hours ago, GusMac said:Got the basic painting done on all the internal structures. Just used the kit decals and they went down nicely with a bit of Microsol
Nice progress on the internals Gus, she will be a beauty.
Cheers Rob-
 2
2
-
-
Carbon and brakes look really good, you seemingly mastered the tougher parts very well.
Cheers Rob-
4
-
-
3 hours ago, BlrwestSiR said:
That looks great Rob. The light set really makes a difference. I'm glad I got one for mine.
Thanks Carl, the light set was worth the wait, and I´m really happy, how beautiful the Kosmos set is made, fitting perfect into the Unicorn.
Cheers Rob-
2
-
-
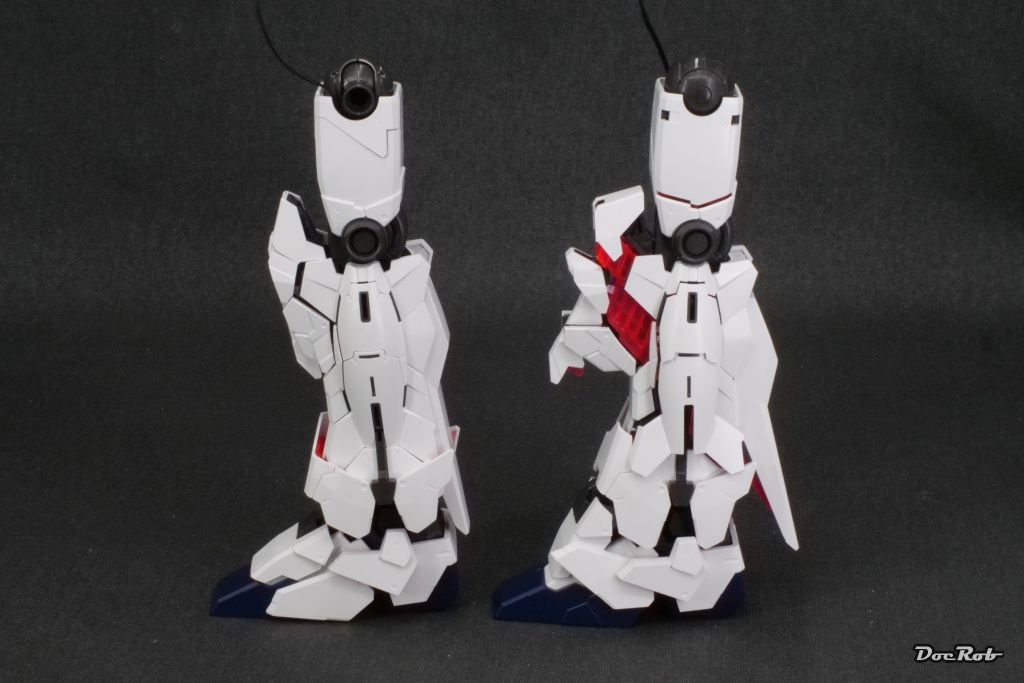
Disco Stu is in the house, this twentysomething meter behemoth is slowly stomping on the dancefloor. I finished the legs and assembled the hips, which also received six LED´s. The build is straight forward, following the manual by the word, as, like mentioned before, you often have no idea, what you are exactly assembling at any given moment. At some point everything got joined and you have tataaa, a hip.
The Kosmos LED set fits perfectly and that´s a great relief, because I expected more trouble with the lighting.
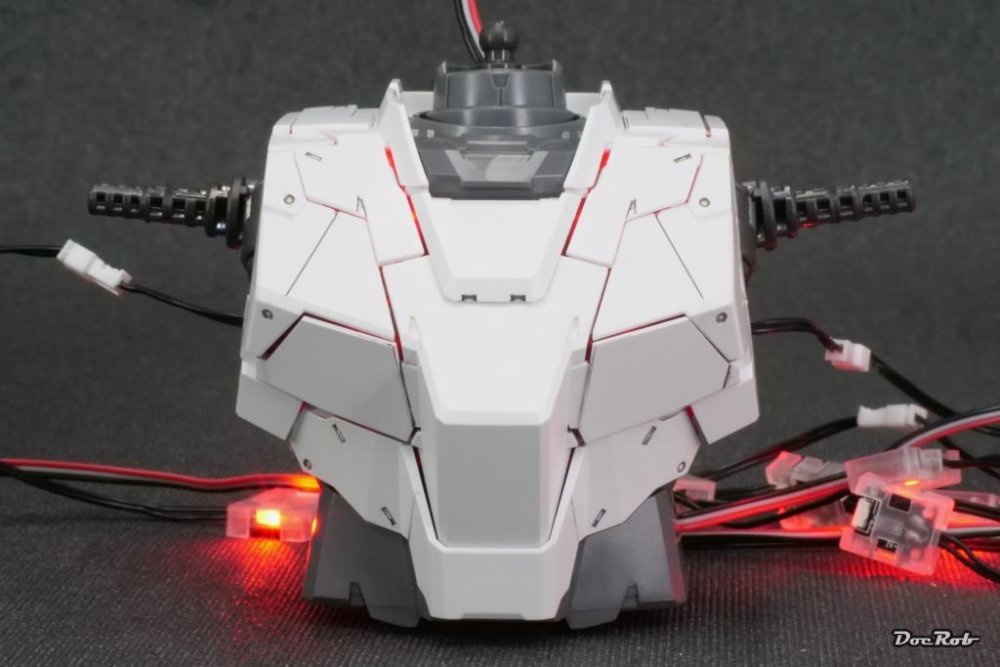
One side of the Unicorn shows the Unicorn-Mode, all closed up, the other Destroy Mode all opened up and emitting more light, clearly.


Cheers Rob-
7
-
-
5 hours ago, GazzaS said:
HI Rob,
Nice work on an interesting subject. Are these guys what was hitherto known collectively as Transformers? Or is there some other difference? I have seen a few in model competitions in the last few years. I'm far behind the times... I haven't even built my first Battletech kit yet. Or is it Battlemech?
Hi Gary, long time no see. Good to have you back? again.
No to all, these Gundam kits are based on a Japanese anime series. They are not Transformers and no Battletech.
Haven´t heard about Battletech in a long time. Eons ago, I used to play it as a board game and had some of the white metal miniatures along a 1/72 kit of the Defender from Imai.
Gundam - Wikipedia
Cheers Rob-
2
-
 1
1
-
-
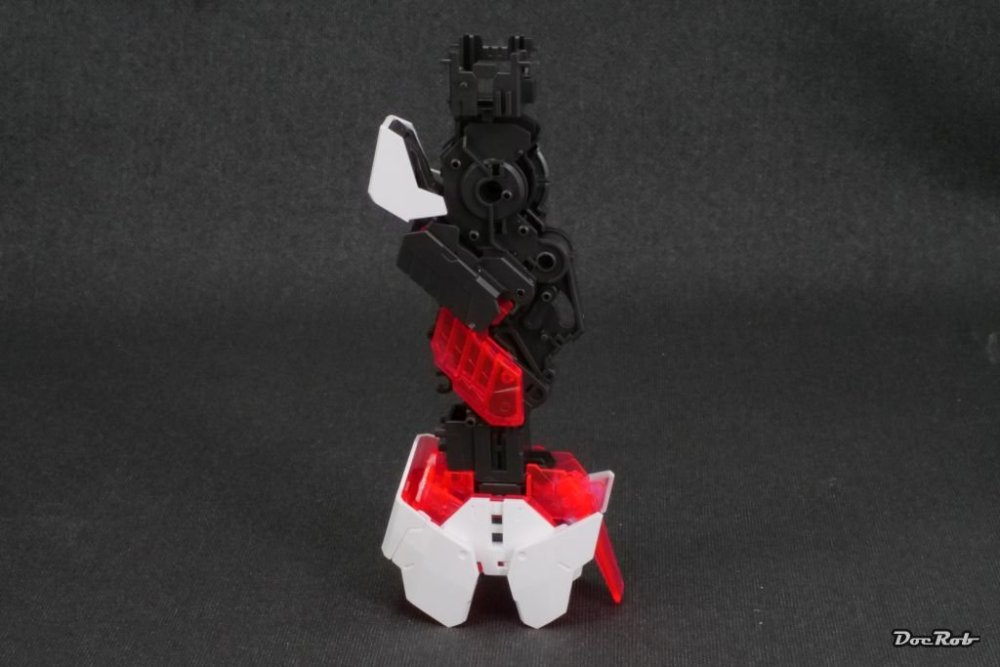
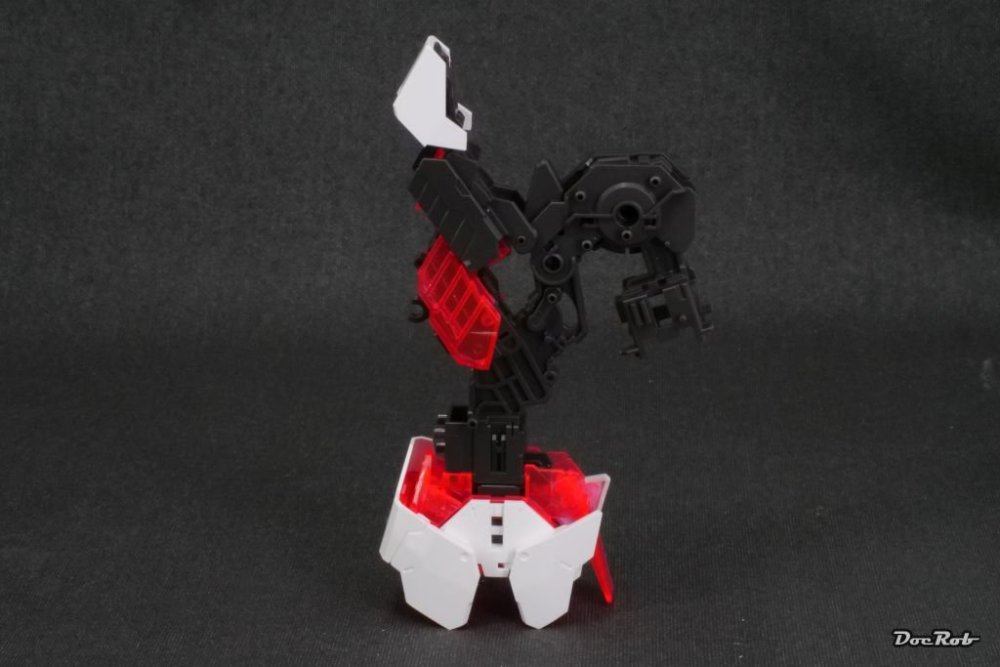
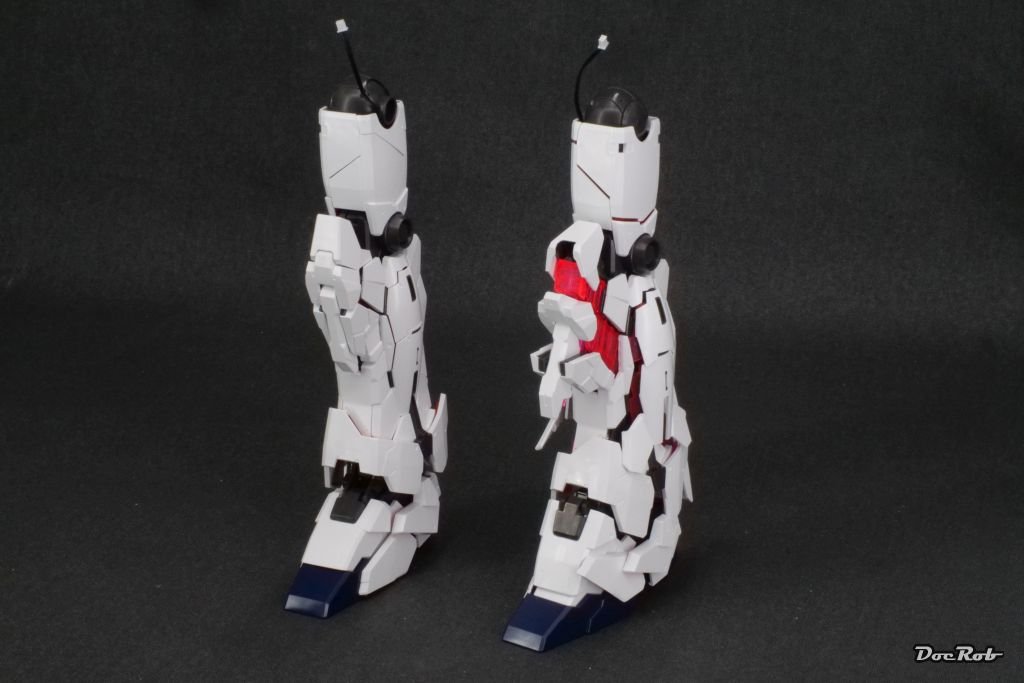
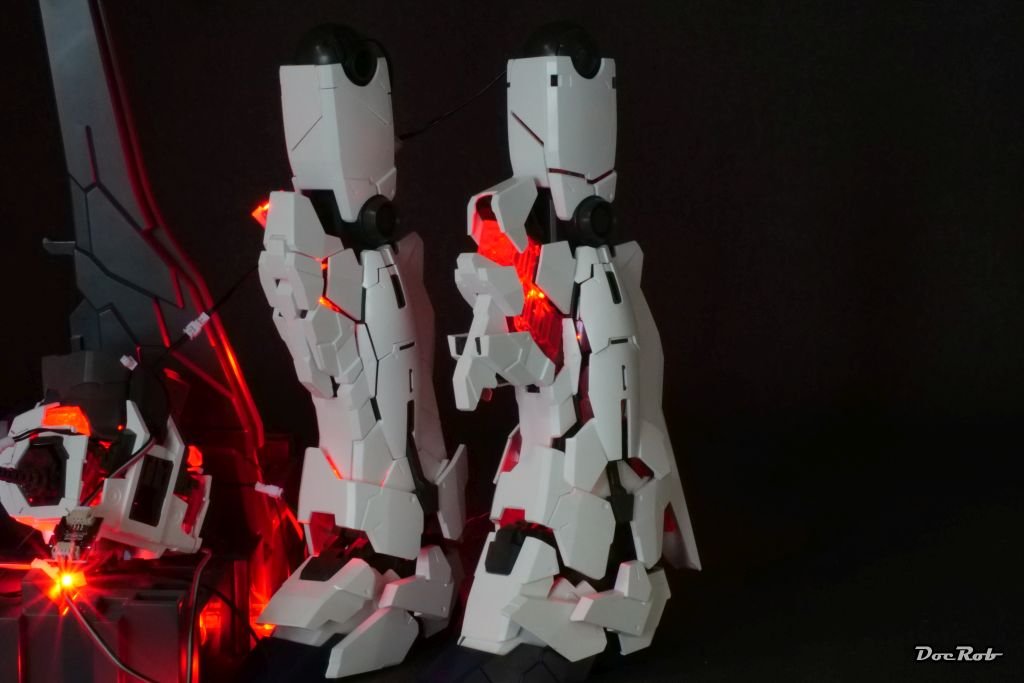
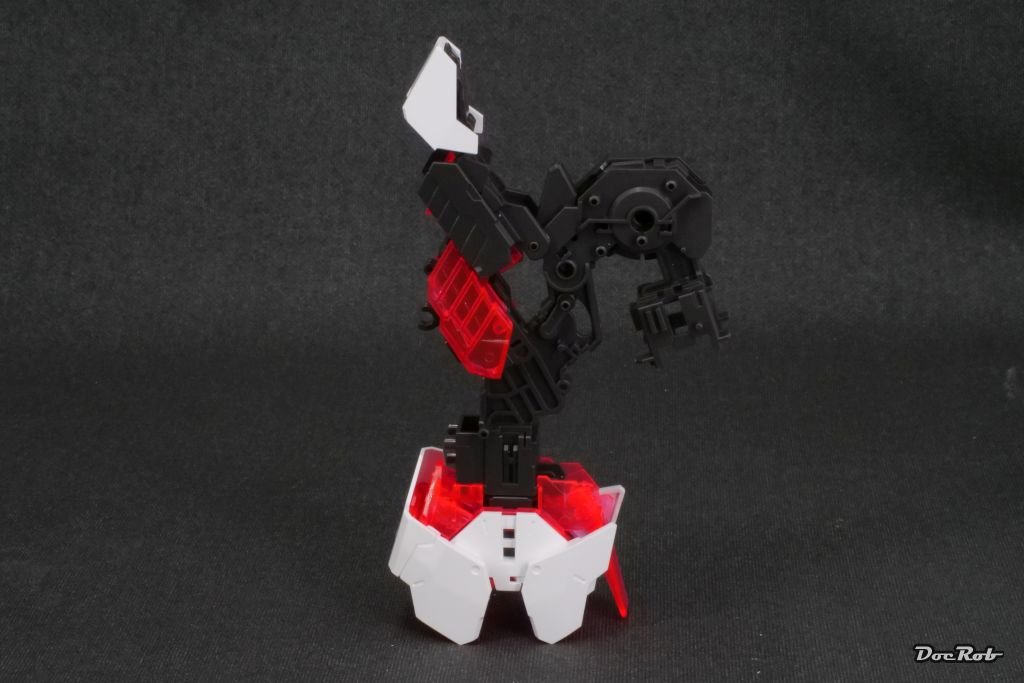
Phew, the legs are done. It was a bit of a Tour de Force and the result is delicate. I haven´t even completely recognized, which parts are articulated. The description of the LED installation in the Bandai manual was absolutely satisfactory to install the Kosmos leg LED´s.
Here are the legs. The left one with all closed hatches and fairings, the right one opened up (you need the manual for that as well) and finally the function test of the installed LED´s.


Cheers Rob-
7
-
-
Can´t wait to see your progress, Gus. I have the same kit in stash and often considered building it. Just checked mine, I added some extras from Quickboost (exhaust, gun barrels and cockpit door) an Aires seat, a Kelik IP and AIMS decals for a colorful silver doped bird.
Cheers Rob-
1
-
-
3 hours ago, BlrwestSiR said:
Progress may be slow but it's coming along.
I've been so tempted to start mine but I really want to finish the bike first. Get something done and off the bench.
It´s an interesting experience Carl. You have build Gundam stuff before, but to me it is absolutely new and it is way different from traditional plastic modelling.
Cheers Rob
-
2
-
-
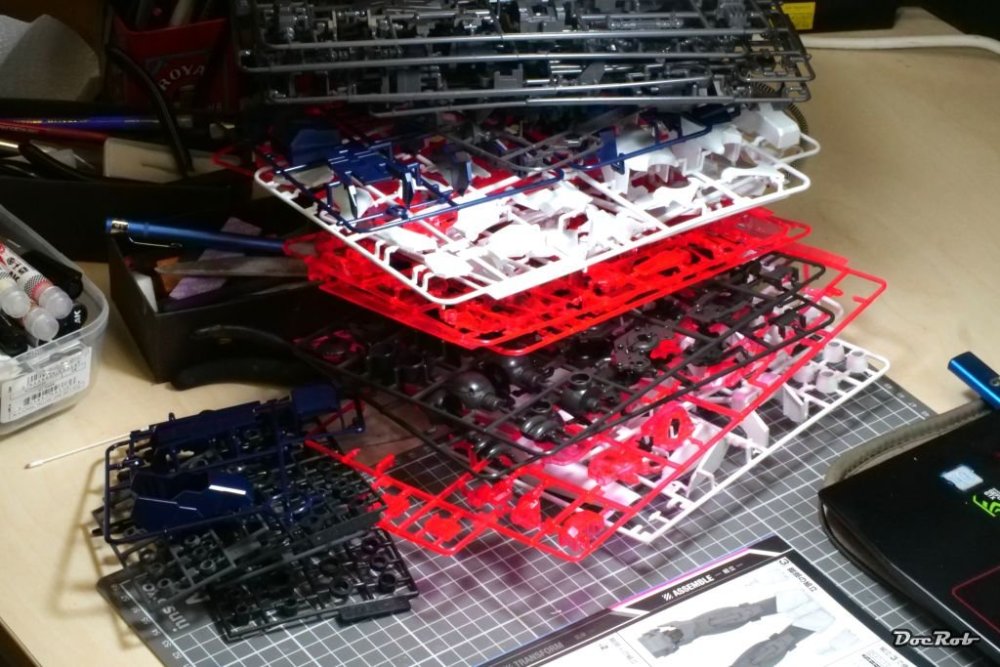
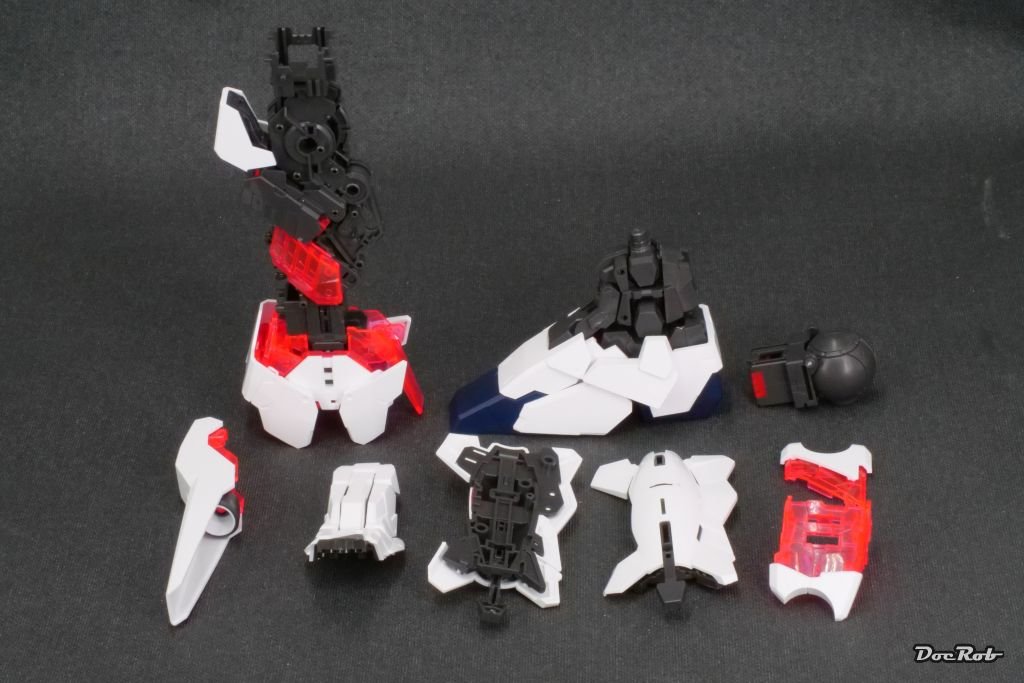
Progress is slower than thought, due to the complicate construction. Worst are the dark grey core parts, because they often get equipped with vinyl kind parts for movement and are really hard to push together firmly.
Another reason, why this kit isn´t an easy build is, you very often have no idea, what you are doing while assembling. With a car kit, you know, it is a brake drum or a front seat and you know where these belongs, here, there is tons of articulation made from strangely and unrecognizable shaped parts, where you can only follow the manual blindly.
Here are the parts for one leg until the LED installation:

An example for basic articulation for the main leg parts:
Cheers Rob-
6
-
-
That has a nice Endzeit vibe, love it. Vegetation looks great.
Cheers Rob-
4
-
-
20 hours ago, Clunkmeister said:
Good LORD!
Just saw this and it's bloody BRILLIANT! Not my normal genre, but that what drew me in.
Thank you, just a finished build in the unfinished line of unfinished GB´s.
Cheers Rob-
1
-
-
Sounds interesting Paul, your suggestions and the Martian Ship project. It is only my second venture into LED lighting with kits. The first was the Nautilus submarine from Pegasus, which I equipped with a VoodooFX lighting kit some years ago. The Kosmos LED kit for the Unicorn is readily prepared, luckily, which is helpful with a kit as complex as this.
Cheers Rob-
2
-
-
That looks super cool Carl. I always found, when I cover the cf-decals with clear semi matte, they even look more realistic. The gloss looks great immediately, but matting down lifts it to another level and unifies the single decals better.
Cheers Rob-
3
-
1
-
-
Fantastic, detailing looks spot on.
Cheers Rob-
1
-
-
3 hours ago, BlrwestSiR said:
I've done that a few times but I almost always glue my kits together anyways.
The Real Grade, Master Grade and Perfect Grade kits tend to have great colour separation in their parts breakdown. So much less masking ,if any which simplifies painting. For example the most recent Gundam I worked on I haven't had to mask anything.
He´s so cute, Carl.
Painting is another thing, I won´t do it with the Unicorn, there are so many moving parts, where I don´t know, if the paint will be in the way or fell victim to abrasion while articulating.3 hours ago, Count0 said:One trick I am aware of with this is cut the pins shorter so you can test fit but get them apart easier. Of course, this option requires you to glue the parts together later for final assemble as the pins no longer give the required friction fit. I am inclined to glue stuff together as much as possible because my small Gundams tend to fall apart... And years of habit.
I will build the Unicorn without glue, there are so many moving parts, I´m not sure, I can identify all from the manual and if something happens with the LED´s, I need to de-assemble. Until now, I can´t think that there are many parts to fell apart with the tight fit of everything.
Cheers Rob-
4
-
-
1 hour ago, BlrwestSiR said:
Lots of sprues there Rob. Very familiar with that pile. I haven't looked closely at this kit but on the more recent ones, the instructions will tell you when you can get rid of the sprues as all the parts are used on the build.
I think that´s not the case here Carl. The manual tells you which sprues you need for the next step, but other ways, I have to relay onto my sharp eyes to get rid of used up sprues.
Cheers Rob-
4
-
-
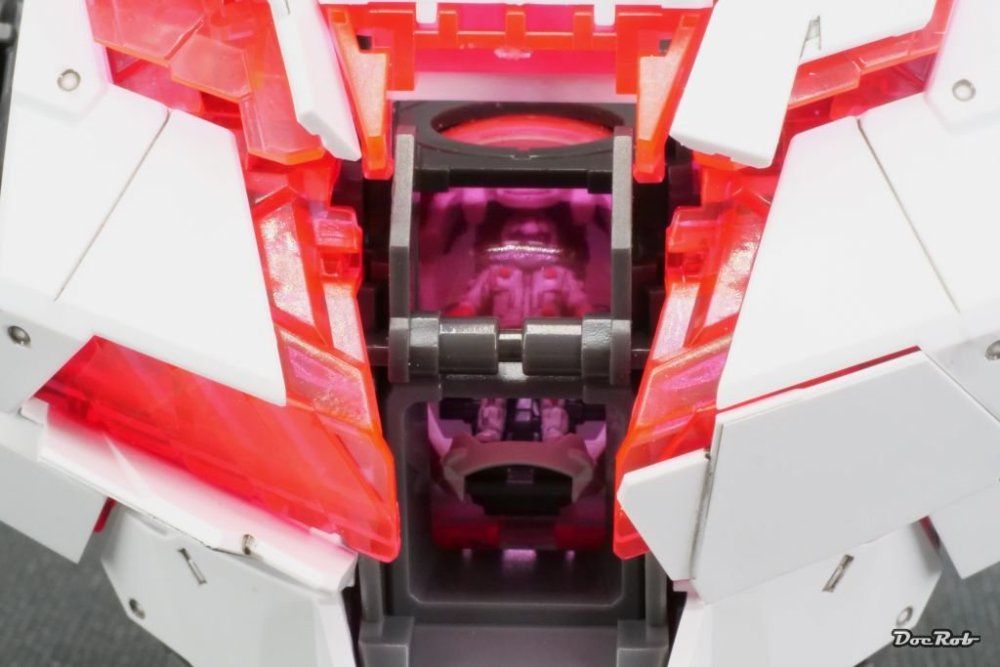
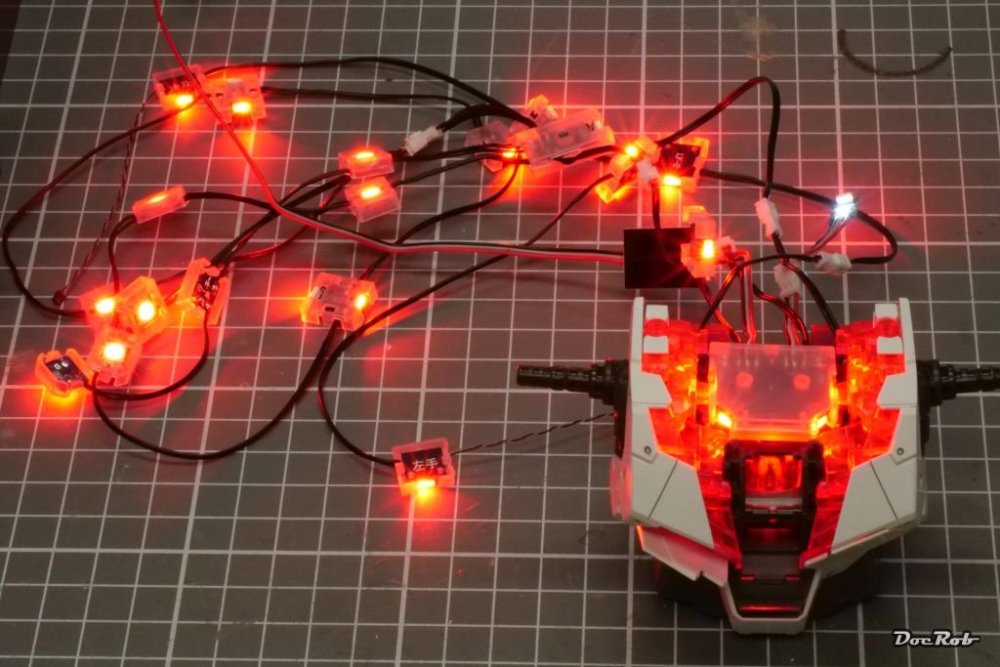
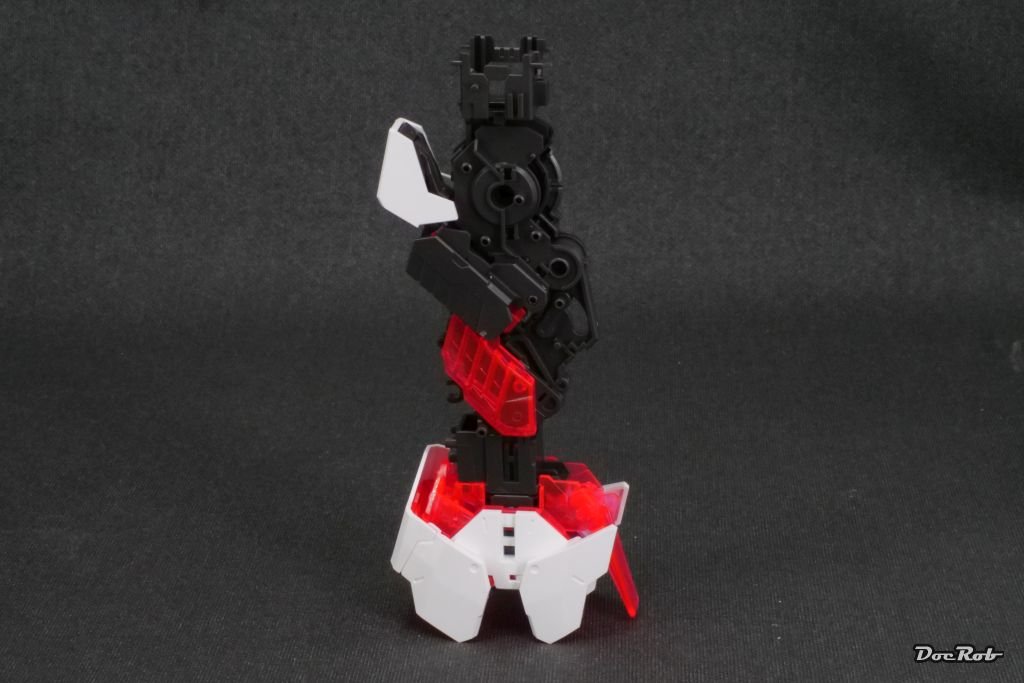
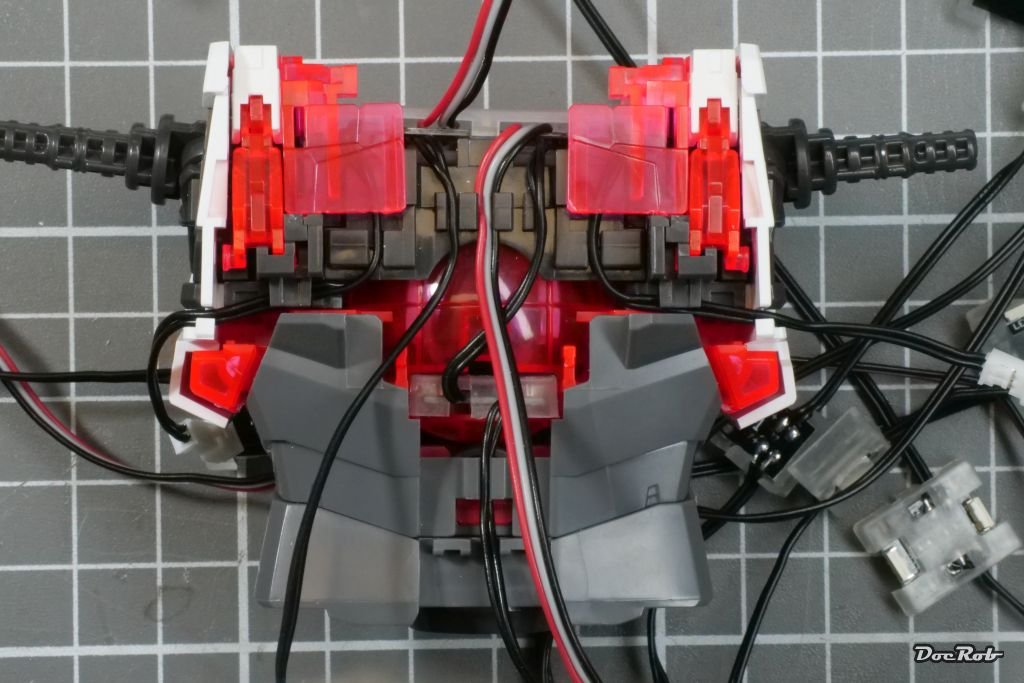
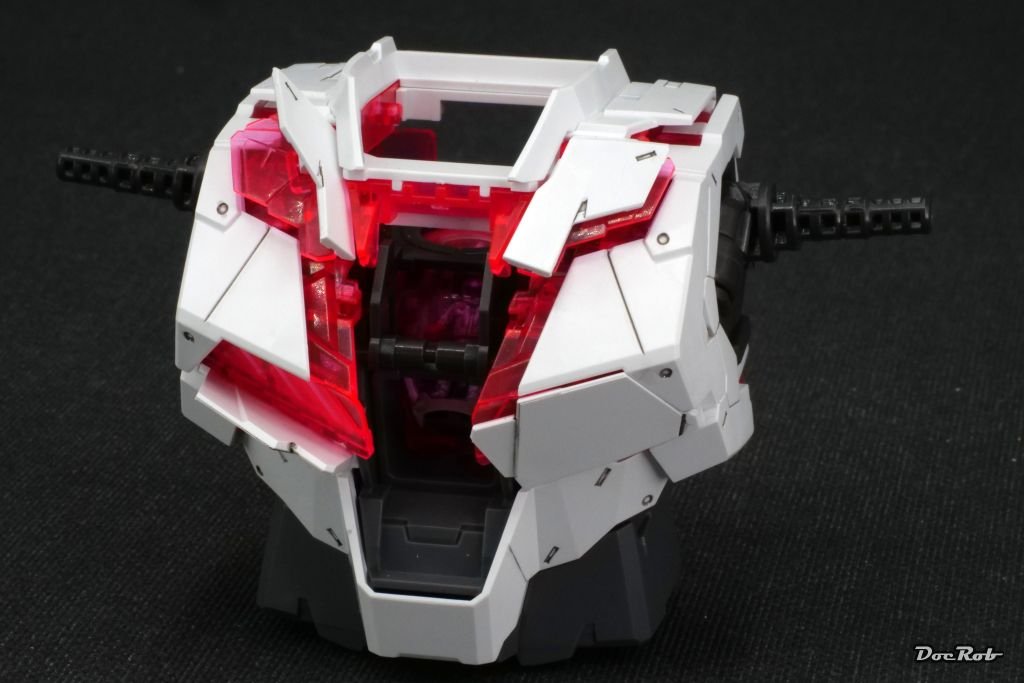
Next was the installation of the LED system from Kosmos. After looking closely into both manuals, it looked to me, that the Kosmos LED set is made very similar than the original Bandai one. That meant, I could follow the Unicorns instructions for these steps. The LED´s for torso, head, legs and arms are already connected, so testing is easy.
I installed the main hub on top of the cockpit and fiddled the appropriate wires into the wire routing channels, the torso backside looked like this when finished:
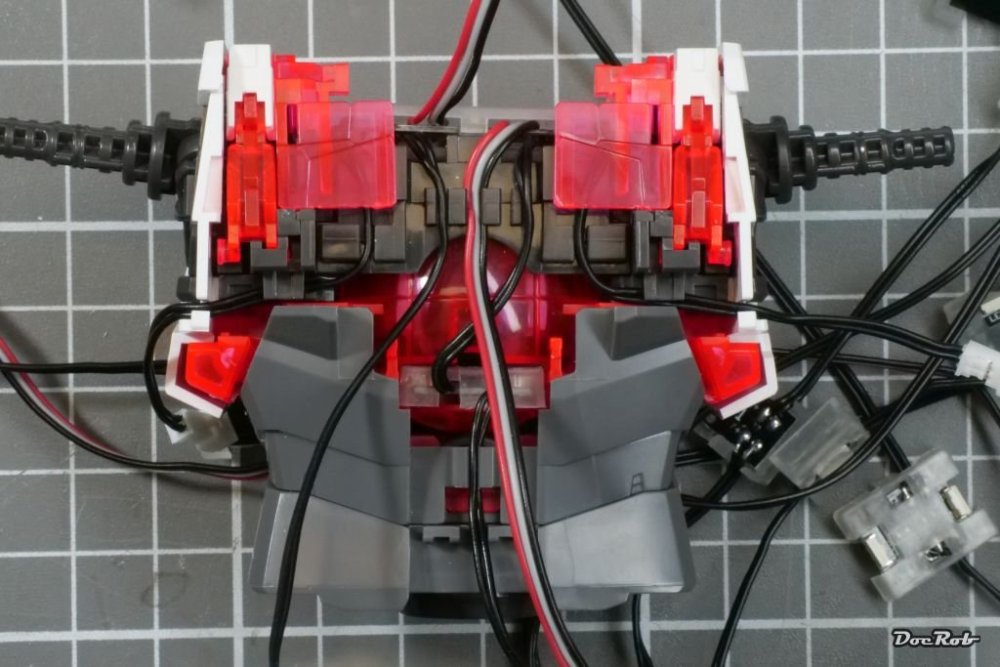
Next, all got covered up:
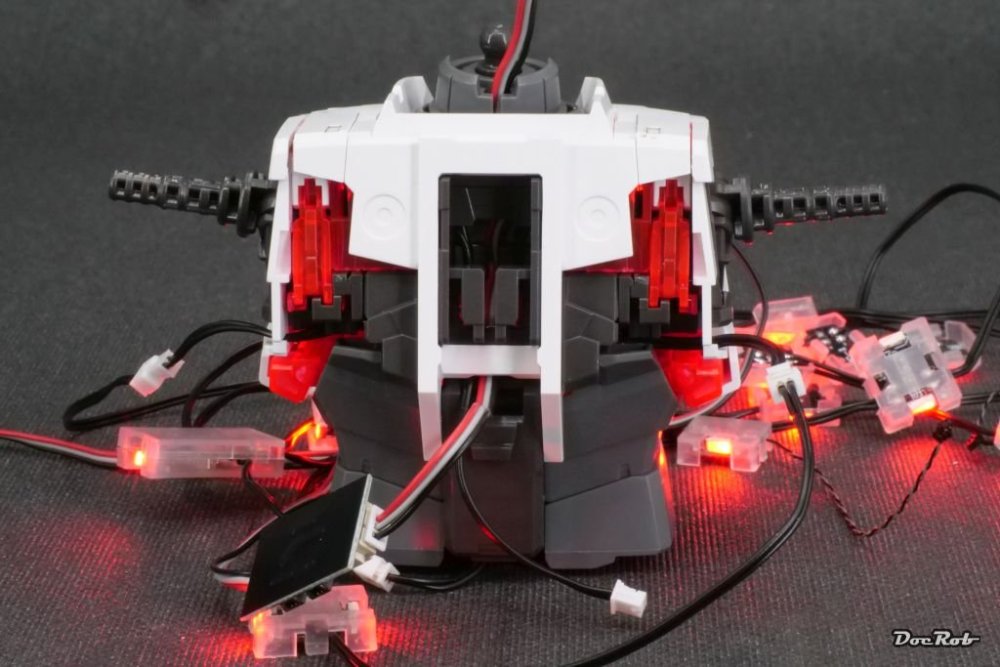
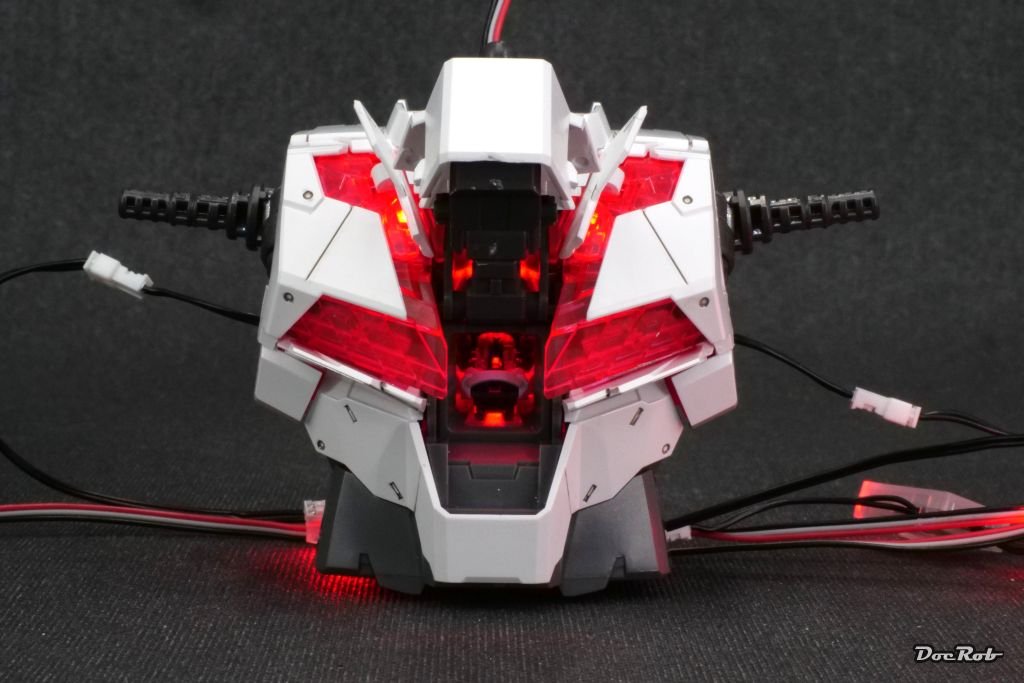
Here are pics from the front of the finished torso with all panels closed (Unicorn mode) and all panels opened (Destroy mode):

After finishing the torso, it took me more than 10 minutes to only pick the sprues for the next section, which are the legs:
Cheers Rob-
5
-
-
42 minutes ago, BlrwestSiR said:
Nice intro Rob. This is going to be a different build from your usual MFH kits.
With the way Bandai kits go together, be careful if you do any test fitting. As they're primarily press fit, separating the parts needs care as the pins are fairly tight and can break off. There are dedicated tools for separating the parts but you can also do it with a thicker bladed hobby knife.
The Unicorn Gundam is the primary mecha from the series Gundam Unicorn and is a prototype. There are 2 additional variants, the second called Banshee in black with gold and the third is the Phenix which shows up in the sequel.
Thank you Carl, it´s indeed a completely different breed than a MFH kit. I powered myself through the BT52 build for some bad weather weeks and needed a bit of a change, therefore the Unicorn kit, which I longed to build since a while.
I hear you about the fit and you are absolutely right. It pays to read the tiny diagrams in the manual very thoroughly, as it is not always easy to determine the orientation of parts (guess how I knew ) I have no separator tool and use a blade and sometimes a screwdriver to pry the parts apart.
I saw the variants of the Unicorn, but liked the original design better.
Cheers Rob-
1
-
-
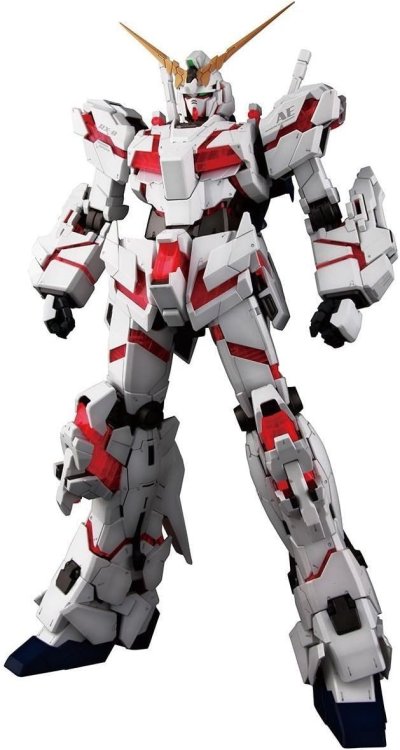
"...and now for something completely different" like the Monty Pythons would have put it. This will be my first venture into the world of Gundam and I have to admit, I have near to no idea about the background and the anime, they were shown in.
I was fascinated about the huge Gundam machines and their engineering as a kit and decided, I want to build one. I chose the Unicorn, because of it´s cool looks, the availability of a pre designed LED kit from Kosmos and the two face character of the Unicorn, plain white, with all hatches and ports closed and showing the glowing red psycho frame with everything opened up.
There is a lot of terminology involved with these kits. Perfect Grade means, it´s the highest grade of detailing in the Bandai range and the scale is 1/60. Highest grade of detailing means also an absurd part count manufactured in different colors and materials, mainly ABS and some vinyl like stuff. The so called Psycho Frame is a red transparent layer under the white armor, which distributes the lights emitted from the LED´s.
The kits are fully articulated, which obviously adds to the complexity of the build. There is no glue needed, and the parts are designed to intersect in many ways, which can be finger bleeding tedious, especially with correcting errors.
The manuals are only Japanese and it is recommended to use a translator with camera function, to get the grips.
The kit:

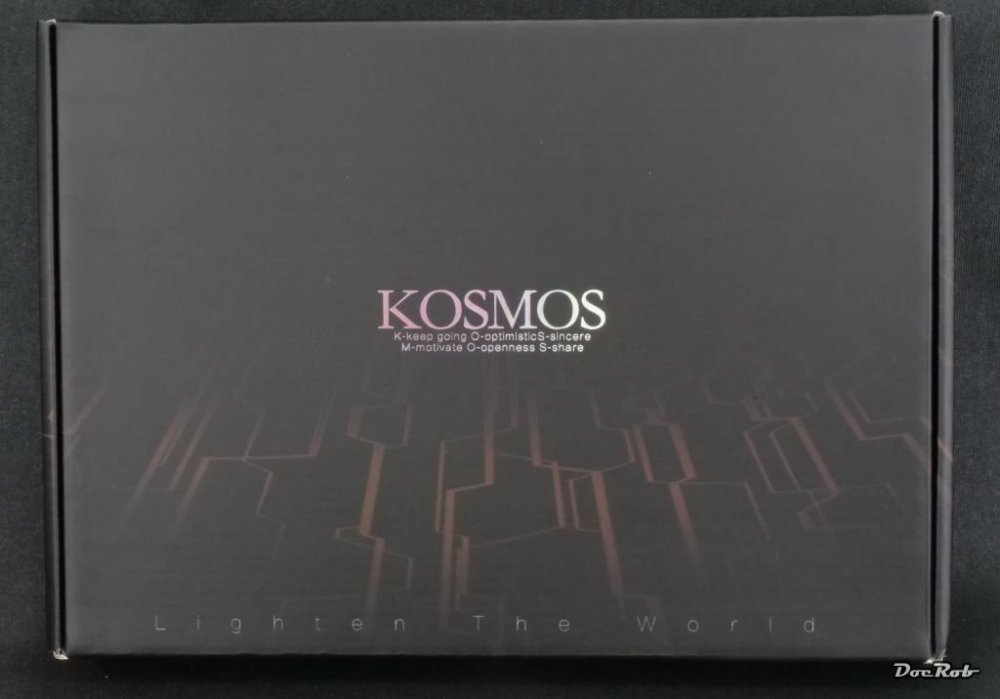
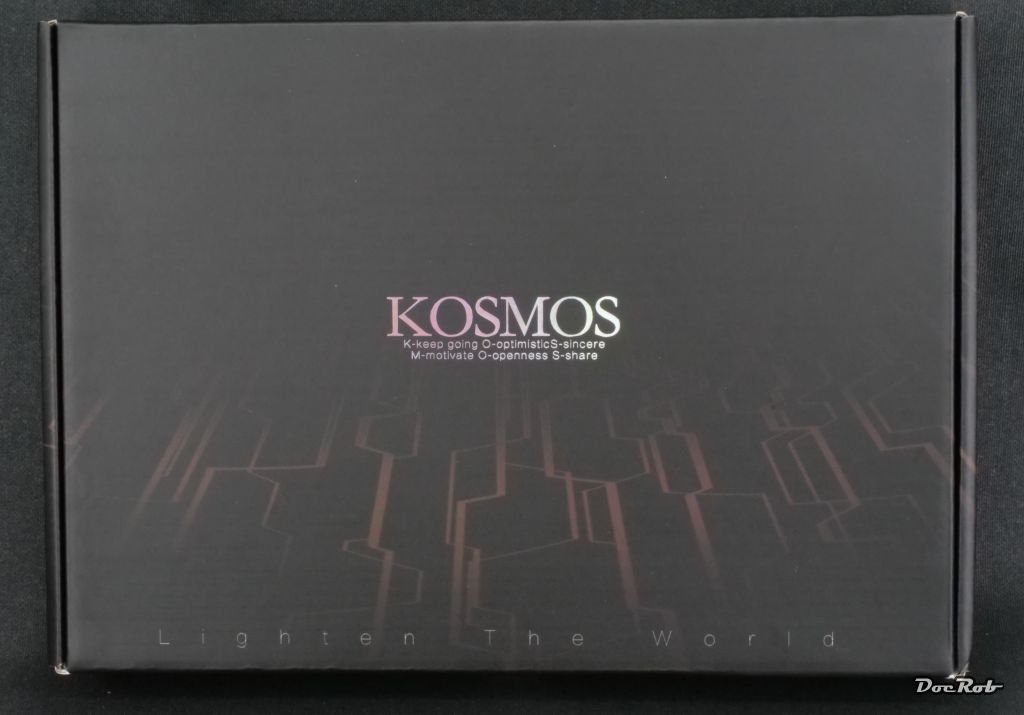
The Kosmos LED set:
...and that´s how the Unicorn is supposed to look:
Cheers Rob-
3
-
-
Well, I started my first Gundam kit, the perfect grade Unicorn (1/60 scale). I thought it would be tons of parts, but easy goin, but it is not that simple and you have to adopt from classical plastic modelling to assemble delicate intersecting parts in multiple layers without glue. It doesn´t help, that either the Unicorns manual or the one for the Kosmos LED kit isn´t in English. Sure a translator helps, but it´s a bit inconvenient.
Anyhow, I managed to build up the torso, making and correcting a few errors. The torso includes the pilots cockpit and is build up until the LED unit comes into play. As you can see, there are some body panels movable, they are opened on the left side. I also used some panel liner.

...and it was light, at least for testing:

Cheers Rob-
7
-
-
2 hours ago, FullArmor said:
BMP-3 turret.
Looks very good.
Cheers Rob-
1
-
1
-
-
Like PW, I would recommend Alclad chrome, with my experiences it is the most realistic looking chrome. It´s very fragile though and needs proper priming. You said, you strip the chrome off the plastic first, that is definitely the way to go. After that, prime with gloss black, Tamiya LP-1 gloss black thinned with leveling thinner is best. Both black primers for metallics from AK or Alclad are terrible and never dry properly.
The best results you achieve, while layering very thin layers of Alclad chrome onto the primer and build up until the blackness completely vanishes.
You shouldn´t clear coat afterwards or mask over, as it will ruin the finish.
For parts like exhausts, there is AK´s super chrome maybe another option. Other than Alclad or AK´s Extreme Metallics, you need to flood it onto the part. The chrome looks extremely good, but it is also very fragile and I have used it only sometimes now and don´t have enough experience for a clear recommendation.
AK Extreme Metallics are great to work with and more durable than Alclad, but their chrome and polished aluminum have less shine than Alclad.
Cheers Rob-
1
-
1
-
-
9 hours ago, belugawhaleman said:
From Dspiae, their ORBIT ELECTRIC DRILL (AT-EDO1).
I thought about this one too, Paul. I would be interested, how useful it is. How fast is the change of bits and things like this. I like the low revolution modus, as my Proxxon is to fast for many things. There are hundreds of holes to be drilled in metal or resin with every MFH build and I mainly hand drill, which is time consuming and sometimes finger cramping, but better to control. This thing could be helpful.
Cheers Rob-
2
-
-
5 hours ago, BlrwestSiR said:
I was thinking about you're not painting it and then I looked at the Gundam kit my son just built. It's from the standard HG series in 1/144. It's much smaller and less detailed and he didn't paint it either, just used a Gundam marker to do some panel lining. It still looks good though.
Nice one, I may paint another one later, when I have a feeling for abrasion due to articulation, but will do panel lining as well and paint some details with the Unicorn.
Cheers Rob-
3
-


Unicorn Gundam - Bandai - Perfect Grade 1/60 Scale
in LSM 1/48 Work in Progress
Posted
I always wanted to build their Mad-Cat then, but only built their Robocop, ED-209 and Catwoman.
Cheers Rob