


Carl Seager
-
Posts
23 -
Joined
-
Last visited
Content Type
Profiles
Forums
Events
Gallery
Everything posted by Carl Seager
-
Just gobsmacked! Brilliant review, brilliant kit.
-
1/8 Sopwith Camel
Carl Seager replied to Carl Seager's topic in LSM 1/35 and Larger Work In Progress
Thanks fellas. I haven't been on in a while as we'll recently relocated to France and we've had much to do getting the new workshop/studio up and running. Nearly there now though so I should be able to make progress on the Camel soon. -
HK B-25J Ave Maria +extras
Carl Seager replied to CruZz's topic in LSM 1/35 and Larger Work In Progress
This is what I've been waiting to see...just beautiful :-) -
HK B-25J Ave Maria +extras
Carl Seager replied to CruZz's topic in LSM 1/35 and Larger Work In Progress
I know I don't say much CruZz...but I'm loving this! -
This is a bit special :-)
-
HK B-25J Ave Maria +extras
Carl Seager replied to CruZz's topic in LSM 1/35 and Larger Work In Progress
Beautiful job and a great build to follow. -
Thanks for the recommendation...just downloaded this (£11.99 from AVF Digital) and it does indeed look superb on the iPad. An excellent book.
-
1/8 Sopwith Camel
Carl Seager replied to Carl Seager's topic in LSM 1/35 and Larger Work In Progress
Thanks Lawman...and Martin, I'm using a plank of barked boxwood that I was given by a luthier friend. I reckon the encredibly fine grain is just about right for this scale and it's so easy to machine without splitting. I generally use old piano keys for such stuff as they too are some of the best seasoned and truest wood available (plus the ebony and ivory come in handy too) but I'd been looking for an excuse to use the boxwood. The prop is actually from a bought free flight SE5a I have hanging on the bedroom wall. I'll be making one to replace this though as it's somewhat undersized for the Camel (I was surprised to discover just how huge those props actually were!)) -
Great review! These things are simply amazing aren't they. It's good to know just how much has gone into producing these kits. So many cast parts to consider let alone all the pe stuff. And the quality! I know they're expensive in model terms but these are works of art and as such...they're positively cheap. You mentioned that they can't be compared to the likes of Wingnut and that is true though I do suspect that Wingnut's attention to detail is rubbing off onto other manufacturers. All very promising for the future of modelling and I kinda think we're in for plenty of exciting stuff from all of them in the future.
-
Imcth 1:32 Desktop Zero and Extra Accessories
Carl Seager replied to JayDee's topic in Aircraft Reviews
Just so's you know, I did enquire direct but got no reply so I eventually ordered it from HLJ. It's on its way :_) -
1/8 Sopwith Camel
Carl Seager replied to Carl Seager's topic in LSM 1/35 and Larger Work In Progress
And here's where I am at the moment...so the posts will slow down somewhat now, lol. -
1/8 Sopwith Camel
Carl Seager replied to Carl Seager's topic in LSM 1/35 and Larger Work In Progress
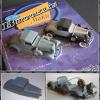
Alluminium barrel casings formed around a brass bar surrounded with lengths of welding rod. The flutes are formed by running a dental tool along the furrows left by the rods. The brass barrel and turned fittings are coming together and the main sections of the gun mounts are nearly ready for soldering. The mount tubes are brass and the mounting lugs are copper. I used copper for the lugs as it is easily folded into a four-ply which allows cutting out all four similar parts at once with the jeweller's saw. The slots in the brass tube were cut with the milling head on the lathe (heart-stopping moment as one shot across the workshop but all worked out okay) -
1/8 Sopwith Camel
Carl Seager replied to Carl Seager's topic in LSM 1/35 and Larger Work In Progress
Frame members bound with thread and rear steel engine mount (made around a wooden former from old biscuit tin, same as the front mount) added to allow that gorgeous Hasegawa Clerget to be slipped in place for the first time. Everything is pressure fitted or pinned using stubs of welding rod at this point, although the engine's timimg case is now bolted to the engine mount with 16ba nuts and bolts. -
1/8 Sopwith Camel
Carl Seager replied to Carl Seager's topic in LSM 1/35 and Larger Work In Progress
All coming together. Just as an aside, in the background of this pic you can see a Labattes Beer Thanker which I mastered for DMP Studios of Canada and which was produced here in England by Brooklin Models. Also a T80 tank master and first cast sections made for Imprint Models. I noticed the other day on Brooklin Models facebook page that the Labattes tanker is being produced again. As the first edition was 4000 models I'm guessing they all sold...which is pretty satisfying. I visited Nigel at Brooklin in Bath during the summer, now THAT place is a proper Aladin's Cave :_) -
1/8 Sopwith Camel
Carl Seager replied to Carl Seager's topic in LSM 1/35 and Larger Work In Progress
Most of the frame components have lightening slots cut into opposite surfaces. Some are fairly ellaborate shapes so require a little patience with a ball end cutter on the lathe... -
1/8 Sopwith Camel
Carl Seager replied to Carl Seager's topic in LSM 1/35 and Larger Work In Progress
Martin, I just checked out your facebook link and that's a great page! Something else to distract my attention :_) By way of an update, this pic shows the method I chose for positioning the longerons, fuselage spars, bearers etc. without using glue. The whole frame will be held together with various steel plates, starting with the engine mount at the front, and bracing wires. Made up a jig by printing off stations 1 to 5 from the plans, having marked them up and positioned them in Photoshop. Printed onto A4 label sheet (I use a lot of that) and stuck to sturdy card before cutting out the openings. These were positioned just forward of their true spots on the jig to allow for extended parts such as the fuselage spars.The steel motor mount and brass tube cowl ring just slipped in place at this point to make it look like something's actually happening. -
1/8 Sopwith Camel
Carl Seager replied to Carl Seager's topic in LSM 1/35 and Larger Work In Progress
Thanks for the welcome and kind words folks. I've just spent the last hour browsing around the forum and there's so much to see! Great stuff. Cees, in answer to your question I'd say both. There just can't be too much reference. Prepare yourself for a shock. The pic is my workshop at the mo and, despite the fact that I'm not proud of being probably the messiest modeller on the planet, you'll see that I surround myself with drawings and photos. Most of my time is spent thinking (and smoking and drinking coffee) but I'm a great believer in having things clear in your head before getting stuck in. -
Imcth 1:32 Desktop Zero and Extra Accessories
Carl Seager replied to JayDee's topic in Aircraft Reviews
I hope you're getting commission as I ordered this a while ago pretty well on the stregth of this brilliant review. I've never really been that keen on photo-etched modelling as it so often lacks the feel of the real thing but it really comes into its own when used in this way. No way could I resist this kit. Great review. -
Eduard 1:4 Bf109E panel
Carl Seager replied to NOVAModeler's topic in LSM 1/32 and Larger Aircraft Ready for Inspection
Lovely job! Ashamed to say I've only just discovered Edard (I know, where have I been!?) but this is just another example of how exciting kits can be...superbly put together and finished. I'm more a WWI era man myself, being something of an old git, but stuff like this temps me to broaden my horizons. -
Wingnut Wings Fokker E.I (Early)
Carl Seager replied to Dave J's topic in LSM 1/32 and Larger Aircraft Ready for Inspection
Beautiful job! The Wingnuts kits are so perfectly engineered aren't they and your build certainly does them justice. I have the Wingnuts Sopwith Tripane staring at me from its box begging to be built...all in good time. I think I'll look at a few more of your posts, and around the forum in general, for a few tips before I tuck in -
1/8 Sopwith Camel
Carl Seager replied to Carl Seager's topic in LSM 1/35 and Larger Work In Progress
Next up is the frame. I'm using boxwood here as I love the stuff and just happen to have a lump of it lying around the workshop. I was amazed by how complicated the frame components actually turned out to be. Having only been able to find pretty poor references on the net I bit the bullit and bought the Replicraft plans from America. I can't reccommend them highly enough as they seem to be the only available source of 'true to the original' drawings available. Having scanned all six 74"x30" sheets I reduced the scale from 5th (all show full scale measurements) to eighth and printed out dozens of sheets of details. -
1/8 Sopwith Camel
Carl Seager replied to Carl Seager's topic in LSM 1/35 and Larger Work In Progress
The above pic shows the roughly beaten aluminium cowl and the chemiwood former. The cowl is mounted on a brass tube ring which is attached to a steel engine mount. The Vickers gun barrel casings have been formed from sheet around the mould seen in the foreground...a brass bar surrounded by pieces of welding rod. Below is the cowl after final beating, filing and ploishing and a closer shot of the gun sleeve mounted on the brass barrel and casing turnings. -
Hi, I'm new to the site so if I'm posting in the wrong spot please feel free to shift/delete post. I have been a professional pattern/model maker for a few decades now and have worked with the likes of Brooklin Models, Corgi, Imprint Models etc. but this is a personal project and I hope it may be of interest to some. During the summer I will be building a full size Sopwith Camel replica fuselage/cockpit for use at showgrounds etc. and meantime I am working out the build system by making an eighth scale model based on original drawings. All built from scratch but for the (rather wonderful) Hasegawa Clerget engine kit. The following pics show progress so far (I'm currently working on the pair of Vickers guns in brass and alluminium) and if there is any response I'll continue to post progress pics as and when they happen.