Dennis7423
-
Posts
73 -
Joined
-
Last visited
Content Type
Profiles
Forums
Events
Gallery
Everything posted by Dennis7423
-
 Great solution to the acorn problem Cees! Keep up the great work. Following along with much interest! - Dennis S. Thornton, CO USA
 -
I found a little bench time this morning, so I got cracking on Phantom a little bit more. I turned my attention to the nose turret, building off the research we've been discussing lately. Why not, as the mojo is currently situated there. The Lancaster bomber used a Frazer-Nash FN5 nose turret. The kit's turret is quite nice out of the box, but has some subtle shape issues. That, and I can't leave well enough alone. Additionally, with much of her innards not going to be the standard black we're used to, it's going to be a focal point of the model. I needed to kick it up a notch, even if only subtly. The easiest mod for the kit parts is drilling out the various lightening holes in the different structures. A simple, quick task immediately improves the look: received_407179460227530 by Dennis SAuter, on Flickr Another simple task is to separate the gun sight from the turret controls. These are molded as one piece in the kit, but the sight traversed up when the guns were elevated. For a kit with the turret guns in a flat, level position, you could get away with it. I elected to separate them: received_416354449055998 by Dennis SAuter, on Flickr I also drilled out the gun sight, which is solid. I'll put some Tamiya clear yellow in there when it's painting time to capture the amber color. A more obvious niggle with the kit are the upper support arms for the turret. On the kit, they are molded as straight triangles: received_666987883829619 by Dennis SAuter, on Flickr On the real thing, they are an intricately curved and rotated piece of metal: received_426209424753274 by Dennis SAuter, on Flickr So, out with the needle files, and away I went. Fortunately, the plastic is thick enough to reshape what's there to better capture that piece: received_2394091067507472 by Dennis SAuter, on Flickr Drill out the lightening holes, thin the plastic, remove the shoddy ammo belt (this will be replaced later), and fill the ejector pin marks, and voila. We're off to greener pastures: received_1419364988236883 by Dennis SAuter, on Flickr Now I've just got to complete the other side. Then, do the same for the upper turret. Piece of cake! It's the little things, right? - Dennis S. Thornton, CO USA
-
From the research I have been doing, it appears to be a natural metal color, rather than a British interior green shade: AvRo Lancaster B.Mk.1 R5666 44 Squadron KM-F front FN5 turret detail (WM TR188) by Dennis SAuter, on Flickr AvRo Lancaster B.Mk.1 June 1942 front FN5 turret detail (IWM TR20) by Dennis SAuter, on Flickr Looks like natural metal in the first photo compared to the green inside the bombardier's bubble, but the second photo seems to show a mix of natural metal and green, perhaps. Thoughts? - Dennis S. Thornton, CO USA
-
Ian, those are fantastic and incredibly helpful photos! Thank you so much! - Dennis S. Thornton, CO USA
-
A very, very small update today, and a request for some further information from the experts. I started by chopping out the cockpit floor where the pilot's pedestal was located. I will lower it, and work on some details underneath it that would be visible from the nose before placing it back into place. Cut, insert plastic card, superglue the bejeezes out of the joins, sand, and voila. Good enough for the folks at home. This is essentially step one towards correcting the cockpit area: 73071521_638880206518523_1822513833835495424_n by Dennis SAuter, on Flickr Step two will begin shortly, and that entails correcting the pilot's seat. It's positioned wrong on the pedestal, and the seat bottom is far too long. I have glued the two base pieces together so that I can begin the surgery process: 72917119_701178707031621_7925287475231064064_n by Dennis SAuter, on Flickr Other cockpit modifications will include correcting the angle of the instrument panel support, wiring, piping, and ribbing on the fuselage halves to hide the wing attachment points. I also purchased a really nice resin RAF parachute from True Details, which I will modify to more accurately represent the ones used by bomber crews. I'll then cast some copies, and put them in their appropriate homes inside the fuselage. 74417322_689998301485772_3716218318265253888_n by Dennis SAuter, on Flickr Work continues slowly on the fuselage, and much faster on the wings. I am in the process of getting the outer nacelles attached to the wings, and hope to have that completed next week. I'm also going to try (very carefully) to drill out the main canopy where the starboard blister will attach, so its actually hollow inside rather than just plastered to the outside of the canopy. Wish me luck. Folks here have pointed out that Phantom likely had the starboard blister, so I will add it to my build. I've been able to deduce from photographs of Phantom that she had natural metal internals for her nose turret. Would the entire nose turret have natural metal internals, or just some pieces? I haven't been able to find many reference photos of the turret internals, let alone photos showing early war ones that weren't painted jet black. Does anyone have any photos they would be willing to share? Additionally, would the upper and tail turret also have natural metal internals like the nose turret? Those I have absolutely no reference photos of, especially of Phantom. Thanks for tuning in folks! As always, comments and critiques are welcome. - Dennis S. Thornton, CO USA
-
Thank you Ian! This is excellent information, and very helpful! - Dennis S. Thornton, CO USA
-
Jeff- I don't have a particular mission date, but perhaps her first Berlin raid? Not sure how easy that would be to track down. Curious if you know which sortie that would have been for her, so I can put the appropriate amount of bombs on the side of the aircraft. I want to model her early in her career, rather than later. - Dennis S. Thornton, CO USA
-
All- Since I have completed my HK 1/32 B-17G, it's time to get cracking on another project. My brother and I were contracted two years ago to build some large scale kits for a flight museum that will open in Salt Lake City, Utah in a few years. I figure, why not get started on another kit! The plan for the museum display is to show, in large-scale, the bombing campaign in Europe using heavy bombers, their escorts, and their opposition. We have completed a B-17E so far, with a B-17F, B-17G, B-24D, B-24J, and Lancaster planned for the heavies. The hope is to make them more or less as accurate as possible, to help share the story of the bombing campaign against Germany. The museum has given us pretty free reign as far as what specific aircraft we model, as long as it was operational in the European campaign. I chose to get started with the HK Models 1/32 Lancaster. After having so much fun building their B-17G, I wanted to get cracking on another one of their excellent kits. So, in steps Lancaster Mk.I EE139, "Phantom of the Ruhr". Originally assigned to 100 Squadron on May 31st, 1943, she went on to fly 121 missions, including 15 trips to Berlin. I plan to model her during her early years, where she wore fuselage codes HW-R. She was later assigned to 550 Squadron, and bore fuselage codes BQ-B. a3425306814_10 by Dennis SAuter, on Flickr While I don't have any in-progress shots yet, I have started on a few small modifications to the kit (chopped up the cockpit floor). Here's what I can glean from photos so far, and I would love any input anyone can provide for this particular airframe: She was an early Mk.I, without side blisters to her canopy. Additionally, from photographs, it appears that she has aluminum interiors to her front turret, aluminum landing gear legs, and aluminum hubs to her wheels. All signs point to her being a very early Mk.I. PhantomofTheRuhrBefore100thOperation by Dennis SAuter, on Flickr img012 by Dennis SAuter, on Flickr 24336d1142014385-lanc-phantomoftheruhr_144 by Dennis SAuter, on Flickr 08741b6a17bc6f1e690930dc43d2f8c5 by Dennis SAuter, on Flickr Here's a few questions I have for the boffins: 1. What type of bomb sight would she have? I have a feeling she has an early SABS (Stabilized Automatic Bomb Sight) because she is such an early bird, but I am not sure, and its not entirely clear in the photos. 2. Would she have her fuselage windows painted over on the sides? (EDIT: It looks like in the last photo I posted, that she does indeed her her windows. I hadn't noticed that before). Hoping you all follow along on what will surely be a long journey once again. Thanks for tuning in! - Dennis S. Thornton, CO USA
-
hk models HK Models 1/32 Avro Lancaster Mk.1 (Part 1)
Dennis7423 replied to JeroenPeters's topic in Aircraft Reviews
I'm thinking the SABS is going to be the most accurate for what I'm building. - Dennis S. Thornton, CO USA -
hk models HK Models 1/32 Avro Lancaster Mk.1 (Part 1)
Dennis7423 replied to JeroenPeters's topic in Aircraft Reviews
Anyone have a source for the early bomb sight in 1/32? I'm building an early Mk.I with mine. - Dennis S. Thornton, CO USA -
Thanks for the kind feedback everyone! She went to her first show last weekend, and placed 1st place in her category (multi-engined, 1/48 and larger). I also got a request to possibly put her into a museum/restoration shop in Colorado that specializes in WWII restorations, which is really exciting! We'll see if it all works out. Now, where did I put that HK Lancaster Mk.I... - Dennis S. Thornton, CO USA
-
After reviewing it, if you can find one, it might save you some work. The rear portion appears correct, and you would just have to convert the kit clear parts for the center canopy section to capture the more prolific glass on the RCN bird. It's worth a shot! And, you get the firebomber bomb bay to boot. - Dennis S. Thornton, CO USA
-
Although he's currently not taking orders, Mike West at Lonestar Models makes a TBM firebomber conversion in 1/32. It contains a resin plug for the canopy area, and the boxed bomb bay. I used to have one, but sold it a few months ago. You might try and source one. Great project! Will be following along :-) - Dennis S. Thornton, CO USA
-
All- Here she is, in all her splendor! I may still fiddle with the weathering a little, but I sure am pleased. I wasn't able to get her into work today for good photos, so I snapped a few outside in the overcast with an actual camera, rather than a cell phone. I started this kit over 4 years ago, and its kind of sentimental to get this one done. She depicts my Grandfather's aircraft, 44-6888, of the 96th BG/337th BS. Her crew unofficially named her "Ragged But Right". The war ended before nose art could be applied. My Grandfather, Joseph Denver, was a bombardier and completed 13 missions at the end of WWII. He first mission was in February of 1945, and he remained in Europe until 1946 as part of the occupation forces. He flew most of his missions in this plane,and that is why I chose to depict her. This is the HK 1/32 B-17G, their initial release, with all of the bells and whistles from Eduard, Profimodeller, and some scratch building. She's airbrushed with AK Extreme Metals and Model Master enamels, and sports a combination of kit decals, Kits World, and custom J Bot Decals for the markings. Here's some photos: DSC_3323 by Dennis SAuter, on Flickr DSC_3324 by Dennis SAuter, on Flickr DSC_3325 by Dennis SAuter, on Flickr DSC_3326 by Dennis SAuter, on Flickr DSC_3327 by Dennis SAuter, on Flickr DSC_3328 by Dennis SAuter, on Flickr DSC_3329 by Dennis SAuter, on Flickr DSC_3336 by Dennis SAuter, on Flickr DSC_3338 by Dennis SAuter, on Flickr I wanted to close this post with the Eight Air Force's letter to St. Peter, which is quite sobering: Let them in, Peter, they are so tired; Give them the couches where the angels sleep. Let them wake whole again to find new dawn fired with sun, not war. And may their peace be deep. Remember where the broken bodies lie... And give them things they like. Let them make noise. God knows how young they were to have to die! Give swing bands, not gold harps, to these our boys. Let them love, Peter - they have had no time - Girls sweet as meadow wing, with flowering hair. They should have trees and bird song, hills to climb - Tell them how they are missed. Say not to fear; It's going to be alright with us down here. All always folks, comments and critiques are welcome. Thanks for tuning in. - Dennis S. Thornton, CO USA
- 11 replies
-
- 10
-

-

-
HK 1/32 B-17G 96th BG "Ragged But Right"
Dennis7423 replied to Dennis7423's topic in LSM 1/35 and Larger Work In Progress
Well folks, I'm sticking a fork in her! Head on over to Ready For Inspection (RFI) for the full post! DSC_3332 by Dennis SAuter, on Flickr - Dennis S. Thornton, CO USA -
HK 1/32 B-17G 96th BG "Ragged But Right"
Dennis7423 replied to Dennis7423's topic in LSM 1/35 and Larger Work In Progress
Well folks. the end is dangerously close! This will likely be my last work in progress photo before she's complete. One wing is done, and the other will go under matte coat today. Weathering, little bits, and it'll be complete! She's looking like she'll be done for the IPMS Great Plains show on Saturday, Sept. 28th in Loveland, Colorado, USA. I'm looking forward to showing her off! If I am able to get her done this week, I will try to sneak into work next Monday to take some more professional photographs in our photography lab. 70887941_10103079334765662_8044854618812841984_o by Dennis SAuter, on Flickr Stay tuned! - Dennis S. Thornton, CO USA -
HK 1/32 B-17G 96th BG "Ragged But Right"
Dennis7423 replied to Dennis7423's topic in LSM 1/35 and Larger Work In Progress
Another small update today! I am nearing completion on the starboard wing. When I left you last, I was getting ready to apply decals. The decals have been applied, a matte coat applied overall (my photos show she wasn't particularly shiny at the end of the war), and I began the weathering process. I like to use an acrylic-based panel line wash, that I make up myself. I use a little acrylic artist's midnight black (black with a hint of blue) paint, about the size of a fingernail, mixed with about two tablespoons of warm/hot water and a few drops of dish soat. I slather it onto the kit, allow it to mostly dry, and the wipe the excess away using cotton pads soaked in warm water. It's really hard to tell in these photos, but I love the subtle look it gives on natural metal, plus the blue gives the metal that perfect hue of exposed aluminum. After that's applied and dried, I began exhaust streaks and heat staining around the hot zones using Tamiya weathering compounds. A mix of soot, mud, and snow gives the desired effect for exhaust staining. I didn't go too crazy on top of the wings and out of the backs of the cowlings, as she was a relatively new bird when she began her service with the 96th BG in January of 1945. The exhaust staining underneath the wings was typically heavier inboard on B-17's; they often used their inboard engines while taxiing around the air bases, especially after landing. I tried to reflect this with my exhaust staining. 70365787_10103061028586392_6385456491758878720_n by Dennis SAuter, on Flickr 69581124_10103061028406752_2774024839961247744_n by Dennis SAuter, on Flickr 69503594_10103061028466632_5897643215904833536_n by Dennis SAuter, on Flickr What's great about the Tamiya weathering compounds is that if you don't like what you've done, you can simply wipe it off with a damp cloth and start over. The wings will get a little bit more weathering once I have the entire air frame together and get a better sense of balancing all of the weathering on her. And, once she's complete, I will bring her to work and take some proper photos. I am a Crime Scene Investigator (CSI), so I can be pretty good with a camera when I want to be! These are just quick cell-phone snaps in some pretty poor lighting, but I don't have a photo booth set up at home and that's what I usually have handy. Hopefully within the month I will have better photos of her, if everything stays on schedule for her to be completed for a show on the 28th of this month. As usual, all comments and critiques are welcome! Thanks for stopping by! - Dennis S. Thornton, CO USA -
HK 1/32 B-17G 96th BG "Ragged But Right"
Dennis7423 replied to Dennis7423's topic in LSM 1/35 and Larger Work In Progress
Oh but of course! Once the airframe is complete, I'll get to weathering her properly. Hopefully soon! - Dennis S. Thornton, CO USA -
HK 1/32 B-17G 96th BG "Ragged But Right"
Dennis7423 replied to Dennis7423's topic in LSM 1/35 and Larger Work In Progress
Another small update! The starboard side wing has received its base coat of matte aluminum, and after a few sessions of polishing, cursing, respraying, polishing, cursing some more, and then spraying some more, I finally had a nice base coat. I then applied AK Extreme Metals aluminum paint to a few panels and panel lines, and applied Dark Aluminum to the "hot zones" around the exhausts and turbos. 69267344_10103054298348842_6393572283436236800_n by Dennis SAuter, on Flickr 69257240_10103054298308922_324606507175903232_n by Dennis SAuter, on Flickr 69160428_10103054298578382_2641277309331439616_n by Dennis SAuter, on Flickr After the metals were complete and were allowed to dry for a little while, I applied the anti-glare panels per Eduard's excellent instructions for 1/48 and 1/72 B-17 anti-glare (This being a Douglas bird it was a little different than Vega and Boeing), and after that, her tell-tale red wing stripes. 69785250_10103054298378782_2874053043442155520_n by Dennis SAuter, on Flickr 69356529_10103054298543452_7908832695310876672_n by Dennis SAuter, on Flickr After completing painting, I just couldn't help but throw the wing onto the fuselage, lay the soon-to-be-applied wing square-C decal on top, and snap a few photos with the engines and props set in place. She's really starting to look the part! 69184403_1124115021119314_6288490140398518272_n by Dennis SAuter, on Flickr 68976969_488375801977678_5497539133649715200_n by Dennis SAuter, on Flickr As usual, all comments and critiques are welcome! Now, where did I leave that other wing... - Dennis S. Thornton, CO USA -
I've tried to find them, but haven't been able to. I likely saw them in 1/48, and that's what I remember. I recommend scratching them; they look really easy to do. - Dennis S. Thornton, CO USA
-
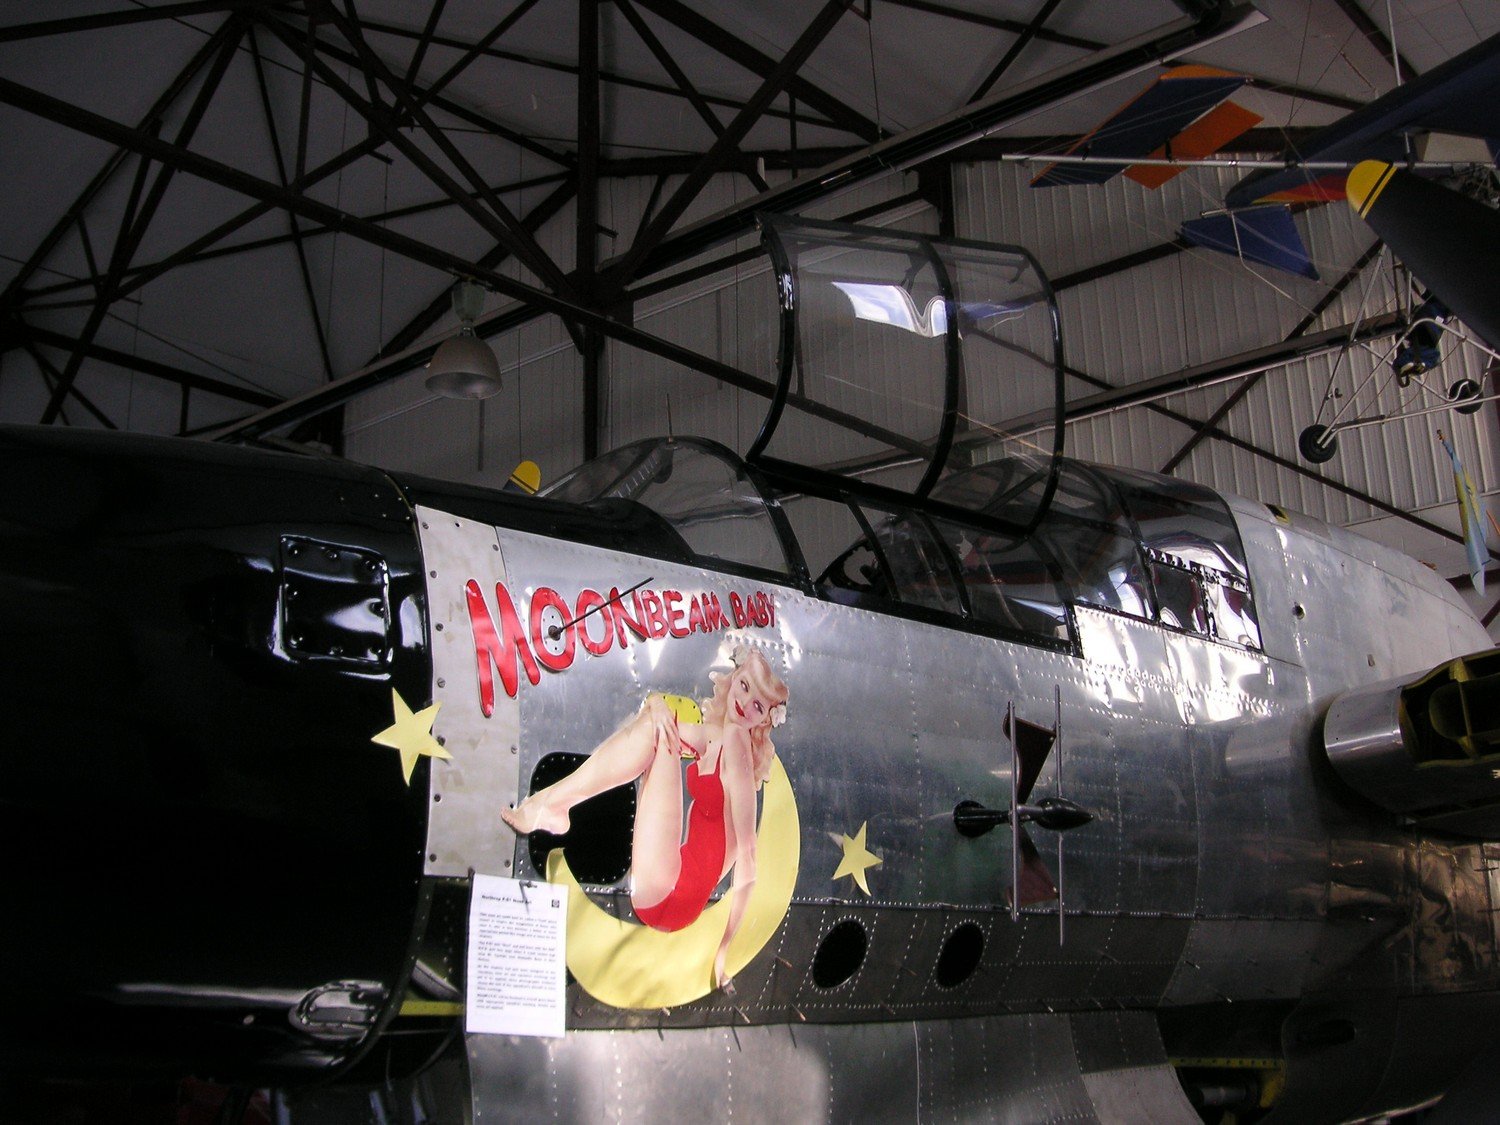
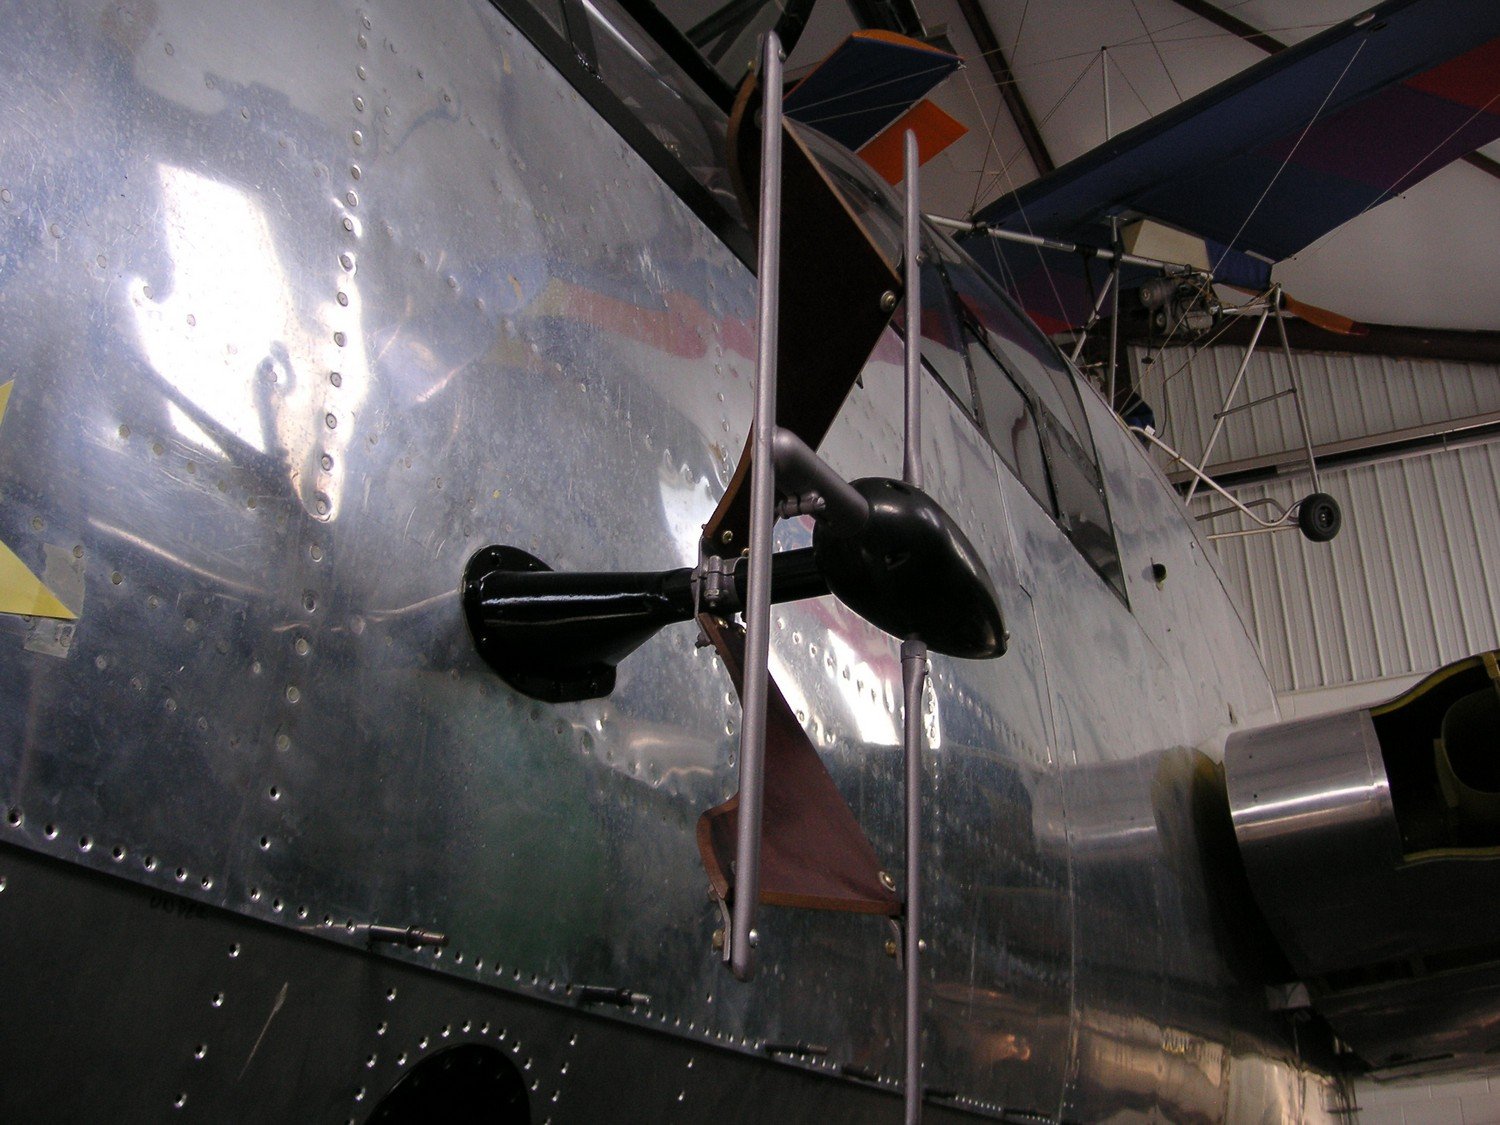
Ernie- Did some more digging, and found these for you from the P-61 restoration at www.maam.org. These should be very helpful! - Dennis S. Thornton, CO USA


-
Ernie, not sure if this helps, but P-61 black windows appear to have the same cheek radar setup. Here's a photo to show: The radar has two dipoles per unit, long dipole in the rear, with an angled support piece. I've seen them in photo-etch/turned brass before, I'm just trying to find them. Not too terribly hard to reproduce. - Dennis S. Thornton, CO USA
-
HK 1/32 B-17G 96th BG "Ragged But Right"
Dennis7423 replied to Dennis7423's topic in LSM 1/35 and Larger Work In Progress
I've never been, but its on the list! I had a chap once who was going to send me a chunk of the original runway from there, but alas, he never did and now I can't get in touch with him. As a side note, because I haven't noted it before, I have a piece of this aircraft in my collection. When the aircraft crashed, my Grandfather removed the airspeed indicator from the bombardier's panel. He eventually brought it home from Europe with him, and I now have it in my collection. I have an actual piece of 44-6888, and that brings me great joy. - Dennis S. Thornton, CO USA -
HK 1/32 B-17G 96th BG "Ragged But Right"
Dennis7423 replied to Dennis7423's topic in LSM 1/35 and Larger Work In Progress
Small update today: The landing gear are a known problem in this kit, as they have a rather improper stance. The stance as kitted is accurate for a bird in the process of lifting off or about to land, as they are essentially in full extension. They should be shorted by approximately 3mm to obtain an accurate height for a loaded, sitting bird. I cut my gear legs at the top of the oleos, and shorted the retraction strut appropriately. I then pinned them with a brass rod, and reattached them with epoxy. It provided a strong bond that will hold the weight of the kit. As I had changed the stance of the kit legs, it required replacement of the kit molded brake lines. I used some of the kit fixtures, and ran my own lines using fine solder. The attachment loops were created with fine strips of Tamiya tape: 68755791_10103040539895892_4160851122501713920_o by Dennis SAuter, on Flickr Once they were fully built out, they were painted with Tamiya sprays, the fine details (brake lines and retraction strut portions) were hand painted, and a wash was applied. Viola! Completed struts, that are an accurate height. This will really help the stance of the completed model. The kit tires, which good in size, are a little bulbous and the diamond tread is a tad pronounced. I used Eduard's Brassin wheels, even though they are documented as being a tad on the small side. I wish I had more options, for accuracy's sake, as my Grandfather's bird had one diamond tread, and one block tread tire. Who knows, maybe some day I can switch one of them out. For painting the tires, I used Tamiya spray matte black, followed by a dry brushing of a darker grey. Snetterton Heath, where she was based, had a concrete/blacktop runway, with paved taxi lanes and concrete parking circles for the bombers. Their activity on dirt and grass was at a minimum, so I kept the tires relatively clean in that regard. Tamiya weathering pastels were applied heavily to the tires, then wiped away so that the deposits were only in the crevices of the tire. While the photo doesn't show it all too terribly well (thanks, cell phone), I am quite pleased with the result: 68248663_10103041067698172_8610831029529214976_o by Dennis SAuter, on Flickr That's all for today folks! I'm in the process of painting the wings in AK Metal, and once those are complete, the rest should fly right by. When she gets displayed at the show at the end of September, I plan on bringing my fancy work camera (I am a CSI), and taking some more professional photographs of her in some better lighting. And, why not another photo from my Grandfather's collection? Who said you couldn't travel in style in Europe? Here, 96th BG/337th BS B-17G 43-38919 (AW-L) sits in her parking circle preparing to be turned down after a mission. Her crew has applied white walls to the tires, making her pretty unique (wouldn't she make a lovely model?): 0554.D.024 by Dennis SAuter, on Flickr As always, comments and critiques are welcome! - Dennis S. Thornton, CO USA -
HK 1/32 B-17G 96th BG "Ragged But Right"
Dennis7423 replied to Dennis7423's topic in LSM 1/35 and Larger Work In Progress
As I refreshed my memory on my thread here, I realize there are other updates I can share with the class, so here goes! I elected to add an Eduard Brassin engine to the build, to give it a little more life with an exposed engine. These little beauties are something to behold, and with careful painting, they really pop! 37613708_10102576627295462_2008003219262799872_n by Dennis SAuter, on Flickr 37602505_10102576627110832_2466304645249630208_n by Dennis SAuter, on Flickr When compared with the kit engines (even with the Eduard and AMS Resin upgrades), you can see the difference. However, since the kit engines will be buried in cowlings behind propellers, the differences won't be as obvious. 37615318_10102576627520012_3179946451123830784_n by Dennis SAuter, on Flickr 37412602_10102576627060932_7072215191089315840_n by Dennis SAuter, on Flickr All four engines are complete, and once I get the wings painted, I can install the engines (the kit engines are already installed in their cowlings, which are painted): 54405583_258361531707186_4458971515550957568_n by Dennis SAuter, on Flickr While I don't have any photographs of 44-6888 flying, I did have a painting commissioned by Wade Meyers showing her in flight. She now proudly flies right above my model desk, so I can glance up at her and think of her better days! 2823203x800 by Dennis SAuter, on Flickr That's all for today folks! More to come, and thanks for following. - Dennis S. Thornton, CO USA