


dr_gn
-
Posts
145 -
Joined
-
Last visited
Content Type
Profiles
Forums
Events
Gallery
Everything posted by dr_gn
-
All, I’ve got a few WW2 FAA aircraft in the stash. I’ve got some Vallejo Model Colour paints that I think are correct in theory for the topsides (70.867 Dark Blue Grey and 70.892 Yellow Olive). However when I put them together they are very low contrast and very dark. Even though this might be correct, I’d rather have slightly lighter versions on 1:72 models - scale lightening if you like. Has anyone got any advice for Model Colour or Model Air designations for a bit of scale fading or scale lightening for this FAA scheme please? I don’t really want to mix paints. I notice that in the Vallejo Air FAA set, for the Swordfish the lower wings are lighter versions of the uppers (like a few RAF biplanes I think). Any advice on the true relative lightness would also be appreciated. Thanks!
-
 There are a few of them around - I think the 4-bladed prop ones have Pratt & Whitney engines fitted, the five bladed ones are the original Centaurus, (which are much rarer and more difficult to maintain engines).
 -
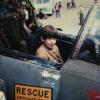
The Sea Fury is always a highlight of the show for me.
-
Here are a few from Farnborough last Thursday:
-
Here are a few from Flying Legends, Sunday:
-
Help with Vallejo / Tamiya RLM Colours Please
dr_gn replied to dr_gn's topic in Modelling Discussion
OK, so it turns out that since I last called in 2 weeks ago, my local hobby shop has closed down. The other UK supplier I use says the Vallejo RLM paints will be released individually in July, with UK stock available around September. So I've gone with Tamiya paints for this one. Thanks for the info. -
Help with Vallejo / Tamiya RLM Colours Please
dr_gn replied to dr_gn's topic in Modelling Discussion
Ok thanks again, I'll try my LHS tomorrow. -
Help with Vallejo / Tamiya RLM Colours Please
dr_gn replied to dr_gn's topic in Modelling Discussion
Great, thanks a lot. The designations are different from in your thread, are they the same paints or are they the "air" variants, or something else? Your model looks superb. -
Guys, I'm going to build an FW190, with the RLM 74, 75, 76 scheme (Grey Violet, Grey Green, Light Blue). I've seen some completed models using Vallejo RLM colours, and the contrast between the 74 and 75 was poor - they looked almost the same colour. I'd like a bit more contrast with mine. Can anyone tell me which paints - preferably from the Vallejo or Tamiya ranges - would do the job? Thanks!
-
Very nice result - mottling looks great.
-
Thanks for that, so I guess it's not some error in my technique or a faulty batch. I was using Tamiya Fine Surface Primer (White), which usually seems fine with most paint types. I suppose Mr. Paint is not really suitable for large areas - it could get very expensive based on my experience. I think becasue it's a satin rather than a matt finish on these particular coulours, it isn't helping with coverage.
-
I got the Mr.Paint Basic White and RAL Flourescent Red yesterday. To be honest I'm not very impressed: Despite shaking the bottles for several minutes, and agitating them with a dropper before airbrushing, they are so thin that the white is like spraying milk. Pretty much no depth of pigment even over white primer. The red is spot-on in terms of colour, but again it would take litres of the stuff to finish my 1:12 scale F1 car. I've used about half a bottle per colour on a test piece, and they are still nowhere near solid colours. Also noticed this morning a slightly textured finish as if they have attacked the plastic in places. I've sent a message to them asking for advice, but I doubt I will use them again, certainly not on this MP4/6 model.
-
Thanks for the kind words George. Overall it was a fun build and a big learning experience.
- 15 replies
-
- 1
-

-
- Uschi van der Rosten
- Mosquito
- (and 2 more)
-
Sorry for the thread bump! I've been struggling to find the correct colour for a 1:12 F1 car I'm building. It's a flourescent red (Marlboro McLaren red/orange). Someone on a car forum found the exact RAL code for this colour, so I put a request on Mr.Paint's Facebook page. Within about an hour, I got a reply that the paint would be available on around 2 weeks. Somewhat skeptical, I checked 2 weeks later and found the exact RAL flourescent red had been mixed and was available to buy. I've ordered 2 bottles, and some white, and am waiting for delivery. That's pretty impressive service! I hope the paint turns out to be just as good; I'm sure it will be.
-
Got 1st in class at IPMS Huddersfield show today, very pleased with that!
- 15 replies
-
- 3
-
-
- Uschi van der Rosten
- Mosquito
- (and 2 more)
-
Overall grey schemes can be tricky to get right, but you nailed it with this one. Great finish.
-
Ferrari 312 F1, Chris Amon,1967 GB Grand prix. MFH, 1/20.
dr_gn replied to pg265's topic in Non LSM 'WIP
Brilliant work - faultless finish. What a great colour. -
Thanks very much, glad you like it.
-
Thanks guys !
-
Thanks very much for the nice comments guys - appreciate it after such a long and tricky build.
-
So here are the finished pictures: Decals were Uschi van der Rosten WGSF48-C (Fine Veneer Plywood), WGSF48-B "Knotless Birch) and Ho-229 Special Edition (1 of 6). There were more than 160 individual pieces in total. Metallic parts were Vallejo Air Silver, Aluminium & Steel. Eduard belts, radiators & intake mesh. Master Model brass machine gun barrels. Little Lenses in various positions. Acetate reflector gunsight. Lead wire brake pipes. Brass tube pitot head. A bit of scratchbuilding in the cockpit. Apart from that OOB. It's another great Tamiya kit. Build thread here: http://forum.largescalemodeller.com/topic/3821-172-tamiya-mosquito-fb-mk-vi-woodgrain-finish/ Thanks for looking!
- 15 replies
-
- 6
-
-
- Uschi van der Rosten
- Mosquito
- (and 2 more)
-
Last in-progress pic is of the rear upper nacelles being filled after fitting, and masked for final painting: Finished pictures here: http://forum.largescalemodeller.com/topic/4396-172-tamiya-dehavilland-mosquito-wood-finish/ Thanks for looking!
-
Started final assembly tonight. I used Araldite to fix the wings - I'd thinned the spars down to give a bit of wiggle room to get a tight fit against the fuselage, and so I needed some adhesive with gap filling properties: And fitted the u/c: Quick check that everything was square (nothing worse than a wonky undercarriage): Hopefully get it finished this week.
-
No problem, I hope the end result is worth the effort! Thanks for the info. I think the elevators were also fabric on early versions. Drilled out the wing tip lamp covers and dotted some Tamiya clear red and green/blue in the holes to represent the coloured bulbs: And added some brake lines to the u/c legs. The thick lead wire will form a couple of oil pipes from the tanks through the bulkheads: Also painted the brass machine guns for the nose. I wrapped bits of tamiya tape around the barrels to help centre them in the oversized holes in the nose cone:
-
Tried oil painting the tailcone, but it didn't really work, so I tried agiain using decals. very fiddly, but it looks better than paint. Maybe needs a bit of fettling, but it will have to do: Also corrected the bomb door surrounds from hardwood to aluminium: I used off-cuts of the woodgrain carrier film border, sliced into strips and sprayed aluminium. The ejector hole surrounds were hand painted with aluminium.