

remcohe
-
Posts
33 -
Joined
-
Last visited
Content Type
Profiles
Forums
Events
Gallery
Everything posted by remcohe
-
1:16 Semi Scratch Sopwith Camel.
remcohe replied to RicHardM8's topic in LSM 1/35 and Larger Work In Progress
I'm most intrigued how you are going to build the engine. My metalwork is not good enough to build an acceptable engine and by far not good enough to make it work. I tend to do the engine on a 3D printer, but that said I never did that before too...... We're both in for a lengthy build full of challenges Remco -
1:24 Grumman F7F Tigercat N7654C
remcohe replied to airscale's topic in LSM 1/35 and Larger Work In Progress
It's like looking at the real thing Remco -
1:24 Grumman F7F Tigercat N7654C
remcohe replied to airscale's topic in LSM 1/35 and Larger Work In Progress
Fabulous work. Until I saw the last pic with the pin, then my jaw dropped Remco -
Ok, so this is where I'm working on for the past 5 years. I added just a few pictures of the 1000 I made. If you click one of the pictures it will take you to the photo bucket album with more pictures from this build. All parts are hand made from boxwood, holly, brass or copper. Remco
-
Idea... missing the large scale ships here. ...
remcohe replied to elmarriachi's topic in Problems? Suggestions? Tell us!
I would not mind to show my build here Remco -
WIP on this very nice kit. I added some details from Sovereign 2000. The biggest issue with the kit is that most of the details are so small you really need to handle it very delicately in order not to break or bend anything. Current status, base coat of german gray added, filters added with different colors of oil paint (red, blue, white, brown) and washes added. I also got some nice figures to make a small diorama Remco
-
1:24 Grumman F7F Tigercat N7654C
remcohe replied to airscale's topic in LSM 1/35 and Larger Work In Progress
It's a joy to watch you build. A few tips on blackening agents, I've used Blacken-It and Caisey's Brass Black. With the latter I have better results. Make sure all the parts are thoroughly degreased by rinsing them an hour in vinegar or an other degreasing solution and clean them with plenty of water. Add a few drops of the blackening agent in distilled water and drop the parts in it. The more you dilute the solution the slower the reaction, but the better the blackened layer will stick to the part. Blacken-It wil give a black/dark brown finish, Caisey's a very dark steel finish. For copper I use Liver of sulphur. Very off topic but this is the result using Casey's: Ships stove Remco -
1:24 Grumman F7F Tigercat N7654C
remcohe replied to airscale's topic in LSM 1/35 and Larger Work In Progress
This is insanely good, like to work tiny bits but this is way beyond my capabilities. Remco -
HpH 1:32 PBY-5A Catalina Cutaway 'Limited Edition'
remcohe replied to Fran's topic in Aircraft Reviews
What a great review to accompany such a fine kit Remco -
1:24 Grumman F7F Tigercat N7654C
remcohe replied to airscale's topic in LSM 1/35 and Larger Work In Progress
Hi Peter, How did you make the brass rivets on the back of the seat? Remco -
Copper and brass are a bit stiff but not to much to bend and shape it. If you anneal them they become very soft but not as soft as lead so they still keep their shape quite easily. Remco
-
Here you'll find probably all you need: http://wires.co.uk Remco
-
1:24 Grumman F7F Tigercat N7654C
remcohe replied to airscale's topic in LSM 1/35 and Larger Work In Progress
This is insanely good! Remco -
The snow looks very convincing. Remco
-
1:16 Scratch build Sopwith Camel
remcohe replied to remcohe's topic in LSM 1/35 and Larger Work In Progress
So a 'few' hours of work later... (cutting tubes, bending eyebolts, silver soldering and blackening) 110 turnbuckles are ready. I did refine the shape a bit by flattening the ring of the eyebolt after soldering it, I think it makes the shape match a real turnbuckle better than with the round eyebolts I showed in one of the previous pictures. Remco -
Very nice! I thought I knew most planes of the Luftwaffe but this one I had never seen before. Remco
-
1:16 Scratch build Sopwith Camel
remcohe replied to remcohe's topic in LSM 1/35 and Larger Work In Progress
I did Alan, it's also a very valuable reference work. Thanks for that tip as well. In a short period I gathered a rather nice collection of reference books to help me on this build. Remco -
1:16 Scratch build Sopwith Camel
remcohe replied to remcohe's topic in LSM 1/35 and Larger Work In Progress
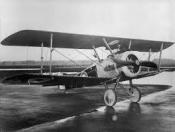
Alan, Thank you for the tip, I ordered the book immediately. It's an e-book so I got it right away and its really a fantastic addition to the drawings I already have. Some parts on the drawings are hard to visualize in 3D. As for the picture, I guest its a training plane for blind flying ;) Remco ps you are also on MSW right? -
1:16 Scratch build Sopwith Camel
remcohe replied to remcohe's topic in LSM 1/35 and Larger Work In Progress
Thank you Cees, it is hard to find good reference material. All replica's show turnbuckles with shiny brass body's and steel eyebolts. But I found one picture of a Camel in the Brussels museum clearly showing dark/black turnbuckles. The former is a lot harder to achieve, the latter is just a matter of dipping in Casey's brass black :-) Remco -
1:16 Scratch build Sopwith Camel
remcohe replied to remcohe's topic in LSM 1/35 and Larger Work In Progress
Ok, here is a small start. Although I'm still organizing all the drawings into smaller sections and putting all the part numbers in a small database for easy lookup I started with making the first turnbuckles. I'll need at least a 100 turnbuckles plus a few extra to feed the Carpet Monster and some oopses. The turnbuckle is made from two pieces of tubing and two ringbolts. Making the ringbolts is the most time consuming, it took the better part of today to make the first 80 ringbolts. I'm still not sure if I'll leave the turnbuckles bare metal of blacken them with blackening agent to tone down the flashy silver. Remco -
What a great project, love the way you are even doing the internals of the Vickers gun. I will follow your build with intrest as I'm building a 1:16 Sopwith Camel from scratch. Remco
-
WNW Sopwith pup in progress to finnishing
remcohe replied to AdrienD's topic in LSM 1/35 and Larger Work In Progress
Splendid work Remco -
Some of my past builds
remcohe replied to Mish's topic in LSM 1/32 and Larger Aircraft Ready for Inspection
That is some very nice work. Remco -
Hi, I would definitely not advise a magnifying lamp, its hard to keep both your eyes and the object at the same distance from the lamp in the focus point. I use an Optivisor but any brand will do, this works much easier as the distance from eye to lens is fixed. I need to check what magnification I use I think it's lens #5 Remco
-
That is really beautiful Remco