

DocRob
-
Posts
6,807 -
Joined
-
Last visited
Content Type
Profiles
Forums
Events
Gallery
Posts posted by DocRob
-
-
17 hours ago, HubertB said:
Great progress, Rob.
Some comments about the engine, if I may.
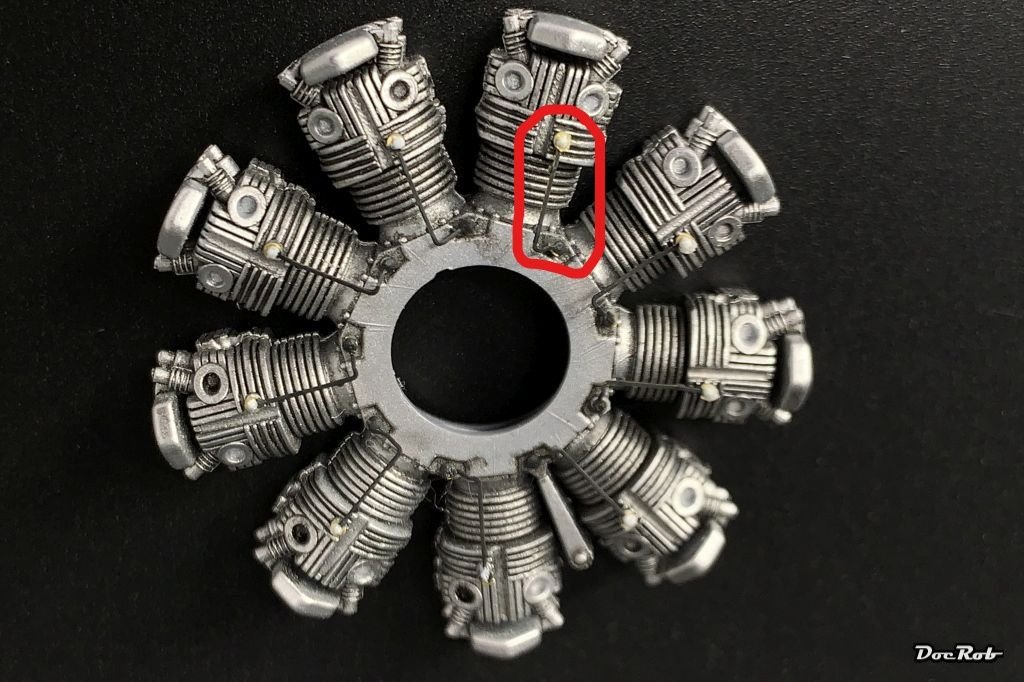
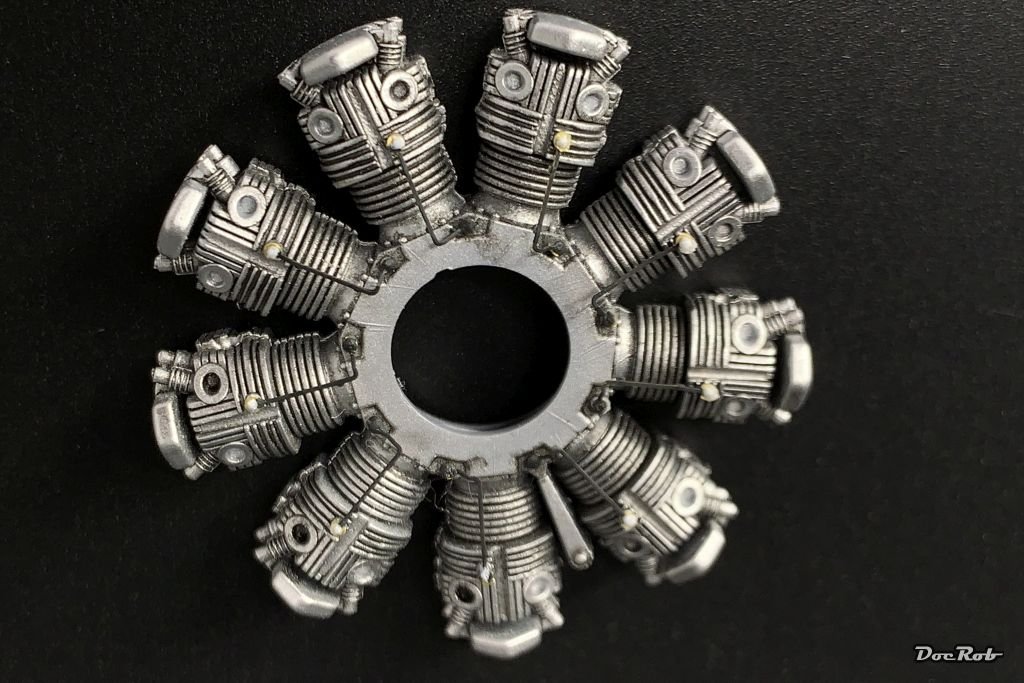
First, what you describe as « the ignition ring » is in fact a kind of pressure monitoring. It was typical of Bristol engines of that time, and, incidentally, of G&R engines, which were initially i spired by the Jupiter, which G&R built under licence.
Second, the engine was less monochromatic than you have painted it. The reduction gear crankcase, the pushrods’ casings (there were two pushrods, one behind another, for admission and exhaust, aligned on the center of each cylinder, and encased in a fairing which is what you see) and the casings of the valve arms, at the head of the cylinder, were black enameled.
Finally, the intake manifold was aluminium with a black center pipe.
Admittedly, most of the engine will not be visible, but maybe you’ll want to add some touches of color.
Thank you Hubert, I'm definitely not an expert with the license build Mercury engine and haven't cared very much about historical correctness of the coloring. The pictures I viewed, showed different layouts and coloring. The cylinder heads sometimes are silver, sometimes half black,... . You are absolutely right about the push rod fairings and rocker covers, which seem to be black on the original engines.
This to me looks like an ignition harness, albeit on some pictures, I saw spark plugs on the side of the cylinder head, but some seem to show this layout.

Like you said, most of the engines features will be hidden behind the fairings and I often do modelling with the sense of making it look right to me personal. I do not claim to build historical correct and like my bit of free styling, but nonetheless, I' am very interested in your facts and opinions, as I like to learn from you all. I know, you spent some time with these type of engines, even doing CAD-drawings for 3D printing, so I can understand, when my approach lets your toa nails curl")
Thanks for letting me know Hubert
Cheers Rob
-
 6
6
-
 1
1
-
 1
1
-
-
2 hours ago, Kaireckstadt said:
What a progress Rob! You are really a high speed modeler in this case.
Awesome looking cockpit section.
curious for the next update!Thanks Kai, normally I'm not very fast, while building my models, but this one got me hooked. I had some stressful days, the last weeks, so it's a relief to find some distraction free time for the PZL.
This plane to me stands for the brave resistance, Polish people put up against the fascist hordes, invading their homeland.Cheers Rob
-
4
-
-
5 hours ago, belugawhaleman said:
Great build so far Rob. I'm enjoying this build of this unique aircraft.
Thanks a lot, I like to wander off the trotten pathes a lot. This kit draws you in, you don't want to stop and I haven't expected it that way.
Cheers Rob
-
3
-
-
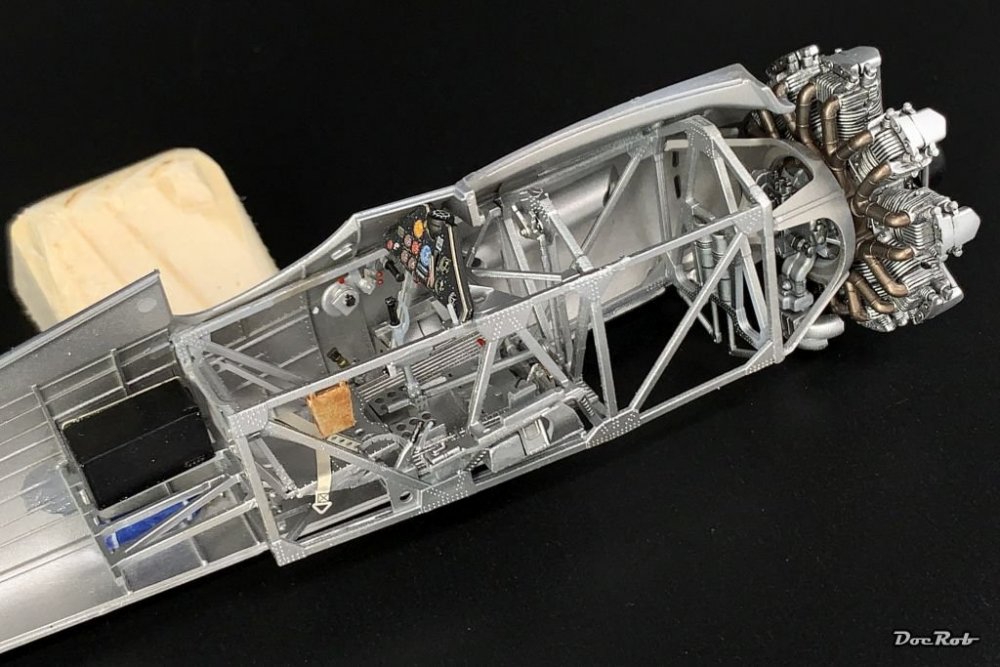
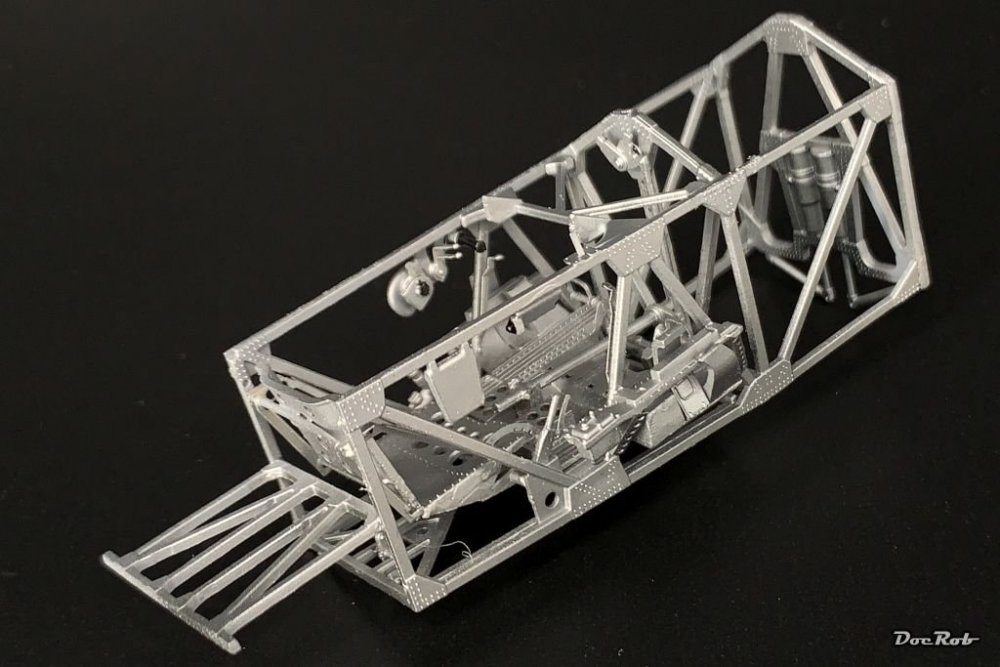
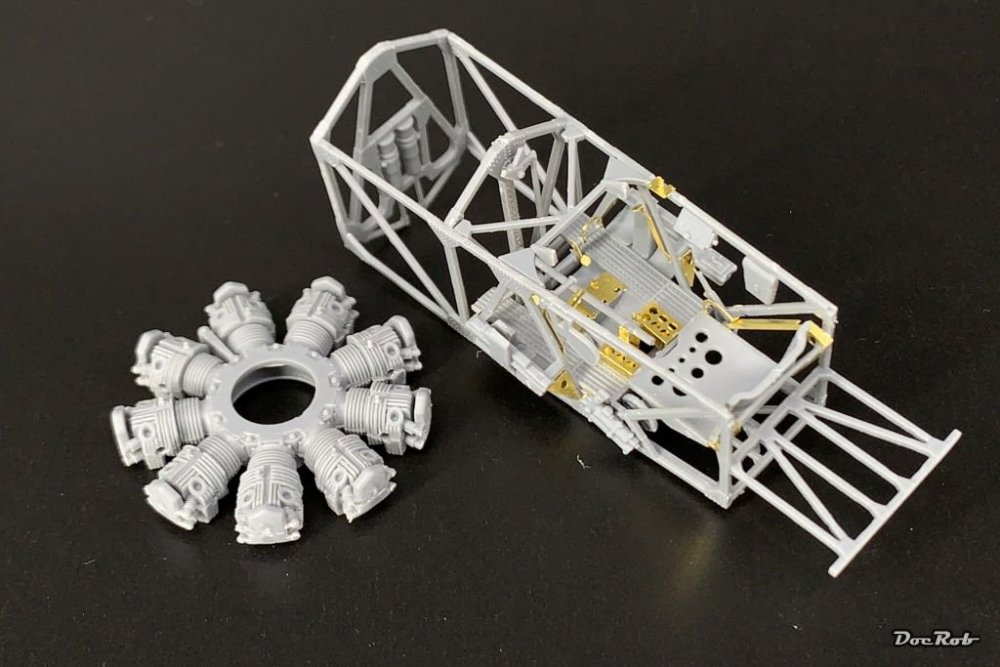
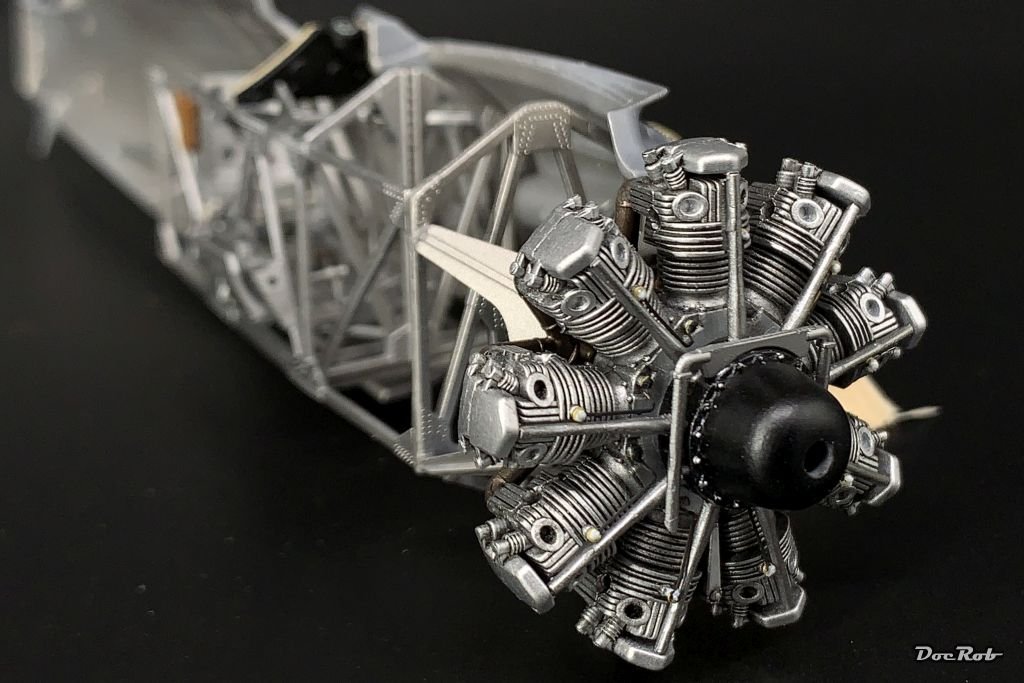
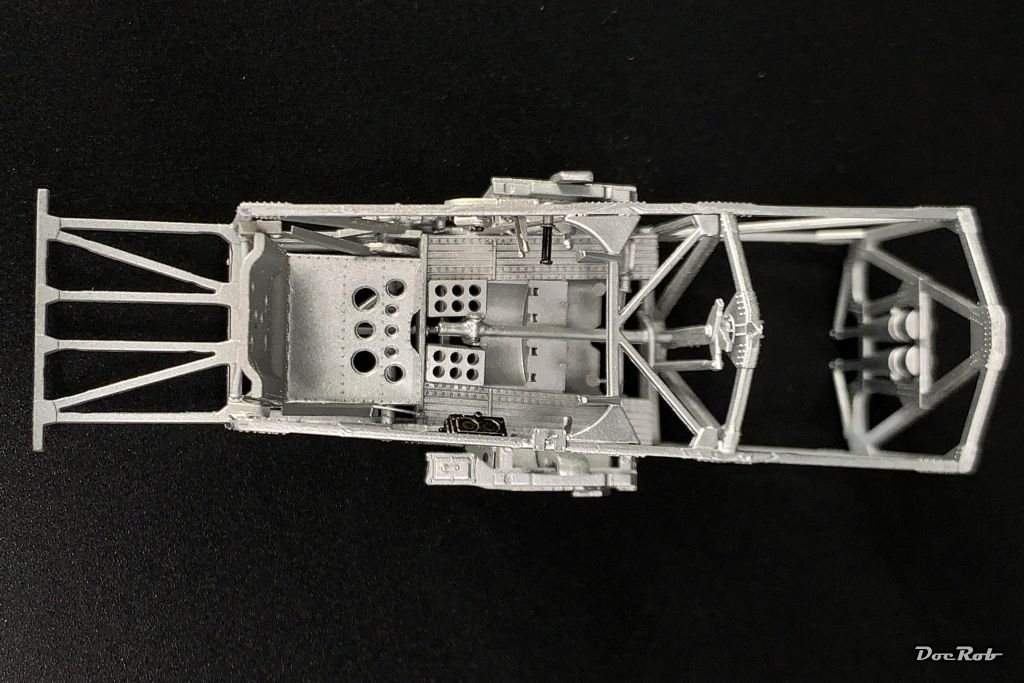
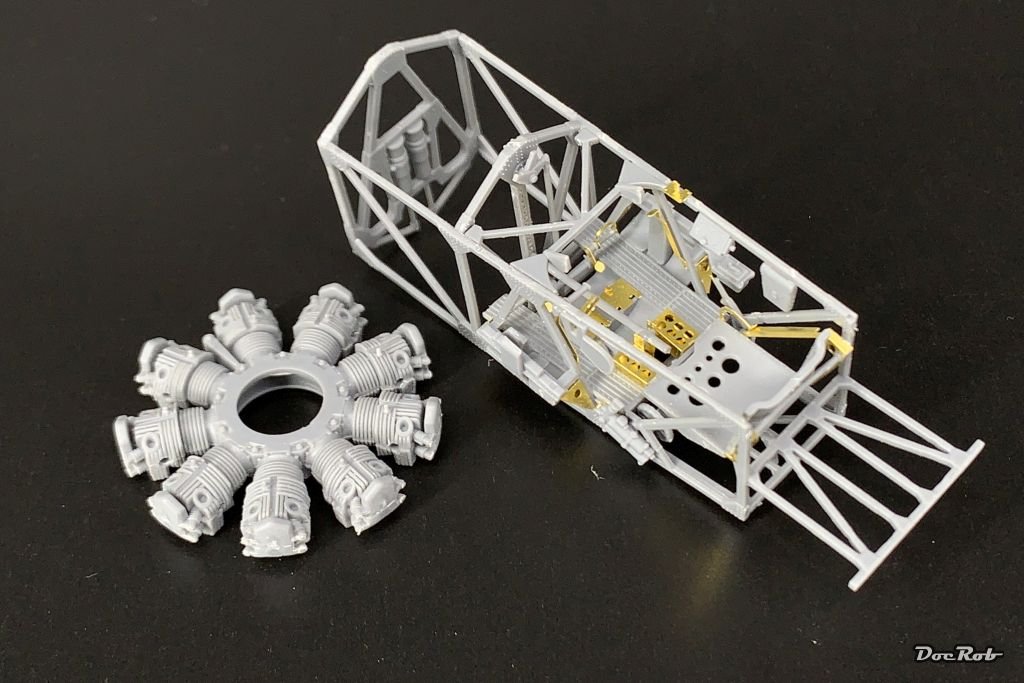
Quite a productive day today, I started to close the fuselage after finishing the engine and engine struts and glued first the cockpit framing and then the engine in one fuselage half.
The engine is fixed on only four tiny attachment points, I hope that will hold up.
Closing the fuselage, I started to glue only the underside and let it cure and then I close the tiny gap on the upper side with a bit of force applied with rubber bands.Cheers Rob


-
7
-
-
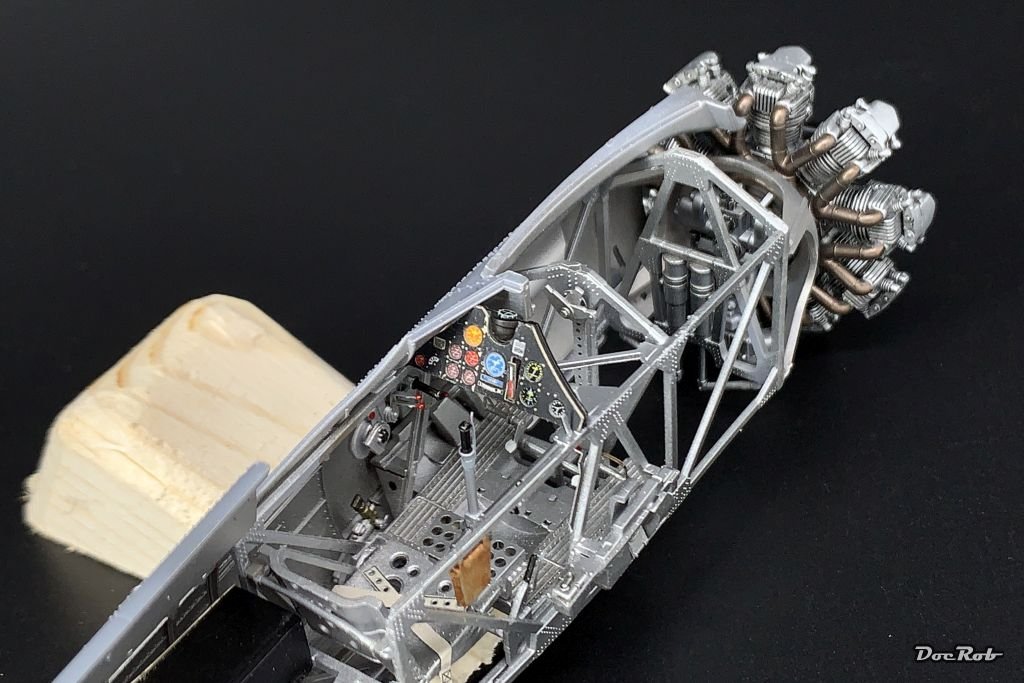
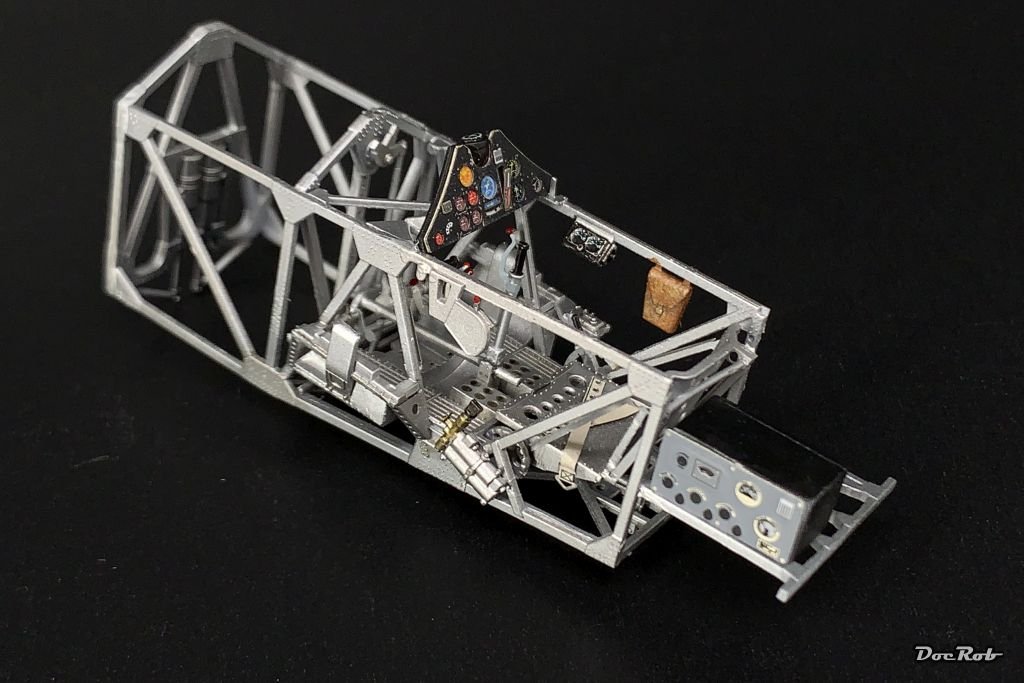
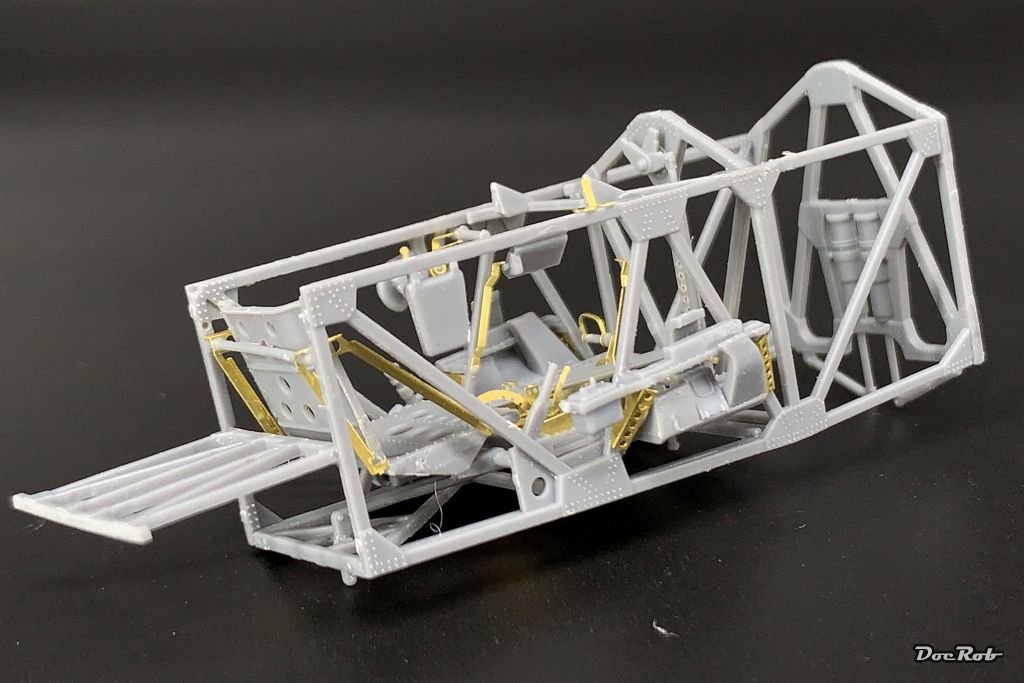
The cockpit is almost done with painting, maybe some more pigments to apply. I added the Yahu dashboard and radio panel, which do look great, but especially the radio would have benefited from painting the plastic, to maintain the knobs.
The seat belts are printed PE from Eduard and the main harness will be added later with the headrest. The headrest and leather bag in the pit, where painted with oils for effect.
Cockpit floor and some other parts were treated with a brown panel wash.
The compass on top of the IP and the side instruments on the cockpit framing got Airscale decals applied, because there were no decals in the kit.
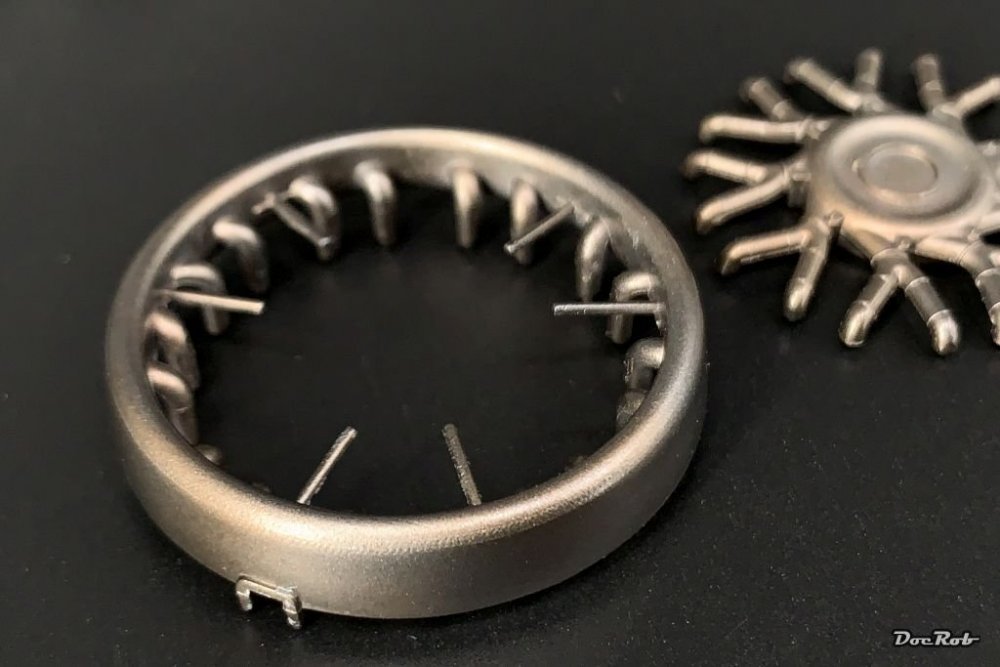
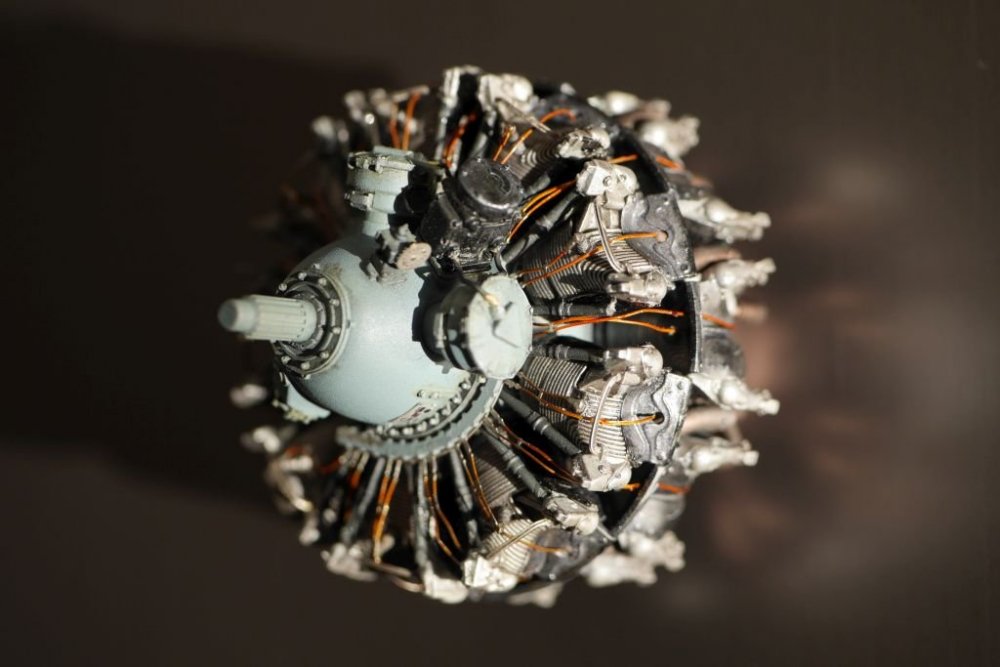
The engine block was sprayed dark aluminum and received to layers of black panel wash. Next I painted the spark plugs white and bent and glued the nine provided PE ignition harnesses in place and painted them Nato black.
I sometimes ranted about the IBG manual, but there is also some shine. All PE parts are separately shown in 1/1 scale with pointing out the exact angles to bend, a great idea.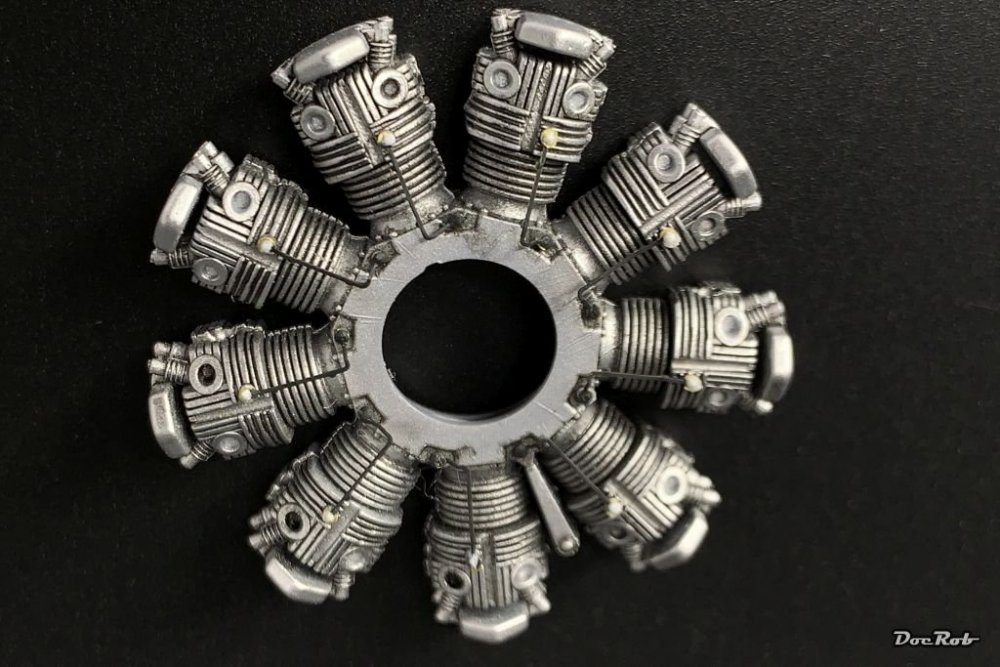
Cheers Rob
-
8
-
-
Thank you Kai, I love to work with metal colors and this kit is so inviting in this aspect and generally is very detailed out of the box, a pleasure build
 .
.
Cheers Rob
-
4
-
-
8 hours ago, Martinnfb said:
in August, Rachael picked up a brand spanking new Wrangler.
Nice ride, congratulations. I have a JK unlimited with dual top and got rid of the hard top soon. Since a year, it sits in a friends garage and will stay there for the next years, as it's so nice to drive open top with the Jeep and we do so as often as possible. The soft top is quite capable weather wise, riding through storms and rain without any issues. I don't know about sub zero conditions though, we don't have that.
Cheers Rob
-
4
-
-
Great build and paintjob John. I love the contrasting scheme. Makes me also want to pull my box from the shelf.
Cheers Rob
-
2
-
-
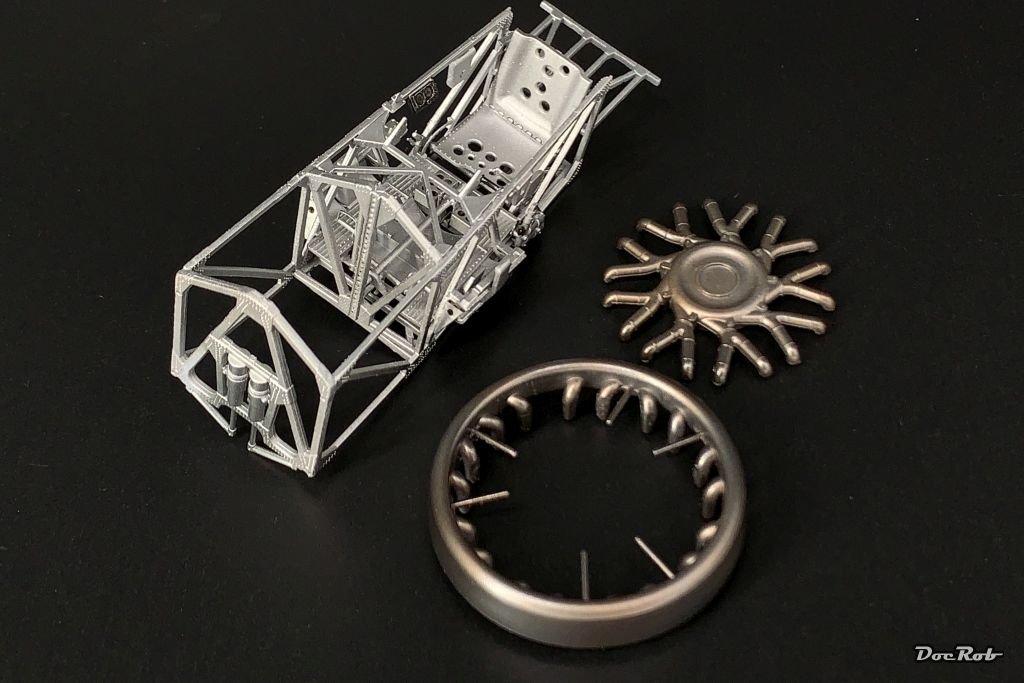
Time for the metals
, one of my favorite parts in modelling. Replicating materials is great fun, be it wood, canvas, skin or cloth, but metals are the best.
Fortunately the PZL is a full metal construction and the interior shows it.
The cockpit framing and insides of the fuselage were sprayed duraluminum and then partially darkened with dark aluminum and in case of the cockpit matte aluminum.
The PE levers in the pit were treated with a tiny drop of white glue, applied with a toothpick, to represent the grip balls.
The exhaust collector ring was painted with multiple uneven layers of first gun metal, then copper, then jet exhaust, then black smoke and last the smoke, with a hint of metallic blue mixed in.
This will only be the base for a nice and worn finish, which I plan to achieve with metal waxes and pigments
All used colors were from the phenomenal AK Xtreme Metal range.Cheers Rob


-
8
-
1
-
-
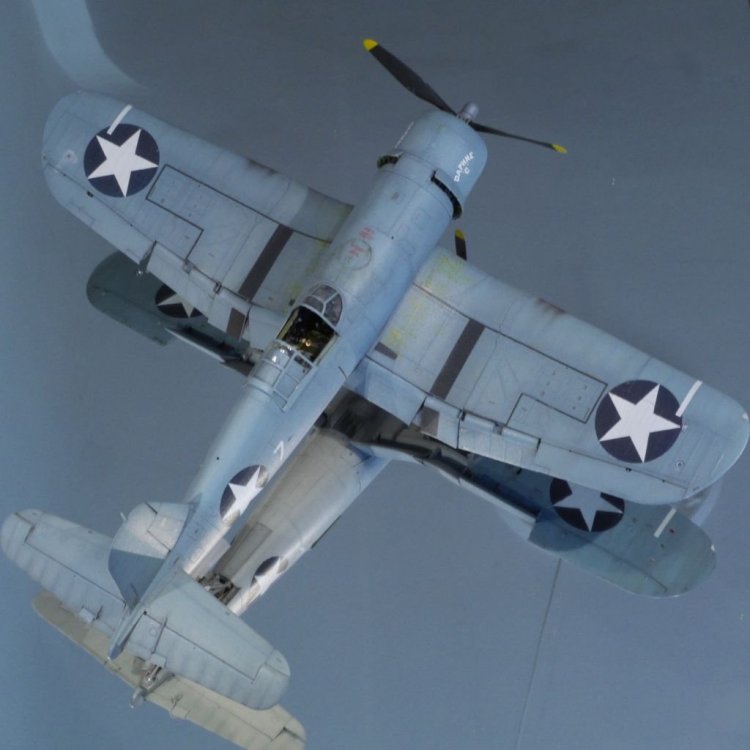
Thank you Peter and Shark, I took my time with the Corsair back in the Berlin days. I had lots of stress, because of work and other things, so I was searching for something to make my unrest soul anchored again. It turned out, that building the Corsair was the best medicine. I totally concentrated on all the stuff, I had to learn and that was a lot by the time. It helped me through a difficult time and ignited the hunger for more modelling and of course learning. Consequently, I left the Corsair in Berlin as a present to my oldest and best friend.
Back to your build Peter and I'm more than sure, yours will look marvelous.
Cheers Rob
-
3
-
-
28 minutes ago, Bomber_County said:
Looking really neat Rob, last day of furlough and the weather is foul, so may join you at the bench……..
Thanks Phil, I was at the bench as well today, due to stormy weather, combined with a dash of volcano ash and primed all the innards of the PZL. Maybe I start with aluminum color later.
Cheers Rob
-
4
-
-
9 hours ago, Peterpools said:
Terrific progress and your work is immaculate and with perfect precision. Can't wait to see the PZL with the interior paint on coming to life.
3 hours ago, GazzaS said:Nice framework and PE, Rob!
Thank you Gentlemen, it feels like two thirds of the manual are about engine and cockpit and later there are only some other thingies to be added, today there will be first paint.
Cheers Rob
-
3
-
-
Thank you Gaz, I like to have a non challenging build from time to time, to have some results to show myself. Always good, when there is not much time for modelling.
Cheers Rob
-
1
-
-
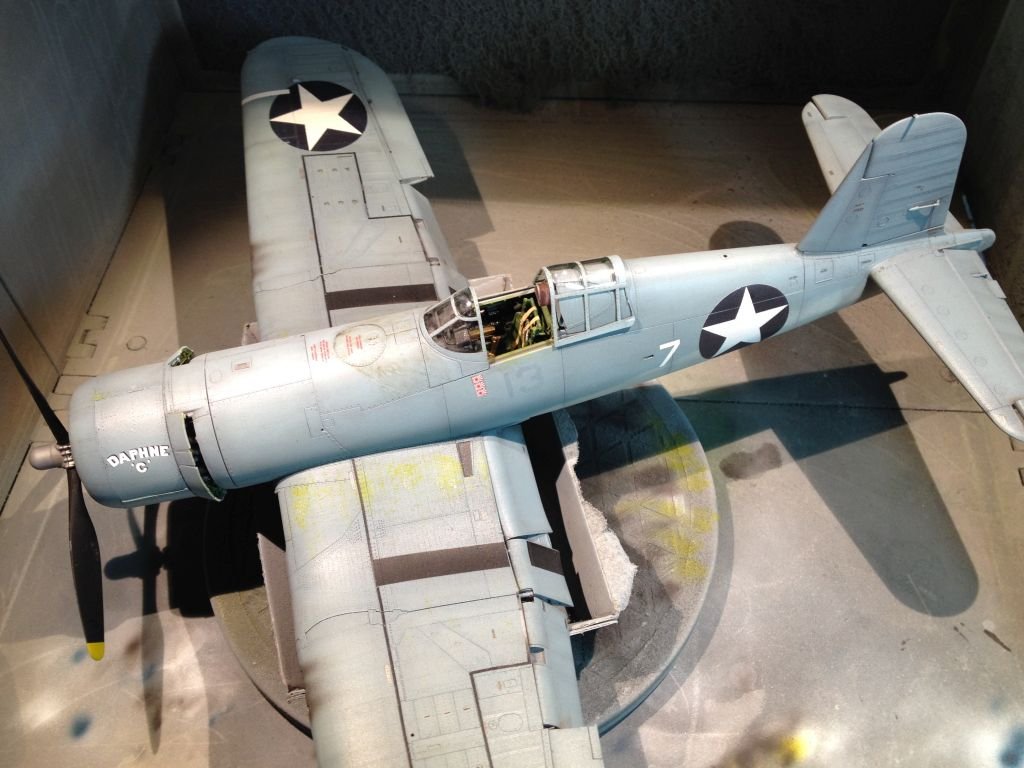
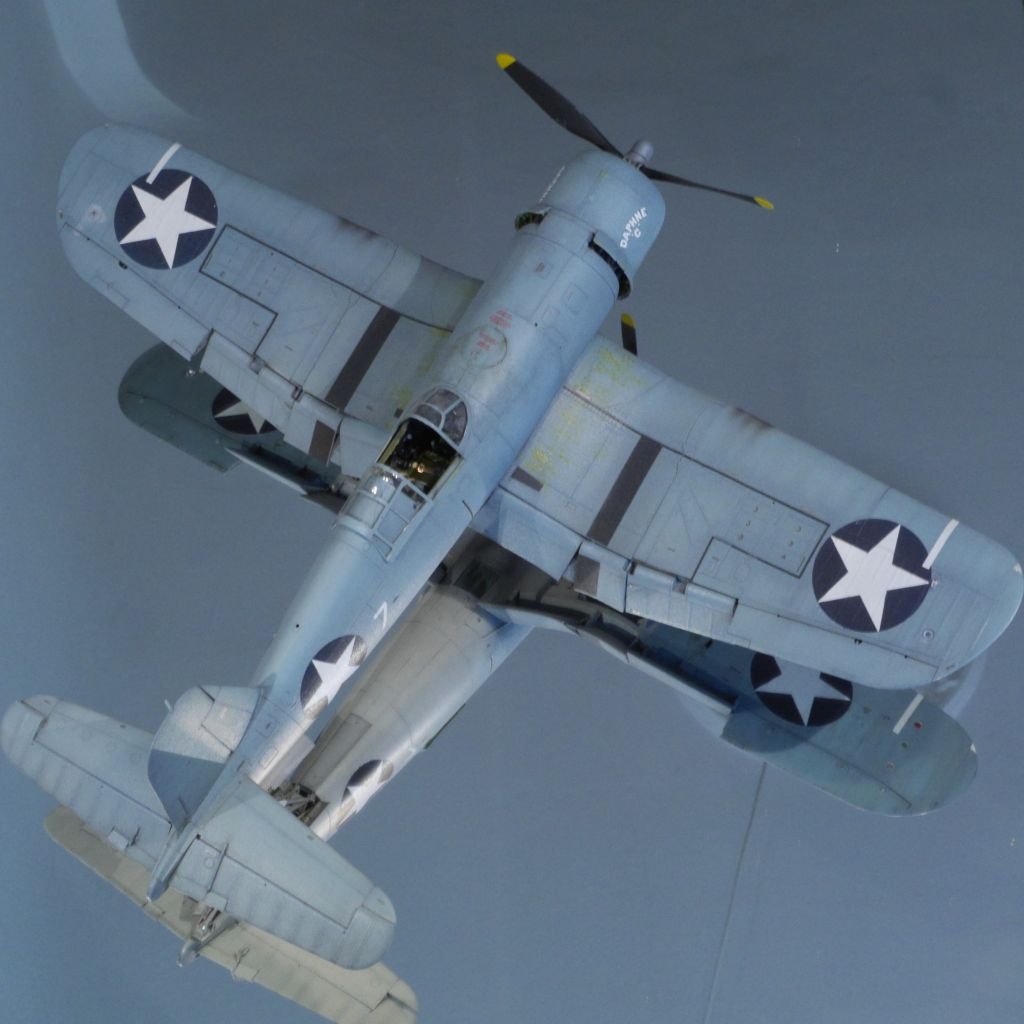
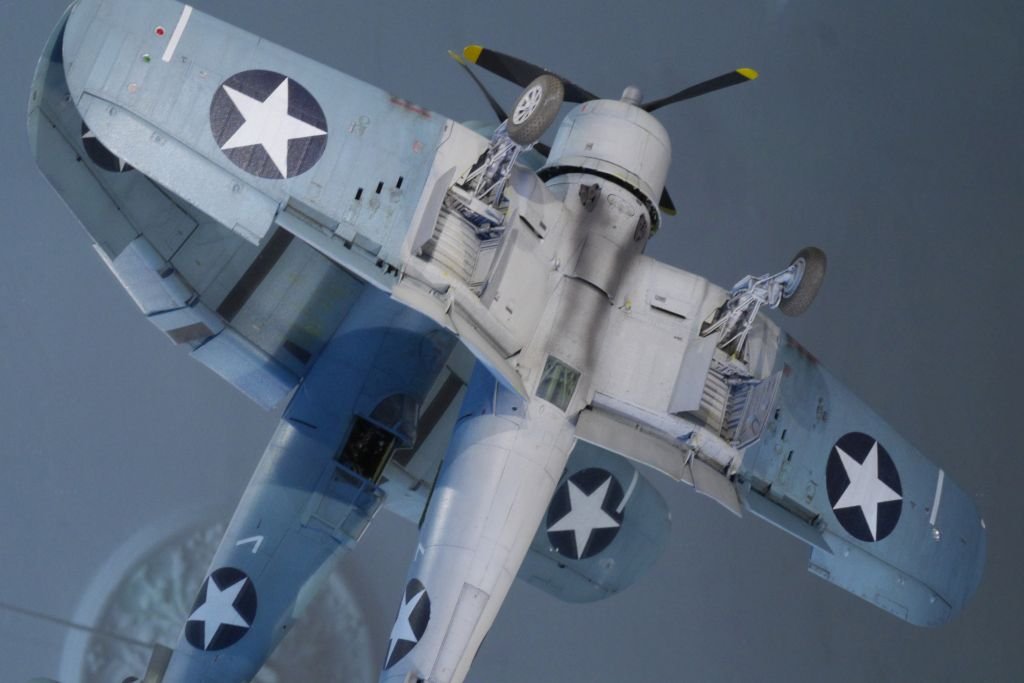
Hi Peter, I hope everything is well with your feet.
The Corsair build was my first earnest plane project, returning to modelling after maybe 25 years of absence from the hobby. I went all out on the AM, willing to learn a lot about resin and PE. It was also the first plane, I used an airbrush to paint.
I used the Brassin cockpit, engine and wheels, some extra PE and sprayed all markings except the stencils. I tried to make the cowlings removable but failed after lots of extra effort, I put into.
I liked the result by the time and it ignited my hunger for more models. The pics are very bad, as I photographed analog mainly by this time and only took some snaps digitally.Cheers Rob


-
7
-
2
-
-
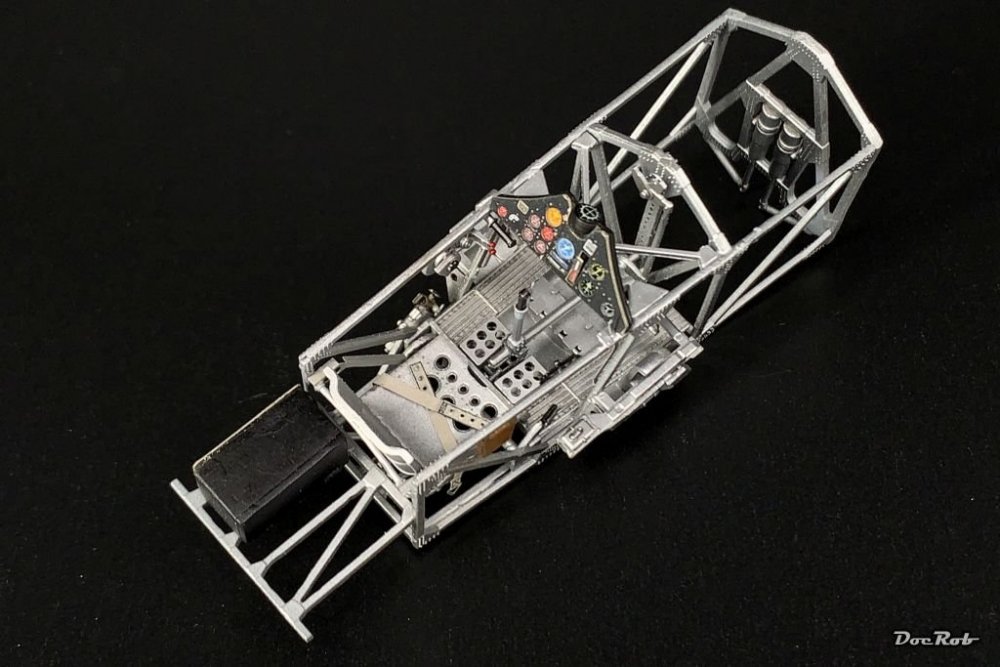
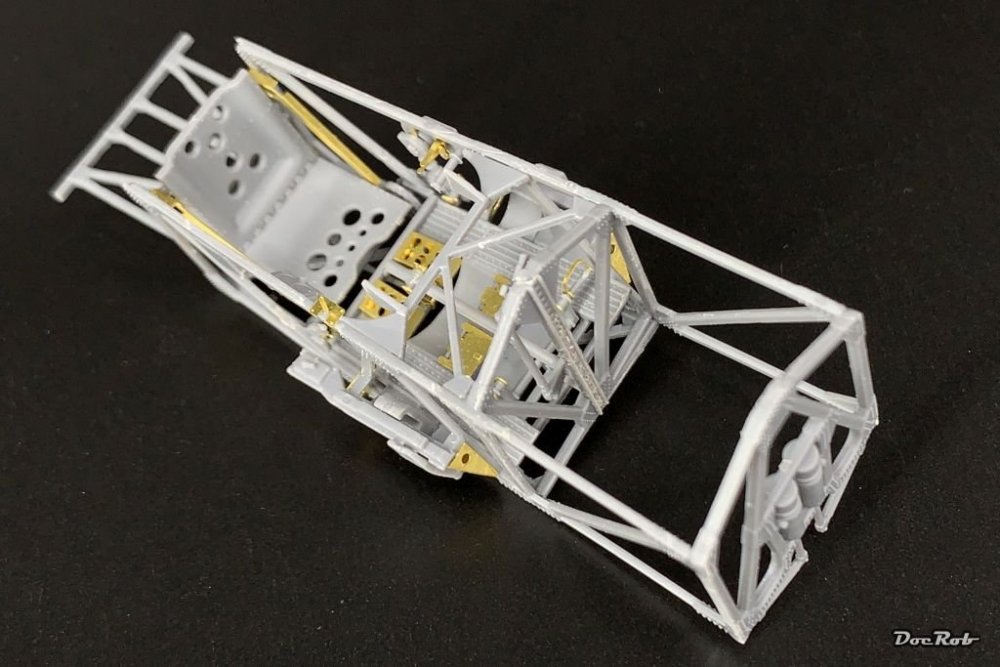
I had not much time over the last days, but I think, I'm closing in on the painting stage. The cockpit with all the framing and attachments is done. Fit of the plastic and PE was good, but location points are often very tiny and the whole construction is a bit fragile, at least, while putting it together. Painting will not be too easy, as I like to paint subassemblies, where I can reach all hidden corners, but this was not possible with the PZL.
On the other hand, the detailing is extremely good, resembling the structure of the real plane without noticeable simplification (ZM do you hear me).
I was eager to reach the painting stage fast with this build, but now, seeing all the detail, I will take my time and enjoy building and painting.Cheers Rob

-
11
-
-
On 9/26/2021 at 2:33 PM, BlrwestSiR said:
You're off to a great start there Rob. Nice to see an uncommon subject being built.
On 9/26/2021 at 5:22 PM, harv said:Oh, I like. Will be following.....harv

Thank you Señhores, I somehow start to like interwar designs, there is elegance and clumsiness combined in one airframe, which tells a story about what was possible engineering wise and where old school approaches still had to be made.
Cheers Rob
-
3
-
-
Bring on the engine Peter and build and paint it up in the same great way, like your cockpit. It really is a joy to follow your gorgeous work and photography, even on an often seen (and self built) kit.
Cheers Rob
-
4
-
-
Very nice build and paintjob and thanks for being the final push, making me buy a Do-17, which I intended to do since a long time.
Cheers Rob
-
4
-
-
On 8/31/2021 at 6:19 PM, Peterpools said:
A brilliant "summer project" build and what a spectacular finish. I'm glad you approached the problems as you did and if it was me, I hope I would have chosen the options as you did. One gorgeous aircraft to add to your display. 🏆🏆🏆
On 8/31/2021 at 7:14 PM, harv said:Rob, beautiful build. You can be proud of it....harv
 1 hour ago, Kaireckstadt said:
Saw this just now Rob!
This is looking awesome!
I really like how this one turned out!
1 hour ago, HubertB said:Ditto for me, and with Kai on the comments !
Muchas gracias Señhores, and apologies for not answering earlier to the older comments. Lots of stuff is happening in the moment.
I can recommend the kit to everyone, looking for an easy and satisfying build. There is always the possibility of doing a pure NMF version of the KI-61. When I'm grown up, I will try this type of camo with the airbrush, there is a Vietnamese Mig-21 in my stash,...Cheers Rob
-
1
-
-
There is an article about the Border Model Lancaster in the Modelling News. Not my cup of tea, too big, but intriguing with all the detail. I would bite, if they would offer a separate nose section.
The Modelling News: Preview: Border Model bombshell, the Lancaster B.MK.I/III in 32nd scaleCheers Rob
-
1
-
-
1 hour ago, Bomber_County said:
Rob, what’s IBG like, never built any of their kits?……a good start with the pit, is the PE part of the kit……….looking forward to this…….
It's my first kit from IBG, but generally I heard good things about their kits. The plastic is very soft, but good to work with and until now I had no fit issues, flash or bad ejector pins are not present with the PZL.
The detail of the plastic is great, fine riveting, the corrugated surfaces of the wings look just phenomenal. The kit is complete and doesn't necessarily need AM. There are even PE seat belts included.
Little downsides until now were very small connector tabs to glue together the cockpit framing and therefore a bit fiddly to assemble, but nothing really bad. The manual is not very good, especially when it comes to painting of the engine or cockpit area.Cheers Rob
-
4
-
-
Very nice Gaz, but why is there so much grime coming from the wheel sections of the wheel wells?
Cheers Rob
-
2
-
-
15 hours ago, Kaireckstadt said:
Interesting kit and nice start.
Seldom seen here. Will follow this with great interest Rob! Place reserved for me? 🍿
13 hours ago, GazzaS said:Rob, nice start to what looks like a delicate assembly. I'll be looking forward to seeing how your paint scheme goes. Especially metal waxes... want to know all about them.
Thank you Kai and Gaz, there will be first paint soon, but only the engine and cockpit. For these I will use an airbrush, brush painting the delicate cockpit framing could lead to knocking parts off.
Cheers Rob
-
3
-
-
1 hour ago, KevinM said:
I will be interested Rob in this painting technique you are going after and this metal waxes? when you get to that point(wax) please expand.
46 minutes ago, Peterpools said:Brilliant choice for your next project and as usual, you're off to a flying start. brush painting with oils - sounds quite the challenge and I'm sure we will all learn from your progress
Thank you gentlemen, painting will be an experiment with unsure outcome, but I used oil colors on different occasions for wood painting weathering and figure painting and liked the way to work with them a lot, lets see...
Cheers Rob
-
3
-


PZL P.11c - Polish Fighter - IBG - 1/32
in LSM 1/35 and Larger Work In Progress
Posted
Thank you Gaz, in the moment we are fine here and have no influences from the volcano other than some headaches and a bad taste, because of the ash and gases. The situation on La Palma is worse though, with more than 1000 houses destroyed and there is no end in sight, as the volcano opens new blowholes. The lava entered the sea and besides forming a new half isle, there are developing acid gases, which we hope will not be blown in our direction.
Today, we had some waves and I had a refreshing and exhausting long surf session, which freed my mind and felt good, because bad thoughts accumulate over time, with that eruption in the background.
One of the worst aspects with the volcano is, that nearly all forecasts by the scientists proved wrong. Sure, there is no exact predicting an eruption like this, but it feels like a total fail to me. It teaches us to prepare a bit more, as we are living on a volcano as well. I'm not a prepper, but we will at least keep our important documents in reach.
The PZL build is another good medicine for unrest souls like me, which make it hard to leave it on the bench. Today though, I will relax and probably not build any further with the aching muscles of my arms and Tomorrow, it's NFL's early game with my fav Cowboys on the screen.
Cheers Rob