

DocRob
-
Posts
6,807 -
Joined
-
Last visited
Content Type
Profiles
Forums
Events
Gallery
Posts posted by DocRob
-
-
4 hours ago, Quintillius said:
Enough to do! I'll keep you informed.
Welcome to the forum and please keep us in the loop. Metal and wood, right down my alley. OcCre rings only a bell connected with wooden ships with me, but this locomotive is really interesting.
Cheers Rob
-
 4
4
-
-
On 9/2/2021 at 10:02 PM, BlrwestSiR said:
Thanks Rob! Looks like I might have a project for next spring. I was thinking of Muskoka chairs originally (they're like Adirondack chairs but Canadian) but I like that yours are something different.
For my Adirondacks I used the following Festool plan. It's in German unfortunately, but the PDF includes a part list and drawings of the parts.
Baupläne Holz | Holz-Ideen & passende Bauanleitungen (festool.de)Cheers Rob
-
3
-
-
I have a similar, but smaller and cheaper tool since years and when it came to assembling single link tracks without a jig, like Friul's, I found it not very handy to work with. The downside is, that the links were secured by the tool on both sides, there is no way to insert pins or brass rods. It might be usable for plastic length and link segment tracks though.
Like Carl said, lots of the single track links which are included in armor kits are build up with the help of included jigs.Cheers Rob
-
1
-
-
7 hours ago, Kaireckstadt said:
It’s more than usable Rob! Looks quite realistic !
3 hours ago, GazzaS said:Great chain and gears, Rob!
Mille gracie Amici, I used some more chrome pigments on the chain links and will use it now as it is.
Cheers Rob
-
4
-
-
Sorry to hear about your problems Harv. If it's only sitting which causes the pain, you should think about a raisable bench and work standing. Sometimes I'm thinking about building one for me too, where working erect is at least an option.
You will be well soon, I hope and you will notice, when the Bourbon impact is bigger than the one of the painkillers") .
.
Cheers Rob
-
4
-
 1
1
-
-
Peter I feel your pain as we already discussed, brothers in fogged canopy issues
 . Your Phantom looks superb and after changing the canopy you will have achieved a stunner.
Could it be easier to remove the canopy with a sharp blade, where it fits the fuselage?
As I had similar problems with my KI-61 build a week ago, I will experiment soon, if this fogging issue arises, when the canopy parts were dipped in Future / Pledge before, which I normally do, but not with the KI-61.
I used Pledge as a clear coat many times and really like the product, but it has it's shortcomings. It is sensible to fogging, when Micro Sol comes into play and it reacts with Tamiya's panel liner and I fear, some of the hotter weathering products can lead to damages too.
Oh how I hate to realize the different unwanted reactions with these aggressive chemicals in modelling.Cheers Rob
-
2
-
-
The pics are sharp as is the 109, Gaz. She's coming together nicely. The surfaces look great and now the fun begins.
Cheers Rob
-
3
-
-
57 minutes ago, BlrwestSiR said:
I missed out on the Bimota but you've got me looking at their Honda Africa Twin bike now. Will have to see if the budget allows for it.
I built the NR a few years ago. The real bike was pretty impressive with its 32 valve 4 cylinder. You know the engineers are running the company when they come out with an engine like that.
Ah, the Africa Twin a good bike for sure, but a bit boring too. The kit is impressive though. The NR was a bit over engineered, when I remember right. Oval pistons, what's the idea behind that?
When it comes to Honda and modelling it's maybe the RC166 with the metal wheel set or a Monkey.Cheers Rob
-
2
-
-
Amazing work, like always, but never fails to impress me.
Cheers Rob
-
3
-
-
5 hours ago, BlrwestSiR said:
Stunning engine there Rob. I love the heat staining on the exhausts. I've done the odd bike kit and have thought of doing one. I recently missed out on a Tamiya Bimota which would have been cool with its truss frame and dual swing arms.
Thank you Carl, it helps a lot to have owned a relatively modern bike and know the shine of all the used materials.
It's my first attempt on bikes, besides a started Honda NR, more than 25 years ago. The Bimota is a strange looking beast, with interesting technical developments and would look great in the display shelf. You may should give it a try, along the bond Lotus....Cheers Rob
-
3
-
-
8 hours ago, harv said:
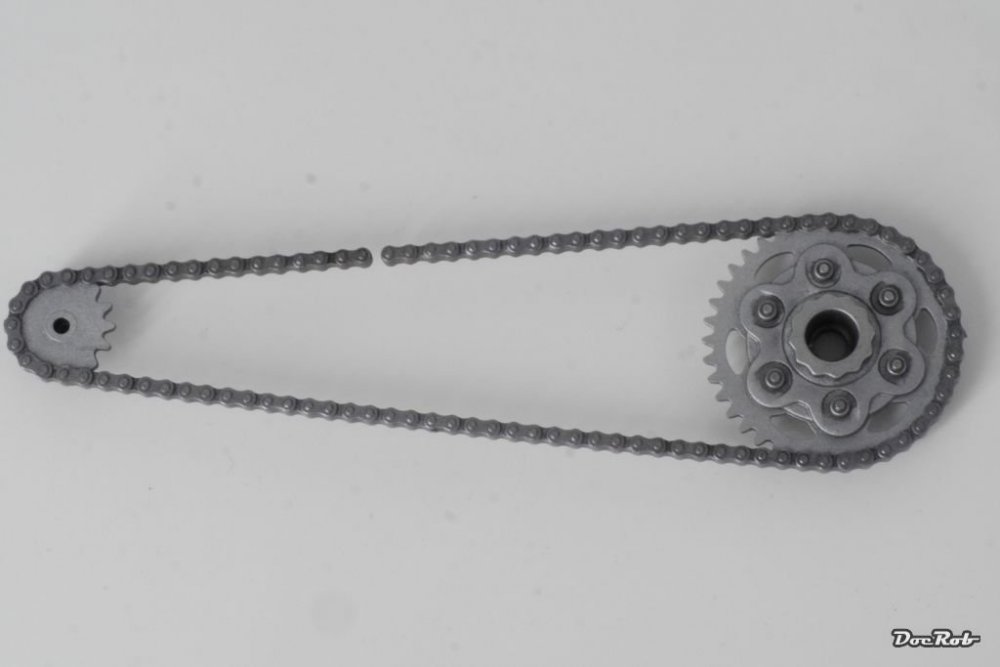
Wow Rob, I'm already blown away . Engine and exhaust look great. I'm surprised that the chain and sprocket are one piece on this scale. Can you get an AM chain for it ? Ducks are my most favorite bike !.....harv

Thank you Harv. Yes the chain, there are different types out there AM wise. I saw one with the hole links as one etched loop with pins in between and one very great looking single link track. This is my first bike build and I want to concentrate on the materials and finish, so I stay with the kit part.
I toyed a bit with it, sprayed the whole thing in a light gun metal shade, then masked the chain and used flat aluminum for the pinions, followed by panel liner, which looks a bit oily due to it being slightly shiny and then rubbed on some chrome pigments. I'd say, it's usable.
Cheers Rob
-
7
-
-
9 hours ago, Peterpools said:
Rob
WOW what a start to an amazing project. I'm just blown away on how you treated the engine and exhaust. A varied pallet doesn't come close.
I'll be in the front row for the entire journey
Thanks Peter, it's a single seater, there is only the front row
. I had nearly all my metallic colors pulled out of the shelf, shaking them up, peeking at the bottom side of the jars for the right shade or base for mixtures. I haven't mixed Xtreme metals and Tamiya LP's though  .
.
Cheers Rob
-
2
-
-
9 hours ago, Wumm said:
You have a very good technique for metals Doc. I especially like the burnishing at the ends of the exhaust pipes, not an easy result to achieve.
10 hours ago, DocRob said:You made me curious, which bike do you have in your stash?
I have the Tamiya Desmo kit, to be used with the Studio 27 transkit to backdate for the 2003 version.
The only difficult choice... Whether to drill all the holes in these gorgeous resin parts for the Catalunya GP Capirossi first win bike?
Thank you Steve, your Desmo project sounds interesting with the conversion included. Drilling out these holes would be to much for me without a template. Only one misaligned hole and the look is gone. Aren't there any decals out. What about the thickness of the resin body parts. If it's to thick, where the holes have to be drilled, it wouldn't look right either.
Cheers Rob
-
2
-
-
1 hour ago, Kaireckstadt said:
What a different subject Rob and what a nice one!
Great start and the engine and brake-discs look stunning. Making all these holes in them will pay off in the end.
I will follow this closely. I build some Revell 1/12 motor-bikes when I was young and also have a 1/12 Tamiya bike on the radar.
Muchas gracias Kai, I really like to have a broad view concerning my modelling projects, I get bored easily.
I'm not sure about the braking disks, I painted them with a steel color and they look better than on the pic, but maybe I will purchase PE brake disks.
You made me curious, which bike do you have in your stash?Cheers Rob
-
4
-
1
-
-
55 minutes ago, Spitfire said:
That looks really good, but then again Ducati's do look like works of art like most Italian bikes, my favourite is the MV F4.
Thanks Dennis, yes, these Ducati's are a piece of art, indeed. They are also able to give you goose bumps. I once attended a Superbike race on the Lausitzring, a bad circuit for motorcycle races, but after the first round maybe fifteen Ducati's with top speed where charging down the long straight, It was an unbelieveable sound, which I will never forget.
I loved my KTM and the Triumph Speed Triple before, but never owned a Ducati until now in 1/12 scale
Cheers Rob
-
5
-
-
3 hours ago, Bomber_County said:
Rob, another genre busting project, really looking forward to this as it’s been on my radar for awhile but probably a step to far…….
Thank you Phil, it is indeed genre busting, as there is no correct way to display the finished Ducati here, but what the heck, when ready, I will put it into the finished aircraft section as it is fast and light
.
it's my first bike build, but I love to try new things and I'm sure you could do as well.2 hours ago, Bomber_County said:Have you tried the AK True Metal paste tubes……..the engine looks stunning…
I've tried the AK metal waxes and I do like them, when used to their purpose. Lately, I used them to repair the NMF on my KI-61, where I had a tacky spot, rubbed away with alcohol and removed some sprayed paint, which I remade with a mix of the waxes, much easier than to respray. They do look very metal like and are easy to apply.
I've used the metal waxes on different occasions, but when masking, decaling or varnishing comes into into play, I do not trust them. Extreme Metals and Tamiya LP paints are perfect for the job accompanied with Uschi pigments, which are the best in business.Cheers Rob
-
5
-
1
-
-
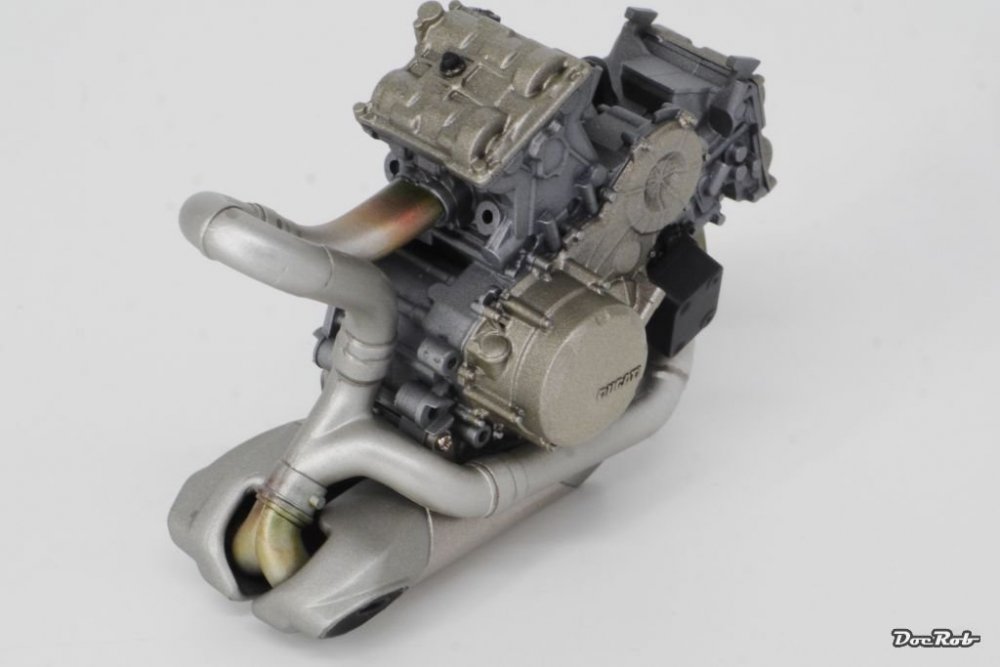
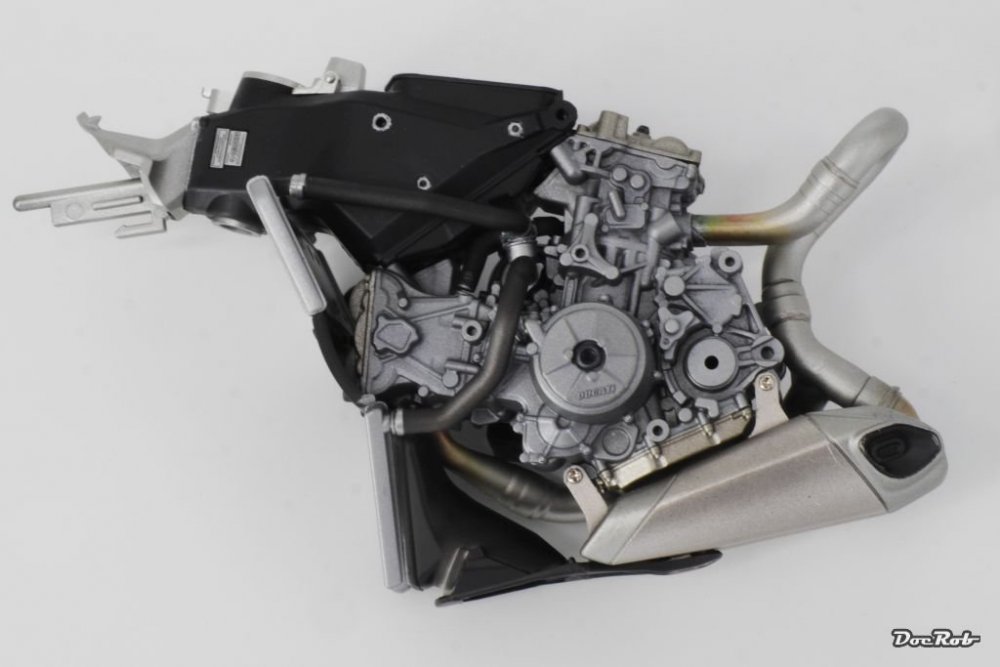
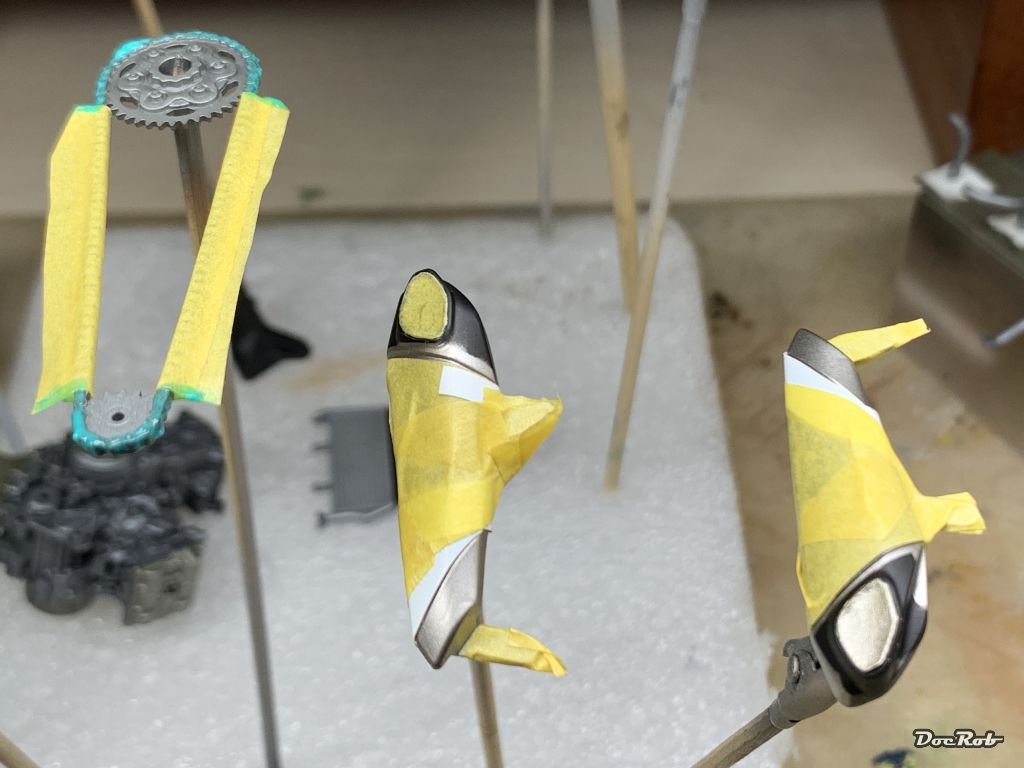
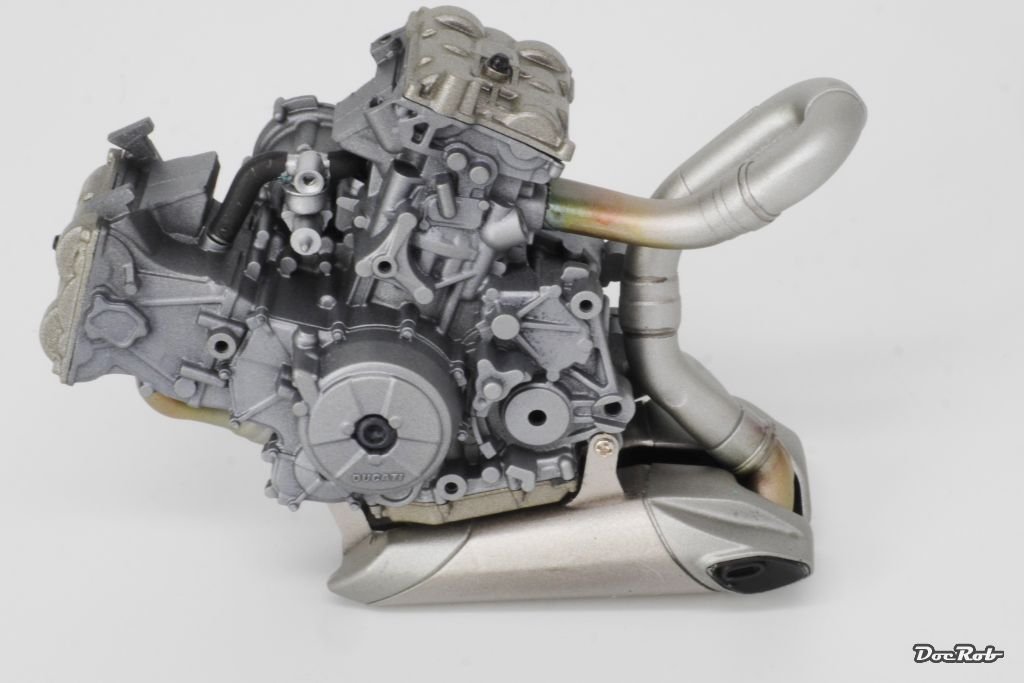
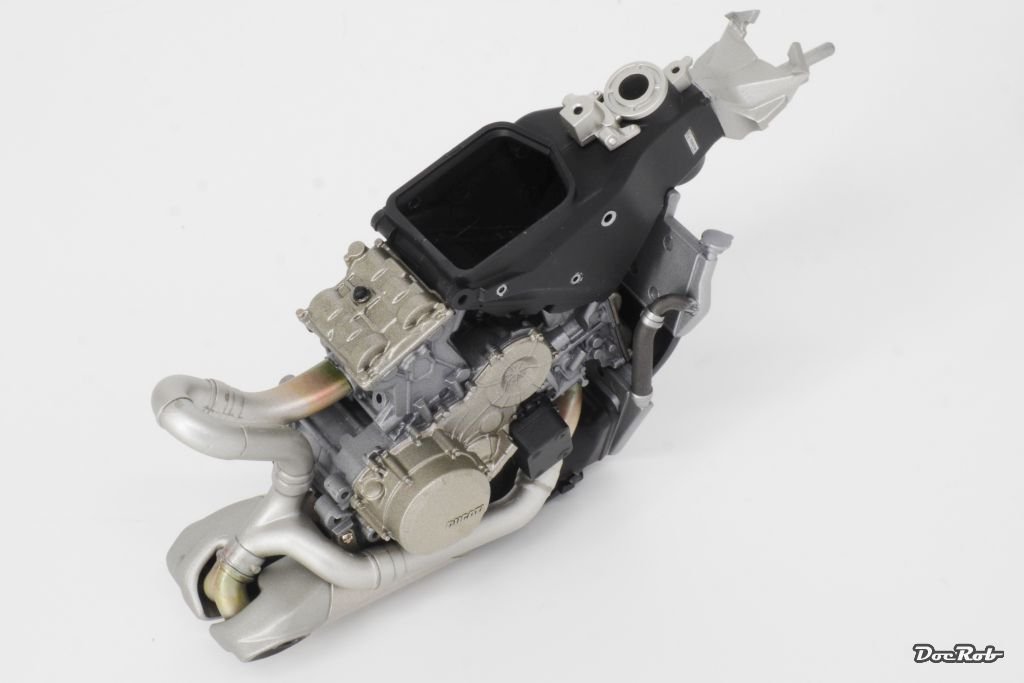
On to the engine, a masterpiece of engineering, light, compact and high powered, which means complex, the way it's constructed. It really pays to study the manual and work methodical. Normally I prepare most components of a kit for one or two long painting sessions, but not with the Ducati. There are so many different colors involved, that I prepared only the engine with exhausts and some parts of the frame / air duct.
To get the multiple metals right, there was a lot of complicated masking involved
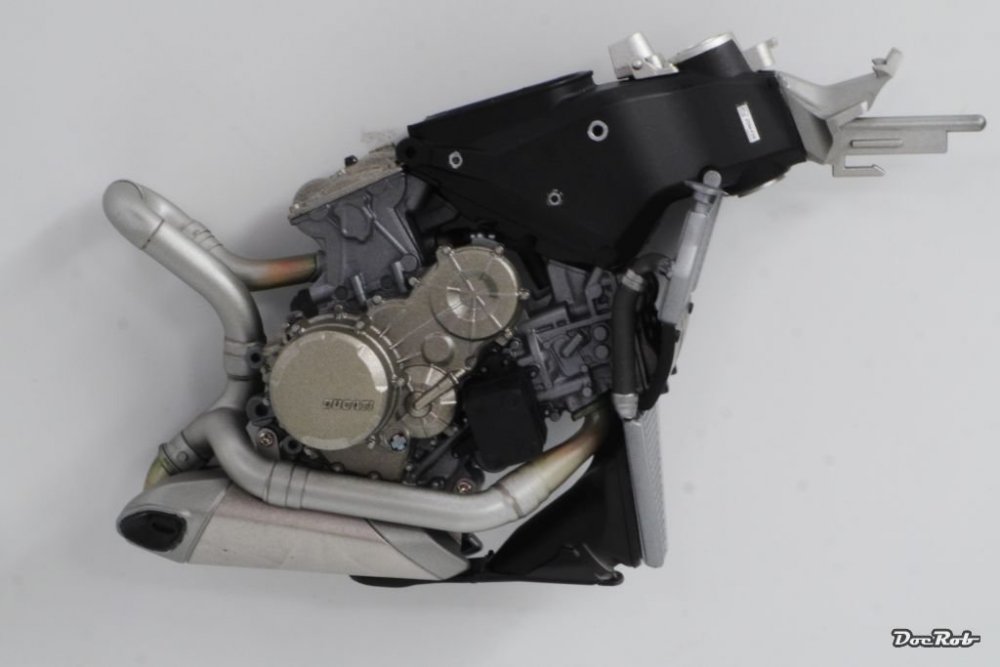
I used Tamiya lacquer colors and AK Extreme Metal colors for all the different metal shades. The engine was painted with dark aluminum and was then treated with some steel pigments for emphasis.
The Cylinder heads and clutch were painted in a mix from titanium gold, a bit of bronze and some metallic gray. The exhaust ends received a coat of dur aluminum and a mix of titanium silver and gun metal.
The same mix in a slightly lighter shade was used for the exhaust tubing, which then was added with translucent yellow, red and blue on the heat stressed parts.
The black frame was painted with the formidable Tamiya LP semi gloss black, which has exactly the right shine.The engine:

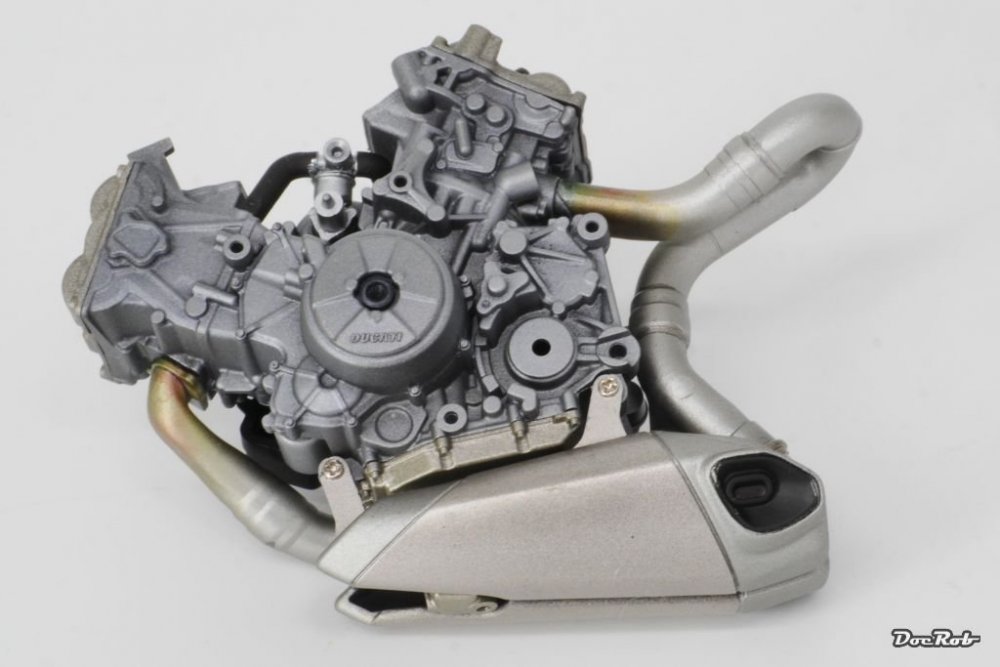
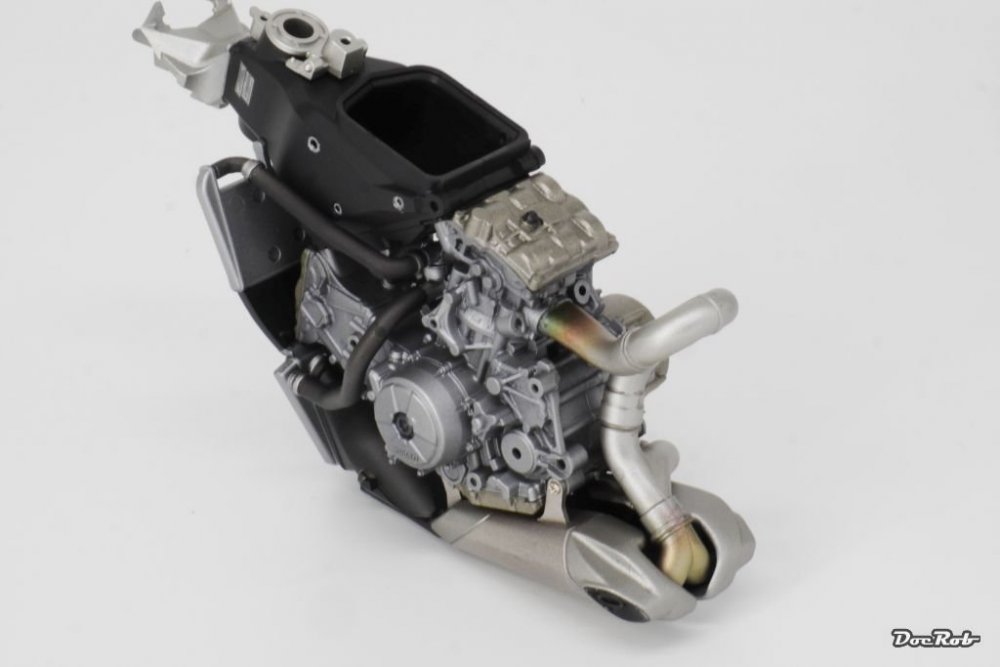
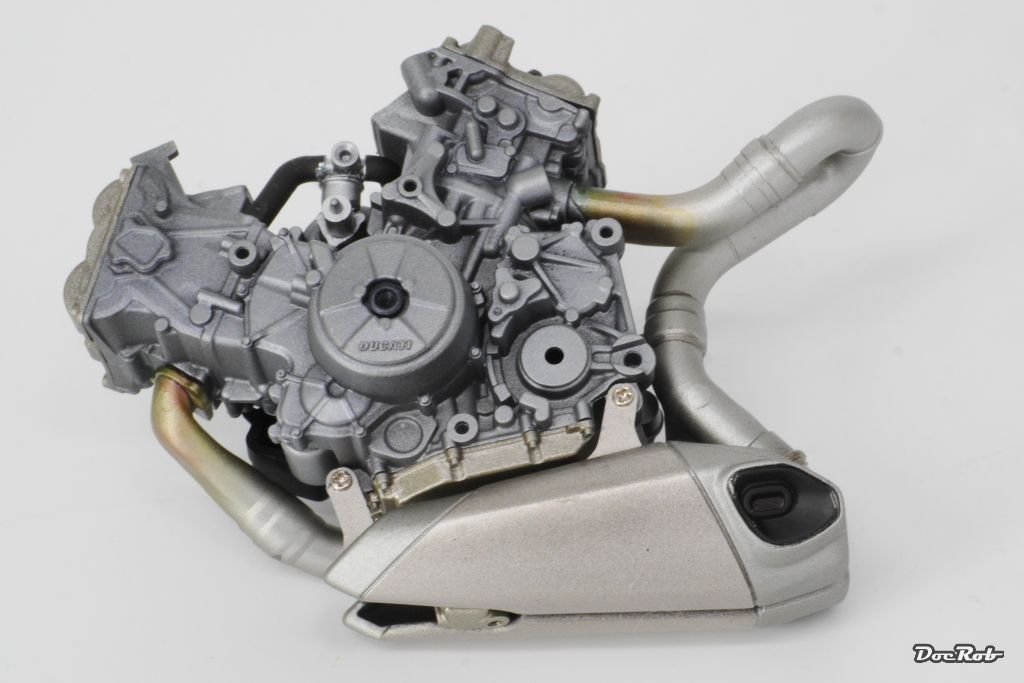
Some of the subassemblies are screwed together. The air duct and frame parts were added this way. They received decals for the serial number and some tubing for the cooling fluids.
The tubes were sprayed matte black and the masked for painting the steel colored fixing fittings.Which now starts to look very busy:
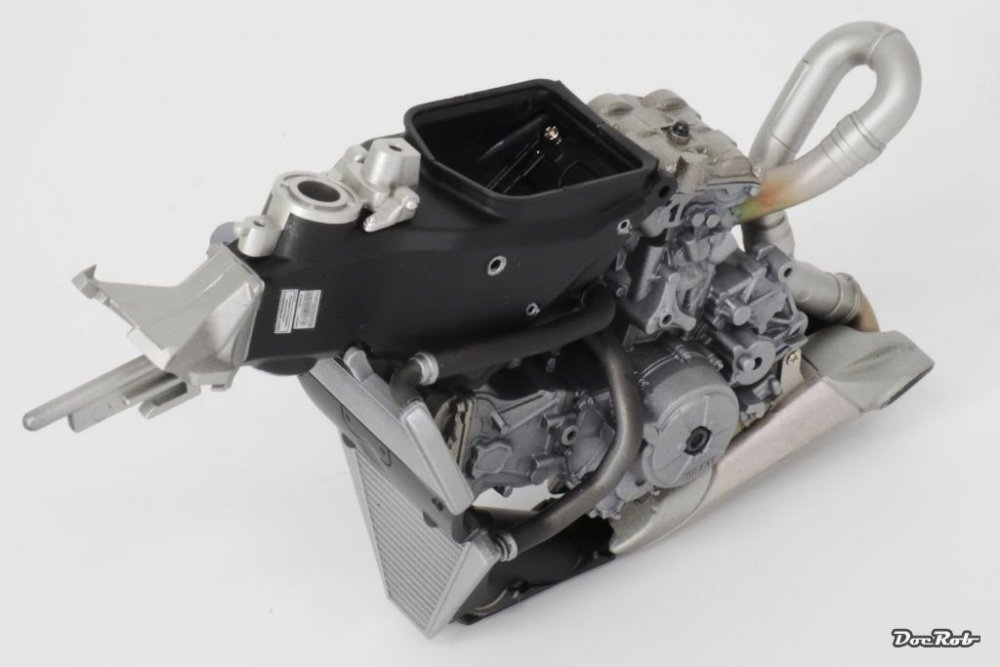
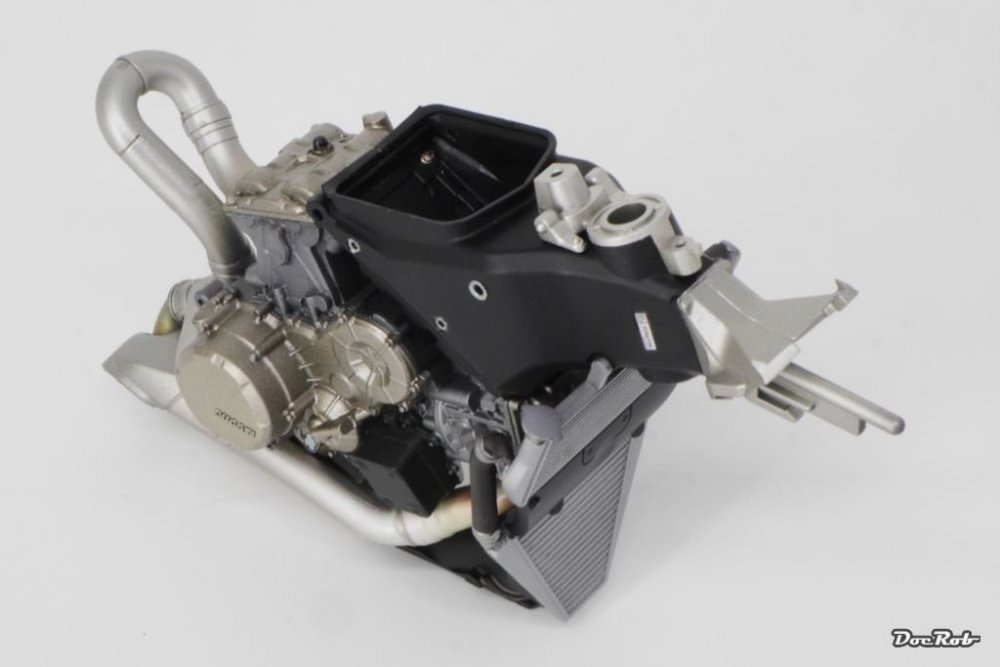

That's where I am with the build and I have to say, I absolutely love the kit. It's a canvas to test material replicating skills and that was, what I was hoping for.
Cheers Rob
-
8
-
-
My first contact with the kit was, like with most of my kits, to search for the hard edges of the built. I immediately found the braking discs a place, where some extra effort would be well spent and drilled out what felt like a thousand holes. The type of plastic Tamiya uses here, the silver grey type, is prone to form burrs, which hare very hard to clean off.
This is the unpainted result: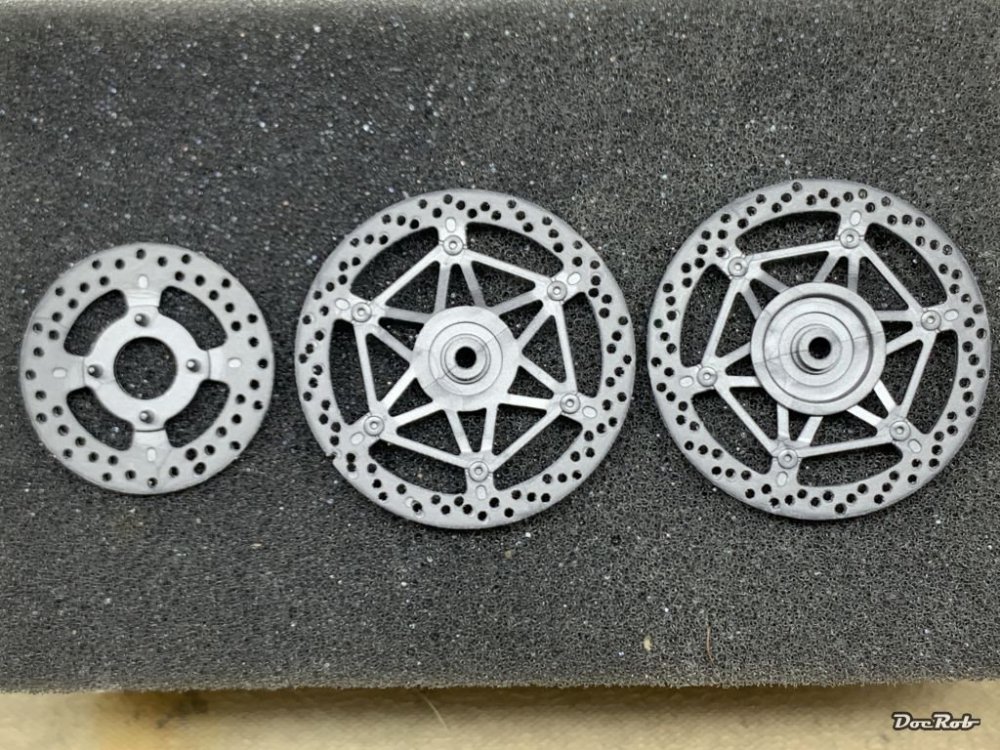
Cheers Rob
-
7
-
-
Buon Giorno Amici, I have a Tamiya run lately for no special reason and this time I go LS. The Tamiya kit rpresents the Ducati 1199 Panigale and will be finished in the Tricolore design.
You have to love European motorcycles for being only half the weight of the average American bike with at least double the acceleration and real handling. I know a bit provocative, but there are other reasons to love them. As they are high tech products, you will have to replicate dozens of different metal correctly, which attracted this project to me. When I lived in Berlin I had a KTM 950 SM, which drove like a sharp blade through the heavy traffic in Berlin. I loved this bike, but left it in Berlin and promise my wife not to buy one for my tiny island.This is the kit:
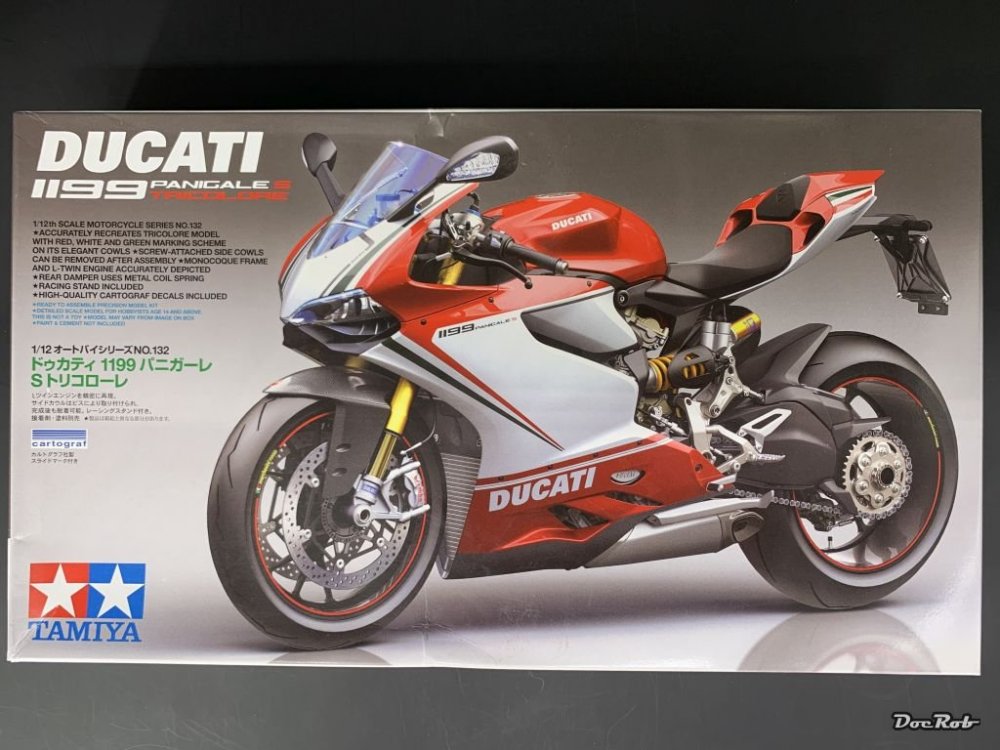
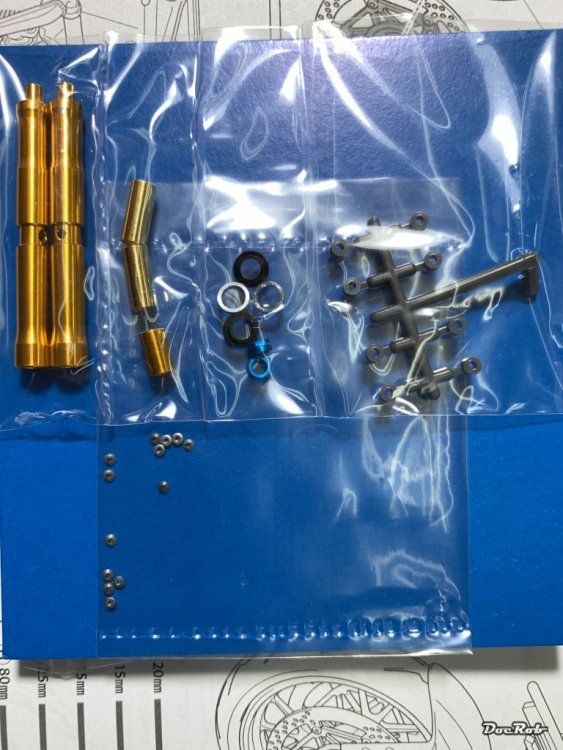
I opted for the metal fork set.
The plastic looks very nicely casted with the exception of the clear canopy dome, which is quite distorted. As it's very prominent, I will buy a vac-formed substitute.
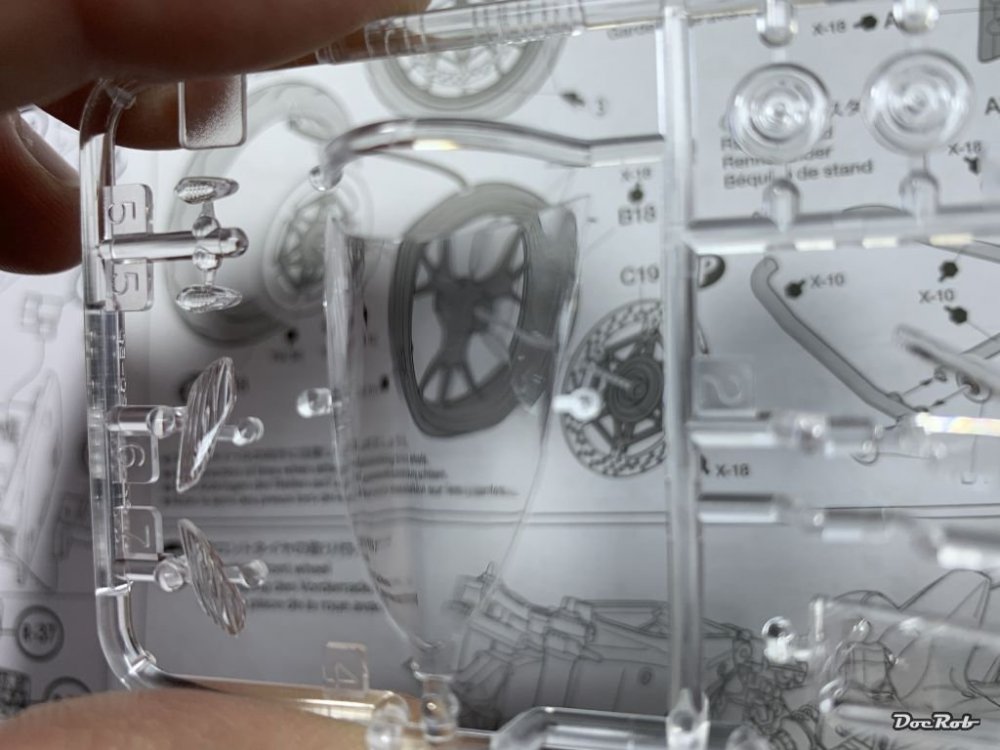
One other irritating thing is the color call outs in the manual. For the engine you need to paint single parts in different, mostly metal colors. I haven't counted, but already used more than ten different metal colors and some of them has to be mixed, which makes it quite confusing to follow the steps, without forgetting to paint some detail this way or another.
Cheers Rob
-
9
-
-
Gaz, I have to admit, that I cant wait to see your lounge chair build up. It will be tricky for sure, given the size, but I love your attention to detail.
Cheers Rob
-
4
-
-
Wow Kai, she's a beauty. What a relief it must be to have such a great result on display in the end. I love these 'pure' jets of her era, only wings, an engine and not much more. The paintjob looks great and vibrant an eye catcher for sure, congratulations. Ah, have I mentioned the display, simple and effective and supplements the pure beauty of the beast.
Cheers Rob
-
1
-
-
The intakes are always a focal point of a jet, the great work you did will pay off in the end Carl.
Cheers Rob
-
3
-
1
-
-
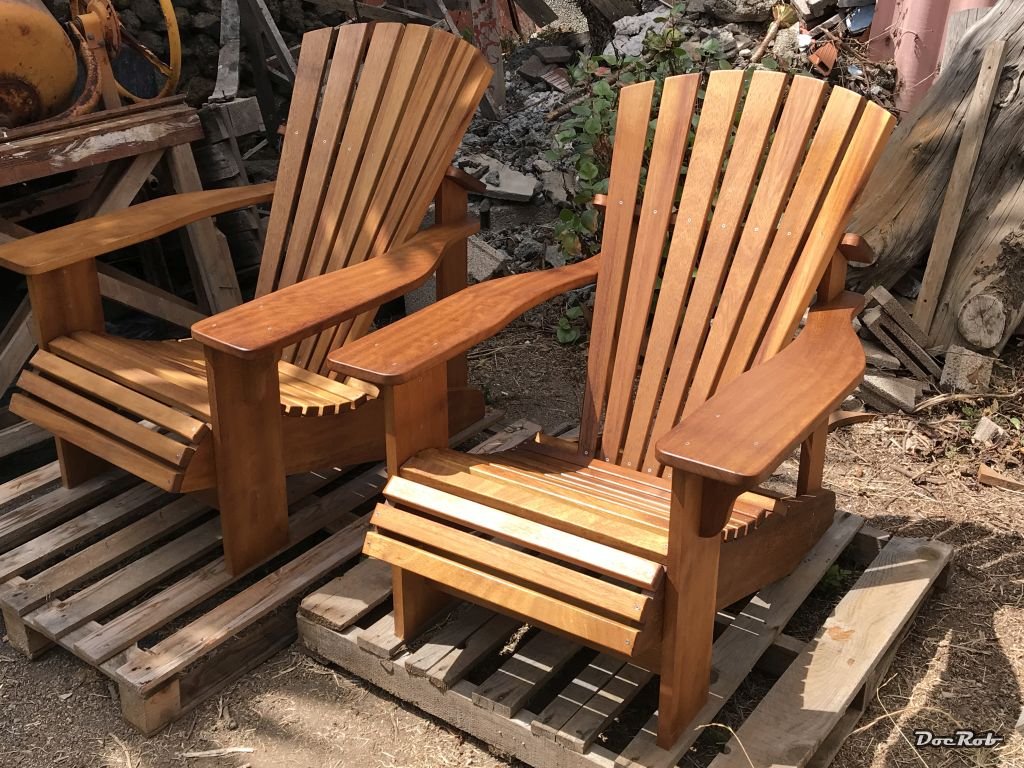
38 minutes ago, BlrwestSiR said:
Thanks Rob! Looks like I might have a project for next spring. I was thinking of Muskoka chairs originally (they're like Adirondack chairs but Canadian) but I like that yours are something different.
I had to google the Muskoka chairs, but they are more or less the same like the Adirondaks. These were the ones I built two years ago, definitely more work than the Kentucky Stick chairs.

Cheers Rob
-
9
-
-
4 hours ago, Bomber_County said:
Rob, this so bizarre, was only looking at the Lady Nelson Cutter by Amati last night………this was on YouTube……..
I've heard good things about the Lady Nelson. You should give it a try Phil. Those Kutters, like my Le Renard and the Lady Nelson are great first builds. Relatively large scale, due to small original ships, only one mast, which reduces rigging and hopefully in the case of the Lady Nelson double planking, which I find important. It's much easier to achieve a good looking hull with thinner decorative planking on top oh the more sturdy ones.
Cheers Rob
-
3
-


Another Shelf of Doom rescue.
in Modelling Discussion
Posted
I always see this one, when it comes to Hughes helis.
Cheers Rob