

DocRob
-
Posts
6,807 -
Joined
-
Last visited
Content Type
Profiles
Forums
Events
Gallery
Posts posted by DocRob
-
-
1 hour ago, recon said:
They just came out with P-51 decals. Sorry for not being more specific.
No problem Mike, the new P-51 decals are printed by Eduard too. Can't say anything about the quality, but I think Eduard wrote something about their new decals in the downloadable 'Info Eduard'. They even claimed, it is possible to remove the carrier film, if I remember it right.
Cheers Rob
-
 1
1
-
-
Hi recon, the question is not very specific. There are not many kits from Eduard in 1/32, so I guess you ask about decals for the Me BF-109 E.
I have an older boxing called 'Bf 109E over the Balkan Peninsula' which includes decals made by Eduard in the Czech Republic, definitely not by Cartograph. A new boxing has Eduard decals as well included.
I have not used these decals, but others printed by Eduard for their 1/48 SSW. They were very fragile, thin and brittle and very hard to adjust on the plane, without destroying them. Where I got them on properly, they looked very good, but to work with them was a pain.Cheers Rob
-
3
-
-
5 hours ago, Wolf Buddee said:
Hi Rob,
I have some of the blackening agent as well but have never found it to do the job 100% so primer and paint works best for me. The trick, of course, is to apply the primer and paint in thin coats to avoid any heavy paint build up.
Hi Wolf, burnishing brass has it's difficulties, that's true. The parts have to be fat free and CA-free. I soak the parts only for some 20 seconds in the bath and move them with a tweezer, because of the developing gas bubbles, there could arise non blackened areas, if not moved properly. I stop the process with dipping the parts in clear water.
I really like the very matte, brownish-black effect scale wise and carefully use some steel pigments from Uschi van der Rosten for a bit of highlighting.Cheers Rob
-
5
-
 1
1
-
-
Very flashy and stylish. she's a beauty. If it wouldn't have been a model of an old plane, I would call the look positively 'retro'
") .
.
Cheers Rob
-
3
-
-
2 hours ago, GazzaS said:
Your painting looks ultra-smooth, Kai! Looking forward to that paint coming off! I usually pull mine about half an hour after I spray... I have no patience!
I do the same, not only because I have no patience. I don't like to have masks or masking materials longer on the kit than necessary. Who knows, which thinner reacts with blue tack, kabuki glue or liquid mask. I also have the feeling, that the risk of damaging masked areas is lesser, when the color has dried, but not totally cured.
Finish line in sight, with your great paintjob, Kai. Hey! Ho!, let's go!
Cheers Rob
-
3
-
-
We have a heat wave in the moment, so I spend a lot of time surfing and swimming in the morning and watering our jungle in the afternoon and have not much time for modelling.
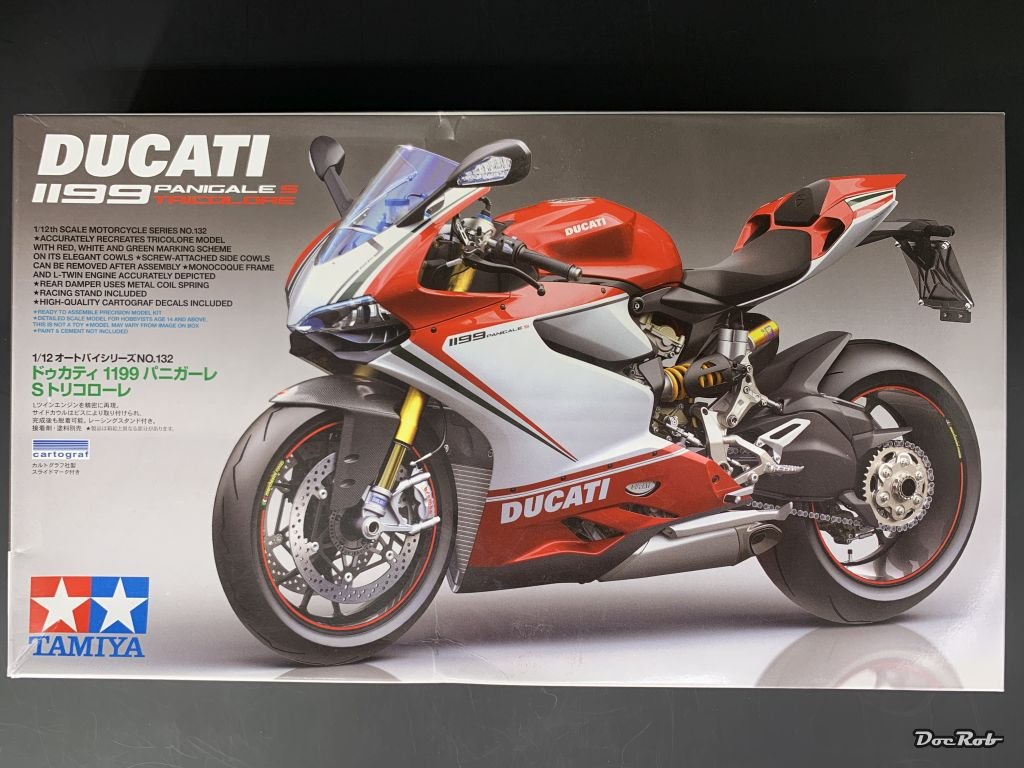
I started a bit on the Ducati Panigale.
I drilled out a million holes in the braking discs, which was a real pain, because the silver grey plastic is super soft and needs dozens rounds of cleanup. I'm not sure about the result and may opt for PE braking disks.
The transparent dome glass is very distorted, so I will buy an aftermarket pre-cut, vac-formed one, as it's very prominent. The bad quality of this relatively simple shaped part surprises me a bit, being a Tamiya kit.
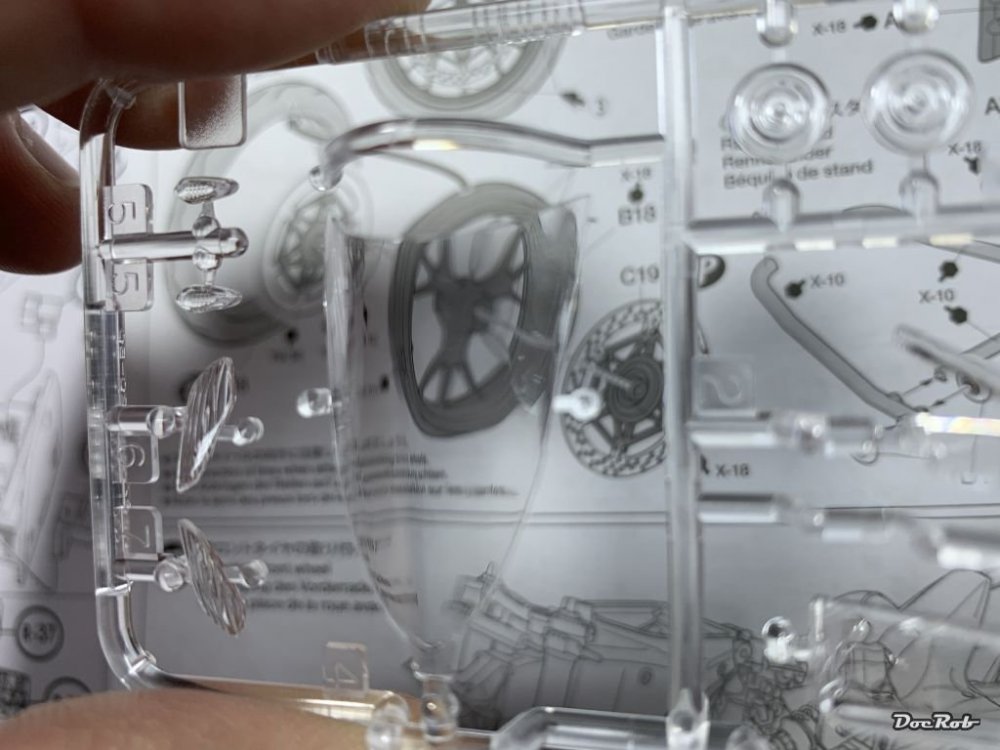
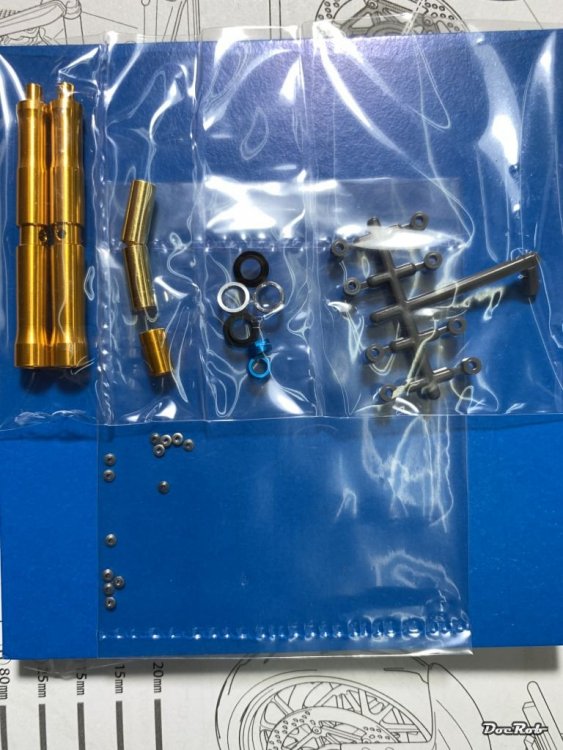
I received the extra metal fork kit, which seems to be very well made, with the anodized parts.
Cheers Rob
-
9
-
-
Can't wait to see, how the paintjob will look in the end, after you peeled of two kilos of masking material.
Cheers Rob
-
2
-
 2
2
-
-
Nice Mike, will follow closely, as I have the same kit in stash and plan to build a version, which was tested near my old hometown of Berlin in Johannistal.
Cheers Rob
-
4
-
-
Great build and presentation. The standout to me is the very believable material rendition and wear.
Cheers Rob
-
4
-
-
I always liked the shape of the Hustler. The way, you covered it with foil makes it appear even better. You can't beat the real thing, the aluminum shine is perfect.
Cheers Rob
-
4
-
-
I like the shades of the face Gaz, looks convincing to me. The good thing with the oils, is you can adjust later, if it doesn't fit the uniform.
Yesterday, I ordered some Archer eyeball decals, along with some tattoo decals. I suck at eye painting. If I get one right, the other does not fit and the figure looks, like it needs some eye surgery. I will post my results with the eyeball decals.Cheers Rob
-
2
-
1
-
-
Great job on painting, decaling and detailing Wolf.
I've used Tamiya X-2 gloss white as a base for Aviattic decals and that worked very well too. There was no need for further gloss coating and I used Tamiya Smoke for enhancing the depth. I just started to use Tamiya lacquers and they spray even better. I will give them a try, with my next WWI plane. Lacquer racing white is available in a jar, no need for decanting.
When I used Master brass barrels for the 08/15's, I burnished the brass and got a very convincing finish, with a non thickness, instead of paint and primer layers. The only downturn is, that you have to spray the plastic or resin parts in an equal color, which is often not too easy to mix.Your build is exceptional and a great tutorial to follow.
Cheers Rob
-
5
-
-
Another great example, where the weathering blends the camo in a beautiful way.
Cheers Rob
-
3
-
1
-
-
Looking good Kai. I found it particular difficult to work with blue tack or Panzer Putty worms for demarcation. It proved hard to me, to get the borders consistent. Might be easier with a huge plane like your Mirage, as it's absolutely necessary to keep the same AB angle at all times, to get it right.
Cheers Rob
-
2
-
-
7 hours ago, BlrwestSiR said:
CF-18. Here's what got me to take it out. An Aires cockpit that fits without making everything paper thin.
That's a new aspect of addiction, like I found that brass barrel in my AM stash, that what gets me starting an 1/32 USS Missouri
 . Or, I never would've build that plane, without having bought that resin exhaust beforehand. I love our hobby.
Cheers Rob
-
2
-
5
-
-
5 hours ago, Bomber_County said:
Rob, you did well not to have those “pinged”……..another missing genre of mine, bikes…….
It was pure luck, other packets were intercepted and returned. My Spanish LHS, which is only about 2000 km away, found a way of creative documentation, to help my cause.
It's my first bike as well, at least model wise. I had some real ones back in Berlin. Here it's only cycling, better for my health, as long, I'm not falling into a canyon, while mountain biking.Cheers Rob
-
6
-
1
-
-
I got probation
, I can continue modelling for a while. Somehow, this packet made it through security, customs and whatever unharmed. There is levelling thinner, lacquer thinner, primer and gloss coat. This loot will last for a while.

To follow my recent trotten path of car modelling, I ordered a Ducati kit, with a separate metal fork kit to follow soon. I hope for a pleasure build, where I can fully concentrate on replicating different materials, specially metals. Browsing through the sprues, left a good impression, except for the glass dome for the canopy, which shows some distortion. There is a pre-cut vac formed one, which I will purchase.

Cheers Rob
-
12
-
-
15 hours ago, GusMac said:
I'm with the artists!

I go en route, fine puntilism meets crude Russian metalwork, what can go wrong?
Cheers Rob
-
3
-
1
-
-
Beautiful and consistent paintjob. I specially like, how you integrated the roundels. I used marbling techniques as well on some projects, but did the marbling, spraying through a metallic sponge for pot cleaning, randomly. With the sponge, there is no risk, of color running under the mask and the pattern is very random, when you move the sponge while spraying.
Cheers Rob
-
5
-
1
-
-
Nice masking job, Kai, it's always a lot of work, to get the masking right, but it will pay off.
Cheers Rob
-
3
-
-
Nice progress with the cowl and the exhaust area. I hope you will address the obstacles there without too much trouble.
The face painting guide is very comprehensive, thanks for that. I follow the old figure painting rule of one base color and two lighter and two darker shades of the same color, mostly.
I like the result you achieved on the faces. The faces itself, hmmm, at least the guy in the middle looks a bit sharper, the right one looks like an oversized potato, I wonder if they produced 'Schiffchen' in his size.Cheers Rob
-
3
-
1
-
-
5 hours ago, Vandy1 VX-4 said:
Just got these. My friend gave me the tomcat for helping him move his fiancé
Nice wage, if the Tomcat is only near as good engineered than their MIG-31, you'll love it. I found the MIG was so clever designed and fit was exceptional, it could have topped Tamiya quality
 .
.
Cheers Rob
-
4
-
-
Like the others said, nice and smooth AB-work, she will look great, with you doing your magic.
Cheers Rob
-
2
-
-
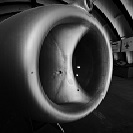
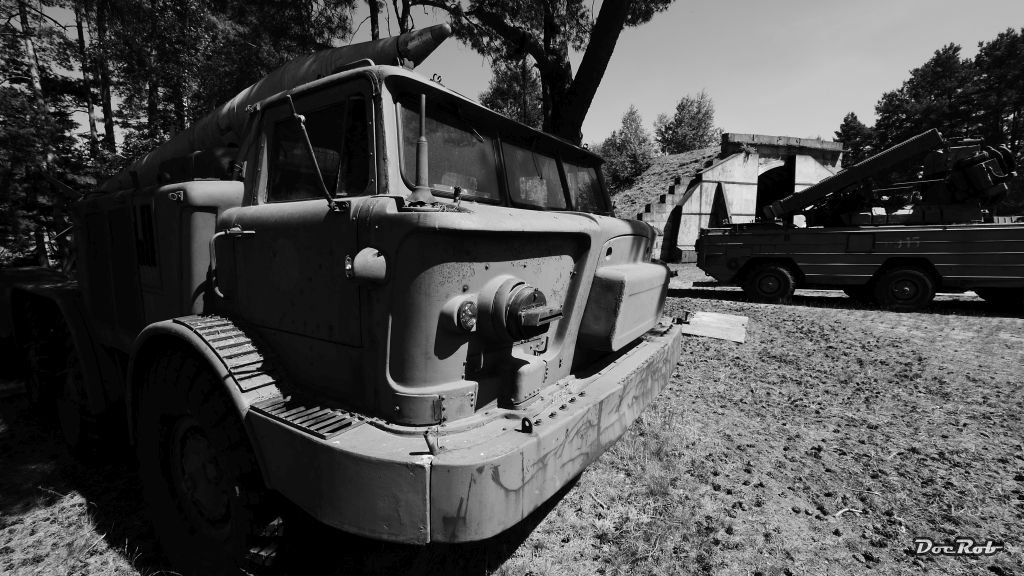
Absolutely fantastic in it's beautiful ugliness. You created a masterpiece and I have to clap my hands to your scratch building abilities.
I can't remember, if I posted this picture of the real thing earlier. It was taken on an abandoned airfield north of Berlin some years ago.Cheers Rob

-
1
-
2
-


What is on your bench right now ? Share a picture :)
in Modelling Discussion
Posted
I know about these sets Carl ,but I definitely will not build a chain from PE-parts, but still consider the Top Studio set, with PE brake discs and other parts.
Cheers Rob