

DocRob
-
Posts
6,807 -
Joined
-
Last visited
Content Type
Profiles
Forums
Events
Gallery
Posts posted by DocRob
-
-
I think the Werfers look great as they are and like Kai, I think a five point glue join should be sufficient. When unsure, you can tab carefully with a cotton swab onto the finalized Werfer-Rohre, with something spongy beneath, in case of. I bet, they wont separate.
In general, I appreciate the sense of security. I like my builds robust, and hate, when after closing the canopy some tiny part inside the fuselage come loose and rattle inside. It's a habit, maybe from my engineering background. Fragile is not good enough
") .
.
Cheers Rob
-
 4
4
-
-
Beautiful result, adding contrast with the nose cone painting and decaling.
I always wonder, why, and not only in this case, air forces of all times bother with camouflage, only to top it with vivid colored markings.Cheers Rob
-
2
-
 1
1
-
-
A very nice plane with a beautiful and striking paintjob, like taken out of a Buck Danny comic book. Great work John.
Cheers Rob
-
1
-
-
Very nice Mark. Are these instruments decals? I have a colored PE-set for mine, but got a bit bored by PE jammed cockpits, lately.
Cheers Rob
-
3
-
1
-
-
I could have taken them for real, except for the wheels being to clean and the angle of the lens in some pics. I echo Martins Bravo, great work.
Cheers Rob
-
2
-
-
2 minutes ago, GazzaS said:
Yes... soldering would be better. But you would want a jig made of non-melting material to hold the parts. I'd hate to see a wing that became a huge heat sink.
A jig is a big word for drilling four tiny holes in a piece of wood
 , but with a jig, you could also provide a stop for the barrel, to get both assemblies congruent.
Cheers Rob
-
3
-
1
-
-
6 hours ago, JohnB said:
LOL Peter. Thanks! Those belts are the plastic Fine Molds belts. All you have to do to them is, using some tweezers, hold them up to a hot light bulb and warm 'em up. THEN you can bend them to shape, etc.
")
Do you have any hot light bulbs left, that's so 19xx
. Belts and pit are looking great John.
Cheers Rob
-
3
-
 3
3
-
-
Gaz, I'm sure you have seen this:
The Modelling News: Gustav’s Bazookas: Eduard Model Accessories WGr.21 rockets for the Bf 109G in ReviewCheers Rob
-
2
-
2
-
-
25 minutes ago, GazzaS said:
Thank you, Rob. Everything is still flexible. The brass - aluminum joint isn't strong and it just seems like the glue won't make a firm joint. I think the best ting would be to use brass tube if you can find it in 8mm.
You could also use copper tube, which is available here in Europe with a diameter of 8mm. You can solder brass and copper, but Aluminum is a different breed.
Cheers Rob
-
2
-
1
-
-
Nice work on the masking Kai.
I use a good mask too, when spraying and try to have a constant airstream in the room when doing so. After spraying lacquers, I leave the workshop for some minutes, when possible.
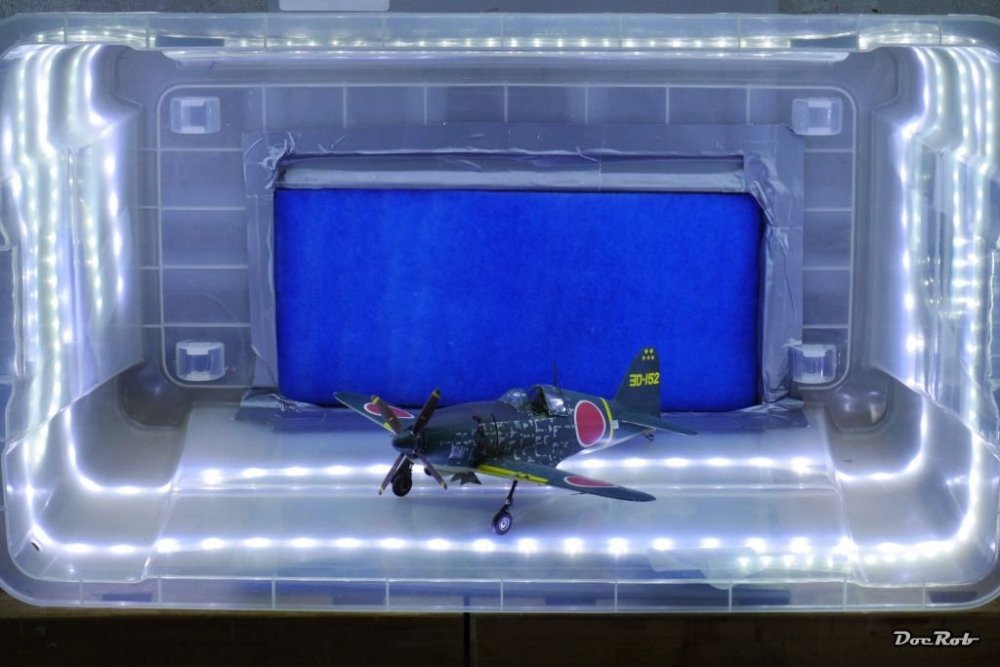
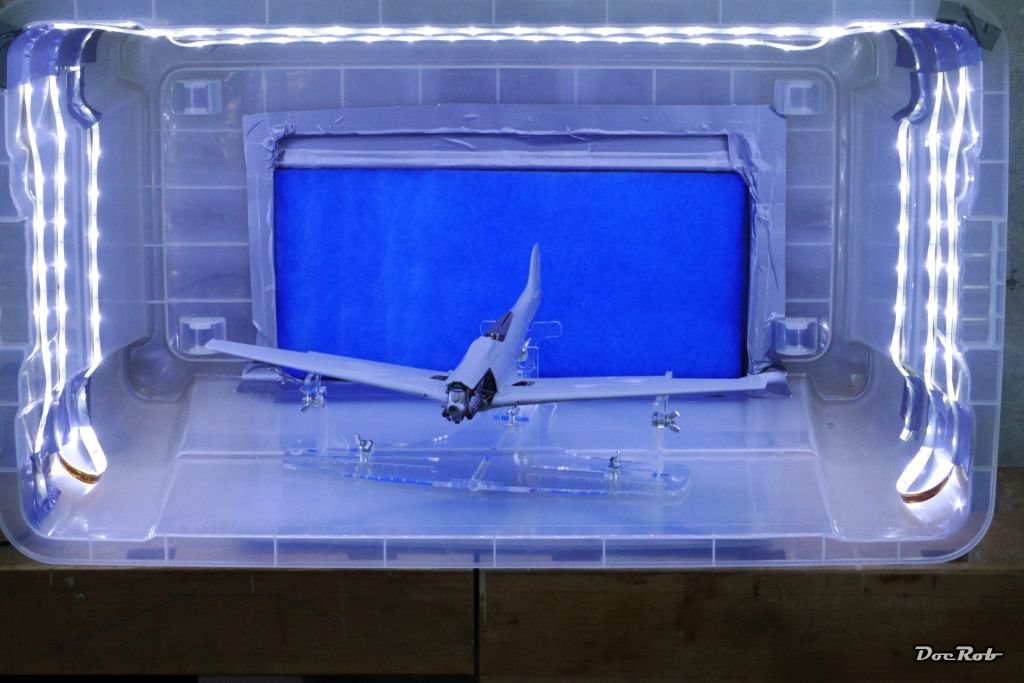
I have a spray booth, but it proved to be to small for 1/32 planes, so I improved it, by adding a transparent plastic container, which is Duct-taped to the suction module. The transparent container was cut to fit and allows to worm some LED strips around for better lighting. It's not the best unit, money can buy, but it works for me.You see the problem
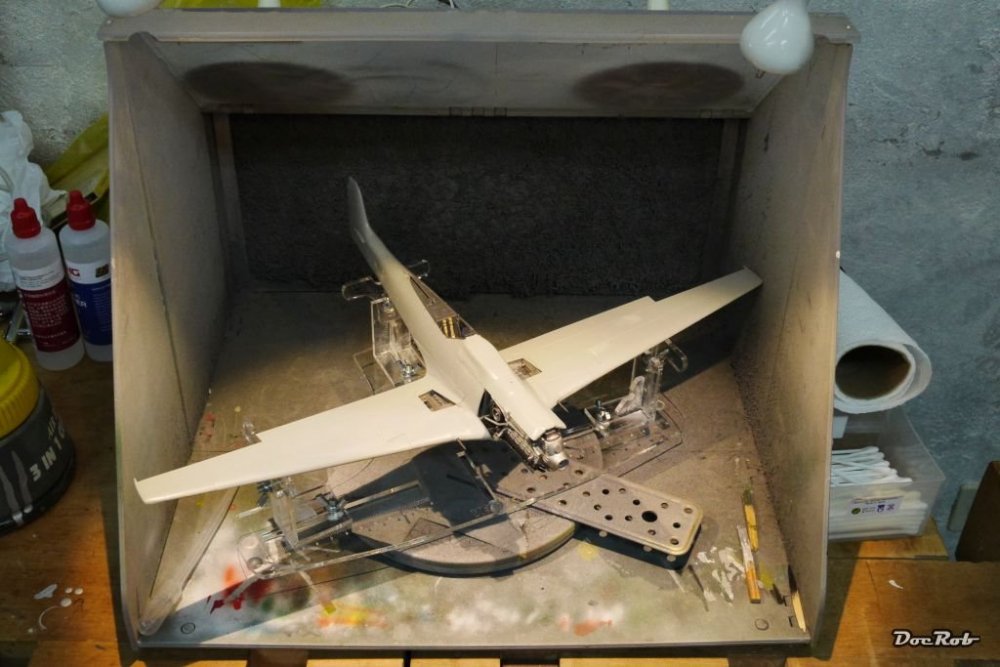
Planning phase with the same kit.
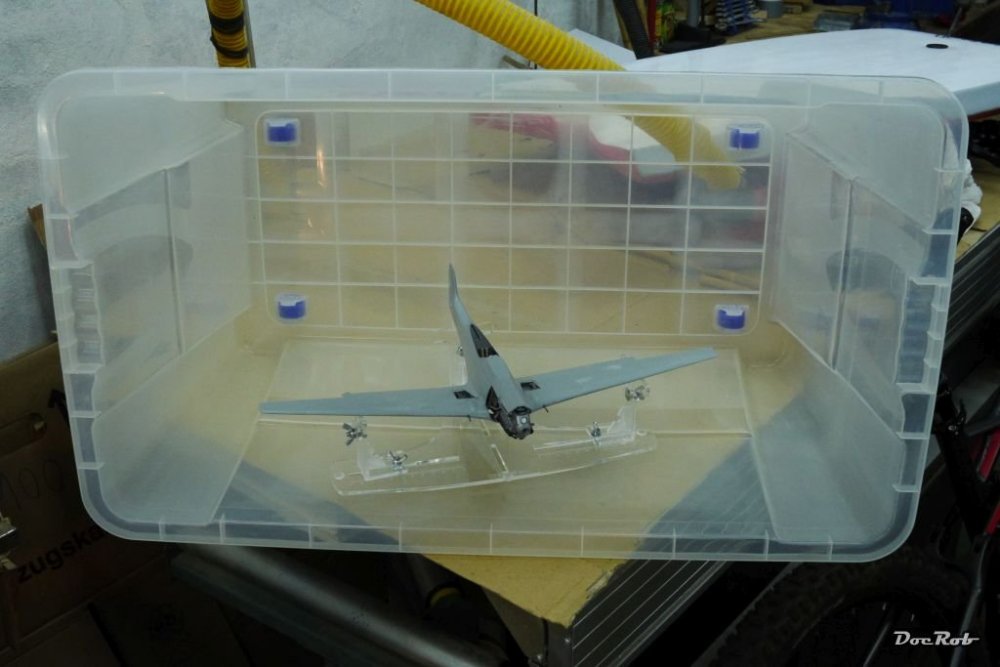
Done (Not the TA-152
)
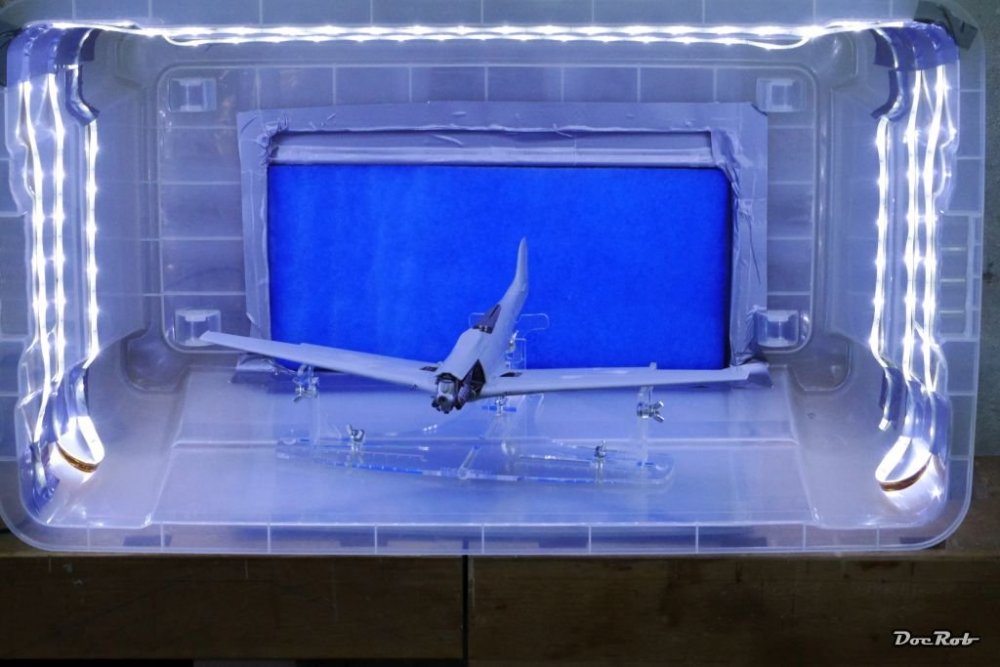
Lastly, I moved the LED strips to the outside. Cleaning the box is much easier this way.
Cheers Rob
-
4
-
1
-
-
Nice work on the rocket tubes, Gaz. I tried to look for correct placement angles on the pics, Eduard's manual and have to say, it's really hard to interpret it correctly. In the Eduard manual, it seems like the front rods are angled forwards, where the back rods are more or less 90 degrees angled. On their CAD pictures all struts seem aligned at 90 degrees. The photos don't make it easier, so in the end, I think you got it right and the most important aspect, the upward angle of the tube looks convincing.
I love metal works in modelling, I just can not hide my metal engineer background.
Cheers Rob
-
1
-
-
Hi John, I used HGW wet transfers on different builds and have very mixed feelings about them. Preparation is the key to success here and a shovel of luck too, I guess.
The process of applying wet transfers is different from usual decals. You cut out the transfer, let it soak like a decal, place it on the model and after some hours of drying, there is the delicate part of removing the transparent carrier film, which adheres on top of the transfer.
The transfers are very fragile and have to be handled absolutely carefully. You have to cut out every single transfer, as the carrier film, which later will be removed covers the whole sheet. That maybe is not a prob with a Corsair, but with millions of tiny stencils on a Jet, it is.
A perfectly glossy and polished surface seems to better the adhesion.The benefit of the wet transfers is, they don't silver at all and there is no trace of carrier film to be seen, they are like tattooed on.
I used them on my MIG-31 for one million of stencils and most of the transfers were intact after removing the carrier film. some were partly destroyed, but it didn't matter that much, because the MIG was relatively worn.With my recent 1/48 Hellcat build, I had not much luck with the HGW's. The national insignia went on beautifully, the cat mouth and eyes were partly damaged after removing the carrier film. I had a very hard time to remove the rest of the fangs and eyes and used the Cartograph kit decals instead. I have no idea what happened, the model was gloss coated, but not polished. The fangs and eyes were placed on slightly curved cowling surfaces and were cut to fit the openable cowlings. The application process was exactly done to the manual. What I found really strange, was the difference in adhesion only millimeters distanced, one part got lifted and another part had to be sanded away.
We had discussions about wet transfers from HGW in various threads, and to me the verdict seems to be, it's not a reliable product. If they work, they are great, if not, be prepared for some extra work. I have some sets and will give them another try, in a way, against better knowledge
.
Last week, I saw a new product, which can be helpful, if you are considering spraying the markings with let's say Maketar masks. 1Man Army has released stencil kabuki masks, which may even be reusable for the addicted Corsair builder
 .
.
F4U 1A/C/D CORSAIR | AK Interactive | The weathering #Brand (ak-interactive.com)
Cheers Rob
-
4
-
1
-
-
Thank you for the comparison Peter. Quite a difference in approach and detail with these two. I'm eager to start my build and ordered a set of MK.1 exhaust nozzles for my Kai Phantom, as the kit supplied look a bit toyish to me. With a good paint job and some scribing, they might be usable, but the inner detail from the Tamiya's is on another level.
Cheers Rob
-
2
-
-
Absolutely stunning as ever. The Mosca is a very strange and interesting little plane and you brought her to life with marvelous painting, decaling and weathering.
I know of another Russian pilot figure made by Copper State. The pose is a bit boring for my taste.
CSM : Russian WWI Pilot (copperstatemodels.com)
Cheers Rob
-
1
-
-
2 hours ago, Bomber_County said:
Nice haul Carl, even nicer to have a LHS so close……..but oh so dangerous…..
I don't need a LHS to drive myself into poverty, quite the opposite, I have to add shipping and customs to all my goods
.
Cheers Rob
-
1
-
3
-
-
Looks perfect now, fixing the overspray payed off. Bring on the black and yellow, please.
Cheers Rob
-
2
-
-
Nice and clean work Peter. Thanks for comparing the burner cans. Tamiya's solution reminds me of the Mosquito wheels. I would appreciate, if you could add a comparison pic of the burner can's plastic. For my ZM Kai Phantom, I will use Res Kit cans, when they are in stock again and also wait for some masks, because the canopy borders are not very prominent as a guide line for cutting my own.
-
2
-
-
7 hours ago, GazzaS said:
Beulen, beulen, beulen... ,keep those beulen smoothin'... Though yer disaproovin'....
Woah, an outburst of pure frustration and understandable, given what this kit throws at you. In my brain cinema, I will always see the Blues Brothers sing Beulen, Beulen, Beulen,... from now on
 .
.
Said Beulen look good now, I think. Bummer with the needed surgery on the wings. It's not a short gap and on both sides, holy cow.Cheers Rob
-
3
-
-
Great looking camo Kai, so many beautiful and different types of Mirages here at the moment, should I ....? Nooooo, I sit and watch how well you guys perform.
Cheers Rob
-
2
-
1
-
-
What a beautiful and vibrant paintjob.
Cheers Rob
-
2
-
-
Oh, I found out myself. All Eduard decals since September 2019 ar produced with the new technology. The corresponding article starts at page 52.
Cheers Rob
-
1
-
-
15 hours ago, Martinnfb said:
skip to 06:00
Indeed, very interesting, is there a way to find out wich are the new and which are the old Eduard decals?
Cheers Rob
-
11 hours ago, krow113 said:
lol
The hardest part about the chains is going into them with a self defeating mindset.
lol
So easy to do , get a robotic assy mindset going and they fly by.
The last one I did for my Hillclimber took an hour to do.
I never liked kardan driven bikes like BMW's, a bike has to have a chain or at least a belt. Model wise, I will stay with what Tamiya provided. It's not too bad and will keep me sane.
BTW: Nice chain on your bike, with even some more links, being a hillclimber, I guess.
Cheers Rob
-
6
-
-
8 hours ago, Martinnfb said:
Stuff I can see without glasses
I see things sometimes, with or without glasses....
Cheers Rob
-
5
-


Share how COVID-19 Quarantine has affected you.
in General Discussion
Posted
I'm completely pfizered since more than a month and a half and a bit astonished, that they vaccinate so slow in Oz. On my islands, they start to jab kits above twelve now, with 70% of the inhabitants having at least their first shot. But that's maybe, because it's summer and the government has a vital interest in having secure tourism with Delta spreading.
Cheers Rob