

DocRob
-
Posts
6,807 -
Joined
-
Last visited
Content Type
Profiles
Forums
Events
Gallery
Posts posted by DocRob
-
-
2 hours ago, GazzaS said:
Thank you, Rob. I'm usually not into pre-season football. My team is different from the ownership down. Our previous owner didn't care if we won or lost. And when Martha Firestone Ford passed the team to her daughter, we finally got an owner interested in more than the money the team brings in. So, we have new coaches and staff and there is a lot to look forward-to.
That's the favorite time of my oldest buddy too and he suffered a lot over the decades. He is still fond of the Wayne Fontes era, where they also had this very special RB, whom I account for the best and most elegant player to ever play his position and that's me speaking as a Cowboys fan of the Emmit Smith era.
Let's have a great NFL season.
Cheers Rob
-
 4
4
-
-
11 minutes ago, Peterpools said:
Being on my side of the pond, not sure if you are talking about preseason NFL Football of soccer. I did watch last night the NY Jets beat the NY Giants and I'm a Giant fan all the way. 🏉
NFL for sure Peter. Doesn't happen too often, the Jets beat anybody, it must be preseason. We will have some difficult weekends in autumn, me being a Cowboys fan
 .
.
Cheers Rob
-
3
-
-
12 minutes ago, Peterpools said:
So very much appreciated you diving in and testing the waters. I'm wondering if this type of decaling might work better with dry transfers? But you surely tamed the beast ad the cammo decals look awesome.
The second set of decals for a Me-BF 109 G2 from Heinrich Bär looks like a nightmare to do by air brush and Kai's hand painted Me110 cammo scheme of 40 years ago is oh so similar and looks the part for sure.
Thanks Peter, in surfing we call it 'current test dummy', which is usually the first guy hopping into the water and sometimes paddles his a.. off, while the others find an easier access to the spot, seeing his misfortune
.
I hope the best (against better knowledge) for the transfers, otherwise, I will do another scheme.
Cheers Rob
-
4
-
-
20 minutes ago, Kaireckstadt said:
I did a Me 110 G-4 when I was 19 (40 years ago!) and didn’t know at this time what an airbrush was. I painted all the squiggles on the model with a brush (like the whole model too). Doesn’t look too bad. This is the oldest model I still have.
Stunning and eye irritating at the same time. Kai you have my respect for painting this kind of camo in general and especially being 19 years old, when you've done, it looks great.
I haven't looked into the Bär camo or project at all, I just have the Eduard 109-G Royal Class box and some additional goodies like the Bär camo transfers, but I guess, it was hand painted on the original. I would use a brush as well or even a marker pen, If the transfers don't work.Cheers Rob
-
5
-
-
Great progress and sexy legs she has, Kai
. In the side view, it seems, like the real thing must have been close to a tail sitter.
Cheers Rob
-
5
-
-
What's the big thing about preseason football. I'm a die hard football fan too, but pre season bores me. It's only competitive training. Can't wait for September.
But who care, when it leads to such a nice detail work in the end. The Marder is not a huge tank and with you reproducing wingnuts, I expect and unearthly level of detail. Gear and tracks look also good, with a perfect sag.Cheers Rob
-
4
-
-
14 hours ago, JohnB said:
A really nice build Rob! I like it! I too have some HGW decals and will probably use some of them at some point but the info you provide here shows how "iffy" they can be. Keep up the good work!!!
") 13 hours ago, Kaireckstadt said:
13 hours ago, Kaireckstadt said:I‘ve never seen the application of the HGW wet camo-decals before.
Now I know what are the traps and advantages and disadvantages of them.
One could interprete the damaged squiggles as paint torn of and regarding the picture with the removed foil it is obvious that not only a few were damaged.
But the result nevertheless is awesome and saves a lot of paintwork.
8 hours ago, Peterpools said:Looking so good and thank you for your warnings when using HGW wet decals.
Muchas gracias Señhores, this build is more an experiment as to figure out, if a wet transfer camo is usable. The result is usable and some of the faulty areas are resolved with the last spare dots. The bad news is ,that there is no logical pattern, where the lifts occur. Some are in curved or angled areas, some flat in the middle, without any panel lines, so i have no idea, what I possibly could do better. The surface was gloss and absolutely fine, with no scratches, damages or other imperfections.
One positive aspect of the wet transfers is, you can apply them onto normal decals, which was necessary here on the wings with the no walk lines.
In the end, the camo will be usable, but if you are after a new unworn look, I'd say, thin your camo color and train your airbrush skills
. I will do this later with a Vietnamese Mig-21, which sports a similar pattern.
Until now, I have no idea, if or how I could repair the damaged dots. It would be a hard task to mix a matching color, given the slight metallic appearance. I fear, more could be ruined than saved.I have another camo set from HGW, which I will possibly use, dumb as I am
 . It's for a Me-BF 109 G2 from Heinrich Bär and I will not paint it by hand for sure.
Bf109G-2 - Camouflage 1/48 - 248053 (hgwmodels.cz)
Cheers Rob
-
2
-
-
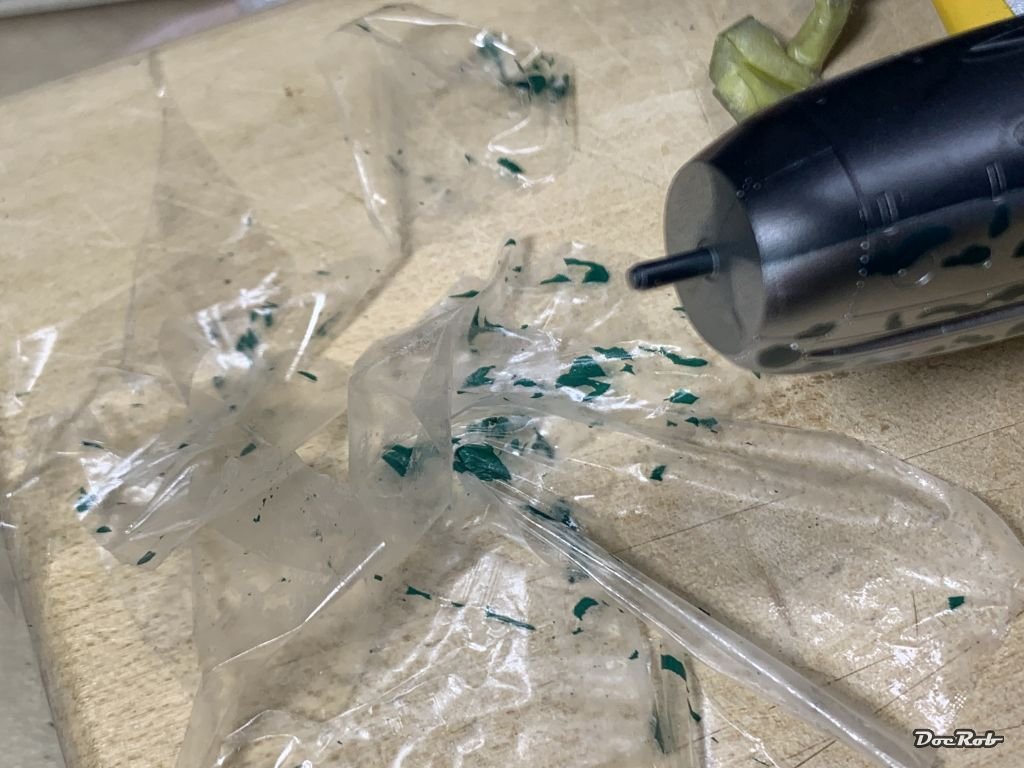
After carefully removing the carrier film I got this.
From far, it looks good enough, but as always with HGW's wet transfers, I pulled some of camo with the carrier film. In detail it looks like this:
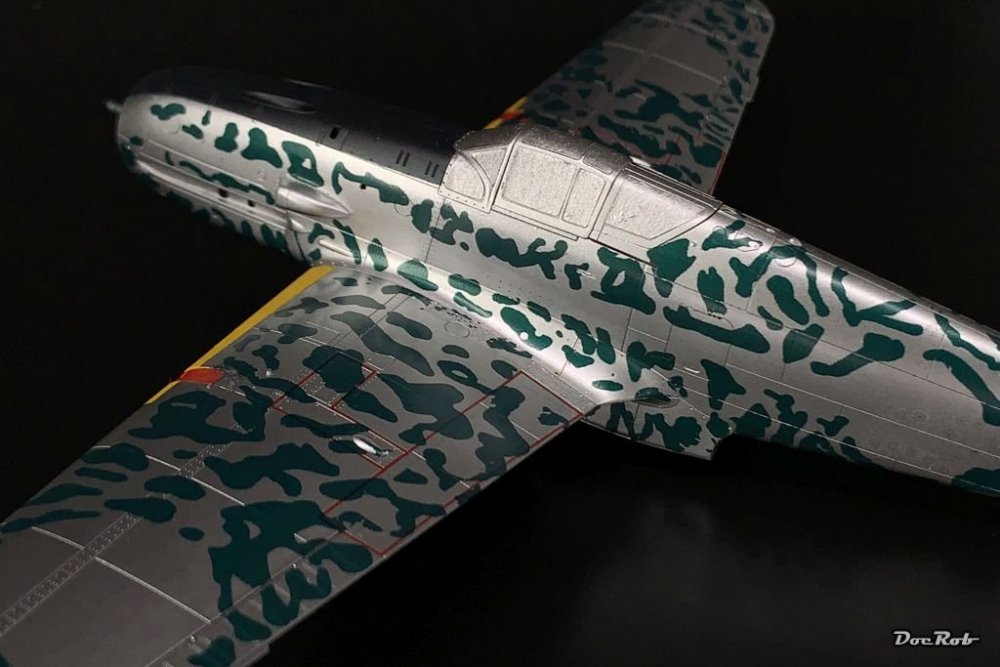
The right wing root received some spare squiggles, but here is, how it initially looked:
As you can see there is a lot of little defects, but I guess, I can get away with it, with some repairs.
This is how the removed carrier film looked and I was really careful. My opinion stands, HGW wet transfers are not to be trusted completely, even if you follow the manual exactly and prepare the surface perfectly.

On the other hand, I like how the aluminum color gies the green dots a nice shine, as they are a bit translucent, blends great into the surface.
Cheers Rob
-
4
-
 1
1
-
-
2 hours ago, Peterpools said:
Beautiful work on the HGW cammo decals ... absolutely a first class work.
1 hour ago, Bomber_County said:Rob, looks very good, good luck with the next stage……
Thank you Amigos, it's not done yet, still some sweat to pour
.
Cheers Rob
-
2
-
-
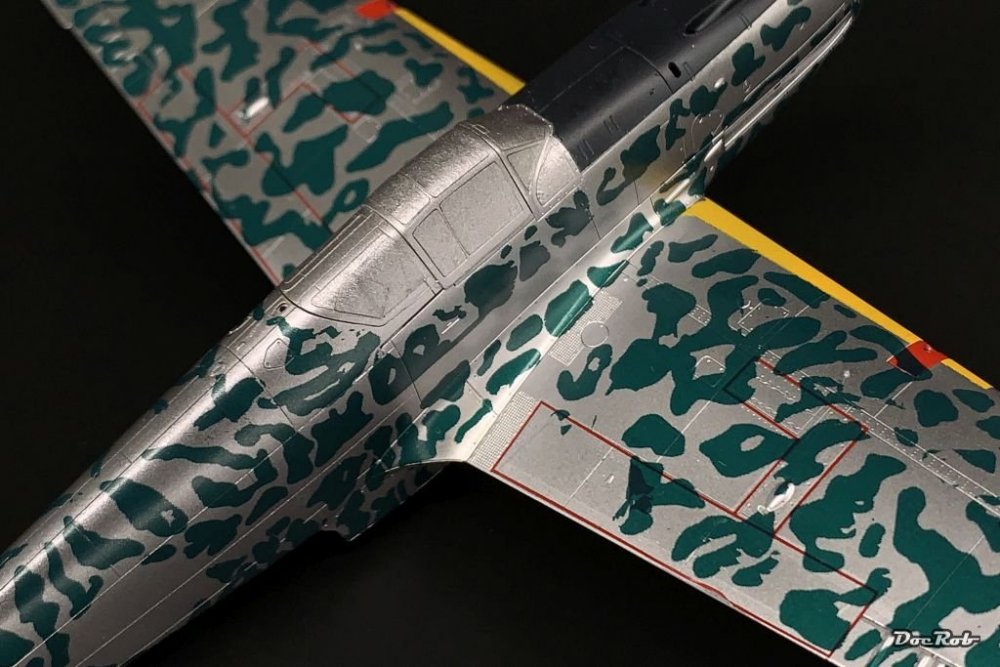
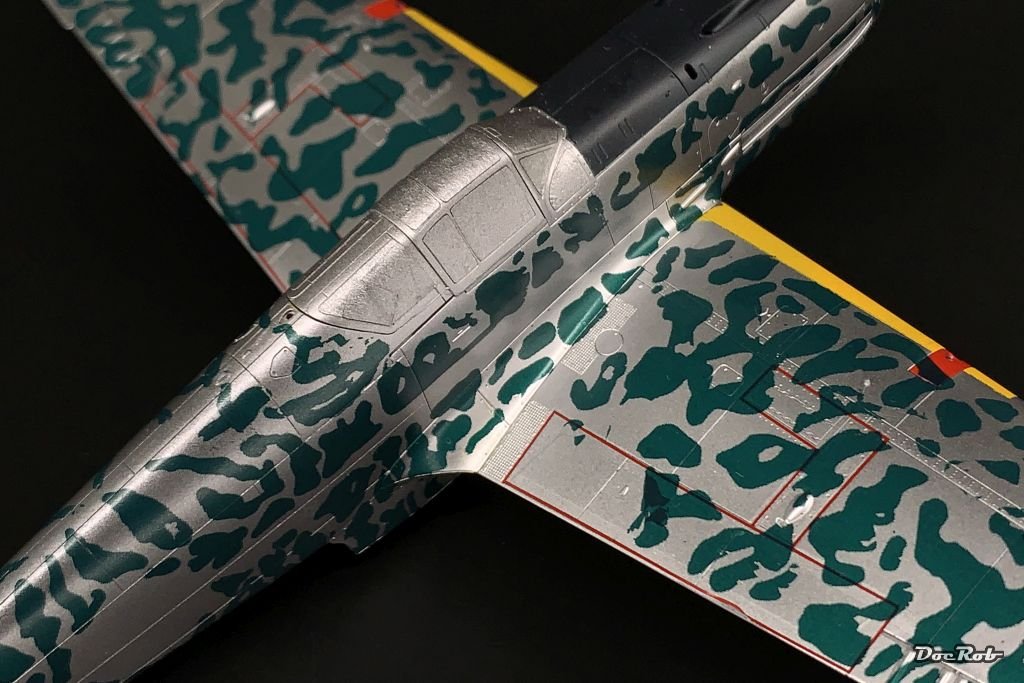
Today, I applied the camo wet transfers from HGW, not an easy task and I made some mistakes. The camo is separated in six parts, wings, upper and lower fuselage sides. I started with the upper fuselage half, to guarantee, that the camo reaches the camo reaches the spine and lays correctly under the canopy and cowling. I then added the lower part, which proved more difficult, because it also covered the wingroot and needs some cutting to fit well. On the other side, I cut the lower part in three pieces, which made the alignment easier.
When I added the wings, I recognized, that I forgot to glue on the guns and gun covers and as I did hastily, a bit of glue went under the transfer, which has to be corrected later.On the second wing, while applying the transfer, some of the camo squiggles adhered rapidly to the wing, while positioning and had to be removed, before I finally positioned the wing transfer. The missing squiggles will be added later.
Generally the wet transfers behaved well. I let them soak in warm water for twenty seconds and applied them to the surface onto brushed on Micro Set. They were strong, good to position (except the wing root accident) and seemed to adhere well.
Lets hope, the kit decals, like stripes and Hinomarus will look good when added later. Positioning is not that easy with these camo transfers and needed a lot of pre thinking. In my case not enough sadly.
In some hours there will be the time of truth, when I remove the carrier film, which is the part, where disaster is lurking, given my experiences with HGW' wet transfers.
Cheers Rob
-
5
-
 1
1
-
-
Like Gaz said, nice detailing, the shading of the tanks adds a lot of life.
Cheers Rob
-
3
-
-
15 hours ago, Peterpools said:
Just showed up at the door!
You'll love the Infini template, I have two different ones and use them often for masking jobs. No need to buy expensive Kabuki strips for lets say masking of WWI props. Very handy these templates, even better than the PE ones I used before. They cut smoother and are more blade friendly.
Cheers Rob
-
3
-
1
-
-
2 hours ago, Martinnfb said:
some hand brushed demarcation lines. I’m not exactly sure if I’m correct with sharp edges, I have only one blurry picture of the aircraft and many Hurrys in Africa we’re like that, although this particular a/c has reversed colours as well which makes the whole affair even more interesting.
Nice camo painting Martin and yes, judging the pic the pattern seems to be sharp edged.
Cheers Rob
-
3
-
1
-
-
Like the others say, great job on the build and modification. Can't wait to see your smooth paint finish on the Ventura.
Cheers Rob
-
3
-
-
Nice progress with the interior. Happy holidays
Cheers Rob
-
4
-
1
-
-
Great thinking and realization with the scratch cowlings. You seem not to be distracted easy, even on such a huge project. At least, beer drinking helps with modelling, I knew it
") .
.
Cheers Rob
-
2
-
 3
3
-
-
Stunning paintjob, clean and smooth, great job Peter. Can't wait to see some metal magic from you, with the nozzles and tail parts.
Cheers Rob
-
3
-
-
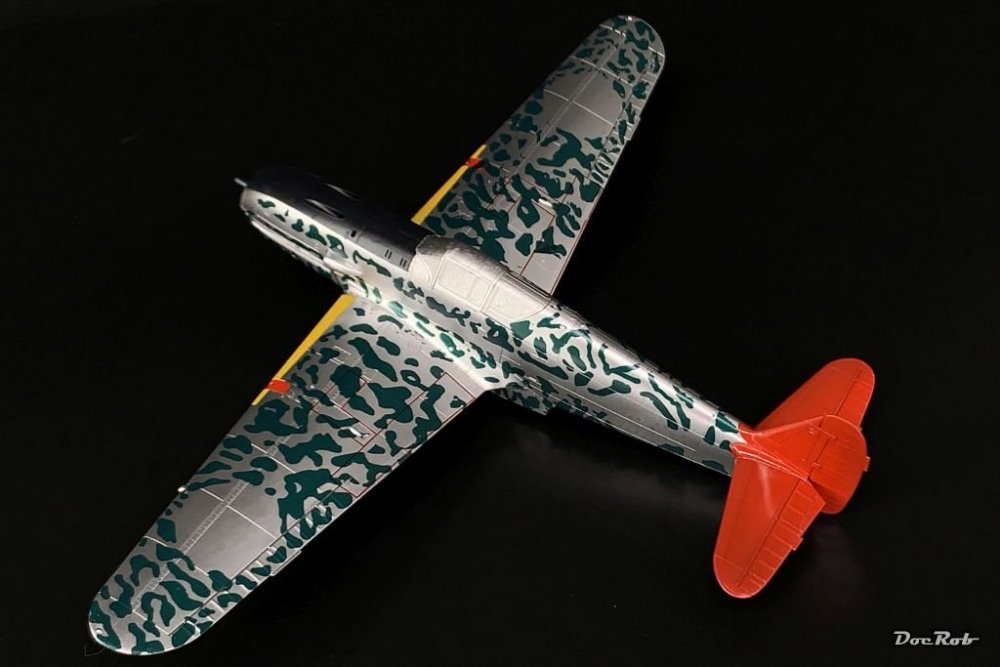
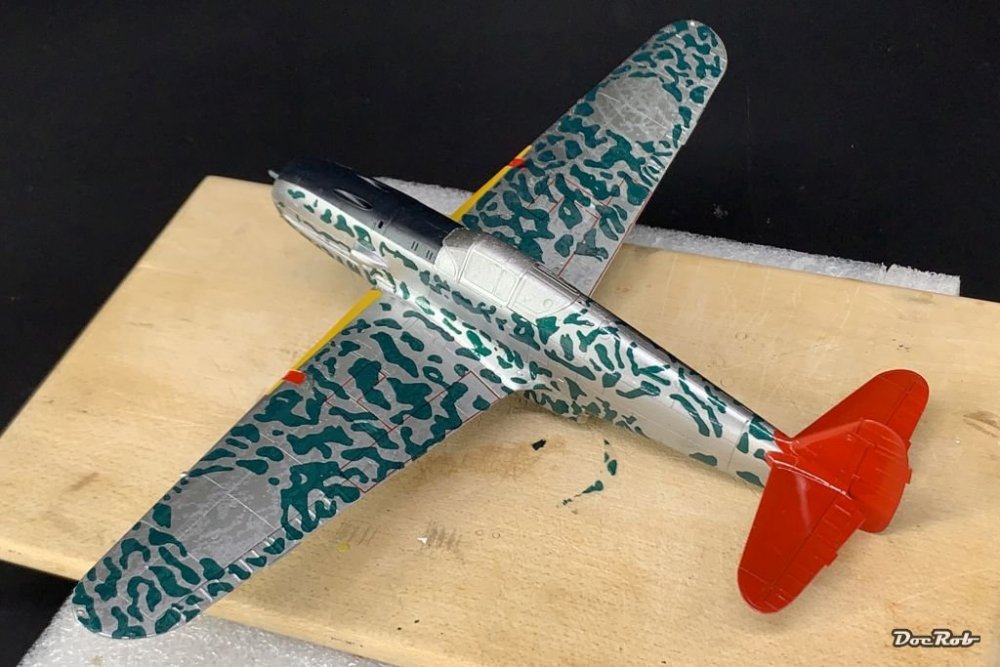
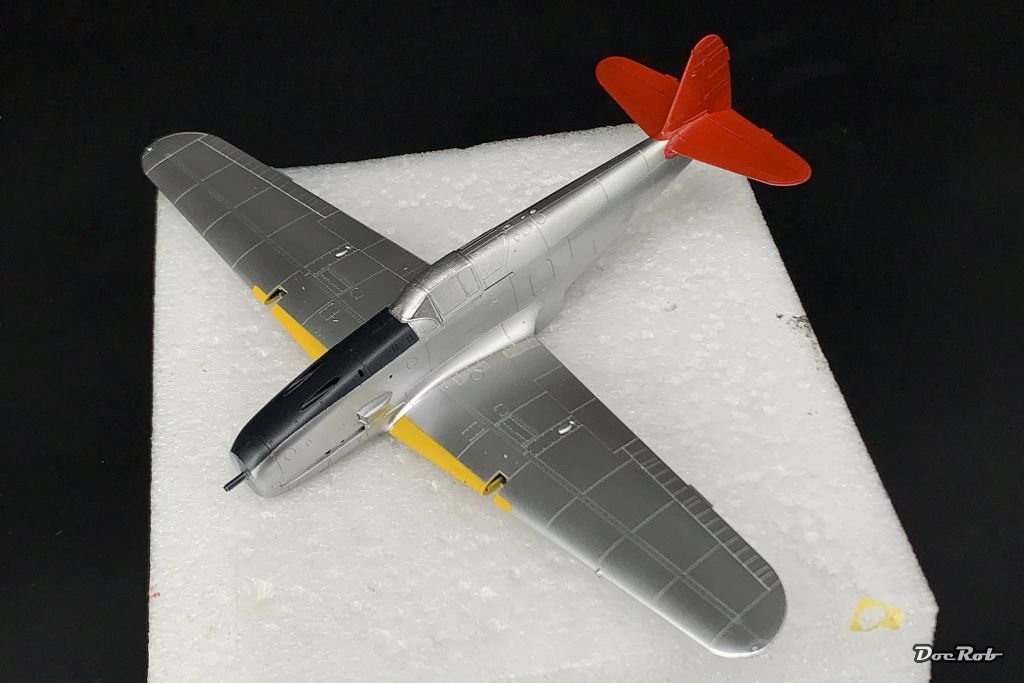
The Ki-61 is starting to look like a parrot. I added the yellow markings on the wings and wheel well covers, using AK Real Color maize yellow. First, I wanted to use the decals for that, but the gun cowling is painted red in between, and I didn't want to slice the decals over a curved wing.
To add to the funky paintjob there will be blue stripes on the fuselage with white borders, but therefore, I use decals. Don't ask me, why they painted some camo onto this vivid airframe, which could be well hidden in a candy store.Cheers Rob

-
3
-
1
-
-
Thank you Phil, I'm looking forward to the wet transfer camo as well, with fearful expectation. It's wet transfers, it's HGW, it failed to me in the past, what can possibly happen
.
Cheers Rob
-
1
-
 2
2
-
-
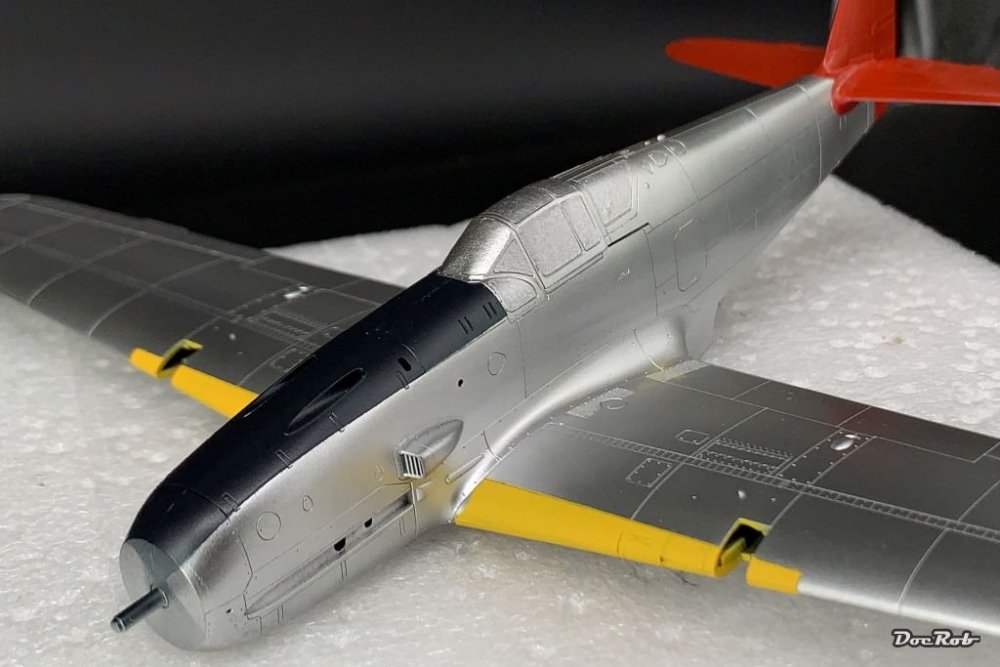
After a light buffing of the clear coat with a cotton cloth, I masked the anti glare panel and tail. The complicated shapes of the tail masking where cut on the more or less 1/48 scale paint plan, using detacked Kabuki and a sharp scalpel.
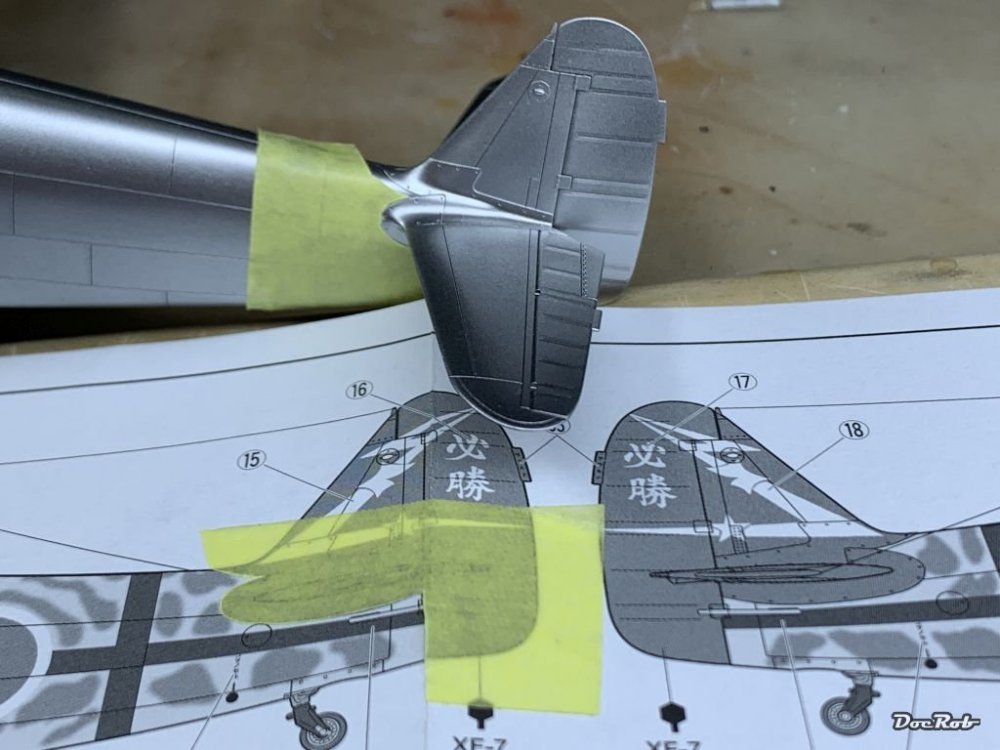
The tail was sprayed with Tamiya's Italian red lacquer, which is glossy and a good base for the decals. The same color was used on the to add gun covers. The anti glare panel was sprayed, using AK's Japanese blue black acrylic, which is indeed a bluish shade of black and should look better than pure black. Some yellow markings on the wings will be next, followed by some decals, which will be half hidden under the camo.
I intend to do as much masking and painting before applying the camo wet transfers, because I don't dare to mask on these, even with a clear coat on top.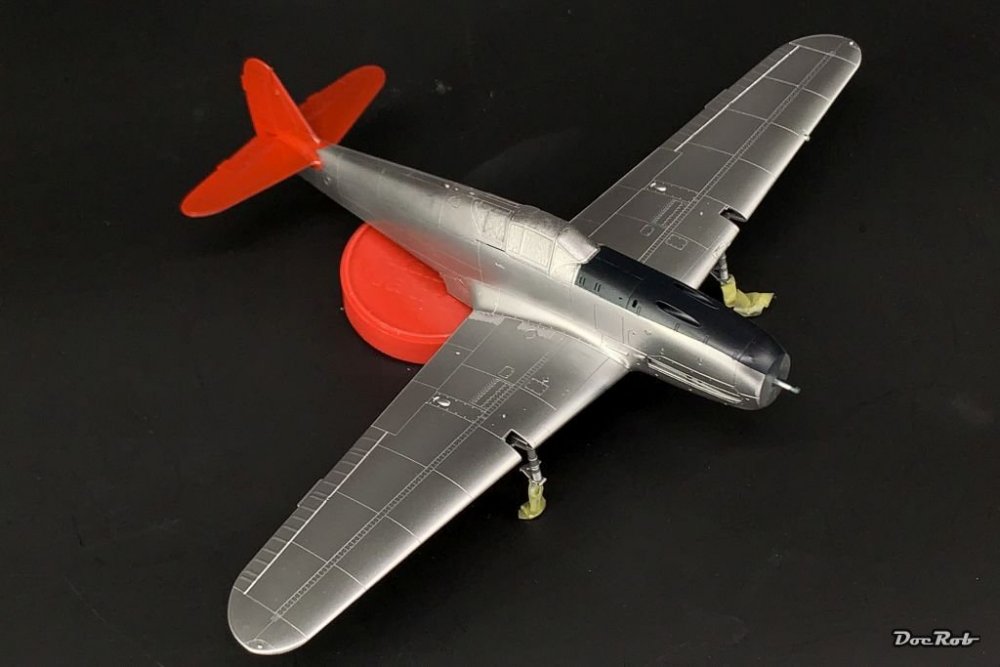
Cheers Rob
-
5
-
-
10 hours ago, Kaireckstadt said:
Should look more often into this category. I missed this completely Rob!
What a stunning build and awesome NMF!
I‘m using AK Extreme Metal colors along with Alclad and the AK colors seem to be more resistant regarding handling of the airbrushed model.
I always clear cote Alclad with Future which makes it much more resistant and reduces risks of damage by decal setting solutions. The appearance of the NMF remains even when covered with Future:Thank you Kai, your pics prove, how great NMF can look, awesome job with the Starfighter. I really like Future as a clear cote, but where Micro Sol comes into play, I'm a bit frightened. More than once Micro Sol left some cloudy areas, where it passed the borders of the decal. That's why I look for a more durable gloss coat for these occasions.
Cheers Rob
-
2
-
-
3 minutes ago, Peterpools said:
Good Golly Miss Molly, absolutely brilliant NMF - love the reflective shine and she surely gleams. Your finish is absolutely flawless❗🥇 I have to admit on my NMF's, I never use a clear gloss overcote, as it tends to dull the metallic shine somewhat unless I'm after a slightly duller, operational finish. Whether I use Tamiya X-22 or Mr Color 46, my two standard clear glosses, both are always thinned with Mr Color Leveling Thinner as both are very thick.
I feel your pain with paint and thinners turning into goo in the air brush - happened to me once to often when I use Model Air and forget to use their own thinner and AB cleaner. I now have a dedicated AB for just Model Air Paints.
I read a lot of guys have some sort of contamination problems when changing brands of paint or types of paint with their air brushes. I've thought about dedicating specific air brushes for specific types of paints: lacquers, acrylics and enamels but never did. I just do a quick strip down when changing types of paints and no problems at all.
Hi Peter, thanks for sharing your experiences. I was considering, applying the decals and wet transfer camo directly onto the polished aluminum, but decided against it. The loss of shine, you mentioned, was substantial with Alclads, when I tried. Xtreme Metals from AK seem to be a bit more lasting, concerning the shine.
I clear coated, because chrome and polished aluminum are more fragile than other Xtreme Metal tones and I have some masking, decaling with setting fluids and embedding the thick Tamiya decals into gloss coat ahead and want to be freed of unwanted surprises.I know the consistency of Model Air with any decent thinner in the AB by own experience
 , but didn't expect it with GX100 and levelling / Lacquer thinner. Maybe I have to thin even more than 2/3 thinner and 1/3 GX100, because I read, that this combo is the go to clear coat solution for many modelers. I have to perform some further testing.
I don't think, contamination is an issue, as I clean my AB very thoroughly and do not only blew some cleaner through it.
Cheers Rob
-
2
-
-
13 minutes ago, Bomber_County said:
Very interesting Rob, I had issues with Future on the F4J with silvering all over the place. I bought some Vallejo gloss varnish and was going to use it over the Extreme metals for P51……..going to have to experiment first I feel……..I similar to yourself, spraying, gloss coating and decals bring me out in a sweat…….
Hi Phil, silvering was never an issue, when I used Future. The problems arose with Micro Sol decal softener, which seemed to react with Future and became a bit cloudy. It could be healed with another coat of Future on top, after the first coat was properly cured.
There is a lot of testing necessary, with different clear coats and thinners. I wish, I could find my holy grail of gloss coating somehow.Cheers Rob
-
3
-
-
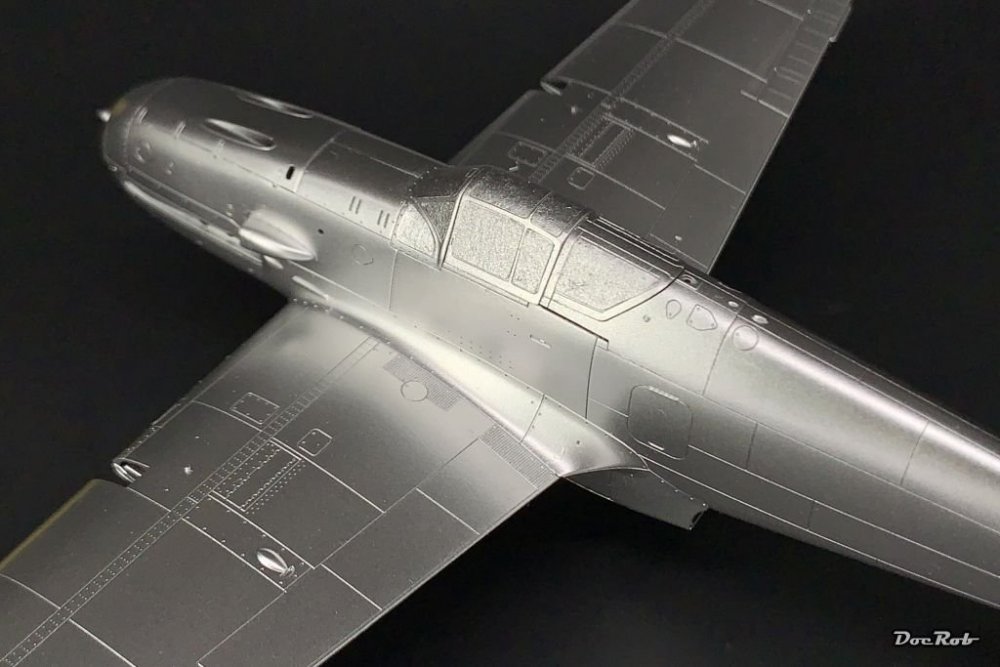
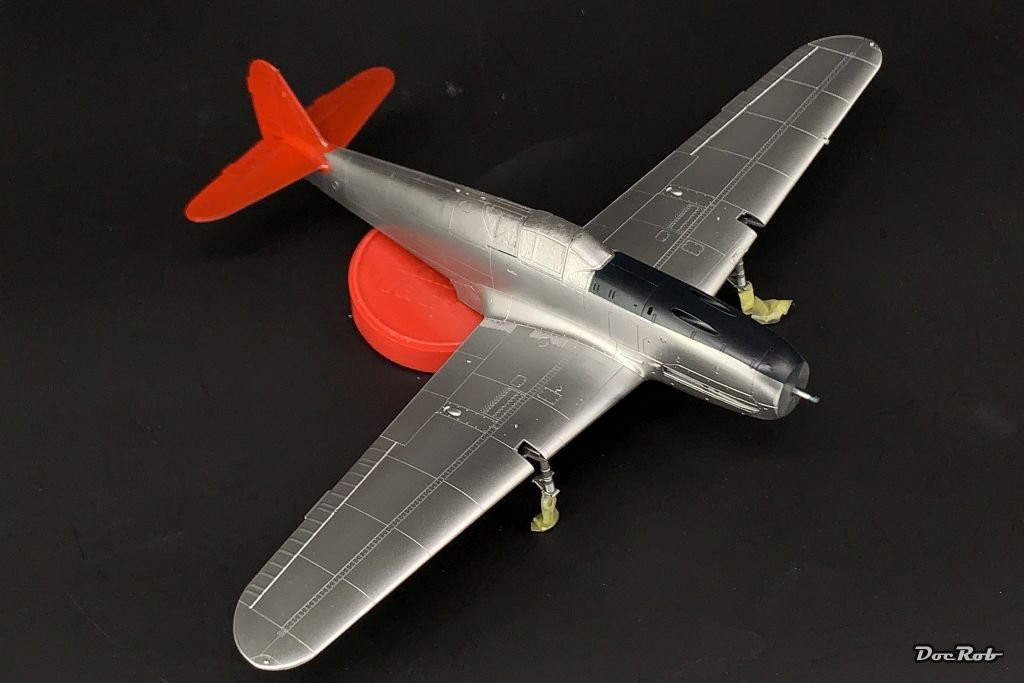
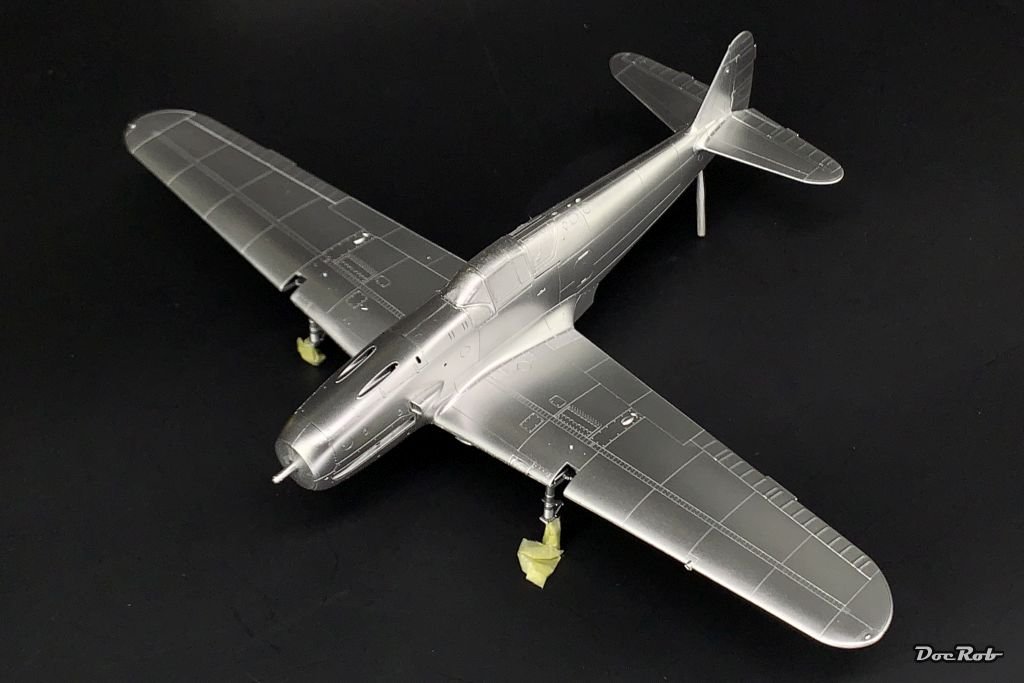
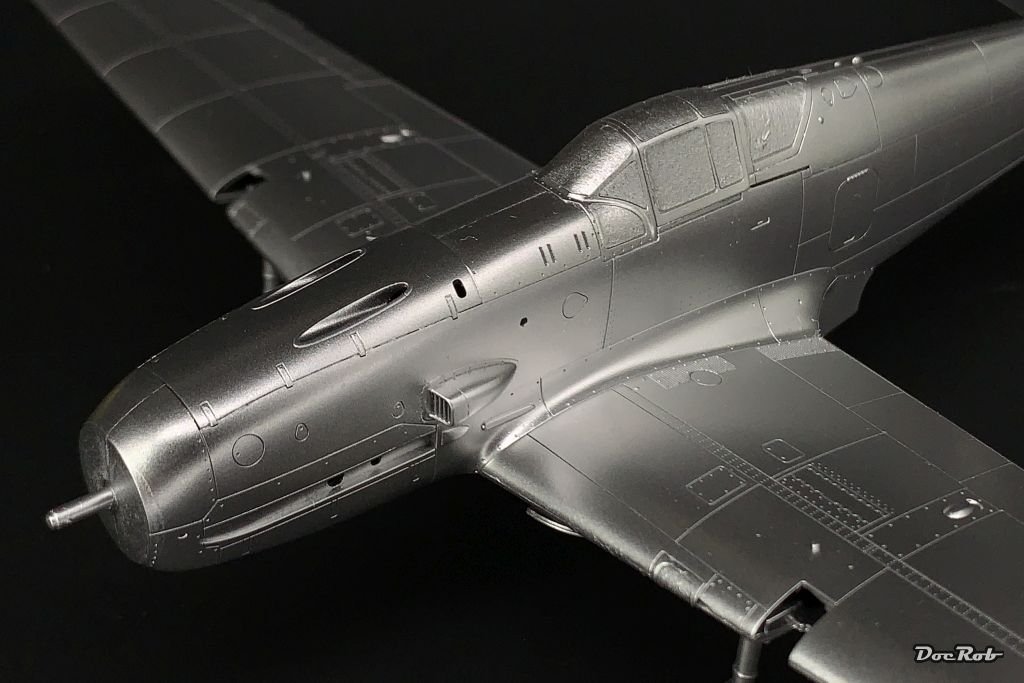
Today, I sprayed on the Extreme Metal polished aluminum, which worked great. On the pictures you see it directly after application. While curing, the shine seems to enhance. When dry, I buffed it a bit with a cotton cloth, which made the gloss very shiny. During gloss coating as a preparation for decaling, I lost a bit of luster, but it still looks great and metal like.
As I had issues with Future as a gloss coat with the application of Micro Sol to soften the decals on other builds, I tried other coatings here. I test sprayed (luckily) Mr. Color GX100 gloss, mixed with Mr. Levelling thinner and later with Tamiya lacquer thinner and got frosted results and goo in the AB.
After cursing and cleaning, I shot Tamiya lacquer clear with Tamiya lacquer thinner and this combo worked, but the mix is very hot. If you apply a wet coat first, the polished aluminum seems to dissolve to a certain grade of blackness.
I reduced the effect with firstly spraying a light misted coat, blew it dry, followed with another coat, also dried it and gave it a third heavier coat.Man, this gloss coat thing gives me creeps, like decaling, the two things, I hate most in modelling.
Has anyone of you experience, how to thin Mr. Color GX100 clear gloss?
Cheers Rob


-
6
-
1
-
1
-


Tamiya F-4B Phantom
in Non LSM 'WIP
Posted
The tail area looks good to me, if you are after a more or less new appearance Peter. . Have I told you, that I have a set of HGW wet transfers for my Academy Phantoms stencils
  . They looked so tempting, having some of the stencils grouped for a certain area. If you remove the carrier film, they will look completely separated, but who knows, If they work...
Let the decal fun begin with all these stencils
Cheers Rob