


GazzaS
-
Posts
6,396 -
Joined
-
Last visited
Content Type
Profiles
Forums
Events
Gallery
Posts posted by GazzaS
-
-
Nice work, Guy. Here I am trying to motivate myself into building a ship and you're against it.
-
 1
1
-
 1
1
-
-
Rob,
All of those metal shields look great. I don't think anyone will notice those missing triangles. Keep rocking it.
On a side note... I been watching Ron Calverly (the model ship) and I'm feeling it start to motivate me to get building on my warships that lie in wait.
-
1
-
 1
1
-
-
Looking good, John!
-
4
-
-
Nice work, Guy! The main reason I prefer indy links is because I like to have a little variation in placement for road wheels and tracks on some piece of terrain. I've got a couple sets of friuls that migrate from model to model as I save the magic tracks for that model that deserves them. Teeny tiny pins suck.
-
1
-
-
2 hours ago, Martinnfb said:
Looking real nice Peter. Check out the perforated tubular frame within the frame of Erla haube, it provided a flow of a hot air to defrost the canopy. But don't worry about that, nobody wants to know the perks of German engineering.
")
Don't forget that ZM omitted the canopy latch lever and the parts that hold the bulletproof glass to the hinged canopy.
-
1
-
-
11 hours ago, Peterpools said:
Thanks Gaz, very much appreciated.
Looking at both photographs, I can see how you handled the edge seam and where ZM missed the boat on the actually to be seen details. I'm with you and wish ZM would have devoted a lot more time and effort into the correctly replicating the visible details and left almost all the hidden details out - a waste of time and money.
I'm almost ready to button up the fuselage, added all the fuselage details, which I painted then RLM 02 only for what little could be seen through the open access panel. I decided to add all the fuselage ribs as they are what align both halves otherwise it becomes one huge unsupported butt join, top and bottom.
I used the fuselage ribs as well.
-
2
-
-
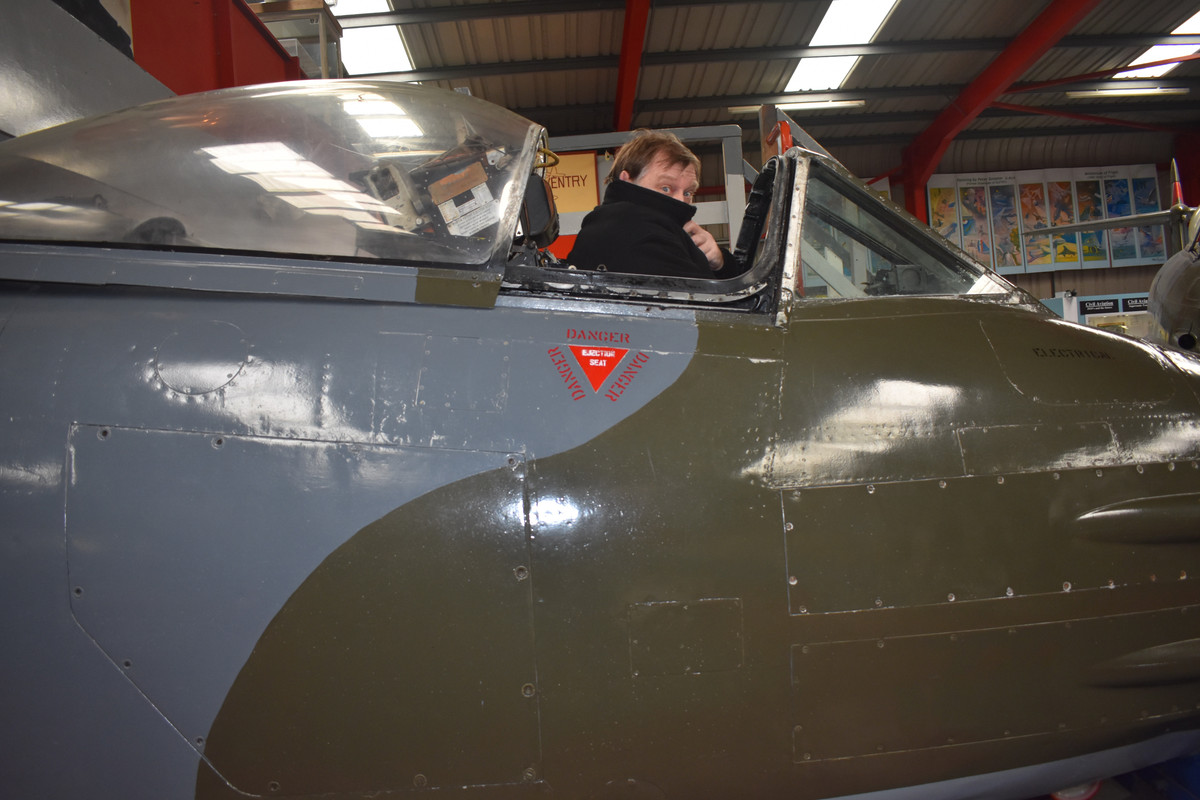
The interior looks excellent, Peter. One of my biggest hates of the model (thanks for reminding me) is the seam that will form once you put the tub into the fuselage. On both sides, just outside of the area you have devoted time and effort to, you will have a seam to fill.
Below is what mine looked like after putting the cockpit tub in and gluing on the windscreen.

But then... a little too late, I remembered it had to look like this: (don't pay any attention to the red arrow)
Note that there is no seam by his left shoulder. This is one of the things I wish zm had engineered cleverly.
-
2
-
1
-
-
Ewww.
-
Awesome!
-
2
-
1
-
-
The Kit IP and cockpit is great with the decals provided and some UV gel for the glass gauges. Seat belts is really all you need.
-
2
-
-
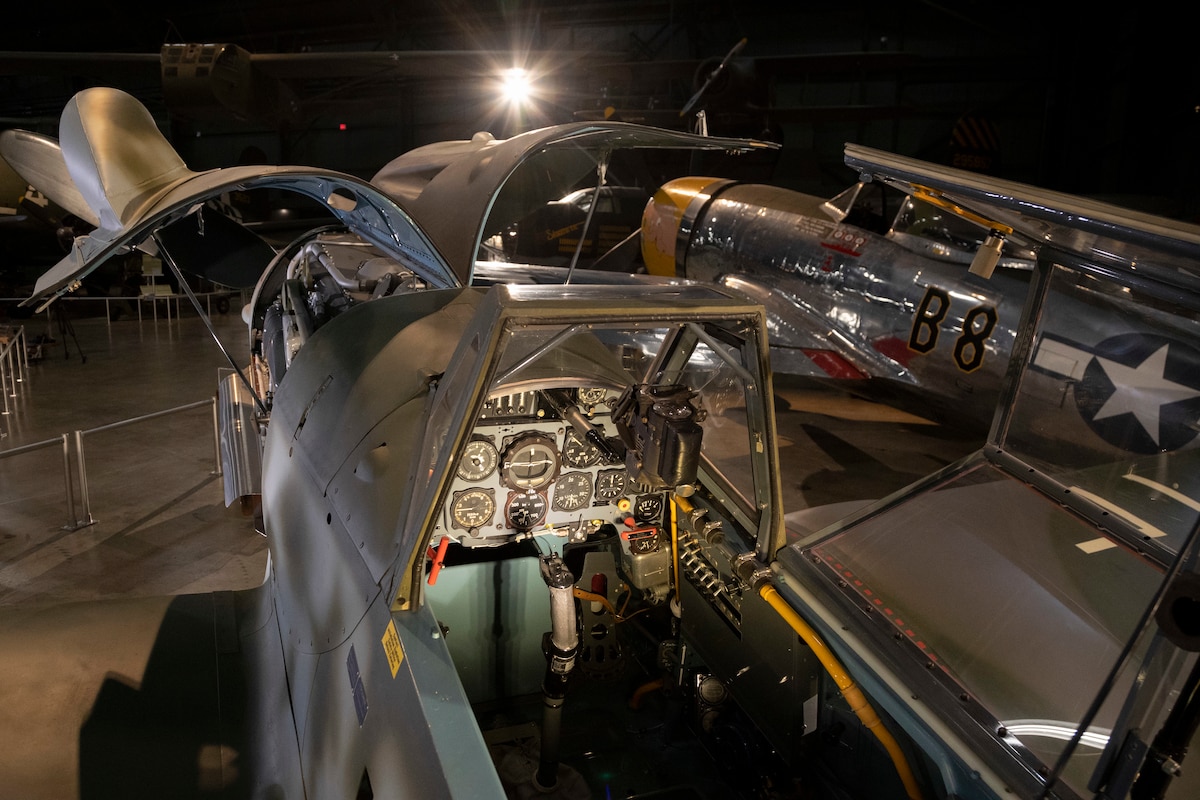
Looking good, John. There are some funny incongruities about the kit. They hyper-detailed engine and the detail-less Galland hood. The great fit of so many parts vs. that tail. Despite all of that, it's a better kit than anyone else has created.
-
5
-
-
14 hours ago, PanzerWomble said:

Quite the Sim Pit for your flight simulator game.
-
4
-
1
-
-
2 hours ago, Martinnfb said:
Gary, what if I make you a master of that eagle in epoxy? I would sculpt one and if you like it I can send it your way. Then you can cast him a little brothers.
Great idea Martin. Thank you for the offer. But it's an art I want to learn at least well enough to supplement my modelling hobby. I have dreams of making authentic looking battle damage. Not something that looks like a few pieces of twisted, drilled, or cracked plastic. But of punctured and twisted metal that suggests and aerial battle followed by either a crash landing, or a narrow escape to be gawked at by ground crews.
Who knows... Maybe I'll make some jewelry or something I can sell one day.
-
3
-
-
On 3/21/2023 at 7:41 AM, Martinnfb said:

With the arrival of the Kotare Spit. everything else got put on hold. Now that I'm waiting on oils to dry and another stretch of workdays, I won't touch it until the weekend at the earliest.
Chasing and Repousse. That's pronounced Re-pooh-say.
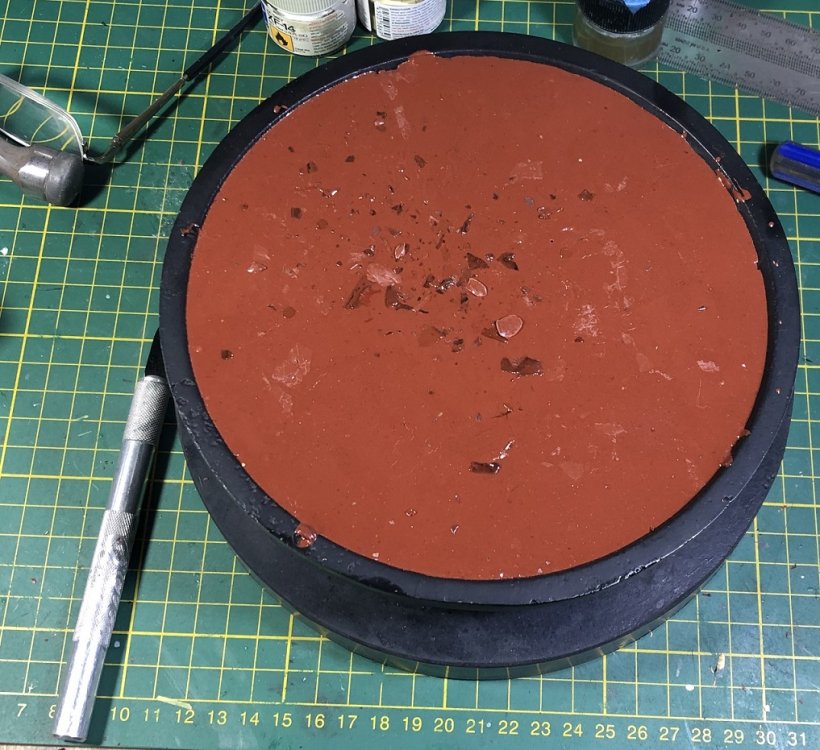
My dearly beloved got me a cast iron pitch bowl and 2kgs (4.4 lbs) of pine pitch resin. The resin arrived in a rectangular tin and had to be smashed into bits and slowly melted into the bowl. This was done in the oven at around 220F... or 107C.
Here is my bowl and the red pitch:
Chasing and Repousse is how they make fantastic artworks like this:
Like Martin says... 3 clicks for best resolution.
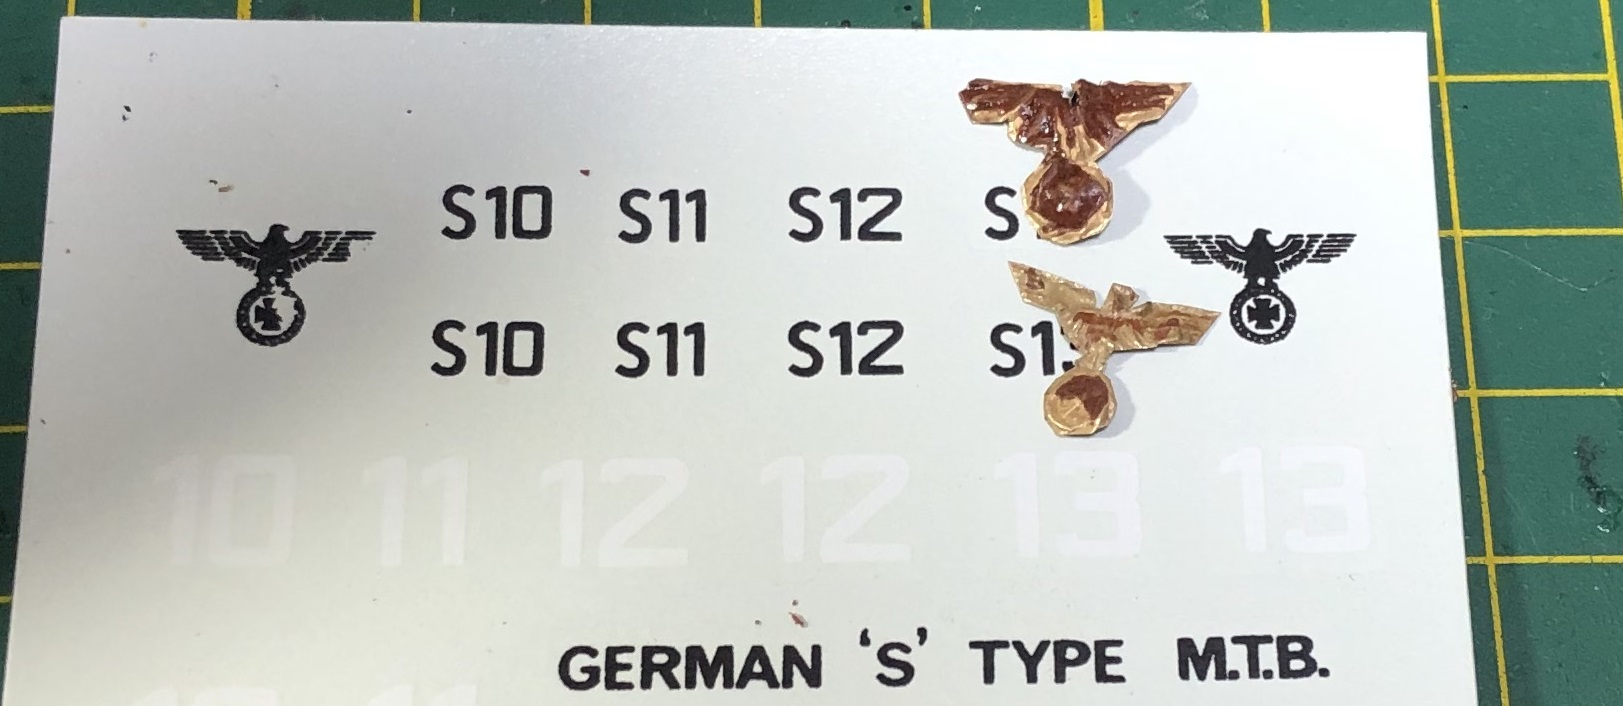
Now, I spent part of this morning trying to make two brass eagles for my s-boat. They are only 12mm by 9mm. Or, 1/2 inch wide by 3/8 inch tall. There are a couple ways to work... you can work from the backside, or the front side. These little guys were from the backside and ended up just a little too big... and ugly.
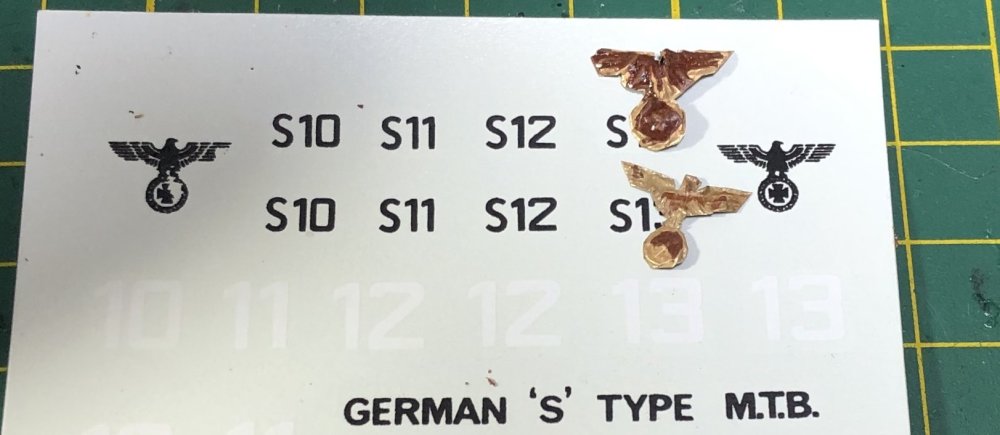
The brown on them is leftover pitch. I tried to melt it off them, but it caught on fire. You can see dark flecks of it on top of the pitch bowl. I don't want to waste any of the pitch, because it ain't cheap. Apparently you can remove it with solvents, but that means any pitch you remove that way is lost for good. I was hoping not to have to buy another block of it.
Anyway... I'm still working on it... Martin.
-
4
-
-
Wow, that Bofors looks great!
-
2
-
-
wow, Rob, she's looking awesome! I'm so far behind in paying attention. You've really been smashing it out.
-
1
-
1
-
-
Great rescribing, Carl. It's still my most hated model related task.
-
2
-
1
-
-
Chris,
Great job attaching the wing. Looks like an airplane now!
-
2
-
1
-
-
Great job on this. Polished plastic... who woulda thunk it.
-
2
-
-
On 3/26/2023 at 3:58 AM, PanzerWomble said:
Ground to a halt here ...really struggling to find any joy with this build.......... tiny blobs of plastic pretending to be detailed ....so I'm parking it on SOD for now . I'll cycle back round in a bit and finish it off before the end of the GB but I need to go do something more intesting . It's answered my question as to whether 1/350 ships are for me ...so glad I didn't flash out $000's on a large Hood or some such . Bit like 1/72 for me - after two builds last year decided I wasn't interesting in the low levevels of detail offered by that scale either.
Sorry to see you docking this. i was looking forward to the result. i can tell you from personal experience that the dragon kits offer a lot more detail with less blob-fakery.
-
3
-
-
5 hours ago, Martinnfb said:
Lovely work on the exhaust,( just like the real thing) Gary. This kit is making me droooool
(pictured Mk.V)
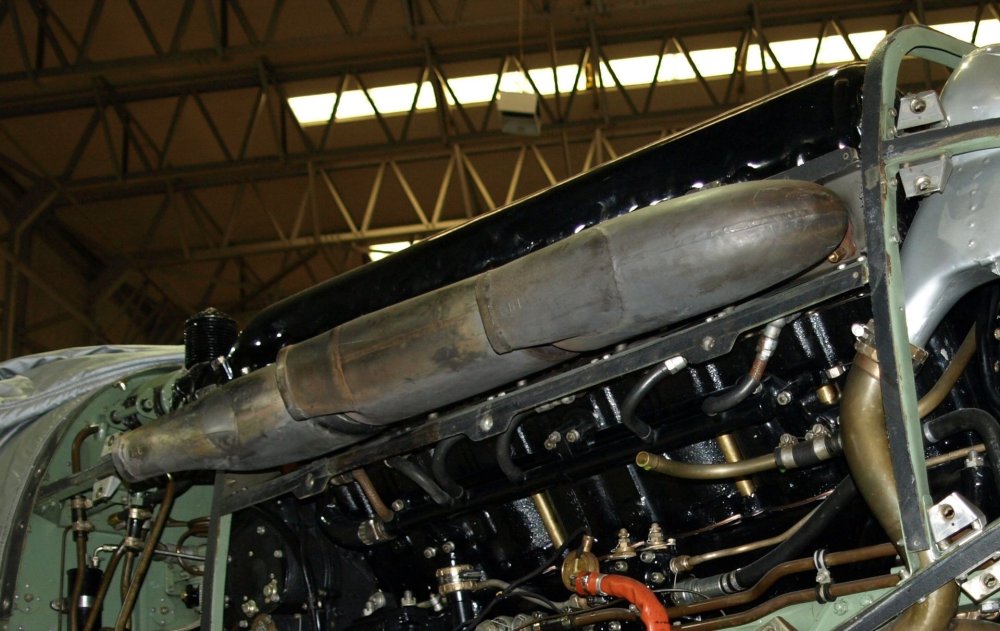
Thank you, Martin! You are the king of reference photos.
-
4
-
-
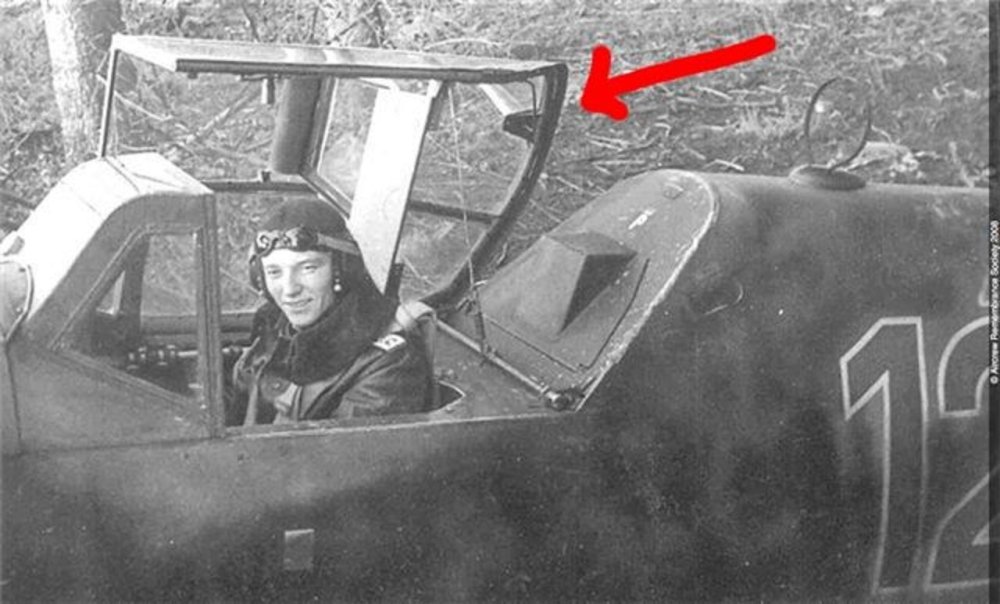
8 hours ago, Martinnfb said:
“Direct vision panel”
Manual says: 'If the hood cannot be opened for any reason such as icing or combat damage, a break-out panel is fitted to the hood which, when pushed out with the elbow or flat of the hand may improve visibility'
don't ask
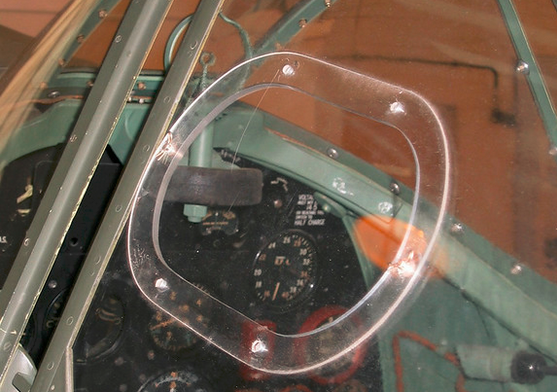
What am I not supposed to ask about? Did you climb on it? Great photo! heh... just noticed the ring sight in place of the reflector sight.
-
2
-
-
9 hours ago, Bomber_County said:
Gaz, stunning build, my only Spit build was probably early 70’s, so like yourself I owe myself a Spit build…….
8 hours ago, Peterpools said:Gaz
Awesome progress and thank you as always for all the photographs - they answer so many questions and highlight the progress you're making.
I see what Rob is pointing out about the seatbelts and on my kit, I'll be using the kit ones as well but will try thinning them out and adding a sag or two. Not sure if it's possible but I'll try.
Of Course, still waiting for my Kotare Spitfire to arrive.
Thanks guys. It's really an awesome kit, and I'm glad I bought it. I may have to do another one eventually. It's simple and the fit is great, so it goes together quickly. If I had a certain plane in mind, I could paint it today. But since I'm still looking for that perfect inspiration and the oiled parts will dry for a week, I don't have to rush.
-
5
-
-
54 minutes ago, DocRob said:
Nice progress Gary, and interesting with your problem solving. Well the spine gap, I guess the light came from above when pictured and will not show as much under paint and decals. The exhaust look great, I wonder if the real thing was made from stainless steel sheet and that's exactly the look you achieved.
Somehow the only thing which nicks me, are the seat belts. They look rubberish and false springy to me, but that might be lighting and shadows playing tricks.Cheers Rob
Thanks Rob. I have been informed that the exhaust were made of an alloy called Iconel. Lots of nickel in it, apparently.
-
5
-


1/35 Border Panzer IV Ausf J .Completed
in LSM 1/35 and Larger Work In Progress
Posted
Oh, that looks awesome. I find a lot of uncaptioned photos on farceb0ok. Only the last is known to be 9th Pz Bulge. Submitted for your casual perusal.