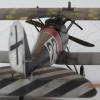
Umlaufmotor Posted November 23, 2013 Posted November 23, 2013 When viewing great models, I often asked myself the question: How does he do this?Well, unfortunately, I do not ever got a satisfactory answer.Often I was sent away at shows from the "masters" with the words: I will not tell my secrets to anyone.Frustrating, BIG frustrating. But.............Ok, remains just left everything to work out themselves. Easier said than done.But the direction is, carefully note the images in the data profiles, try to find original photos as many as possible.Every tiny detail counts in the images!! The excellent Windsock Datafiles, the Wingnut Wing webside, the vintage Aviator ore other diverse Websides.There is plenty of good material. So, now enough waffling.To anticipate, I'm not a fan of modeller mysteries and secrets. For this reason I would like to show you some of my techniques.Most of it is realy easy and simple.Often I just came Coincidentally at a good result.Try it if you like it - if it does not please you, then do not try.I am sure that many of you have their own method to represent faithfully a good model.It would be great if everyone would contribute to that, the "Hints and Tips" pagewould meet with life and sharing his secrets with us all. And please, be not angry with me because of my bad english - google translator.... So, finally to work.During the great war, it was common to repair passing shots in the wings with fabric.Many times these repairs were decorated with cockades, iron crosses and date, some times only with a piece of fabric.Original images give information. Here in this case, a run-down and battered Jasta 37 Pfalz D.IIIa.The original images are from the WNW-webside. I used leftover decals (Balkenkreuze) to represent the patches.The decals were painted with Gunze "Sail Color". Then sealed with glossy varnish. The position of the patches was marked with a pencil on the model. Well matched pieces are cut out of the decals. The painted decals behave just like normal decals.The repair patches are now attached to the positions as shown on the original image. After the decals are in place , leave to dry thoroughly. Do not forget the underside of the wing also needs to be repaired! Then seal with clear lacquer.Now some weathering - done. Looks convincing , does it? Servus Bertl 4
Administrators Fran Posted November 23, 2013 Administrators Posted November 23, 2013 Fantastic tips!!!! thanks Bertl. Francisco
Daywalker Posted November 23, 2013 Posted November 23, 2013 I have read some very good and informative tips from you today, thank you so much for taking the time to document and share them with us!
Administrators JayDee Posted November 23, 2013 Administrators Posted November 23, 2013 Another superb 'how to'. Can you tell me how you get that realistic leather effect on the edge of the cockpit exterior?
Umlaufmotor Posted November 24, 2013 Author Posted November 24, 2013 Of course, James. I used a very thin Resin saw. After this, the cockpit rim was polished with steel wool until the sawn edges were slightly rounded. I used various medium brown and light brown colors to paint the leather rim.The wells were accented with dark oil color broth. Finally, I painted the buttons with Mr. Metal Color "Brass"...........................with the Spite of a toothpick. ---- And many thanks to all for your kind words!!!! Servus Bertl

Recommended Posts
Create an account or sign in to comment
You need to be a member in order to leave a comment
Create an account
Sign up for a new account in our community. It's easy!
Register a new accountSign in
Already have an account? Sign in here.
Sign In Now