

dr_gn
-
Posts
145 -
Joined
-
Last visited
Content Type
Profiles
Forums
Events
Gallery
Posts posted by dr_gn
-
-
I never learn. Building two kits at once takes at least three times as long as building them one at a time, but whatever; the Mosquito is more of an experiment, right? I wanted a grey/green Spitfire to go with my Mk.1, and since I've been a bit Beaufighter curious for a while, when I saw this I thought it would be rude not to get it:
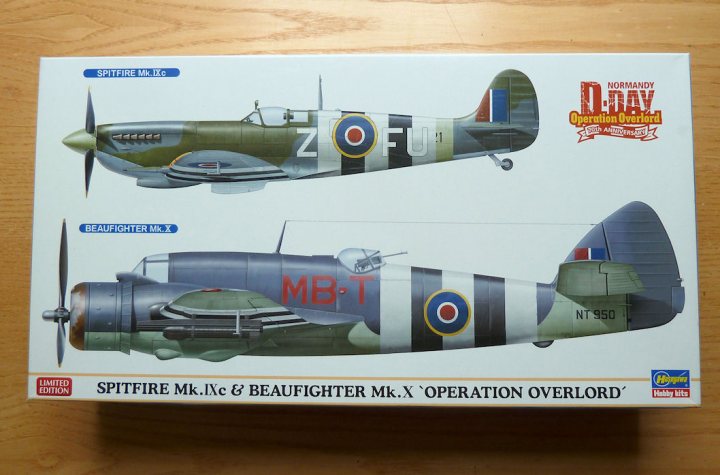
I believe the Spitfire dates from the '90's, and comprised relatively few parts, and pretty sparse interior detail. This won't be much of a problem with a closed canopy though: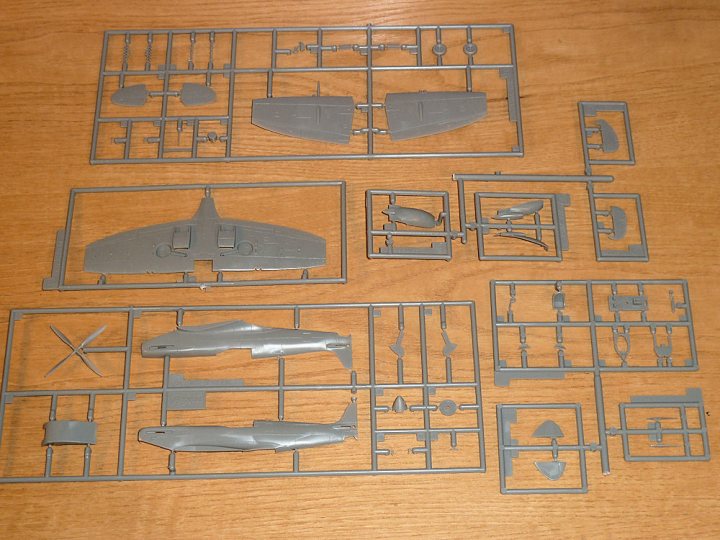
With the exception of some seatbelts, this will be OOB (really this time), although I'd like to finish it without invasion stripes, so I've got some alternative decals in the pipeline.
An hour of cleaning up the parts allowed pretty much the whole model to be assembled with Tamiya tape, with very little evidence of any significant gaps or fit issues. One of the cannon fairings had got broken in the box, but a bit of work with a drill and brass pin will soon fix that: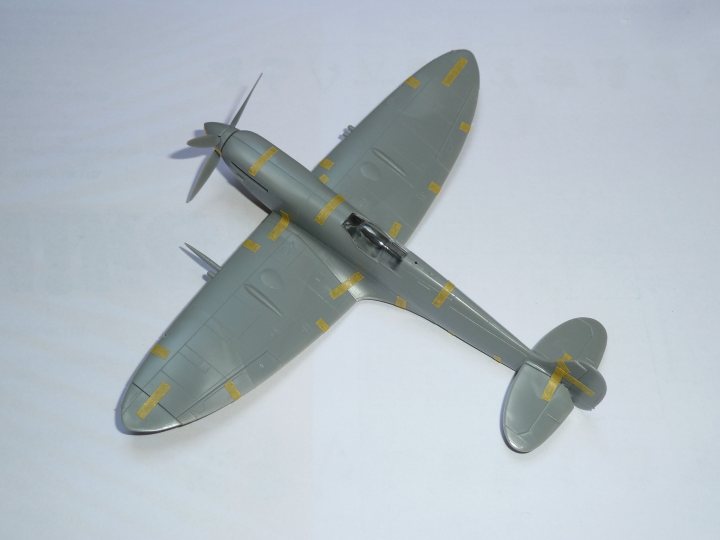
A decent 1:72 Spitfire is always a good model to build... -
I'm still figuring out the subtleties of woodgrain. Alex from UvdR has been very helpful with this, although his work is do damned good, and he makes it look so easy, it can be a bit overwhelming to try and match his standards.
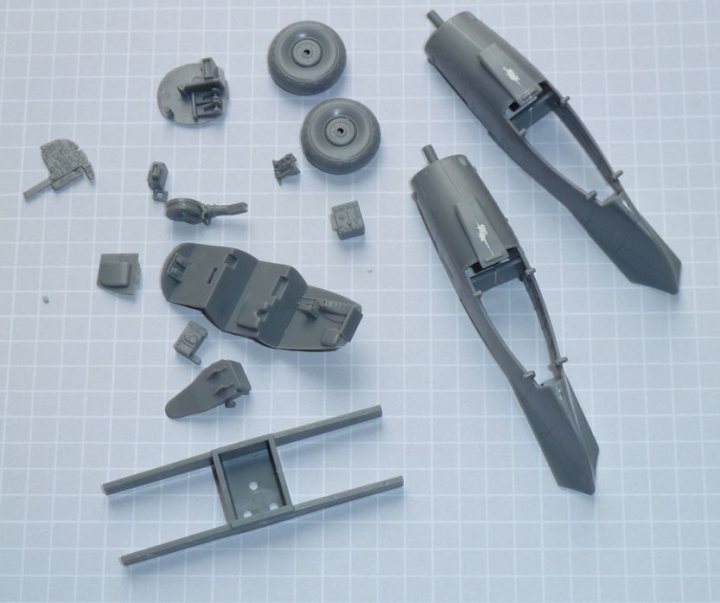
Anyway, in the meantime I made a start on cleaning up the cockpit parts and assembling the engine nacelles etc. There are a few ejector pin marks still to fill in the wheel wells, and I'm not sure if the ones in the cockpit are covered by random bits of office furniture or not, but it looks OK so far:
-
This illustrates the problems I have with oil paint woodgrain (and why I was keen to try decals):
The first panels I did (the lighter ones) were masked off and more oils applied in another direction.
1) It's very difficult to judge the amount of oil paint to remove during the graining process. The second panels are much darker than the first, even though I assumed they'd look similar. As it stands there is too much contrast for my liking.
2) Even though I used Liquin drying medium again, the paint hasn't dried. The first panels went matt within a few minutes, whereas these look like they could take weeks to set, judging by how similar they look to my SE.5a parts did (in terms of sheen). Obviously there can be no masking before the oil is fully cured.
So there you go. I wondered whether to try using enamels instead of oils for the grain, after all its a dissimilar paint to the acrylic basecoat, and has the same thinners, but they dry predictably...so why not? In fact why use oils over enamels in the first place - it's not like oils are widely used in model aircraft modelling to start with?
A long way to go with this one I think.Alex from UvdR has very kindly been offering me some advice on how to perfect these techniques, so I'm sure with a bit of guidance I'll get a nice result.
At present, I'm working on painting the interior. More updates soon hopefully. Ta.
-
 3
3
-
-
I guess I convinced myself that this wouldn't be that difficult to do. But it actually is. First off: Do some test pieces for woodgrain decals and oil paints, then compare results.
Decals: Paint and preshade base colours: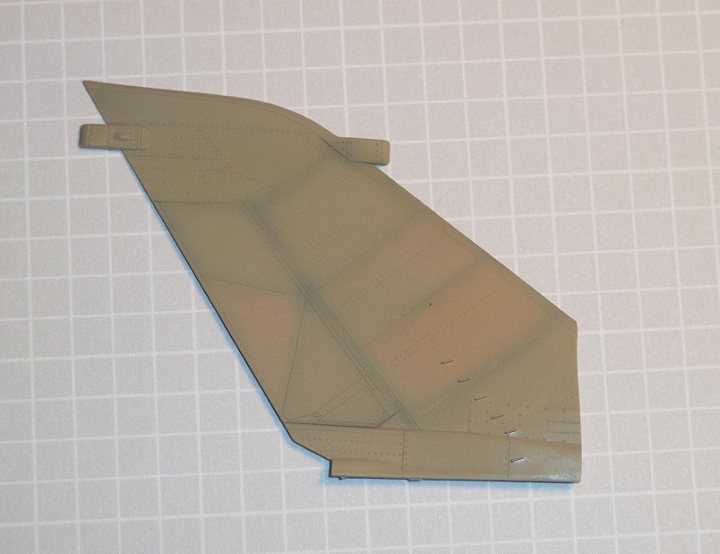
Then cut a mask for the panel: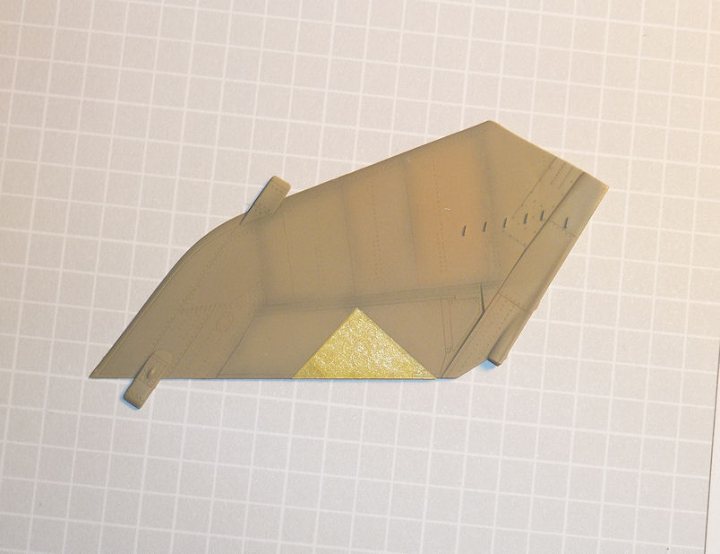
Transfer to the decal paper: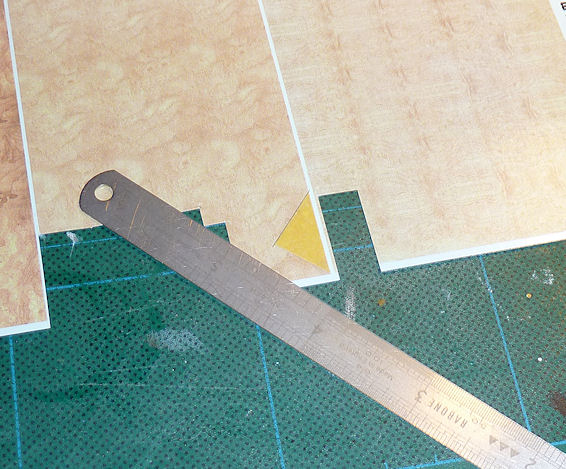
Cut out and apply decal (+repeat):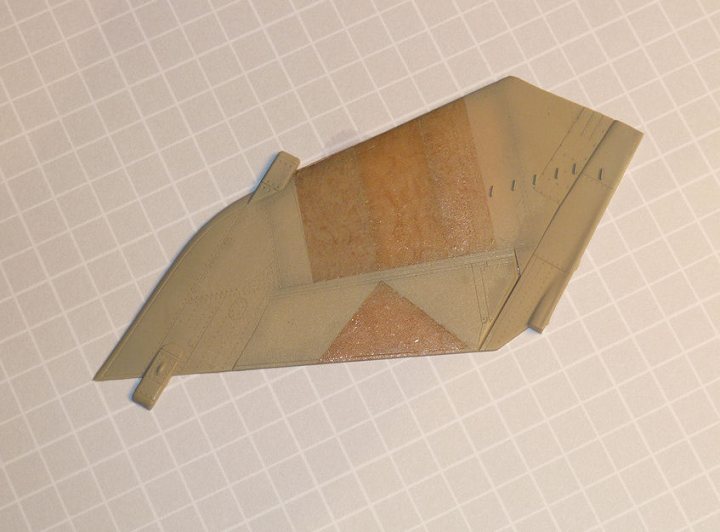
Oils:
Basecoat, preshade, mask and than add wavy lines of oil paint: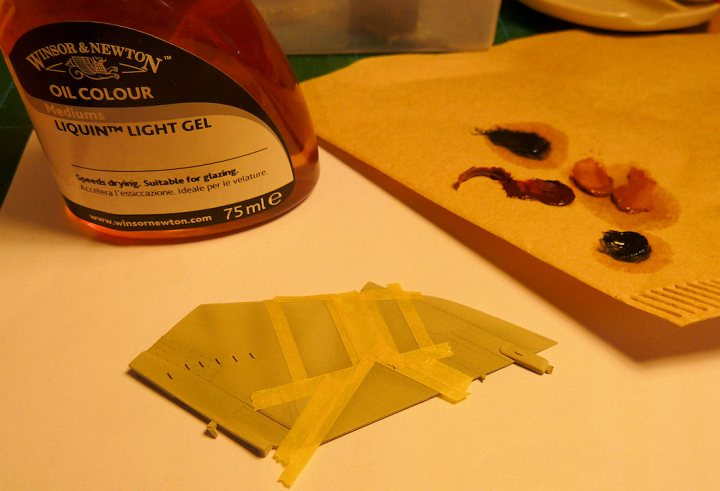
Results: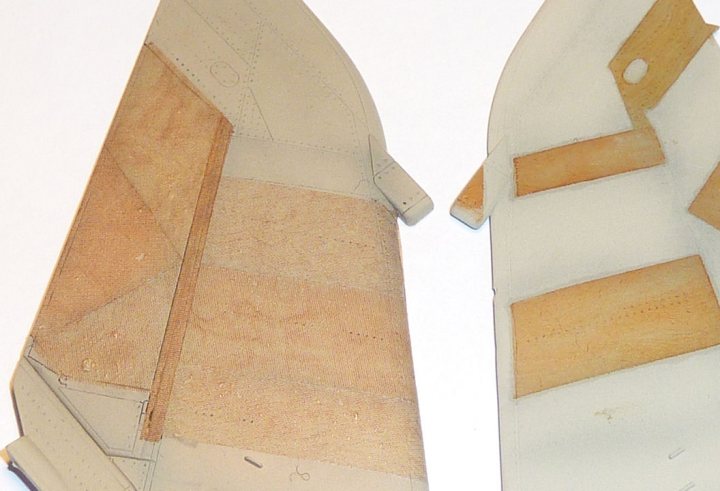
So the decals tended to blister, and they are not as nice a colour (too pink IMO). The woodgrain effect is very nice, although there is no long grain decals so I can't get the herringbone effect apparent on certain adjacent panels. Alex from UvdR has offered to try and print some long grain to try, so we will see how it goes. One big problem with the decals would appear to be cutting them around small access panels which need to remain base colour (silver). The decals are extremely fragile, so masking and painting these bits last would be a very risky business.
The oil paint method looks nice enough, but takes ages to dry (although I've experimented with W&N Liquin this time to try and speed it up), and again it's a very fragile finish and more masking is needed becasue each panel needs masking and painting individually. However, I've found that small details can be msked over with latex and the oil paint removed very easily, then cleaned up if necessary with white spitit on a fine brush.
So...pros and cons for both methods. I'm erring towards hand painting in oils, but I do like the grain of the decals... -
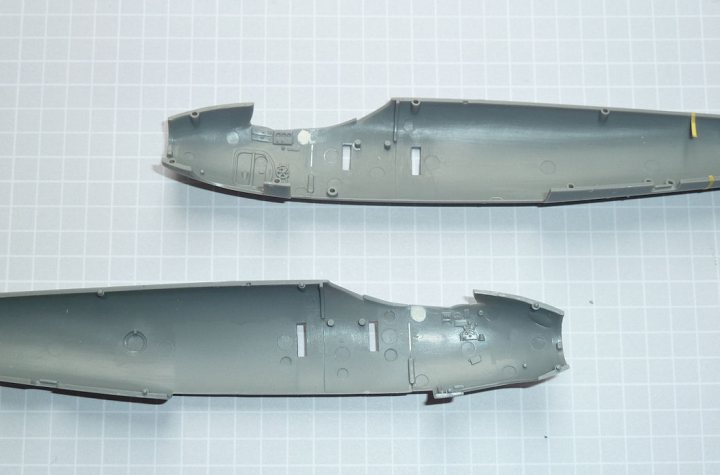
I made a start on trimming and fitting the main sub-assemblies together. I'll probably be deviating from the kit assembly plan quite considerably in order to make the woodgrain decal demarcations easier. This is where a perfect fit of the main components is important - no way I can use filler. Since there was a longitudinal split down the fuselage on the real thing, my intention is to finish each half, then join together during final assembly. Time will tell if this was a good idea. At least if the decals don't work first time, I can strip the whole thing and start again with the minimum of hassle.
Two identical "C" sprues for each nacelle, I thought Tamiay had mistakenly moulded four identical propellers, but someone pointed out the are early (pointed) and late (wide) bladed versions: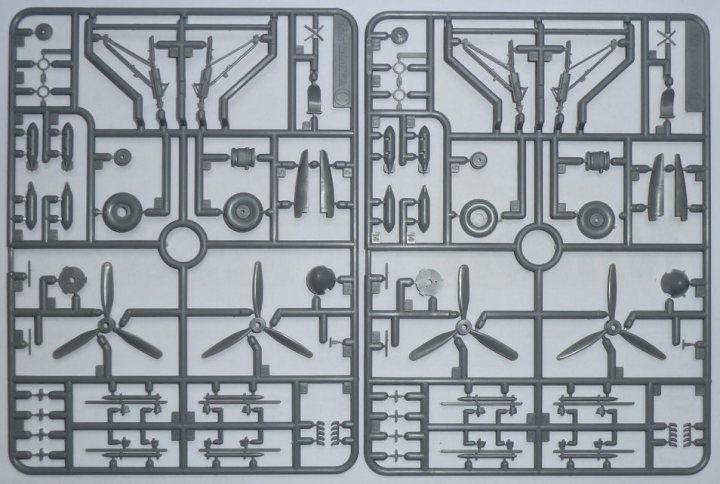
Fuselage halves are split to allow different nose versions. Again, the front sections snap into place leaving little sign of a join: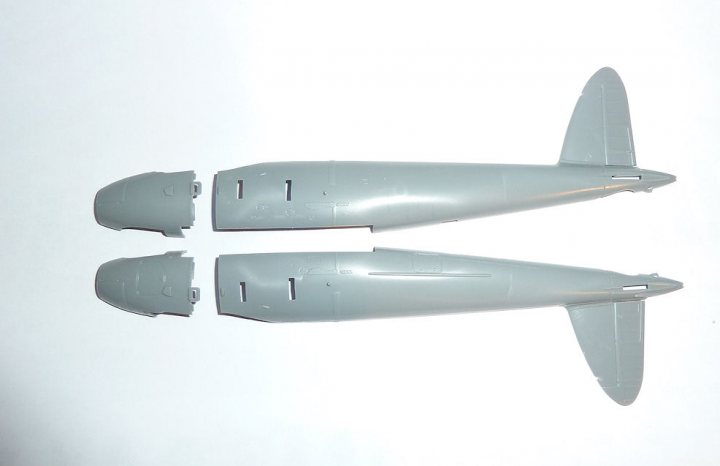
Wings, nacelles and nose sections glued together, all taped together dry to check fit: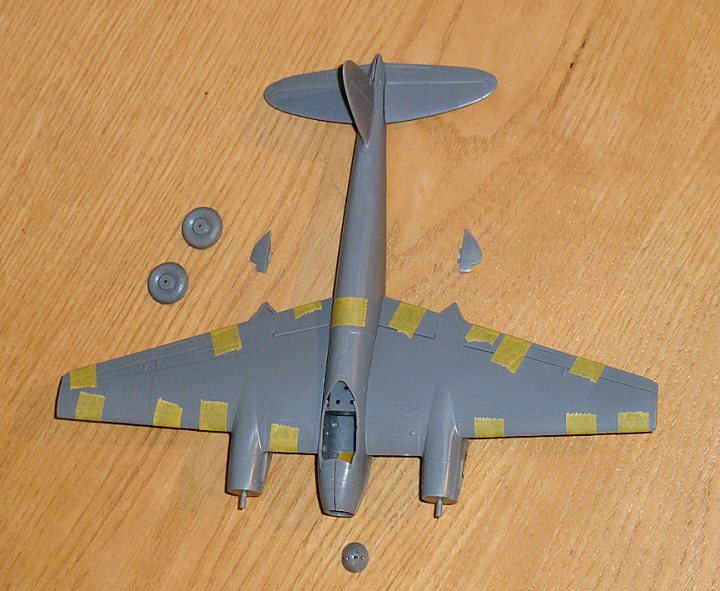
-
Hello All,
This is mt first WIP thread here. I did submit my completed WnW SE.5a in the early days of LSM, but I'm afraid since then I've been mainly modelling 1:72.
Anyway, this project was started recently, and featured on Quitmodeller until recently...that's another story I guess. This is the story so far. I thought starting a build thread would motivate me to at least get on with the preliminary research, but more on that later...
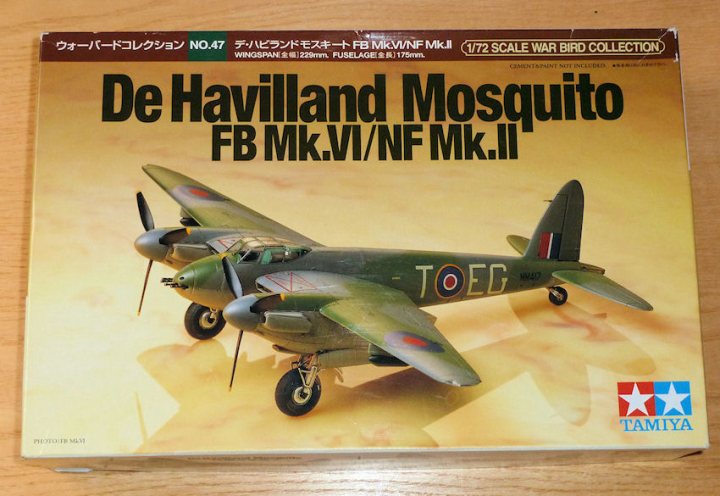
Usual Tamiya quality, looks like little or no filler will be needed, which is a good job in this case...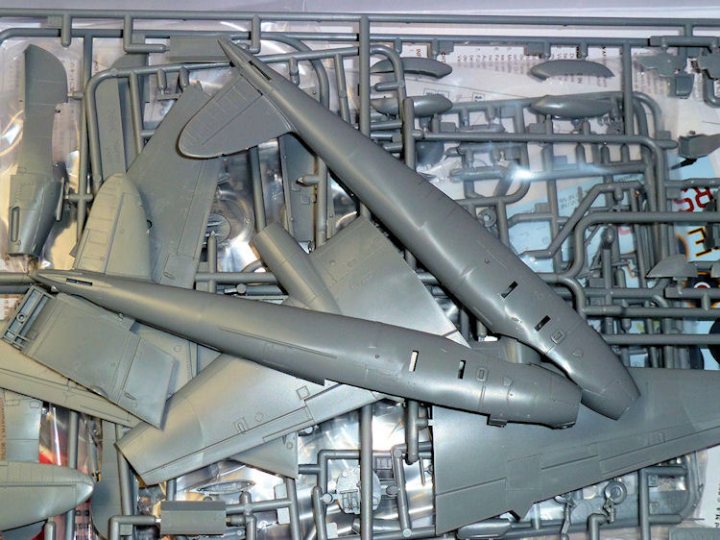
I also went for the simple Eduard etch set, Master Model brass machine guns, and as an experiment in time saving (ha ha) a set of Eduard pre-cut canopy masks: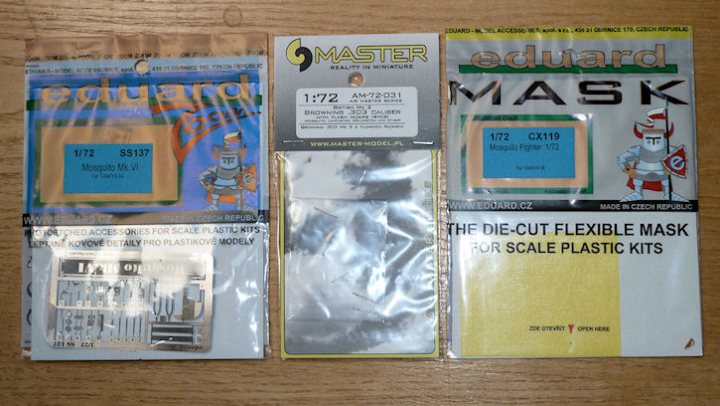
Even though the Mosquito is undoubtedly a beautiful aircraft, in model form I think it can often look a bit bland and “seen one seen them all” –ish. Maybe it’s because of the lack of surface detail to break up the wooden airframe skins, I don’t know. So I’ve decided to finish mine in unpainted form, just a bare wood finish with the appropriate bits finished in aluminium, steel and fabric. I realise that this would never be possible (or extremely unlikely) in real life due to the way the aircraft was assembled and finished, but the idea is to give an impression of the different materials used in construction. I’ve seen a couple of Mosquito models either semi, or completely finished like this, but none are particularly accurate as far as I can tell. Anyway, with all this in mind, I got some Uschi woodgrain decals (more on this later):
And I’ll probably be using these in conjunction with the oil paint method of simulating woodgrain on certain features, as I did on my WnW SE.5a here: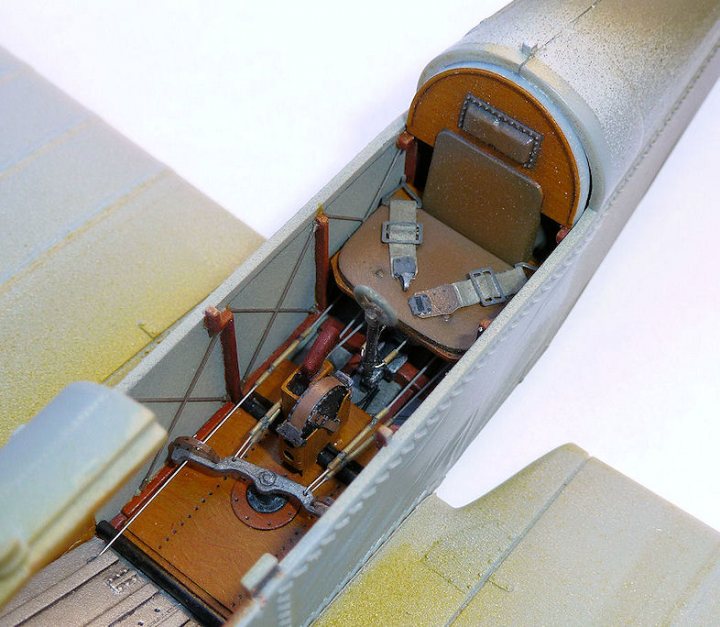
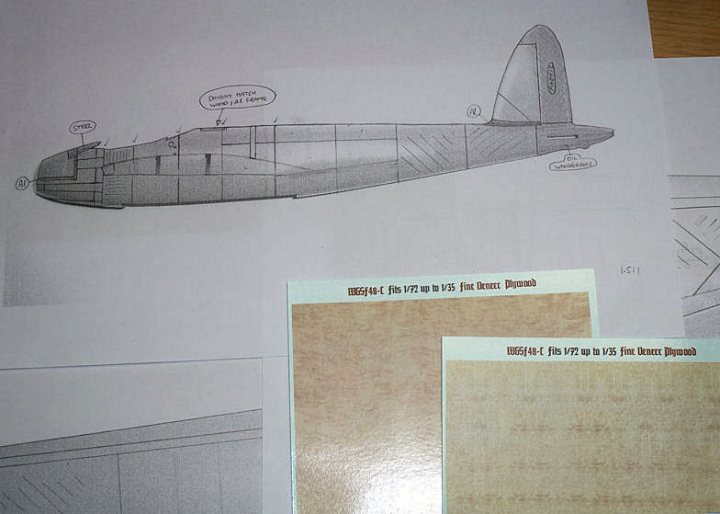
...and Vallejo Air Silver (for the ailerons, elevators, nacelles, various fairings and covers), a CDL colour (for the rudder, which was fabric covered), and Vallejo Air Steel (for the forward cockpit armour). The Interior will be painted as normal, as will the propellers.I made a start by sketching the various panels onto photographs of the kit fuselage and wings. It’s not at all easy to figure out the panel breaks from reference photographs, but I’m getting there. In reality there would be hundreds of white dots all over the skins where the outer ply sheets were screwed and the heads filled, but I’ll not be including these:
-
Hello all! I think this is my first post since day one on the forum, with my WnW SE5a. I've not done any more larger scale stuff since then, but wanted to support the forum, so if it's OK I'd like to share a few of my 1:72 builds occasionally?
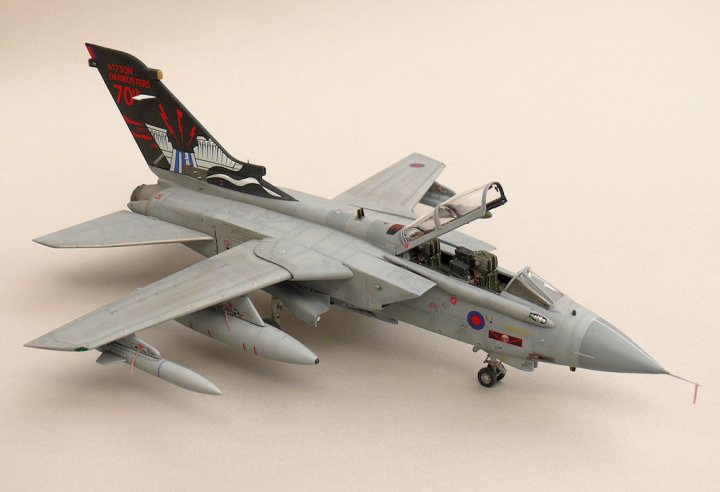
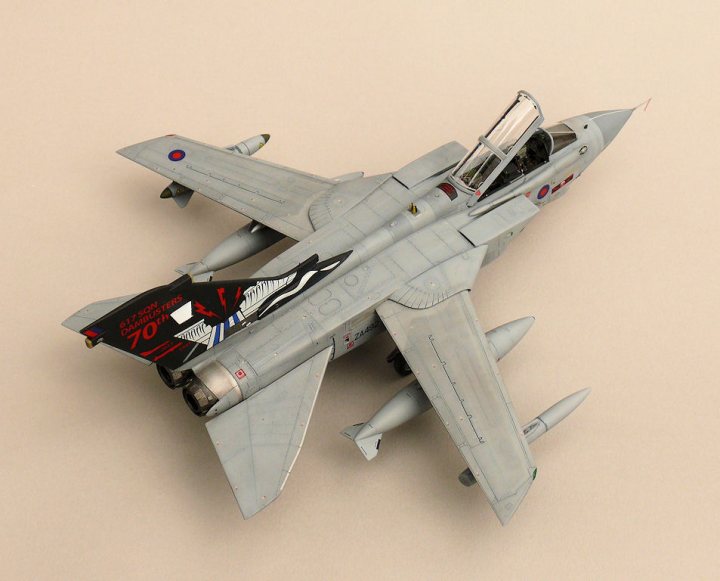
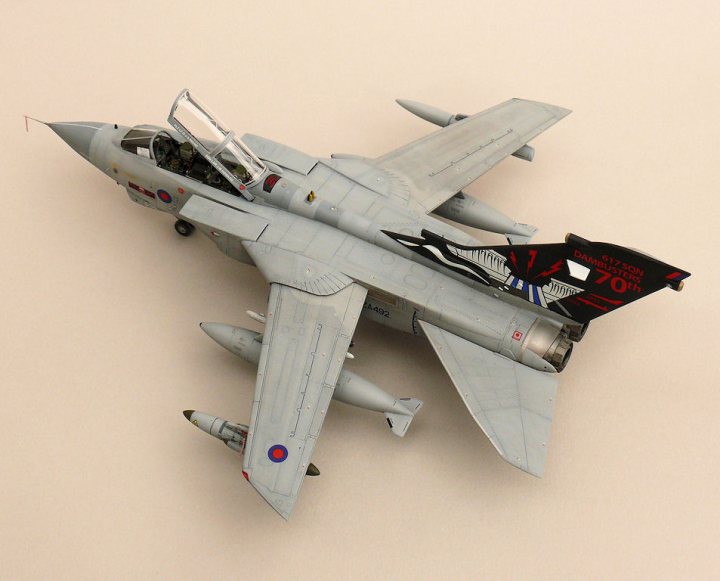
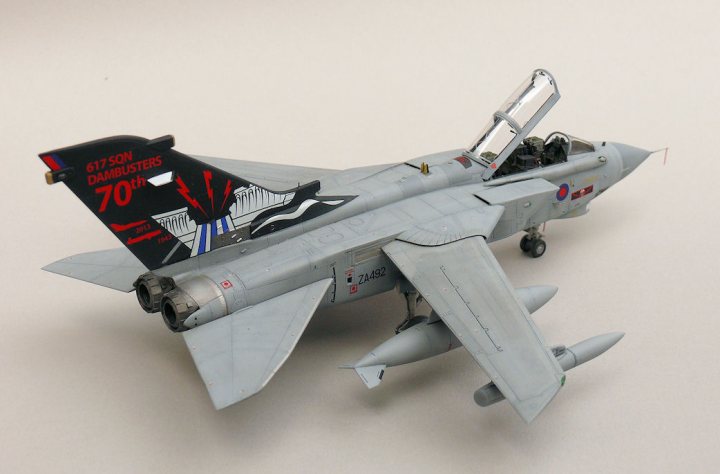
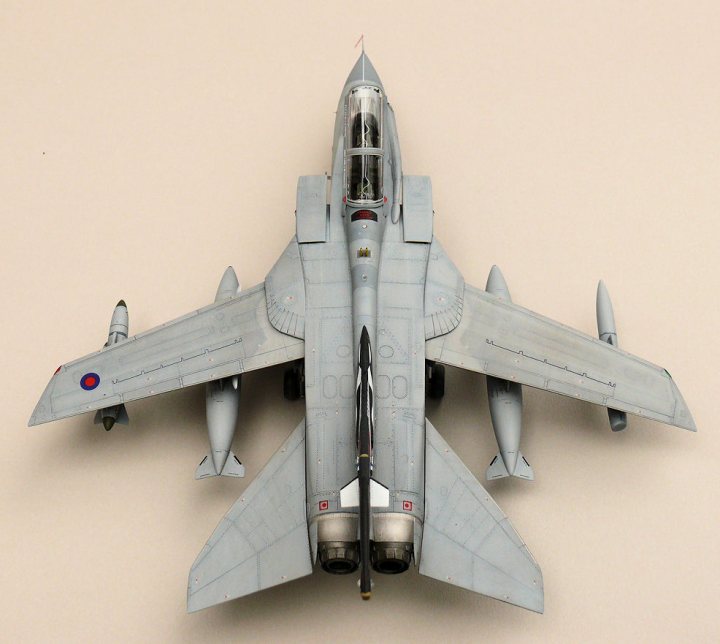
This build was inspired by my visit to the Derwent dam anniversary flypast of the BBMF Lancaster back in May 2013. I loved the 617 Squadron Tornados that also 'performed' that day. A lot of RAF commemorative schemes appear to have been designed by pre-school kids, but this one I think is pretty smart:
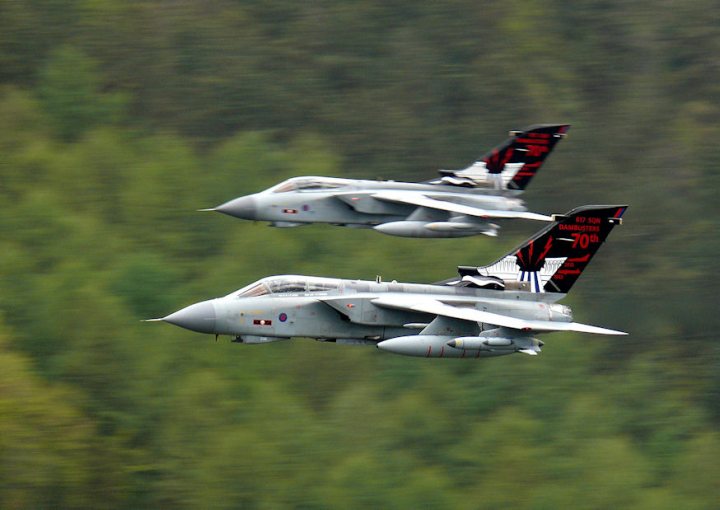
When I subsequently saw the Airfix kit with that scheme, I had to have it. Long story short, it's one of the worst kits I've ever seen, so I decided to convert the infinitely better Revell GR1 to GR4 spec, and use only the excellent Cartograf decals from the Airfix kit. This involved quite a bit of work, plus some additional details while I was at it.
Modifications included:
- Aires resin cockpit and wheel wells
- SBS resin nose cone
- Freightdog resin FLIR pod
- Master Model brass nose cone pitot tube and AoA probes
- Little Lenses for landing lights, HUD projector and LRMTS gubbins
- Cartograf decals (from the Airfix kit)
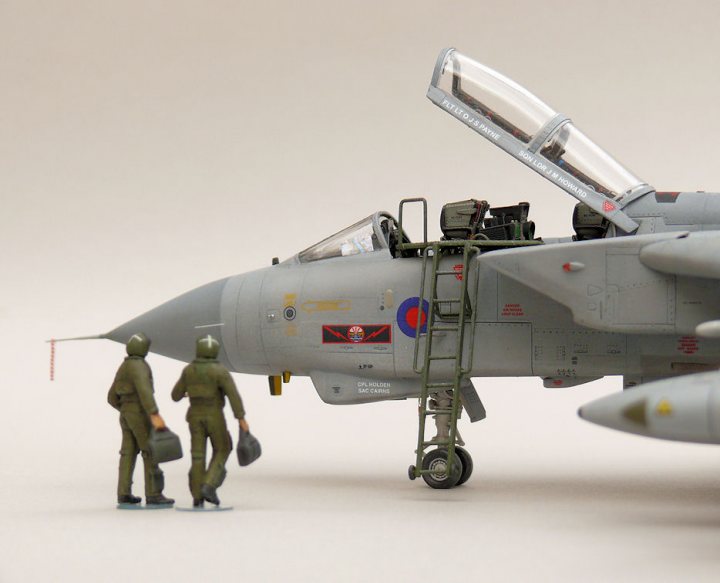
- Flightpath crew access ladder
- PJ Resin crew figures
- Airwaves “Remove Before Flight” tags
- Scratchbuilt vacuum formed canopy (0.5mm PET-G sheet) & internal details
- Scratchbuilt LRMTS pod & window (plastic strip & clear acetate)
- Scratchbuilt main door rams (brass tubes)
- Scratchbuilt paper/tape wing seals
- Scratchbuilt fin de-icer (brass tubes)
- Scratchbuilt cockpit shoulder cills (plastic strip) & latches (scrap p/e)
- Scratchbuilt engine intake vanes (plastic card)
- Photo-etch afterburner flame holders (Eduard)
- Photo-etch rivet added to dorsal spine behind rear canopy
- Boxed-in APU exhaust internals
- Internal stiffening added around u/c bays (plastic strips)
- Brake pipes (lead wire)
- Cannon barrel drilled out
- Modified & repositioned BOZ 107 pod (rear fairing)
- Modified fin heat exchanger duct (lengthened)
- Modified fin-top RWR pod (rear extension shortened)
- Modified cockpit pitot tubes (brass tube)
- Modified tail mounting (brass rod/aluminium tube)
- Modified IFR fairing (thinned next to stbd. intake)
- Modified wing pylons (stabilising tabs removed & brass/plastic rod locating pins added)
- Modified port missile mounting (guide rails and pockets added)
- Modified fuselage ventral rails (pocketed, and rear mounts added)
- Modified front u/c leg (shortened)
- Repositioned & drilled out under-fuselage air intake
- Repositioned main gear doors
- 1:25,000 O/S pilot's map of Derwent Reservoir (scaled print)
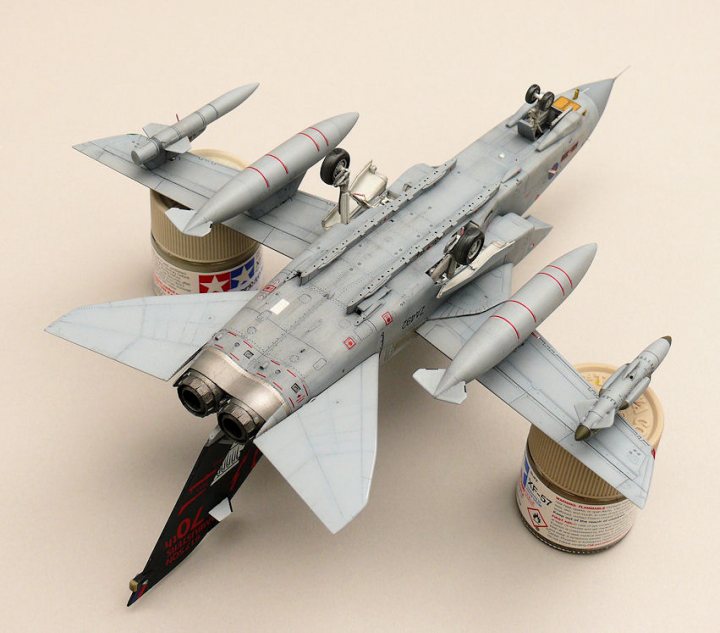
- Overall faded Medium Sea Grey was a mix of Vallejo Light Grey 70.990 [RAL7001] (80%) Vallejo White 70.951 [RLM21] (20%). Preshaded with Vallejo German Grey 70.995 + MIG Dark Wash.
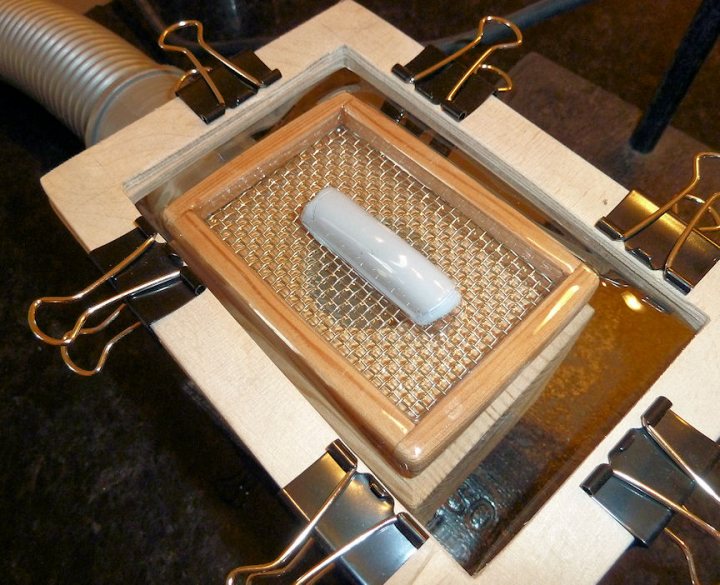
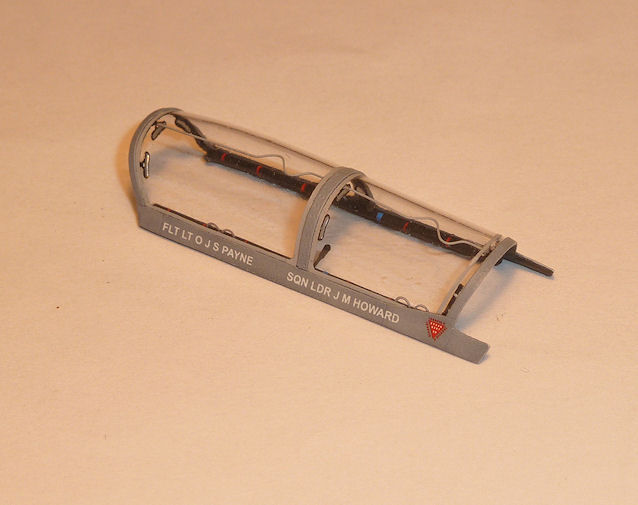
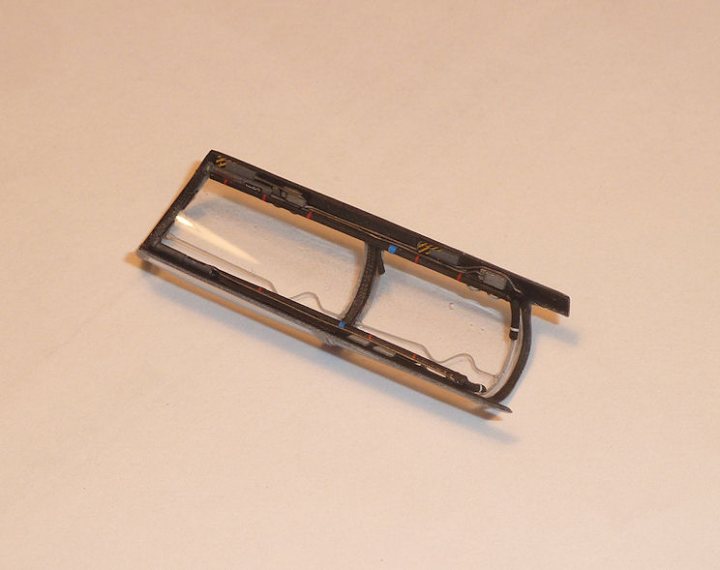
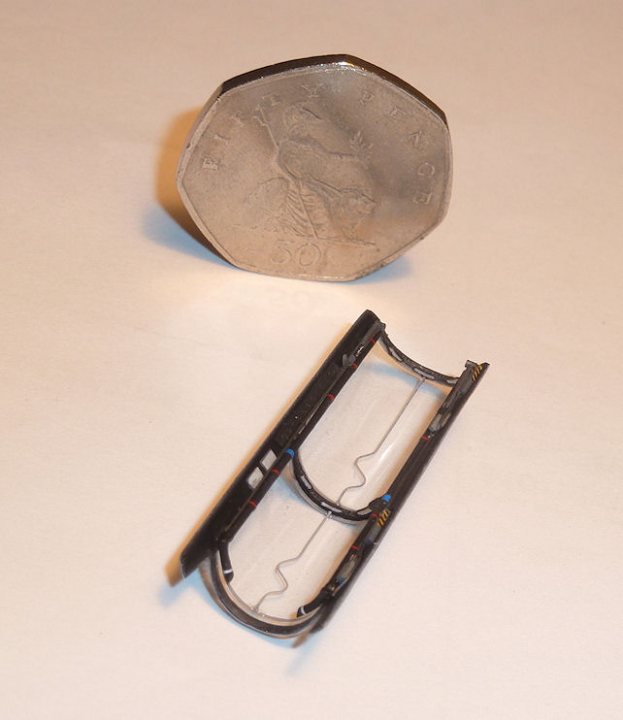
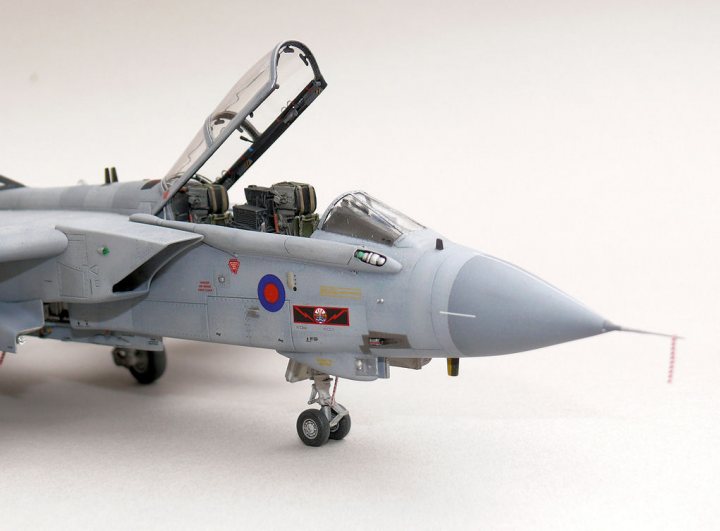
The Revell canopy, in fact all the transparent parts, were hopelessly bad, so with the absence of any aftermarket items, I opted to build a vacforming box, and make my own canopy out of PET-G sheet and plastic paper for the frames. I used the original Revell canopy as a female mould for the vacform plug (Milliput):
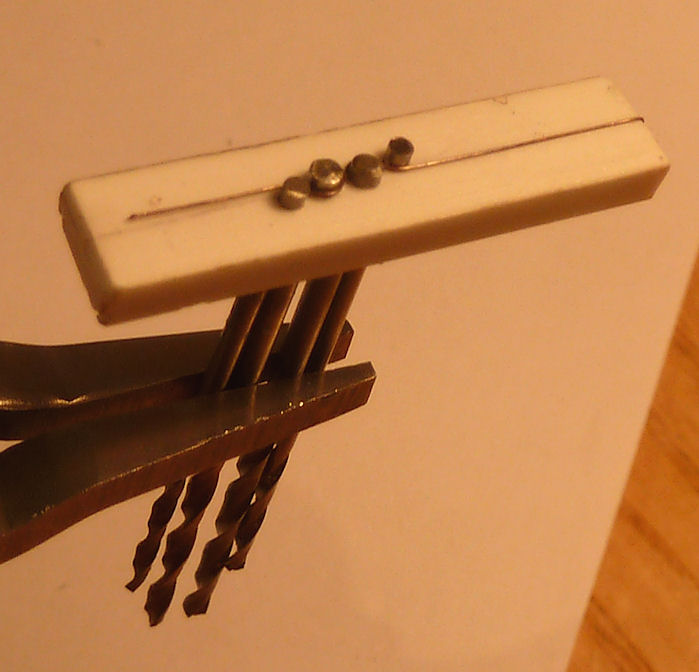
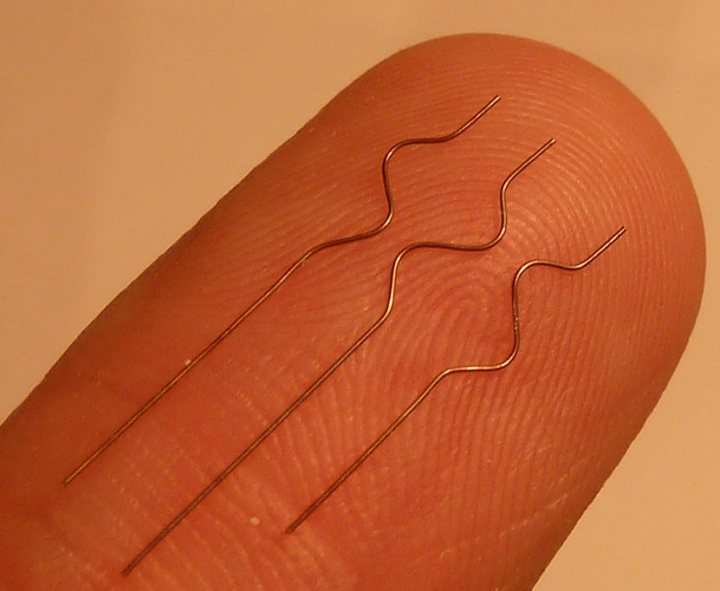
The MDC (canopy Miniature Detonation Cord) was made using annealed copper wire in a jig I made from some drills:
And I also made a punch and die to make some canopy corner radius decals:
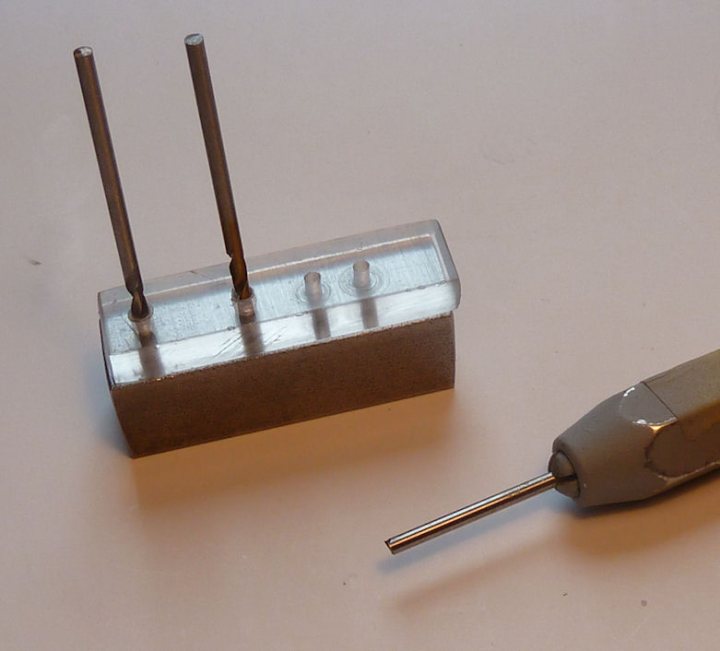
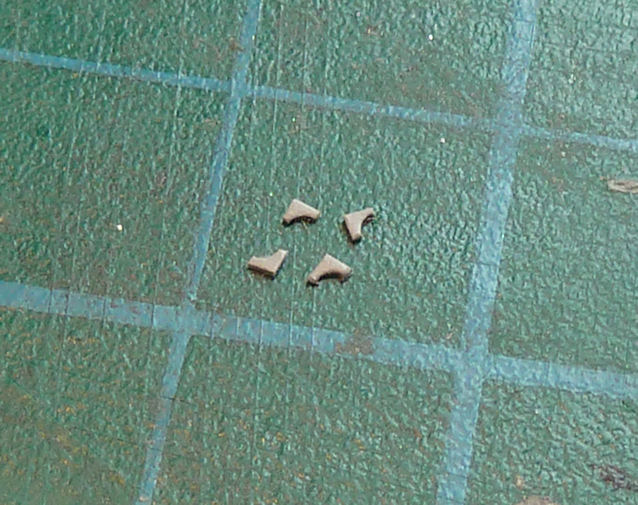
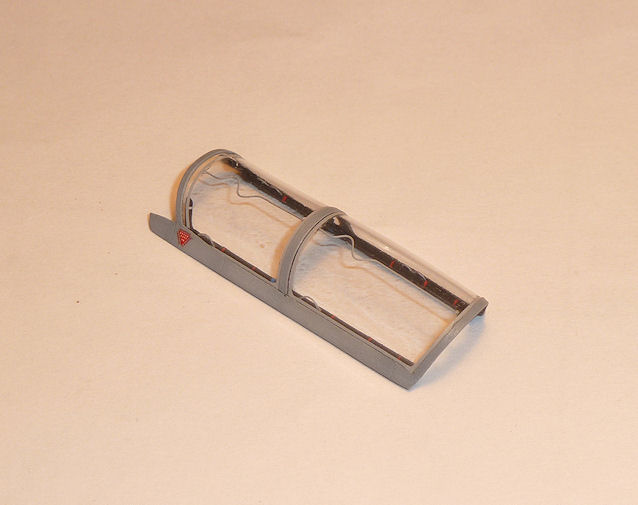
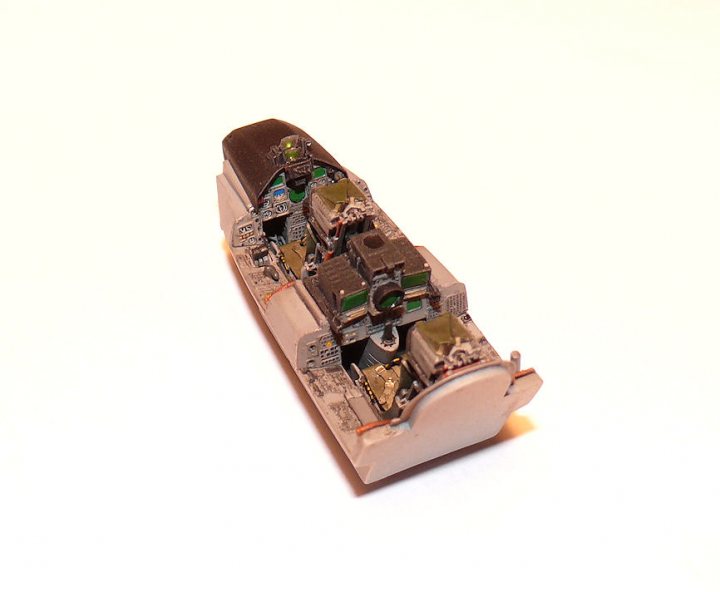
I must get myself a proper punch and die set one day. Anyway, here is the finished canopy. The internal details were scratch built, apart form the mirrors which were form the Aires cockpit set. Frankly I'm amazed it worked out as well as it did:
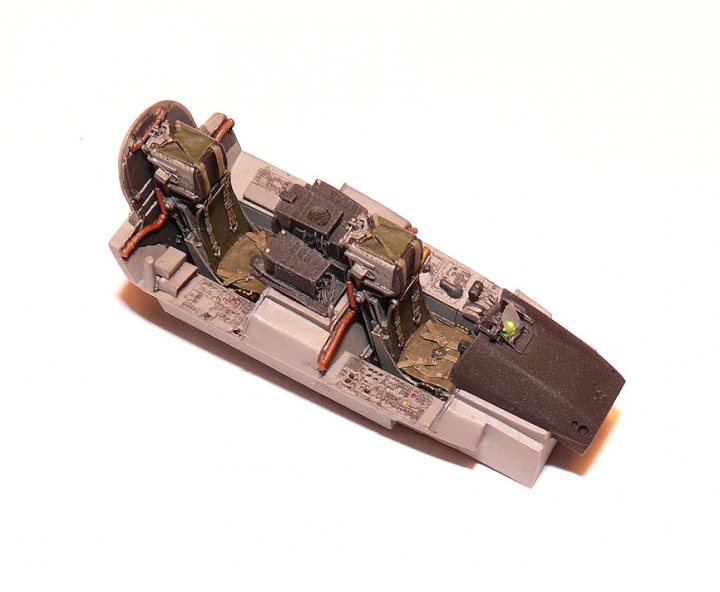
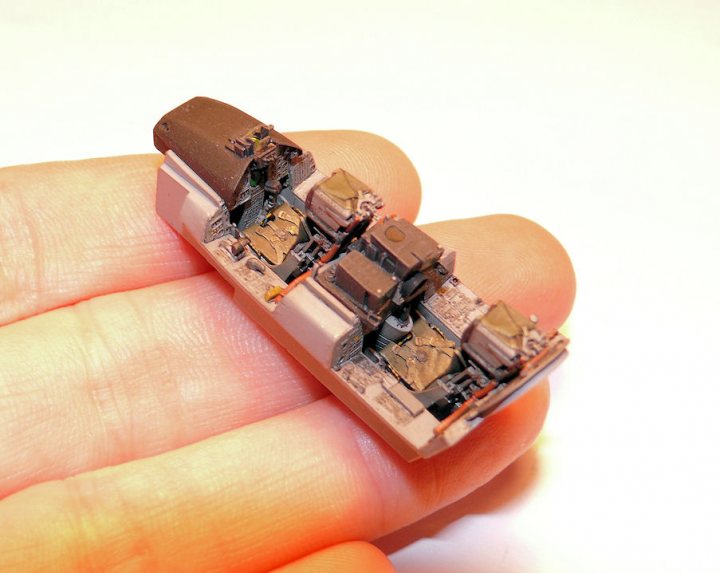
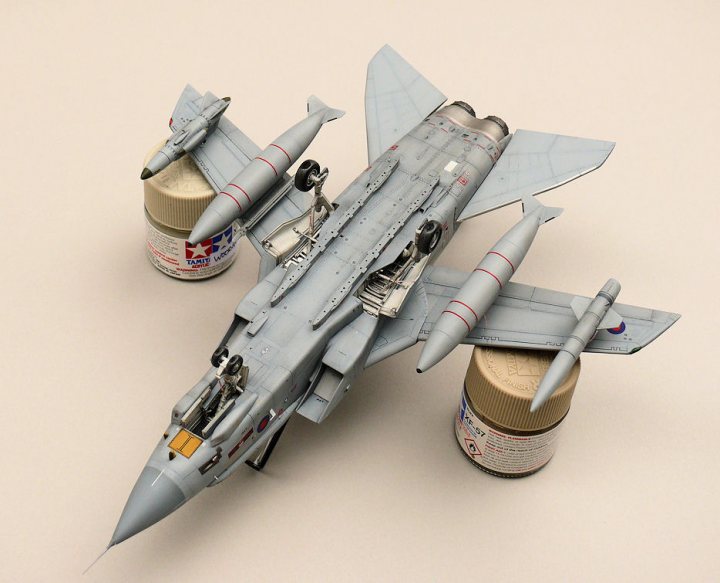
This is the excellent Aires resin cockpit. Really for a GR1, but....whatever:
Here's the completed model. Obviously, being me I did mess up something - the result is that the port wing is a slightly diferent shade from the stbd, but there you go; I hope it's not too noticable:
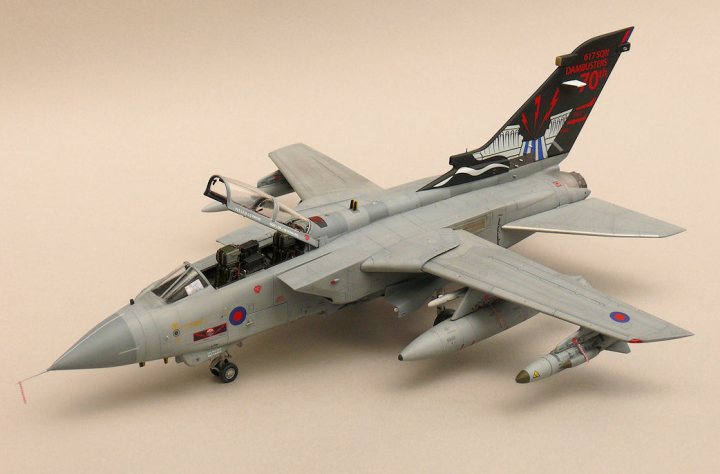
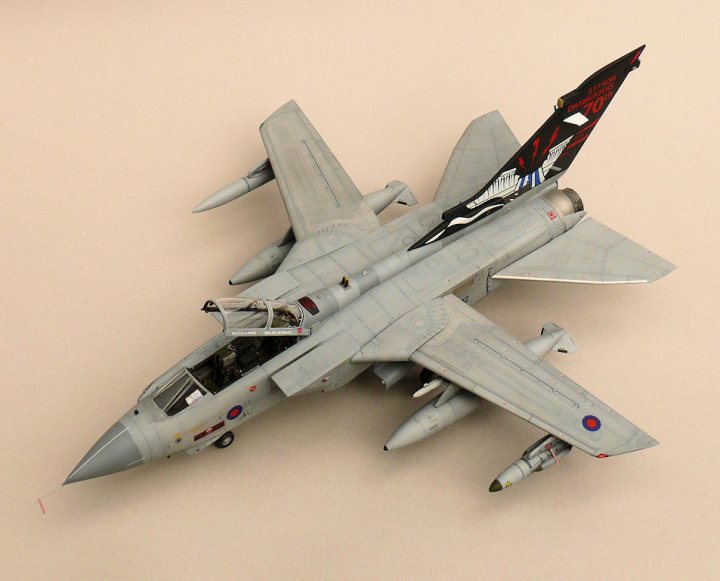
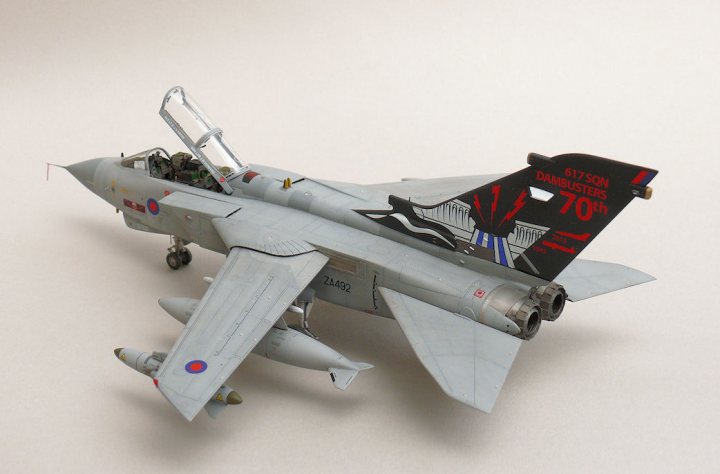
Hope you like it, Cheers, Garth.
-
4
-
There's a good video of the process here (or at least the process I used - there are several methods):
Apologies for partial thread hijack - I just thought it might be useful!
There was some trial and error on mine regarding scale (my fault basically). Next time I will print out several versions at x0.9, x1 and x1.1 modelled scale, and select the best one. Saves time and frustration when one comes back too big! (assuming the cost for extras is minimal obviously).
Imagine one day being able to CAD model (or download) an entire WW2 bomber, with every detail dowm to engine internals, then print it out as a section of your choice...in colour...?
This is where I think it's going in the next 10 years...this is why I (as you) are embracing this technology from the start. Almost limitless modelling possibilities. One day there will be a small corner of the Telford show devoted to "models built from ye olde Injection moulded kits!
-
Hi Steve,
Thnx! Sure!
The 3d drawing is quite basic, since this piece is quite basic.
The 3D printer printed with very thin layers of molten plastic. It builds up from the bottom.
The more expensive the printer, the finer the detail and thinner the layers.
So the printing starts on a platform. And the thicker or higher the part is, the higher the print head moves..
The size of the object is limited by how wide and how high the print-head can get.
Hope to have a first sample soon!
Cheers,
Jeroen
There's a good video of the process here (or at least the process I used - there are several methods):
Apologies for partial thread hijack - I just thought it might be useful!
-
Wow! Thnx dr-gn!
I might try that place, but first I'll try Shapeways. I've had some of their stuff in my hands, and was amazed by the detail.
Yes I could use real nuts and bolts, but I'd like to print several bosses. Axial, Heine, Garuda and add them to my stash, spares box and maybe send some to anyone who needs them

Thnx again!
Cheers,
Jeroen
No problem!
Strange I looked at Shapeways for mine, but the resolution they listed on the website was nothing like what I needed.
Oh well, we are getting a high resolution STL system at work soon. Happy days.
-
1
-
-
Hello again. Long time no post, but I've been working in 1:72 mostly.
Have you considered using turned nuts/bolts from a car detailling supplier? They might look better than plastic in the end.
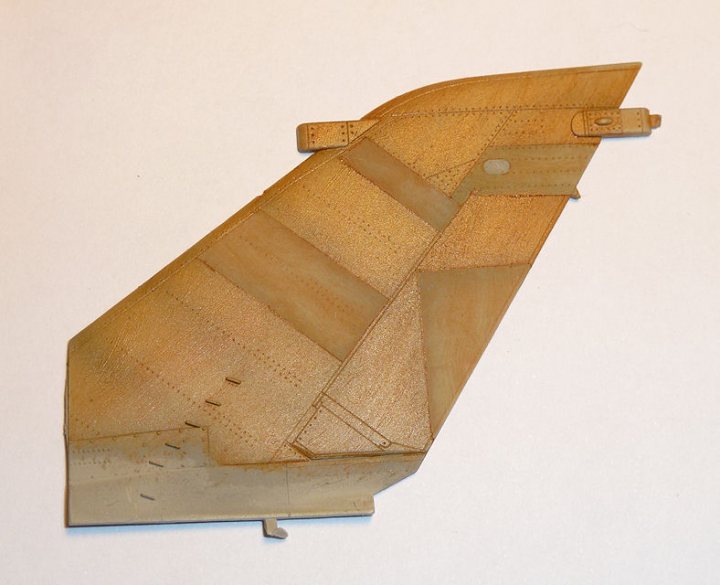
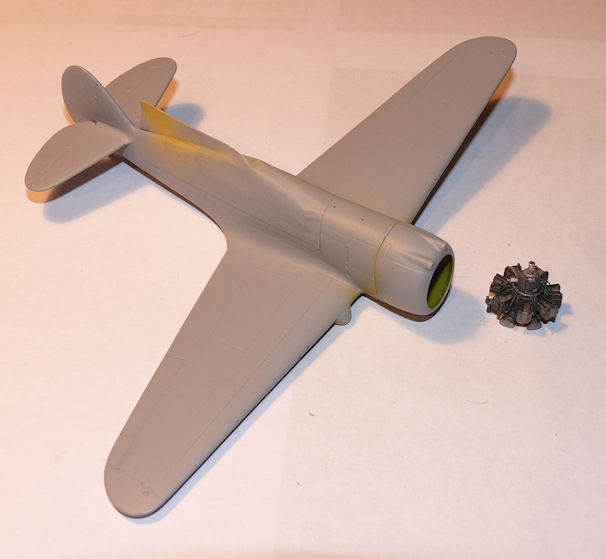
I'm in the process of finishing a Curtiss Hawk in 1:72 with an RP'd cowling. It was a Special Hobby kit, and the original cowl was just...totally useless in terms of shape and fit. It was a case of throw away the model, or use it as an experiment!
You need a mega high resolution process - I ended up using stereolithography using the DWS system from this place:
http://www.jewelleryprototyping.co.uk/
Here is the part they made for me:

And here it is fitted:
Good Luck!
-
2
-
-
Beautiful build - great paint and weathering too. That prop looks the business.
-
Yea I think I could do something!
Give me a few days and will knock something up...
Great!
The thought of spattering (if that's how it's done) a perfect paint/decal job like that fills me with terror...If I tried something like that, I know it would turn out looking like I'd sneezed on it.
-
Jim, as I said before - briliant work, beautifully displayed too.
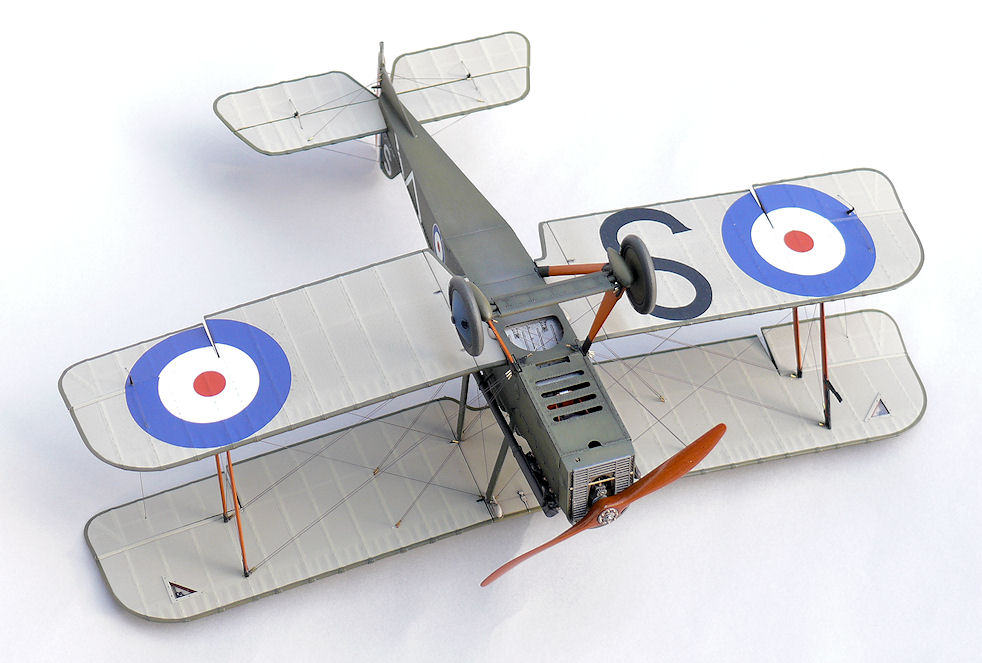
Just looking at the rigging makes my eyes hurt. Great job.
-
Again, consistently superb work. The subtle weathering works extremely well on this one - and I know from experience that it's difficult to bring a low contrast scheme to life.
Would be nice to have a picture of your display cabinet!
-
Another absolute stunner. The oil staining and spattering under the wings is perfect - any chance of a 'how to' - it really makes the model come to life?
-
Wow,
Thanks for the positive comments guys. I really appreciate them. There was a build thread on the SP&R forum; I'll try to post some WIP pictures and comments here when I get chance. The woodgrain was the worst part for me - trial and error especially waiting for the oil paint to dry (and knowing when it was really dry!).
Mike - the wing alignment was automatic. The kit is so good that the result you see in the pictures is pretty much the only way it can fit. As I said in the original post, the engineering of this kit is unbelievably good. Do I have any plans for future WnW builds? Not at the moment, I have a stash of kits to build aready. One day I will build another WnW kit, perhaps with a more interesting colour scheme. Having said that, if WnW made something inter-war like perhaps a Hawker Fury or Hawker Hart, I'd probably buy one straight away!
James, thanks again for the comments! TBH I doubt I'll be able to take part in a group build, firstly becasue I don't have a model (and as I said I've got loads of other stuff in the stash including an 1:48 F-22 and a 1:32 Sea Venom
 ), and secondly becasue of lack of time what with a young family and everything. If there's a group build relevant to anything I've already got I'll be there!
Thanks again everyone!
ETA - James - the photography is very simple. Wait for an overcast day. Get some A1 light grey paper, and go outside and drape it over a table/wall to form a horizontal and vertical background with a radius between the two so that it form a seamless transition. Stand the model on it. Camera on tripod, 2 second self timer and just take some photos. That's it. My camera is a Panasonic FZ50 bridge camera (not even an SLR). I've tried indoor photography, but can never get the lighting right. Outside you can't really go wrong.
-
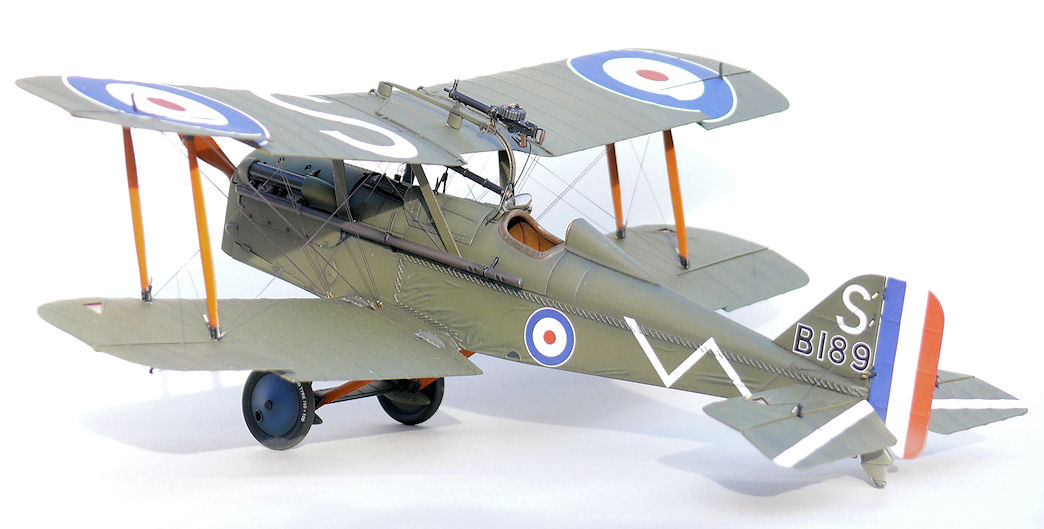
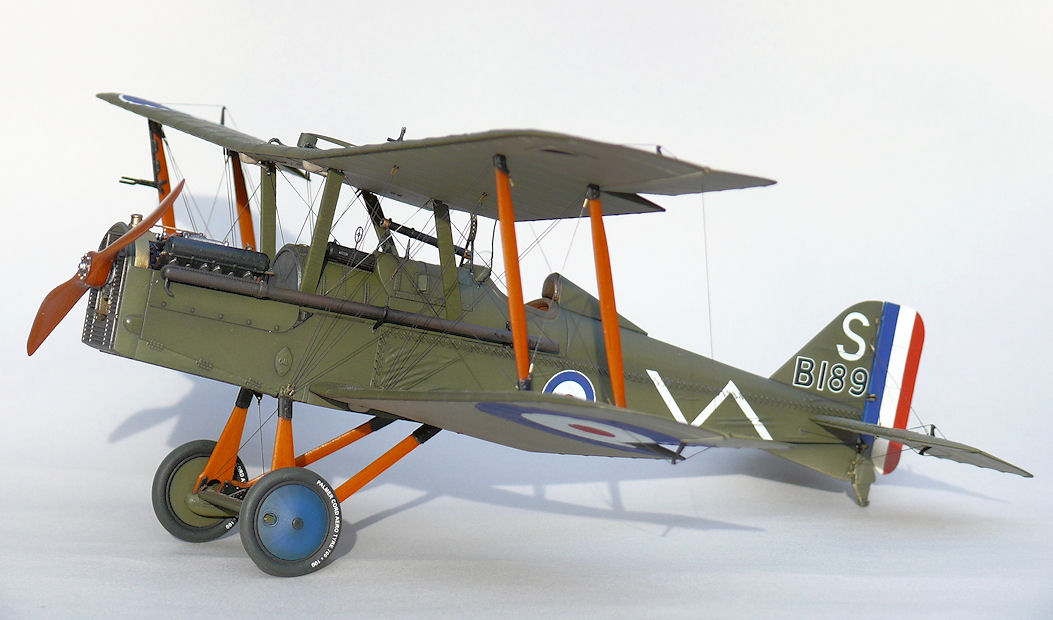
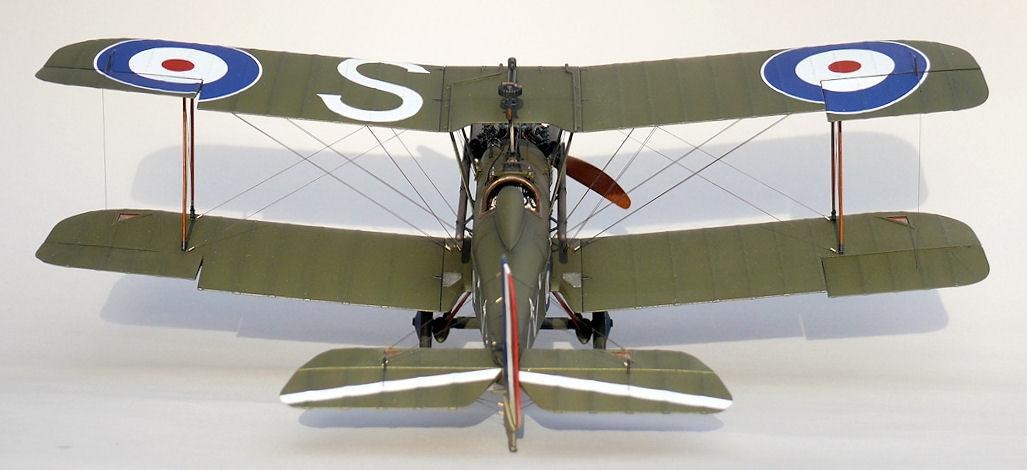
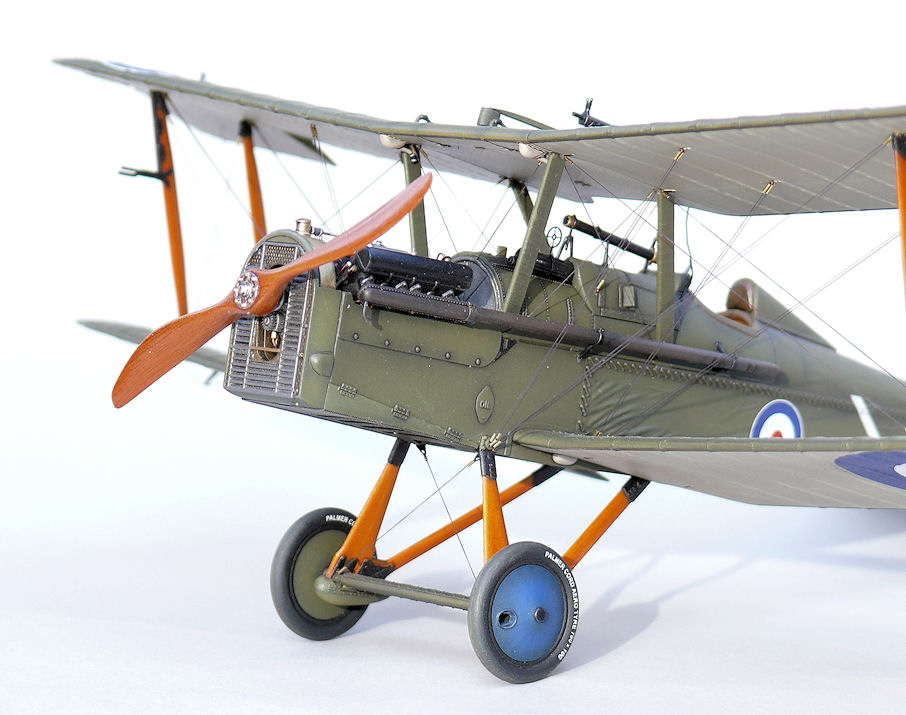
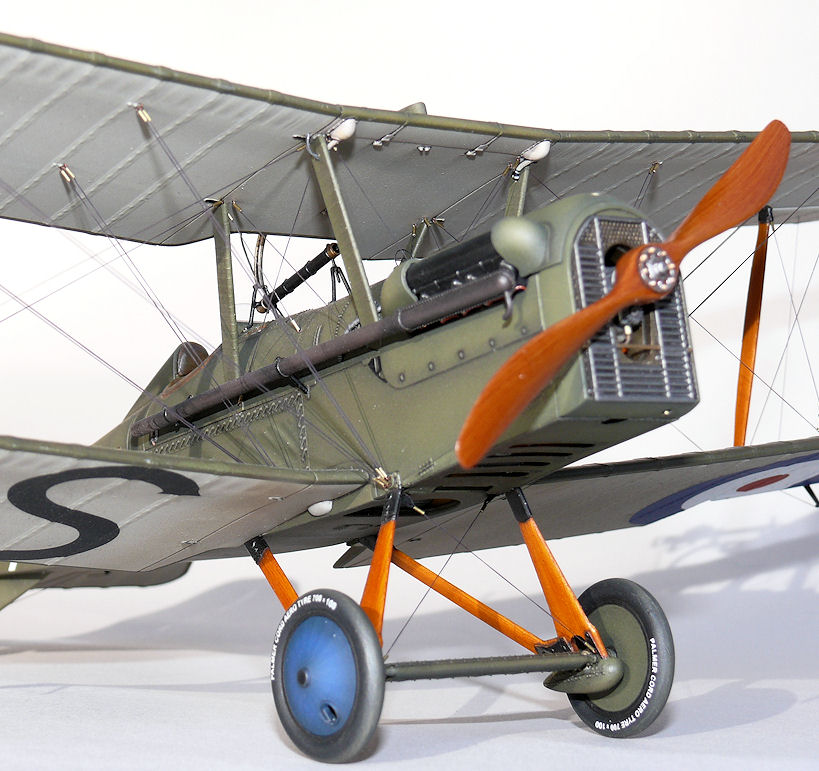
This is the Wingnut Wings SE.5a, built with quite a few scratchbuilt details, and some of the stuff included in the HGW super detail kit. I also used the Pheon corrected fin and rudder.
It's finished with Pheon decals representing the machine of Capt. J. H.Tudhope (40 Sqdn.).
I'm happy with it in terms of, with my current modelling experience, I don't think I could improve on it if I were to start again. There are things I'd like to improve on in terms of weathering and making the linen look more aged, but I don't have the confidence to try any more new techniques on a model like this.
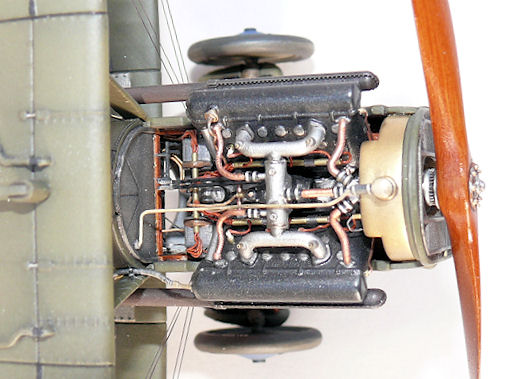
Despite this being one of the very first kits produced by Wingnut Wings (and I think it's fair to say there were one or two isues with the instruction booklet and possibly the fin and rudder stitching details) it's by far the best kit I've ever built in over 35 years of modelling. The engieering and fit of the parts is uncanny. For example, the Lewis gun Foster mount fits on top of the upper wing, and the lower end of the curved sction of this part locates perfectly on the rear of the telescopic gun sight. for this to happen, I think I counted more than 15 separate parts that all had to align perfectly during various stages of assembly. They all did.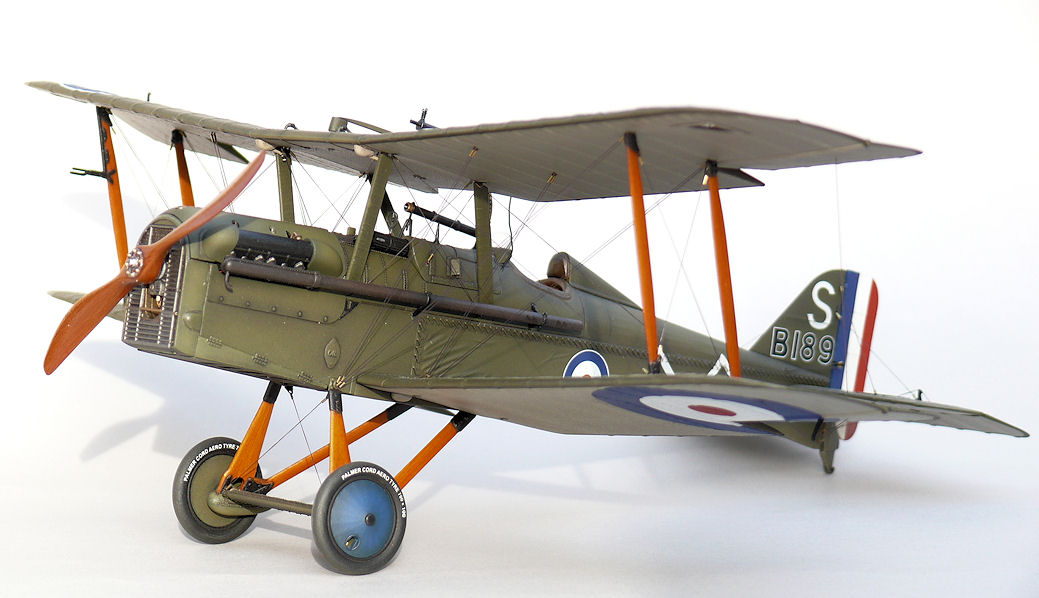

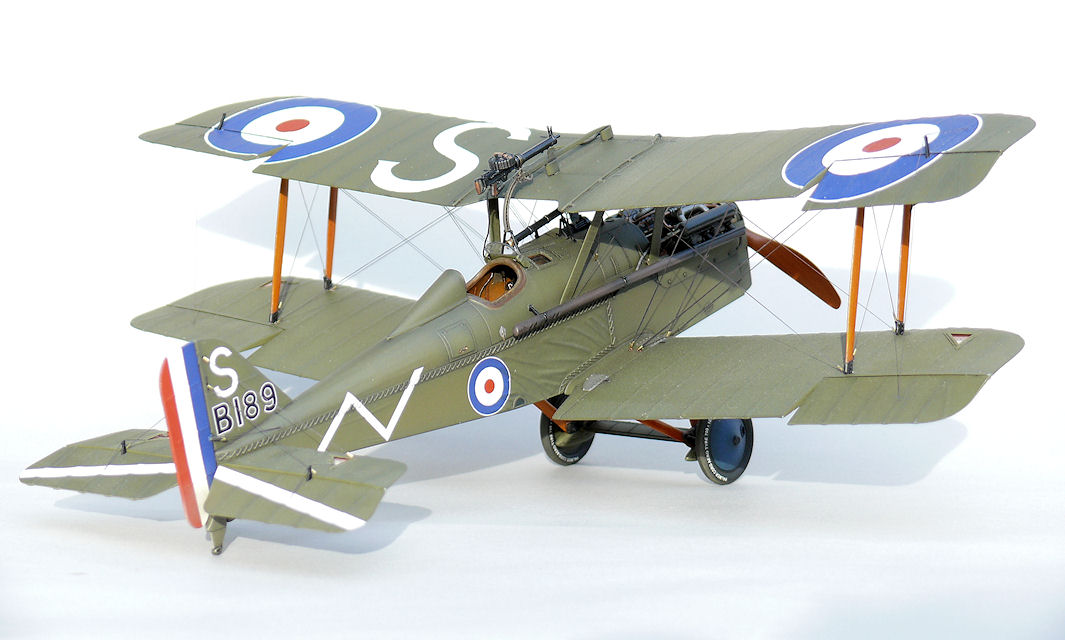
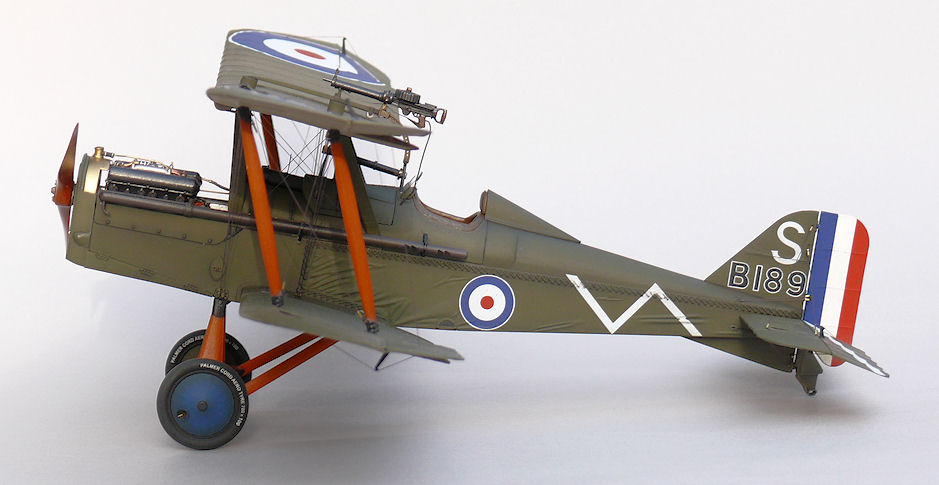
I entered it in the IPMS Huddersfield show in February, and got first prize in 1:32 aircraft:
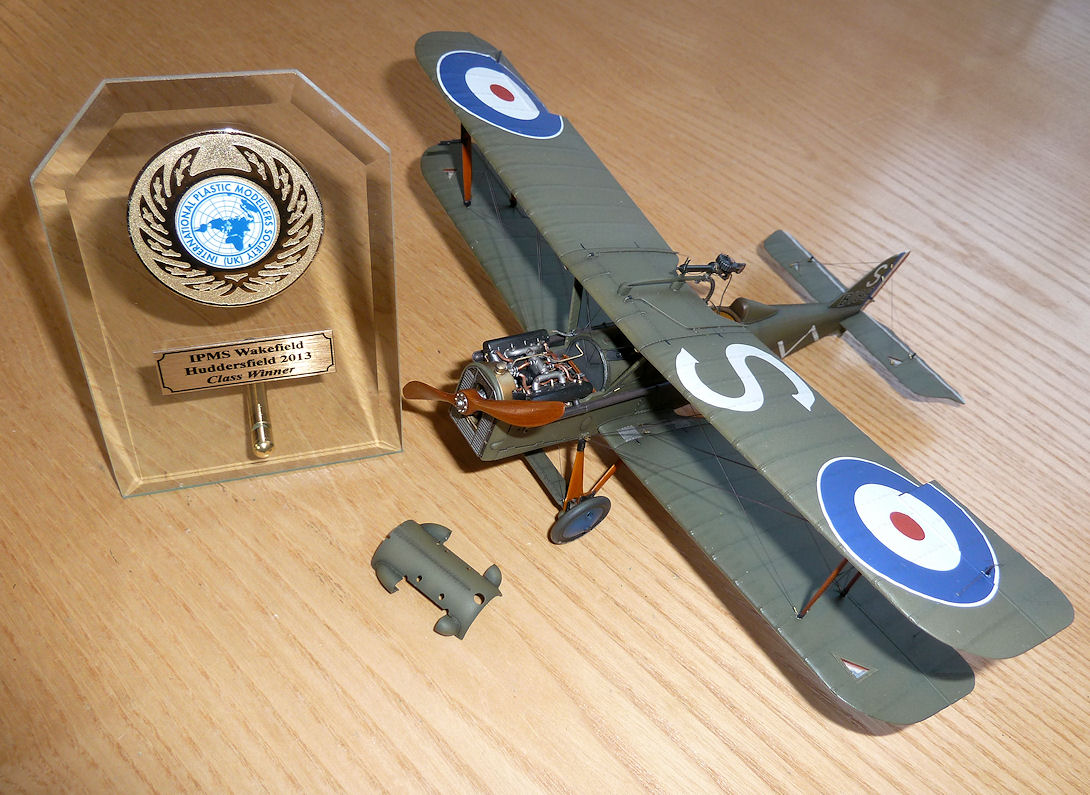
As a postscript - this is a special model for me. The first model my Dad and I built together was a 1:72 Revell SE.5a (when I was about 4 or 5 years old). This Wingnut Wings SE.5a was the last model I completed before my Dad passed away last month - just after the Huddersfield show. He loved it when I showed the winners trophy to him in hospital. I dedicate this model to my Dad - thanks for teaching me the importance of attention to detail, not just for modelling...
-
5
-
Tamiya Churchill VII 1:35
in LSM 1/35 and Larger Work In Progress
Posted
Nice work - I bet you're tired of looking at wheels though - there are dozens of them! If I ever build a tank model again, it will be one of these: Churchill tanks were built in a factory a couple of miles from where I live. My dad used to watch them being tested. One day the headphones from a tank commander fell off the turret and got crushed under the tracks. My dad ran over and picked them up - I've still got their mangled remains somewhere.