


Wouter
-
Posts
183 -
Joined
-
Last visited
Content Type
Profiles
Forums
Events
Gallery
Everything posted by Wouter
-
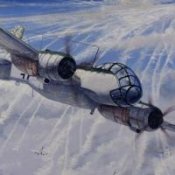 Great subject, very well executed Michael
 -
The other day I was thinking: why doesnt LSM have a proper frontpage/website? I know the forum originated from Scaleplasticandrail, which was, in my opinion an excellent review website. That work still continues today with reviews from James, Jeroen and a few others, which are posted here on the forum. But these reviews tend to get burried rather quick. Wouldn't it be great to get an even better platform to showcase these reviews? And probably the occasional build from members. We could think up a build of the week or month by voting in the forums for example. I'd recon it's probably not as easy as it's sound, not to mention the costs for hosting and the extra time for support. But with the growing numbers it might be worth some consideration.
-
I'm out of the loop, are you banned from LSP? And what's with the surge of people from LSP to here? Not that I'm complaining, just curious.
-
1/48 Wellington Mk.X (He727 NA-K)
Wouter replied to JeroenPeters's topic in LSM 1/35 and Larger Work In Progress
That´s some serious progress you got there Jeroen, keep it going!- 304 replies
-
- 3
-

-
- wilnis crash
- trumpeter
- (and 1 more)
-
I skipped a few steps posting, so it appears i made some big steps in the mean time. For painting I went with only a slightly weathered look, but due to the end of the war conditions I wanted the paint to start fading a little. Getting there ever so slowly and I found some time to take a few beauty shots outside in the sun. Steps done after last post: - camouflage painting (all done with MR paint - paint) - gloss coat - decals and sprayed markings. The larger decals in the kit didn't adhere very well so I ended up spray painting them. Looks better anyway and lesson learned that shortcuts don't work in modelling... - panel line wash - sprayed exhaust staining - satin coat - removed canopy mask! yeah. On to the last bits and bobs (landing gear, antennas, guns, periscope). Cheers, Wouter And one of my favourite angles
- 98 replies
-
- 11
-
-
Hi, it's a kit form JH Models. I bought mine from the Aviationmegastore, but you can also order direct from JH models: http://www.jhmodels.eu/plastic-models/model-stands/no-3201-stand-new/ Yep, the foam is just temporary for painting
-
1/48 Wellington Mk.X (He727 NA-K)
Wouter replied to JeroenPeters's topic in LSM 1/35 and Larger Work In Progress
OMG Jeroen, you really like to torture yourself with that PE... impressive stuff! Love the printed aerial picture, it's gonna be a model/memorial to cherish when finished.- 304 replies
-
- 1
-
-
- wilnis crash
- trumpeter
- (and 1 more)
-
1/48 Wellington Mk.X (He727 NA-K)
Wouter replied to JeroenPeters's topic in LSM 1/35 and Larger Work In Progress
goed bezig- 304 replies
-
- 1
-
-
- wilnis crash
- trumpeter
- (and 1 more)
-
1/48 Wellington Mk.X (He727 NA-K)
Wouter replied to JeroenPeters's topic in LSM 1/35 and Larger Work In Progress
Hnnnnngggg... eye twitch... That's some serious test for your patience- 304 replies
-
- 1
-
-
- wilnis crash
- trumpeter
- (and 1 more)
-
And we've got wings! No turning back now. I've spent a copious amount of time to blend the wing root smooth, but the time spent here will pay off at the painting stage (so I hope ). Next update we'll see some color.
-
So, I'm slowly working to on this one to get to the painting stage. Lot's of sanding, filling and (re)scribing to do. It's just so hard to get the panel lines straight, especially when they cross different materials like resin, filler and plastic. I'm now at the stage I'm calling it a day because I'll never get them perfect. Anyway, besides that, one of the smaller but still prominent part of the build is the turbo scoop beneath the engines. It's a tricky shape to get right. John mentioned this in the manual that he thinks the scoop should be altered and I tend to agree with him. I haven't found one picture showing the original scoop in good detail, but after studying the available material I found the parts provided in the kit to round and to short and not enough definition at the base. Here's how the look unaltered: Here are some of the better pictures I found showing the shape of the scoop Looking at these pictures I found the shape to be oval from the front, longer from the side profile slightly tapering to the back, and a flared base. On the last picture you can also see that there is a panel line between the front and the rest of the scoop. I reshaped the kit parts using milliput. In the end I omitted the panel because I couldn't get a decent straight line around the scoop. But all in all I think the altered shape is closer to the pictures then teh unaltered one.
-
Alright, after a few evenings of putty, sanding, rinse and repeat, I've painted the canopy. I decided to pull off the masking because the canopy is now essentially finished. The real canopy was also finished in a black/grey color and not painted with the rest of the fuselage. I'm going to tape off the canopy as a whole for the rest of the build. I still have to do some touch up, but all in all it turned out pretty well. Considering this is my first vac canopy I'm pleased with the result. I'm was pleasantly surprised with what can be seen from the outside, so all the hard work and details are not for nothing. With the canopy finished, the rest of the build shoudl be pretty straightforward and I can see the finish line in the distance! Cheers, Wouter
-
ust a quick pic before going off to bed. The canopy is attached to the cockpit. First with just a few drops of CA and after that was set I ran epoxy through all the joints. This was left to dry for 24 hours. Currently working on blending everything together by eliminating unwanted seams, restoring details and corrections on the canopy fairing. Everything looks really messy right now, but we'll get it sorted out. Cheers, Wouter
-
Well, to put my money where my mouth is I dug op my dslr. The cockpit was placed on a makeshift photobooth to get some decent pictures. The dslr does take a lot better pictures then my mobile, so I should do it more often. I made the picture pretty highres, but tried to keep the filesize down for those on crappy internet. Now this is done I'll guess I'm going to close up the cockpit/canopy this weekend. Enjoy!
-
In another very lengthy session I finished the inside of the canopy. Framework, details like handle's, light fixture, wiring and not to forget the moisture taps in (almost) every corner. All 22 of them.. gasp. In finished of with painting the framing. In the picture it looks a bit messy because I didn't paint the whole frame on the inside, only the ribs. I figured this won't be seen when I have painted the outside framing. So, this was the last step before closing the cockpit. Before I'll do that I'm going to take some better pictures of all the details, so I can always look at those when I mess up ! Till next time, Wouter
-
Just had a very lengthy masking session with the upper canopy. Fresh blade, masking tape and a lot of patience. Now I can add the inner structure, moisture taps and other details. After painting I can glue the canopy in place, Woohoo! Can't wait to get there.
-
I'll finish with a few glamour shots (on the old legs by the way) Cheers, Wouter
-
Next up; something that brought me back to this build. The fantastic replacement propeller set by Henri Daehne! Oh boy, if haven't seen these in real life yet you're in for a treat. Excellent casting, superb detail and very accurate. Ok, one minor flaw due to resin shrinkage, the hubs had a few dimpels. These where easliy fixed with some filler. The resin used is pretty hard but also flexible. The blades are razor sharp at the trailing edge, but due to the flexibel resin the can take a beating. You have to purposely bent them (to far) to damage or break them. Here is a blade compared to the kit part, it's like night and day in details and shape After a little cleaning, cutting to length and adding the counterbalancing weigths you quickly have eigth blades and after painting Pre assembly and finished. I place them beside the kit part for comparison. If you're qoing to build this kit, do yourself a pleasure and buy this easy and relatively cheap upgrade. Henri Daehne also makes a version without the hub for even more detail!
-
Evening all, or goodmorning if you're somewhere else on the planet I have been procrastinating on finishing the cockpit, since I dread the tedious masking. So I turned my attention to some other things that needed to be done. First the landing gear. Since I don't have the G-factor undercarriage and the model is quiet heavy I was looking for a way to strengthen the kit parts. I came up with this solution: Unaltered kit parts clean the inside Hard metal rod and brass tubing fitted This was glued using 5 min resin. the gear was now rock solid. Somewhere along the way I found this picture You can see that the oleo is much more compressed then the Revell kit parts. I went back to reference photos and almost every plane has the compression. Besides that, on several Ju388 the oleo proctection covers (socks) are missing. Enough elements for me to alter the landing gear. Since altering the previously strengthened parts wasn't an option I needed a new pair . Luckily I was able to acquire a cheap Ju88 A1. I figured I could use the 'old' gear on that kit at a certain time in the future and use the 'new' ones for my 388. I approached the landing gear the same way like last time, but cutting out the covers. These were replaced with a piece of brass, representing the oleo. I made sure the brass pices were shorther than the 'socks'. both done Extra details added and the brake line So, pretty happy with that. Looks a lot more at what I can see in my reference. More...
-
Good evening all. Just before preparing to close up the cockpit, Brian a.k.a. Levier kindly provided me with another very helpful picture. It's an overhead view to the front of the cockpit and it also shows the jump seat. With this picture and the other reference I have, i was finally able to solve the puzzle. With the permission of Brian, here's the picture. Thanks again Brian! Like I showed earlier the seat is attached add two points to the floor. I thought the rods that form a triangle are part of the rotating meganism, but no. there is an arm beneath the triangle. The triangle itslef is fixed and anchors the seat against the side wall in the fold out position. It's then attached at three points. Simple but clever solution. So now you know. Here's a new graphic showing what I mean. Well, new info means more details. I went back to the observer seat in my build and changed a few bits and bops. Shifted the attachment point on the floor, added a piece of rod representing the front rotating arm and i added a handle on the side of the seat (presumably used to activate the folding mechanism). With this last piece of the puzzle I am now ready to close the cockpit! I already made the frame on the inside of the front part of the canopy . Plus masking and not to forget, the moisture traps (little white circles) in the windows. The lower canopy is now glued (drying as we speak with 24 hour epxoy) to the cockpit. With this part attached I could also make the fresh air handle. This is the long thin rod from the canopy to the side of the pilot seat (with blue knob). Fiddly but very important detail because it's pretty visible. If I have enough time this weekend I will concentrate on the upper canopy and with a bit of luck I'm able to close it up. Major milestone! I'd recon the build is pretty straightforward from thereon Cheers, Wouter
-
I made a little drawing explaining how the observer seat works (well best guess). Here's the seat in it's stowed postion behind the pilots seat. Side view Top Front And here it's in the fold out position. I haven't figured out the exact mechanism yet, but the seat has arms attached and during the fold out these pivot the seat not only sideways, but also up to about the same height as the other two seats. I hope the pictures are self explanatory enough. Side view Top Front This construction was a necessity, otherwise the observer seat would block the entry hatch ( the large hole behind the seat in the fold out position). And for the icing on the cake, here's the one and only picture I found of the illusive observer seat! Cheers, Wouter
-
IP is complete! I installed the Fug217 viewing device. Take note that this device was actually not attached to the instrument bar but rather to the canopy. Since i won't be able to do that (well technically I could, but the risk of falling/breaking from the canopy would be to great of a risk) I had to adjust a little. I created a little bracket from brass. This bracket is attached to the instrument bar and then protrudes to the front. The sichtgerät (viewing device) is then attached to this bracket. The bracket itself is almost invisible due to all te wires beneath it and the little Fug217 controller in front. Lastly I attached some brass rods which represent the actual attachment points. Cheers, Wouter
-
That's it for now. Enjoy, and feel free to ask any questions. Cheers, Wouter
-
With the IP finished I slowly can start thinking about wrapping up on the cockpit. Some pictures of the state it's in right now. I'll let the pictures do the talking, but here's what I added: - rear cockpit armor plate above the radio units. - observer seat - pilot's seat - control stick - more details on the 'peiltochterkompass' (the big one on the right side - added the IP to the instrument bar - added the oxygen instrument's to the instrument bar - added a control valve for the airconditioning