rverissimo
-
Posts
126 -
Joined
-
Last visited
Recent Profile Visitors
2,725 profile views


-

ICM 1:32 DH.82A Tiger Moth World Air Forces
rverissimo replied to rverissimo's topic in Aircraft Reviews
Thanks ! a very original subject ! -
ICM 1:32 DH.82A Tiger Moth World Air Forces
rverissimo replied to rverissimo's topic in Aircraft Reviews
Hi ! all decorations options are very interesting, colorful and unique! but of course the Portuguese Bird sits on the top of the preferences... now i just need to finish ALL my pending projects and sort out all the confusion that has taken over my workbench for some time now!! Ricardo Veríssimo -
hi! for me i'm a absolute fan of '46 subjects.... regards!
-
hi ! great job on that beast!
-
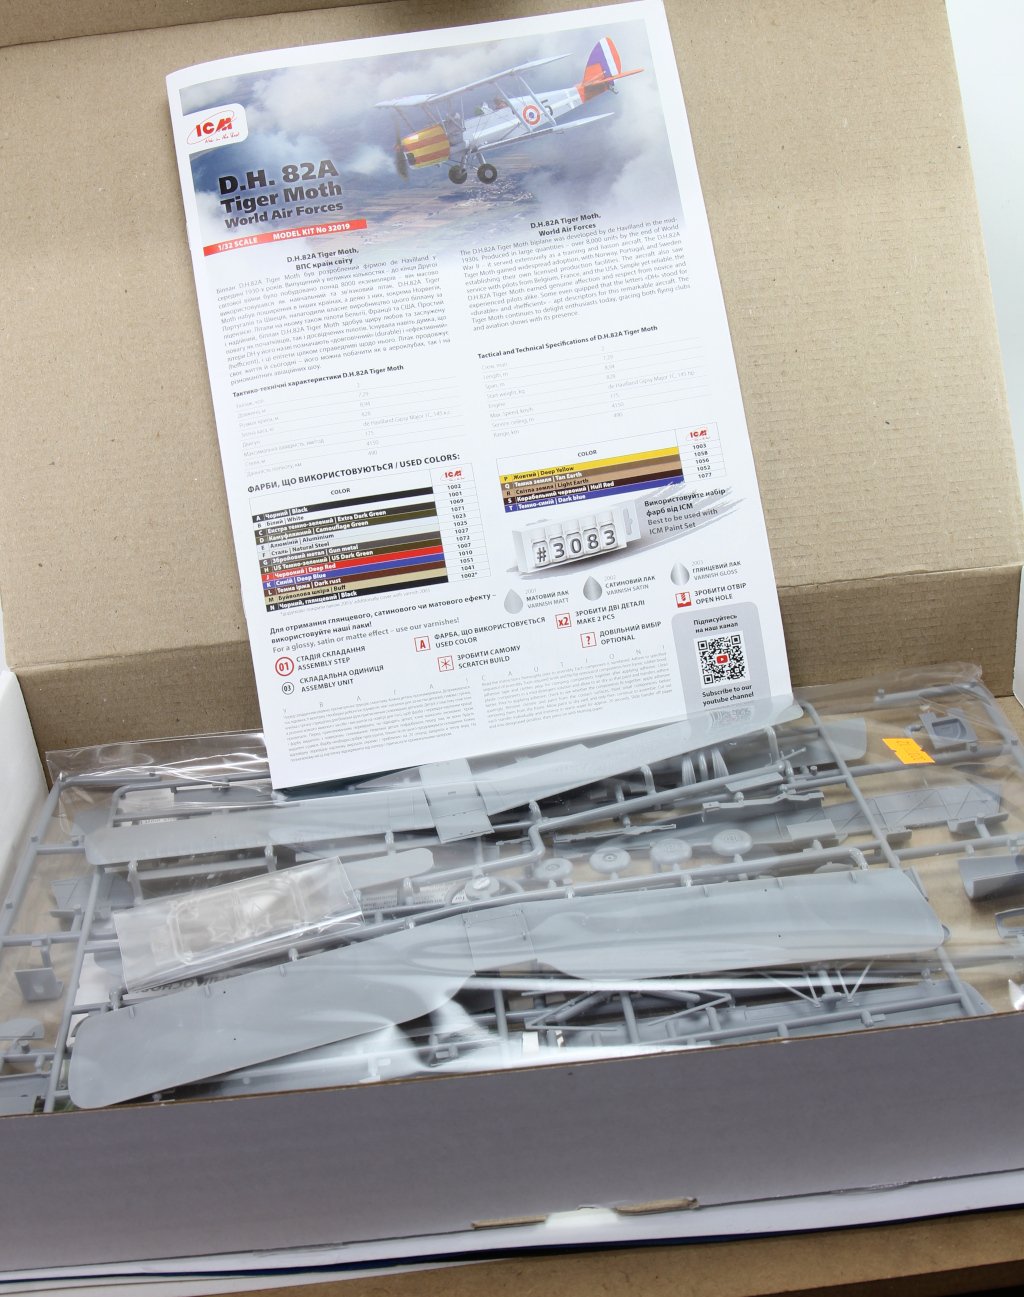
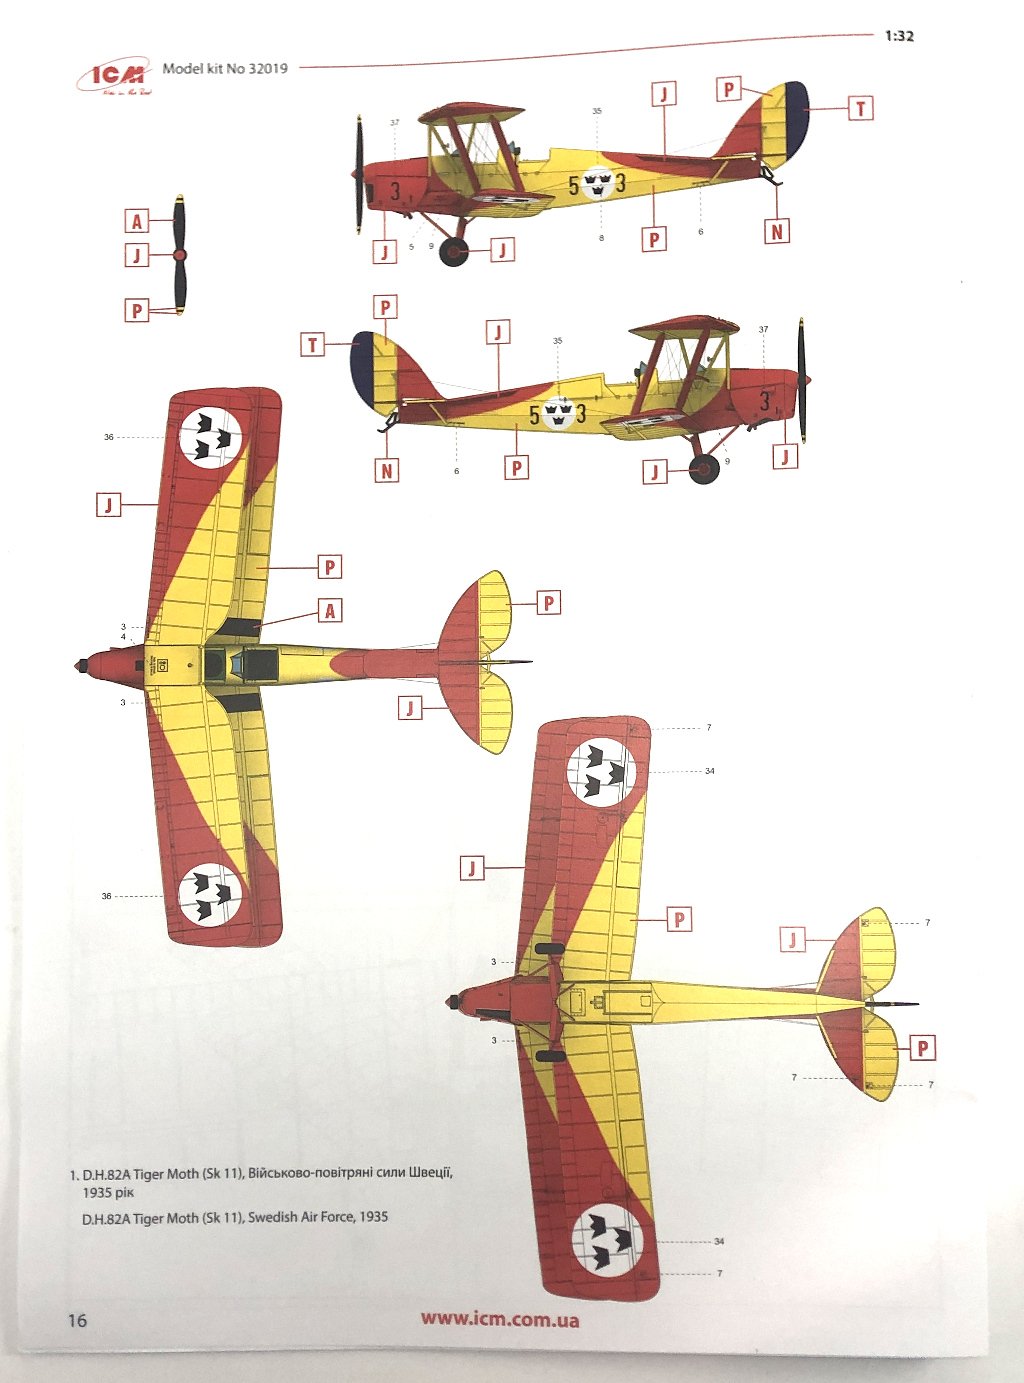
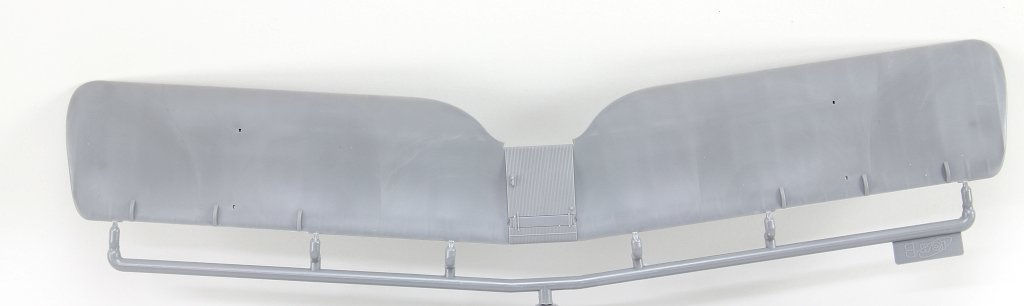
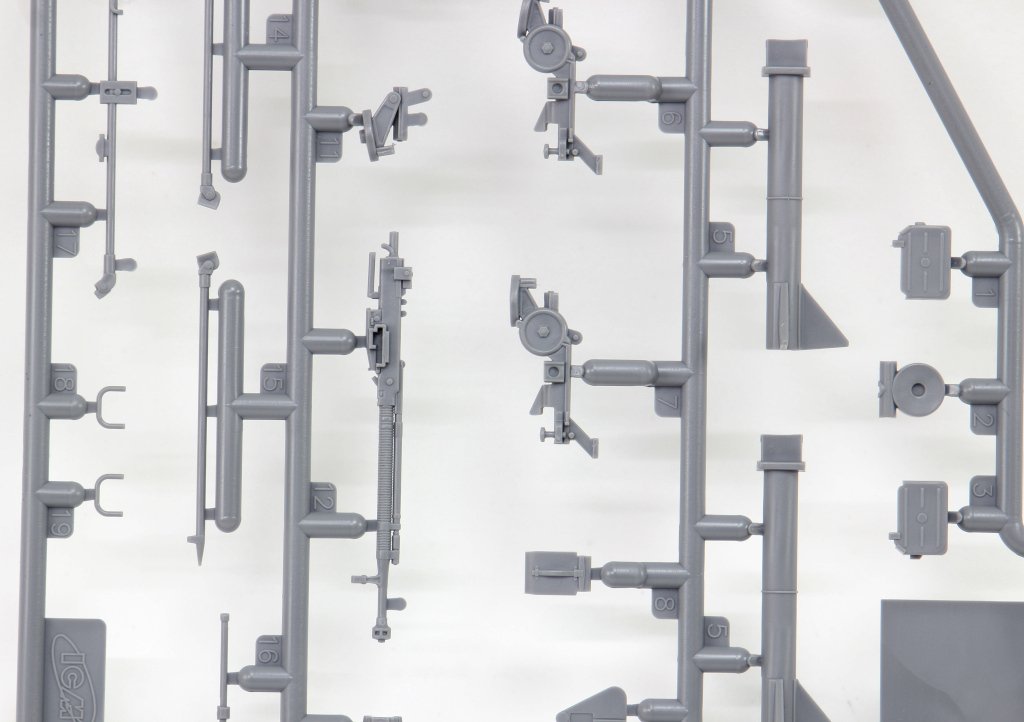
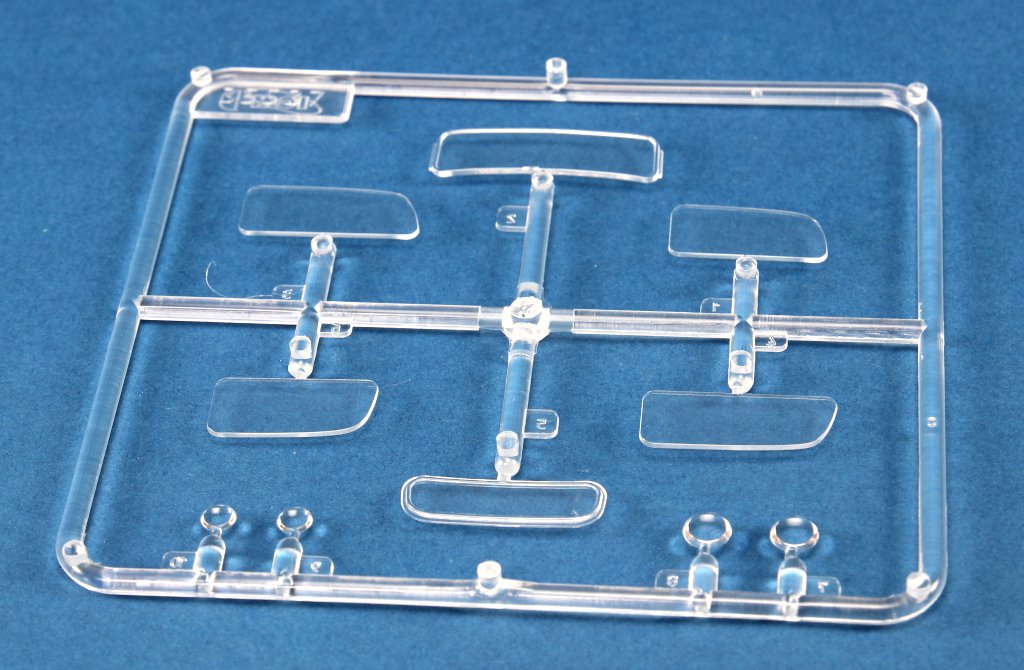
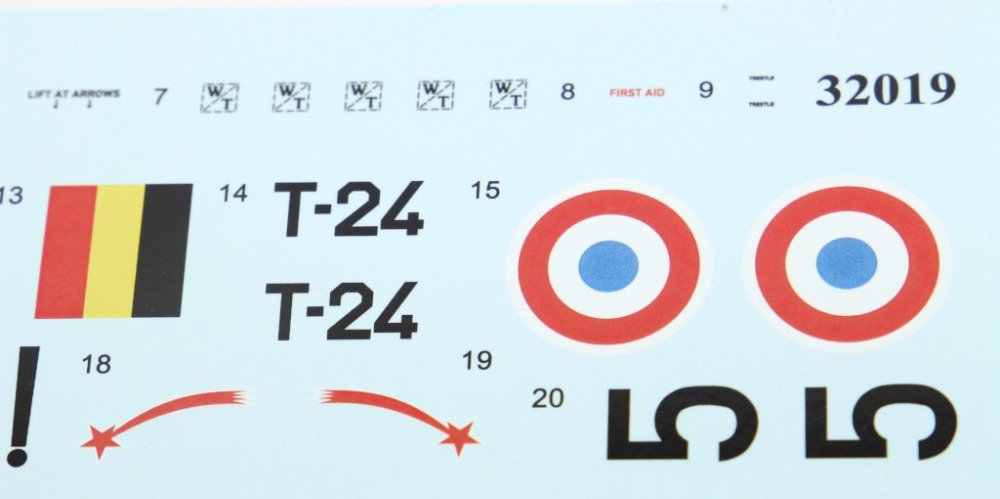
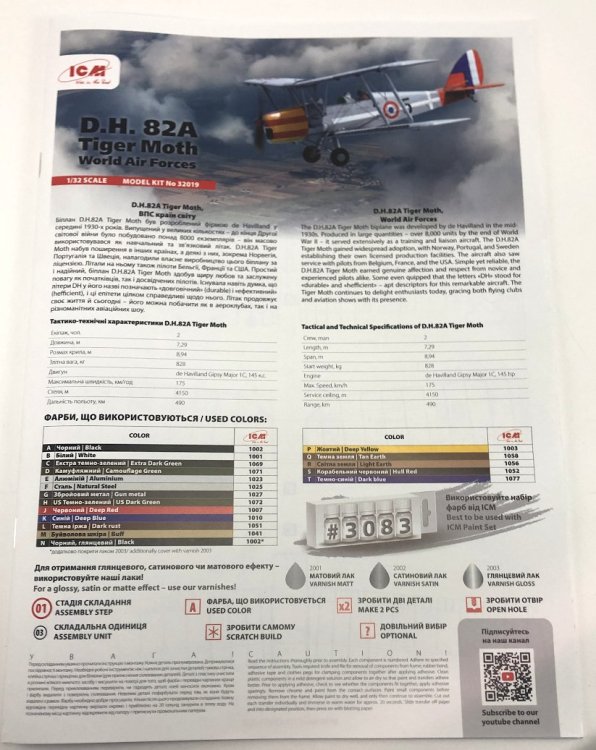
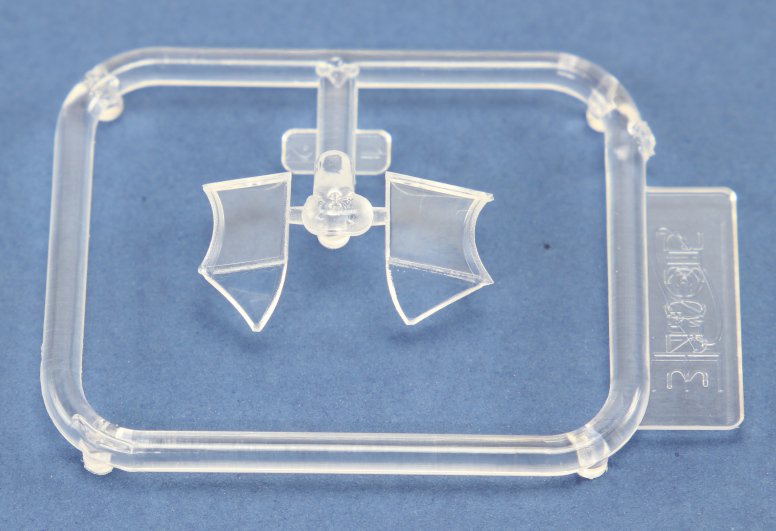
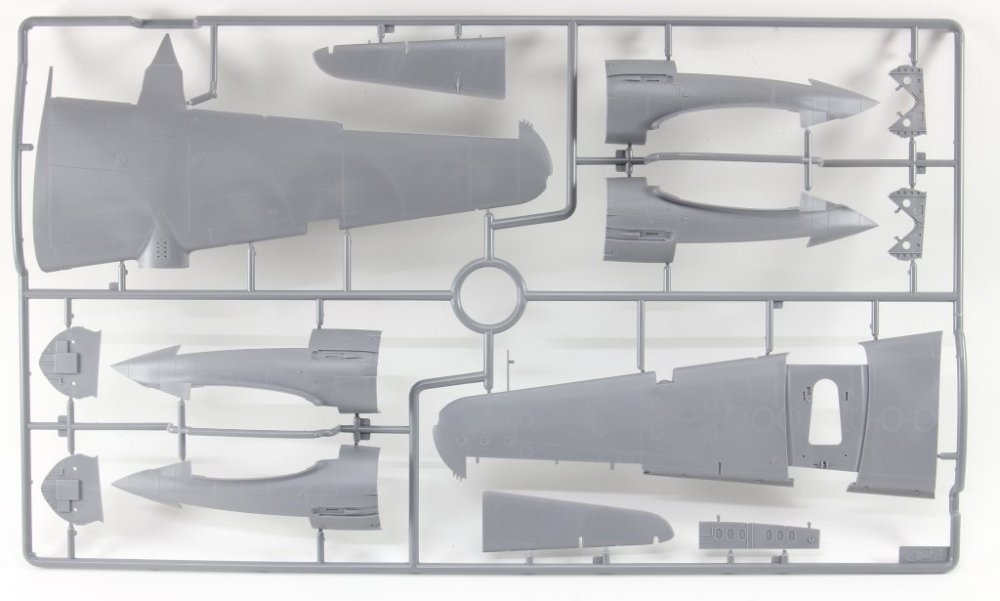
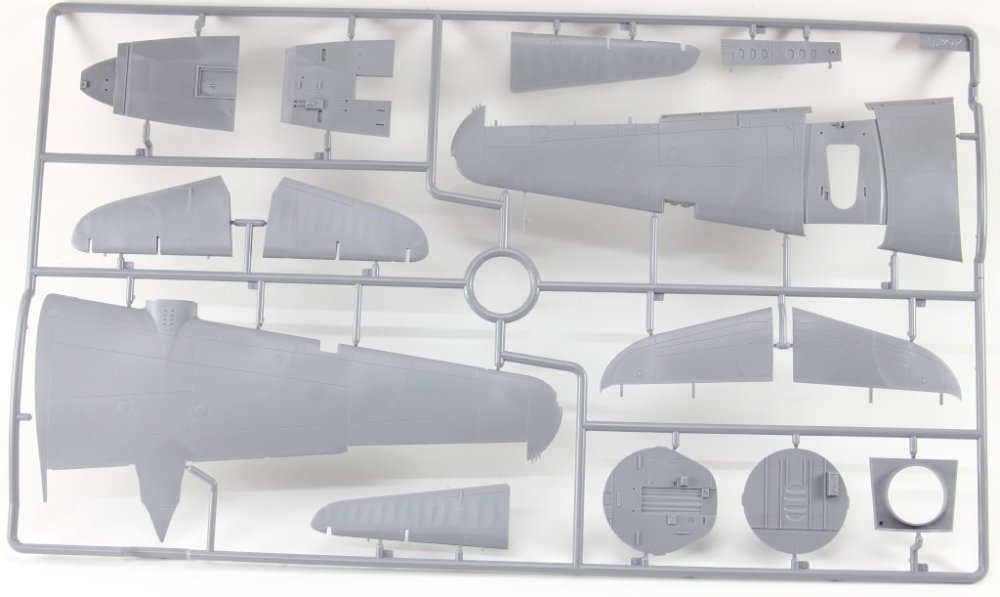
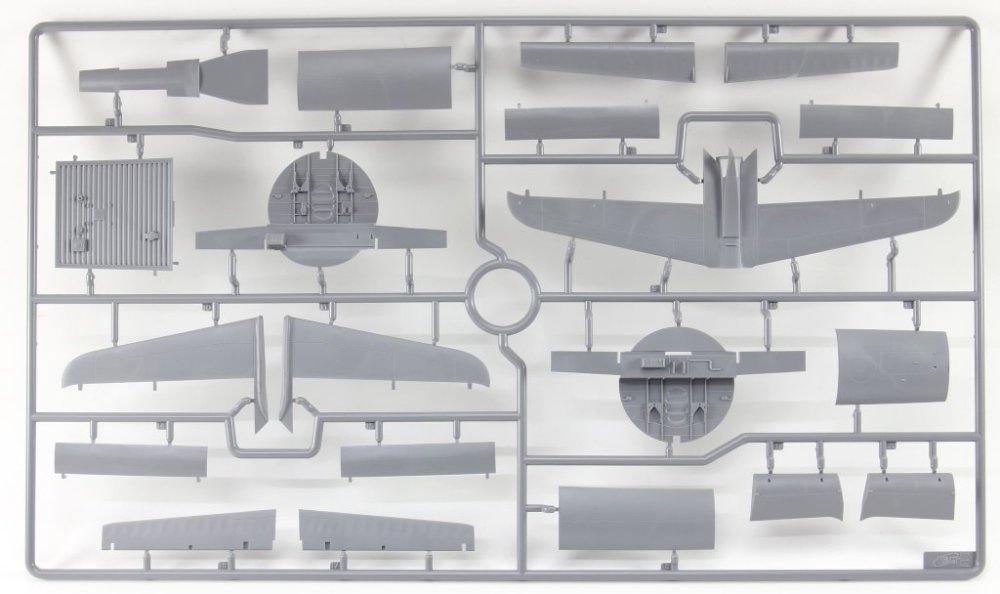
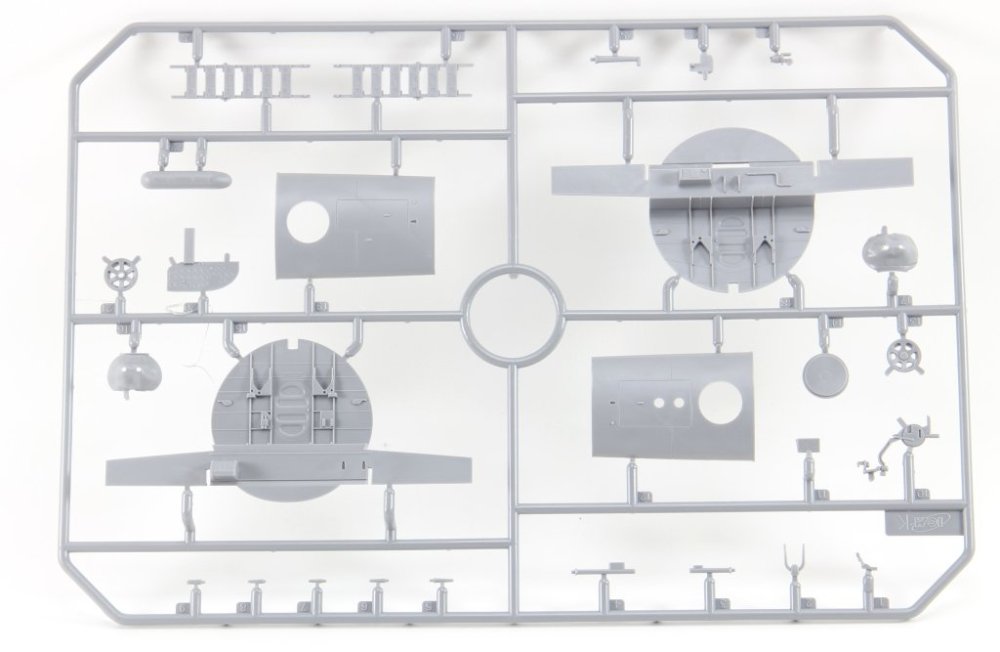
ICM 1:32 DH.82A Tiger Moth World Air Forces Ref.32019 Introduction The de Havilland DH.82A Tiger Moth was a training biplane developed in the United Kingdom in the early 1930s. It entered service with the Royal Air Force as the primary basic trainer, preparing thousands of pilots during the Second World War. Robust, simple, and reliable, it saw extensive use by air forces around the world and was produced under licence in several countries. Its balanced performance and predictable flying characteristics made it ideal for basic instruction. Even today, it remains in use, having passed into civilian hands where it continues to fly. This offering from ICM, available since 2020, has seen several iterations, with this latest version featuring eye-catching markings representing a range of international air forces. What’s in the box! Inside the sturdy cardboard box, you’ll find: 1 decal sheet 1 instruction booklet A clear bag containing 4 grey sprues A small sprue with the windscreens Altogether, there are 93 parts included. Sprues display Sprue A This sprue provides the fuselage halves and the upper halves of both wings. These components feature moulded detail representing the aircraft’s internal structure, subtly evoking the doped fabric stretched over its wooden frame — a delicate effect that’s nicely captured. The rudder and horizontal stabilisers are each supplied as single-piece mouldings. The engine comes in two halves and offers a fair level of detail, although there’s certainly room for enhancement with the addition of ignition wiring and fuel lines. The fuel tank, located atop the upper wing, is finely rendered with convincing scale detail. General layout and detail for the Sprue A Sprue B This sprue contains the upper wing. The top half is moulded as a single piece, while the lower sub-wings are supplied separately (found on Sprue A). Sprue C This sprue includes the upper half of the lower wing structure and the cockpit floor, both moulded as a single piece. The ailerons are provided as separate parts, as are the lower halves of each wing. Sprue D This sprue contains several interior components of the model: The instrument panels (front and rear) feature appropriate detailing, fitting for the simplicity of the real aircraft 😉. The propeller is moulded as a single piece, including both the blades and the hub. The upper wing struts (spars) are also supplied as individual pieces, offering solid detail and requiring minimal cleanup. The oil tank is well rendered, with nicely reproduced fastening bolt details. Additional note There’s a small part, D4, that deserves special mention for the crucial function it represents : mounted to the spar of the left wing, it’s the aircraft’s airspeed indicator. This clever mechanism uses a calibrated spring to actuate a pointer, displaying the aircraft’s speed in knots! General layout view of sprue D Sprue E This small clear sprue provides the two windscreens, each moulded as a single-piece component in transparent, distortion-free plastic. The moulded metal frame detailing is sharply defined, making the masking process for painting significantly easier. Instructions The instruction booklet is A4 in size and consists of 20 pages, The first page presents the colour guide, all fo the ICM colour range, next we have parts layout and a step-by-step assembly with clear, easy-to-follow drawings. At the end, there's a small template for masking the windscreens, along with a helpful view of the completed model with all rigging applied. A special mention must go to the detailed and clearly illustrated rigging diagram included in the build process, which also provides the exact lengths required for each line. Even for those without prior experience in the art of rigging, like myself, the guide makes it far easier to plan and approach the task 😊 Marking Options The kit includes five vibrant and distinctive colour schemes representing Tiger Moths from various international air forces: DH.82A Tiger Moth (Sk 11), Swedish Air Force, 1935 2. DH.82A Tiger Moth, Portuguese Air Force, 1939 3. DH.82A Tiger Moth, Vichy French Air Force, 1941 4. DH.82A Tiger Moth, 353rd Fighter Group, US Army Air Forces (USAAF), 1943 5. DH.82A Tiger Moth, Belgian Air Force, 1945 Decals The decal sheet provided includes markings for the five available versions as well as service stencils. The decals are well printed, with good colour definition and sharp detailing. Note: With all due respect to the various versions and their nationalities, the Portuguese Air Force scheme is, of course, the one that stands out most to me. I exchanged thoughts with a few fellow modellers, who confirmed that several historical details from the period — such as the tail markings featuring the armillary sphere — are accurately represented and rendered in the correct colours. Conclusion This is yet another reissue of a tried-and-tested kit. Despite the scale — which often implies added complexity — that’s not the case here. Much like the real aircraft, this 1:32 scale kit is characterised by its straightforward construction, making it well suited to both experienced modellers and newcomers alike. My only specific note goes to the rigging wiring: in my view, it's presented very clearly and isn’t at all intimidating, even for those with limited experience in this aspect of building. The marking options are bold, refreshing, and far from the ordinary — guaranteed to make each finished model stand out visually. All in all, it's a kit I can recommend for its simplicity, low complexity, and distinctive selection of liveries. Thanks to ICM for the model for review Ricardo Verissimo


.jpg.05538474d978b1db07287dd022afe6c1.jpg)

-
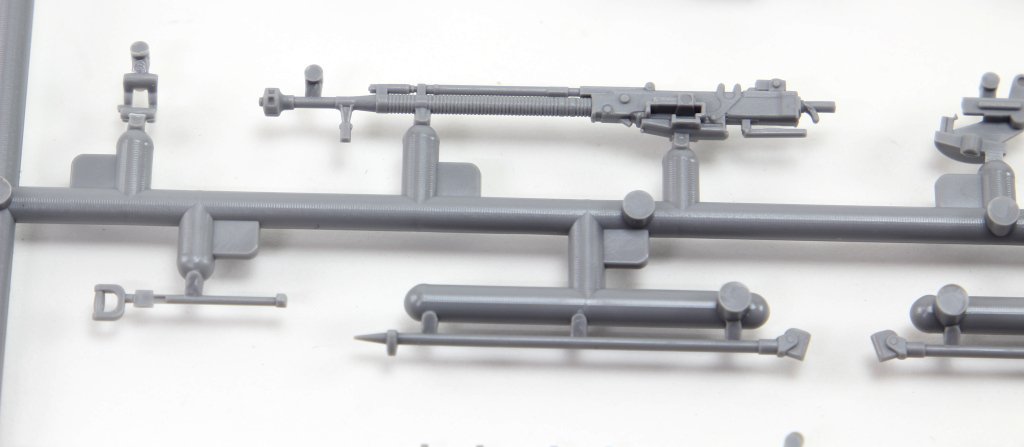
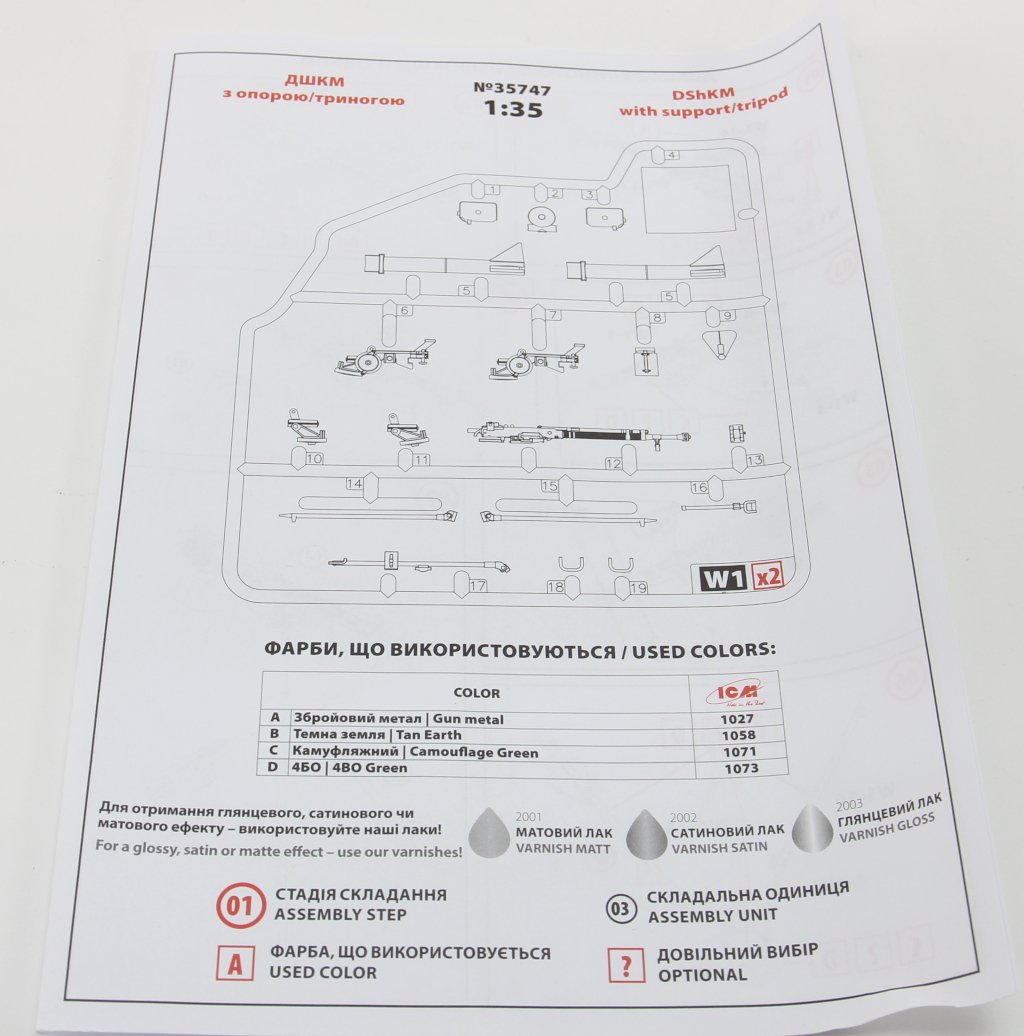
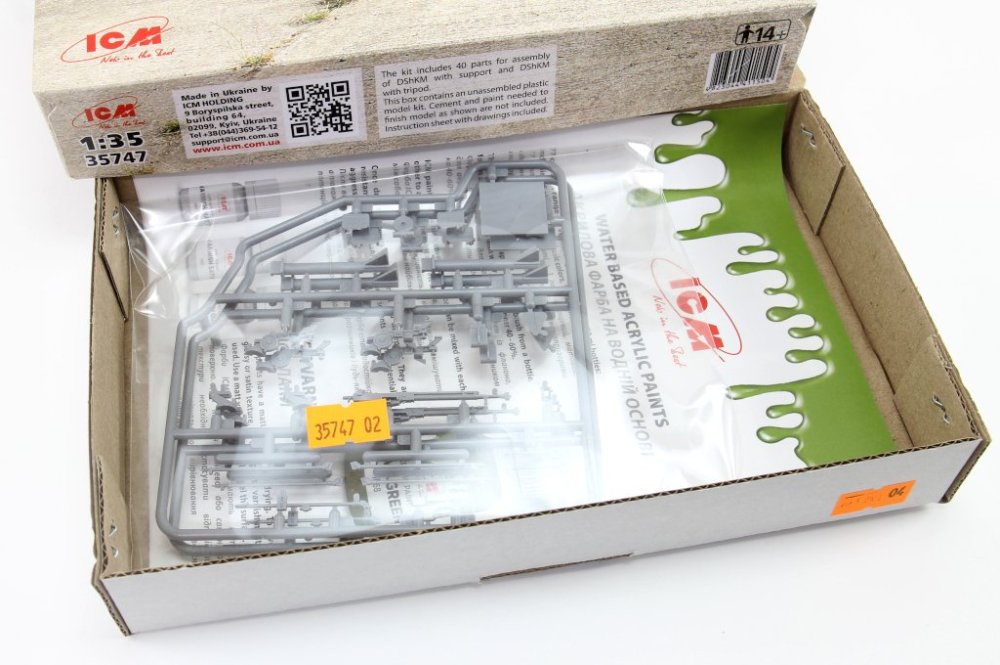
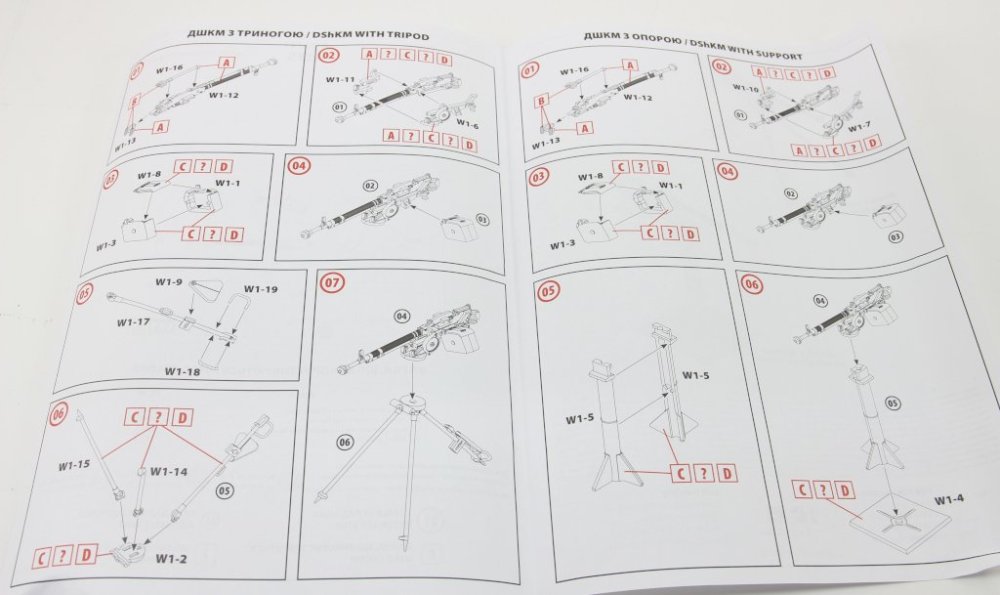
ICM 1:35 DShKM with support / tripod Catalogue number 35747 Introduction ICM continues its dynamic approach of offering various scale kits and accessories to complement 1:35 vehicles and dioramas. The set under review features the DShKM. This heavy machine gun, a contemporary of the Western M2HB, has long been associated with the armed forces of the Eastern Bloc and with virtually every theatre where their military hardware has seen action. Whether used as a secondary weapon on the turret of an armoured vehicle, mounted on the deck of an attack boat, or more recently in improvised roles, its versatility is well documented. The kit includes two identical sprues, offering options to mount the weapon on a base typically intended for fixed positions (a rectangular platform suitable for anchoring), commonly seen in bunkers, vehicle cargo beds, or even small boats, as well as a tripod mount generally used in mobile anti-aircraft roles. With some modelling skill, this set can also be adapted to represent a secondary weapon mounted on the turret of an armoured vehicle. What’s in the box! Inside the familiar ICM cardboard box, we find a bag containing two identical sprues, an instruction leaflet, and a small colour chart featuring the ICM paint range. Sprue W1 (x2) This sprue provides all the parts needed to assemble the weapon. The gun’s body and barrel are moulded as a single piece, with an acceptable level of detail for the scale. There is a mould line (a common limitation of injection moulding), but its removal should be straightforward and not pose a risk of damaging the part. The barrel is not hollowed out. The remaining parts, molded in halves, form the mounting system for the tripod or fixed base, along with the sight and ammunition box. No parts provided for the sight usually seen on the anti-aircraft duties. Note: No 12.7mm ammunition belts are included. Instructions A small instruction leaflet is included, with a step-by-step assembly guide and reference to the available configuration options, along with colour codes for painting. On the final page, both mounting options (tripod or fixed base) are shown. Conclusion This is a very simple set depicting a relevant military subject, which can greatly enhance a small diorama or vehicle scene. The level of detail on the weapon is adequate and may well be a superior alternative to similar offerings from other brands, which may now be showing their age. As such, this is a recommended set! Many thanks to ICM for the review sample. Ricardo Veríssimo


.jpg.650172811bd36507974aa6879bbdc836.jpg)
-
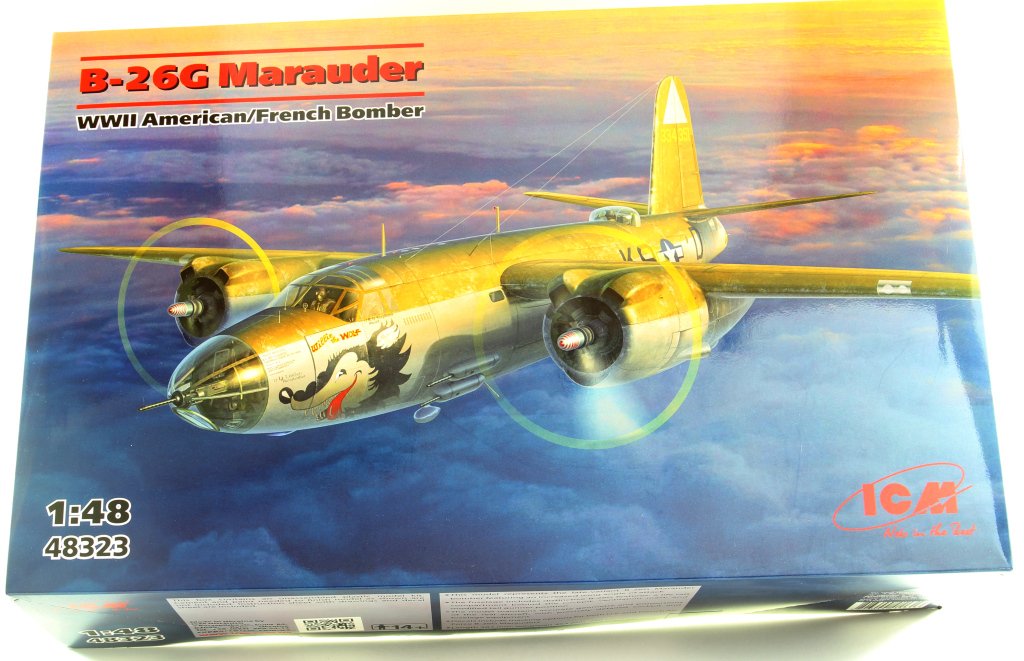
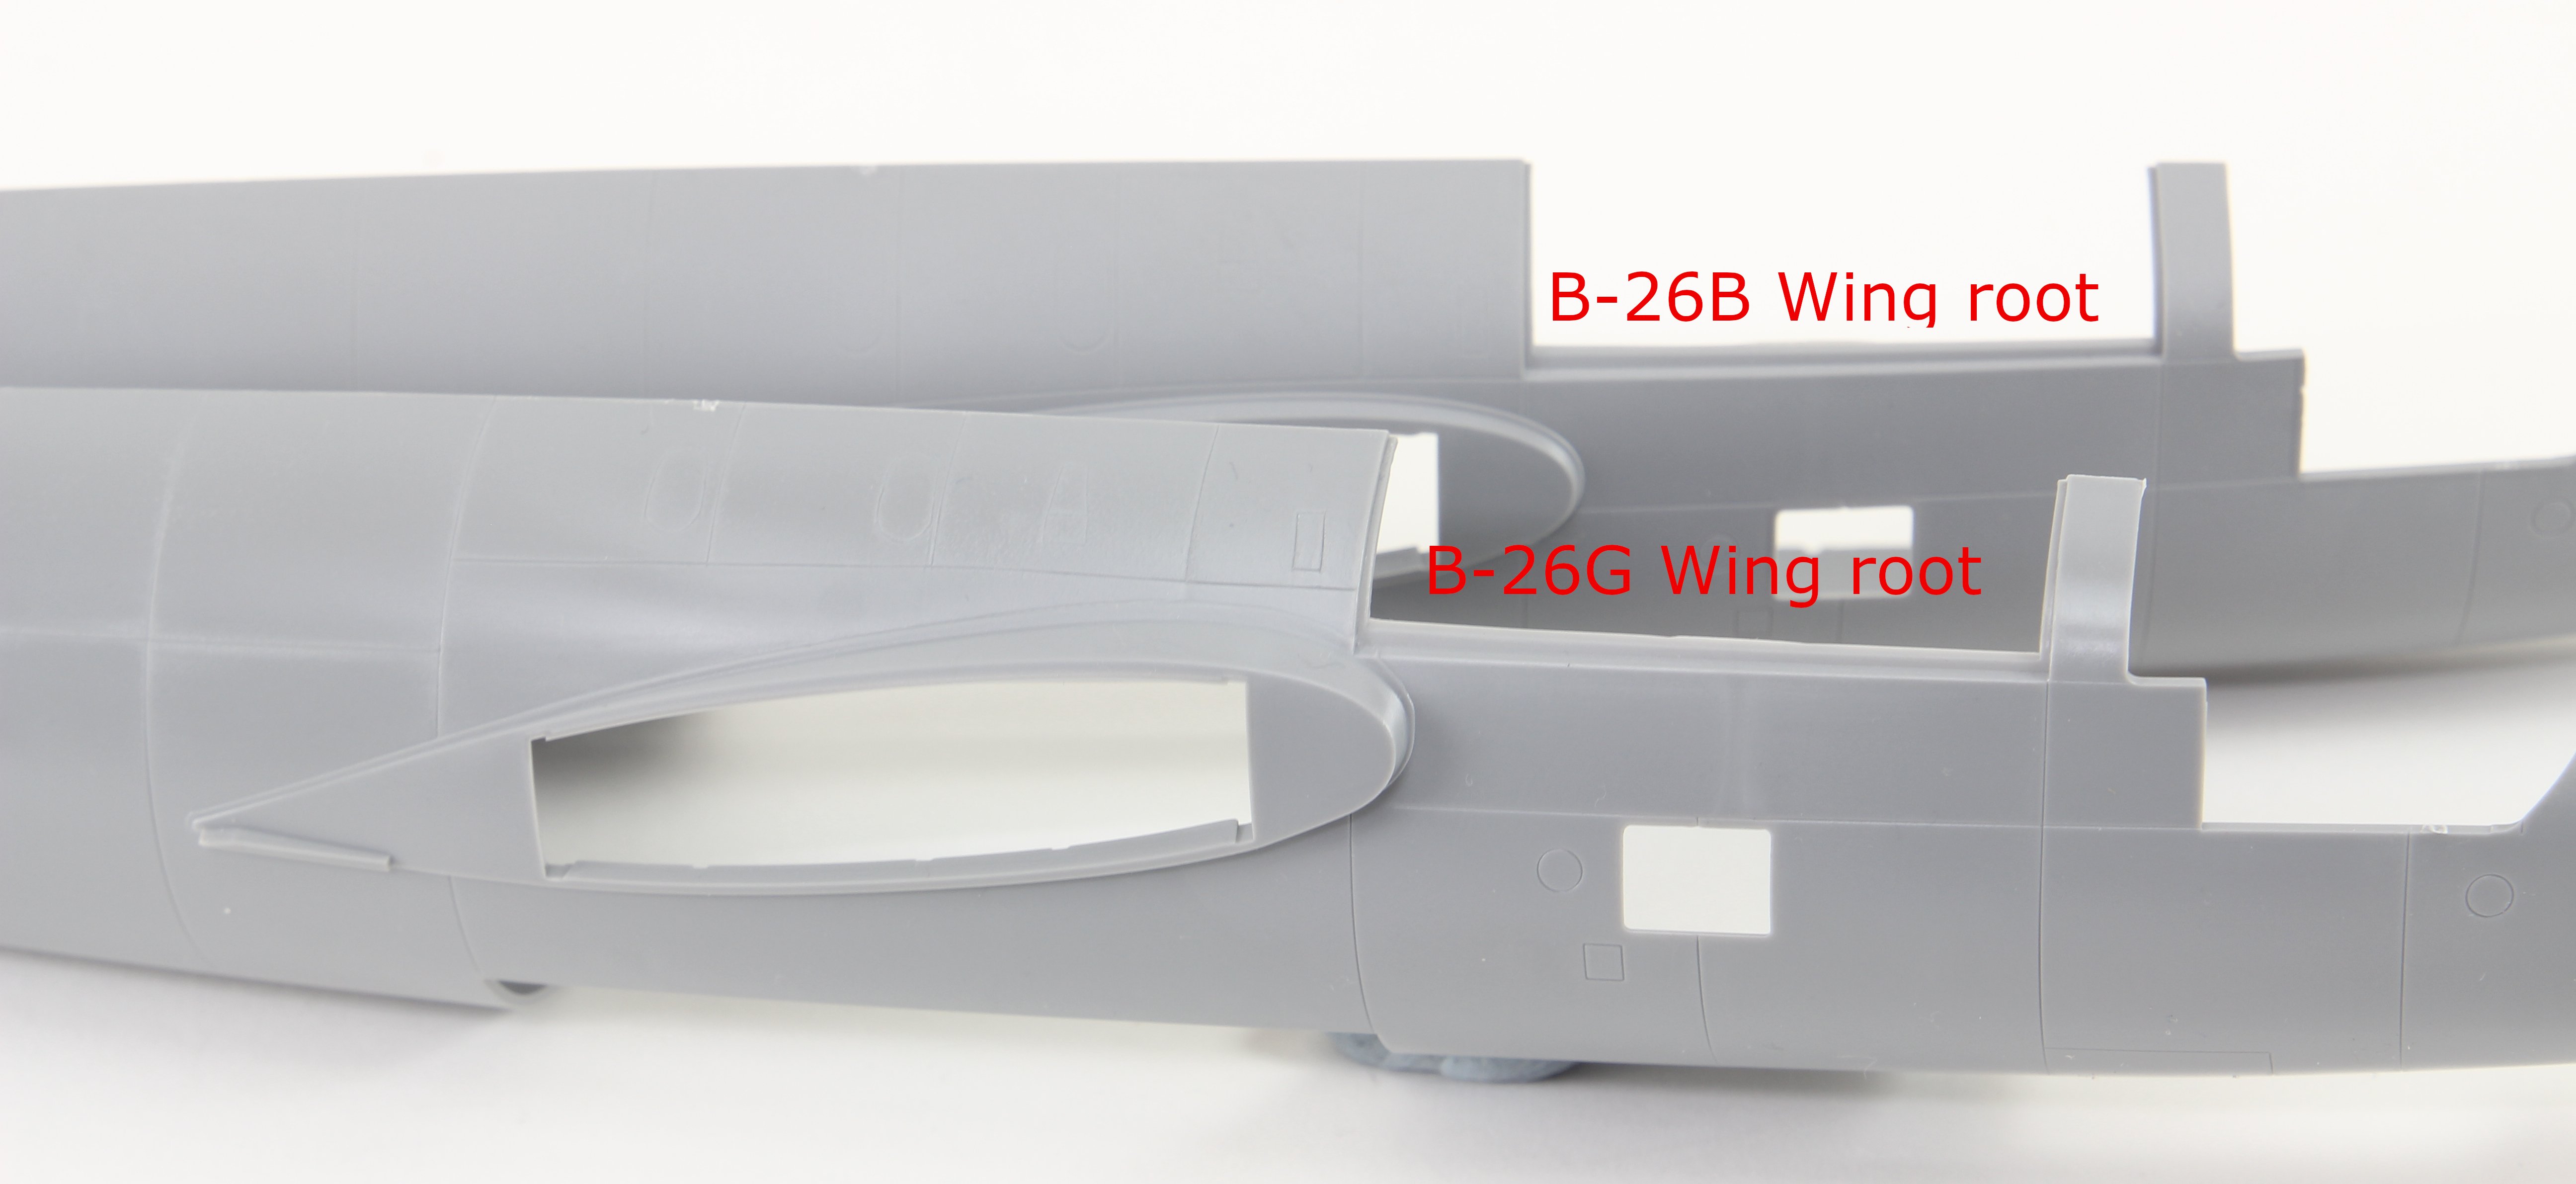
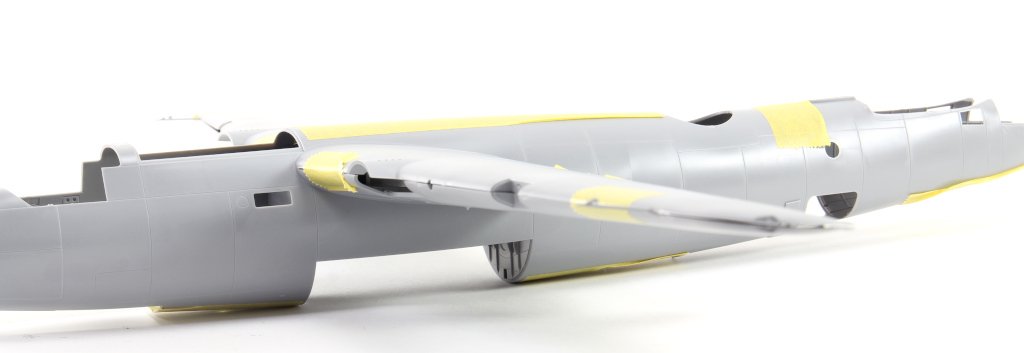
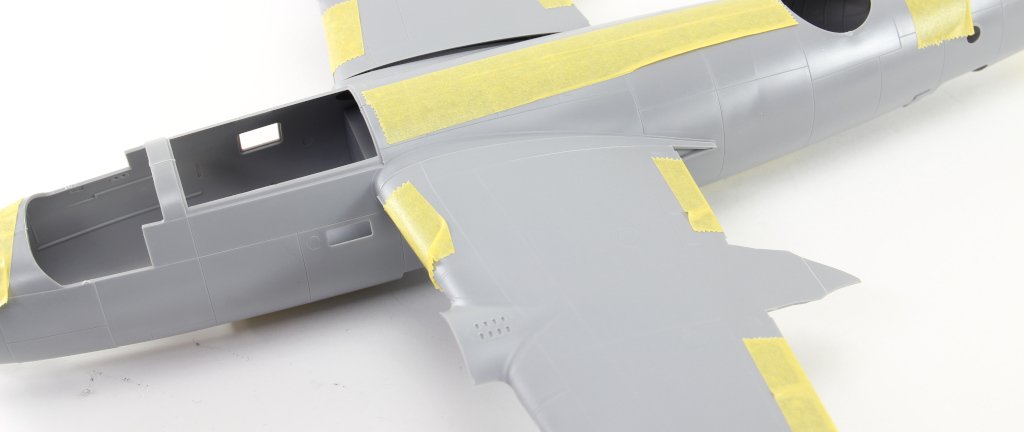
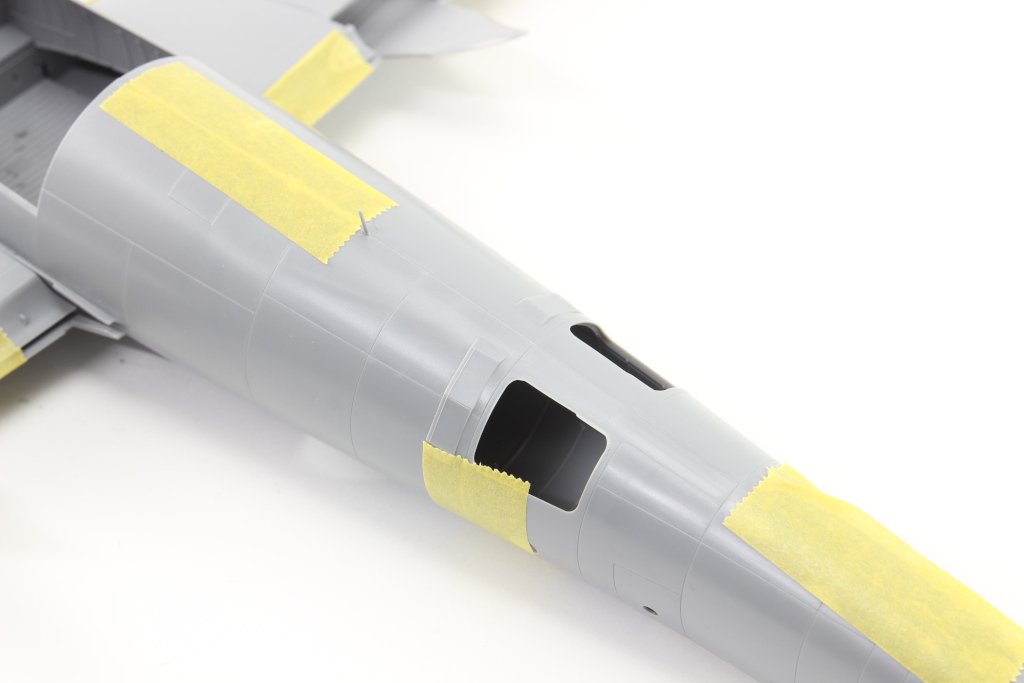
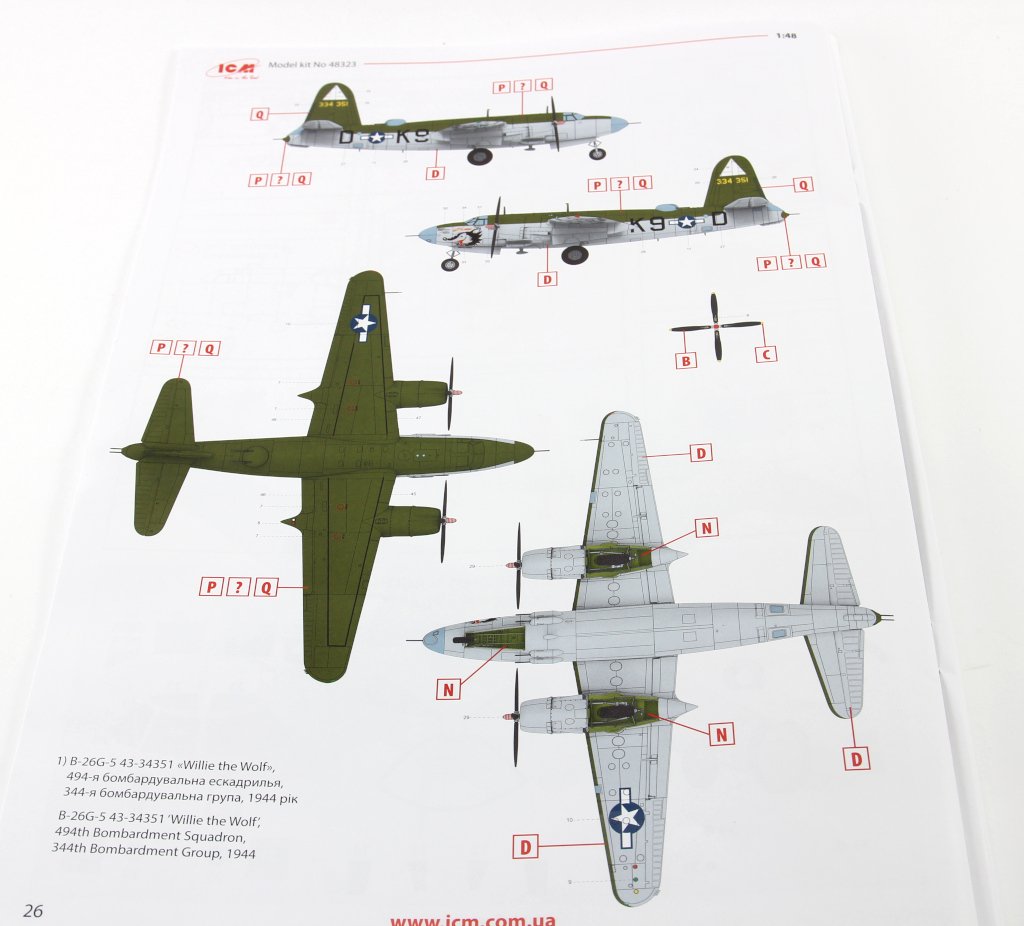
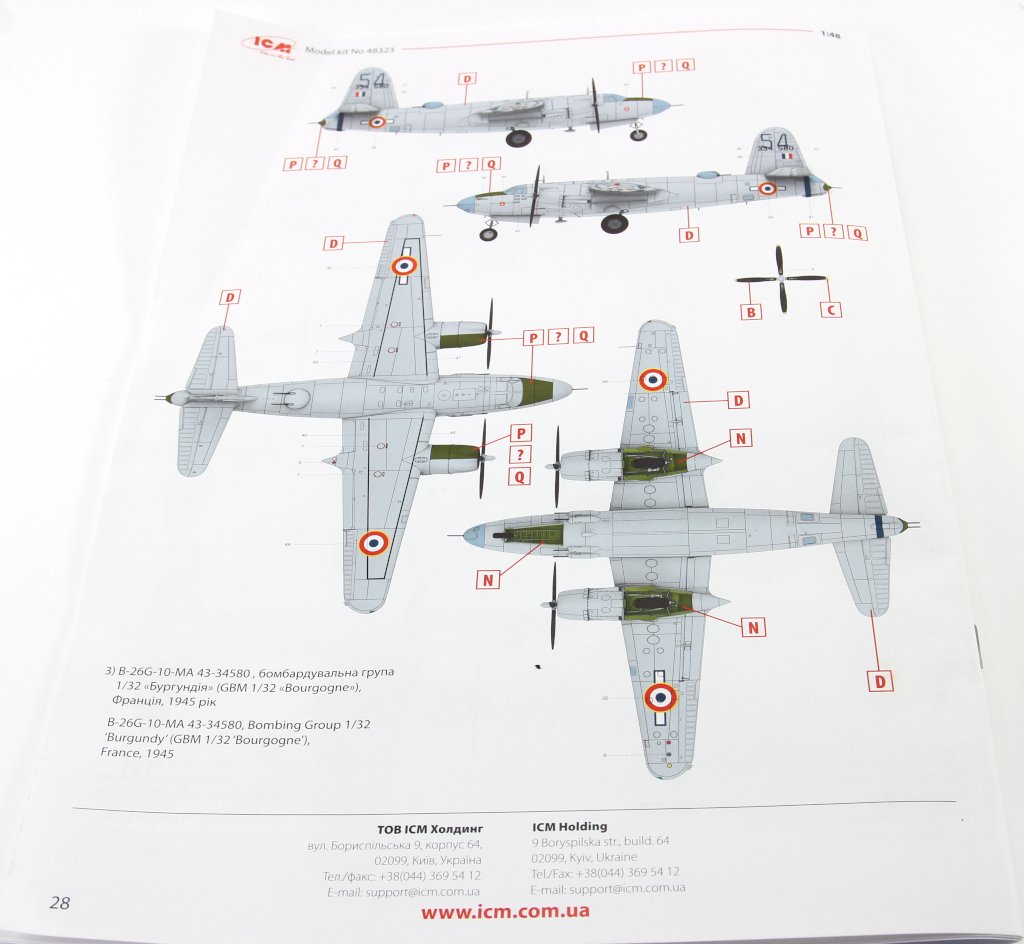
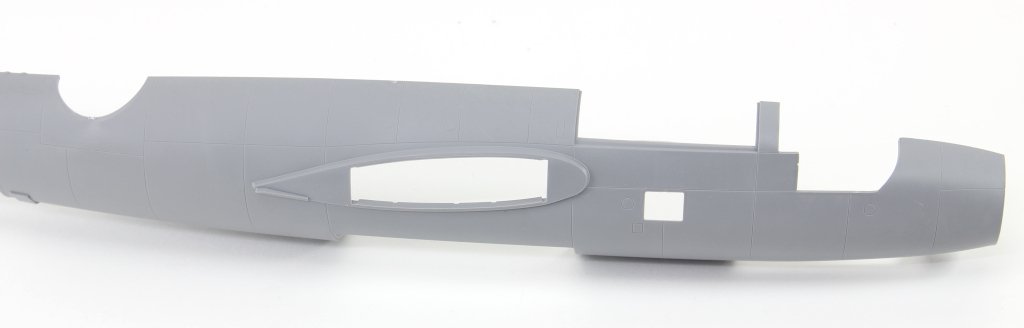
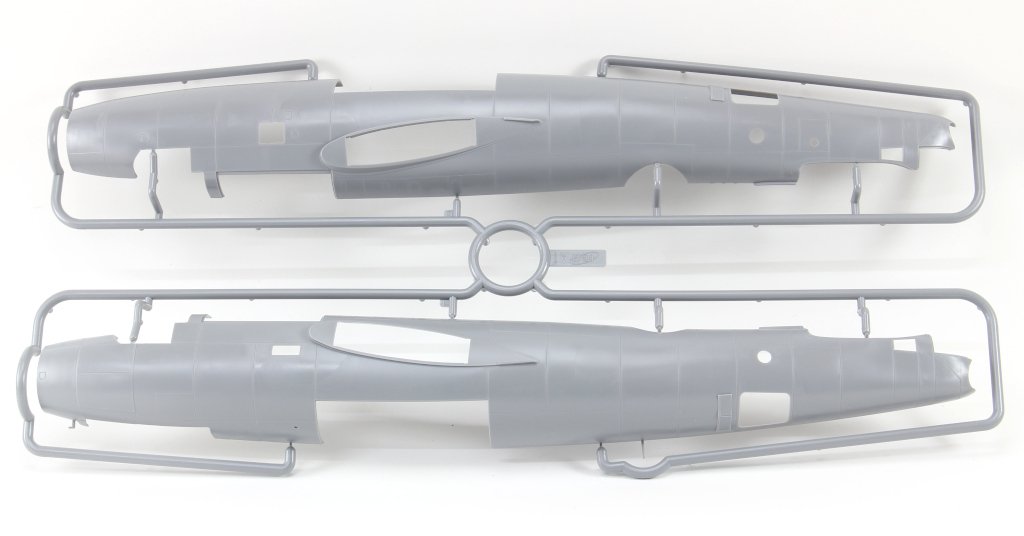
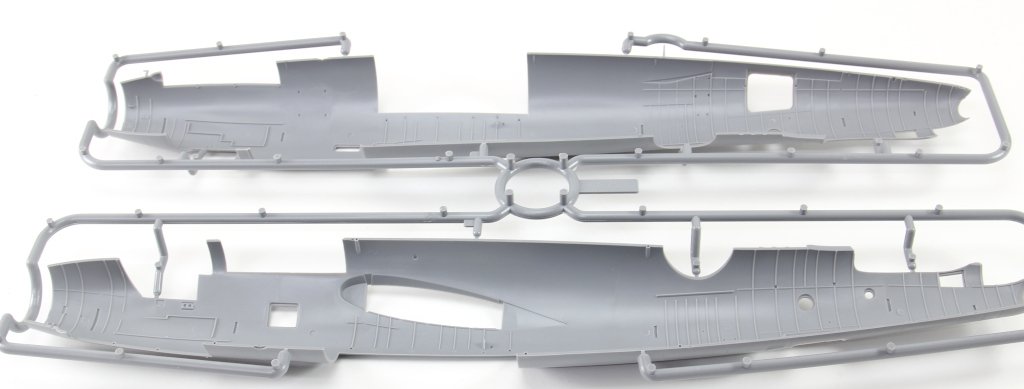
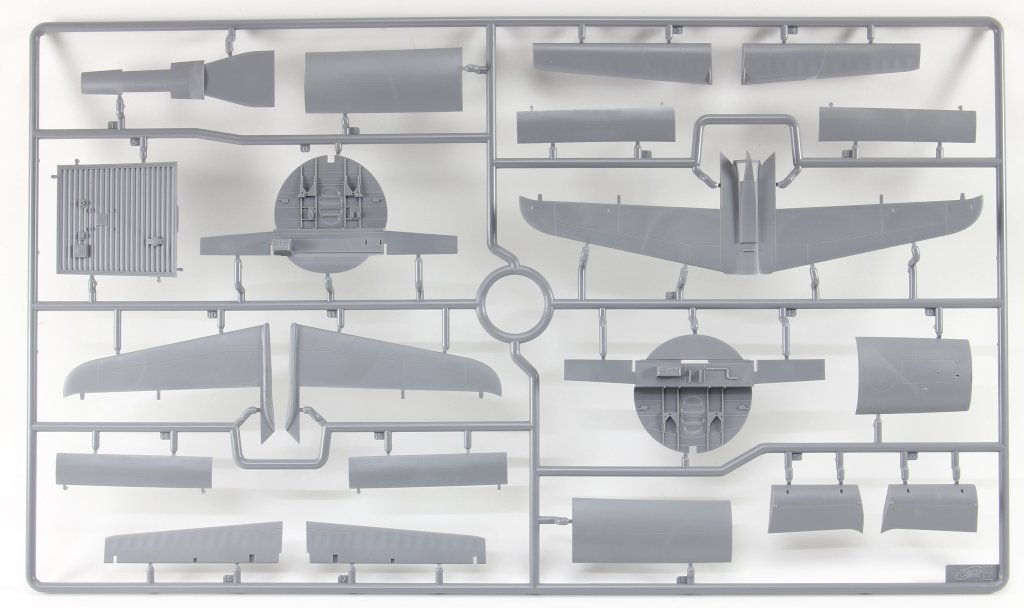
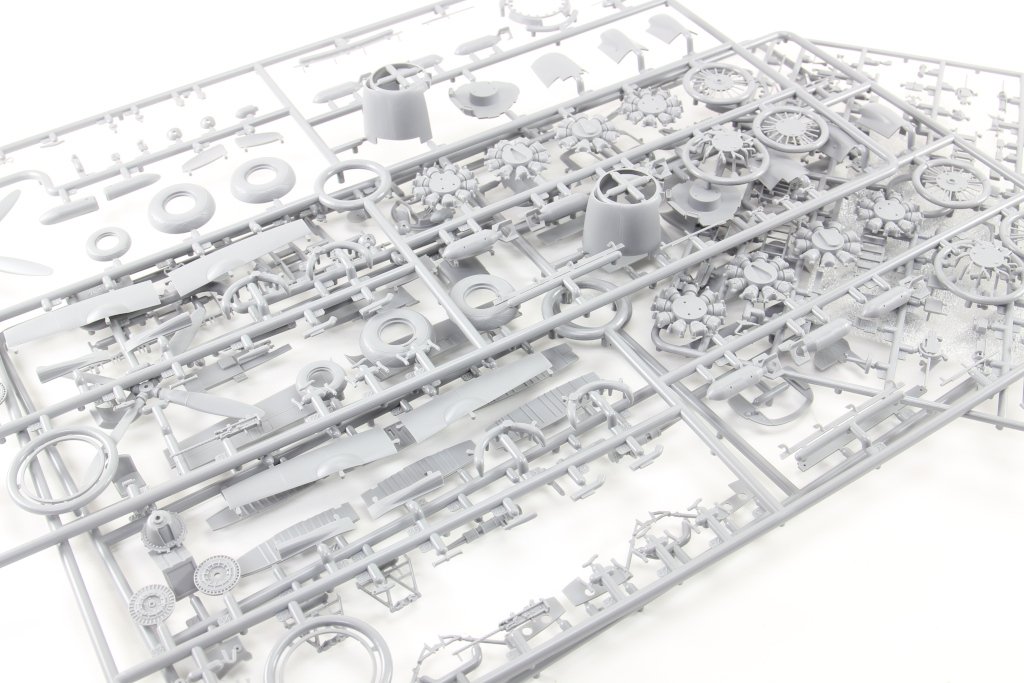
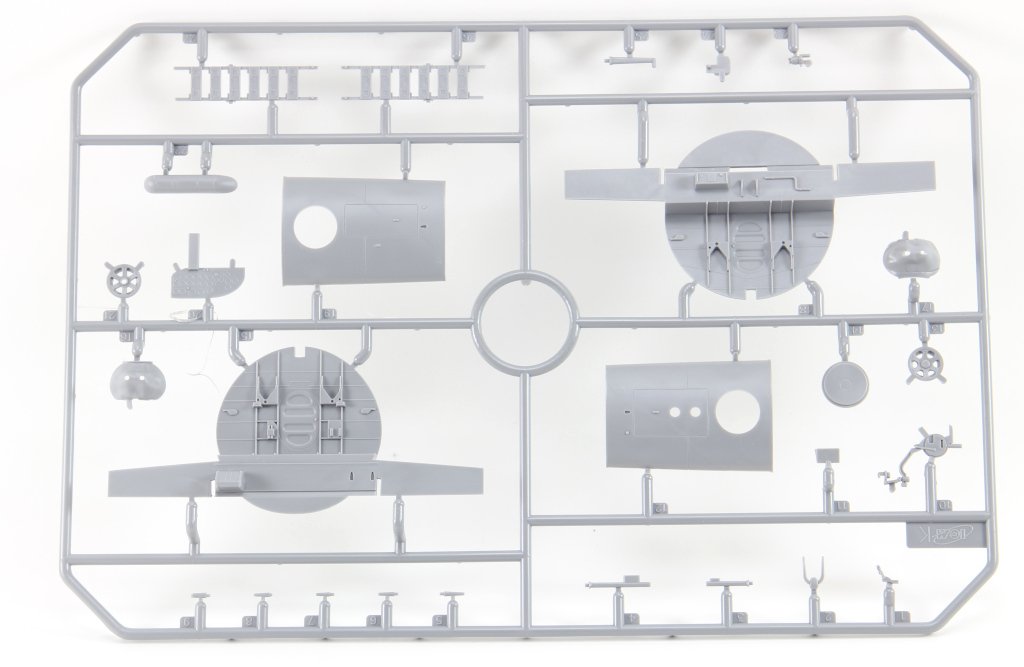
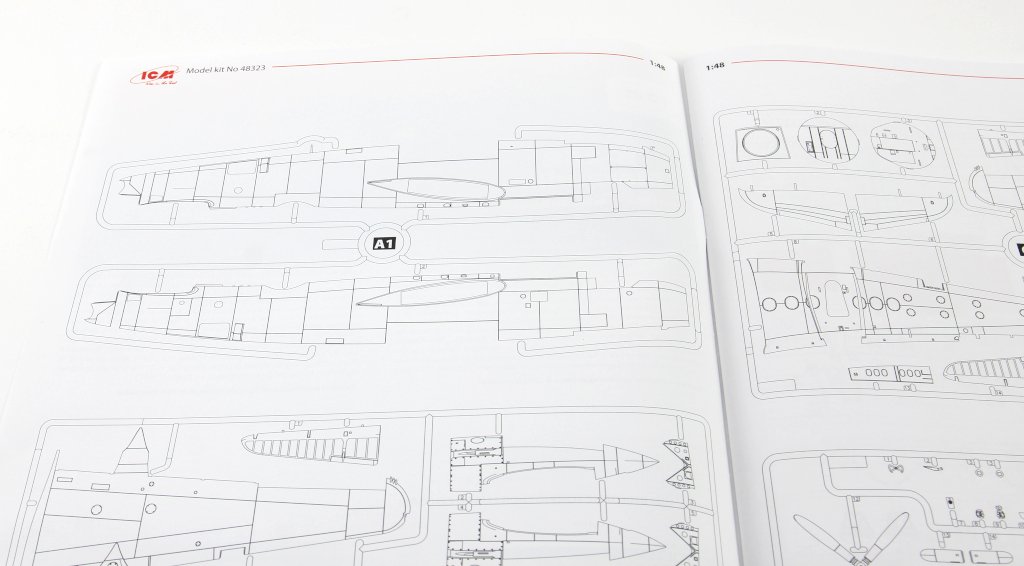
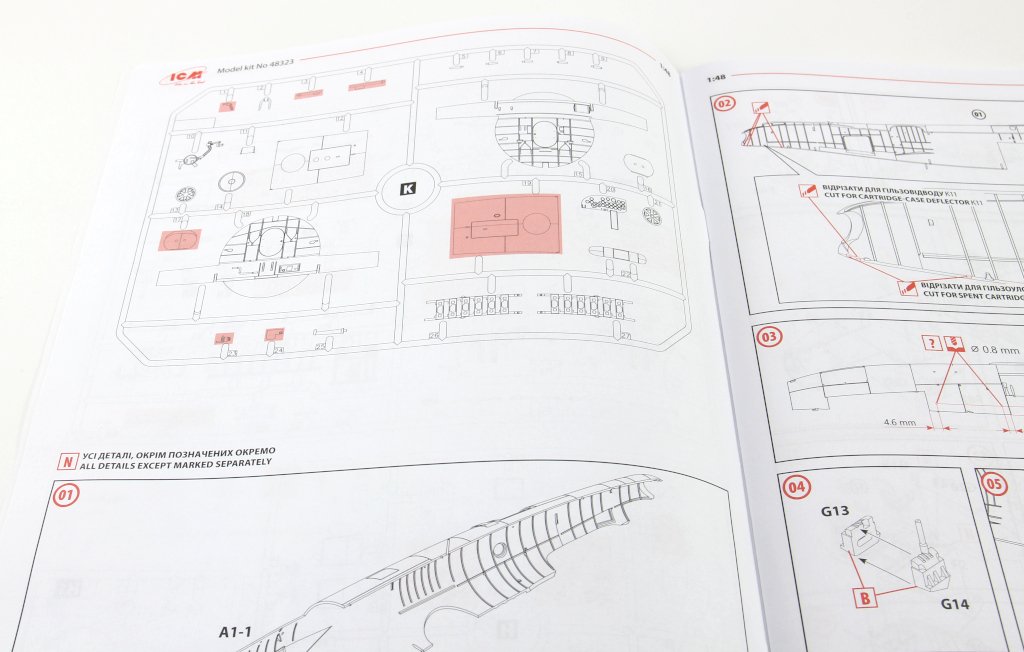
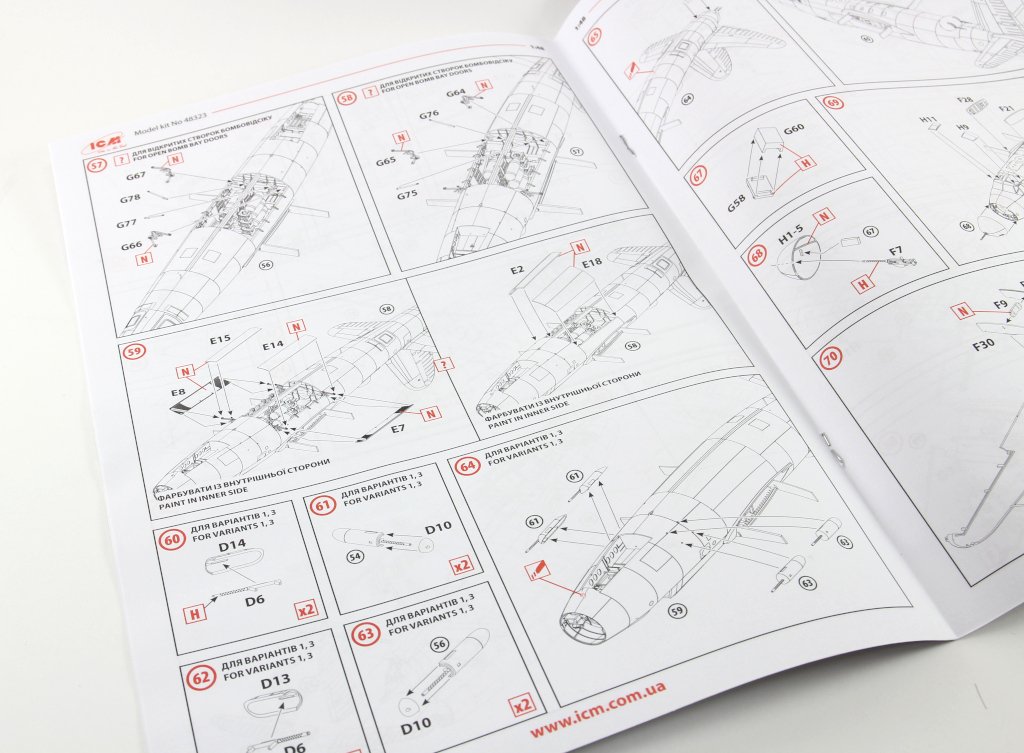
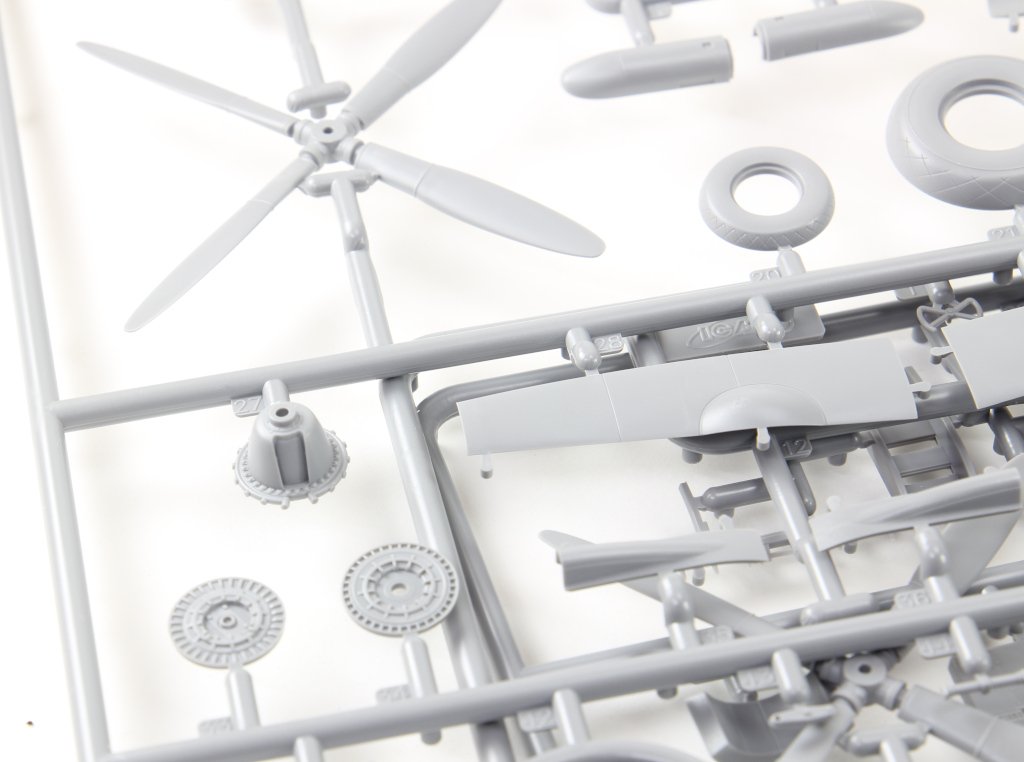
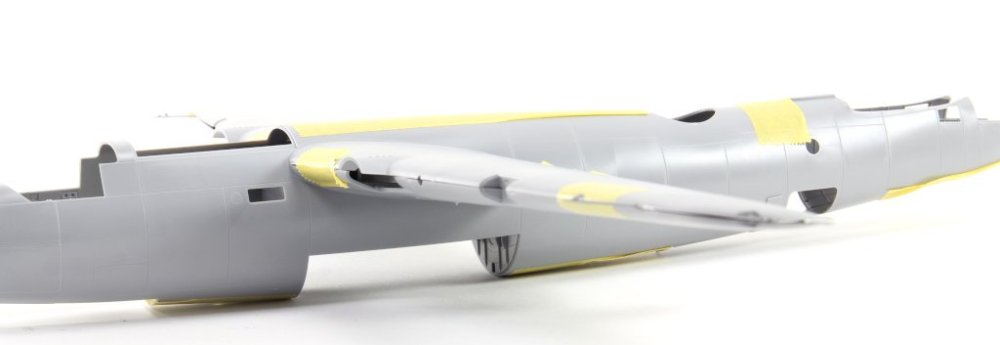
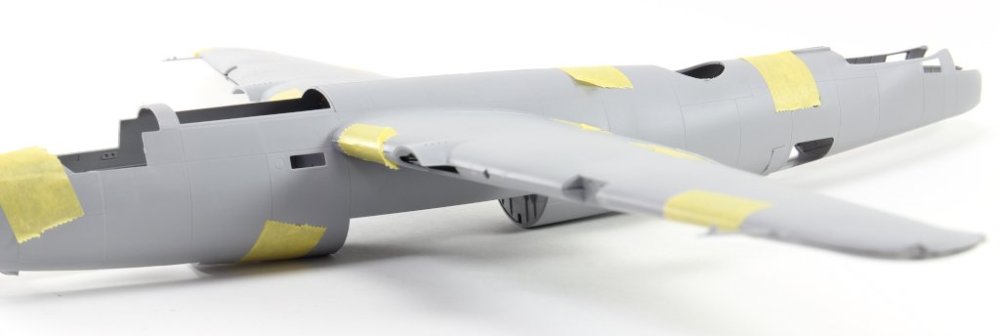
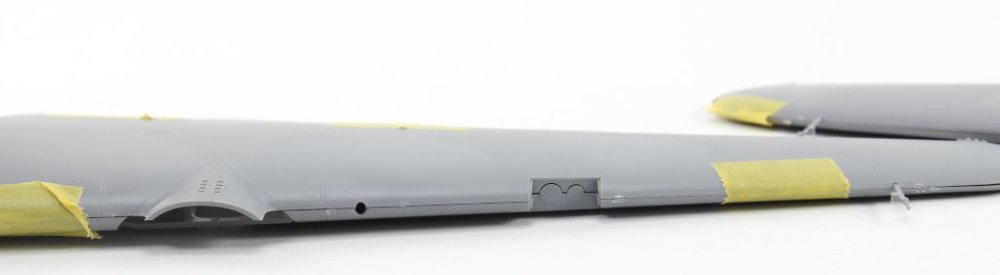
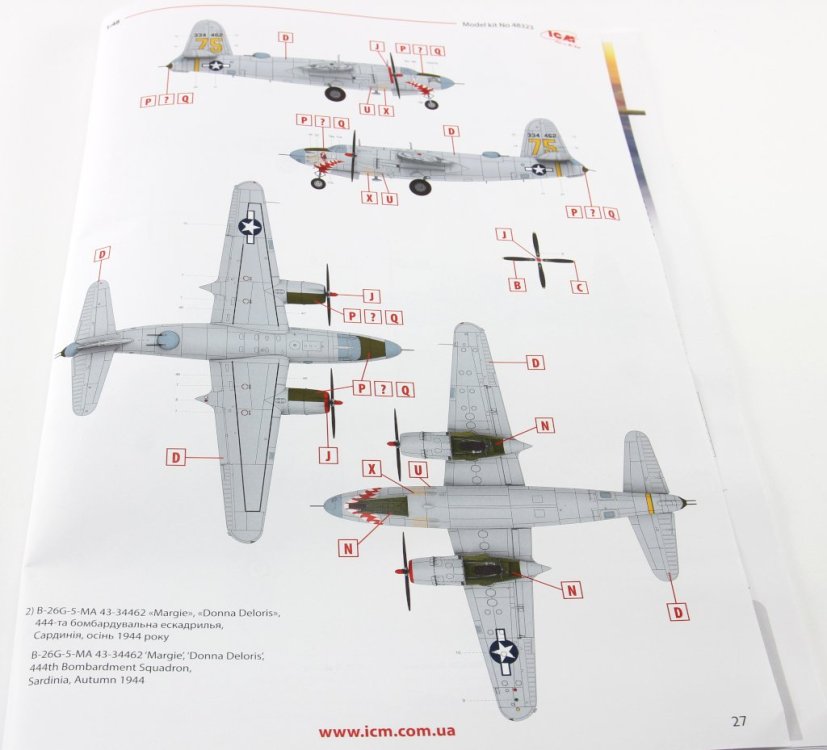
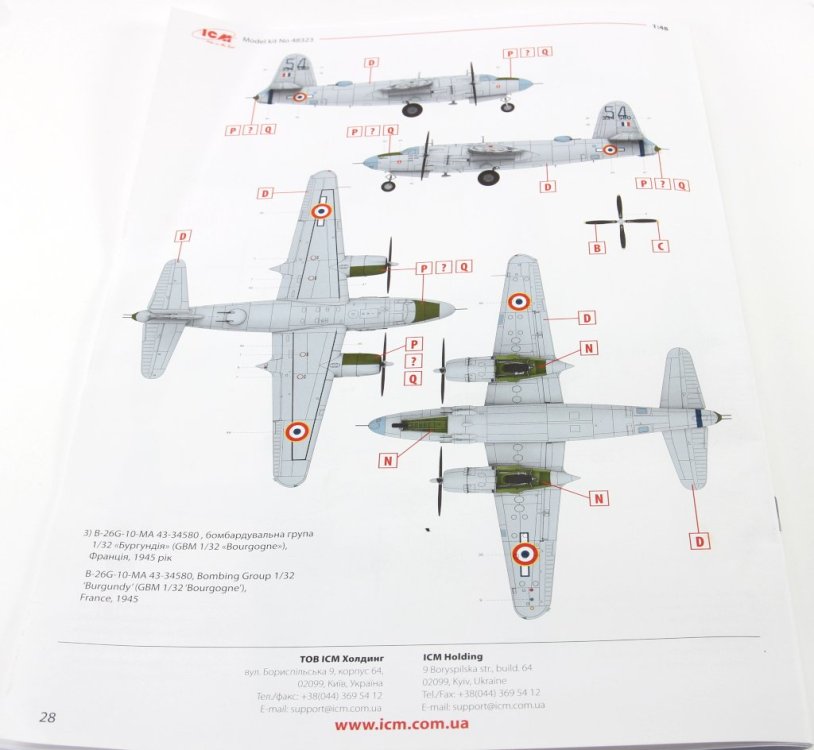
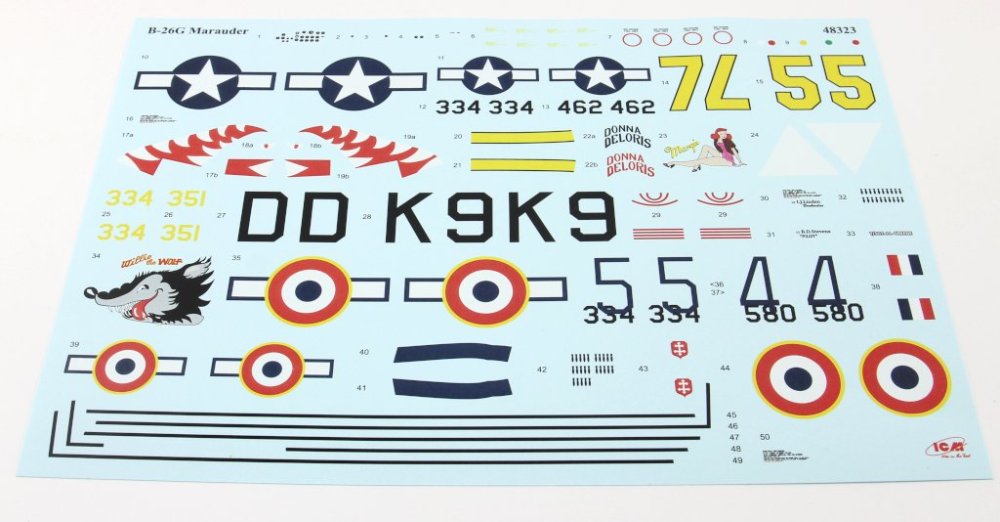
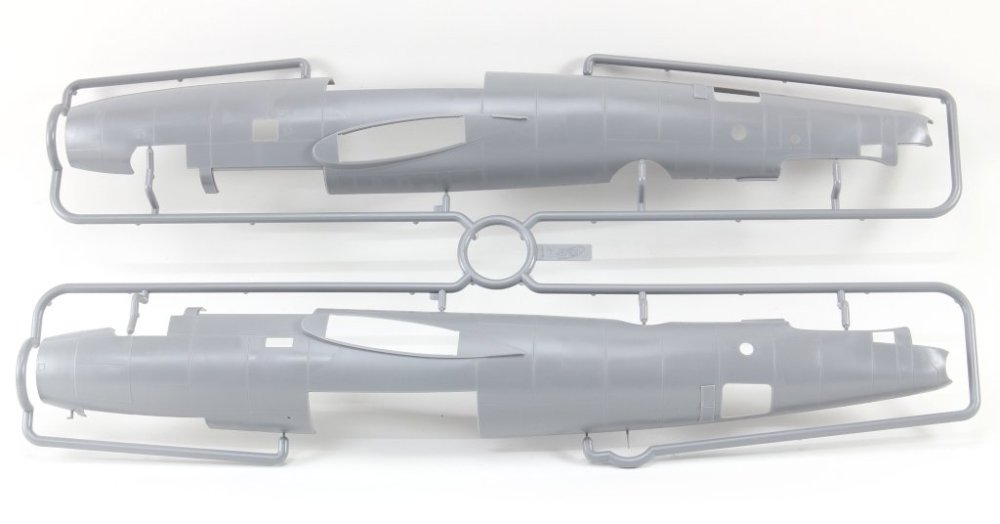
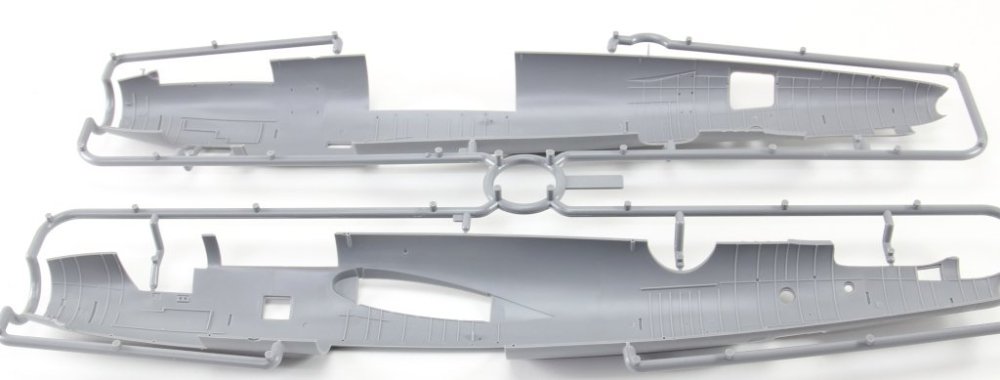
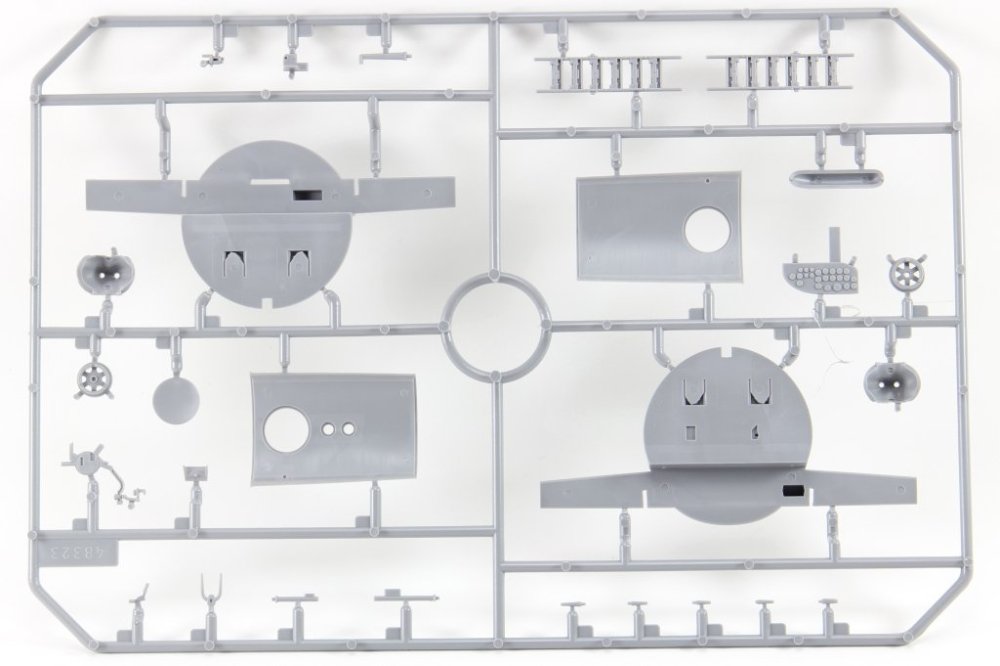
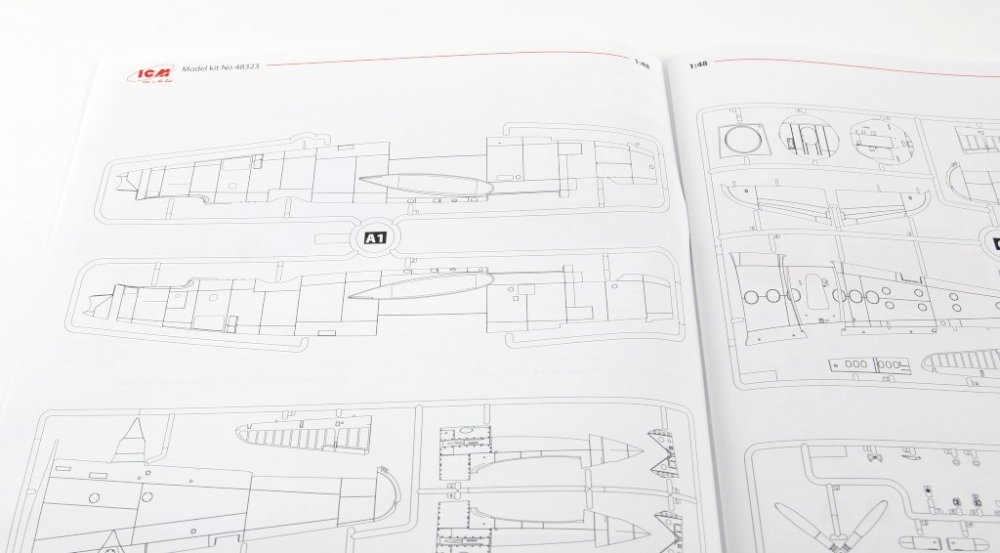
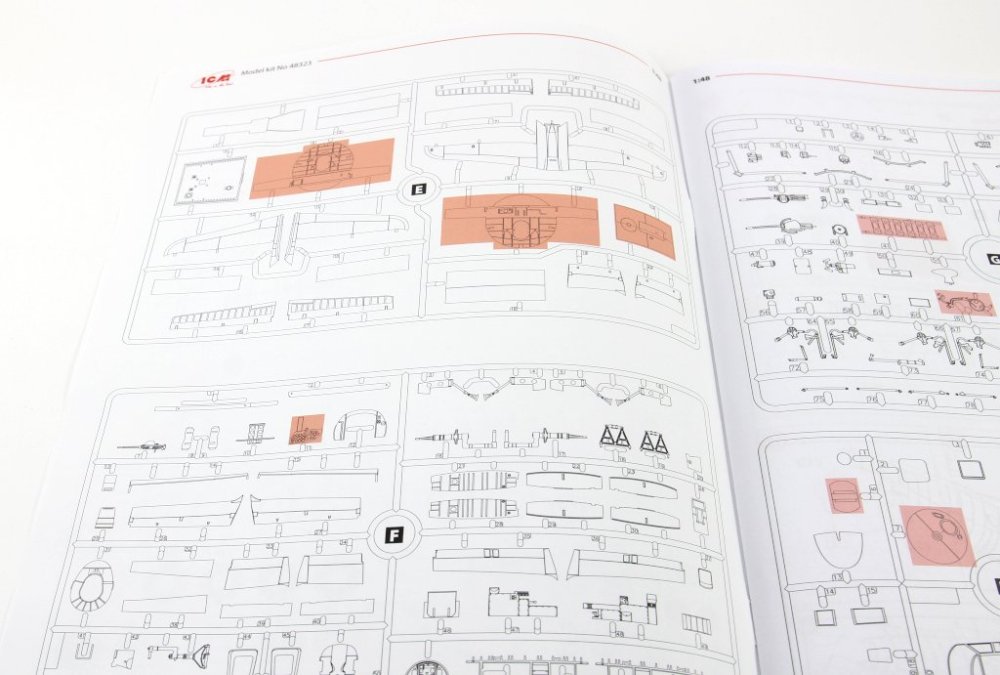
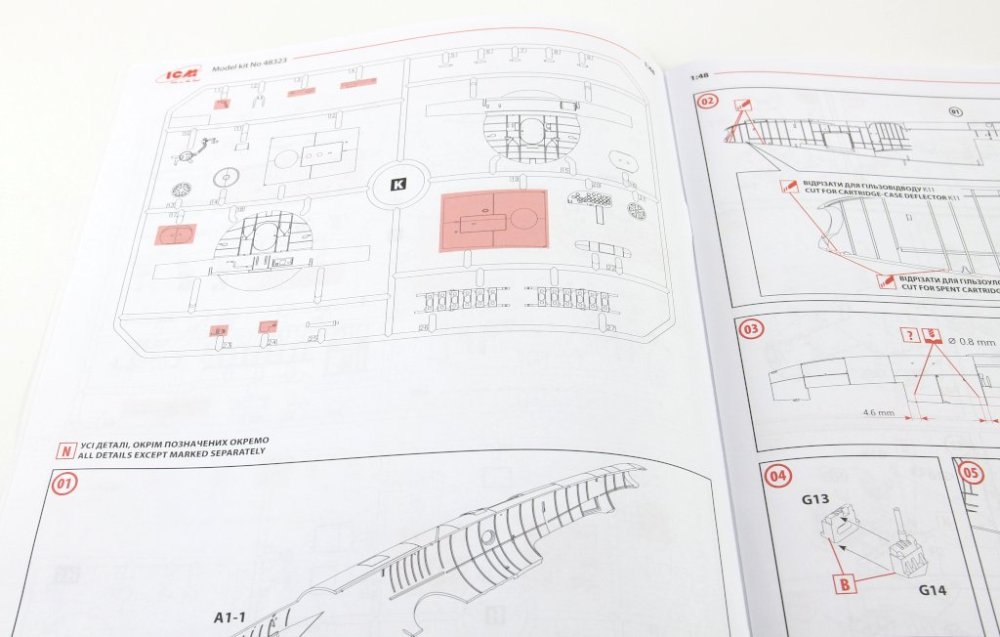
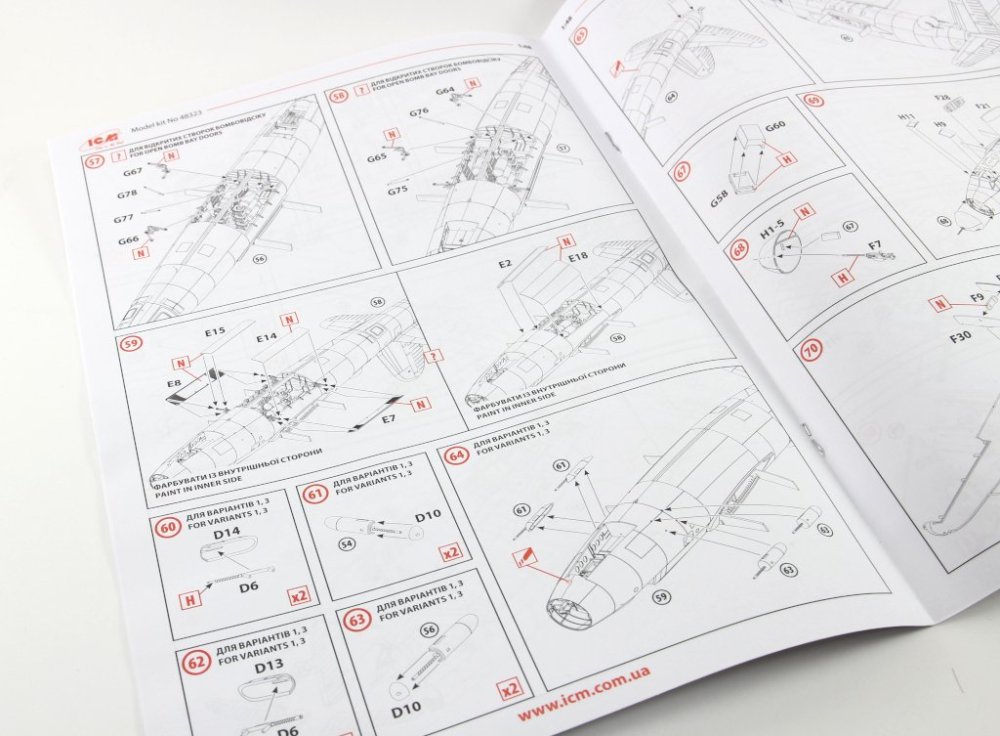
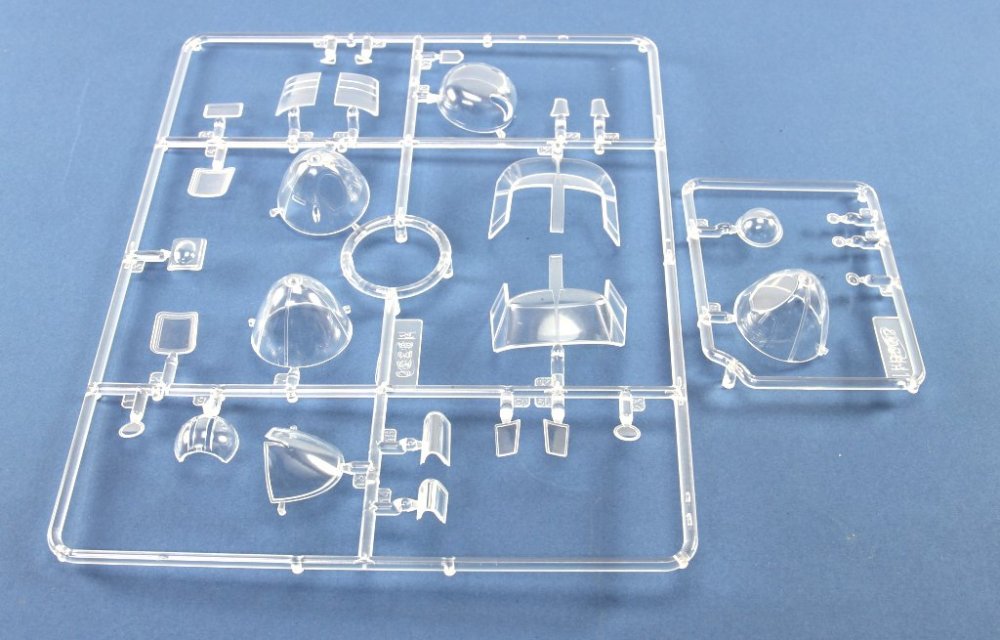
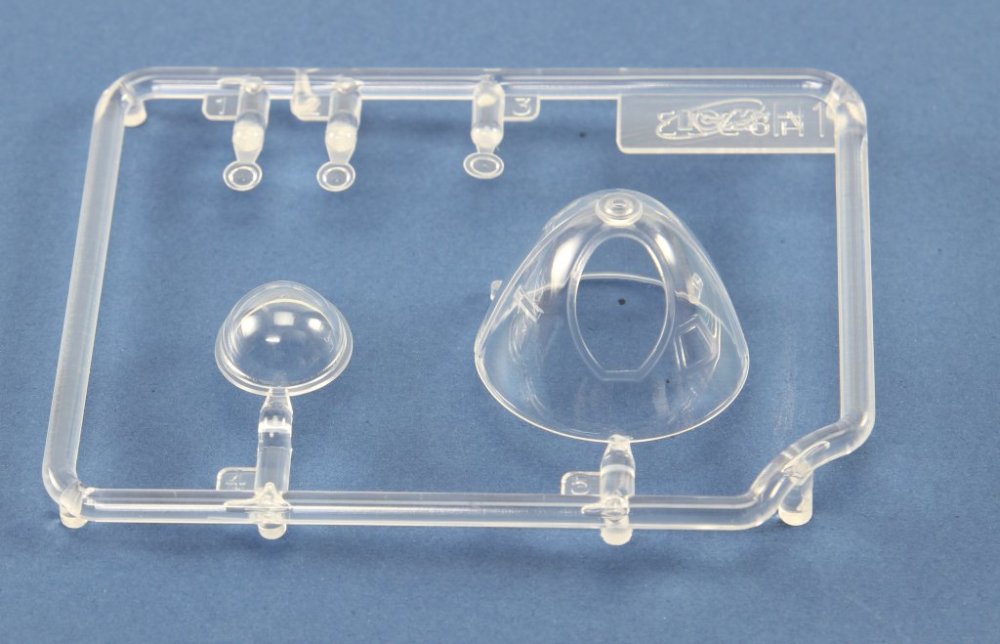
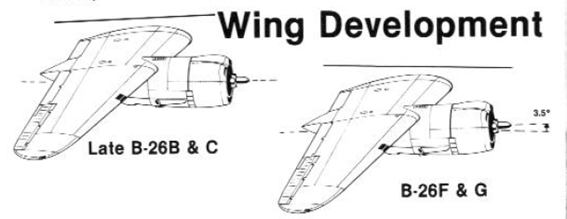
ICM 1:48 B-26G Marauder WWII American/French bomber ICM 48323 Available here Introduction ICM presents the third iteration of this new mould of the elegant B-26 in 1:48 scale. In this case, the “G” version, featuring new parts and fuselages provided specifically for this version. The aim of my review is to focus on the necessary corrections to accurately replicate this version, rather than a detailed examination and presentation of the moulds and parts, as it shares most of the sprues with earlier versions, already presented here and here. Historical Context The early versions of this model exhibited landing and take-off characteristics that resulted in a high rate of accidents during these phases of flight. To reduce the landing and take-off speeds, the wing incidence was increased by 3.5 degrees. This modification lowered the landing and take-off speeds, but at the expense of maximum speed, which was reduced to 277 mph. Another significant change was the standardization of internal equipment, thus creating the “G” version of the B-26. The last of the 1931 B-26G units left the production line on 30 March 1944. Economic concerns and the reputation created by the early versions of the B-26 (nicknamed the “widowmaker”) led to the abandonment of this model and its replacement largely by the A-26 Invader, which had greater range and speed. Meanwhile, for example, a B-25 had 25% lower production costs. What's in the box As previously mentioned, the rigid cardboard box with a lid contains 2 transparent bags holding a total of 11 sprues, three of which are specific to this version. Sprue A1 includes the fuselage with modifications to the wing angle (which differs from earlier versions). Similarly, sprue K1 provides the specific parts for this version, featuring spars for attaching the wing root, a new instrument panel, and the wheels' rims for the landing gear. Sprue H1 supplies the specific plexiglass nose for this version. Overall, the moulds have excellent detail, though some location pins (mould marks) are present in certain areas—they are very shallow and easy to remove. The box also includes an A4 instruction booklet with 28 pages and a decal sheet offering three decoration options Decoration options Three decoration options are supplied: 1 - B-26G-5 43-34351 "Willie the Wolf", 494th Bombardment Squadron, 344th Bombardment Group, 1944 2 - B-26G-5-MA 43-34462 "Margie", "Donna Deloris", 444th Bombardment Squadron, Sardinia, Autumn 1944 Note: this airplane does not mount the lateral gunpacks 3 - B-26G-10-MA 43-34580, Bombing Group 1/32 "Burgundy" (GBM 1/32 "Bourgogne"), France, 1945 Decals sheet Forensic Analysis As previously mentioned, the most striking modification is the change to the wing angle, which is a key feature of this version. To confirm this characteristic, a dry fit is in order to verify it and carry out a comparison with the previous version. At first glance, and by comparing the fuselage of both versions, the alteration is clearly visible. I then proceeded with the dry fit of the fuselage, wings, and wing spars for testing purposes. Using the fuselage of the B-26G and its wings, the wing is mounted at a positive angle relative to the fuselage axis. Taking advantage of the dry-fit assembly, we can also observe the flawless junction of the fuselage halves/wings and the snug, flush fit of the wings to the fuselage (I must note that the parts were not fully fitted but only joined using Tamiya adhesive tape). Using the fuselage of the B version, I performed a dry fit using the spars from the B version along with the wings from the “G” version (which are identical). The B-26B Fuselage The photos are explicit and make it clear that the difference is evident for the G version. While taking advantage of the photo session—though I apologise as I may not have perfectly captured what I am describing—I present an image of the wing’s leading edge to demonstrate it. Despite the image showing a fault in the union, I can confirm that the fit and alignment are perfect, even though there are few alignment pins. Conclusion A new and updated mould of the B-26 was highly anticipated by model enthusiasts, and this series of offerings from ICM delivered on that expectation with flying colours. The modifications in this version are clear and have been well represented by ICM, showcasing the differences from earlier versions. The decoration options provide diverse and original choices. This is a model with some complexity, marked by numerous sub-assemblies and phases. It is not suitable for beginner modellers due to its complexity and the number of parts; however, modellers with intermediate and advanced skills will not struggle to manage such a significant modelling project. I would like to make one caveat regarding the antennas and pitot tubes moulded into one of the fuselage halves, and the pitot tubes moulded into the wings. Of course, we all prefer these parts to be moulded as separate pieces for protection and application at the end of assembly. Although this matter has been addressed and explained, speaking as a modeller, when these specific features are present in a model, I usually remove the piece, identify it, and set it aside to be reattached in its final destination after assembly and painting are completed. As such, this model comes highly recommended! Our thanks to ICM for the review sample and for making available a great model! This model is available here: Ricardo Veríssimo


.jpg.27dcf1ec470d04dc85fadb76e3d0a636.jpg)
-
Hi ! Thanks for you feedback !
-
Hi thanks for the feedback! Ricardo Veríssimo
-
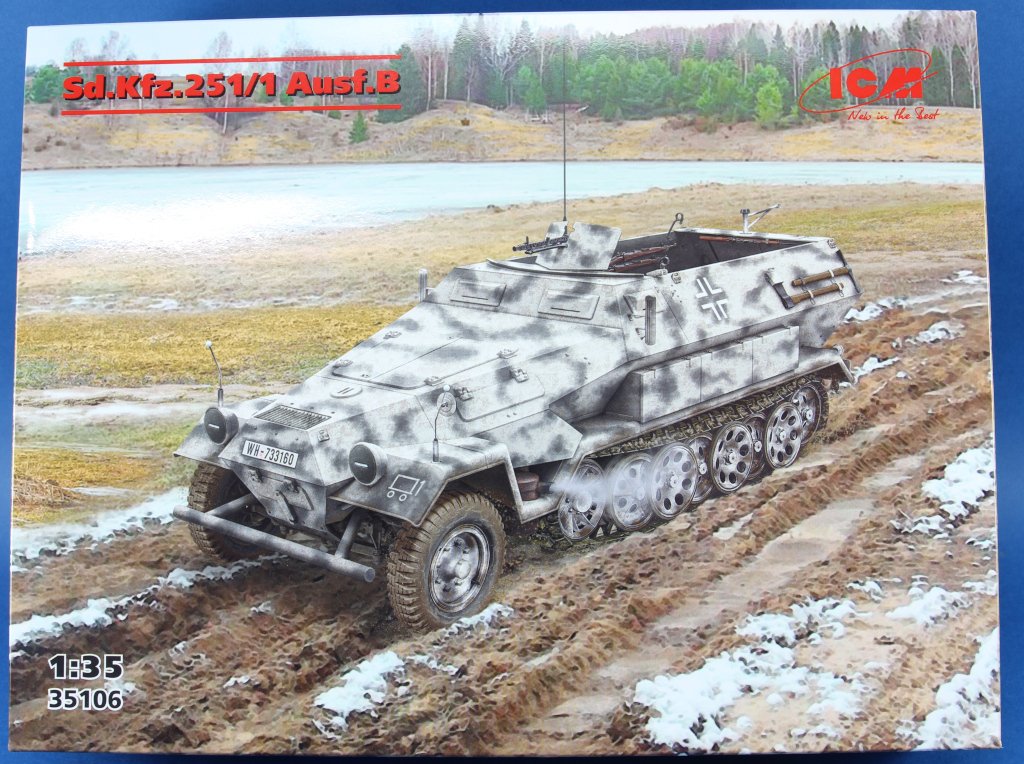
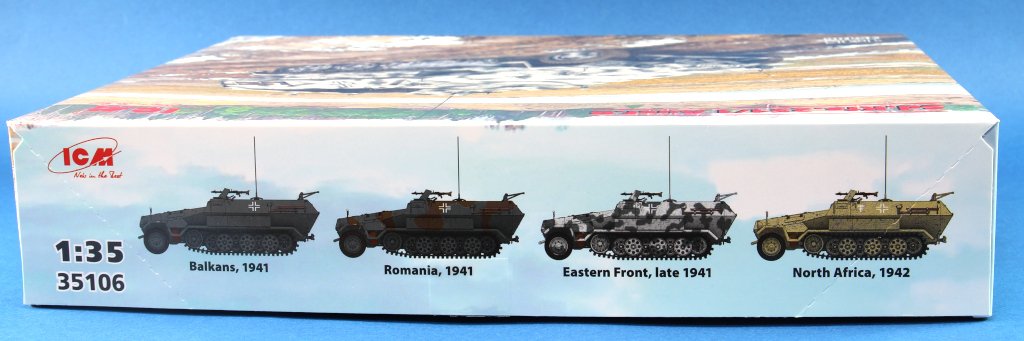
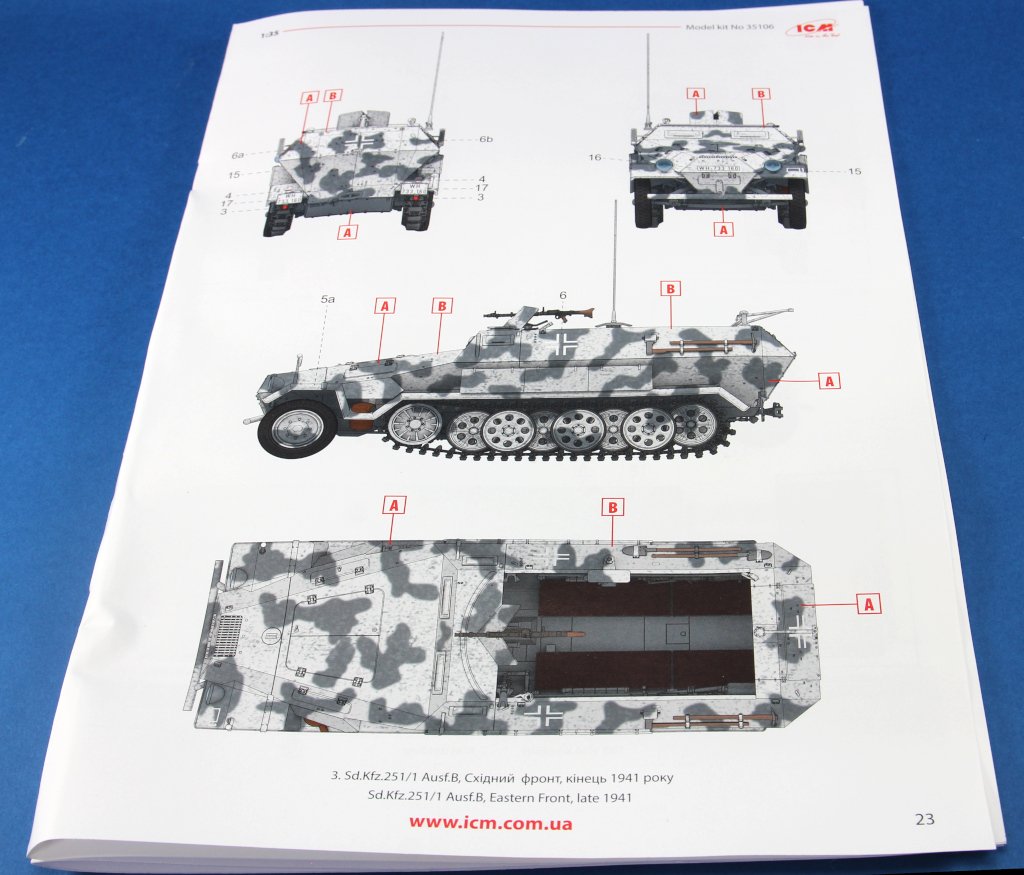
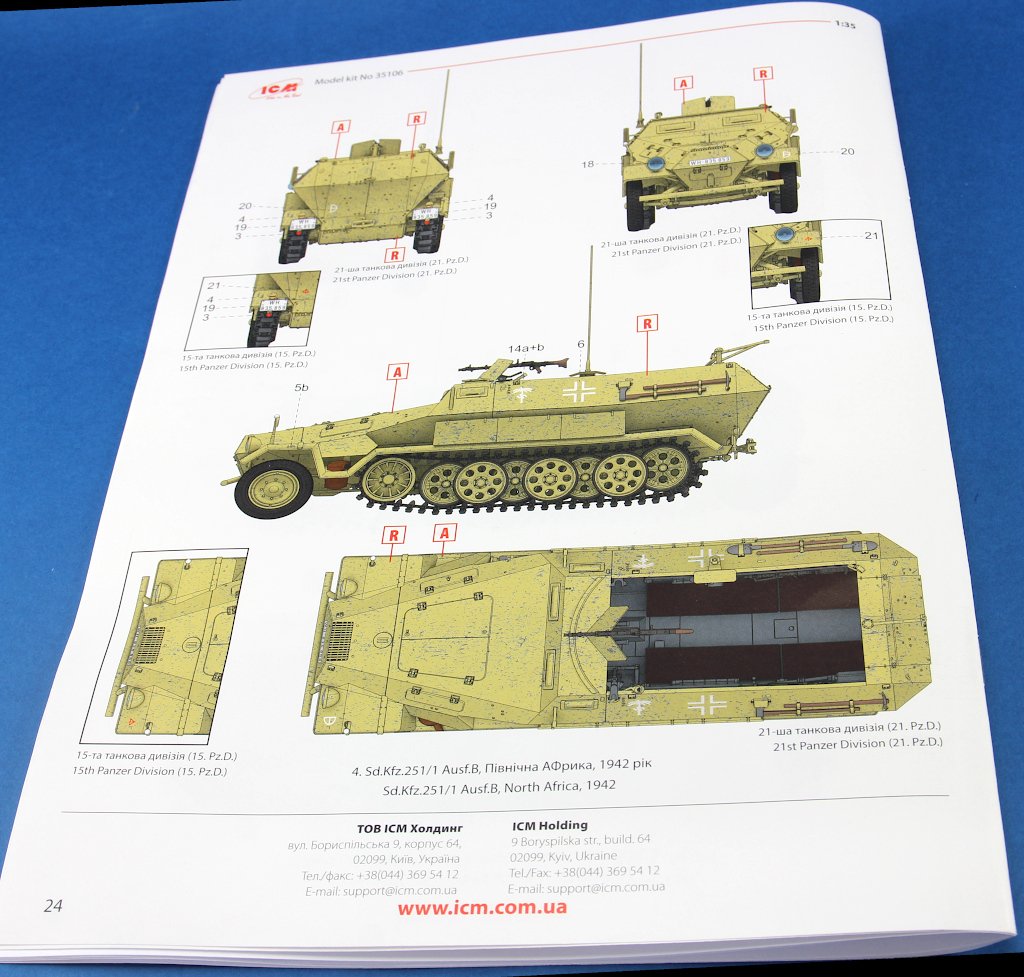
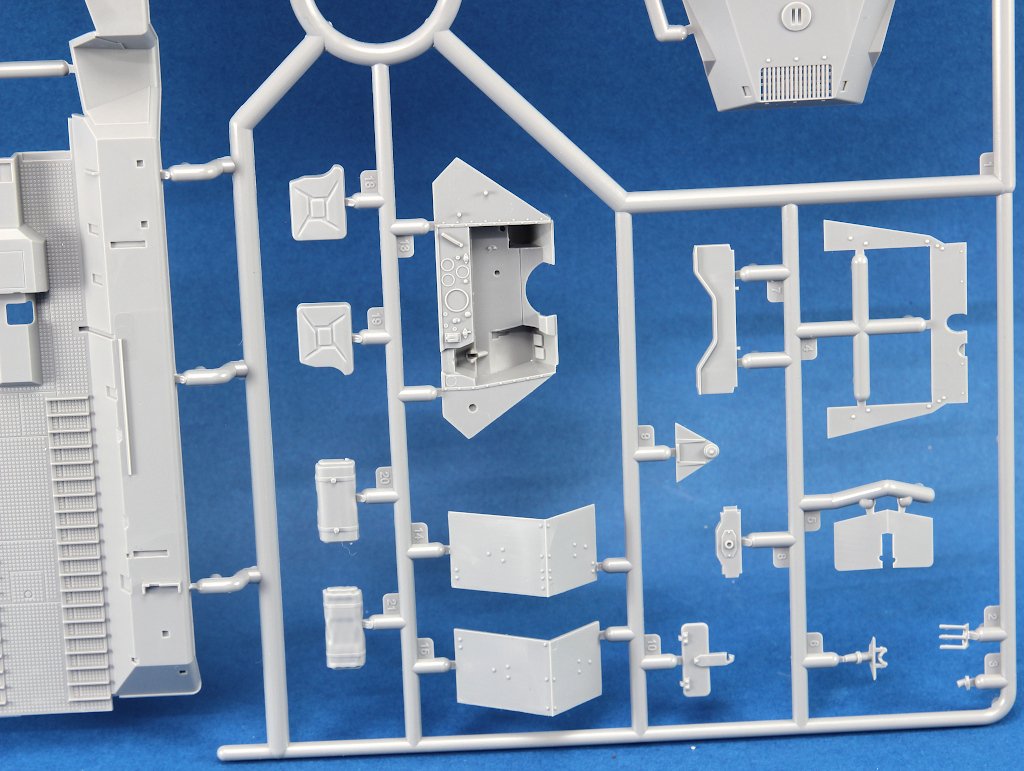
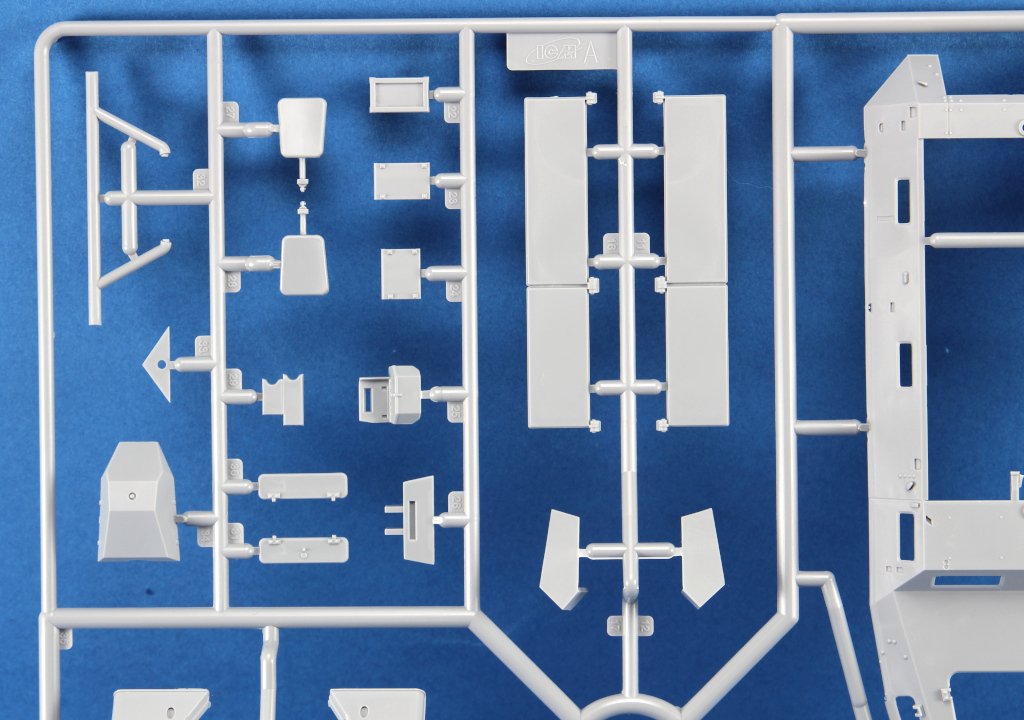
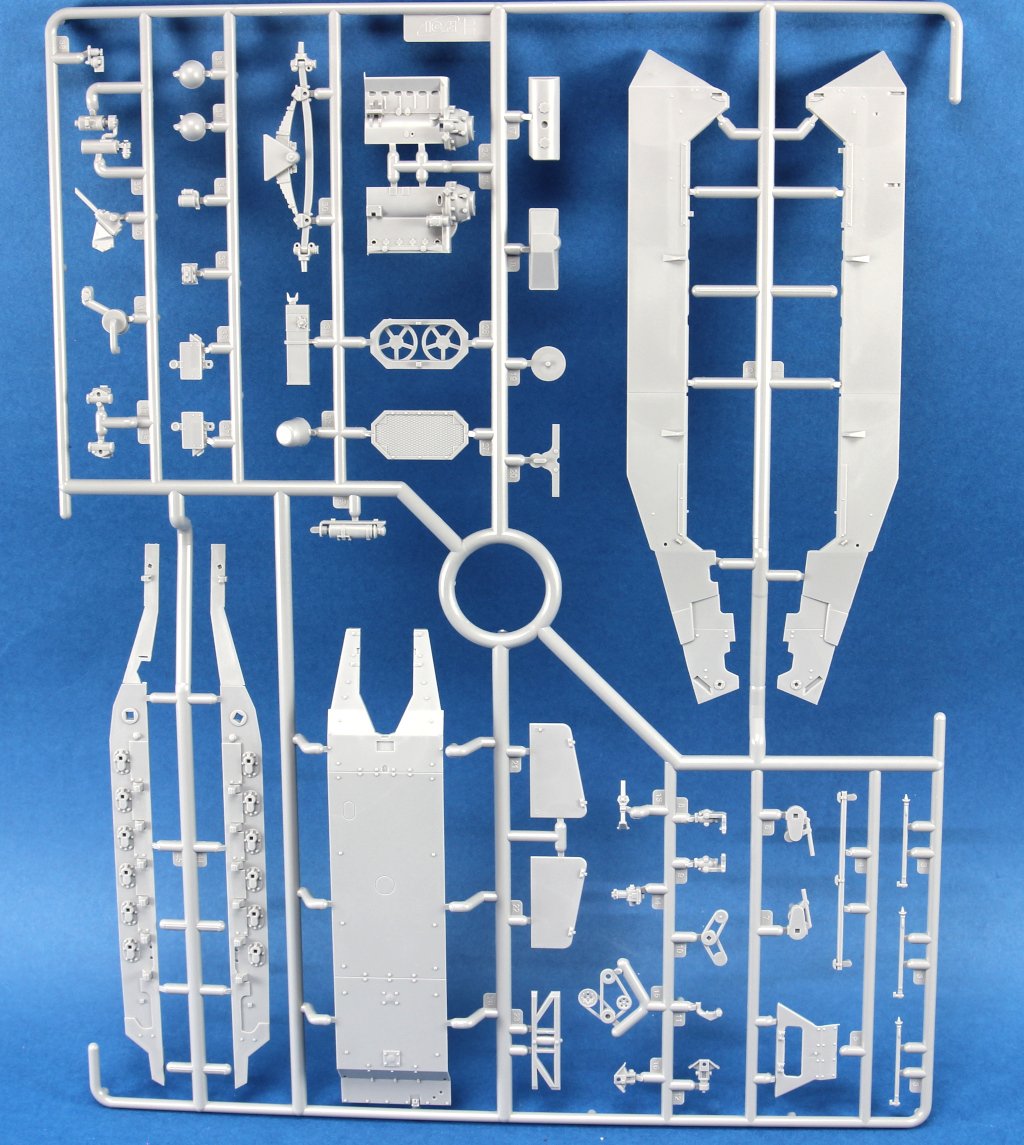
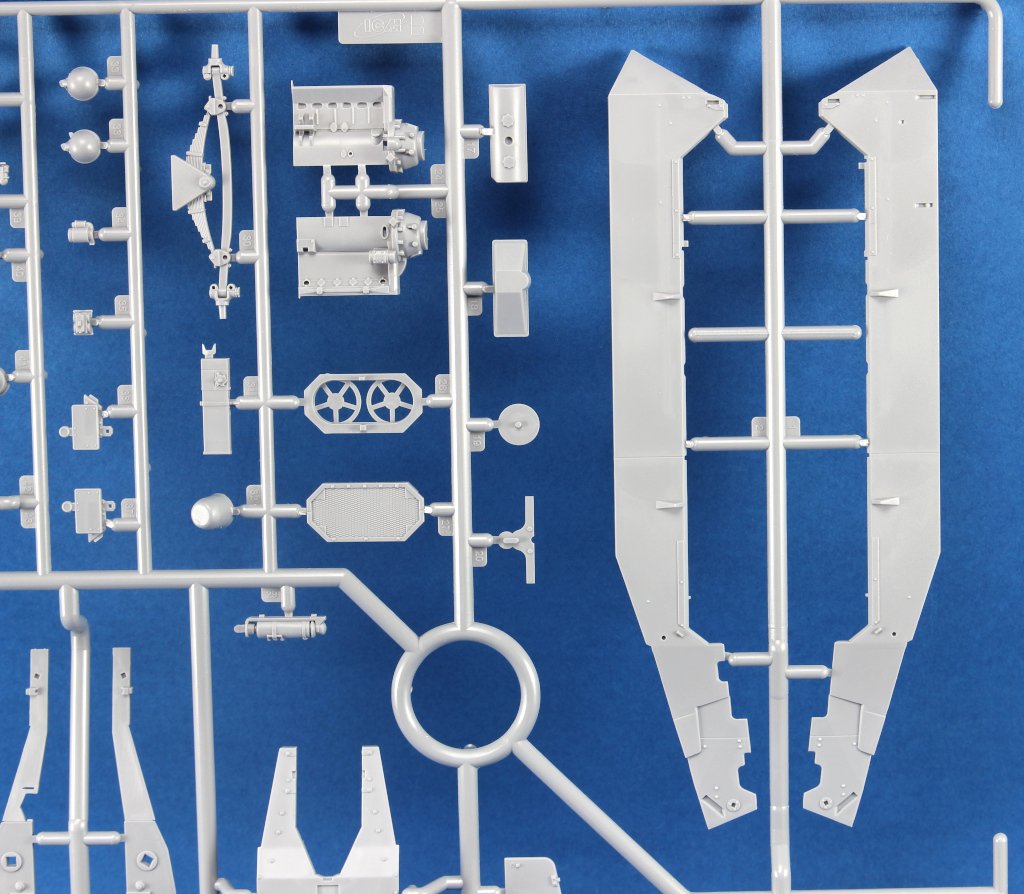
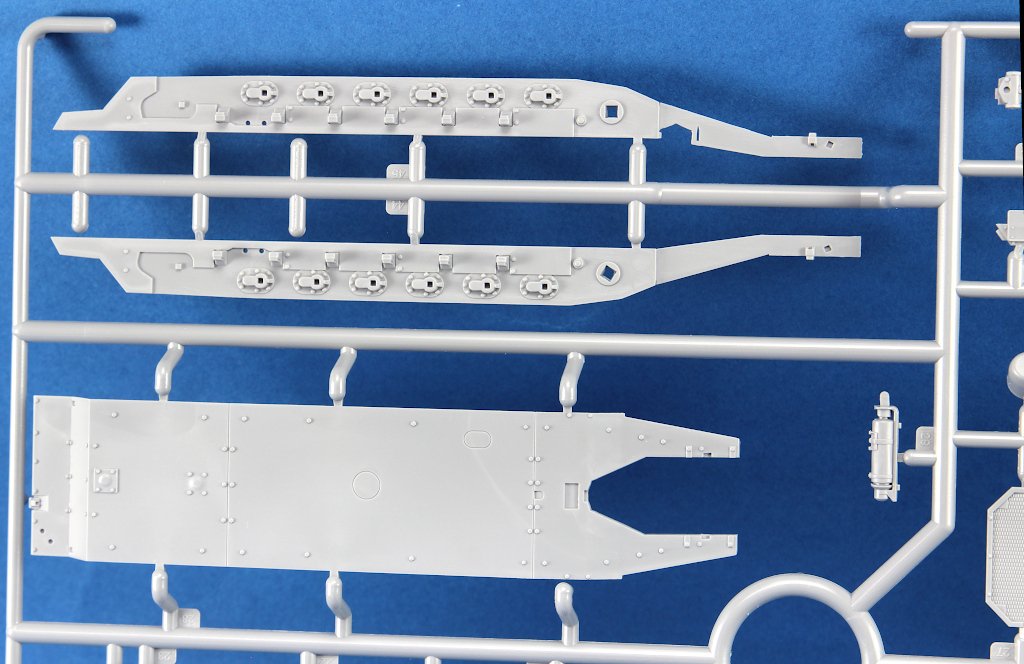
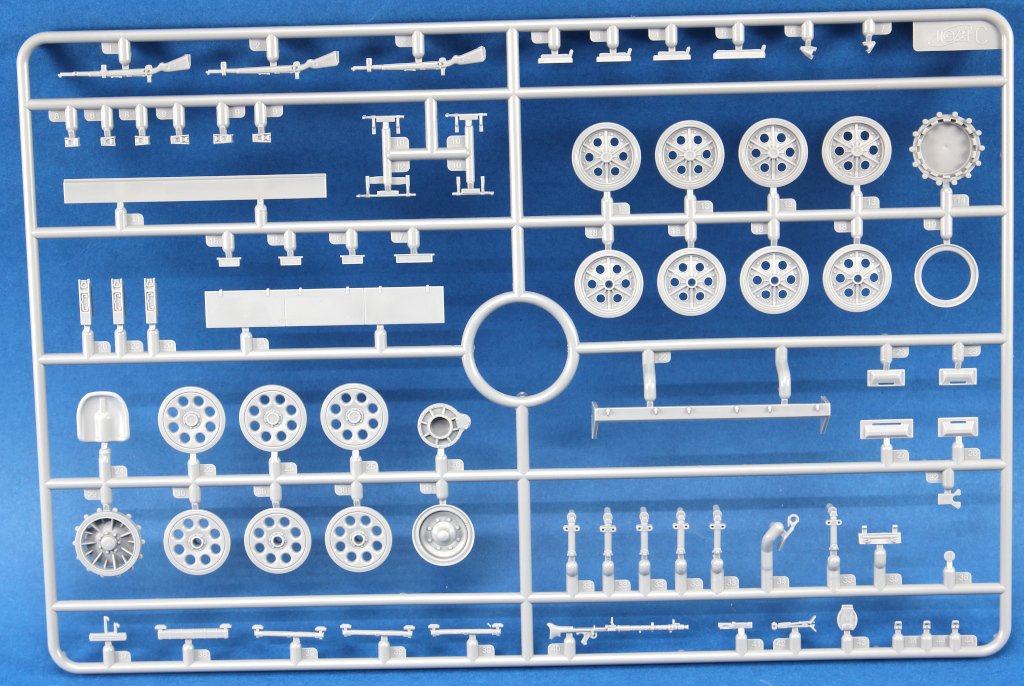
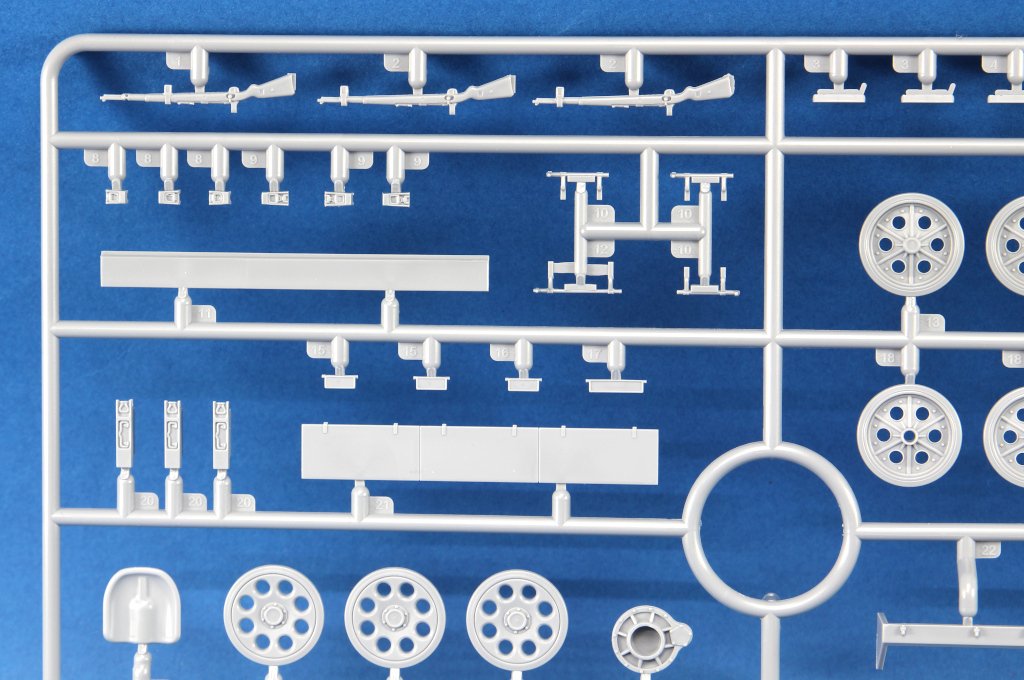
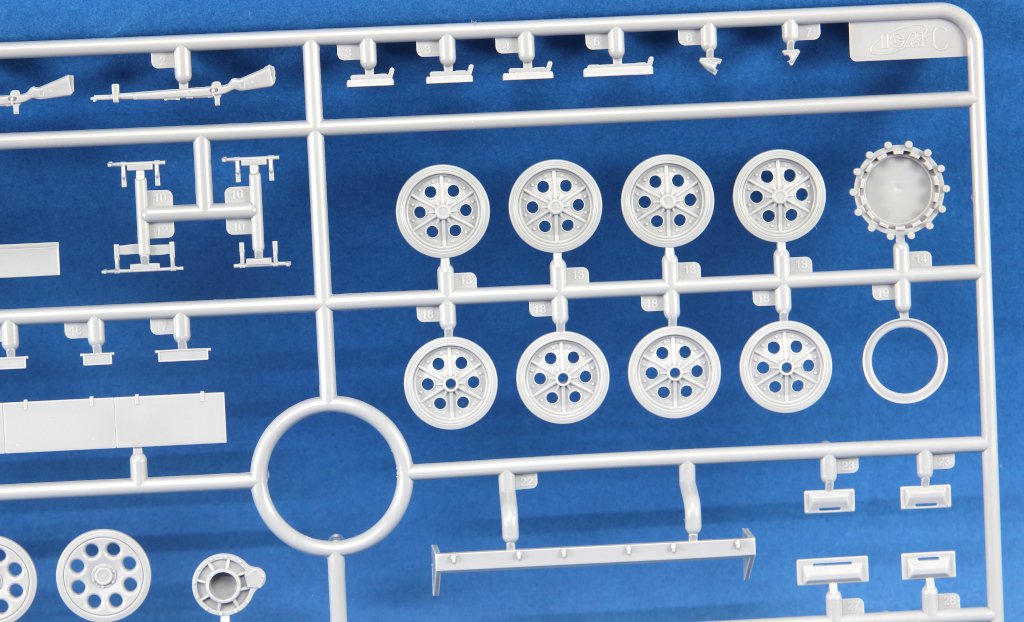
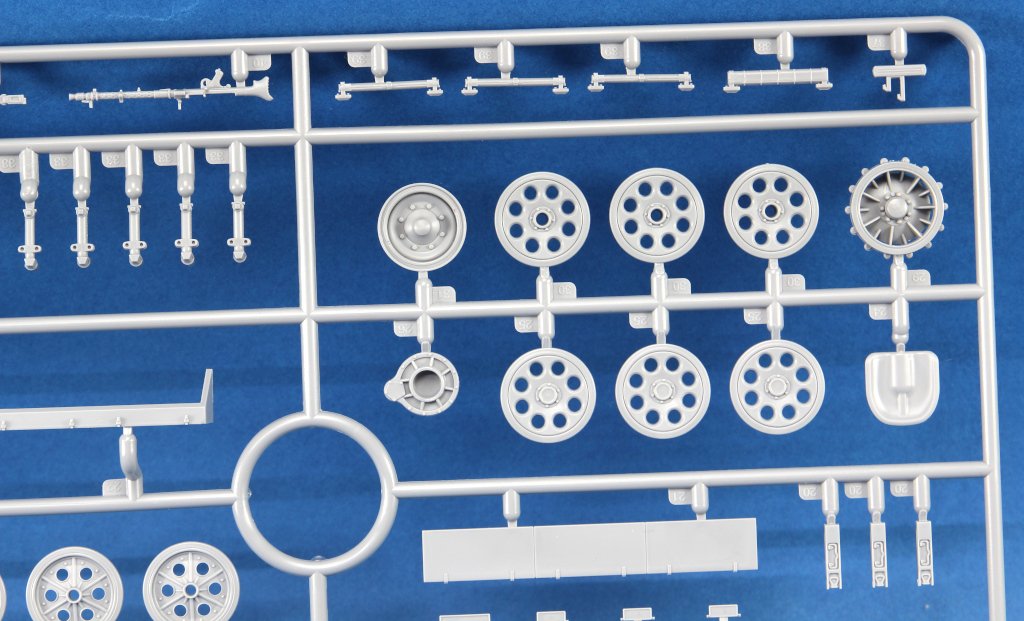
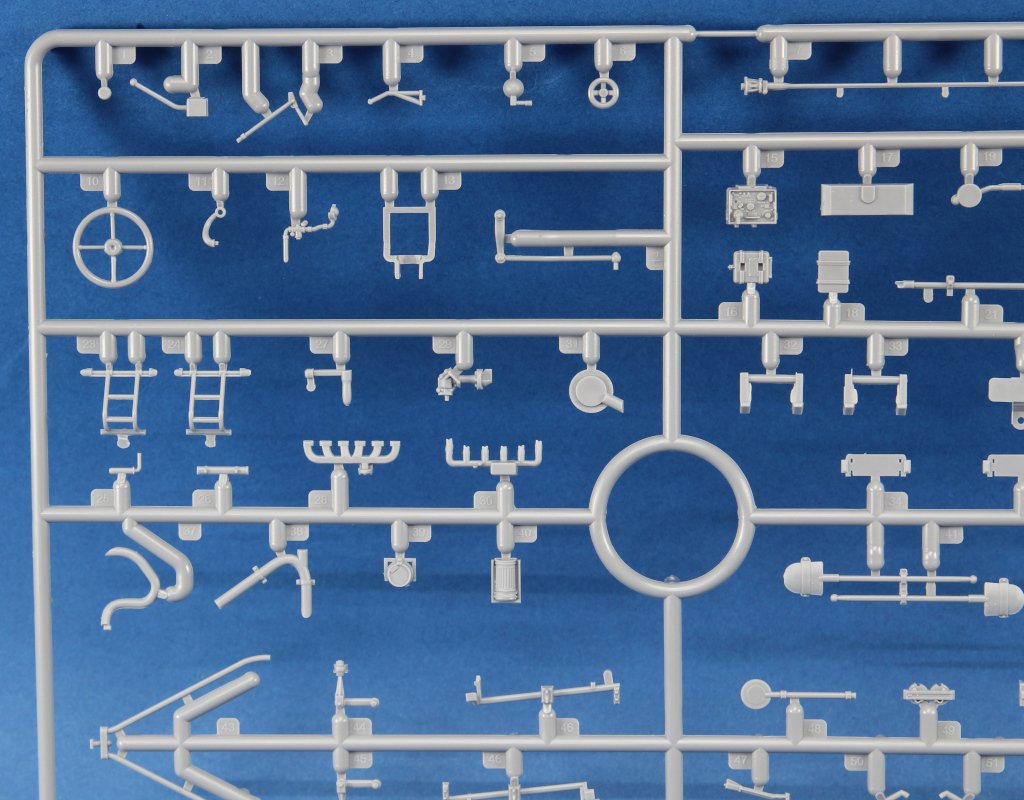
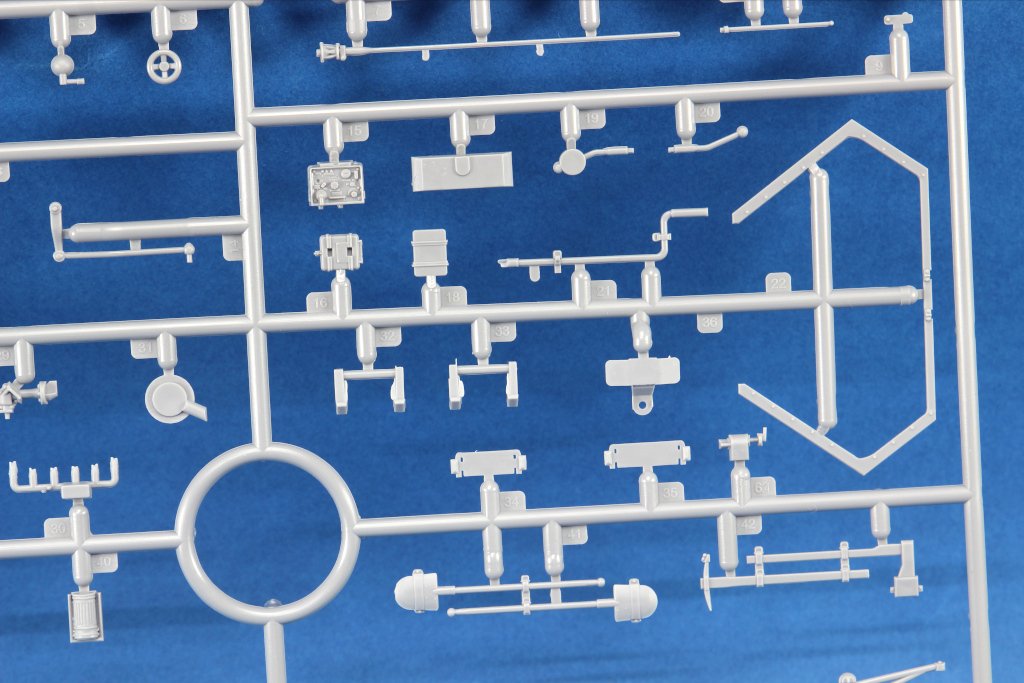
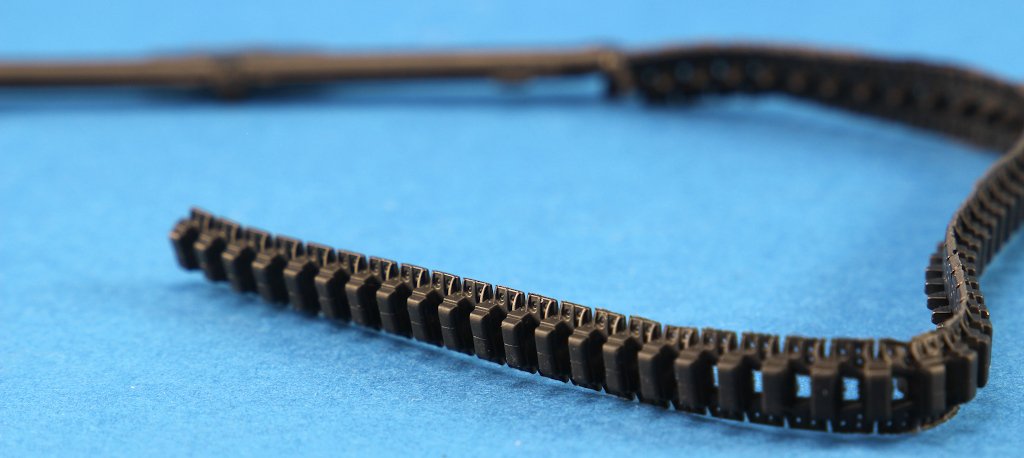
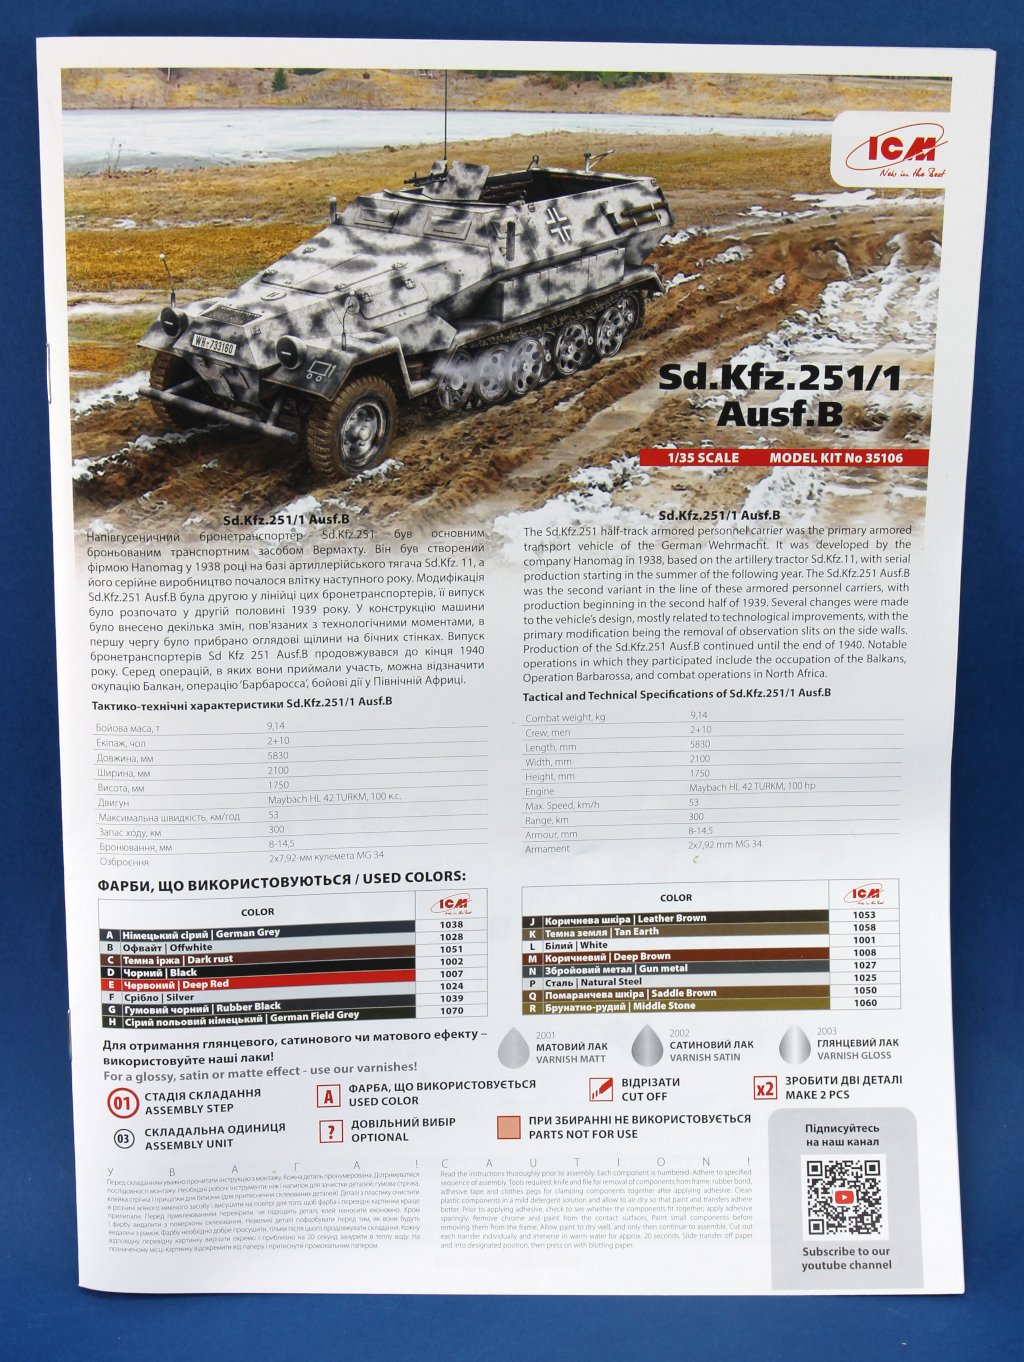
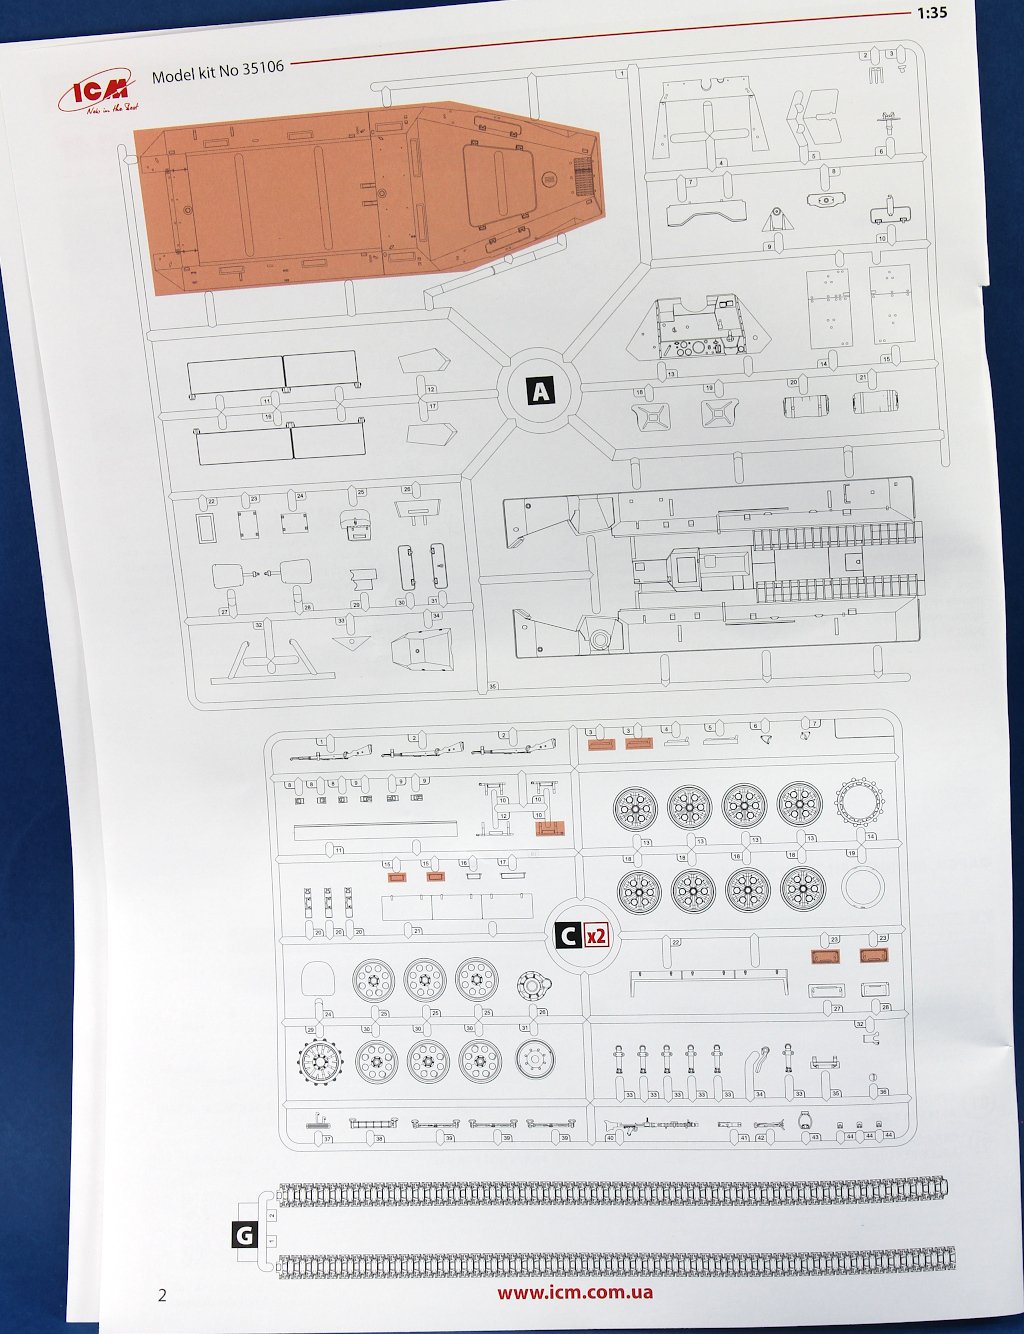
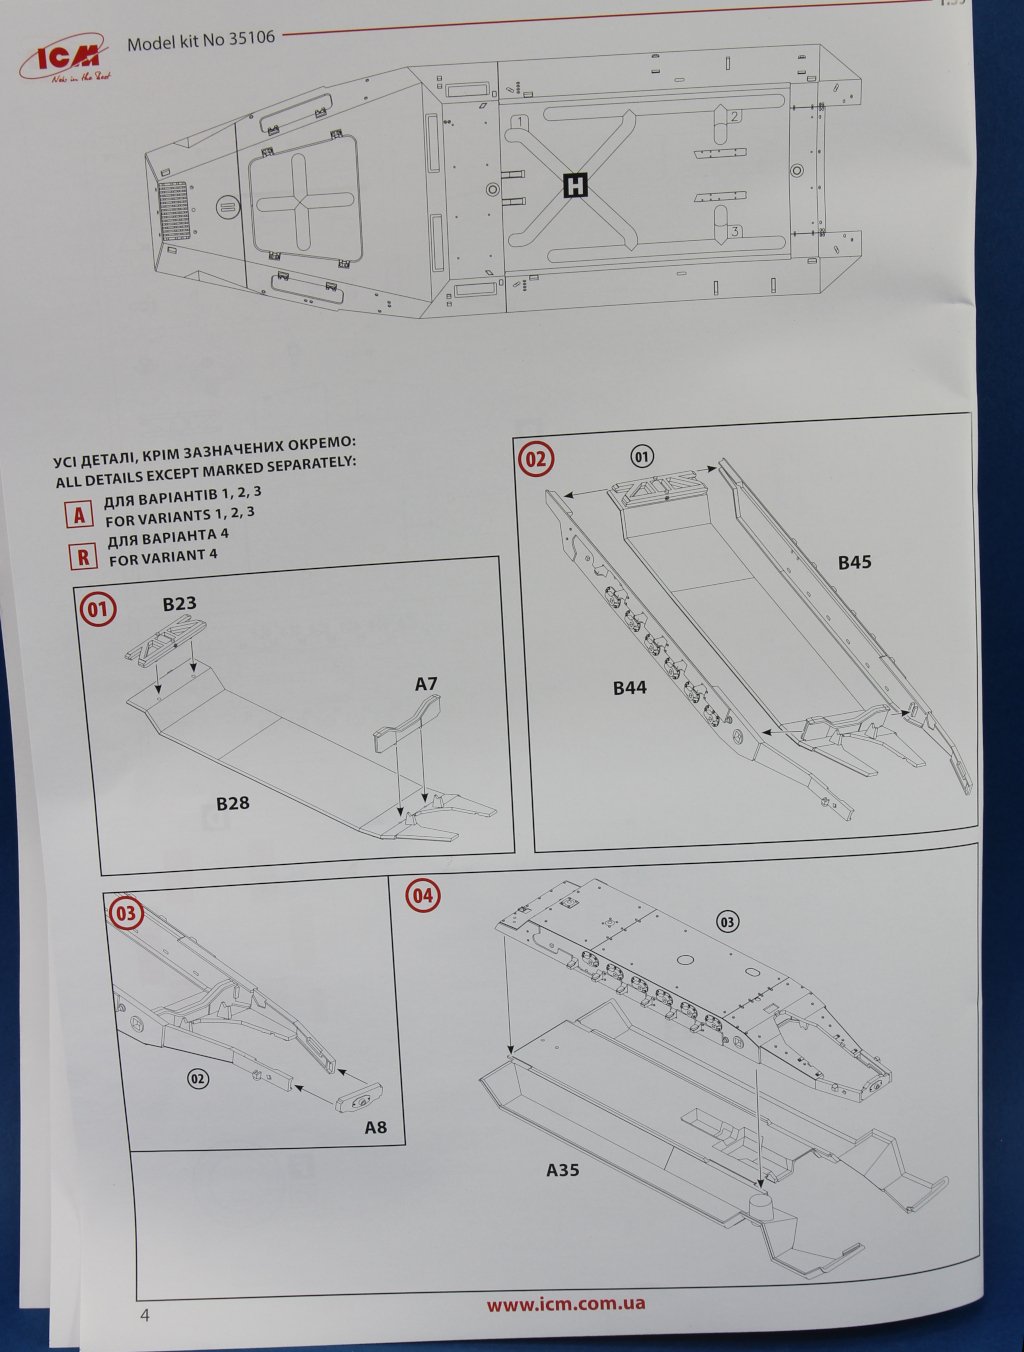
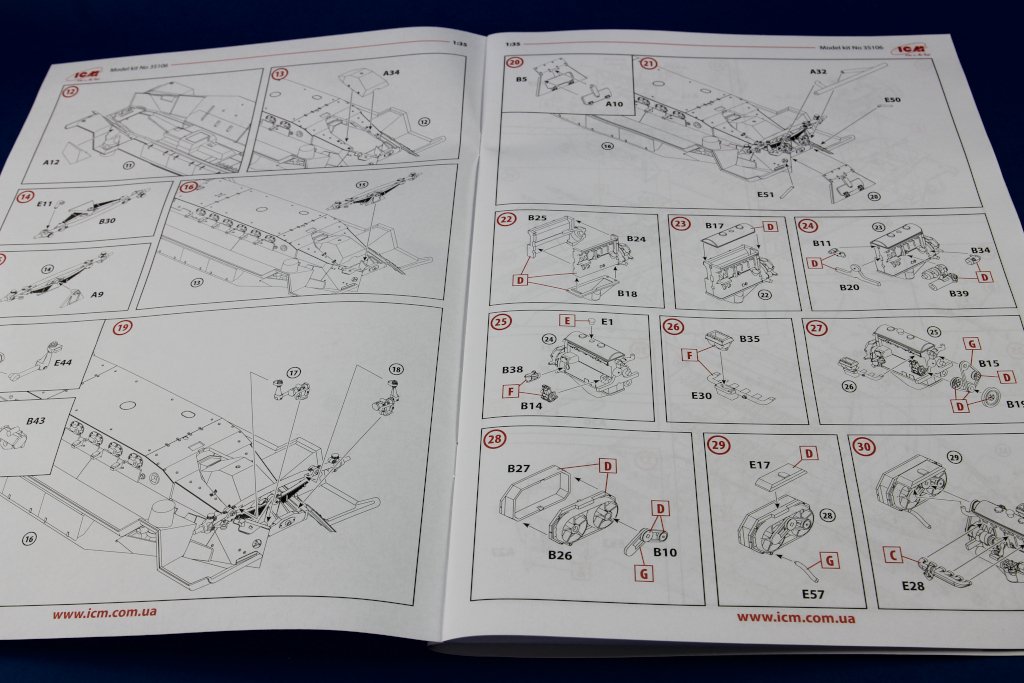
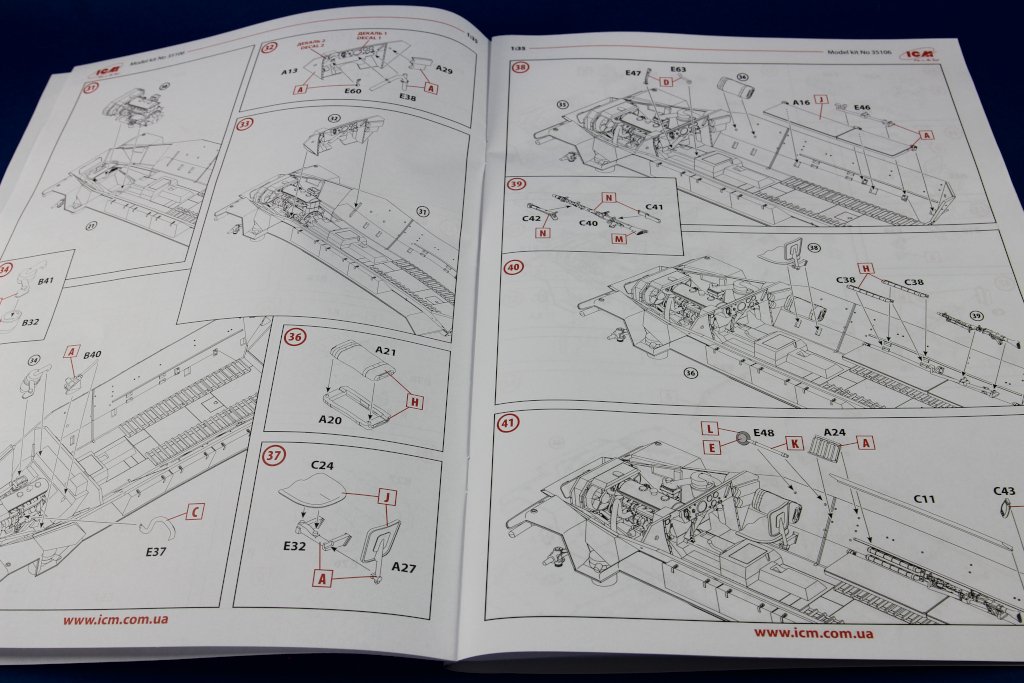
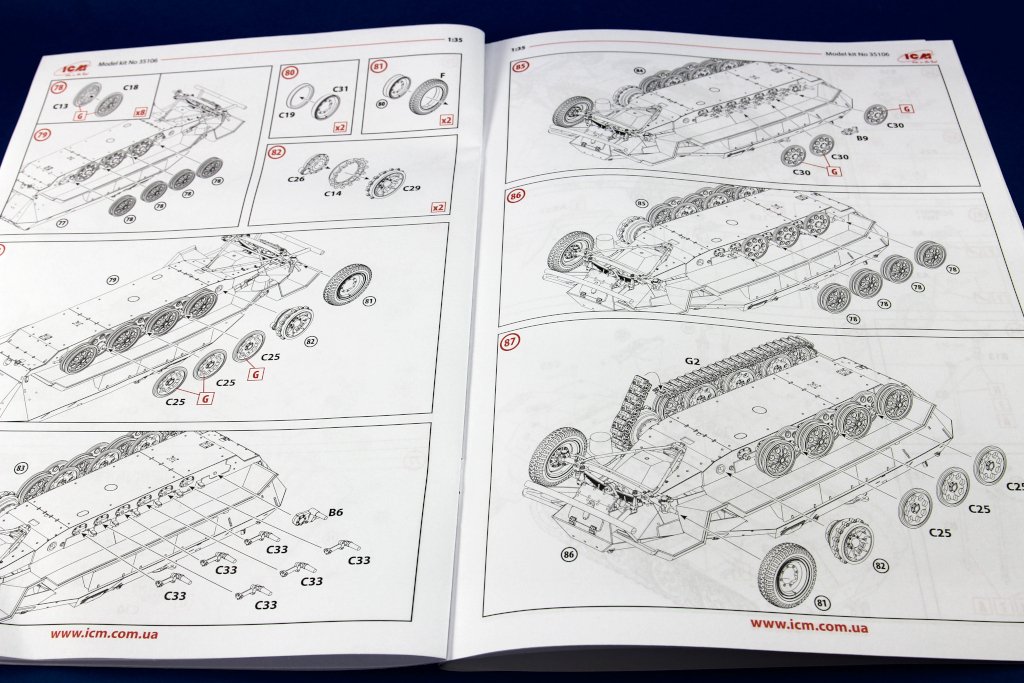
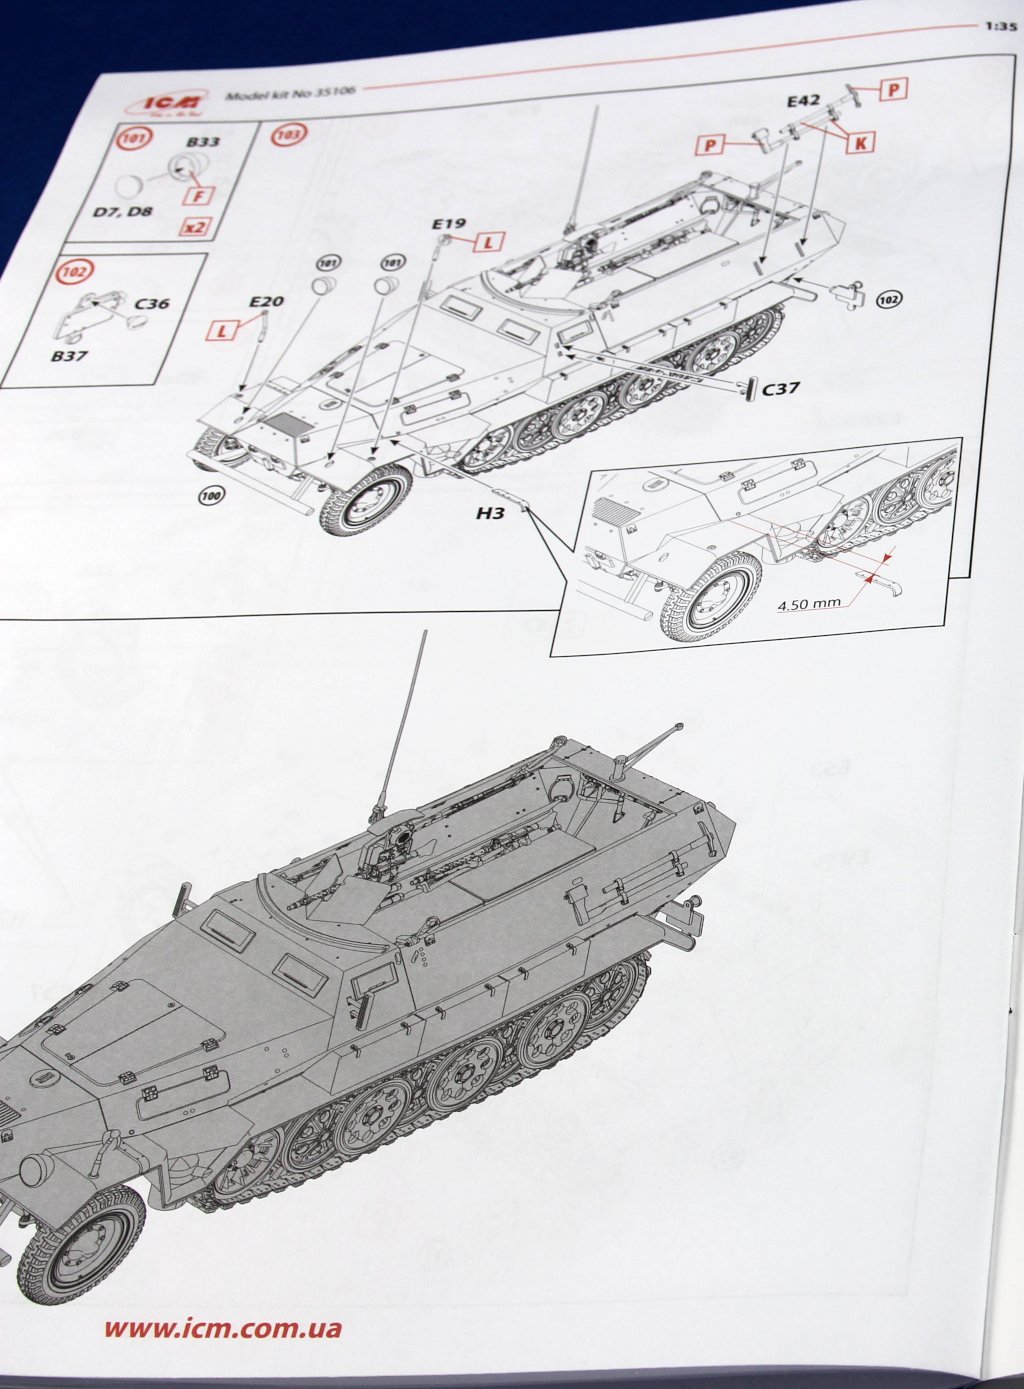
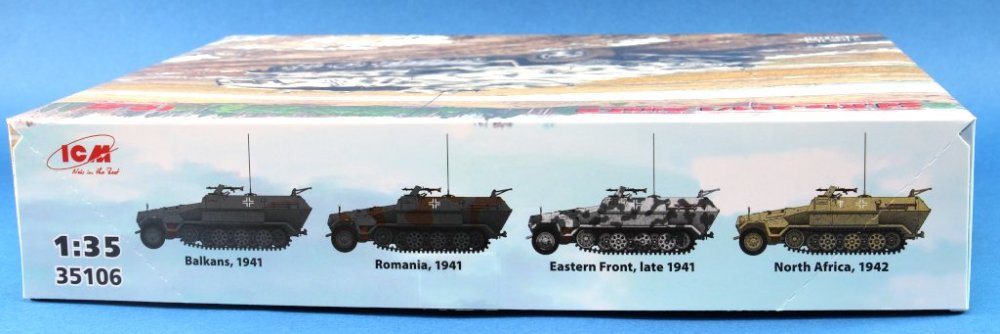
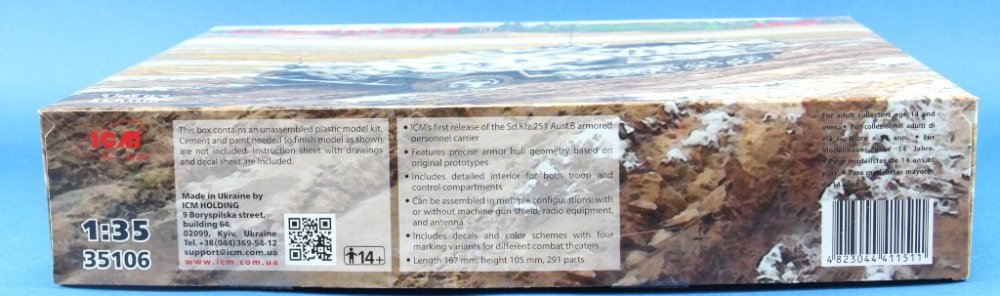
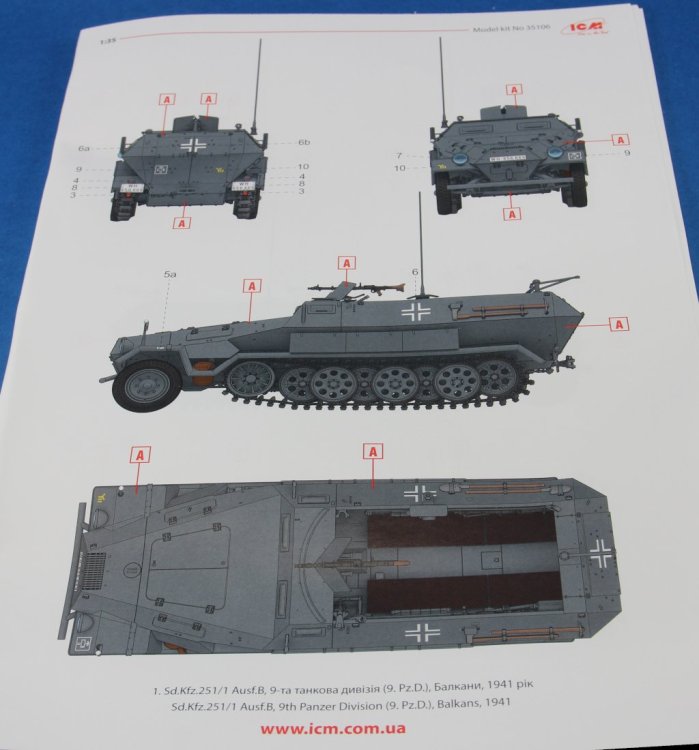
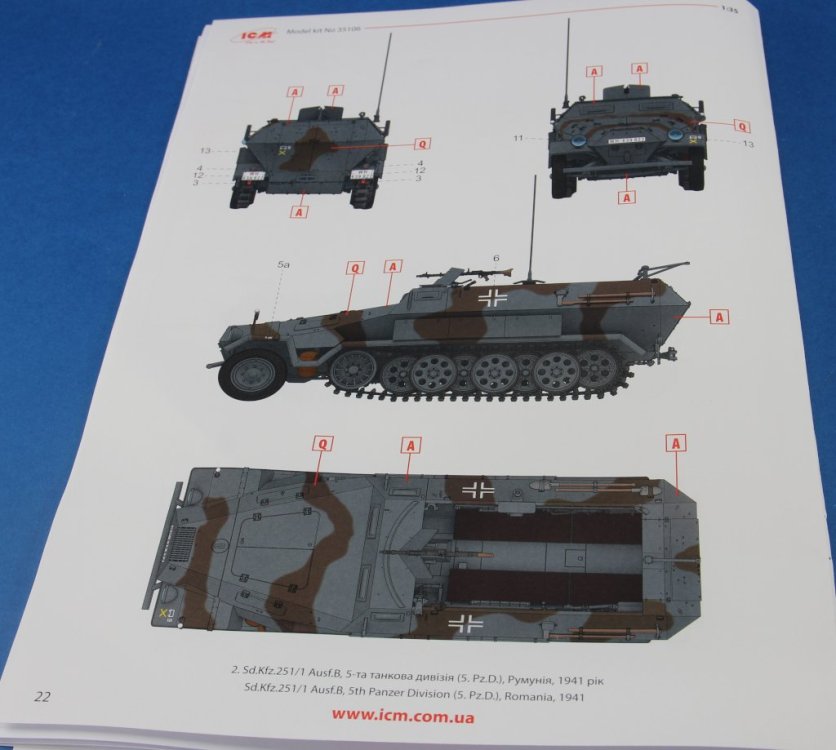
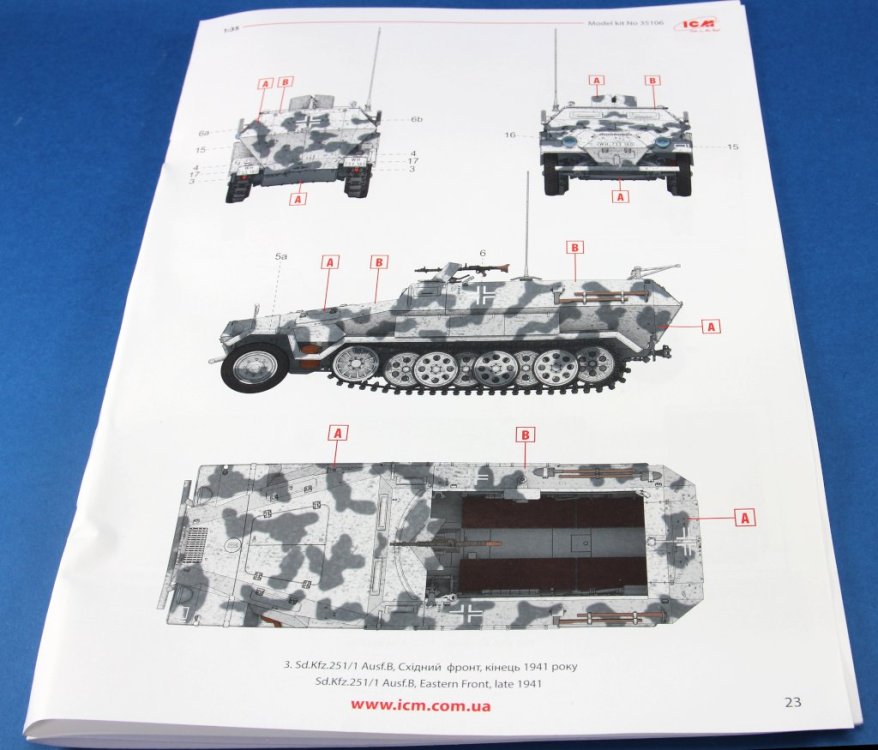
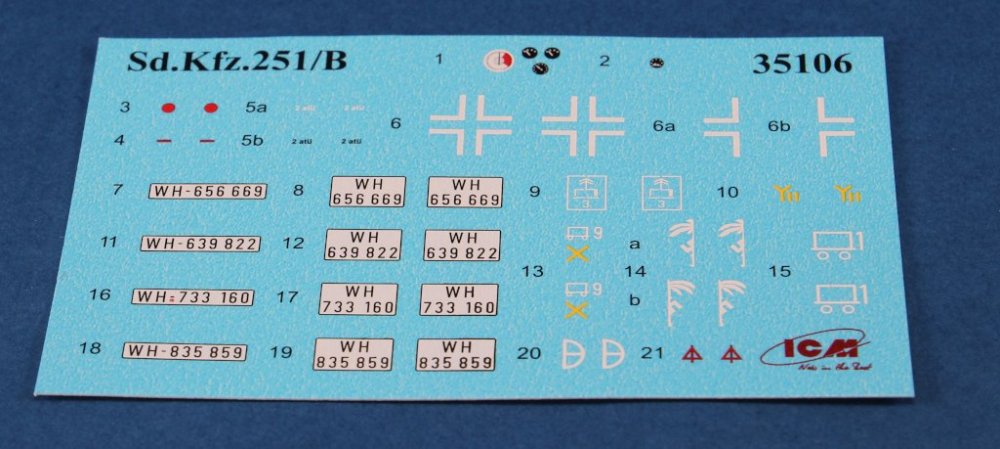
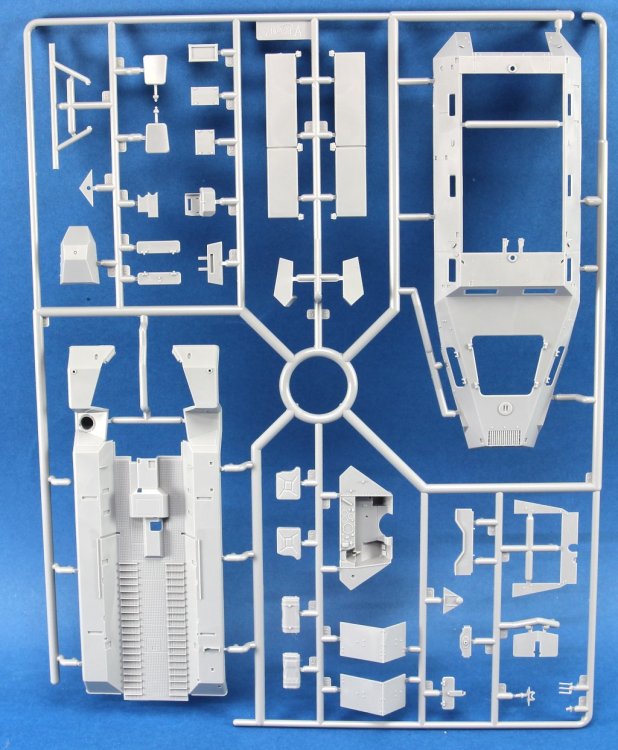
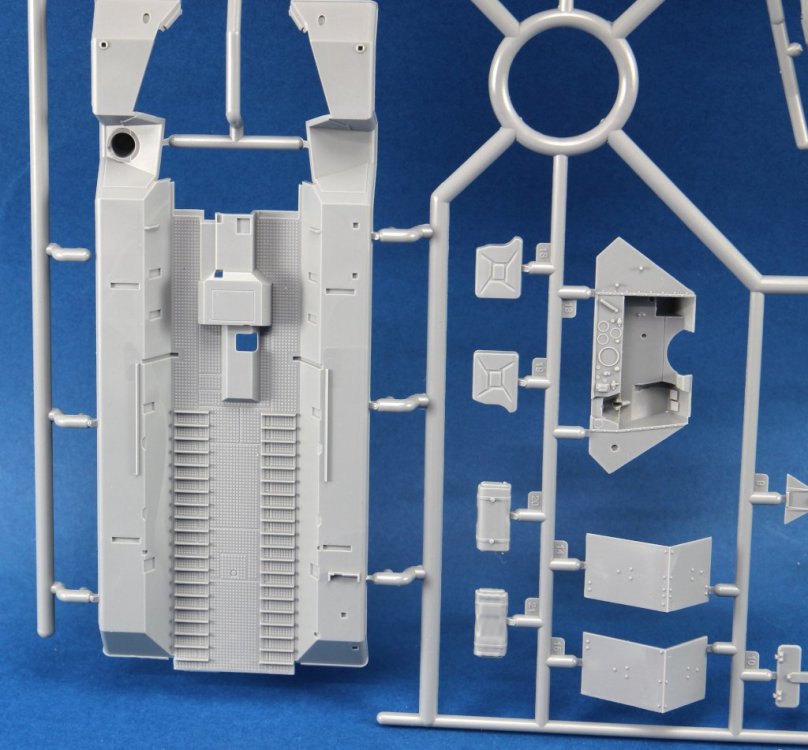
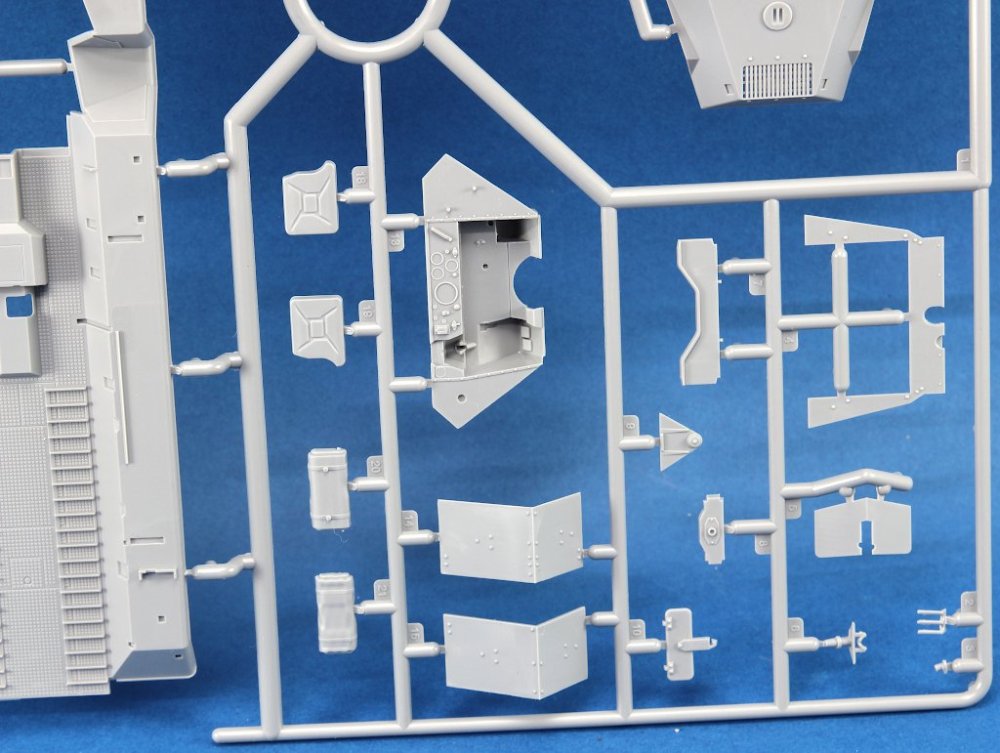
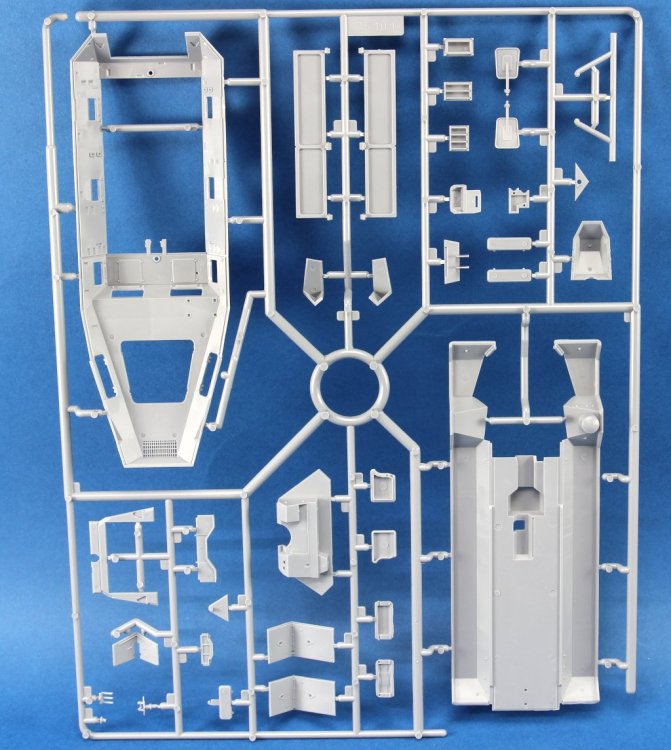
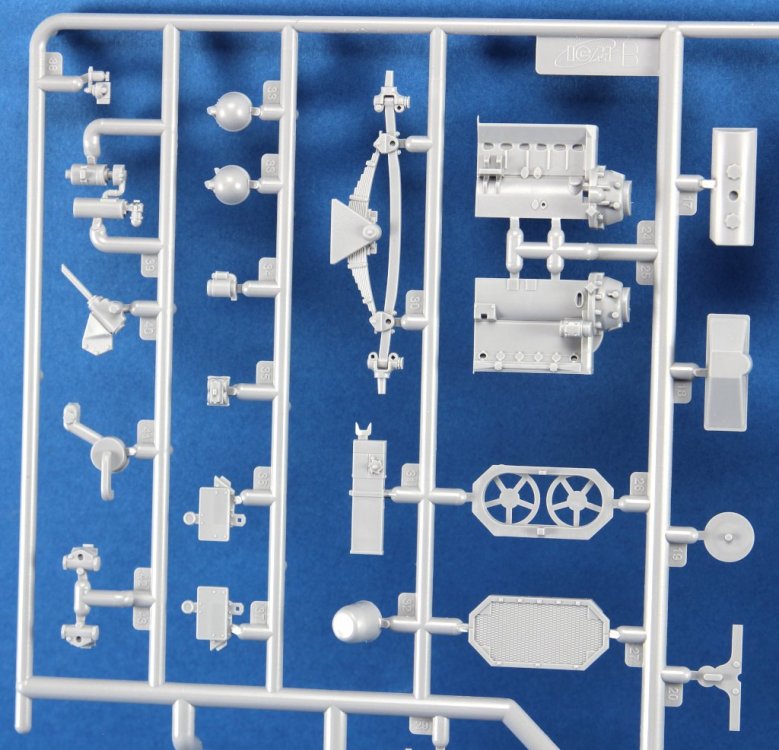
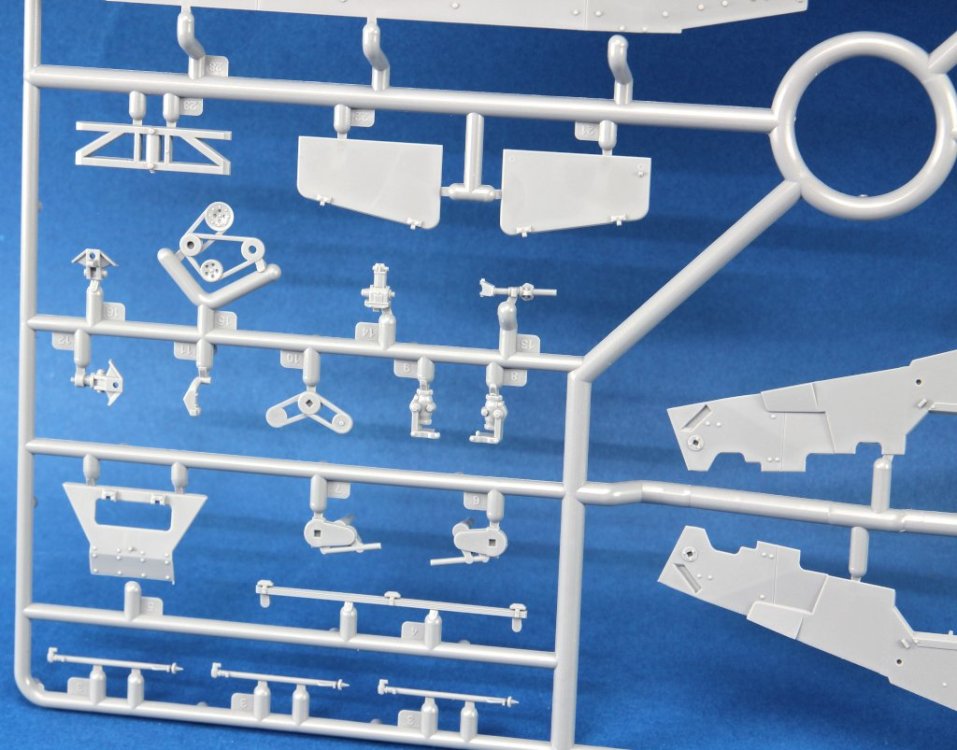
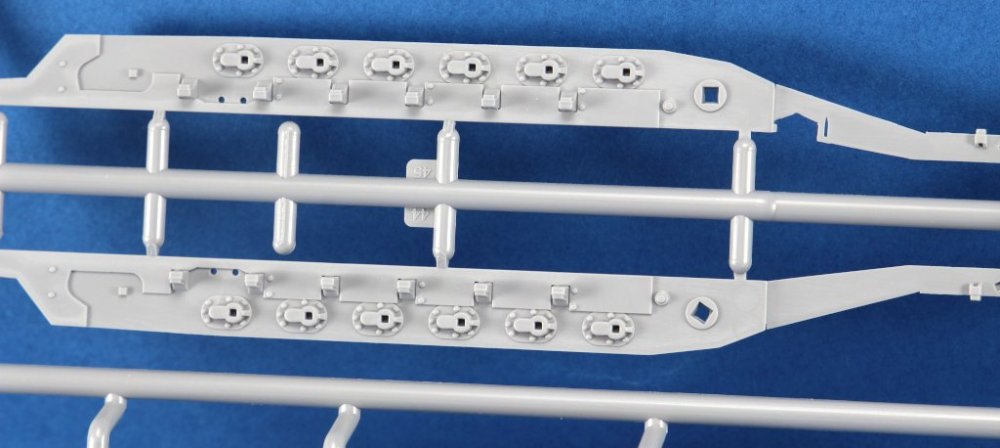
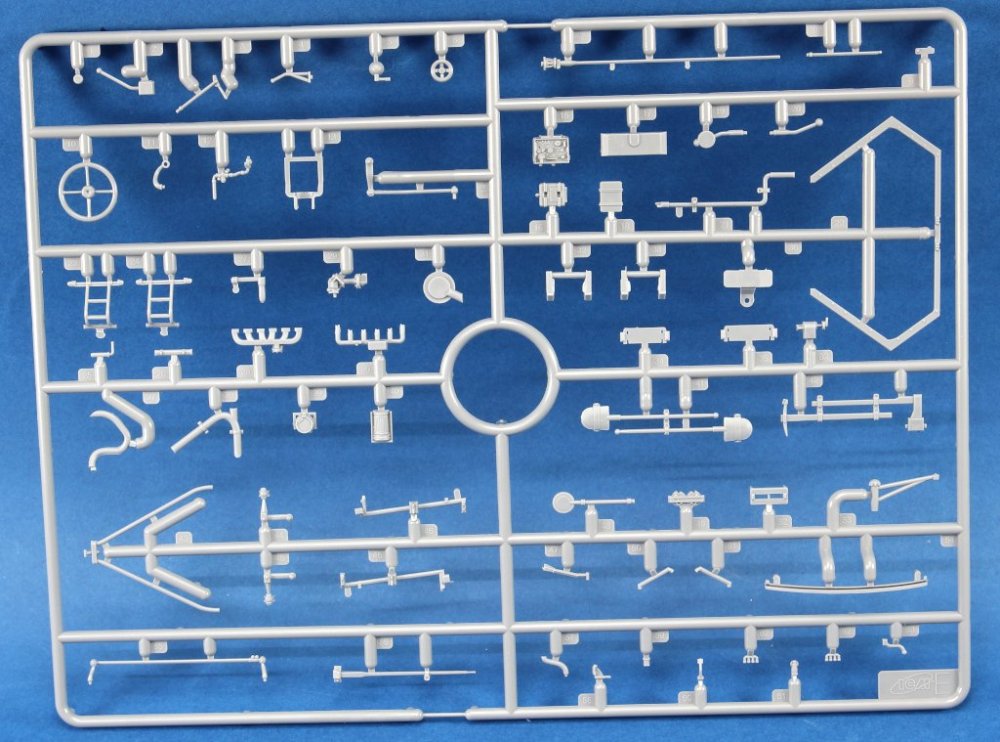
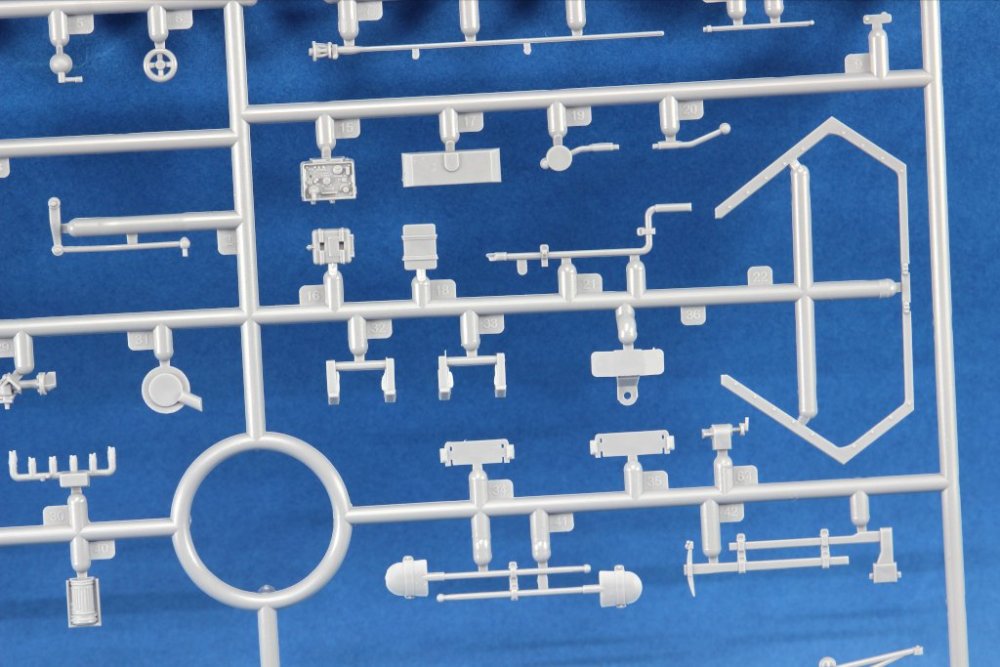
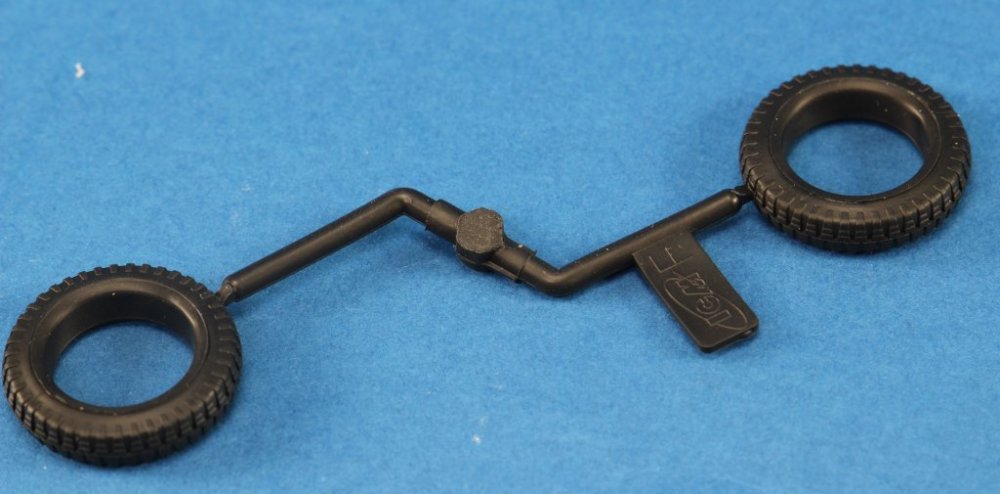
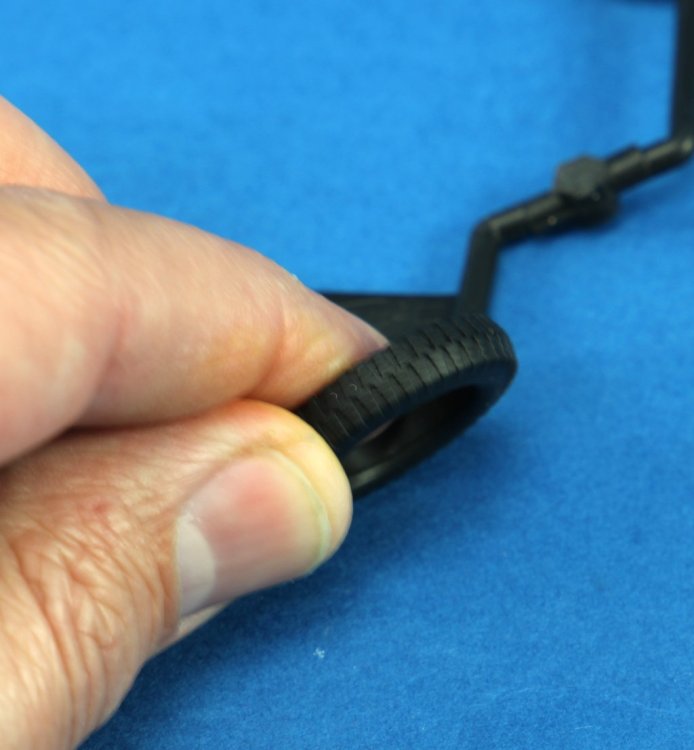
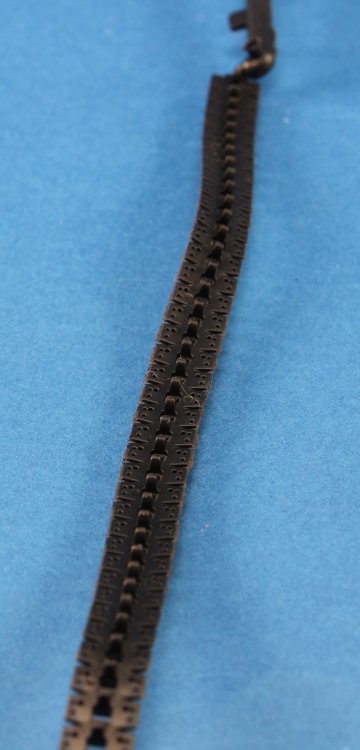
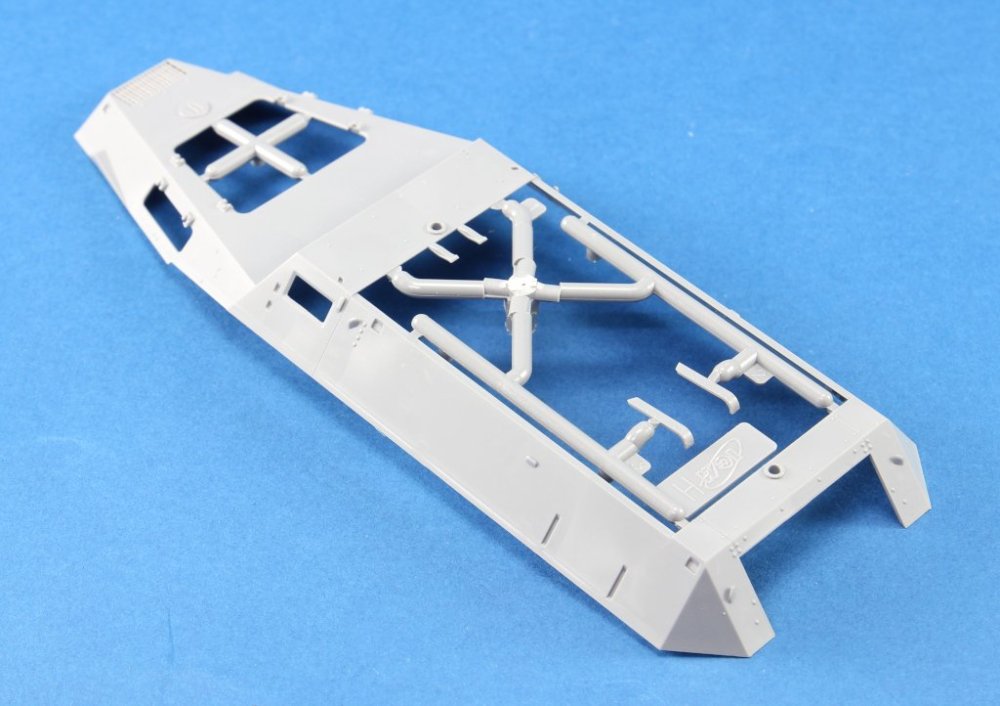
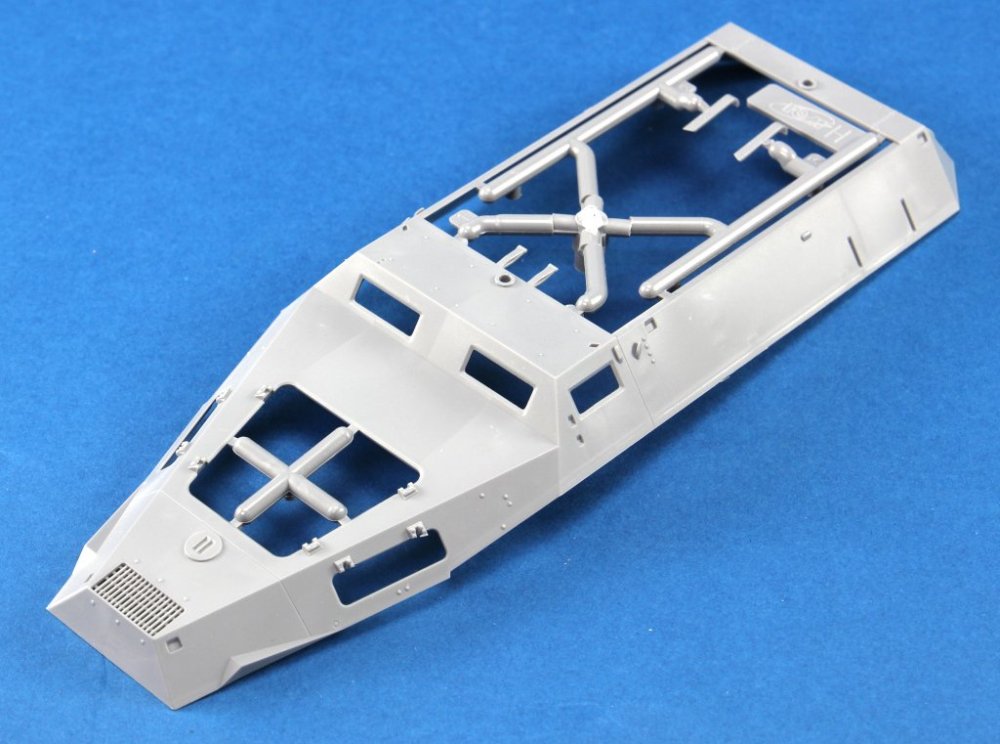
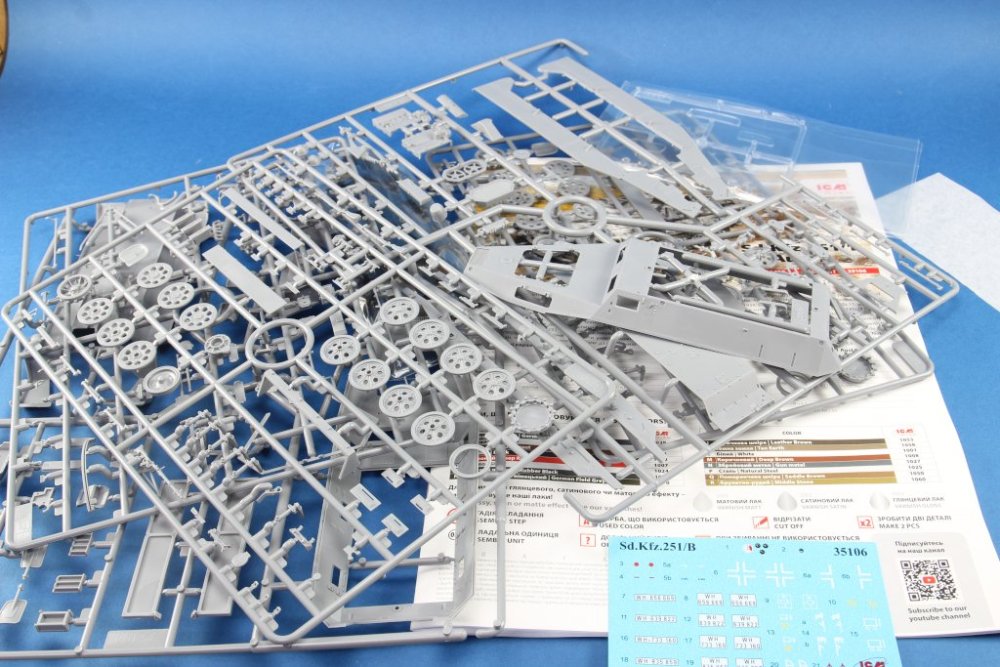
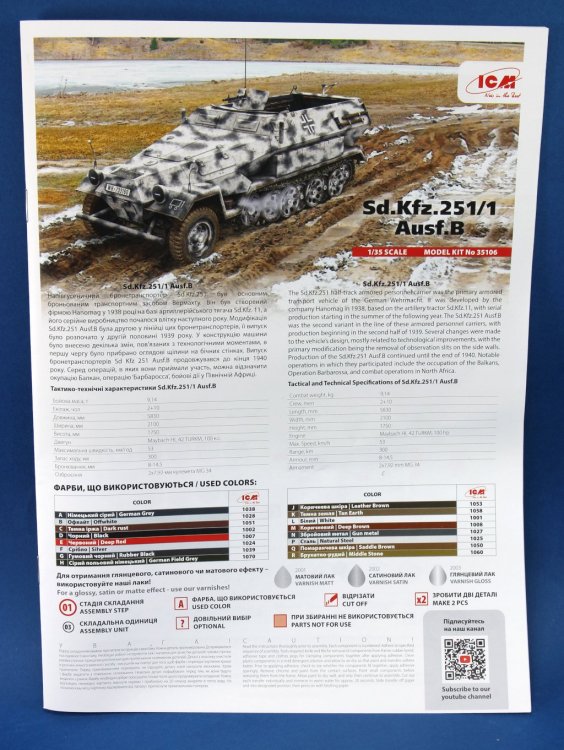
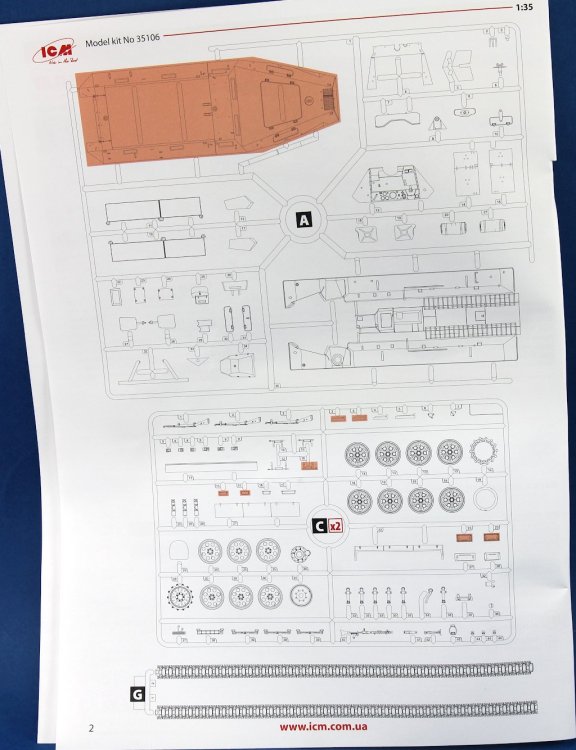
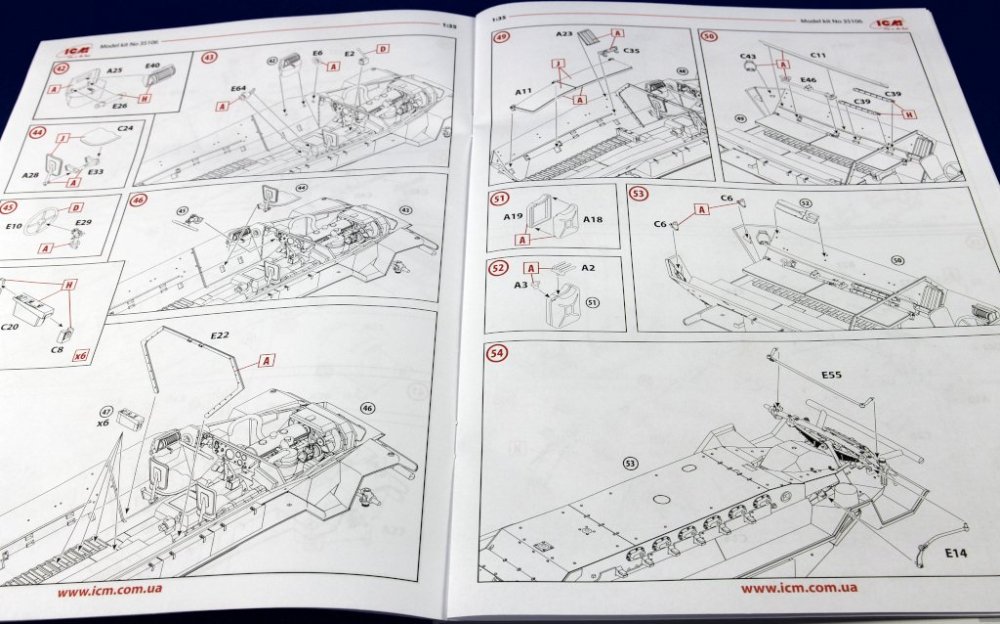
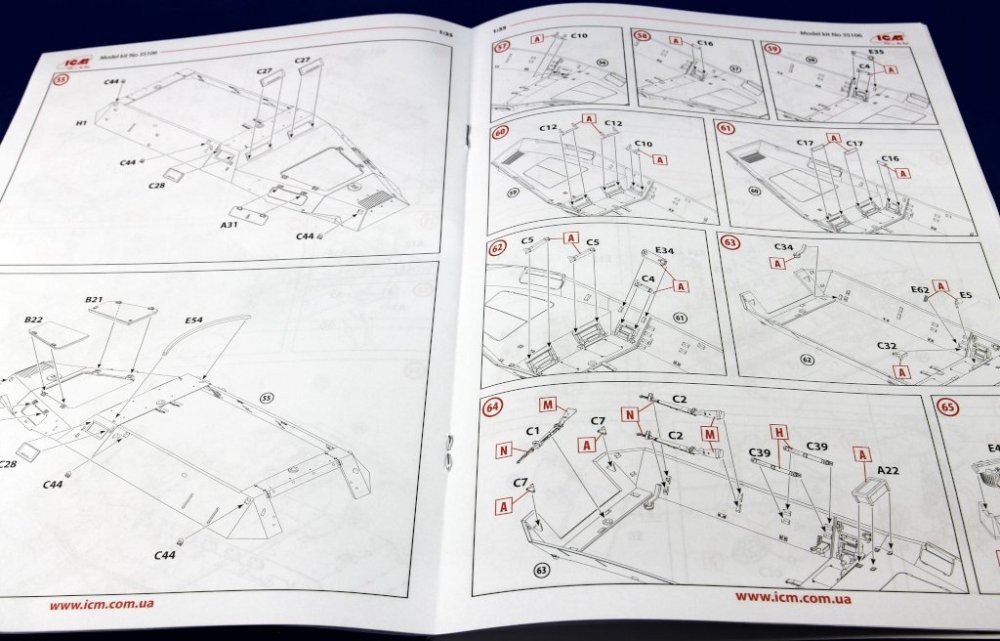
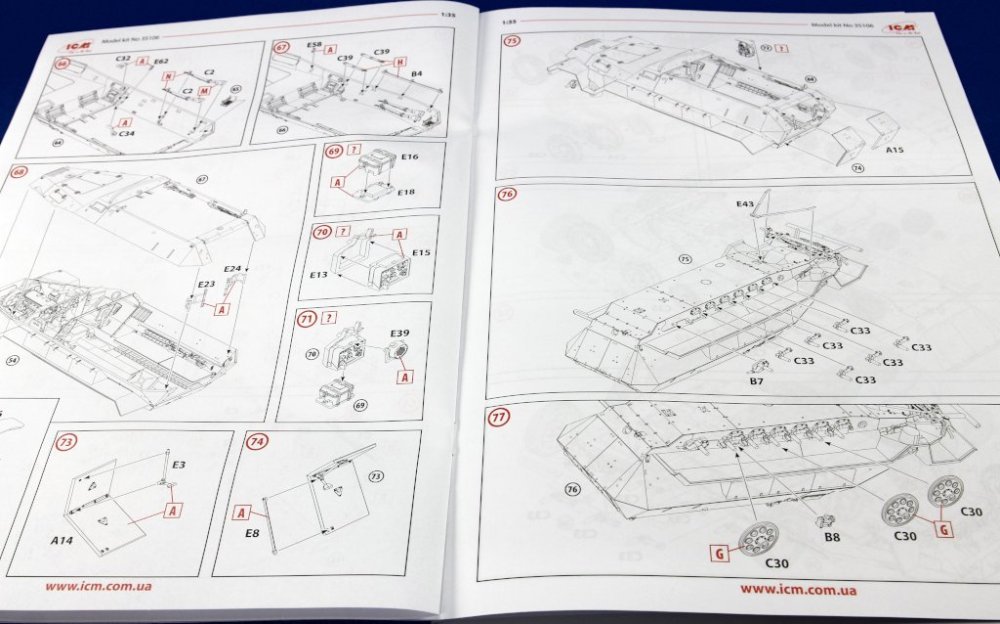
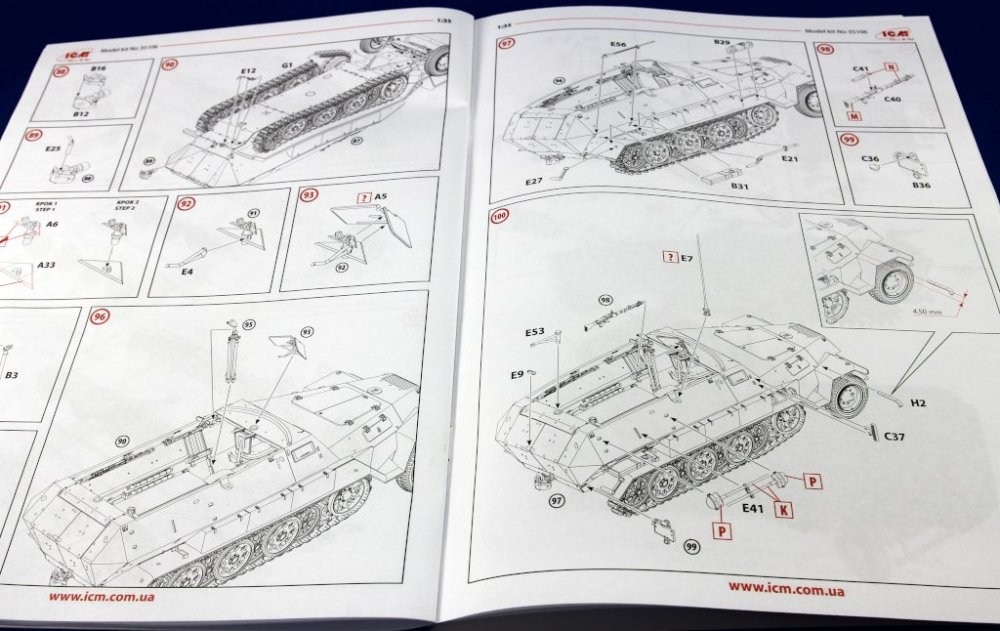
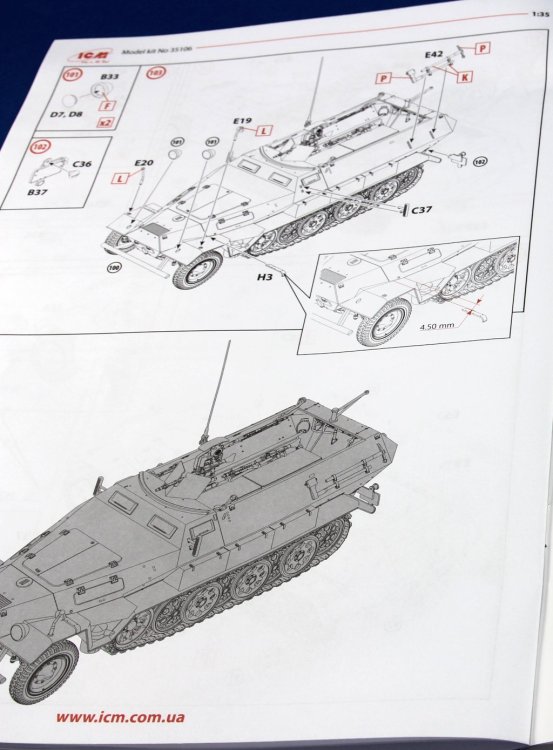
ICM 1:35 Sd. Kfz. 251/1 Ausf. B Ref: 35106 Available here Introduction The Sd. Kfz.251 was the all-purpose tool of the German army during WWII. Its flexibility and adaptability are demonstrated by the numerous versions this model assumed. The idea behind the concept was to transport a squad (gruppe) of soldiers (10 men) along with their equipment efficiently. Early combat experience led to the Ausf. B model, which incorporated a few changes from the A version. These included the elimination of viewports in the rear body sides and the reorganization of stowage and some internal fittings. A new MG mount with an armored shield and fixed pivot improved the gunner’s protection and enhanced the gun’s accuracy. The antenna mount was relocated from the right front mudguard to the right upper side, above the radio installation. Returning to the subject at hand, ICM presents us with another version of this classic military vehicle—this time, the second variation of an early version. What’s in the box In the typical presentation, we have a box with a artbox showing a sd.kfz.251 moving in a winter scenery (steppe). A lidded corrugated and sturdy box protects the content. Inside we have 6 light grey sprues, on clear sprue and two black rubber type sprues with the tires and tracks. A small decal sheet and a A4 colour instruction book. In a typical presentation, the box features an art cover depicting a Sd. Kfz.251 moving through a winter landscape (steppe). A sturdy corrugated box with a lid ensures the contents are well-protected. Inside, there are six light grey sprues, one clear sprue, and two black rubber sprues containing the tyres and tracks ( total 291 parts). Additionally, a small decal sheet and an A4 colour instruction manual are included. Sprue A This sprue provides the parts for the bodywork and chassis. The upper section of the structure should not be considered, as it is not correct for the “B” version. Notably, the lower half of the combat and driver's compartment is moulded in a single piece, featuring appropriate detailing of the anti-slip flooring. Sprue B This sprue provides the components for the Maybach HL 42 6-cylinder petrol engine, which can be built into a more than reasonable reproduction of the real engine. It includes fan belts, an authentic crankcase and block, magnetos, and a carburettor. The lower sides of the cabin are also included, and the bolted armoured belly plate is presented as a single piece with detailed bolt work. Additionally, the leaf-spring suspension bar, axle, and drive pinions are provided. Sprue C This sprue (two are provided) includes the wheels and track rollers, which feature adequate detailing. It is worth noting the vision ports, which in the model are designated for assembly in the closed position. However, with some modification, they can be displayed in the open position. Sprue D This sprue provides the parts that replicate the vehicle's glass components. For this particular model, only the optical groups for the front headlights will be required. The remaining parts can be set aside and stored in the spares box for future use. Sprue E This sprue provides parts and accessories, including the antenna, tools, steering components, and miscellaneous pieces. A notable highlight is the detail of the radio, with its adjustment and frequency knobs moulded as a single piece. Sprue H This sprue provides the entire upper bodywork for the “B” version, with a noticeable absence of the observation windows found in the middle/late versions of the Sd. Kfz. 251. Of particular note is the mesh grille at the front of the bonnet, which showcases appropriate detailing for an injection-moulded part. Wheels and Tracks Represented in flexible black rubber, they feature adequate detailing, considering the material they are made from. For the more demanding among us, resin wheels or link-by-link tracks, either 3D-printed or in white metal, can be chosen as alternatives. Decals A small sheet containing the various license plates, national and tactical markings, and instruments for the driver’s office. They are suitable thin with minimal carrier film and perfect registration. Instructions The instruction manual follows ICM’s typical standard. It is an A4 booklet with saddle-stitch binding, where the first and last four pages are printed on glossy, coloured paper. The cover image of the model is presented on the first pages, while the last four pages showcase the decoration options in coloured profiles and include a colour reference chart corresponding to ICM’s colour range. Colour mapping to other ranges can be done using widely available equivalence tables online. The manual guides us through 103 construction steps and includes four decoration options, spanning a total of 24 pages. The instructions are clear and direct, leaving no doubt as to which piece goes were. Decoration Options Four decoration options are provided, covering theatres of operations ranging from Eastern Europe to North Africa: 1 Sd.Kfz.251/1 Ausf.B - 9th Panzer Division, Balkans 1941 2 Sd.Kfz.251/1 Ausf.B - 5th Panzer Division, Romania 1941 3 Sd.Kfz.251/1 Ausf.B - Eastern front, late 1941 4 Sd.Kfz.251/1 Ausf.B – North Africa 1942 Conclusion Currently, there are multiple options available for this model, ranging from classic releases to more recent moulds, benefiting from advancements in moulding and design. This is the case with ICM's offering. It allows for a smooth and relaxed build, resulting in a model with adequate detail and all the accessories that make up the vehicle. There is the possibility of showcasing the assembled and painted engine with the maintenance hatches open, enabling the model to be displayed in a diorama, telling a story. The option to assemble the interior with its details (raincoats, tools, weaponry) adds value to the final result, whether you are an experienced modeller seeking intricate detail or a beginner impressed and motivated by the number of pieces and their precision. It is a superb model and highly recommended! My sincere thanks to ICM for the review sample! This set is available here: Ricardo Verissimo

.jpg.dc1d6ef0d8e1ffb6e66ce3c3d10c3e30.jpg)


-
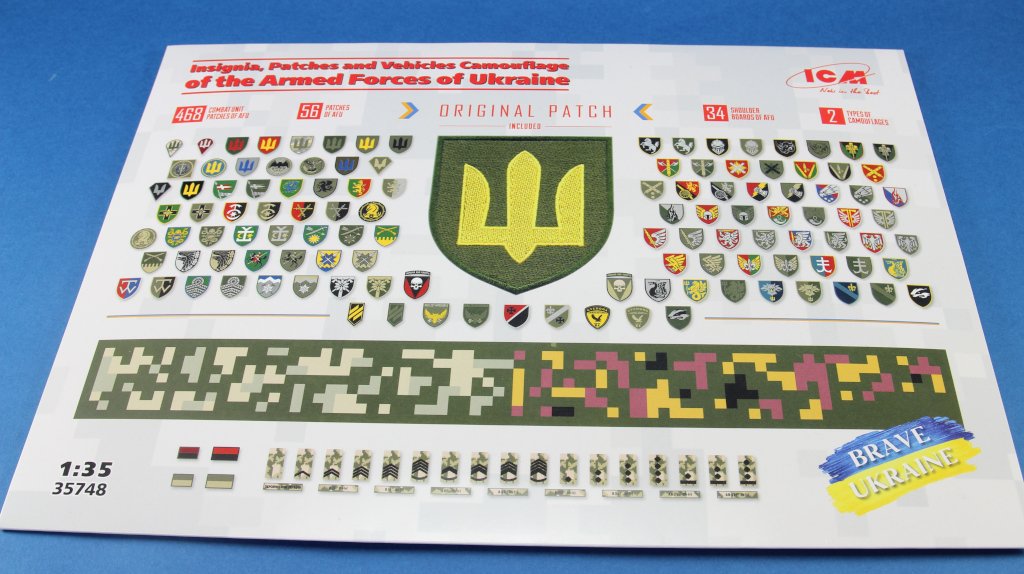
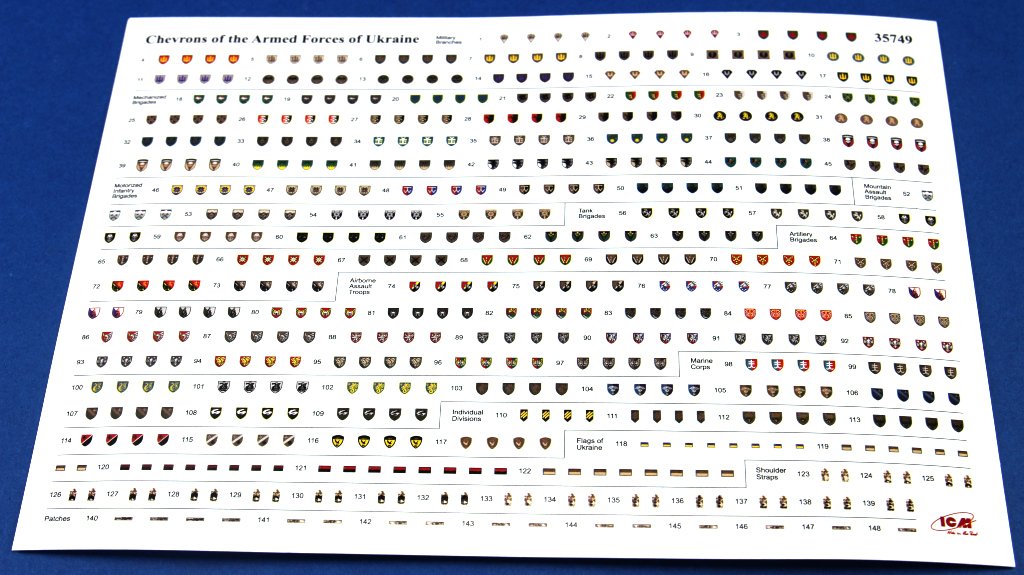
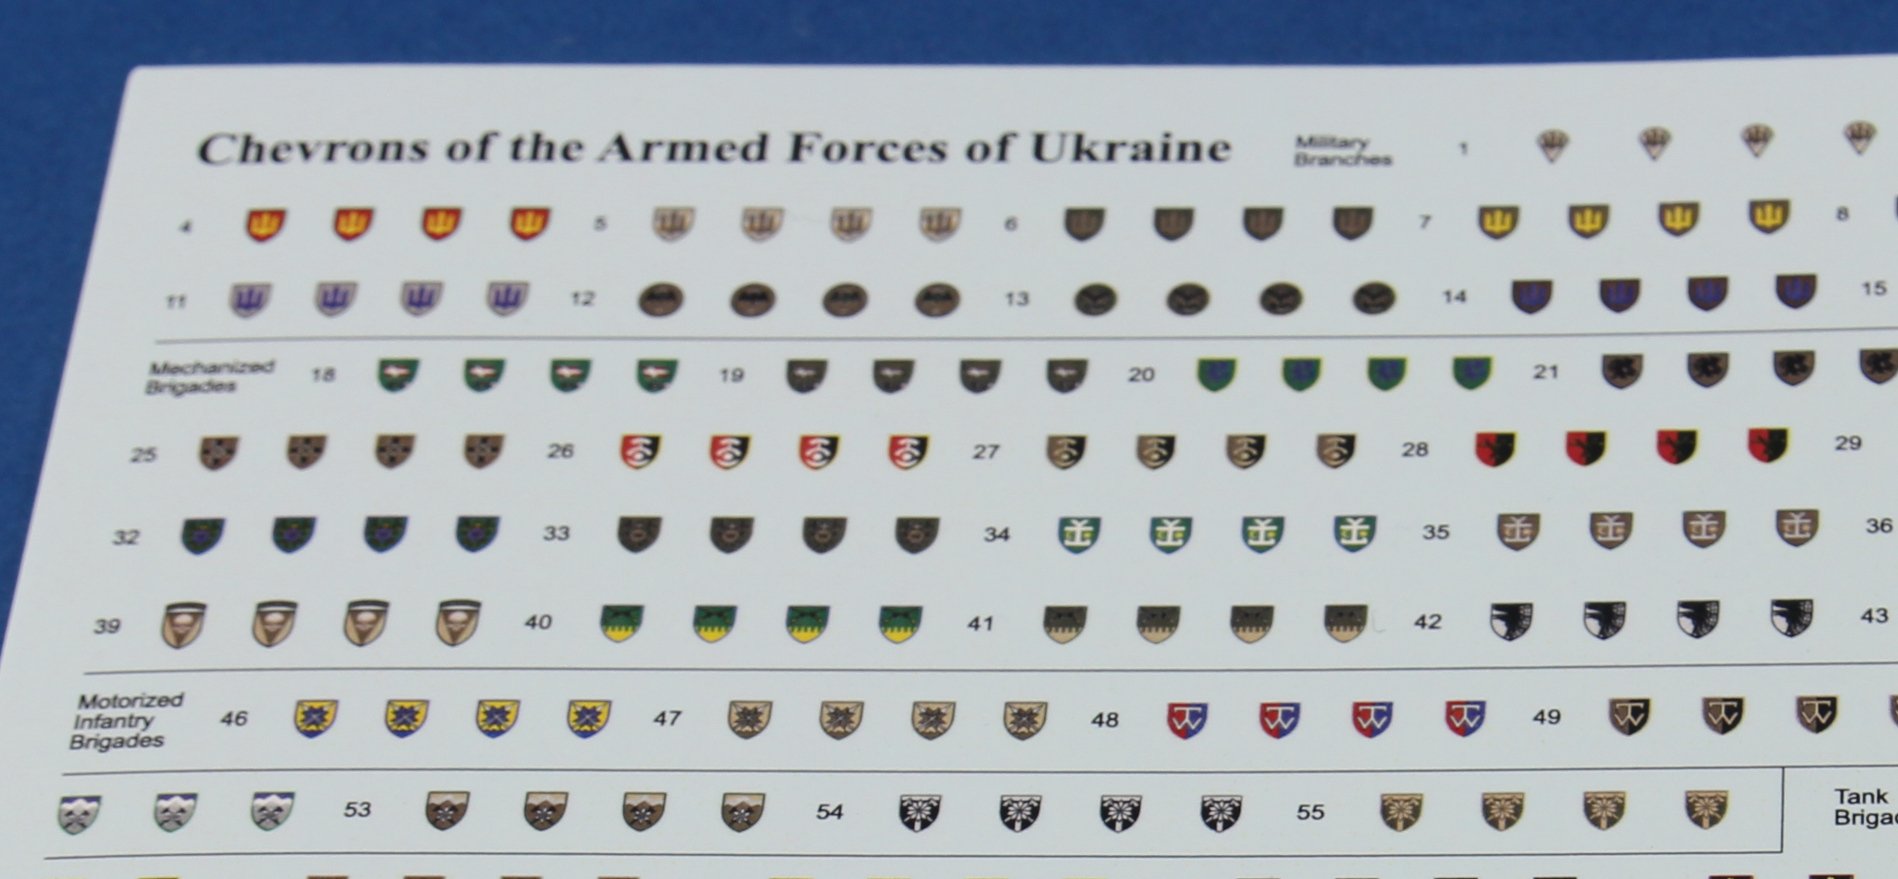
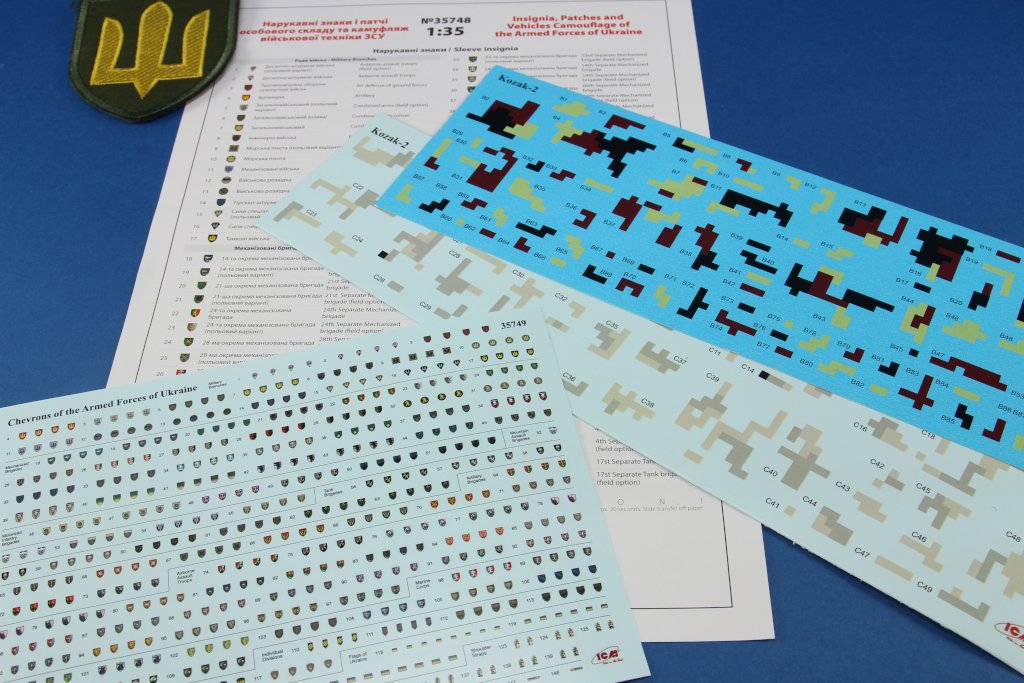
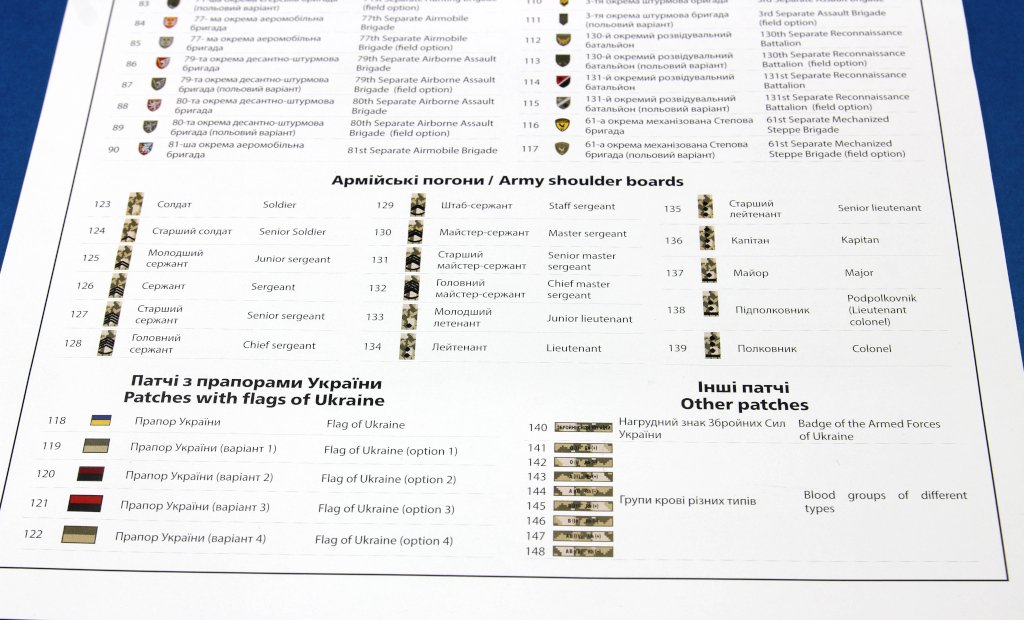
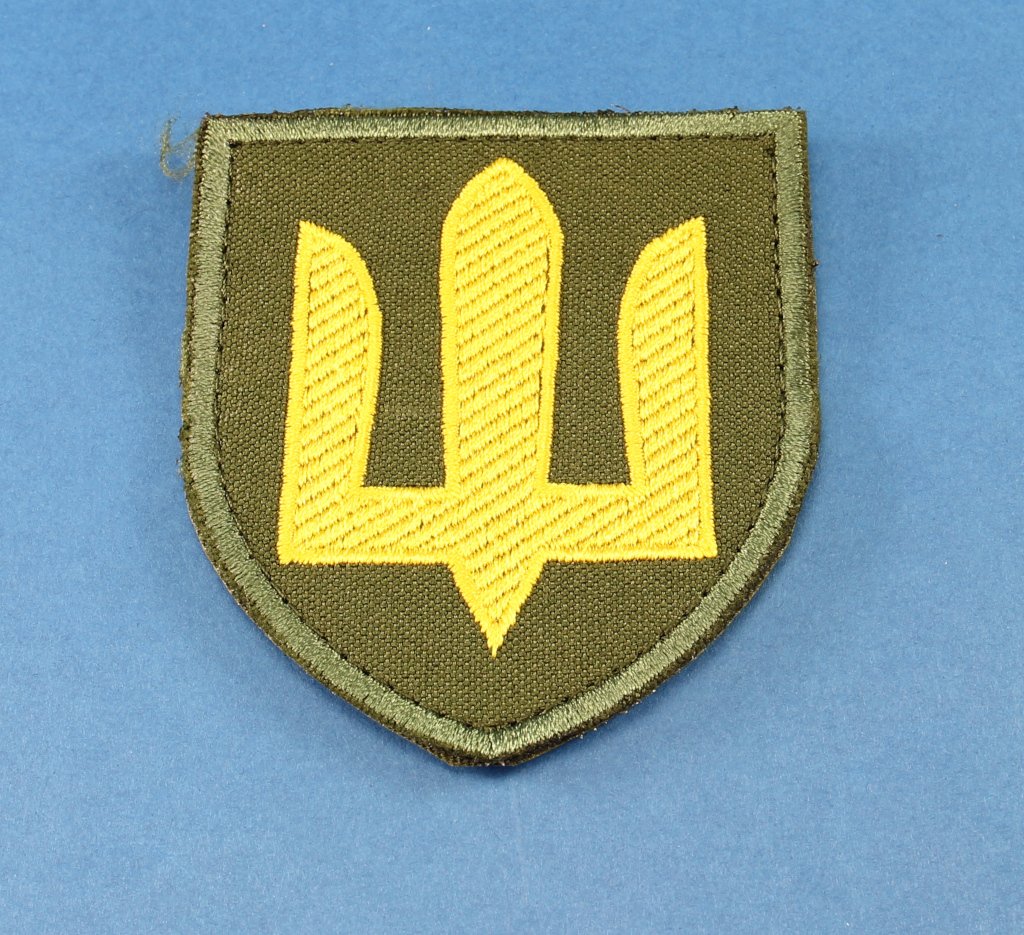
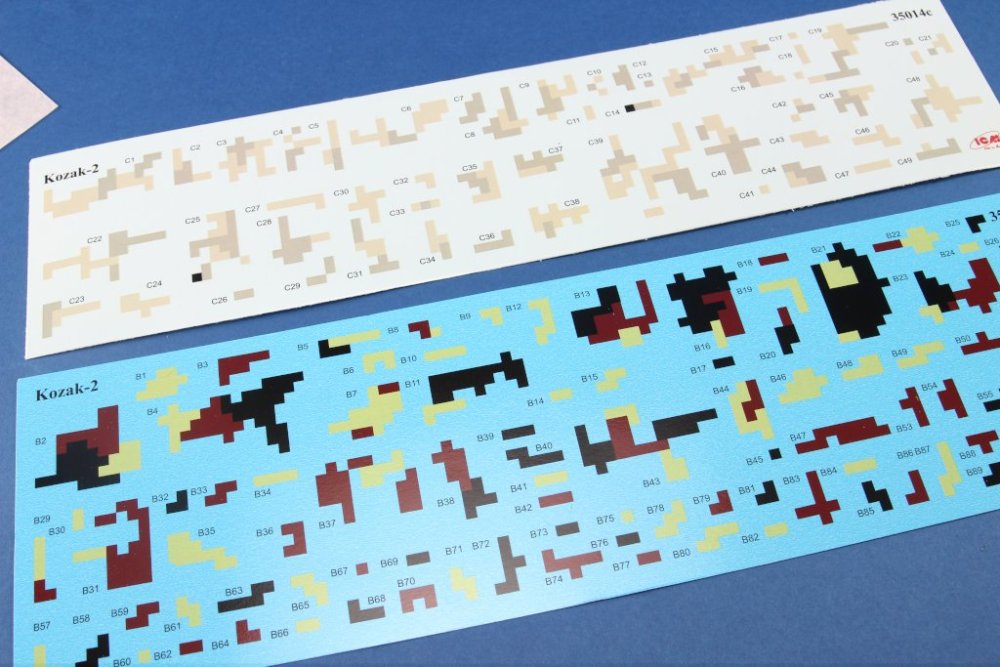
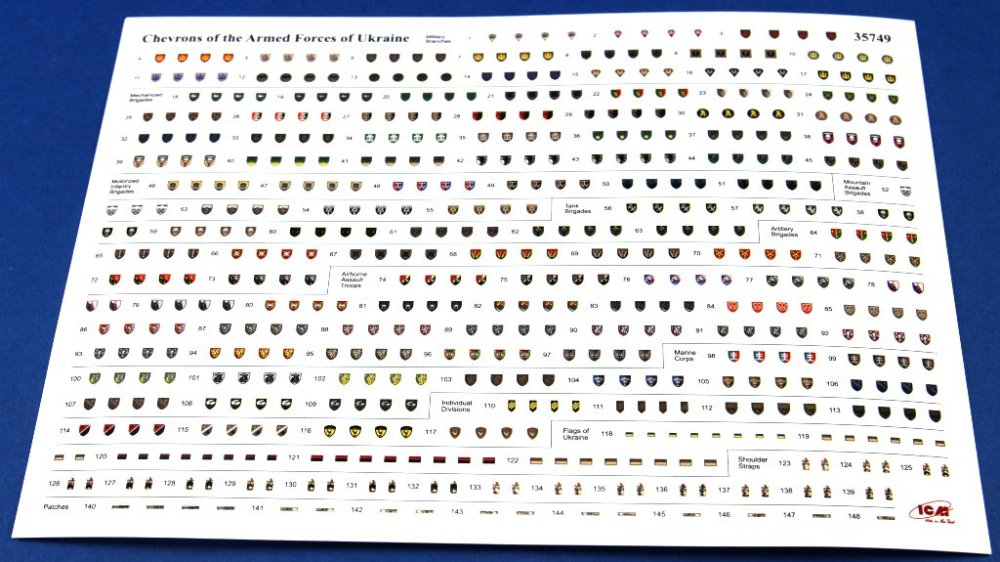
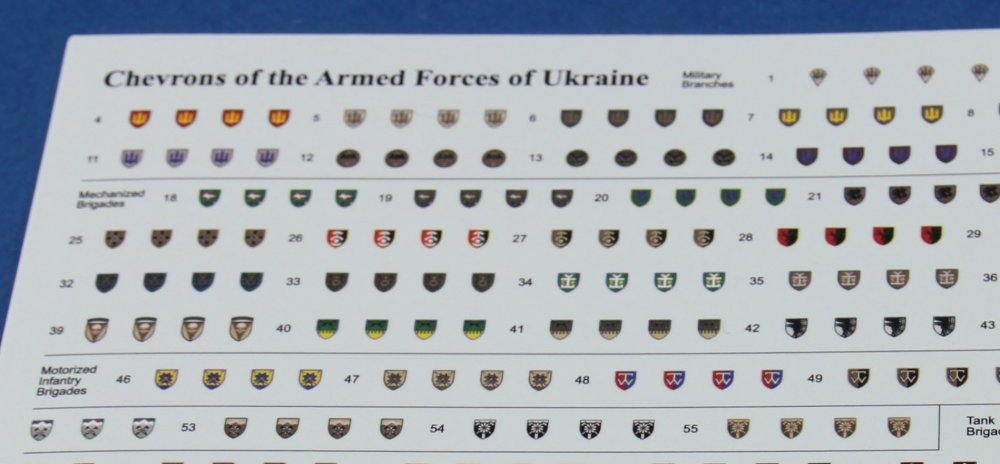
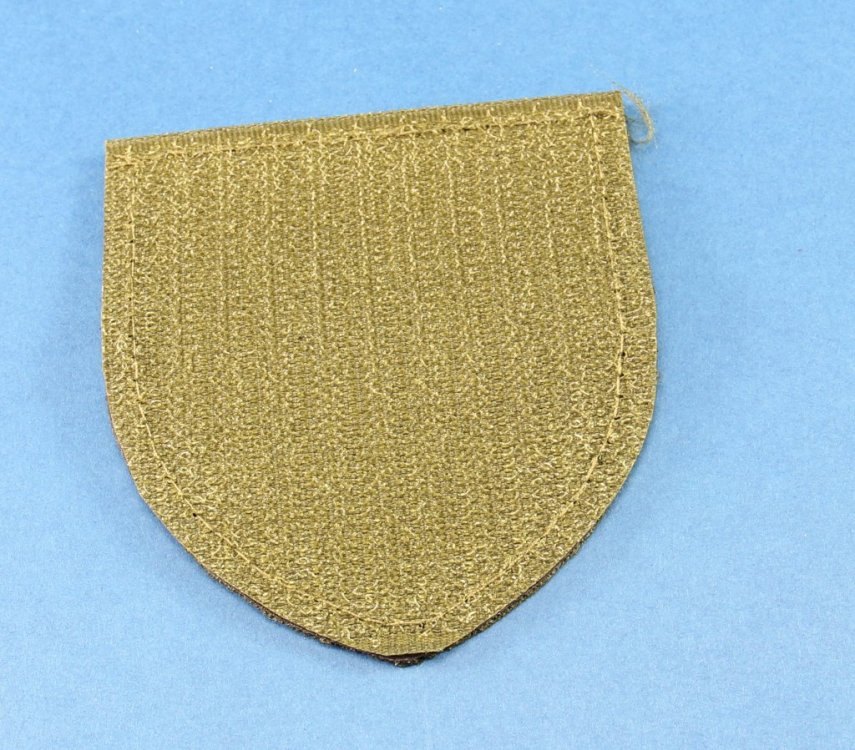
ICM 1:35 Insignia, Patches and Vehicles Camouflage of the Armed Forces of Ukraine Ref: 35748 Available here ICM is a brand that offers a highly diverse and original catalogue of modelling products. An example is this set: decals for emblems of all the Ukrainian armed forces. This is a particularly unique set, as it enables figures to be decorated with the colors and identifying emblems of various military units of the Ukrainian army. What’s in the bag Inside the envelope ( as this set is supplied in a cardbox type white envelope, we'll have: 3 sheets of decals 1 sheet with a numbered and explained list containing all sleeve insignias for the Ukrainian armed forces. Additionally, decals are provided for: Shoulder boards for various ranks Patches with the Ukrainian flag (several options available) Tactical identification tapes with the Ukrainian flag and blood type. For sleeve insignias, there are: Military branches Mechanized brigades Motorized infantry brigades Mountain assault brigades Tank brigades Artillery brigades Airborne assault troops Marine corps Individual divisions The decals are organized on the sheet by these topics, with four decals for each insignia. Shoulder straps are provided in pairs. For the various options of the Ukrainian flag, there are eight of each. Other patches are available in pairs, while some are supplied as single copies. The decals are finely printed, with appropriate and clearly defined colors. Also supplied is a a4 sheet with description of what brigade / battalion belongs to. In this sheet there's a number matching the patch in the decal sheet. Vehicle Camouflage decal sheets These two sheets originate from set 35014 (review here), allowing modellers to complement the base painting of a vehicle operating in the theater of operations. Bonus item: Ukrainian armed forces patch. Conclusion As mentioned previously, this is a highly original set, focused on the current conflict in Ukraine. The offering allows for the detailing and enhancement of figure painting with real visual elements, significantly elevating the quality in a simple way. It’s worth noting that applying the decals with sleeve emblems may require adjustments and the use of specific products for this purpose (e.g., Micro Set and Micro Sol). Similarly, the digital camouflage decal sheets (featuring geometric shapes of various colours and patterns) can simplify the modelling of vehicles using this type of camouflage in their paintwork. The bonus fabric emblem patch adds a finishing touch to this offering. This set is highly recommended! My sincere thanks to ICM for the review sample! This set is available here:


.jpg.8b27eb0670f8c73ffe0cef2c33dfffca.jpg)

-
- 1
-

-
- icm
- 1:35 scale
- (and 2 more)
-
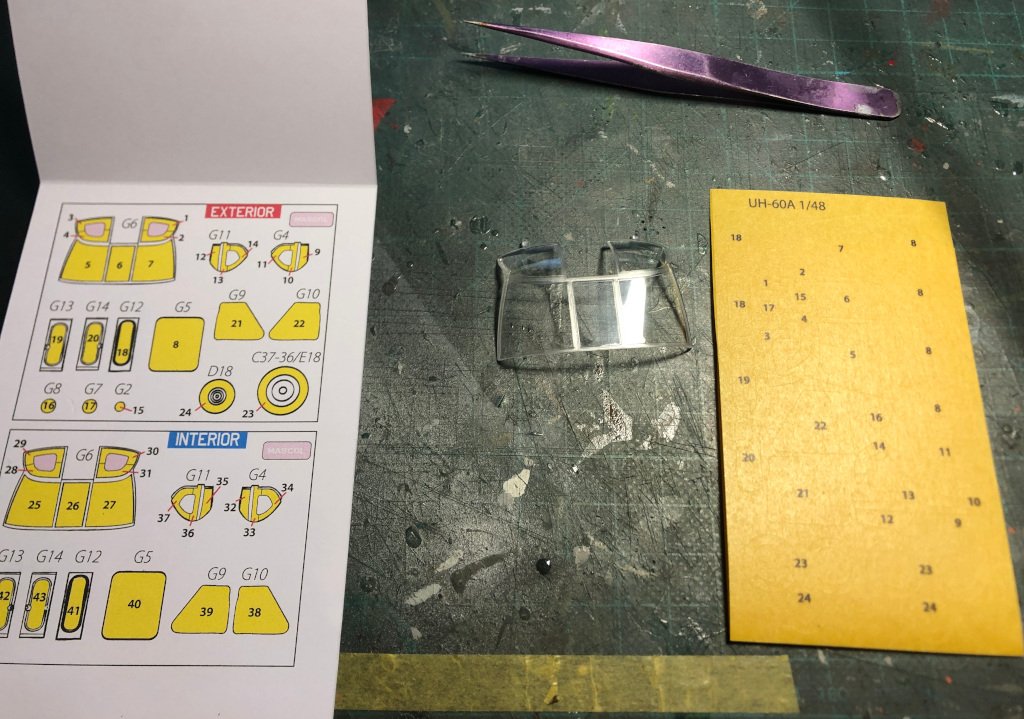
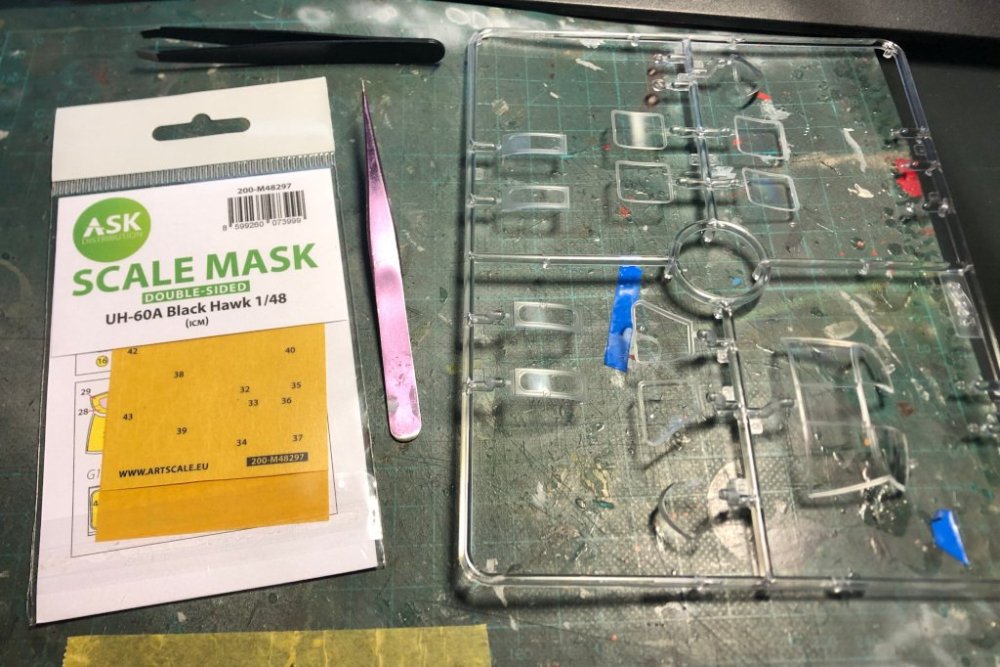
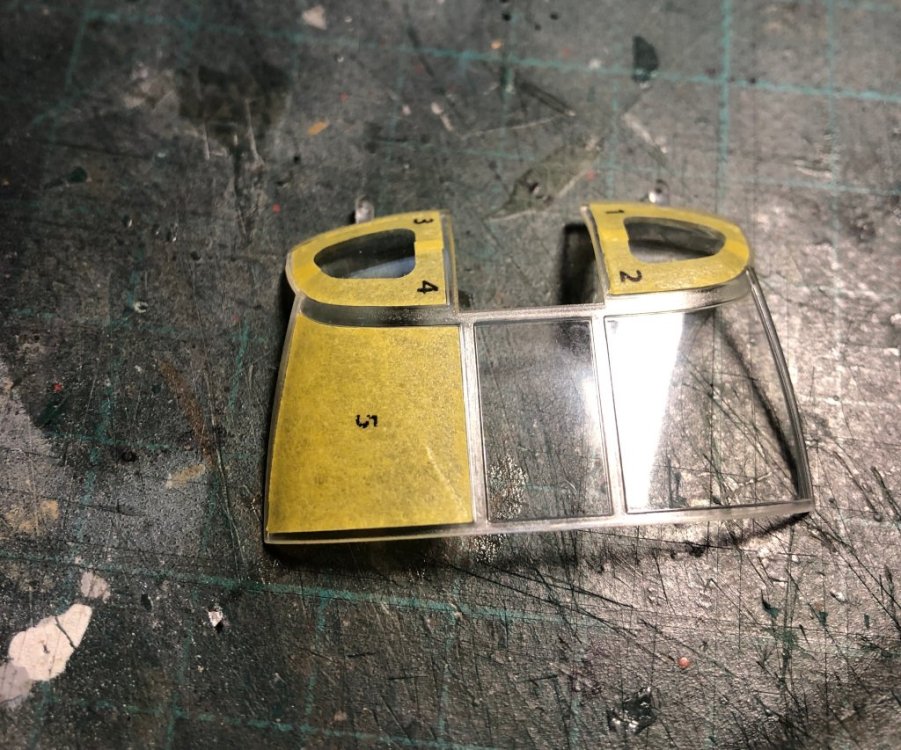
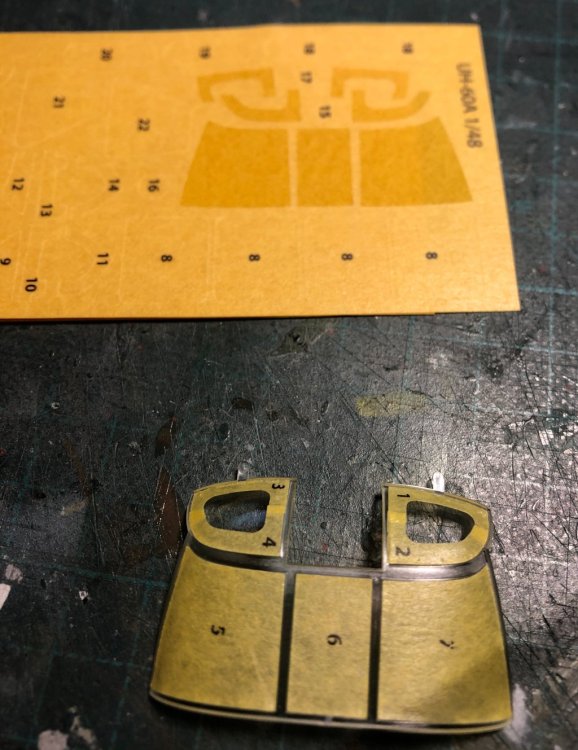
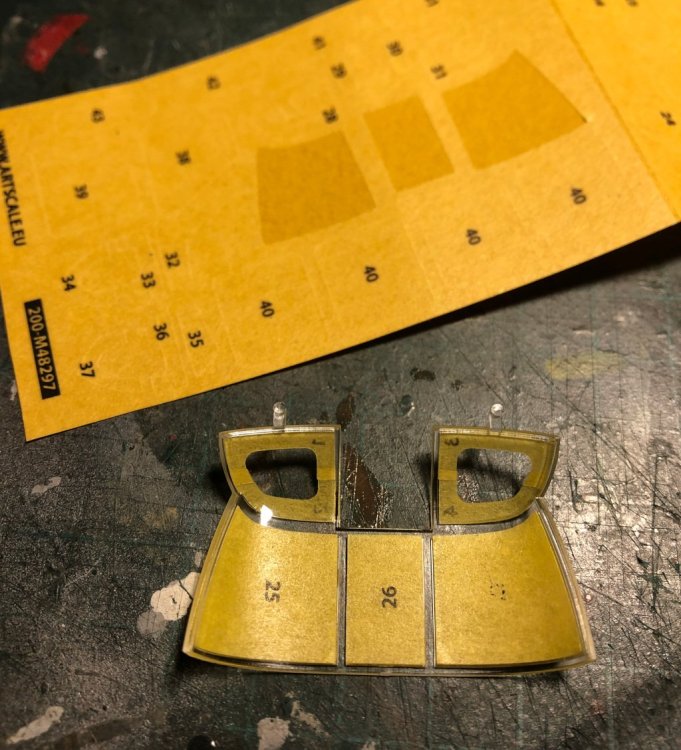
Hi all! Having already reviewed some of ASK’s masks (here) and with the ICM 1:48 UH-60A available, ( review here) I decided to roll up my sleeves and apply the masks to the windscreen. The application scheme is easy to understand, as each mask is numbered. The process is quick, and the masks fit perfectly to the corresponding “glass” of the windscreen. . After 10 minutes, the exterior masks were in place The interior part took a little longer, as it does not have frames to align the masks, unlike the exterior ones. However, simply using the external masks as a guide ensures proper alignment. And there we have it—a windscreen ready for painting and fitting into place. The masks performed according to their quality. The sections that outline only the glass require occasional adjustments, but I attribute this more to the modeller’s skill than the material itself. They can be removed and re-positioned without losing adhesion. So, here is a small step-by-step guide for applying ASK’s masks. Thanks for watching ! Ricardo Veríssimo

-
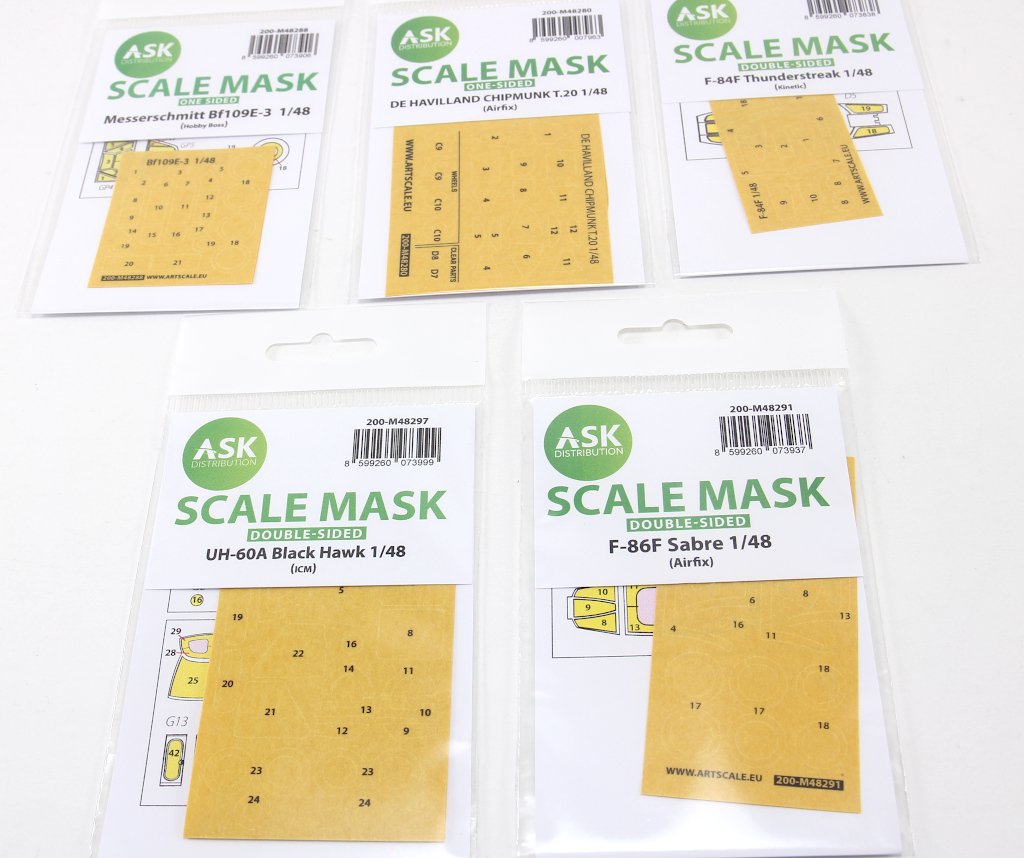
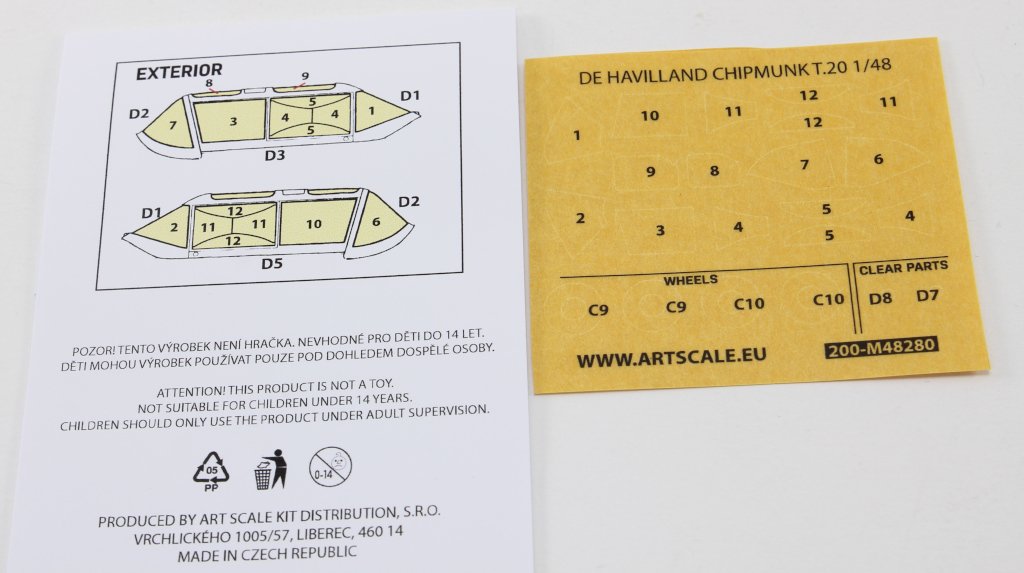
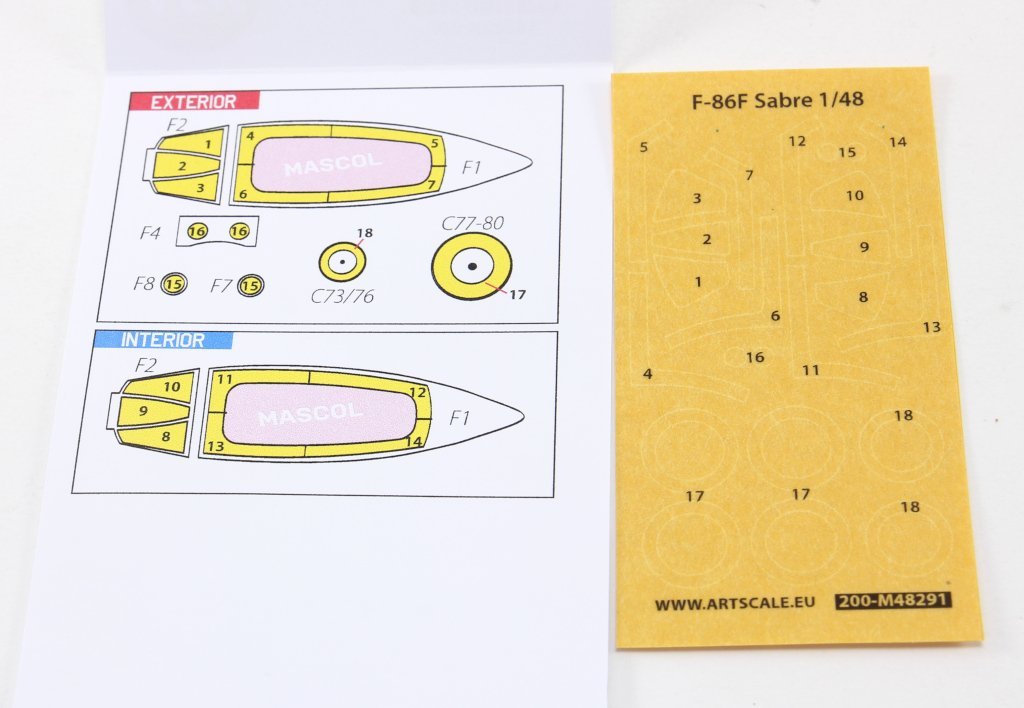
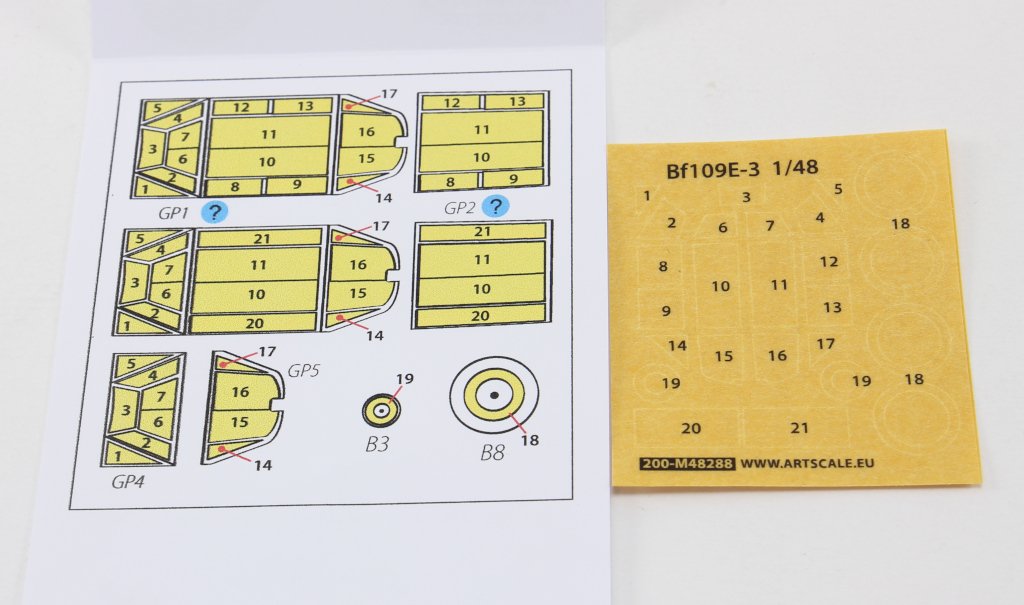
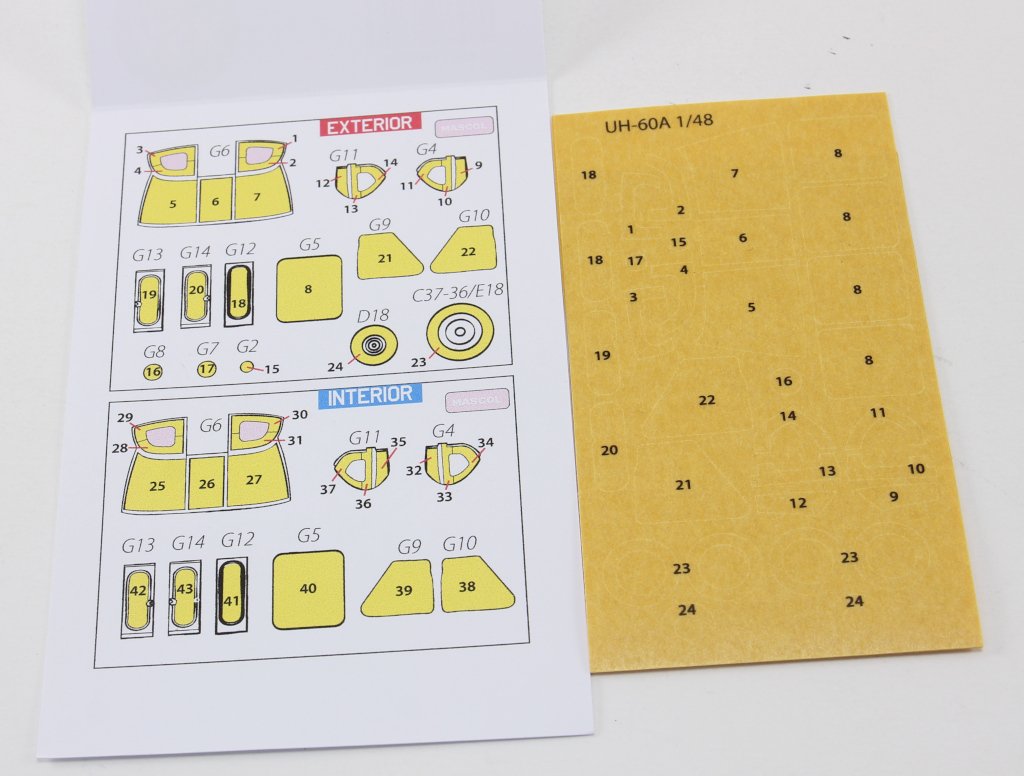
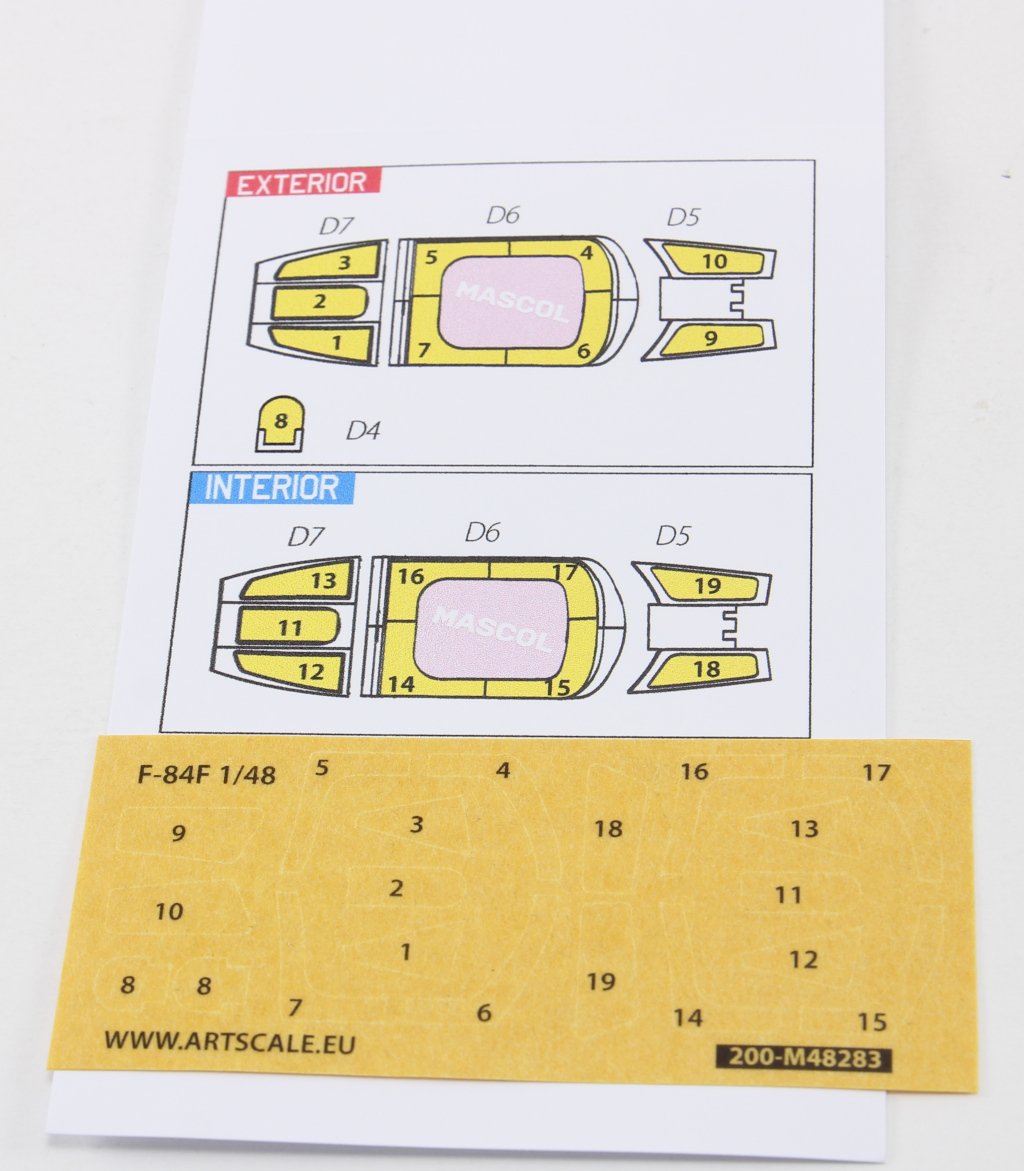
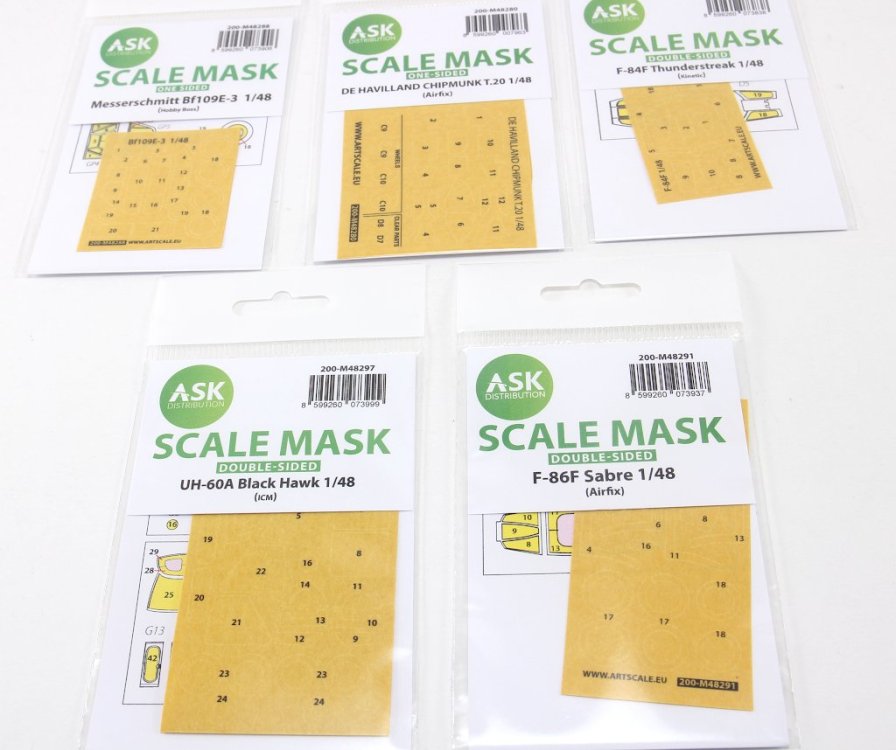
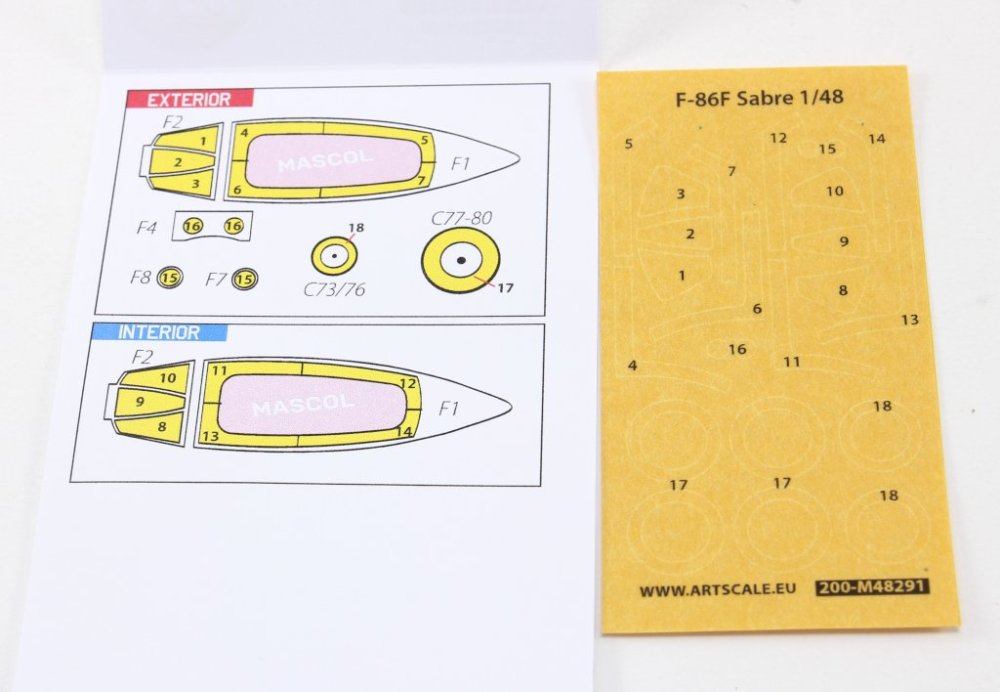
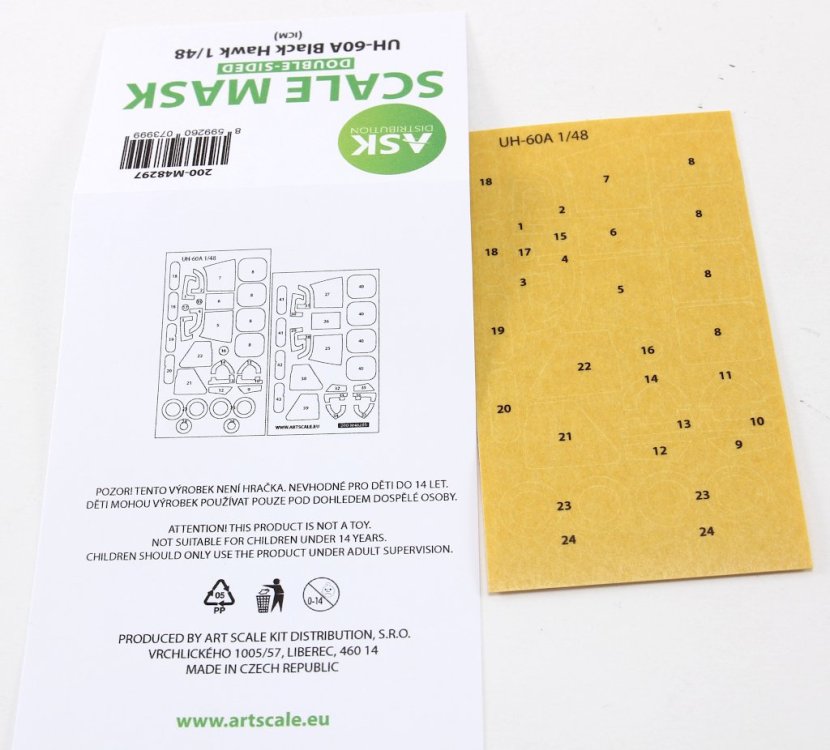
Art at scale canopy Masks 1:48 scale several subjects Introduction Art Scale Kit (also known as ASK) is a model hobby shop and now it is known in the modelling world all around for their decals, tools and 3D productions. These are some of the new sets released on a 1:48 scale, all in their typical clear plastic bag. Each mask is numbered and identified on the colour drawn supplied on the plastic frame that carries and protects the mask sheet. The mask material is like Kabuki tape, with a similar handle, flexibility of other brands. 1:48 BF-109E-3 one-sided (Hobby Boss) Code: 200-M48288 Price Tag: 6,60€ This set provides external masks for the canopy of the Emil from Hobby Boss, as well as masks for painting the rims of the front and rear wheels. Additionally, masks are included for the late versions of the Emil's canopy (parts 20 and 21). 1:48 F-86F sabre double sided (Airfix) Code: 200-M48291 Price Tag: 7,90€ This set provides both internal and external masks for the canopy (to outline the frames and fill the centre with Maskol) and the windscreen (full masks). It also includes masks to allow painting of the rims of the front and rear landing gear wheels. Furthermore, the set provides masks for the landing lights located under the air intake, which in the model can be assembled in the retracted or extended position. 1:48 De Havilland Chipmunk T.20 one-sided (Airfix) Code: 200-M48280 Price Tag: 7,90€ This set, designed for the Airfix’s 1:48 Chipmunk, supply the external masks for the complete canopy, Wheels and clear parts like the landing lights. At the assembly draw it’s possible to identify the models part number and for each frame, the correspondent mask number. 1:48 F-84F Thunderstreak double sided (kinetic) Code: 200-M48283 Price Tag: 7,90€ This set provides exterior and interior masks for the three parts of the canopy. For the central section, the masks are partial (applied along the frames), and the interior should be filled with Maskol or suitable masking tape. A mask for the gunsight is also included. 1:48 UH-60A Black hawk double sided (ICM) Code: 200-M48297 Price tag: 11,20€ This set provides internal and external masks for all transparent parts of the ICM Black Hawk (review available here), as well as masks for the wheel rims. Conclusion Nowadays, we have a wide range of options when it comes to painting masks—this is a fact. Some are easier to apply and handle than others. Focusing my analysis on the presented sets, and having already used them, I can say that the masks are easy to use and handle. The material they are made from has elasticity, allowing for adjustments, sticking and unsticking without losing adhesion properties to plastic. The double-sided options offer greater detail, as they allow for the painting of the interior frames, thus eliminating the typical shine of this type of plastic, making the model more realistic. The inclusion of masks for the remaining transparent parts and even for painting the wheel rims facilitates and speeds up the process. I also note that double-sided masks always have a more “economical” alternative in the form of one-sided masks, available at a more competitive price. VERY Highly recommended Our thanks to ASK – Art Scale Kit for the review samples. Ricardo Veríssimo


-
- 3
-

-
- art scale kit
- ask
- (and 2 more)
-
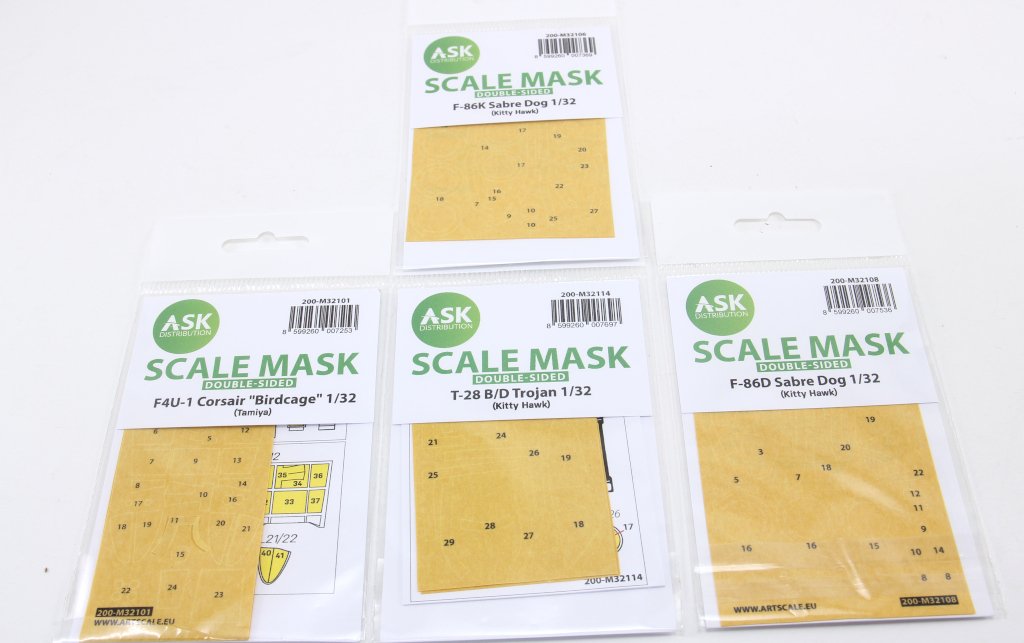
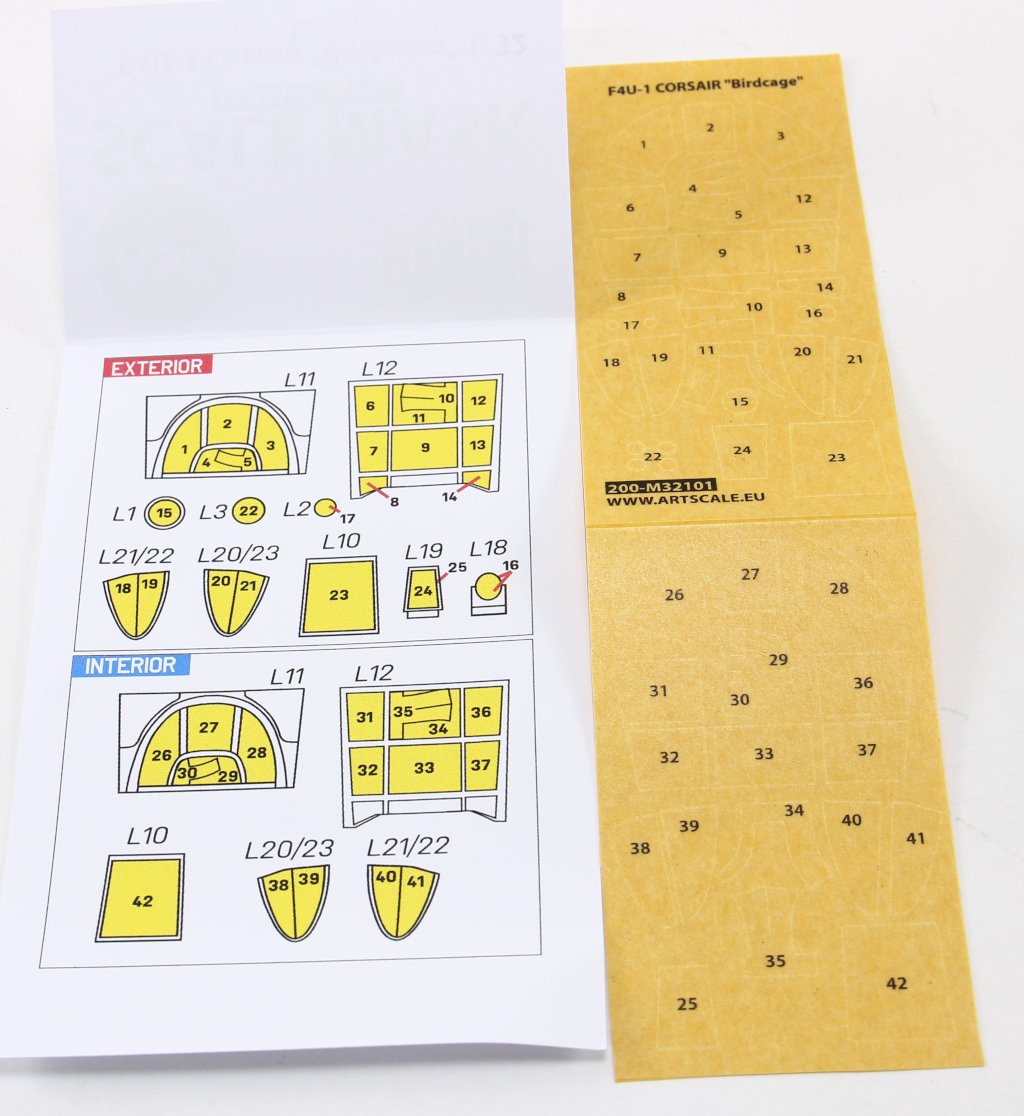
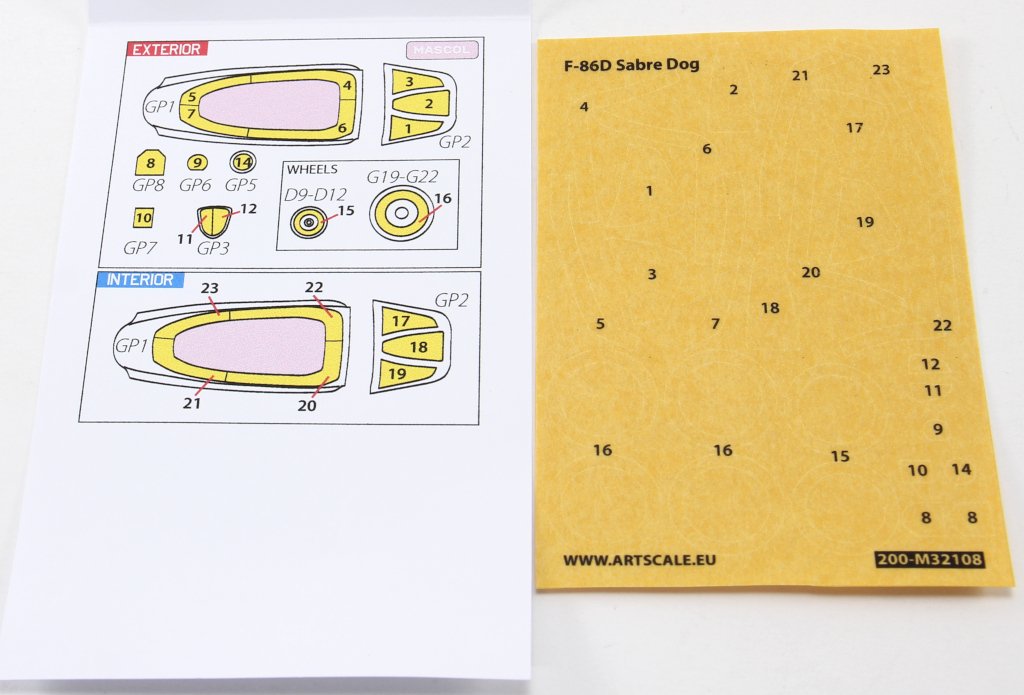
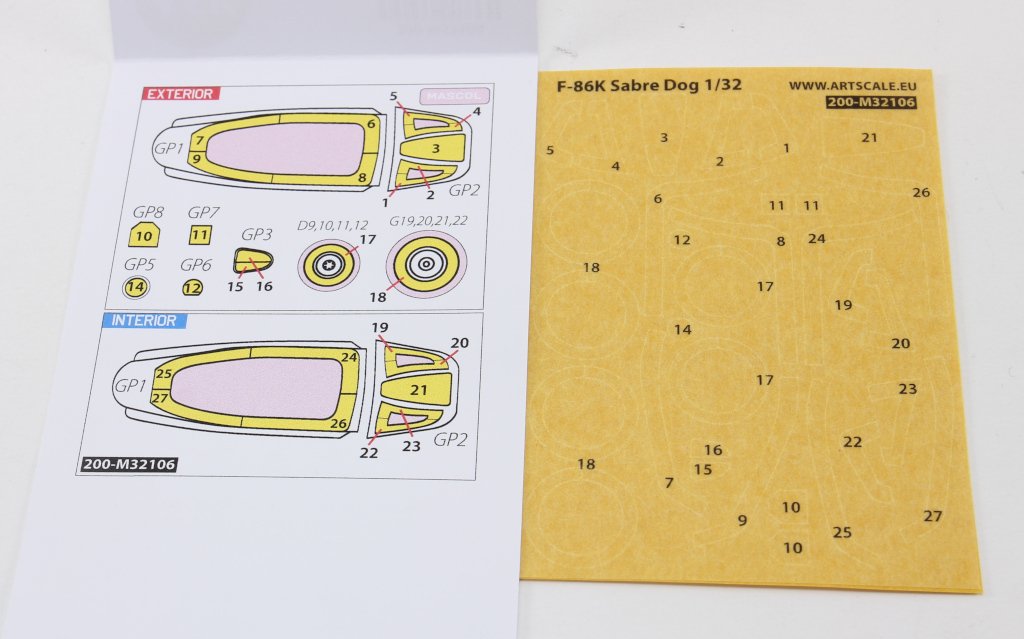
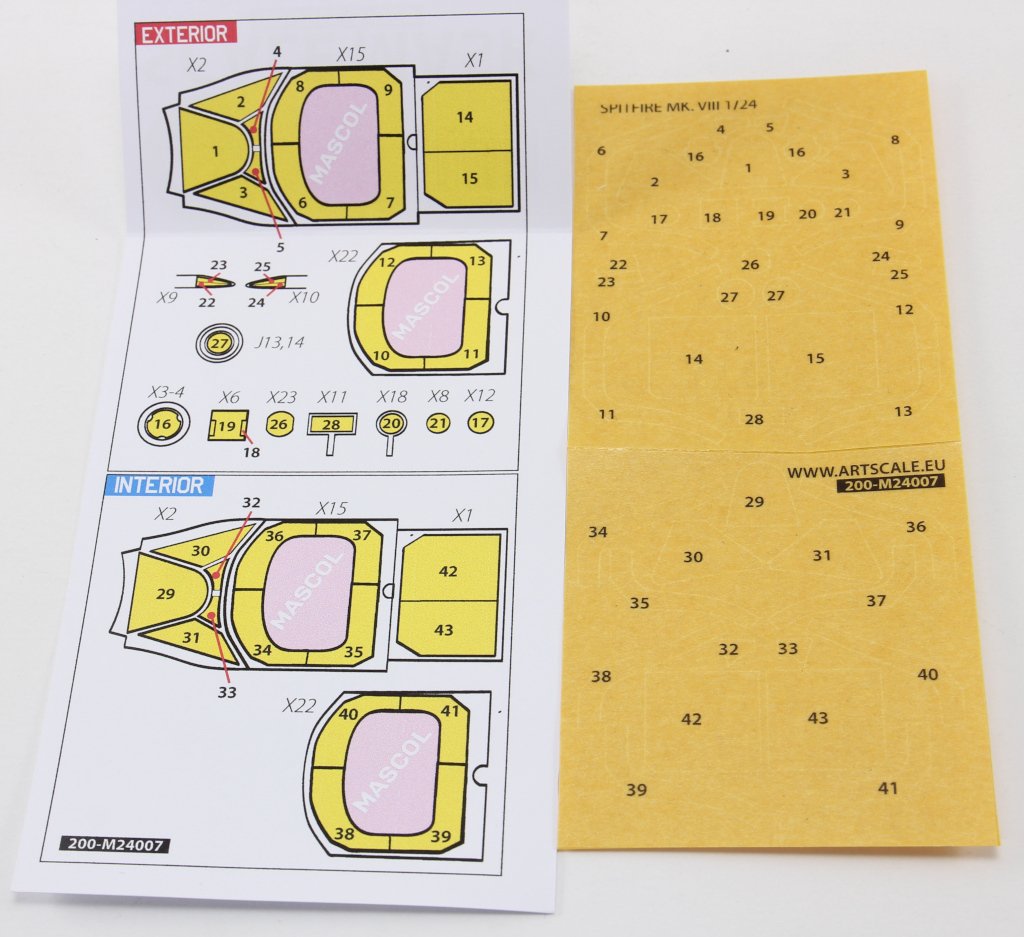
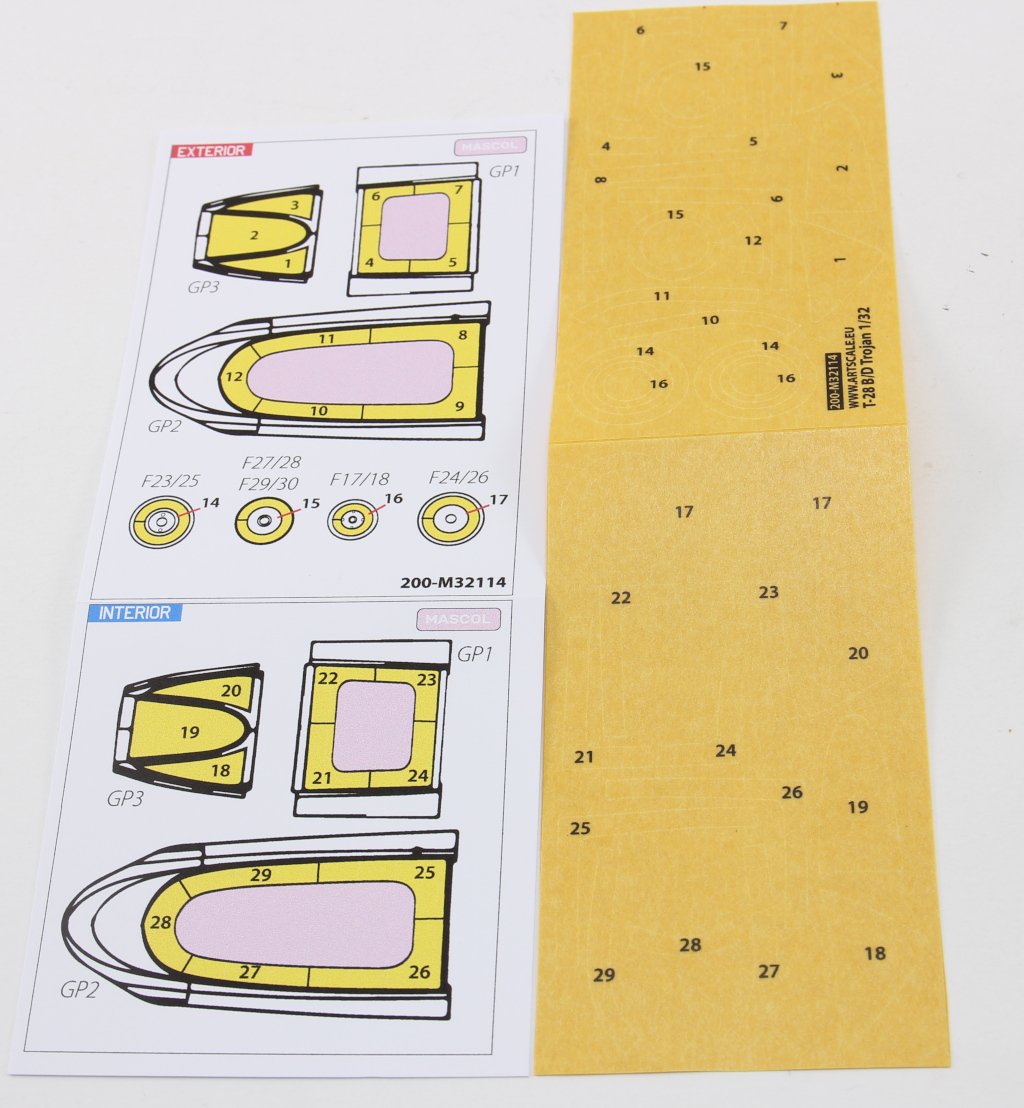
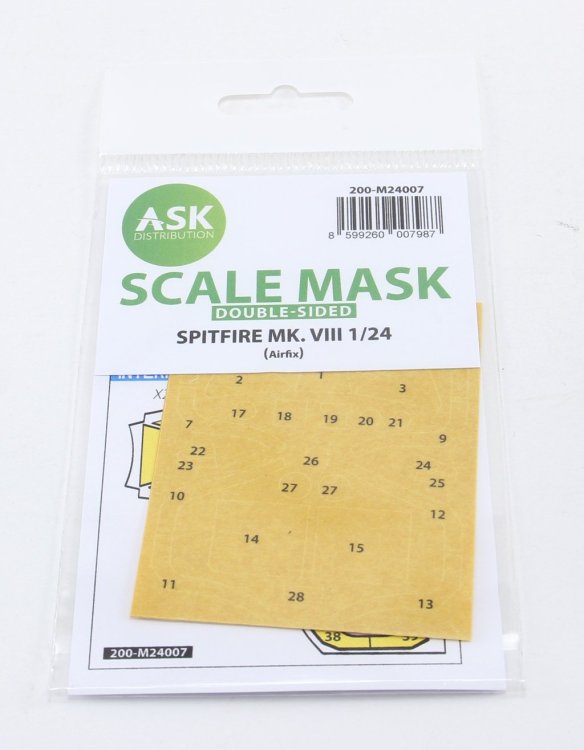
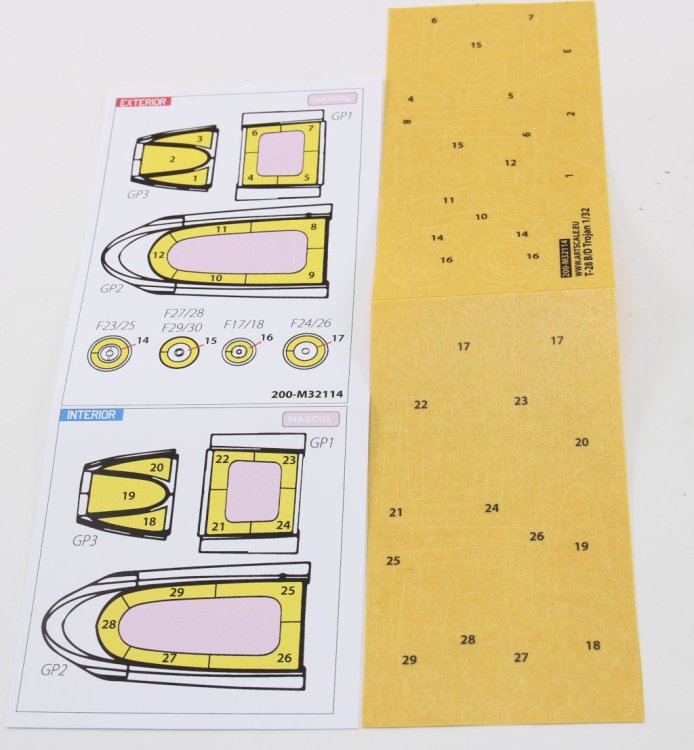
Art at scale canopy Masks 1:24 and 1:32 scale several subjects Introduction Art Scale Kit (also known as ASK) is a model hobby shop and now it is known in the modelling world all around for their decals, tools and 3D productions. These are some of the new sets released at 1:24 and 1:32 scale, all in their typical clear plastic bag. Each mask is numbered and identified on the colour drawn supplied on the plastic frame that carries and protects the mask sheet. The mask material is like Kabuki tape, with a similar handle, flexibility of other brands. 1:24 scale 1:24 Spitfire MK. VIII double-sided (Airfix) Code: 200-M24007 Price tag: 11,80€ This set provides exterior and interior masks for the three parts of the canopy. For the central section, the masks are partial (applied along the frames), and the interior should be filled with Maskol or suitable masking tape. Additionally, masks are provided for: mirrors, navigation lights, gunsight reflector, landing lights, and the tail wheel. 1:32 scale 1:32 F-86K Sabre Dog double-sided (kitty Hawk) Code: 200-M32106 Price tag: 10,30€ This set provides internal and external masks for the windscreen and canopy of the model. Masks are also included for the wheel rims and other transparent parts of the model. 1:32 F-86D Sabre Dog double-sided (kitty Hawk) Code: 200-M32108 Price tag: 10,30€ This set provides internal and external masks for the windscreen and canopy of the model. Masks are also included for the wheel rims and other transparent parts of the model. 1:32 T-28 B/D Trojan double-sided ( Kitty Hawk) Code: 200-M32114 Price tag: 10,30€ This set provides internal and external masks for the windscreen and canopy of the model. Masks are also included for the wheel rims. 1:32 F4U-1 Corsair “Birdcage” double-sided (Tamiya) Code: 200-M32101 Price tag: 10,30€ This set provides individual masks for the interior and exterior of the windscreen and canopy, side windows, lower window, navigation lights, and gunsight for the Tamiya model. conclusion Nowadays, we have a wide range of options when it comes to painting masks—this is a fact. Some are easier to apply and handle than others. Focusing my analysis on the presented sets, and having already used them, I can say that the masks are easy to use and handle. The material they are made from has elasticity, allowing for adjustments, sticking and unsticking without losing adhesion properties to plastic. The double-sided options offer greater detail, as they allow for the painting of the interior frames, thus eliminating the typical shine of this type of plastic, making the model more realistic. The inclusion of masks for the remaining transparent parts and even for painting the wheel rims facilitates and speeds up the process. I also note that double-sided masks always have a more “economical” alternative in the form of one-sided masks, available at a more competitive price. VERY Highly recommended Our thanks to ASK – Art Scale Kit for the review samples. Ricardo Veríssimo


-
- 1
-
-
- art scale kit
- ask
- (and 3 more)
-
1:48 Art Scale Kit Aichi D3A1 Val Decals and stencils
rverissimo replied to rverissimo's topic in Non-LSM Reviews
Hi @KevinM thanks for the feedback !