

jbyrne629
-
Posts
27 -
Joined
-
Last visited
Content Type
Profiles
Forums
Events
Gallery
Everything posted by jbyrne629
-
My First kit was the revell 1:48 P-51 Big Beautiful Doll mustang when i was about 10 years old. I actually painted everything and then screwed up putting the checkered nose decal. After that I believe it was a B-17 or a B-24 I can't really remember. I just remember mixing my own paint color for the plane and it came out like a glossy midnight green. It was completely and utterly historically inaccurate but damn did it look good hanging from my ceiling. There was one model I never finished and it has been bothering me for some. I can't even begin to tell you who the manufacturer of the model was or even what type of jet it was. I know that it was a yellow jet and had rubber wheels included in the kit that I thought was awesome at the time. If anybody knows at all what I am talking about I would really like to know what kit that was so I can buy it and actually finish it this time. I have recently come back to the hobby and because me and the wife just bought a house it is really hard to find any type of bench time.
-
Fantastic, I got The tamiya P-51 in the stash ready to go as soon as i practice a NMF on a less expensive bird. I love the life raft sculpting there, it adds a nice touch of realism to it.
-
Hi All, Is it possible to thin Mr. Surfacer with regular lacquer thinner or do you have to use Mr. Leveling Thinner?
-
I pulled the trigger and got the Grex Tritium TG .3mm from amazon. Good price and 2 day shipping with prime. I am pretty excited to try it out, I have never had a dual action guy before.
-
I usually stick to the tamiya acrylics and model master enamels, I have never really had any issues with them.
-
Ahh, now you have me wanting to up my budget. The .2mm TG model looks perfect. I don't know how the wife would react to spending $200+ on an airbrush...
-
In order to scale the decals up they would have to be in vector format. It wouldn't be possible in Photoshop because it is a bitmap based program. If you can trace the decals in Adobe Illustrator it should be possible to scale them up.
-
I really like the look of the XT. I feel like the trigger action would really help in controlling the paint flow. They have it on this site for $159, that is still in my budget. I just need a high quality brush for the projects I have in mind coming up. http://www.dickblick.com/products/grex-airbrushes/
-
Hi All, Its been a while since I posted but I am currently in the market for a Dual Action gravity feed airbrush. I currently own a badger 200NH single action that frankly stinks at detail work. I came across the Grex Genesis XD for $109 and I was wondering if anyone on the forum has any experience or suggestions. I know airbrushes are very personal things I am really just looking for a general idea if this model would be suitable for the fine detail work I am looking to use it for. Thanks in advance
-
Oil dot filtering on smaller scales?
jbyrne629 replied to NOVAModeler's topic in Modelling Discussion
Does anybody know of a good source for a dot filtering tutorial or how to? -
That is sexy. You may have just helped me pick a scheme.
-
Thanks for the info. I stumbled across this scheme that I think would look badass. looks like it is from the 61st FS 56th FG 8th Airforce. I wonder if I could find this decal set anywhere.
-
Hi all, I am just starting to do my research for a Bubbletop Jug. I am going to be building and I was wondering what color the wheel wells were painted. Were they painte in the green zinc chromate or yellow? Also was the cockpit done in interior green or a different color. Thanks a lot guys
-
Scratchbuild "Bloody Paralyser" HP 0/400
jbyrne629 replied to Wingco57's topic in LSM 1/35 and Larger Work In Progress
Sweet Jesus, that is incredible. Where did you get the plans to work off to scratch build this? -
Thank you guys for the kind words. Getting such positive feedback really has me excited to start my next projects.
-
Yea it was just a stupid mistake. I was just so excited to see how the masks worked that I took them off before doing the decals. It's a mistake I won't make again
-
Revell 1/48 p-47 d and a 1/48 me262a. I am afraid of the me262 a bit
-
My last few finished projects
jbyrne629 replied to NOVAModeler's topic in LSM 1/32 and Larger Aircraft Ready for Inspection
I love those natural metal finsihes. I can't wait to build up the courage to do that on my tamiya P-47. -
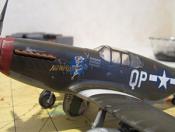
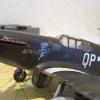
Hello All, I chose this P-51B as my reintroduction to building models as I have always loved the look and the history of the P-51's. My main goals with this build was to use resin upgrade parts for the first time and just the best I could at making as real a looking plane as possible. There are a few places where I fell short and a lot of mistakes were made, but as this was my first build back I am viewing it as a learning experience. Aftermarket Parts I used were: Verlinden resin cockpit After Market Decals from KitsWorld Eduard Masks Working with resin for the first time was an eye opening experience, I really loved the look when it was completed as compared to how it would look with the standard kit parts. The sidewall detail is fantastic and it went together pretty easy once I got the hang of trimming the kit details and making everything fit. The only problem is I posed the canopy closed, so it is really not visible especially since I am a bit of a fool and covered the canopy with a dull coat, so they are all nice and fogged up. The kits world decals were fantastic to work with, they really responded to the microsol and microset and really snuggled down to the fuselage detail. The tamiya kit decals on the other hand seems unbelievably thick and took multiple applications of the microset to snuggle down even a little bit, but for a first build in a while i managed to get away with no silvering of the decals and that is just fine by me. Eduard masks are a must for me as I really don't have the patience to mask a canopy free hand with tamiya tape. The one mistake was securing the canopy and removing the masks too early and as mentioned earlier I hit the canopy with a dull coat and it looks like ass now, but I am just ready to move on. I used a silver prismacolor Pencil to simulate the paint chipping, and I may have over done it just a bit (understatement of the century) but the reference photos i had show Captain. Megura's bird looking really really worn and beat down, and since previously I was working with armor I guess the real weathered look just felt more natural to me. Additional weathing was done with an oil wash of Raw umber and the panel lines were pin washed with Ivory Black artist oils thinned with Mona Lisa odorless thinner. Additional weathering was done with chalk pastels. I used a dark grey on the wheels to tone down the flat black and then hit them with some raw umber to give them a grime look. The blast tubes were streaked with some black pastels applied with a stiff brush. Finally the exhausts were given a little rusted law with burnt sienna. One mistake I made here was when I went to seal the pastels with model masters Dulcoate, all of the pastel work essentially dissapeared and I had to go back and do it all again, but its just another learning experience. The Paints are Tamiya acrylics (OD, Neutral Grey, flat white, flat black) and Model Master Enamels (insignia red and flat yellow). I used a single action Badger NH 200 airbrush. Which is just not good on the small detail stuff. I am really in the market for an Iwata or Grex gravity feed double action job, but the budget is just not condusive at the moment. Overall this was a very fun and enjoyable build and I am looking forward to the critique from the forum. Now on to the Photos.
-
THe Panther tank is probably my favorite tank of WW2. I absolutely love the look of the German armor. IMO they were really ahead of their time. While I have 3 airplanes I want to finish first, I think I might have to keep an eye out for a Panther Tank to get me back into the Dark Side... I will definitely be following this build with great interest!
-
Tamiya Spitfire Mk XVIe
jbyrne629 replied to pfuf's topic in LSM 1/32 and Larger Aircraft Ready for Inspection
That is some fantastic work! I have never built a spitfire but its definitely on my to do list.