

lawman56
-
Posts
283 -
Joined
-
Last visited
Content Type
Profiles
Forums
Events
Gallery
Everything posted by lawman56
-
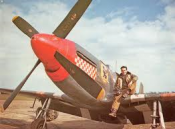
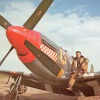 Finally! I've finished my Freccia, and although I was slacking on the WIP, I did finally see it through. The title on this is "Una Freccai In Libia", which is Italian for "An Arrow In Libya". Since I have a limited amount of time to spend online, feel free to ask me any questions about my techniques, supplies, etc... Comments, questions, and monetary donations are welcome! (especially that last one) Thanks for looking!
 -
I would also love to see an S.M. 79, although a few single engine Italian fighters would be nice as well. As would a P-38, and B-26, and.......
-
Thanks Cees. It's Tom's builds that have me thinking. Currently I have no specific ideas in mind, but eventually I would like to tackle the S.M. 79 that I recently saw featured on LSP. I've developed a taste for Italian aircraft, which are a bit scarce in 1/32.
-
Greeting all, I've been toying with the idea of trying a vacuform type kit. My question is, after looking at some of the Tigger and Combat Models offerings, what would be a good starter kit? I have the ability to scratchbuild, so that's not an issue. I love to do research, so finding plans and blueprints isn't an issue either. Just thought I'd give one a go to see if it's something I might like to do, and would like some of the forums feedback. Thanks, Joe
-
Hasegawa !/32 Boeing P-26 Peashooter
lawman56 replied to RalphSarc's topic in LSM 1/35 and Larger Work In Progress
I have to agree with Jonathan. Very inspiring to see someone as motivated as you! I swear, as soon as you finished that Ju-88, you've been just flying (no pun intended ) through kits! Each time they seem to get more interesting. -
Revell 1/28 Sopwith F.1 Camel
lawman56 replied to RalphSarc's topic in LSM 1/32 and Larger Aircraft Ready for Inspection
Looks great! -
Revell 1/28 Sopwith F.1 Camel
lawman56 replied to RalphSarc's topic in LSM 1/35 and Larger Work In Progress
Absolutely love the wood grain Ralph! -
That figure looks fantastic!
-
Fantastic work! Combines my two favorites, trains and armor!
-
After helping a friend get back into model building, he has been building a stash by purchasing ebay lots. The plus side, is the things that he has no interest in, he gives to me. My latest toy Should be interesting. The diorama wheels are already turning.......
-
Special Hobby G.50bis Freccia
lawman56 replied to lawman56's topic in LSM 1/35 and Larger Work In Progress
So I finally got a chance to put a little weathing into the seat and floor. So far, that and the cokpit walls are almost done, and the IP just requies a little touch up. Then I can glue the fuselage together. Yay! -
You did a great job Ralph! If I hadn't followed your build, I'd have no idea this was a vintage kit!
-
I've been floating around LSM lately, just checking things out and have noticed an interesting trend, mostly in aircraft. When I was in high school, building a 1/32 aircraft meant either Revell, an extremely expensive Tamiya, or a fair vacumold thingy. Now, not only are there tons of aircraft, aftermarket, etc... but the subject matter is fantastic! Back then, (the early 80s), if you got a 1/32, it was generally a P-40, Corsair, P-38, P-51 or any other "popular" aircraft. Nobody except us history freaks and Luftwaffe afficianados had even heard of an Uhu, Salamander, or a number of other non-mainstream aircraft. Hell, I'm building a Freccia and even that was obscure! Now we have a number of folks building kits that years ago would have been scratchbuilt for a museum display. And the AM companies are making things for them as well. Never, ever thought I'd see the day when I looked at a forum and said "wow another (insert obscure aircraft here). Wonder how this person will do it?" Truly amazing and fantastic times we live in....
-
Prior to driving my eyes crossed gluing sesame seeds to my G.50s cowl, (see Freccia G.50 post), I got the right arm of my gun aimer in the position I want it. I might need to tweak it a little, but I think it might work as is. The holes you see in the floor, are for mounting the rest of the crew. Thanks for looking!
-
Special Hobby G.50bis Freccia
lawman56 replied to lawman56's topic in LSM 1/35 and Larger Work In Progress
Ok. Finally had a chance to do a little more on my G.50. This morning was spent affixing tiny resin bumps to the cowling. I assume there is a purpose behind these on the actual aircraft, maybe rocker arm clearance, but on the model, they just serve to justify the purchase of a magnifier. Notice they are tiny. Actually, they're the size of a sesame seed. Imagine having to glue them onto a hamburger bun! No wonder the fast food industry wants to raise minimum wage..... Until we meet again...... -
Stunning work! I love PE, but you sir, have a love affair with it! At least for this build. So far I might, (might I say), be able to pull of the plane launches, but not so sure about that radar array.
-
Eduard Bf-109E done
lawman56 replied to JohnB's topic in LSM 1/32 and Larger Aircraft Ready for Inspection
Beautifully done! Another kit I'd like to build someday..... -
Revell Vintage 1982 1/32 A-1A Skyraider
lawman56 replied to RalphSarc's topic in LSM 1/35 and Larger Work In Progress
I love how the folded wings double as a stand...... -
Revell Vintage 1982 1/32 A-1A Skyraider
lawman56 replied to RalphSarc's topic in LSM 1/35 and Larger Work In Progress
Very true Ralph. Plus, let's be honest, you can't really screw these up! -
Revell Vintage 1982 1/32 A-1A Skyraider
lawman56 replied to RalphSarc's topic in LSM 1/35 and Larger Work In Progress
I remember building a bunch of the old Revell kits. At one time, in high school, my friends would bring me their old finished kits and I would rejuvenate them. I learned a whole lot of scratchbuilding and paint masking skills on those old crates! This should be interesting to watch, especially in these days of crazy aftermarket! -
Getting much closer to done. Finished the 5th crewman and glued his torso in the vehicle. Tomorrow, (hopefully), I'll glue on his arms. I had to assemble him this way, since I've built him so his hands appear to be working the traverse and elevation wheels. Once he's in place, I can affix the other two crewmen on the left side. Then I can temporarily place the right side crewman in until I build #6, who will be just to the rear of the .50 Cal mount. Here's an idea of what it will look like once completed. Thanks for looking!
-
Sorry to hear that. I just checked a few of my posts from January, and the pics are still up. Wish I could tell you more.
-
Special Hobby G.50bis Freccia
lawman56 replied to lawman56's topic in LSM 1/35 and Larger Work In Progress
Matt, at one time, Doogs was building the Finnish one, but I think he got frustrated with the cockpit, (plus other projects needing his attention), and shelved it. I know he had started one, because when I had first made mention of getting one, he warned me about the instrument panel. Honestly I had no idea what, exactly, he meant until I saw it myself. -
Alright, crewmember #4 done! Crewman #5 is almost done. Then on to #6 and I'll finally have the whole diorama finished.
-
Special Hobby G.50bis Freccia
lawman56 replied to lawman56's topic in LSM 1/35 and Larger Work In Progress
Hello all. Thought I'd bring everyone up to speed as to the progress on the "Italian Job", as it were. I promised mysefl I wouldn't go overboard with this build, and so far I think I'm doing quite well. So far I've only had to scratchbuild two items, the pushrods for the engine and a spacer to separate upper and lower instrument panels. Here you see the styrene rod I used to create the pushrods. Pretty simple, really. If nothing else, I suggest at least making enough to cover the front cylinder banks, as this will be seen through the cowling. My engine after painting and a light black wash. I painted the cylinders MM Steel and the pushrods aluminum. Here's the scratchbuilt spacer I created for the IP. If you look at pics of the cockpit, you'll notice a curved spar that connects right and left fuselage sides, separating upper from lower instrument panels. Not really sure why this wasn't built into the kit, but I managed to at least represent it. Thanks for looking!