

Bomber_County
-
Posts
5,793 -
Joined
-
Last visited
Content Type
Profiles
Forums
Events
Gallery
Posts posted by Bomber_County
-
-
9 hours ago, ScottsGT said:
Okay, all kidding aside with a build from my nerd stash….
This is the perfect excuse for me to dig this one out of the stash just now. I’ve been looking for a reason ever since I scored it off Amazon for something like $40 a few years back.
Good grief Charlie Brown…I had to shuffle moving boxes full of models around and up and down on the ladder to pull the moving box this was packed away in.
Then I had to put them all away. 🤪
I also have the G-Factor brass gear for it as well. No ladder work, but a little digging to get to them in the morning.
I bet y’all did nazi that coming, did ya??
When the statements “ladders, moving boxes, multiple ladder movements etc” perhaps the stash warehouse is a little……………over to your wife………..
-
 4
4
-
-
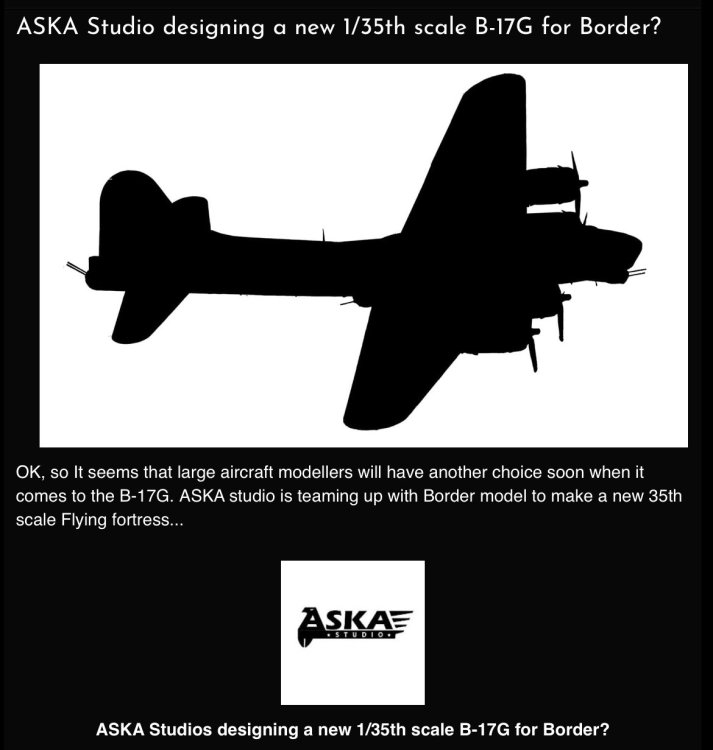
From the guys at Modelling News…….
Good on Border for bringing another kit to market, some people are going to go into meltdown………..
-
 3
3
-
3
-
 1
1
-
-
11 hours ago, KevinM said:
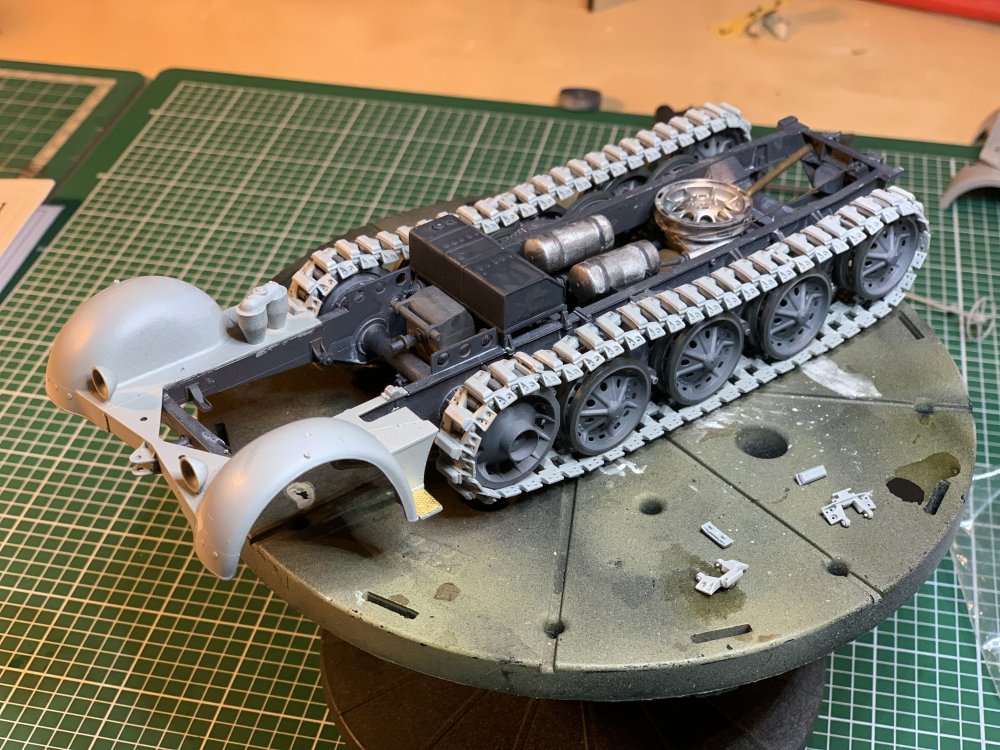
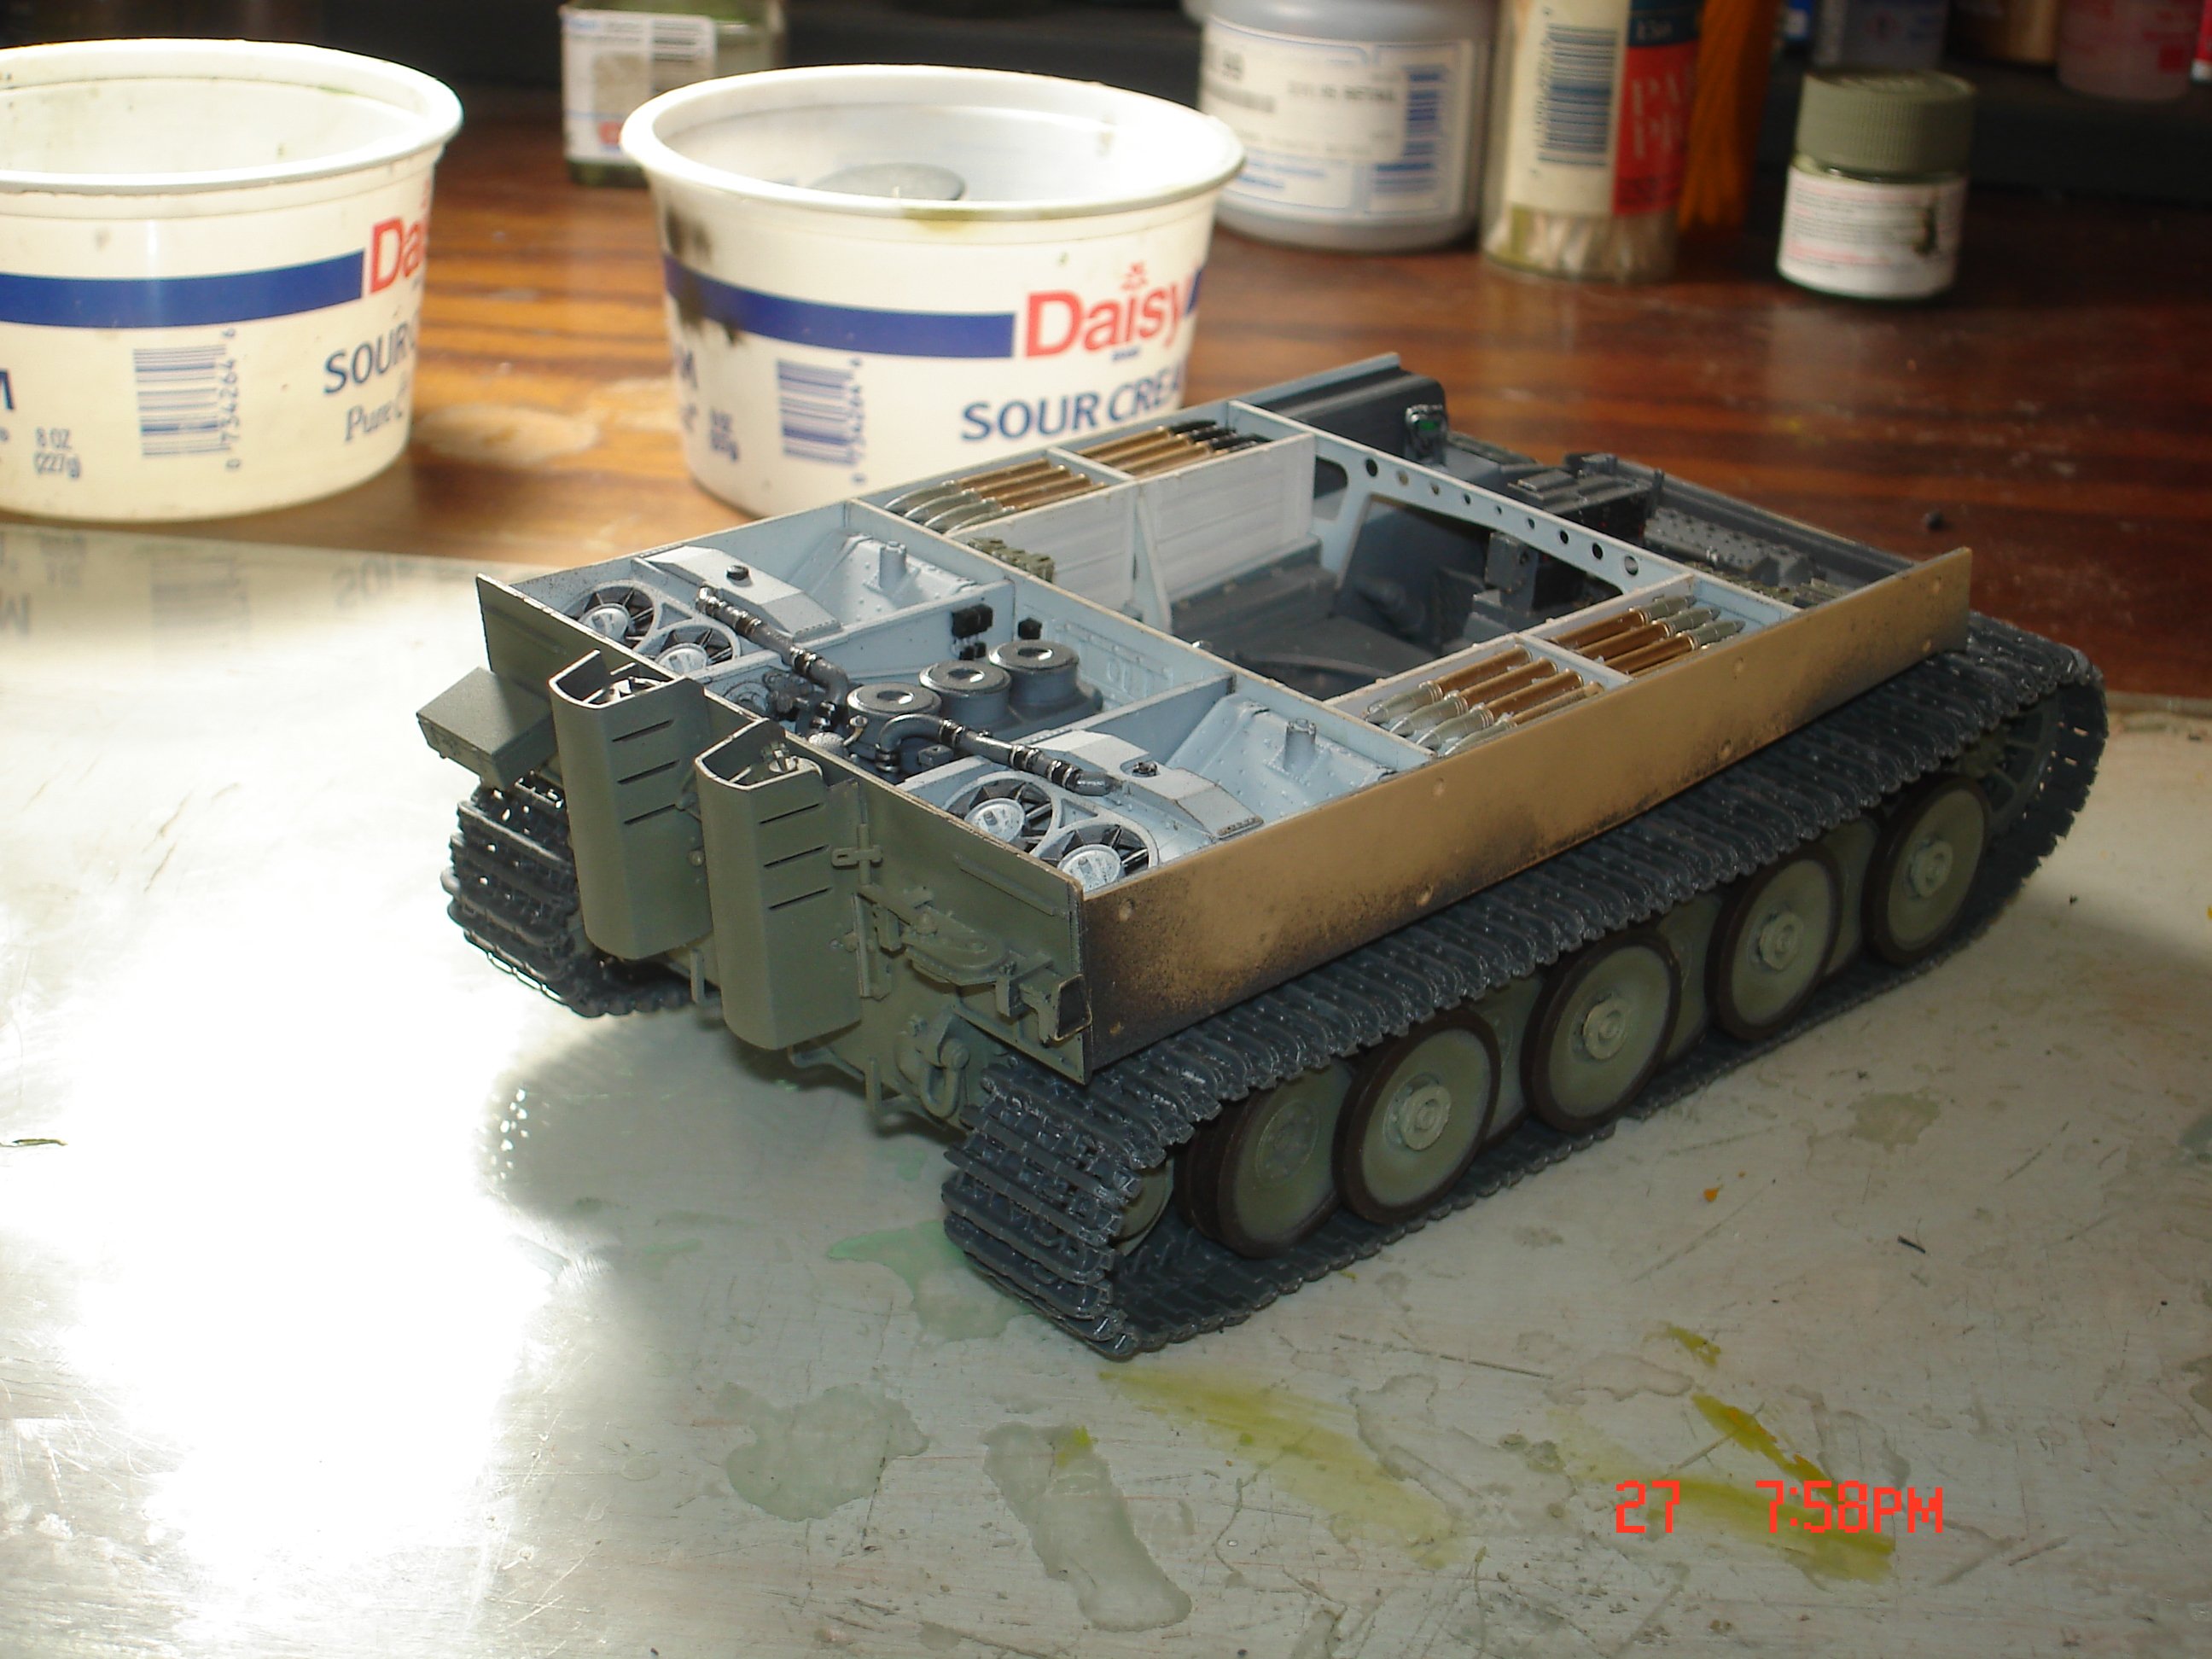
I am back on this build for a little bit of a go while/which parts have arrived for the Sharnhorst still have the bug for something else so here I am.I finished up the wheels and have started on the tracks now I see the comment 5 parts per track that almost 500 for each side
 I am getting more efficient though organization,preparation and good lighting along with a plan.The glue I am using for the nails is a mixture roughly 50/50 of Tamy Thick/thin I had to many nails coming out with the thin and tracks trying to weld this glues the head for the most part.I lay the 19 tracks in the guide and that 1/4" tamy tape gets applied down the center I can now pic up the track and drive the nails home while in hand.I then from the patch of green tape apply that CA that's activated by light and apply the teeth to the tracks every other track again holding in hand and the teeth with my fingers I leave a stub attached under good lighting.It is taking me about 30/40 minutes to finish a 19 track segment ATTM.
Tracks are finished except for adding one more link out to 97 96 would pull any slack out of the top.I black gloss based and painted them MM Gun Metal looks a dark iron grey.
")

Great to see this back again Kev, I did one of RFM panzers with the same track build up, hmmmmmmm was fiddly and time consuming. In my opinion you cannot beat Dragons Magic Tracks for simplicity………
-
1
-
-
I’m a nay……my job is a project deadline defined profession, also after the last two GB’s …….pass……
-
3
-
-
The 1/16th scale AFV’s range seem to be burgeoning, personally in think they are just to big and if manufacturers are going big, add more detail. From what I’ve seen, some are just scaled 35th with no or sometimes less detail…….
-
3
-
-
23 hours ago, Peterpools said:
Phil
Looks great and so glad the ZM Mustang is back on the bench and underway agai, Your choice for the paint scheme sounds awesome.
Thanks Peter, this time I’m going to finish it……
-
4
-
-
Very nice “cave”…….I spend an inordinate amount of time rearranging and tidying my workspace. I hate a cluttered bench …….very jealous Hubert. What’s going to the first project…….
-
4
-
 1
1
-
-
I missed this, that looks a lot of fun……l.
-
1
-
-
1 hour ago, CANicoll said:

I started this in Nov 2020, it’s time I finished this one………..
-
4
-
1
-
-
The scheme I’ve decided to do is OD top surfaces and minimal amount of NMF. After deciding not to strip but just flatten and rub down, I started on the invasion strips using Tamiya acrylic, next I’ll redo the NMF using any acrylic silver……..after that the OD maybe Xtracolour faded OD but have to wait so I can properly vent…….

-
11
-
-
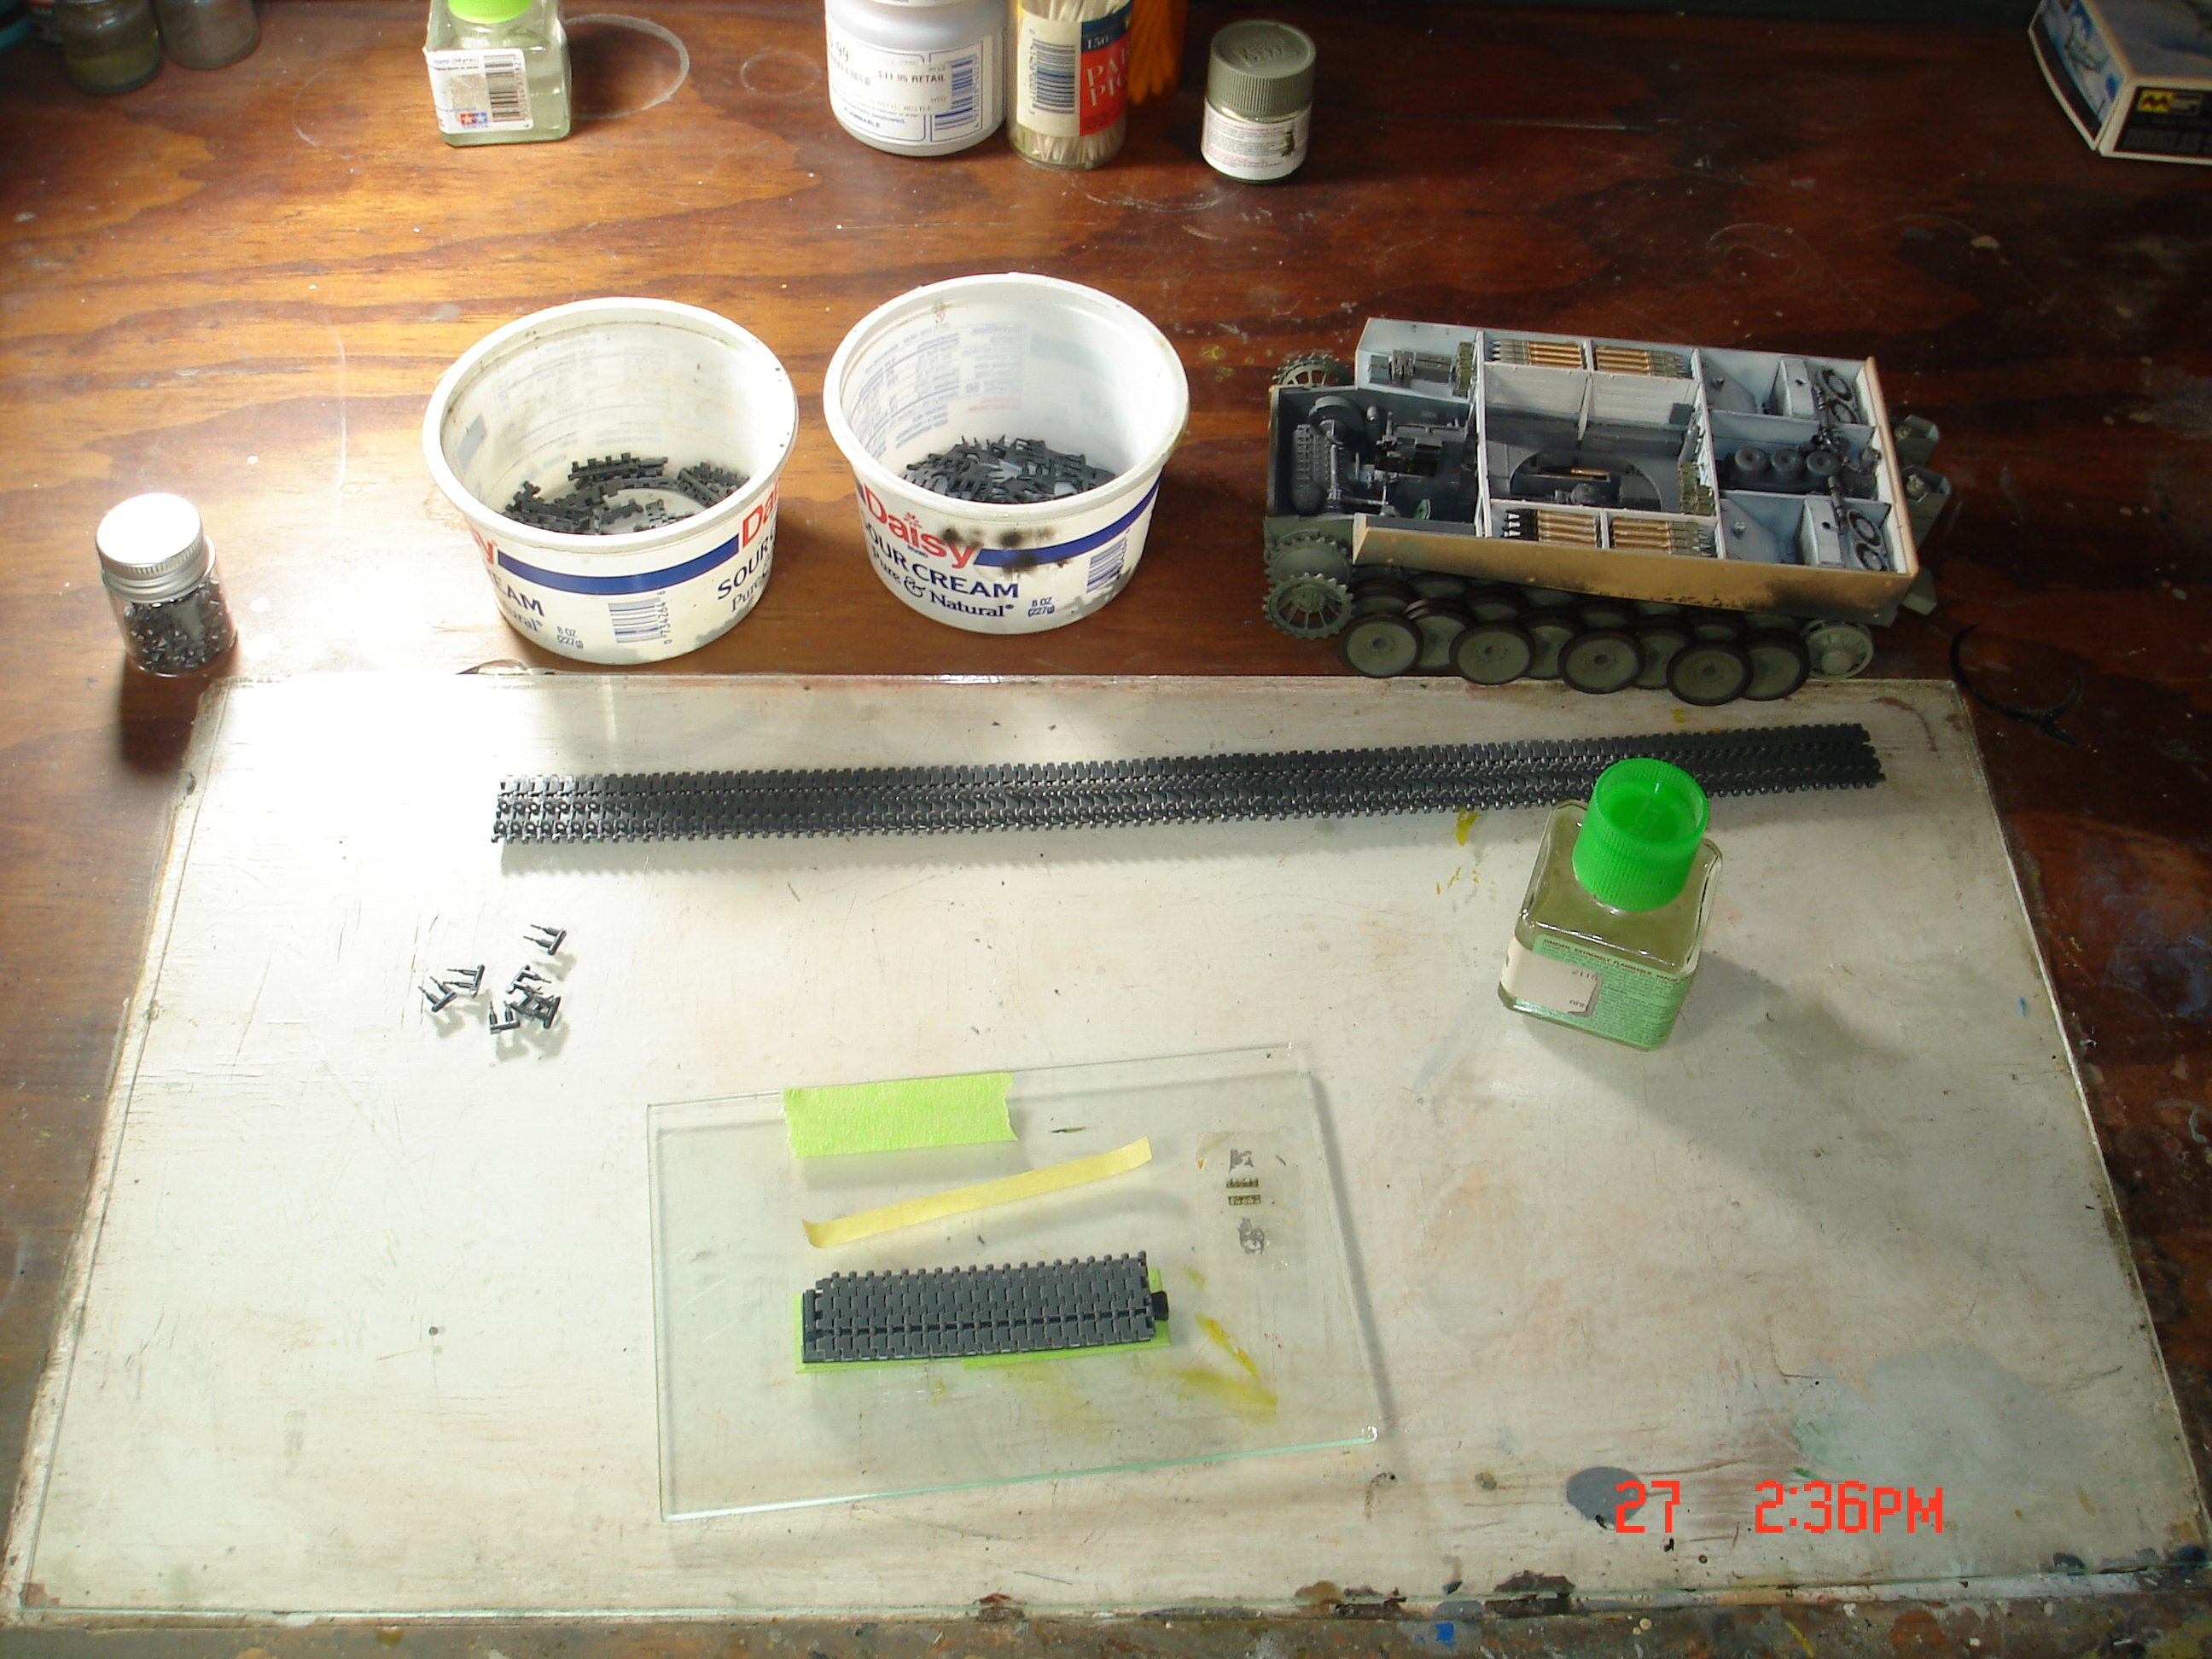
A little therapeutic track building, each link is two items and I ensured that they are all flexible…….you have to love Dragon’s Magic Tracks………

-
2
-
-
On 1/16/2024 at 2:33 PM, DocRob said:
Great work Phil, that´s as close to F1 kits as you can get with armor, being all open. You see, its only a small step and brighter colors
 (and no carbon decals).
Cheers Rob
Rob, much appreciated, I’m really liking these half tracks and especially the Dragon ones. Their detailing is amazing, I was toying with the idea of adding more but it will ever be seen, unfortunately. I keep looking at the F1’s but you’re right everything is one show so needs a different approach…..
-
1
-
-
Never built HobbyBoss so interesting to see how it builds up…….looking good
-
1
-
-
2 hours ago, ScottsGT said:
Funny you say that…She’s got a 4 day trip scheduled with our daughter for a skiing trip in Feb.
")
Perfect, Operation Replenish The Stash has begun, full briefing at 0800…….
-
3
-
4
-
-
Yummy……
-
6
-
2
-
-
3 hours ago, HubertB said:
A 1/48 kit occupies roughly 30% of the volume of the 1/32 equivalent …
")
Hubert
No decimal places? or 30% precisely ………roughly is not good enough…….🙄
-
5
-
-
16 hours ago, ScottsGT said:
Cool Martin! Send me a list of what’s in your stash and I’ll start picking out what I want.

Only if you can get them passed SWMBO………perhaps a cruise for her ans a friend to give you a window of opportunity……….
-
5
-
4
-
-
I haven driven a Super 7 on a track day, scared myself s*******l**********……..
-
2
-
 1
1
-
-
That is very very nice. I’ve the Border A6 / A8 in the stash, if that comes out a quarter as nice I’ll be pleased. Congrats absolutely stunning……
-
3
-
-
That pony certainly is shiny…….stunning as ever….
-
Dennis, flawless finish, congrats on a stunning build.
-
3
-
-
Hats off to Kotare, great to see them asking for comments and observations. For me, hmmmmmmm on the fence…….
-
3
-
-
1 hour ago, Spitfire said:
I did not plan to buy any kits in 2024 but the HpH Kate to go with the Infinity Val was a tentative purchase until I saw the price £216, so I swerved and pre ordered the Border Kate instead at £72. We shall see how it turns out.
Cheers
Dennis
£216…………that is a little uphill……..hats off to Border……..their Fw190 sprues look amazing, so if the Kate is as good sign me up…….
-
4
-
-
On 11/28/2023 at 10:39 PM, Fran said:
1:48
Ki-21-Ib “Sally”
ICM

Catalogue n.º 48195
€ 54,20 – in Art Scale Kit
“The Mitsubishi Ki-21, formal designation "Type 97 Heavy Bomber" (九七式重爆撃機, Kyūnana-shiki jūbakugekiki) was a Japanese heavy bomber during World War II. It began operations during the Second Sino-Japanese War participating in the Nomonhan Incident, and in the first stages of the Pacific War, including the Malayan, Burmese, Dutch East Indies and New Guinea Campaigns. It was also used to attack targets as far-flung as western China, India and northern Australia. The Allies designated it under the reporting names "Sally" /"Gwen".
In 1936, the Imperial Japanese Army Air Service issued a requirement for a new heavy bomber to replace both the Ki-20 (Army Type 92 Heavy Bomber) and the Ki-1 (Army Type 93 Heavy Bomber).
The design called for a crew of at least four, top speed of 400 km/h (250 mph), endurance of at least five hours, and a bombload of 750 kg (1,650 lb). The design parameters were very ambitious for the mid-1930's; few twin-engine bombers anywhere in the world could exceed such performance at that time.
Both Mitsubishi and Nakajima were asked to build two prototypes each, a further proposal from Kawasaki was rejected. The Mitsubishi design was an all-metal mid-wing cantilever monoplane with retractable landing gear, ventral bomb bay and two radial engines.
The first prototype flew on 18 December 1936, with the second prototype, which differed in replacing the dorsal turret of the first prototype with a long greenhouse canopy, following later in the month.
In the resulting competition Mitsubishi's Ki-21 and Nakajima's Ki-19 were found to be similar, with the Ki-21 having better performance while the Nakajima design was a better bombing platform and had more reliable engines. In order to make a final decision, two further prototype were ordered from both Mitsubishi and Nakajima, with Mitsubishi instructed to change its own 615 kW (825 hp) Mitsubishi Ha-6 radial engines for the Nakajima Ha-5 engines used by the Nakajima design and vice versa, while the Ki-21 gained a revised glazed nose similar to that of the Ki-19 and revised tail surfaces. Thus modified, the Ki-21 proved superior and was ordered into production as the "Army Type 97 Heavy Bomber Model 1A", being ordered into production in November 1937.
Production aircraft began to enter service in August 1938, supplementing and then replacing the Fiat BR.20 bombers which had been purchased as an interim measure.
Several improved versions followed (see below) before the production of the type ended in September 1944. A total of 2,064 aircraft were built, 1,713 by Mitsubishi and 351 by Nakajima.
The Ki-21-Ia was used in combat in the war with China by the 60th Sentai from autumn 1938, carrying out long-range unescorted bombing missions in conjunction with the BR.20 equipped 12th and 98th Sentais. The Ki-21 proved to be more successful than the BR.20, having a longer range and being more robust and reliable. Two more Sentais, the 58th and 61st deployed to Manchuria in the summer of 1939 for operations against China, with aircraft from the 61st also being heavily used against Russian and Mongolian Forces during the Nomonhan Incident in June–July 1939.
Losses were high during early combat operations, with weaknesses including a lack of armament and self-sealing fuel tanks, while the aircraft's oxygen system also proved unreliable. The Ki-21-Ib was an improved version designed to address the armament issue by increasing the number of 7.7 mm (.303 in) Type 89 machine guns to five, and incorporating improvements to the horizontal tail surfaces and trailing edge flaps. In addition, the bomb bay was enlarged. The tail gun was a 'stinger' installation and was remotely controlled. Also, the fuel tanks were partially protected with laminated rubber sheets.
This was followed in production by the Ki-21-Ic with provision for a 500 L (130 US gal) auxiliary fuel tank, fitted in the rear weapons bay and one more 7.7 mm (.303 in) machine gun, bringing the total to six. Four 50 kg (110 lb) bombs were carried externally. To offset the increase in weight the main wheels of the Ki-21-IC were increased in size.]
However, by the attack on Pearl Harbor and the start of the Pacific War, improvements in the ROC Air Force caused losses to mount, and most Ki-21-1a, -1b and -1c were relegated to training or second-line duties.
Front line units from mid-1940 were equipped with the Ki-21-IIa ("Army Type 97 Heavy Bomber Model 2A") with the more powerful 1,118 kW (1,500 hp) Mitsubishi Ha-101 air-cooled engines and larger horizontal tail surfaces. This became the main version operated by most IJAAF heavy bomber squadrons at the beginning of the Pacific War and played a major role in many early campaigns. For operations over the Philippines the JAAF's 5th, 14th and 62nd Air Groups, based in Taiwan, attacked American targets at Aparri, Tuguegarao, Vigan and other targets in Luzon on 8 December 1941. The 3rd, 12th, 60th, and 98th Air Groups, based in French Indochina, struck British and Australian targets in Thailand and Malaya, bombing Alor Star, Sungai Petani and Butterworth under escort by Nakajima Ki-27 and Ki-43 fighters. However, starting from operations over Burma in December 1941 and early 1942, the Ki-21 began to suffer heavy casualties from Curtiss P-40s and Hawker Hurricanes.
To partially compensate, the IJAAF introduced the Ki-21-IIb, with a pedal-operated upper turret with one 12.7 mm (0.50 in) Type 1 machine gun, redesigned cockpit canopies and increased fuel capacity. Although used in all fronts in the Pacific theater, it became clear by 1942 that the design was rapidly becoming obsolete, and was increasingly shifted away from front-line service.
In spite of its shortcomings, the Ki-21 remained in service until the end of the war, being utilized as transport (along with the civil transport version MC-21), bomber crew and paratrooper trainer, for liaison and communications, special commando and secret missions, and kamikaze operations.
Nine Ki-21-Ia/b's were sold by Japan to Thailand in 1940 for use by the Royal Thai Air Force against Vichy French forces in French Indochina but did not participate in the French-Thai War as its crews had not completed training.
Towards the end of the war, remaining Ki-21s were used by Giretsu Special Forces in strikes against American forces in Okinawa and the Ryūkyū Islands. One of the noted operations was an attack on the Allied-held Yontan airfield and Kadena airfield on the night of 24 May 1945. Twelve Ki-21-IIb's of the Daisan Dokuritsu Hikōtai were dispatched for a strike, each with 14 commandos. Five managed to crash-land on the Yontan airfield. Only one plane landed successfully. The surviving raiders, armed with submachine guns and explosives, then wrought havoc on the supplies and nearby aircraft, destroyed 70,000 US gallons (260,000 L) of fuel and nine aircraft, and damaged 26 more.
A number of Ki-21-Ia were modified to serve as military transports for use by Greater Japan Airways, which was under contract by the Japanese Army in China for transportation. Designated "MC-21", these aircraft had all armament and military equipment removed. Used primarily as cargo transports, each could also seat nine paratroopers. Aircraft built from the start as transports were given the separate designation of Mitsubishi Ki-57, with equivalent civil aircraft being designated MC-20.
Historical entry by Wikipedia.
A video of Ki-21 Sally in action is not quite often.
https://www.youtube.com/watch?v=L9Mj3QEjfs8
Let`s take a look at the ICM Sally.
Beware, this is not a 1:72 scale!
It`s the brand new 1:48, all new mold, Ki-21 Ib “Sally”
ICM boxes are quite sturdy, as the art design is just a cover top for a top-opening box, quite sturdy and resistance. It is a nice solution, and I believe probably a lower cost one.
The box-art is quite attractive but that would be hard not to be as the Sally is a quite elegant aircraft (at least to me)
Inside of the box, seven gray plastic sprue and one large clear part sprue.

The gray plastic is easy to work with no being to brittle or not to soft.
The fuselage halve is not in an entire piece, with the tail being separate.


That is entire related with the difference between the A version and this version, the B as this one were made improvements to the horizontal tail surfaces and trailing edge flaps
The main part fuselage has all the internal ribbing, in the cockpit area and all others compartments, upper gunner and bombardier compartment. The details straight from the box are quite good and it will make a busy compartments and a good cockpit.
One very good thing that you see in all latest ICM models is the internal frame from the fuselage clear that it will assure you a good and sturdy fit.
A few injection marks but probably only one will be visible, and in fact is very soft so no problem in removing it.


You can see, in the inside fuselage, the rear fuselage door…. I would love to have the option to open this door. Could be an easy solution to give: an extra with a door so you could remove it for the fuselage with some right tools, with no worries in damaging the door as you would had another extra door to replace it.

The tail and elevator fins, which have separate flying surfaces and rudder panel. The surface details on these, with the recessed canvas looks quite good.


Moving to the wings. They come in two halfs, as usual, and have separate ailerons but not flaps.


Inside the wings, in the fuselage connection there is the ICM usual connection sturdy system to help the modellers in having a quite easy fit between fuselage and wings.


The surface detail is limited to panel lines that are very well defined and clean and a few raised panels.

The wheels pit have almost no detail so there is lots of rooms to AM.

The wheels are in two halfs… I really don’t like wheels in two halves but I got to give to ICM… These are a very good looking wheels with very good rims detail.

The engine has a good detail straight from the box but as always there`s space for aftermarket sets. If this was in 1:32, I was all in for a engine detail set. In 1:48 and with in-box detail I will probably stay in the oob details which is quite good.


All the parts are very fragile and with a very good detail. I`m in fact impressed with the detail that ICM can get from injection modeling.


All the clear parts, and there are quite a few, are made with very good frame detail and they are in fact clear.


And this particularly kit does have lots of clear parts but most of all, a lot of windows to mask.
ICM gives the modeler a paper template in the instructions but its more than 120 windows. So, honestly, an AM mask it would be most welcome and a really really time saver. Althought is a nice touch from ICM.

One single almost A5 size sheet, with all the markings, insignias, instruments and several stencils.


The colour and pigmentation looks quite good. I think that they are ICM productions and they usually work well.
Options given:
There are four options on the decal sheet, all but one in light green-grey, differentiated by their unit markings, the final markings having a dense dark green squiggle camouflage scheme over the green-grey. From the box you can build one of the following:
1. 60th Sentai, China, 1940

2. 60th Sentai, 2nd Chutai, China, 1940

3. Hamamatsu Army Flying School, Japan, probably 1941

4. 25 Hikodan Shireibu Hikohan, Japan, 1943

The instructions is a booklet with good drawings, simple to follow and see where all parts goes.


The first 3 pages and the last 3 pages are in satin paper. It`s usually like this (is the same in the Beaufort and the He-111) and I don’t understand why and I don’t see any reason for that.
The colour indication. I hear an interview of one of ICM CEO saying that ICM wants to be a all in company so all the ICM production is a vertical one, they made the CAD, the steel molds, the decals and now they are making also paints.
So all the colour indication are ICM references. There`s not much colour indication (could be better) and the ones that are, are ICM color…
For me that is a downside as ICM are not available worldwide as Tamiya, Gunze or AK.
Conclusion:
Finally a Ki-21 Sally in 1:48!!
Its time to leave the Sanger one and tackle this beauty.
The parts are very well mold.
It`s really looks like a Ki-21. The clear parts, and this one has a lot of them, are flawless, absolutely gorgeous!
So you can get a really nice model straight from the box with the well-known high current ICM quality, even without any extra parts (resin or PE).
The lowdown, at least until a massification sales worldwide, is the colour indication, with only ICM colour, each are new and, for example, I never see how they work and how easy its to work with them.
For a novice modeler, that can easily get Tamiya, Gunze, or AK paints, could be problematic to get the correct colour.
For the experience modeler, that will not be an issue.
It`s 9,3 out of 10.
A great kit with very good detail OOB. Downside: the colors indication.
My sincere thanks to ICM for the review sample.


Thanks Fran for the review, I am a real fan of ICM having done the Ju88, have Beaufort and He111 in the stash. Time to add this as well…..
-
1
-


S.M.79 – II „Sparviero” 1:48 Trumpeter
in LSM 1/48 Work in Progress
Posted
Yummy, never seen this built or a build log……..