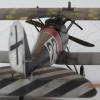
Umlaufmotor Posted December 7, 2013 Posted December 7, 2013 I always use fishing line for rigging.In most cases 0.10 mm, but 0.12 mm also. I use always 0.08mm for control cables..............here a look into the WNW Hansa Brandenburg W.29 The fishing line is painted with Tamiya paint.I use a mixture approximately 85% aluminum and 15% NATO black, if the aircraft is to be represented relatively new. The older I want to represent it, the more Nato black I use. The line must be painted before rigging. I used micro tube, to represent the leather cover around the end of the rigging wire. Micro means in this case really "Micro".This stuff comes in a variety of diameters.On my Albatross I used a tube with outer diameter 0.289 mm!The inner diameter is 0.254 mm (I used 0,10mm fishing line as an rigging wire).This micro tube comes from electrical engineering and is used as an insulator.The great advantage of this tube:He can cut very well with a hobby knife....It is very stable and therefore does not break....He makes an excellent bond with super glue....He's already the right color to the leather covering of the spliced rope ends represent....He can be painted very well with acrylic paints....It saves enormous working time at the rigging.So far so good, unfortunately there is a catch...........This micro tube is disproportionately expensive. More on this later. In the following pictures I want to show you my own way to rigging the ww1-birds.First, the micro tube - the size comparison with a match. We need a piece of 1mm length per cable end. Cut it with a very sharp hobby knife. CAUTION, the particle can jump away (usually on the carpet or in the own eye ) The tube is pushed with a sharp forceps to the wire. And again a match for size comparison. The yellow arrow points to the turnbuckle by which we want to tension the rigging wire. Now the rigging wire is pushed through the eyelet.Always pushes the line from back to front (to you), the bracing will be a bit easier. And now the micro tube is held with the tweezers(see the yellow arrow).Caution, do not press too hard - otherwise can not be threaded through the wire end. If the end of the wire was pushed through the tube, the wire is pulled with tweezers (see the yellow Arrow). The wire marked with the red "x" is pulled in the direction of the yellow arrow.Then, the small tube will pushed toward the turnbuckle, see the light blue arrow. If the wire is stretched and the small hose is in its place, something super glue is then applied (the place is marked with a red arrow)After that, the excess cable end can be cut off very, VERY! carefully (marked with a yellow arrow). The next both pictures are from the bottom of the upper wing. Unfortunately, I failed to take pictures from the same point as in the pics before. But the path is the same. Now, the rigging wire on the turnbuckle is done. Here on the WNW Pfalz D.IIIa is a combination of both, turnbuckle and eyelet. And that's all. The micro tube - or hose -, can be painted with flat clear, I think this also looks much better. And here's a link to the micro tube. http://www.amazonsupply.com/translucent-amber-miniature-polyimide-tubing/dp/B003TLNL5I/ref=sr_1_1?sr=1-1&qid=1359148509&filterBy.feature_seven_browse-bin=5485625011 As I said, a bit pricey. I think, you also comes to a good result with hot drawn Q-tips. ..............but I for myself do not want to sacrifice the micro tube. Servus Bertl 3
Administrators Fran Posted December 7, 2013 Administrators Posted December 7, 2013 Awesome tutorial!!!!!! I will follow it!!! Bertl in the turnbluke glue to the wing, the eye is glue directly to the hole? Cheers
Daywalker Posted December 7, 2013 Posted December 7, 2013 Another amazingly well done tutorial. One question- where did you get that white black with the grooves and pins to cut to specific lengths? Would like to find one of those.
mgbgtv8steve Posted December 8, 2013 Posted December 8, 2013 Great tutorial Bertl - more please! I think you've had a few responses asking where you got your cutting block from - can I ask 'where did you get your cutting block from or did you make it yourself?' I'd really like one. Keep up the great work Bertl! Regards, Steve S.
olfogey Posted December 10, 2013 Posted December 10, 2013 GREAT tutorial.................much needed info for a "new" "Wingnut" (lol) Jim J. -- "olfogey"
BoMonroe Posted December 10, 2013 Posted December 10, 2013 aaaaaahhhhhhhh that is what that stuff is for! doh. Not that expensive considering 30" ought to be a lifetime supply? 1
mspaw Posted January 3, 2014 Posted January 3, 2014 This may not be the right place to ask, but im looking at ordering polymide tubing with similar specs to what bertl has sugested. Unfortuatly th minimum order is for 16 pieces at 48", far more than a lifetimes worth. Would anyone here be interested picking up a pice from me if I made an order? Thanks -Michael
One-Oh-Four Posted June 5, 2014 Posted June 5, 2014 Ah, I was looking how you did this Bertl! Thanks very much!
Growler Posted August 10, 2015 Posted August 10, 2015 You sir, are a madman! But you do incredible work.

Recommended Posts
Create an account or sign in to comment
You need to be a member in order to leave a comment
Create an account
Sign up for a new account in our community. It's easy!
Register a new accountSign in
Already have an account? Sign in here.
Sign In Now