ThomasProbert
-
Posts
410 -
Joined
-
Last visited
Content Type
Profiles
Forums
Events
Gallery
Everything posted by ThomasProbert
-

Short Sunderland MkII
ThomasProbert replied to ThomasProbert's topic in LSM 1/35 and Larger Work In Progress
It’s usually dry and ready for sanding within 30 minutes. It’s great stuff! Tom -
Short Sunderland MkII
ThomasProbert replied to ThomasProbert's topic in LSM 1/35 and Larger Work In Progress
Good evening guys and gals... Another Sunderland update for you, which has mainly involved filling, sanding and scribing. But from a good old fashioned vacform, who'd expect anything less? The rather unsightly joins at the wing roots have been taken care of over the course of this this week. The first and most challenging task was to eliminate the nasty step seen in the previous update where the wing profile didn't match that of the wing-mounted root. My go to filler for these sort of tasks, P38, soon made short work of that and after an initial sanding session, you can see the extent of the work having been done at the forward wing root: I've since spent a fair few hours finetuning the shape and profile of the roots, and also added the obliterated panel detail back. The wing and root profile now match perfectly, and I can confidently say, 'job done': The undersides still need some detailing but the join was fine here, and as you can see I've boxed in the bomb runners ready for further detailing in due course: I've also added the openings for the double-landing light set up on the port wing: It's starting to take shape quite nicely now... Next up is making something resembling Sunderland stabilisers from these: Until next time, Tom -
Short Sunderland MkII
ThomasProbert replied to ThomasProbert's topic in LSM 1/35 and Larger Work In Progress
Do it! The more people promoting the dark arts the better! The upper wing surfaces are now on - before joining upper and lower surfaces I reinforced the leading edges of the wings with thick left over sprues from the HobbyBoss 1/32nd B-24. This not only provides strength, but gives a much larger gluing surface. It's not neat and it's not pretty, but it does the job. The joining surfaces for the nacelles were done in the standard way using plastic card tabs: The fuselage to wing join is not great, especially on the left wing. Mind the gap! However, this will be easily dealt with using filler, but it's always a good idea to pack such large gaps with plastic card: I took a lot of time ensuring the trailing edges are level at the roots, as well as the upper surfaces being as level as possible without leaving any hard to deal with steps. However, the wing root moulded in the fuselage is actually a slightly different shape to the wing - this is not unusual with vacforms but it does leave an awkward step to deal with: This will be a job for my trusty P-38 car body filler... The size of this model is now really apparent - I told the wife we should have bought a bigger sofa! It'll now be a case of some filling and sanding - stay tuned! All the best, Tom -
Short Sunderland MkII
ThomasProbert replied to ThomasProbert's topic in LSM 1/35 and Larger Work In Progress
Afternoon all, Progress has lowed a little of late due to work: marking exam papers and end of term reports have, sadly, taken priority! Anyway, I've been slowly getting the upper wing surfaces scribed. Dymo tape is used for the more complex curves, with a flexible metal ruler for the rest: I've also, once again, left the wings in their backing sheet for increased rigidity. Fuel tank covers still to be done, but I'm trying to work out the exact shapes of these as I don't think the plans I have are quite right: The next task will be to get the wings cut out, sanded to shape and added to the lower surfaces already attached to the fuselage... Stay tuned! Tom -
Short Sunderland MkII
ThomasProbert replied to ThomasProbert's topic in LSM 1/35 and Larger Work In Progress
Theoretically a swipe of filler would do the trick, but the CA dries so fast you can repair as you go... With the lower wings scribed, I have been working on making the internal wing spars this week. The plastic is reasonably thick but due to the sheer size of the wings, they have the structural properties of a windsock on a calm day so much is needed... First it was a case of using the plans to make the central spar from plastic card: With this 'master spar' it was relatively easy to fabricate the rest - and in turn each of these was attached to the stub-spars I'd made earlier and of course to the lower wing skins. I used good old fashioned poly-cement as it dries nice and slowly and allows careful alignment which CA, for example, wouldn't allow. Having each wing's dihedral the same as the other is obviously vital - even the slightest misalignment shows in this scale, so being a believer in the simple things in life I simply cut out a cardboard jig from the plans... ...and used this to align the wings: Here you can see how the main wing spars interlock with the smaller stub-spars that protrude from the fuselage: Now it'll be a case of scribing the upper wing surfaces and these will then slip over the internal spar structure and sandwich everything together, making a nice and solid wing... he says hopefully: Scribing the upper wing surfaces looks as if it's going to be a nightmare of epic proportions... I may be a while. All the best, Tom -
Short Sunderland MkII
ThomasProbert replied to ThomasProbert's topic in LSM 1/35 and Larger Work In Progress
Indeed. Certainly makes life a lot easier. However, scribing around the complex curves of the bow and rear fuselage was far from fun! Fear not, I always have a tube of CA for quick repair jobs - it’s happened on a few occasions even with relatively straightforward scribing on this one. -
Short Sunderland MkII
ThomasProbert replied to ThomasProbert's topic in LSM 1/35 and Larger Work In Progress
I've had a few pleasant evenings watching Euro 2020 and scribing the wings at the same time - certainly makes a rather boring task more entertaining - unless you're watching England of course... I don't think the pictures show the panel detail all that well, but you get the general idea from these shots. I scribe the wings whilst still on the backing sheet as this reduces flex and makes the task much easier - here they are with the main lines done: I've since removed them from the backing sheet and removed the bomb runners and landing lights on the leading edge of the port wing. I need to give the mating surfaces a final sand and then I'll be adding the lower wings to the fuselage and construct the spars before sandwiching them with the upper wing surfaces. Stay tuned... Tom -
Short Sunderland MkII
ThomasProbert replied to ThomasProbert's topic in LSM 1/35 and Larger Work In Progress
Morning all, I dug the wings out over the weekend in preparation for work to commence - as you can see the Sunderland is one LARGE aeroplane. The wife isn't overly impressed. Never mind. Lots of scribing and reinforcing work ahead... Tom -
Short Sunderland MkII
ThomasProbert replied to ThomasProbert's topic in LSM 1/35 and Larger Work In Progress
I'm not sure yet, Cees - I have numerous copies of the turret so will look through them to find the best of the bunch as make a decision later down the line. Ha! Yes, so it does! I've now completed the scribing of the main fuselage panel lines, and given the whole airframe a gentle rub-down with fine sandpaper to make the surface completely uniform. The detail doesn't show up as well as I'd like in the pictures, but hopefully they'll give you the general idea. Forward nose section: Mid-sections: And the rear fuselage: The mid-upper fairing has been completed and added, the the turret itself test fitted: So... here's the state of play. Fuselage as complete as it needs to be at this stage, so I may have a look at the wings next: Until next time, Tom -
Short Sunderland MkII
ThomasProbert replied to ThomasProbert's topic in LSM 1/35 and Larger Work In Progress
Taking a break from the tedium of scribing, I've had a look at the mid-upper that was fitted to the MkII Sunderland. You get the basic shape of the fairing which is mounted off-set of the centreline (to starboard) on the upper fuselage, and the turret glazing itself (which still has its protective coating on): The fairing was trimmed to the correct size using the plans I have, and turret itself has also been trimmed and test fitted after its aperture was opened up: Once the remaining scribing is done on the upper fuse, this will be ready to install. Take care all, Tom -
Short Sunderland MkII
ThomasProbert replied to ThomasProbert's topic in LSM 1/35 and Larger Work In Progress
You're absolutely right - some time away is often all that's needed to reinvigorate and refresh... The long process of scribing the panel detail has begun. This is the culmination of two nights' work so far - with at least another long session needed to finish the upper fuselage: Back soon with an update over the weekend, all being well. All the best, Tom -
Short Sunderland MkII
ThomasProbert replied to ThomasProbert's topic in LSM 1/35 and Larger Work In Progress
Evening all, It's been a while since this build saw any action, so time for an overdue update... Last time I'd been working on this I had made some good progress with the interior and was more or less ready to join the fuselage halves. I finished off adding some details such as the radio operator's chair to the flightdeck and the depth charge racks to the centre section, as this would be impossible to install once the fuselage was together. I'd also fabricated some beefy wing spars and attached these to the appropriate internal bulkheads: I also added some low-tac tape to the interior of the cabin windows to keep dust and debris entering the fuselage to the minimum - this can easily be removed after painting is complete: It was then that disaster struck - I was happily working away on the kitchen table when the need for a cuppa meant I got up from the table and unbeknown to me, my hoodie had caught on the rear fuselage and whole lot went crashing to the floor. Typically, it was the side where all the bulkheads were glued and as you can imagine, when it hit the tiled floor it was carnage. The interior sections all came away, some breaking into smaller parts. The nose section was totally destroyed and the flightdeck, stairs and forward floors all smashed into an unknown number of pieces. A mammoth, and totally morale-sapping repair job was needed. I simply picked the whole lot up and put it all into a bin liner - manging to overcome the desire to bin the whole thing - and put it into the back of the attic until I could gather my thoughts and find the mojo to repair it all... ...fast forward a few months and I was in the loft having a rummage and I came across a rather sorry bag of Sunderland parts. Suddenly the accident seemed a distant memory and it was time to get going again. The interior was painstaking rebuilt over a few evenings and then it was a case of adding the two fuselage halves together. This went without a hitch, and here we are now: It sure is a big old brute - here it is alongside a 1/32nd F-4J that's entering the home straight, and that ain't small! Barring any further mishaps, this build is back on track! All the best, Tom -
Another great update, Cees! Will the reshaping of the wing profile effect the angle of the engines and thrust line at all? Tom
-
Short Sunderland MkII
ThomasProbert replied to ThomasProbert's topic in LSM 1/35 and Larger Work In Progress
Hi Cees, Spars will be thick plastic card - I've a tried and tested method of supporting the wings so stay tuned for when the time comes! I've had the Sunderland out again over the weekend. At some point in my future I'll learn to focus on just one model at a time, but I seem incapable of that at the moment... Now that I'm happy with the interior structure I've done the final positioning of the bulkheads which are now all firmly in place and give a lovely and strong structure to the model: I've also begun working on the hefty support frames for the pilots' seats - these will be fitted after the fuselage is together but it's easier to work out dimensions and positioning whilst the halves are separate: I've also made the mooring winch which sits in the nose as well as the racks for additional depth-charges that reside in the centre bomb room: These obviously need to be painted before adding - and then I'll be making some of the smaller details to add to the visible areas of the fuselage before I can close her up! Regards to all, Tom -
This is soooooooo good, Cees! Can’t wait to see it under some paint
-
I've already got load of big projects on the go which I seem to be making very little progress with - I've promised myself I must finish either the Sunderland, 1/48th B-52 or the Shackleton before I go back to it. However, seeing yours has got me thinking...
-
Yes, Cees! Great progress. I almost makes me want to get mine out and start working on it again... almost... Tom
-
HobbyBoss' 1/32nd B-24D Liberator
ThomasProbert replied to ThomasProbert's topic in LSM 1/35 and Larger Work In Progress
It does indeed build well - at least so far. The wing is the main area with the errors and the aerofoil shape is clearly off, but as you say you wouldn’t mistake it for anything else and that’s fine by me! The white areas are matt white paint - I always do this after giving the joints a quick sanding. It helps smooth the surface and reduces micro scratches before primer etc. -
HobbyBoss' 1/32nd B-24D Liberator
ThomasProbert replied to ThomasProbert's topic in LSM 1/35 and Larger Work In Progress
This week I've been working on mating the fuselage halves as well as the wings which are now attached to the fuselage. The fit is excellent the huge spar gives a very positive and strong join - there is no flex at all in the wings and everything is nice and rigid which is most reassuring considering the size of the thing. As usual, I'll let the pictures do the talking: Next up is attaching the underside of the nacelles and getting the wings finished off. Regards to all, Tom -
This is a great start, Cees - I love the way you dart from project to project as it makes me feel less of a grass-hopper mind! Tom
-
HobbyBoss' 1/32nd B-24D Liberator
ThomasProbert replied to ThomasProbert's topic in LSM 1/35 and Larger Work In Progress
Thanks, Rob. I've added a few chips and scuffs here and there, but I won't add much more. I'm a 'less is more' type of chap when it comes to weathering - I can't stand the 'it's been parked in Davis-Monthan for the last 60 years ' look! Don't forget the 1/32nd Sunderland, 1/48th B-52 and the numerous other projects, too! Those, Peter, are true words of wisdom! -
HobbyBoss' 1/32nd B-24D Liberator
ThomasProbert replied to ThomasProbert's topic in LSM 1/35 and Larger Work In Progress
It's been a while since I updated this thread but that's how long it's taken me to finish the interior of this monster! I've been working on it on and off and in between other builds to be fair, but there's lots of detail painting needed and plenty to keep the builder quiet even out of the box! Sadly, most of it disappears when the fuselage halves are joined, but at least I know it's there! Joining the fuselage halves will be the next job - hopefully progress will be a bit quicker from now on... Tom -
Peterpools is coming home!
ThomasProbert replied to Peterpools's topic in Site & Forum Announcements
Wishing you all the very best for a speedy recovery, Peter! We'll look forward to seeing your progress on the F-16, too. Tom -
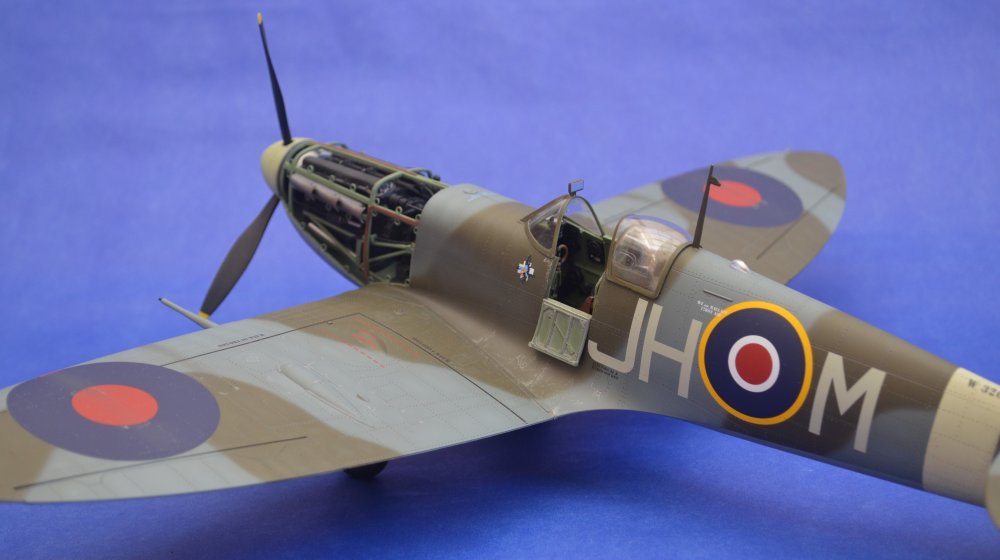
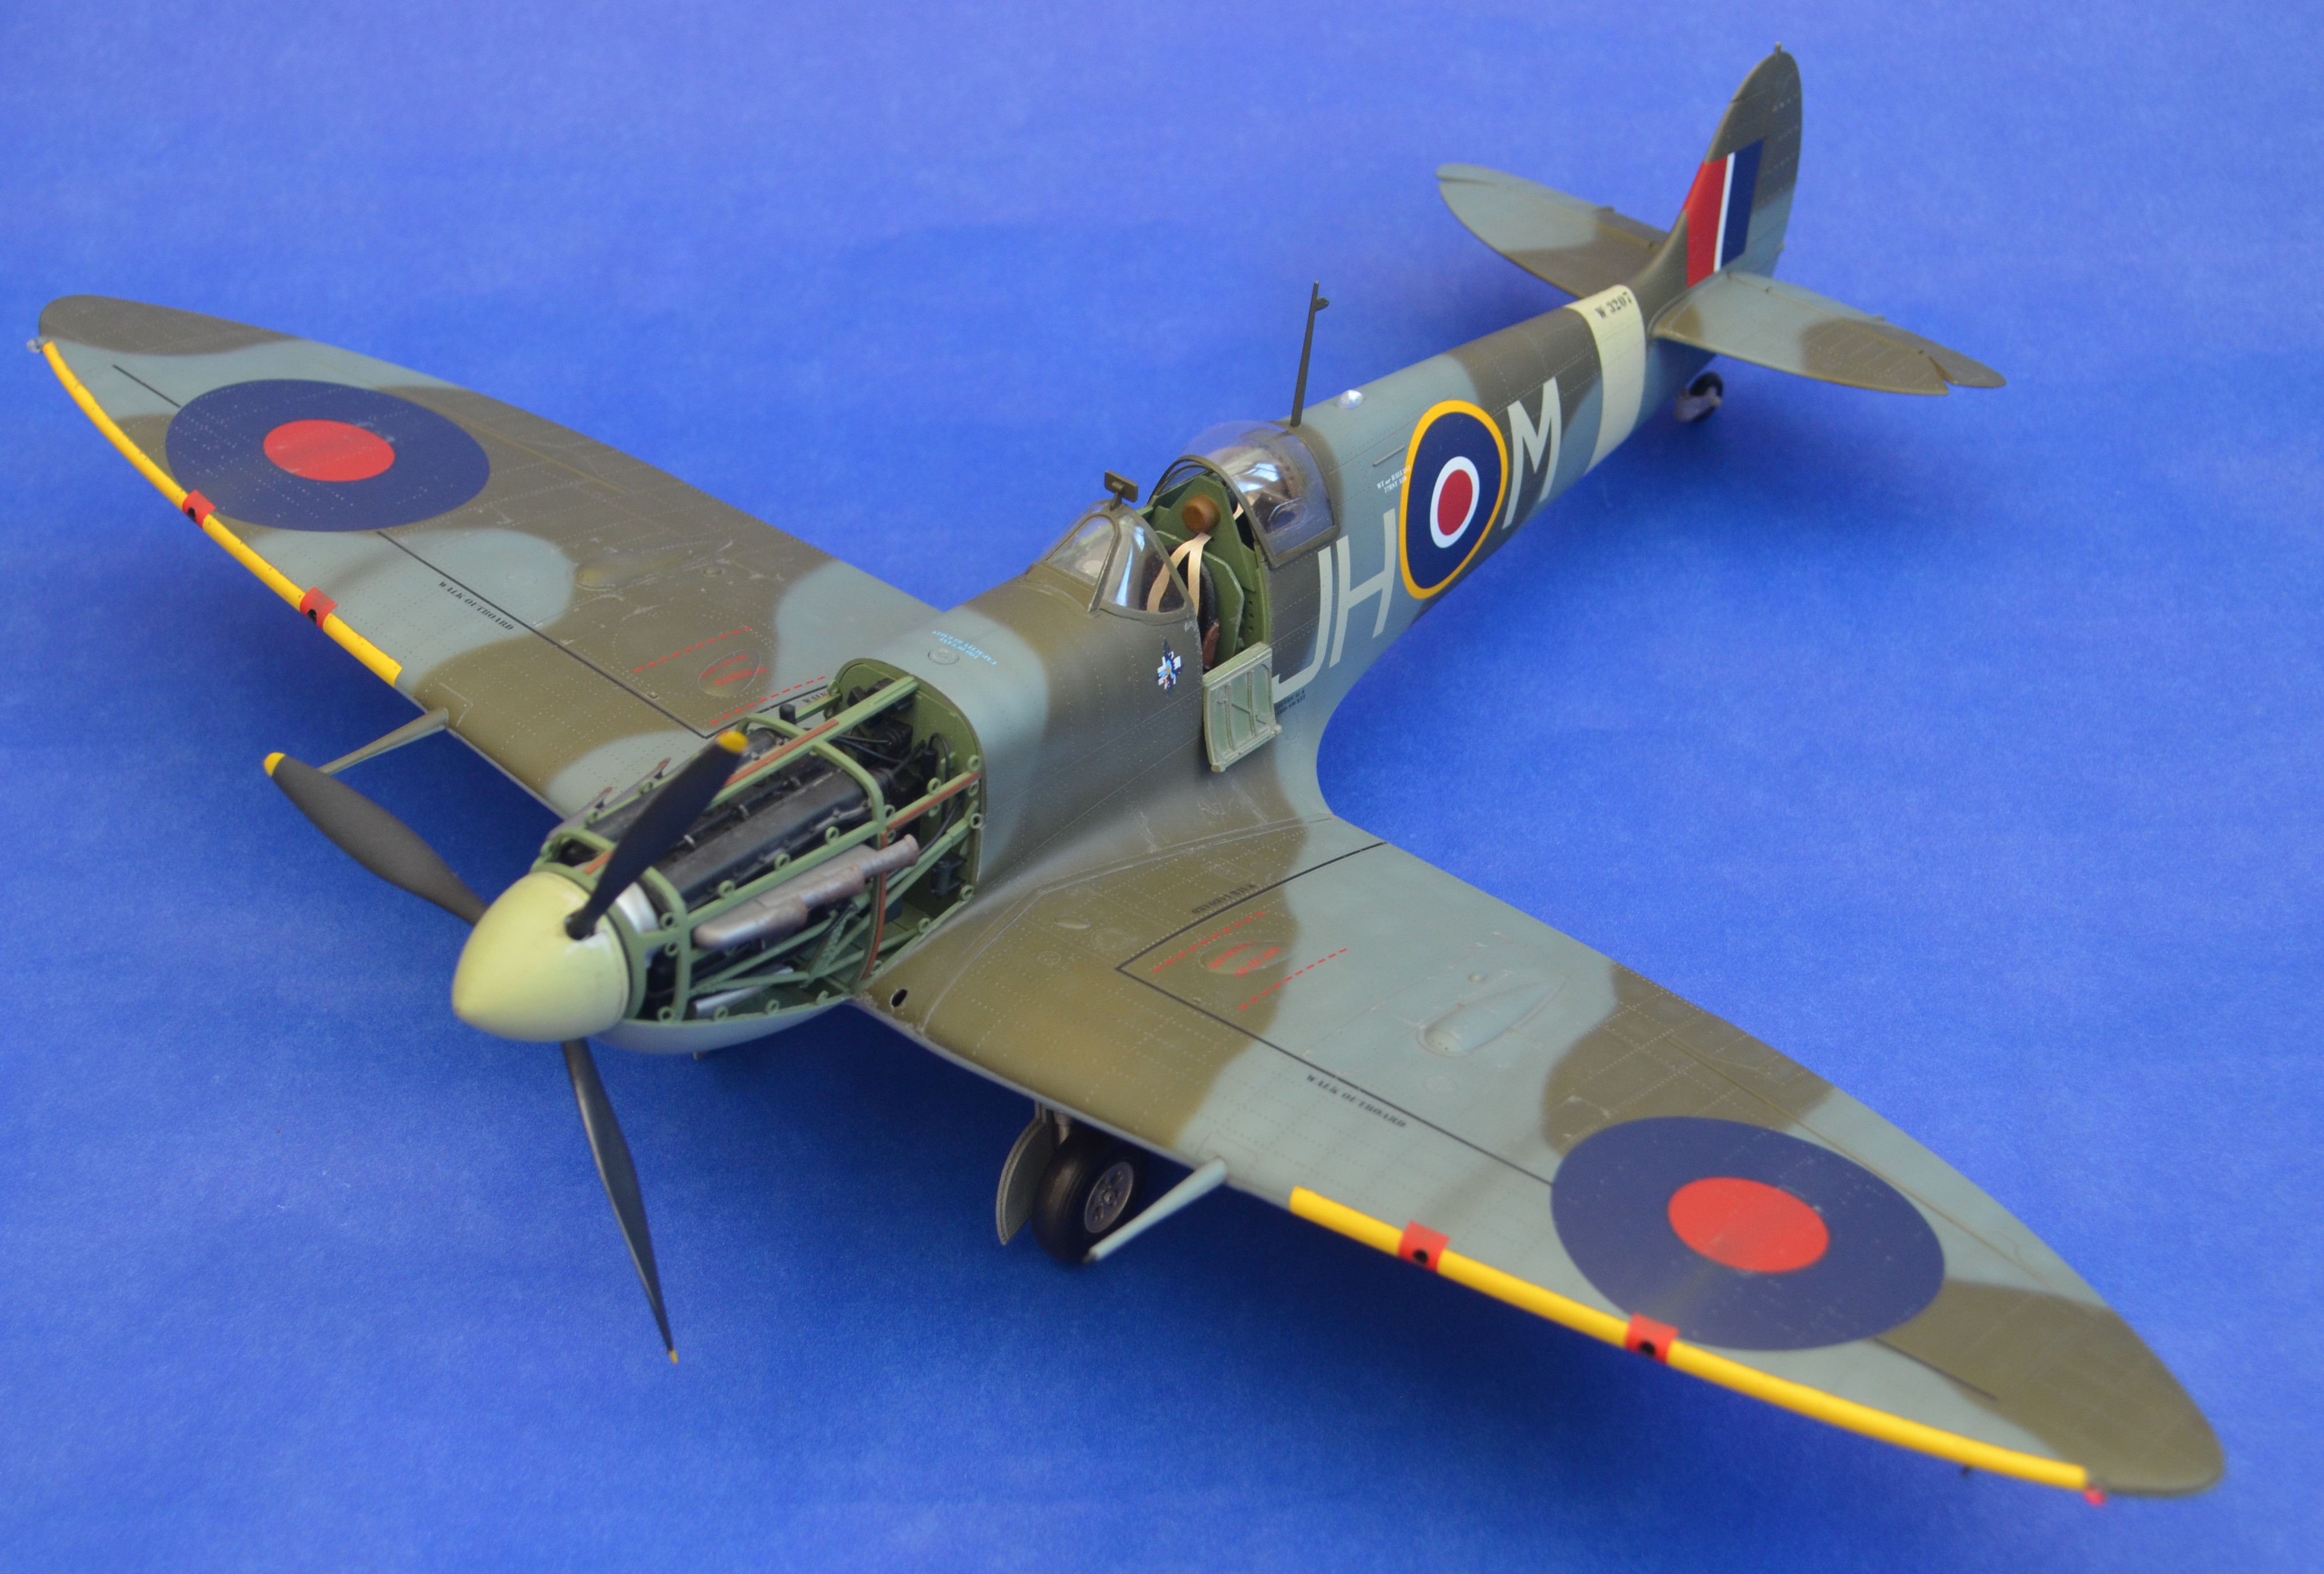
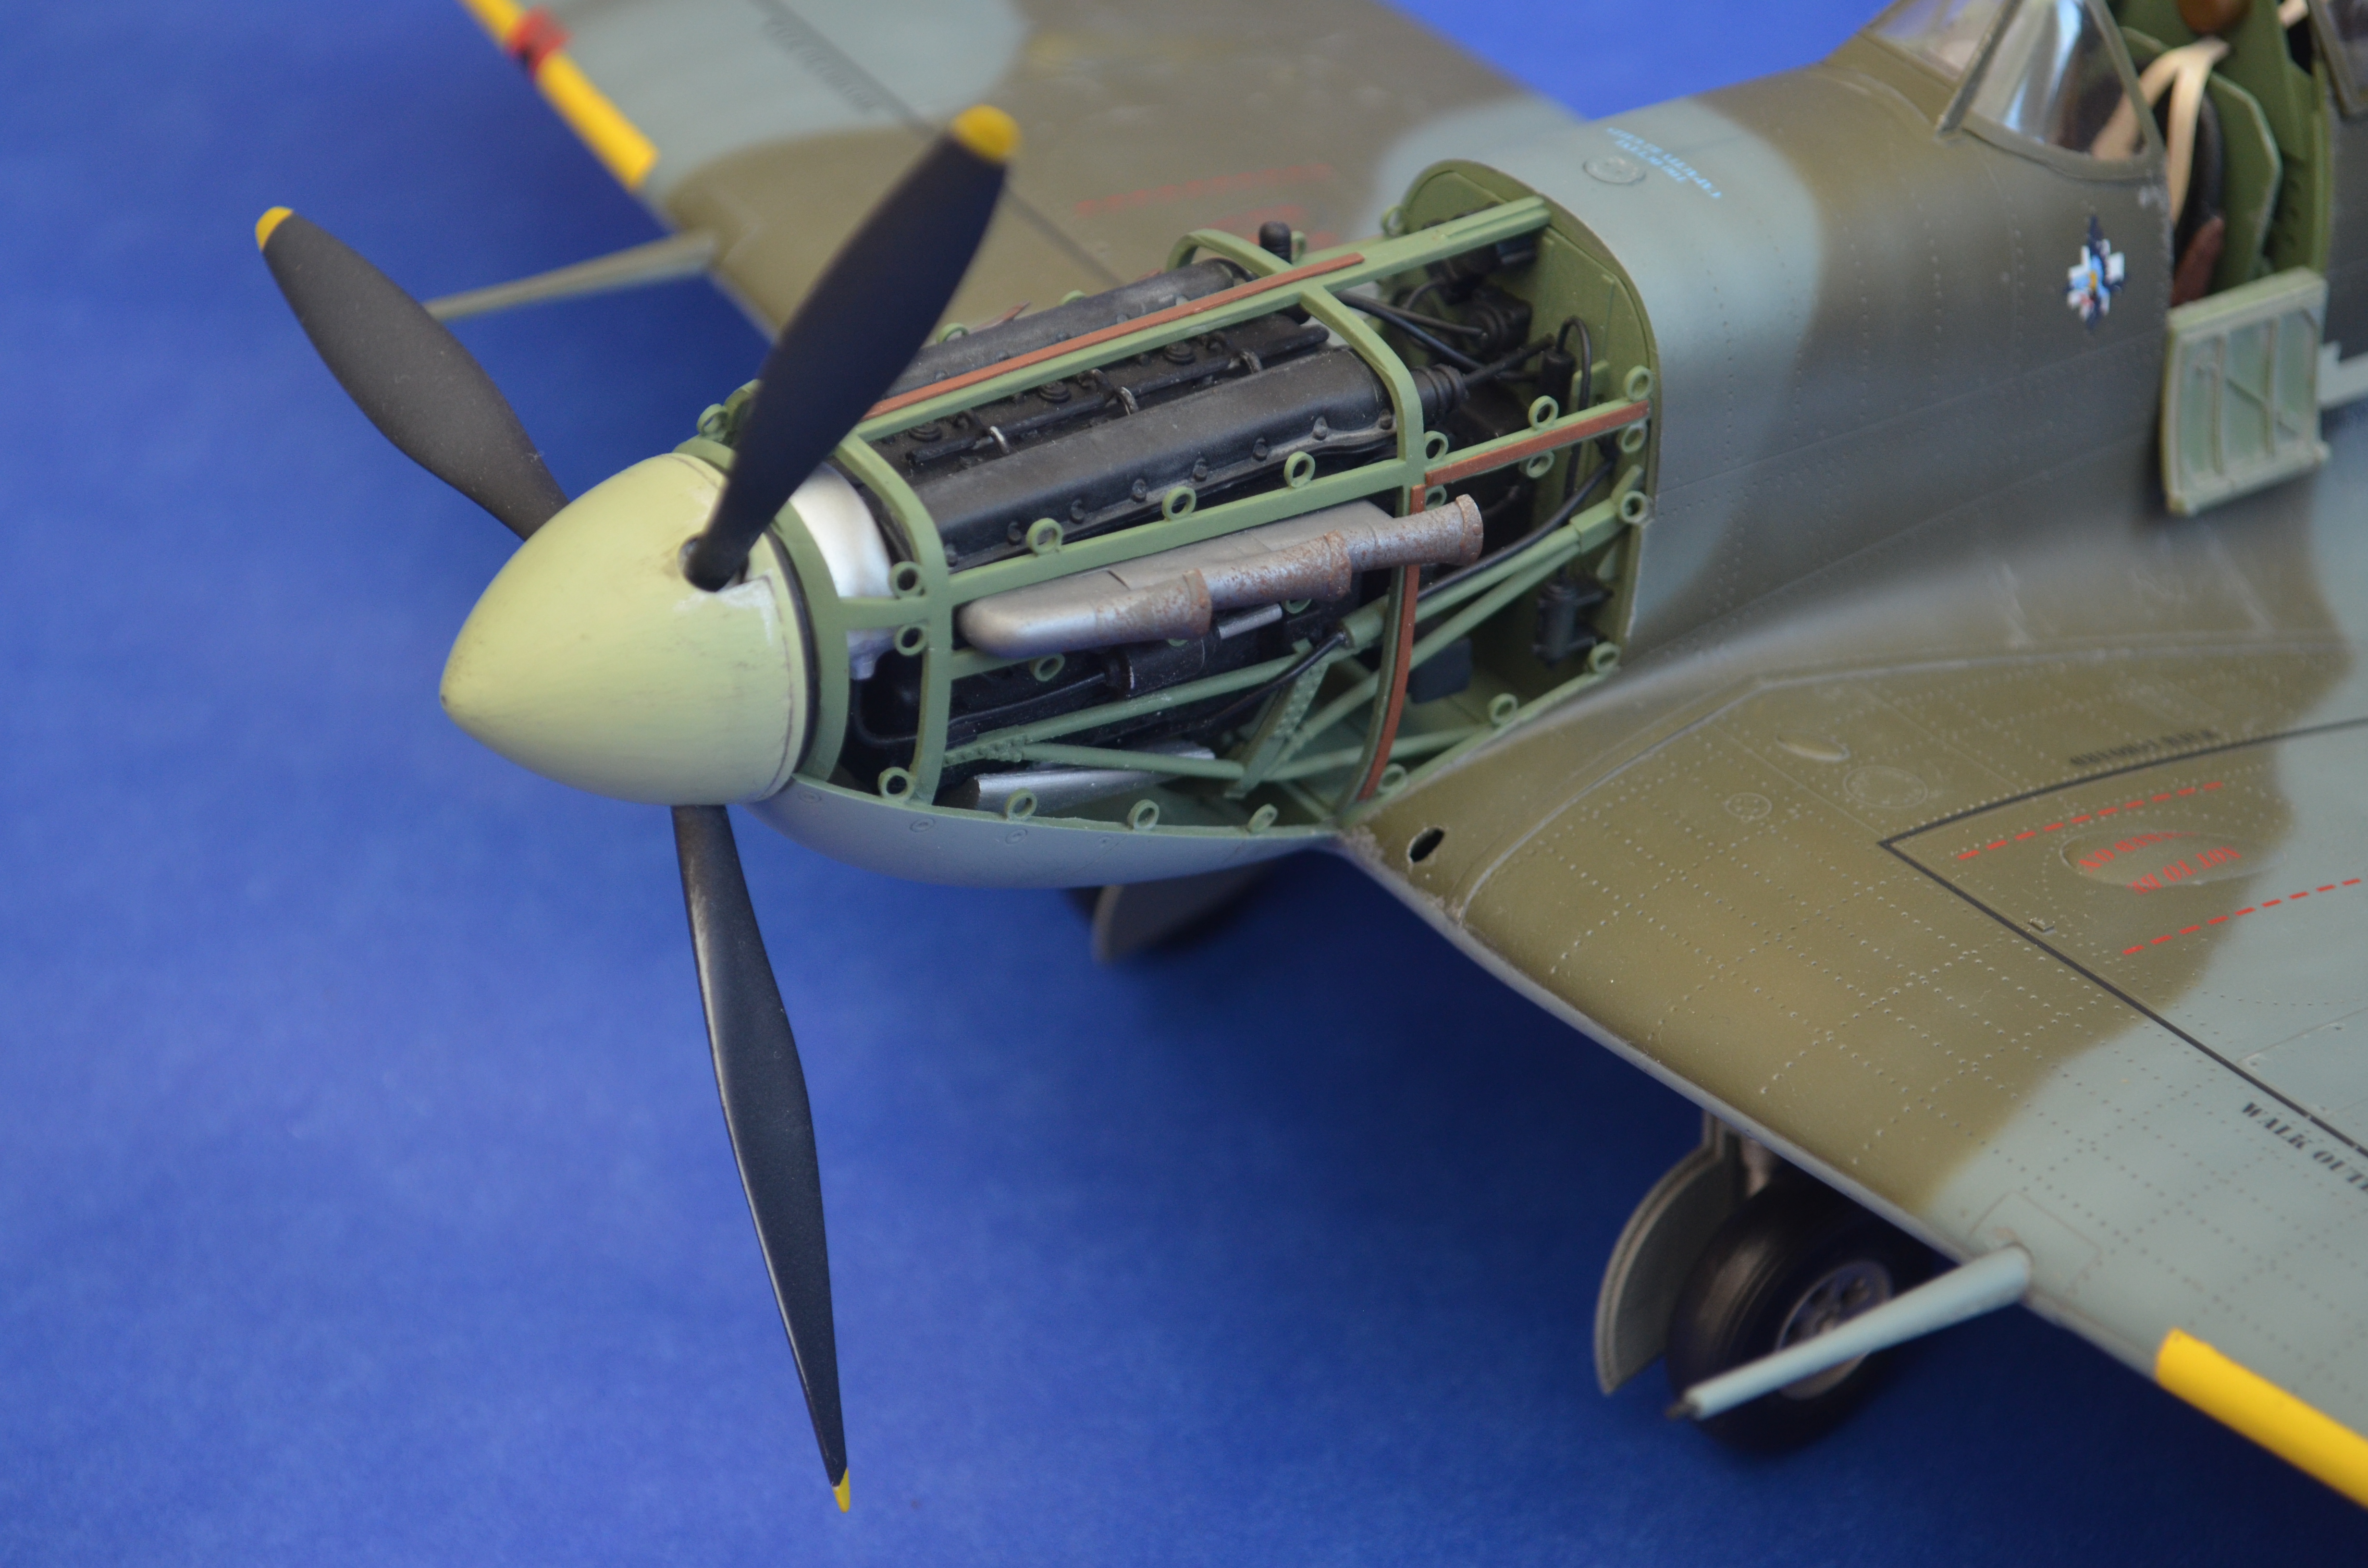
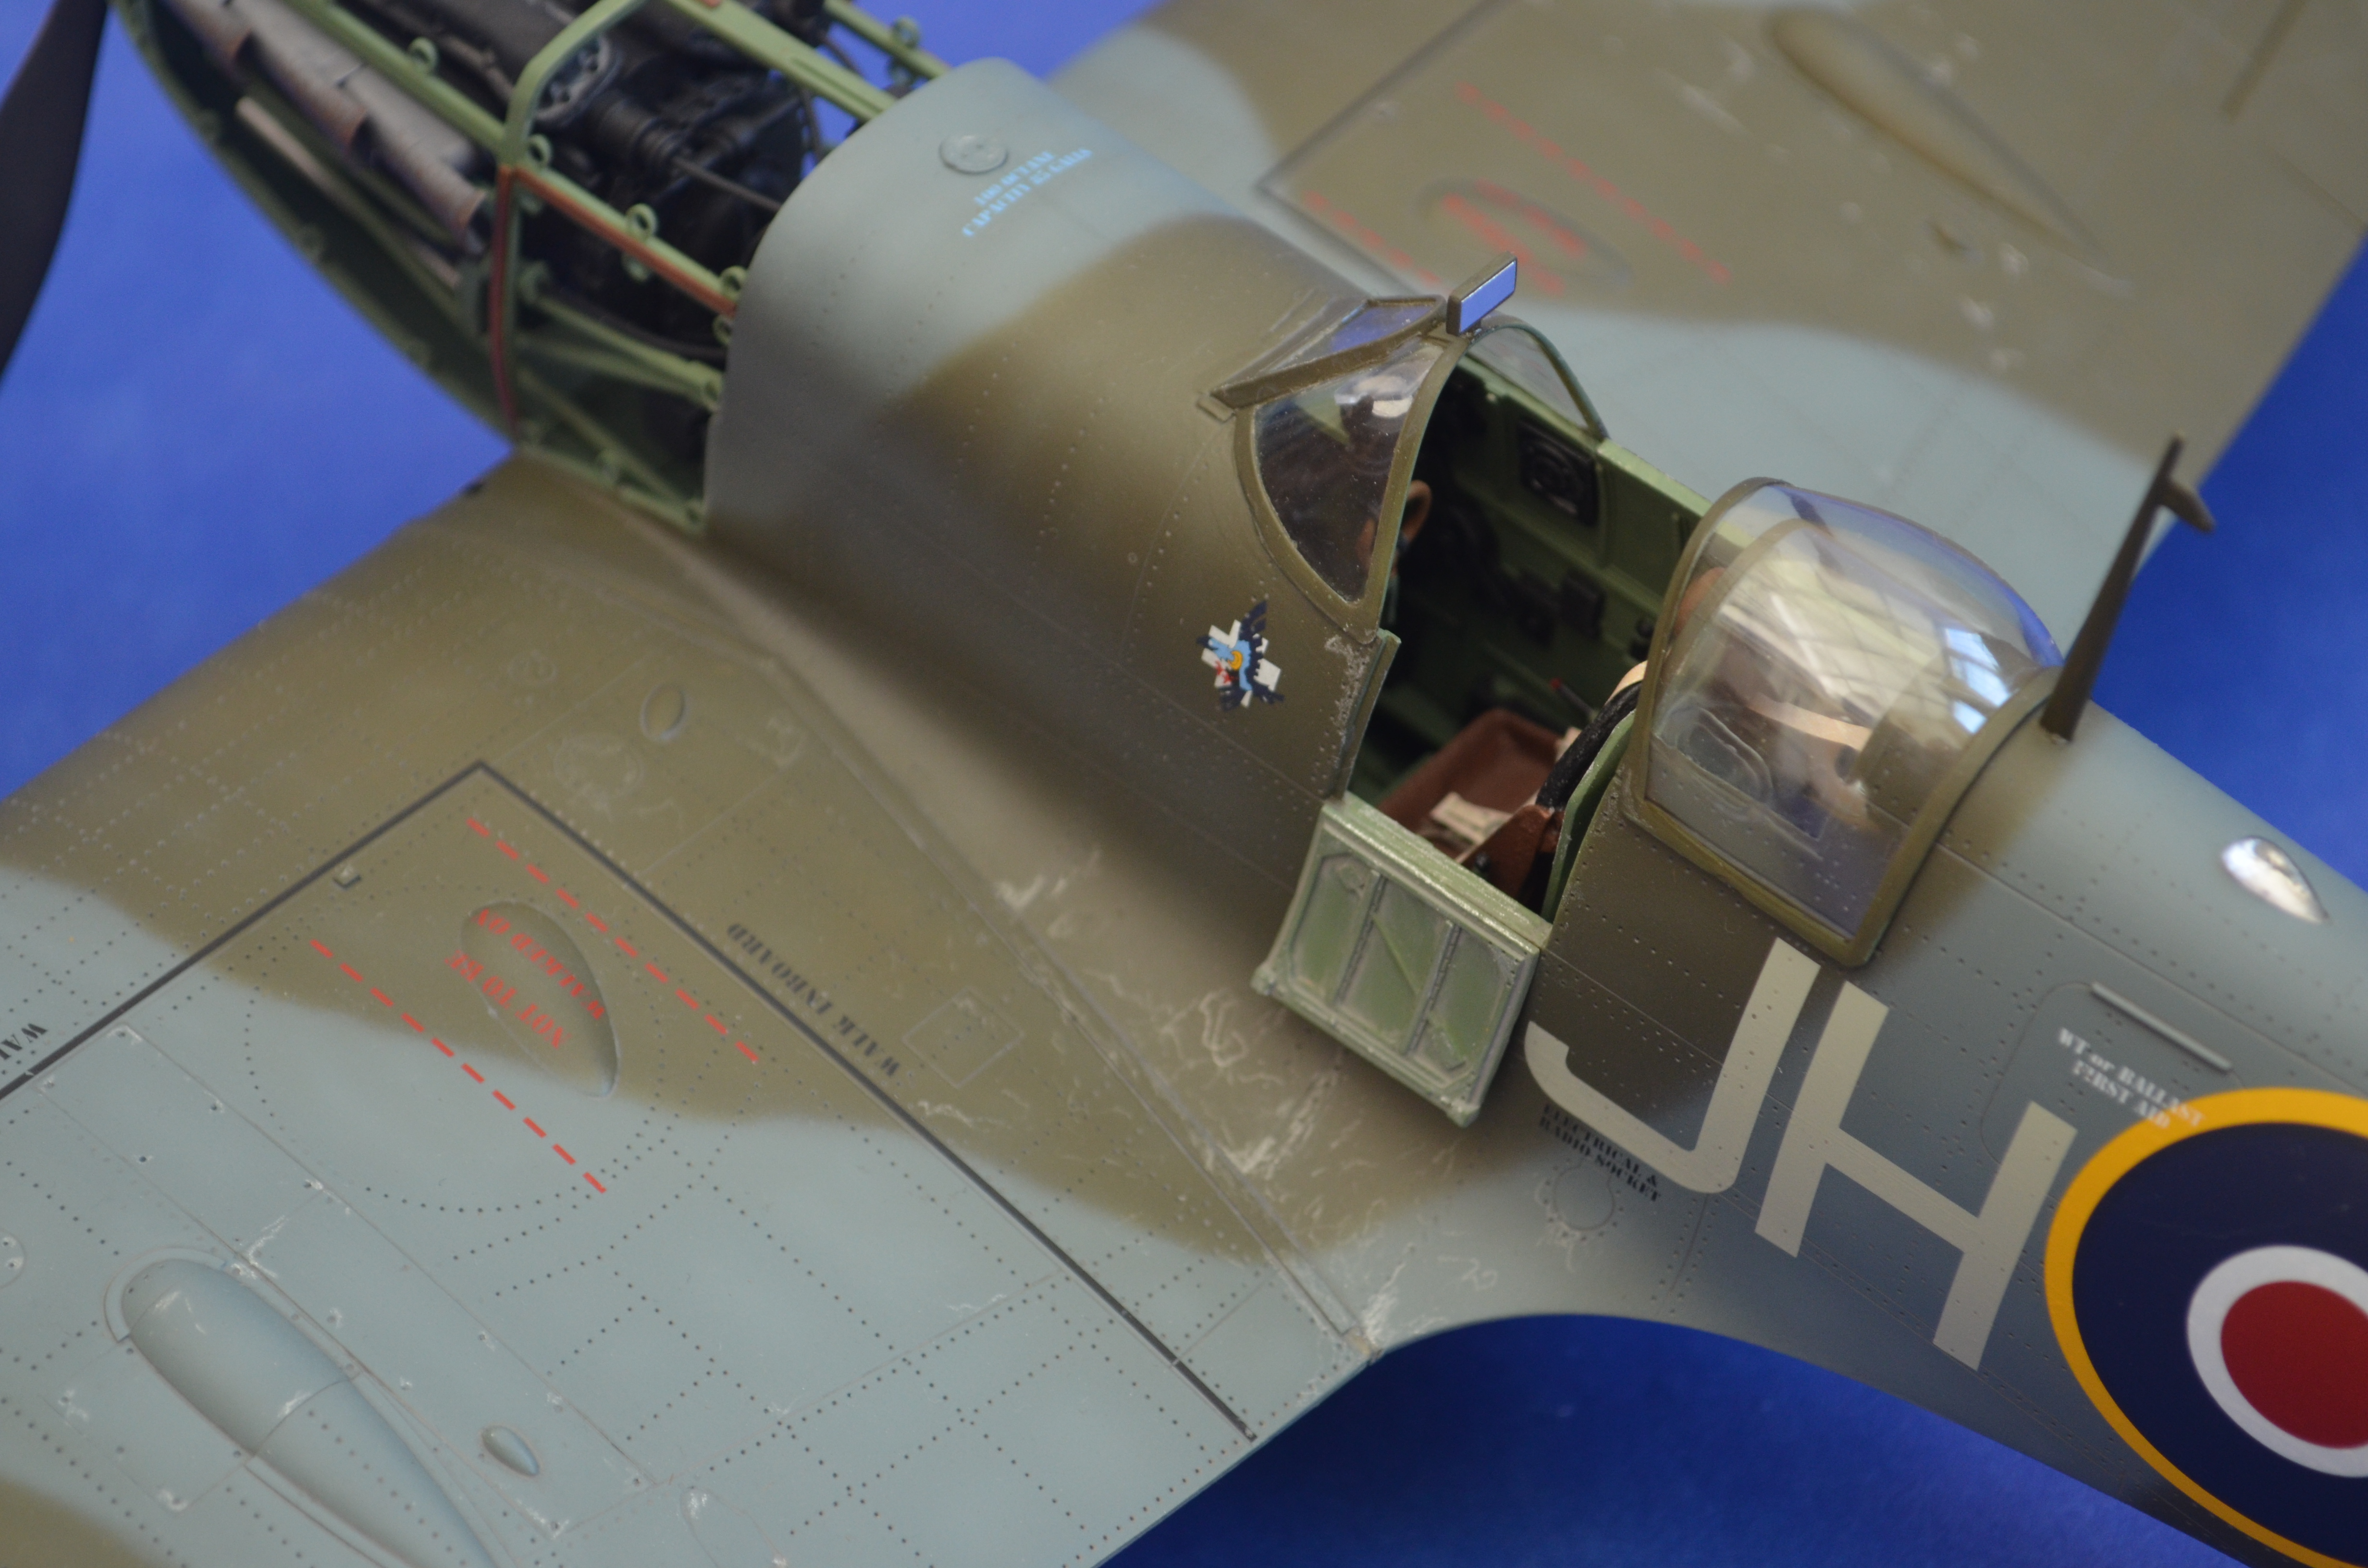
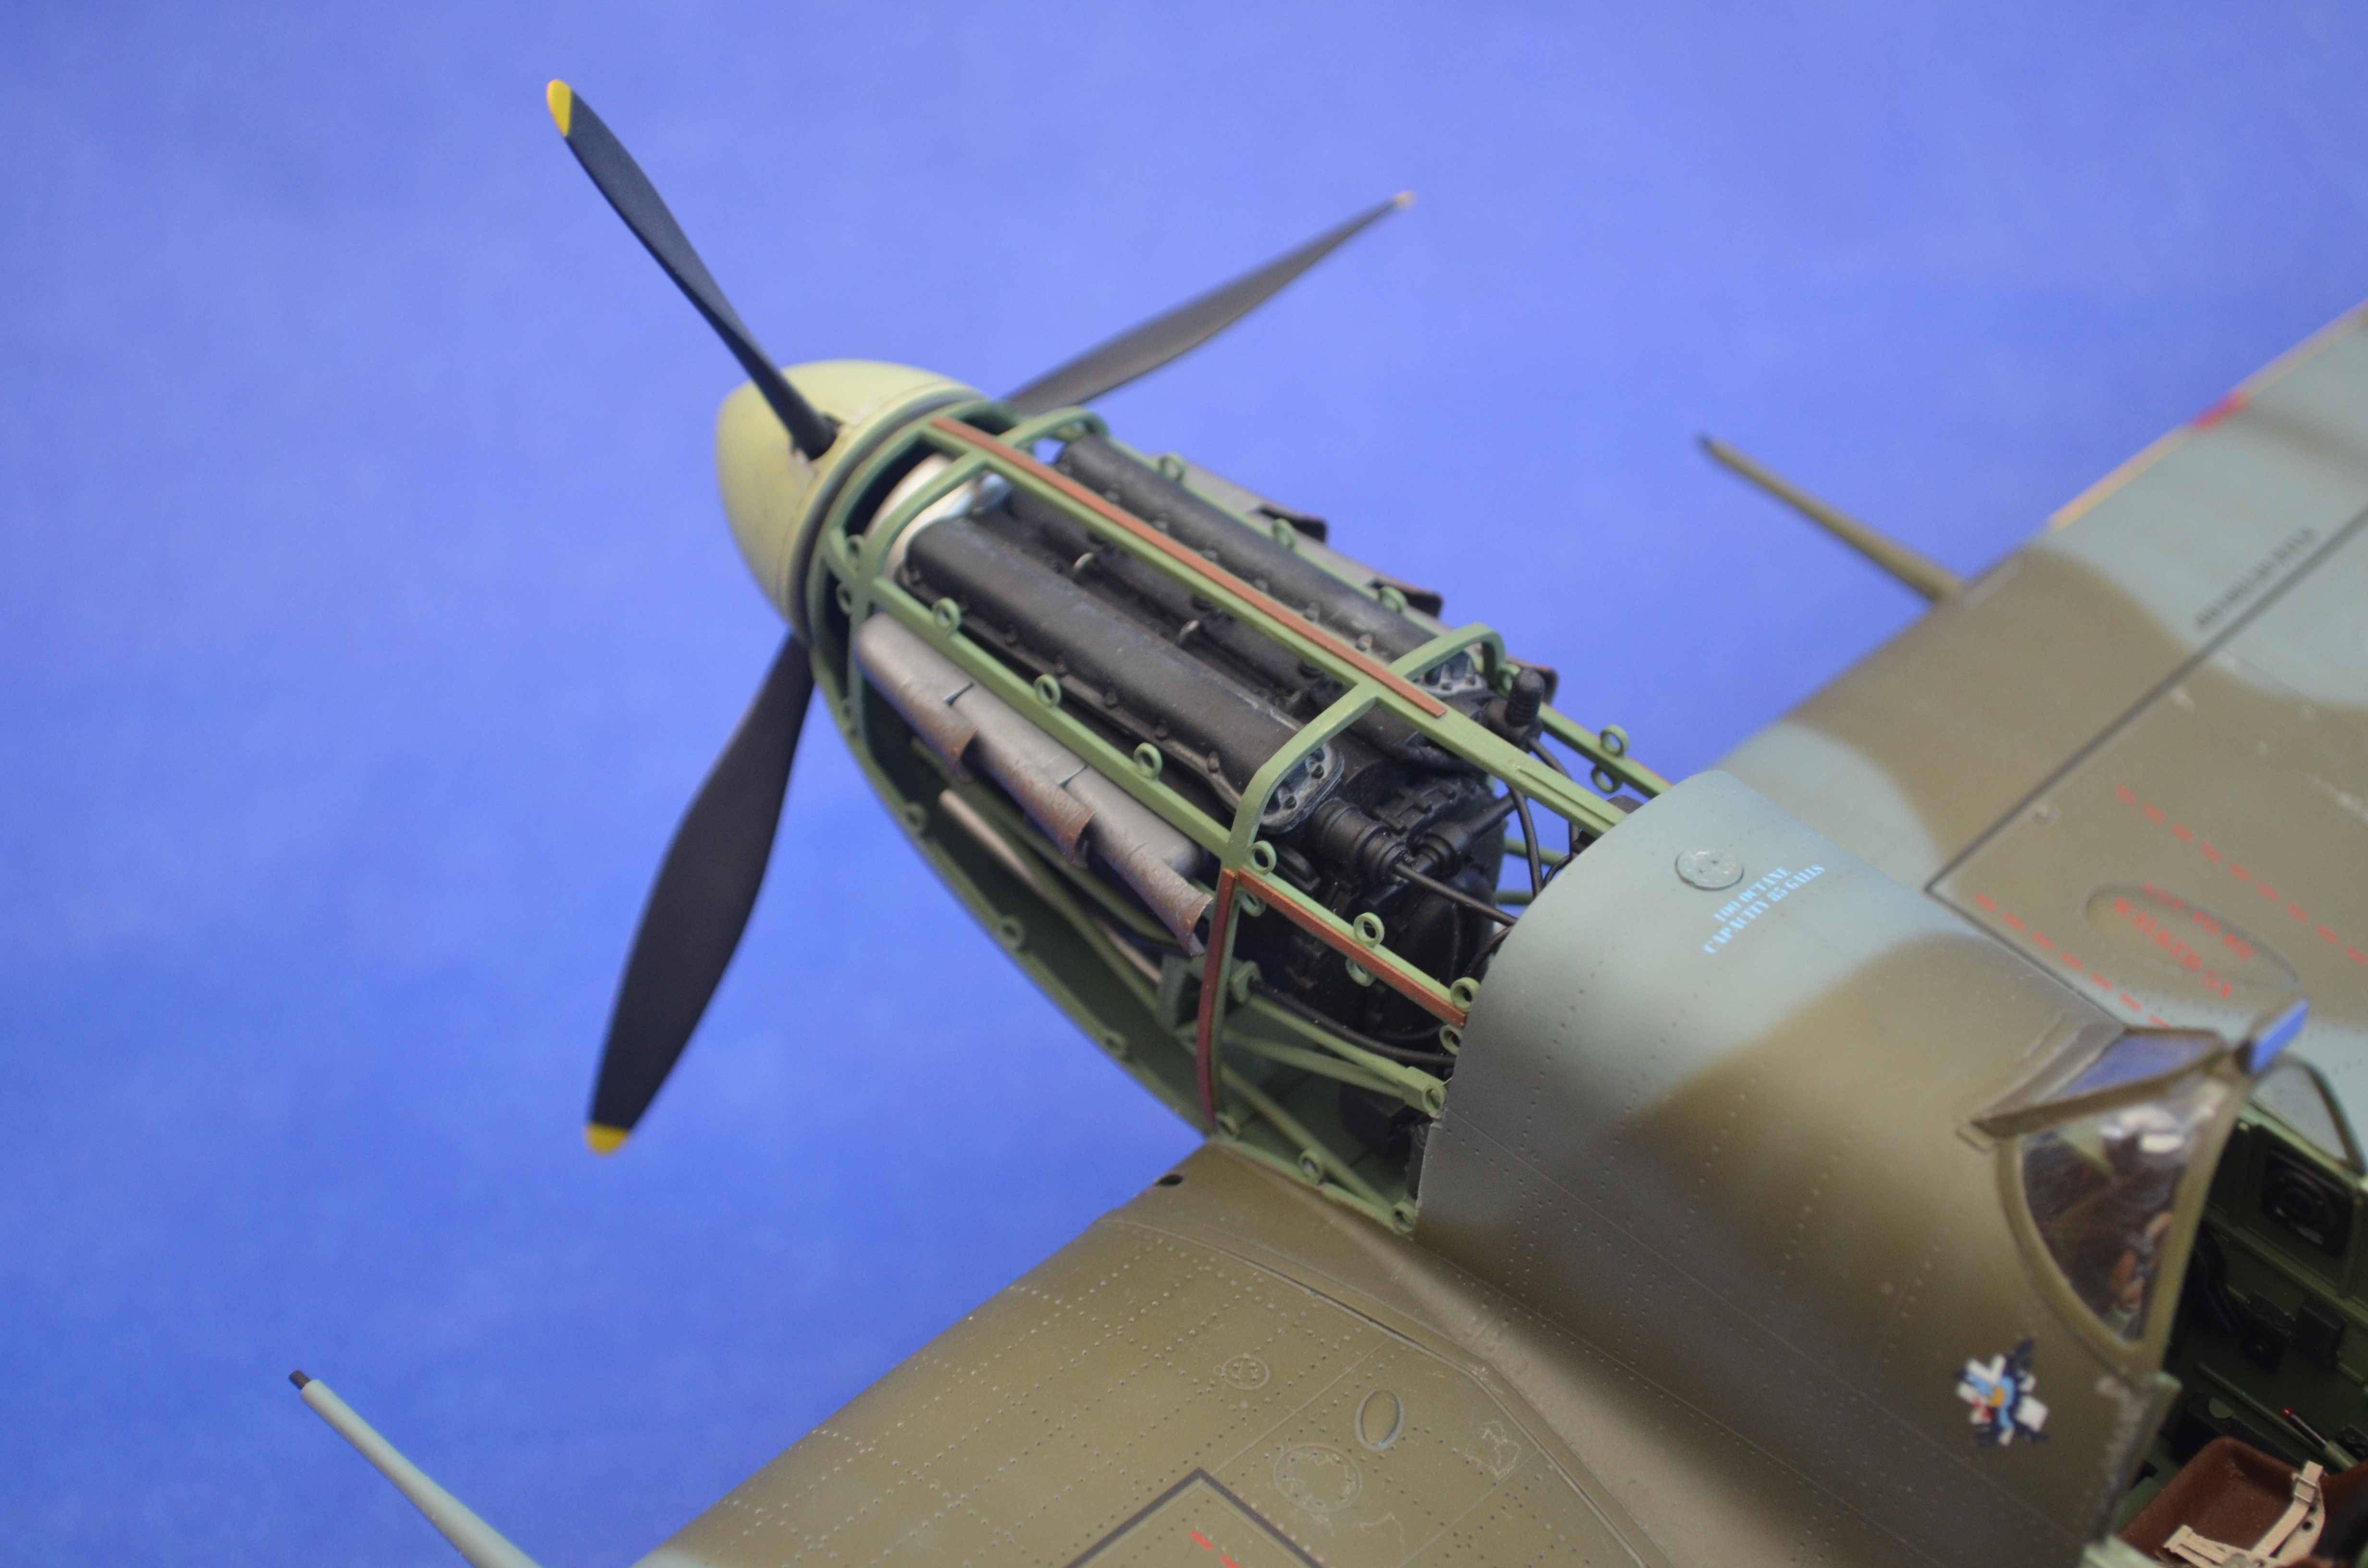
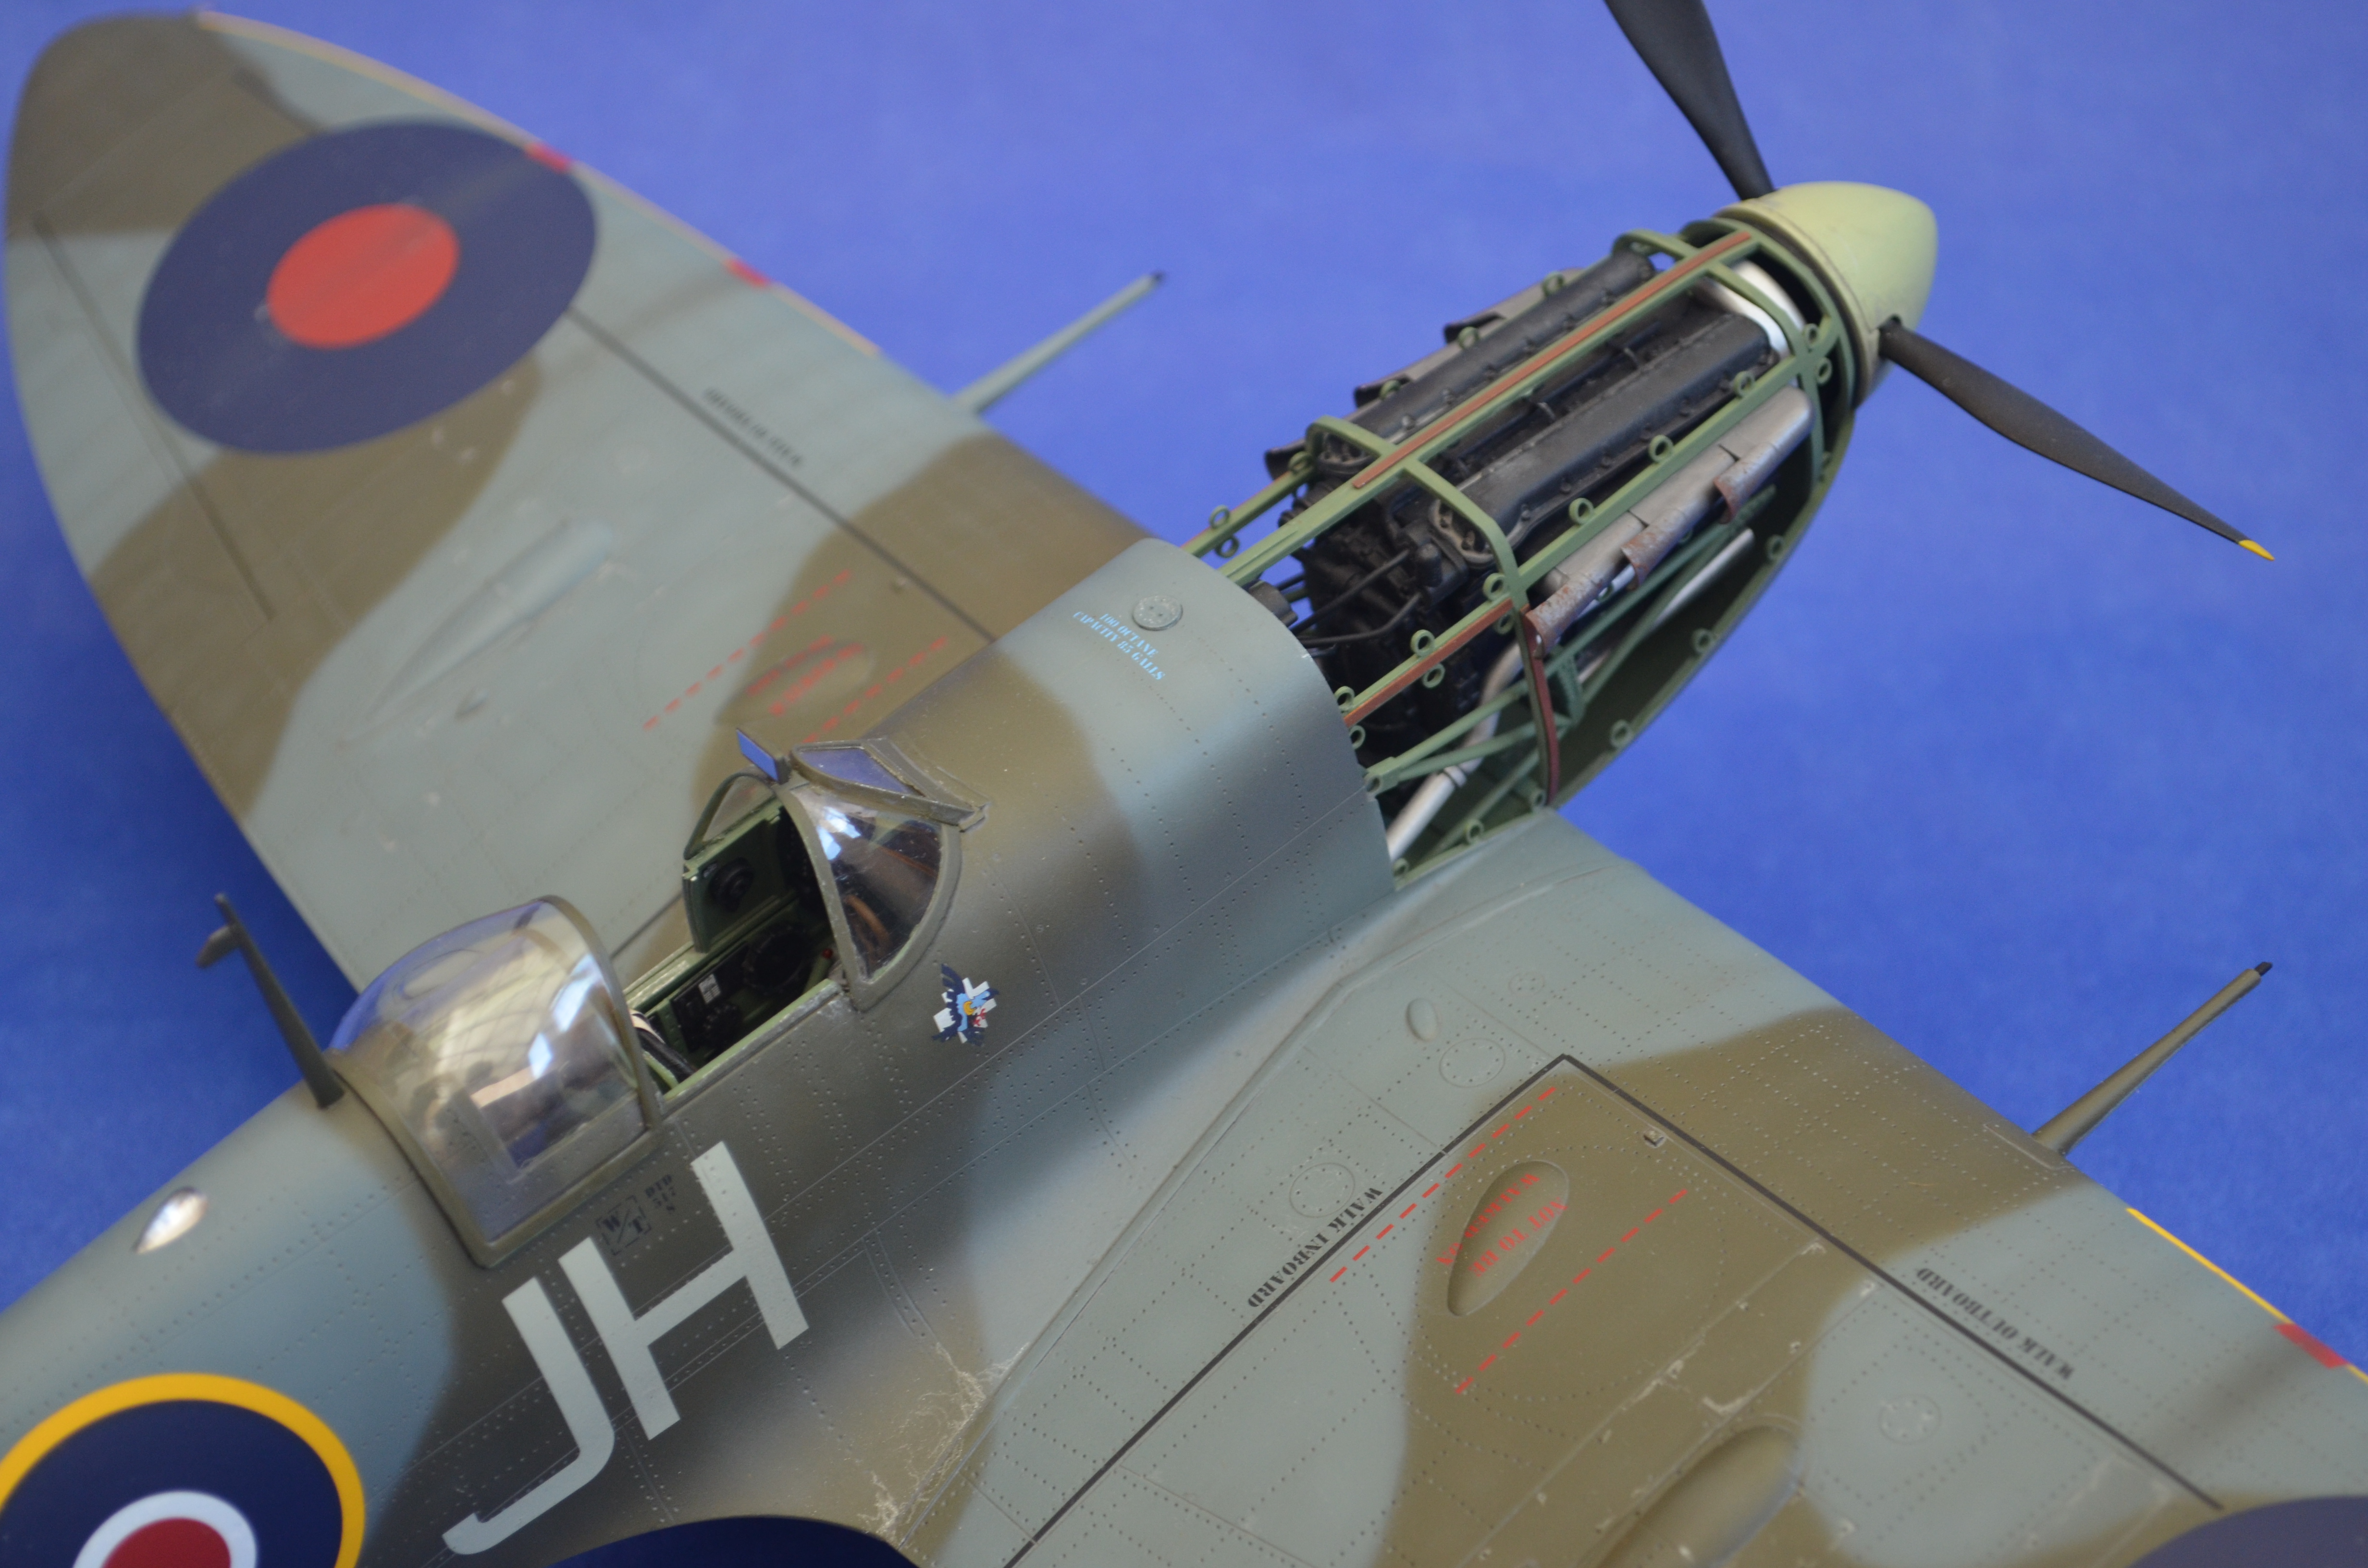
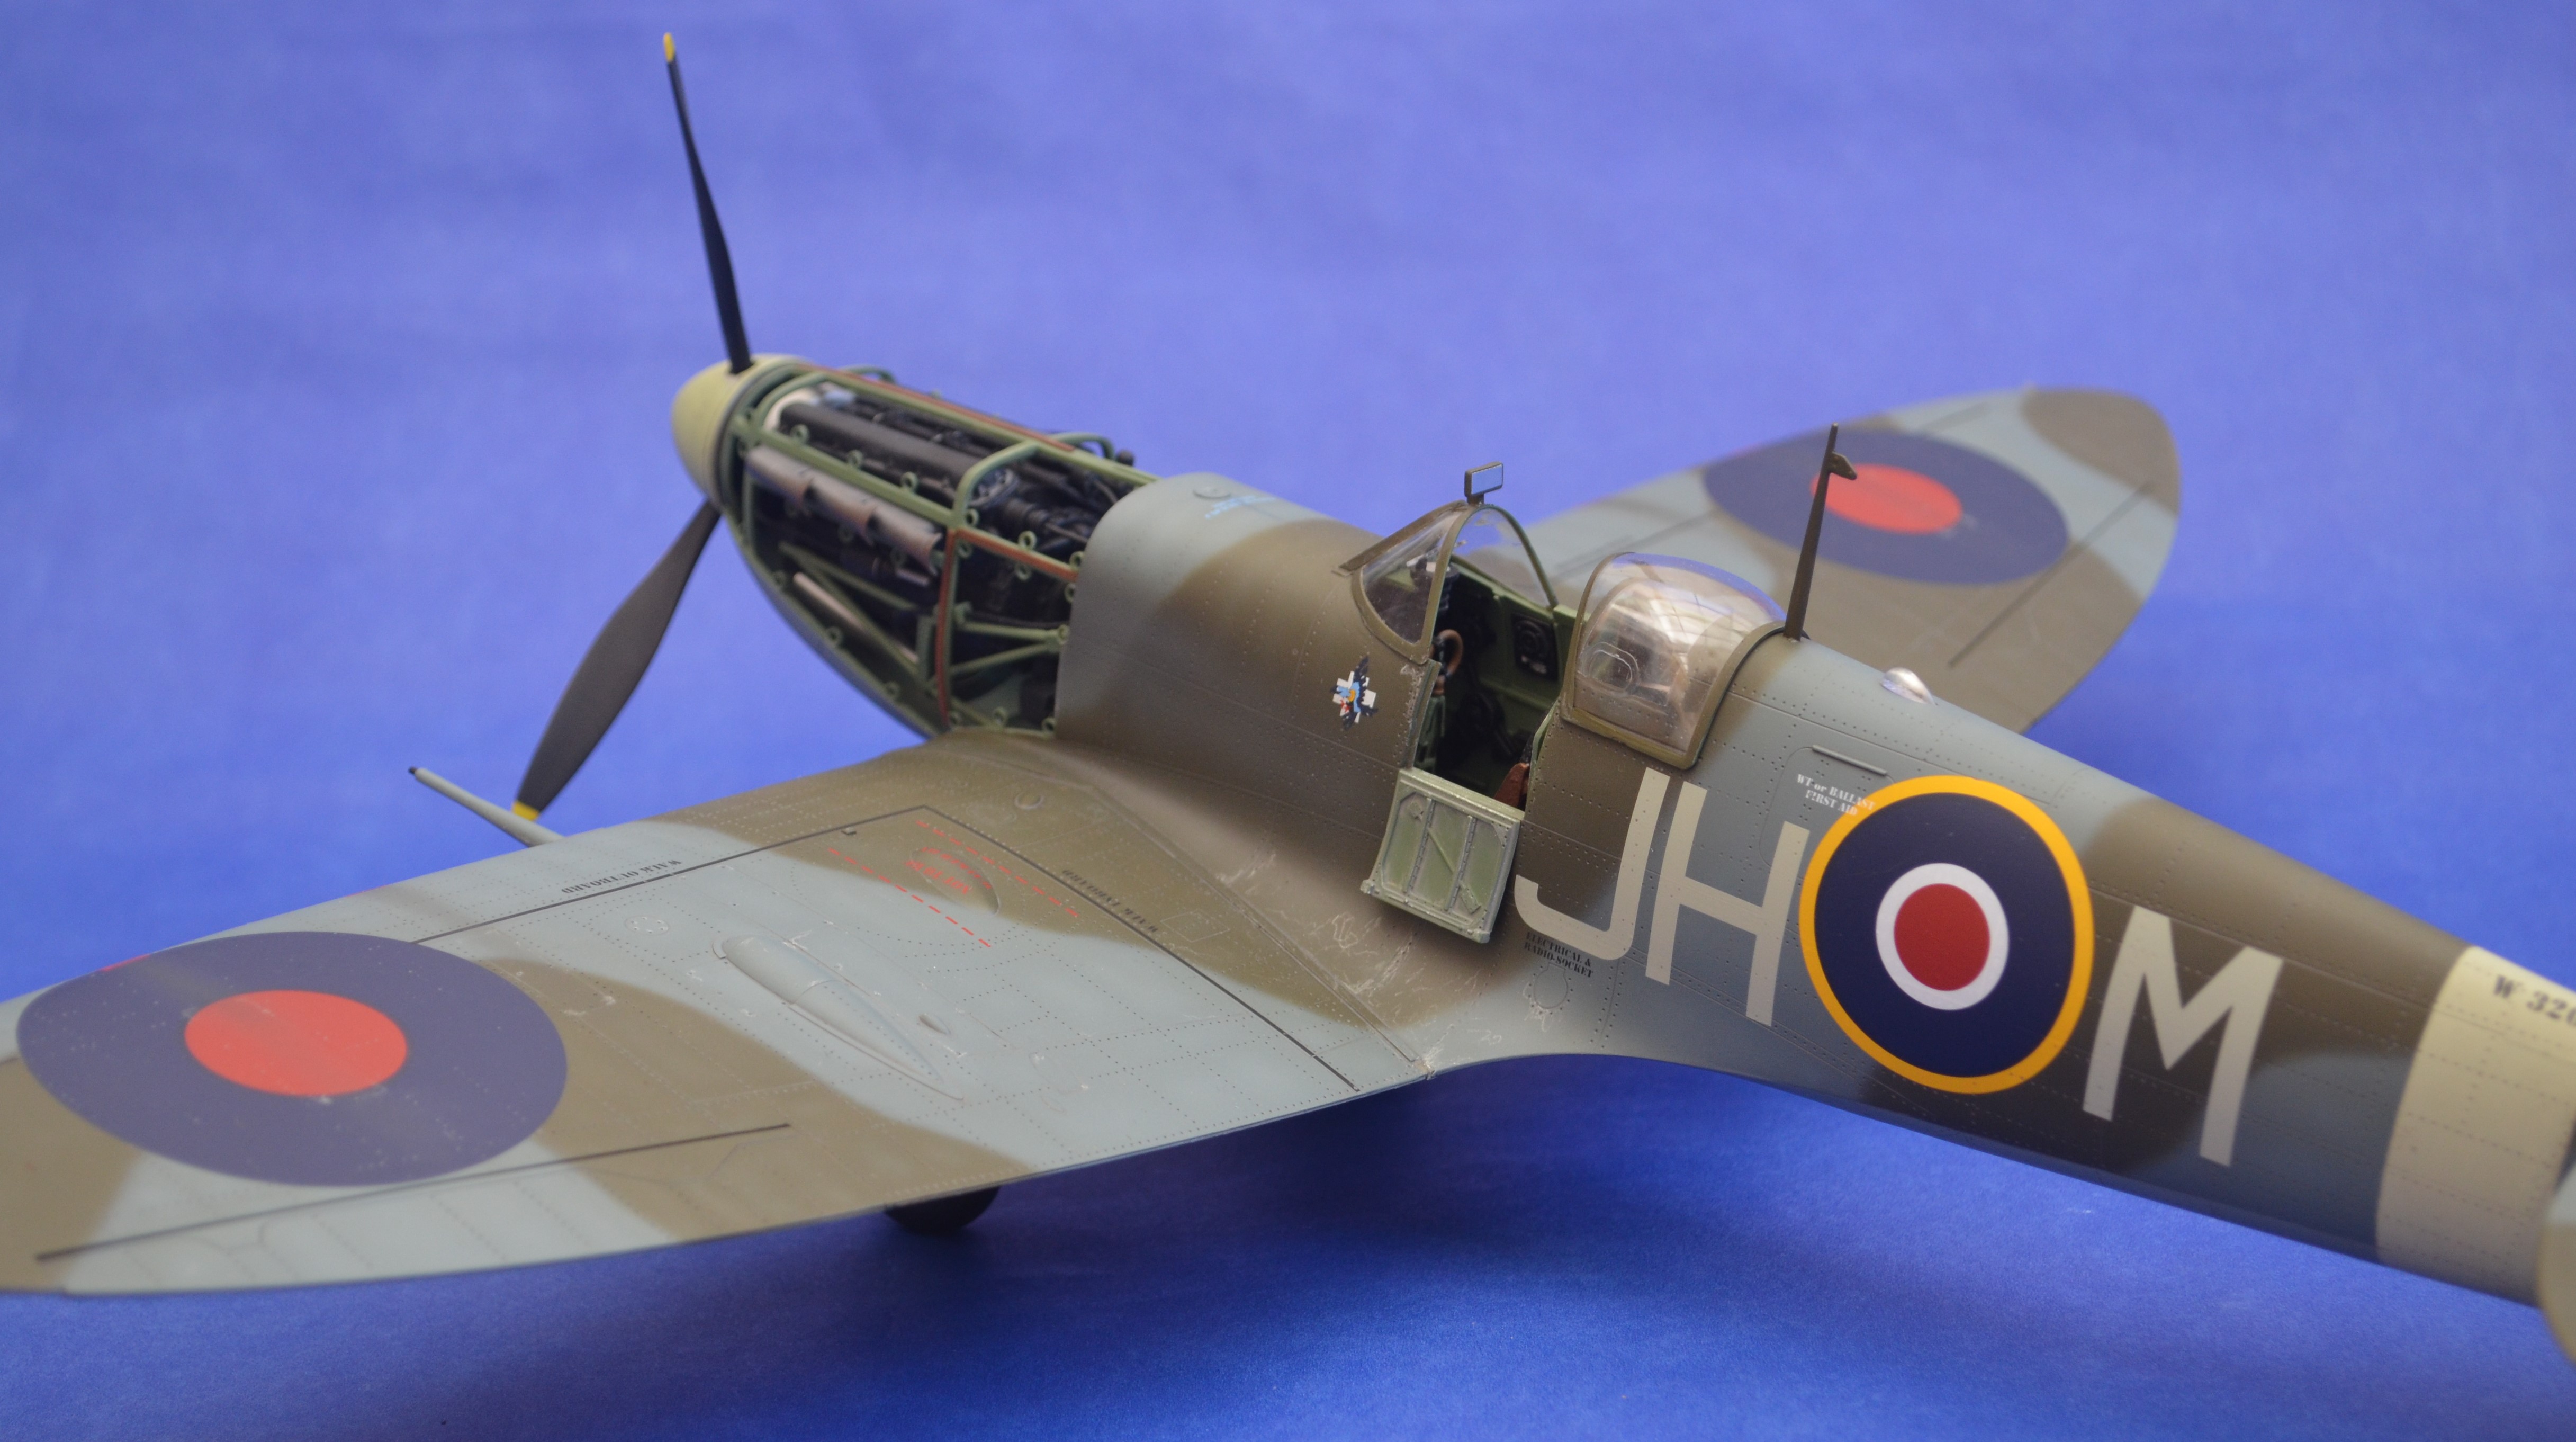
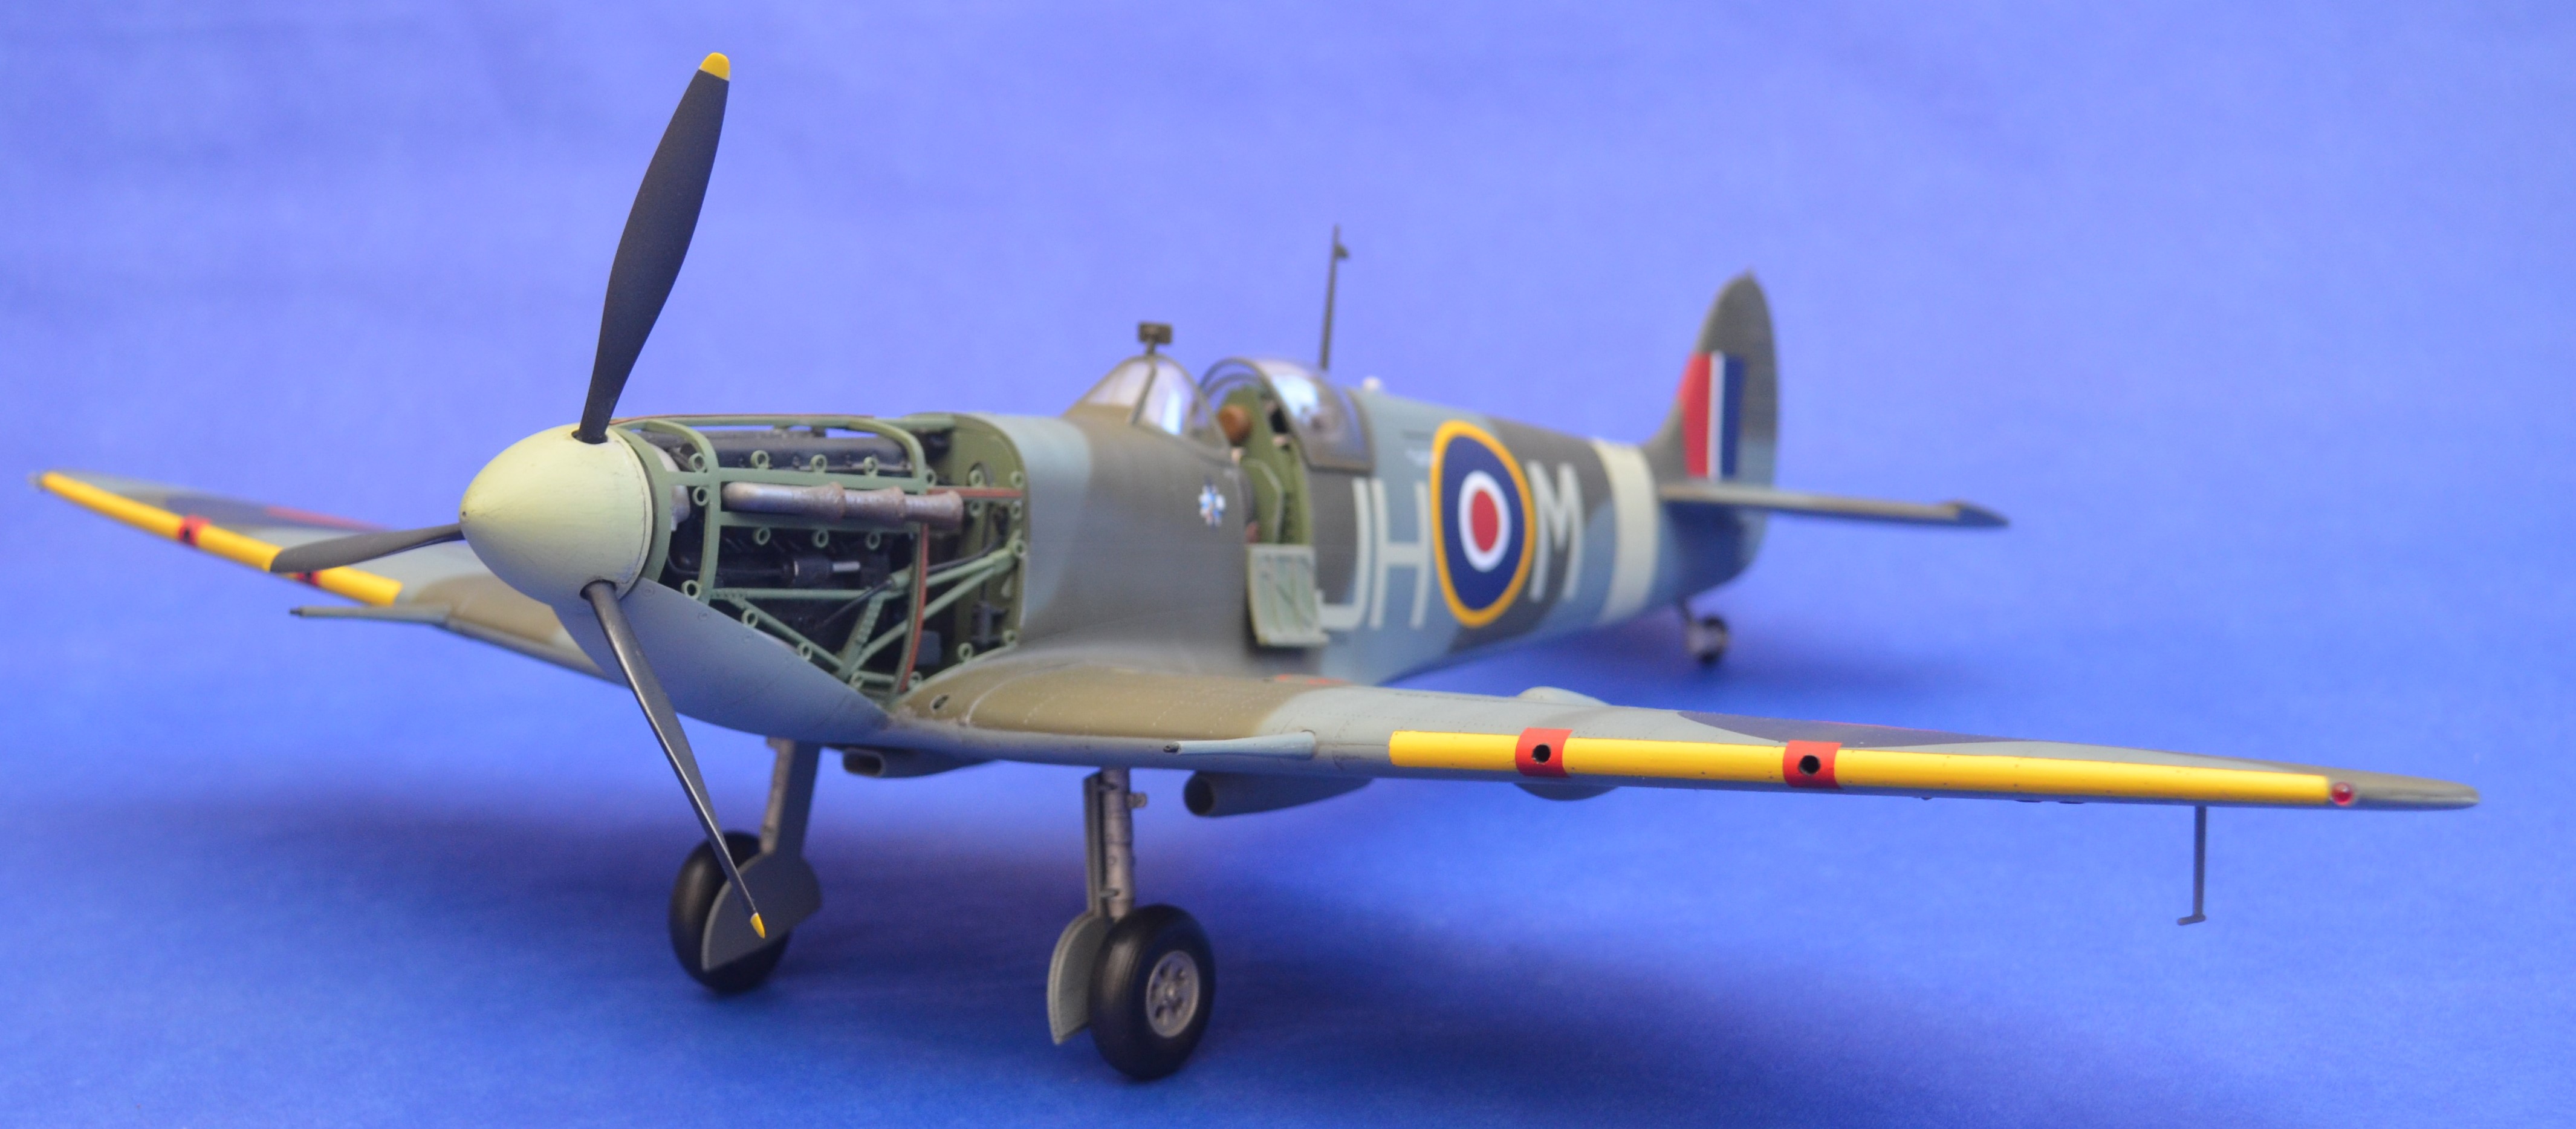
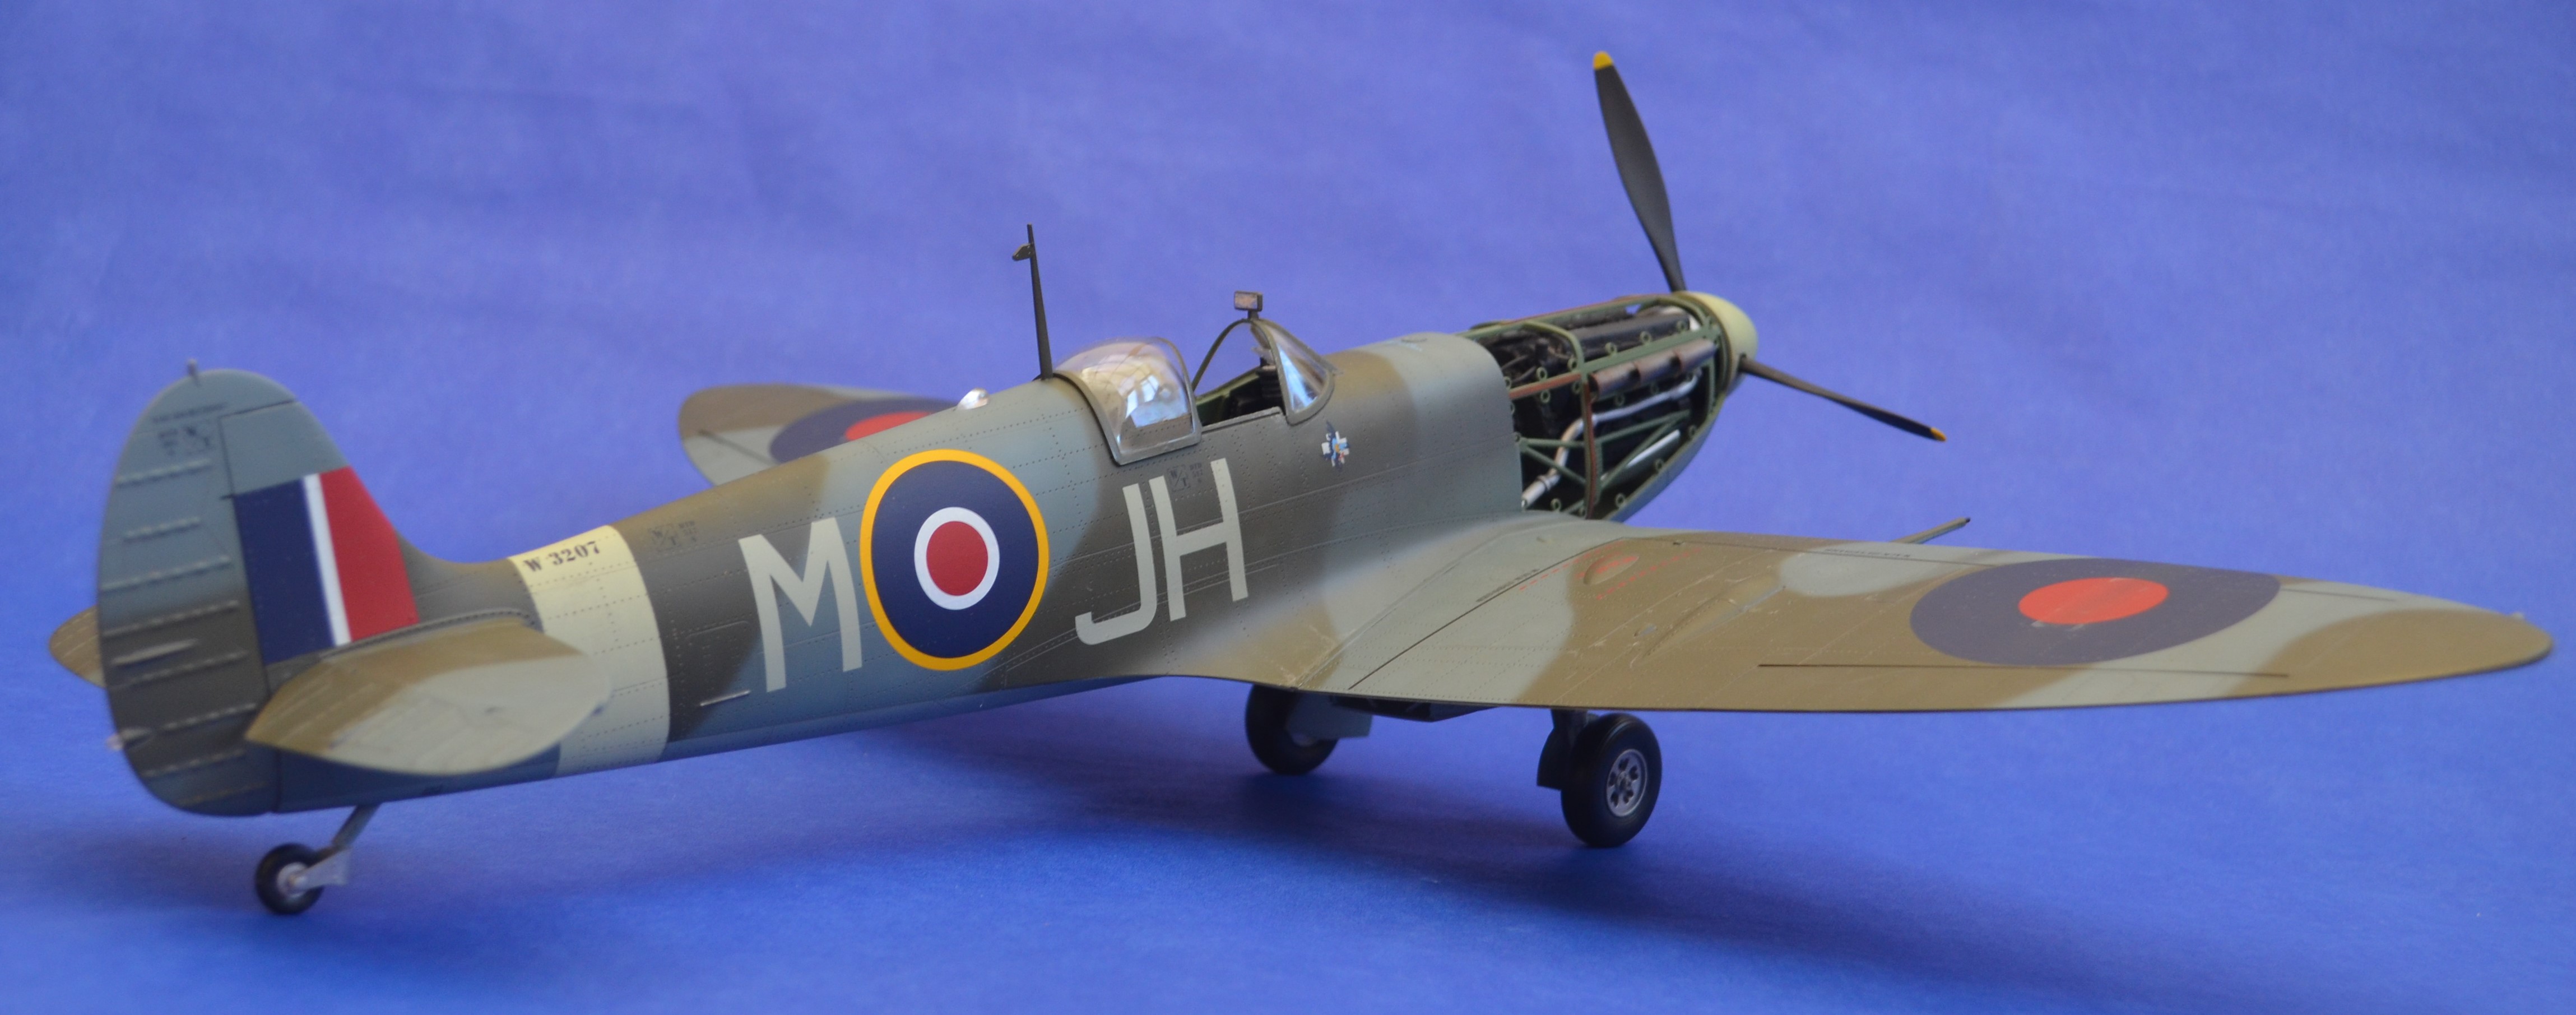
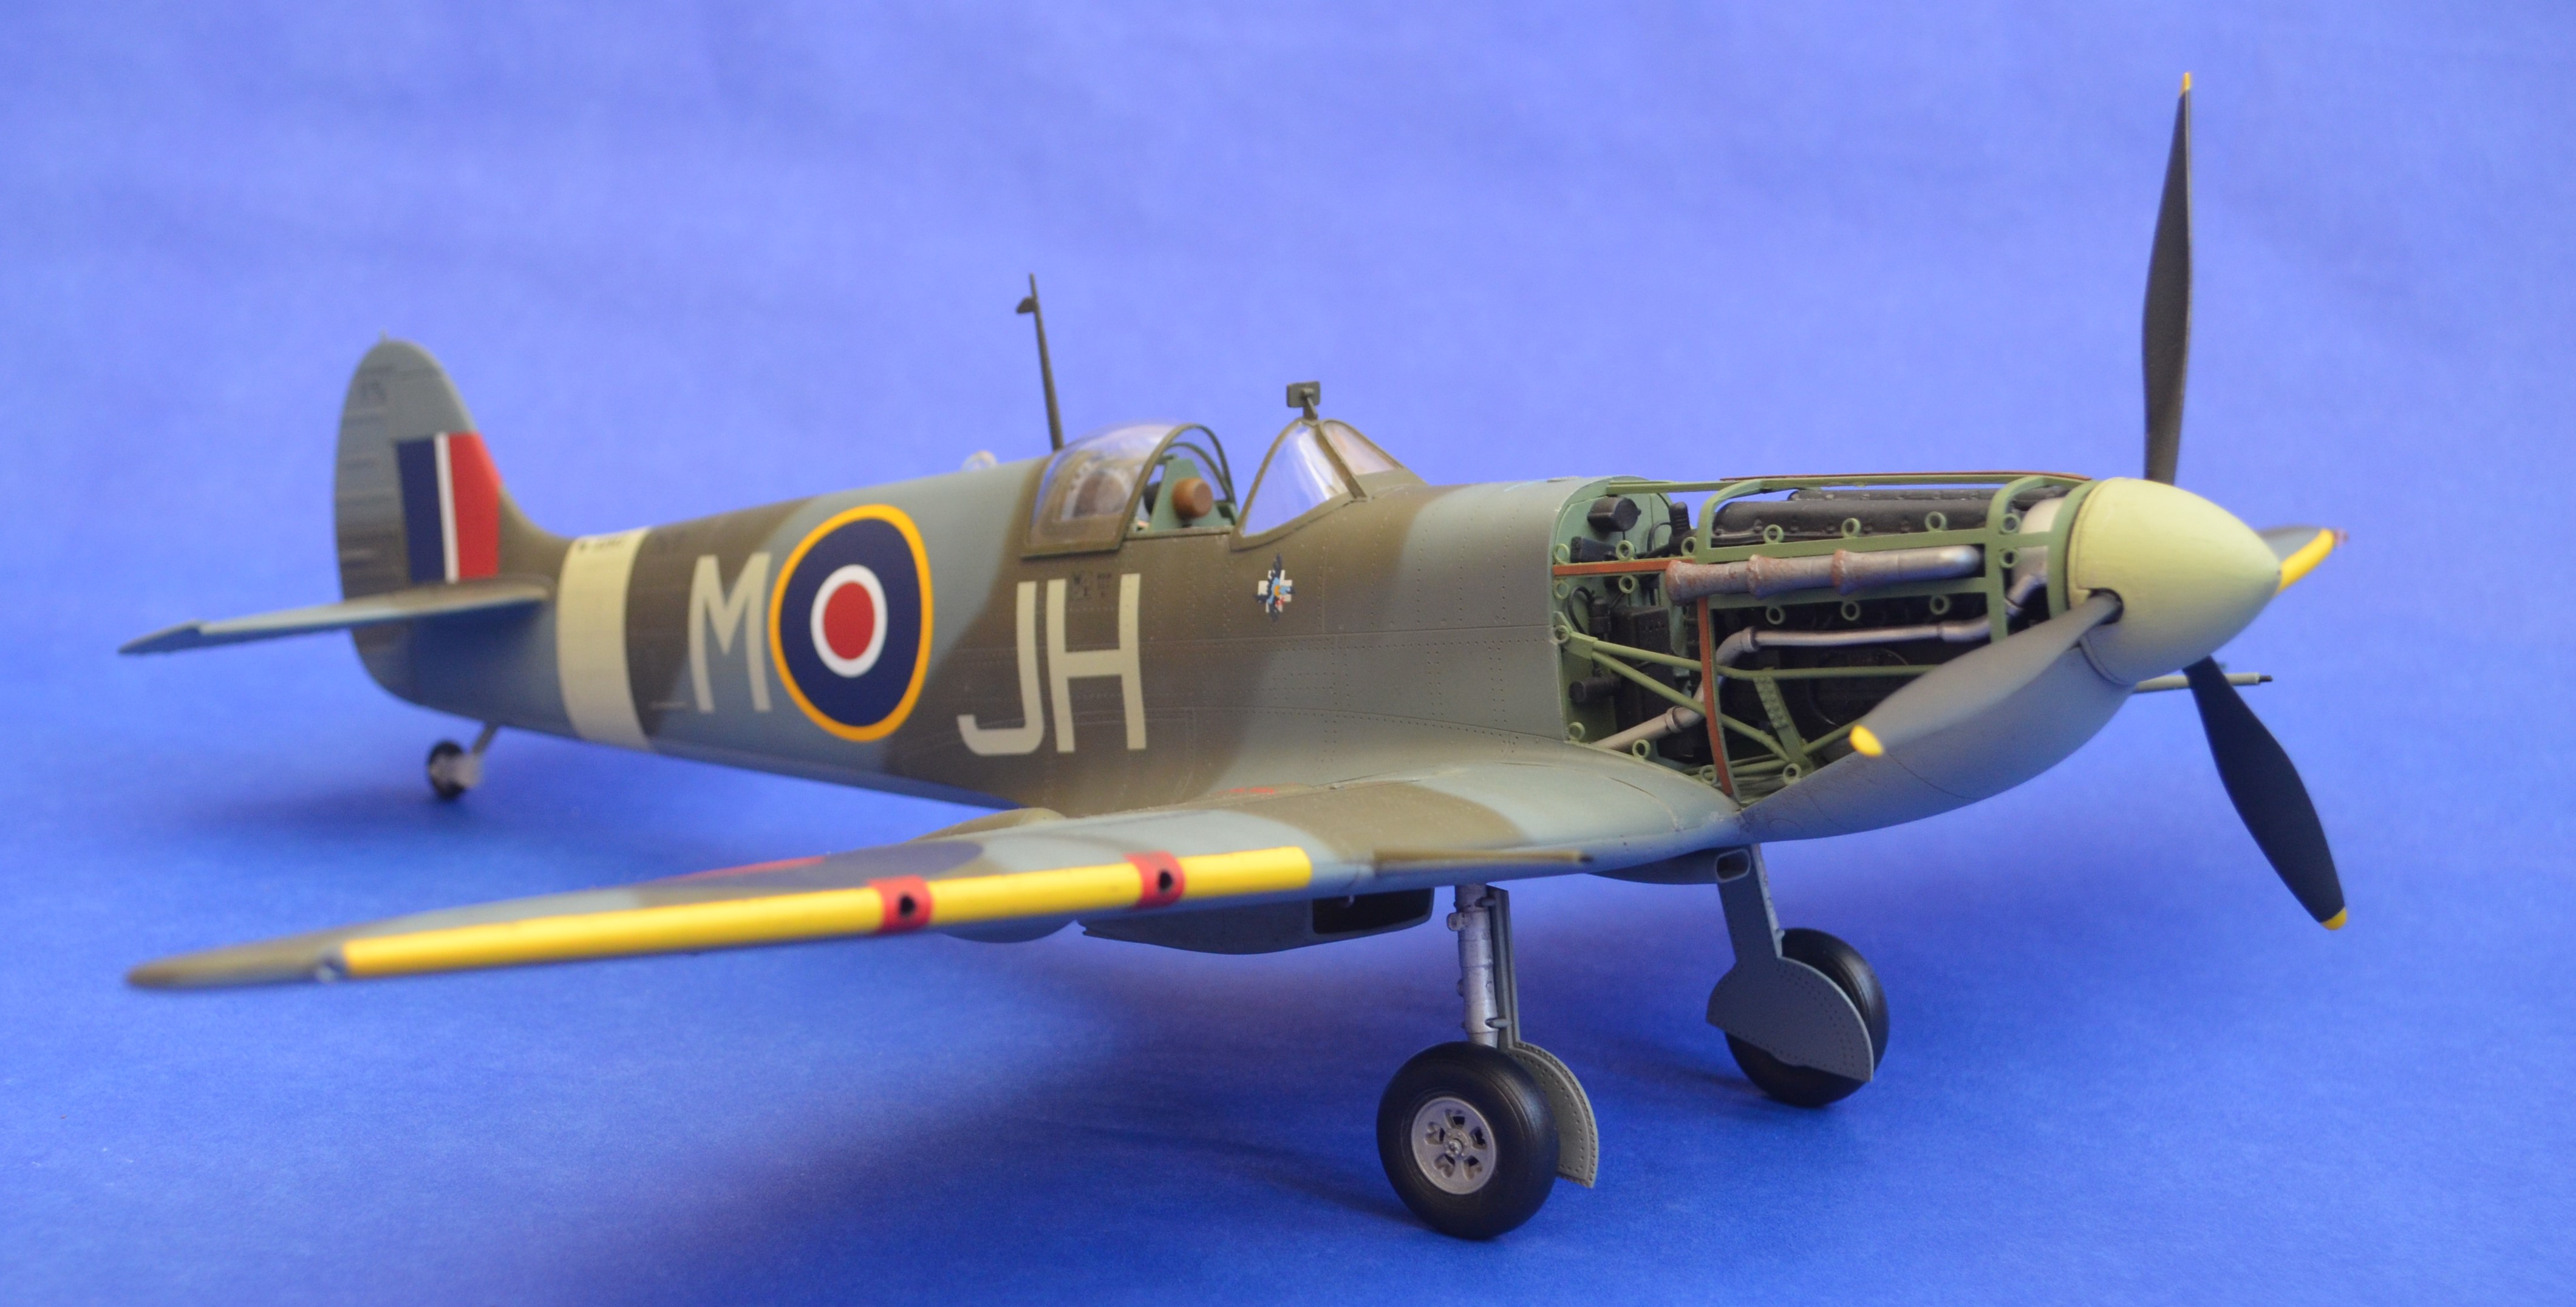
Thanks Hubert. The earlier single stage Merlin variants have significantly less forward rake than the later twin-stage Merlin variants, but nevertheless I agree the angle is slightly too vertical. Unfortunately, other than doing major surgery to the mountings within the wing, this is how it comes in the box... All the best, Tom
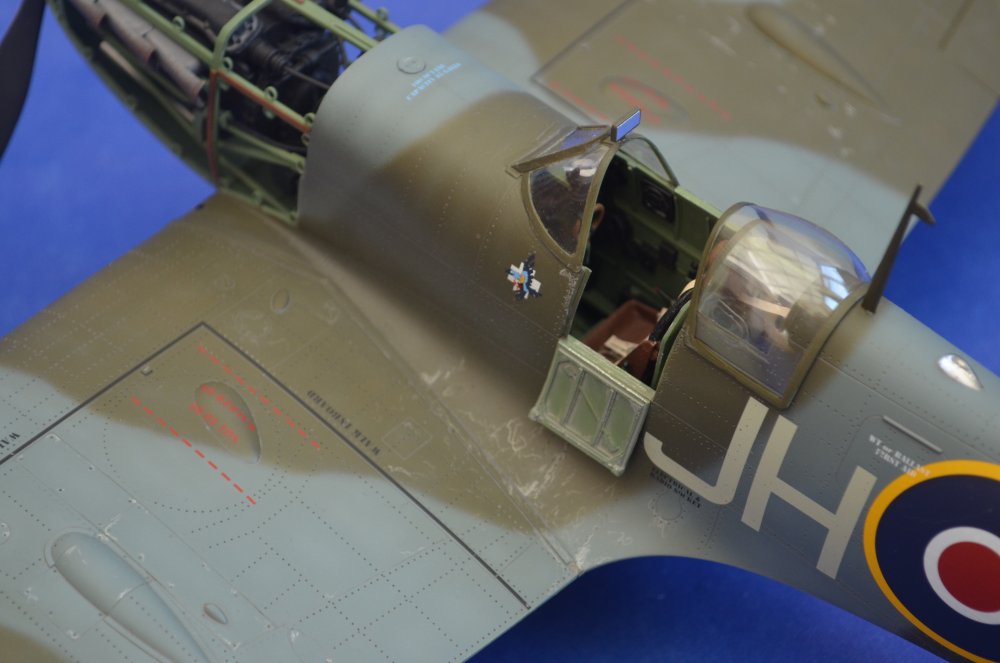
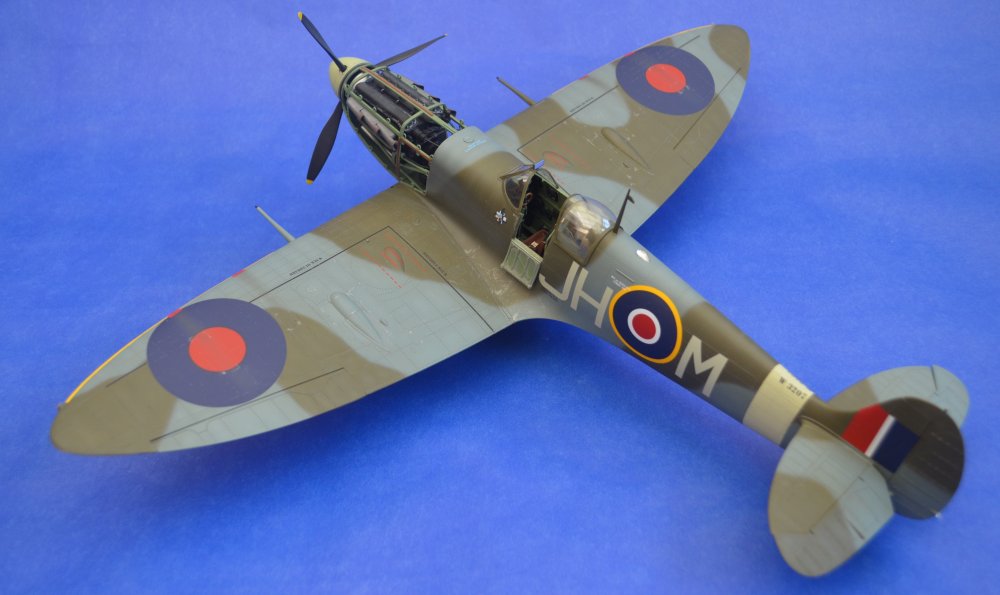
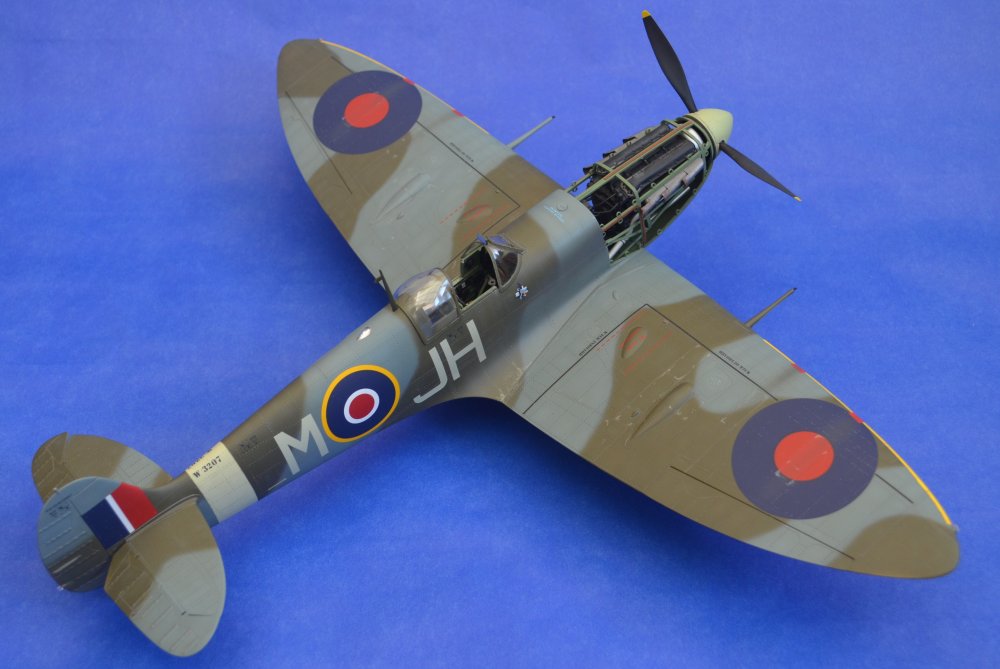
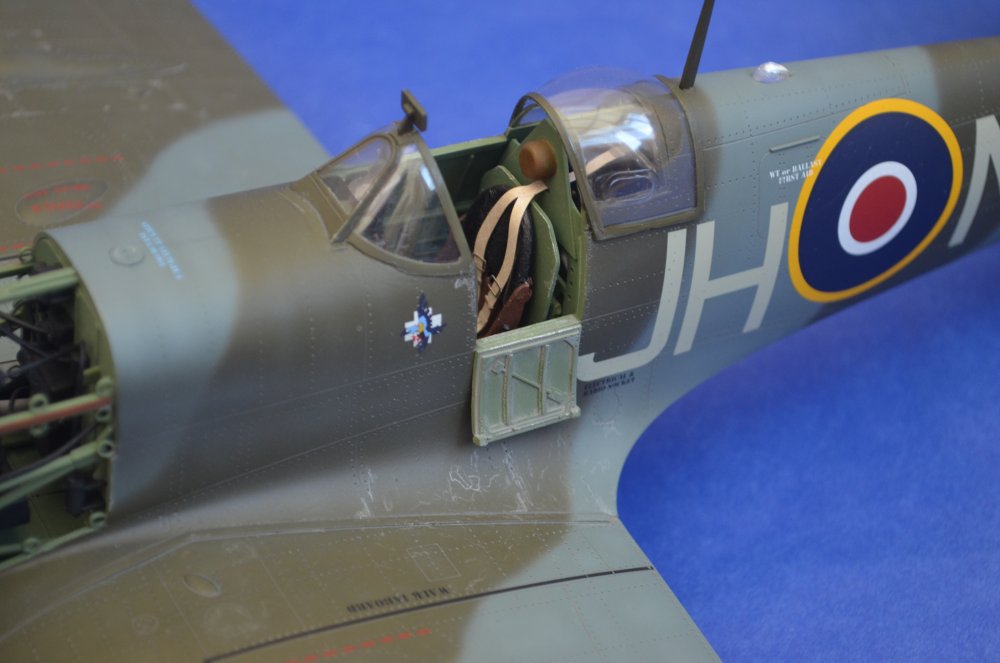
-
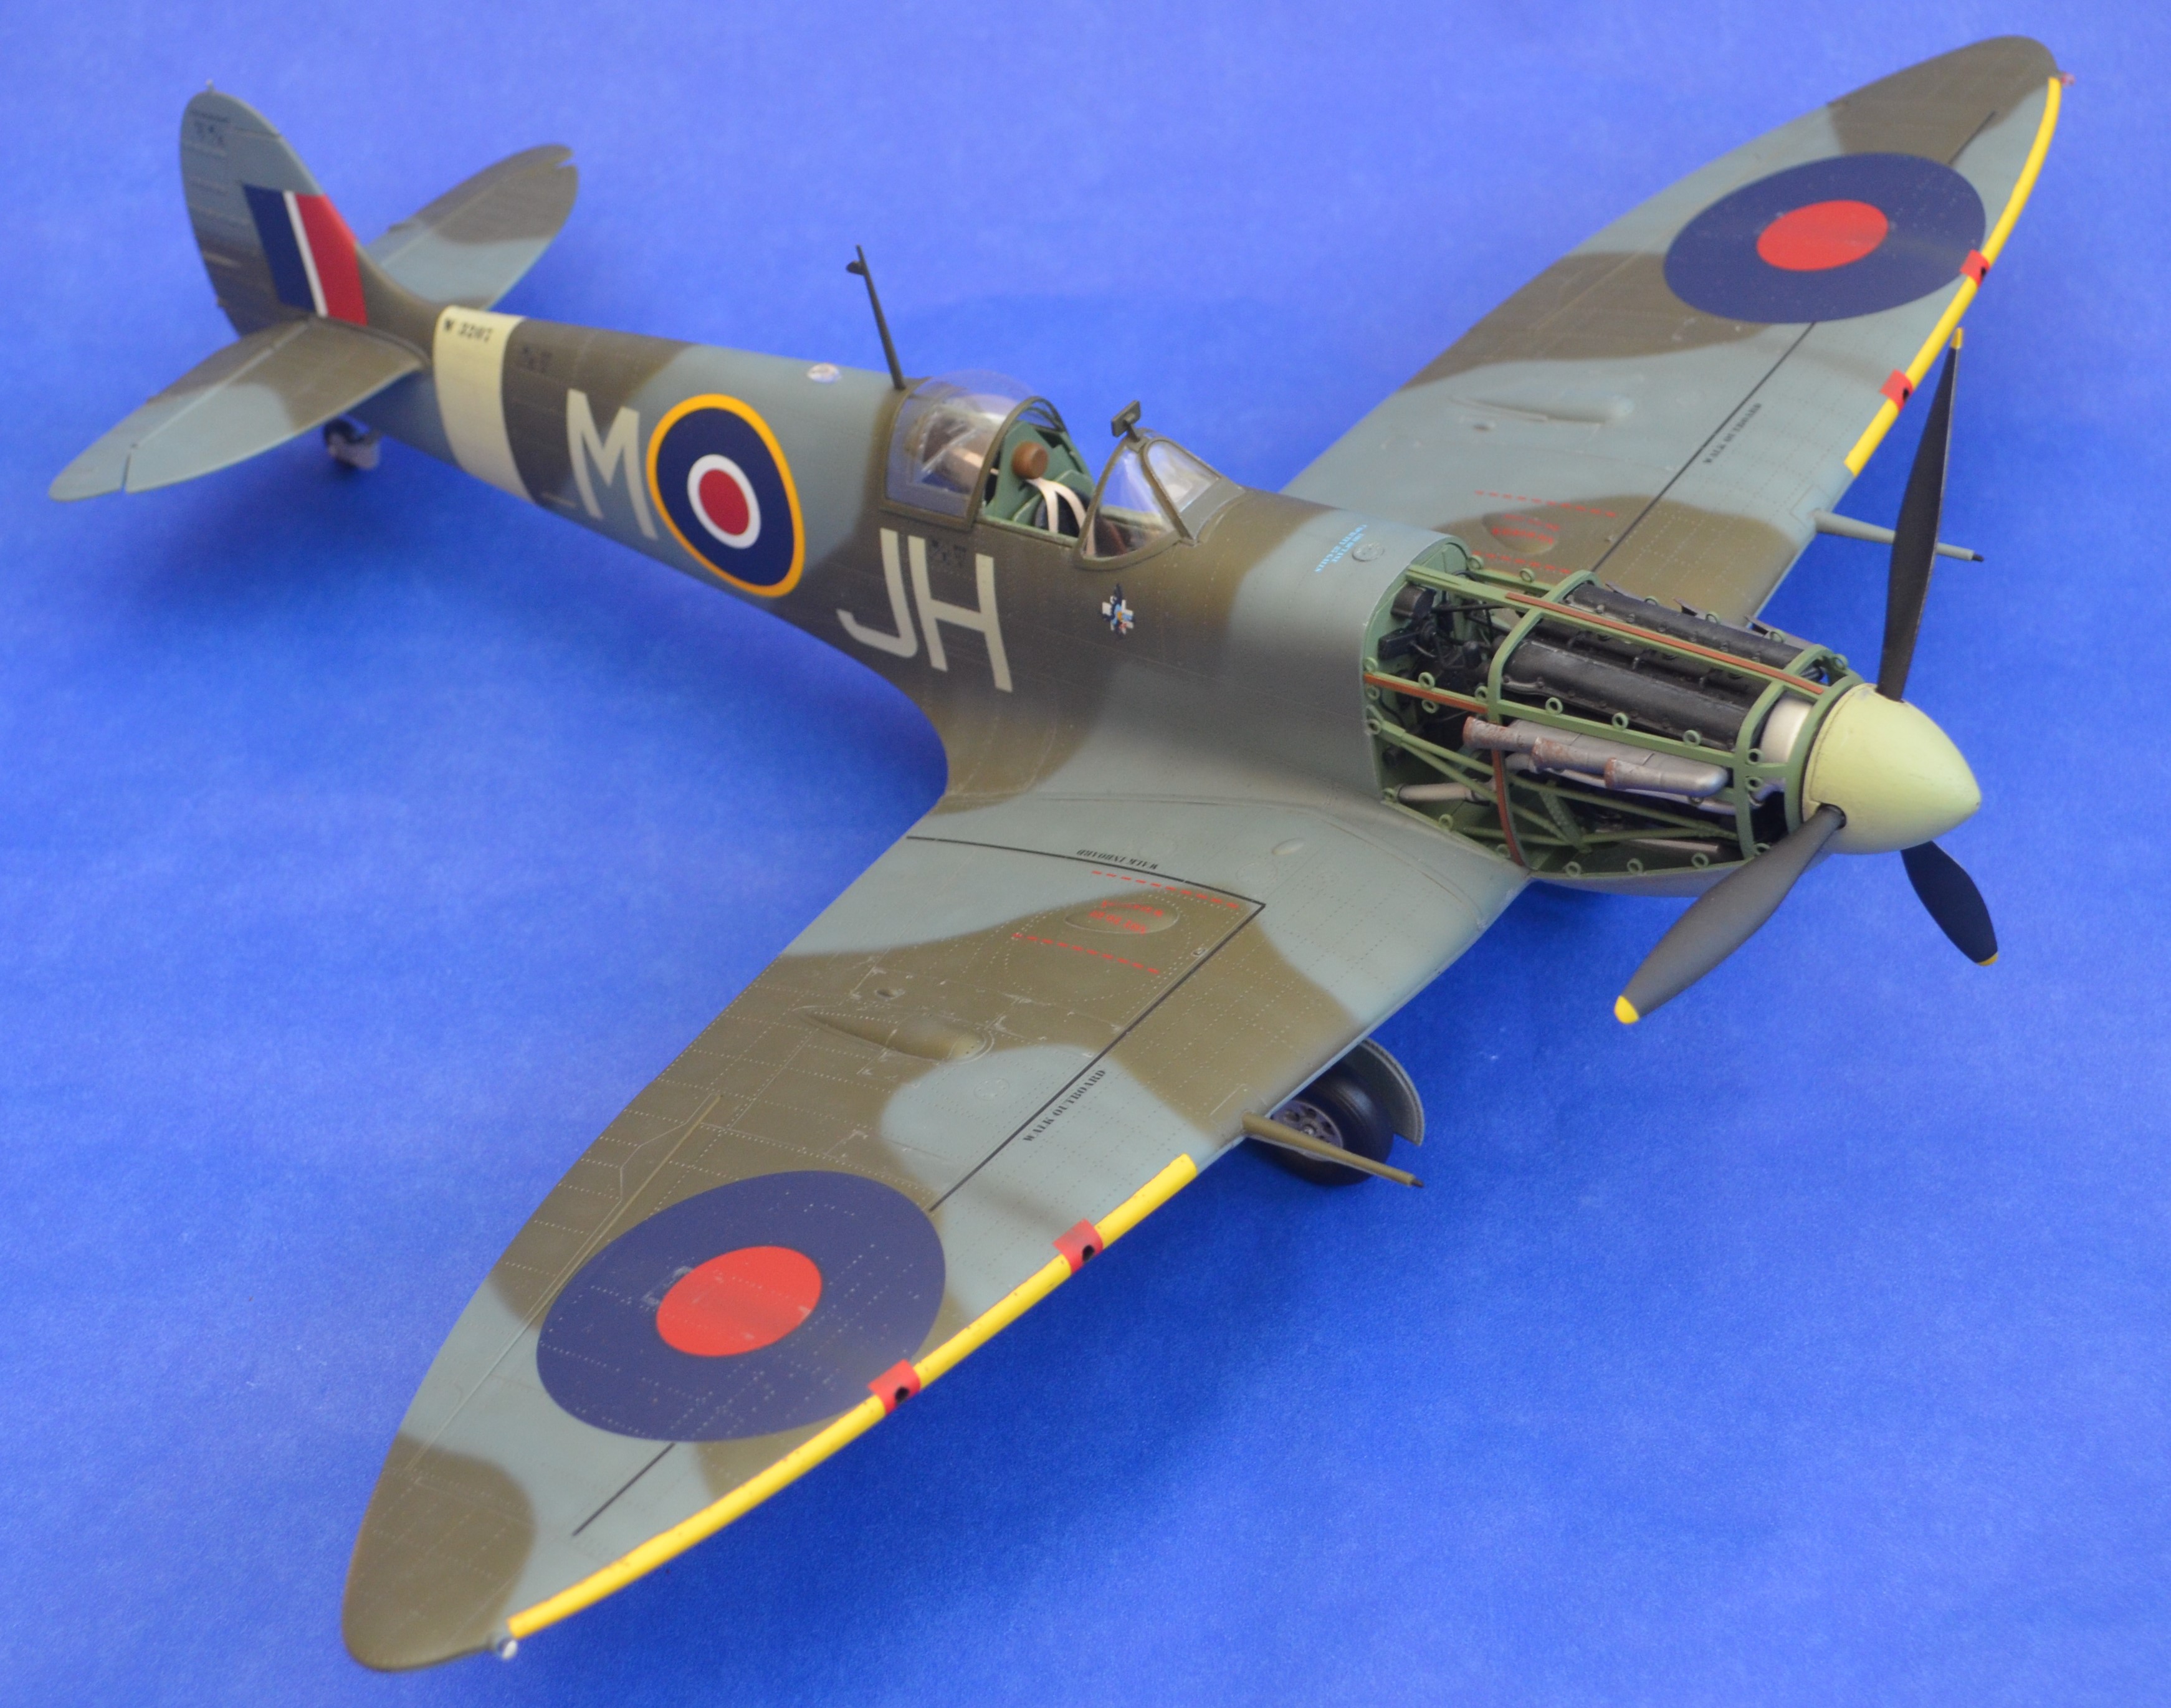
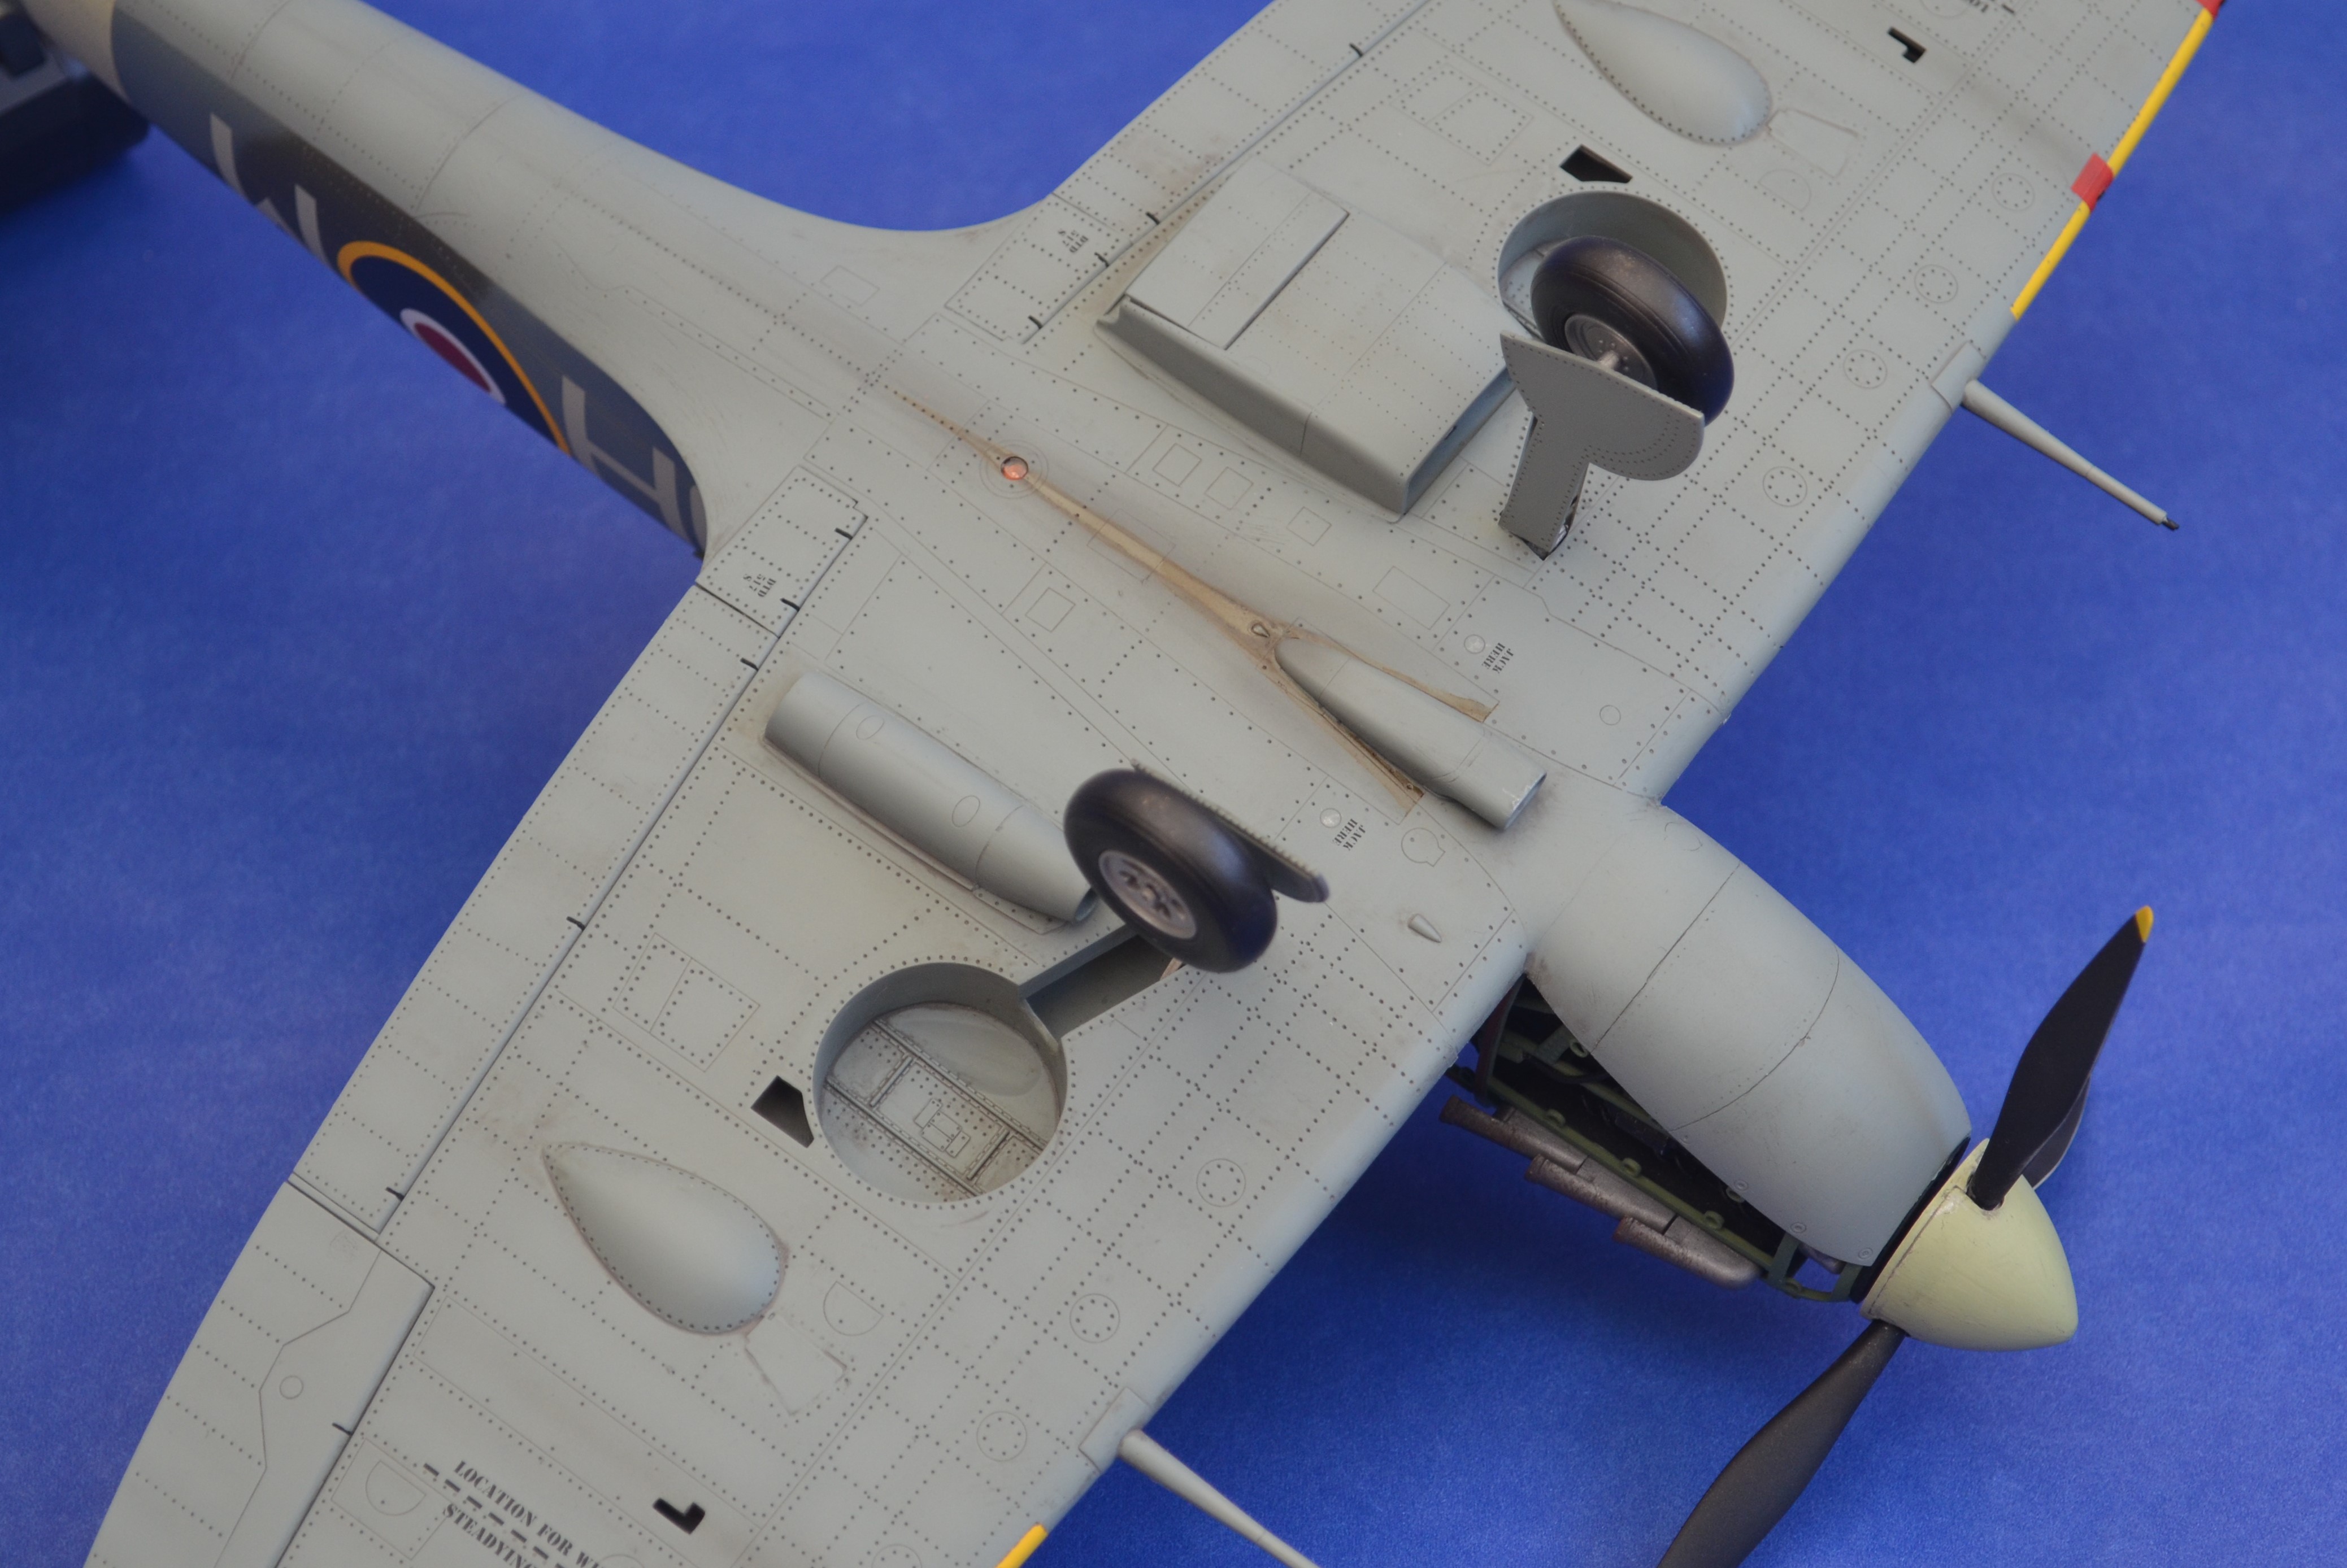
Trumpeter's 1/24th scale Spitfire MkV was an interesting build. Out of the box, there's lots wrong but thankfully Grey Matter provide replacement stabilisers (the kit's are moulded fabric-covered), new exhausts and a new seat (but you have the make the armour plate yourself). I also added a few bits to the engine such as the cowling fasteners, as well as the prominent coolant pipework on the right side of the engine running back from the header tank that's completely missing in the kit. The colours of the decals were well off too, so Techmod came to the rescue here. It's a shame is has so many niggles as it's a kit that goes together really well with no filler needed. Surface details are fairly good, and overall it was a really fun build. I think it probably has the edge over the ancient Airfix kit, but sadly you need to invest a few extra quid if you want an accurate 1/24th Spit. Best wishes to all, Tom