


HubertB
-
Posts
2,437 -
Joined
-
Last visited
Content Type
Profiles
Forums
Events
Gallery
Posts posted by HubertB
-
-
7 hours ago, GazzaS said:
Ummmm... yeah. can't say I disagree with you on that one. Is there a single KH kit out there that doesn't require fuselage extensions or other undesirable kind of work? I don't hear much nice said about KH.
The T-28 is in the top-list of KH kits, and builds nicely OOB. John got a kit where the parts have been demolded too early, and still hot. Tough luck, I agree ...
But it says something about abysmally poor QC procedures, not the kit design per se (like for instance the nose area of the F-86 D)
Hubert
-
 1
1
-
-
5 hours ago, Bill_S said:
I went into my LHS for a small bottle of Tamiya XF-12.

The question now is: Do I wait for a Quinta set, or preorder Airscale's set?
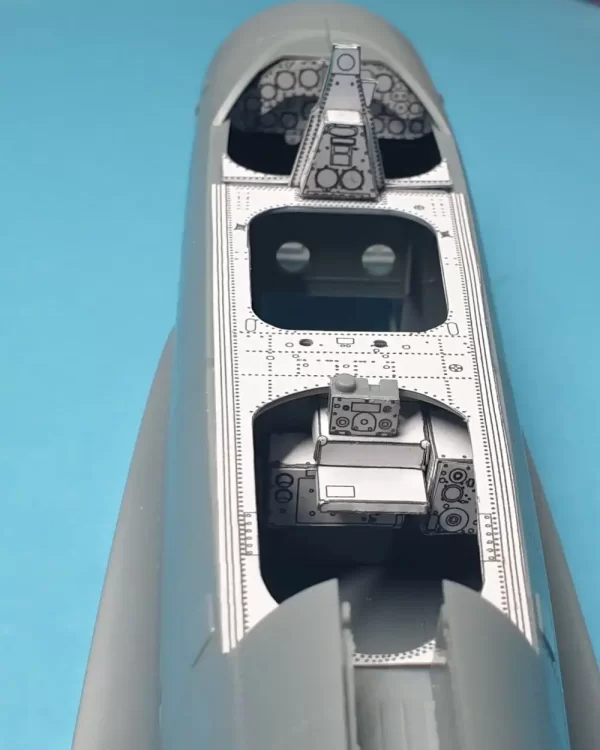
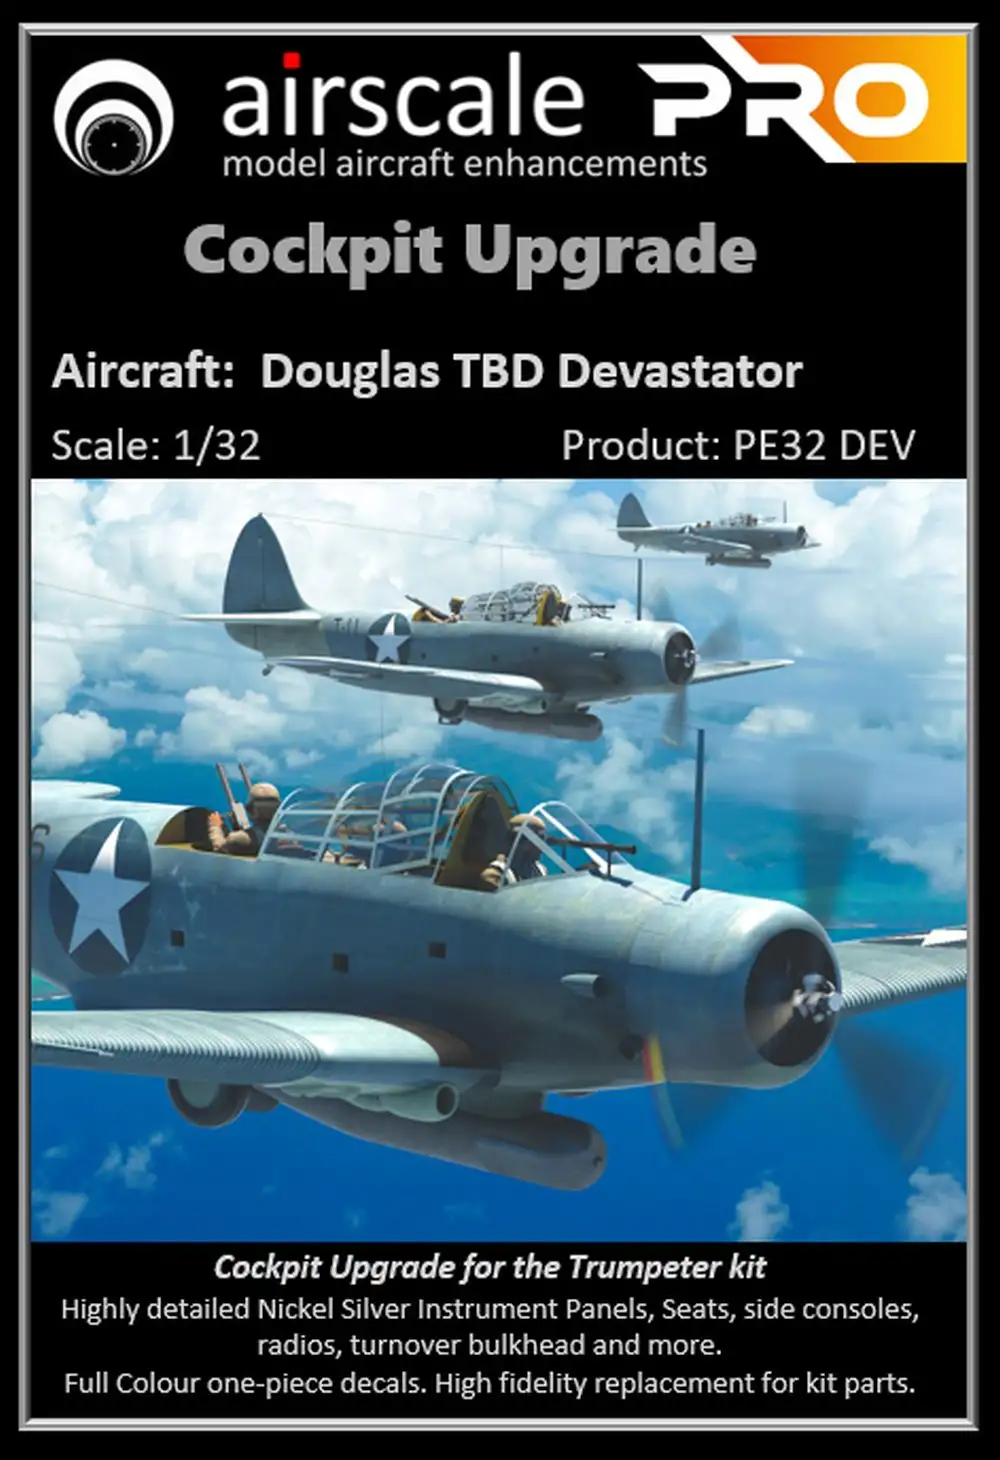
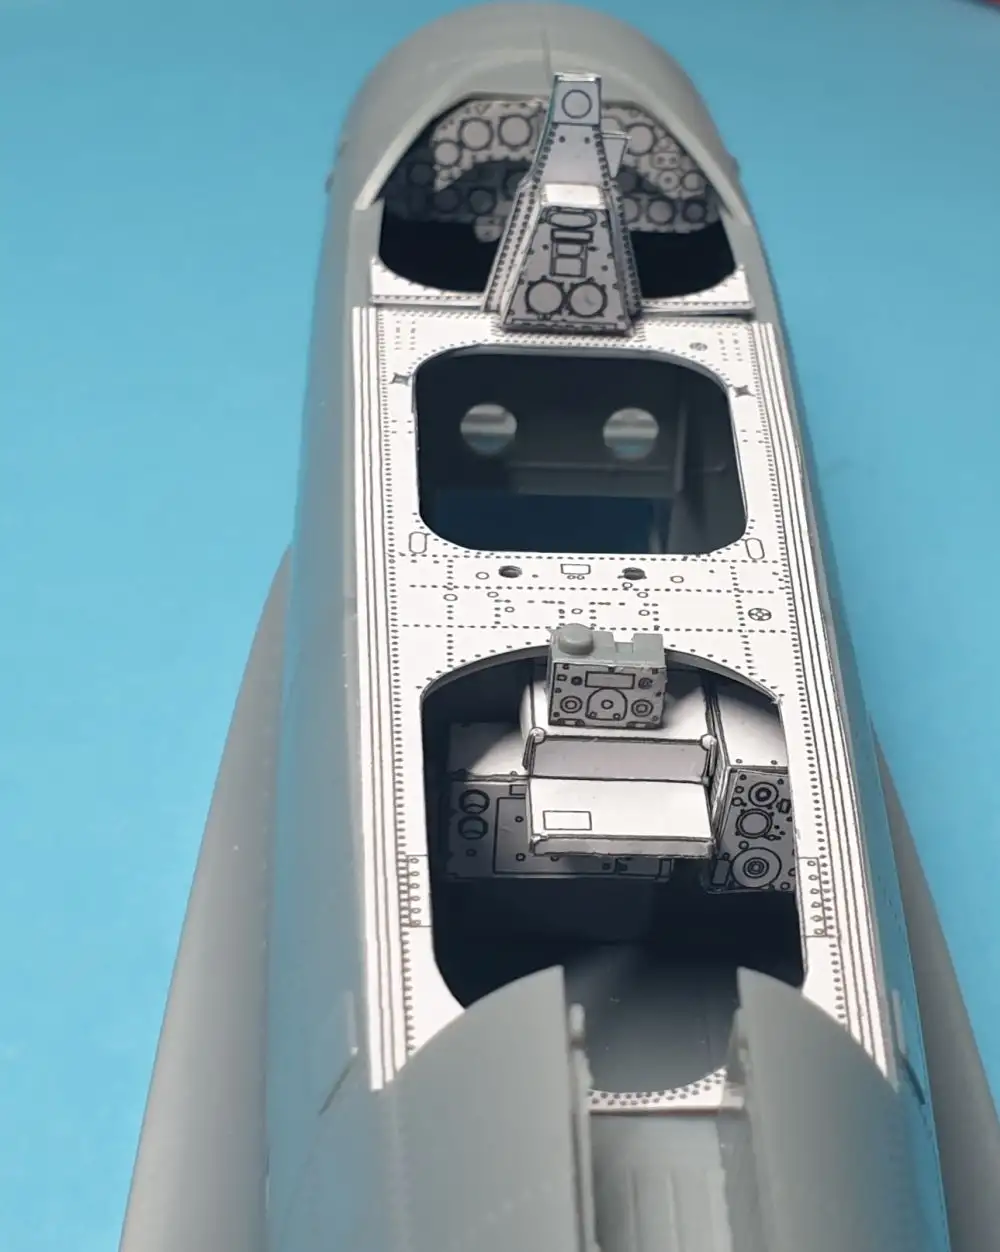
Peter's (Airscale) set is a lot more than just the IP and side consoles. It's detailing and accurizing a lot of the areas treated with minimal detail by Trumpeter... (and for the record, yes, I helped Peter by providing documentation on the TBD, so I may be a bit biased
") , but the essence of Airscale's set is still what I describe)
, but the essence of Airscale's set is still what I describe)
Hubert
-
3
-
 1
1
-
-
7 minutes ago, DocRob said:
I thought the same like Hubert, instantly, but looking more close to your pictures, it seems all is invisible after closing the fuselage. The only possible area to leave a view could be the side door.
Cheers Rob
I fully agree. I was just teasing Phil. It’s a different story however with the Mk IV and its glss nose …
Hubert
-
3
-
-
9 hours ago, Martinnfb said:
Cougar is such a cool looking airframe, good for you guys. A question for you all. Have you built any of these fisher kits, if so, how did it go?

Yes. One (the STM / PT-20), which is shown n the gallery here, and the Cutlass is under way …
Compared to other resin kits, they are « la crème de la crème », with great surface detailing, very little pour stubs to cut off, and generally good fitting (knowing resin is a product that can shrink up to 3 % when curing) : in short, they are - essentially - a dream to build, and compare well to most injection-molded kits in the overall building experience.
As for my stash, it’s currently palletised, so no way I can take a pic, sorry.
Here is my list:
- Skyray
- Cougar
- F9F-8 T Twogar
- Ryan PT-22
- Red Baron
- Bell X1-E
- F9F-5 Panther
Plus the two tiny biplanes (Pitts S2 and Eagle) that Fisher re-released.
I really regret not taking the plunge on the F9F-2 and the two Sea Fury racers, Miss Merced and September Fury.
Hubert
-
4
-
2
-
-
24 minutes ago, ScottsGT said:
Y’all need to do Paul a solid favor and build those kits!
I’ve got three different Fishers, going to try and do one a year or every other year.That’s the plan. I have the Cutlass under way … And two of my last 5 builds are Fisher’s …
(That’s 9 left to go
)
Hubert
-
2
-
1
-
-
Wow Phil ! This cockpit is looking great !
(But you forgot to add the wires leading to the instruments’ casings, says Mr AMS 😇)
Hubert
-
3
-
-
5 hours ago, GazzaS said:
Thanks Phil. Sorry, not watching the cricket. I'm sure there will be replays on the TV at work all week. Which will probably be better because they often skip the slow parts.
Aren’t « slow parts » the very essence of cricket ?
Enquiring minds want to know 🙄 ?Hubert
-
1
-
-
41 minutes ago, Bill_S said:
Wow! I would love to get my hands on a Fisher Skyray, but I fear the asking price may be out of my range.
You don’t risk anything for asking, do you
?
Me, I keep my Precious [Fisher kits] (including the Skyray), in my hooked hands, all fangs glistening in the dark, so beware … 😂
Hubert
-
 7
7
-
-
Nice one, Kriss 👍!
Hubert
-
3
-
-
A few weeks ago, the air here over Central Portugal was hazy with the Canadian wildfires smokes.
Nothing like last Wednesday however, where a fire on Serra de Montejunto, 45 kms north of Lisbon, was pushed by strong Northern winds. We live 20 kms south of Losbon, and the evening sky was brown with smoke, and the air smelled burnt wood during the subsequent night. The fire was put out quickly, during the night, by some 380 firemen and 10 aerial support crafts, thankfully. Nothing like that with the Canadian fires, unfortunately.
Hubert
-
3
-
-
17 hours ago, ScottsGT said:
I have literally spent all day scouring the internet for weathering ideas and watched the dogfight scene yet again two or four times today to see what condition these birds were in during filming. Not sure if it’s a low resolution video thing, or were these aircraft really clean for this movie? Honestly, everything I could find of the A model around the time of these paint colors seems to be pretty clean. Just a few hydraulic leaks here and there on flap and aileron hinge points, little nasty behind drop tanks and the winglets that hang down. But this build isn’t getting the drop tanks. Hopefully I won’t have to spend too much time making it look used.
The general rule is that US Navy aircrafts take a lot of beating, and weather rapidly (but then the paint is patched-up by maintenance crews as allowing corrosion is a no-go, hence the quilted effect which, for once, is justified). This said, the weathering was a lot heavier on the Forrestal-class CVs than the CVNs, because of the fuel exhaust soot from the boilers. And, most likely, the US Navy wanted their Tomcats to look pristine for the Hollywood guys …
So, I’d say little weathering is the best option for this specific model …
Hubert
-
2
-
-
2 minutes ago, airscale said:
hey, hey boys, nice to see you all
")
Fantastic build here Clunk, and I just wanted to pass my personal & public thanks to Hubert, without whom our latest set for the Devastator would literally not have been possible
looking forward to getting re-aquainted 🥰
Simultaneous post with Peter
…
And glad I could (modestly) help on this one …
Hubert
-
3
-
-
9 hours ago, BlrwestSiR said:
Look what's just been announced:

Pic of the mock up.
The pre-order link is here …
https://www.airscale.co.uk/#!/airscale-Pro-1-32-TBD-Devastator/p/572300117/category=153261775
Peter has really gone to town on developing this set.
HTH
Hubert
-
4
-
-
Fantastic 👍 !
Hubert
-
1
-
-
Good fix on the windscreen, Ernie.
There should be soon a great AM set for the cockpit. It will help a lot to fill this huge space under the greenhouse.Keep the great work.
Hubert
-
5
-
-
The problem with PE flat « rigging » is effectively the thermal expansion differential between the metal and plastic or resin. It’s going to sag at some time in the kit’s life. Even Paul Fisher, who supplies flat PE wires for the Ryan ST-M / PT -20, advises against using it … I ended up using round monofilament, and only the keenest eye will argue it’s the wrong profile.
If you need the structural strength of wires, and therefore monofilament, then round wire is still a better option than flat PE. I have found flat monofilament, which is rarer than a hen’s teeth, but it is so wide that I am not even sure it could be used on the 1/32 Swordfish …
If structural strength is not needed, then Prym or the like can be used …
Hubert
-
1
-
1
-
-
On 6/24/2023 at 11:29 PM, GazzaS said:
I like jets in flight... looks better than on the ground...
The epitome of this being the F-22 : weird - if not ugly - looking squatting on the ground, but impressively beautiful in flight …
Hubert
-
2
-
-
6 minutes ago, BlrwestSiR said:
The Meteor was a detuned Merlin used in several British tanks. I think many Russian tanks had V-12 engines as well.
You’re right. I just did a quick search. Many tanks had a V-12, including the German MBT of WWII, the Russian tanks from T-34 to T-72 …
Plus trucks, and even boats …
(the cars and aircrafts are an easy group to identify)
Hubert
-
2
-
-
One subject that always appealed to me was « 12-cylinders engine». That would open the field to a lot of aircrafts and, on LSM, some cars and even, I believe, some tanks
Hubert.
-
1
-
-
7 hours ago, ScottsGT said:
Just trying to get me to spend more money, aren’t you?
That’s nothing compared to Kevin ‘s extraordinarily bad influence. That microscope and screen is some seriously great and useful stuff for modelling, but it ain’t cheap … See what you done, Kevin 🤬 ?
Hubert
-
4
-
-
Great choice ! I have found memories of the Monogram ‘57 ‘Vette I built in my youth years. I api ted it blue and cream 🙄
Hubert
-
4
-
-
2 hours ago, DocRob said:
The result looks absolutely fantastic, but your processual planning seems to be a bit on the weak side, or was that only to have an excuse to miss the deadline of the GB, Hubert?
I can feel all the pain you went through and my nerves wouldn't have kept up with it, I guess.Cheers Rob
I think you nailed the issue, Rob
! That was piss-poor planning on my side!
I looked at that bang-seat picture I don’t know how many times without managing to get the full picture. And not only the pic, but the drawings from the various manuals, including the tensioning device detail drawing in the Ginter book. Then my brain stopped farting, but I had already committed to assembly, so it was disassembly, and more than once !
Ditto for the paint: I had read, and it’s mentioned by Fisher, that the seat was Interior Green. Then I re-read the painting instructions in one of the manuals, and found out that the tub was also painted Interior Green !
!
If I had any prejudice that I was good at planning my modelling tasks, than this misconception was shot down in flames by my Cutlass

Sic transit gloria mundi …
Hubert
-
3
-
2
-
-
Well, as this GB is drawing to its end, it’s time to show where I am standing with it. It won’t be much of a surprise if I say it’s nowhere near finished.The last weeks have been a demonstration of the consequences of poor planning, and not understanding well enough what I was seeing and what it meant for the project. Most of the issues have arisen from working on the ejection seat. But first, this is what the original looked like :

Plenty of info to integrate, and to translate into a model. Not in particular the safety belt, and the hint at how it goes above the seat tubing structure into what is probably a tensioning device ( a drawing of which is shown in the Ginter book). Note also ghe rear structure of the seat, with some tubes (the central one being the rocket propulsor). Finally, note the headrest, its attachment to a tubes’ structure, and the way it stands proud of the rear structure, made of I-beams and the top structure bearing an armoured panel, and the face curtain mechanism.
Fisher has represented the seat with one part of the rear structure directly molded with the rear cockpit tub bulkhead. The face curtain / armoured plate structure is an add-on by Fisher, to be glued to the seat bucket, to which some PE parts are added to represent the side-tube of the seat-bucket, and the side leg-guards. They are , es expectable with PE, a bit flat and two-dimensional. The seat harness is also PE, and is glued to the tube structure supporting the headrest.
As I have written, my kit suffered in the past from some resin-tasting and munching by my cat. Fortunately, I could order a replacement from Paul, but the replacement were badly warped in some areas, like the rear bulkhead, the armoured plate/face curtain mechanism or the headrest tube structure. Some kit-bashing between what I could salvage of the original cockpit, and some scratch-building was of the order of the day.
However, I had not understood well enough the details of the seat. For instance, I had scratchbuilt the headrest structure, with tubes, rods, some folded brass sheet, when I realised that the bucket structure and the rear structure needed to go together, and to leave some space for the belt-tensioning device …
So enters the saw to remove a resin plug from the rear of the bucket, and a chisel to remove the rear seat structure from the bulkhead ! Nerve-wracking sequence # 1 !


But then, it dawned on me that the resin on the back of the bucket seat was still too much. Nerve-wracking exercise #2 : get the power tool out to remove the excessive resin with a burr ! Yes, you are right, it’s a bad idea when you have already glued in some delicate parts, which started flying to feed tha carpet monster !
And then the poor planning / bad documentation analysis came back to the forefront : not only the seat, but the cockpit tub, bulkhead, control yoke and pedals were not black but interior green ! Ok, I need to mask the side consoles without damaging any of the details there … And nerve-wracking exercise #3 done !

On the above pic, you will also notice that I have rebuilt and added to the bulkhead the guides between which the the seat I- beams slided during the ejection sequence. These were made with some folded brass sheet, and plastic rod « rollers ».
I had annealed the Fisher-supplied seat harness, but I was still struggling with the fact that it was not a good representation of the tensioning device behind the bucket. And then the carpet monster ate one half of it !
But these early ejection seat harnesses used basically the same model as the WWII prop-planes harnesses. And I had a supply of those, from HGW, in the AM stash. Those of you who have used them know what treading the harness through the PE buckles can be : nerve-wracking exercise #4 !(Btw, although it’s here, done in full 10-pieces detail, I forgot to take a puc of the rear of the bucket with the harness-tensioning device - sorry)
And here is the result of 4 weeks of doing, undoing, redoing, re-undoing, re-re-doing, and repainting :


The next pics shows the seat blu-tacked together. The « floating » wire-bundle on the right side of the rear seat frame actually attaches to the side of the bucket, so this will be done when the seat is put together. I am still unsure whether this should be done now, or after the cockpit tub has been glued in position in the front fuselage.


And a final view of the repainted cockpit tub …

Time to move on to detailing the front LG bay. The below pic shows what Fisher is supplying. Two point to note: 1) the big tube on the bottom left of the bay is already and add-on. It is the tube that brings compressed air from one of the engines to the pipe on the landing gear that feeds the turbine pre-rotating the wheels before landing, to reduce the whiplash effect on the gear at touch-down. 2) the ram in the center is actually the one that actuates the closing of the gear-bay doors. As such, it is too long, and needs shortening, as below :

Note on the bottom of the bay the compressed tube is prolonged. The ribbed effect was done by coiling some 0.4 mm wire around a 1 mm dia solder wire.
And that is where I stand (with a bit more details still done since) one day before the GB ends !
Hubert
-
7
-
-
4 hours ago, ScottsGT said:
I just realized that there is no Sunday July 10. Does this mean it goes on forever? Or July 9, tomorrow? Or Monday July 10?
YESSSSS
!
Now I can see my « pot-de-vin » worked. The next Sunday July 10 th is in …2033 ! Now I have ample time to finish my Cutlass 👍 !
Hubert
-
3
-

D’Oh! What did I do to myself!!??!
in General Discussion
Posted
Where is this talked-on drone delivery when you need it 🤬 ?
Hubert