CrankyCrafstman
-
Posts
1,350 -
Joined
-
Last visited
Content Type
Profiles
Forums
Events
Gallery
Everything posted by CrankyCrafstman
-

This is for Jeff
CrankyCrafstman replied to CrankyCrafstman's topic in LSM 1/35 and Larger Work In Progress
Nope he's shiftin gears...lol Ron G -
This is for Jeff
CrankyCrafstman replied to CrankyCrafstman's topic in LSM 1/35 and Larger Work In Progress
I just realized I have the fuel, brake and the clutch pedels bass ackwords...Opps! Easy fix though. Ron G -
This is for Jeff
CrankyCrafstman replied to CrankyCrafstman's topic in LSM 1/35 and Larger Work In Progress
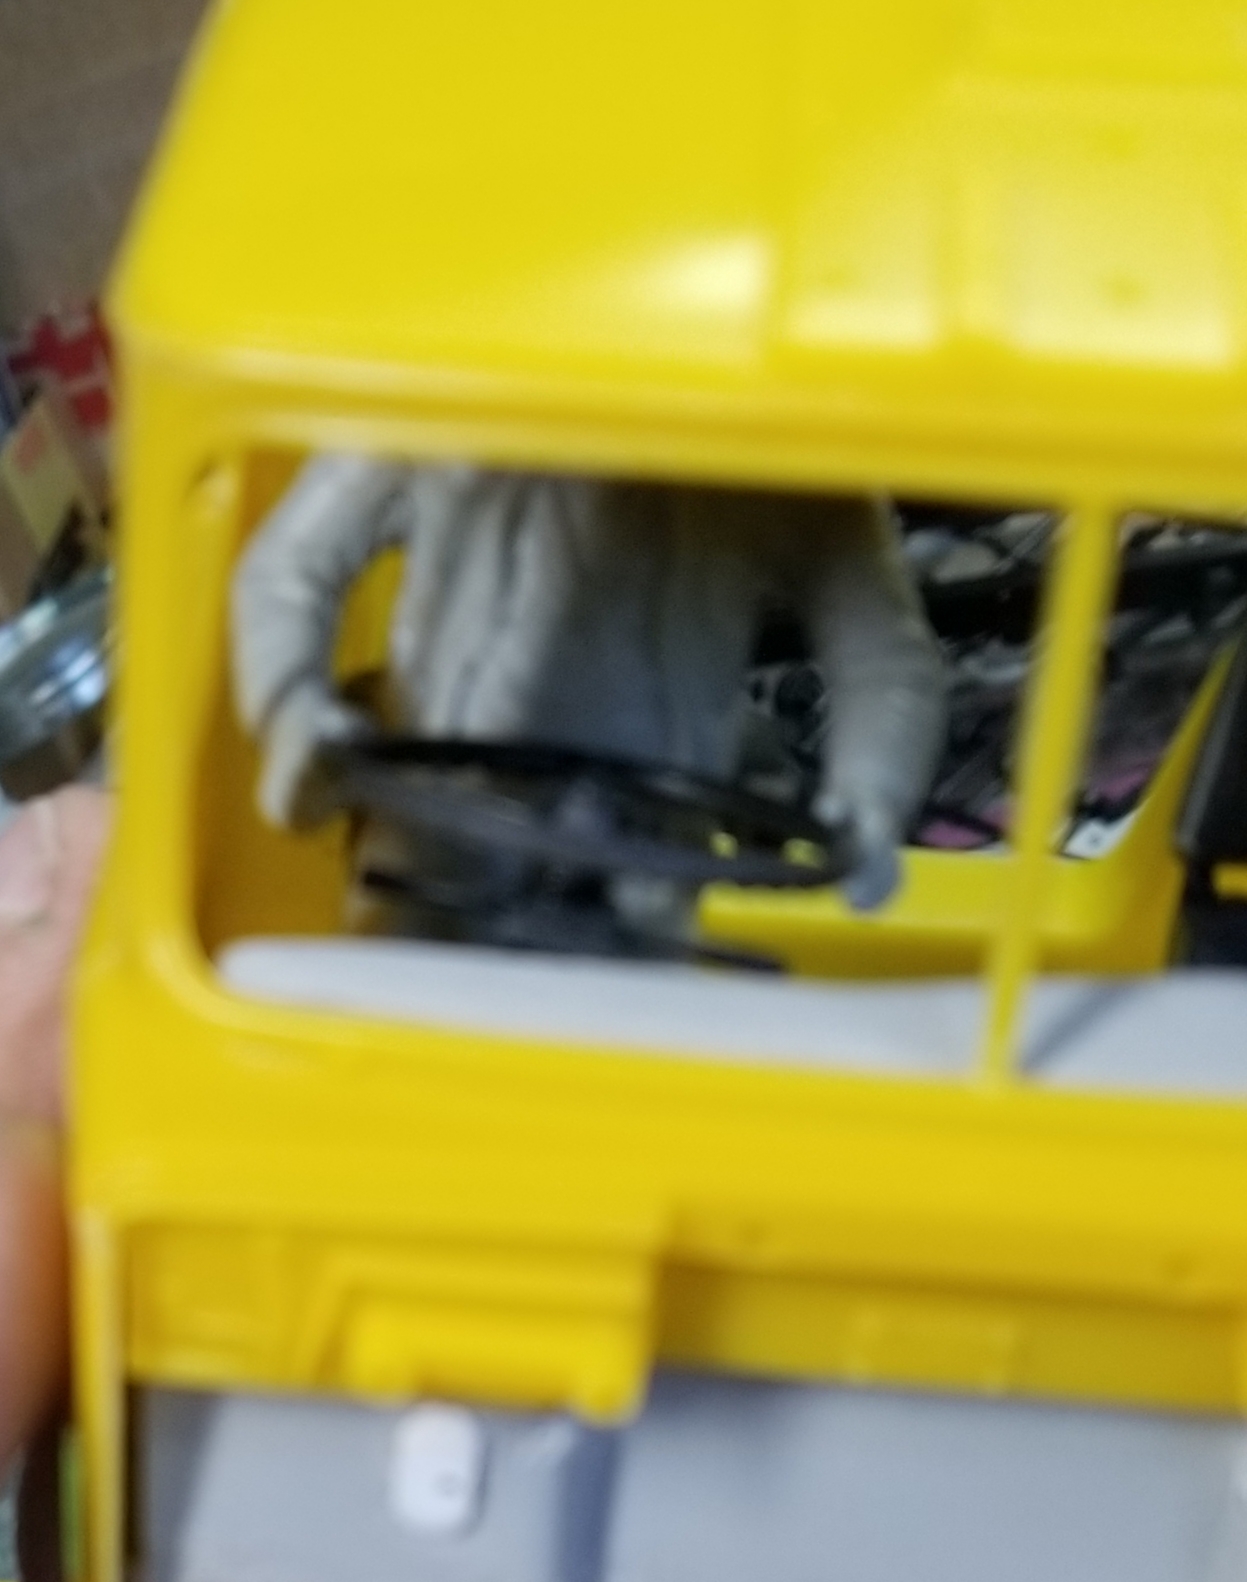
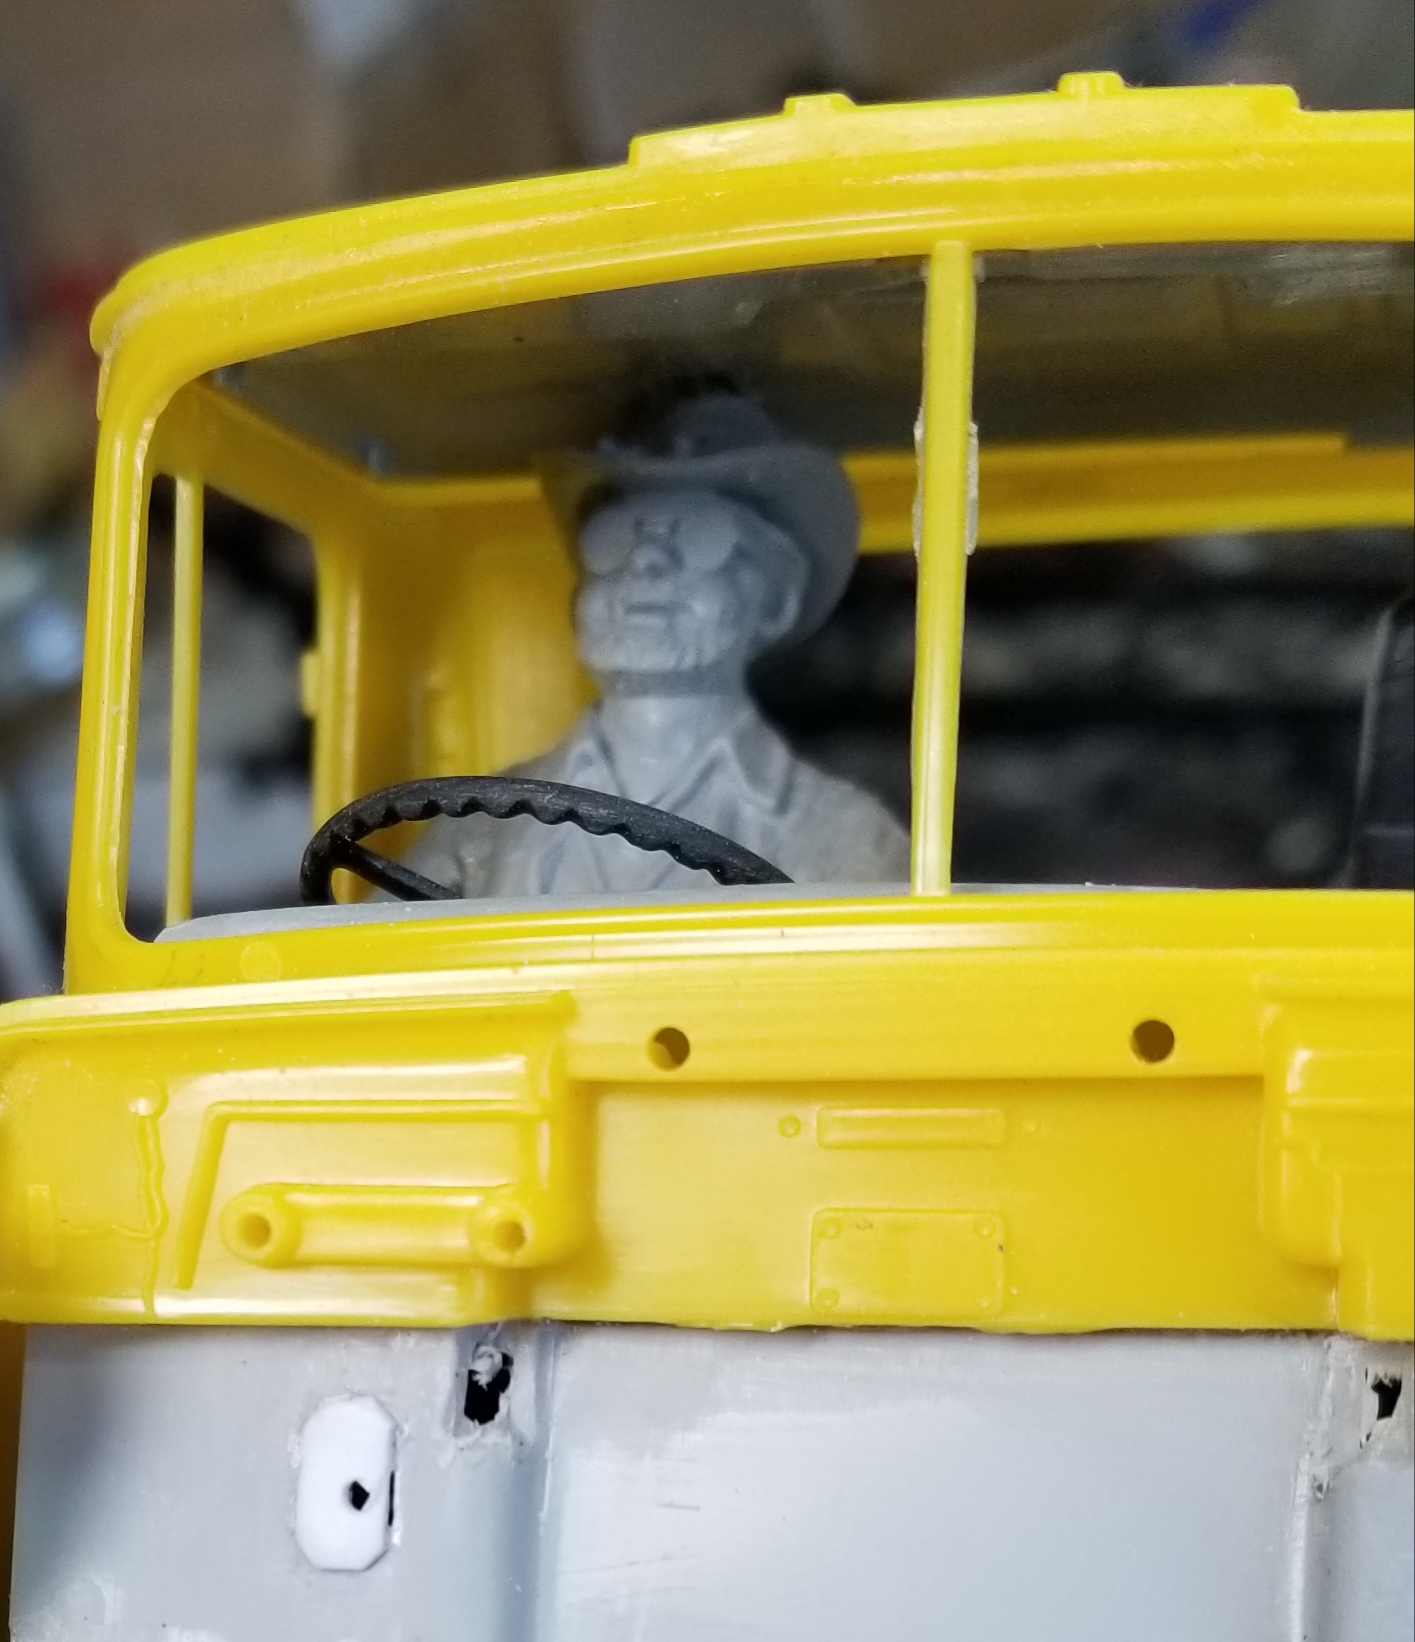
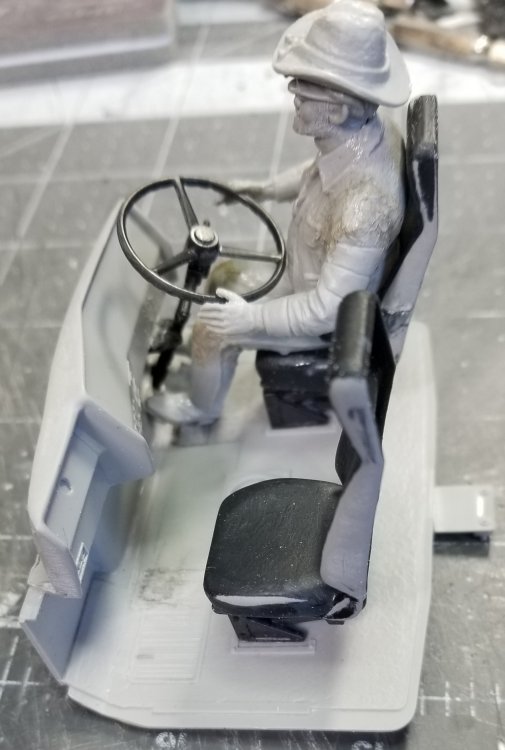
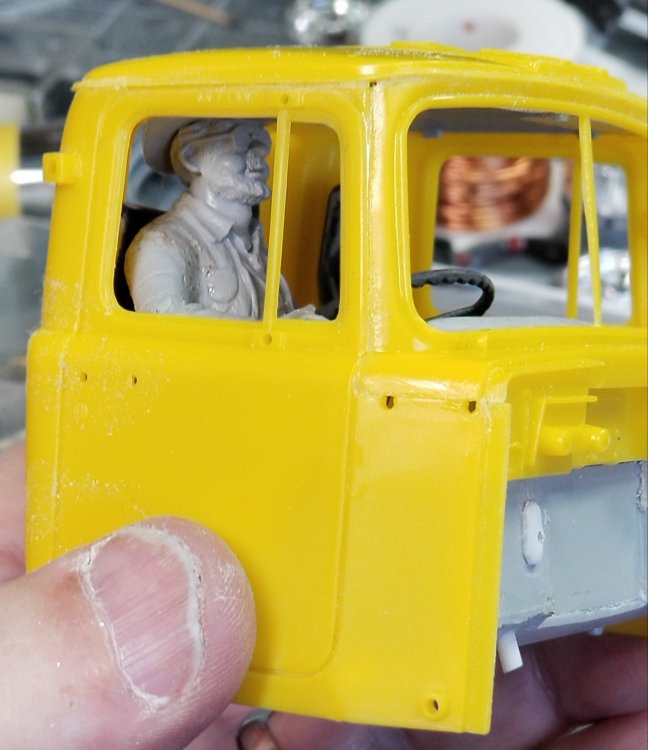
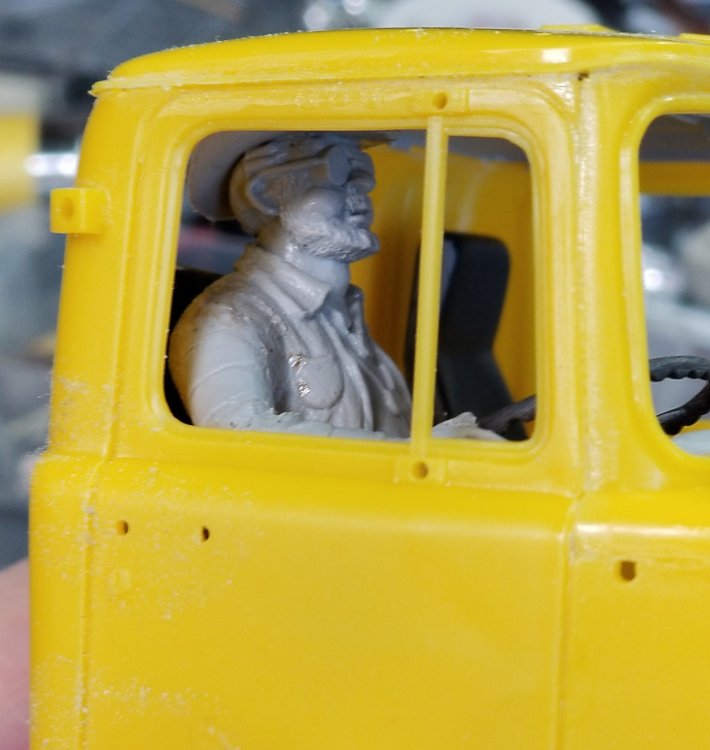
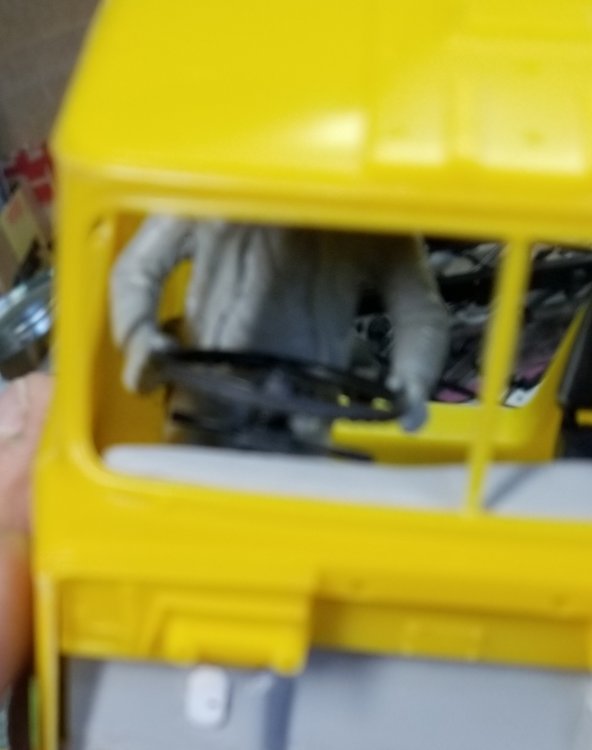
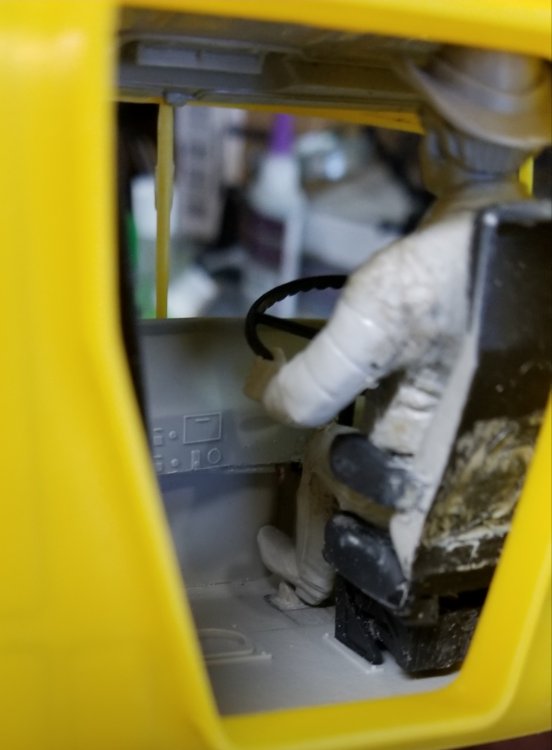
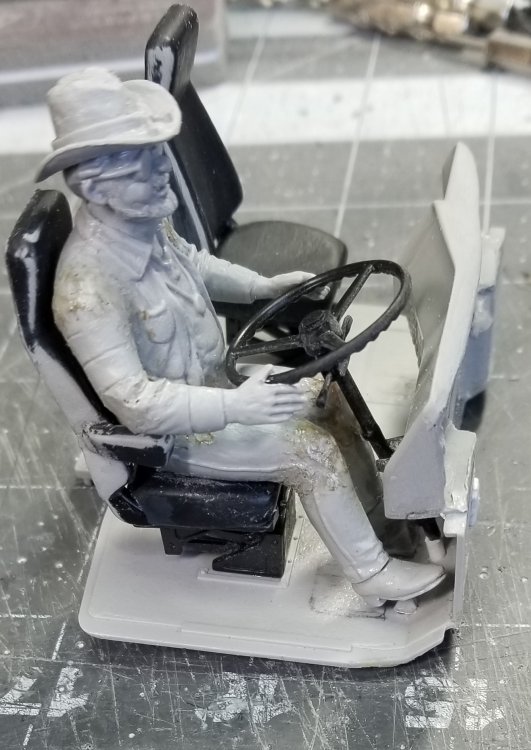
Hey guys Here's the final art work for the mural Jeff. I'm going to add a round tag under his collar that will be red with a white "U" on it. I also did some work on the Mack Superliner cab interior. I took the left hand drive dash from the Western Star and cut it up to fit in the Mack. It's not as wide and way deeper then the original dash for the Mack, but after some plastic magic...lol it fits great. this view shows the Mack interior with the driver figure that I kit bashed together. I also removed the arm rests from the two seats snd added them to the driver's seat in the down position, the passenger will not have them. This was not easily done, I had to cut the boots off of one set of legs in order to add them to the seated set of legs, after I removed the feet with the sandals off of those. I put the torso withe the cowboy hat onto these, then I added the arms from the seated figure to the final figure. After this I had to use a soldering iron to heat the arms and legs to bend them into position...wheh! this view shows the driver figure in the driving position. closer view of the driver. He actually looks a little like me...lol this view shows that his hands are on the steering wheel. this view shows that he just barely fits in the cab. I had to lower the seat mechanism and make a depression in the roof interior panel to make this work. this view from the rear shows that his feet sit on the fuel and brake pedals. this view shows that his right foot sits on the clutch.pedal. well that's it for now be back with more updates soon. Ron G

-
This is for Jeff
CrankyCrafstman replied to CrankyCrafstman's topic in LSM 1/35 and Larger Work In Progress
Since the bullDOG is the Mack mascot. And Australia is the "land down UNDER" How about " UNDERDOG" for a name? What do your guys think? Ron G -
This is for Jeff
CrankyCrafstman replied to CrankyCrafstman's topic in LSM 1/35 and Larger Work In Progress
-
This is for Jeff
CrankyCrafstman replied to CrankyCrafstman's topic in LSM 1/35 and Larger Work In Progress
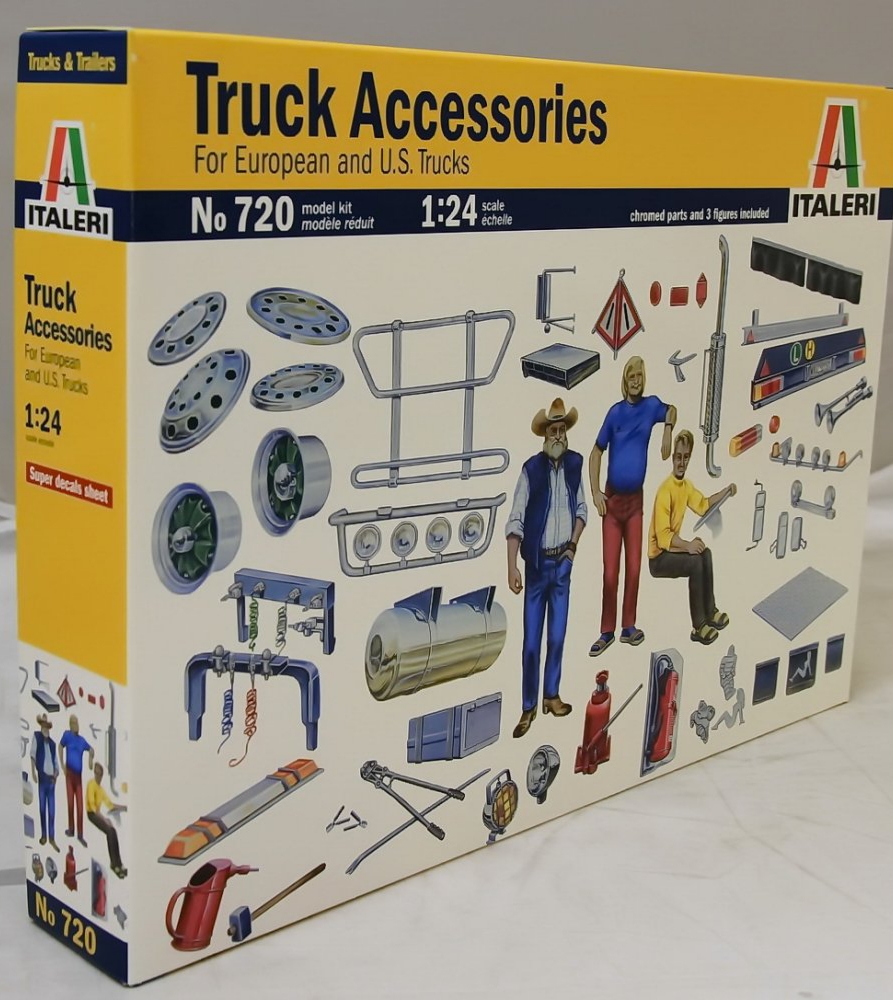
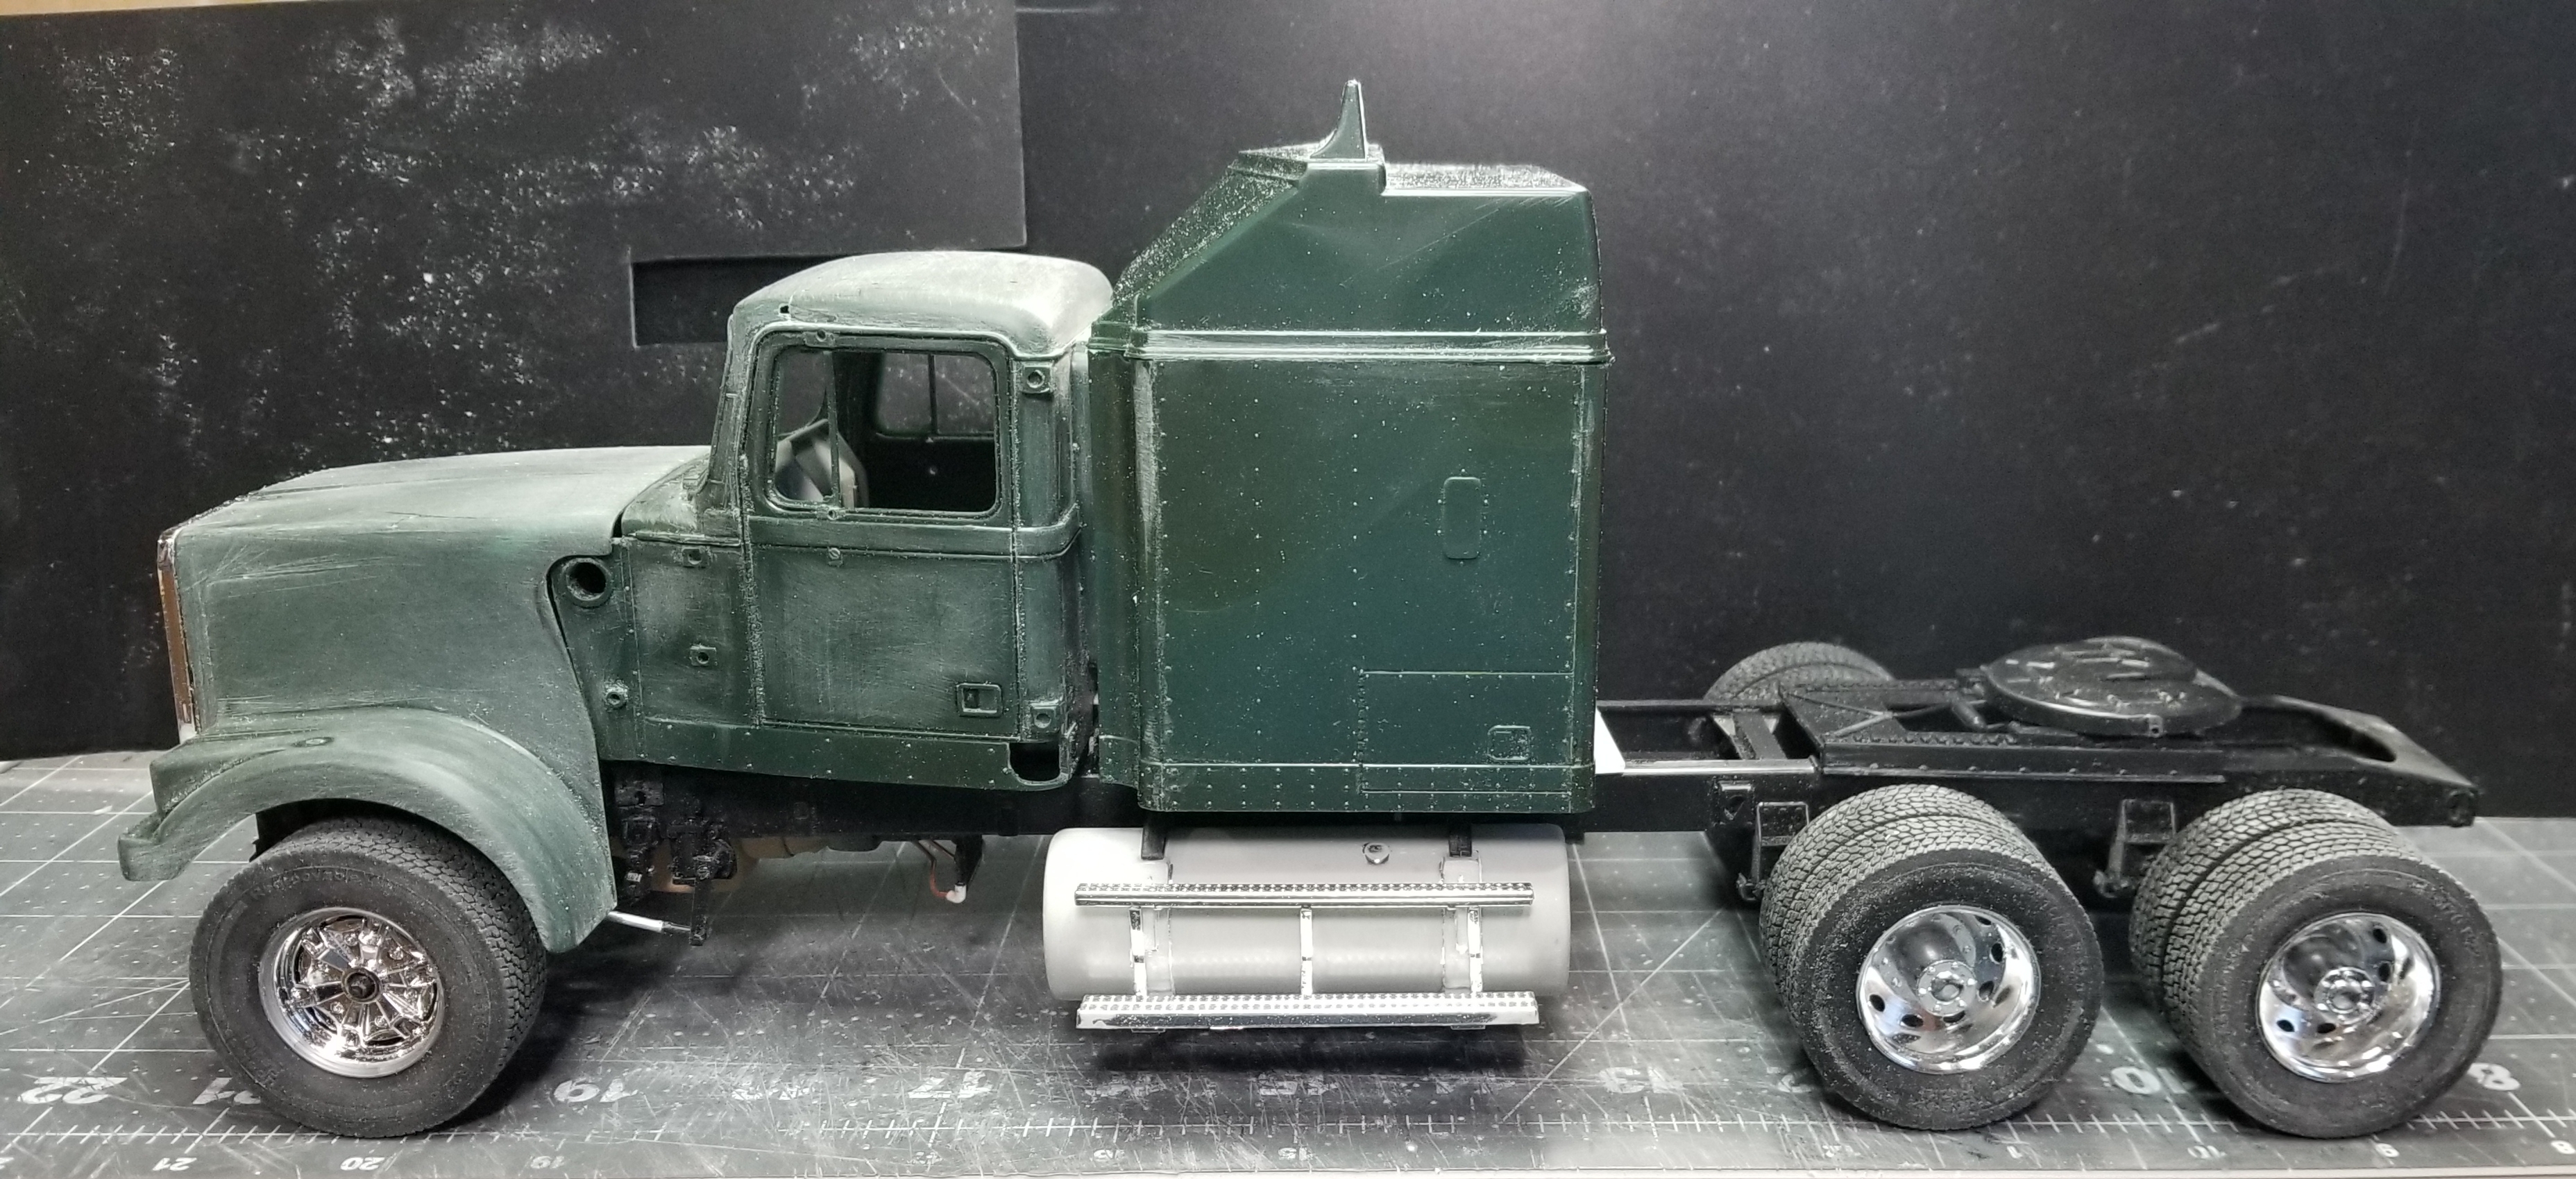
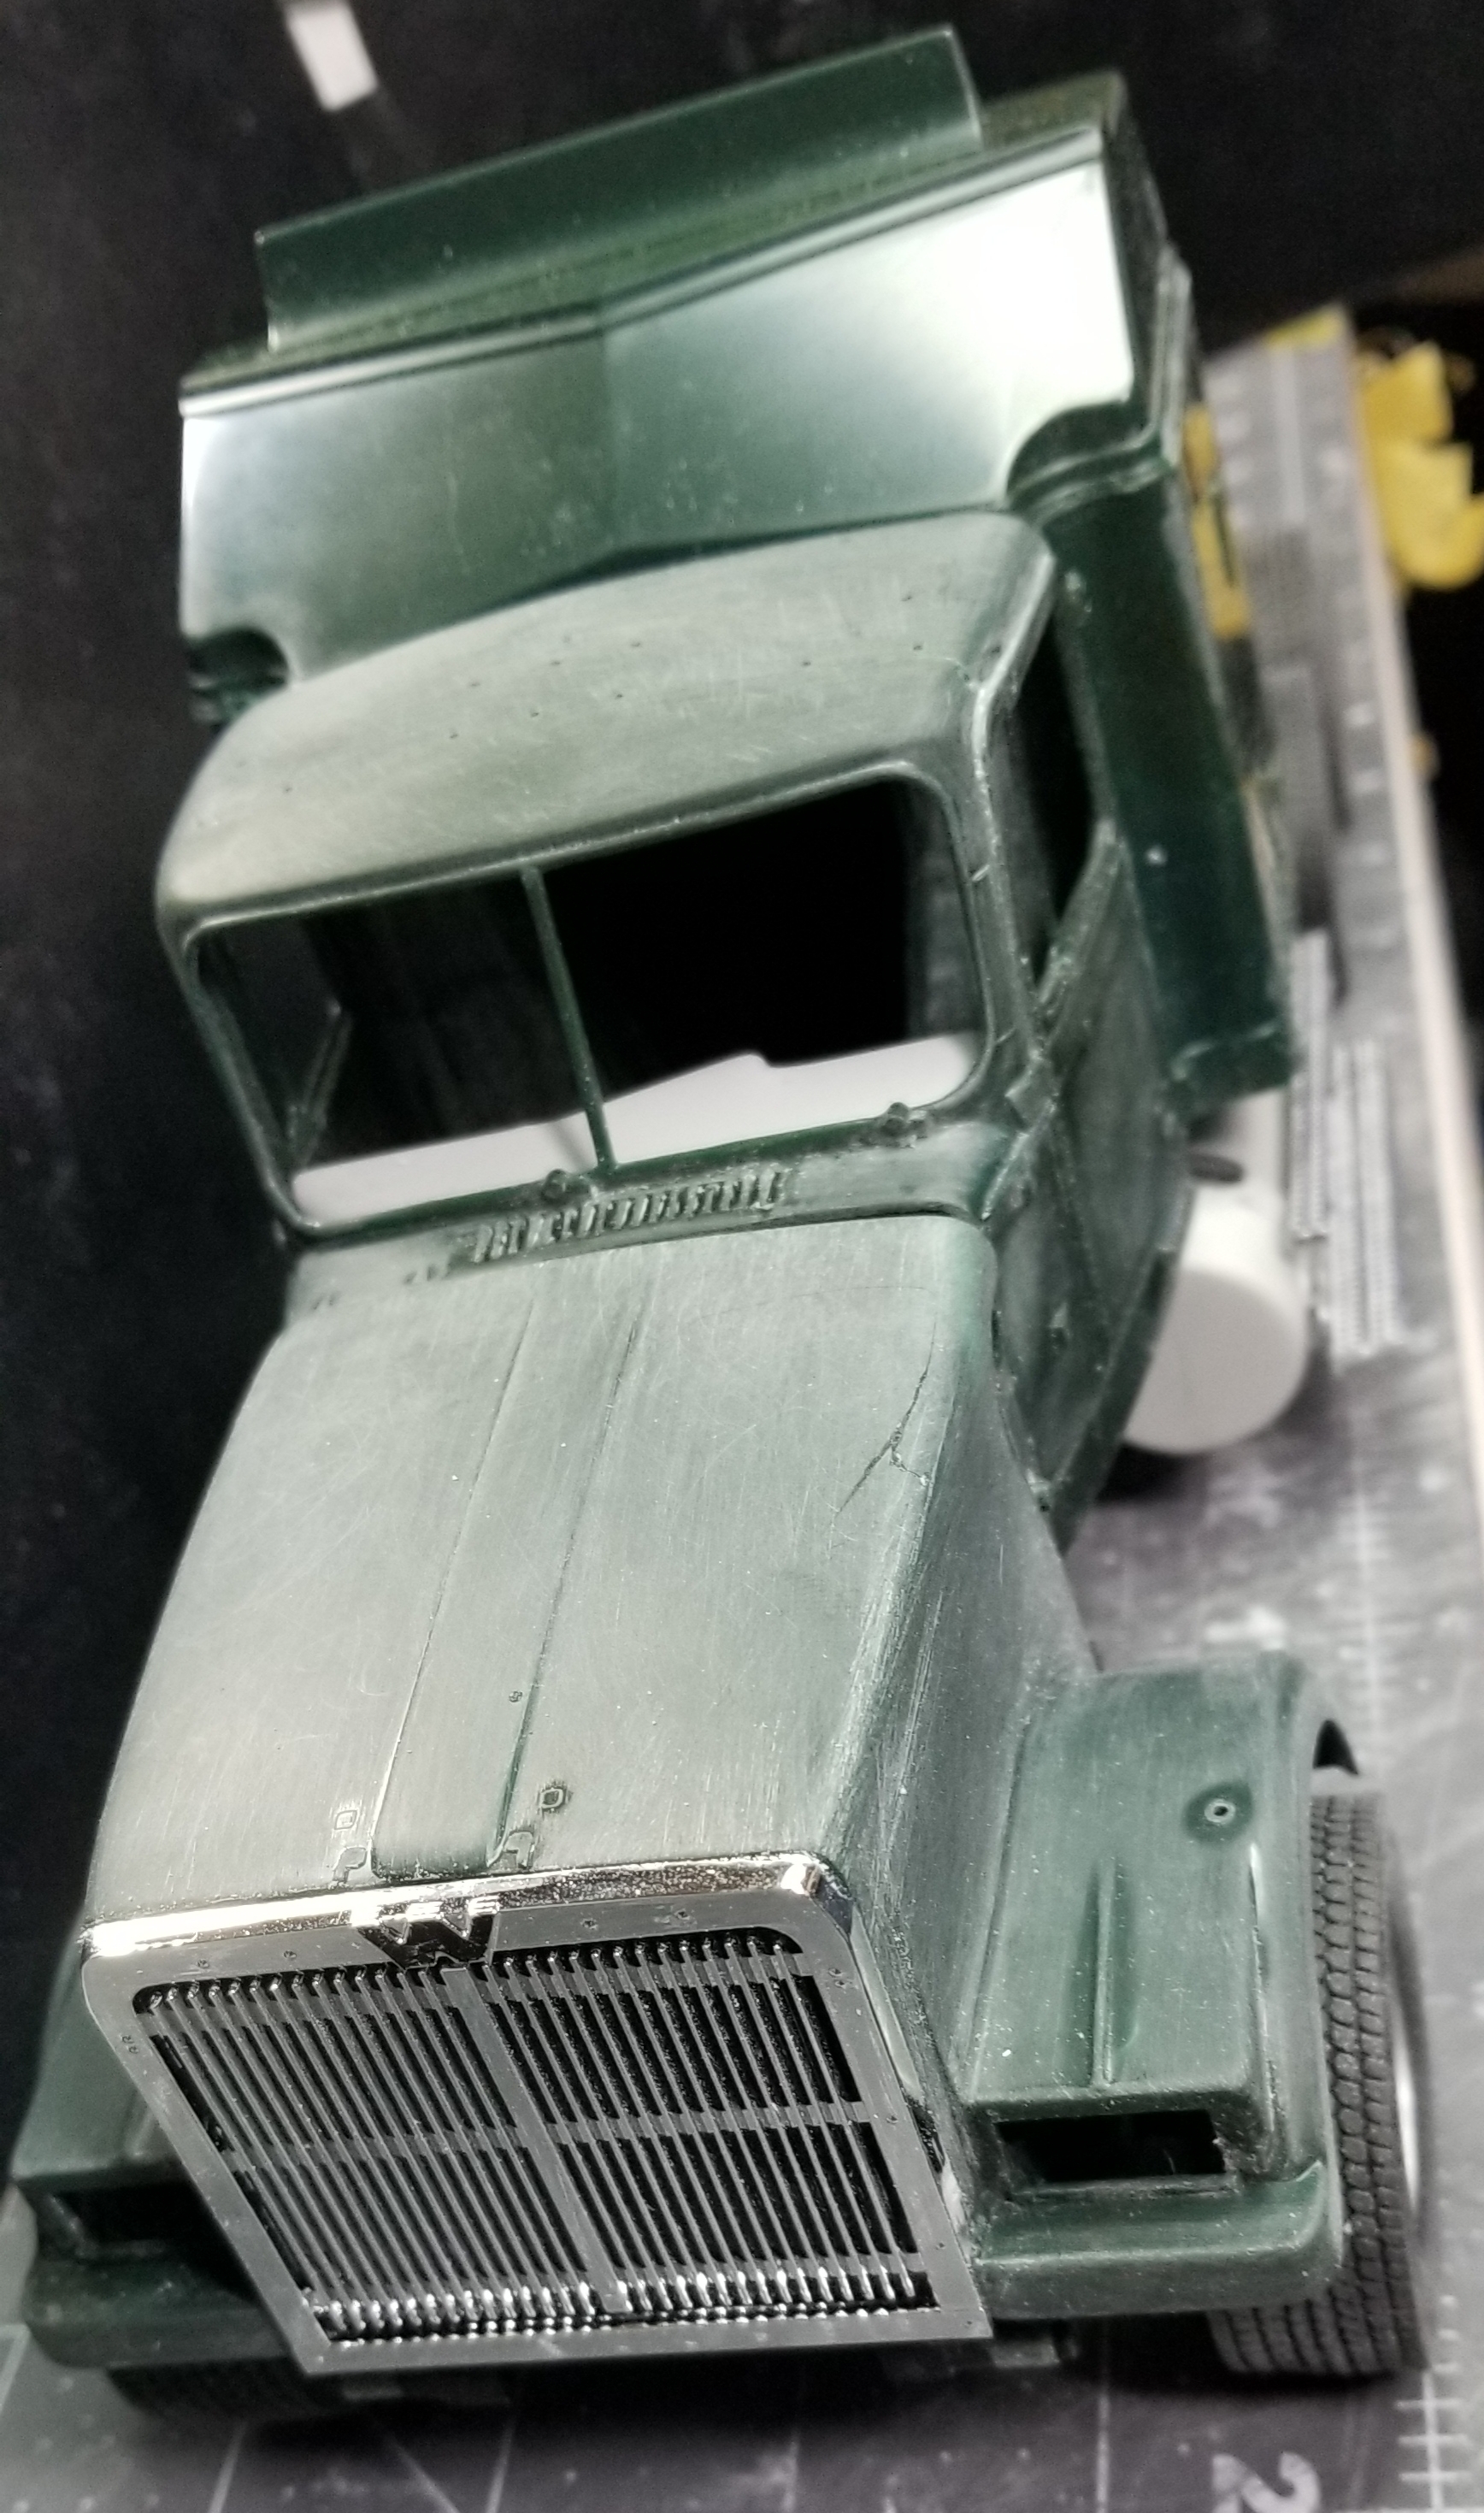
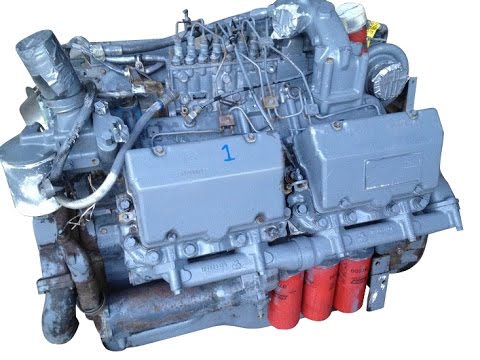
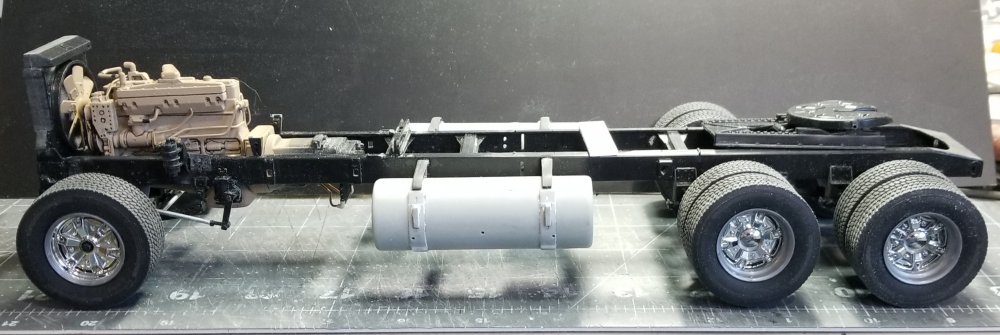
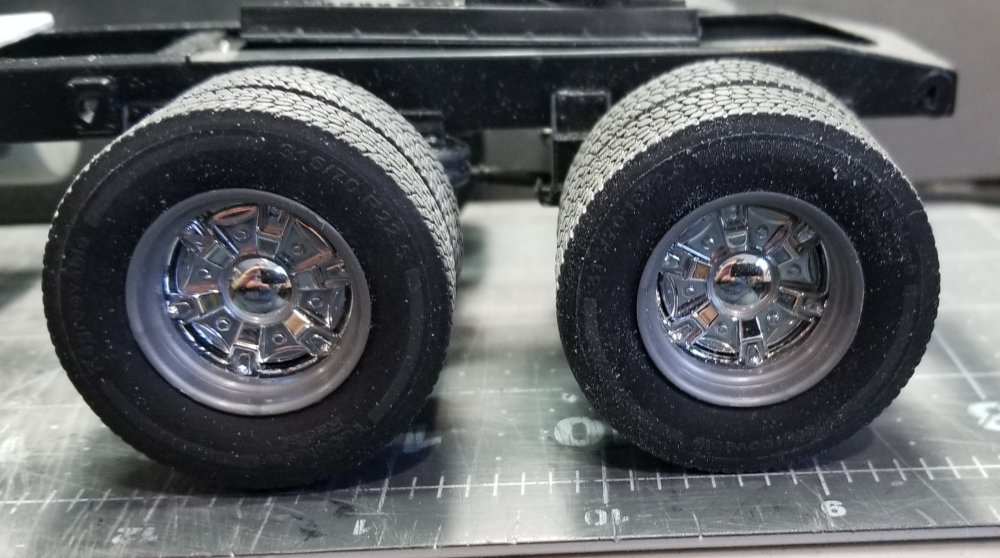
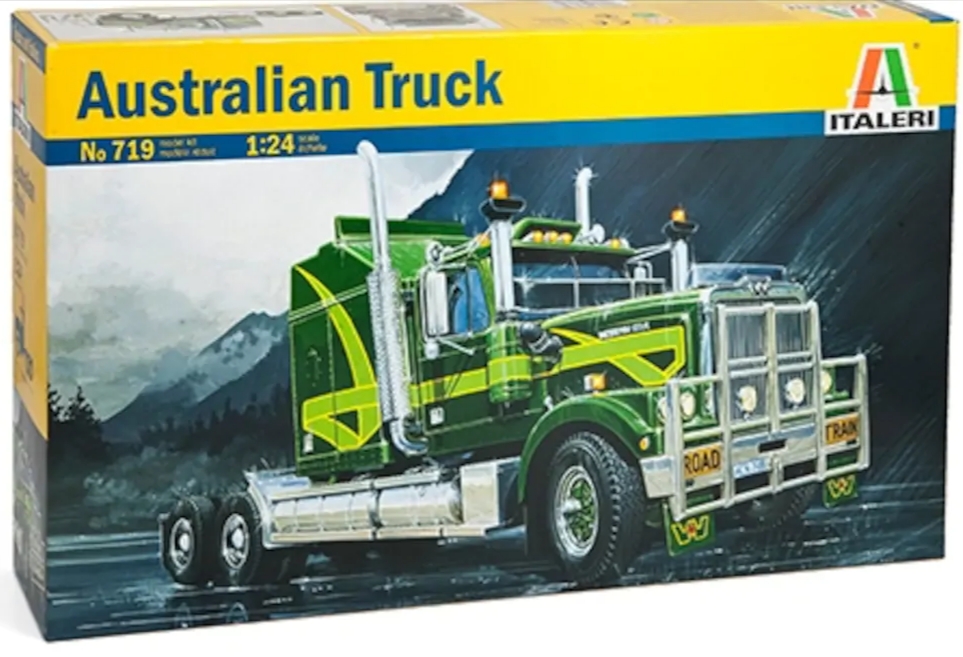
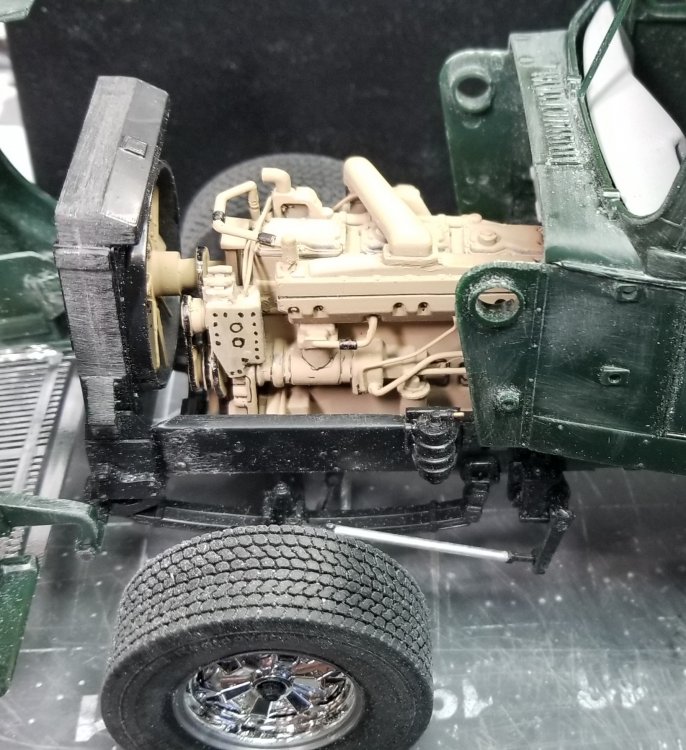
The 1/24 Italeri Mack Superliner kit and the 1/24 truck accessories kit showed up today. this is the basic kit, there will be alot of changes made to it to make it into a Aussie road train hauler! this view shows the truck accessories kit. I purchased this to get the rear Mack 6 spoke wheels for the Mack Superliner. this view shows the Mack E9 that I'm adding to the Mack. YES,...I bought a bunch of stuff from Auslowe model trucks, shh!!!...don't tell the wife, I don't want to be the next Bobbet!...lol this view shows the Bulldog I'm going to hand paint on the back of the sleeper. I need to come up with a name, I was thinking of "Tasmanian Devel Dog. this view shows the frame for the Western Star, but it's the same as the Mack's except it will be right hand drive. this view shows the front 385/65-R22.5 on a widened Mack 6 spoke wheel. this view shows the rear 315/80-R22.5 on custom made Mack 6 spoke wheels. I had to add a outer rim to the chrome outer wheel and I got the inner rear wheels from the 1/24 Italeri European tractors tyres and rims kit, that's where the tires came from. Yeah I had to take parts from three different kits to make these, but I think they look pretty cool. view from the top. Well that's it for now be back soon with more. Ron G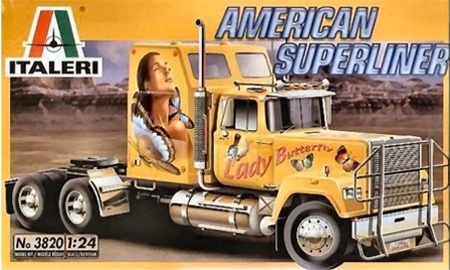

.jpg.dbaaba692e6bbad7d54aa725b8b5212e.jpg)

-
This is for Jeff
CrankyCrafstman replied to CrankyCrafstman's topic in LSM 1/35 and Larger Work In Progress
Thanks guys It will look better when I put the 378 cab on her Jeff. Ron G -
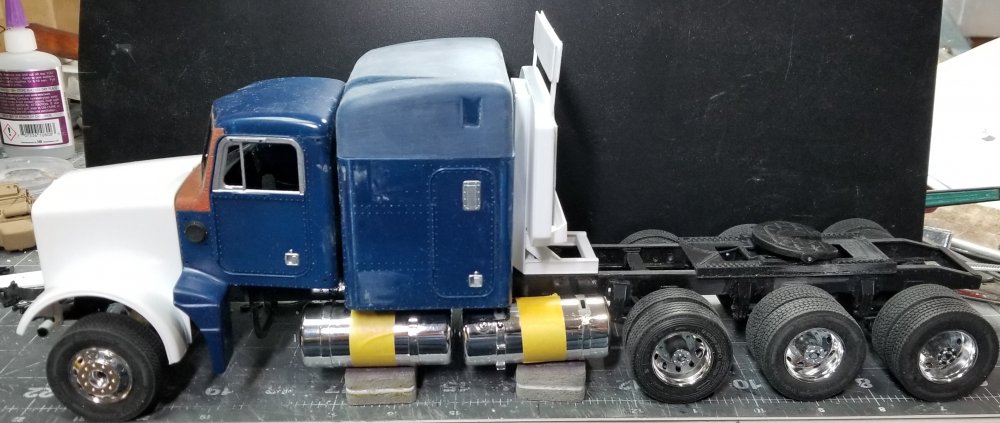
Hey Jeff I can't post a picture in a PM, so here's where I'm at on the Pete. she's not much to look at right now, but she's going to be beautiful all done up in orange and black. Ron G
- 58 replies
-
- 10
-

-
1/24 scale Italeri Western Star
CrankyCrafstman replied to CrankyCrafstman's topic in LSM 1/35 and Larger Work In Progress
Thanks guys -
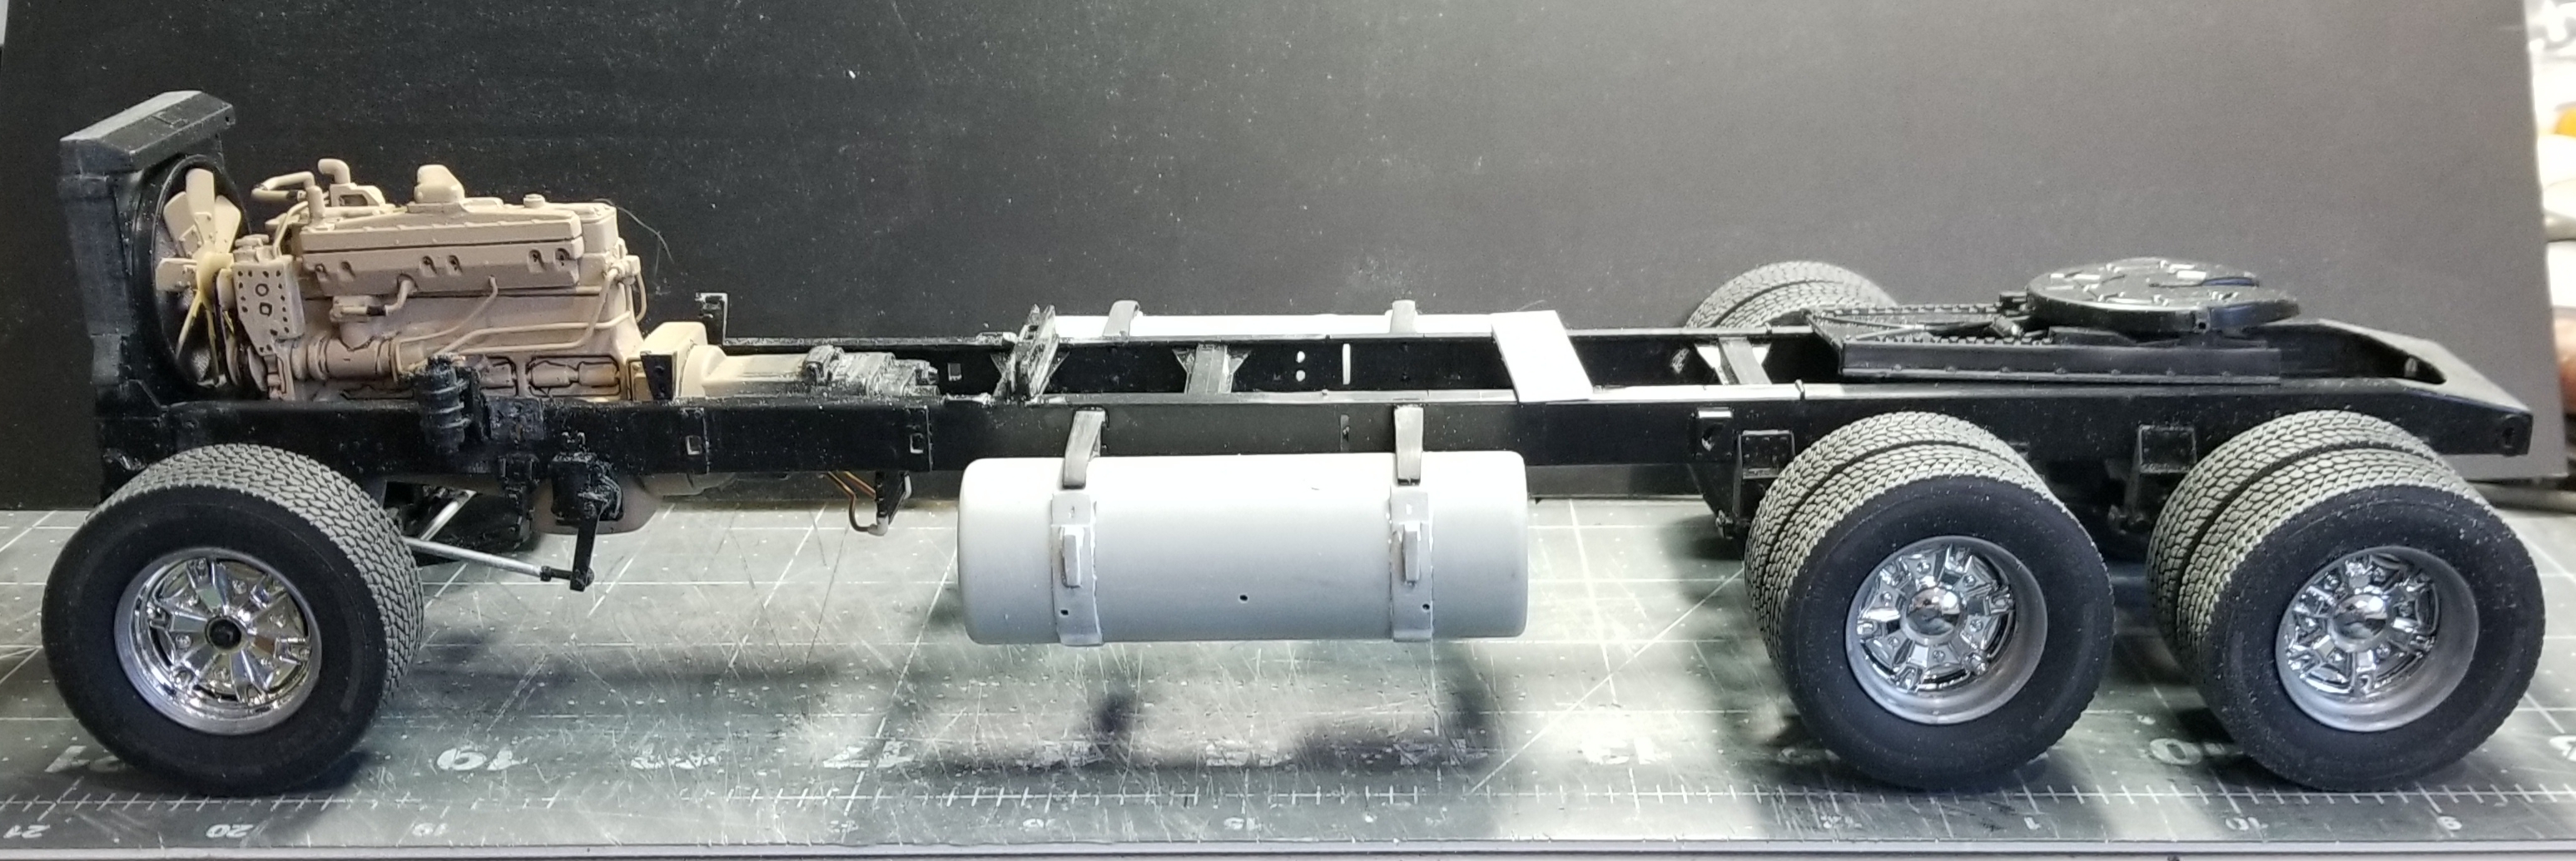
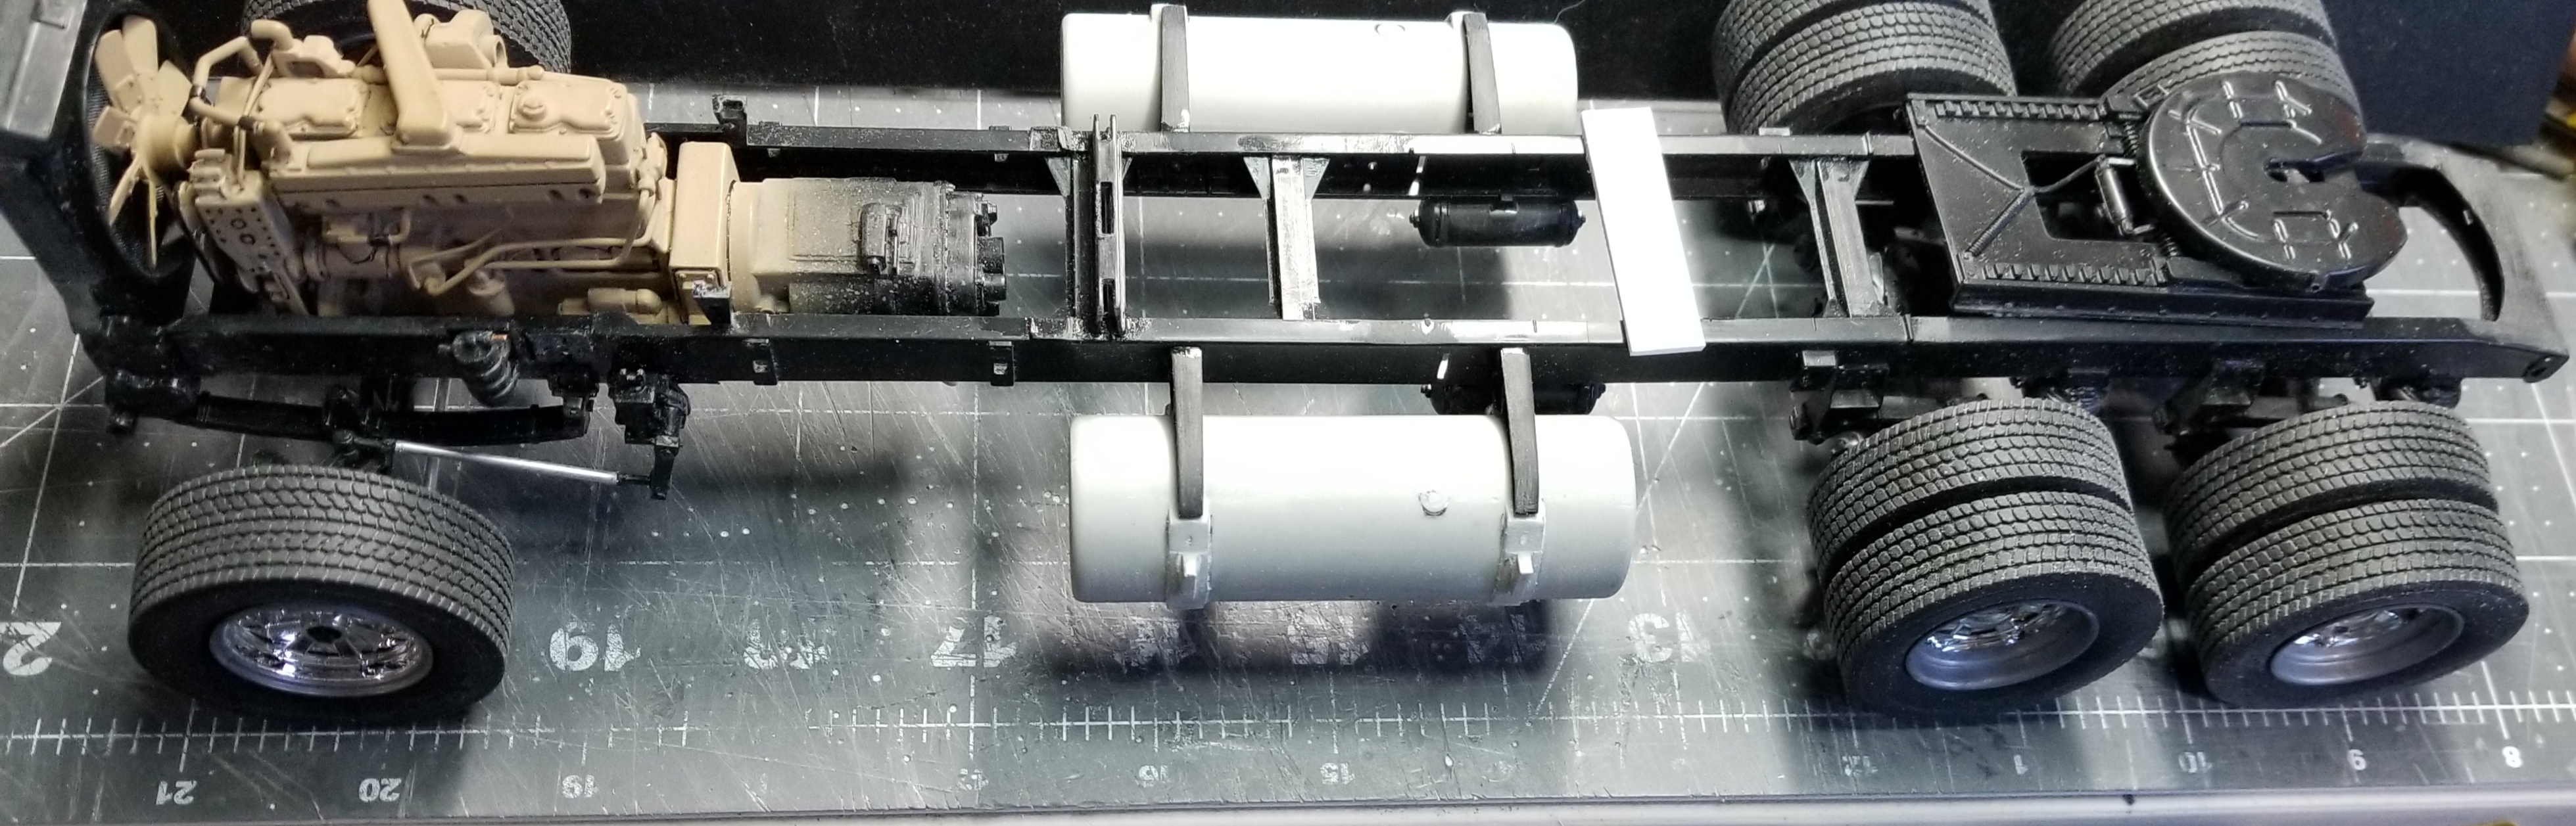
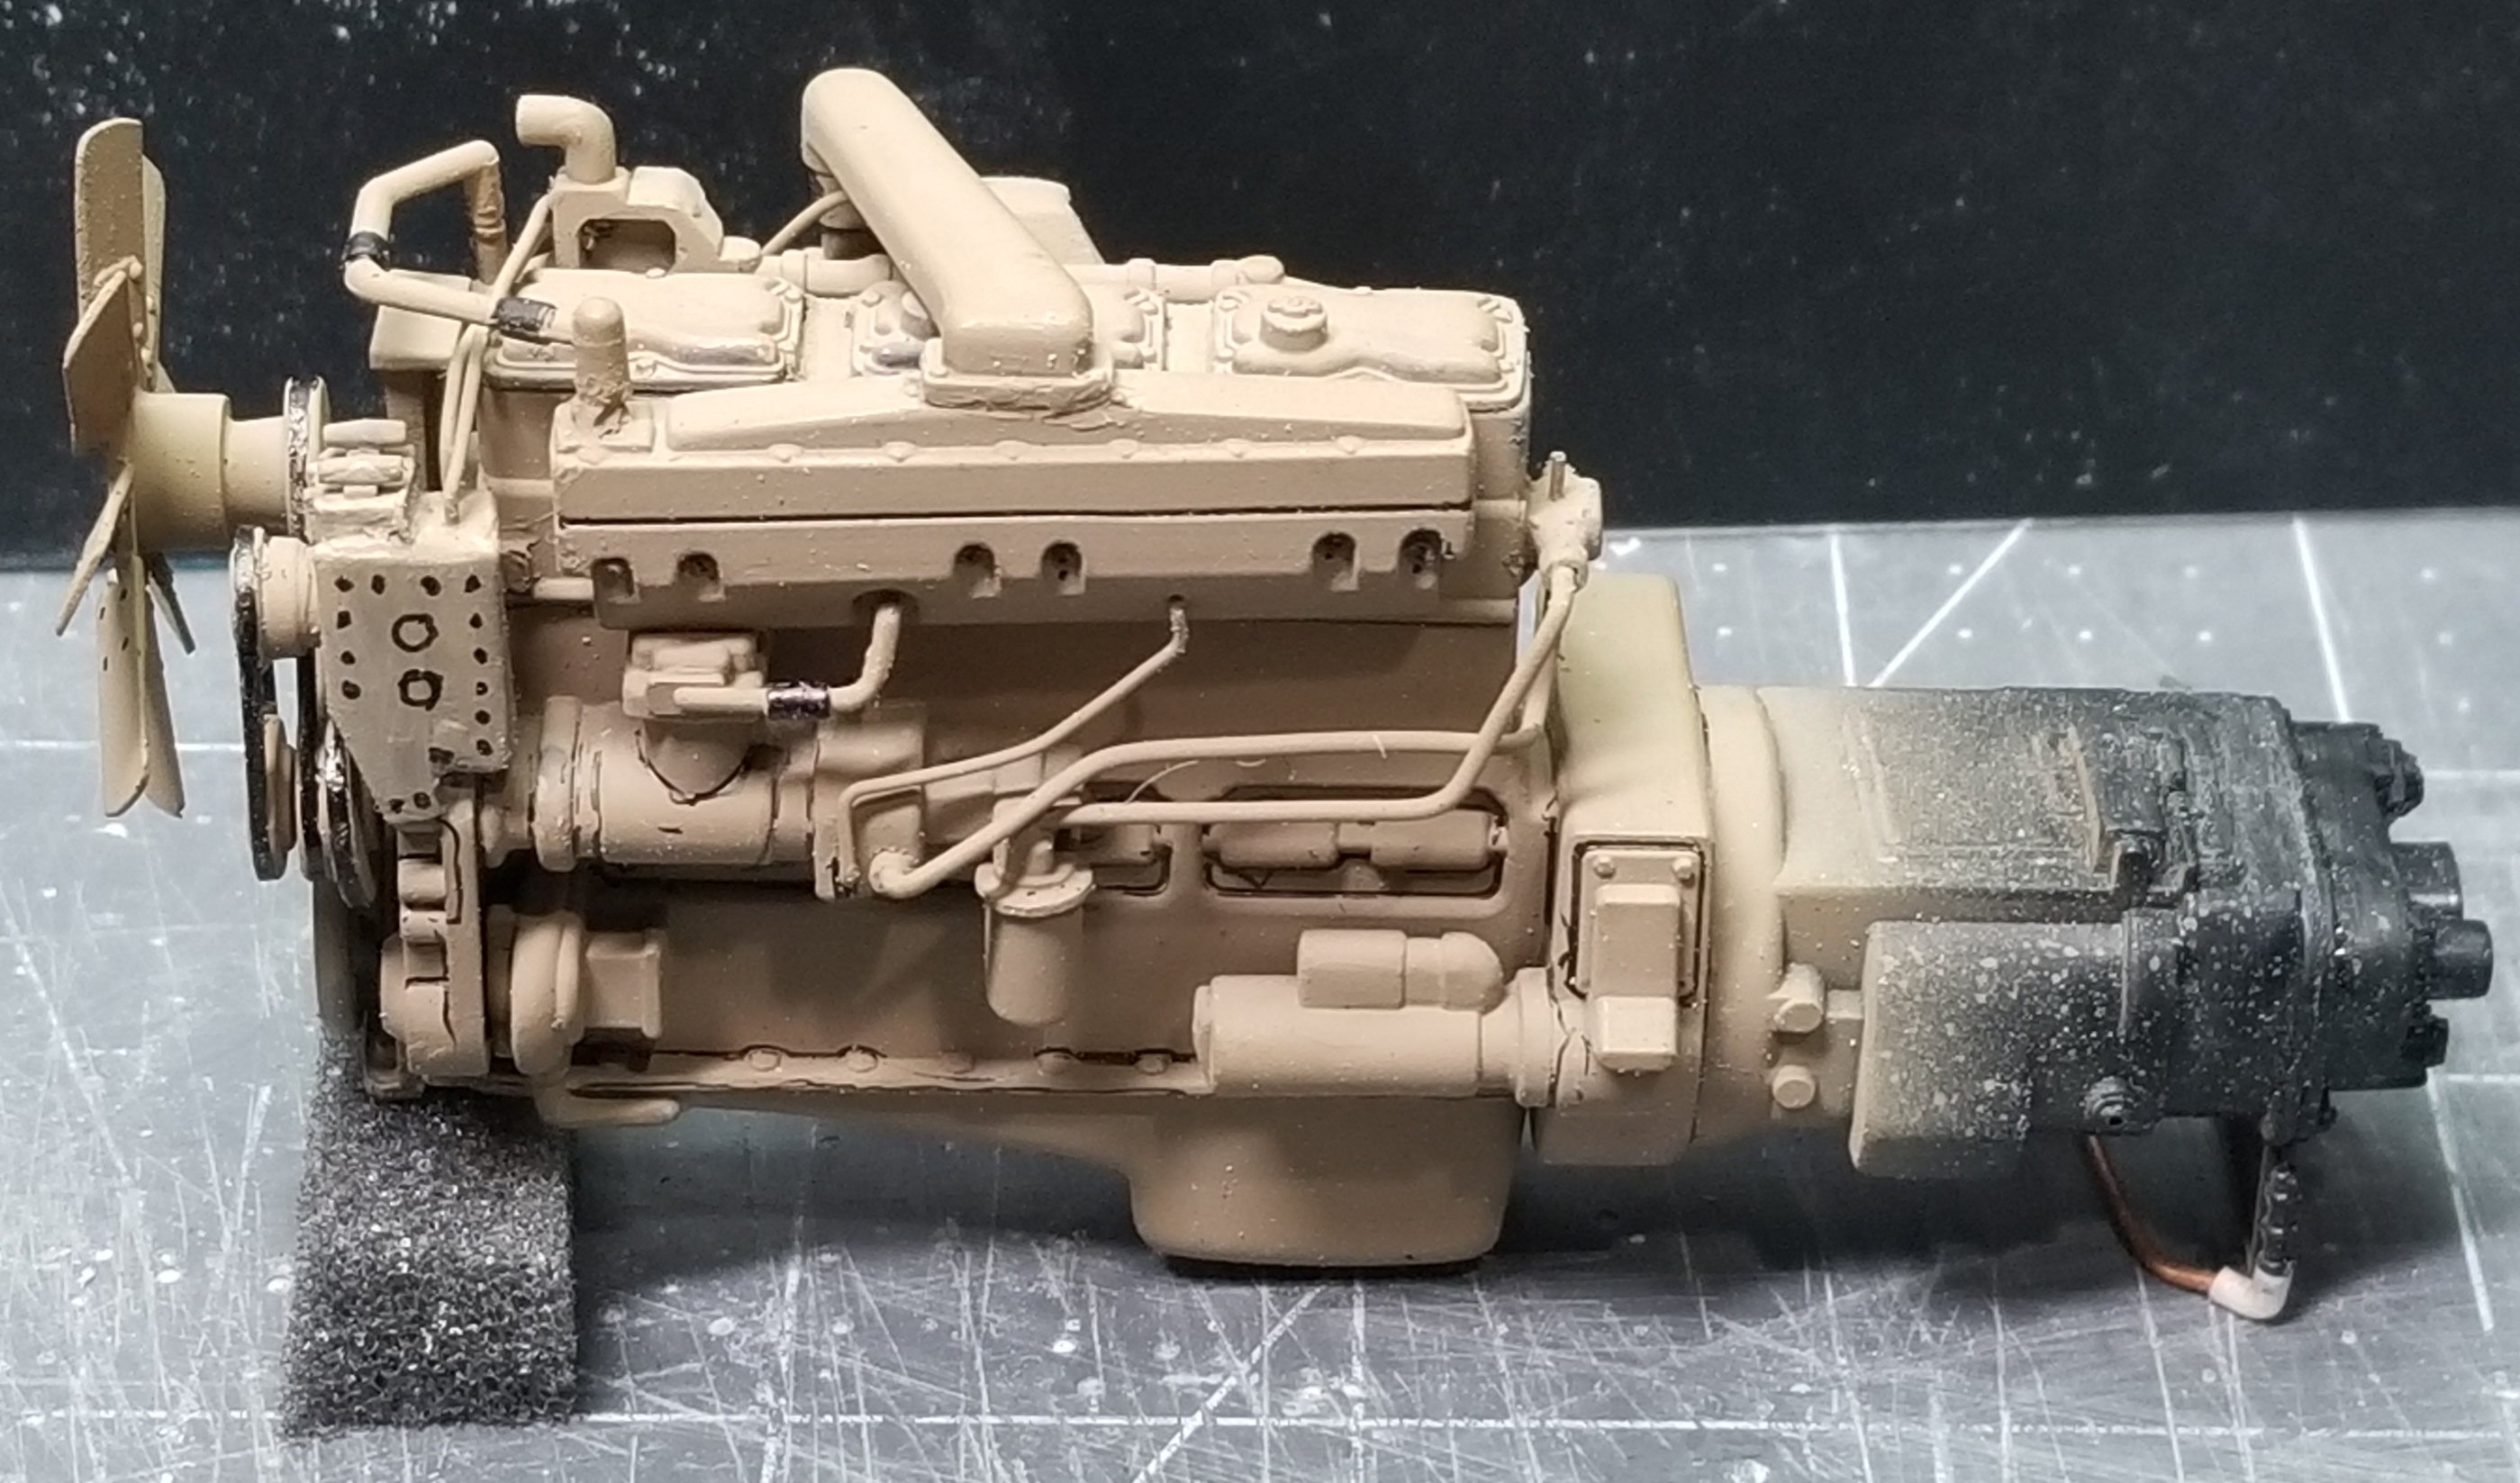
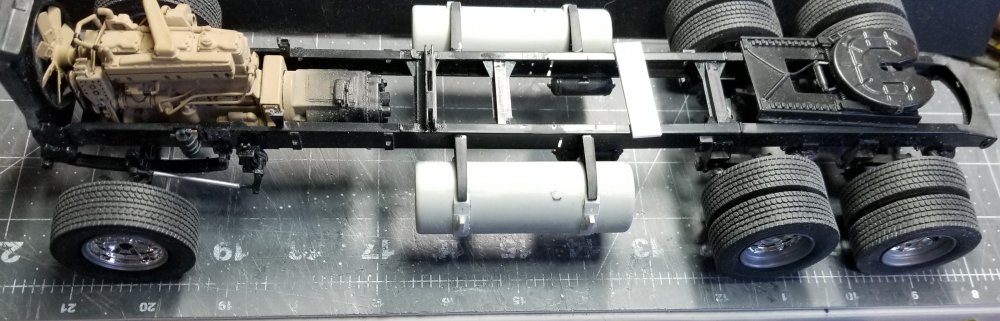
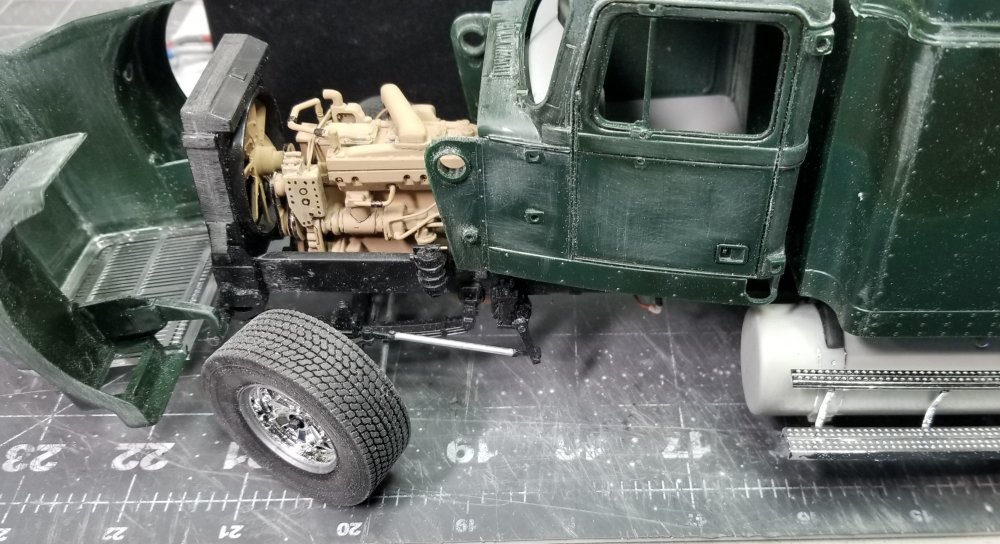
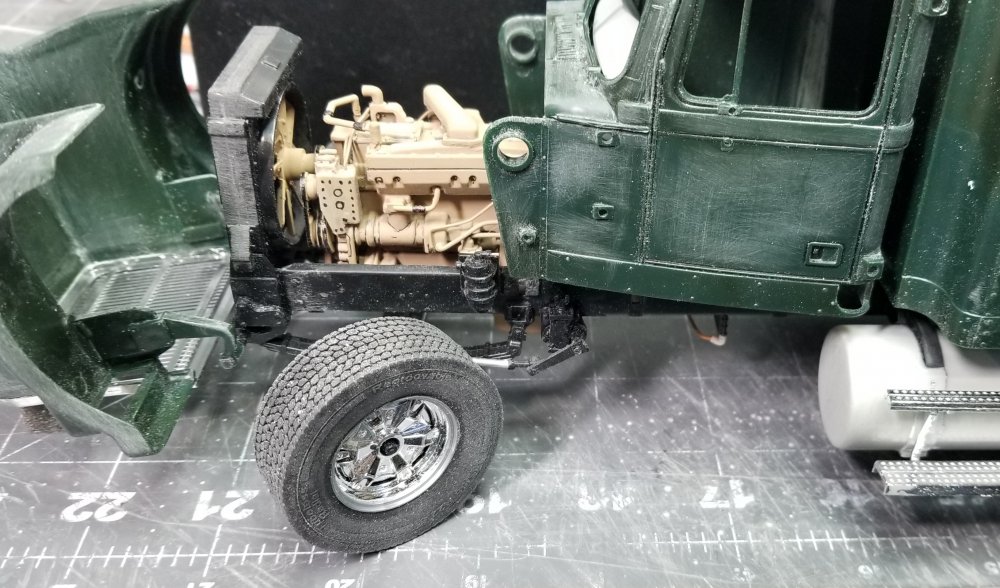
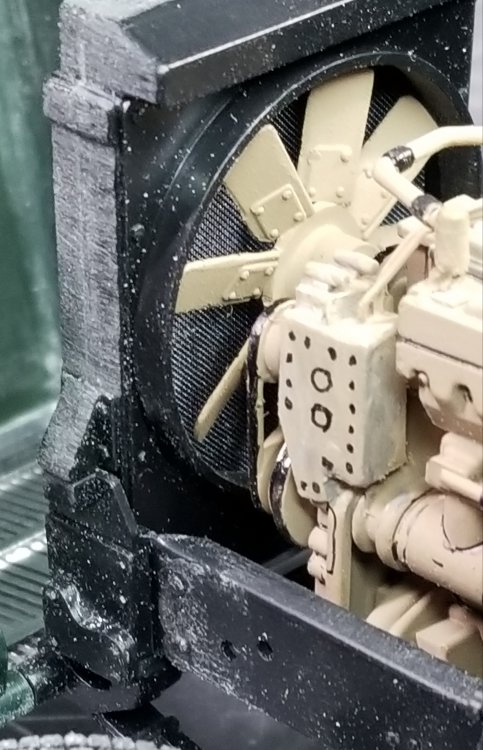
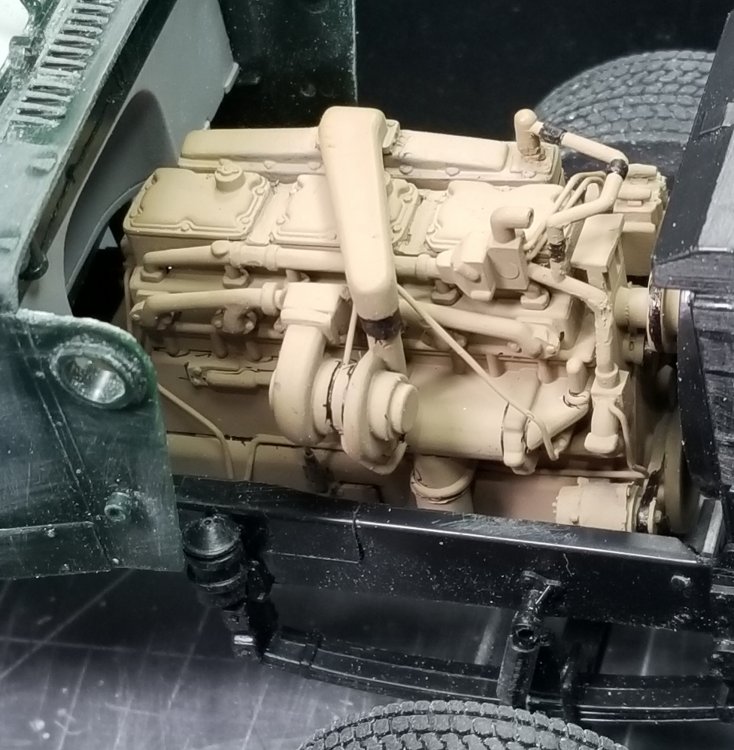
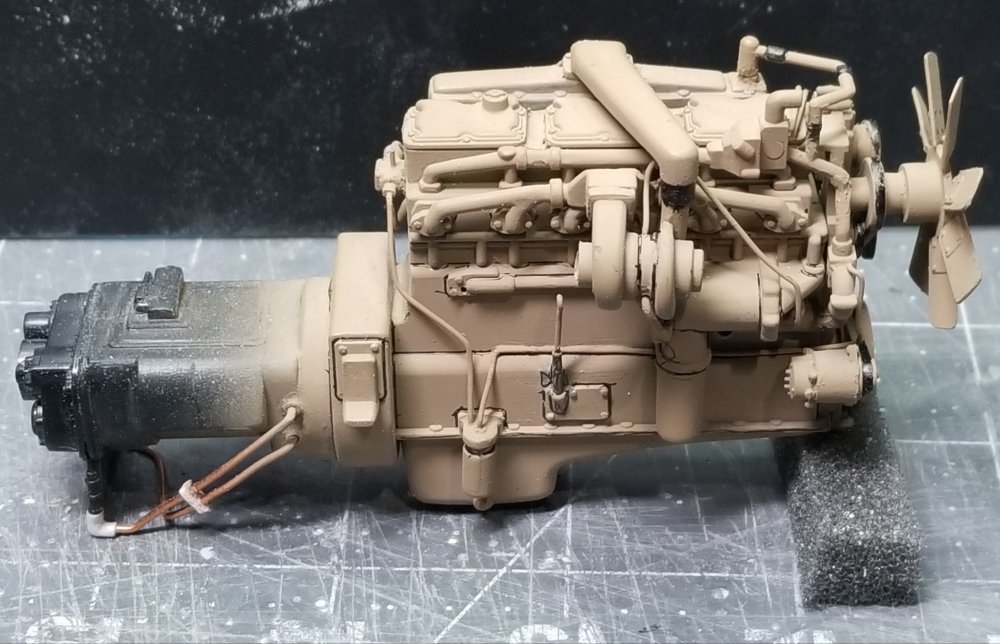
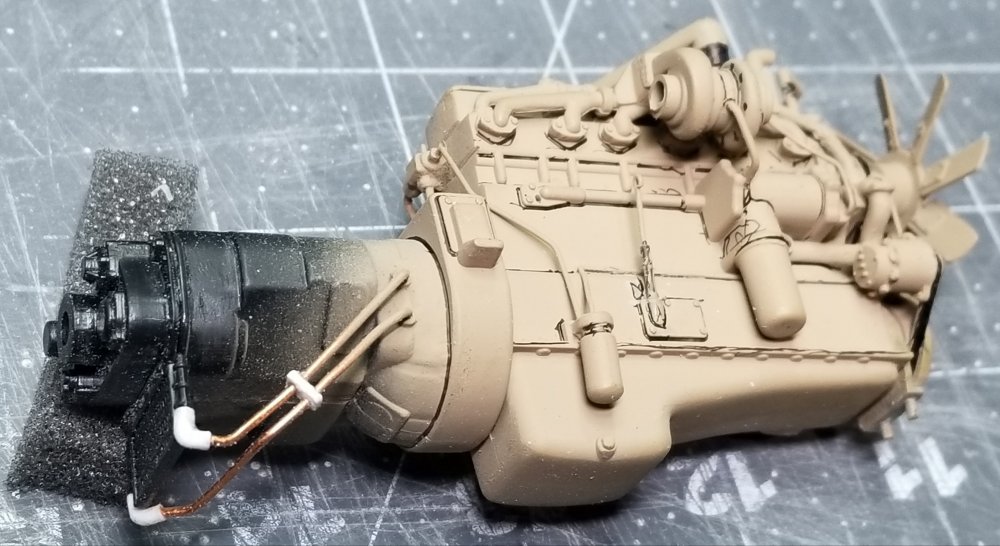
Hey all I bought this kit for the Cummins NTC-400 engine so I can put it in the 1/24 Italeri Peterbilt 378 that I purchased off of Ebay to pull the 6 axle flatbed, and it is in the mail as we speak. I'm going to take the Detroit diesel series 60 out of the Pete and put it in the Western Star. Does anyone, like Jeff maybe, know how hard it would be to convert the Detroit 60 into an early Cummins X15? I'm hoping I can, as I don't really want to have a Detroit diesel. So, I started by putting the Cummins NTC-400 together so I could detail it, and that led to building the Western Star. I also have a 1/24 Italeri Mack Superliner coming in the mail (If my wife finds out how much I have spent in the last week she is going to castrate me!...lol) My plans are to take the Australian parts, tanks, air cleaners, bull bar, etc. From the Western Star and put them on the Mack. I plan on swapping the interiors of the two trucks so I will have a right hand drive Mack and a left hand drive Western Star. Thank God Italeri kind of comminized there trucks so you can switch parts around. this view shows the Italeri Western Star kit I'm using. this view shows how far I am on this build. Its just temporarily put together. view from the front. this view shows the Cummins NTC-400. The front and rear tires are from the European truck rims and wheels kit. The fronts are 385's and the rears are 315's. These are for Italeris European trucks. this view shows the steering mechanism turning right. this view shows the steering mechanism turning left. this close up view shows the micro screen from model car garage that I used to simulate the rear of the radiator. this view shows the Cummins NTC-400 sitting in place for pictures only. this view shows the Cummins NTC-400 and the details that I added. I painted it with a custom mix of Tamiya tan, dark yellow and brown. I'm still adding painted detail to it. I need to add a gloss clear over it, then weathering. view from the other side. this view shows the lines from the trans to the trans cooler. Well that's it for now be back soon with more. Ron G


-
Aussie T610 SAR truck
CrankyCrafstman replied to mark31's topic in LSM 1/35 and Larger Work In Progress
Probably not going to happen. 1/24 Italeri Australian Western Star truck (already have) all prices are what I found off of Ebay. 1/24 Italeri Mack Superliner - $77.00 1/24 Italeri dummper trailer (4) at $75.00 each $300.00 48, yeah I said 48 wheels/tires from Scenes Unlimited $250.00 So $77.00 + $300.00 + $250.00 = $627.00 plus tax snd shipping...YIKES! RON G -
Aussie T610 SAR truck
CrankyCrafstman replied to mark31's topic in LSM 1/35 and Larger Work In Progress
NOW! This would be a cool build, now let's see 1/24 scale Italeri mack Superliner along with Italeri Australian truck (western star) along with four of the Italeri dumper trailers. You would have to scratch build the three dolly's and figure out were to get the wheels/tires from the dumper trailer for the dollys, but it is doable, though it would be on the expensive side. This my be my next build, since I already have the Italeri Australian truck kit to start with. Let's see whats on the plate. 1/25 Kenworth W925 and Michigan gravel train, 1/25 Peterbilt 359 heavy haul tractor, with scratch built XL Specialized HD130 drop nose lowboy trailer with jeep and booster/stinger, 1/25 Caterpillar 375F L excavator to go on it and a 1/25 Peterbilt dump truck with AMT Autocar dump box. I wonder if I'm going to live that long...lol Ron G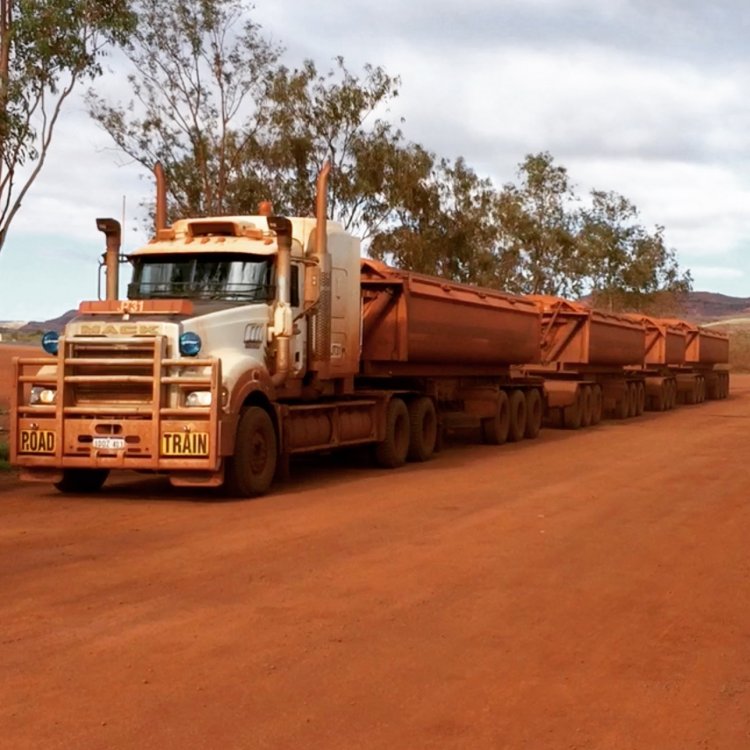
-
Yeah, I could use the plastic kit parts from the AMT flatbed trailer kit, but I think I can make them out of very thin aluminum sheet stock, I don't know I haven't checked into it yet. Ron G
-
Yeah, thats what I was thinking.
-
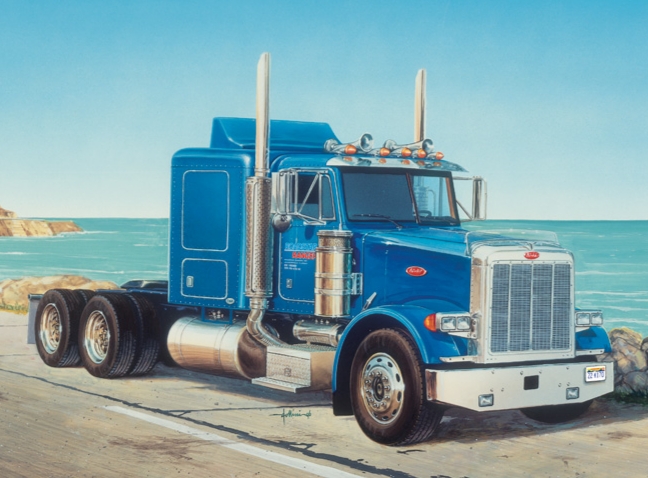
Hey Jeff You don't see these around here (Detroit/Flint, Mi) anymore, but back in the hey day of the Auto industry they were everywhere hauling big steel sheet metal rolls for the auto plants to stamp out fenders, doors, hoods, etc. And yes the tires were usually way worn out...lol Ron G
-
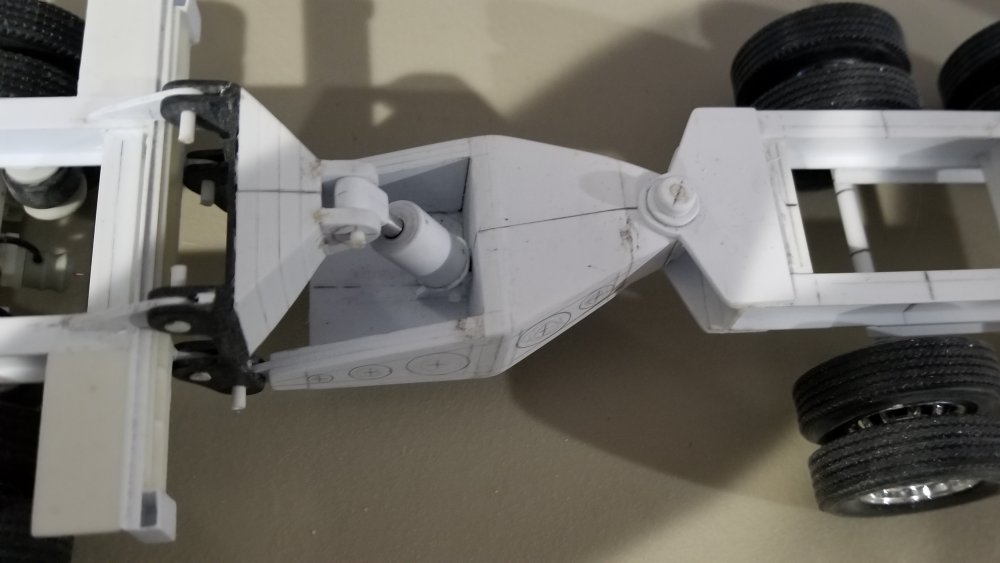
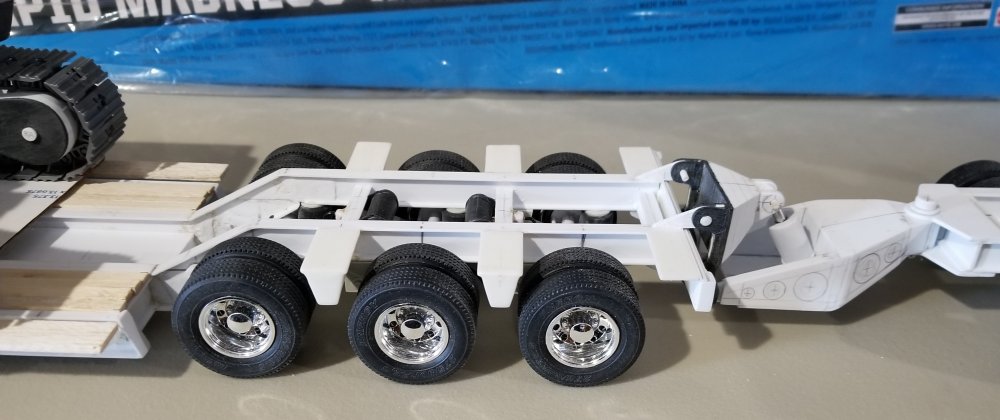
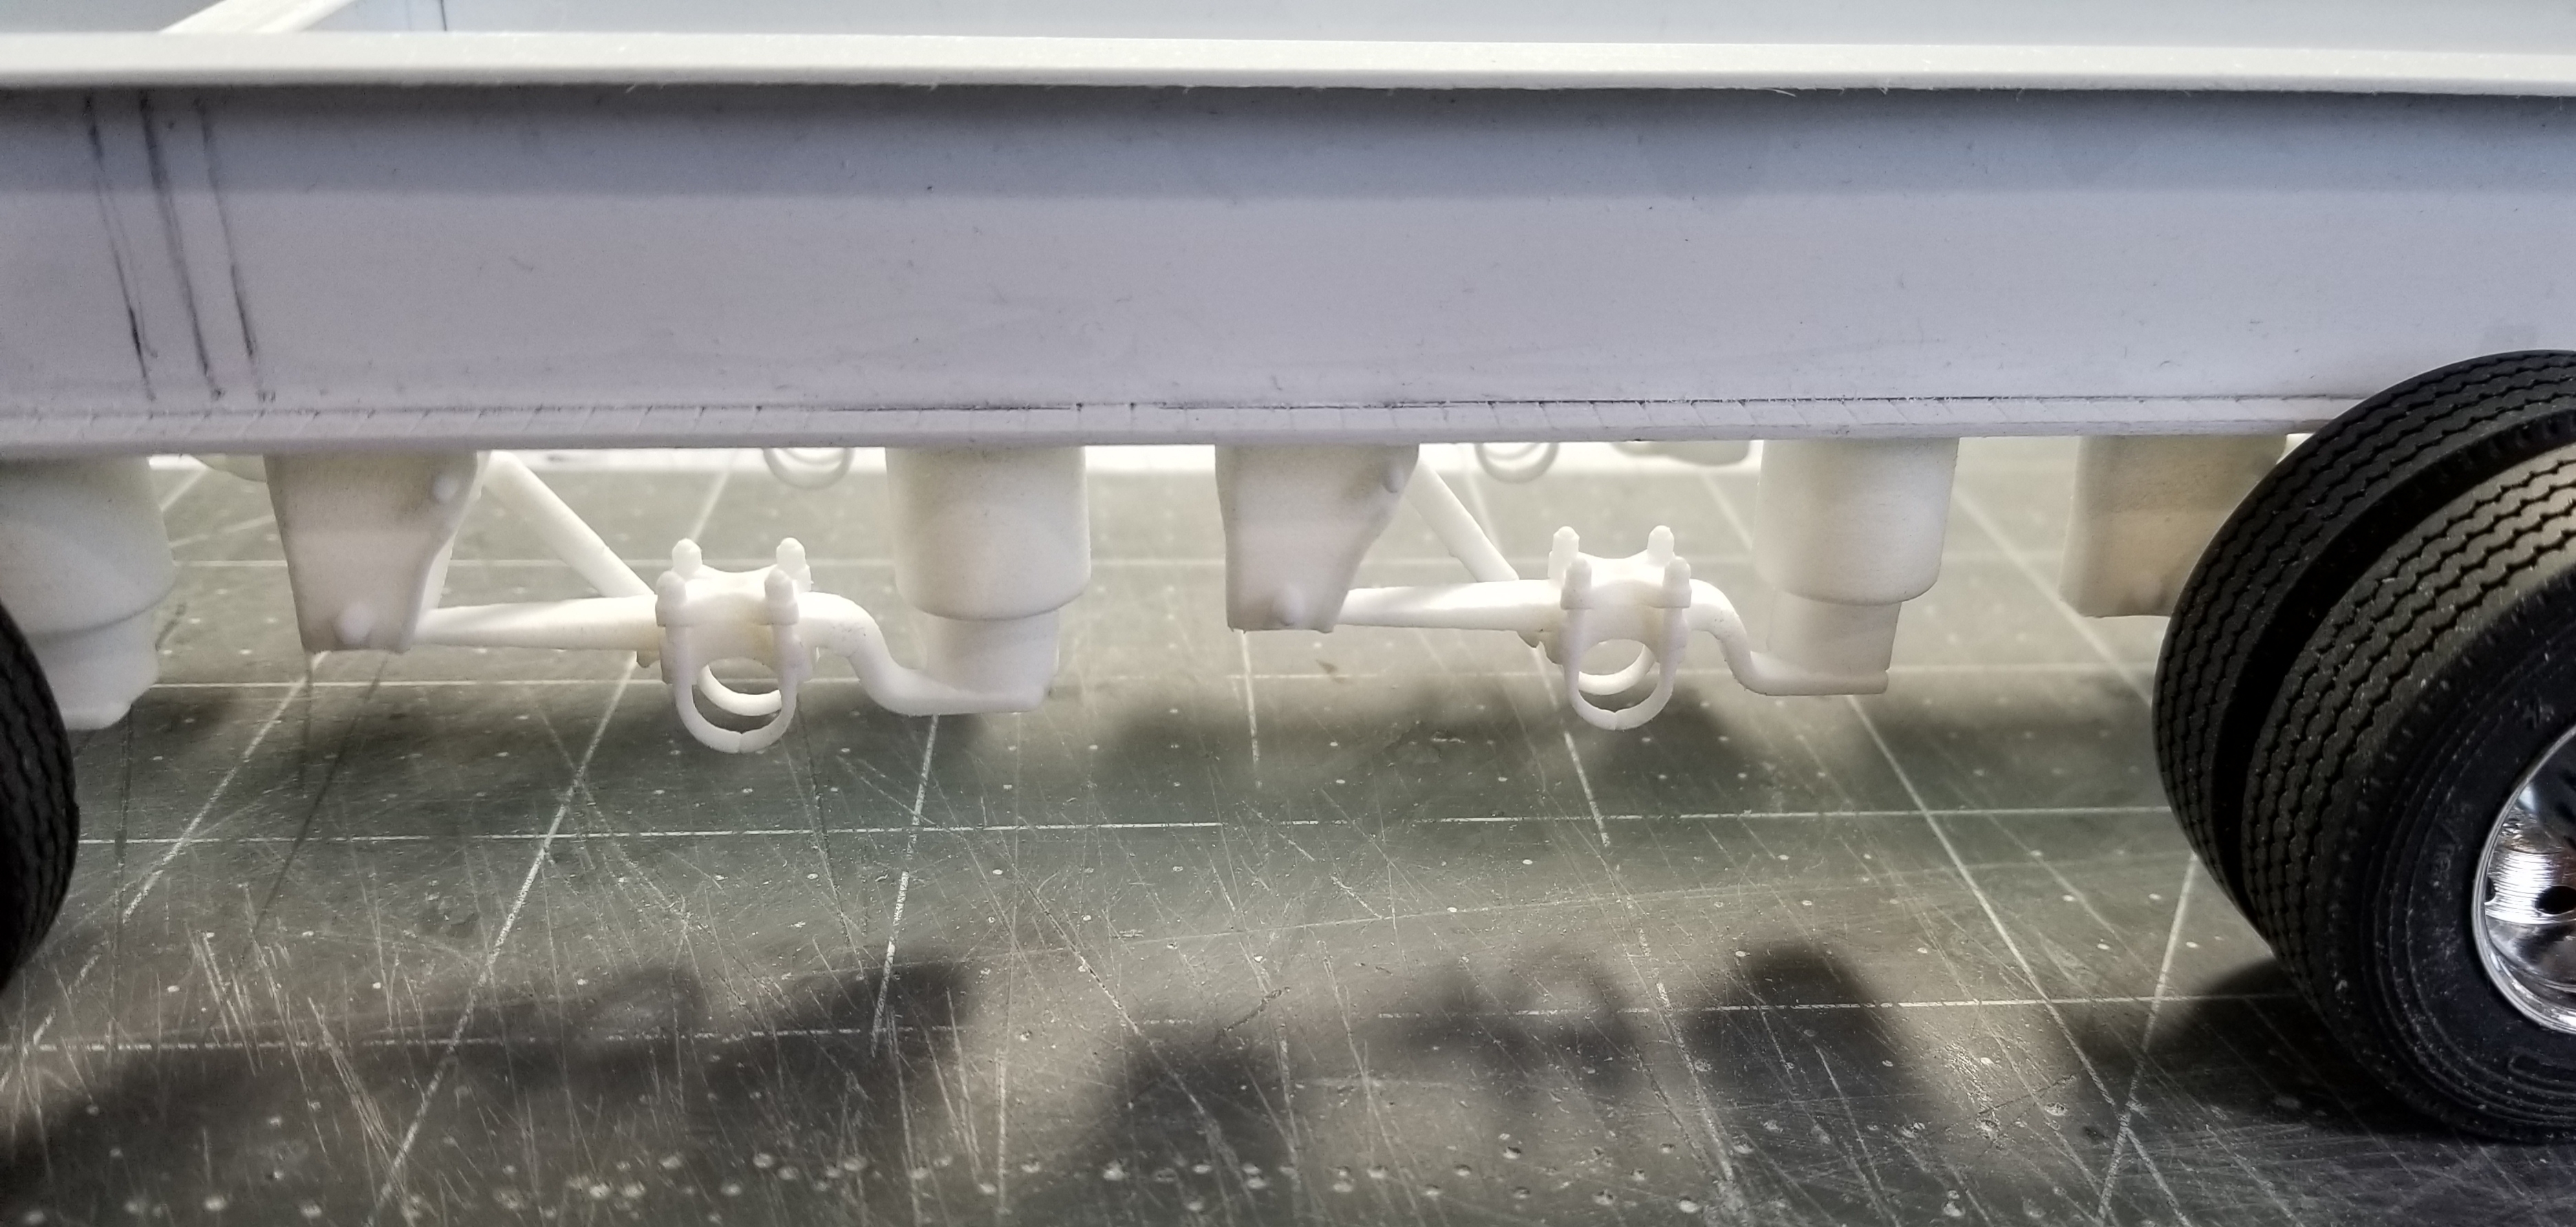
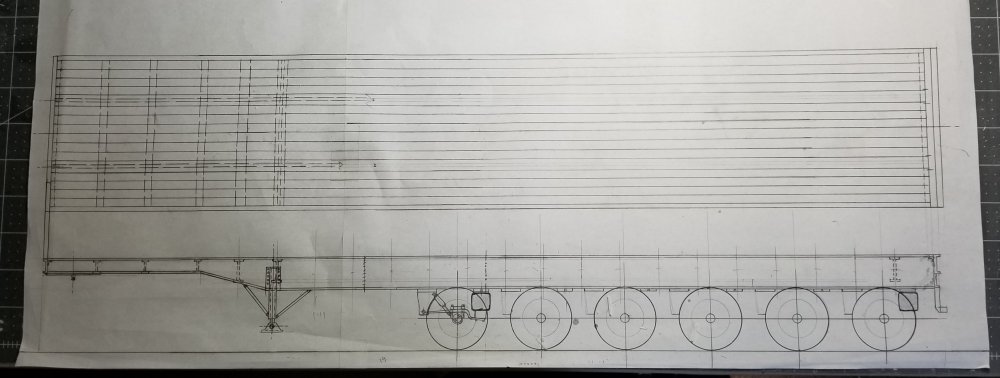
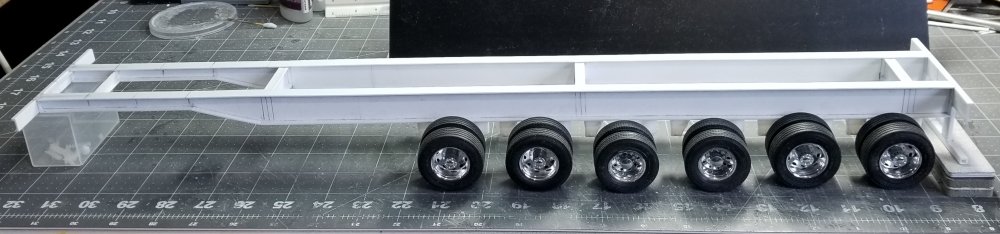
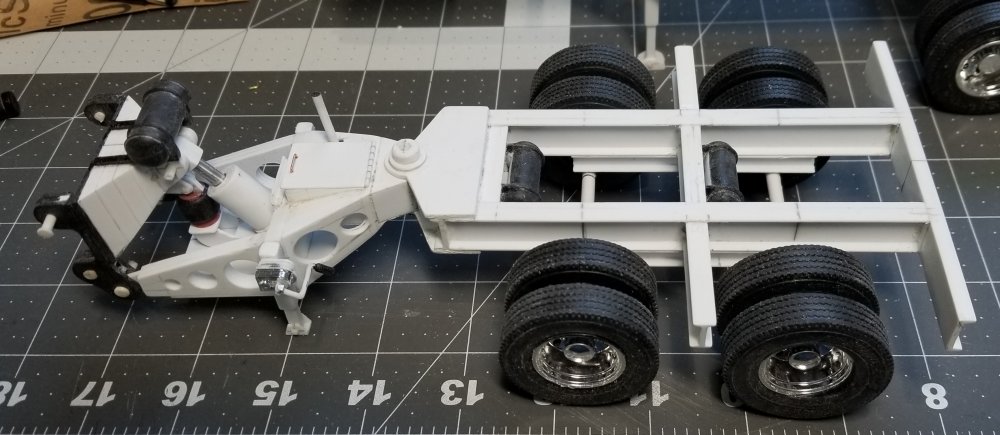
Hey all Well I did it, I started another project. I purchased some air suspensions from Shapways for the lowboy, but they were to tall, they were meant for a standard height trailer...sooo, I decided to start a new project so I could use them. I'm making a 6 axle heavy haul/steel hauler 48' flatbed trailer based off of info form the internet and kind like the AMT flatbed trailer, but different. here is my drawing that I built it from. side view of 6 axle flatbed trailer. this view shows the air suspensions that I'm using, they still need a lot of work. I now need 6 complete air brake setups. this view shows the Italeri Peterbilt 378 tractor that will be pulling it. I'm going to replace the Detroit diesel that comes with it with a Cummins from the Australian Western Star from Italeri. I have 4 extra rear duals from an old old kit that I did eons ago that I might use to add a pusher axle to it, don't know for sure, will see. Well that's it for now be back soon with more. Ron G

- 51 replies
-
- 10
-
-

-
Discard this
-
Thanks guys
-
Aussie T610 SAR truck
CrankyCrafstman replied to mark31's topic in LSM 1/35 and Larger Work In Progress
Looking good Mark, she's going to be a beauty when she's done. Ron G -
Aussie T610 SAR truck
CrankyCrafstman replied to mark31's topic in LSM 1/35 and Larger Work In Progress
Hey Mark I just found this build, and will definitely be following along. WOW!, just WOW!, I mean really WOW! Ron G -
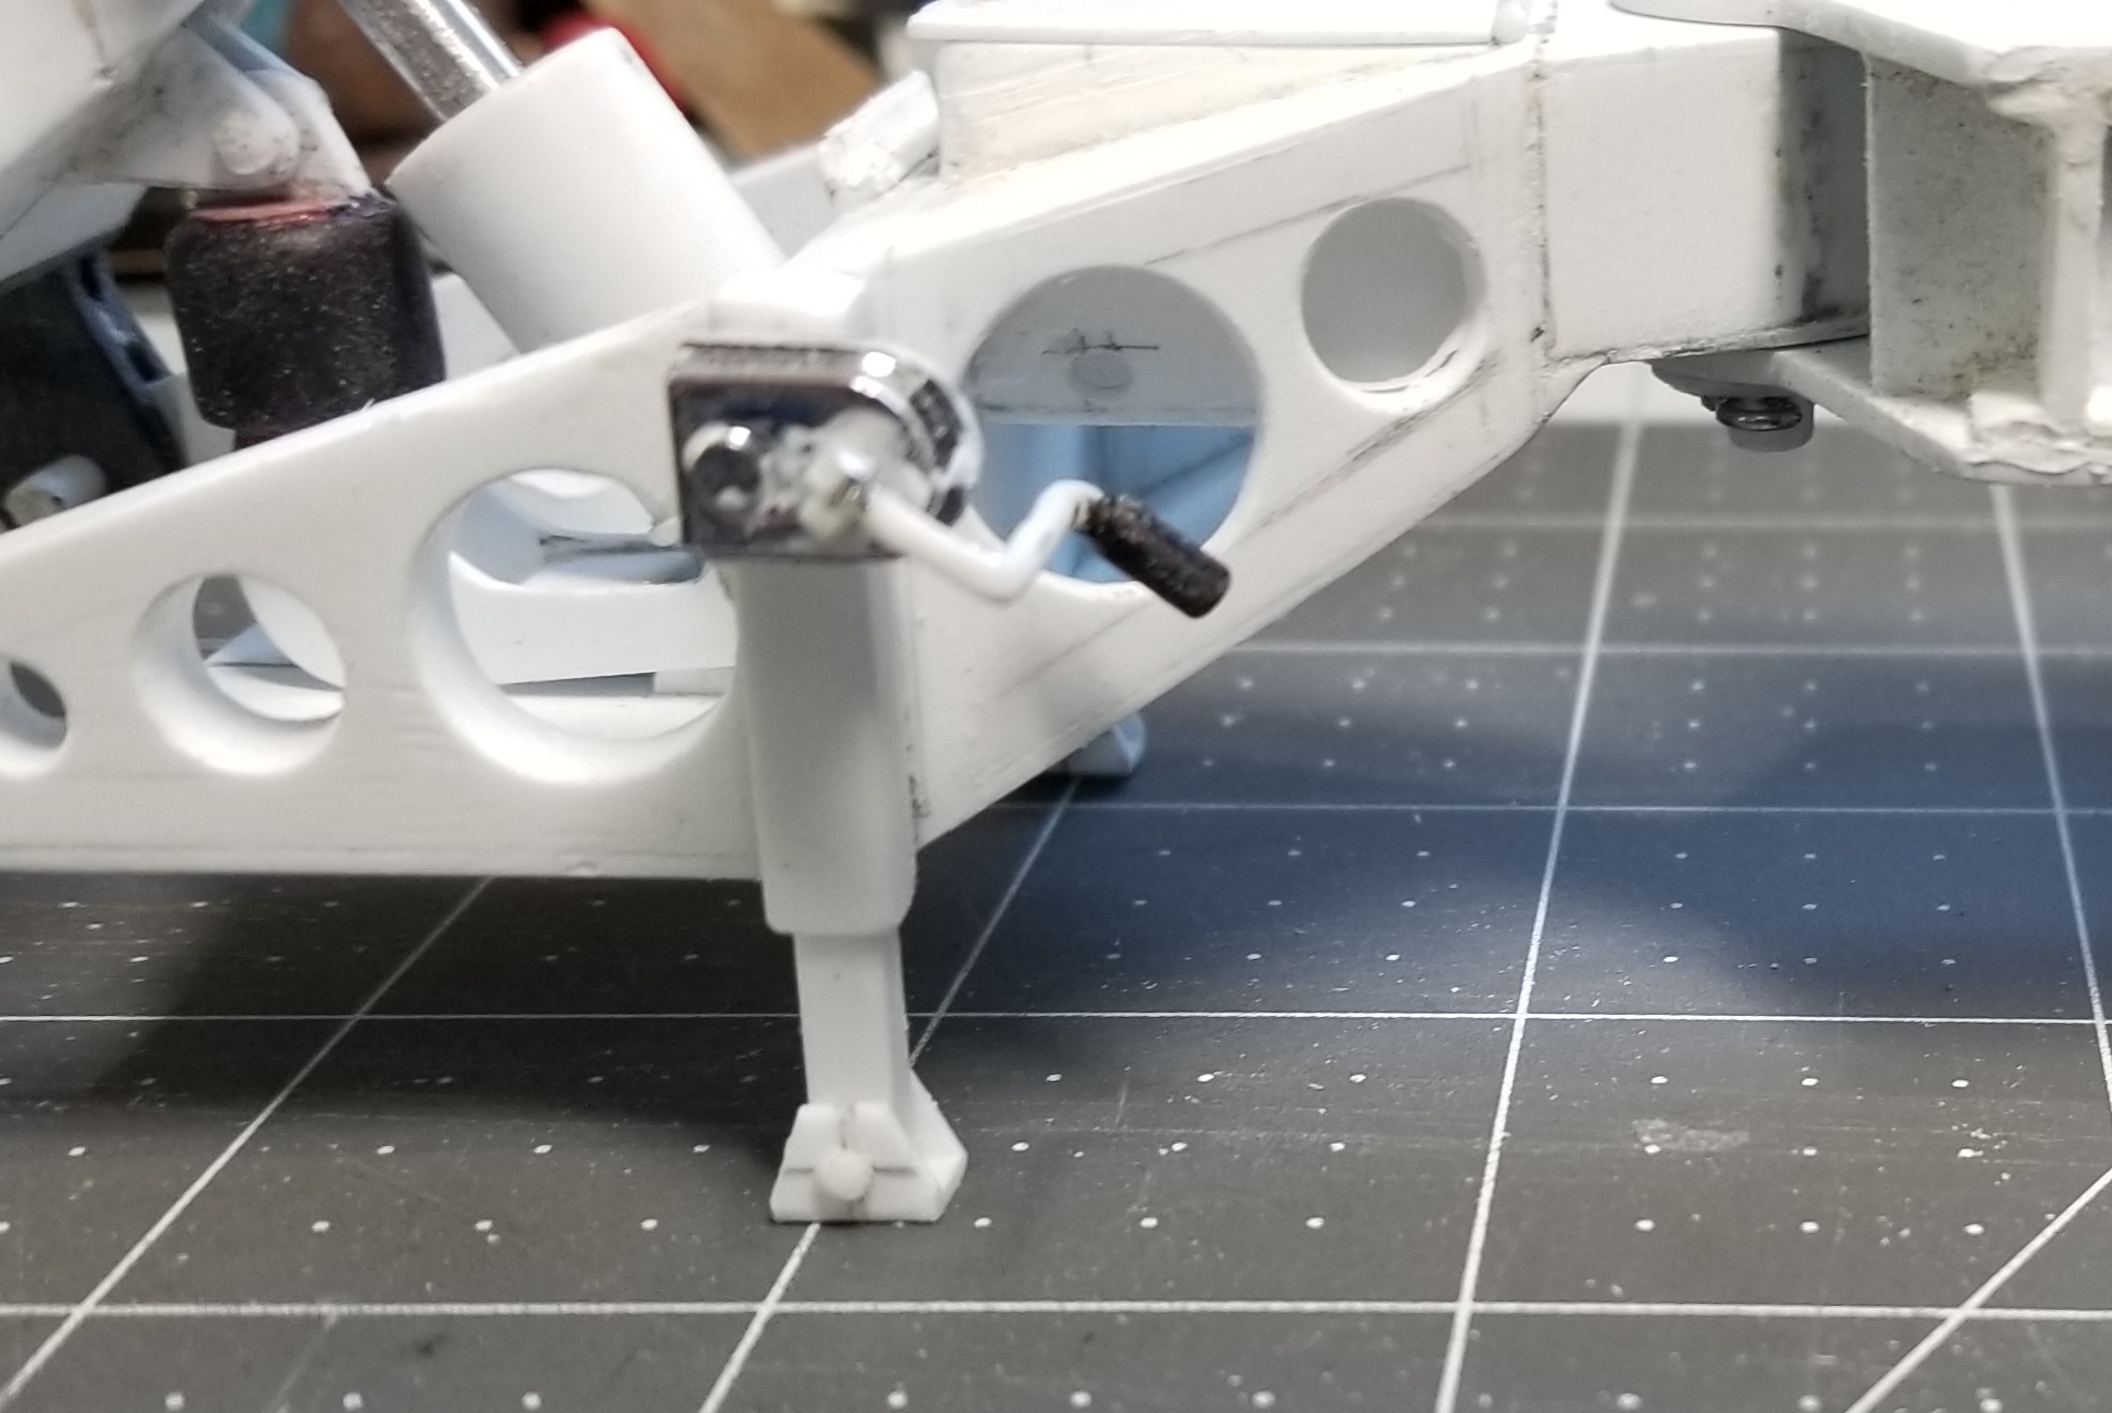
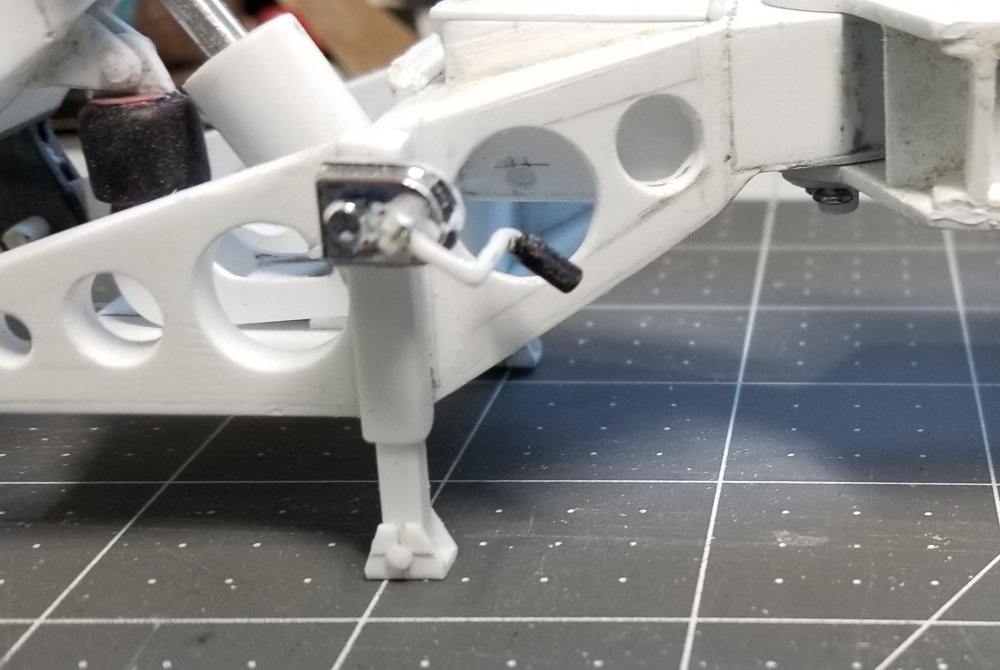
Hey all Small update for you all. this view shows the support legs that I added to the booster/stinger and that I moved the nitrogen tank to the mounting bracket for the trailer. Also the frame braces between the tires. this view shows the support legs and crank mechanism. Well that's it, be back soon. Ron G
-
Thanks guys
-
Amazing work!
-
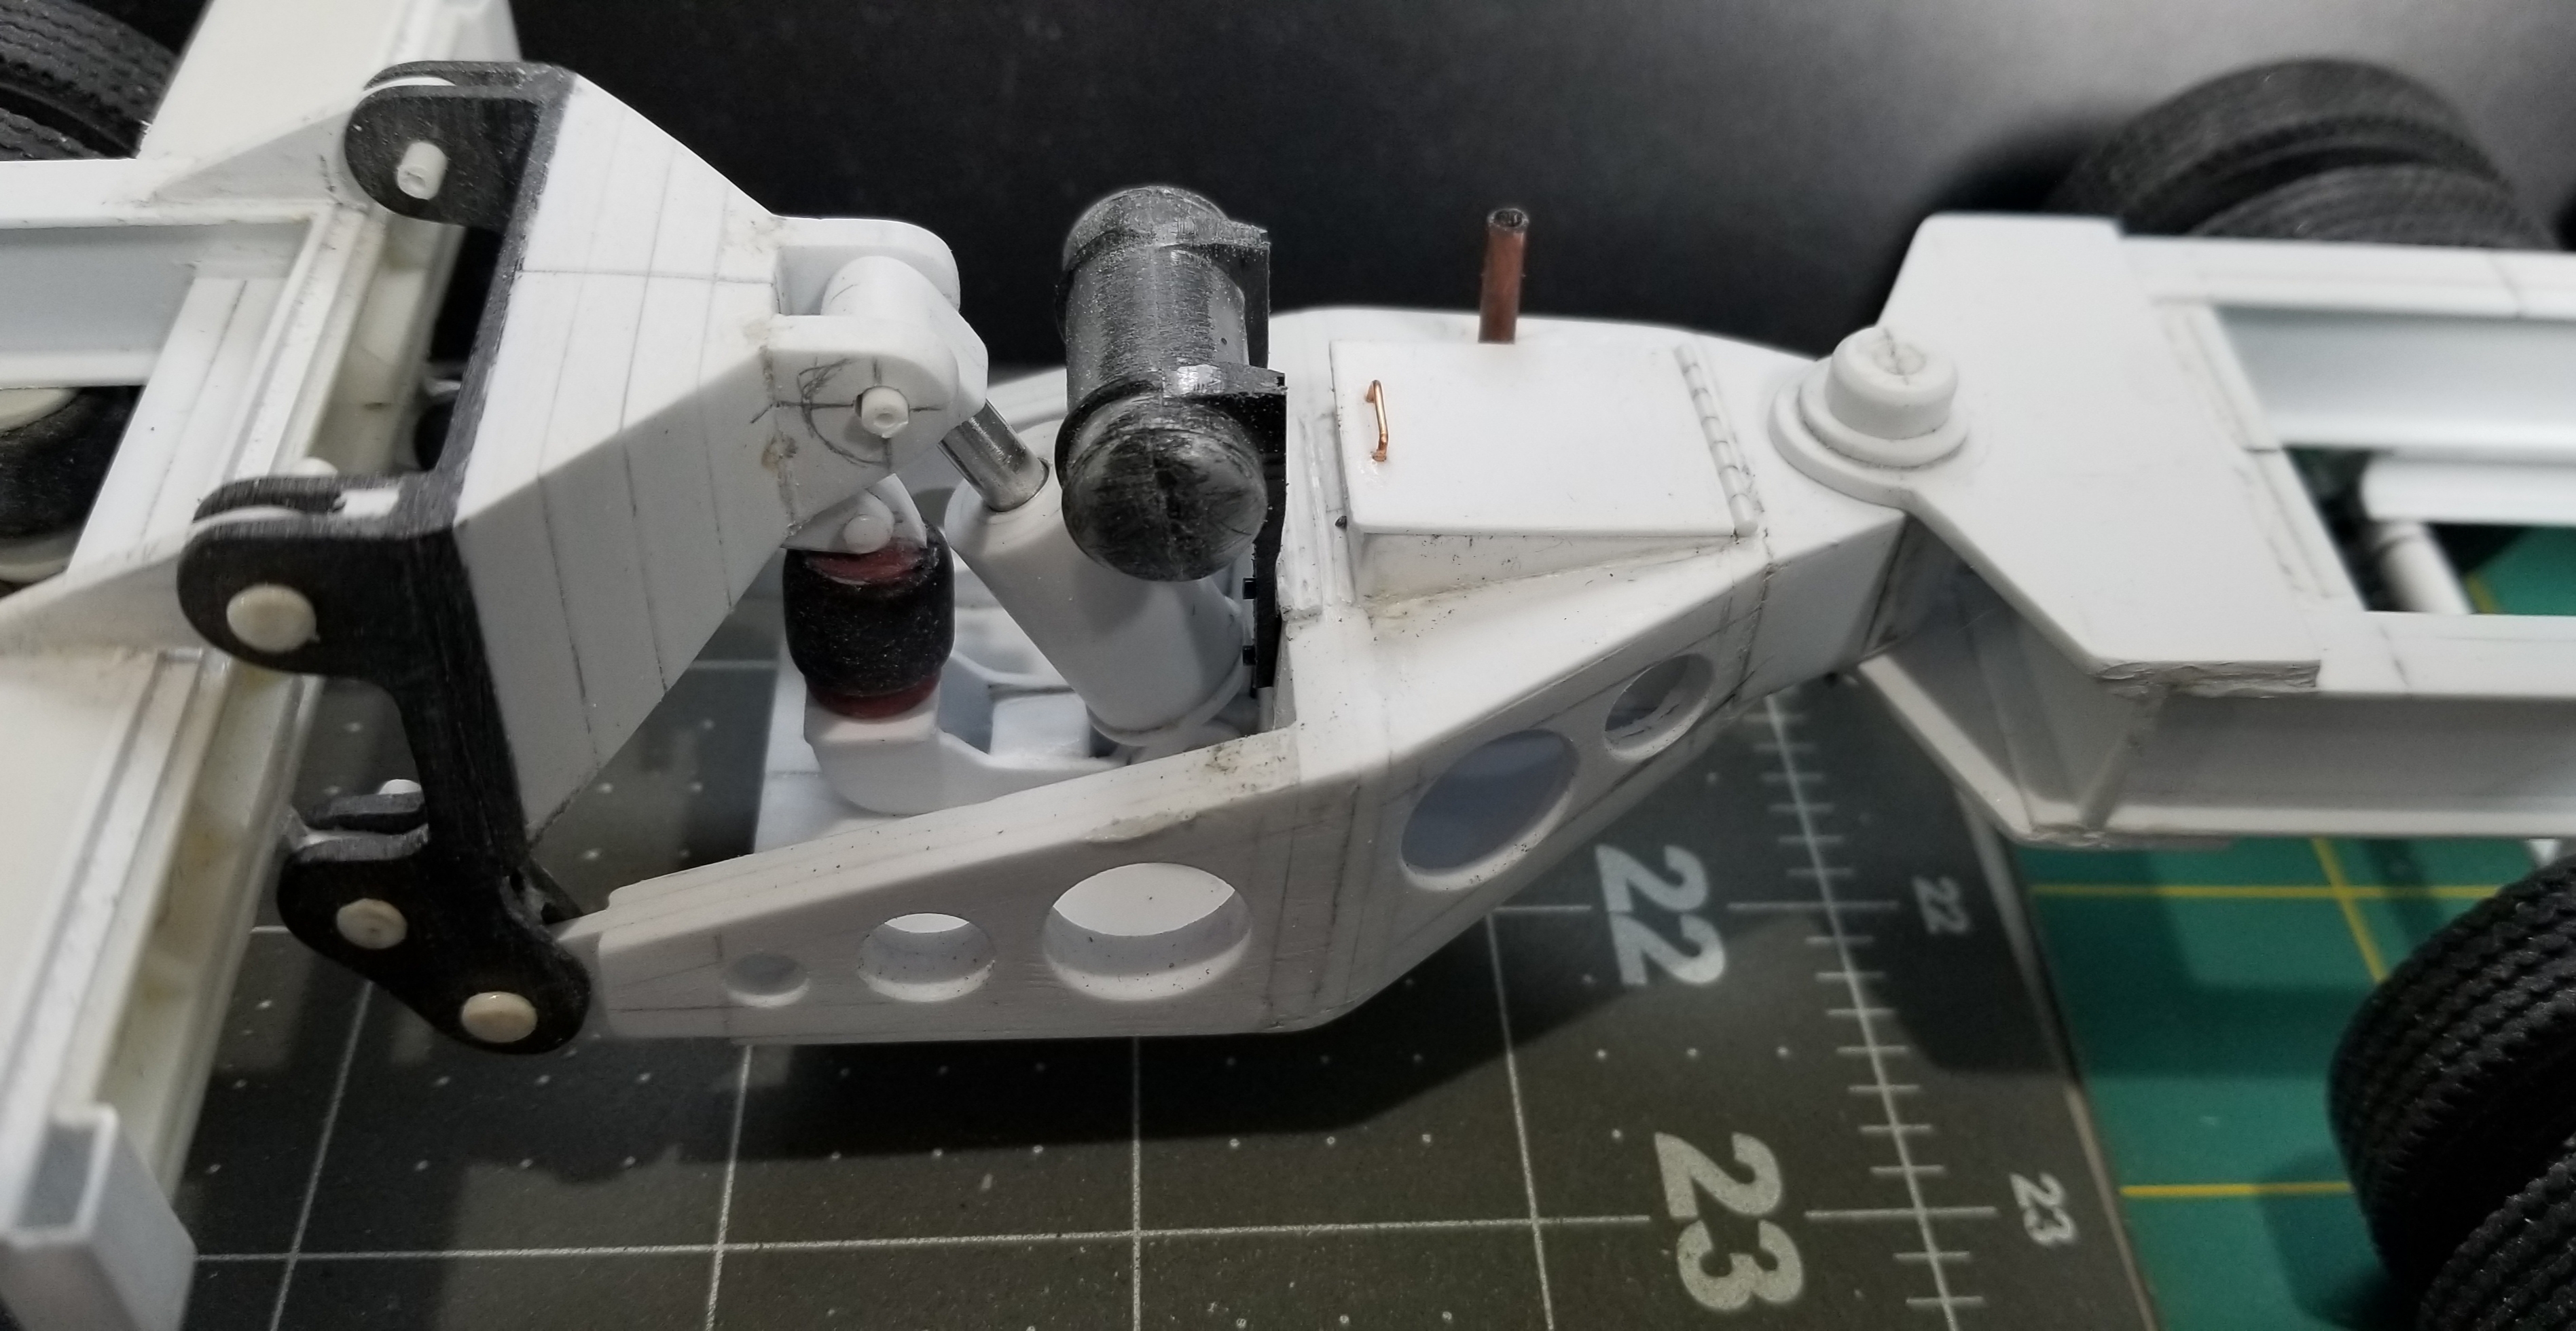
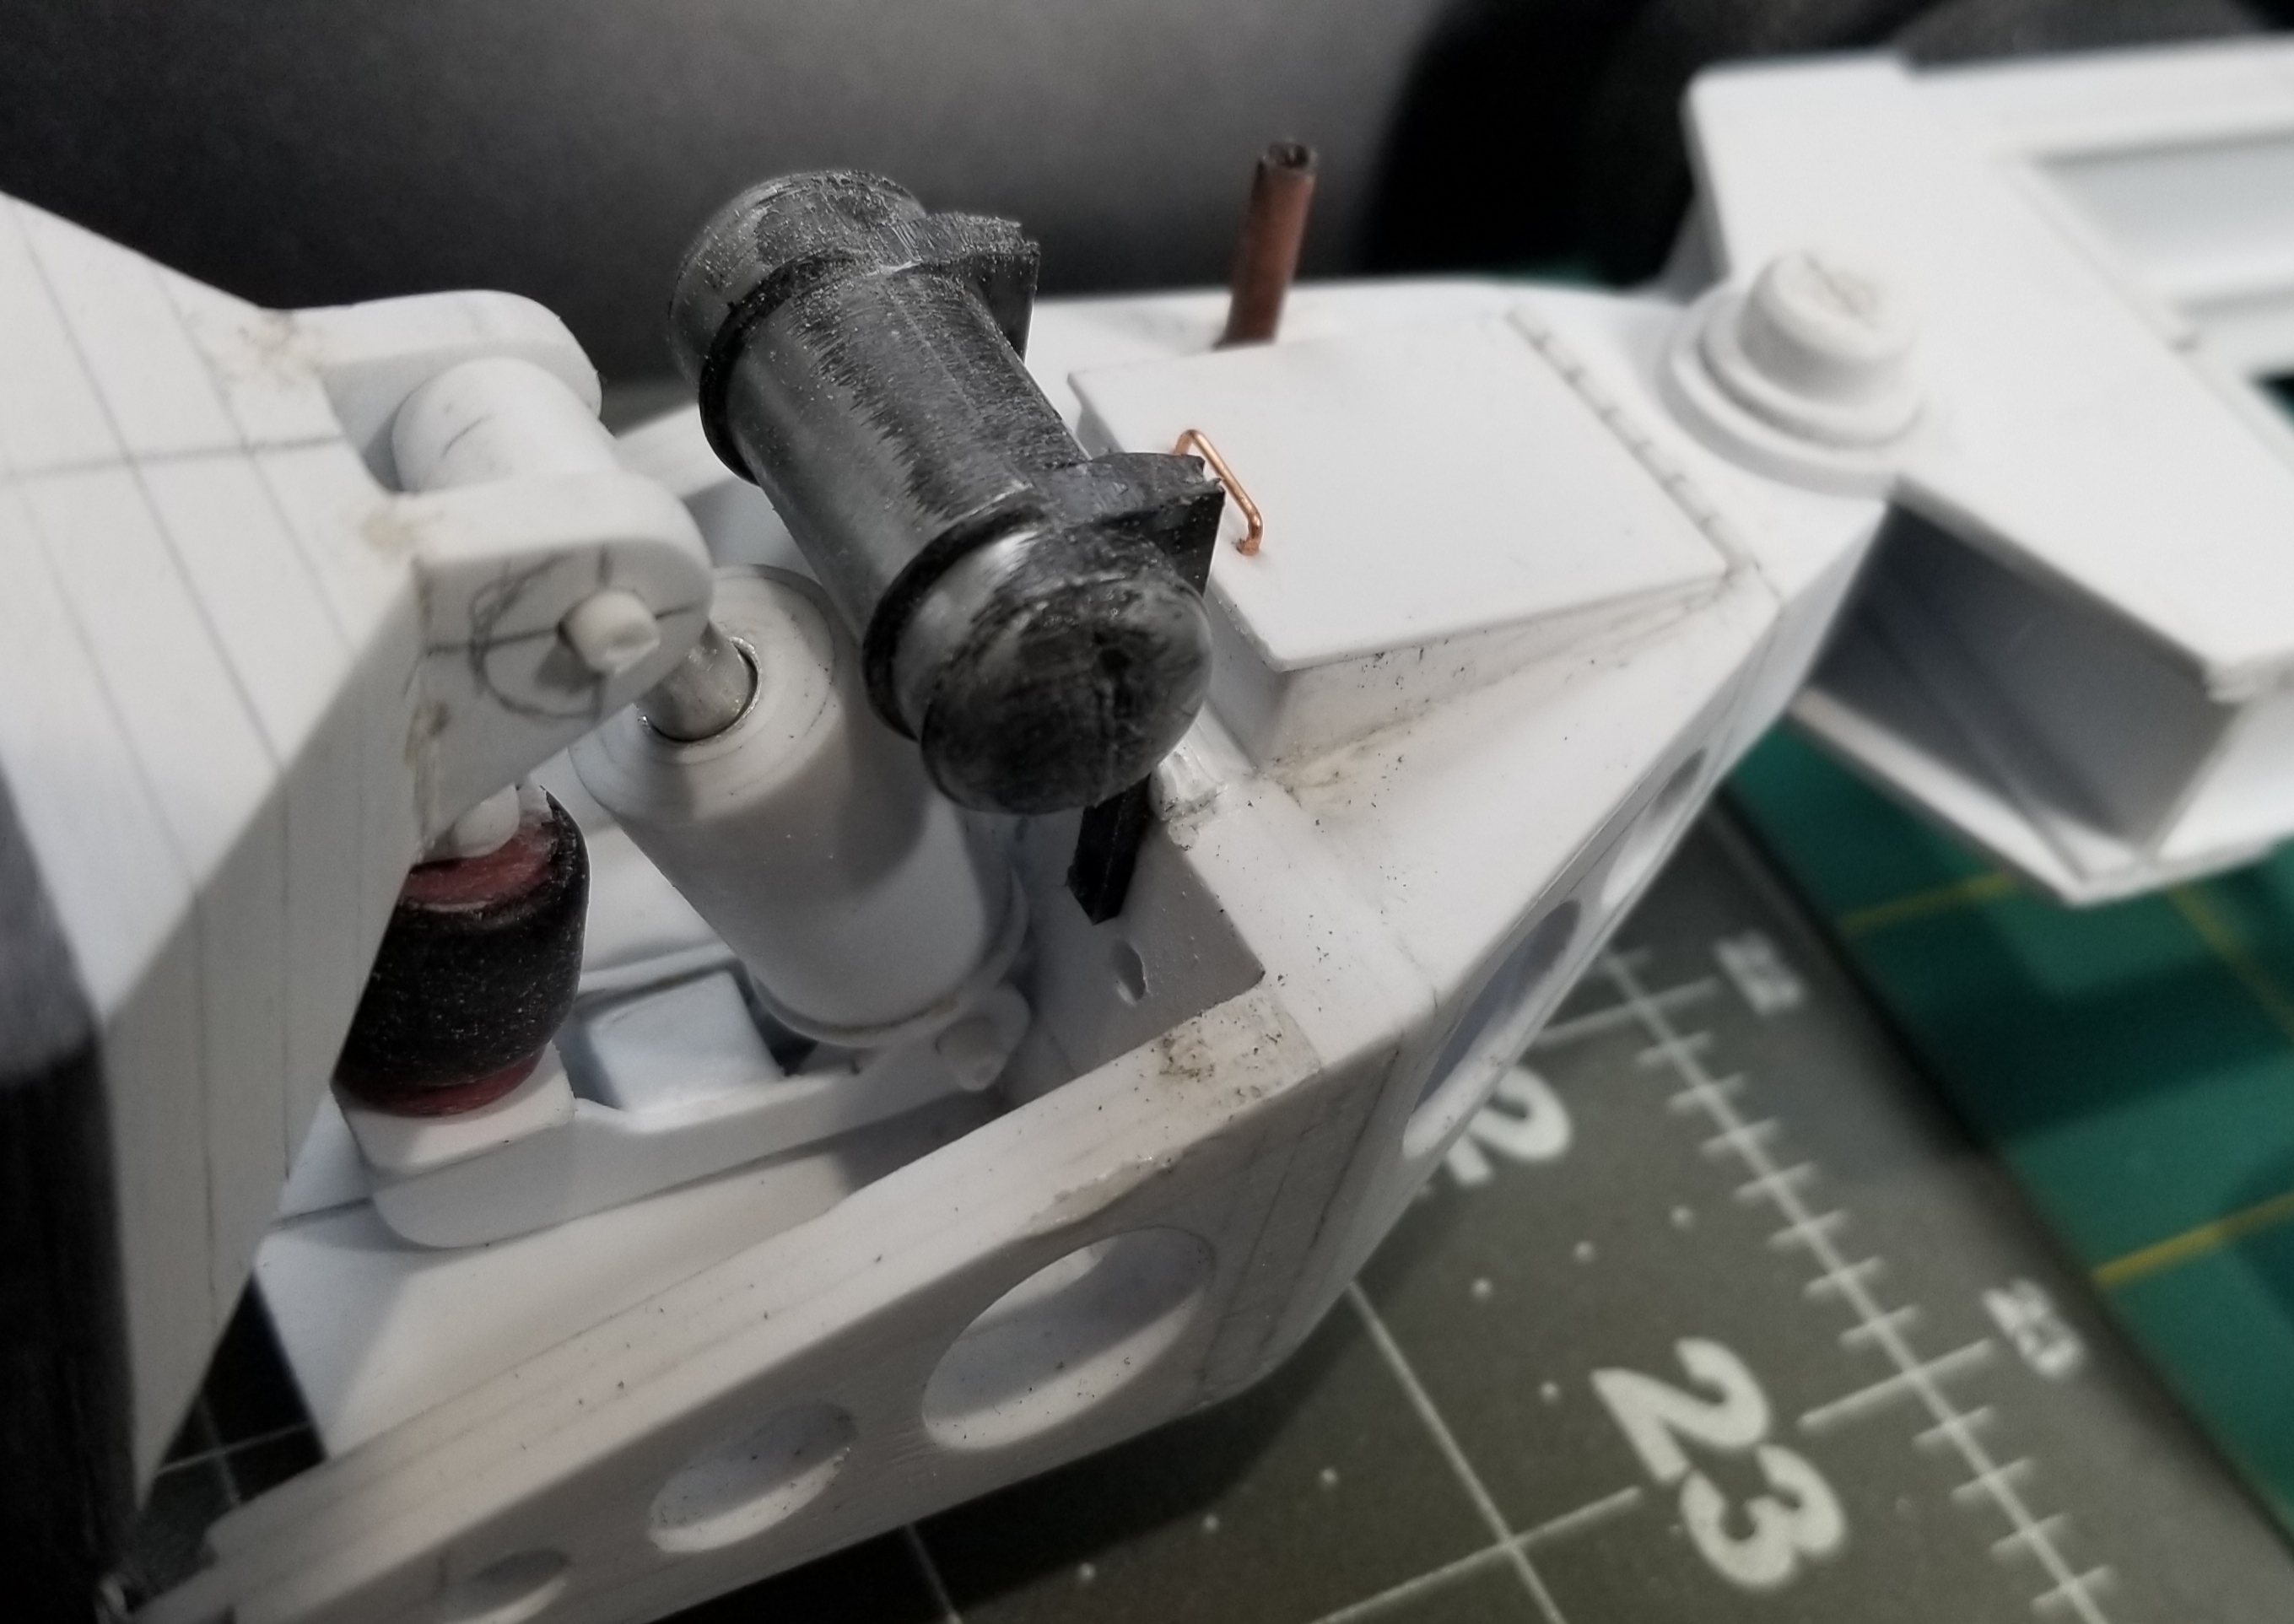
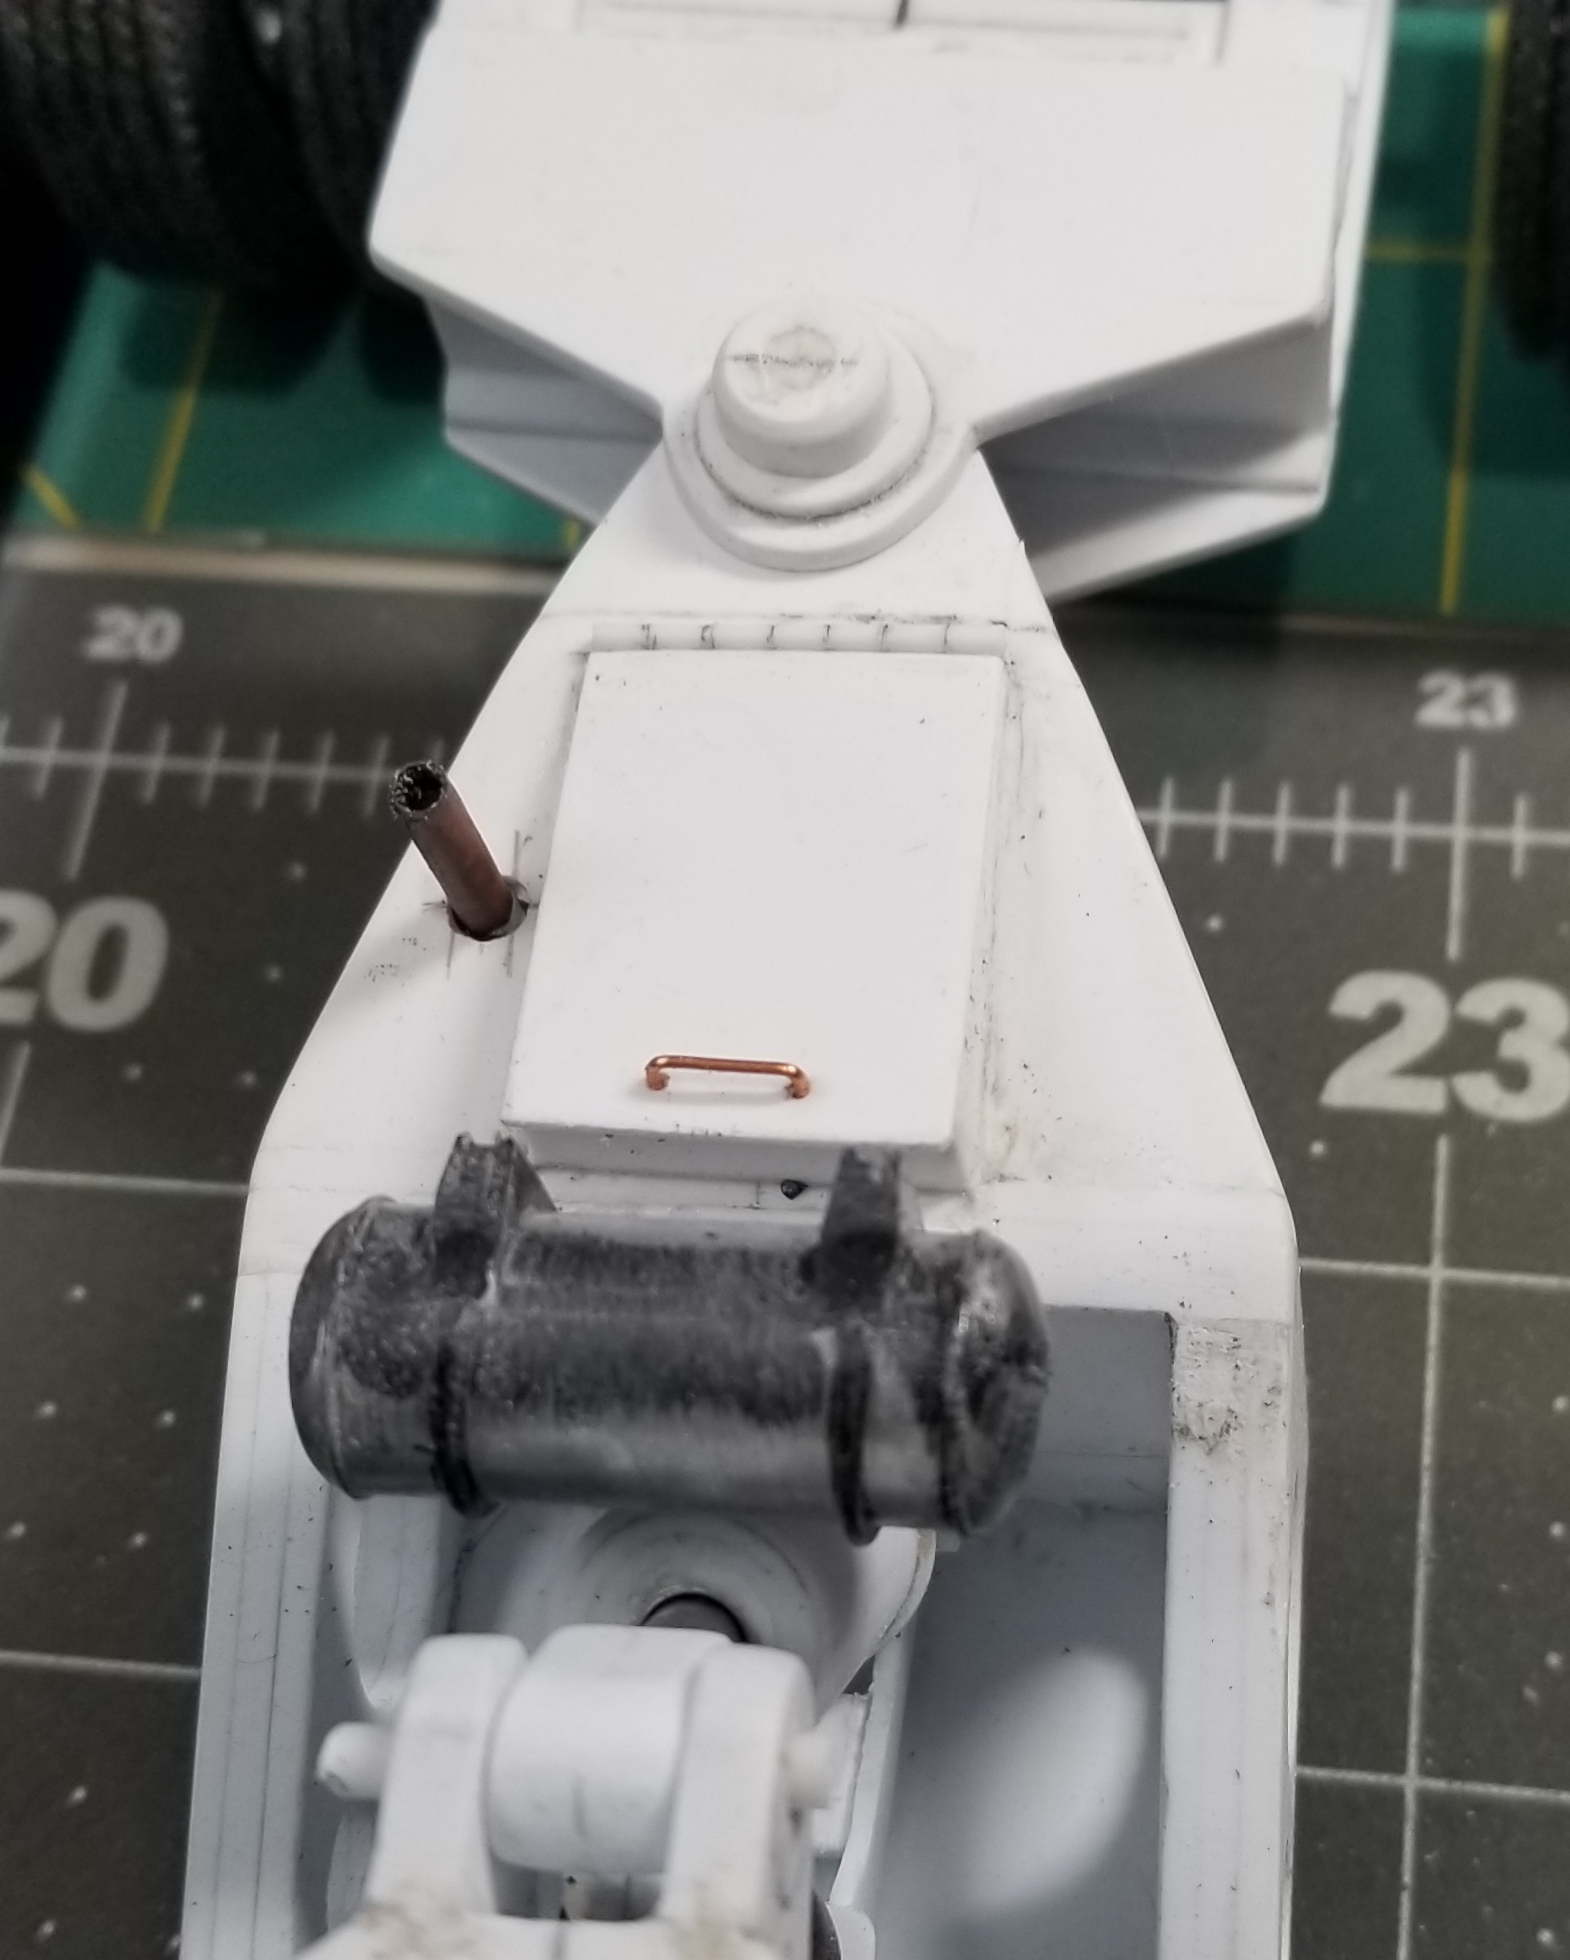
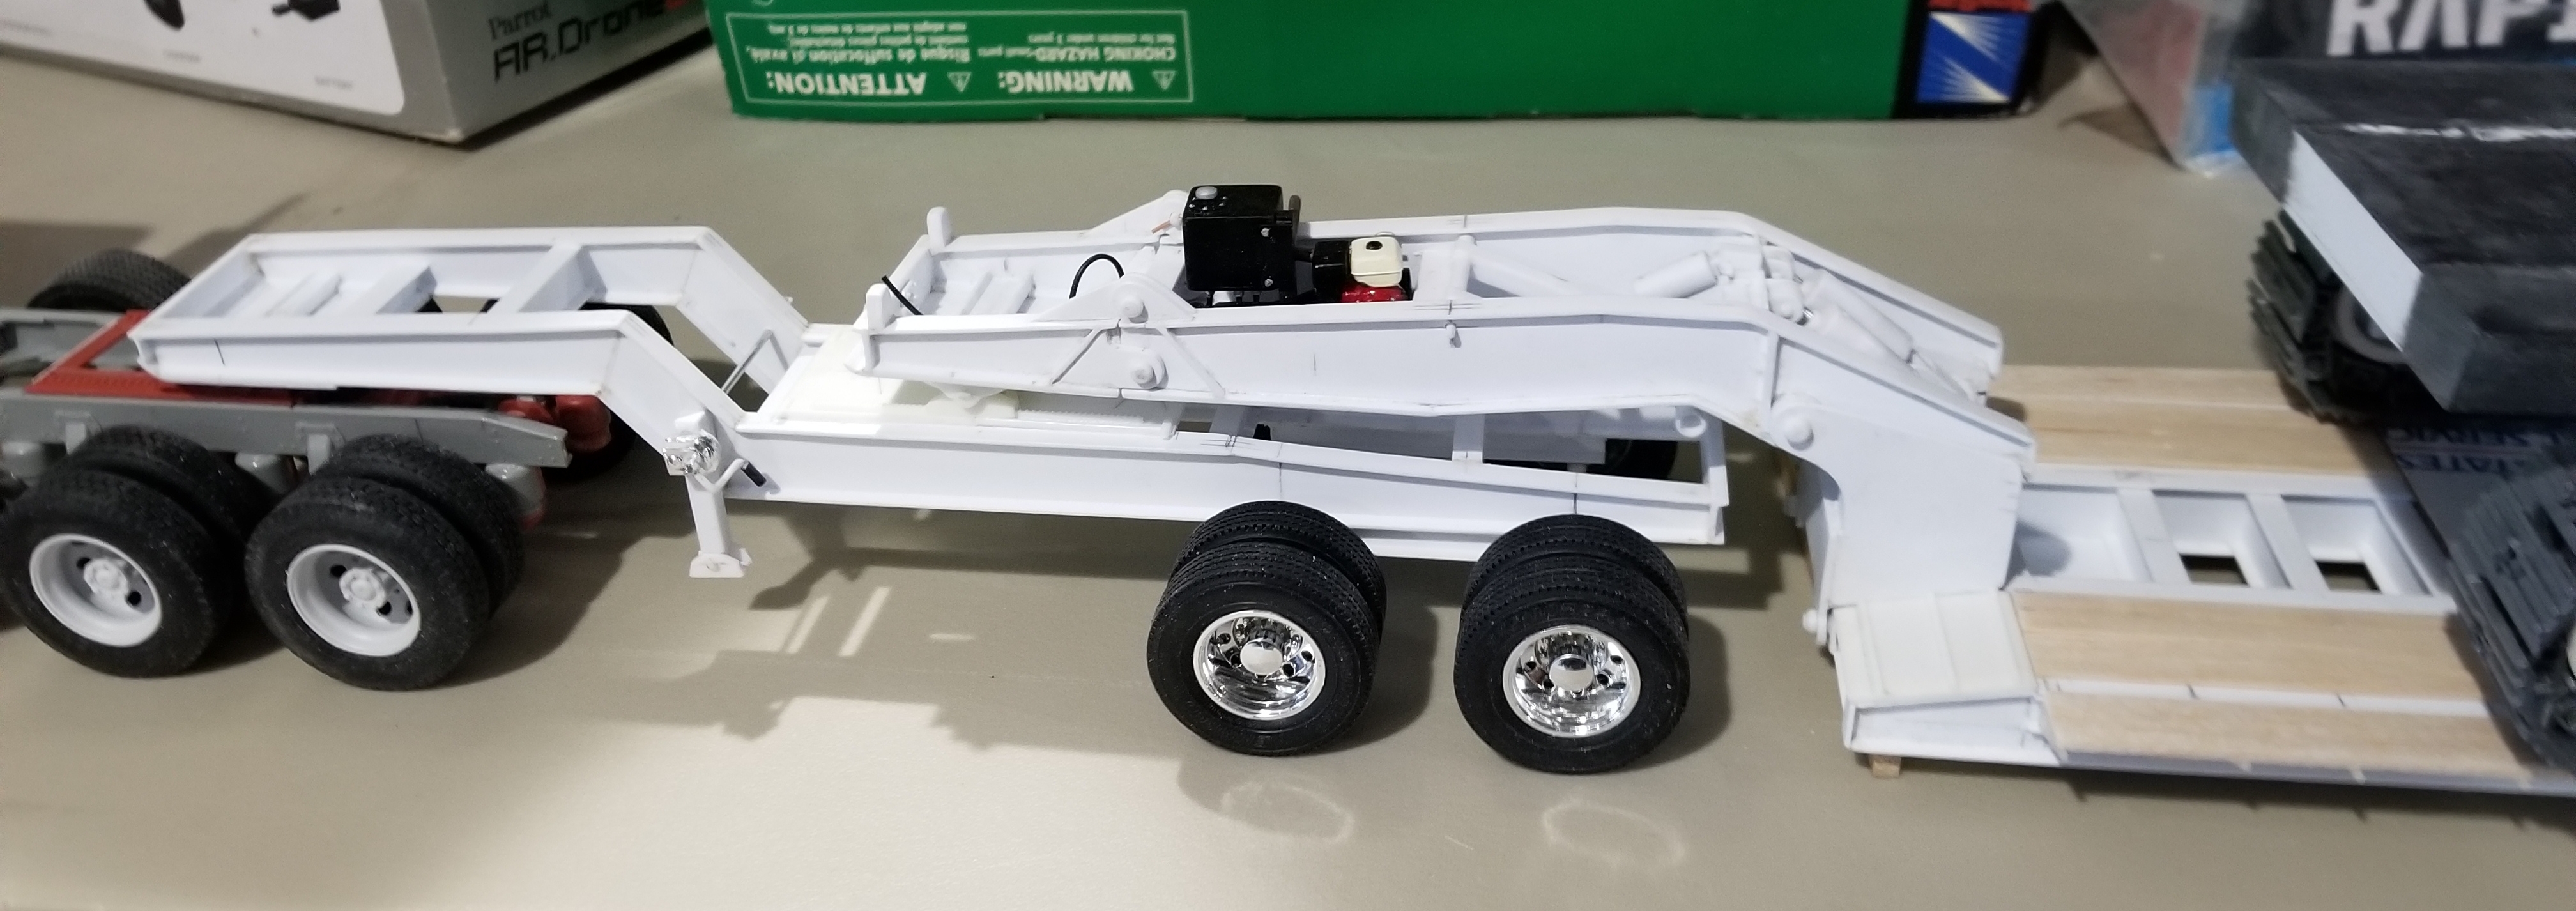
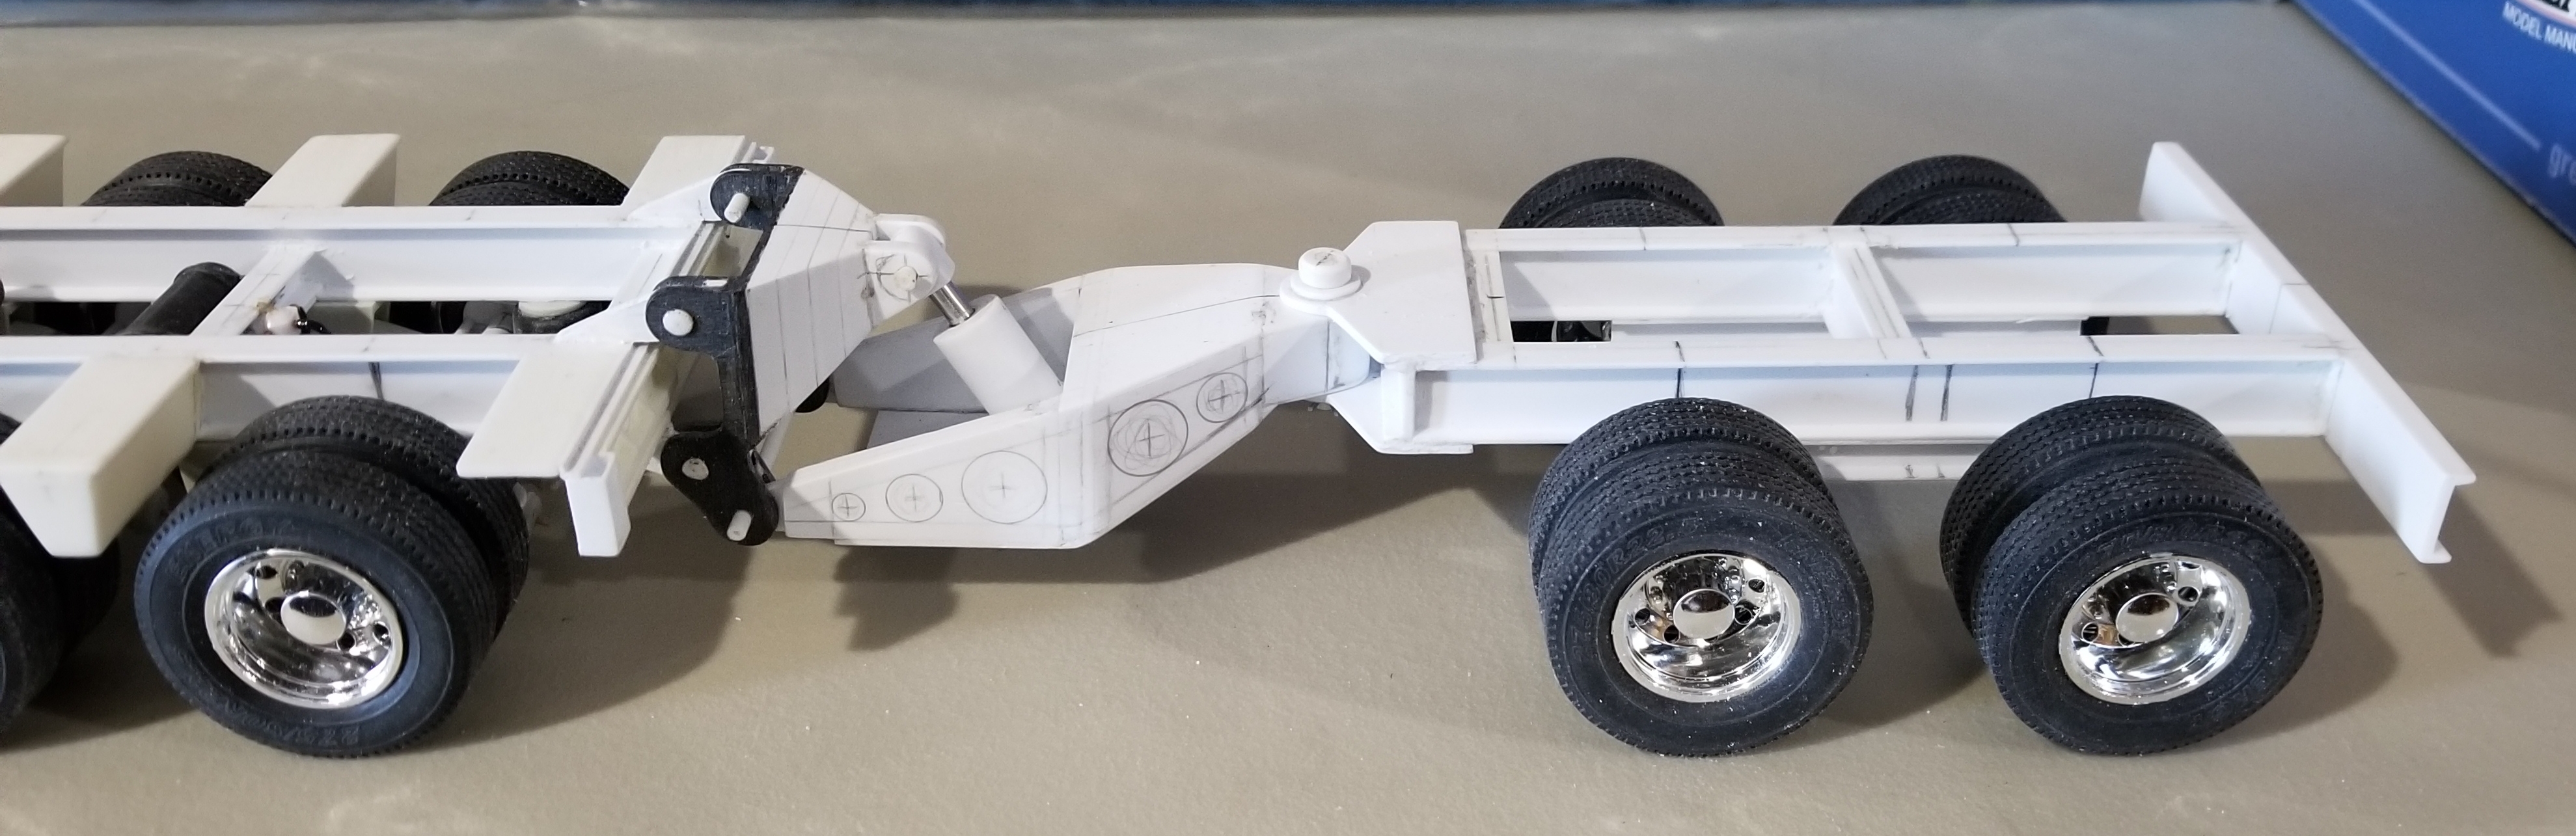
Hey guys Small update. I did some more work on the booster/stinger. side view of the XL 42 PMB booster/stinger. I drilled some lightning holes in it. view looking down at the booster/stinger. You can see the nitrogen bag with mounting bracket I added, I also added a power pack, its under the cover with the handle, you can see the exhaust pipe for it sticking up and I added a nitrogen holding tank just above the hydraulic cylinder. this view shows the nitrogen bag, nitrogen tank and the power pack cover and exhaust. view looking down at the nitrogen tank and power pack cover and exhaust. Now all I have to do is plumb the darn thing...lol. well that's it be back soon with more. Ron G
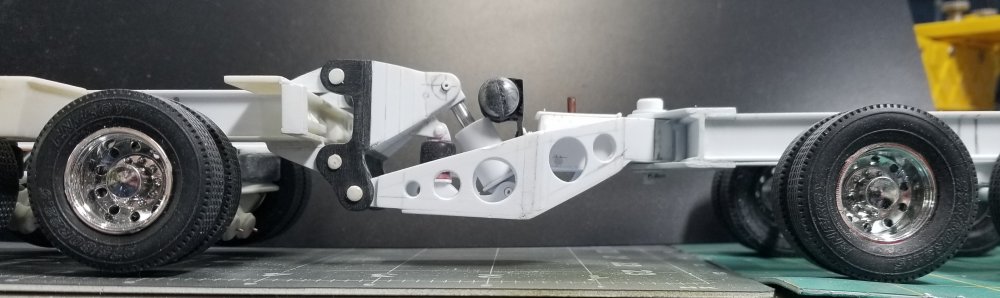
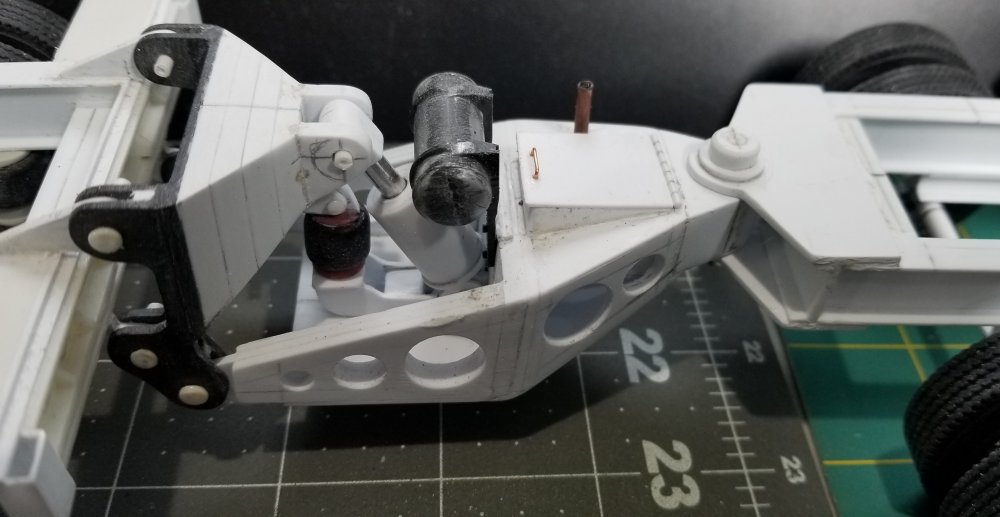
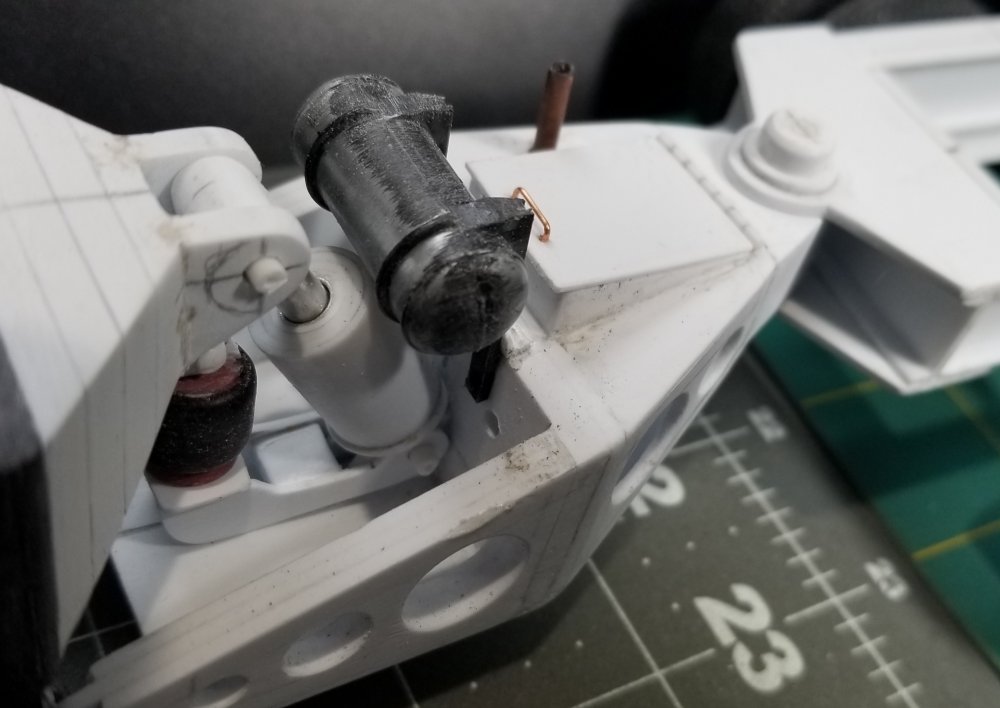

-
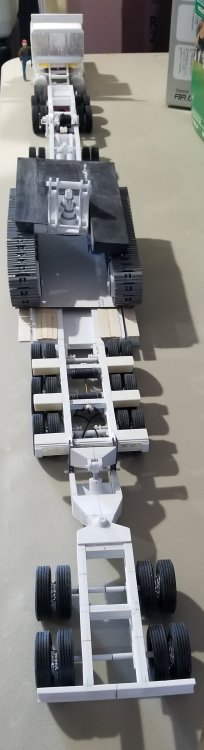
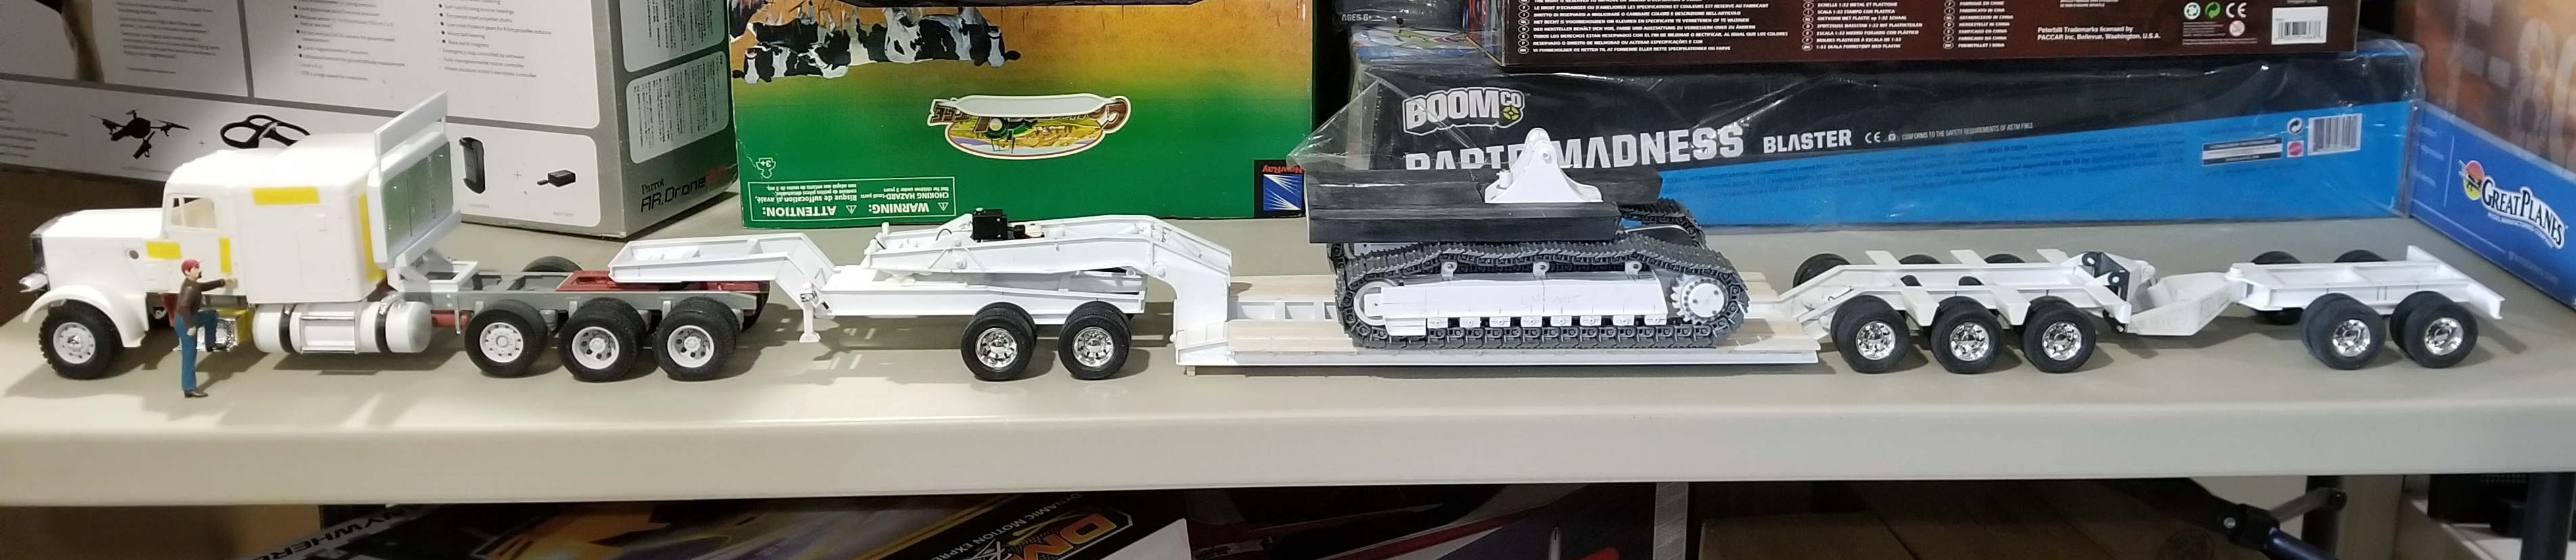
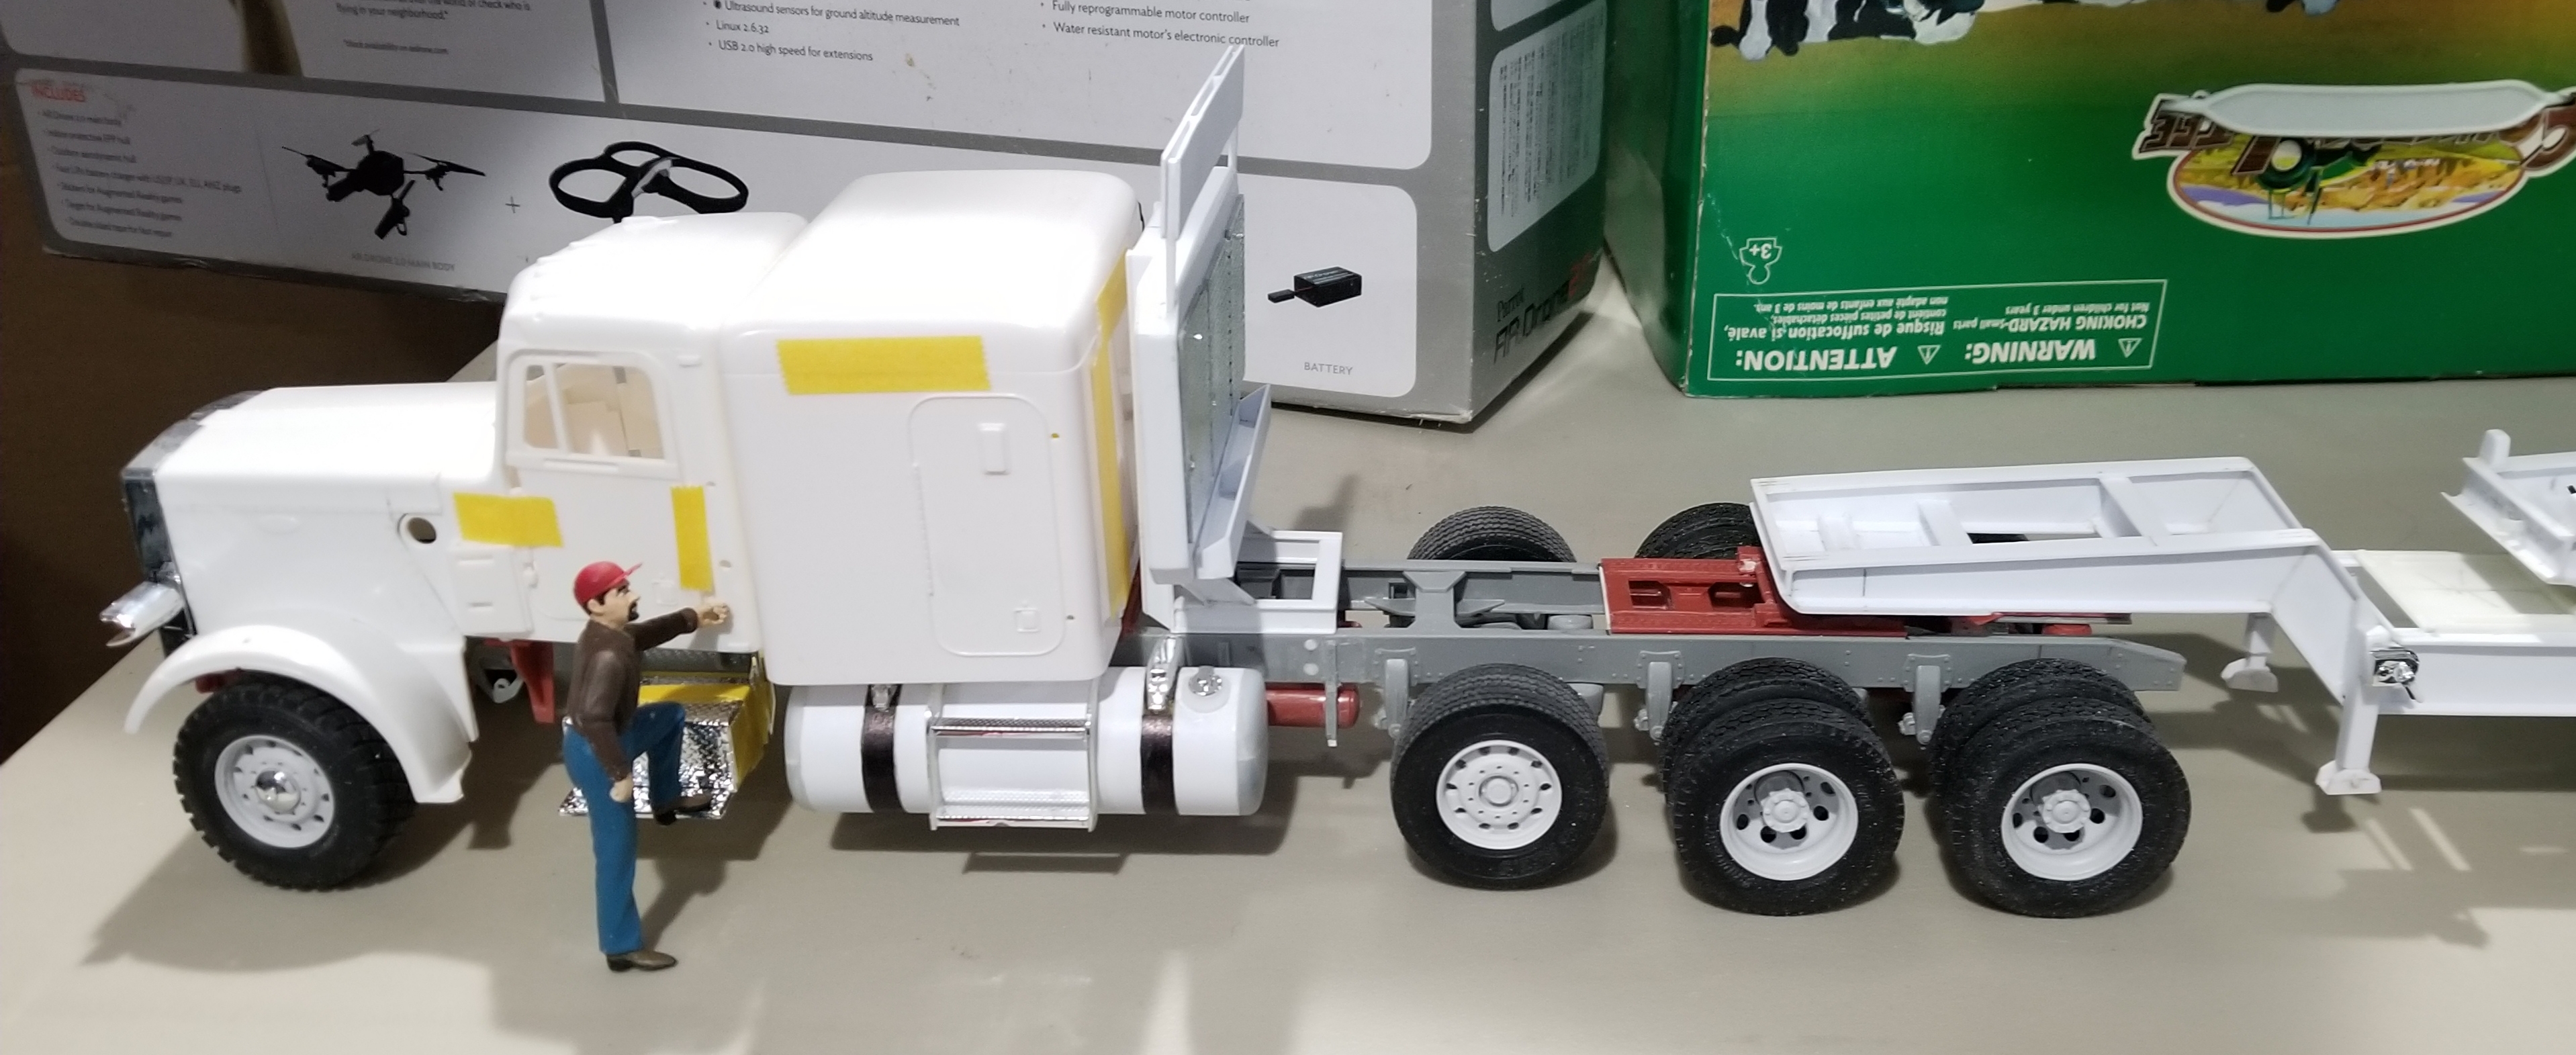
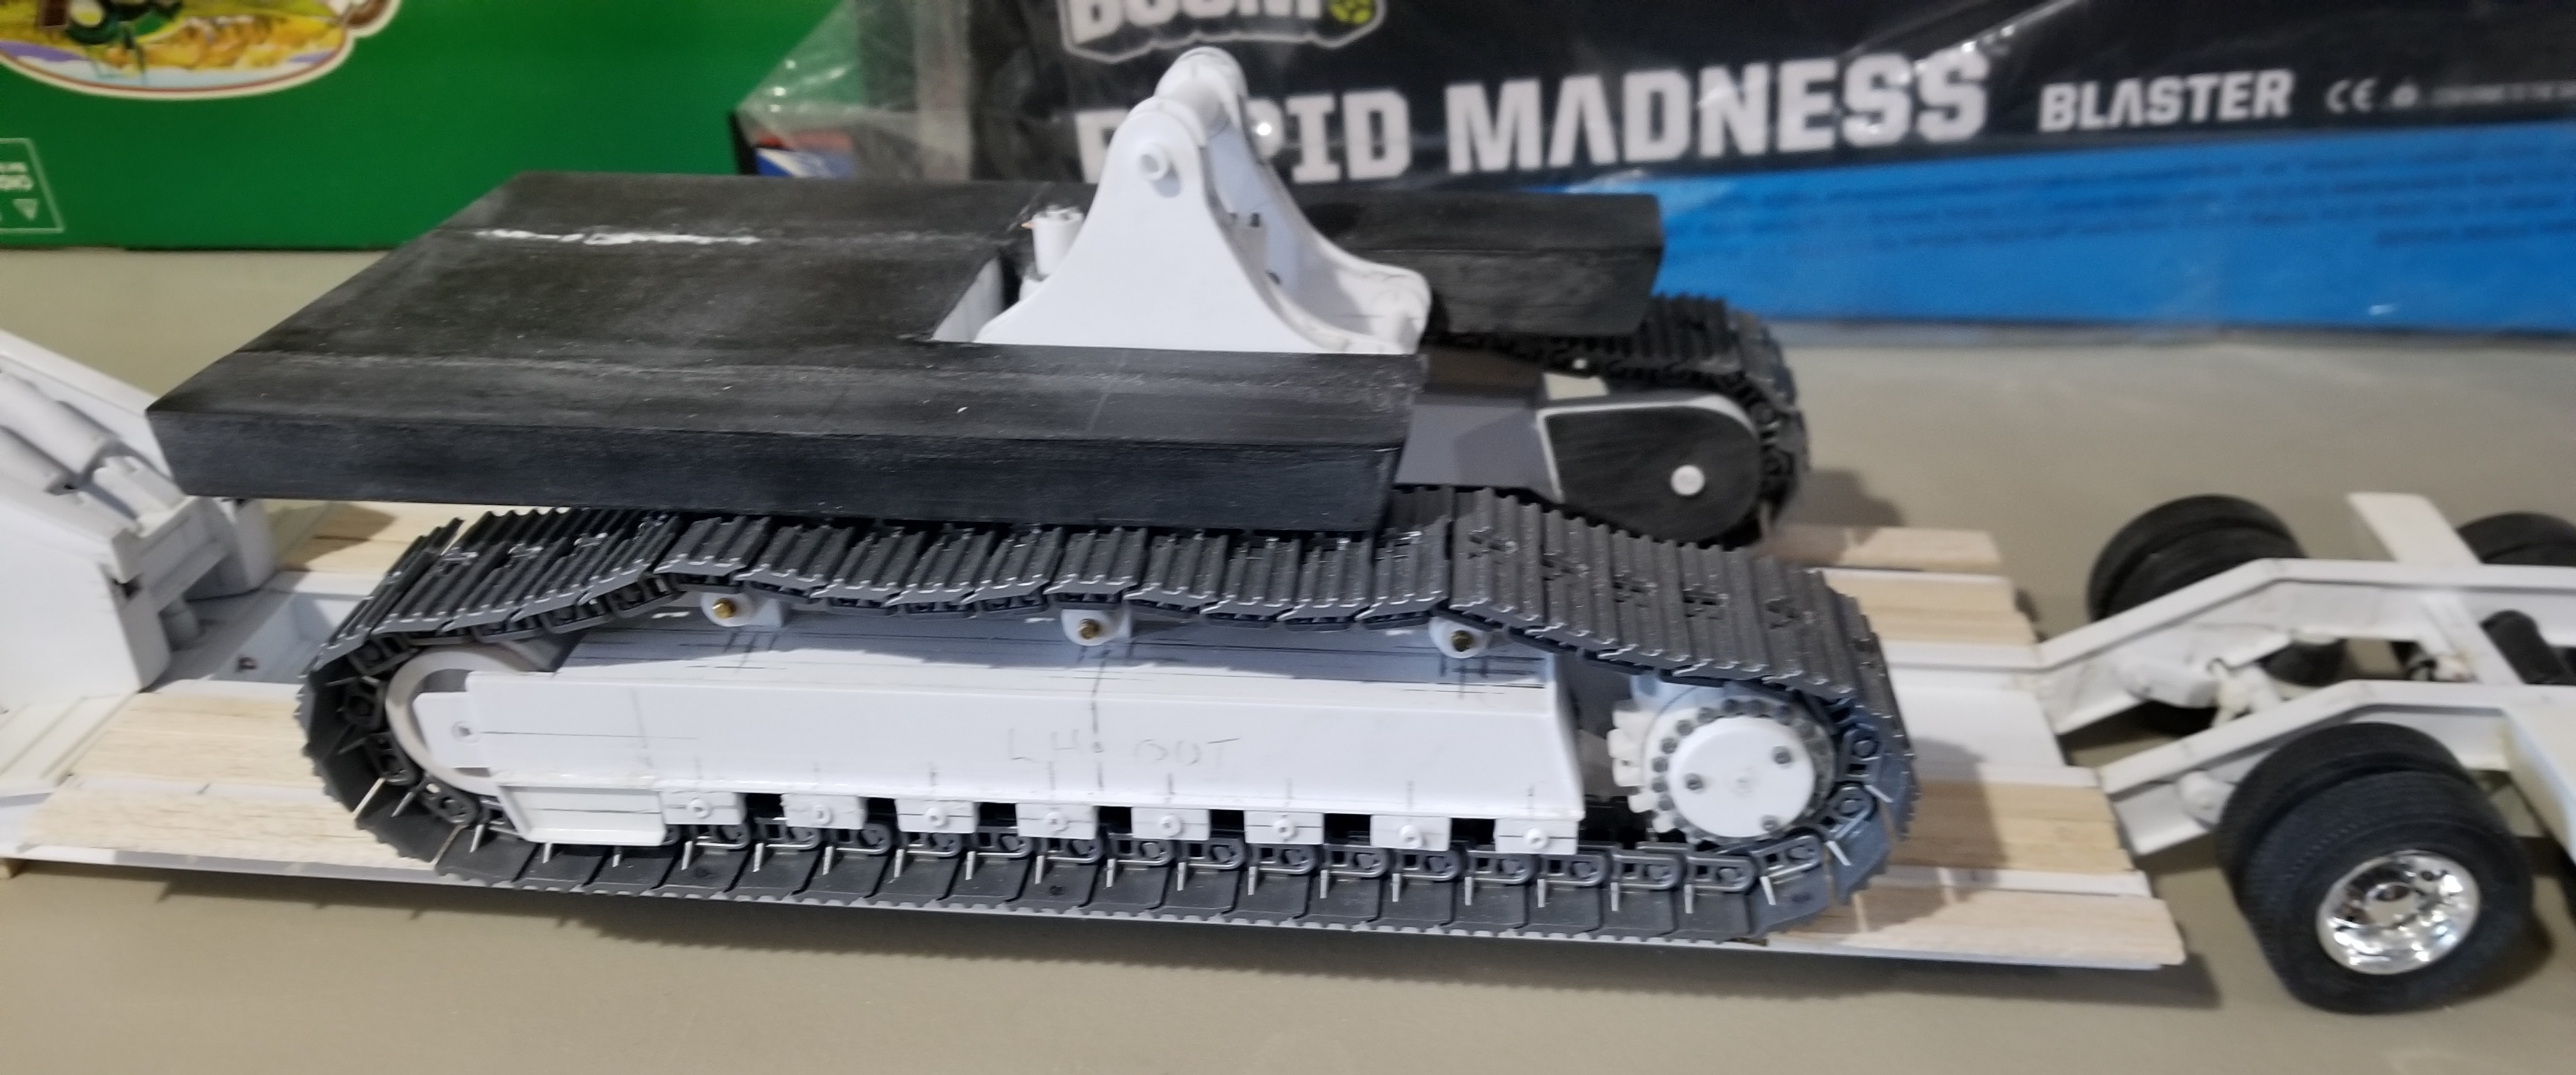
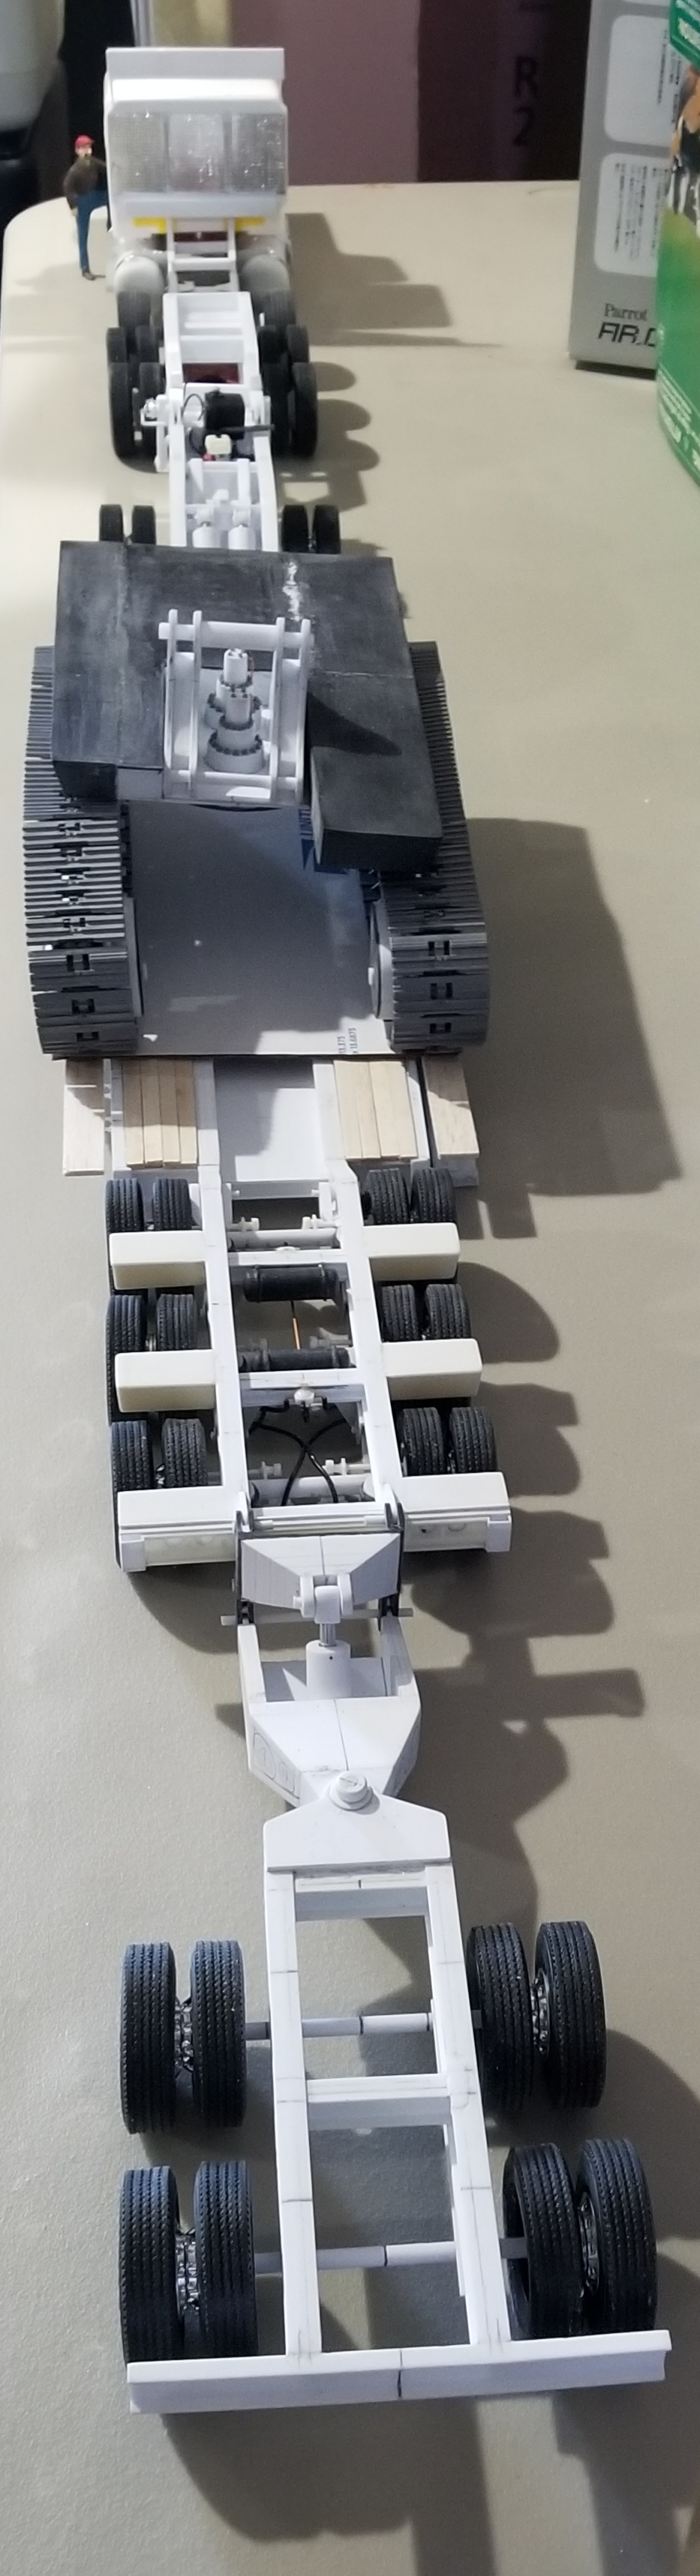
Hey guys Get out the butter and salt, I have a new batch of pop corn ready...lol. I have the booster/stinger almost completely built, I'd say about 80%. I assembled everything temporarily together to see how it looks, and WOW!!!! It's Lloooonngg!!! So here are some pictures for you all to perose. this view shows the mounting bracket, the attachment/pivot bracket with the hydraulic cylinder and the booster/stinger. same thing from above. this view shows the whole set up, WOW! this view shows the Peterbilt 359 heavy haul tractor attached to the jeep this view shows the XL 80 JPS jeep attached to the trailer. this view shows the XL 130 HD drop nose RGN trailer with the Cat 374F L sitting on it. The outrigger boards and deck boards are in place. this view shows the rear of the trailer attached to the booster/stinger. this view shows the XL 42 PMB booster/stinger. This view shows the whole thing from the rear looking forward. You can just see the driver waayy up there at the front...lol well that's it for now be back with more updates soon. Ron G