Landlubber Mike
-
Posts
1,277 -
Joined
-
Last visited
Content Type
Profiles
Forums
Events
Gallery
Everything posted by Landlubber Mike
-
There is only one logical way to hang the TP roll!
-
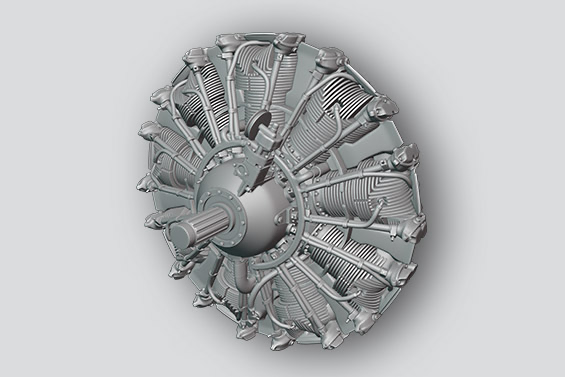
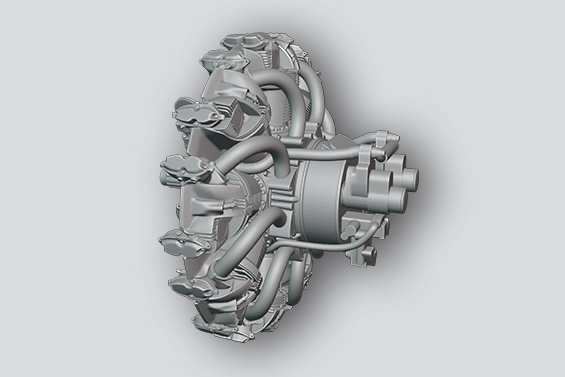
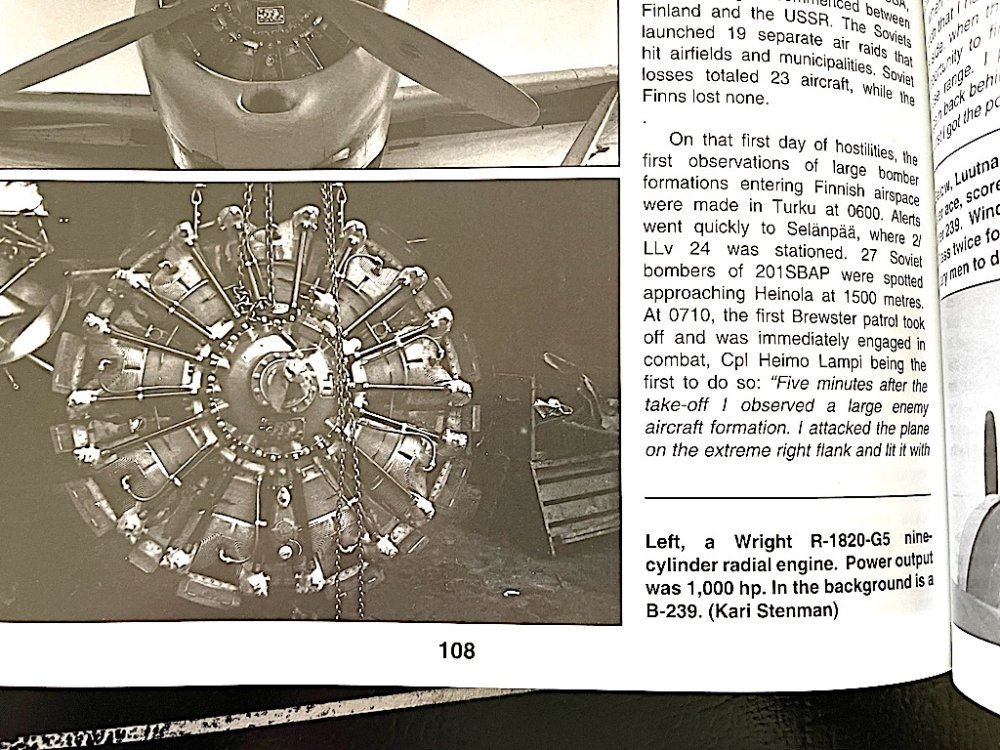
Thanks Hubert, that's very helpful to know. Maybe I'll skip the Vector and look elsewhere then. When looking for alternative R-1820s, I found the one you ordered: Also found this one from PrintScale which looks promising: The PrintScale one looks closer to the R-1820-G5 that my B-239 had (round ignition ring versus the more horseshoe-shaped one), though it looks like they have the ignition wiring opposite - the wire on the left side of the cylinder is wired into the front of the cylinder according to the picture below (from Naval Fighters Number 104), while PrintScale has the wire coming from the right side. Ugh, never easy is it? Maybe I'll take a look at the Vector one and see what is going on with it.

-
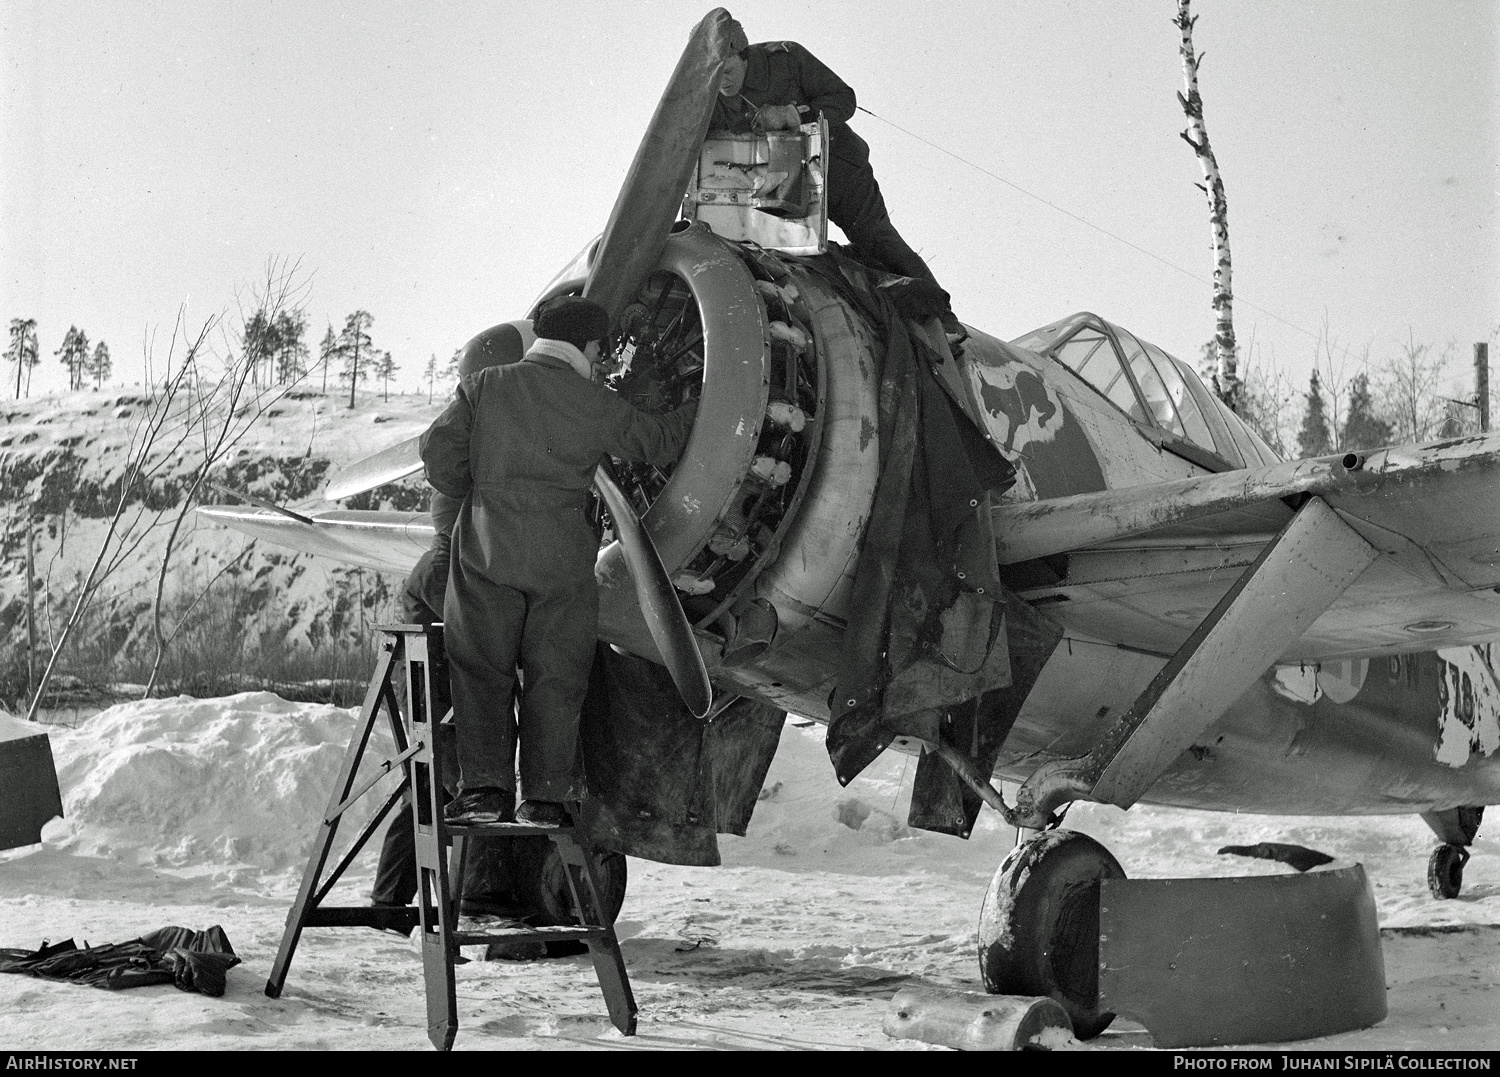
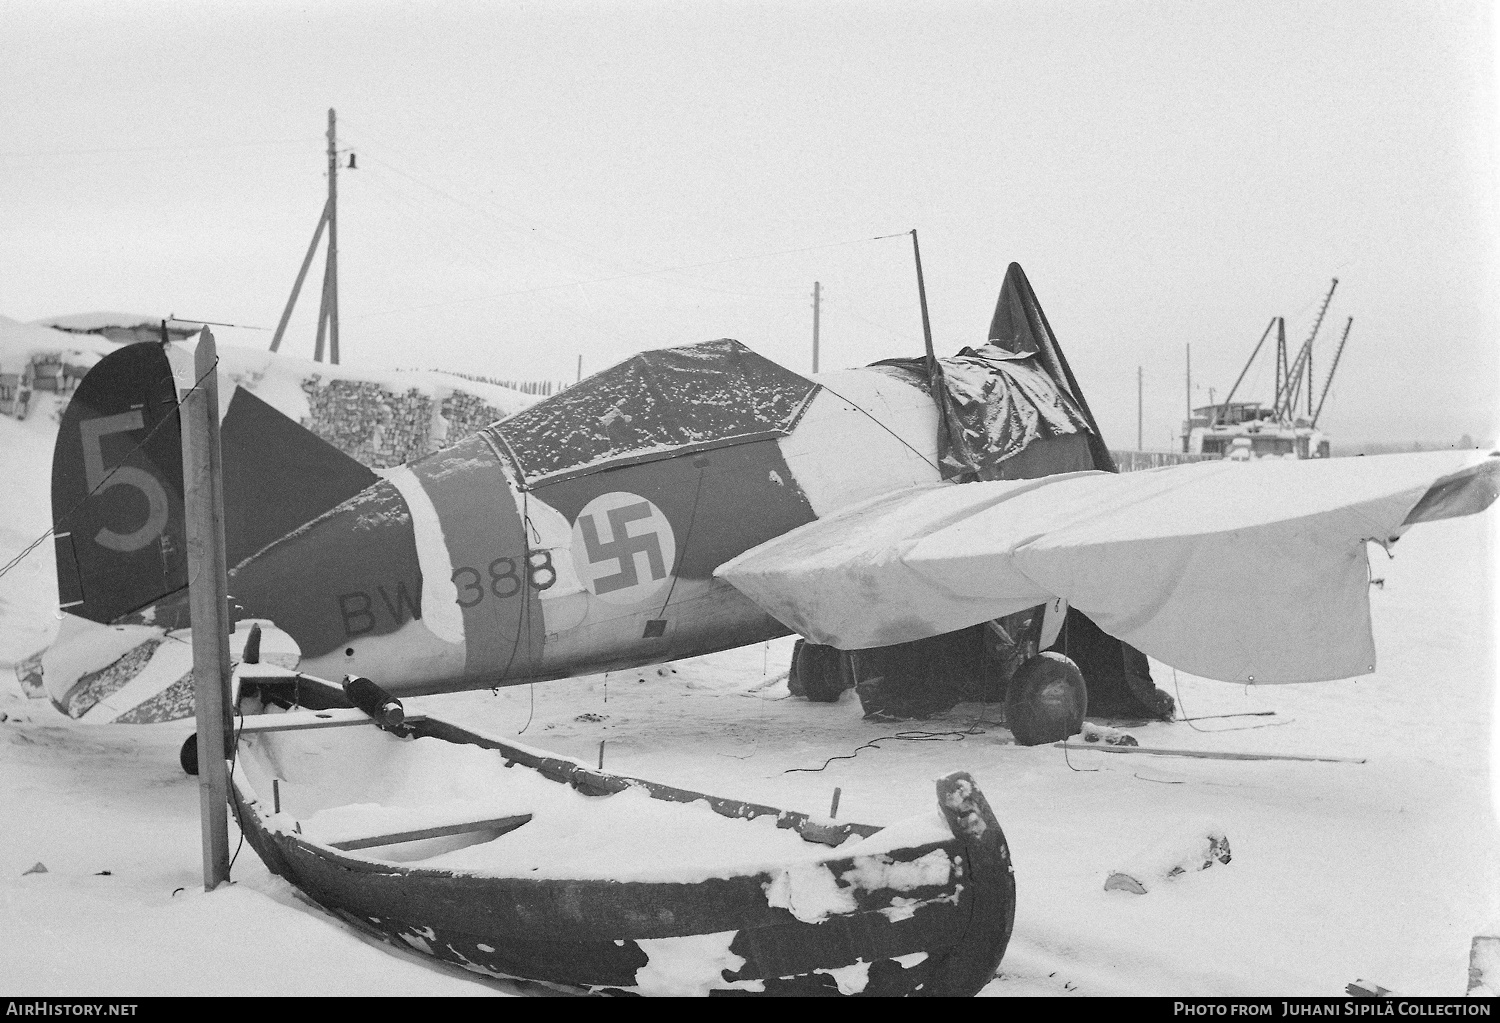
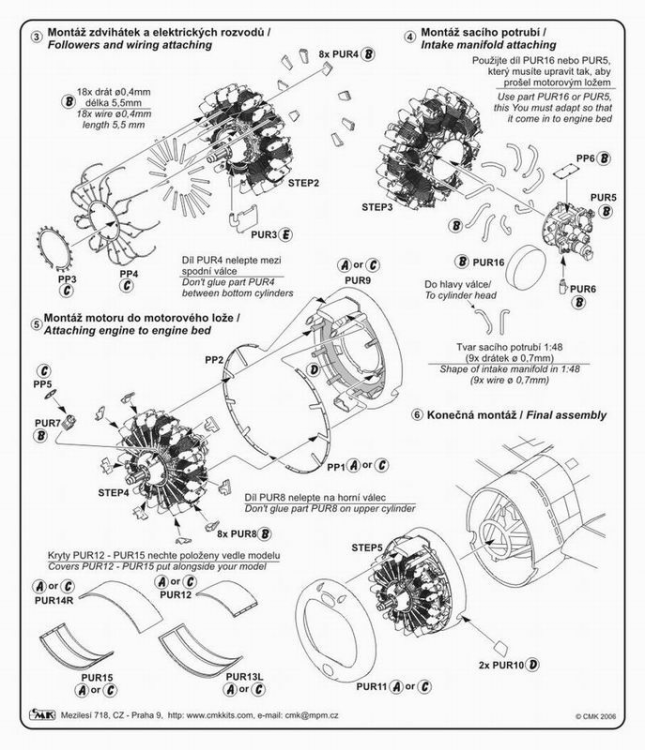
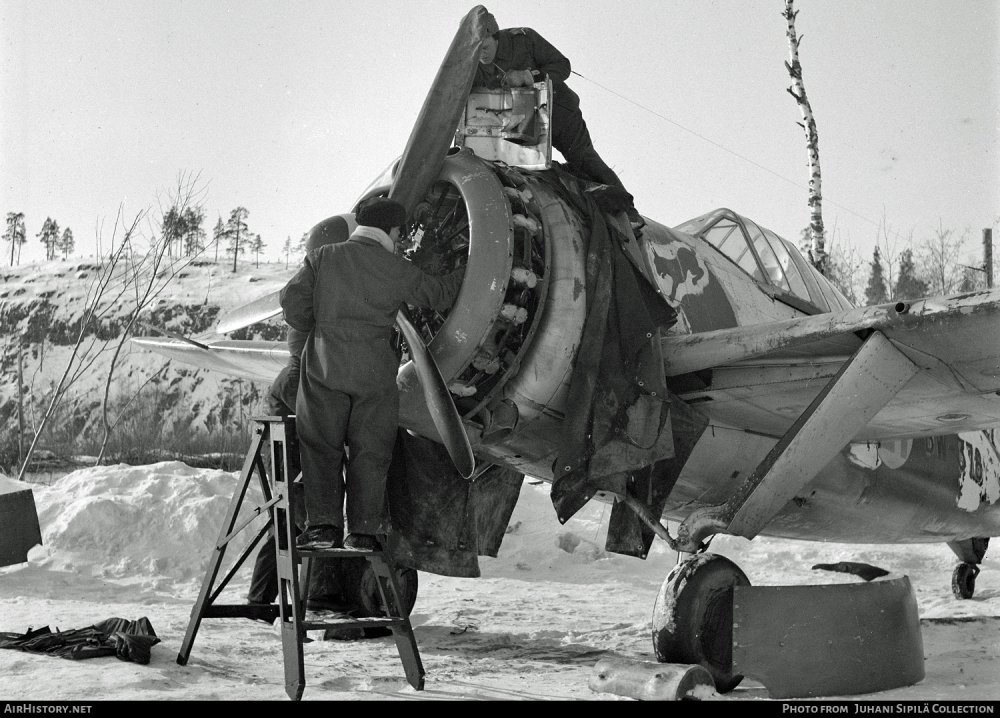
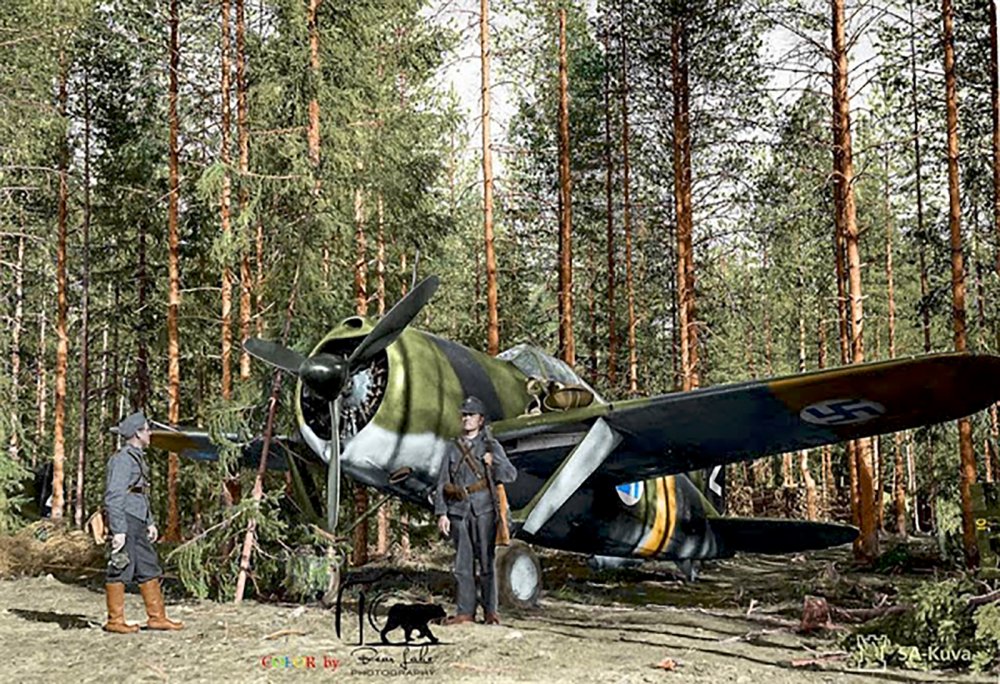
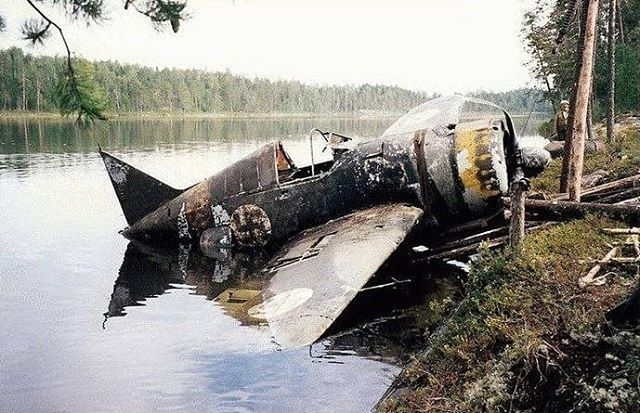
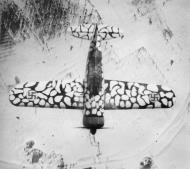
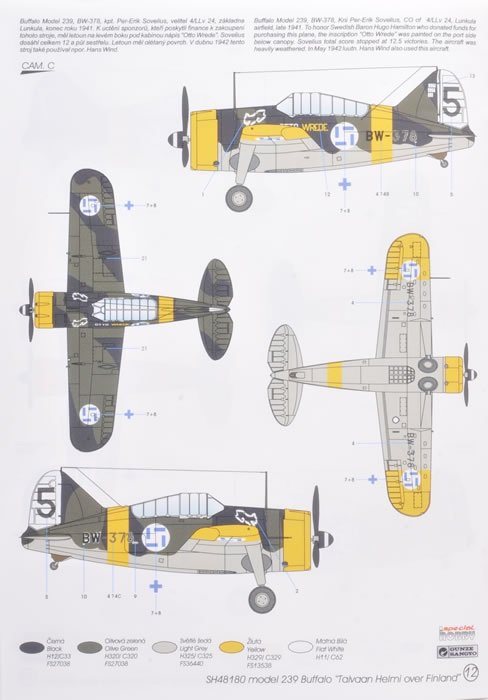
After some noodling, I think I'm going to try to recreate this picture in a model diorama: Sorry for using this log to record my thoughts, but I think I've worked through some of the trickier parts, which are: 1. Representing the BW-378 - fortunately, the kit includes decals for BW-378 (Camo C). The picture above suggests that the plane was re-painted/painted over in a winter camo scheme that looks very similar to the kit's scheme in Camo A, so I'll use A as the model with C's markings. Super lucky here, as not having the numbers would have probably made me scrap this whole crazy idea. The one thing I'm not sure about is whether in adding white for winter camo, the tail would have been repainted from white to blue - my guess is not since it seems like typical practice was to apply white paint over existing paint - here the olive and black areas of the plane - rather than repaint sections like the tail. Too bad though, as I think the blue tail looks pretty sharp. 2. Engine - with the panels open, I'll need to have a more detailed engine than the kit engine. The B-239 used a 950HP Wright R-1820-G5 Cyclone. Looking around, there are a few mid-late R-1820 aftermarket engines out there. Fortunately I already have a Vector engine (32-005) that looks like it might fit the bill. I had bought it for the Dauntless kit I won in the Christmas raffle here on LSM a few years ago, so I might try and use that one and see if it fits. 3. Cowl interior parts - on my 1/48 kit, I had opened similar panels using a CMK engine set which included the engine mounting pieces. For this 1/32 kit, it looks like things will be much simpler. I won't have to cut the access panels from the fuselage halves (as in step 1 on the 1/48 build) because the halves end in the right place since the 1/32 kit includes separate parts for the access panels. Plus, I believe that the 'curved-in' shape of the ends of the fuselage halves, together with the engine mounting pieces in the kit, get you PUR9 and PP1 and PP2 from the 1/48 kit (see instructions below). So, I think that all I will need to do is modify the kits access panels to show the one on the ground and the one held by the mechanic on top of the nose of the plane (which incudes the air vent, which should be fairly easy to replicate). Lucked out here (I hope) as replicating PUR9 wouldn't be easy. 4. Figures. Ultimately, these might be the trickiest parts of the diorama. I'll probably find figures that most closely match the poses of the three in the picture, and Frankenstein them with other parts like "winter heads with hats", gloves, and boots, and probably add or modify details using Milliput or similar materials. 5. Other diorama items. The ladder and wheel chocks should be fairly easy to replicate. The tarps will be tricky - I might use something like Modelspan, which I think I would be able to wet, fold and drape. If anyone has any other suggestions, I'd love to hear them. There are a few products to replicate snow, so hopefully that won't be an issue. I'd really like to replicate that birch tree in the background if I can - it adds a nice touch to the scene! All in all, I think this might be a lot easier to accomplish than I first feared. Thanks for bearing with me on my little build treatise!


-
1/48 Revell MDD FG1 Phantom 892 Sdn FAA 1972 RFI
Landlubber Mike replied to PanzerWomble's topic in Archived GB's Sub Forum
Wow PW!! Beautiful work!- 13 replies
-
- 3
-

-
- phantom fg1
- revell
- (and 2 more)
-
Well that sucks - was hoping that the rear canopy issue was only on the 1/48 kits. It wasn't quite as noticeable to me on the last kit until I started looking at fitting the canopy. Sorry also about the fuselage halves. The back half seems to fit fairly well, so what I might do is start by gluing the back half and maybe the bottom on the front halves, then work out what to do on the top of the front half. I'm worried that if I try to force the top half, I might have seams popping elsewhere as it looks like I could have a 2-3mm gap. Might be a better idea for me to close the gap with a piece of styrene. I might put this one to the side for a bit, as I think I might attempt to do a diorama recreating one of the pictures I posted earlier (see my next post below), and I really need to get moving on my Walrus/Albatross group build project. So, you might end up passing me pretty quickly. I'm always happy to take a look at things if you have any questions and want to bounce things off someone.
-
Thanks Rob - I think that will show a bit more interesting details if I go that way, rather than show it as fully buttoned up and ready to launch off the catapult (kinda boring).
-
I just looked at the wings and fuselage halves and you're totally right. Ugh. I didn't read anyone having a problem. Here are four logs I have bookmarked that I check along the way: https://www.britmodeller.com/forums/index.php?/topic/235066413-‘taivaan-helmi’-brewster-buffalo-132-special-hobby/& https://modelingmadness.com/review/allies/us/usn/reybuff.htm https://www.britmodeller.com/forums/index.php?/topic/235002982-special-hobby-132-buffalo-mk-1/ https://www.modelforum.cz/viewtopic.php?f=57&t=125858&hilit=Brewster+buffalo The last one of the four took an approach that I probably will do - scuff up the mating surfaces, and insert a small rod or two, epoxy, and hope for the best. See page 2 of his log. Though, he might have broken the wings off which is why the mating surfaces look scuffed - a little hard to understand even with the translation.
-
Hey Neil, I hadn't looked at the wings until I saw your post. Arghhh!!! 🤬 Why would they do the wings that way?? In the minute I've had to think about it, I'll probably epoxy brass rod to help give a little more stability to the bond. I tend to be a lap modeler, and drop or bang into things all the time. I'd be really concerned with just gluing with cement or CA. Ugh, ruined my afternoon, thanks! 😆 Oh, one thing while I'm thinking about the wings. On the 1/48 kit, they had a divot on the underside of each wing for lights. In the 339-23 that I built in 1/48, only one wing should have had a light so I filled the other in. I believe that my current instructions say to fill one of them, but in case yours doesn't, you might want to look into it if you're into accuracy.
-
Thanks Peter for sharing your techniques and consumables. I'll have to look into trying those. Really appreciate it! And really sweet Ford!! Love it! As an FYI, I saw that some people go with MCW Finishes for paints - they have lots that match specific car colors. I think they may be lacquers and enamels. https://mcwfinishes.com/
-
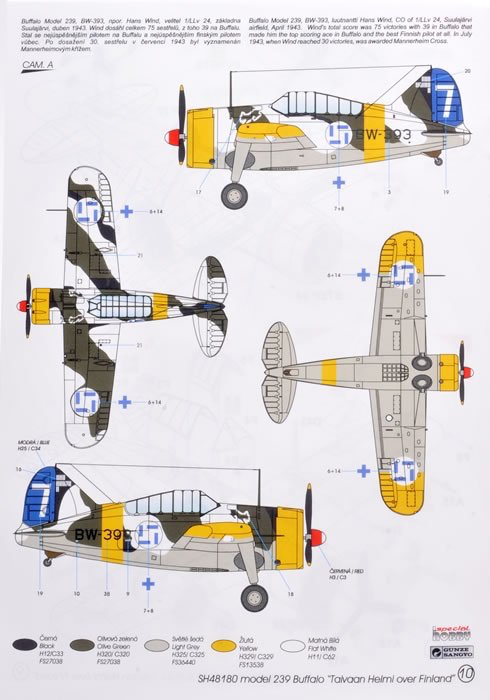
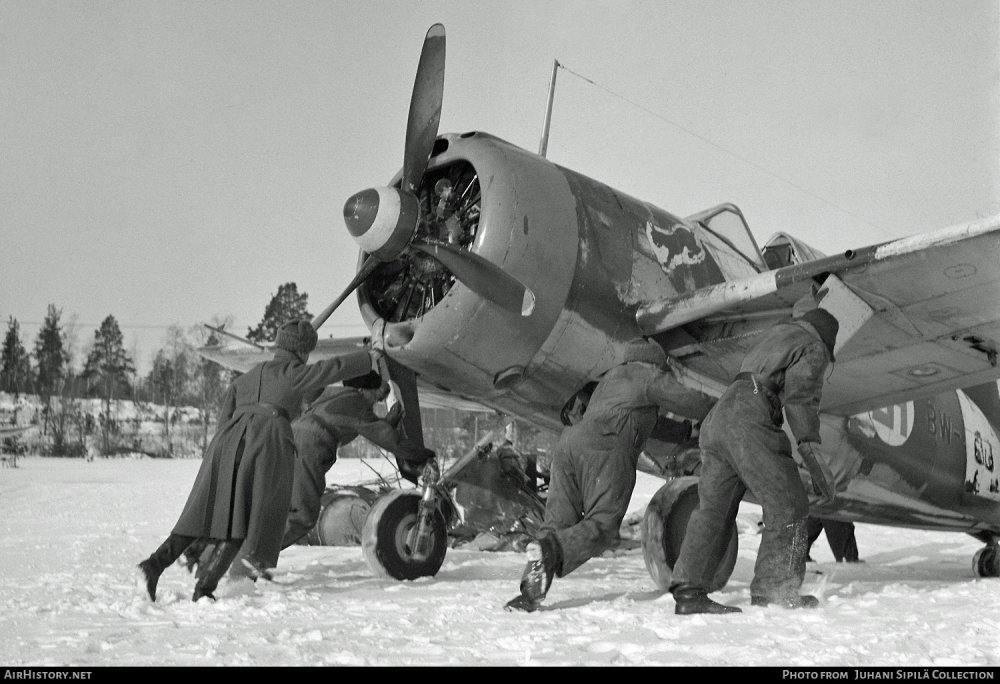
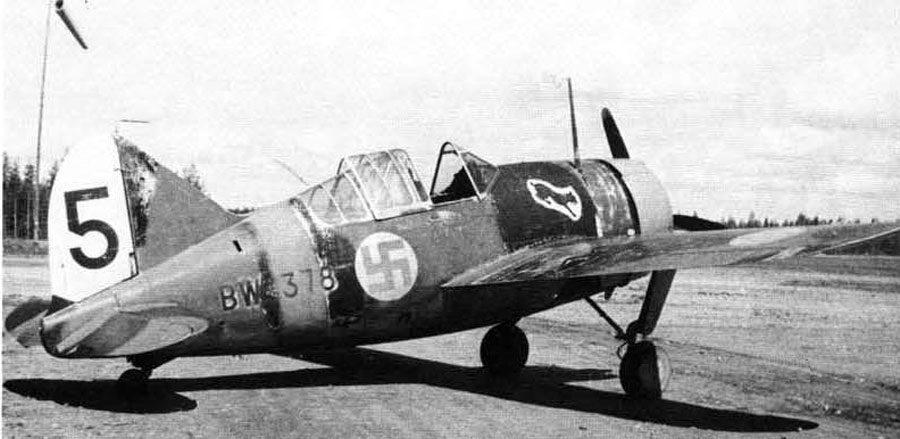
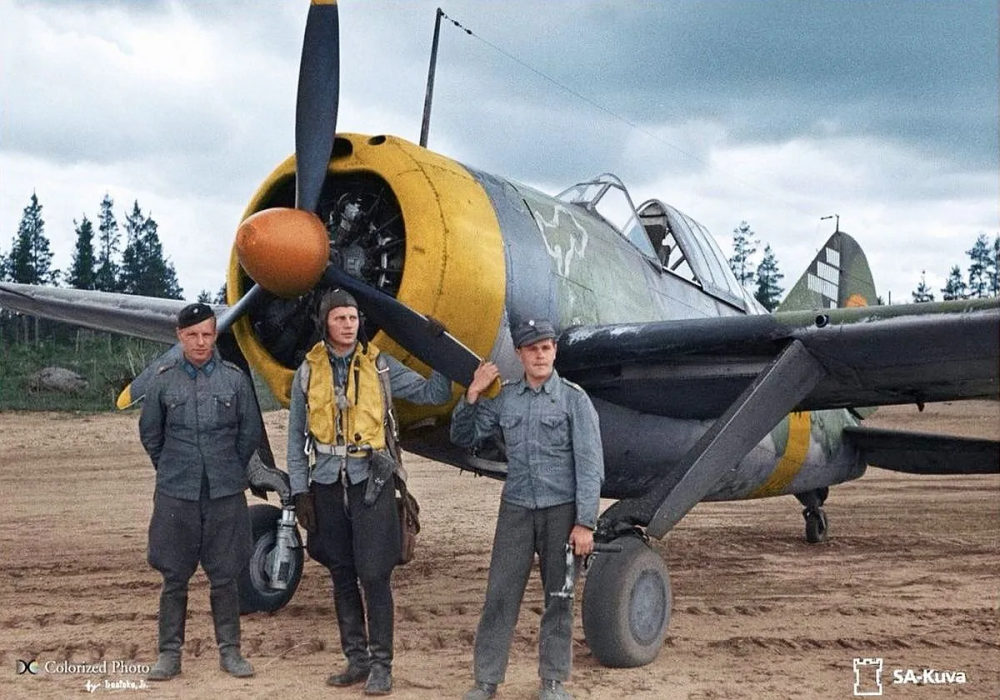
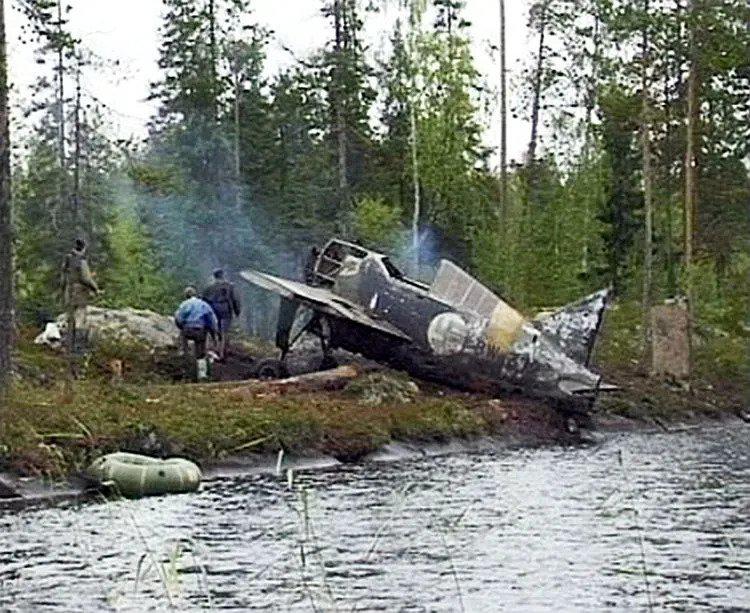
Since I'm on a roll, I wanted to share some B-239 pics I found online. I wasn't planning on putting this model in a diorama, but I think it would be pretty cool to diorama the first or third pictures below. Unfortunately I'm not having luck with finding appropriate figures and numbering could be tricky. BW-378 (March 17, 1942) - looks to have more white in camo scheme, likely because of winter camo due to date, similar to Camo A in kit: Another of the BW-378 (same plane as Camo C in kit which is dated late 1941): BW-383 (March 17, 1942): Interesting camo scheme: The famous Lt. Hans Wind (302 combat sorties, 75 confirmed kills, ranked second on Finnish aces list): Of course, if the model ends up looking like a piece of crap, I could go for BW-372 which was pulled from a Russian lake in 1998: https://www.warbirdforum.com/bw372.htm


-
Clear the Bench! It's Kotare Spitfire time!
Landlubber Mike replied to GazzaS's topic in LSM 1/35 and Larger Work In Progress
Looks like a well made kit. Looking forward to this one! -
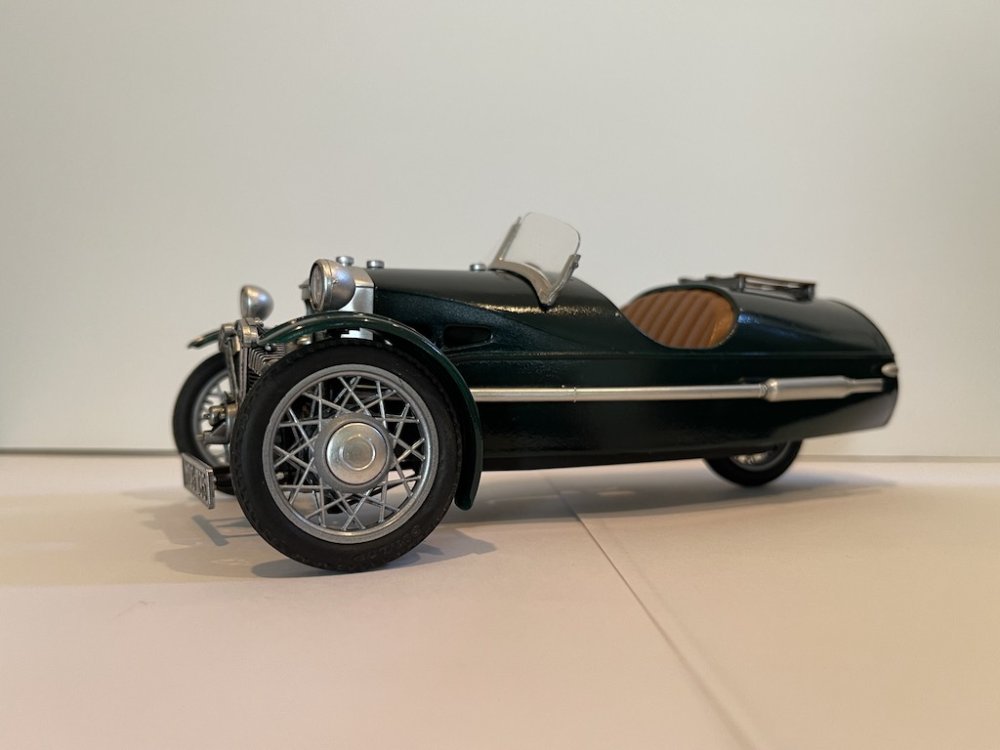
Thanks Peter, appreciate the kind words! I'm still fairly new to plastic modeling and am still feeling my way around. I did a couple of car models and used Tamiya rattle cans and Vallejo Model Air paints. Those were fine, but Tamiya's line of colors is a bit limiting so I decided to branch out. A lot of car guys swear by Zero Paints and their 2K gloss coats, but those you definitely want to be wearing a respirator for. I tried them out on my Morgan 3-wheeler (old kit from Entex). Really nice coverage, but the solvents you recommended to clean out the airbrush afterwards are pretty harsh. I left a small bristle brush sitting in the solvent trying to clean out my nozzle and the bristles actually started melting. 😳 Not sure if I posted this before, but the British green paint job came out pretty nice (for the chrome parts, I used Vallejo Metal Color): On the plane side, I started with Tamiya and Vallejo. I quickly found Mr. Surfacer to be my absolute favorite primer though for everything - cars, planes, ships, etc. So, I tried using Mr. Color paints on my 1/48 Buffalo build and really liked them. I also have Alclad paints on the shelf that I tried once and liked. I need to figure out what to use for clears. I've liked Mr. Color (rattle can and airbrush) but I almost had a disaster with them on my Wildcat (likely sprayed too heavy). So I don't know what I want to do. It's been really nice like using Vallejo so far on the Walrus and Buffalo. For interiors, I'll stick with Vallejo as there is little need to tape usually. For exteriors, I'll probably stick with Mr. Surfacer primer and generally use a mix of Mr. Color and Vallejo for colors. I am going to try using Vallejo for the exterior on my Walrus. Of course, just after the paints arrived, I o saw a build log online where someone similarly used Vallejo which came up in sheets off the model - had to strip it down and re-paint 😳 Hopefully I have a better experience! For this build, I think I'm going to use Tamiya or Mr. Color for the yellow wing tips and fuselage band - those will go on first, and then I can tape and not really worry about the tape lifting (and the opacity and coverage is better than what I can get from Vallejo I think). Rest of the colors will probably be a combination of Mr. Color and Vallejo. For me, acrylics is mostly about the ease of use and cleanups. I am less concerned about the toxicity, but probably should be. I use a spray booth in my basement that vents to a half window - unfortunately I can't open the screen, so just have the vent pipe up against the screen and I leave the window open for an hour or more. Given the amount I spray, I think I should generally be ok with the filter, venting, etc., but probably should still try to switch over to acrylics as much as possible. Sorry for the long treatise!
-
I'm a little more used to those kind of fit issues after trying to shoehorn the Aires detail set into my Tamiya Wildcat build. That probably added 40 extra hours to the build (if not more), though probably would take a lot less time now that I've been through that exercise. I know what you mean though. It is a bit frustrating when things just don't fit and it's not from user error. You have to wonder if kits are test built before release. Maybe it's just my personality, but I wouldn't release anything that seemed to have clear fit issues. It's too bad though, as Special Hobby kits some really cool subjects. After this one, I have their Siebel 204D and Lloyd C.V ser. 46 kits, so maybe I have some masochistic tendencies.
-
Hey Neil, hope the little I've posted has been of some help. Let me know if you have any questions as you move along - feel free to post them here or via PM. I've actually enjoyed working on it as well, and really enjoyed working on the SH 1/48 kit. A bit more challenging than shake and bake kits, but not too bad if you take your time. For fuselage fit, the back half seems to fit completely fine. Forward of the canopy, the bottom of the fuselage halves look to fit ok, but I think the top halves are a touch short. I ran into very similar issues with the 1/48 kit as you can see below. I forget how I ended up closing that gap, but I think the 1/32 kit will be proportionately bigger. I probably will need to run a strip of plastic between the halves to close it. One other potential issue I should note. On my 1/48 build, looking at the right fuselage half, the area between the end of the cockpit and the tail fin had a flatter profile than the left half. I don't think it was that my kit part was warped, I think it's just how the mold was as I believe I found another 1/48 log that mentioned the same issue. I ended up building that area back up by using Tamiya 2-part epoxy putty which surprisingly worked really well given it was my first time using it. Unfortunately, I came across a 1/32 log that suggested the same issue. So, just wanted to pass that along as something to look out for.

-
Thanks B-C! Glad to have you along! Indeed! That's what I'm hoping Rob. There are a few little nubs here and there to help locate things like the bulkheads and firewalls, but nothing to really lock things in place. So, I would glue a sub-assembly and then add the other fuselage half to help the sub-assembly get into what I assumed to be the proper place as the glue dried. In all honesty, to this point it hasn't been that bad especially since I sorta knew what to plan for after the 1/48 SH Buffalo. For modellers that expect Tamiya-type fit though, Special Hobby is probably not for them.
-
Thanks Chris! Haven't quite figured out how to set it all up, but I have a faint idea in my head. For figures, Plasticsoldierreview.com is a pretty good resource. I ordered the three Red Box Japanese sets in 1/72, which get top marks from them (the Hasegawa set does as well). http://plasticsoldierreview.com/review.aspx?id=2360
-
Thanks John! I think you're right that the -3 (and the 339-23 I did in 1/48 scale) had the longer nose. There might be some other changes you'd need to make as well, like the panel lines, exhaust location, etc. This SH kit included two sets of fuselage halves - obviously you only use one, so now I have a good sized paint mule. The one for the 239 had a different set of panel lines, and the exhausts come out of the bottom of the cowl, and not the side as with the other set that was included in the box. Certainly not insurmountable.
-
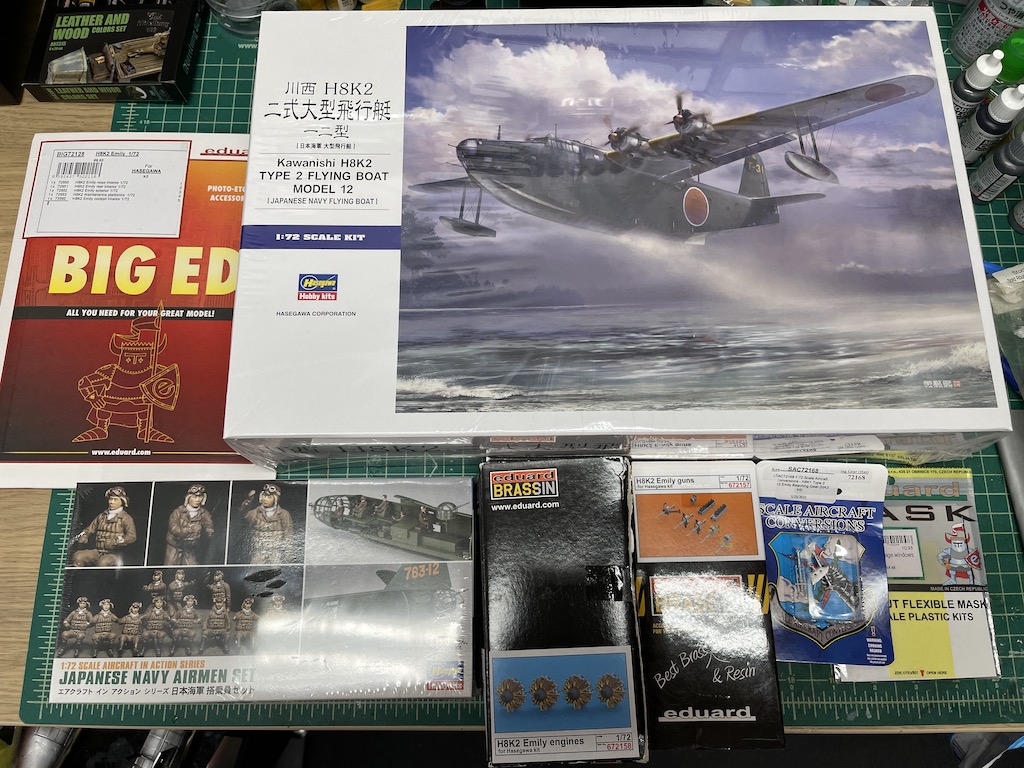
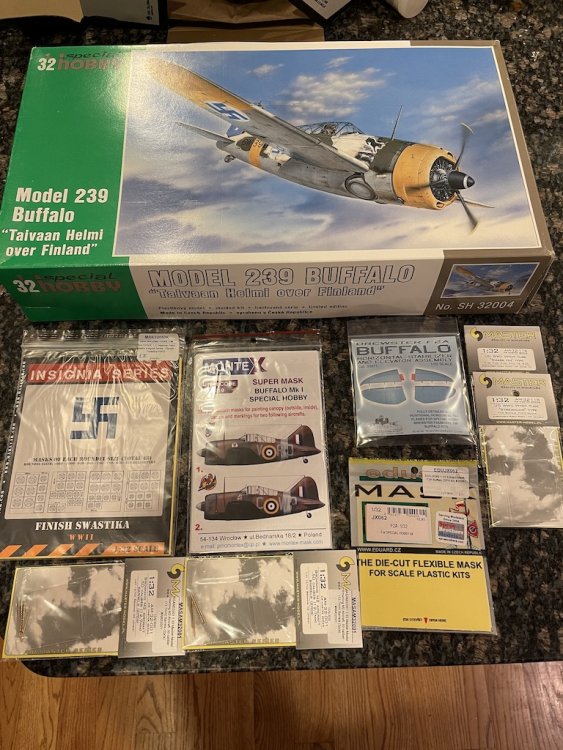
I hesitated to post this since @KevinM was going to build this kit, but a few weeks ago I saw Sprue Brothers' big sale on Hasegawa items and saw this kit. I have been looking for a Special Hobby Sunderland Mk. III given the pretty amazing BigEd PE set that's available for it, but no luck (plus, sounds like there are fit and other issues with the kit). When I saw the Hasegawa Emily, I found out that it had a similar BigEd set, as well as some other goodies, and even better, it supposedly goes together very nicely. So, scratch the Sunderland and here comes the Emily. Managed to track down the available aftermarket so I'm a pretty happy camper. Even at 1/72 this thing is a beast. I'm thinking of modeling it as a two-sided diorama - with the full exterior and crew running around loading and servicing the plane on one side, and the other side cutaway (with the wing removed) showing the crew in position at the various stations. I managed to find the Hasegawa Japanese Navy Airmen set, and also ordered some Red Box sets of Japanese air crew so I should be all set with the figures. This will help me to show both the interior and exterior of the plane and avoid problems with other plane kits where all the interior detail gets buttoned up never to be seen again. Even better, I'll be able to save space with one of the wings removed.

-
Wow John, really nice! Well done, one of my favorites of your [many] builds.
-
Thanks Kevin! This one is kinda easy with everything in aluminum. There's some black and other colors thrown in, but fairly easy scheme. That being said, the SH instructions suggested that some of the bulkheads and other parts be interior green. Seemed a bit odd to me, so I wasn't sure if it was a mistake. I checked other builds and they seem to generally paint everything aluminum, so I went with that approach which made assembly and painting much easier. It's not like anyone is going to be able to see much of the interior anyway.
-
Thanks! And I know, what a shame. I probably will try to model it with the windows and canopy open, and maybe the nose gunner position open as well, so people can get a slight peek as to what's inside. Would be cool to do a cutaway model of this bird in a bigger scale.
-
Thanks Rockie! Always nice to get that first coat of paint down.
-
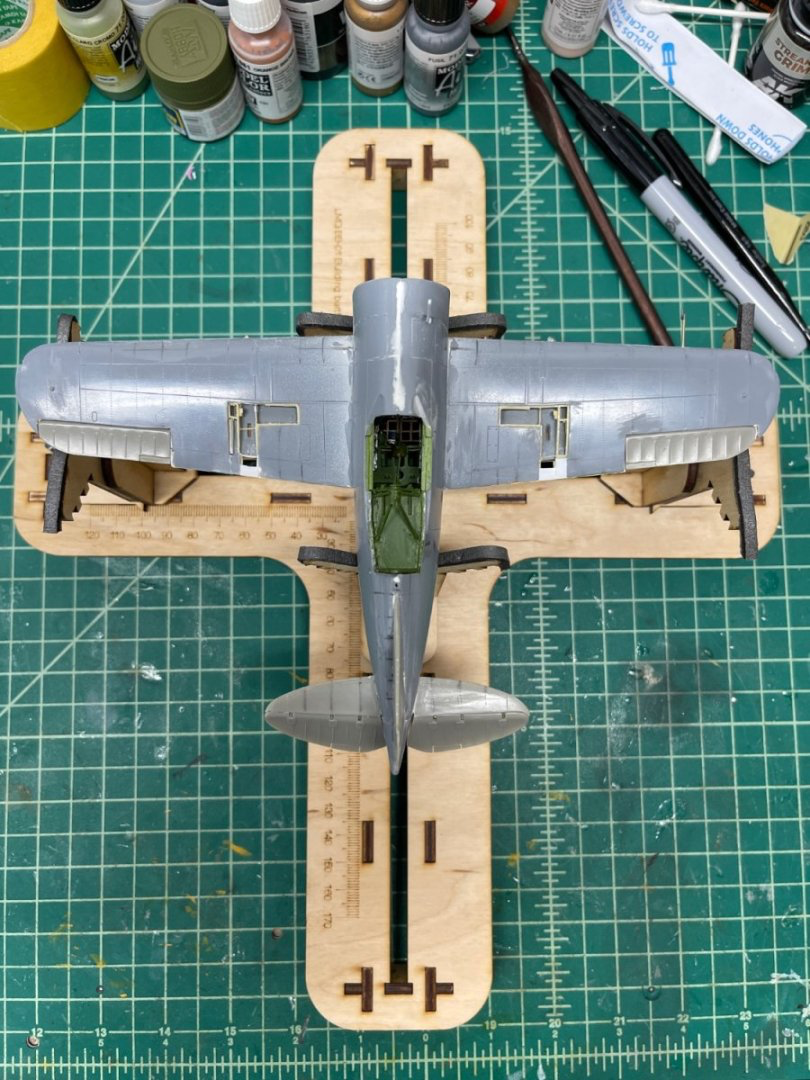
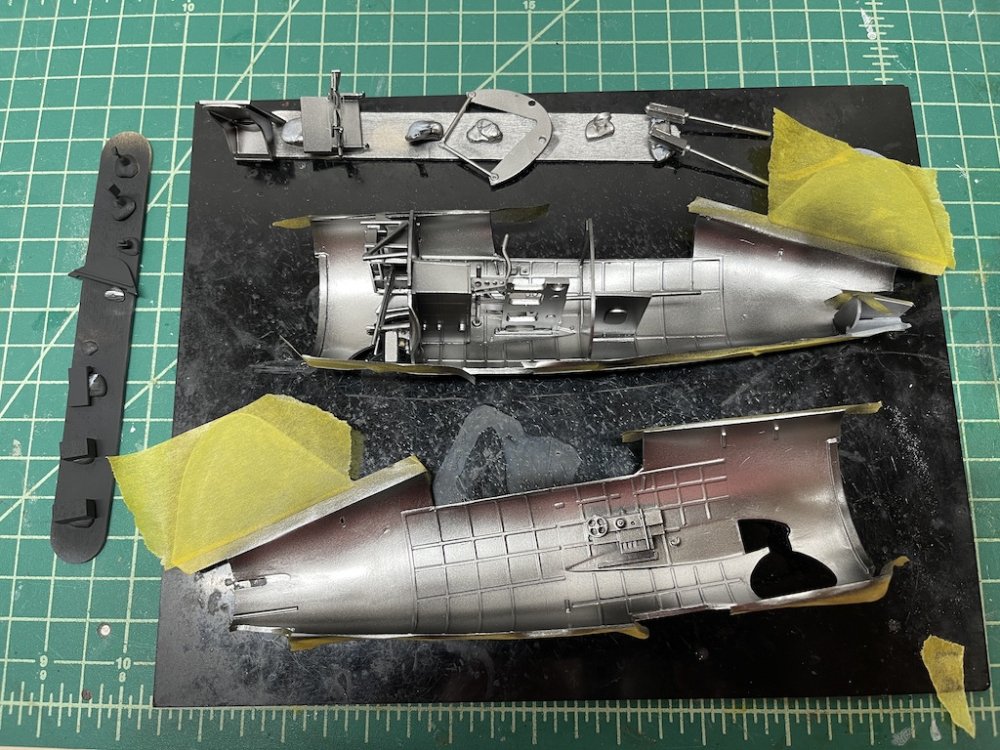
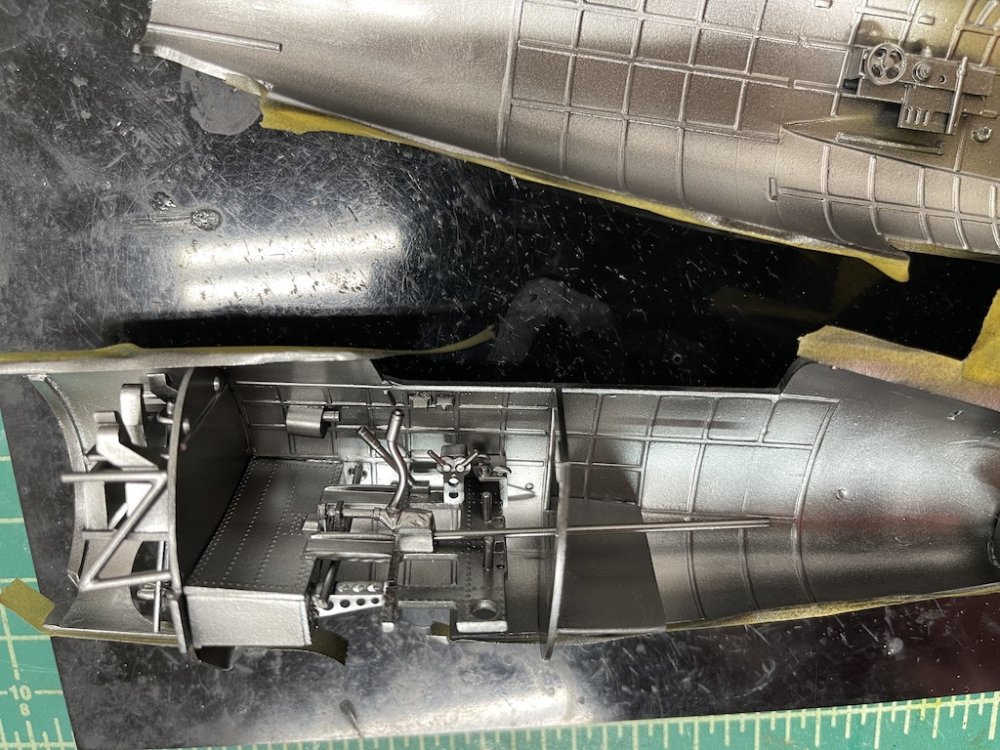
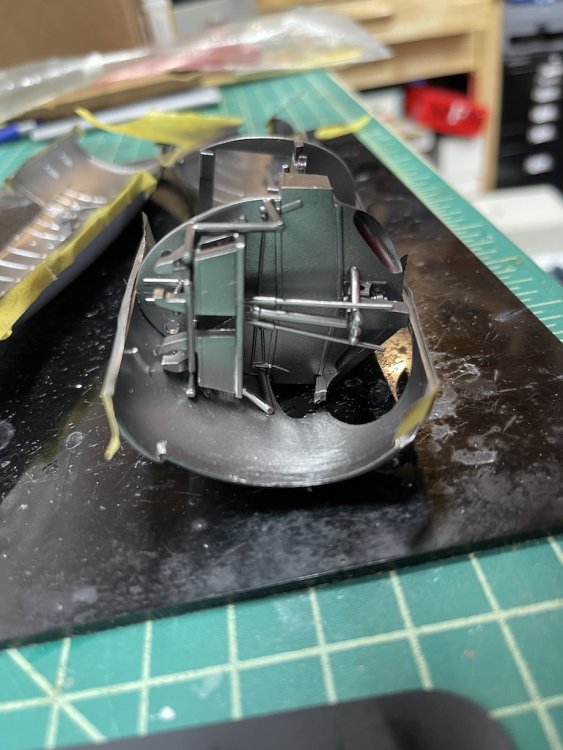
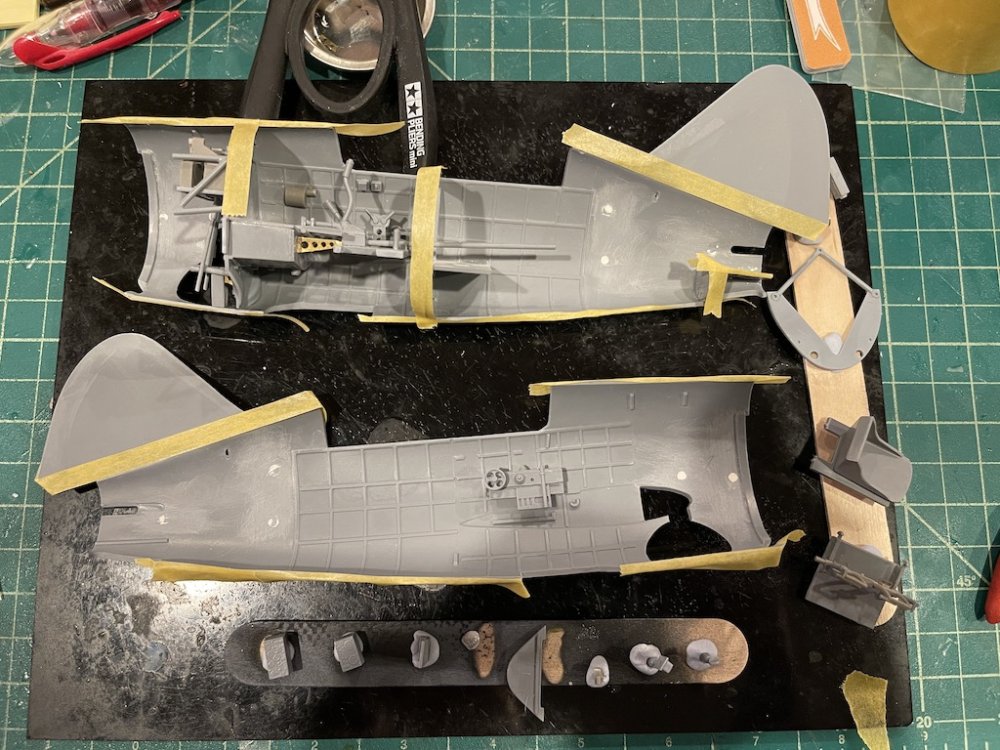
Here's where I am today. Managed to get painted the interior of the fuselage halves and remaining interior items to install. I'm pretty happy with how things are looking. I went ahead and used Vallejo's Metal Color Duraluminum. It sprays very well. After using mostly Mr. Color paints on my 1/48 Buffalo, it's been nice to go back to acrylics for ease of preparing the airbrush and cleaning. I'll still use Mr. Surfacer for the exterior primer and either Mr. Color or Tamiya for some of the harder to paint colors like the yellow on the cowl and wing tips, but I might go back to using acrylic elsewhere. Thanks for looking in!
- 65 replies
-
- 11
-
-
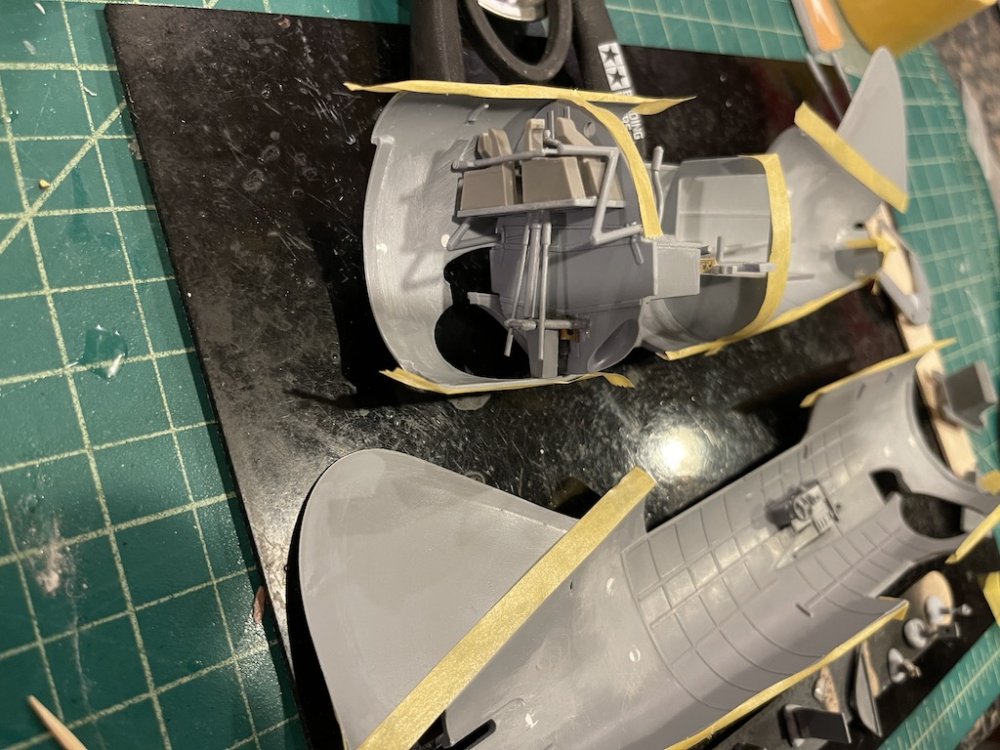
With the fit issues on getting the fuselage closed up, I thought it would be better to add as much of the interior as possible to one of the fuselage halves, rather than trying to install what are three or four separate assemblies into the fuselage halves and then trying to get it closed up. Taking this approach allows me to position the sub-assemblies on one half of the fuselage, and while the glue is drying, test the fit and get the final location by dry fitting the other fuselage half over it. Takes quite a bit of time, but I think it will be less painful in the long run. Instructions are ok I suppose - generally there are no locating marks, pins, etc., so you have to sorta guess where the instruction arrows point you. Thankfully there are other builds out there on the web to doublecheck yourself.
- 65 replies
-
- 10
-
-

-
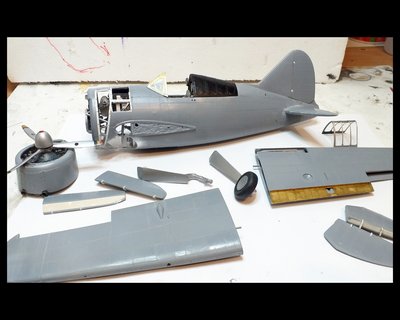
While waiting on parts to dry on my Walrus for the group build or otherwise just needing a break from it, I started the Buffalo 239 Finnish version from Special Hobby in 1/32. Yay, my first LSM for this board! Anyway, since I just finished their 1/48 Buffalo kit, I figured I might as well tackle this one given I know what to look out for. Unlike the 1/48 kit I just finished, this one I will be building mostly out of the box with considerably less aftermarket. The kit is like the 1/48 kit (and probably most SH kits) in that in addition to the plastic, you get resin and PE details in the box. It's been interesting comparing this to the Airfix Walrus that I'm working on. The Airfix kit has great fit but a lot of flash and injector marks and other cleanup that you need to do. This Special Hobby kit needs much less cleanup, but the fit is not the greatest. I can tell already that I'll have a big gap closing up the fuselage forward of the cockpit 🤬 But, so far this has been an enjoyable build over the last week or so.
- 65 replies
-
- 10
-