Landlubber Mike
-
Posts
1,277 -
Joined
-
Last visited
Content Type
Profiles
Forums
Events
Gallery
Everything posted by Landlubber Mike
-
Wow, really well done!! If you were going to turn that into a lawn dart, I'd hate to think of what you would do with my models! That's a really fantastic diorama! If you don't mind, can I ask what blue you used for the insignia? I have to paint similar Finnish swastikas on an upcoming Finnish Buffalo build, and was trying to find a paint that matched that blue.
-
Revell 1/32 Spitfire Mk IIa
Landlubber Mike replied to Peterpools's topic in LSM 1/35 and Larger Work In Progress
Wow, you're off and running after the Kingfisher, aren't you! Really fantastic work on the interior, great job!! -
Monogram 1/48 O-S2U Kingfisher
Landlubber Mike replied to Peterpools's topic in Archived GB's Sub Forum
Great first one in bag! What a way to kick off this group build, nice job Peter!! -
ProModeler 1/48 PBY-5A Catalina + Goodies, RFI
Landlubber Mike replied to CANicoll's topic in Let’s Get Wet Group Build.
Wow, those figures came out fantastic!! Nice job! -
Amazing PE work Rob - those cranes look incredible. Very nice job!!
- 329 replies
-
- 2
-

-

-
- uss arizona
- eduard
- (and 1 more)
-
Wow Peter, looks fantastic! You really did the old kit proud. Looks like it should be the box cover!
-
"Pasture" F4U-4 finished
Landlubber Mike replied to JohnB's topic in LSM 1/32 and Larger Aircraft Ready for Inspection
Another beauty John - love the color scheme! Well done on mixing and matching parts. -
Beautiful!! Your canopy lines are perfect, wow! Very very nice job.
-
Wow, really great job Jerry!
-
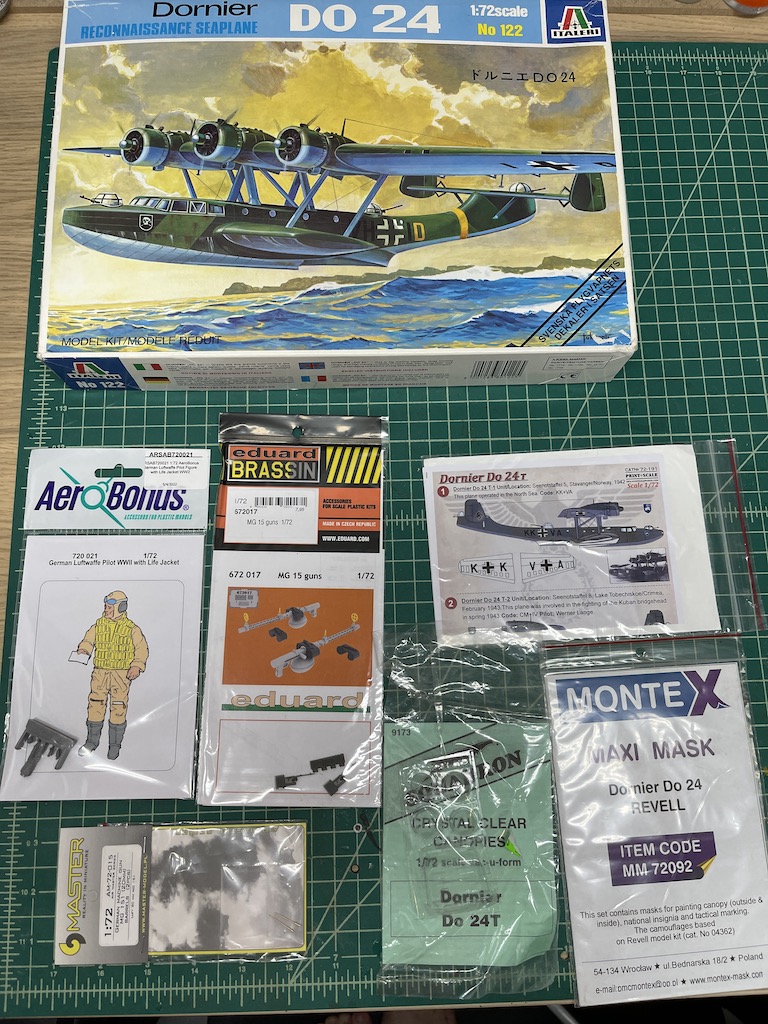
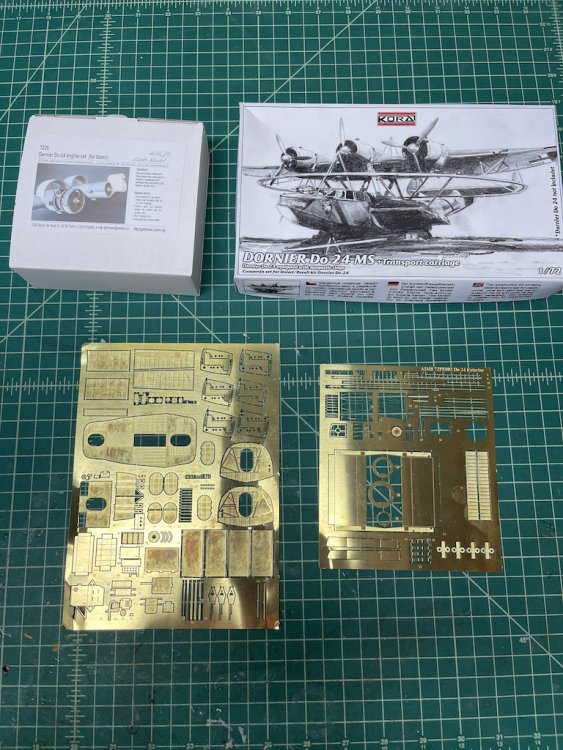
Another quirky one for the stash. I've been interested in the Dornier Do 24T model for quite a while, and happened upon an eBay auction for not only the kit, but also the Squadron canopies (supposedly a big improvement over the kit ones) and more importantly, the out of production Goffy resin engine detailing set. When I looked up what other aftermarket was out there, I found that Hannants was carrying the AIMS very detailed interior and exterior sets, along with a Kora transport carriage that also includes parts to convert the model into a minesweeper. Ended up snagging the kit off eBay for an excellent price and picked up some other AM goodies. John's AIMS PE sets are fantastic, and the Goffy engine set looks great as well. Not sure what to think of the Kora set though - the resin parts look good, but the instructions are horrendous. I can probably figure out how to put the carriage together, but doing the minesweeper conversion is going to take a lot of guesswork. I bought the kit more for the carriage than the minesweeper, so it's all good. There's only a record of one minesweeper from what I can tell, and markings would be a guessing game since there may only be one grainy picture of it out there. Obviously not a LSM (it's probably 1/3 the size of the same scale BV 222 I posted earlier), but a pretty interesting subject especially with the current group build.

-
Now that looks really great PW - wow!
-
Between builds build F4U-4
Landlubber Mike replied to JohnB's topic in LSM 1/35 and Larger Work In Progress
Very nice - and typical fast - work John. That paint scheme looks really cool! Can I ask what paint you used to paint the propeller? I'm not sure if it's the lighting or anything, but I like the effect you got on it. Thanks! -
Revell-S-100 Schnellboat-1/72
Landlubber Mike replied to KevinM's topic in Let’s Get Wet Group Build.
Nice job on the mine! And be strong should you enter the LHS...you know you can do it... -
Looking good Rob! Now it's starting to look like a ship - always a fun stage to hit in a ship build. Good luck with the gaps!
- 329 replies
-
- 4
-
-
-
- uss arizona
- eduard
- (and 1 more)
-
Tamiya F4F-4 built as FM-1 Wildcat - 1/48 - FINISHED
Landlubber Mike replied to Landlubber Mike's topic in Non LSM 'WIP
It's quite possible there is residue from a prior painting session, but I also break down the airbrush, and try to thoroughly clean out the nozzle, needle, etc. I only have this issue with Mr. Color's clear. It's just so thick, and even thinning it 2-3 parts thinner to 1 part clear, I'll get the gummed up issue when starting to spray. After maybe 10 seconds of continual spraying with maybe some back-flushing, I'll get a bit of spray to come out. Then maybe after another 30 seconds, it will start coming out the full spray. I really don't have this with other paints and clears. My primary airbrush is an Iwata Eclipse with a 0.35 nozzle. I think what is happening is that some of the clear isn't completely dissolved in the thinner, so it settles and gums things up. Eventually, as more and more thinner/thinned mix is pulled through the brush, things get more dissolved. As I'm typing this, maybe what I need to do is pre-mix the clear and thinner before adding it to the cup. I don't have to do that with other paints and clears, but maybe it's worth trying that out here. Hmm... -
Unfortunately, there's not much out there for the kit. Eduard did a set for the antennas which you can find here and there, a set for the engine (which seems incredibly scarce), and masks (which seem really scarce). A couple of others came out with masks also, but I'm having a hard time sourcing them. I didn't find any AM decals for this one either. Hence, it's probably advisable to try to find the 2014 release rather than take the chance on the ones from the early 2000s. I think it would be fun to open the it up and scratch a little of the interior - kinda like you can on big transports like the Ju-52 and the Me 323. This kit is huge though even at 1/72, so I'm not sure about making it into a diorama except for using the CMK towing car which would serve more as a stand since this kit doesn't include a stand for the model. I have a couple of the Pro Modeler Ju-52s along with the Master-X pontoon and ski conversions, so I'll probably use those kits for dioramas (though, the Ju-52 at 1/48 is pretty sizable too).
-
Tamiya F4F-4 built as FM-1 Wildcat - 1/48 - FINISHED
Landlubber Mike replied to Landlubber Mike's topic in Non LSM 'WIP
I actually manually turn the PSI up on my compressor to get the airbrush primed. Once the flow is going the way it should, I then turn it down on my compressor to my working PSI. Sorry for all the confusion! -
If you guys are thinking about this kit, take a look at this build on Scalemates. This was what convinced me to build this monster https://www.scalemates.com/profiles/mate.php?id=10148&p=albums&album=40097&view=list
-
Yeah the chisel is so great - I have a few different sizes and even shapes from UMM, with some square faced and some oval faced. I just picked up some other tools from UMM a few months ago that included a set of reamers that have already come in handy. I'm kind of a tool junky and like to try new things out. Of course, some people can just use a #11 blade, some sandpaper and tube cement and build pristine models. It's like on the wooden ship model side. There are so many tools you can buy, including power tools, to make work easier and more accurate. Then there are those that are using a few basic tools that are creating museum quality pieces lol
-
Tamiya F4F-4 built as FM-1 Wildcat - 1/48 - FINISHED
Landlubber Mike replied to Landlubber Mike's topic in Non LSM 'WIP
Sorry, I fear that I'm confusing everyone with what I have been saying. When I shoot the GX100 clear, I find that it takes the airbrush a little while to be able to start spraying the clear as if I was spraying Mr. Color, Vallejo, etc. Either nothing comes out initially, or just a tiny bit of spray comes out. One thing I have done is just keep spraying (off the model) until the airbrush is spraying a full spray. That sometimes takes a while, so what I've done in the alternative is to turn the PSI up to 40-60, and spray off the model until the airbrush is going at the proper rate. Once that point is reached, then I turn it back down to get the working pressure of 18-22 and start spraying the model. In both cases, I feel like it takes a bit of time for the thinner to work through the nozzle, etc. to get to the full spray point. Spraying at a higher PSI just helps push the mixture through the airbrush to get the airbrush innards primed enough with thinner to get to proper spray patterns. I think I'll try using a 0.5 airbrush next time, and using Rob's approach of shooting some thinner through the airbrush before starting with the GX100. -
Revell originally released it in 2002 and then 2003. They seem to have re-released it in 2014, which is the version I have. I don't think they have re-released it since.
-
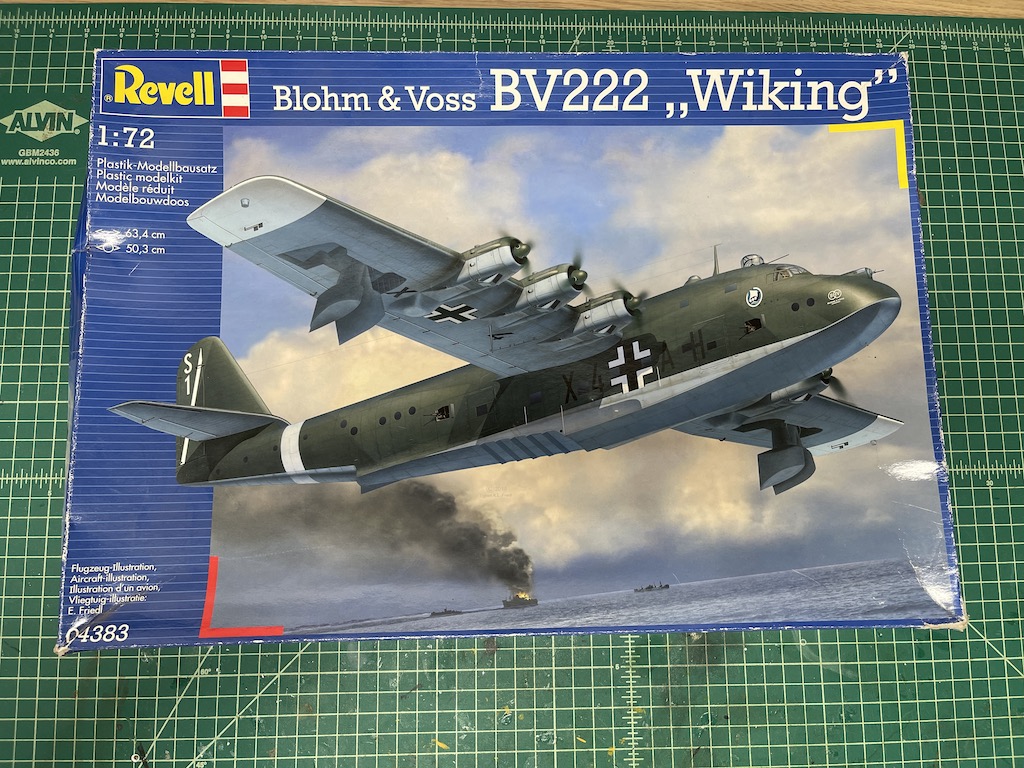
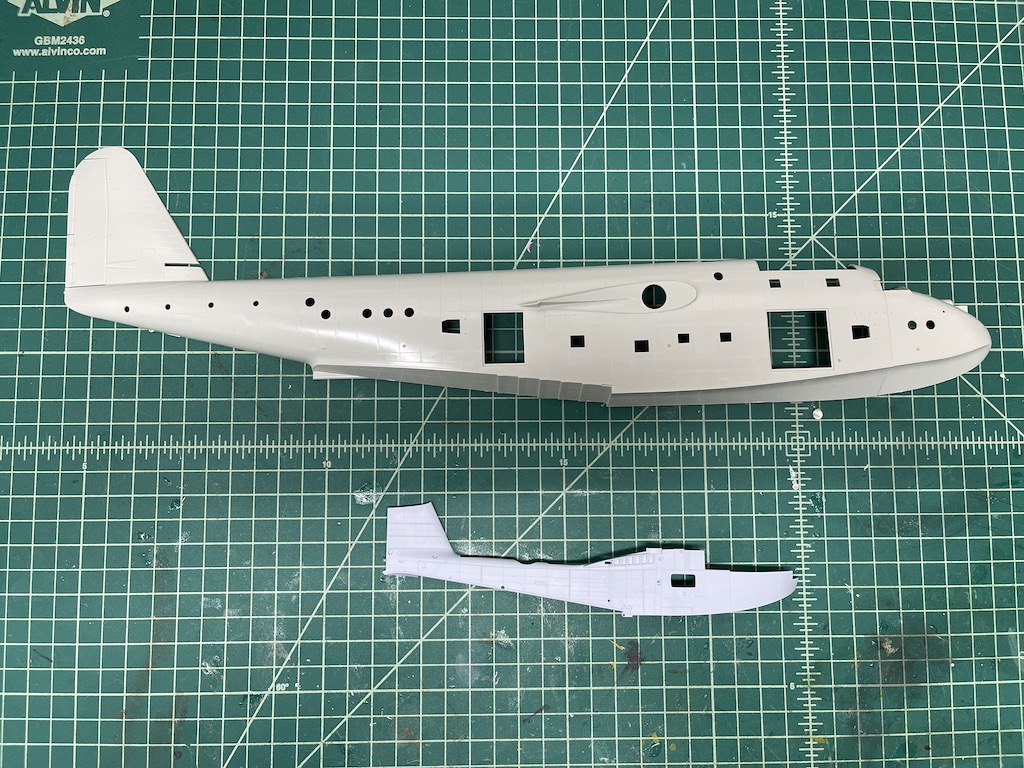
After doing research for one of my builds, I came across a build log of Revell's Blohm & Voss BV 222. Really majestic looking plane, so I picked one up off eBay. Not much aftermarket for it, but there is a trolley cart you can get for it which I'm planning to pick up. Kit came today, and looks really nice. The plane must have been gigantic in person. This kit is 1/72, but the model is huge! Here's a question - does this count as a LSM? Here's a picture of the fuselage half against a fuselage half of my current 1/48 Walrus. I really wanted to find a Special Hobby Sunderland Mk. III in 1/72 scale because Eduard makes an insanely detailed PE set for it, but I'm wondering if it's just too big now that I see what I have with the BV 222.


-
Wow, that's crazy!! My kind of crazy though, I'd do it just to challenge myself.
-
Thanks Peter! Chisels are a godsend for sure. I use mine a lot. I doubt anyone will see much of anything from the outside. The windows are pretty tiny, and the inside is really crowded with the seat, bulkheads, tables, etc. I just like to push myself on the PE as my 1/350 and 1/700 ship models typically have fairly extensive PE sets, so it's good practice. To be honest, I'm probably down to 10 builds now with the Wildcat and Buffalo done. I just get bored, or in the case of the wooden ship builds where you have dozens (if not more) repetitive tasks to perform, burned out. Rather than take a long break from modeling, I just pick something else up. I found that with my first wooden ship build, I would take long breaks of six months or more away from the workbench. More recently, I was working on one of my current wooden ship models and spent an inordinate amount of time over a 2-3 week period trying to square things up on the hull because my keel was slightly warped as well as frame a dozen gunports on each side. That was over a year ago, and I haven't had the inclination to pick the kit up since! Will need to wait until the PTSD lessens. To keep them organized, I just keep the models together in the kit box or a bigger container or just somewhere where they can be safely stored. Having a build log tends to remind me where I was with the build. And I usually annotate the instructions to remind me of tasks I need to do. One good thing about putting the model away for a spell is that it gives me time to consciously or subconsciously work out how to tackle things when I'm stuck, rather than try to just get through things to keep progressing when I lack the motivation to do so. Some probably would say all this is a clear symptom of severe attention deficit disorder - yet, I think I've said this before, but for me it's the journey and not the destination that interests me. I don't care about completing builds all that much, I just like to keep busy building. I assume it's a compass. I just build what my Eduard overlords tell me to build...