PAnderson Posted September 2, 2013 Posted September 2, 2013 I decided to start the build on this magnificent, all metal kit of a 1/32 P-51 Mustang. I will take my time on this and will probably add Tamiya's P-51 to this in the future also. I can't say enough about this kit, it is simply awe inspiring. here is the shot of the finished model. I started the engine and have finished the first page of the beautiful instructions. And here are the results. The castings in this kit are beautiful and very well detailed. This kit will be painted as far as interior detail is concerned. The fuse and wings will be left bare metal. That's page 1 of the instructions. More will be added as time permits. Which will probably be soon as this kit keeps beckoning me. Paul 5
LindsayT Posted September 2, 2013 Posted September 2, 2013 This will be an interesting build to watch! What are you using for glue? Plain ol' CA? Lindsay
PAnderson Posted September 2, 2013 Author Posted September 2, 2013 This will be an interesting build to watch! What are you using for glue? Plain ol' CA? Lindsay Lindsay, Yes, plain old crazy glue for a lot of it but for the photo etch I am going to give Gator Grip a try. First time using it. Paul
Grant Posted September 2, 2013 Posted September 2, 2013 Paul, I'm so glad you've gone for this. I know you were looking for something out of the ordinary and this certainly fits the bill. I'm watching with great (and envious) interest. From what you've shown so far ... very impressed. 1
PAnderson Posted September 3, 2013 Author Posted September 3, 2013 Paul, I'm so glad you've gone for this. I know you were looking for something out of the ordinary and this certainly fits the bill. I'm watching with great (and envious) interest. From what you've shown so far ... very impressed. It's all your fault Grant. 1
Jamme Posted September 3, 2013 Posted September 3, 2013 Really nice kit. And a great start on the engine, Paul. Cheers, Jamme
DougN Posted September 13, 2013 Posted September 13, 2013 Really looking forward to this! I have this kit and the Zero, and have been thinking about how to approach all those PE structural parts. I was thinking of getting a small solder set up but if if can be done easily with glue that will be even better! Doug
happy1 Posted October 11, 2013 Posted October 11, 2013 Where do you even get something like this?? Paul
Grant Posted October 11, 2013 Posted October 11, 2013 Paul, In terms of glues, our mutual friend Mark Adams, has experimented with a number of brands of glues on the big brother of this kit - the 1:16th Zero - and swears by using Loctite medium (for the white metal) and thin for the PE etc. He spend a lot of time over this as he found other glues were, for some reason, ineffectual and too "brittle". If you were to consider soldering, he also strongly recommends using Carrs solder (Red) for the photo etch. I'm so looking forward to this. PS: Still haven't progressed much with my 1:16th Zero but, once the 1/8th Aston is out of the way (just waiting for some tiny screws that I've run out of) I will get cracking on it.
PAnderson Posted October 11, 2013 Author Posted October 11, 2013 Paul, Gorilla glue also makes a CA that has a "rubber" component in it that takes a lot of the brittleness out of it. I have had a lot of success with it but it is a little on the thick side. It does create good, stable bond. I will be posting pictures of the finished, unpainted engine soon. Paul Grant, Thanks for your thoughts in regards to Mark and the Zero. We are working on a solution to getting that kit shipped to me in the States. Again, thanks a lot my friend. Paul
Administrators JayDee Posted October 24, 2013 Administrators Posted October 24, 2013 Our sample arrived here today, so keep up the great work with this one....I am watching
PAnderson Posted October 24, 2013 Author Posted October 24, 2013 Guys, After starting a new job in Sept. I have not had a lot of bench time. I have completed the engine and put the first coat of black on it. I have completed part of one wing and I am trying to bring the second wing up to this point. The instructions show the assembly of one wing with opposite part #'s for the second wing, so I am trying to just go with the flow. The assembly is amazing but using any kind of CA is problematic and time consuming when trying to use it sparingly. The white metal is obviously easier to work with. I never did like PE so I am gritting my teeth and just "doing it". A LOT of PE here so I hope my teeth hold up. I will be posting progress so far this weekend. I have to go to Detroit next week, so another little set back. She is moving along though. I am starting another project this weekend because I need something to break away to for a while periodically. Revell's 1/72 Flower Class Corvette. I will just have to enjoy that one myself. Oh' lest we forget, I will also post more pics of my WNW Sopwith Pup and 1/6 Le Rhone engine, which is coming along nicely too. Just not a enough time these days. Paul 1
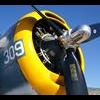
PAnderson Posted October 27, 2013 Author Posted October 27, 2013 Hello again. As promised, here are some shots of the Merlin engine from this damn awesome kit. The bare metal shots are of the finished engine primed with Tamiya Metal Primer. The others are shots of the painted engine minus detail painting, yet to come would like to get some decals of 1/32 "Rolls Royce" to adorn the valve covers. Any body know of a source? Next will be pics of the wing assembly once I get the left wing to the same stage in building as the right wing. Enjoy Paul 1
PAnderson Posted October 27, 2013 Author Posted October 27, 2013 I am also looking for some detail shots of P-51 engines, painted as installed. If anyone knows a source, could you please post some links Thanks! Paul
Administrators JeroenPeters Posted October 27, 2013 Administrators Posted October 27, 2013 Hi there! Looking great! Should be heavy when finished. I might have missed it, but how are you going to color this bird?
Dave J Posted October 28, 2013 Posted October 28, 2013 That Merlin looks very Tamiya! It even has the two pin locations on the supercharger duct at the rear....
jep1210 Posted November 29, 2013 Posted November 29, 2013 Fantastic, I registered just to follow along Looking forwad to see it progress. Glad you decided to paint at least some of the parts. 1
PAnderson Posted December 30, 2013 Author Posted December 30, 2013 Damn, it sure has been long enough. Time for an update. My apologies for not post this sooner but time has been my enemy. Or so it seems. Here is an update to the 1/32 Desktop Mustang. The wings are half done but took a break from the fiddly bits of the spars and the inefficiency of CA on this kind of build. No other choice really but trying to find an easier method of application seeing you need 4 hands for this thing, LOL. So I took a breather from the wings and decided to do the cockpit section. I painted the cockpit from some reference, mainly Tamiya's 1/32 P-51 kit instructions, since I will be building that also to sit next to this. So, without further ado, here are some shots from the cockpit section. The fit on all of this is amazing, just a pin being a new medium to learn. Sorry about the focus on some of the pics, I like modelling more than picture taking. ) All the tabs and location point are so well engineered, this kit is amazing. But it is not plastic, takes some getting used too. As you see the cockpit, this will be how the entire plane will get painted. Internal details only, for the most part. I also bought the Desktop Zero and will get the Me-109 later this year. Hope you all enjoy these. I will post more as I build. Next? To finish the wings. Happy New Year, Paul 2
JonathanReed Posted December 30, 2013 Posted December 30, 2013 Sweet! Love it! Keep it up and keep us posted.
Administrators JayDee Posted December 30, 2013 Administrators Posted December 30, 2013 Great update Paul. I was only looking at this topic yesterday, and it's good to see your approach. I do prefer the painted interior of this than left in bare metal, and that's the way I'll go with mine.
Grant Posted December 30, 2013 Posted December 30, 2013 This is great progress Paul, thanks. I certainly agree with the consensus in that the interior screams out for colour but not so the exterior which, if I'm reading between the lines correctly, you're going to leaving bare ( ). It's going to be a very, very sweet model Paul.

Recommended Posts
Create an account or sign in to comment
You need to be a member in order to leave a comment
Create an account
Sign up for a new account in our community. It's easy!
Register a new accountSign in
Already have an account? Sign in here.
Sign In Now