
James H
-
Posts
3,257 -
Joined
-
Last visited
Content Type
Profiles
Forums
Events
Gallery
Everything posted by James H
-
Wood Grain Decals Uschi van der Rosten Catalogue and price: See article inventory Available from Uschi van der Rosten and Arrow-Wolf Models It's been a while since we featured Uschi van der Rosten's original wood grain decal here on SP&R, and I remember it being a product which was released at the perfect time with regard to an explosion of World War 1 modelling. Many things must still surely put modellers off trying this genre. Two of the main ones that come to mind are rigging, and of course depicting the various timber panels and boards that these early birds had. Of course, it's not just WW1 modelling that benefited from Uschi's wood grain decals, but it also laid the way wide open to many different uses, from dioramas, to civilian vehicles, and also to some rather nice 'bare bones' studies of military aircraft in their bare wood and metal forms. Uschi's decals are unusual in that they still require a number of basic model painting skills to use properly. This of course applies to the sets which we have here now too, and we will come onto that shortly. For a reminder of just what can be achieved with wood grain decal, here is the fuselage of my Wingnut Wings LVG C.VI that I built a couple of years ago. This was completed with a single sheet of the Rich decal. You might think that you need more than one set for these larger 1:32 birds, but it is enough. I didn't get these new sets of decals in the conventional way, i.e. through the post, with an accompanying email/letter. Instead, I arranged to meet Alex and his wonderful wife in Munich, where we arranged a nice evening meal. Some superb German wine and Weissbier flowed. A much welcomed break with fantastic friends. Accompanied by my wife, we spent a few hours chatting away and Alex explained his ideas to me as he always does. He also brought with him the F-86 Sabre droptank that he'd been using to promote his latest wood veneer decals. Now that was seriously impressive. At the meeting, Alex provided me with the following decal sets: WGP-1, (1:48,1:32,1:32), 'Bright Planking, coarse/fine, 14,99 € WGP-2, (1:48,1:32,1:32), 'Dark Planking, coarse/fine, 14,99 € WGSF-48C (1:72, 1:48, 1:32), Assorted Veneer, fine/medium/coarse, 14,99 € Go to this link to purchase. And to compliment this article, Grant of Arrow-Wolf Models has sent a sample of Uschi's knotless woodgrain decal: WGSF-48B, 'Knotless', Rich/pale, £14 Knotless The 'knotless' decal sheet is perhaps the first of this latest batch to have been released, and was developed in response to modellers who wished to create a realistic timber appearance, but without the multitude of knots that the previous releases had printed. This makes sense as some WW1 aircraft were indeed skinned with timber that was more uniform in appearance. An example of this is shown below on a reproduction Albatros D.III which is currently being flown from Munich's Flugwerft Oberschelissheim museum. It was with this machine in mind, and in multi-pitcorial form, that Uschi developed this particular set. The 'Knotless package', like all Uschi wood grain decal sets, contains TWO sheets of decal, measuring approximately 200mm x 120mm. One sheet contains a full printing of a knotless design in 'Rich' colour. The pattern is repetitive, and you will need to mix and match the various panels in order to break things up a little, but as you can see from the LVG whose decal was similar in execution, that is very simple to achieve. The second sheet contains a paler representation of the knotless approach, but importantly, it isn't the same pattern as the rich colour sheet, enabling the two to work organically together when used in conjunction. Planking We are perhaps beginning to see a woodgrain decal solution for diorama modellers with these two releases. It's highly unlikely that these decal sheets would be suitable for an actual aircraft, but they could be used for some aspects of vehicles, such as those flat back trucks used for both military and civilian purposes. Ship diorama modellers will also see a use too, as the planking pattern system on some of these sheets is very indicative of the patterns used on the decks of timber ships. There are two sheets in each set; light planking, fine/coarse, and dark planking, fine/coarse. One of the lighter sheets doesn't have any planking system employed except for single, long lengths run together consecutively. This is very useful in its own right, or even as something which could be cut up and reassembled in your own staggered planking format. The colours of the other sheets does tend to lend these decals to be used for diorama use, as stated, because the colour of the timbers is similar to what you may find on the floors of domestic dwellings. The package description states that the planking decals can be used for vehicles, as stated, aircraft, furniture, and also diorama items such as crates. What a cool idea! From that, you could look at duck-boards, timber beams, worktops, pallets etc. Never underestimate just what you can use these for! Veneer Simply, this decal set contains two sheets of fine-grain wood veneer decal. The first sheet is singularly printed with a beautifully fine veneer pattern, with a superb appearance, and a pattern which doesn't look at all bad with regard to repetition. For me, this is probably the nicest looking of Uschi's sheets, and this specific sheet will have 1000's of uses for the modeller. Uschi describes this appearance as that of 'birchwood' which is very typical of the WW1 aircraft fuselages that were left in bare timber and varnished. I don't think he's far off the mark there. I'll be using some of this in my current Bachem Ba 349 build on Large Scale Modeller, in which the finish will be left in bare timber and metal as a study of the aircraft's construction. The second sheet is split into 3 areas. These are fine, medium and coarse representations, although please understand that all of them are still rather fine in relation to regular timber, but instead show a different style of pattern, which when displayed alongside the regular main sheet decals, should look amazing. All of these decal sheets are superbly printed, with a pretty non-visible pixilation, unless you look very, very closely. That aspect is nothing at all to worry about, and won't affect the finish of your model. Having used Uschi decal before, I know that this grade of decal film does allow repositioning, even under setting solution, yet still works beautifully with those solutions. You will also find that the decals can be worked by finger into various compound curves, and can be made to cover just about any shape surface. The decals are also printed with a transparent backing. This means that you will need to apply various base colours and shading to your model before you apply the decal to this. This allows you to work with your own tones and highlights and if you mix and match things a little, you can get various impressions from the very same sheet of decal. The possibilities are endless, and I would suggest that you test these base colours and decal ensembles before you begin your project proper. Conclusion Wood grain decals are Uschi van der Rosten's signature product, and he sure knows how to deliver. The products are superbly researched and meticulously recreated before undergoing testing prior to release. You need to know that you cannot apply masking tape directly to the top of the decal sheet when you transfer the various panel shapes from your model to the sheet. You'll need to reduce the tack of this first, or you'll lift the decal from the sheet. When you've mastered the process of transferring shapes, you can, for example, decal a whole fuselage in a couple of hours. Practice makes perfect. This is a top notch product produced by a guy who actually cares about your results. I've tried the product, and I can vouch for it totally. Very highly recommended James H My thanks to Uschi van der Rosten and Arrow-Wolf Models for the review samples used here. To purchase directly, click the links in the review.
-
you might want to ask Dave about that
-

My Two Fokkers From WNW
James H replied to Fokkerchen85's topic in LSM 1/32 and Larger Aircraft Ready for Inspection
Always great to see some WNW builds on here -
Get back to your WNW kit!
-
Looks like one for the 'to buy' list...
-
Welcome to LSM! Your titles look seriously nice. I hope you'll share more information with us.
-
MSW is a sister site
-
Hi Sebastian. Welcome to LSM. We cater to both Armour/AFV and aircraft in 1:35+ scales. Jim
-
WNW Albatros DV FINISHED !!!
James H replied to coolboxx's topic in LSM 1/35 and Larger Work In Progress
Pimp! -
WNW Albatros DV FINISHED !!!
James H replied to coolboxx's topic in LSM 1/35 and Larger Work In Progress
Darren, that really has to be the best Albatros I've seen. Your construction, finishing techniques and use of that new loz decal. The whole package. I hope you won't leave us with no ongoing build, and start another WNW immediately -
All WW1 models are not small She's looking really good, and you get a good sense of perspective on the Ninak's size too. What do you use as a final finish? (varnish etc?)
-
Superb Mike. Two of these in stash.......must resist
-
Hi Cees, Yes, the forward canopy shape was reworked as they weren't happy with the profile and contour. Even in David's finished pictures, it looks pretty damn good, so no doubt we'll be even happier with the new one. Definitely 'Uhu' in appearance, unlike the Revell botch job.
-
Special Hobby 1/32 Fiat G.50 (SH32044 & 56)
James H replied to petr@specialhobby's topic in Special Hobby
Limitations of injection moulding process I imagine. Not a problem in assembly though. -
Question : Is there interest in a WIP of a Tornado ECR ?
James H replied to Jamme's topic in Modelling Discussion
Absolutely -
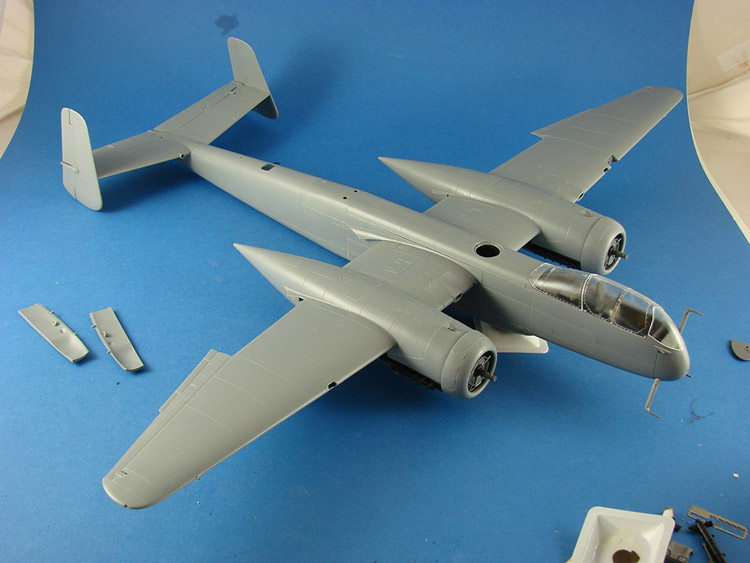
Conclusion This kit isn’t perfect, but it certainly isn’t too far from the mark. Overall shapes and angles seem to be correct. The revised canopy is certainly more on the money that the one I used on my test build. The complicated fuselage contours seem to be faithfully reproduced, and the whole kit is a masterpiece of intuitive engineering. The wheels hubs don’t look perfect, but of course there are aftermarket solutions available. The crew access ladder cuts too steeply up the side of the fuselage, but these certainly aren’t deal breakers. There is an ejector seat framework absent from the cockpit too. There’s going to be no rushing this build, especially if you are going to complete the interior with full detail, but you really don’t want to rush this kit. My test shot fit together like a dream, with only minor niggles along the way, and ones that could be fathomed or fixed in a few minutes. Before the release of this kit, there was some discussion over the inclusion of the tail bumper for the A-0 version, with some saying this wasn’t correct for this machine. I remember one person haranguing me over this, but I knew that both options were available, so perhaps we’ll see later variants released in future. With the cost of developing this kit, it would certainly make sense to maximize the use of the moulds. The Heinkel He 219 is certainly an ambitious release for such a young brand, but they have carried it off with aplomb. One feels the Revell kit was severely rushed, and probably because of ZM’s intention to release their own kit. The end result for Revell is a severely flawed kit for a reasonable cost (if you’re happy to build a model that ‘looks like a He 219’, but has many, many shape issues), or a more expensive, but far more accurate release from ZM. If you are a modeller who isn’t too bothered about shelling out the initial extra cost for a kit, then it certainly beats trying to correct the multitude of errors with the Revell kit; some of which simply can’t be fixed anyway. The cost of the extra parts to improve the Revell also adds to the cost, whereas you don’t actually need ZM’s extra parts to complete a great OOB model. This has to be one of the ultimate plastic kits currently on the market. Around three years of research and development well spent. A real no brainer if you like bucket-loads of great detail. Very highly recommended Our sincere thanks to Volks Japan for the review sample used here. To purchase directly, click THIS link.
-
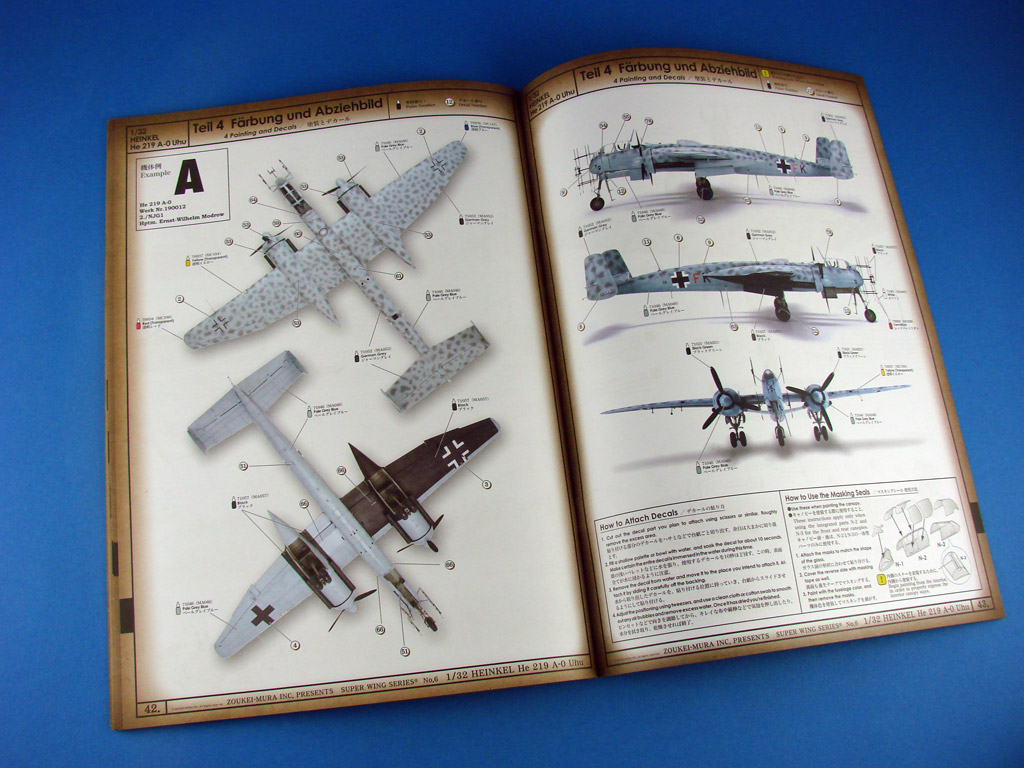
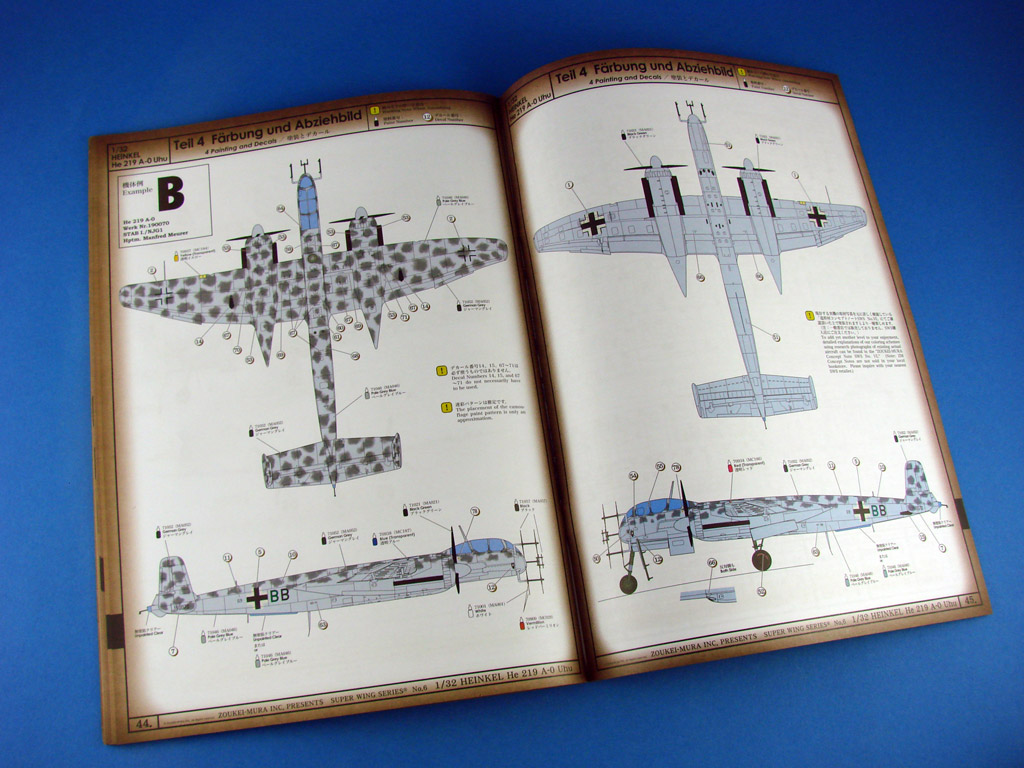
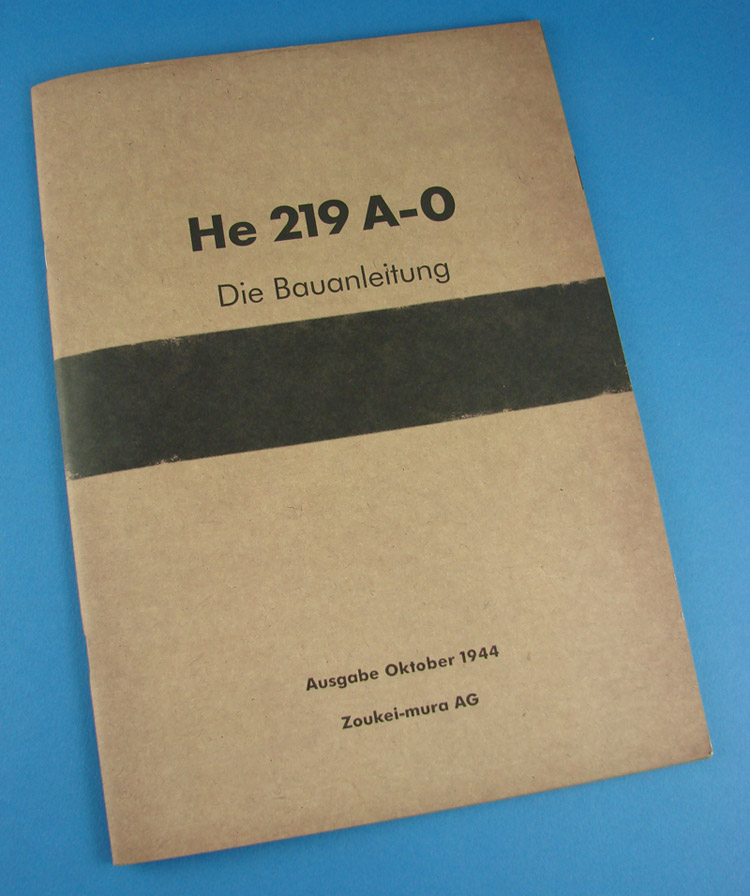
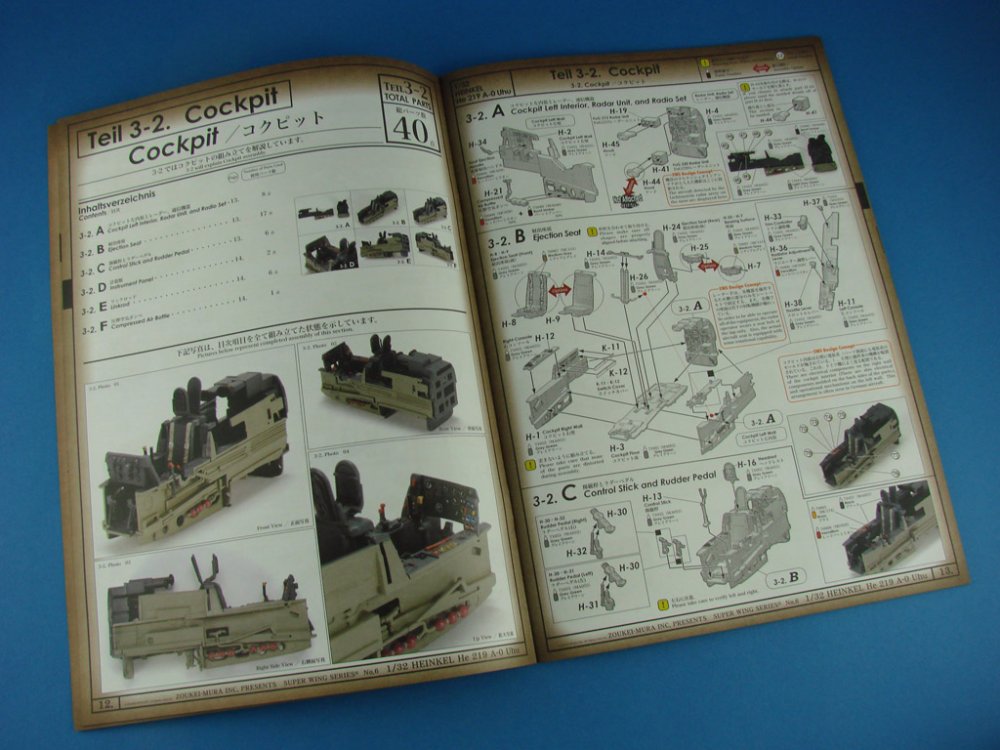
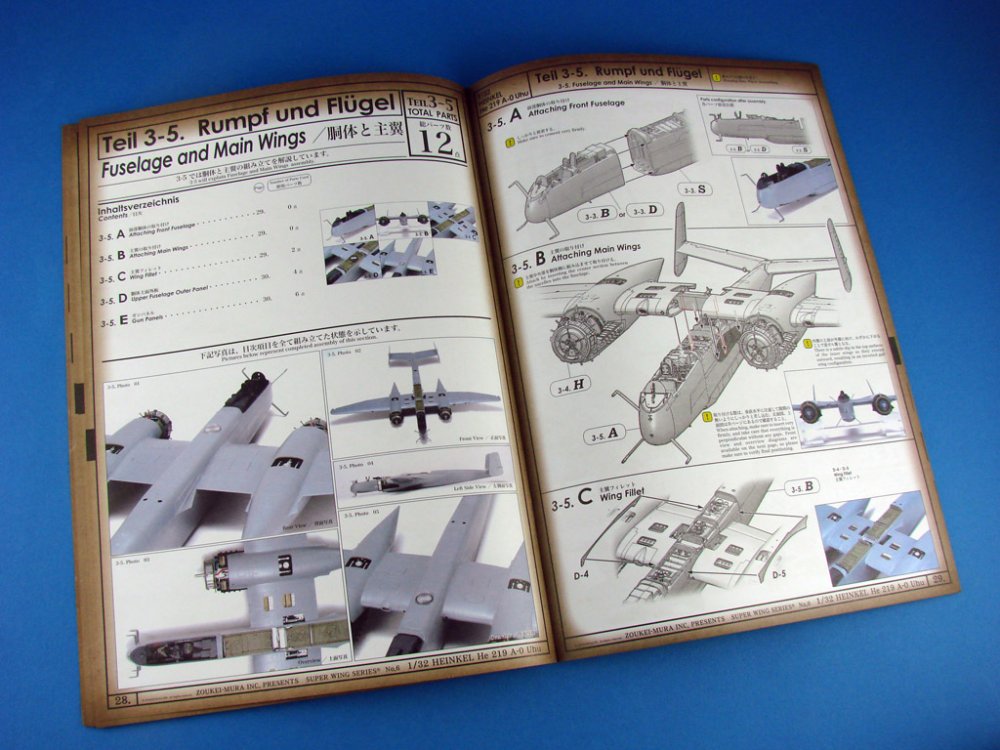
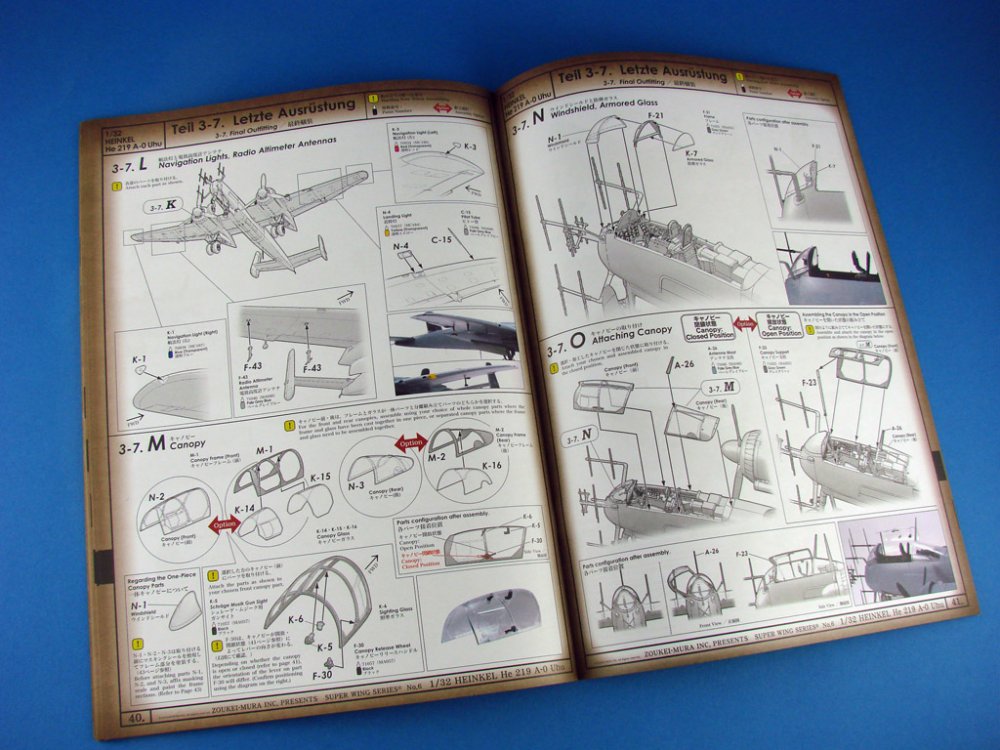
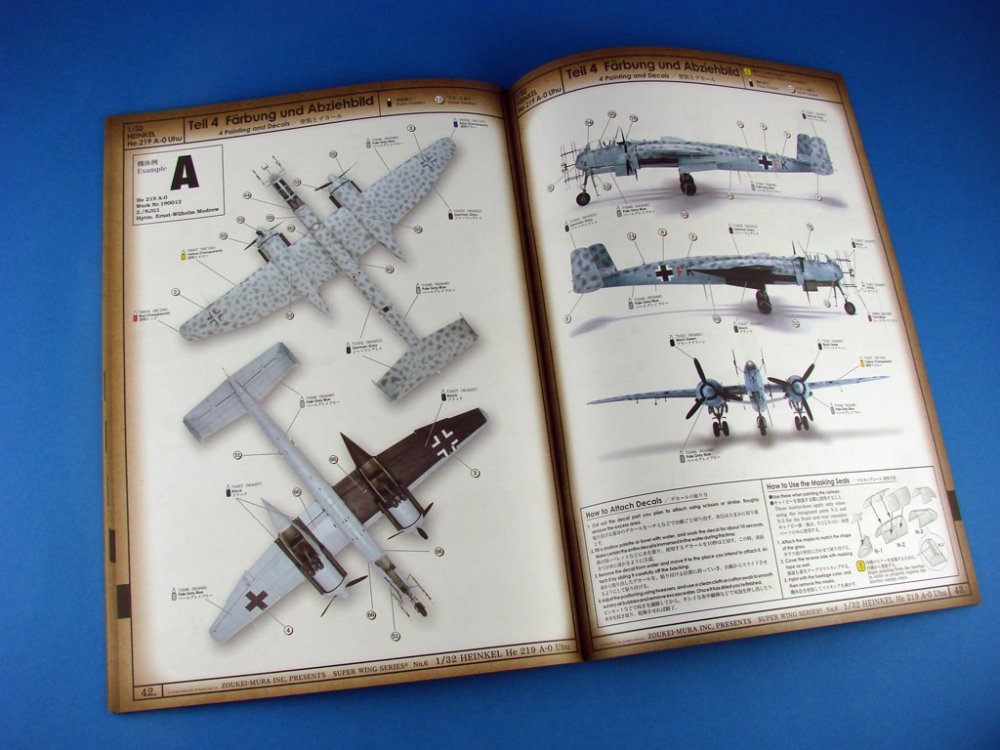
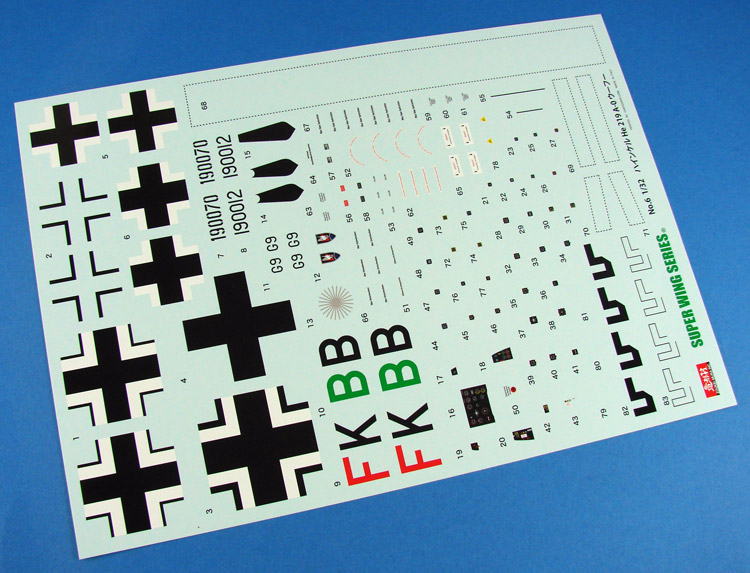
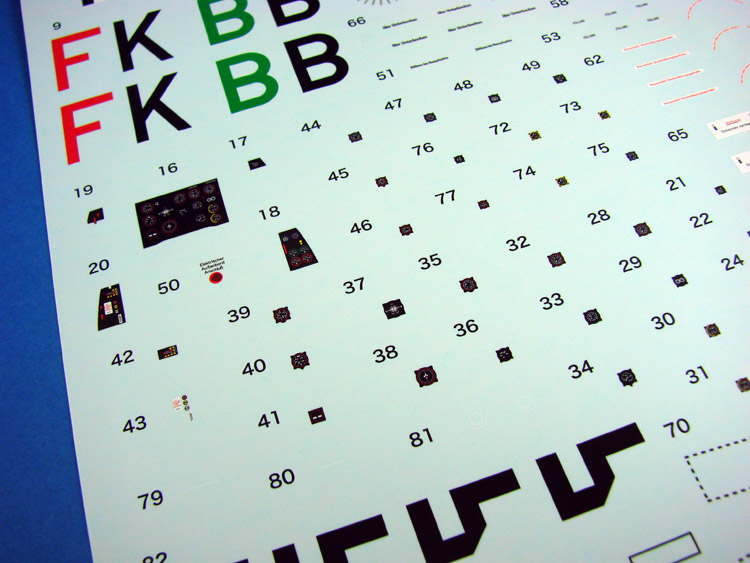
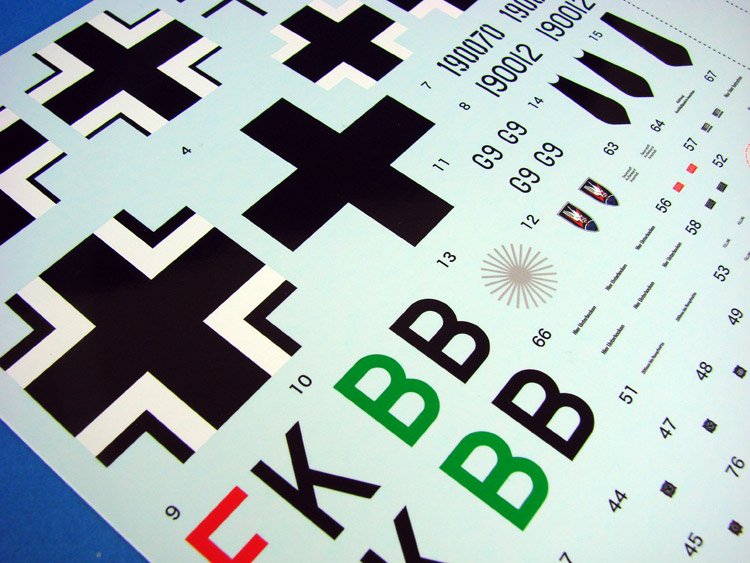
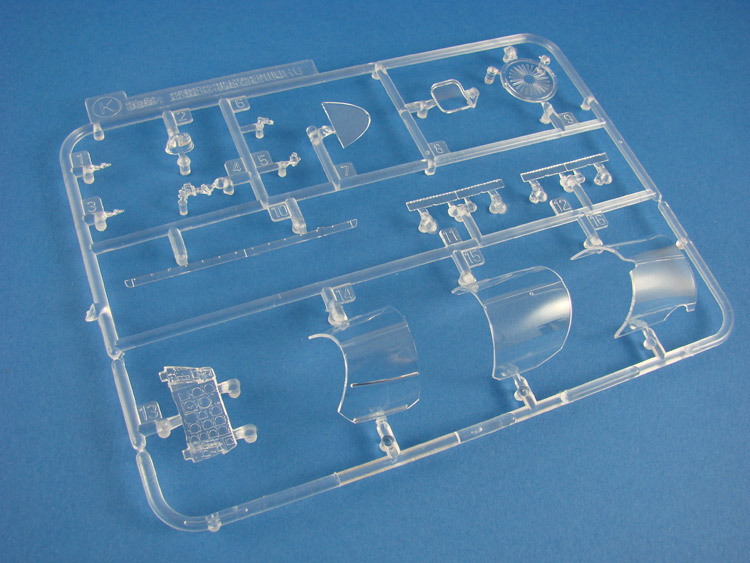
INSTRUCTIONS Next to Wingnut Wings manuals, I would say that the Zoukei-mura ones are my next favourite in terms of style and graphical illustration. Made to look a little like a WW2 document from the front page, this 48 page A4 booklet starts with an introduction on the He 219, followed by an overview of the model kit, describing elements of the actual aircraft design alongside the teams miniature recreation of it. The manual is split into chapters which deal with specific areas of construction, and sub-sections within these which deal with the tail plane, final outfitting etc. There are Vallejo paint codes given throughout construction, and the CAD generated drawings are mostly easy to follow, with just the odd picture being a little ambiguous due to the angle of the CAD render. Still, in respect of the latter, assembly should still be straightforward, although of course I do NOT recommend this for a beginner to the hobby! You certainly need to have your wits about you due to the complexity of the design. Throughout the manual, there are notes within red boxes, and they are called ‘SWS Design Concepts’. These refer to actual detail of the real aircraft, and a technical description. Of course, these details have been reproduced within this kit. A number of illustrative photos of the model appear at regular intervals in order to show partial and completed assemblies. The rear pages of the booklet have an overview of the kit sprues so that you may locate things a little easier. As the plastic is no longer coloured to represent various areas of the project, this becomes a very useful tool. As well as colour photos of the finished model at the rear of the manual for one of the TWO schemes available, we have a colour profile to depict the second scheme. The included schemes are: He 219A-0, Wk.Nr.190012, 2./NJG1, Hptm. Ernst-Wilhelm Modrow He 219A-0, Wk.Nr.190070, STAB I./NJG1, Hptm. Manfred Meurer DECALS A single sheet of decals is supplied, containing all exterior and interior decals, stencils, national markings, and also swastikas, although these are split into two parts in order to comply with some countries draconian democracies. The great news is that ZM are now using Cartograf to print their decals, and the colour definition etc is far better than I’ve seen in their previous kits, especially with regard to the cockpit instrument decals which were so dark as to be unusable on the Ta 152H-1 kit. The decals are printed in perfect register, and with minimal carrier film. The colours look authentic without being too vivid. My only criticism of them is that they are slightly thicker than what we usually see from Cartograf, but of course, that aspect is down to ZM who ordered that specification. The Japanese obviously like thicker decals than non home-marker customers.


-
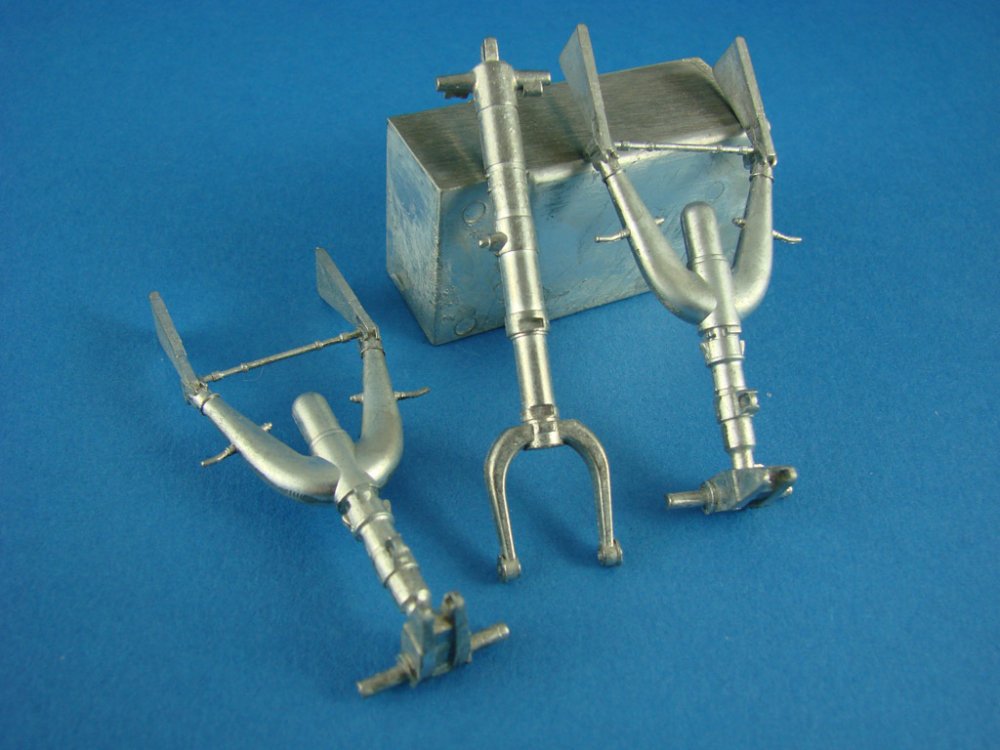
OVERALL ASSESSMENT Moulding generally is excellent, with ejector pin marks being quite unobtrusive. Sink marks don’t seem to feature on my sample, and throughout, very little in the way of flash is to be seen, although a small number of parts will need a quick tickle with a fresh blade. Clear parts are superbly transparent, and again, with no other flaw. MASKS A single green vinyl, die-cut mask set is provided. The cutting is sharp, and previous experience with ZM masks has been very good, and they conform well to the various curves of the canopy. METAL PARTS As mentioned and seen in a post above this, a die cast weight is supplied to fit into the forward fuel cell, and all three undercarriage struts are provided as die cast parts too. The overall quality is excellent, but if you wish to go the extra mile, ZM now sell a set produced for them by the amazing G-Factor. These are cast in white bronze. A single metal pin is included for use as the front strut axle.

-
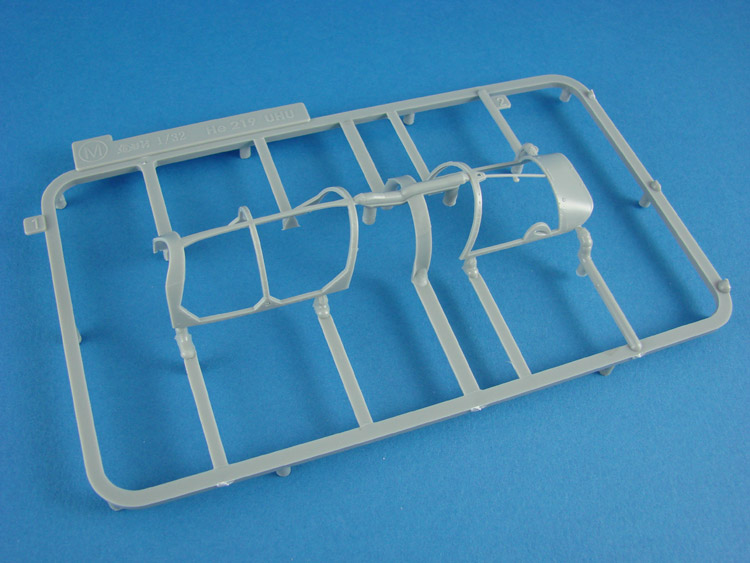
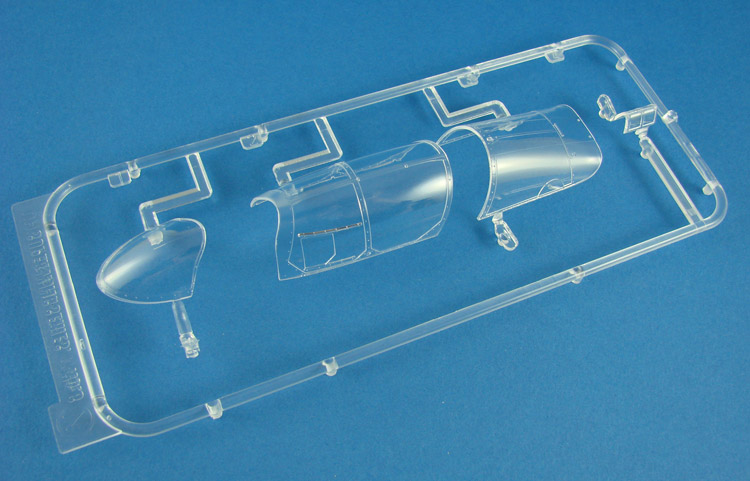
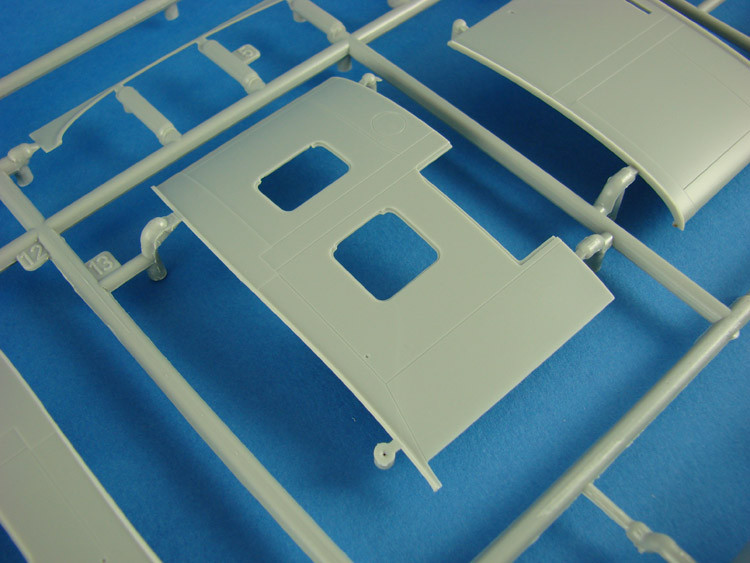
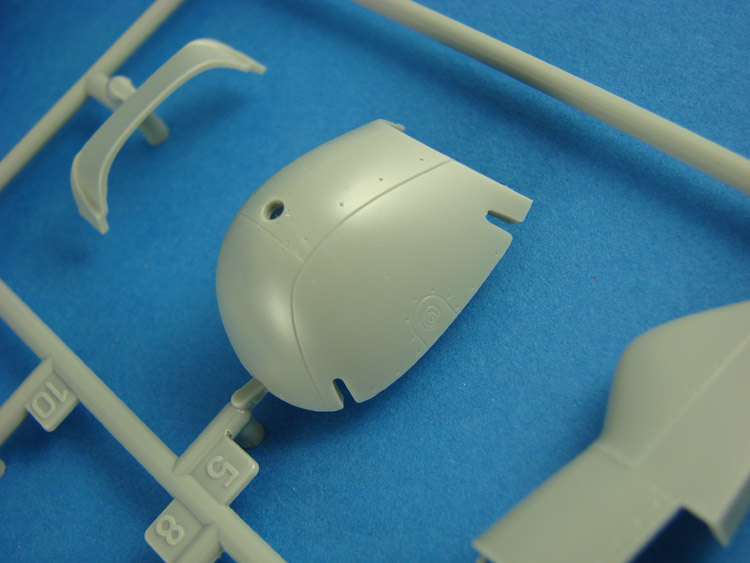
ERRATA The kit is supplied with its FuG antennae moulded in plastic, and while these look very good, I would perhaps opt for the brass ones which are Zoukei-mura sell as a separate set. The canopy is also provided as two options. The first is the regular moulded set of parts which we are all used to seeing. The second option is more unusual in that a whole delicate canopy frame is provided as a single moulded part, into which a number of clear canopy parts install. Left and right panels are moulded as one, with a trough along the centerline into which the frame installs. For me, I would perhaps try the second options as it should look far more natural than the parts we are used to seeing. Either way, if you don’t get on with the second way of doing this, you still have the regular canopy parts to fall back on.
-
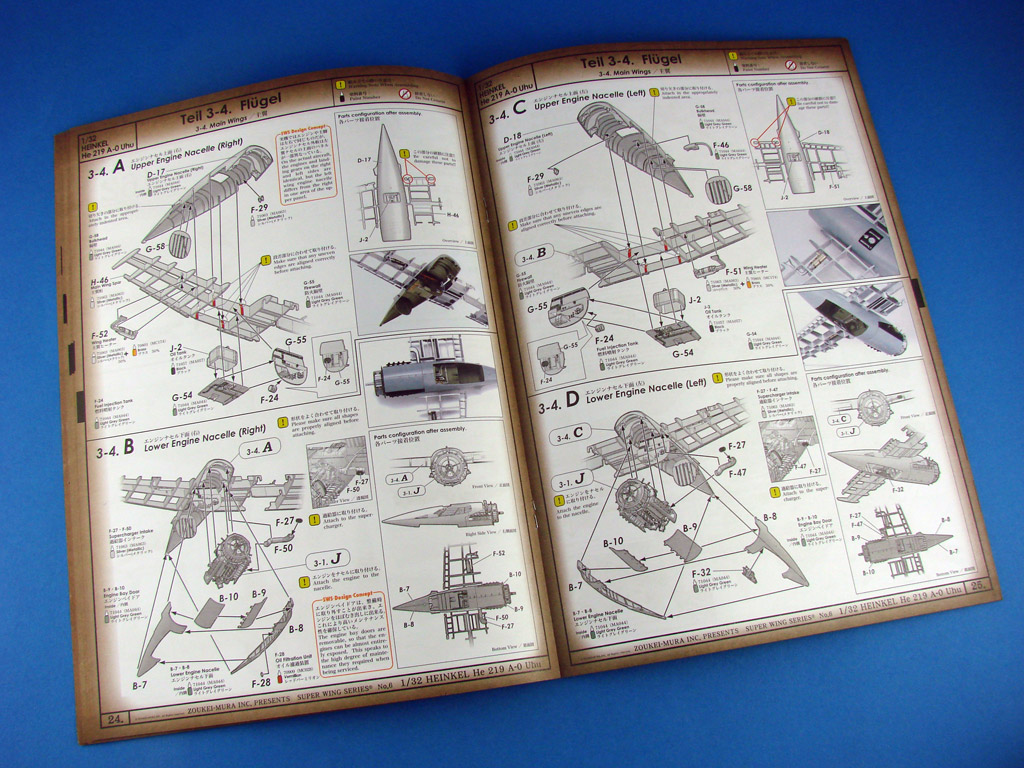
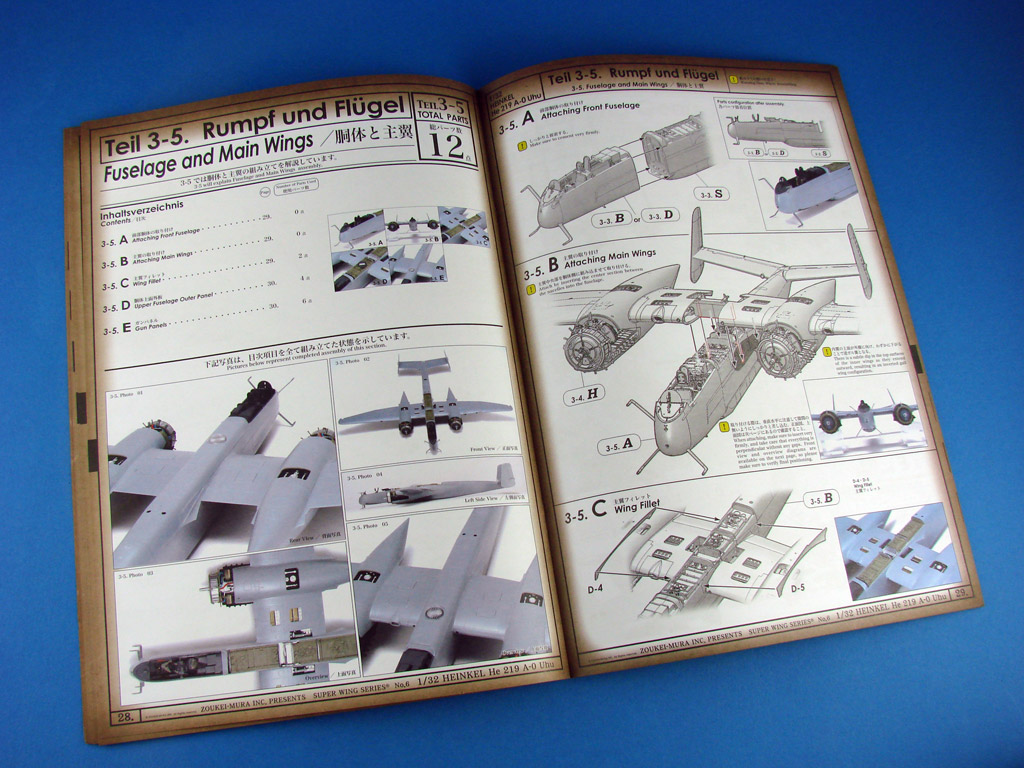
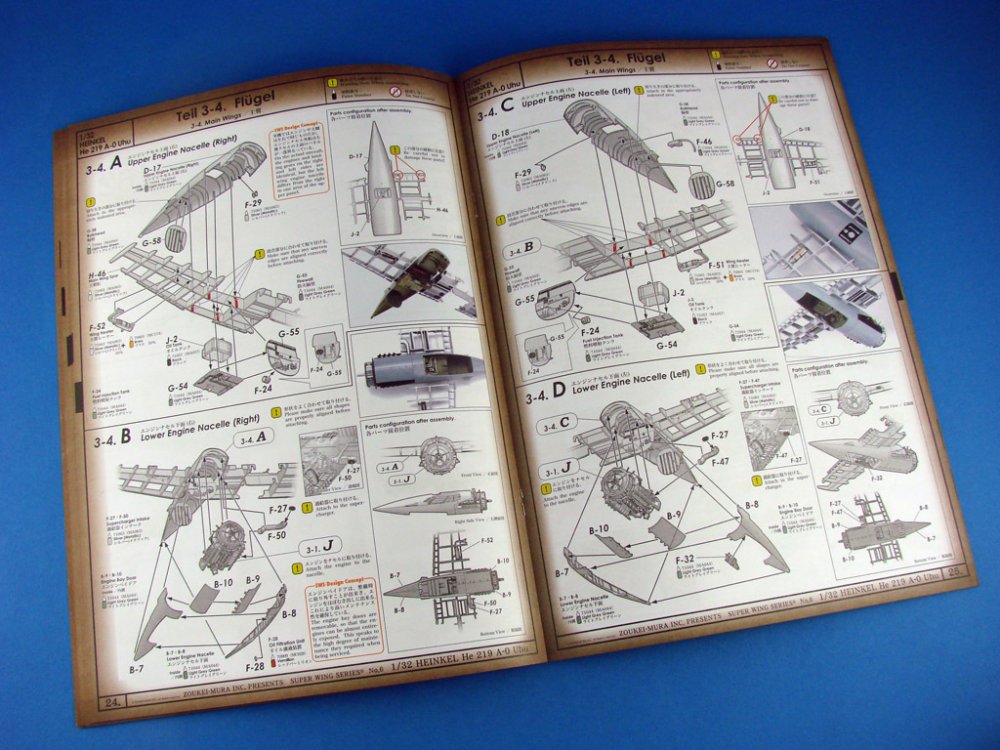
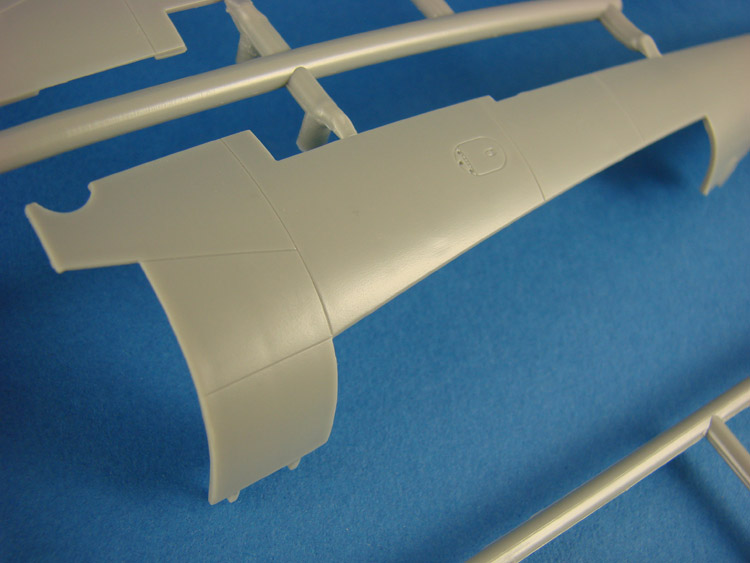
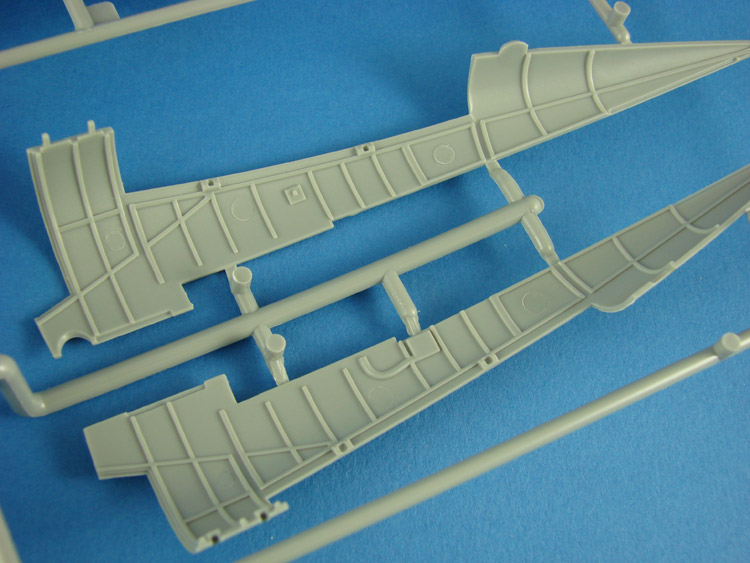
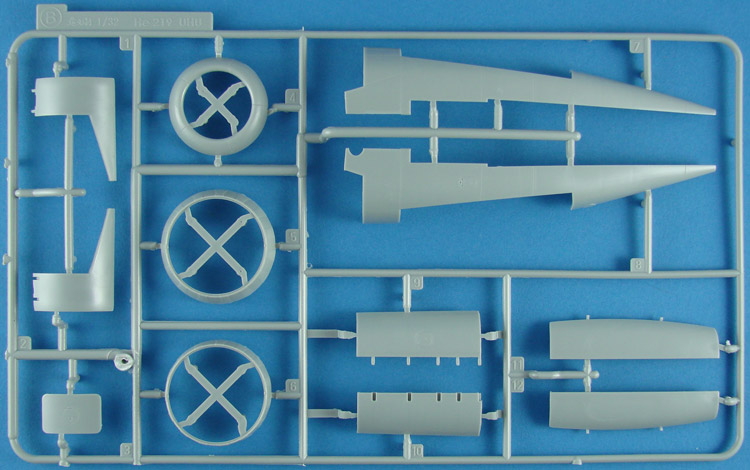
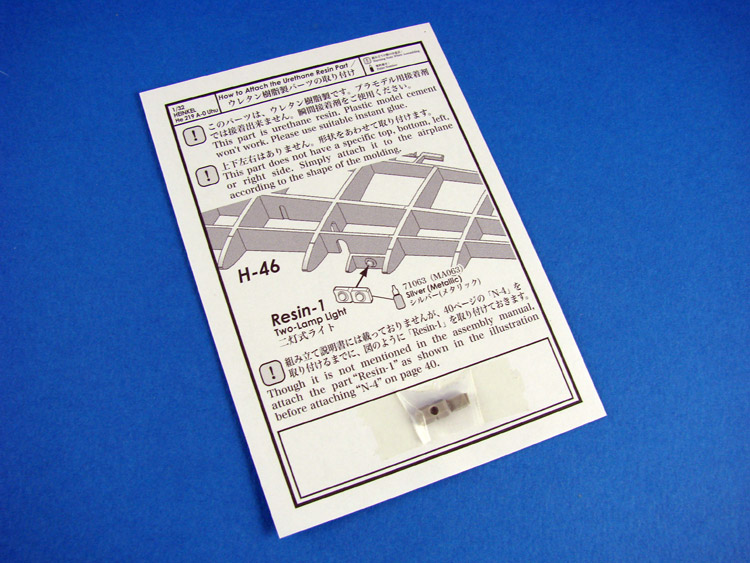
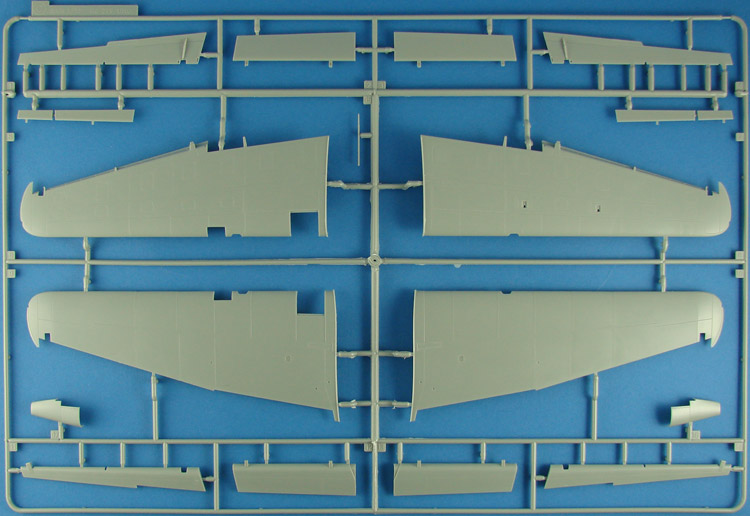
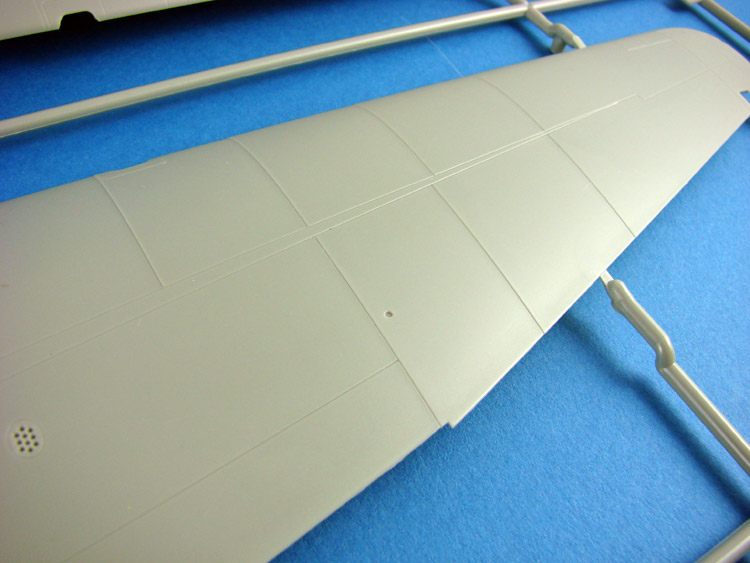
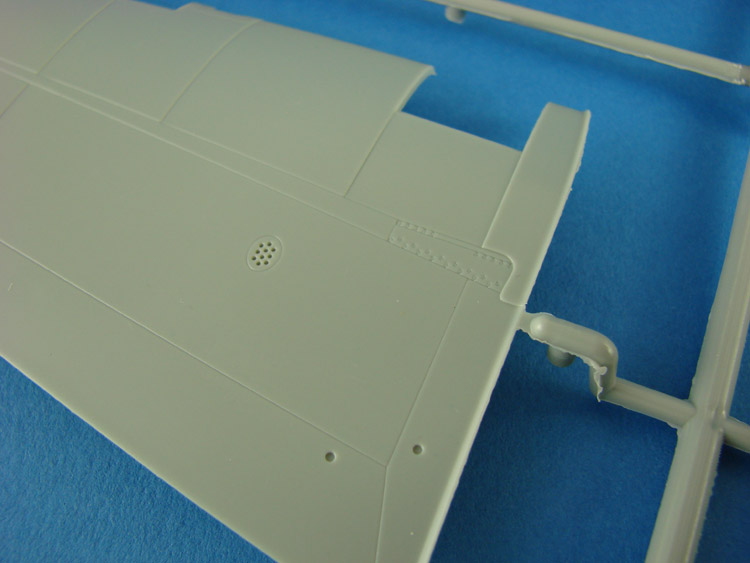
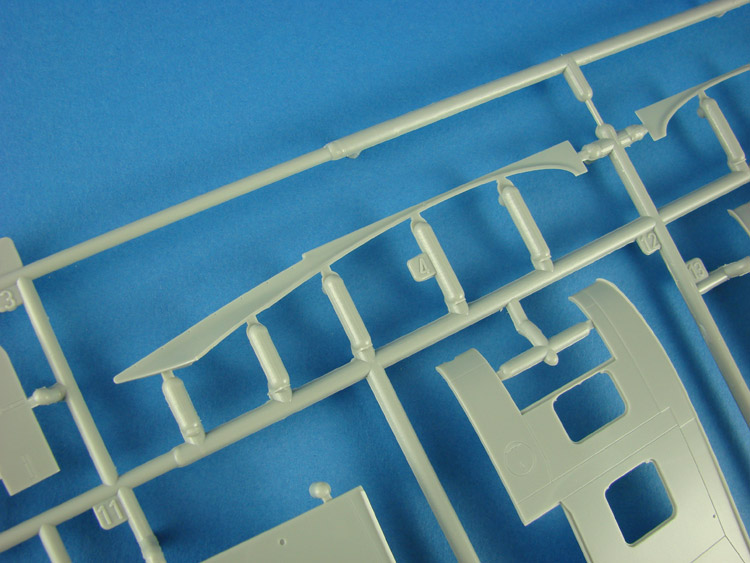
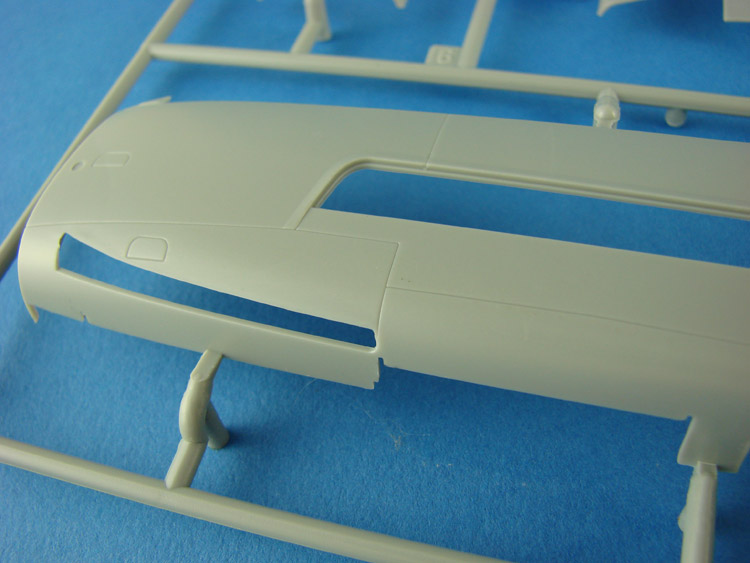
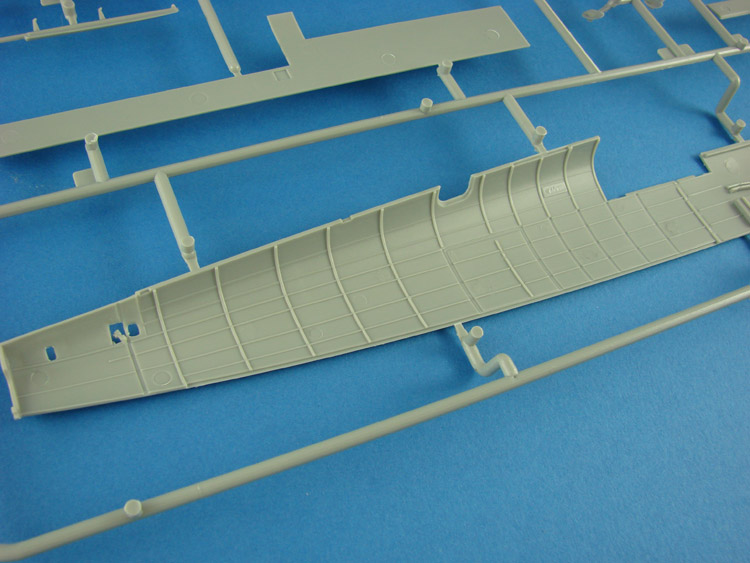
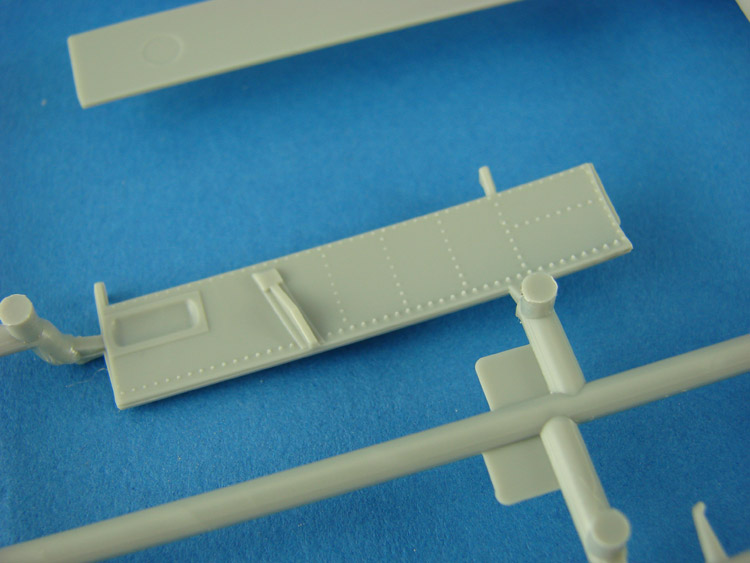
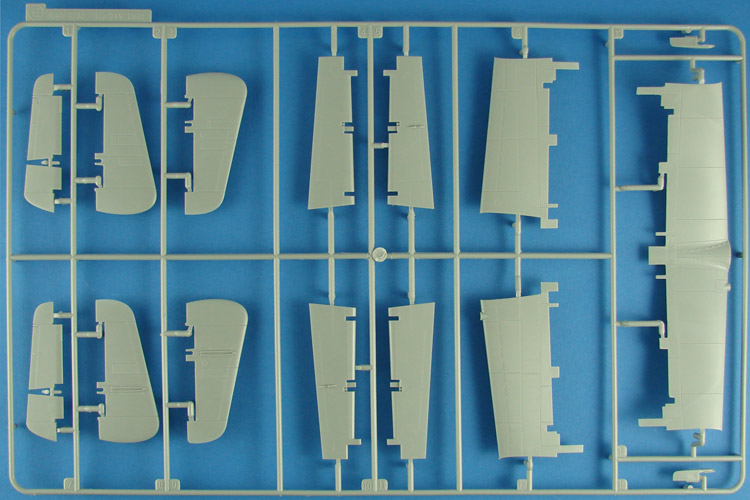
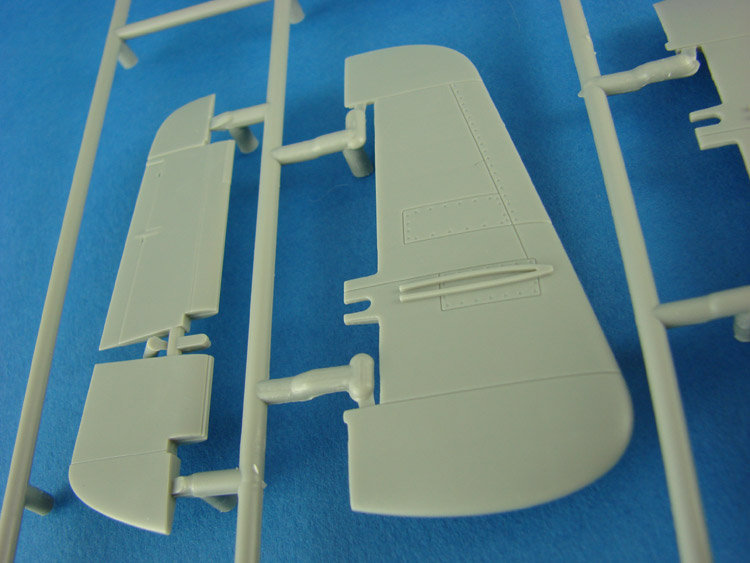
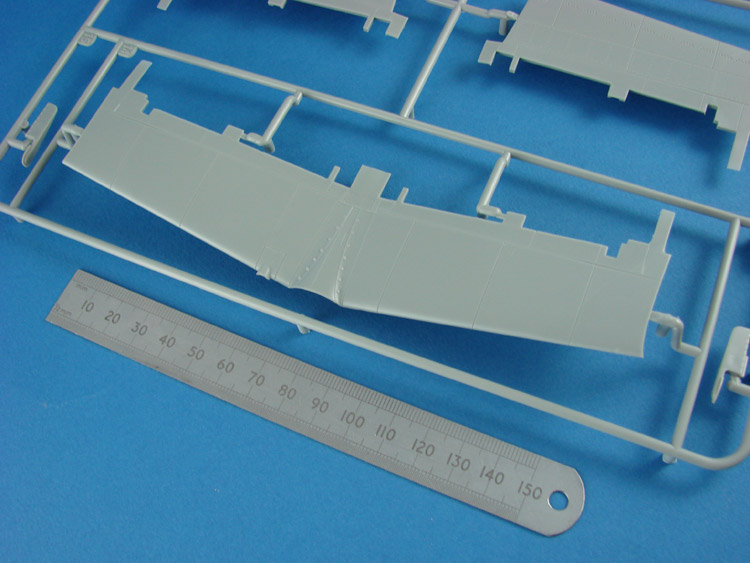
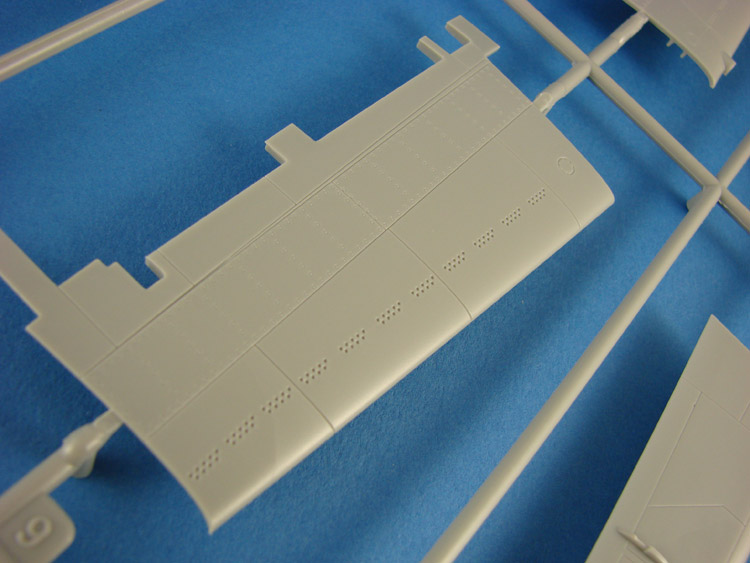
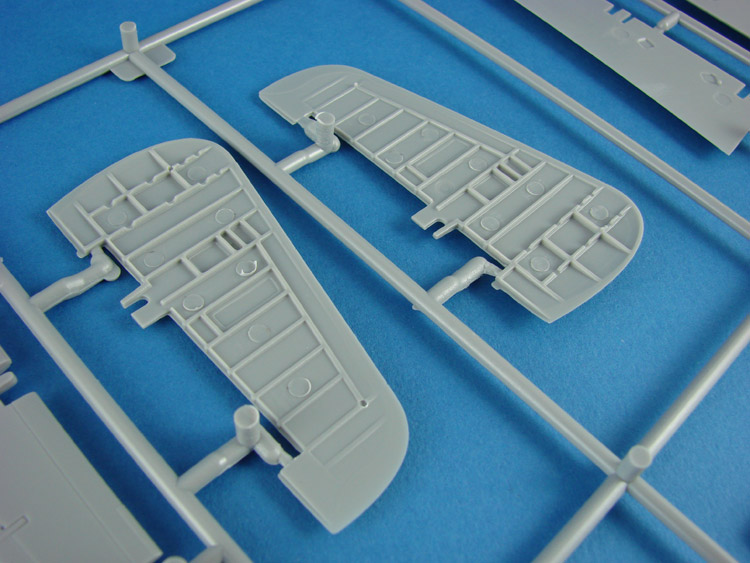
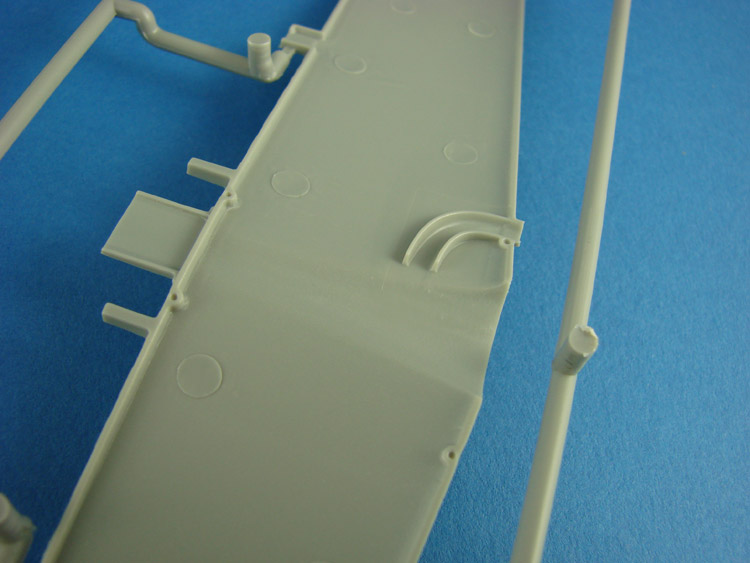
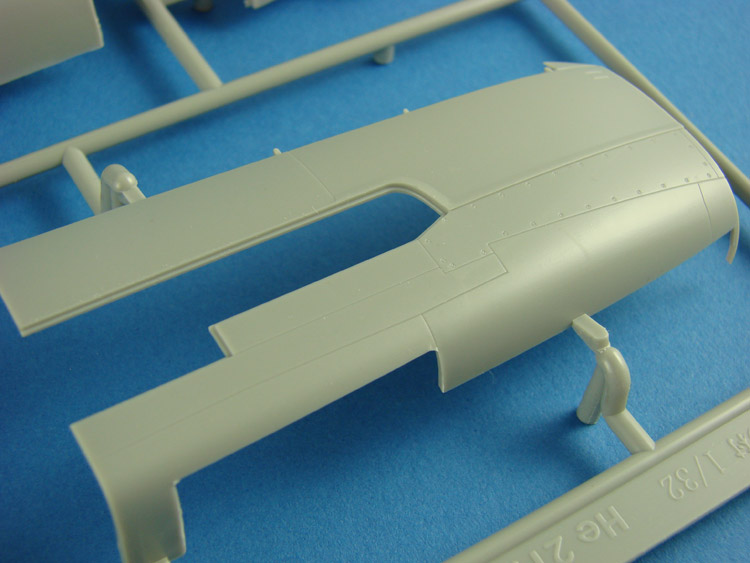
WINGS & UNDERCARRIAGE The wings are built around a simplified spar and rib structure which is moulded as a single, large piece! Within the wing go the various intake ducts and heaters, the inboard MG151 machine guns and ammunition, and then into this fit the upper nacelles, which slot nicely into position. The detailed wheel bays are then constructed on the underside of the upper nacelle, allowing excellent access for painting. The bays are chock full of interlocking pipe-work detail and electrical cabling. Of course, the nacelles also sport oil and fuel tanks, and the inclusion of separate access ports means you can display these when the model is complete. The external wing surfaces are split into inboard and outboard panels, both upper and lower. The fit to the nacelles and fuselage is seamless, and the upper lapped metal plating of the wing surface is also reproduced superbly. I demonstrated this to the many visitors of our stand at SMW 2012, and it definitely did have many modellers talking. As far as I know, this is the first time this effect has been reproduced at this scale. Unlike my test shot, this release also has a small resin leading edge light which is taped to an amendment sheet within the instructions wallet. Was this a part omitted from the sprues accidentally? I think it probably was With the wings completed, the whole full span assembly slots into channels which run between the fuselage formers, and again, the assembly just clicks into place. With the wing installed, the fuel cells can then be assembled and installed, and the upper spine attached. Separate wing to fuselage wing root parts then complete that assembly. This final release comes with a die-cast metal block which fits in the forward cell, and helps keep that nose wheel firmly on the ground. For my test shot, I filled this cell with lead shot, and having test fit the undercarriage, I can say it does work, with no need to find extra places to stash weight. Two sprues included Two options are provided for the undercarriage, and these are for the regular plastic parts, whilst the other is for a set of die-cast metal struts which are included in the kit. Having built the test shot with the plastic parts, I would say that the metal ones would be favoured by me for this build. The He 219 is a very heavy model when complete, and whilst the plastic legs are still strong, the metal ones would provide extra insurance against breakage, whilst also meaning that there are no real seams to eradicate in difficult to access areas. You will need a small jewelers file to finally clean a few marks, but that is it. You will use the main metal legs with a number of non load-bearing plastic parts which are common to both options. Wing inner and outer flaps can be posed in a neutral or drooped position, whilst the ailerons are designed to be simply plugged into the wing in a neutral position.

-
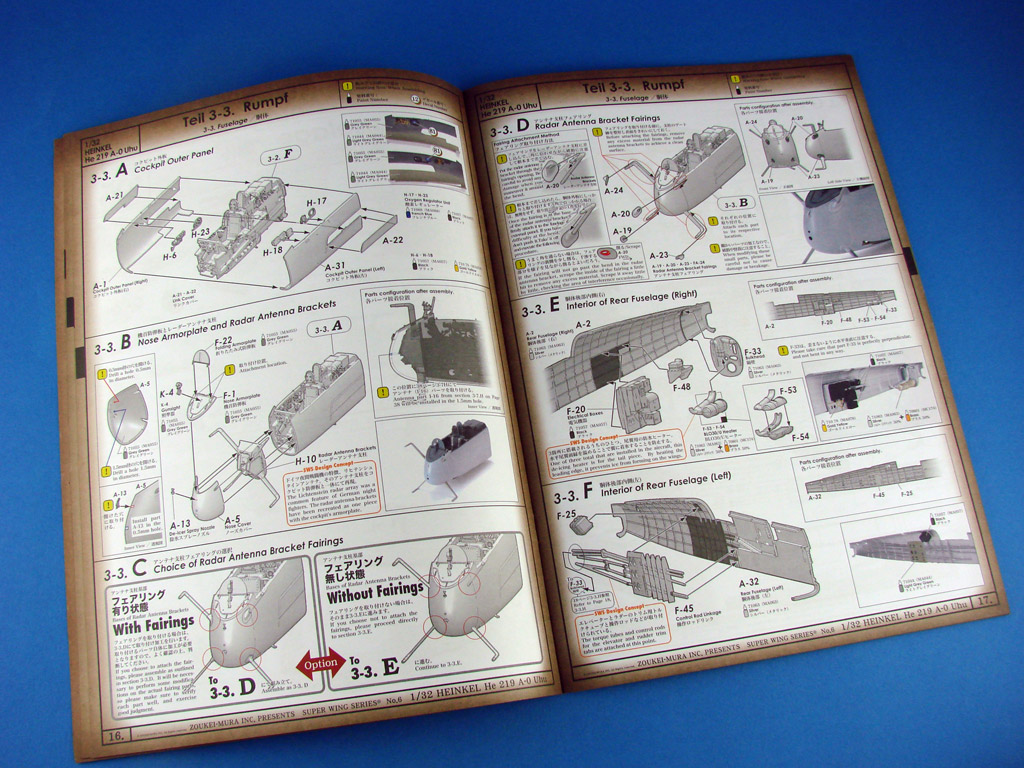
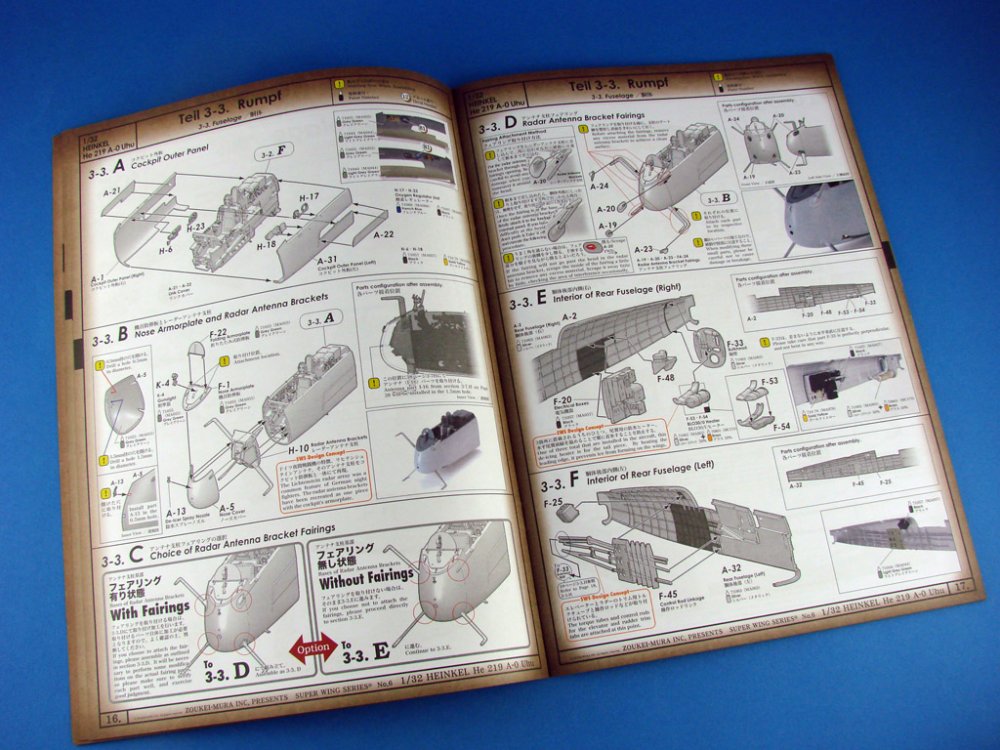
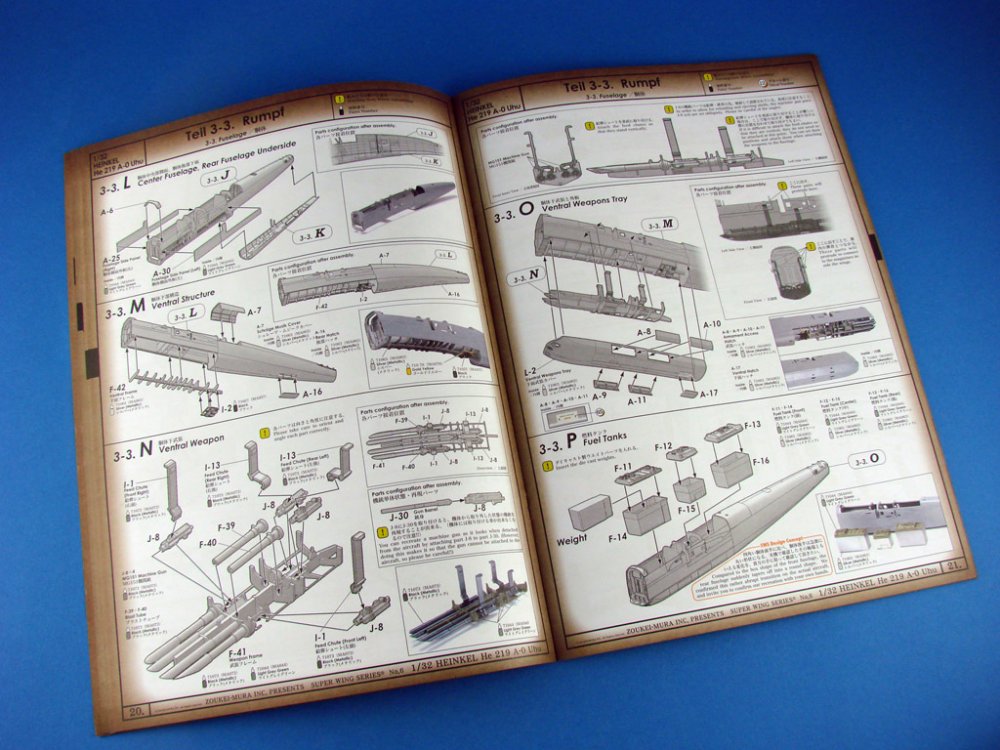
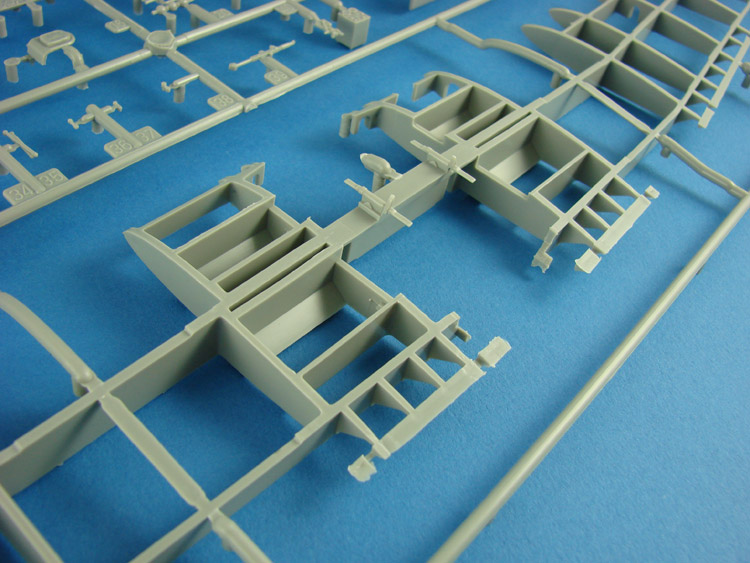
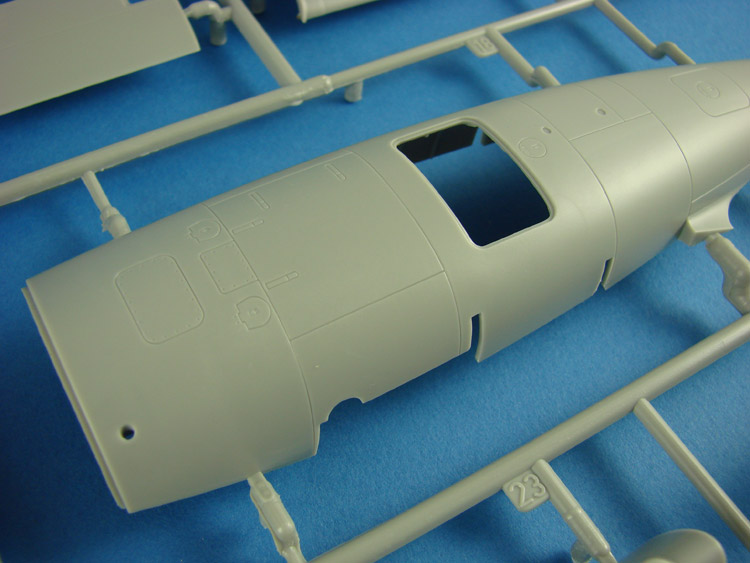
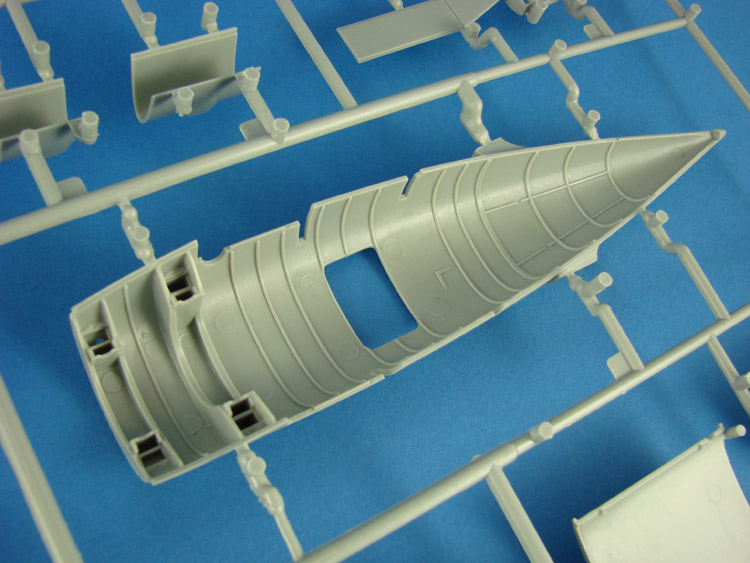
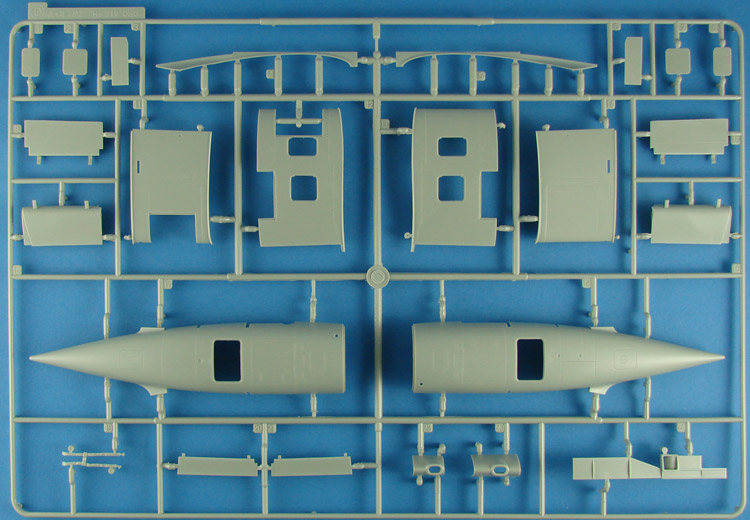
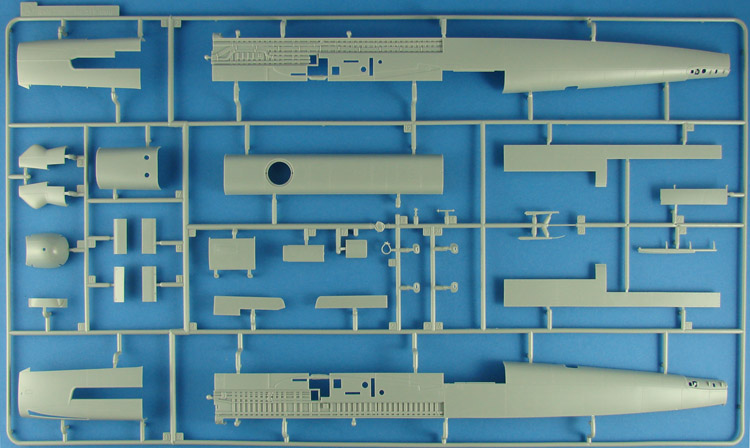
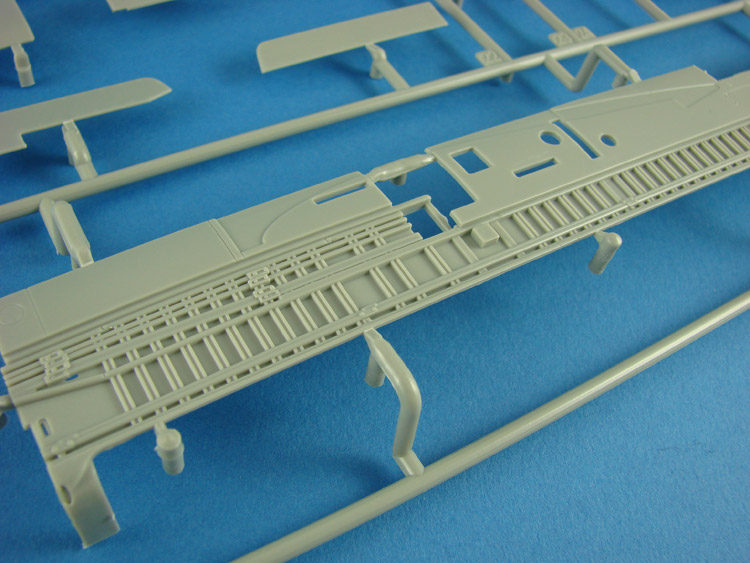
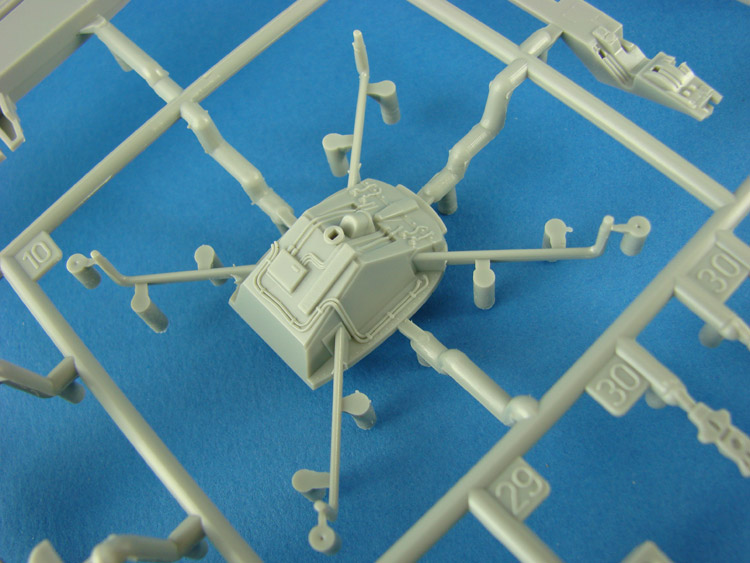
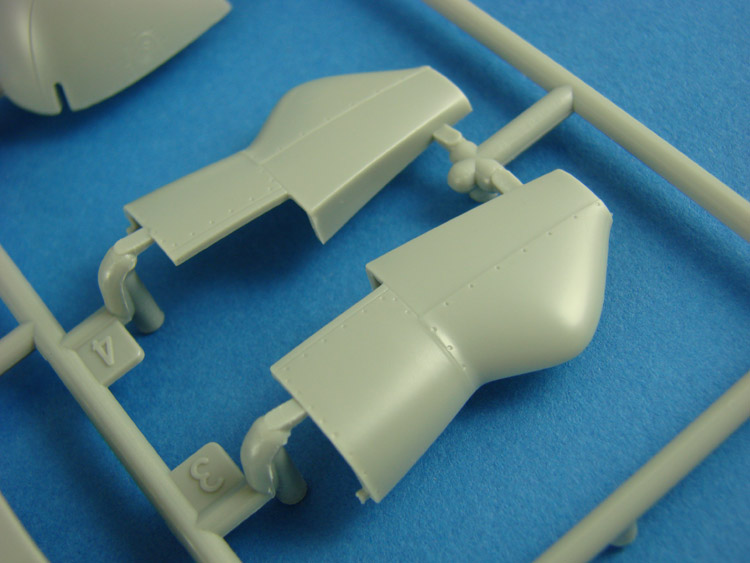
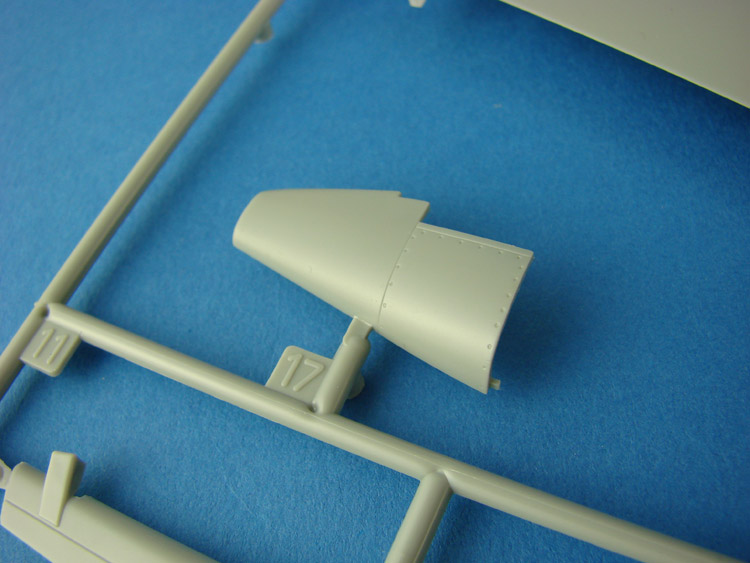
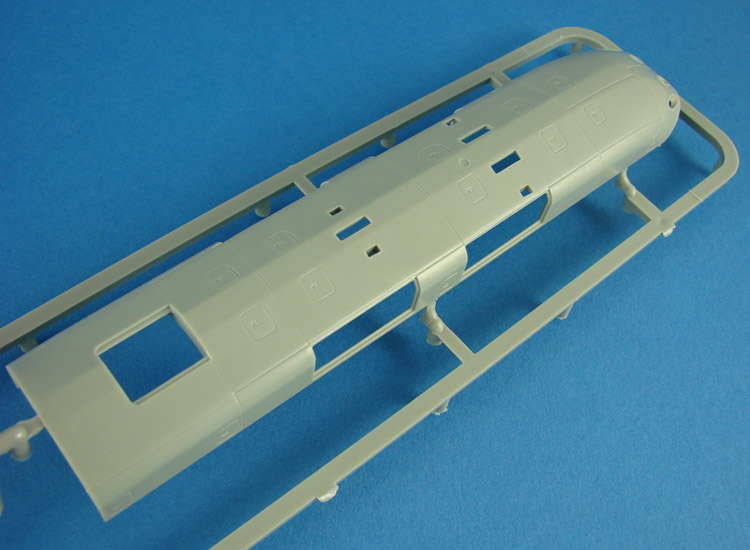
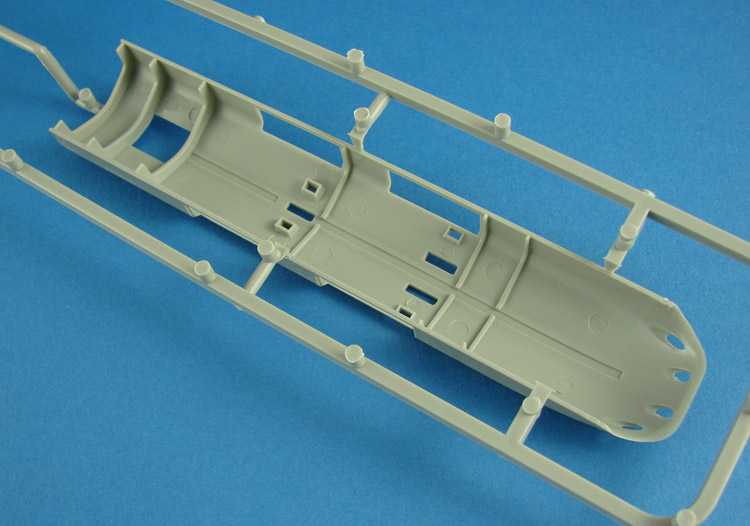
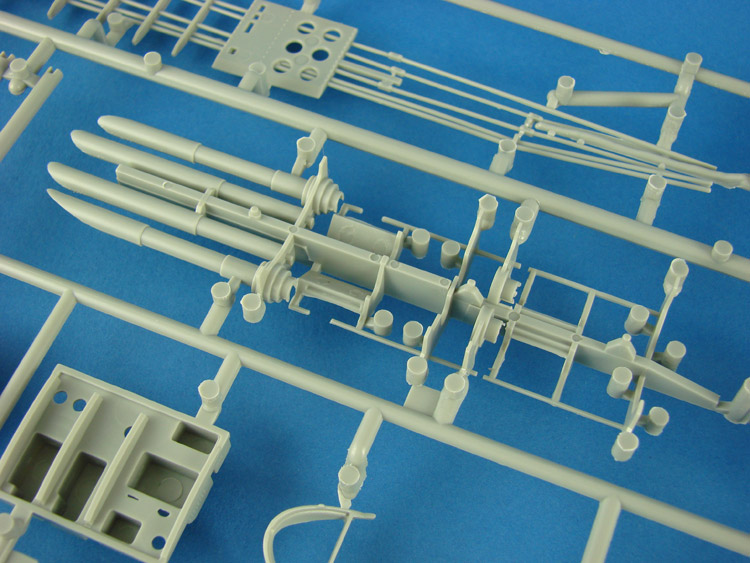
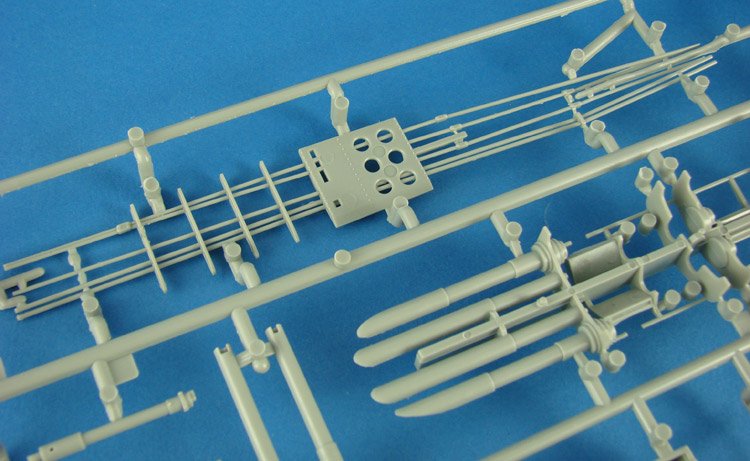
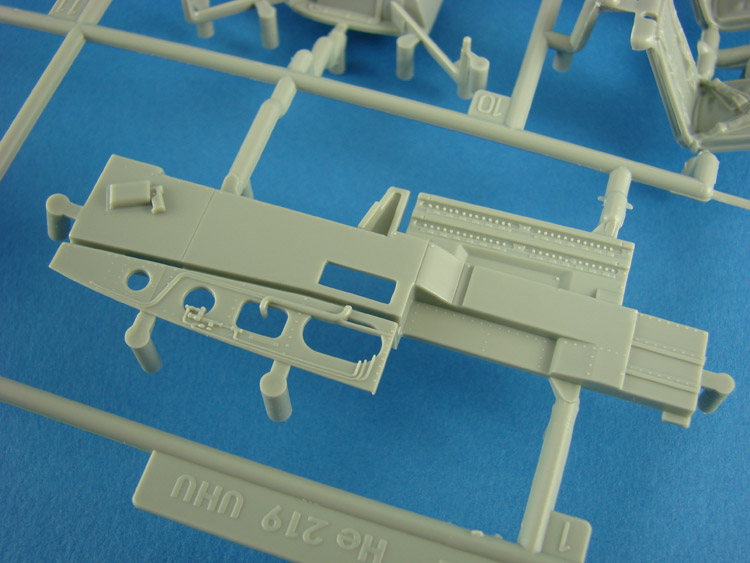
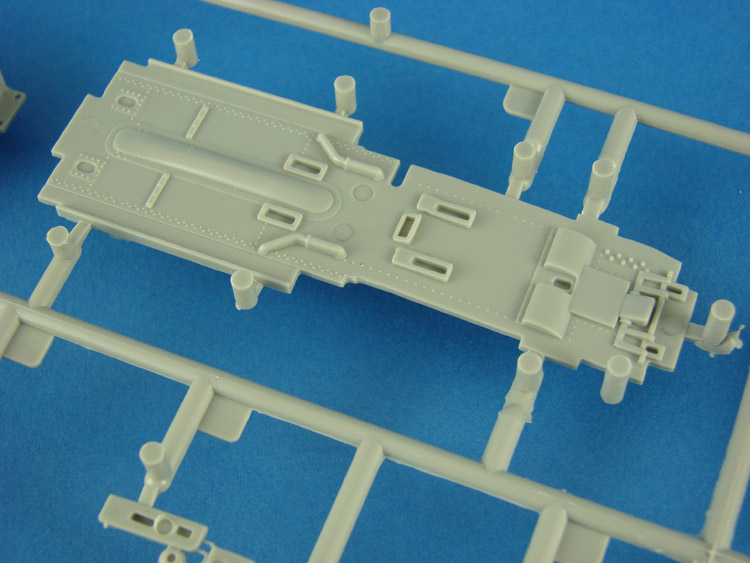
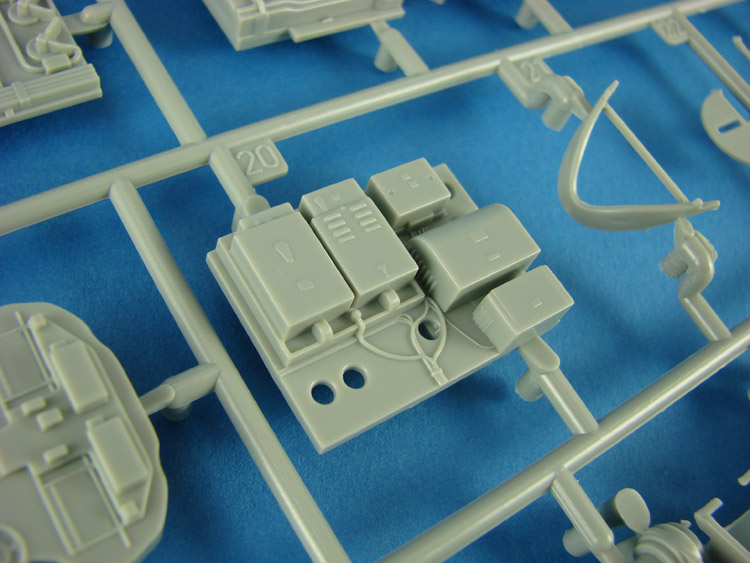
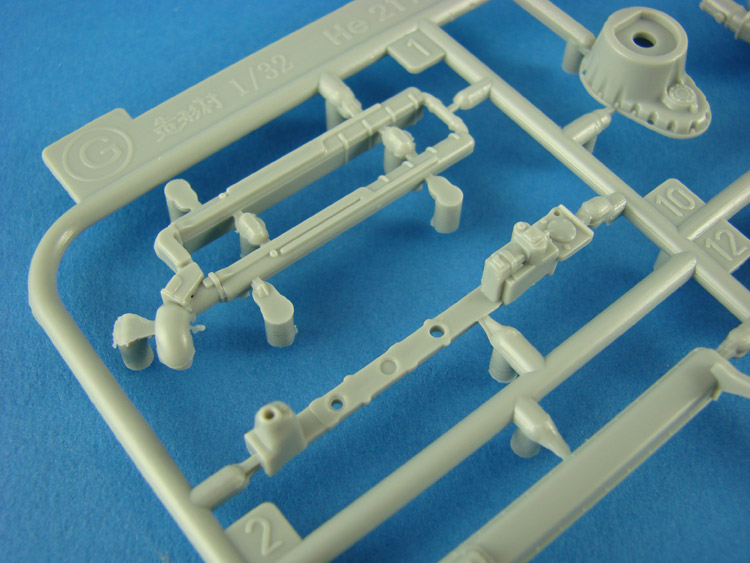
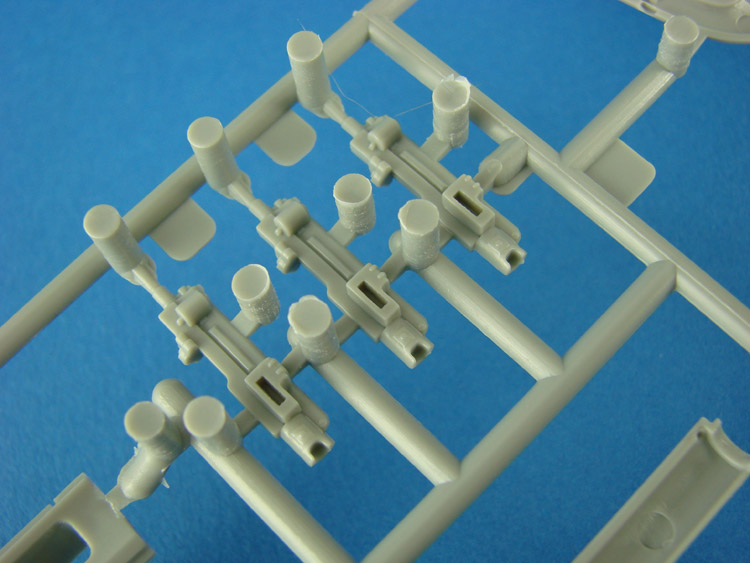
FUSELAGE The parts breakdown of this kit really betrays the size that this model builds up into. Be warned, it is quite a large project when assembled. That style of parts breakdown is never more evident than with the rear fuselage, which is basically the whole fuselage length, minus the cockpit area. Parts count for this area, including skinning the cockpit tub and building the tail surfaces, comes to ONE HUNDRED AND FIVE. The exterior of the fuselage is broken down into six main sections; 2 x side walls with rear upper deck, lower pack, upper fuel tank cover, lower fuselage and Shräge Musik upper panel. As well as the exterior panels which can be left off to display the cables/linkages, the interior is extremely detailed. Test shot image, by James H Inside that rear fuselage, you have three large fuel cells with the various fillers and plumbing realistically moulded. To the rear of the fuel cell installation is the Shräge Musik, upward firing MK108 equipment. Set an a slightly rear facing angle, the upper fuselage panel for this is separate, meaning you could in effect leave it off or removable to show this detail. The rearmost fuselage interior is moulded with complete stringer and former detail, and contains a position for the crew member who would be evaluating the various avionics installations which are situated here, and of course supplied in super detail, such as the electrical panels and radio equipment. Duckboards and a harness are fitted here for that crew member, and a posable crew entry door under the rear fuse. The various tail surface control rods and linkages are also supplied as well as the blower unit which provides the tail surfaces with their anti-freezing system! Under the Uhu’s nose cover is a panel with avionics and wiring too, and the four dipole arms are integrally moulded to this. Optional arm fairings are supplied which will need slitting in order to slide them into position. The rudders and elevators are moulded separately, and while it is easy to position the rudders, you’ll need to slice the locating tabs from the elevators if you wish to do the same here. Two minutes with a knife will fix this. The fitting of all tail parts to each other and the Heinkel are all very positive and very easy to accomplish. Optional bumpered and bumperless tail parts are included too. The bumpered tail should allow you to build later versions of the He 219 from this box, but I do feel that Zoukei-mura may have other plans to maximize the use of their expensive moulds. Time will tell. The He 219’s main armament were 4 x MG151 guns mounted in the belly of the machine. This ‘weapons pack’ is of course a separately constructed unit on this kit, which is built around an interior framework and external ‘skin’. Each gun has its blast tubes moulded into the framework in what has to be one of the most amazing feats of injection moulding I’ve ever seen. The guns of course have their barrels and ammunition feeds as separate parts, and the gun access doors are moulded separately too so you may pose them open, as is the avionics. The whole pack almost clicks into place on the fuselage. Again, thoughtful engineering.
-
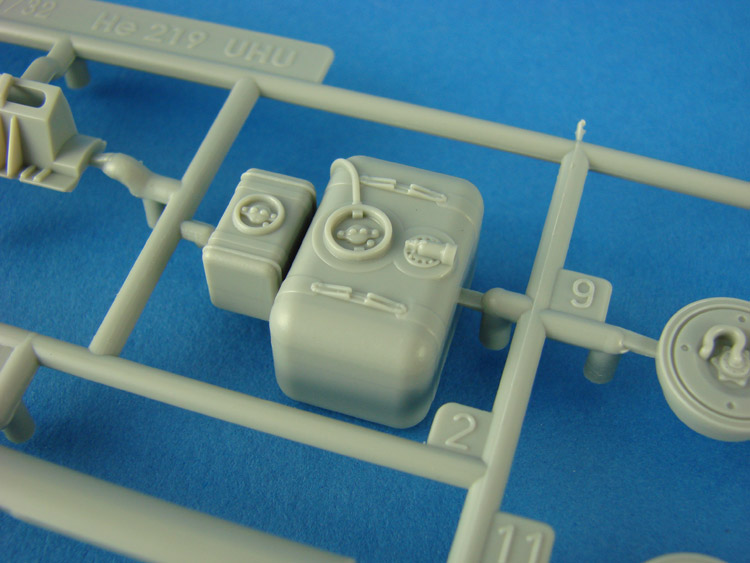
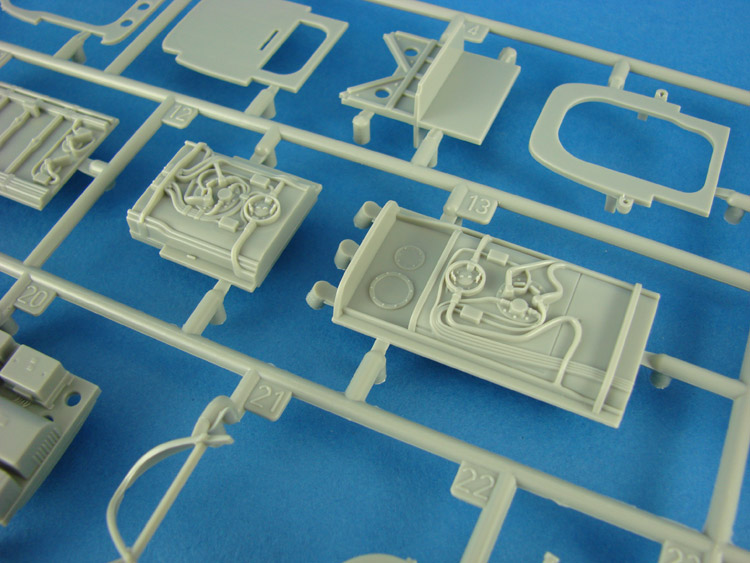
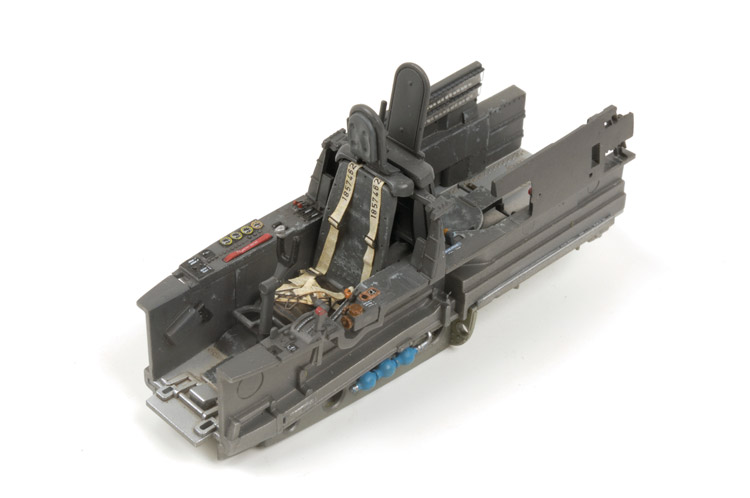
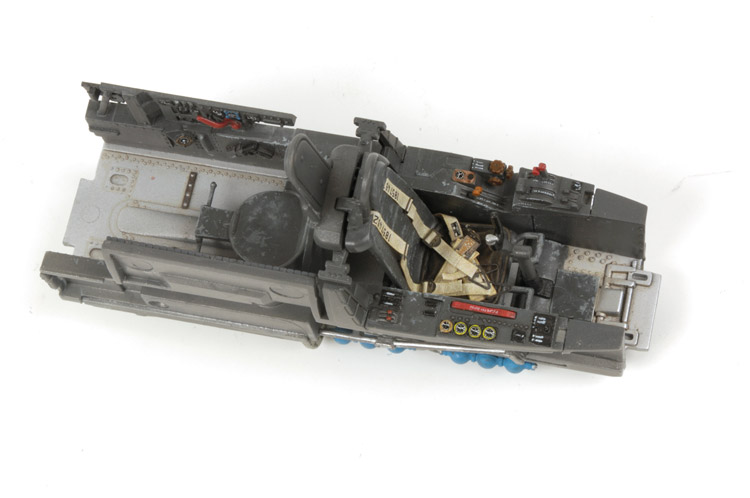
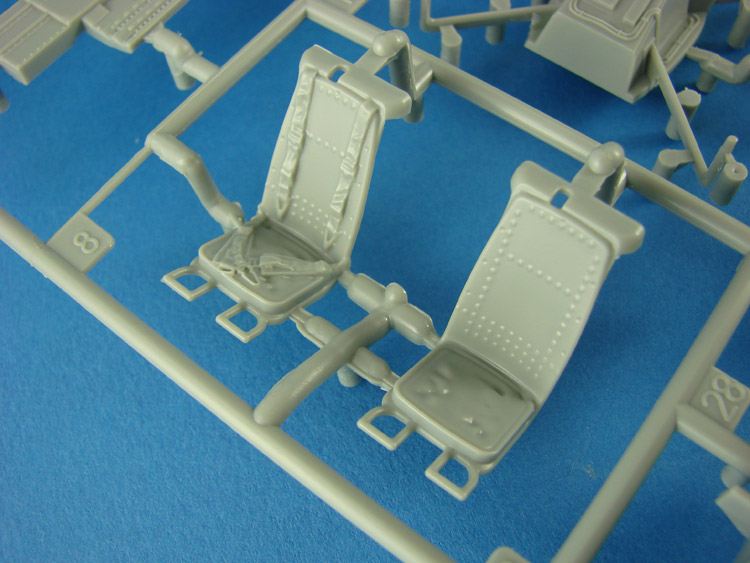
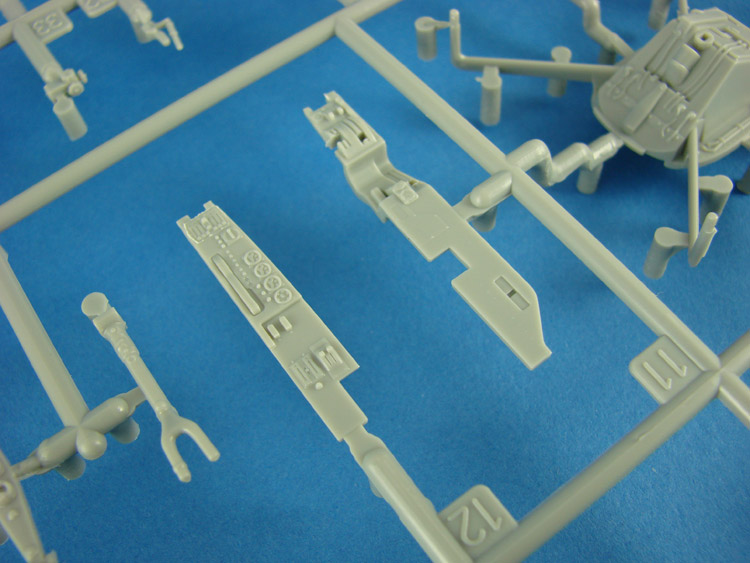
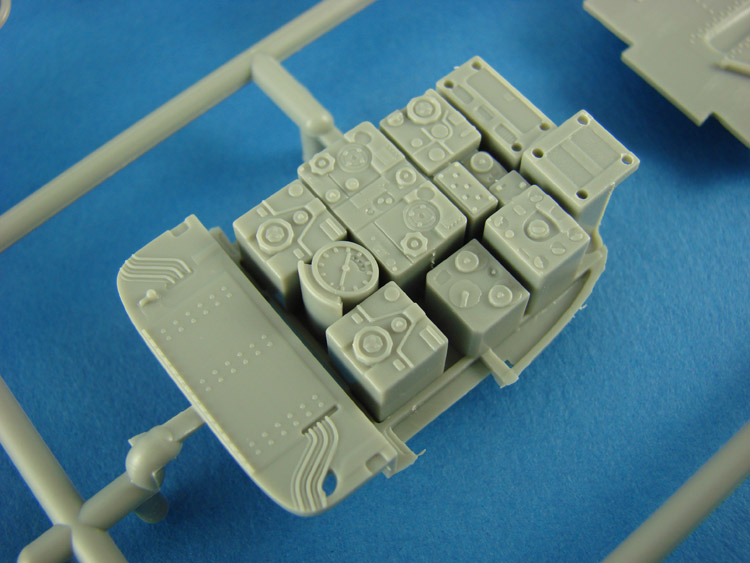
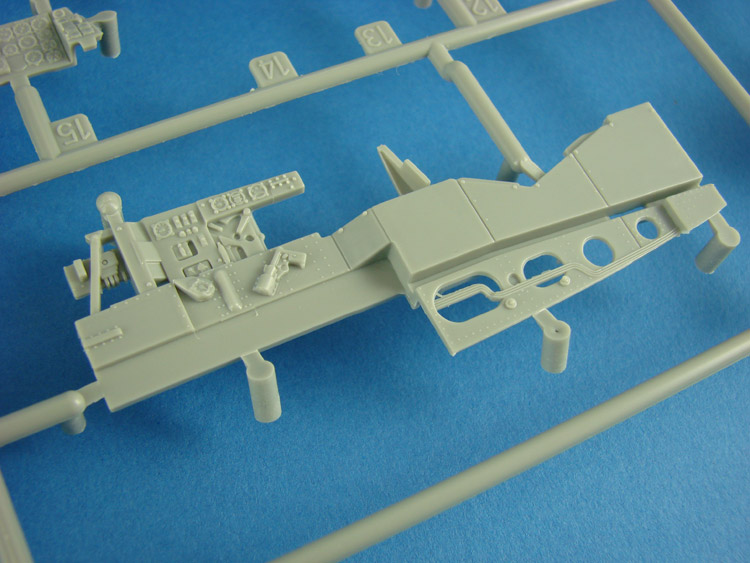
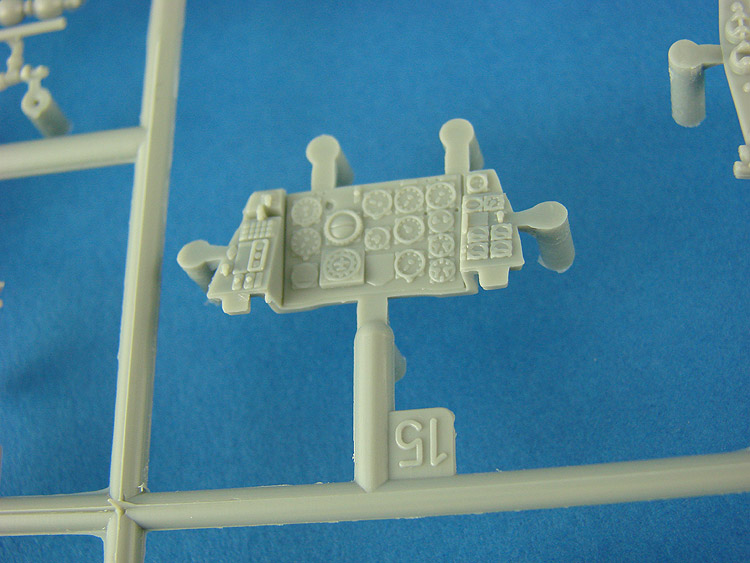
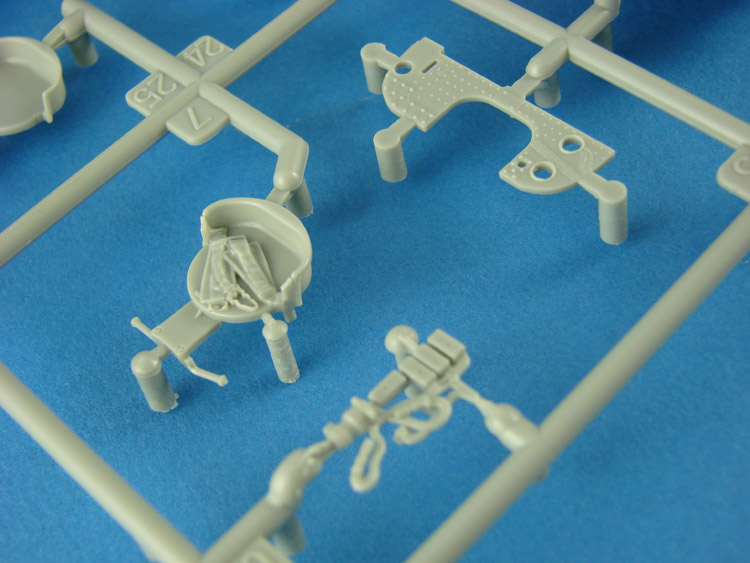
COCKPIT Now we can finally take a look at the cockpit. The office itself is built as a module which is encased in the forward external nose parts. If you like detail, you won’t be disappointed here. This is one of the nicest and most comprehensive cockpits I’ve seen. I’ve enclosed a couple of photos of my test shot project, to give you an idea of the level of detail. This project used Airscale decals though, as the test kit wasn’t sent with decals. ZM give the modeller a number of options when it comes to building the instrument panel. You can choose either the grey part with moulded instrument detail, or the clear part with blank instrument faces. You can choose to either paint the detail yourself or add individual instrument/bezal decals. There is even an decal which you can use to simply add to the entire instrument panel face instead. The office comprises of superbly detailed seats (option for seats with and without moulded belts), console instrumentation, ejection handles and blast tubes, trim controllers and every other piece of equipment which look to be faithfully reproduced. Comparisons with Kagero’s He 219 books and research photos I have, show that, unlike Revell’s kit, this one is pretty accurate. The rear cockpit fuse/switch panels are supplied with clear cover strips too. An accurately reproduced radio bank is provided for the rear office, with options for the radar unit scopes. I would like to have seen some decals for this area, but alas, you will need to source your own for the various placards etc. Cockpit detail doesn’t exist just within the tub, but also outside too. External detail includes compressed air tanks for the ejection seats (fully plumbed in!), and the various cable and control linkage channels. These can actually (mostly) be seen if you choose to leave off the exterior panels. These channels also run down the fuselage exterior and underneath the wings. The detail/posing and diorama possibilities are endless. According to the manual, the cockpit area consists of FORTY parts, which don’t include the external shells, nose and any interior armoured windscreen and frames. So, pretty comprehensive. Photos above courtesy of David Parker, Air Modeller (published in ZM He 219 'Concept Note') Test shot model, built by James H
-
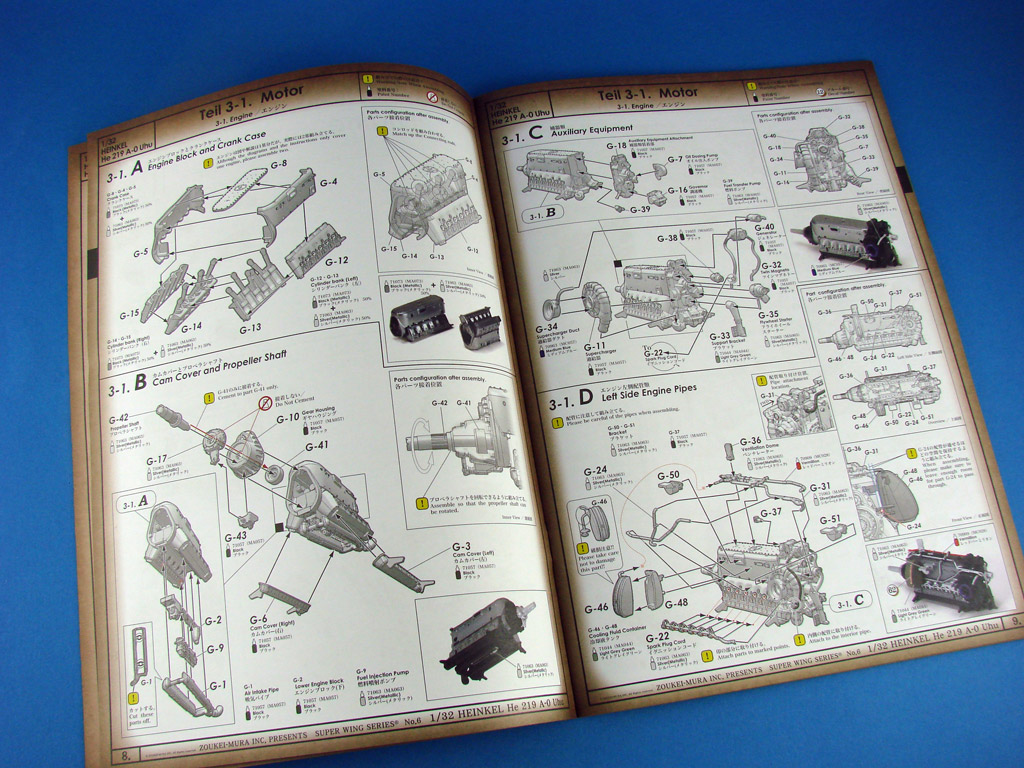
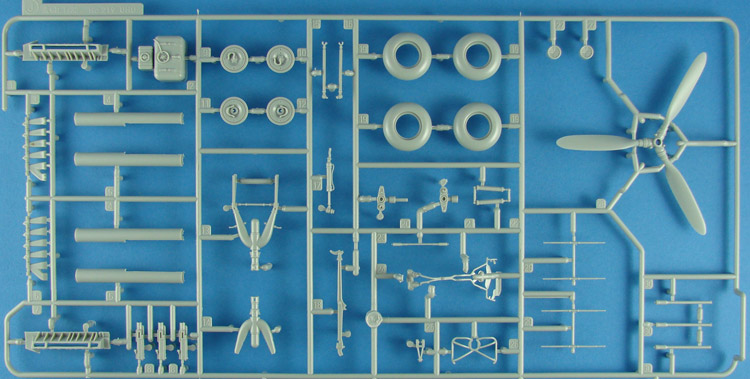
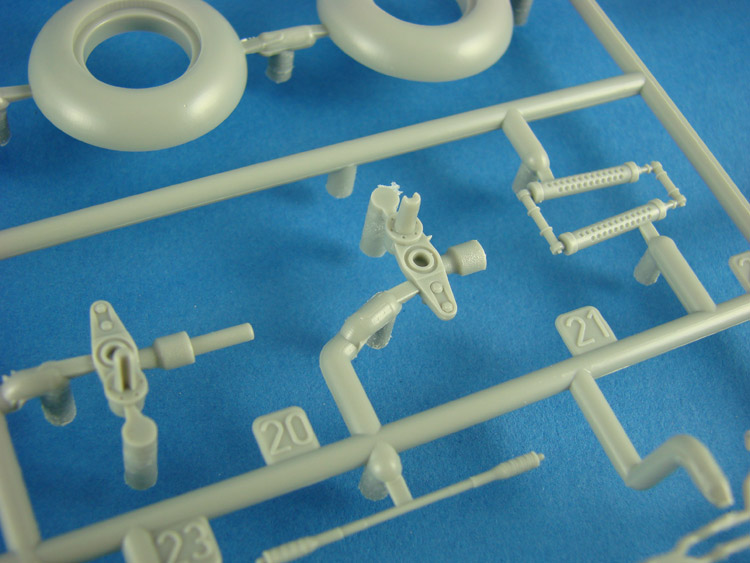
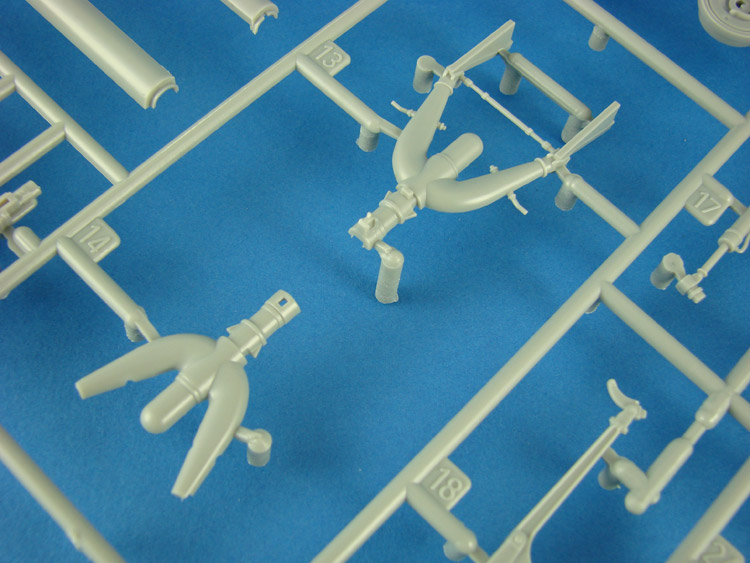
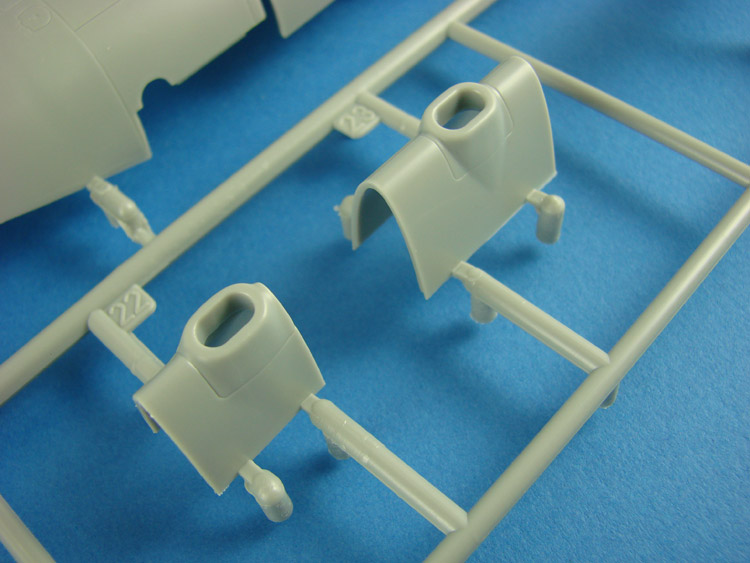
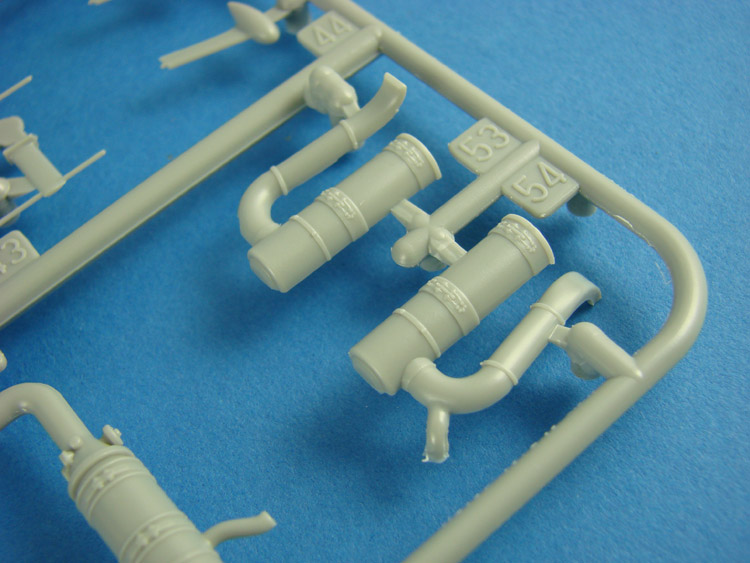
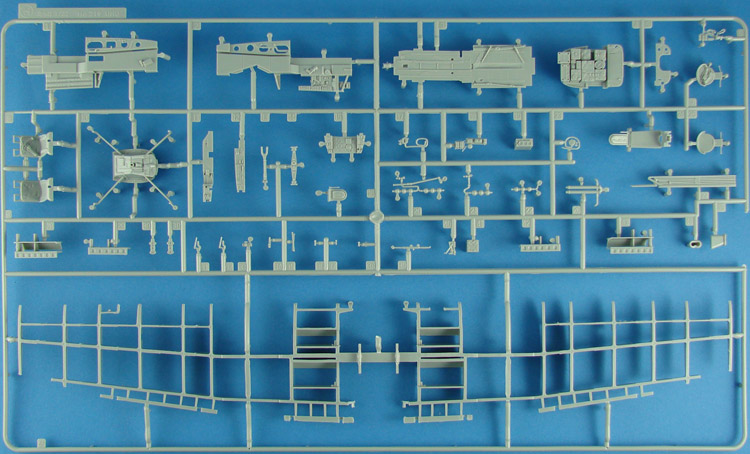
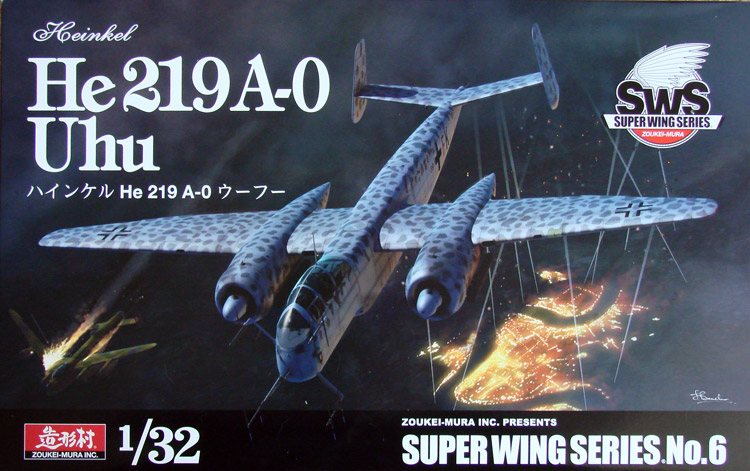
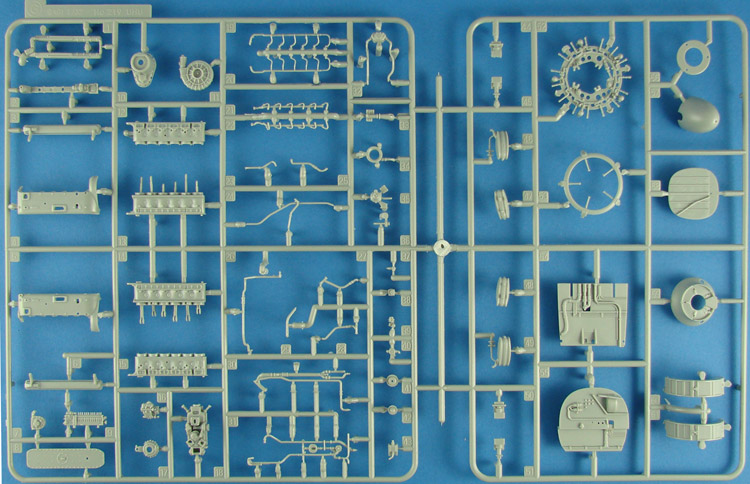
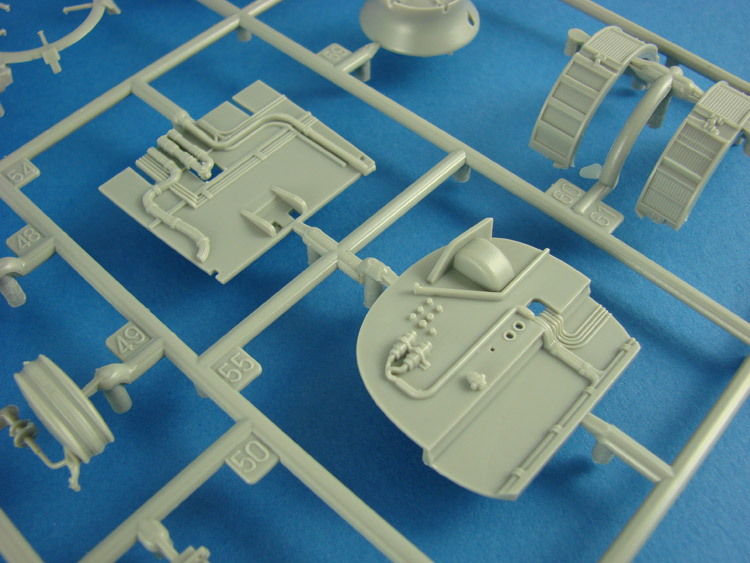
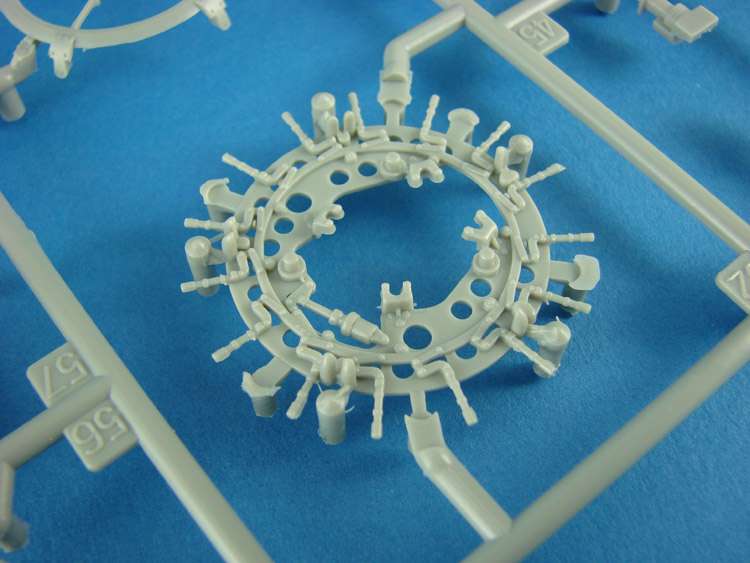
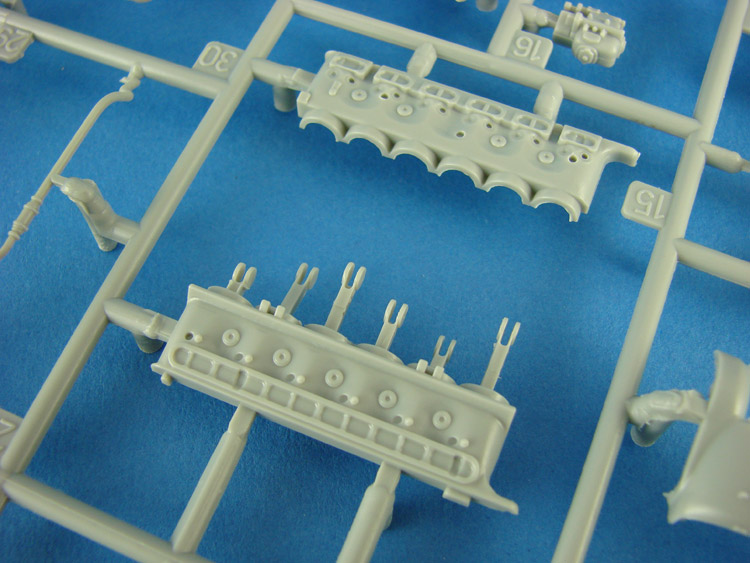
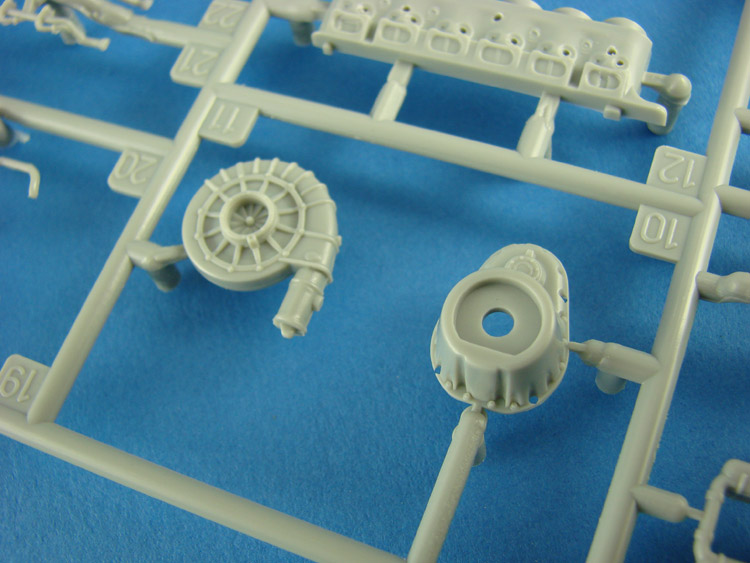
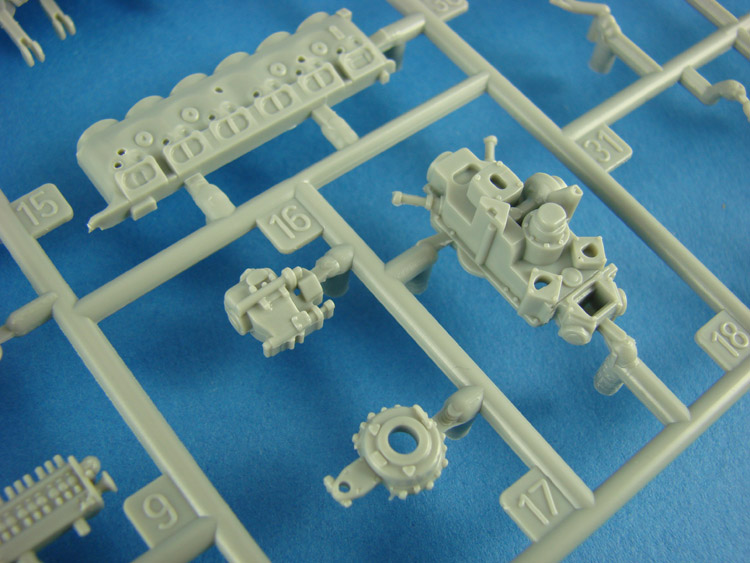
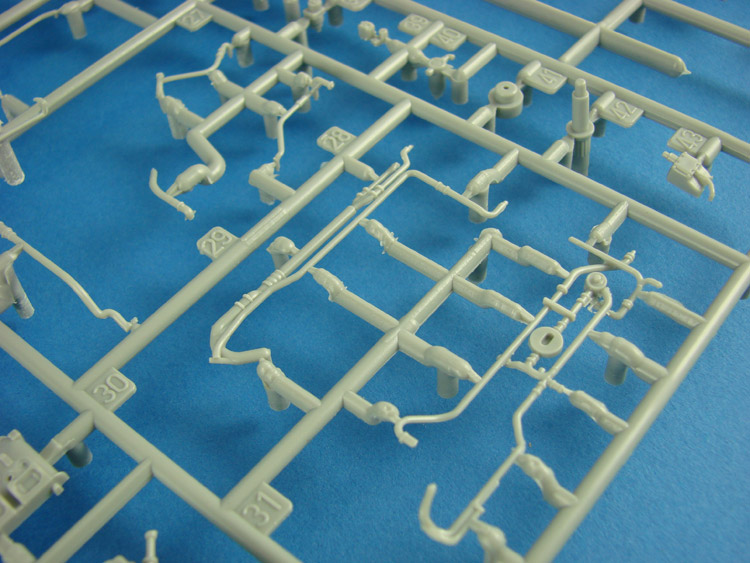
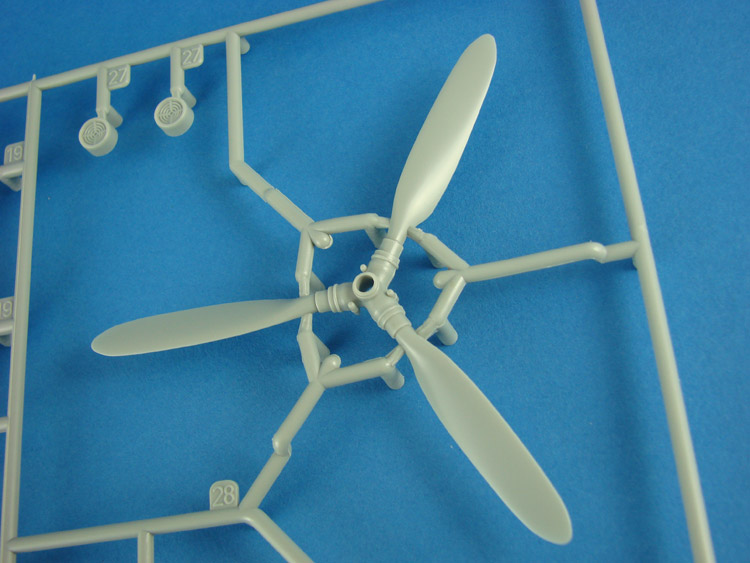
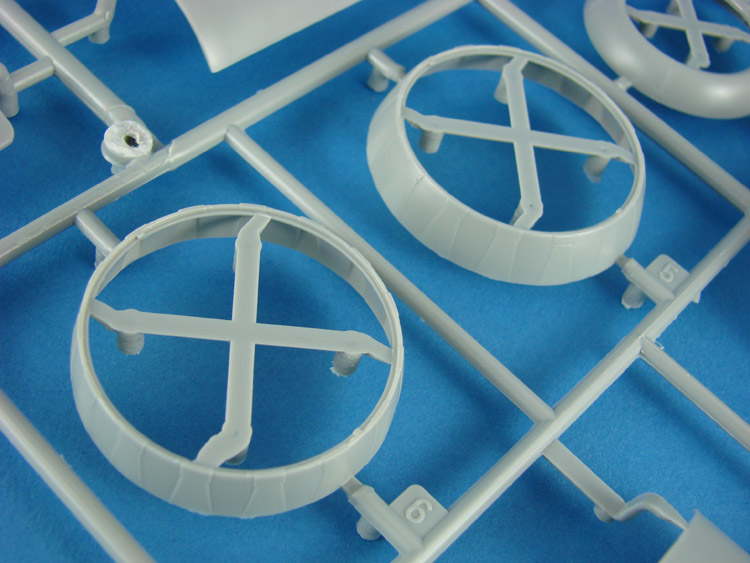
1:32 Heinkel He 219A-0 ‘Uhu’ Zoukei-mura Catalogue # SWS No.6 Available from Volks Japan for 16,590¥ The Heinkel He 219 was a machine that almost never was. If it had been down to certain senior factions in the RLM, the project would have been dead in the water in its very early prototypical stage. Heinkel’s machine almost lost out to Messerschmitt’s Me 210/410 project, which was mostly beset with design and technical issues. The He 219 has the honour of being the first operational aircraft to be fitted with ejection seats, and had the type entered service earlier, and in quantity, it would most certainly have affected the success of the RAF’s night bombing operations over Germany. The He 219 was indeed designed as a night-fighter, and to this end was much better suited to it than other machines which were merely adapted for this purpose, such as the Ju 88 and Bf 110. The He 219 was heavily armed with 4 guns in a weapons pack in the aircraft’s belly, 2 wing mounted guns and 2 upward firing guns. The aircraft is typically known as the ‘Mosquito killer’, yet its performance in many aspects was inferior to the DH. Mosquito. Having said this, the type generally operated with success. The A-0 version was fitted with an armour plate panel which could be raised up in front of the armoured glass, giving extra protection from a direct encounter with a bomber turret. Under 300 of all He 219 variants were built, with only one surviving today in the USA. This is the machine which ZM have studied and agonized over in bringing this model kit to you. This is a model kit that I am already very familiar with. I make no secret of the fact that I have an ongoing relationship with Zoukei-mura, and at Scale Model World 2012, I was demonstrating the test shots of the He 219 to potential customers. Towards the end of last year, I also built a test shot of this model kit, so I am very familiar with the overall construction, and the positives and negatives which I myself perceive. That test shot was moulded in the familiar ZM 3 colour plastic, and came without instructions, decals, metal parts and masks etc. ZM listened to your comments about the three colour plastic use, and despite the Japanese home market liking this concept, they have now ditched it in favour of grey only. I for one am very happy with that decision. Without further ado, we’ll take a look at this shiny new release and see what you get for your hard-earned. Test shot image. Model by James H This is a large box, not unlike the Revell He 219 release, but unlike the Revell kit whose parts are few and seem lost in that big box, this kit is CHOCK FULL of plastic. There’s hardly a square inch free in there. Underneath the box lid, adorned by a superb artwork from Jerry Boucher, lies the inner carton, this time with a fold over lid to help contain the many sprues and stop them from bulging the lid outwards. Before we go in there, Jerry’s artwork is well worth mentioning. Specially commissioned for this release, a He 219A-0 is seen at night over a burning German city, whilst the Uhu’s noble quarry, a Lancaster, is seen veering away in flames. Superbly atmospheric, and most definitely the best ZM artwork to date. After prising the rather airtight lid from the box, and opening the flap lid, the first thing to be seen is the instruction manual, in a guise as a WW2 document, in a sleeve which also contains a large decal sheet, vinyl canopy masks and a resin leading edge lamp. More on these items later. First we need to take a look at the flood of styrene that we have here. When I say there are a lot of parts here, I really don’t joke. The Heinkel He 219A-0 kit is spread over FIFTEEN light grey sprues and TWO clear ones. The total parts count for this release is around 470, not including some die-cast parts which are supplied wrapped in foam, and within a narrow cardboard sleeve to prevent them from rolling around amongst the sprue bags. As I have previously mentioned, this release differs from the previous Zoukei-mura releases in that all sprues, with the obvious transparent exceptions, are now moulded in light grey plastic. This is a very welcome move from the gimmicky multi-colour releases, and finally dispels the myth about kit detail being soft. Both the silver and plastic did indeed make things look that way, but under a coat of primer, you could see the detail was sharp. The grey plastic has that same effect. Now, how do you tackle a review of such a detailed kit with a large number of parts? I think perhaps the best way to tackle this is to look at the construction of the model, and the options and detail within, and let the actual photos do the talking for the sprues. ENGINES TWO OF THESE SPRUES PROVIDED If you’re used to starting your construction with the pilot’s office, then we have a slight departure here, with your build beginning with the He 219’s two Daimler Benz 603 engines. Yes, this kit has included both powerplants for you build, and perhaps display with open cowls. The sheer depth of detail is incredible too. Each engine consists of SIXTY parts, and is a mini project in its own right. Each cylinder bank is moulded with piston and con-rods within, and when assembled to the crank case, the con-rods connect together. So, what’s the point? Well, I found on my test shot that this enabled me to get the angles of the cylinder banks correct in relation to the crank case, even though the fit of these parts together was nigh on perfect. A gimmick? Who knows, but this is the design those for SWS kits. Some modellers like this, and some don’t. The engines are adorned with extremely detailed ancillary parts, such as glycol tanks, magnetos, flywheels, supercharger, and fuel injection gear, as well as a LOT of plumbing that seems to weave its way over every face of the engine. Again, having built this earlier, I know that these various parts fit and match together with ease. Each engine also has a fully detailed annular radiator assembly, and the detail associated with opening/closing the external radiator flaps. You really have to see this to believe it, complete with the multitude of pistons that govern this aspect. To position as closed, you need to snip a predetermined length from the end of each piston. The flaps themselves are supplied as either open or closed options, and superbly/crisply moulded. Both engines have authentic damped fixing points attached to them which push neatly into sockets in the upper cowl. Whilst at SMW2012, we had a constant stream of people asking if we were going to be releasing the engine as a separate kit. It really is that good. Only this evening, I took the kit to Bolton IPMS to show the guys there, and again I was asked about the engine as a separate.


-
Zoukei-mura He219 "UHU" - built
James H replied to afvmodeller's topic in LSM 1/32 and Larger Aircraft Ready for Inspection
I know I've already said this David, but that is one seriously outstanding build. I knew you were a little hacked off with having to do that scheme, but you nailed it, especially that reworked cockpit area. You should have cast that in resin. I might even have considered that scheme myself. -
Lovely work as per usual David. Are those rivet decals you used in there too? That Uschi wood decal is awesome. Which set did you use for that?