
James H
-
Posts
3,257 -
Joined
-
Last visited
Content Type
Profiles
Forums
Events
Gallery
Everything posted by James H
-
Profiles added
-

Wingnut Wings 1:32 Fokker D.VII F ‘Fighting Fokkers Part 5’
James H replied to James H's topic in Aircraft Reviews
It's the striped, painted-over-crosses, no MG fitted Goering machine for me. It just looks an oddity, especially with its 1920 date. -
I think we're waiting for it to go live right now.......well, at least that's my thinking as I want to add the profiles!
-
I don't think WNW will do the all-white Goering machine, or the candy stripe Udet machine. You'll need to source some ref for the stripes, but that's easily done.
-
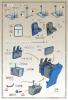
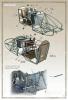
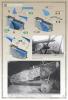
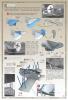
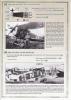
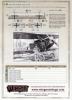
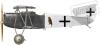
1:32 Fokker D.VII F Wingnut Wings Catalogue # 32031 Available from Wingnut Wings for $79.00, with FREE worldwide delivery About the D.VII F The Great War is shrouded in controversial and often difficult to prove hard facts. Some facts however are indeed undeniable and one of those allows us to say, with certainty, the Fokker D.VII in all of its guises was the most successful German fighter aircraft to have been designed and developed during the Great War years. Design and development were key to this success and with every ounce of vigour both allied and axis powers realised very quickly that it was crucial in this game of cat and mouse. I think it would be fair to say design and development was perhaps never more critical than in the race to dominate the skies for which the victor would be awarded air supremacy. The pilots that flew the D.VII aircraft were in awe of their charge while the Allied pilots who were pitched against them knew they faced something with tenacious and deadly capabilities that far outweighed anything they had to offer at the time. However, design and development never stood still in these war years and in fact pressed forward at an astonishing rate for both sides. The Allies soon found themselves in a position where they were re-gaining ground and the established superiority the Germans had gained was slowly dwindling away. This called for drastic and even more determined effort from the German perspective. The result of this determination for design and development gave rise to the first Fokker D.VII to be powered by the BMW IIIa engine which entered service with Jasta 11 in June of 1918. The D.VII powered by the mighty BMW IIIa would be classed as the ‘F’ variant. This new BMW engine when used in conjunction with the D.VII created an even more deadly and superior opponent for anything the Allies could muster. With its ability to maintain power at higher altitudes it enabled the D.VII to not only out climb any allied opponent it encountered in combat but also proved to make the aircraft highly manoeuvrable at all speeds and at all altitudes. It is thought around 750 units (though this estimate varies greatly) of these BMW IIIa engines were built in the BMW factory in Munich. Image by courtesy and kind permission of lukem78, DeviantArt While German pilots adored this new aircraft and gave huge accolades and preference to its superior power, limited production capability meant it could not keep up with demand even though some production was transferred to the Opel factory in Russelsheim. This limited production of the BMW engine called for the less powerful Mercedes D.IIIau powered aircraft to continue until the end of the war. Ernst Udet was squadron leader of Jasta 11 and it was his unit that was first to receive this Fokker D.VII F. He very quickly acknowledged the amazing performance of the BMW IIIa engine after its ability was proven in combat. This is what he had to say………. “There can be no doubt that the BMW engine was the absolute highlight in power unit development towards the end of the war. The only bad thing was that it came too late”. The kit The sheer number of schemes available for the previous three Wingnut Wings Fokker D.VII kits is varied, covering some of the machines flown by a number of main protagonists of the D.VII. As well as the kit decals, there are of course WNW’s own aftermarket sheets, and also some from Pheon, on the cusp of release. Of course, there were a few omissions with WNW’s own releases, such as the machines of Udet and Goering. The simple reason is that these pilots flew the D.VII F, and until this release, it wasn’t possible to properly portray these aircraft. Just jumping ahead a little though, the first thing I did with this sample was to check those schemes, and lo and behold, Udet’s machine is portrayed, with an option to produce the famous ‘Du Doch Nicht’ scheme. The one I always wanted to create! Anyway, I’ll not get too far ahead of myself. Wingnut Wings Fokker D.VII F kit comes with probably the nicest artwork of any of the D.VII releases. Painted by the talented Steve Anderson, this image depicts 501/18 “RedW W” of Jasta 26, in combat above the cloud-base with a Sopwith Camel. The artwork is gilt edged as per all WNW releases, and the box edge depicts the FIVE schemes available for this kit. More on those later. So how does this kit vary in relation to the previous Fok/Alb/OAW releases? Well, essentially, the sprues are identical with the exception of Sprue E which contains the new BMW IIIa ‘altitude’ engine. The kit spec says that there are 36 parts which are exclusive to this release, and counting the parts over the connected specifically labelled Fokker D.VII F sprues E & G, there are indeed that number of parts. Sprue E is for the engine, and sprue G contains engine cowls and a late production oil tank, exhaust stack etc. Interestingly, even though 36 new parts are included, FOUR of them aren't for use with this kit, with only one of them, a prop boss, shown on the new extra decal sheet for this release. Sprue I is one pertaining to the earlier Fokker D.VII (Fok) release, but appropriate to the D.VII F Before we take a look at the kit, here are WNW’s own statistics pertaining to this release: 198 high quality injection moulded plastic parts, including 36 parts exclusive to this release (#32031) All new highly detailed high-performance BMW IIIa ‘altitude’ engine. 8 photo-etched metal detail parts 32 page, fully illustrated instruction manual 3 high quality Cartograf decal sheets, including fitted, 4-colour lozenge and markings for 5 aircraft. Let’s take a look under the hood. The Fokker D.VII F is moulded across NINE light grey sprues (E & G joined together) and ONE clear sprue, all individually bagged to protect them. An instruction sheet is also bagged along with a separately packaged photo etch fret. All three decal sheets are also packaged together. SPRUE A This sprue contains the majority of the smaller detail parts associated with both the fuselage interior and also the two engine radiators utilised on the D.VII F (although six are given for the various D.VII kit versions). The choice of low, mid or high MG installations are taken from your hands too, as only the higher MG mount and ammunition feed drums are to be used. There is a single option of instrument panel out of the supplied two, and the earlier D.VII oil tank is redundant. Not to reiterate the sheer detail supplied on this sprue would be criminal. The D.VII had been in long-term development, with this sprue being dated 2008. WNW came into existence with its first releases a year later, in 2009, so with the actual D.VII kits not being released until late in 2012, you certainly can’t ever say these guys rush things! Detail is excellent. The former onto which the pilot’s seat is mounted has fabric laced onto the tubular framework, all looking very sharp. Decal sections are included for the fabric elements. This sprue contains the fuel tank, fuel tank fillers, seat with separate cushion, compass and gimbal, control column, cockpit floor, torsion tube, rudder pedals, maximal fuel gauge, firewall and fuel tank pressurising pump, to name but a few parts. Externally, the rudder and vertical fin are to be found here too, as can the fuselage axle and undercarriage struts. SPRUE B This is a generic Fokker D.VII sprue, containing the fuselage halves (sans engine cowls), interior fuselage tubular side walls, cabane struts, tail plane support struts, engine support framework and mounts, and lacing strip for underneath the fuselage. You will need to choose which scheme you will do right from the start, as there are a small number of options throughout this kit which pertain only to certain machines. The interior front of the fuselage has some access port options which apply to specific aircraft, and you will need to carefully open these up for 3 of the 5 machines. The fuselage itself is superb with the most subtle framework and taught covering being exhibited externally, and delicate control cable exit holes being ready to accept those cables. The complicated forward cabane struts which consist of three individual struts, bracketed together are moulded as a single part, with positive strut location pins. SPRUE C This is the clear sprue containing two windscreen options. Moulding is excellent, clear, and suitable thin. SPRUE D (x2) There are TWO Sprue D's within this kit, catering to the guns, ailerons and wheels; basically anything which is twinned-up. This indeed means the ailerons aren't 'handed', and they are fairly smooth, with no harsh rib/fabric ensemble. The wheels, moulded in a single piece with 'GOTHANIA' logo, have a separate external hub, but despite all the hub options, only one of these is designed to be used for the D.VII F. Two styles of Spandau are included; both one with a moulded cooling jacket and one without. For the latter, a photo etch part is included which needs annealing before wrapping around part D6, which is a rod of the correct circumference. This is a welcome addition in the newer kits, meaning you don’t need to rifle through your drill bit drawer to find something suitable to use as a former. Wing outer 'Z' struts are to be found here, as are numerous small parts, such as elevator horns and lifting handles. Only one variety of lifting handle should be used in this release, making part D14 redundant. SPRUE E As previously mentioned, this is the new BMW IIIa engine sprue. The engine parts look very similar to the Mercedes engine in a lot of respects, but there are of course a number of layout and shape differences. The crank case is certainly busier and more angular, with some heavy duty cast mounting points. This engine had the option to mount the carburettor on the opposite side, and this can be seen here, with the starboard side port being moulded with a blanking port. The ignition lead conduit is replaced here with a double conduit, as all the spark plugs on the BMW cylinders were located on the port side of the engine. A staple of the BMW IIIa was that it was a water-cooled engine, and the carburettor has the associated extra plumbing, as well as a separate plumbing run linked to the water pump. A generator is included, although the instructions do say that this isn’t always shown to be installed. You would need to check the rather sketchy reference material from this period, and where it doesn’t exist, do with your own personal tastes and intuition. The sprue is shown as having a 2011 date, and the reproduction of the engine looks to be excellent in comparison with my own reference. Various serial and data plate elements are located on the decal sheet. Heine and Axial propellers are also supplied on this sprue, as are a two-part strut mounted anemometer. SPRUE F Only two parts exist here, and these are the upper wing parts, split into upper and lower panels, due to the quite thick chord of the D.VII wing. A number of internal locating pins are varying heights help to maintain the rigidity of the wing despite the considerable void within the kit parts when assembled. The wing detail is excellent, with delicately represented rib and fabric detail, as well as crisp access port representation and positive strut location points. Care will be needed with removing the seam at the front of the wing when it comes to the small wing stacking points which are integrally moulded. SPRUE G Back to another D.VII F specific sprue again. There are five upper engine cowl parts moulded here, with only three of them to be used with this release, hinting that there may be another release in the pipeline to utilise the redundant parts here. One of the new cowl parts has the most delicate of open louvre arrangements, whilst the other parts to be used on this variant are the late production oil tank, the high exhaust manifold and an unidentified part, G4. SPRUE H On this sprue you will find the lower wing, moulded in one piece with regard to port and starboard, but again split into upper and lower panels in order to cater to the thick wing chord. The wing exhibits the same high quality fabric and rib rendition we saw on the upper wing panels, with the port and starboard wings being joined by a double spar which locates into the fuselage underside, and is then hidden by an external plate. A one piece horizontal tail plane and one piece elevator are also moulded here. The tail plane has a shaped guide on the underside which helps with positive location into the fuselage. Two upper fuselage coamings are included, but only one is suitable for this release. You will need to drill holes for the fuel filler locations, but these are clearly marked and will present no problem. SPRUE I This is the Fokker D.VII (Fok) sprue which contains the different permutations of engine cowl side panels and also an upper cowl cover and forward engine cowl cover. Again, not all parts are to be used with this release, with seven of these parts to be consigned to your spares stash. The undercarriage axle ‘wing’ is also found here, and luckily, you’ll not have to cut this to fit the D.VII F as the wing was a standard length. PLASTIC PARTS SUMMARY I love reviewing Wingnut Wings kits because there is usually very little to say with regard to negativity. The same applies here, as all parts are superbly moulded, with nigh-on zero flash, and intelligently placed ejector pin marks which will cause the modeller no concern. Engineering is also very clever and you can most certainly tell that the modeller’s experience is one that the WNW team wish to enjoy. After all, it keeps us coming back for more! PHOTO ETCH A single fret of bare metal brass parts is included, and contains EIGHT parts. These are notably the seatbelts, Spandau MG blast channels which run along the engine upper area, MG reticules and cooling jackets. Production is sharp, with excellent detail present on the belts. INSTRUCTIONS I reckon I’ll still be finding ways to describe the fantastic WNW instruction manuals in different ways in another 5 years, but the simple truth is that it really is hard to describe such a high quality publication in any other way. Weighing in at 30 pages, and printed on a satin finish, high grade paper, the manual shows the various constructional stages using shaded ink to distinguish the new parts added to the various sequences. A rigging drawing (for the little that exists on a D.VII) is also included. A number of coloured sequences are included which show painted sections in better clarity, and paint colour references are given throughout, relating to Humbrol, Misterkit and Tamiya paints. I hope in future that they also include my paint of choice, Gunze/Mr Color. A number of both period and contemporary images are shown throughout the manual, giving the modeller excellent reference material to work to. The last pages of the manual are given over to the five schemes supplied. The schemes are shown in profile, and planform/section where appropriate, along with a history of the aircraft and its pilot. More on the schemes in a moment. DECALS Three large sheets of decals are provided here, all printed by Cartograf. Two of these sheets contain the lozenge fabric panels, all pre-shaped and including pre-printed rib tapes. Some modellers lament the non-inclusion of separate rib tapes, but having just added some to my Pfalz D.IIIa, I think I can happily forgo that experience again. The third sheet includes the national markings and individual machine motifs, as well as the various stencils, data plates and cockpit instrument decals. Printing is in perfect register, with excellent colour reproduction and solidity. Now, to that Udet scheme. The scheme supplied in this kit doesn’t have the ‘Du Doch Nicht’ on the tail plane, and it also just has lozenge covered wings. Thankfully though, Wingnut Wings have seen fit to mention this machine, and although not supplying information for the red and white candy stripe wings, they have generously supplied the ‘Du Doch Nicht’ decals in case you want to do this scheme. You will have to reference the other paint quirks for this machine, and notes are given to say that they believe that that machine was in fact a different machine to the one given as a main scheme. I also wondered if they would supply the all-white Goering scheme, and they haven’t, BUT, they have included a machine co-flown by both Goering and Loerzer on the decal sheet review we publish today. The five schemes supplied here are: Fokker D.VII F 460/18, Eric Just, Jasta 11, August 1918 (6 victories) Fokker D.VII F 501/18, “Red W”, Jasta 26, November 1918 Fokker D.VII F 4253/18, Ernst Udet, Jasta 4, September 1918 (62 victories) Fokker D.VII F 4330/18, Egon Koepsch?, Jasta 4, August 1918 (9 victories) Fokker D.VII F Karl Bolle, Jasta 2, November 1918 (36 victories) Conclusion Well, what else can I say? The possibility of building the D.VII I always wanted to do is now a reality in this fantastic, highly detailed, superbly engineered and high quality release. I really am in my element here. The parts breakdown is enough to keep the most ardent detail freak happy, and the almost rig-less subject should be enough to break-in a whole new generation of aspiring WW1 modeller. I can’t criticise this release in any way, and I currently wonder just how much better things can get from this point. Very highly recommended. Our sincere thanks to Wingnut Wings for the review sample used here. To purchase directly, click THIS link. Martin Philpott & James H

-
Wingnut Wings 1:32 Fokker D.VII F ‘Fighting Fokkers Part 5’
James H posted a topic in Aircraft Reviews
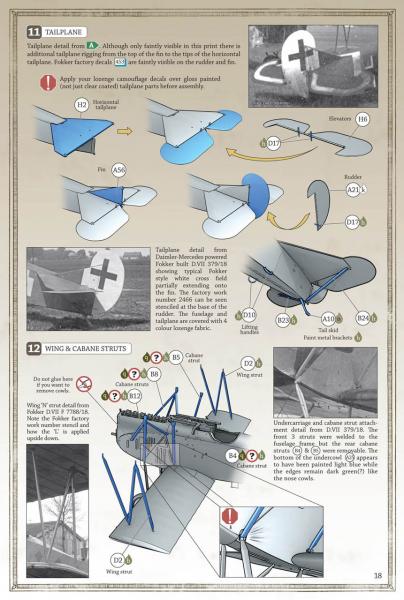
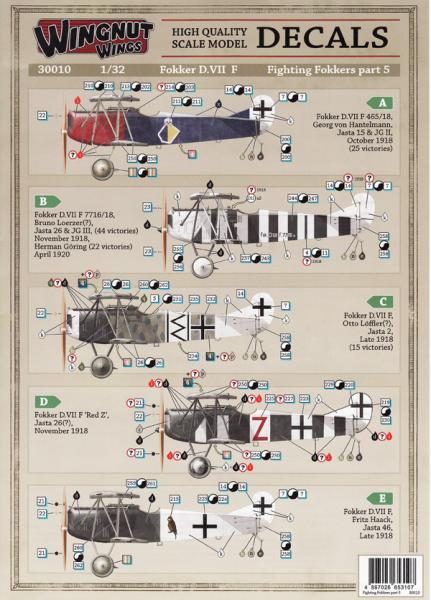
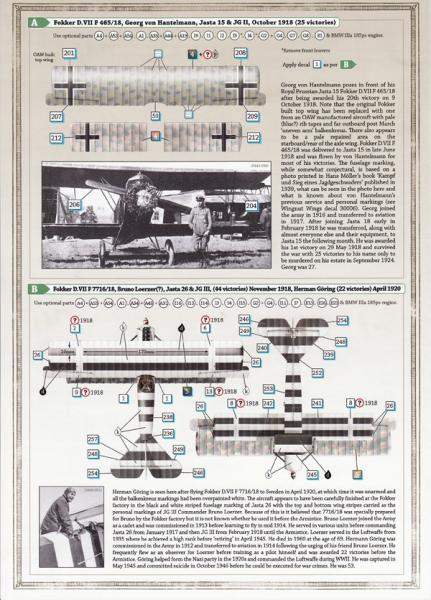
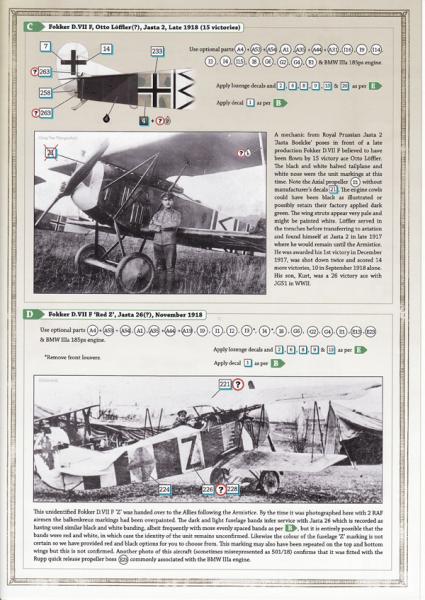
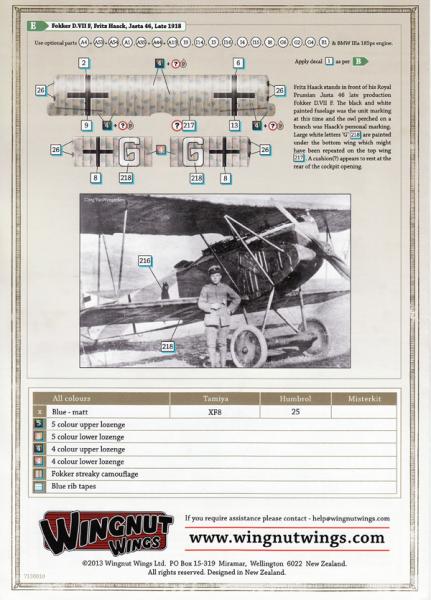
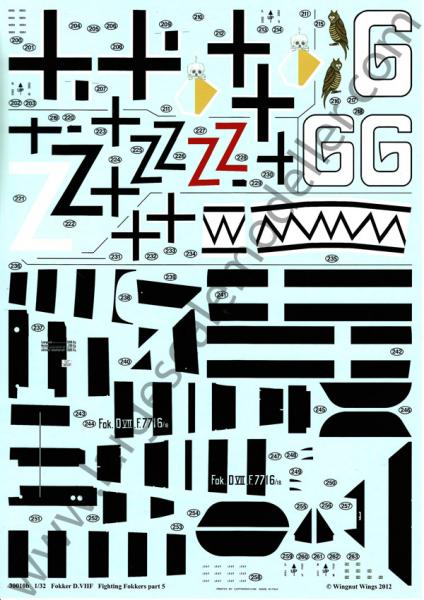
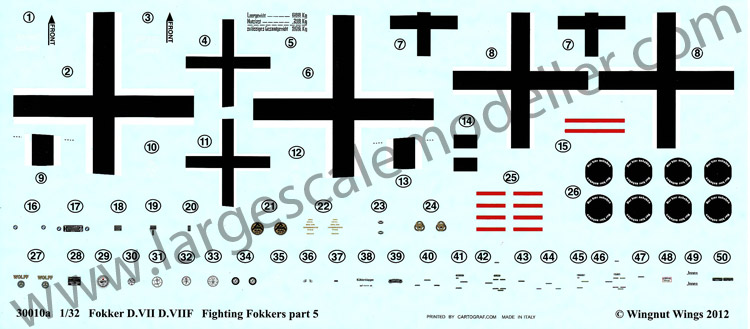
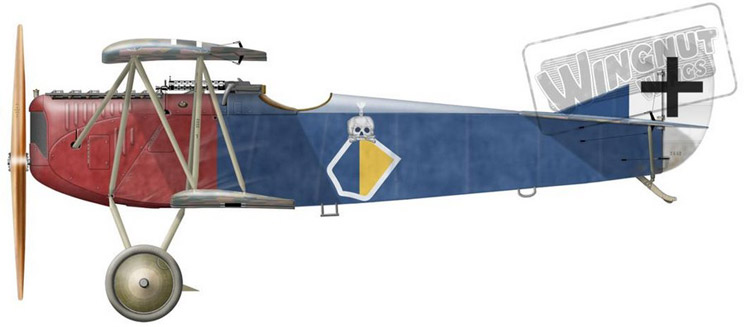
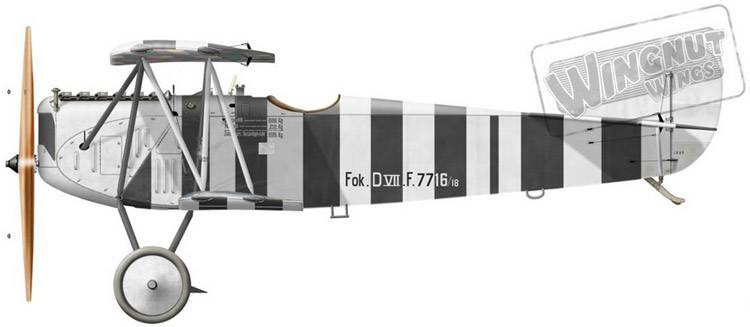
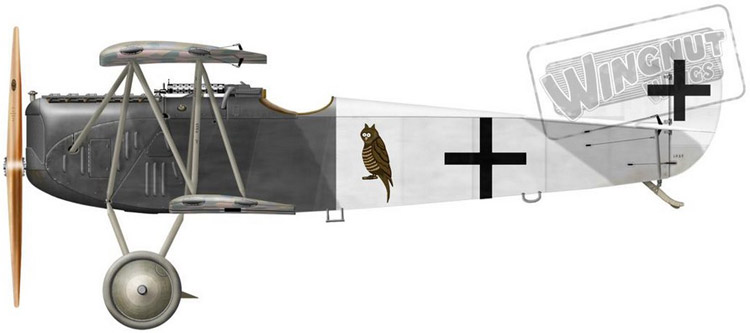
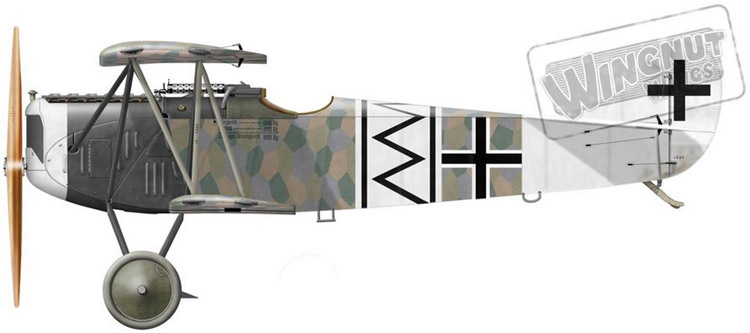
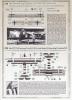
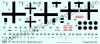
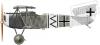
1:32 Fokker D.VII F ‘Fighting Fokkers Part 5’ Wingnut Wings Catalogue # 30010 Available from Wingnut Wings for $19.00 with FREE worldwide delivery Wingnut Wings don’t tend to release a new item by itself, and although this time we do in fact only have a single kit release, it is met by an accompanying new decal set, offering another FIVE schemes to add to the five in the regular kit release. The D.VII was most certainly one of the most colourful aircraft operated by the Idflieg, and the sheer number of schemes which are possible mean that you’d be building D.VII models forever and a day if you wished to dent them. Luckily, Wingnut Wings have done their research and brought us another set of attractive and varied schemes for their brand new kit, recently launched at the Omaka Air Show. This release contains TWO high quality decal sheets, printed by Cartograf. The larger sheet contains the various personal emblems, codes, motifs and also a large number of panel sections. The latter are designed to make some of the schemes with bands and shapes which roll around the fuselage, just that little bit more achievable. Of course, there are some wide expanses of clear carrier film here, but that it so thin as to not be of any real concern. Where serials and weight tables clash with these panels, then they are printed as part of that panel. It’s a great touch, and I like it very much. These various panels also have a number of indents and holes printed into them which coincide with the various control cable openings and fuel filler ports. It really is almost impossible to position these incorrectly with the way they have been designed. The second, smaller sheet contains the various national markings and whole extra set of stencils and instrument decals. The crosses contain holes for the control cables to pass through, and are split where they pass from the wing to the aileron, or from the fin to the rudder. Printing is first class, and the decals are quite thin too, with the colour being both solid and authentic, as well as being in perfect register. For some schemes, you will need to combine the supplied decals with the lozenge that is provided in the kit, or with extra decal sets available from Wingnut Wings, such as rib tapes, and the Fokker streaking decals (although to my knowledge, Wingnut Wings don’t actually sell this as a separate item yet – contact them for details). The instruction sheet has the five machine profiles printed on the front page, with colour reference given, as well as clear decal placement identification. Inside the instructions, and rolling onto the back page, the schemes are shown in various planform and sectional details, where appropriate, along with a history of the machine/pilot, and their fate. We all know what happened to Hermann Göring! Alongside each scheme, a period image of the aircraft is supplied, and a set of notes about which alternative parts are to be used for that specific machine. It is worth noting that the Goering machine isn't fitted with MGs due to its post-war status. The five schemes included with this release are: Fokker D.VII F 465/18, Georg von Hantelmann, Jasta 15 & JG II, October 1918 (25 victories) Fokker D.VII F 7716/18, Bruno Loerzer(?), Jasta 26 & JG III, (44 victories) November 1918, Hermann Göring (22 victories), April 1920. Fokker D.VII F Otto Löffler (?), Jasta 2, Late 1918 (15 victories) Fokker D.VII F, ‘Red Z’, Jasta 26 (?), November 1918 Fokker D.VII F, Fritz Haack, Jasta 46, Late 1918 Conclusion This decal set provides five very varied schemes for the brand new D.VII F kit, and I’m thinking that you might well need to purchase more than one D.VII F kit in order to cram some of these in. In this set, the Göring scheme really appeals to me because of the notoriety of the pilot, the excellent banded colours, over-painted balkenkreuz, and the fact no guns are carried. Truly an original. For those wanting something a little different, I’m sure there’s something here that will appeal. Very highly recommended. Our sincere thanks to Wingnut Wings for the review sample used here. To purchase directly, click THIS link.


-
I've sent them an email and notified them of our existence...
-
.......and he's OFF!! I have the FE.2b detail set, and it has that same style of IP, so it's good to see one built up. Great work so far. I know you'll not disappoint
-
I want this! http://www.inzpan.com/1_4_Fw_190_Cockpit_Kit_p/600001.htm
-
Wingnut Wing SE.5a Hisso WIP
James H replied to Jeroenveen1's topic in LSM 1/35 and Larger Work In Progress
Any interest? You kidding? I can't wait to see your work on this. You're right too. I don't think WNW would mold the brace wires internally now. I'm used to seeing provision to do this yourself on the later kits. You sure can see the way WNW were thinking and how they improved further though. Lovely work so far too. More superb wood graining. Interested to see how you'll tackle the monotone exterior. What scheme you doing? -
Prime? I don't do that Unless it's a bright colour I'm working with, such as the blue on my Pfalz fuselage. @ Martin: Glad you like them. They were both a joy to build.
-
Hi all, I did this kit on the back of the Bf 110C instrument panel I completed for the Messerschmitt GB, but this isn't part of that GB. I just built this for the hell of it. Great little kit, but maybe not quite as much fun for me as the 110 panel. Hope you like it:
-
I must be strong. My Gotha stays in the pile, for now. Got to be strong.............. Absolutely loving the work. In progress images at all?
-
WW1 generally tends to be smaller than the average WW2, with the exception of perhaps the Gotha, FE.2b, Junkers J.1 and Brisfit. I'm building the Pfalz D.IIIa at the moment, and it's a superb kit, with reasonably simple rig. I'd perhaps look at that one
-
WNW Albatros DV FINISHED !!!
James H replied to coolboxx's topic in LSM 1/35 and Larger Work In Progress
Hey Mike, you KNOW you want to.... -
Nice review Dave! Can't wait to see these on your ZM kit.
-
Parrot Express Focke-Wulf Fw 190D, JV44
James H replied to James H's topic in LSM 1/32 and Larger Aircraft Ready for Inspection
This was from my pre-impressionist days, before I really learned to plagiarise. -
WnW Fokker E.III (Immelmann)
James H replied to JeroenPeters's topic in LSM 1/35 and Larger Work In Progress
Oh Lord! And I already committed to a D.VII! Absolutely love this one. Probably the best Eindecker I've yet seen. -
AW Whitley Mk V, a journey
James H replied to Wingco57's topic in LSM 1/35 and Larger Work In Progress
Looking real good Cees. This is gonna be awesome! -
Cheers. These loz are a bitch!
-
Parrot Express Focke-Wulf Fw 190D, JV44
James H replied to James H's topic in LSM 1/35 and Larger Work In Progress
Probably one of my most enjoyable builds so far. -
All I got this last few days was this:
-
WnW Fokker E.III (Immelmann)
James H replied to JeroenPeters's topic in LSM 1/35 and Larger Work In Progress
Hey Jeroen.....come on, what do I display my Pfalz with? -
WnW Fokker E.III (Immelmann)
James H replied to JeroenPeters's topic in LSM 1/35 and Larger Work In Progress
Superb work! I don't know how he does it. He's always in the stables with a glass of vino! Save me that little cake please. -
You can build the kit perfectly well OOB, and you don't need the aftermarket sets. They are there should you wish to choose the etch/brass/resin route for your model. As with any other kit, you would usually buy these as extras. and with the ZM kit, this is no different. What i do think though is the base kit builds up well enough not to need the parts as such, as there is already some serious detail on offer. Here's my ZM He 219 cockpit....built from the box with the exception of the Radu seatbelts I used.