
Umlaufmotor
-
Posts
303 -
Joined
-
Last visited
Content Type
Profiles
Forums
Events
Gallery
Everything posted by Umlaufmotor
-
In the spring of 1918, the Balkenkreuz was replaced by the Eisernes Kreuz. Often the Balkenkreuz was painted over with a similar shade of the base color . In our case, WNW sets a light gray color. The kit decal Balkenkreuze " before 1918 " are cut precisely along the black contour. This is very important - so that the transparent carrier film is removed . This carrier film would be otherwise painted and distort the outer contour. Now, the decals are painted with a light gray color. When the paint has dried, the edges and the contour of the rib tapes are shaded with Tamiya "Smoke". Thereafter, the decals are applied to the correct position. Here in this case I used some " softening " Allow to dry and then fix it with gloss clear lacquer. I use to always clear Tamiya paint . When the paint has dried, the new Balkenkreuze be attached. Then seal with clear lacquer and then weathering - done. With this little trick, omitted taping and painting the old "Eisernes Kreuz". Servus Bertl
-
When viewing great models, I often asked myself the question: How does he do this? Well, unfortunately, I do not ever got a satisfactory answer. Often I was sent away at shows from the "masters" with the words: I will not tell my secrets to anyone. Frustrating, BIG frustrating. But.............Ok, remains just left everything to work out themselves. Easier said than done. But the direction is, carefully note the images in the data profiles, try to find original photos as many as possible. Every tiny detail counts in the images!! The excellent Windsock Datafiles, the Wingnut Wing webside, the vintage Aviator ore other diverse Websides. There is plenty of good material. So, now enough waffling. To anticipate, I'm not a fan of modeller mysteries and secrets. For this reason I would like to show you some of my techniques. Most of it is realy easy and simple. Often I just came Coincidentally at a good result. Try it if you like it - if it does not please you, then do not try. I am sure that many of you have their own method to represent faithfully a good model. It would be great if everyone would contribute to that, the "Hints and Tips" page would meet with life and sharing his secrets with us all. And please, be not angry with me because of my bad english - google translator.... So, finally to work. During the great war, it was common to repair passing shots in the wings with fabric. Many times these repairs were decorated with cockades, iron crosses and date, some times only with a piece of fabric. Original images give information. Here in this case, a run-down and battered Jasta 37 Pfalz D.IIIa. The original images are from the WNW-webside. I used leftover decals (Balkenkreuze) to represent the patches. The decals were painted with Gunze "Sail Color". Then sealed with glossy varnish. The position of the patches was marked with a pencil on the model. Well matched pieces are cut out of the decals. The painted decals behave just like normal decals. The repair patches are now attached to the positions as shown on the original image. After the decals are in place , leave to dry thoroughly. Do not forget the underside of the wing also needs to be repaired! Then seal with clear lacquer. Now some weathering - done. Looks convincing , does it? Servus Bertl
-
Hansa Brandenburg W.29
Umlaufmotor replied to Umlaufmotor's topic in LSM 1/35 and Larger Work In Progress
Thank you, Francesco - but with only one selling book, I can not eat my fill. Thank you, Martin. I always use usually a mixture of about 50% Mr. Metal primer and 50% Mr Color Thinner. Several thin layers of paint after another. Tamiya clear works also good, but the primer can be paint thinner. Thank you, Jeroen. Please try it, it's a very easy and simple method. Servus Bertl -
Hansa Brandenburg W.29
Umlaufmotor replied to Umlaufmotor's topic in LSM 1/35 and Larger Work In Progress
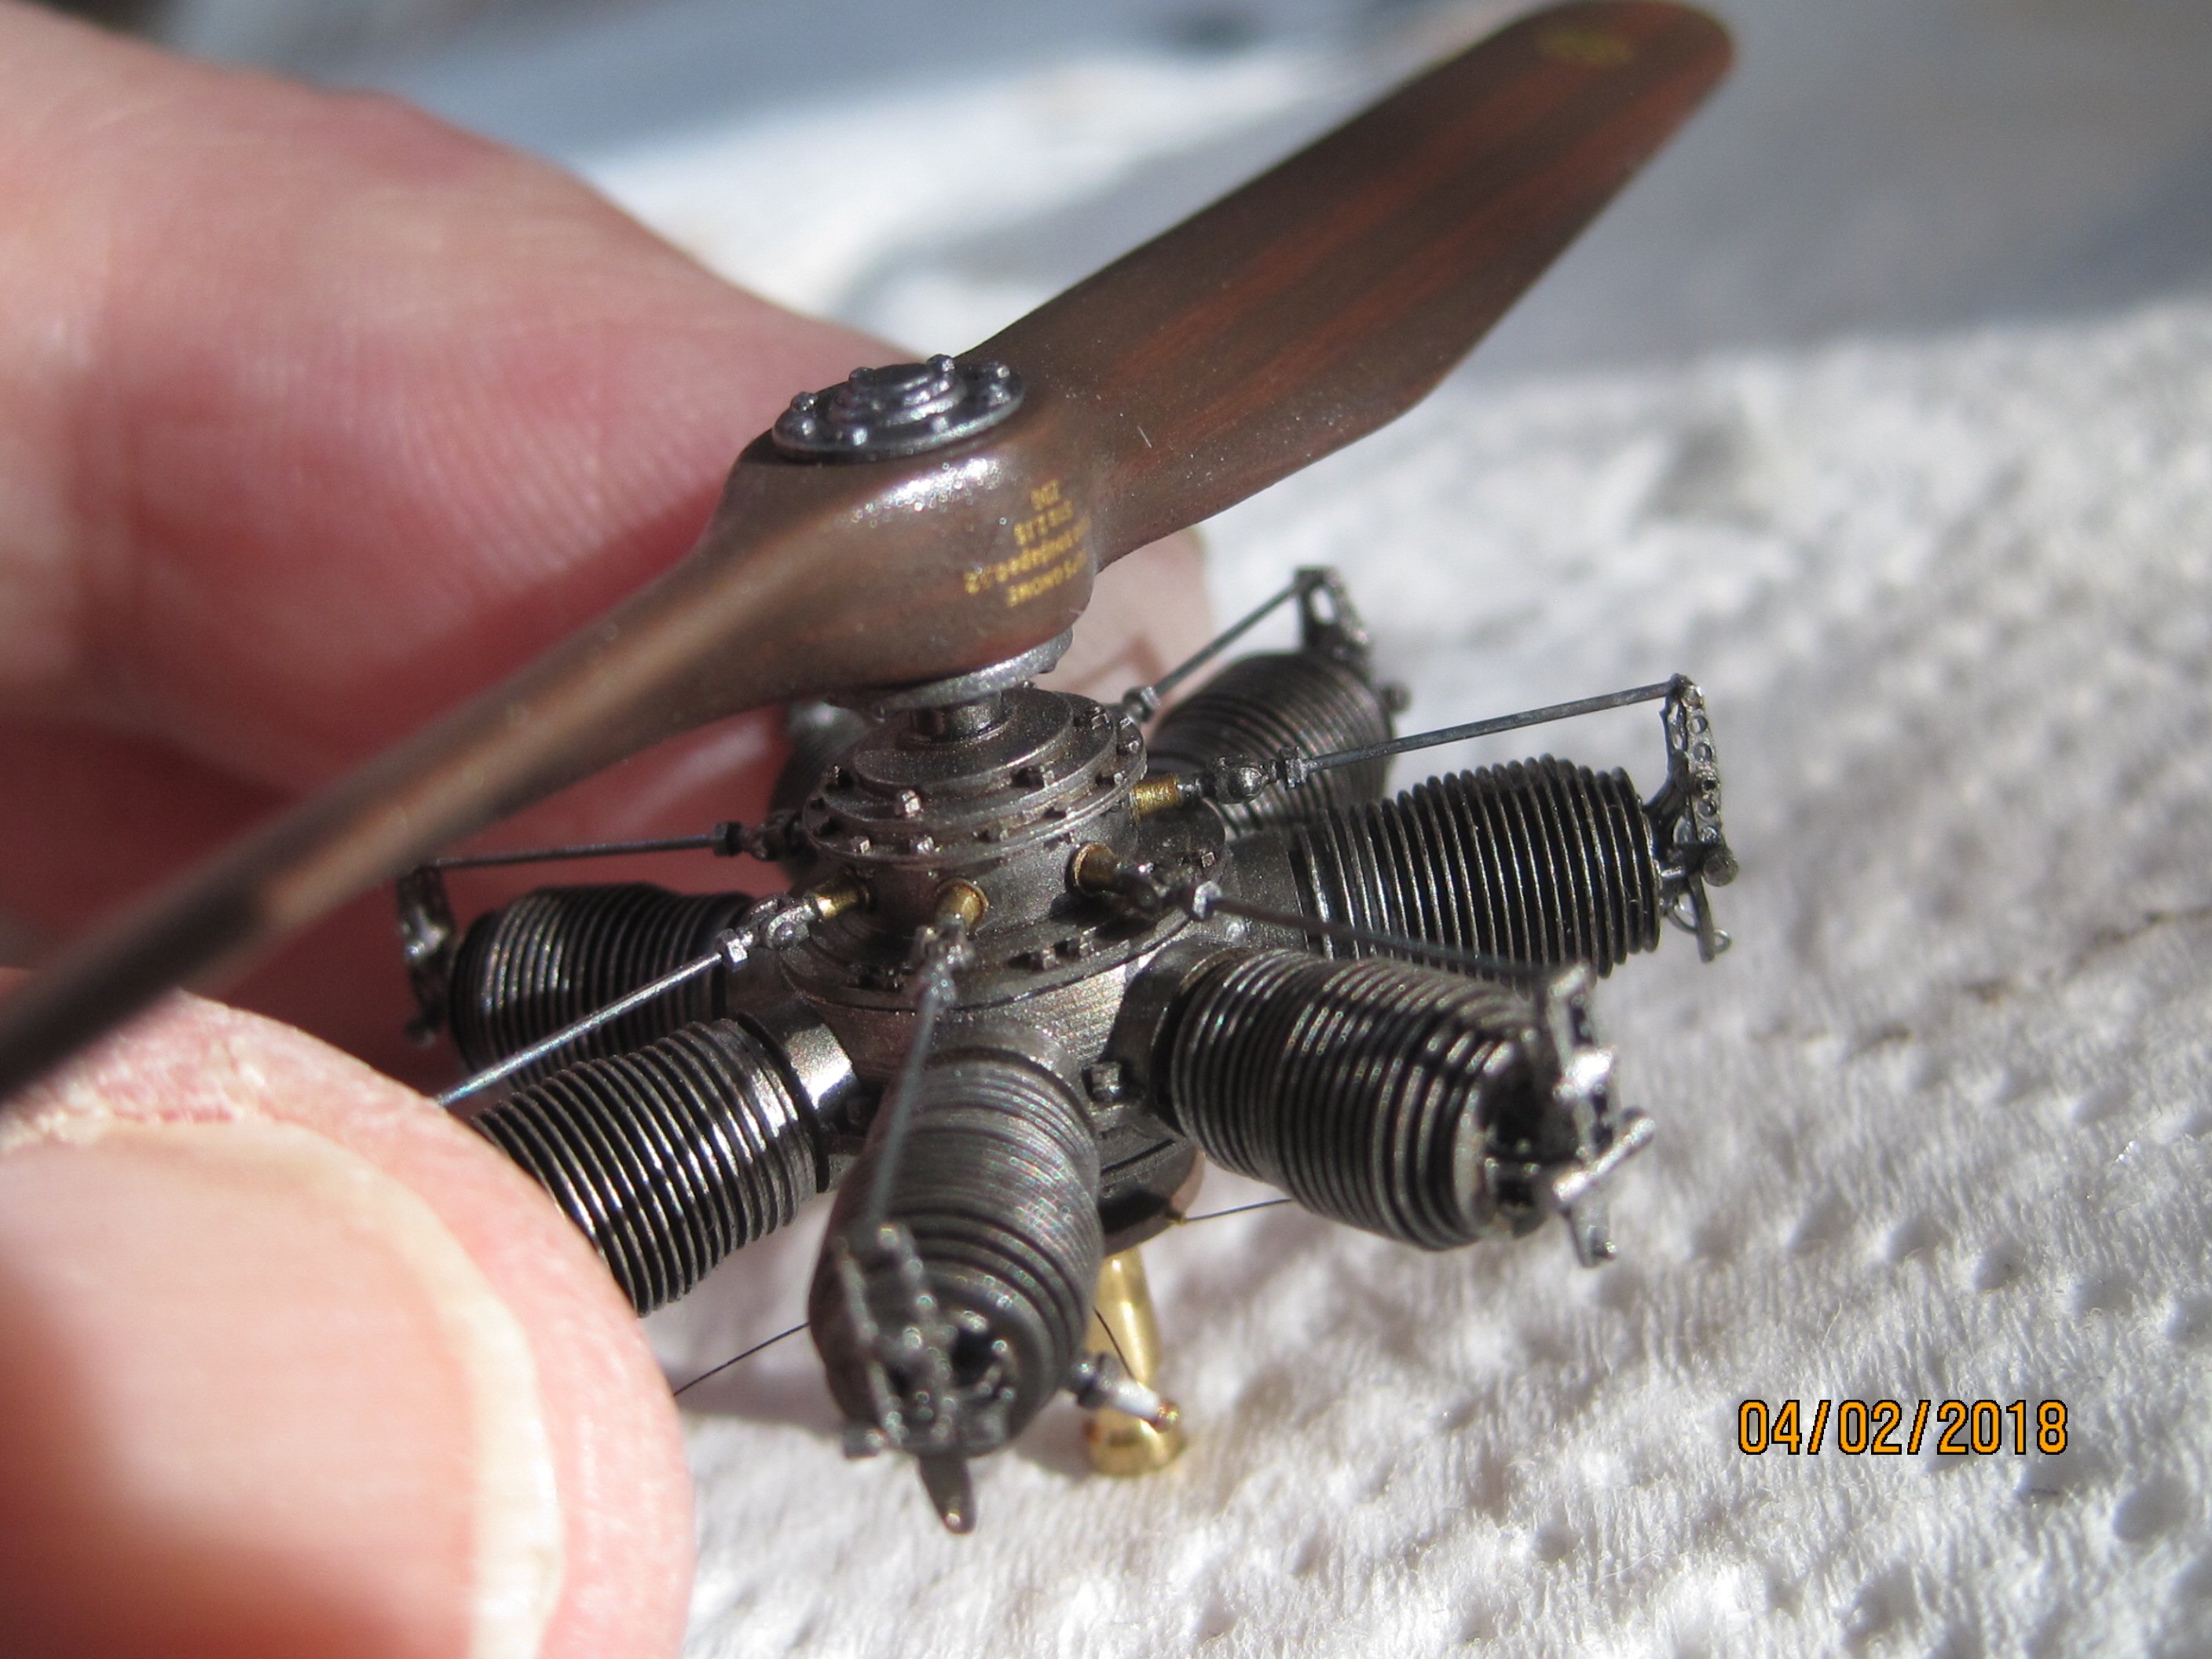
Many many thanks to all of you for the applause. Here are some pictures of my attempt to represent the aluminum skin. I use always Mr. Metal Color (polish color) for that. First, a thin layer Mr. Metal Primer is applied as a primer. Thereafter, the aluminum shade is painted. Allow to dry this color. NOT polish. Now applied irregular spots Mr. Metal Color "Iron" with an old short-haired brush . To vary the effect, you can be painted smaller spots with "stainless". Leave to dry the paint. After being polished with the short-haired brush. The brush is moved in rotation. Please do not press to hard with the brush, otherwise too much paint is polished away. The different effect in different lighting conditions is not to be overlooked. Attention, Important! After polishing must be sealed with high-gloss clear coat, NEVER with matt varnish. Servus Bertl -
Yeah, the Floh - a really crazy plane ...................- but,..............why not? Servus Bertl
-
Hansa Brandenburg W.29
Umlaufmotor replied to Umlaufmotor's topic in LSM 1/35 and Larger Work In Progress
Of course, both front MG's were also detailed. Kitpart's, brass tubes, a little scratch-work .........- ready. The most interesting challenge: The weapons numbers. Written with a thin pencil.................................................... ..................................Yeah, I know - that's pretty stupid. Servus Bertl -
Hansa Brandenburg W.29
Umlaufmotor replied to Umlaufmotor's topic in LSM 1/35 and Larger Work In Progress
Thank you all very very much for your kind comments. I am very happy that you like this work. The following pictures show the detail work on the observer MG. This work is a mix of the beautiful parts of the kit, the master model company and a little scratch work. The scope consists of the kit parts, brass tube and plastic waste. I used a simple piece of a clear plastic rod and a drop of Tamiya "clear yellow" to represent the eyepiece. Servus Bertl -
A few "furnishings" of the cockpit. Servus Bertl
-
Here is a simple but effective way to make the tubular frame at the rudder visible under the fabric cover. First, the rudder is painted with Gunze "Sail Color". Then paint the tubular structure with a black pen. Thereafter, it is painted with highly diluted "Sail Color". !!Not too much paint, the black tube frame must remain visible!! The decals are applied. Next, Decals are sealed with Tamiya clear coat. With fine steel wool you can polished in a fine fabric structure, ---- this is clearly visible in the reflection of light. Servus Bertl
-
Well, I must say --- not necessarily a model for me, but I know that many of us have long been waiting for. ................... I'm waiting for the Christmas surprise.......................Halberstadt CL.II? Thanks to Francisco, by the way. Servus Bertl
-
How could I forget it: .................. Rumpler 6B1 Servus Bertl
-
A very simple way to represent the fabric back wall....................... - paper! A Gunze Sail-color painted paper. Thereafter, polishing the fabric structure with fine steel wool into the painted paper. Crumple and wrinkled the paper and glued - done. Servus Bertl
-
This fuselage and engine looks superb, absolutely convincing in my eyes Servus Bertl
-
Hello everyone, thank you for your kind comments. Here are some pictures from the cockpit ...................... long time ago that was built. Here you can see - inside the cockpit on the ground floor -, the two turnbuckles of the rigging cable from the landing gear . Servus Bertl
-
Pfalz D.IIIa, Jasta 37
Umlaufmotor replied to Umlaufmotor's topic in WNW and WW1 Ready for Inspection'
here continue: [/url] Servus Bertl -
Pfalz D.IIIa, Jasta 37
Umlaufmotor replied to Umlaufmotor's topic in WNW and WW1 Ready for Inspection'
The right side of the rudder: -
Pfalz D.IIIa, Jasta 37
Umlaufmotor replied to Umlaufmotor's topic in WNW and WW1 Ready for Inspection'
Thank you Martin and Jamme Here is my attempt to present the rudder with its various layers of paint and dirt. Close to the original as possible was my target for myself: Servus Bertl -
Pfalz D.IIIa, Jasta 37
Umlaufmotor replied to Umlaufmotor's topic in WNW and WW1 Ready for Inspection'
The Tailskid with "rubber cord": Servus Bertl -
Pfalz D.IIIa, Jasta 37
Umlaufmotor replied to Umlaufmotor's topic in WNW and WW1 Ready for Inspection'
"Making of" of the working fuel-airpump: Servus Bertl -
Pfalz D.IIIa, Jasta 37
Umlaufmotor replied to Umlaufmotor's topic in WNW and WW1 Ready for Inspection'
Thank you so much for the flowers, friends! @dino.flyer Your wrong! According to Geneva Convention shrink rays are no longer prohibited. Except for commercial purposes. But believe me, these shrink rays are not working. I've tried it on our German Chancellor ...................... no success. Quite the opposite has occurred. Here are some "Pfalz in progress" pictures: "Making of" of the seat cushion. Servus Bertl -
In work since ........................ ? Completion ........................?
-
In work since ........................ ? Completion ........................? Servus Bertl
-
Albatros D.I Albatros D.II Albatros D.III Albatros D.III OEFFAG Albatros W.4 Albatros C.III Halberstadt CL.II Halberstadt CL.IV Roland C.II Walfisch Hansa Brandenburg W.12 Rumpler D.I Dornier D.I Junkers D.I Pfalz E.I/E.II/E.IV Pfalz D.III Pfalz D.VIII Friedrichshafen FF33 SiemensSchuckert D.III/D.IV Fokker F.1/Dr.1 Fokker E.V/D.VIII .............................................................................
-
Pfalz D.IIIa, Jasta 37
Umlaufmotor replied to Umlaufmotor's topic in WNW and WW1 Ready for Inspection'
Part two And yes, I'm a absolutely Wingnut fan Servus Bertl -
Hello, here are pictures of my Wingnut Wings Pfalz D.IIIa of Jasta 37 It's early November 1918, -- this aircraft has its best time behind itself. Run down, dirty and tattered it does now service in a Jasta school. The original images are from the WNW webside Servus Bertl