

PAnderson
-
Posts
285 -
Joined
-
Last visited
Content Type
Profiles
Forums
Events
Gallery
Everything posted by PAnderson
-
Well, since this is a large scale modelling site, and we all like the idea of 3D printing, here is the ultimate modelling. And now, for something completely different. http://wonderfulengineering.com/this-giant-3d-printer-will-print-your-house-in-24-hours/
-
 Raising the gun off the ground naturally slackened the tracks and the suspension, no weight on them. The turnbuckles were used to lift the bottom of the tracks to keep them from dragging. my take on it anyway. The instructions are wrong.
 -
This is "LARGE" scale modellor after all.
-
Actually Matt, it has quite a few.pin marks. I deal with it. The molding is really good though. Very little flash but the pin marks are pain. It doesn't have as many as Nige's build. Not looking forward to that.
-
Thanks guys
-
OK, I know this isn't armor in the usual sense but bear with me. This locomotive will be couple with Trumpeter's Morser Karl and a couple of livery cars with anti-aircraft protection. Can't have a Morser without protection can we? I am glad I didn't start the Morser first, I would have horned in on Nige's build. Mine will come next. Excited to some of this different stuff on our fine forum. OK, Here is what constitutes my train. 2 of these, loaded with anti-aircraft guns and other sundries. and enough of this to hold it all Here is the scheme I am after. I also have ALL of the photo etch from Eduard, 4 sets. Some of this is pretty useless, for me anyway. I will use as much as my fingers can handle. Some is totally unneeded, like in the cabin. Here is where it is at. When I started this, I wasn't going to post it. I saw Niges build and said "why not". I asked James H. if I could post it and he said OK, if I could tie it into a full armor build. No paint on any of this until I get all the sub-assemblies built. Not sure how to paint this so it will wait until I see some progress on how this thing goes together. This next shot is not assembled. I didn't like the molded on piping, so I cut it off and added brass wire and nuts. I finished the floor and the roof of the cab above. Next is some primer on some other objects. Red oxide primer on everything. For those of us in the states, I find Rustoleum's acrylic primer to be very satisfactory for my needs. White, grey, black and this red oxide color. The wood parts(real wood) are for the slats around the coal tub. And lastly, here is the body of the tender in finished color. Eventually, I will end up with something like this. That's all for now. I hope you like it. Paul
-
What I just got. I have been wanting a Meng model a long time. Then I bought this. And after my jaw hit the floor........well, what can I say. This kit is fabulous. I think I will have to get that bulldozer now.
-
There are even pics of a 1/6 floating around on the net. Still, this will be epic. I have longed for one of those, but reason always got the best of me. Not to mention lack of funds.
-
Make a nice diorama with your Morser-Karl. Gotta watch this.
-
Bf 110 Schemes.... I can't Bloody Choose... Help!!
PAnderson replied to Dave J's topic in Modelling Discussion
Option #2 for me. You could build 4 you know. On your lunch hour. Paul -
Rick, I am not an expert on soldering but you may need to be very careful with the white metal. I do know there are several "grades" concerning melting point. Some may not withstand soldering temps. Try it first on a an un-needed part or a bit of sprue if possible. Paul
-
Imcth 1:32 Desktop Zero and Extra Accessories
PAnderson replied to JayDee's topic in Aircraft Reviews
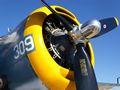
Way to go James, beautiful review. Beautiful kit also. Since I have this one, I can certainly attest to the overall quality. These kits are absolutely amazing and worth every penny. You have to see it with your own eyes to understand. The white metal castings are flawless as James describes and builds up into breathtaking realism. Here is a pic of the P-51 engine parts (some) before assembly. And one of the built painted engine before detailing. Like I said, worth every penny. Great review James!!! -
Way cool Rick, wonderful work. I love this scheme and your weathering is off the charts. Is the Rufe being spoken of the one in FSM? Paul
- 20 replies
-
- 1
-

-
- Eric Hartmann
- Bf109G6
- (and 1 more)
-
Loved the photos of the mold. thanks. being an ex-mold maker, that was inspiring. Paul
-
Yes, if your really ambitious, each Karl had 2 Fahrgestells for munition support. Quite an undertaking if you ask me. Paul
-
OMG, I haven't looked in that box for a while. What an epic build this will be. Totally out of the ordinary, fits right in here if you ask me. I started the Br-52 and that is another complex kit so far. That Morser-Karl looks like it will be difficult to paint, meaning what order to paint everything. What scheme are you planning for this by the way? Paul
-
I will be watching wit great interest. I have this also and will build mine with the Trumpeter Br-52 Locomotive, which has already been started. Nice to see something like this on LSM. Paul
-
1/32 IMCTH Desktop Mustang
PAnderson replied to PAnderson's topic in LSM 1/35 and Larger Work In Progress
Damn, it sure has been long enough. Time for an update. My apologies for not post this sooner but time has been my enemy. Or so it seems. Here is an update to the 1/32 Desktop Mustang. The wings are half done but took a break from the fiddly bits of the spars and the inefficiency of CA on this kind of build. No other choice really but trying to find an easier method of application seeing you need 4 hands for this thing, LOL. So I took a breather from the wings and decided to do the cockpit section. I painted the cockpit from some reference, mainly Tamiya's 1/32 P-51 kit instructions, since I will be building that also to sit next to this. So, without further ado, here are some shots from the cockpit section. The fit on all of this is amazing, just a pin being a new medium to learn. Sorry about the focus on some of the pics, I like modelling more than picture taking. ) All the tabs and location point are so well engineered, this kit is amazing. But it is not plastic, takes some getting used too. As you see the cockpit, this will be how the entire plane will get painted. Internal details only, for the most part. I also bought the Desktop Zero and will get the Me-109 later this year. Hope you all enjoy these. I will post more as I build. Next? To finish the wings. Happy New Year, Paul -
Aaron, I wonder if these might help too. These are finger drills which, for me, offer a lot more control and get into tighter places. I have a complete set of these. I prefer these to a Dremel mounted drill by a long shot. http://www.micromark.com/finger-drills-74-80-set-of-4,7285.html Paul
-
I could really use some "hands on" advice............
PAnderson replied to olfogey's topic in Modelling Discussion
Jim, Keep at it Jim, even try that WNW kit you have. I got back into modelling about 15 years ago because I liked it and missed it. But it more importantly became therapy for me too. My eyesight isn't what it used to be either. I can see long distance just fine but close up requires mega magnification. I use an Opti-Visor with interchangeable lenses along with reading glasses. More importantly, I take medication for seizures that makes my hands shake. So, modelling becomes therapy. I build nothing smaller than 1/32 and I was afraid to try a WNW kit after seeing the first one I bought. Did it anyway. And the rigging. It took longer but came out pretty good. This therapy is also good for my job as a machinist/machine technician. And my job is also good for my hobbies. Stick with it and prepare. I know for a fact that it works to help steady the nerves. Use good lighting like previously mentioned. Another good idea is to play music that you like. Use your hobby as a therapy. More people do it for that reason than you might think. Most of all, do not give up. I now have 13 WNW kits in my stash and will buy more. That 1/16 Camel you have sounds perfect. I have that also. Here is a little inspiration. http://forum.largescalemodeller.com/topic/648-fokker-dviialb-is-done/ Keep on plugging, Paul -
The best one out there is the Opti-Visor. It's what I use. You can also get different magnifiers for it. Flips up and down. I use it with a pair of reading glasses for extra "ooomph". I can see at the atomic level. LOL. Paul
-
Awesome review Jim, simply one of the best you have done. I am building this kit right now and can attest to the beauty of this kit. Everything was thought out engineering wise and even though it is a very complex kit, it is easy to build if you are patient and take your time. New skills need to be learned on this kit but well worth the time and effort. The result will be a showpiece for anyone's collection. I do plan on doing Tamiya's 1/32 P-51 to display along side this kit and will paint the interiors alike. No wing skins on this baby. Paul
-
Way to go Jeroen! That is the most lovely build I have seen to date. The detail and color jump off the page. Seriously dude, you can't imagine anything better than that. Paul
-
1/32 IMCTH Desktop Mustang
PAnderson replied to PAnderson's topic in LSM 1/35 and Larger Work In Progress
I am also looking for some detail shots of P-51 engines, painted as installed. If anyone knows a source, could you please post some links Thanks! Paul -
1/32 IMCTH Desktop Mustang
PAnderson replied to PAnderson's topic in LSM 1/35 and Larger Work In Progress
Hello again. As promised, here are some shots of the Merlin engine from this damn awesome kit. The bare metal shots are of the finished engine primed with Tamiya Metal Primer. The others are shots of the painted engine minus detail painting, yet to come would like to get some decals of 1/32 "Rolls Royce" to adorn the valve covers. Any body know of a source? Next will be pics of the wing assembly once I get the left wing to the same stage in building as the right wing. Enjoy Paul