rverissimo
-
Posts
147 -
Joined
-
Last visited
Content Type
Profiles
Forums
Events
Gallery
Everything posted by rverissimo
-
Thanks !
-

1:72 AZ Model Mig-17PF - another one off the bench!
rverissimo replied to rverissimo's topic in Non LSM Ready for Inspection.
Thanks Kevin! it was very satisfying having this one completed! Now next Hangar Queen! Have a nice 2025! -
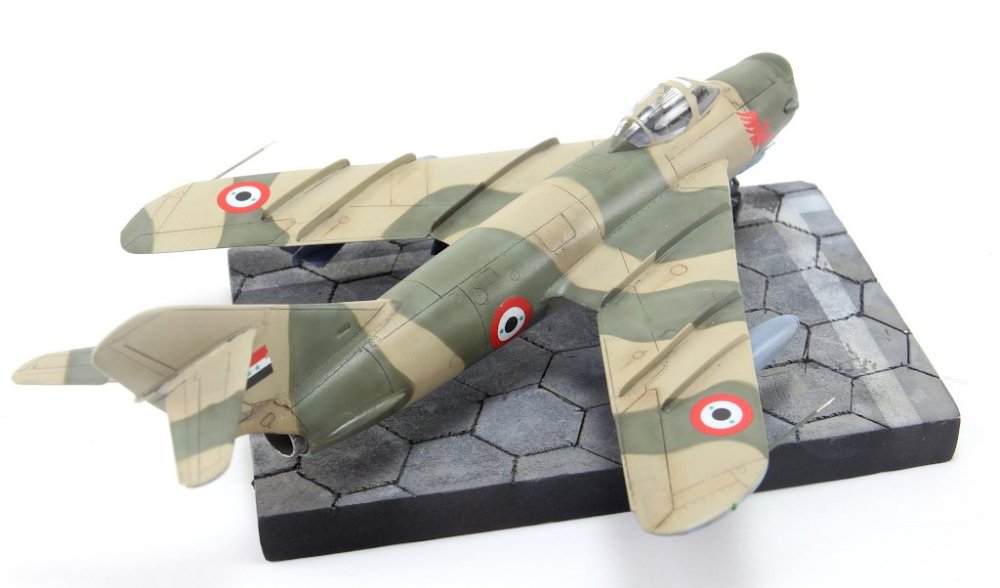
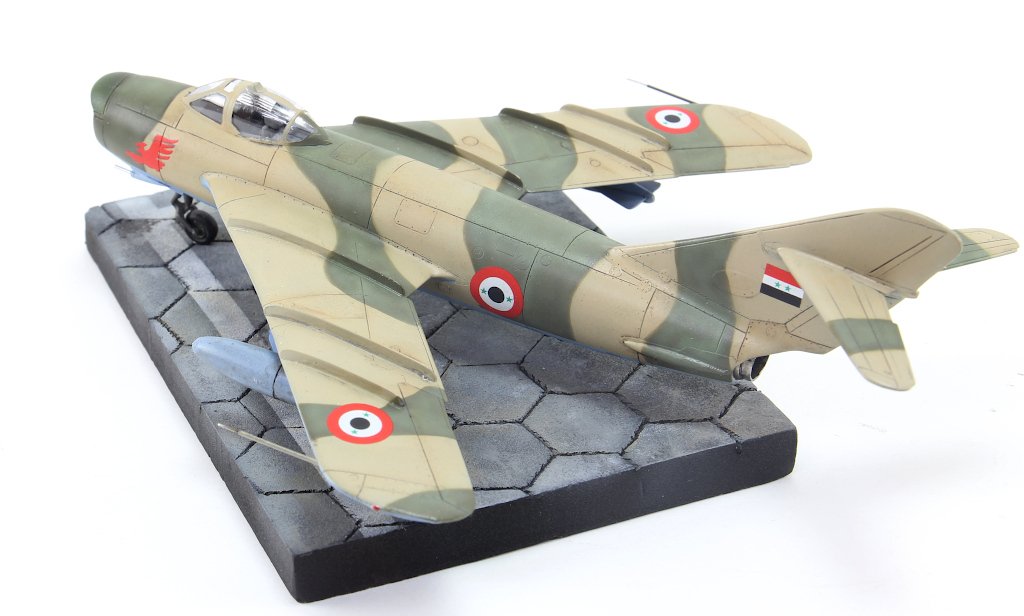
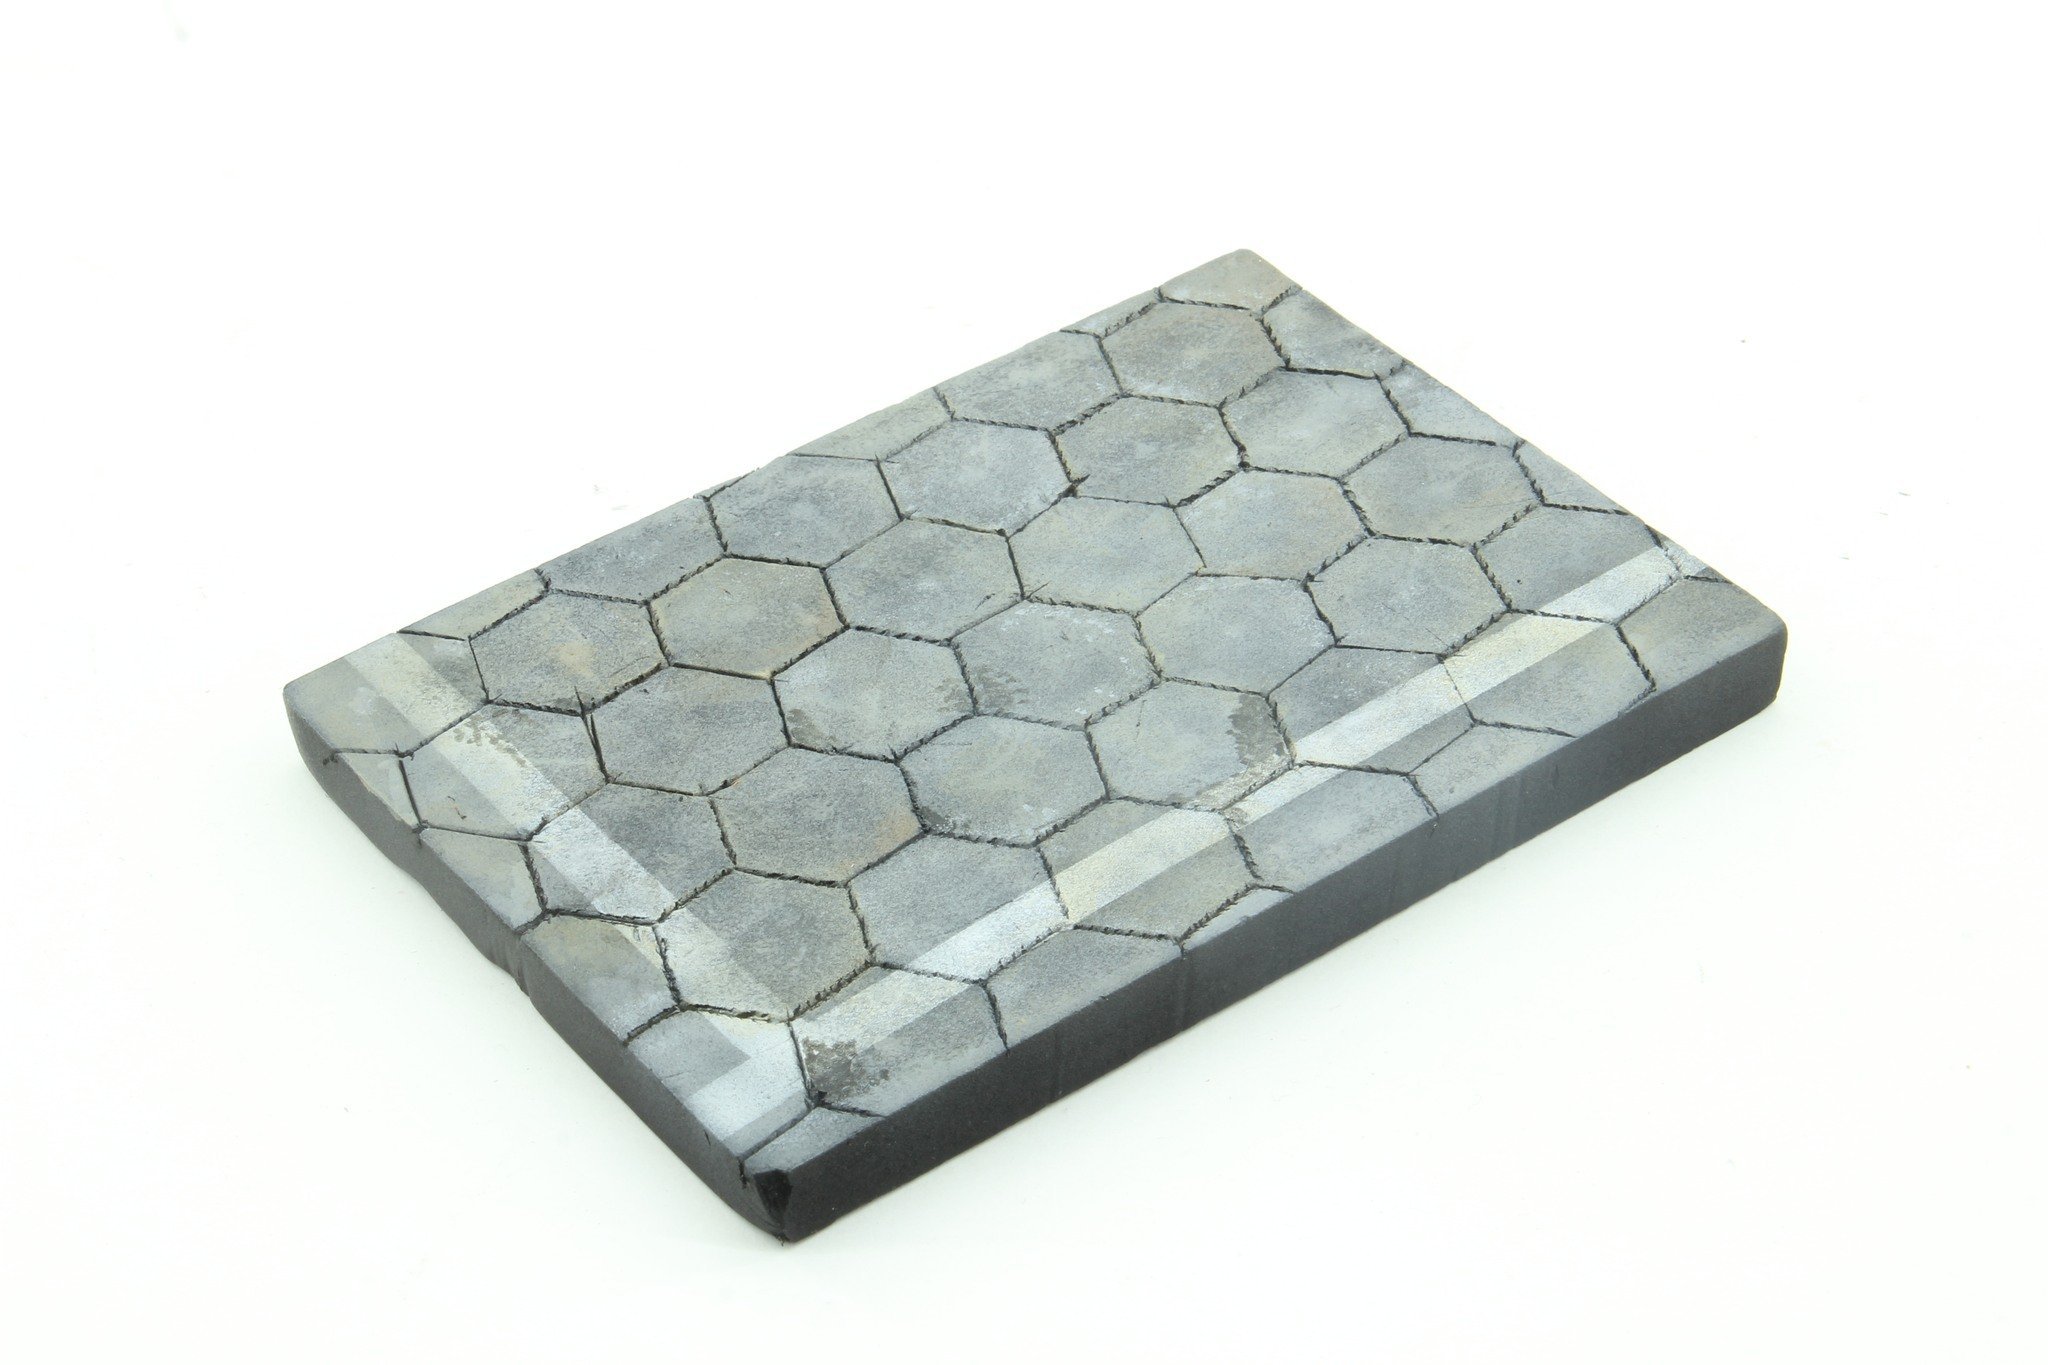
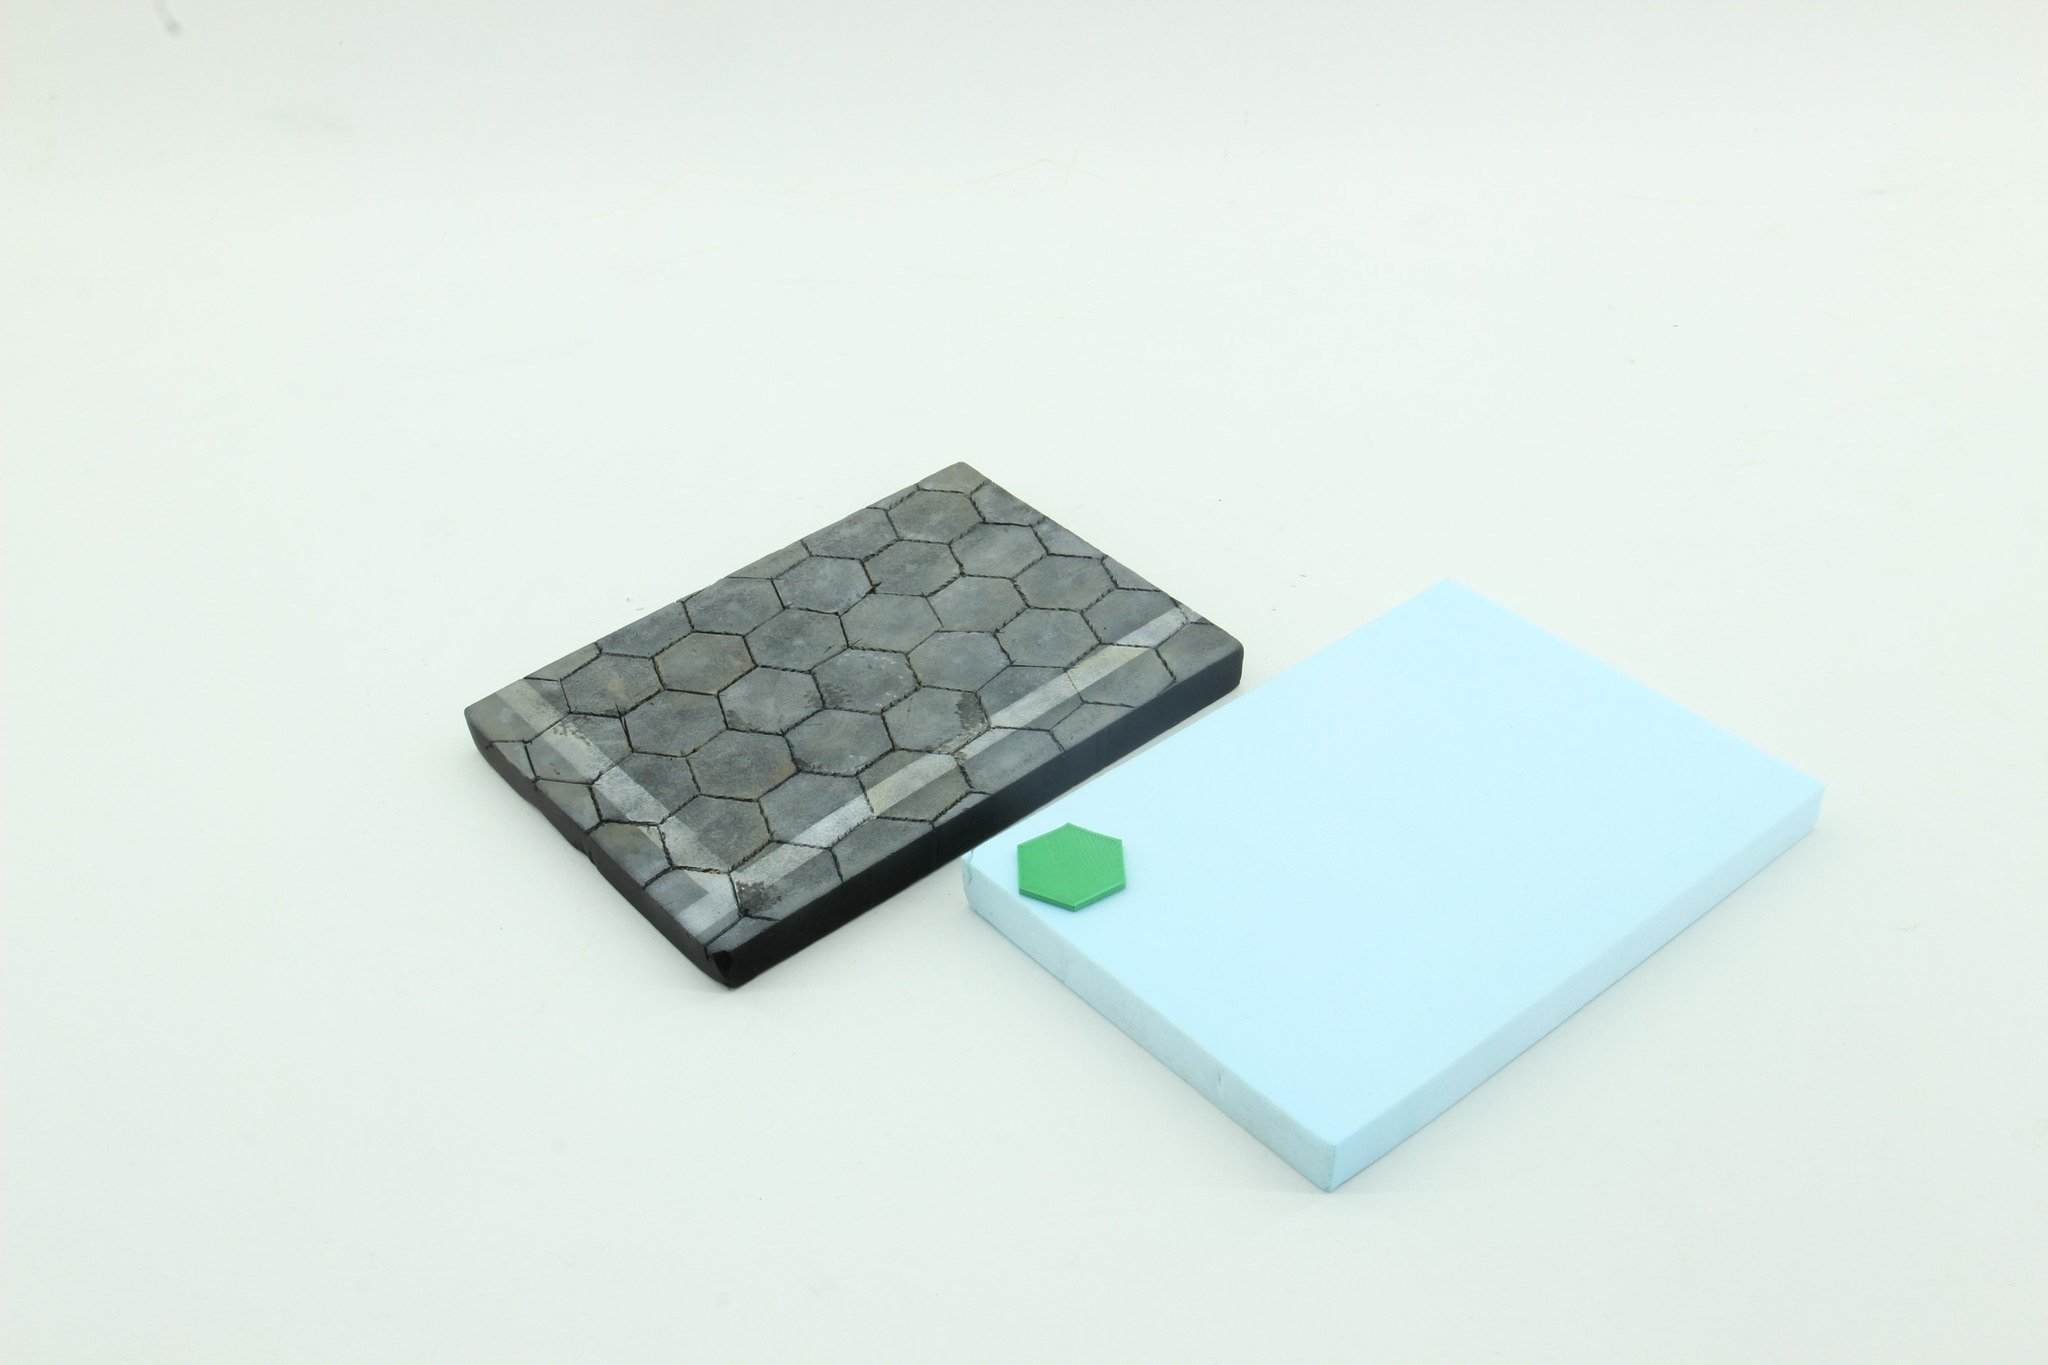
hi all! 2024 it was a very good modelling year for me and for my backlog models I was able to finish 4 hangar queens ! This is the last one! 1:72 AZ model Mig17PF on Egypt AF colours! The model is a very difficult model to build, make no doubts of that, but despite of that it has very good details ( some of them i had to rescrive them). As if that was not enough, i cracked the front windshield and lost one of the main landing gears . A good friend of mine help me handing me a mig-17 PF from SMER. So i was able to adapt the canopy and the main gears from SMER on the AZ models airframe. It was not perfect, but it was done. the Pitot tubes ( that on the kit are very chunky and offscale ) so i replace them with 2 diameter needles trimmed to fit inside one of other). the colours used were from AK real colour (for the sand), for the underside blue, gunze and the green is a raf green from Tamiya ( sorry guys, did not wrote the exact colous). the weathering was achieved using lighter and darker tones of the base colours to create patches and beaten up camouflage. panel weathering was made with oil colours. The decals were a positive aspect of the model and performed flawless with the help of microset / microsol system. Used several light layers of vallejo matt varnish thinned with airbrush thinner from the same brand. the base was a piece of roofmate cut and carved with a template that i draw and printed in my 3D printer to replicate the typical soviet airfields slabs used . Painting and weathering was achieved using vallejo acrylic range. I'm happy to finish the model, it has some errors but it's done! thanks for watching! have a nice 2025!


-
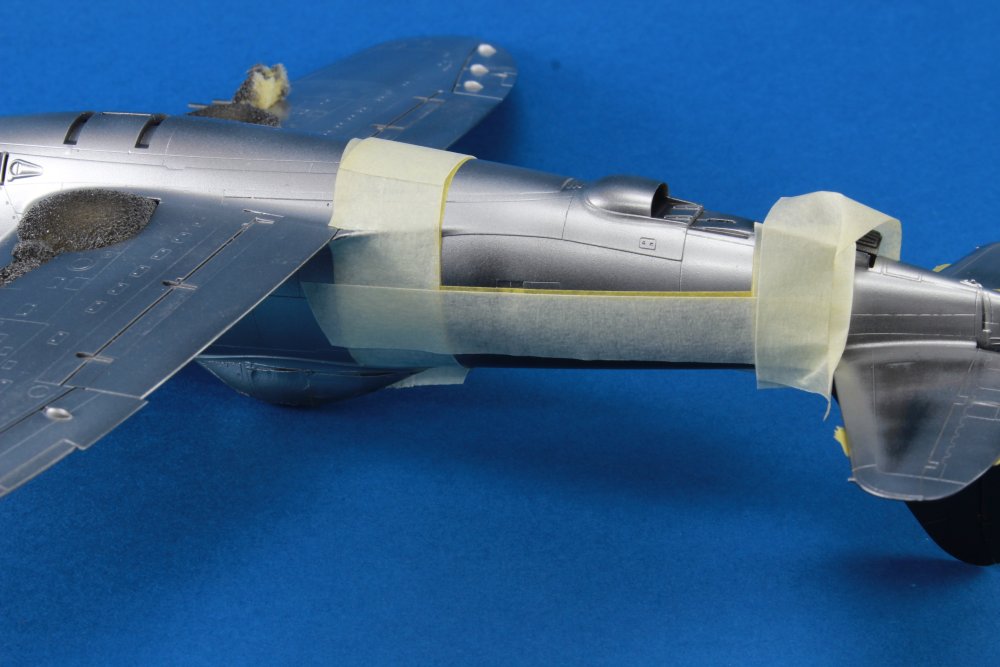
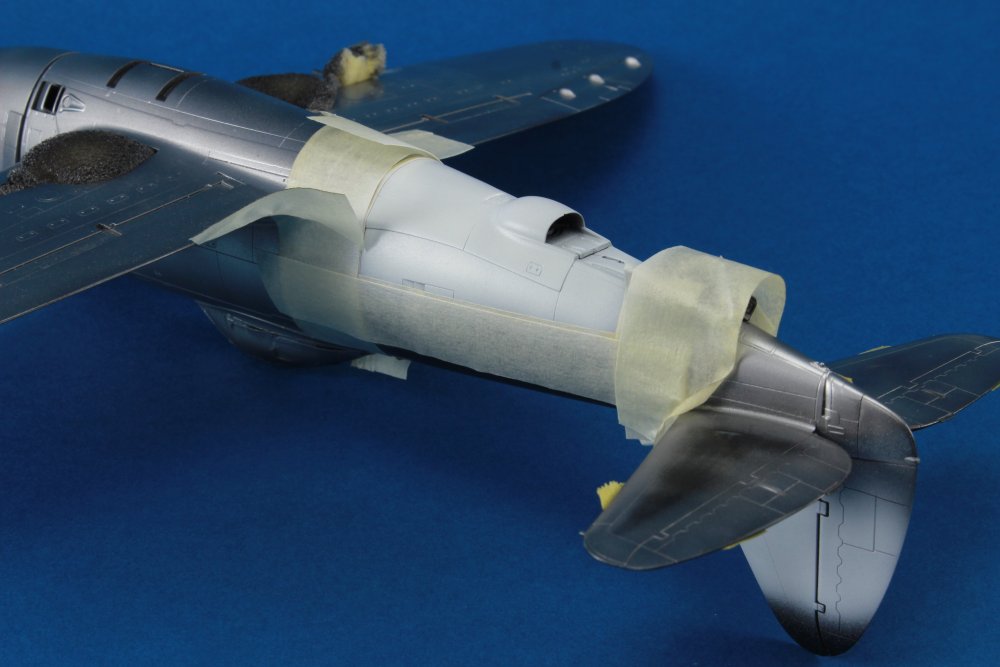
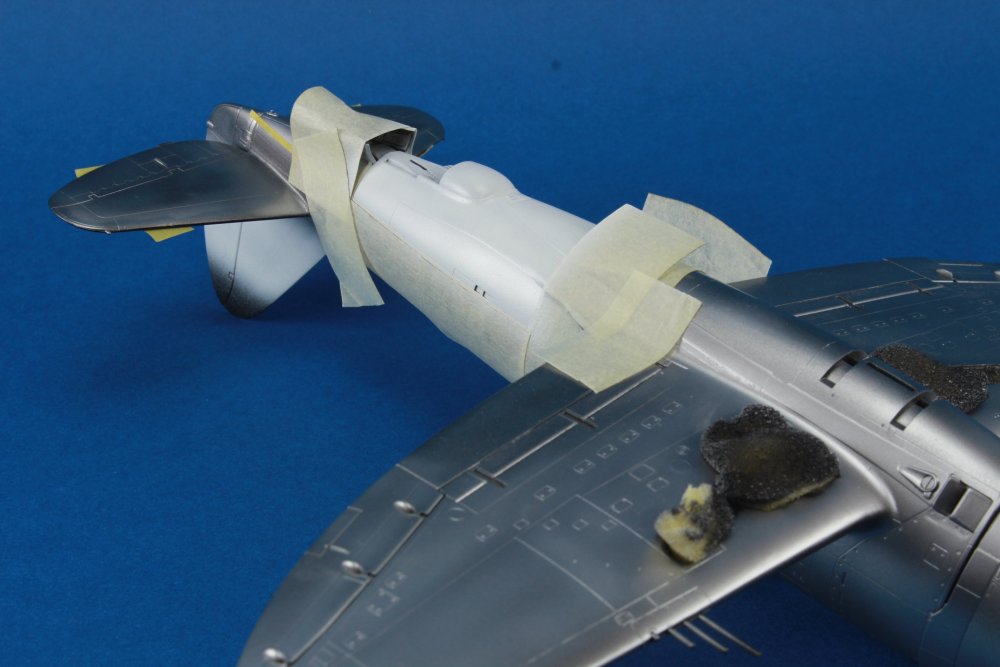
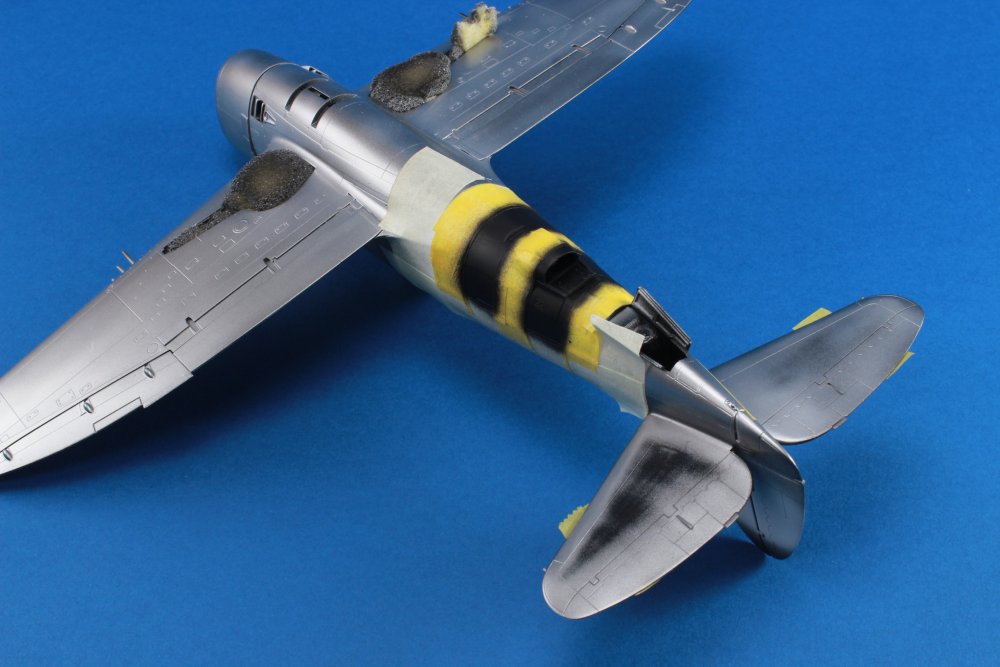
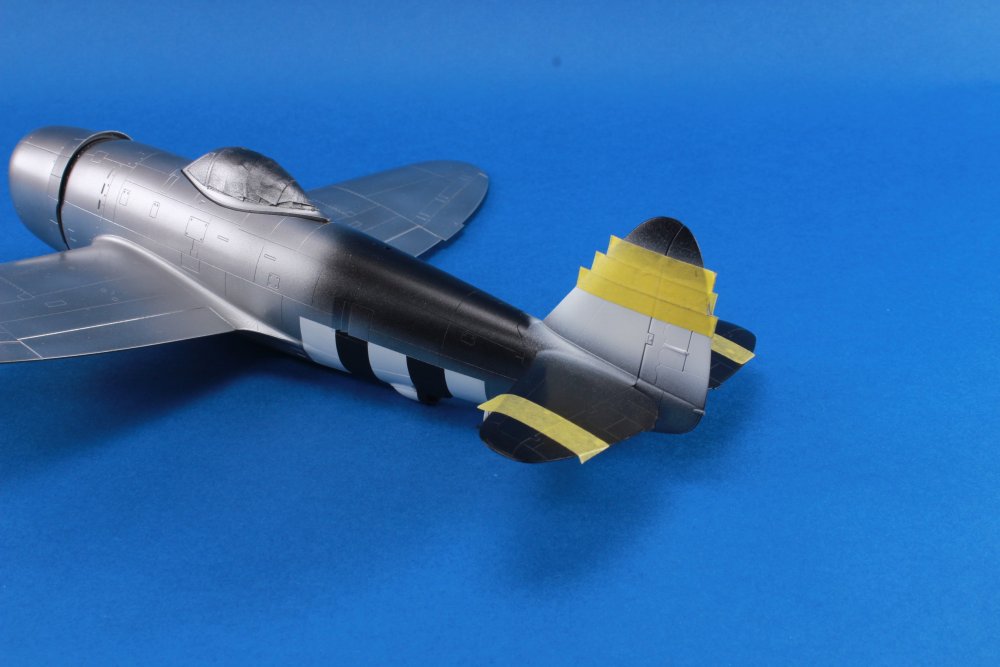
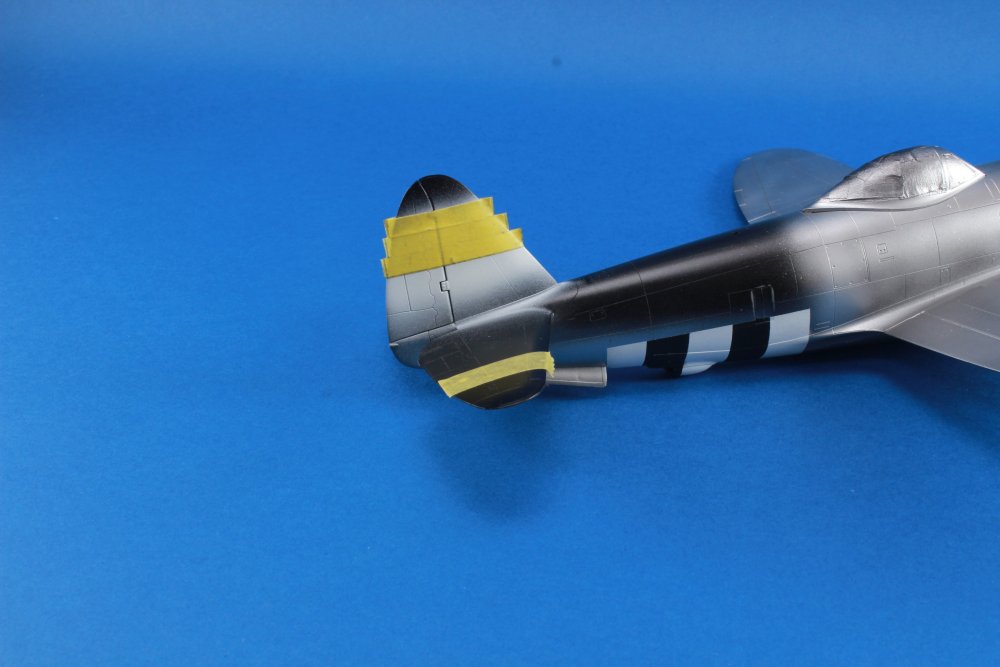
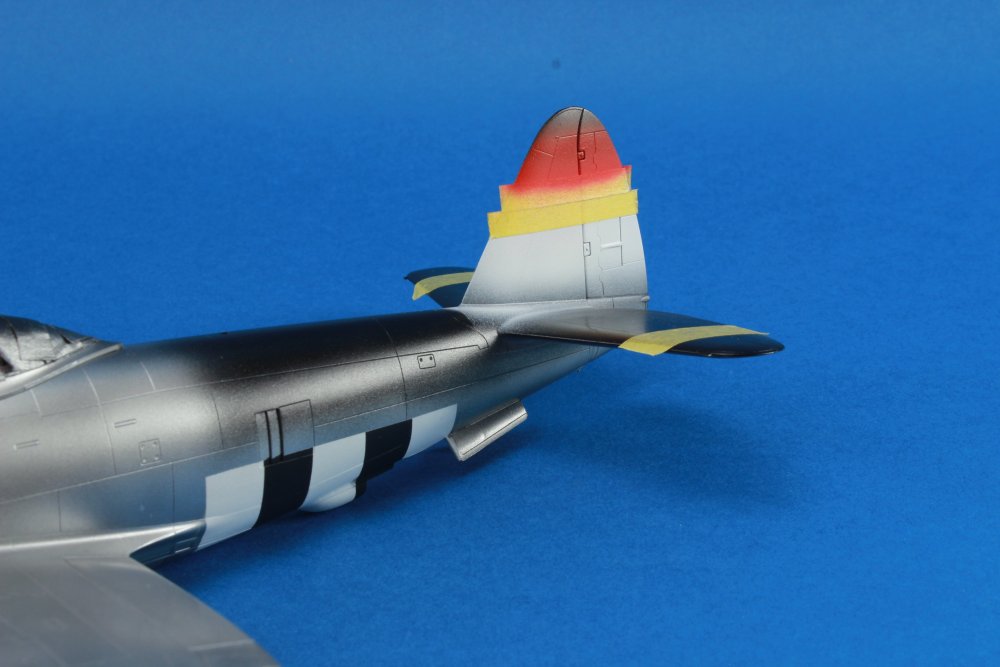
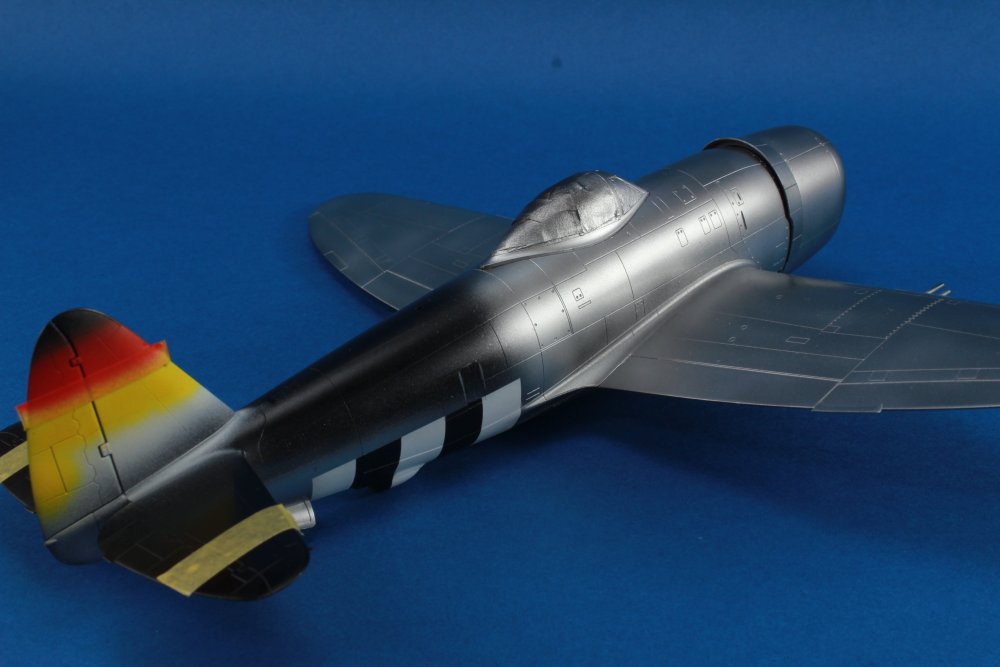
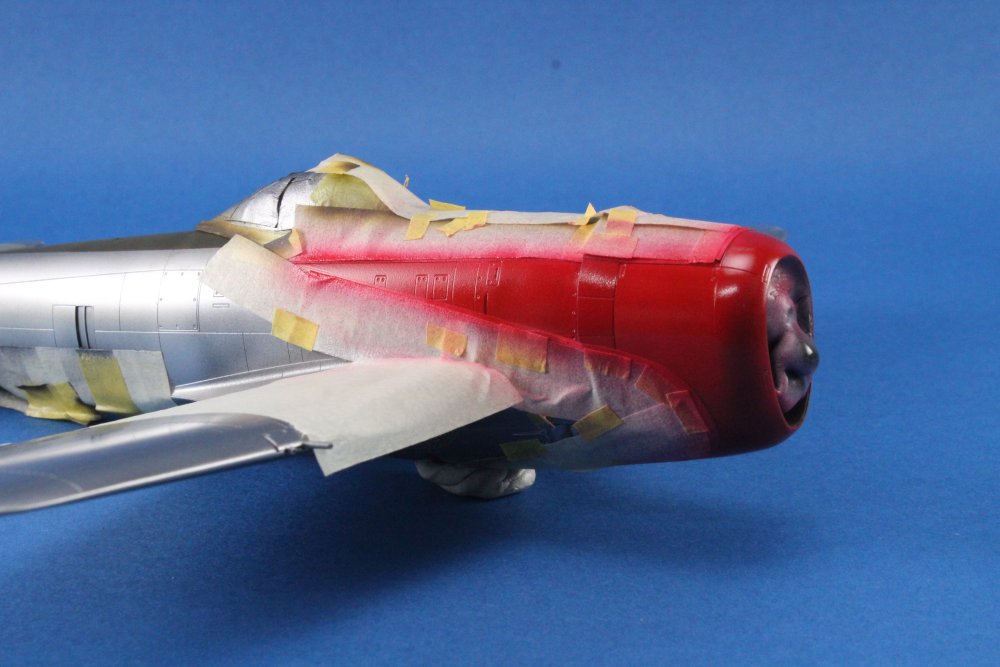
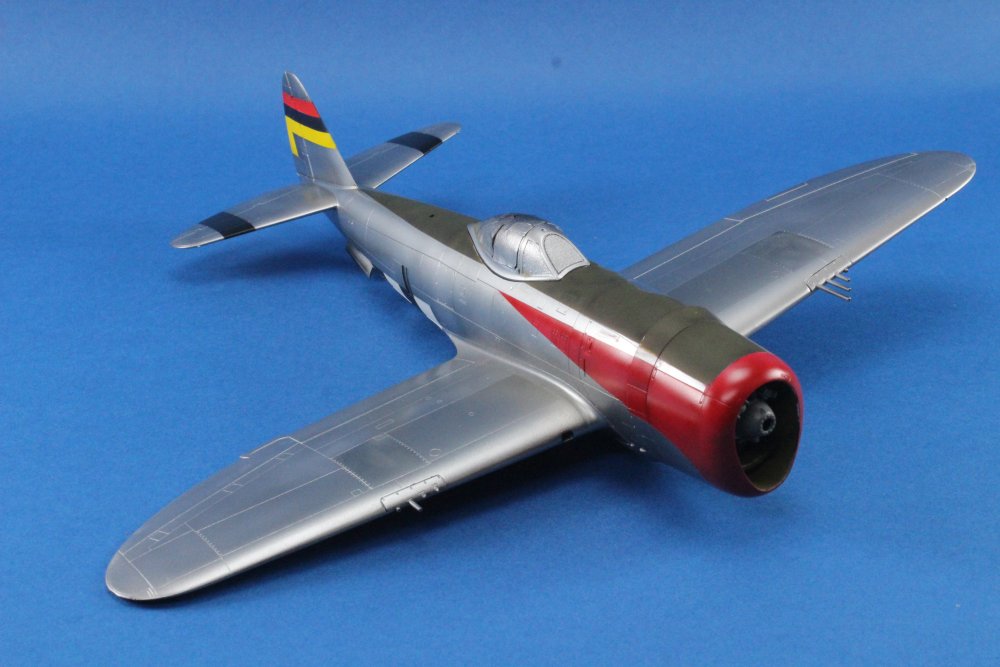
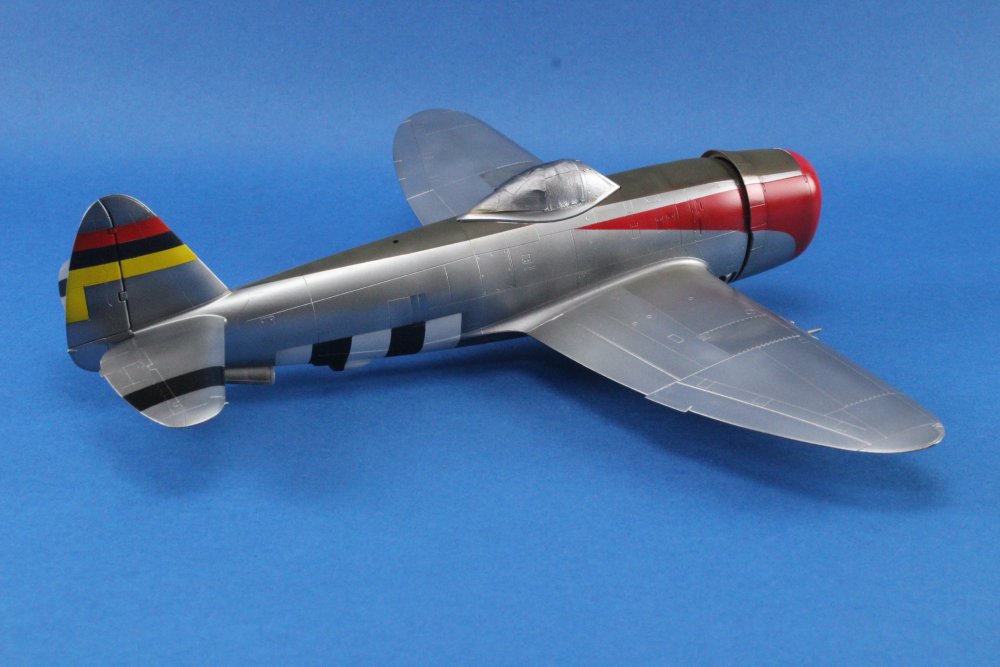
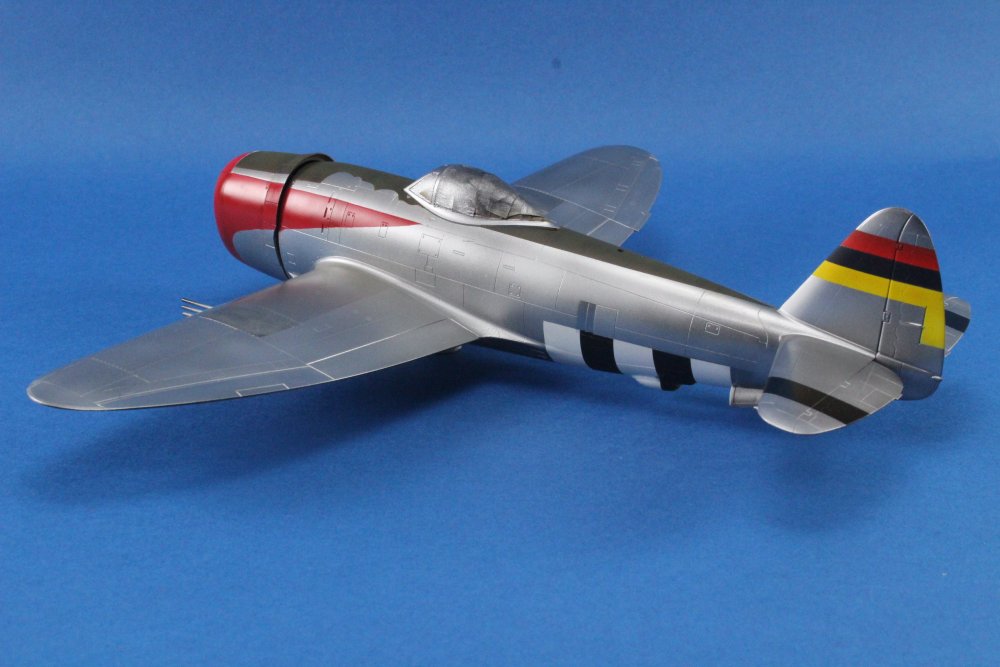
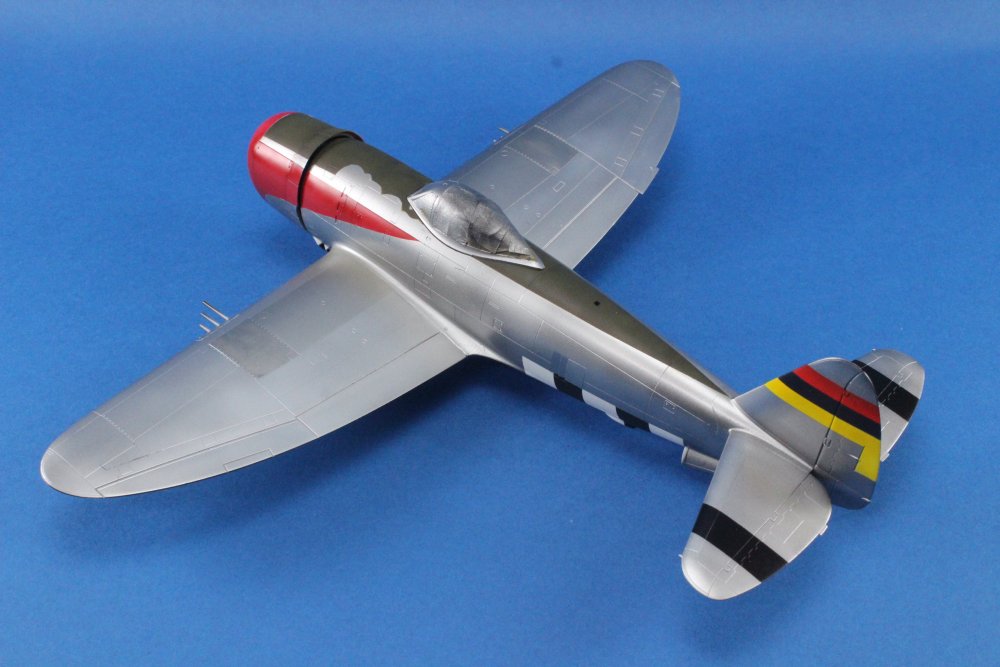
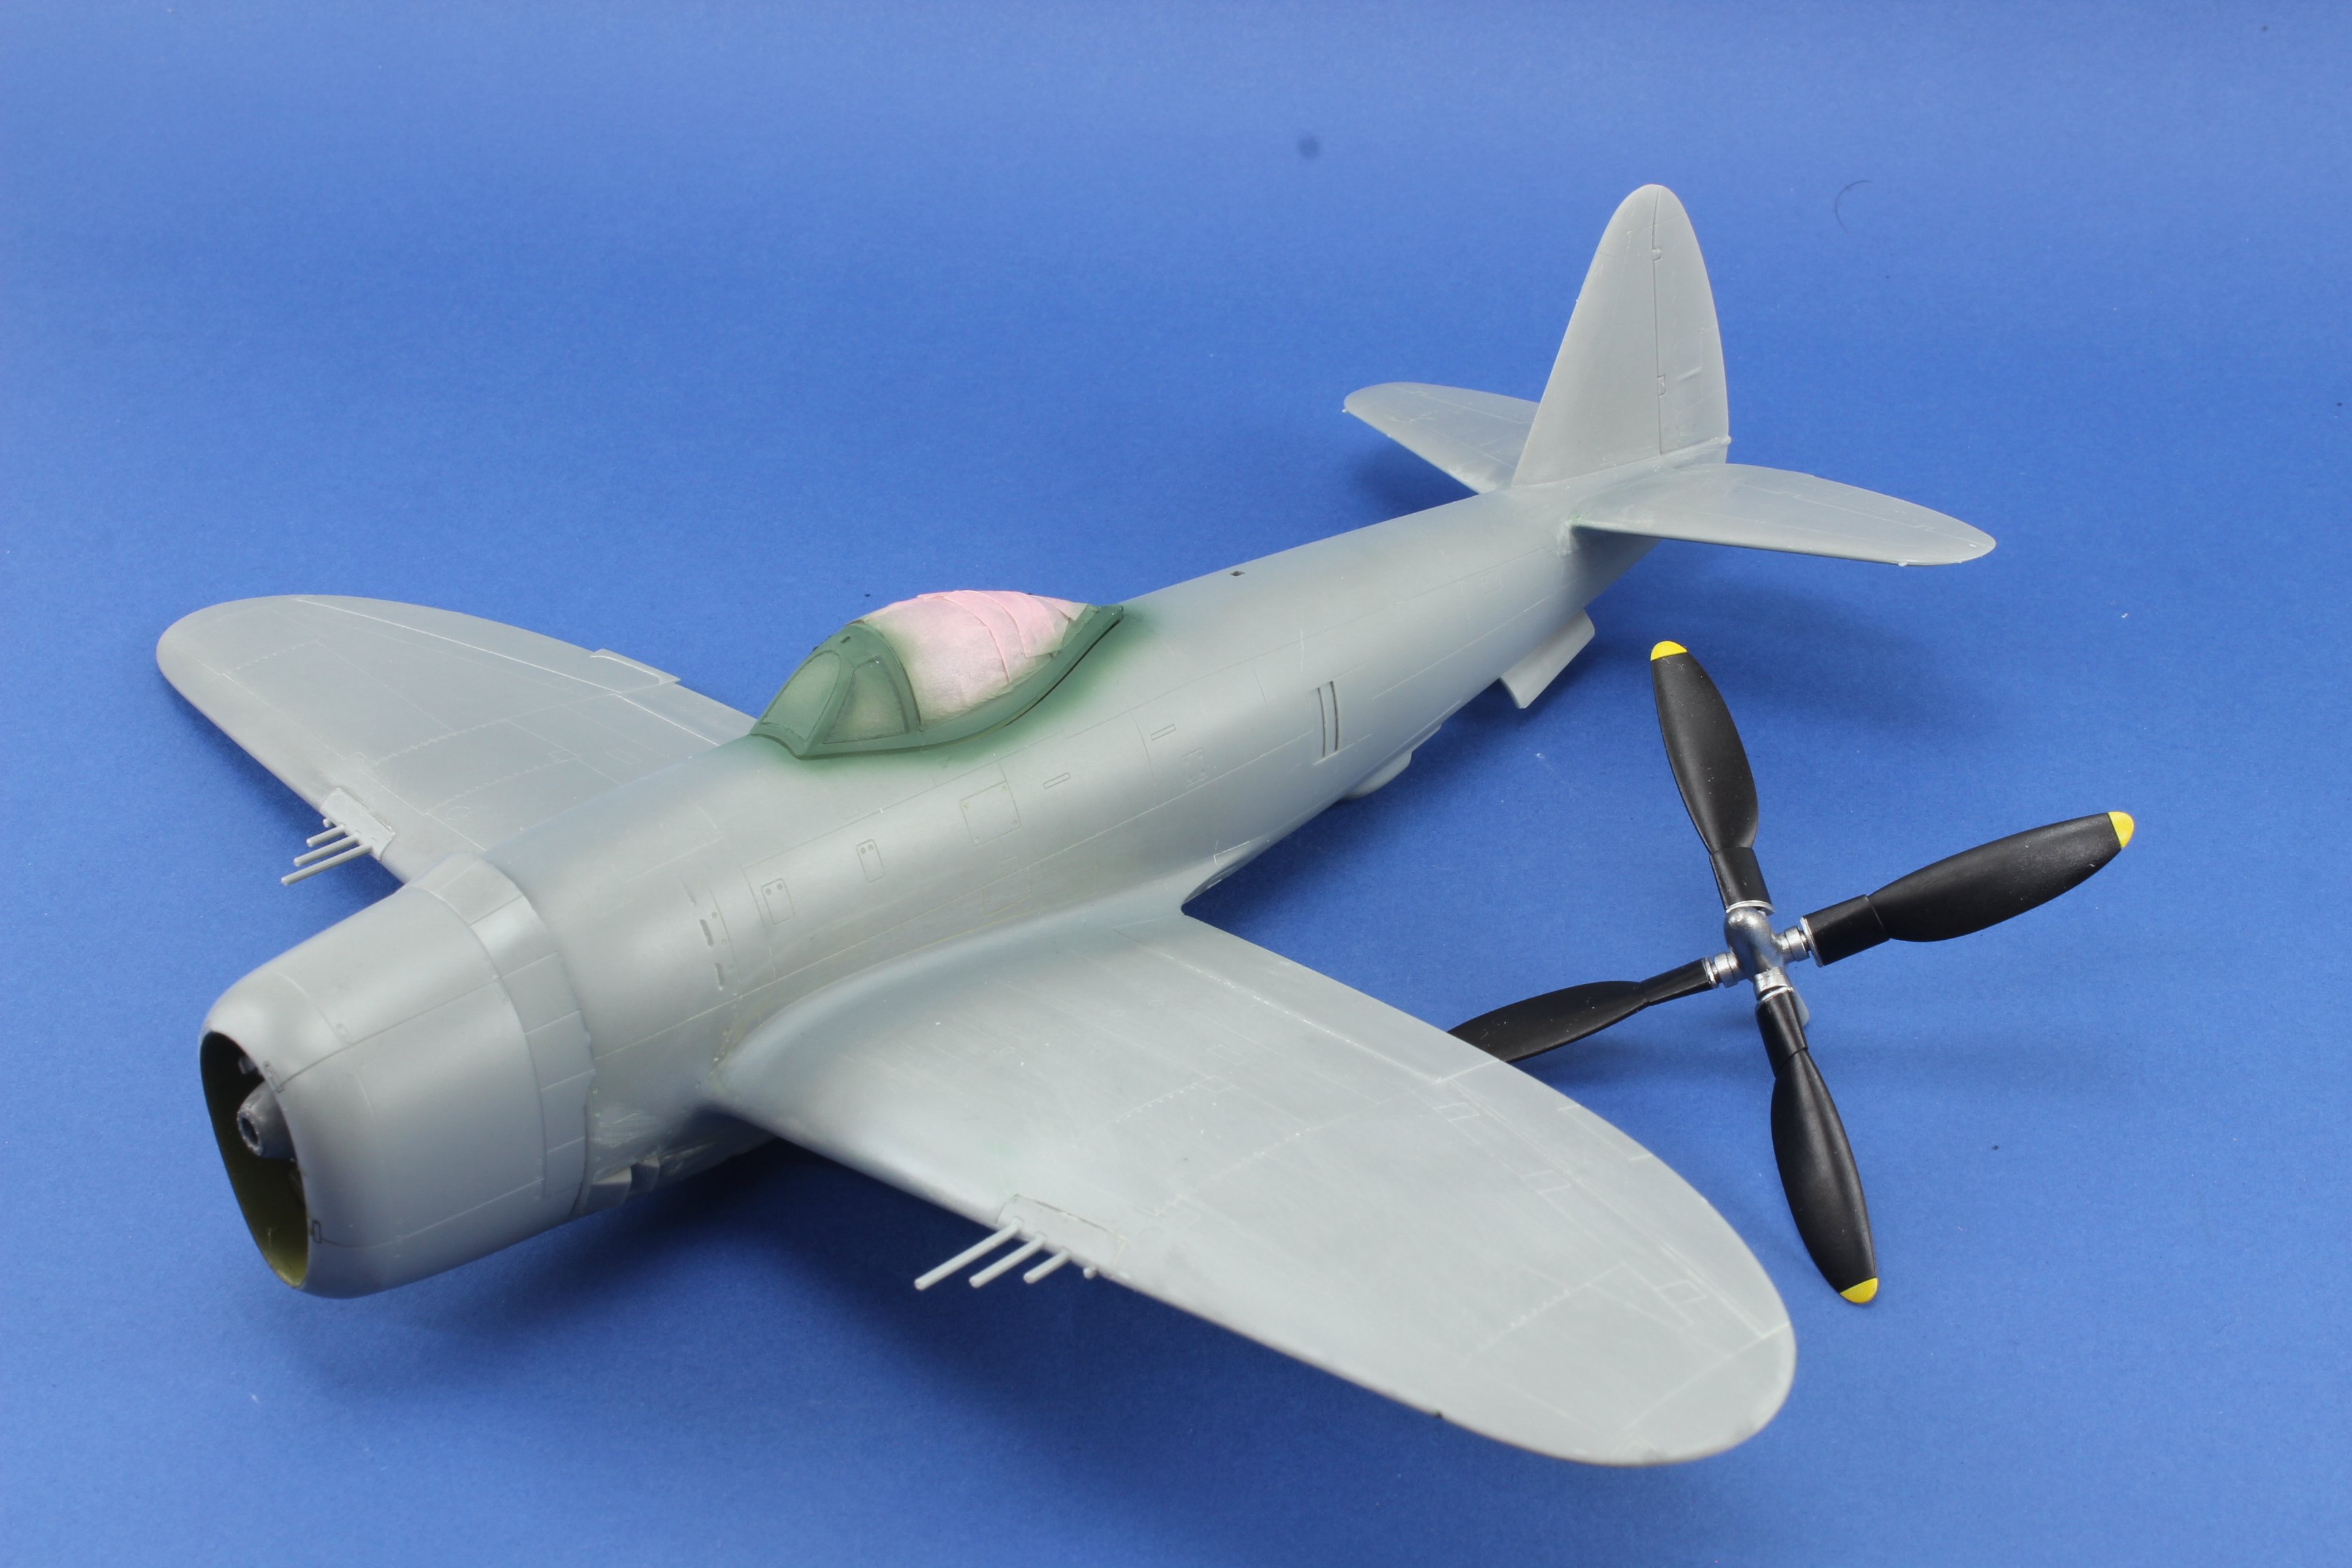
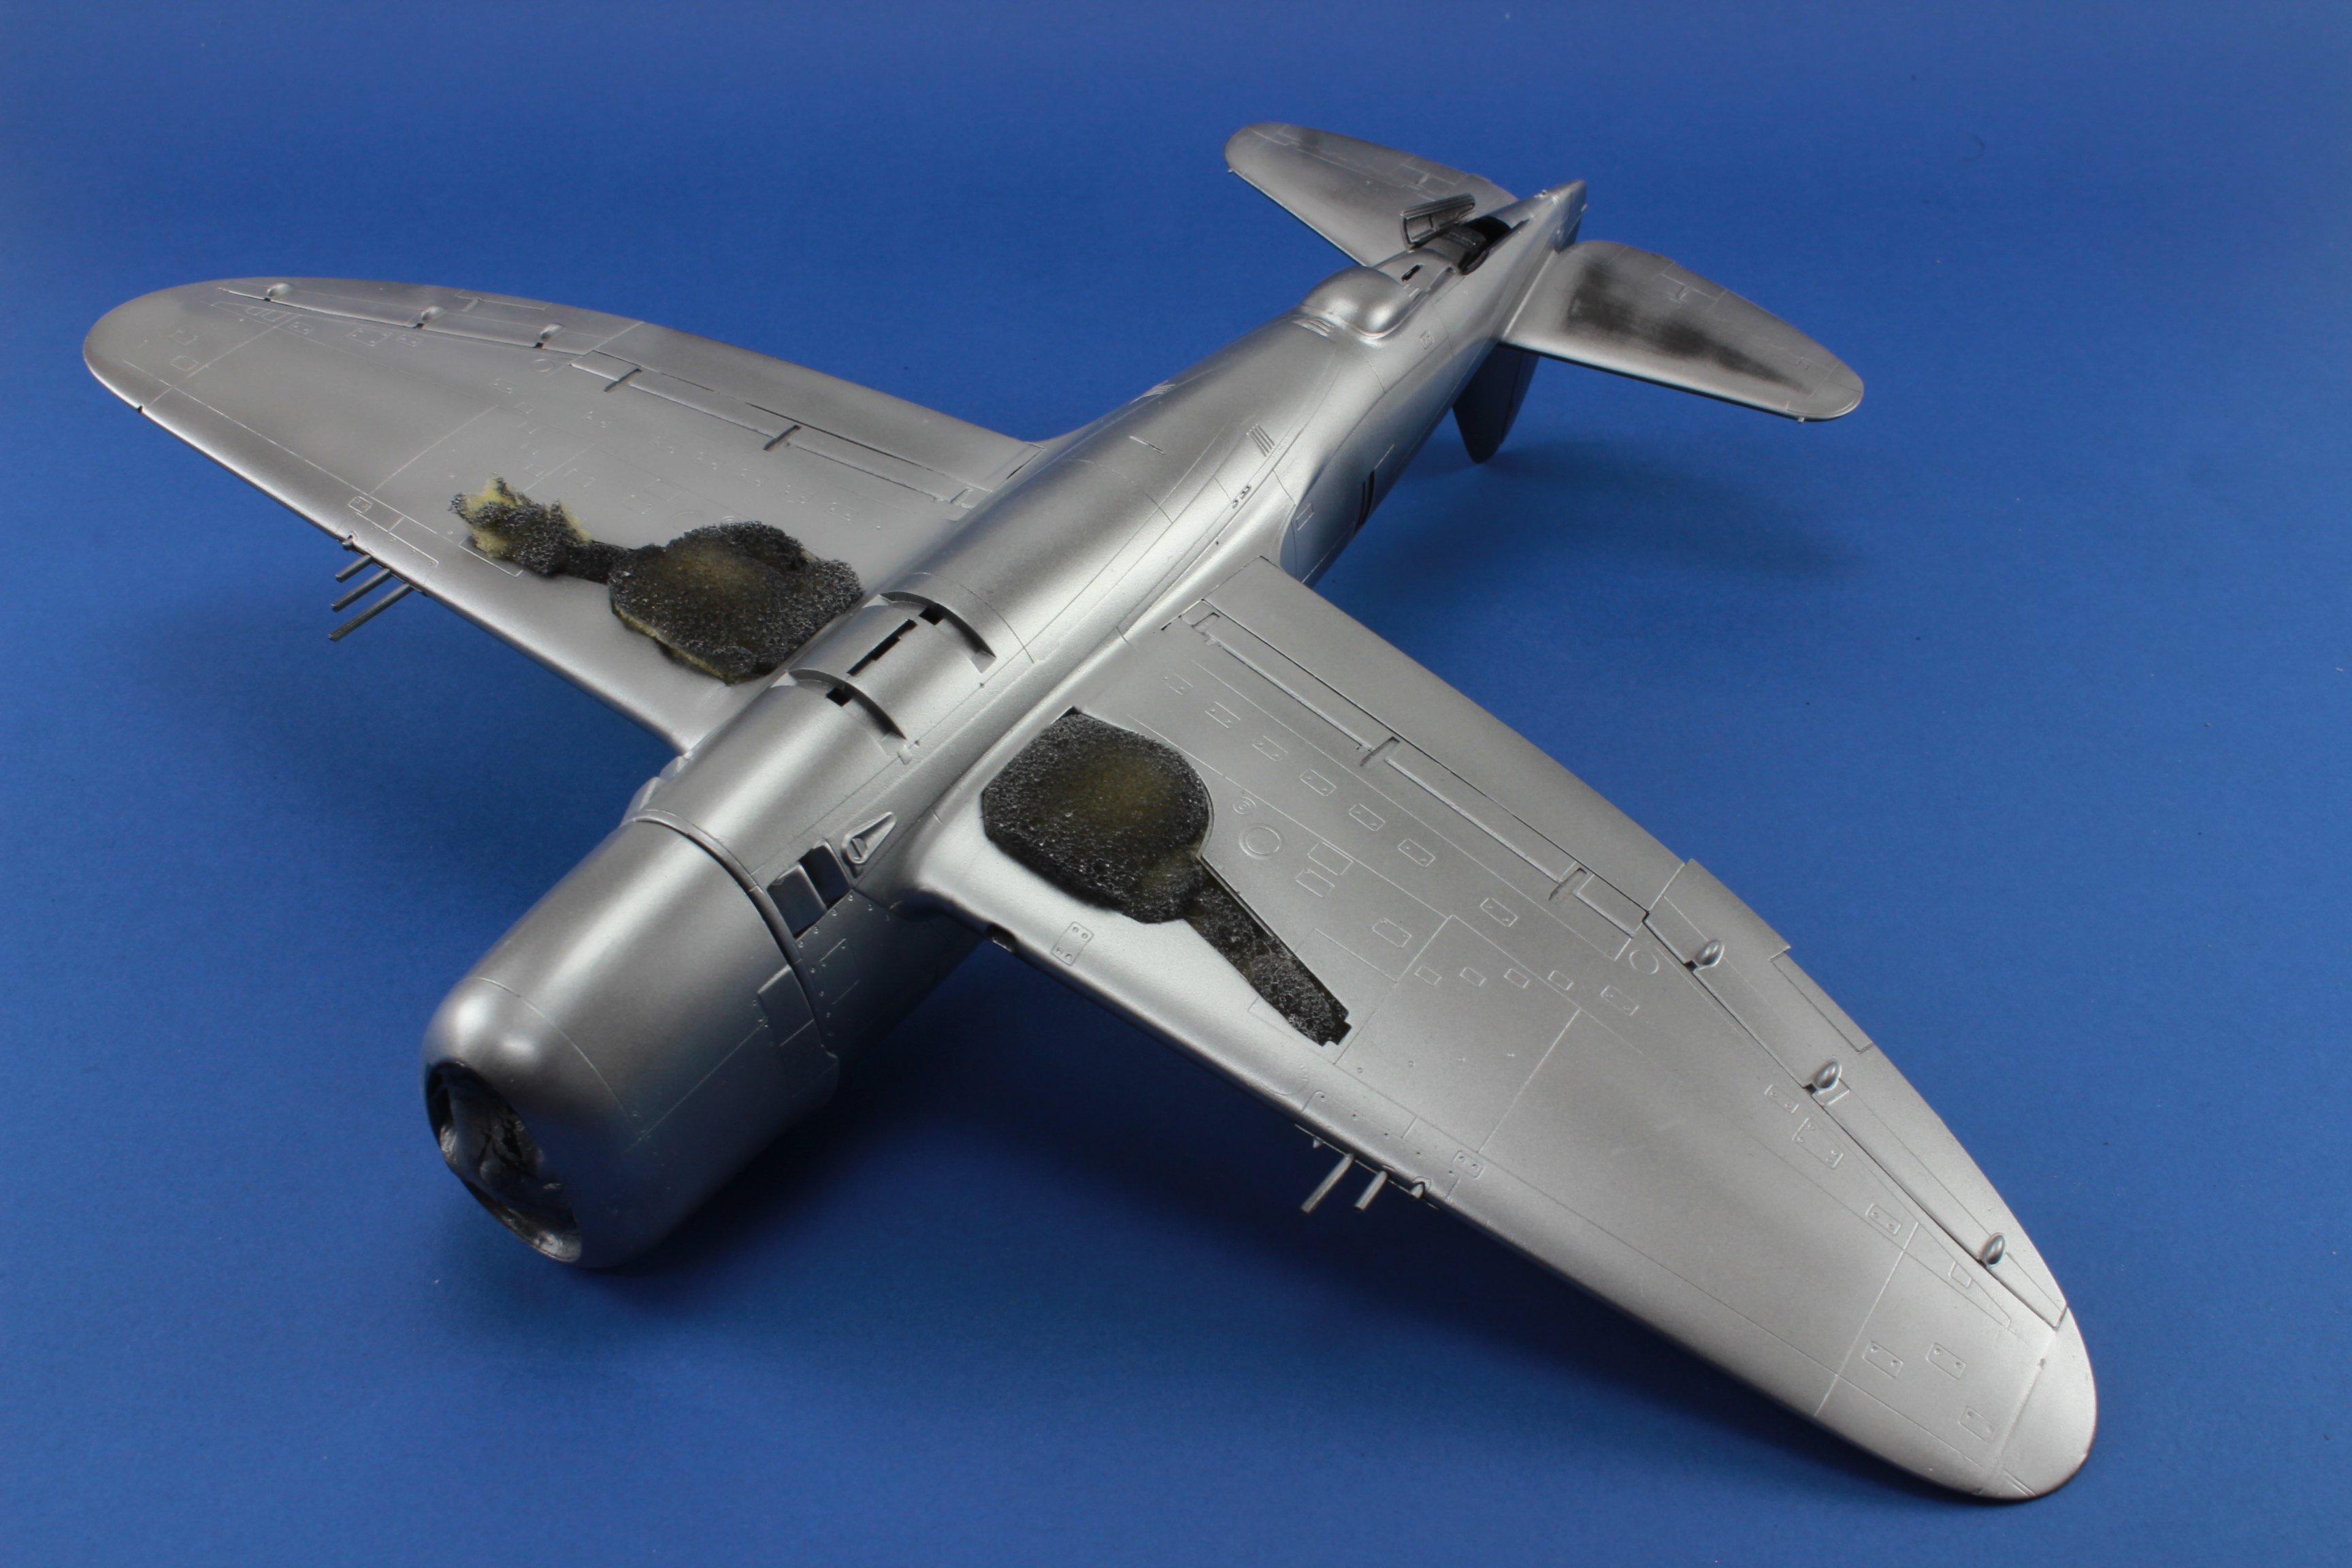
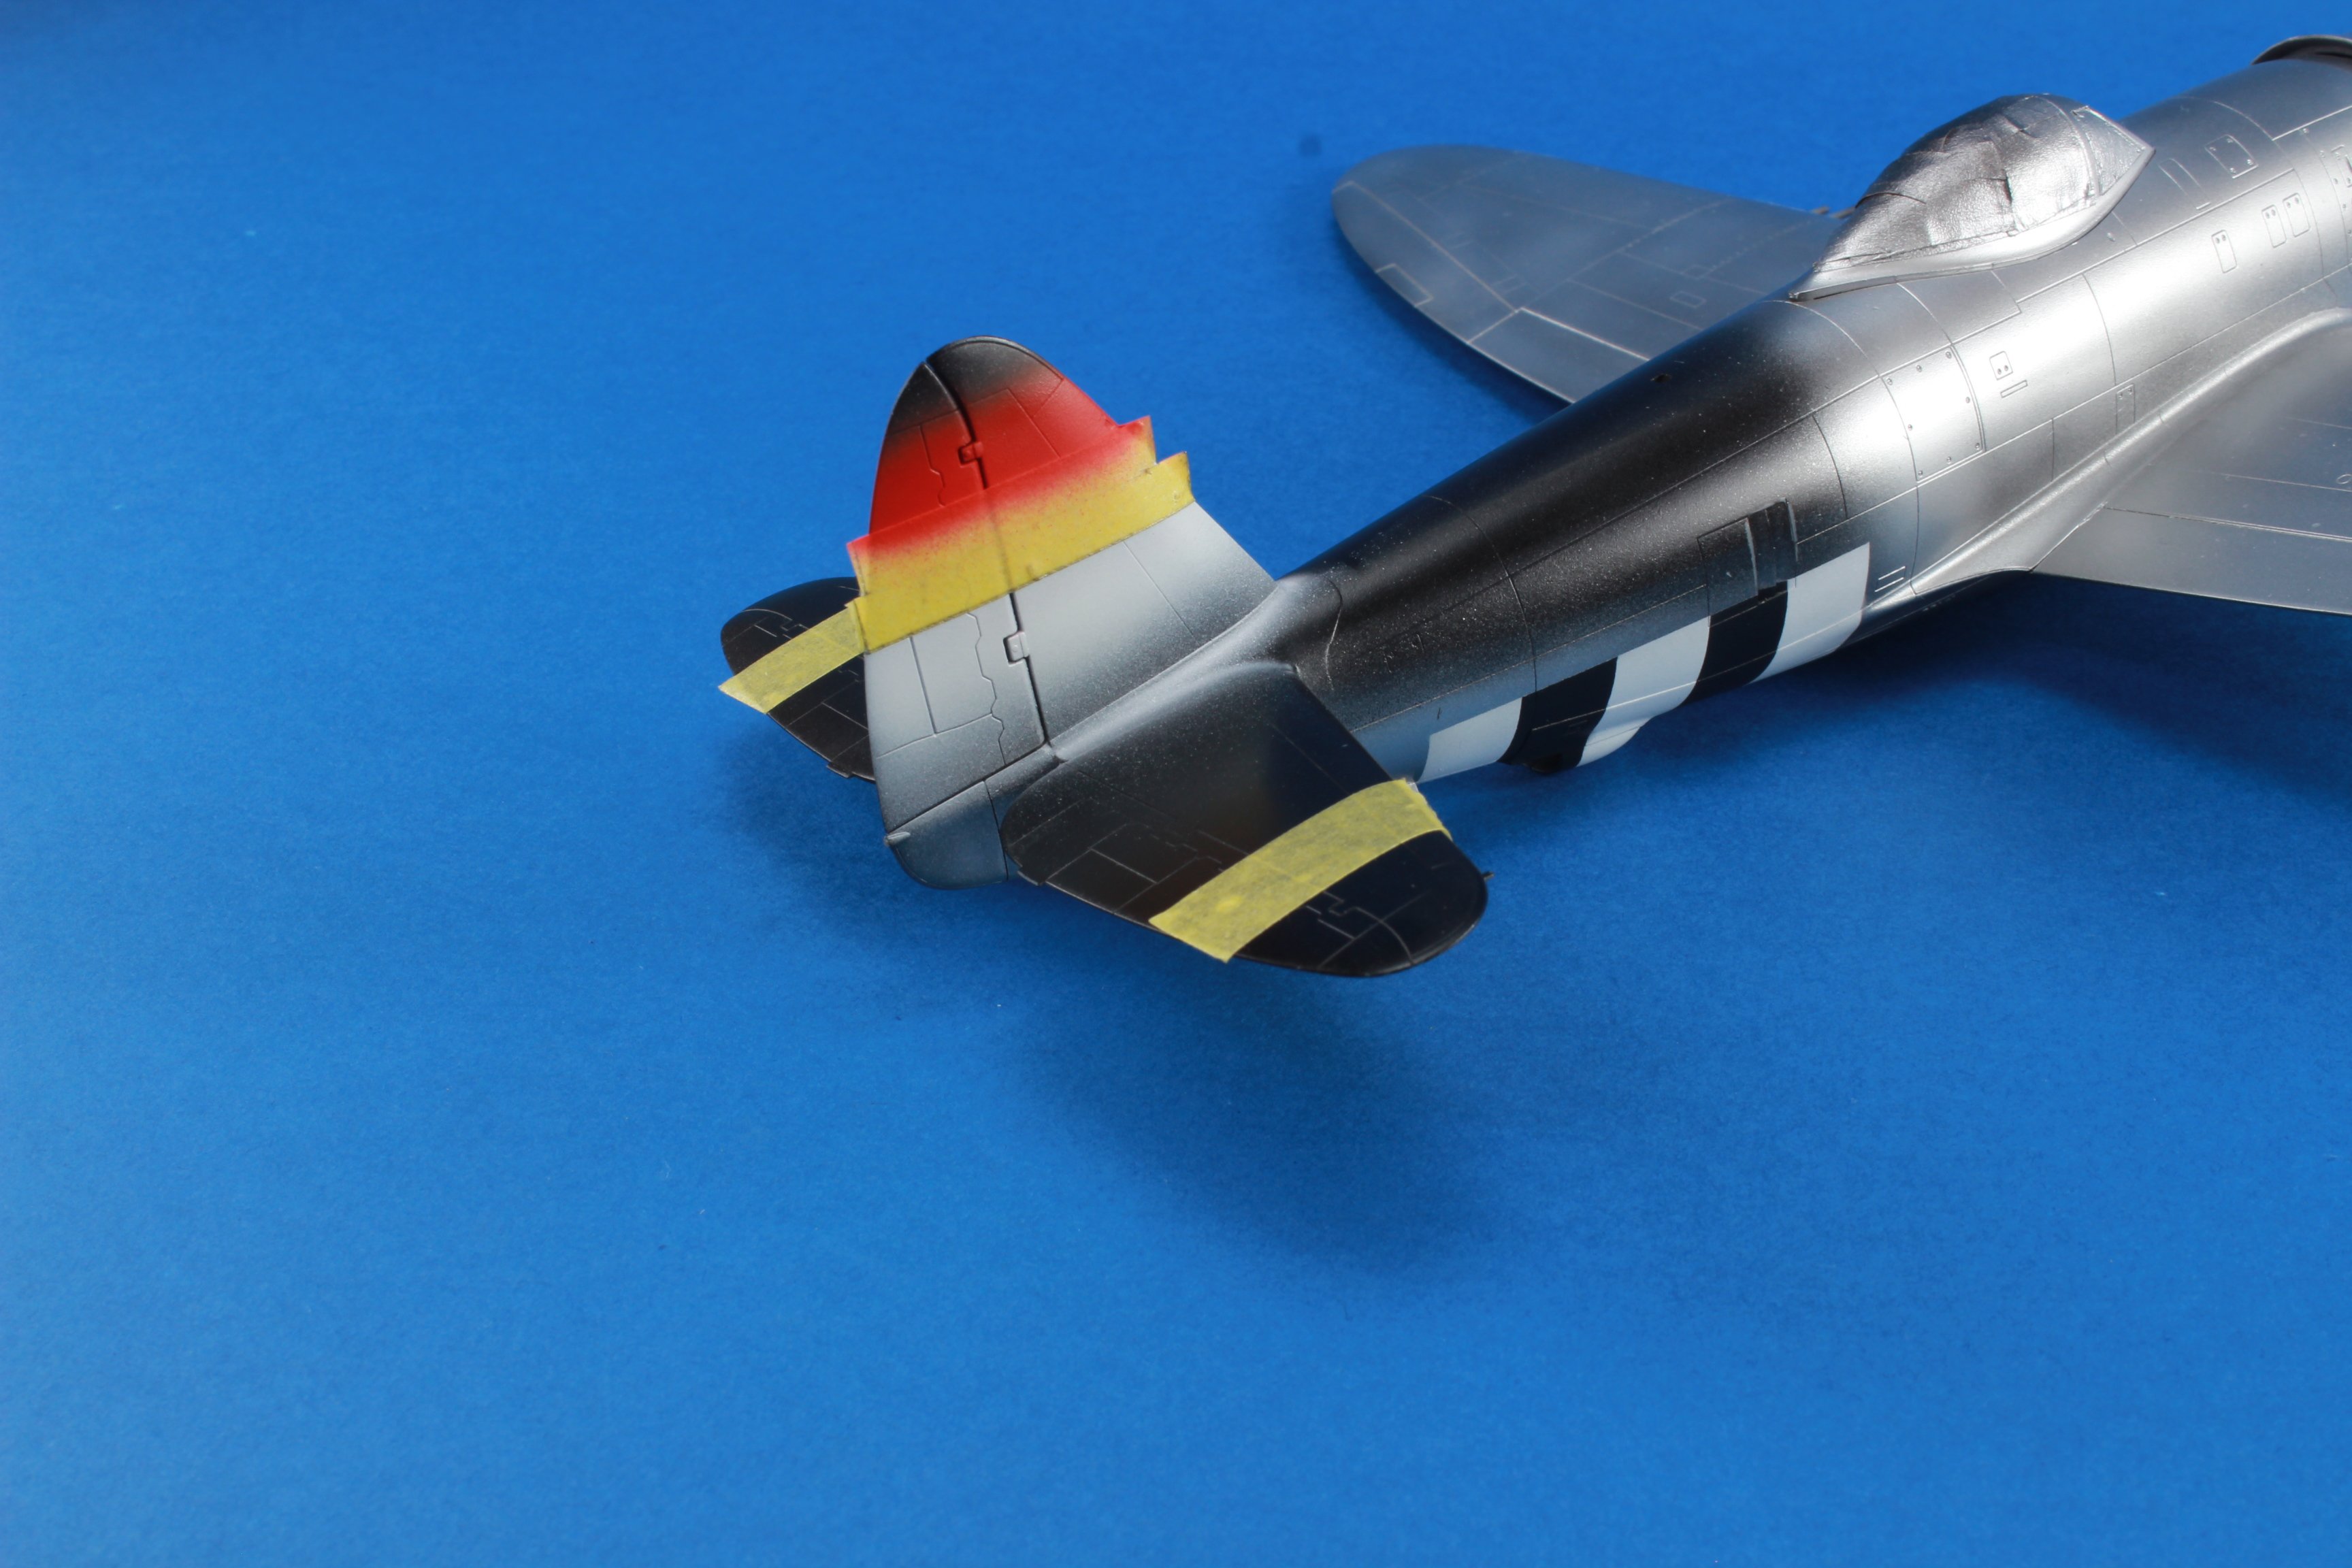
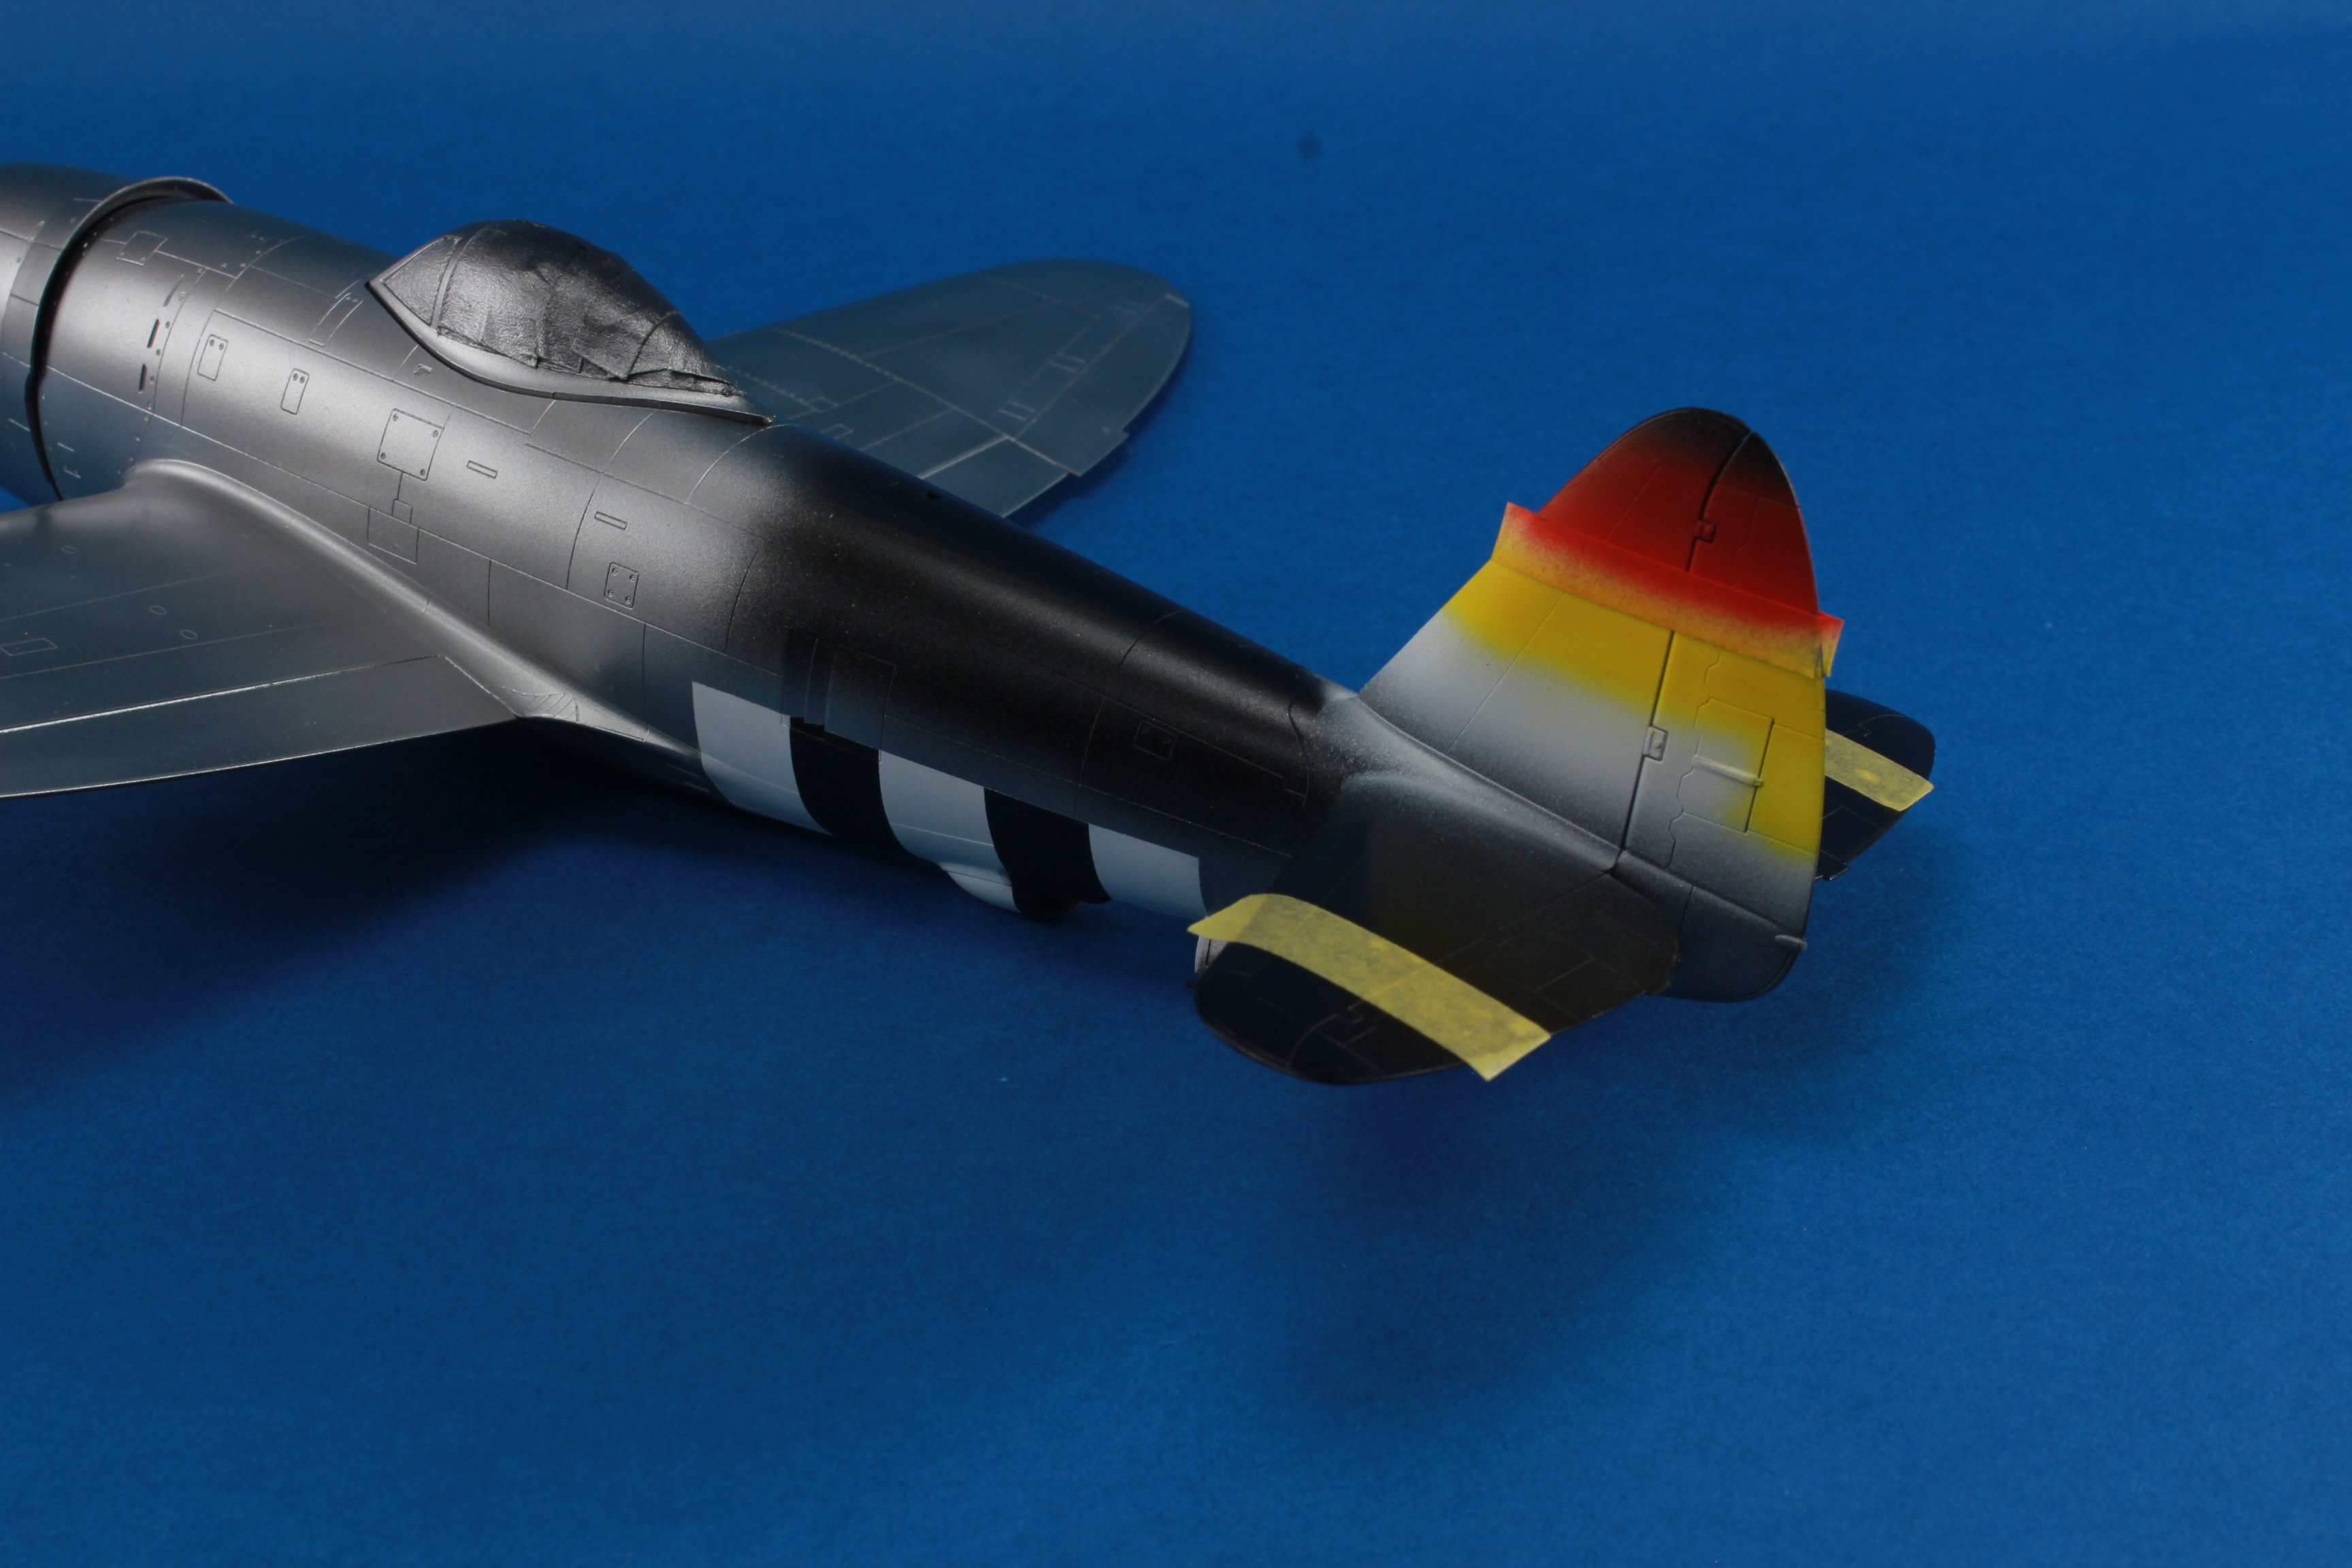
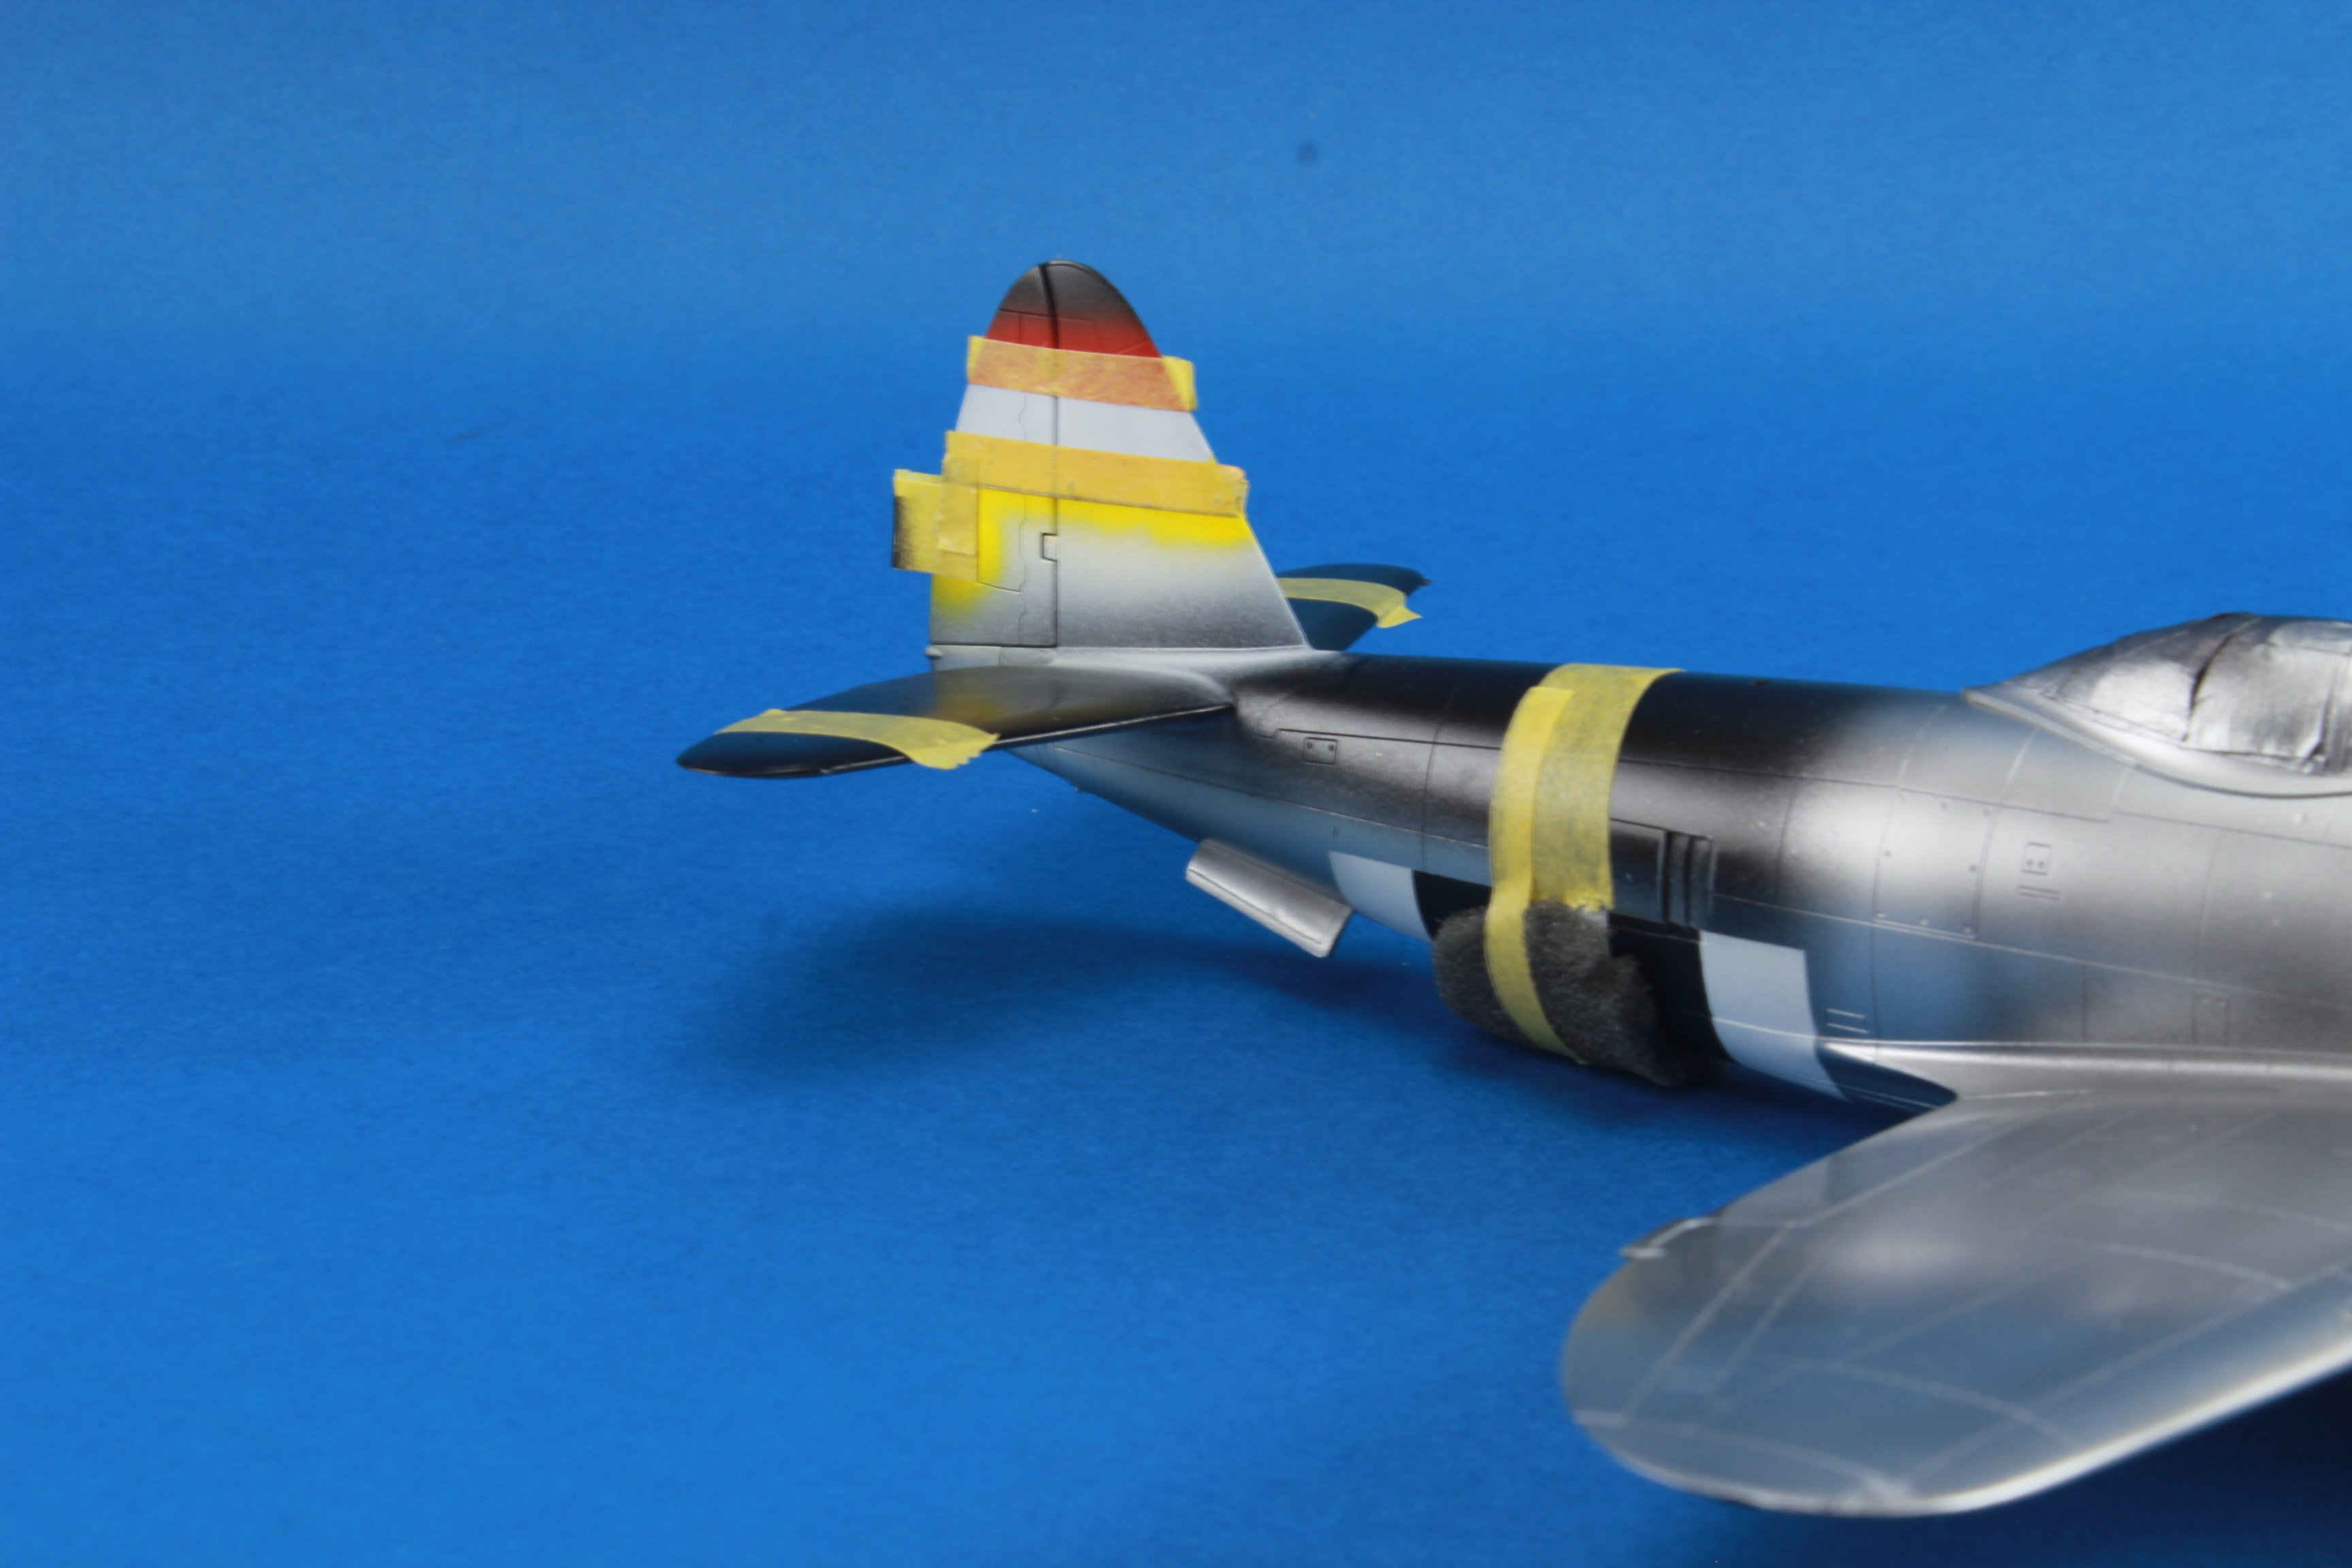
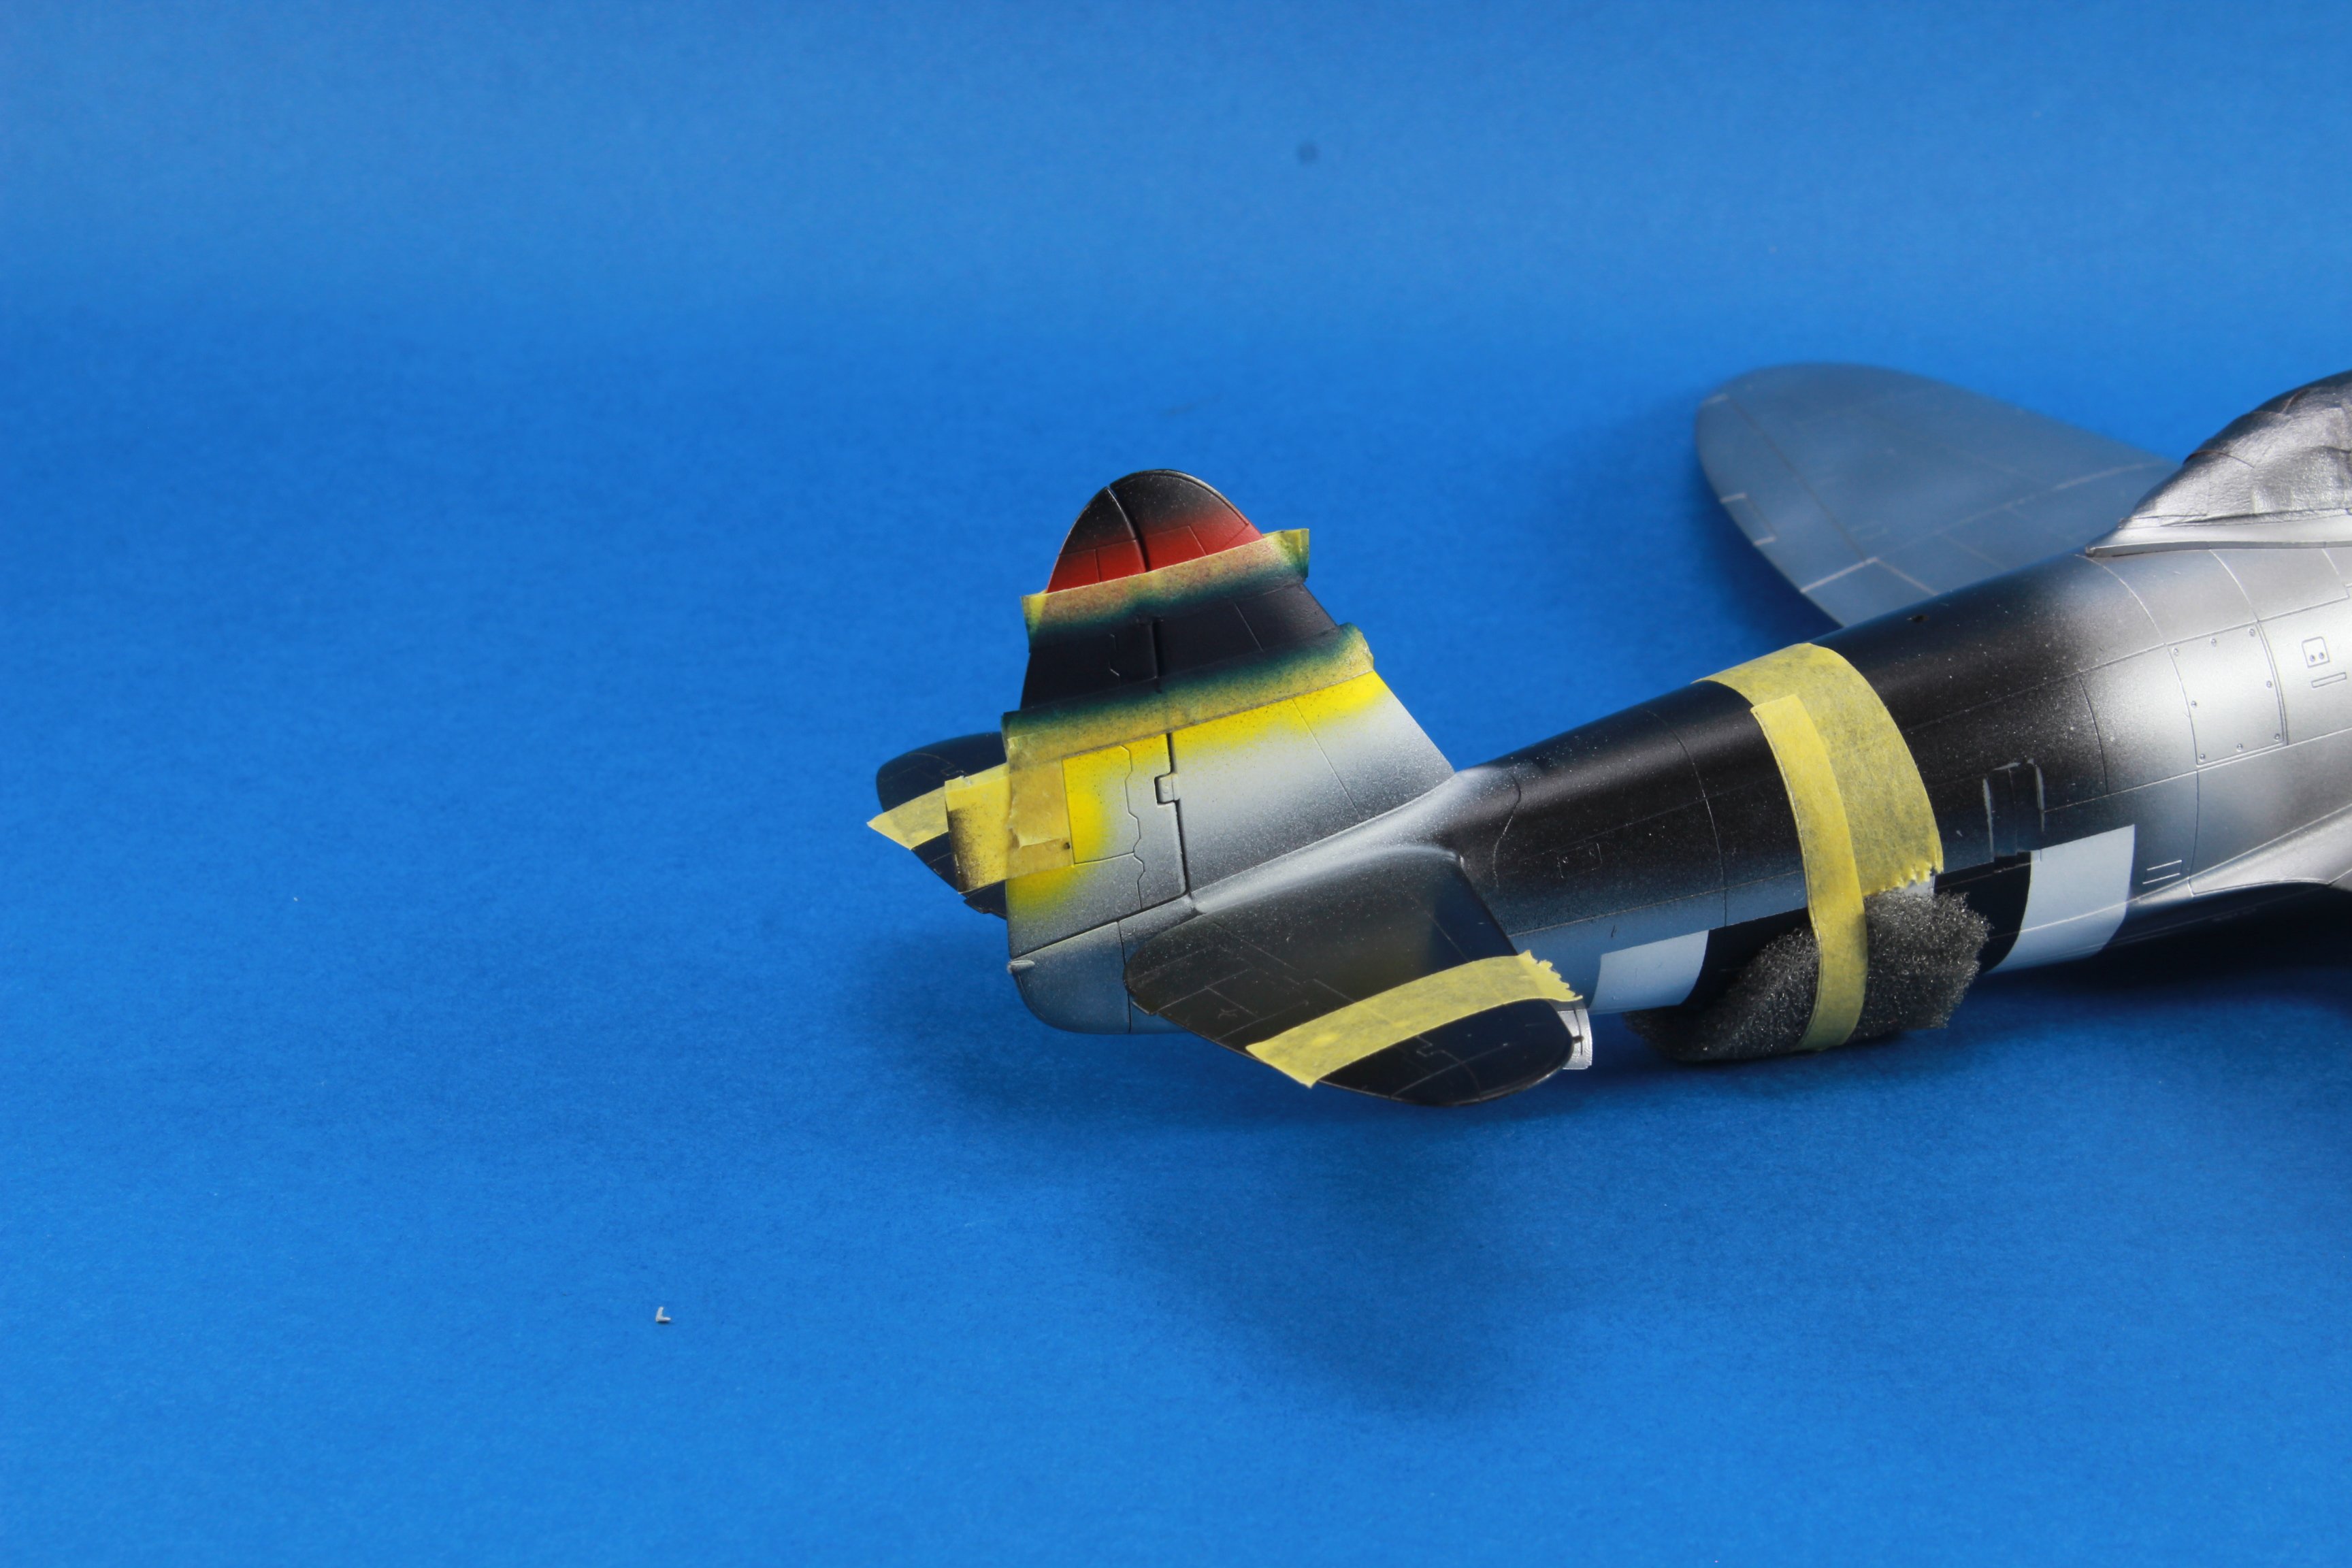
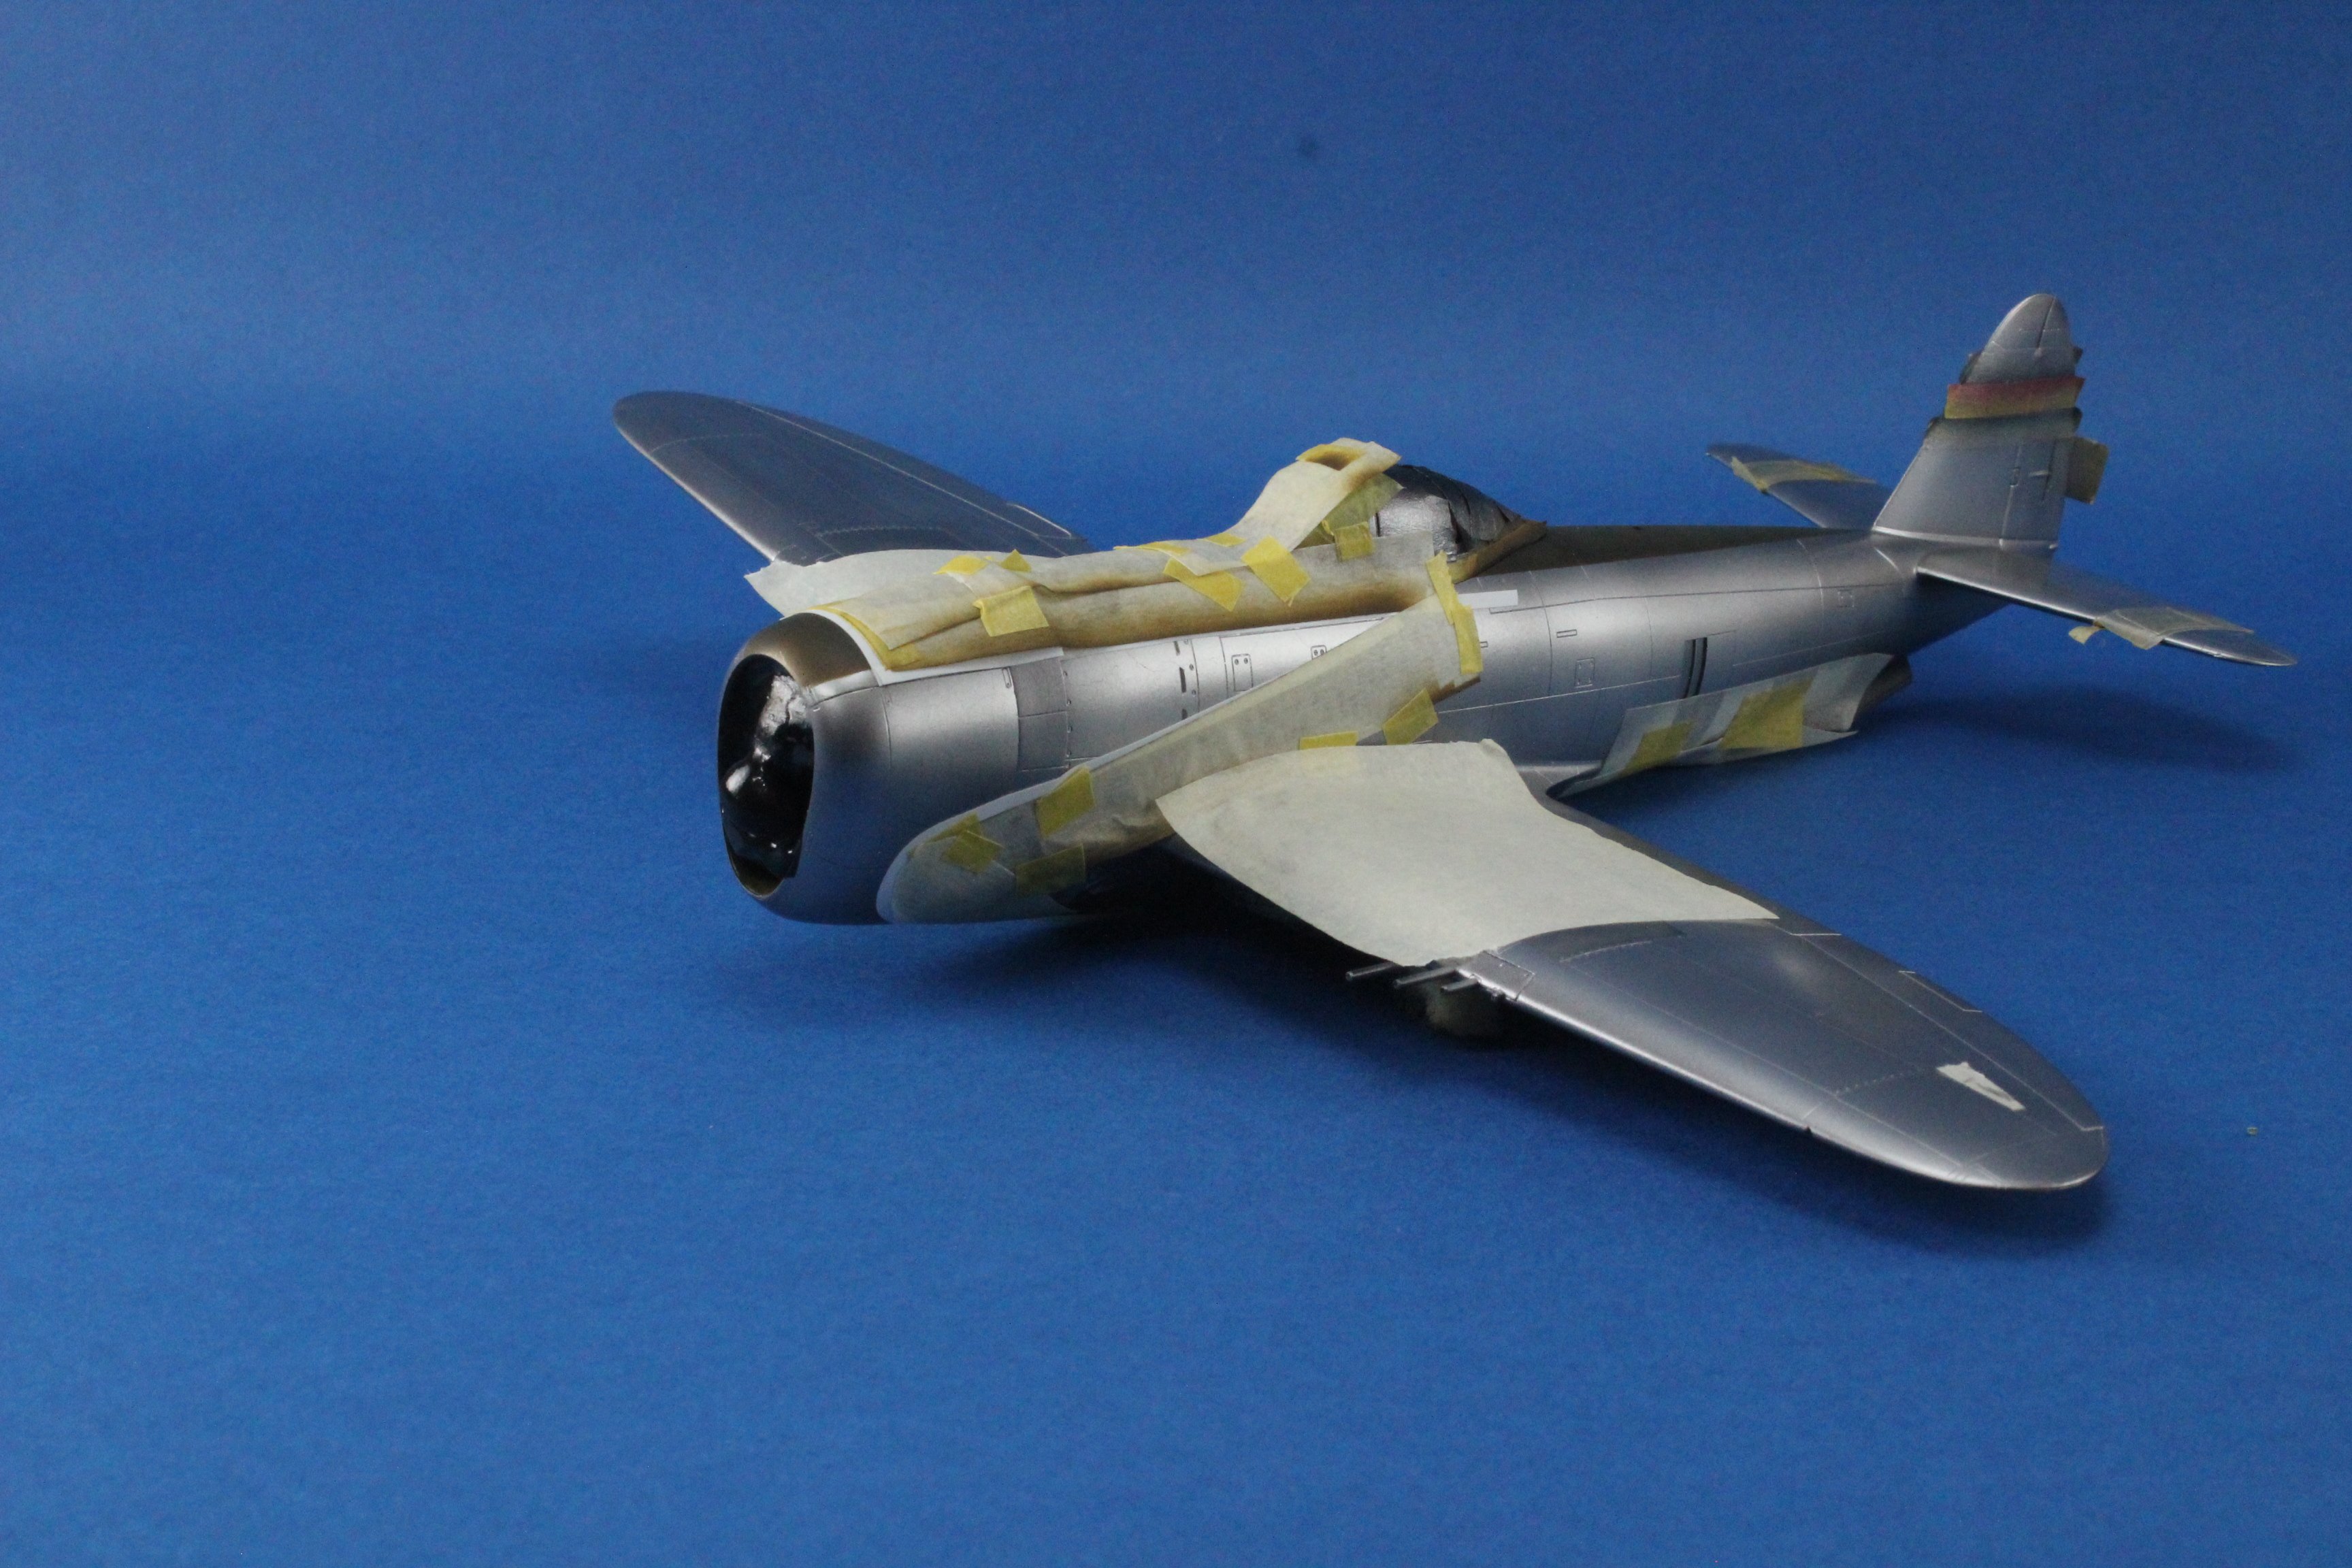
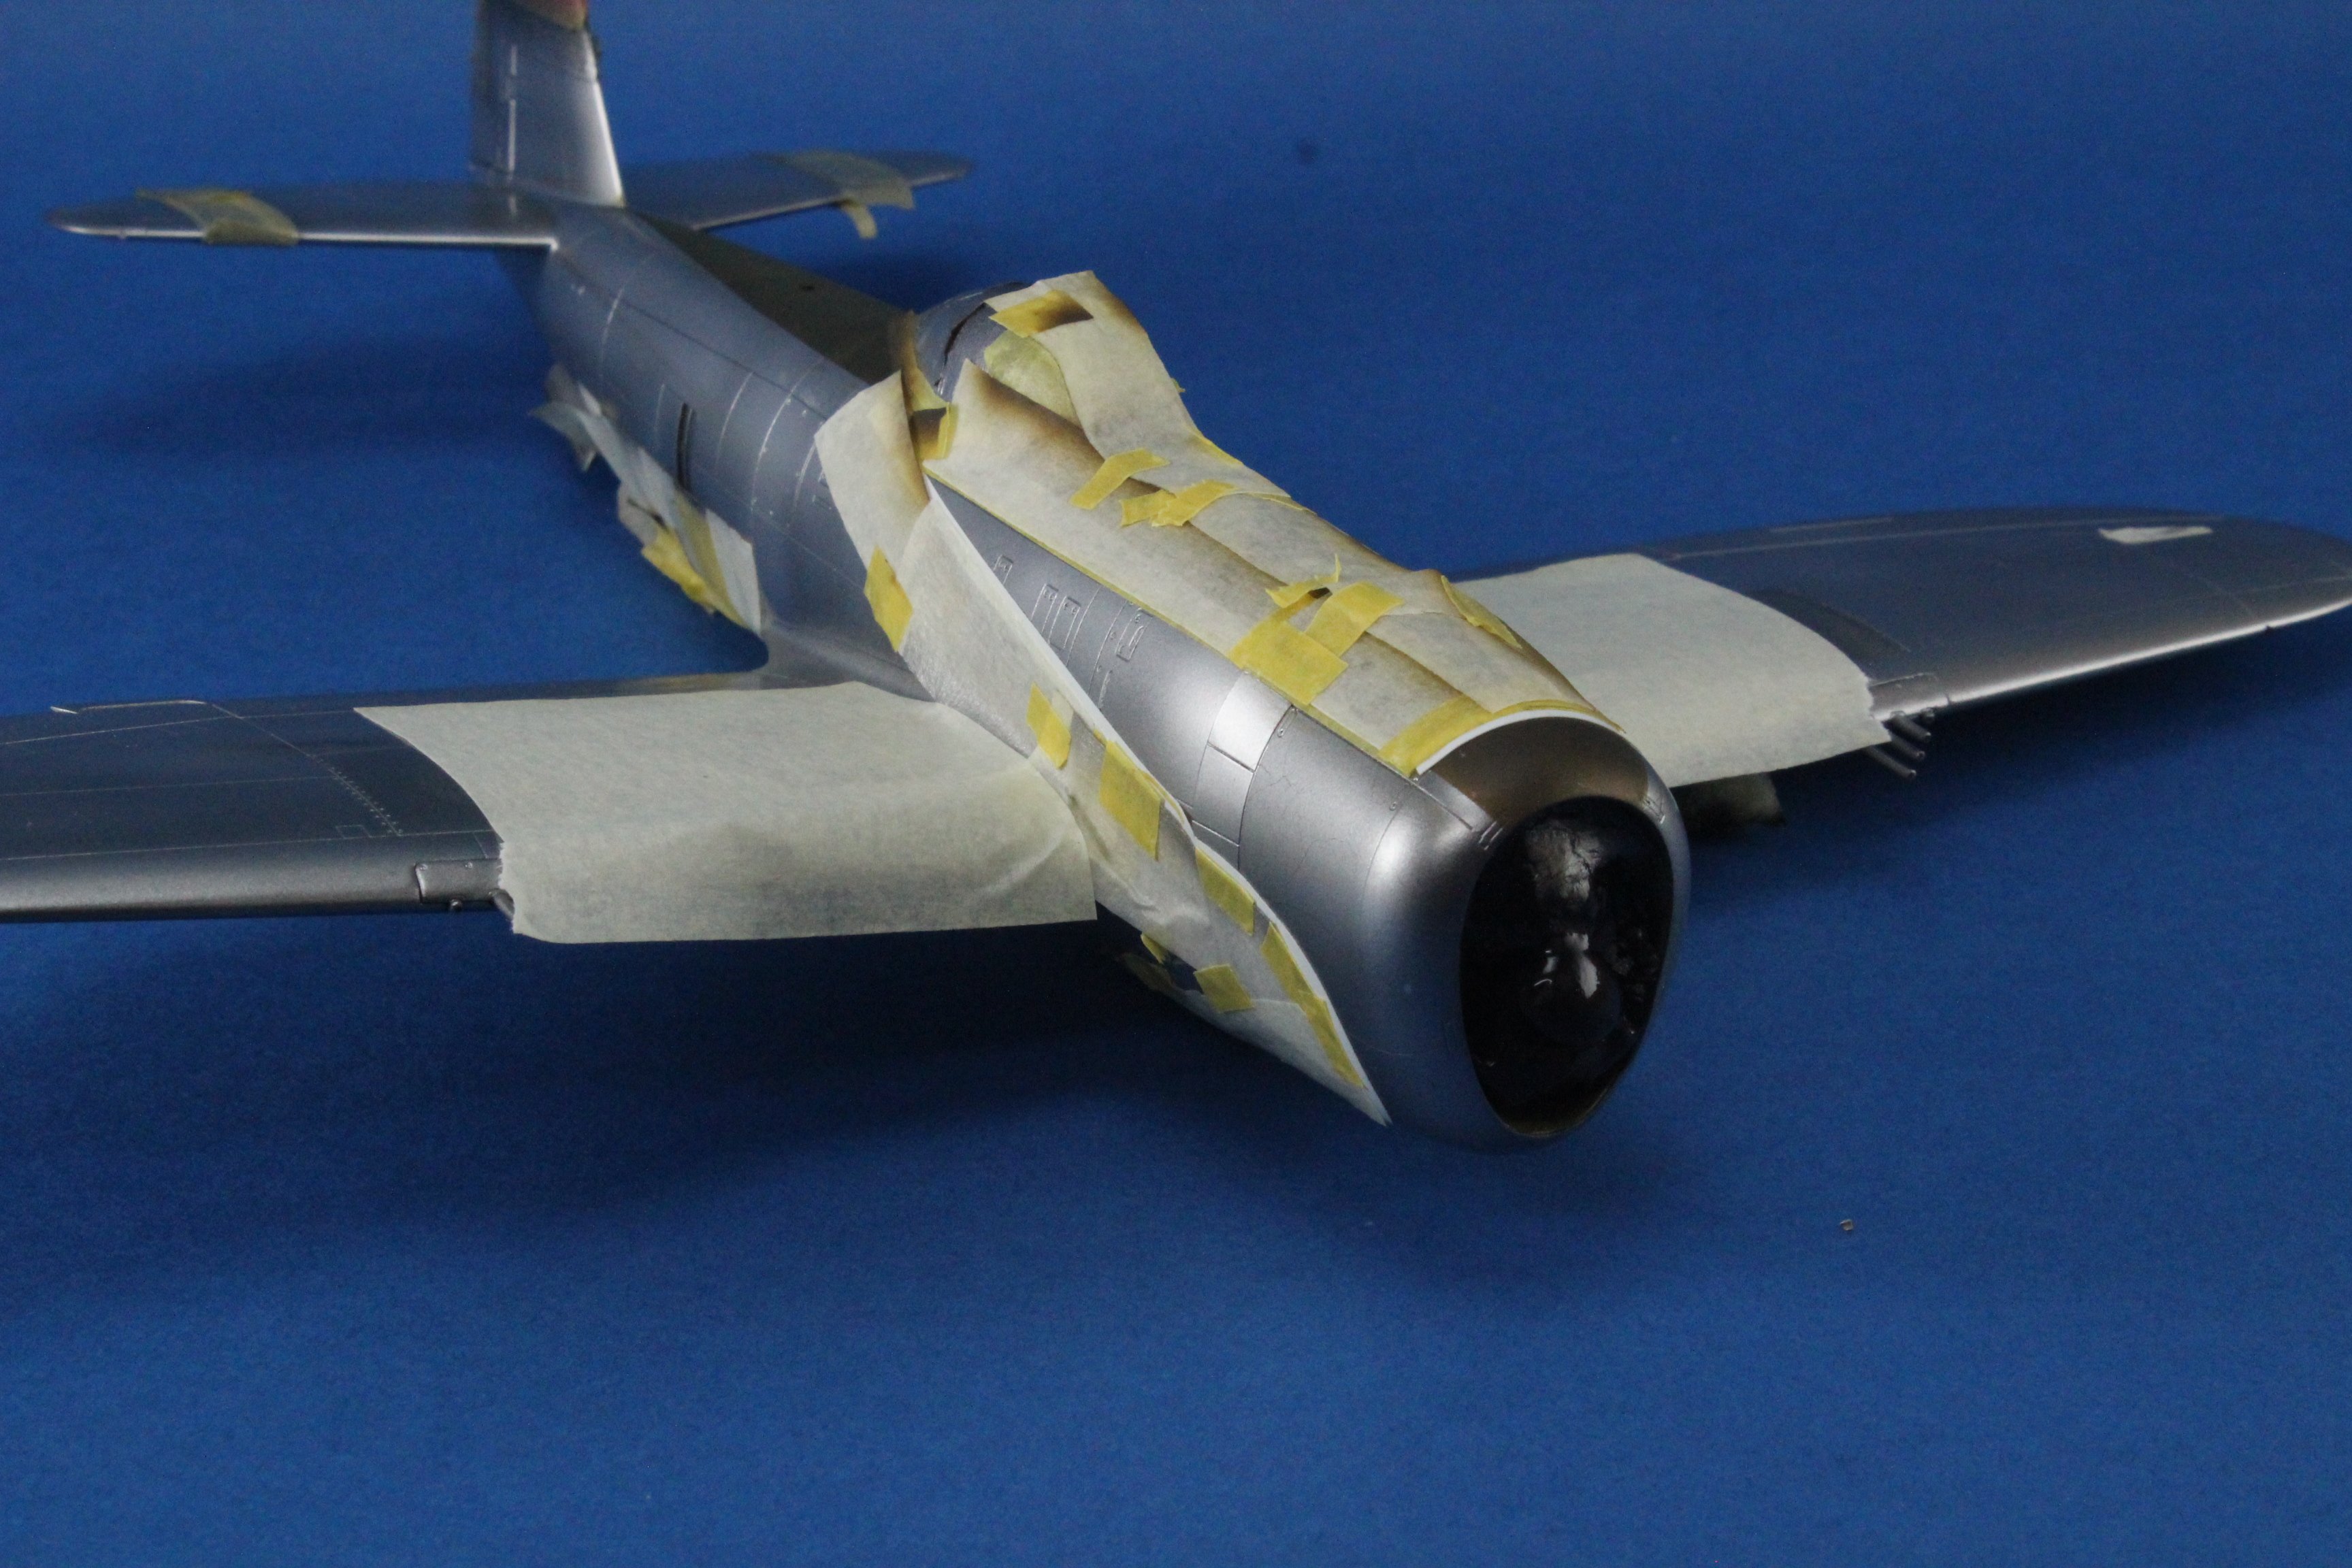
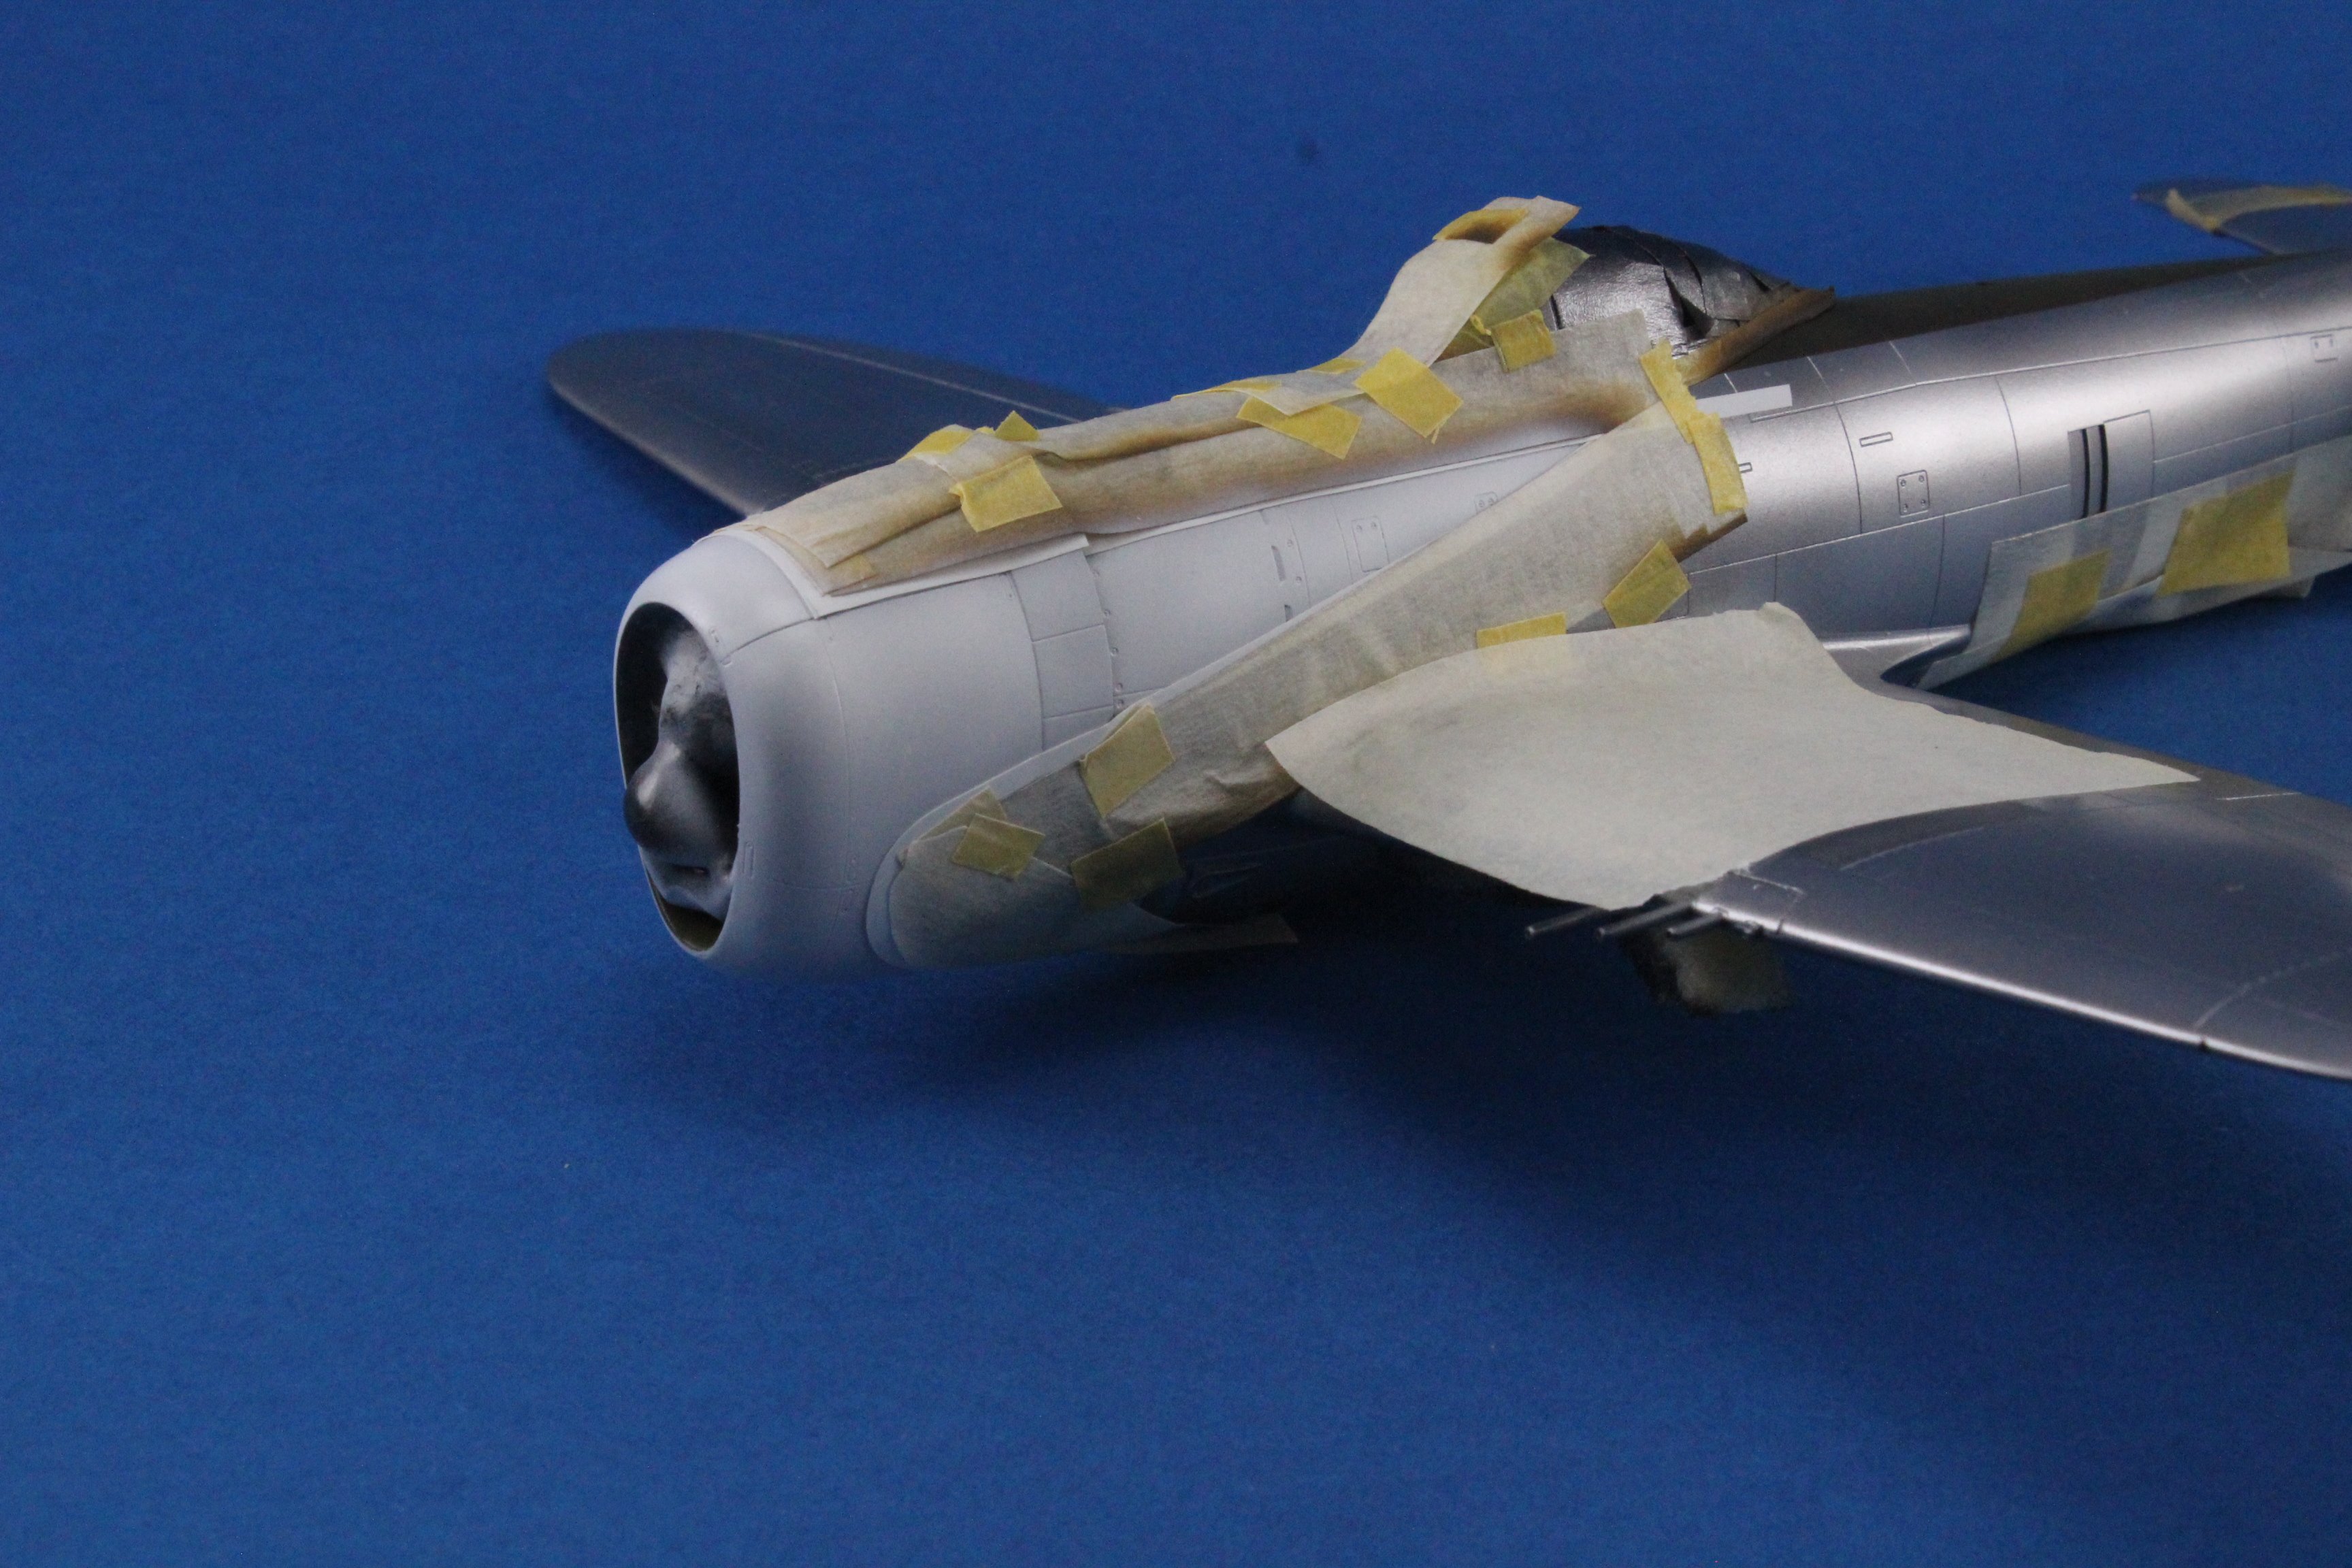
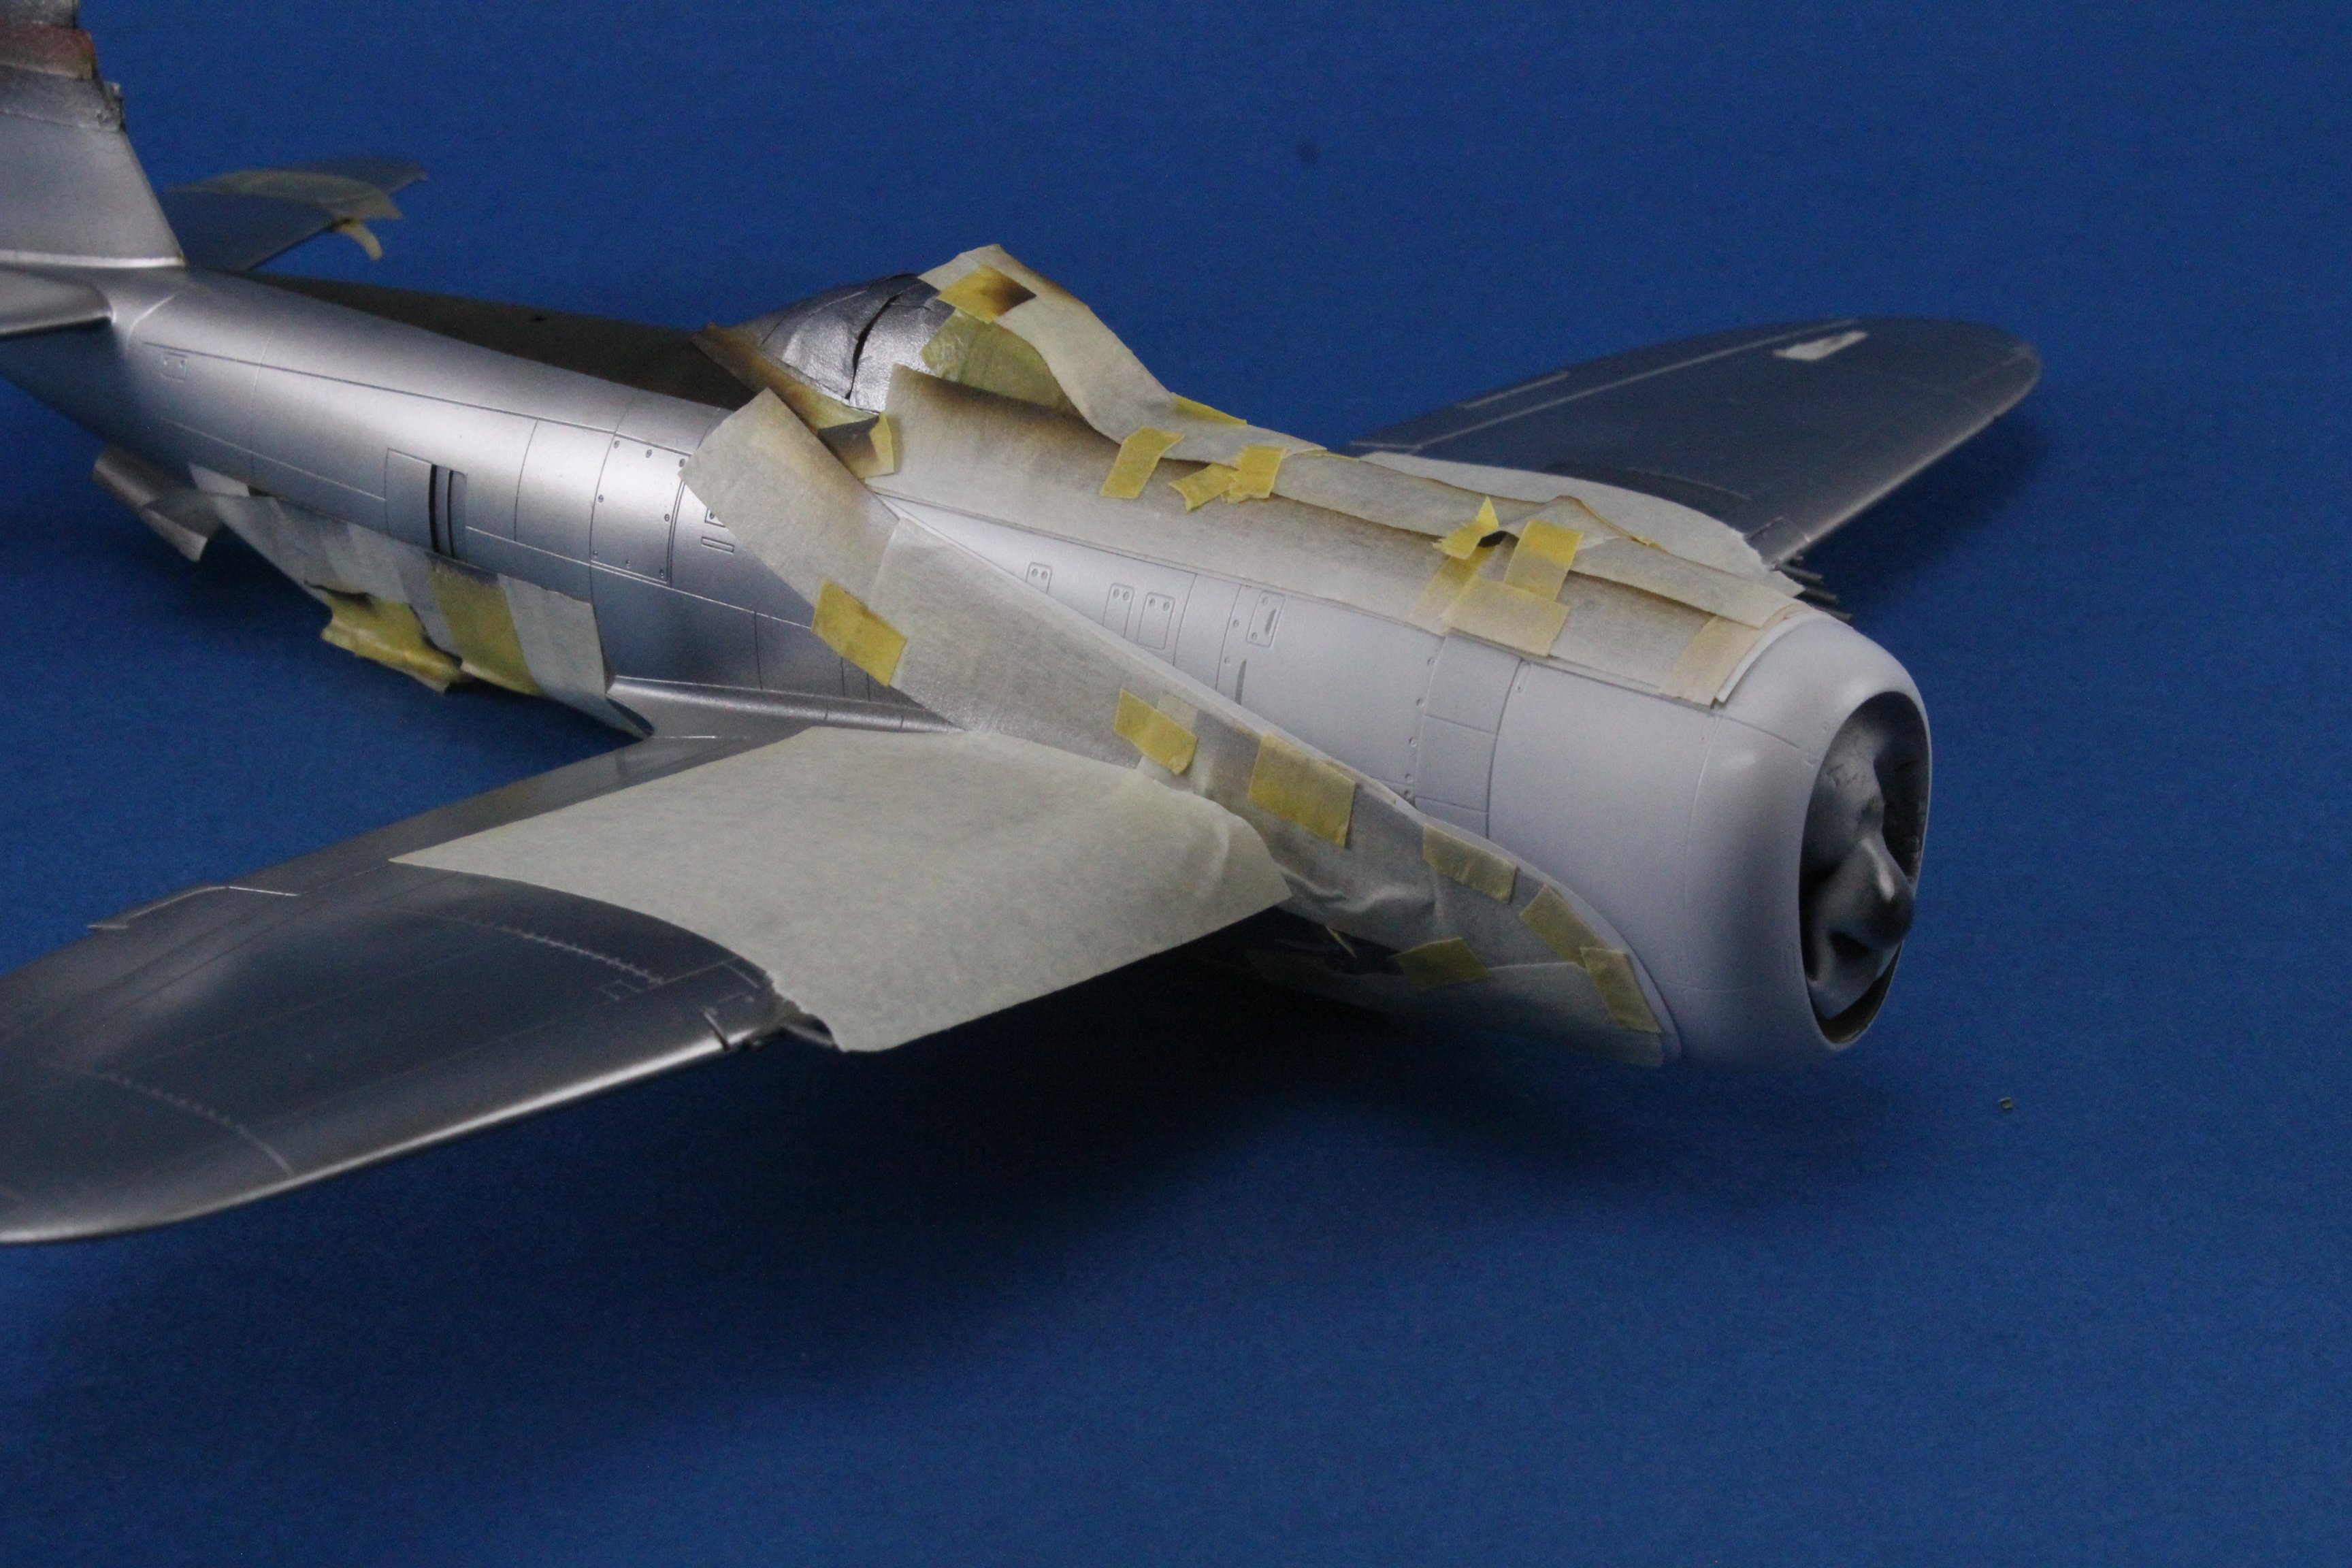
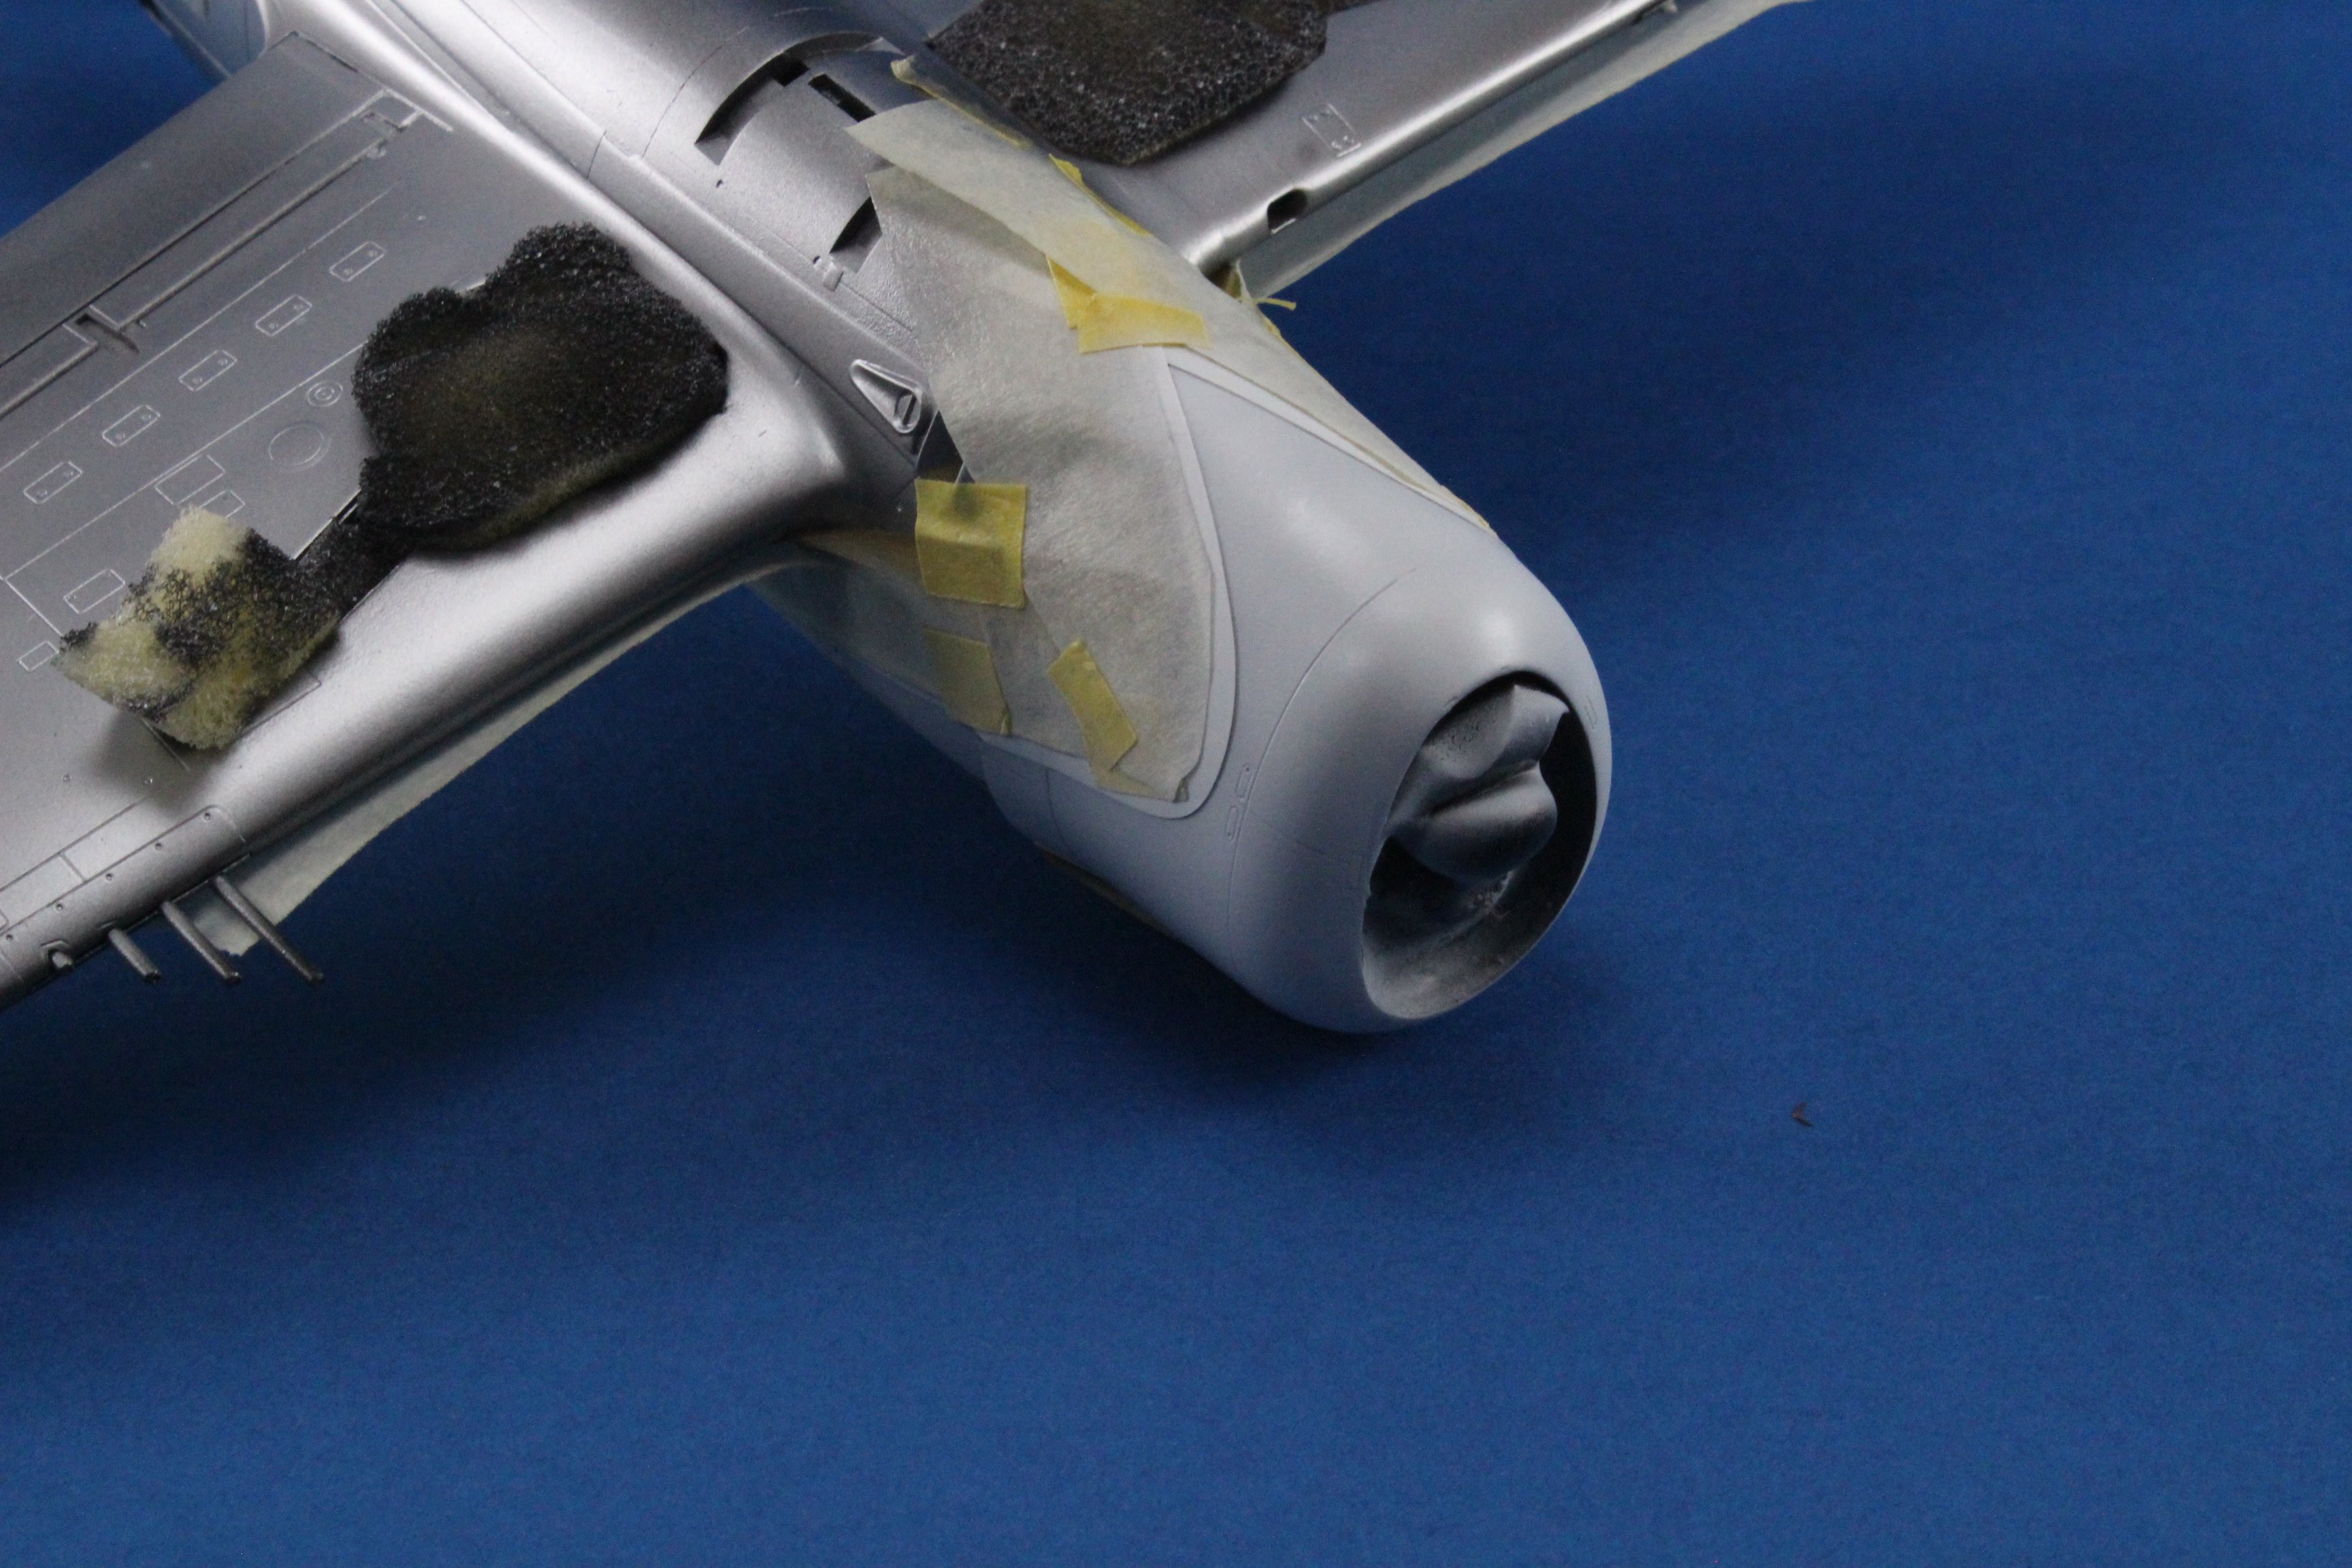
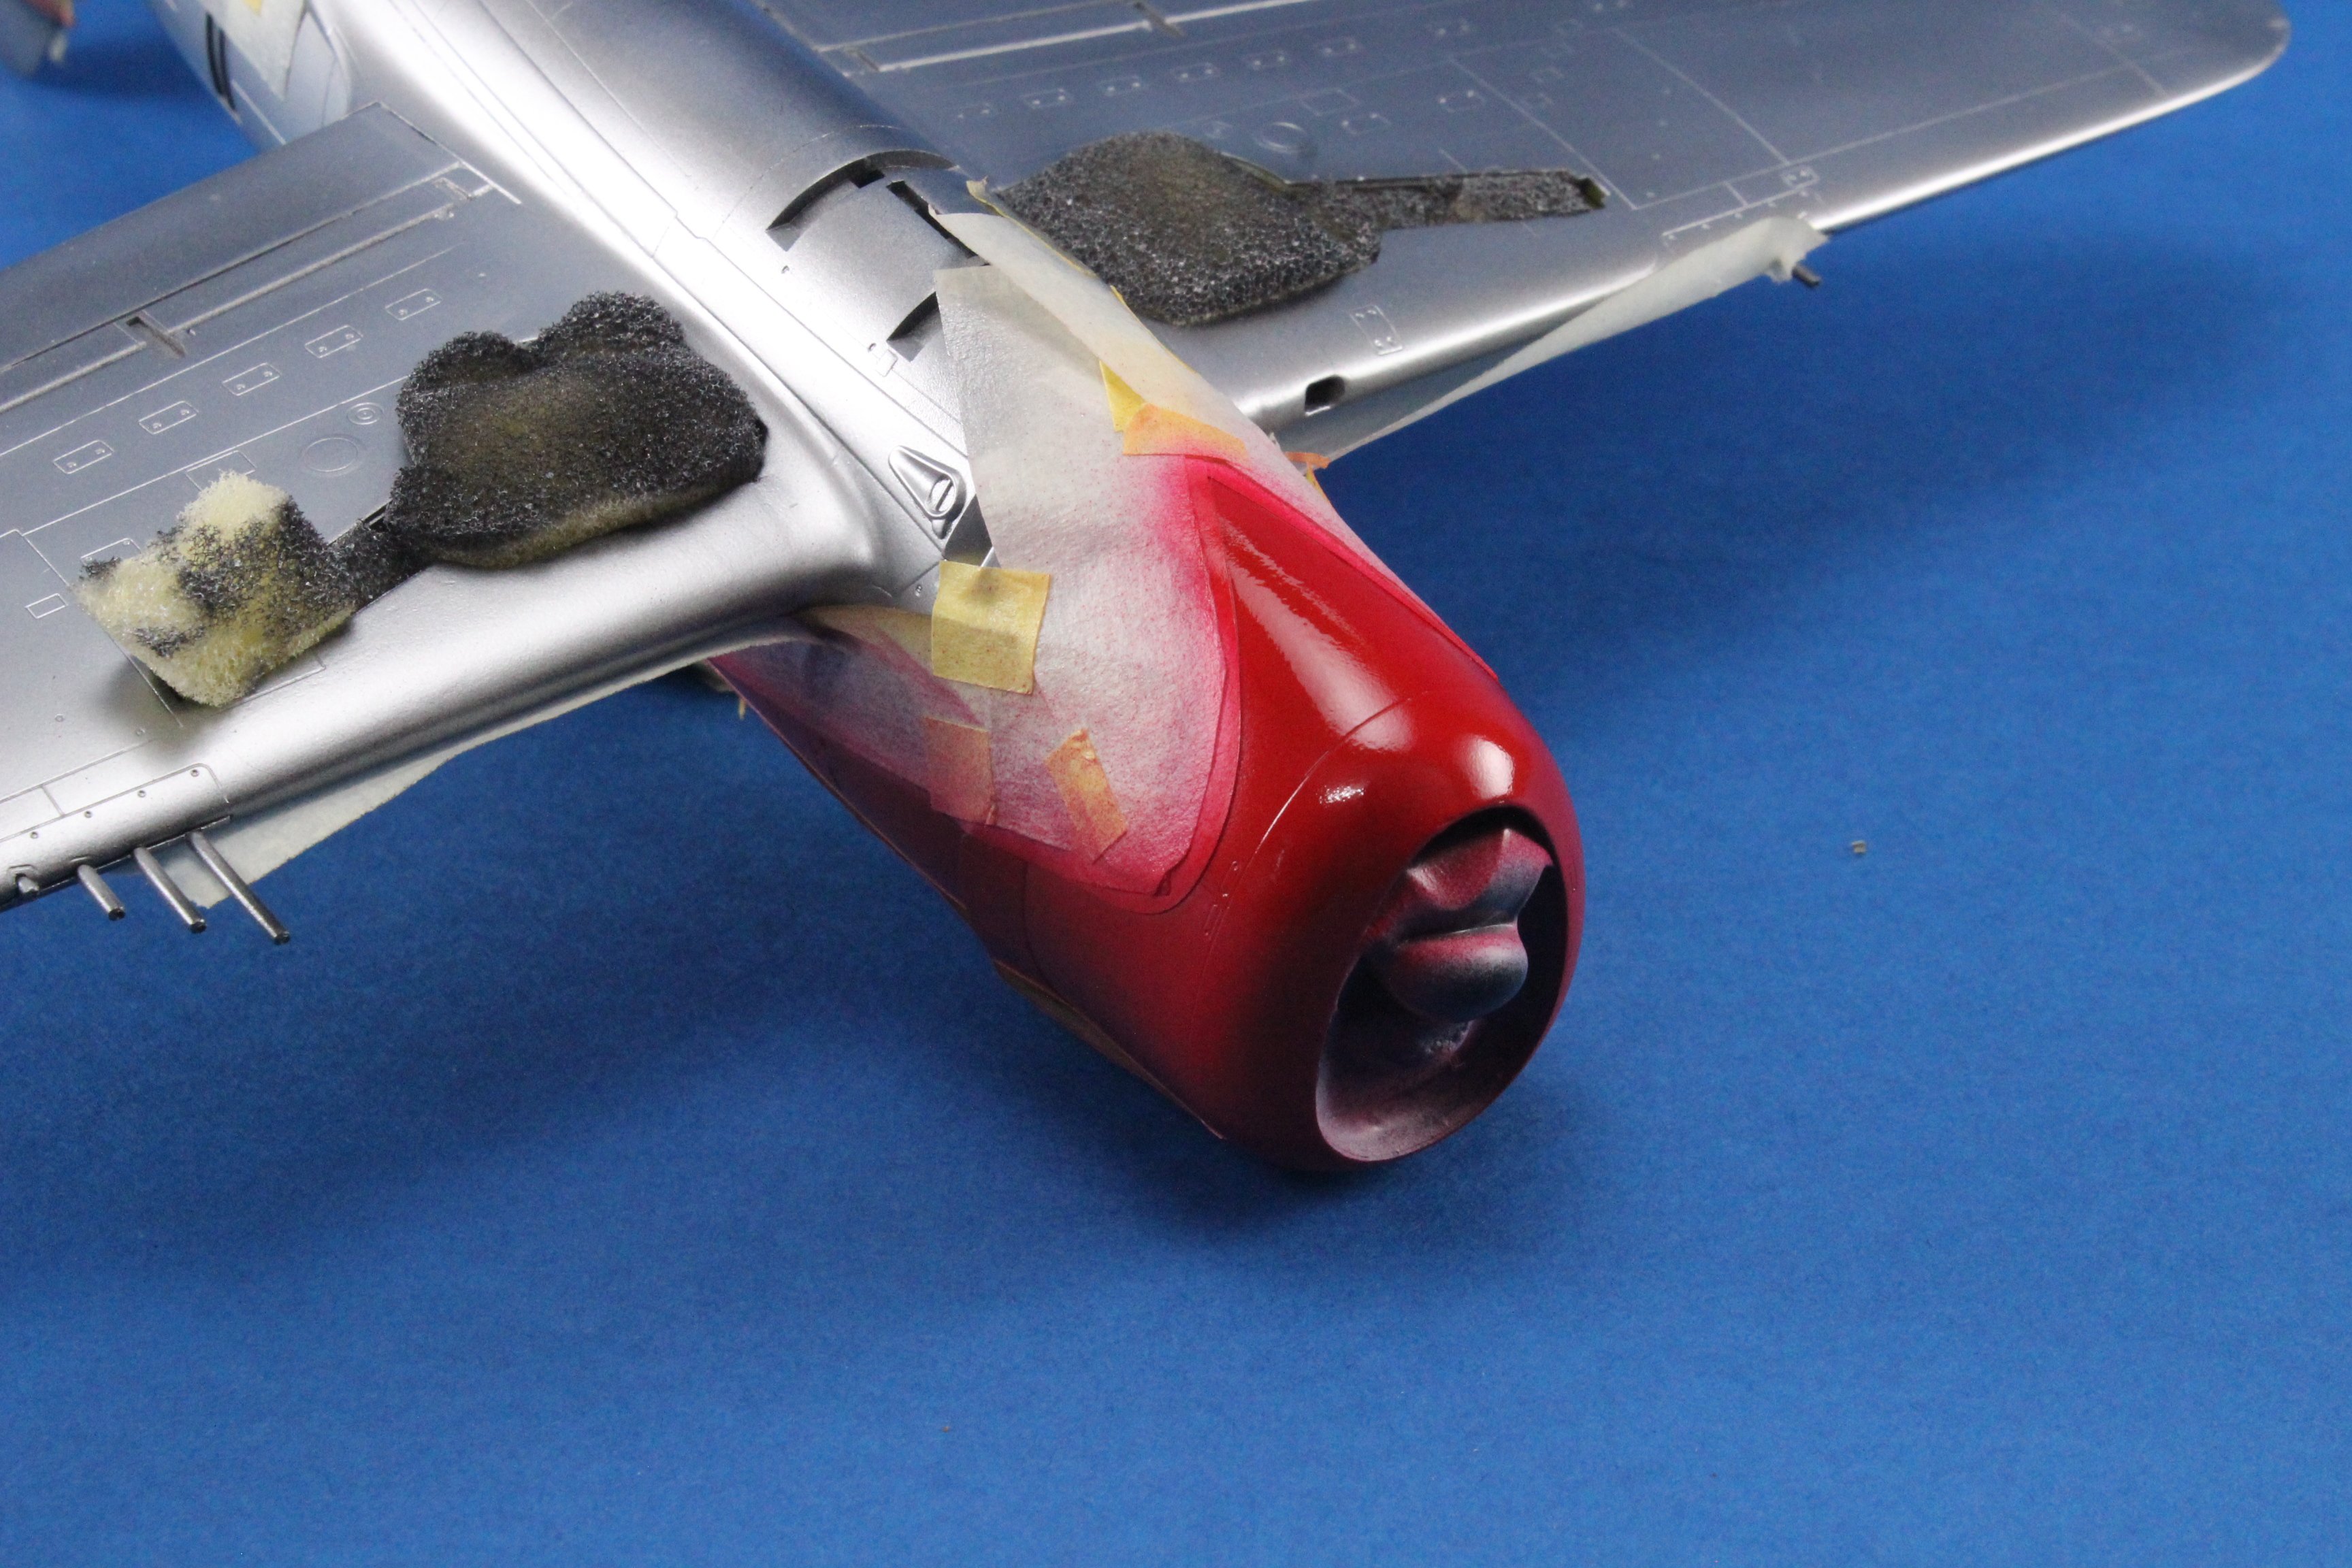
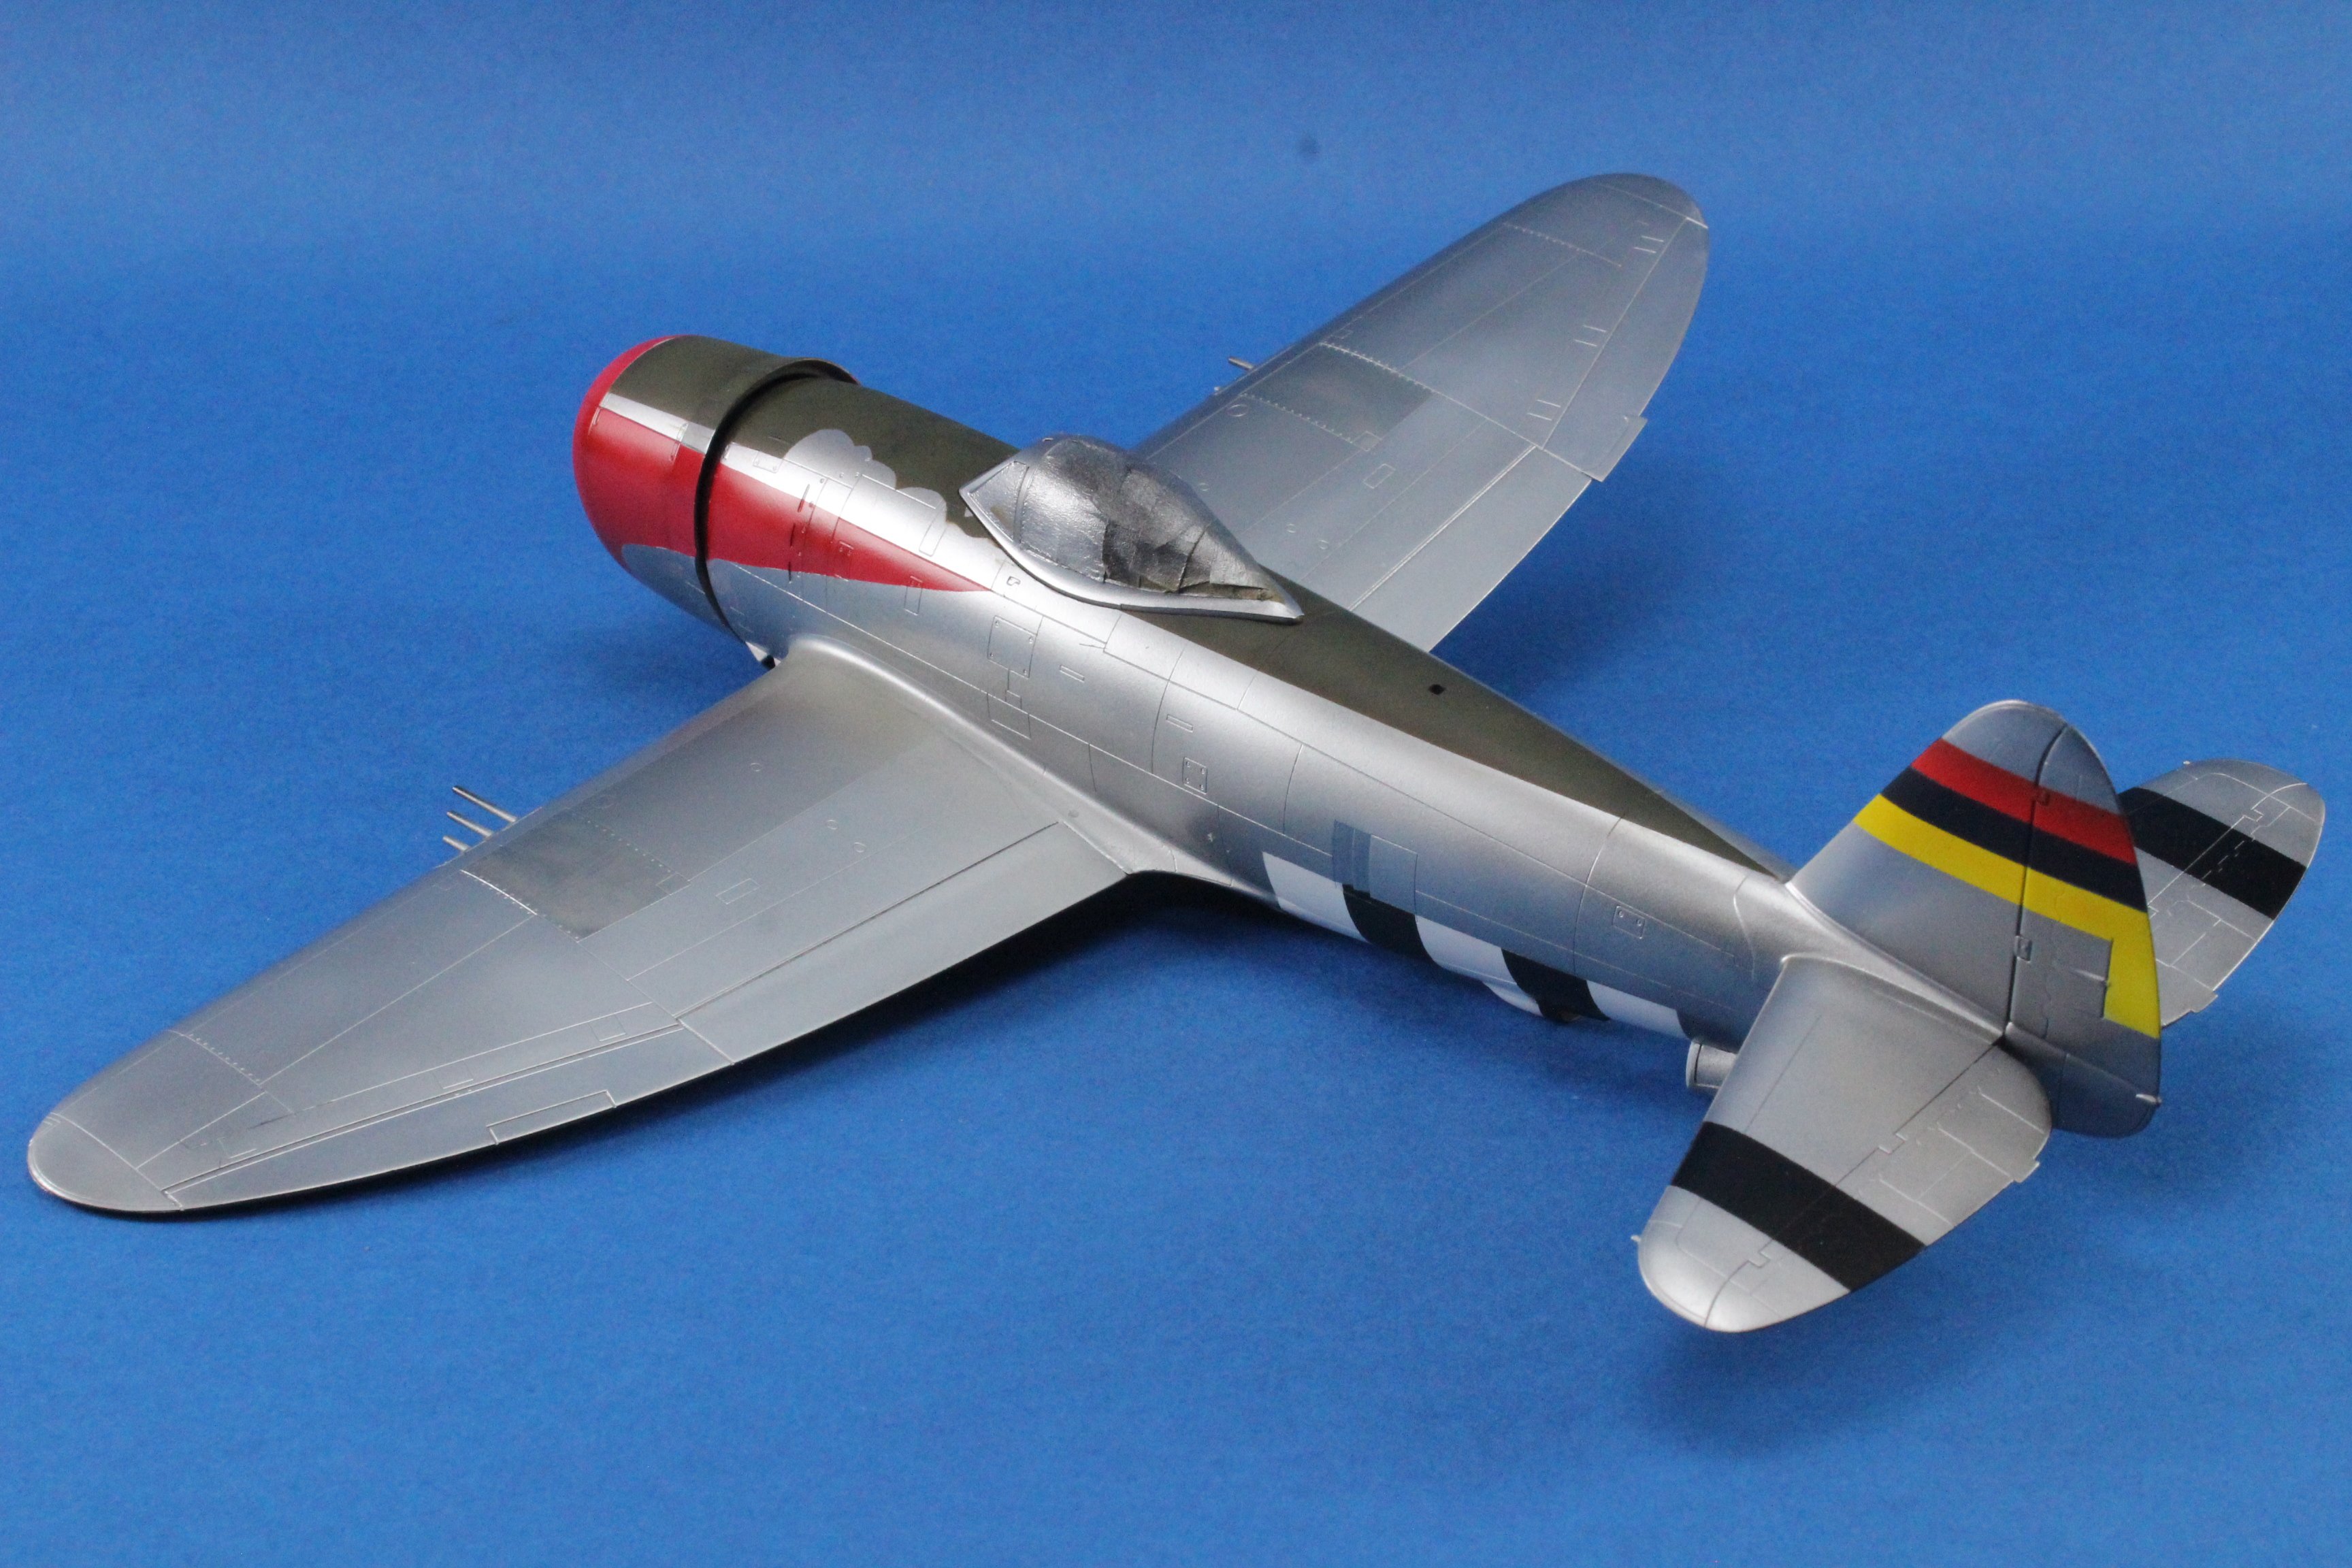
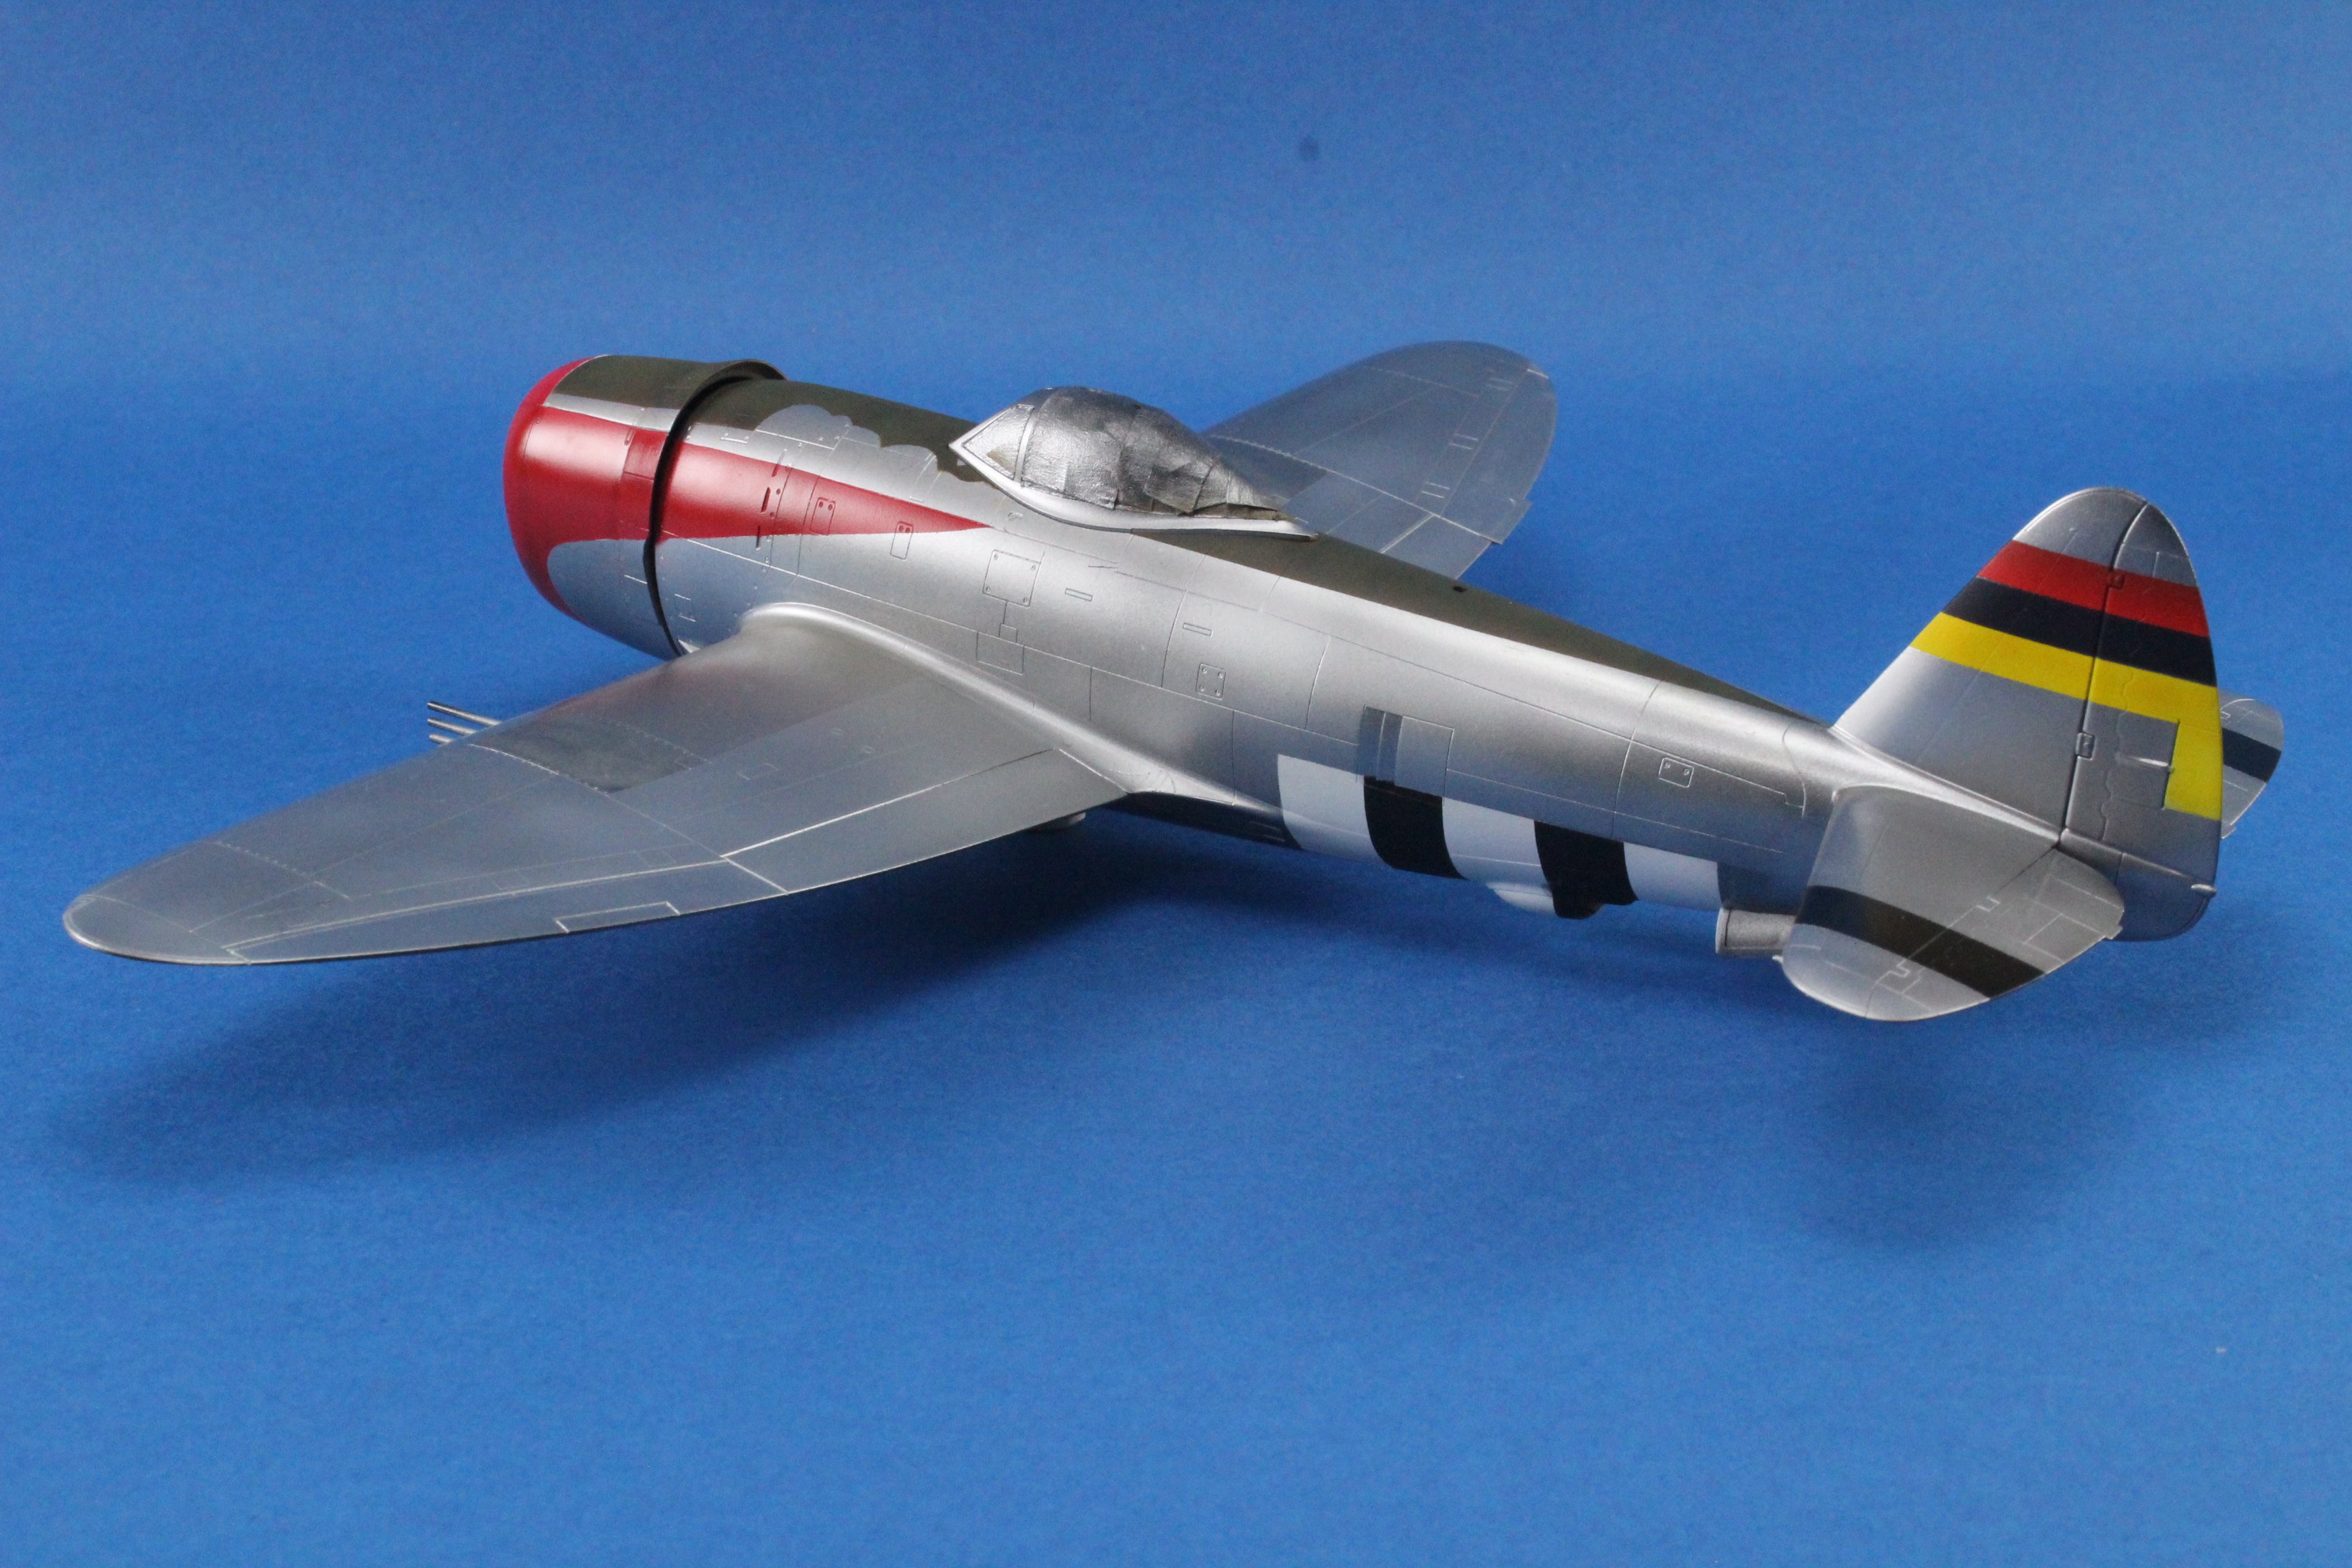
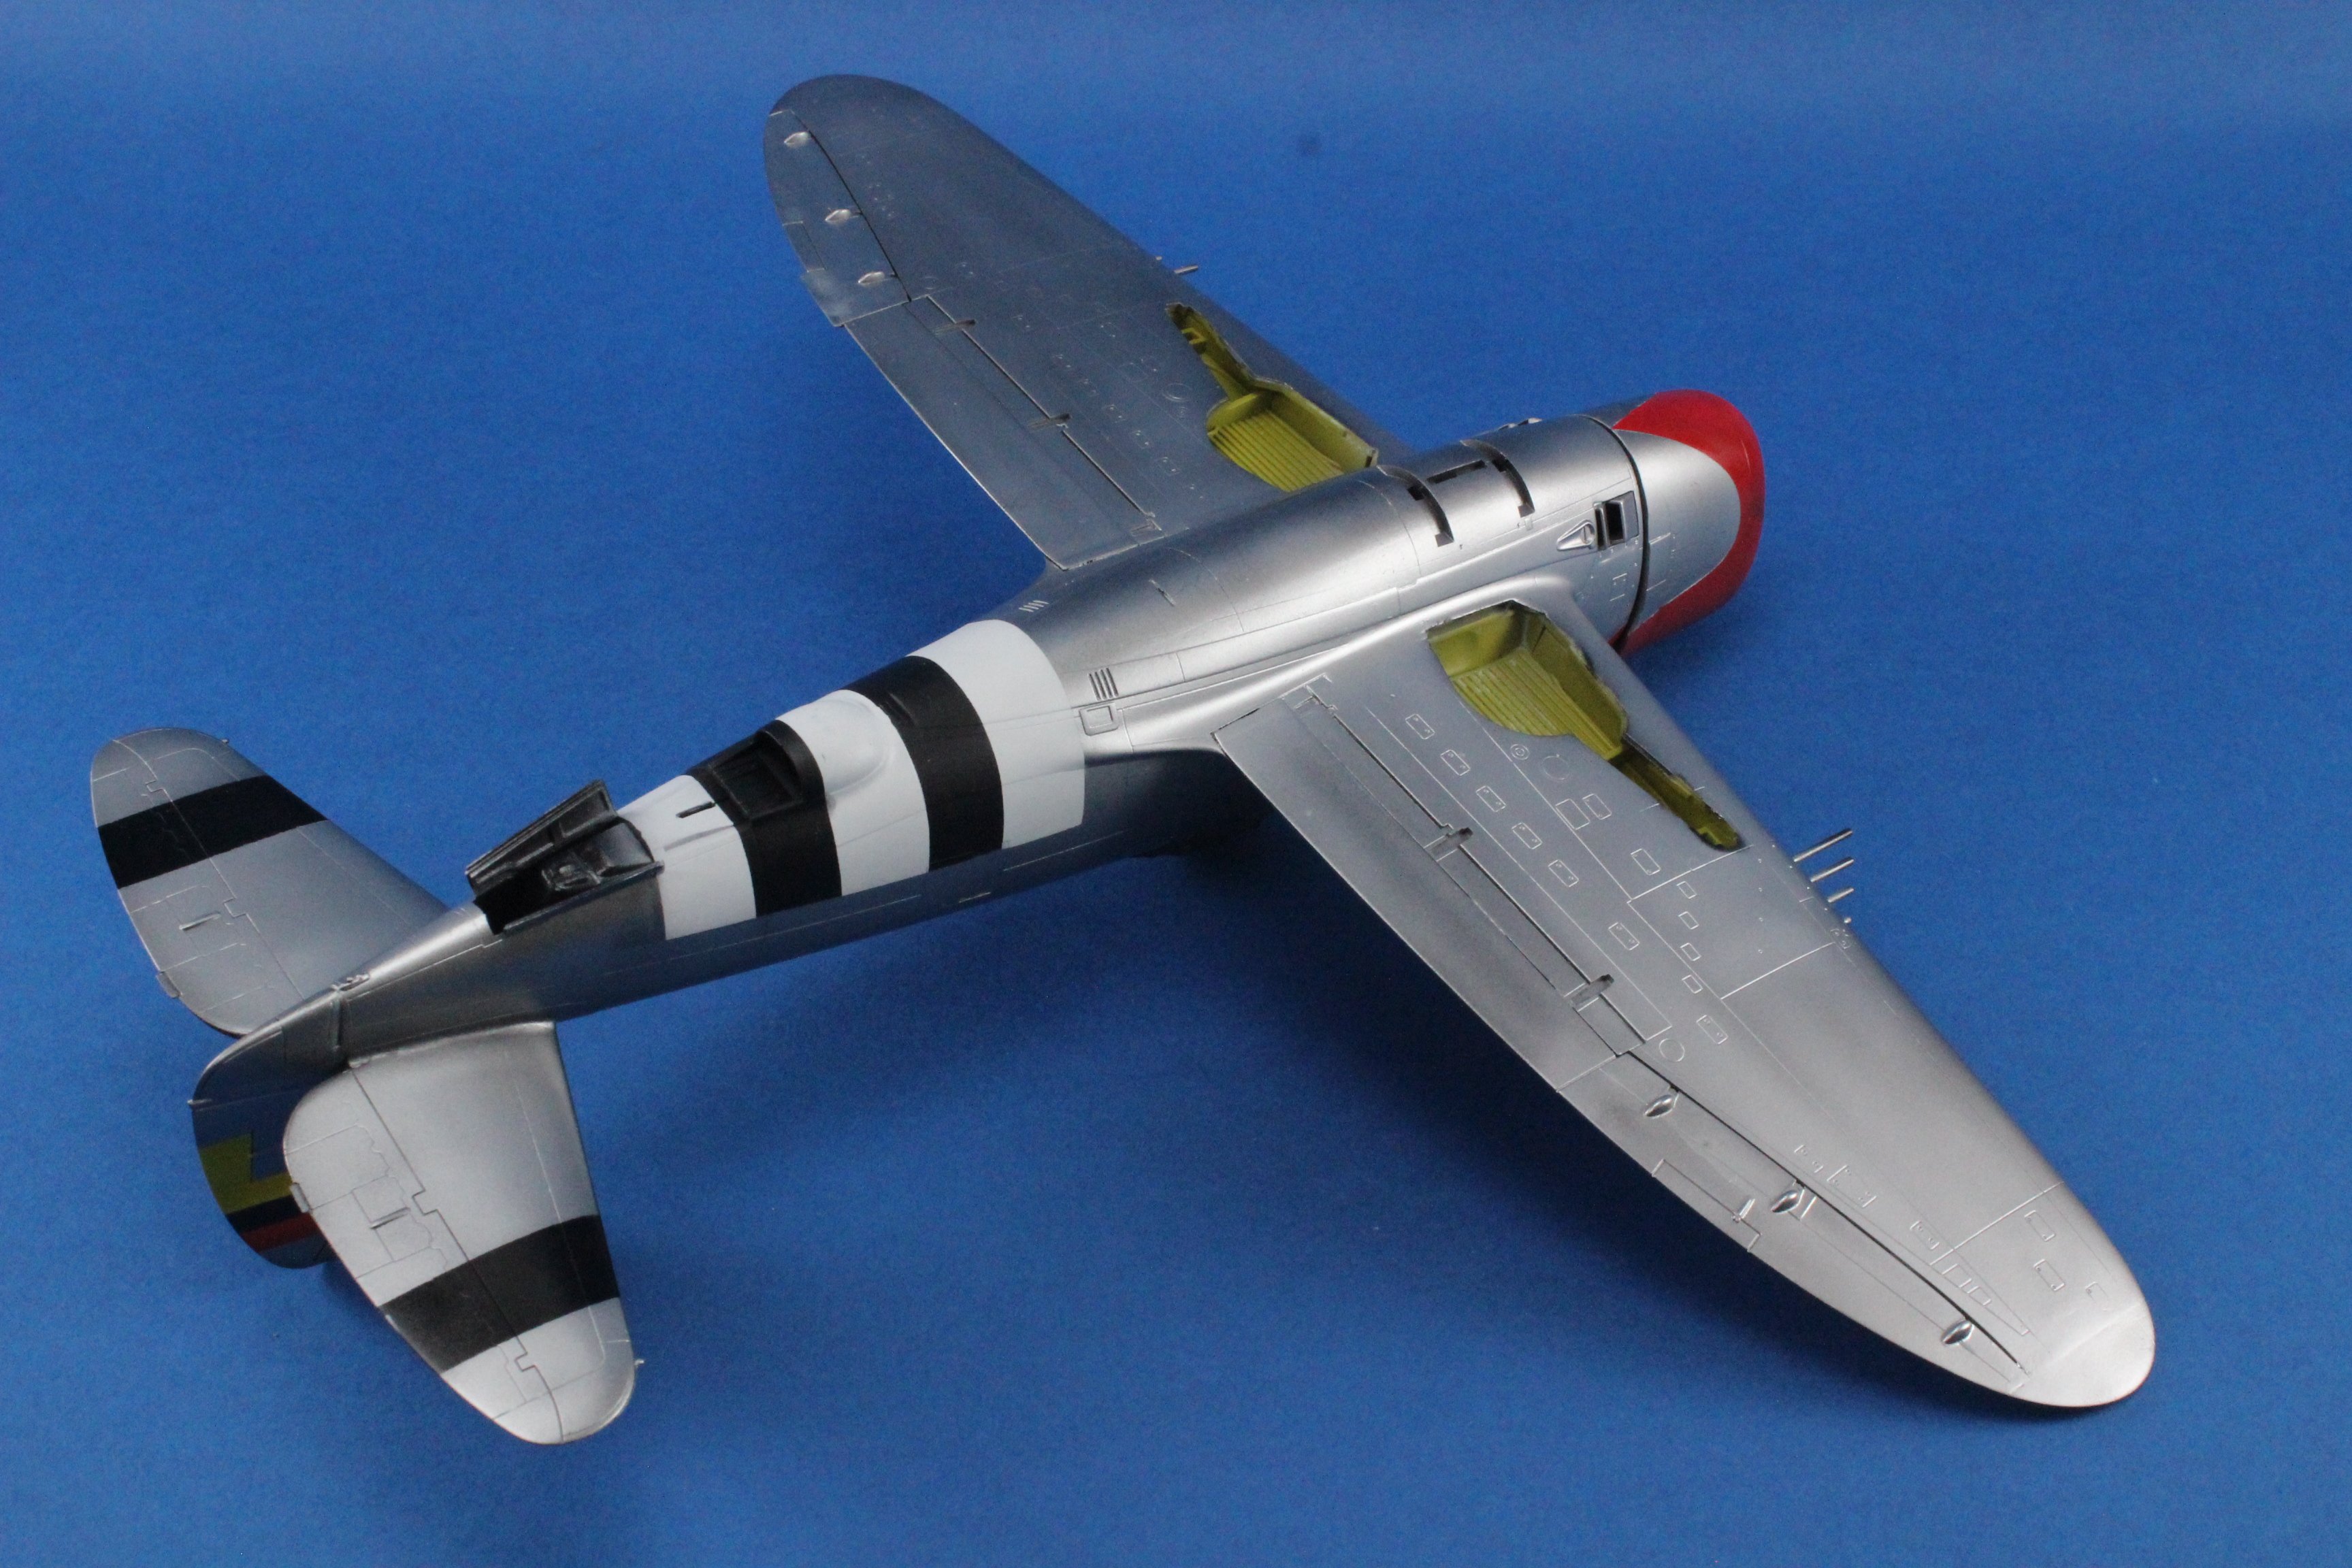
Hi all! i would like to present a model that has been on my workbench for a couple of years, due to a missing part ( Landing gear wheel). I decided that until i finish some of my older models, i will not start a new one, so this year i've dedicated myself to end / conclude this models. This is one of them. Hobbyeasy 1:48 Scale P-47D . This is a very simplified but easy to build model and it's on my workbench since 2017. Using a 3D resin set from eduard to fit the P-47D from miniart wheels, i proceed with it's conclusion. The set it's easy to paint and assemble , and i adapt the wheel shaft with a 1mm metal rod and attach it to the landing gear. When i was satisfied with the fit, i then paint the wheels. Also missing from the model was the pitot tube. i scratch a new one from a 0,6mm needle and some plasticard. It's not on my standards, but i'm really happy to close this chapter. Some work in progress photos , from 2017 and the final ones ! The Final ones! thanks for watching and have a fantastic and healthy 2025!


.thumb.JPG.568d1b0c1ec3826c66057d750be5861a.JPG)
.thumb.JPG.45f8083f1440b6d03d0321a22482fcb2.JPG)
.thumb.JPG.5dd36dec573735c8baf122022b1d8923.JPG)
.thumb.JPG.e3aa3ba4d9855ea046e85967a8177c4d.JPG)
.thumb.JPG.ca280e24e6028dea7719e950237a861d.JPG)
.thumb.JPG.14c10cfbac421db1572f8866c7686dbf.JPG)
- 10 replies
-
- 11
-

-

-
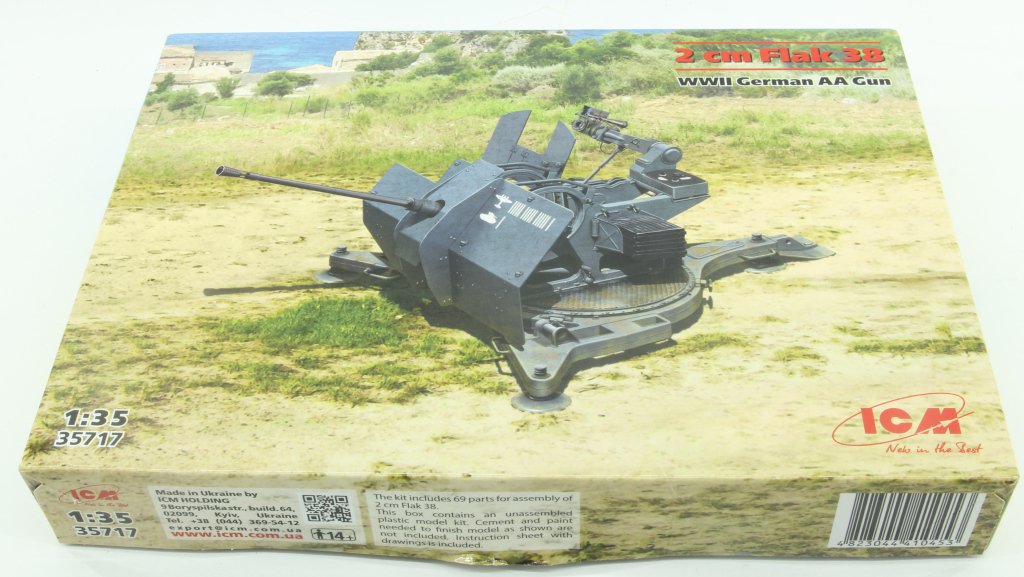
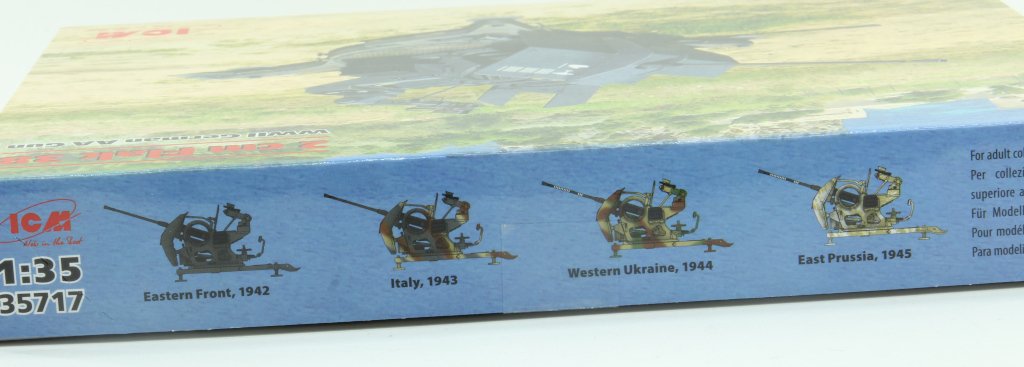
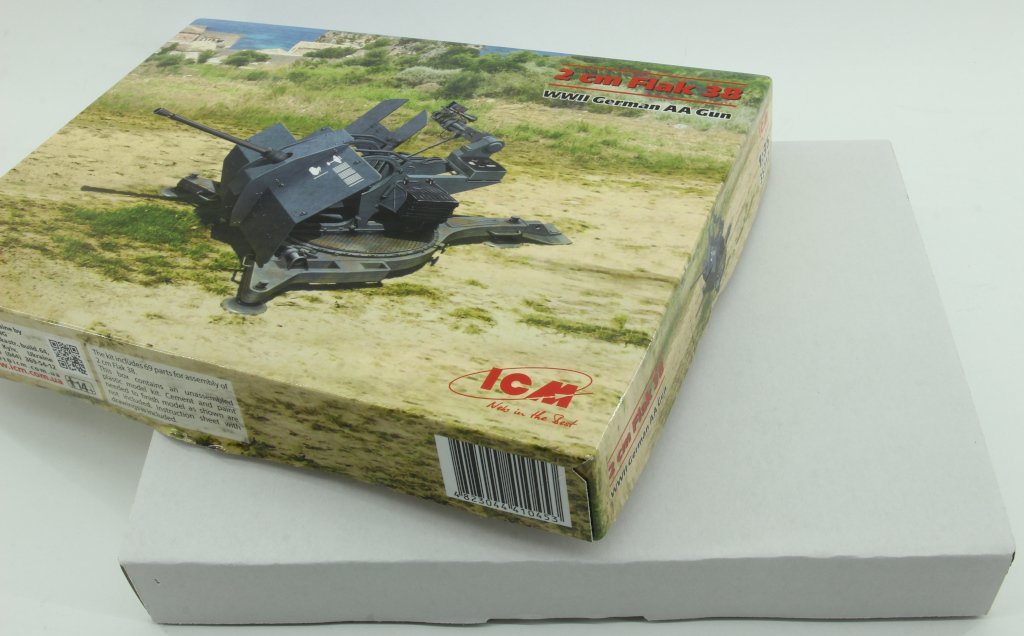
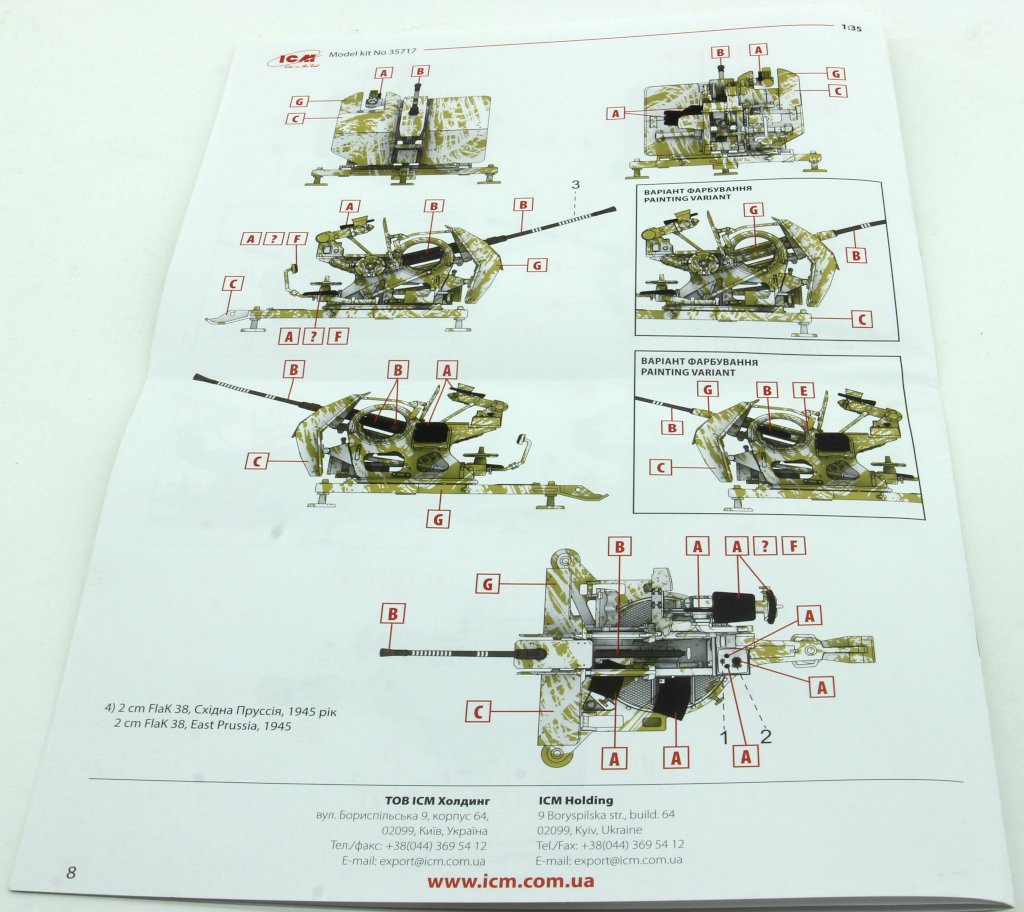
ICM 1:35 2cm Flak 38 "WWII German AA Gun"
rverissimo replied to rverissimo's topic in Armour/AFV Reviews
Thanks for the words and for the picture of the flak without armour plates ! -
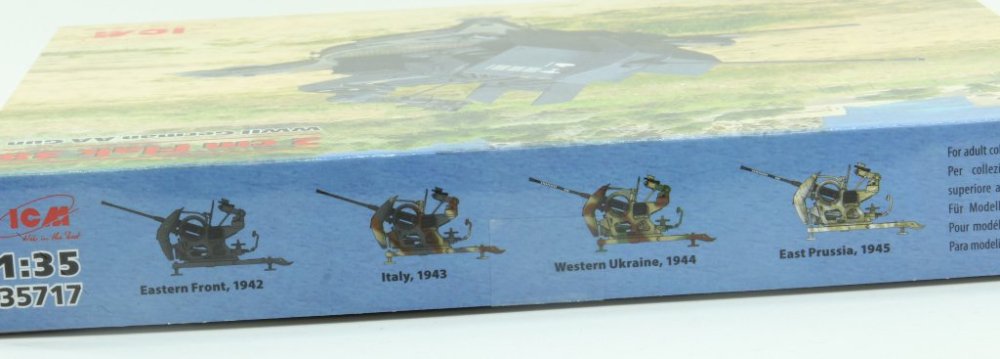
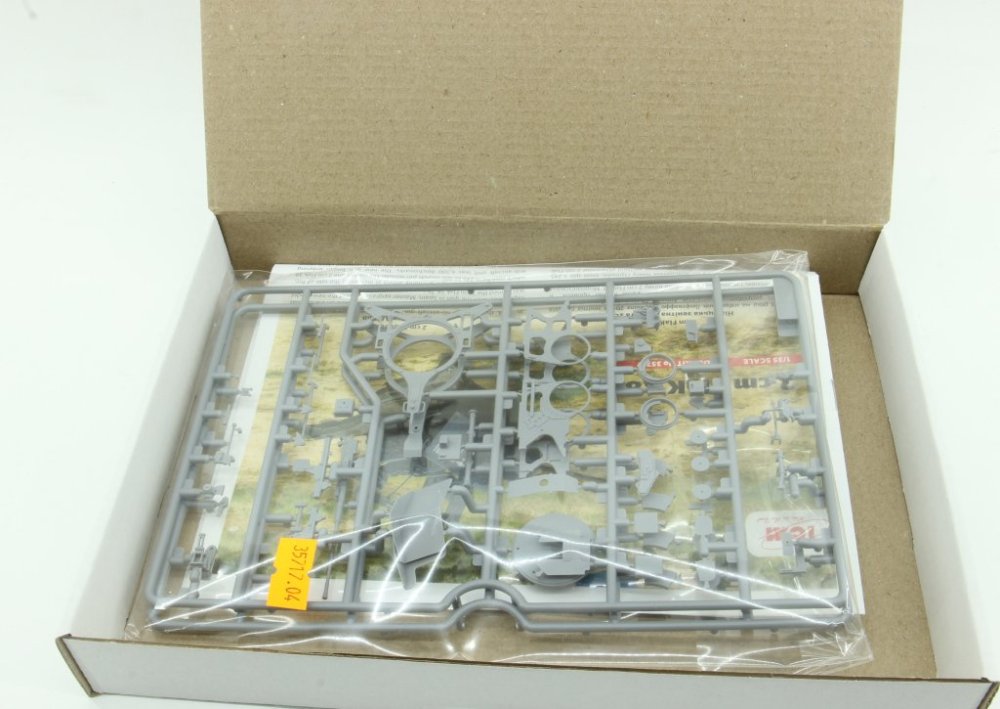
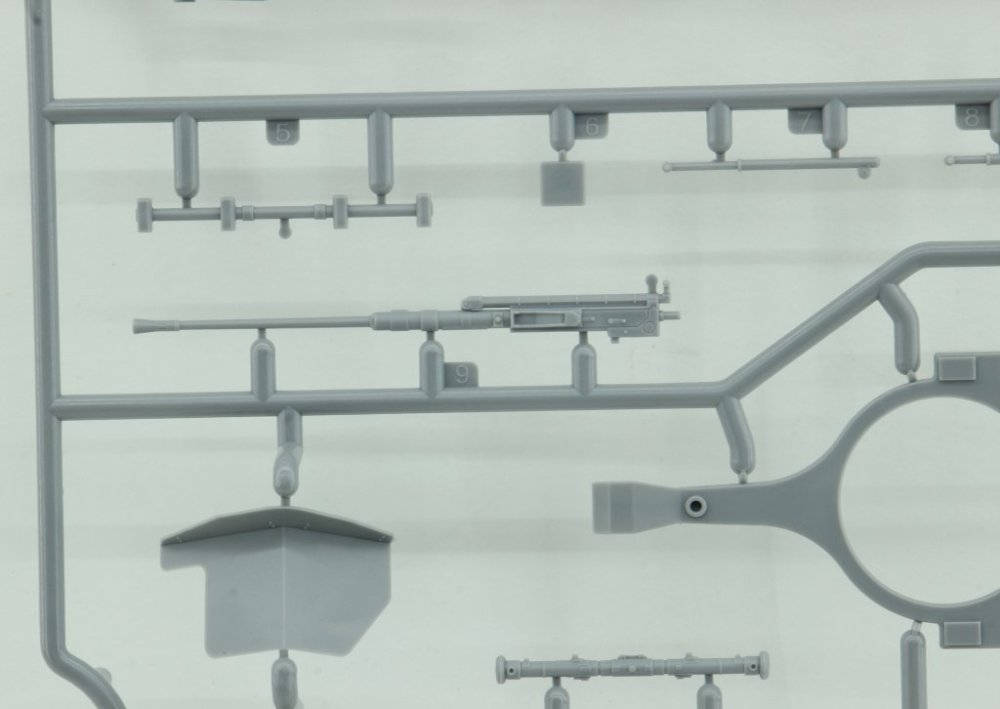
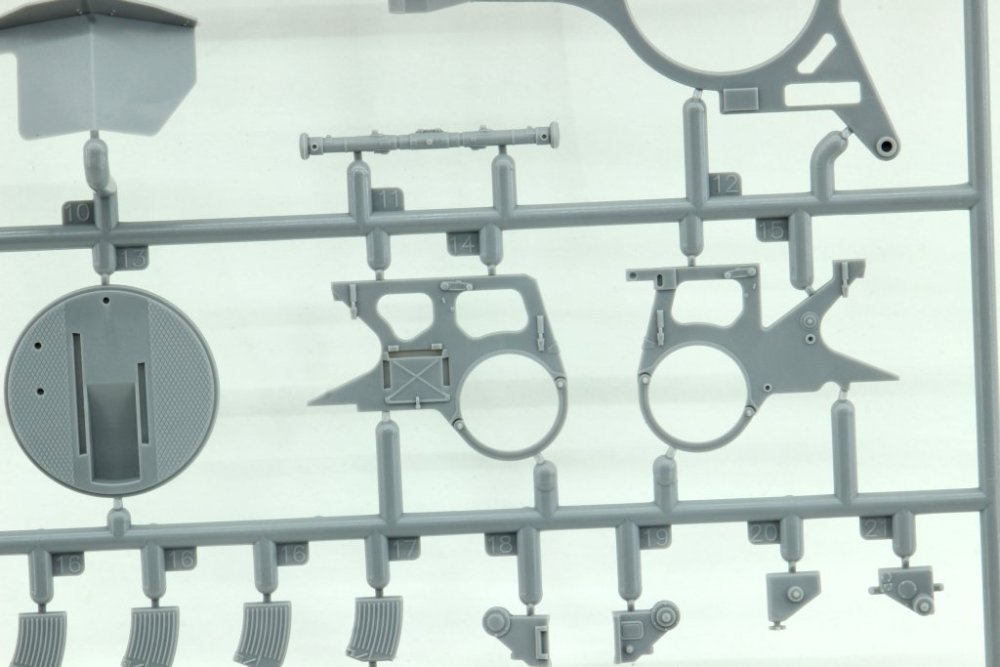
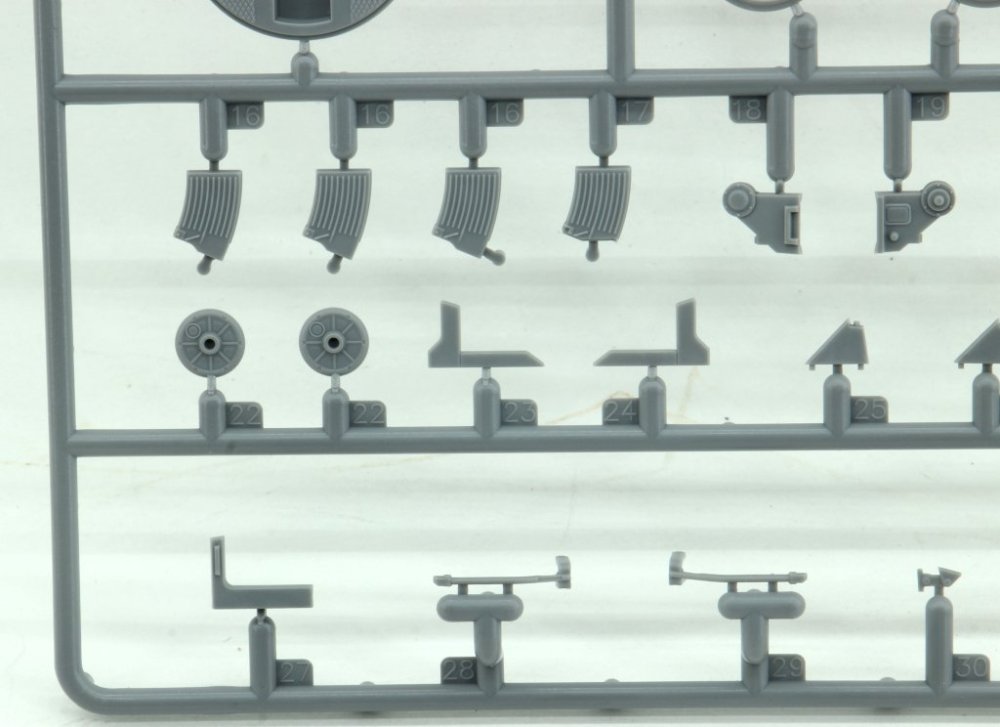
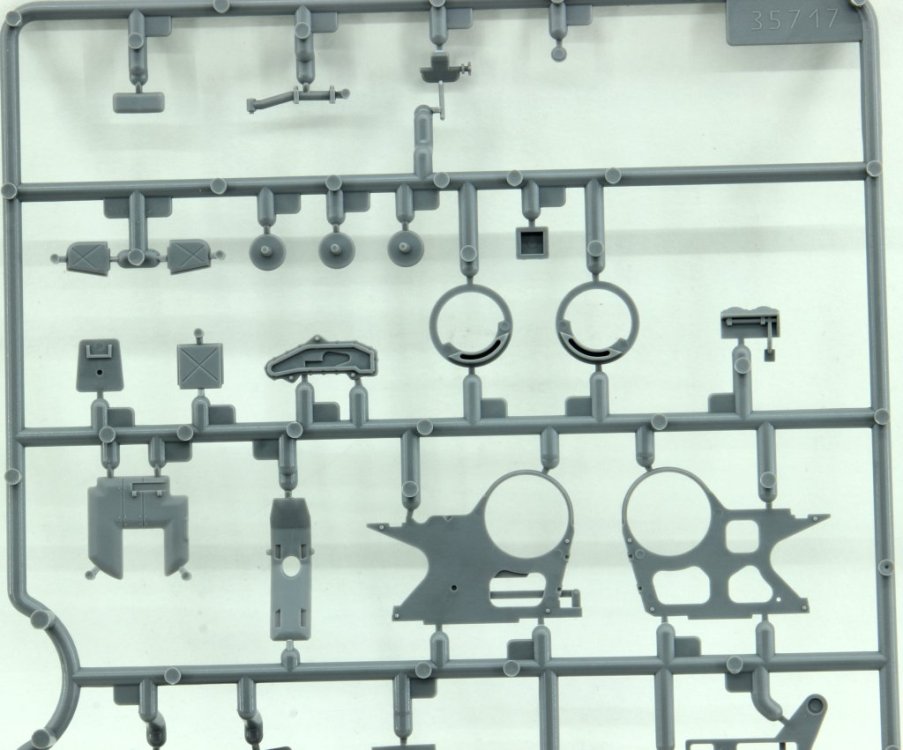
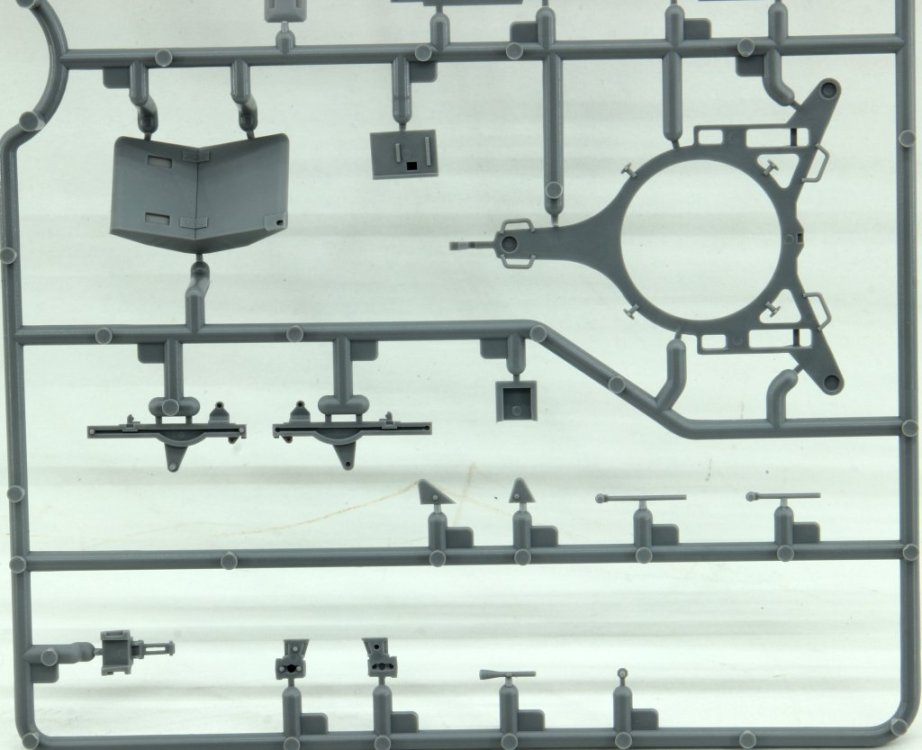
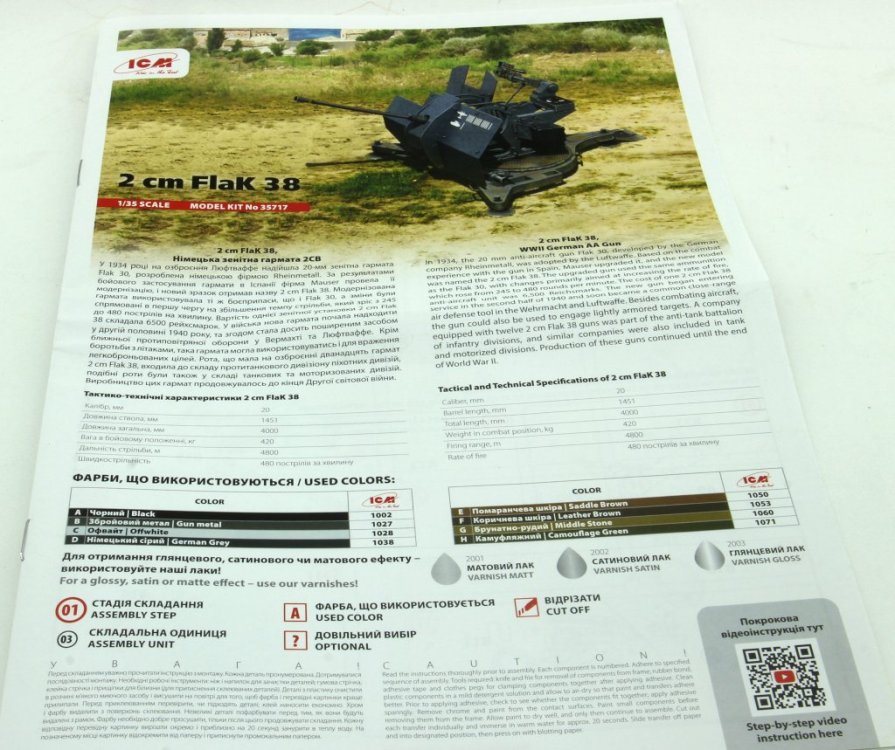
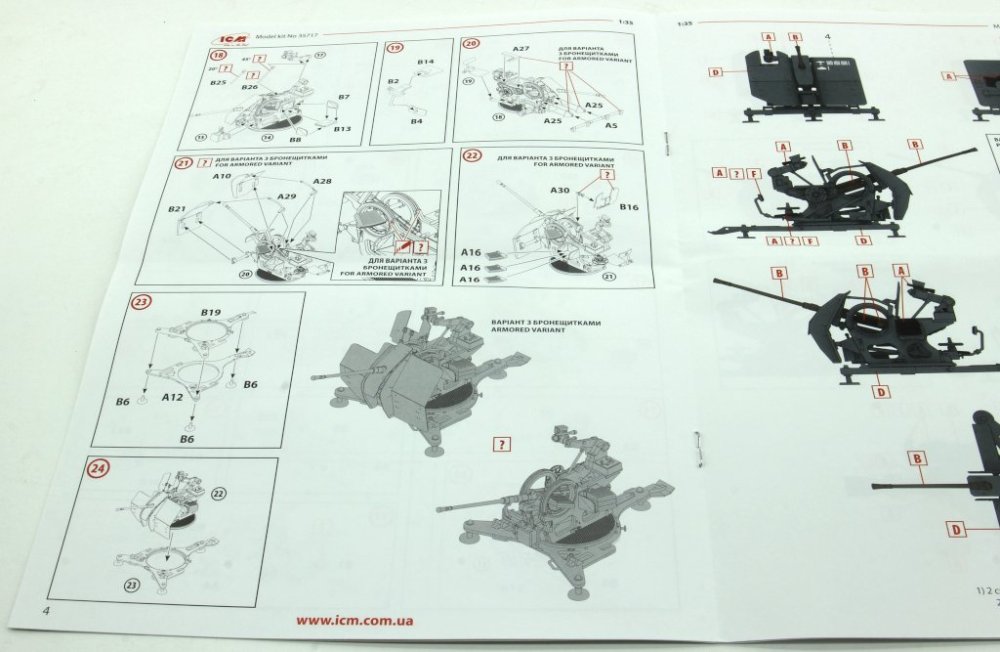
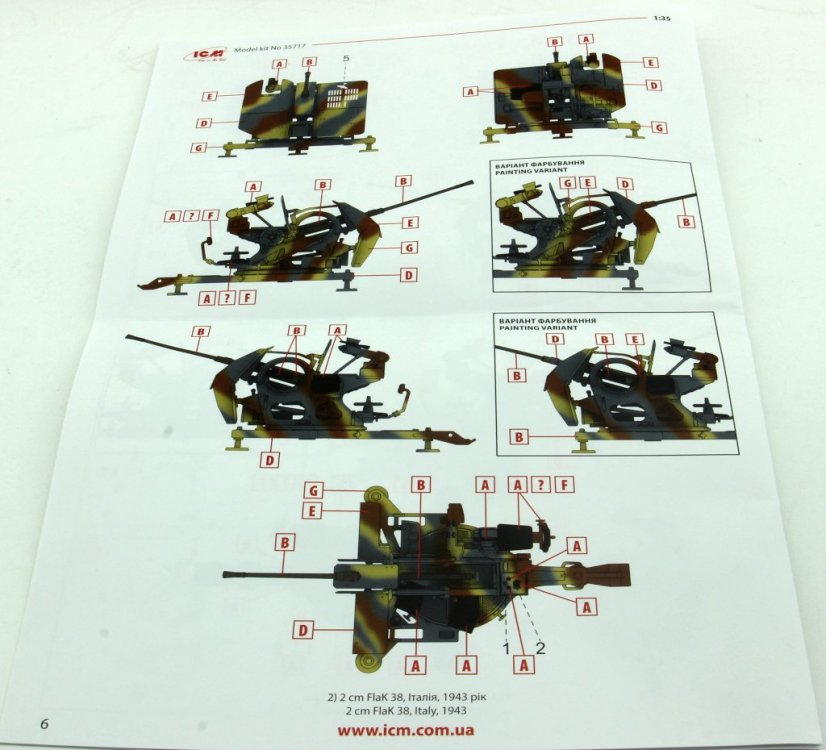
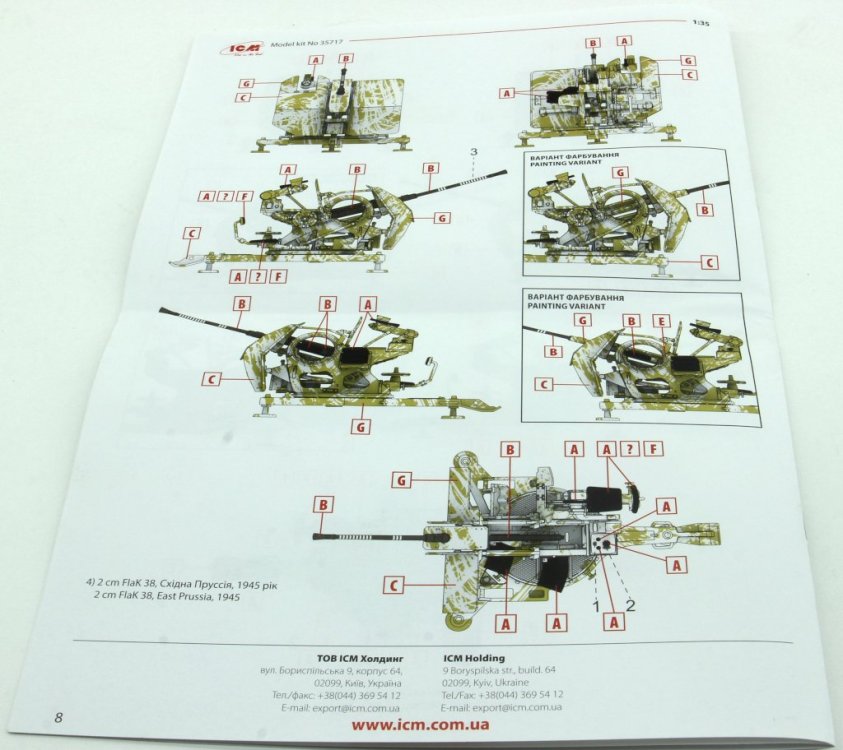
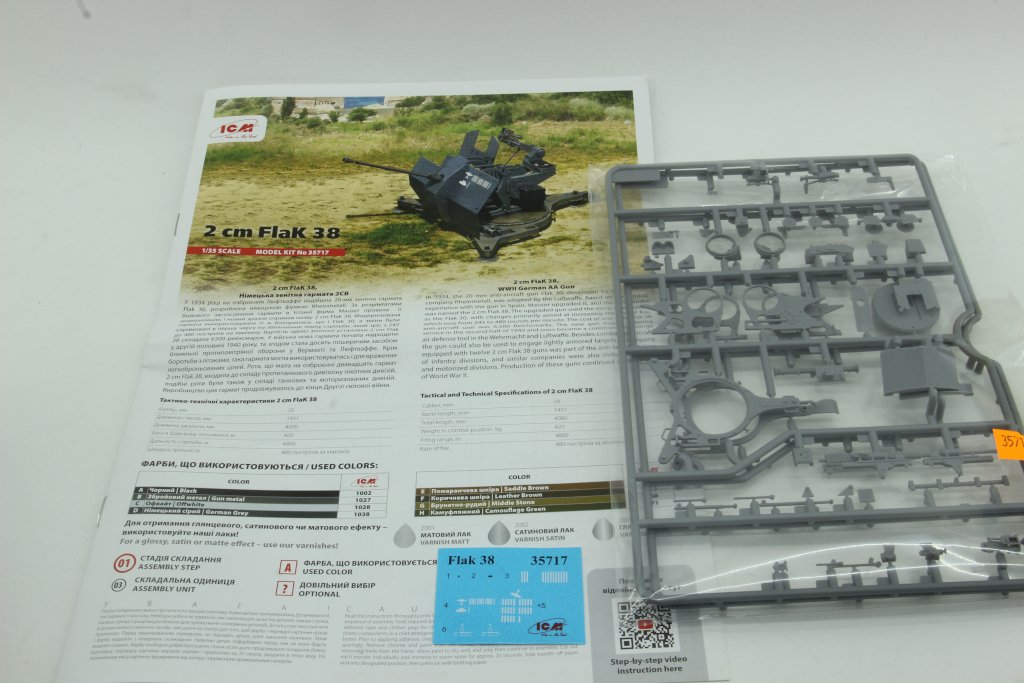
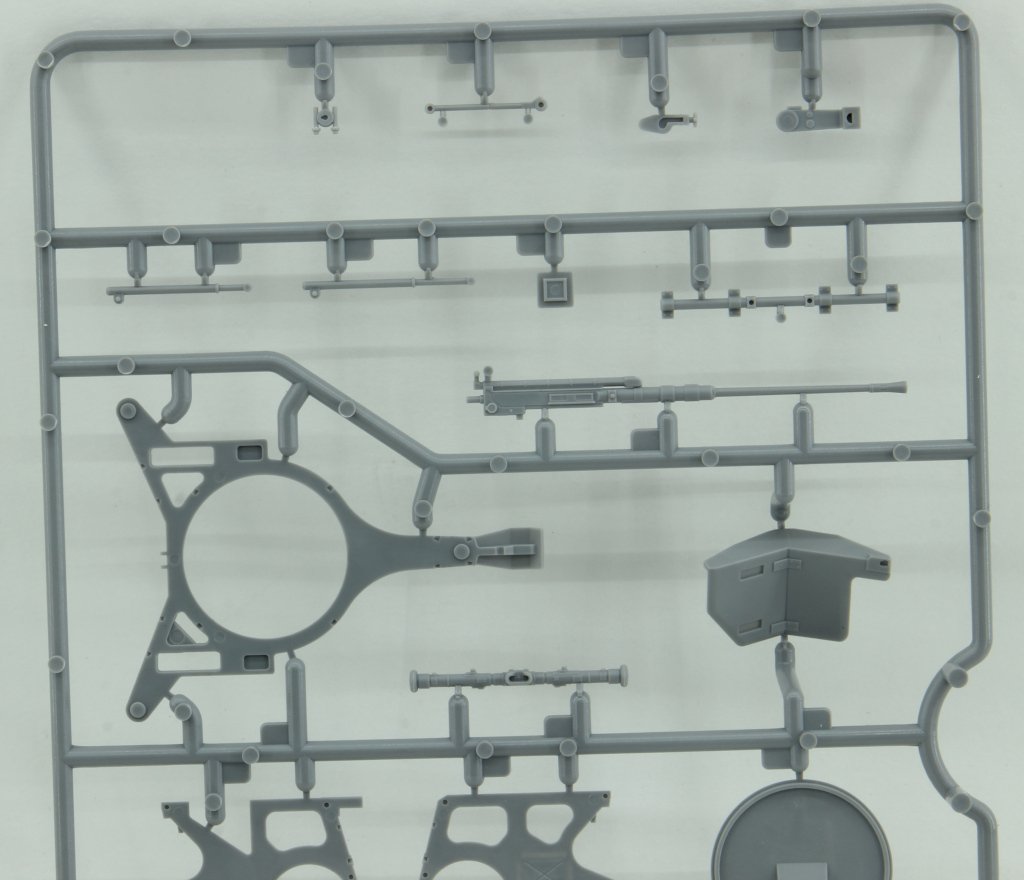
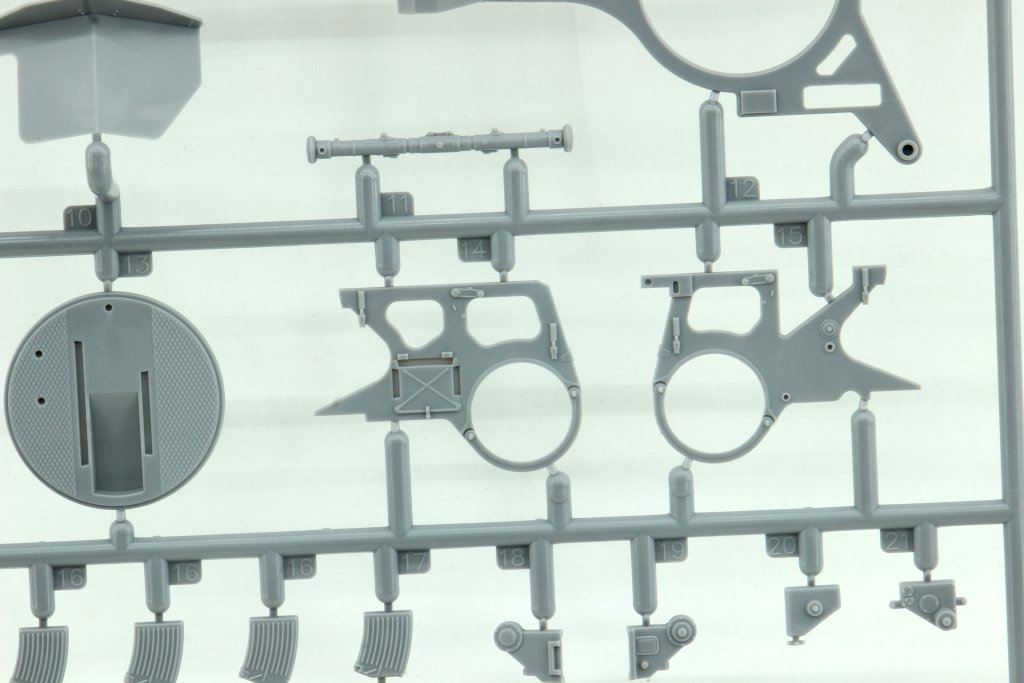
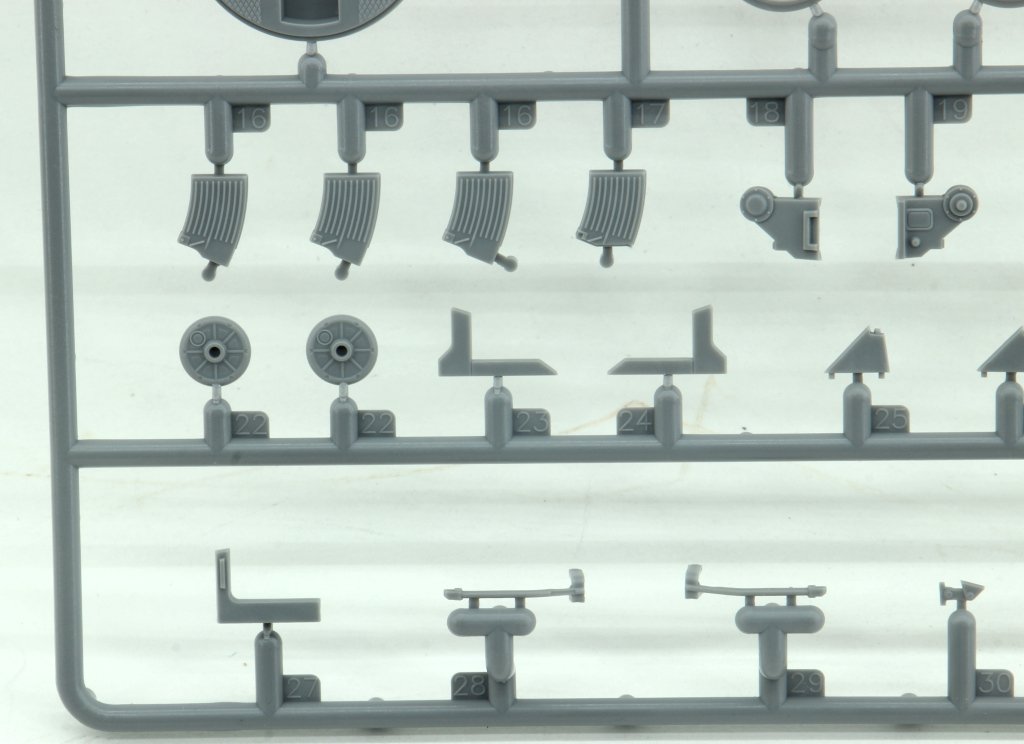
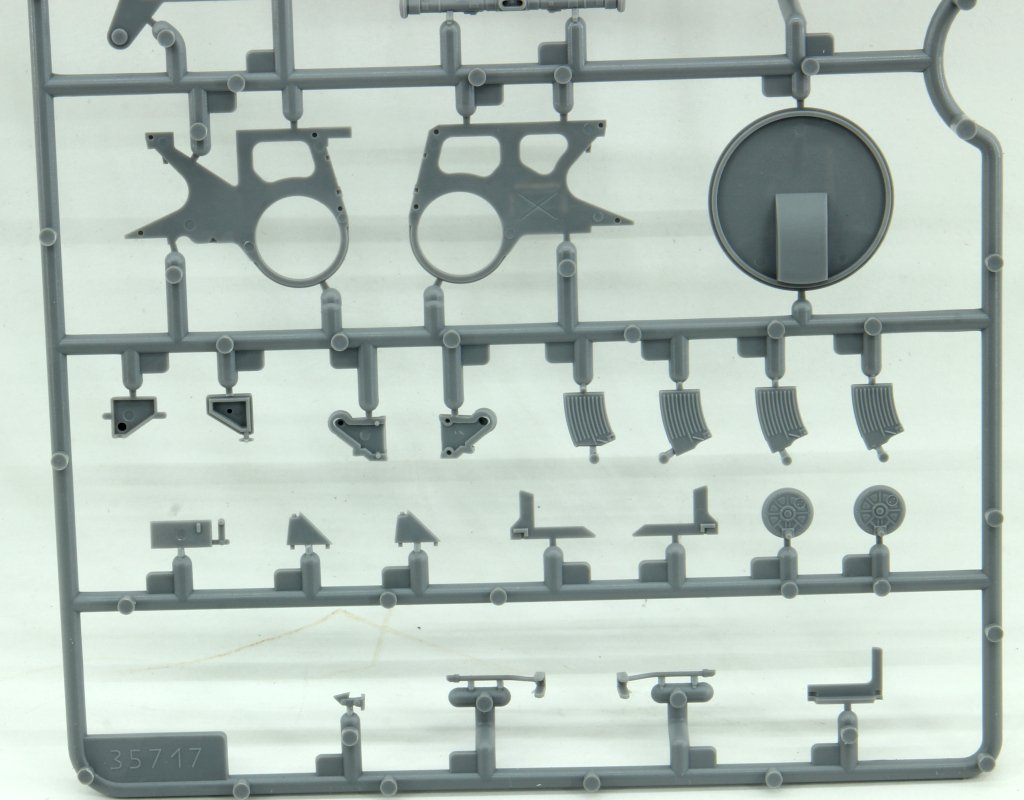
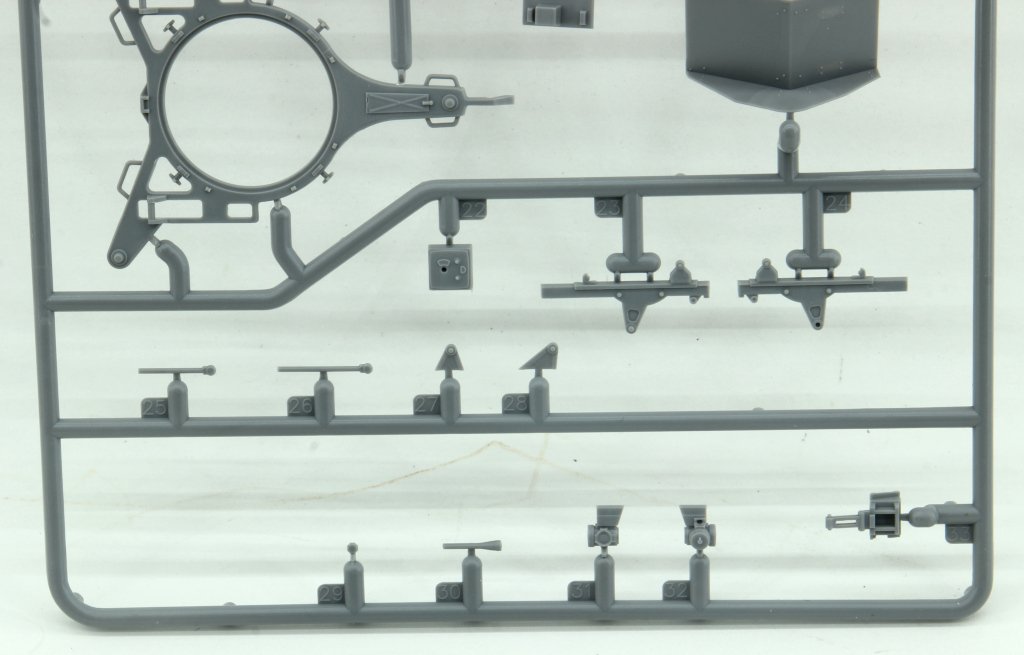
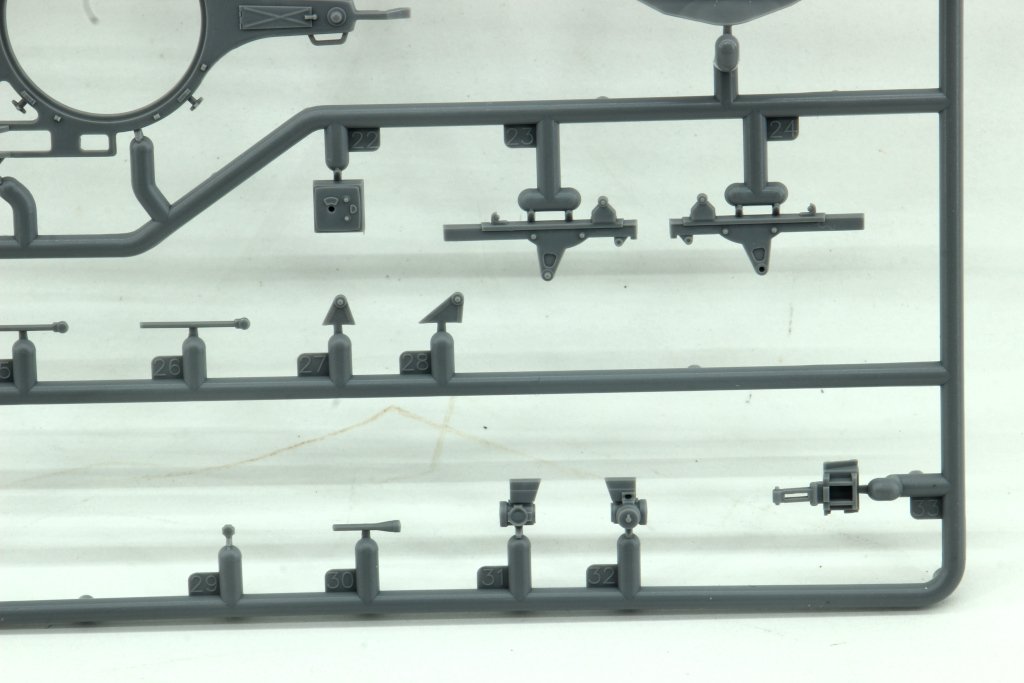
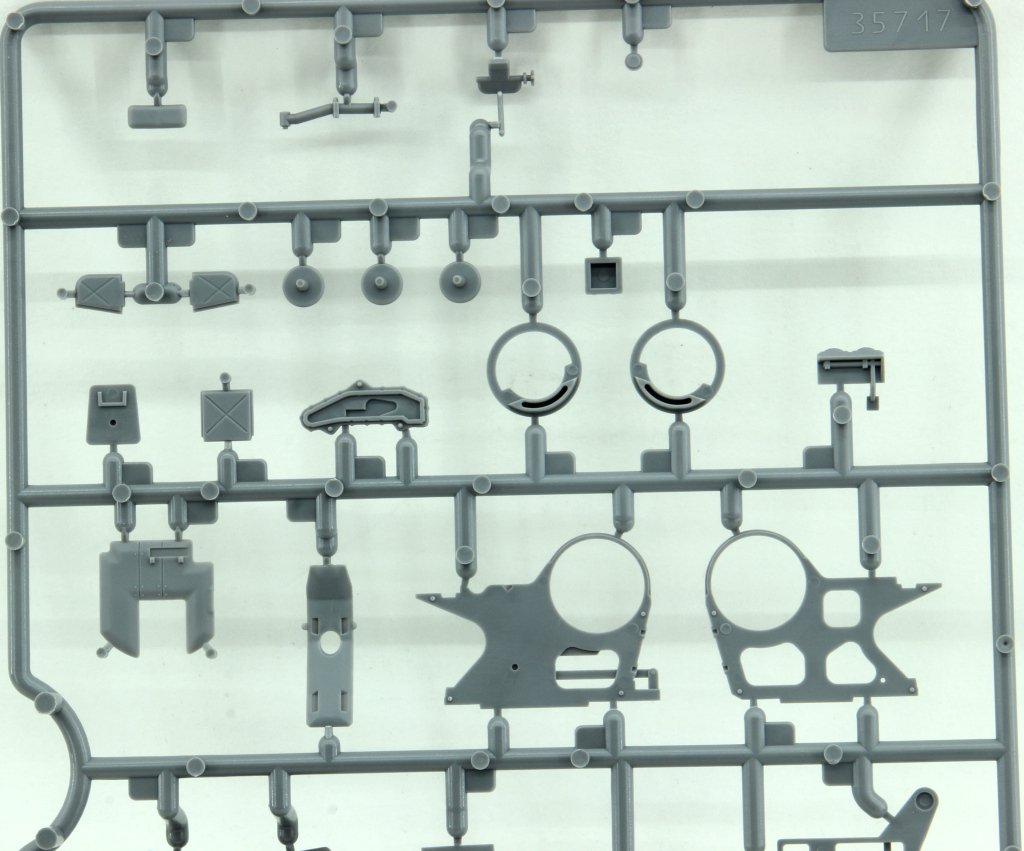
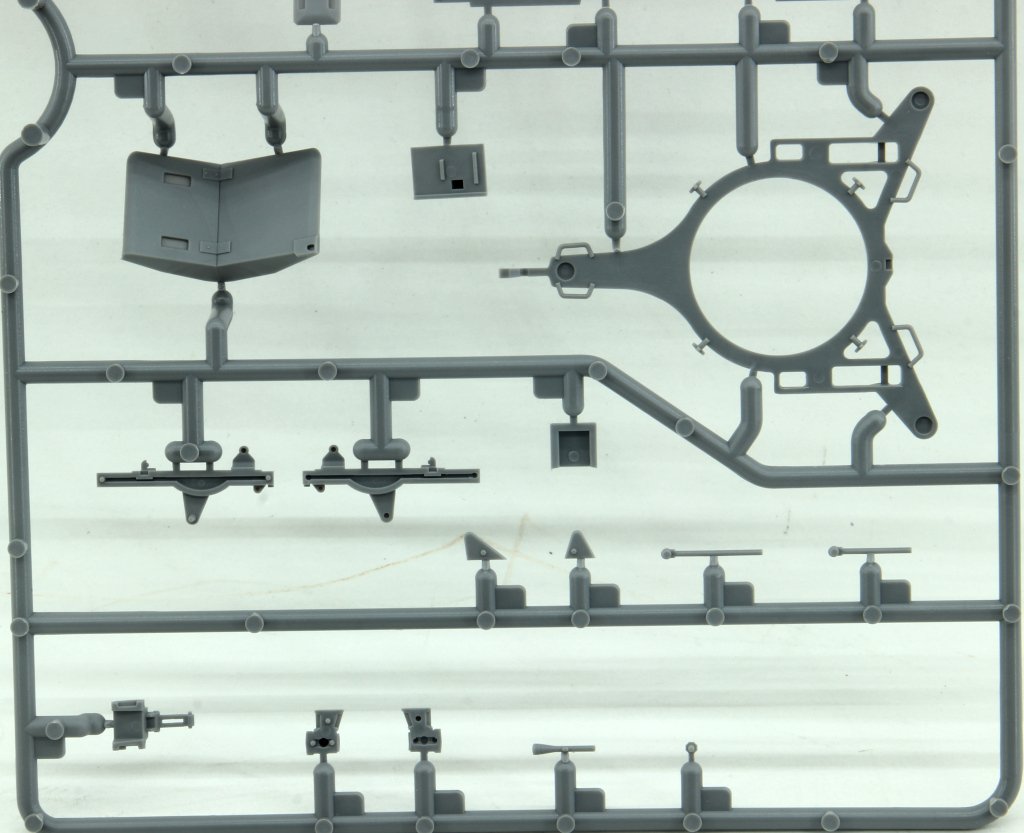
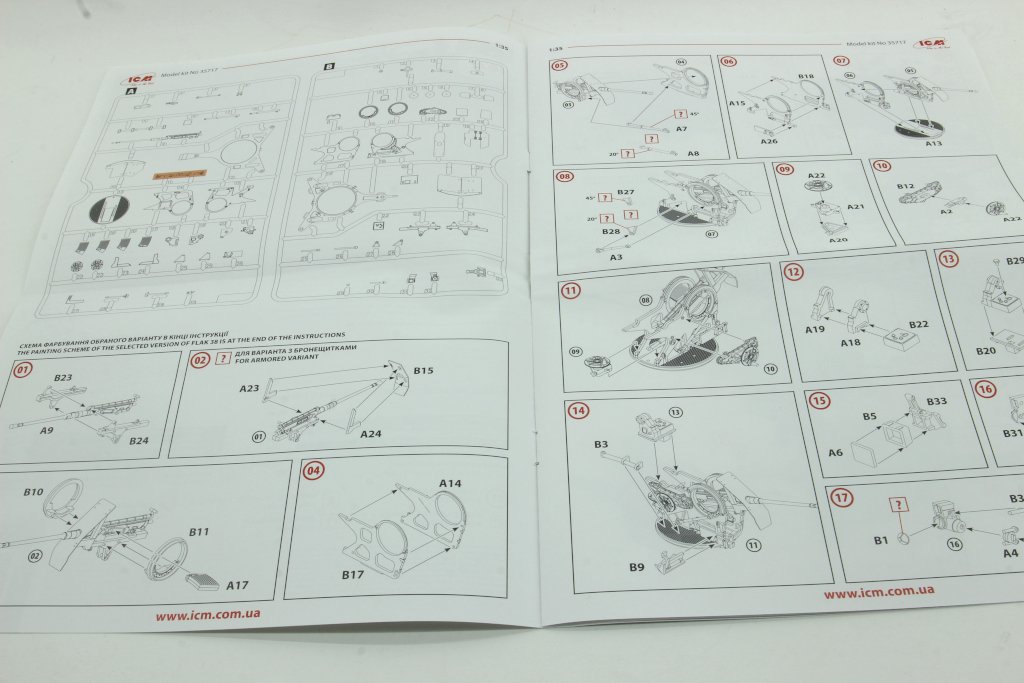
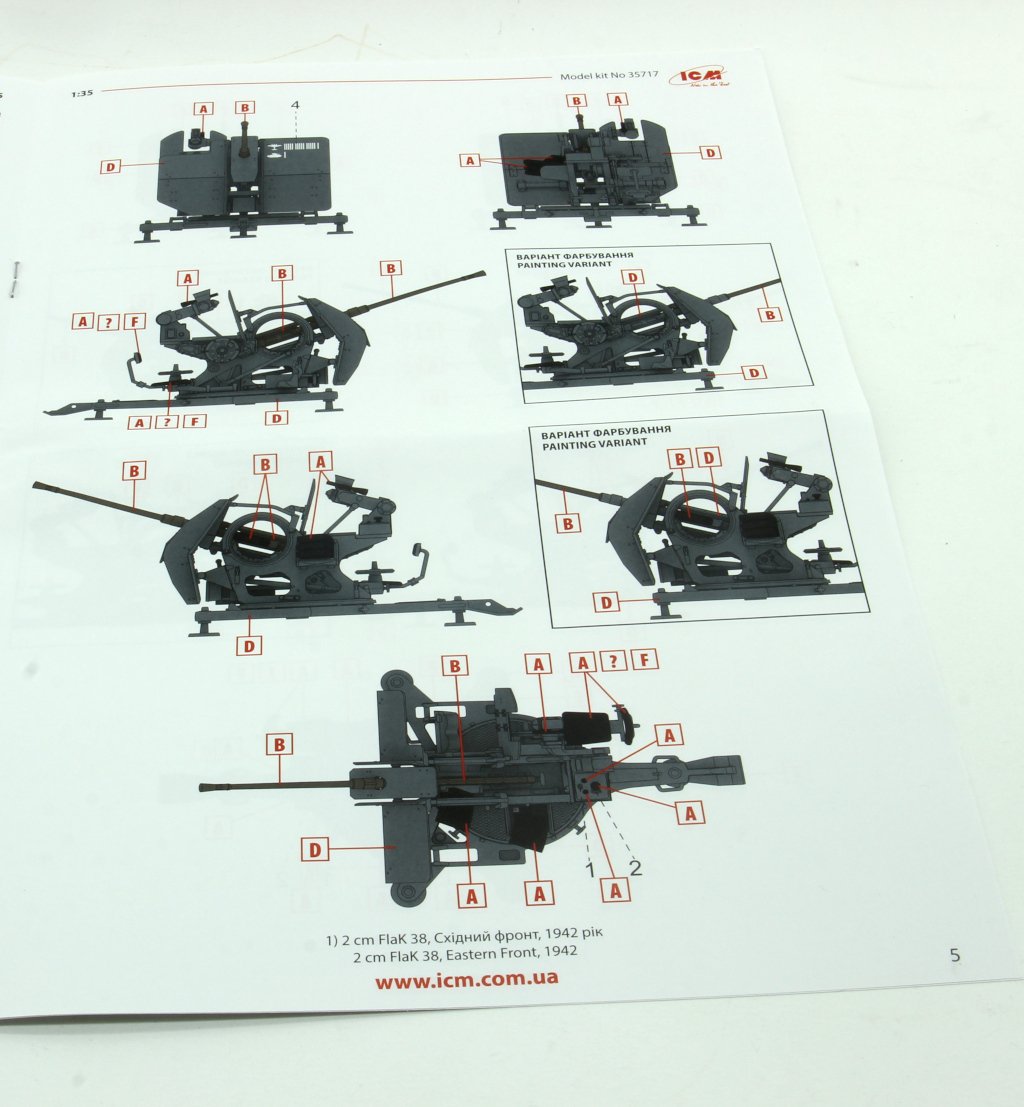
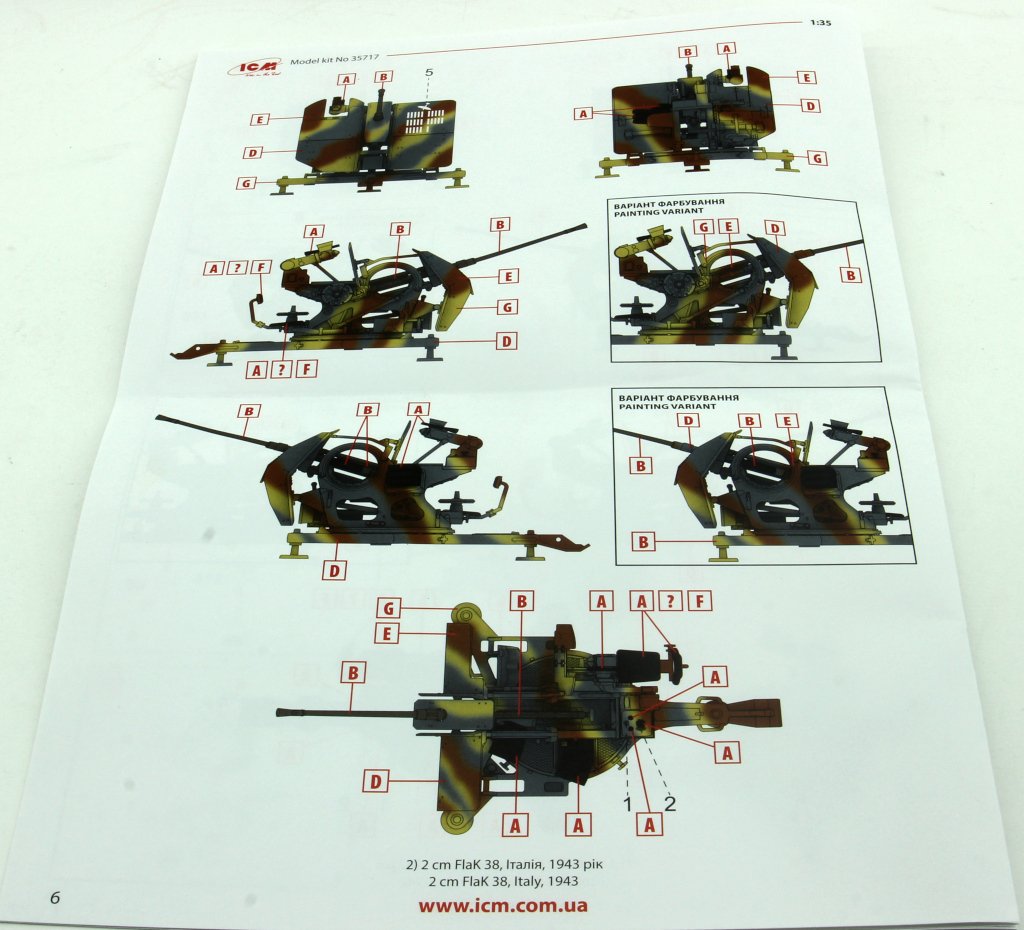
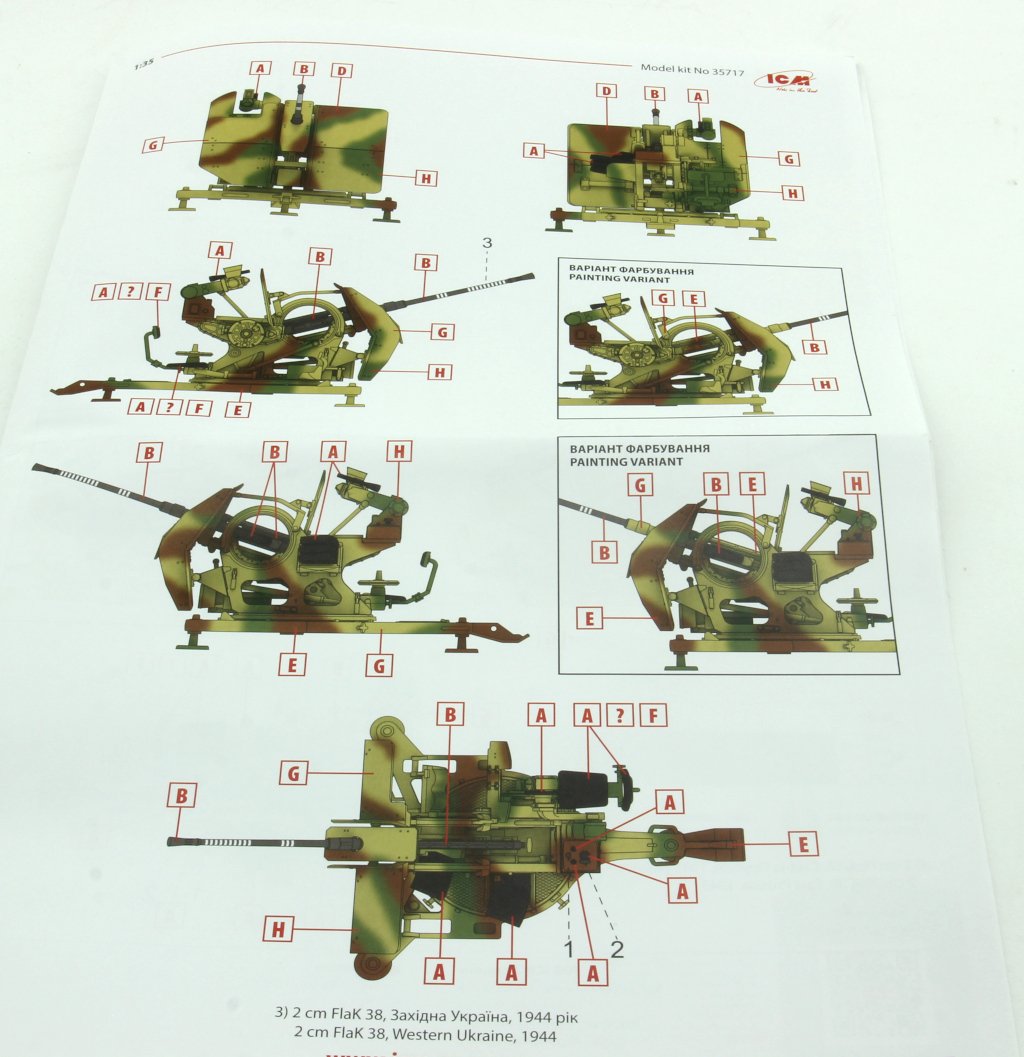
ICM 1:35 2Cm Flak 38 “WWII German AA Gun” Ref: 35717 Introduction ICM is a well-known player in our modelling world, and over the years has consistently delivered increasingly detailed and intricate models. In this case, we have a small model with a big history, recognized by almost the entire modelling community. The Flak 38 has been offered by several brands over the years, with varying levels of detail. Immediately, the classic Flak 38 from Tamiya comes to mind. This offering represents a technological evolution in moulding techniques and finesse in model detailing. What’s in the Box: The small box allows you to identify and understand its contents, and you can consult the decoration options via the side of the box. Inside the cardboard box, we find: 2 sprues (a total of 69 parts), a small decal sheet, an instruction booklet, and a colour catalogue from ICM Sprue A: Among the parts included on this sprue, the fully moulded weapon (in a single piece) stands out. The barrel is not hollowed out, and since the muzzle brake is conical, some care should be taken to detail this visible component of the assembly. The lower tripod base is also included in this sprue, moulded as a single piece. The gun mounting supports, including the rotating carriage components, are also present. The parts representing the cranks that control vertical and horizontal rotation are included on this sprue. Sprue B The central armour plate (which is optional to install) is present, along with the rivets that attach it to the gun’s frame. This armour, along with the side plates, is optional, allowing the final model to be displayed without these shields installed. The supports and components of the sighting system are included on this sprue, as are the inner halves of the gun mounting supports and the upper half of the tripod base, which is moulded as a single piece as well. The handles on this part are appropriately detailed for the scale. Instructions: A satin-finish booklet with clear building sequences (as typical of ICM instructions). Four decoration options are provided, each with seven colour profiles featuring very original painting schemes that represent various theatres of operation where this military machine was deployed. The colour references are exclusively for ICM paints, but conversion to other brands is straightforward. The small decal sheet has good colour registration and should pose no issues during application. Conclusion: This is a small historical World War II military piece, previously represented by other brands, but the detailing here stands out, making it distinctive and noteworthy. It is, in fact, an easy-to-build model of a classic in military modelling. A recommended model, whether displayed in a simple vignette with a figure or as part of a complex diorama! Thanks for ICM for the review sample!


.jpg.7a8c3c1f03a88e43b5be397bf8782cd5.jpg)
-
Hi guys! thanks for watching and for the feedback !
-
Thanks for the feedback !
-
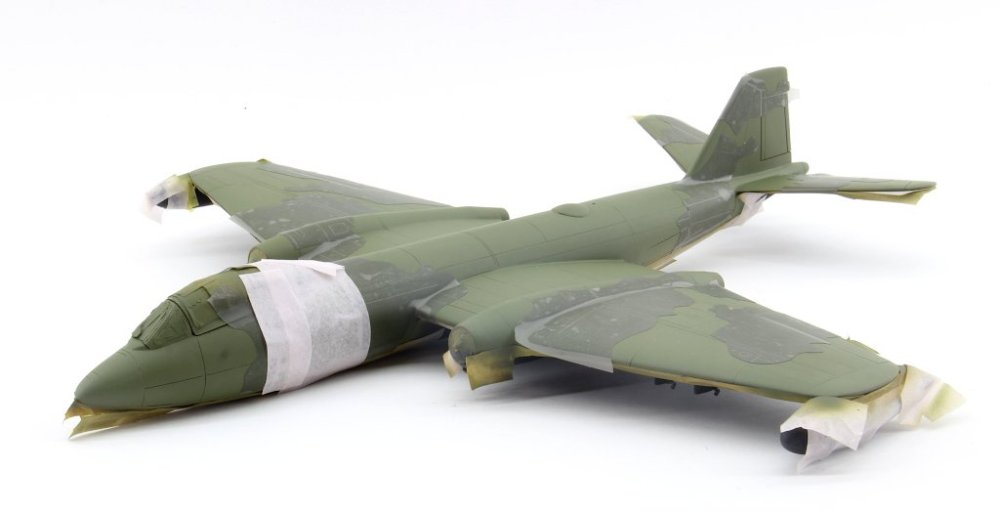
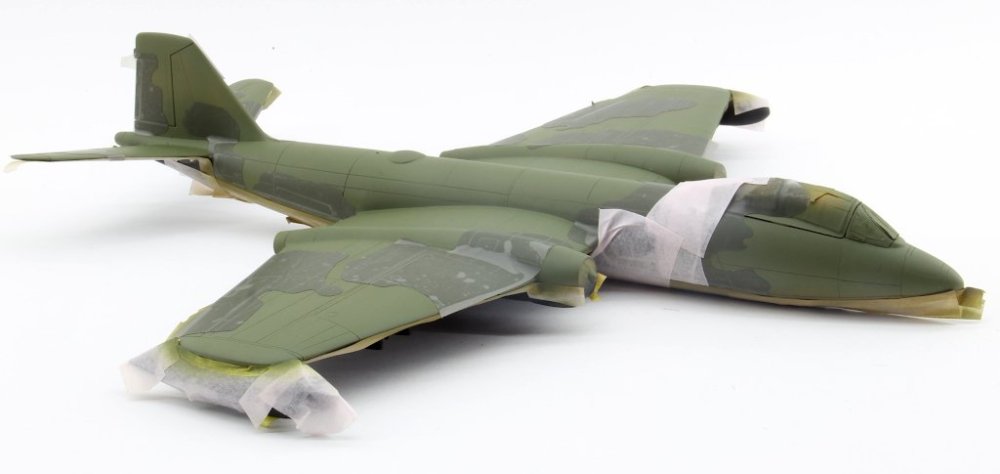
Hi all! thanks for the feedback. In the meantime this model advanced and concluded. I don't have any more build photos of this process but i would like to share the final photos, with the model attached to it's base ( It was not made by me, it was offered by a friend Modeller) . The model needed to be glued to the base, due to it's weight. Thanks for watching and comment this build!
.thumb.JPG.947603005d42adddcaee9c9ec2f69361.JPG)
.thumb.JPG.fd1ef728b2a54bb294384fe789fd1572.JPG)
.thumb.JPG.a234af779c135bd0d5b7345f7a3f645a.JPG)
.thumb.JPG.9fc9ba98be0ea614e4b0fc4918080282.JPG)
.thumb.JPG.838c3b533e9e2f96b3fcf4a7a9042927.JPG)
.thumb.JPG.7cfbe2caf5d668c8c19069ebe3c6bb02.JPG)
.thumb.JPG.4b56f819a6cfe586f030cc387847e37a.JPG)
.thumb.JPG.9a7d67da755647abc83ce5b78a49d1c2.JPG)
.thumb.JPG.89f723dbc791694e548e82700e544437.JPG)
.thumb.JPG.36b6bbdf3d67e220d49fb7f5bf1f9090.JPG)
-
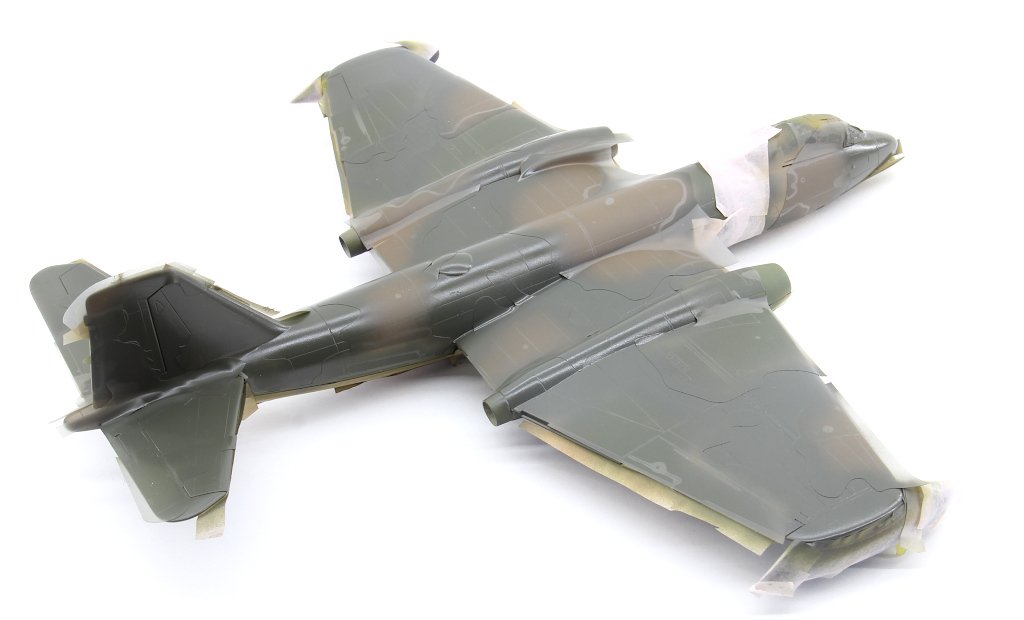
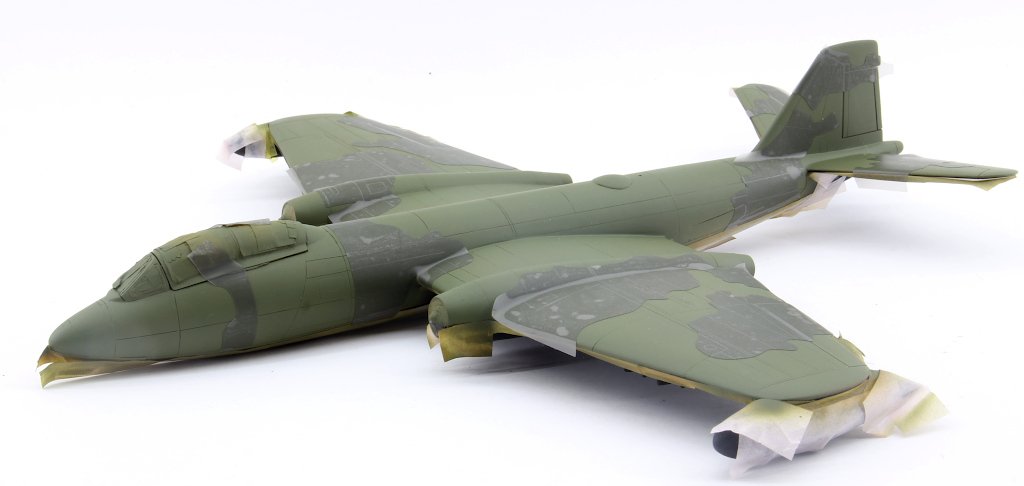
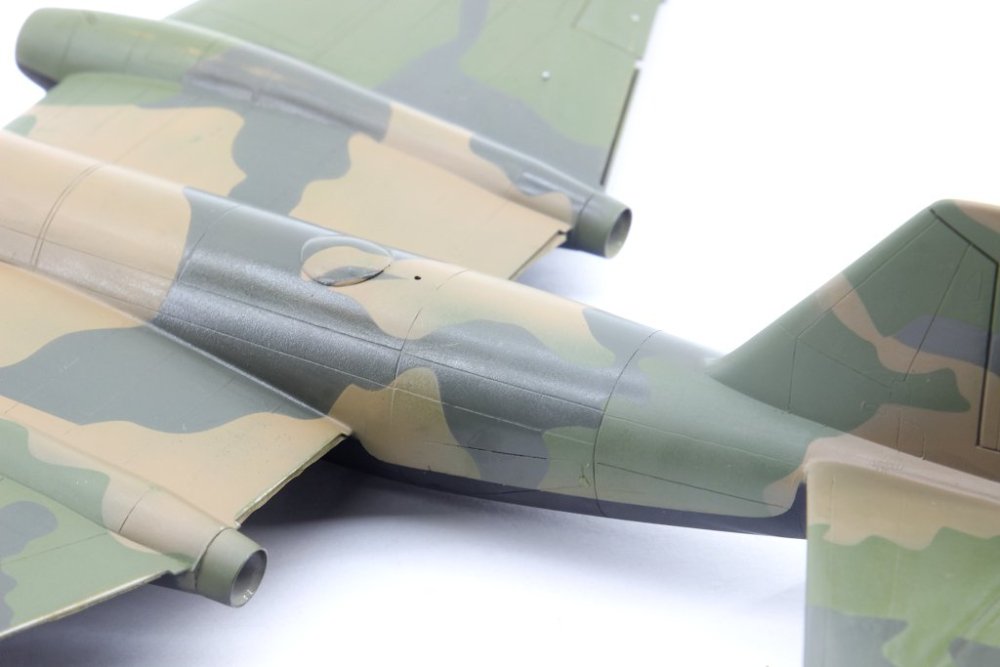
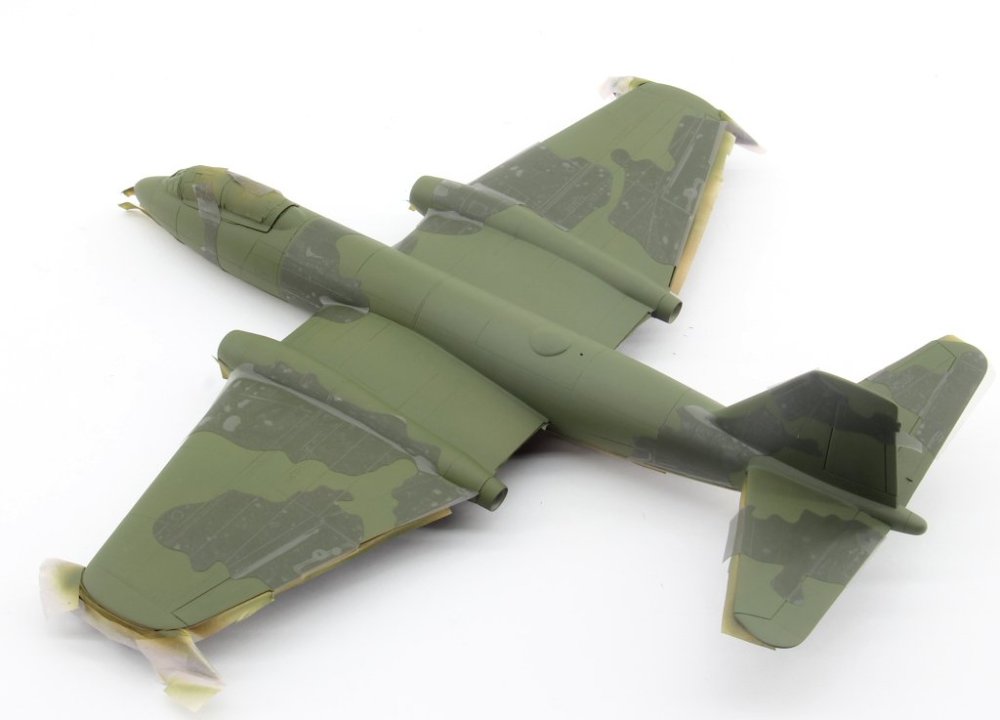
Hi all! Sorry for no updates in some time.. A small update on the build: So i finished the camouflage painting and then i started applying weathering effects with the camouflage colours used, varying with light and warmer tones to create a patchy and worm out look. I was so excited with the weathering process that i even started dirtying the upper wings sections before even applying decals... sometimes i don't know what's on my mind... anyway.. a gloss coat was applied ( alclaad 2 gloss varnish) and the decals went without a issue. nevertheless some silvering is showed on several decals, that i need to properly treat. so, this is the current status of the build: thanks for watching!


-
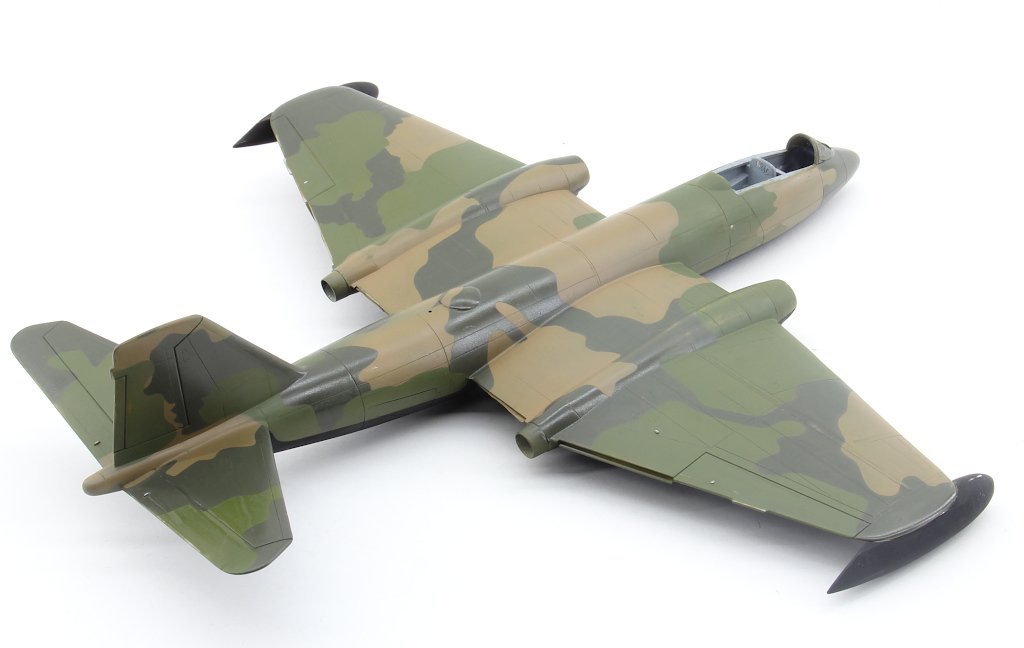
Hi all! It's been a while since i started this review/ project. As the painting process ended, i can pronounce my conclusions and final opinion on this set. As you may recall, i use this reviewed set on this model, and i couldn't be more happy with it. Some say that this is cheating on the hobby, but for me, it's a way to allow me to focus on what i really enjoy: Painting, with out no worries about, if the camouflage contour was correct, if i was having overspray on the previous camouflage colour ( to give some examples). I don't have a very steady hand to paint some details with airbrush. That's a fact. This masks, despite needing some attention to apply, they are flexible and permissive to corrections and adjustments. I was very satisfied by the way they supplied me with a very neat and appealing colour job! and that's a wrap! thanks all for watching!
-
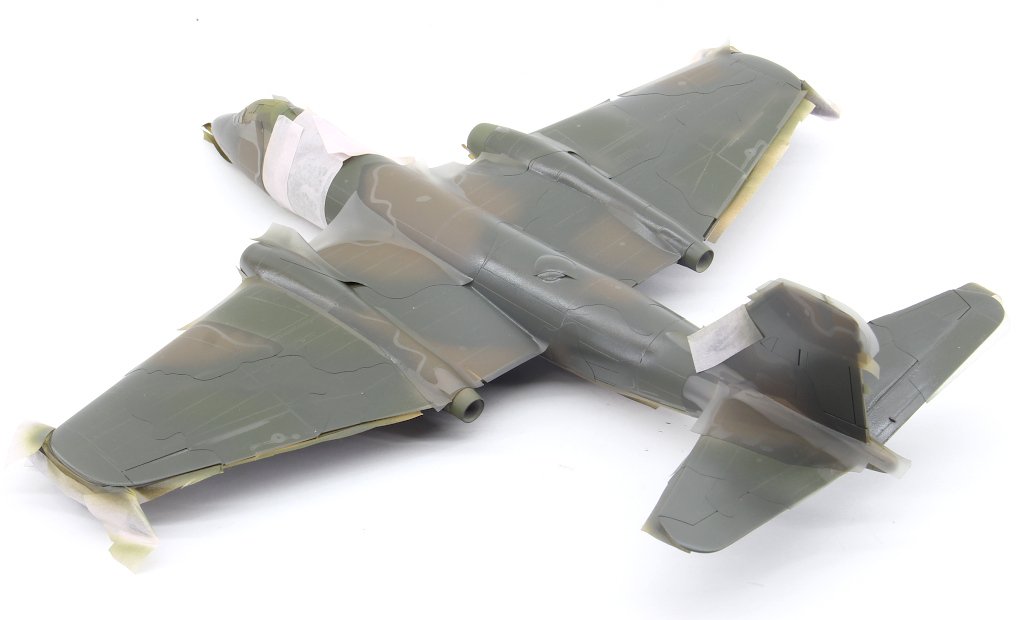
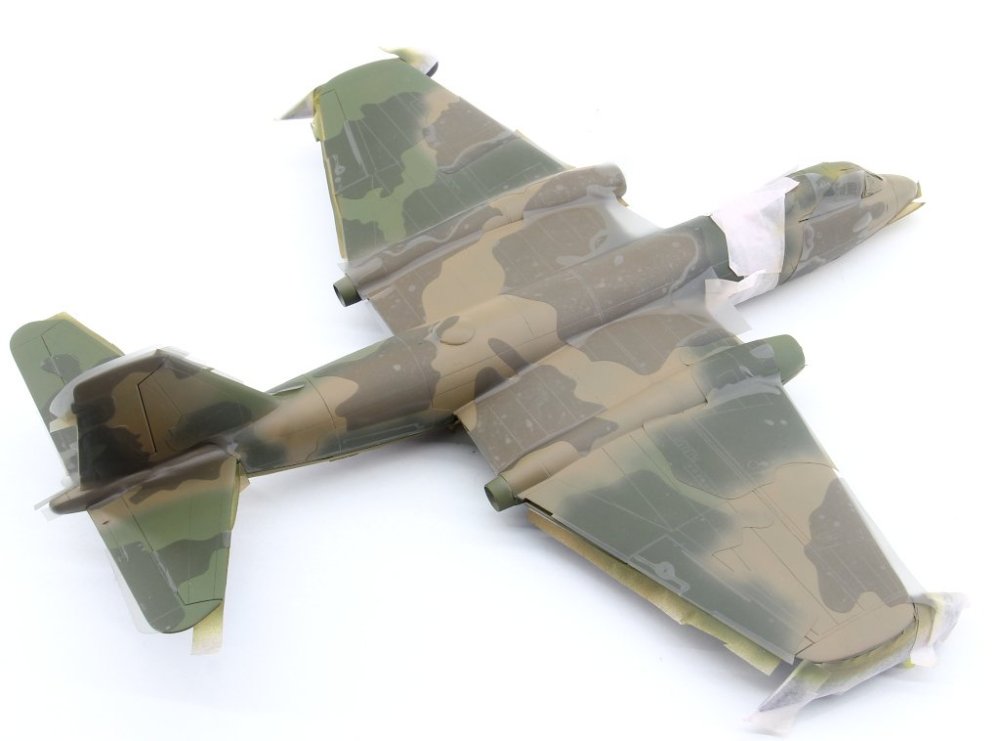
Hi all! A new update on the painting process: upon application of the masks for the light green, it was time for painting the brown patches of the camouflage I've tried to paint only the areas covered with brown, but it appears that i 've failed some areas.. more on that later... After one day of proper sun curing, it was time to aplly the last set of masks ( for the brown parts). And the final colour ( forest green) I made a mistake. Over thinned this colour and in some parts, a small "wall" of paint was created in the demarcation masks of the camouflage. Finally, the moment i was waiting for: Some considerations: There are some mistakes on the camouflage patterns. They were not caused by the masks itself but by me. this set is for Italeri / revell / airfix ( which are 3 different models) so a compromise was needed to suite all three models. the masks allow this adaptation and in some areas ( tail area) was was not very competent adjusting the set. Also you'll note some grey primer, this is the result of polishing for a uniform surface. in the mean while, this was corrected. remember when i told to proper paint all areas... some touch up are in order. thanks for watching !


-
Academy 1/48 B-25PBJ-1D--Finished
rverissimo replied to KevinM's topic in The Great Twins Broup Bluild
Great build ! looking forward to check the painting! regards Ricardo Verissimo -
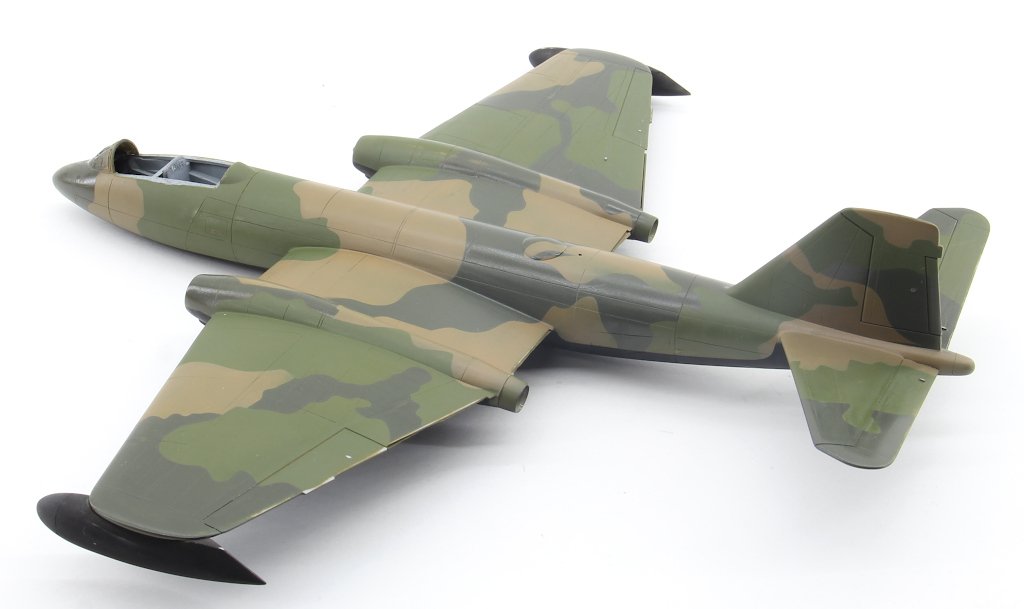
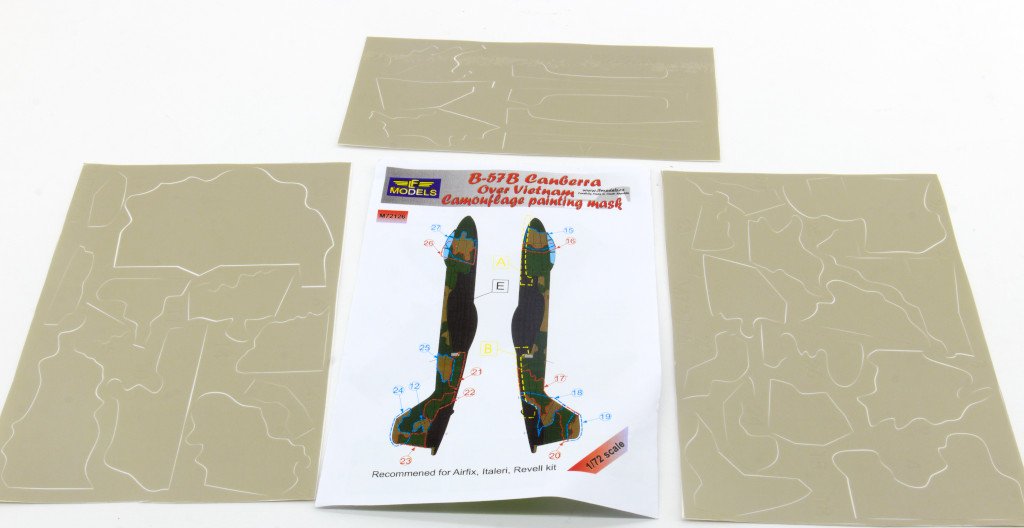
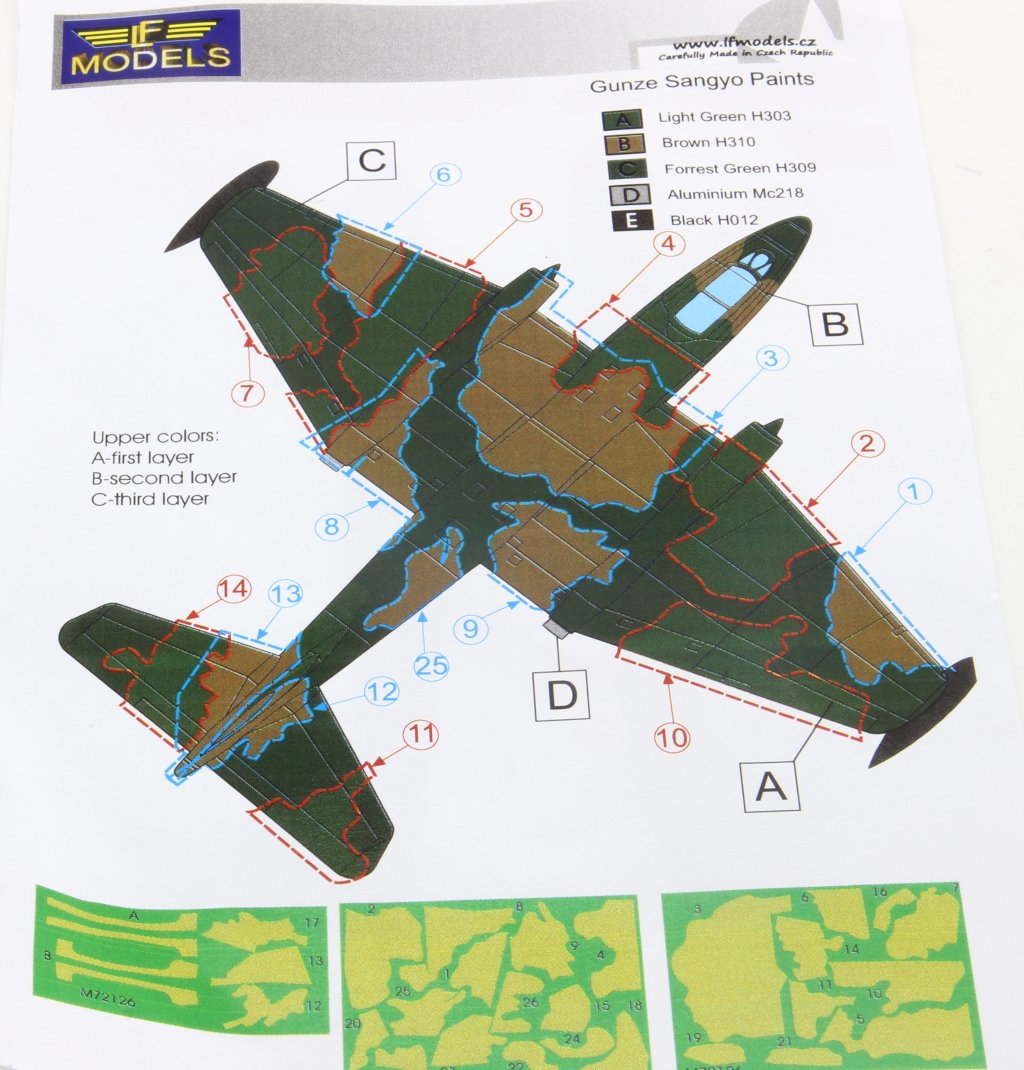
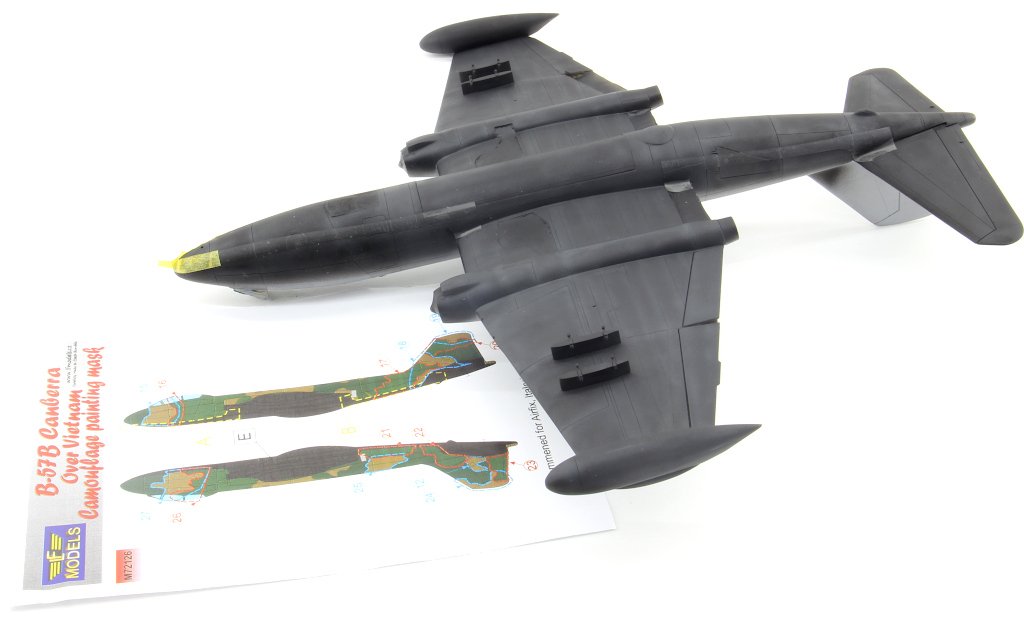
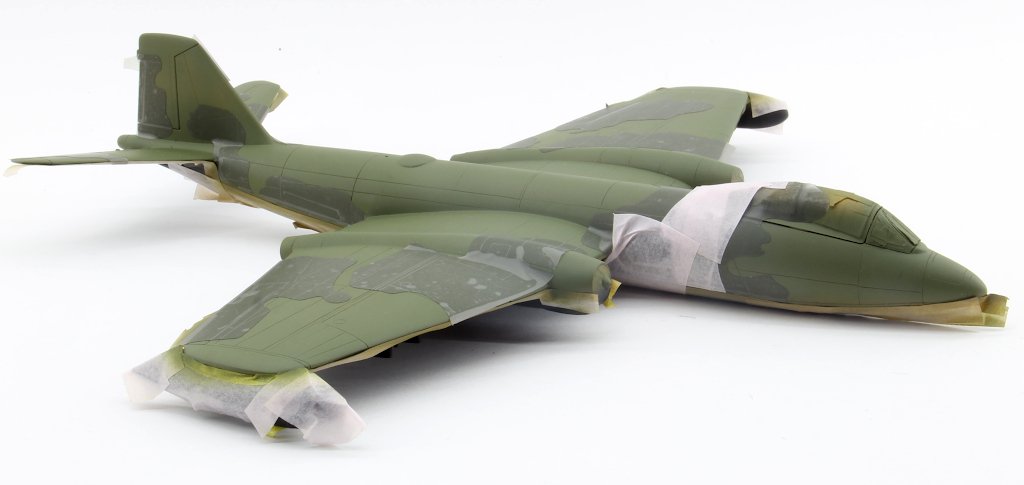
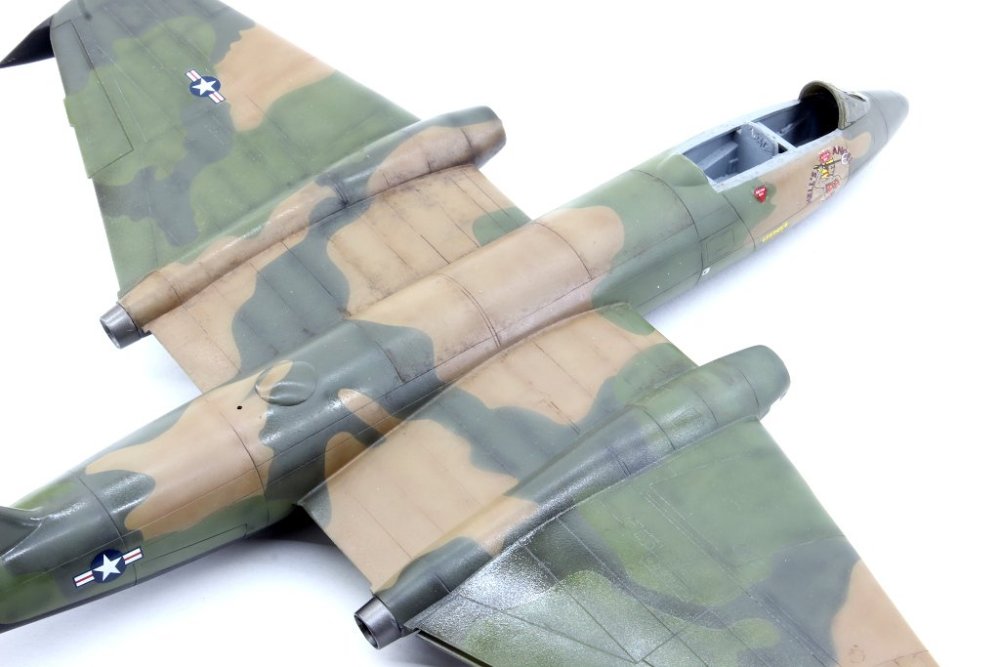
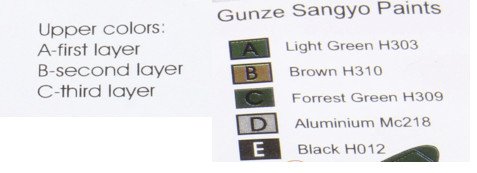
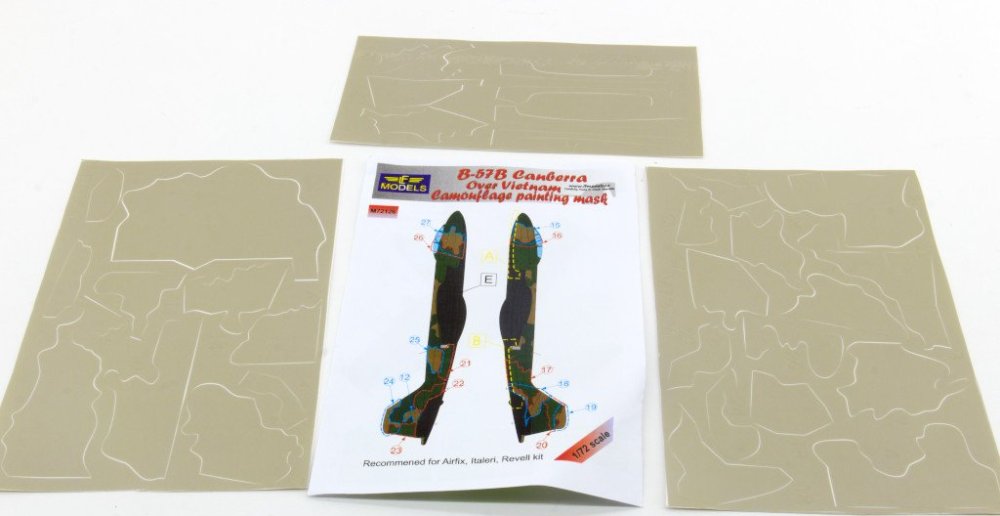
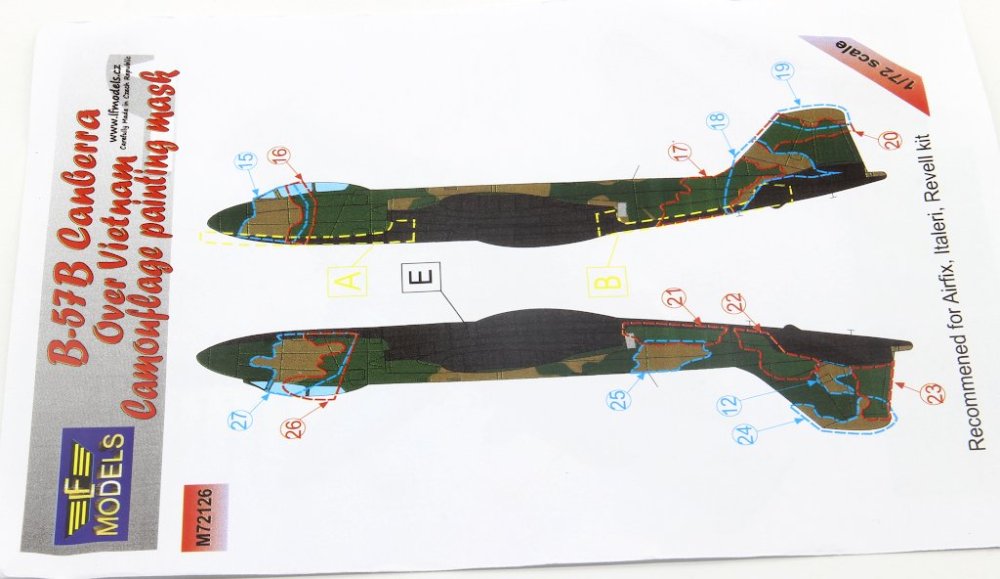
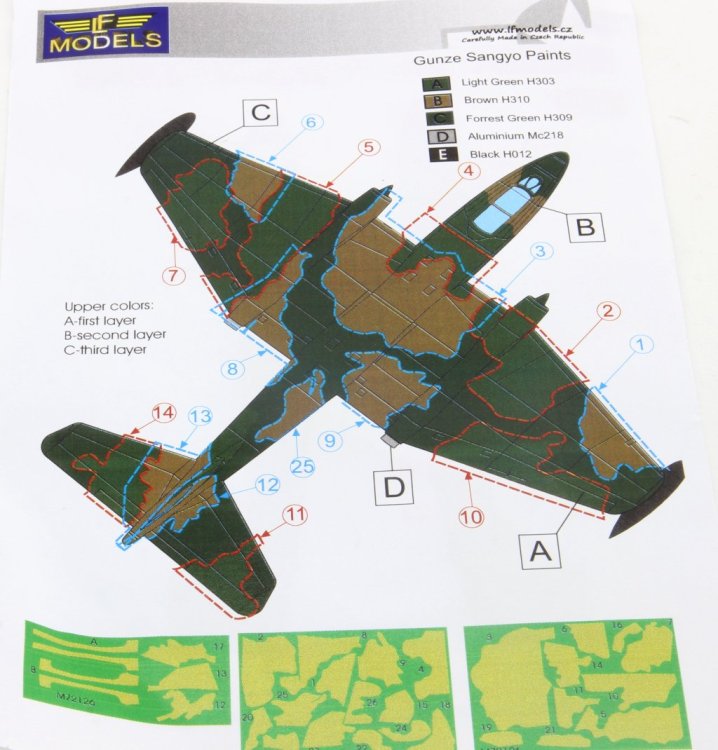
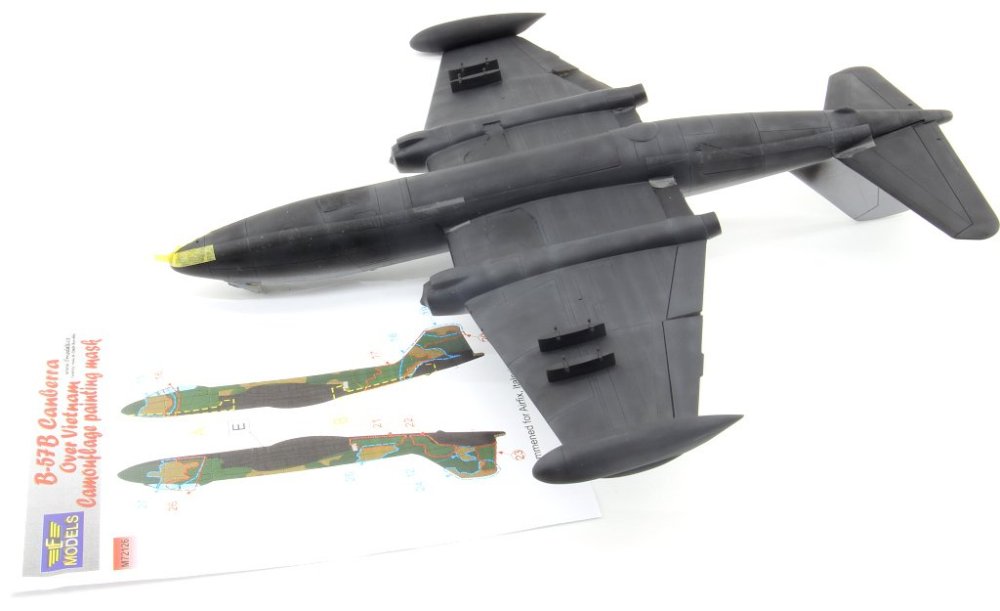
LF Models - B-57 Canberra Over Vietnam - Camouflage painting Mask 1:72 Scale catalogue : N72126 On my workbench, I have a good number of unfinished models—the infamous “shelf queens.” One of these was an Italeri B-57B in 1:72 scale, which I thought would be a good time to finish with this set. I stumbled upon it while randomly browsing the internet in search of a painting solution for this model. LF Models offers a set of camouflage masks (Vietnam) for this model, so I decided to order it. In a small plastic bag, I received a sheet (double-sided) containing colour instructions on how to apply the camouflage masks on three profiles, as well as the identification of the colours to use (Gunze) and the painting sequence to follow. A very important note: read the instructions carefully… just a heads-up 😊. Also included were three vinyl sheets with the masks themselves. Each mask is numbered to indicate where it should be applied on the model. There are also masks included to delineate the upper and lower fuselage paint (yellow lines on the side profiles). On the back of the instruction sheet, there is the top profile, as well as the indication of the colours and the painting sequence. The first colour to apply (corresponding to the first masks to be applied) is the lightest green (Colour A), followed by brown (Colour B), and the remaining areas of the fuselage and wings that are left unmasked will be painted with the third colour (in this case, Forrest Green). This sheet also provides a visual reference for each of the vinyl mask sheets, showing the location of each piece. Conclusion: Some may think that masks are a shortcut to a perfect final result, avoiding the classic approach of freehand airbrushing, using masks with Blu-Tack rolls, or even, for the more “vintage” modellers, brush painting. In my specific case, I currently don’t have a steady hand to airbrush this type of paint job without external aids, and the complexity of the pattern wouldn’t be properly replicated using Blu-Tack rolls to form the patterns. LF Models offers a wide range of masks on their website (https://www.lfmodels.com/) for many aviation models and more, which, as I mentioned, can greatly help in clearing our workbenches of models that have been left idle due to a lack of “painting skills” to finish them. If you wish, you can follow the experience of applying the masks and painting in this LSM Topic, where I am sharing the step-by-step process. Final note: I will give my opinion once I finish the painting, but I can already say that I find the task very intuitive and smooth. thanks for watching!

-
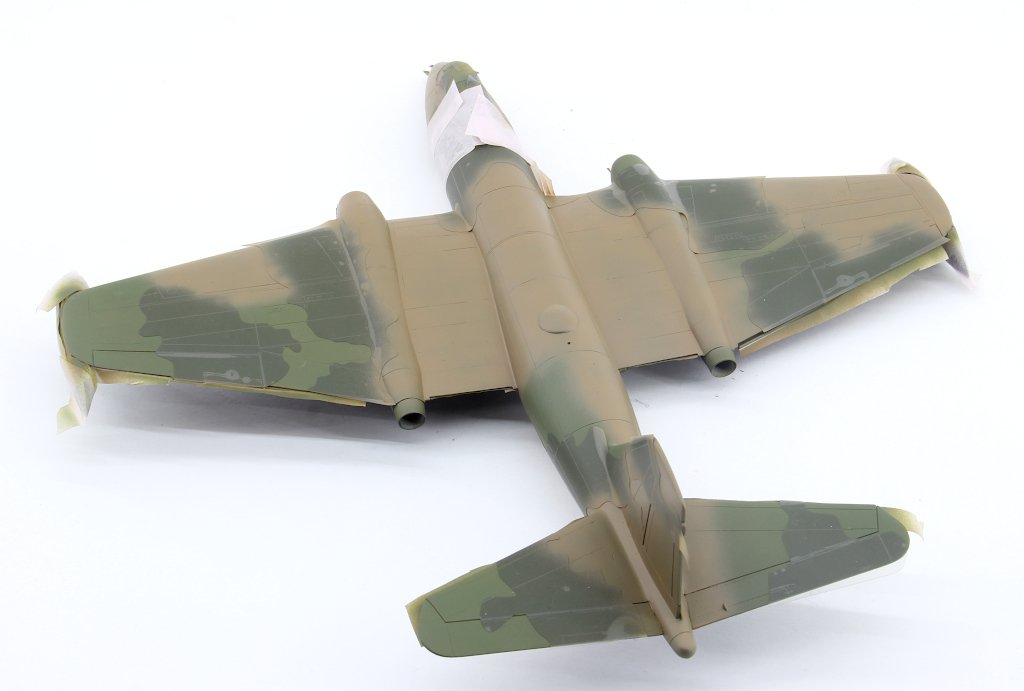
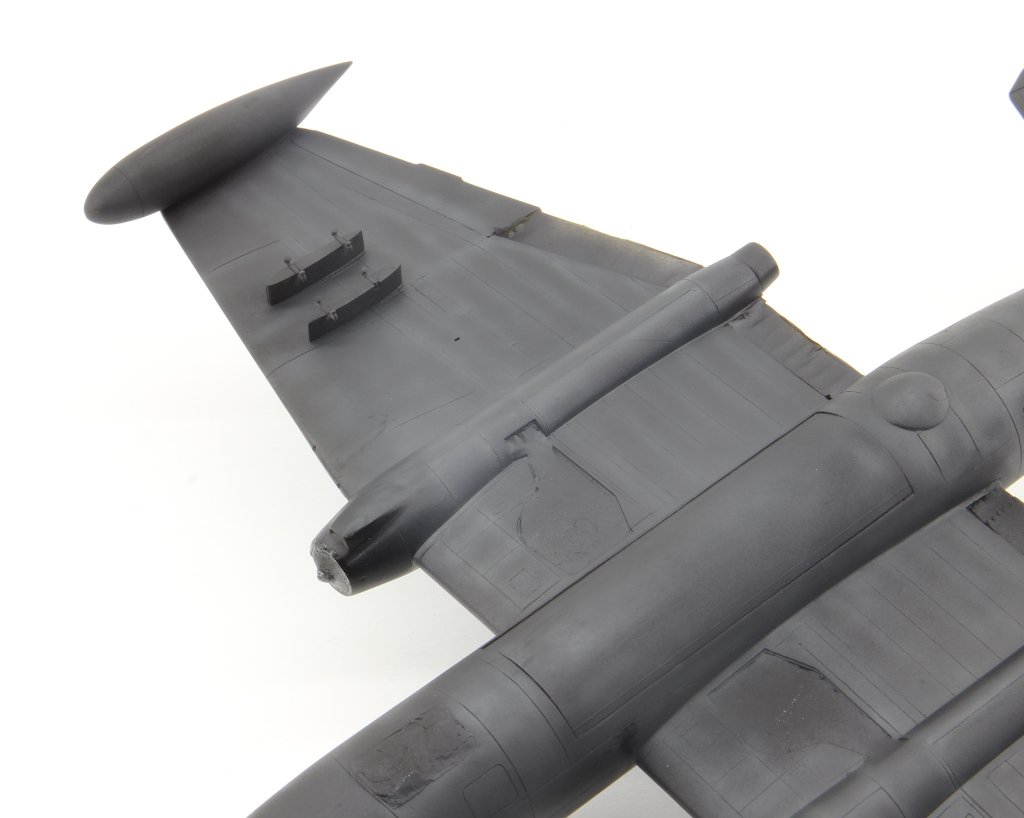
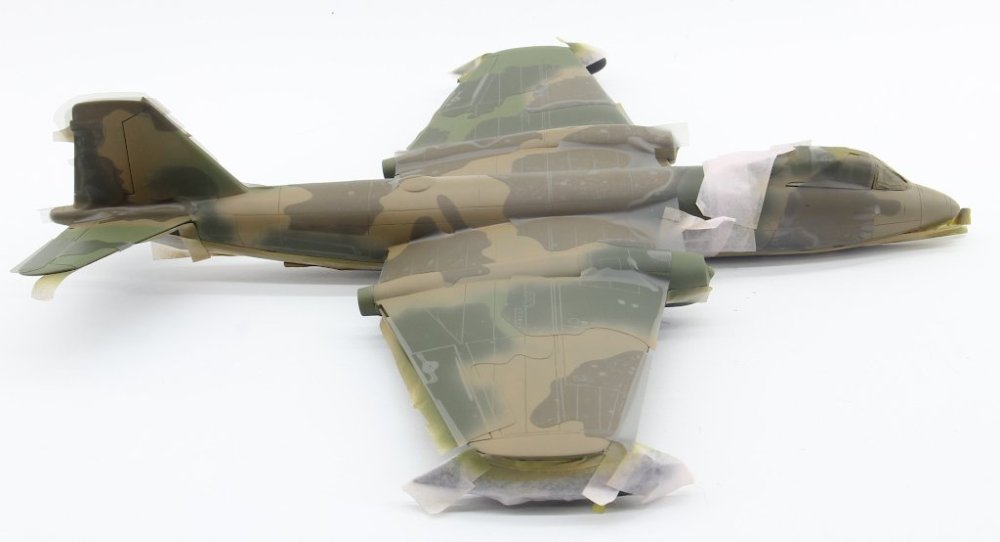
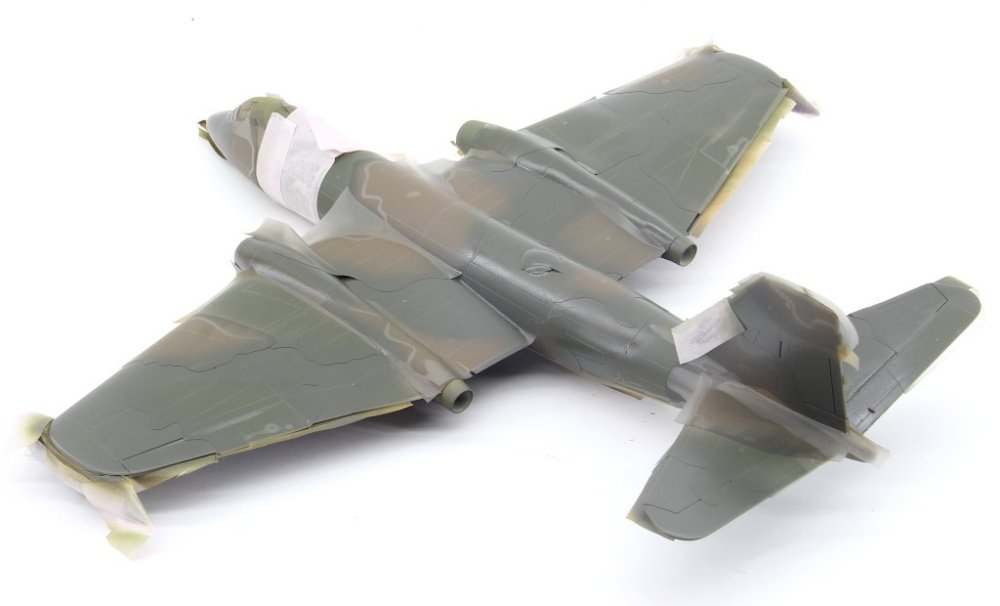
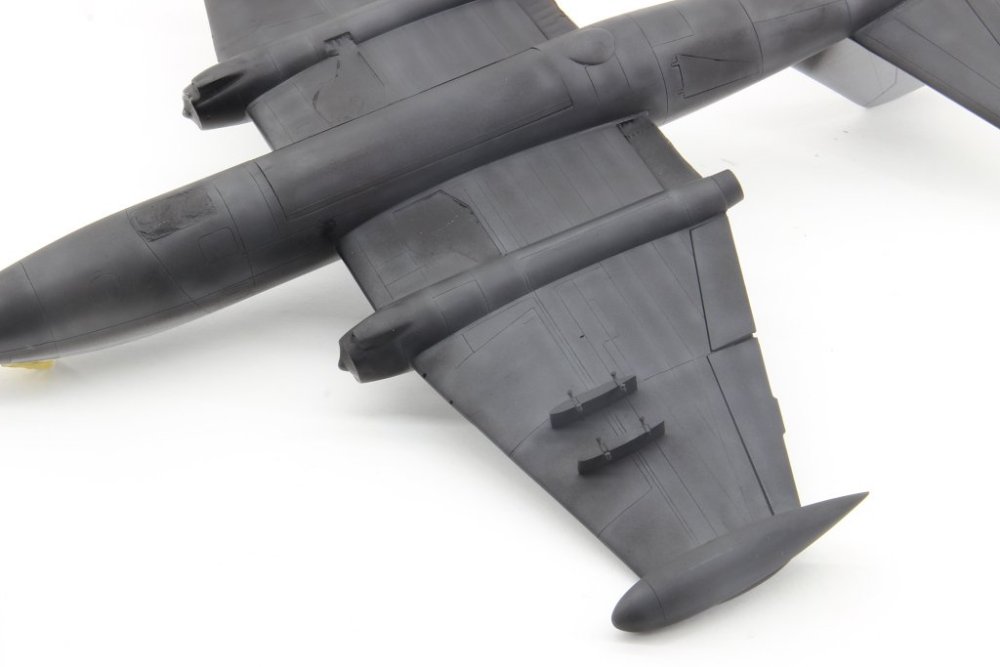
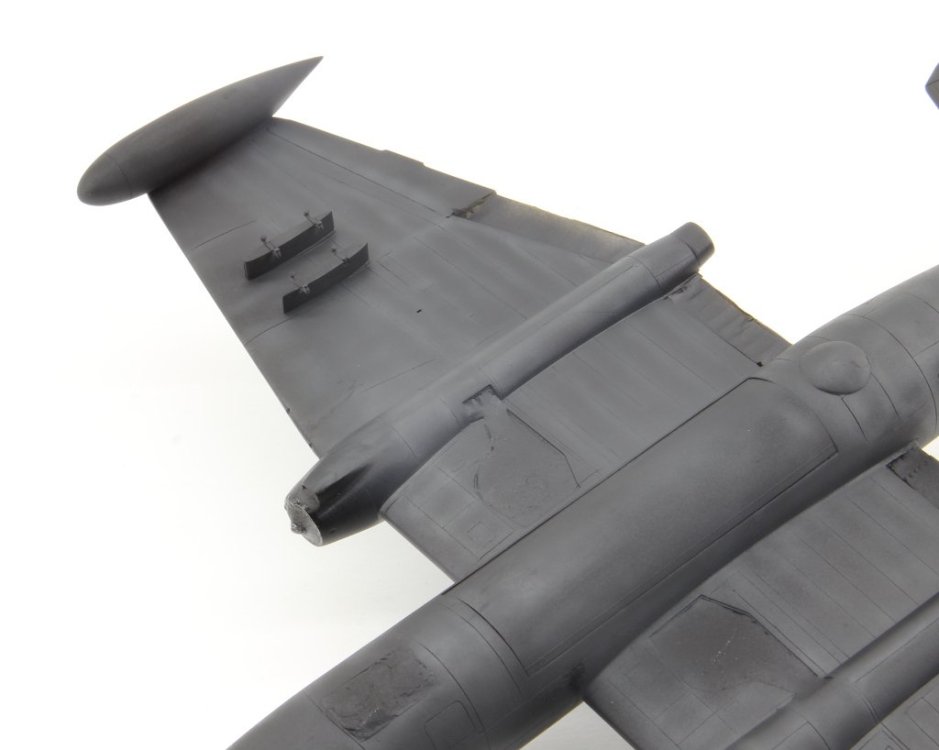
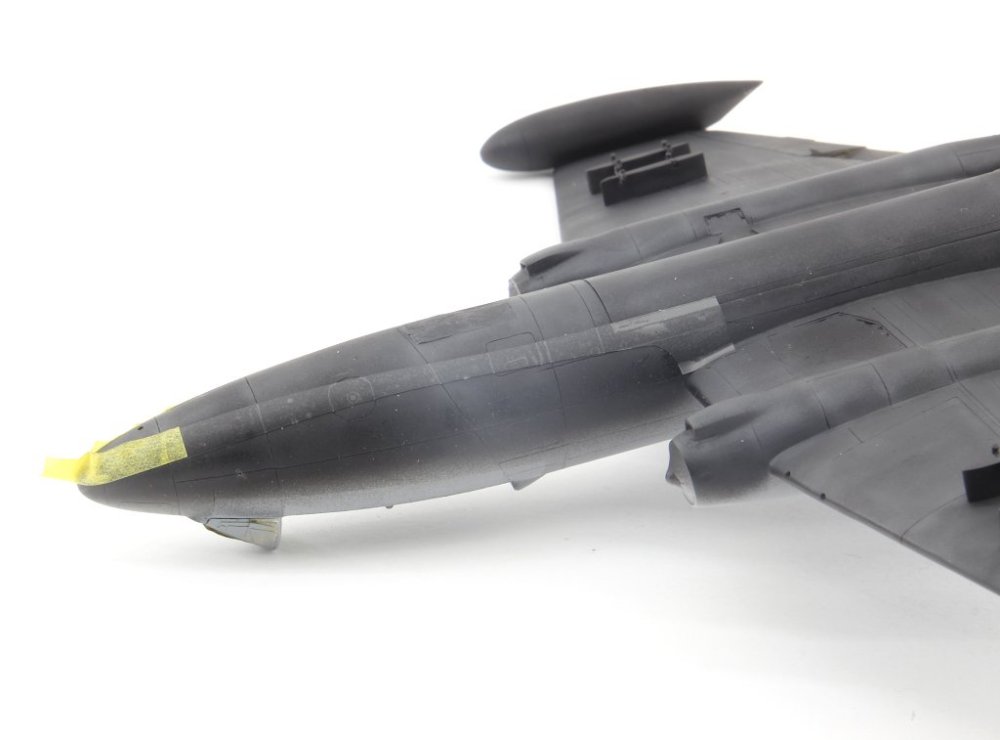
It is not that difficult. it has a lot of strait panels and it's easy to re scribe. The small inspection and service ports, that's a different matter just some more pictures of the underside of the B-57: by this time, i applied the first four masks of the LF models set. Demarcation between the upper colours and the underside one. Just a small update on the painting and masking process, as i just publish a review with photos of the LF models camouflage masks for this model. One word of advice, always dedicate proper time to read the instructions using my typical mindset for painting, i started with the lighter colour for the upper camouflage.. but that's not what the instructions for the masks dictate... so i need to respray all upper surfaces with the lighter green, and for now this is the current status of the model: With care, time and calm music and zen mood ( whisky usually do the job), i started to apply the masks for the first colour ( light green) Remember : all masks will protect the covered area with the assigned camouflaged colour. So the last colour to apply will be in areas that are not covered. On this last photo, it's visible that the mask covering part of the right engine panel it's not full set. This is to the fact that this mask was the first to be placed, and probably I'll remove it and correct the placement. In general, it's wasn't a difficult task. the areas with angles, the masks need some fine adjust with the help of a pen or a round object to help adapt to the surface. the pink mask is used to cover that particular area of the fuselage that is painted on light green. the mask cover only the contour of the camouflage. that all for now. thanks for watching!


-
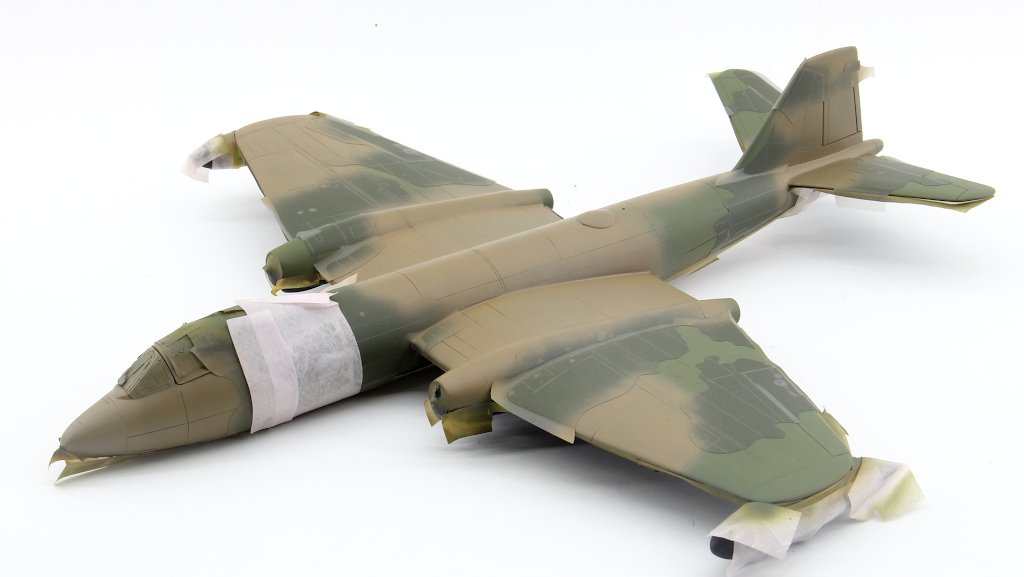
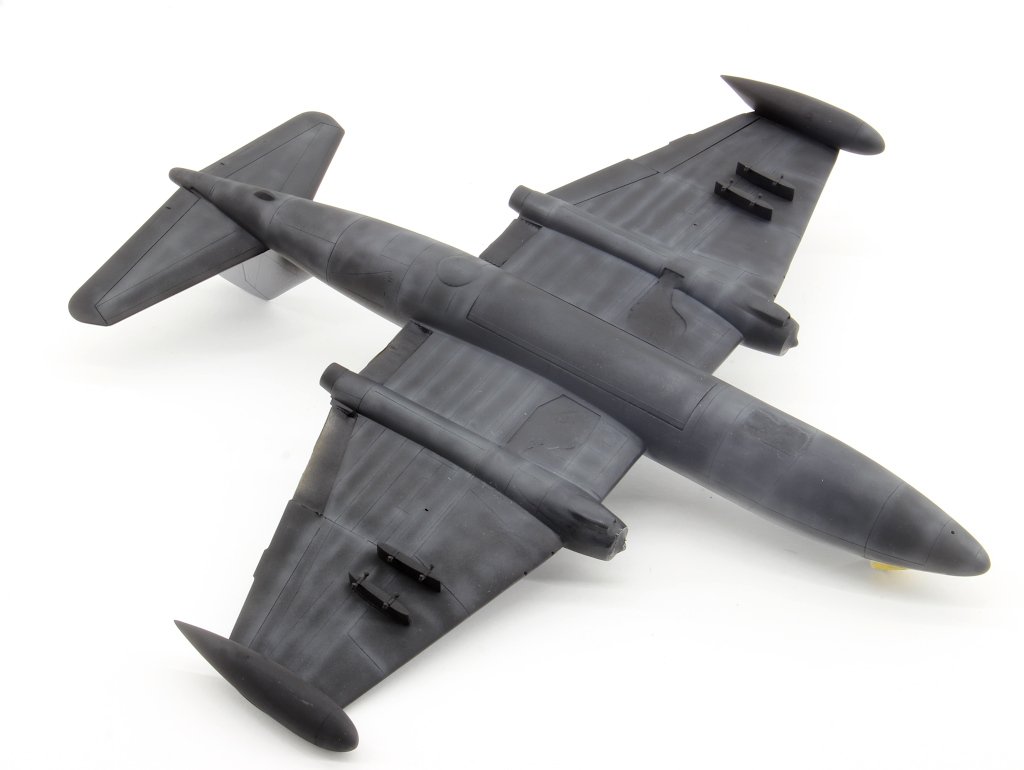
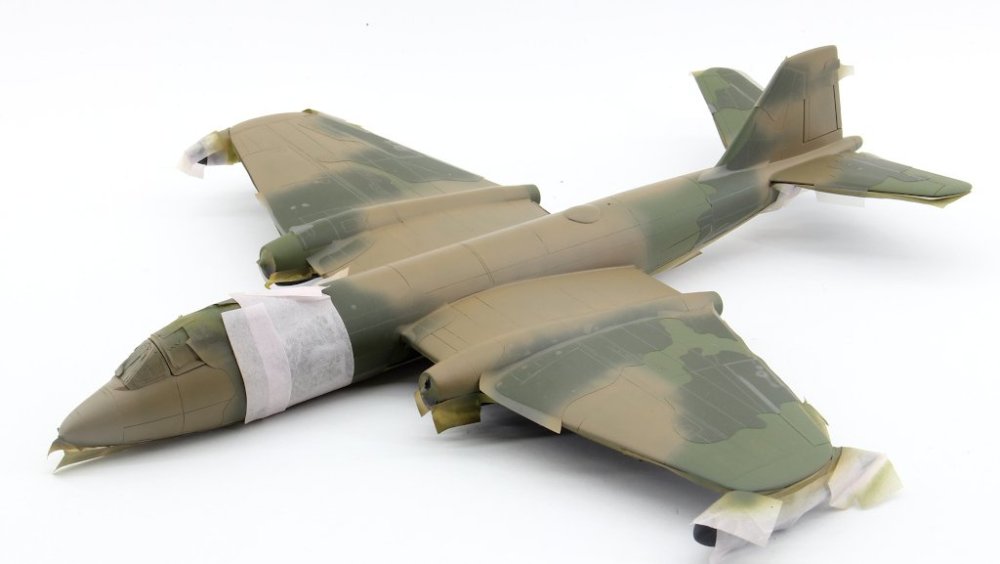
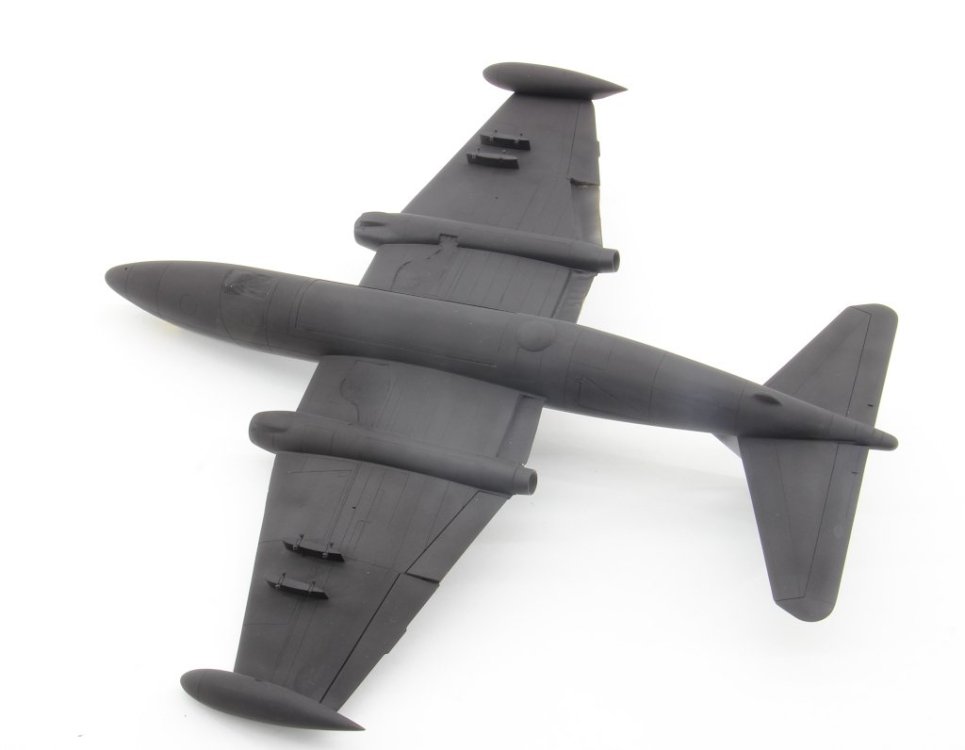
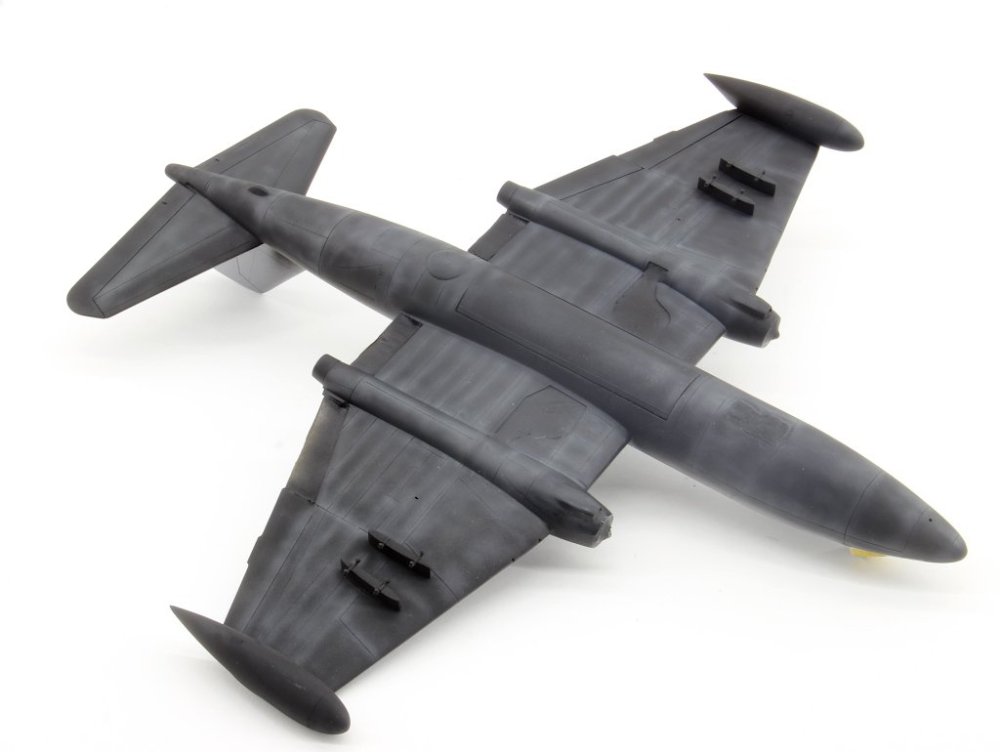
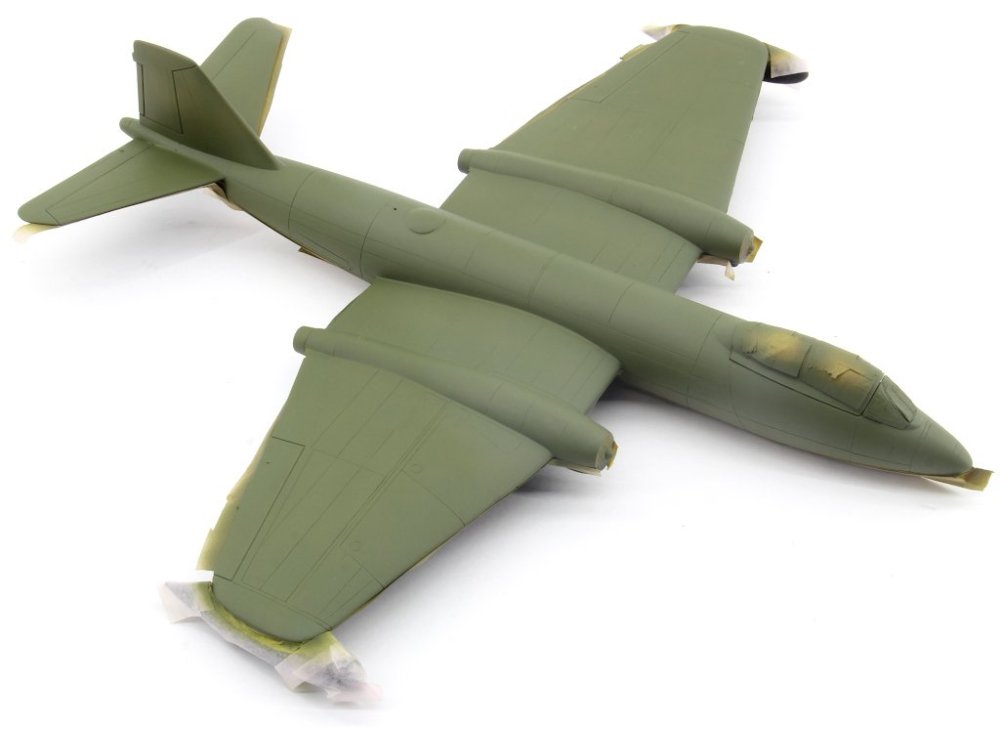
Hi all! I'm starting a in progress topic of one of may current builds. It's Italeri 1:72 B-57B Canberra, that i 've started some years ago. My goal on this build was to try and improve panel remark skills, as this models has panel marks in hi relief. I don't have a step by step photos of the process, but all errors were corrected with superglue mixed with baby powder. Also, the painting scheme to be used ( Vietnam 3 colour scheme) will be painted using LF masks. I also will publish a review of this masks here on (non) LSM reviews. for now some pictures of the assembly process, priming and underside colour. Correcting and filling seams.. Build complete. time for some primer. Underside paint applied ( XF-1 Tamiya as base colour) with some nuances using XF-69 Tamiya ( Nato Black) and also mixed with some grey. in the end, i applied a very light coat of XF-1 in order to try and blend the mess. I'll try to share some better quality pictures of it.
.JPG.baba6fa084db107febccf2d1612edb29.JPG)
.JPG.af07d90842f0f4ffd47733ffda7650fc.JPG)
.JPG.9453309b57501ab1d474e851e0374eab.JPG)
.JPG.1b18d282cdecad56f500c624a34d98ca.JPG)
.JPG.884f97ef2bac84d7776755903650423b.JPG)
.JPG.85f84a299b0bf0408679e3845a21c742.JPG)
.JPG.2639405b3968595693fff433d6ce82e2.JPG)
.JPG.d83ded07d10a19842decc934da3a36a6.JPG)
.JPG.539ec727e550c0a204d4ca4d5229f426.JPG)
.JPG.467698d59a89869d7a2aef42446ee469.JPG)
.JPG.cb3759d6ef544b7827fa91465fcd8bf1.JPG)
.JPG.9ba2bcfe92bda83093947dbb1013f602.JPG)
-
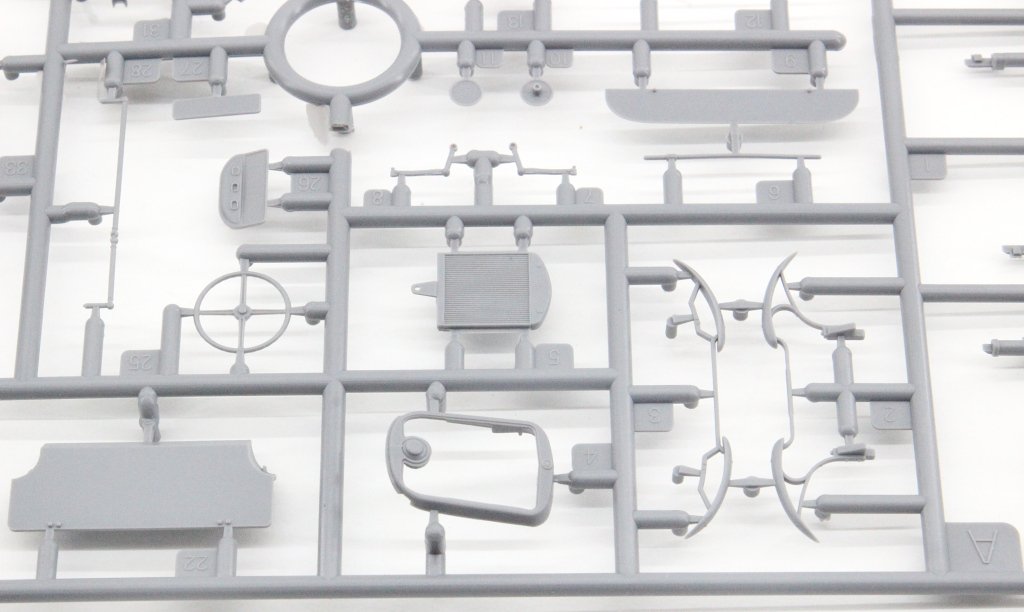
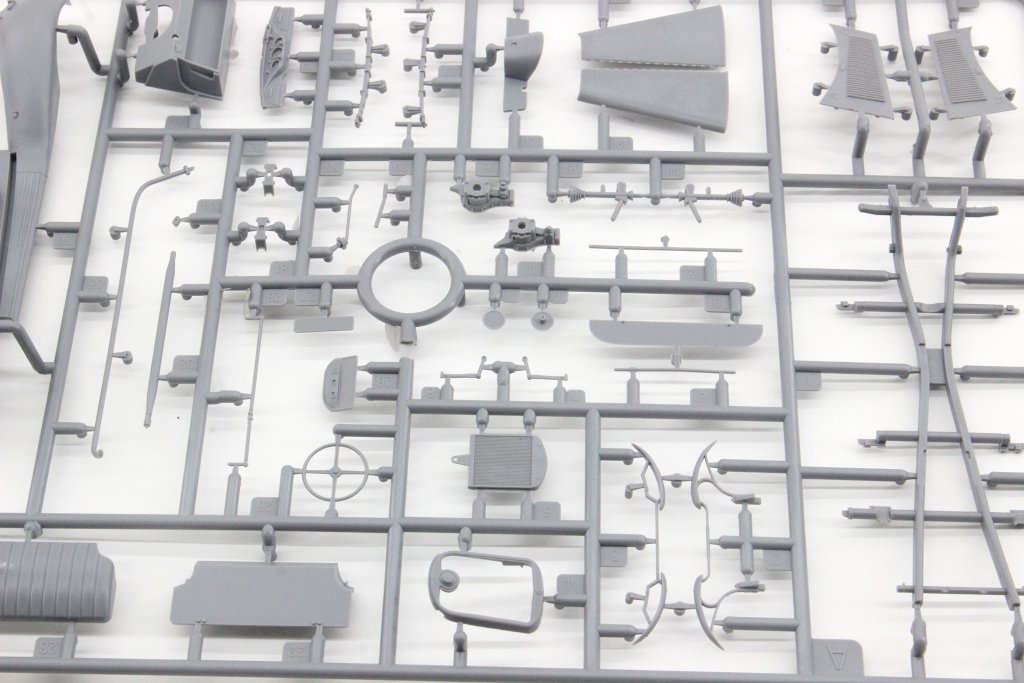
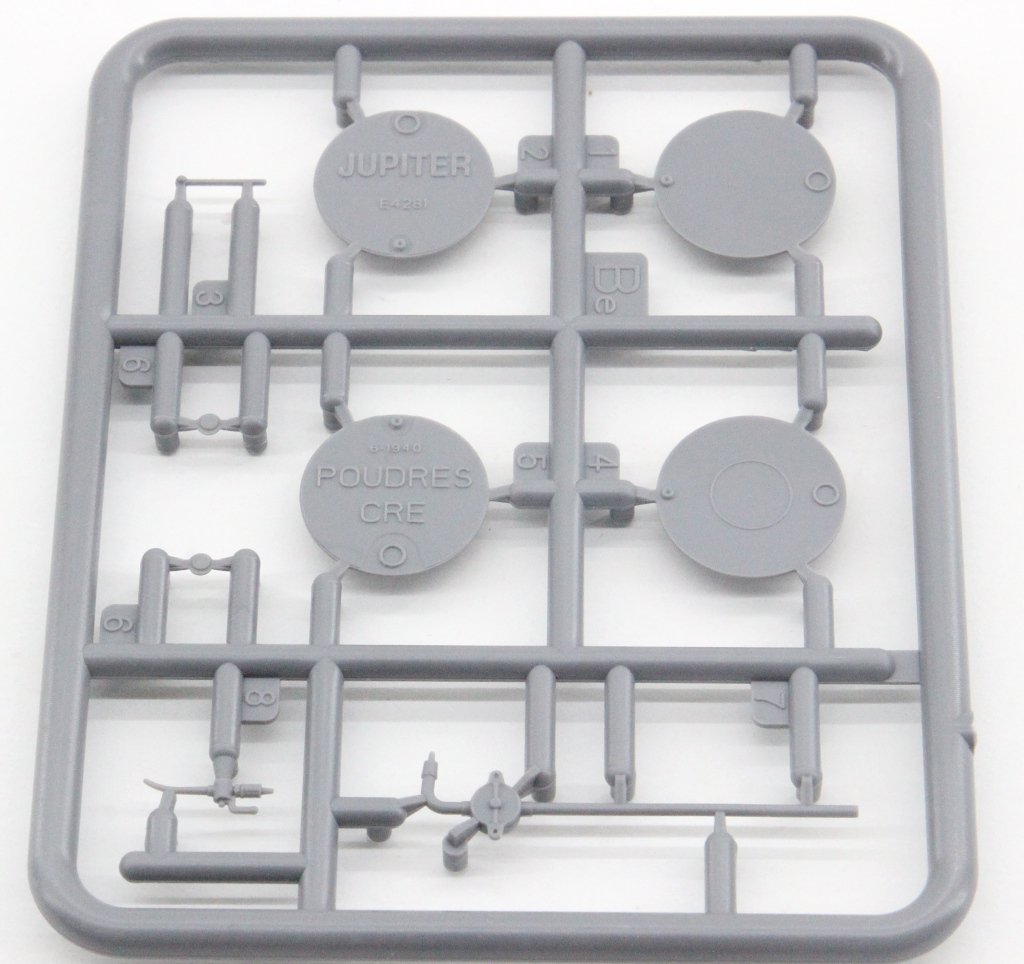
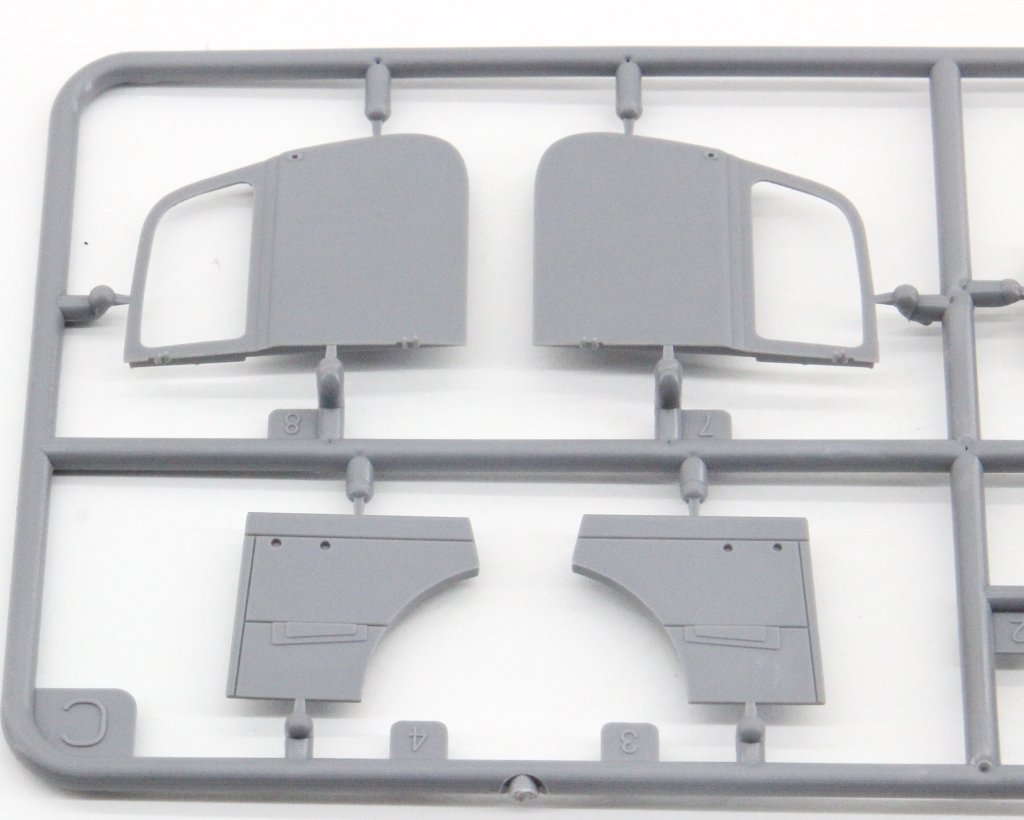
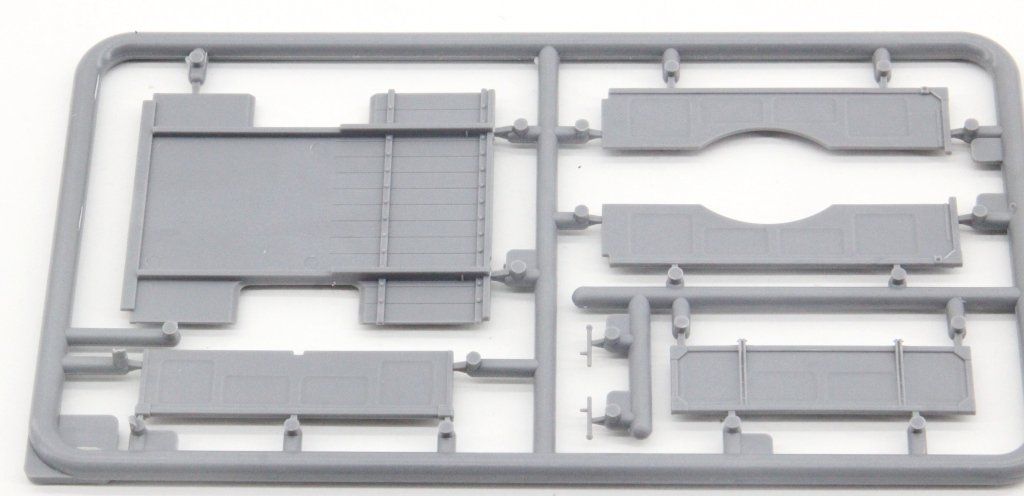
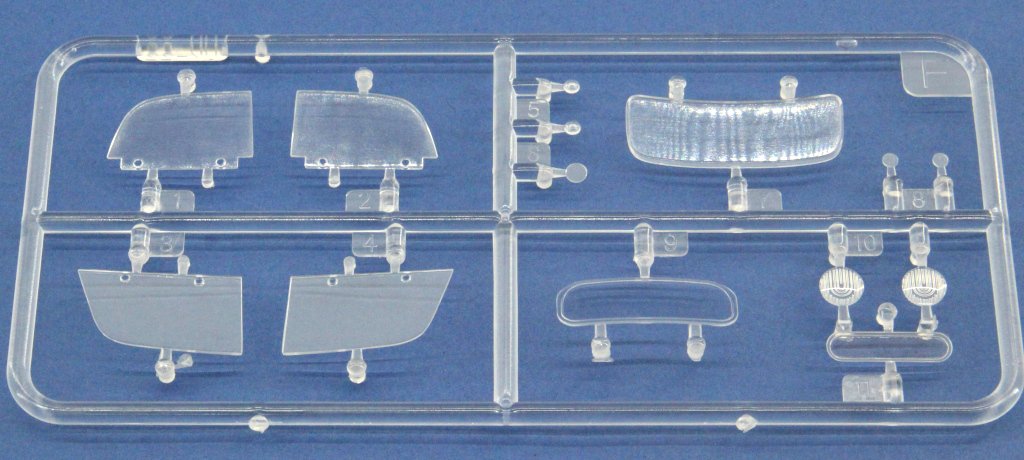
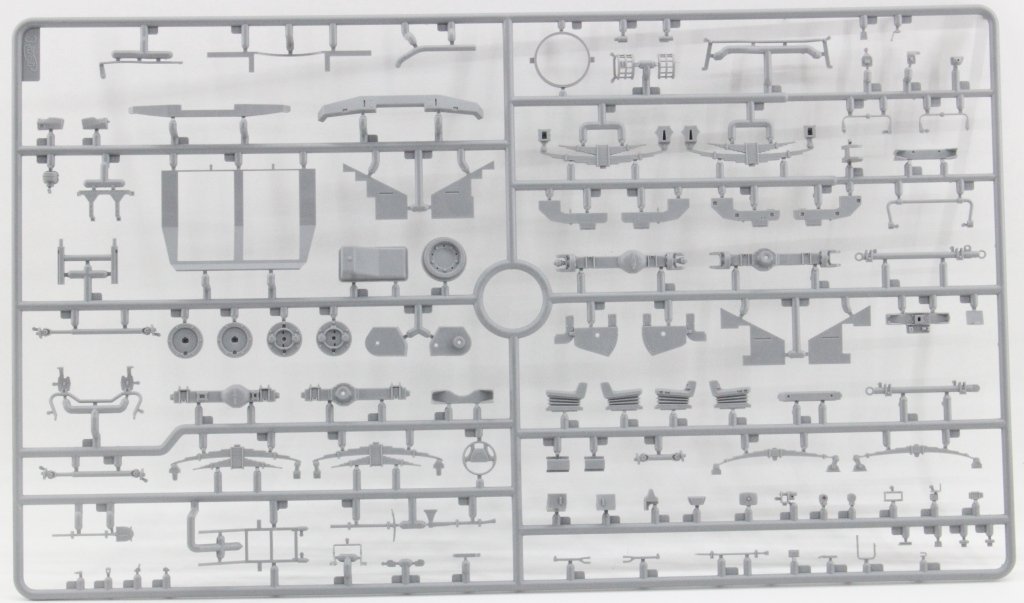
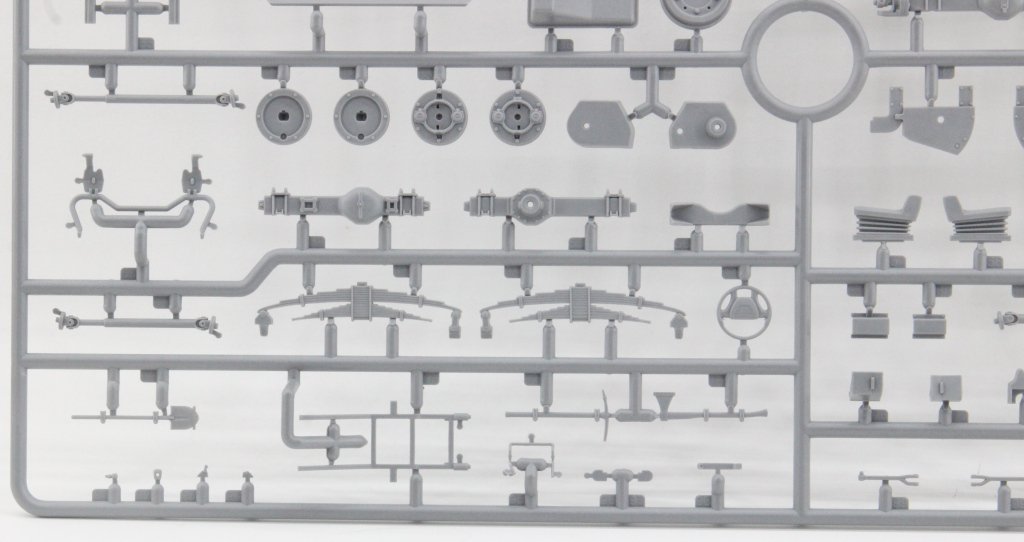
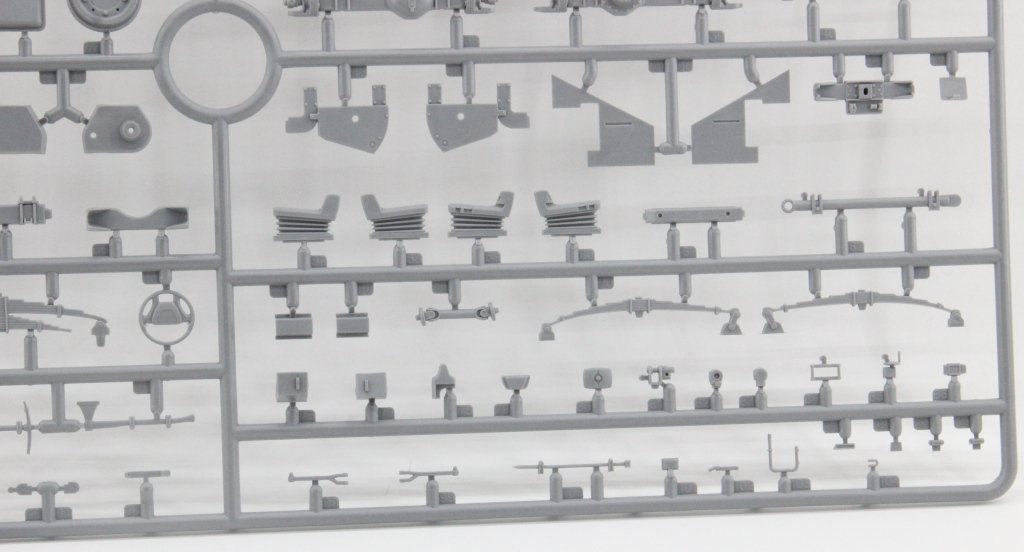
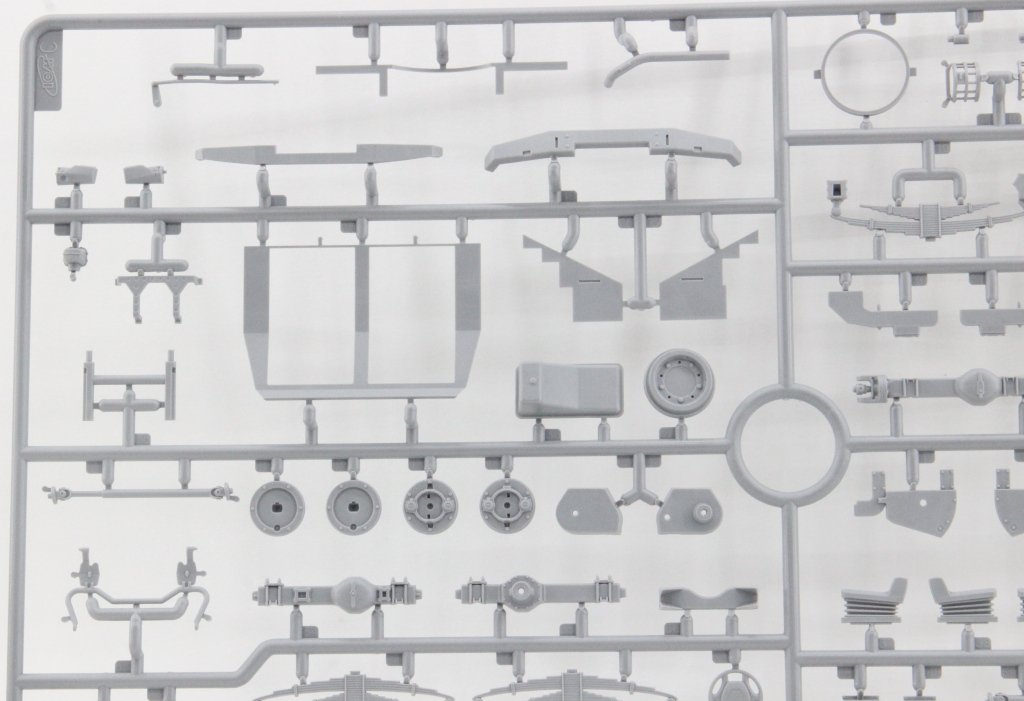
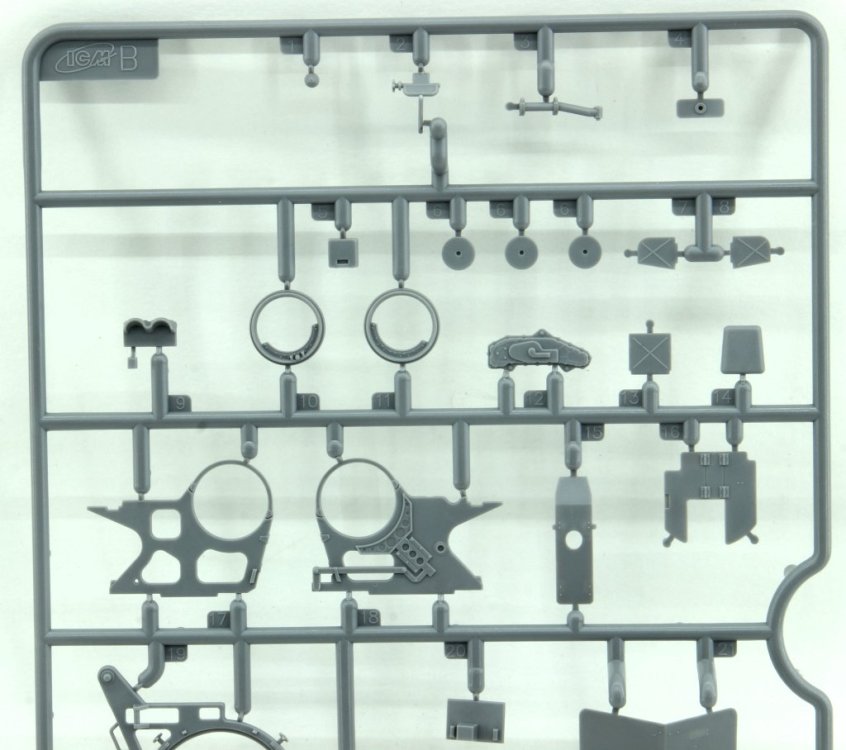
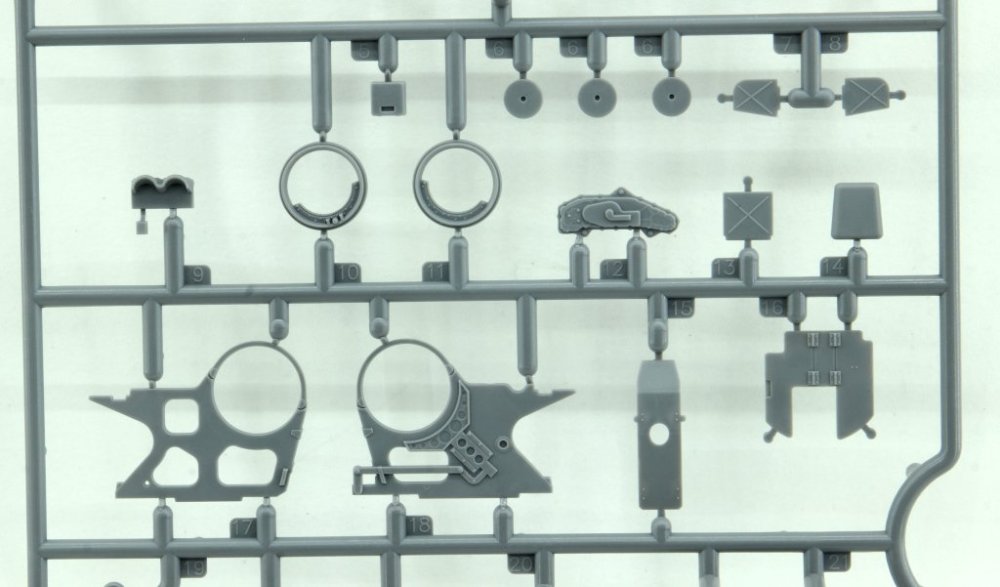
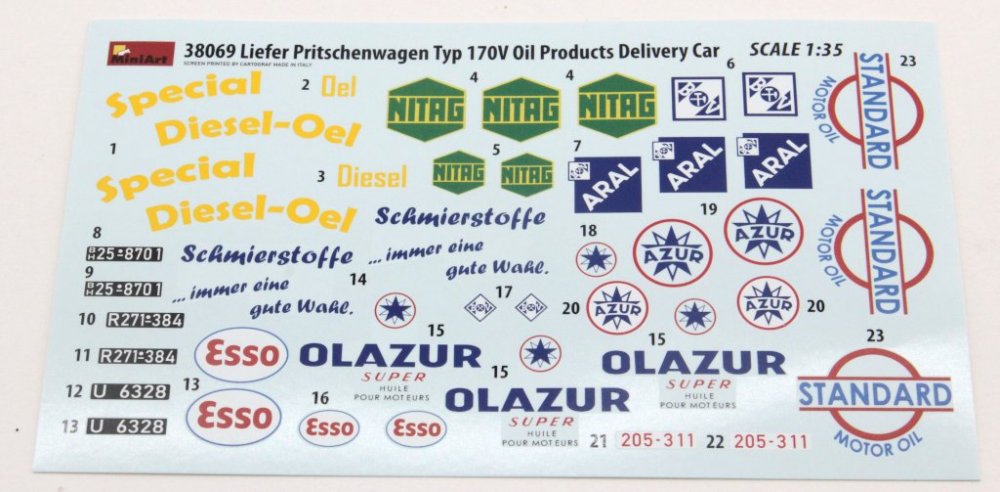
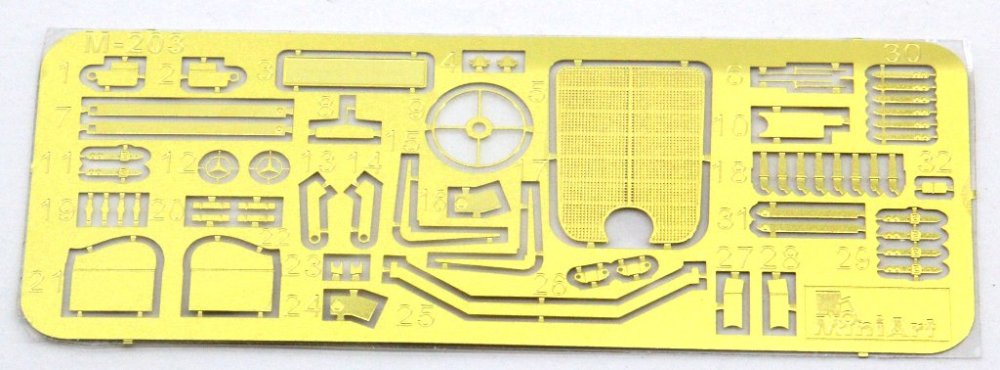
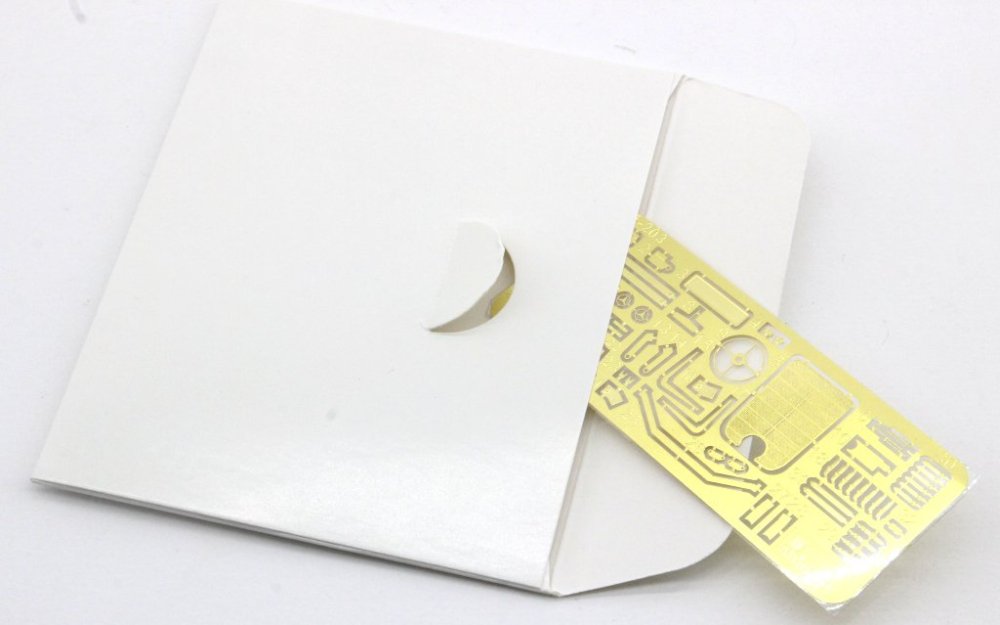
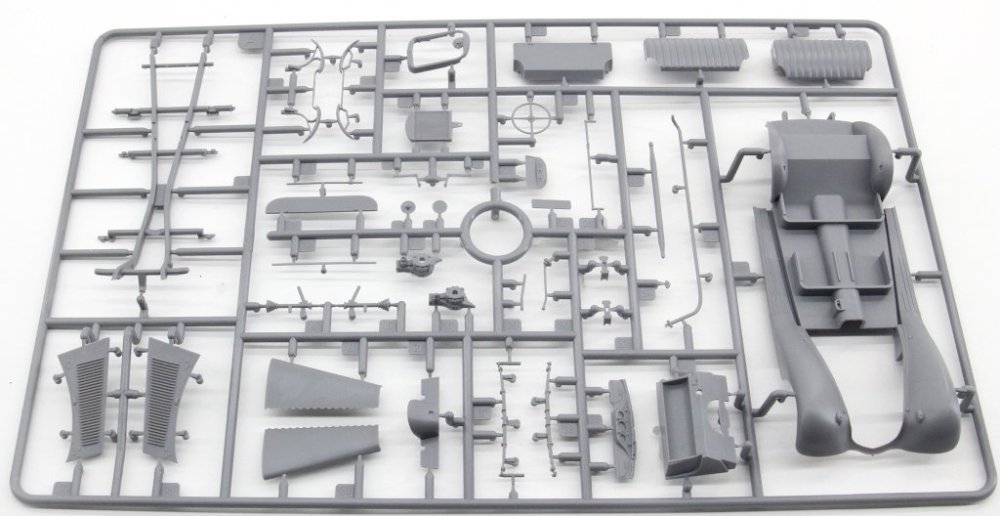
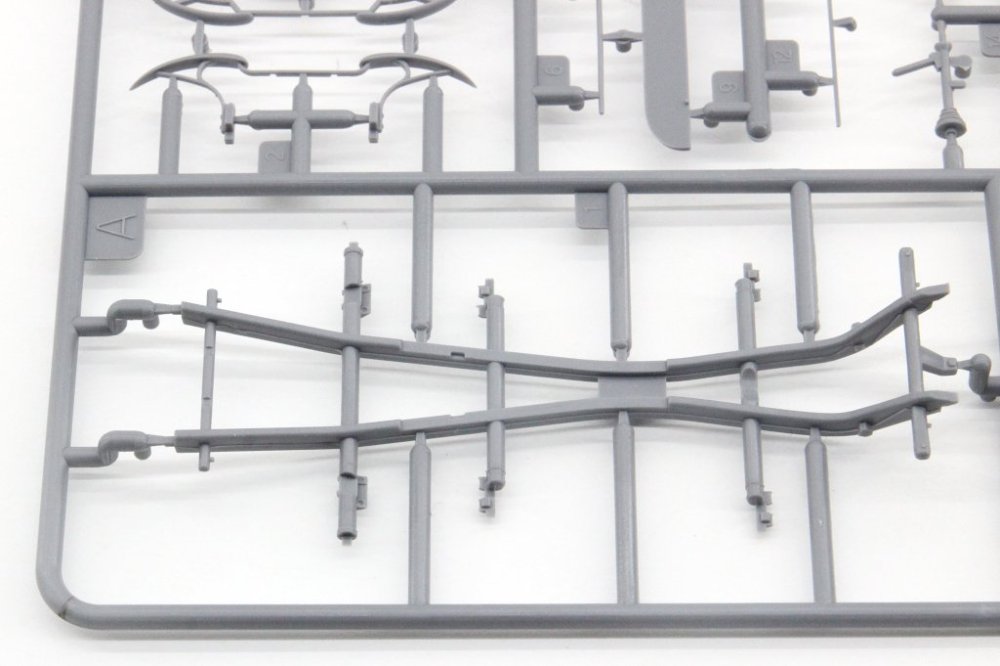
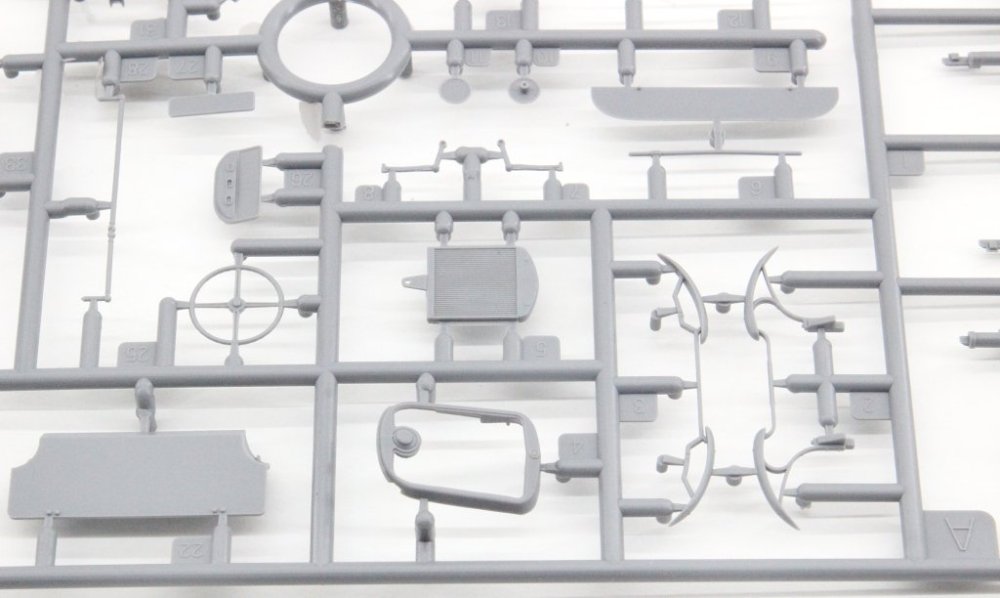
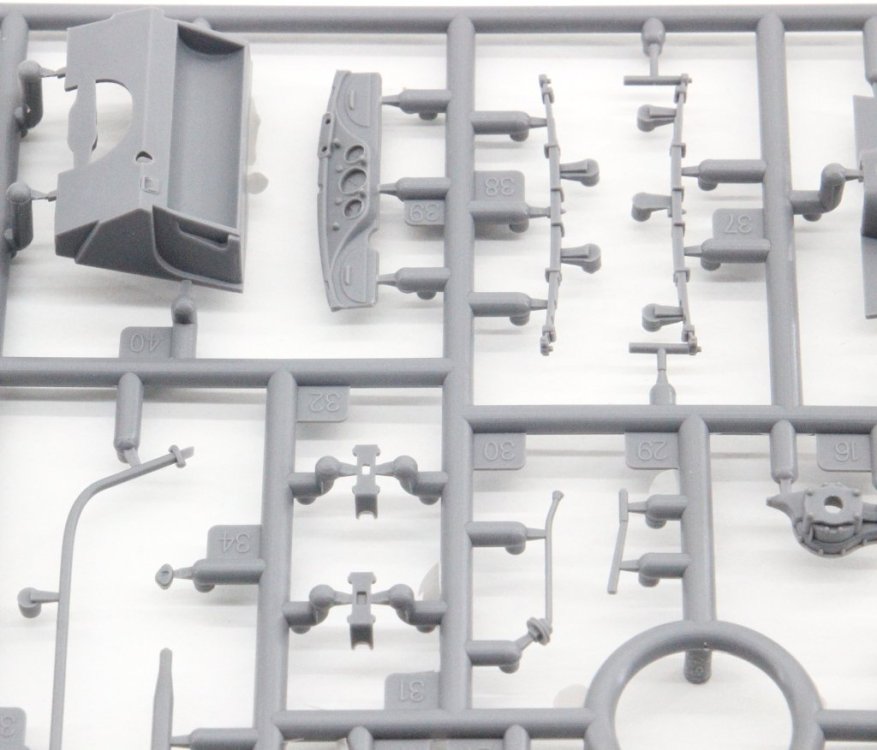
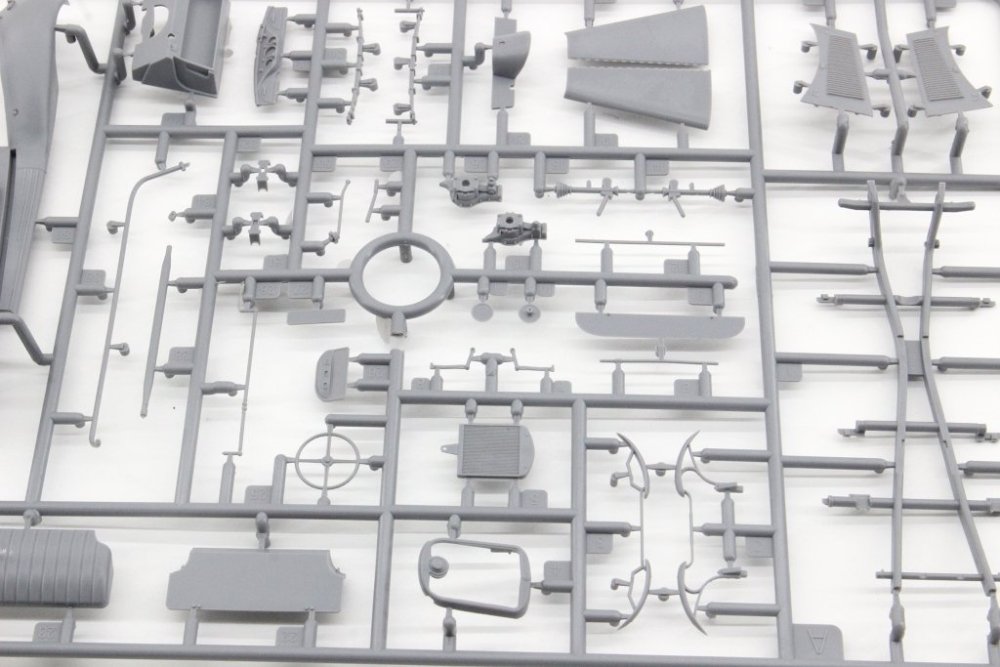
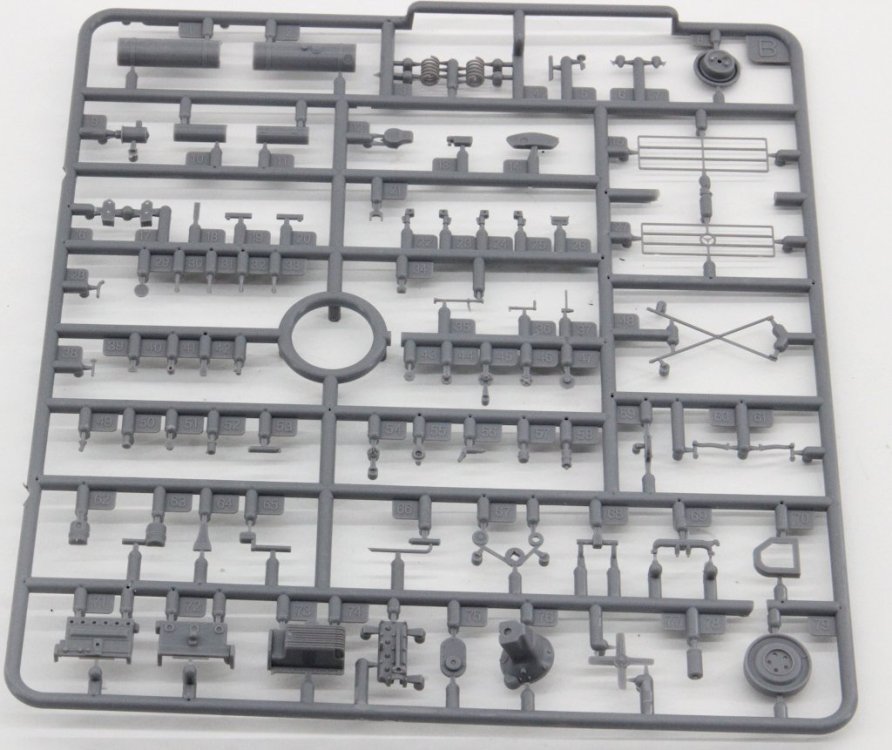
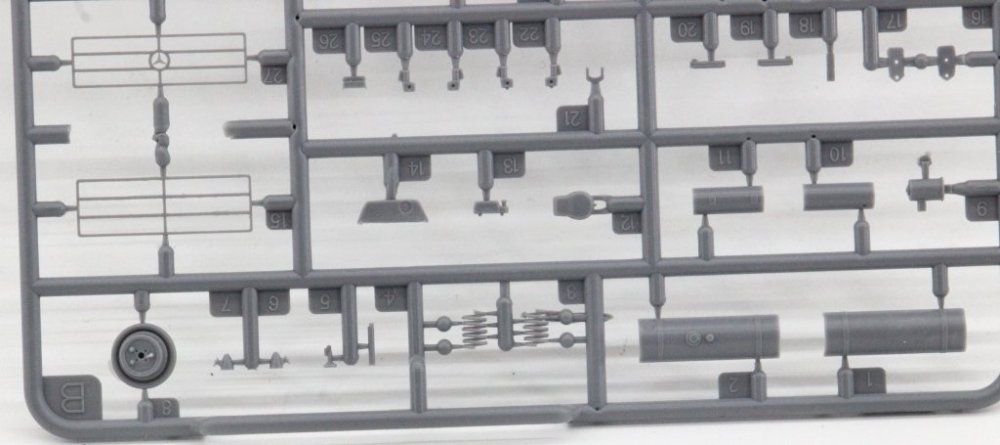
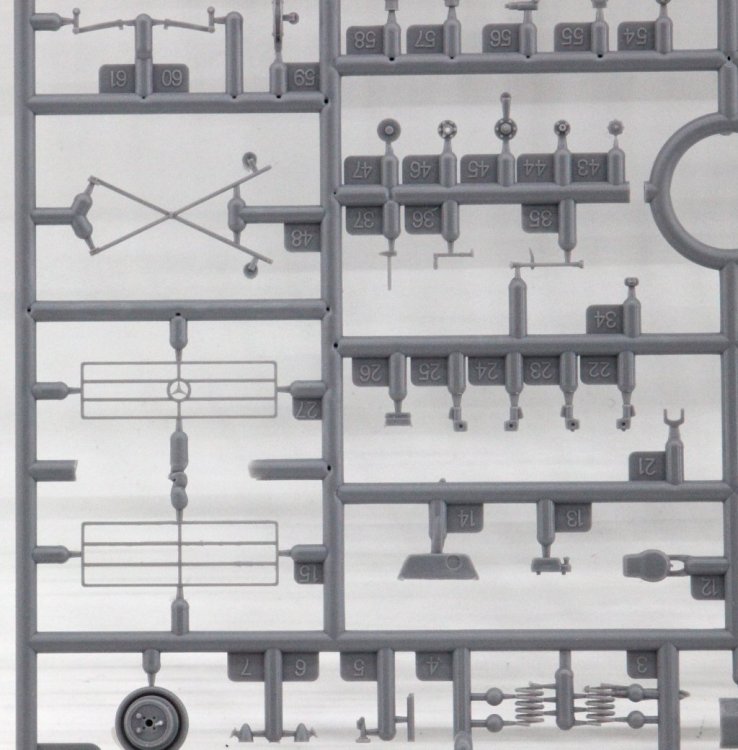
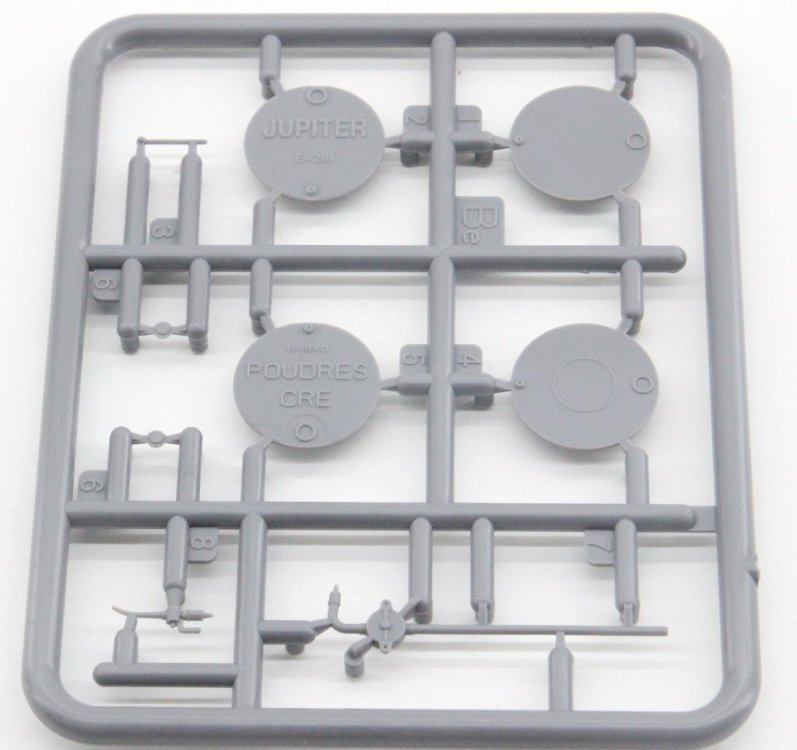
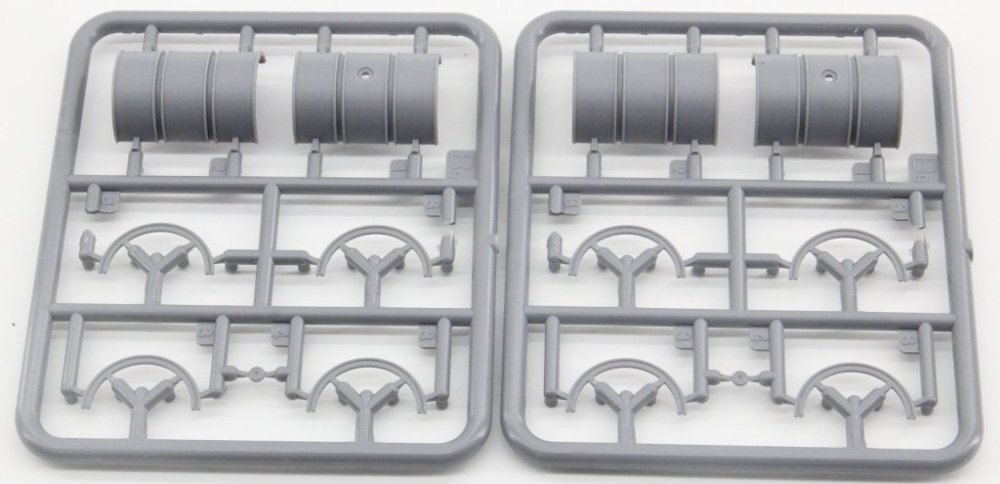
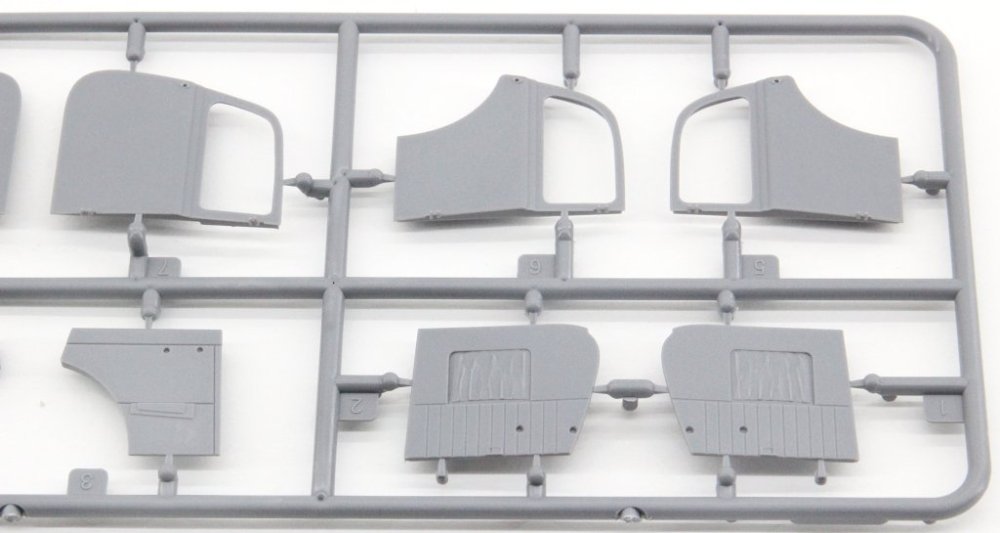
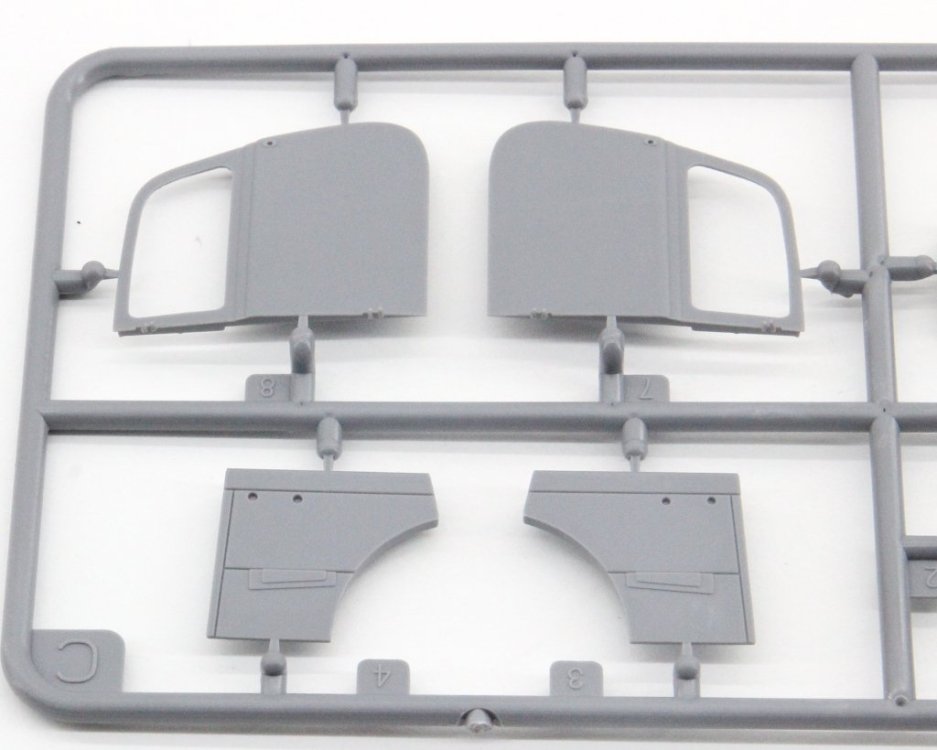
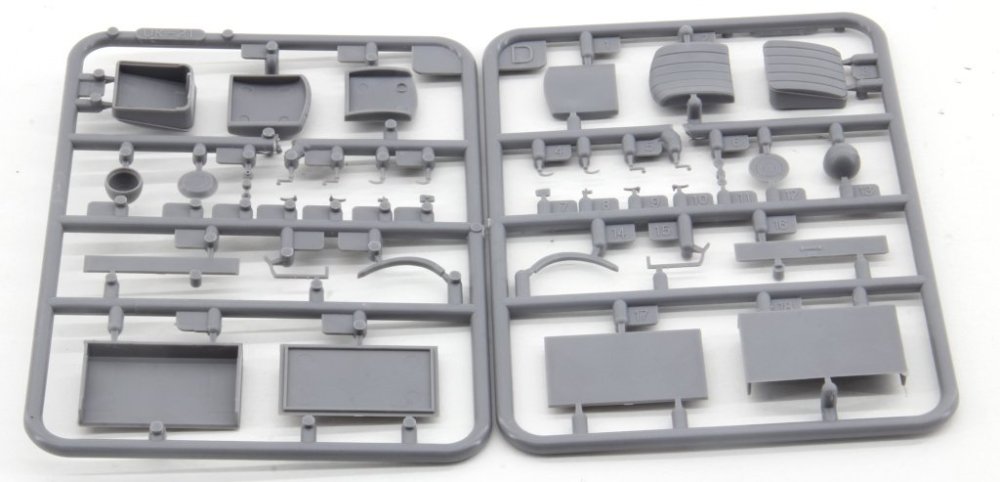
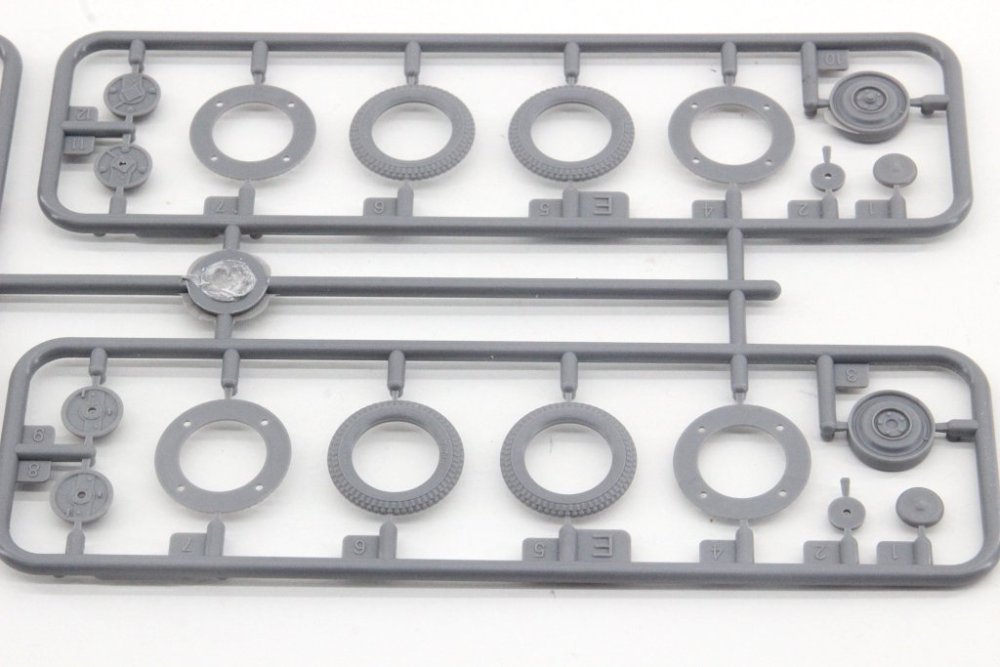
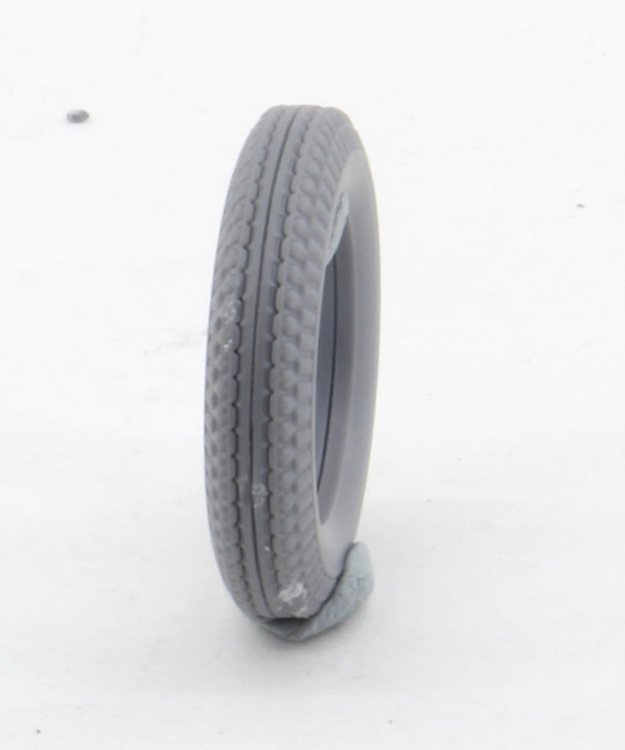
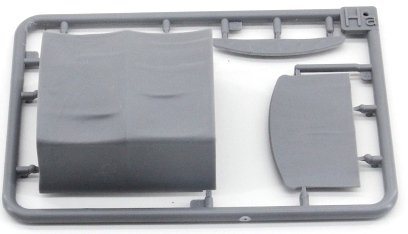
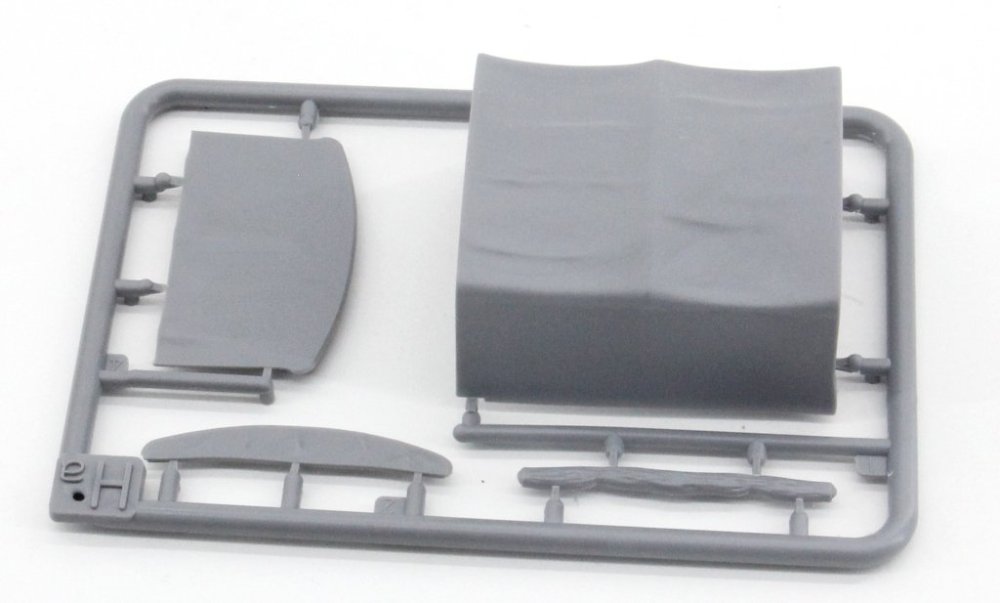
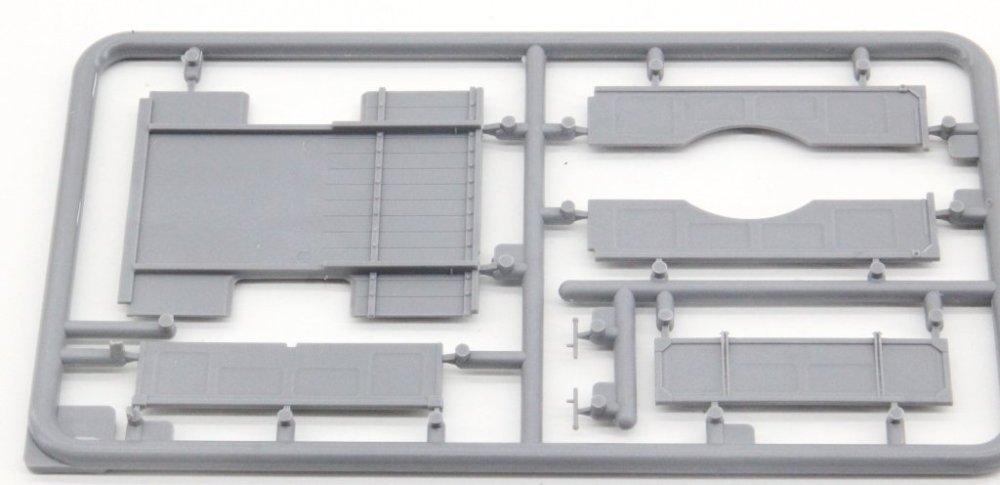
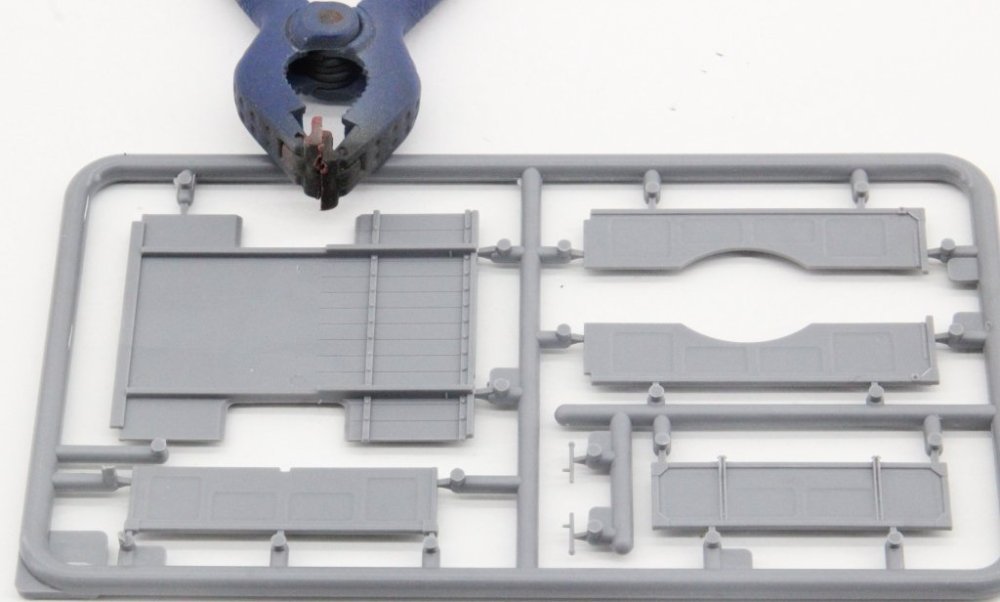
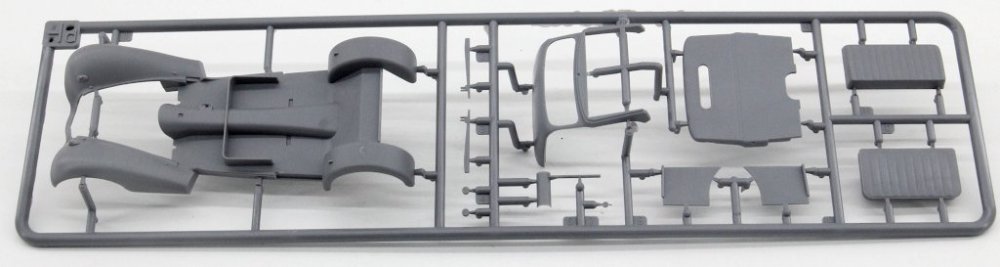
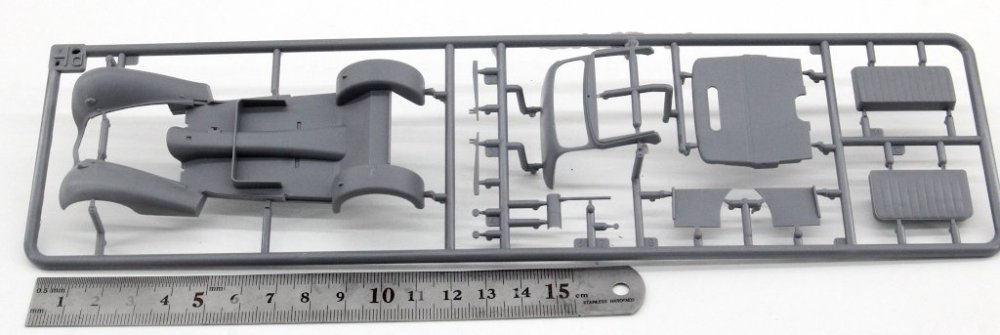
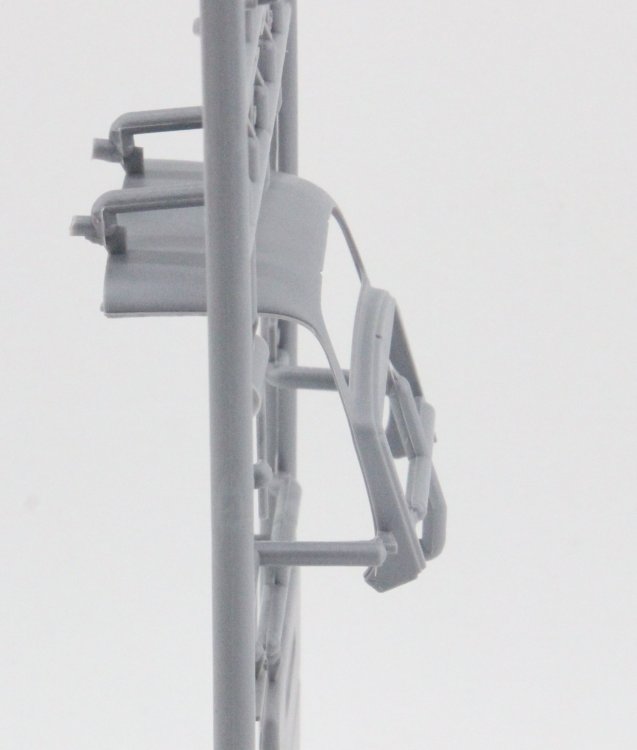
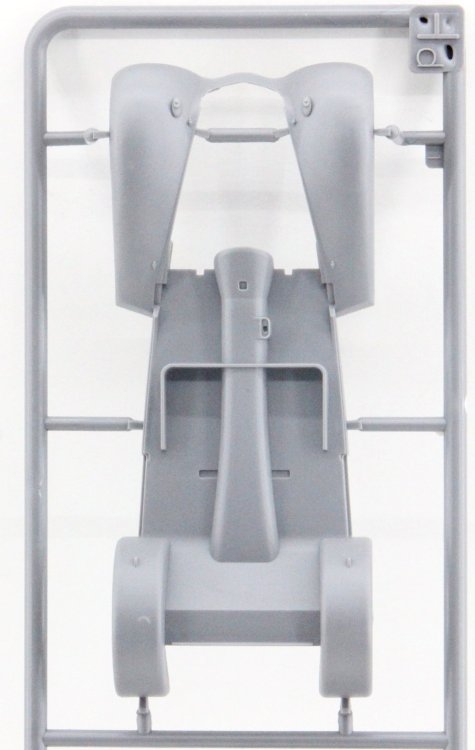
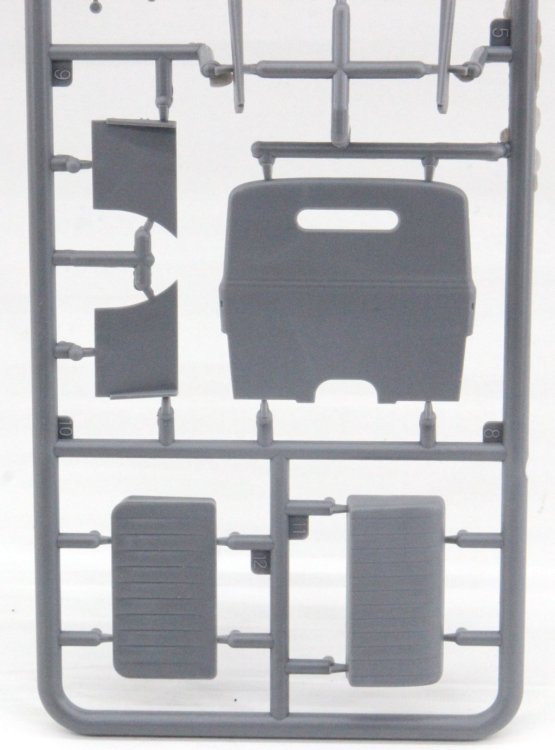
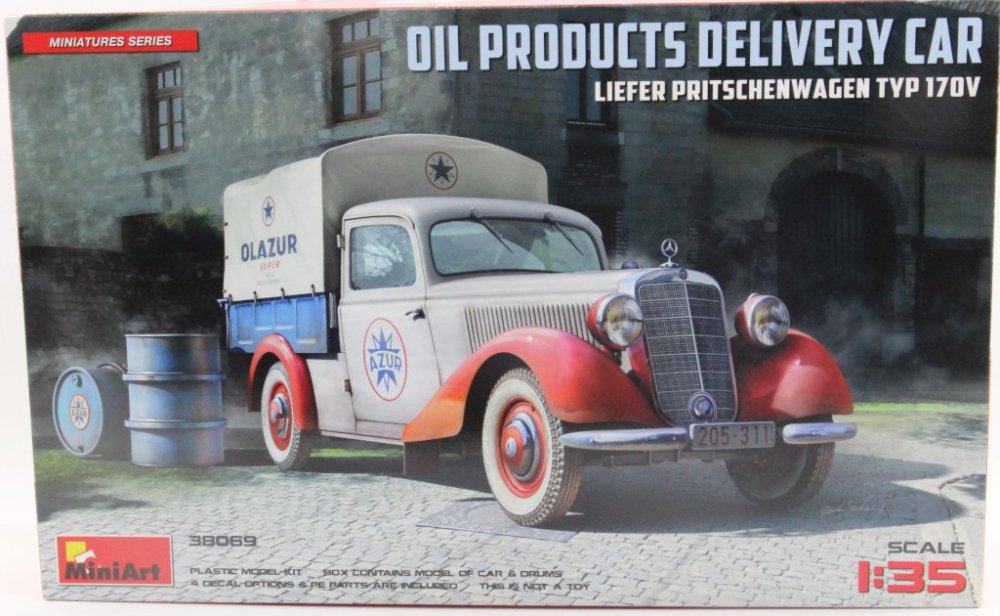
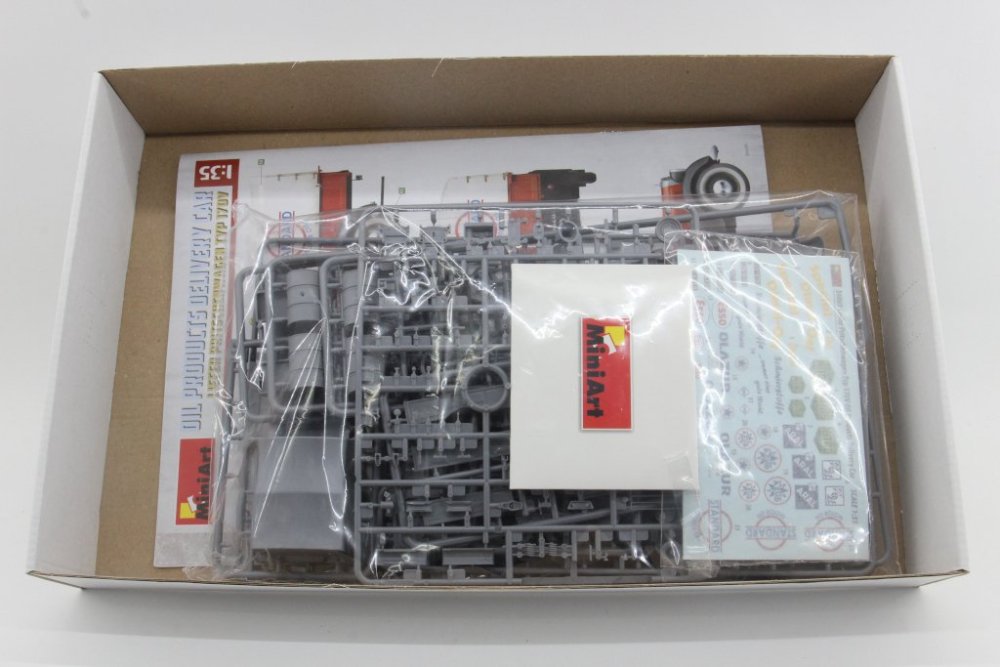
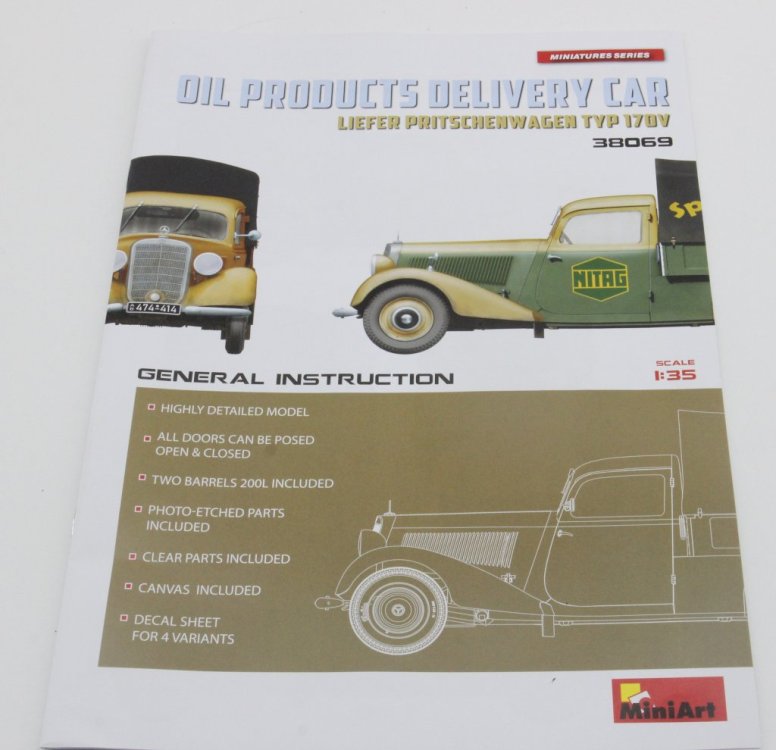
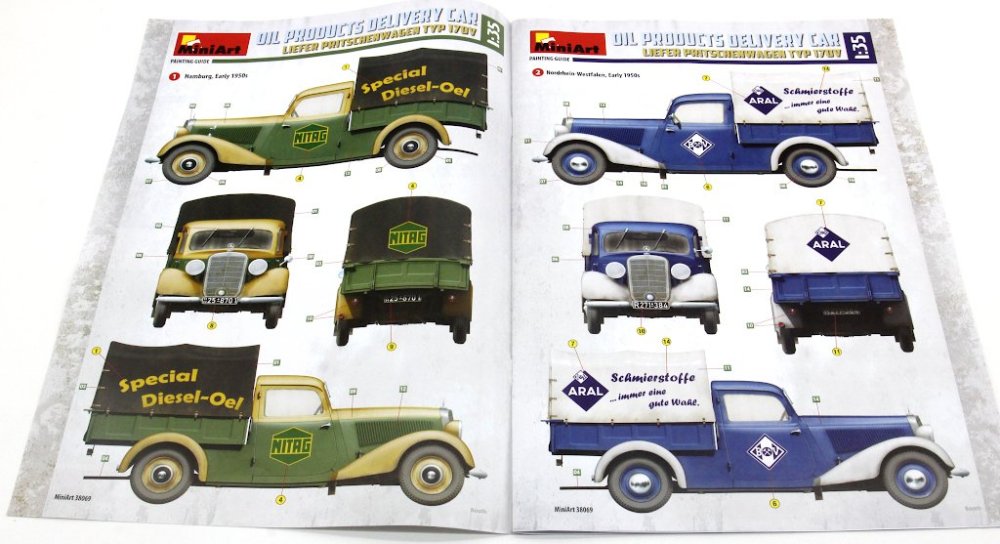
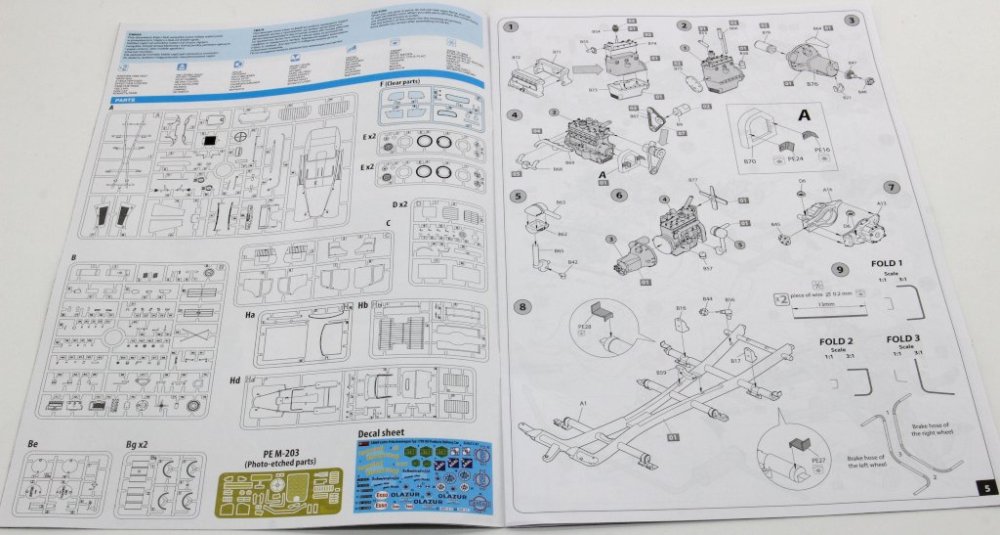
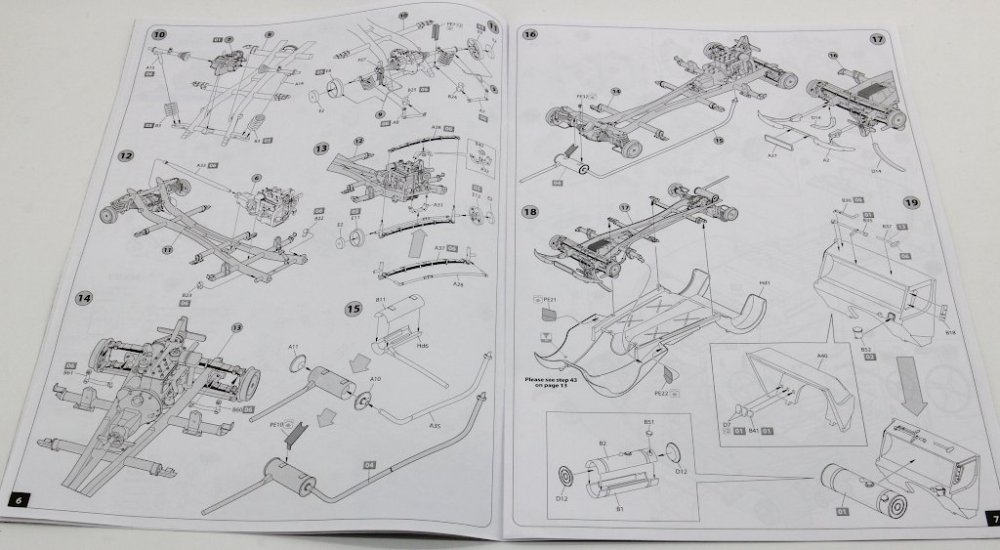
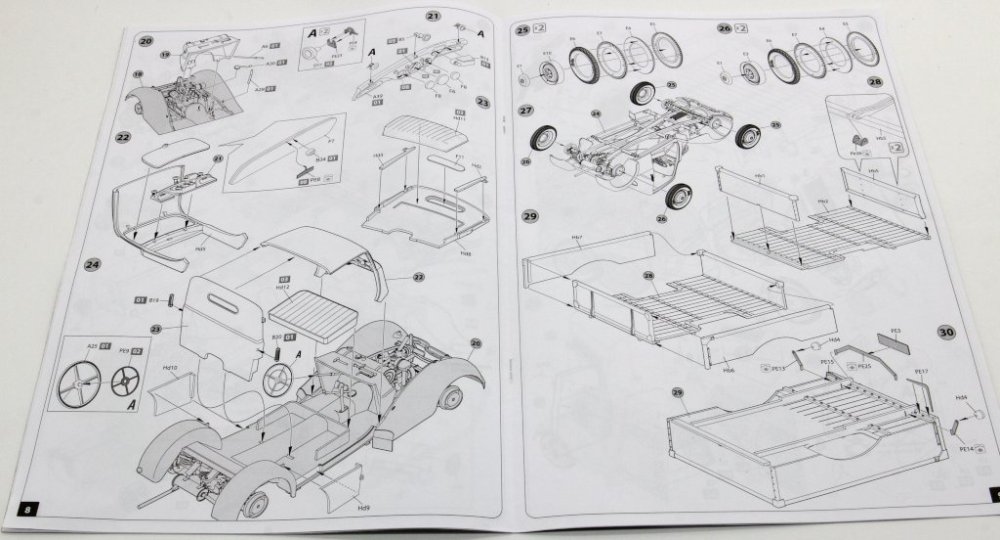
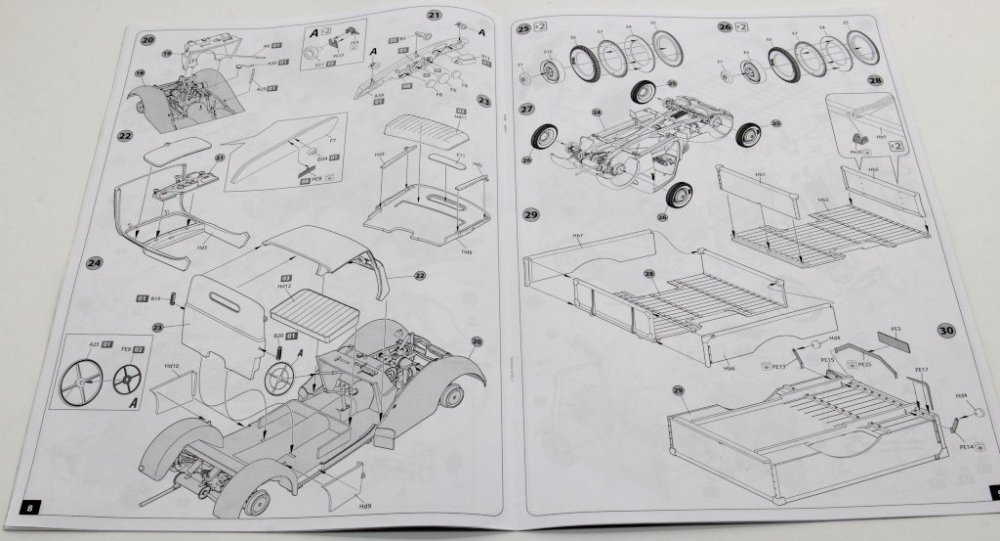
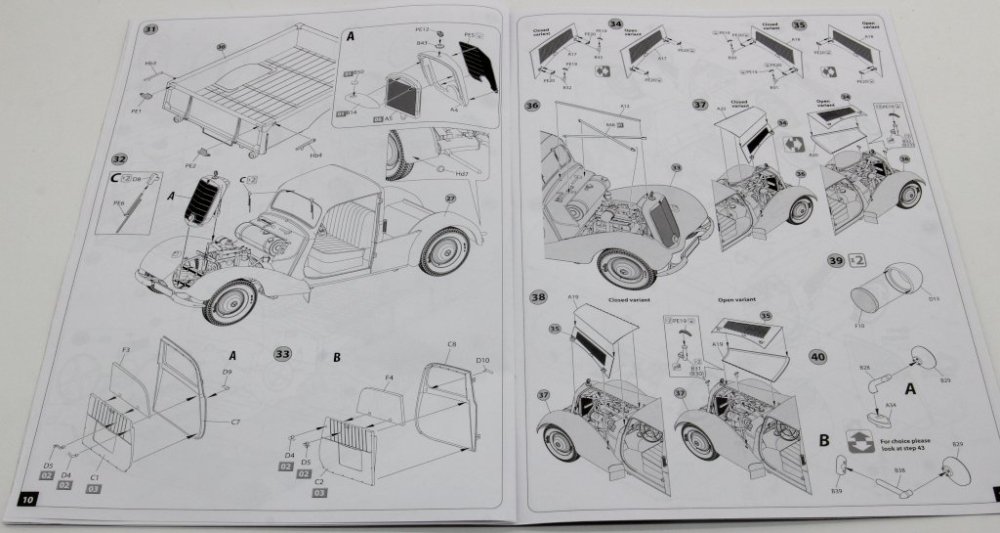
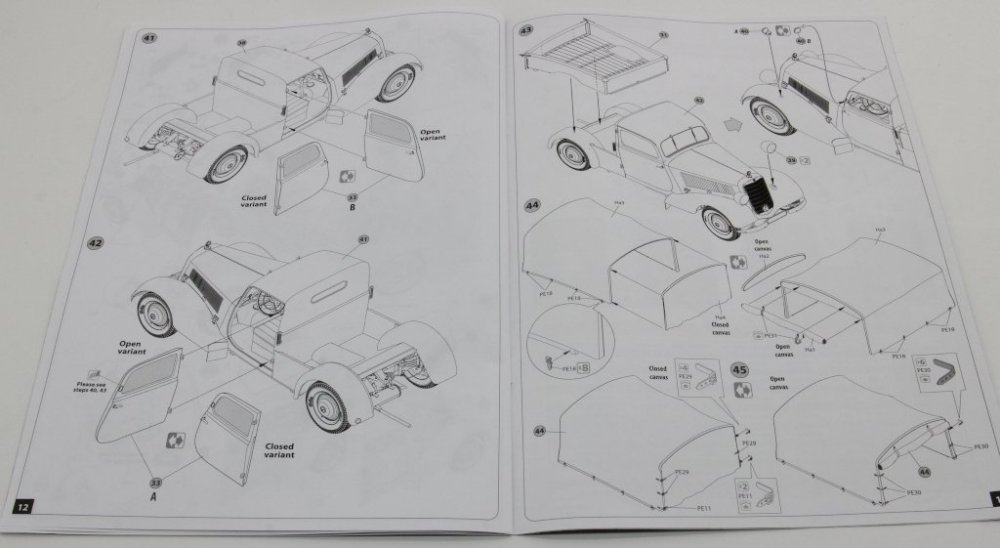
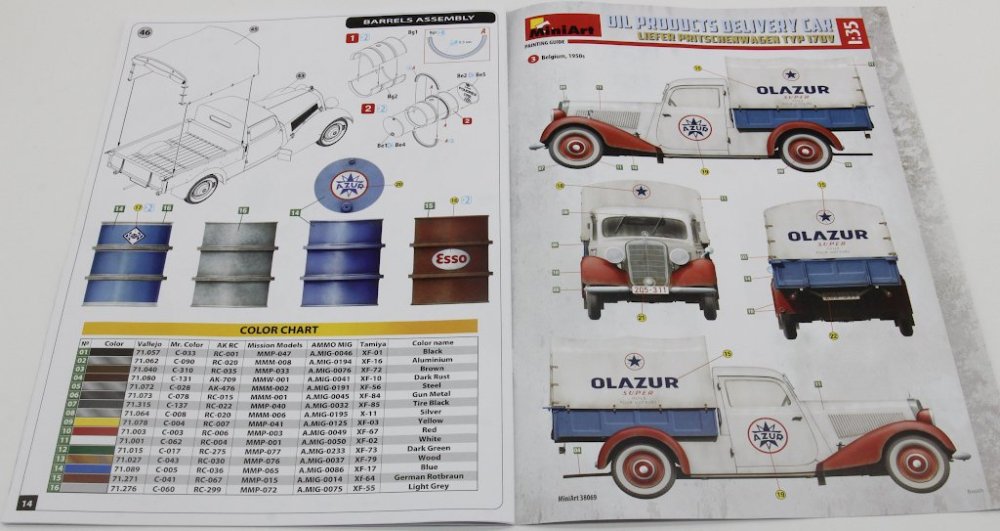
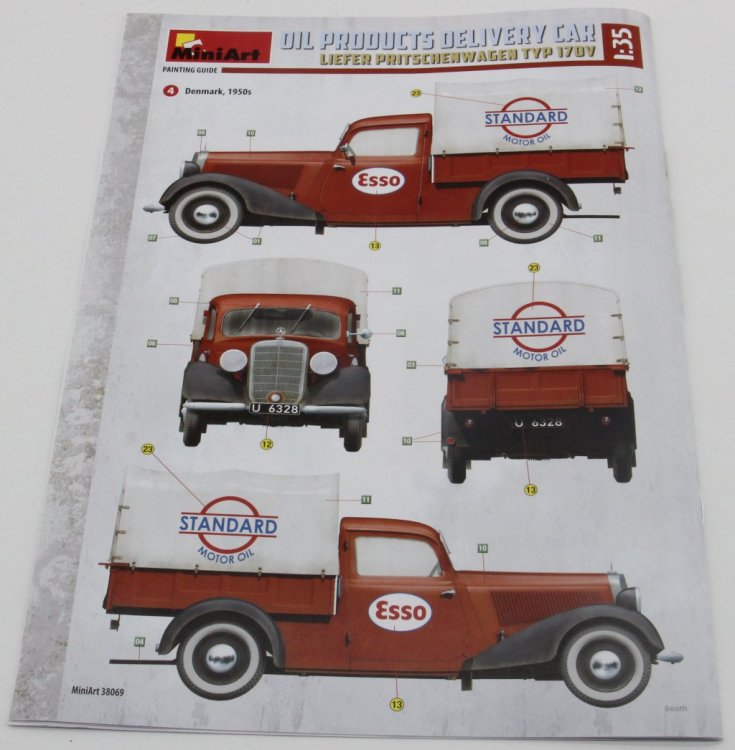
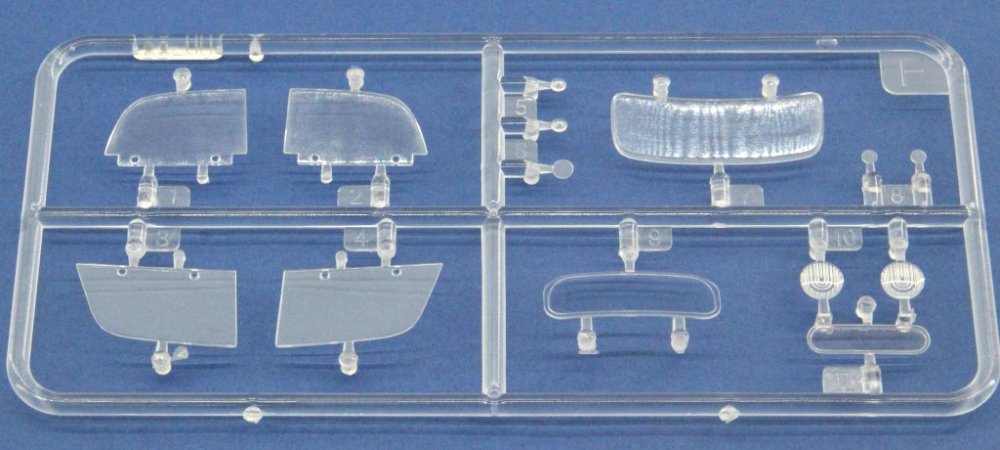
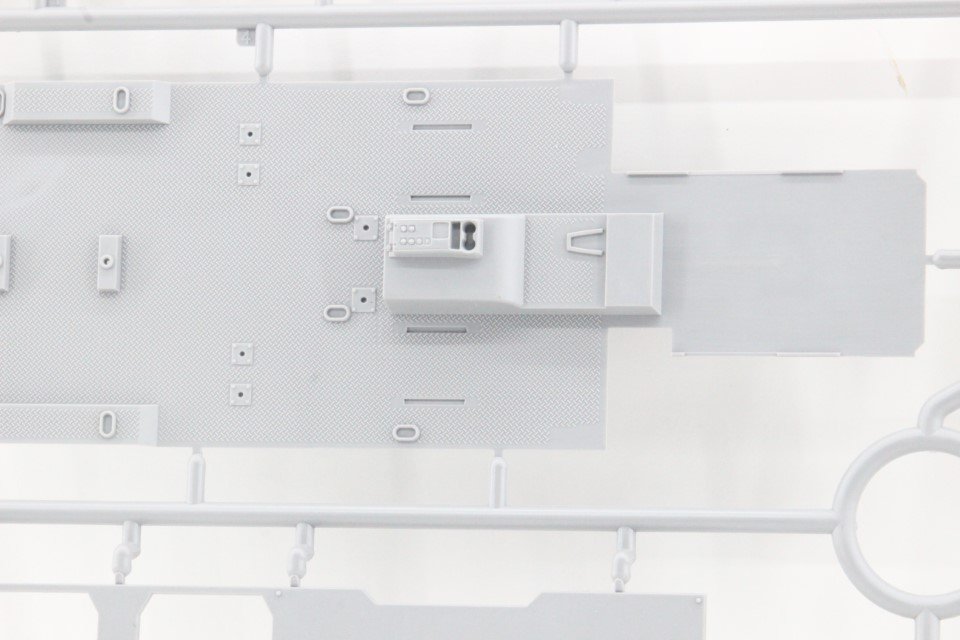
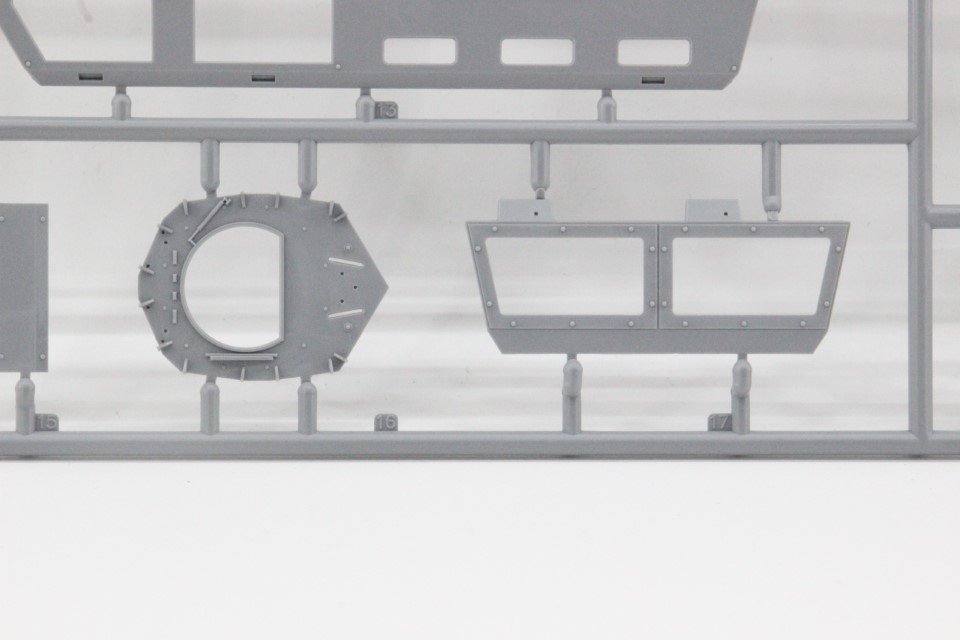
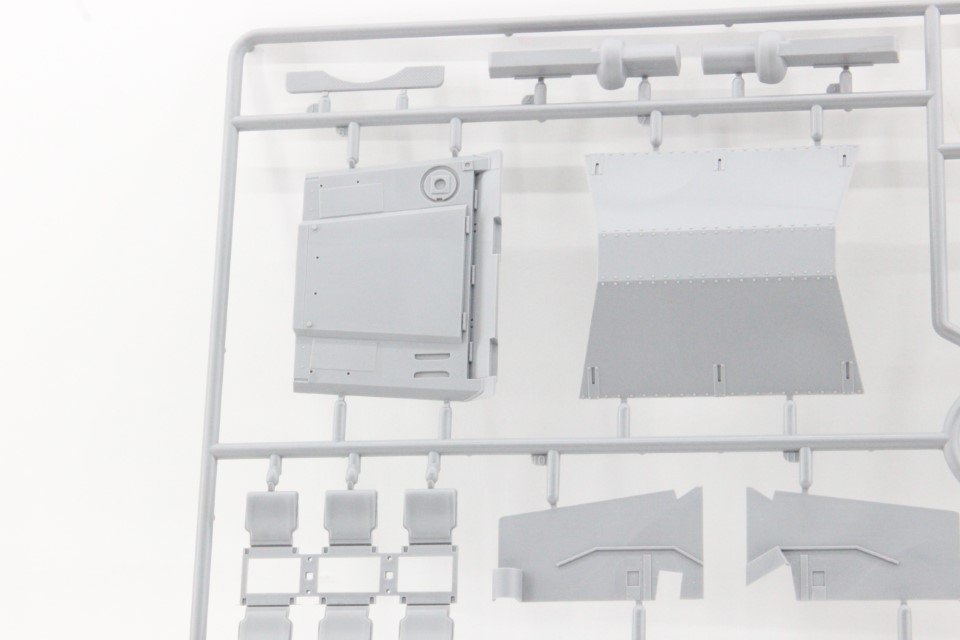
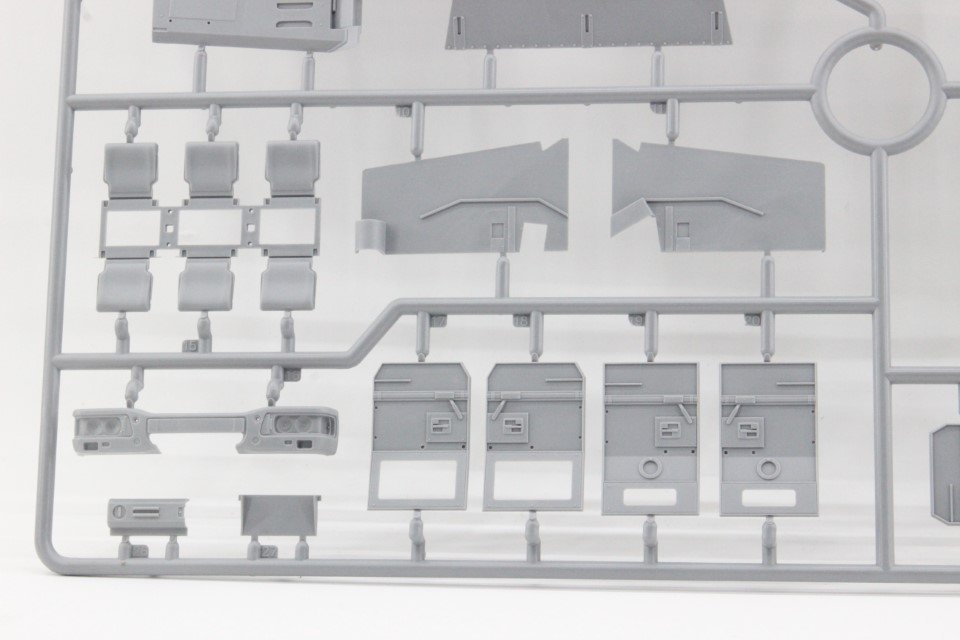
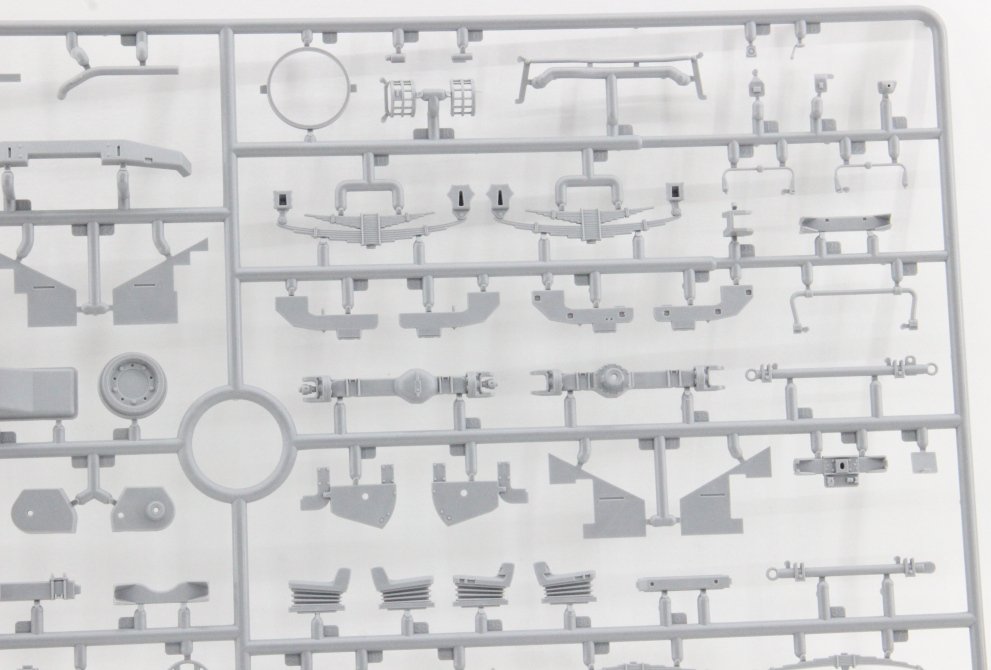
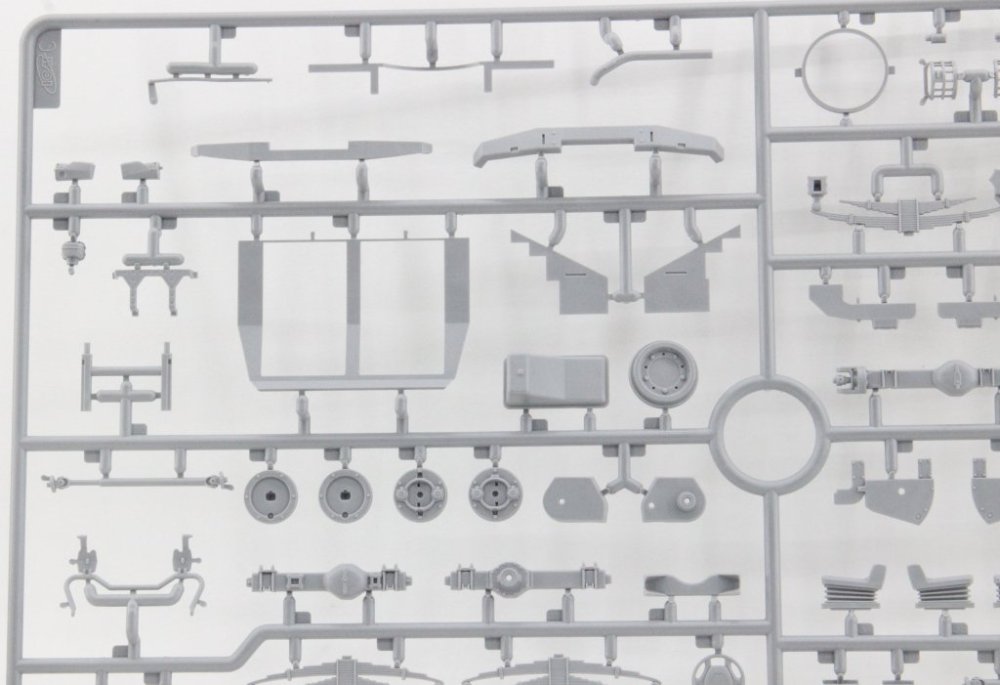
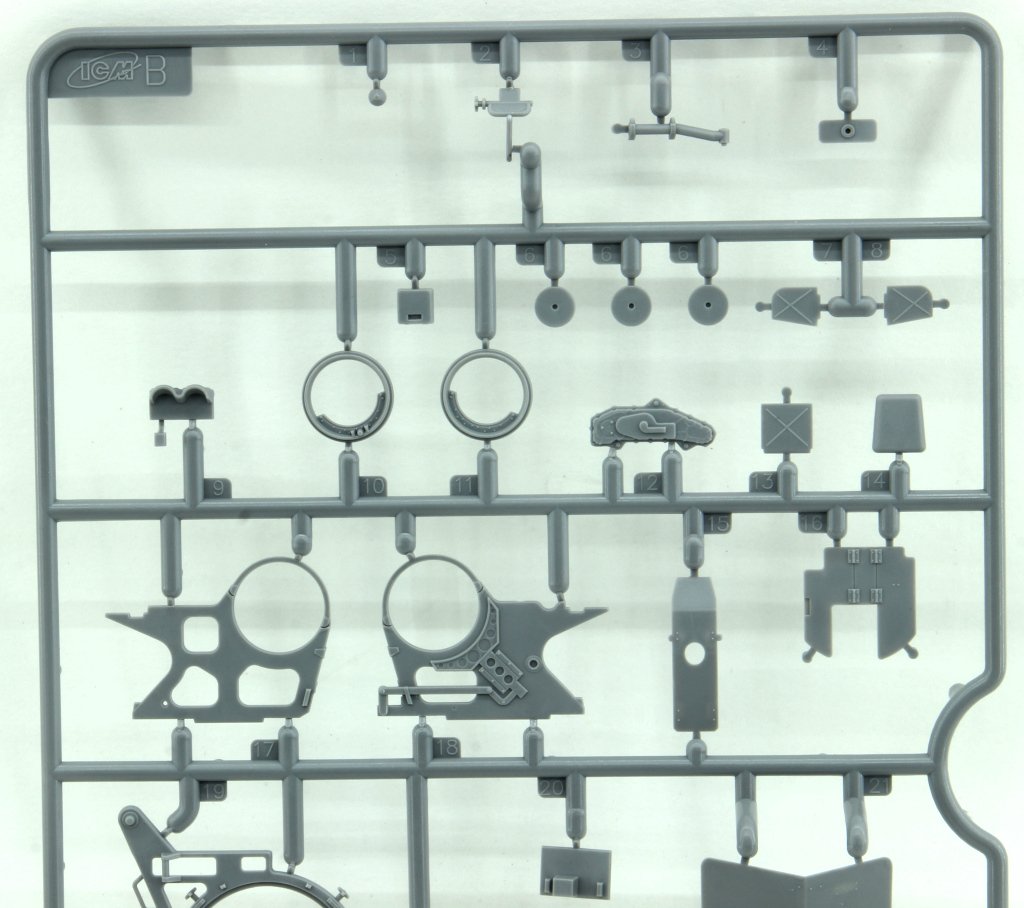
1:35 MiniArt Oil Products delivery Car Liefer Pritschenwagen TYP 170V catalogue number : 38069 Price tag: 35,50€ Miniart has been presenting us with some quite interesting models, featuring intricate details through the inclusion of small parts and subassemblies that ultimately result in a unique model. Let’s proceed with the review: Some historic background on this model: The Mercedes Benz 170 model was synonymous during the mid-1930s and up until 1942 in Germany as the brand's most popular vehicle. In the post-war period, it was again the 170 model that helped to relaunch the sales and reputation of this iconic German car manufacturer, with production continuing until 1955. The "V" designation indicates that the engine was mounted at the front, distinguishing it from the 170H model, where the powertrain was mounted at the rear of the vehicle. This model presented by MiniArt is yet another variation in the 170 family, offered over the years. It is the 170 Va model (chassis for specific cargo boxes), produced between 1950 and 1952. In this particular case, it represents vehicles used for transporting oil barrels (although the cargo box was suitable for all types of loads). what's inside the box: The packaging consists of a top lid featuring the model's image, covering a sturdy cardboard container designed to protect the sprues. Inside, there is a bag containing all the sprues, decals with transparent parts, and a small envelope with the photo-etched pieces. The instructions are located at the bottom of the box. Sprues this set comes with 14 grey plastic sprues, and one with clear parts. Also a photoetch fret and a decal sheet. Sprue A The largest sprue in the set provides us with a series of parts for constructing the vehicle's chassis, as well as interior components such as the steering wheel, engine firewall, and instrument panel. The chassis is provided as a single piece, onto which all the mechanical components will be attached. Other notable components include the external radiator frame (to be complemented with the photo-etched grille) and the front bumpers, which are supplied as a single piece. This sprue also includes some parts not used in this version, with the most notable being the body shell for the Sedan version. The engine covers are also included, featuring the typical open air-cooling grilles, which are intricately detailed and add great value when displayed with the engine exposed. Sprue B This sprue contains the parts that make up the engine, gearbox, engine mounts, fuel tank, steering components, and rear suspension. The detail in the rear suspension springs particularly caught my attention. Small details that stand out include the ashtray and cigar lighter for the interior! Another small piece that intrigued me was the distributor, which of course will require wiring for the spark plugs (I just hope I get the sequence right!). Sprue C This sprue includes the doors (which can be displayed open or closed) as well as the interior linings. Other doors for different versions are also provided (which could be useful for filling the cargo box!). Sprue D Two sprues D are included, though some parts are not used in this version. Noteworthy details include the internal components of the cabin, such as door handles and the intricate detailing of the front headlights. Sprue E Four sprues E are included. Each one contains the parts for assembling the vehicle's wheels, the rims, hubcaps, as well as the brakes (front and rear), as they differ. An interesting detail is that each wheel is made up of four parts, allowing for greater tread detail on the tyres. By doing a quick dry fit of the parts that make up a tyre, it's clear why the wheels are separated into four pieces. The three-dimensional effect of the tyre tread grooves is clear and realistic, as seen in the photos below. note : the tire brand is also stamped on the tire wall. Sprue F (Clear Parts) This transparent sprue includes all the "glass" parts of the model. The front and rear windscreens, as well as the door windows, feature guides that facilitate placement and alignment in the doors. The grooves on the main headlamp lenses (interior) are particularly eye-catching once assembled. There are also three circles corresponding to the dials on the vehicle's instrument panel. Care should be taken when removing these parts from the sprue, as they are prone to cracking. Sprue Be This sprue is the first of two parts needed to construct the oil barrels that accompany the set. On this sprue, we have the top and bottom caps of the two barrels, as well as the caps and a manual oil pump, which adds a certain "operational" feel to one of the barrels. Sprue Bg These two sprues contain the two halves of the barrels, along with the corresponding side reinforcements. This set of sprues is specific to the van version. Sprue Ha This sprue, specific to this version, provides the canvas cover for the cargo box. It allows the canvas to be displayed either open or covered, concealing the interior. Sprue Hb This sprue provides the parts needed to assemble the cargo box, including the base, side walls, rear, and front panels. The rear panel can be displayed open or closed, thanks to pins on the tailgate that allow movement through a photo-etched hinge. Just to compare the size of the cargo box. Not big! Sprue Hd This sprue provides the parts for assembling the bodywork of this version (van), consisting of: a specific body with a short cabin (two seats) and a single bench, characteristic of this version. The fine detail of the front wind shield / A pilar and roof. Photo-Etch Parts A set of photo-etched sheets is included, which will enhance the detail and finesse of the model. Notable pieces include the radiator grille, the iconic Mercedes star, windscreen wipers, mirrors, engine and body mounts, as well as the various buckles for the cargo box canvas. The inner circle of the steering wheel, typically used for the horn, is also provided as a photo-etch part. I recommend lightly sanding the bonding area and, if possible, the painting area, to facilitate the processes mentioned above. the Photo Etch Fret, is protected by a small envelope. Decals A single decal sheet is provided, with attention drawn to the logos of the various decoration options available. The film on the decals is minimal; however, some decals, due to their complexity, feature areas of film that can be minimised by cutting the decal into smaller sections and applying them gradually to the final model. The decals are produced by Cartograf, a brand well-known and recognised for its quality. Instructions As usual, Miniart presents us with a full-colour instruction guide in A4 format, with 8 pages, 4 of which (the decoration options on glossy paper) and the remaining (assembly instructions) on matte paper. The assembly instructions are divided into 46 steps (some of which are duplicated), with two additional steps for assembling the barrels. Noteworthy is the bending diagram for the brake pipes, from the chassis to the drums. The pipes running from the brake pump to the chassis are missing (but that's just me being meticulous 😊). The steps are clear, leaving no room for doubt regarding the gluing and placement. The decoration plans are in colour, with paint references provided in a colour chart at the end of the assembly, referencing various available and accessible brands As mentioned, 4 decoration options are available. All of them very unique and appealing ! A Diagram is provided to bend brake tubes ! original ! Conclusion This small and original model brings a lot of personality and colour to the "olive drab" or "grey" world of military models. The painting options are very appealing, and I must admit, I’m finding it difficult to choose my favourite decoration. The small parts, which we all love because they enrich the final model, require careful handling, but nothing that an experienced modeller hasn't encountered in every model. By this i'm not saying that it's not adequated to unexperienced modellers, they just need to take some care on the small parts and photo etch handling! It's not a weekend project, but it's also not a six-month project or a shelf queen! The subassemblies allow for a relaxed painting process, knowing in advance that they can be easily fitted into the model. As this is a "civilian" version, we can stray from the military schemes and make use of the reds, whites, and blues that often sit on the shelf waiting to be used 😊 It is indeed a model to recommend, and kudos to Miniart for the originality of the subject! To get one just click here Note: This model will be hitting my workbench soon, so stay tuned for updates on the build!


-
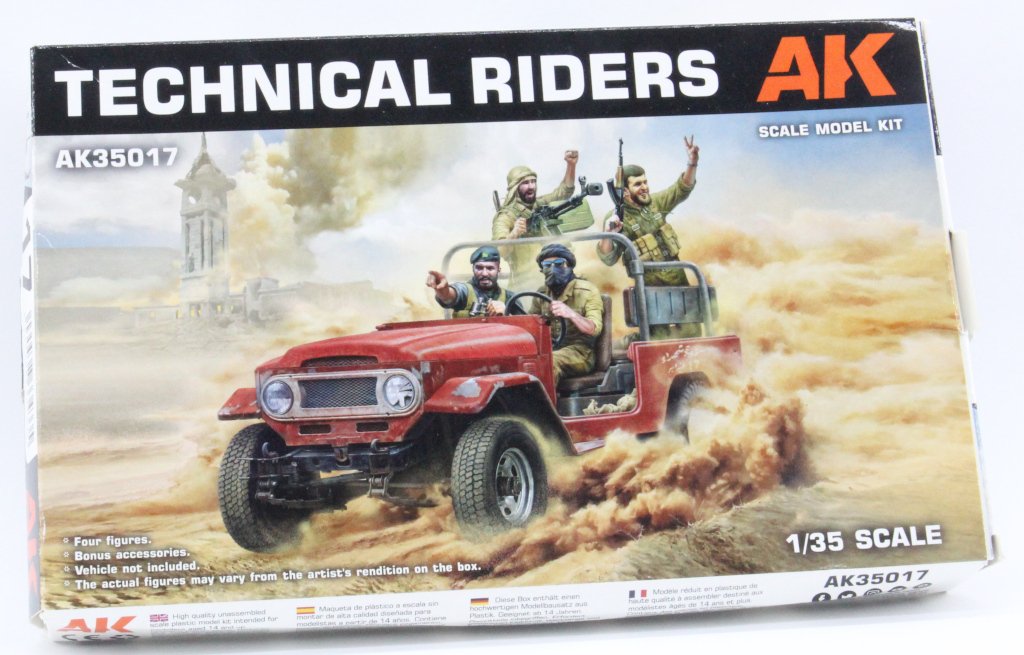
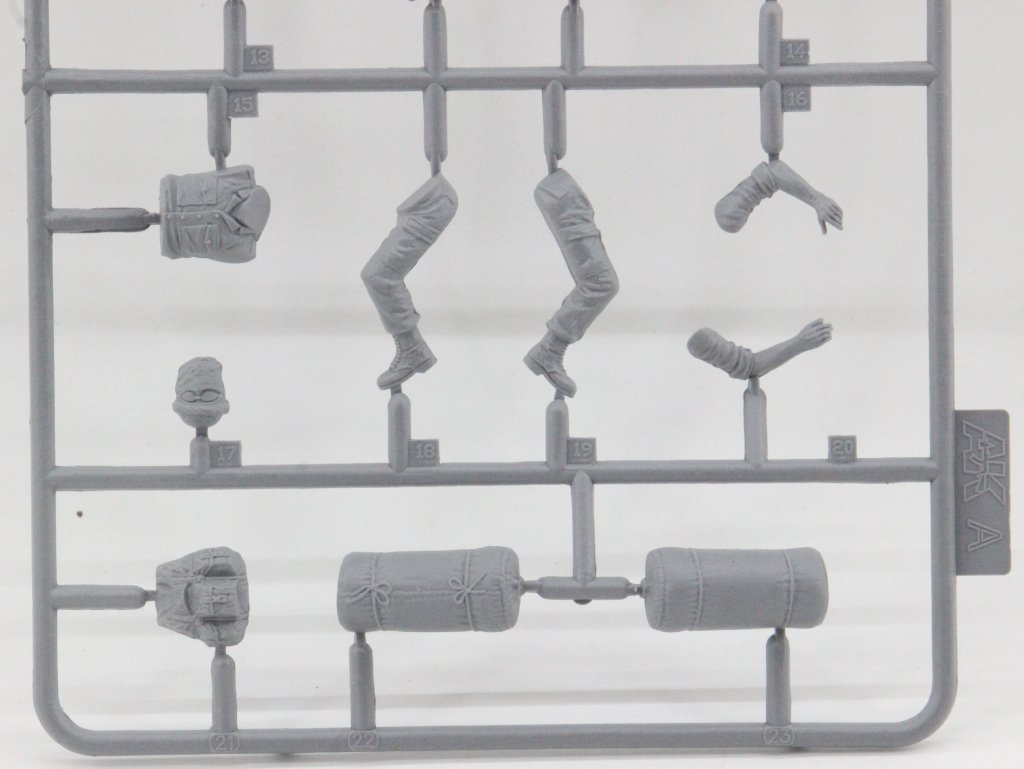
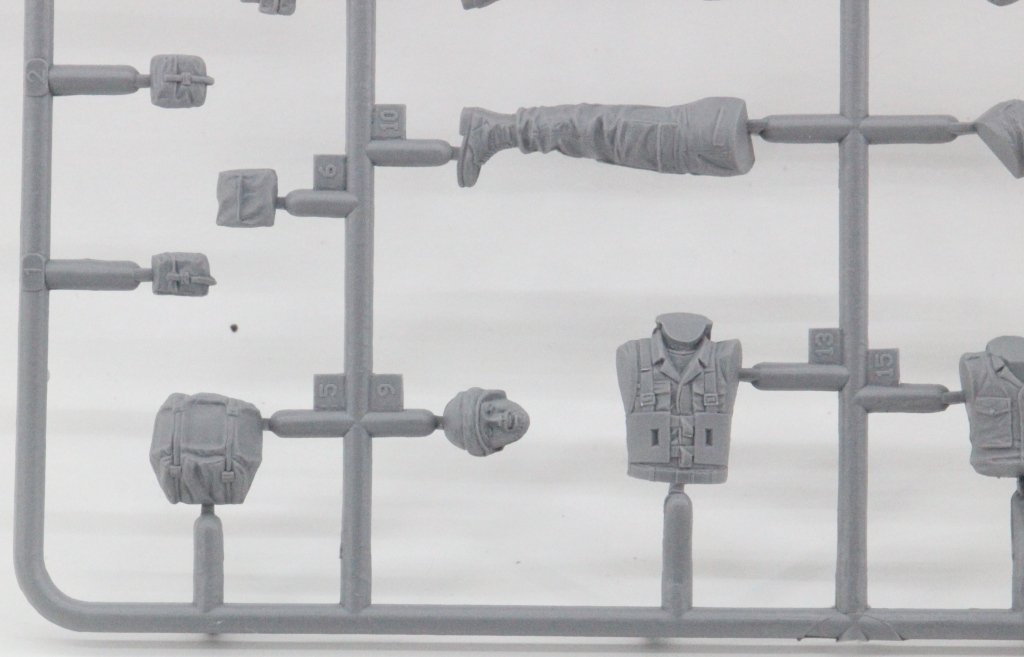
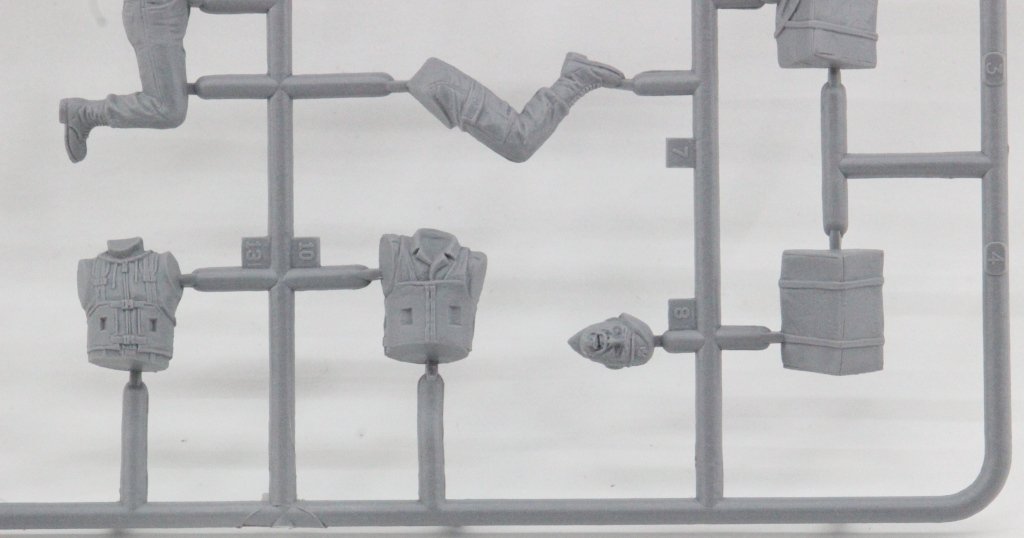
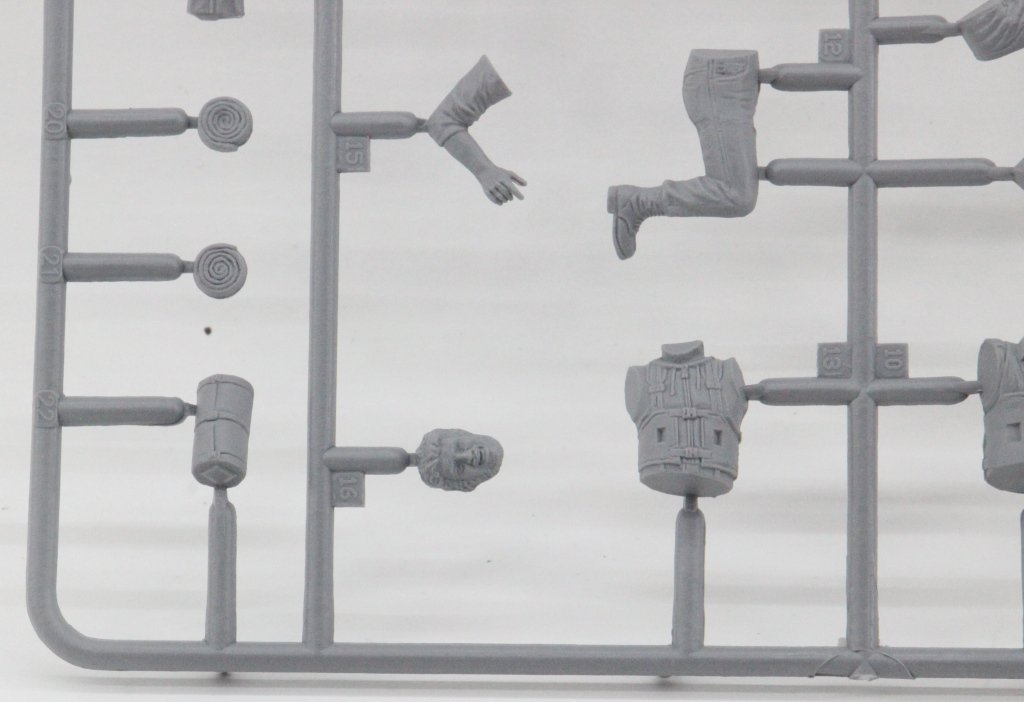
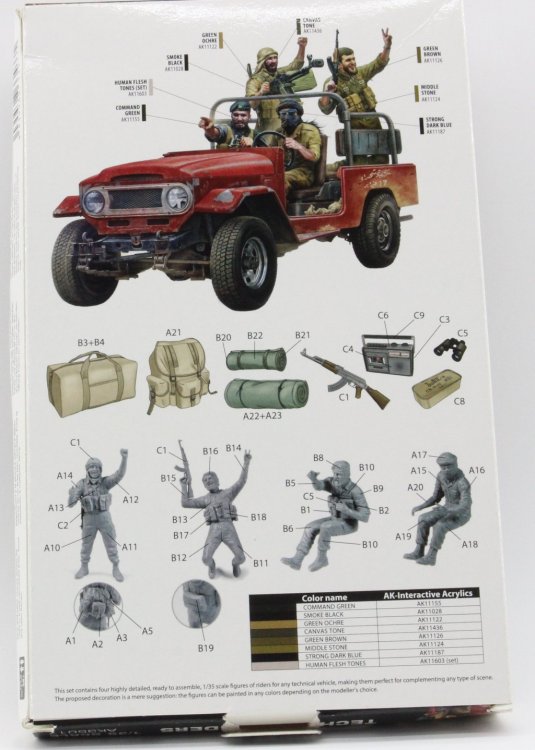
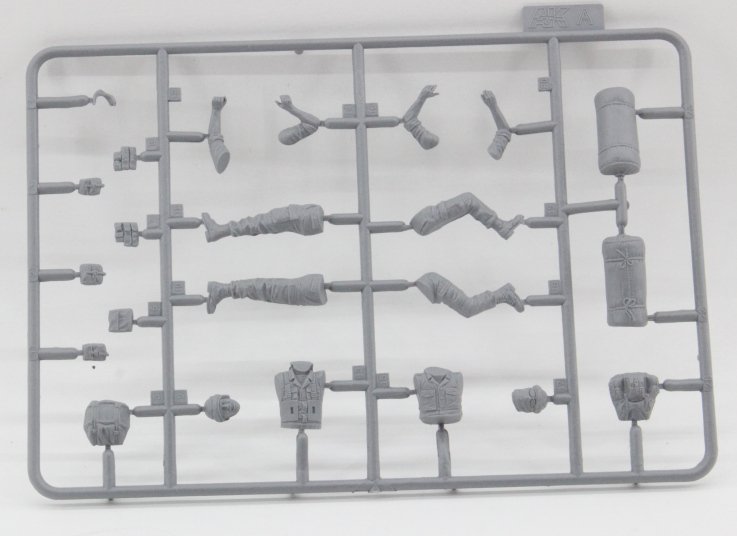
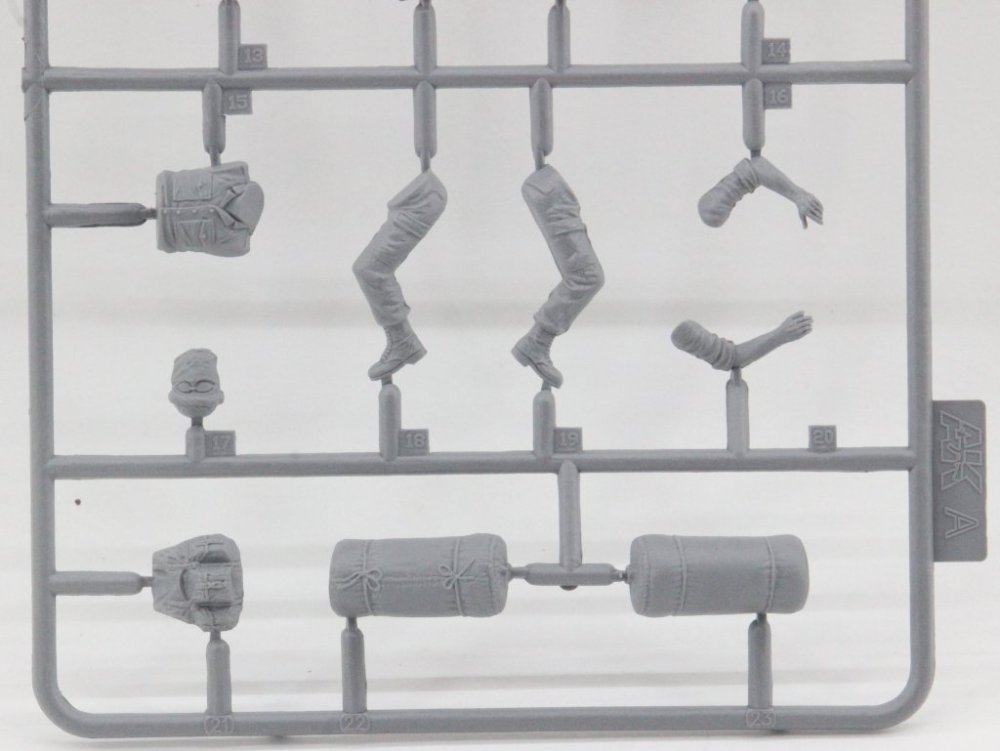
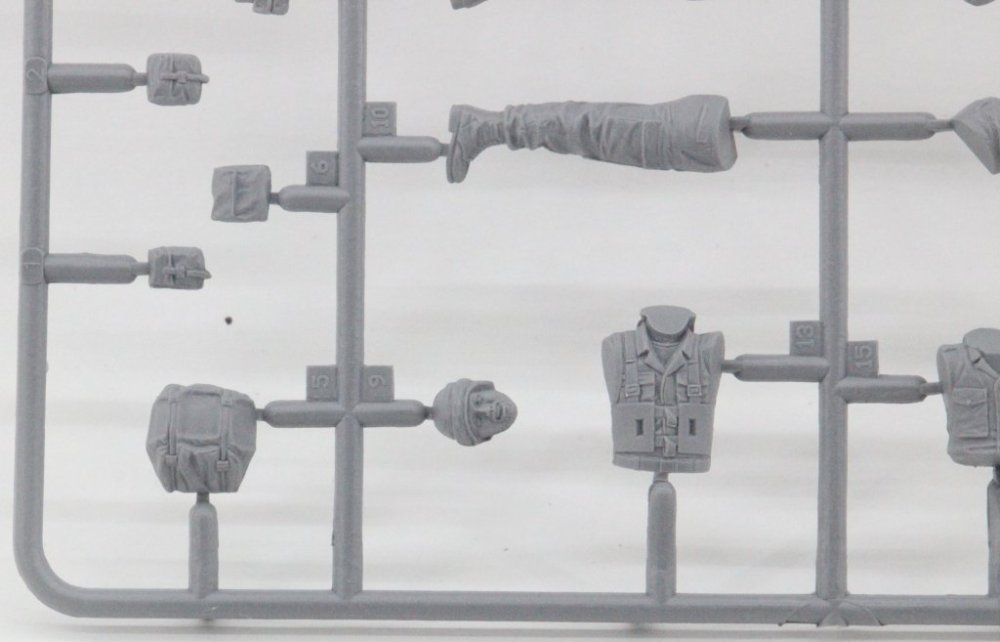
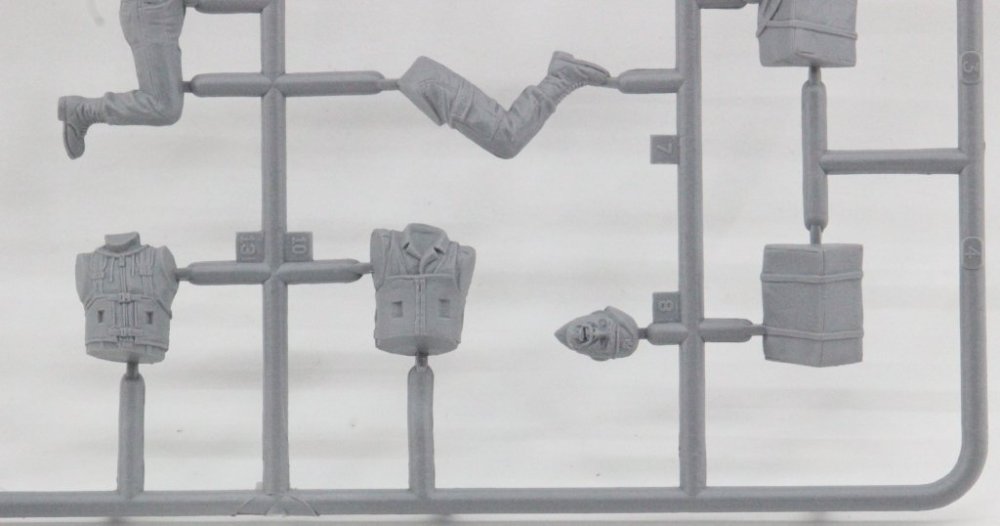
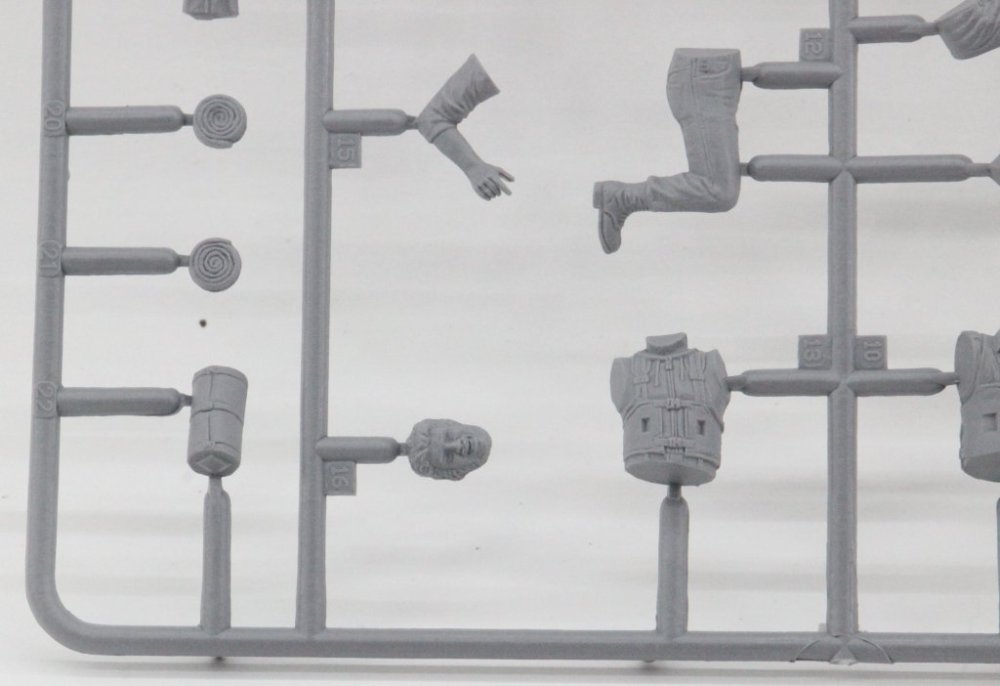
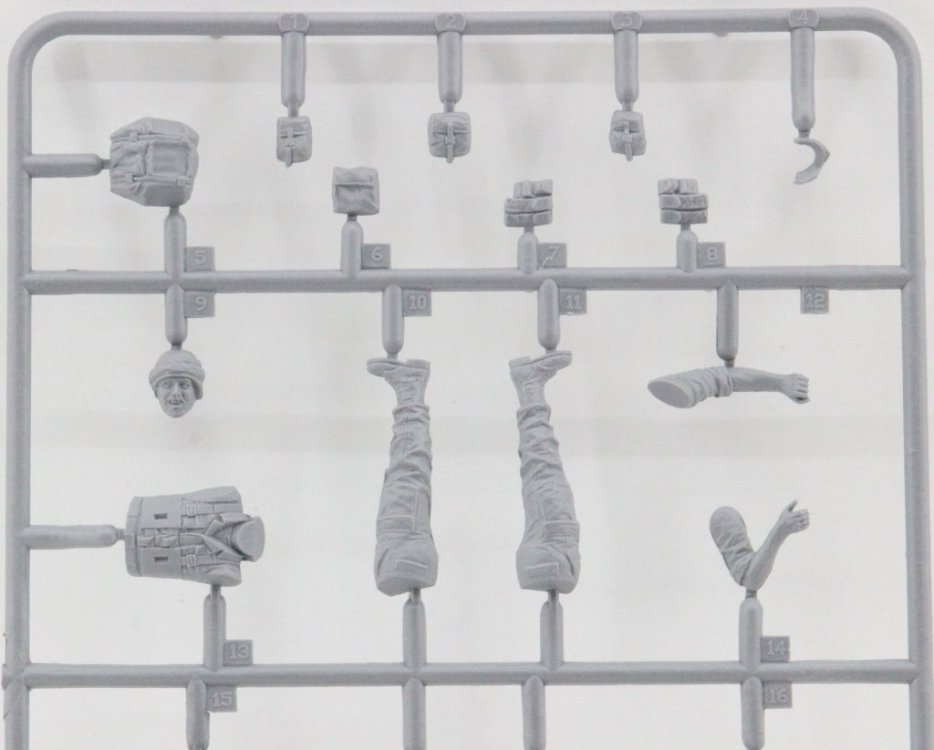
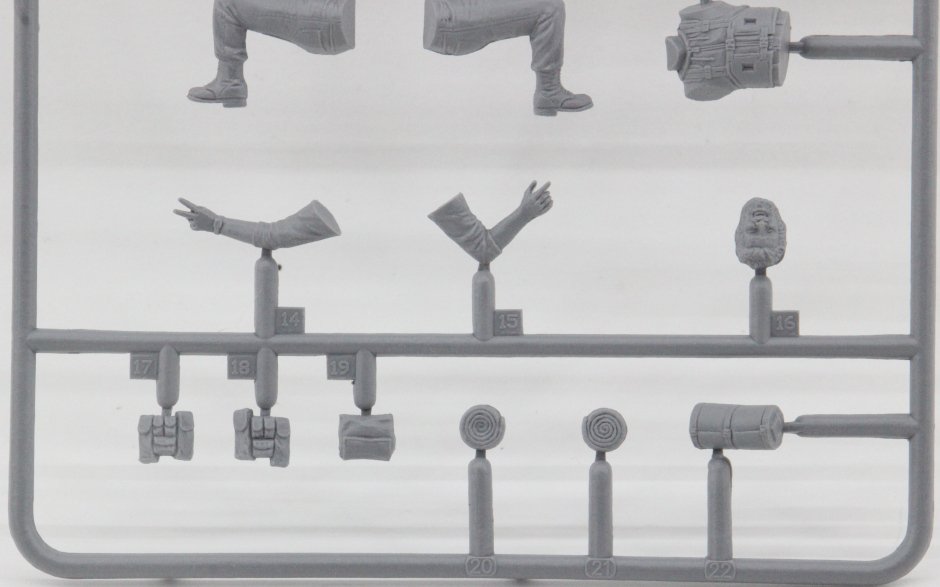
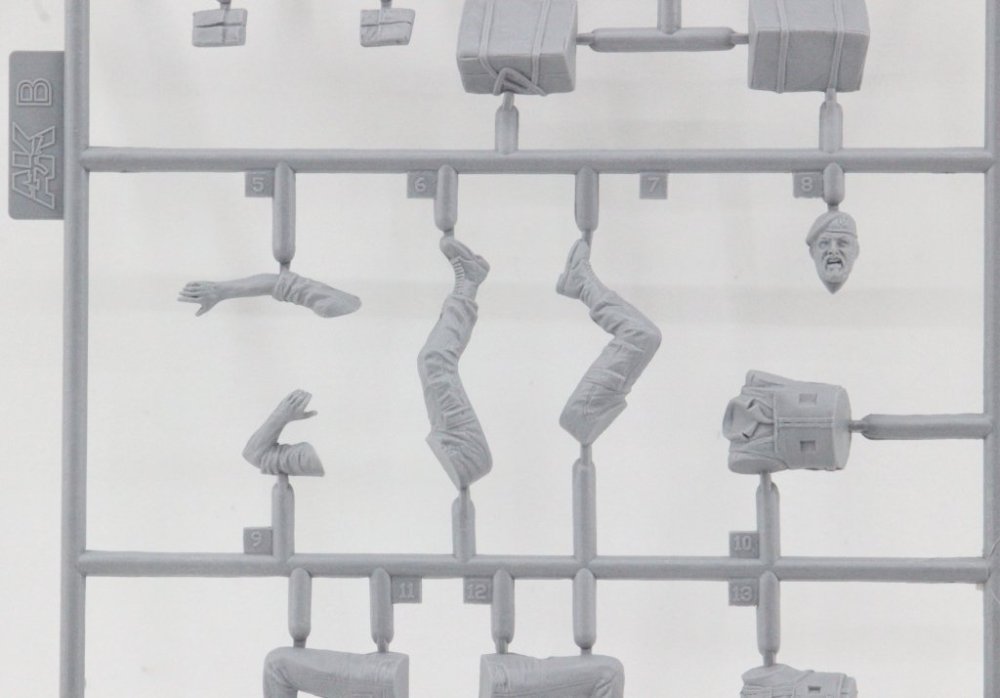
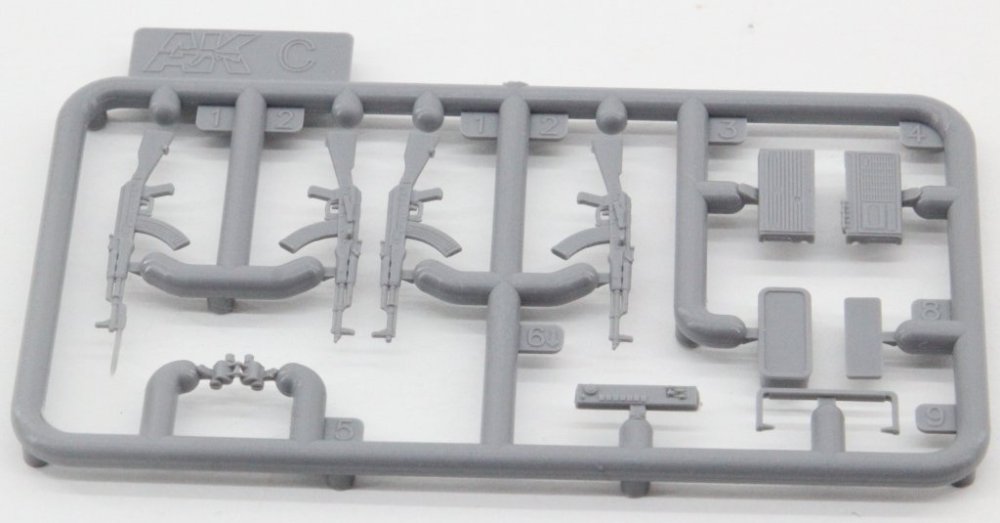
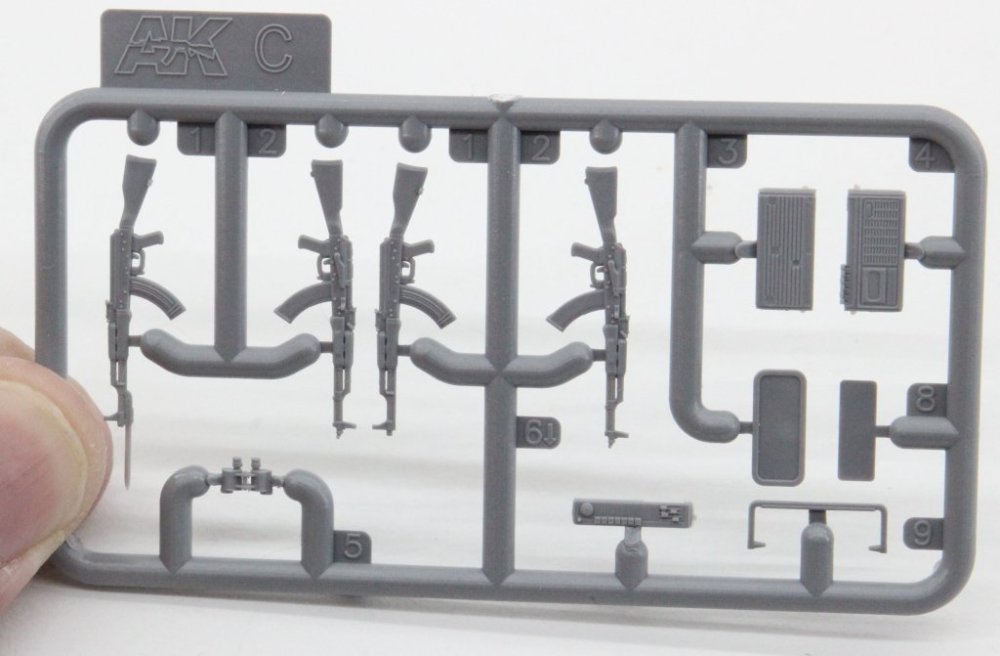
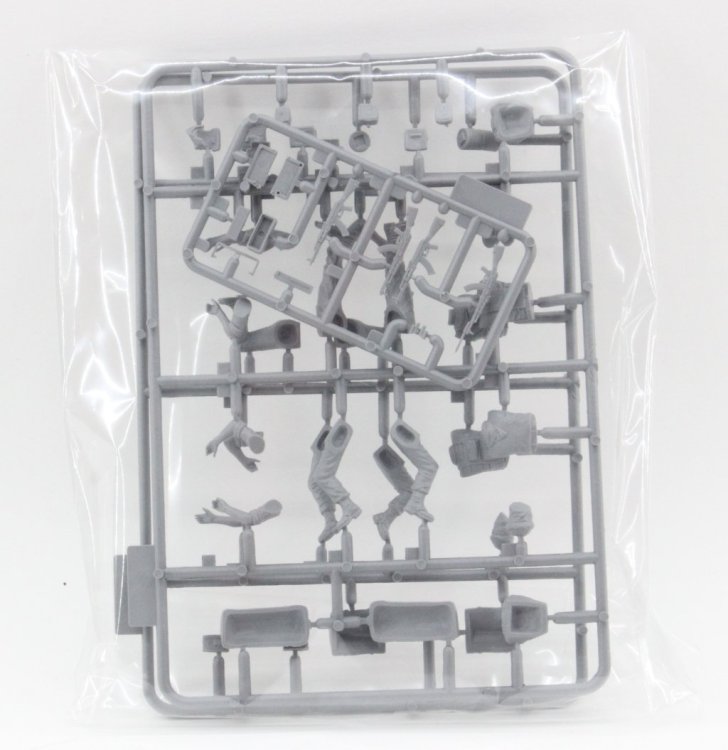
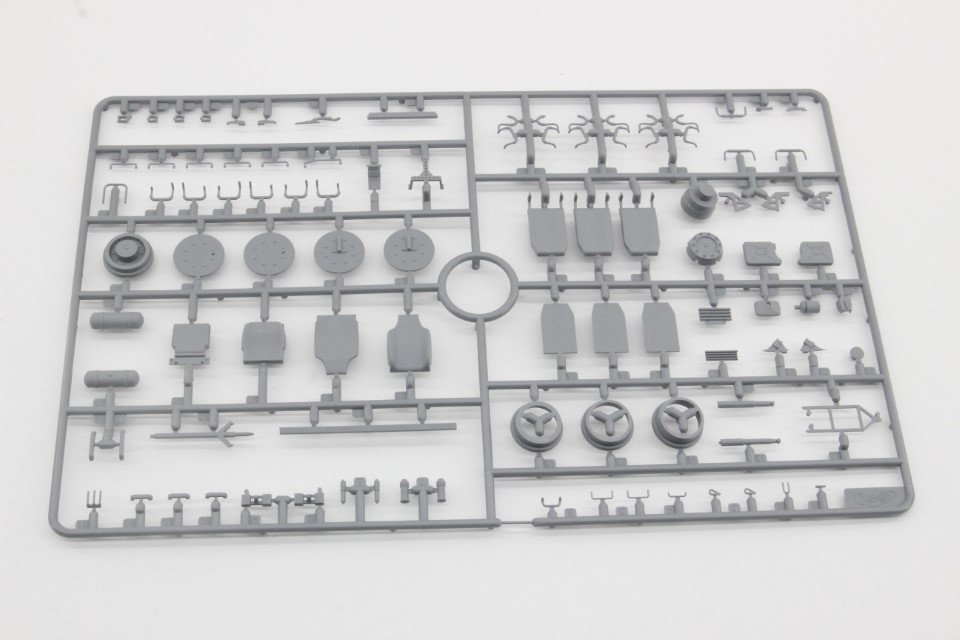
AK INTERACTIVE 1:35 AK35017 “Technical Riders” Available from AK-Interactive for 12,95€ This set of figures from AK-Interactive is released to perfectly adapt to Ak’s own series of FJ-43 pick-ups, mainly set 35002 (FJ43 PICKUP WITH DSHK). The set consists of 4 figures perfectly suited to the pickup truck environment, namely the driver and the "Vehicle Commander." The box suggests a used vehicle along with the location of its occupants. The clothing style and gear used suggest the location as a combat team somewhere in the Middle East or Africa. Along with the figures, a set of accessories is provided in the form of sleeping bags, a tent roll, a large transport bag, backpacks, binoculars, an ammunition box, and a portable cassette radio (!). On the back cover, there is a simple yet effective presentation of the figures available for reference, a suggested paint colour scheme (using the range of AK Interactive acrylics sets or individual references), as well as a simple assembly guide for the figures and their respective accessories, mainly backpacks and ammunition vests for assault rifles. The vehicle commander is holding binoculars in his hand. The two figures occupying the cargo box and holding the heavy machine gun have a natural pose as if they were celebrating a victory or conquest. What’s in the box In the box, there are 3 sprues, two of them containing the figures, and the third (smaller) one holding assault weapons and some accessories. Sprue A - This sprue provides the parts for assembling two of the figures: the driver and the heavy machine gun operator. The detail and anatomical shape of the models are suitable for the injection technology used. There are mold marks on the pieces due to the manufacturing process, but these can be easily removed with a blade and sandpaper. The clothing creases are adequate and detailed enough to stand out with proper painting. The faces also have suitable detail, although care must be taken when removing the (slight) mold marks, as these are in quite visible areas. The torsos of both figures are well done, with proper locations for attaching various accessories (ammunition pouches). The vehicle driver wears a scarf covering his face and sunglasses for style. The heavy machine gun operator has a celebratory pose, with one arm raised and clenched fingers while the other hand holds the machine gun. The upper limbs are represented with rolled-up sleeves, and the fingers are well defined. The details on the backpacks (accessories) are adequate, with designated areas for attaching exterior pockets (molded as a separate piece). Sprue B - On this sprue, the remaining crew members are provided, to be placed in the vehicle's cargo area. The poses are natural, as previously mentioned. The vehicle commander, with a beard, has a head perfectly sized and also comes with a molded military beret. In his left hand, binoculars can be added. The second figure stands in a celebratory position, holding an assault rifle in the right hand and making a victory sign (V) with the raised hand. Sprue C - This smaller sprue includes: 4 assault weapons, detailed to scale and technology. Note the screw detail, barrel, and trigger guard protection. Additionally, the sprue provides binoculars in a single piece, a two-part ammunition box, and a very original accessory - a portable radio-cassette player (quite 80s)! Conclusion: The set is straightforward in construction and design, suitable for the aforementioned vehicle but adaptable for other vehicles as well. Beginner modelers can use this set without major constraints or difficulties. Advanced modelers can enhance the figures, complementing the basics. The mold marks mentioned are due to the limitations of the injection technology, but they are easily manageable during removal, which shouldn't discourage any modeler. Moreover, the affordable price of this set allows for complementing these types of vehicles without a substantial increase in the final project cost. Our Thanks to Ak-Interactive for the review sample! Ricardo Veríssimo


-
- 3
-
-
- ak interactive
- 1:35
- (and 1 more)
-
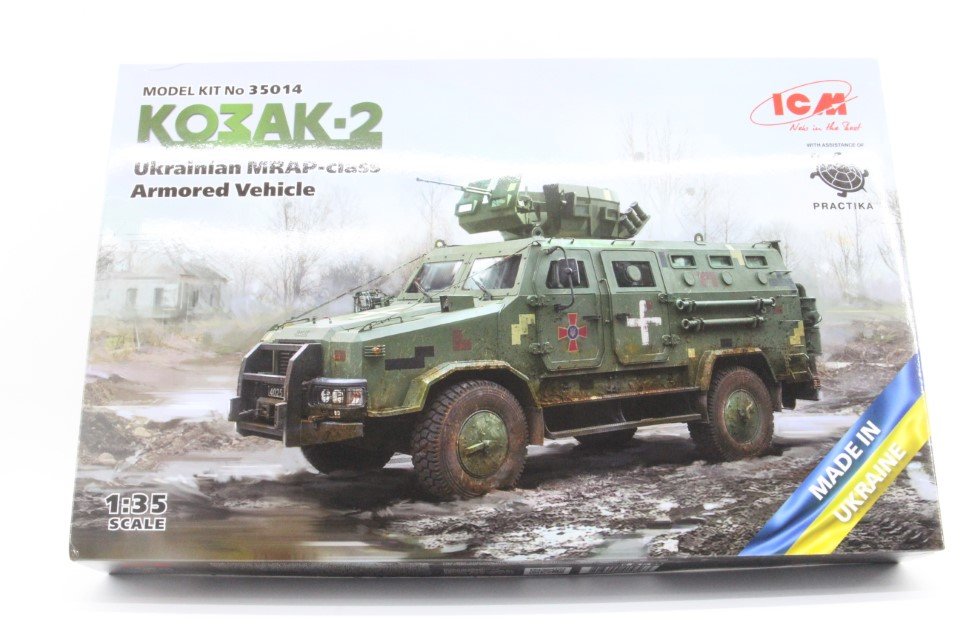
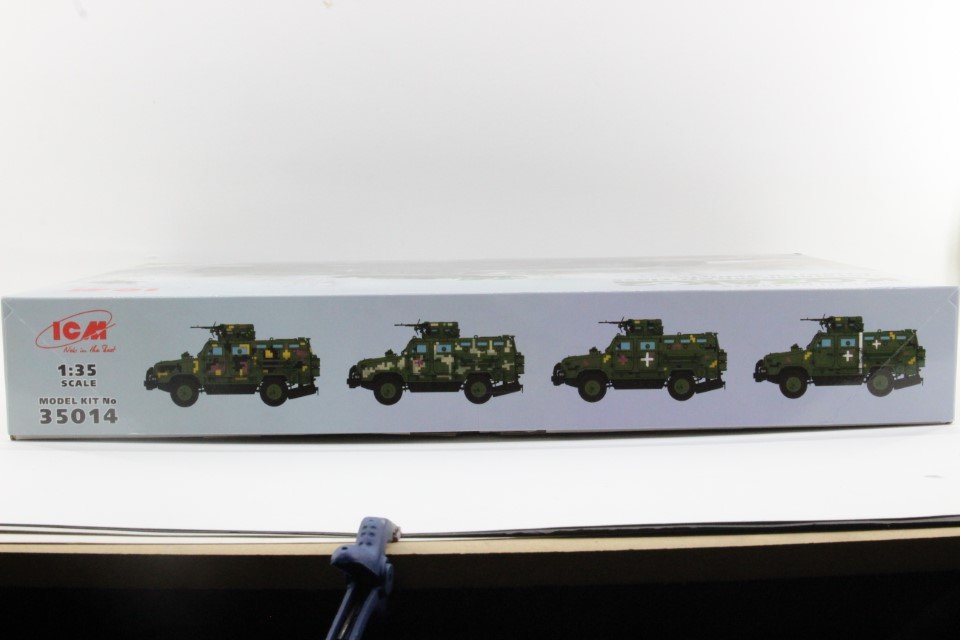
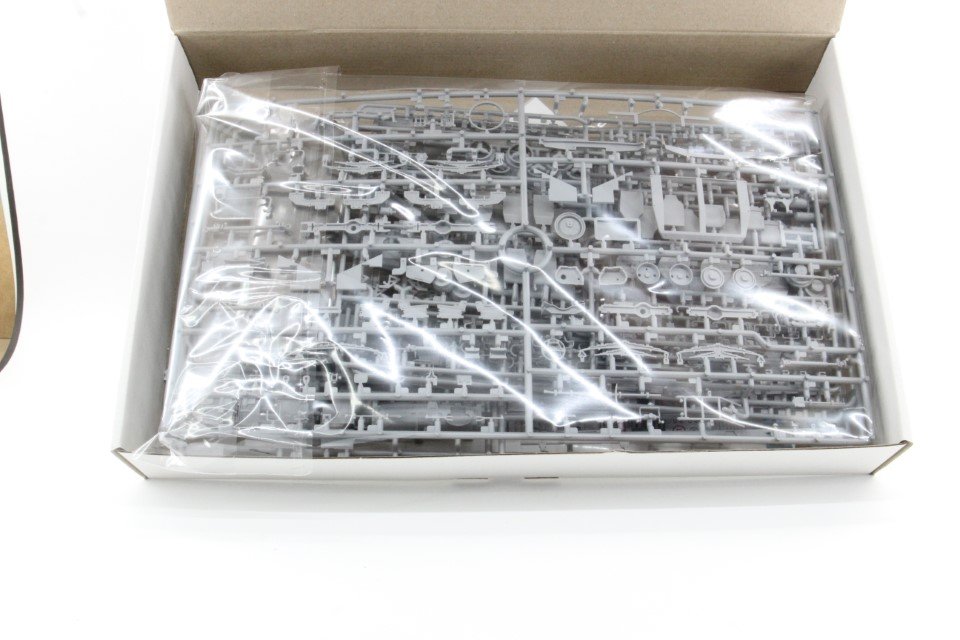
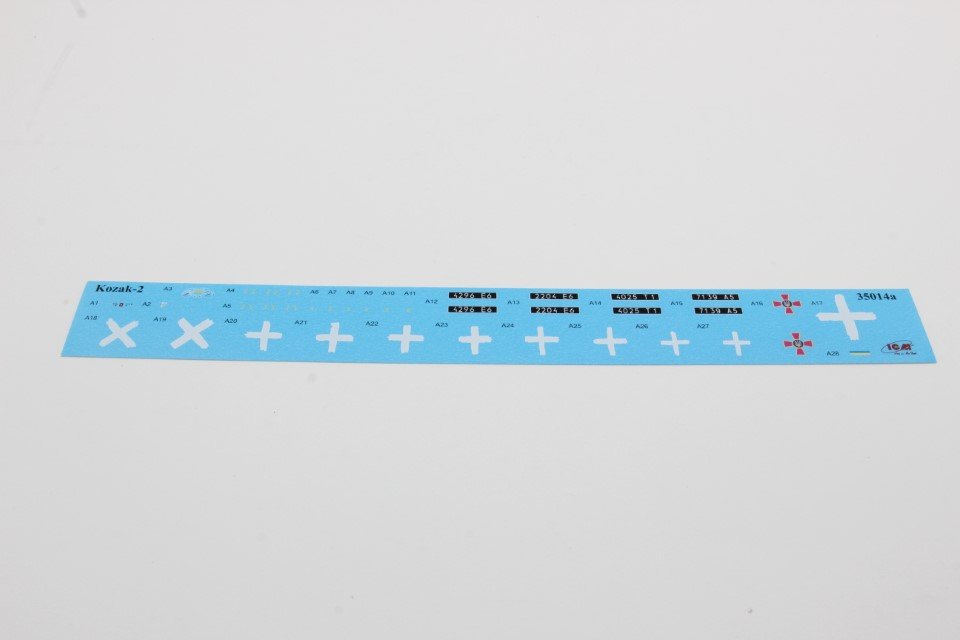
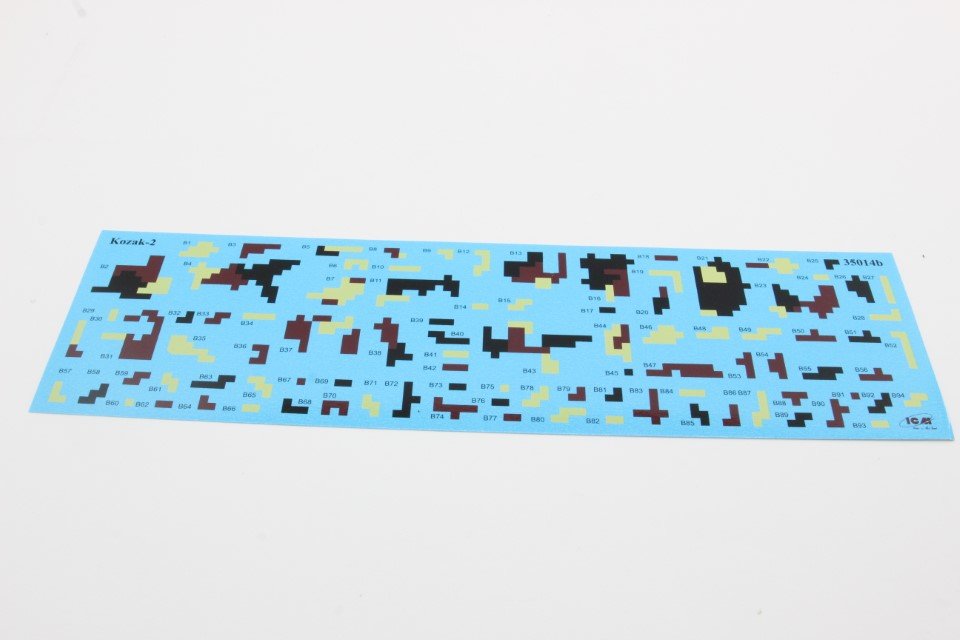
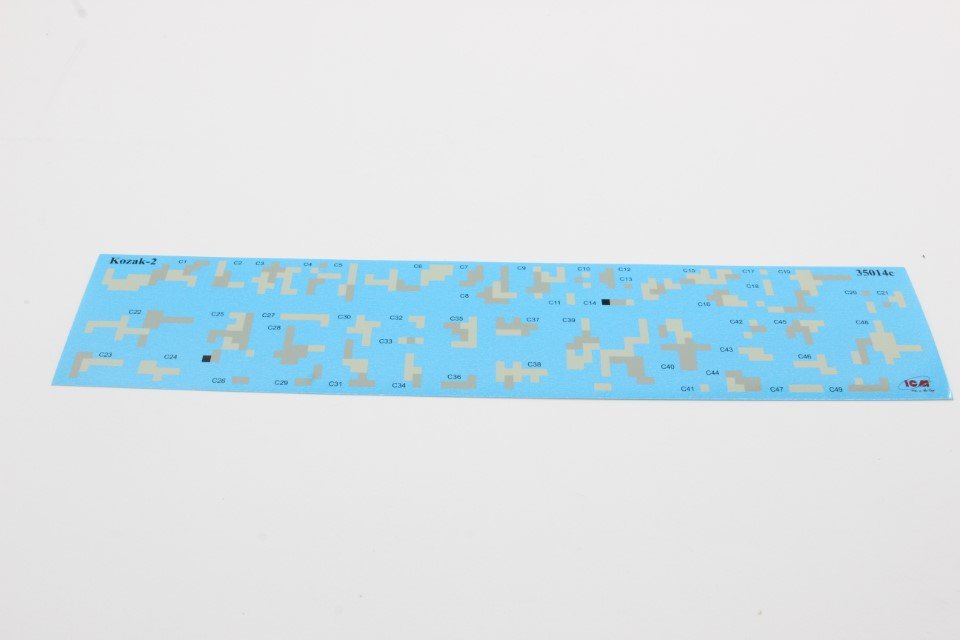
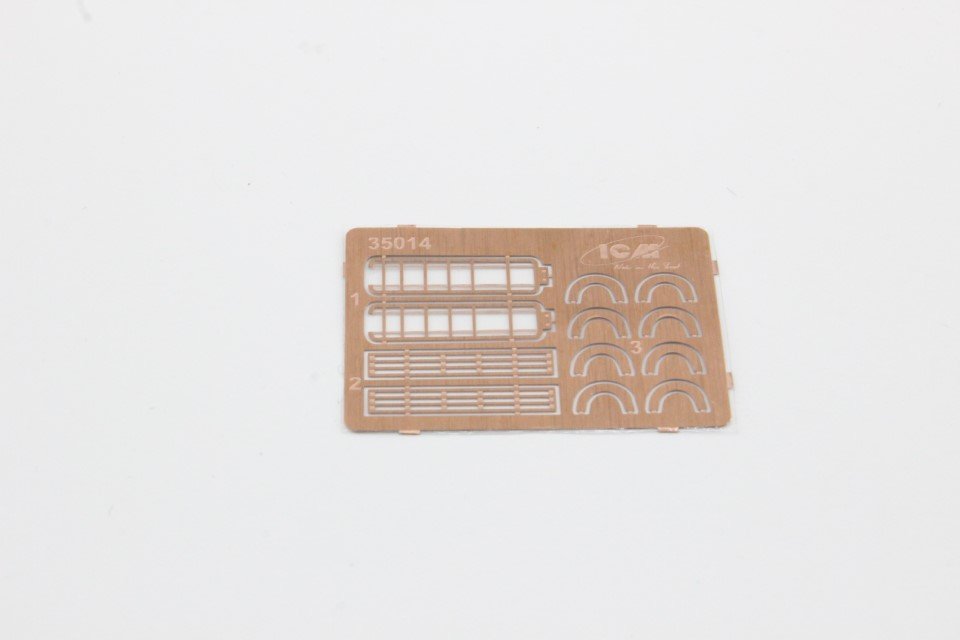
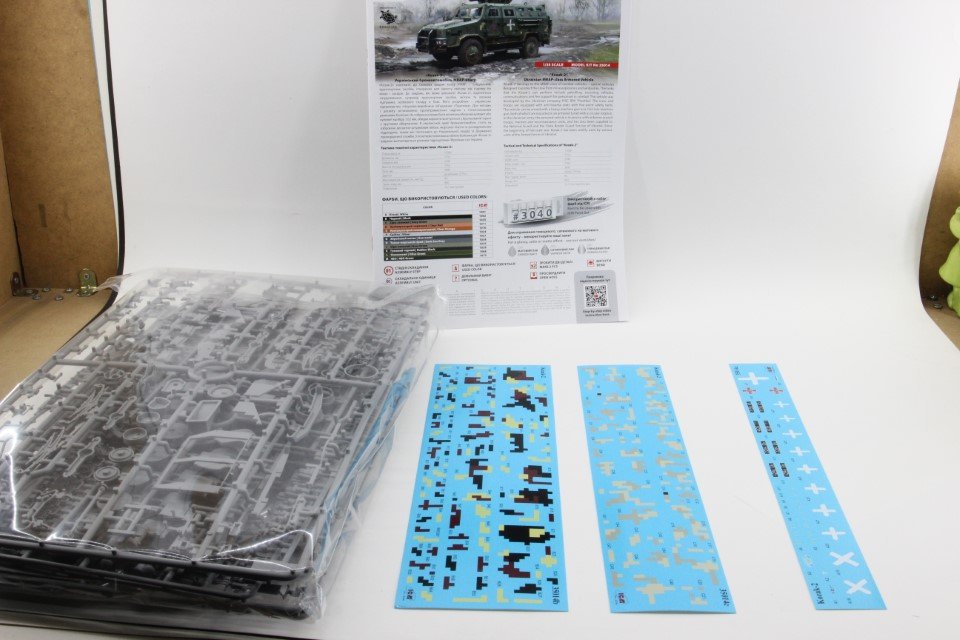
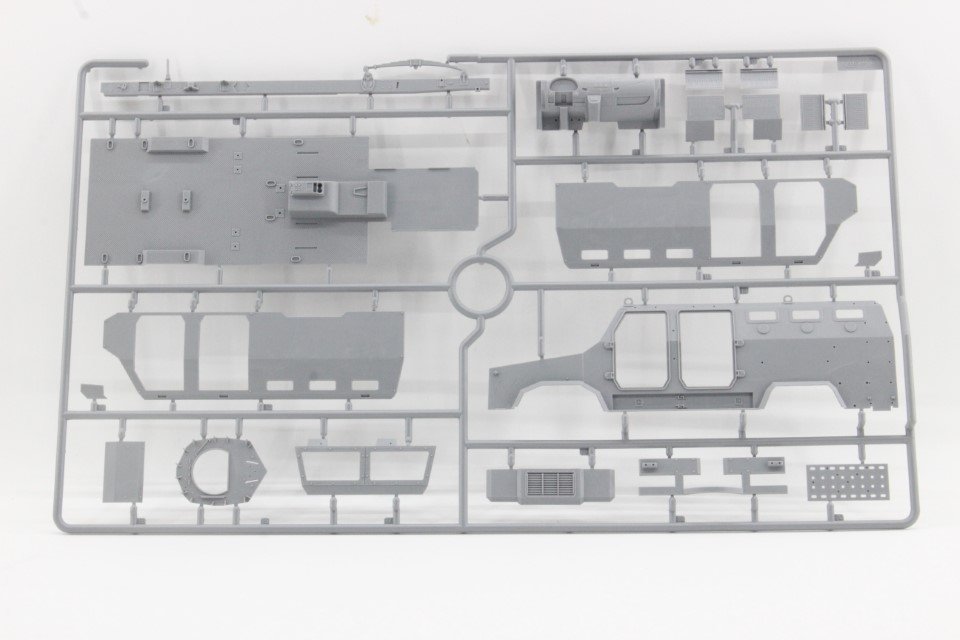
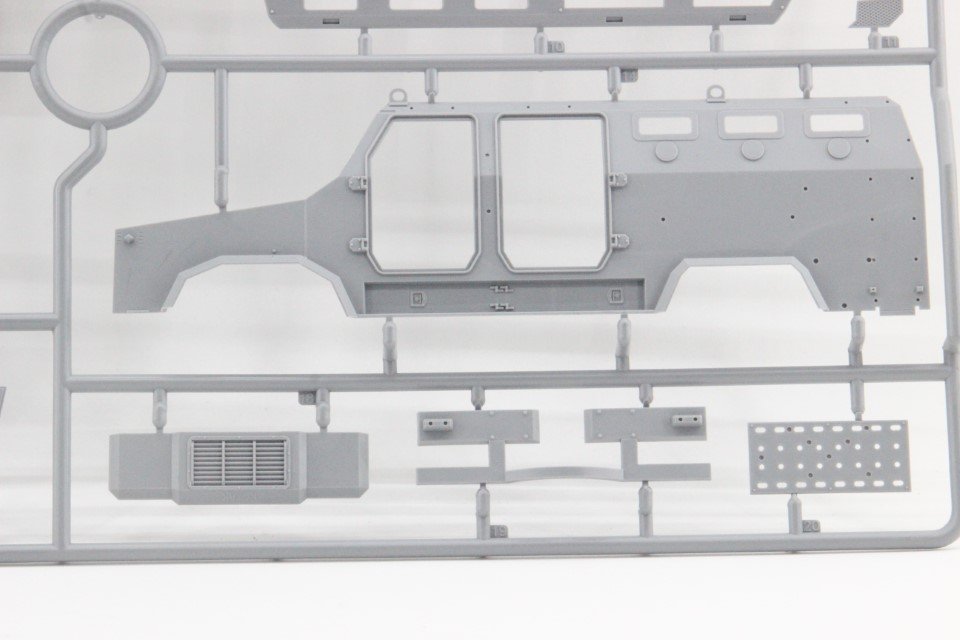
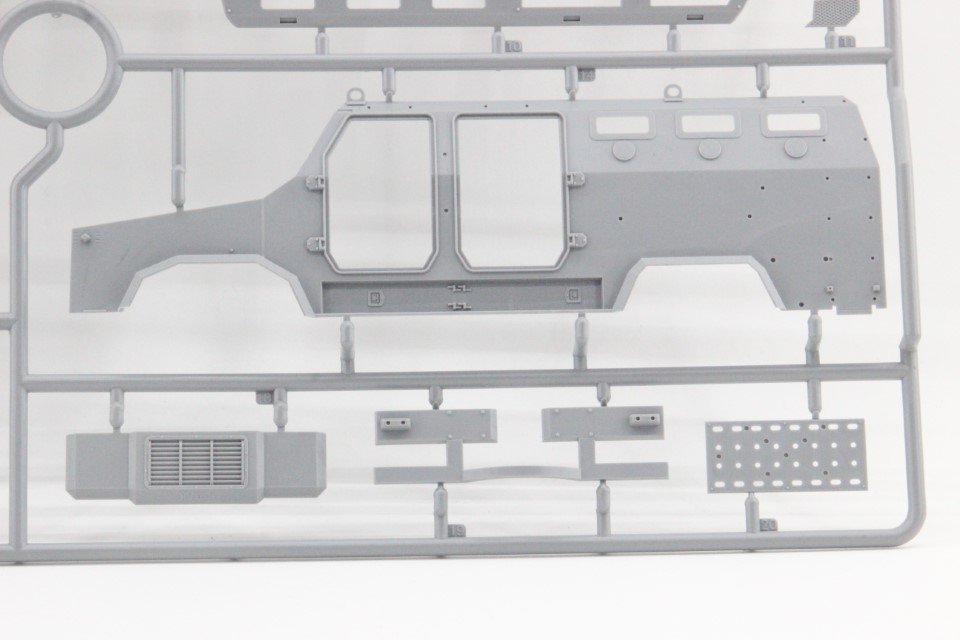
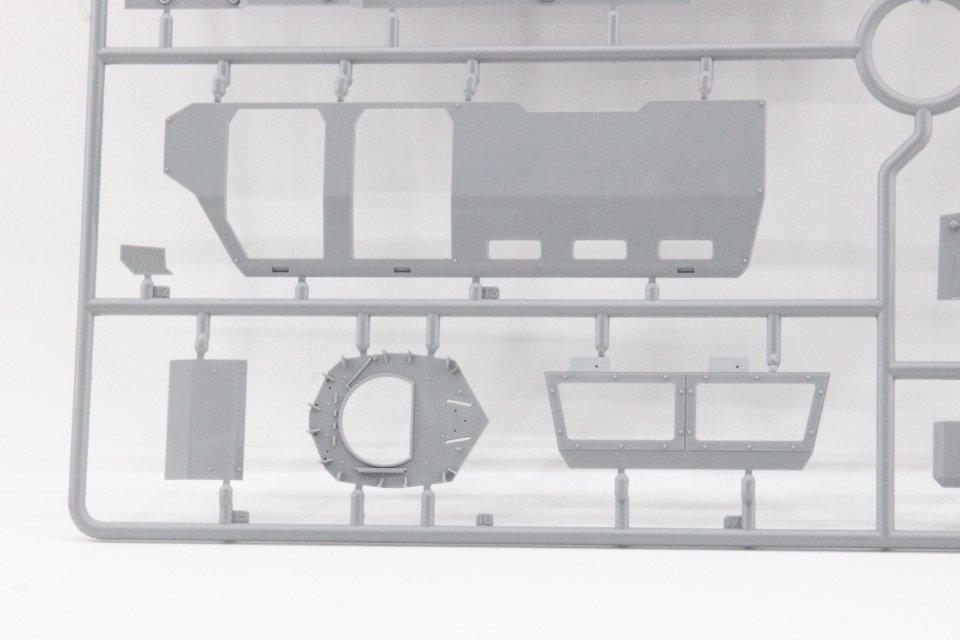
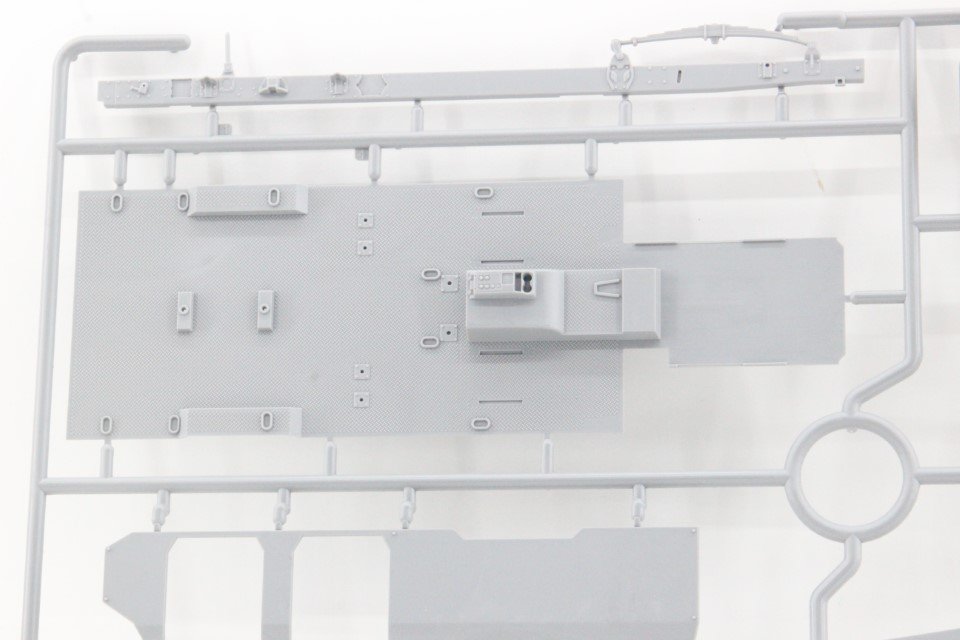
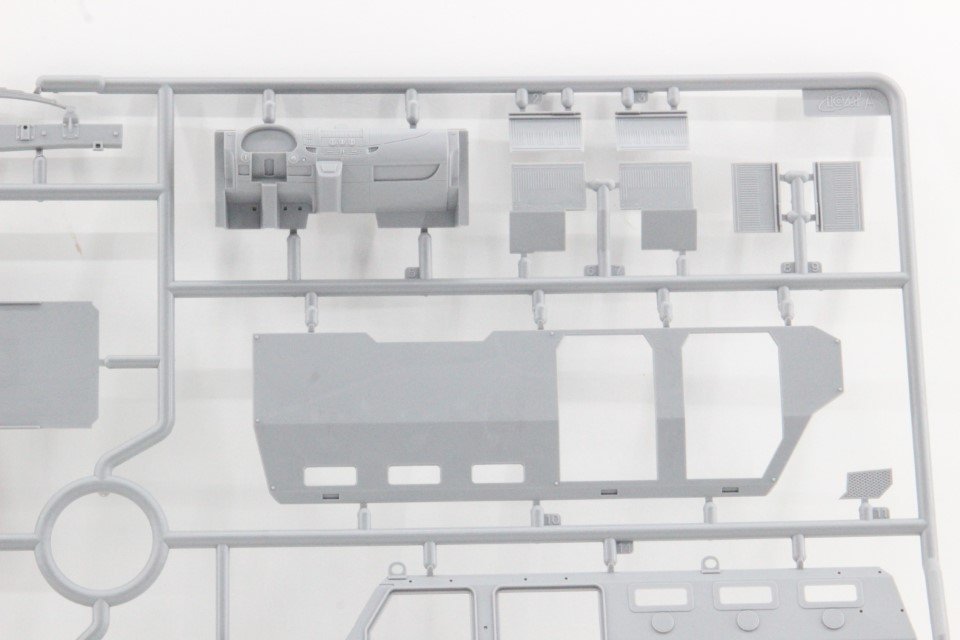
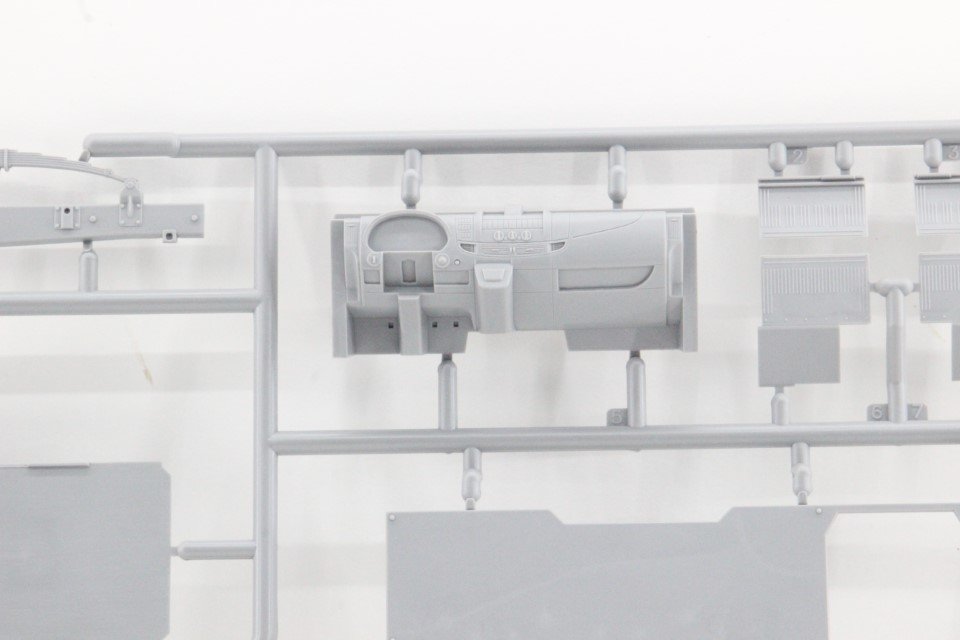
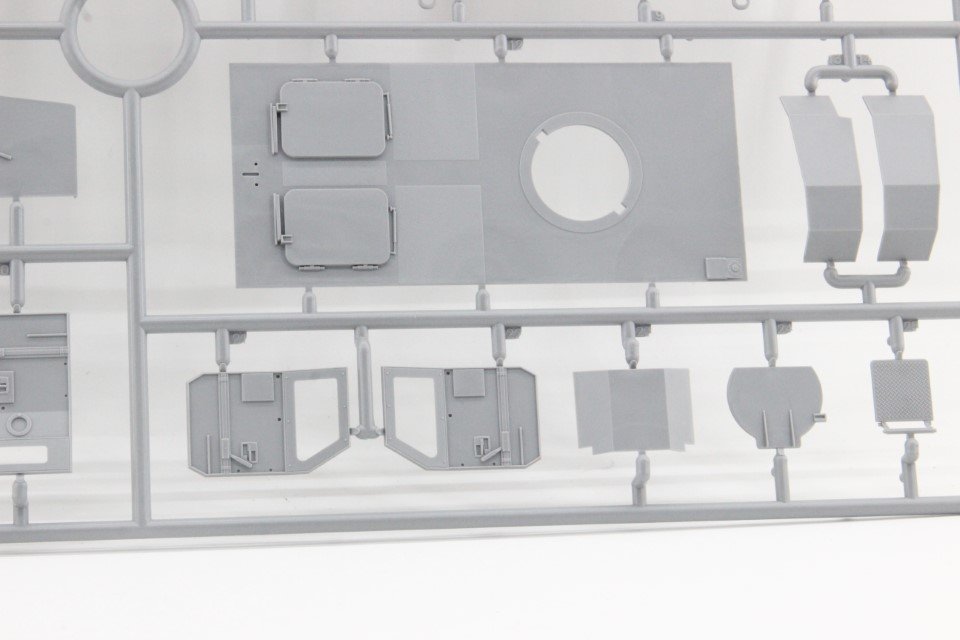
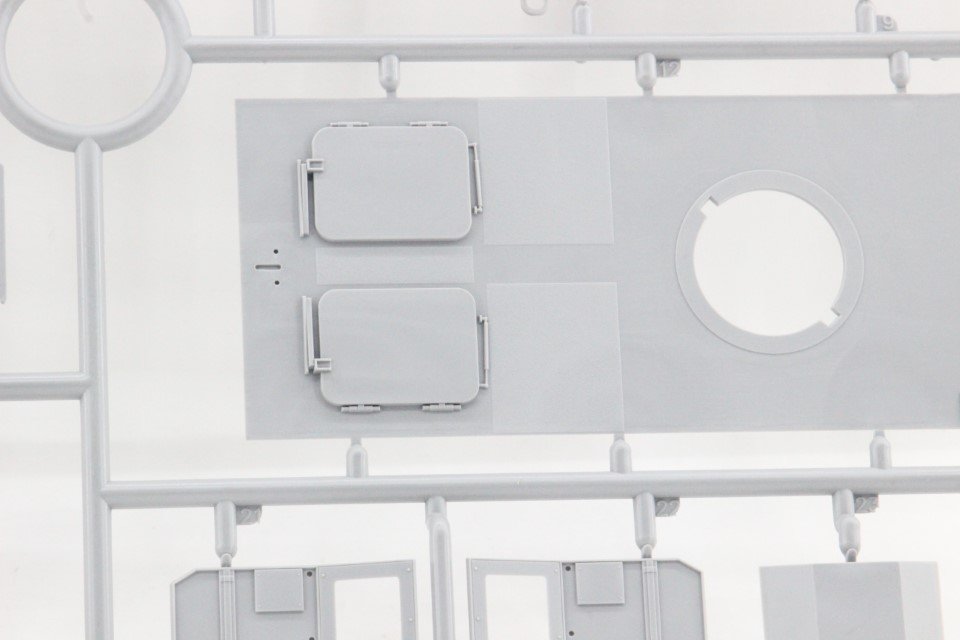
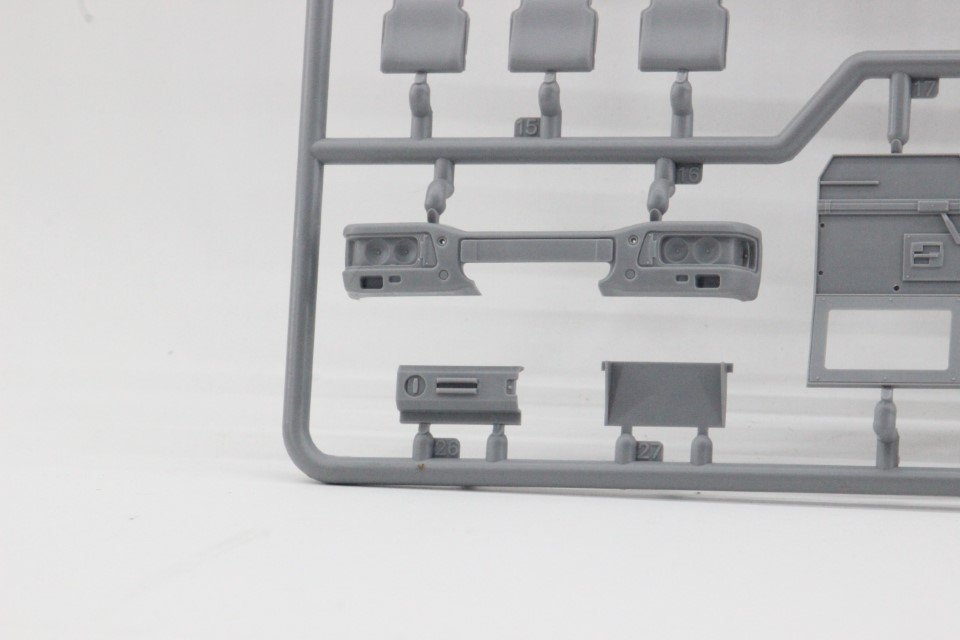
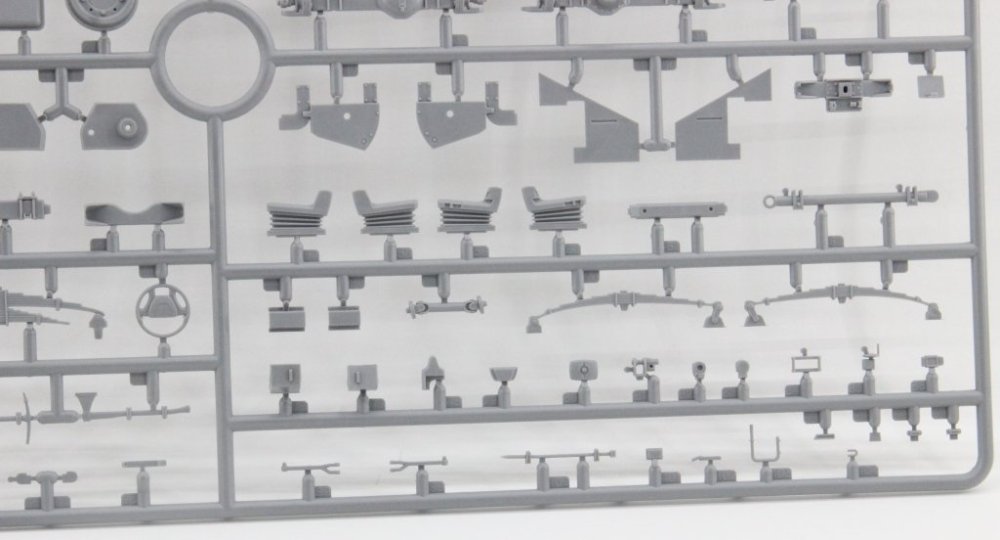
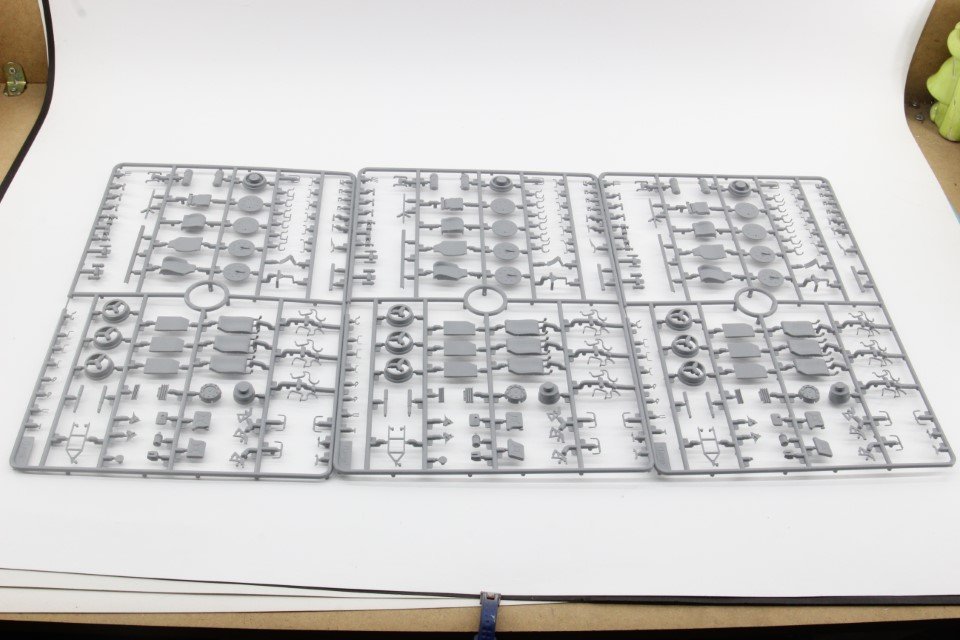
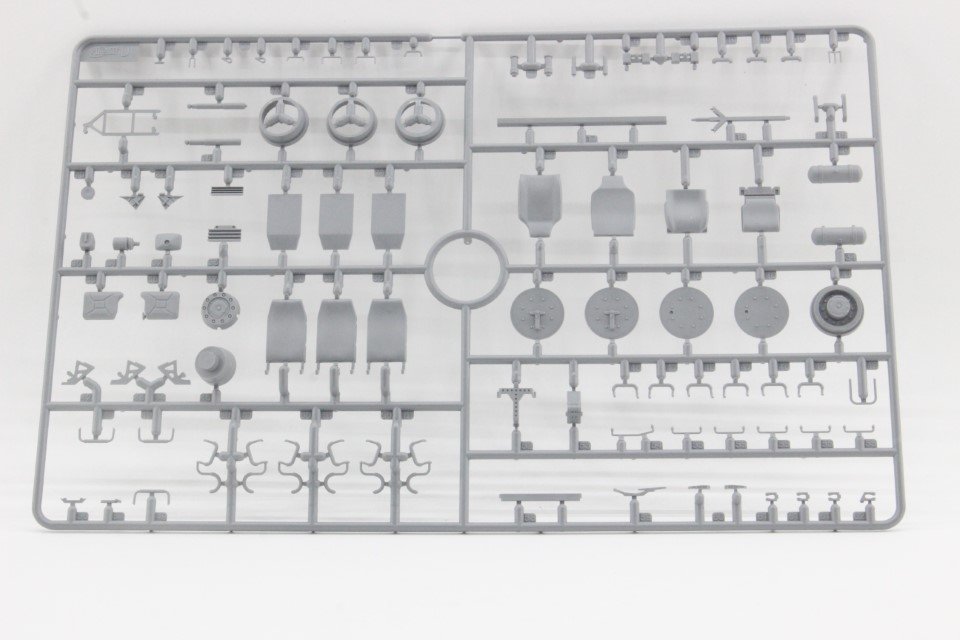
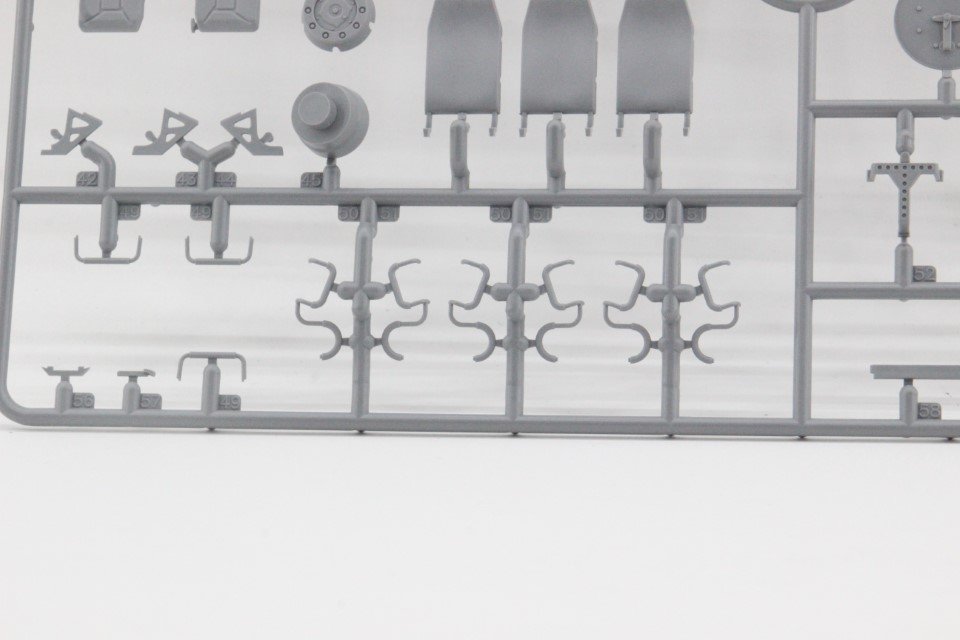
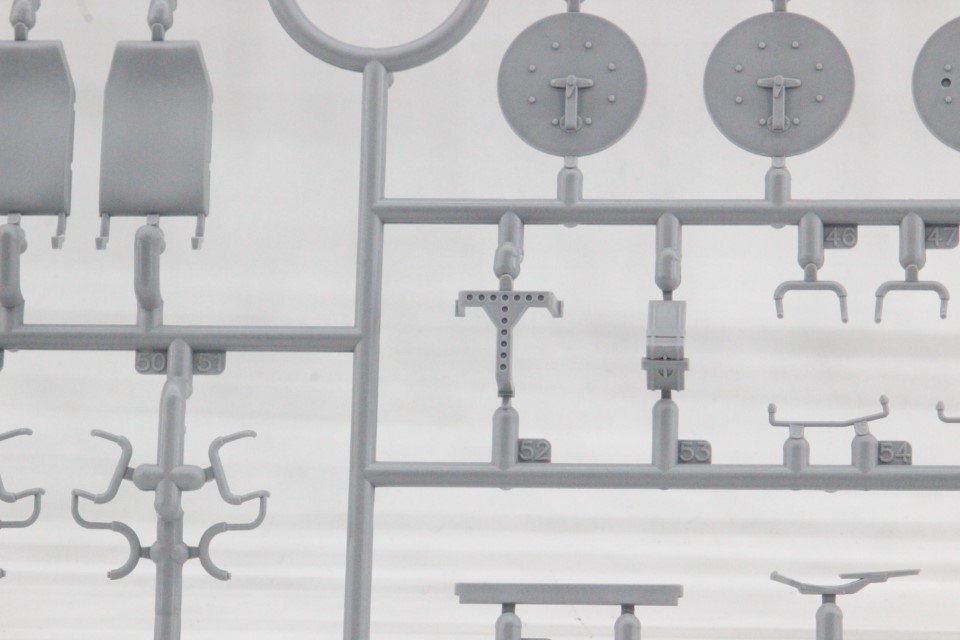
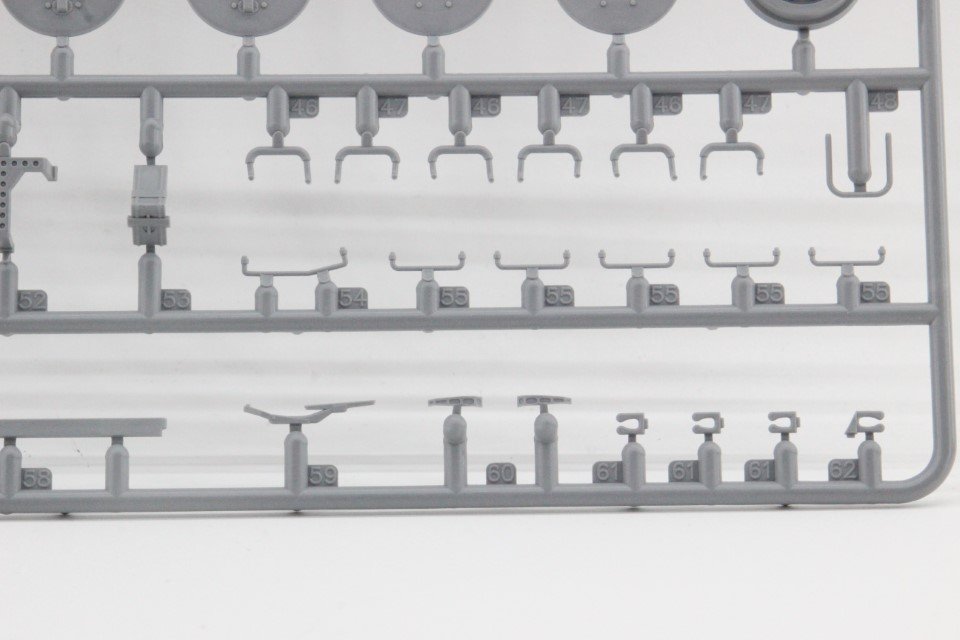
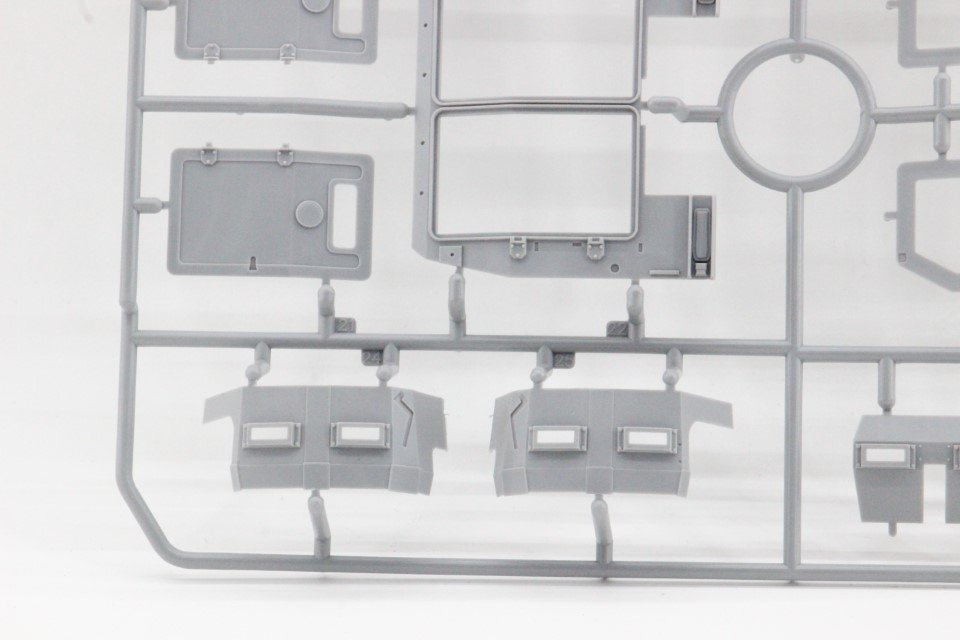
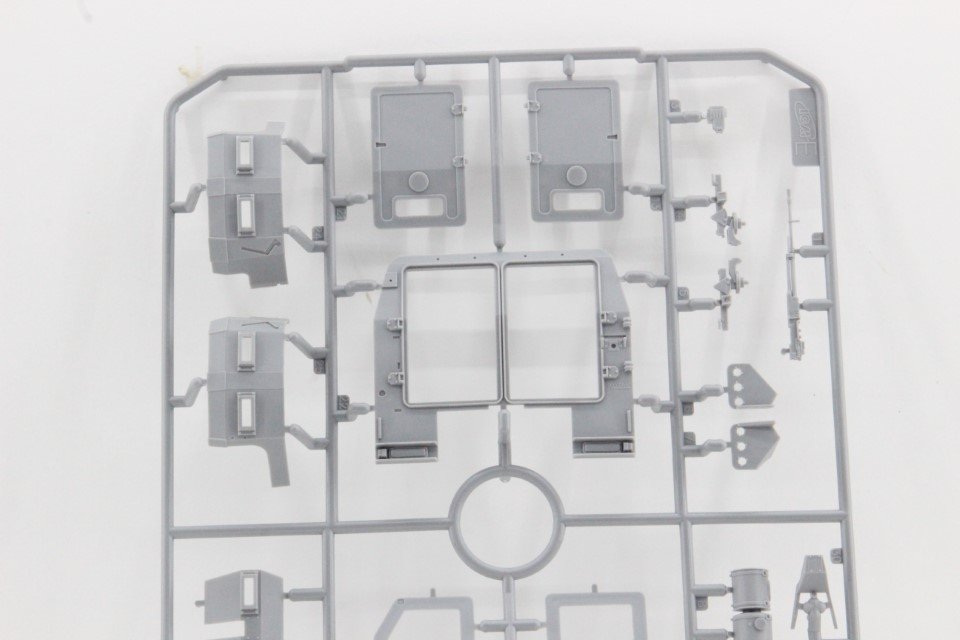
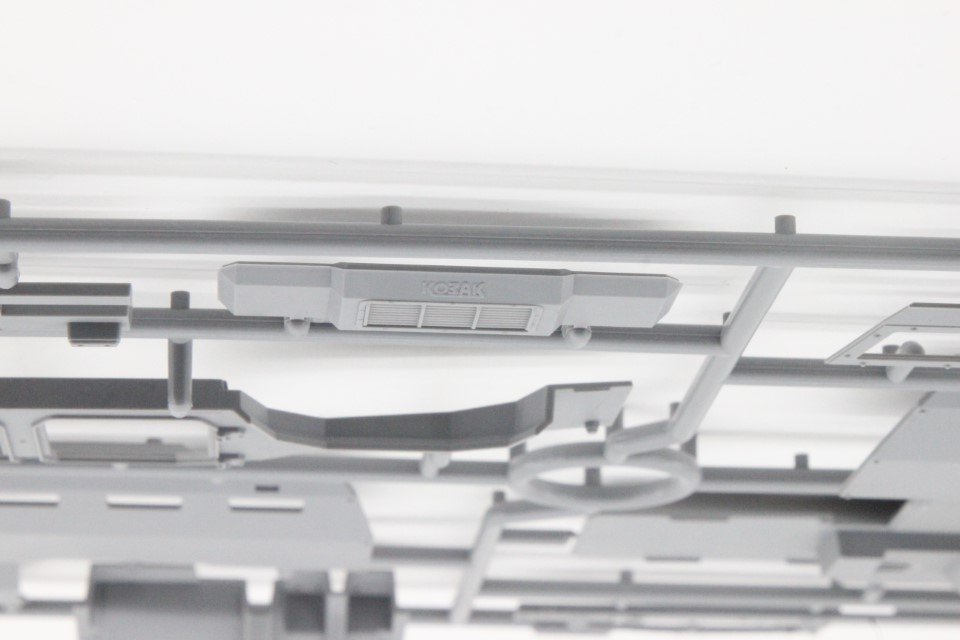
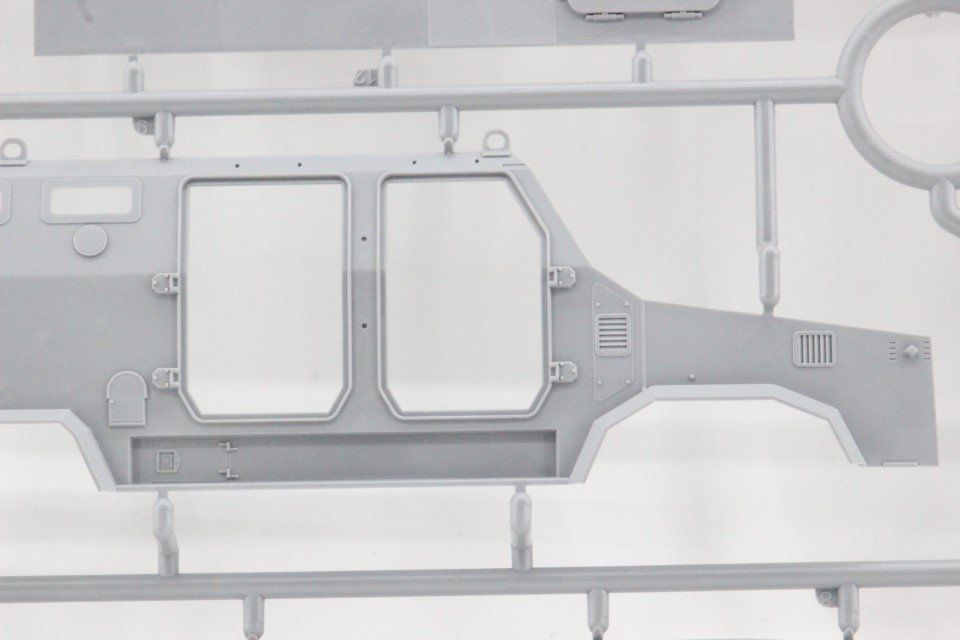
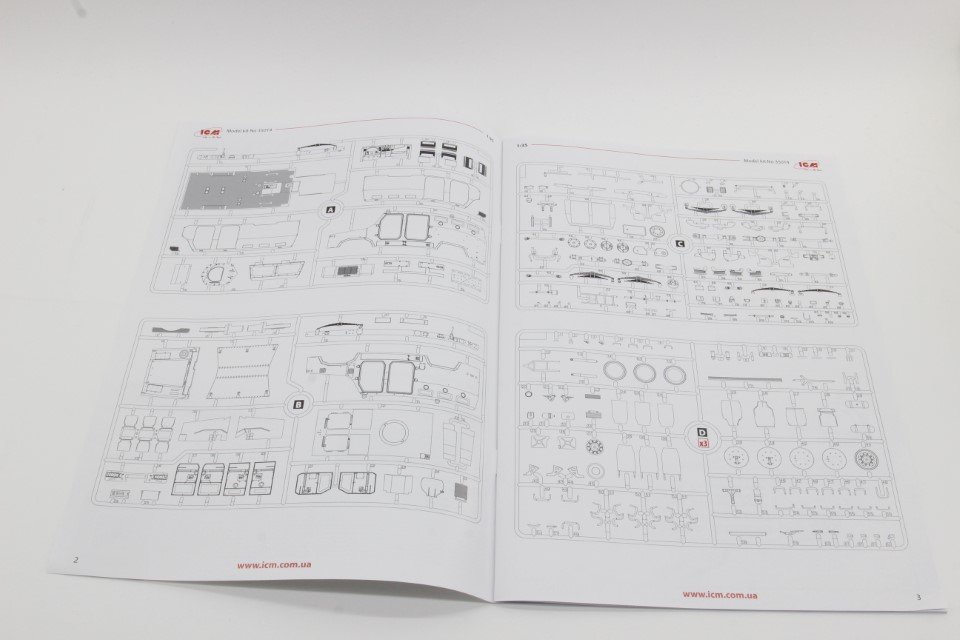
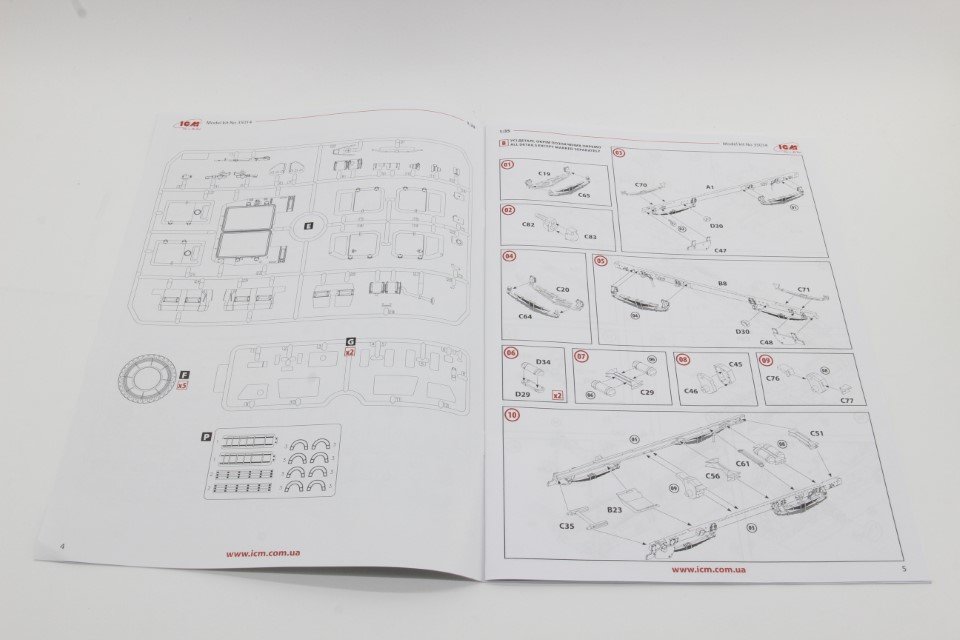
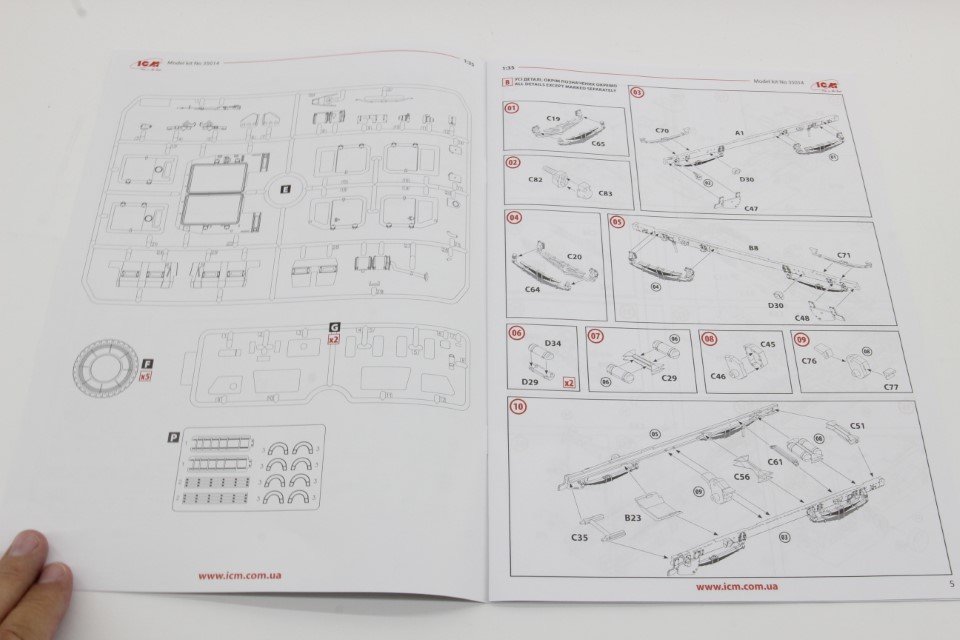
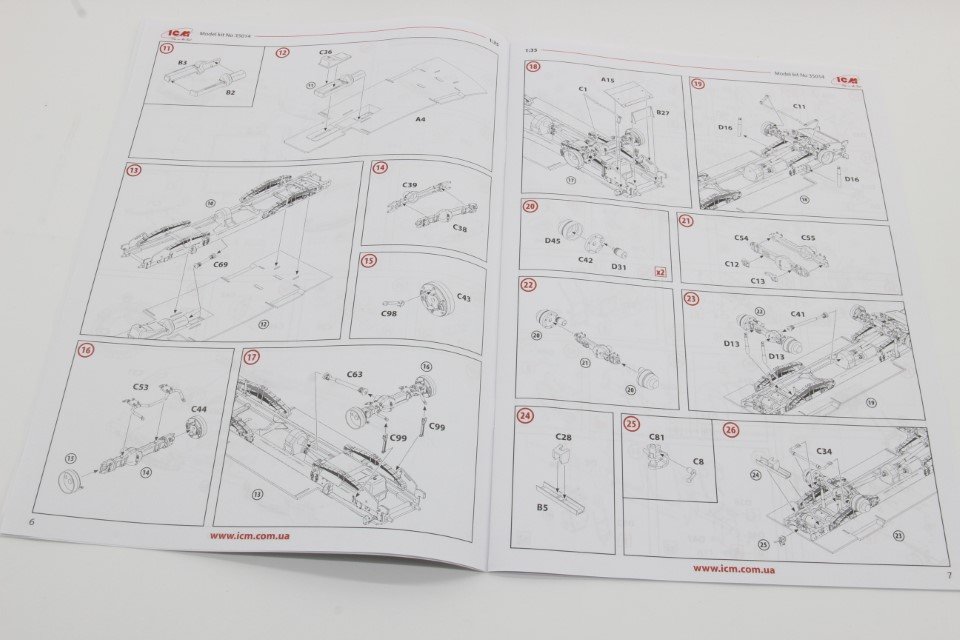
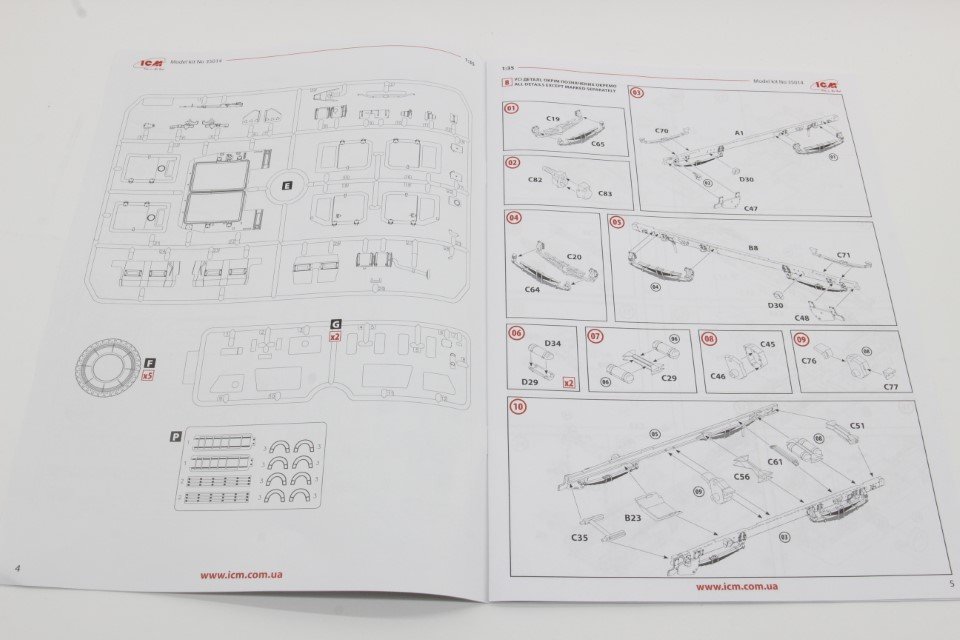
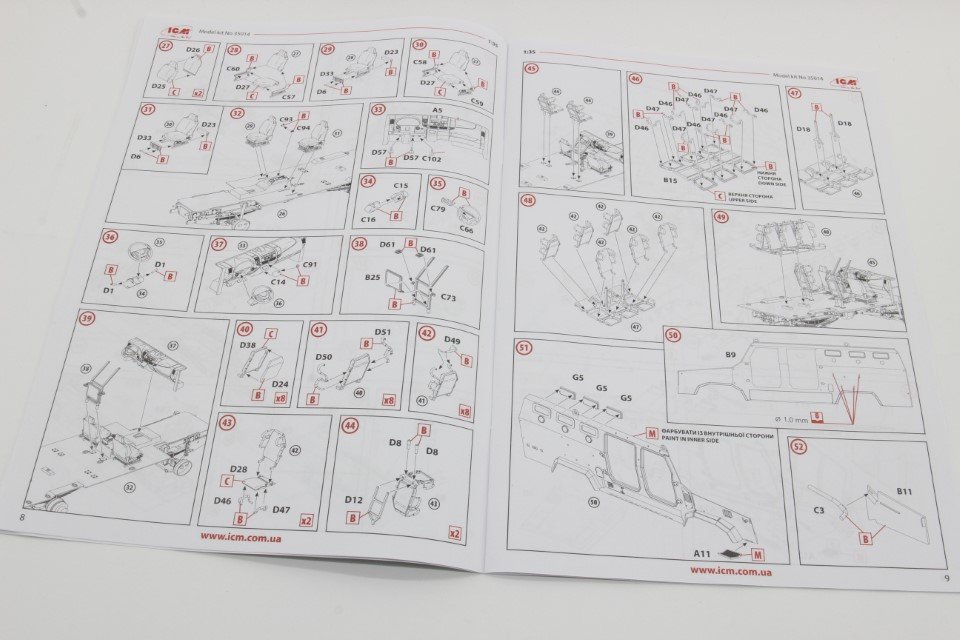
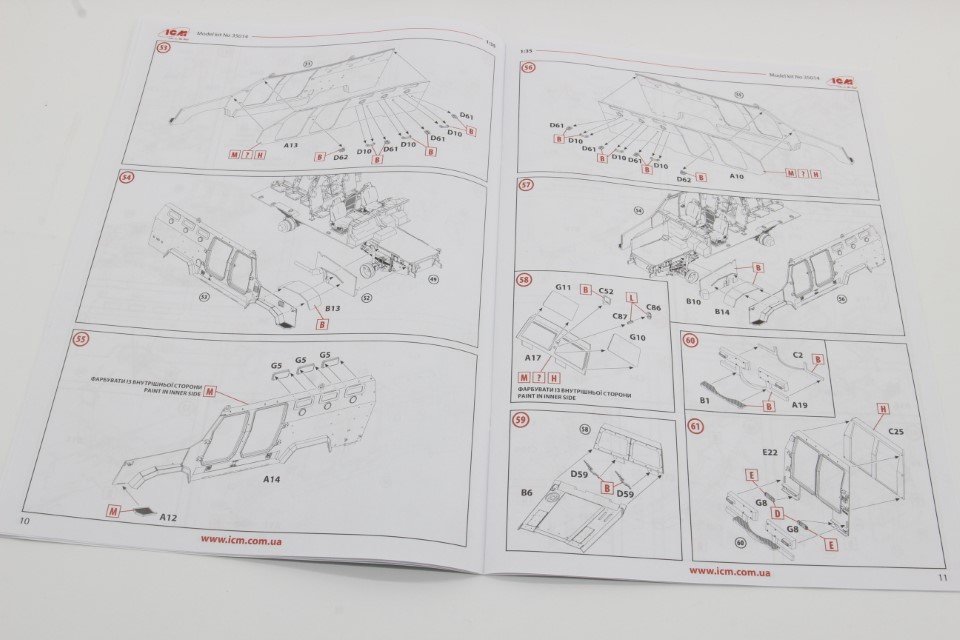
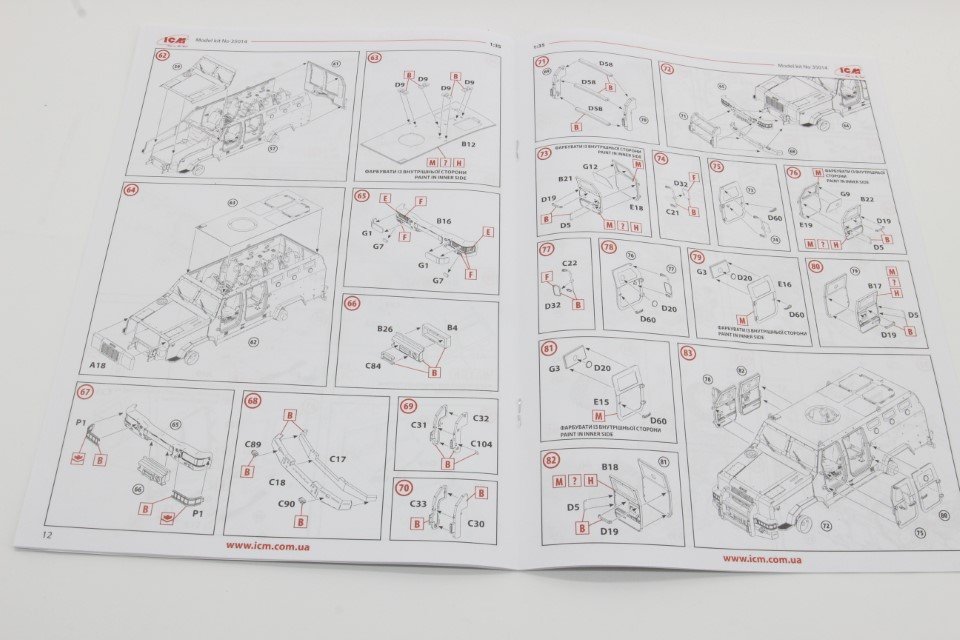
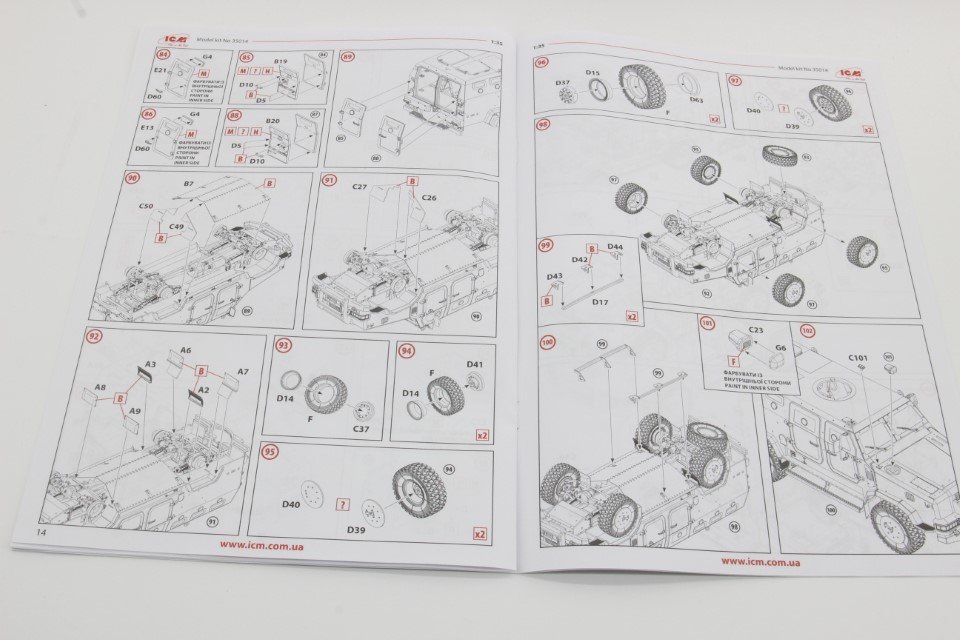
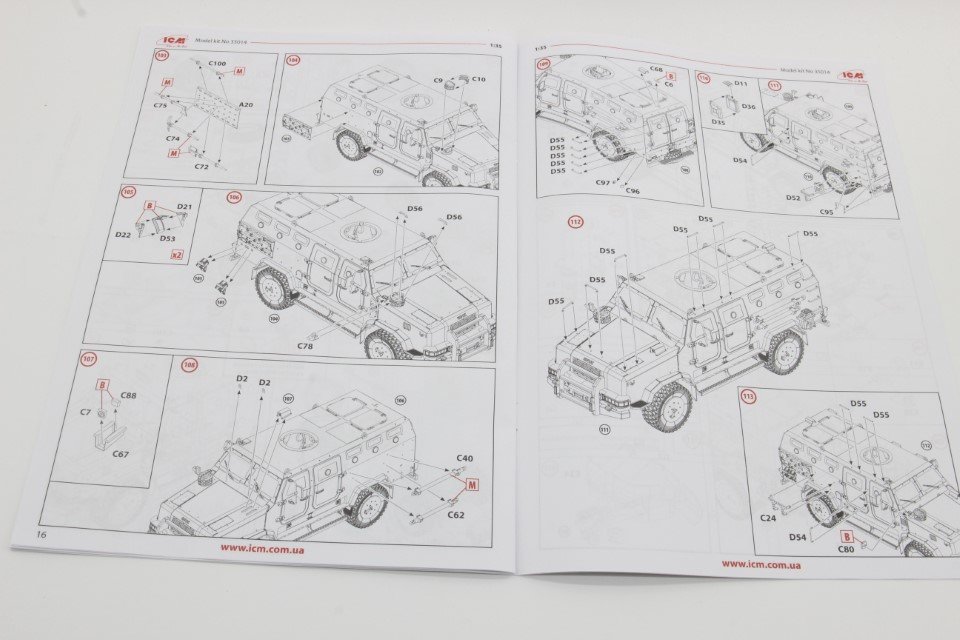
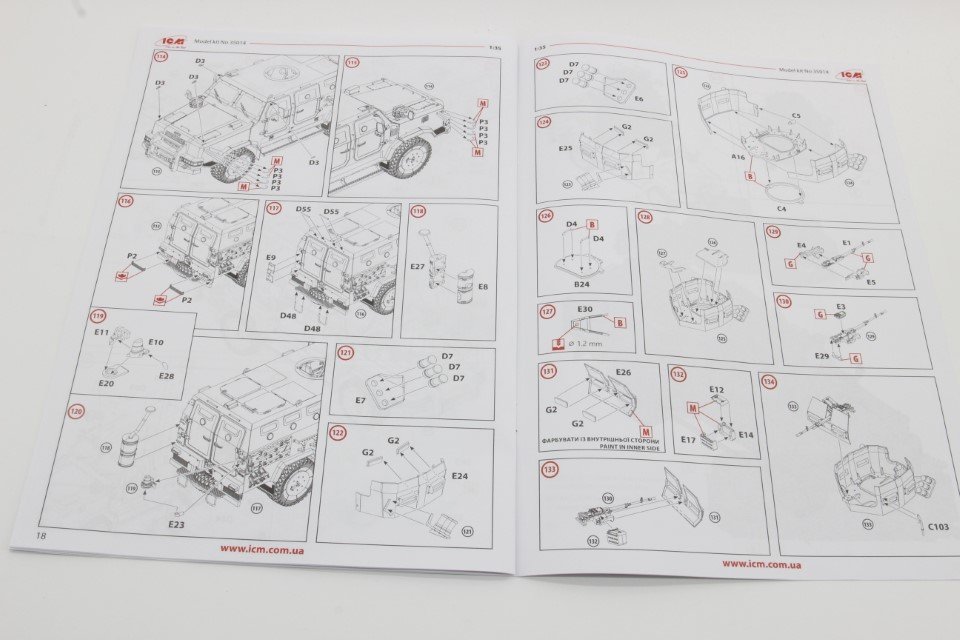
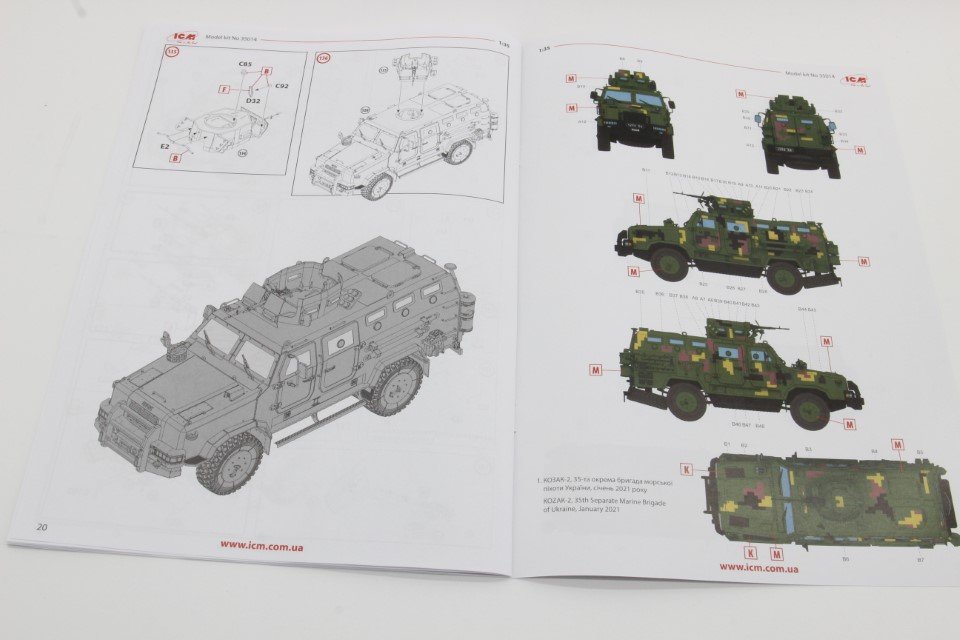
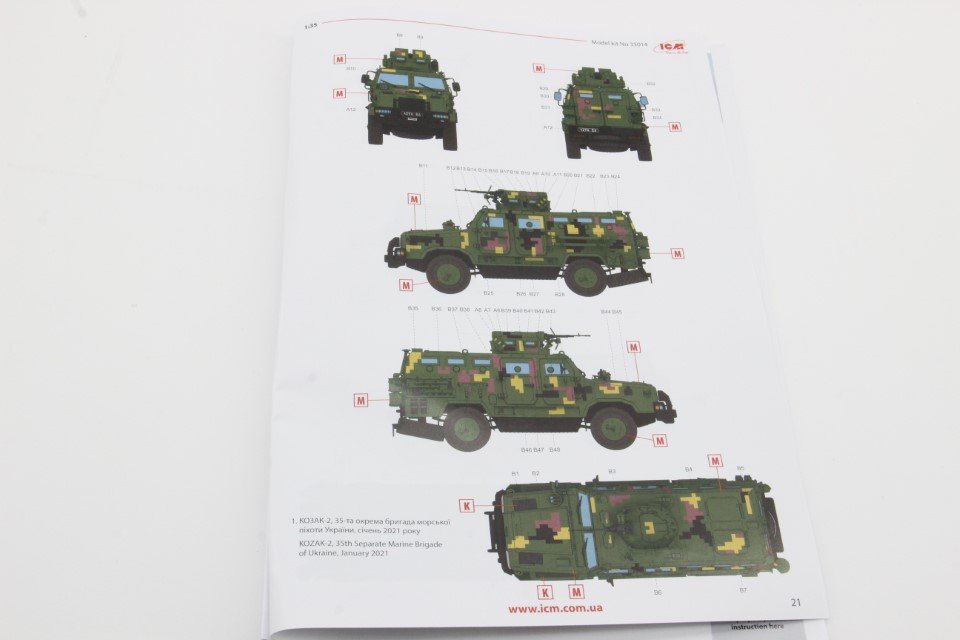
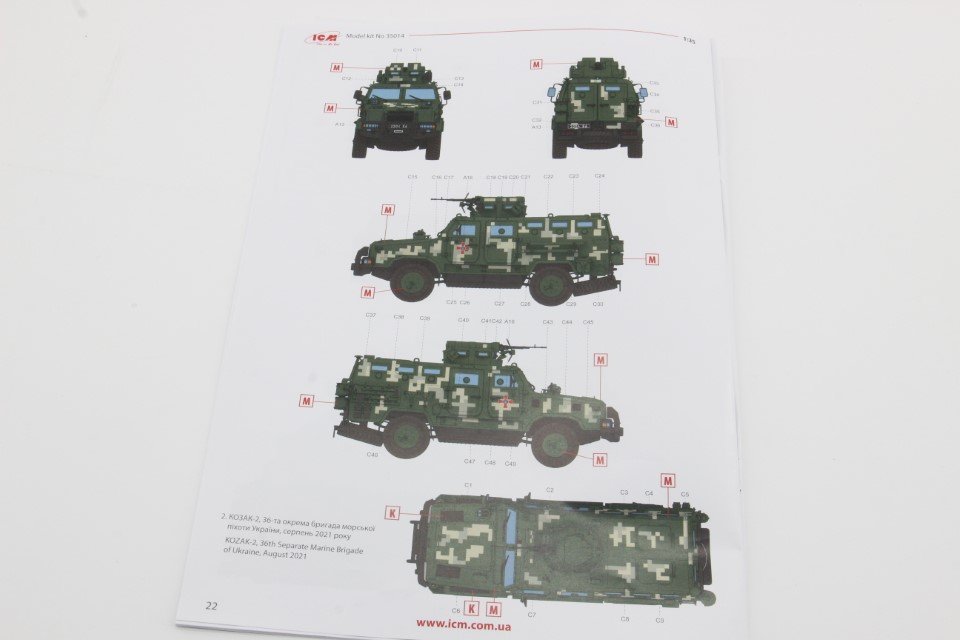
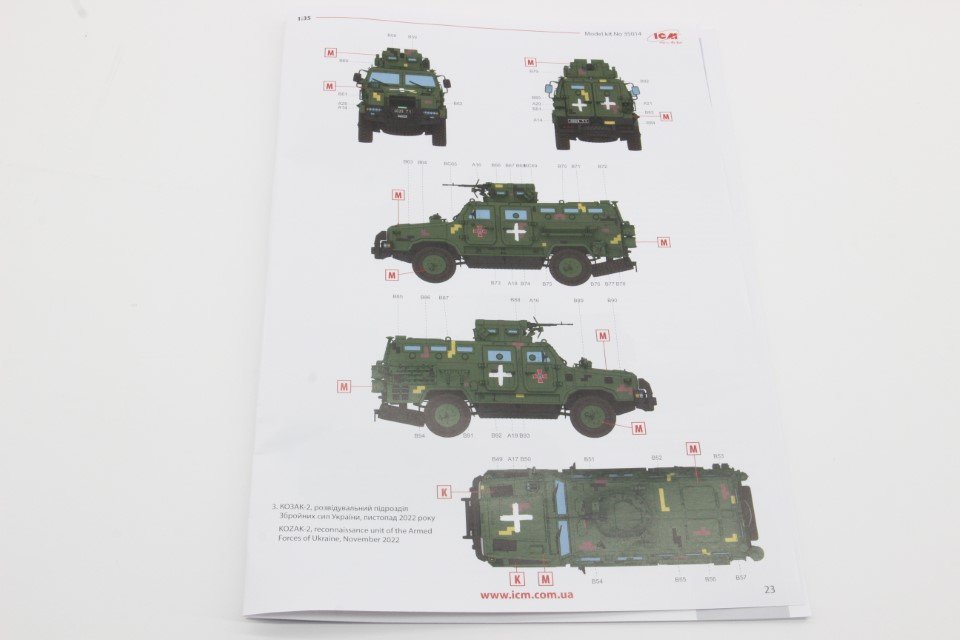
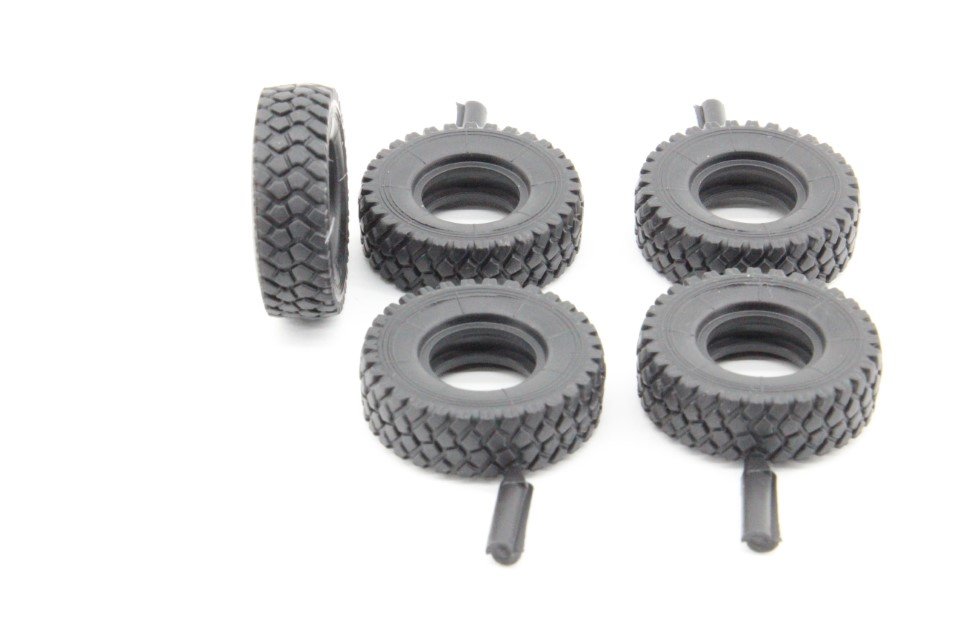
1:35 Kozak 2 “Ukranian MRAP -Class Armored Vehicle” ICM Catalogue Nº 35014 Introduction The Kozak-2 is a 4x4 multi-purpose, wheeled, armoured combat vehicle designed and manufactured by Ukrainian defence company NPO Practika to meet the mission needs of the Armed Forces of Ukraine, the National Guard, and the Border Guard Service. Practika developed two versions of the Kozak based on the EuroCargo 4×4 truck chassis developed by Iveco, a manufacturer of light, medium and heavy commercial vehicles based in Italy. The base version of Kozak was unveiled in August 2009. A Kozak-2 prototype vehicle underwent tests in November 2014 and a further modified version was demonstrated in March 2015 It includes a V-shaped armoured hull to protect the crew against anti-personnel mines or other explosives. It also uses suspended seats, and a collapsible sandwich structure in the floor to deflect and absorb mine blasts. Designed for high mobility operations, both urban and rural, Kozak-2 can carry a crew of 10, a driver and a commander with 8 deployable dismounts. The vehicle fitted with a turret, capable of mounting up to a 12.7mm machine gun. The vehicle is intended to offer enhanced security for the Ukrainian troops. It can be configured for patrol / reconnaissance, mobile command post, ambulance, cargo / repair / maintenance, and special operations. Currently deployed in the Ukrainian conflict and exported to Indonesia and Bangladesh. Source: https://defence-blog.com/ukrainian-army-receives-40-kozak-2-light-armored-vehicles/ https://www.army-technology.com/projects/kozak-2-multi-purpose-armoured-vehicle/?cf-view https://en.wikipedia.org/wiki/Kozak_(armored_personnel_carrier) Let’s look at the kit then: The box is sturdy, as the art design is just a cover top for a top opening box. Inside the box: 7 grey injected plastic sprues 2 clear plastic (Windows) sprues 5 rubber tires 1 photo etch fret. 3 decal sheets The sprues in detail Sprue A - In this Sprue, the most striking feature is the vehicle's body floor. It is composed of non-slip flooring (which exhibits appropriate and visible detailing). The central console is also integrated into the same piece. The instrument panel and front console are also part of this grid and display an acceptable level of detail. The left external side panel is noteworthy for its appropriately scaled detail, as well as the interior walls of these same panels. It's an original way to detail the vehicle's interior without compromising complexity in the mould with an injection on both faces of the piece. The front grid presents an eye-catching detail, despite being moulded in a single piece and without holes between the strips allowing air passage for cooling. The vehicle model logo is also visible and clear. Sprue B – In this sprue, the highlighted elements undoubtedly include the right outer side panel, the V-shaped shielding plate for the lower part of the body/chassis, aimed at helping to dissipate the energy from landmine explosions or improvised explosive devices (IEDs). This V-shaped structure is known as the 'V-shaped chassis' or 'chassis in V.' The front bumper with the attachments for the headlights is presented as a single piece, as well as the inner halves of the existing vehicle doors and access hatches. Body components and transmission are present, although the latter is quite simplified. As it is a hidden piece, little detail will be visible in the final model. Note also the roof (where two of the hatches are moulded in the closed position), as well as the bonnet, with appropriate details. Sprue C - In this grid, the parts that make up the transmission and respective shafts, suspension (in this case, suspension springs are represented by two halves), some visible components of the engine (given that the kit does not include an engine), tools, as well as the structure where they fit in, are present. The tools are molded as a single piece and include their respective fastenings. Sprue D - Three identical grids are provided, as they supply all the necessary parts several times during the model assembly. The rims for the wheels, as well as the wheel hubs. Various parts of the passenger seats. It is noteworthy that each seat consists of a set of parts that include, for example, the coverings for the back of the driver and passenger seats, various handles for the rear seats. Also, note the detail in the various handles to be used on the exterior and interior of the model. Attention and care should be given when removing these parts from the grid, due to their delicate nature. Some modelers may prefer to replace these handles with metal or copper equivalents Sprue E - This sprue consists of the parts that make up the outer halves of the side doors. It also includes the rear panel of the model, highlighting the hinges of the rear doors as well as the base for the rear lighting assembly. Furthermore, there are armour plates that compose the small tower on the roof, where the machine gun, its support, and the ammunition box are situated. The latter are represented in two halves, so proper gluing and alignment should be carefully handled. Sprue F - The tires (5 in total) are represented in vinyl and as a single piece. Despite the material used, which personally I'm not a fan of, the detail is adequate, with a good representation of the treads on the surface and the reinforcing veins on the sides of the tires. Sprue G - Two grids of transparent parts are provided, well-defined and clear. The pieces that make up the door windows and the windshield have a fitting groove that facilitates assembly in their respective areas. Note: the dark background stands out the colour parts details. Sprue P: A small sheet of photo-etched engravings accompanies the model and is designed to advantageously replace the detail and scale of the protections for the front side indicators and the protections of the front and rear light clusters. Instructions The instruction book accompanying it, totaling 24 pages, includes a historical overview of the model, technical and tactical data, and a colour chart that, in this case, only provides references for ICM's range of colours. This is understandable as they're launching their own range; however, finding equivalents for other brands in the market isn't difficult. The scheme and location of each piece are presented in grid diagrams on the following pages of the instruction book, which is divided into a total of 136 steps/phases of construction. It might seem like a lot, but it's not. Many steps involve the assembly of two pieces, so effectively expanding to this number of stages, in my opinion, makes the process more manageable. It allows for a more relaxed approach and simplifies the assembly process, as we don't have to ponder over the best construction sequence. Each step is marked with the Grid Letter and the corresponding piece number, a familiar structure for many model brands. This model indeed presents numerous small yet important details. Therefore, to focus on these small realism notes, this extensive instruction sheet becomes crucial. The drawings are clear and understandable. Whenever necessary, the respective colour letter is referenced to paint the correspondent piece. Markings There are four options on the decal sheet, all with a base coat of green, and various digital camouflages applied over the top. From the box you can build one of the following: 1 - KOZAK-2, 35th Separate Marine Brigade of Ukraine, January 2021 2 - KOZAK-2, 36th Separate Marine Brigade of Ukraine, August 2021 3 - KOZAK-2, reconnaissance unit of the Armed Forces of Ukraine, November 2022 4 - KOZAK-2, an unknown unit of the Armed Forces of Ukraine, autumn 2022 Again, all diagrams refer to the correspondent colour letter listed on the first page. So this brings this review to the last item of the box: Decals This set provides us with three decals sheets. Decal sheet A – supply us with all common marks for all marking options, as license plates, service marking, national marking and dashboard instruments and interior knobs and switches. Regarding this last one decals, no information is provided, nevertheless, it’s intuitive where it should go. Decal Sheet B – The larger of the three sheets, provides a set of several digital geometric camouflage Decals to apply on top of the common green base colour, shared by all versions. Some are one in red brow, others sand colour and some with a darker shade of green and they all are used for the camouflage for three decoration options. Decal Sheet C – this sheet is destined to the digital pattern, in sand colour shades, of the fourth option. This is a method to facilitate a process that would otherwise complicate the completion and finishing of this model. The most discerning modeler will certainly paint all the digital spots of the camouflage. Myself as a modeller I appreciate this solution. Will speed up the model decoration and conclusion. It is really a plus. Conclusion These lines are always difficult to express. I enjoy and like this model. The injection parts are clean and detailed as an injection mould allow us. The construction will not bring any issue, nevertheless some care is needed to handle and assemble all small and fragile parts, but in the end you will in your collection a very attractive and unique model of a modern vehicle. It’s suited to novice and advance modellers due to its simplicity of assembly and permits super detailing, also showcase the detailed interior, thanks to the possibility of mounting the side and rear doors in the open position. A must for all fans of modern military vehicle in the main scale (1:35) The possibility to use decals as digital camouflage patches is a very good idea and will definitively motivate any modeller to overcame the model conclusion. Highly Recommended ! My sincere thanks to ICM for the review sample


.JPG.7f43d5e5fd097598a066599f45e4ede9.JPG)

-
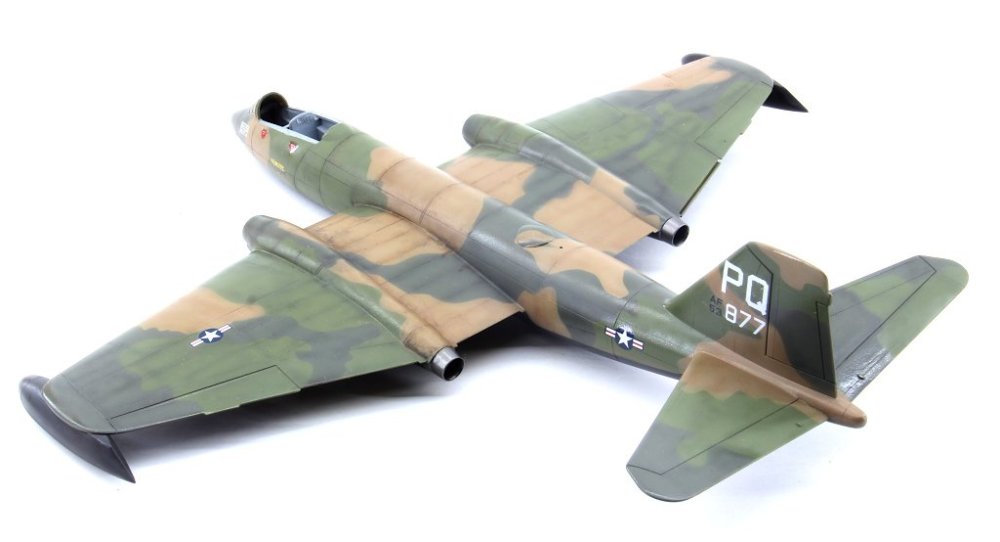
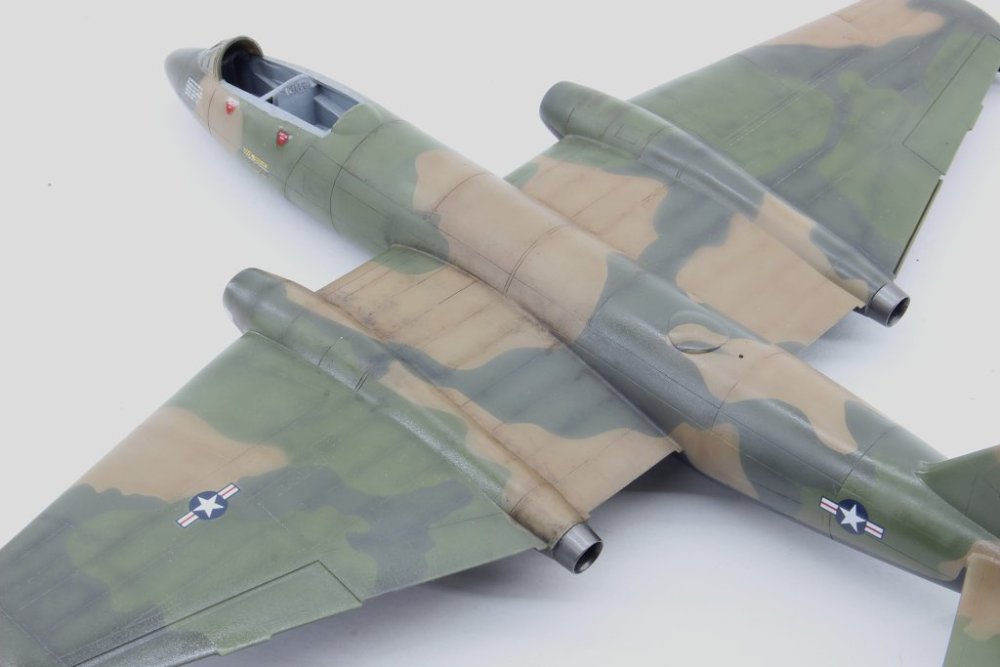
Hi Everyone, Just to share some pictures of my latest model Finished ( not quite finished as i'm still thinking on adding the external tanks) This is a model that is on my workbench about 20 (!!!) years, so i decided to give it a go... Build oob with exception of ejection seat harness, RBF in copper wire and brass from a wine bottle. Tail marks ( Blue and white) are painted, as i did not trust in the decals provided. Paints used are Gunze ( grey) and Tamiya (White). The models lacks some details ( for example - navigation lights on the wings) so i had to mask and paint them. also the yellow strips on the windshield despite beeing oversize, they are decals leftovers. And it's done!
.JPG.dcf100129b8864f72e93f85883a3e9be.JPG)
.JPG.92e23bed270675092b68b11150e63d25.JPG)
.JPG.5dcf75583666bf764e9b8d85d5b3ff76.JPG)
.JPG.f79362e0d6d4119486b6cb9bd4001e1f.JPG)
.JPG.0fcec26be1102e1e6f4bab878f63b841.JPG)
.JPG.ff690e5bead07fde37b38ca0513f6c4a.JPG)
.JPG.833050202e72b3ff1c2d3d15110f5630.JPG)
.JPG.4a87eed0b978d06885a3dce6df154720.JPG)
.JPG.33e3c7b1b9a420a34bda7743a696b28f.JPG)
.JPG.f4ef3cfa355b468181265720e235c39f.JPG)
.JPG.7c4af34bba3180412012db54bb72e670.JPG)
.JPG.ee448c2c11097932f8e92738e1ccbeed.JPG)
.JPG.01a52207f6900a0dbeadf06e4c629ff4.JPG)
-
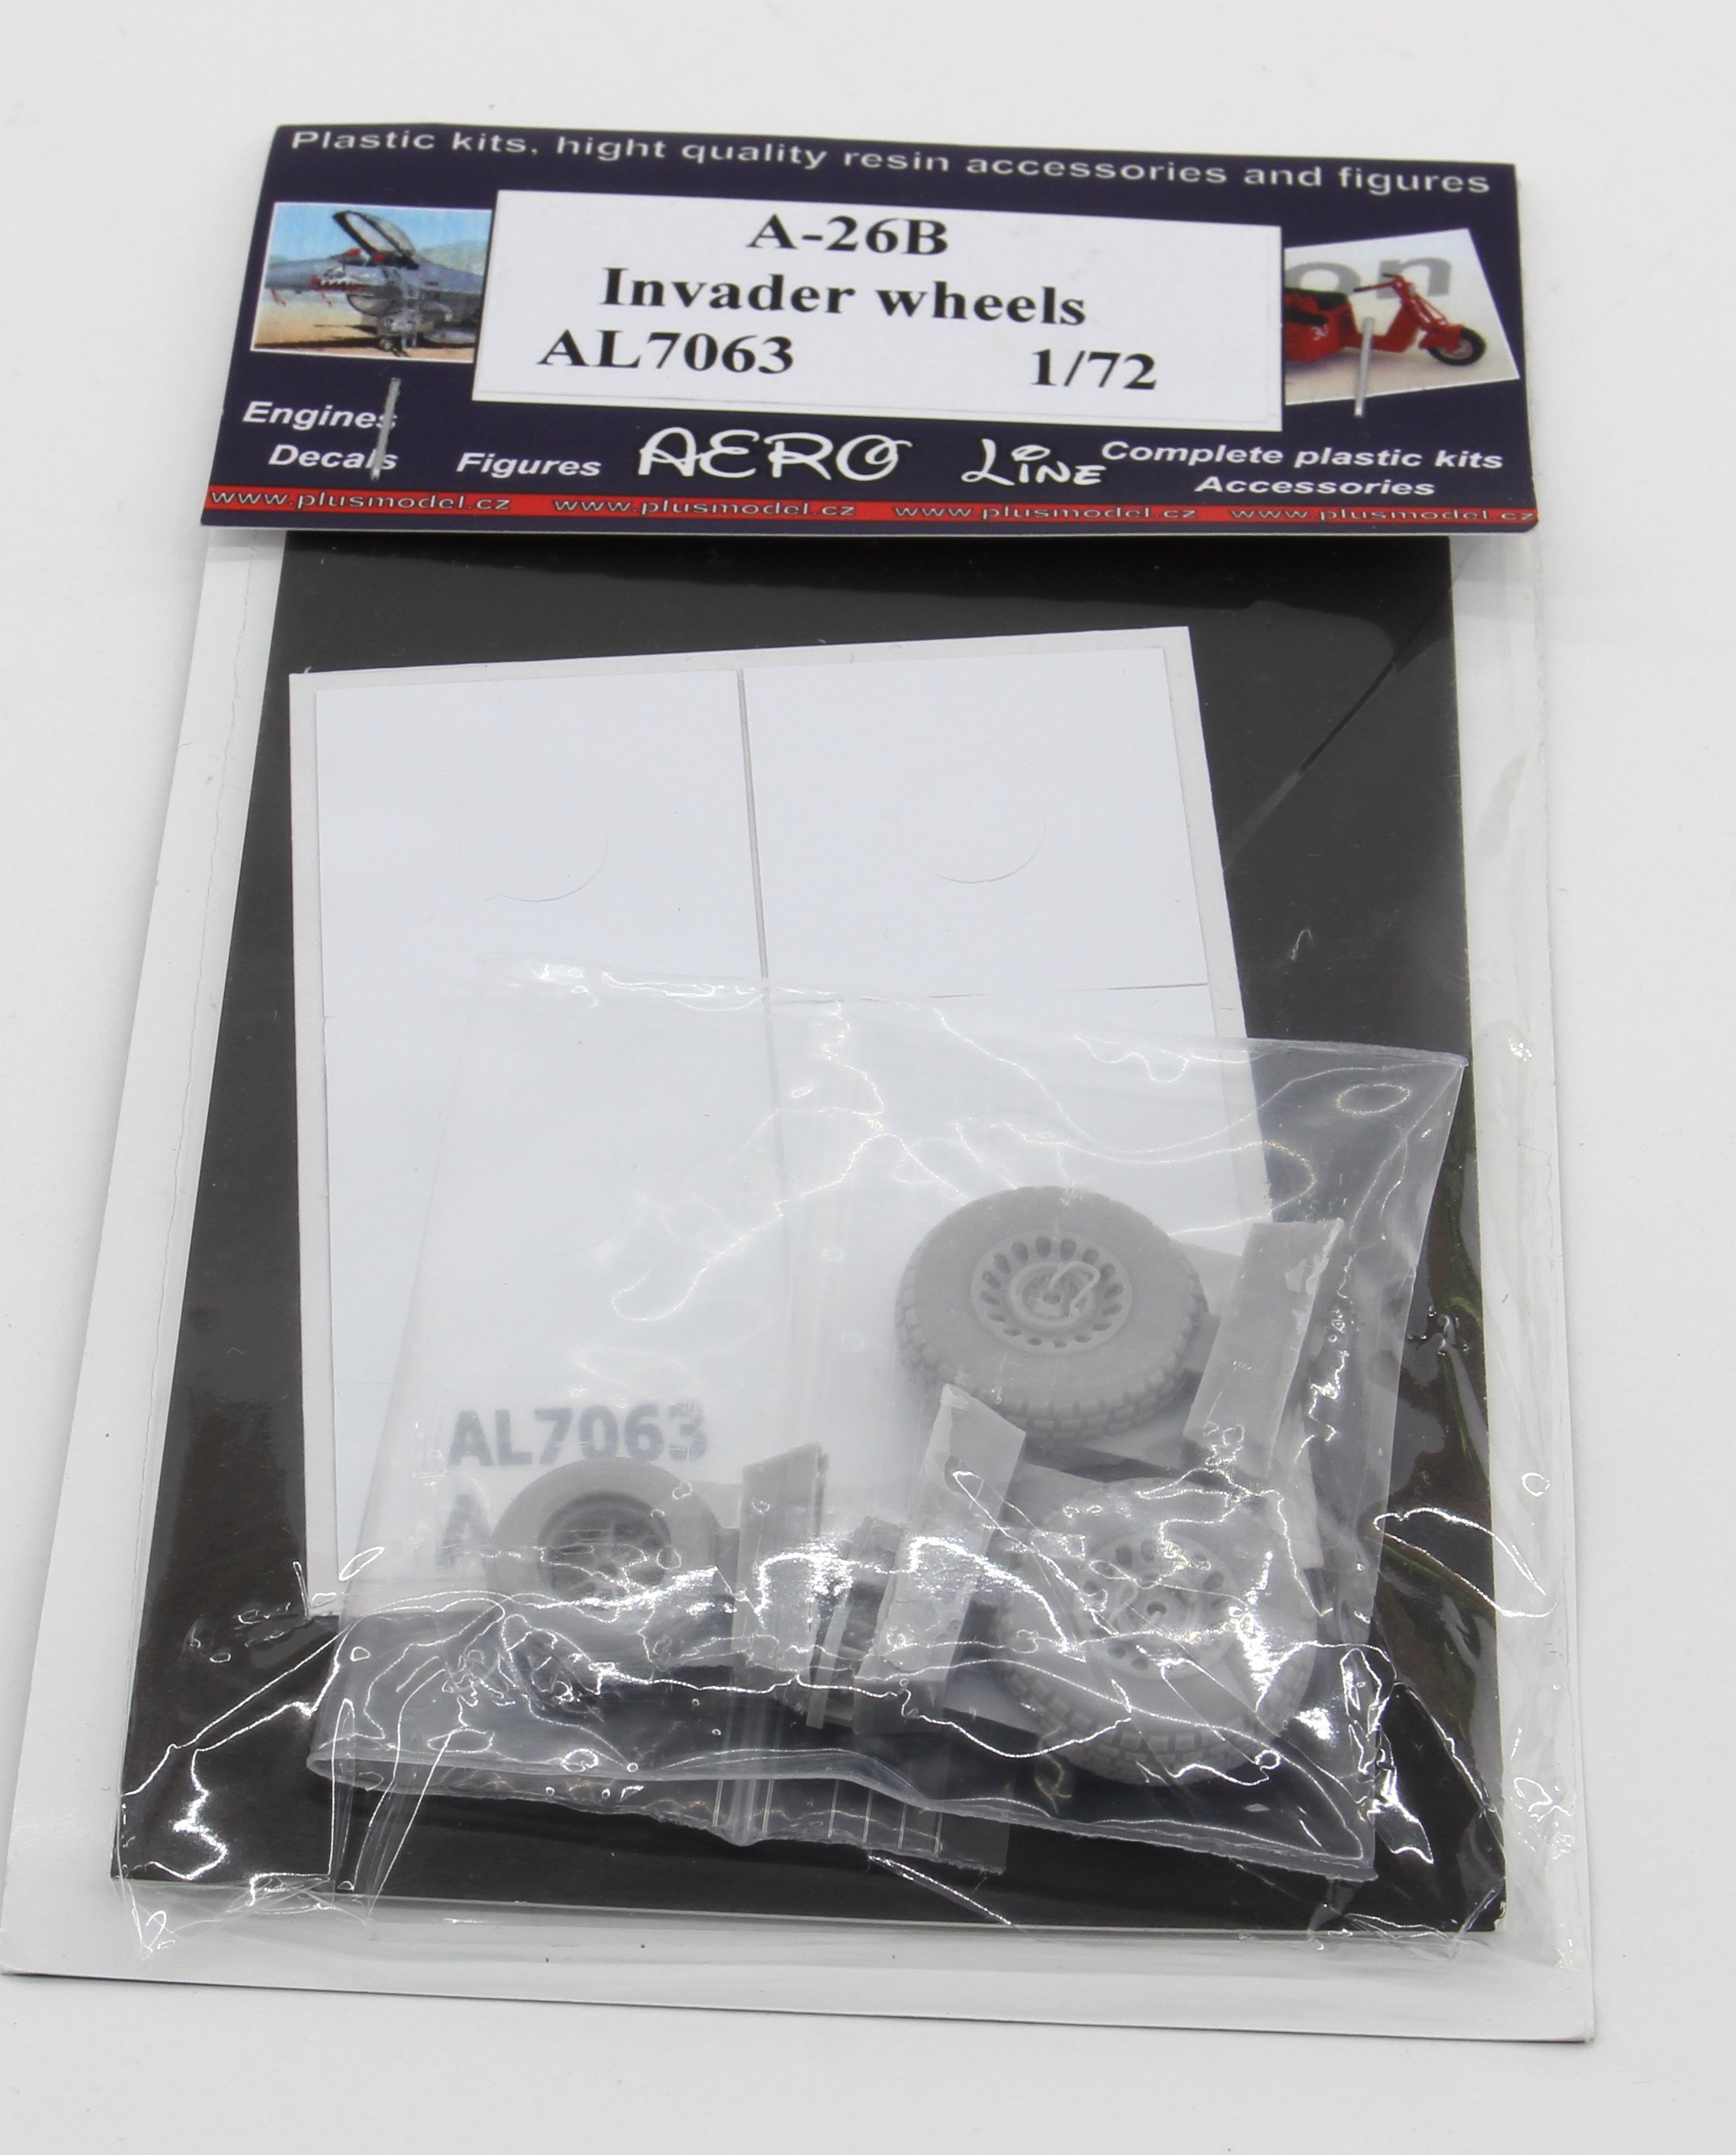
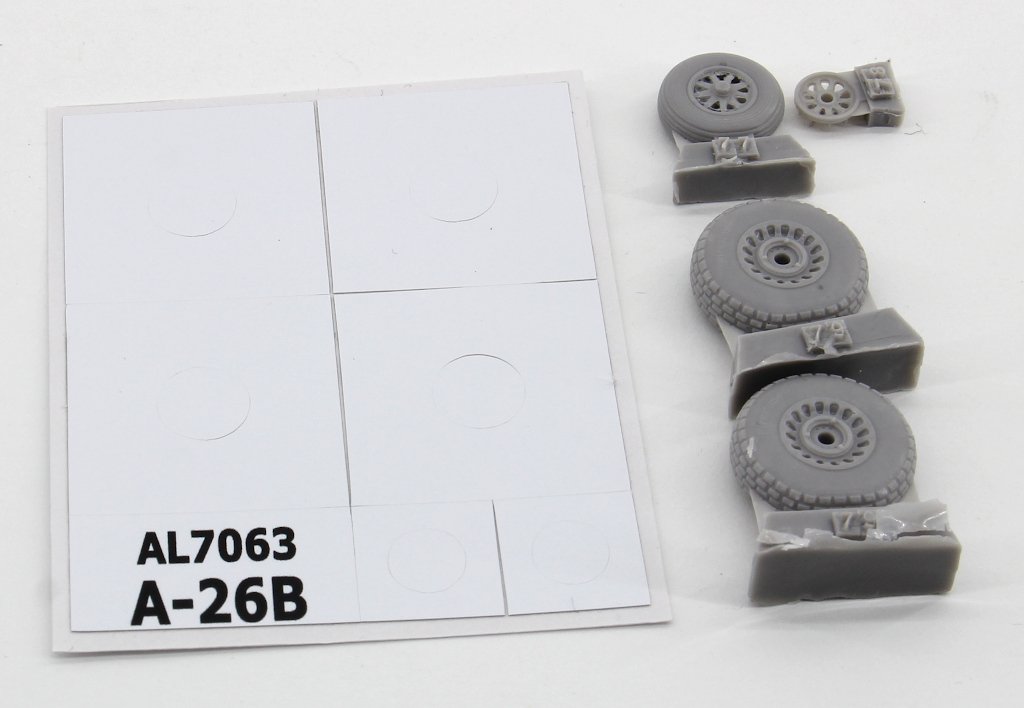
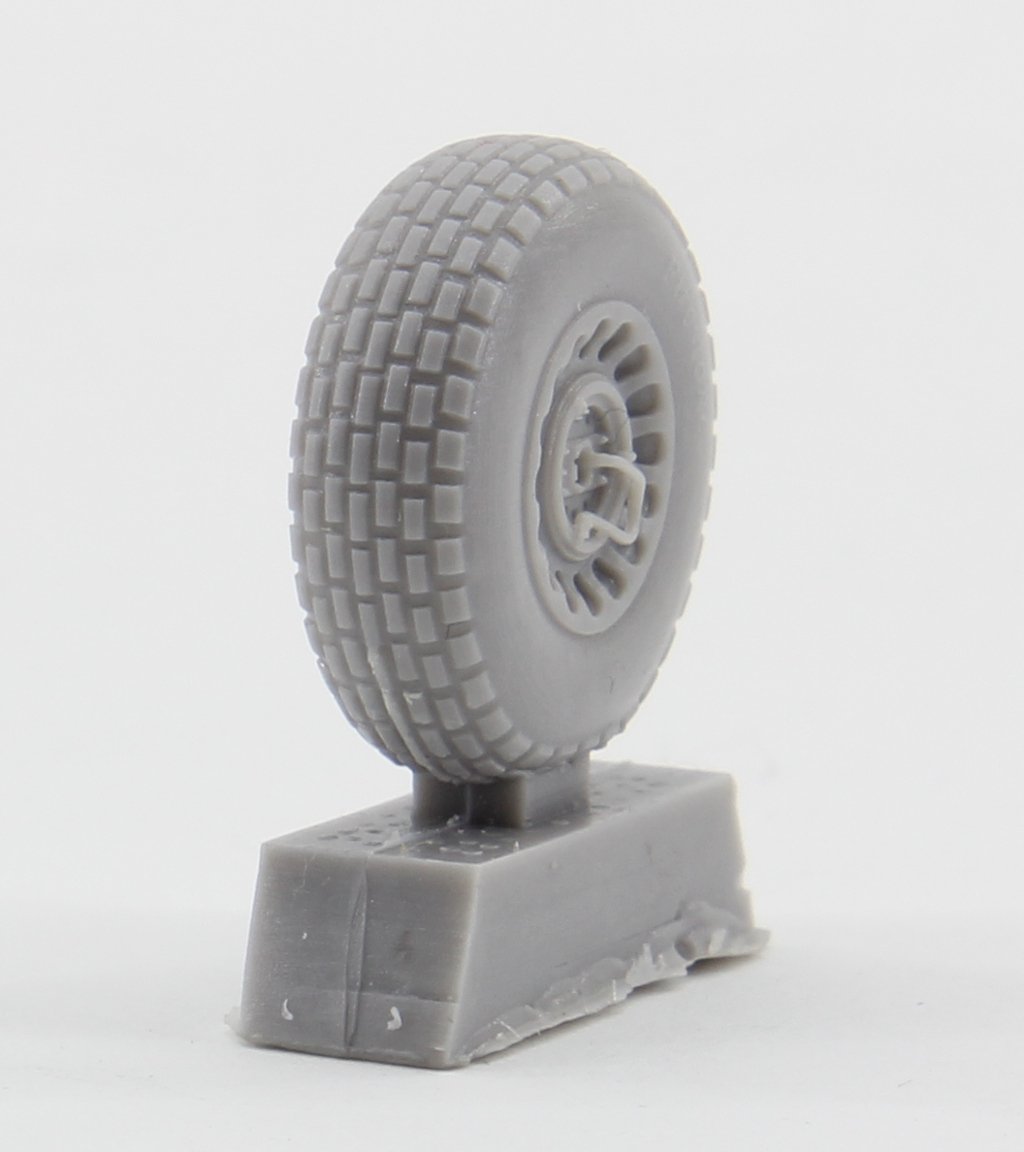
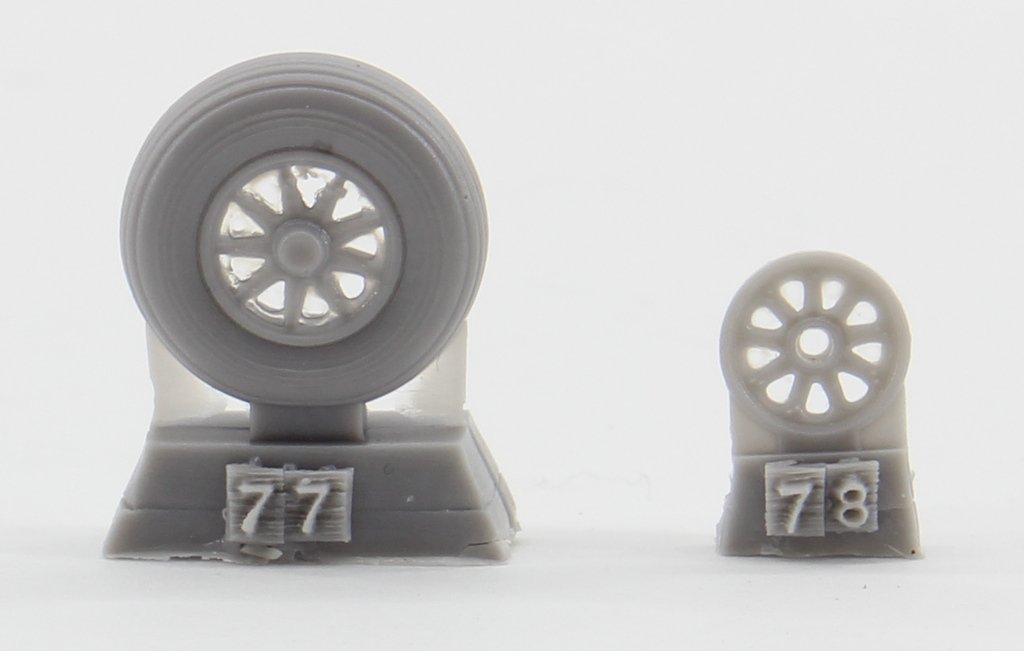
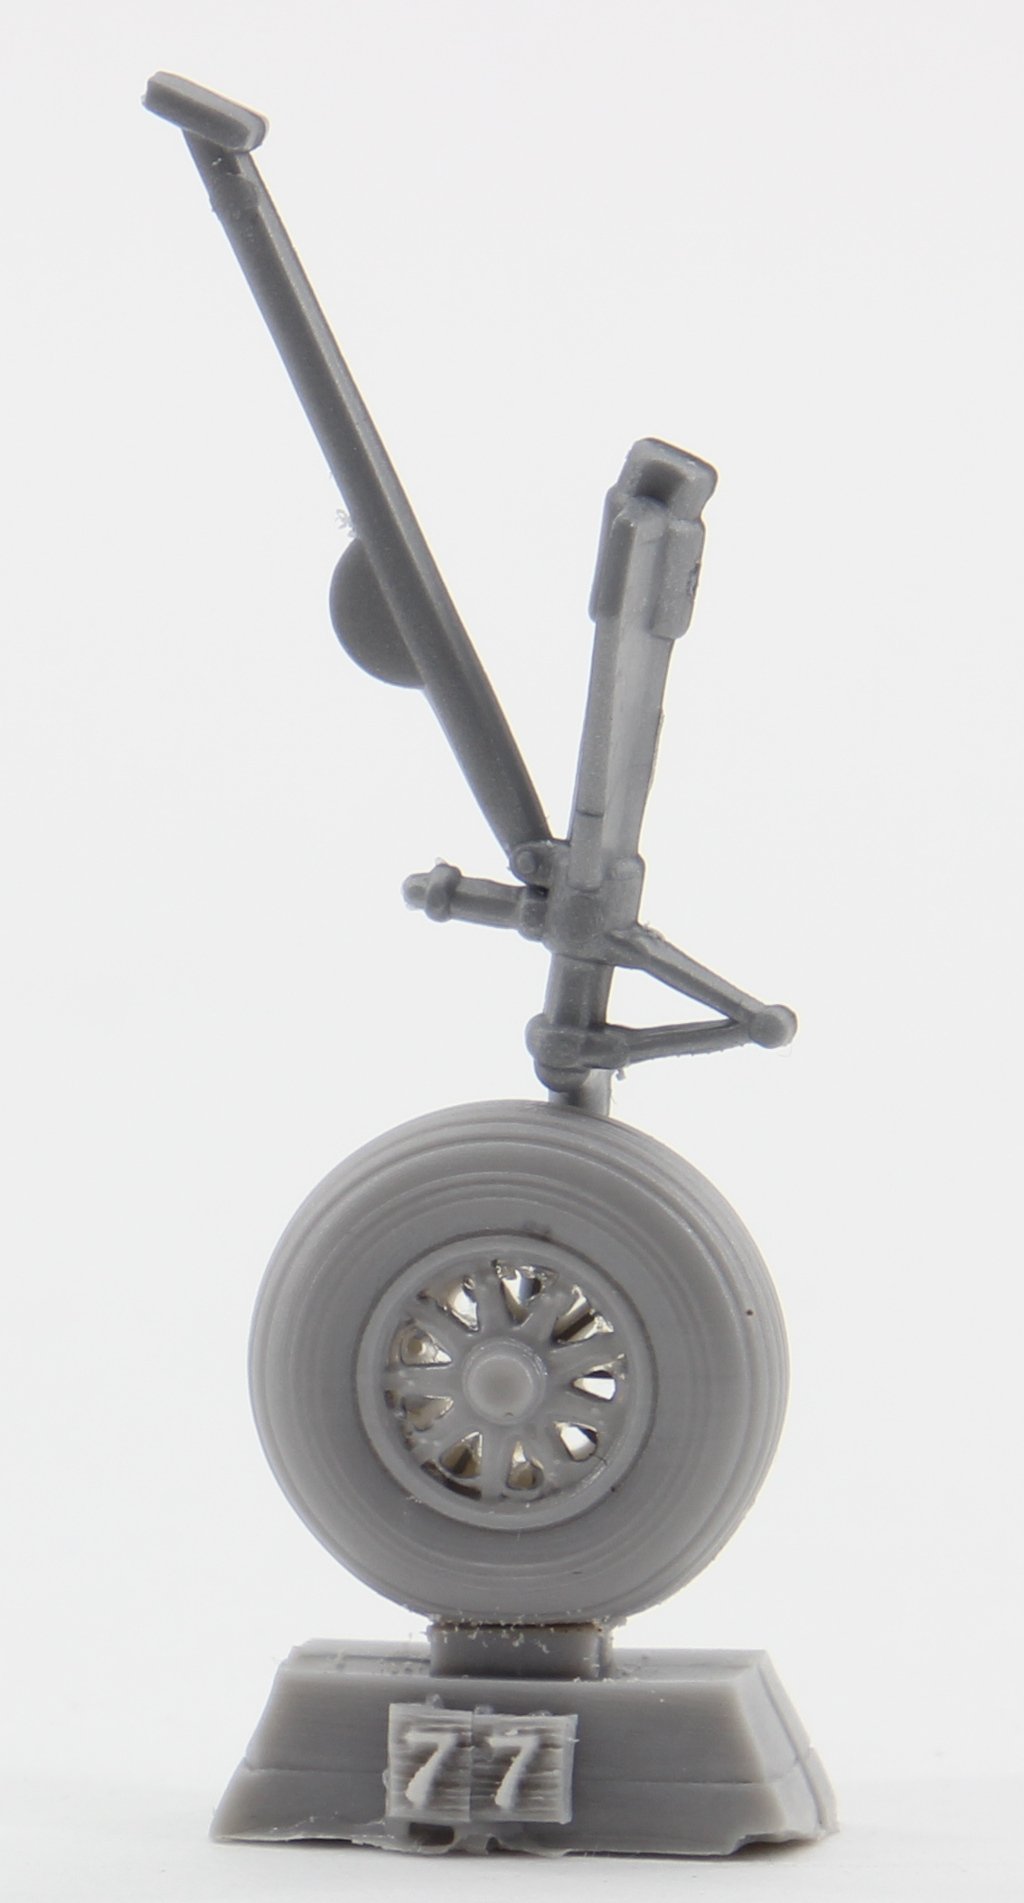
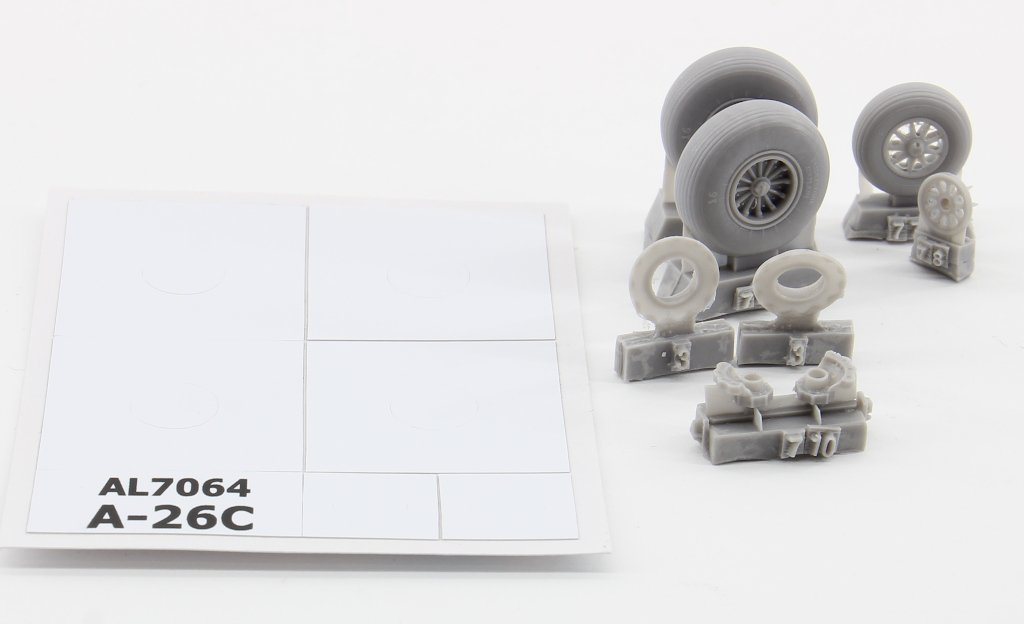
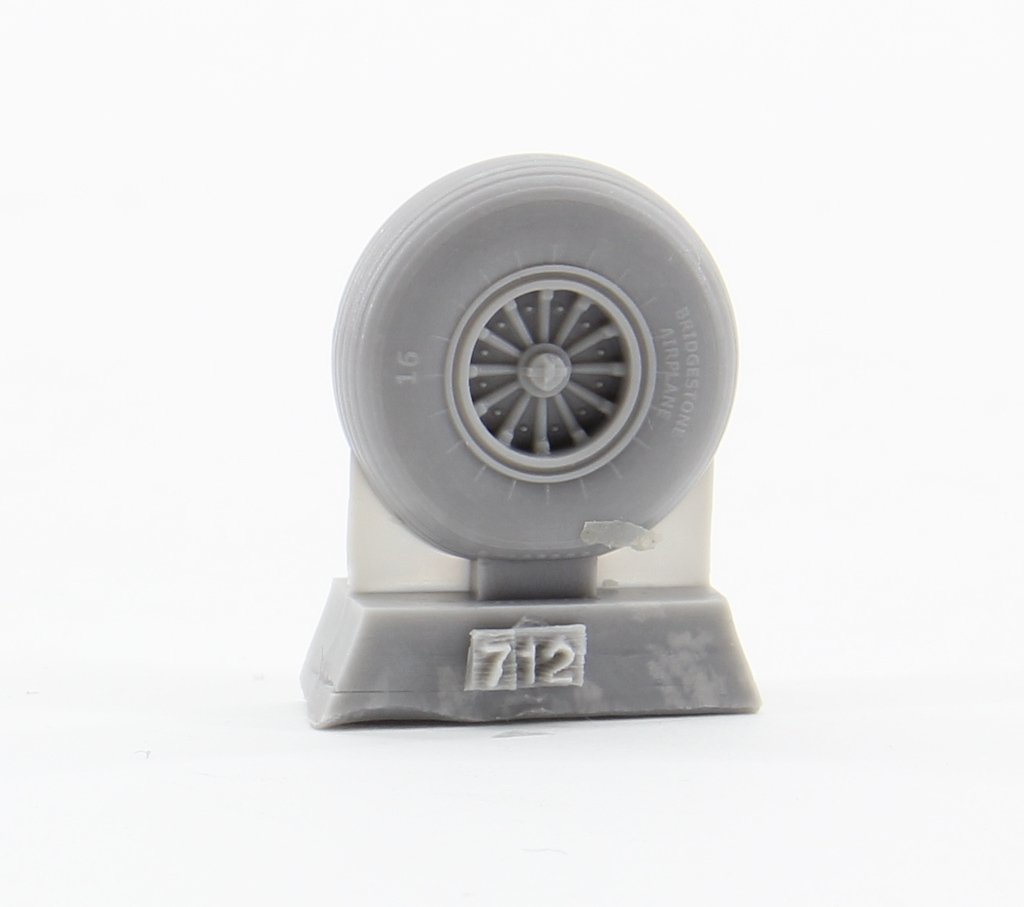
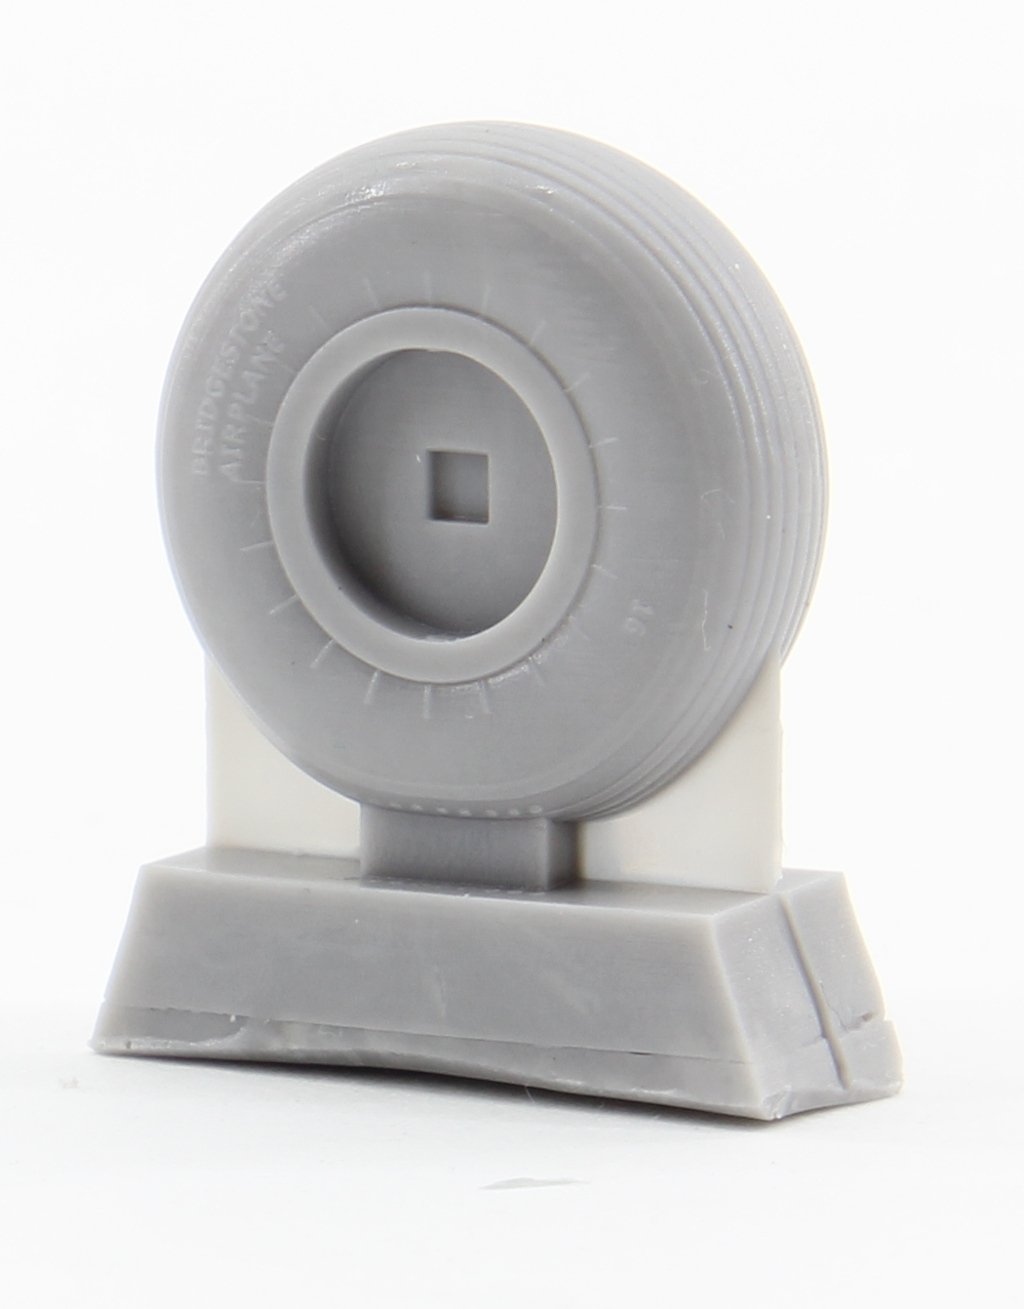
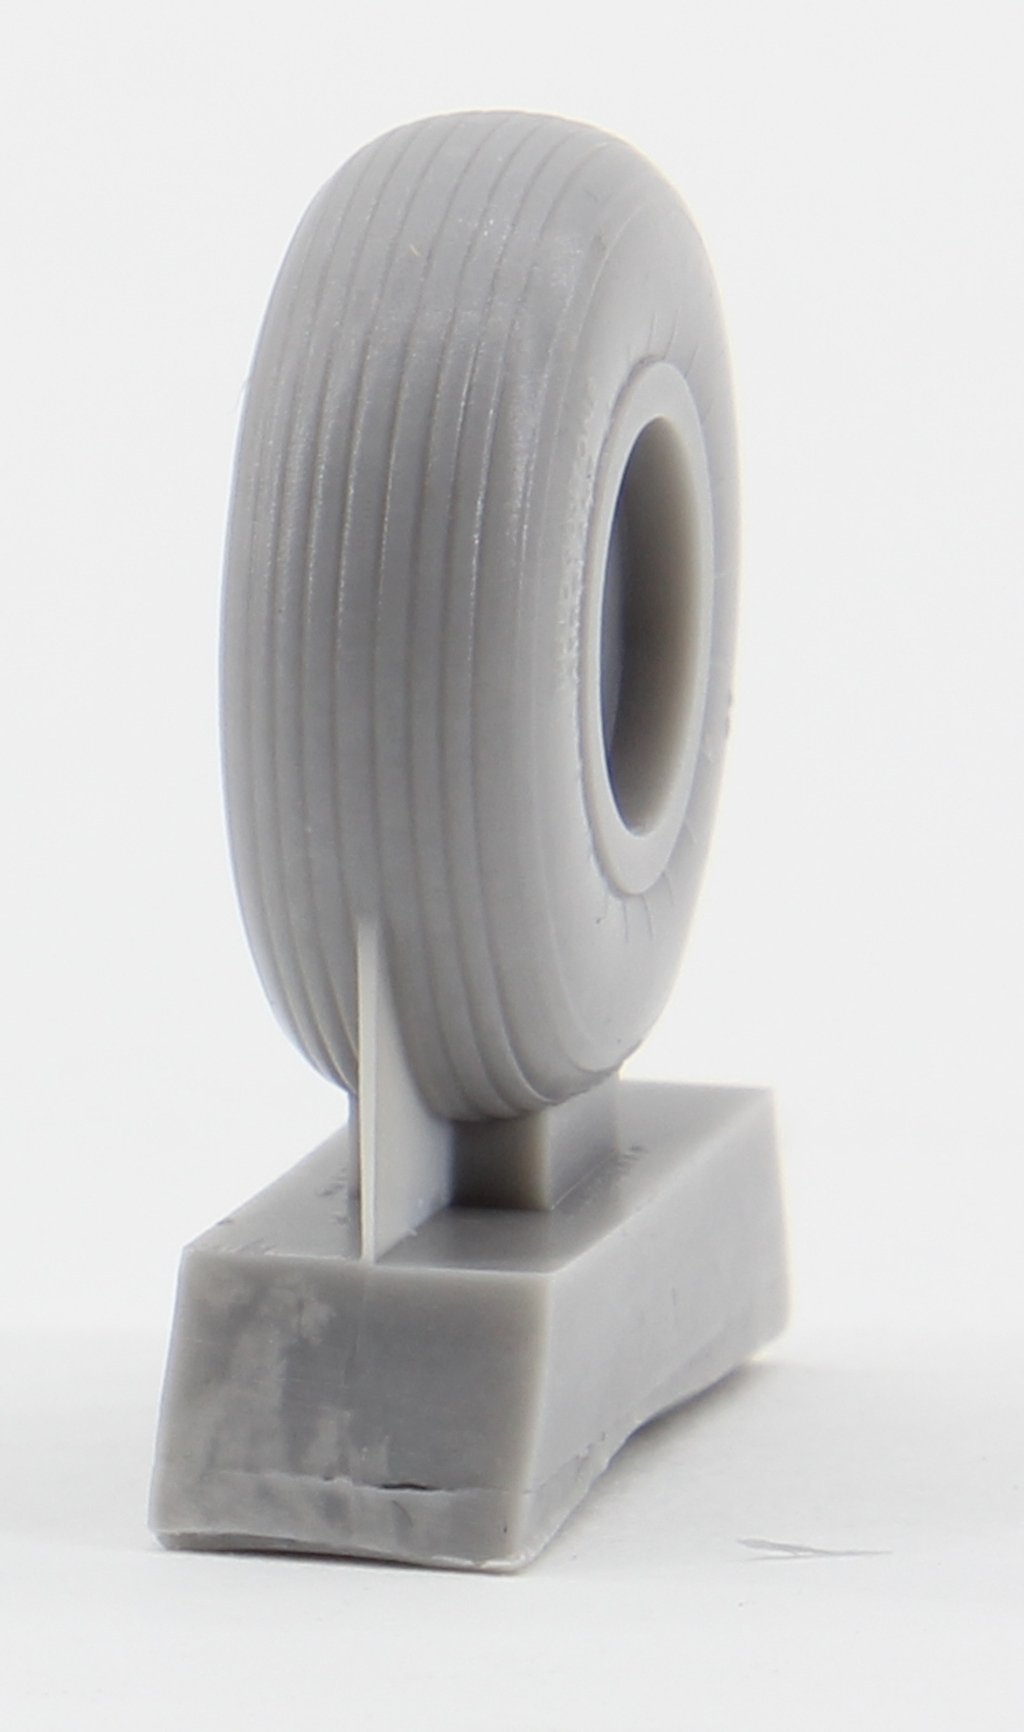
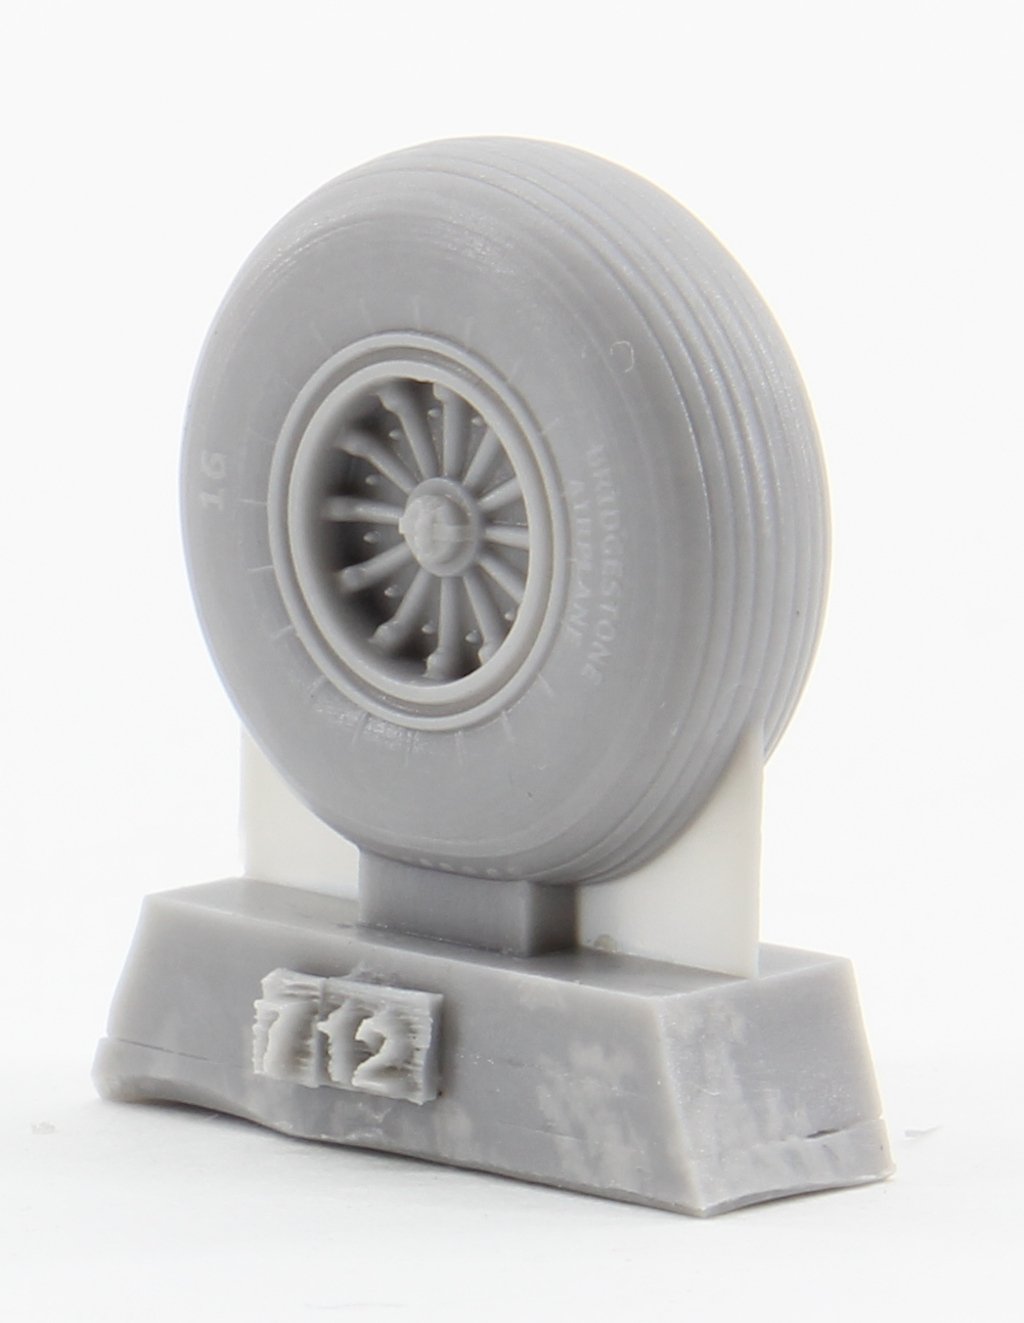
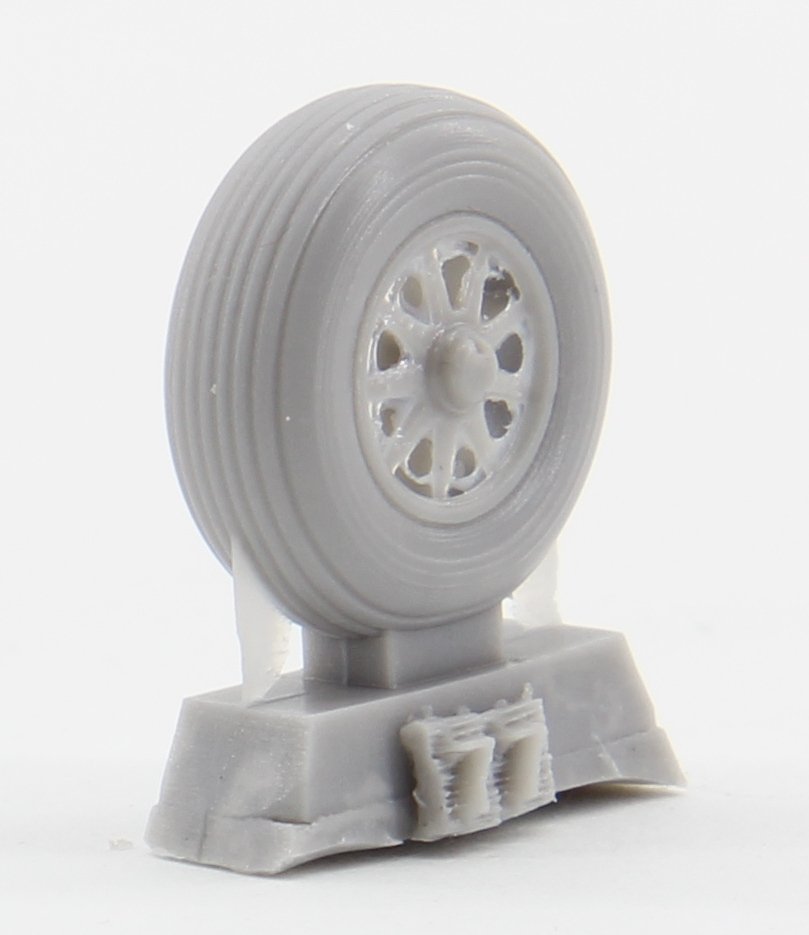
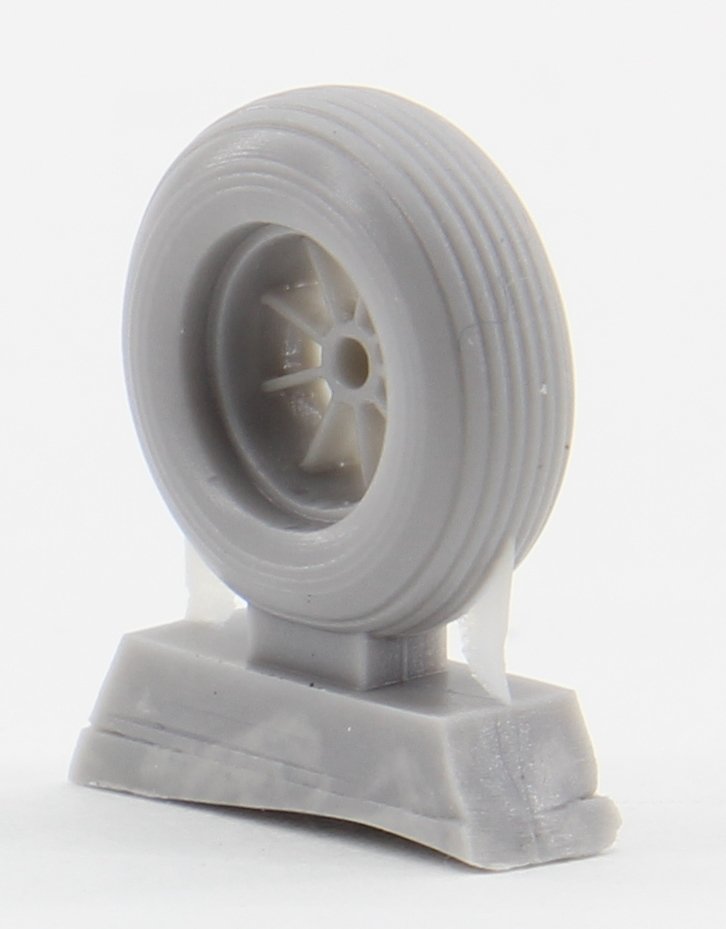
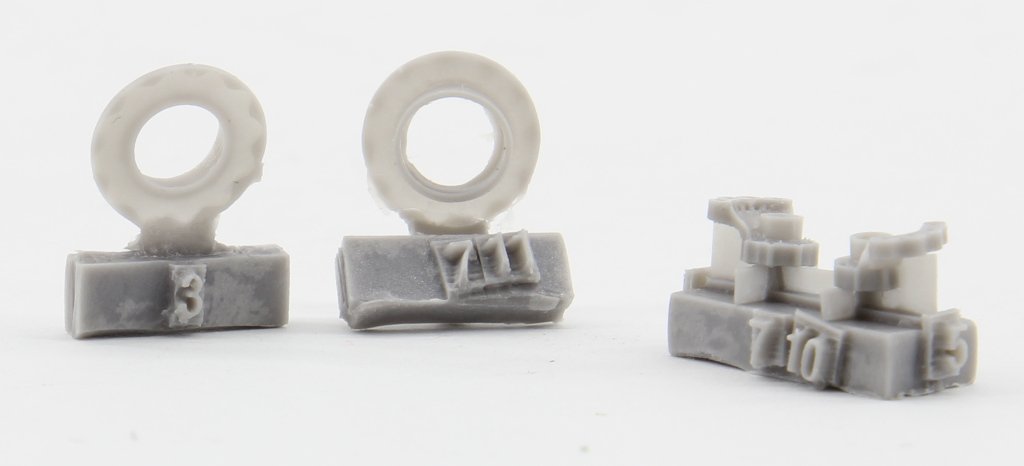
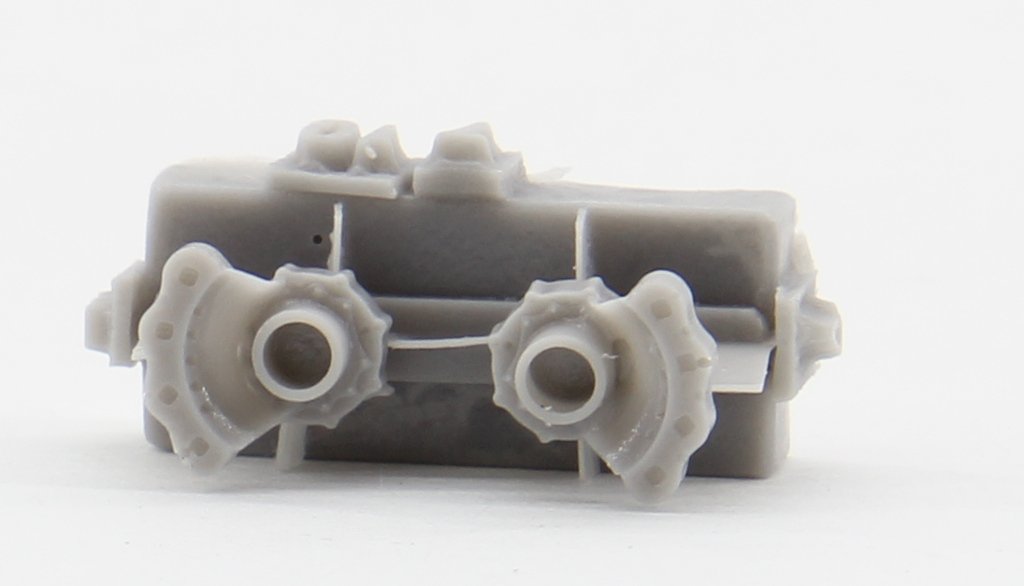
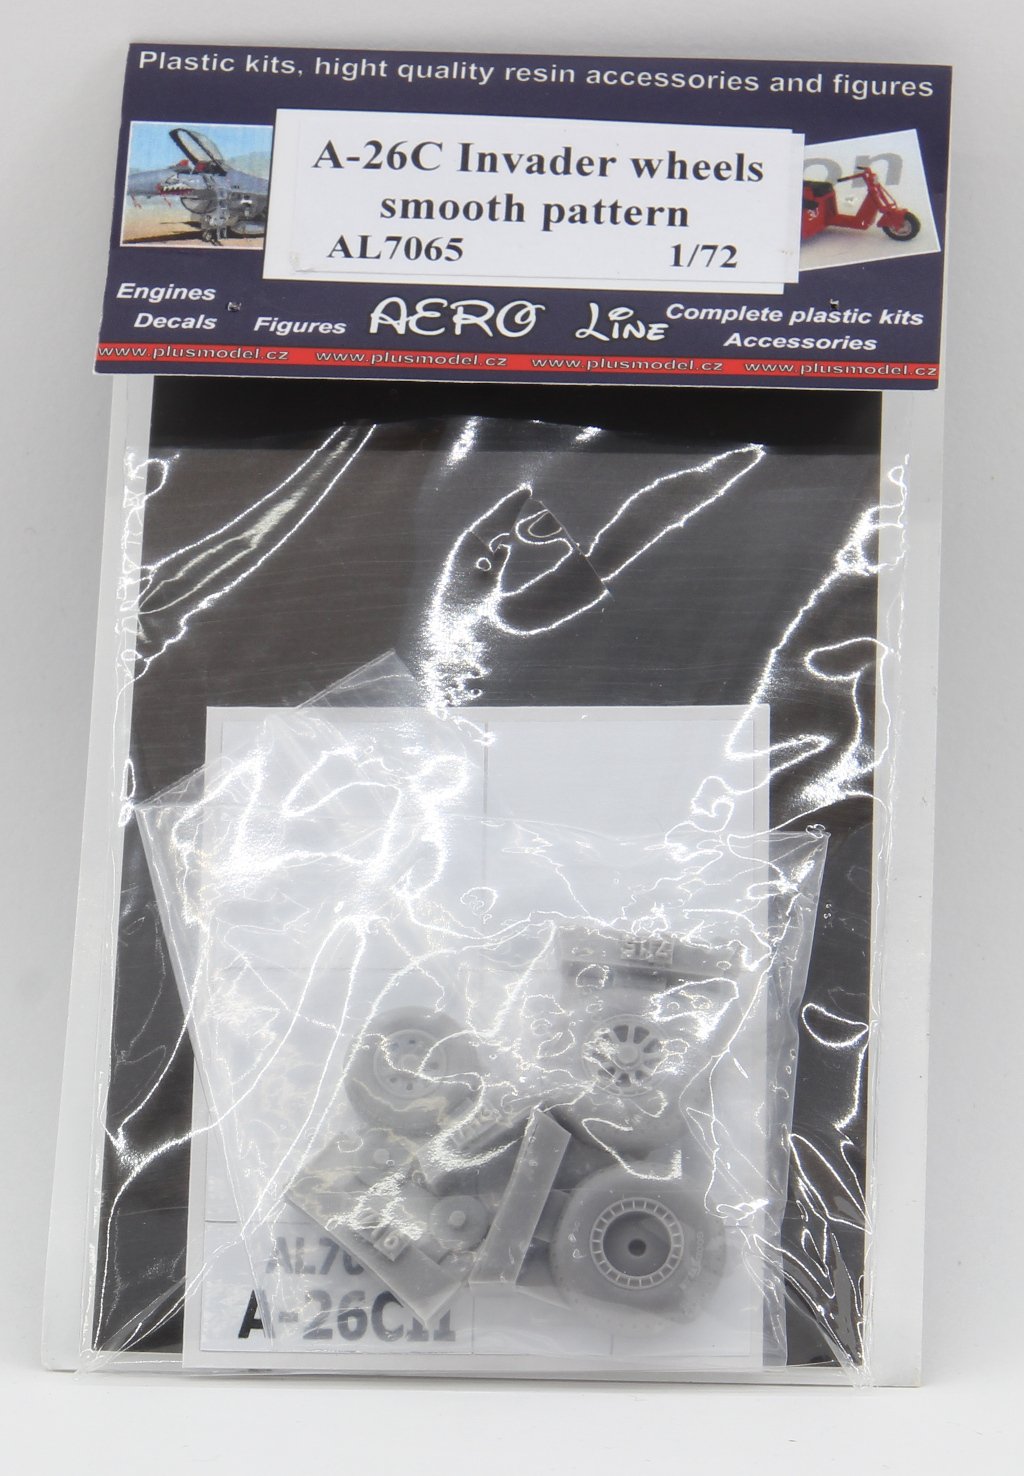
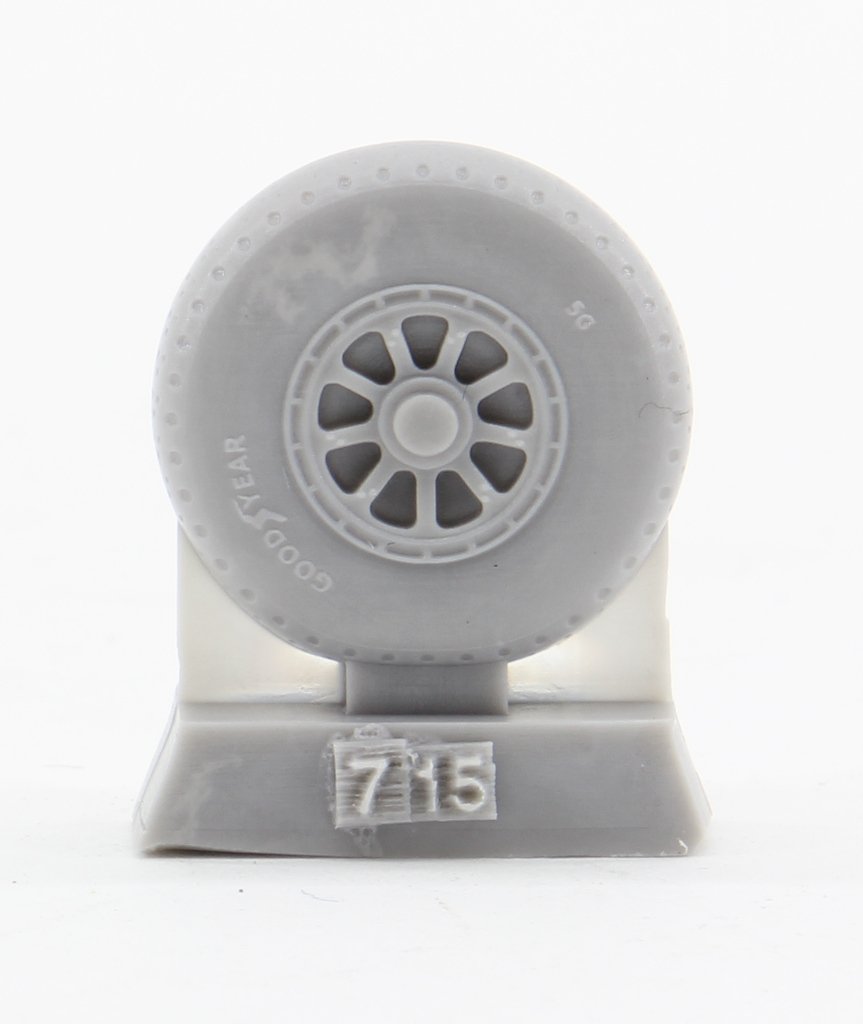
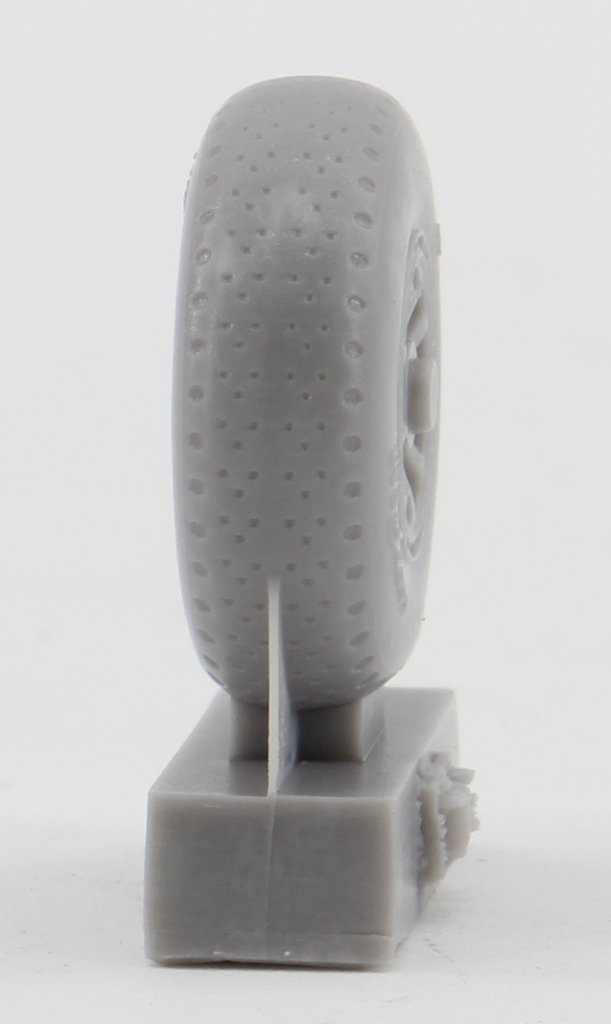
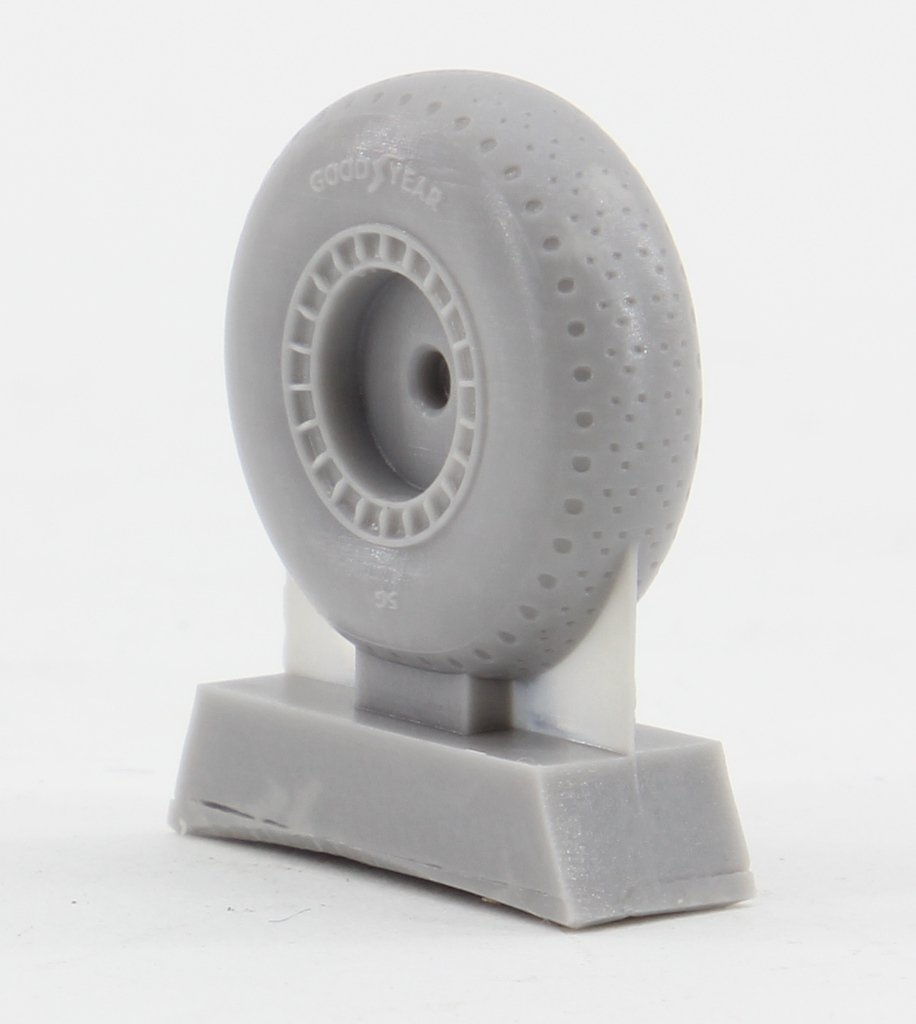
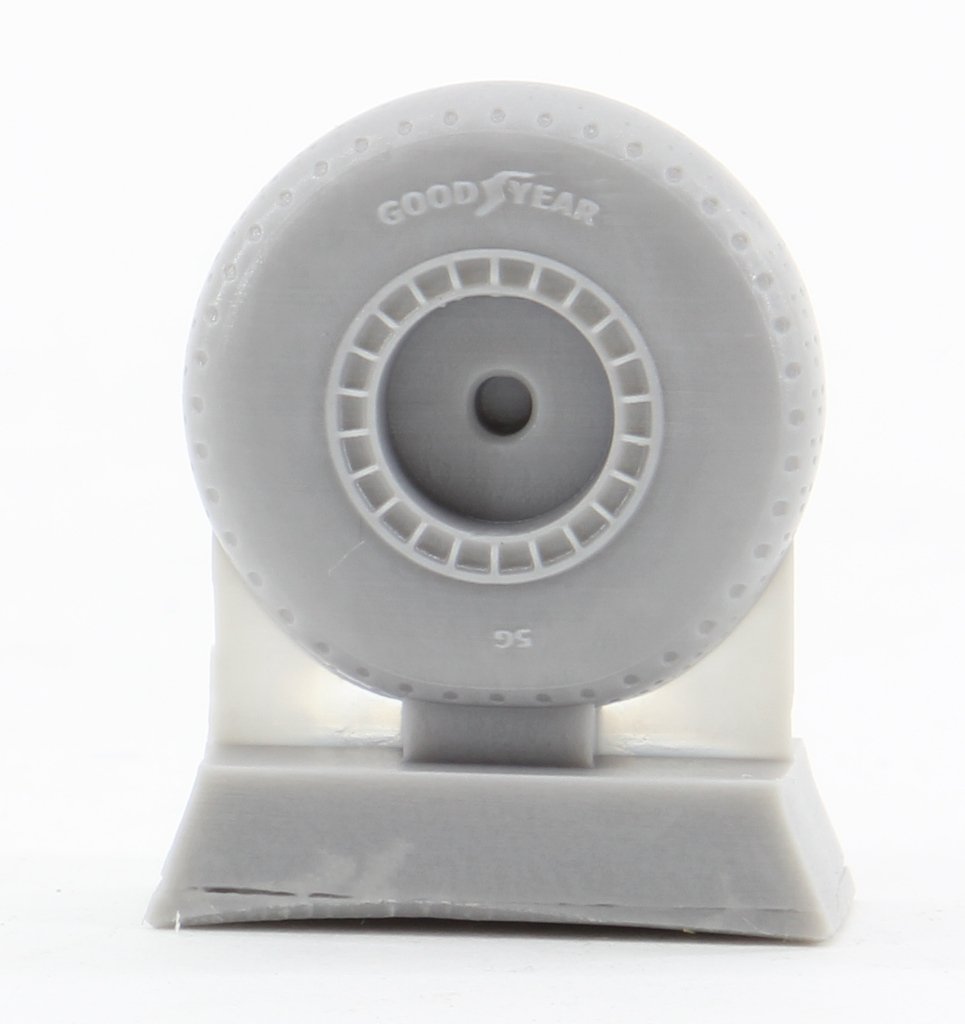
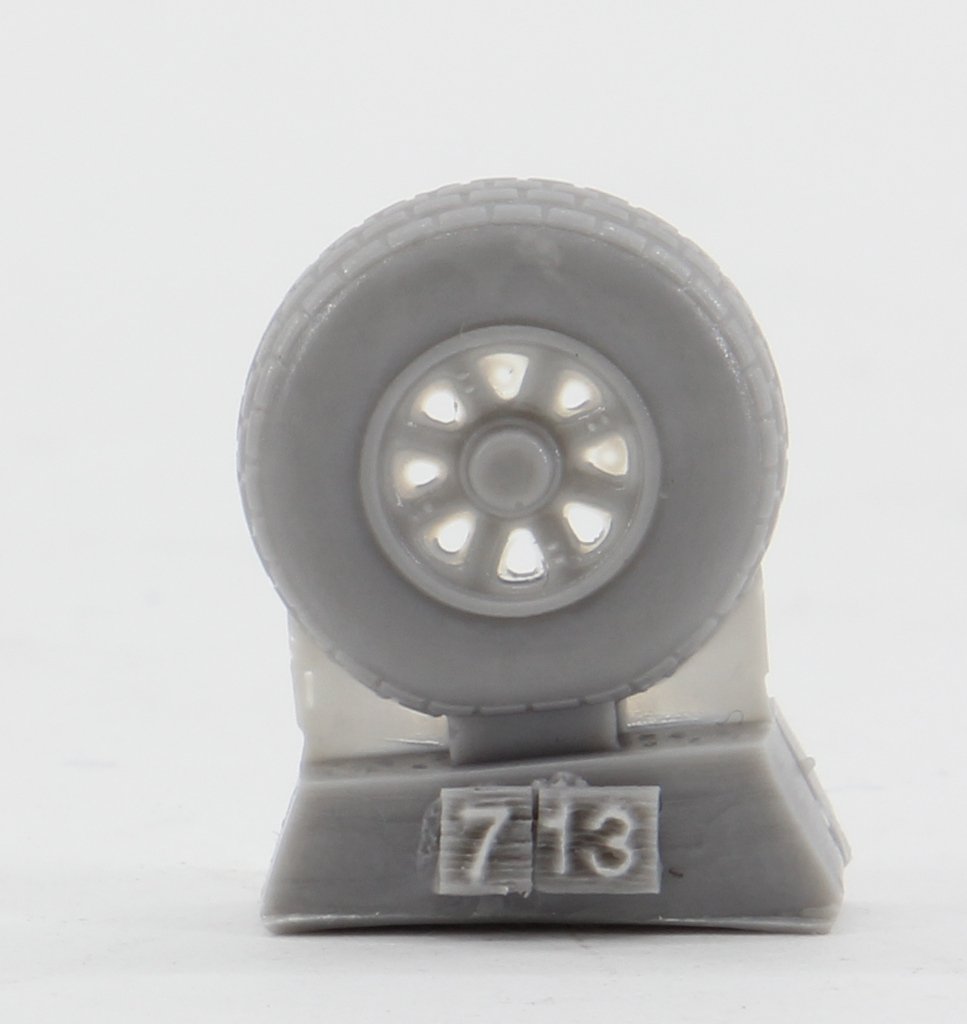
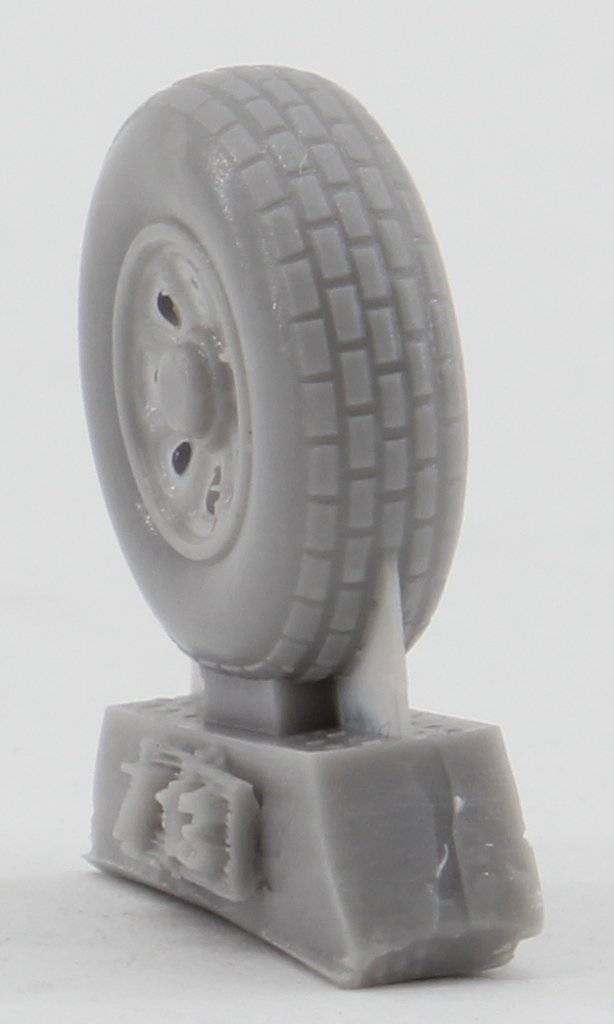
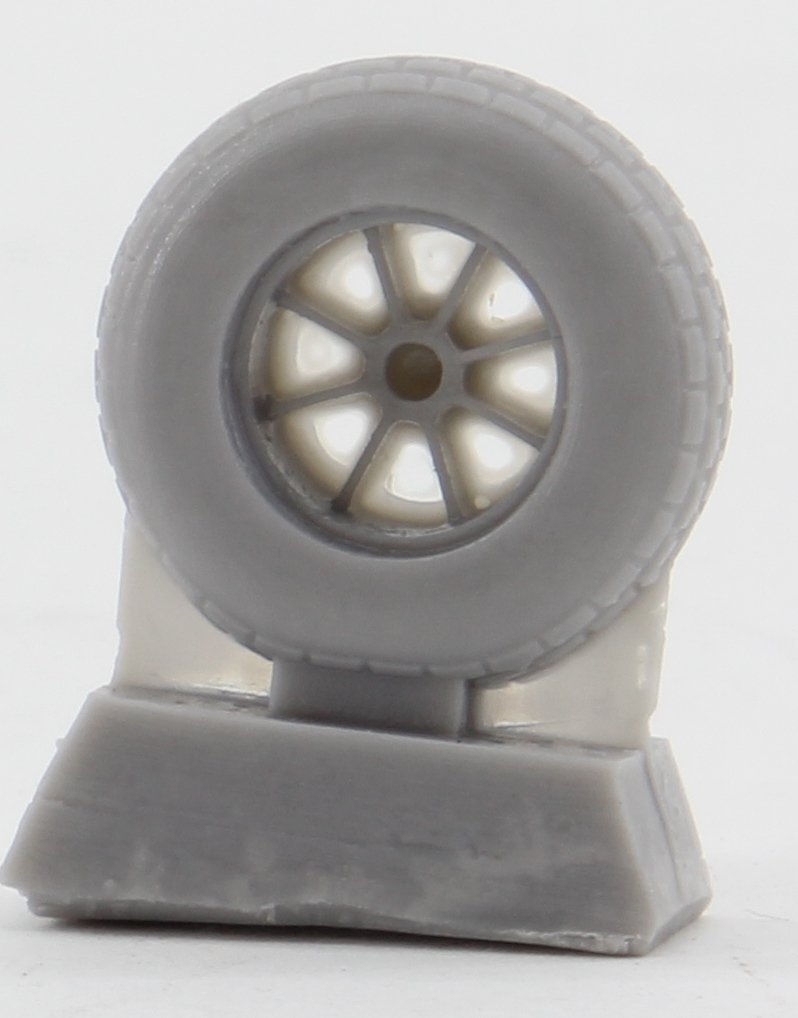
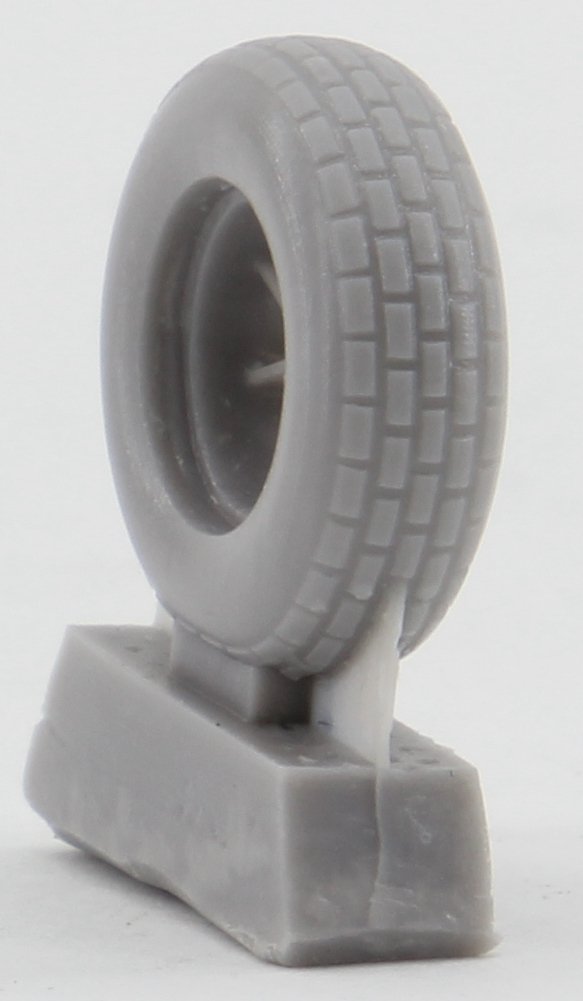
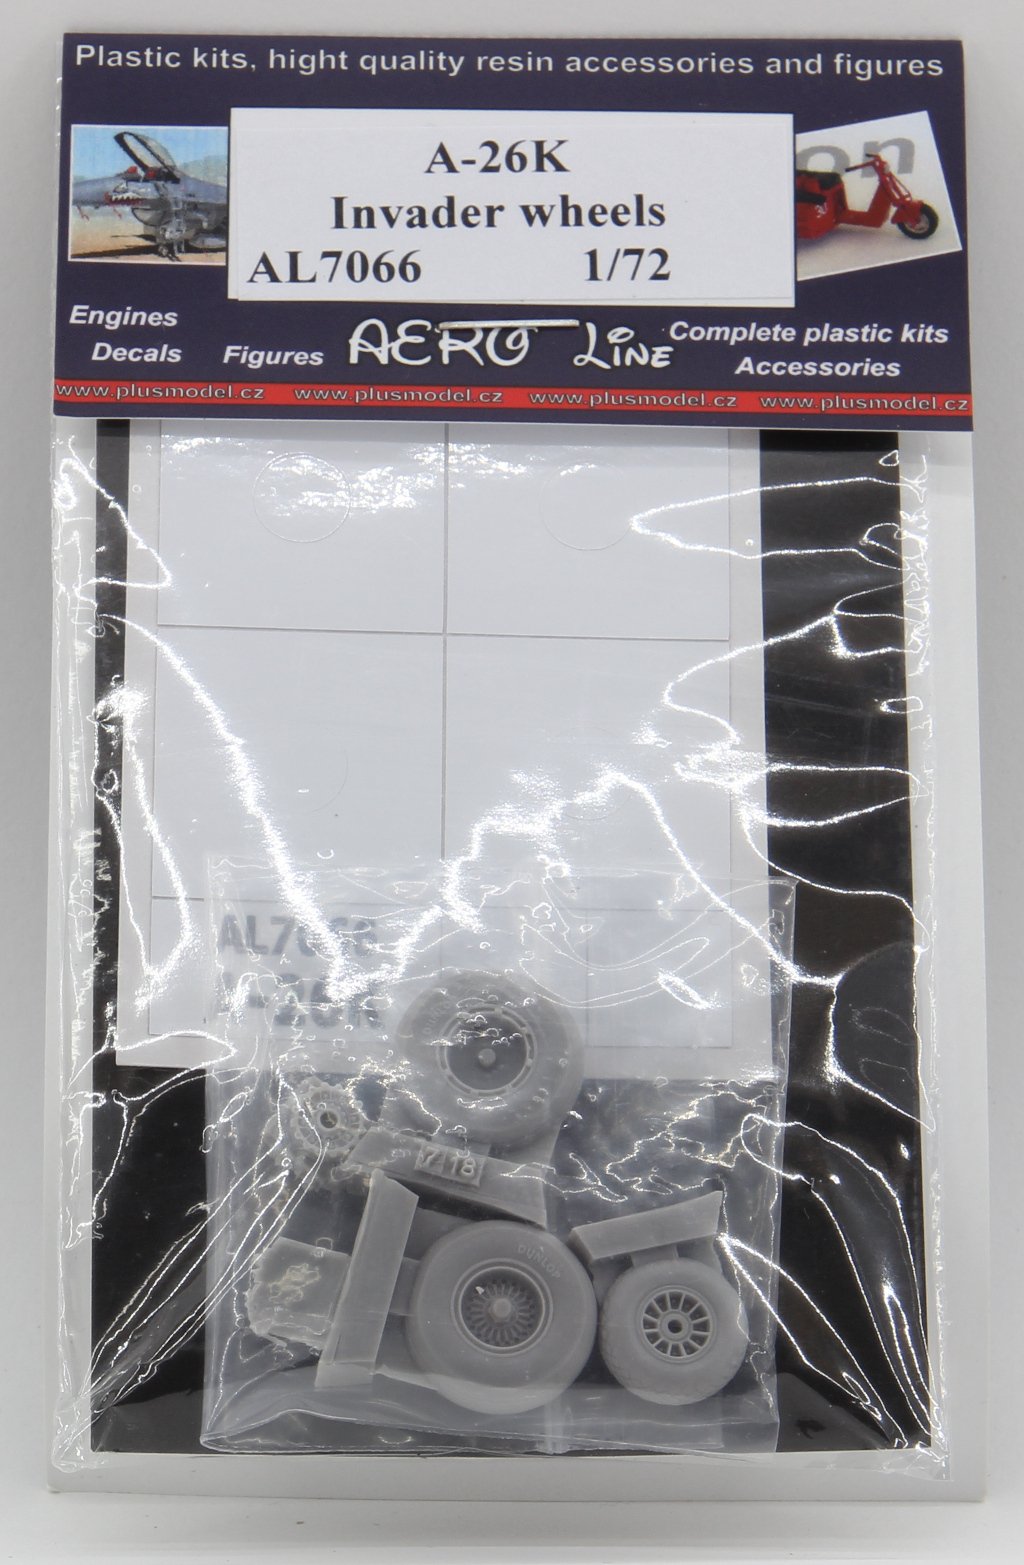
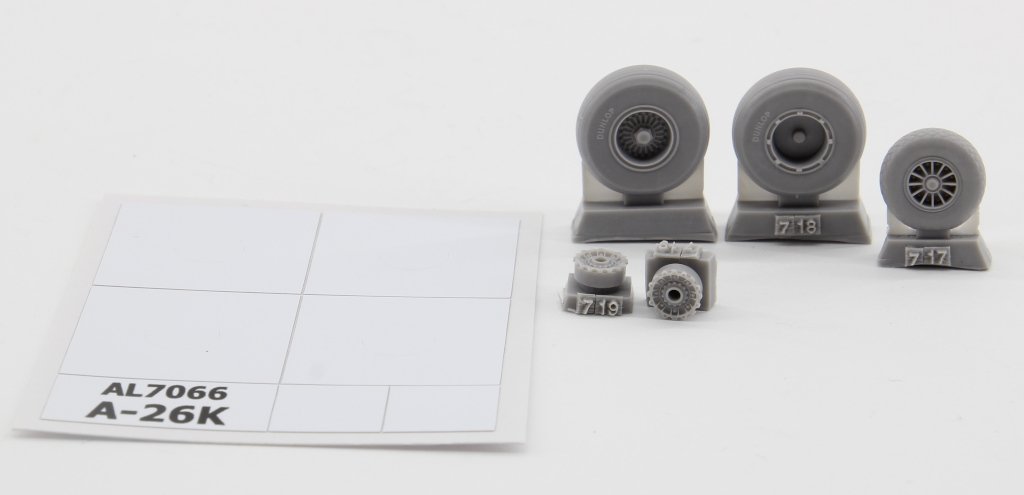
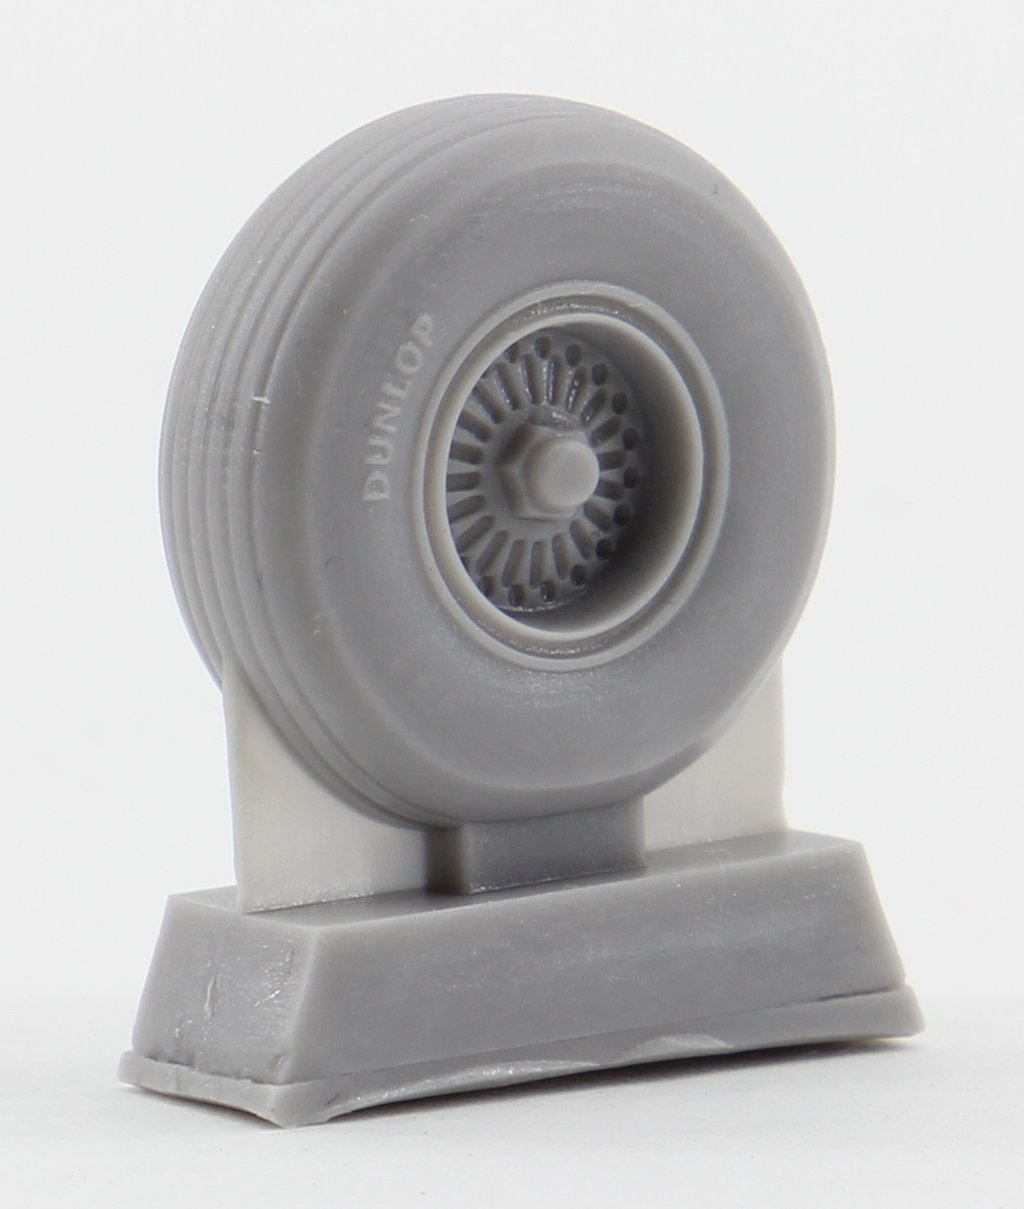
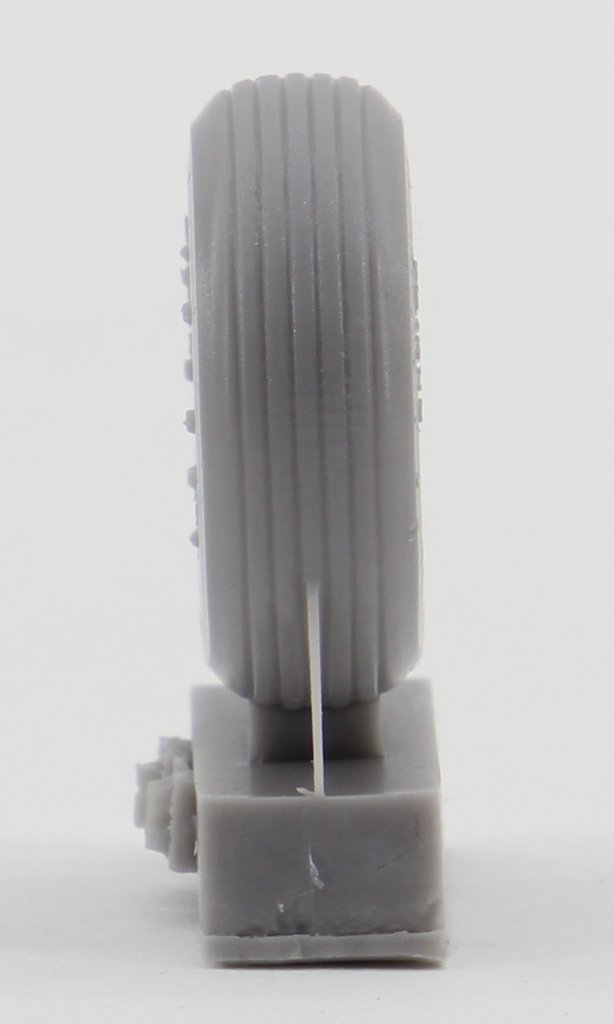
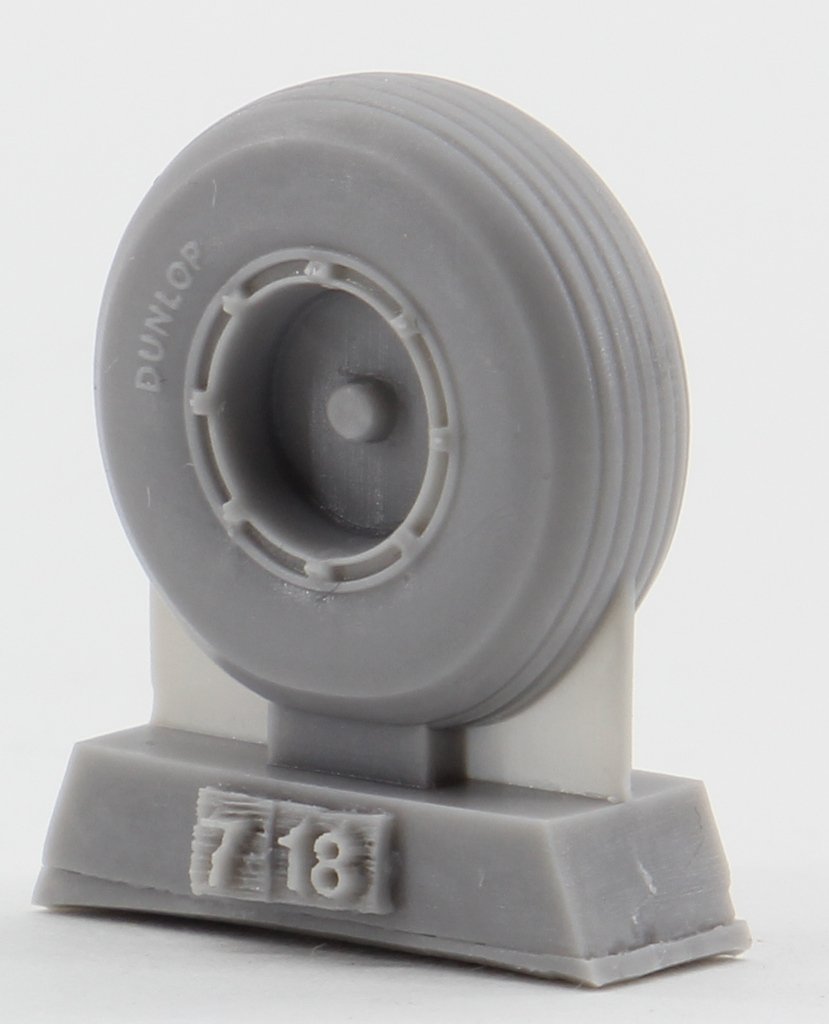
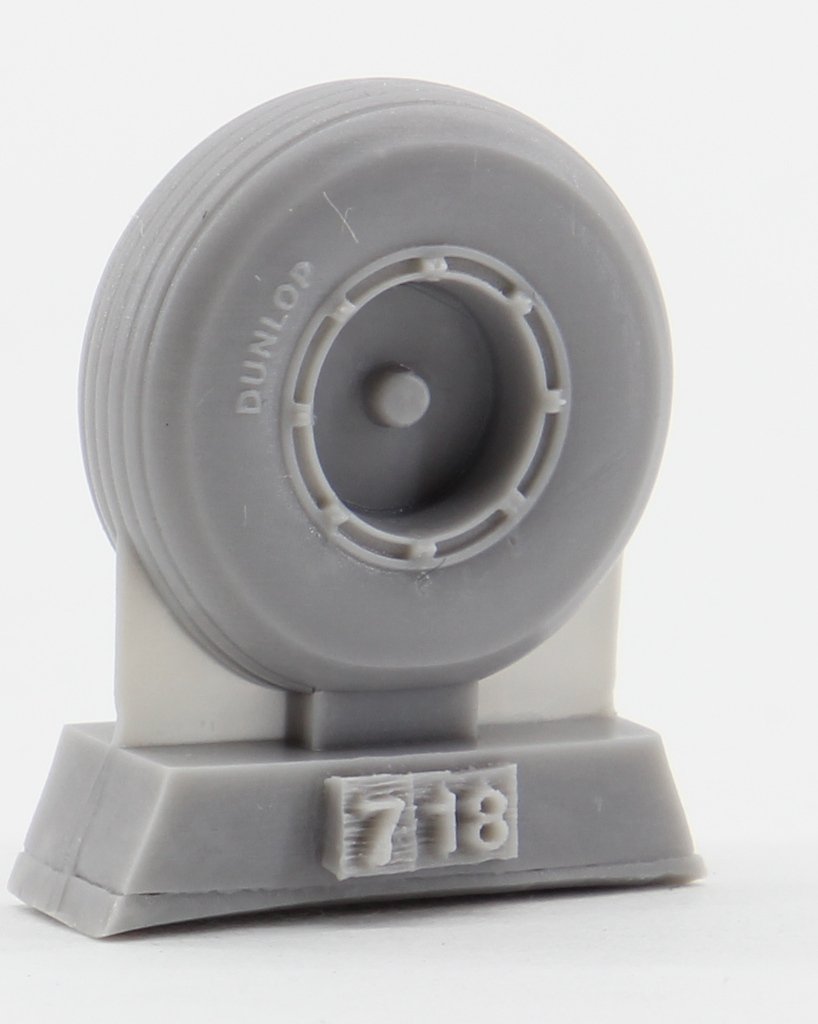
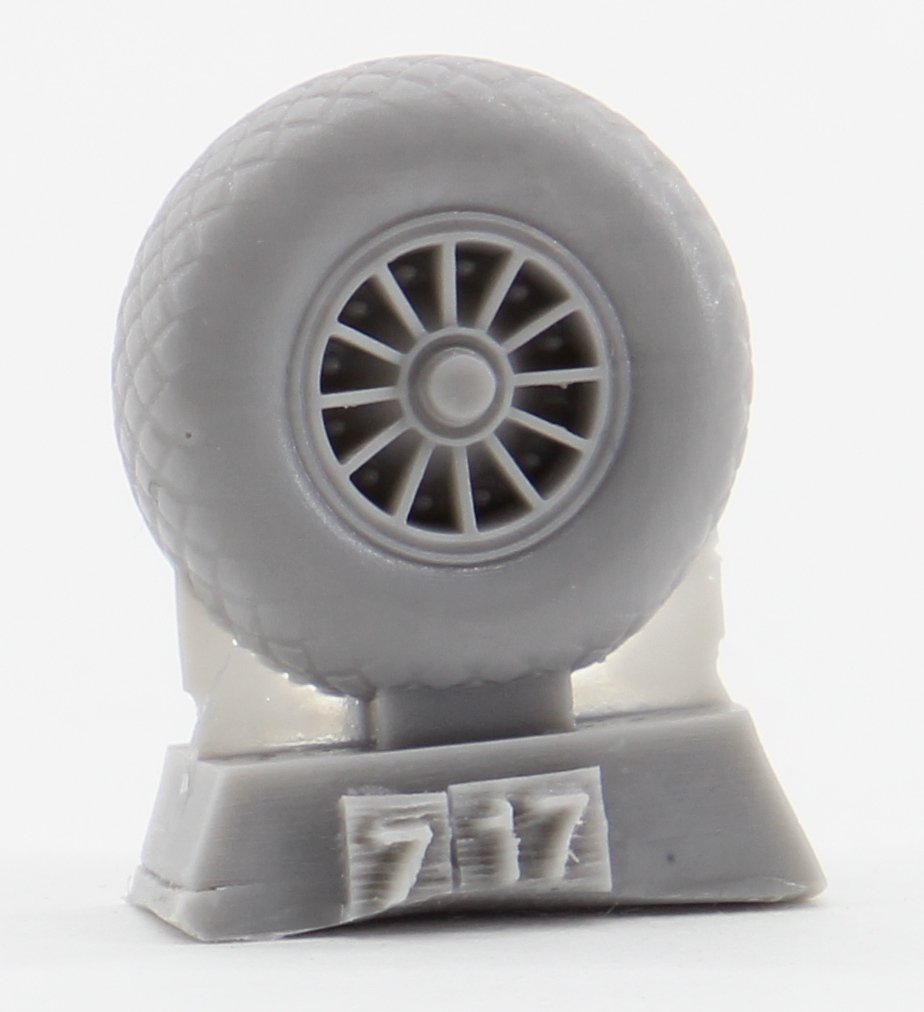
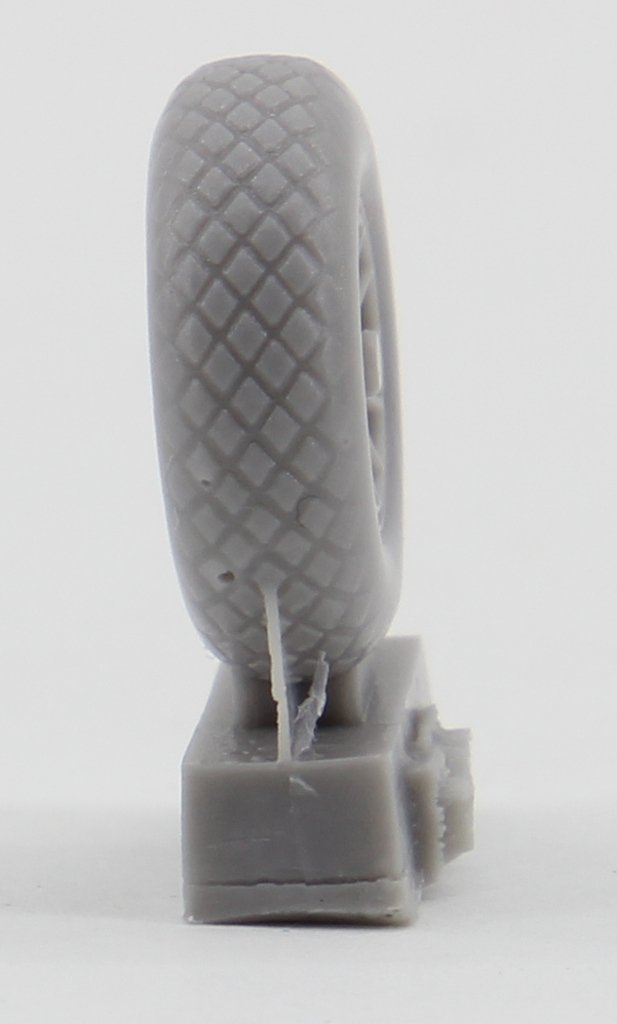
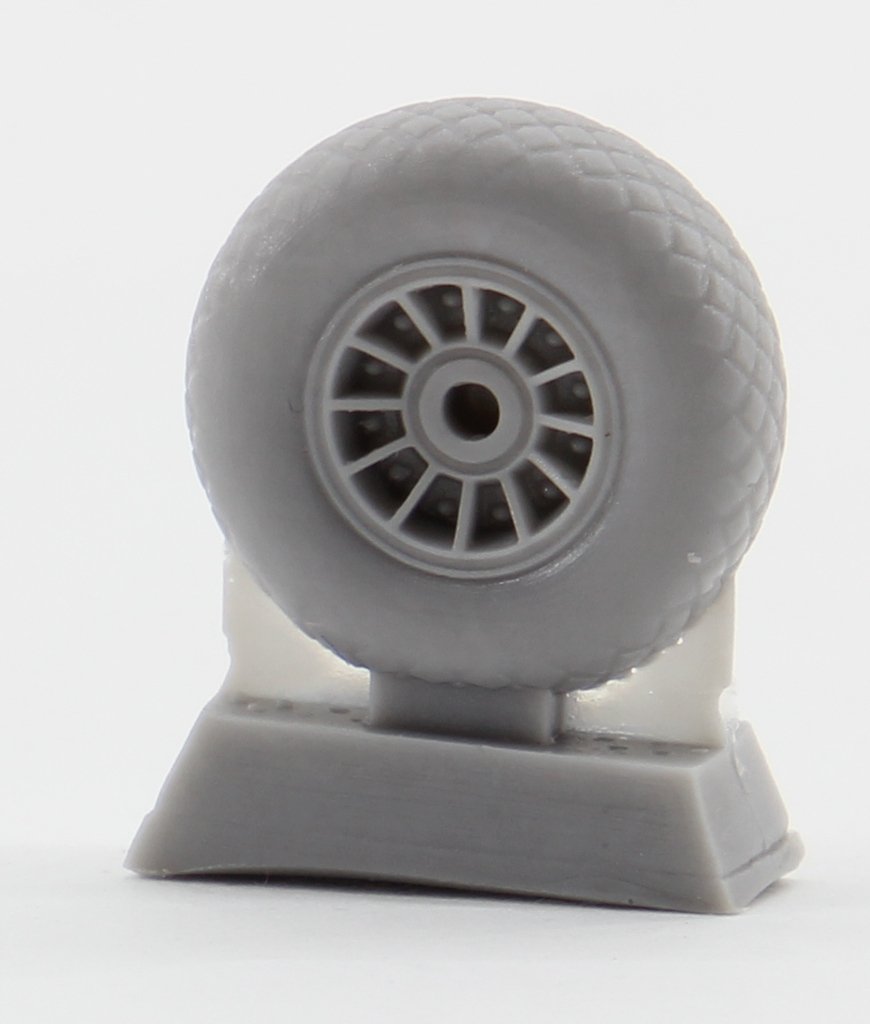
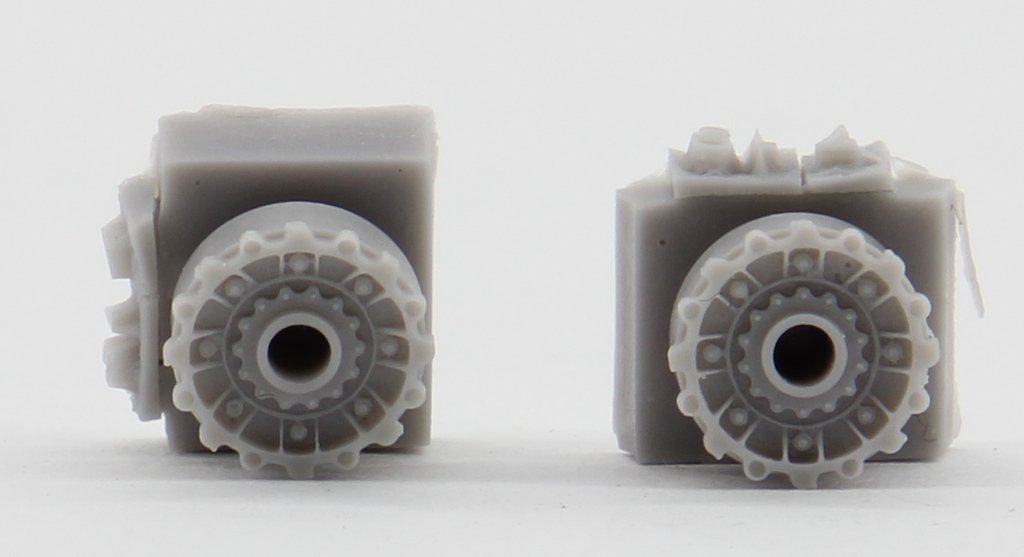
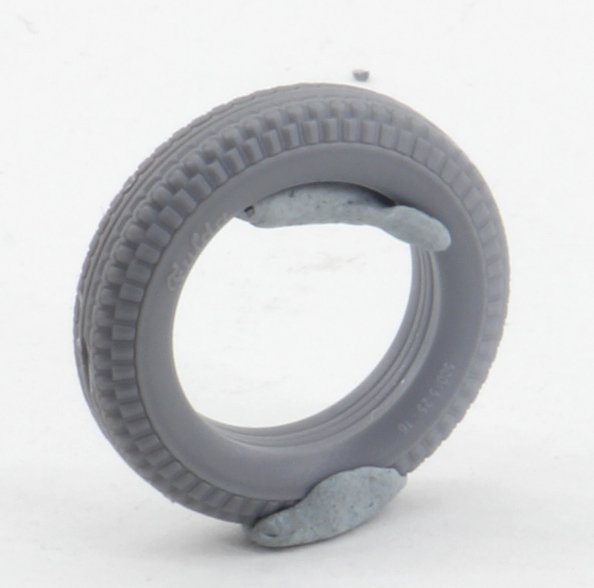
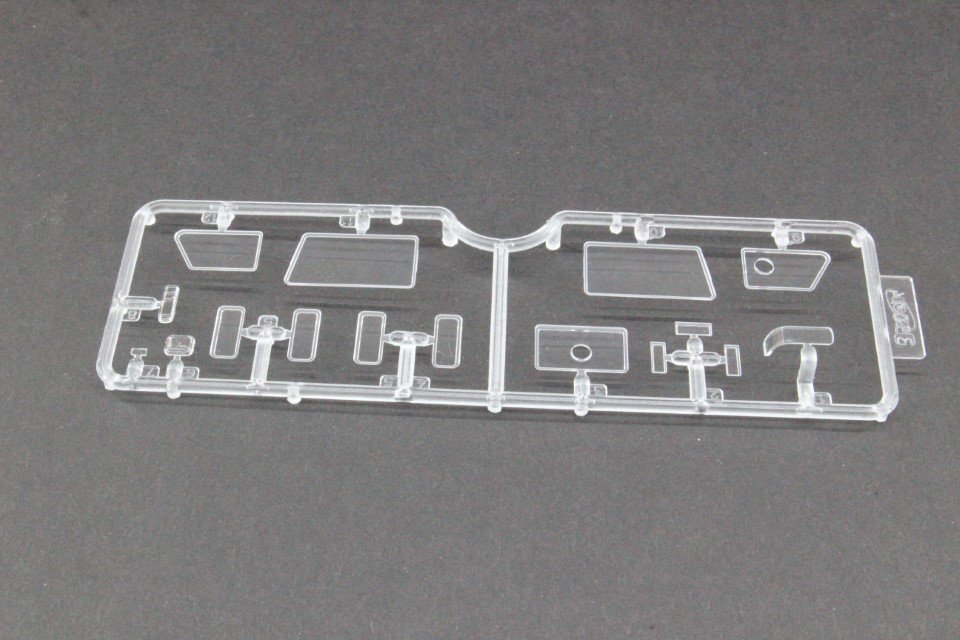
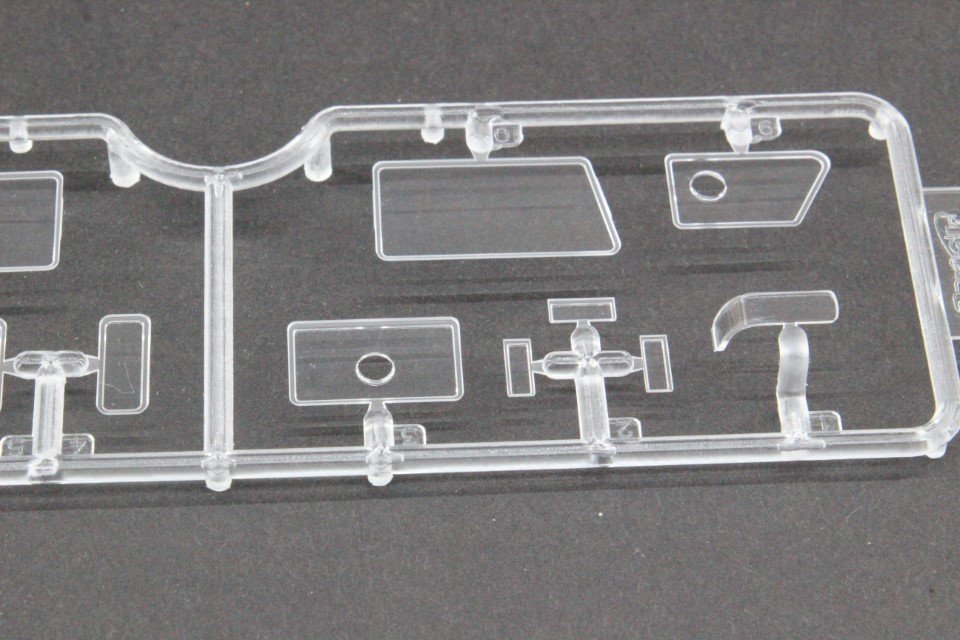
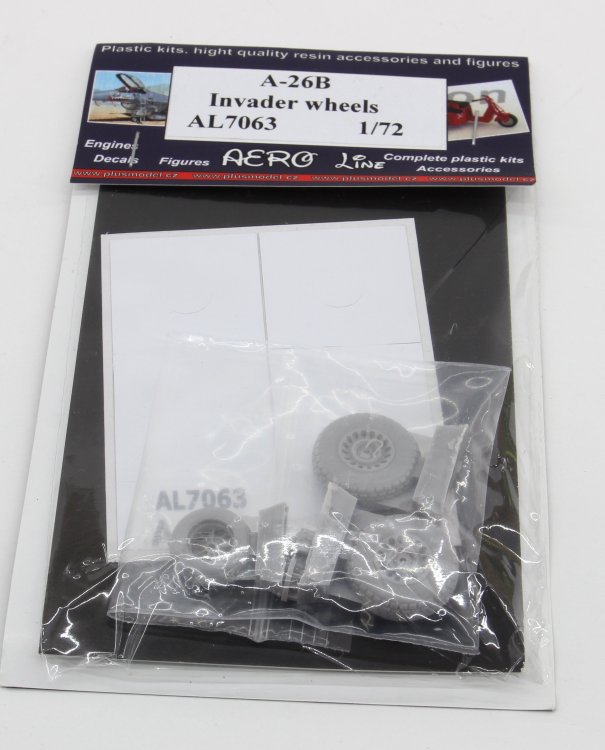
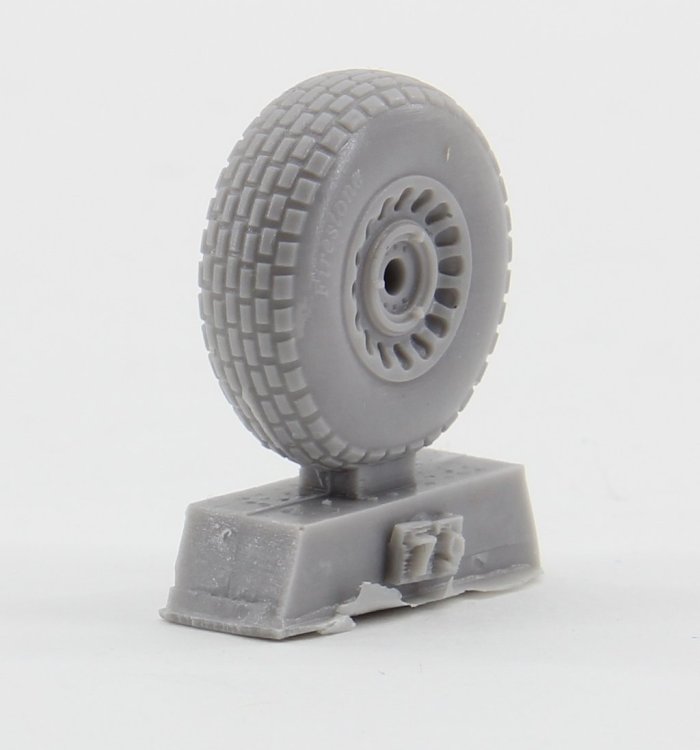
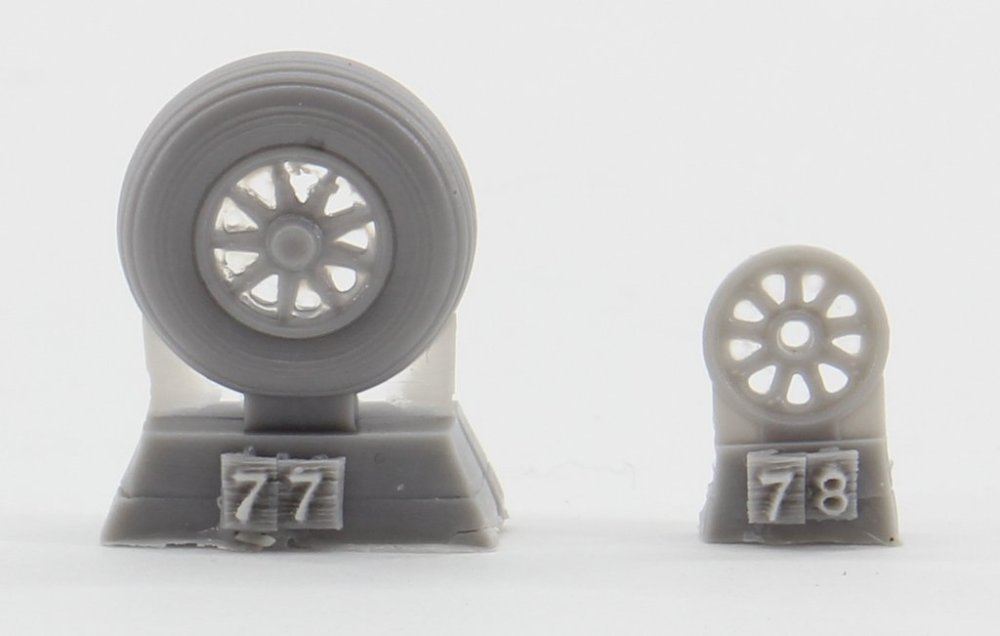
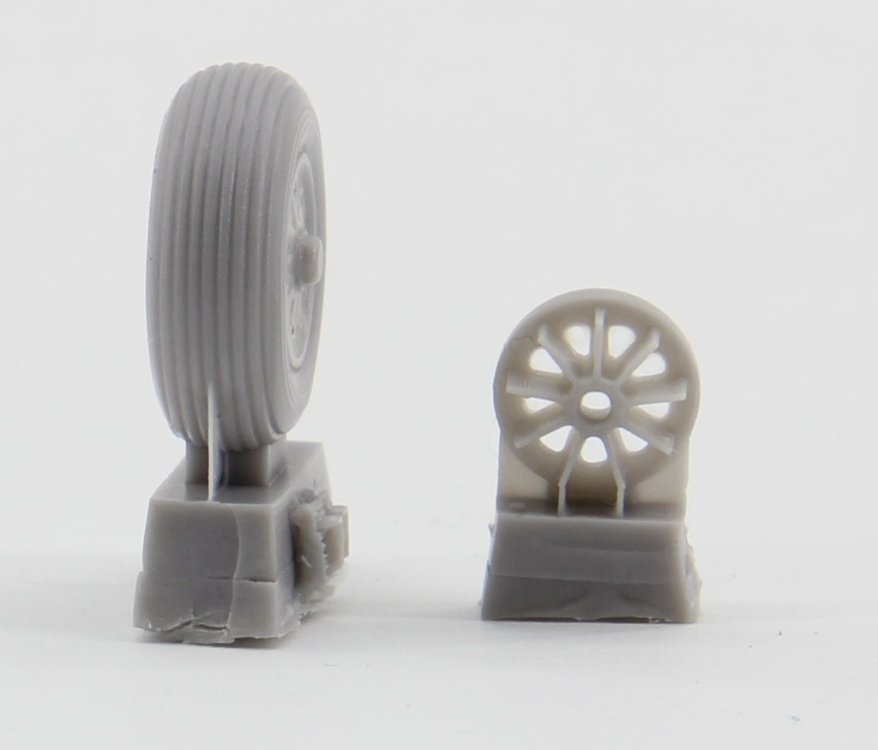
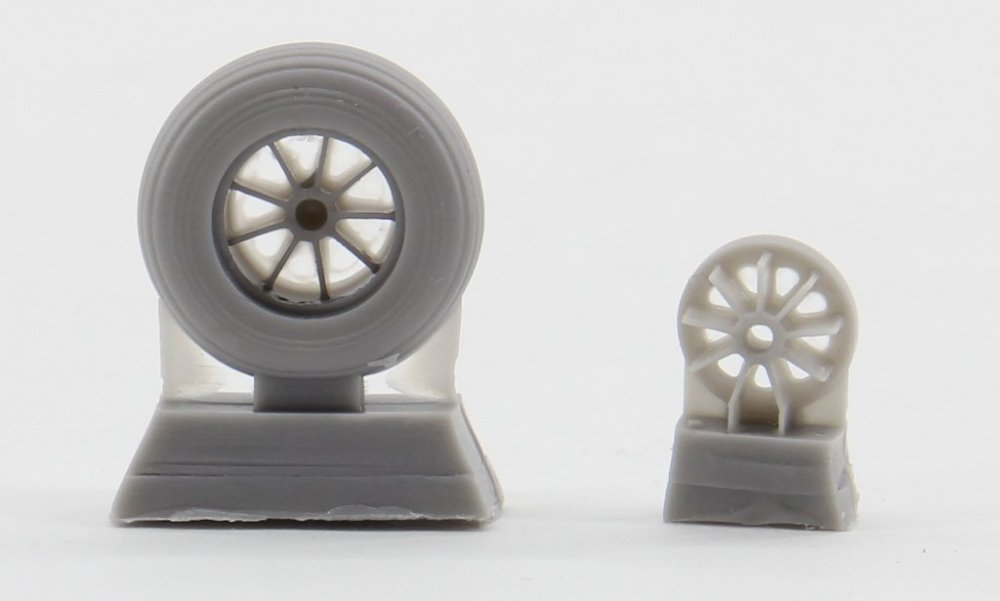
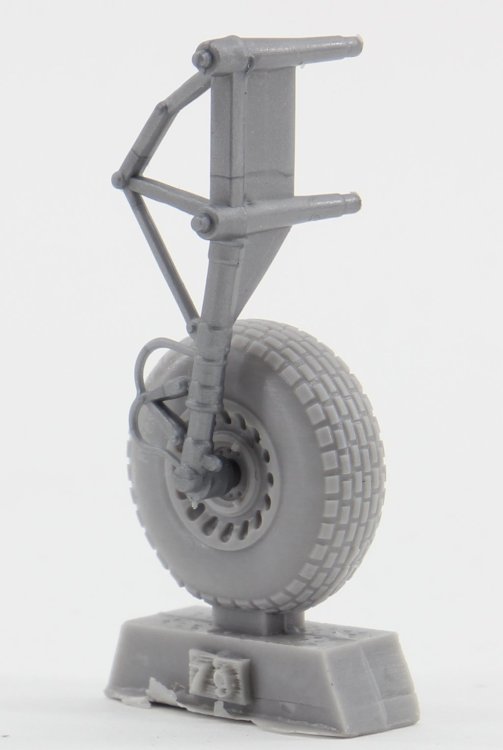
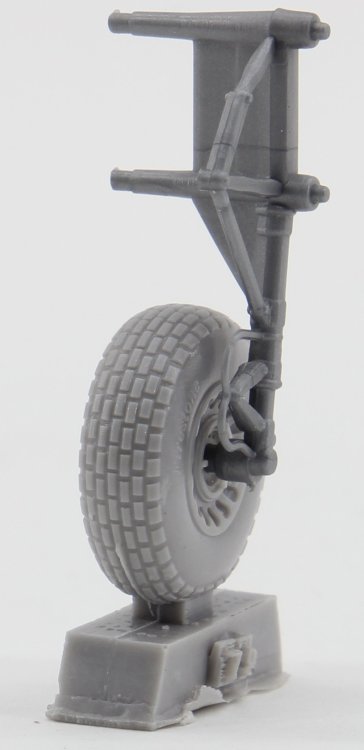
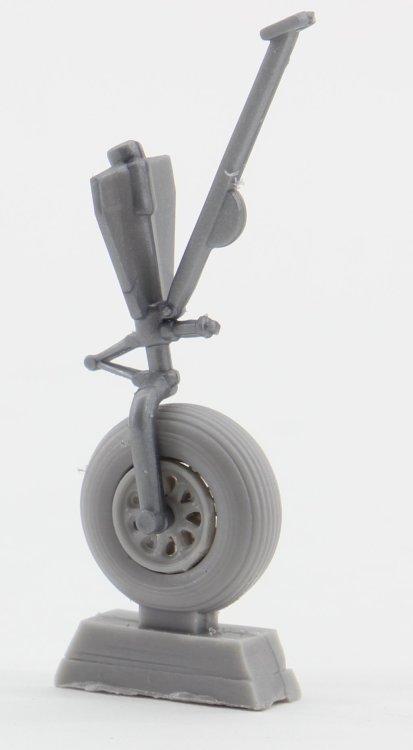
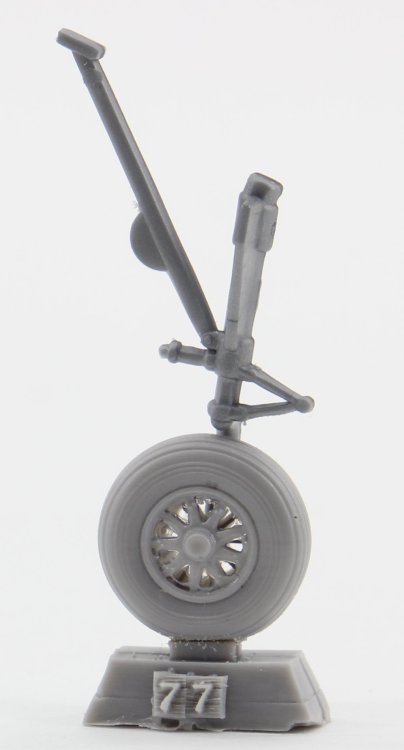
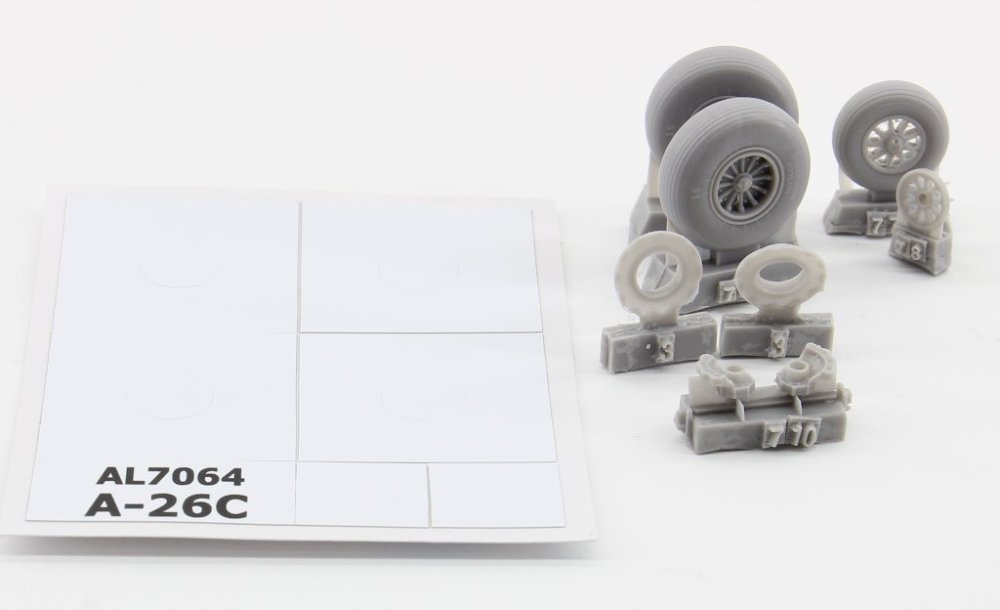
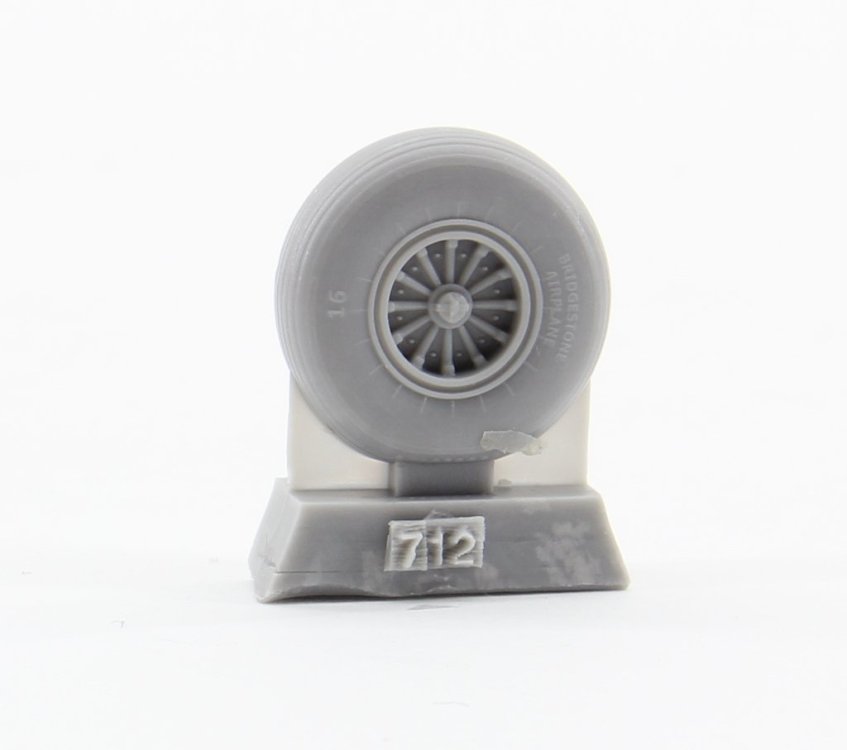
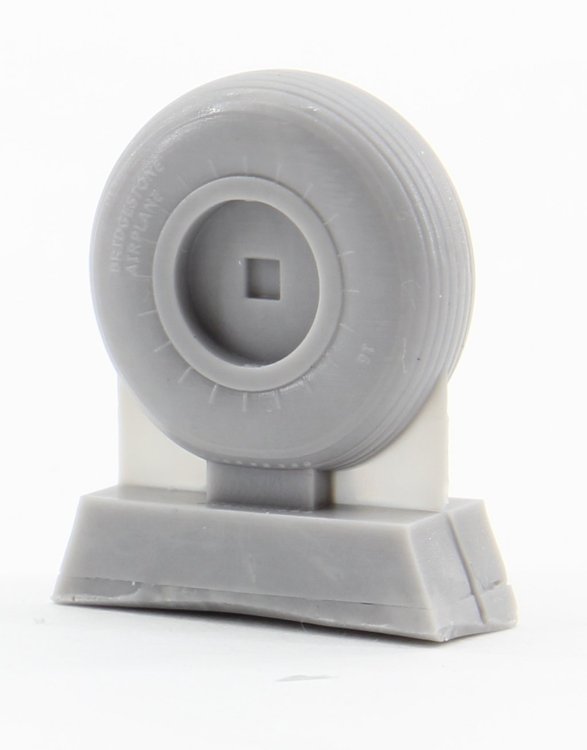
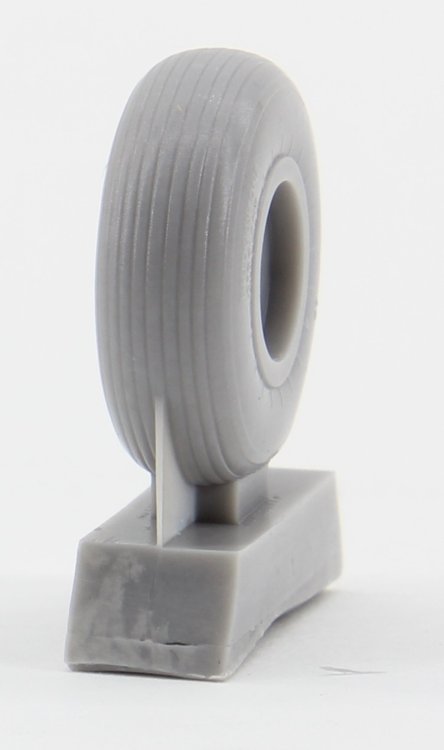
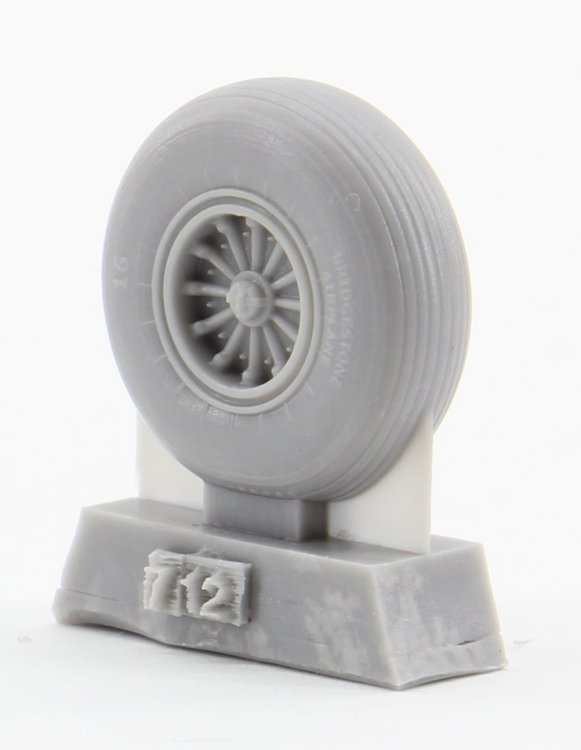
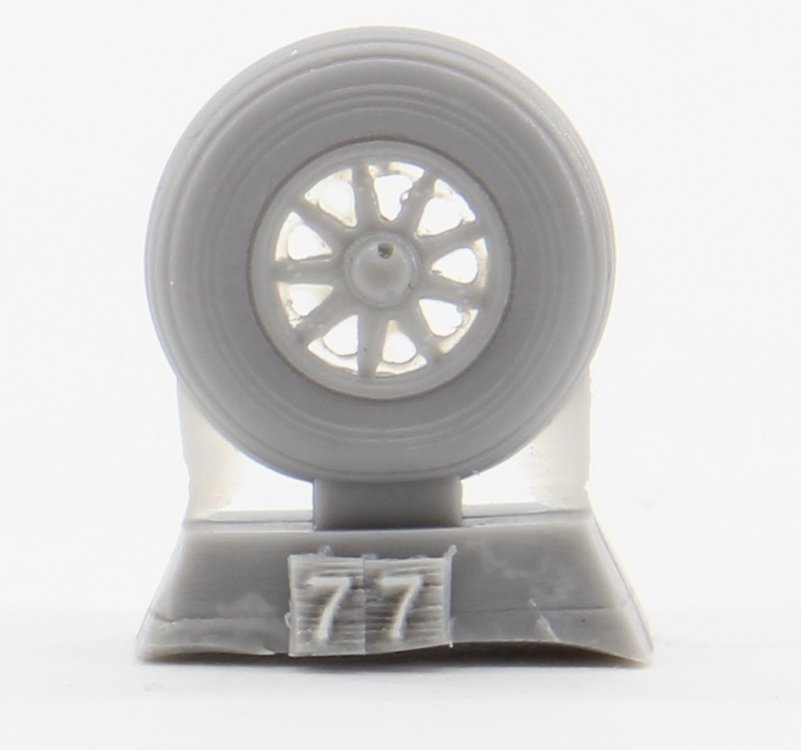
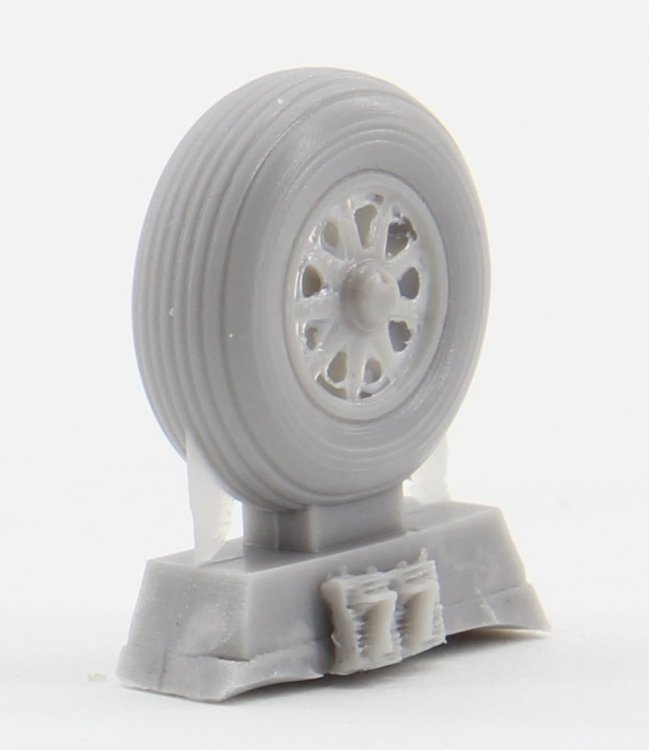
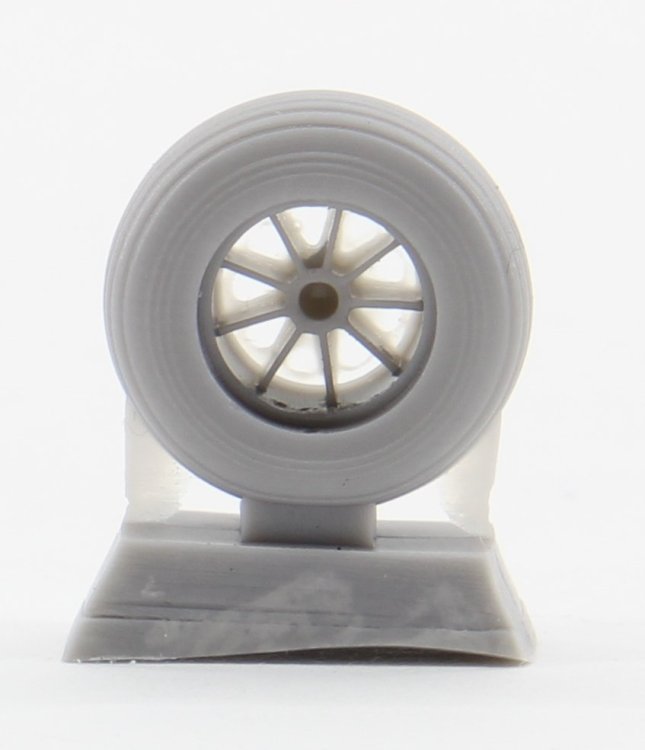
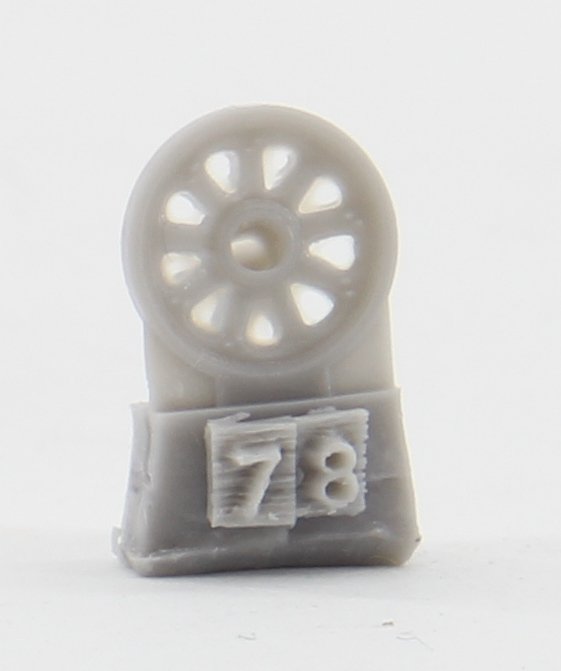
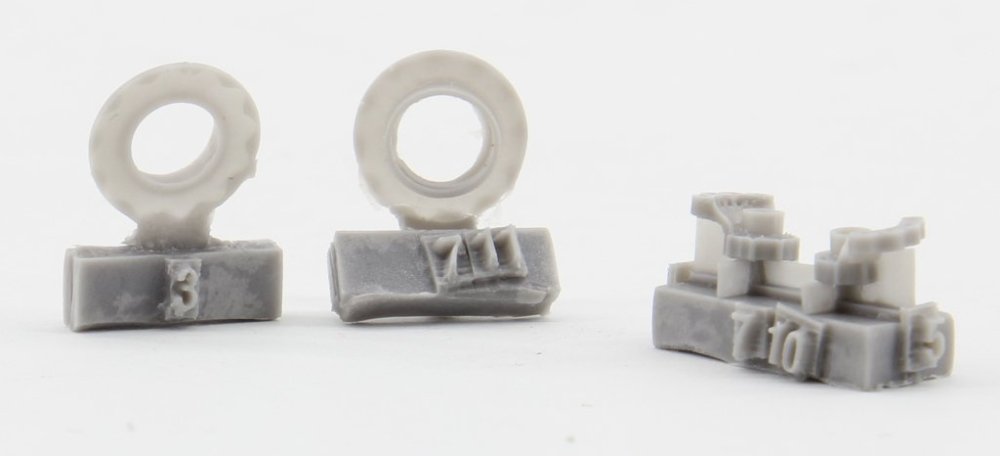
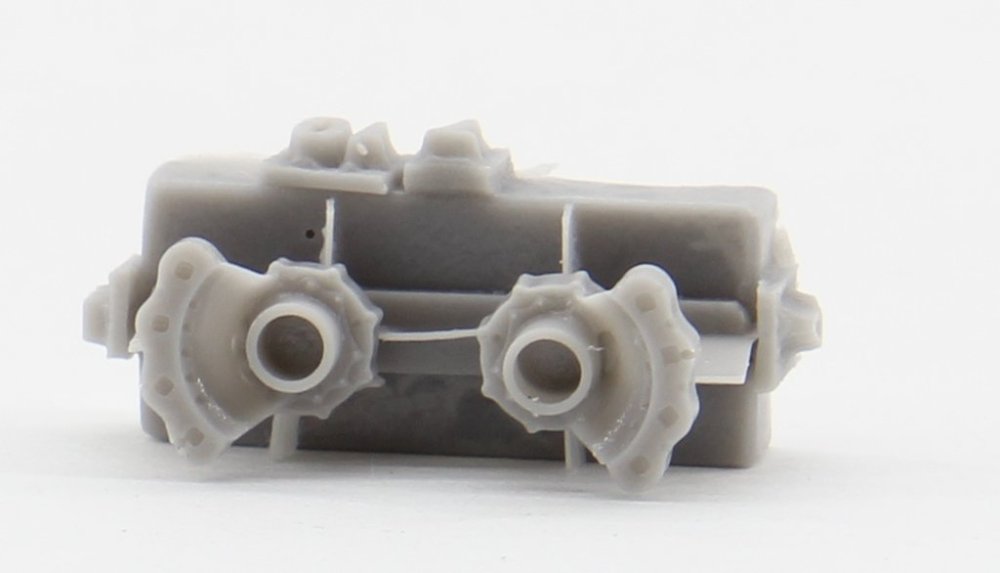
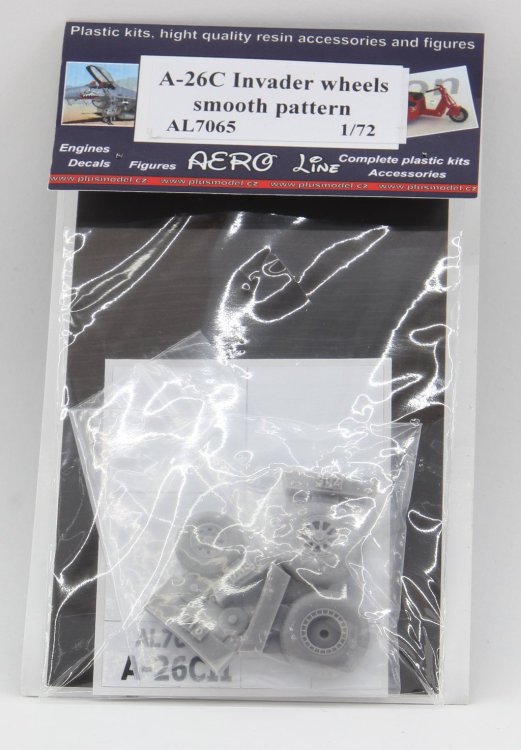
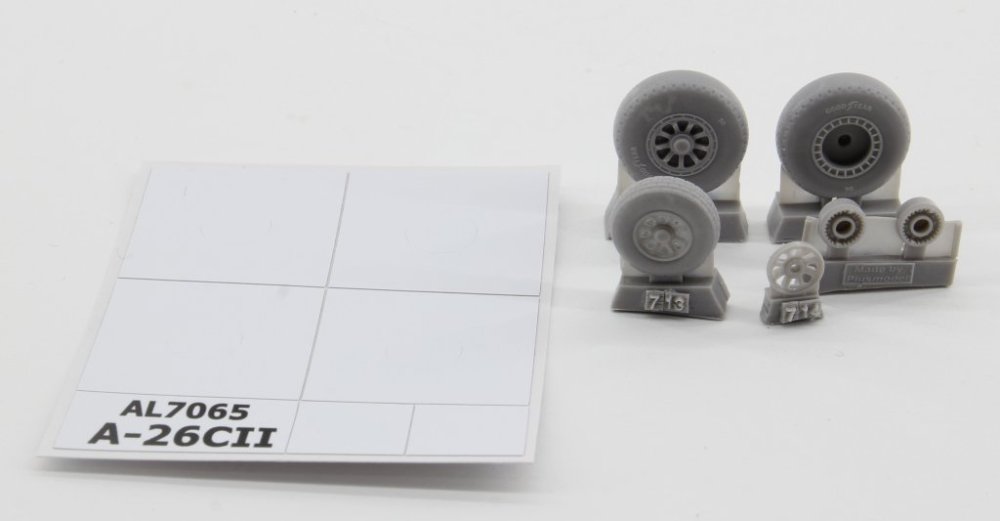
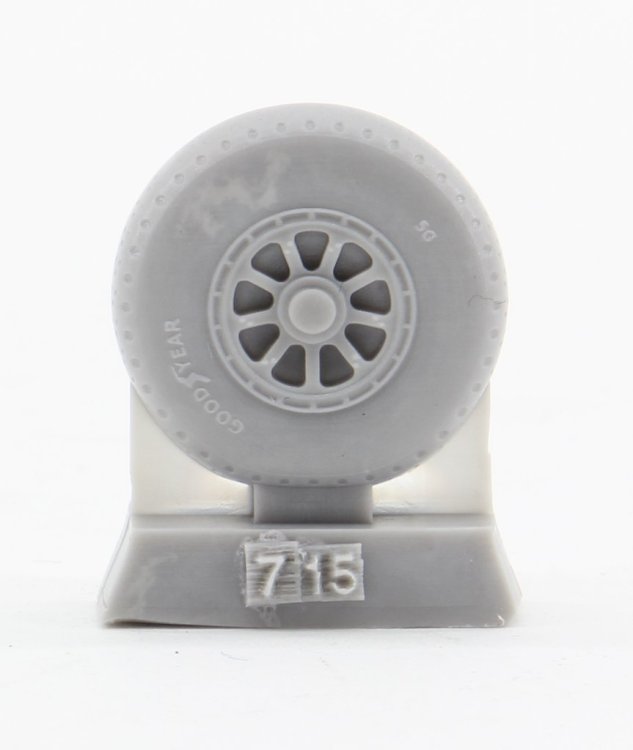
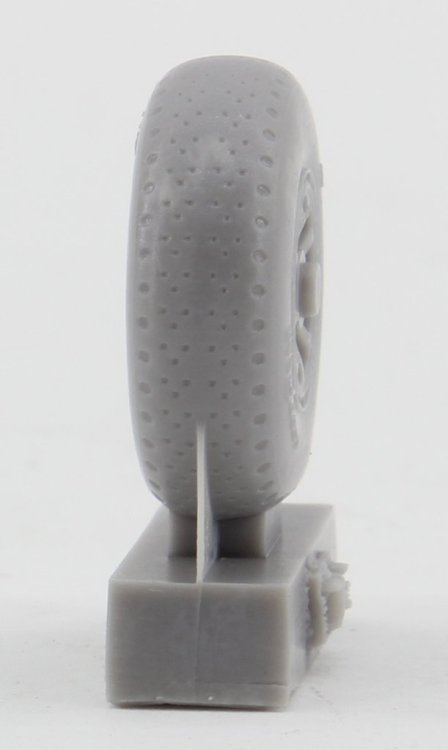
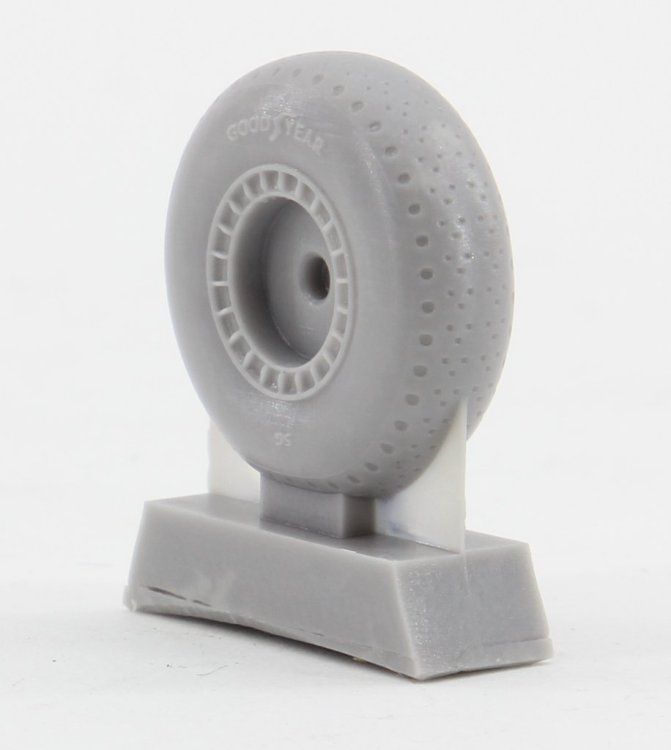
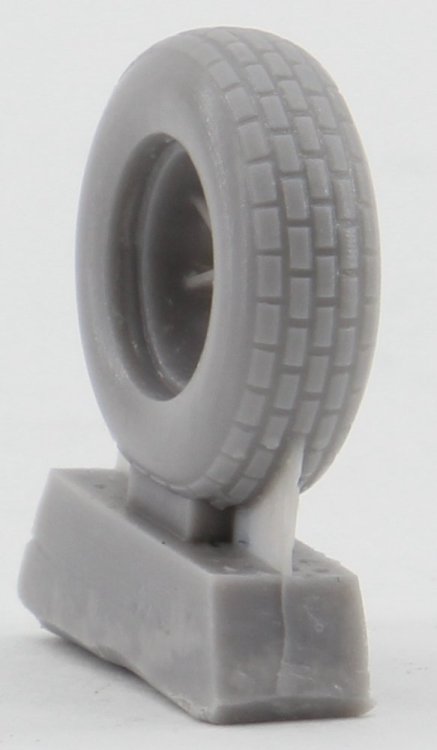
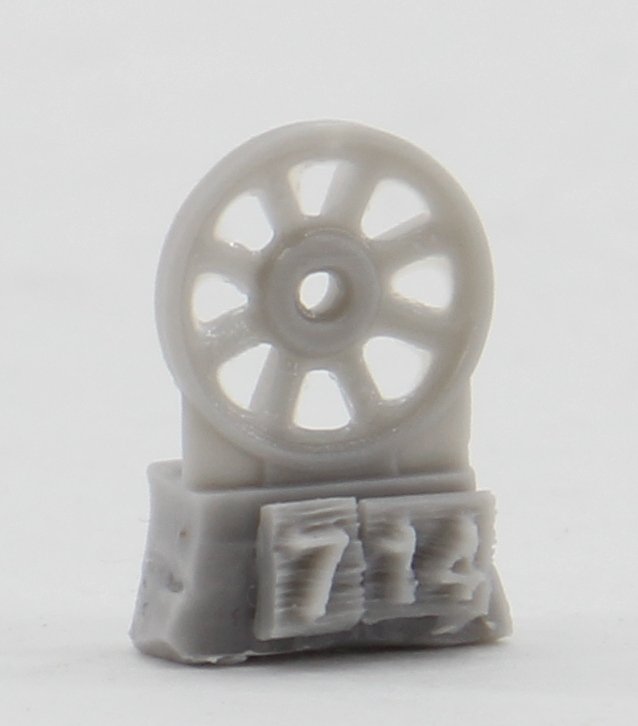
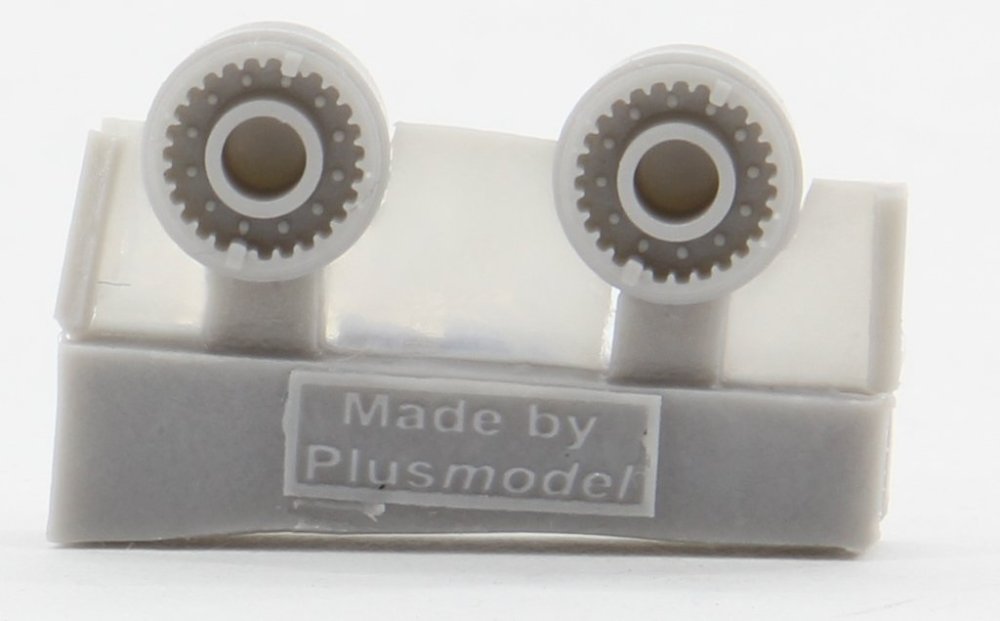
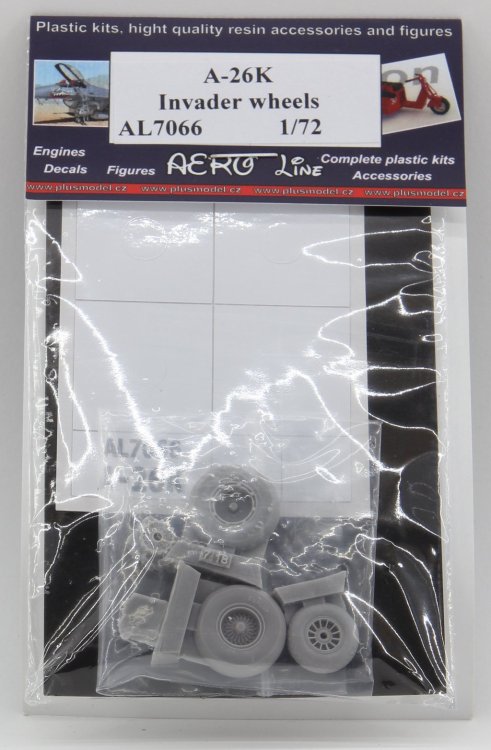
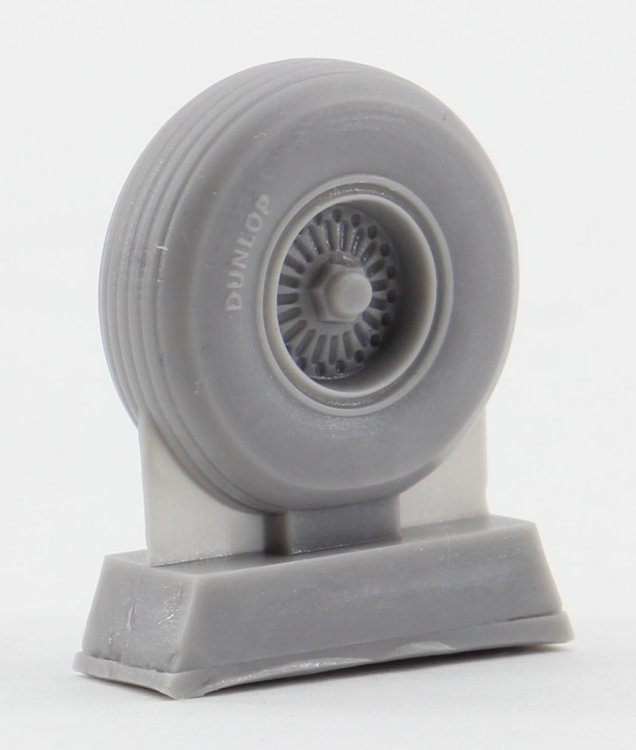
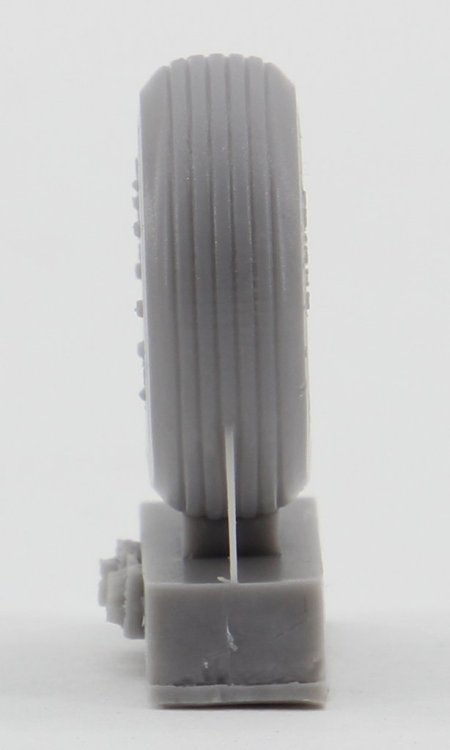
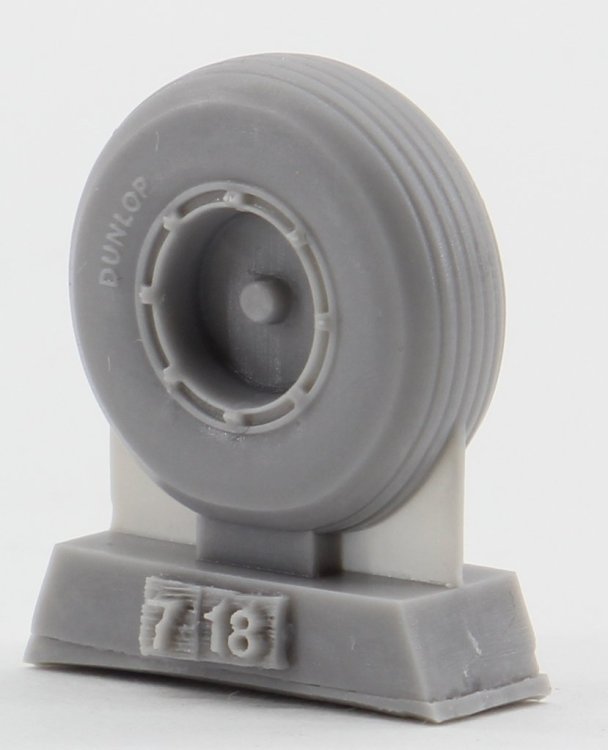
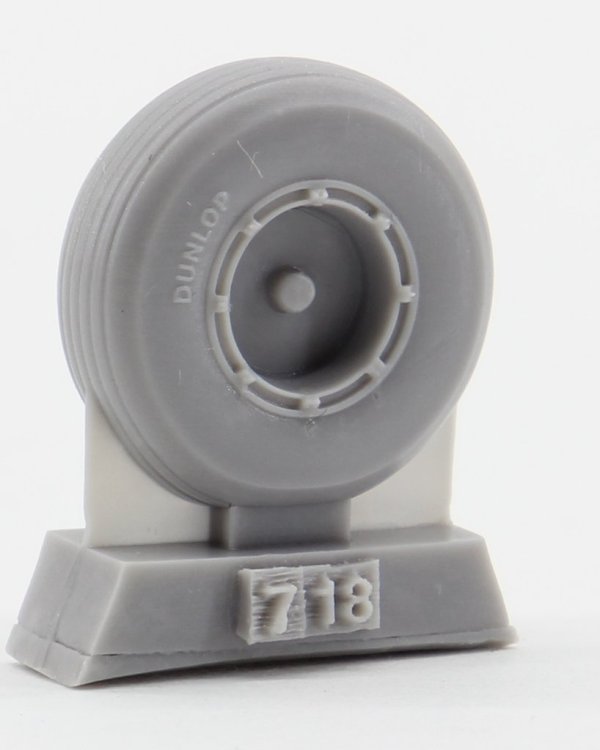
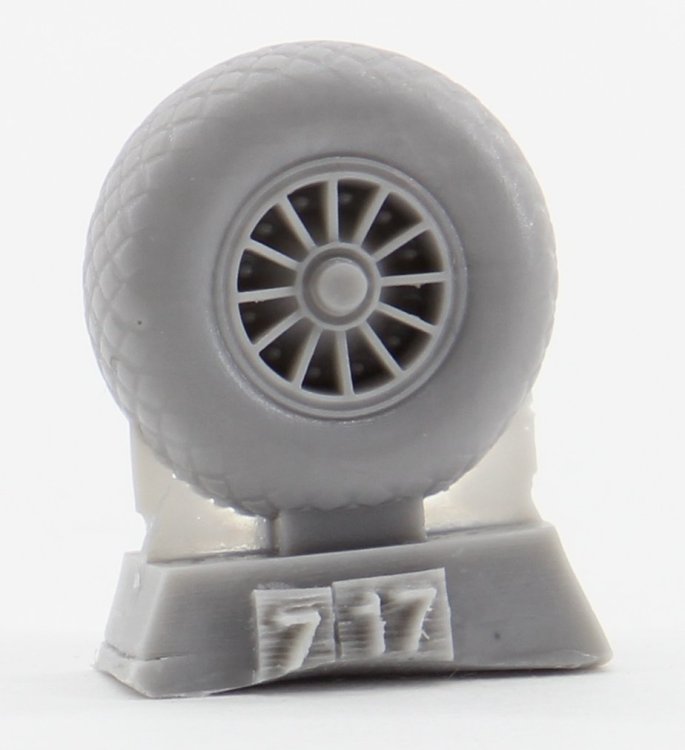
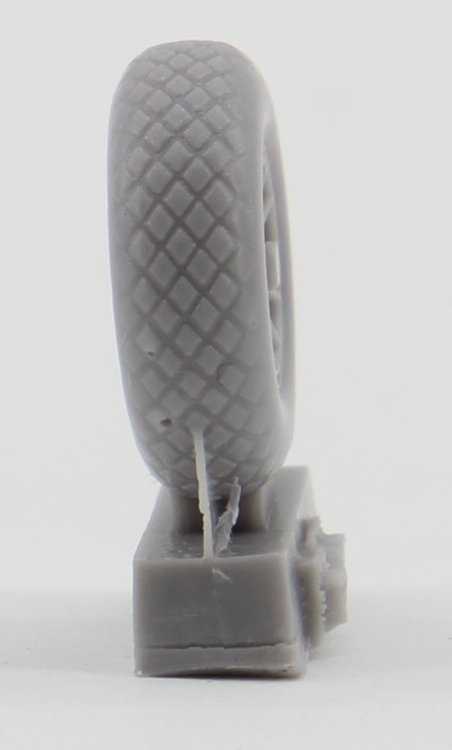
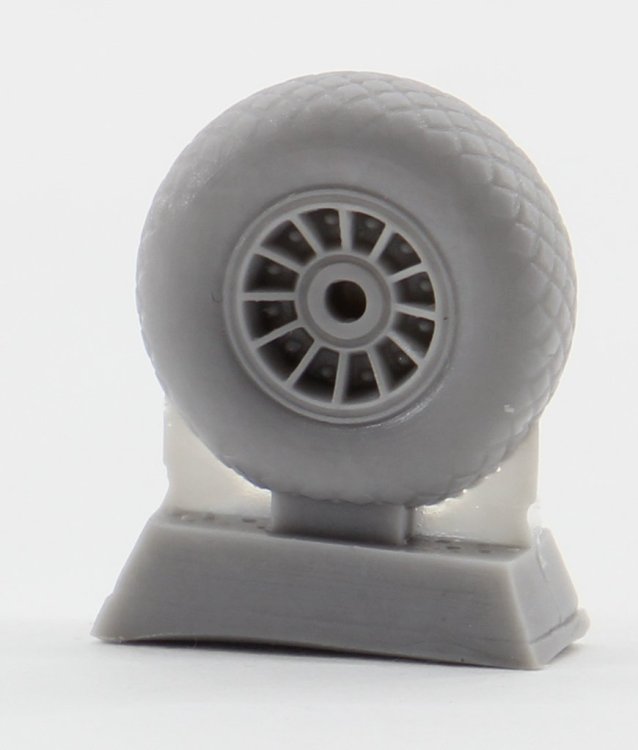
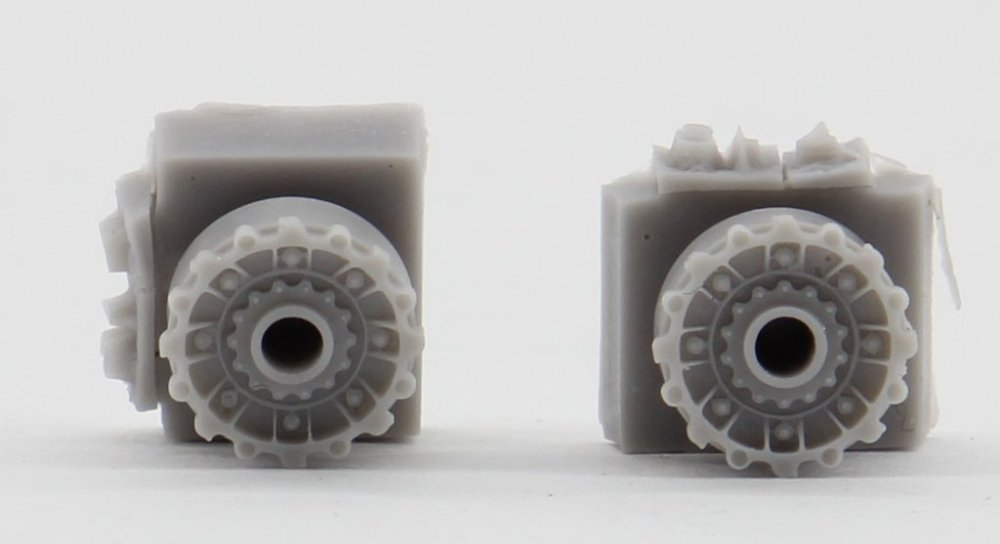
Plusmodel 1:72 Wheels for A-26 variants #AL7063 #AL7064 #AL7065 #AL7066 Introduction This review presents 4 sets of resin wheels and rims to enhance A-26 Models in 1:72 Scale ( Italeri / Revell or Airfix). AL7063 A-26B Invader wheels In the clear bag, the content is visible for inspection. No reference picture is provided, but with the internet available, it is possible to consult some reference for painting. According to my references, the wheels hubs should be painted metallic colour. 4 resin items are supplied (2 complete main wheels, 1 front wheels with separate rim) The main wheels present an exquisite detail that will show up upon painting. The tire pattern will benefit from a proper weathering. The front wheel also boosts a nice and in scale detail. Some care will be needed to clean up the rim and remove the wheel from the moulding block. AL7064 A-26B Invader wheels grooved pattern This set is the most complex of them all, as the main wheels are accompanied by extra details on the form of the brake drums and callipers. The main wheels present us a nice and soft detail on the rim and on the tire the manufacturer logo is presented. This will show with a proper paint job. The back of the tire also presents the same detail but now, it has the location holes to glue the brake disk and callipers. No instructions are provided so keep your references close. The front wheel also has a nice detail, some cleaning to the rim is necessary but nothing complicated. AL7065 A-26C Invader wheels smooth pattern This set contains 6 resin parts, two rear wheels with the inner component of the rim separately and a front wheel with a separate half of the rim. The main wheels are composed by the tyre and front rim and the rear rim as a separate part. Also, important to mention the detail of the producer's logo and the very particular pattern of the tire tread. The front tire and rim offer the same characteristics already indicated. Some care is needed to clean up the rim. AL7066 A-26K Invader wheels This set is applied to the final versions of the A-26, namely the improved and upgraded version, used in the Vietnam conflict. This set is composed by 5 resin parts and paint masks. The rear wheels are composed by the tyre and front rim and the rear rim as a separate part. The front wheel is one resin piece. Common to all sets The removal of the casting blocks can be done with no effort, using a small saw, as the attachment to the casting mould is minimal and it’s located on the area of the tire in touch with the ground. The tires are mould with weight effect. Painting masks All sets include a small vinyl pre-cut paint mask. Should you prefer to paint the wheel first and then the tyre, you have two sets available. Also, if you prefer to paint the tyre first and then the centre rim, also two sets are at your disposition. Test Fit In order to check the parts fit, I grab my 1:72 A-26 Invader from Revell ( Italeri) and give a test. The result is showed in the pictures above, perfect fit. Conclusion This set is a improve on the kit’s parts, as they will be a very acessible and it will improve the basic model. All wheels are an easy replace to the original ones. This is a must set to enhance the look of the original model and as so, recommended. Our thanks to Plusmodel for the review samples and all the support given. To purchase this directly, click on the following links: #AL7063 #AL7064 #AL7065 #AL7066


-
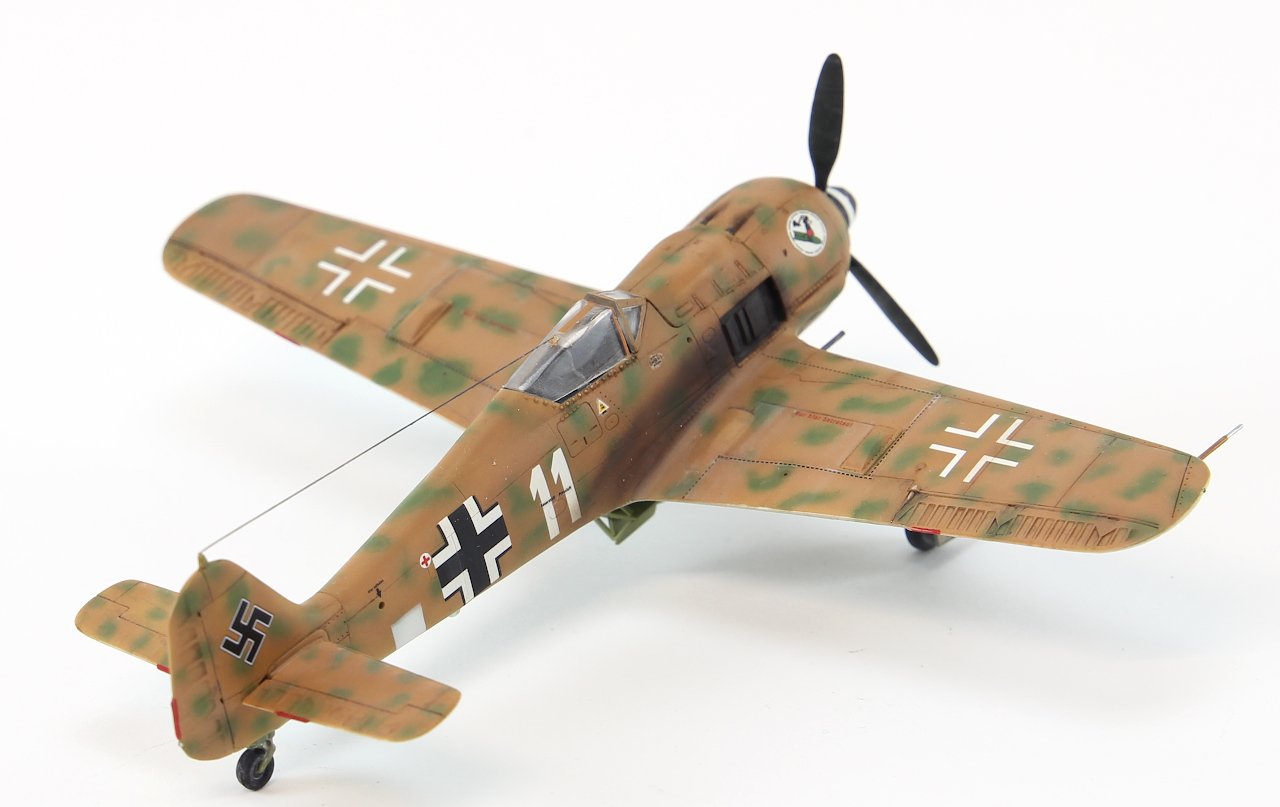
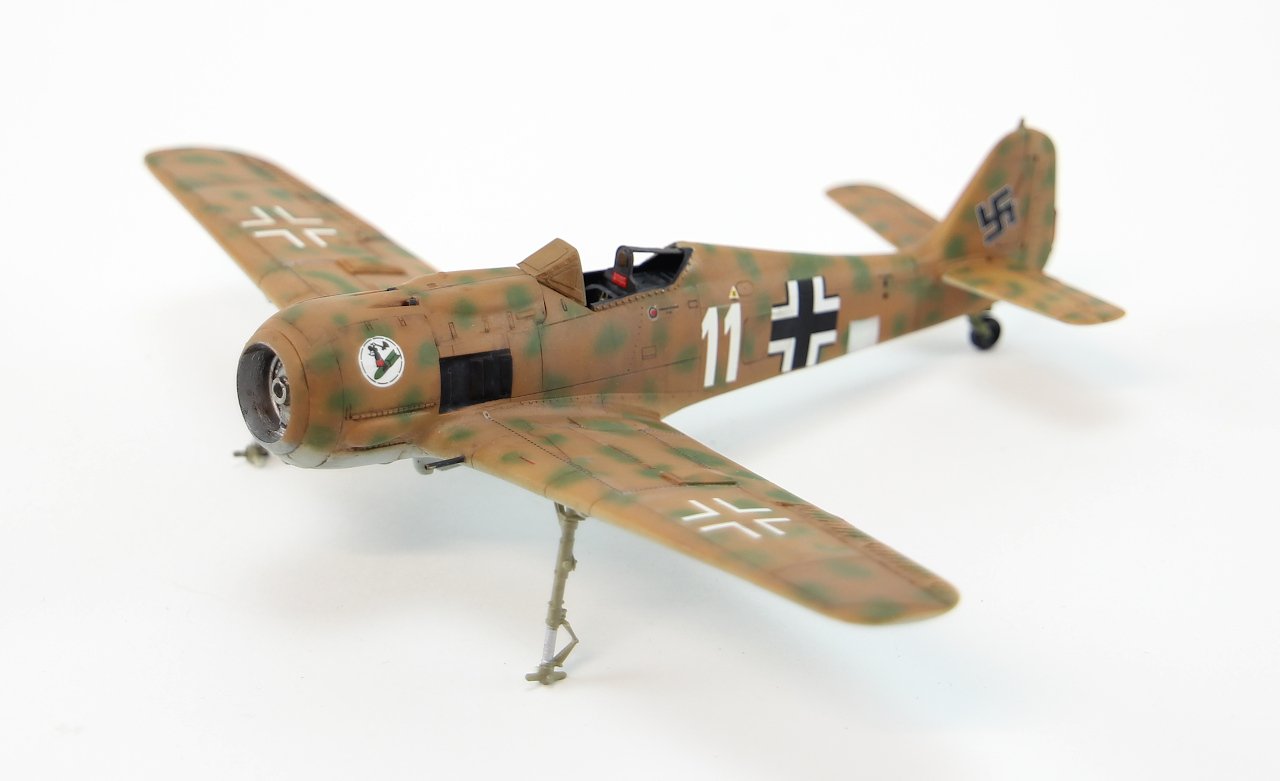
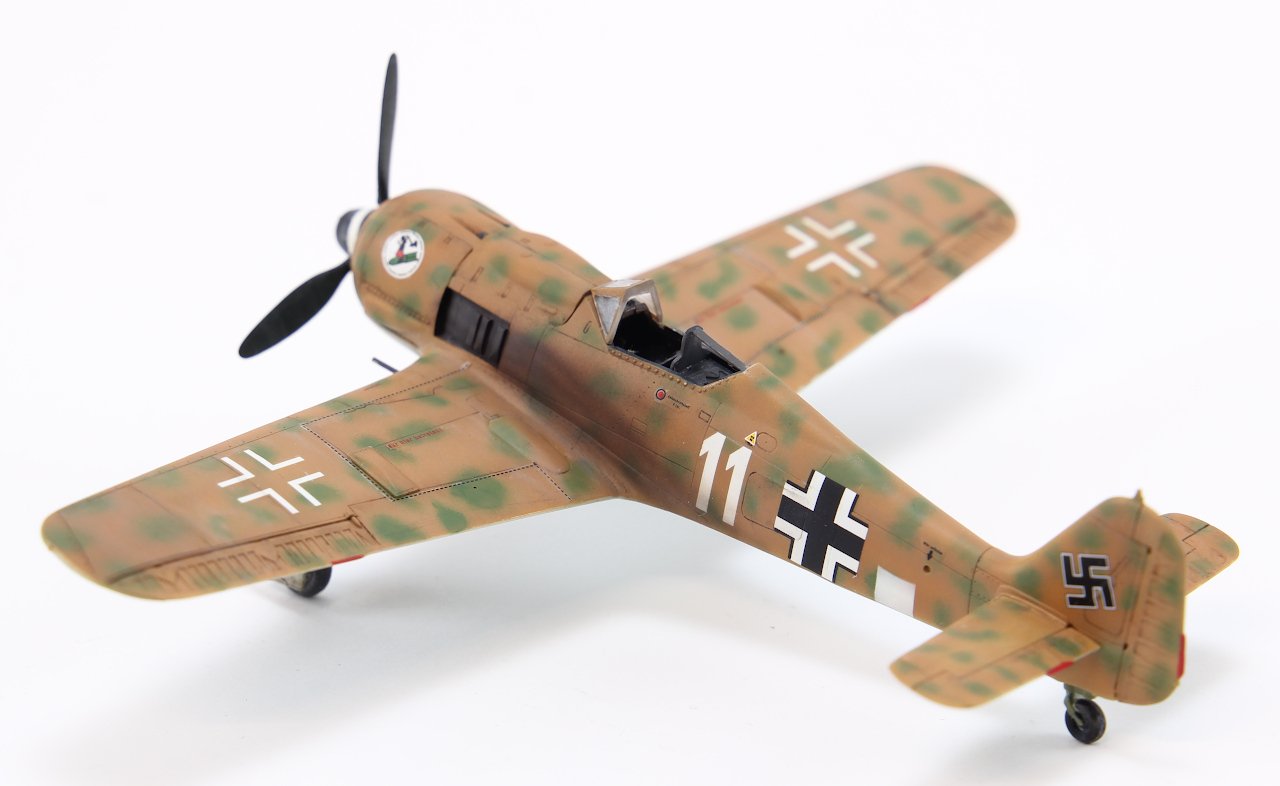
1:72 Revell Fw-190F8 step by step build - COMPLETED 19/09/2021
rverissimo replied to rverissimo's topic in Non LSM 'WIP
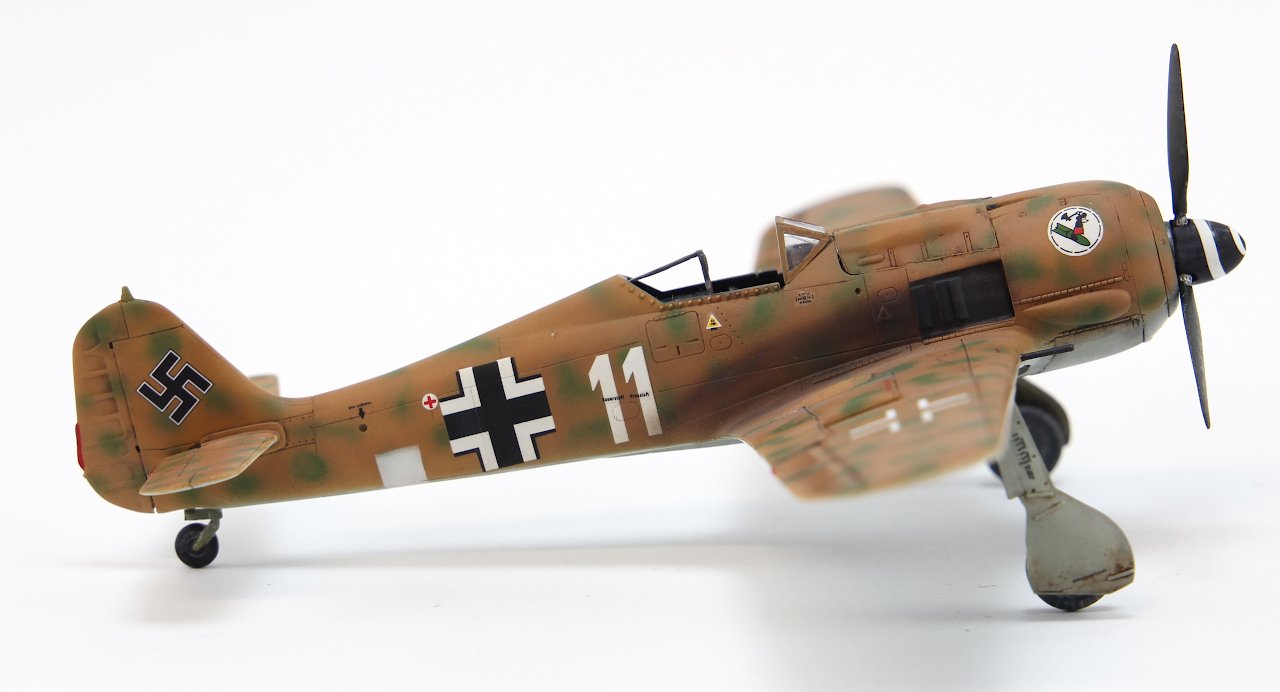
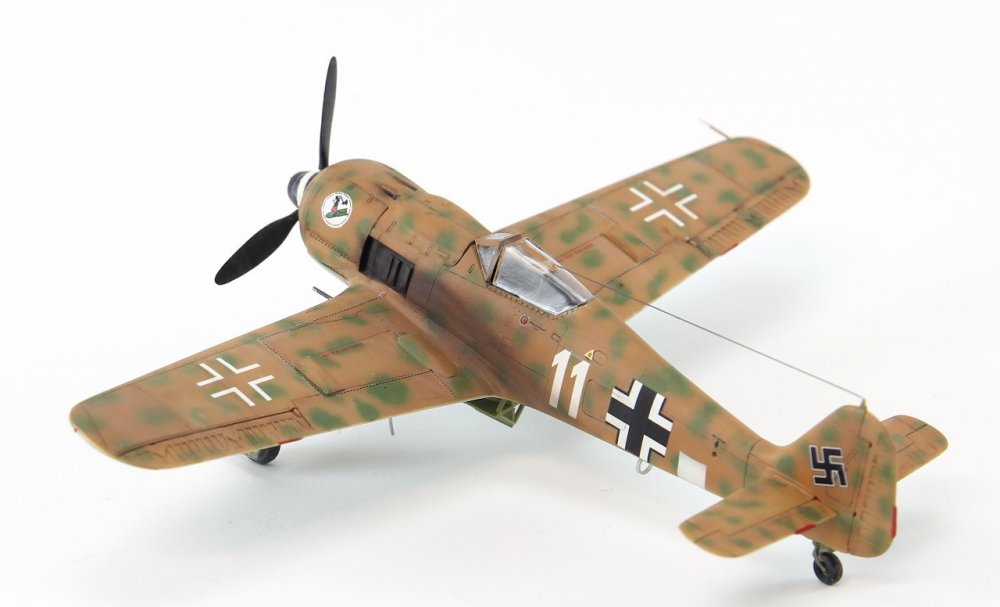
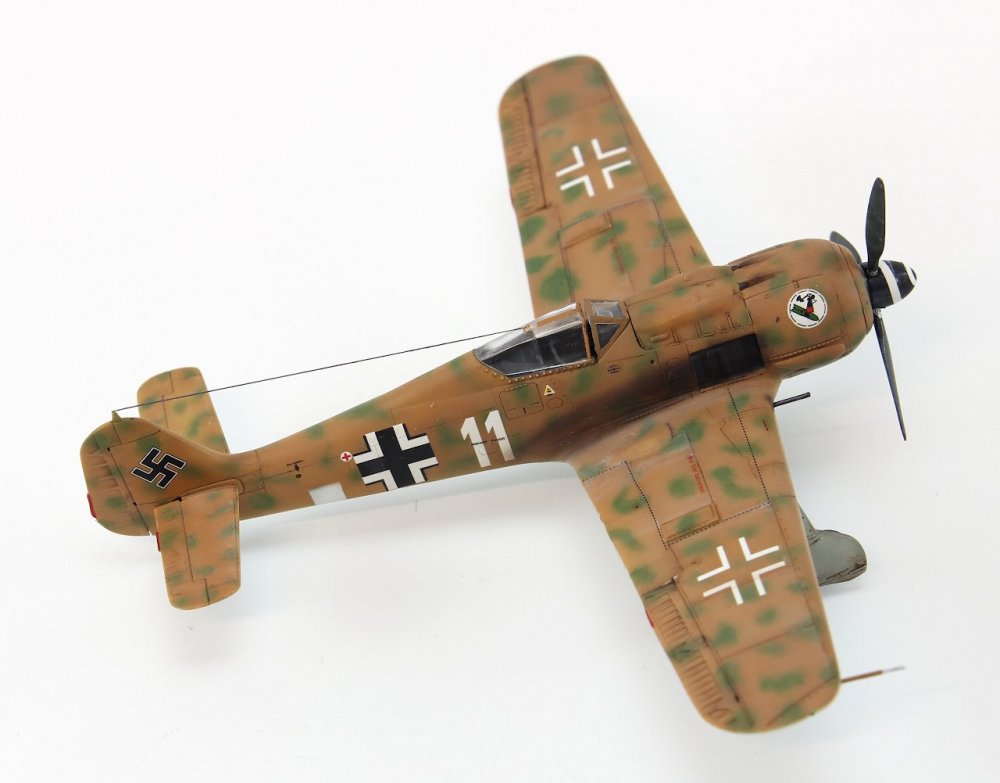
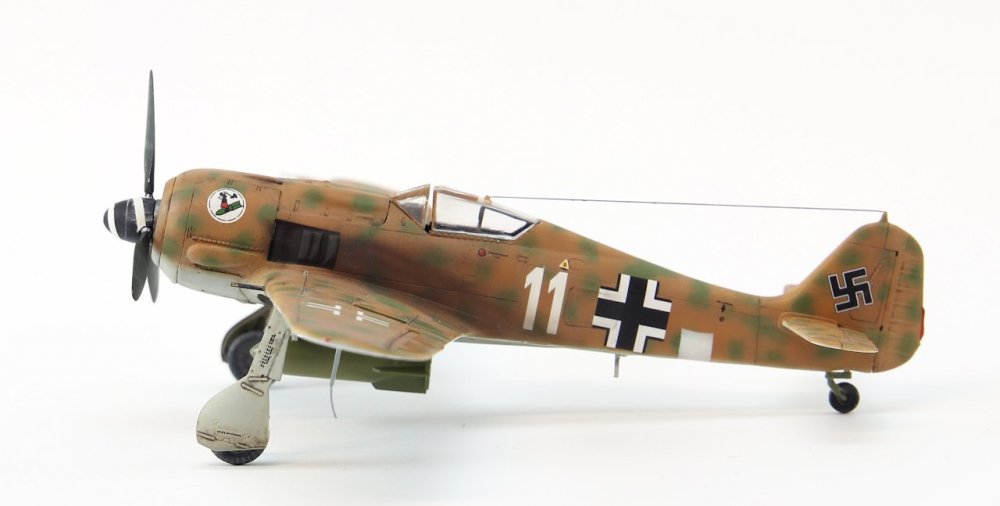
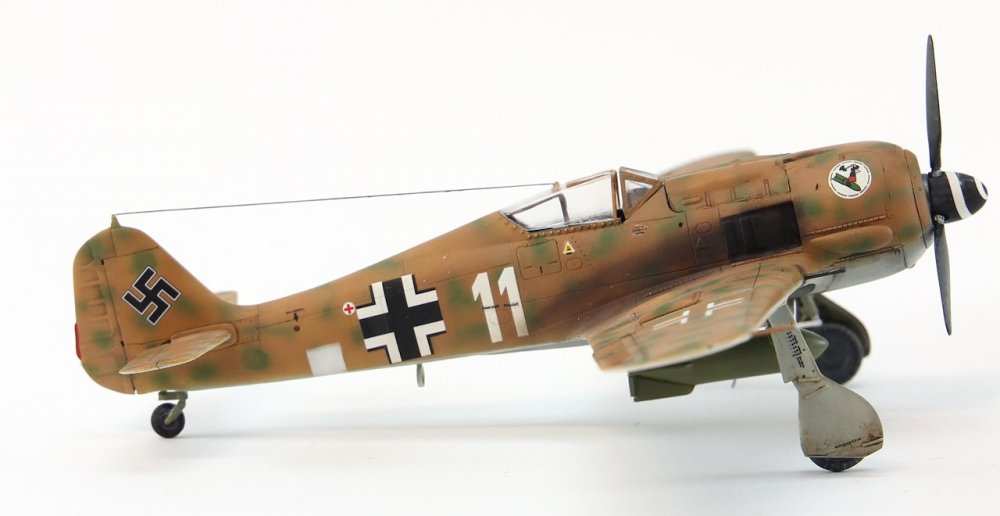
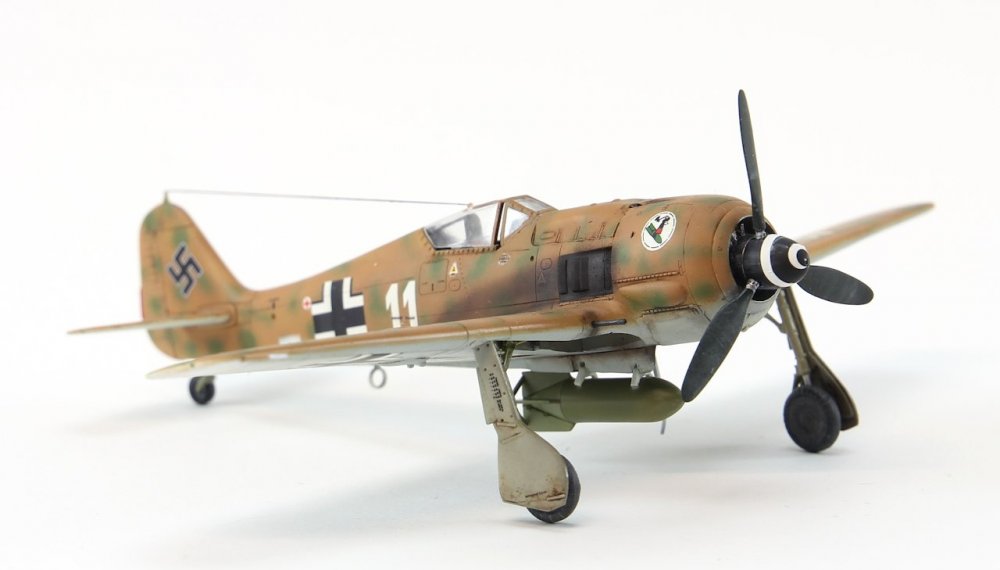
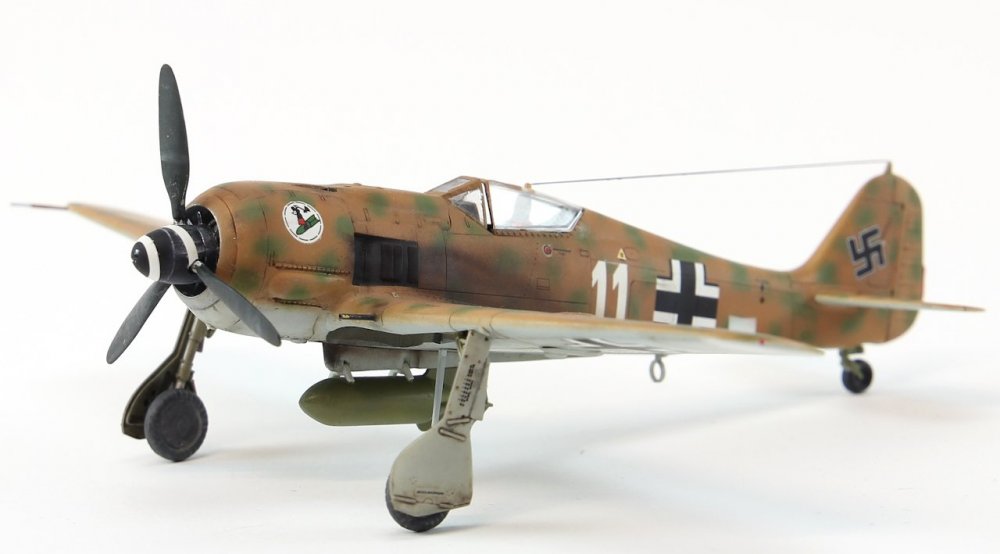
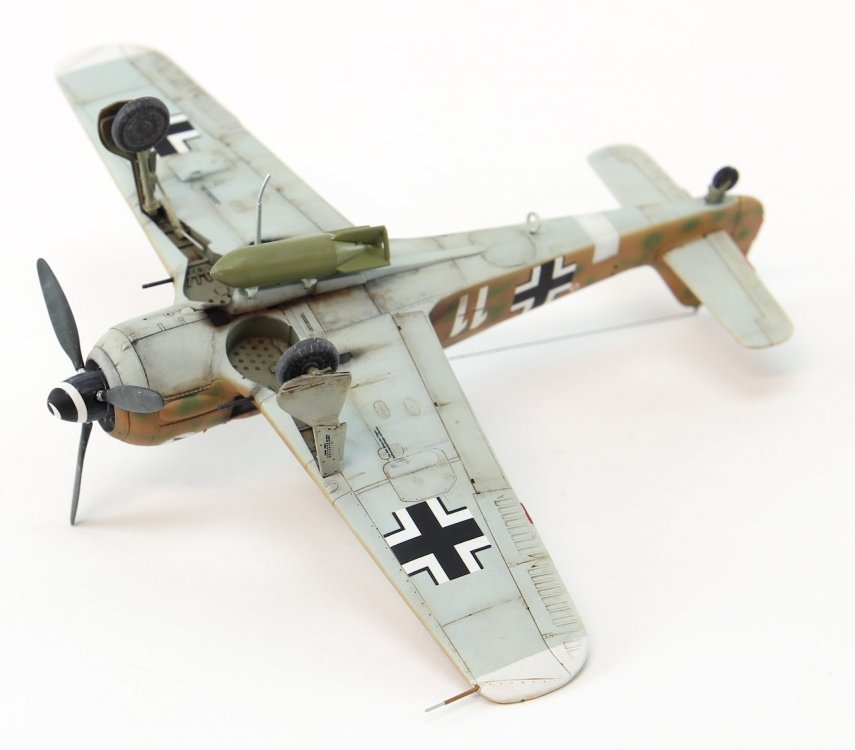
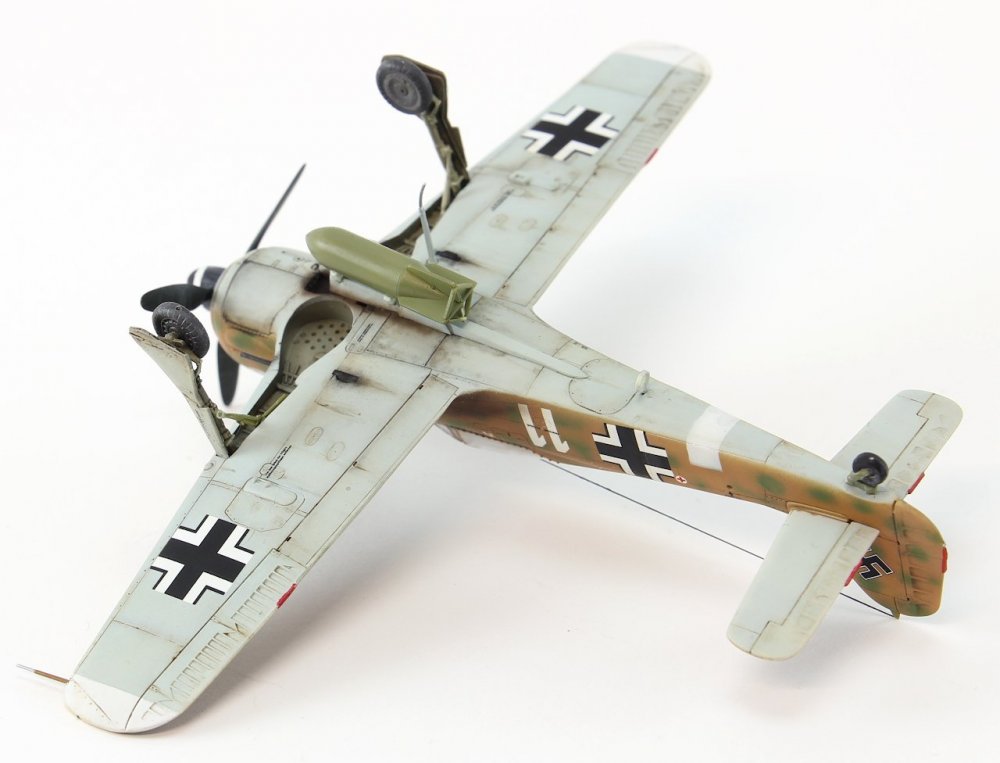
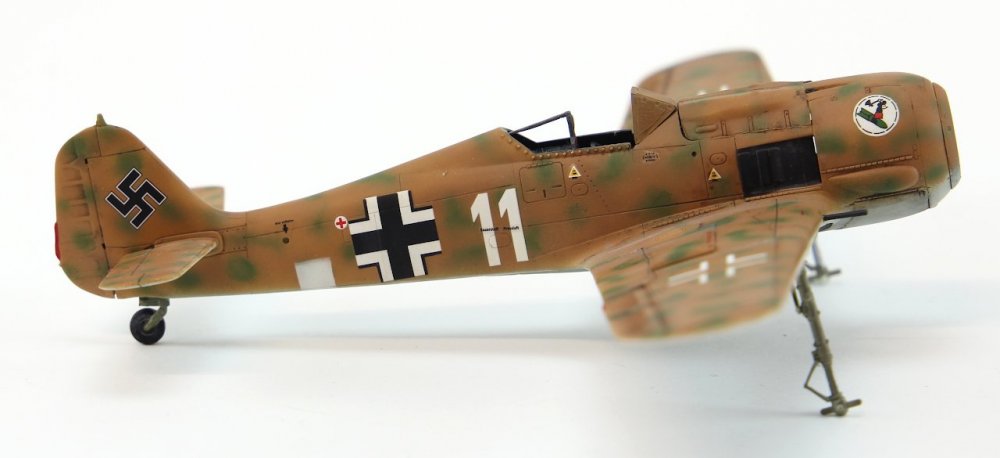
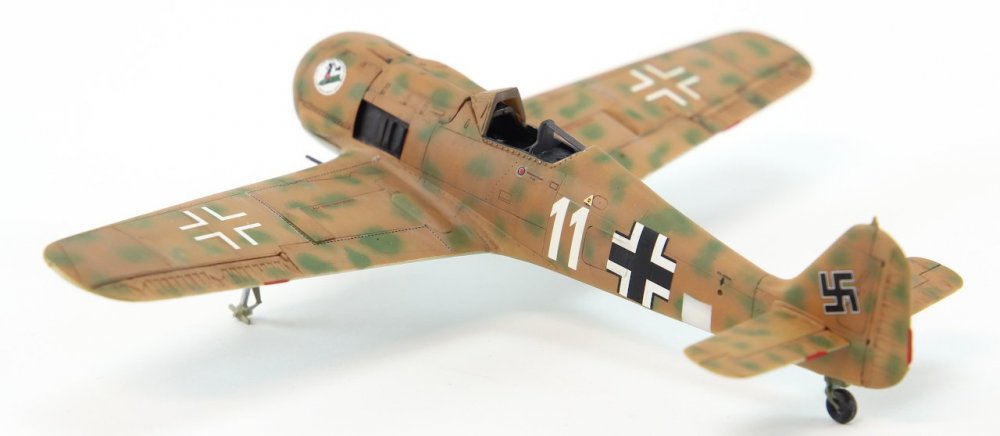
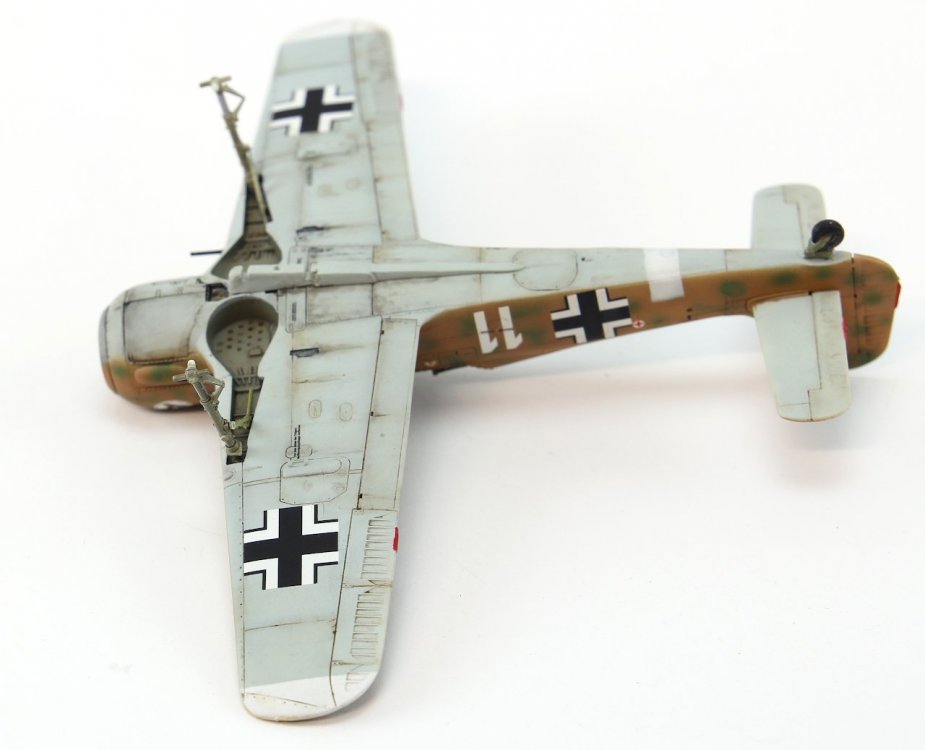
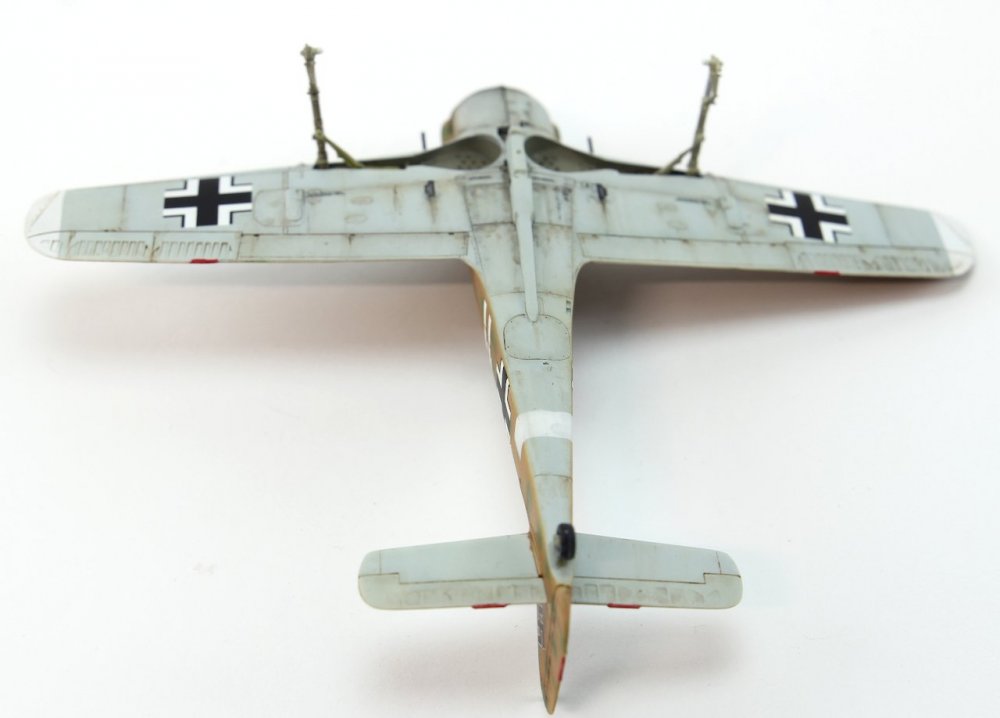
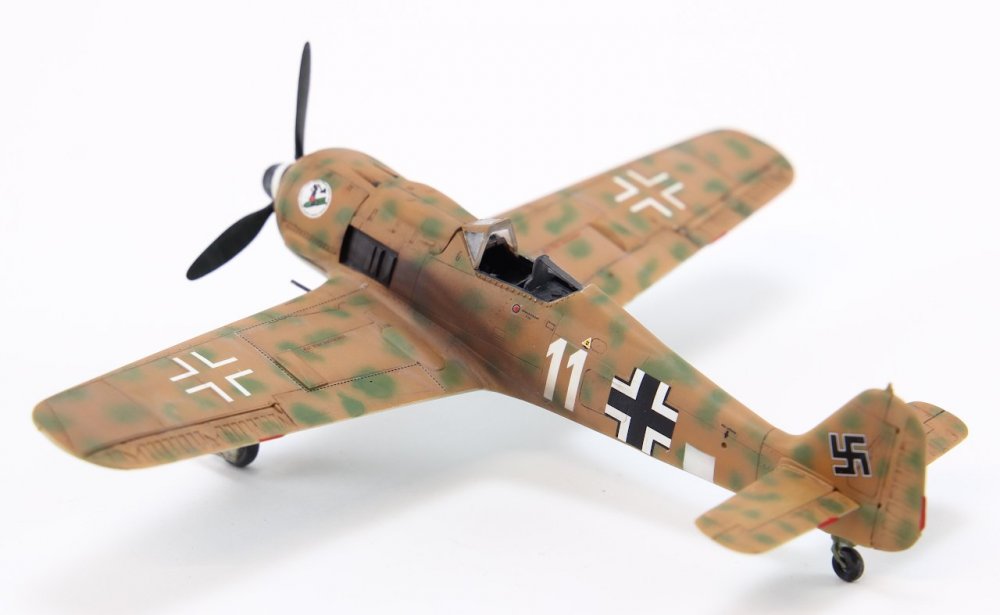
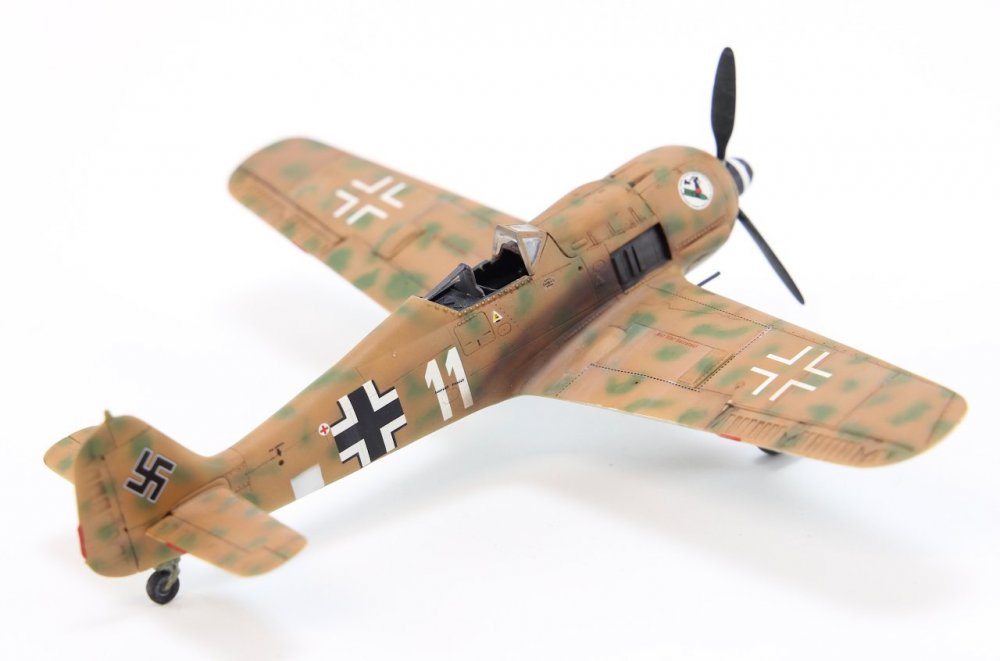
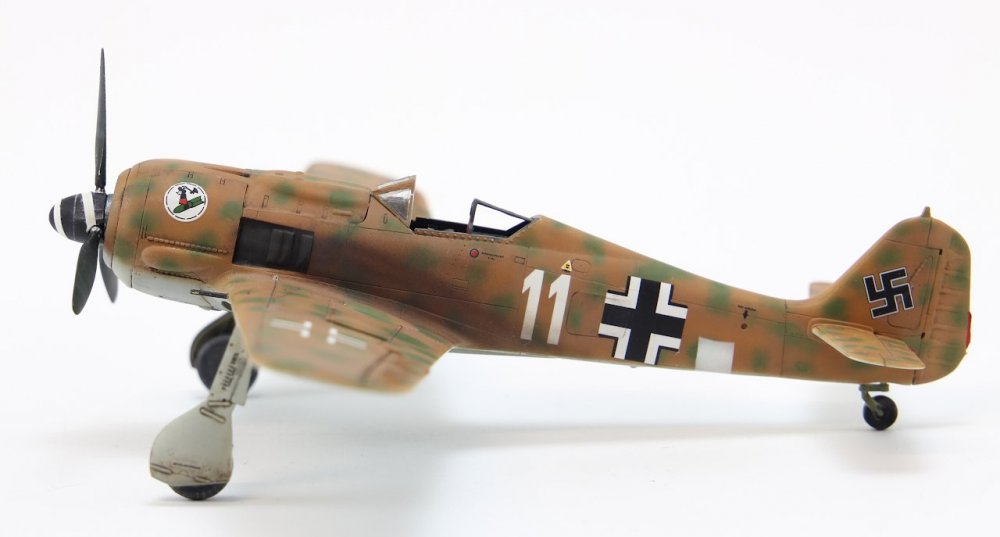
hi Peter ! thanks! Well... my friends, this is the end... Acabado / finished! It was a small challange and i still don't like the canopy and some of the decals but some times things are what they are, and i'm satisfied with the end result. So let me share the final photos Thanks for watching and comment! Now to the next model ! All the best !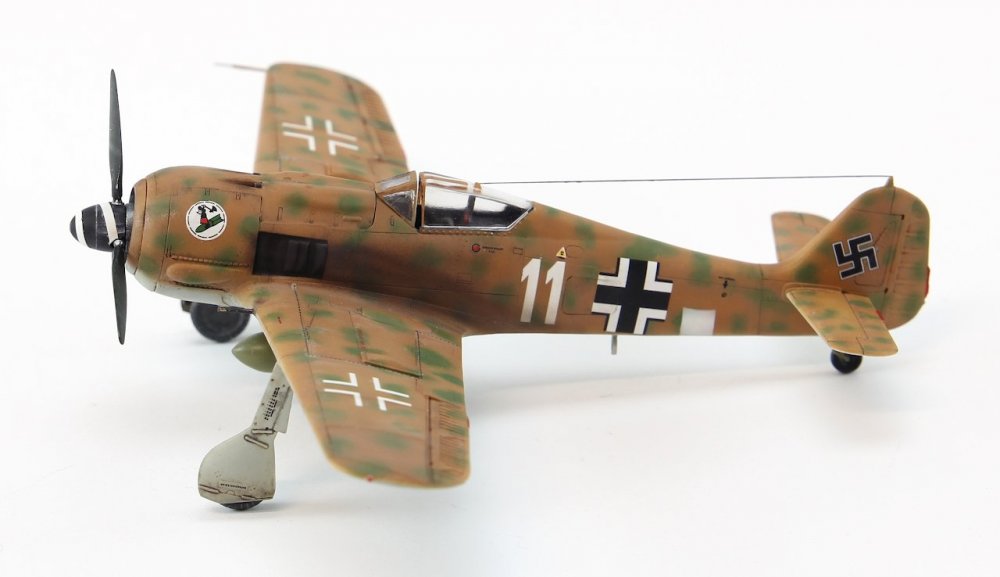

-
1:72 Revell Fw-190F8 step by step build - COMPLETED 19/09/2021
rverissimo replied to rverissimo's topic in Non LSM 'WIP
Hi Peter! thanks for the words! Here's a small update on the build. It has some shortcomings. The Decals, despite a gloss surface simply keep with silvering... some walkways on the wings are the prove of that. The decals were set and the matt finished applied. Weathering was replicated with oils and the exaust stains were made by airbrush mixing Acrylic tamiya XF-10 flat Brown with XF-1 Matt Black. It's always a good view to observe a model on his own wheels. Propeller in place and exaust stains painted. Almost done. Despite the fact that the canopy in undersized comparing to canopy rails, it's a mistake that I'll have to live with. I tried a canopy from another Revell's FW-190 and the end result is the same. Nevertheless i do enjoy the end result.


-
1:72 Revell Fw-190F8 step by step build - COMPLETED 19/09/2021
rverissimo replied to rverissimo's topic in Non LSM 'WIP
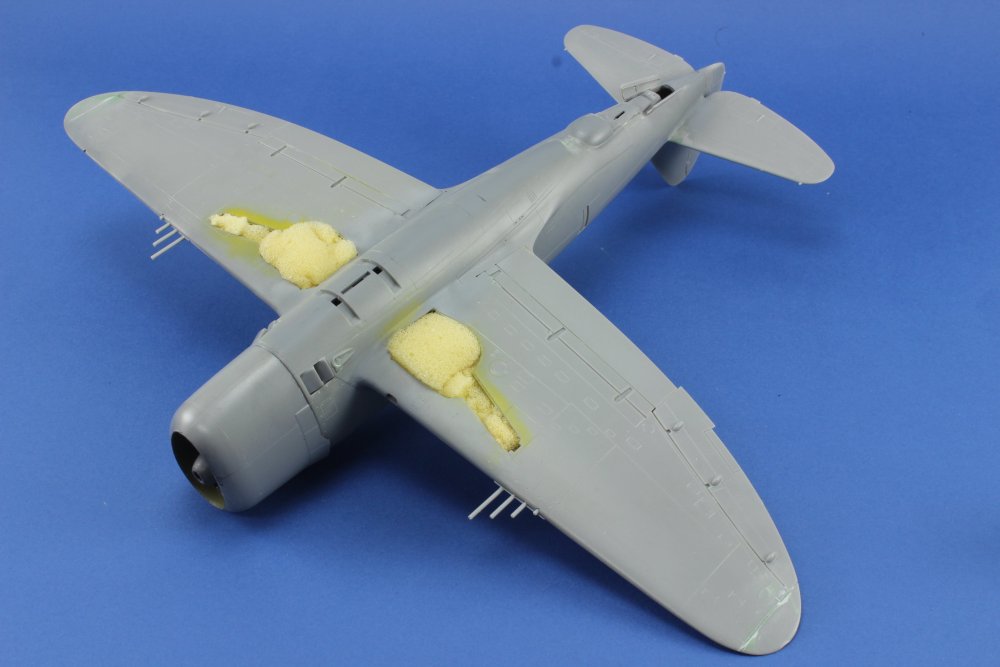
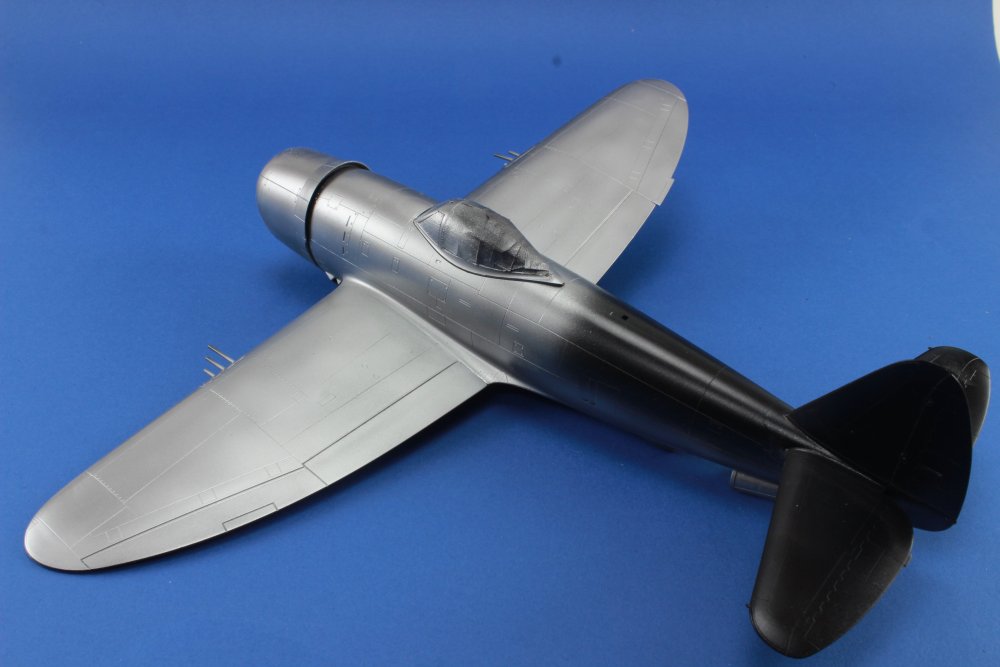
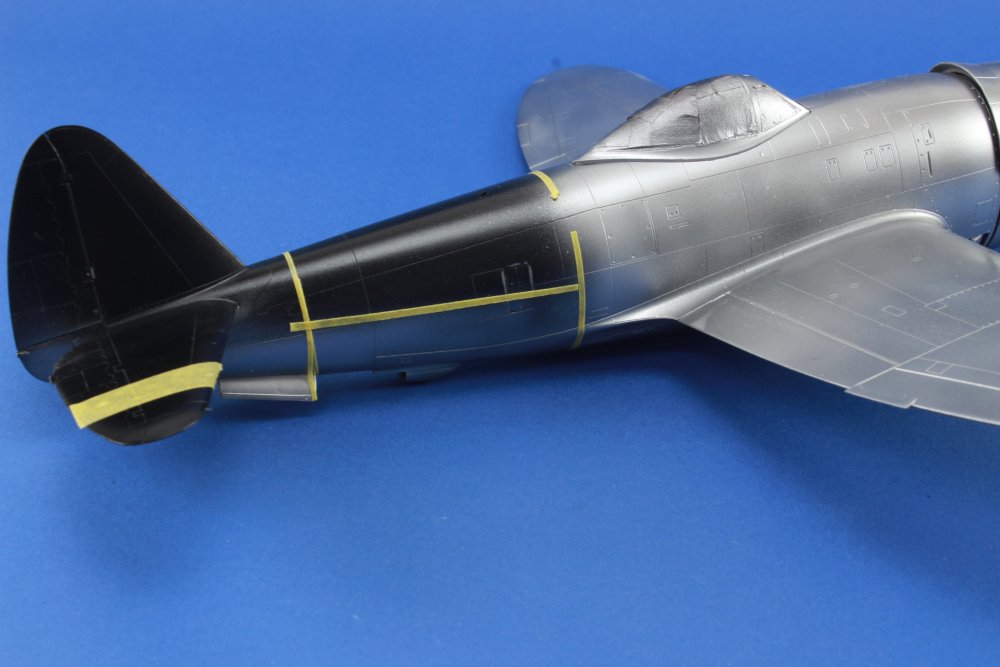
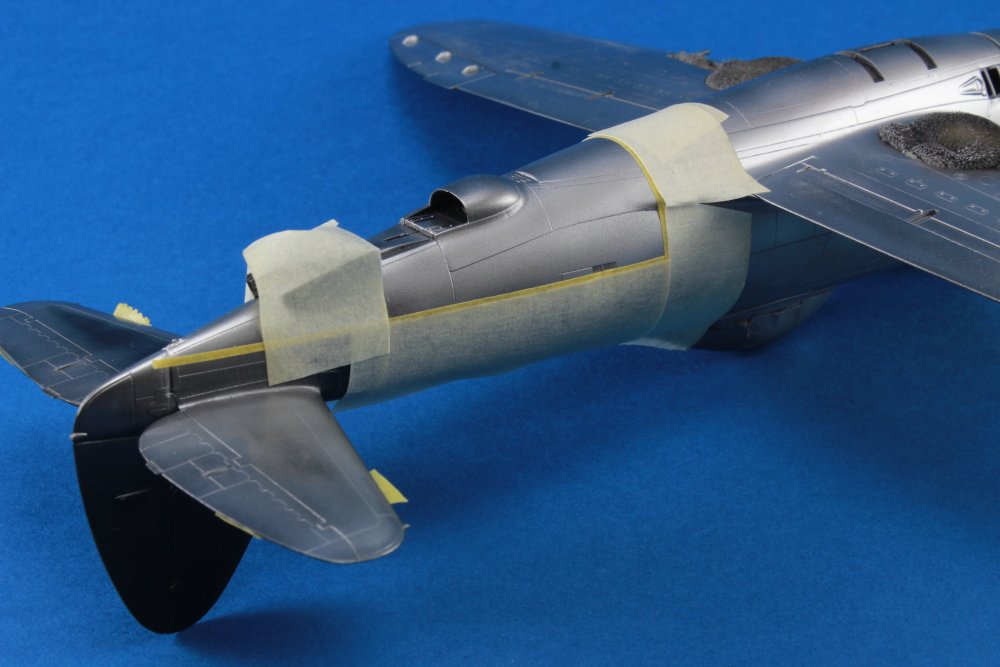
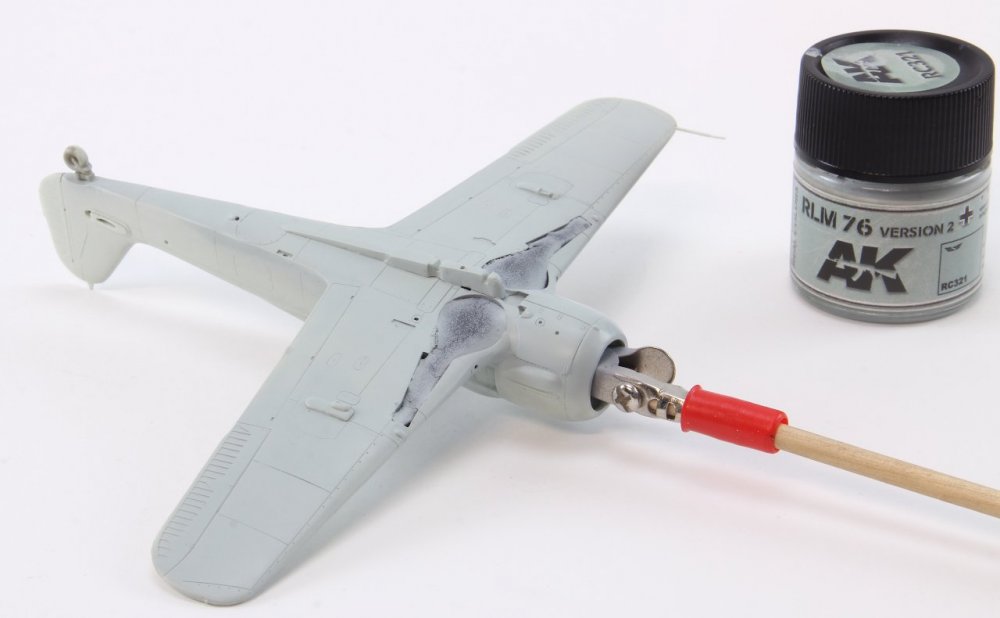
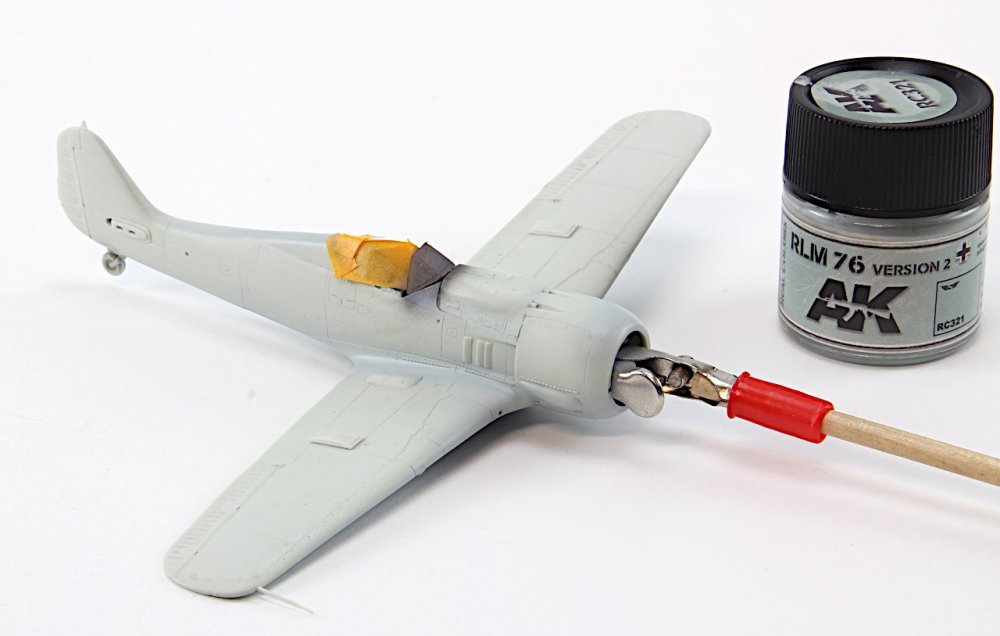
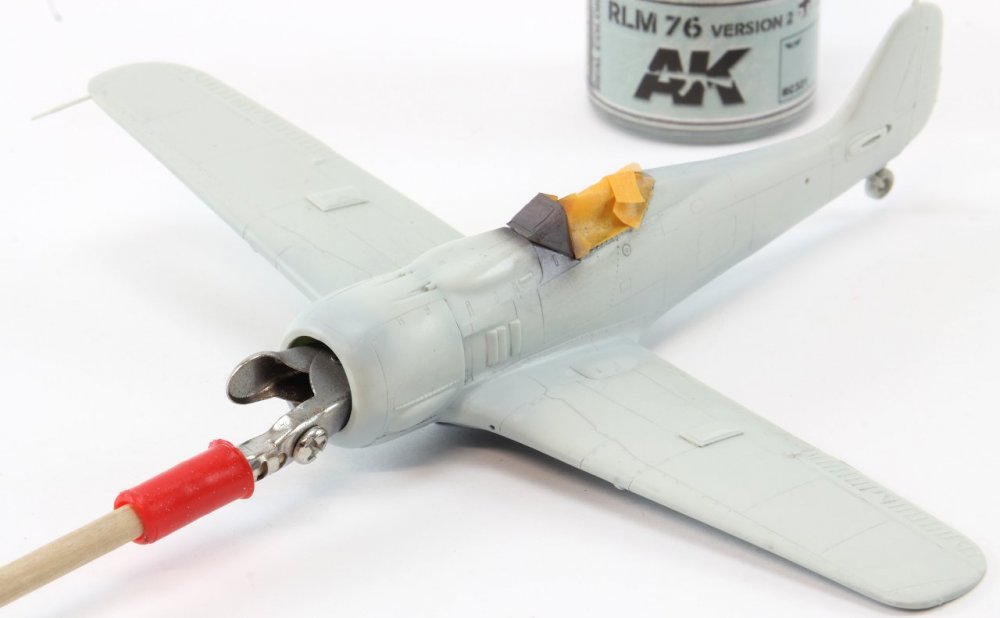
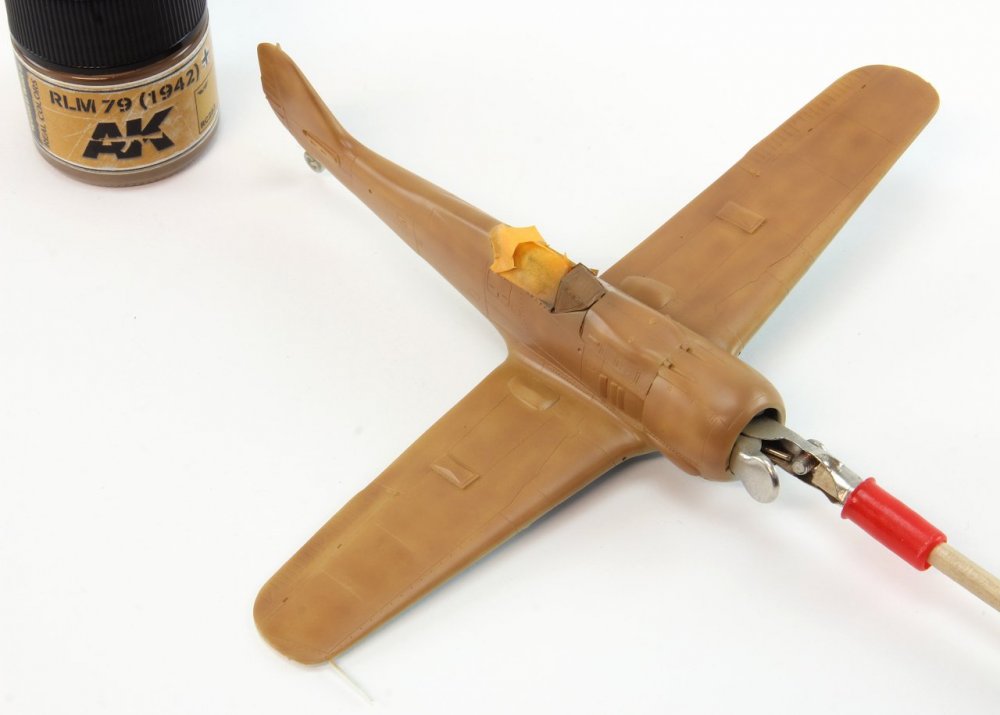
Hi Guys! Sorry for the long delay on this build... the Painting process advanced and some issues came along... The main landing bay was masked with this "putty" in order to protect the paint. And almost imediately i applied the base colour, using AK RC range. the excess colour helped keep the "putty" fixed until it's removal. Followed by the upper surfaces main colour, also from AK's RC air Range. I applied the coat without any primer, just polished the surface with a 3000 Grid pad. Followed by the green camouflage mottle, and this ie where all the trouble came. It's clear in the pictures that some spots simply are not "blend" and smooth. Instead of performing the painting sesson only in one shot, i did it over three nights, and i was unable to replicate the same paint dilution, and even operate the airbrush in a proper way... some say that working very late in night may produce this results. Also you'll notice that one of the left wing panel is slightly darker than the rest of the airframe. Well this is due to the fact that i put my finger moistered with thinner in that area, and i think that i do not need to explain more. in the meanwhile the decals have been applied but i did not take any picture yet. thanks for watching best regards Ricardo Veríssimo

-
1:72 Revell Fw-190F8 step by step build - COMPLETED 19/09/2021
rverissimo replied to rverissimo's topic in Non LSM 'WIP
Hi Kaireckstadt ! sorry has i din not answer your question. The livery is the same as the boxart ! check the first picture! Thanks for the feedback Guys! Here's a small update ! Last night my attention were on the cockpit area, mainly the gunsight detail. The model's original part is a plastic part, so i remove it and replace it with a piece of clear acetate. But first, some painting is required . RLM66 from Gunze range are perfect for the job. A decal was set on the headrest armour plate. All details were brush painted with vallejo acrylics. Note: the gunsight glass was glued in place using white glue. At the time i took the picture, was still drying. thanks for watching! have a nice Sunday !


.JPG.70b82626fd688783bcceb102ffd0bfd0.JPG)
.JPG.c94644258bbeb82f97f32d9360b9b0aa.JPG)
.JPG.e4e5589efc368047da5fe1061b50a758.JPG)
.JPG.2c051b2849bd43f5e37281babeaa9021.JPG)
.JPG.28c7ad43feb4627017fffdfb73cdeb47.JPG)
.JPG.6ac0b200a6471b2a97157568bb3fcbfd.JPG)


.JPG.38fdead404a6f44cf8c1e0522bb244f1.JPG)
.JPG.65549eab6b555da224ea8c029e1c5c01.JPG)
.JPG.9e2bd84d10ba2e6fc981ee107d90ffb2.JPG)
.JPG.62bbd4a8ee544b24b8e6c3943a8f1c9a.JPG)
.JPG.41524bd83a86a73b6b41baf1fd273f63.JPG)
.JPG.ebe12c2ce2c9ee82d4440a61c11ad88f.JPG)
.JPG.8d1e15dfc2eb42f797f3cfa23ba6ea15.JPG)
.JPG.f80f845b38fc2e0bffe2b8483b1987f3.JPG)
.JPG.286ada1598018a489ed31e1266165e38.JPG)
.JPG.b2742ea80a7abad401d87631ff6bac24.JPG)