


rverissimo
-
Posts
147 -
Joined
-
Last visited
Content Type
Profiles
Forums
Events
Gallery
Everything posted by rverissimo
-
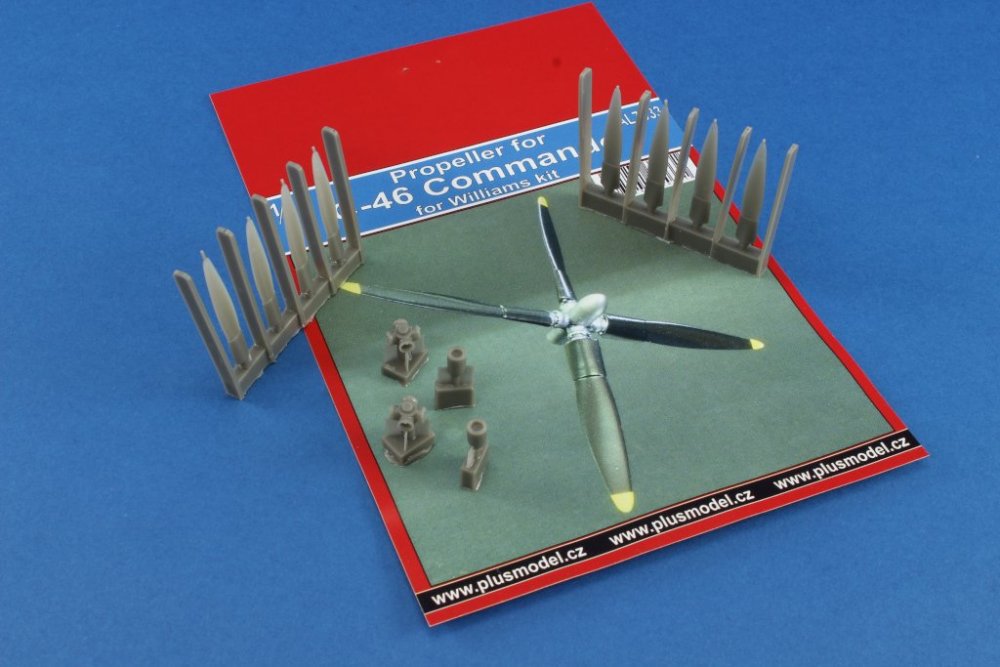
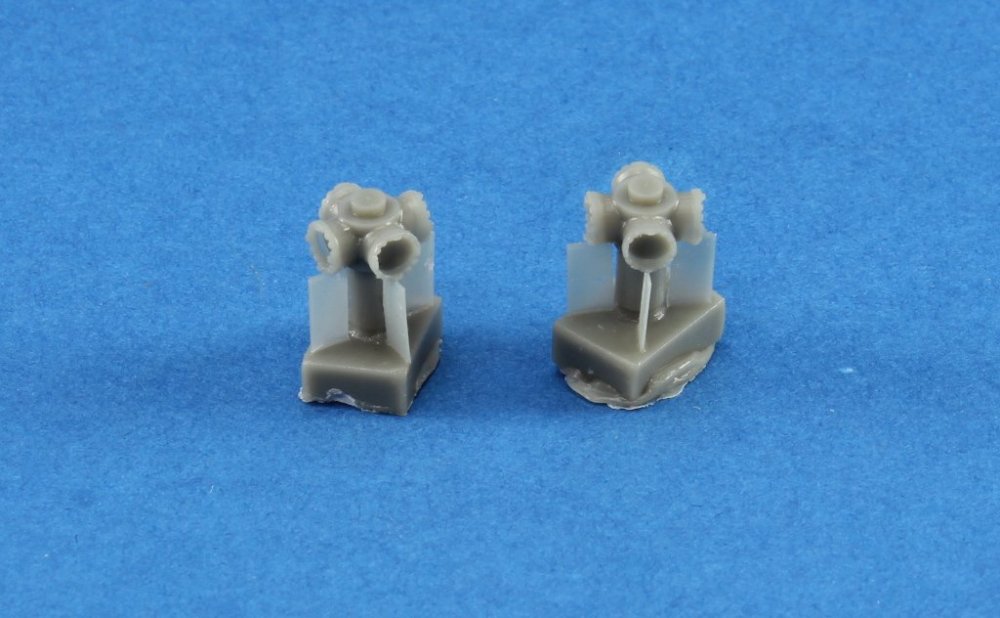
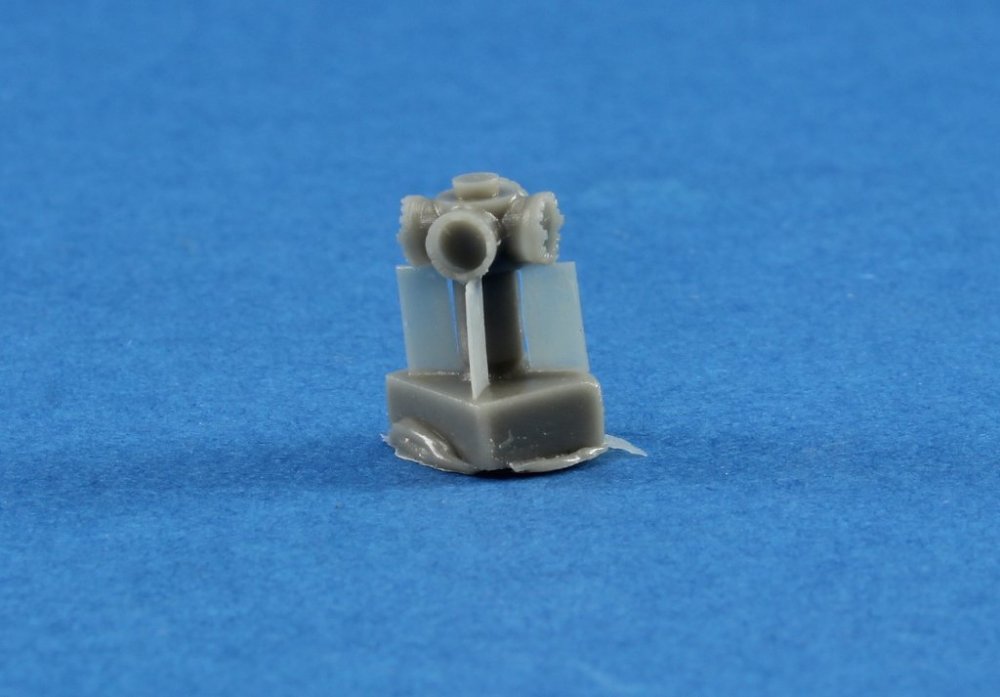
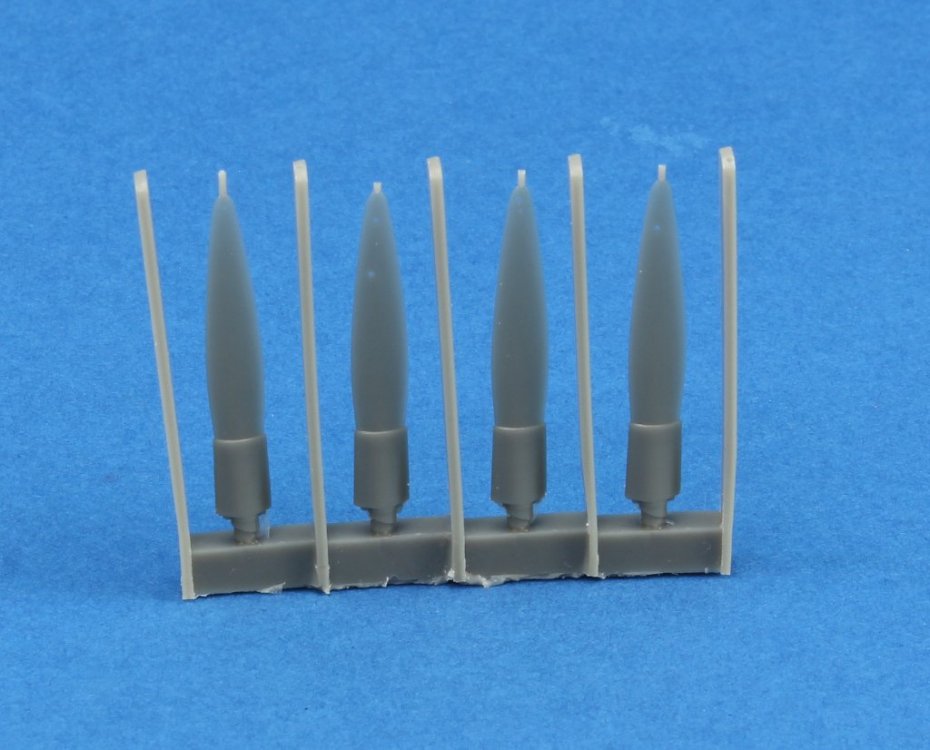
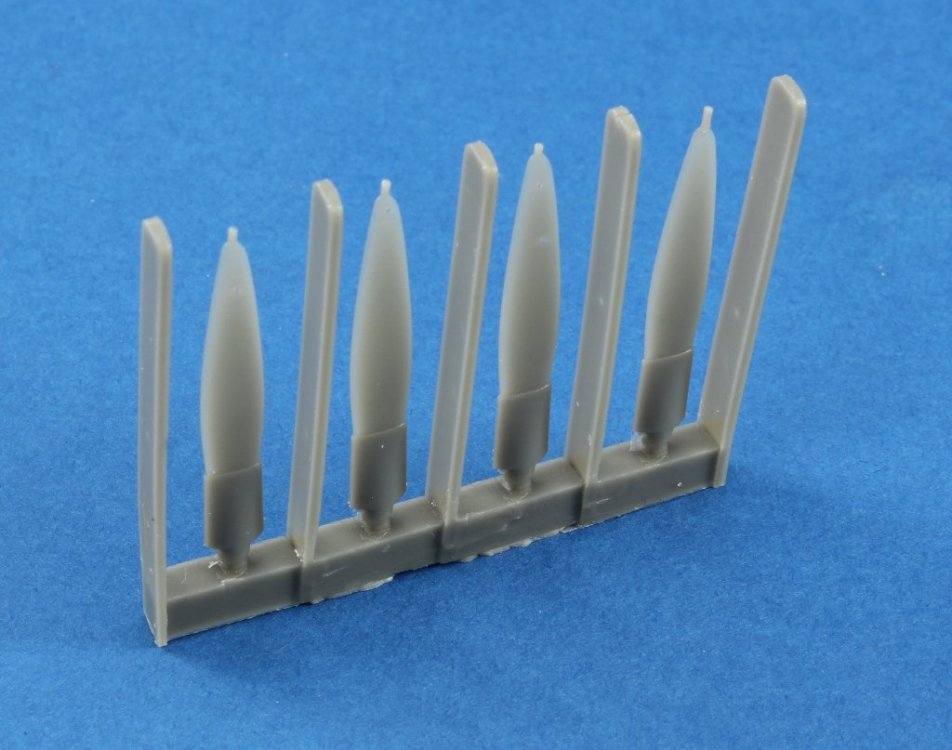
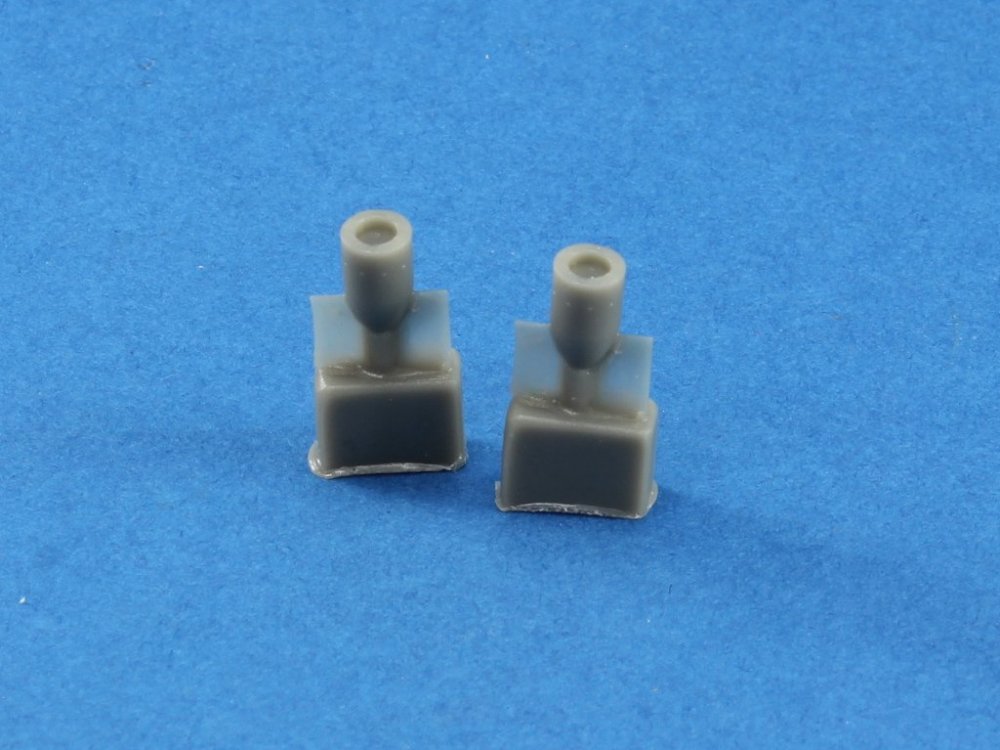
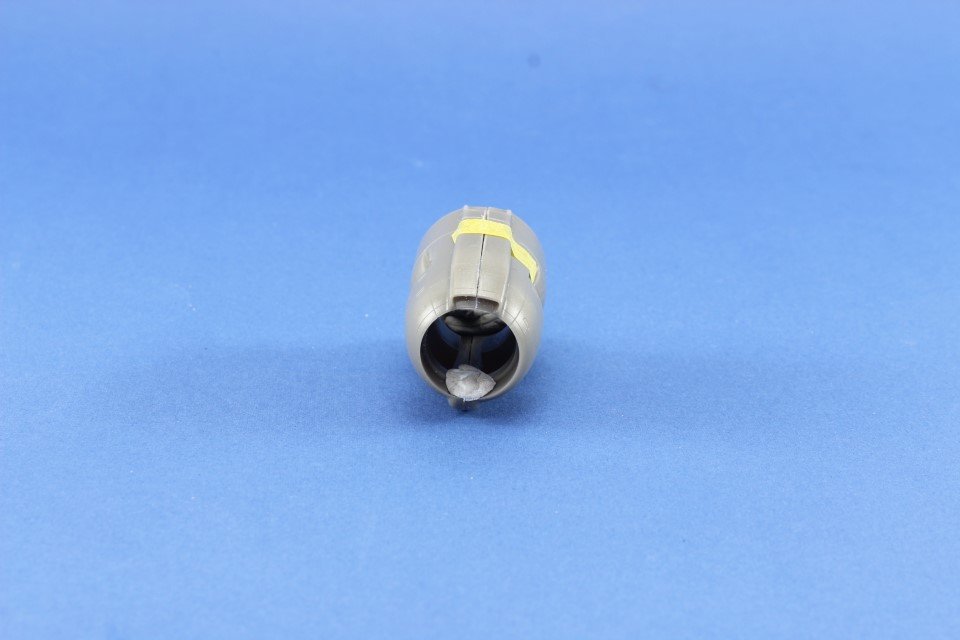
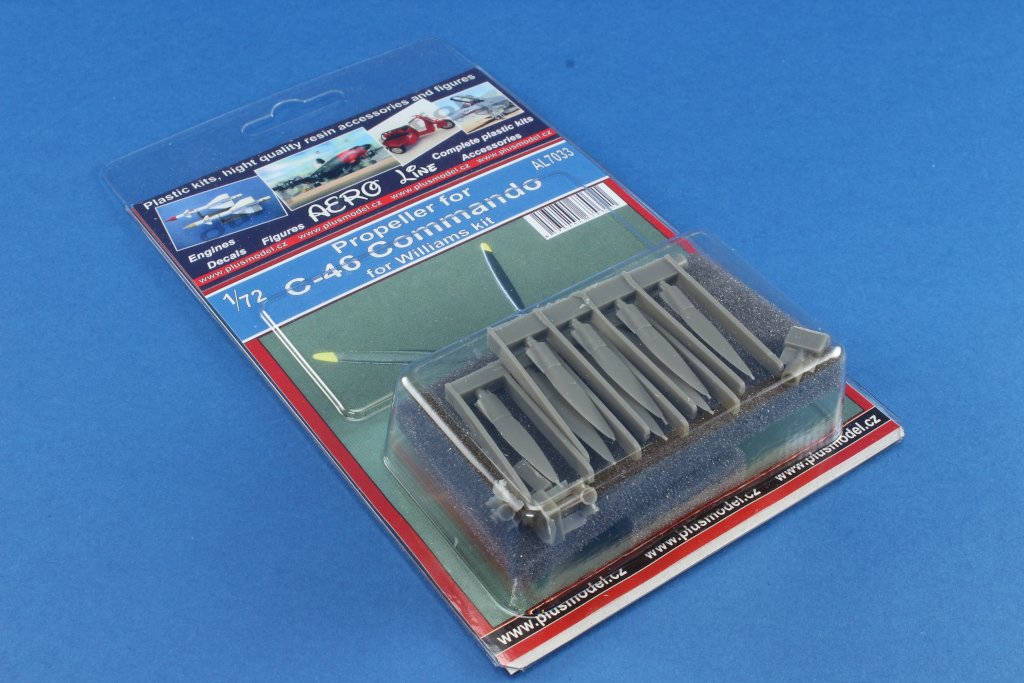
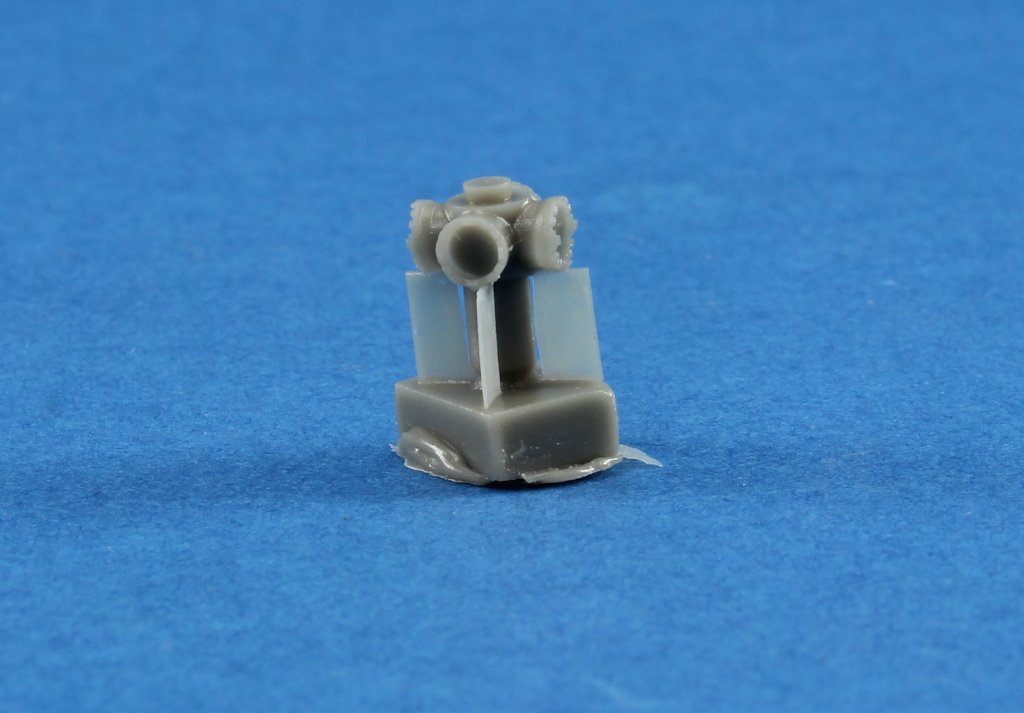
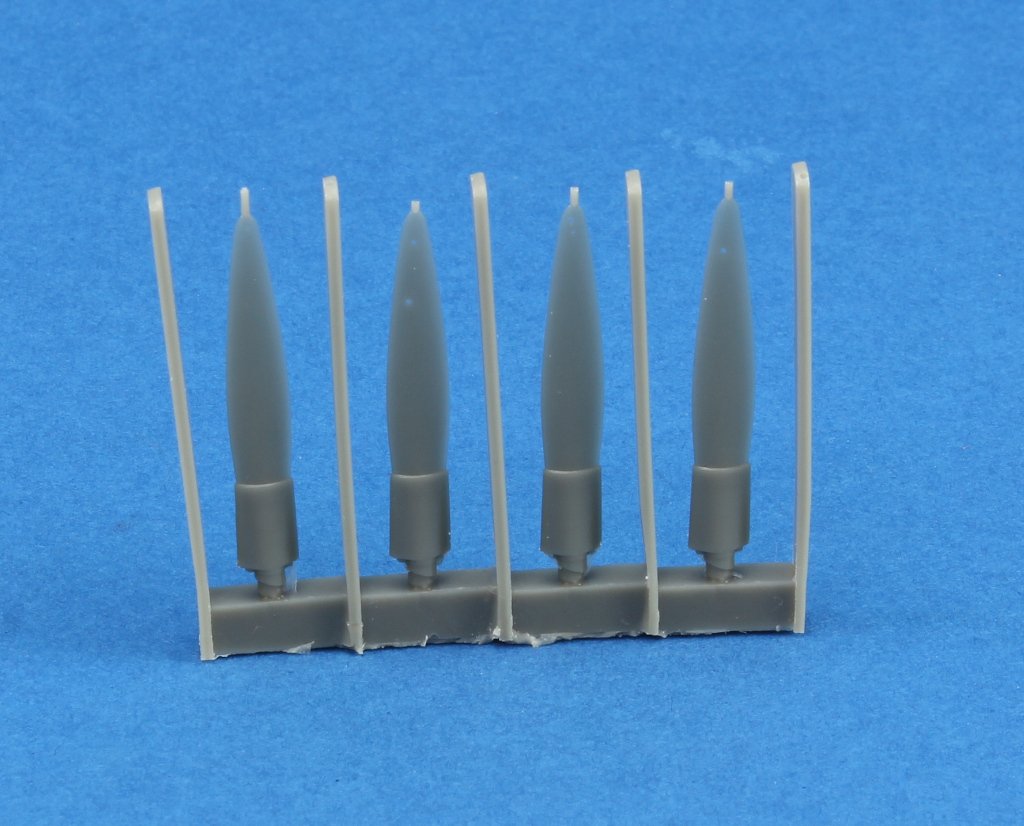
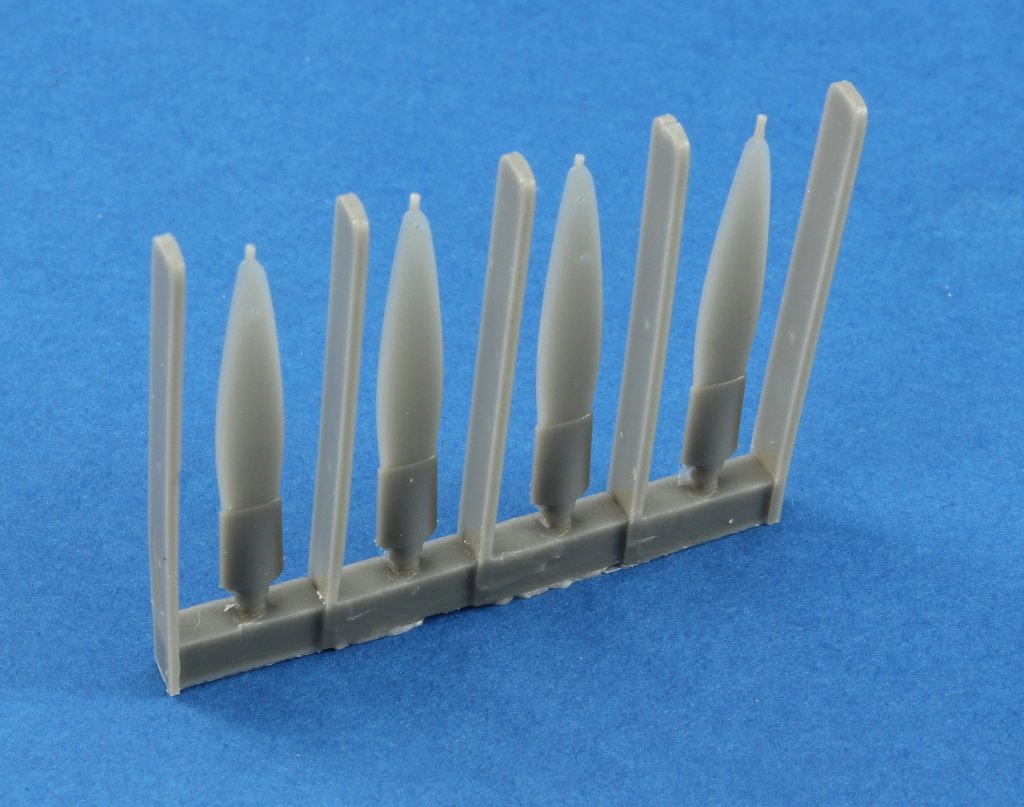
Plusmodel 1:72 Propeller for C-46 Commando #AL7033 Introduction This recent release from Plusmodel was designed to replace the propellers of a rare and vintage model: William Brothers 1:72 C-46 Commando. Being the only game in town for this classic transport mule, this set is a must improvement comparing the model’s original offering. What’s on the box Inside the clear blister you’ll 6 resin objects composing: 2 sets with four propellers 2 propeller hubs 2 early type Spinners The back paper presents a colour picture of a completed and painted propeller as reference. This allow to represent the Curtiss electric cuffed propeller usually associated with early versions of the C-46. Nevertheless, please remember that this airplane still flies nowadays and check your reference about the propeller used. Propeller hubs The propeller hubs are nicely detailed. Despite the fact that no jig is provided to properly align the propellers to the centre hub, plusmodel came up with a clever system: The area where the propeller meets the hub are sloped, so in order to proper fit the parts, they need to align in a reverse mode. This guarantees a proper alignment of all propellers around the hub. Propeller The propellers are nice detailed and the removal from the casting mould is (almost) trouble free, just take your time, a fine saw and a mask (to protect from resin powder) should do the job. As mentioned early, the propeller base has a mark to cut in angle for proper fit on the propeller hub. Spinner The spinners, on my analysis, are the difficult items to work, due to their small size and by their connection points to the casting block located on the front of it. Careful removal and sanding are required to guarantee a proper shape and pristine finish. Comparing…. I was lucky to get my hands on the original model (Thanks Pedro!) and plusmodel set are a major improvement over model’s offering. Conclusion This set is a strait forward replacement and improve over the model’s parts. Some attention is necessary on the spinner mould block removal and in the end you’ll get a better and detailed model of this iconic airplane. Highly recommended! Our thanks to Plusmodel for the review samples and all the support given. To purchase this directly, click THIS Link Ricardo Veríssimo


-
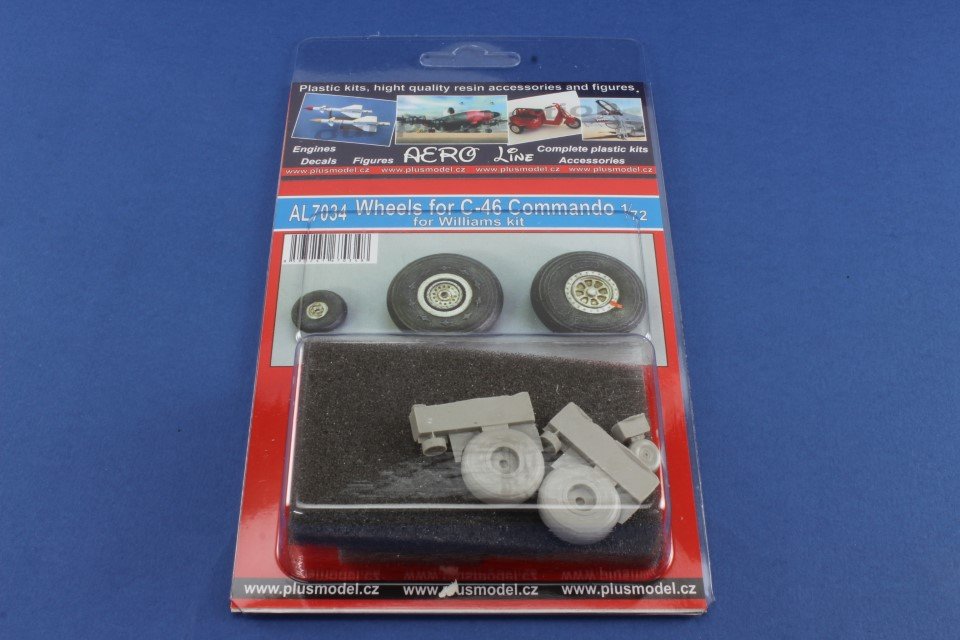
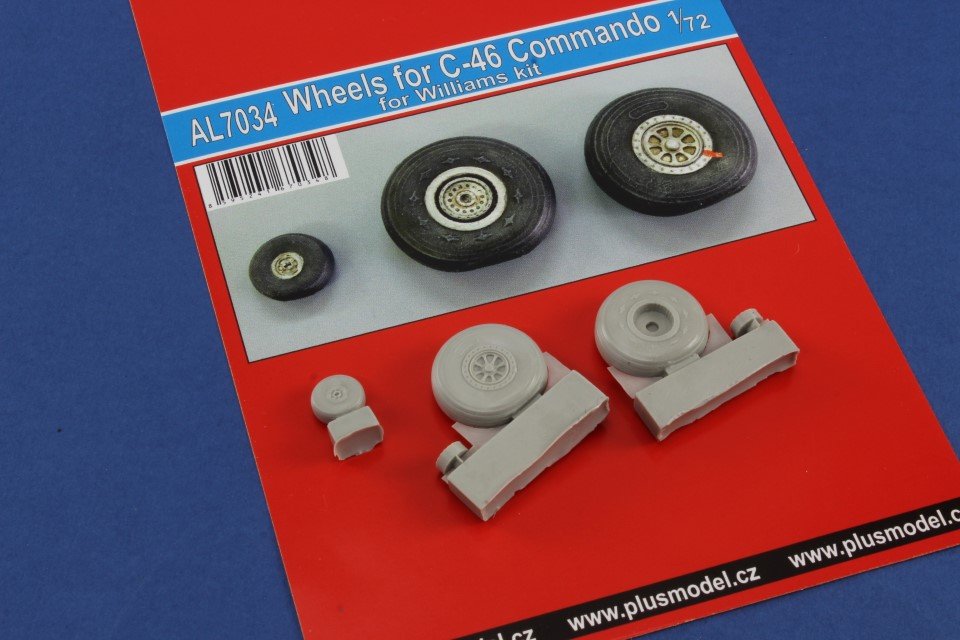
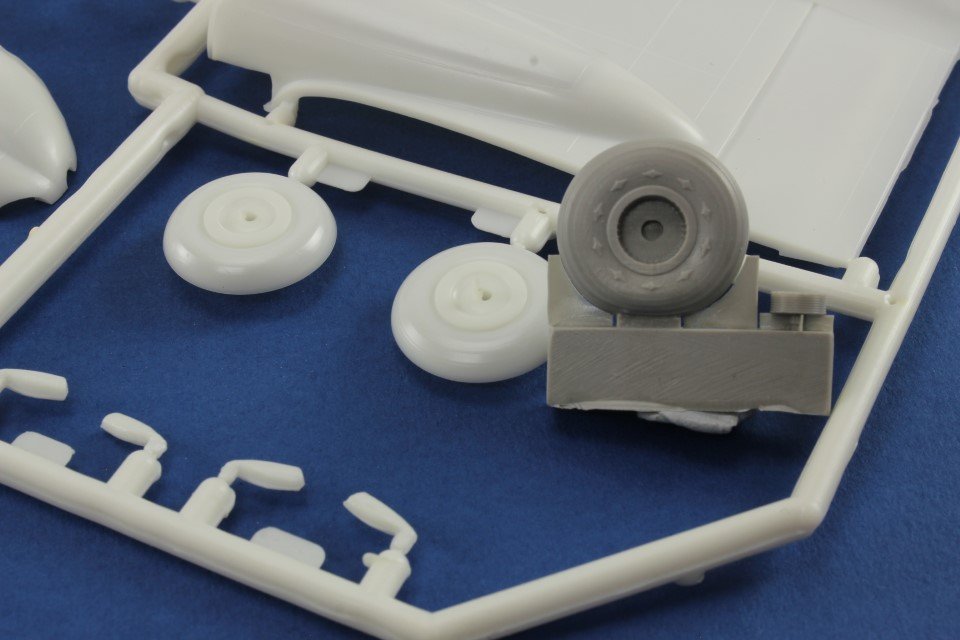
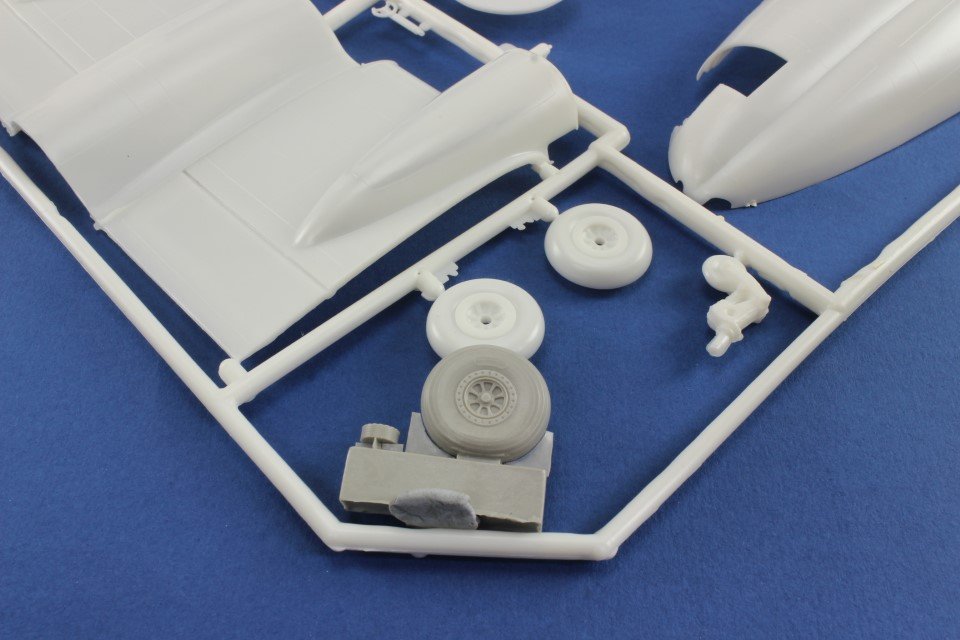
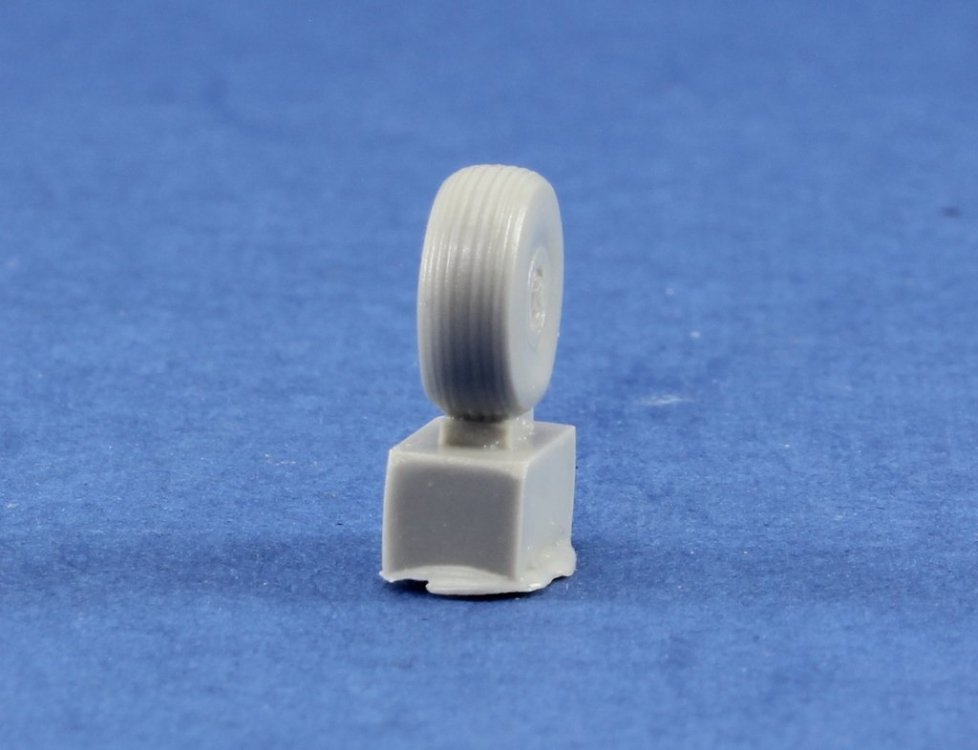
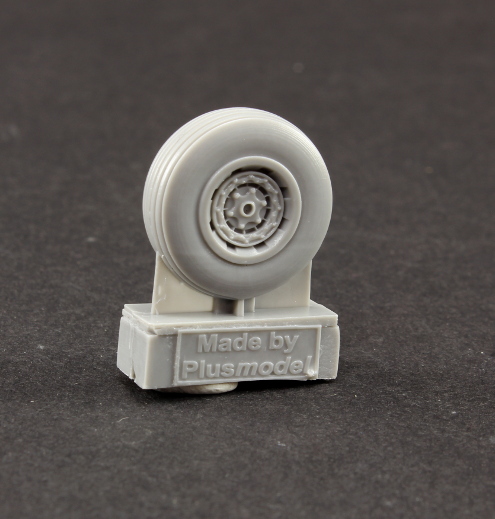
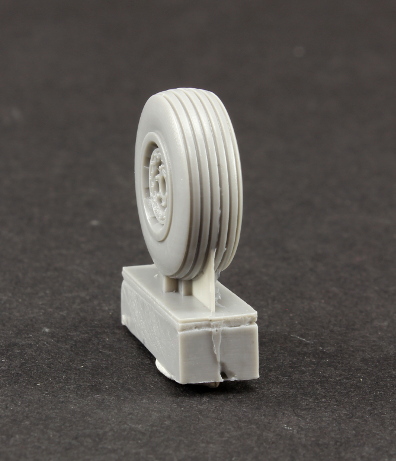
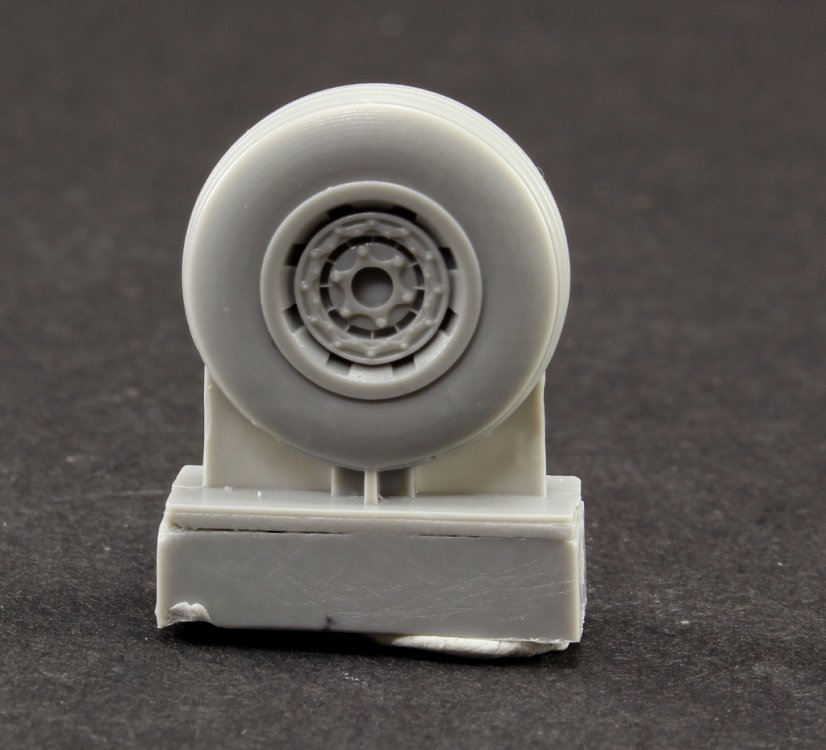
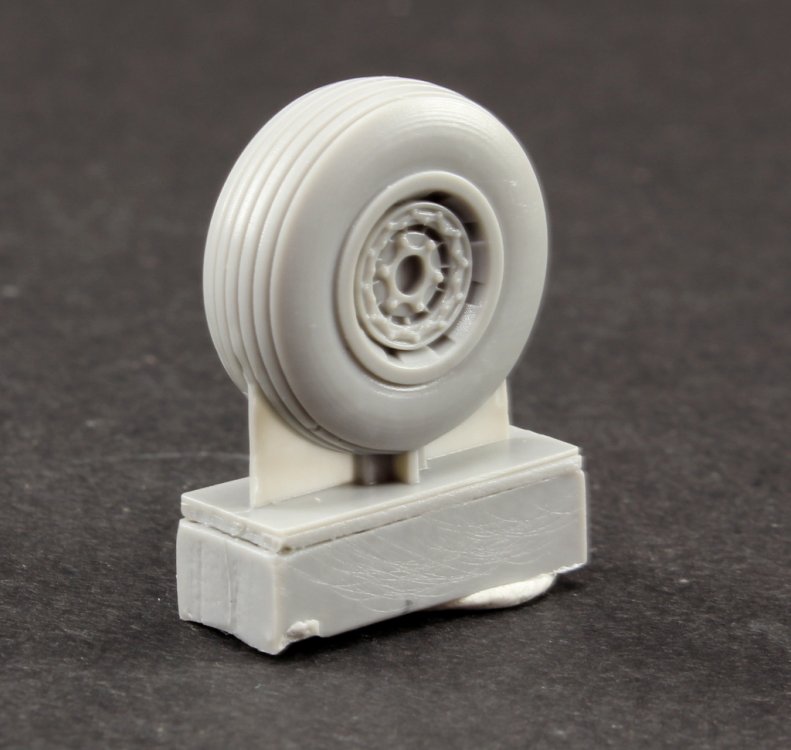
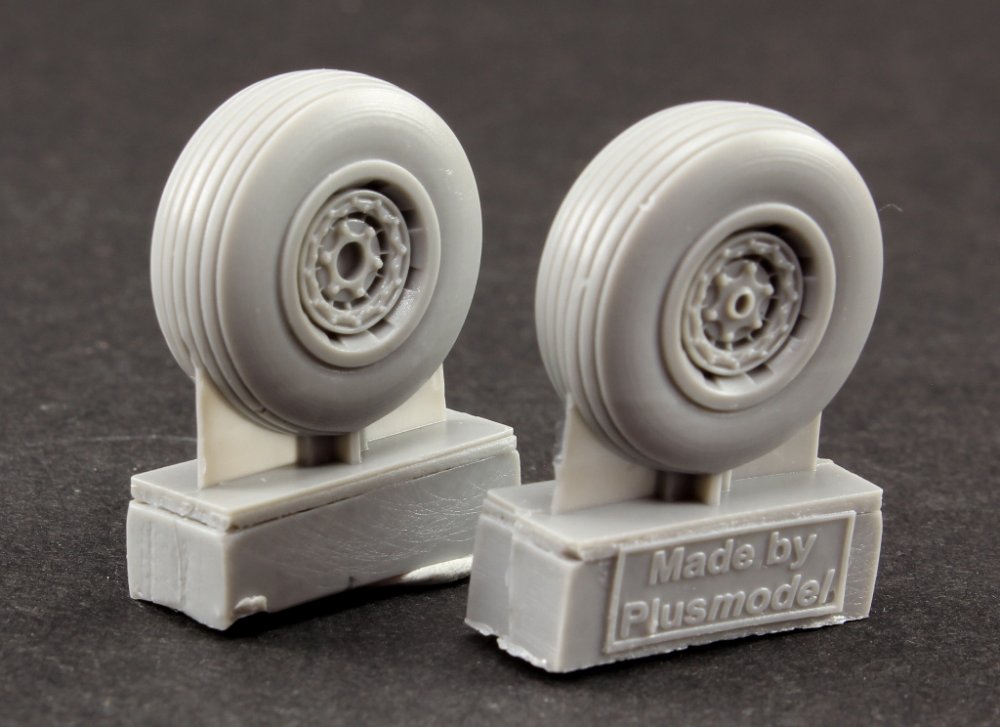
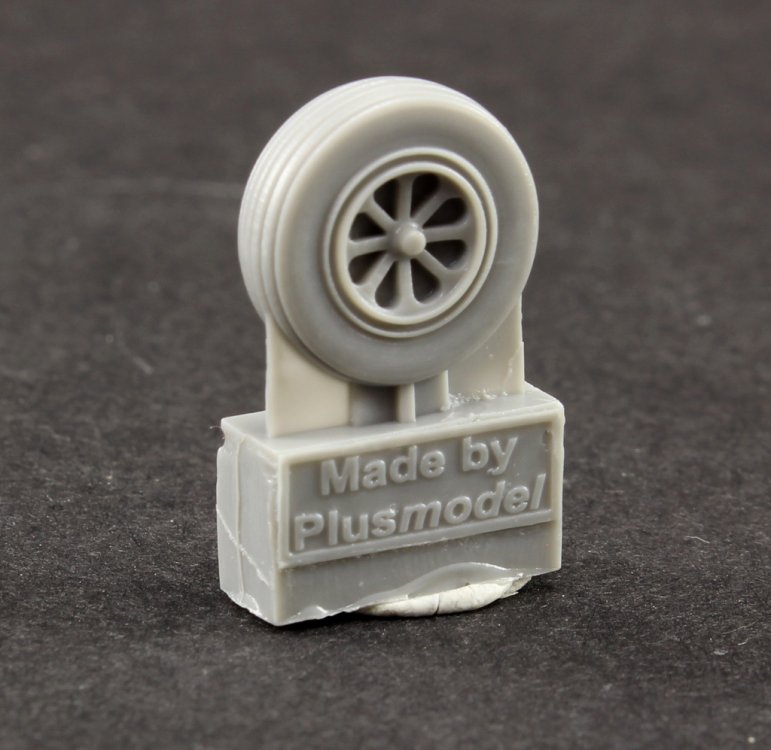
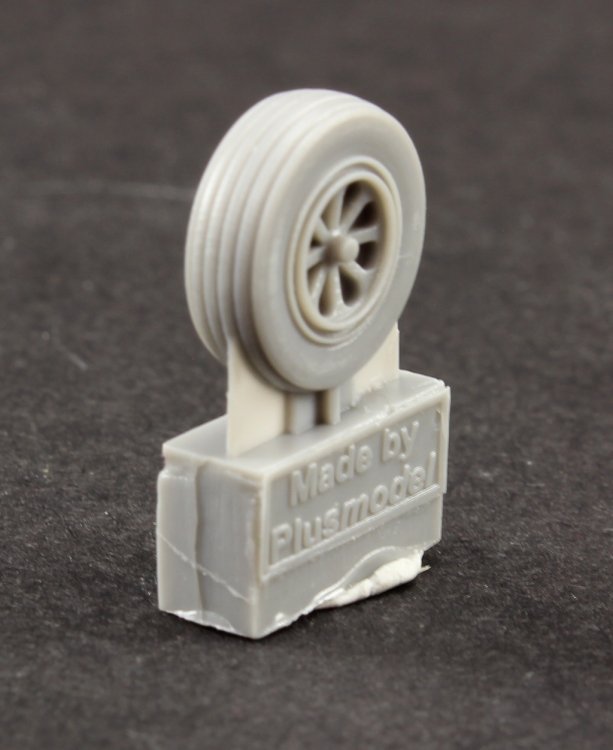
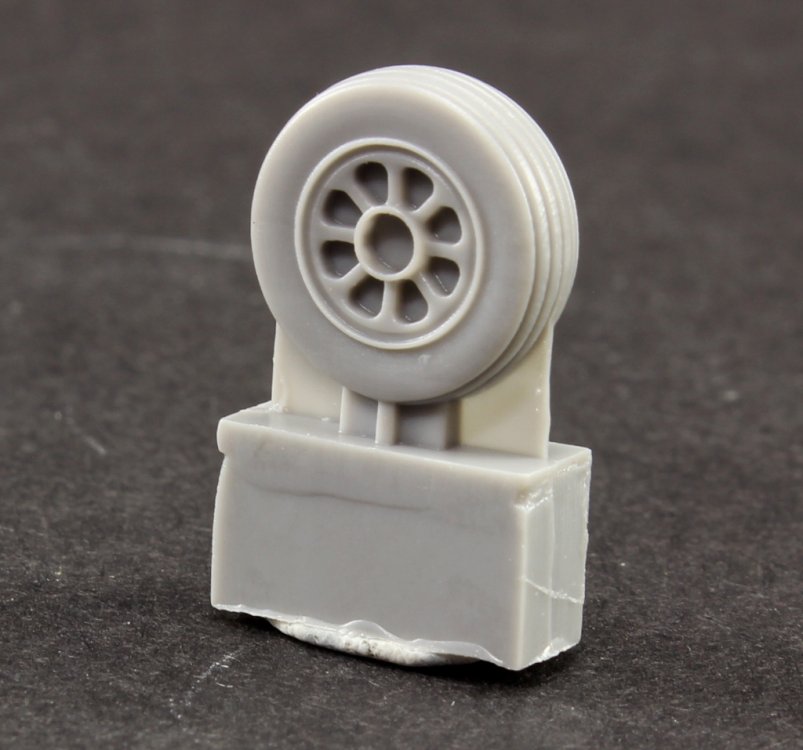
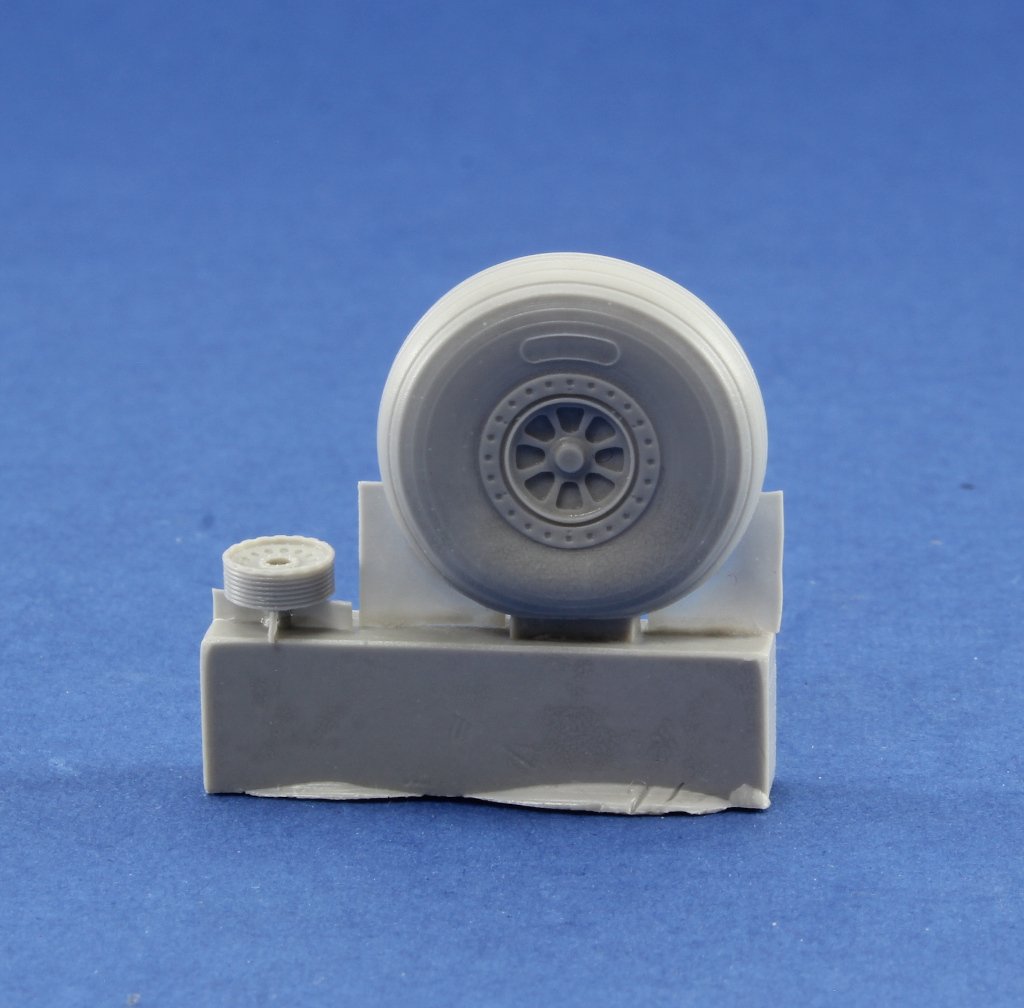
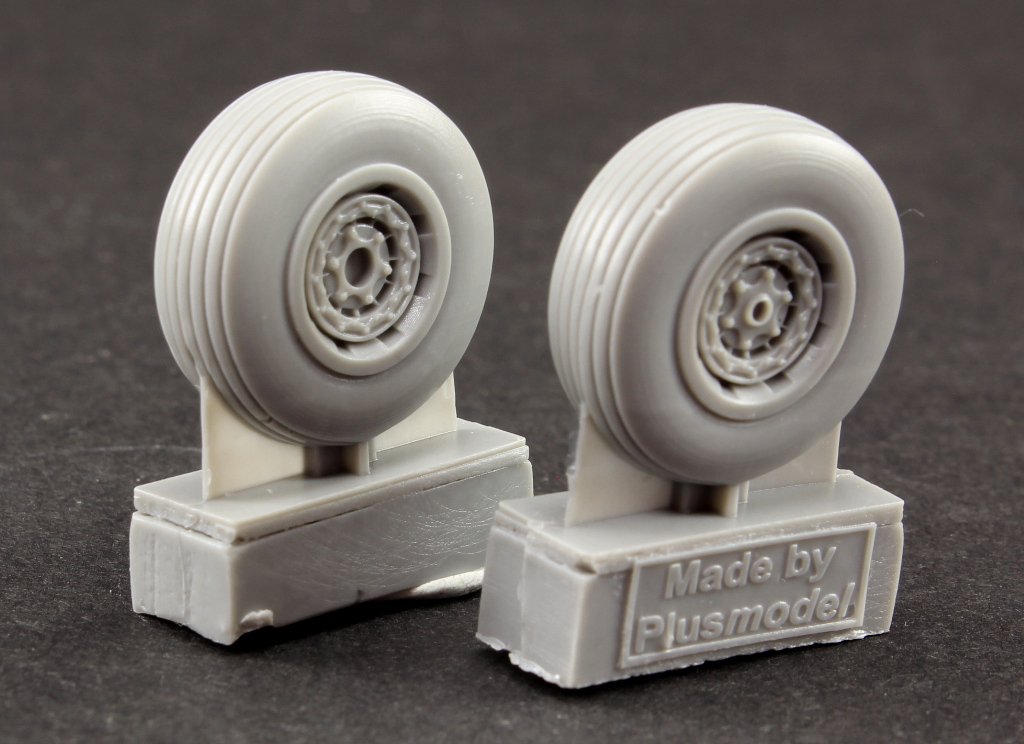
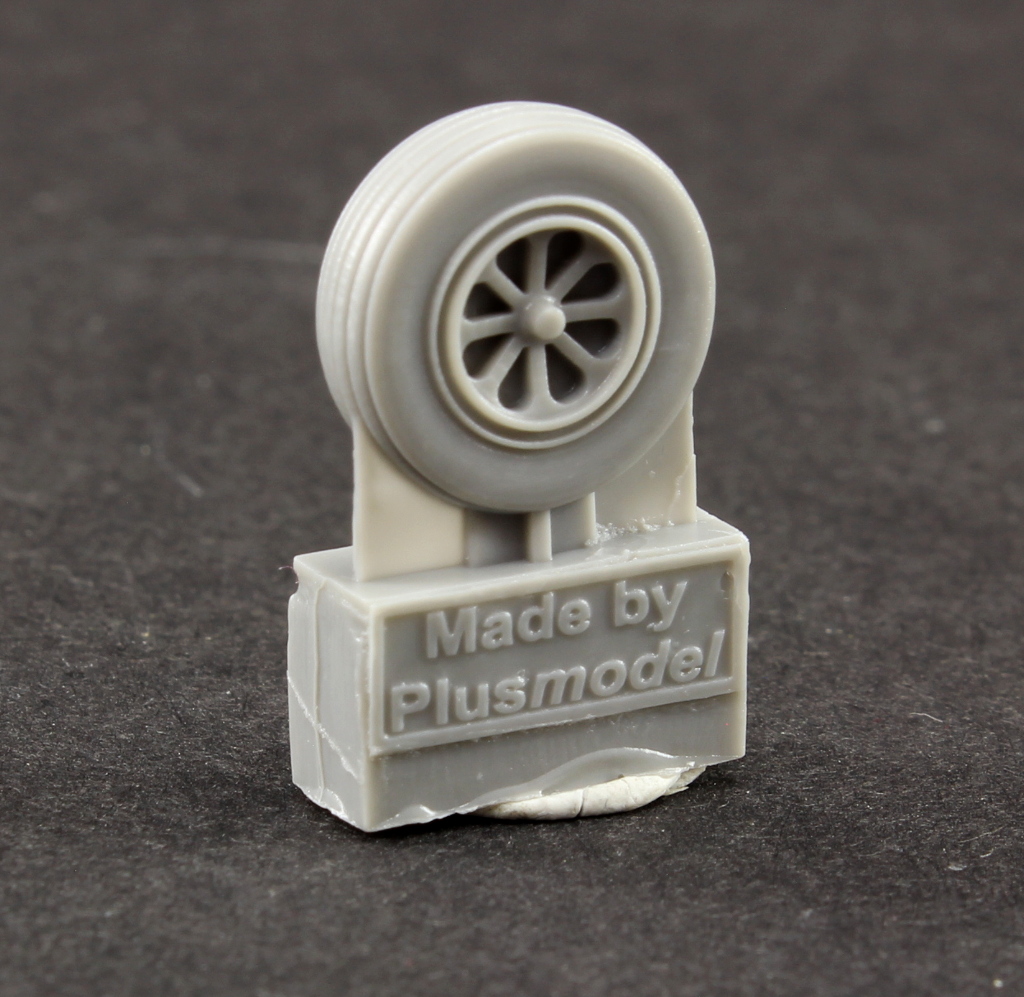
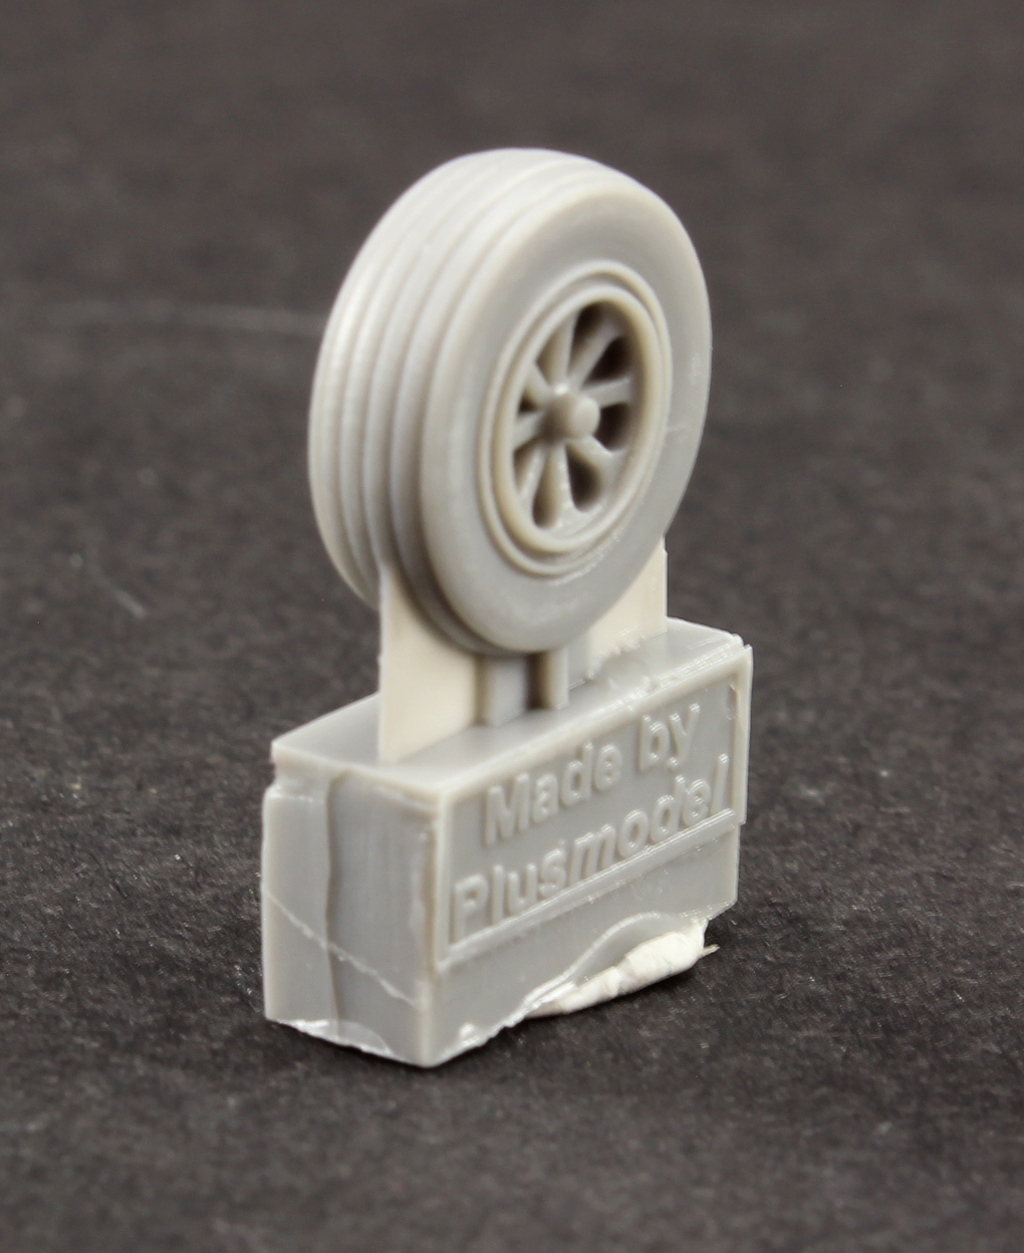
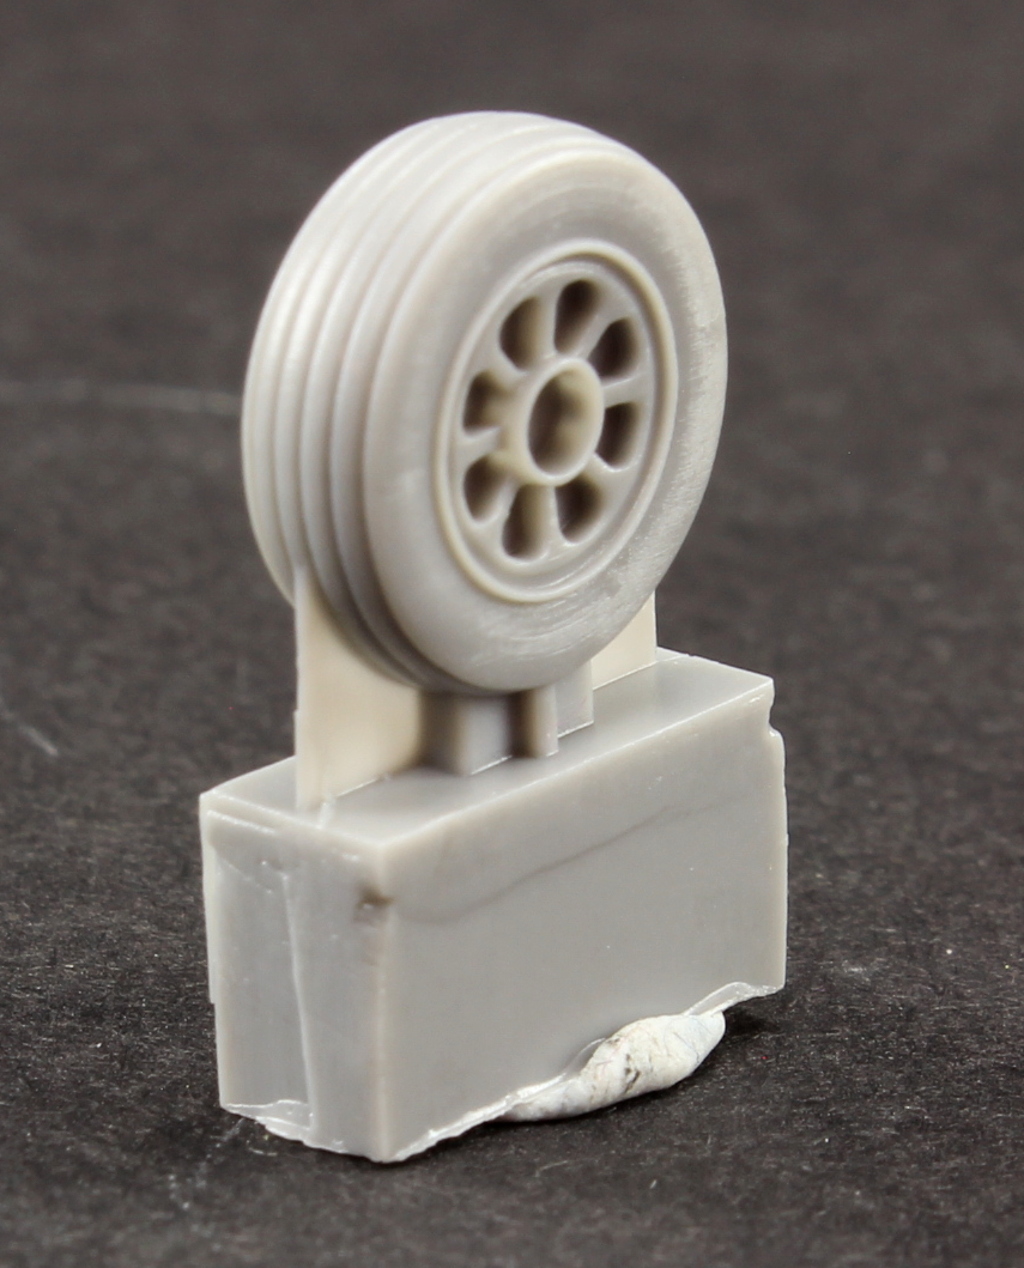
Plusmodel 1:72 Wheels for C-46 Commando #AL7034 On our beloved hobby, on what airplane modelling concern, there’s still room for new models. It’s not the case for the model for which this set is intended. The 70’s 1:72 Williams Brothers C-46 is the only offer if you pretend to build this model. What’s on the box The box is clear about the content. Two main wheels and a rear one. On the back paper, photographs of the set already paint and weathered, to serve as inspiration. As many WW2 American airplanes, the wheel hub’s painted Metallic and the tyre painted on the eternal black, or tyre black, or dark grey, whatever suites the modeller’s personal interpretation. Main wheels The main wheels are composed by the tyre and front rim and the rear rim as a separate part. The removal of the casting blocks can be done with no effort, using a small saw, as the attachment to the casting mould is minimal and it’s located on the area of the tire in touch with the ground. The tires are mould with weight effect. The overall detail of the wheels is good specially comparing to the kit’s offering. Rear wheel This is the smaller wheel to fit on the tail landing gear. As the main wheels, detail is good and it will enhance, again, the kit’s offering. Comparing Plusmodel’s wheel with the plastic one the gain Is clear, despite some surgery is required to remove the kit’s original with the resin replacement. With some patience and a panpipe playlist on your favourite digital player will do the job. Conclusion This set is a improve on the kit’s parts, mainly to the fact that the mould has its first release on the 70’s. The main wheels are an easy replace to the original ones and the rear one will require a small intervention to replace but nothing too difficult. This is a must set to enhance the look of the original model and as so, recommended. Our thanks to Plusmodel for the review samples and all the support given. To purchase this directly, click THIS link Ricardo Veríssimo


-
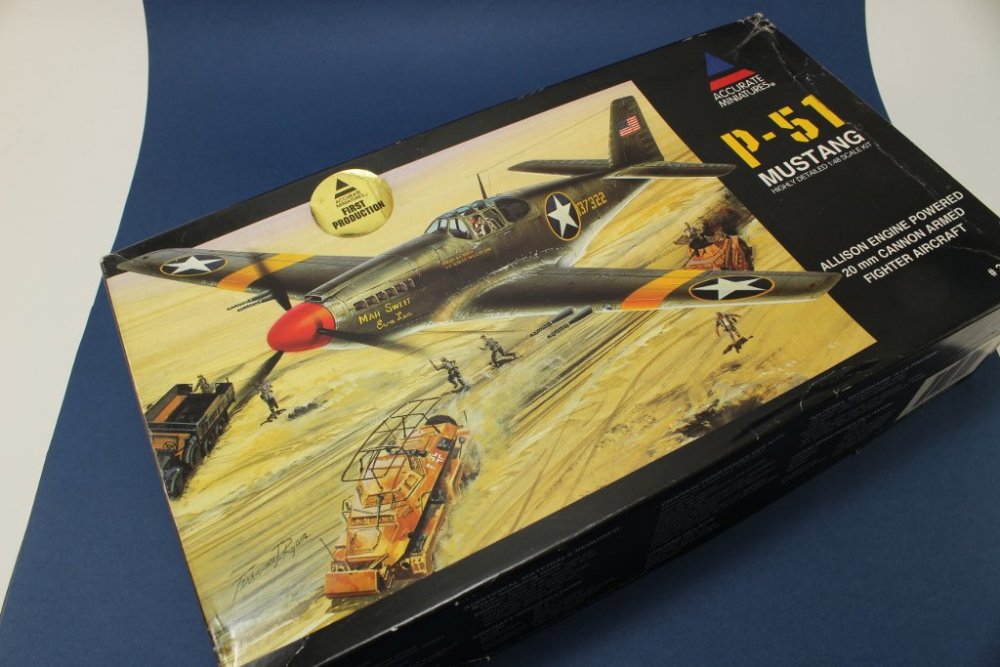
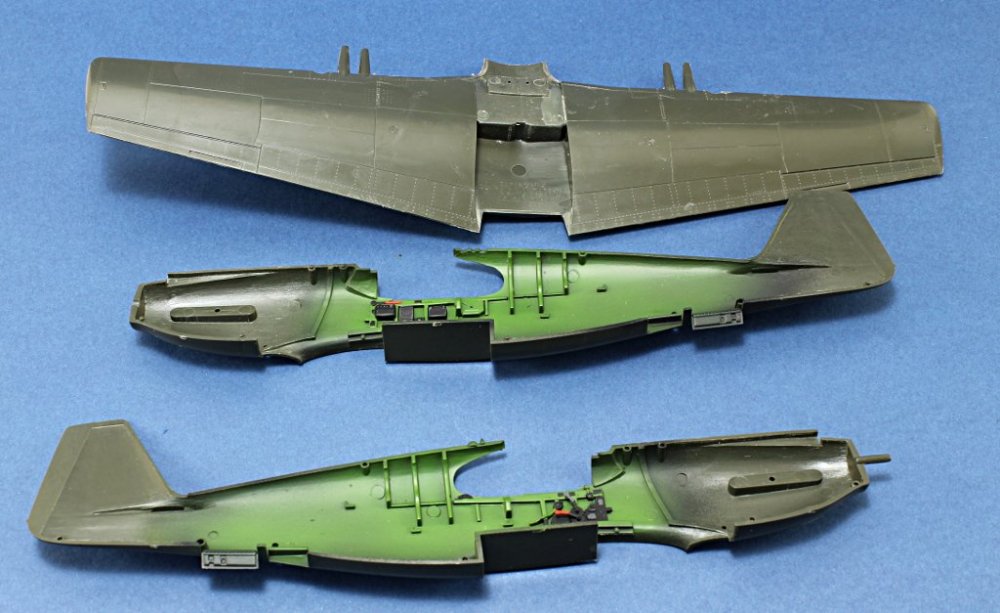
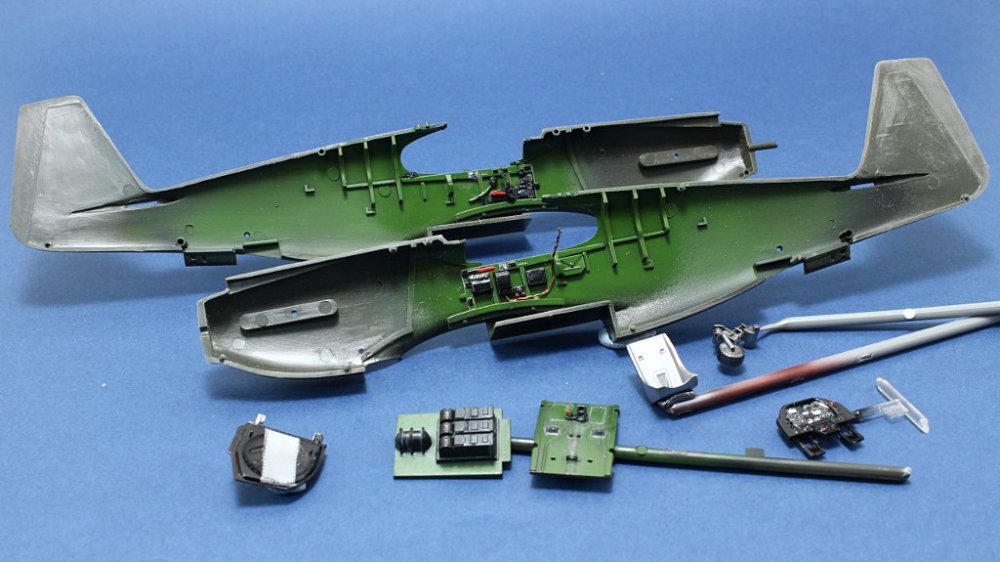
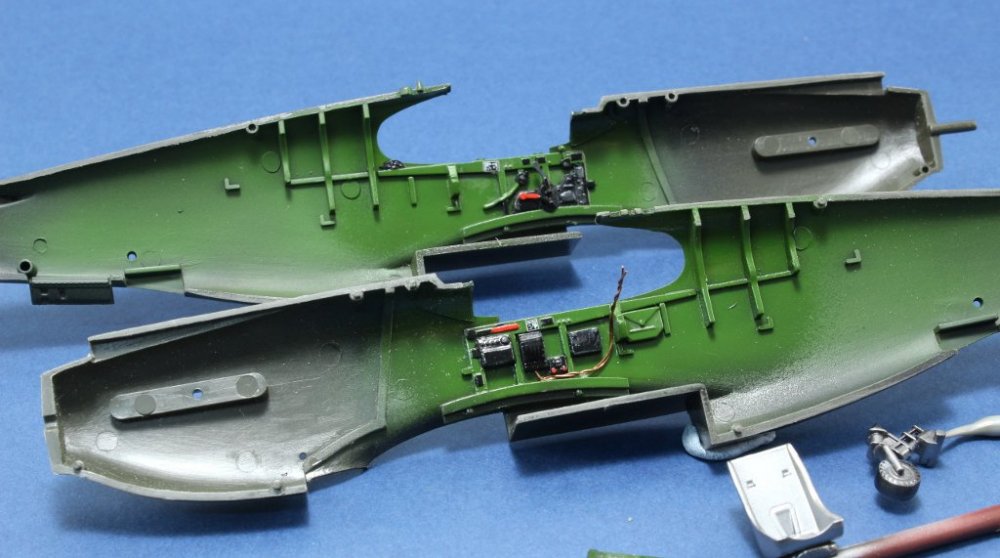
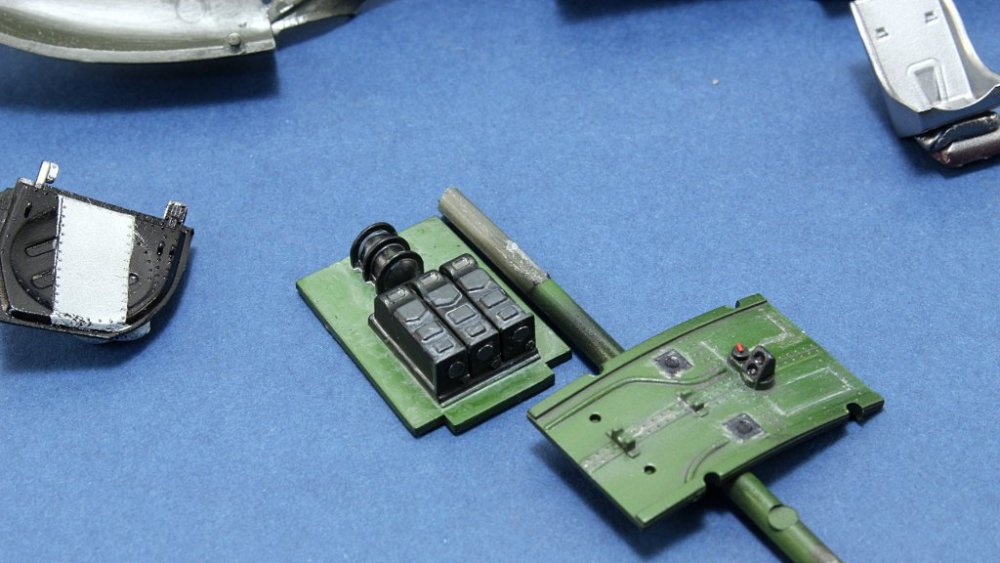
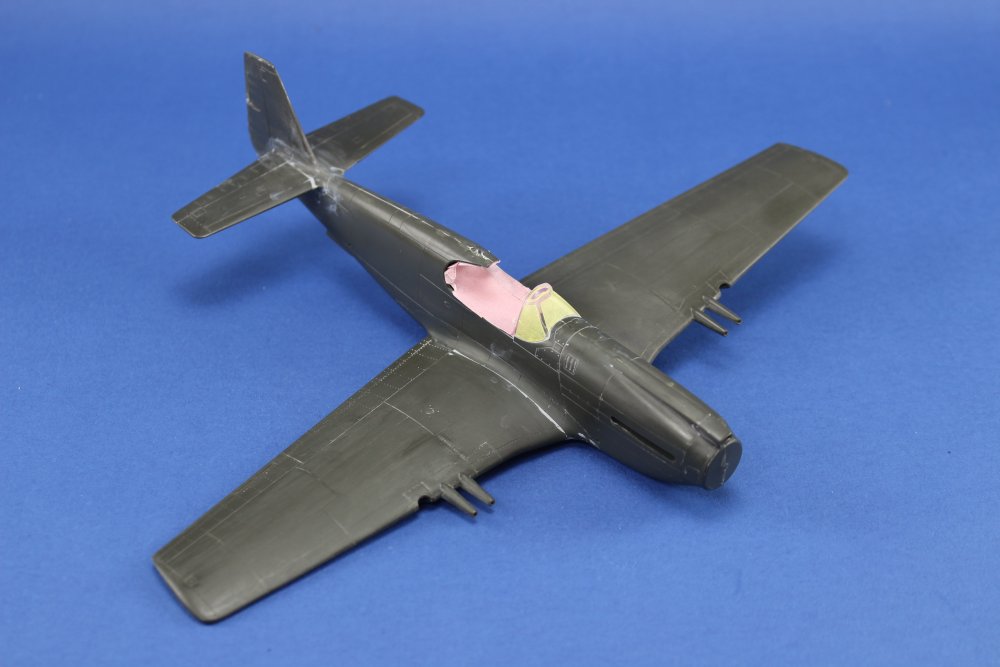
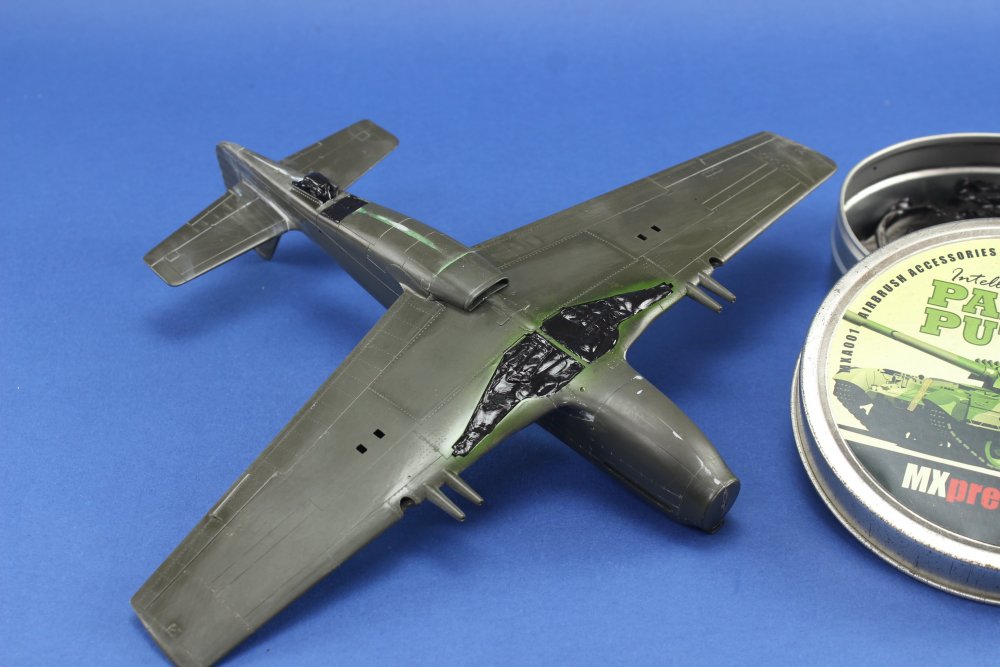
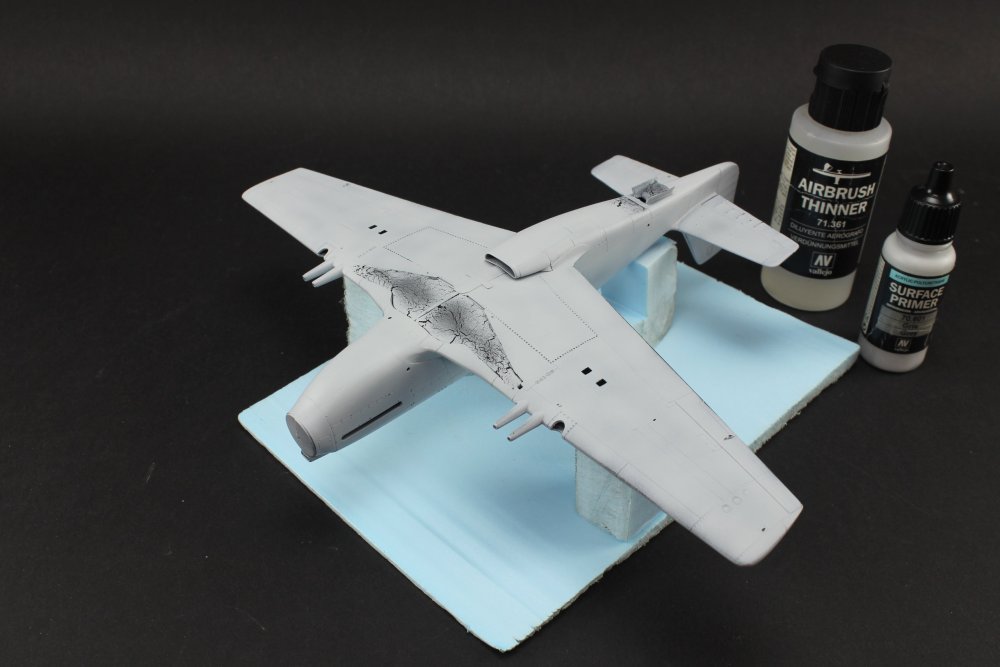
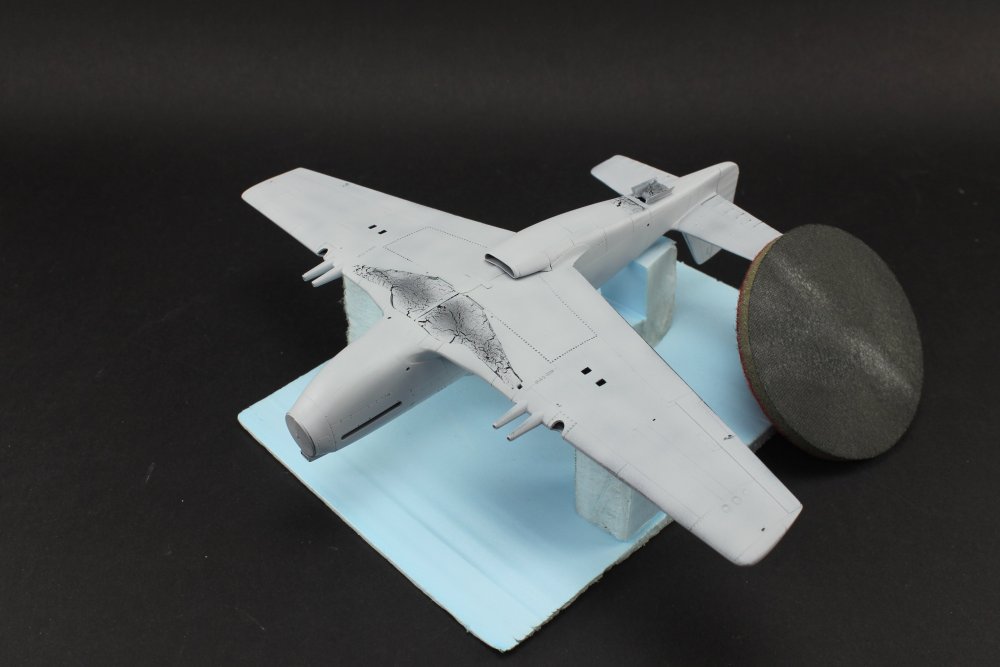
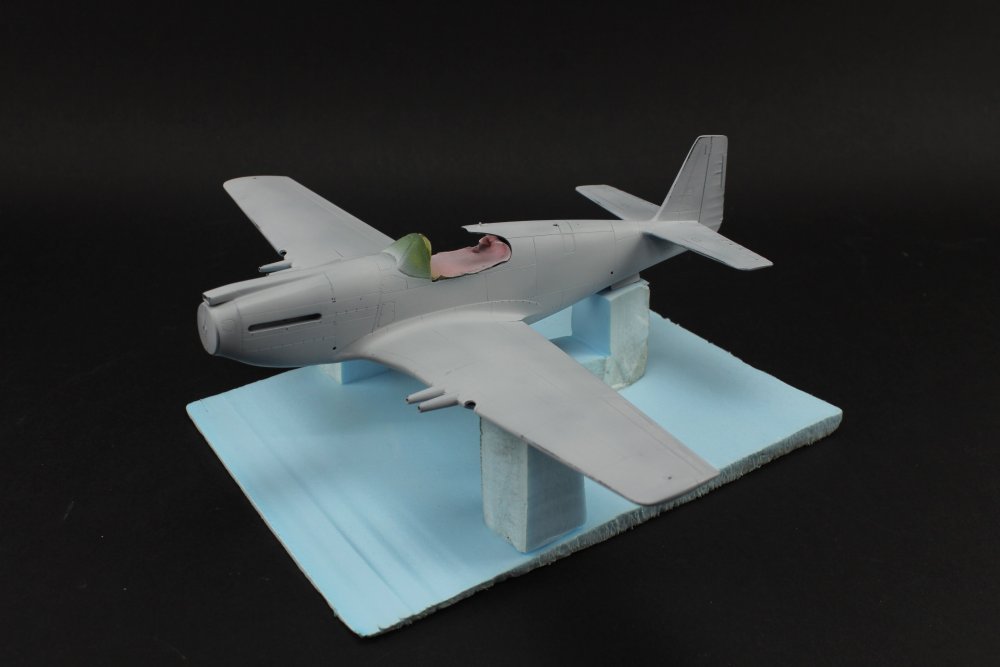
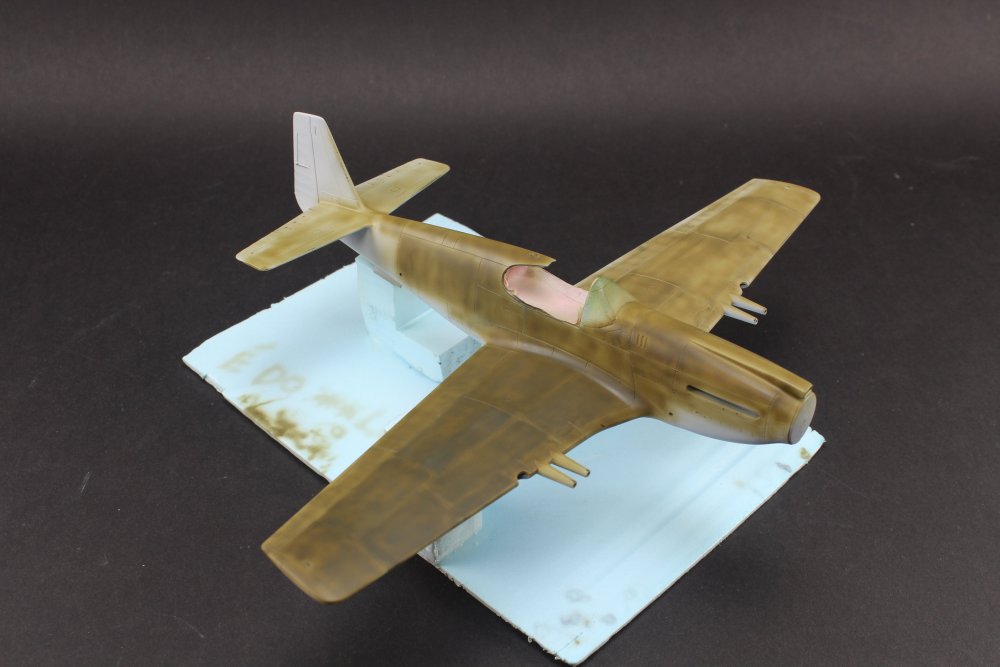
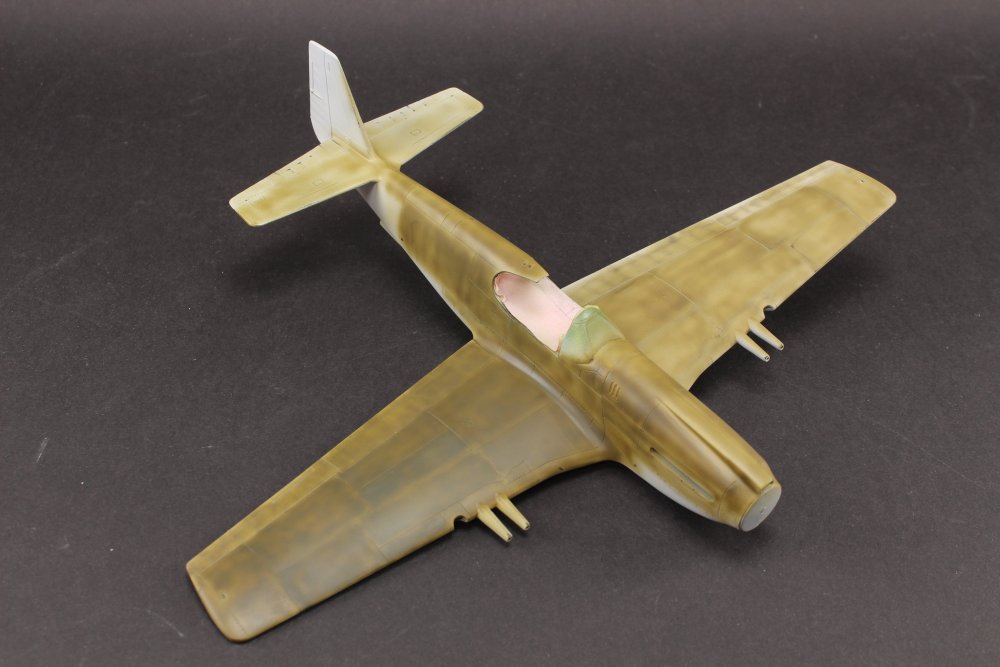
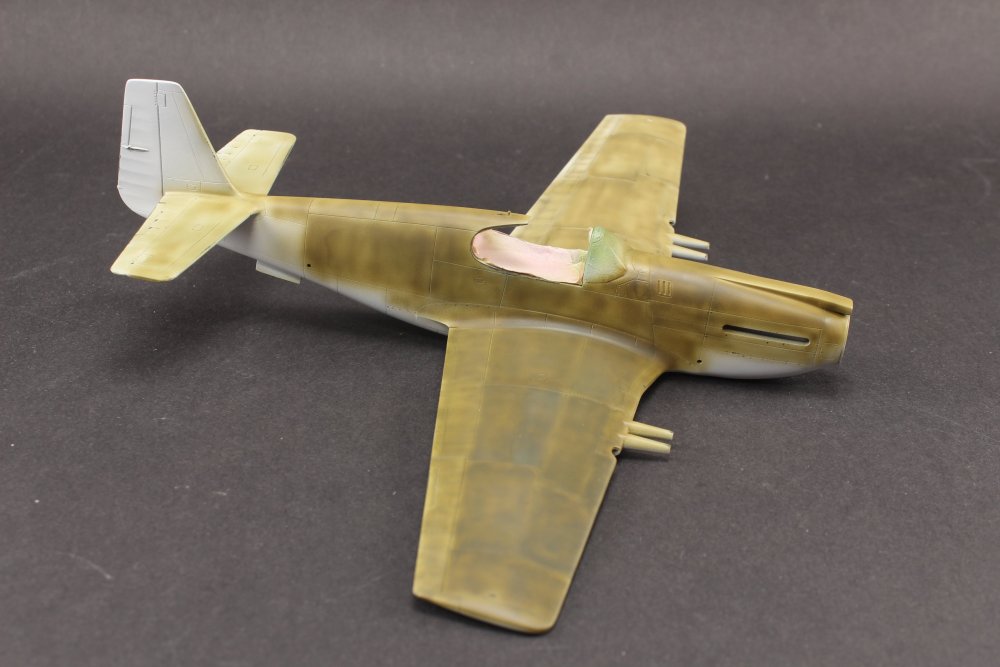
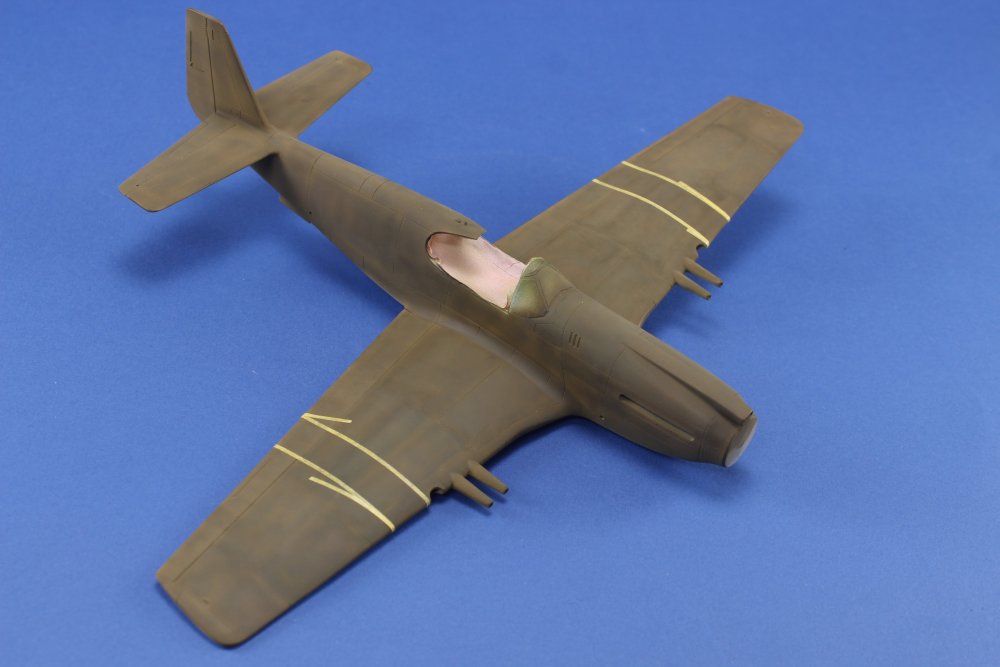
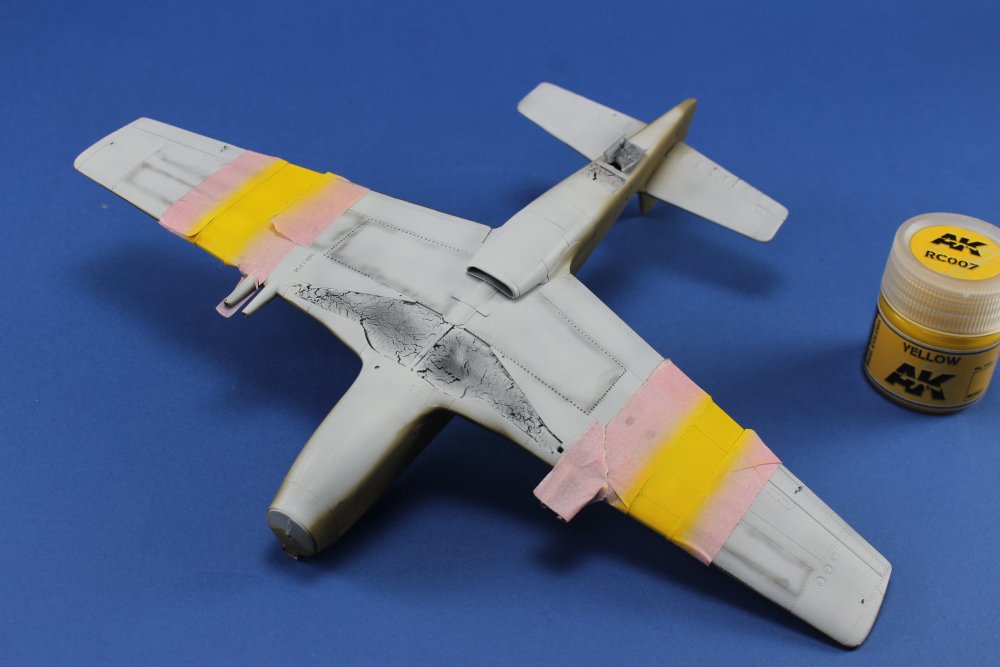
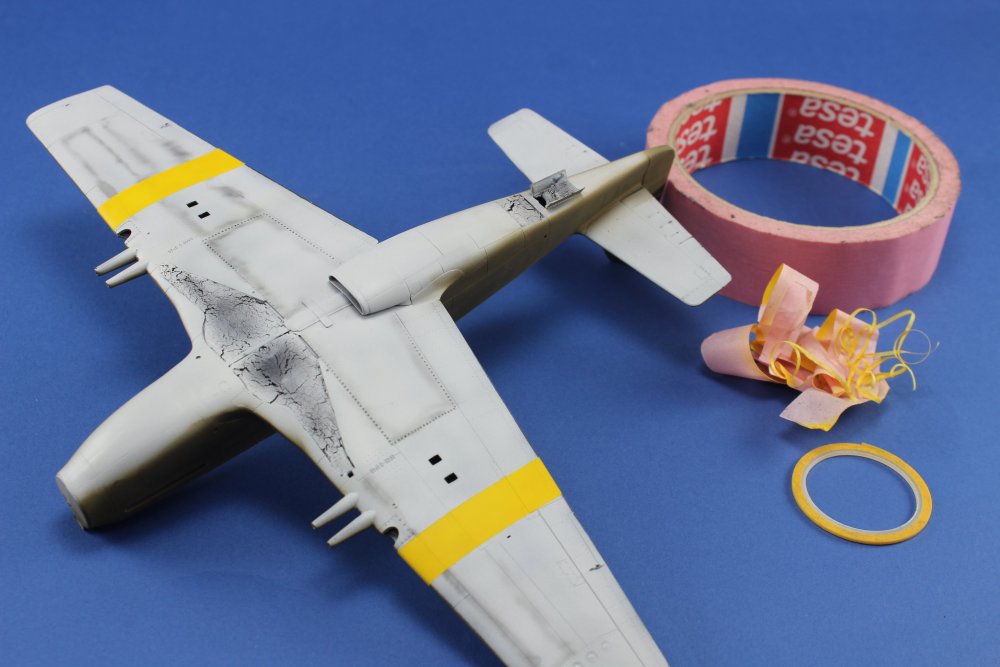
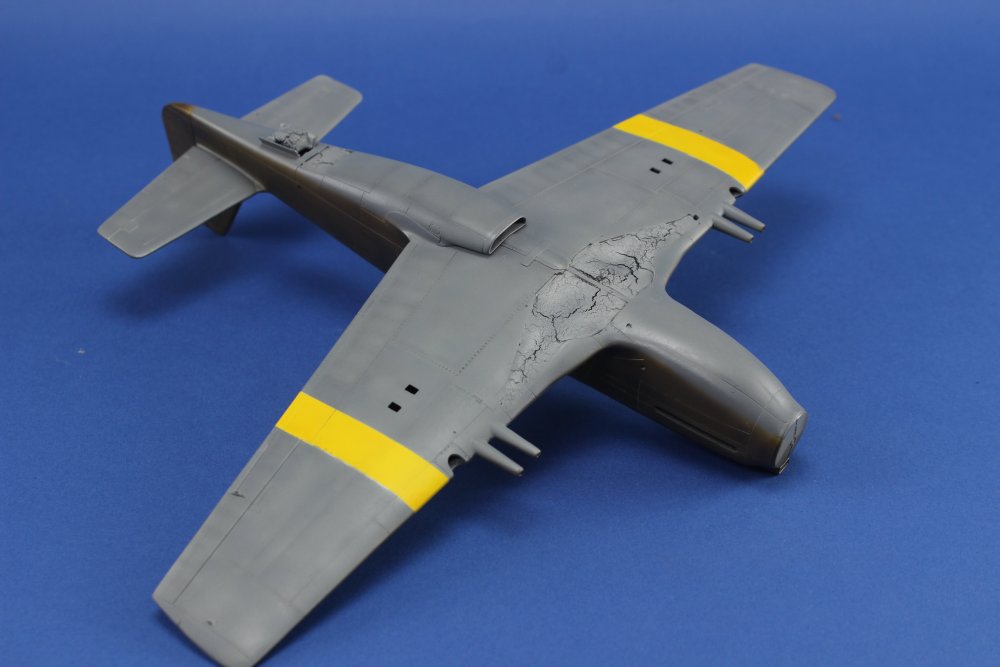
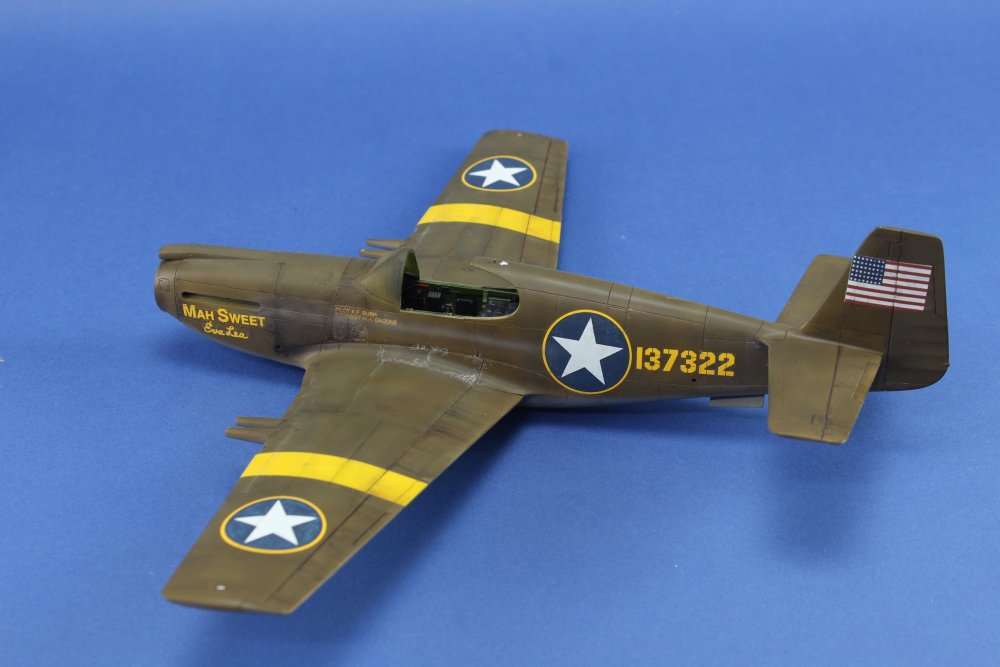
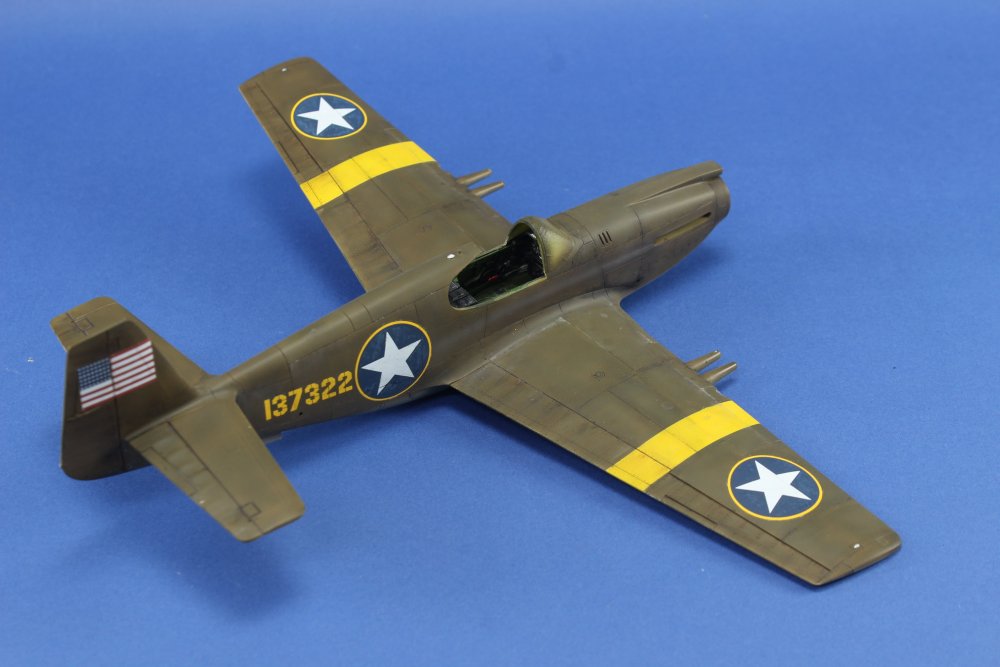
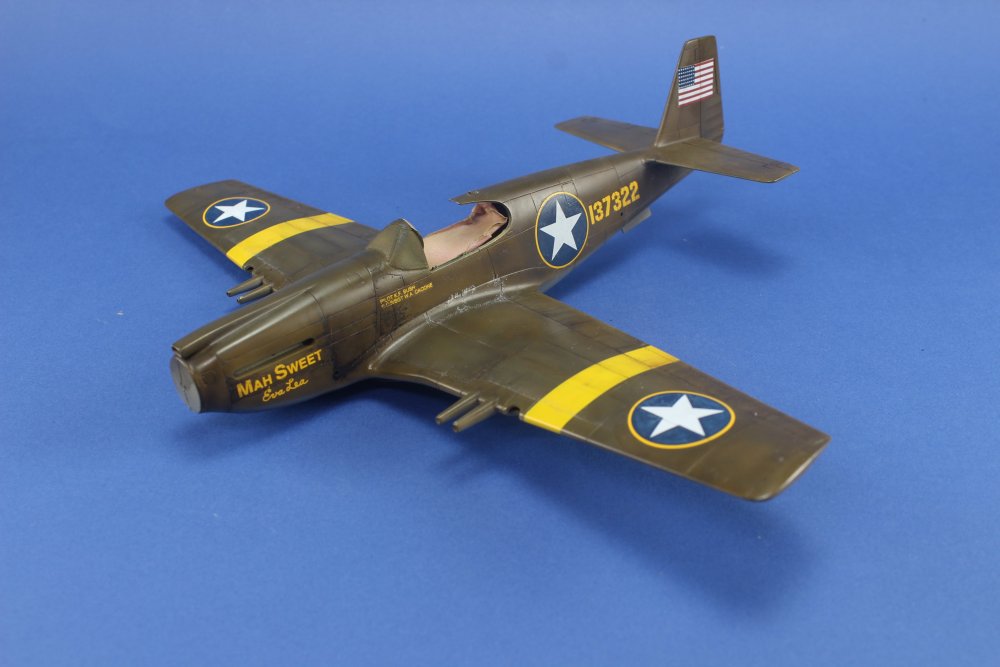
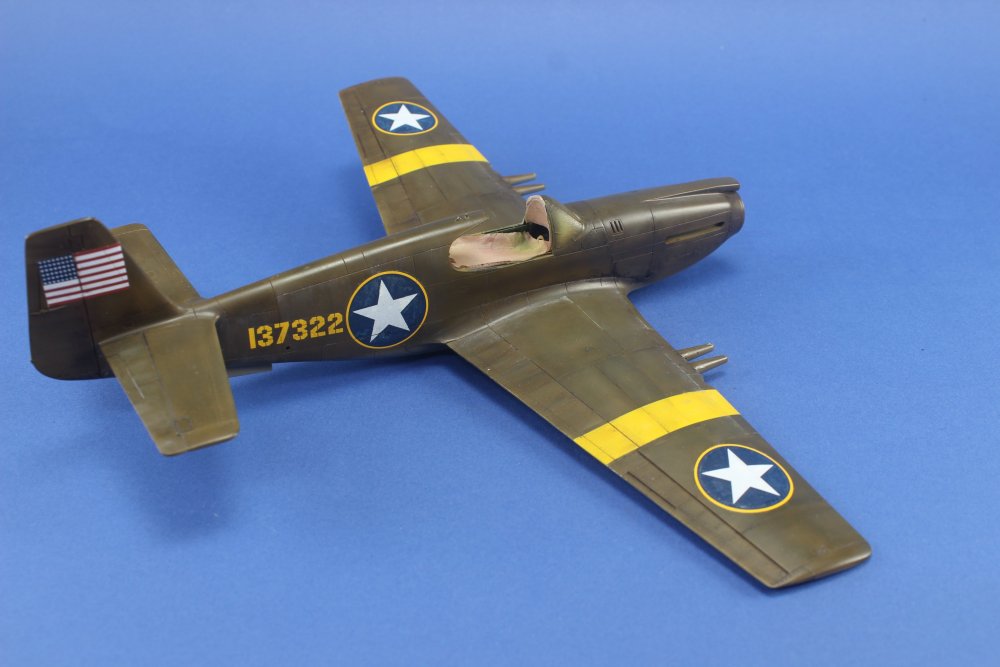
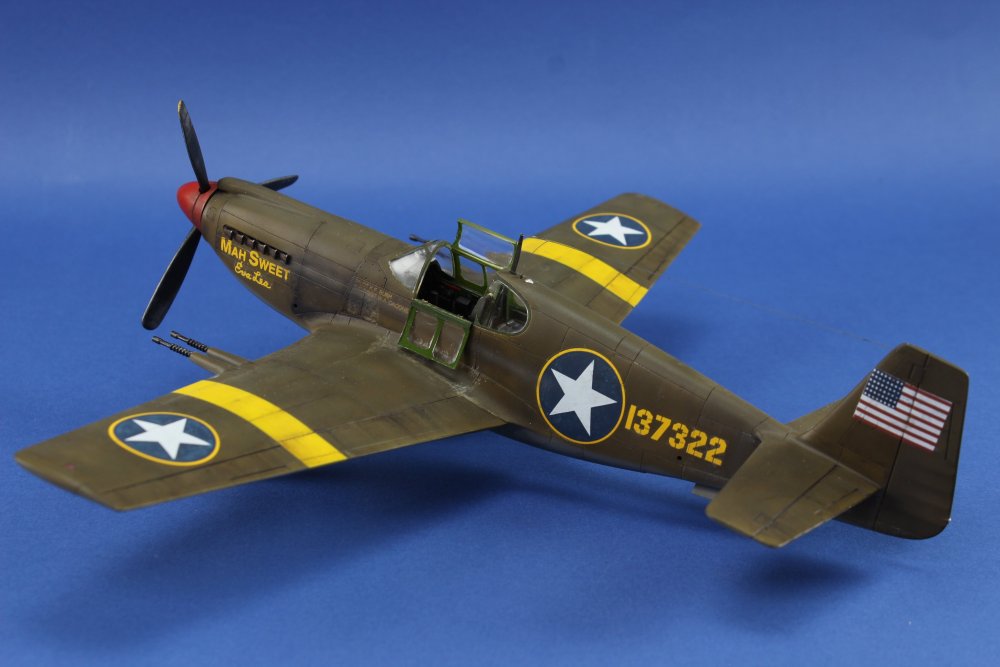
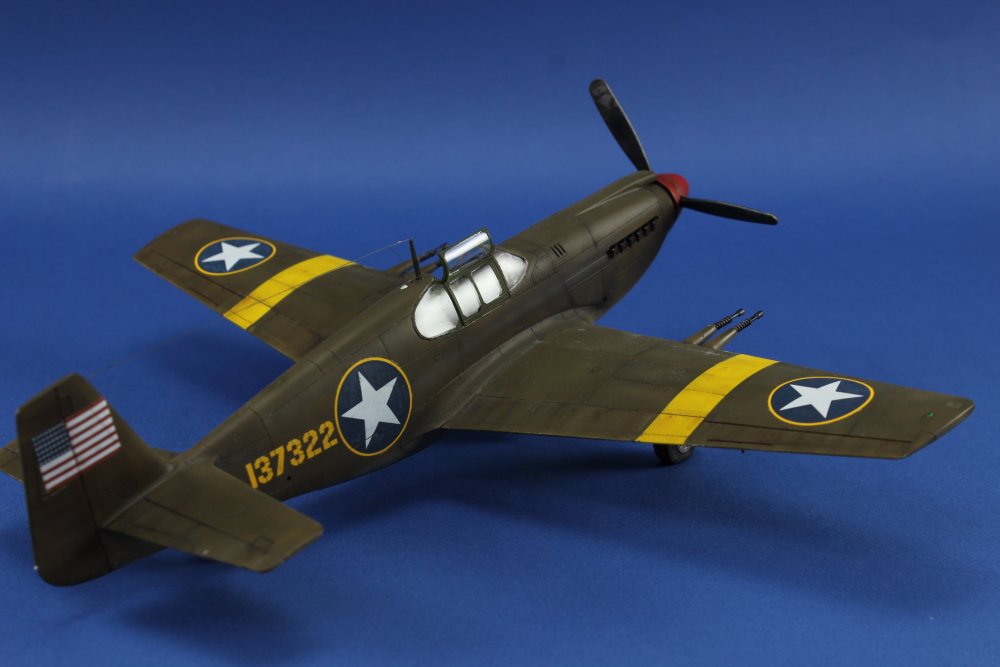
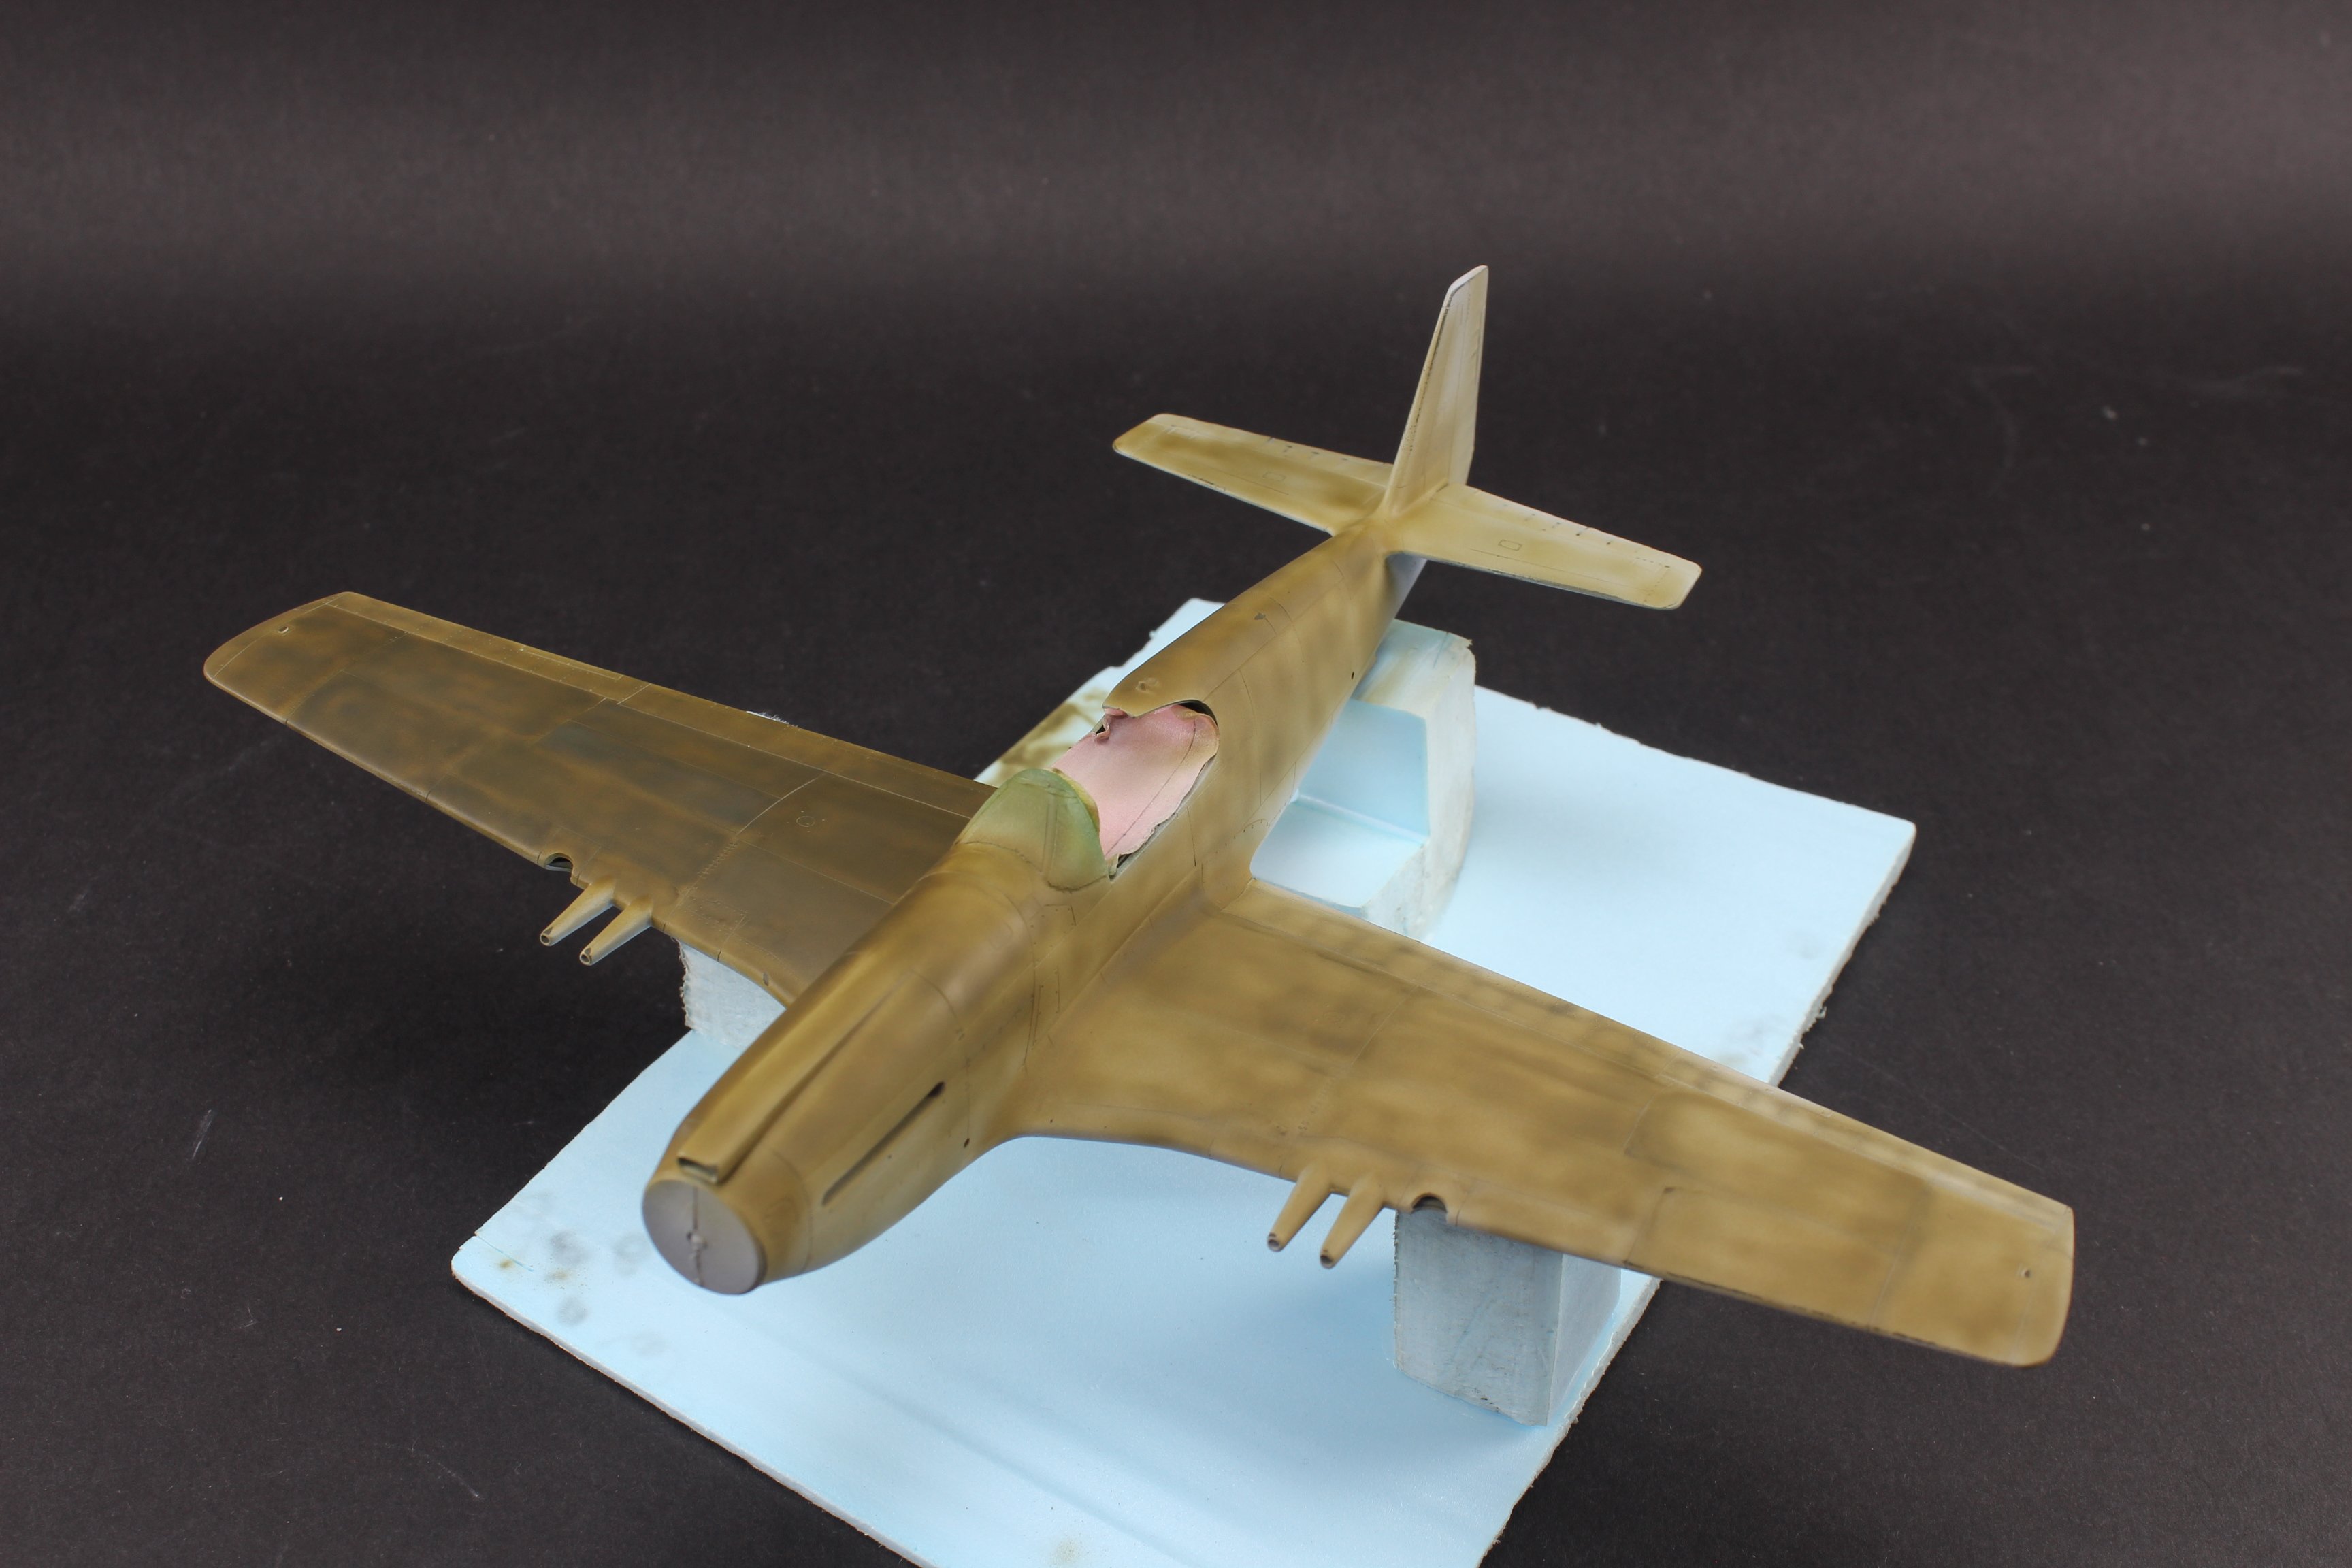
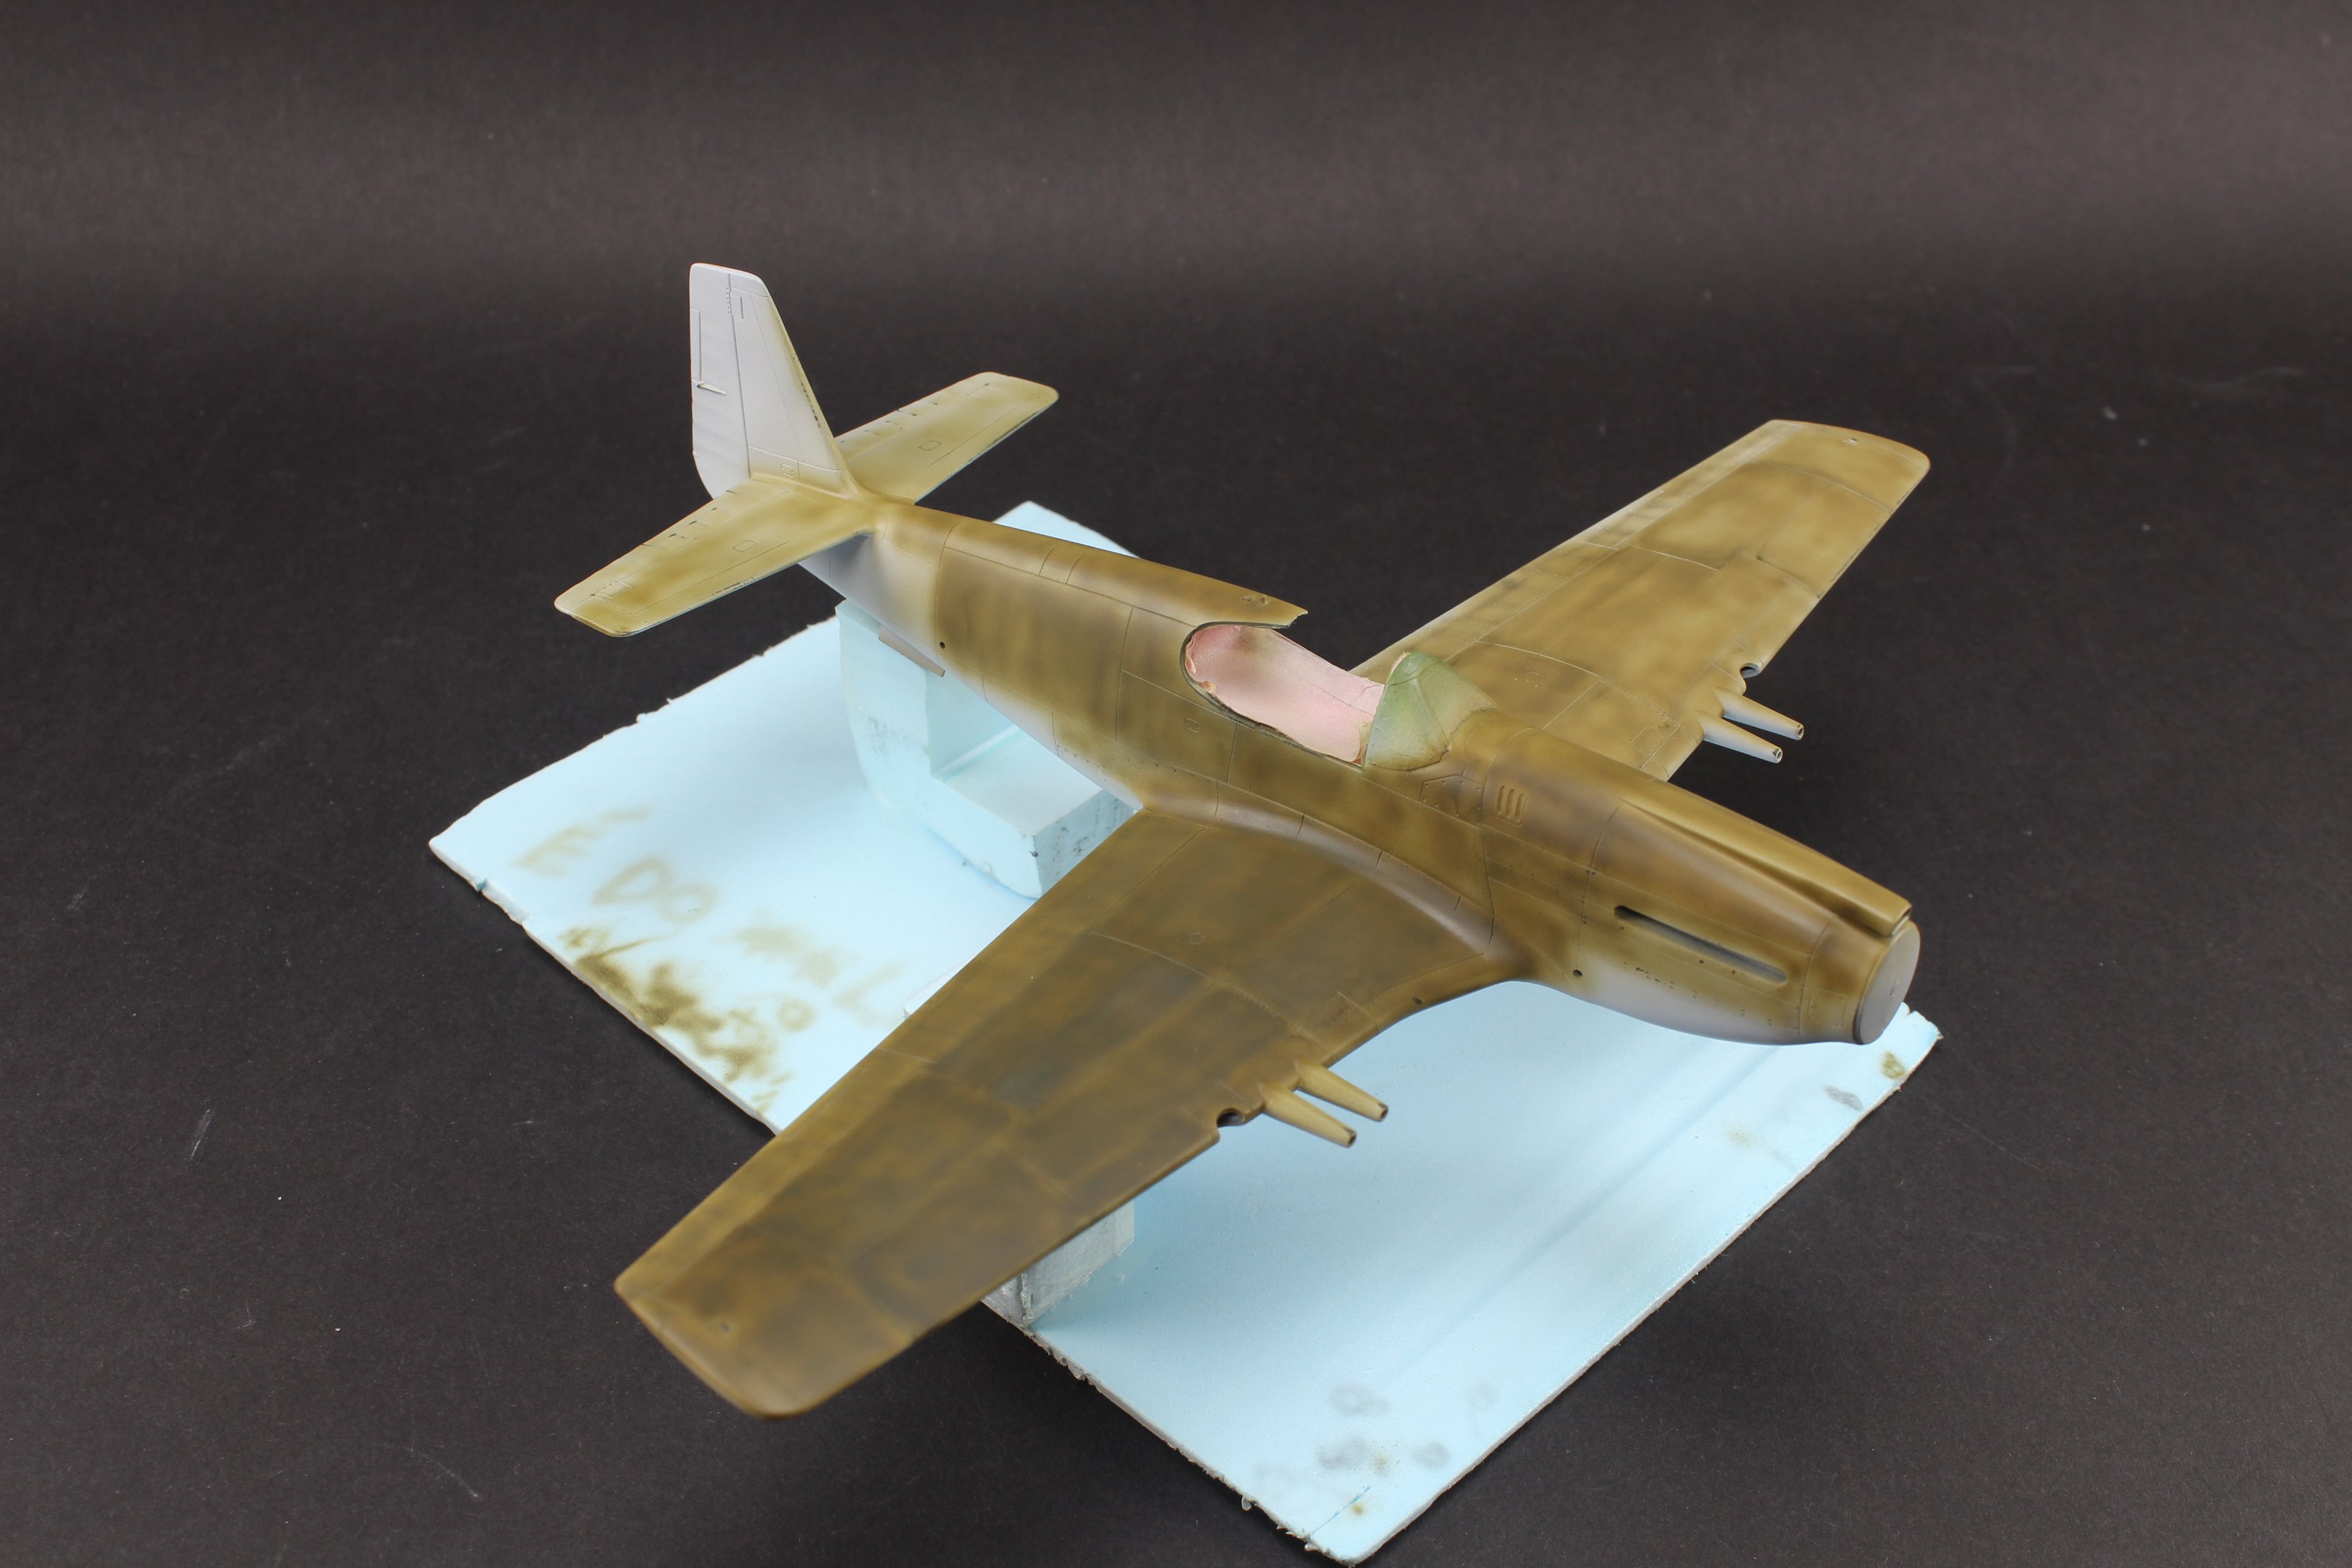
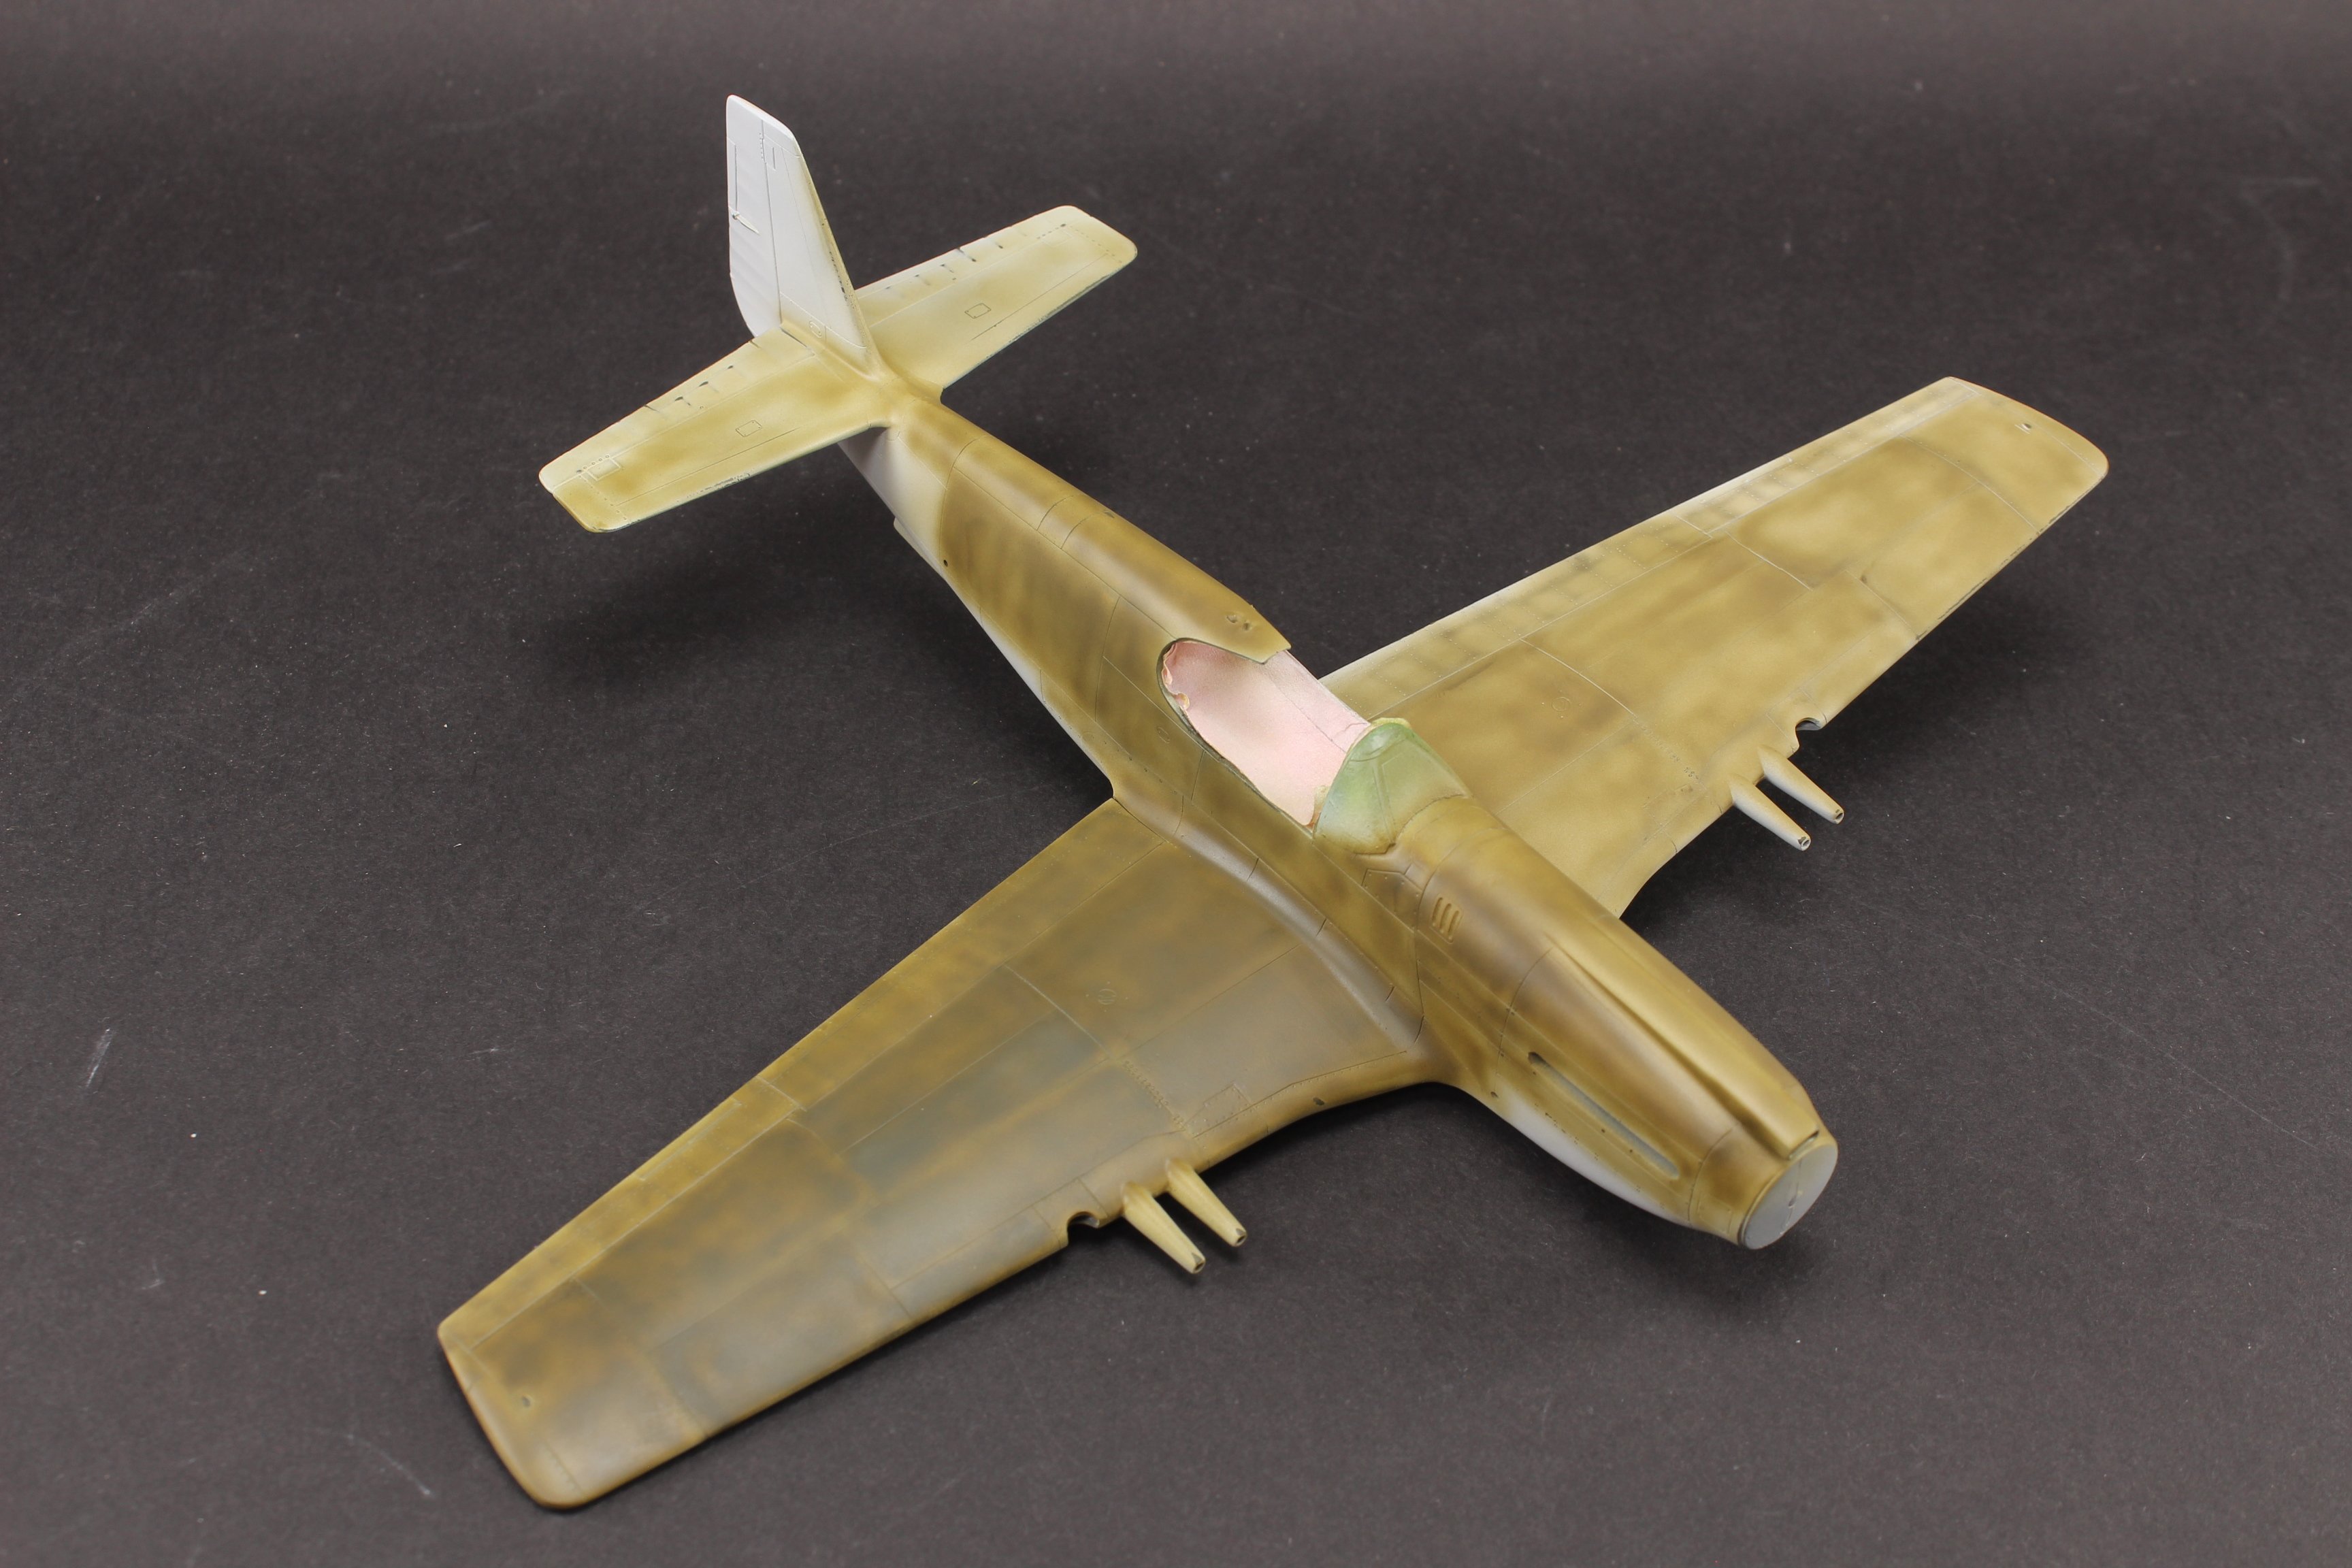
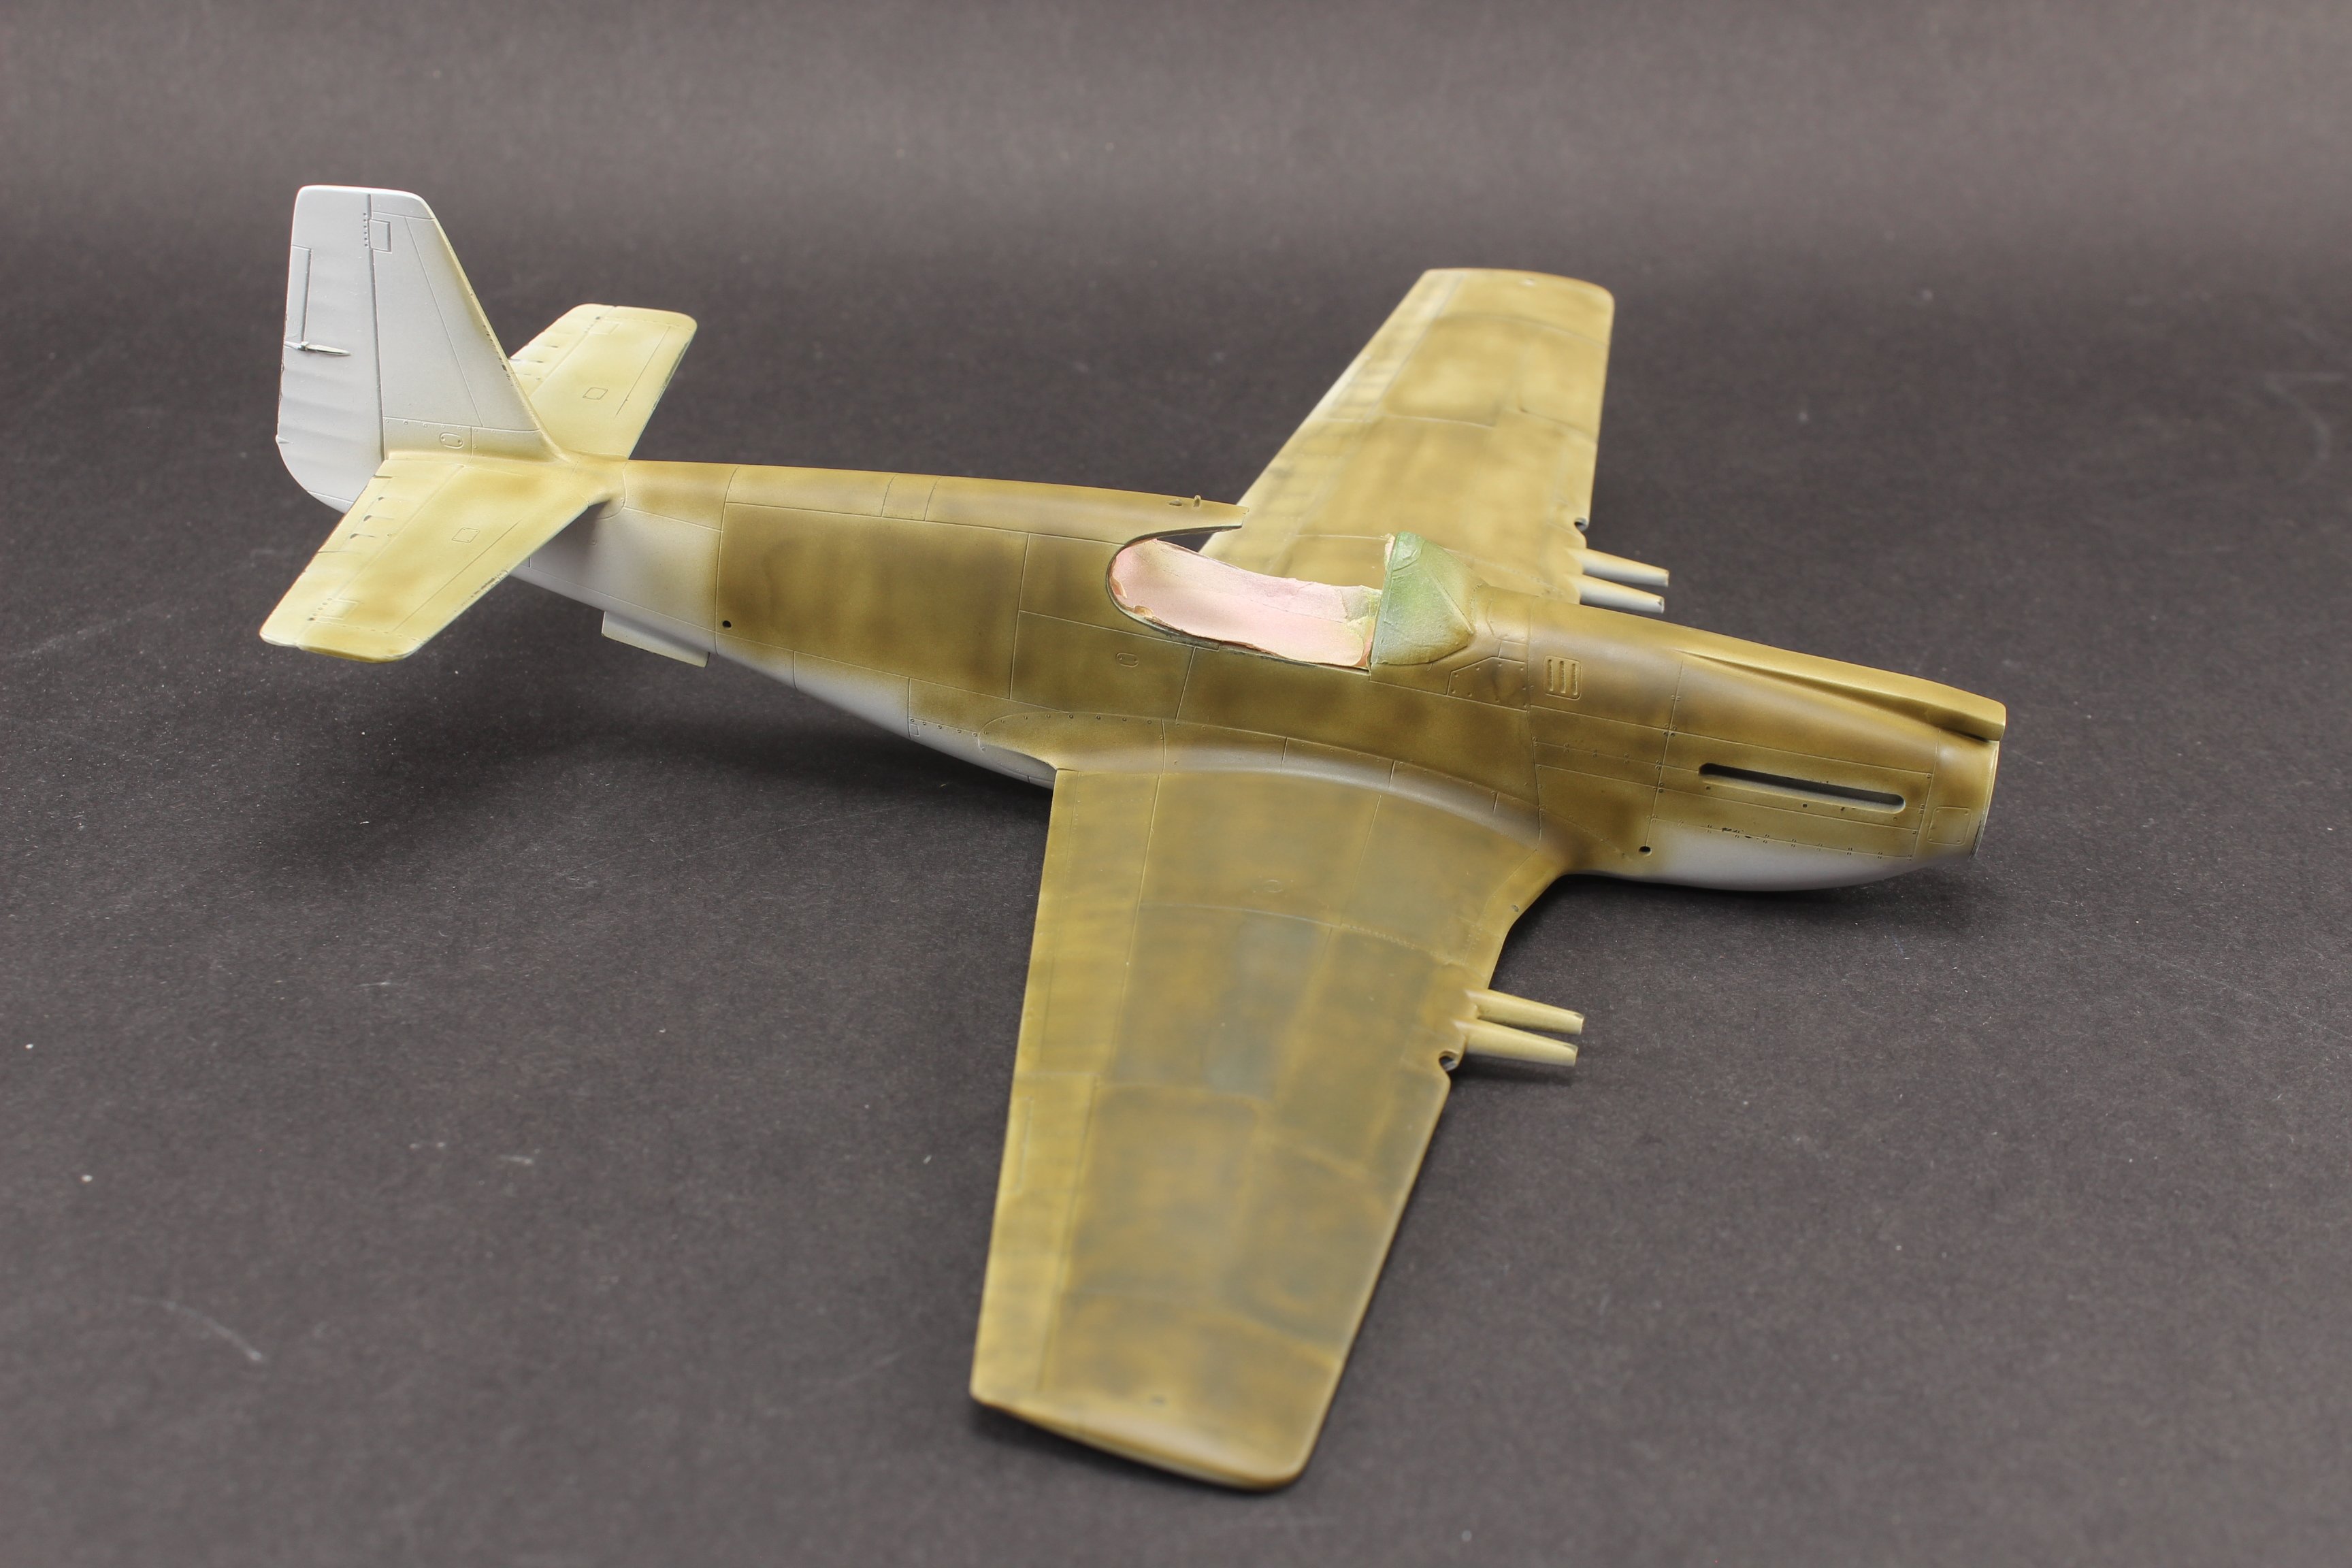
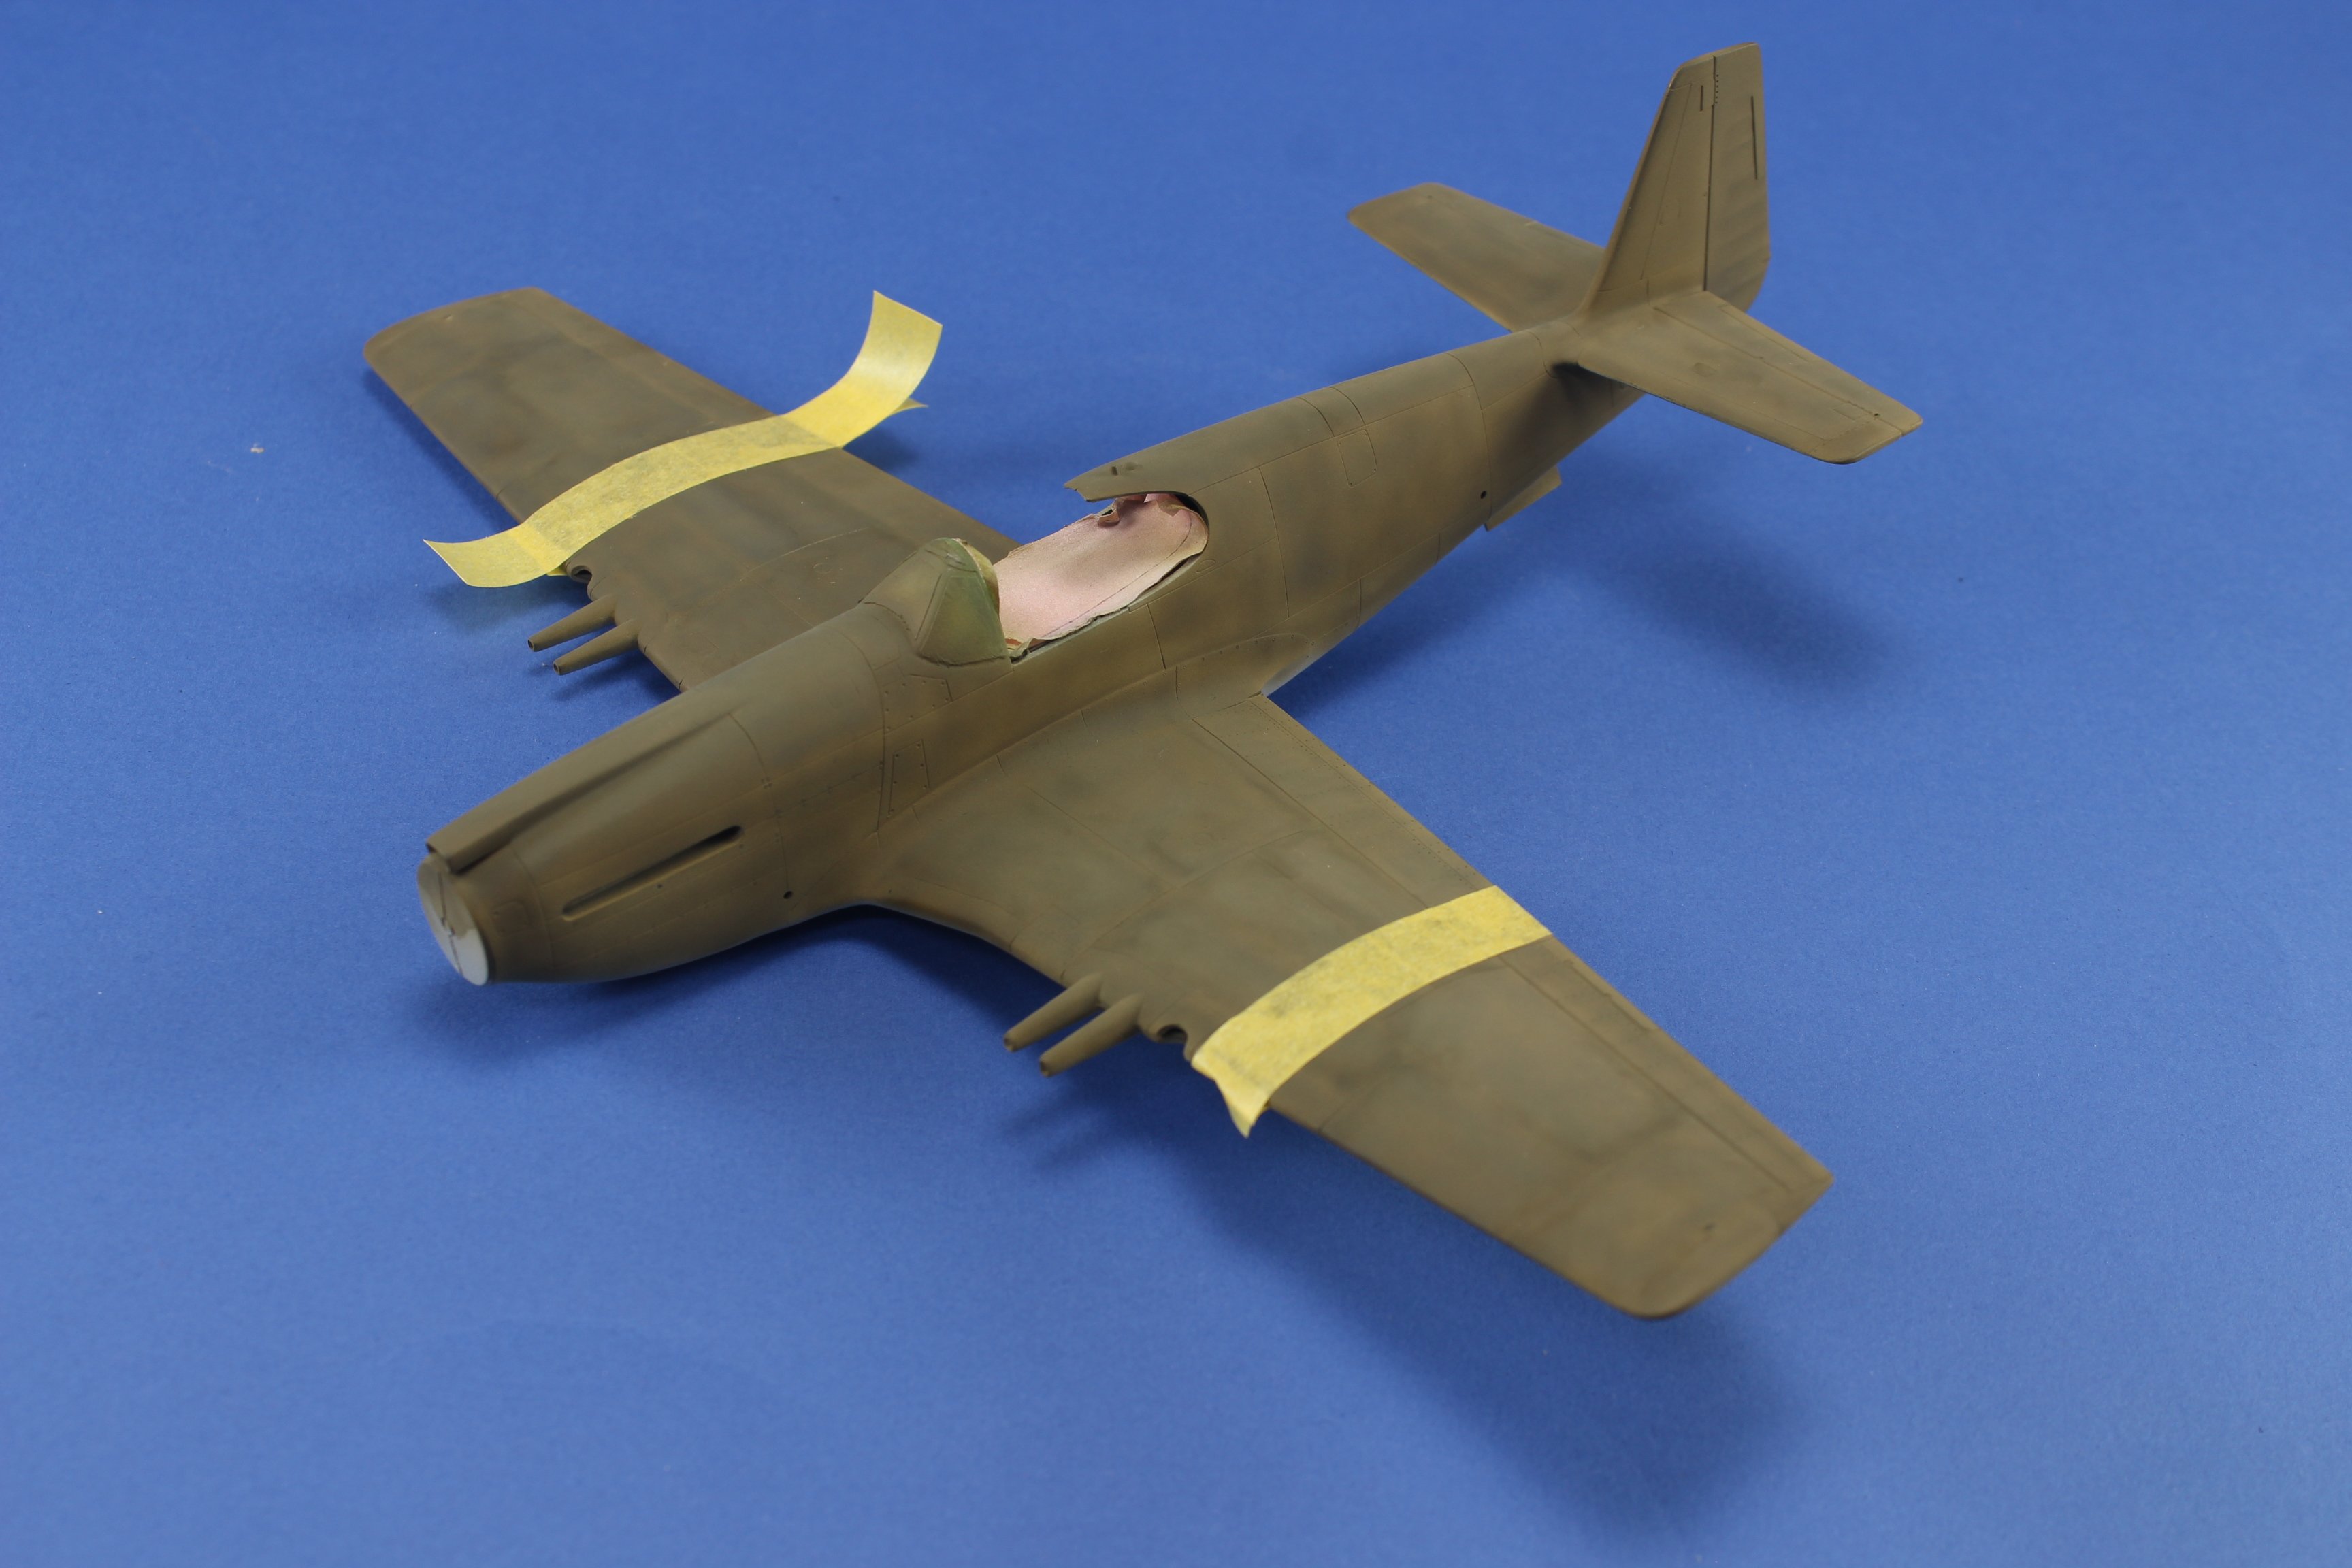
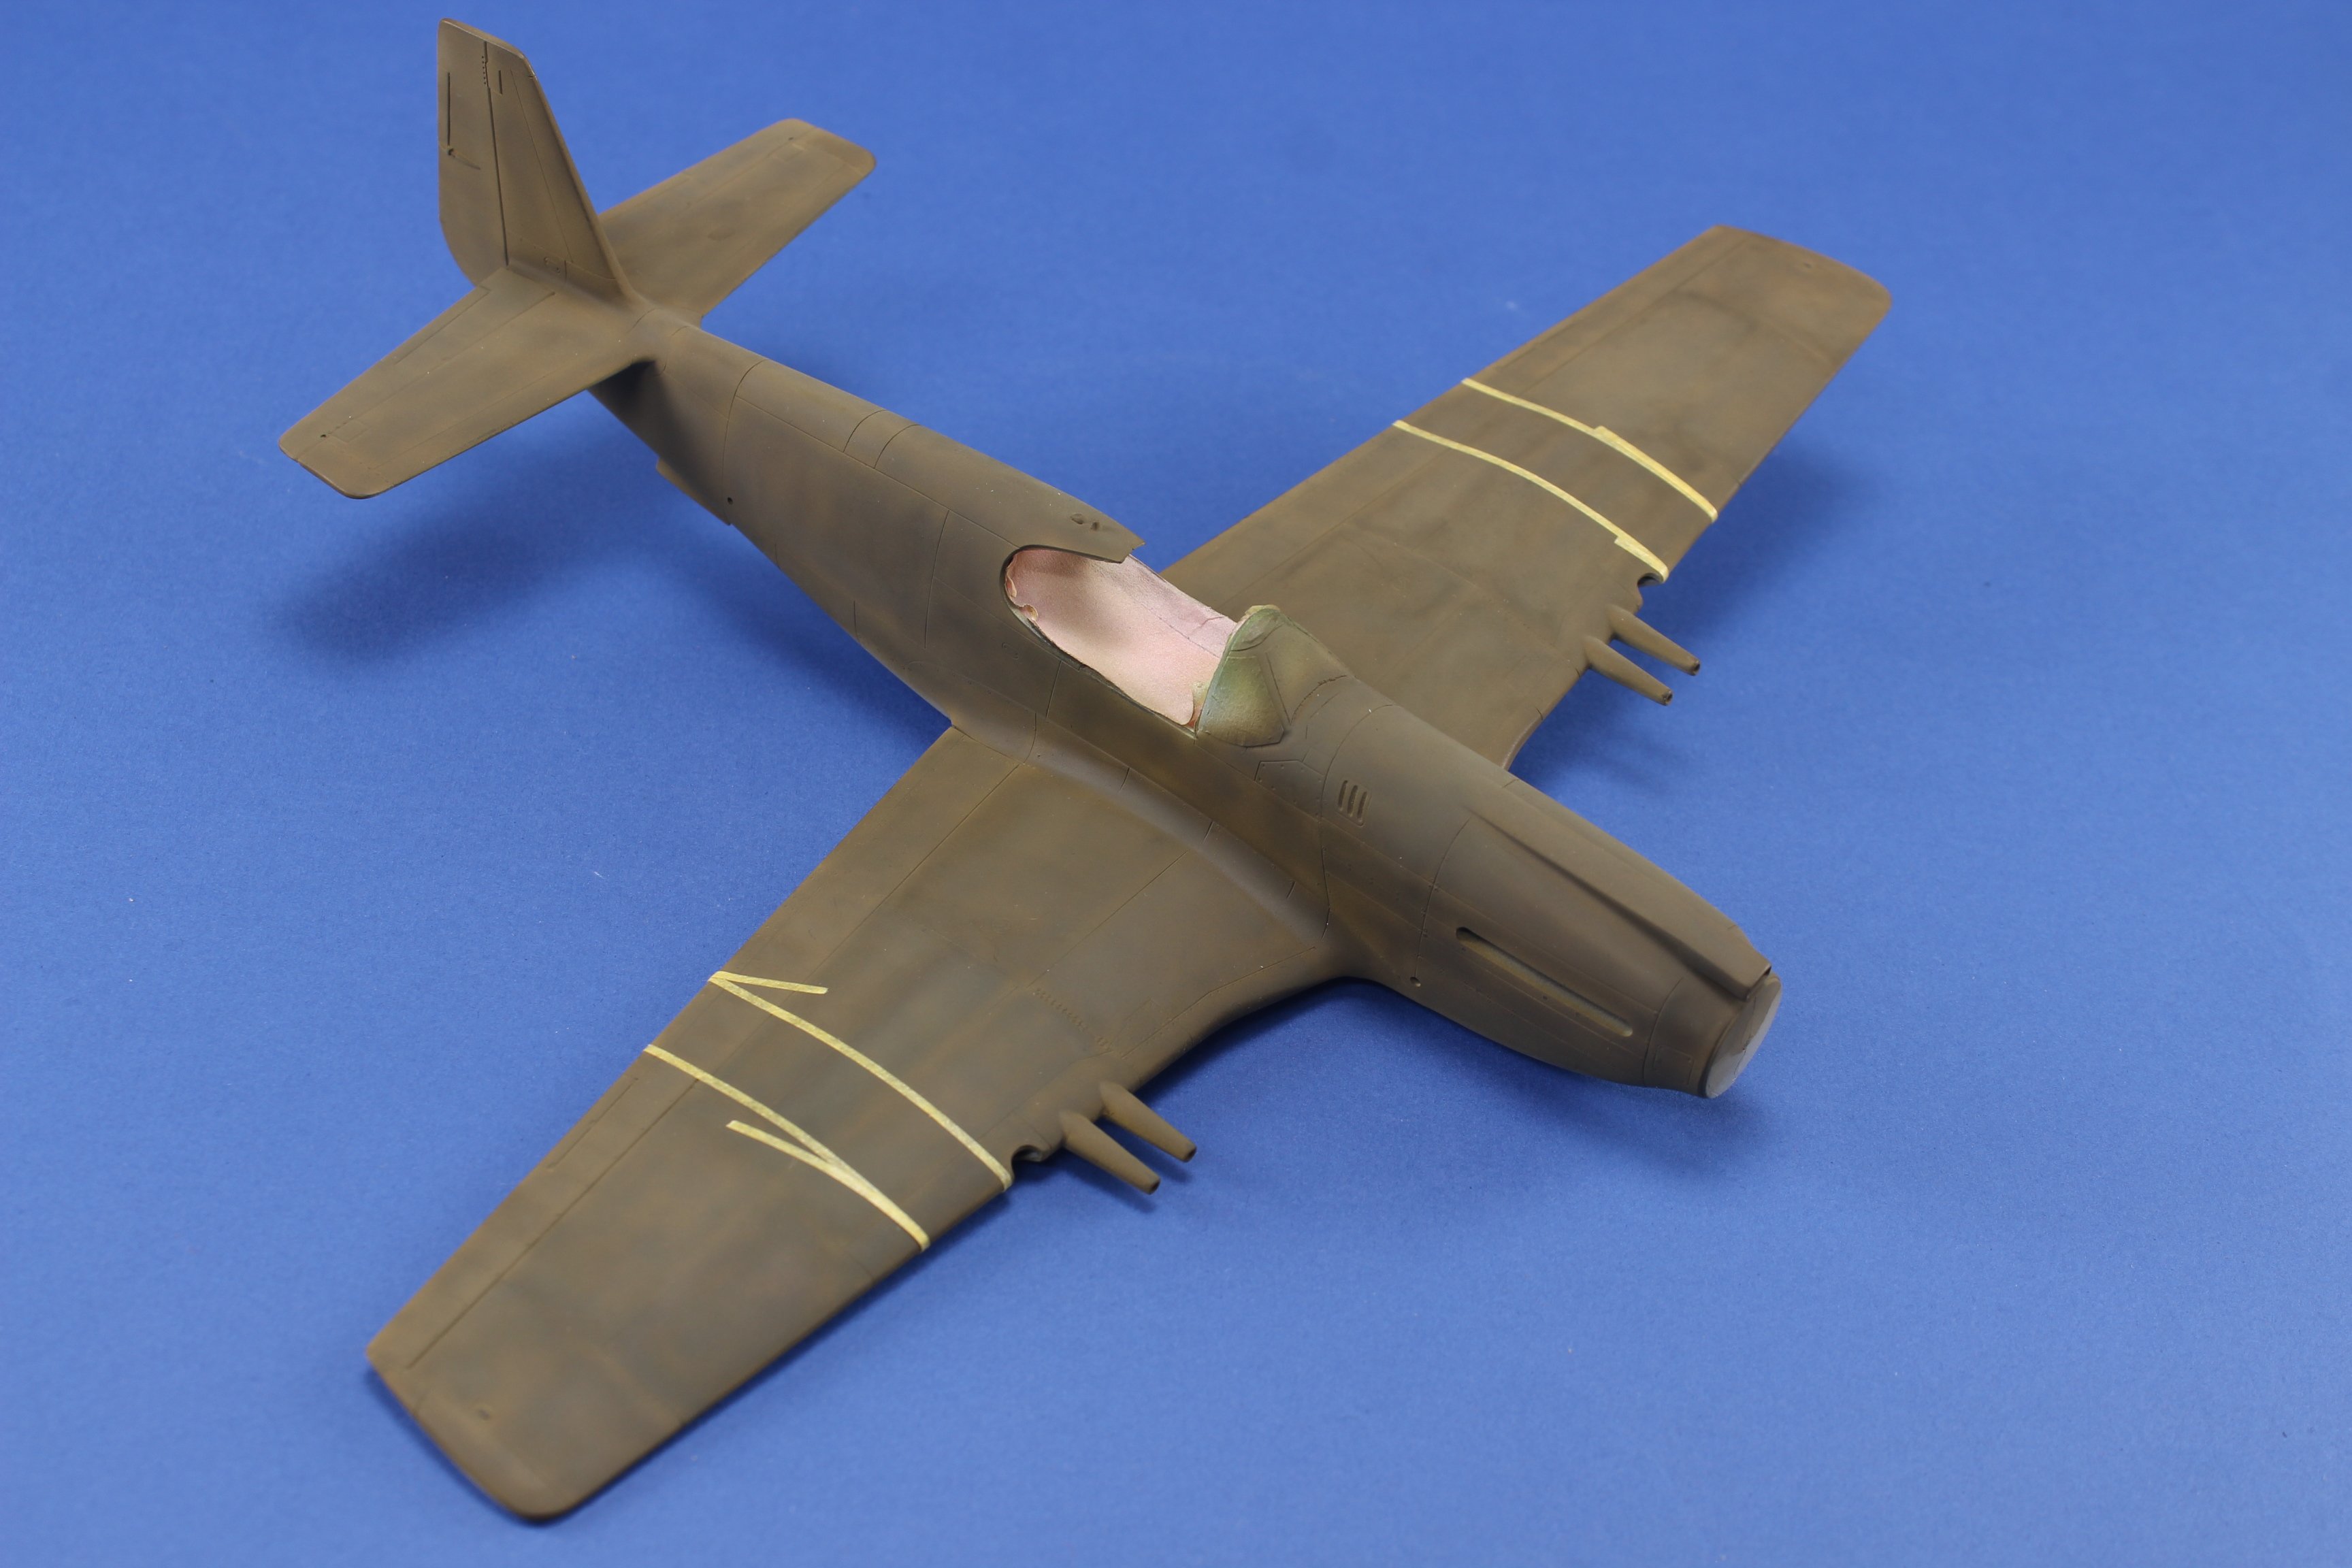
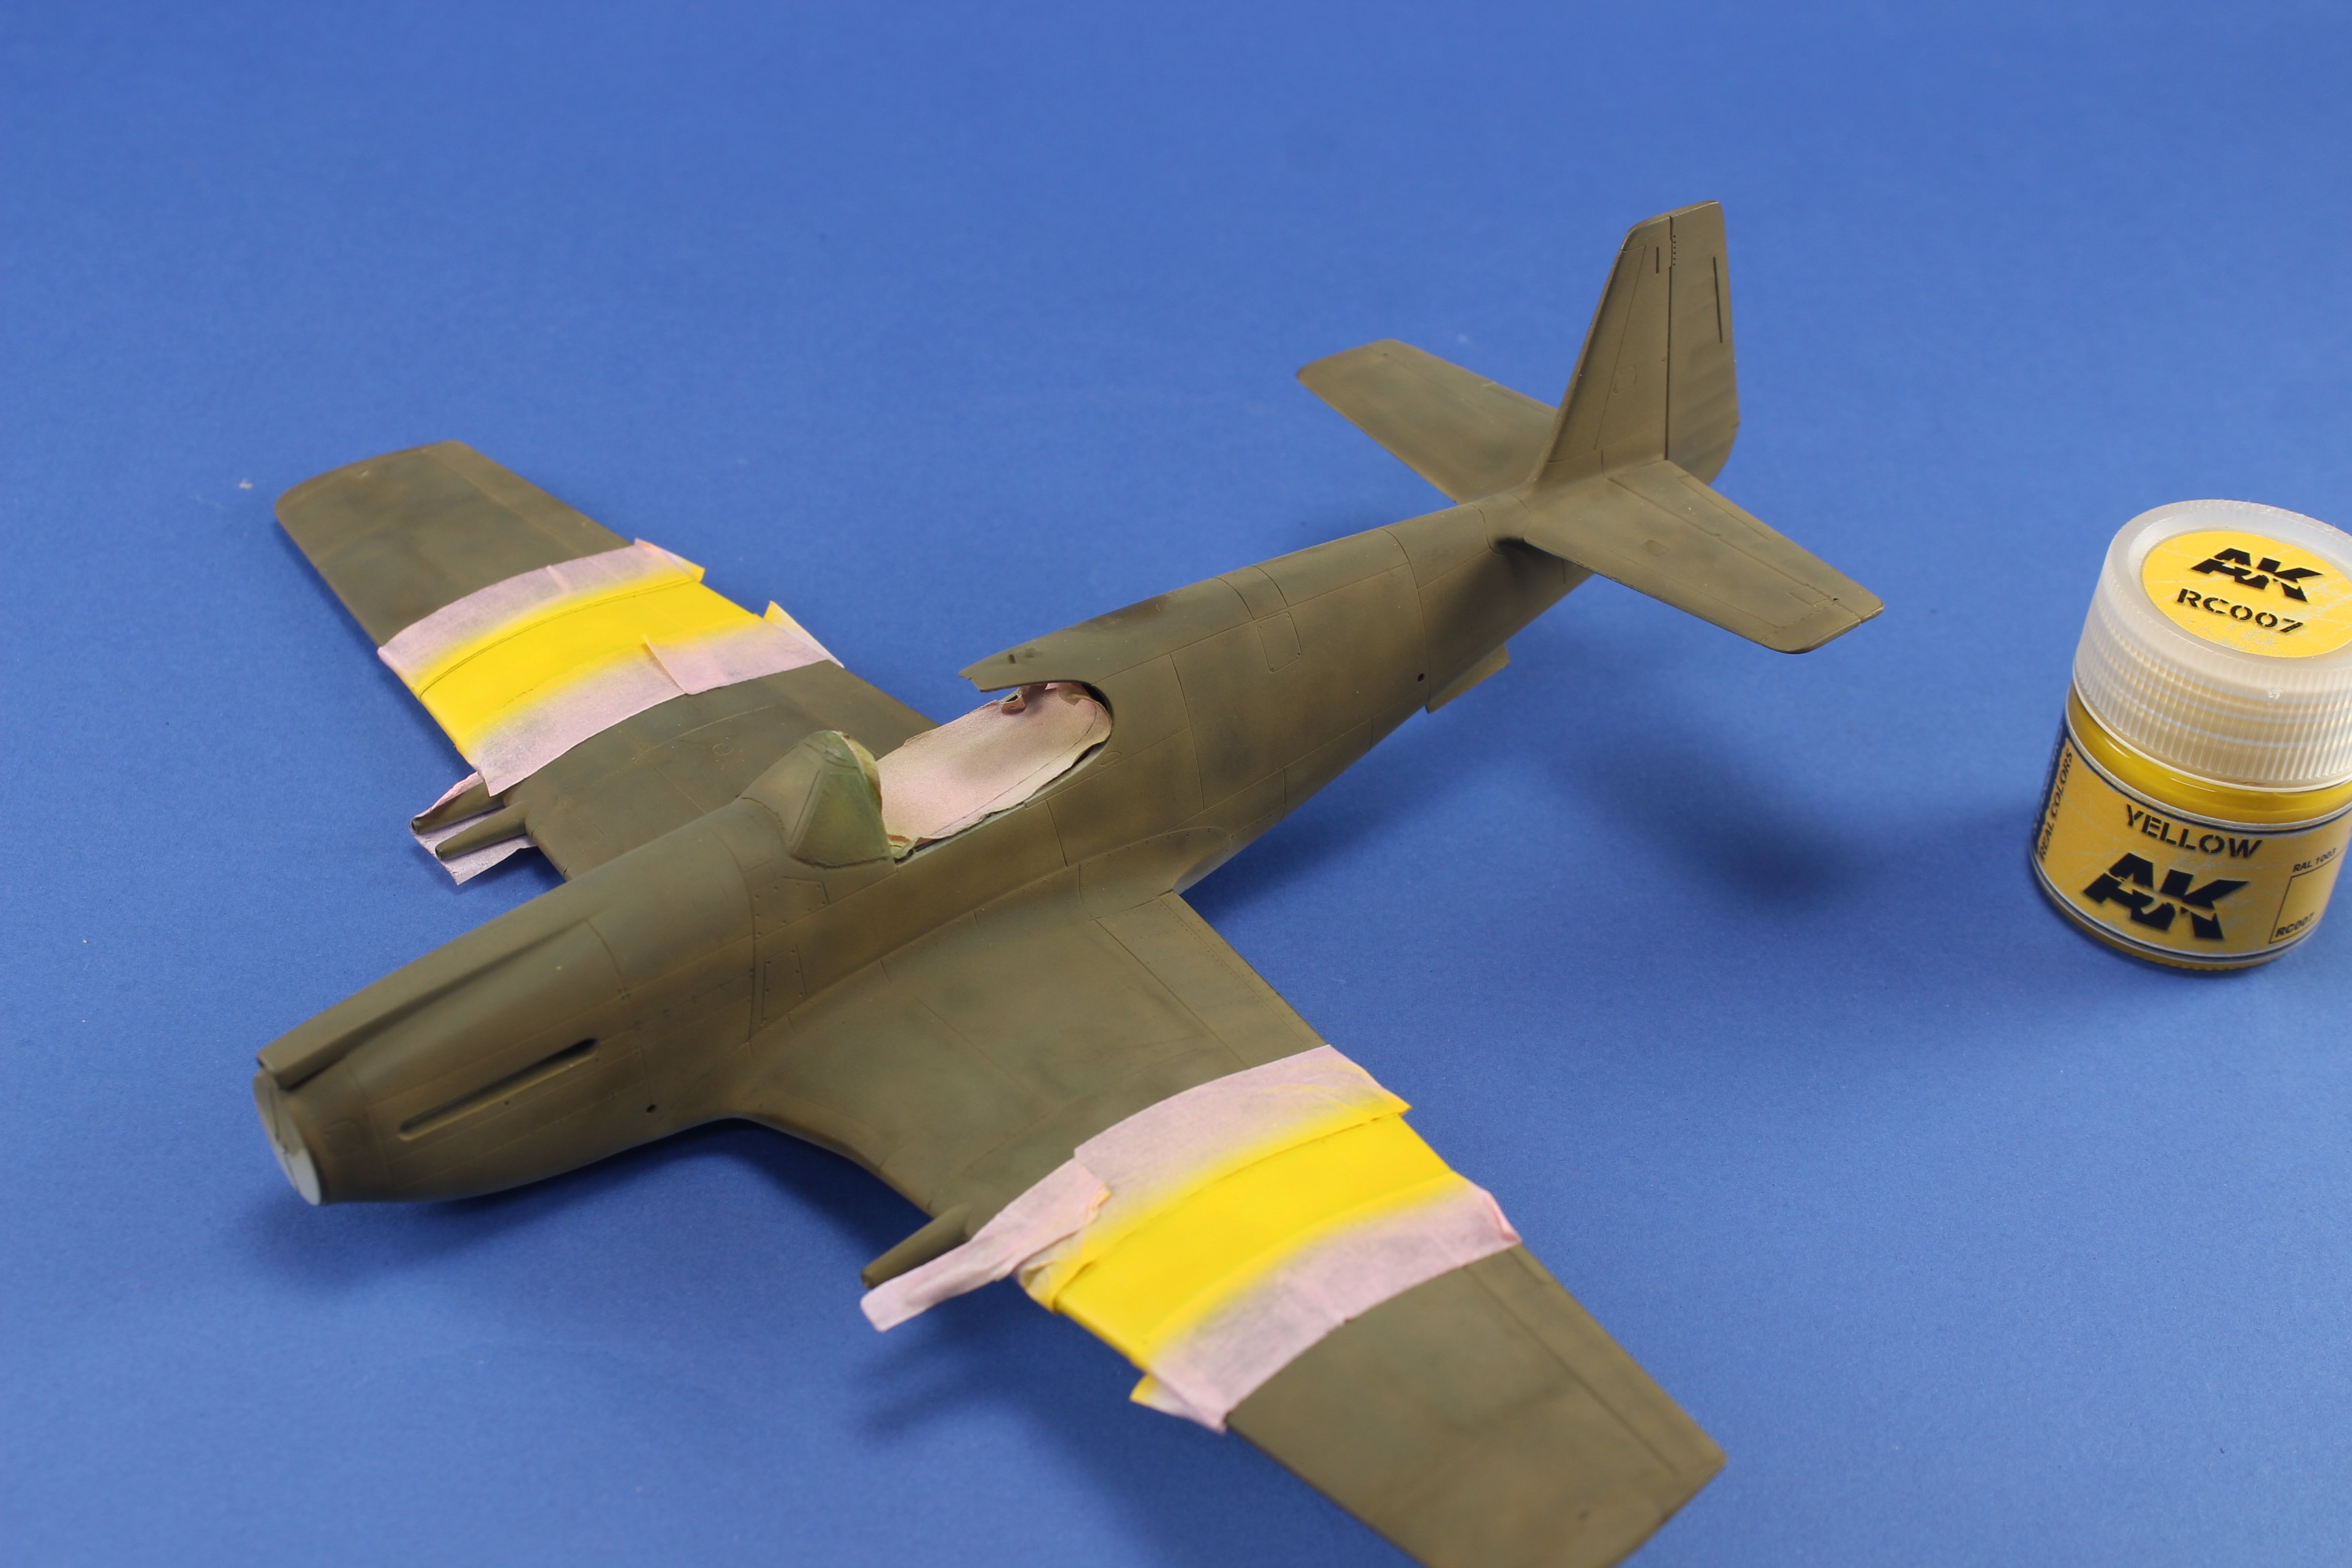
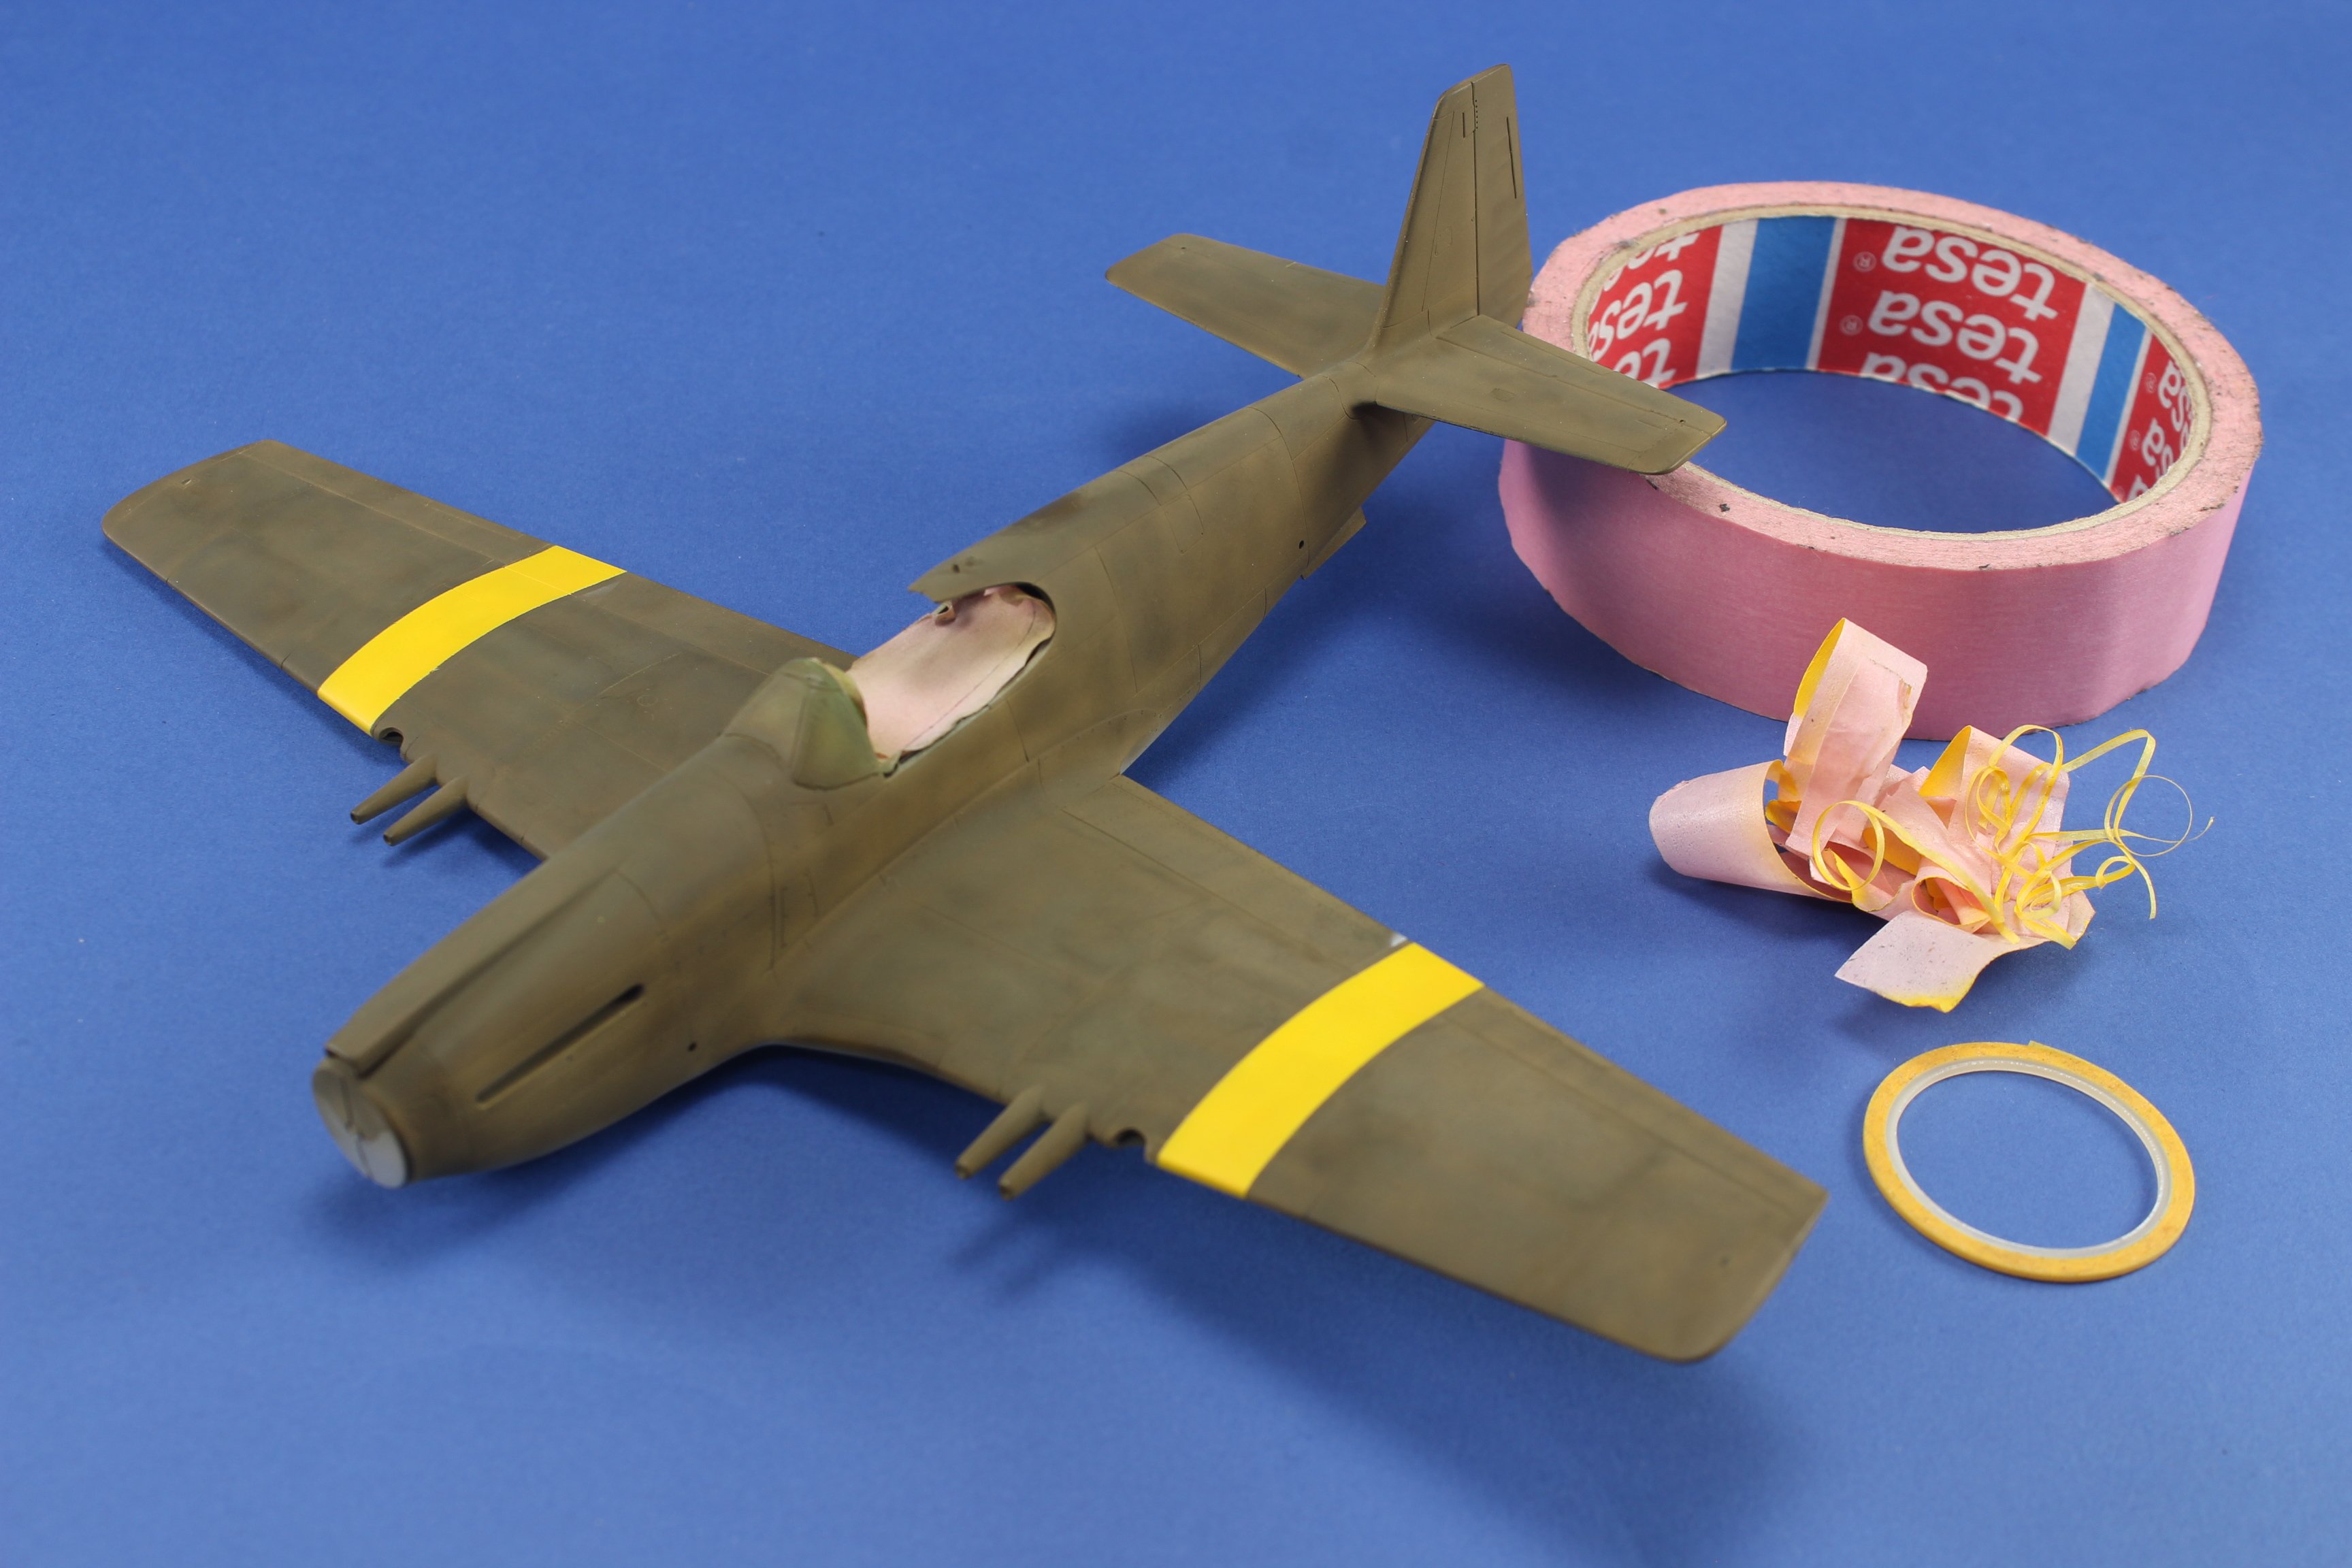
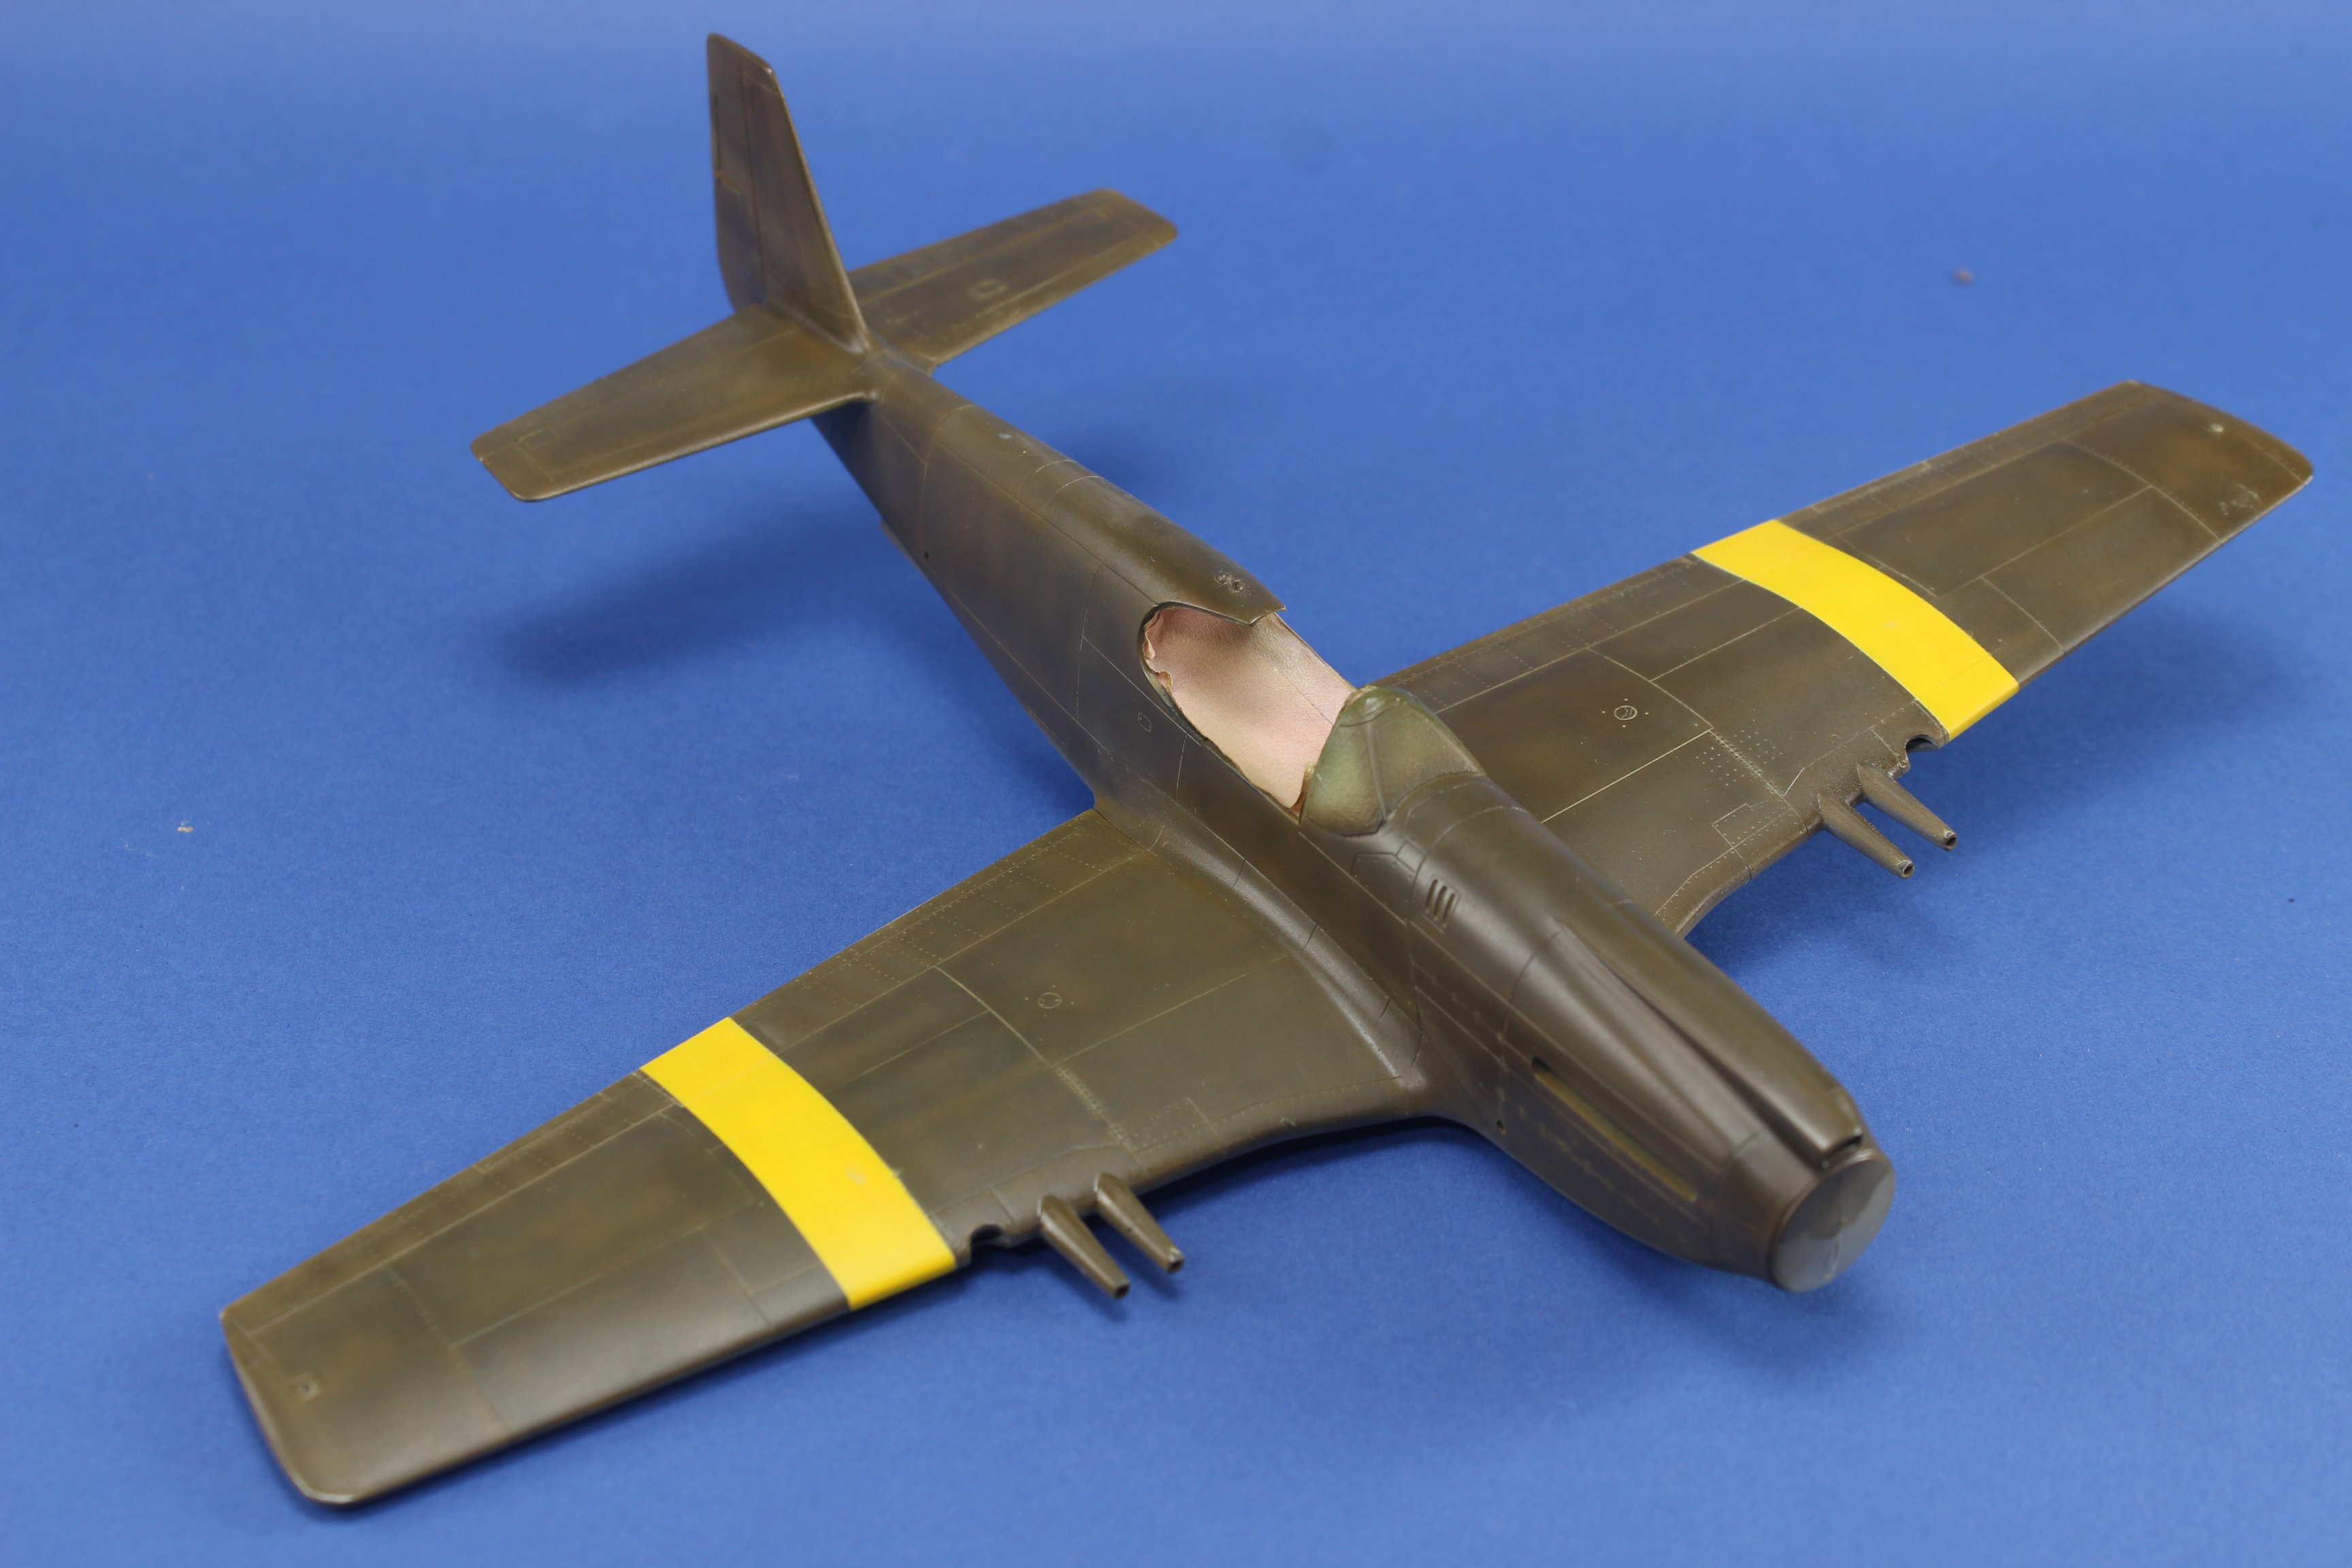
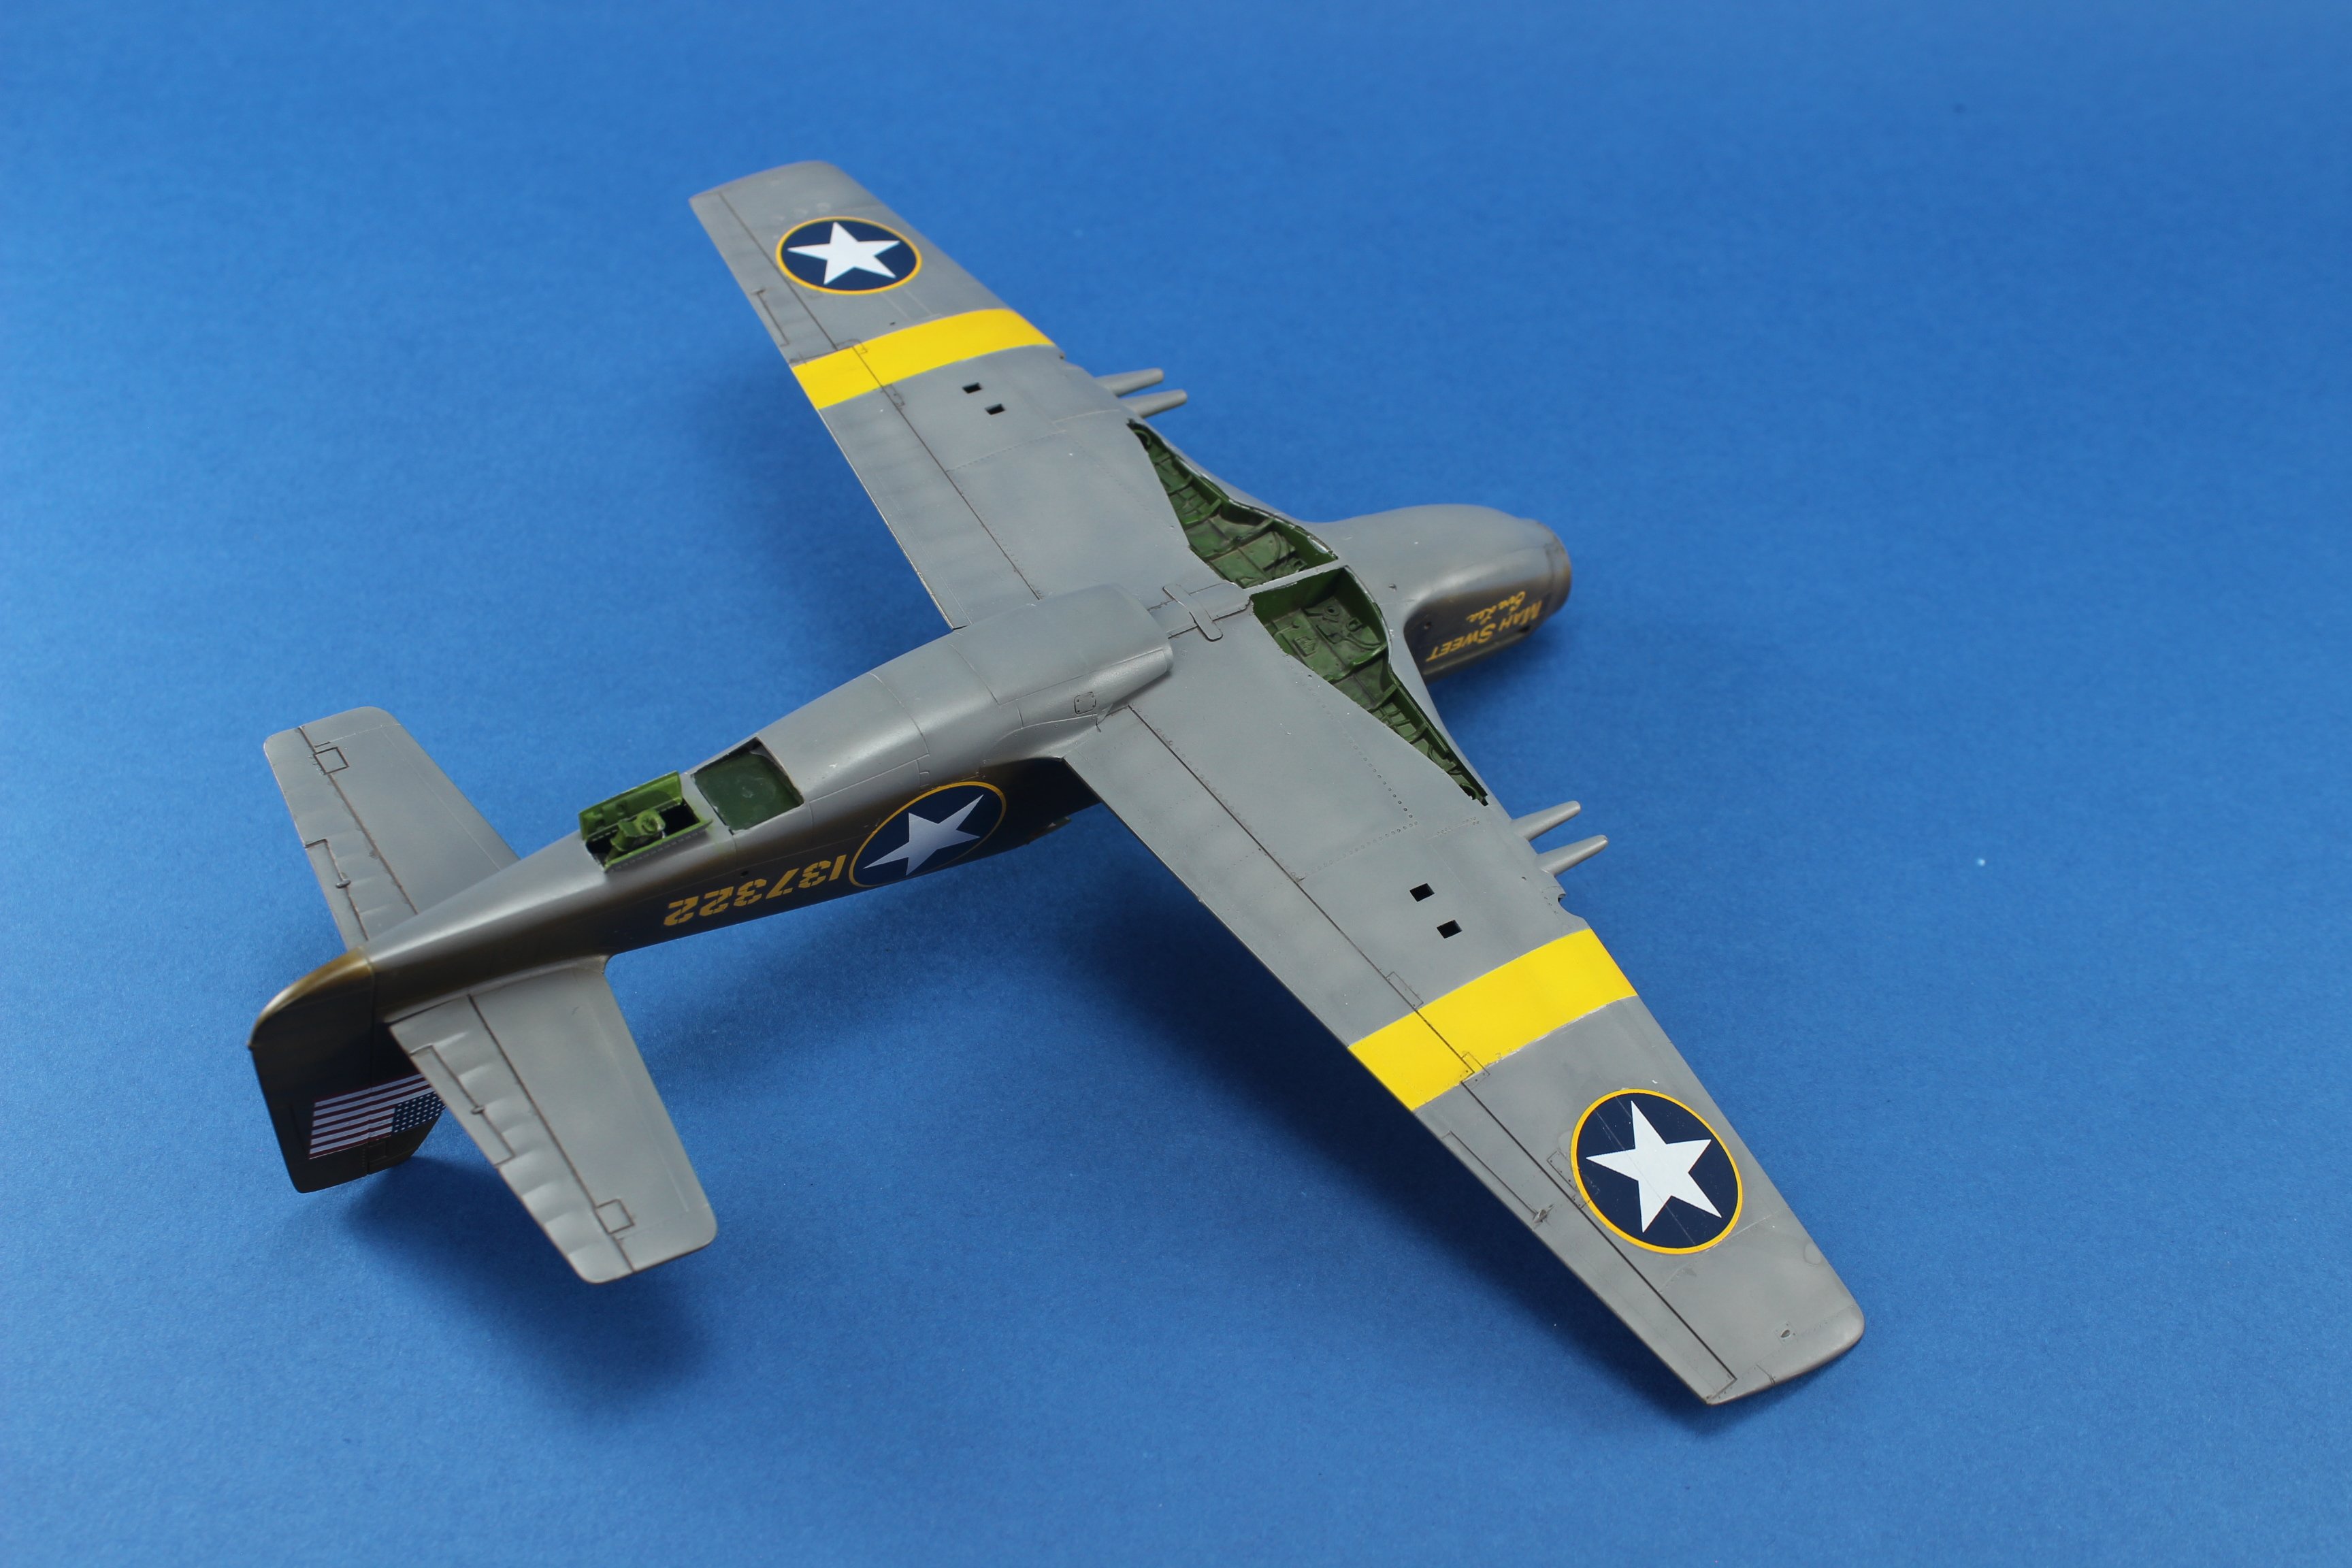
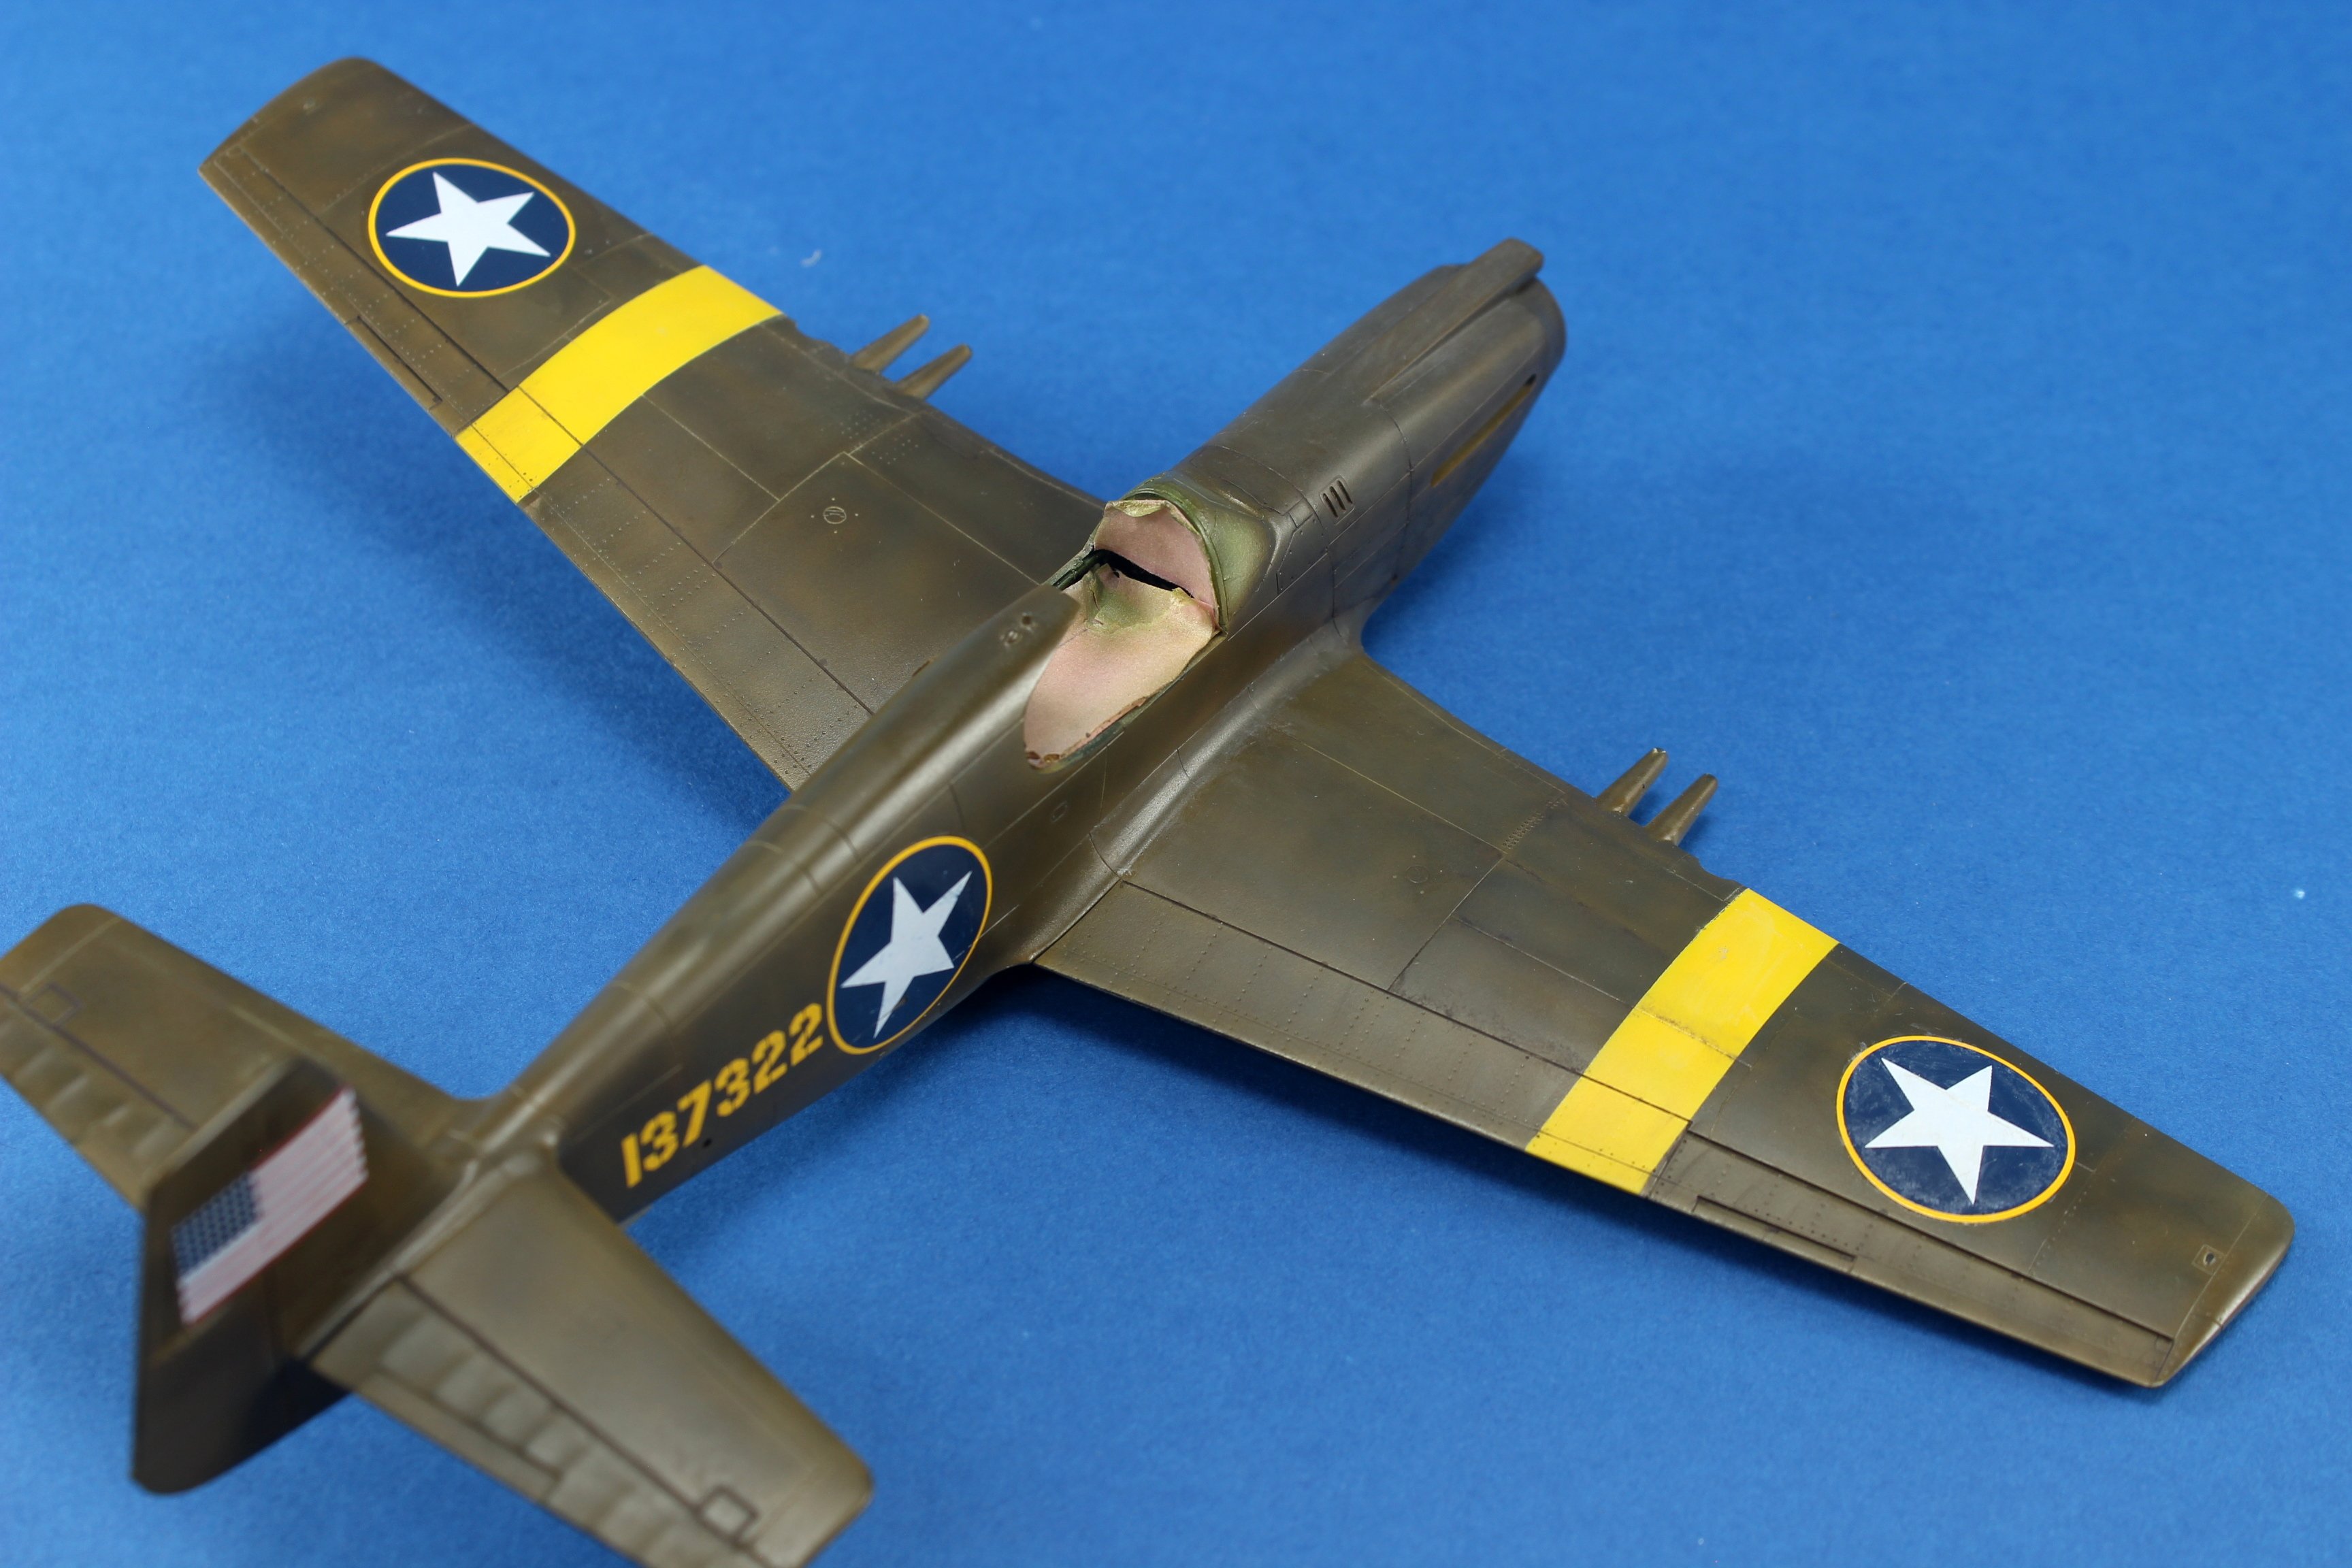
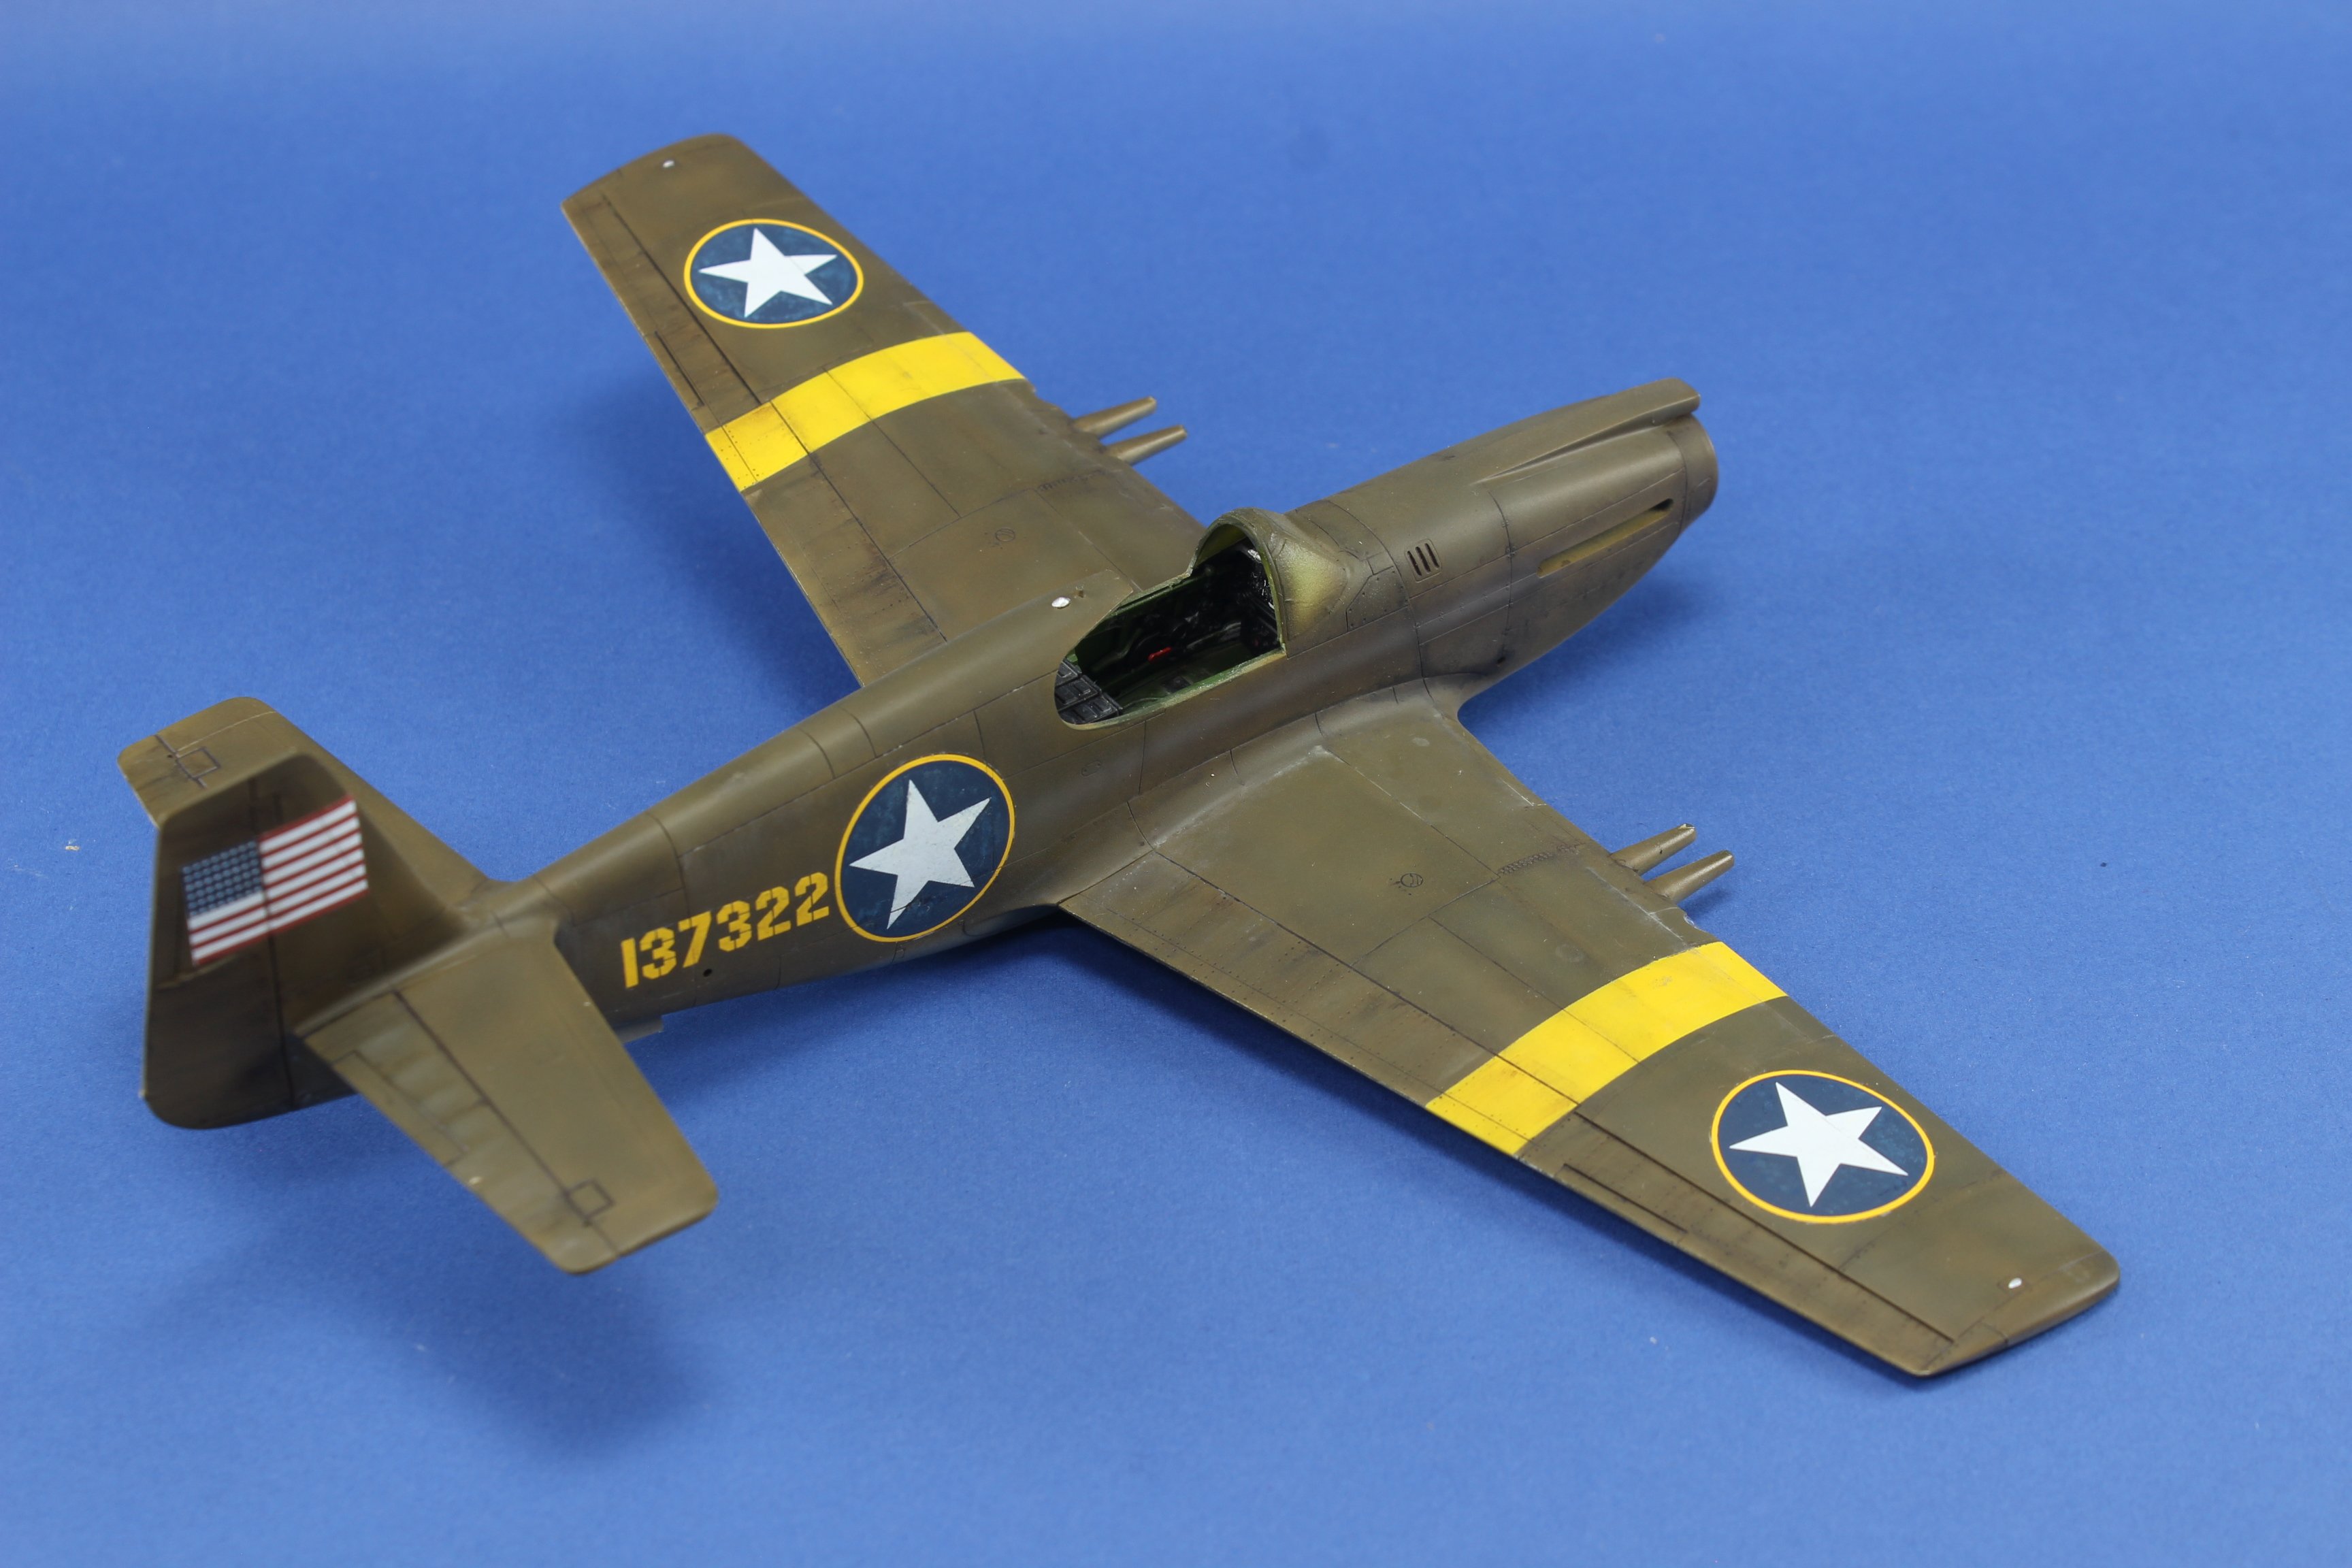
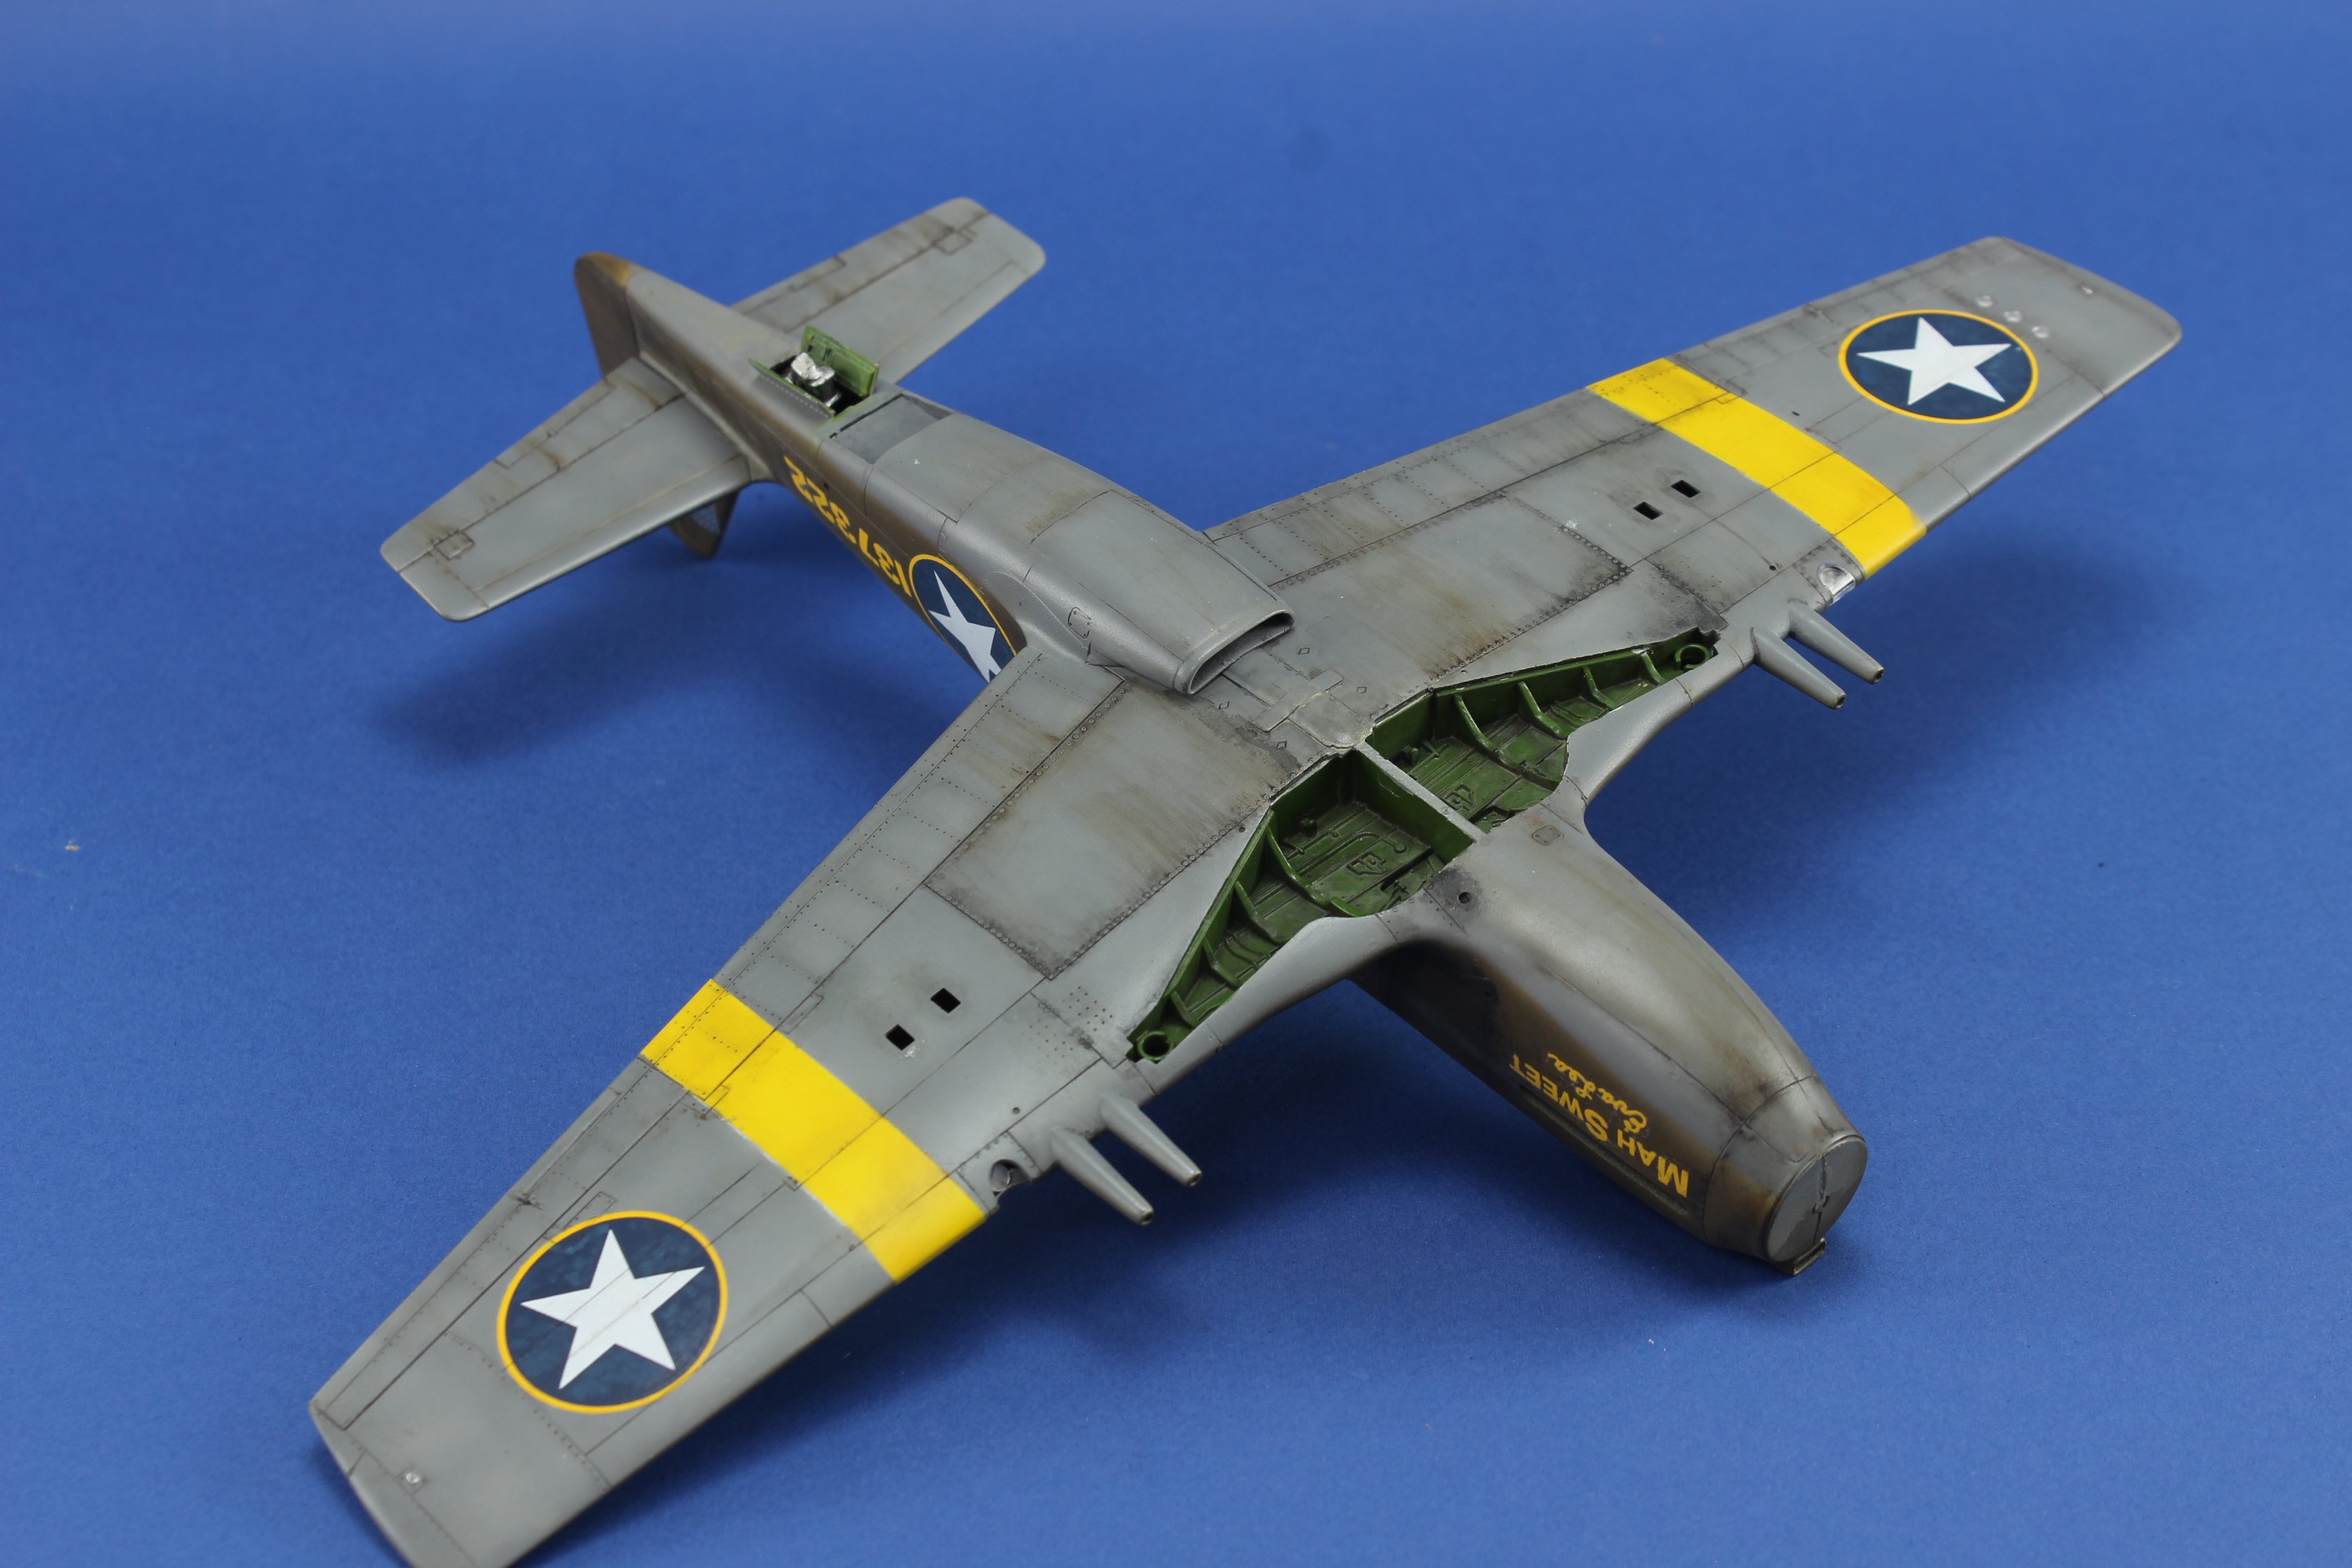
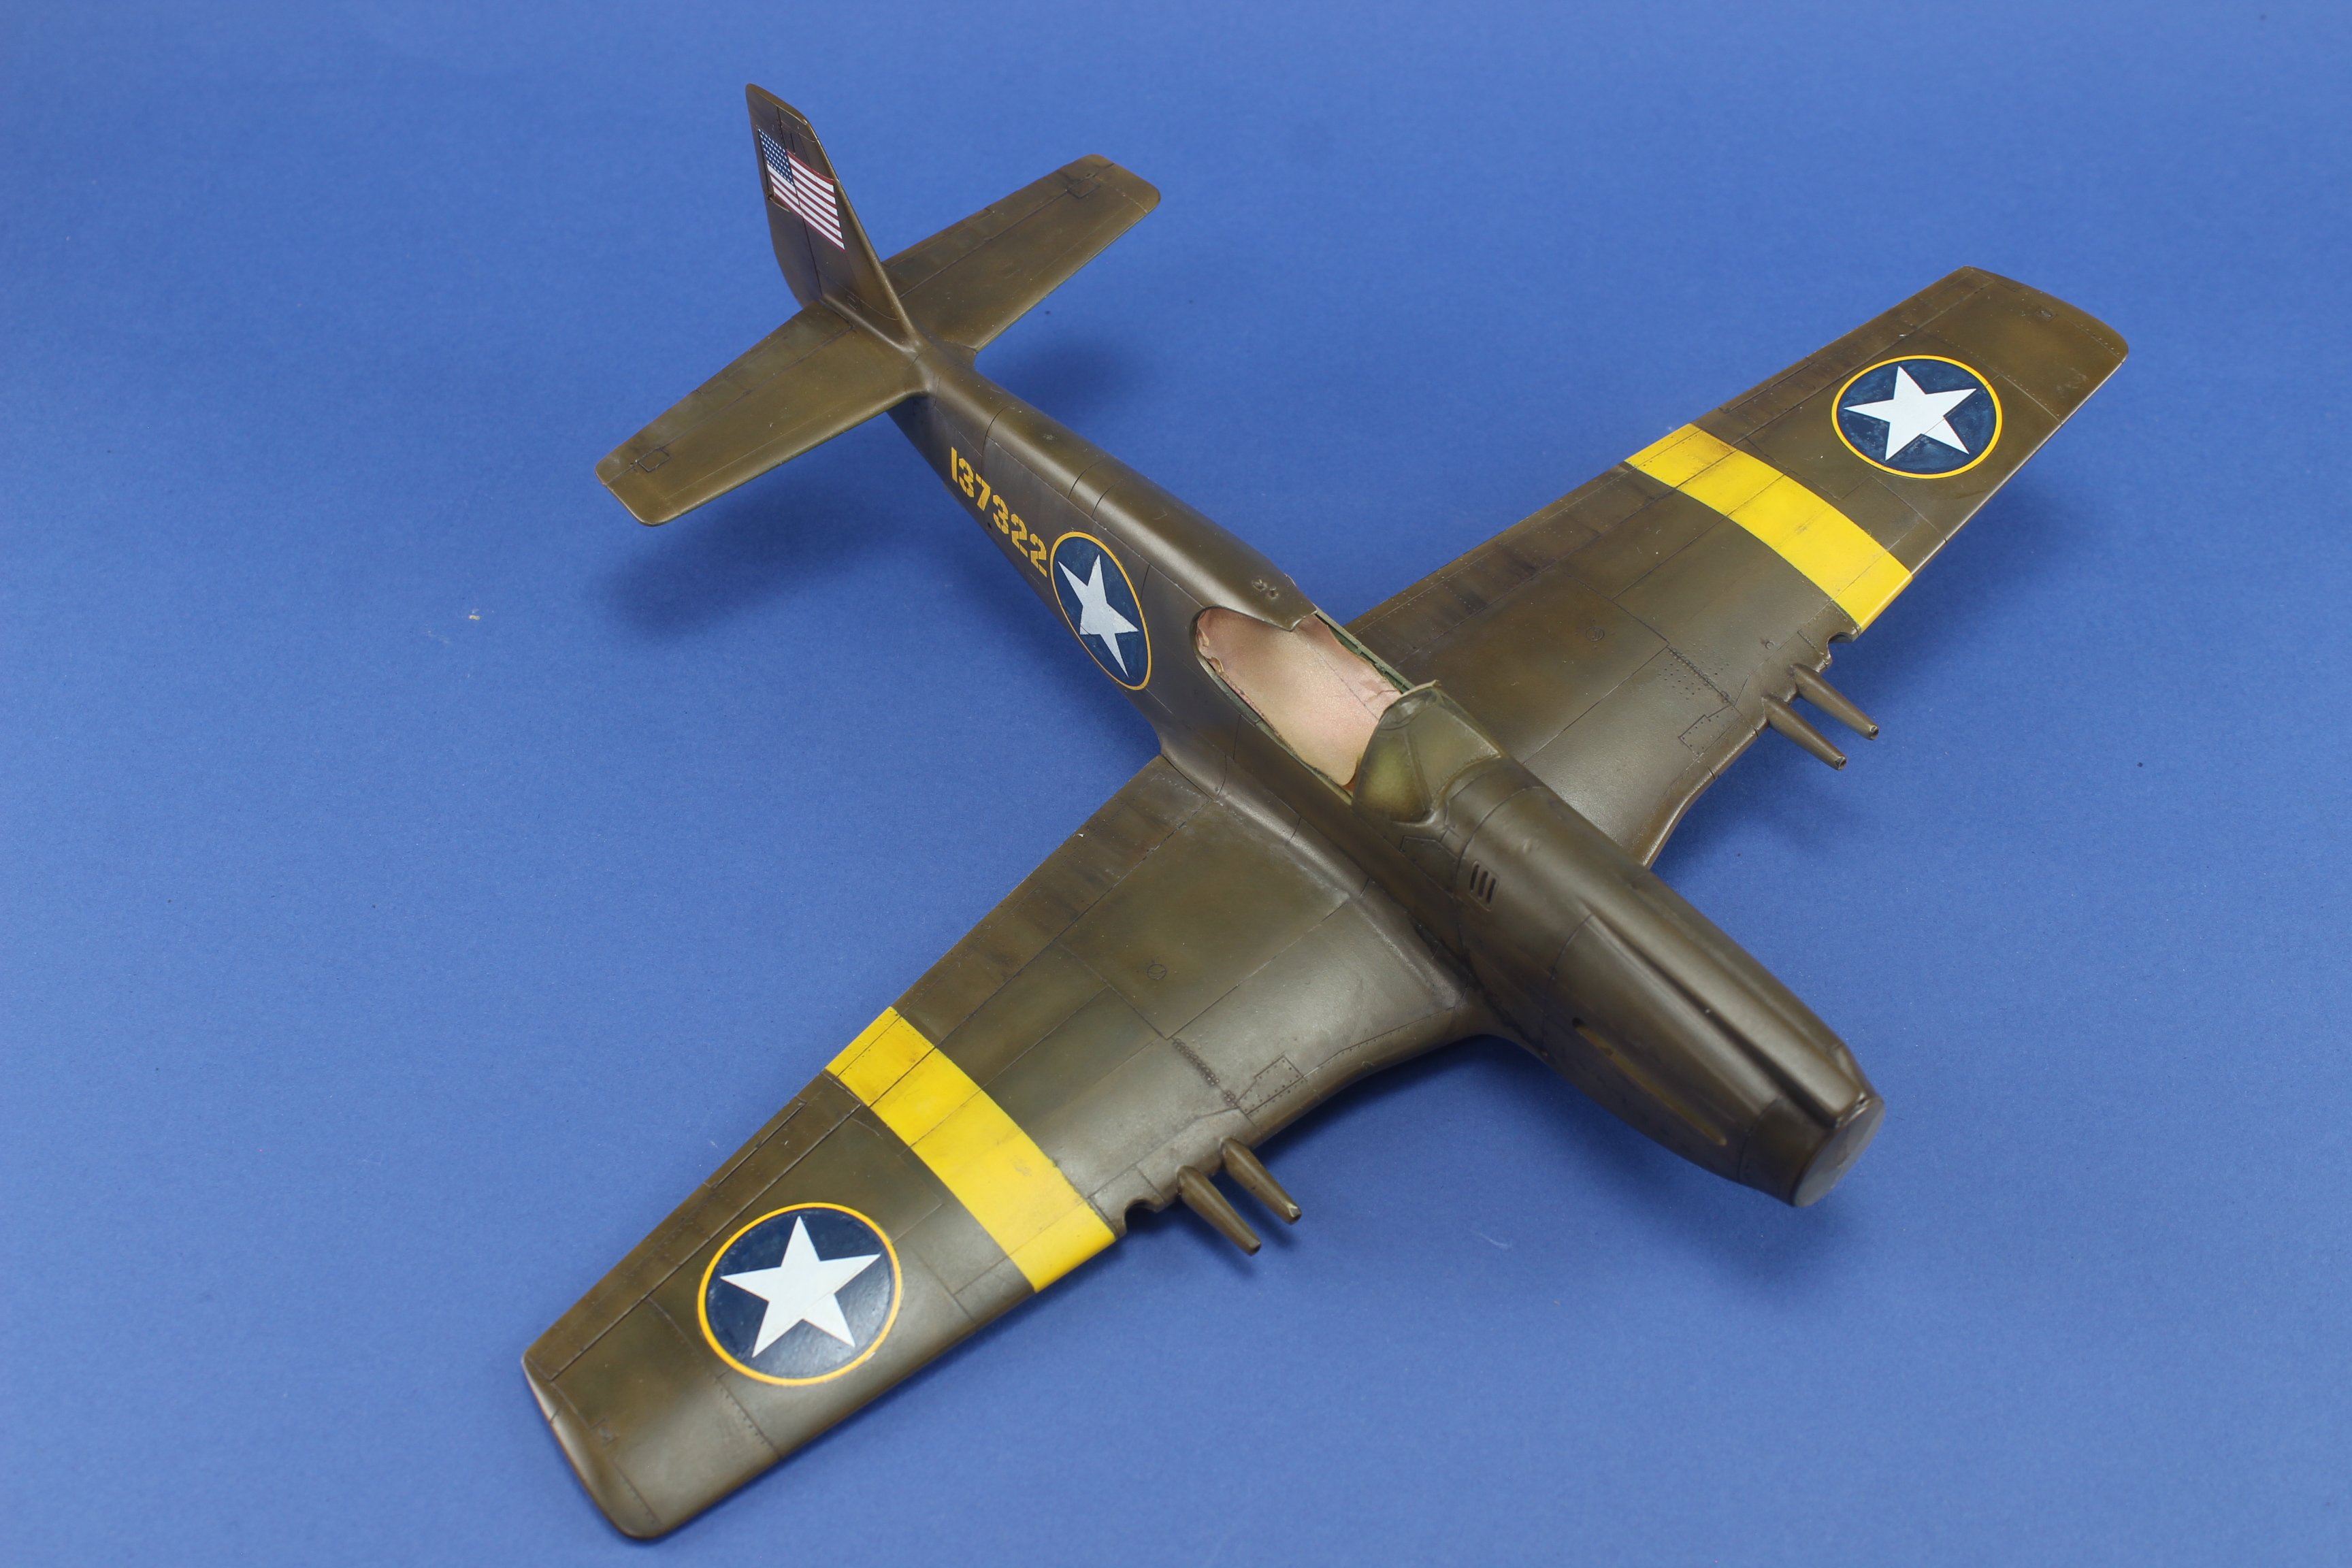
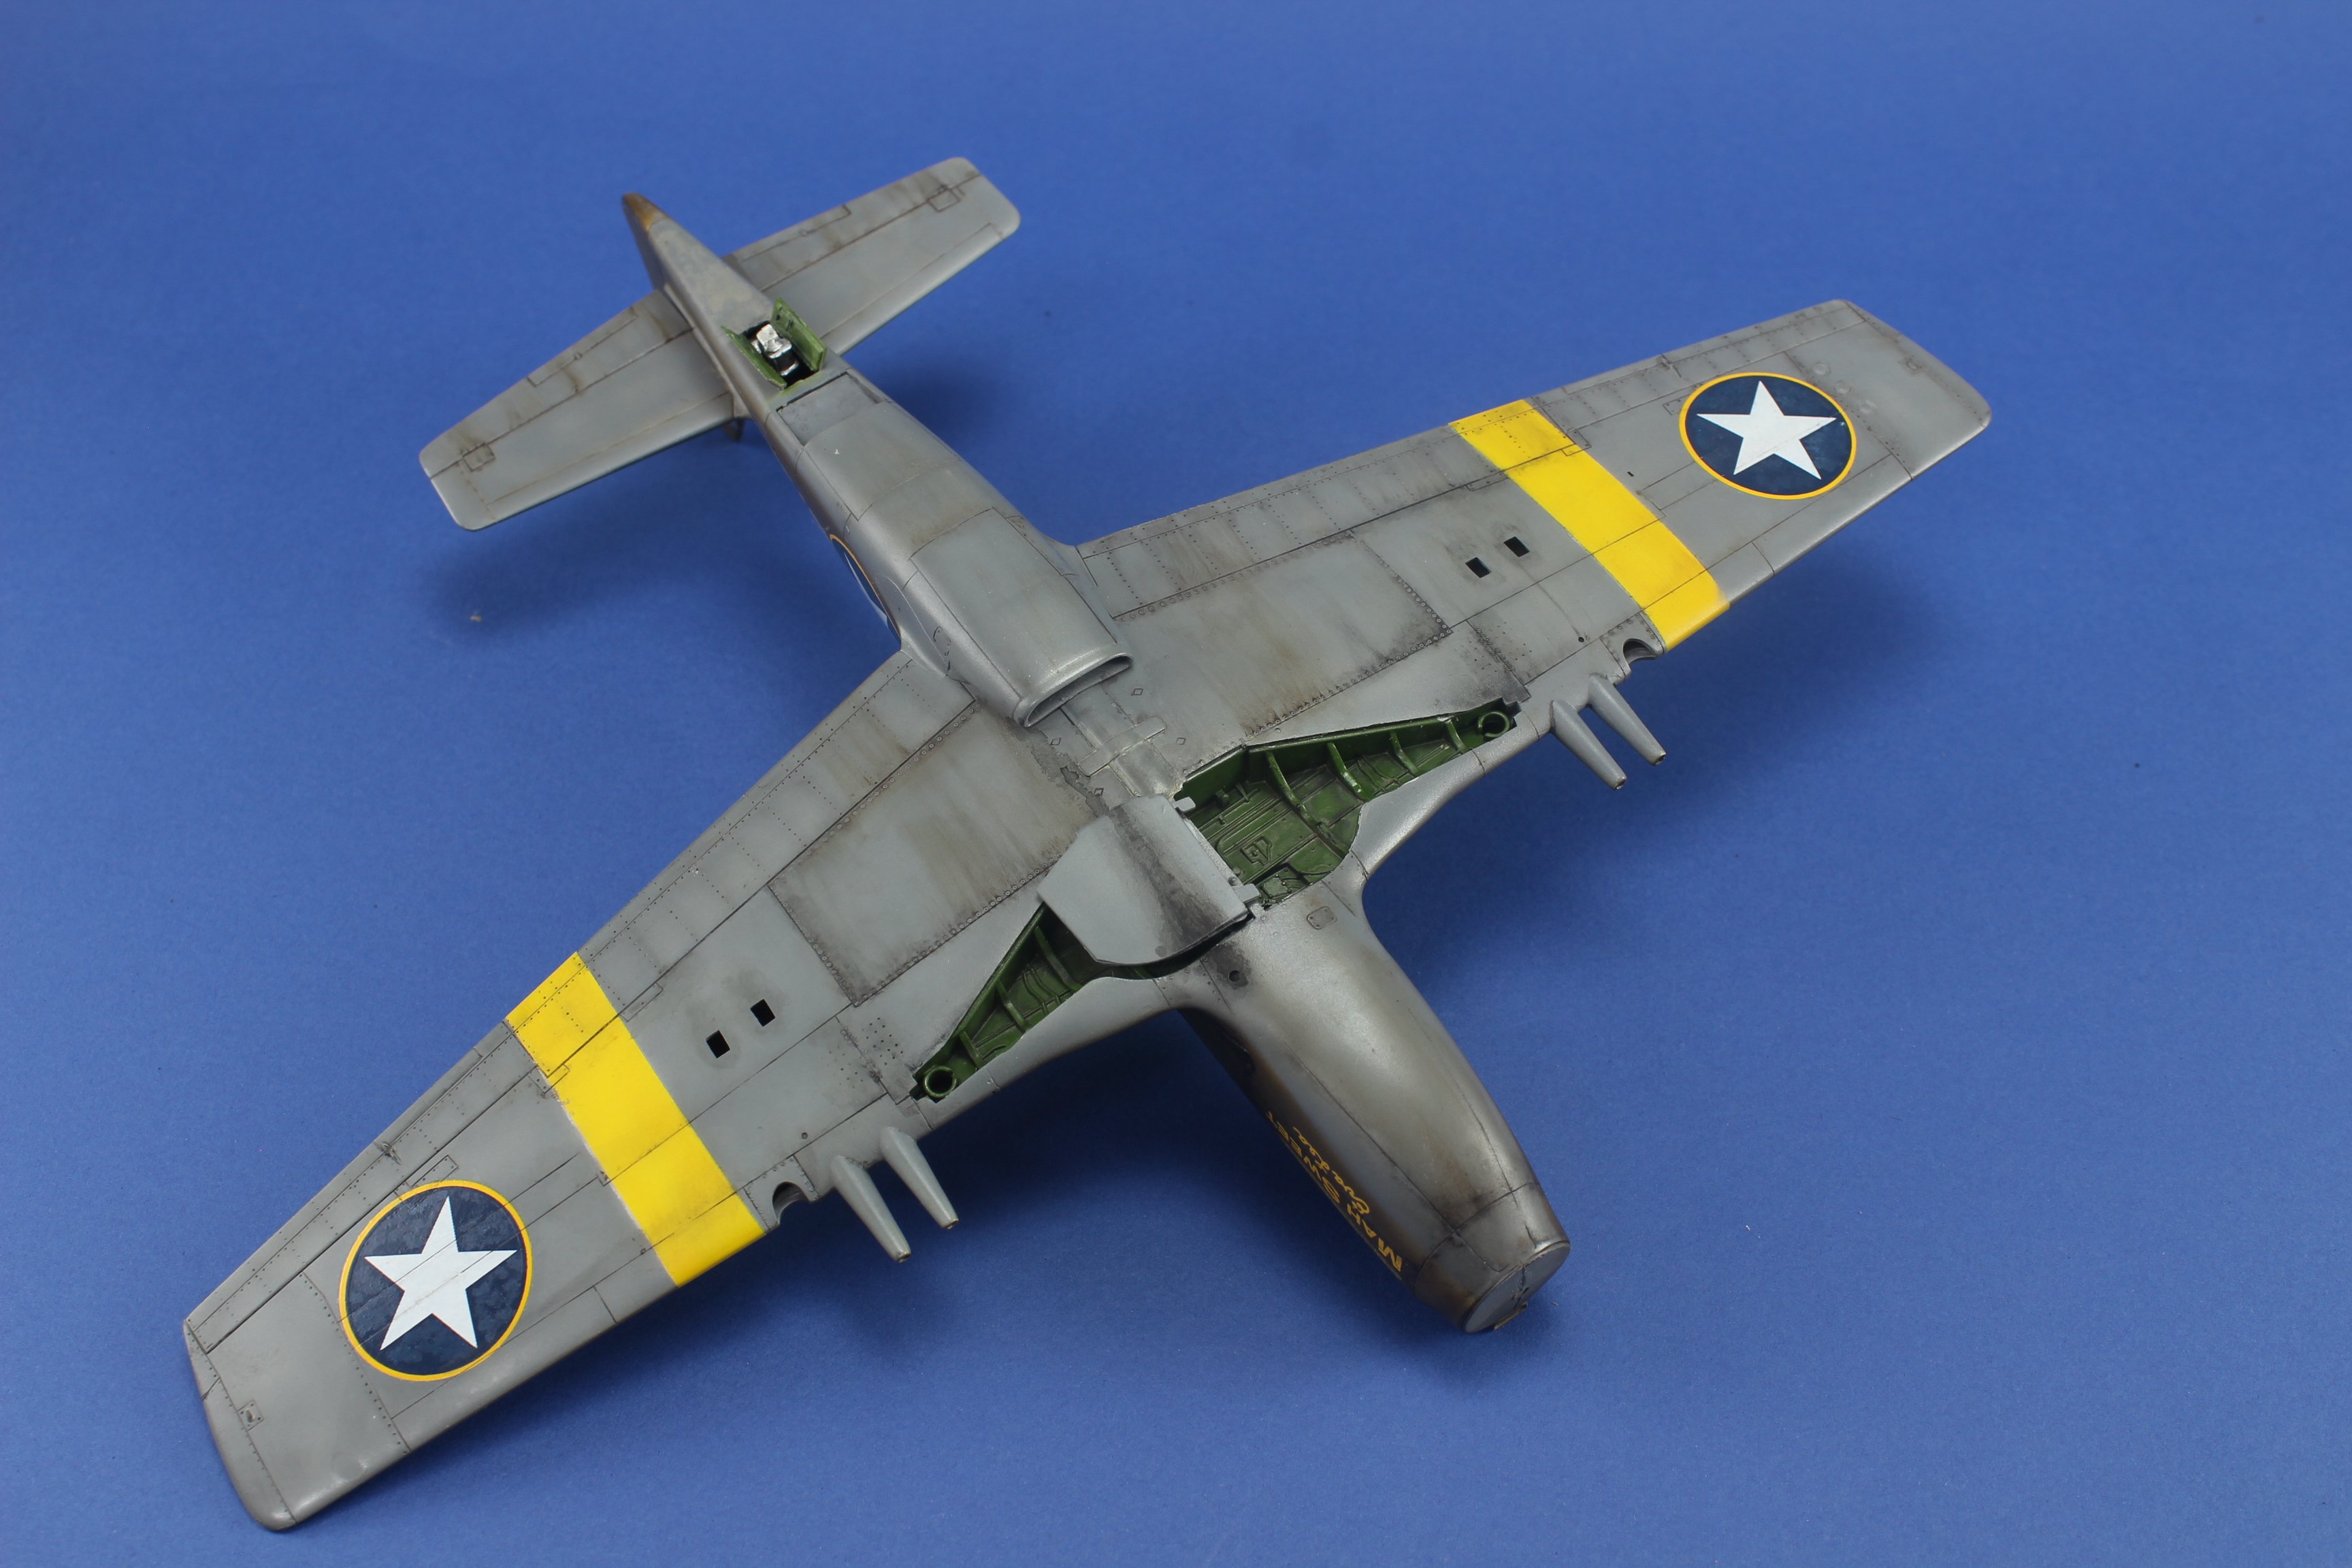
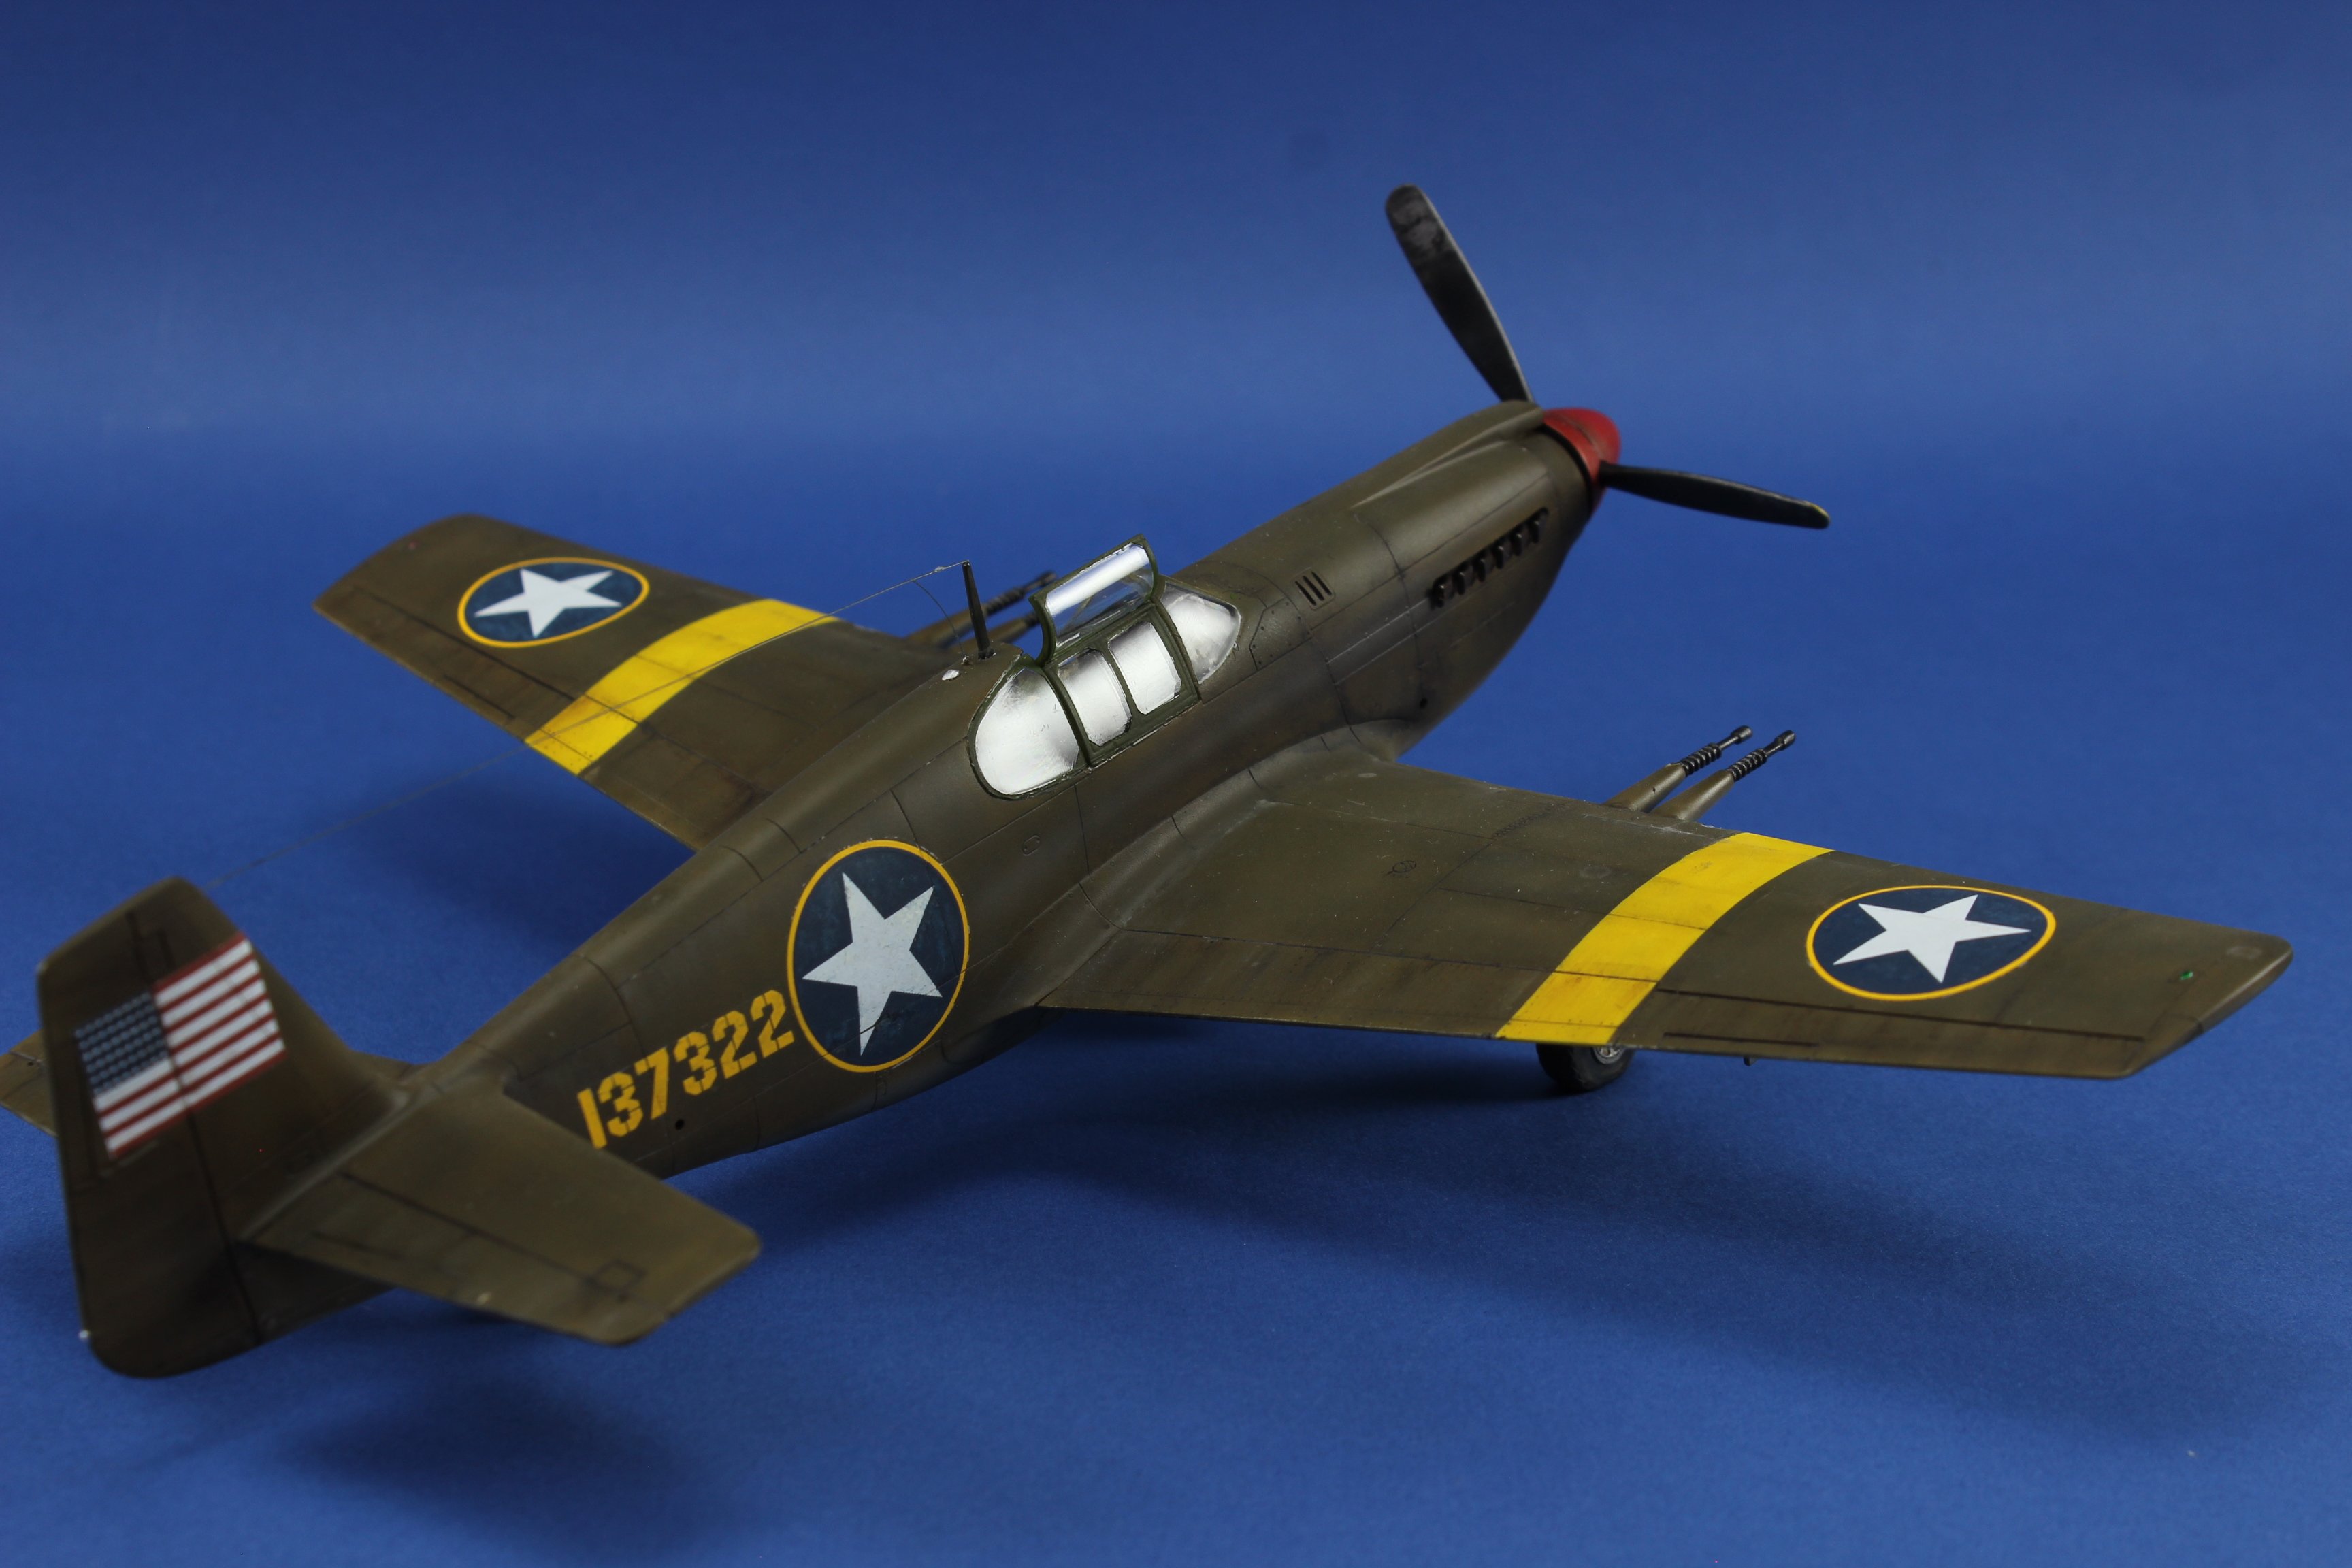
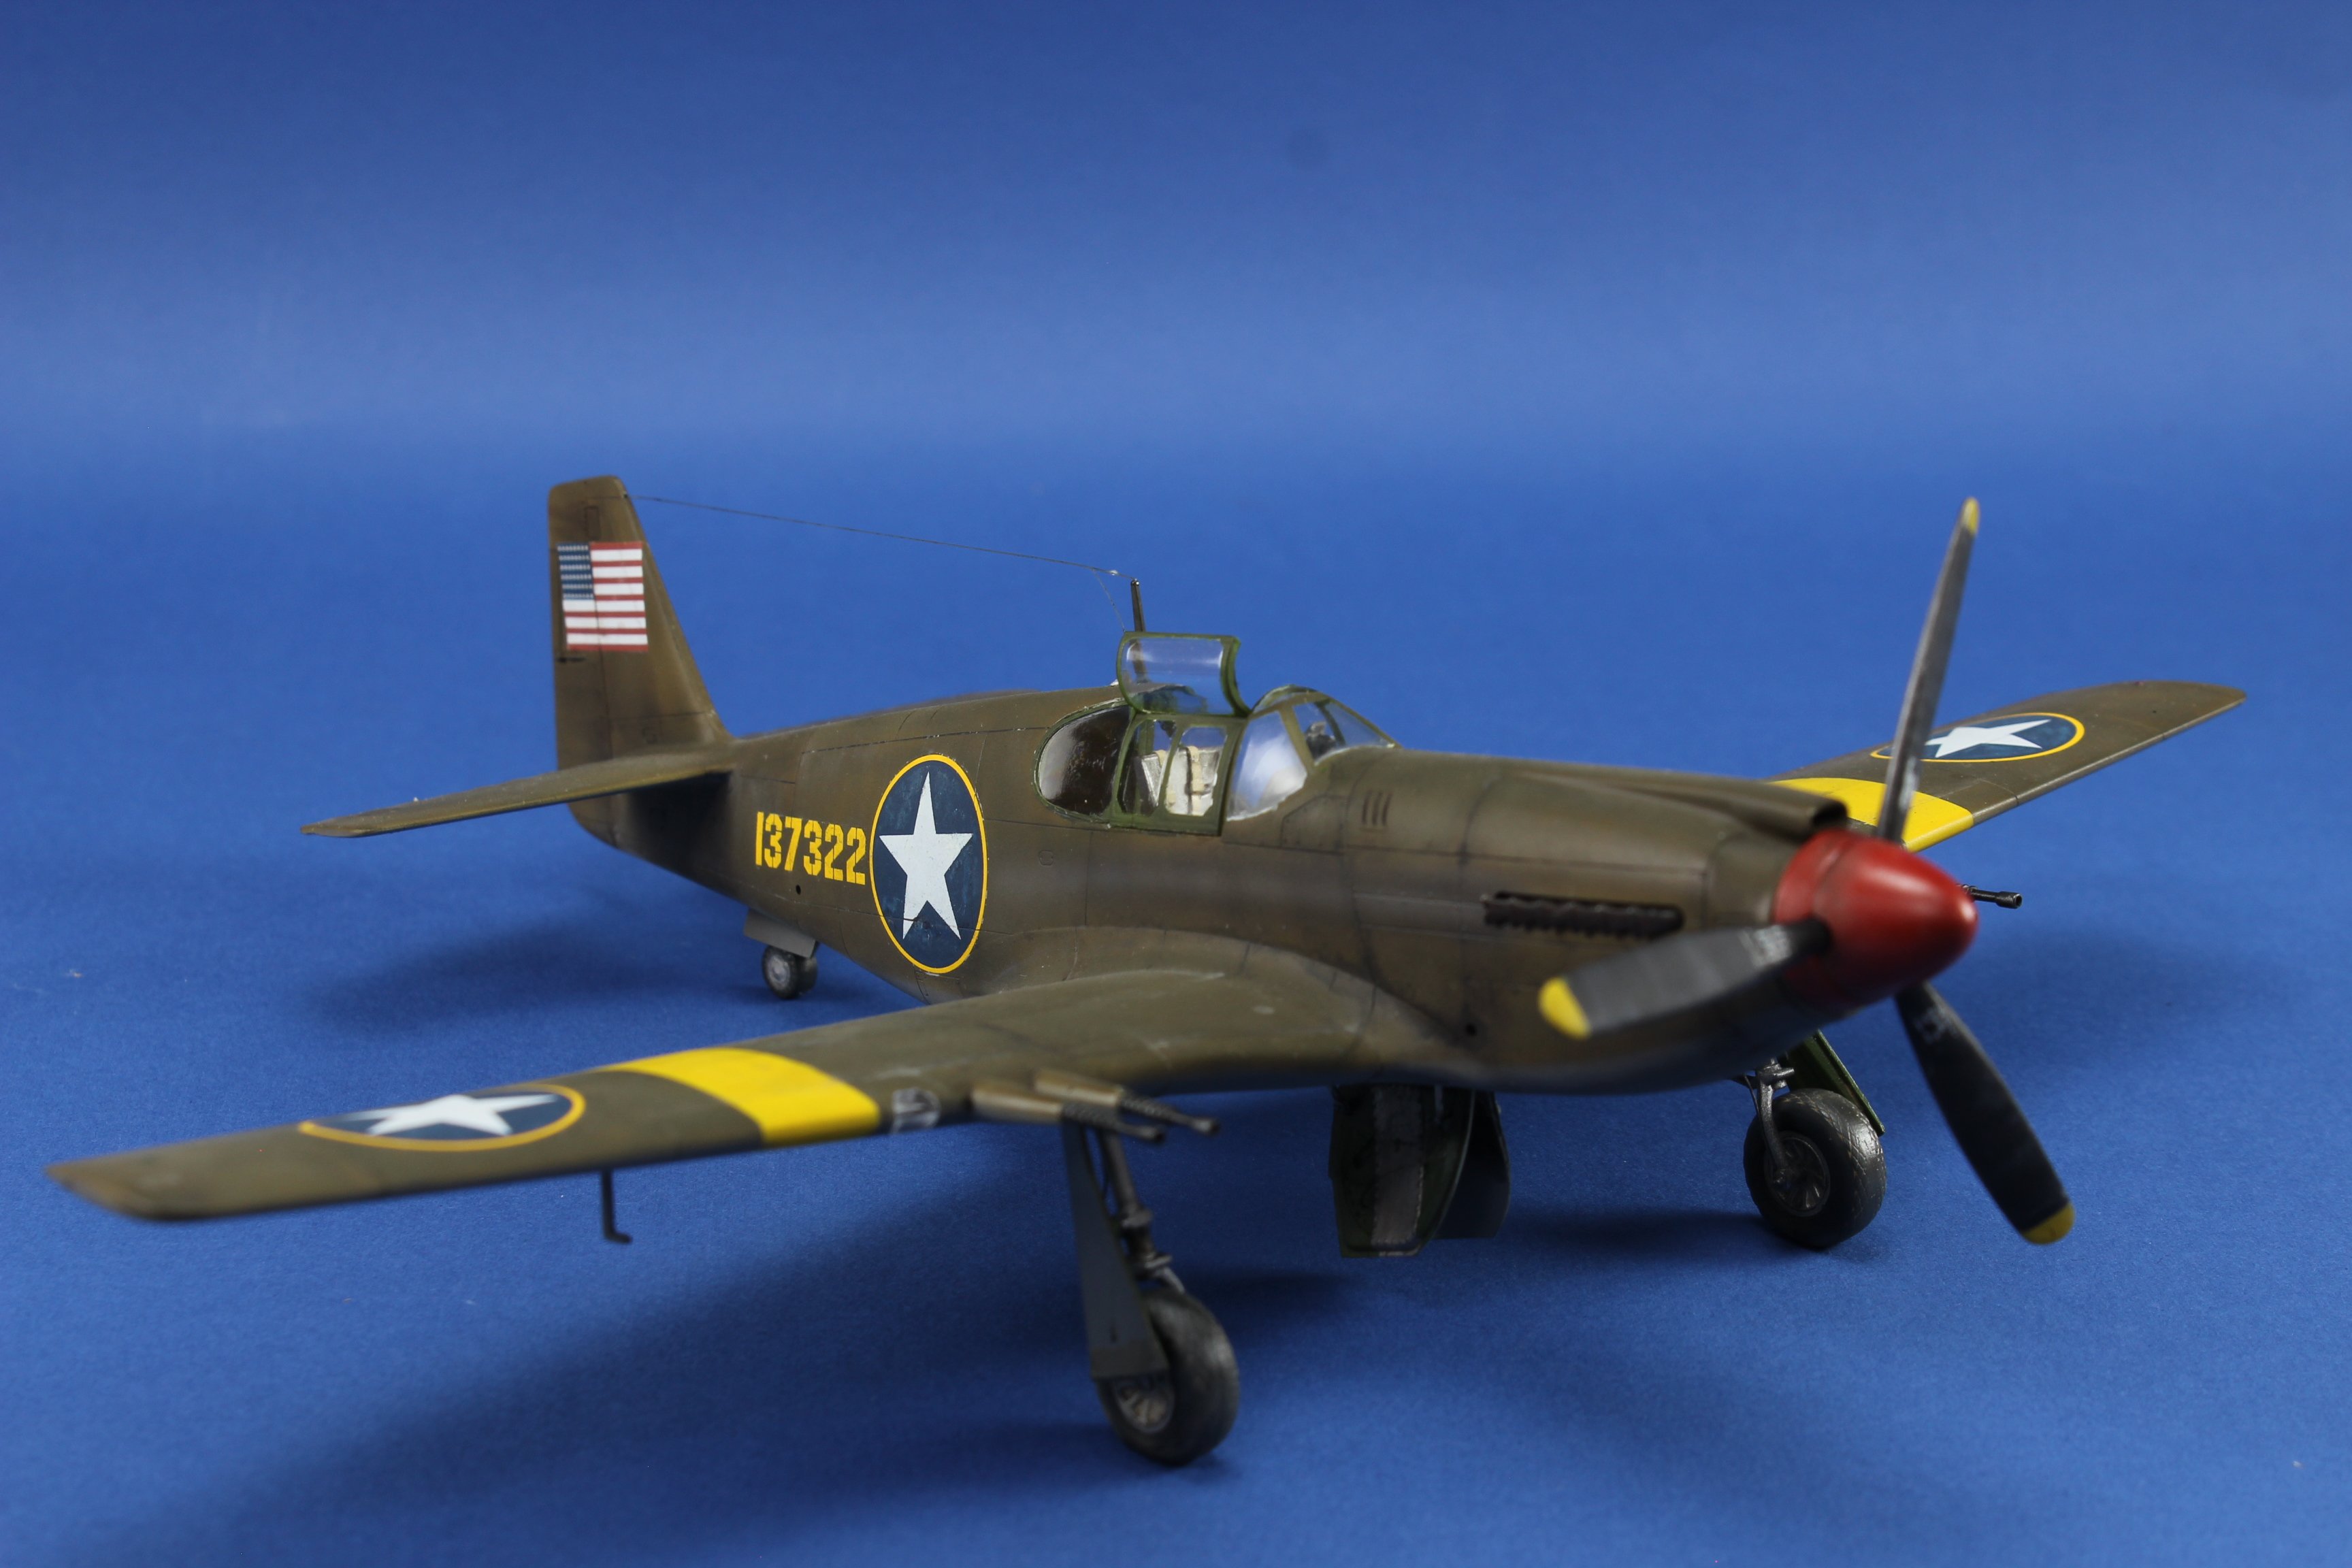
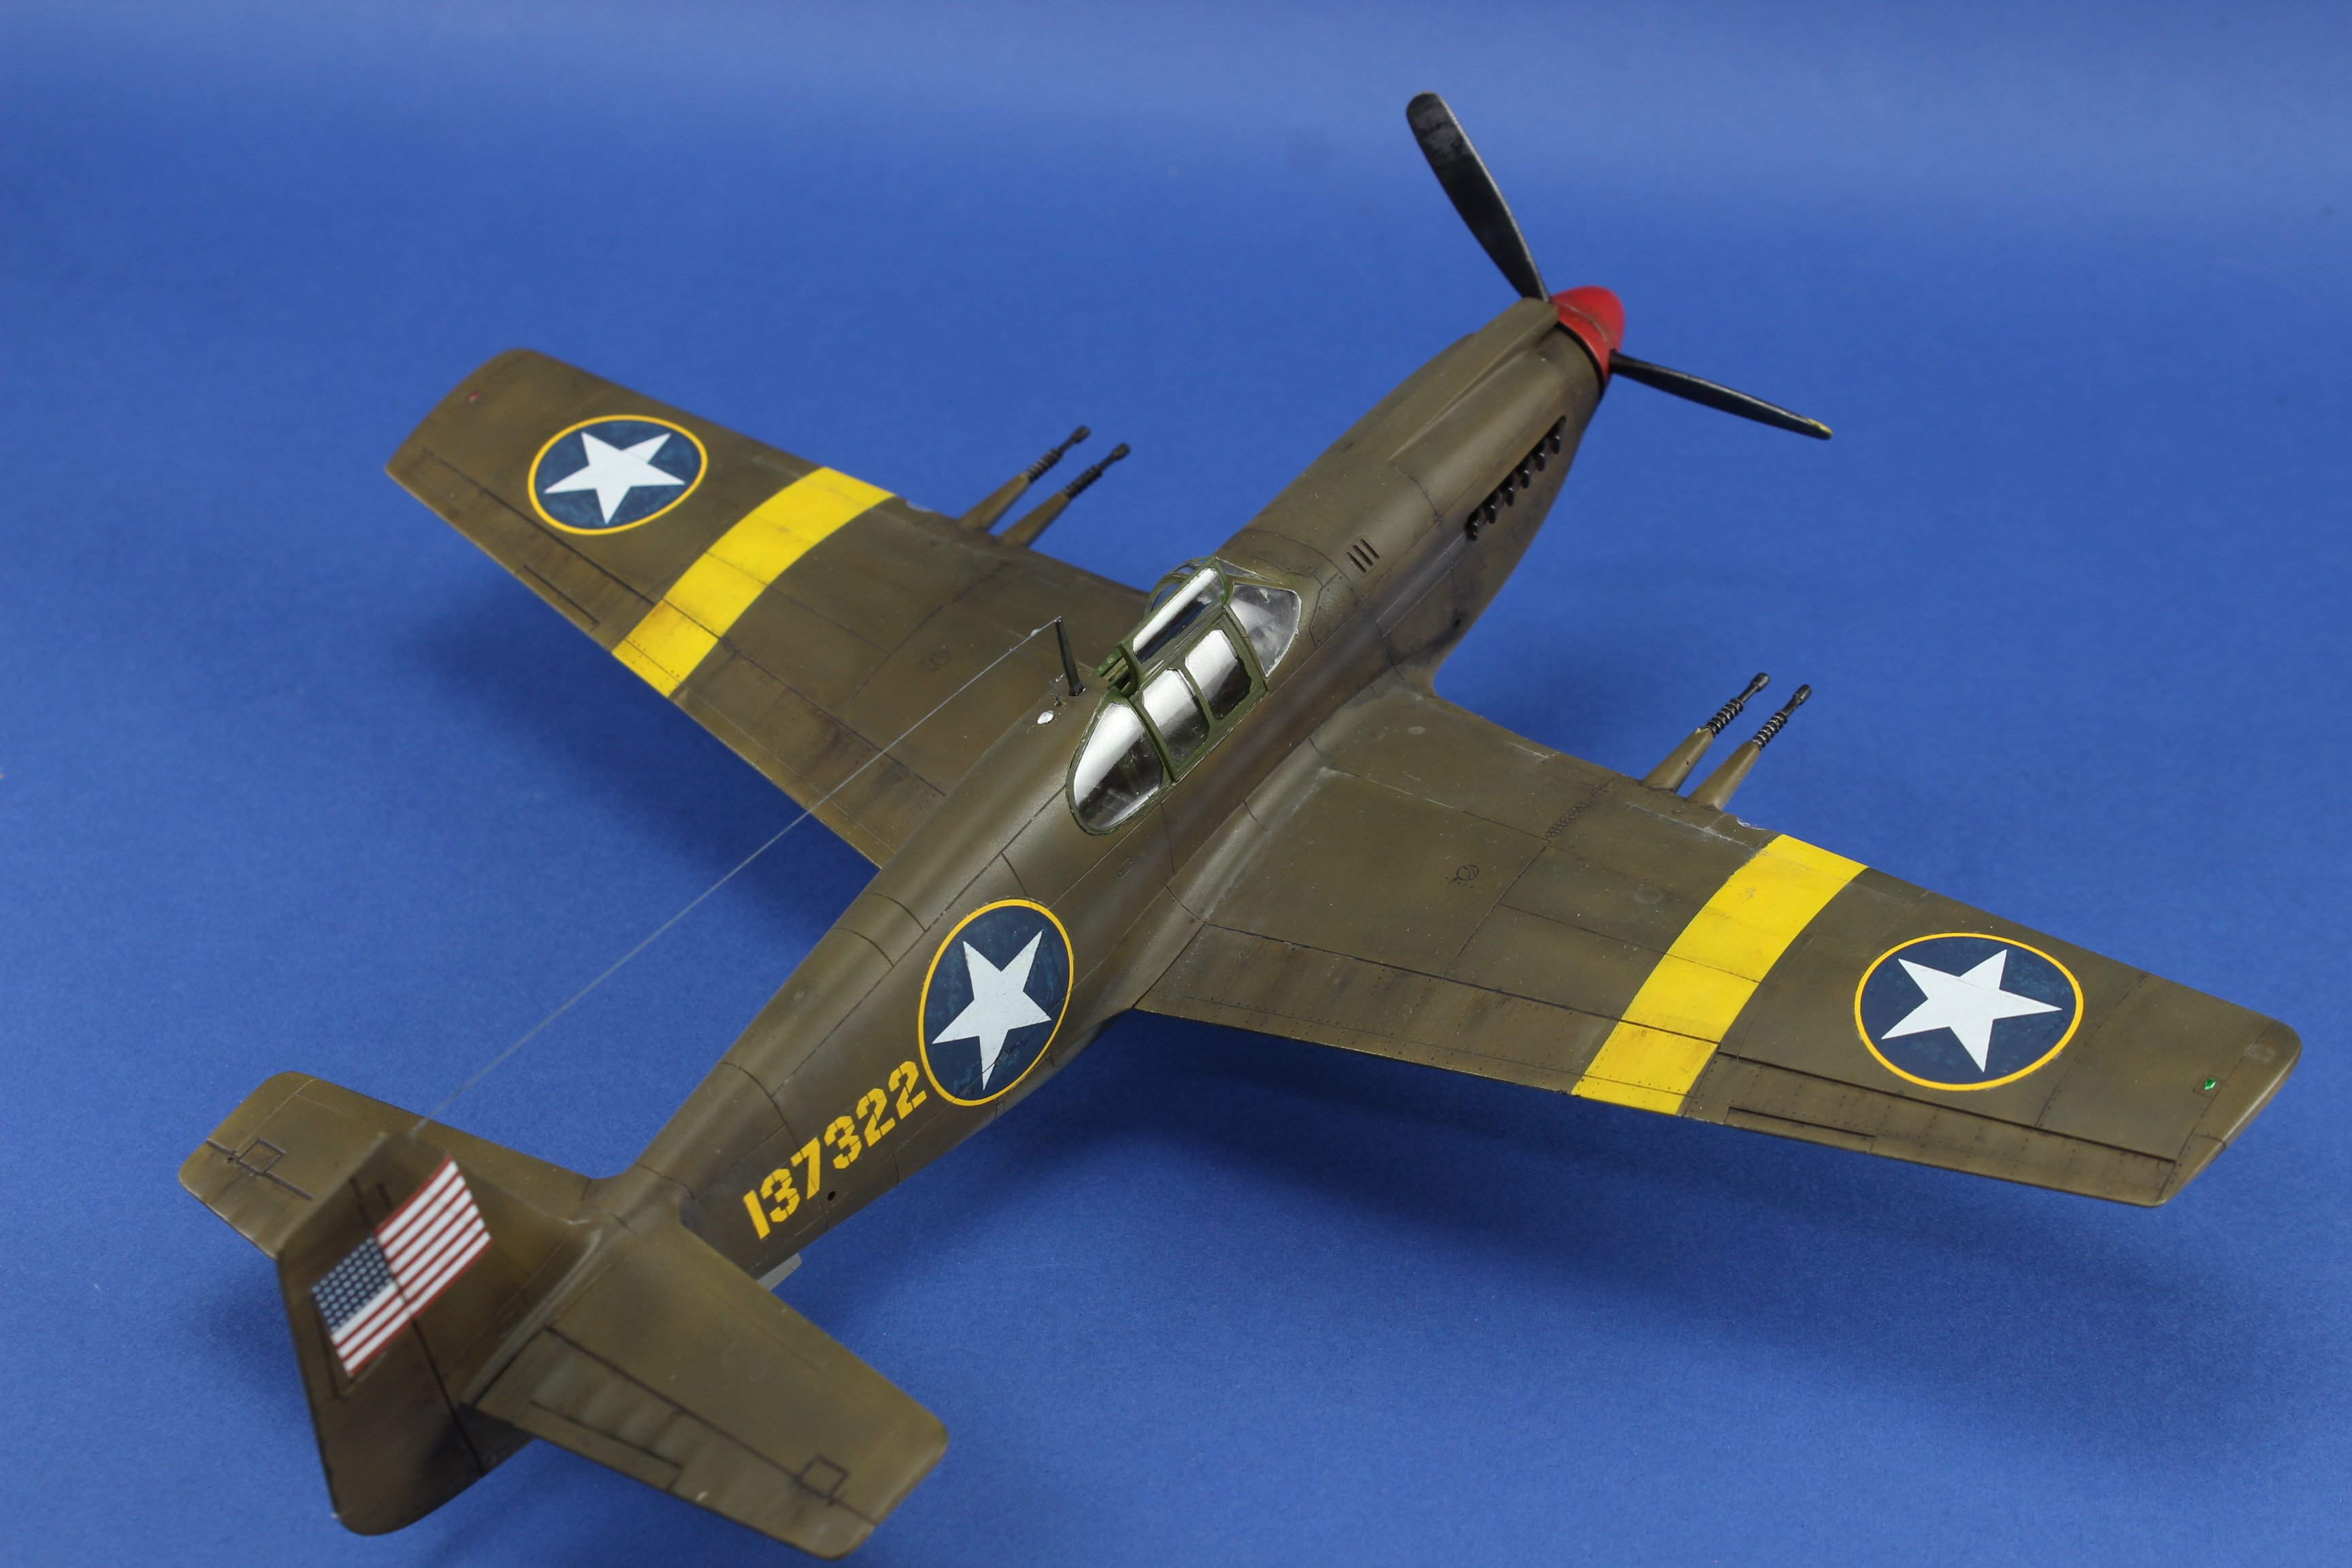
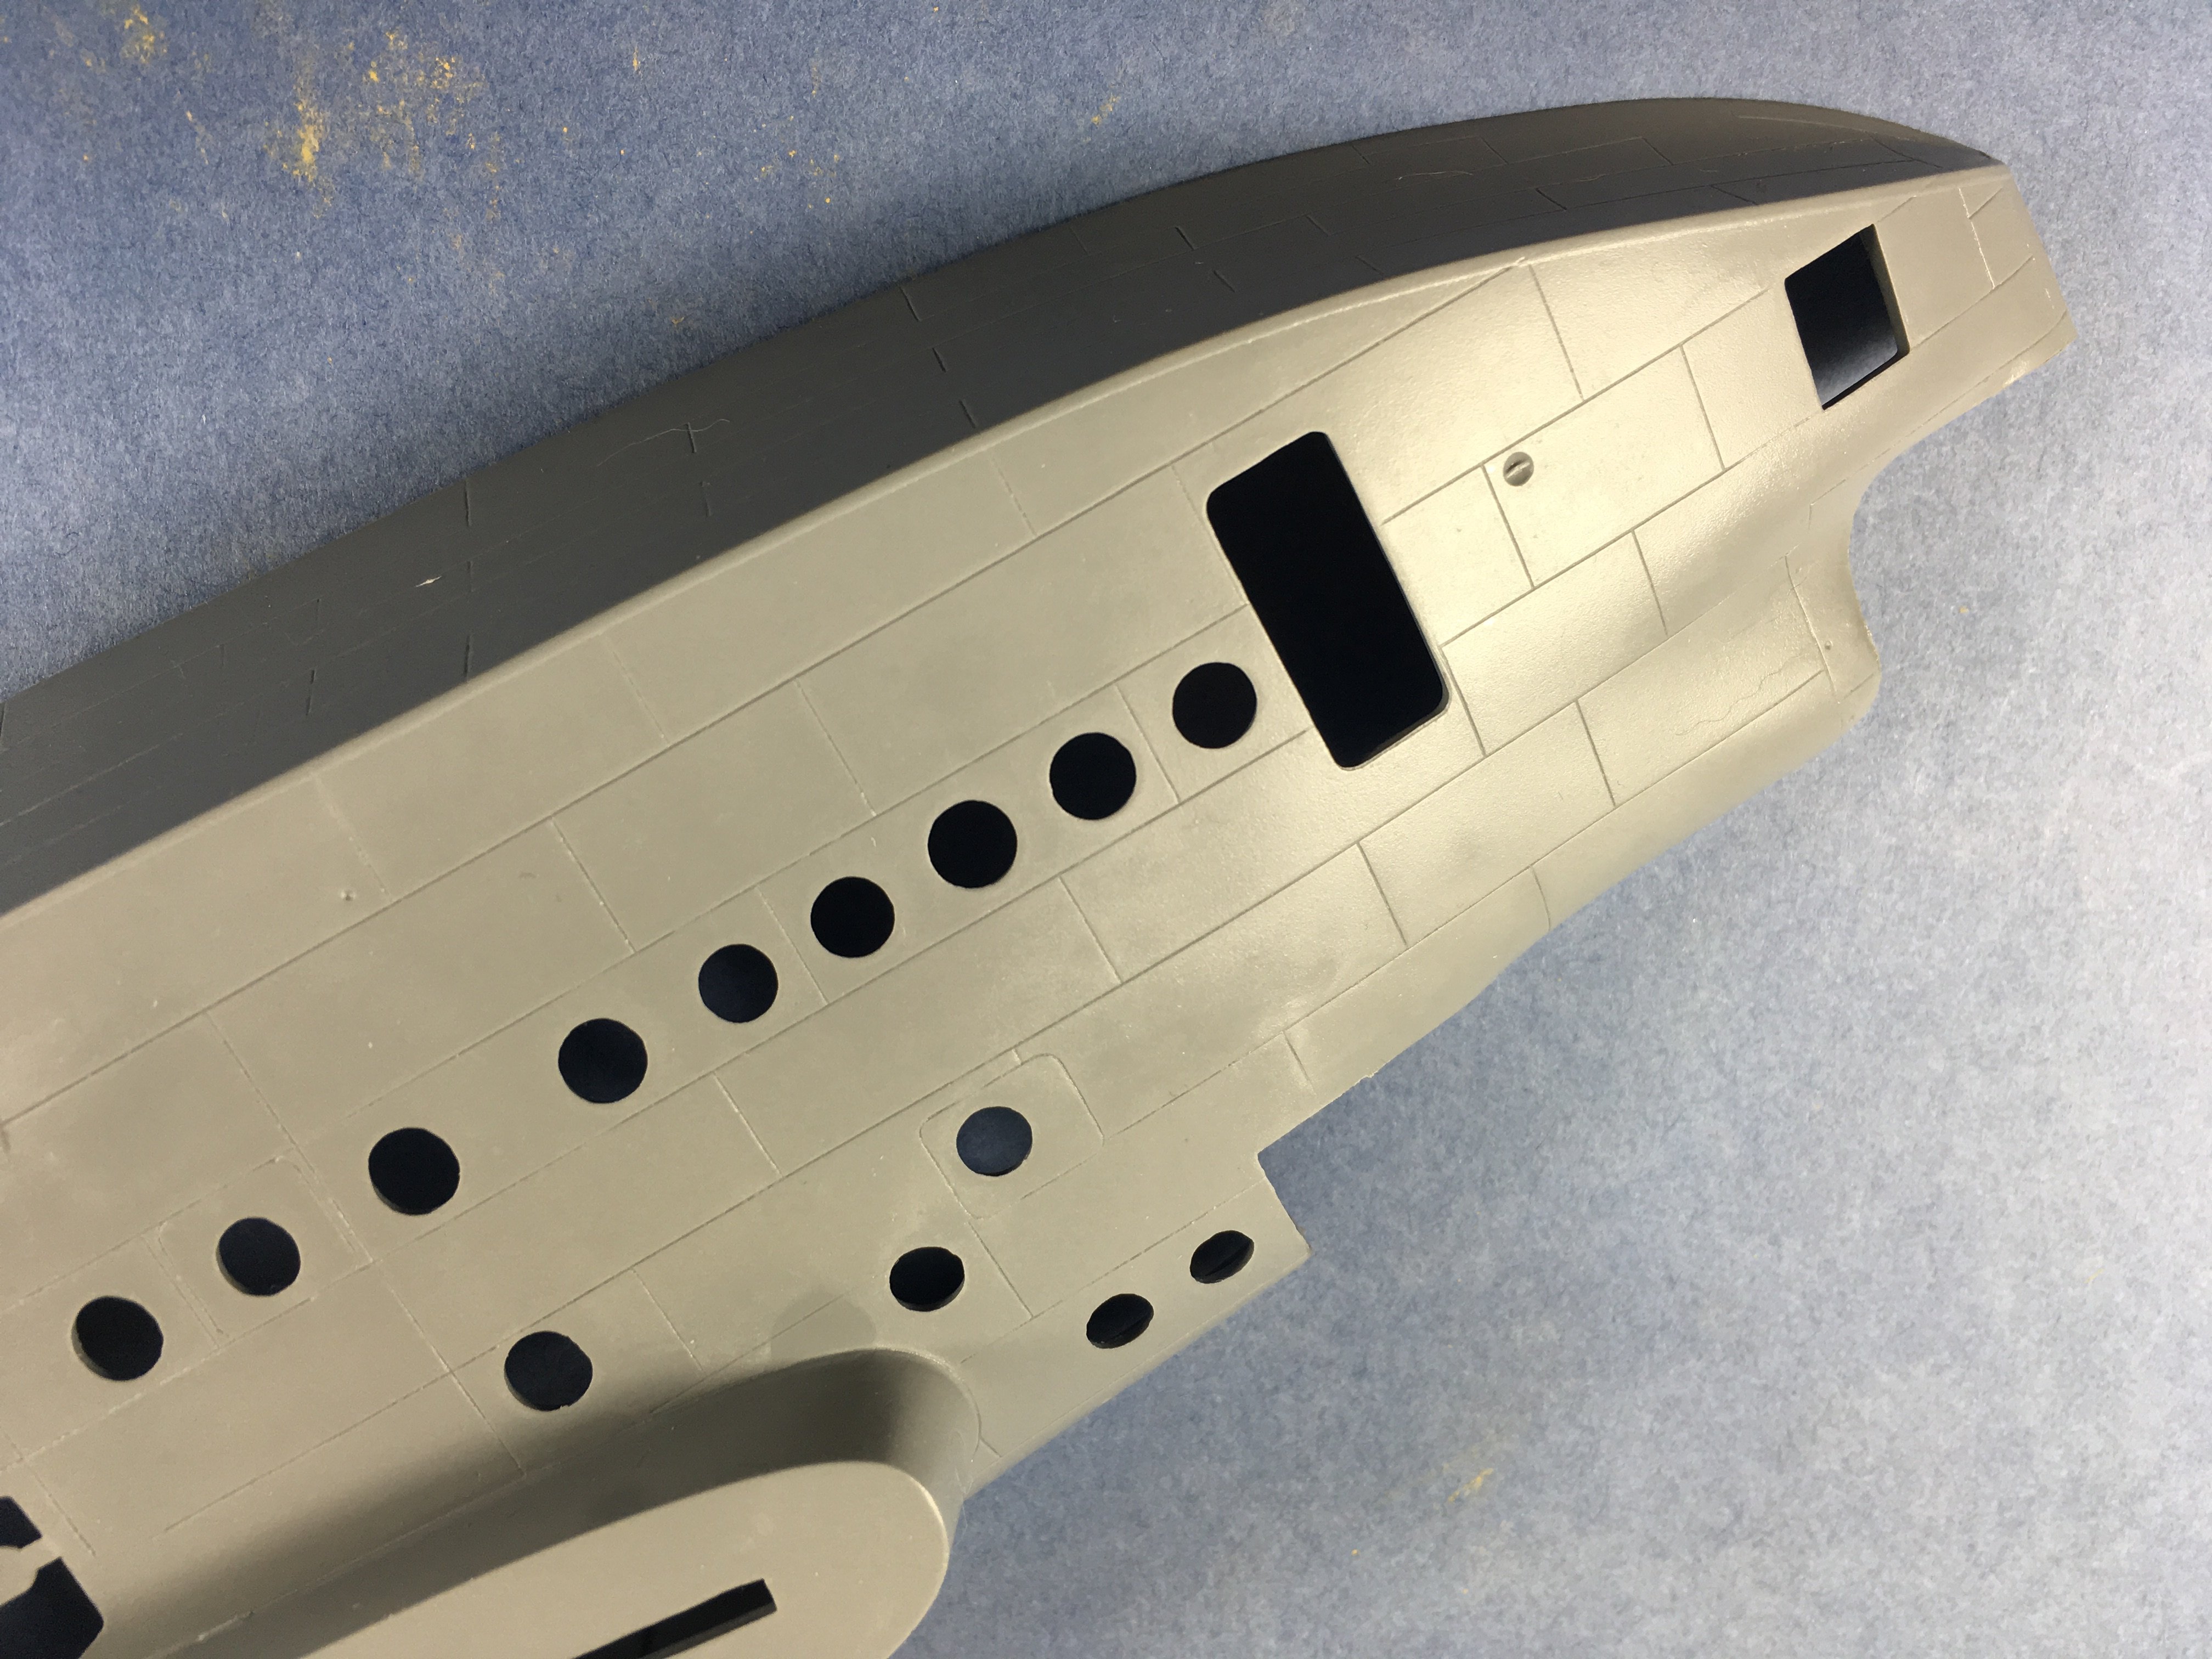
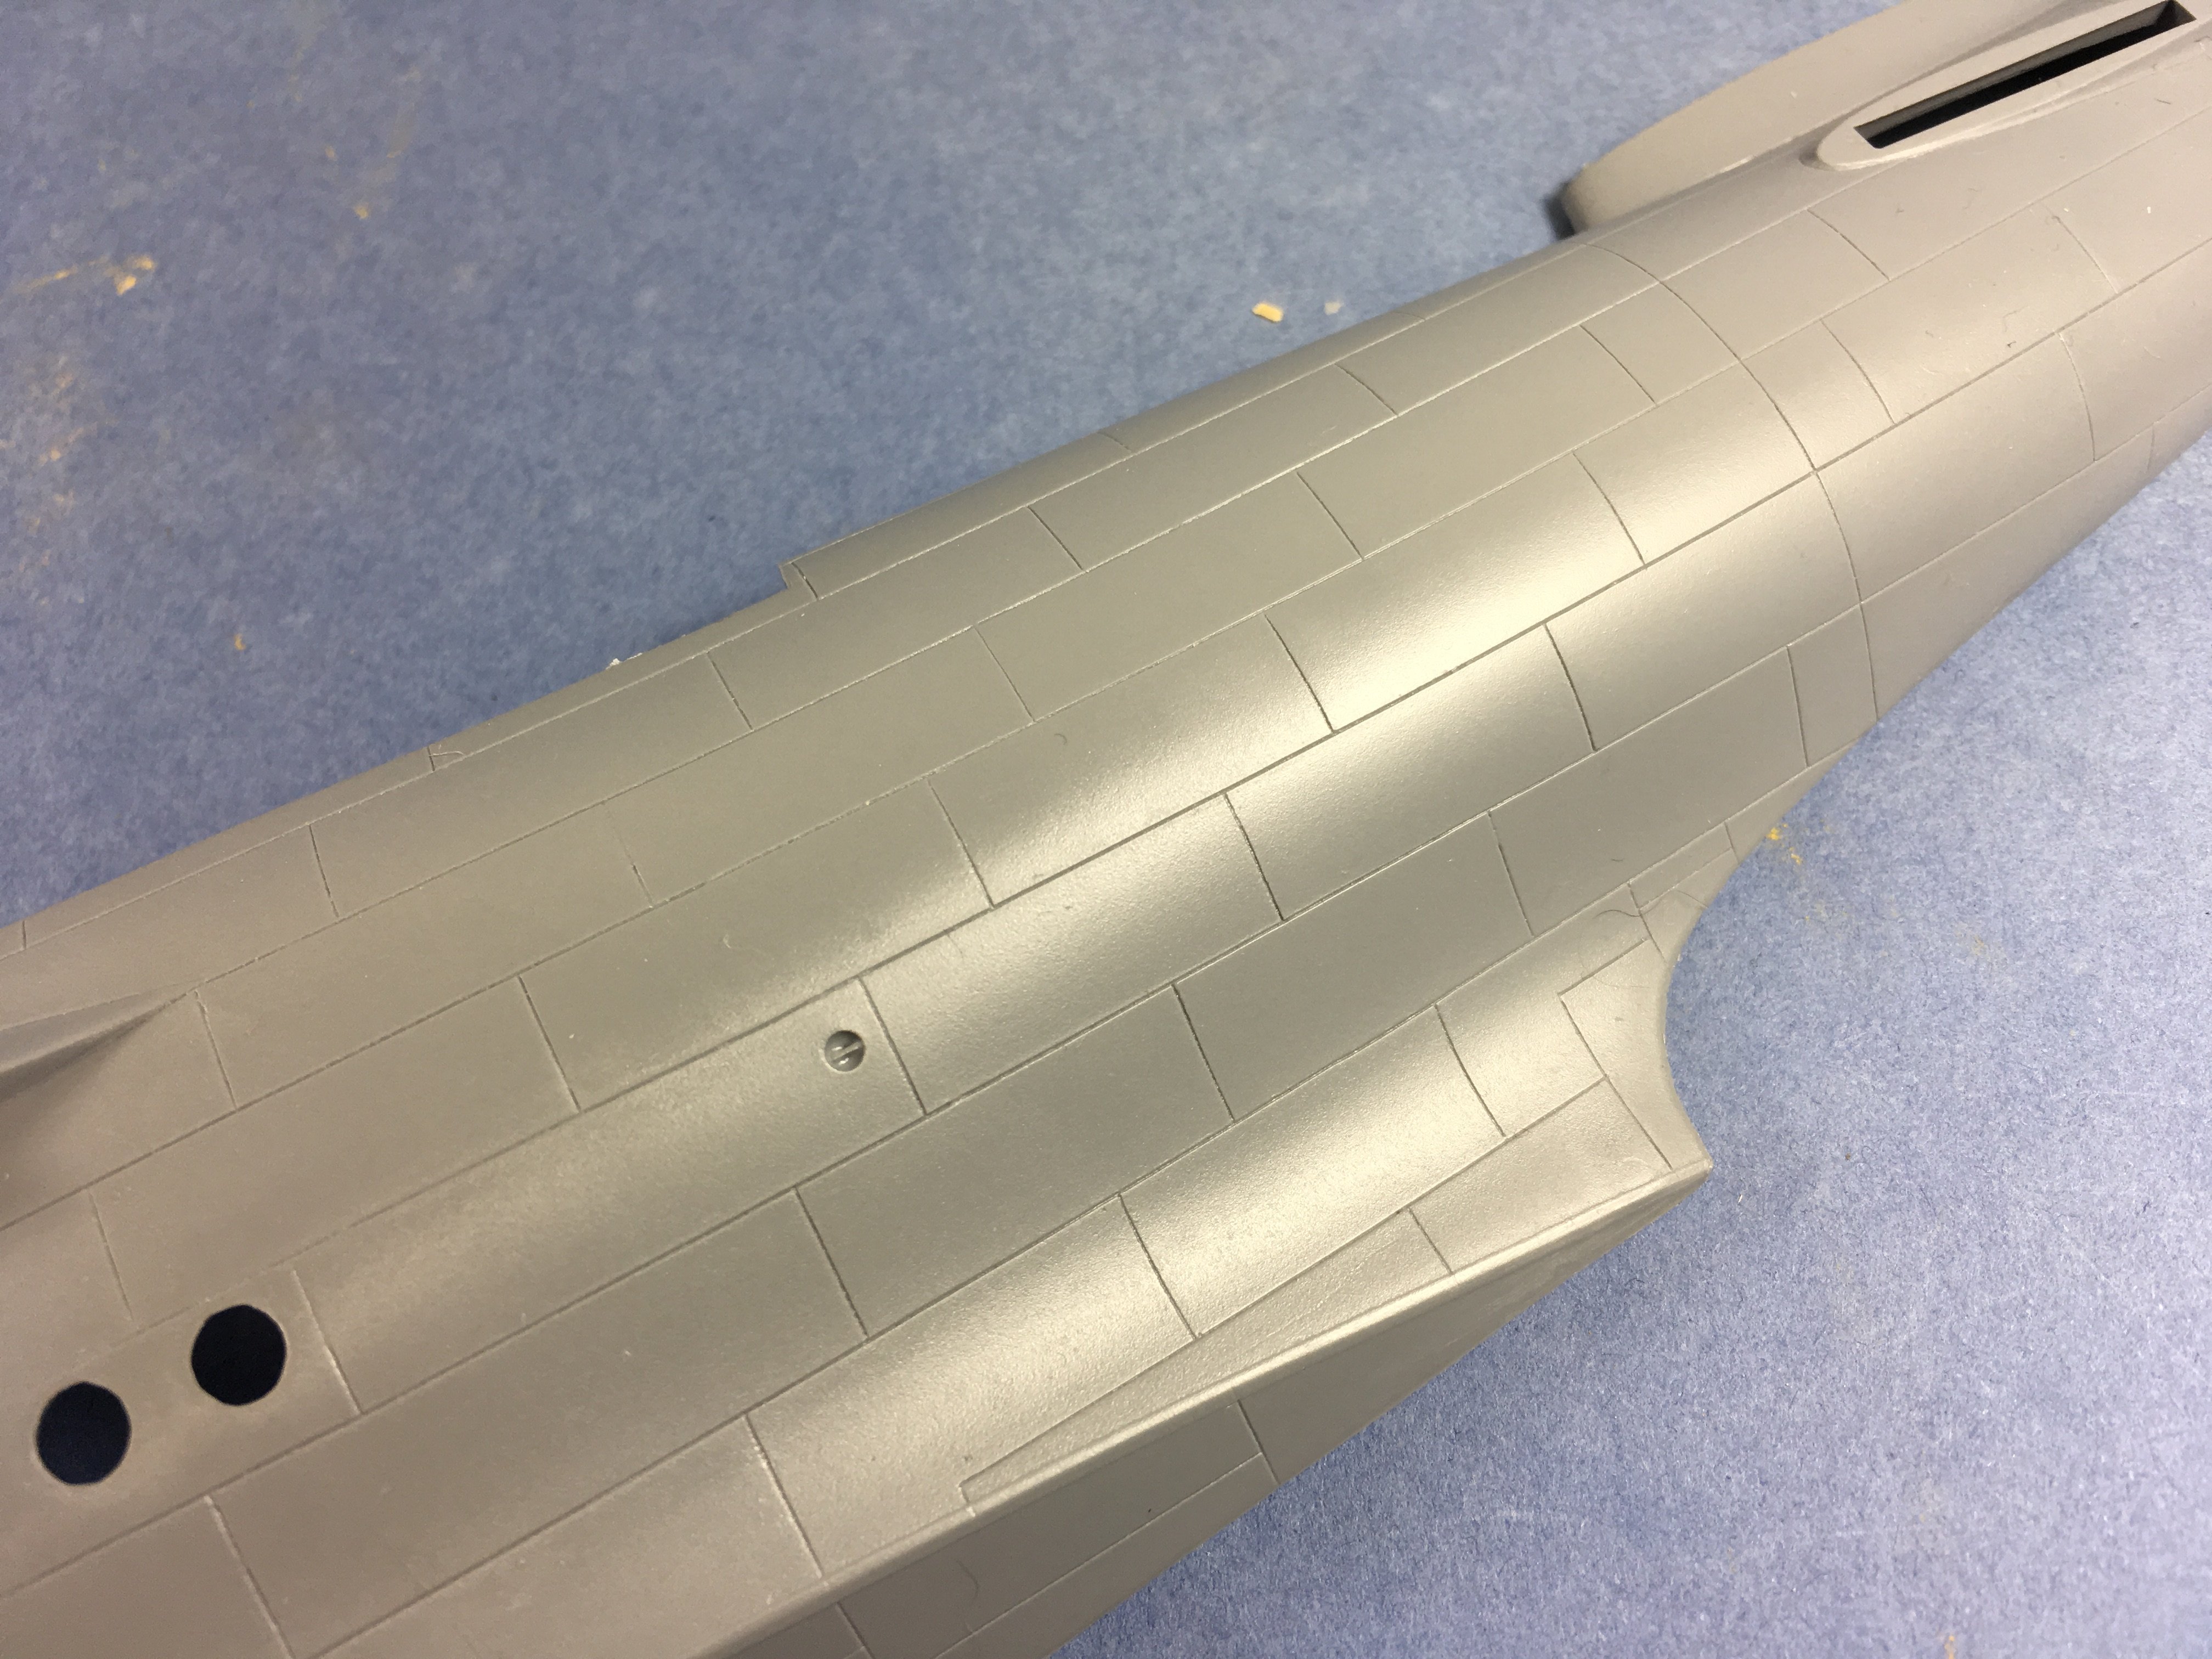
Hi all! Let me present the first concluded build of this year. This model was hunting my workbench at least 4 years, and it was the ideal time to conclude it . The model it self is not bad at all and I've already built the RAF rendition of the Allison Engine P-51 almost a decade ago. Some attention is necessary to guarantee a decent fit or we are going to have lot of troubles with joints. In the end it will look like a early P-51 Mustang The beginning (cockpit what else...) All parts were removed from the spruce and prepared for primer and interior colour ( i opted to a zinc chromate green from Vallejo ModelAir range) All small details were brush painted with vallejo ModelColor. cockpit parts and radio rack painted with the base colours. Cockpit (almost ready) . I opted to paint the seat metallic shade, as i checked some references that state that this would be possible. If it was correct or not, i liked the colour variation. Electric wiring was added to the bulkhead in order to simulate misc cables. In the end.. if you look closely to the cockpit you'll see it, but some times i wonder why i even bother to add details that no one will notice ! I also painted at that time the exhausts ( Metallic enamel paint ( XF-56 Tamiya ) then highly diluted Brown and black from Tamiya (acrylic) via airbrush followed by located brown washes. Several years later.... I decided that this model really needed to get out of my shame stash... some Putty was required on the wings root and in the bottom end ( as pictures show) . Once again i like to mention that this work was caused by the modeller that, despite several years of experience ALWAYS make the same mistakes... Perhaps due to the fact that his beloved hobby is limited to improper hours usually after a day's work and parent assigned duties. anyway I've found out that i had in stock a set of Eduard Masks for this model and what better time to use them. The wind shield required some "blending" to the fuselage with tamiya putty and Gunze Mr Surface. A tedious but worth every second spent. Gear bays and radiator outlet covered with Masking putty. Ready to paint. All the fuselage had been sanded and polished with 2000/ 3000 sand paper. I'm a clumsy modeller, one of my trade marks is one of my fingerprints carved on the plastic due to excess glue. It's like a imaginary mystic entity drive my finger to precisely the point were the glue was. Let the painting begin... I prepare my favourite primer ( in this case Vallejo Grey primer ) and applied several light coats. followed by another polish session with a 2000 Grit sanding pad . I work in a garage and it's not the most adequate place to perform such "cleaning" tasks. Then i started painting the upper colour ( Tamiya XF-62 Olive Drab) highly diluted and applied a panel at a time. When i start painting i don't have a idea of the concluded model. All i know is that i wanted to replicate a machine operating in North Africa so... so worn colours were required. I don't have the correct formula, but i added several tones of yellow and green to the base colour and.. i had fun... The bottom colour was Neutral Grey from Tamiya, also in the same pattern. I apologize as i didn't take any pictures of the process. How to complicate or spend one hour of modelling time to paint stripes The combination of decal stripes and me simply doesn't work. So.. lets paint some yellow stripes. Mark the stripes location Outline the stripes Mask the exterior Add the base ( several light layers) white Then yellow Masks removed ( damage control at standby) then i hurried up, painted the underside and sealed with a coat of clear gloss Fast Forward some weeks and the decals already in place. At this time i still didn't have a clue about the final look. so i did the logical and rational step.. i started weathering... Oils spils were created with several Oils ( what a cliché..) from (former) Mig Productions range. I kept chipping to a minimal using a silver pencil on the wing root. Ochre Oil tones were used to give the wing a Dust look. I took some artistic freedom ( remember i was having some fun with my hobby). The insignias were weathered with acrylic colours and washes. the exhausts stains were airbrush painted with grey, brown and black colours all from Tamiya Acrylic range ( XF-19 / XF-10 and XF-1) highly diluted with Tamiya's acrylic thinner Fast Forward some months... ta daaa... final result ! Canopy, antennas, navigation lights, landing gear and doors, pitot tube and cannons added. Conclusion It's concluded. And it looks like a early P-51 Mustang. I enjoy it and its concluded. Thanks for watching and i apologize for any grammatical or opinion error. Let me know your thought on the comments below! thanks once again! best regards!


.JPG.6fd757b59bbedc253afc7b383a613e86.JPG)
.JPG.6560d8f513efecf37df16660844401e7.JPG)
.JPG.55d611dbd858ec86d74b614ce9261782.JPG)
.JPG.0094022fa1b06410bafc7c173fdddda8.JPG)
.JPG.314ecc80de747eb0c1bdb3cdc56222bb.JPG)
.JPG.4781bb6ba1be6d8091cba3b04d407577.JPG)

-
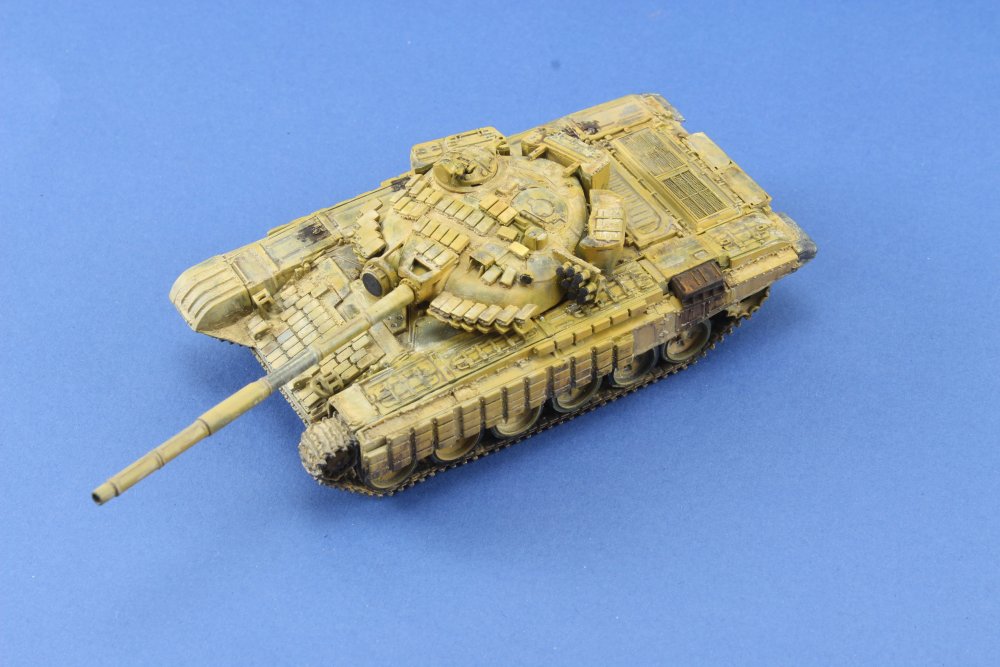
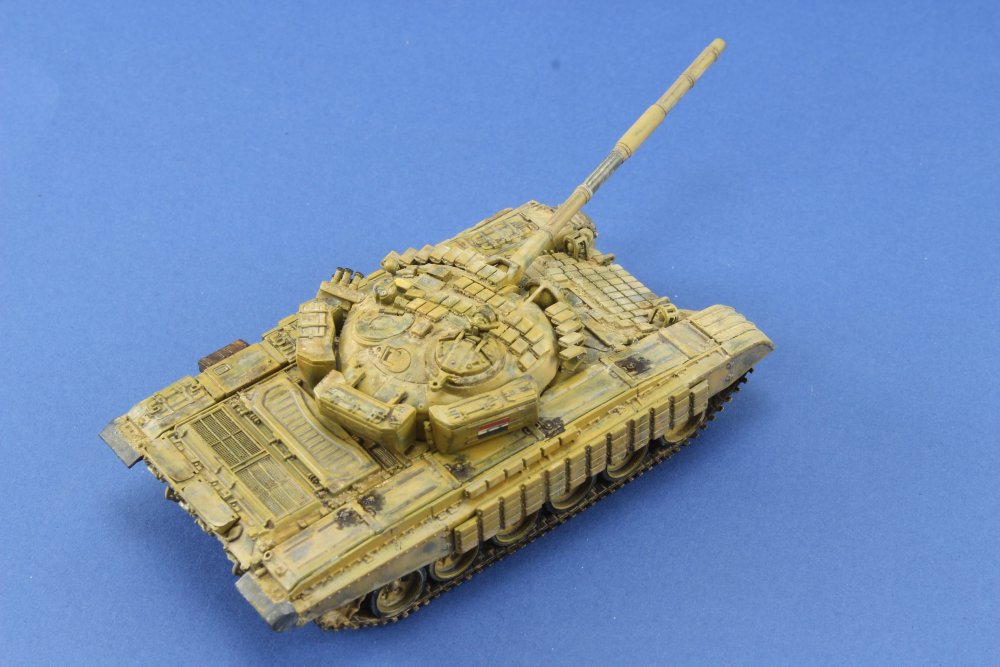
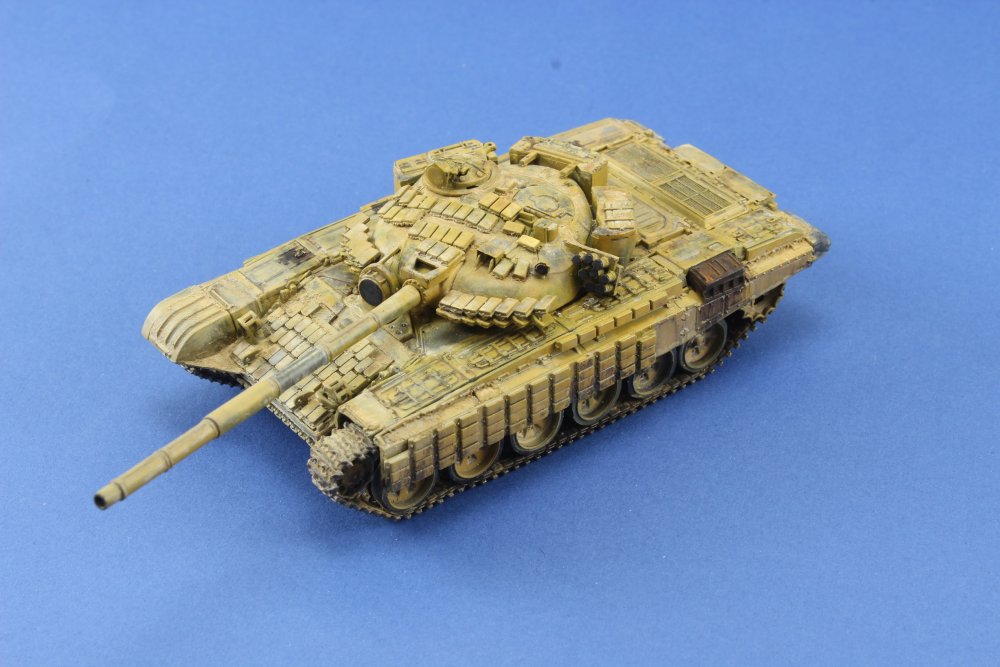
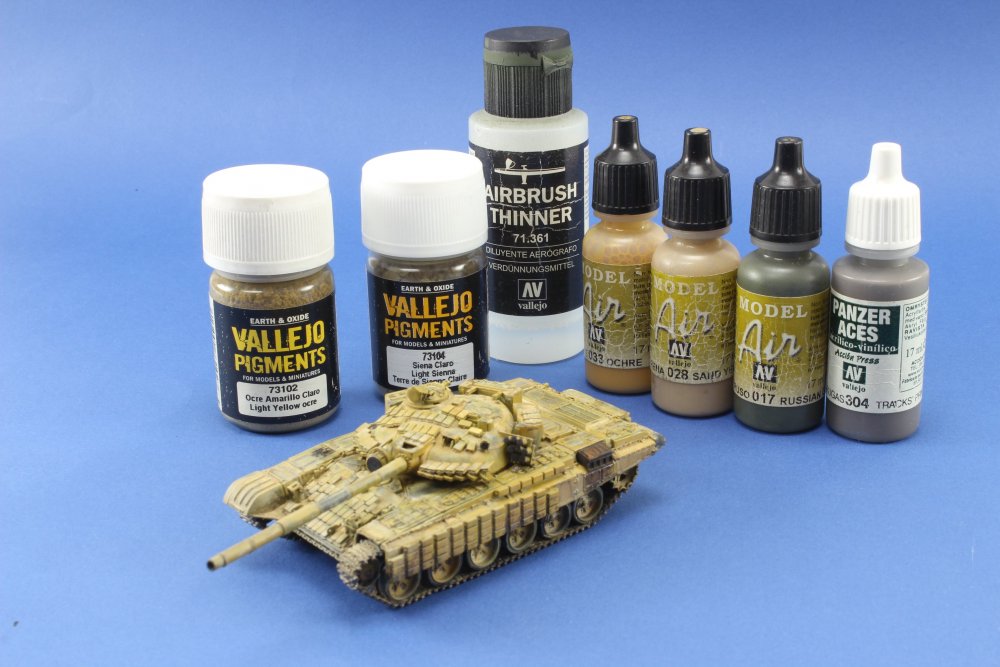
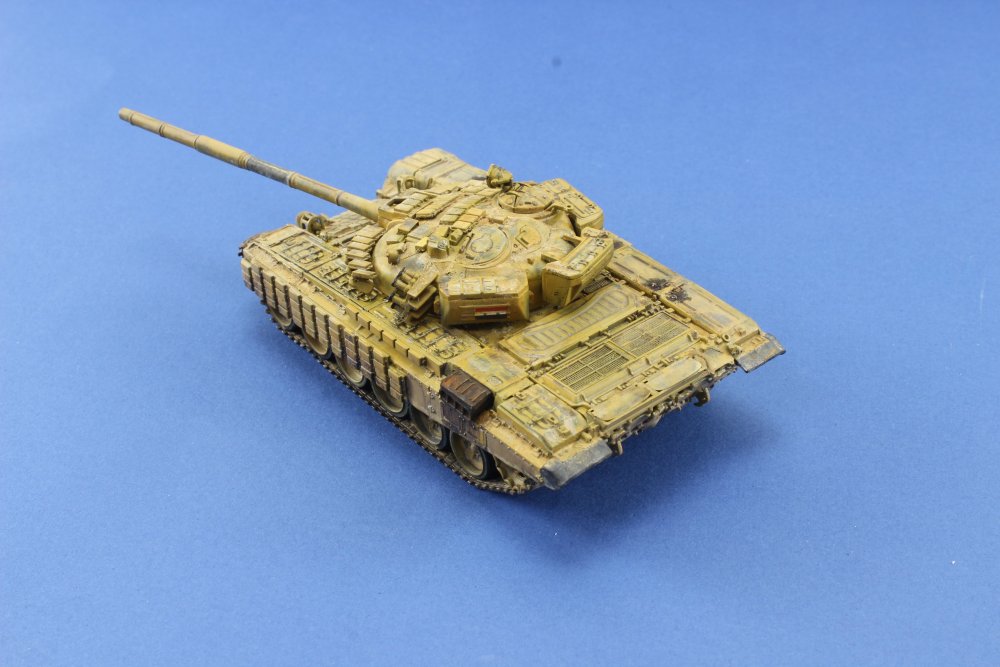
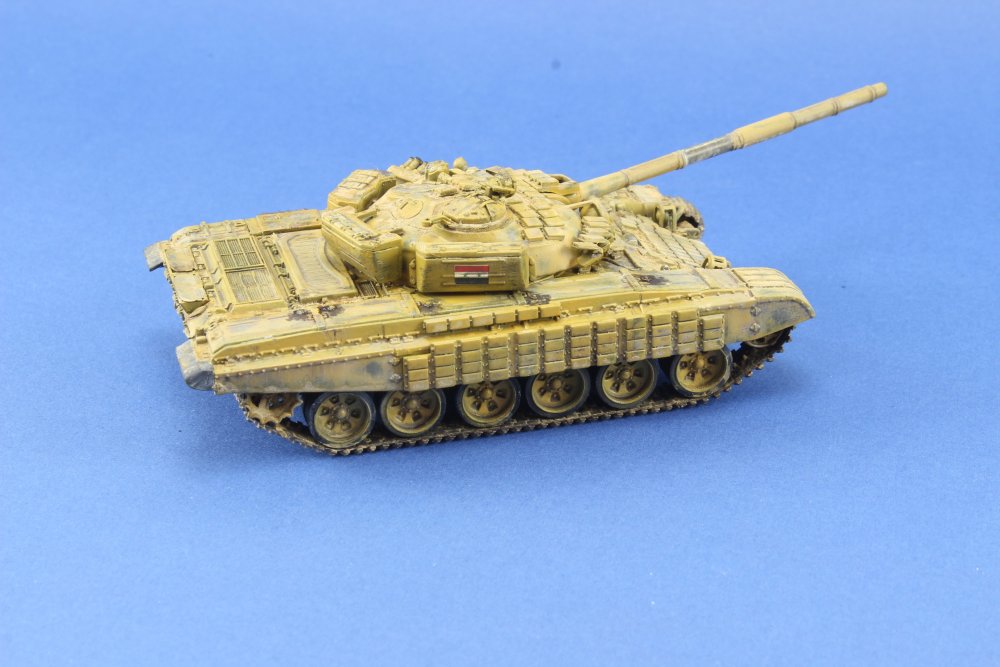
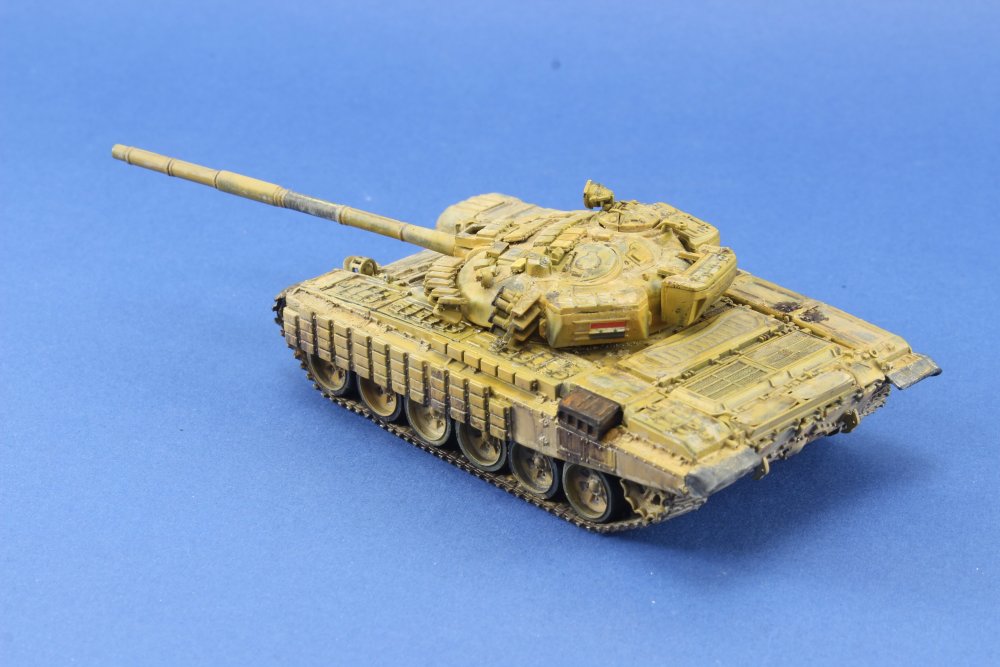
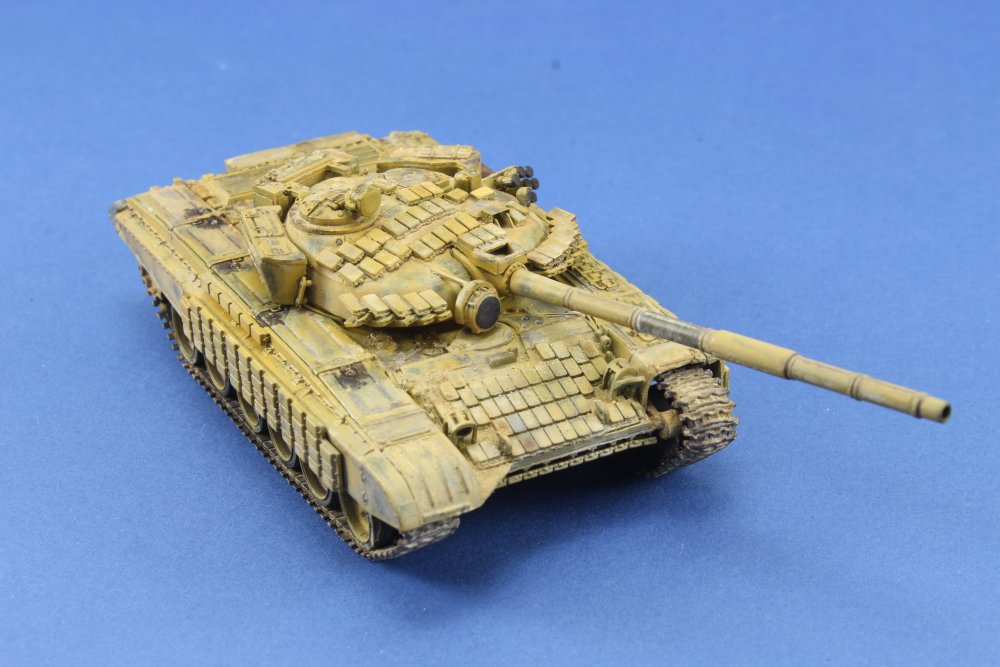
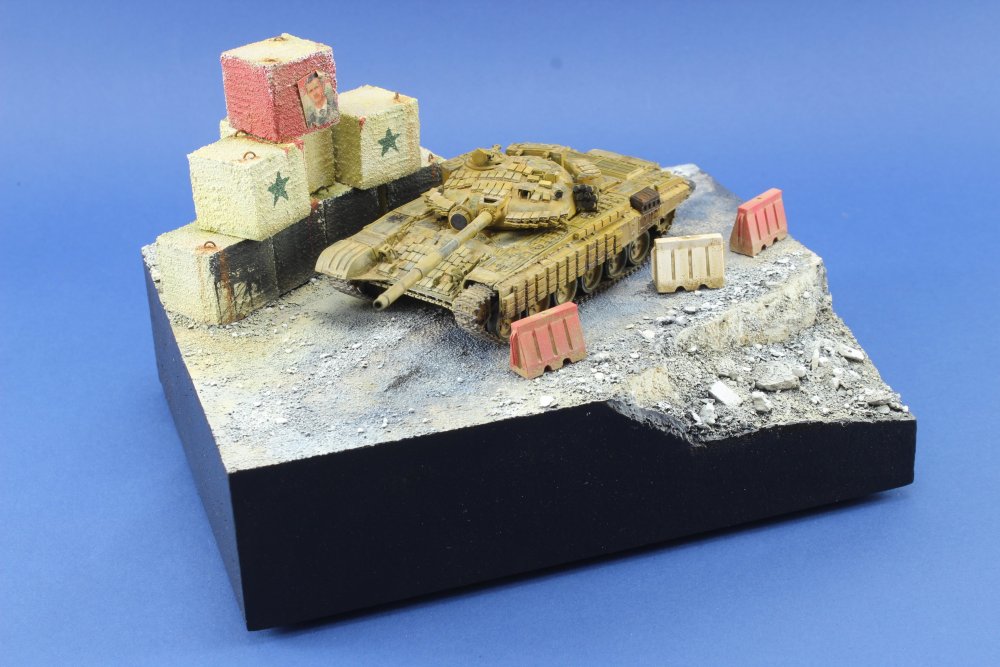
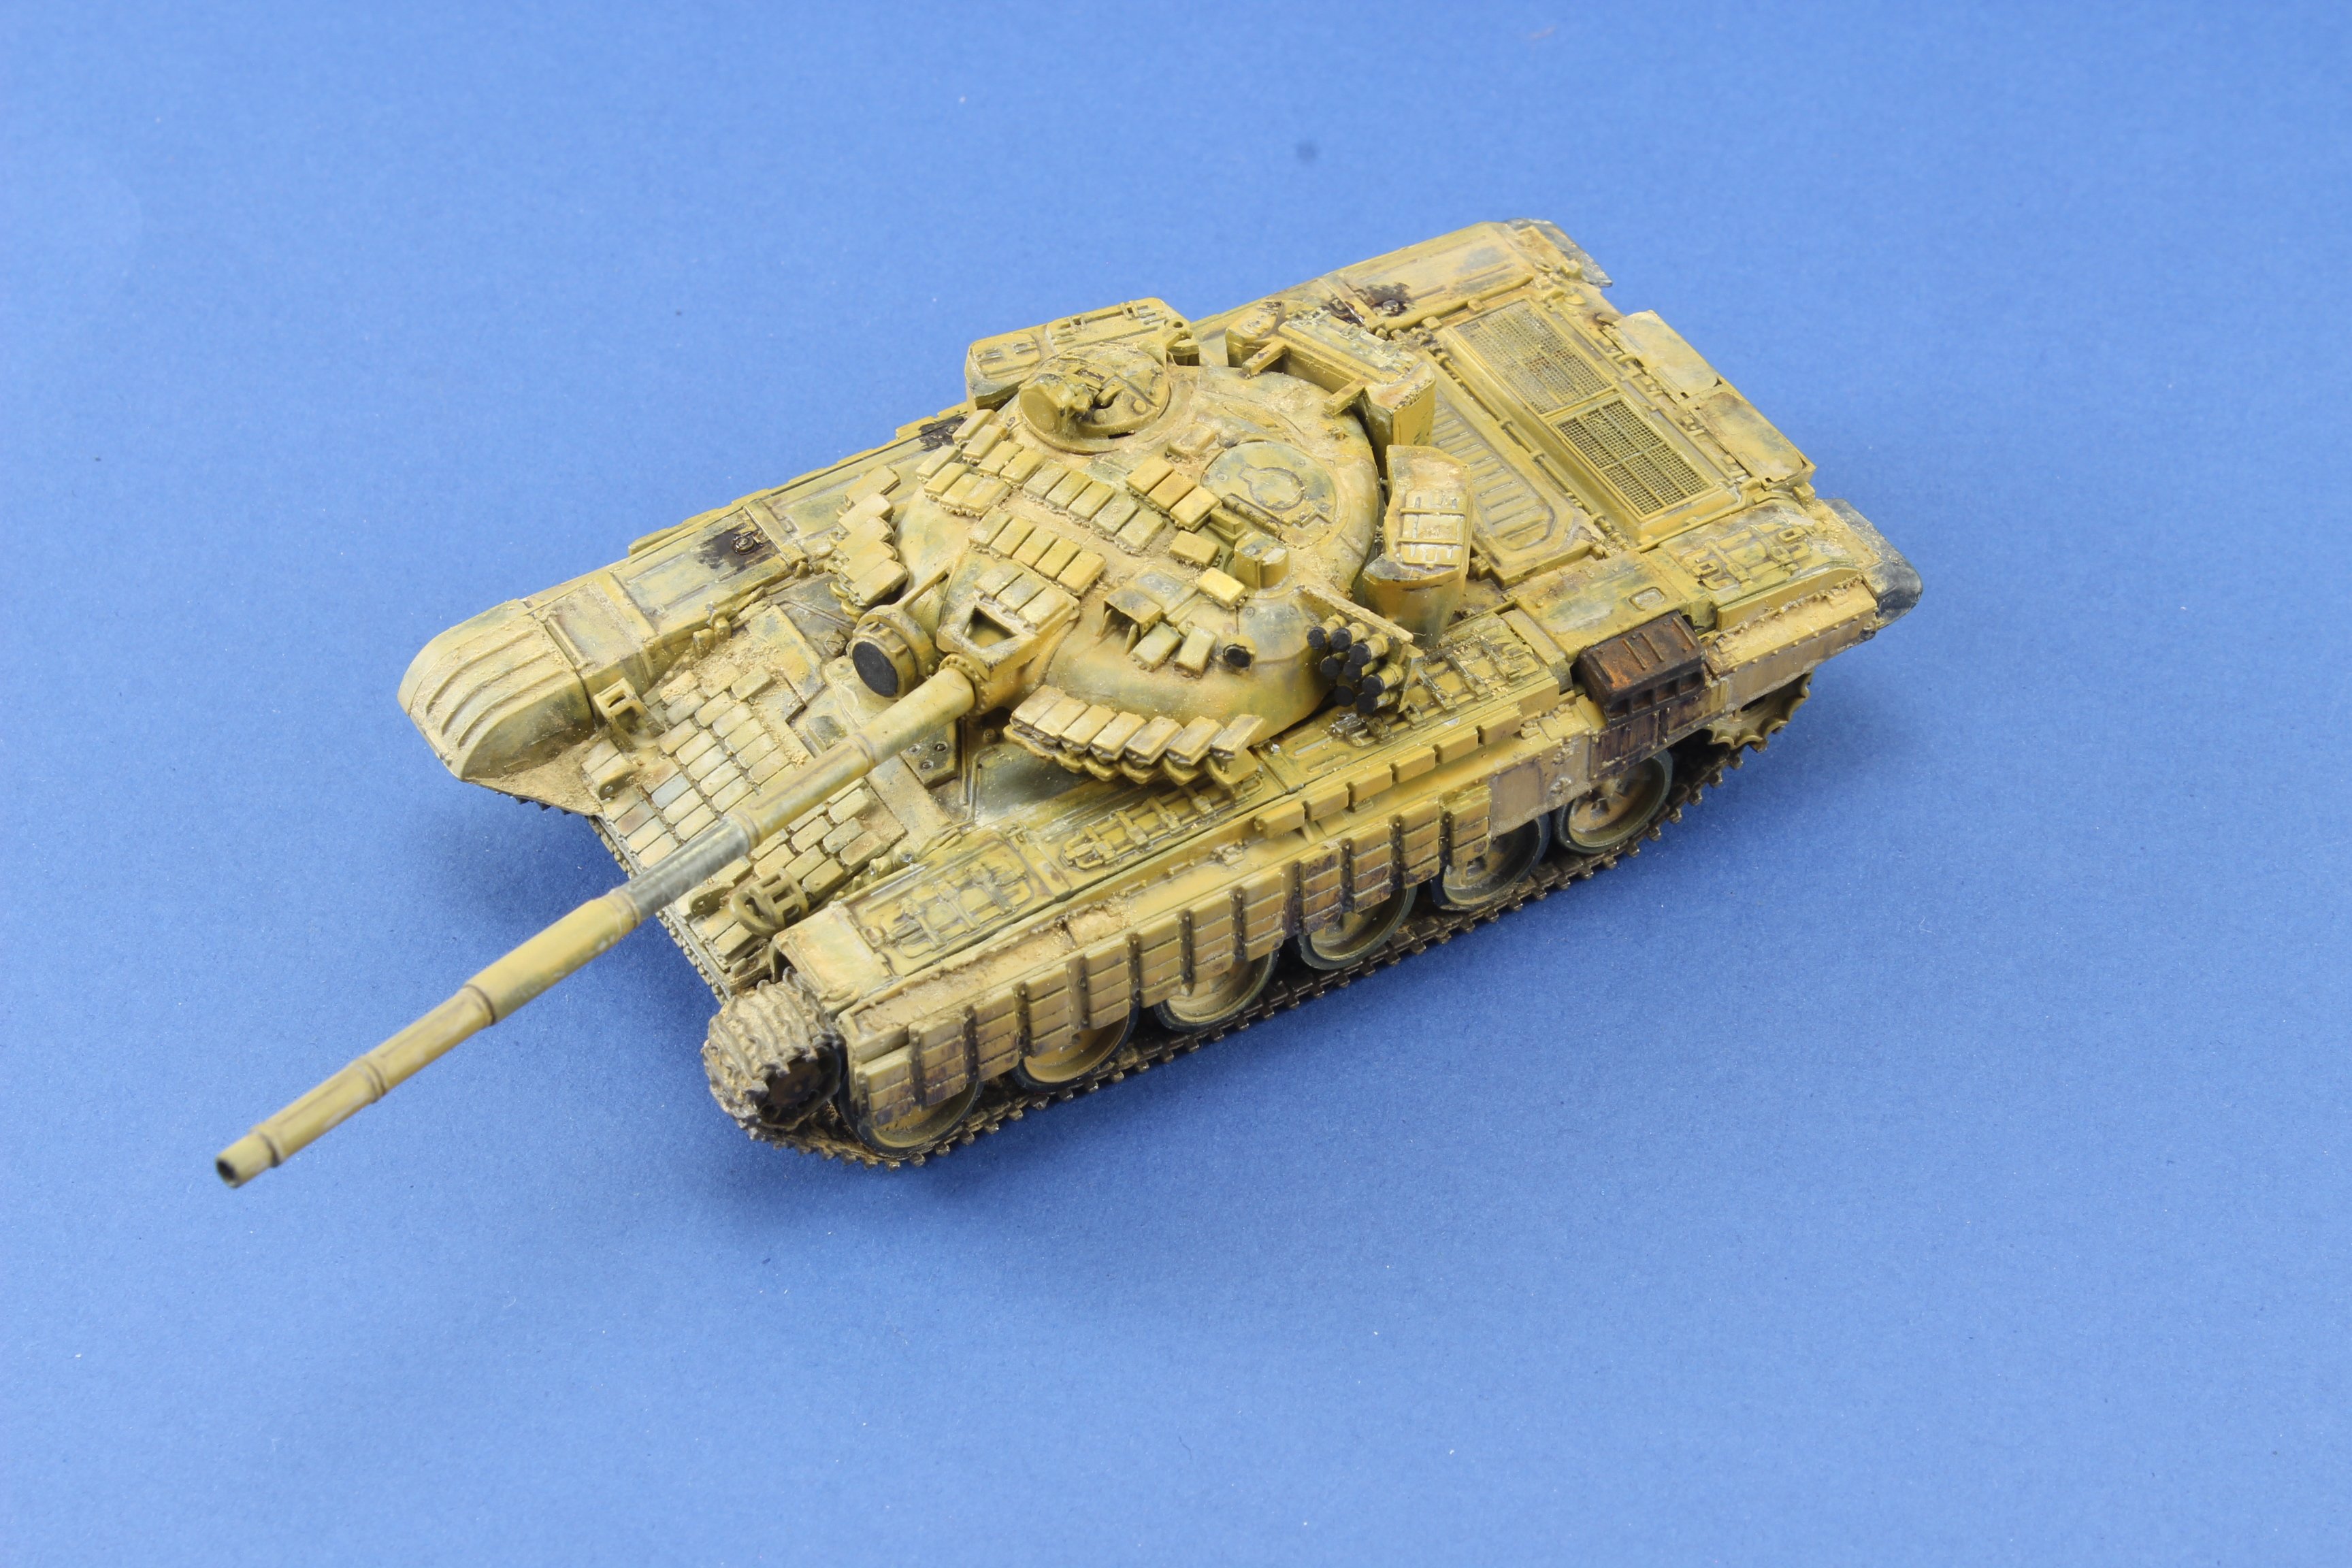
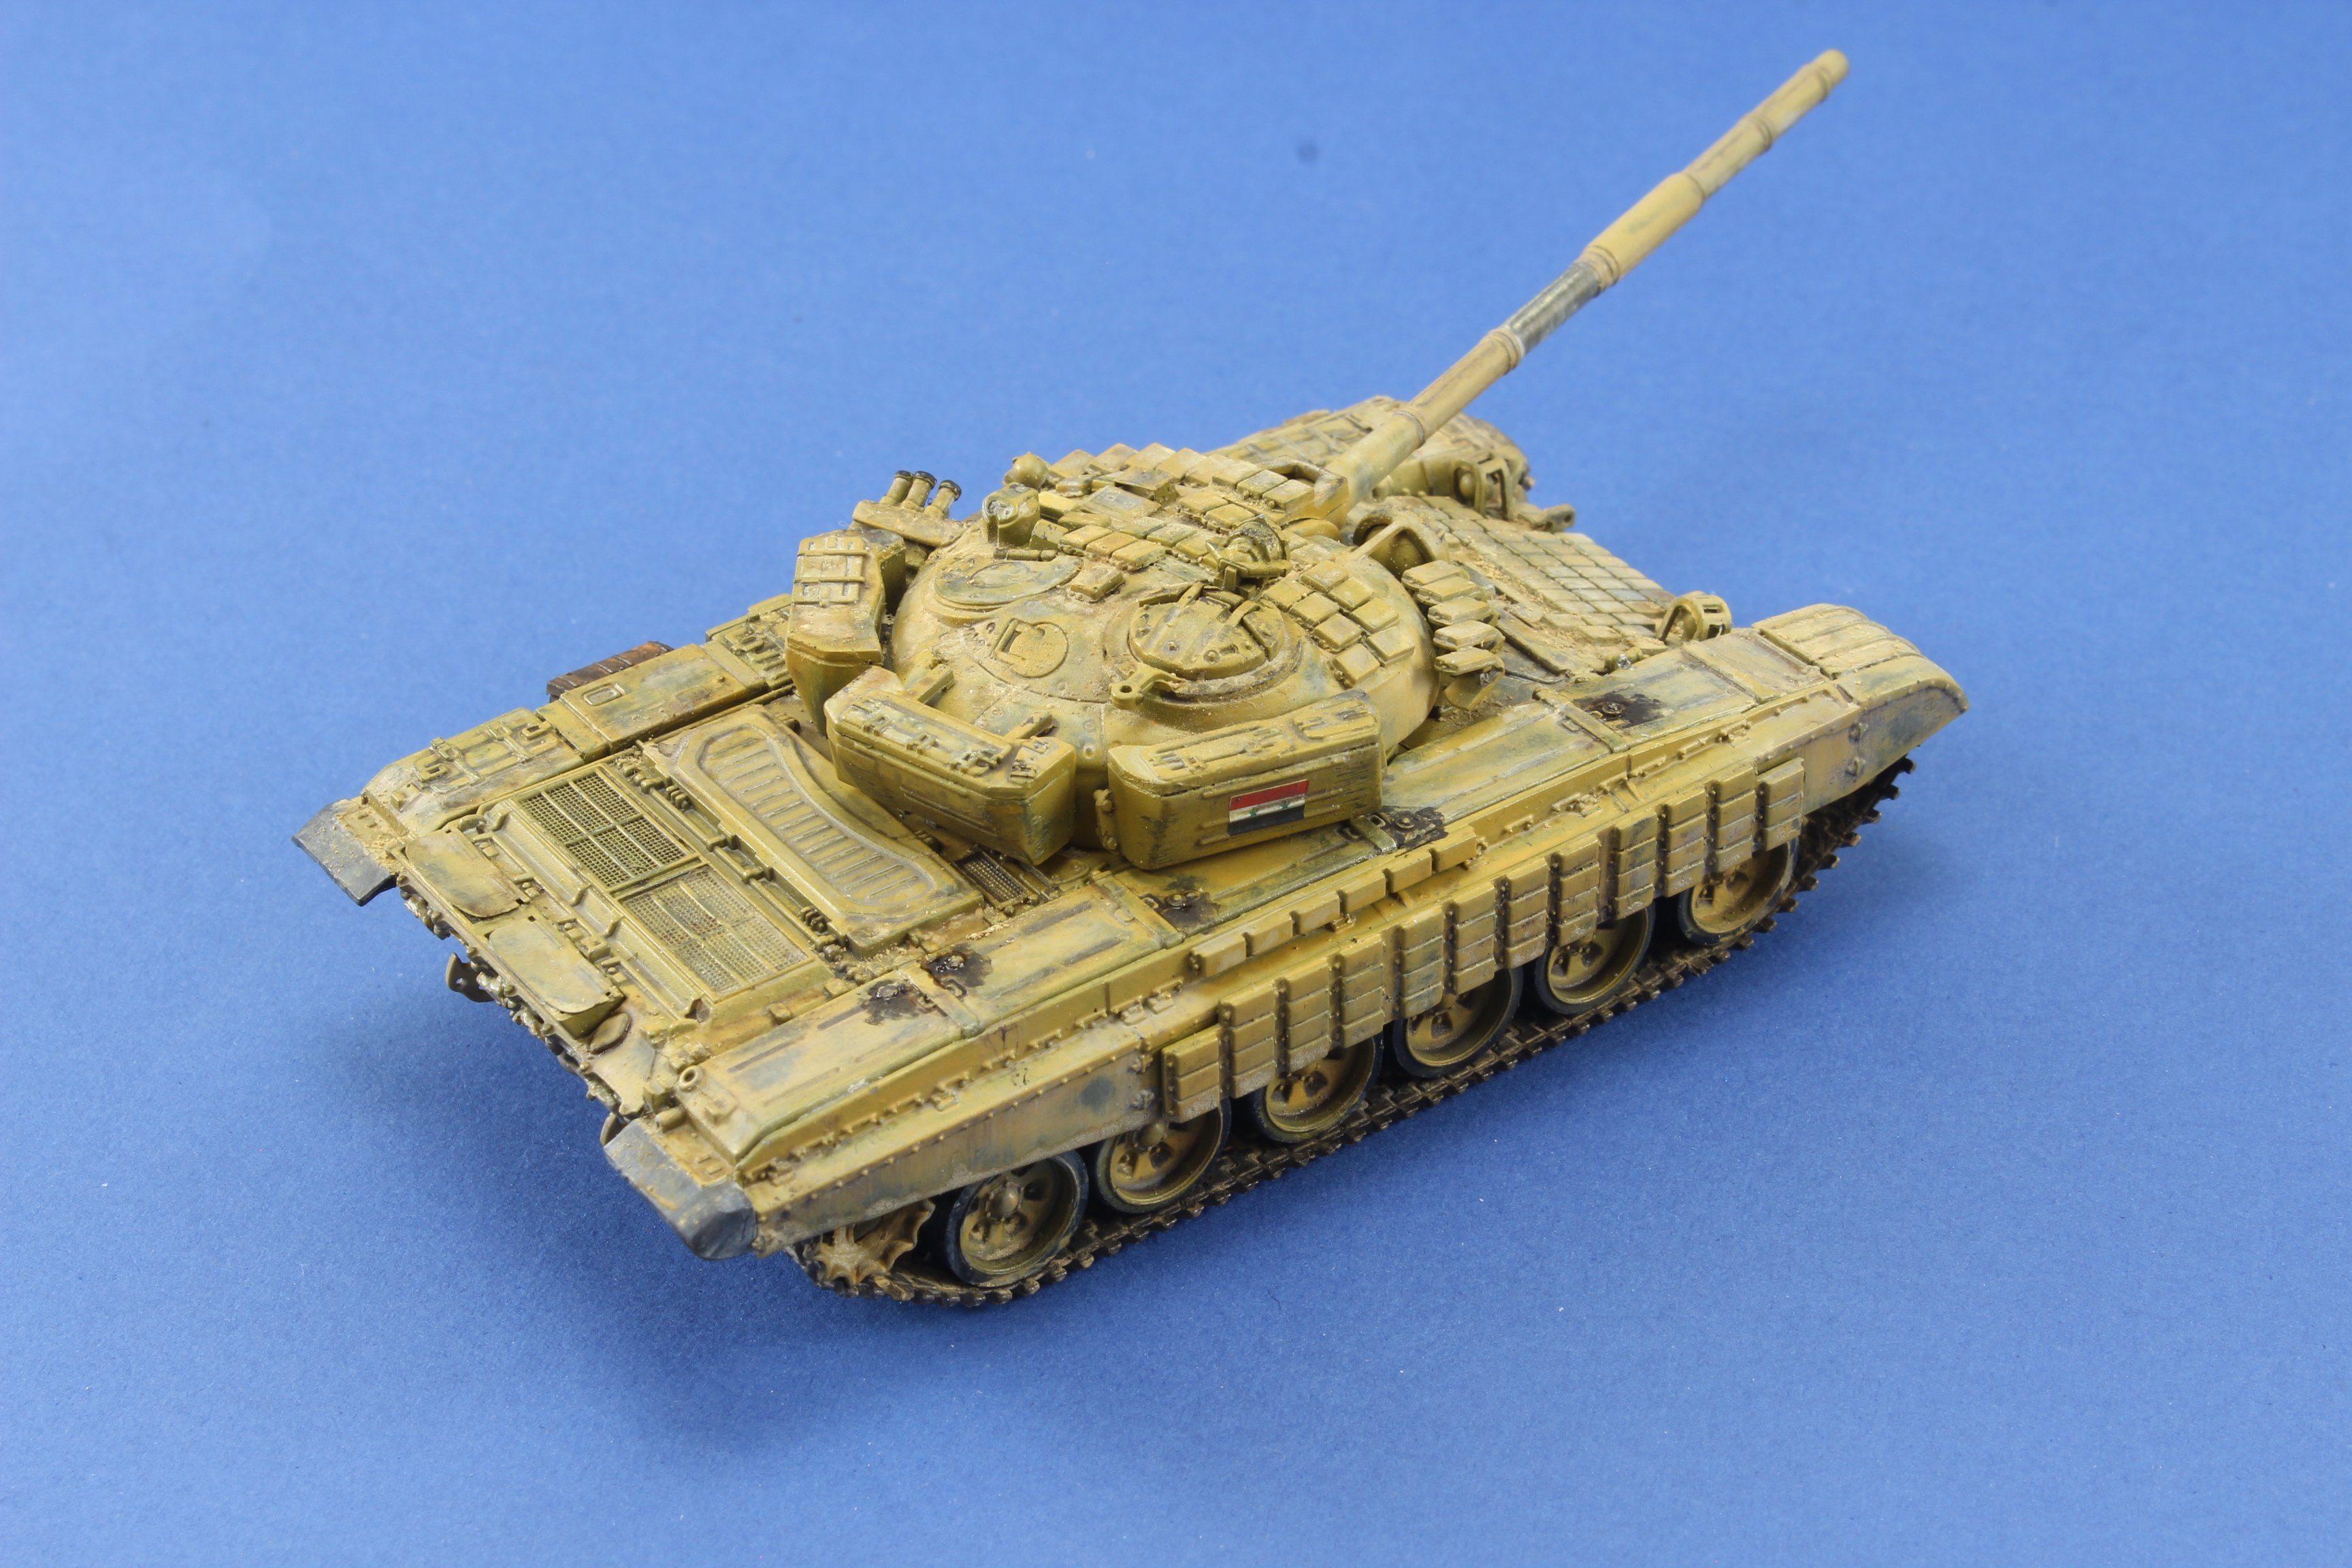
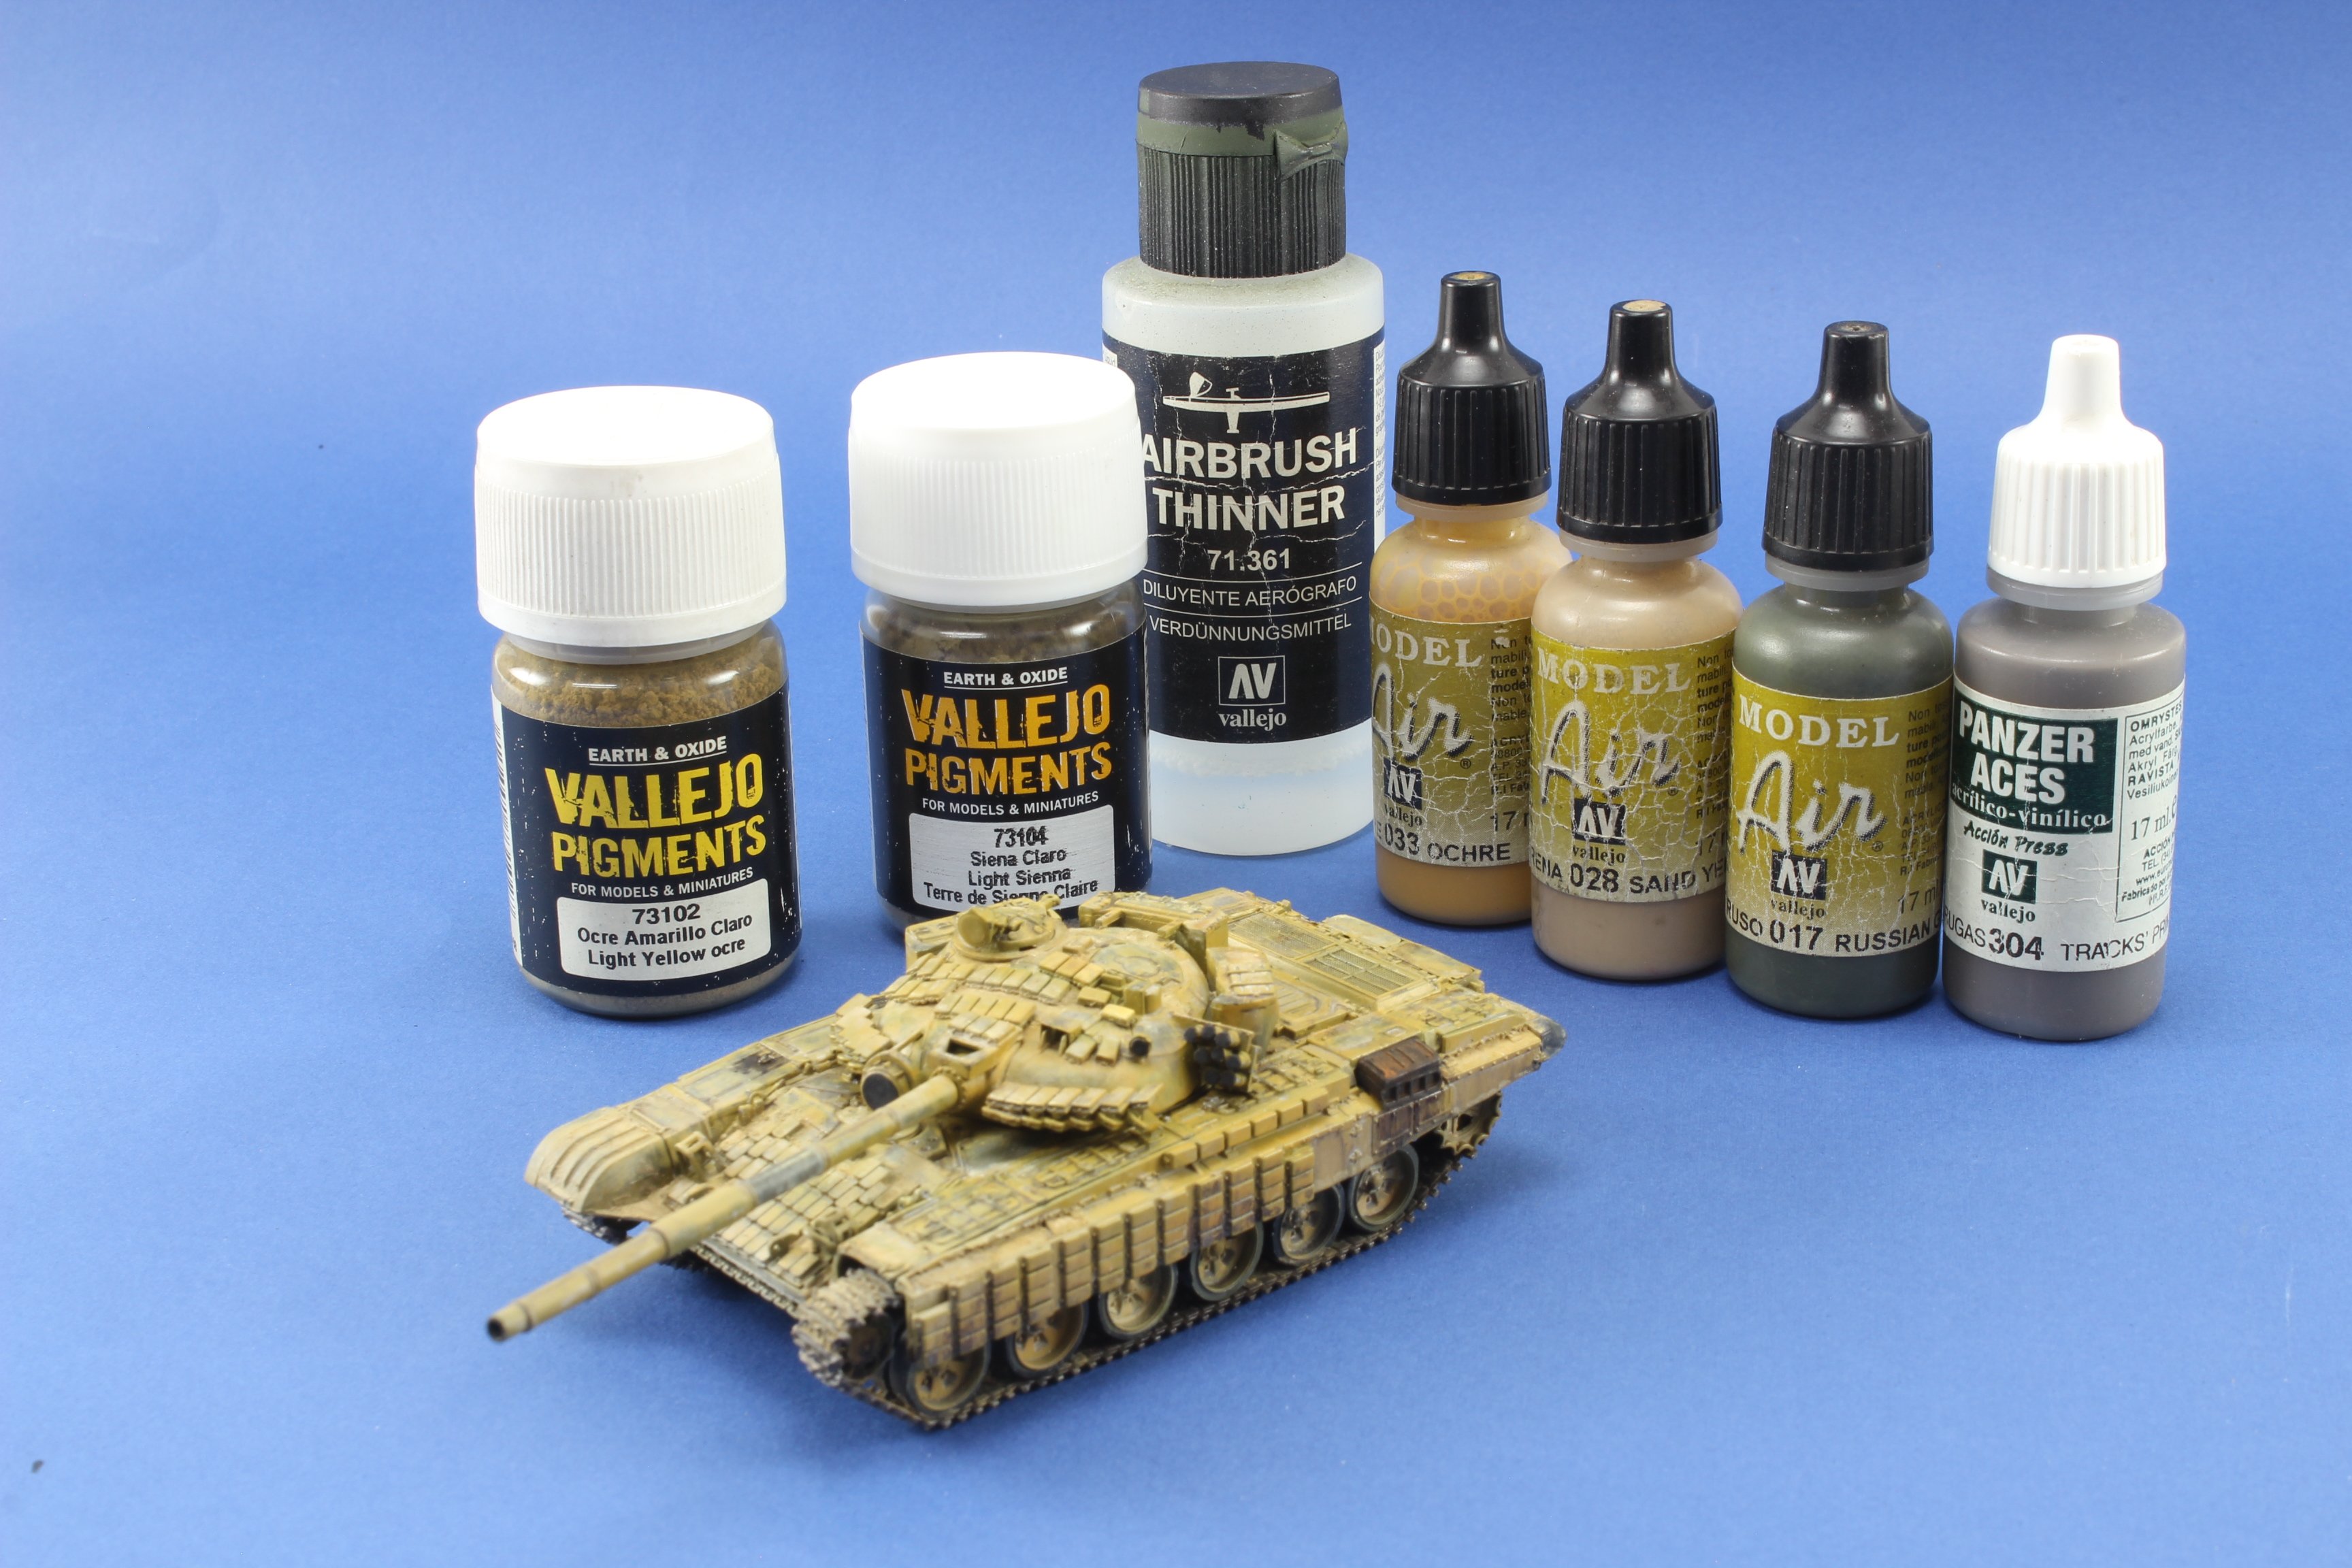
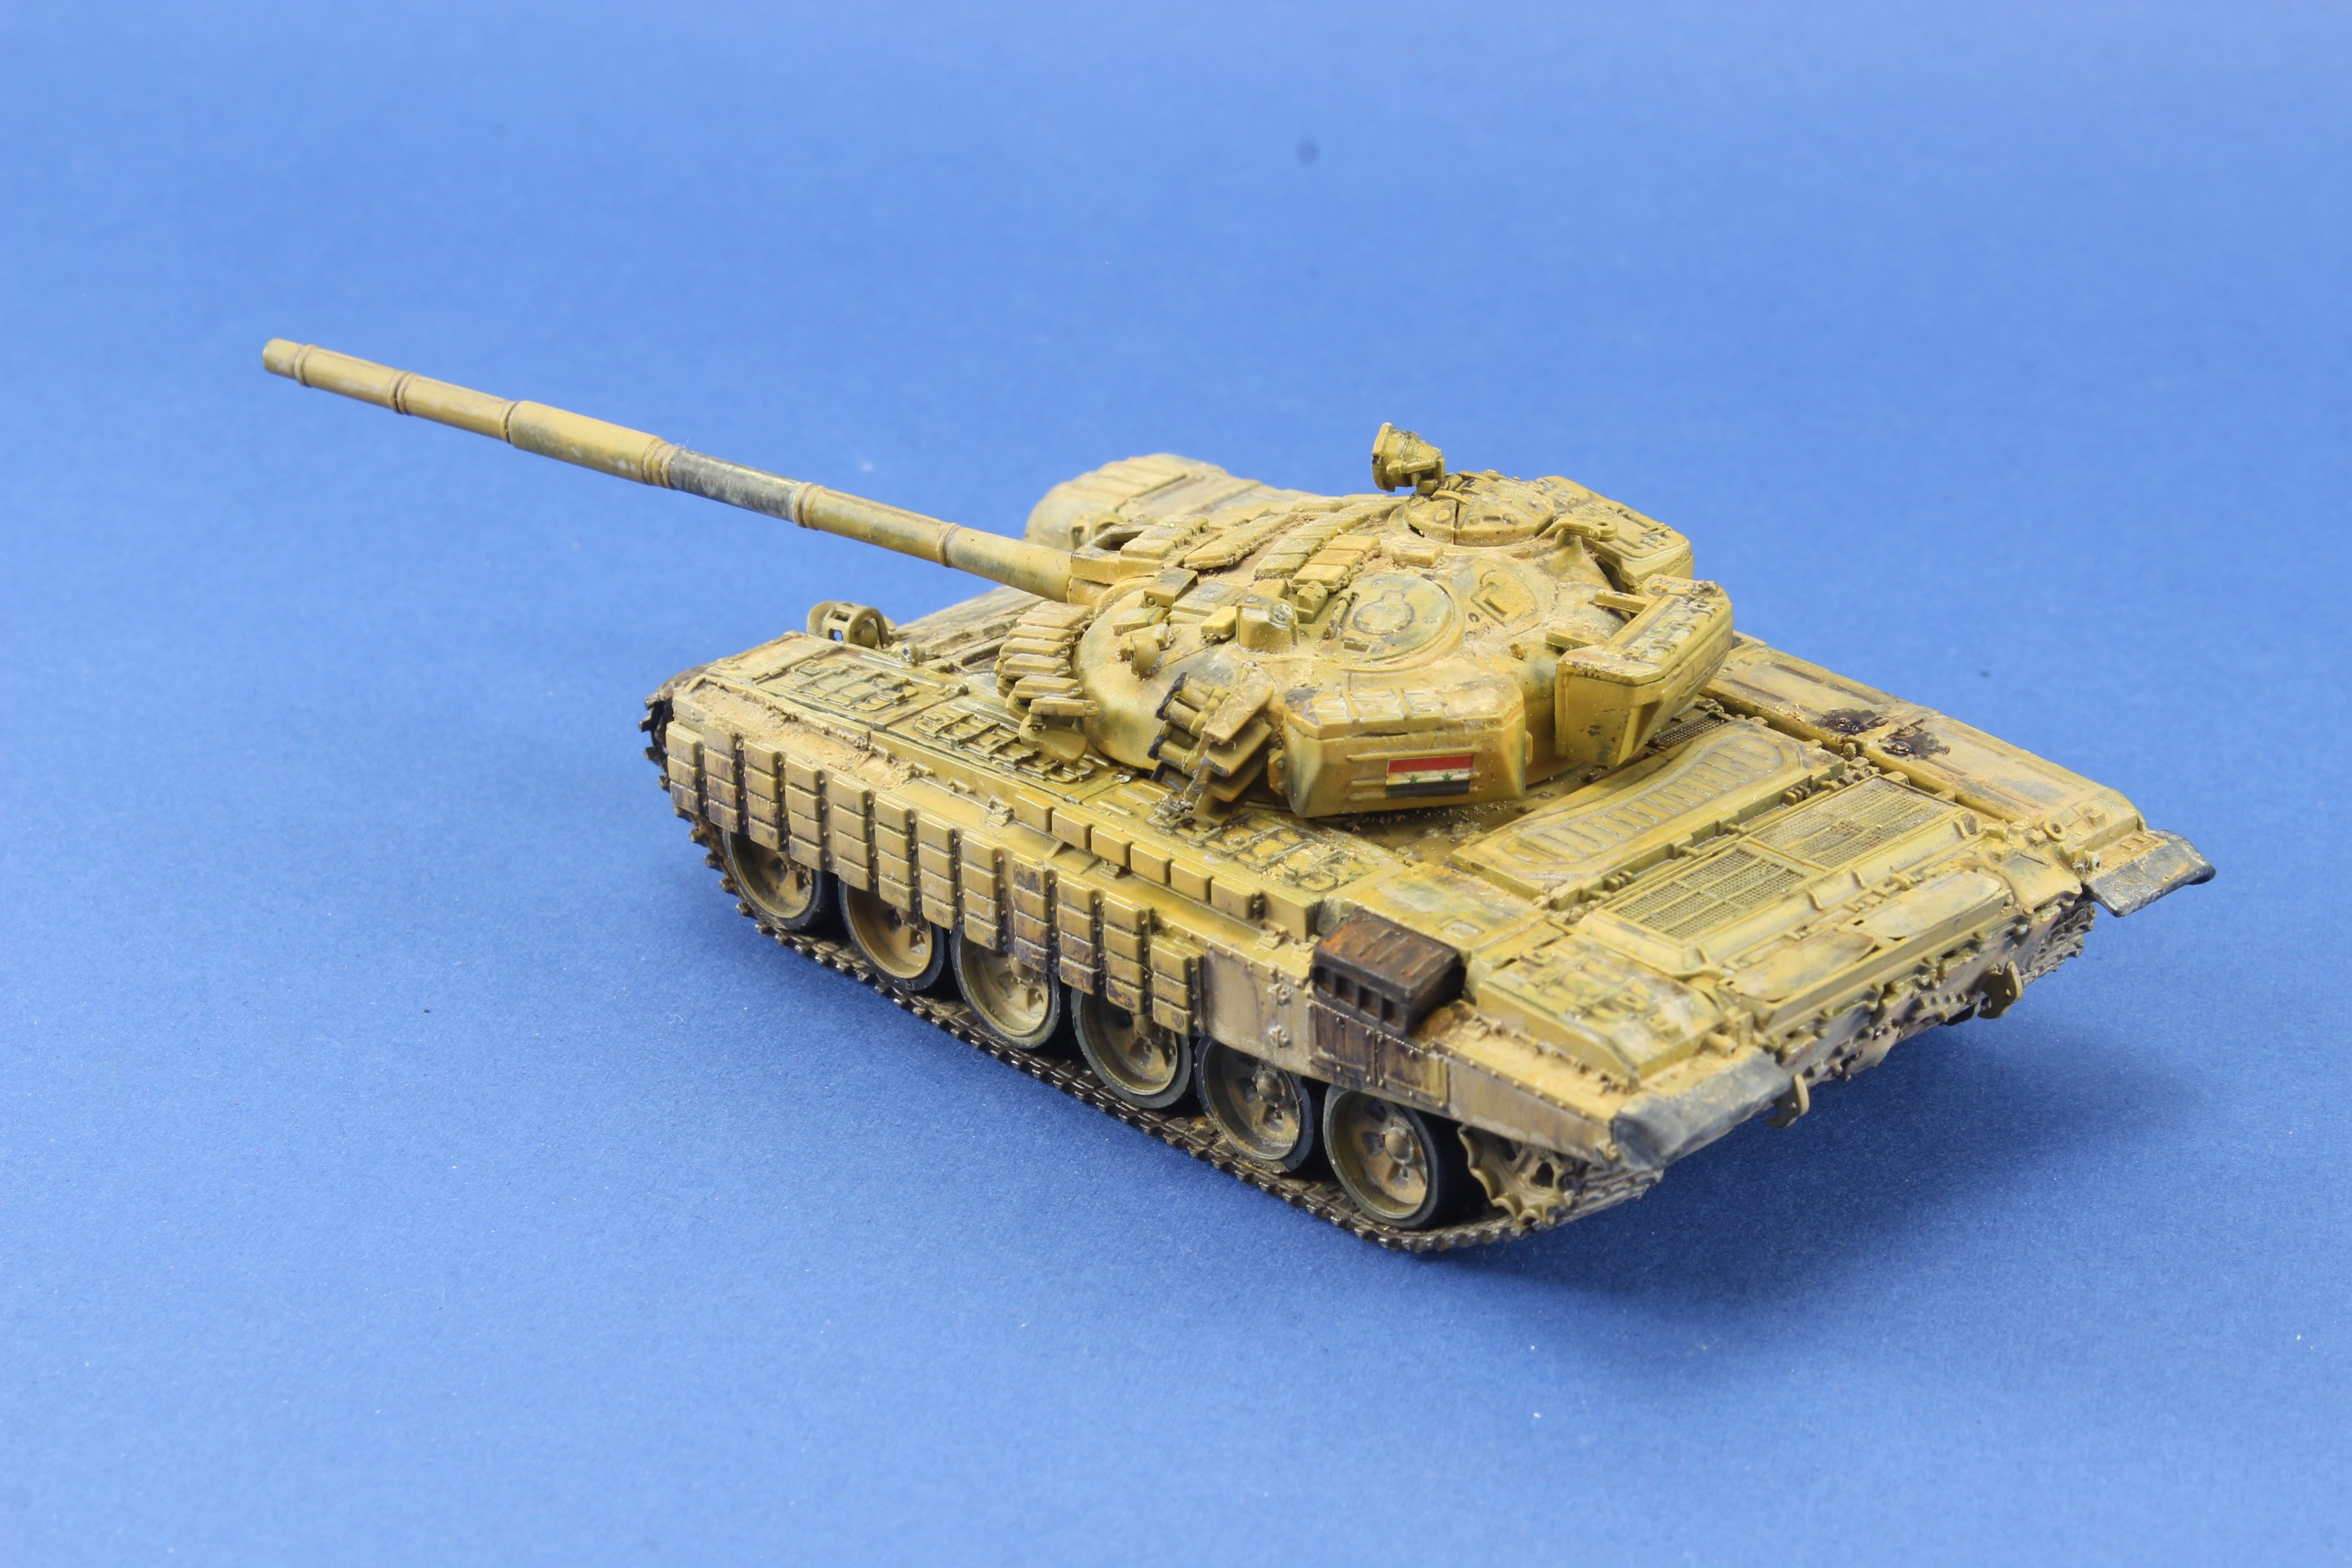
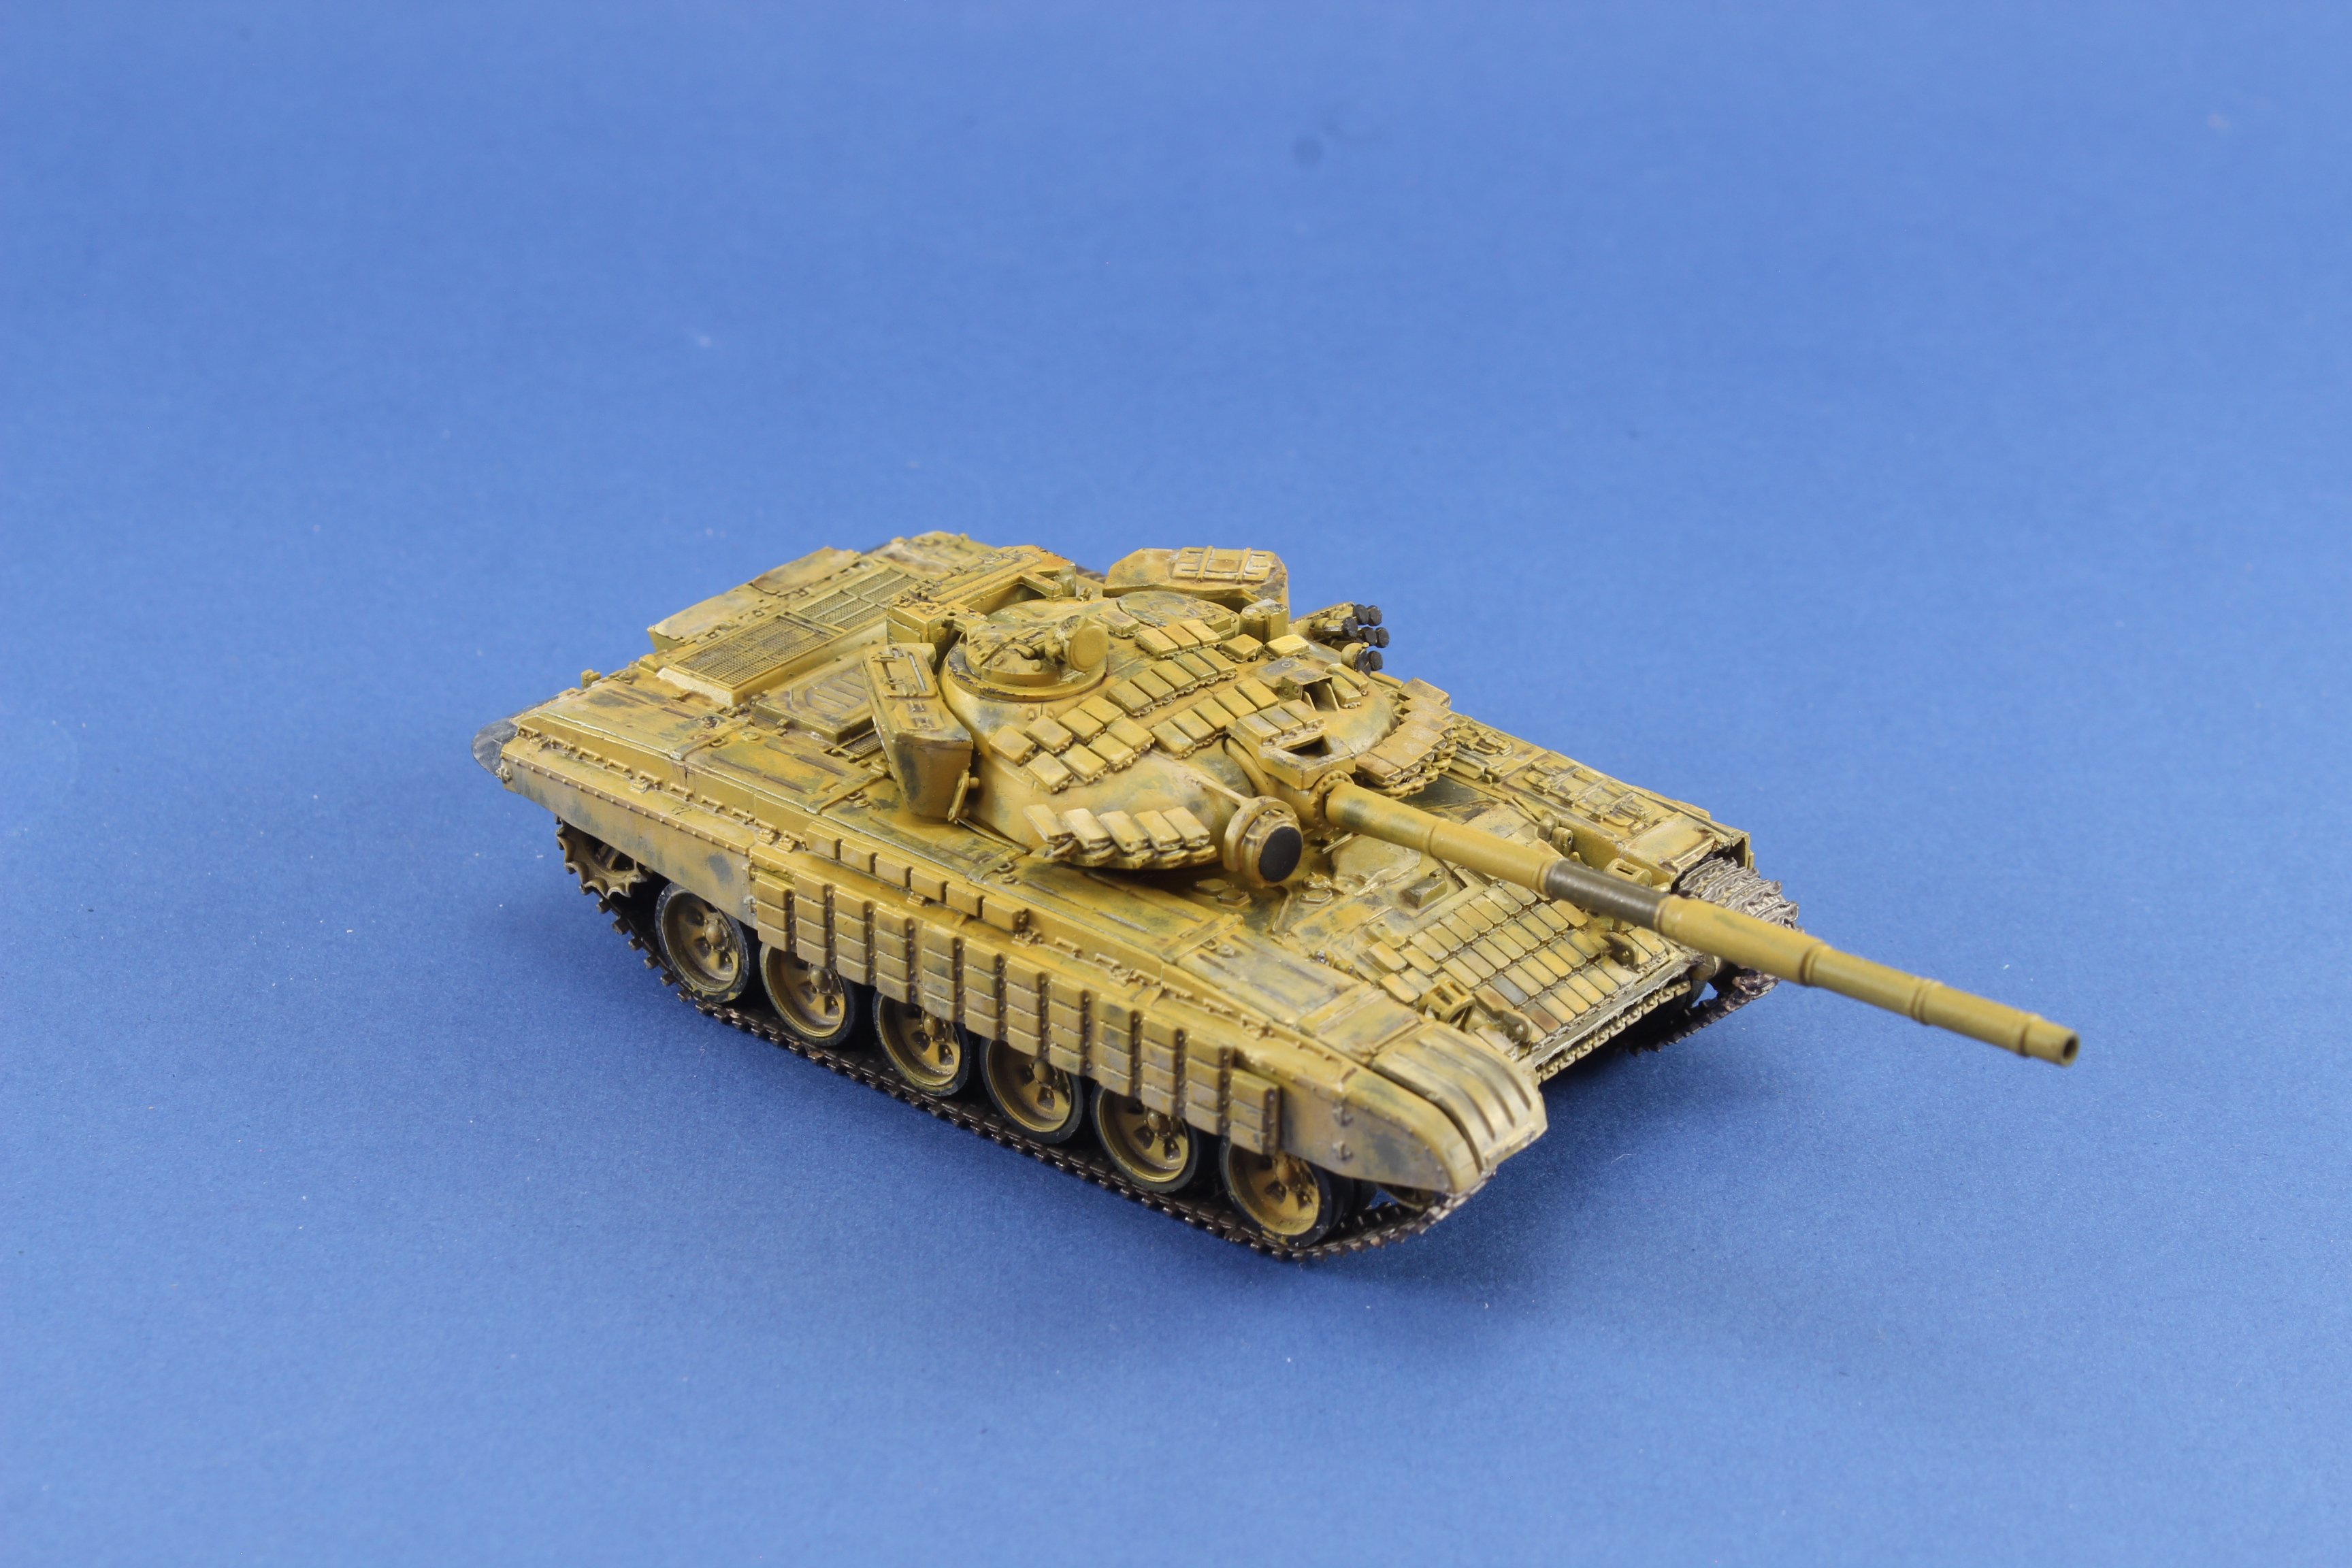
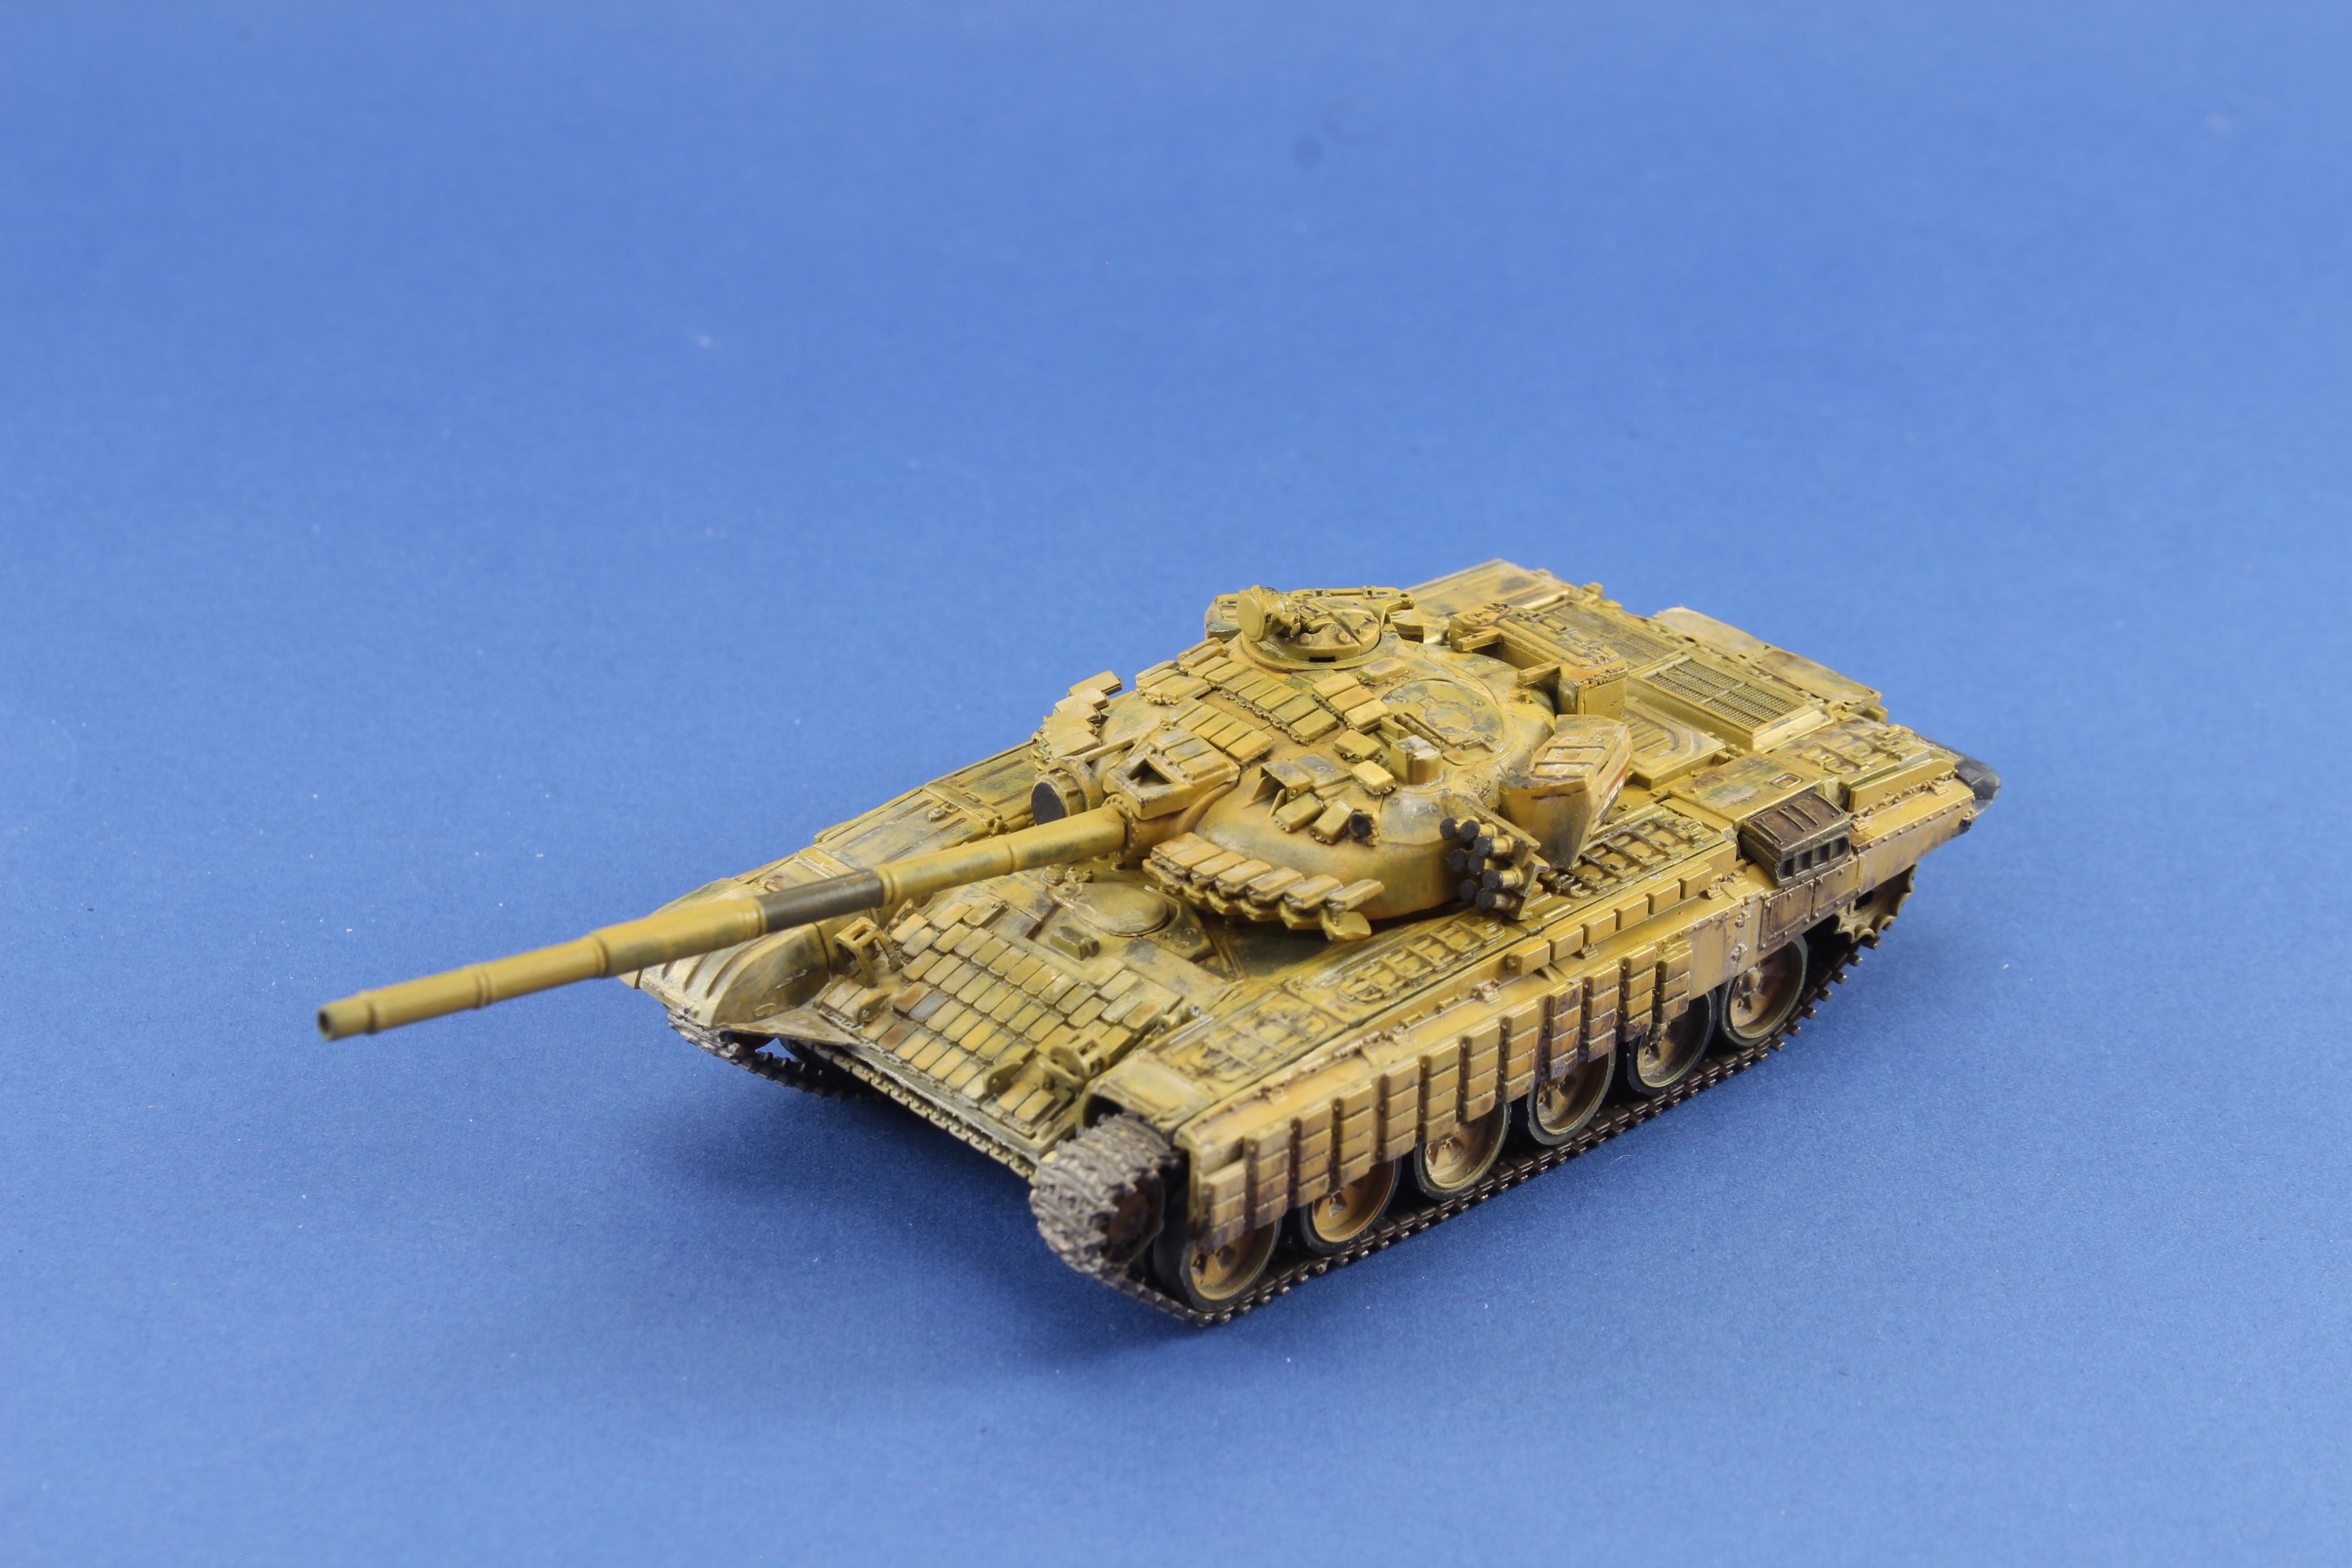
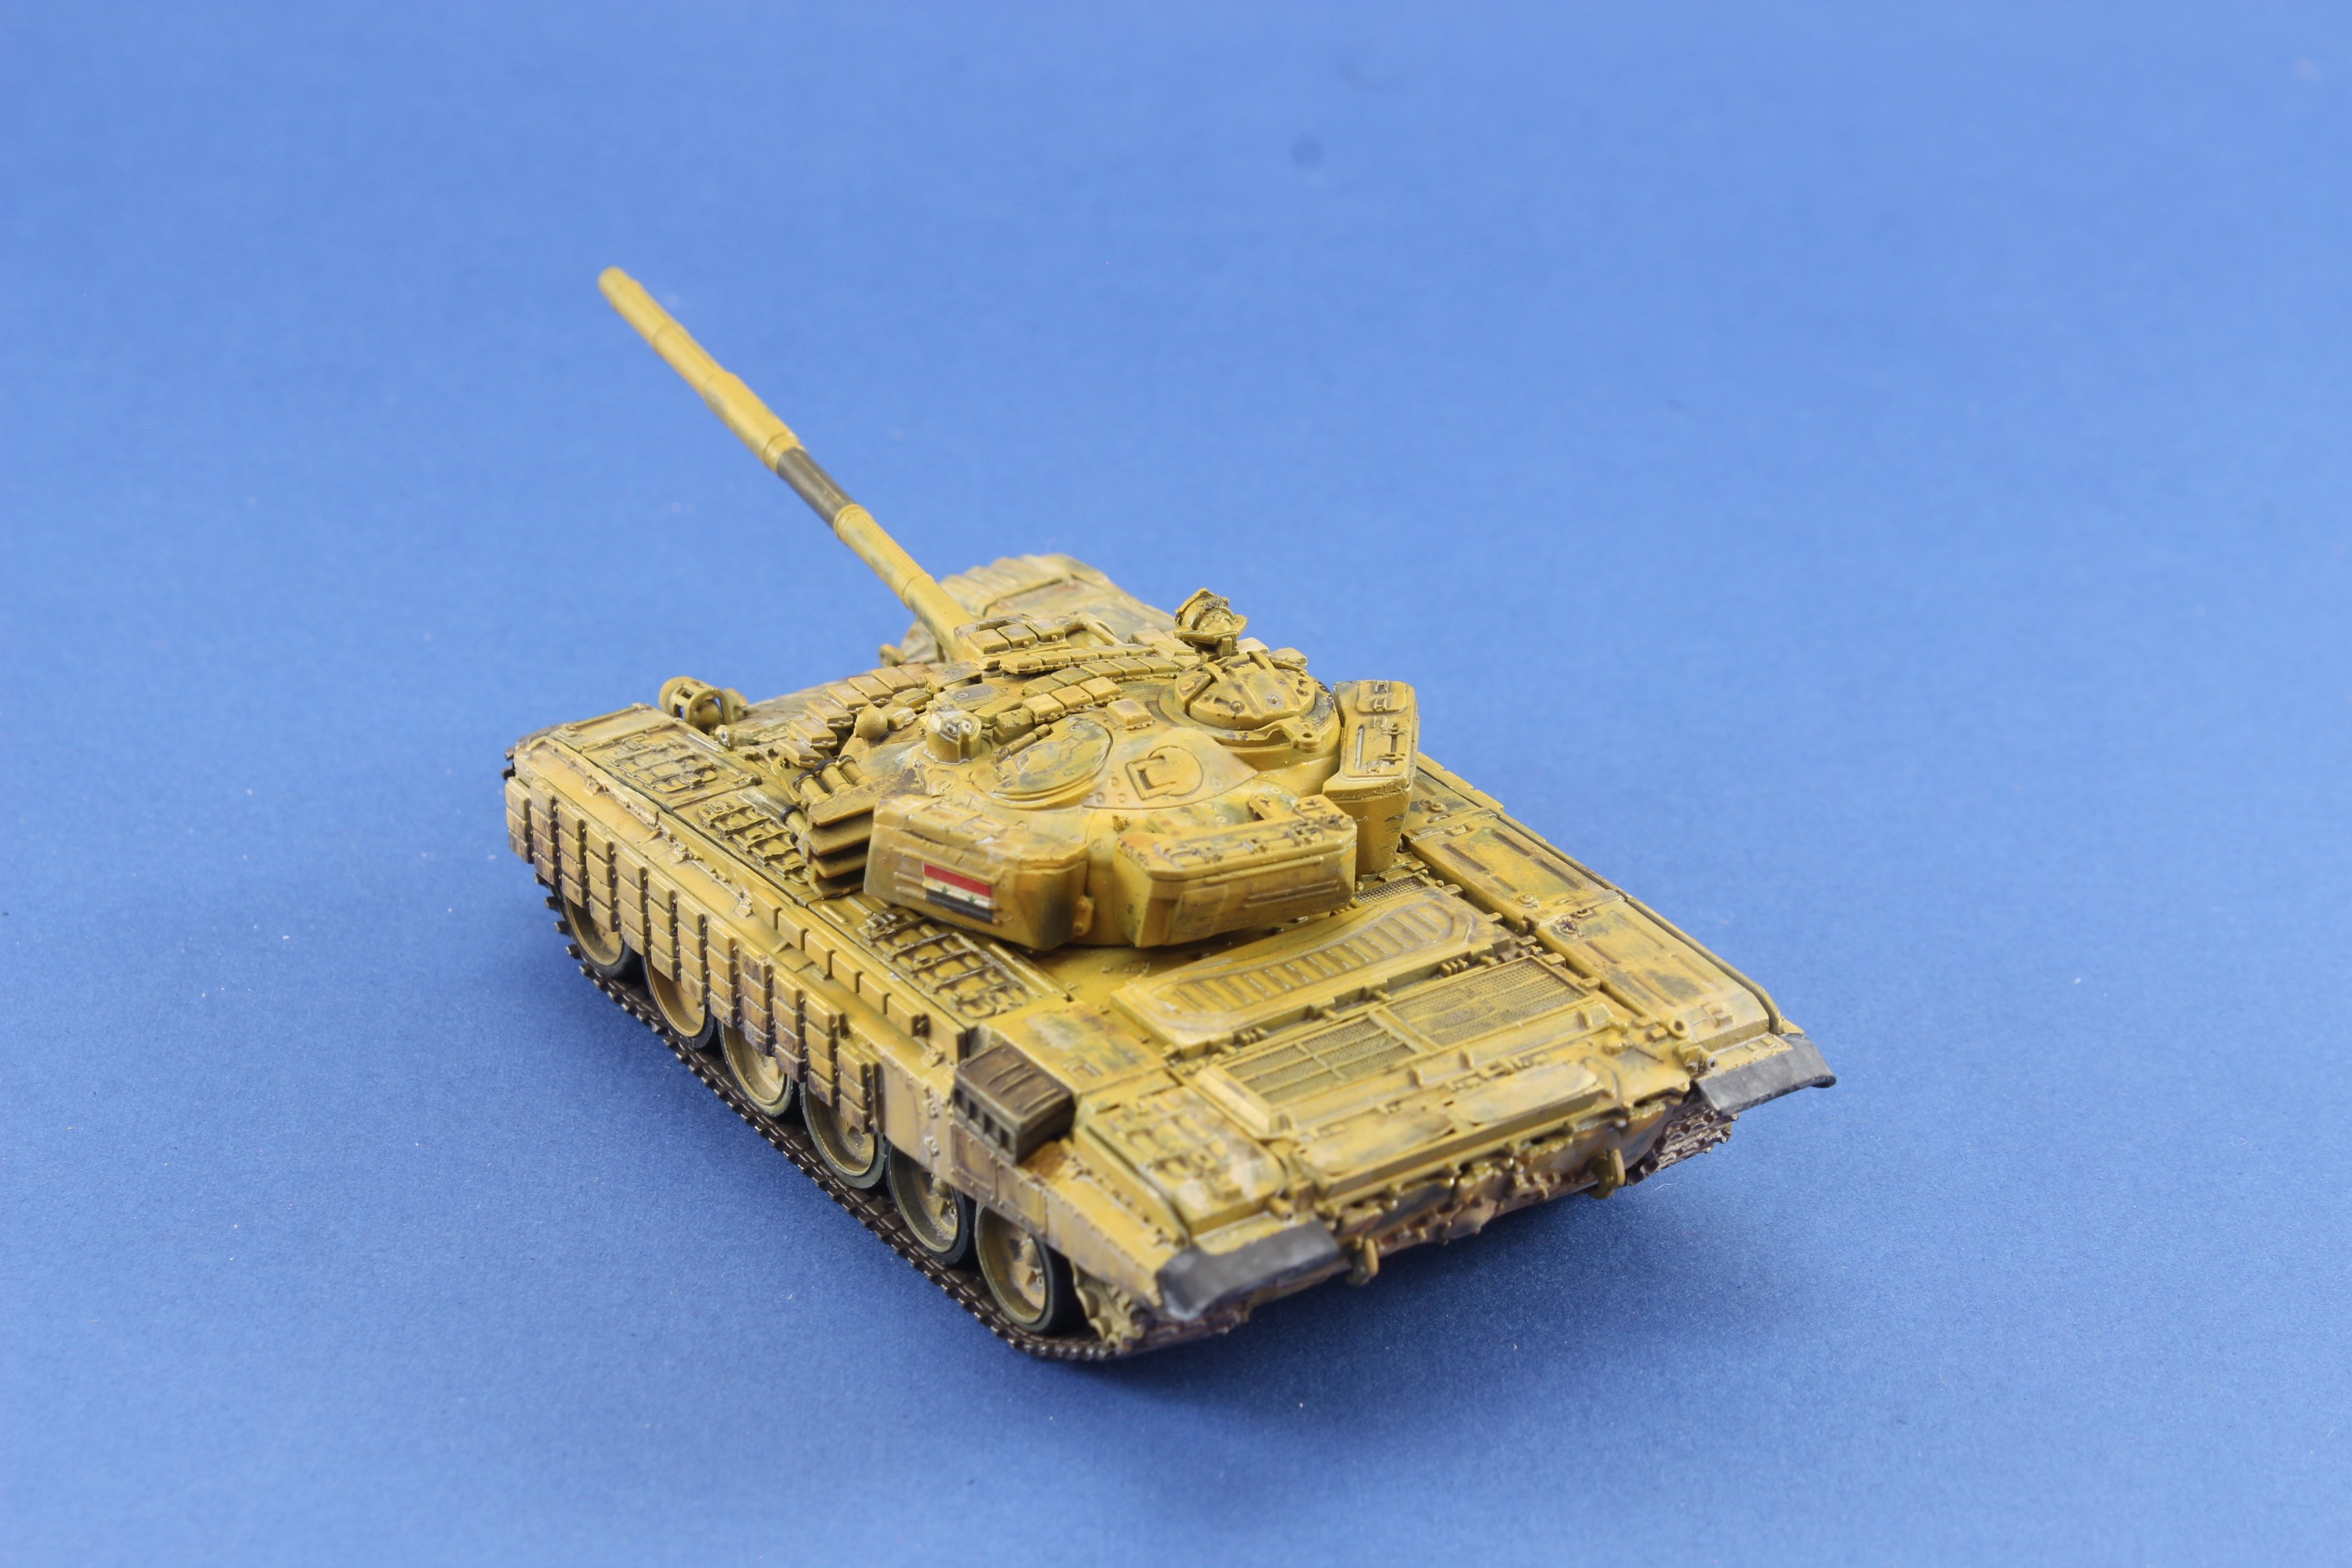
Hi all! I would like to present my last model ( actually the first armour model this year). It's a T-72Av 1:72 scale from Modelcollect. the model is well detailed and not very complex to complete. Im my opinion one of the weakest part of the model is the tracks ( um piece vinil / kind of Dragon's Magic tracks ). All paint used were Vallejo ModelAir . weathering was achieved with oils from (former) Mig Productions and Vallejo Pigments mixed with Airbrush Thinner. Painting with the first stage of weathering ( oils ) Finished model And the final picture, on his base, not made by me, but build by José Brito! thanks for watching!


-
Hi Maru! Thanks for the feedback! Indeed it is with some nice detail ! Now where did i put My 1:48 Corsair's stash?
-
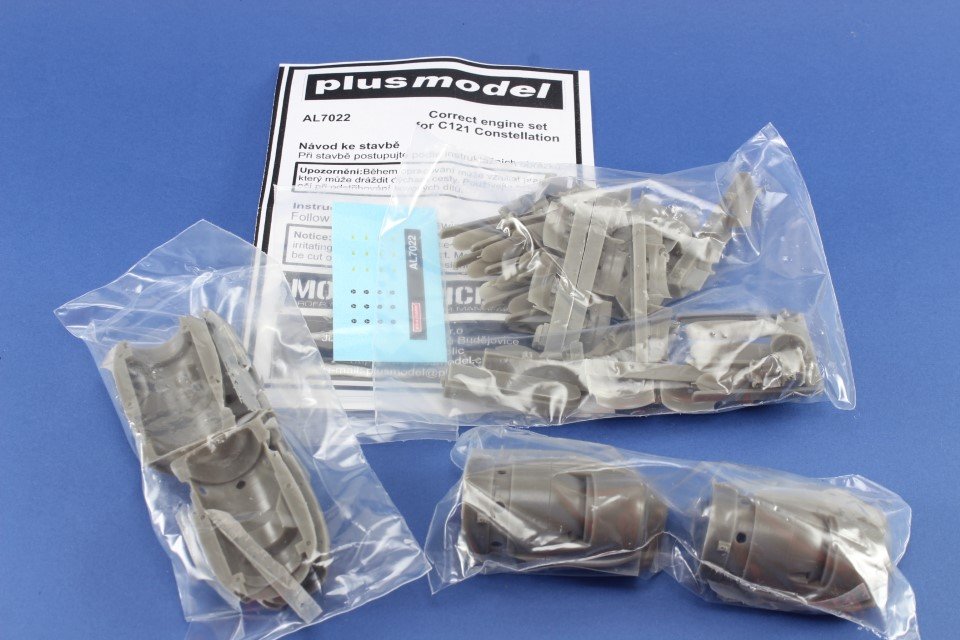
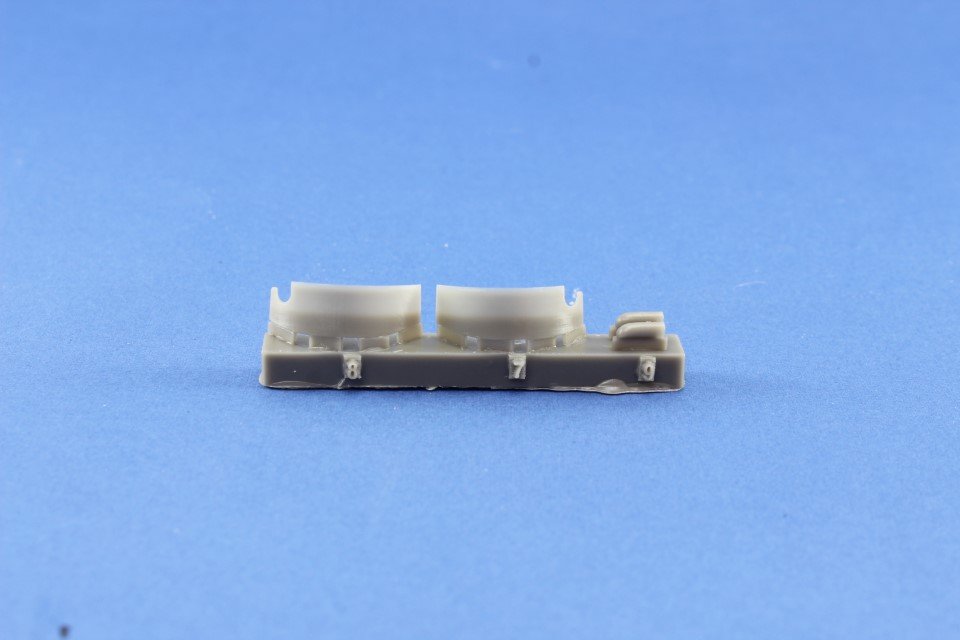
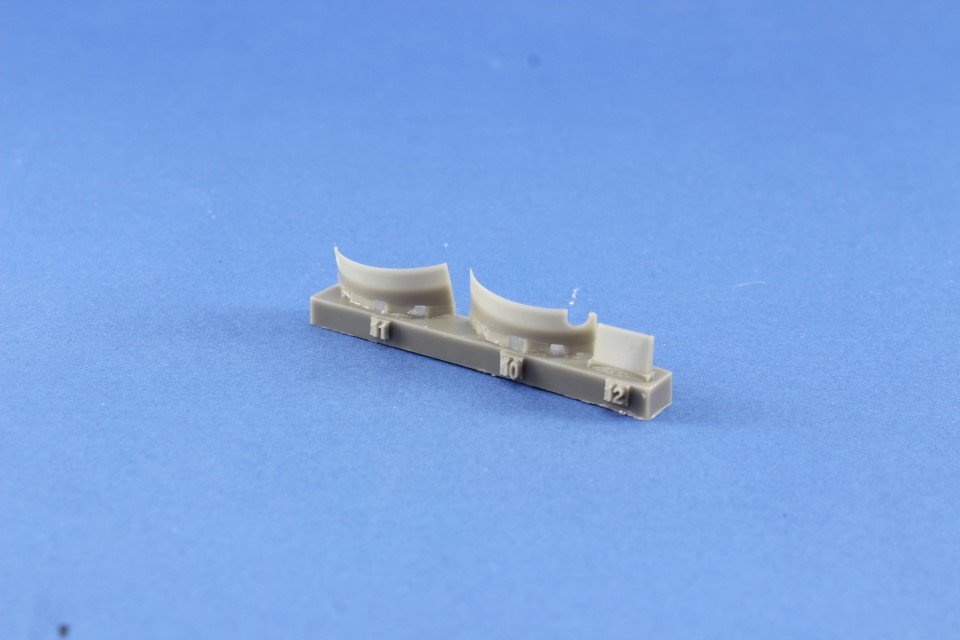
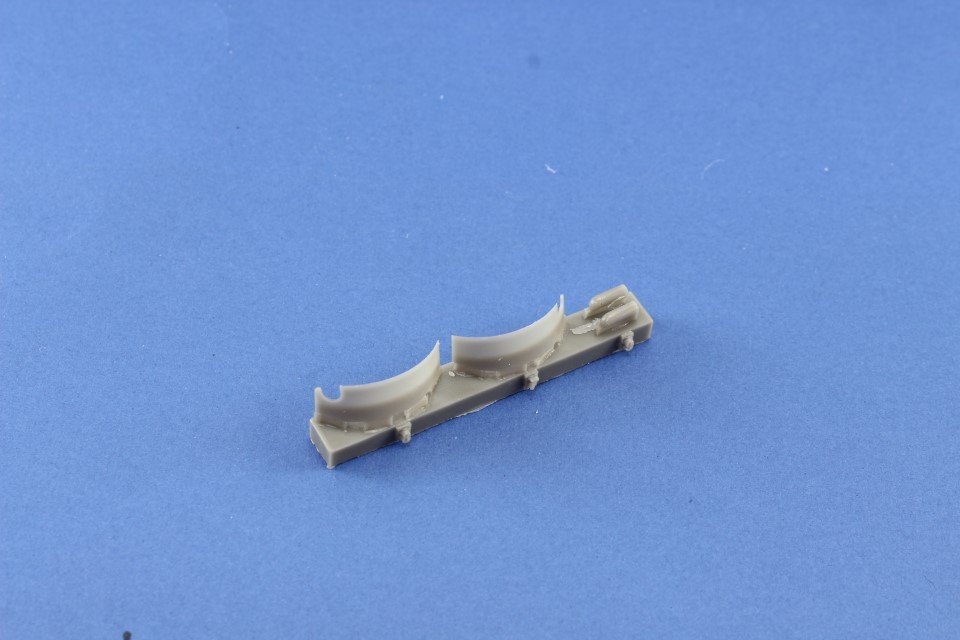
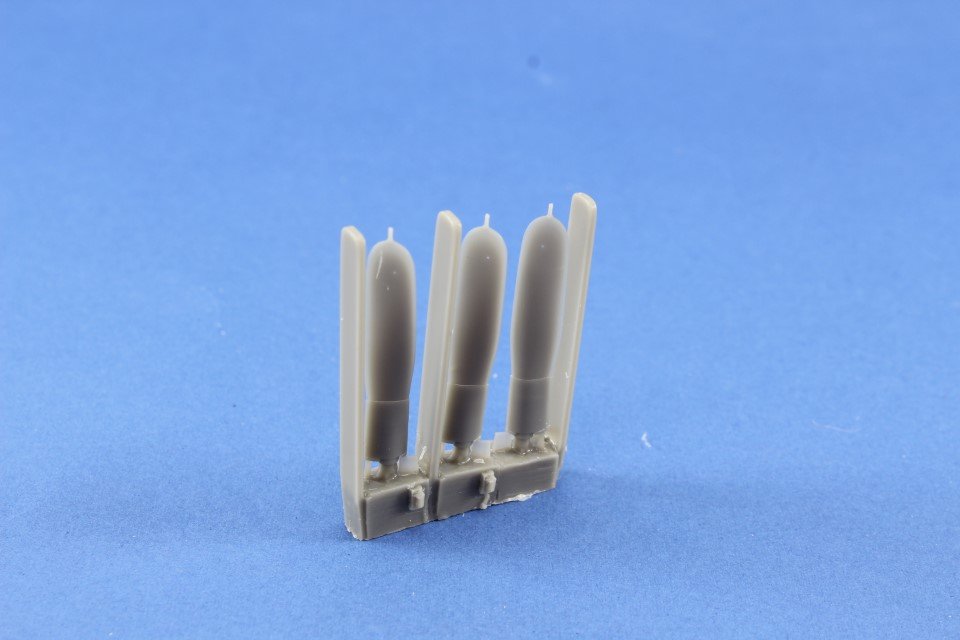
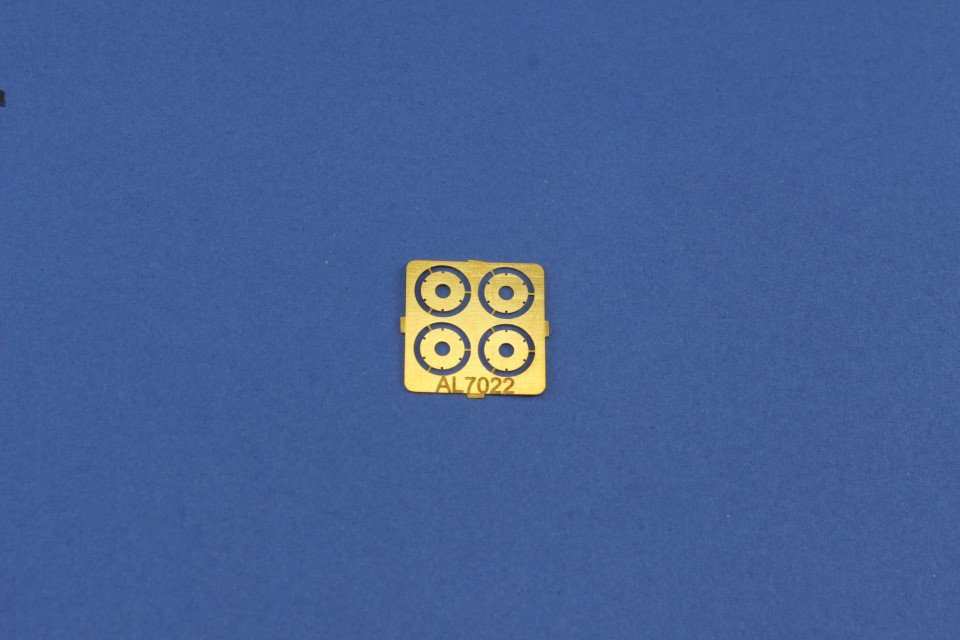
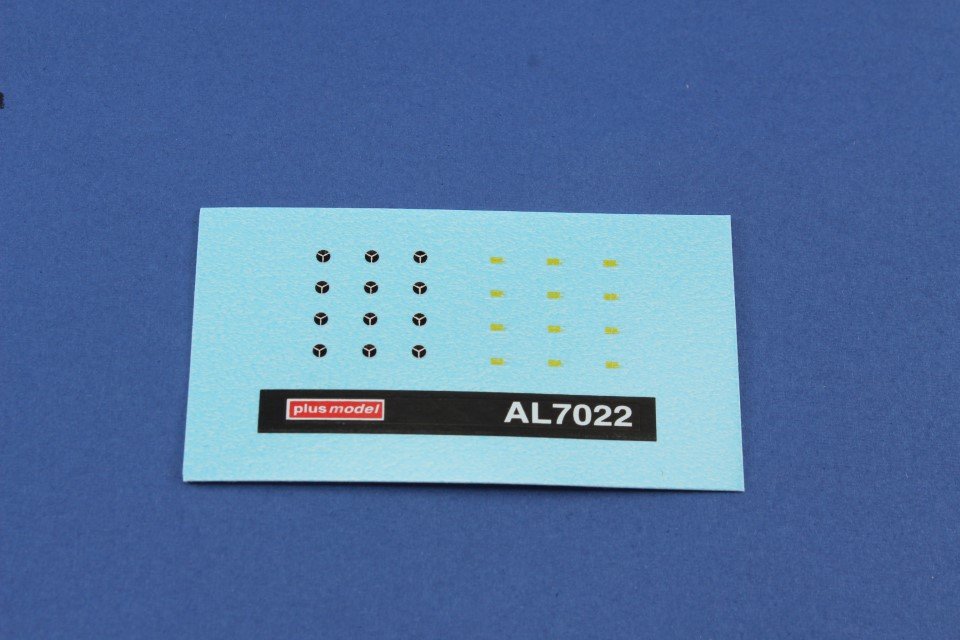
 Plusmodel 1:72 Correct engine set for C-121 Constellation #AL7022 Introduction On our beloved hobby, on what airplane modelling concern, there are some parts, areas, location sometimes neglected as they are away from focus. This set from Plusmodel focus on the engine area and propellers for the venerable 1:72 Heller Constellation (L649 /749 or C-121) offer, as direct replacement for the kit’s parts. So, what’s on the box Inside the card box, you’ll get 4 Bags with 46 resin parts, a small PE sheet, a decal sheet and a flyer containing a simple instruction guide. All parts are numerated for an easy identification The resin parts layout is composed by the following: Engine cowlings 8x half engine covers (left and right side) for the 4 engines. This represents an early variant (with only one exhaust on either side of the engines); Please note that the radial engine itself is not included so the Kit’s part needs to be fitted when assembling. Also included the cooling grills (which allows to choose between closed and open) a part for each option and side. Also available is the oil cowl, which can be posed on the open position. Eight resin exhaust tubes are also included. Propellers On this department, this set represents the Curtiss electric cuffed prop, so it comes with the following: 4 sets of 3 propellers; 4 propeller hubs and 4 early type spinners, 4 PE parts representing the outer Hub and a decal sheet with the propeller stencils Also provided is an assembly jig, that allows the propeller correct angle on the hub. Instructions: A simple flyer is provided with all information required for the assembly, with no information regarding the paint to use (specially for the propellers), so check your references. Normally I would conclude my review on this part. Nevertheless, I felt that a small demonstration was in need to properly present this review. So, I selected a set of engine cowlings, remove it from its casting blocks (an easy task with a photoetch razor) The fit is adequate, and the panel lines are recessed with nice detail. A simple dry fit shows a small gap on the top and bottom. The parts do have location pins to ease the join between the two halves, but based on the tests made, the removal of this location pins will allow a better adjustment of parts fit, minimizing the gap. As i was not able to obtain Heller's model, i was not able to test the fit on the model, but comparing photos of the model part's with the Plusmodel's offer, they appear to be direct replace. Conclusion This set is a strait forward substitution of the model’s parts. Some attention is necessary on the engine cowling assembly, in order to minimize the gap between the half’s, and this is the main issue, but a necessary one due to the part in hand. The propeller set is also presented with a nice detail and a improve over the Kit’s offering Recommended! Our thanks to Plusmodel for the review samples and all the support given. To purchase this directly, click THIS link Ricardo Veríssimo
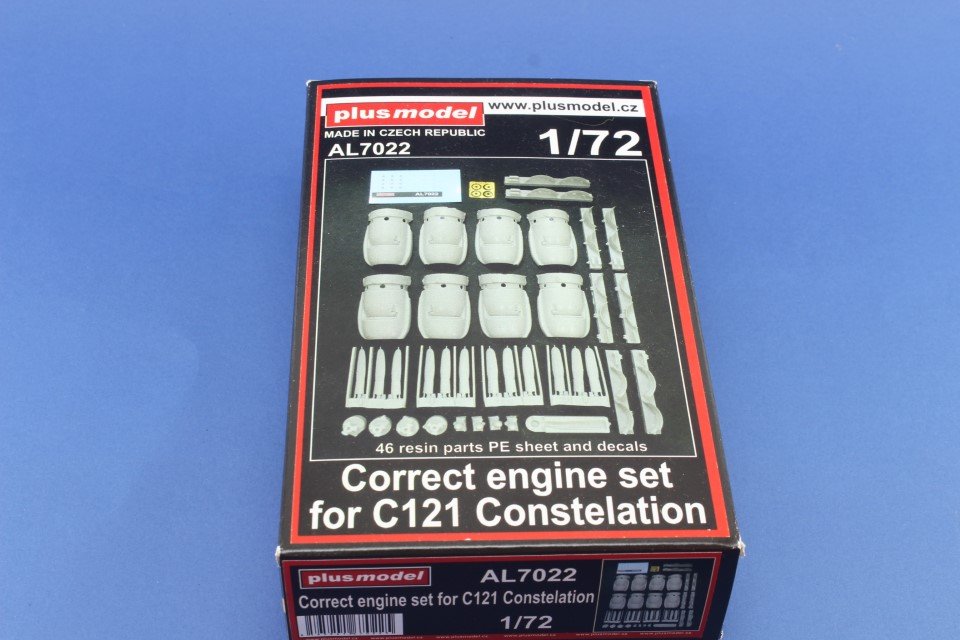


-
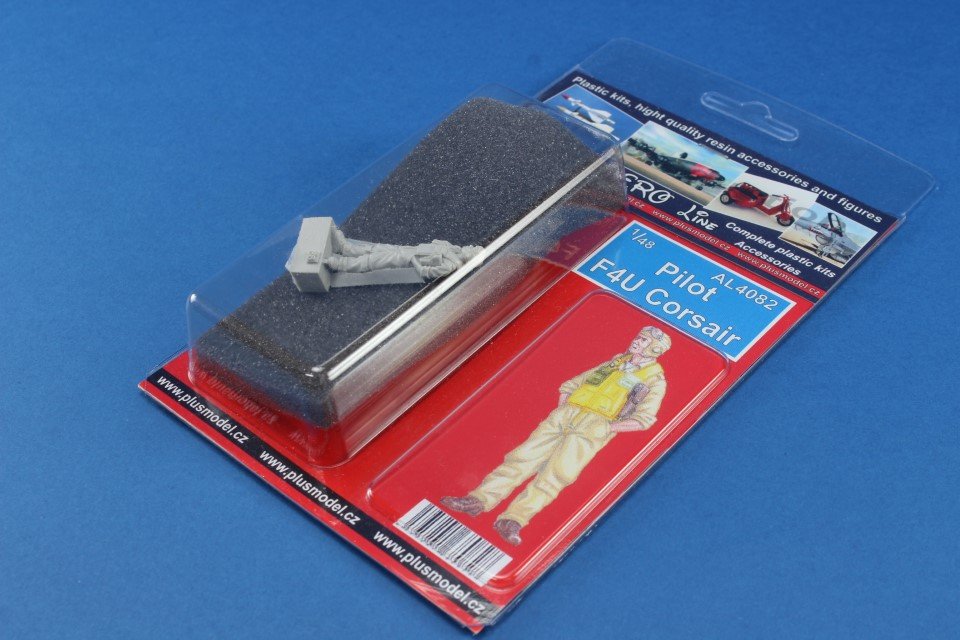
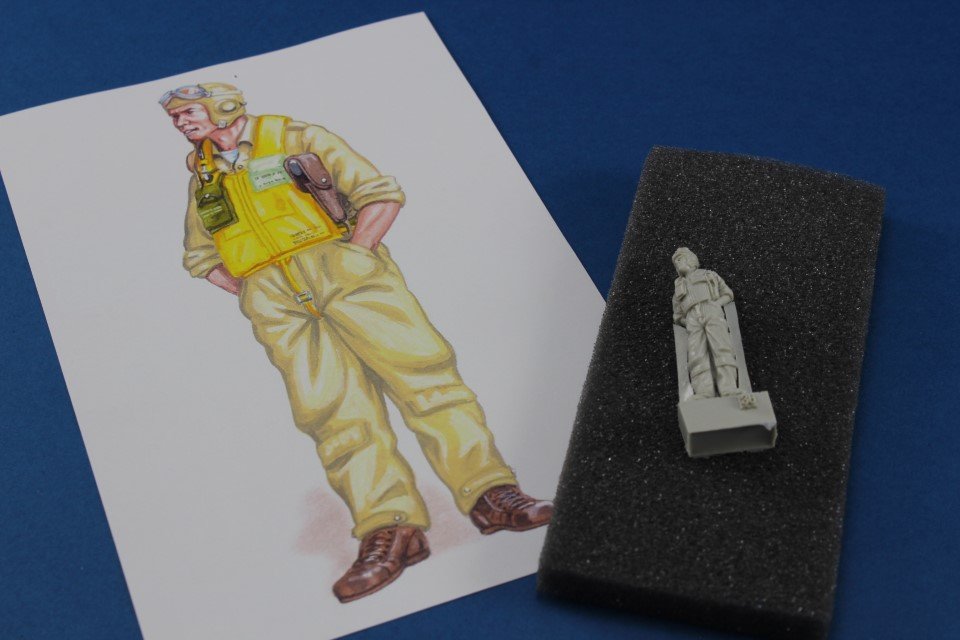
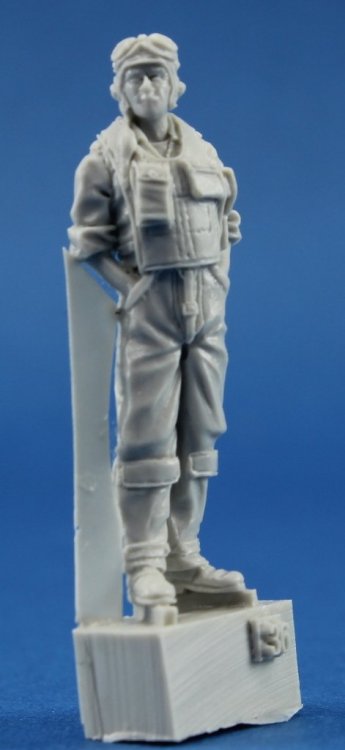
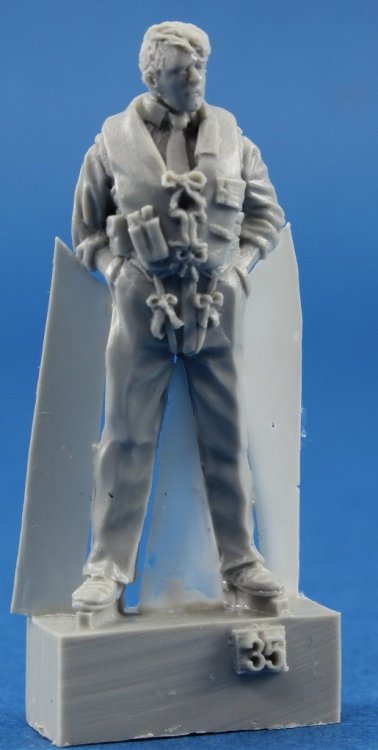
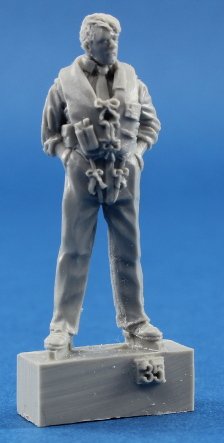
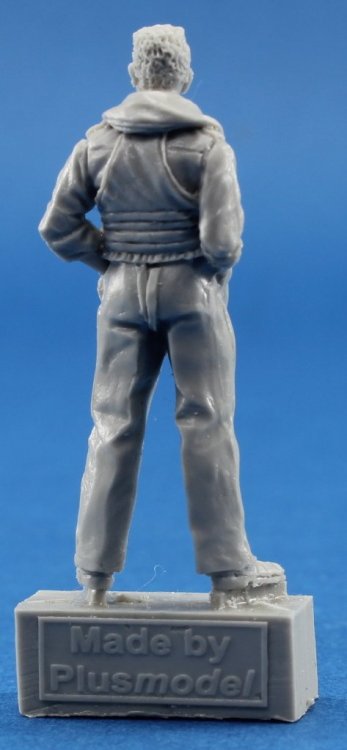
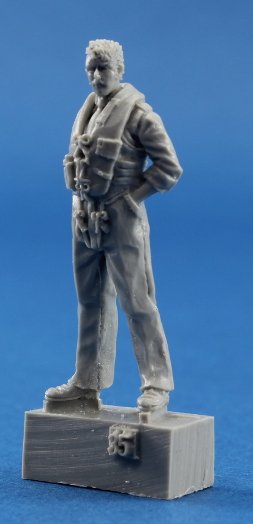
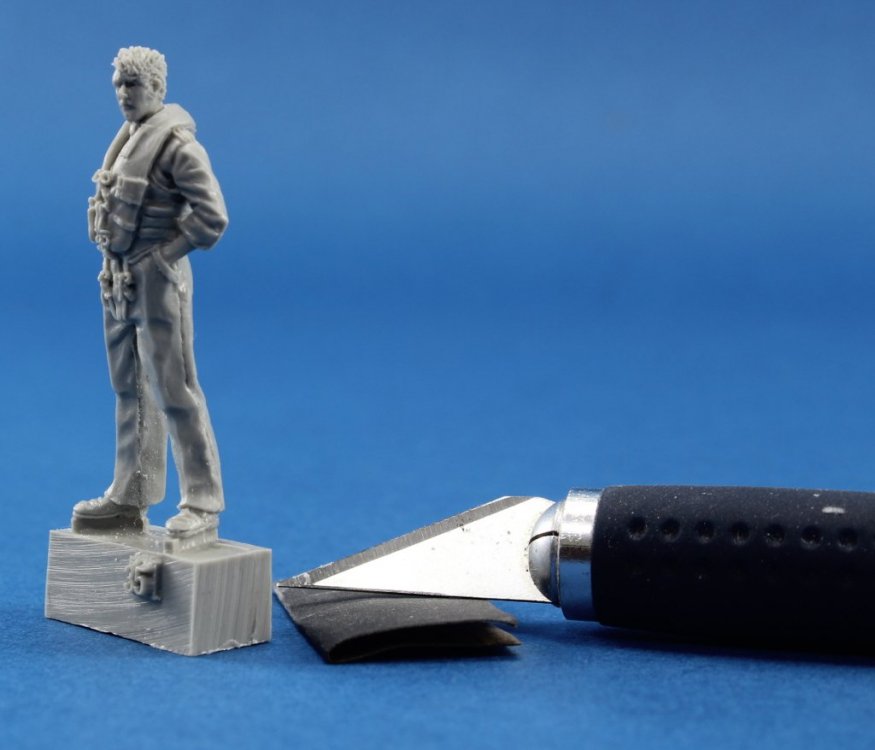
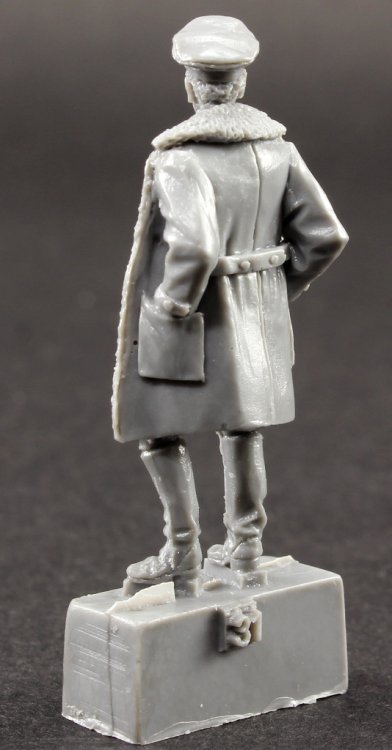
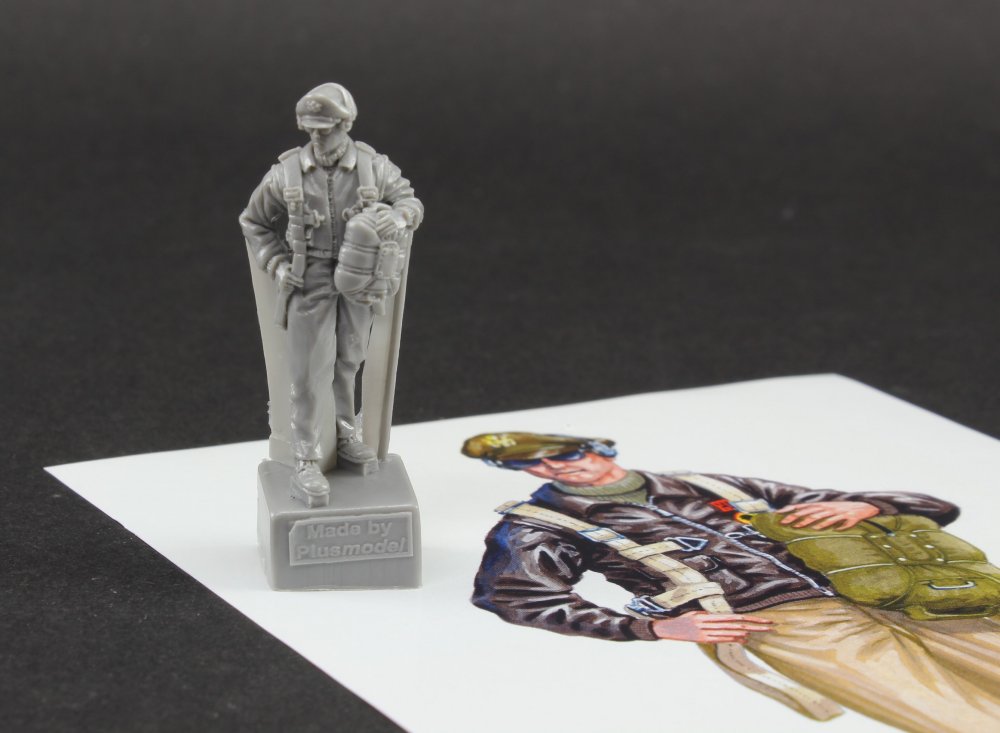
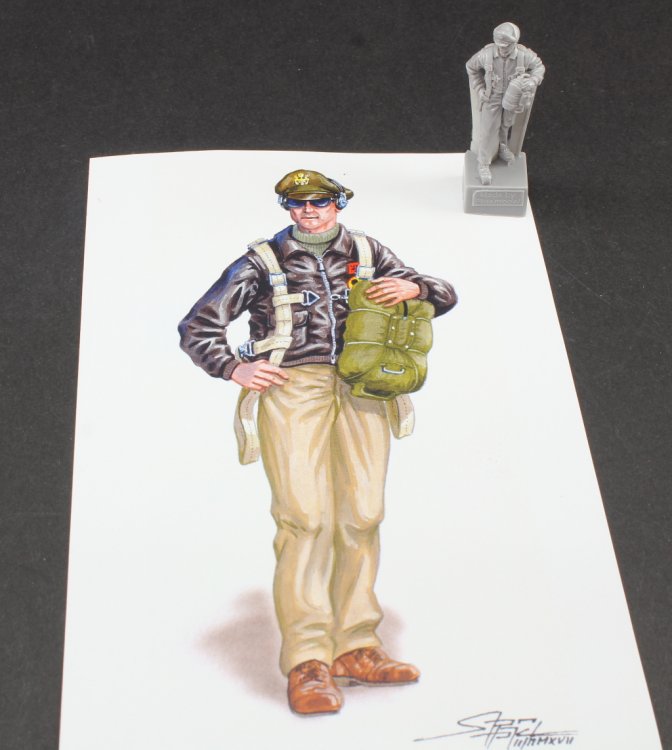
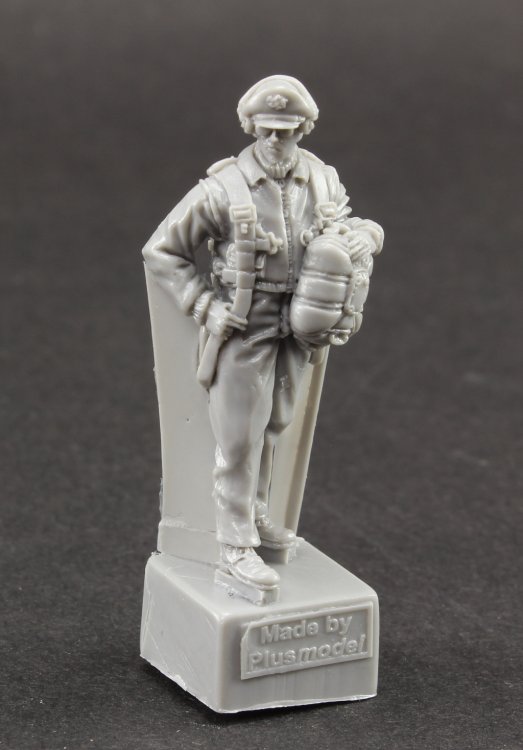
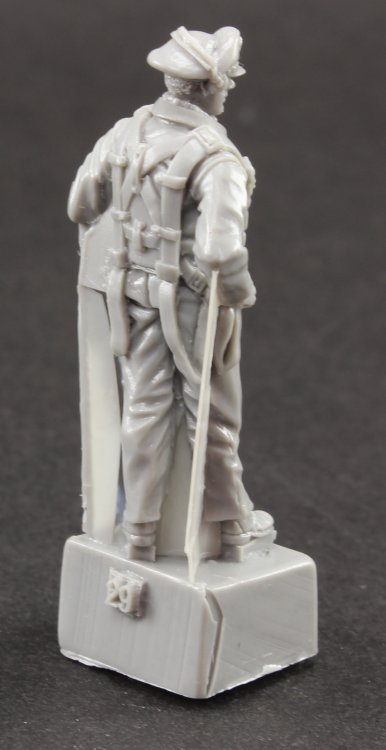
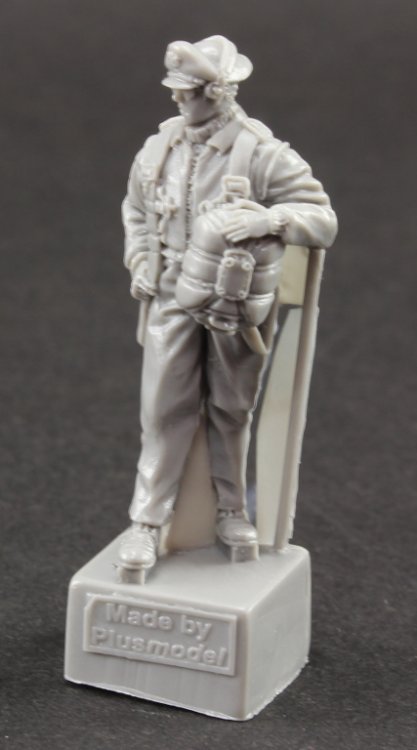
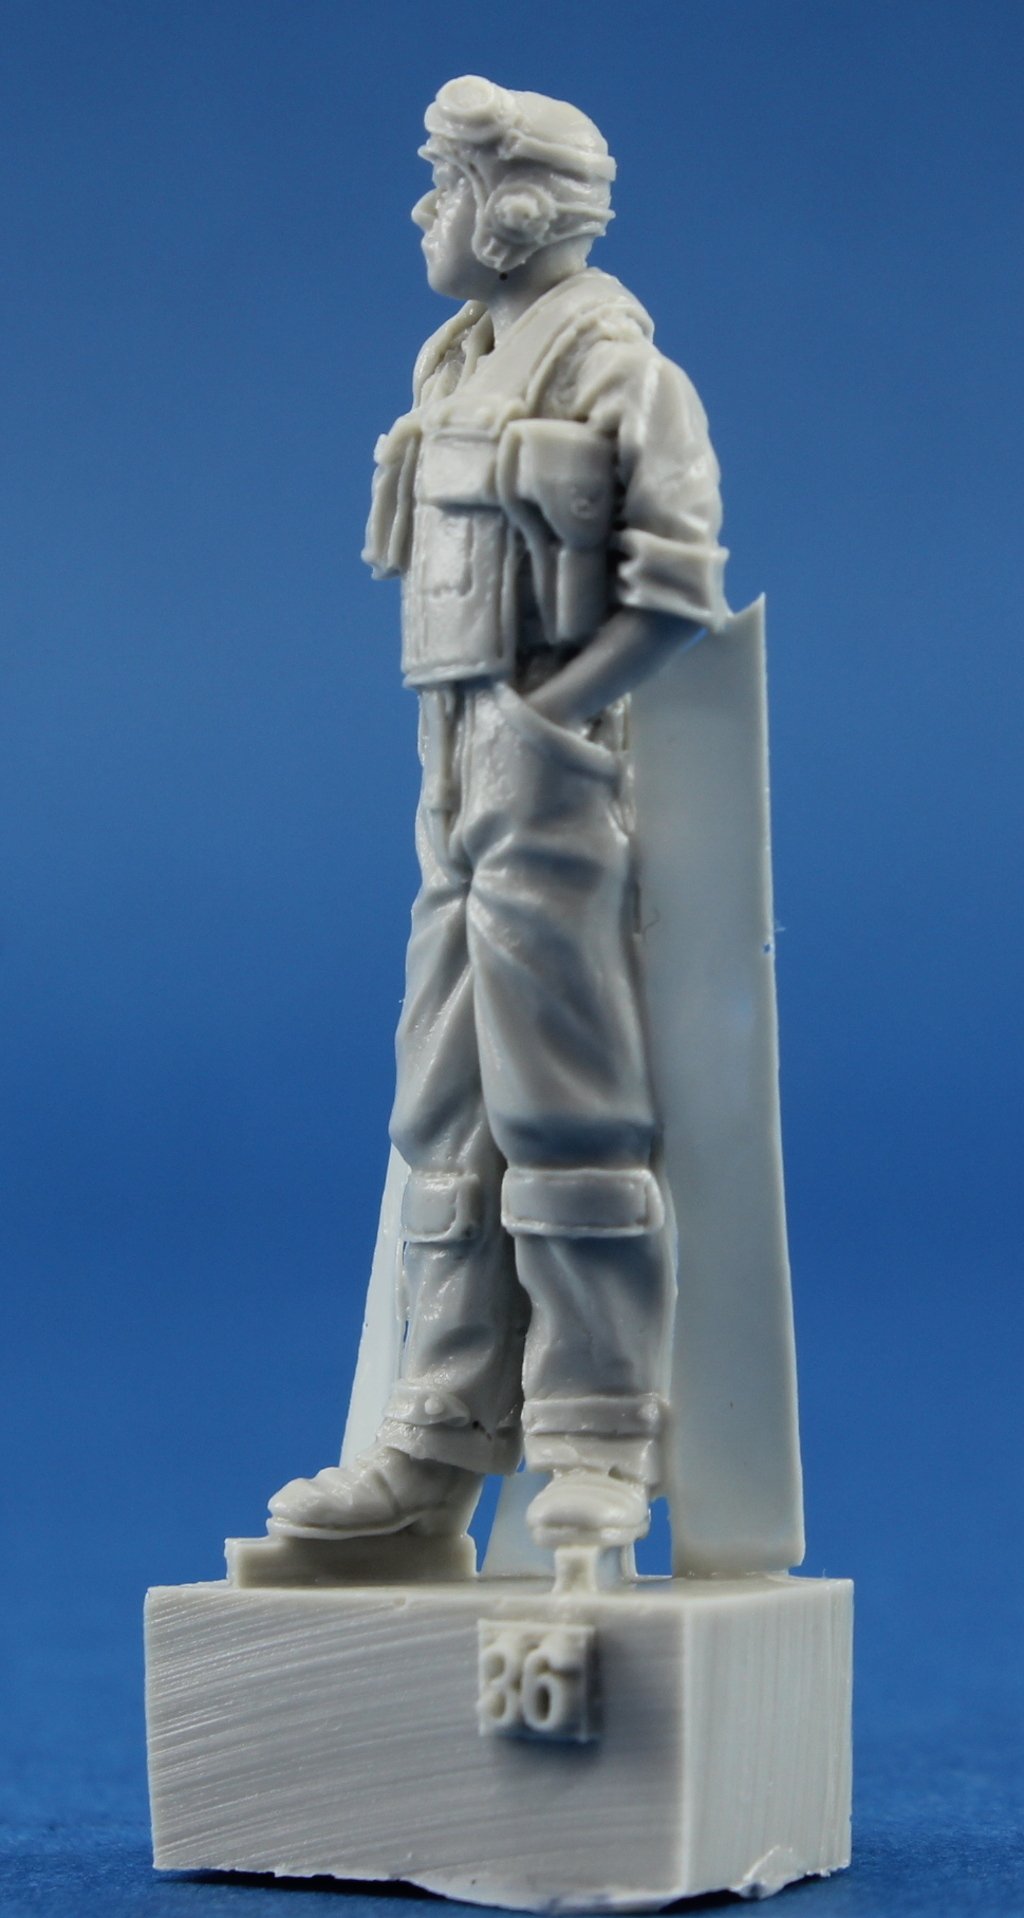
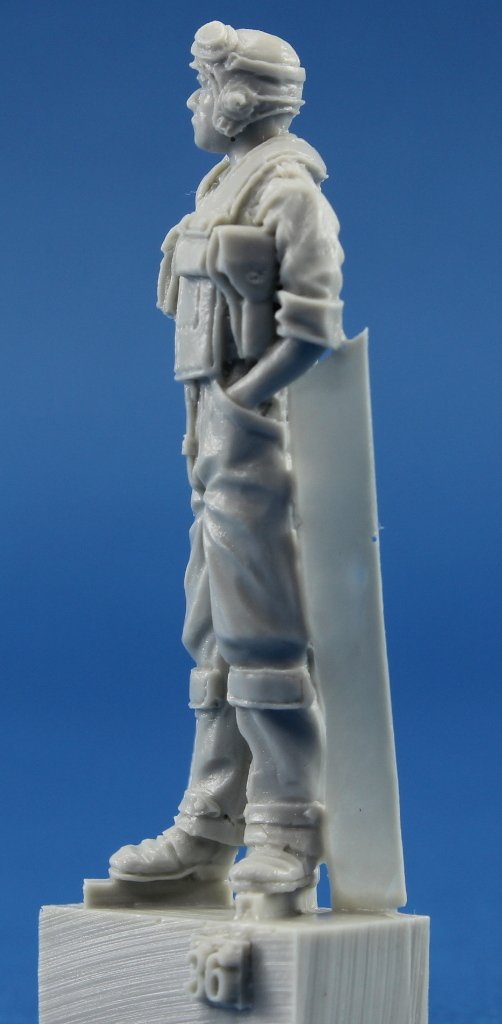
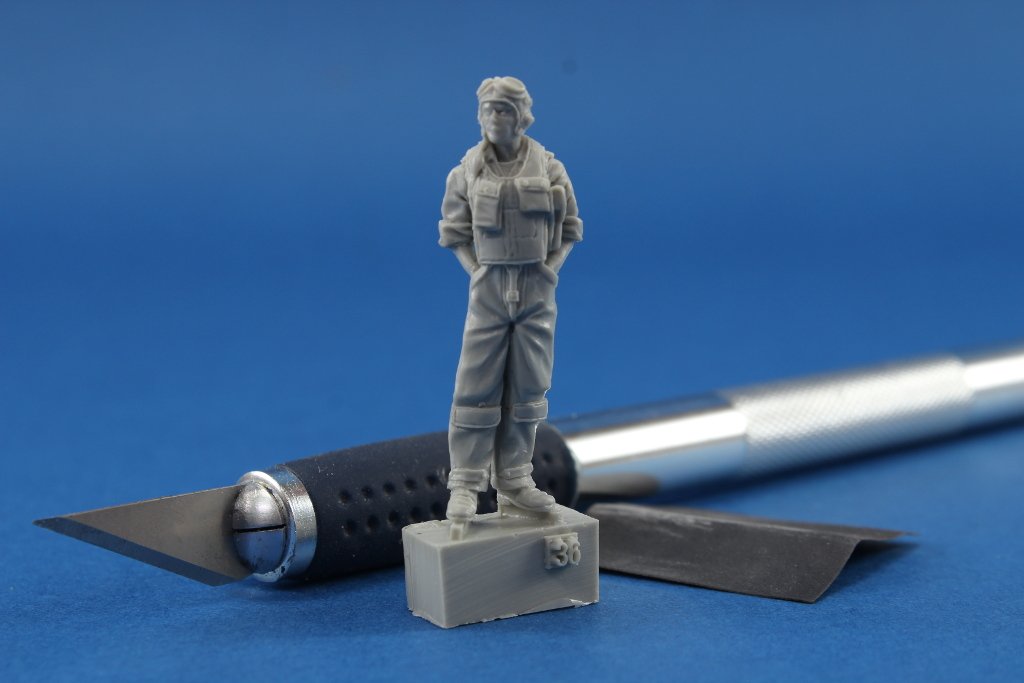
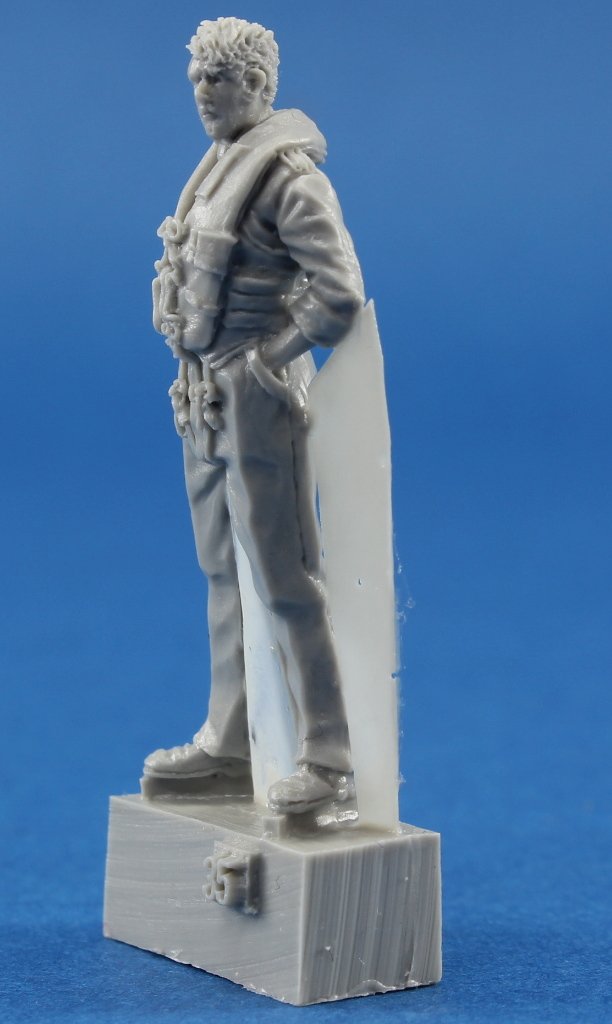
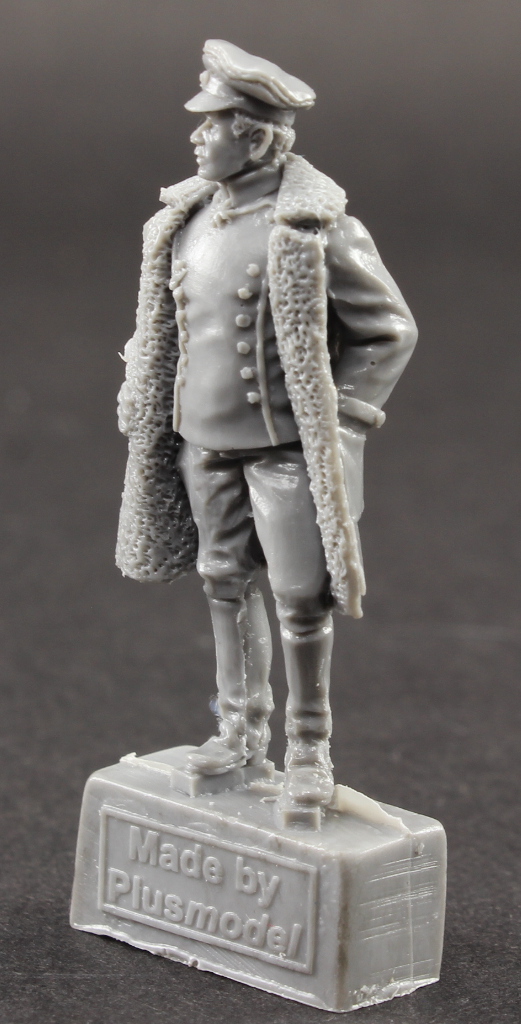
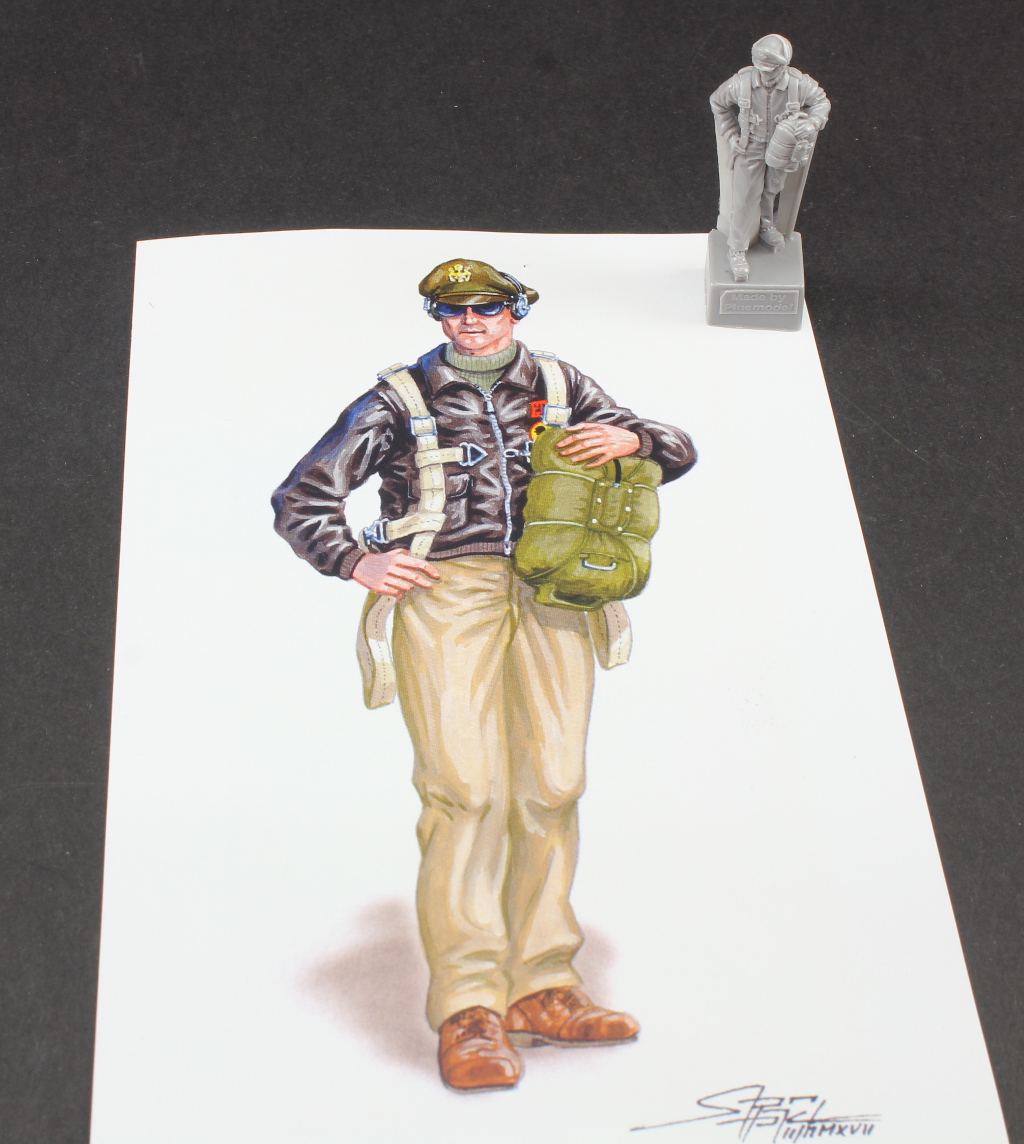
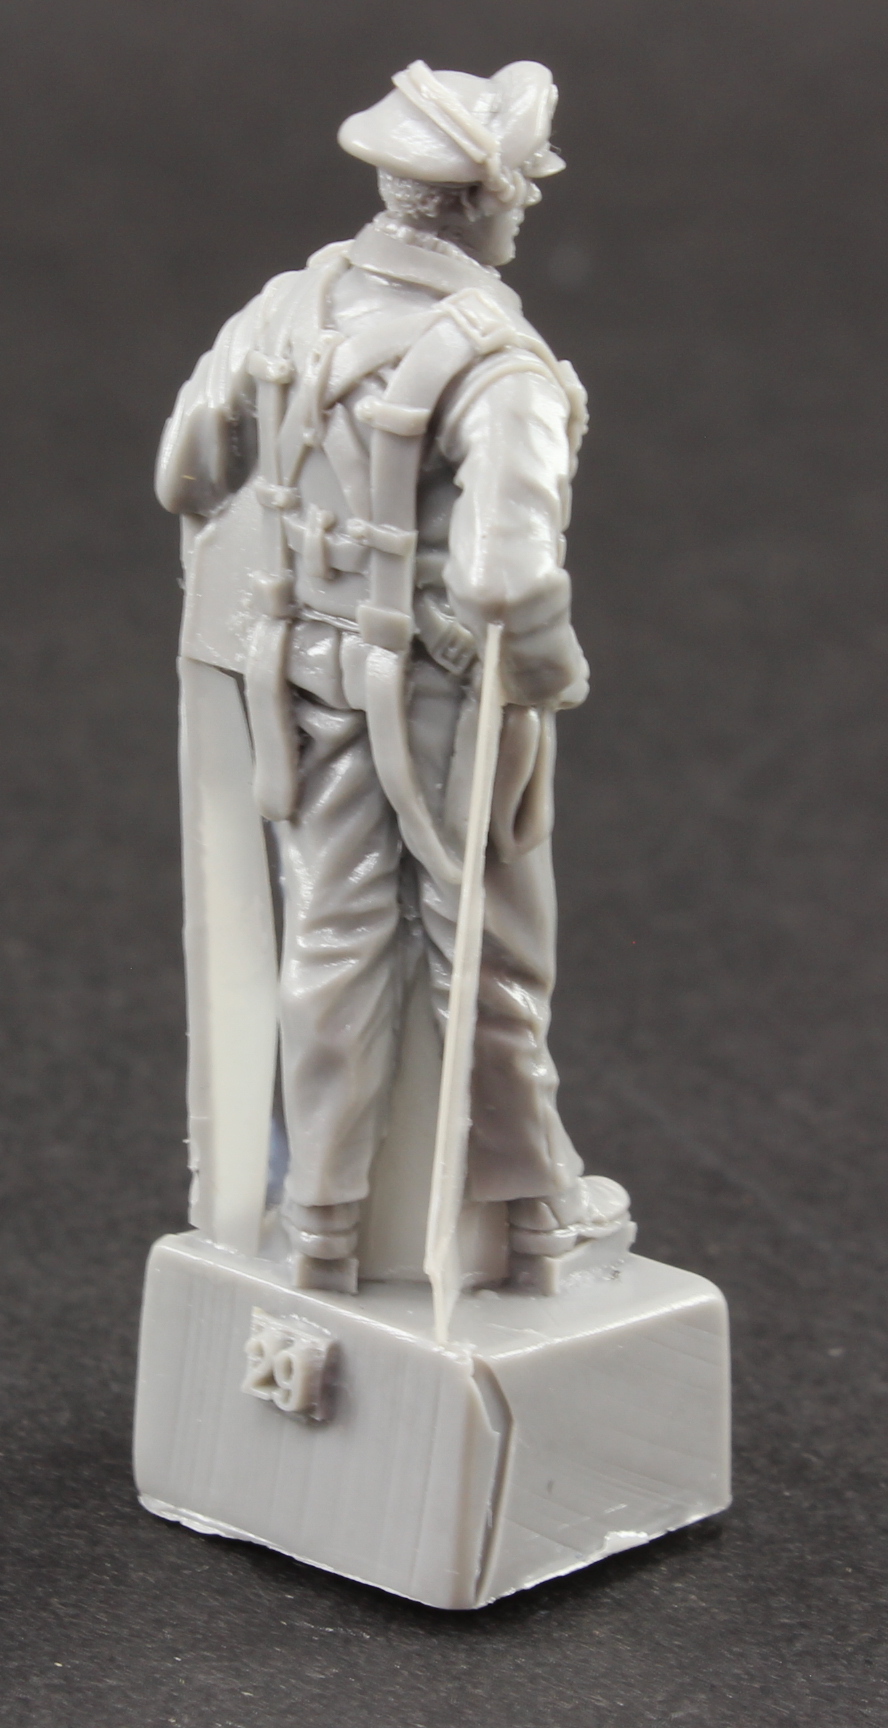
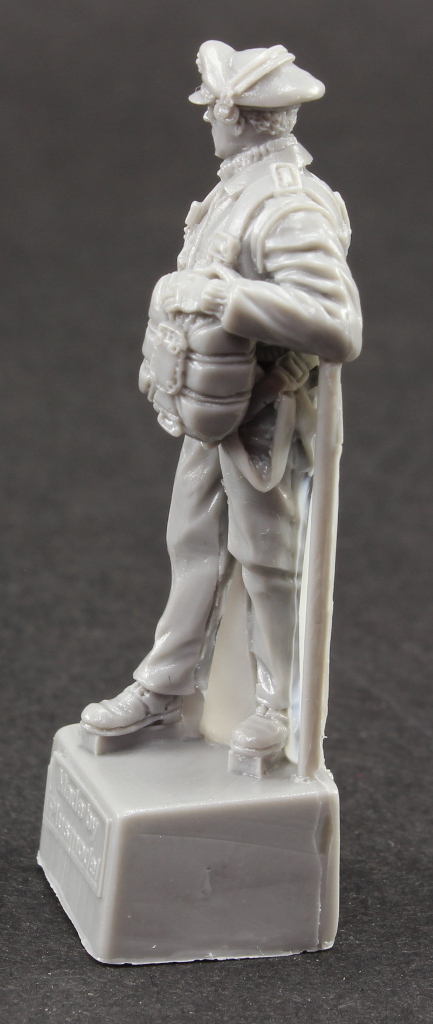
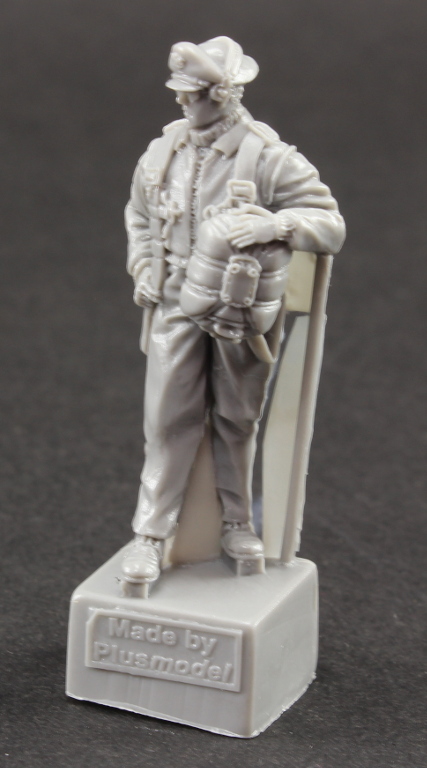
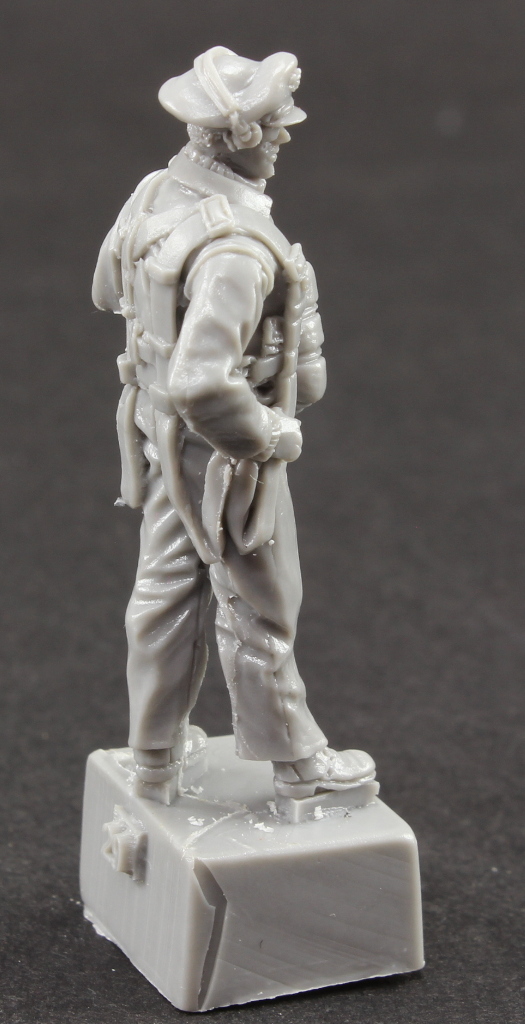
Plusmodel Aero Line Series 1:48 Pilot F4U Corsair #AL4082 Introduction Plusmodel offers aeroplanes modellers fans, a quick and easy way to complement a simple vignette with a 1:48 scale P-51 Mustang (WWII) As previous releases and reviews made by me at LSM, the word associated with these products are: simplicity. What’s on the box? The clear plastic box shows what you get, one resin piece containing a 1:48 representation of a WW2 F4U Corsair pilot, again as common feature on this series, in a relax pose, with both hands on the trousers pockets. The model is on full flight set, composing the helmet with goggles and a Mae West life jacket. Hanging from his left shoulder, a holster with service handgun. Despite no painting guide is supplied, the label’s back is printed with a large full colour draw of the figure. Lots of inspiration on this subject through a quick internet search using your favourite search engine A small mold line is detected along the length of the legs and arms, most probably due to the cast process, but nothing that a modelling knife and a 600 abrasive sandpaper won’t fix. As proof of my writing, I went to my cave and proceed with the mold and resin excess clean. At the end of 15 minutes work, this was the result: ready for a soapy wash and when dry, some primer. As by the pictures, the detail is adequate and with a good quality brush and steady hands can create a very appellative complement to our model airplane. Of special notice on a finished model is the contrasting yellow life jacket, on the rather khaki overall flight suit. Conclusion This is a nice and easy addition to any 1:48 WWII F4U corsair out there! Tamiya, Hobbyboss, Hasegawa or Academy! A simple base with the bird and pilot is always a perfect duet! Highly recommended! Thanks to Plusmodel for the sample review Ricardo Veríssimo


-
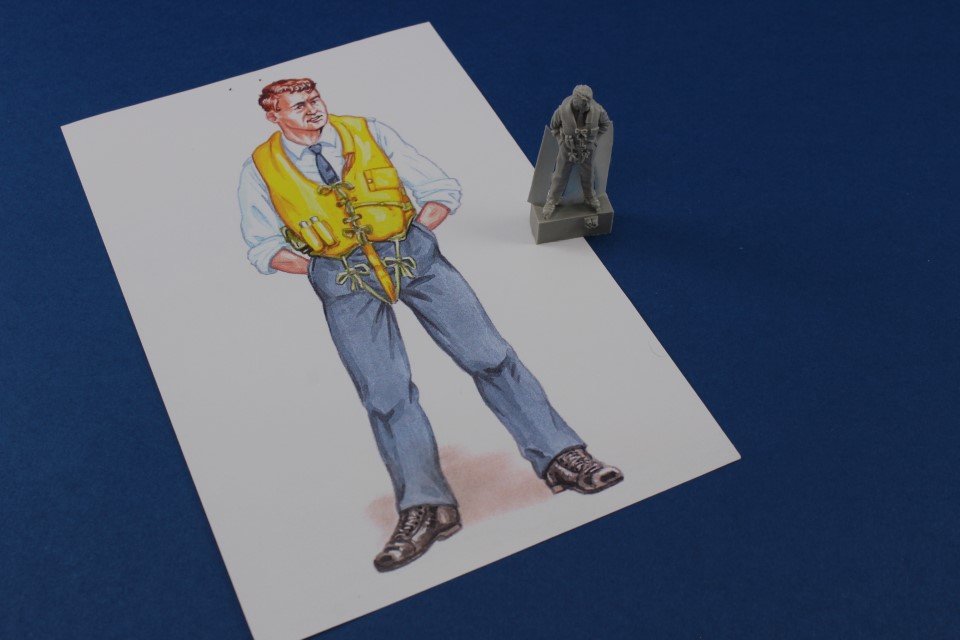
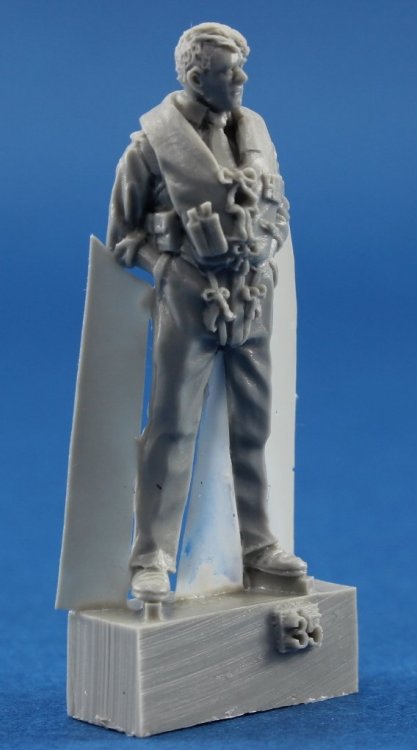
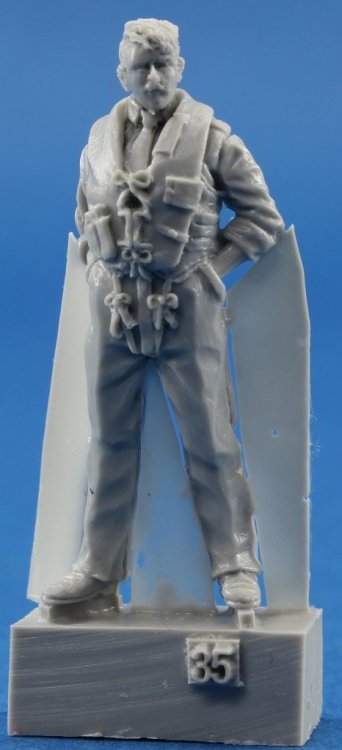
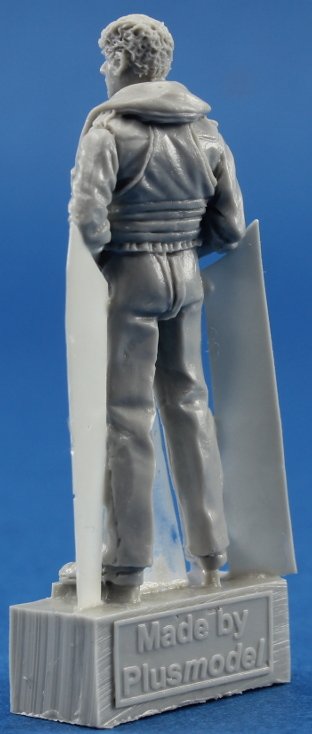
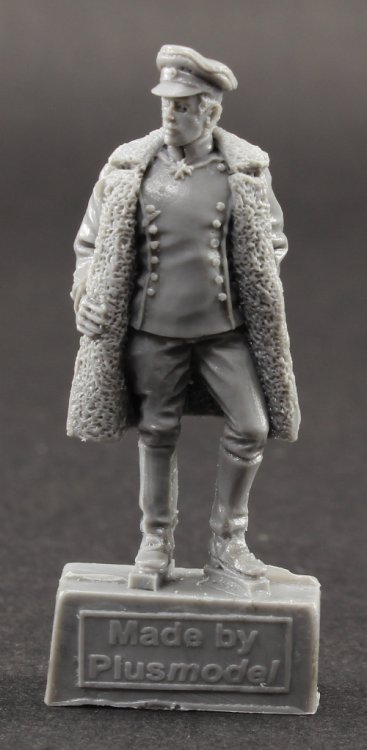
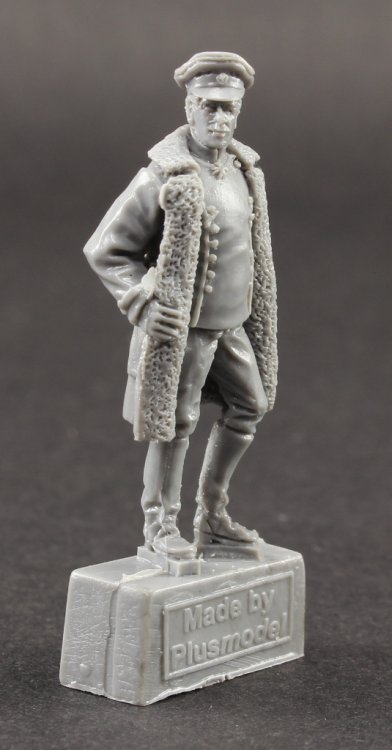
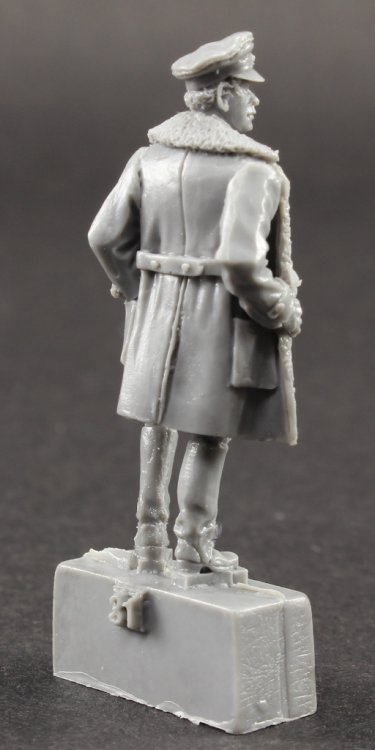
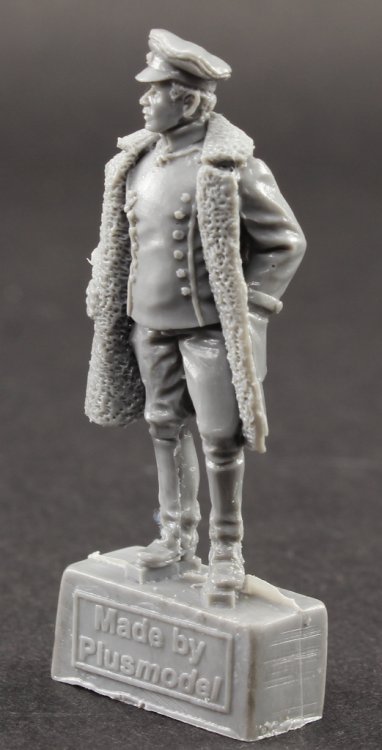
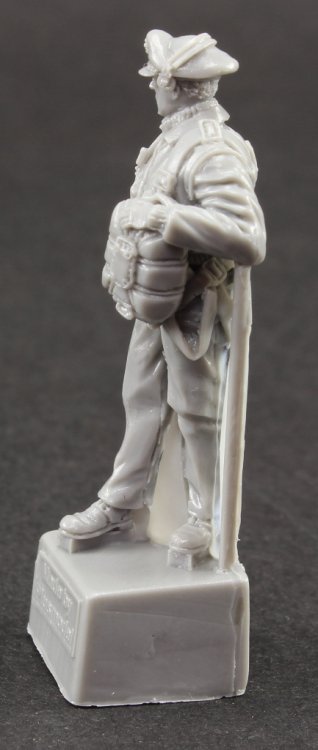
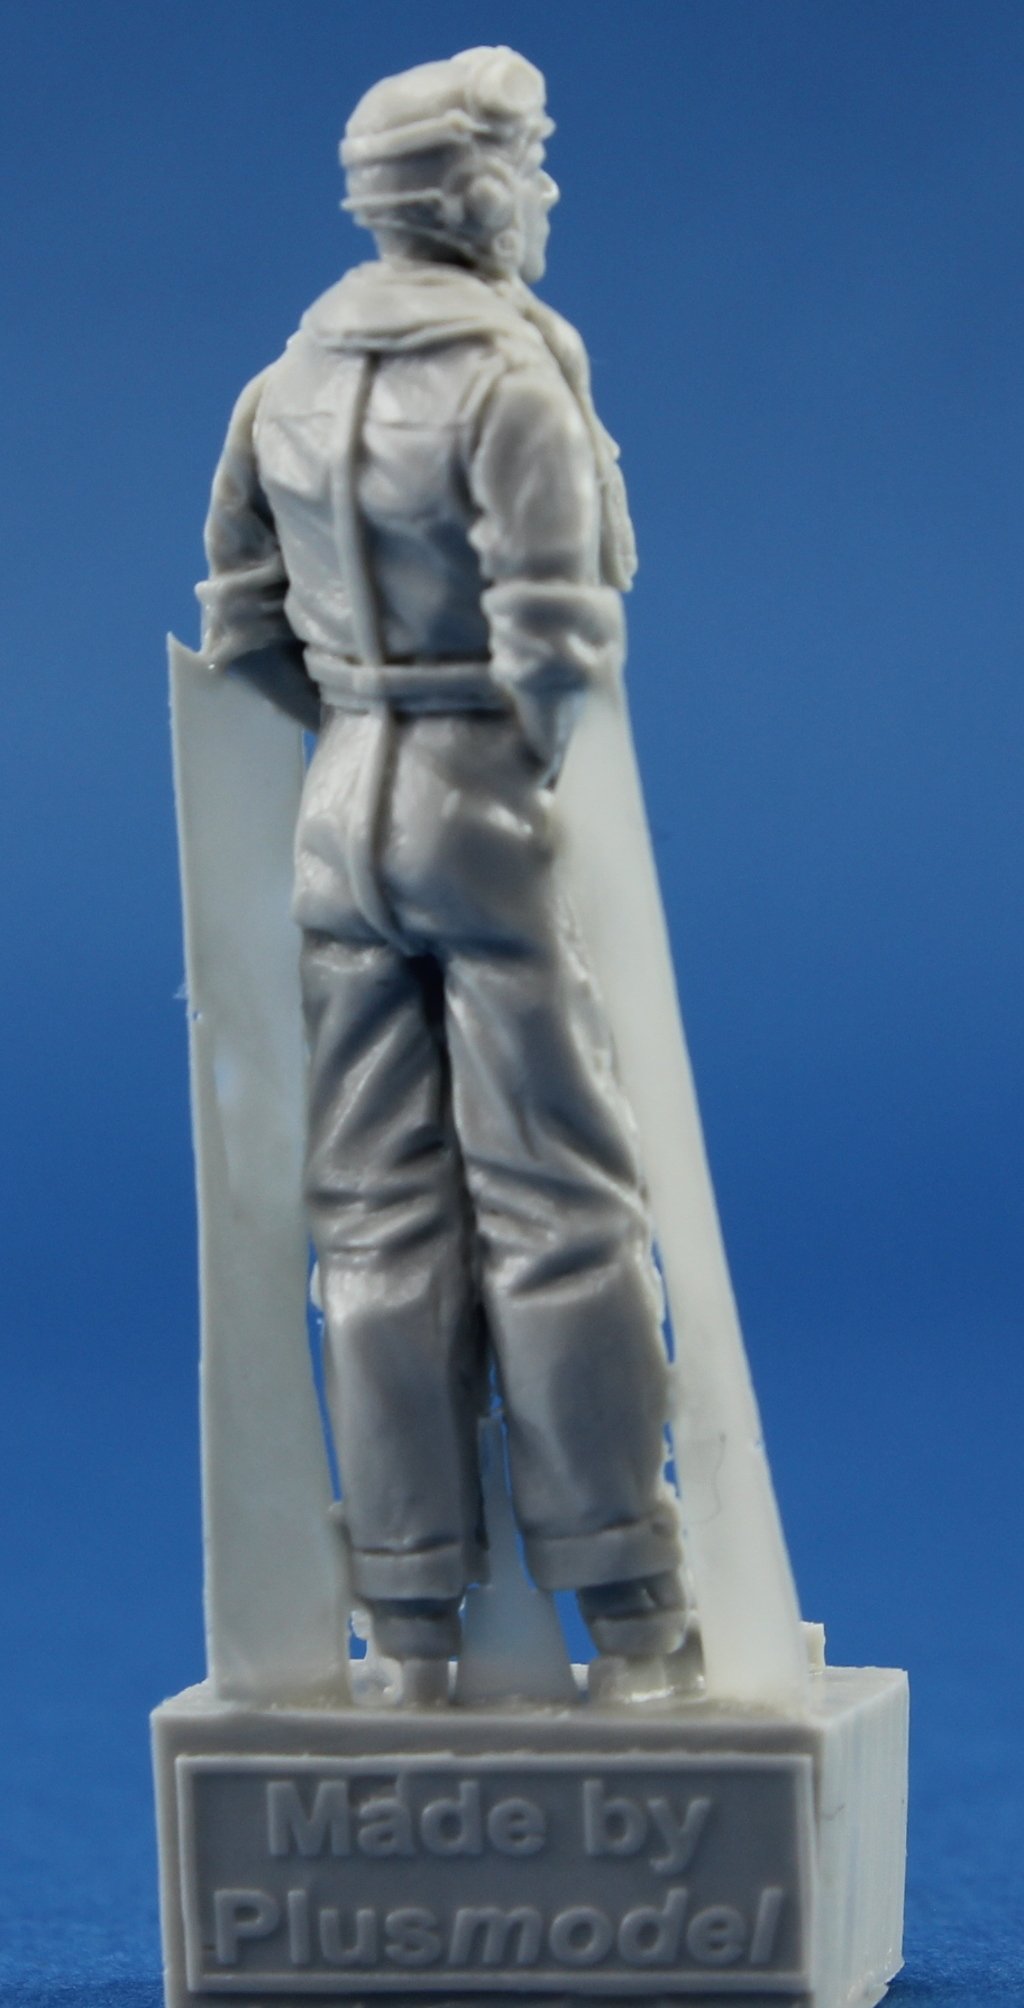
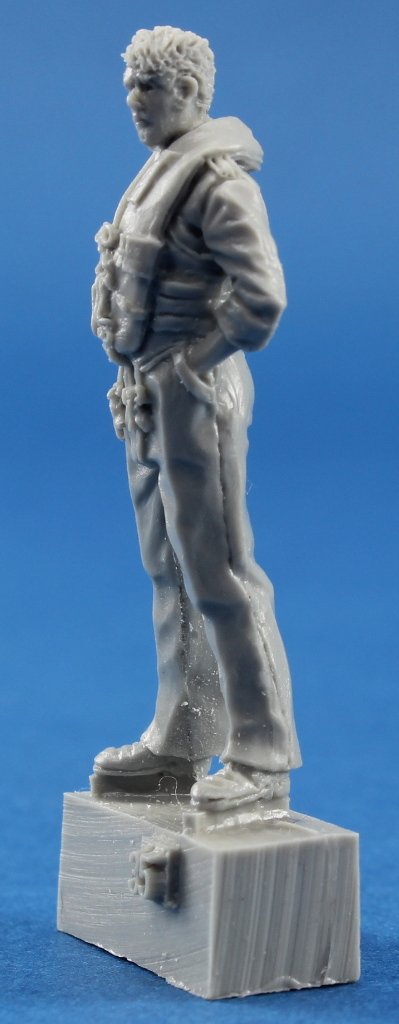
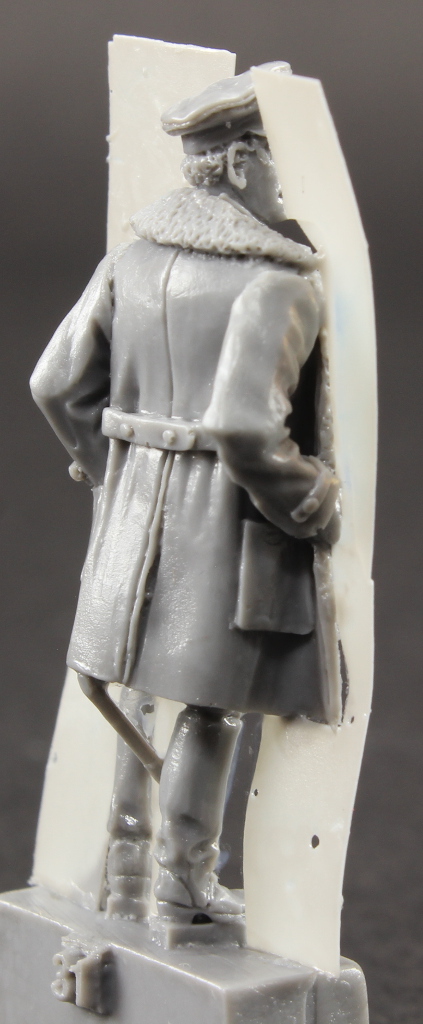
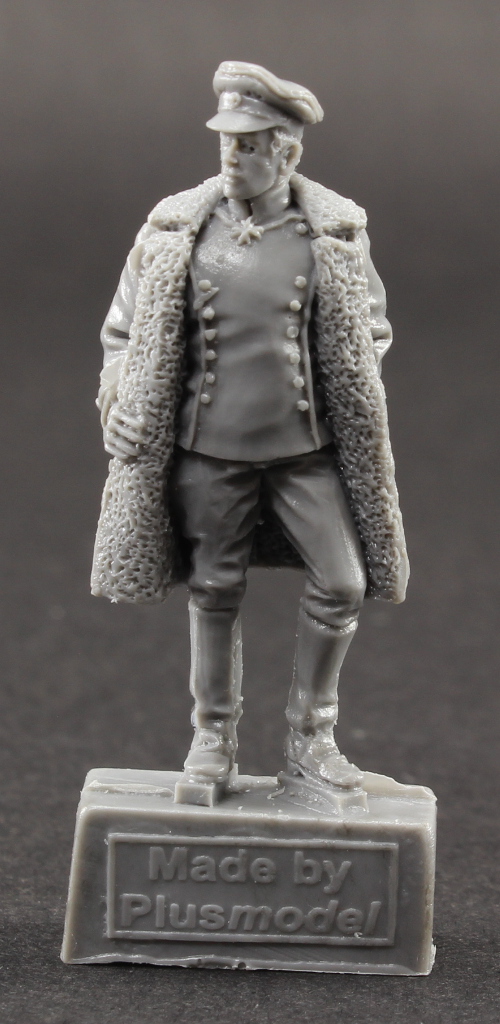
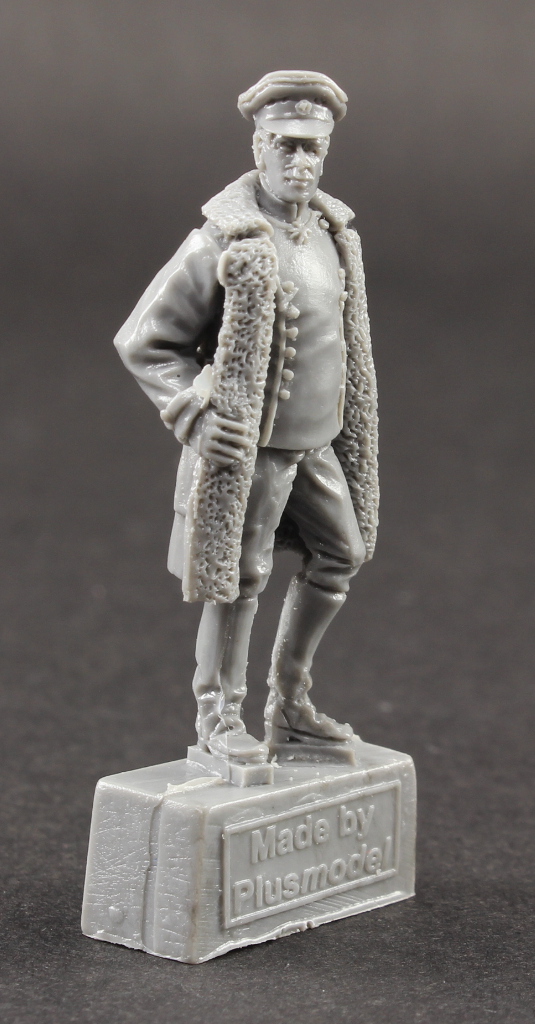
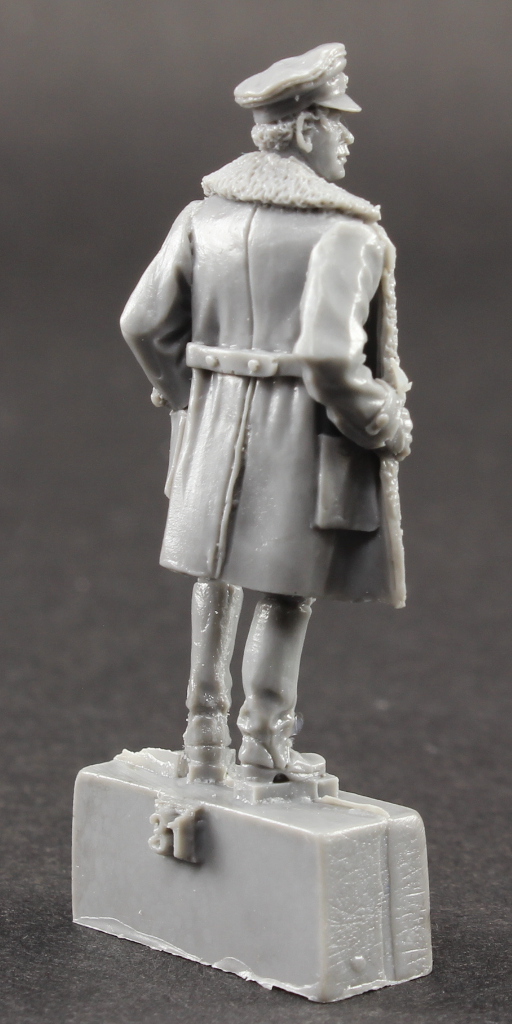
Plusmodel Aero Line Series 1:48 Tempest pilot Ref: AL4081 Introduction Plusmodel offers aeroplanes modellers, a quick and easy way to complement a simple vignette with a 1:48 scale Hawker Tempest pilot (WWII) As previous releases and reviews made by me at LSM, the word associated with these products are: simplicity. As a (almost) dedicated airplane modeller, the act of painting a figure to complement a set of plastic injected built and painted to look like a scale flying machine, looks scaring and a new territory. What’s on the box? The clear plastic box shows what you get, one resin piece containing a 1:48 representation of a WW2 Hawker Tempest pilot on the typical RAF flight uniform and wearing a life vest and on a rather relax pose, with both hands on the trousers pockets. As usual on this sets, no painting instruction are provided, but the label’s back is printed with a large full color draw of the figure. Lots of inspiration on this subject through a quick internet search using your favourite search engine. A close up pictures provide some detail. A small mold line is detected along the length of the legs and arms, most probably due to the cast process, but nothing that a modelling knife and a 600 abrasive sandpaper won’t fix. As proof of my writing, I went to my cave and proceed with the mold and resin excess clean. At the end of 15 minutes work, this was the result: ready for a soapy wash and after dry, some primer. As by the pictures, the detail is adequate and with a good quality brush and steady hands can create a very appellative complement to our model airplane. Please note that the "seam" visible on the interior and exterior part of the trousers are in fact the representation of the stitching line and not a fault on the mold. Conclusion This set is a nice and easy addition to any Tempest on 48 scale and it will pair with Eduard’s new release and already reviewed here ! Highly recommended! Our thanks to Plusmodel for the review samples and all the support given. To purchase this directly, click THIS link Ricardo Veríssimo


-
100 Years of Soviet and Russian Military Parades- 1917 -2017 The Red Army on Parade Volume 1 1917 – 1945 Author: James Kinnear Publisher: Canfora Graphic Design & Publishing Pages:256 500+ photos Hardback Introduction Canfora presents us the first part of 3 books covering 100 years of Russian Military Parades. This event held annually gained worldwide fame due to the mass presentation of Military vehicles in parade on the also famous red square. Despite the fact that parades were organized on this location before the Russian Revolution, it was on this period that it started to be associated as a annual demonstration of red Army and latterly Soviet Army military might. This volume (1) covers 28 years of Russian military parades, hold on red square (1917-1945). Researched and written by James Kinnear, who had written hundreds of articles on soviet and Russian military technology, this book is the culmination of his collecting material on a subject that never had been covered so depth. The book is organized chronologically, by decades, presenting the reader the historical context of each era, focusing on the military vehicles on the parades. The reader is presented with a precise and detailed historical event, and very well documented by the quantity and quality of the included photographs. It positively surprised me, more than 500 pictures published and even more unpublished. Of particular interest are the pages dedicated to the parades staged during WWII period with focus on the 1st May 1945, 24th June 1945 – The VE Victory Parade and 7th September 1945 – The Allied Victory Parade – Berlin, where the new IS-3 heavy tank was “introduced” and paraded to the shock of foreign commanders, that had not expected to see from a country weakened by four years of war for survival. Also, worth mention is the relation of all “tekhnika” – the equipment presented on all parades, included: foreign, light, fast, medium and heavy tanks, Self-propelled and towed artillery and military transport. Conclusion This book is intended as a neutral account of the armoured vehicles and weapons systems that have been demonstrated on the red square in the past century, presented in a unique and in-depth narrative for this world-famous event. The book is hard covered with matt finish and the image reproduction is high quality even though some pictures had almost 100 years. This is a high recommended book for everyone interested on contemporary military history. To purchase this directly, click here. If you found this review helpful and decide to purchase this product, please tell them you read about it at Large Scale Modeller! Disclaimer: all photos all in low quality to preserve and prevent all copyright. Ricardo Veríssimo
.JPG.79d16ee0b6c1f9e8e33f5217978bd0c5.JPG)
.JPG.4df2231fa983765c3f36131d2cf7f09e.JPG)
.JPG.27b4e8b3a0dac406b1c561fdf1e07988.JPG)
.JPG.96e9f450fe2af1cb74dbb65321d72566.JPG)
.JPG.89bf733a3f0797ebcefefae81e33b171.JPG)
.JPG.05a2d6bb96ec8701cec061ea9bd606f4.JPG)
.JPG.e3bdf4c06bd20e9088cca96bb1233ace.JPG)
.JPG.d4a9a6b2af51f04411e4710233bb45fa.JPG)
.JPG.659cf679af3dff02c58b74ee6fde8361.JPG)
.JPG.8e9be59221cee68331fcd5bc6d5879f8.JPG)
.JPG.8d2f14a700098a1a5e26d1ce4ba61569.JPG)
.JPG.642f0520c9390d85737be9ebb9b07f33.JPG)
.JPG.11bb0bcfb94c89fa82662646a673ddf8.JPG)
.JPG.2c68c8ecc1b422862137e13cef7cd206.JPG)
.JPG.3357d579cbe16ca79af2e5be165f0c96.JPG)
.JPG.0148552a05785c6330c44b295a2c8b46.JPG)
-
hi ! Great Review! As a WoT Player, i can confirm that the E-50's is one of the game's best! it's iconic! On the modelling's end, it looks a very interesting subject, due to the artistic freedom allowed when it comes to painting ! cheers Ricardo Veríssimo
-
Red Machines 1 T-60 Small Tank & Variants Authors: James Kinnear & Yuri Pasholok Publisher: Canfora Graphic Design & Publishing Price(EU): 34,50€ Introduction Canfora presents us a book with a different content of the ones already reviewed. This new series focus on a type of machine, and on this subject, the Russian Light Tank T-60 and series. Being the third most numerous tank-types built in the Soviet Union during the 1941-45 “Great Patriotic War”, behind only the T-34 Medium Tank and the Su-76 Self-Propelled gun. Despite the fame of being under armed and weakly armed, played a crucial part on the critical period of 1941-42 when the soviet manufacturing plants struggled to replace combat losses at the front. Canfora bring us the compiled of several years of archival research and study, on the form a hard cover book, containing the development and service life of the T-60 light tank. So what about content… This book composes of several chapters, for better understanding: Introduction Chapter 1 - Development History Takes us thru the model genesis and development notes, as also inform on the man responsible for the T-60 Design (Nikolai Aleksandrovich). Chapter 2 - T-60 Production at plant nº37, KhTZ (Kharkov) & GA (Gorky) Description of the first prototypes build, production notes and history. In fact some interesting information is described, as for example, the difficulties posed on the factories to obtain and manufacture of the tank’s parts Chapter 3 – Re-Armament and Modernization An approach on the reviews for update the T-60 during the production stage in terms of up armor protection and firepower. Chapter 4 – T-60 Production at Plant Nº264 (Krasnoarmeisk), Nº37 (Sverdlovsk), Nº38 (Kirov) Chapter 5 – The T-60 In service and combat This chapter takes thru operational combat service. Complemented with a quantity of war time photos (German and soviet origins), on capture and / or destroyed vehicles. Chapter 6 – T-60 Variants and Prototypes Present us all variants (produced and proposed) based on the T-60 Chassis. The iconic flying tank Chapter 7 - T-60 Description and Walkarounds Chapter 8 – T-60 Preserved Tanks This chapter describe location of all know restore vehicles and the background history. Also mentioned is the status of the preserved tank (static display, running condition, etc). All of this is accompanied of color photos of the restored units. Also available are several color profiles and technical drawings of the several versions produced. Conclusion This is a fantastic book, on one of the mechanic workhorse of the Soviet army on the first stage of WWII. Despite not being a expert on the subject in hands, the reading in interesting and detailed enough to keep us addicted on the reading. The graphical support (B/W photos, drawings, Color photos and profiles), are flawless, and the glossy pages gave the book a much differentiated look and touch which these days it’s not very common to see on many publications. The content is appealing for those of us who enjoy reading about military history, and the modeler is presented with some very inspiring photos and walkaround details. This book is to couple with any 1:35 scale T-60 model! Highly Recommended! To purchase this directly, click here. If you found this review helpful and decide to purchase this product, please tell them you read about it at Large Scale Modeller! Disclaimer: all photos all in low quality to preserve and prevent all copyright. Ricardo Veríssimo
.thumb.JPG.42d57dd2edae5c7b460644fa20d5dc0a.JPG)
.thumb.JPG.18a9b744127f216efc7aeb108e3ca58c.JPG)
.thumb.JPG.b1dd994be276148a3cdbdac0eef2426a.JPG)
.thumb.JPG.107b55d0a6e7f46b3698c5660977b3c4.JPG)
.thumb.JPG.e8255d9aa0546d0994ba81c2cedaad21.JPG)
.thumb.JPG.914cce2d826aecd7a139475f0c365beb.JPG)
.thumb.JPG.cf5bbdf50cfe00513363ecd5b6961c0d.JPG)
.thumb.JPG.c3da48d9f9f69418aff167c330323519.JPG)
.thumb.JPG.842b4a520b464f627f1b276d2e304f1b.JPG)
.thumb.JPG.3f6b241480dc55cf9414193d4cab12a8.JPG)
.thumb.JPG.2c36188394efef84b7091e58c243cf20.JPG)
.thumb.JPG.610845e4637ba2fb4ebf501dc5f37a82.JPG)
.thumb.JPG.85734e34c0aa5dbaf8501907bed8d5a8.JPG)
.thumb.JPG.225428b3bda605e85efa81c67ab57c28.JPG)
.thumb.JPG.7933c1421faf6d0f4fa2acd880b1ff59.JPG)
.thumb.JPG.ea4aa931e04962f15648a289bf056b46.JPG)
.thumb.JPG.881542b39e2efc387cbb196adf6468f1.JPG)
.thumb.JPG.8e67b6843884efd7c0f78d4738ae8b84.JPG)
.thumb.JPG.7d2b0dcfbd4592c7f557226dc24cbacb.JPG)
.thumb.JPG.ec4f56e319f837f9de401ae614416767.JPG)
.thumb.JPG.f0352260d02539a872c314860151c69a.JPG)
.thumb.JPG.216fd76000eb2a0470c32233ef33af4a.JPG)
.thumb.JPG.da6f1fd6ea046333c1360a512c8dffd3.JPG)
.thumb.JPG.d359e72049cb8d4996714138b0e76531.JPG)
.thumb.JPG.c6d514efbaf2aa8d717dac690eb3743b.JPG)
.thumb.JPG.d3a0f7437f7c47727d47055a8c6d1e56.JPG)
.thumb.JPG.5172cc7f99998f71d7cb49cde1a332cd.JPG)
.thumb.JPG.3ec5744ff8f9df1774db13402063a4d8.JPG)
.thumb.JPG.565838fdf5fa6656587b468453347362.JPG)
.thumb.JPG.21bd5cb075df94dd3e8fb349ae84b2cd.JPG)
.thumb.JPG.5e4db1397cfebf088a991e854603e532.JPG)
.thumb.JPG.60eed87fe33f0d660611ec0003d2aa62.JPG)
.thumb.JPG.7c332ea6bfa9c9fbcc0f53150626a6ed.JPG)
.thumb.JPG.b3411d62dd73a5f26cbcf43705d52d1a.JPG)
.thumb.JPG.8c6fcc3244117b2db51079816c62dfa2.JPG)

-
- 1
-

-
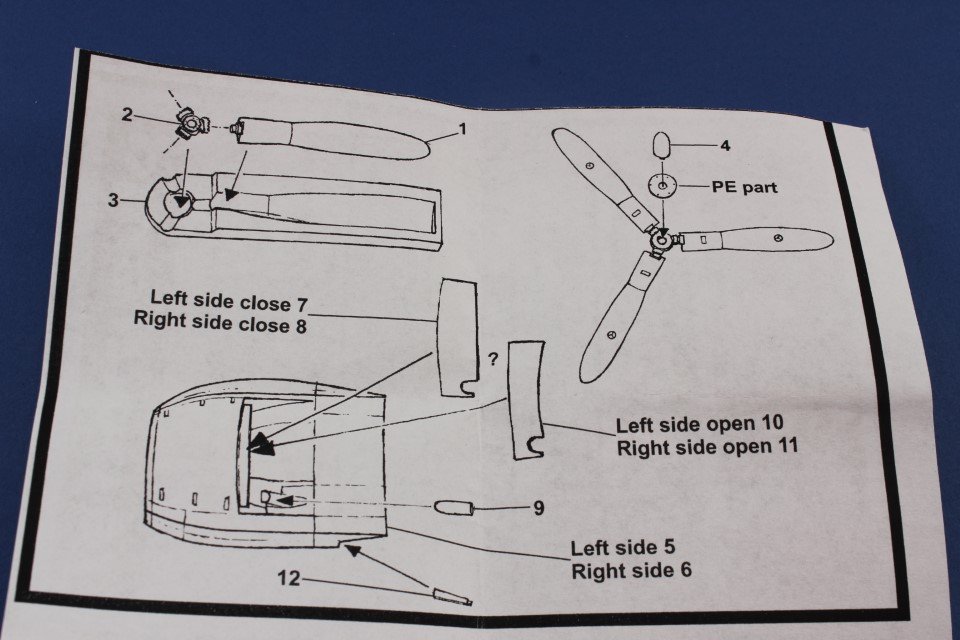
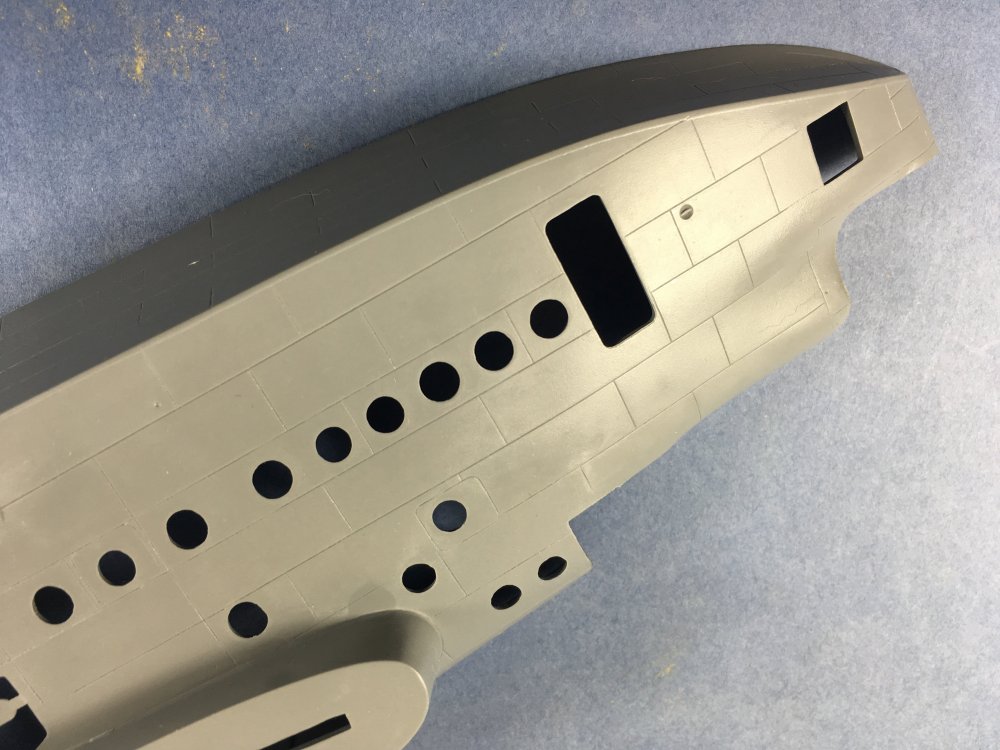
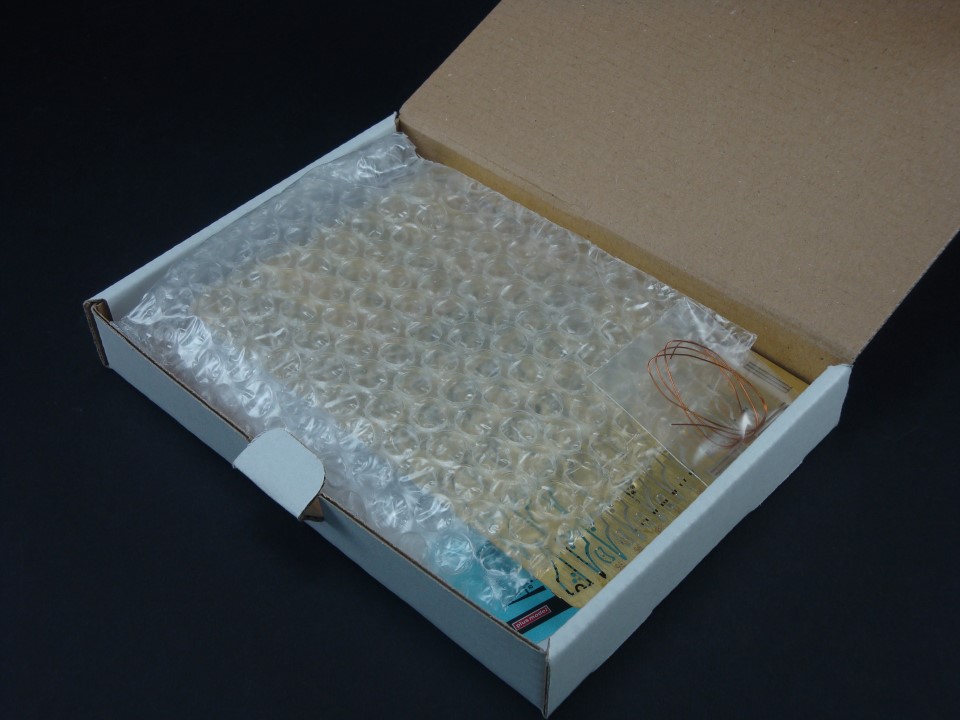
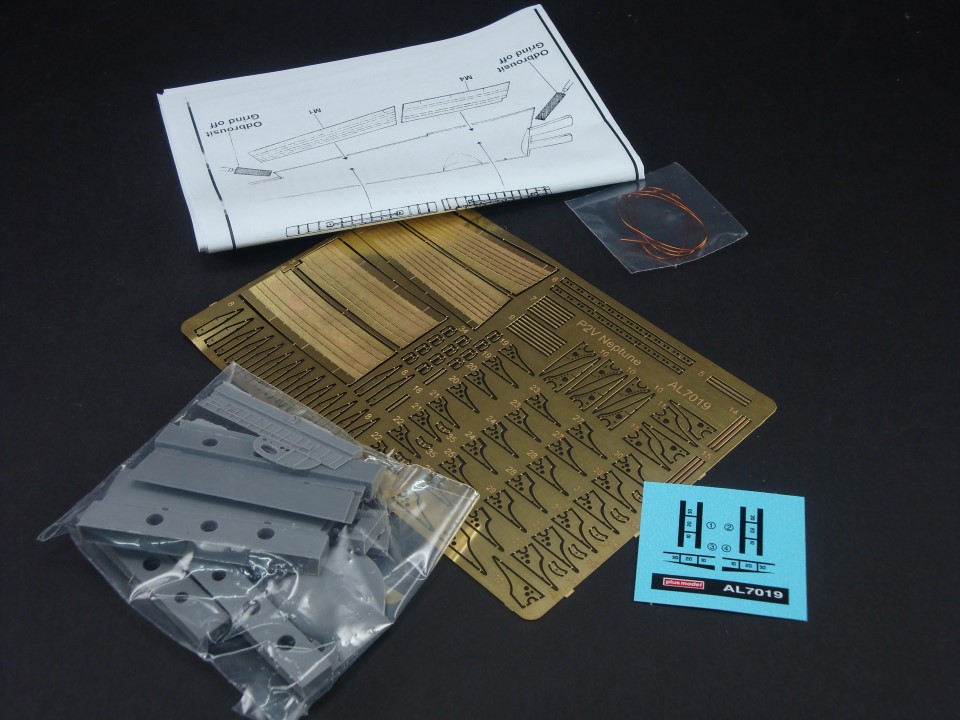
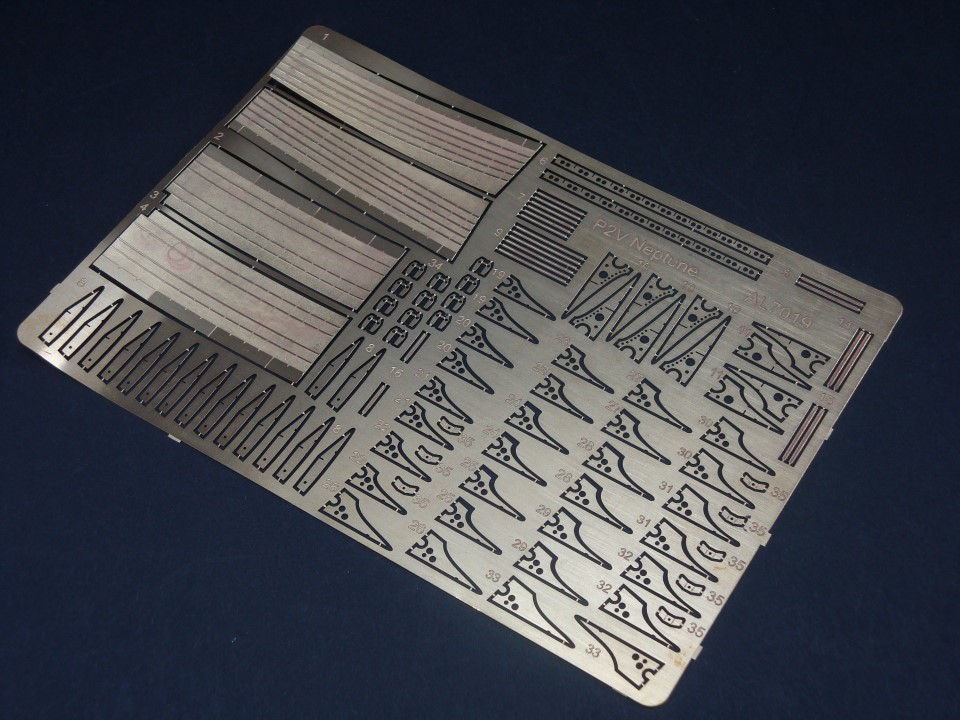
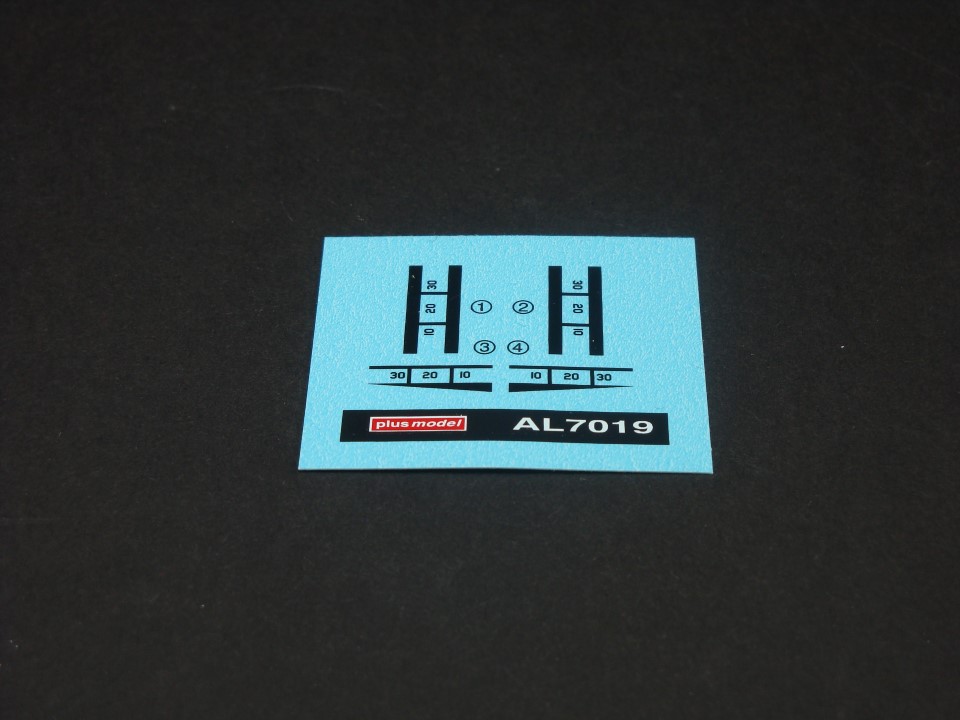
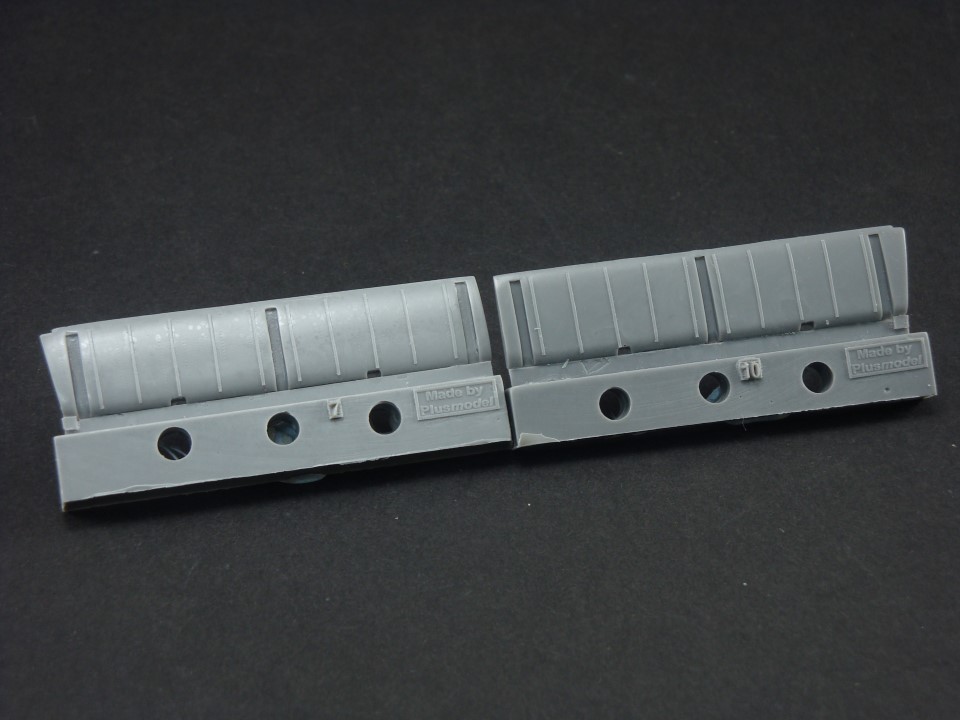
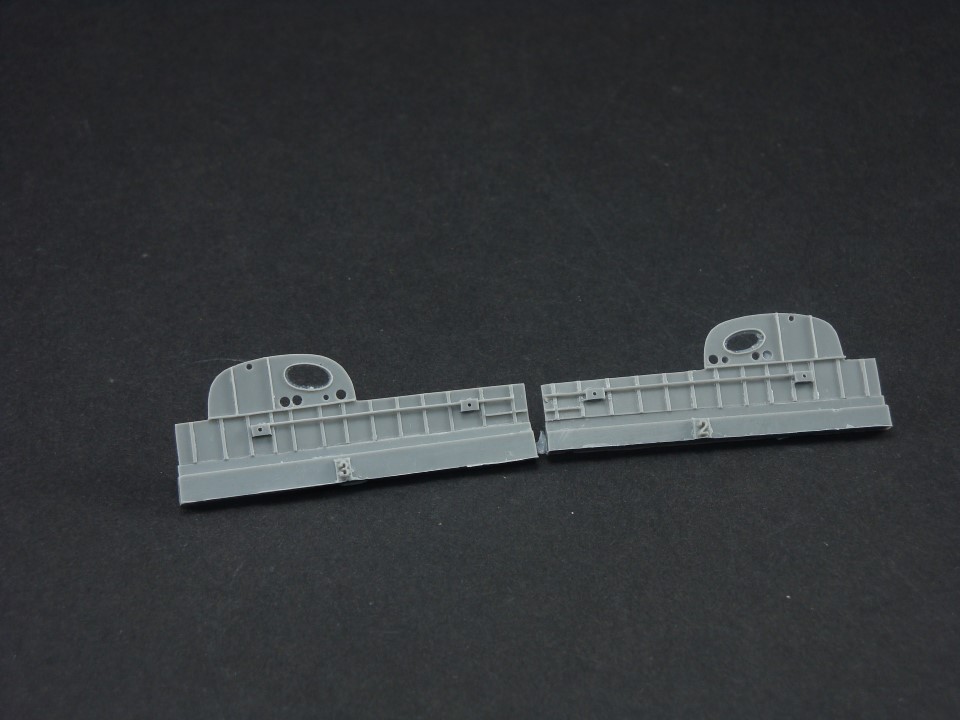
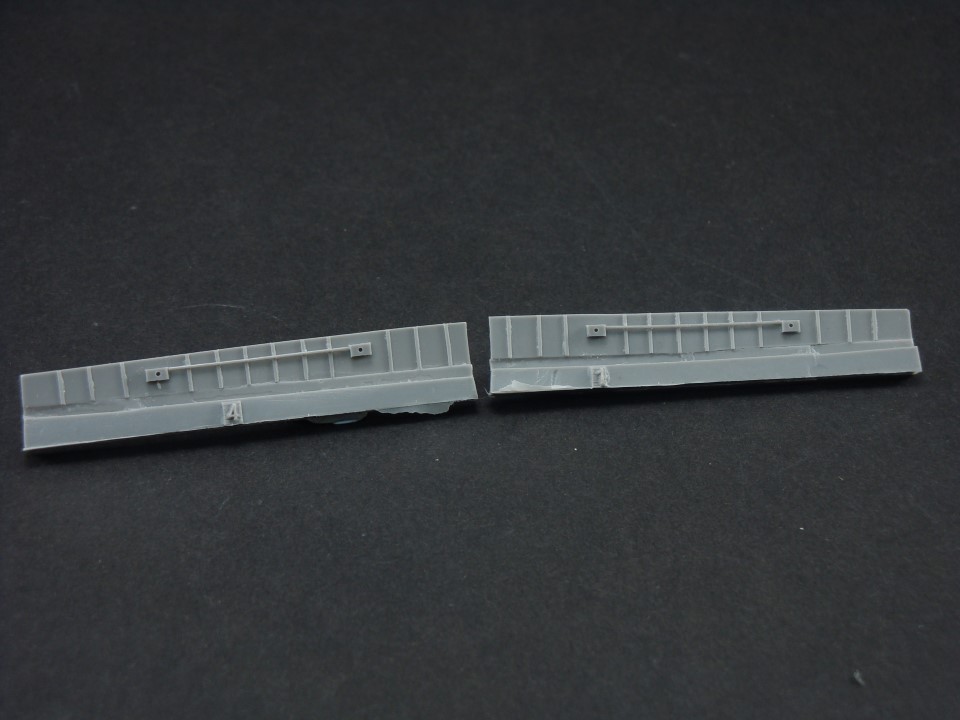
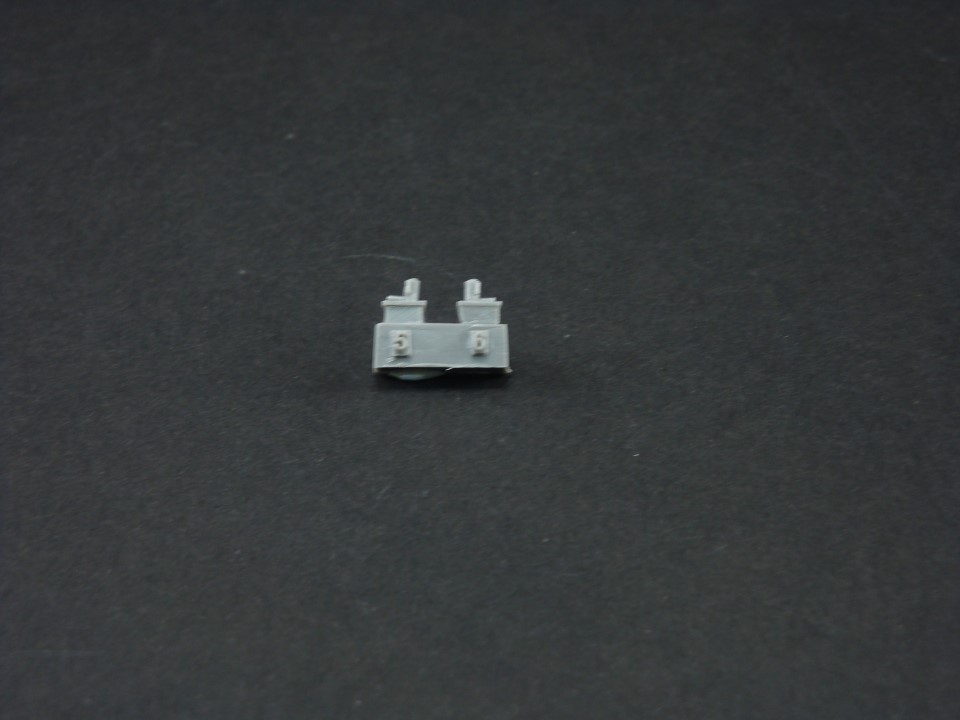
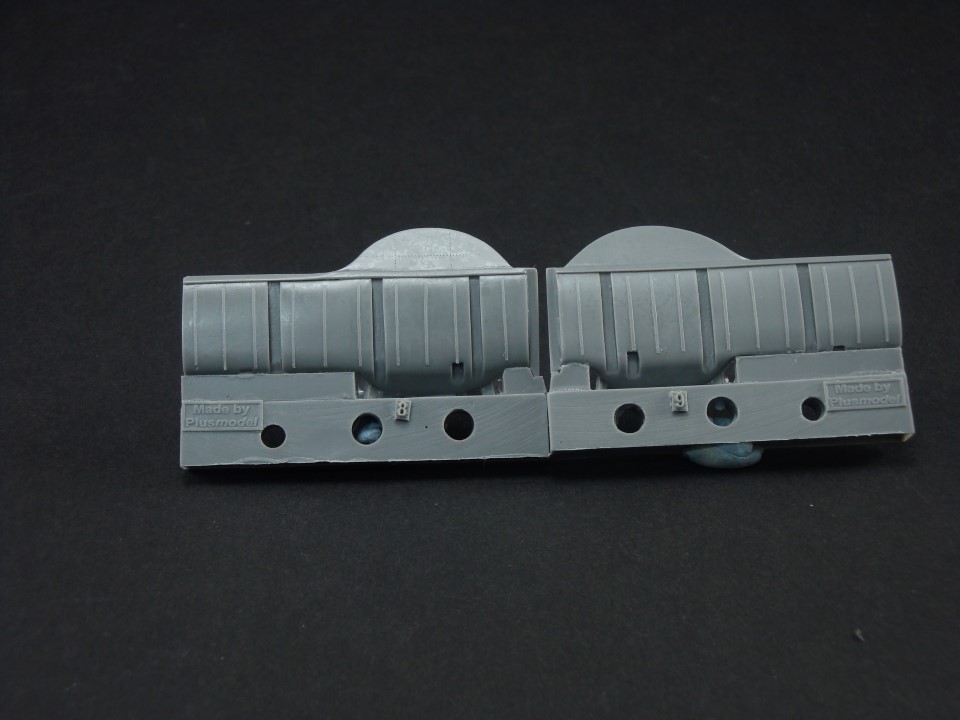
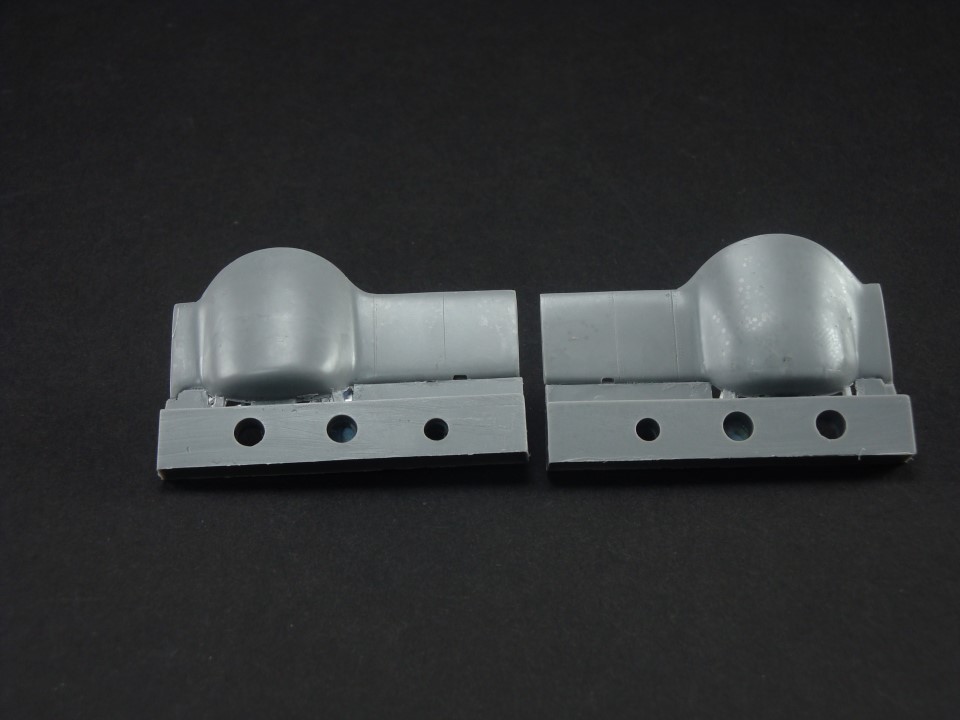
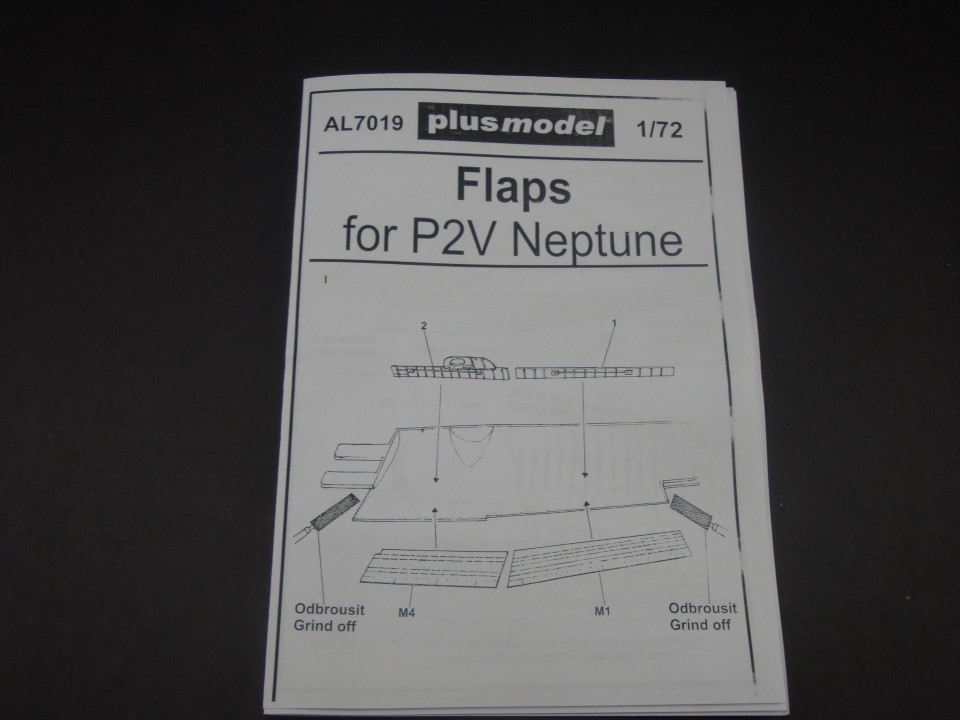
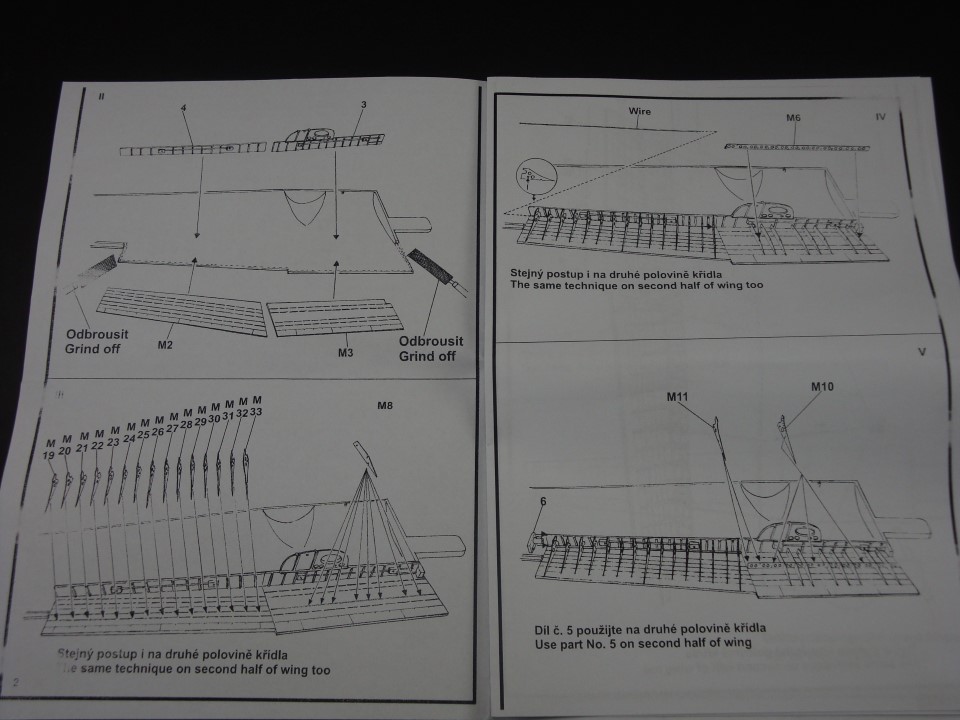
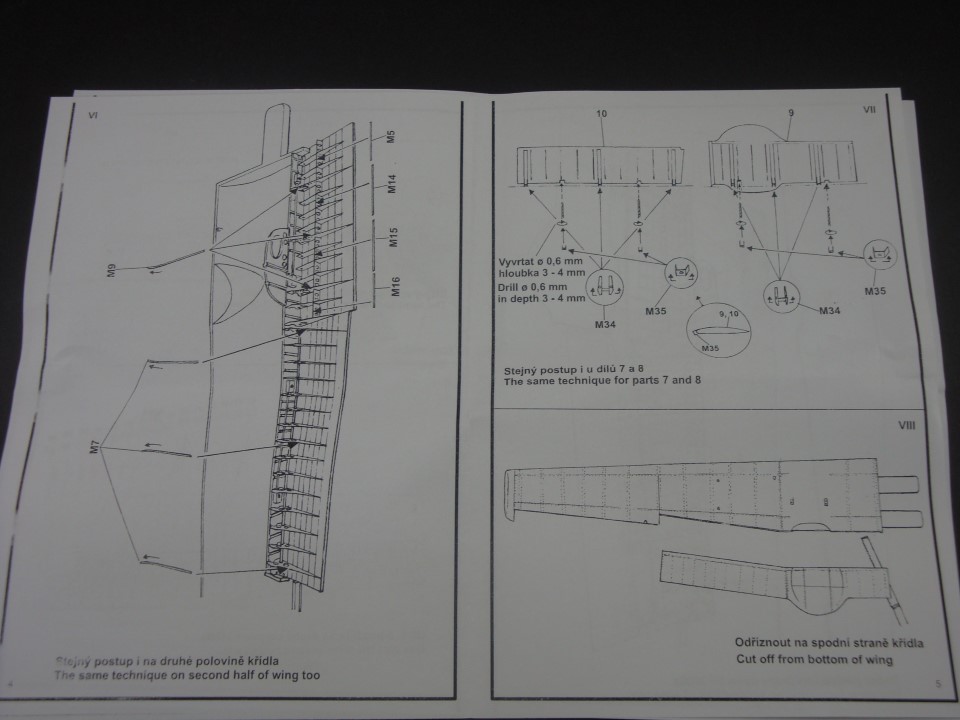
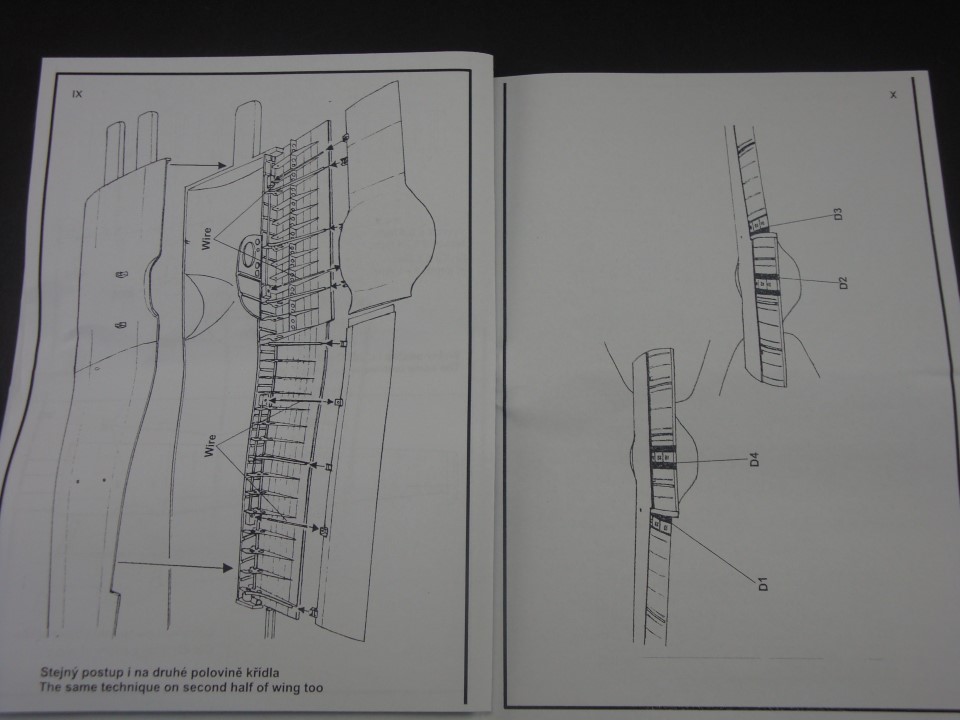
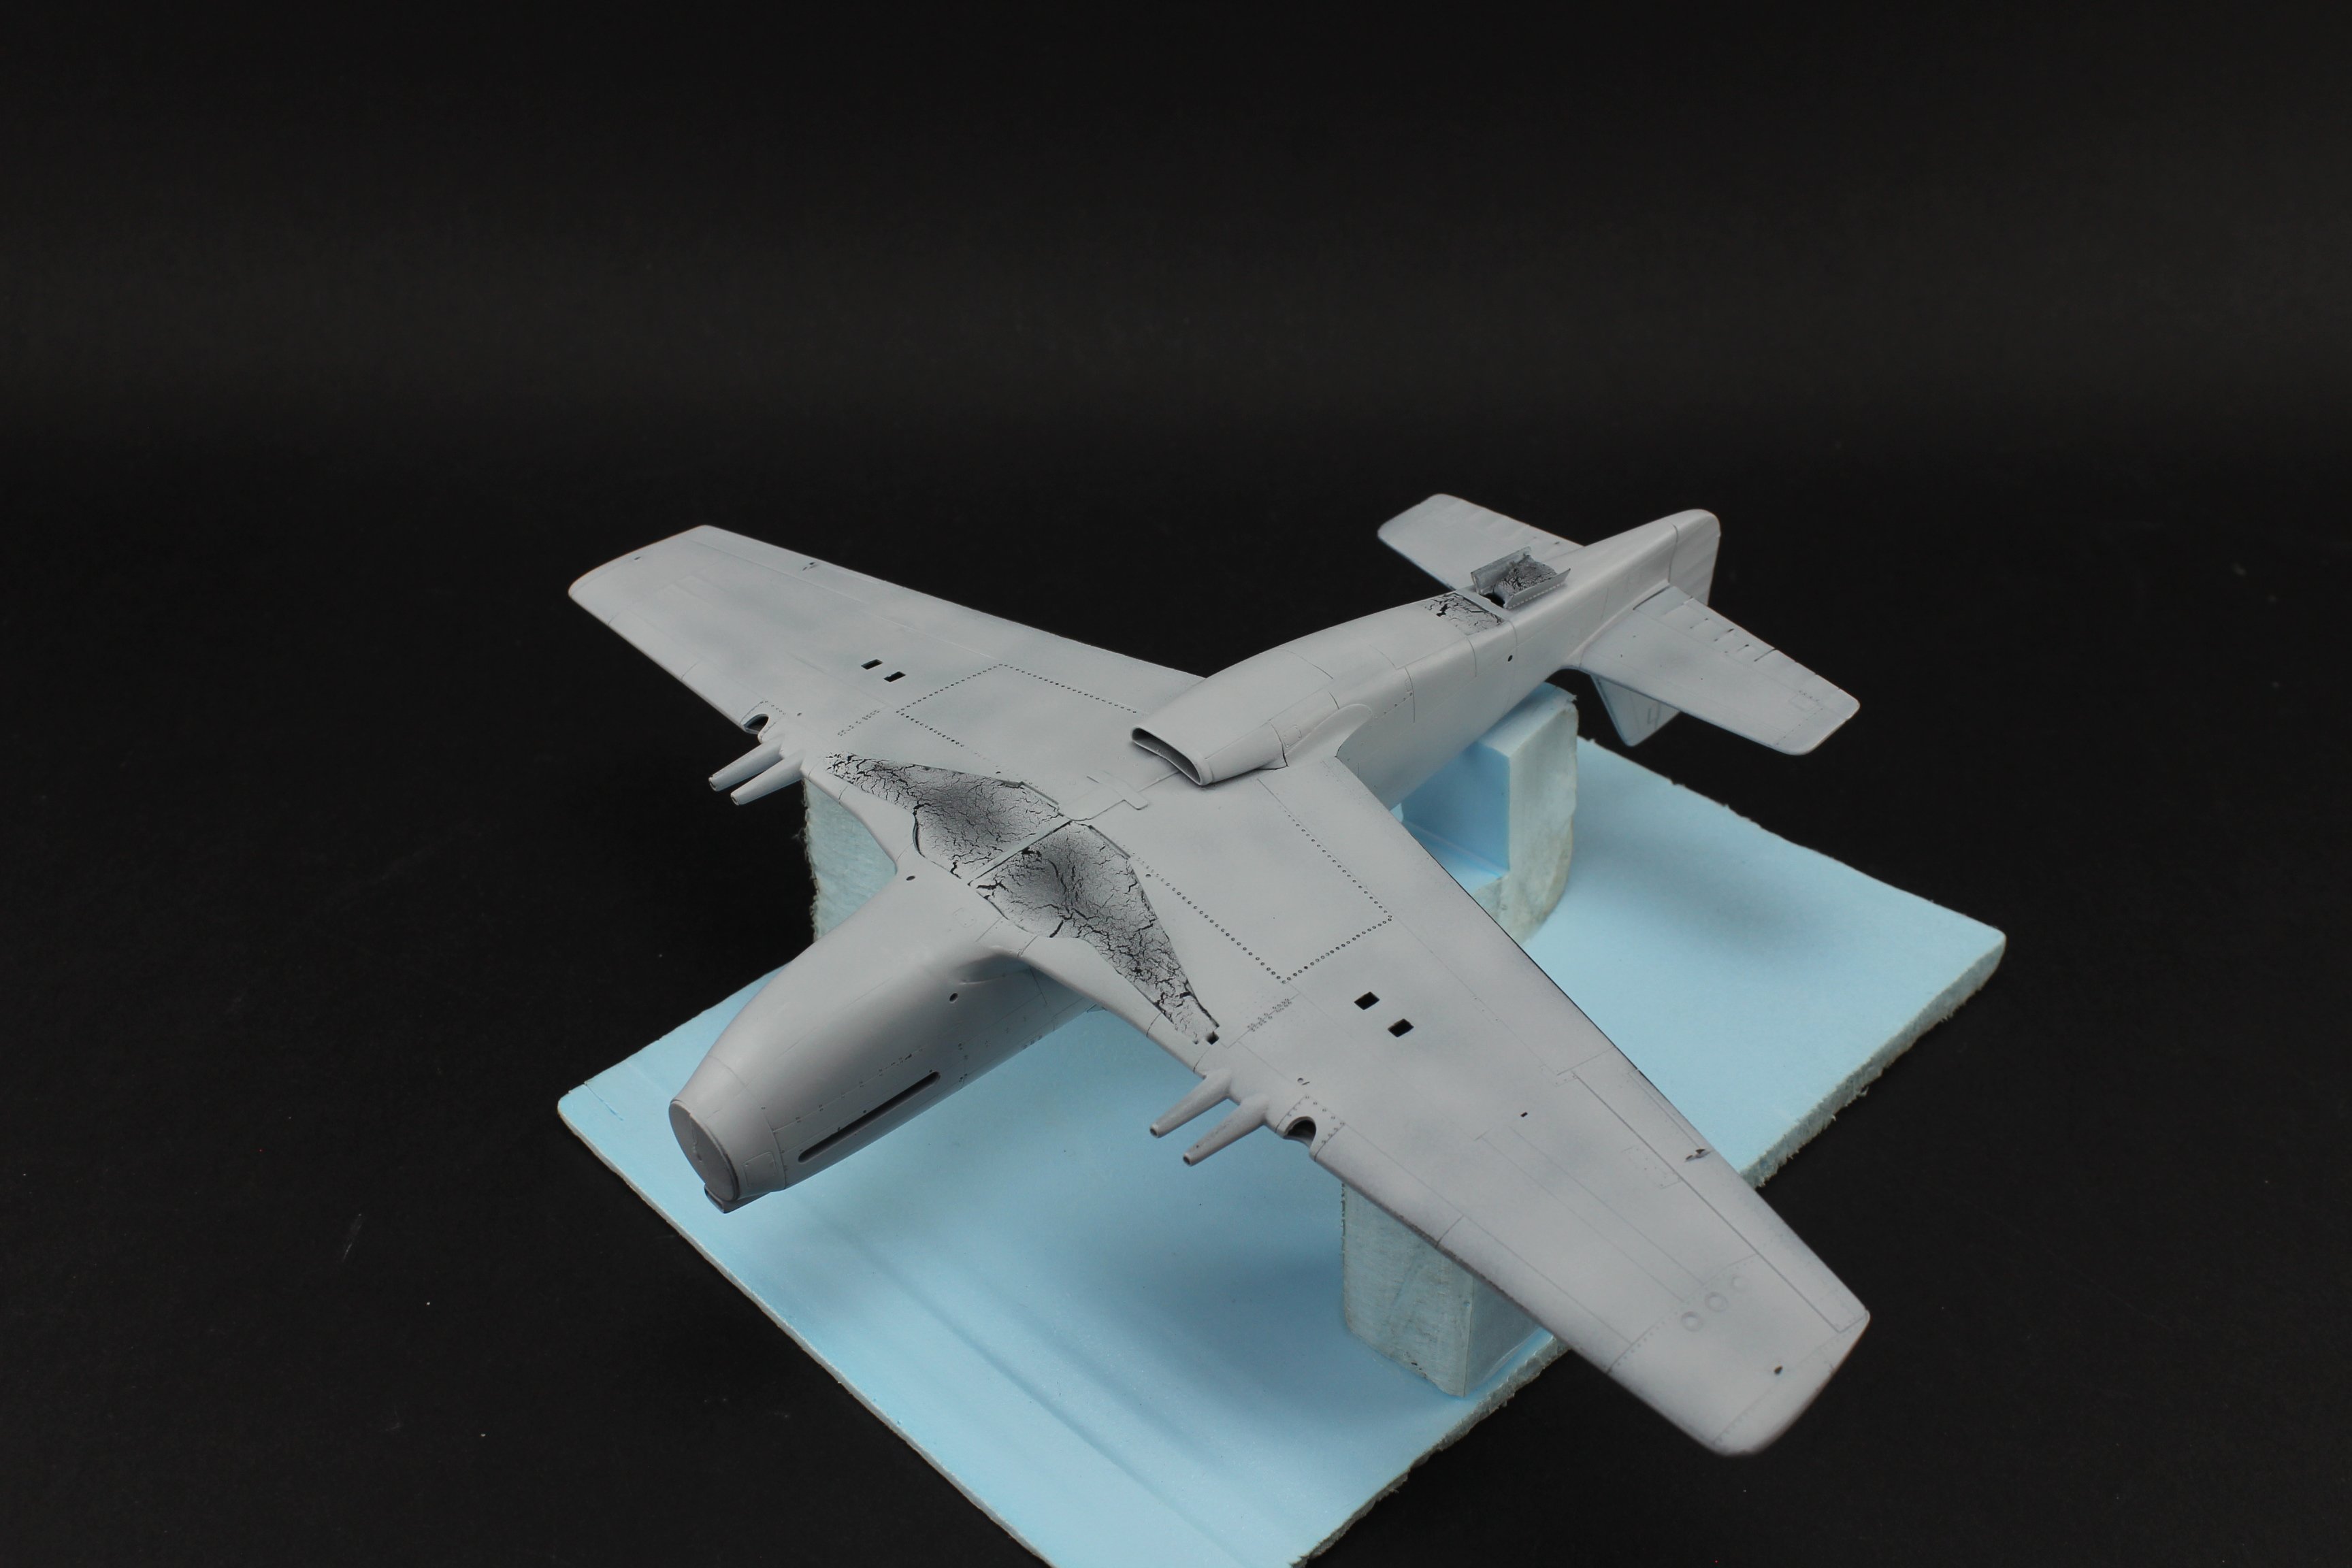
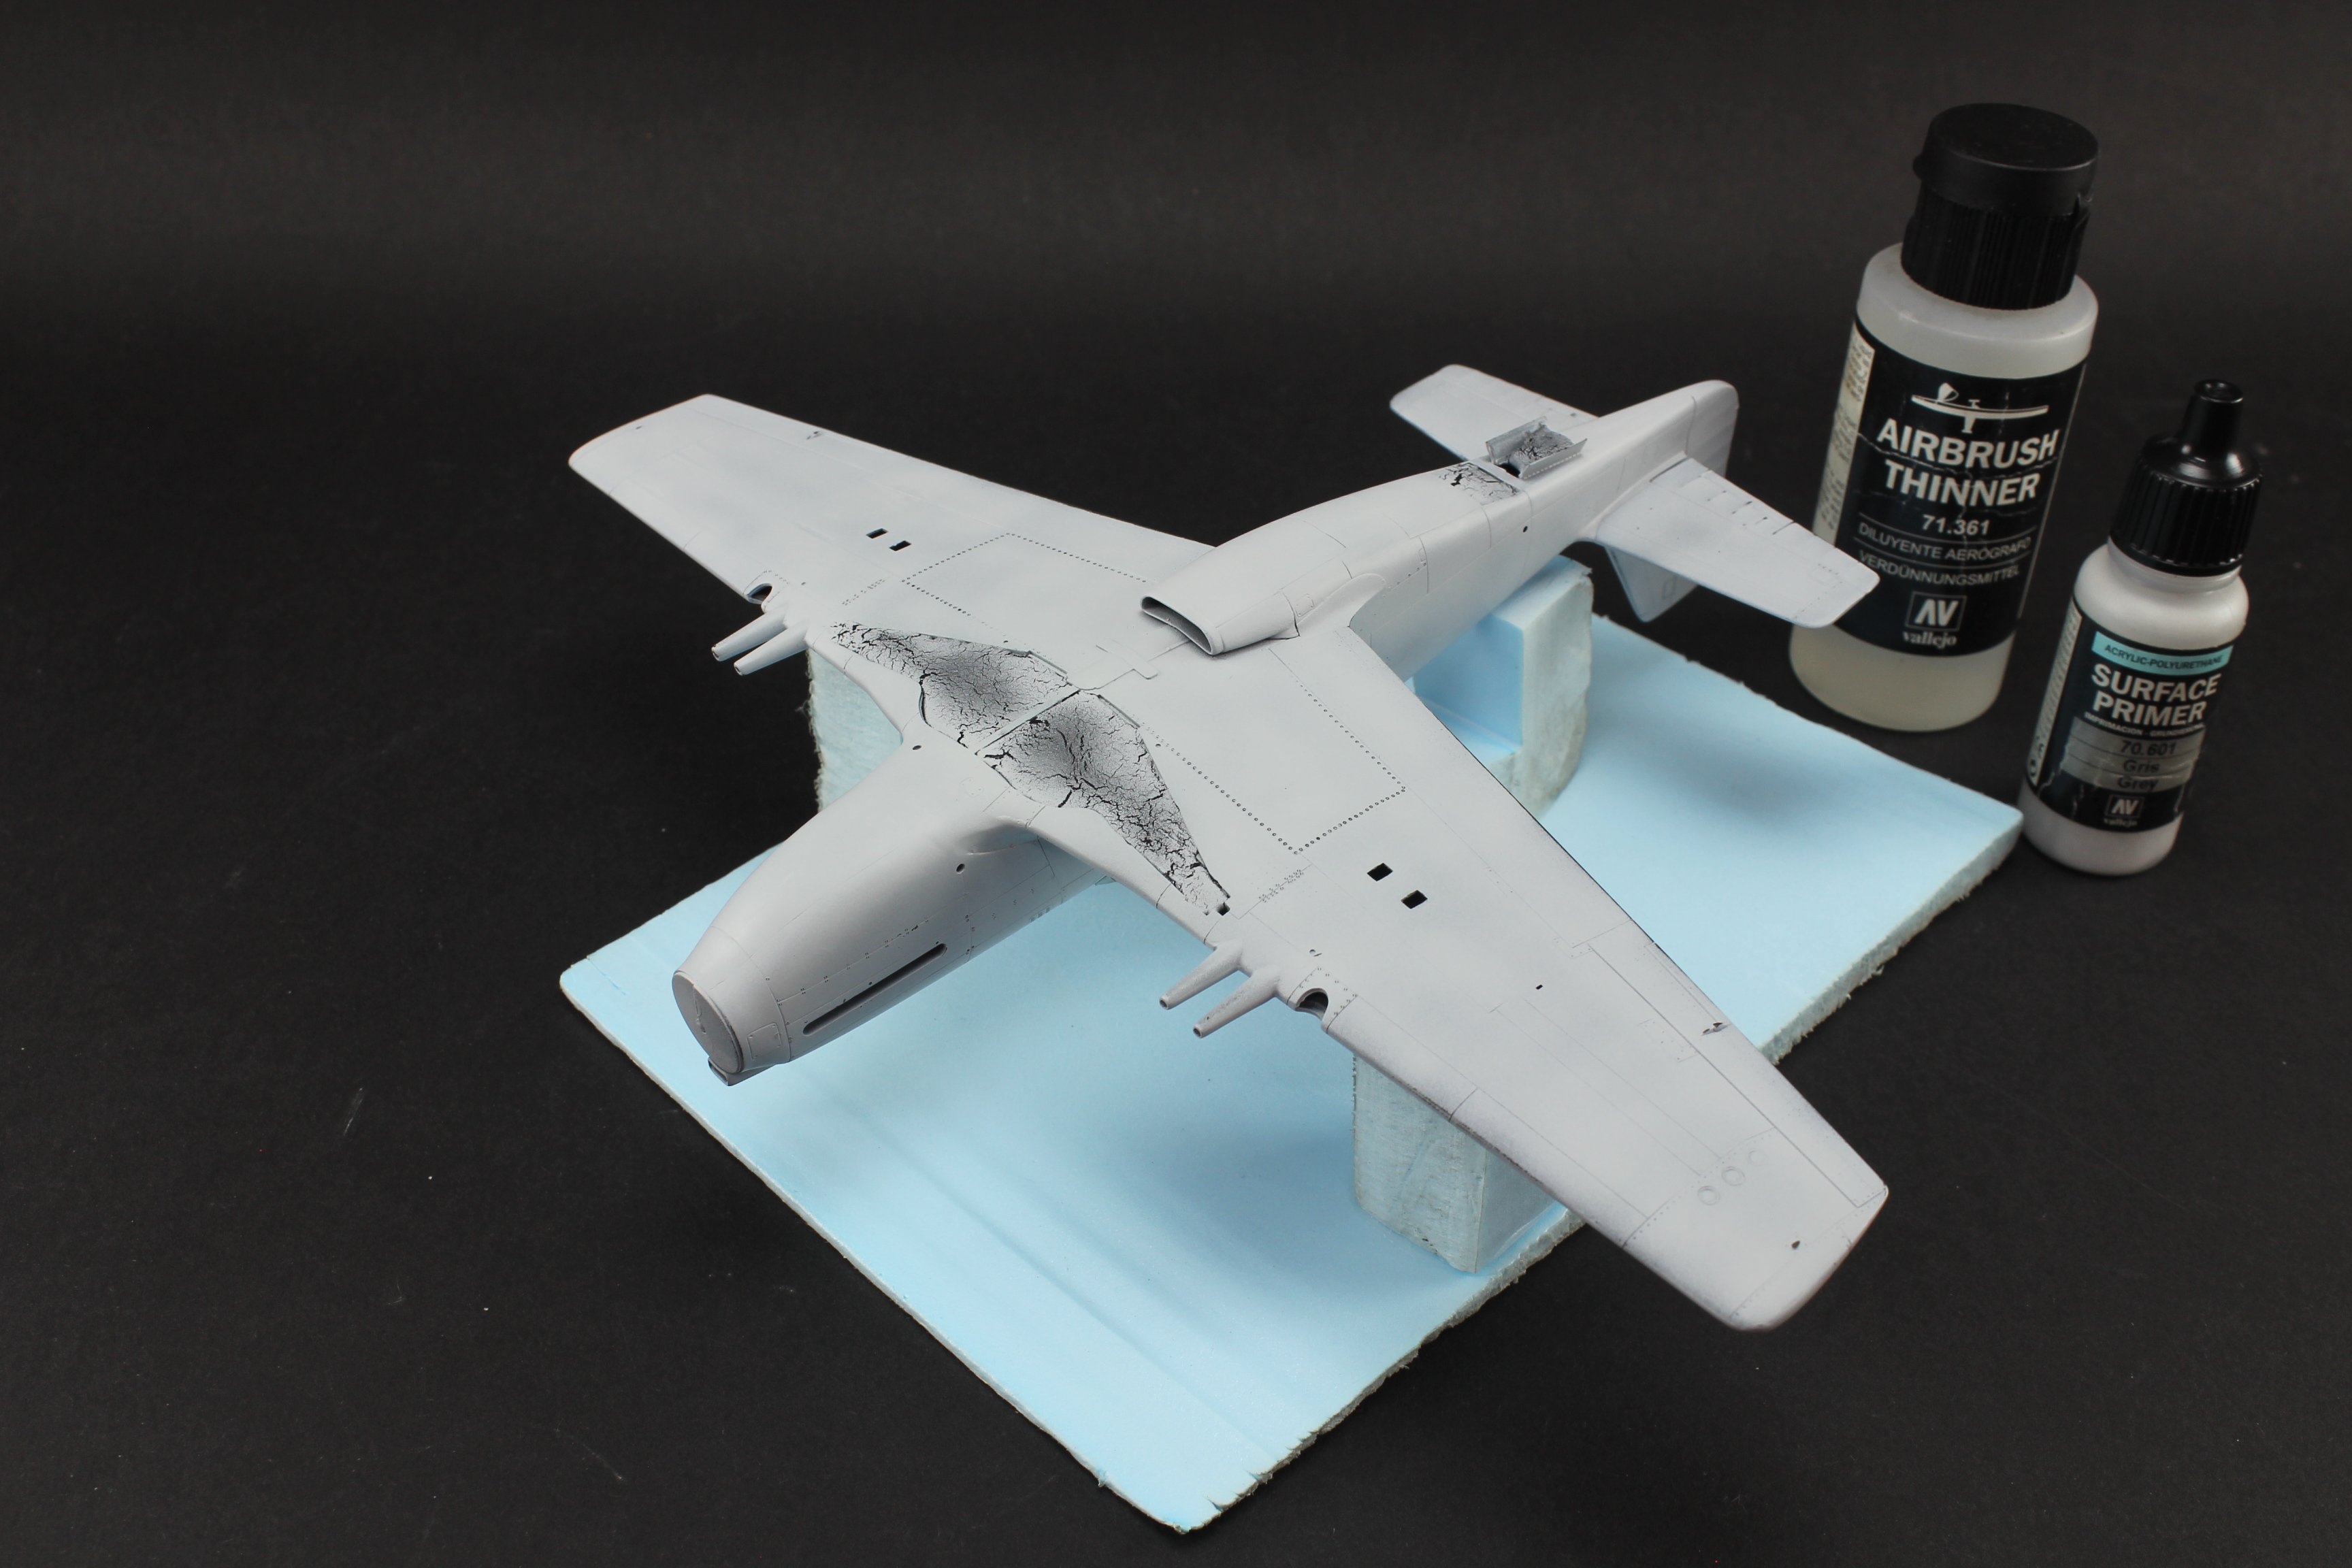
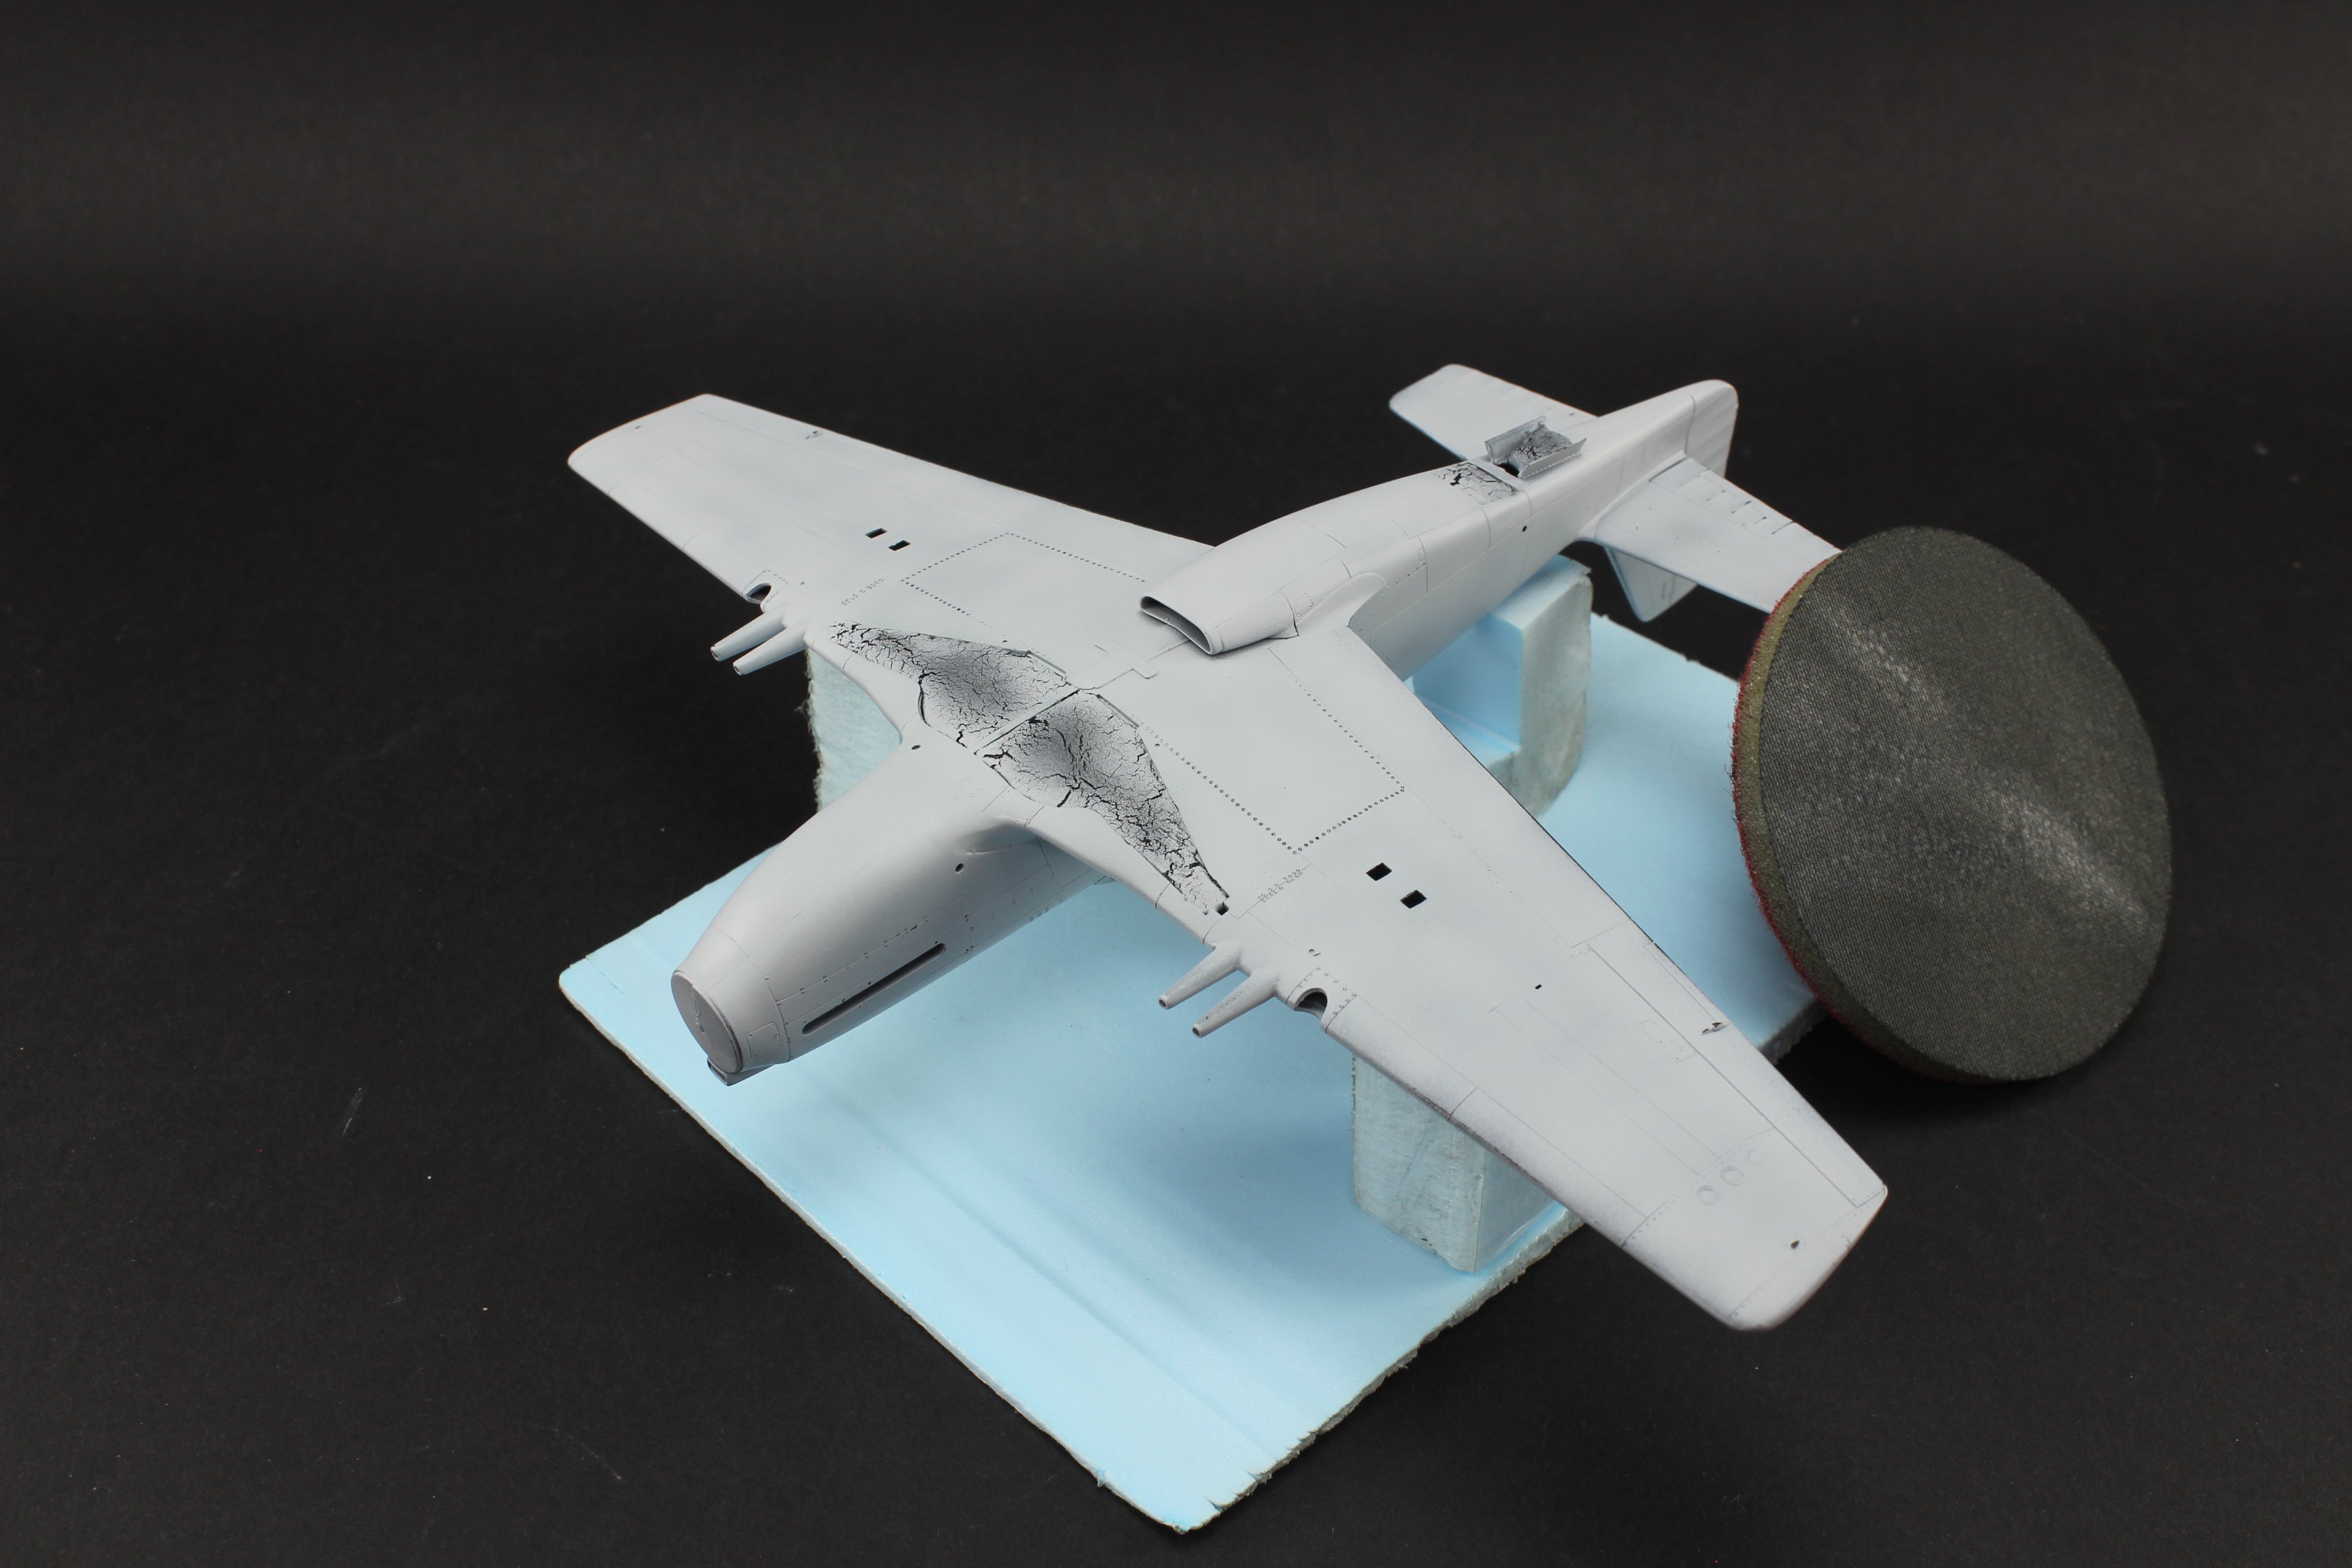
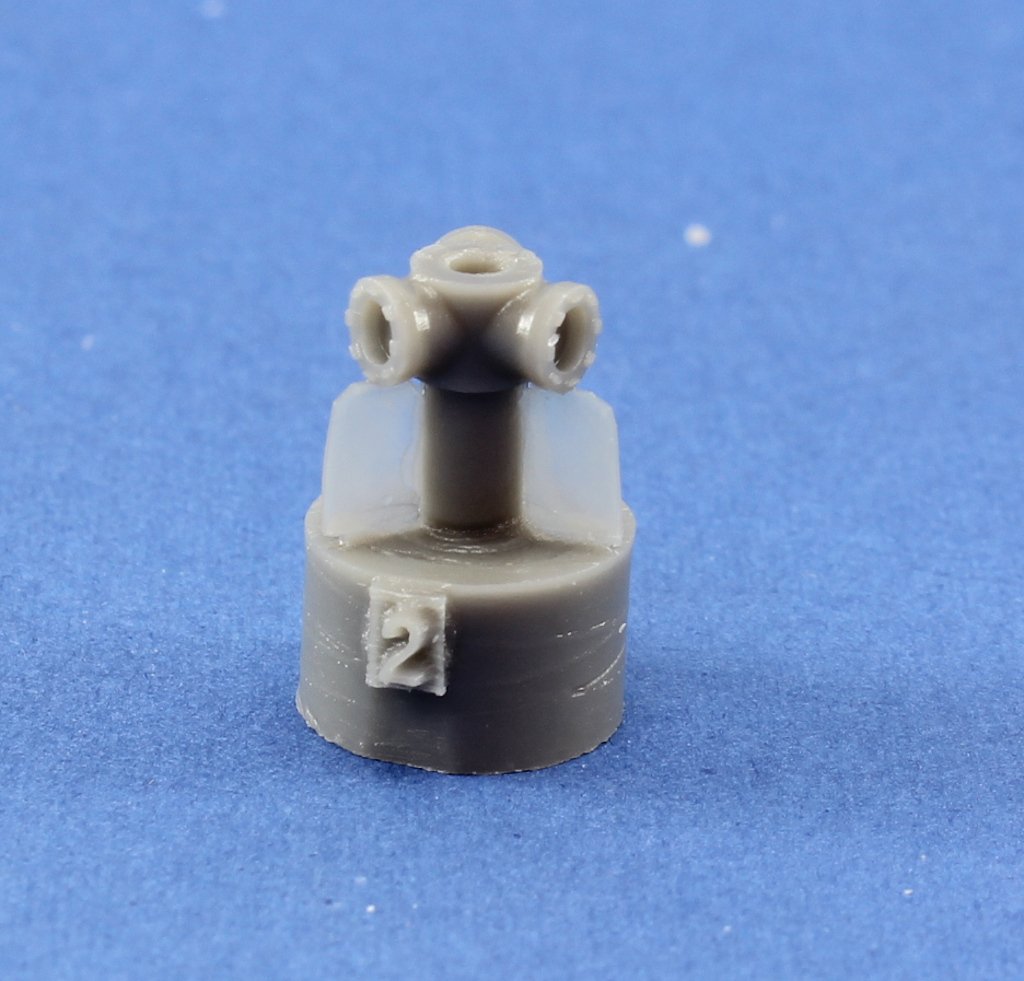
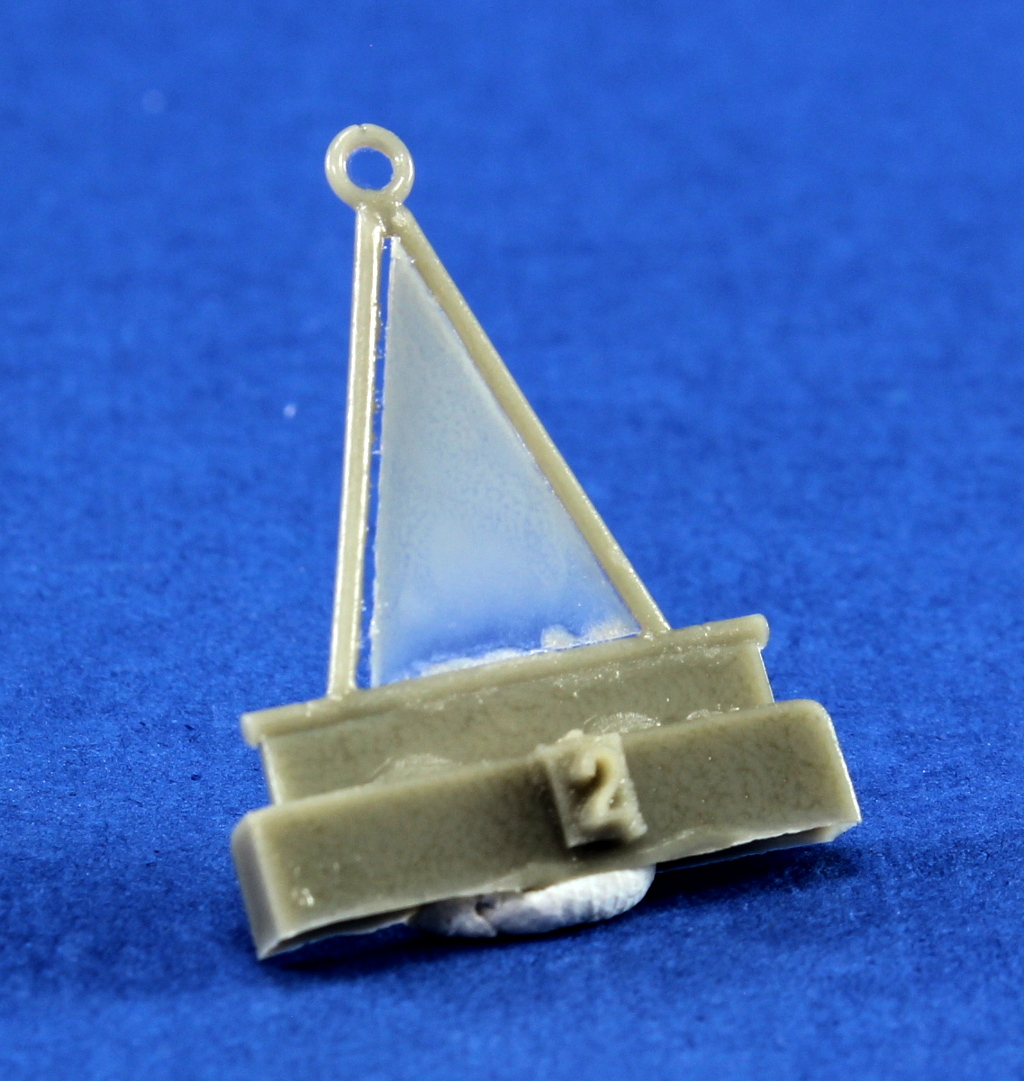
Plusmodel 1:72 Flaps for P2V Neptune #AL7019 Introduction By definition an Airplane is a set of metal plates, wires, screws, glue paint and luck, aggregated to form a machine that defies all laws of nature. Well, the flaps play a important roll on this balance. This release from plusmodel, allows replacing and enhancing P2V’s in 1:72 flaps and internal frames. As already stated on one of my reviews, the only game in town for this model is Hasegawa’s rendition, dating back to 1973. What’s on the box? On the cardboard box, a plastic bubble bag protects the resin parts and and photoetch fret, decals and a tread of cooper wire. The photoetch fret it has a considerable amount of parts (ribs) and spars to rebuild all interior flaps structure. The grand total is 119 parts for this set. The photoetch structure is a rather complex construction. The union of the pieces could be achieved using cyano glue and a lot of patience. The most skilled can resort to soldering all photoetch parts, which will guarantee a solid structure, permissive to tear and wear for all assembly / painting process. Some times and despite all care and love delivered on our models, a part always flies away on the painting process, and by Murphy’s Law, it’s always the smallest one. The resin parts show a nice detail and the process of parts removal from the casting block,it’s straightforward with a saw or a sharp hobby knife. The resin parts compose the vertical structure of the flaps compartment, inside the wing. The photo-etch spars and ribs will attach to this parts. The flaps itself are composed by two parts each wing. The small decal sheet contains small stencils representing the angle of the deployed flap. The instructions are presented as a small booklet with 4 pages. They are direct and objective. On my eyes, the diagram doesn’t pose any doubt regarding the parts assembly and their location. Conclusion This is an area of the airplane that, to be proper represented on this kind of birds, need some work involved. This set will definitely require some skills to assemble due to the parts detail and complexity. Nevertheless, nothing that some sessions with quality background music and drink, it will turn into a stunning scale representation. Recommended Our thanks to Plusmodel for the review samples and all the support given. To purchase this directly, click THIS link Ricardo Veríssimo


-
Hi James! nice review! It seams like a logical update on this subject first release!
-
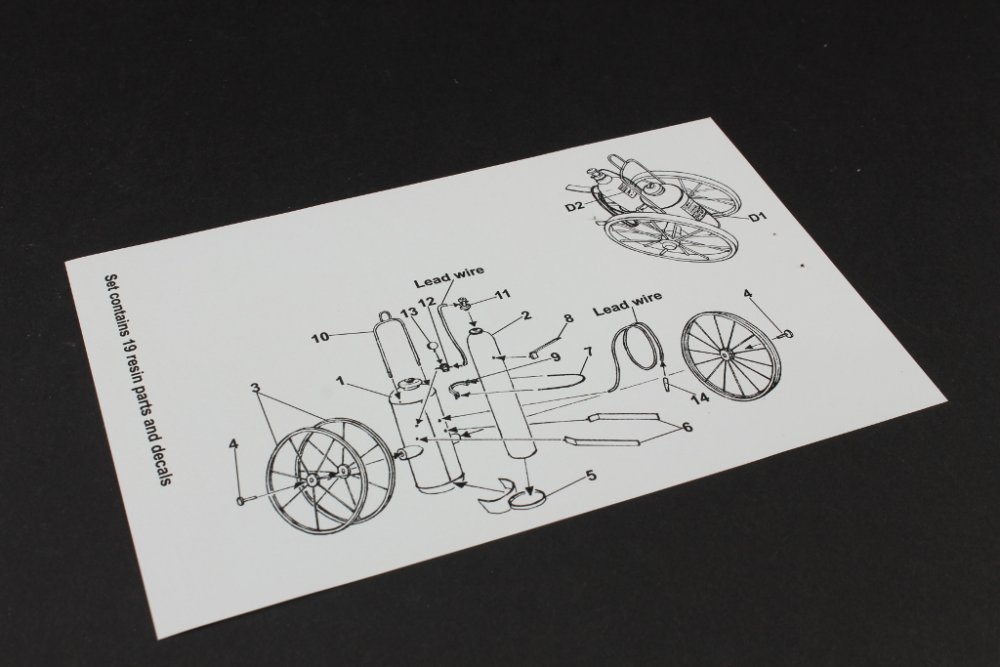
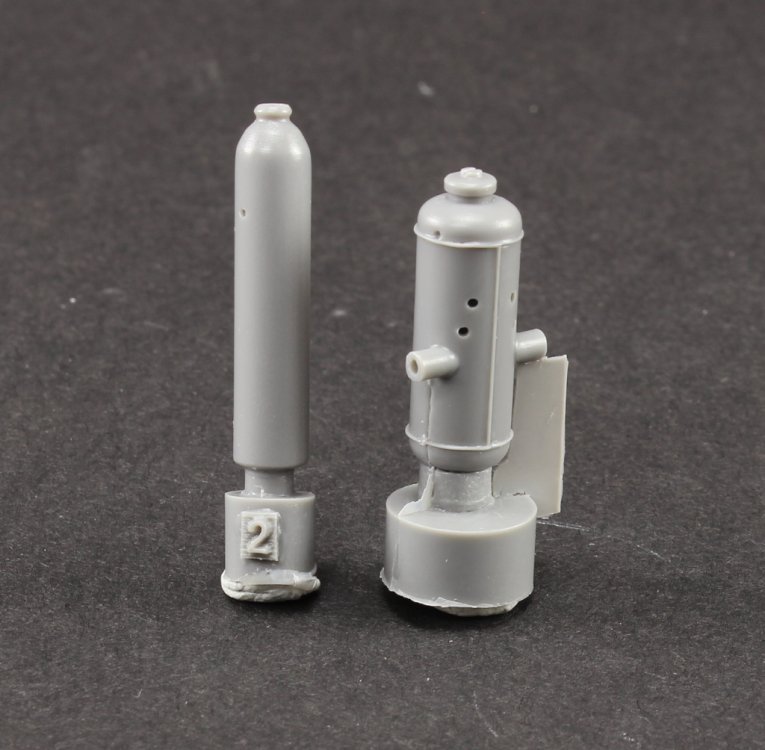
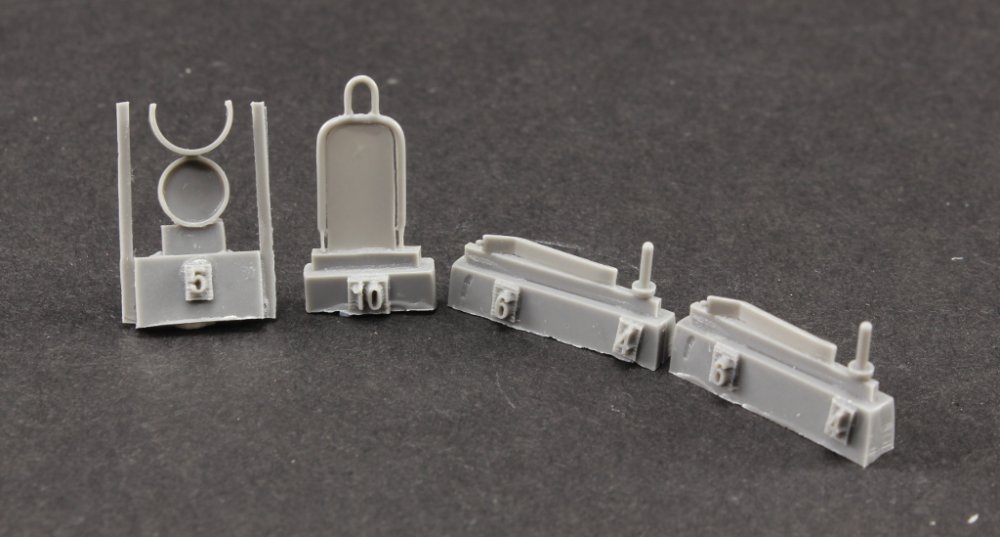
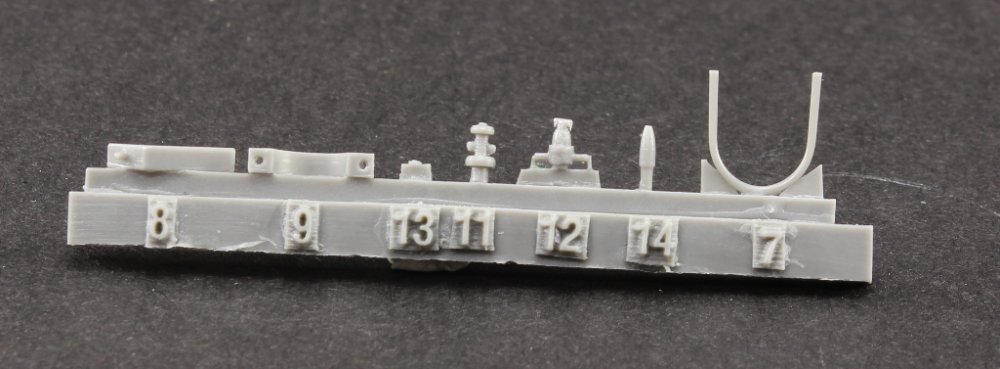
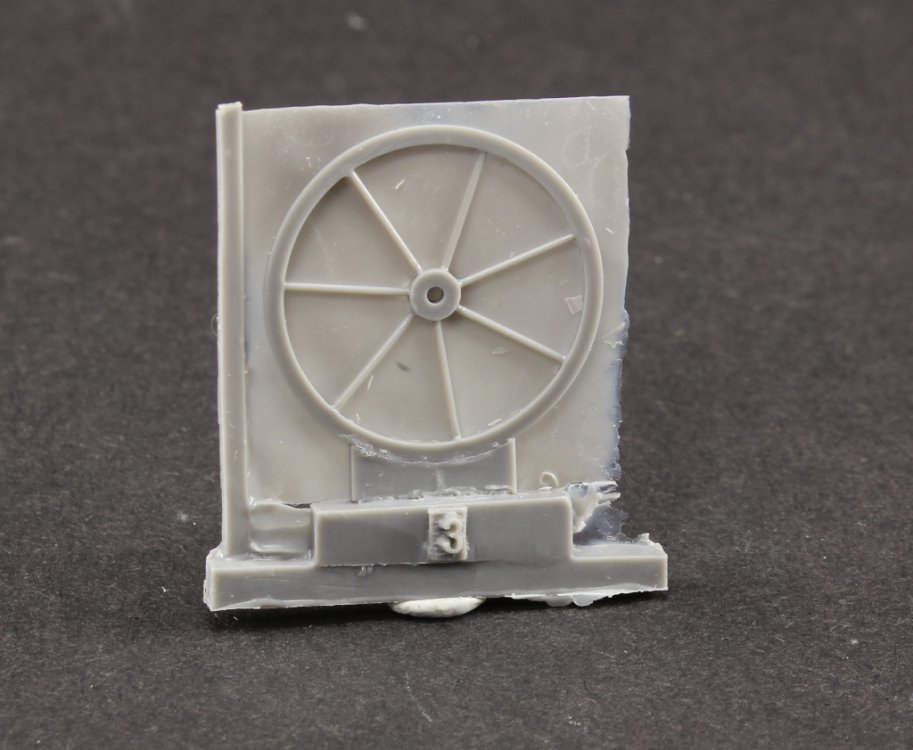
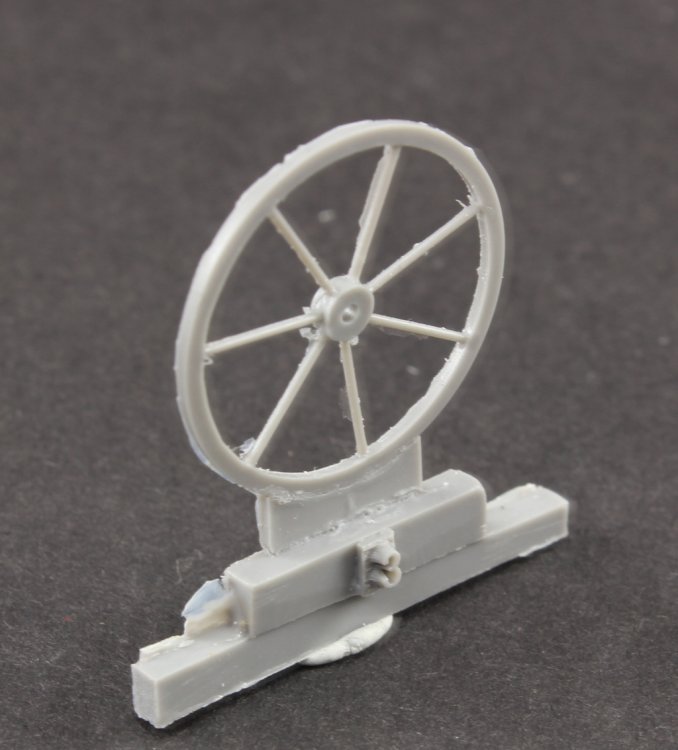
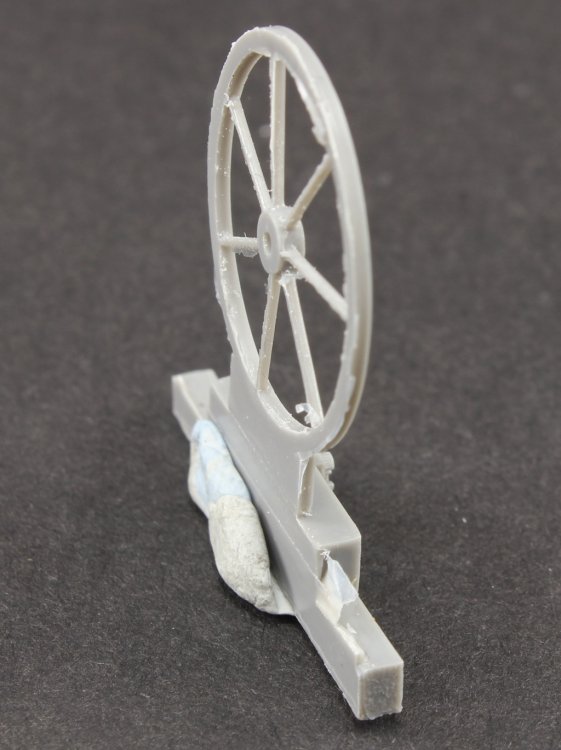
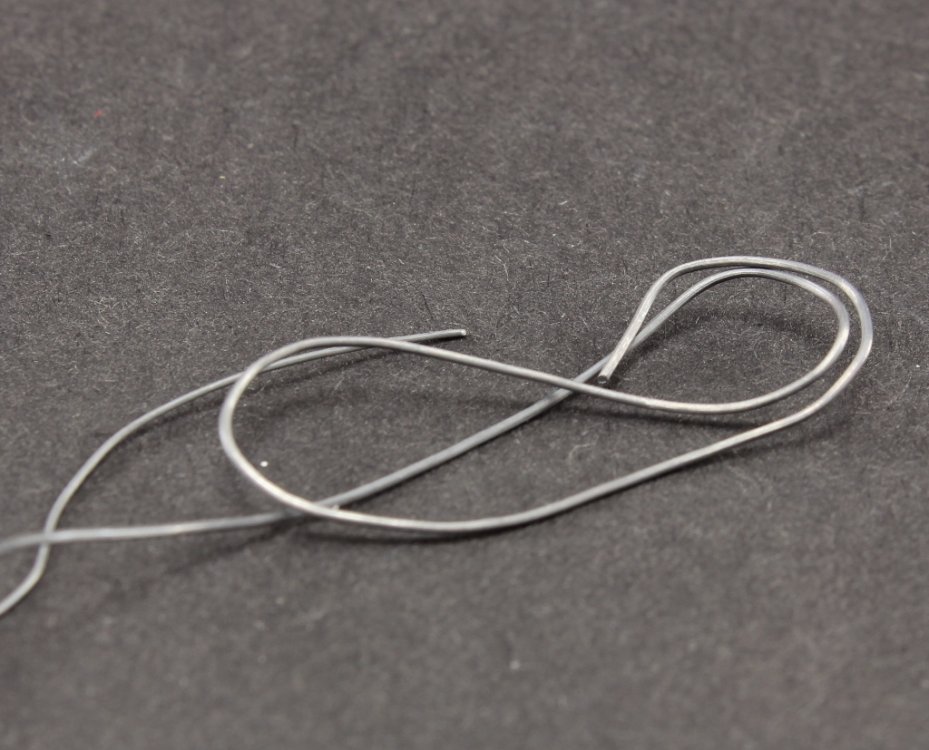
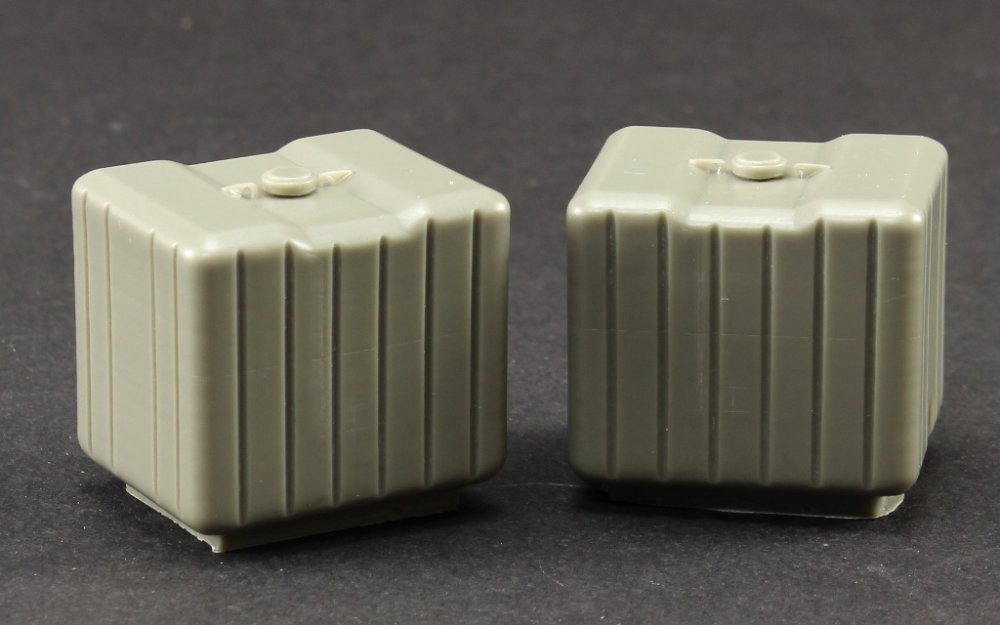
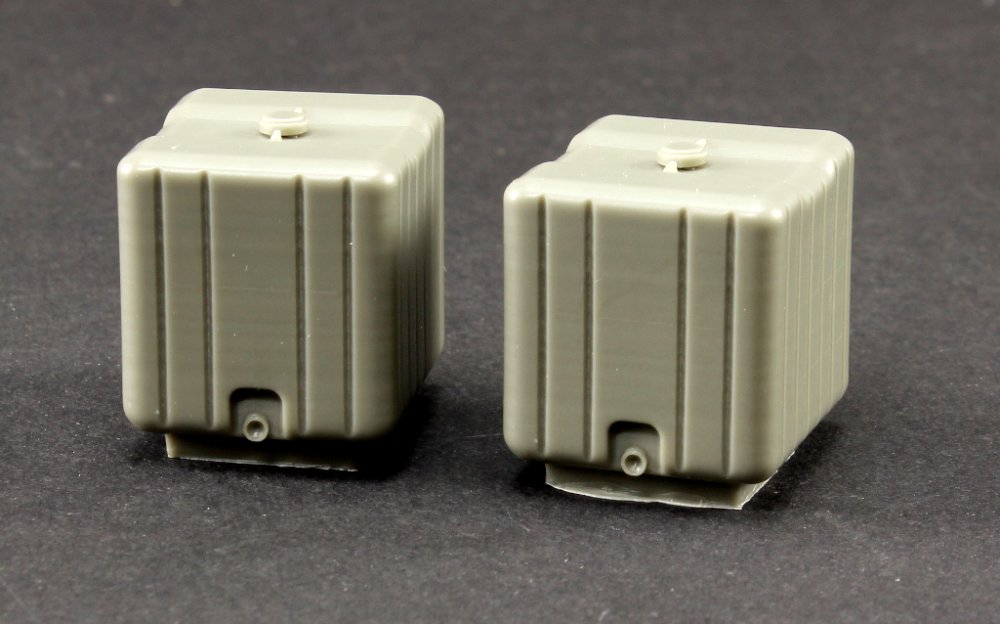
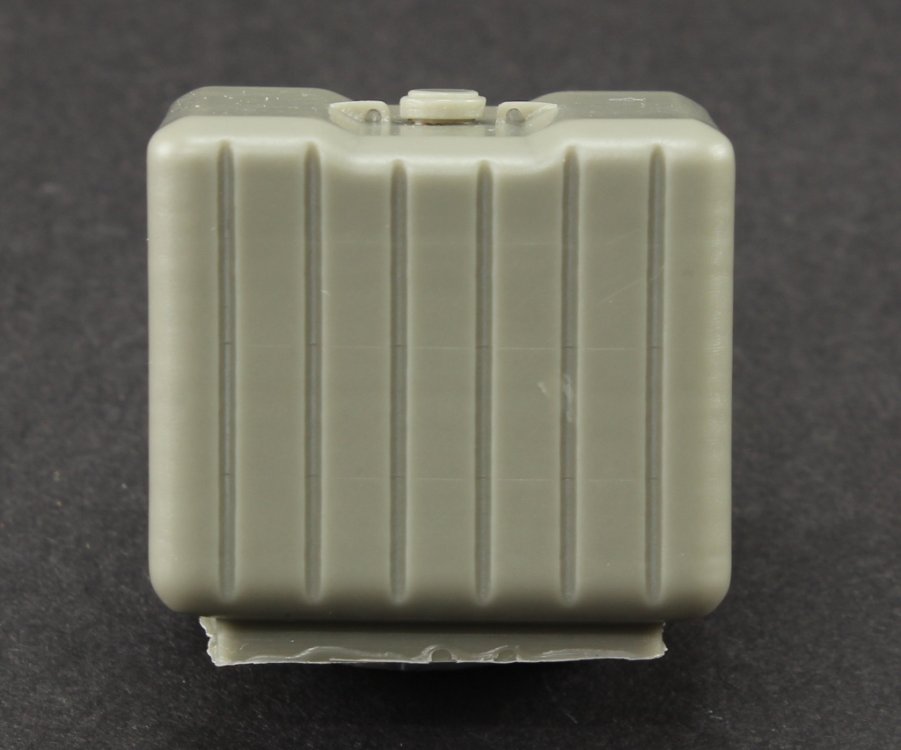
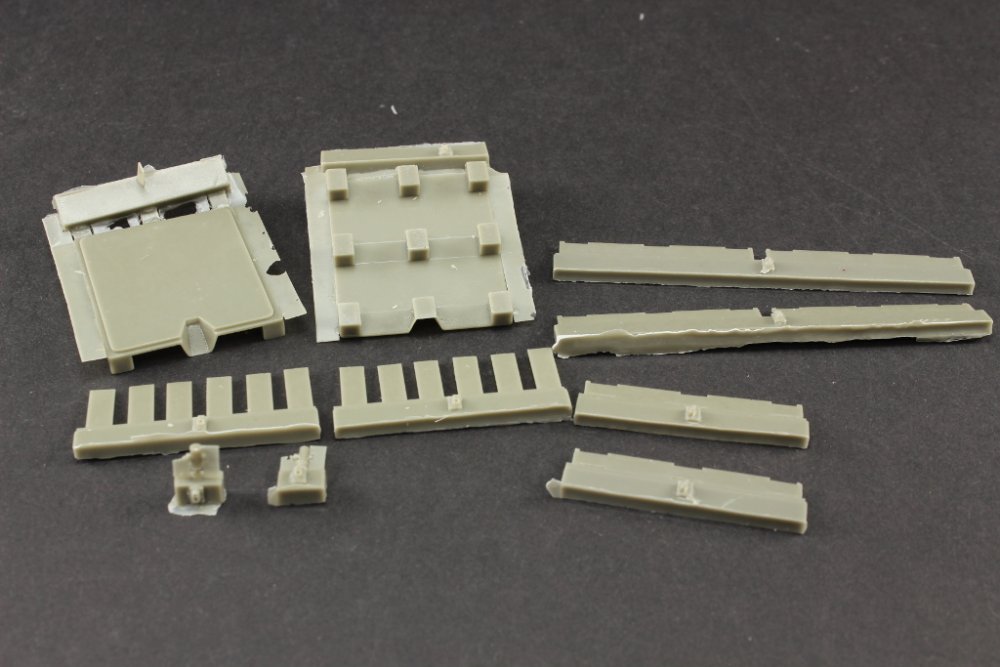
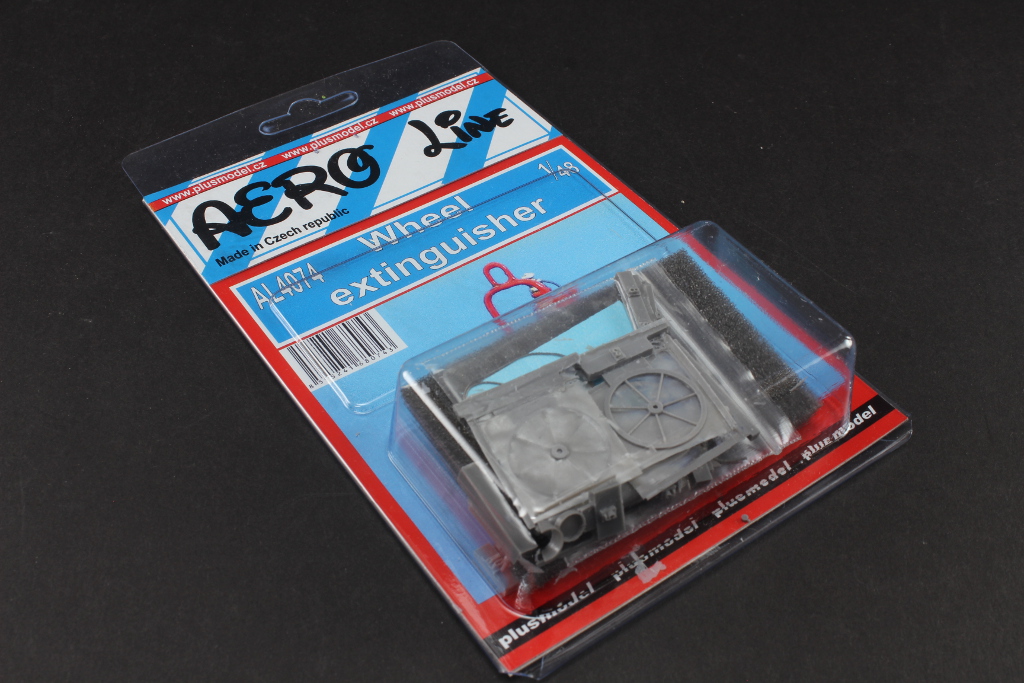
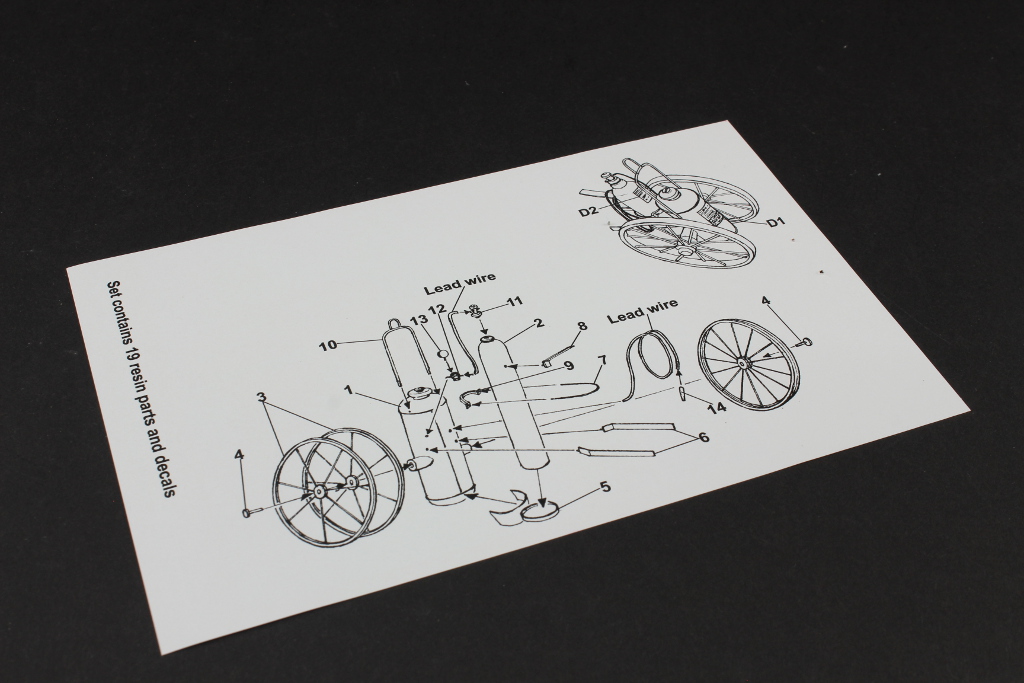
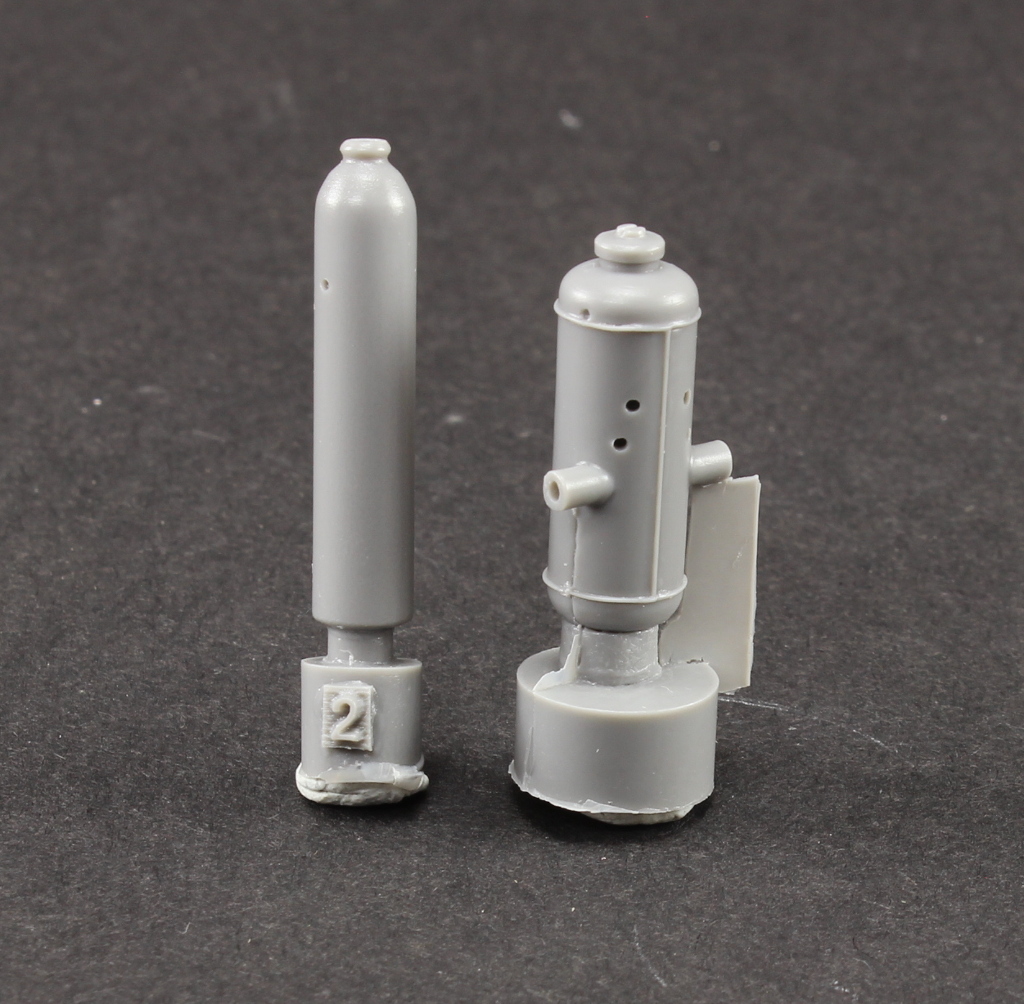
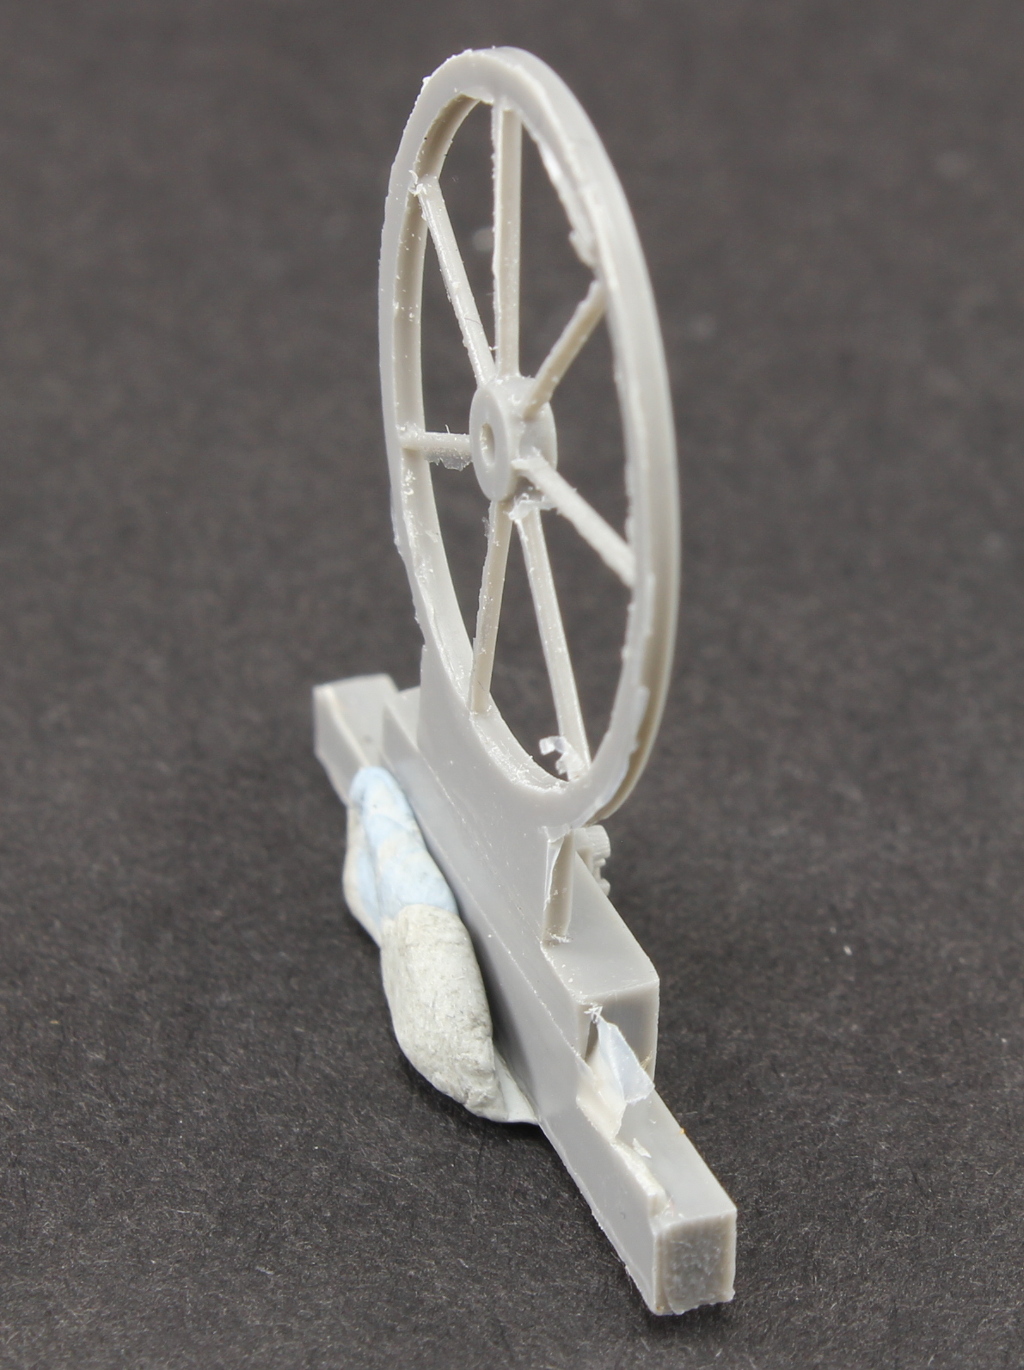
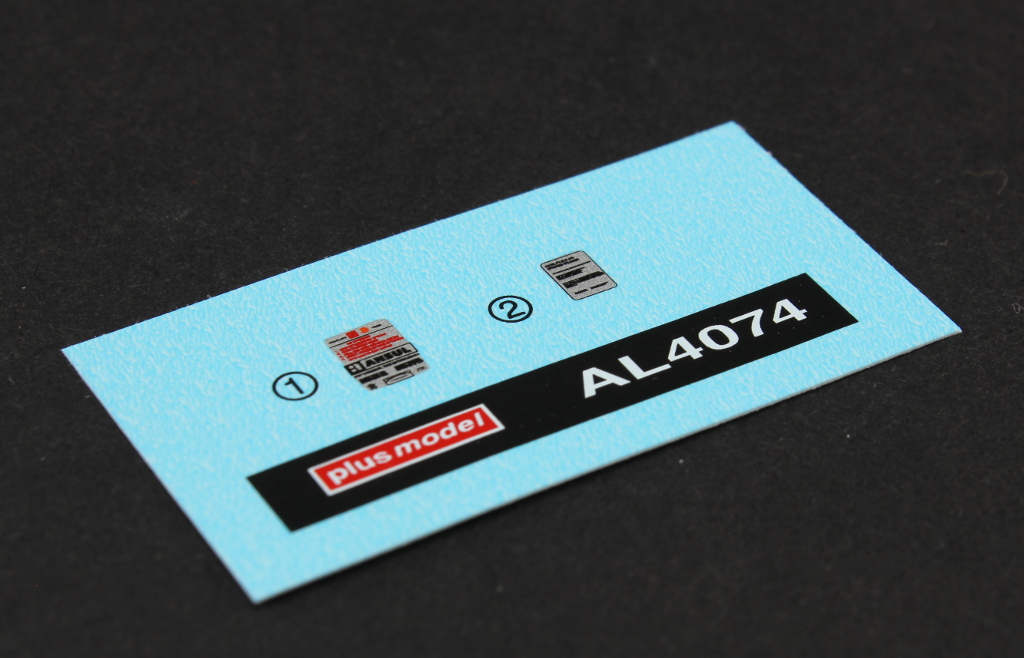
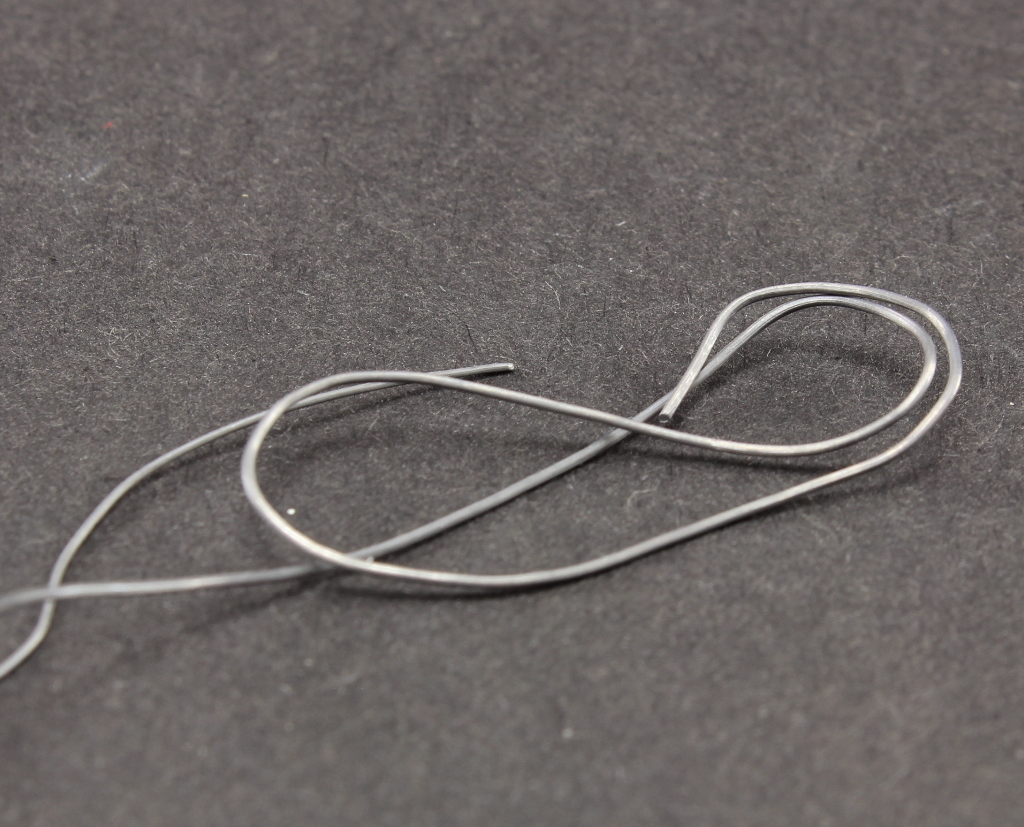
Plusmodel (aeroline) 1:48 wheel extinguisher Plusmodel Aero Line Series #AL4074 Introduction On every airfield, this important accessory is present on several forms. On this case, it’s a 150lb (+/- 60 Kg), extinguisher, mounted on a wheel cart. For what I was able to investigate, this accessory represents a Ansul A-150 series standard steel wheel extinguisher. As an American brand, it’s correct to assume that’s a accessory presented on Americans / allied airfields. So what’s on the box Plusmodel present us with a 1:48 scale composed of 19 resin parts, a small decal sheet and a length of cooper wire, to simulate the rubber hose. The instruction drawing is on the back of the front image and it’s a simple diagram. The resin parts are well moulded and present a fair amount of detail. The steel tanks present a very interesting detail on the form of the weld seams. Just for academic curiosity : the front tank is for the dry agent powder and the rear cylinder contains nitrogen. The extinguisher wheel chassis is composed by the below parts, and besides parts 6, that will require some care to remove them from the mould block, the removal and clean up will be strait forward. The remaining parts compose the steel cases gauges, the hose nozzle and tank plunger. Each steel wheel is compose by two parts (inner and outer ring), glued together. The resin flash is easily removed using a hobby knife, but cleaning all the reminiscent flash could take some time, due to the wheel spokes. Upon assembly, a gap may be showed on the external area when the two wheels are joined. In this scenario, some putty might be necessary to properly eliminate the gap, or, a plasticard length could be glued to simulate a kind of rubber or steel layer, protecting the outside of the wheel. The decal sheet composed two warning and instruction stickers. The length of lead wire is used to simulate the hose. Conclusion This item, despite its simplicity, some care must be taken on the parts removal from the casting blocks. Also, the wheel assembly may require some attention, but on the end, and after a proper red paint coat, it will look a very unique accessory to add on a 1:48 diorama. Recommended! Our thanks to Plusmodel for the review samples and all the support given. To purchase this directly, click THIS link Ricardo Veríssimo


-
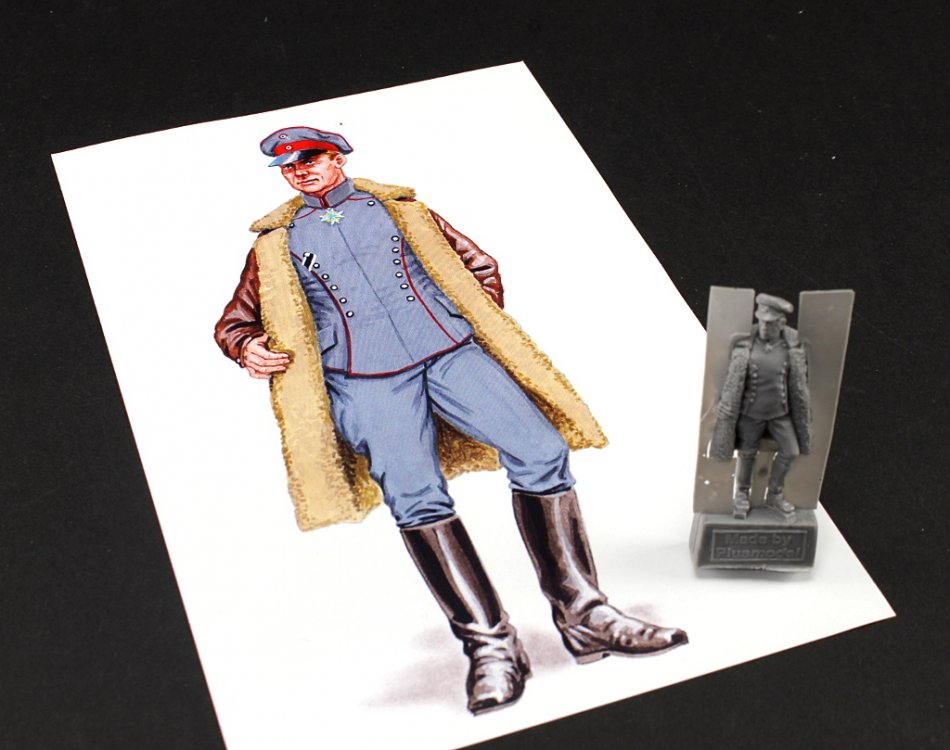
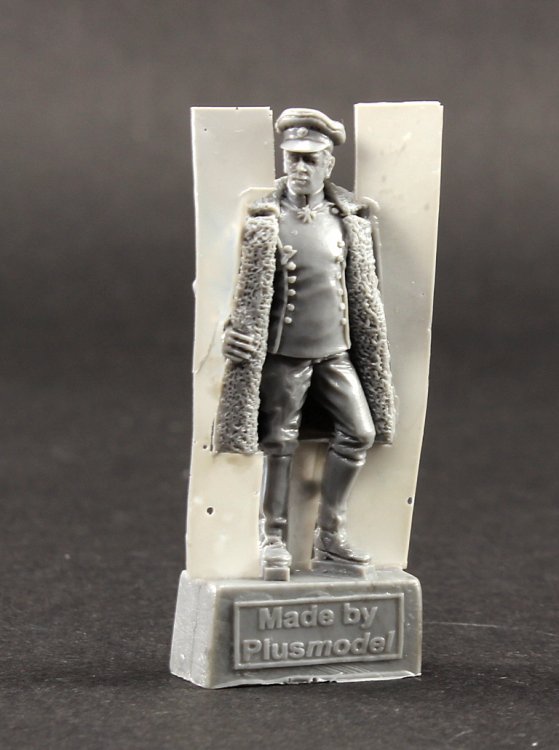
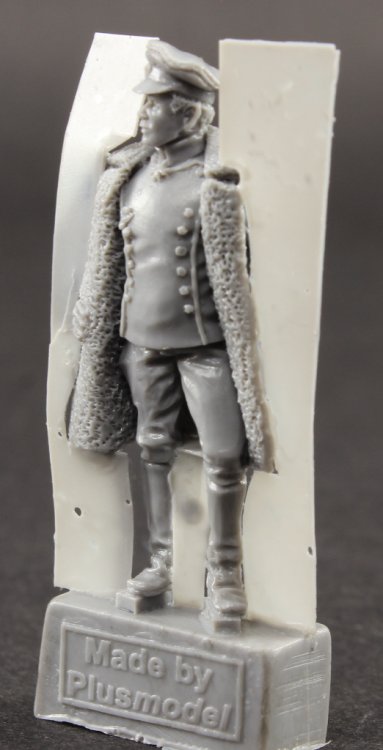
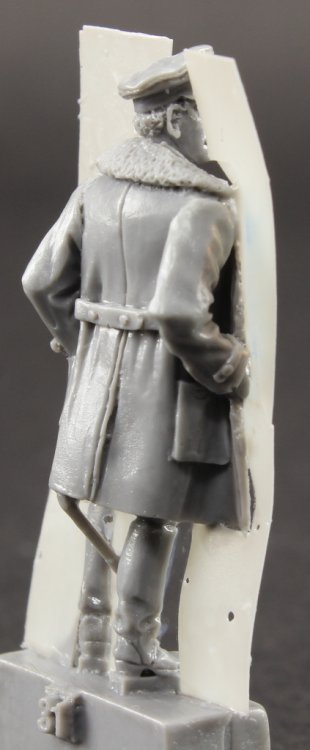
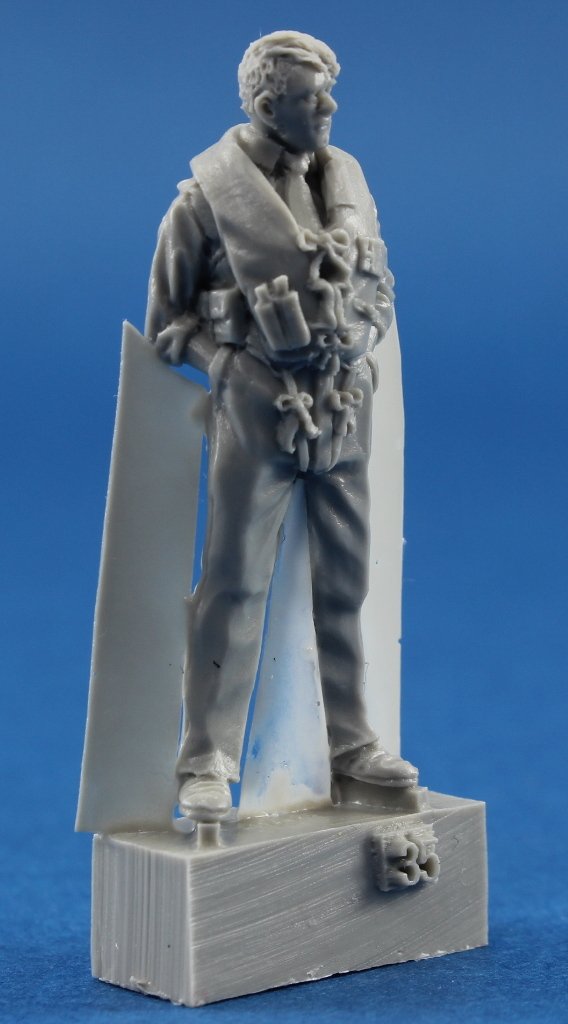
Plusmodel Aero Line Series 1:48 WWI Albatros Pilot #AL4077 Introduction Plusmodel offers aeroplanes modellers fans, a quick and easy way to complement a simple vignette with a 1:48 scale WWI Albatros Pilot. When I sat on my workbench and opened the box containing this item, my first thought was: “Nice! No need to glue parts!” If I could label this release from plusmodel I would retain: efficient and straight forward. What’s on the box? The clear plastic box, shows what you get, one resin piece containing a 1:48 representation of a WWI Pilot officer from a Albatros (family) German airplane in a relax pose, retaining one hand on the leather flight jacket and another one holding the jacket from the lining. The pose could be interpreted as if the pilot was posing in front of his airplane, for a picture perhaps? There’s a mould residue located on the leg area but easily removed with a hobby knife. The line could be completely eliminated with some light and careful water sand paper. Despite if my interpretation is correct watching the figure, with a proper painting process it will look just adequate as a component for a small base for Eduard / Revell Albatros D.V for example? No painting guide is supplied; the label’s back is printed with a large full color draw of the figure. Lots of inspiration on this subject through a quick internet search using your favorite search engine. Conclusion This is a nice and easy addition to any 1:48 WWI albatros out there! A simple base with the bird and pilot is always a perfect duet. Balance is created! Highly recommended! Ricardo Veríssimo


-
On display vol.4 Under the Red Star – Soviet WWII Vehicles Author – several Publisher: Canfora Graphic Design & Publishing Price: 23,50€ (EU price) Introduction Being a proud owner of two previously releases (The Nordic edge series and On Display – Post war armour), and being books with quality content by an array of skilled modellers I was anxious and very curious about this new volume from Canfora Publishing on WWII Russian vehicles. Well, let’s see if the expectations were fulfilled! So what about content… Under the red Star is presented on a A4 format. The attentions go for the Su-100 close up and a small picture for every model presented on the book. A closer look is also possible to consult all contributors for this publication. A total of 8 full builds are presented and described with clear and detailed photos of all phases: As so, and for every chapter on this book, we’ll get: historical context / introduction; model assembly and detailing; Painting Weathering Accessories Base (if applicable) Also available for each build, a step by step photo report with caption of the task (it can include any of the following: assembly, detailing, painting weathering close up. These captions sum up a process and display a lot of knowledge that a regular modeller can retain and use on its own projects. Some notes Nowadays we are presented with several paths to approach to a model kit project. Either painting or weather with enamel / lacquer paint and based products or using acrylic based paints / weathering products. On this book, we are presented with articles with this “approaches”. Despite the fact that for all builds, the painting process resort to acrylic paints, the weathering section derivates on the classic enamel /oils approach, some of them resort to acrylic products for this task. As obvious, this could add extra interest to a very know subject, as WWII Russian vehicles. On content and on display So on this book, we’ll get the following builds: 1. 1:35 KV-1S 1. 1:35 Gaz-AA Cargo Truck 1. 1:35 Su-76 1. 1:35 IS-2 1. 1:35 SU-100 1. 1:35 OT-34 1. 1:35 T70 1. 1:35 BT-7 Conclusion In the last years, the amount of magazines, special dedicated books and brands, made available to all, a great amount of literature ranging almost all of the favourites modelling subjects. Sometimes it’s necessary to proper filter the content available, due to cost limitations, or just to have the best info in hand. This book presents a good content balance, as every article has an adequate pictures resolution, the support text is sufficient even for any modeller ordinary modeller with minimal knowledge of the English language. I have my fair share of modelling books, bought or just borrowed from other modellers and in my opinion this book deserves to be on any modeller’s library. With the proximity of the Christmas celebration, this is a perfect gift to ask Santa Claus. Just make sure that your Christmas sock is big enough to accommodate this book! Highly recommended by its overall quality and mainly as a source of modelling inspiration. To purchase this directly, click here. If you found this review helpful and decide to purchase this product, please tell them you read about it at Large Scale Modeller! Disclaimer: all photos all in low quality to preserve and prevent all copyright. Ricardo Veríssimo
.thumb.JPG.8a0836703e288b57a25f6be6b93f6c4c.JPG)
.thumb.JPG.a49e726d36e2ba7d8d215c3a70bc9334.JPG)
.thumb.JPG.cbfe1e530c03cfc7898a098354d306c8.JPG)
.thumb.JPG.846f4d913de020b10331787759096a36.JPG)
.thumb.JPG.702b16effbfda2876900b2101a5dd88e.JPG)
.thumb.JPG.5cb320bcef9ae8c1671a91ebc8a8c0c7.JPG)
.thumb.JPG.7946ce700b0b71773335a3e01a177d82.JPG)
.thumb.JPG.93392ff79bc8b407ef3401e5f73ae068.JPG)
.thumb.JPG.8987b5d40d0012aa4dc041c83b1cce48.JPG)
.thumb.JPG.aaca41bb0a7f6f77a9867530dbd6fd1a.JPG)
.thumb.JPG.8544864e0e2c301d40e856531b287d2f.JPG)
.thumb.JPG.21f912bfc101151a63e710f6304764c6.JPG)
.thumb.JPG.877fcd52b611f14f5a3438e2894859de.JPG)
.thumb.JPG.f6f692830b79e6578de07ec9aaf27b97.JPG)
.thumb.JPG.8042cf3e8bee3d865b0e938b0a2dbb53.JPG)
.thumb.JPG.ddb94bc1513d99df9c5e56328ce5a4b1.JPG)
.thumb.JPG.9e22312b696293f4113e4eba45ae6b55.JPG)
.thumb.JPG.efc65768e75f41abe77a58465bdf7f3f.JPG)

-
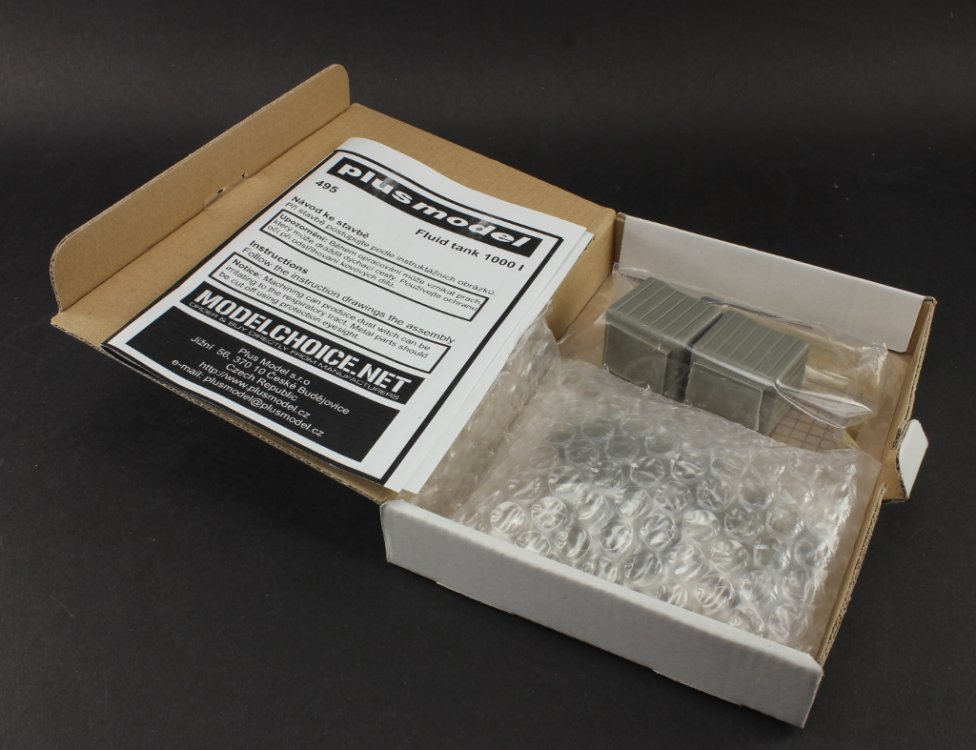
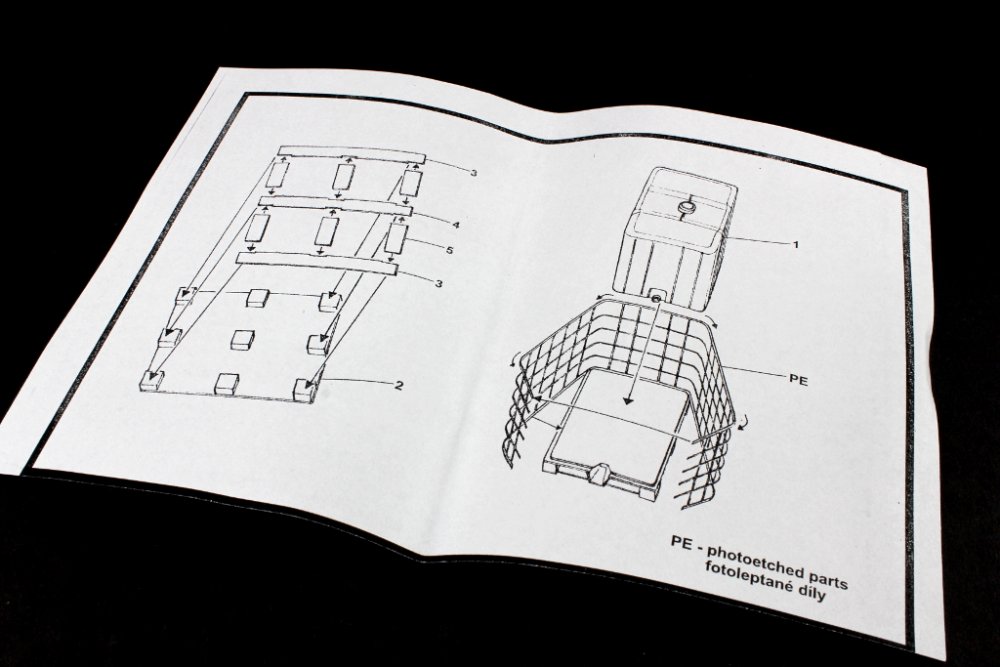
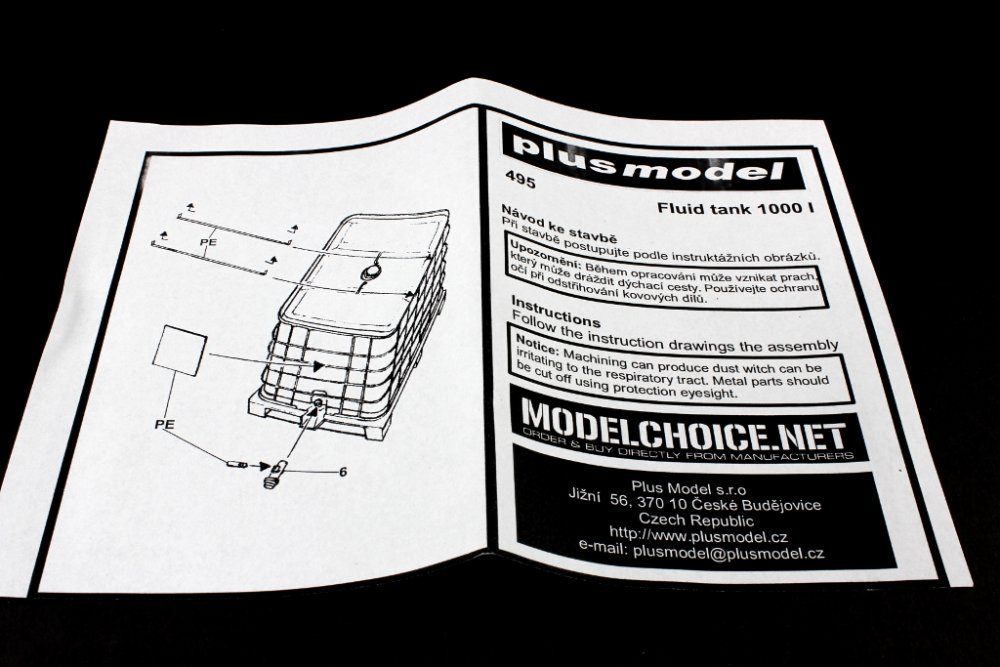
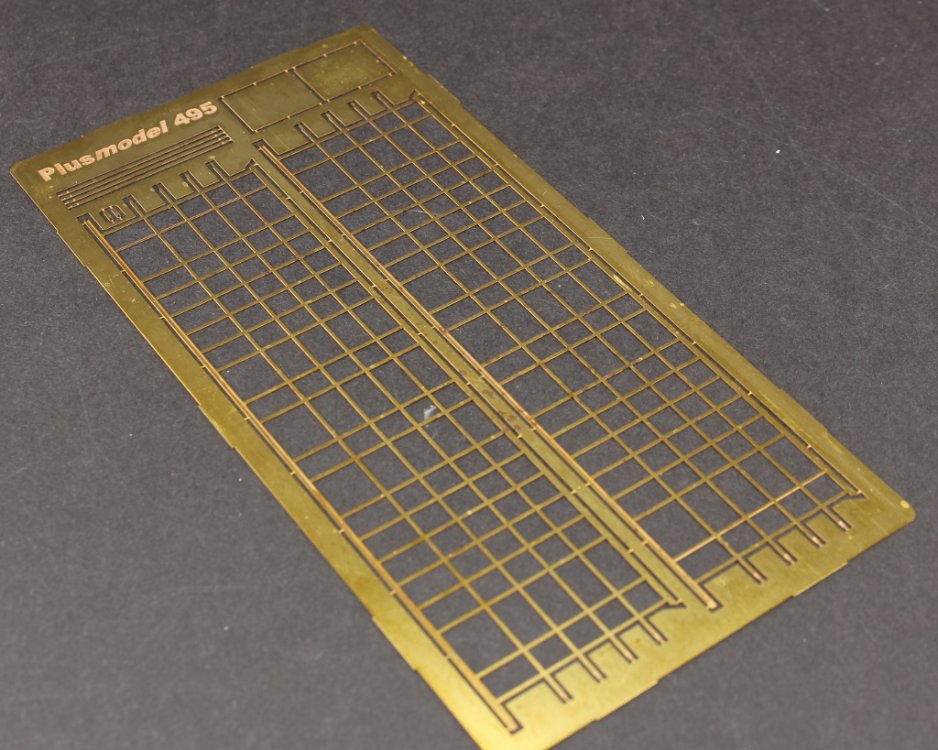
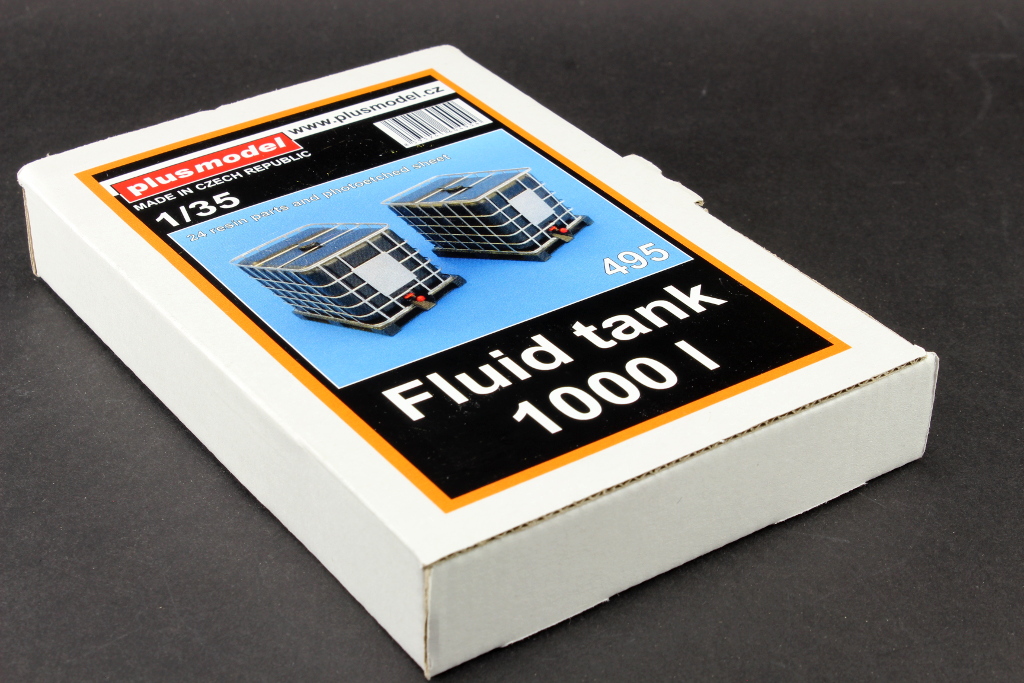
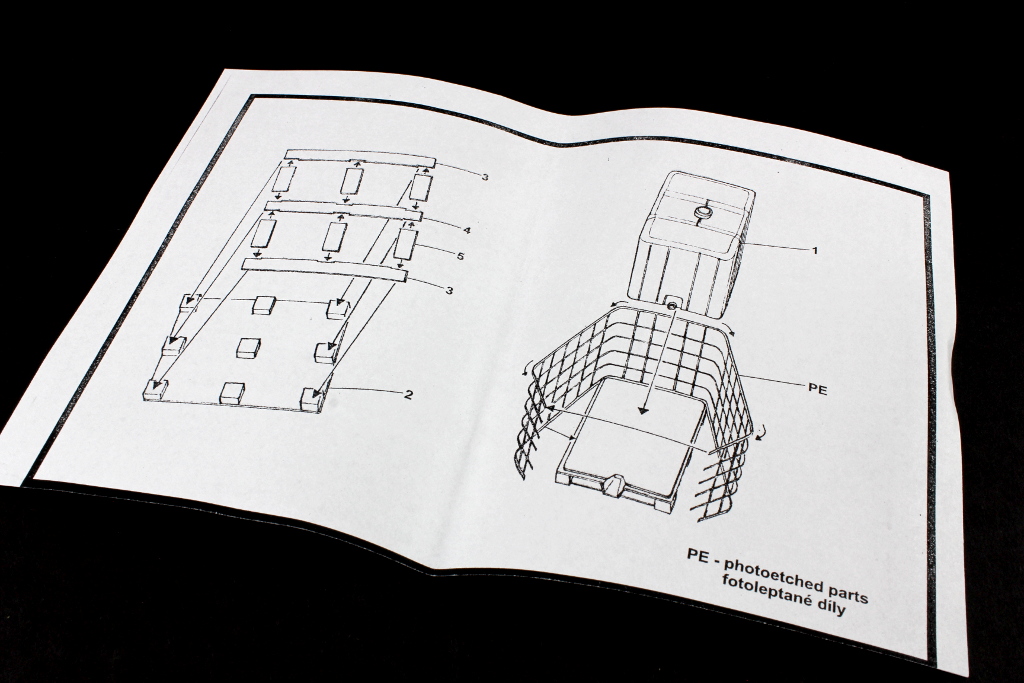
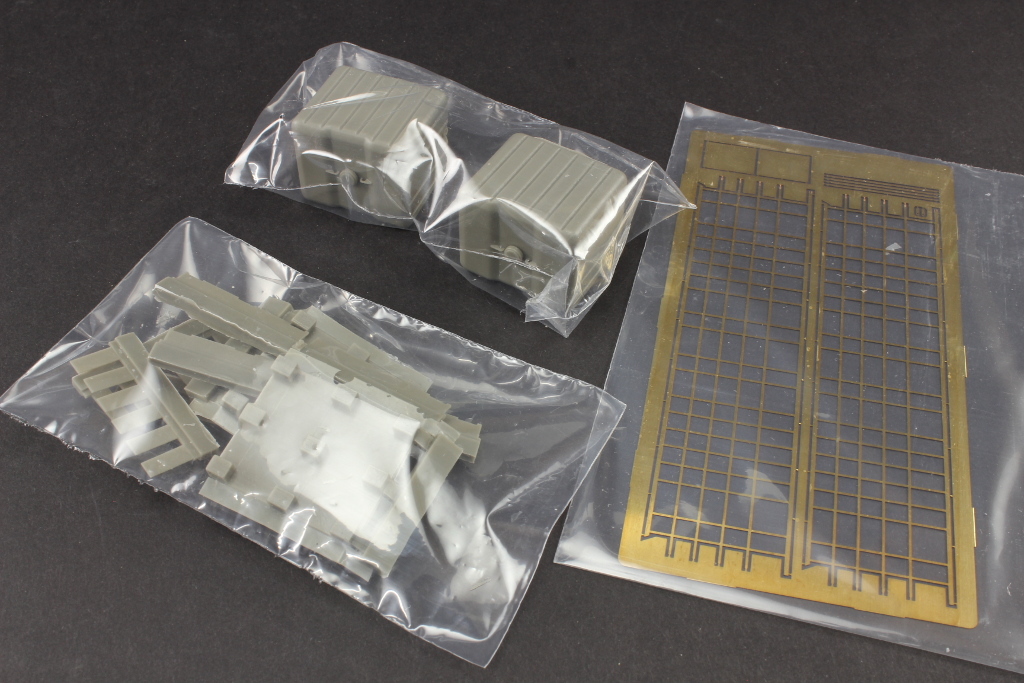
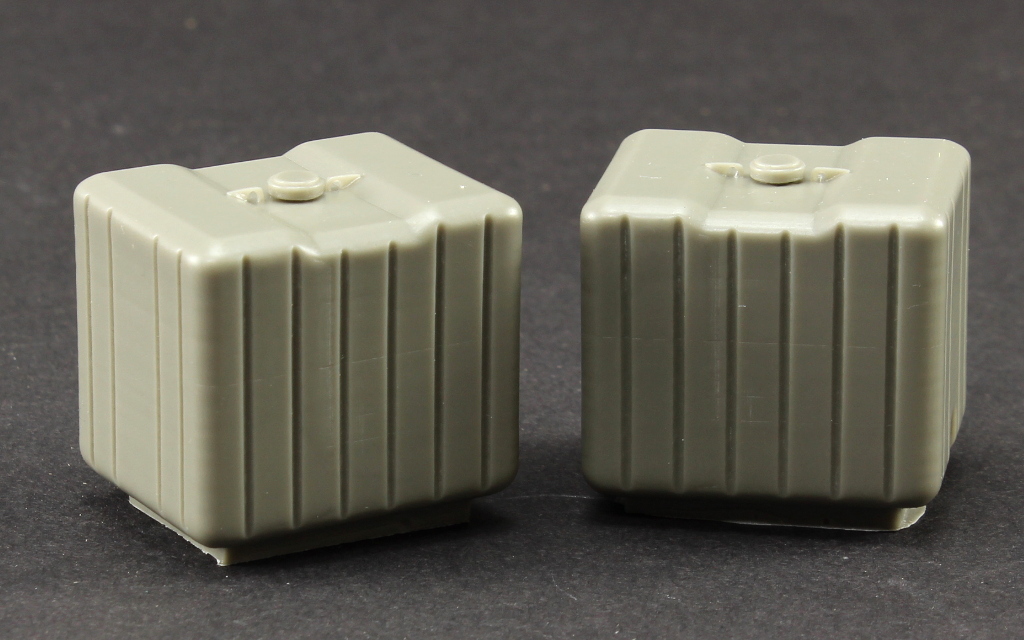
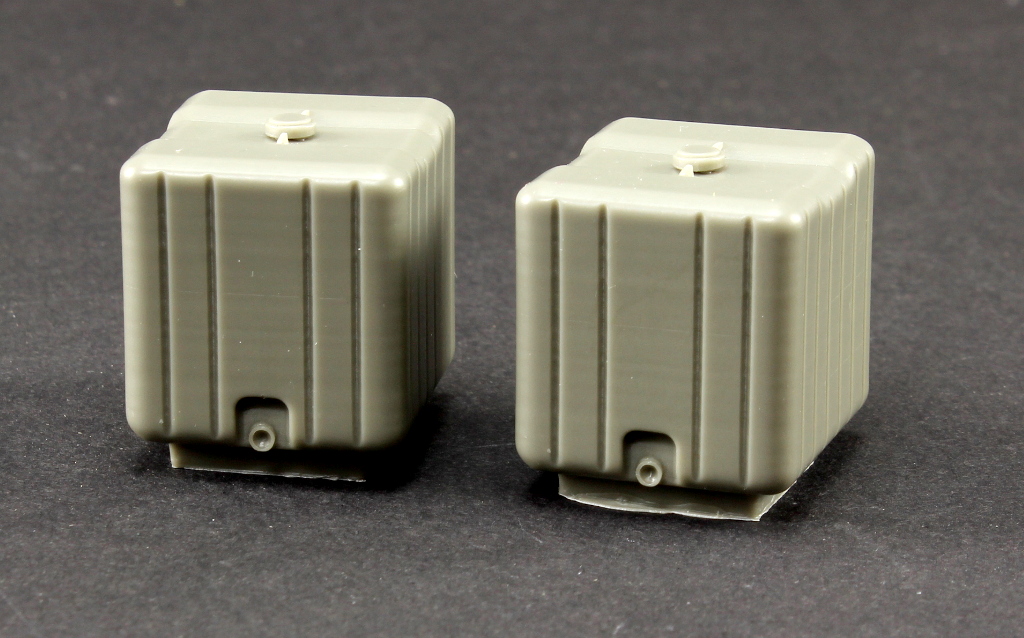
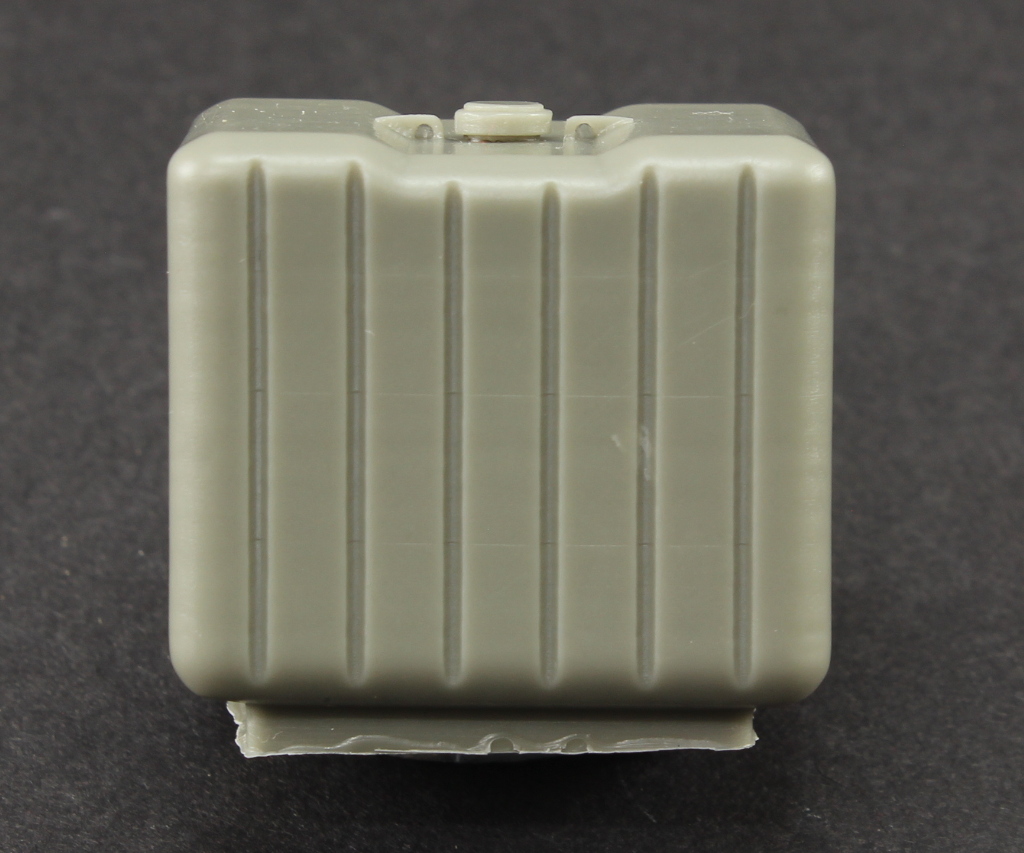
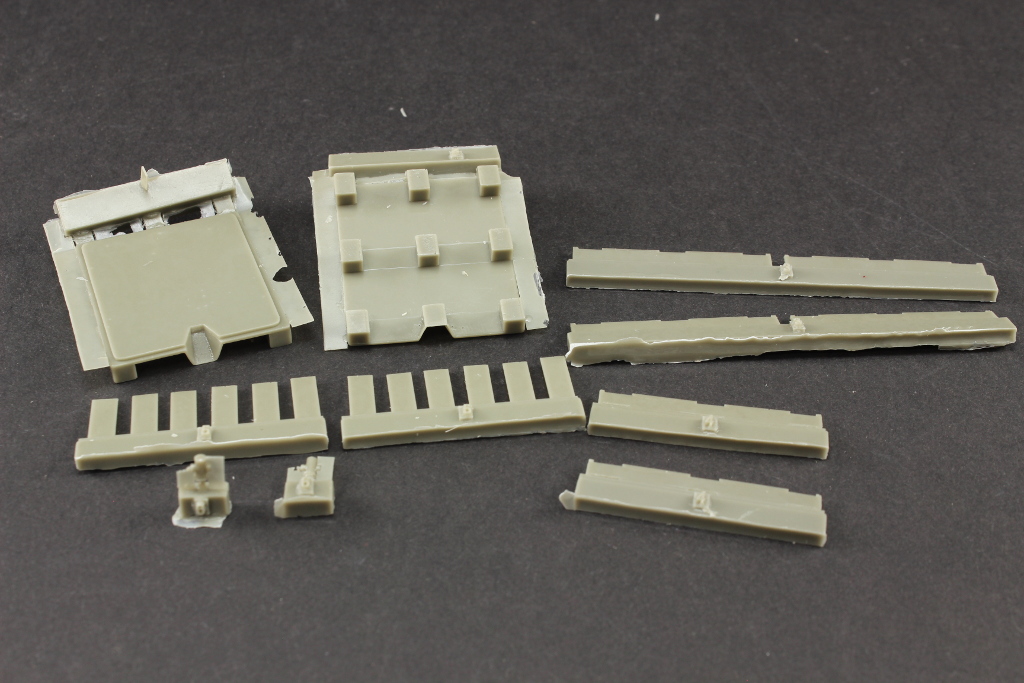
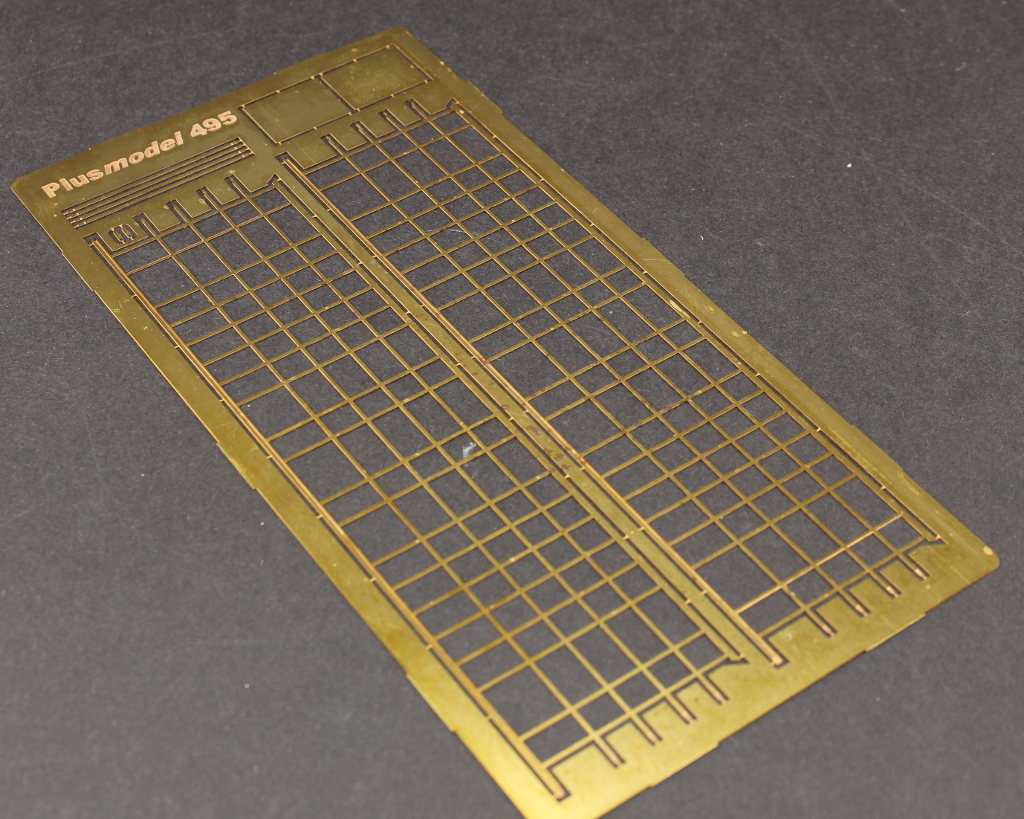
Plusmodel 1:35 Fluid tank 1000l Catalogue #495 The daily objects are always something to differentiate on our model miniature world. This set is one of those examples. I came across these objects on daily basis. They are modular build; allow storing a considerable amount of liquids (chemical, fuel or plain simple water) Mounted on the back of a pickup truck, allow to irrigate the most far away potato field. This release from Plusmodel is composed by two of this deposits. Upon opening the card box this is what we'll get: 24 resin parts separated on two bags. The most fragile parts are bubble bag protected. The deposits are conditioned on a separate bag. One photo etch fret containing the metal protection that surrounds the tank. Details… always the details On a closer look, the tanks are one single resin piece. On the top the filling cap is moulded closed with a nice and smooth detail. Some care is needed to remove the considerable resin block located on the bottom, despite this area is not visible on the finished model. As this tanks are gravity feed, there a hole for the tap, that allow on the real object to drain the liquid inside The remaining resin parts make the deposit base (usually a black plastic mould). Despite presented with resin flash and some mould blocks; these are easily removed and clean. A small and holding an interesting detail is the taps, which are complemented with a photoetch handle. And about the photo etch? Well.. Actually In my opinion, this is the sub set that really brings my concern regarding the approach to use in order to blend it to the resin tank. The instructions state the proper order to bend it around the resin tank. Beginning from the central folds, working towards the front. There are some vertical grooves on the resin deposit that are aligned with the photo etch rectangular pattern. With some tape is possible to fix the photo etch to the resin part and mark where to bend in order to shape the photo etch. The bond can be accomplished with cyano glue, but some will prefer to weld it. in either cases, clean the photo etch with a light abrasive sand paper. Instructions – the guide for a happy ending An A5 size paper is supplied as instruction guide. Simple and suffice. Conclusion This set is a original piece as an accessory to a modern diorama, simple and with a nice detail. The challenge to simulate a half fill tank can create a interesting focus point on a diorama, as on the real ones, and for example, if fill with water, create a discoloration on the area filled with the liquid. The assembly is not difficult, but some care and modelling engineer Is needed to add the photoetch part of the model. Highly recommended! Our thanks to Plusmodel for the review samples and all the support given. To purchase this directly, click THIS link Ricardo Veríssimo


-
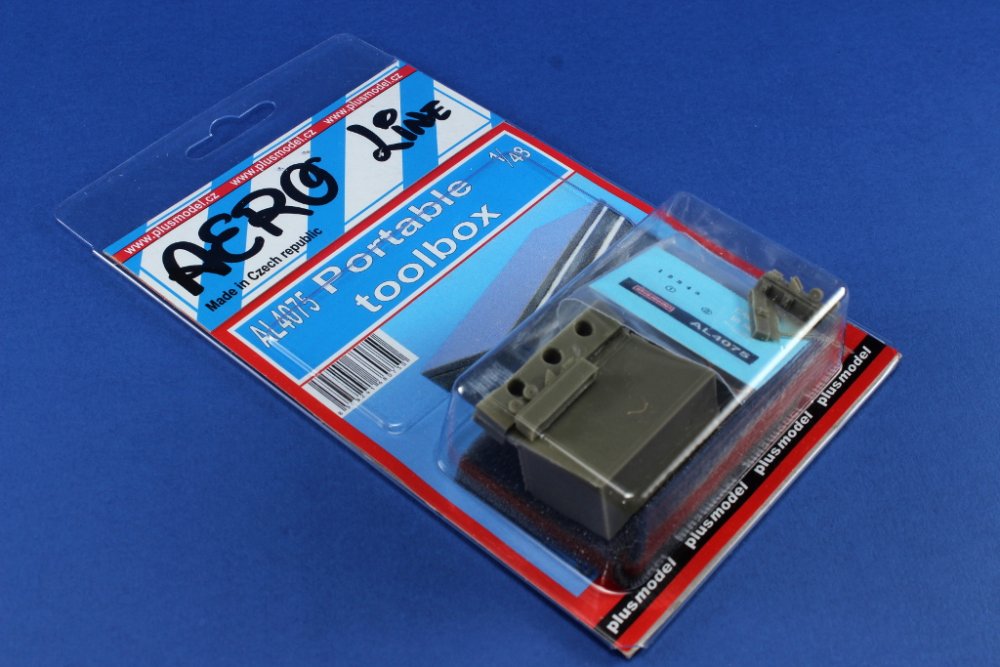
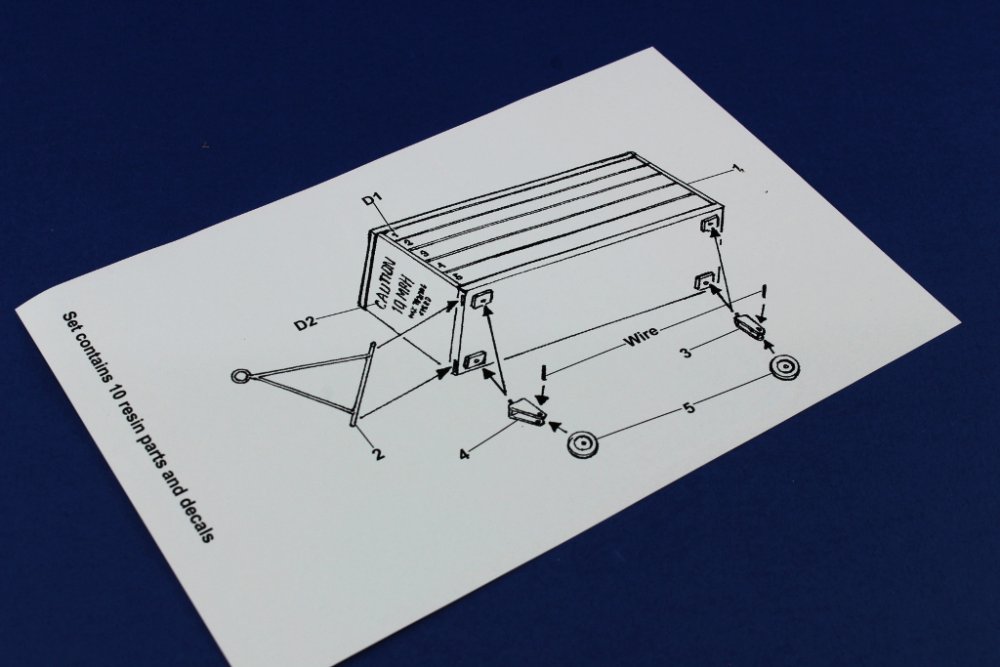
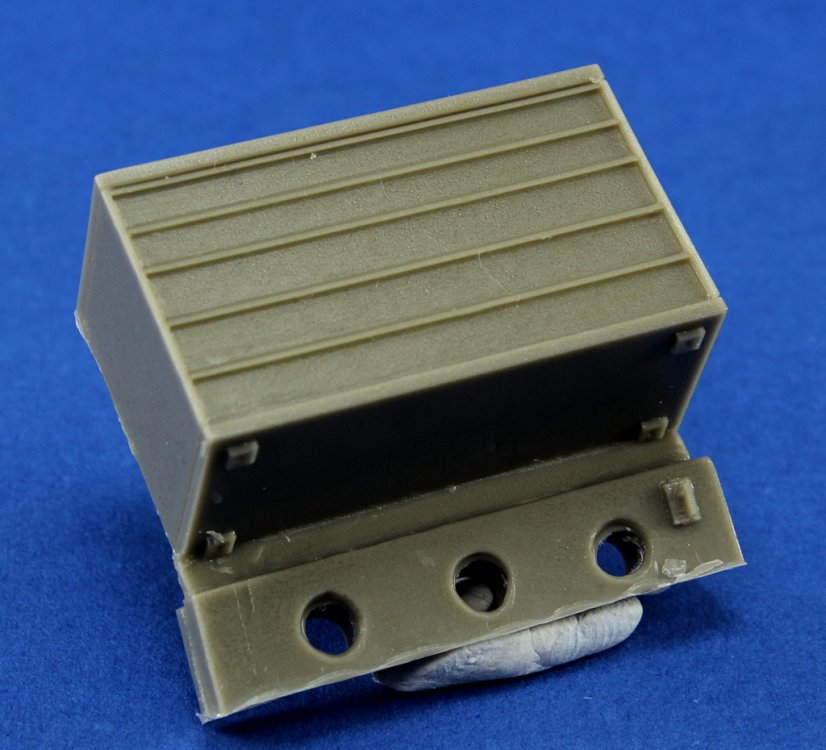
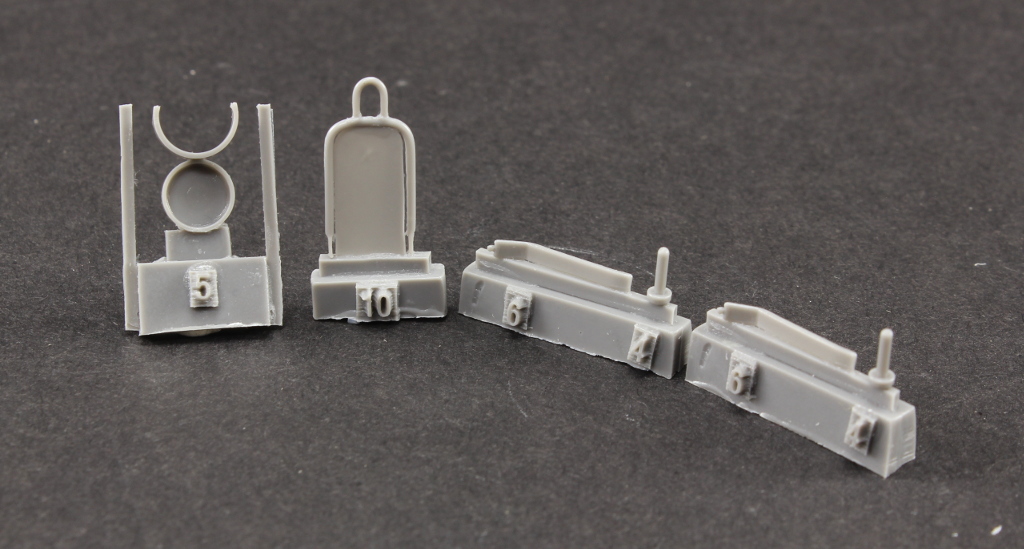
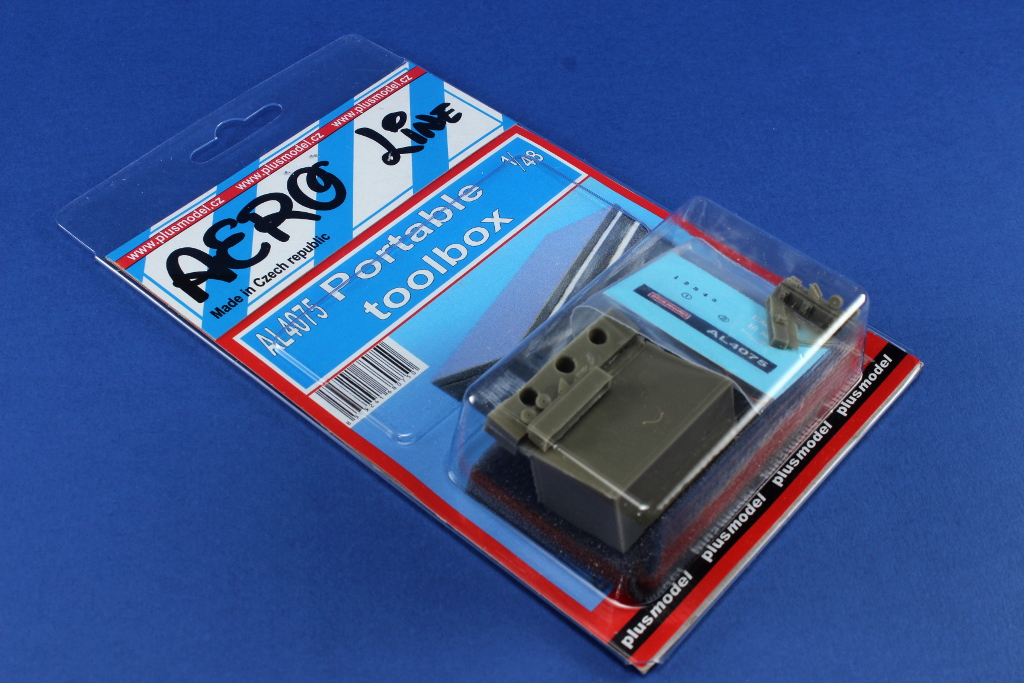
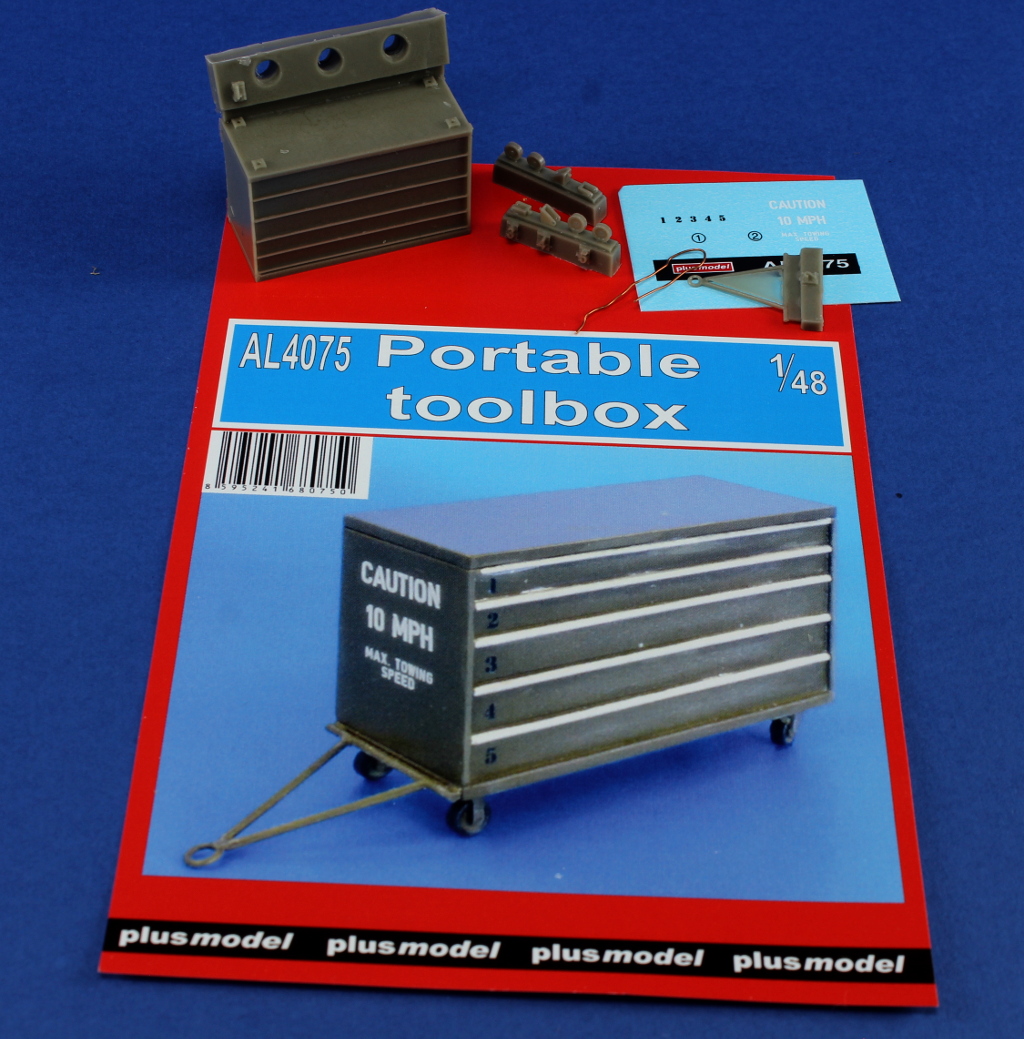
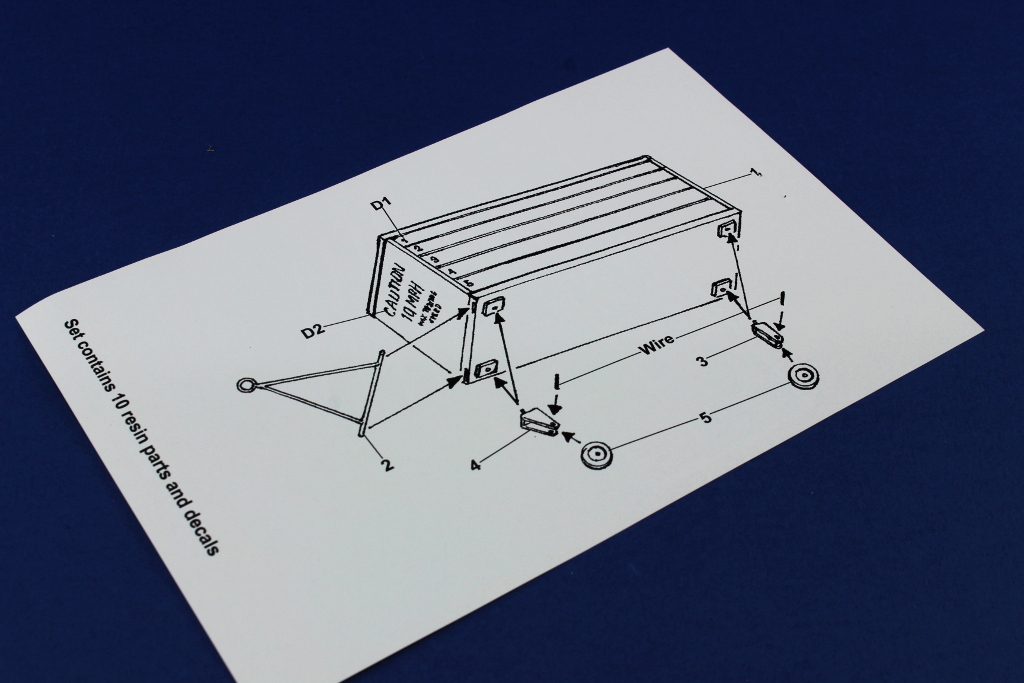
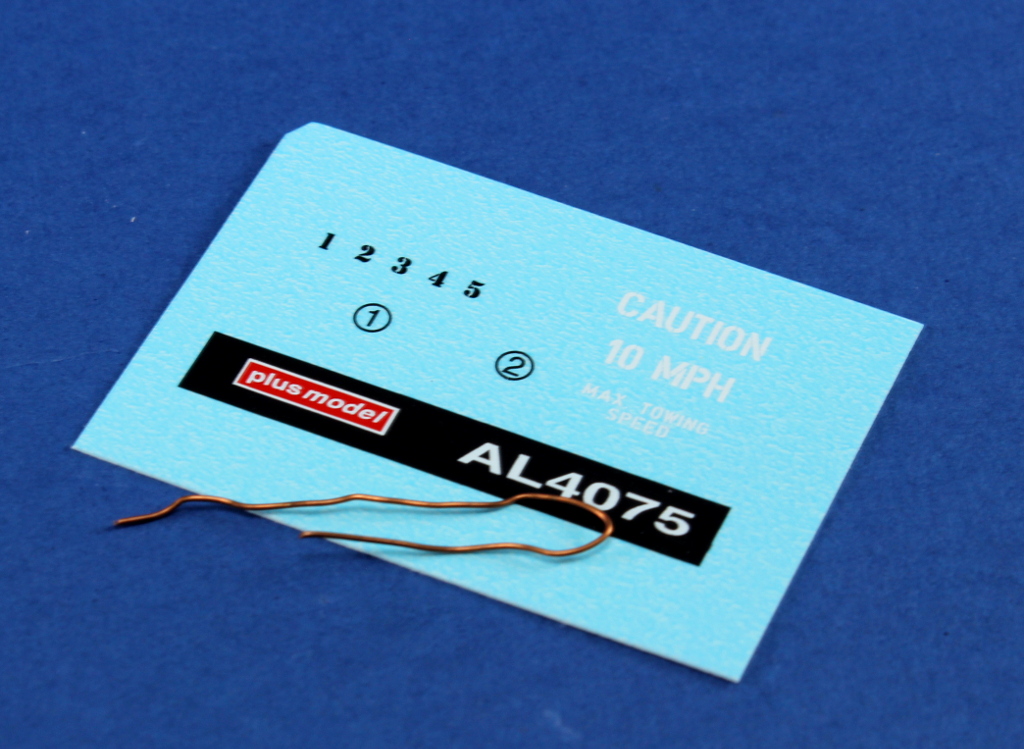
Plusmodel (aeroline) 1:48 Portable Toolbox Plusmodel Aero Line Series #AL4075 Introduction Nearly on every air plane on maintenance this item is necessary for a proper access to any tool needed to repair an air bird. The toolbox model appears to resemble to a modern item and not, for example, a WWII item. So what’s on the box This release from plusmodel supplied us with 10 resin parts, a length of cooper wire and a small decal sheet with stencils. The instruction drawing is on the back of the front image and it’s a simple diagram. The box is supplied as one unique piece, attach to the moulding bloc at one of its corners, minimizing the risk of damage when removing and cleaning of the mould block. The connection is located on the lower part of the box, thus, not visible on the completed model. The front and rear wheels are represented by two identical sets, composed each by: Two wheels, front and rear wheel mount. These parts, especially the wheels mounts are particular fragile and extra care must be taken to remove them from the resin block. The junction of the wheel and the mount is made by the use of a small length of cooper wire (supplied on the set). The last item of this set is the coupler. The part is very fragile so I repeat the advice give on the wheels. Take extra care on the part detachment to the resin mould block. The decal sheet is small, but well printed. Conclusion This item, despite its simplicity, some care must be take on the parts removal from the casting blocks. Despite that, it’s a strait forward build and with a proper paint and weathering it will bring attention to any model air plane diorama in 1:48 scale. Recommended! Our thanks to Plusmodel for the review samples and all the support given. To purchase this directly, click THIS link Ricardo Veríssimo


-
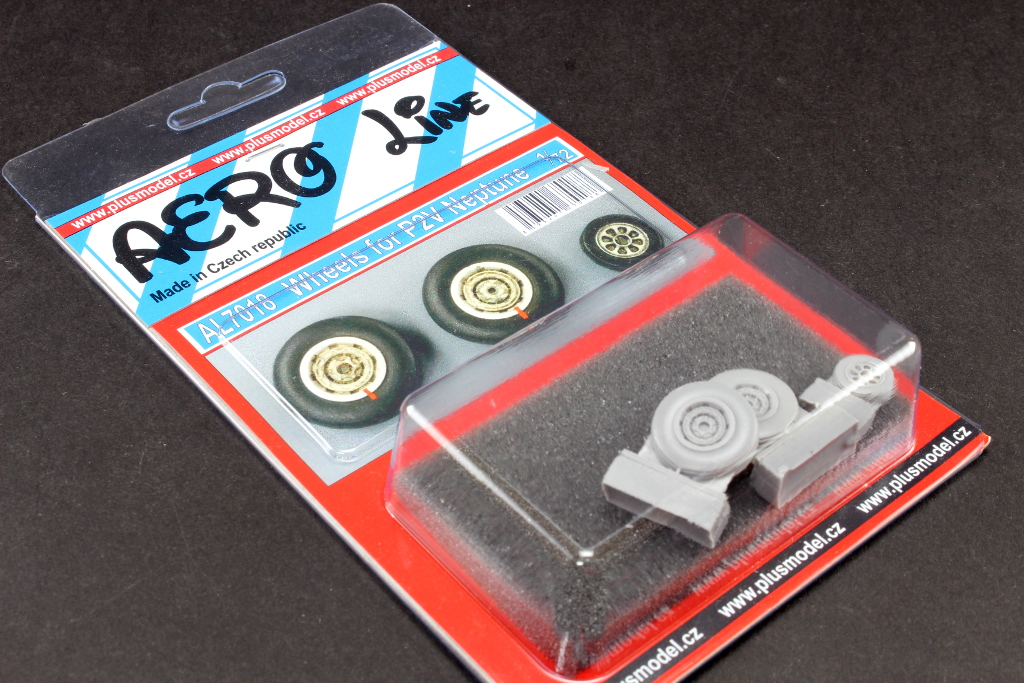
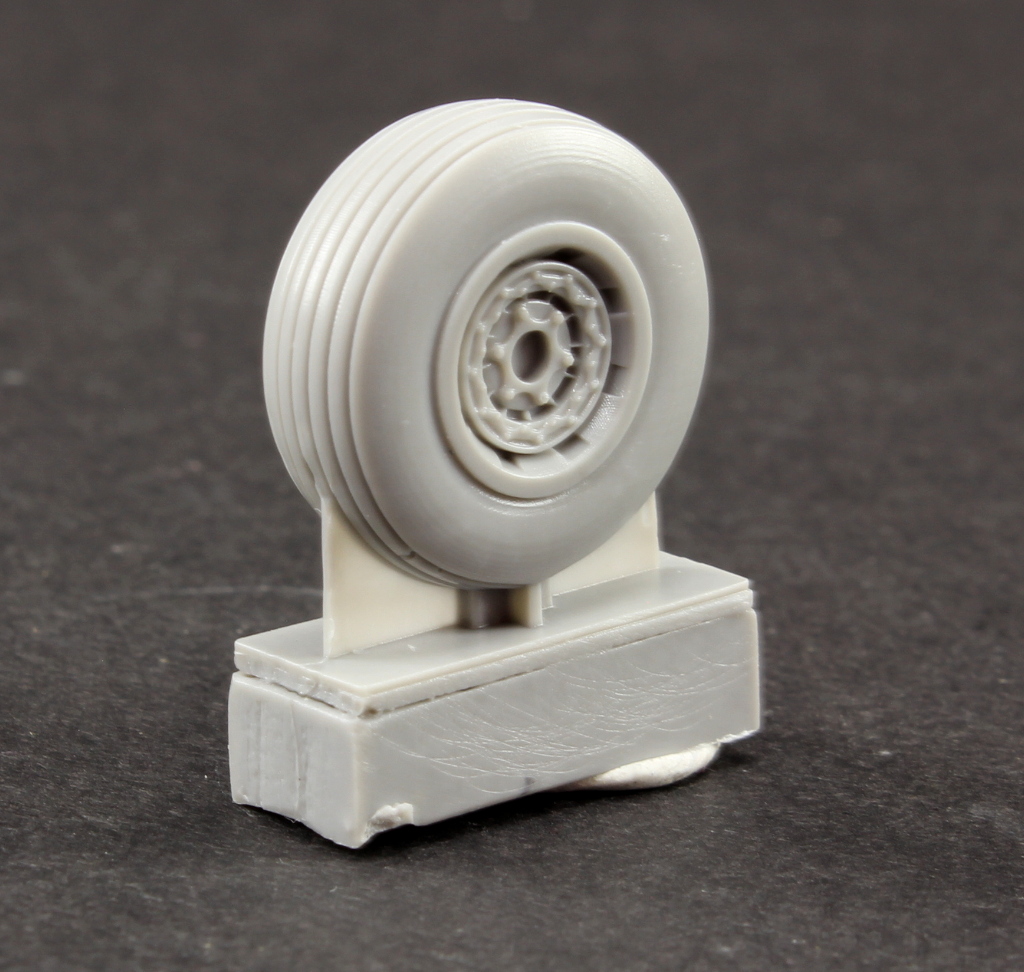
Plusmodel Aero Line Series 1:72 Wheels forP2V Neptune #AL7018 Introduction On our beloved hobby, on what airplane modelling concern, there are some parts, areas, location sometimes neglected as they are away from focus. The wheels are one of those parts. They are, obvious, a important part of the real thing, as, they are on the model. If you are having our model standing on the ground, you can show it crashed, or on maintenance jacks or on their landing gear. On the base, there they are… the wheels. They can be, new, beat up, oily and greasy, covered on mud, dust or just slicks. I’m going to focus on the set, not comparing them to the correspondent parts on the model, as I don’t own a 1:72 P2V Neptune bird, despite my countries’ air force, operated the type. Nevertheless I did some research and I came up with the following: apparently the only game in town is Hasegawa’s one, which backdates to 1973 moulds. what’s on the box The clear plastic box shows what you get: three resin wheels ( 1 front wheel and two rear wheels). On the back paper, photographs of the set already paint and weathered, to serve as inspiration. As many contemporary American air planes, the wheel hub’s painted white (to facilitate any oil leaks. The tyre painted on the eternal black, or tyre black, or dark grey, whatever suites the modeller’s personal interpretation. Front wheel This is the smaller wheel to fit on the front landing gear. The detail is adequate to the scale. The tire pattern consists of 5 parallel tread lines with no weight effect (on my research and normally on fair amount of parked air planes), the area in contact with the ground show a certain deformation or weighted effect caused by the airplanes weight applied on the wheels. This effect can be lightly reproduced by gentle sanding of the wheel area that touches the ground. Rear wheels These two wheels, as the front one, are not weighted, and do show a excellent detail on the wheel hub and tire pattern. The removal of the casting blocks can be done with no effort, using a small saw, and the main attachment point is located on the raised area of the tyre pattern. After the part separation, all that’s need is to use a sand pad and remove the remaining material. Conclusion This set is a strait forward update to the model’s parts. Using as compare guide, the Hasegawa model, this are supplied by two half that glue to form the tire. This can cause a seam hard to eliminate as could also destroy the tread pattern surrounding. The tire tread could be properly weathered after the paint process to show all detail. In the end and on the finished model, they will overstep! On point to note is that, on the all the pictures that I consulted, the tires present the “weight” effect on the tire area in contact with the ground. This is a must set to “spice” up any version of the 1:72 P2V Neptune Recommended! Our thanks to Plusmodel for the review samples and all the support given. To purchase this directly, click THIS link Ricardo Veríssimo


-
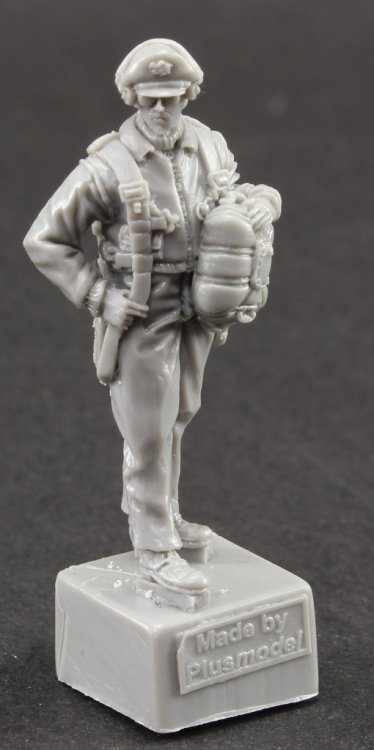
Plusmodel Aero Line Series 1:48 P-51 Pilot #AL4072 Introduction Plusmodel offers aeroplanes modellers fans, a quick and easy way to complement a simple vignette with a 1:48 scale P-51 Mustang (WWII). When I sat on my workbench and opened the box containing this item, my first thought was: “Nice! No need to glue parts!” If I could label this release I would retain: efficient and straight forward. What’s on the box? The clear plastic box, shows what you get, one resin piece containing a 1:48 representation of a WW2 P-51 jockey in a relax pose, retaining one hand on the hip and another one above the parachute bag in a pose that I could describe as looking for his plane after another working’s day! Despite no painting guide is supplied, the label’s back is printed with a large full colour draw of the figure. Lots of inspiration on this subject through a quick internet search using your favourite search engine. A small mould line is detected along the length of the legs, most probably due to the cast process, but nothing that a modelling knife and low abrasive sand paper won’t fix. As by the pictures, the detail is adequate and good quality brush and steady hands can create a very appellative complement to a P-51 in 1:48 scale Conclusion This is a nice and easy addition to any 1:48 WWII P-51 Mustang out there! A simple base with the bird and pilot is always a perfect duet. Like ying and yang ! Highly recommended! Our thanks to Plusmodel for the review samples and all the support given. To purchase this directly, click THIS link Ricardo Veríssimo
.thumb.JPG.fc6dcc7491053c63f294e61090704ab8.JPG)


-
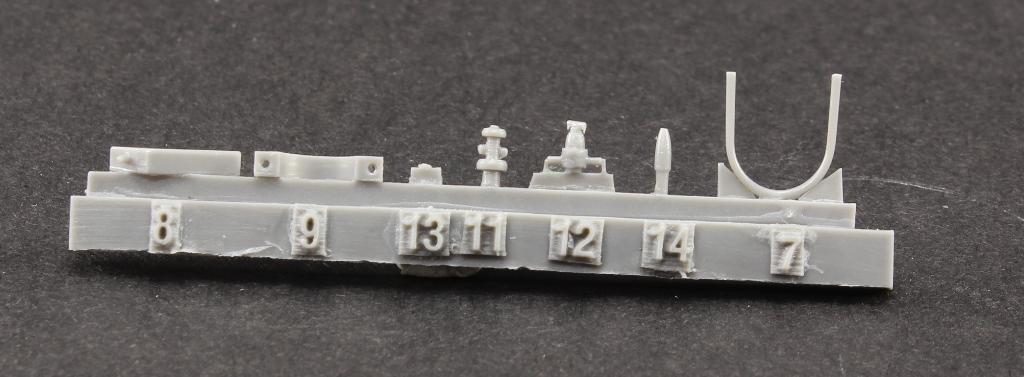
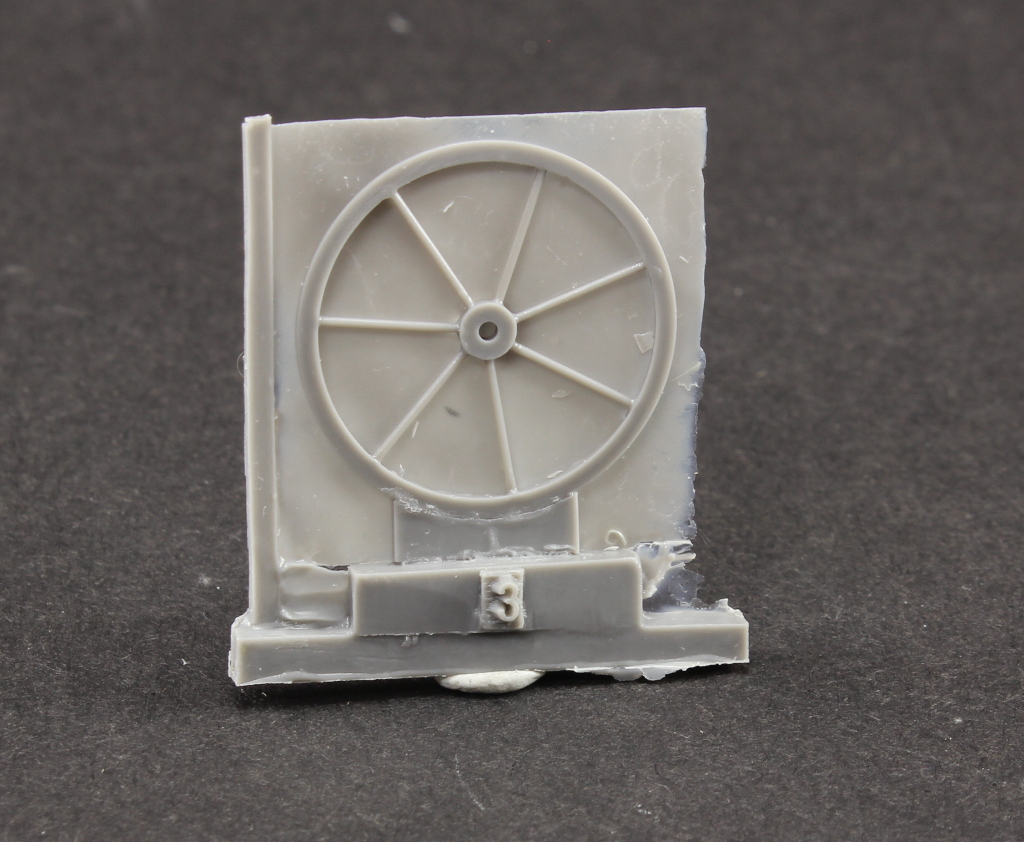
Plusmodel 1:35 U.S. Road roller PlusModel Catalogue #467 Introduction On our everyday paths, on the roads, we come across on same given time, usually when we are late for a meeting (or late for work, or picking up the kids), with a road repair. Usually there’s a machine with a resemblance with this model on review. On this particular case, Plusmodel presents us with a 1:35 scale replica of a hyster C330A smooth drum roller, on a military or civil paint. This dual drum roller model in particular has been around since the 80’s. A internet search using or favourite search tool will deliver us with a ton of highly motivated, beat up machines with a lot of scratch and general tear & wear. So what’s on the box? Upon opening the card box, we are presented with several bags containing 106 resin parts (including 4 clear resin parts), photo etch which includes the radiator fan, and the engine cover (bonnet?) grills. The parts source is completed with a length of copper wire and a decal sheet is also provided. All of this is wrapped on a bubble bag. The box has more than sufficient space to hold all the parts, but i must admit that some of the most fragile resin parts of this set, could be better protected from the harsh environments that characterize some postal services. On our review, the front and rear drum suffered from immediate contacts with other parts, resulting in some damage (easily fixed). As the previous photos show, the front and rear drum are moulded in one piece each. Each of them offers a scale rendition of the real ones. Let’s then begin There are some major resin components on this model that sustain all the build, I’ll focus the piece nº3 – the body chassis: There are some resin flush to remove, but it’s minimal and with a sharp hobby knife, easily removed. There’s also a resin mould block, that, to be properly removed, I would recommend the use of a small saw. The location pins for the several parts to be attached on the “chassis” are clearly defined. The engine – a hidden kit on the kit This section capture some of my attention for a long time, due to the considerable sub-assemblies and the detail put in it. The engine group is compose of several pieces, including, of course, the engine block, with raised and detailed nuts and bolts, clutch housing and location holes for the engine exhaust manifolds and remaining mechanical parts (pumps, intakes, tubing, etc) Detroit Diesel Power! Small details as the starting engine, oil pump and filters are also included as separate resin parts. The cooling system is also present with the radiator and several hoses as does the exhaust system Pulleys, several engine parts and exhaust muffler several filters (oil, fuel, etc) Moving on to other areas: Seats, steering wheel and instrument console . Air filter cover, seat rails. Front and rear drum blades and sprinklers (to clean and lubricate the drums for example to prevent hot asphalt sticking to the drum). Engine compartment cover Front drum guide fork. Rear drum axel covers Battery pack and front drum drive axle connector. Clear parts for headlamps Enter the photo etch fret The photoetch fret supplies us with the radiator fan, several engine belts (yep, belts..) and engine cover grills See! photo-etch belts ! (instructions - step XII ) Decal sheet The decal sheet covers the basic stencils for the decoration options. the carrier film is minimal with a good and well defined print. Paint and decoration Plusmodels offers 3 paint options All dark green Military decoration with a 80's 4 colour camouflage A yellow and black machine Instructions The instructions are in the traditional Plusmodel type, being three A4 sheets, folded in half, making a small booklet of 12 pages, with drawings for the several construction stages. Conclusions Every year we are presented with a new king tiger, a new Sherman, a new FW-190. this model isn't it. It's a complete approach to a very exotic theme. the fact that comes as a complete resin kit with photo etch could strike fear on some modellers out there. ( i know because i also felt it). But when i started to analyse the pieces, admiring the details, the location pins for the parts, like a regular plastic model, i started being interested by it. I do believe that the real challenge lies on the pieces removal and cleaning, despite the fact that the "flash" is easily removed with a blade. The pieces preparation for paint and it's sub-assembly approach could require a bit of planning and thinking ahead, but in the end it will turn into a very attractive and quite original model. Our thanks to Plusmodel for the review samples and all the support given. To purchase this directly, click THIS link Ricardo Veríssimo
.thumb.JPG.d9e64094af91404178b8d00b362df533.JPG)
.thumb.JPG.537d4db40fed2fff6c5c18613d5f8468.JPG)
.thumb.jpeg.67a4b769cfc3460ec8cd80fd8682139a.jpeg)
.thumb.JPG.232e70cb2ee9d8c9a5b21856b46062d4.JPG)
.thumb.JPG.0ab9279ffe3f6e33ab3a1497d6e9242b.JPG)
.thumb.JPG.19f41def8cf5c853d14cecdfa5ddb583.JPG)
.thumb.JPG.4130013574d76df0572012269ba404f0.JPG)
.thumb.JPG.01a3b2257ad6a2b0225918f5342100fa.JPG)
.thumb.JPG.b05649ac284ae4855168e70f1fa72f93.JPG)
.thumb.JPG.e8ceb9cfd0e9bebc954098243219c265.JPG)
.thumb.JPG.57c22d5ea6dabc6e46b563608b943e46.JPG)
.thumb.JPG.f479c355fd44eb24f0fe23a6d2eb2037.JPG)
.thumb.JPG.b0314e15bb55168705461aa2d3152fdf.JPG)
.thumb.JPG.2326be92e17d709767a7a2d3de867f10.JPG)
.thumb.JPG.3209c1bc2c906137b18c0d537702274f.JPG)
.thumb.JPG.209ba4f70f57688ad344feedc69d587e.JPG)
.thumb.JPG.ef745d1869f4f71aa9a10809dbc8660d.JPG)
.thumb.JPG.c6b274a376f1e4643d3556f0885df09f.JPG)
.thumb.JPG.56605f829fafdc8005f5e2c25e6056fc.JPG)
.thumb.JPG.9097bd0cfadd7f4d193fd45fc999b0c2.JPG)
.thumb.JPG.c64c6905d13160b92d223f51c0a7f3f6.JPG)
.thumb.JPG.6a8d1e276add84e62108cbb35ea5643a.JPG)
.thumb.JPG.af33a05b58801f3ff2c126cc4c1d2182.JPG)
.thumb.JPG.80606c845e29c3b32c80c561a08ee194.JPG)
.thumb.JPG.ec6a695487fc2295ea4d041ad7aa518a.JPG)
.thumb.JPG.f7af59542e5fb3f341483964384f41a1.JPG)
.thumb.JPG.7541bacc956c9fbc1a55ac9ef13da07f.JPG)
.thumb.JPG.48ed3e3b6dcdd734e9593d5b80f67e1f.JPG)
.thumb.JPG.ec52017f5b3e66ec0999e9be11195c4c.JPG)
.thumb.JPG.25aa242f5b2b0d9ab9d992b88e7cdd1b.JPG)
.thumb.JPG.ef69611d0a439dc55d603759b5fd7df3.JPG)
.thumb.JPG.5303e6d454c8f3b7c75015faf79dc7b2.JPG)
.thumb.JPG.4e77eafe467dd3239f0a734139a9cff8.JPG)
.thumb.JPG.a440c3f82bd88b4ba242afbfed62d1f7.JPG)
.thumb.JPG.d0bc631e092e45b0575d61528df4ec51.JPG)
.thumb.JPG.0662fc4d79e4f0a4534becd53ca4b904.JPG)
.thumb.JPG.d1ce52e430b97d80155e95449e00d0a4.JPG)
.thumb.JPG.2914e5c16ed742b954a8deffc7979144.JPG)
.thumb.JPG.9acbb0c45dead5a00b62121da76a6e16.JPG)
.thumb.JPG.5ba1037238bd71a0ecd1f3216d45a35e.JPG)
.thumb.JPG.ca7a75eb1253ba0b704a630092295b56.JPG)
.thumb.JPG.9d2ffced24cd521b07215002b2f8f566.JPG)
.JPG.3d9a3b2d6cffc94f34d51b64b83b6342.JPG)
.thumb.jpeg.3c22cb547e631a3487260dddc2a60253.jpeg)
.thumb.jpeg.86939b5618bdda3cb019a66e0307c372.jpeg)
.thumb.jpeg.f96c95b704e617bc596cc500098fc00f.jpeg)

-
hi Olsen! Thanks for the explanation on the paint patchy look! It looks very convincing! For me, this is the best part of the trade! following up !
-
Hello! Very nice and straightforward build! It's a Tamiya, period!
-
Hello, That's a big bird ! keep up!
-
Wingspan2 1:32 aircraft modelling Author – several Publisher: Canfora Graphic Design & Publishing Price: 27€ Introduction Being a proud owner of two previously releases (The Nordic edge series and On Display – Post war armour), and being books with quality content by an array of skilled modellers I was anxious and very curious about the second approach from Canfora Publishing on large scale aircraft territory. Well, let’s see if the expectations were fulfilled! So, what’s on the box... ah … book! Wingspan2 is presented on an A4 Landscape format. A magnificent F-4C is presented as front cover. The book guides us through 10 1:32 scale models built by 8 modellers. Every chapter describes a complete build. In the beginning of each chapter, we’re presented with a visual layout of the completed model a description of the brand, accessories and paint / weathering products used on the article. One key aspect is the introduction text that makes us fix our attention on that particular build, even if it does not fit on our “taste”. The historical framework of the model, what’s on the box of that particular kit, looks like if it’s a story that we are reading. For each build there are several pages dedicated to step by step details. Varying from painting techniques, weathering methods, scratch build and extra detailing. As a good support, on these step by steps pages, every picture has a correspondent label describing the operation, So… what about a taste of the content? As described, 10 builds are included: 1:32 Zero M2B 1:32 Felixstowe F.2A 1:32 Ta-152H-1 1:32 F-4C Phantom II 1:32 N1K2-J Shiden-kai 1:32 Ju-87G-1 Stuka 1:32 AV-8B Harrier II 1:32 Hurricane MK.IIC 1:32 P-61A Black Widow 1:32 Bf-109F4 A final touch I couldn’t be indifferent for this visual index made by the external frames of the articles. Each of them have an external frame of a different colour. Nice touch! Conclusion I have my fair share of modelling books. I found that some are rather sparse on the key details; some really can go neat picking for rivet numbers. This one is really balanced. The pictures have nice definition and detail. We can stare at them and find small and interesting details. The fact that the layout choose was landscape, allows that same pictures to frame the complete aircraft without losing details. This is a book to be keep near the workbench, to be used in cases of an inspiration emergency, in a moment were our minds ask “how I’m I going to do that effect”, when we are waiting in the car for the wife / girlfriend to finish their shopping or leaving home, and we have that amount of time just to appreciate a good reading! Yes… I highly recommend this book as great source of inspiration! To purchase this directly, click here If you found this review helpful and decide to purchase this product, please tell them you read about it at Large Scale Modeller! Disclaimer: all photos all in low quality to preserve and prevent all copyright. A special thanks to Canfora Publishing for the review sample Ricardo Veríssimo
.thumb.JPG.5a23fe3ad384ec95b1f72628167eba4a.JPG)
.thumb.JPG.9198960c88a6ece84693d913dcfa7843.JPG)
.thumb.JPG.d7dd0c6429485f3a61a073804be504b6.JPG)
.thumb.JPG.aaa370ac9a66b614d998b87e82026749.JPG)
.thumb.JPG.62c4ed0551584ef891a3a5b557c68946.JPG)
.thumb.JPG.7770fd63b621f02954be97d0848a33c1.JPG)
.thumb.JPG.286e4d0223fc2a15d54c61d8a4df11f7.JPG)
.thumb.JPG.f21555ae79e52e61a4ccfb35c51feb45.JPG)
.thumb.JPG.829fe78953c757ff4b3cbc7130f55f4c.JPG)
.thumb.JPG.8ca48554e69cdbeebc21d3a70d03ad54.JPG)
.thumb.JPG.036fc34aba9f47a2a90a27a7b0b02367.JPG)
.thumb.JPG.c7dbfc0d3dffeef587525863d483c011.JPG)
.thumb.JPG.e7b67d939486bb8239036b1116eb3100.JPG)
.thumb.JPG.7259fc66e496919de496a4ca1667e941.JPG)
.thumb.JPG.a60781125e44da73ab4ccf1e90f00232.JPG)
.thumb.JPG.a83d32297e9e6a62ef83ff270dd4b226.JPG)
.thumb.JPG.5fab944872655aefe5ec0a52ae0d501c.JPG)
.thumb.JPG.58f48d8b01445aa8e447fad178ee8f3d.JPG)
.thumb.JPG.a981c1a097eade0aeef2a4df1ae9949d.JPG)
.thumb.JPG.b0ea1b2036bb83492b231988b1021c8d.JPG)
.thumb.JPG.9e0197bf26887f7da0f9e8a46ee75410.JPG)
.thumb.JPG.a562d6dfb38e6960959d9bb7e07210c8.JPG)
.thumb.JPG.ad6676271a9f2c6394ff312ce52c4858.JPG)


.JPG.55ee7552aebaef8a47462e32e6c79878.JPG)
.JPG.63771e6010523707d4dae29e1857a7e6.JPG)
.JPG.f75bac2431833094686450c72b1a4b10.JPG)
.JPG.f0d9b2cd15606d4cbb08455a573b13b2.JPG)
.JPG.4869365769859cc34adf86dae02dba3d.JPG)
.JPG.d207d5fe9e510e5902236bacd730c289.JPG)
.JPG.f888156be7b449237ee4ce15594c2aa4.JPG)
.JPG.52fa499f4aee06ca500ce1bf8d45ed55.JPG)
.JPG.2ef228798a81d23a6521e4beee148d8b.JPG)
.JPG.6b1baf40b7e9c5786936b011b060b358.JPG)
.JPG.58491fc8f8de47162c7d48e0a5d8f4ff.JPG)
.JPG.d00352284a2093b0d78768ba41606c1c.JPG)
.JPG.5a974a766301b2b718fe846e0171f26a.JPG)
.JPG.016aed8b042488c570c6ce6649d971af.JPG)
.JPG.da033235cc5ef7d52912d1684648dcb6.JPG)
.JPG.2e7c1304eea3b0741045822d3ffd9a14.JPG)
.JPG.1497eff7a34ccc6bf3dc2195078ca098.JPG)
.JPG.d65110faa08c6df8e3317c62045599ec.JPG)
.JPG.bd94ce25fce9d0d834c0a0d7cd9c47f4.JPG)
.JPG.6eea0b53f34d3b6363c4fb7a8e80396e.JPG)
.JPG.ac8742d67db67556fa60783e8c603017.JPG)
.JPG.ecc680b273685b9118a2418969d453f3.JPG)
.JPG.40d512fa8ee8a0457a60cc4d8c63533f.JPG)
.JPG.5040af94892da014327faf969f47a81d.JPG)
.JPG.93a5bf6dda41aac7b845d31e7a3cf8d0.JPG)
.JPG.2afc450288531c9d234d38a1575e26e4.JPG)
.JPG.15f41fd610745a8231233230b5301e0f.JPG)
.JPG.032a0a443dcf92c5e85991994b61f5ef.JPG)
.JPG.7939283ad2eeb7433fba177726371e9f.JPG)
.JPG.04aa7183fafc5e93ce6cf5bd43fc3095.JPG)
.JPG.dbf0b32f3f90773bbe0f2b36eae399cd.JPG)
.JPG.b18c93c7259e64e0b50b529aaab835ae.JPG)
.JPG.413f6d9c852605ce52b3f30c556a0031.JPG)
.JPG.a6207c9eaaa2f6602c0be95d4a932db6.JPG)
.JPG.4c575243893575cccb1c0f2e1b302a35.JPG)


.JPG.586658a2171bbf4d0e0607816f044660.JPG)
.JPG.408f05ab84aabddabca831ba8911c3bf.JPG)
.JPG.a696ded739e46dc47987a351ca418844.JPG)
.JPG.41e1e8fb082078fe094d59d9bda84c96.JPG)
.JPG.79508fc747c99c958e2c54a315073087.JPG)
.JPG.08bec003c6b49c35108cf7c49b70c65f.JPG)
.JPG.ad22704f48df2ea8f6c55314e1bb7647.JPG)
.JPG.565379c596ef96162b3858c9f9fd2be3.JPG)
.JPG.b83e9b631cd48e7a3653f638fcfaeedd.JPG)
.JPG.4d81e95e833fe9065ac9b792a24a7803.JPG)
.JPG.0b26137ac5efa5db050d4a3523450e2a.JPG)
.JPG.34806ba44c8560b893fe6d12fea02399.JPG)
.JPG.0eff58116620af720fe923d4ee6933a9.JPG)
.JPG.2d08c672a137f951bc1c5d937b6d9db1.JPG)
.JPG.4d43ec570302f340ba1348906e6a0a13.JPG)
.JPG.b24716c02f7d8fd610c0f70677f752da.JPG)
.JPG.1614ec8ddac872f2a25a84f2601d32ed.JPG)
.JPG.a6e3ba3f62b8b5eb653512c113d047b1.JPG)


.JPG.421440b8e5481ee541fd8df286e8cc45.JPG)


.JPG.5cd1ecb3980df44048442371bfa74aac.JPG)
.JPG.13ce17f84e9dfe217fa7ee936607af24.JPG)
.jpeg.973061daf79d02790d0f90c07fcdeb59.jpeg)
.JPG.e4a29904455d2d5cda430c8f3f298212.JPG)
.JPG.96a2956cc5c9658a3fbc8875d2e818a8.JPG)
.JPG.c765f674467daad76367303bf3b97200.JPG)
.JPG.d6192a02dbddc6b5acec6315e6efbabd.JPG)
.JPG.a061fb07a68977bfb8708f8a257003fe.JPG)
.JPG.ee312503c40c0a24975a2ee35f41d8a9.JPG)
.JPG.5b23af9ab57e609b2d36a2577d7b7a1f.JPG)
.JPG.f79d67c68a8c335250ba5c7081fbe267.JPG)
.JPG.e0f494c8b014df608fe94669e47c460f.JPG)
.JPG.8ef74b8cb09840e2b8f5b61c3c8cebc0.JPG)
.JPG.18aa48f2925dbfdcf8499afcaf1d2aeb.JPG)
.JPG.619ec09c72ba39a480b48f1f1d3a512e.JPG)
.JPG.19846347fad01c6c26cb8ae9392a7899.JPG)
.JPG.b04b679d438cfd935821e06a77513511.JPG)
.JPG.f721098cb5c4cb7bd8e034ece6b89bff.JPG)
.JPG.83523ae53a927b17bda09251538b1e60.JPG)
.JPG.272feed9be59c9f45574aa56ecaf2d0c.JPG)
.JPG.916f0a87ec52d11e74552e05b02969bd.JPG)
.JPG.e561dcf9458a87e36a0c136b94ad2fe8.JPG)
.JPG.7eebf65583abc76f9b2806fedbf03178.JPG)
.JPG.4018a01d6bafbb8c3da15276bd1ee134.JPG)
.JPG.63ef07d4eeaf6e567f4ce05292beaa9e.JPG)
.JPG.555a79fa7427fc4ca67dca0032965556.JPG)
.JPG.e8397dc9807009057bb939dbdb235100.JPG)
.JPG.292bf452c958e855d423bc5f925e0338.JPG)
.JPG.8768a8752d4a0049a18f1dc793163edb.JPG)
.JPG.389319e6b07ad4d3a0c702387de0b4f1.JPG)
.JPG.df813e6919fa67751c64b224be454e6e.JPG)
.JPG.d069091581e3a1125581b04c915b6de8.JPG)
.JPG.7fe9deb231d31bc92d2014dfc0c5f601.JPG)
.JPG.e9a12fac6bb1b8f062036462bc60e06a.JPG)
.JPG.bcee5e923e42018798e423edd5884e37.JPG)
.JPG.057027599cf13ff2af8e6c7fdb63f57e.JPG)
.JPG.cb3d9e3e731112c1bf3b58f2aecb343f.JPG)
.JPG.7c17a017744951df149afb56f1358782.JPG)
.JPG.f8b61a31406052c70b040ef1eabd0d1f.JPG)
.JPG.b5736120297ce68e2e63e192966a6576.JPG)
.JPG.a862ec580896548e2edc4ca29834e6cb.JPG)
.JPG.fc6c55e8591338867611f872355b7925.JPG)
.jpeg.d91729683e09d42ed25d9145478cb777.jpeg)
.jpeg.a85d455831e2774aaff37045b6a65bdc.jpeg)
.jpeg.095623d87408fc627f30a0a9d06f5d78.jpeg)
.JPG.30ee042428a4b257e231d34579b7b606.JPG)
.JPG.e41fa7477ed6c98f5c3494abac5a3357.JPG)
.JPG.1c7af692b2fb2c90253053ad302f40af.JPG)
.JPG.e77fbd6c3472ebedc9a8148d153e1786.JPG)
.JPG.ee6c2b41cdafdbea28e0533028e5ba9c.JPG)
.JPG.f3936f537e98c2489ce2a5429a3ae69f.JPG)
.JPG.2d2966fd256f3190f7b9eeb6456720b6.JPG)
.JPG.ab182a51523dbf59ec61702db53ae2c7.JPG)
.JPG.9cf2ef821720bee653e02a08fe12a716.JPG)
.JPG.19990b0b6bc7b4eb628275a54588f122.JPG)
.JPG.b53bb9fcbf6954ffe9163f899133c974.JPG)
.JPG.2d3874d61984986691f8ddb79d435813.JPG)
.JPG.41ae5bb69f971ff729446b5ef88571b8.JPG)
.JPG.96ed862e065f195ce5b94dc17cb87934.JPG)
.JPG.04b2e980c46151e72ed7eb3caf057aed.JPG)
.JPG.dbaee7dffa4b3d8119377a2bc5bf4f23.JPG)
.JPG.ace5086a8f1548b233661656e545f6b2.JPG)
.JPG.939fa6aaa1ebfe73117b4c9deff54418.JPG)
.JPG.32d267fdba488cafb65c8b08c6af4f66.JPG)
.JPG.1c4324ee36ab8aae7652e456beb63454.JPG)
.JPG.a7c87be8dd8ea6d5b49d065ce7655457.JPG)
.JPG.c6b9c74b52cfbe4f59bdf9d8920190b5.JPG)
.JPG.a51a3cc2e73a31331cae34ebb70ad92a.JPG)