rverissimo
-
Posts
147 -
Joined
-
Last visited
Content Type
Profiles
Forums
Events
Gallery
Everything posted by rverissimo
-
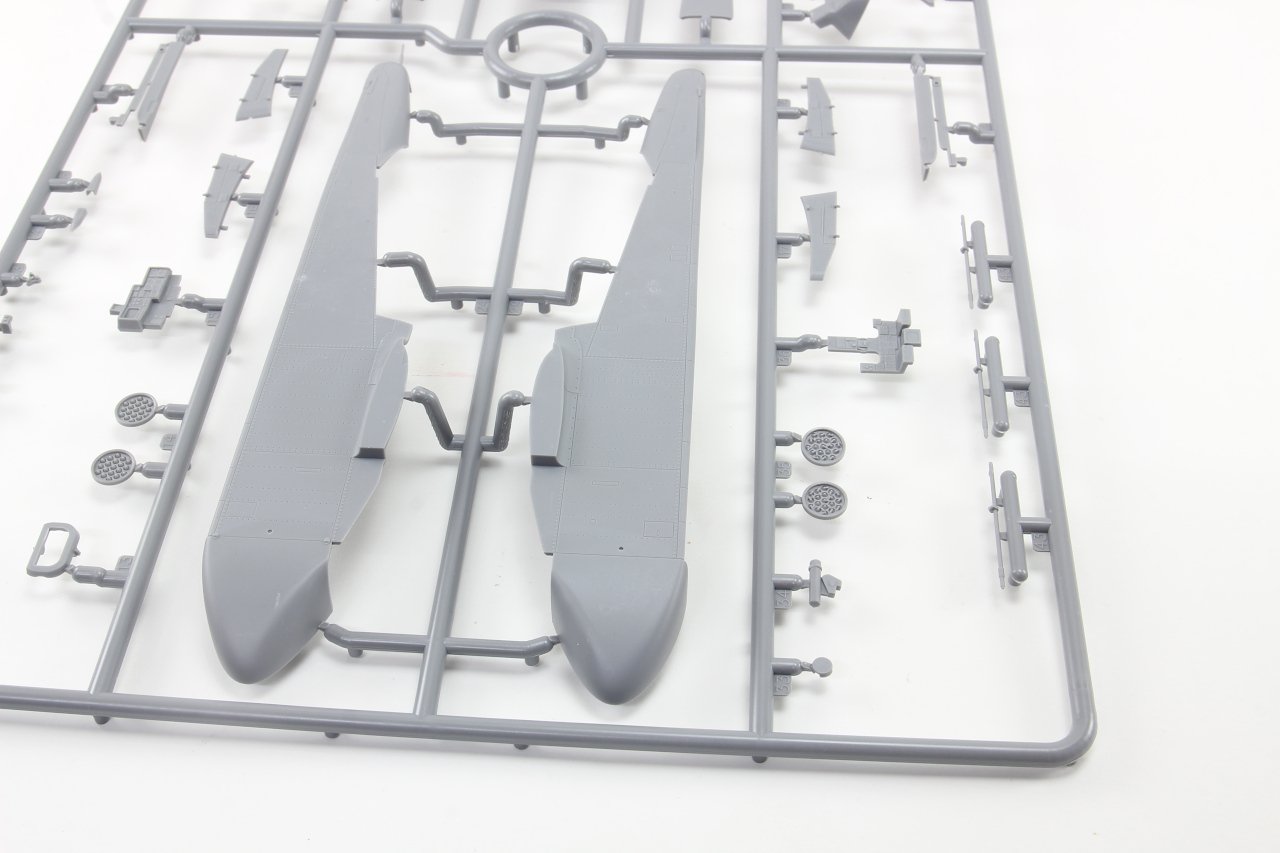
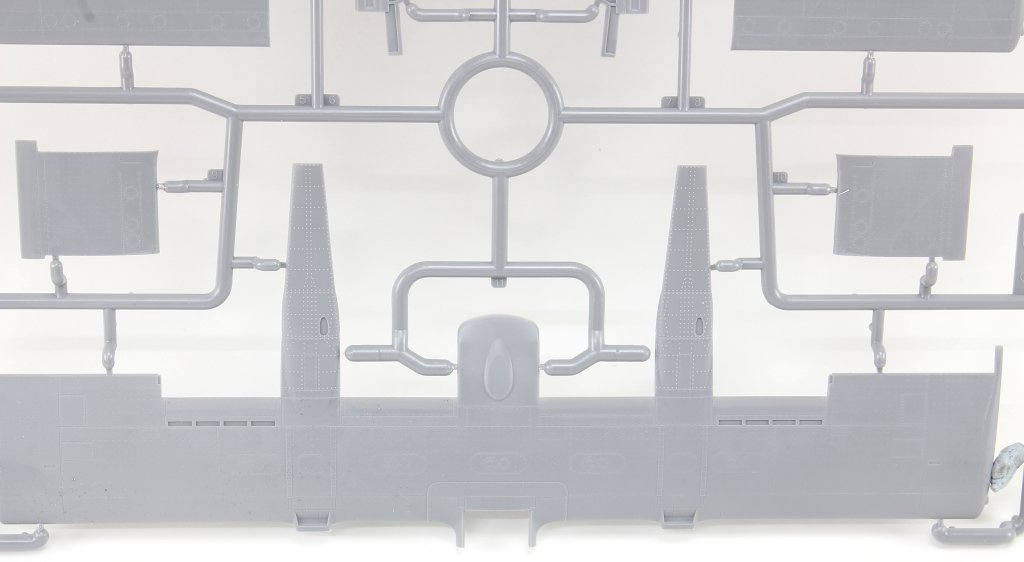
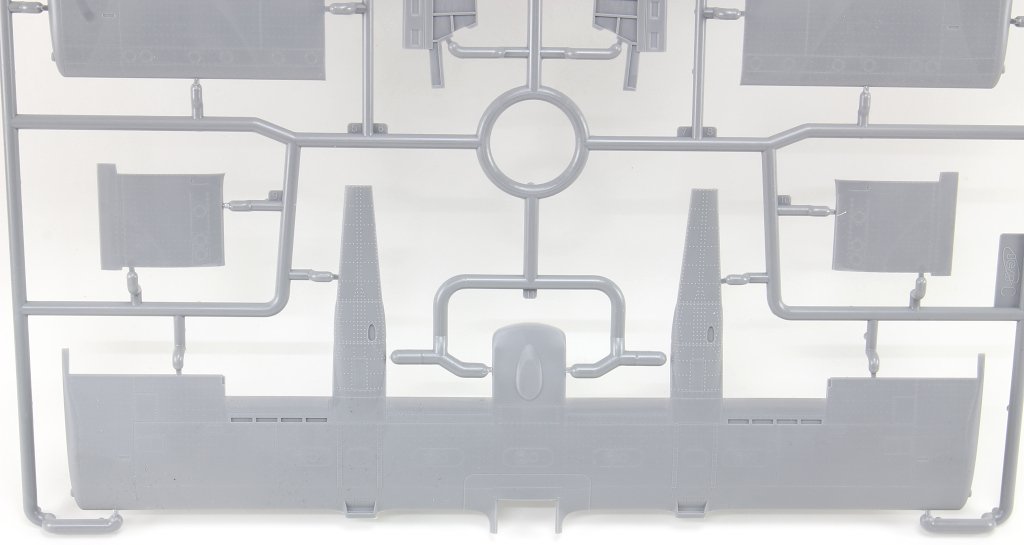
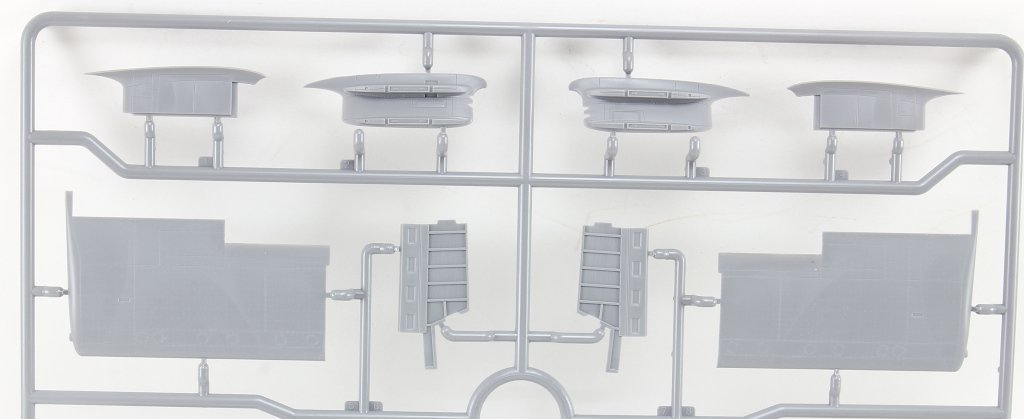
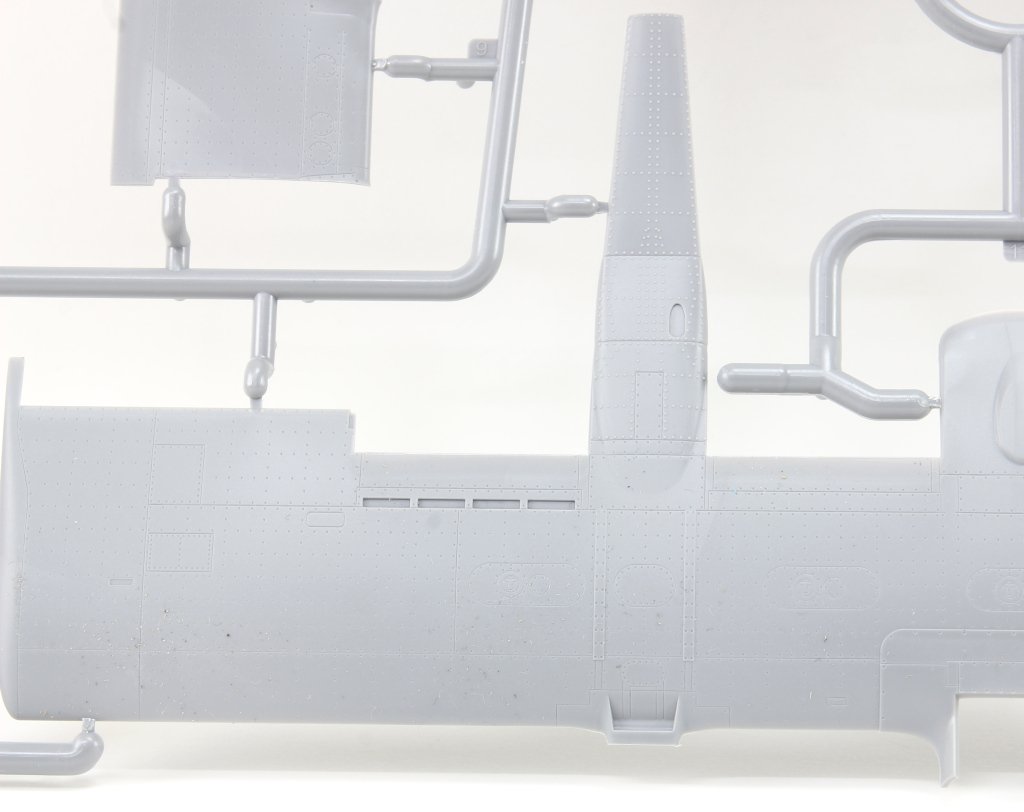
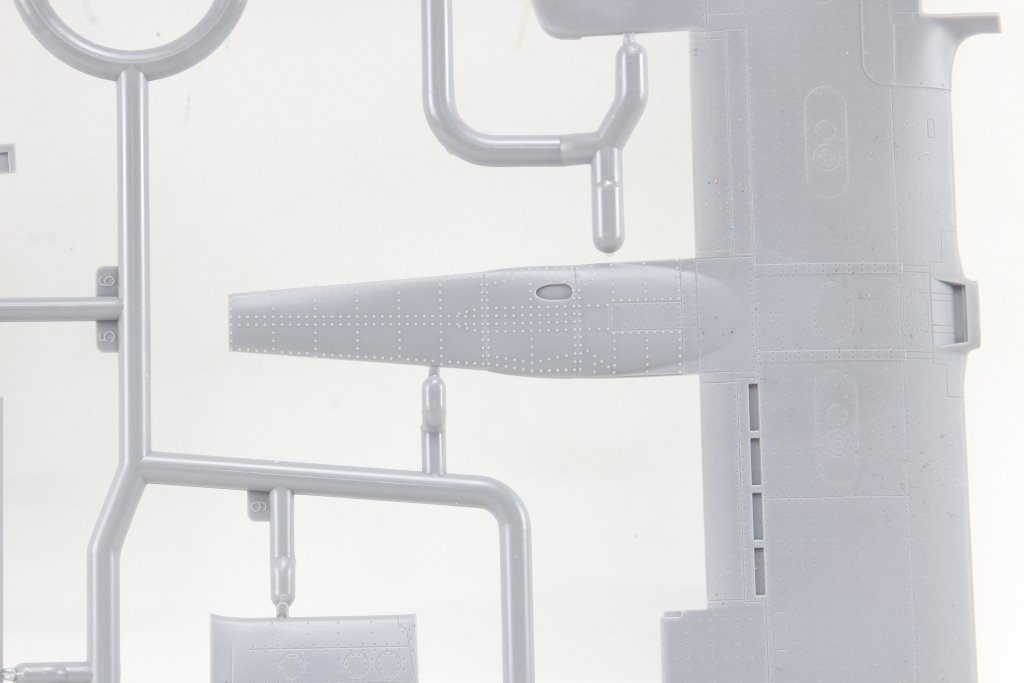
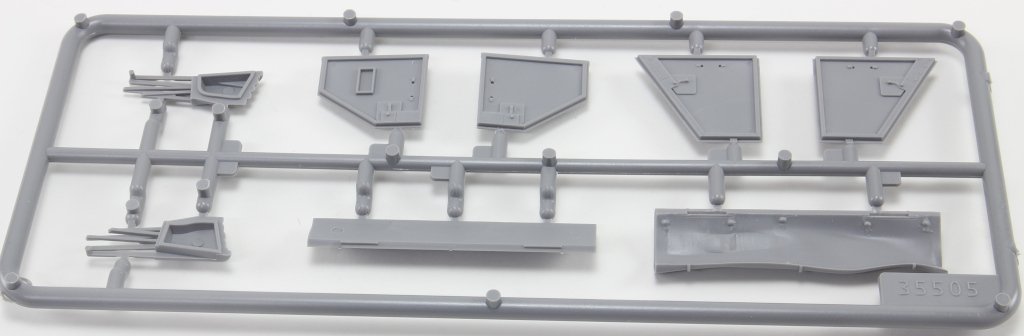
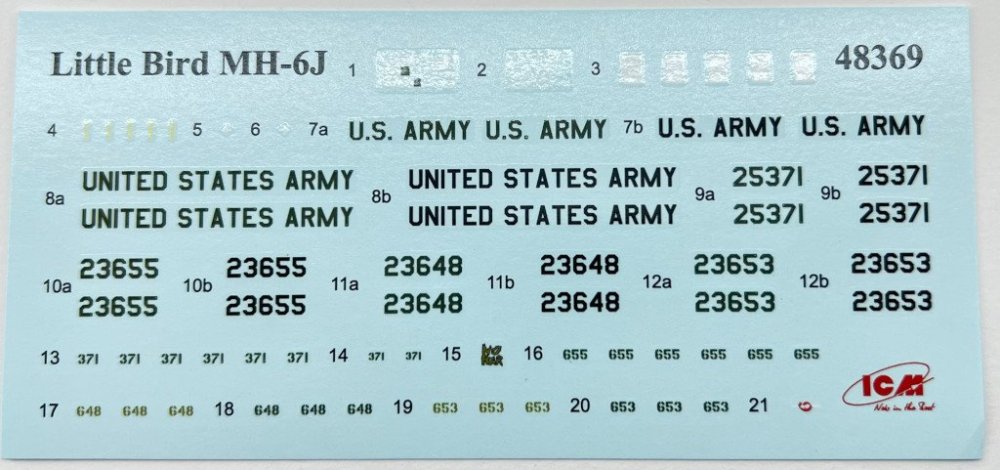
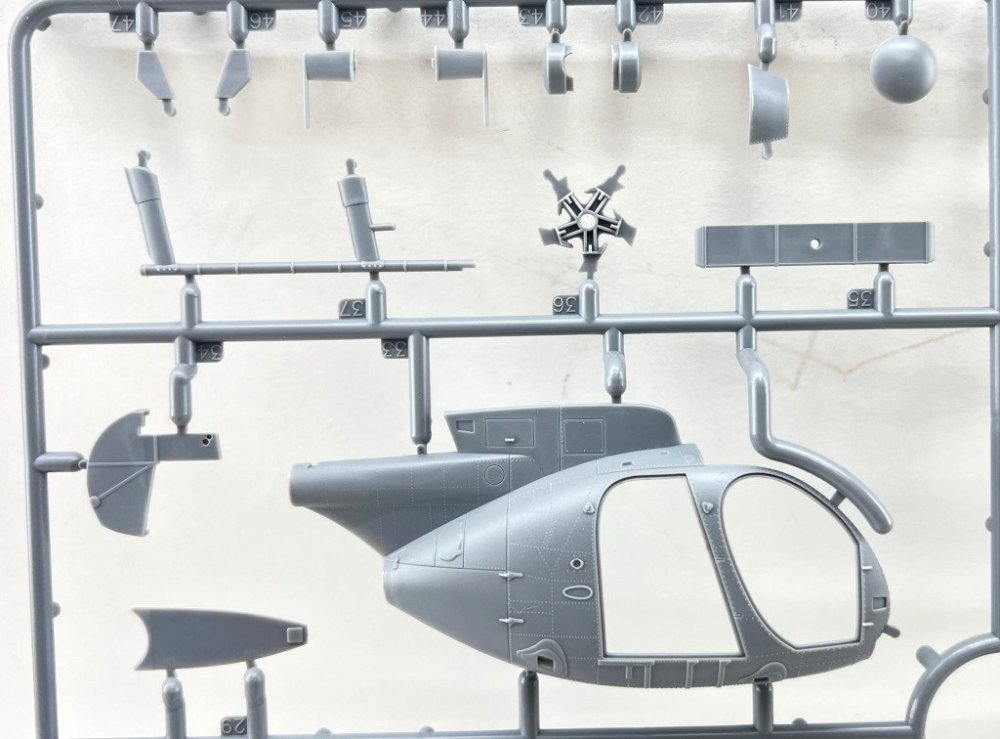
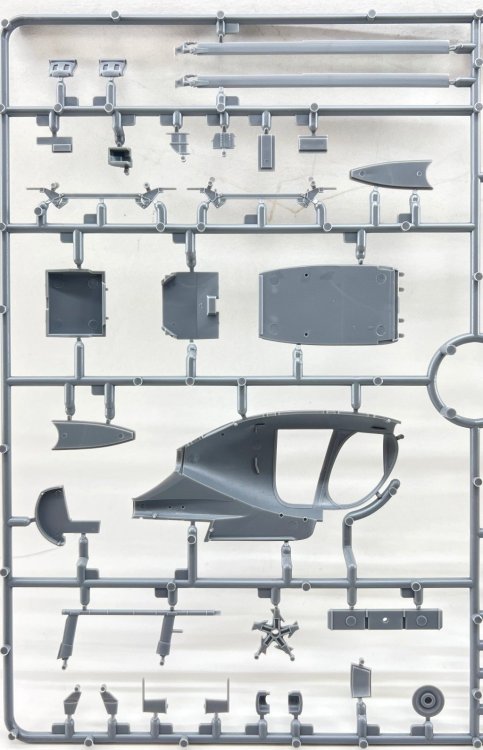
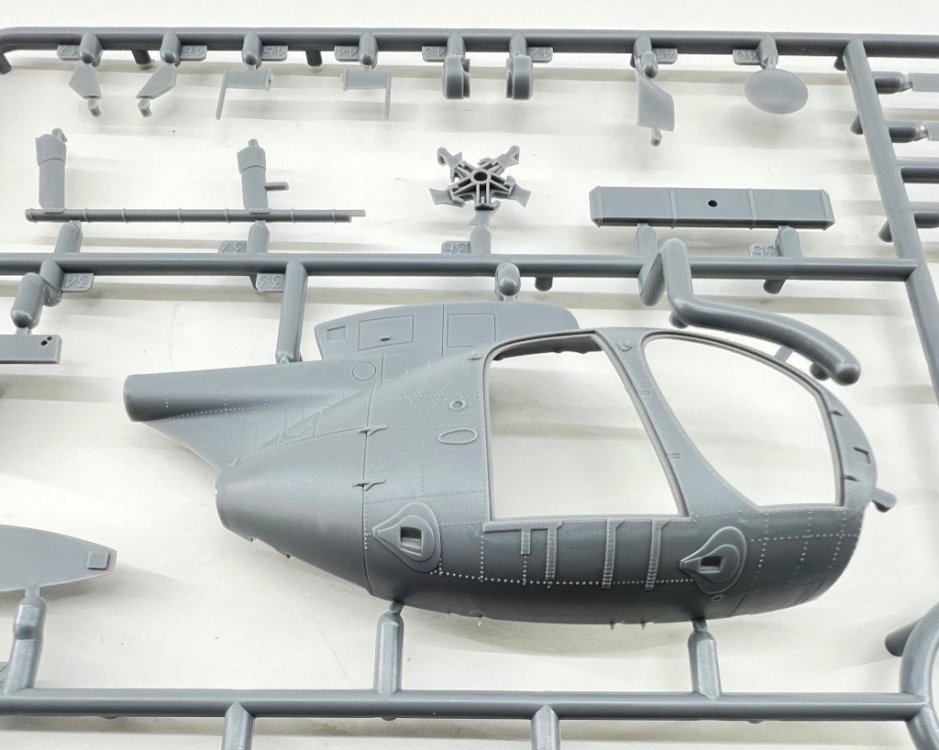
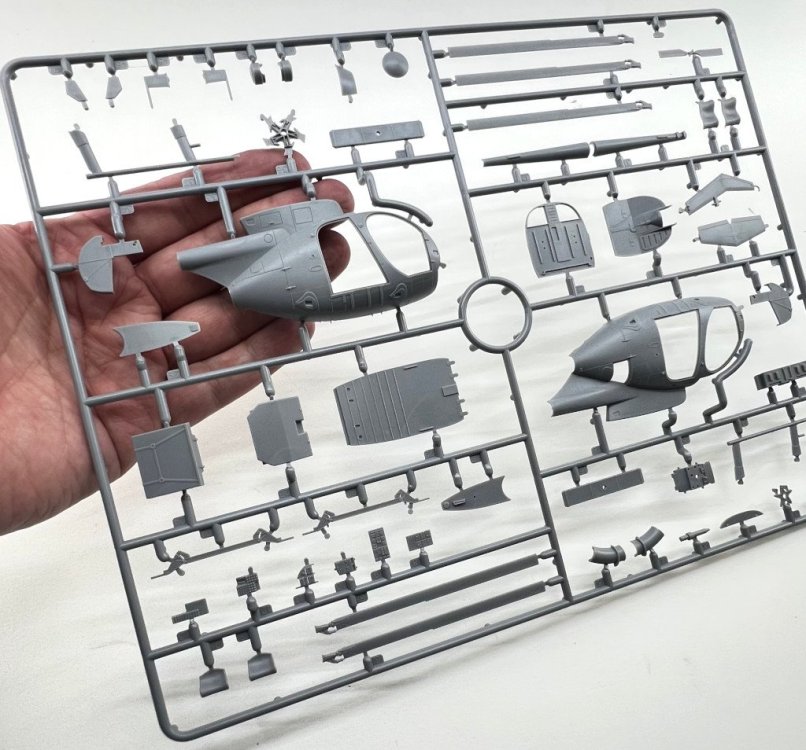
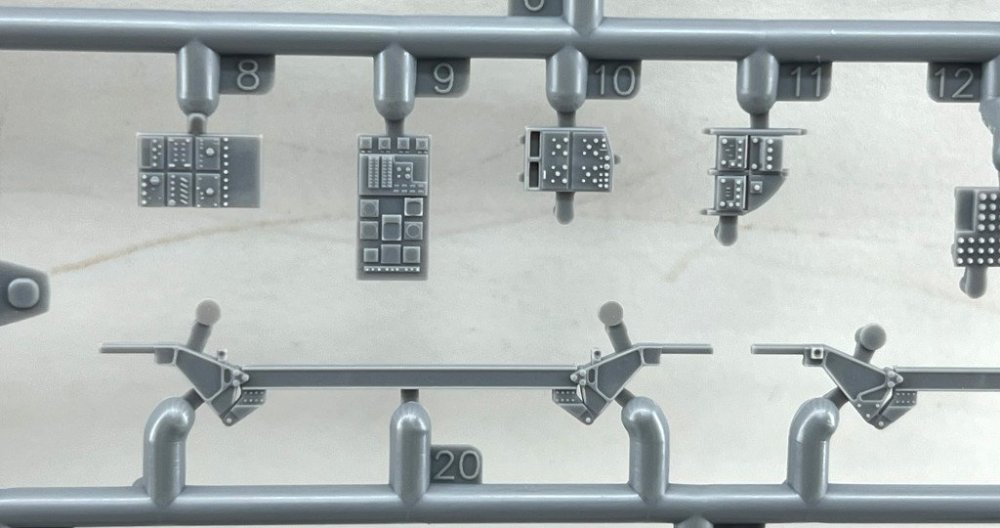
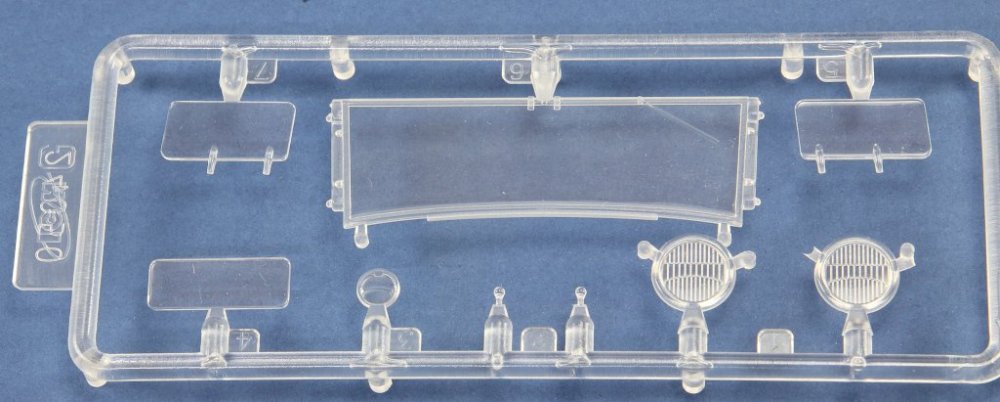
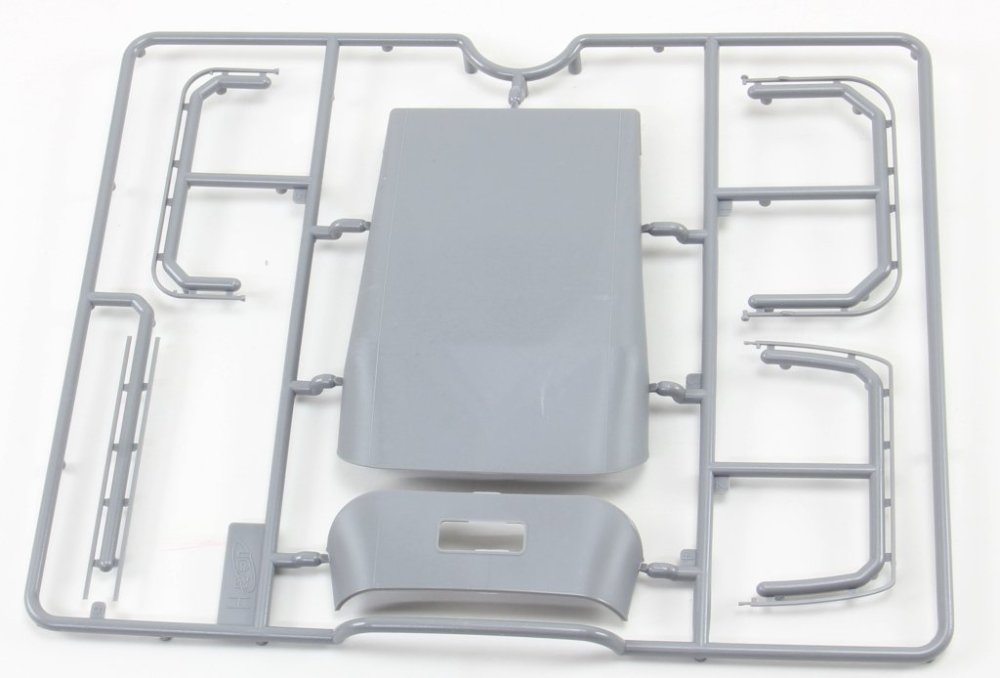
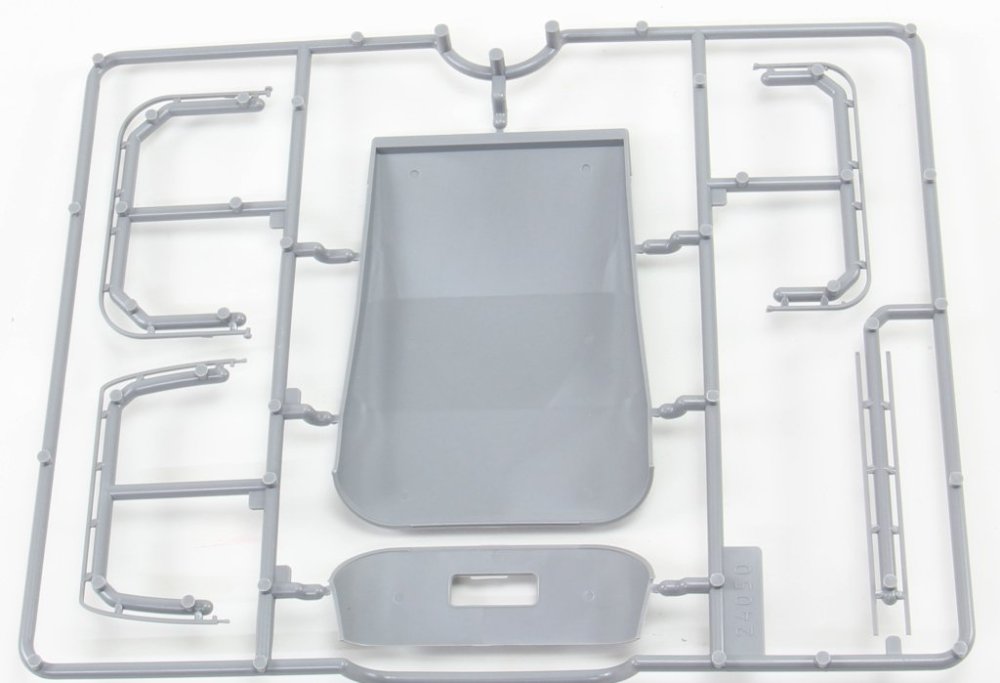
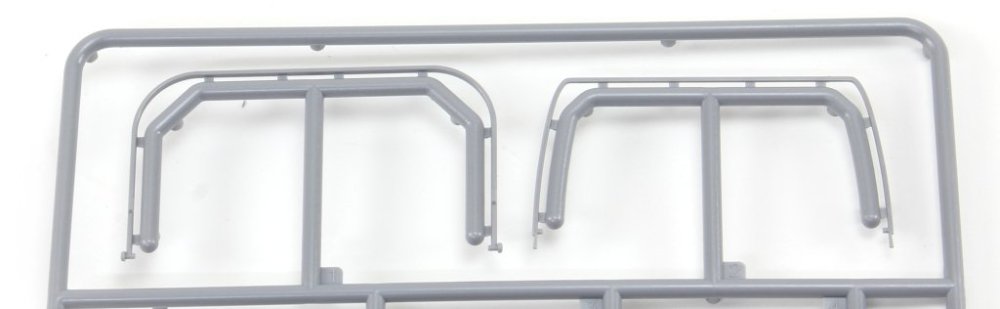
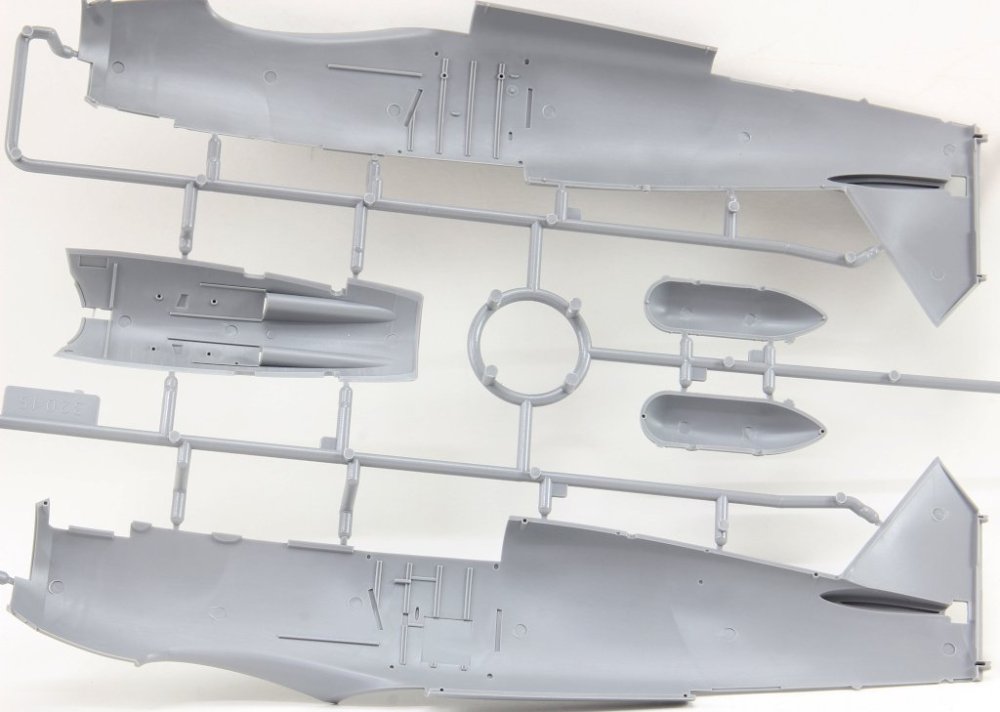
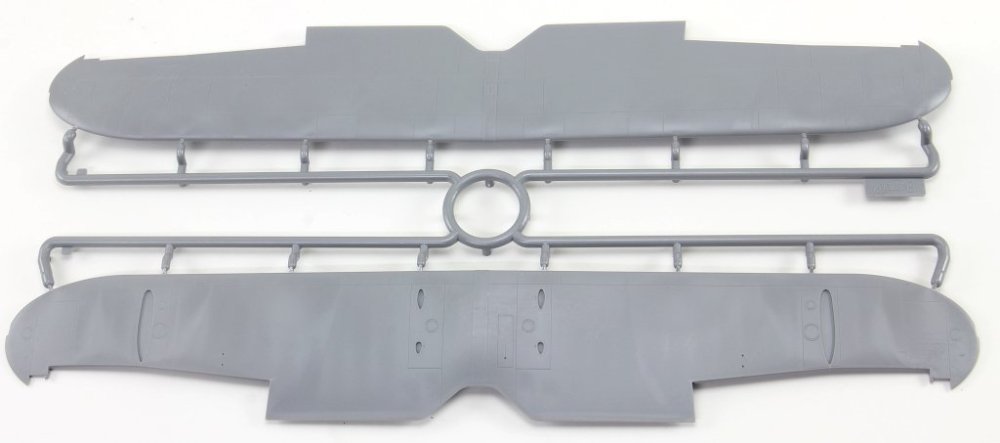
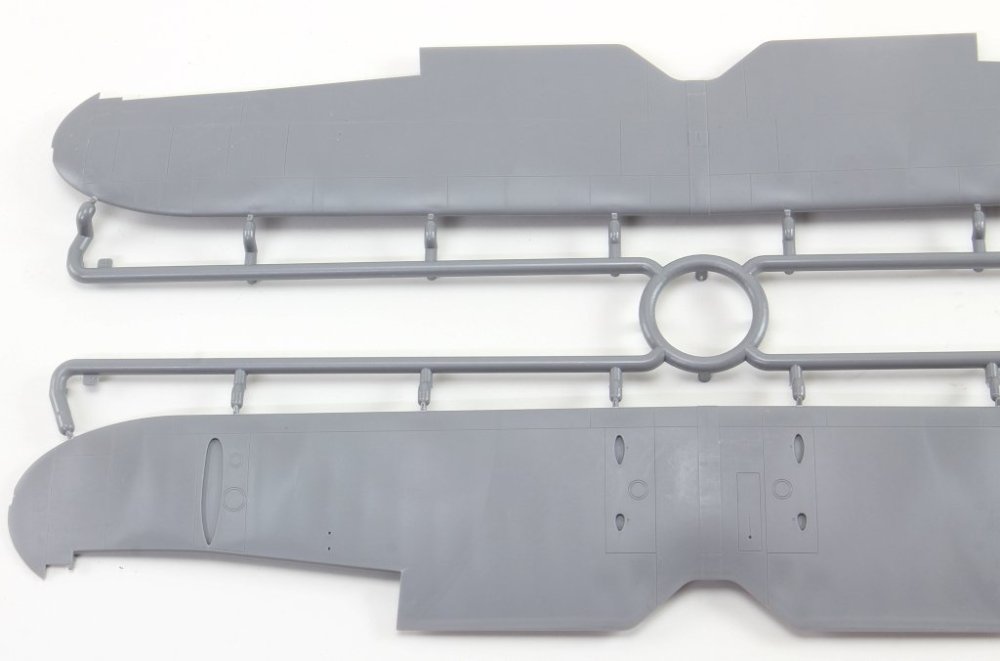
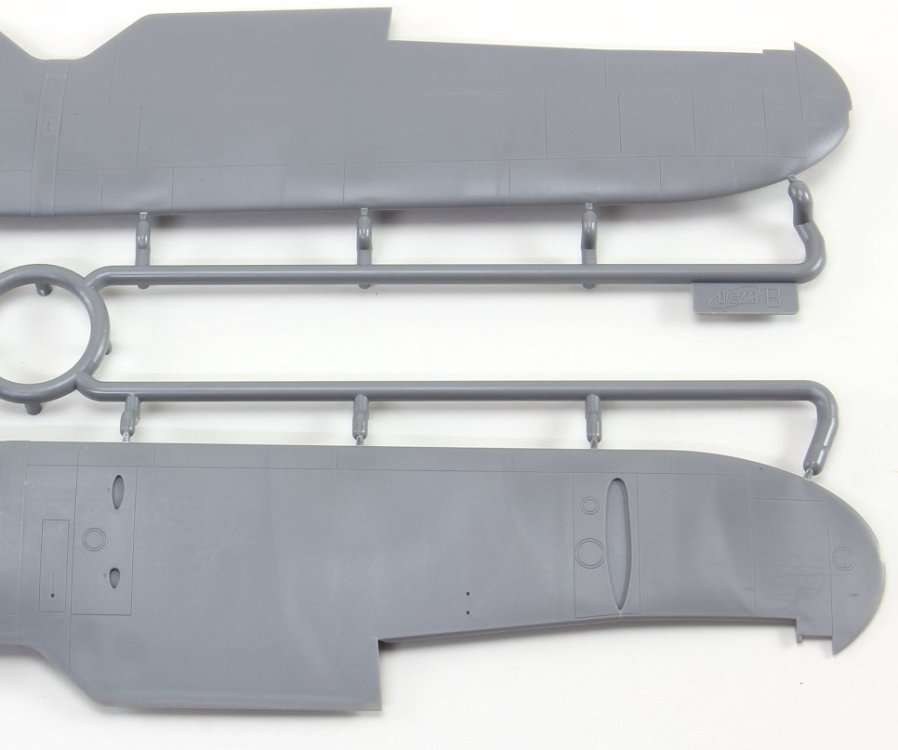
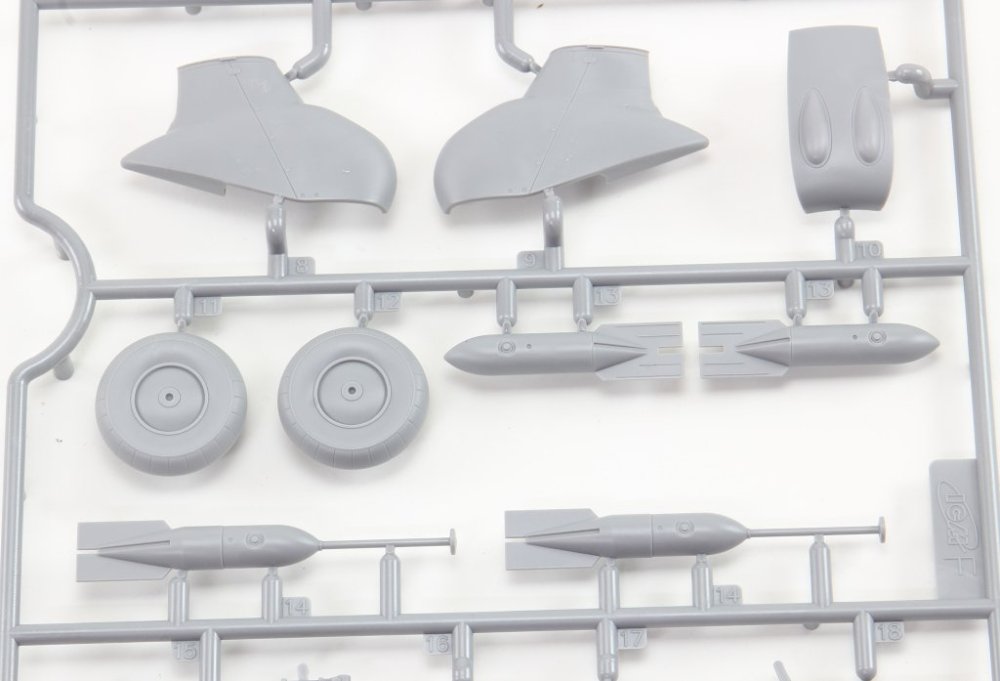
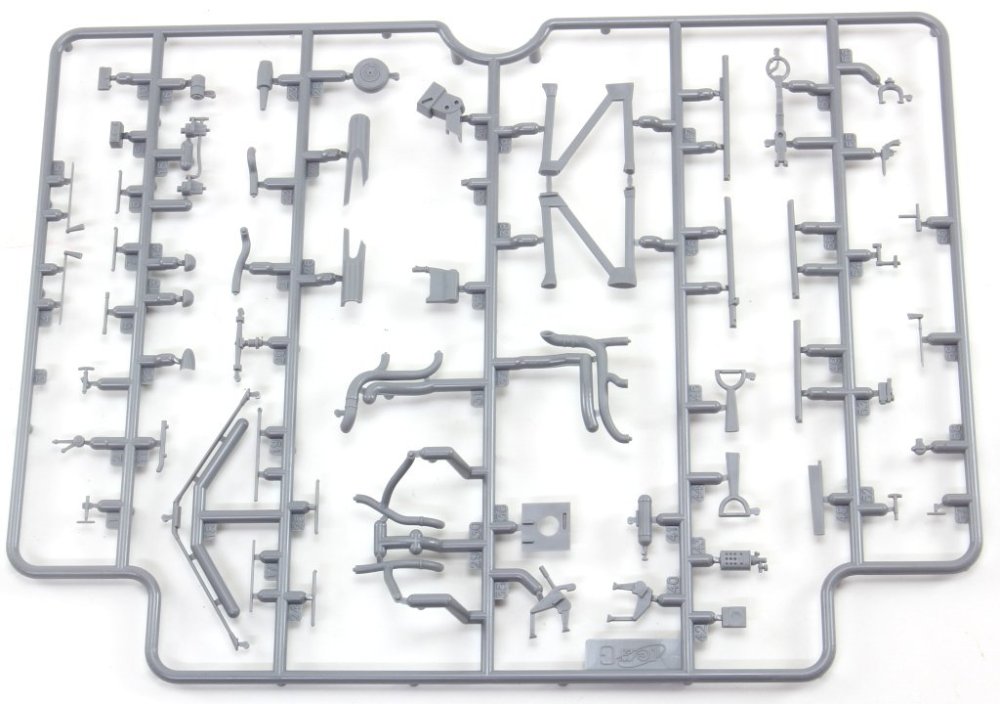
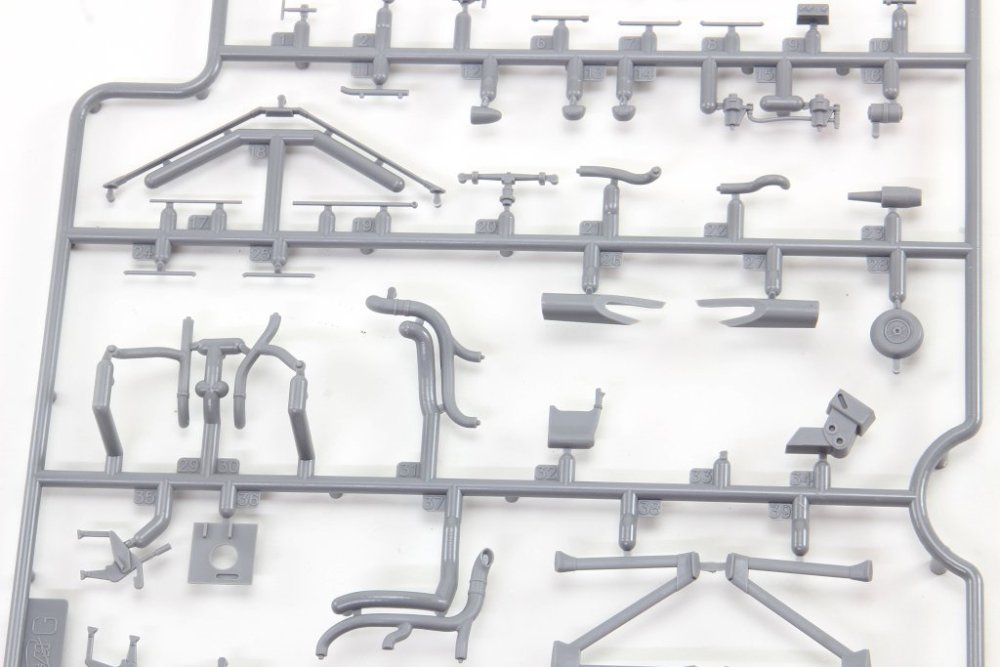
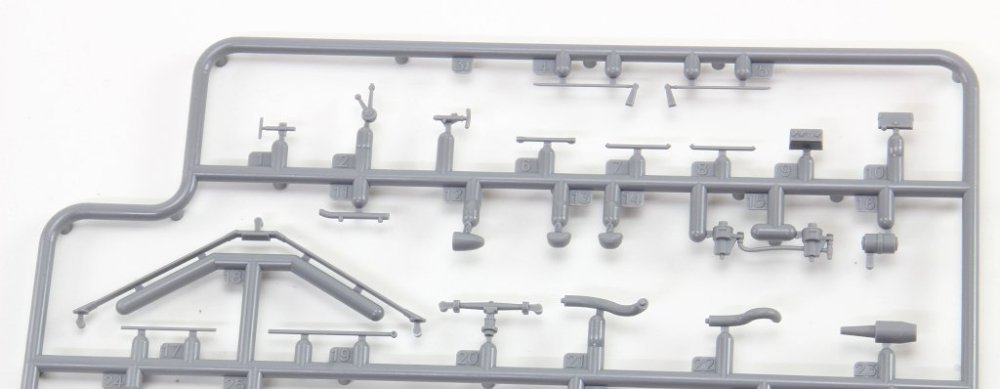
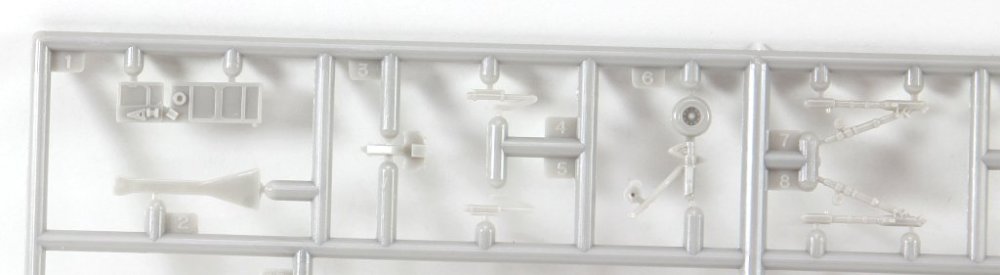
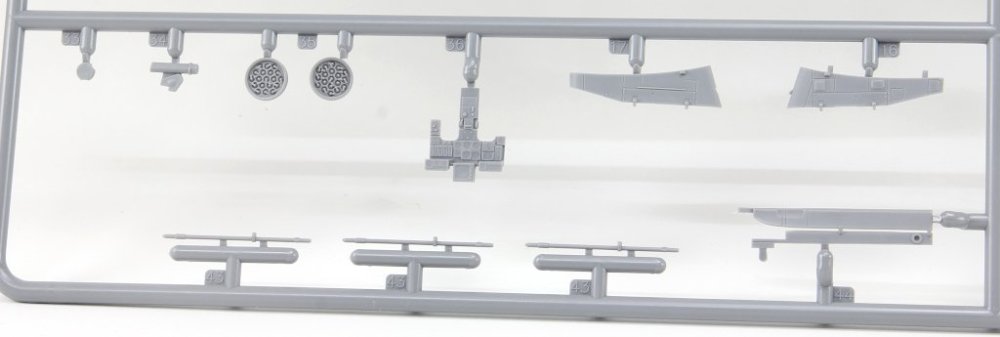
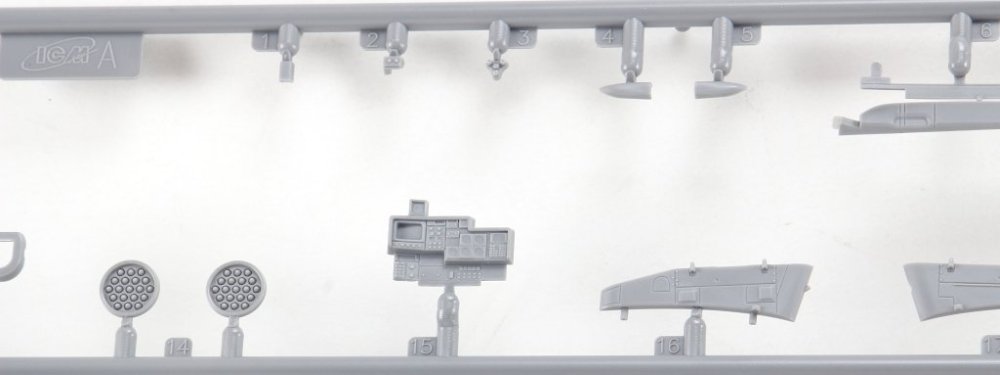
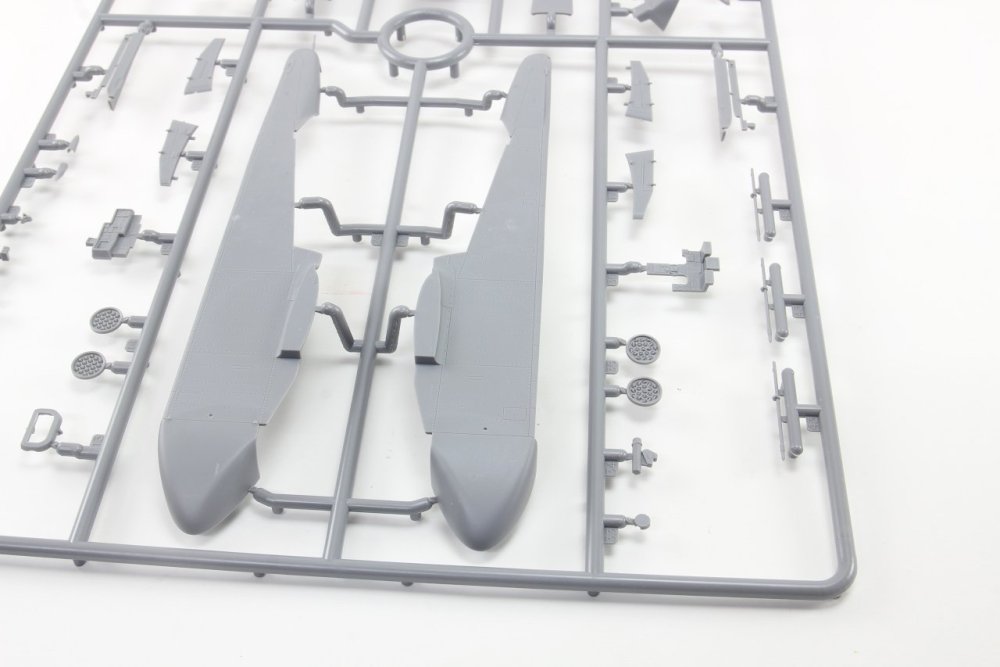
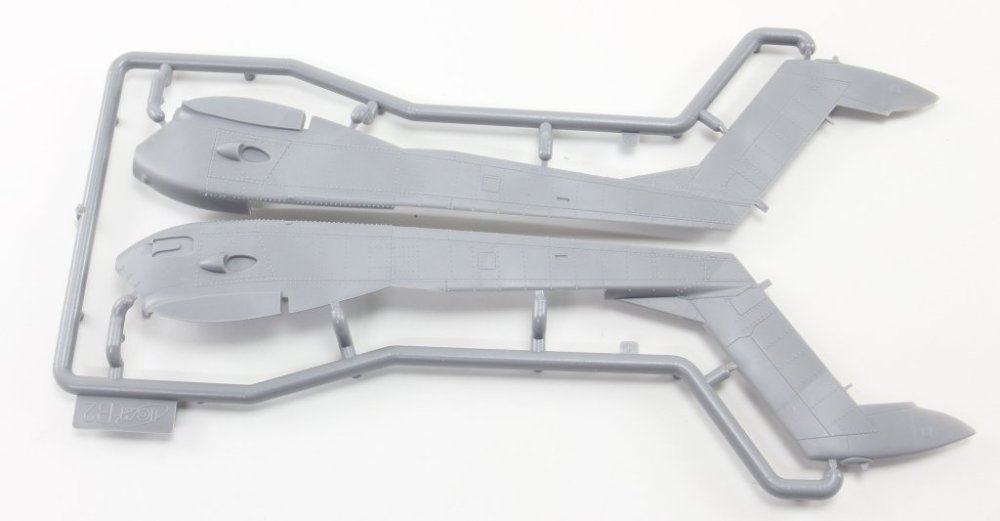
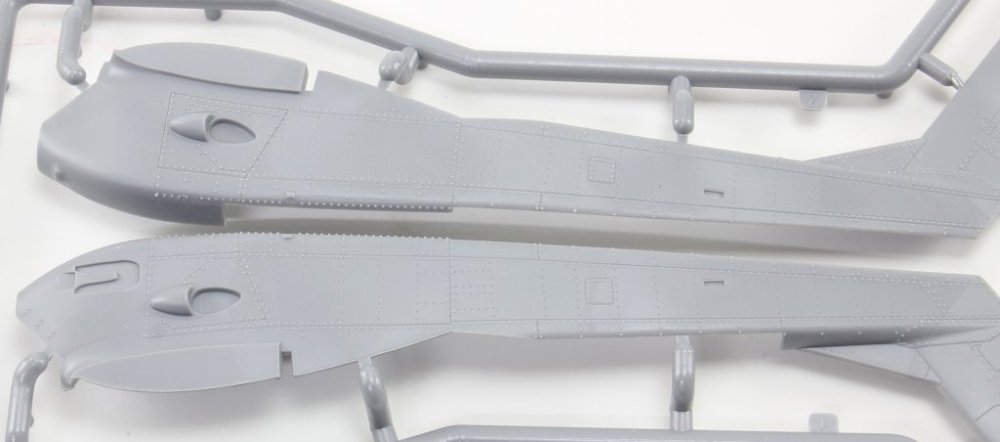
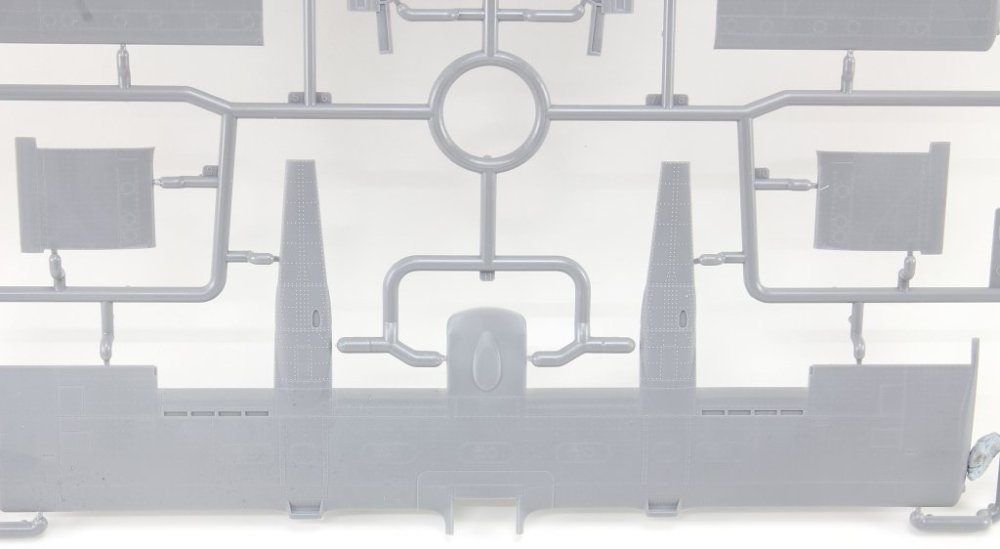
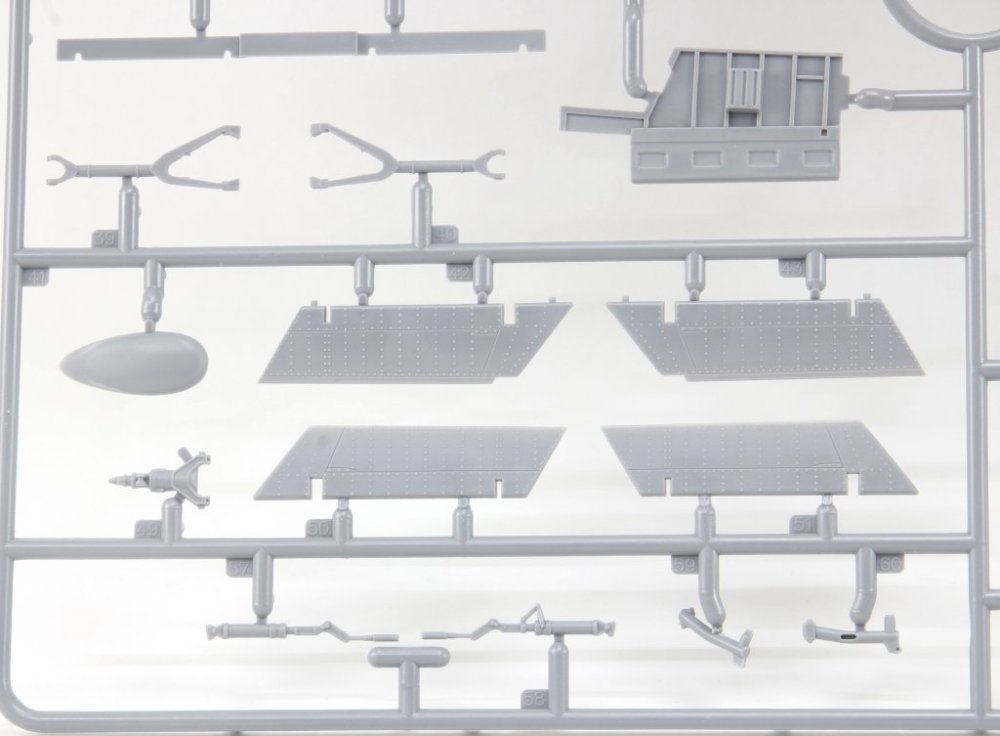
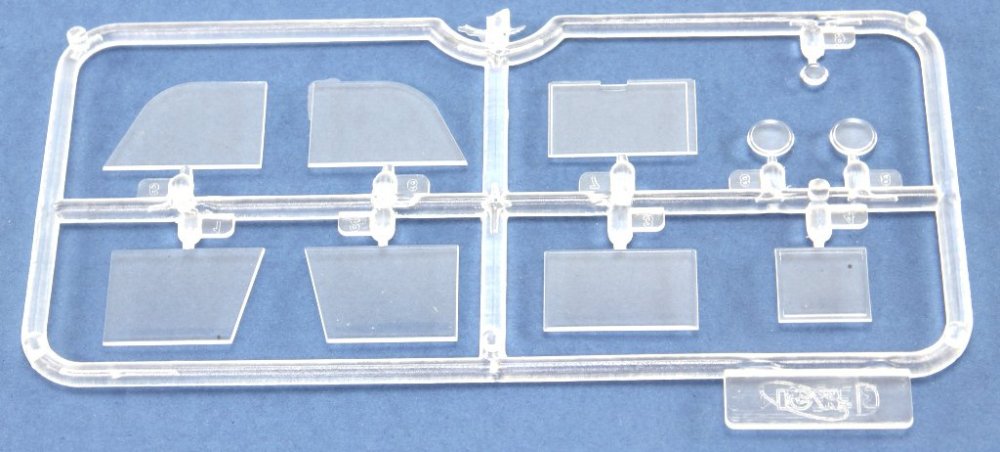
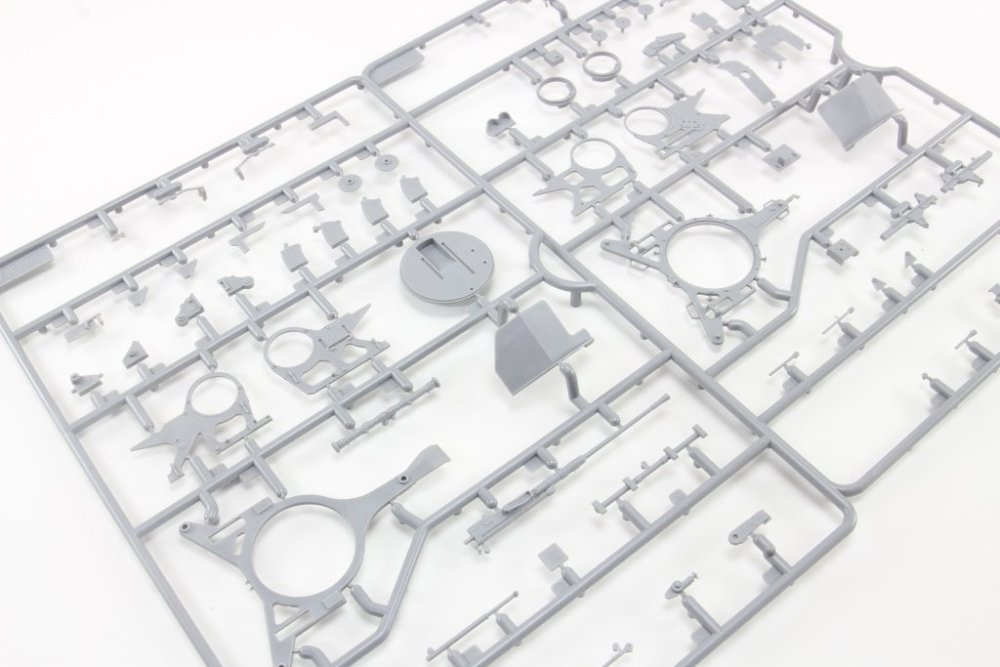
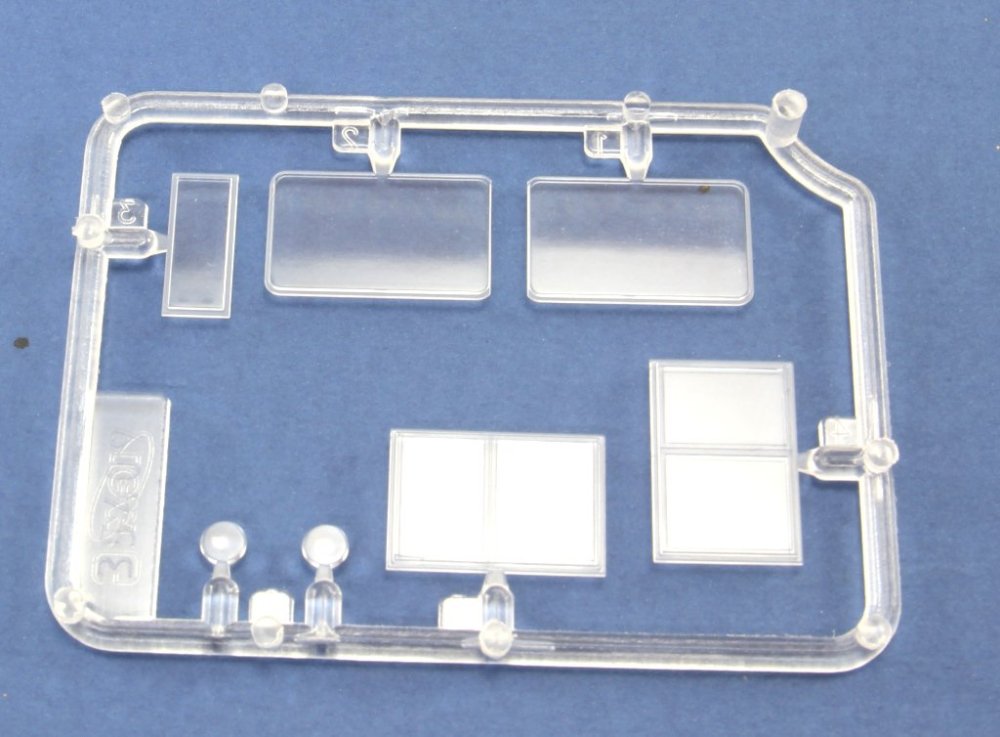
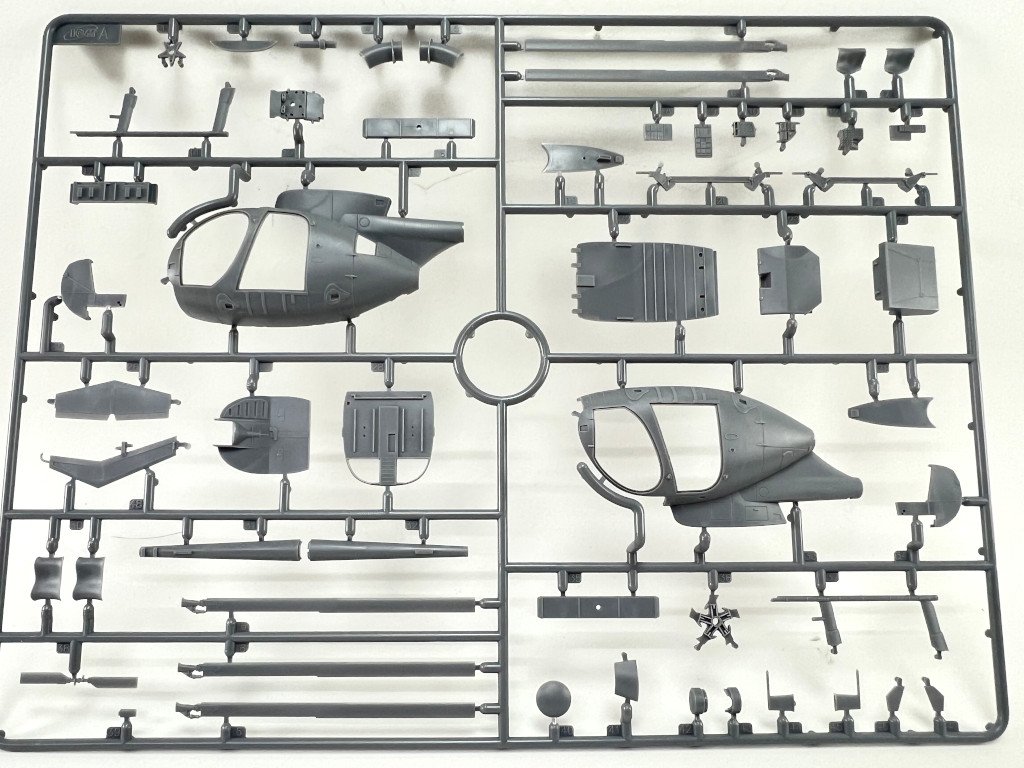
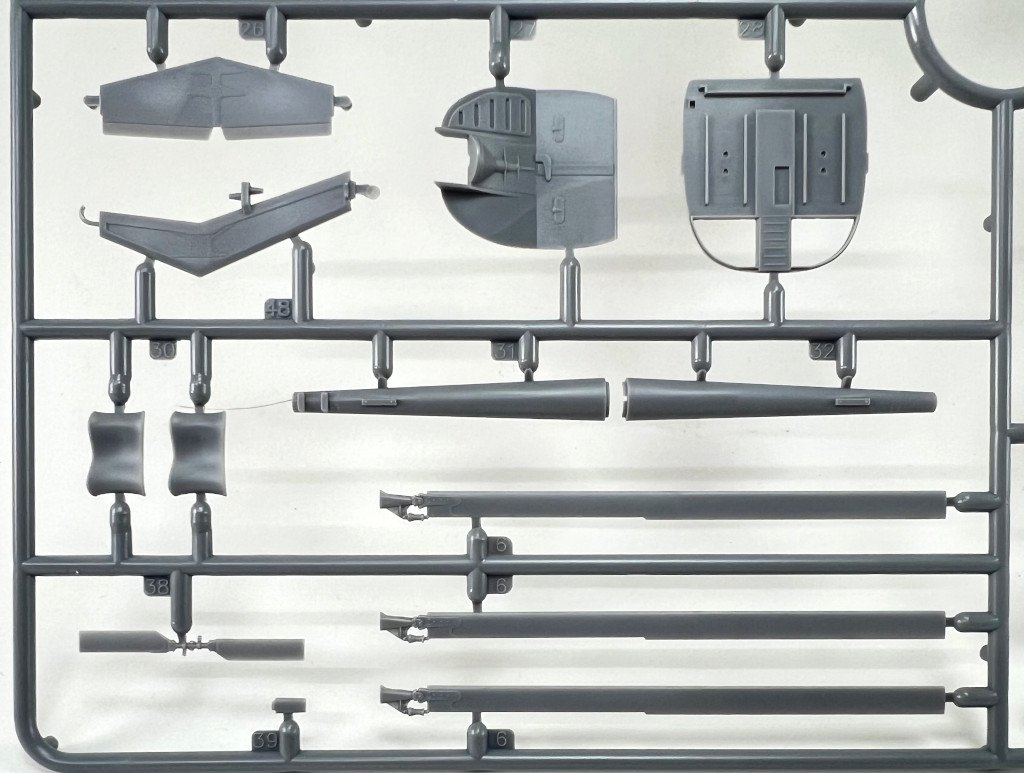
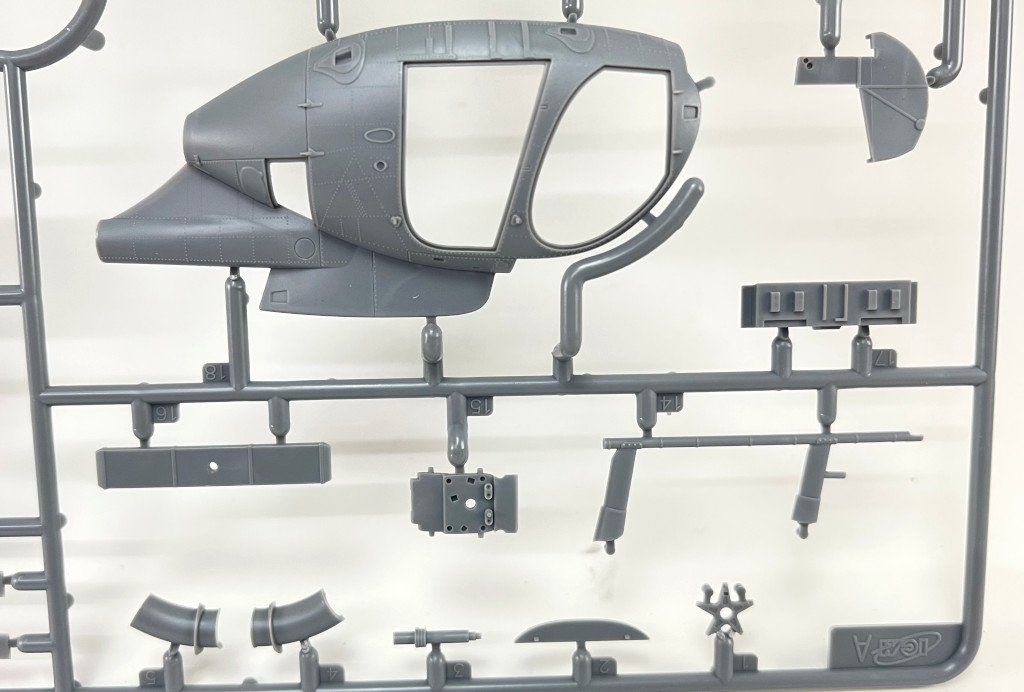
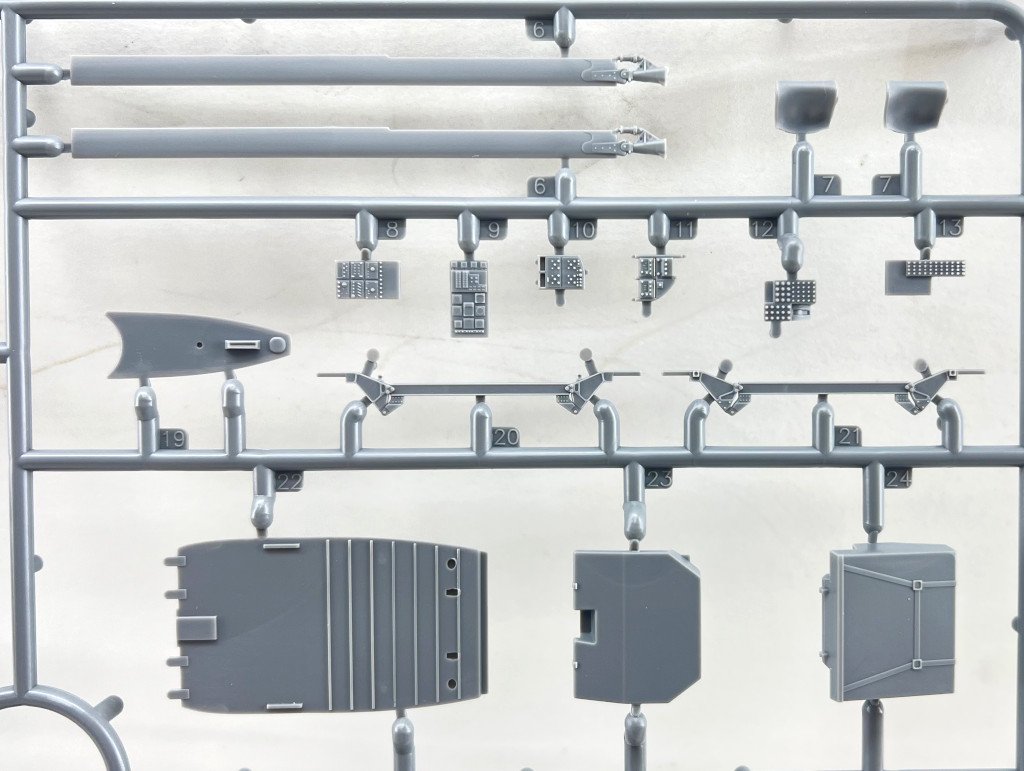
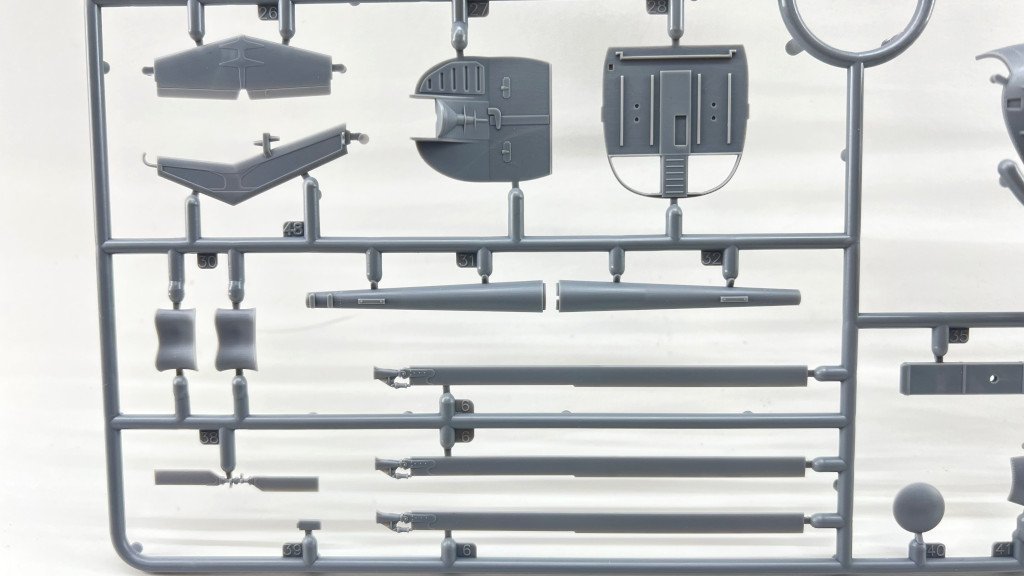
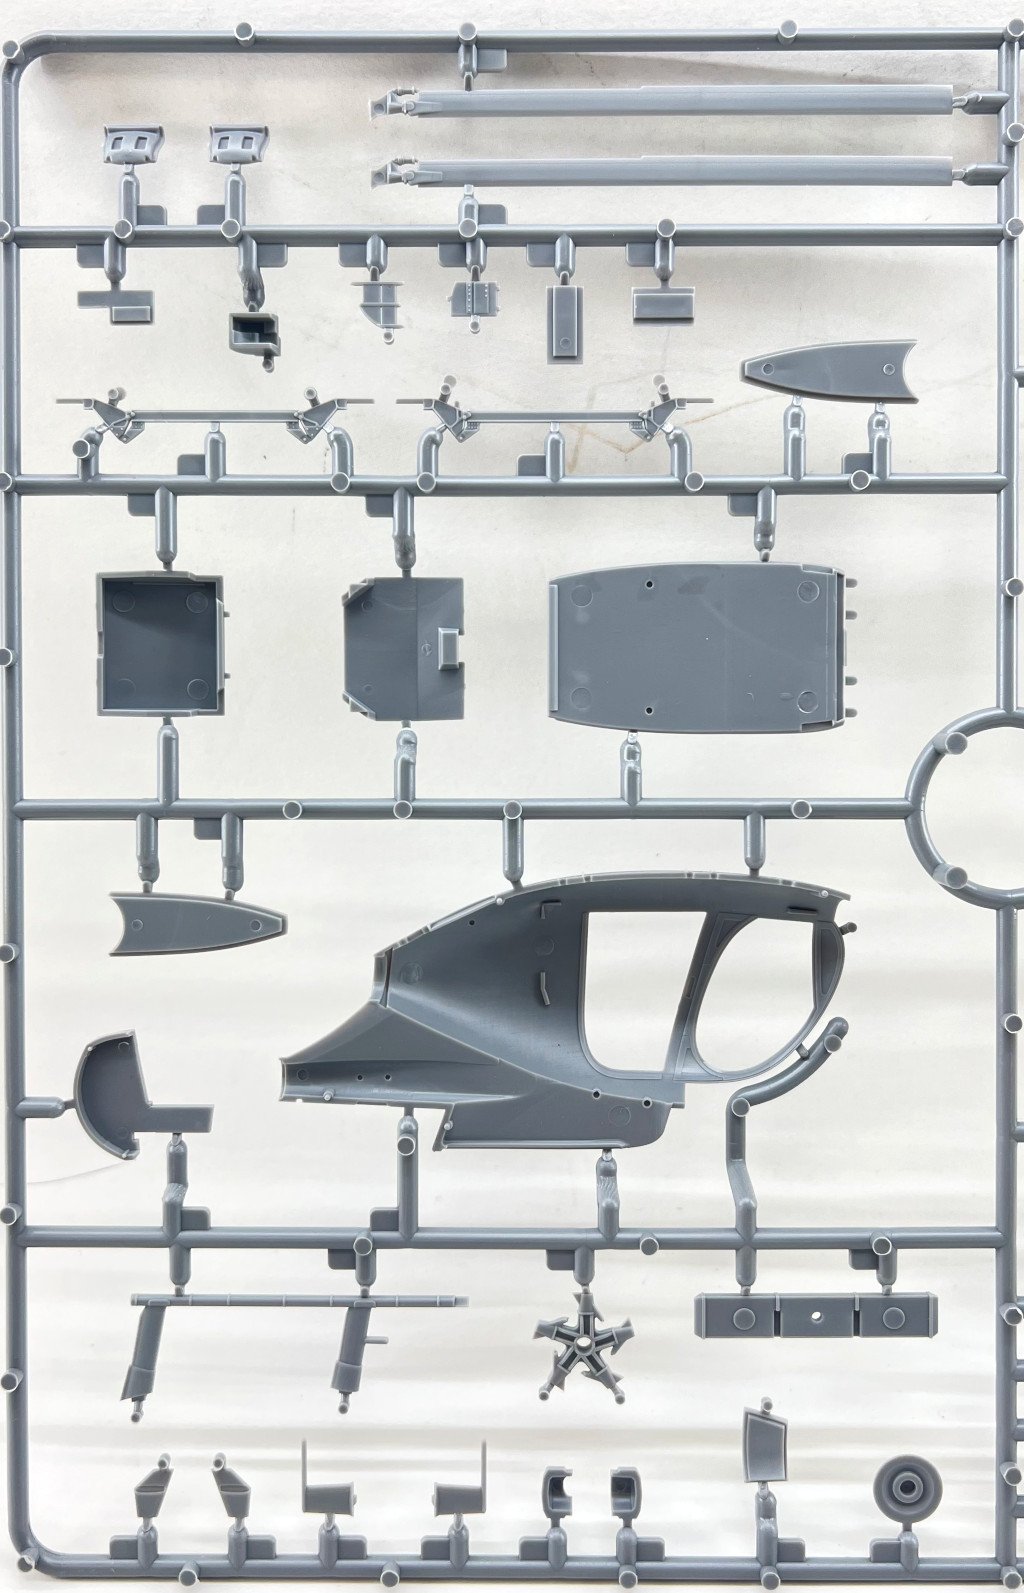
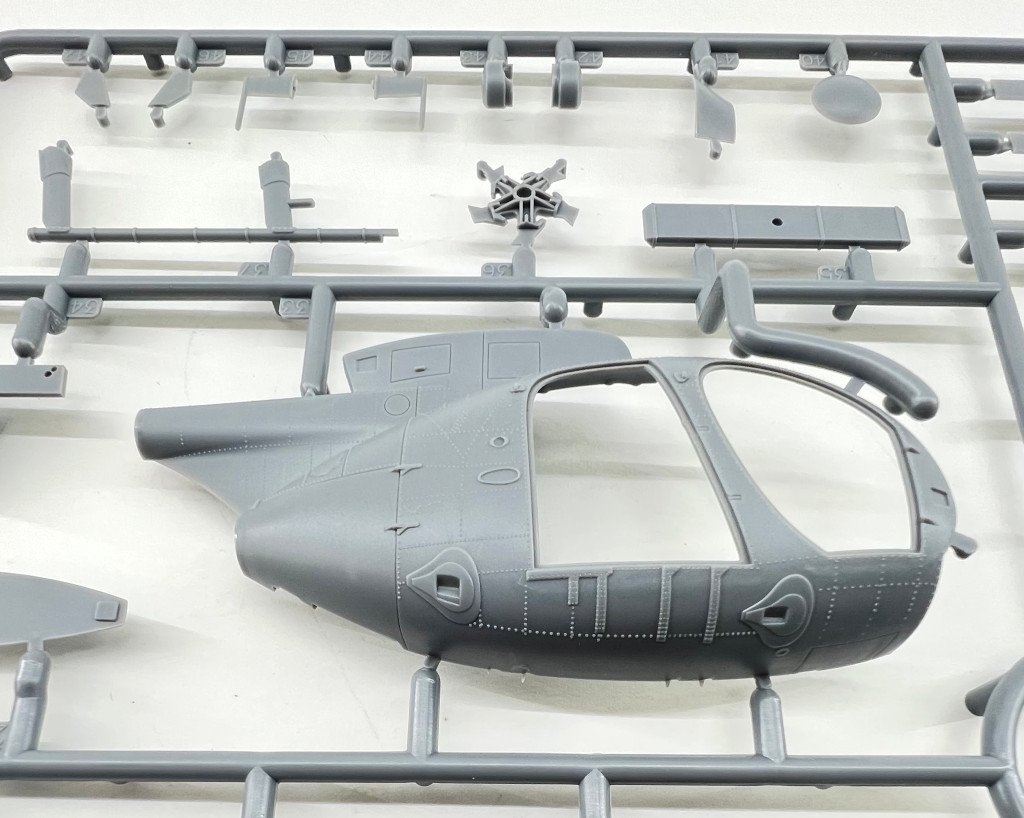
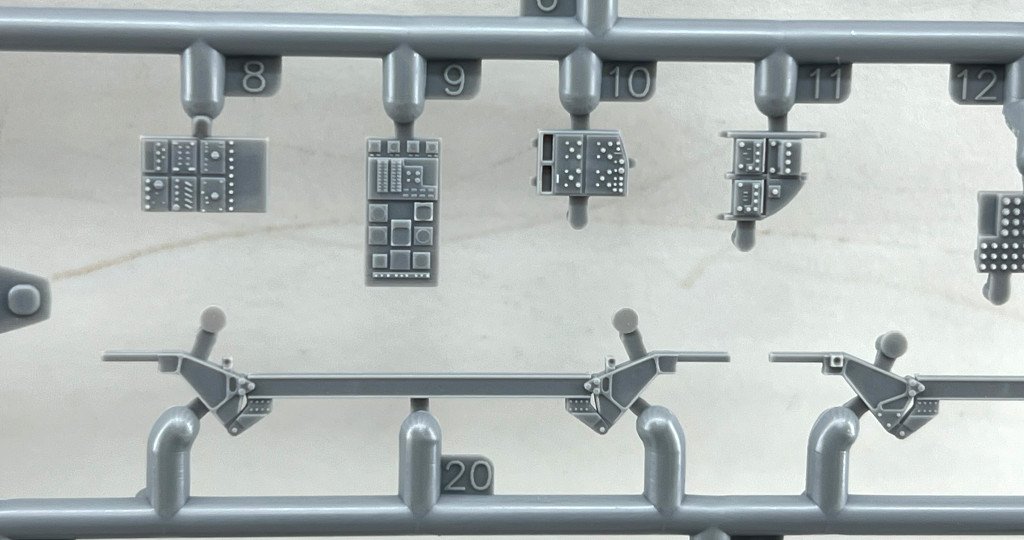
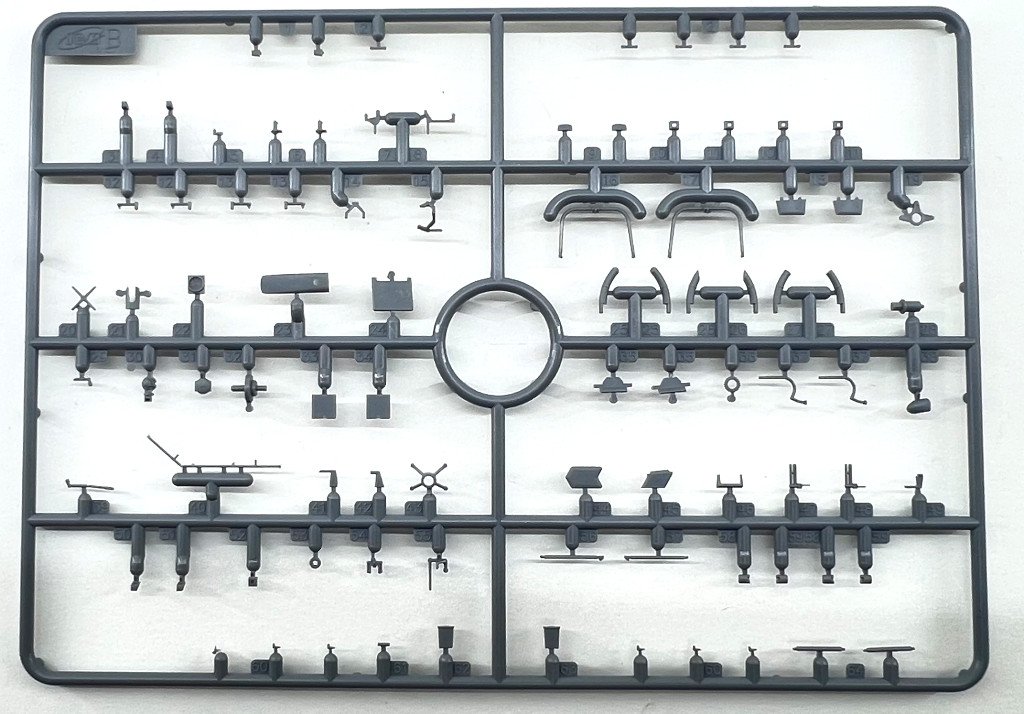
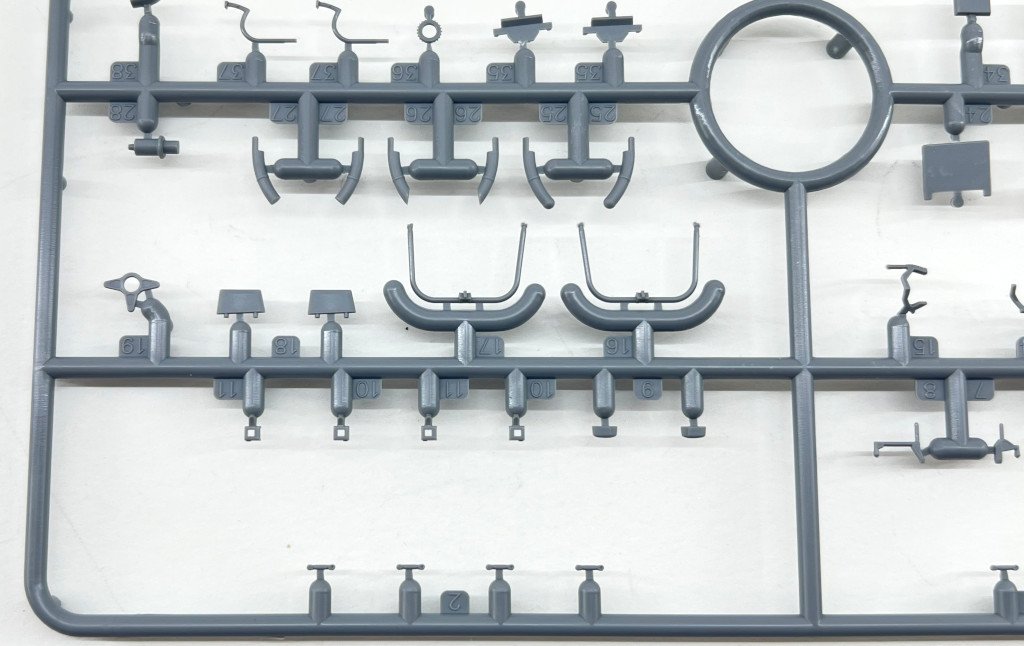
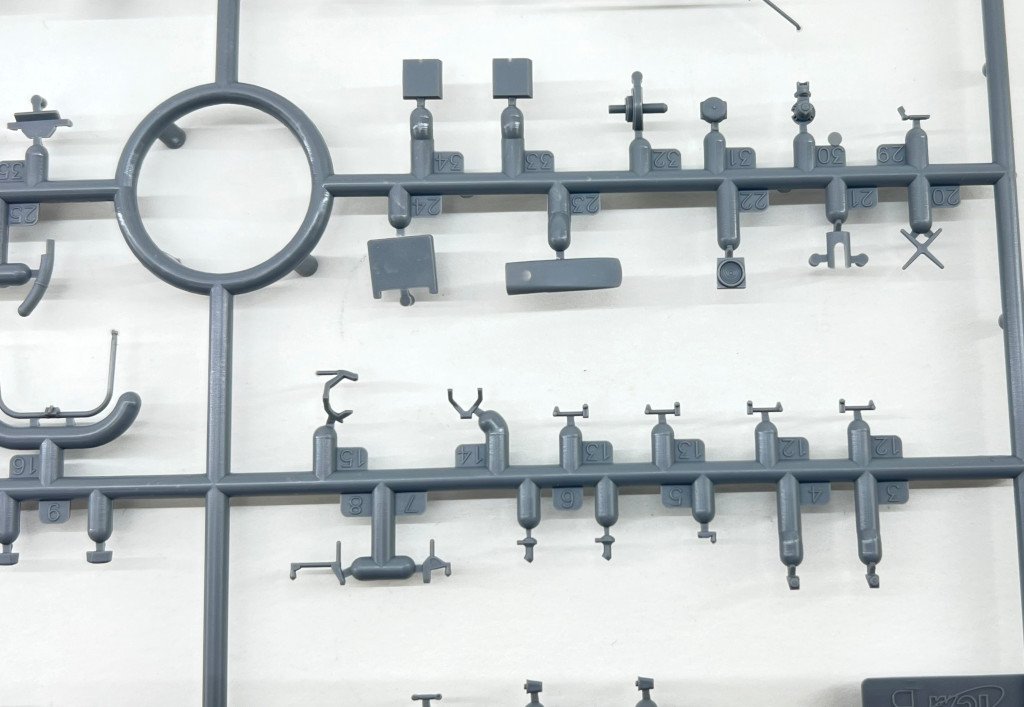
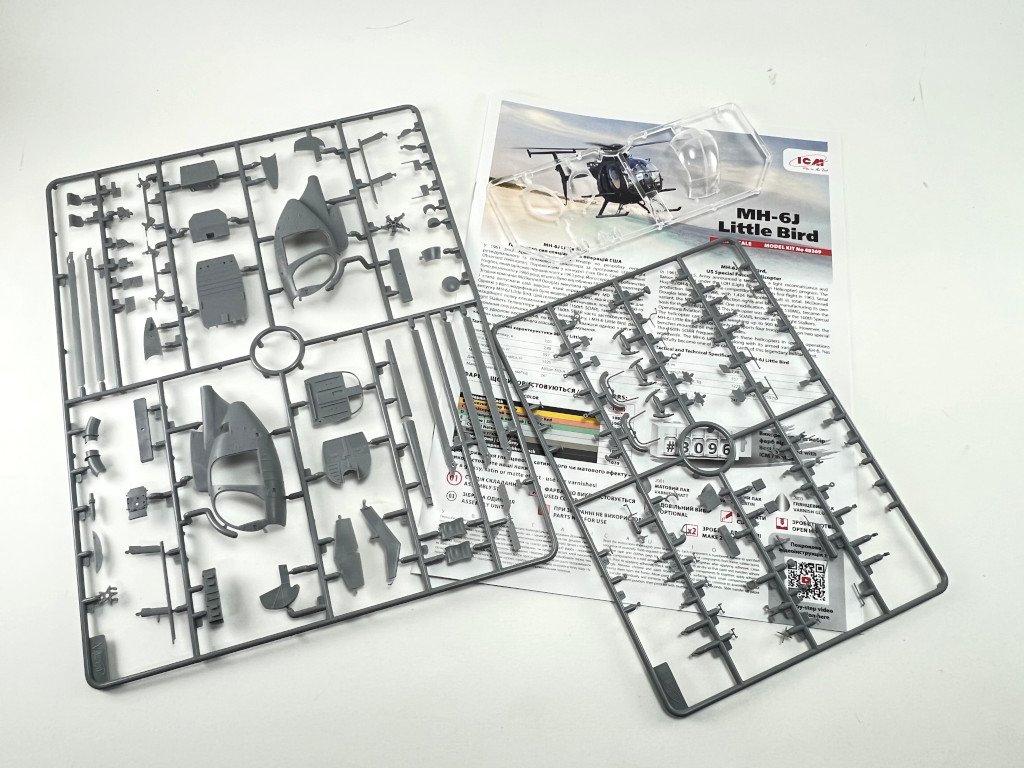
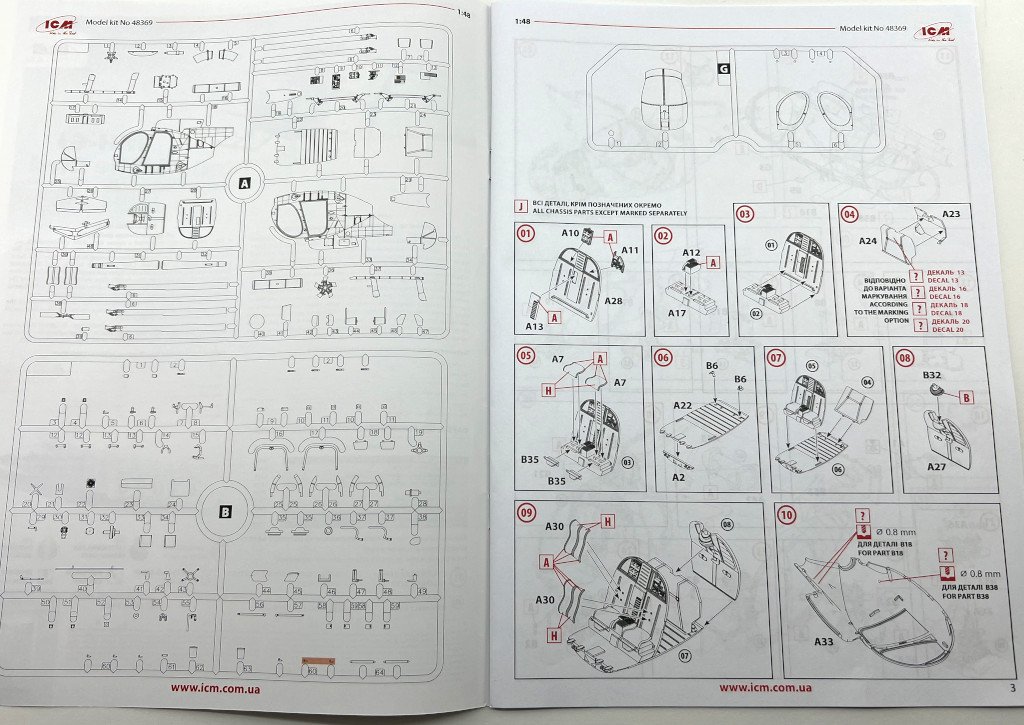
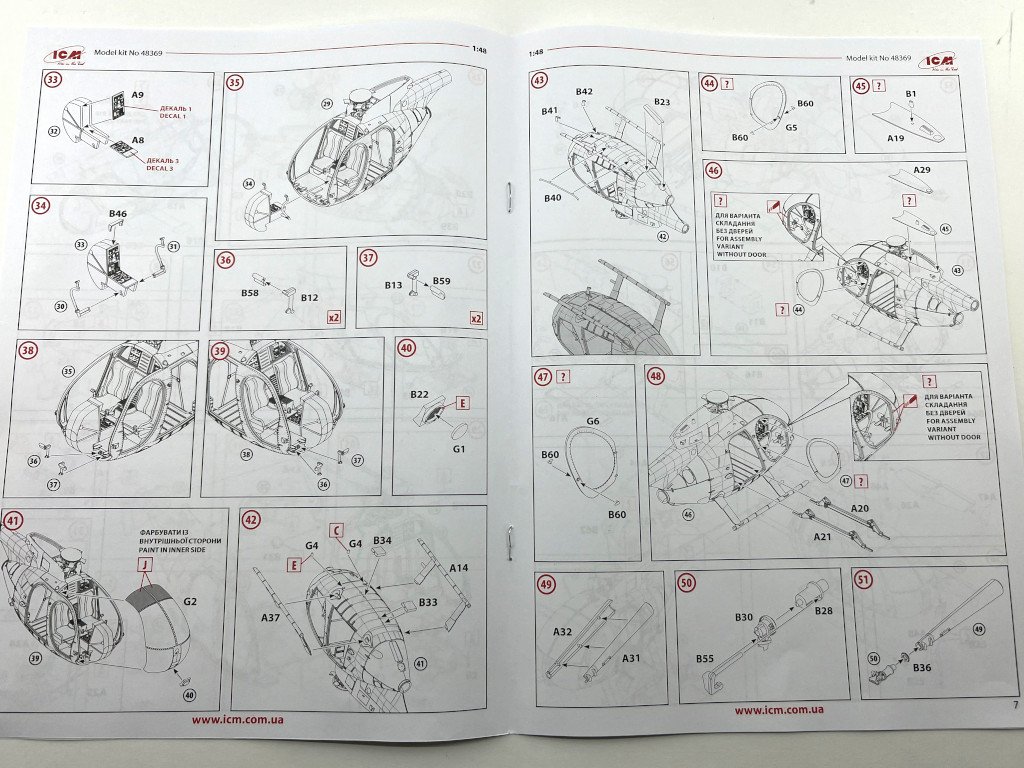
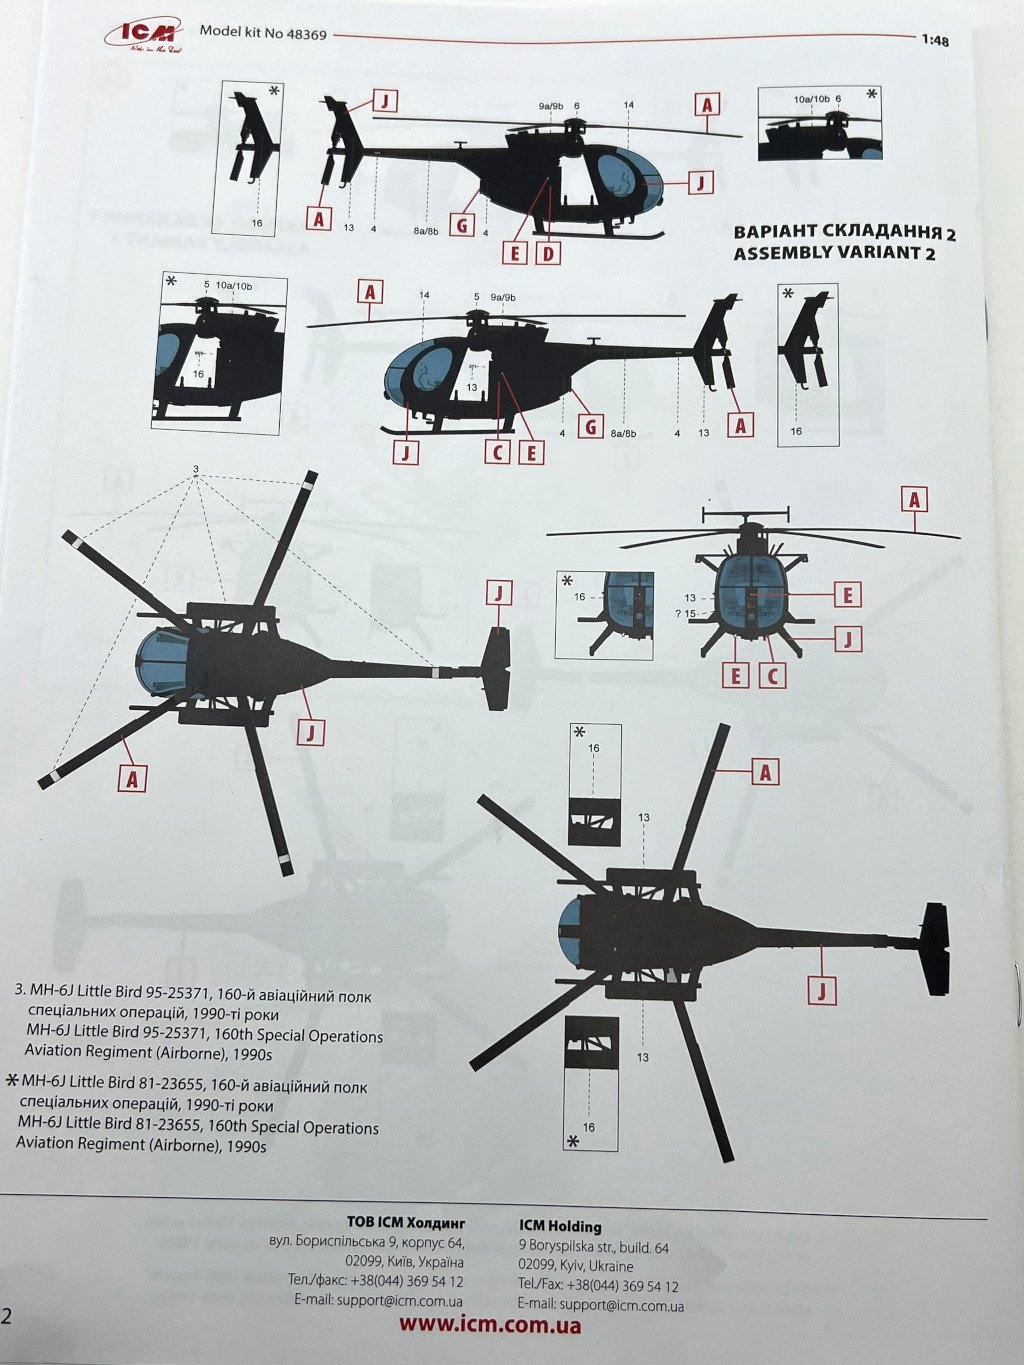
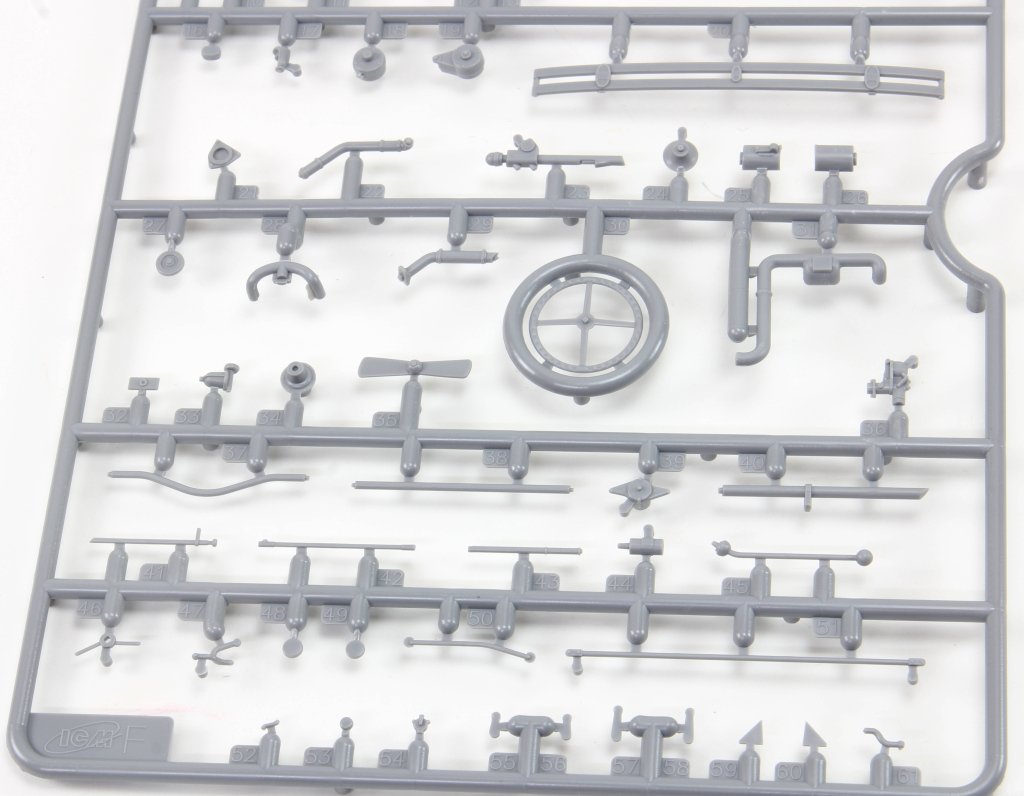
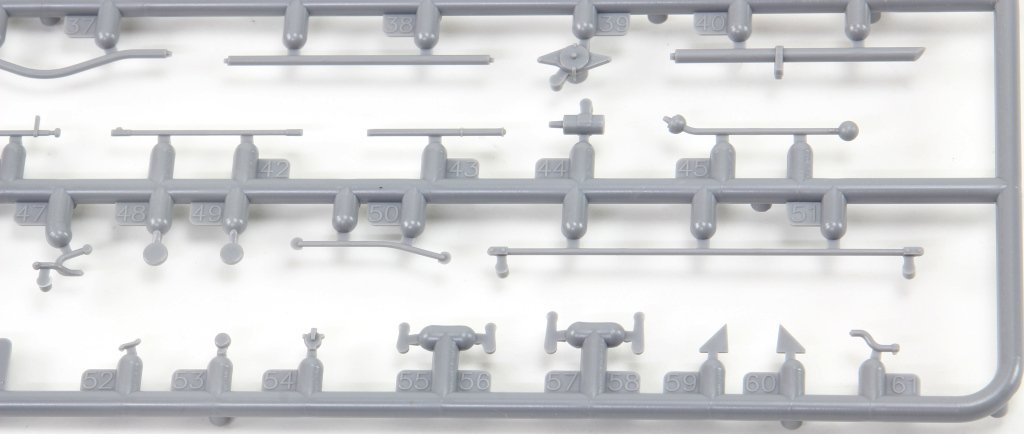
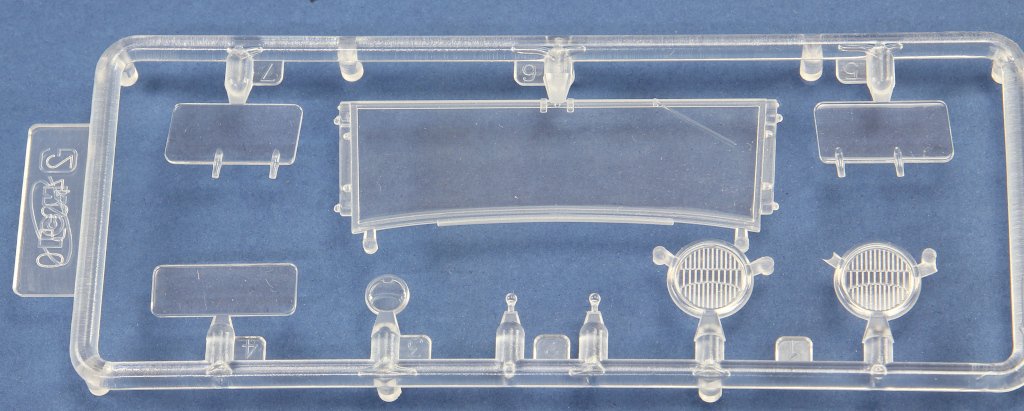
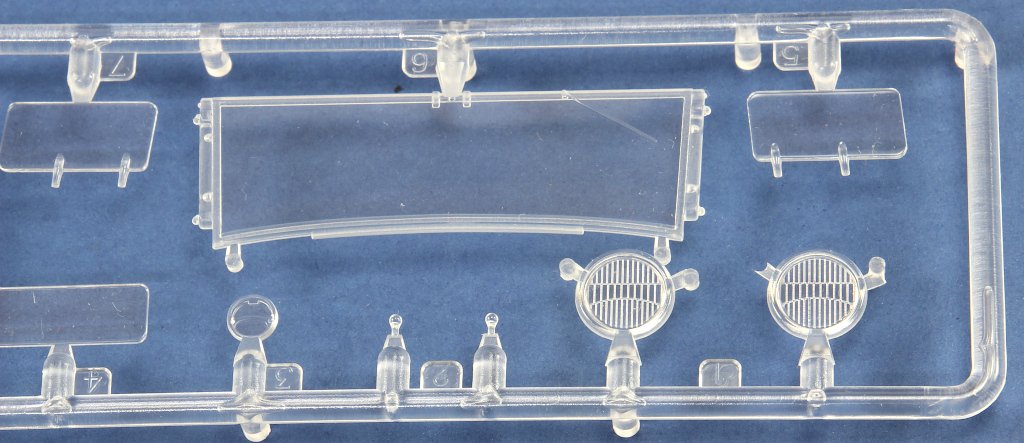
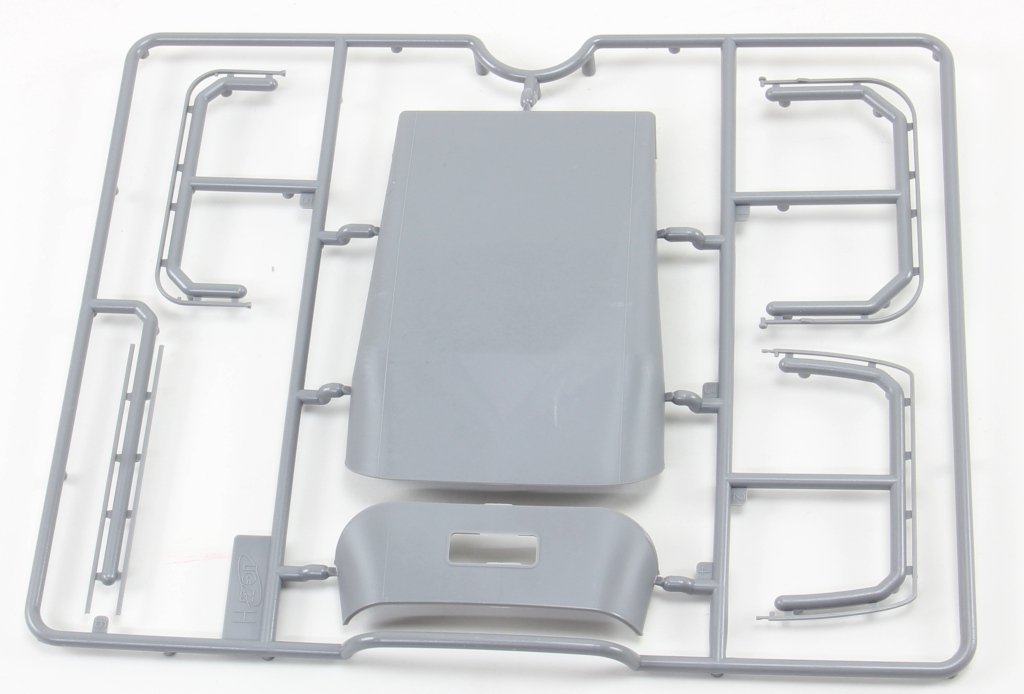
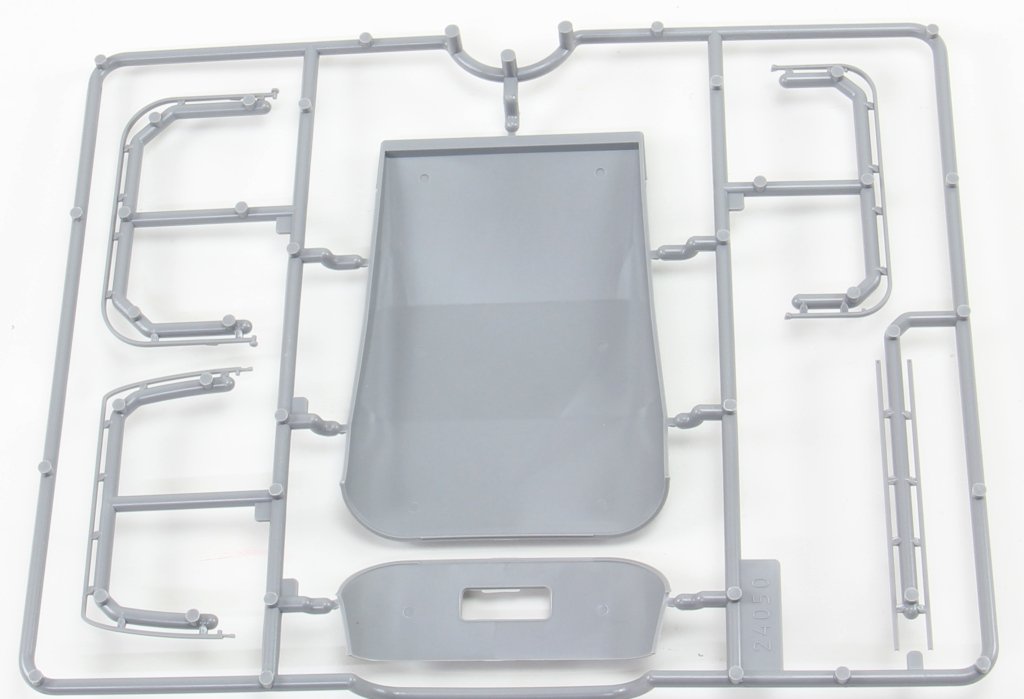
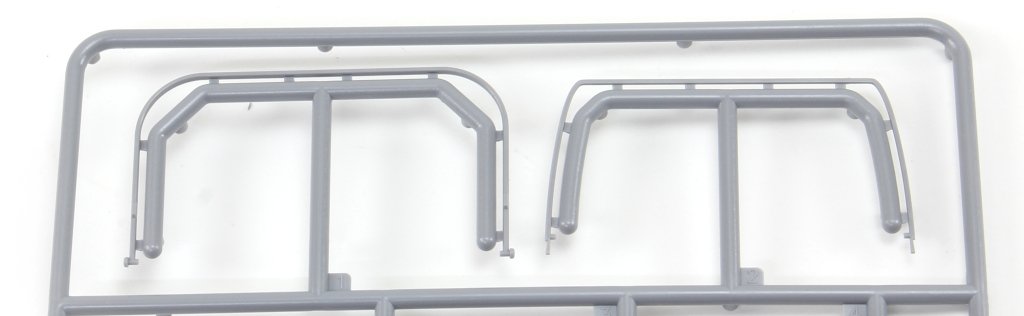
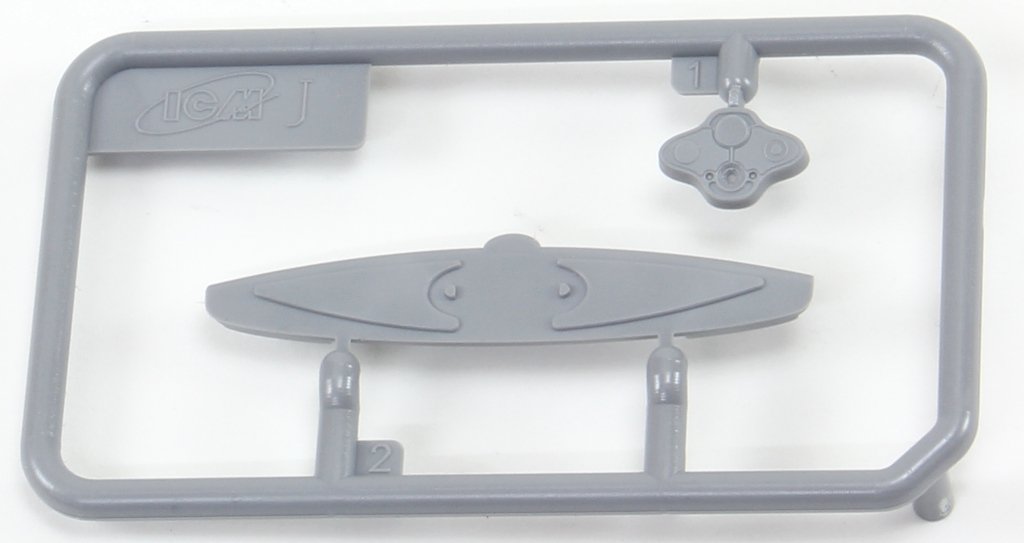
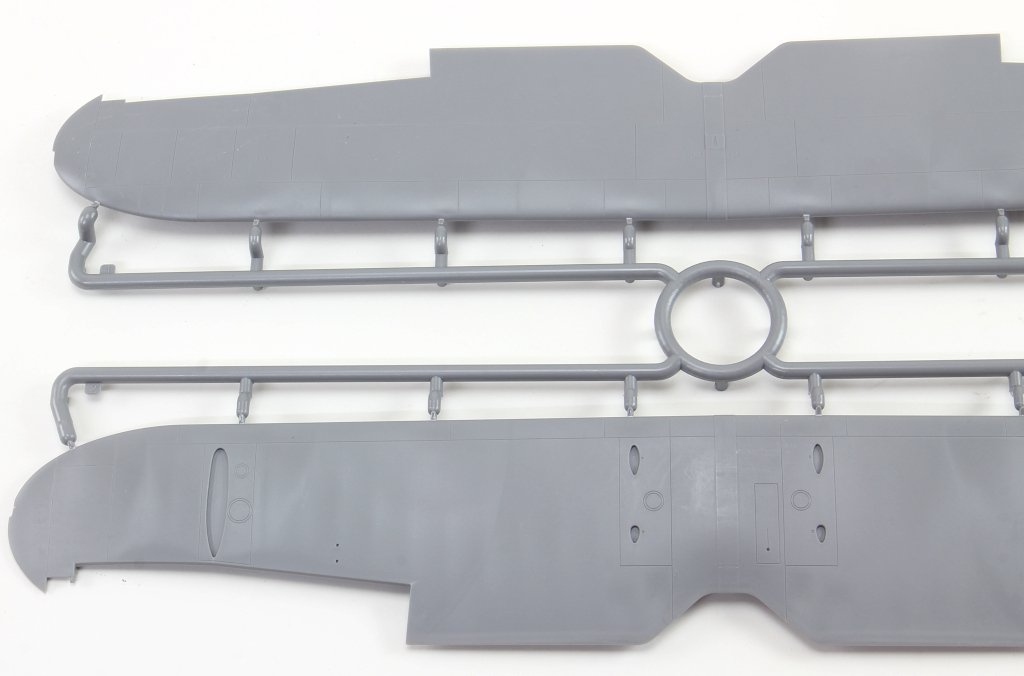
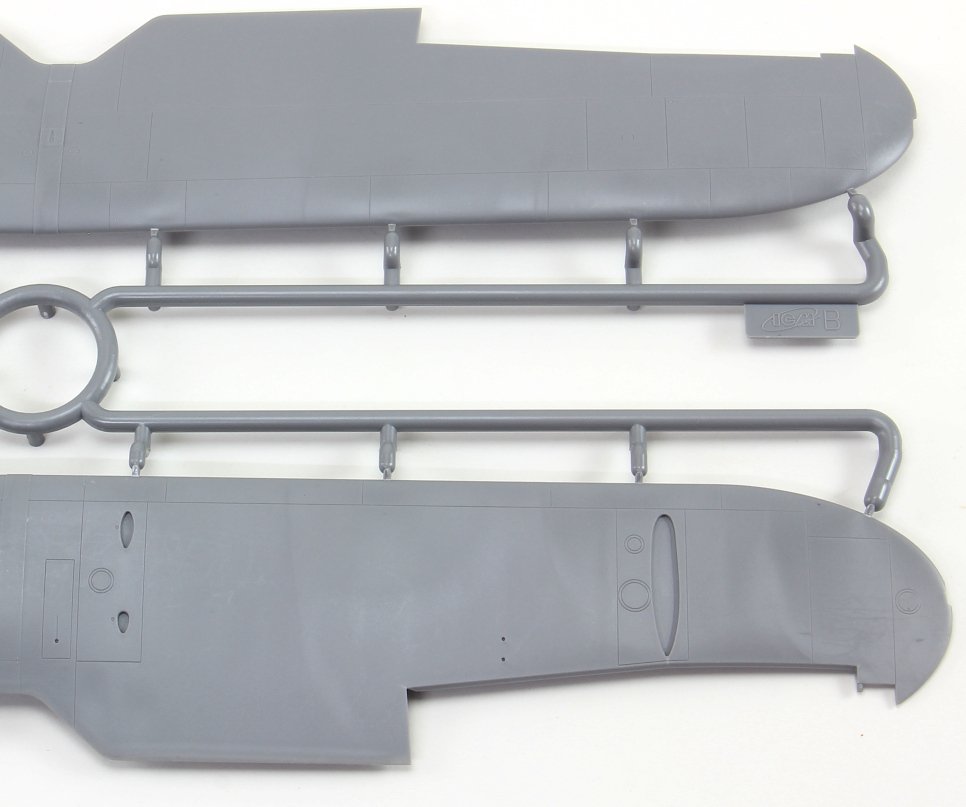
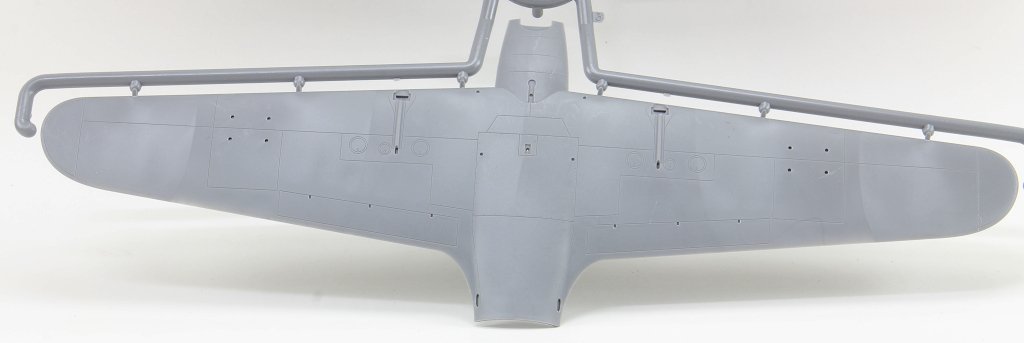
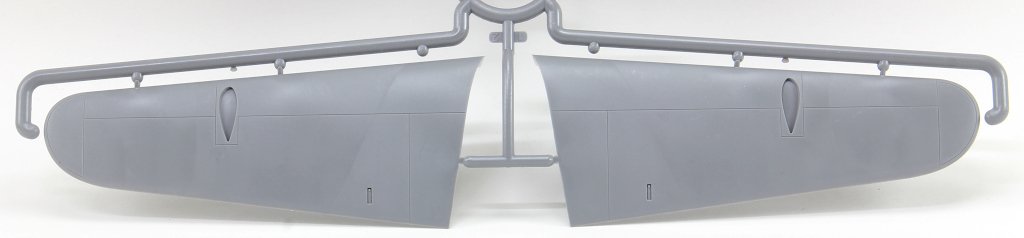
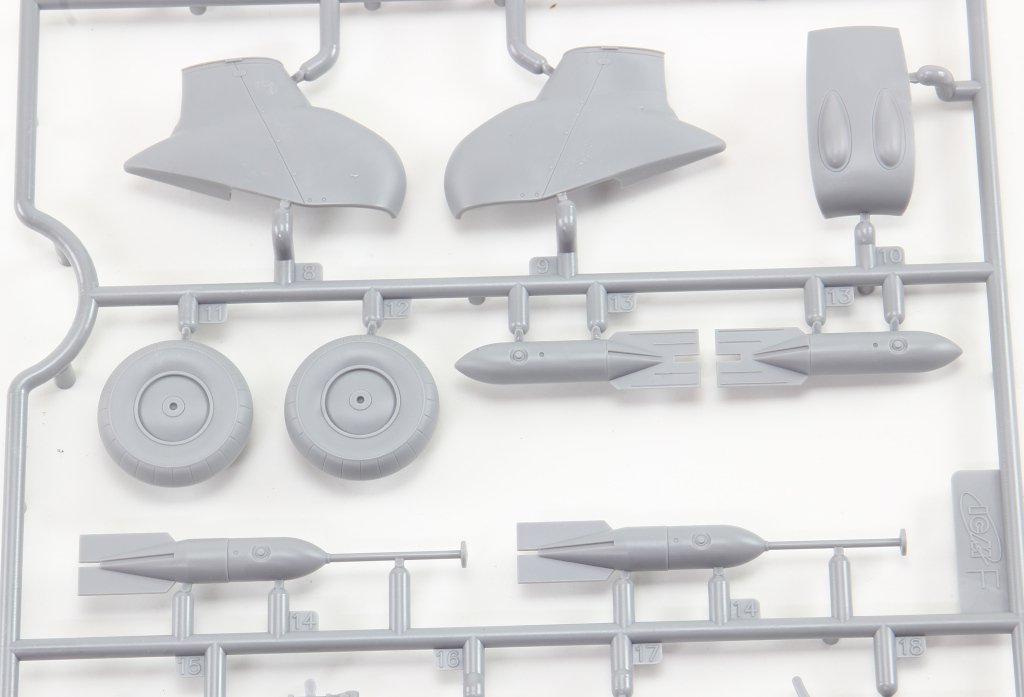
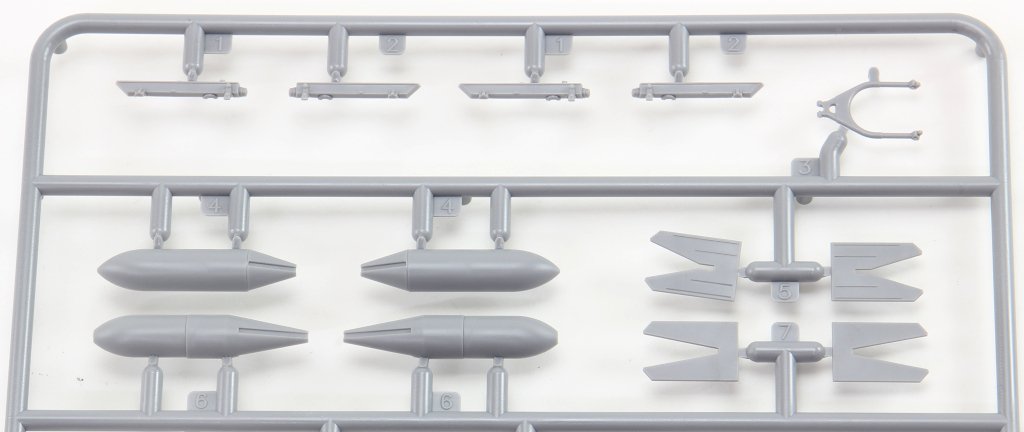
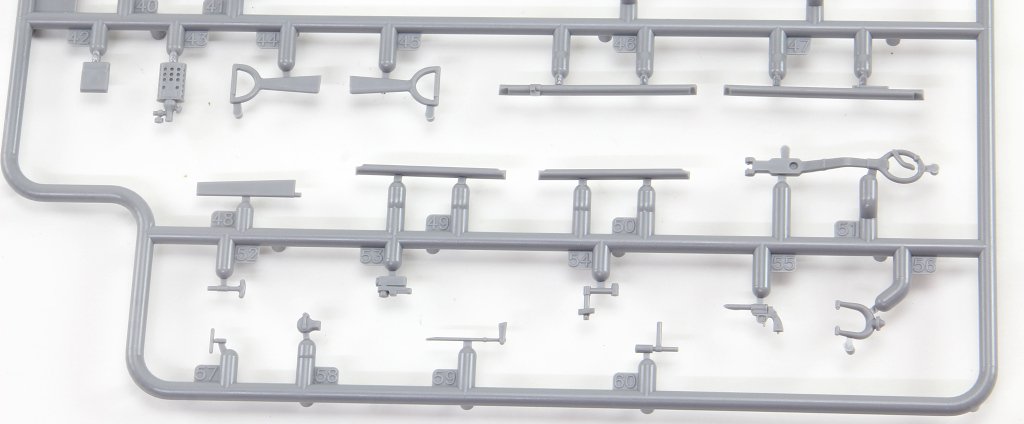
ICM 1:48 MH-6J Little Bird US special Forces Helicopter Ref: 48369 Price Tag : 31,20€ Available here Introduction The MH‑6J Little Bird is a specialised variant derived from the Hughes/MD 500 family, originally developed under the 1960s LOH program and later refined to meet the needs of the 160th Special Operations Aviation Regiment (SOAR), the famed Night Stalkers. Designed for rapid insertion and extraction of special forces, it combines compact dimensions, exceptional agility, and the ability to carry operators on external benches, making it ideal for discreet missions in complex environments. These characteristics have made the Little Bird an icon of modern special operations—and an especially appealing subject for scale modellers. In terms of modelling offerings, since the 1980s Hasegawa, Fujimi and Academy / Minicraft, have released several kits of the Hughes 500 family, mostly covering the early OH‑6 and MH‑6 variants of this versatile light helicopter. However, the more recent iterations of this little “bird” have long been overlooked—until this new release from ICM, which finally provides a modern, well‑detailed tooling of this specialised version. What’s in the Box Inside the box we find two (!!) grey sprues and one sprue with the clear parts, for a total of 147 parts, plus an instruction booklet, a decal sheet, and an ICM colour chart. I must admit that when I first received the box, I was expecting something… well, larger 😊 — but great surprises often come in small packages! My first impression was indeed: so few parts? 😄 Two sprues! A more detailed inspection quickly confirmed my expectations. The fuselage comes with recessed panel lines and raised rivets, exactly as it should. The layout of the parts allows for a quick and straightforward build. One detail that stood out while reviewing the instructions: out of all the parts, only two are not used in this model! Quite unusual! 😄 Sprue A This sprue provides the main structural elements of the model. The fuselage is supplied in two longitudinal halves (left and right), and the external detail immediately stands out: recessed panel lines for the engine covers and maintenance access panels and raised rivets and reinforcement plates with the correct size and definition for a compact kit like this. The main structural cockpit components are also present, such as the floor and the firewall separating the cockpit from the transport area. Avionics and flight control components are included and display very good detail, which will stand out beautifully once painted. The seats do not include moulded-on seatbelts. One must scratch-build them or use aftermarket replacements. The tail is moulded as a separate piece, which eases assembly and handling, and can conveniently be added after painting. The tailplane is provided in four individual parts, each featuring subtle raised reinforcement plates. No engine is included — only the exhaust nozzle. Sprue B This sprue supplies the smaller components that complete the model. Here we have various antennas and external avionics/communication boxes. All the components for the main rotor are included here, providing an accurate representation of this critical part of the helicopter. Additional small cockpit parts are present, such as pedals, cyclic sticks, and engine collective controls. An interesting and original detail is the inclusion of door handles (both interior and exterior). One of the build options allows the model to be displayed with or without the cockpit doors. Sprue G This small sprue contains the clear parts, which are free from distortion and scratches. The photos do not do justice to their quality. The large, slightly concave front windscreen immediately stands out and fits onto the nose section. The front doors and various navigation lights make up the remaining pieces. The framing detail is excellent, with raised rivets that look fantastic once painted. For those who prefer to cut their own paint masks, the raised frames will greatly ease the process. Decals The small decal sheet provides markings for four aircraft, all belonging to the 160th SOAR Two stencil options are included for each aircraft: buzz numbers and U.S. Army identification in black, or in olive drab. Instrument panel dials are included (separate, without background). A small “no fear” inscription is supplied for one aircraft, to be placed on the nose. The rest of the stencils are generic. White rotor-blade stripes are also provided as decals. The quality is in line with ICM’s usual standard, with good colour saturation, minimal carrier film, and sharp printing. Instructions As typical of ICM, the A4 booklet with 12 pages presents the assembly 67 steps clearly and without ambiguity, making it easy to follow. The first page lists the colours needed for the full paint scheme. Marking Options As noted earlier, four marking options are included — all aircraft from the 160th SOAR, circa the 1990s, and all painted in a single dark shade (a greyish black) with low-visibility markings appropriate for the stealthy role these aircraft performed. Conclusion This is a small but excellent model of an iconic helicopter, immortalized in the film “Black Hawk Down”. The simplicity of the parts makes it appealing both to beginners and to experienced modellers. Without doubt, this new kit of this compact helicopter will surely lead to other versions in the near future (hopefully!), such as armed, naval, or even civilian variants. Until then, we have this little modelling gem — highly recommended! My thanks to ICM for providing the review sample!


.jpg.c19454eece8954d4ce96a00560caeae5.jpg)
-
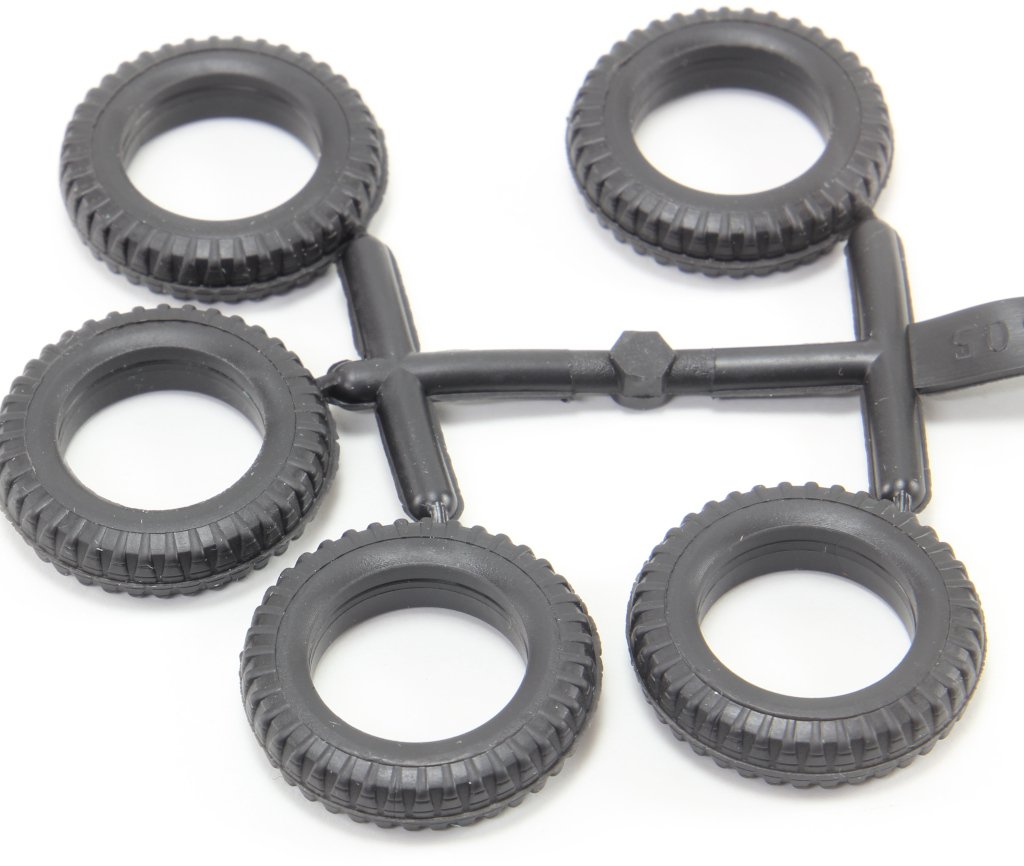
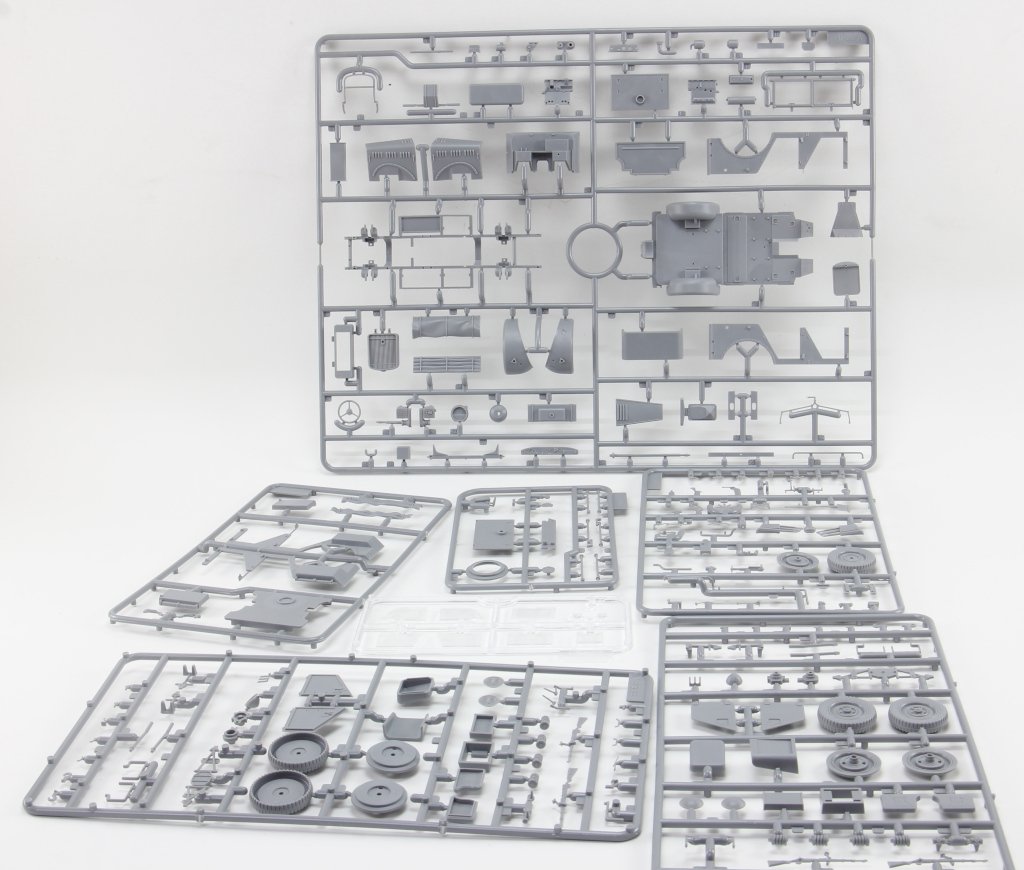
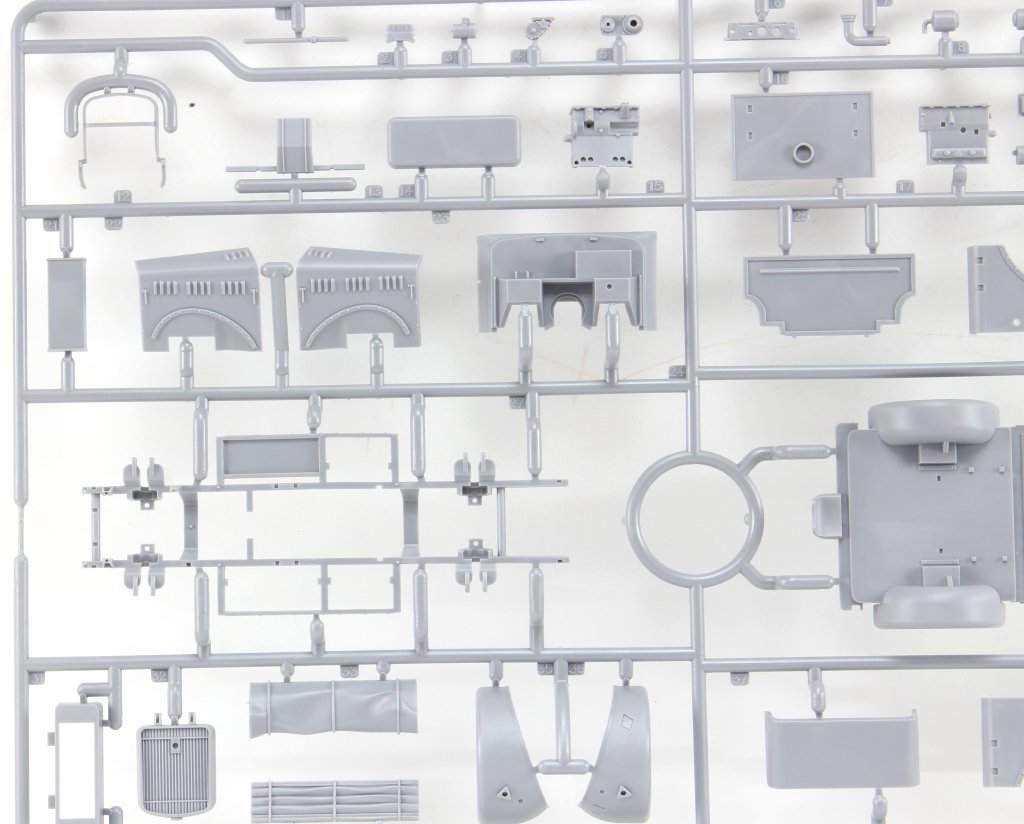
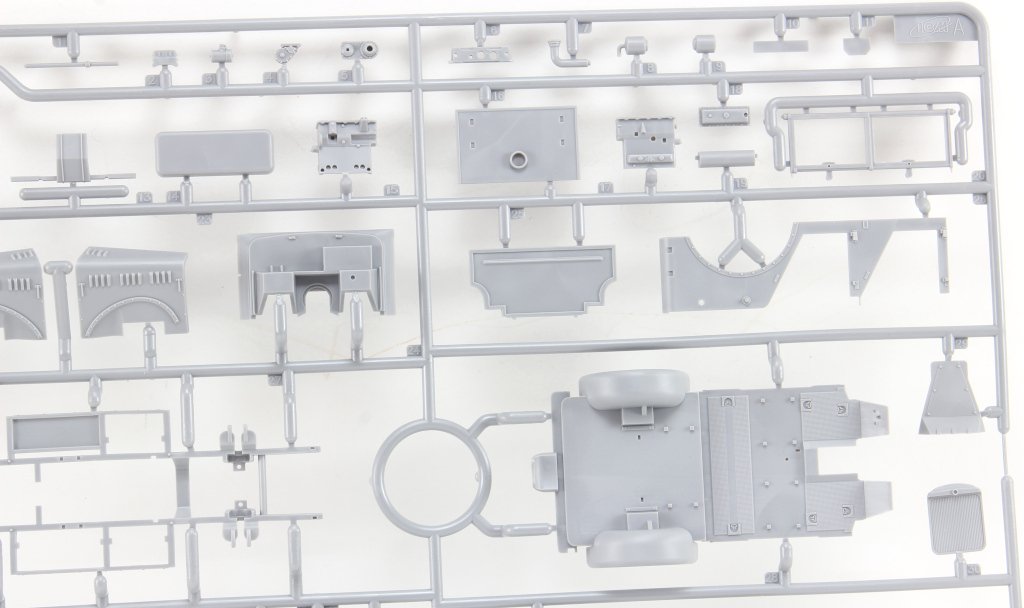
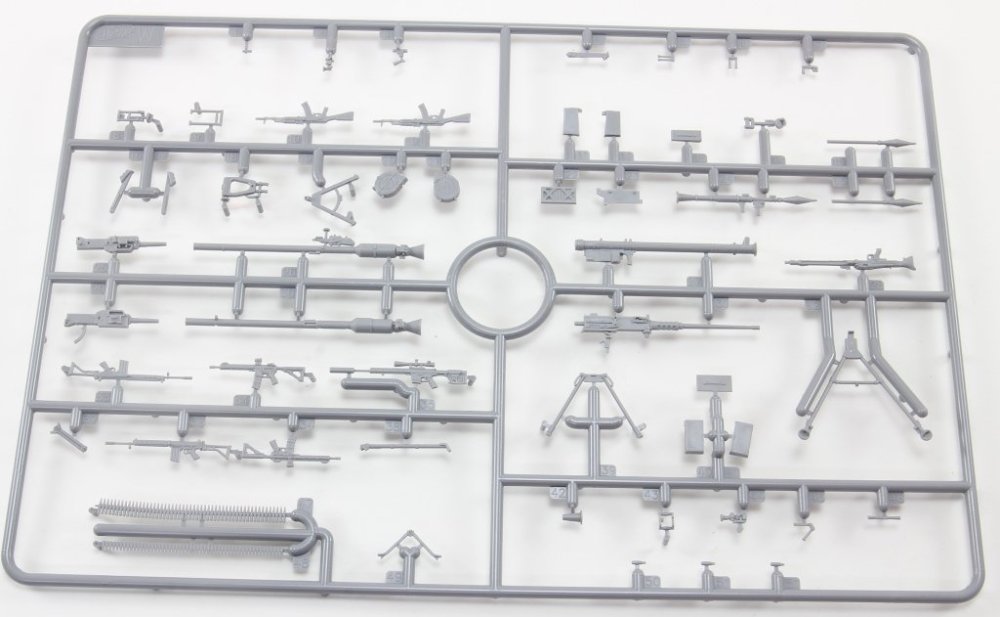
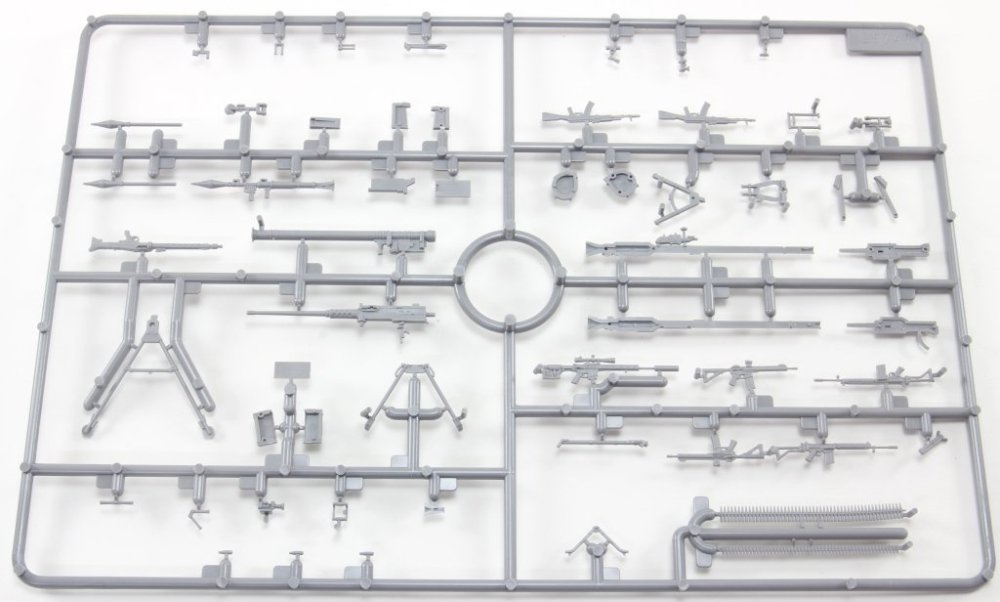
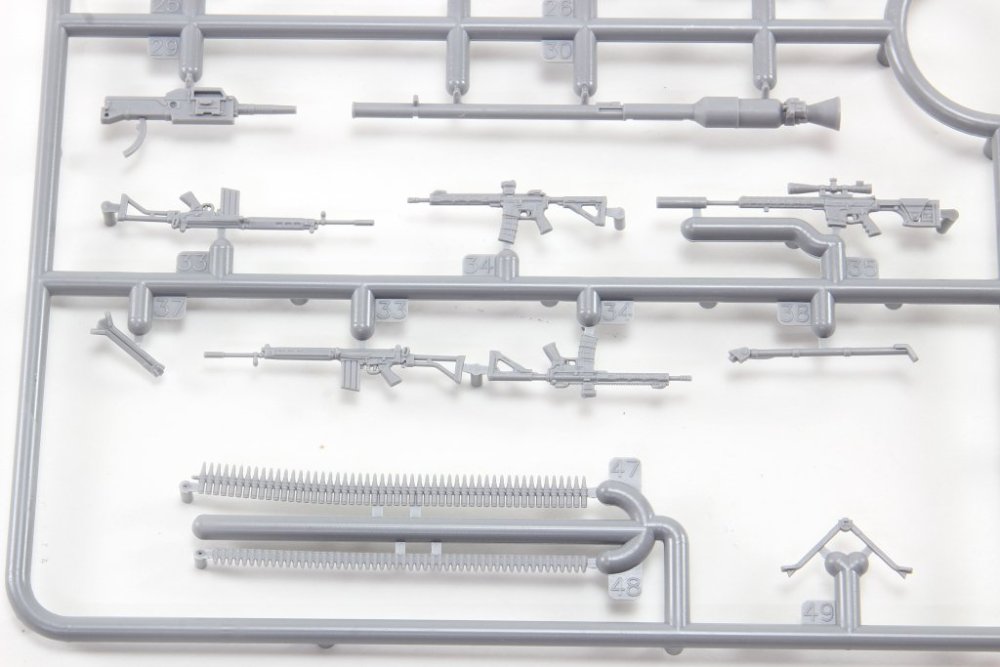
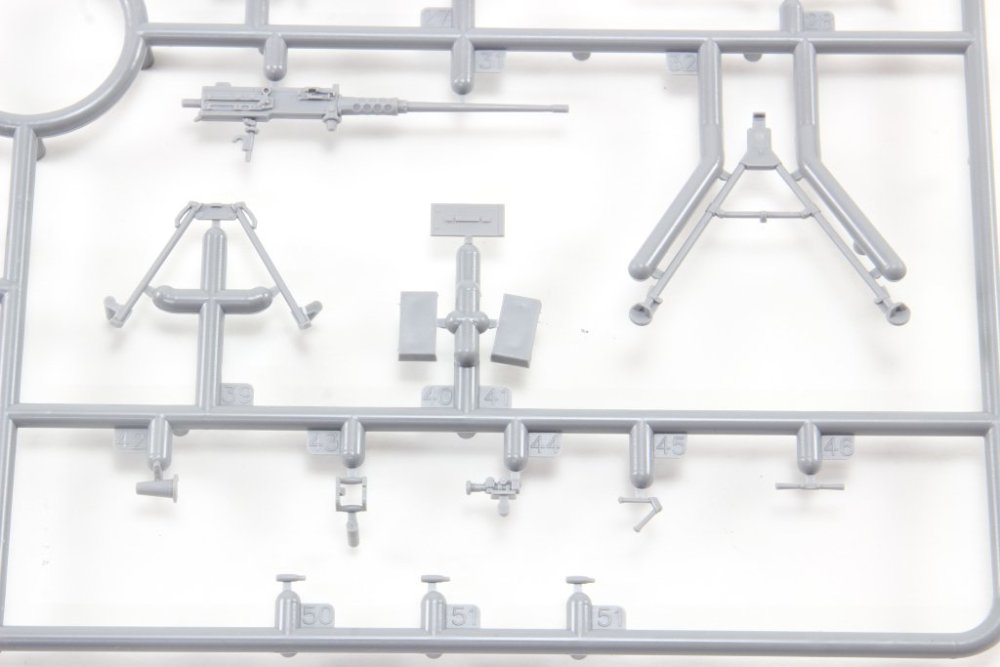
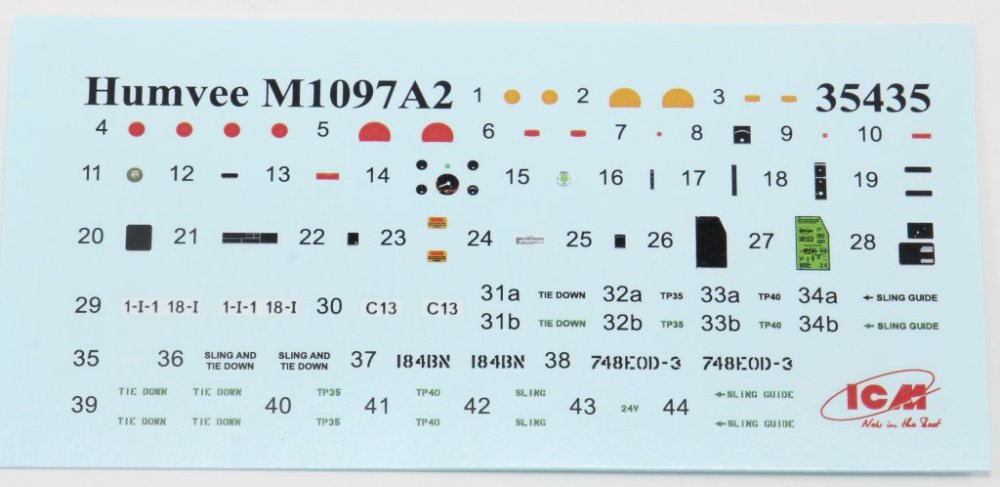
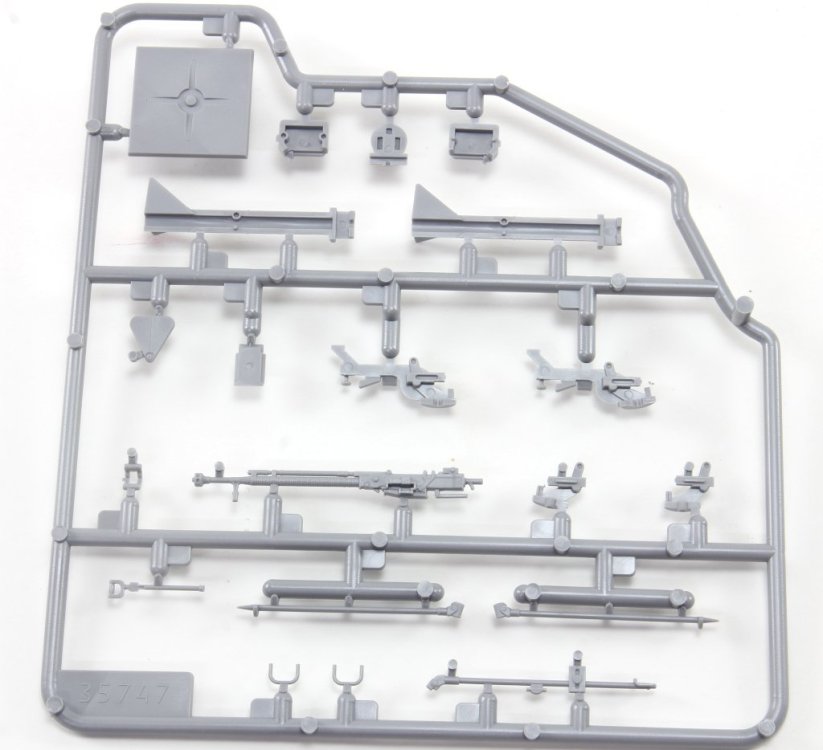
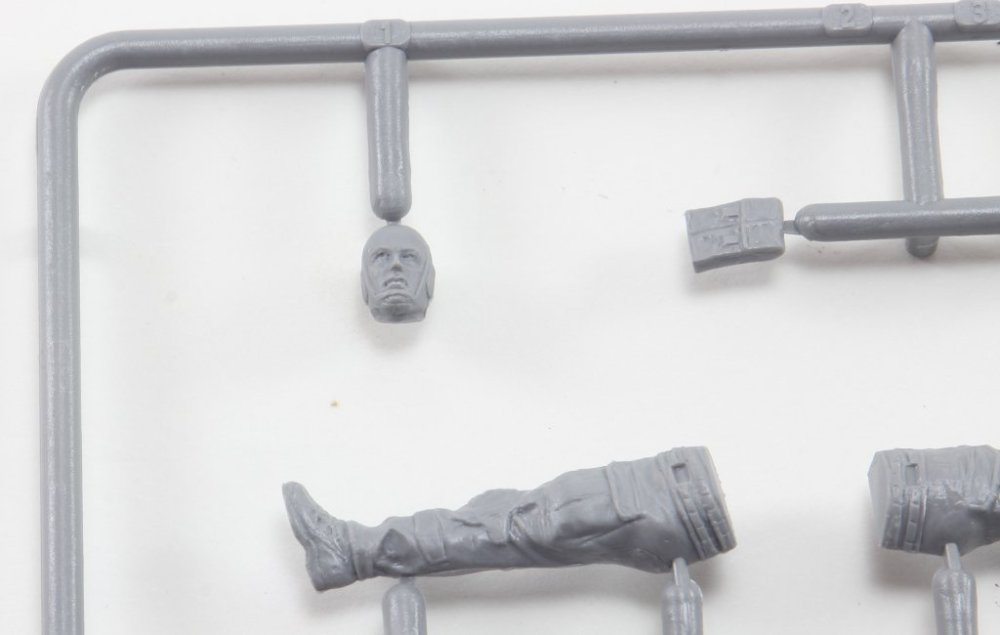
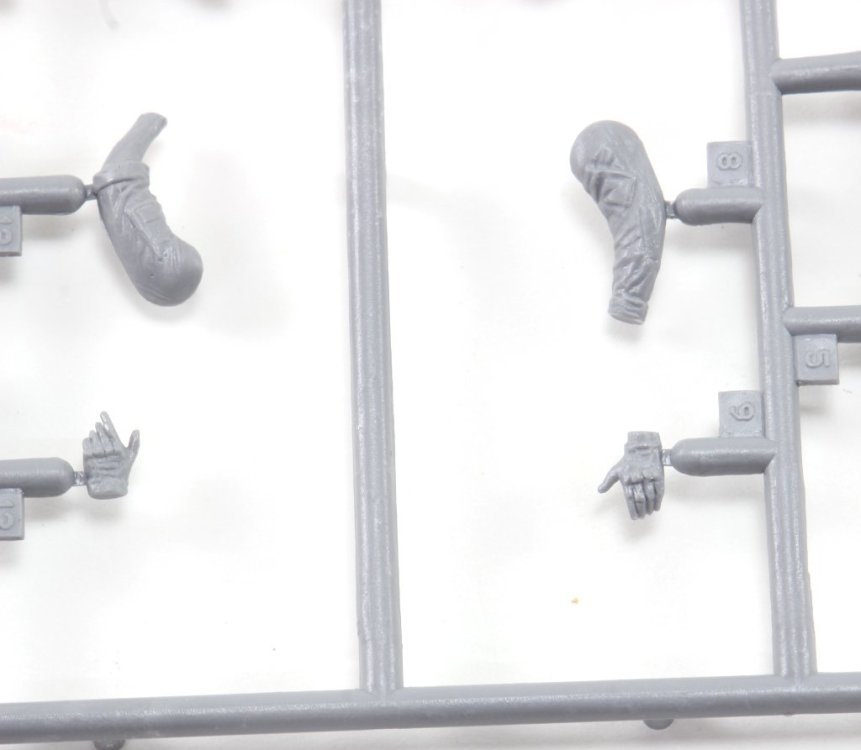
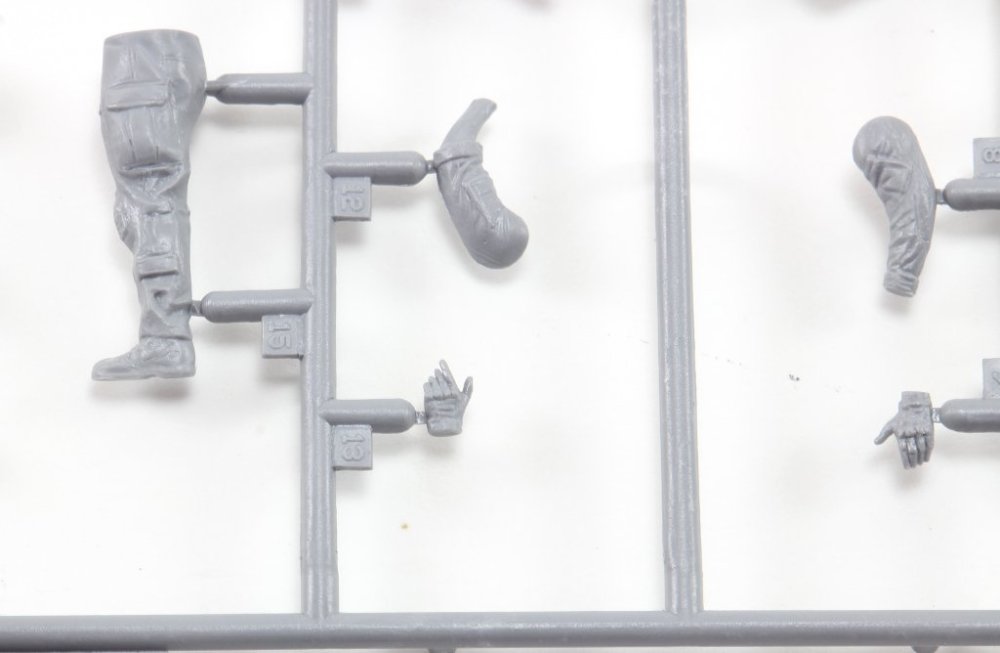
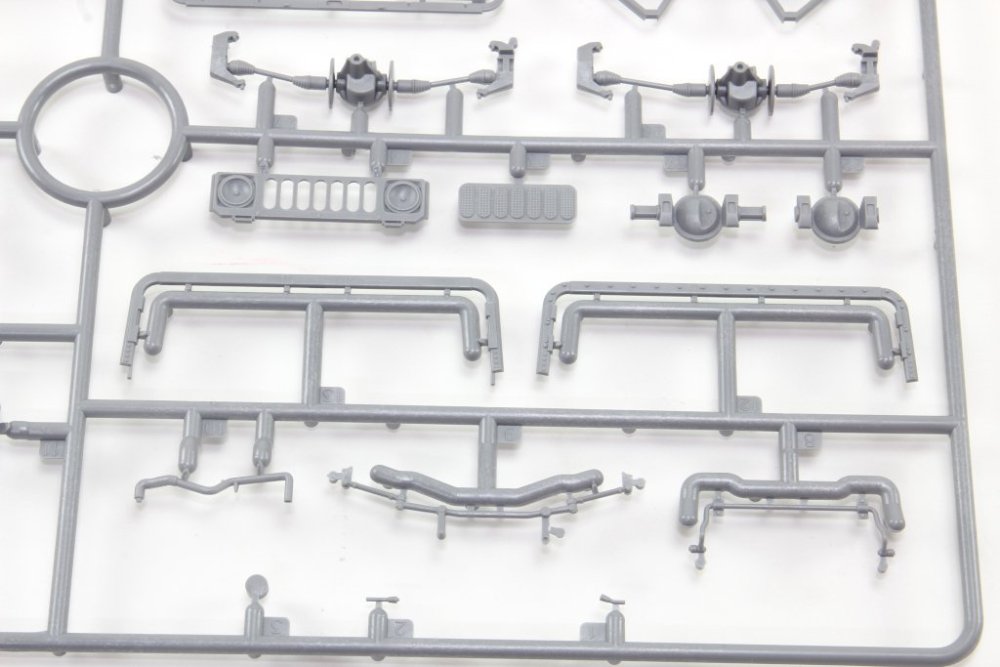
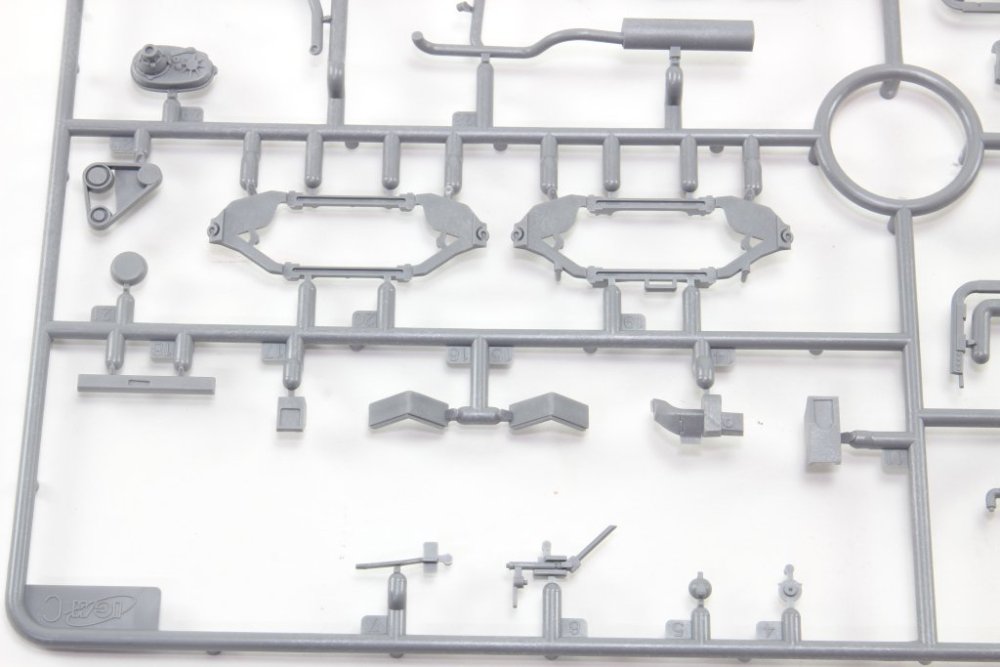
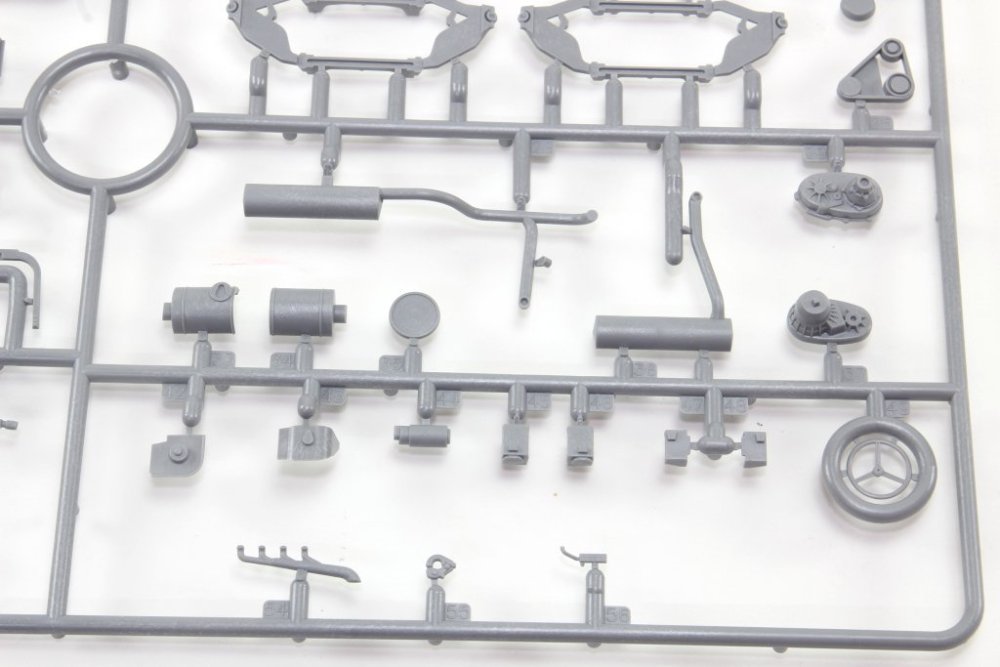
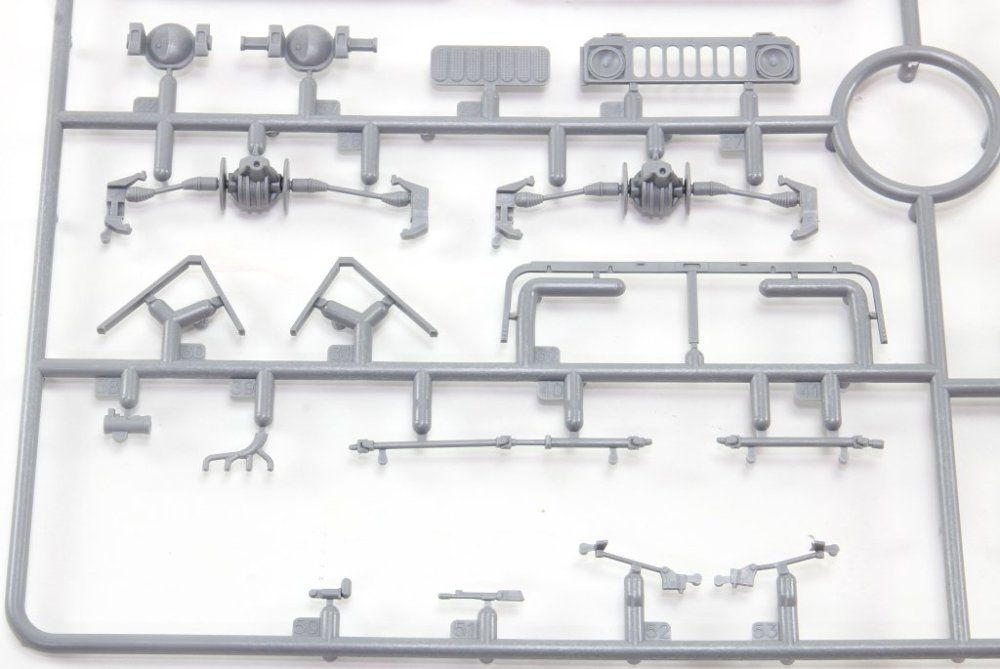
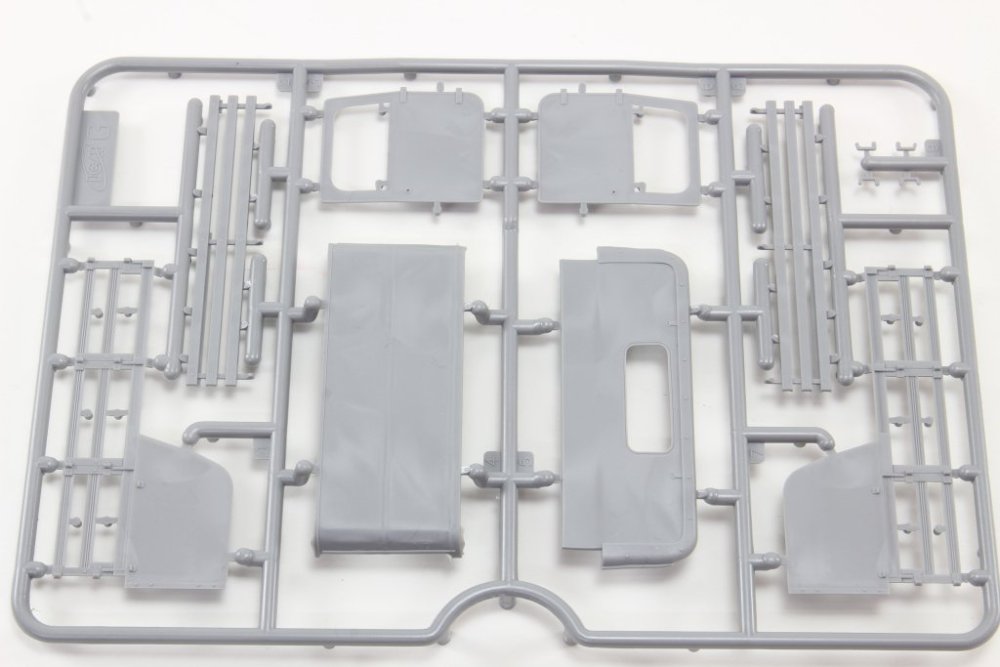
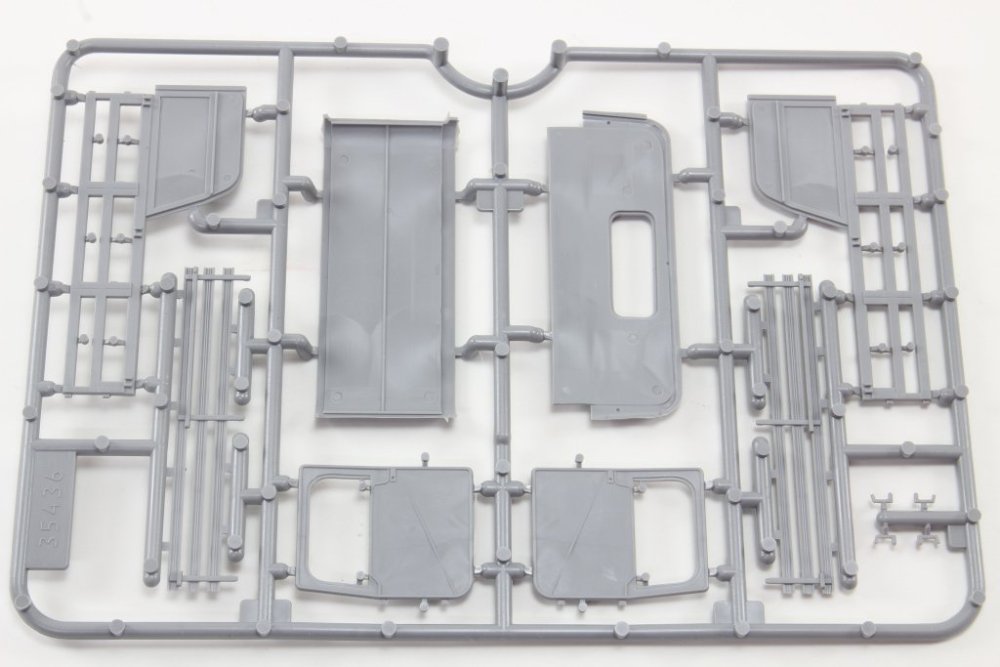
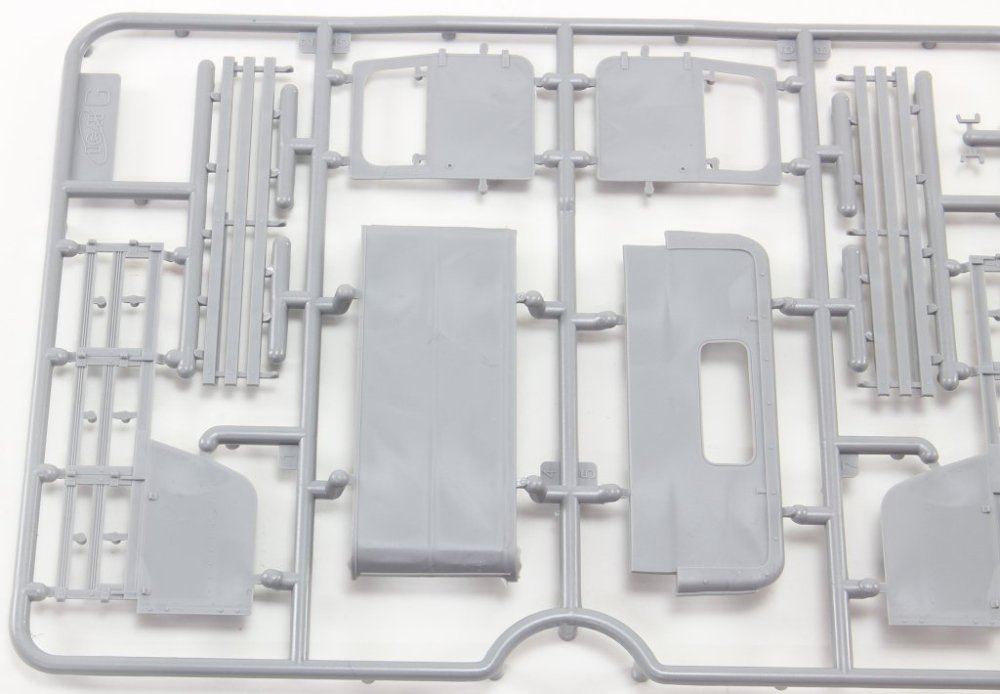
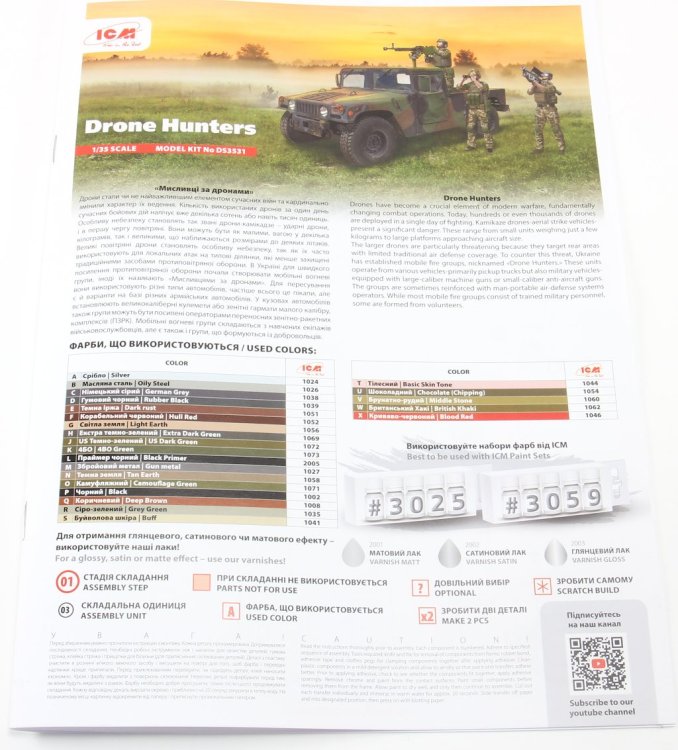
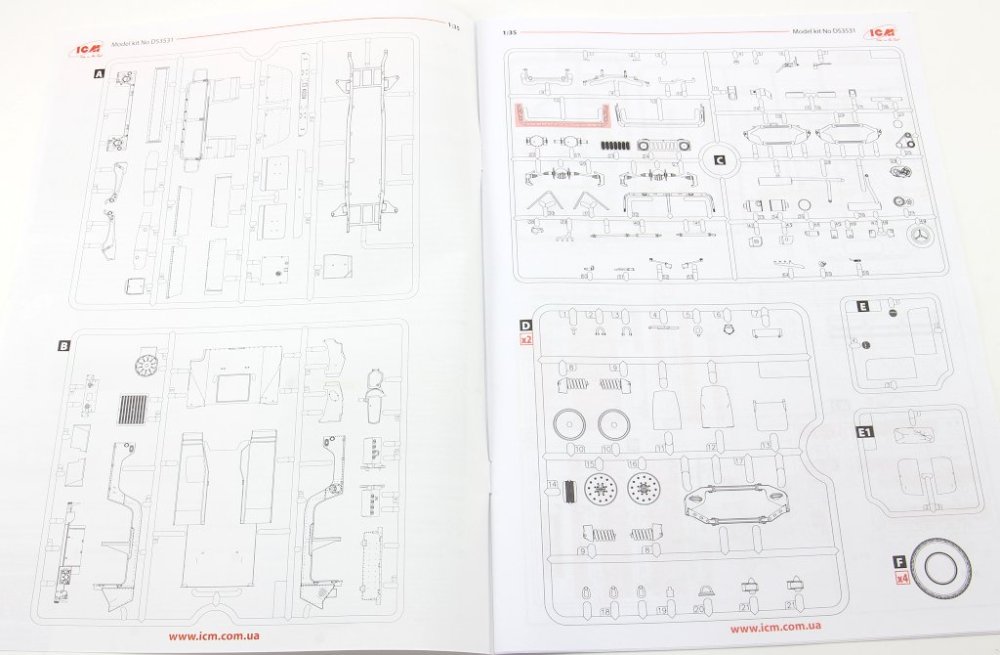
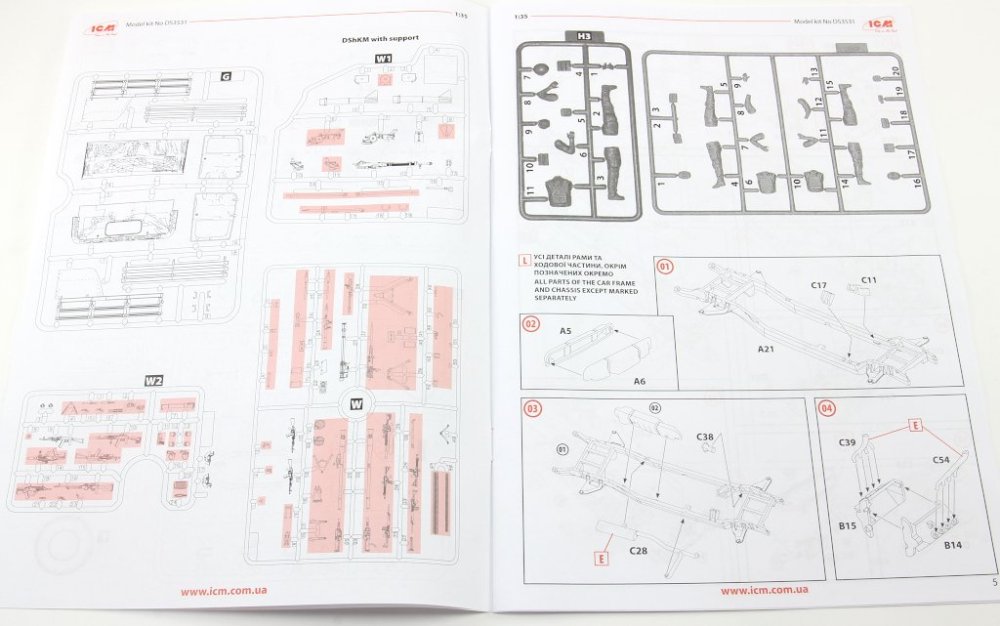
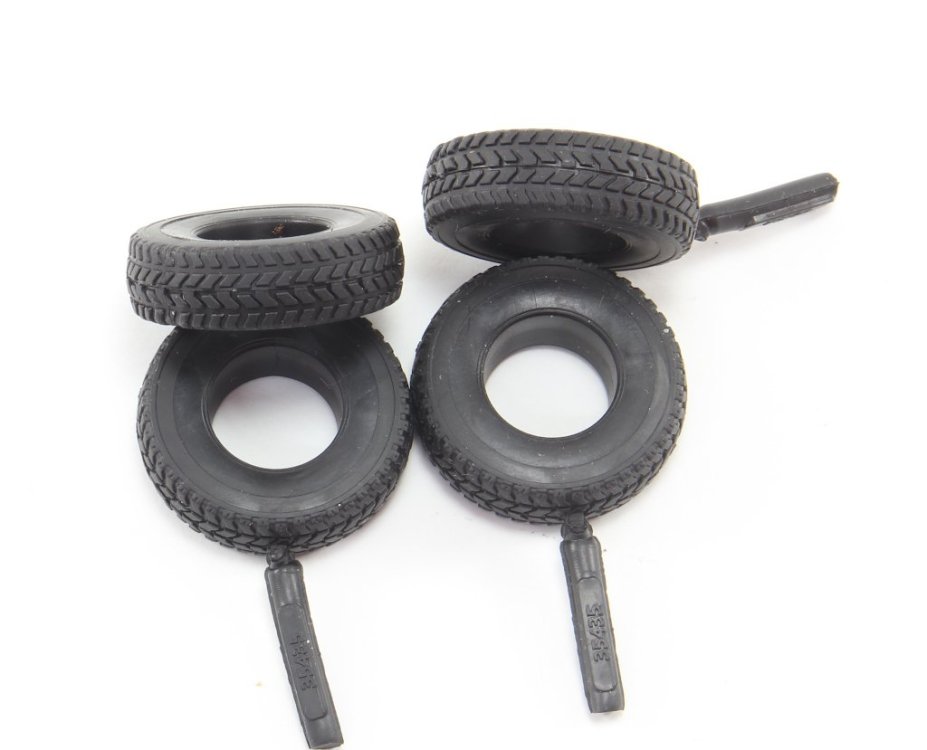
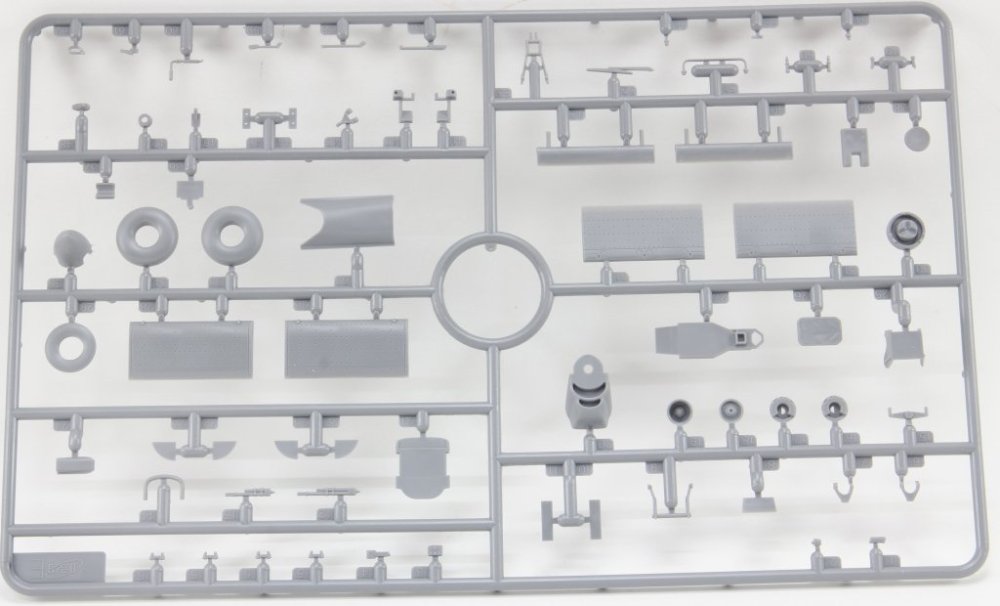
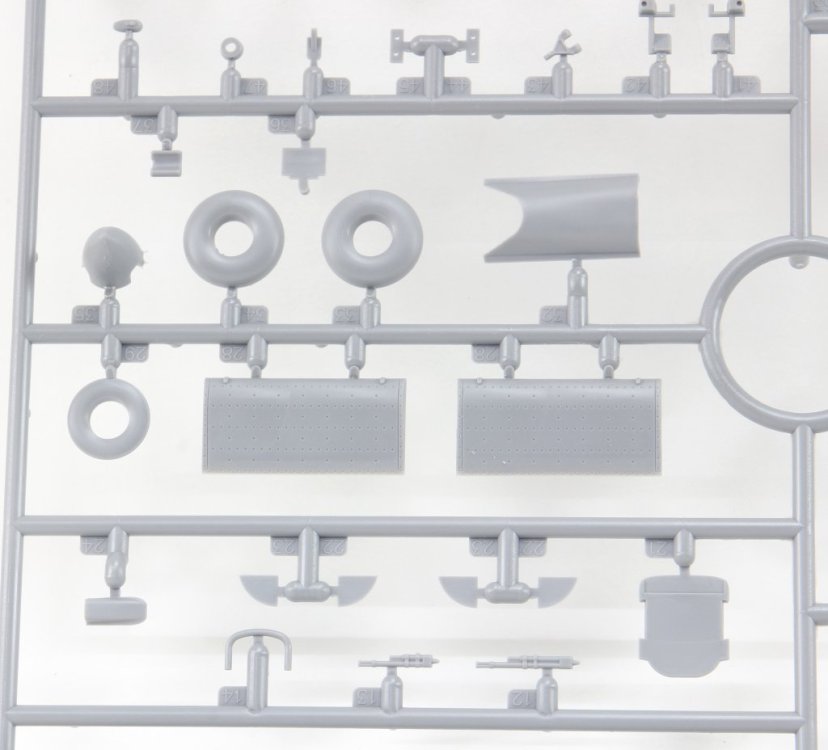
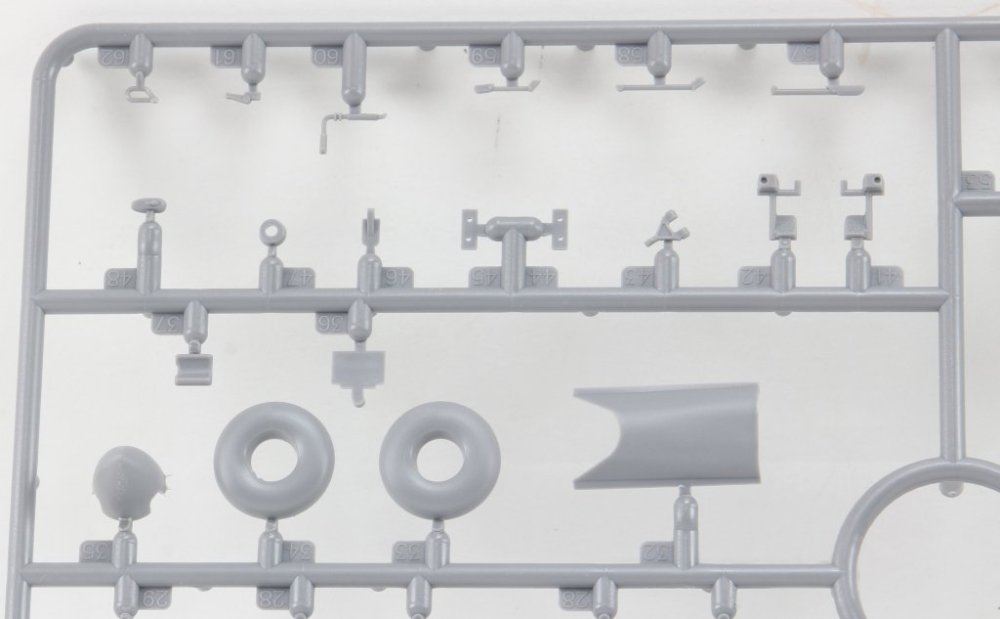
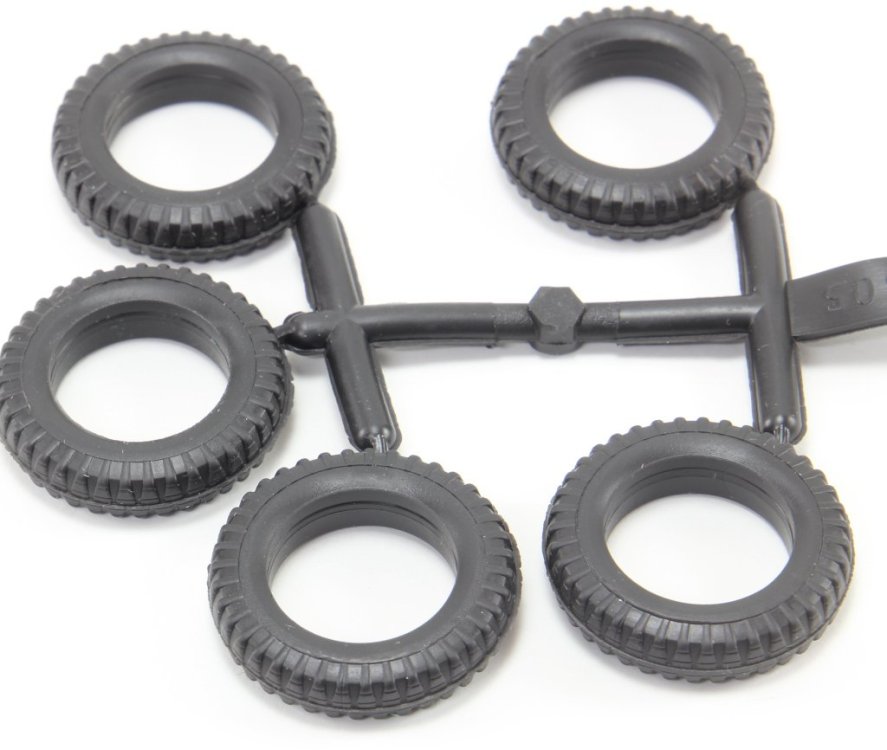
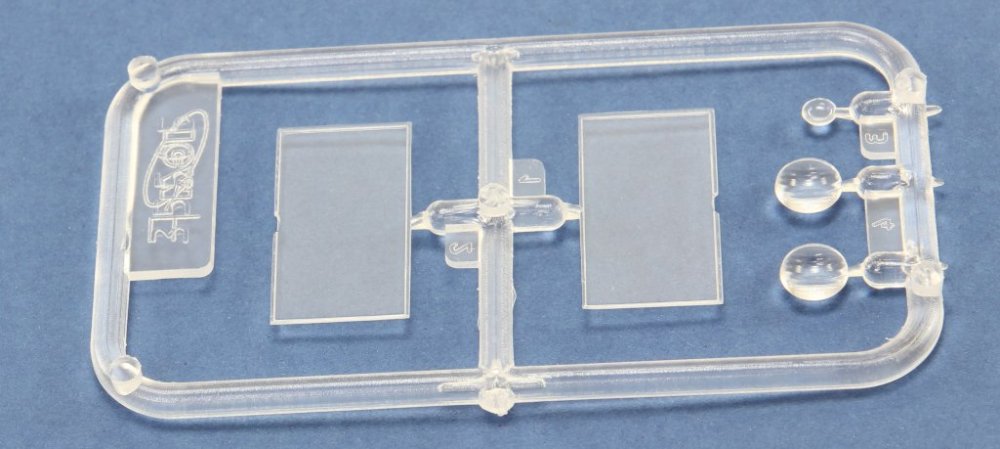
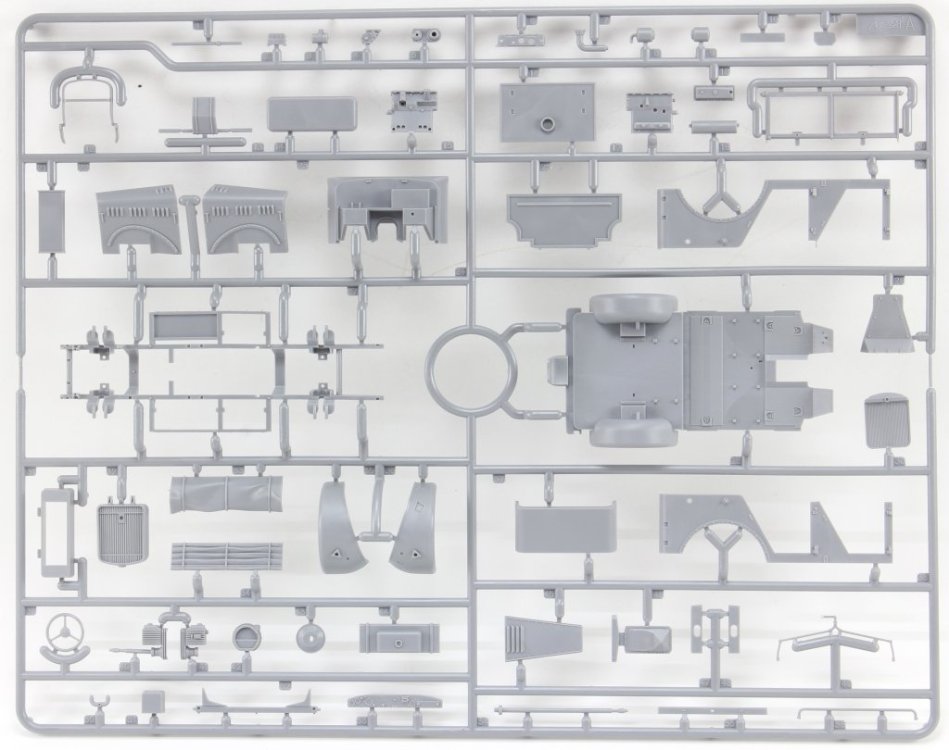
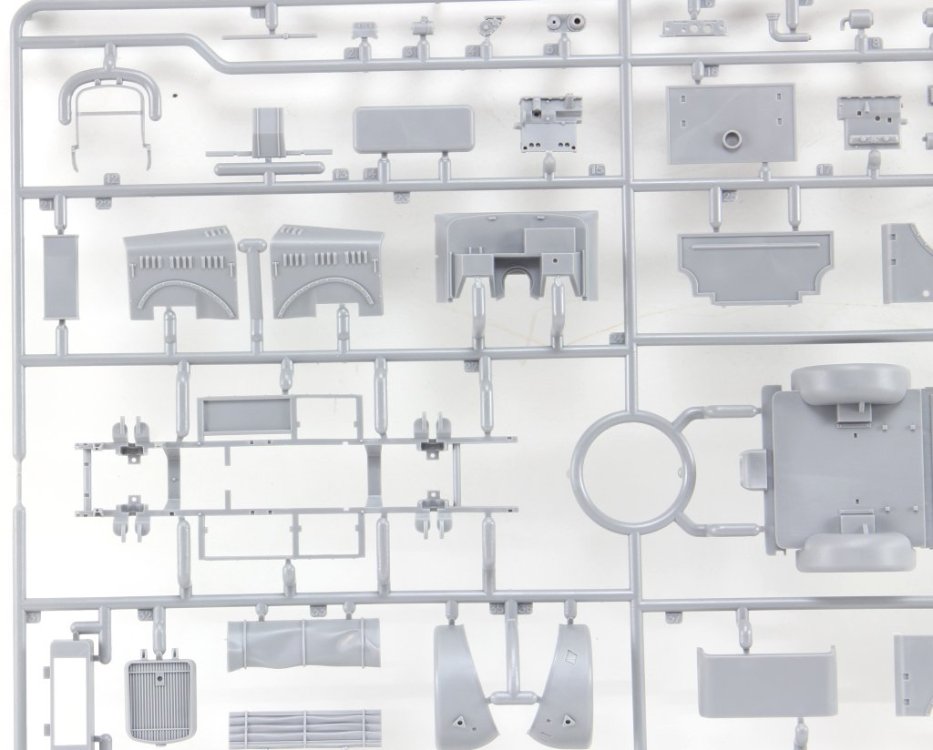
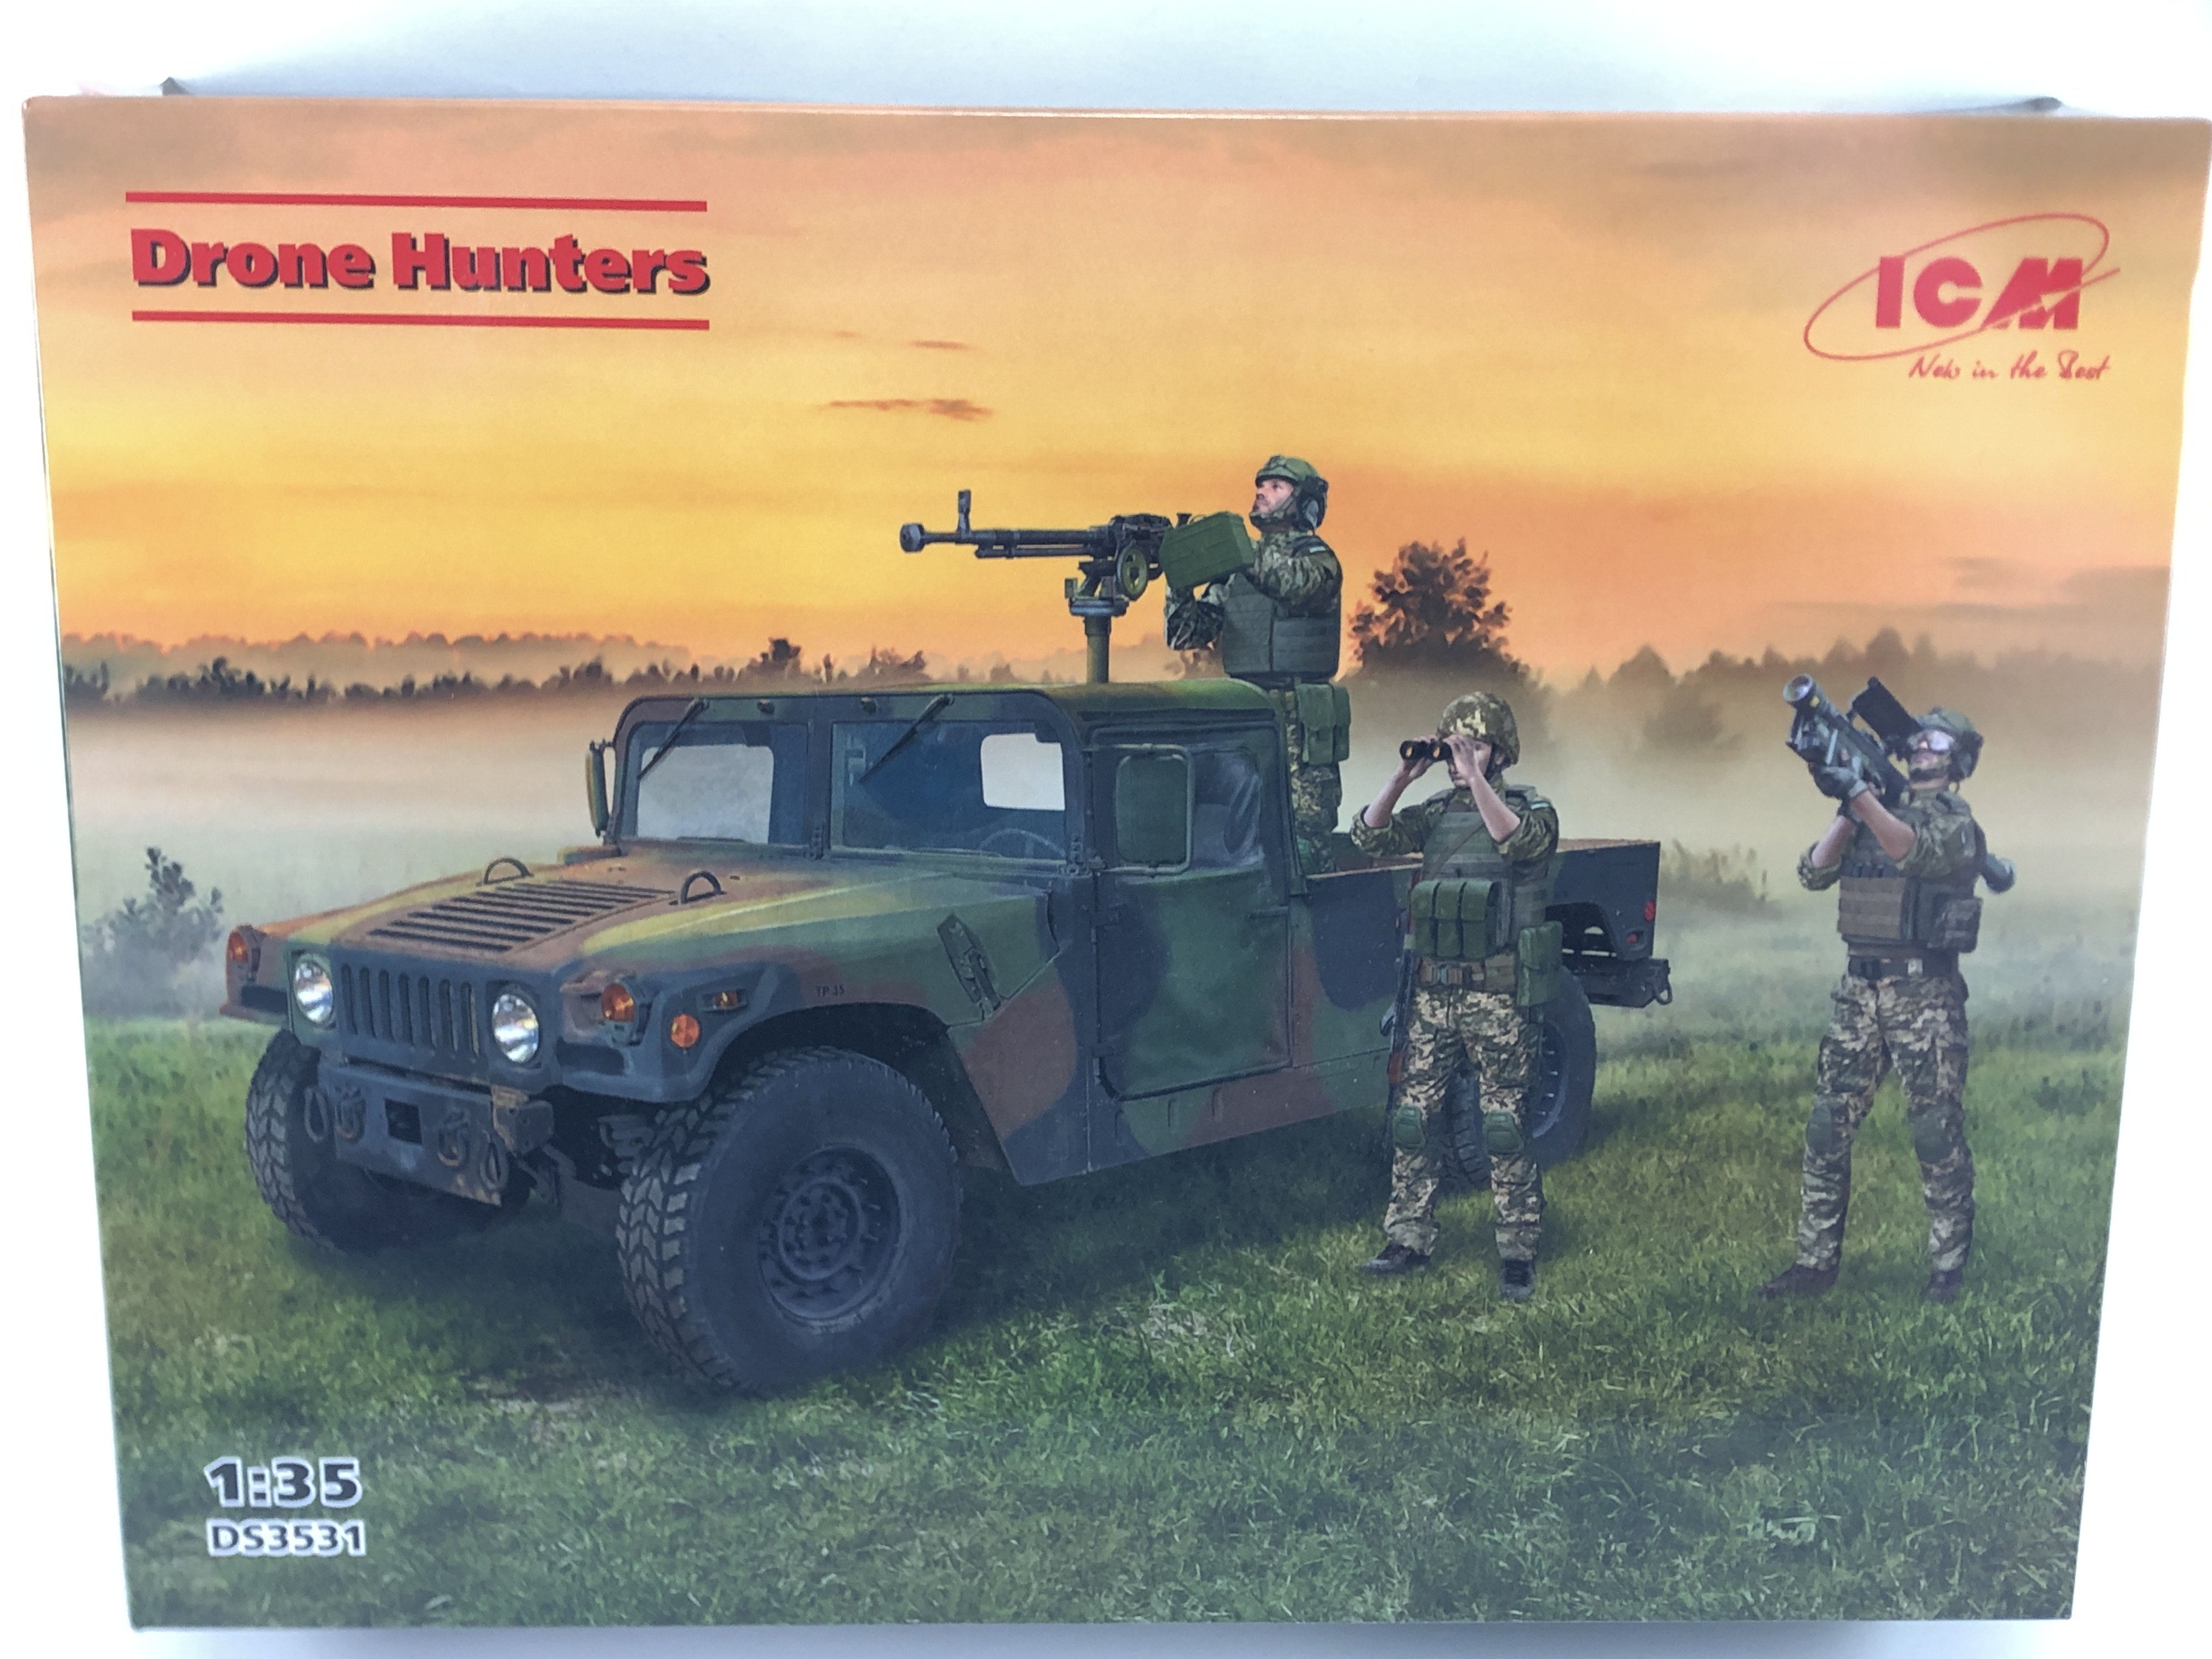
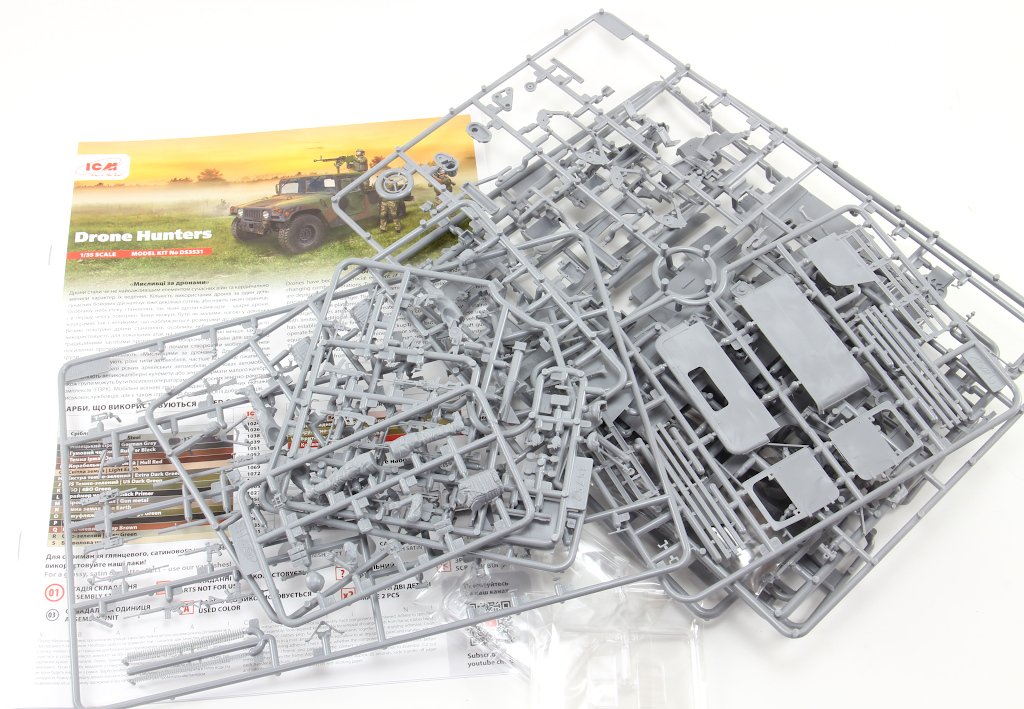
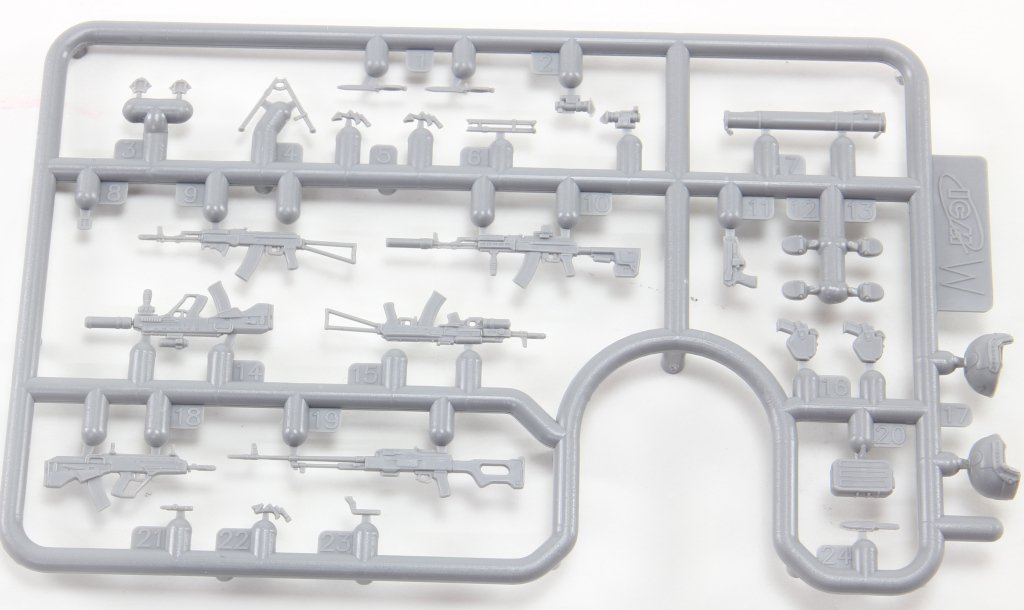
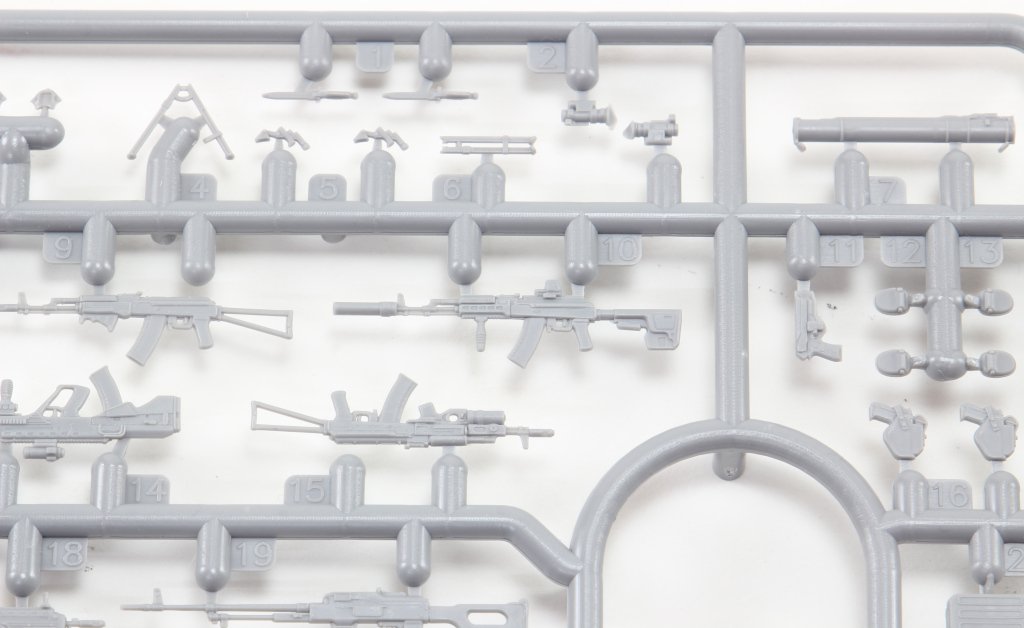
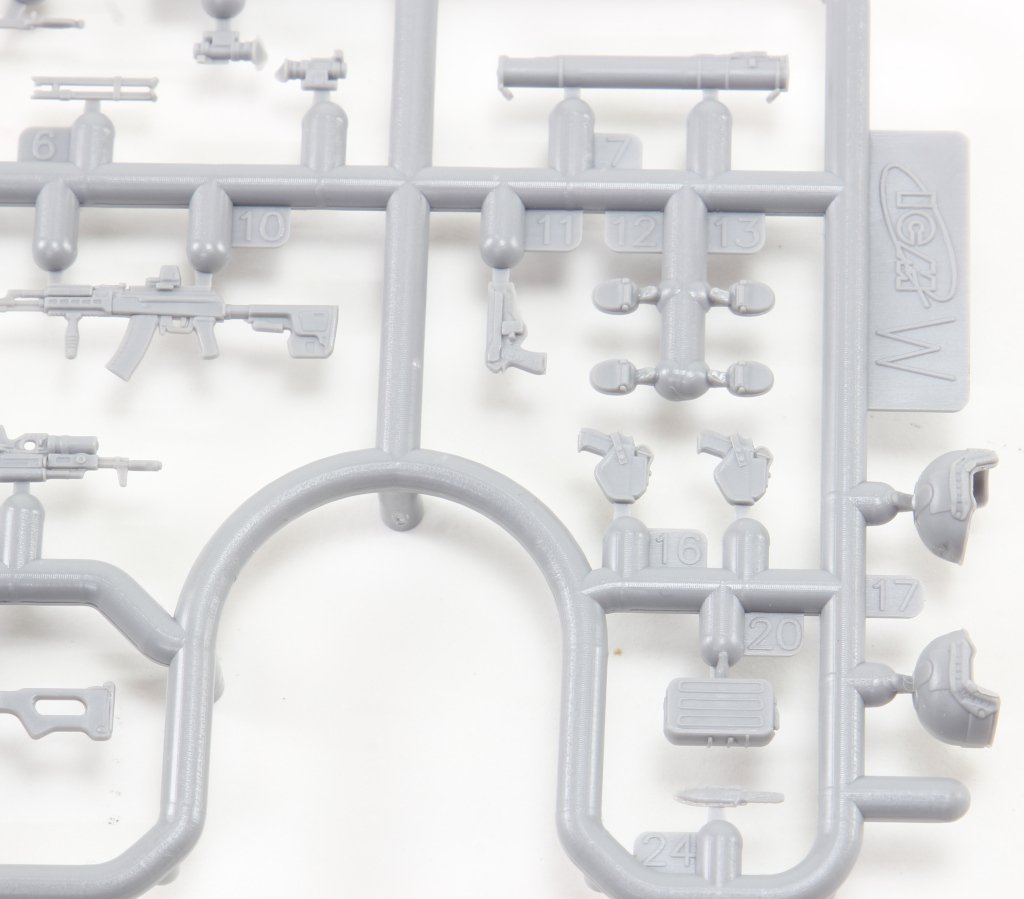
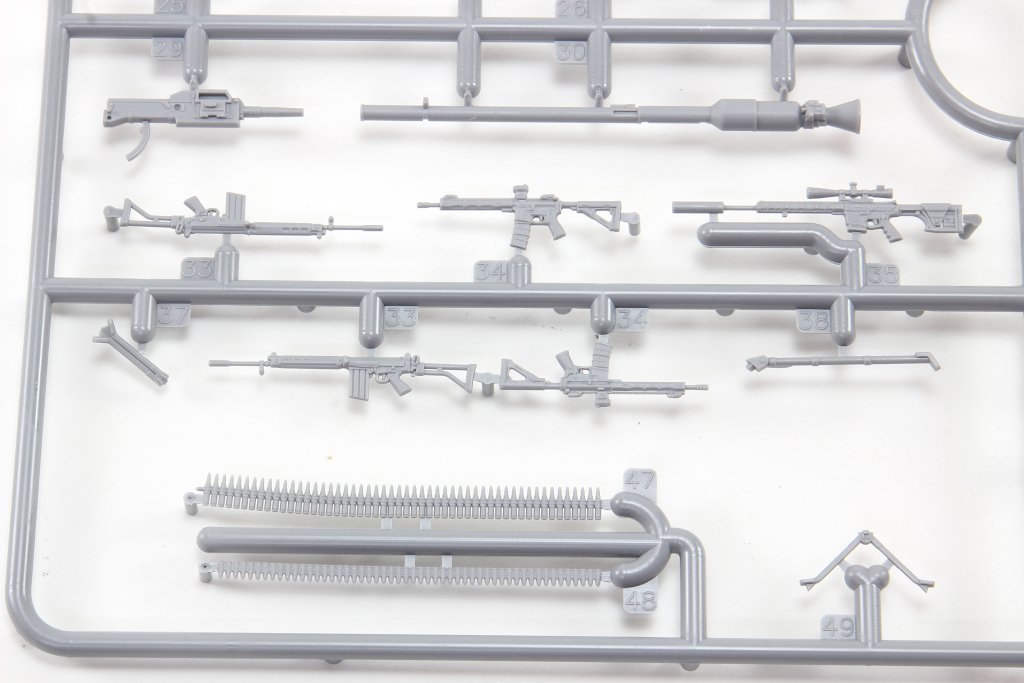
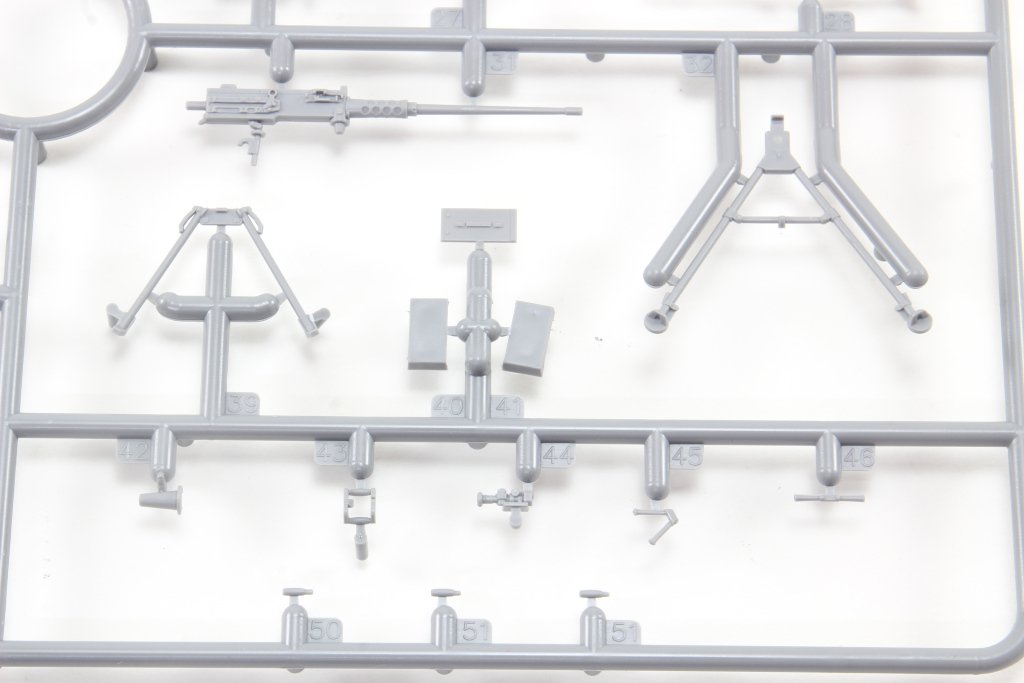
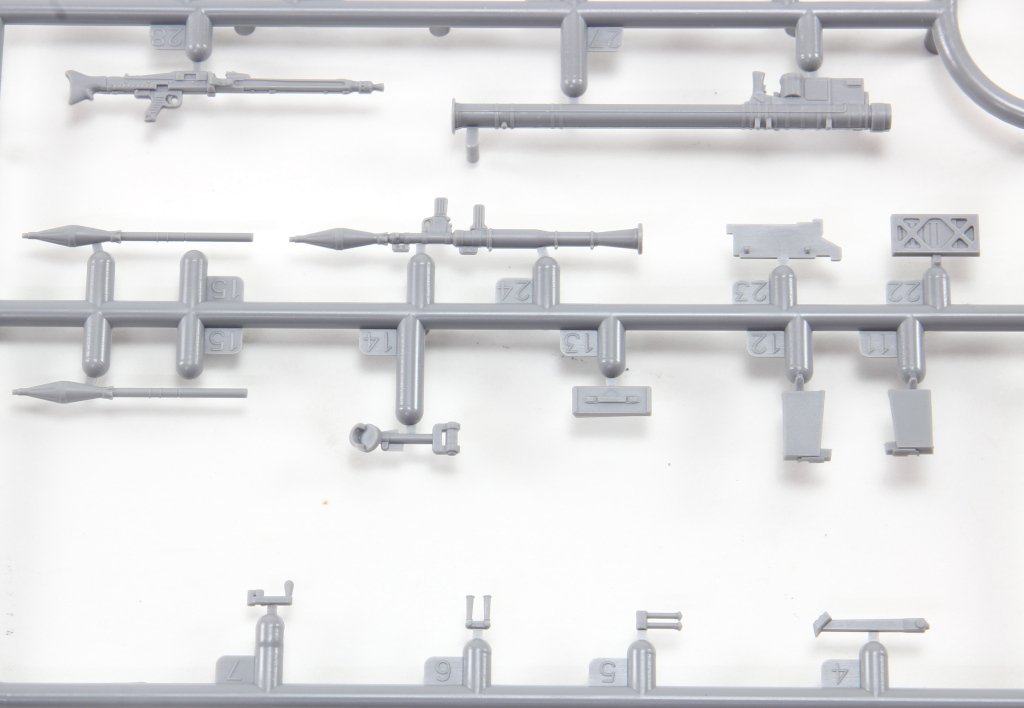
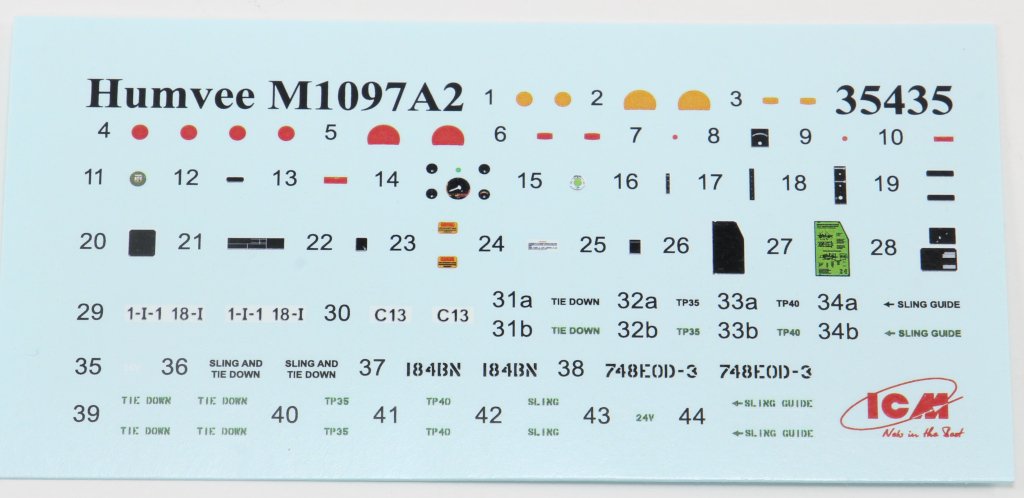
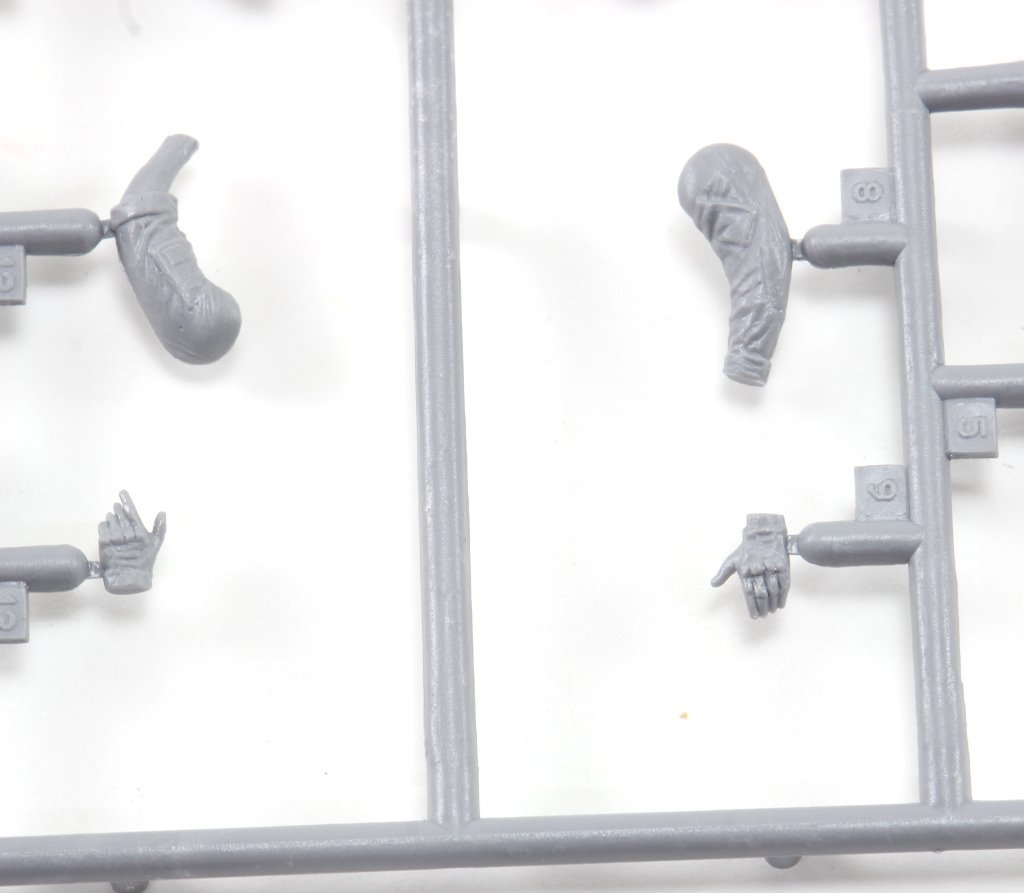
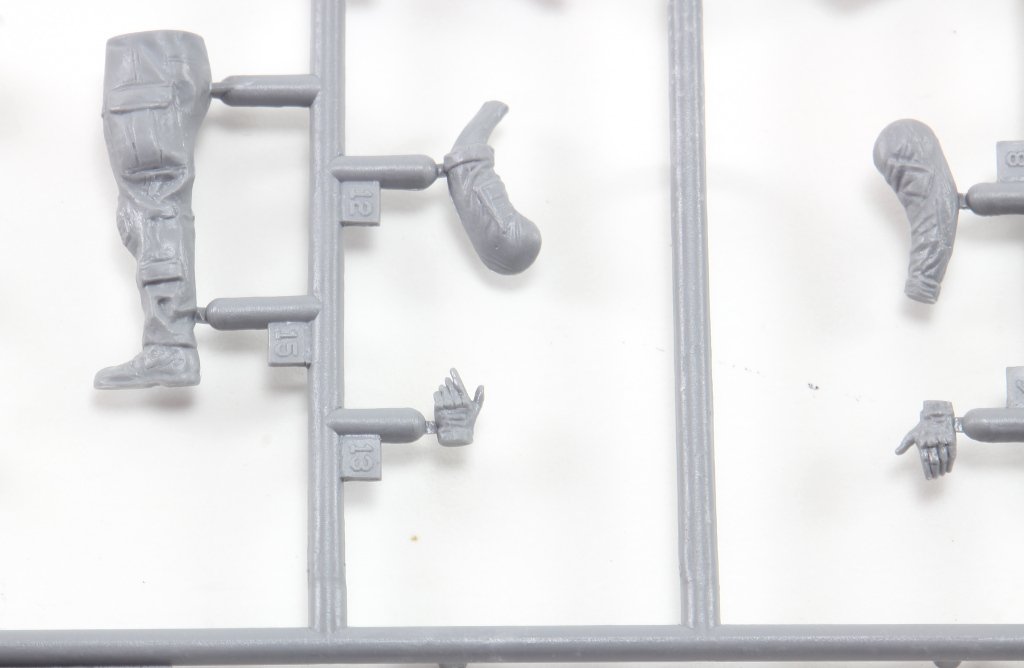
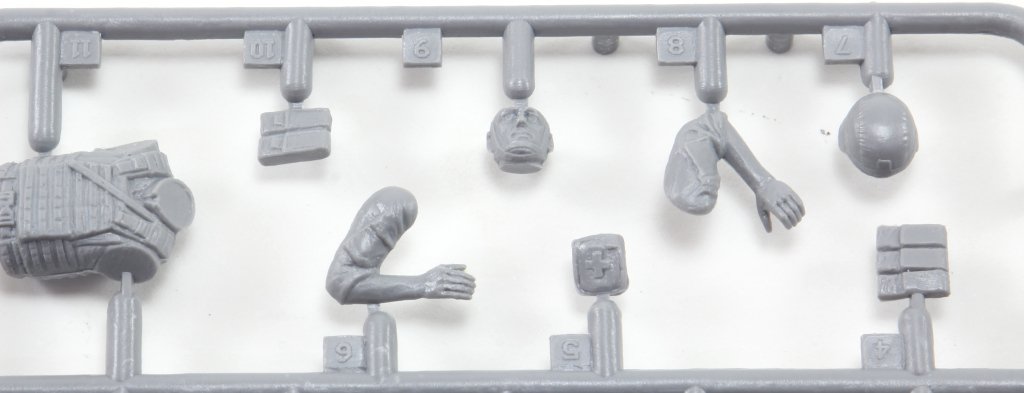
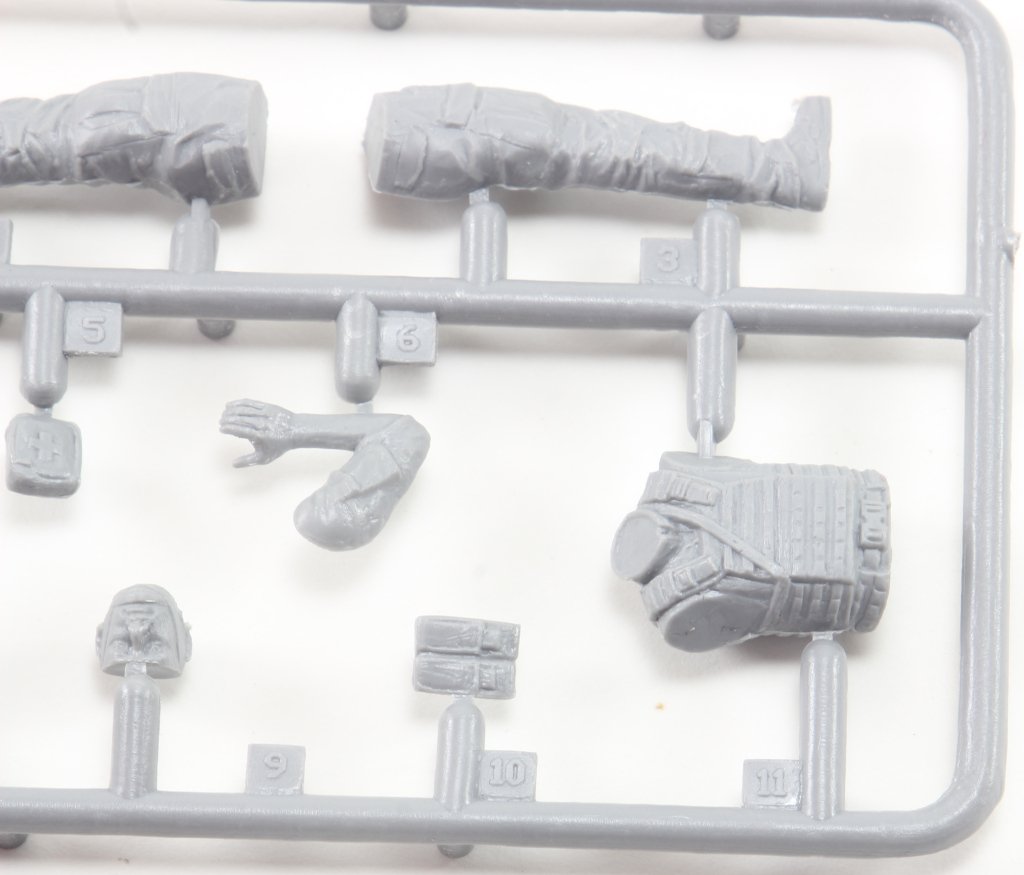
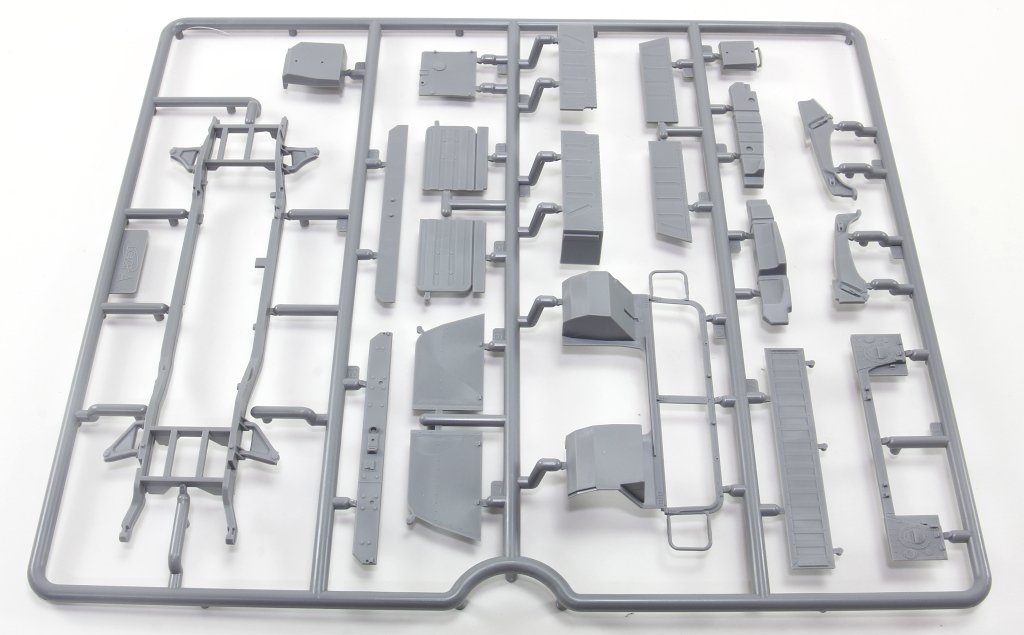
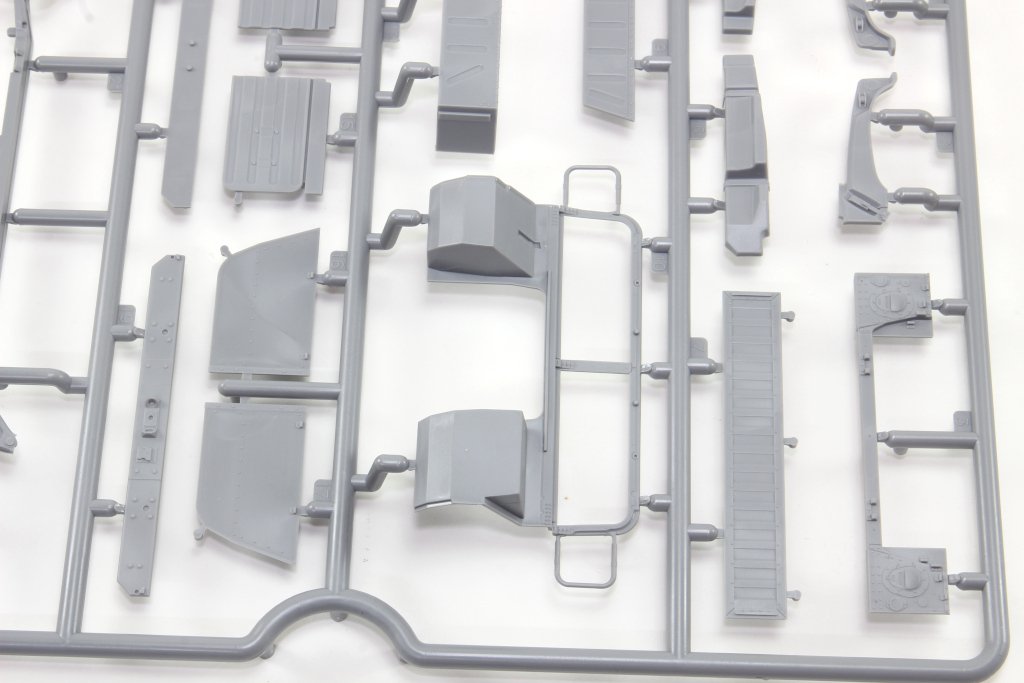
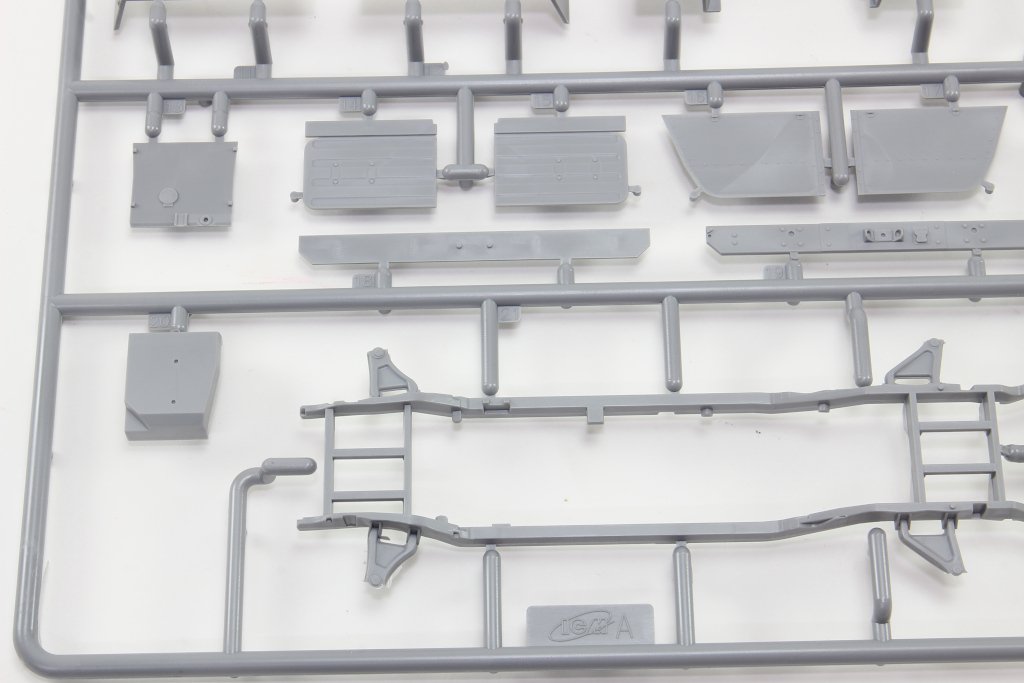
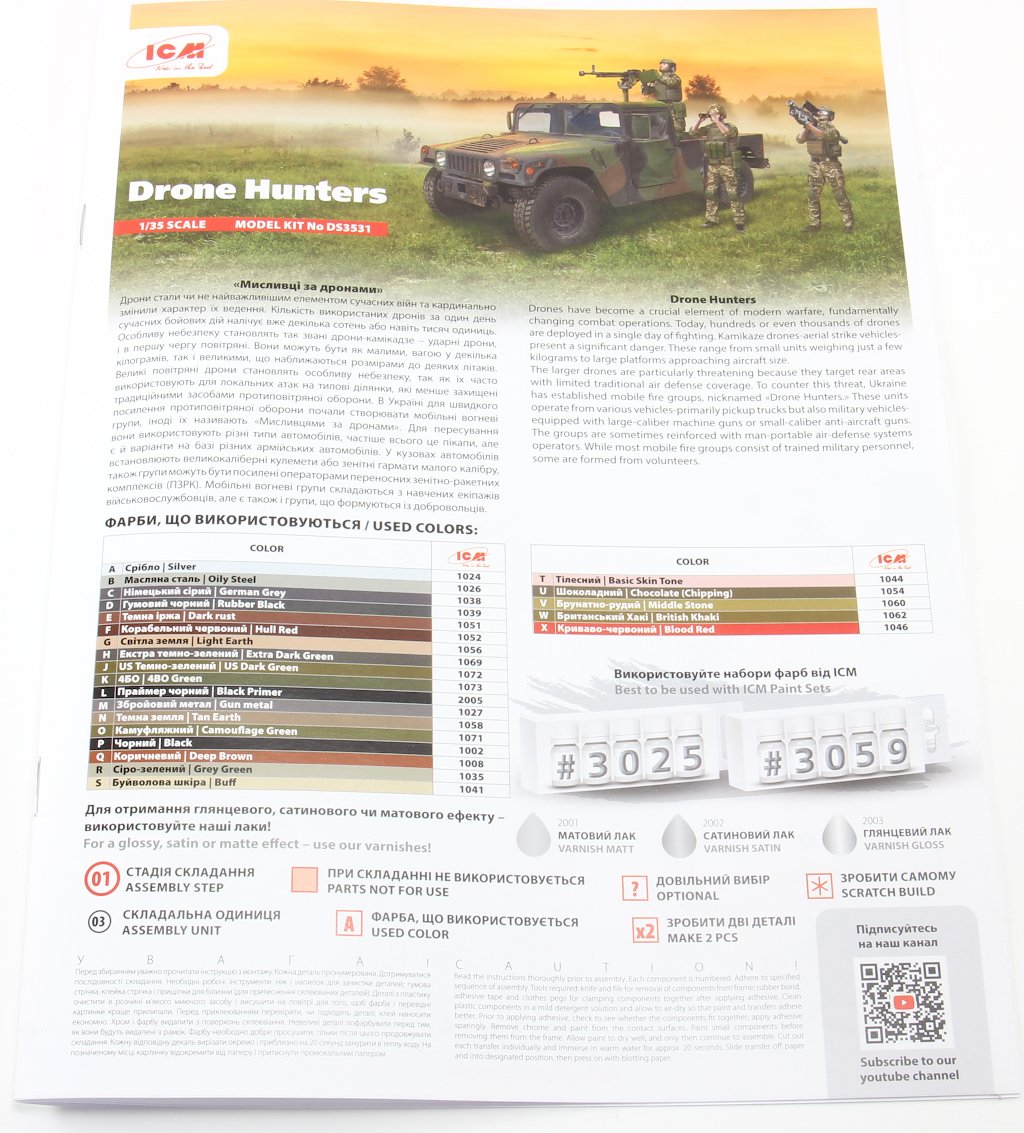
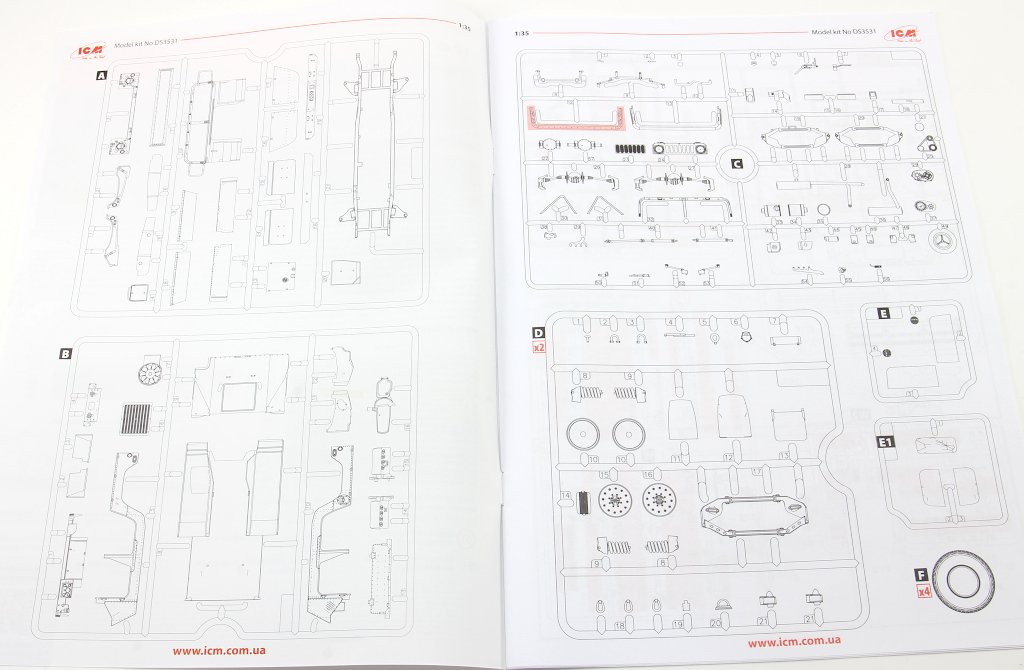
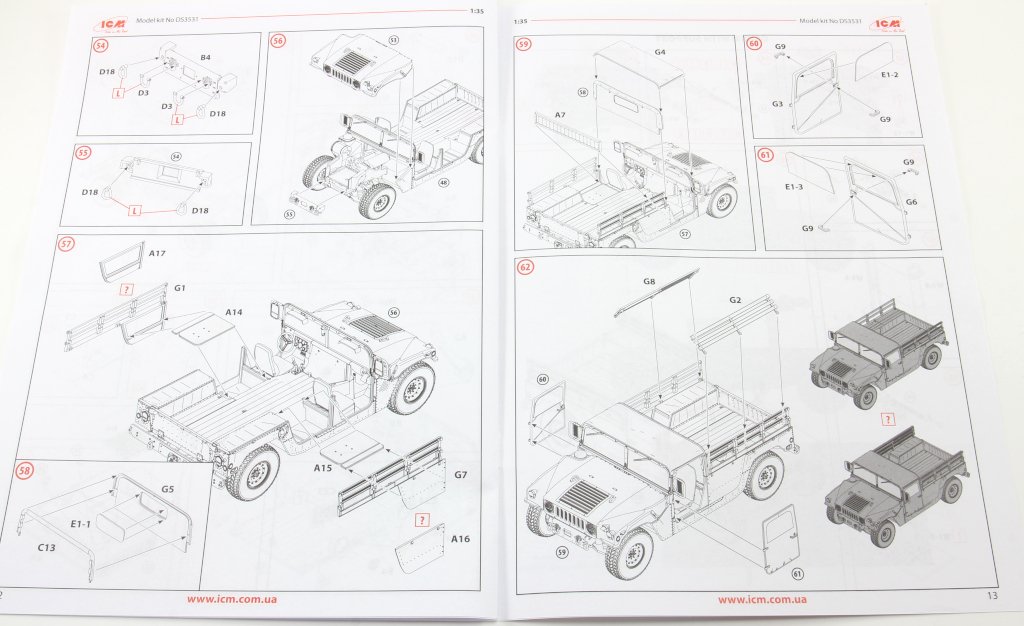
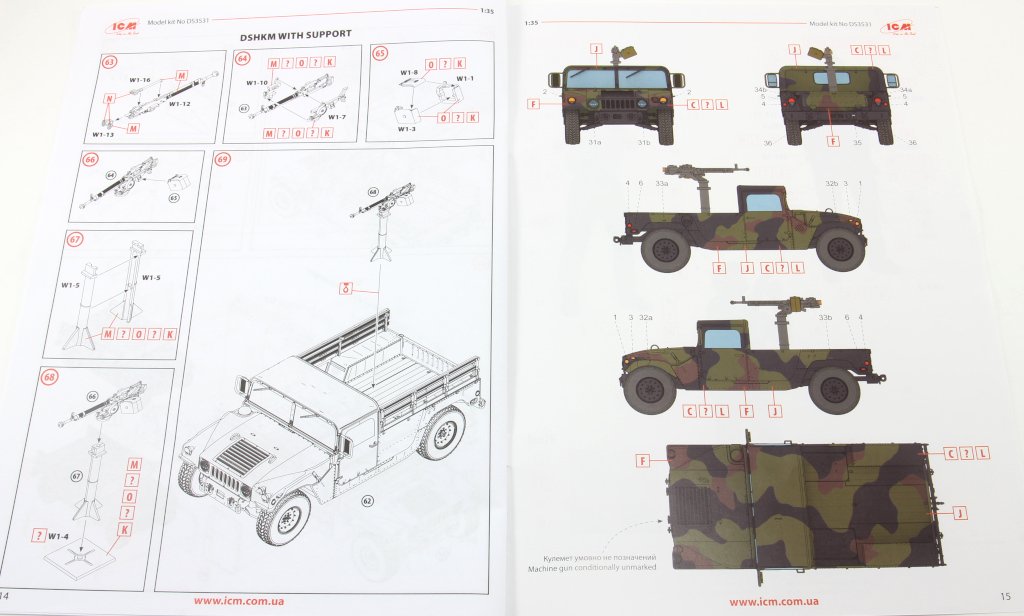
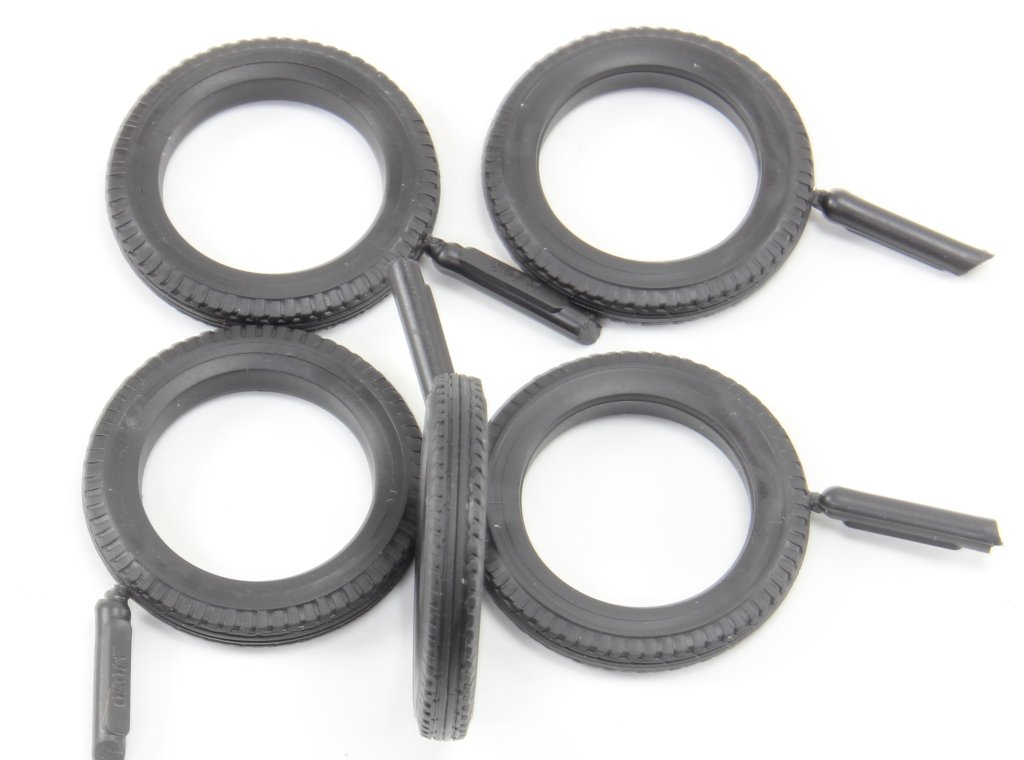
Drone Hunters Humvee M1097A2 with DShKM machine gun, gunner, observer and MANPADS operator Ref: DS3531 Available here Price: 41,30€ Introduction The HMMWV (High Mobility Multipurpose Wheeled Vehicle), affectionately and universally known as the Humvee, originated in 1979, developed by AM General for the U.S. Army as a light all‑terrain vehicle. It was intended to replace the Vietnam‑era M151 Jeep and the M561 “Gama Goat”, as well as several other light vehicles in service at the time. Its versatility allowed for the development of multiple specialised variants (ambulance, command, etc.), and as operational theatres evolved, additional armour and crew‑protection equipment were introduced. The Humvee was adopted by numerous armed forces and remains a mechanised symbol of the U.S. military to this day. With the recent conflict in Ukraine, many of these veterans have found their way onto the battlefield, fulfilling various roles — in the case of this set, as drone hunters. This ICM set represents a Ukrainian team specialised in locating and neutralising enemy attack drones. In true Ukrainian fashion, the cargo bed features the classic Soviet DShK heavy machine gun. The Hummer provided in this kit represents the base model version (M1097A2), using a new mould from 2024, already released previously under the Revell brand. What’s in the Box Inside ICM’s typical sturdy and secure cardboard box, we find: • 13 sprues (2 of them clear) • 4 rubber tyres • A small decal sheet • An instruction booklet • A leaflet with ICM’s paint range This set is full of little surprises — and here’s why: Hummer Sprue A This sprue includes the full chassis of the Hummer, along with the windscreen frame, the cabin firewall, and the side panels of the front wheel arches. Additional body components are also included. Sprue B Here we have the remaining bodywork elements: cabin floor, bonnet, a one‑piece side panel, and several smaller panels. The engine block (supplied in two halves) and the sump are also found here. Sprue C This sprue contains transmission components (differentials) and complete suspension axles. Two types of windscreen frames are supplied (armoured and unarmoured), although this version is not the up‑armoured variant. Sprue D (x2) These sprues provide duplicated components for the vehicle: two wheels, one of the two front seats (this is the cargo version, so the cabin features only two seats). The suspension springs come in halves, so some sanding and alignment will be needed to achieve a realistic appearance. Sprues E and E1 (Clear) These clear sprues contain the windscreen and headlight lenses. E1 provides the door windows and rear window. All clear parts are crisp and free from distortion or scratches. Sprue F Four rubber tyres are supplied. The tread pattern is well reproduced, though personally I find plastic tyres easier to paint and more realistic. 😊 Sprue G This sprue provides exterior panels and canvas covers, moulded with a subtle ripple texture replicating fabric. Sprues W Series These three sprues include a variety of weapons. Although the instructions indicate that many parts are unused, they can of course be kept for future projects or added to this build. Sprue W This sprue contains the parts for the Stinger missile launcher carried by one of the operators, as well as personal weapons. It also provides a generous selection of additional weaponry — a Browning M2HB, a 105mm recoilless rifle, an RPG with ammunition, and various Western assault rifles. Sprue W1 This sprue contains the DShKM heavy machine gun mounted in the cargo bed of the Hummer. A detailed presentation of this set has already been made in thiw post, should you wish to learn more: Sprue W2 This sprue includes small accessories such as the team’s helmets and their infrared‑vision mounts. Other accessories are marked as unused but can be incorporated into the build or saved for future use. Sprue H3 These two sprues provide parts for the three crew figures. Each figure consists of two legs, torso, two arms, and a head — the standard breakdown for 1:35 injected‑plastic figures. Clothing texture and poses are appropriate for the moulding technology, with well‑defined facial expressions and hand details. The torsos come with moulded tactical vests, and accessories such as pouches and small first‑aid packs are included separately. Decals ICM’s decals are of the usual quality, with good definition, sharp printing, and minimal carrier film. Instruction Sheet As expected from ICM, the instructions are clear and well presented: • Glossy paper with full‑colour painting and marking guides • 16 pages, with the build spread across 69 steps • Well‑drawn, easy‑to-follow diagrams with no ambiguity in part placement Marking Options One decoration option is provided for a generic vehicle under ukranian use. Conclusion This is yet another well‑balanced release from ICM, offering excellent value for money. The set is, by itself, capable of telling a complete story — vehicle, crew, and context — without requiring additional aftermarket investment. Of course, the modeller may always choose to upgrade or detail the build further, but the kit’s base offering provides everything necessary for a satisfying project. For beginners, this is a straightforward and trouble‑free build — simply assemble and paint! More experienced modellers may choose to enhance the Humvee with extra detailing, such as opening and detailing the engine compartment, adding stowage, or incorporating the personal gear and accessories typically found on front line vehicles, bringing extra life and realism to the scene. This is yet another recommended kit, suitable for both experienced modellers and beginners! our thanks to ICM for the review sample! Avaliable here:


.thumb.jpg.0a44fac5338655dd1736726ac23966c7.jpg)
.jpg.f14c886bcb5e0e37c7e0ffcb11e12185.jpg)

-
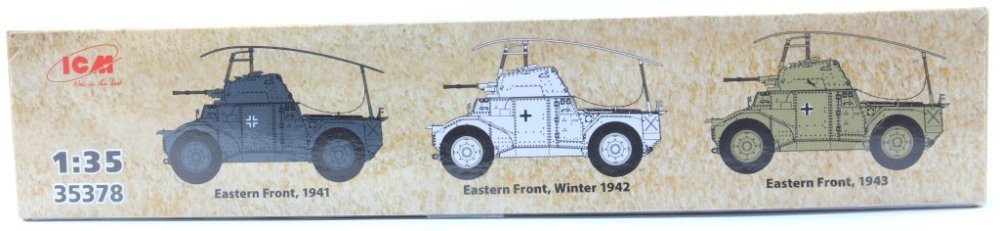
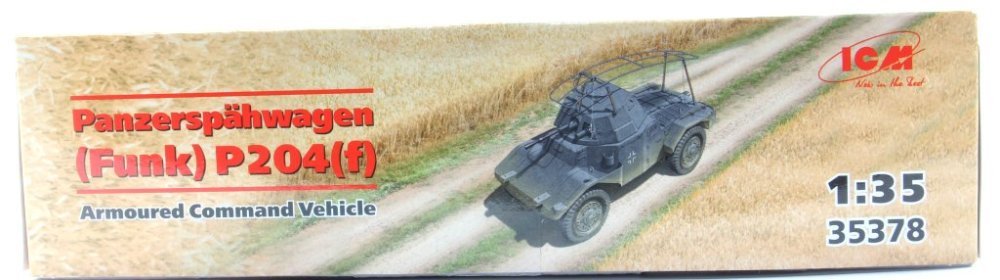
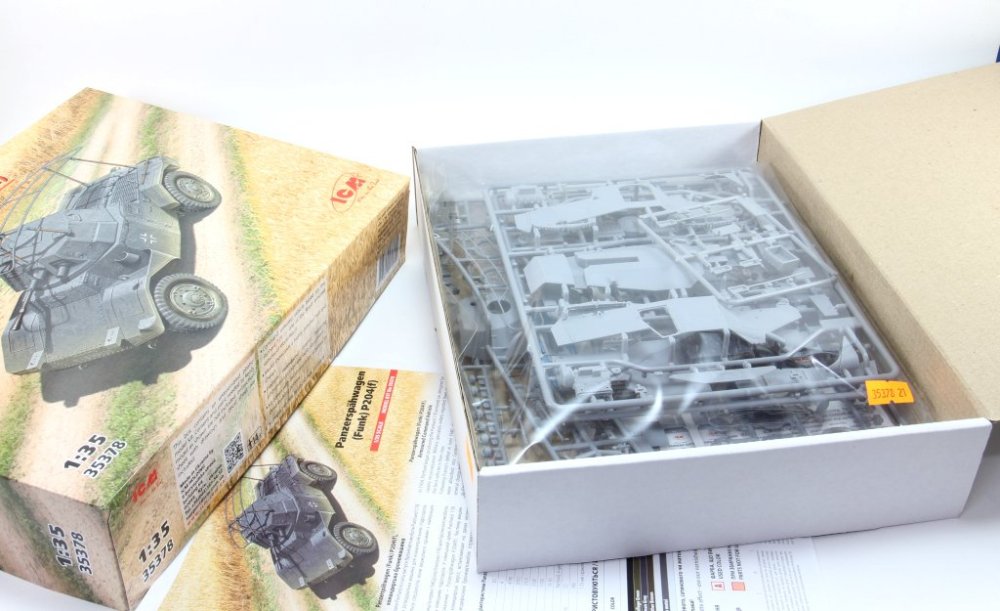
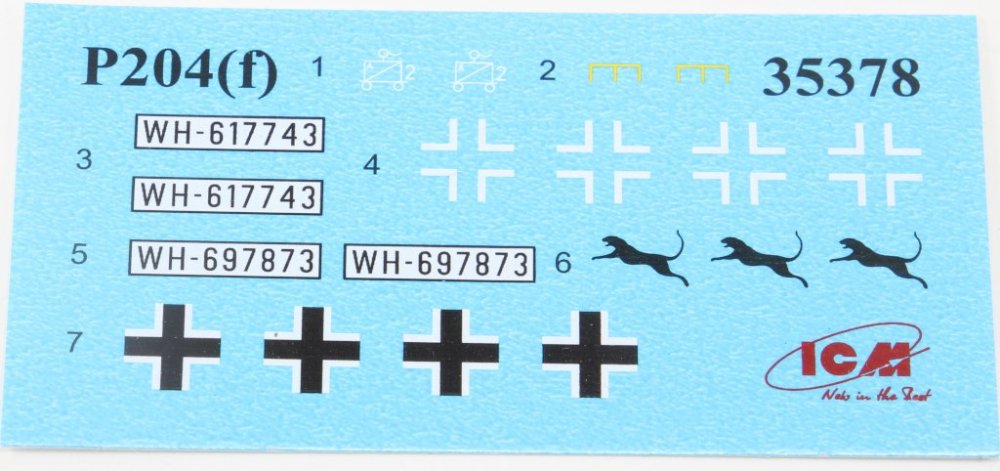
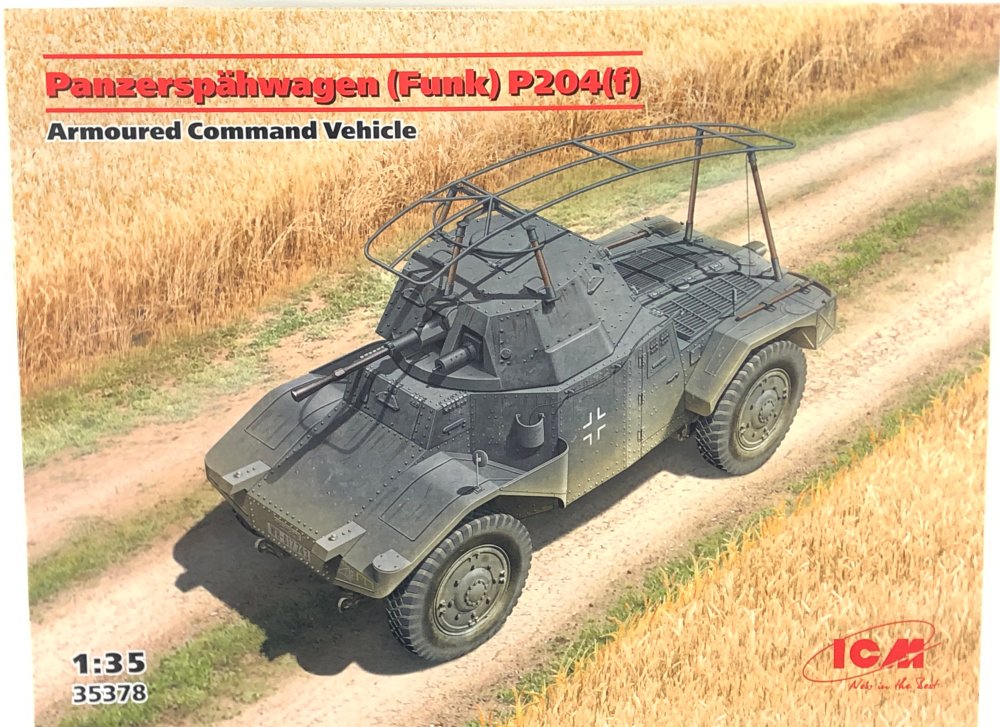
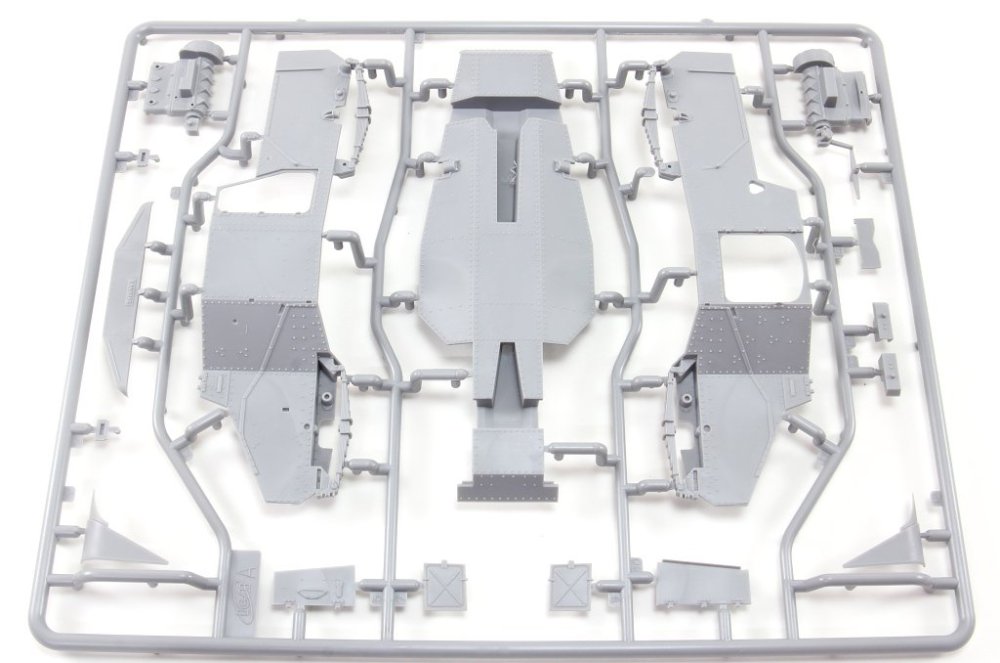
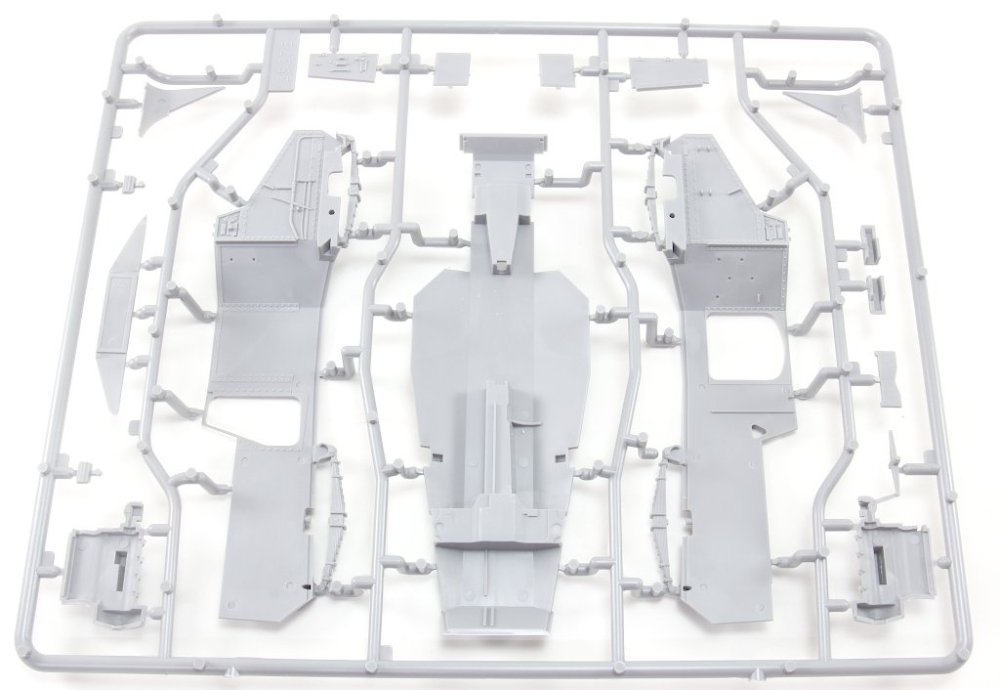
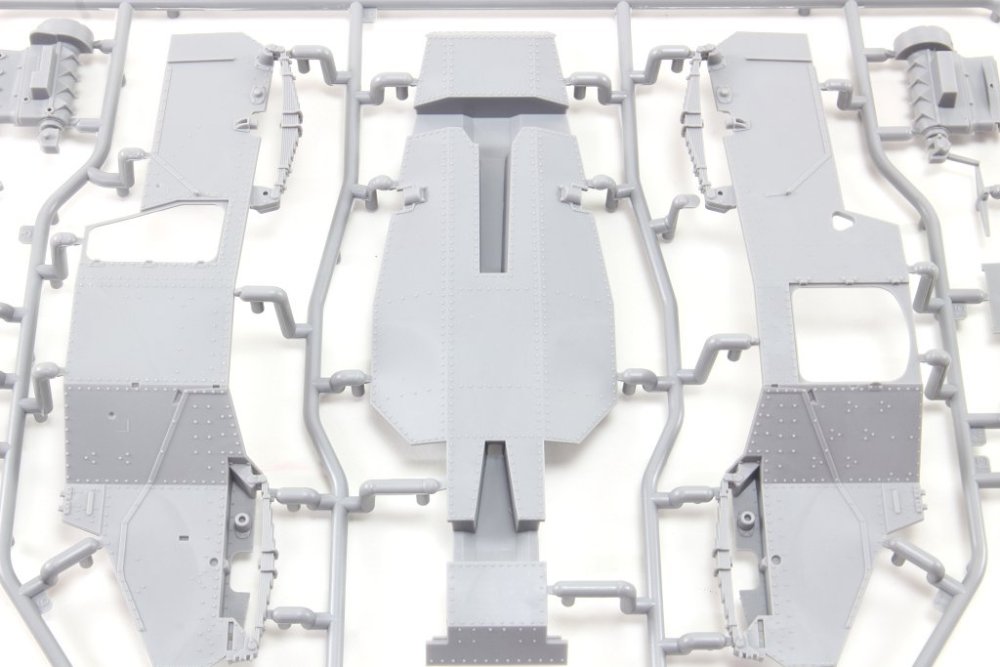
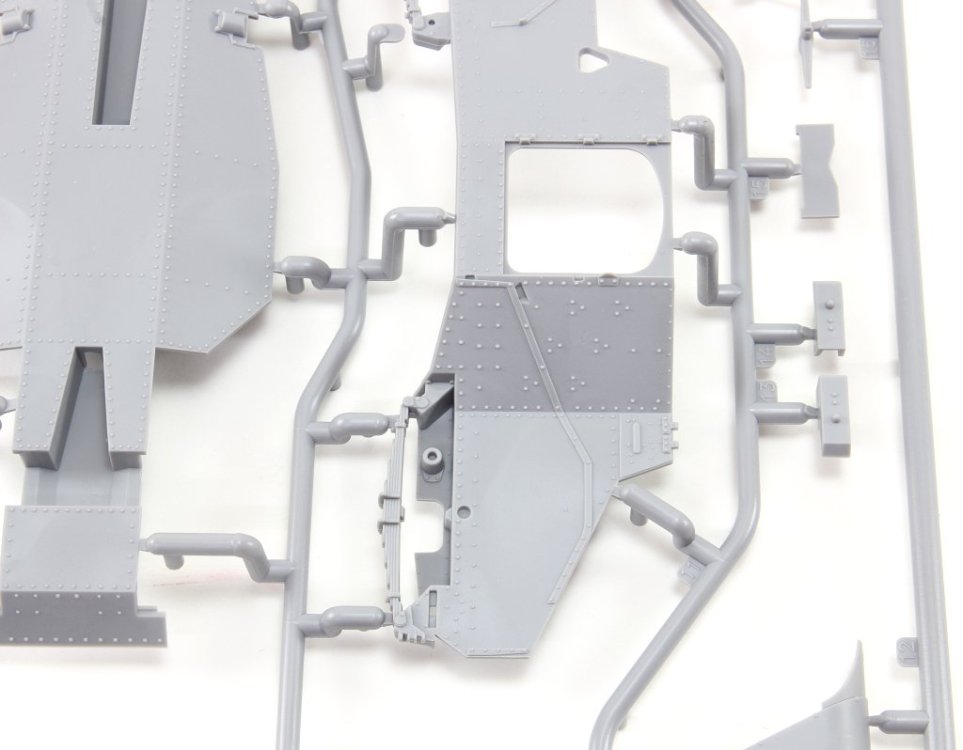
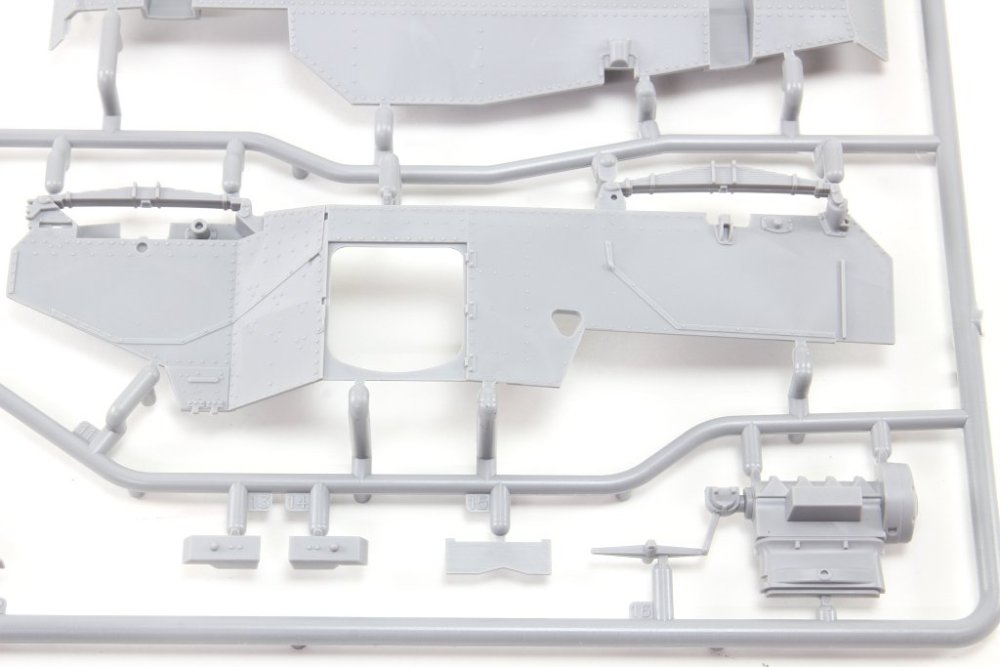
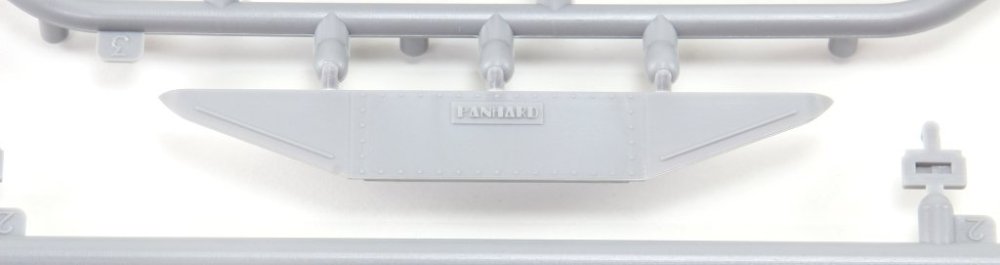
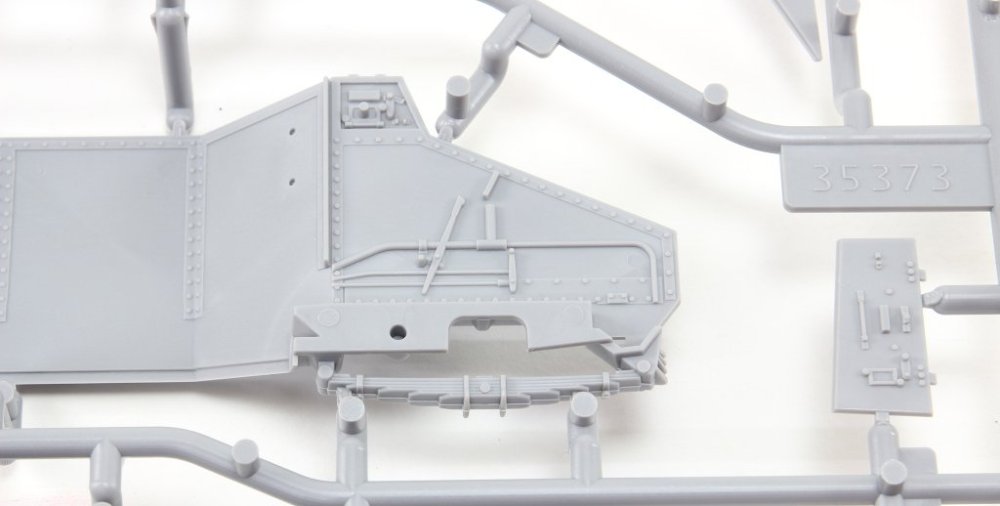
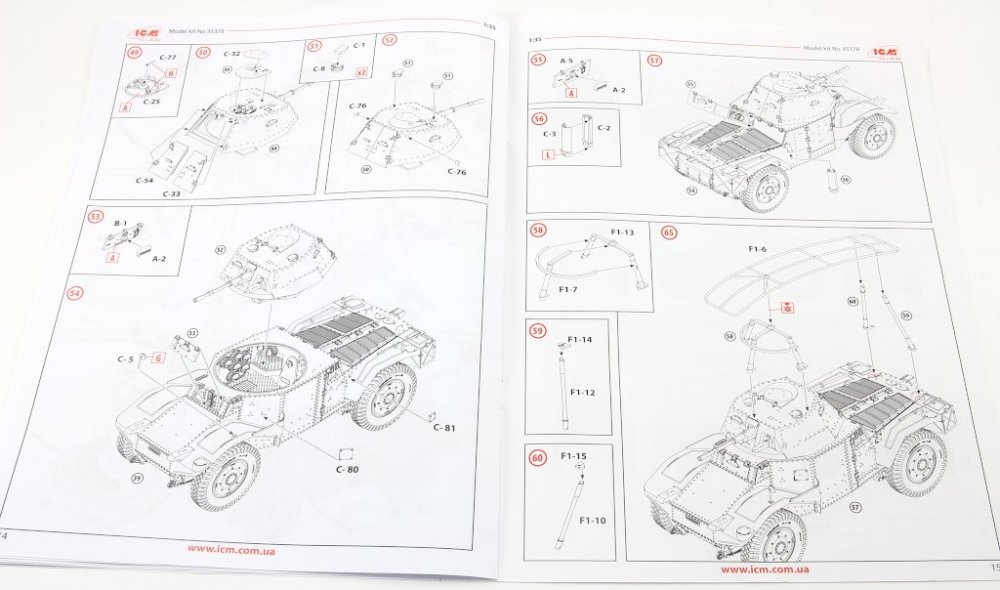
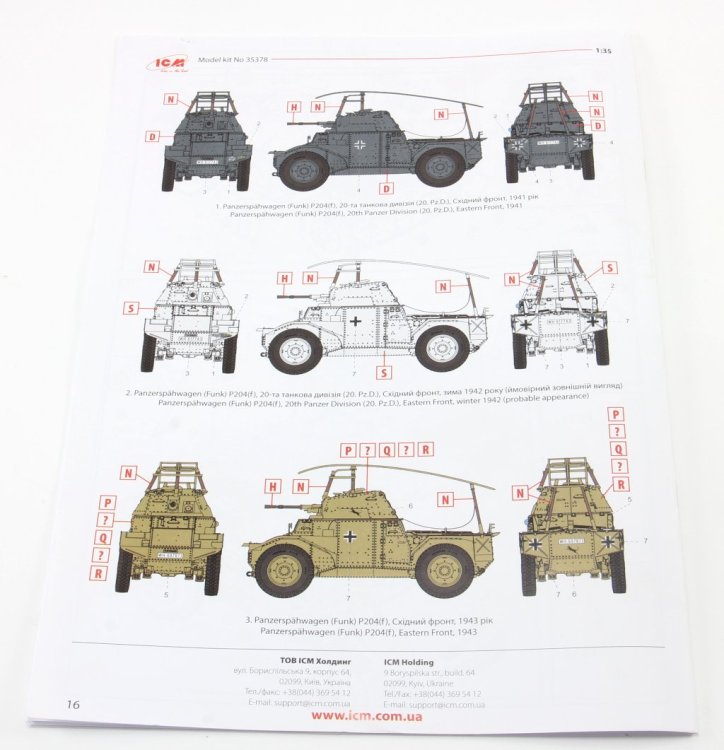
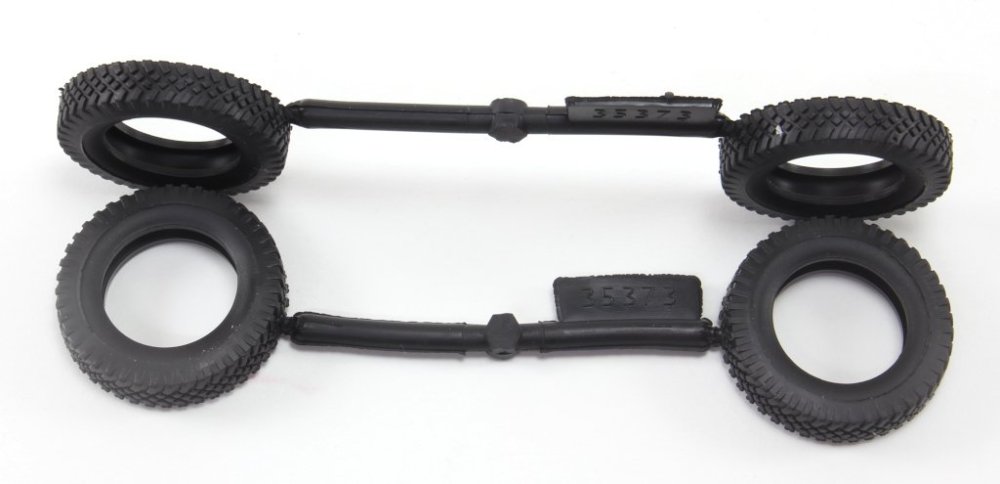
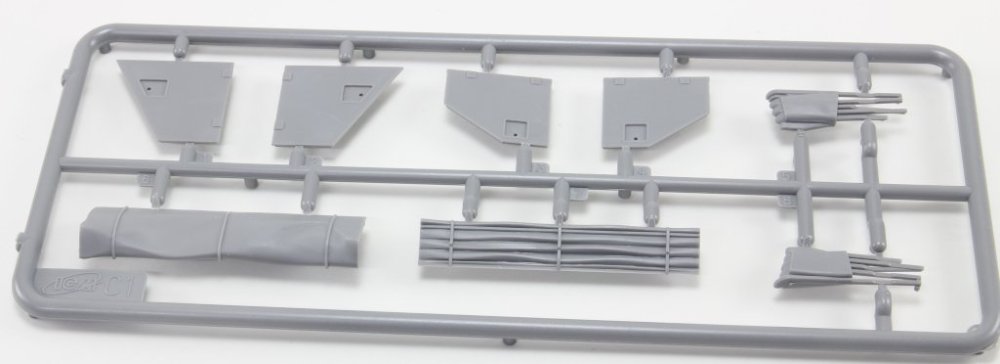
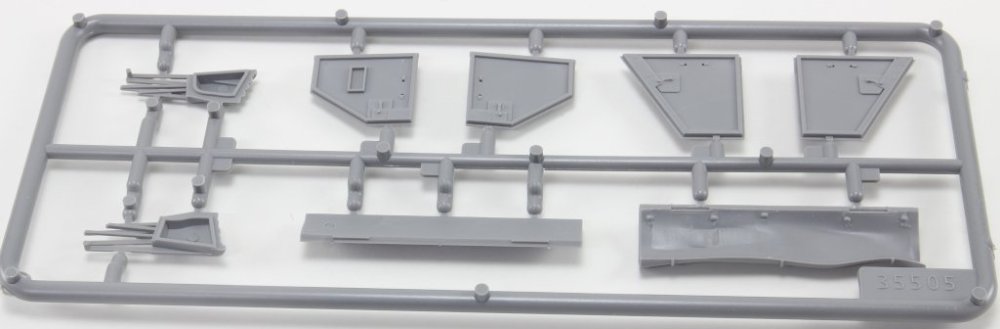
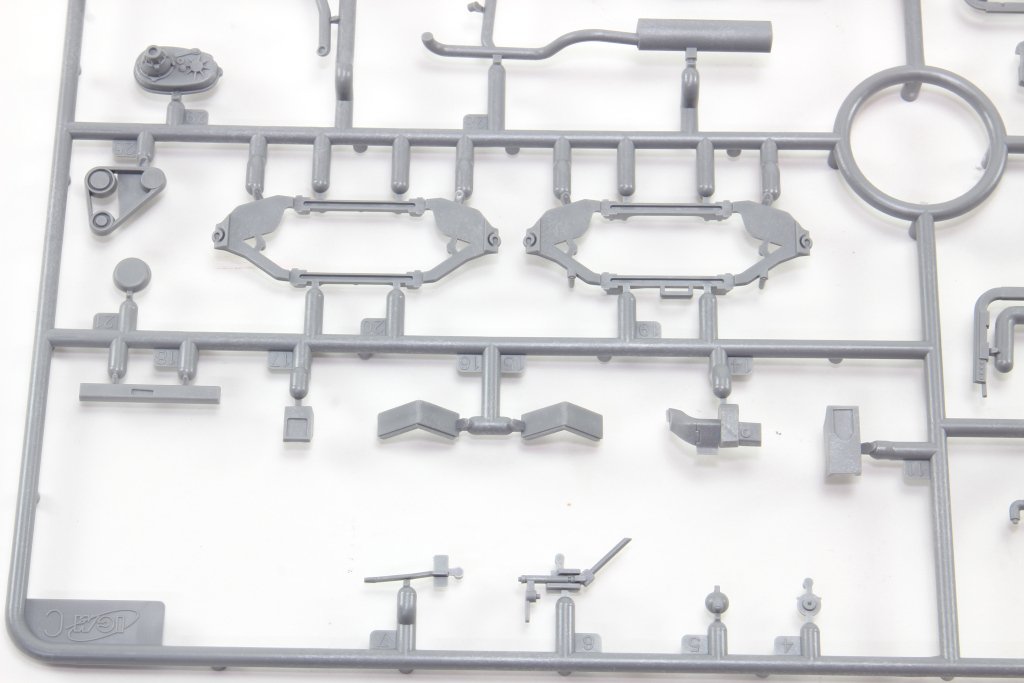
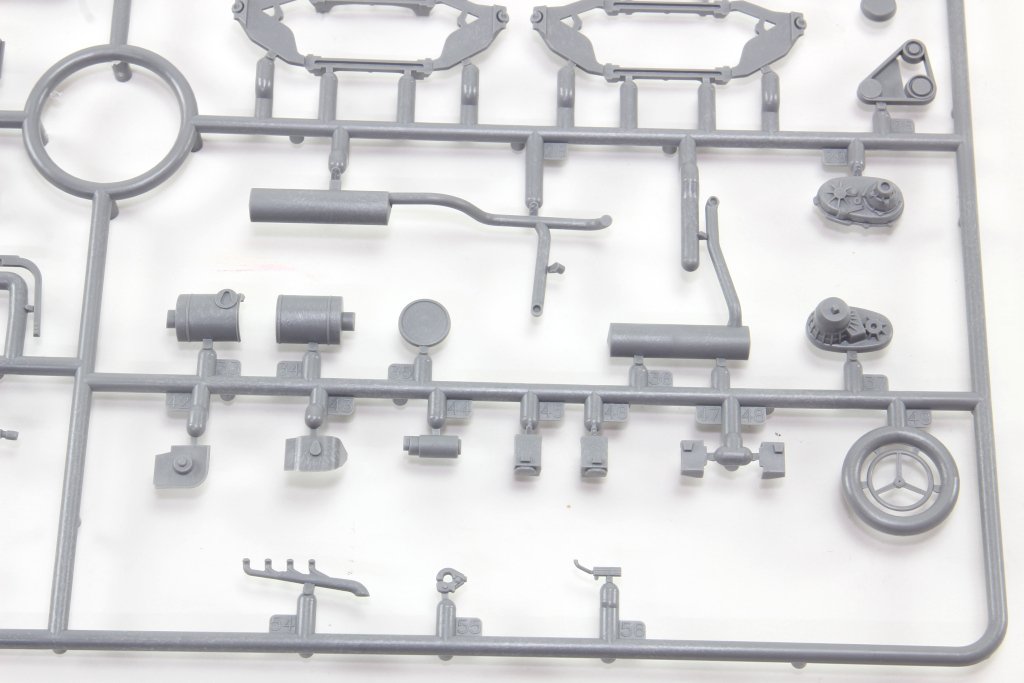
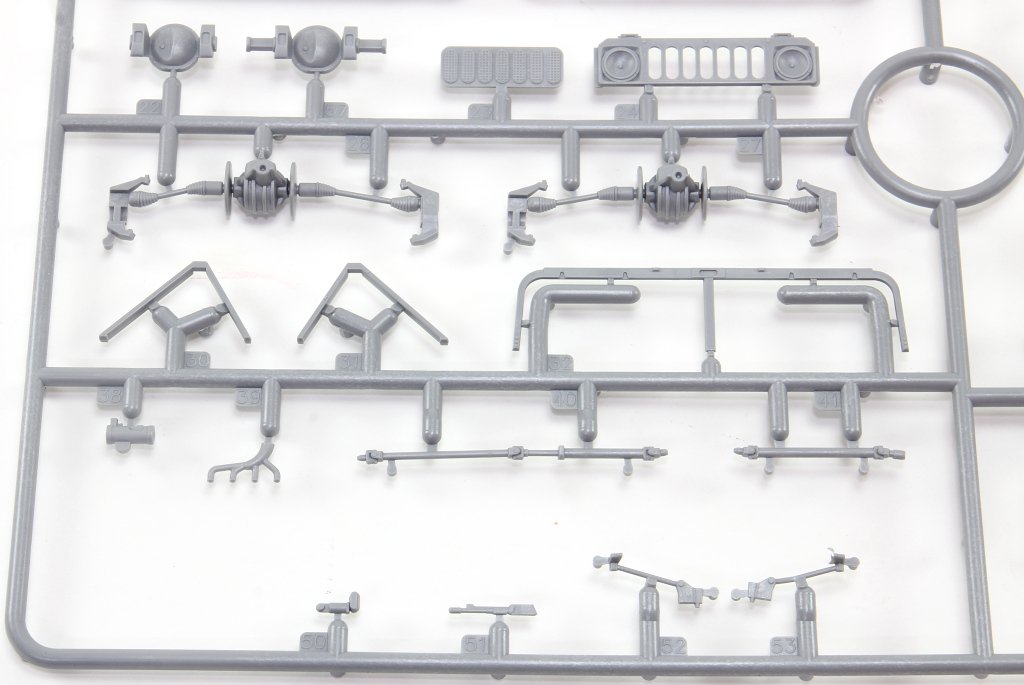
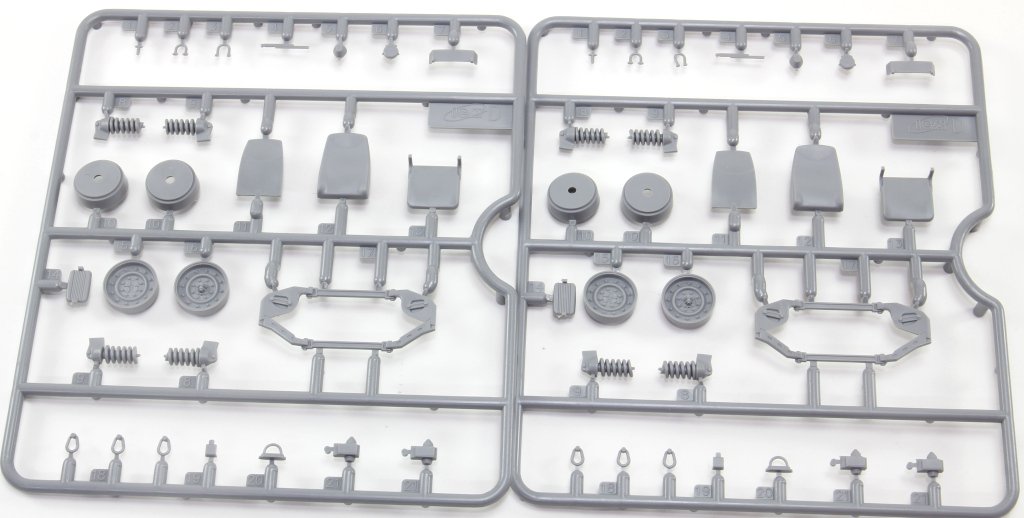
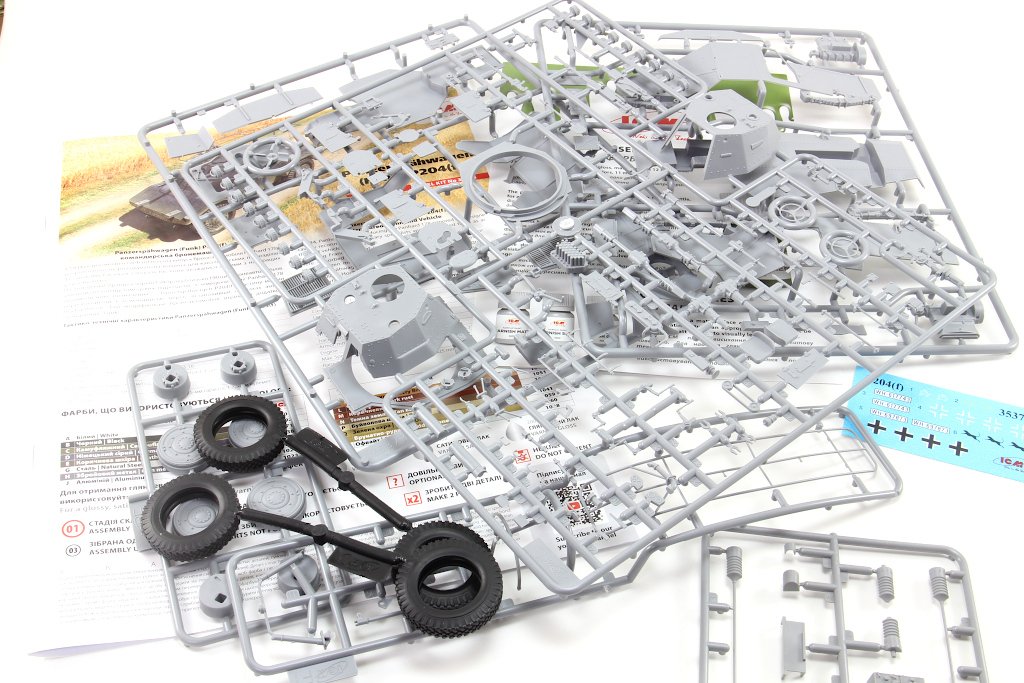
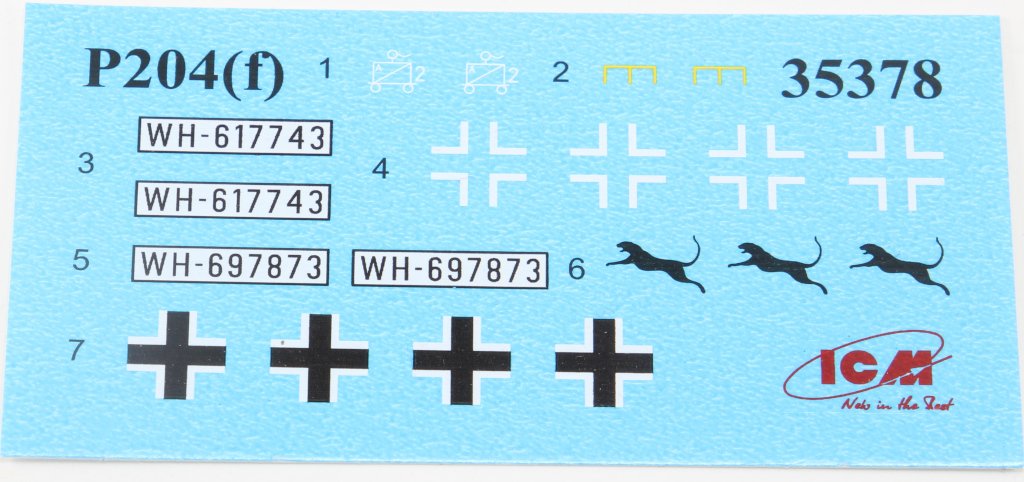
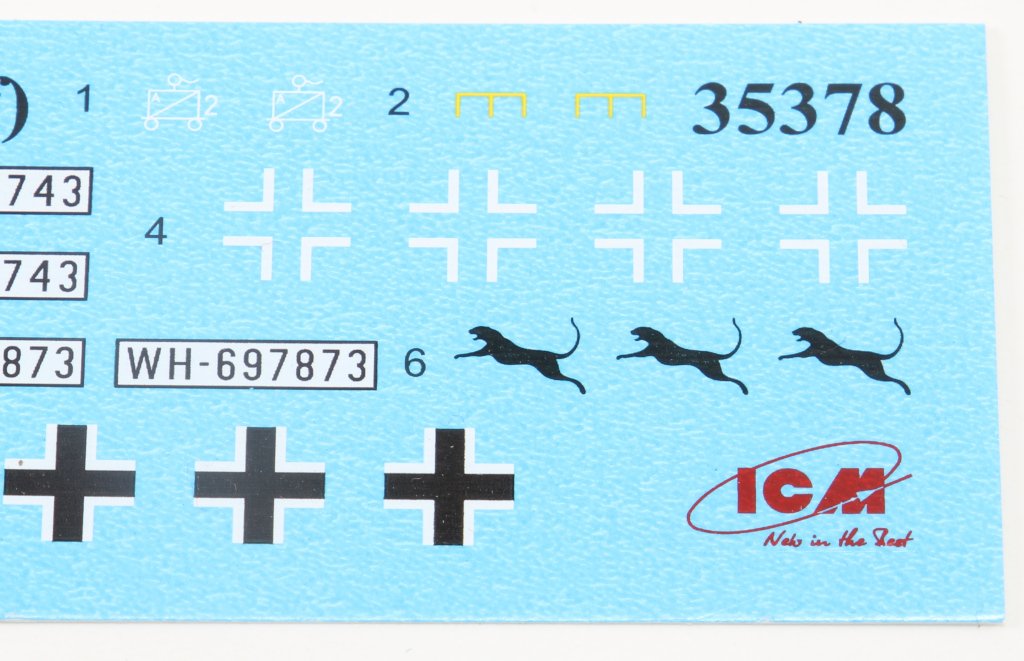
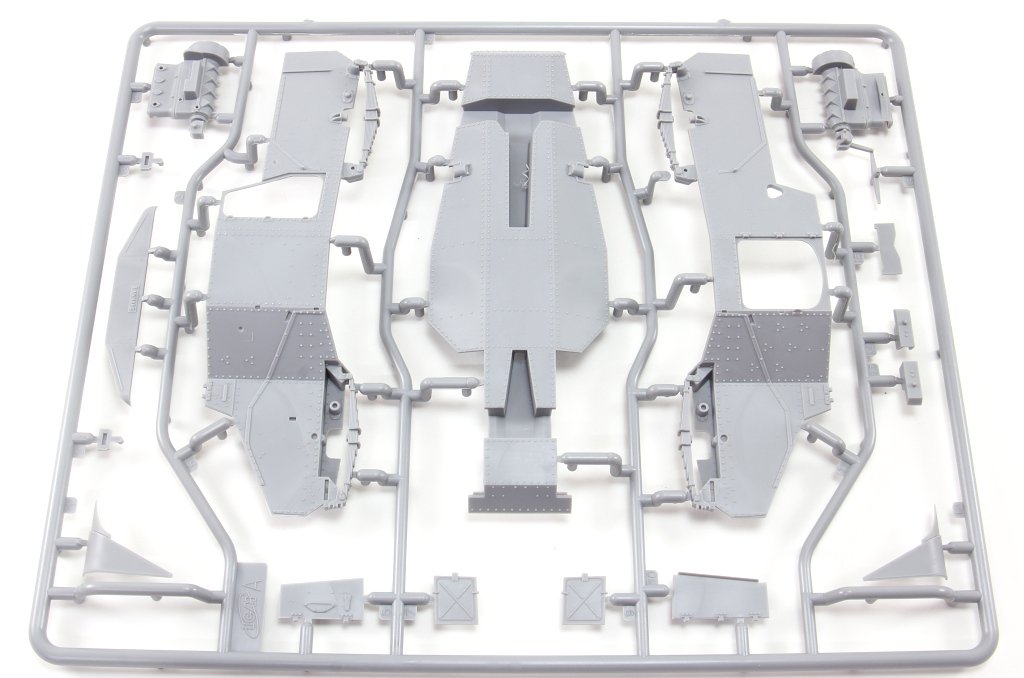
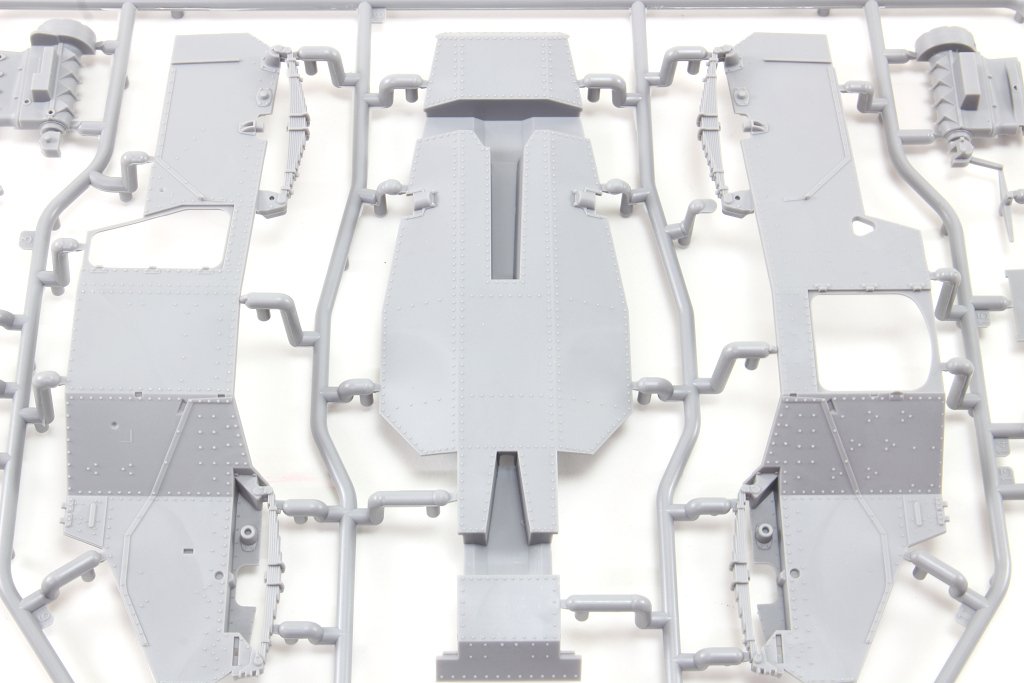
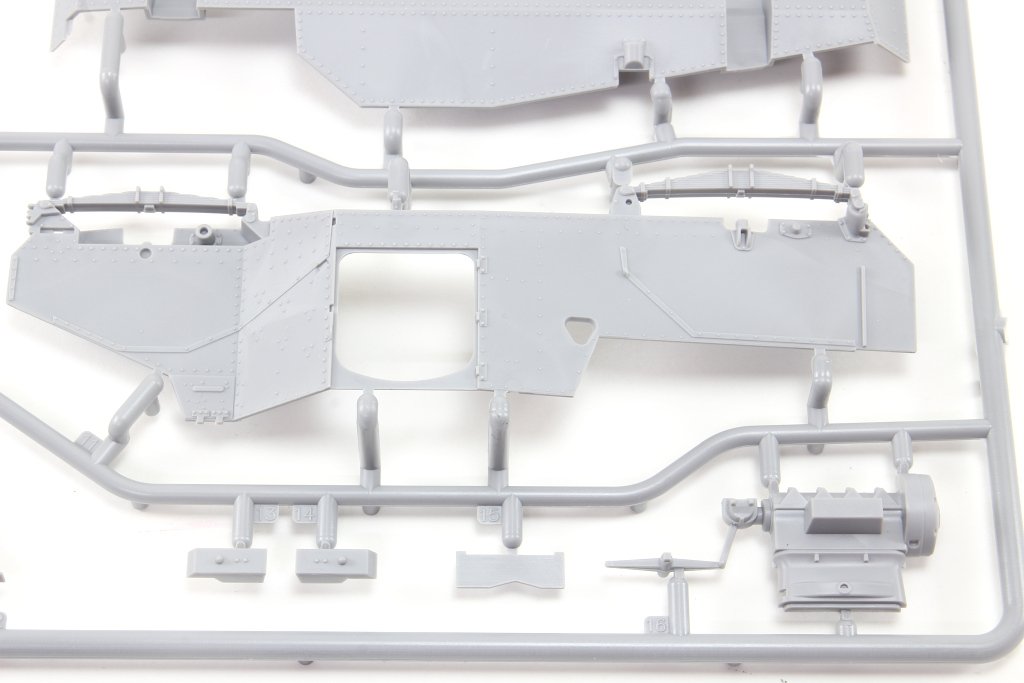
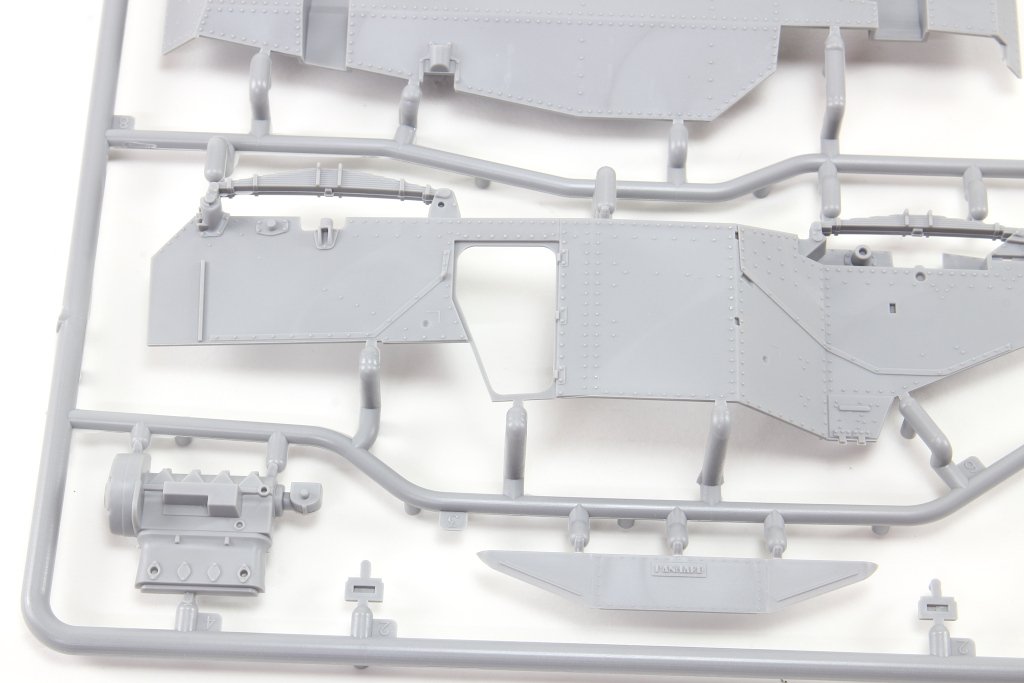
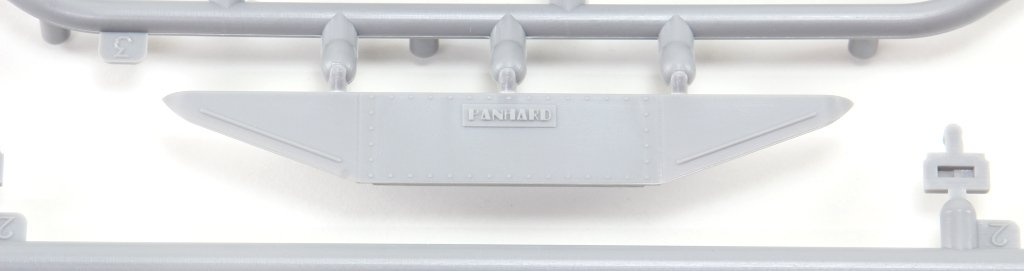
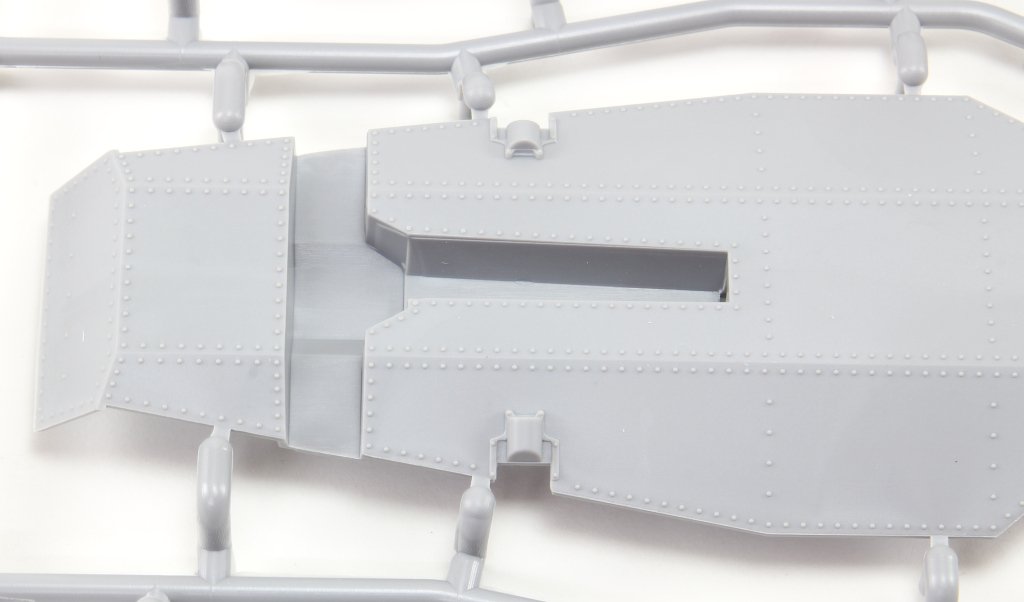
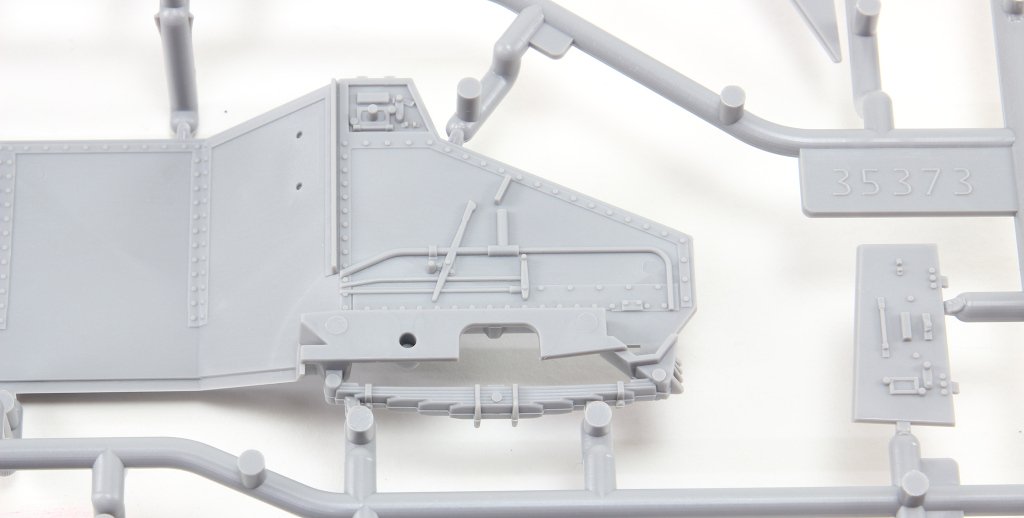
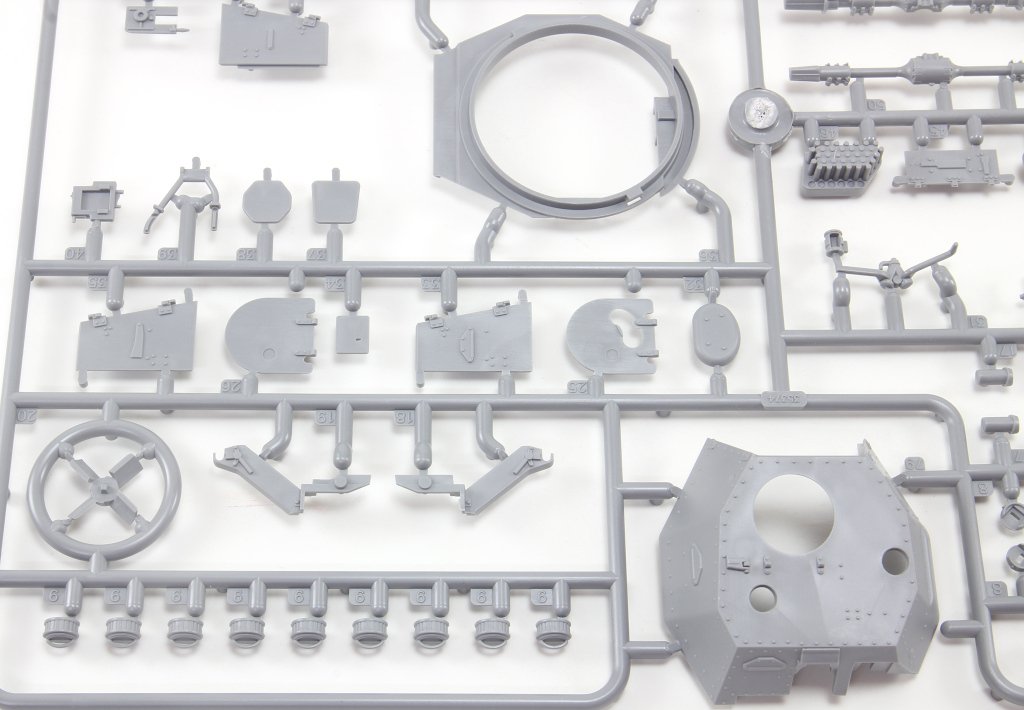
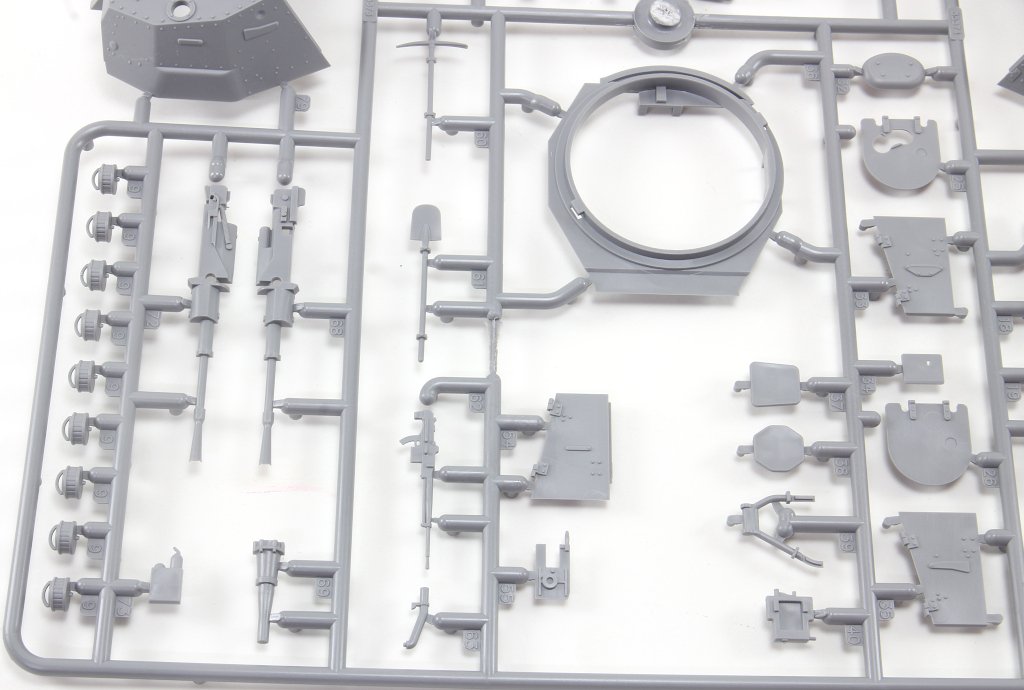
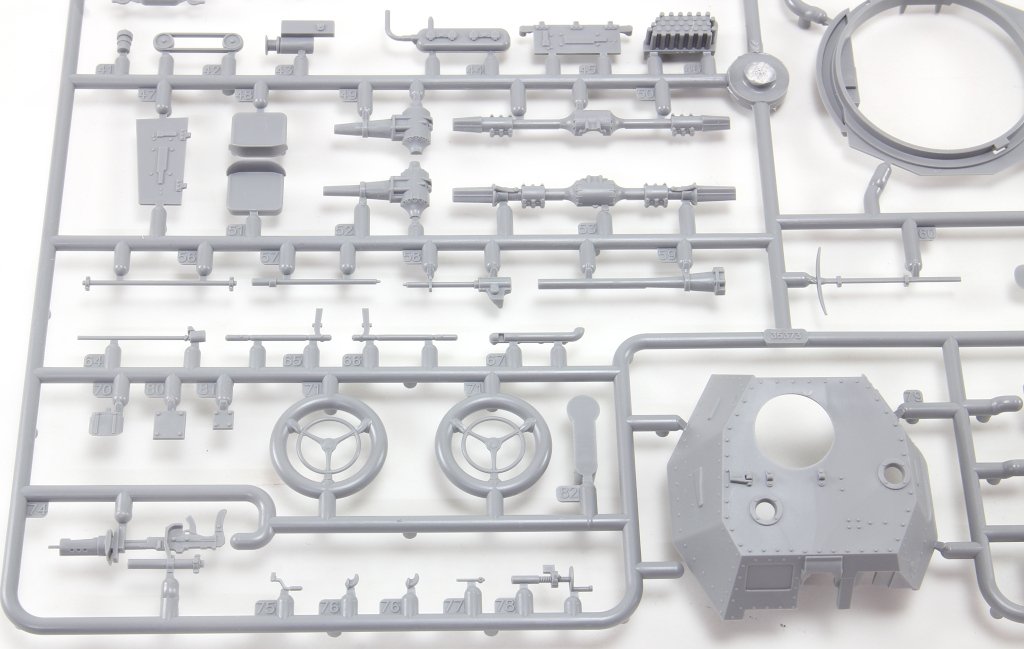
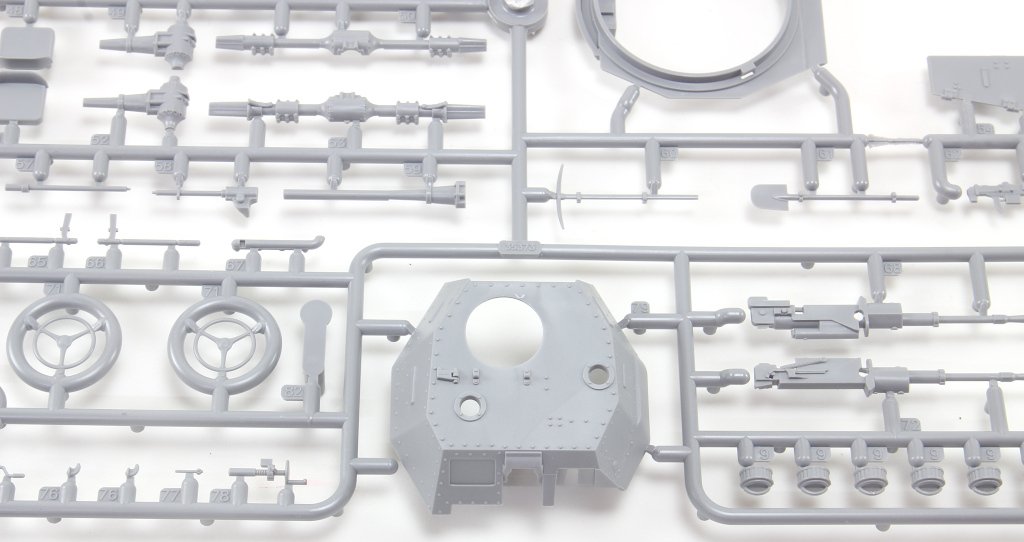
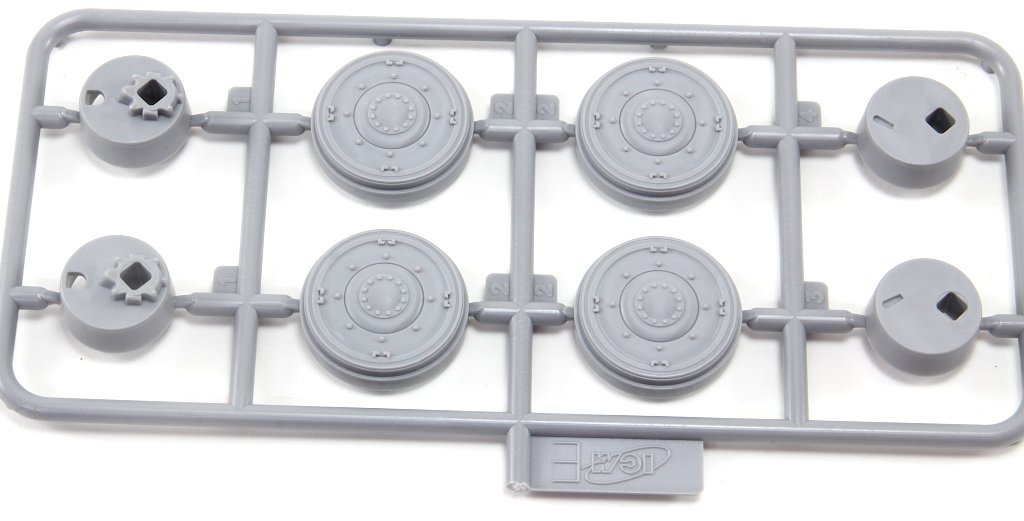
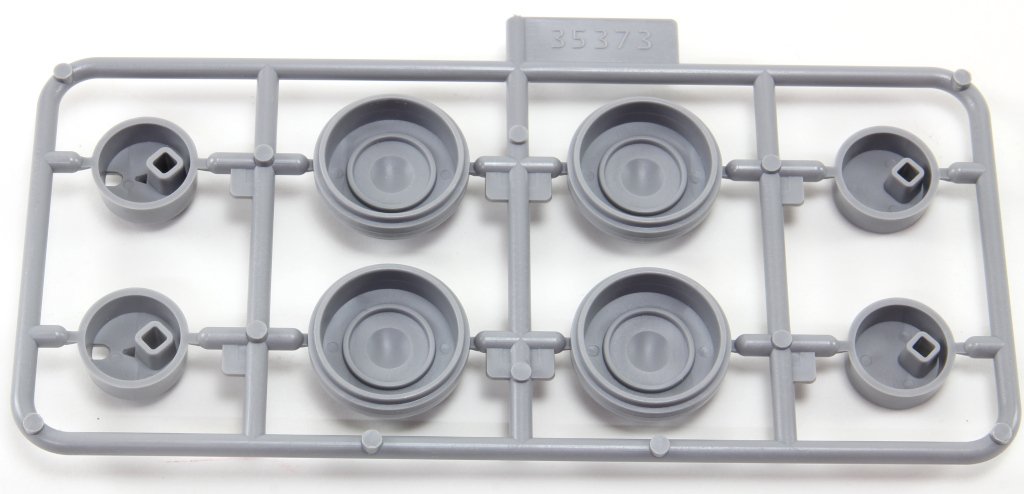
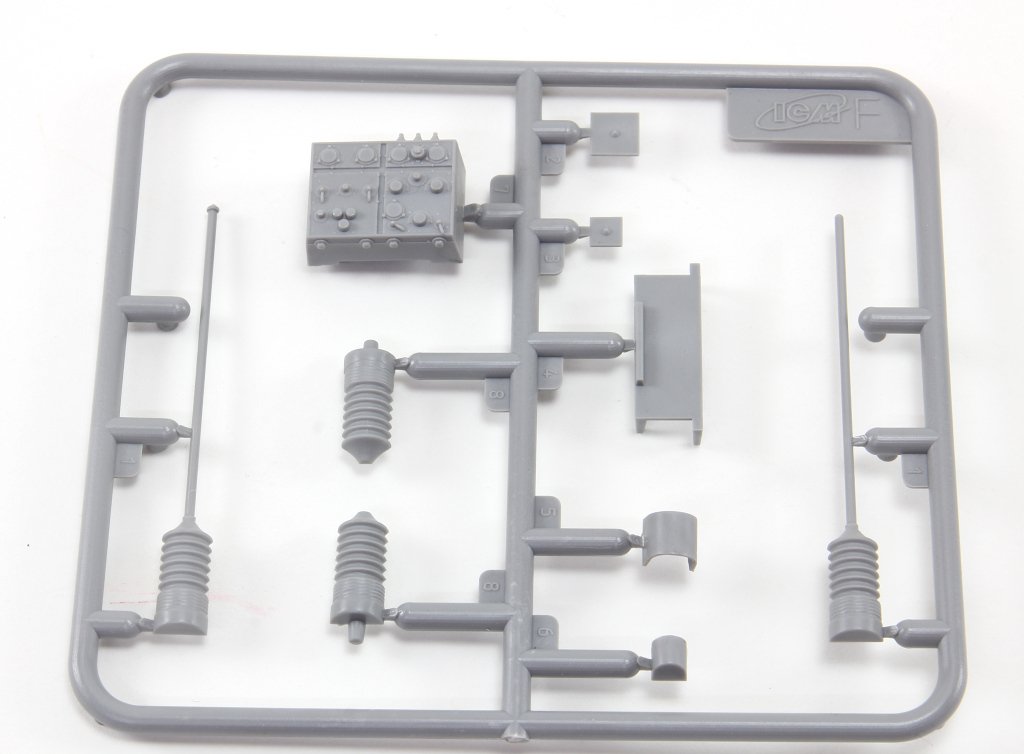
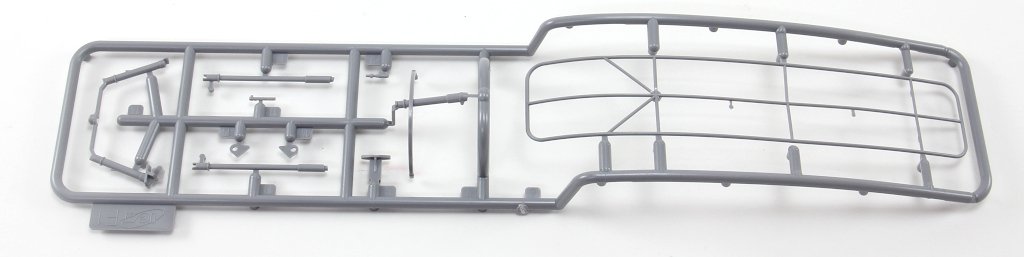
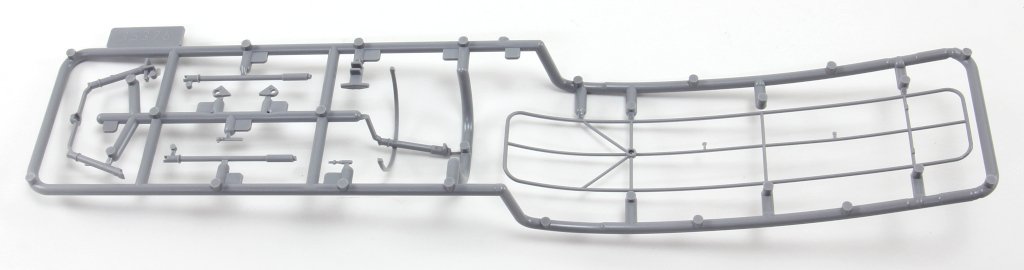
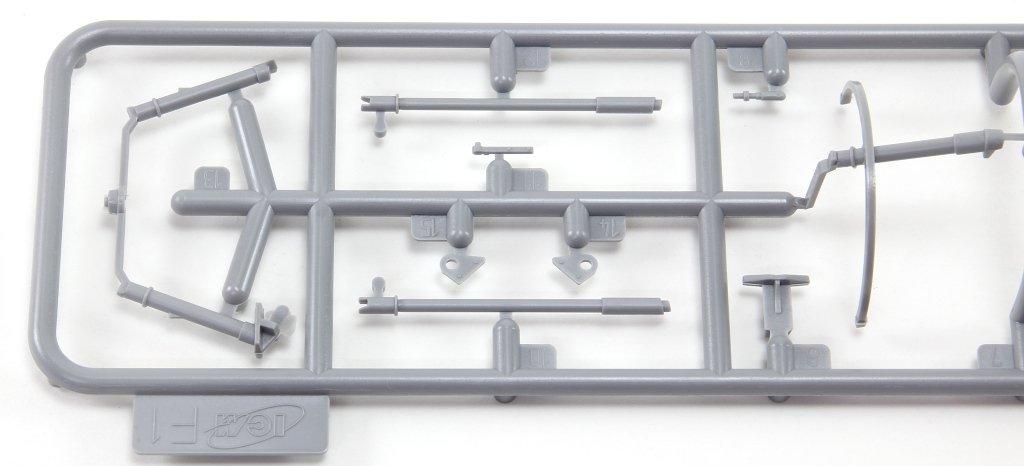
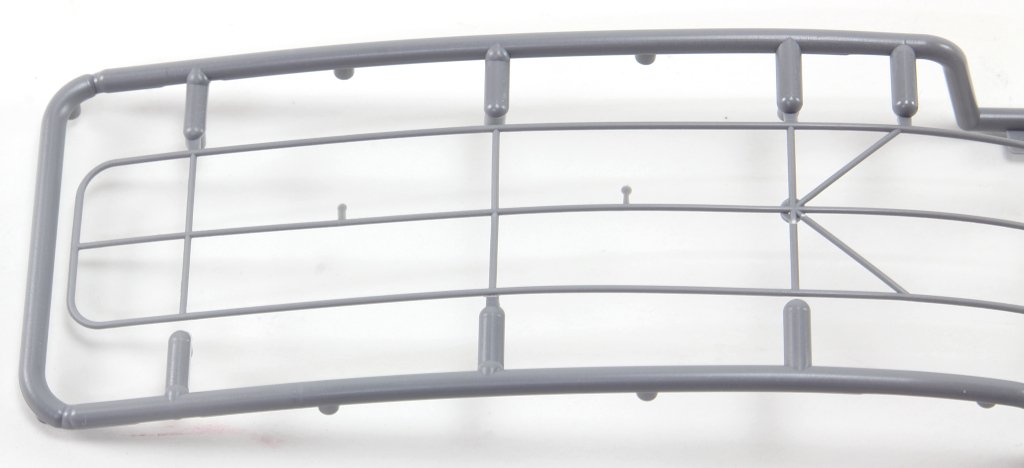
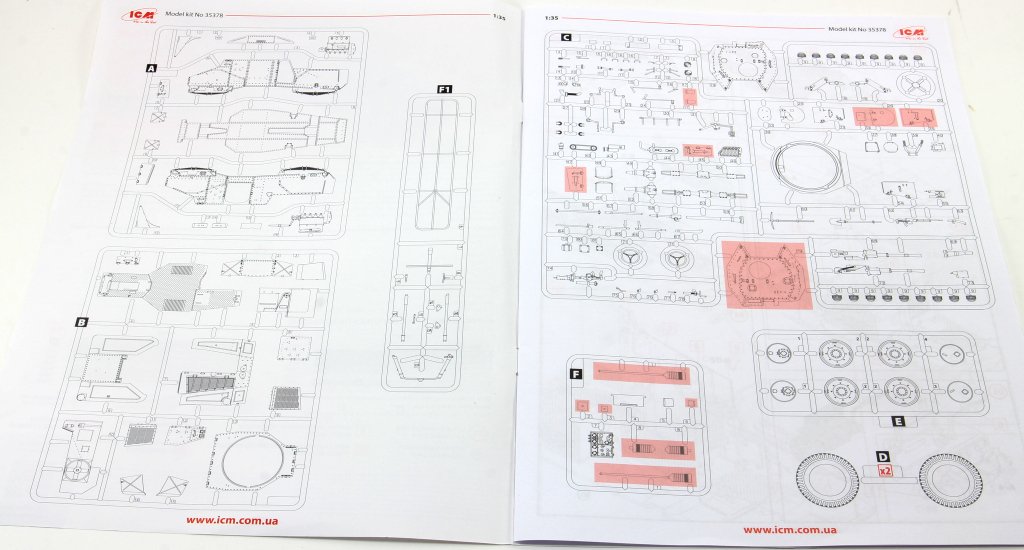
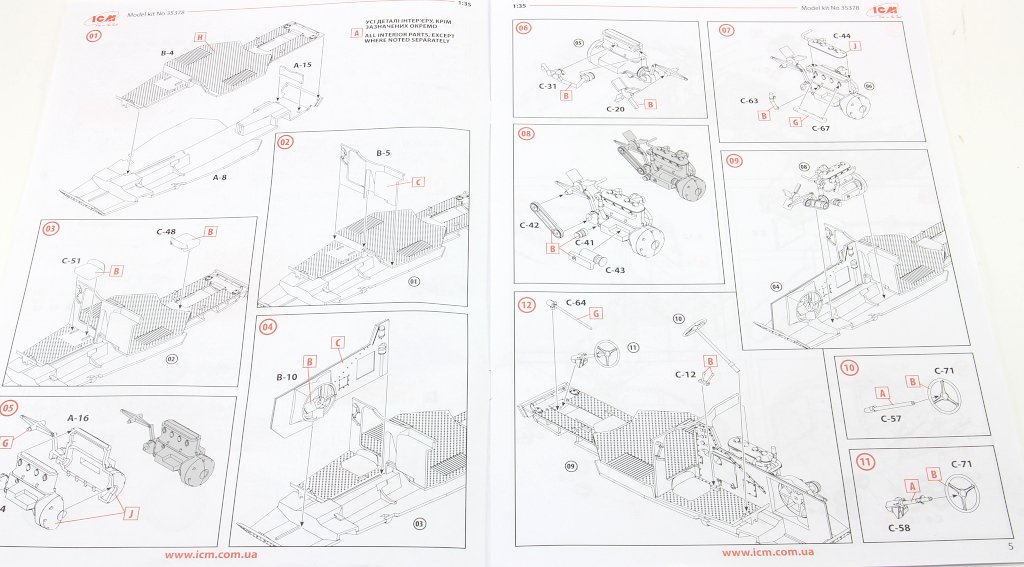
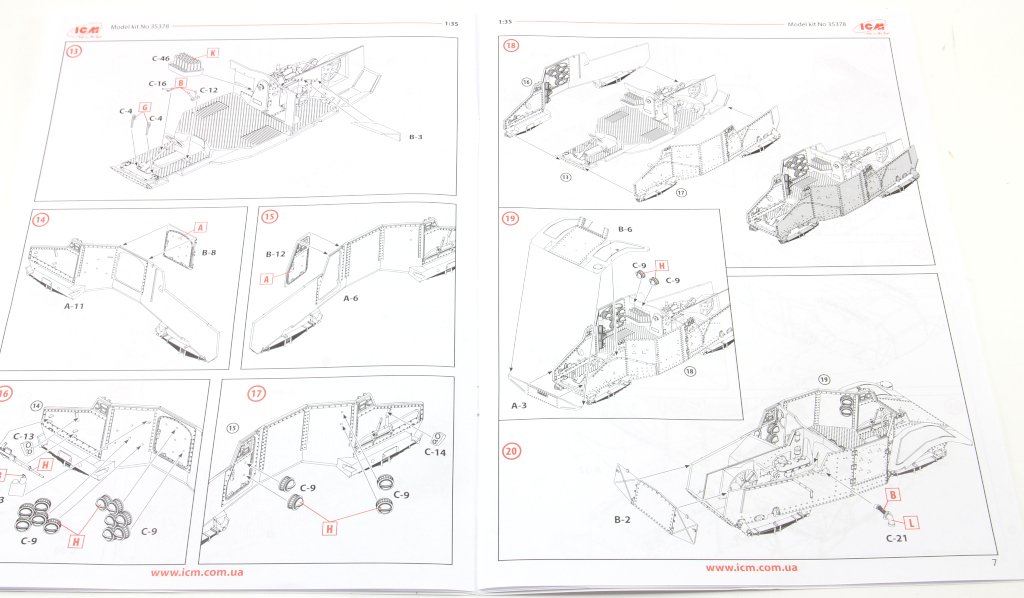
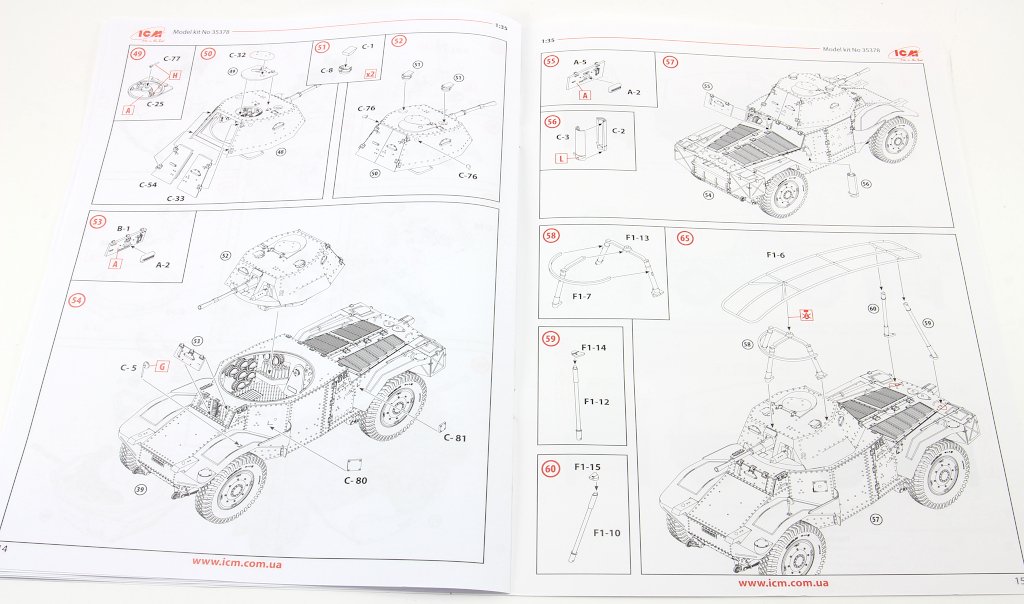
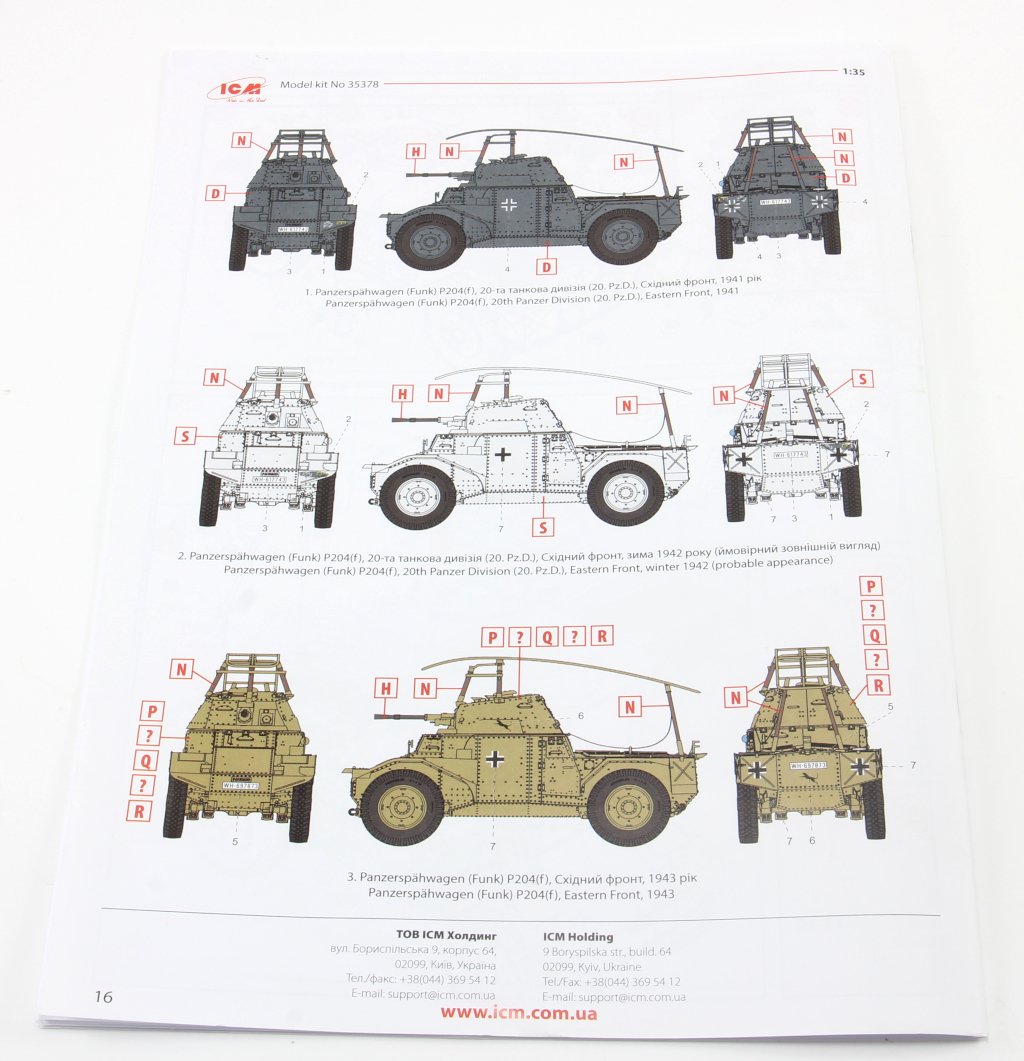
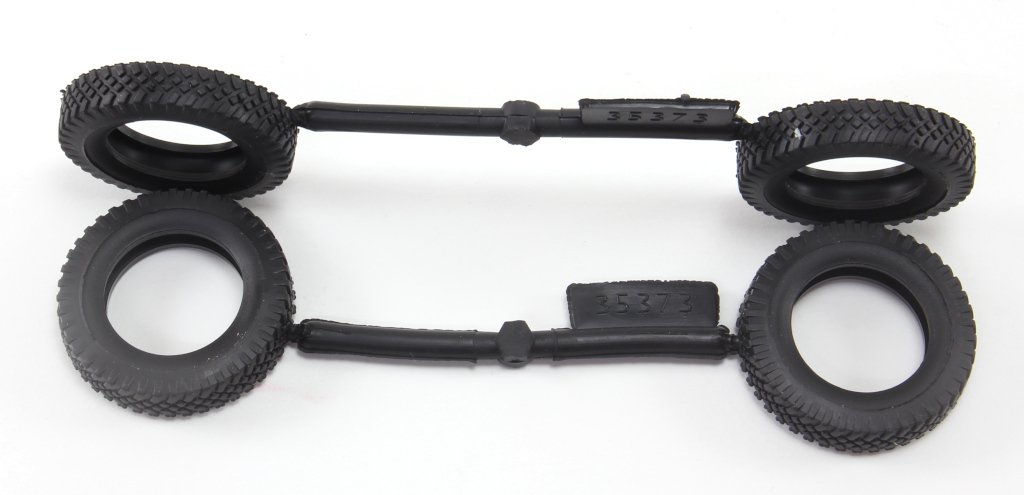
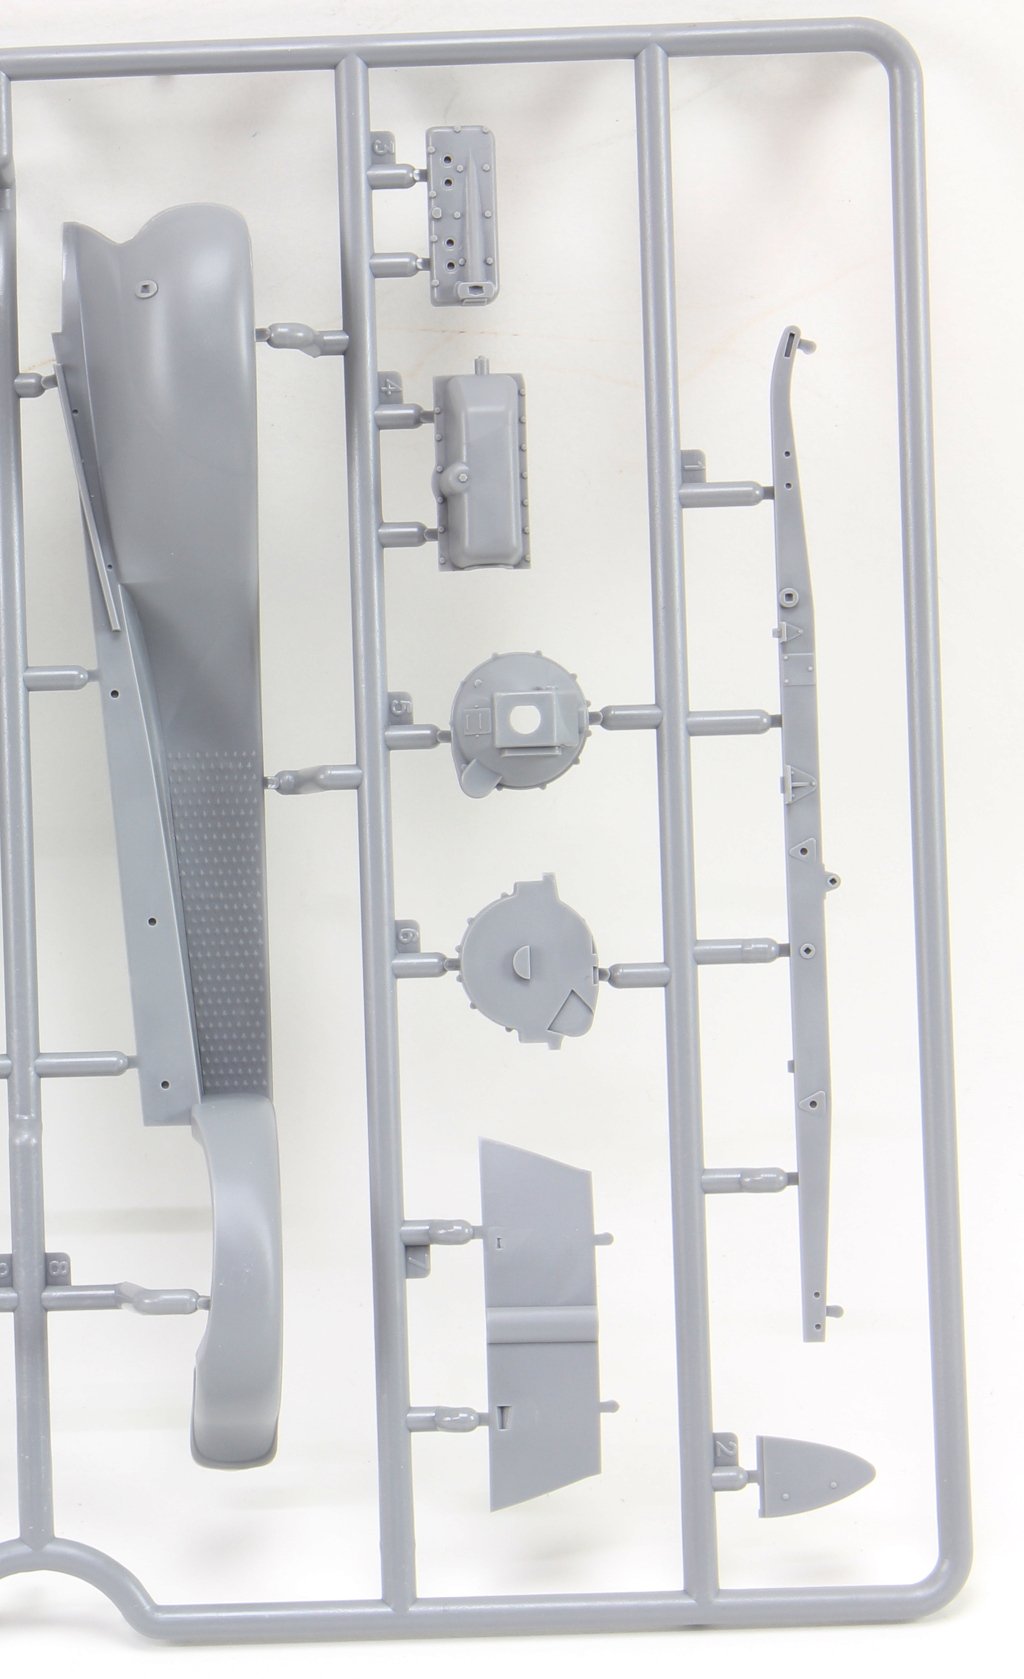
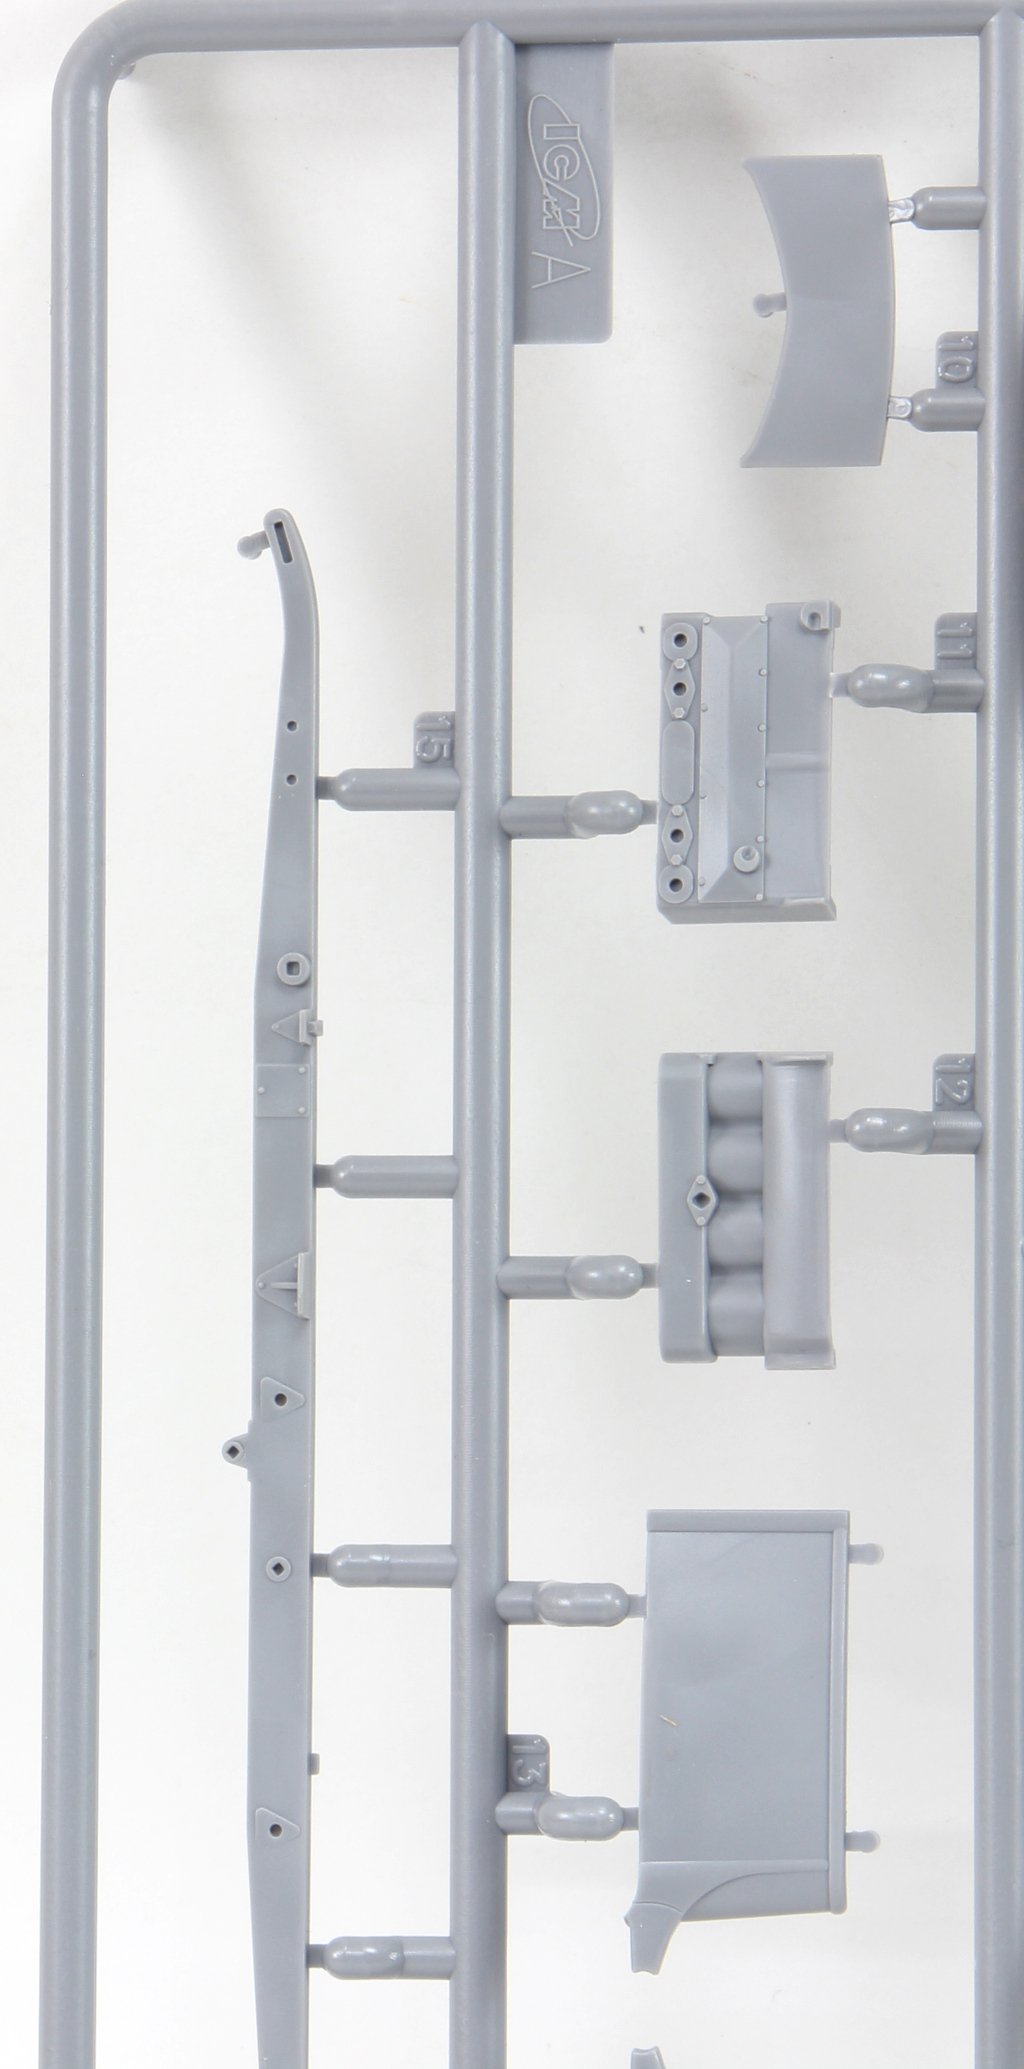
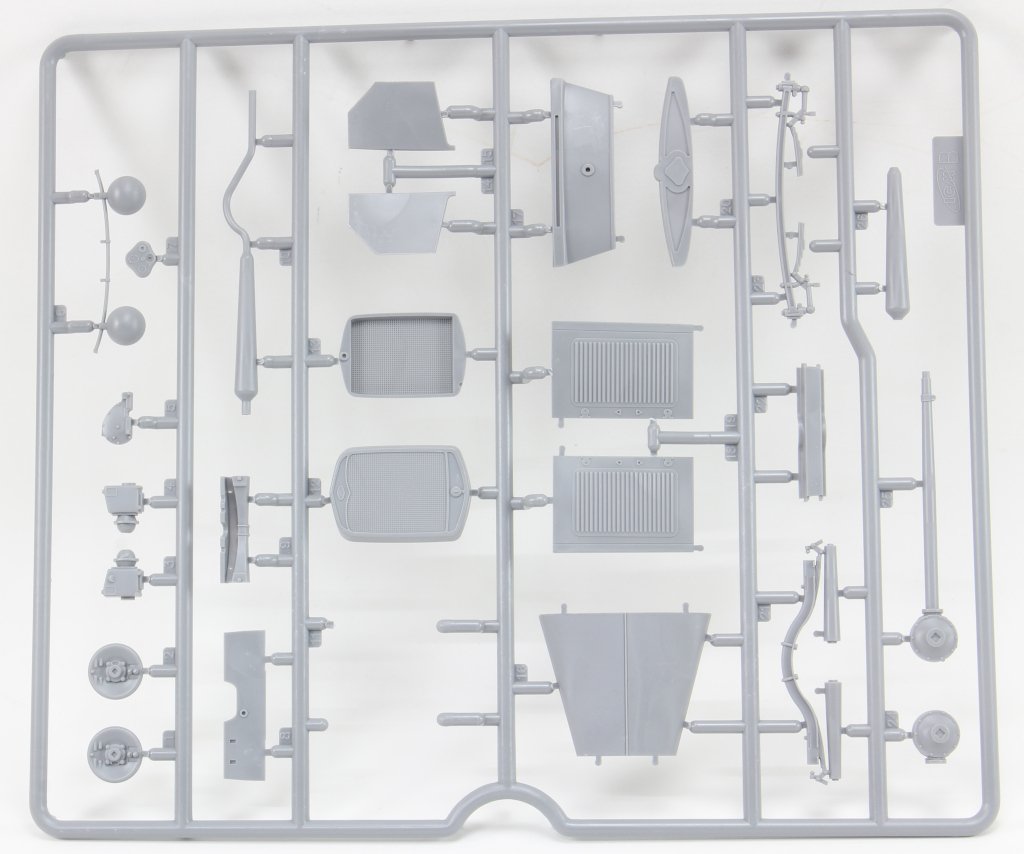
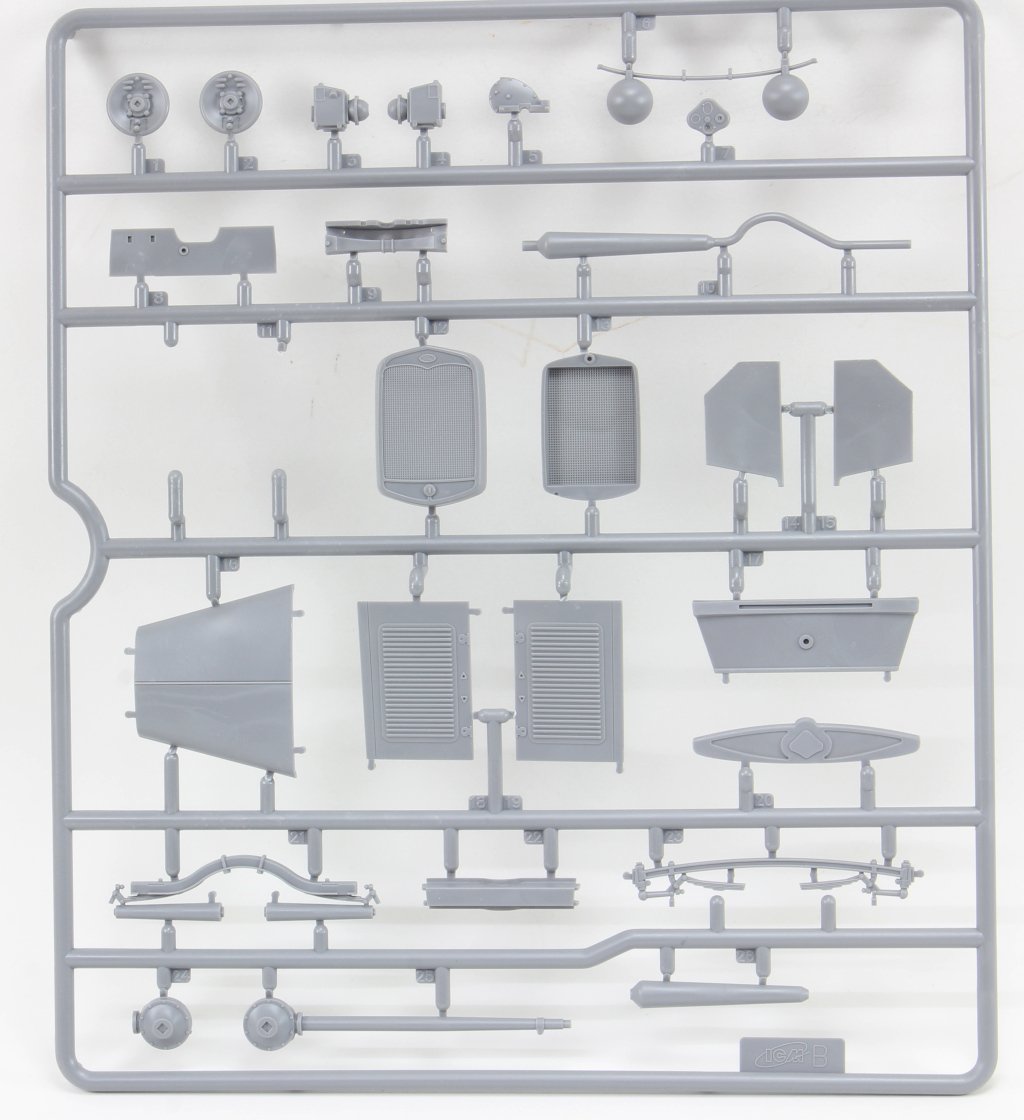
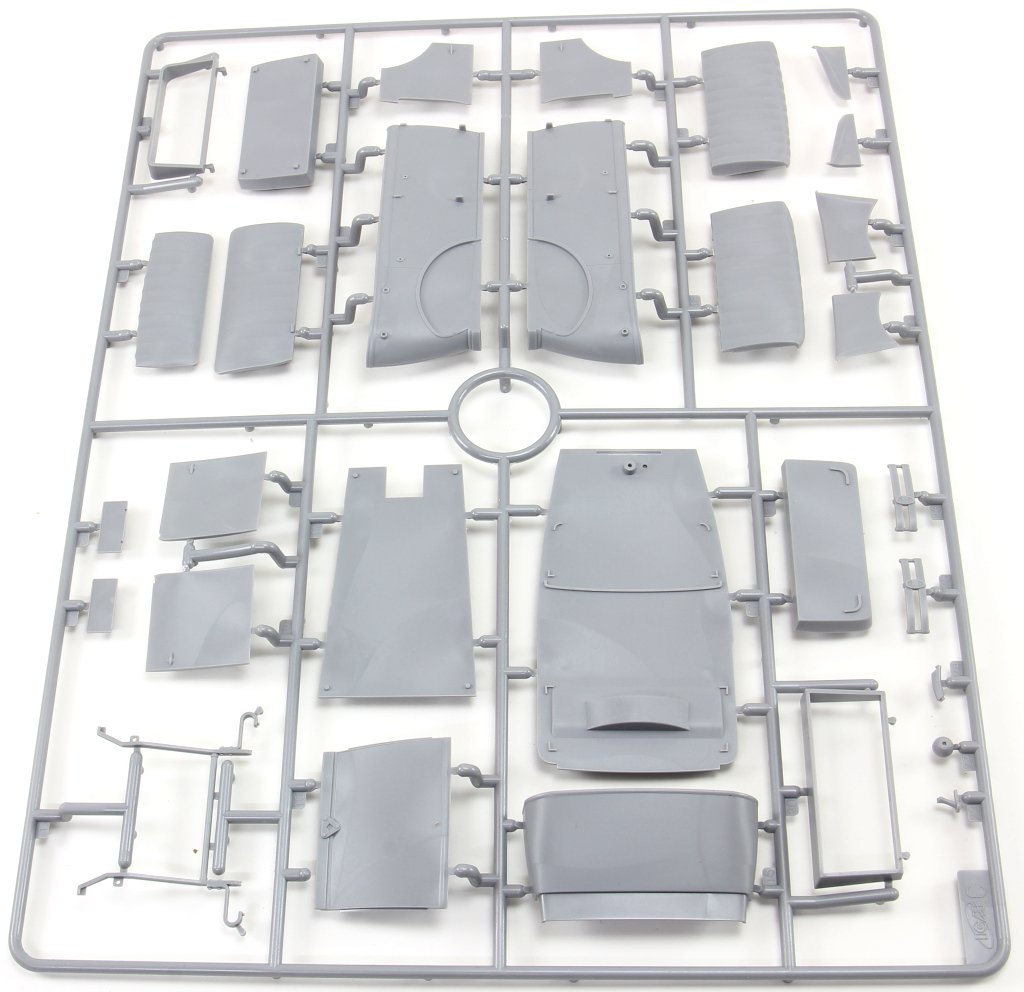
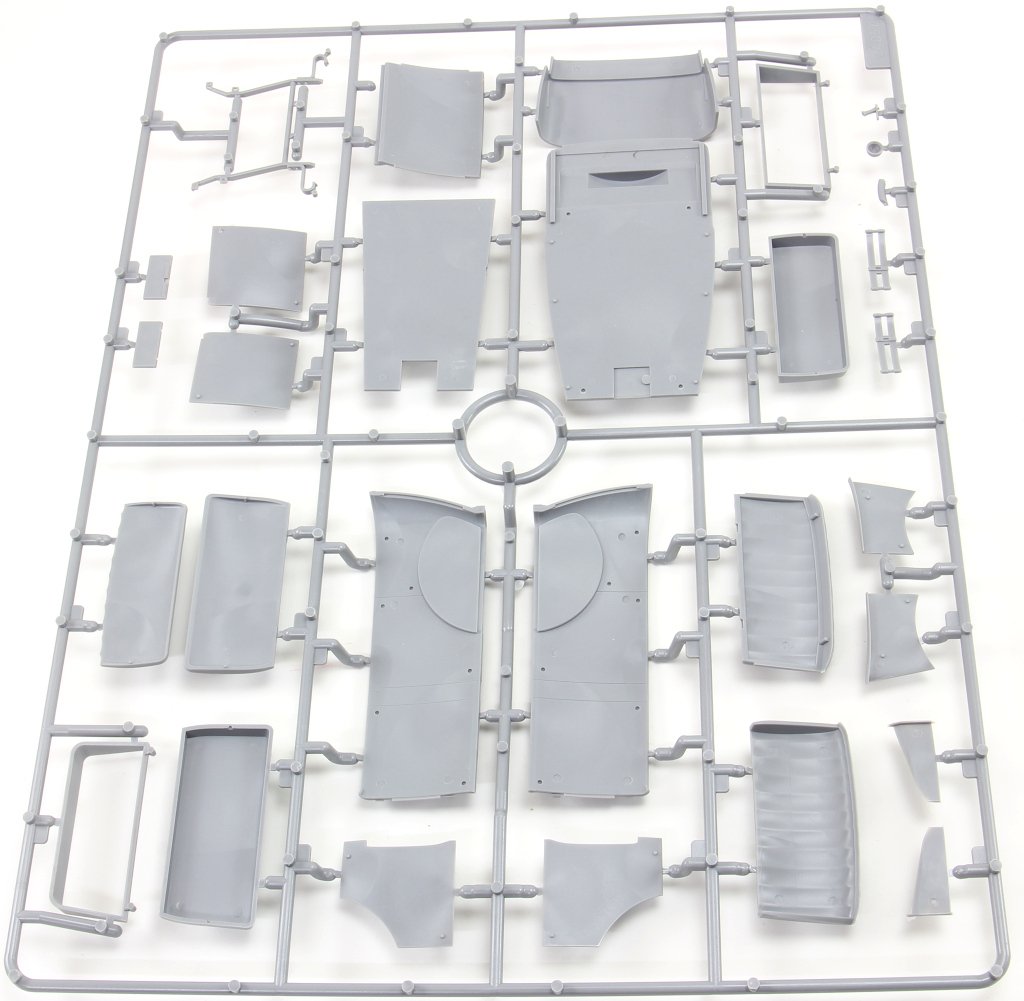
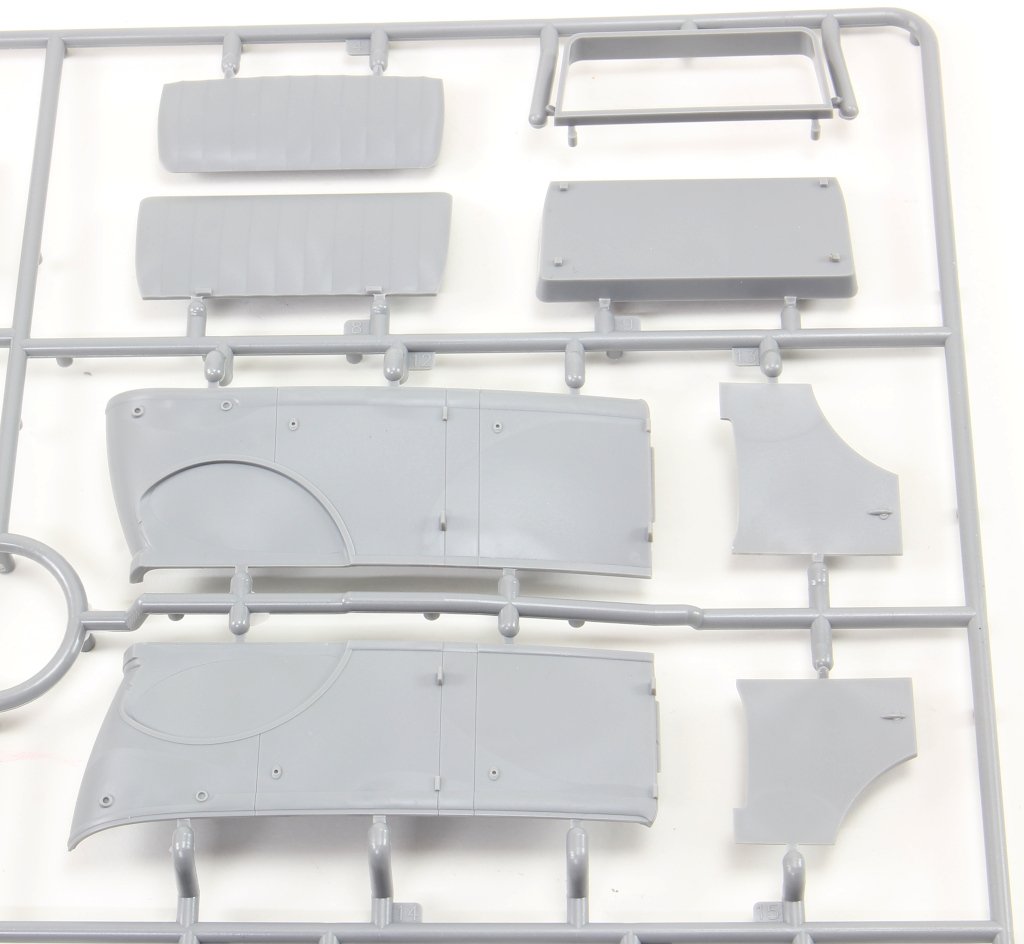
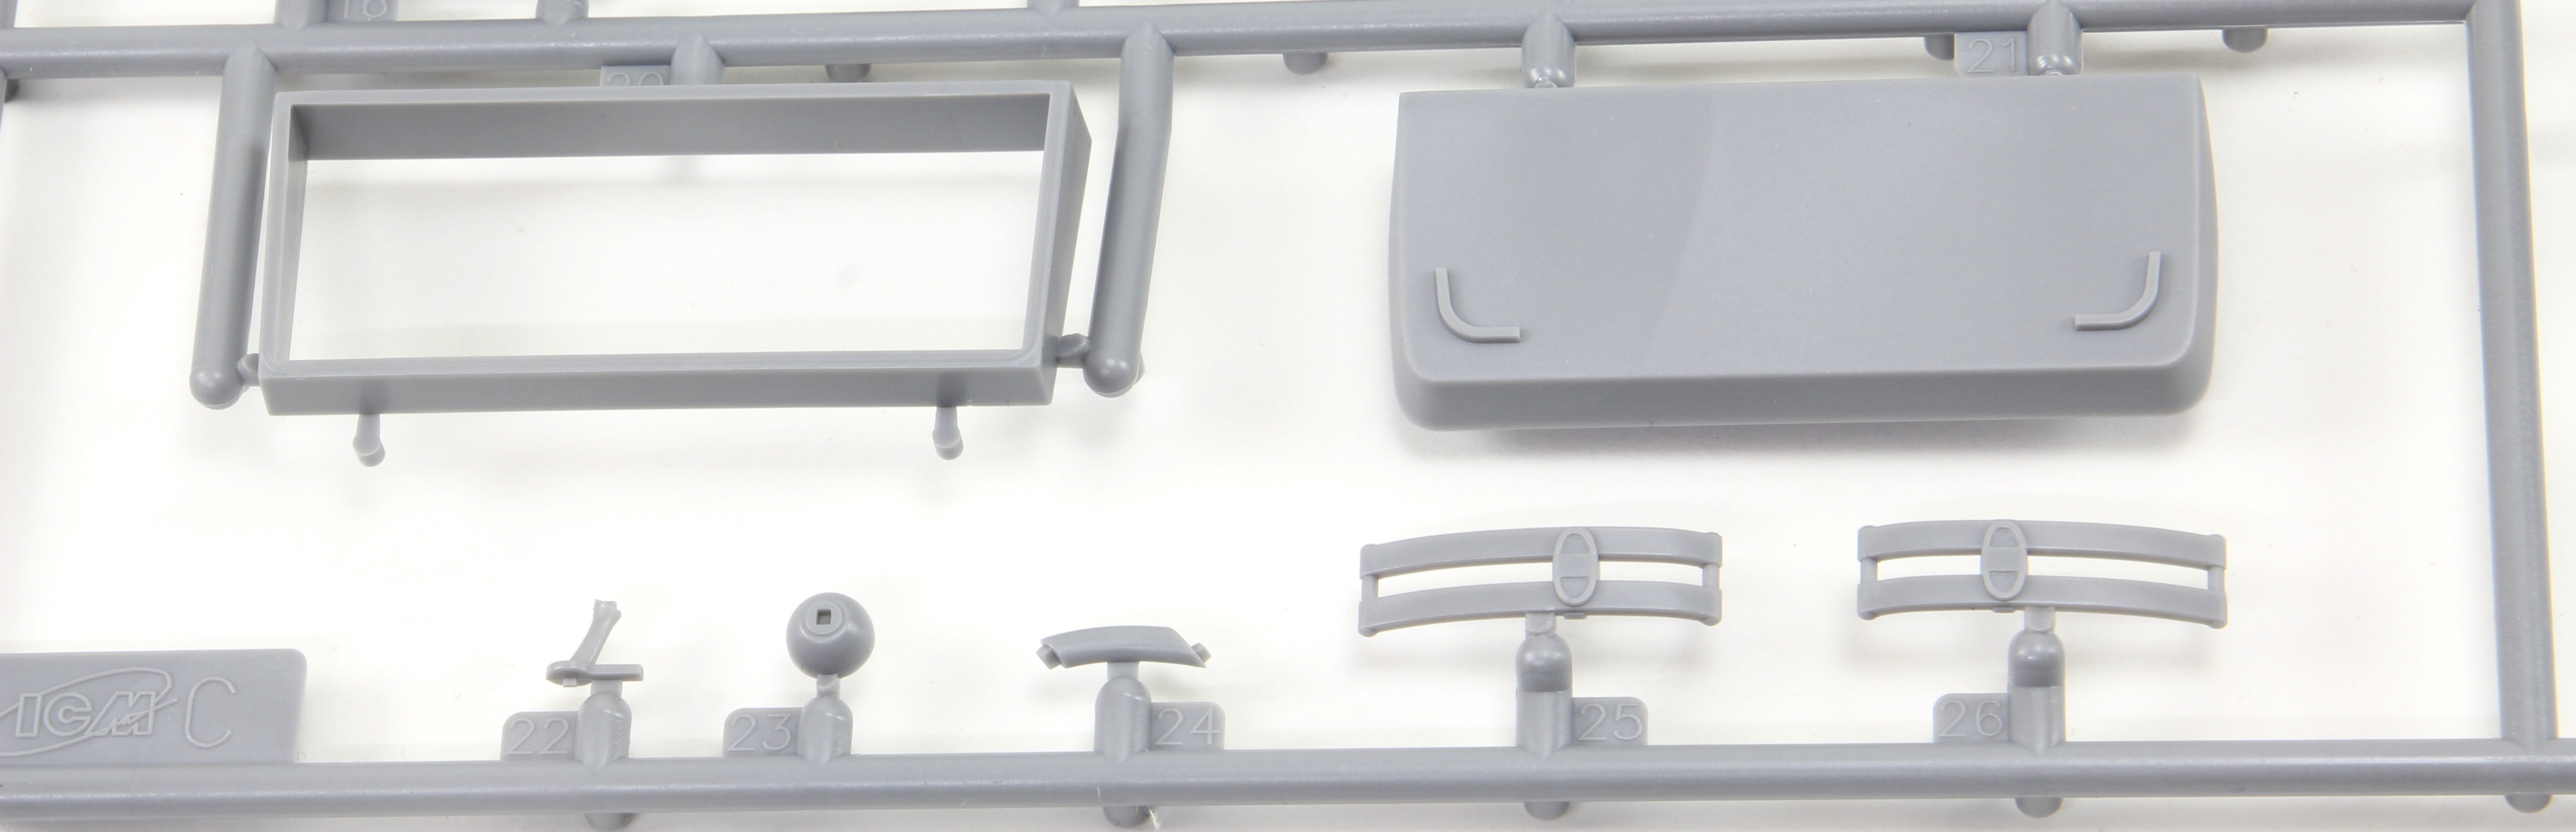
ICM 1:35 Panzerspähwagen (Funk) P204(f) Ref.35378 Introduction The Panhard 178 was one of the most iconic armoured reconnaissance vehicles of the pre-Second World War era, developed by France to equip its mechanised cavalry units. Featuring an innovative design for its time, combining good mobility, adequate armour and effective armament, it quickly became an essential element in French reconnaissance operations. After the fall of France in 1940, hundreds of these vehicles were captured by the Wehrmacht and incorporated under the designation Panzerspähwagen P204(f). The Germans adapted some units, reinforcing armament and modifying communication systems, in this case a rectangular frame antenna monted on the top of the vehicle, using a pivotal support on the top of the turret and the remaing supports on the rear of the vehicle. Usually used a radio FuG 10, used for long range communications, which operated on high frequencies. Employing them in patrol and security missions across occupied territories. This dual history — as a symbol of French defence and as a resource repurposed by the invader — makes the Panhard 178 a fascinating piece for any enthusiast of historic military vehicles. This set released by ICM as command vehicle is in fact a new variation for the originally released in 2015, has already been offered by several brands and in various versions. However, this command variant in German Army colours (on wheels) is being made available for the very first time. Whats in the box! In typical ICM design, we have a top-opening cardboard box that protects its contents very securely. Inside, there are a total of eight sprues (two with the rubber tyres), and one of them contains the communication antenna typical of these radio-equipped versions. The box also includes an instruction booklet, a decal sheet, and a colour chart featuring ICM’s paint range. At first glance, the kit offers a very acceptable level of external detail, with the numerous rivet lines that make up the vehicle’s structure standing out, as well as the complete underside protection of the hull. A full interior is provided—simple, but adequate considering what will be visible once the model is assembled. A complete engine and the two driver compartments are also included. Lets then visit the sprues for more detail! Sprue A This sprue provides the outer side panels of the vehicle in a single piece, along with the entire lower structure where the parts will be mounted. The rivet detail on these pieces is noteworthy. The engine block is also supplied in two halves. A very fine detail if you ask me! The rivets details are impressive and present in all the hull Interior detail is present in the one part mould lateral structure Sprue B This sprue includes the interior floor of the vehicle (onto which many interior details will be added), as well as horizontal plates of the armoured structure (rear cooling and engine access panels, side panels, and the front plate). A common feature remains the finesse of the details and finishes, such as the engine cooling grilles, which, despite being moulded in a single piece, faithfully represent the real panels. the interior anti splip floor is present, allowing the final model to be present with doors and hatches open! The cooling air panel is moulded in the rear panel, and it's very scale convincing ! Closer view ! Sprue C This sprue contains various details for both the interior and exterior of the vehicle, such as the main gun (supplied in two halves), the turret and its ring, differentials, transmissions, and several components of the fighting compartment. Sprue D (x2) Four rubber tyres are provided. The tread pattern is appropriate for the scale, although personally, I still prefer plastic wheels. Sprue E This sprue provides the four wheel rims, which include interior detailing as well as the slots that will fit onto the differentials. Sprue F This sprue is dedicated to the communication equipment (in this case, three parts), while the remaining pieces are not used and correspond to the mast antennas of the French version. Sprue F1 This sprue provides the parts to reproduce this specific version—the rectangular frame antenna moulded in a single piece, along with the pivoting and movable mount that allows turret rotation and the respective rear supports. Decals The small decal sheet includes licence plates, Balkenkreuz, tactical markings, and divisional insignia for the three decoration options. As we have come to expect from ICM, these decals offer excellent resolution and colour density, with almost no visible carrier film. Instruction Sheet In line with ICM’s usual quality, the instructions match the overall standard of the kit: Glossy paper with full-colour painting and marking profiles 16 pages, with the build process divided into 61 steps Clear and easy-to-follow assembly diagrams, leaving no doubt about part placement Marking Options Three options are provided, all in a single overall colour, although at least one of them (with winter camouflage) allows variation on the base colour (grey or the typical dark yellow). Note: The instructions do not mention the placement of the wiring connecting the antenna to the radio set, although it can be observed on the marking options page. Option 1 – Panzerspähwagen (Funk) P204(f), 20th Panzer Division (20. Pz.D.), Eastern Front, 1941 This option depicts a fully grey vehicle. Option 2 – Panzerspähwagen (Funk) P204(f), 20th Panzer Division (20. Pz.D.), Eastern Front, winter 1942 (probable appearance) This vehicle appears in a white winter camouflage. Option 3 – Panzerspähwagen (Funk) P204(f), Eastern Front, 1943 This option allows for an overall dark yellow finish. Conclusion This is another variation of a model that, in reality, performed several roles, and this latest release expands the family of versions of this truly versatile vehicle. It is also a fact that its reissue by several brands (such as Tamiya, Revell, and Heller) proves the quality and originality of the model. It is a compact kit for its scale, which will appeal to many modellers—like me—who have limited display space 😊. It also allows for a dynamic diorama, as the access doors to the fighting compartment can be shown open, and the hatches and engine can be displayed. This is yet another recommended kit, suitable for both experienced modellers and beginners! our thanks to ICM for the review sample! Ricardo Veríssimo


.jpg.c0f37f55d91e5d9c301739072ad98844.jpg)
-

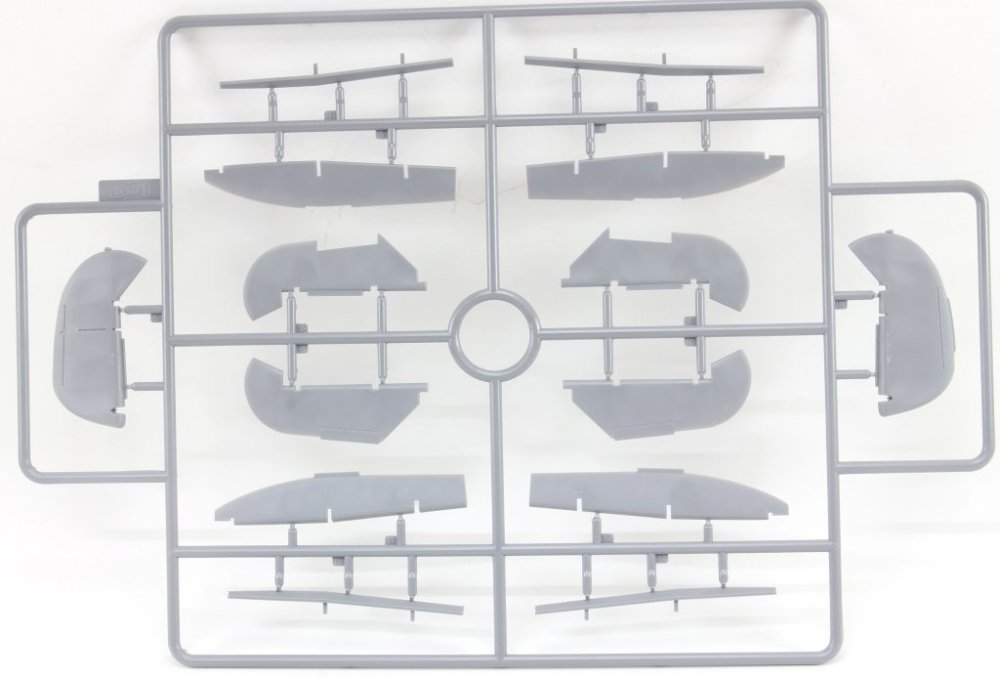
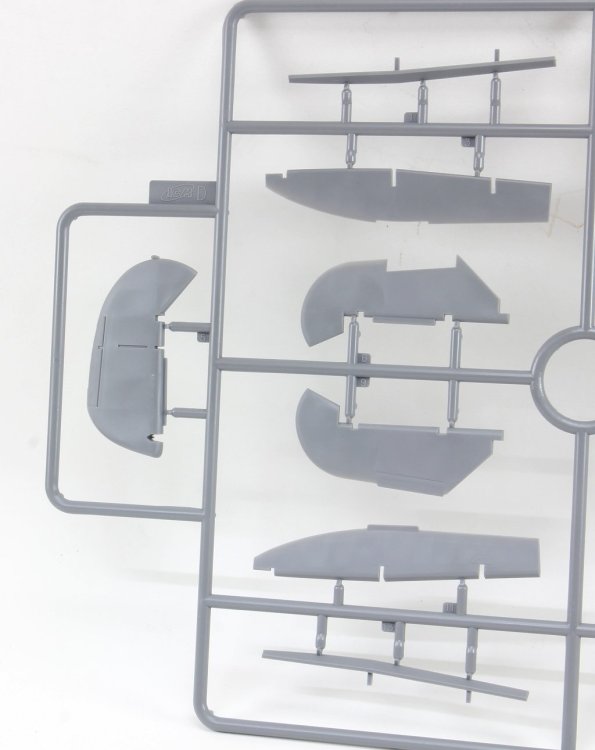
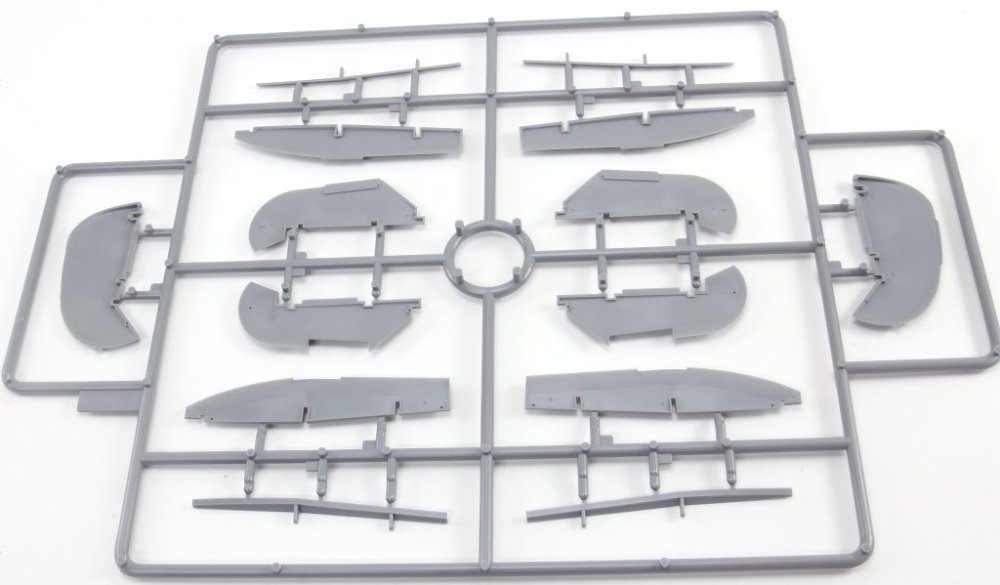
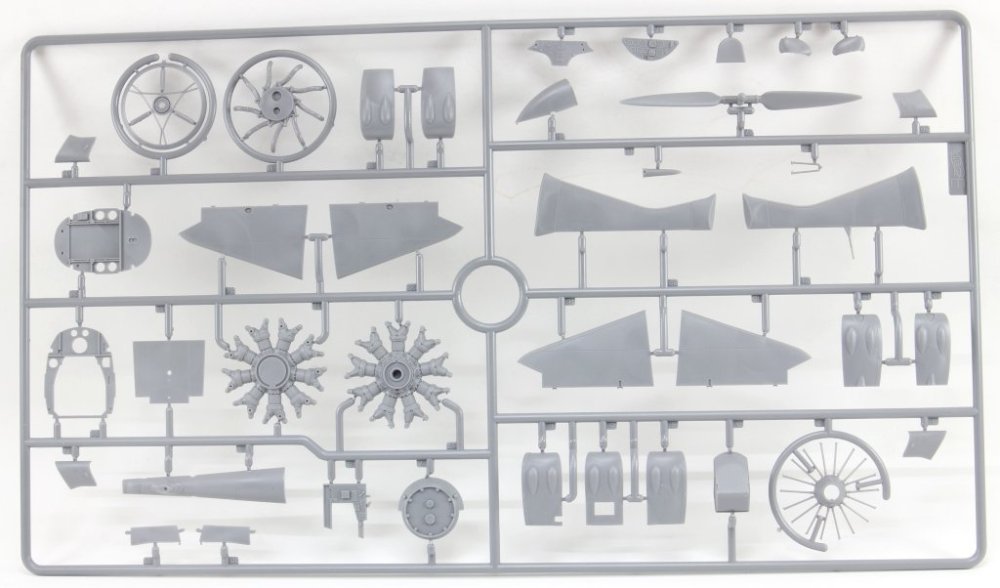
1:32 ICM - Battle of Malta (Sea Gladiator and CR. 42 Falco).
rverissimo replied to Fran's topic in Aircraft Reviews
hi ! great review of a fantastic set ! -
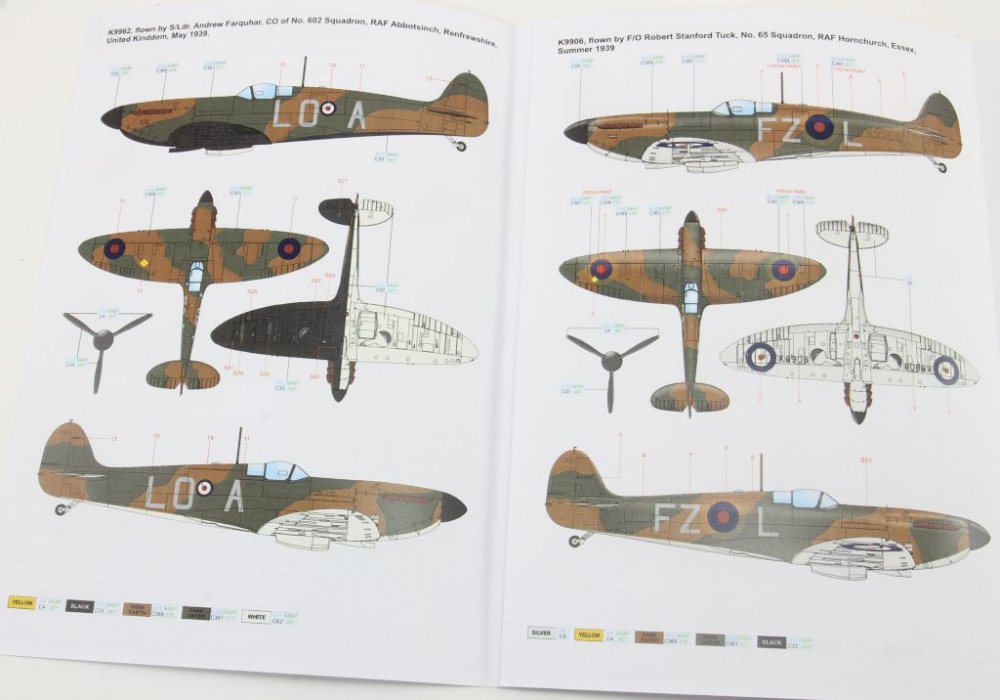
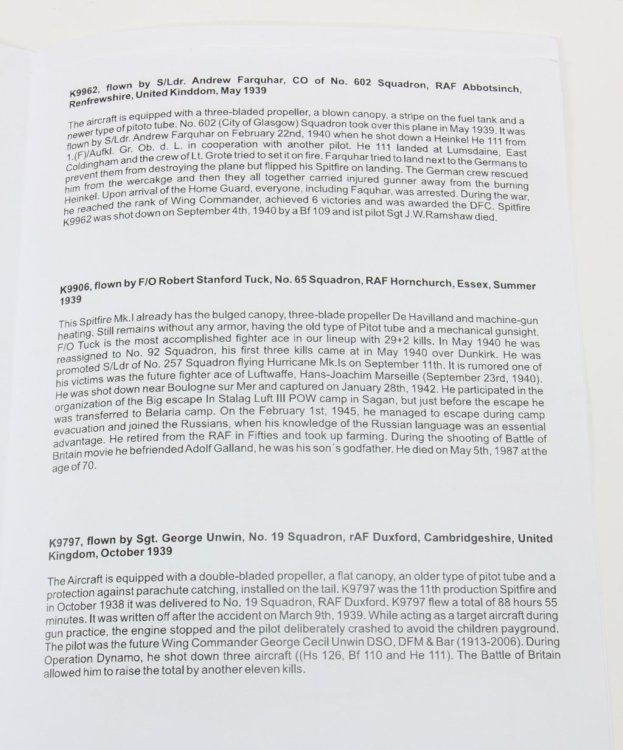
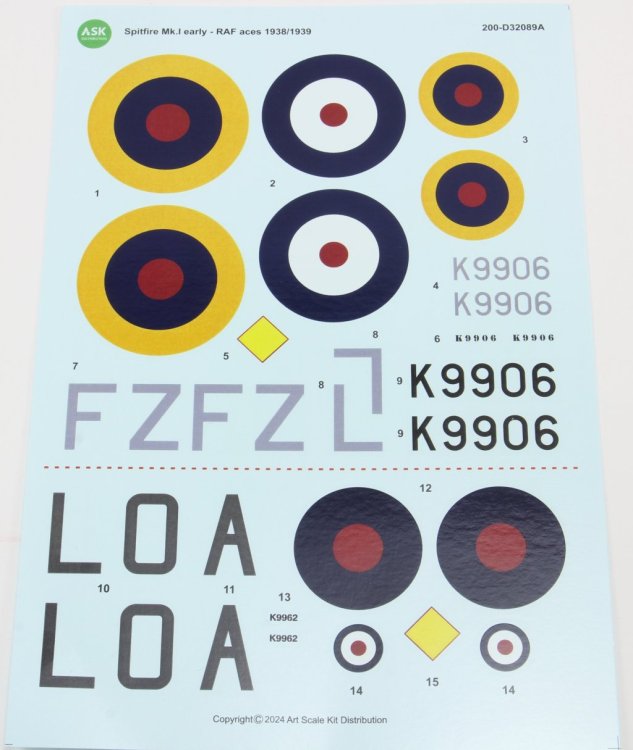
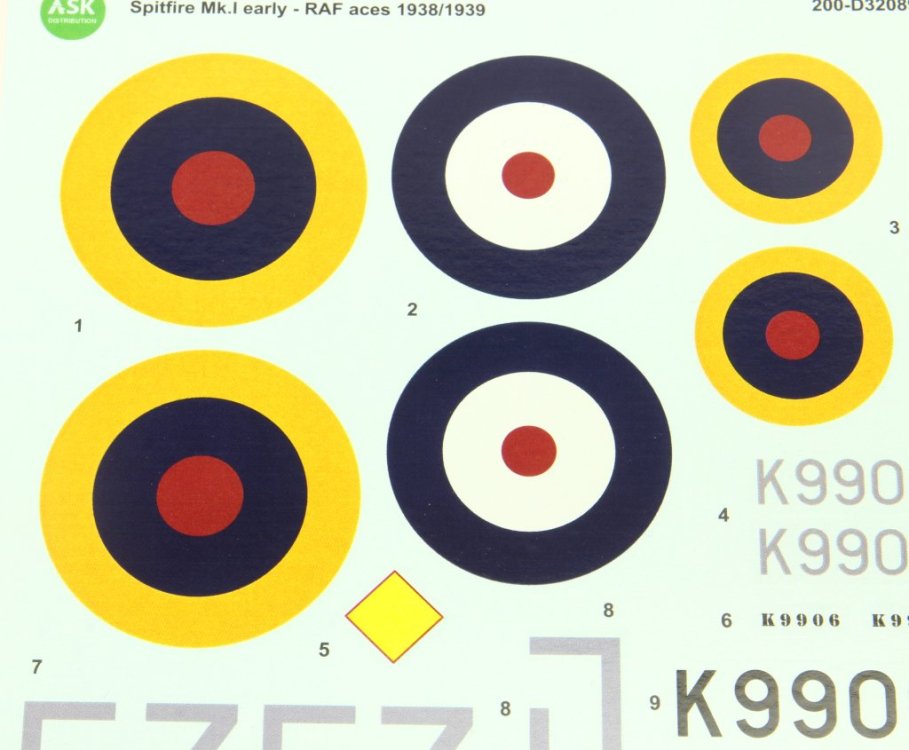
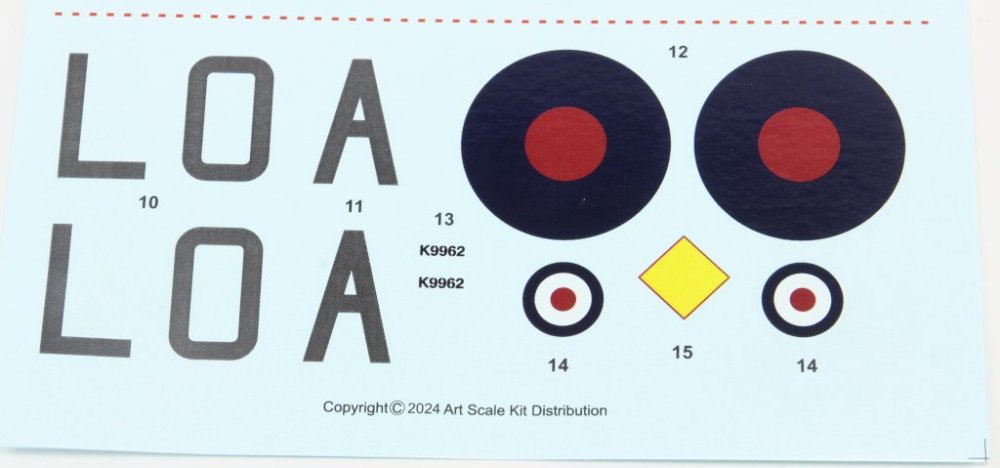
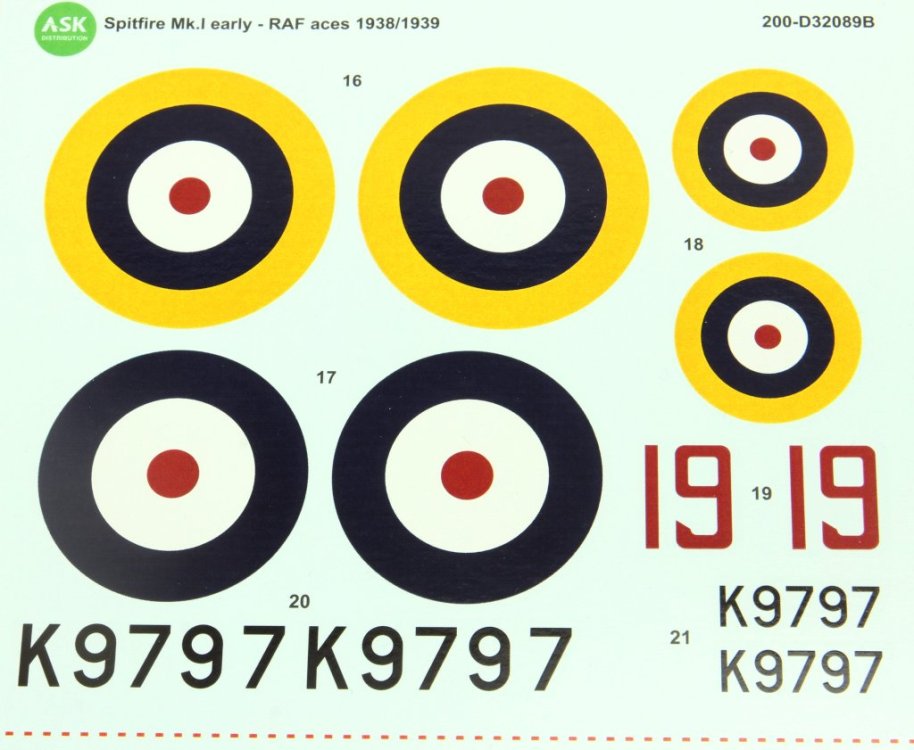
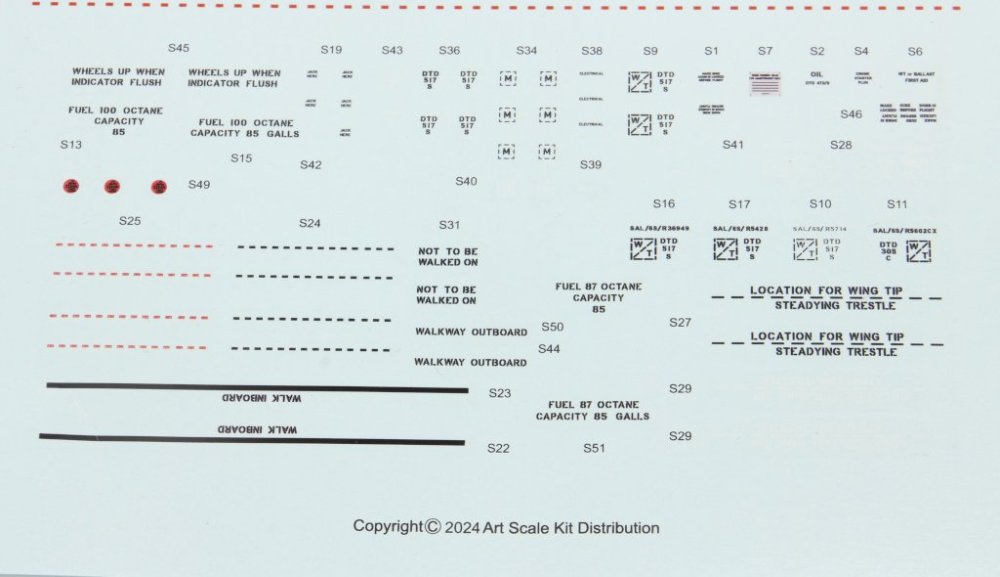
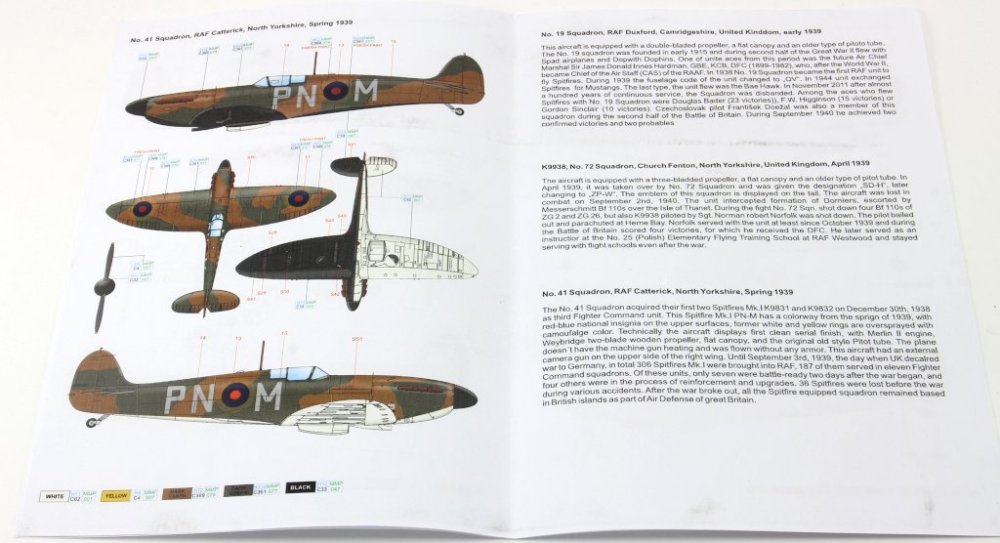
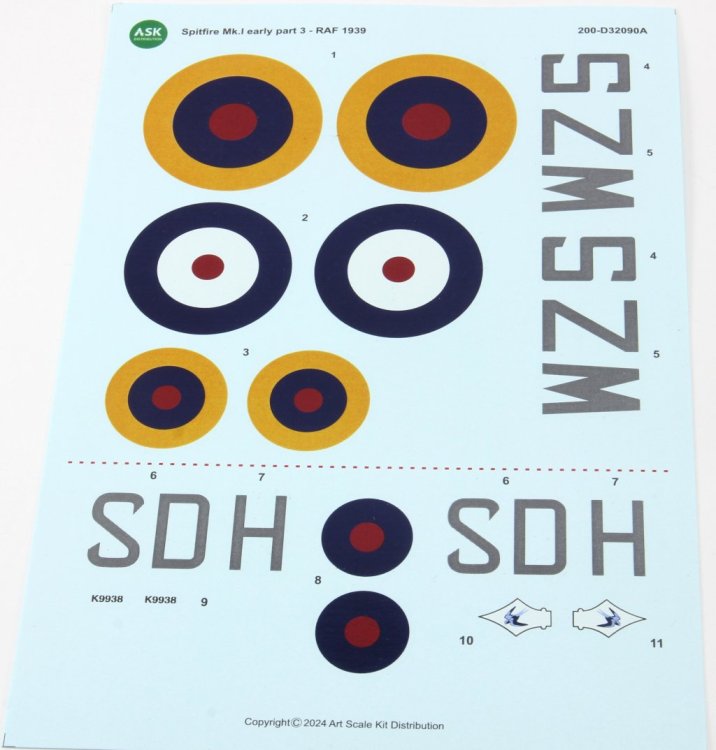
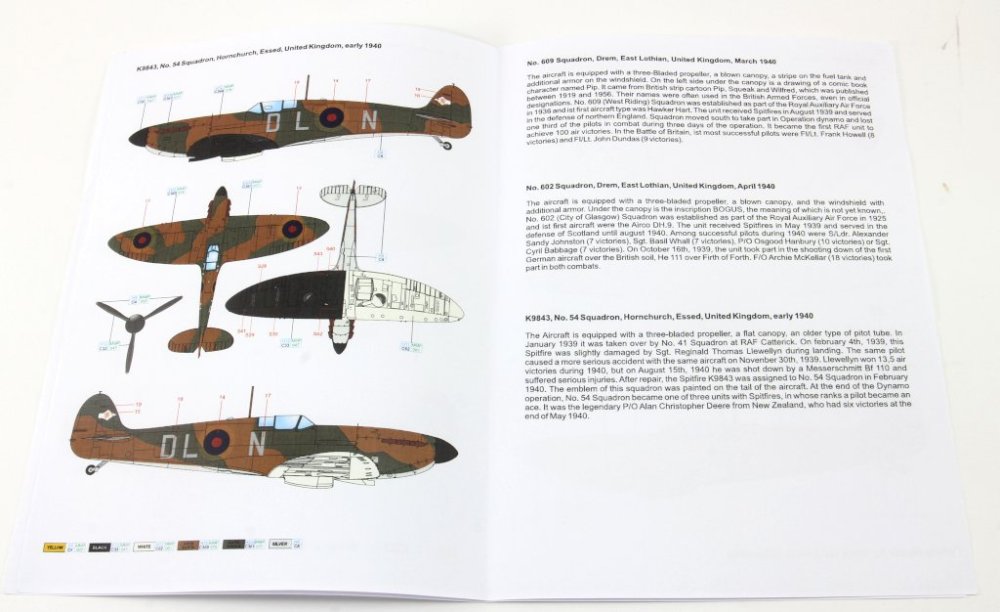
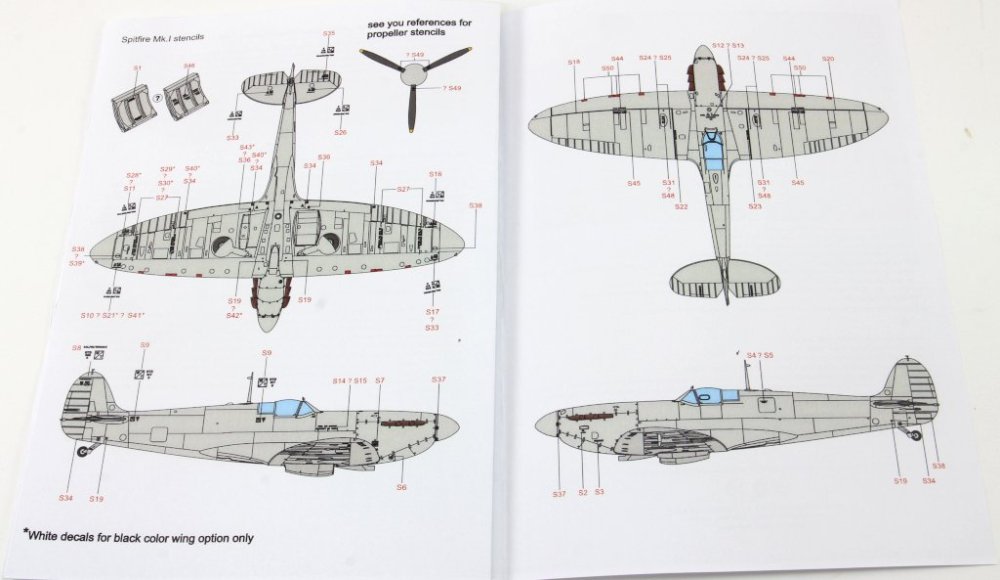
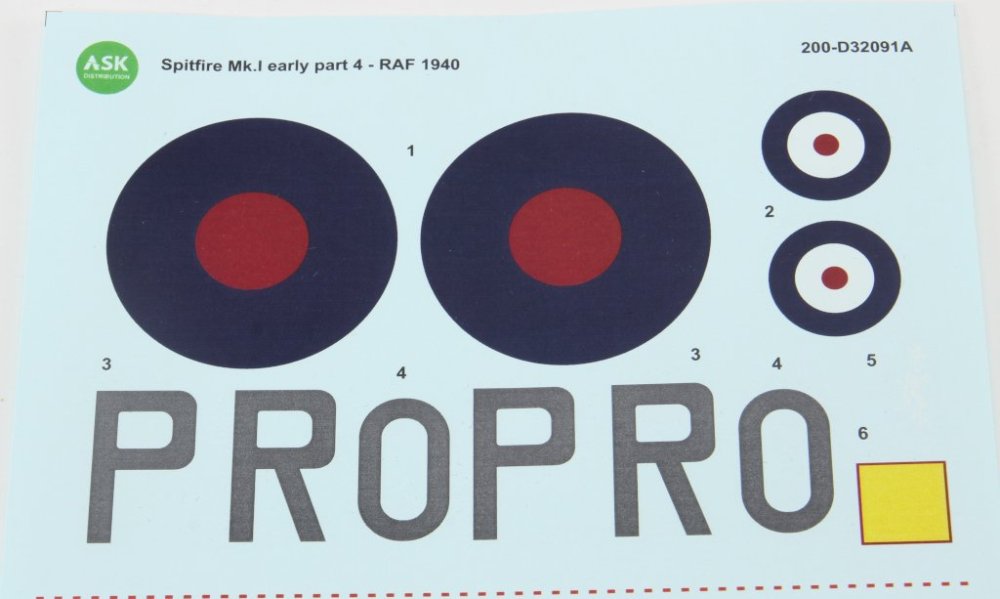
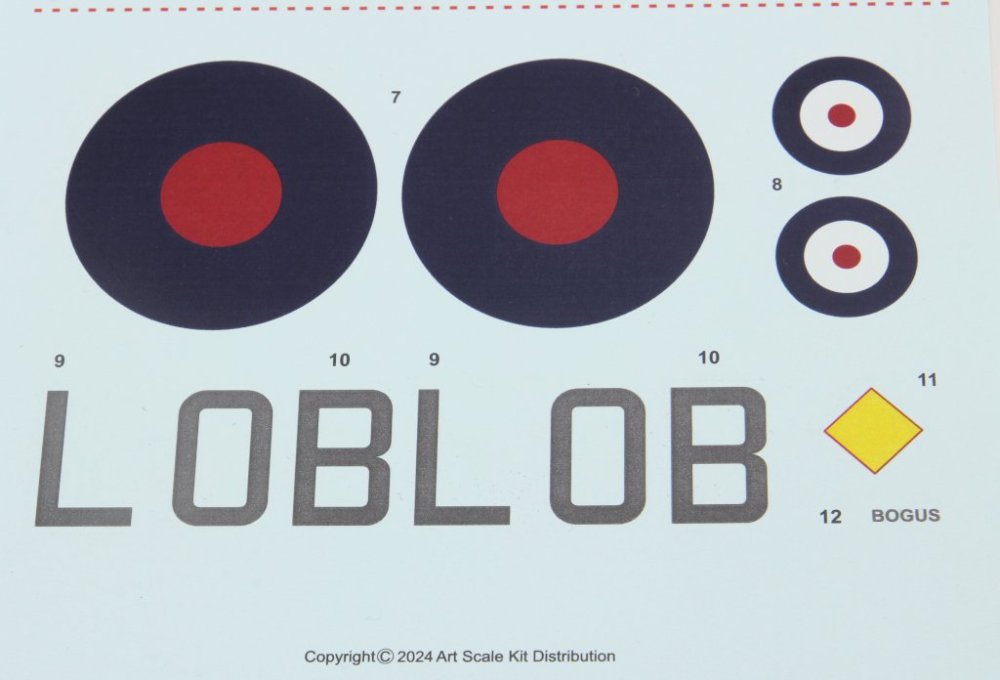
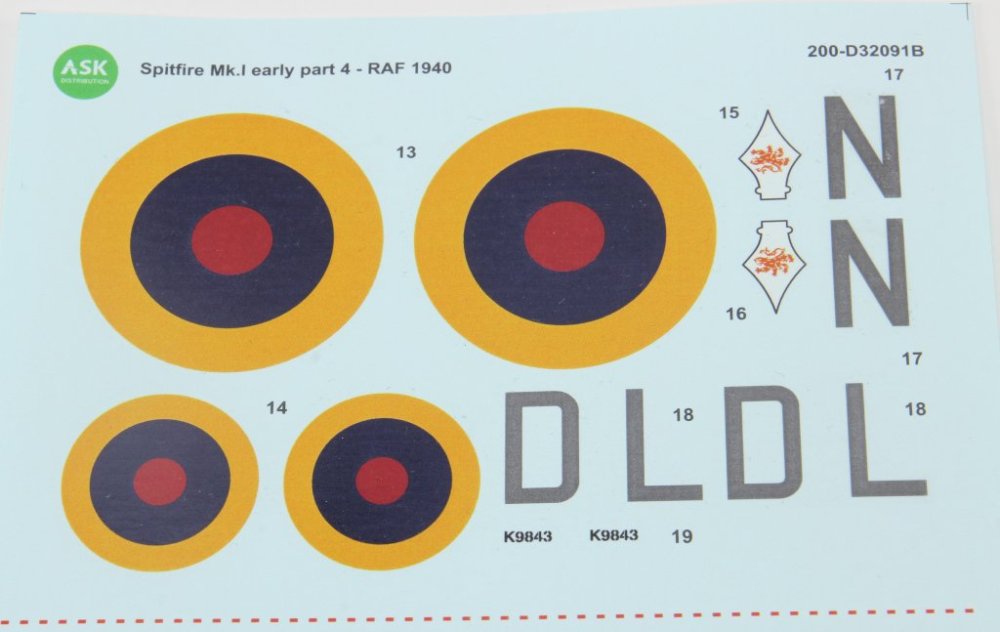
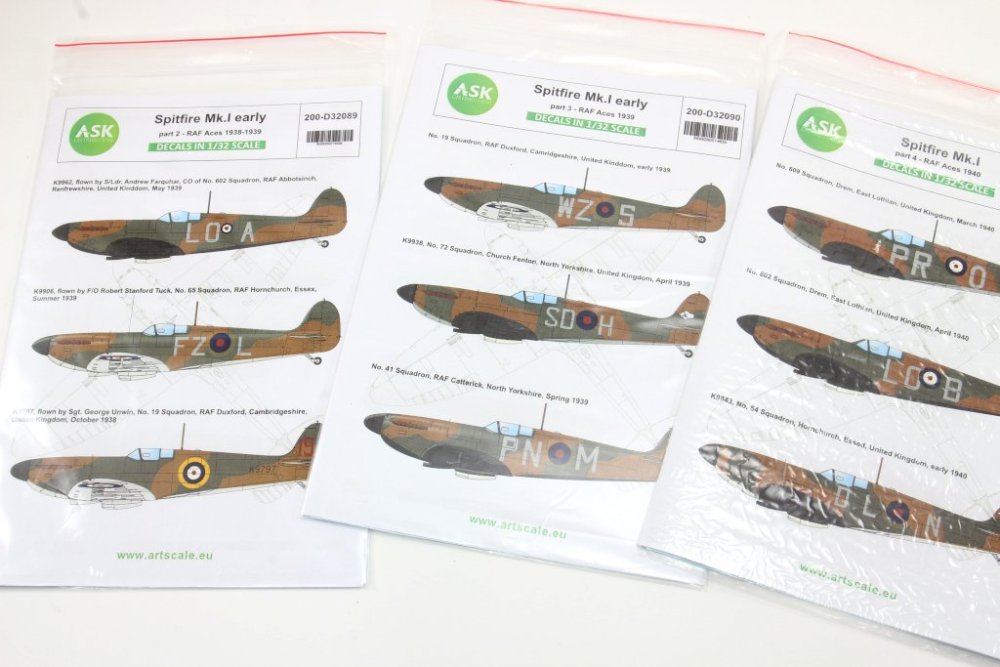
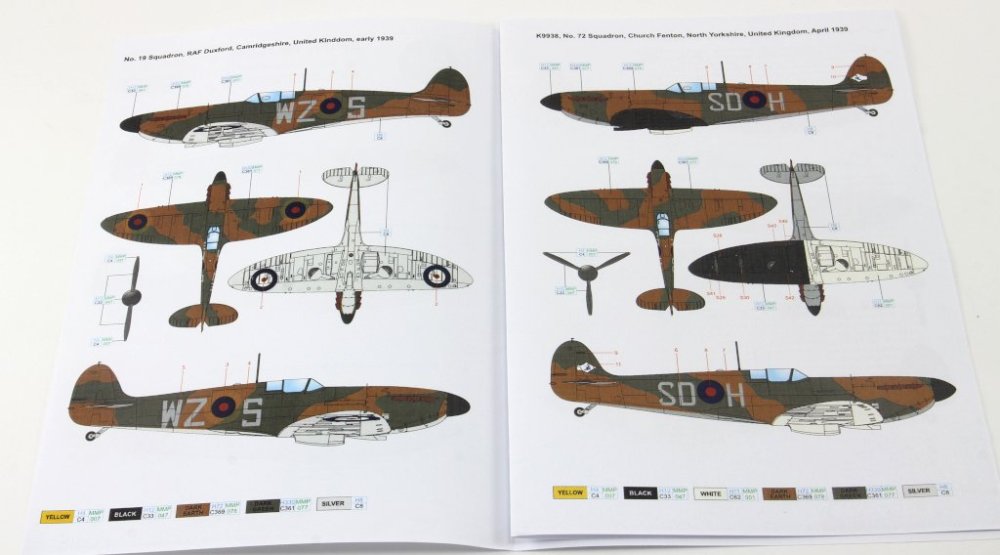
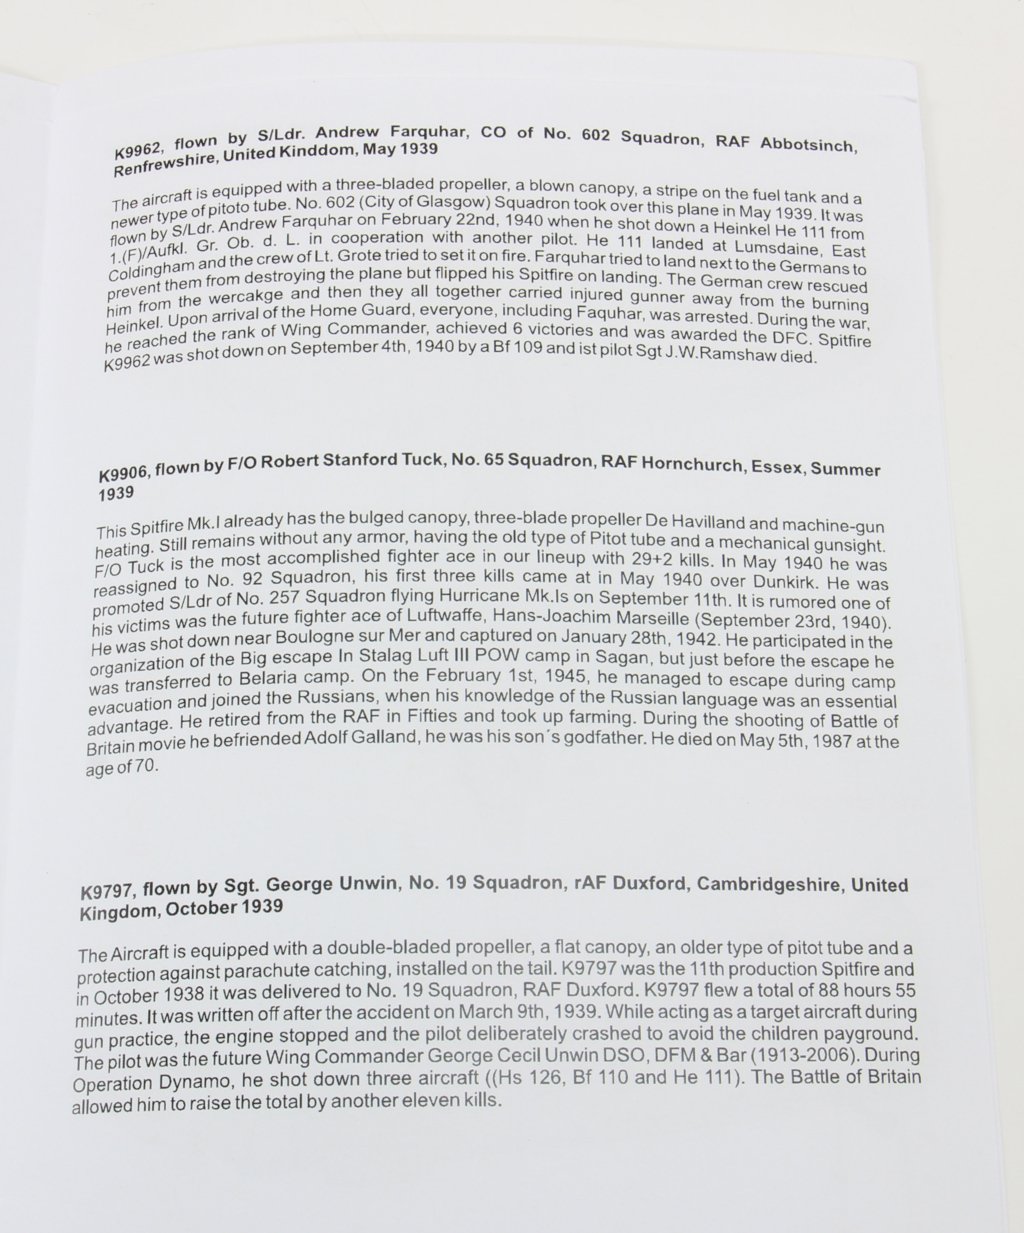
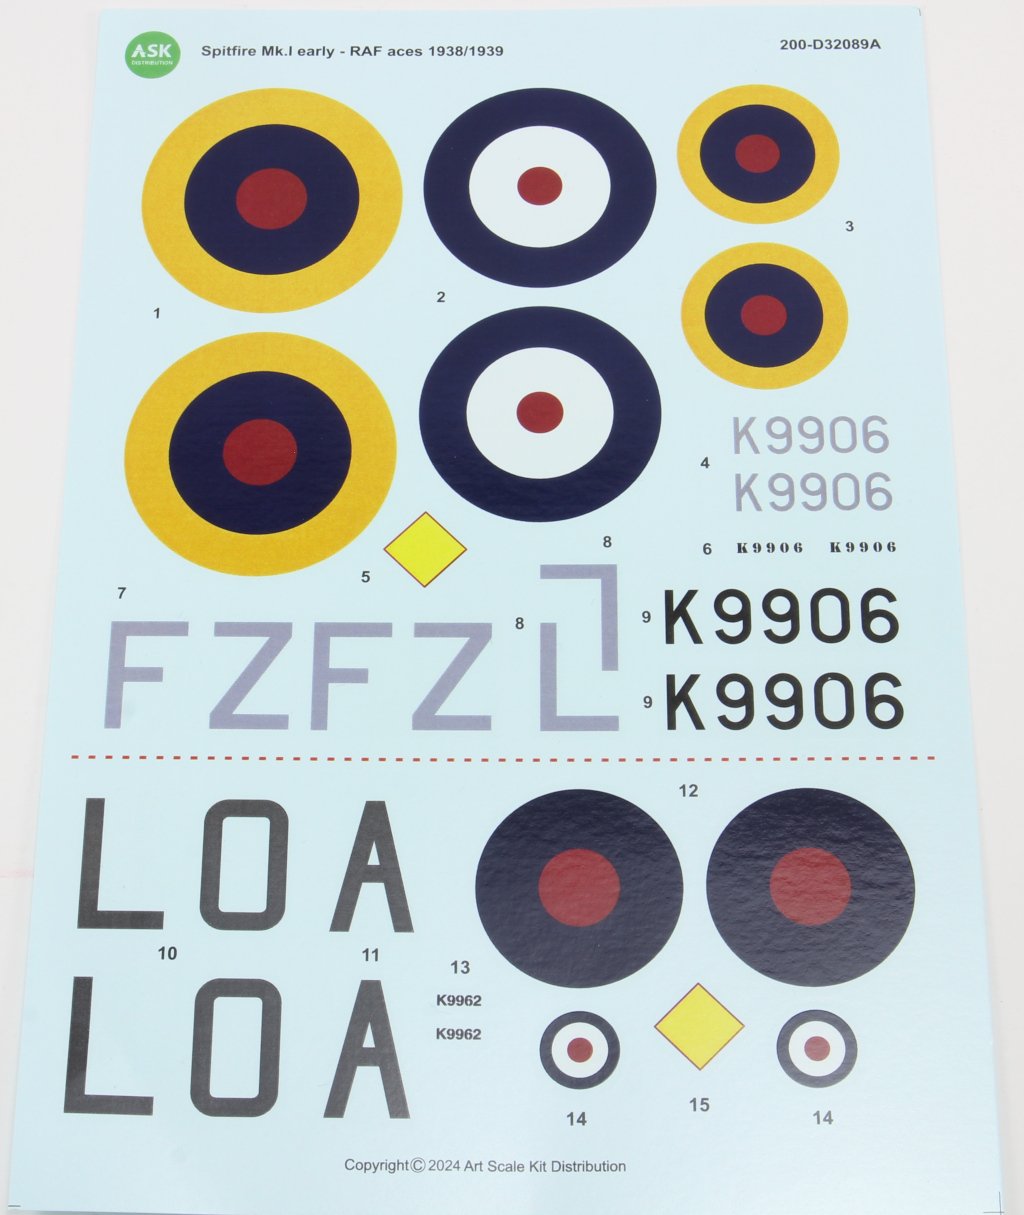
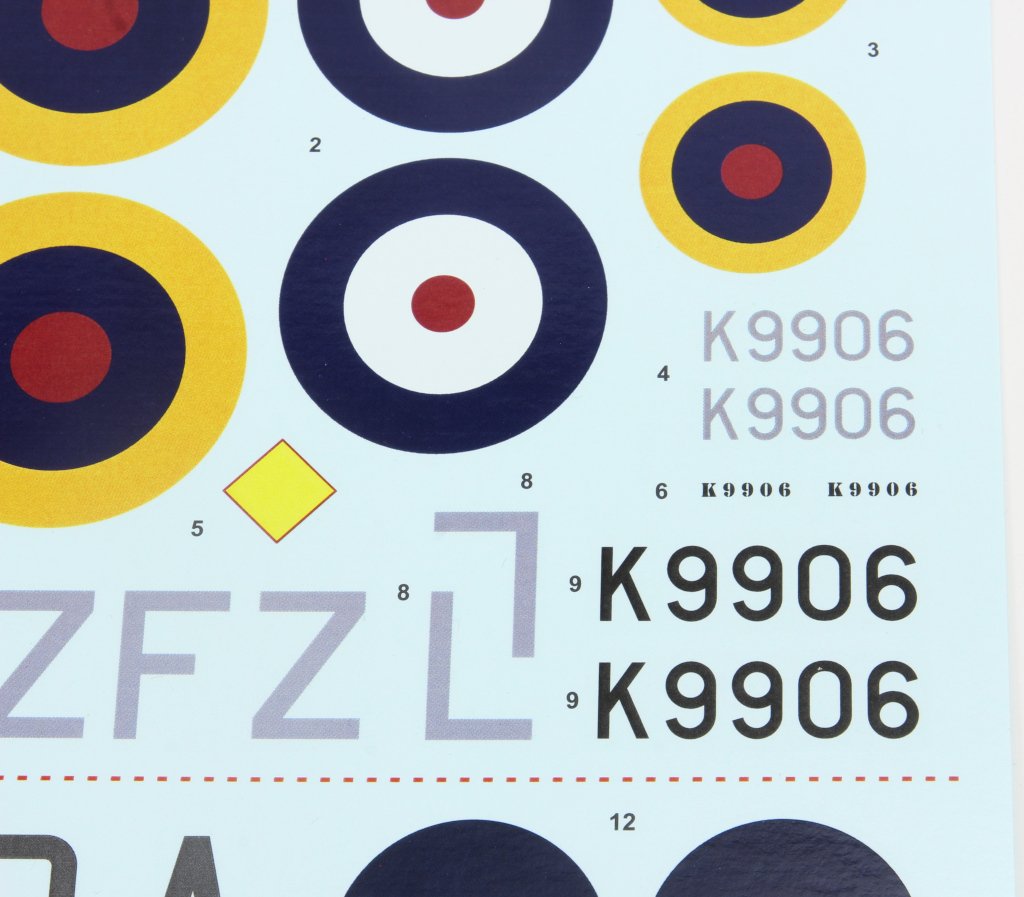
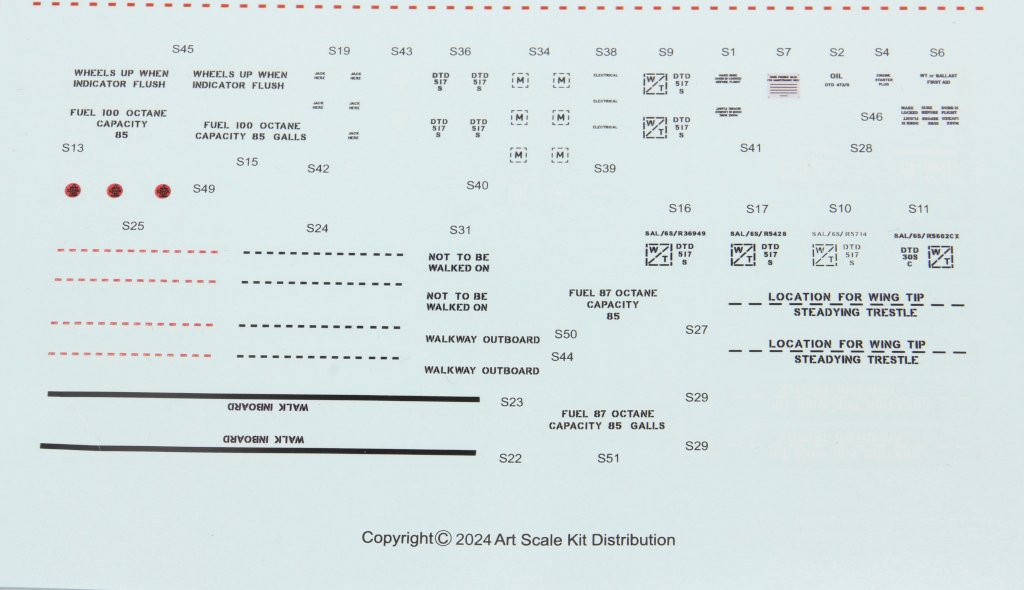
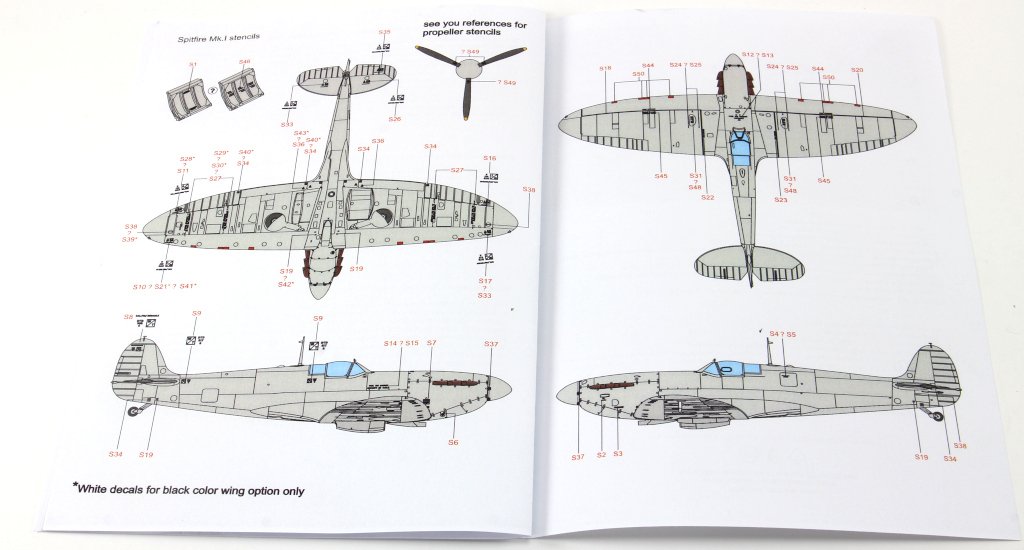
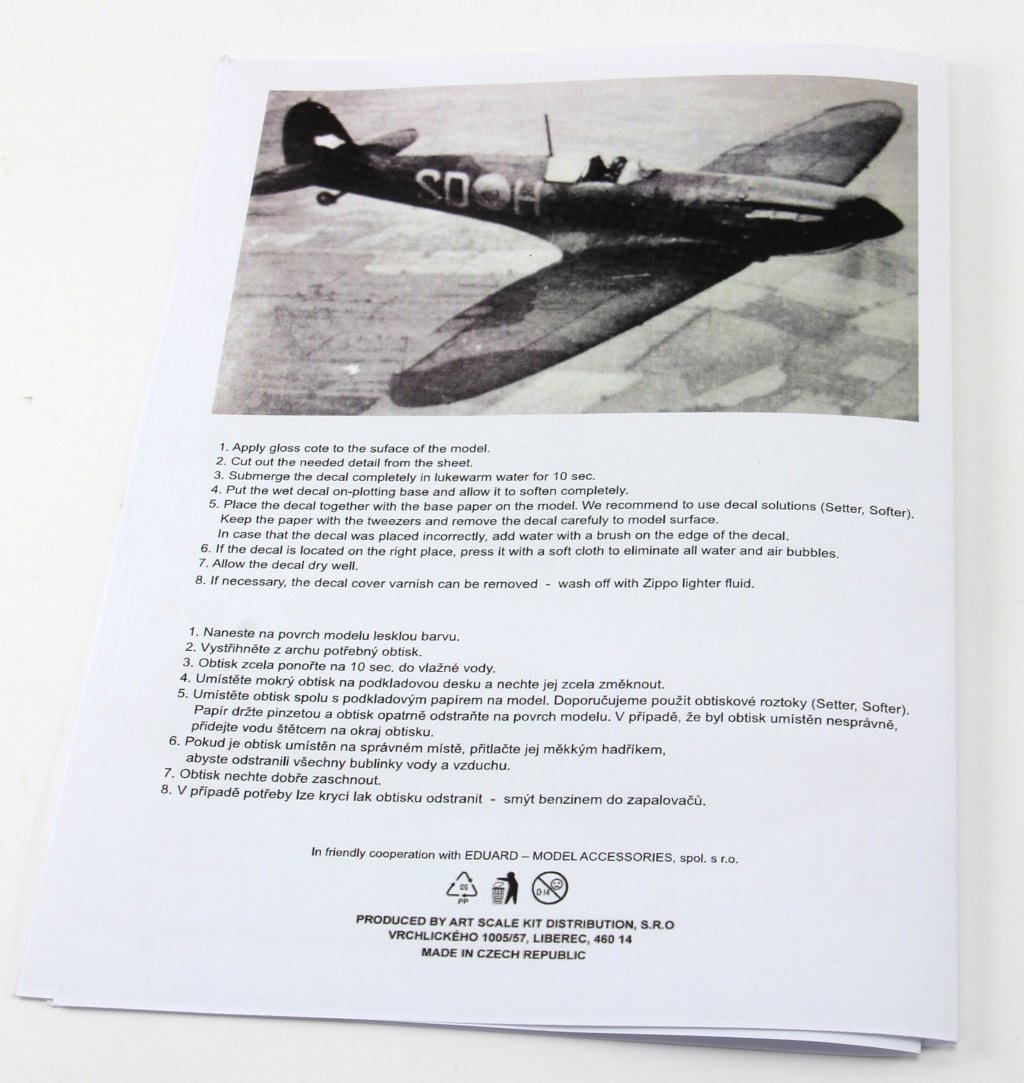
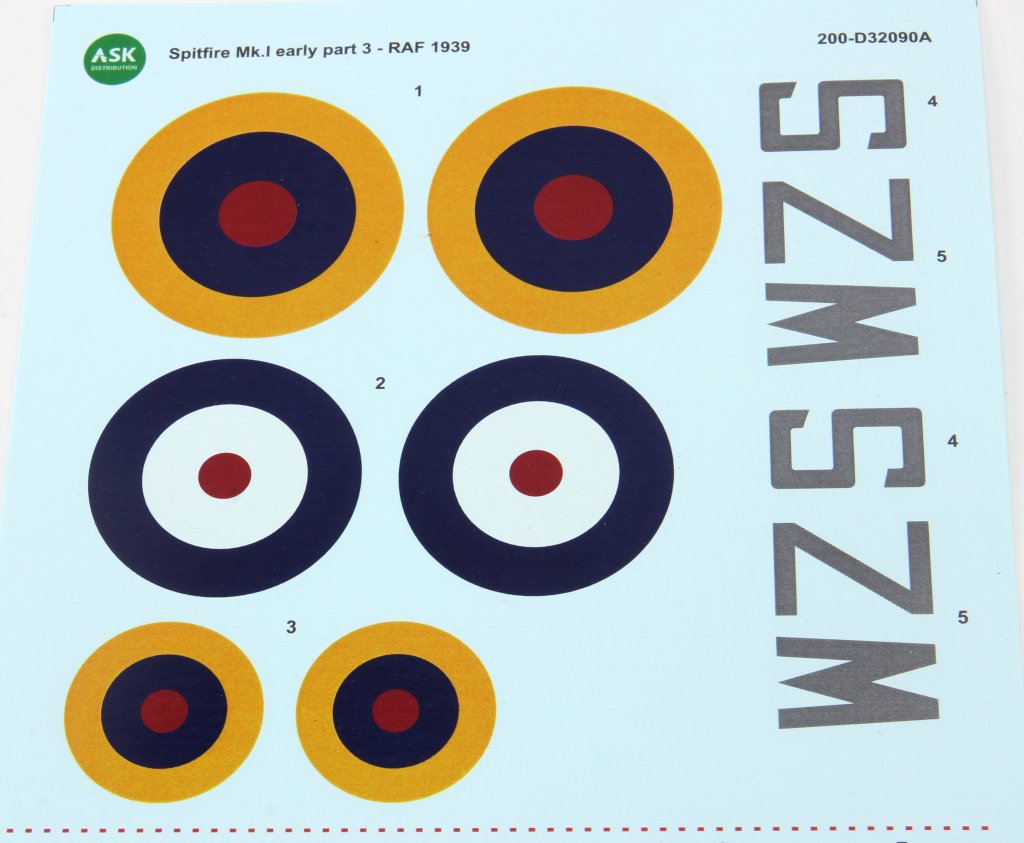
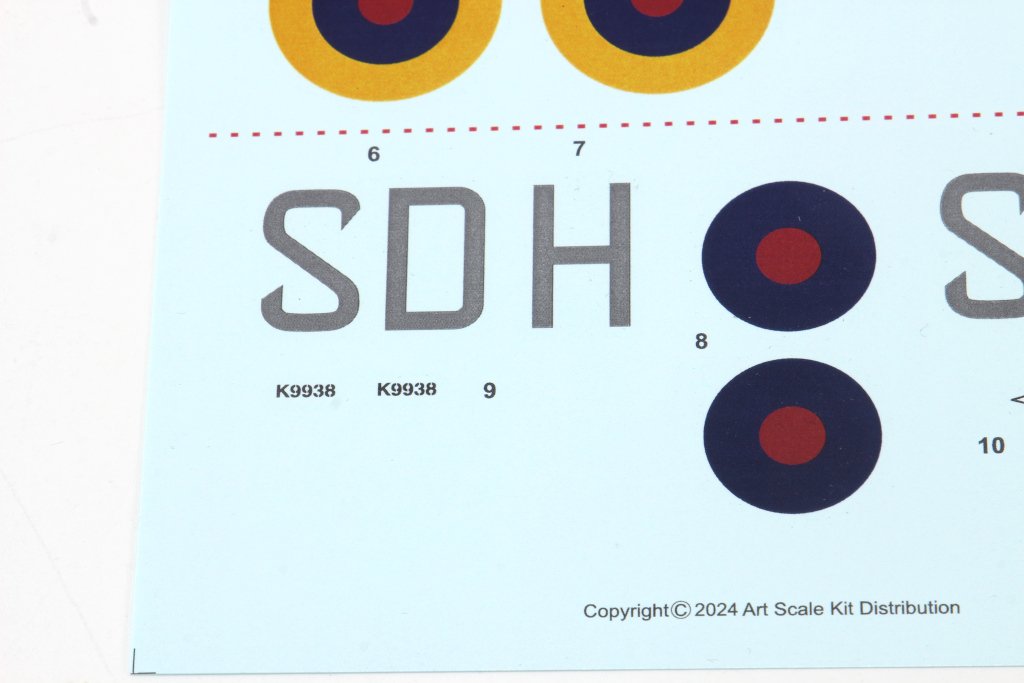
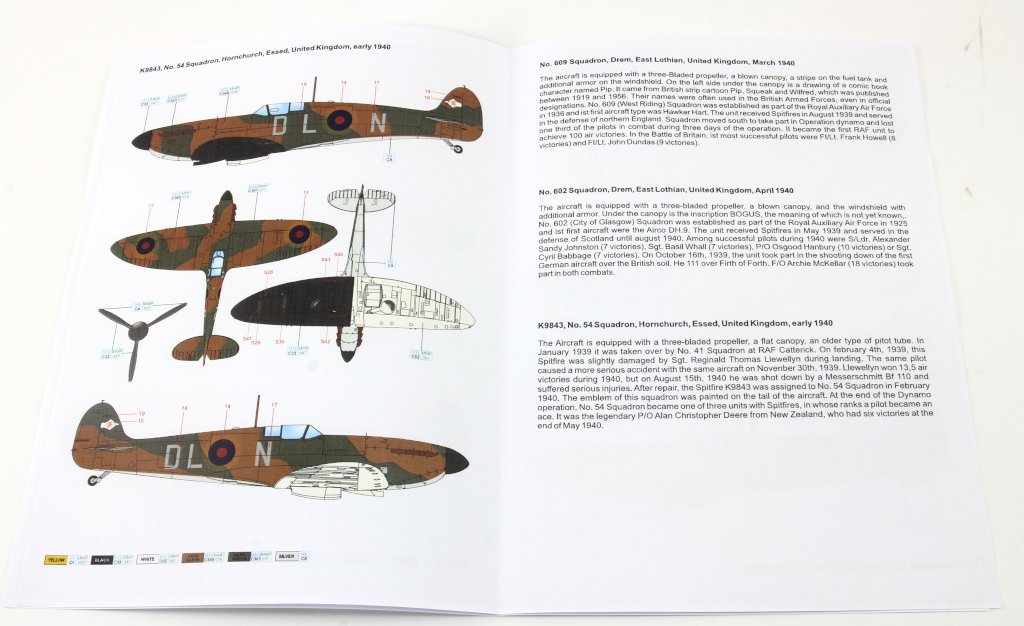
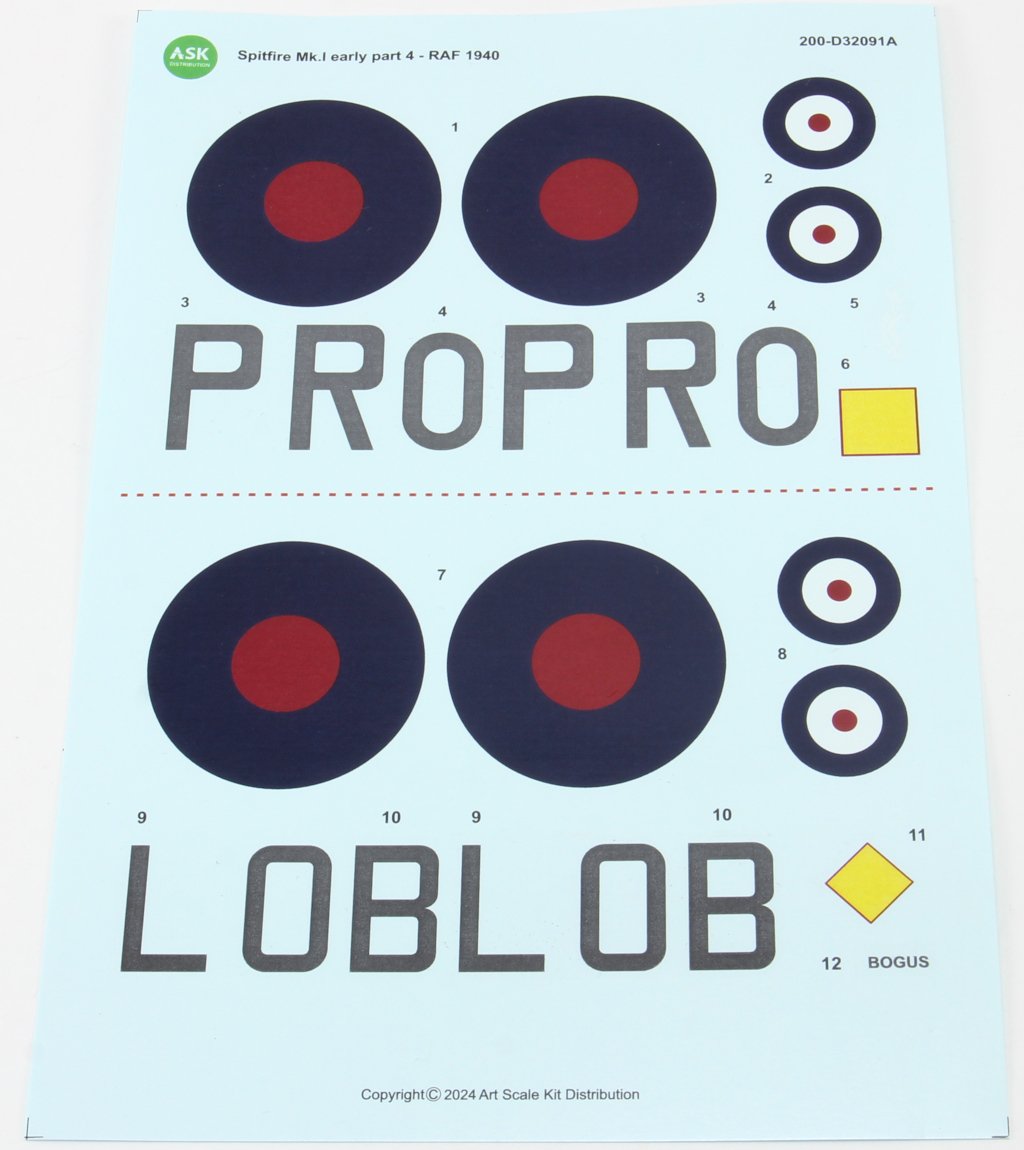
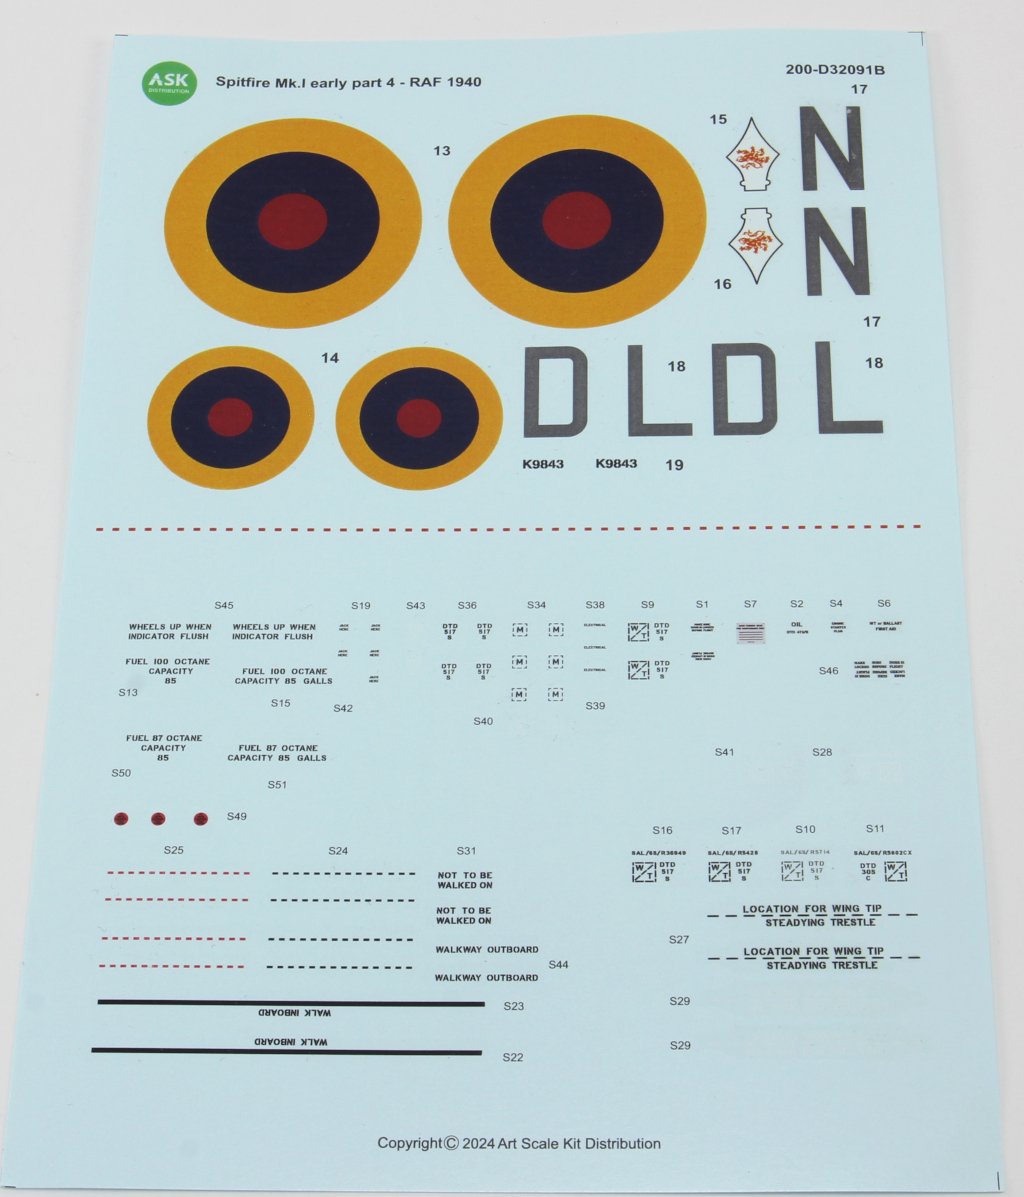
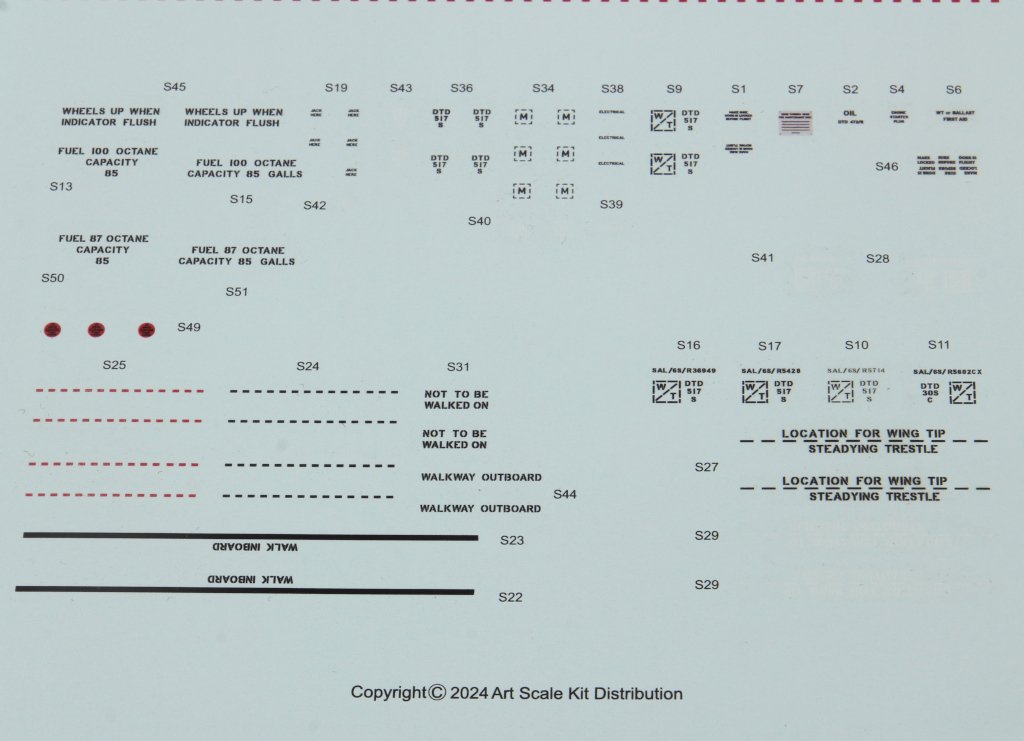
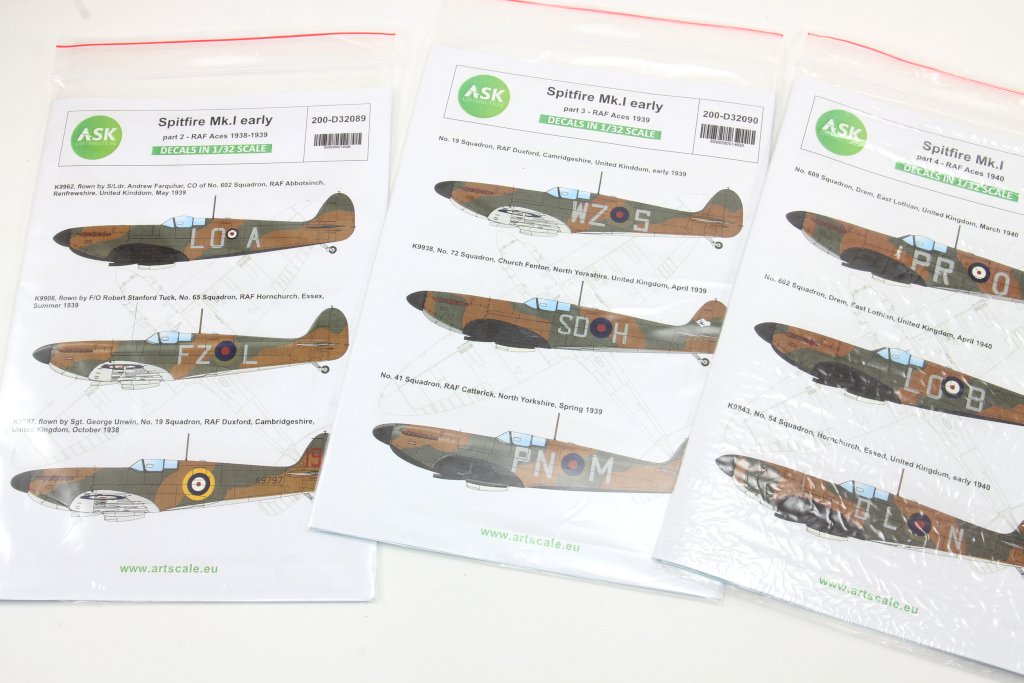
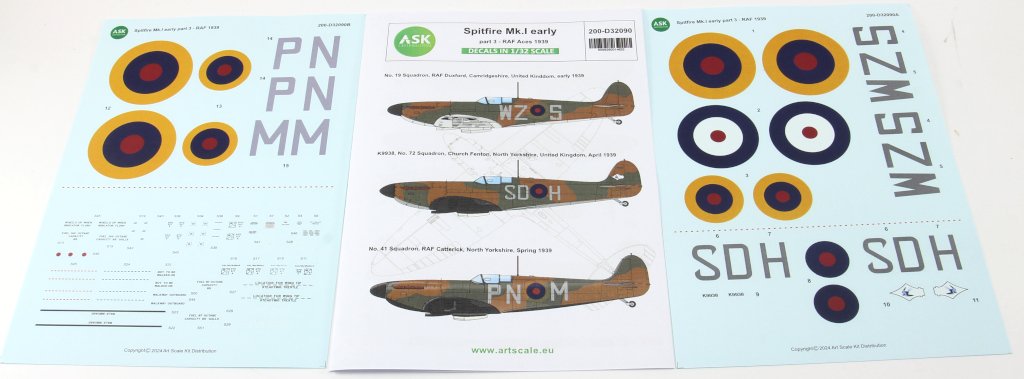
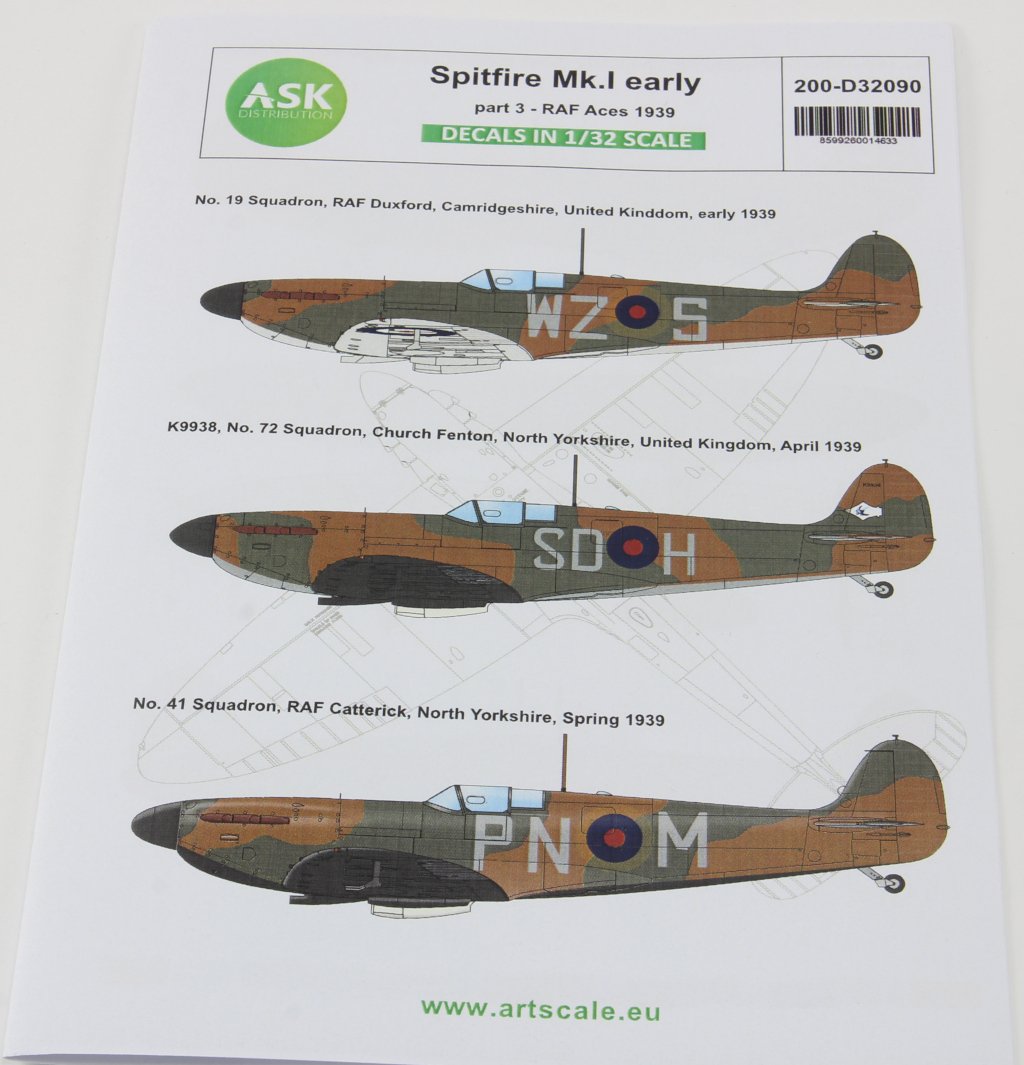
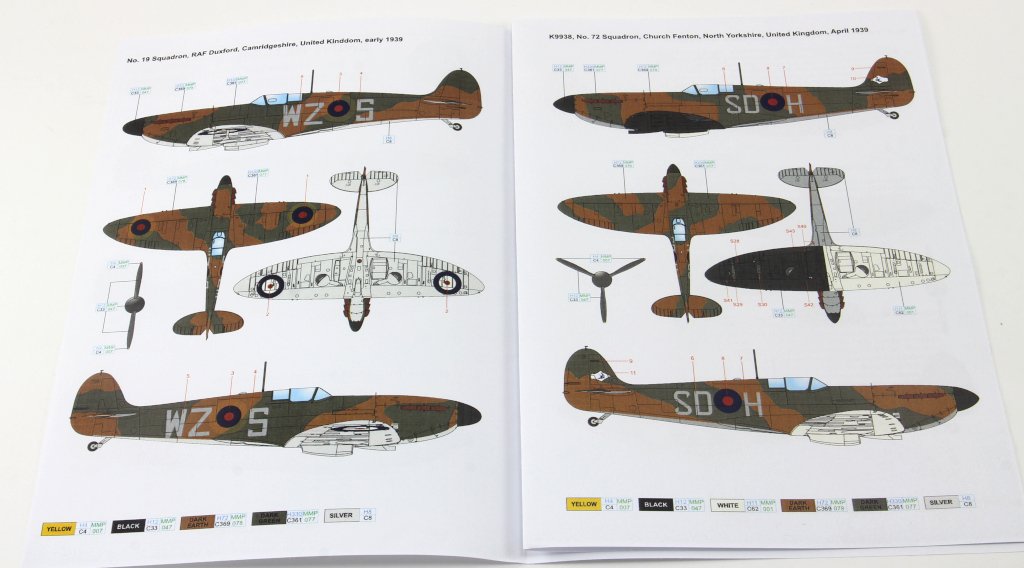
ASK - Art Scale Kit Decal sheet 1:32 Spitfire Mk.1 Decals ( several sheets) sets available here Introduction Currently available are several 1:32 scale options for the early version of the iconic Spitfire Mk.I, including the highly anticipated release from Kotare Models, which covers the initial variants through to the Mk.Ia (mid-production) and raising the bar in terms of quality, detail and finesse as a reference of the best molds technoly available. The older Hasegawa offering may also serve as a more budget-friendly alternative, for which these decals can be used. These decals were produced in collaboration with Eduard, which in itself is a mark of quality. The printing is of superior standard, with well-defined colours. The roundels are perfectly centred and the decal film is minimal. However, for the more perfectionist modeller, trimming the excess film will help reduce the risk of silvering. The set includes three decal sheets, allowing for a choice between three different liveries, along with a complete set of service stencils and warning markings. Instructions The instructions (printed on an A5 sheet) present the three available liveries with clear four-view profiles, showing the camouflage patterns and decal placement. Suggested paint references include equivalents for the Gunze and MMP ranges. Stencil placement is also thoroughly covered, with dedicated four-view diagrams and notes regarding the use of white decals in cases where the wing is painted black. Also included is a brief historical and operational summary of each aircraft represented. so let's check the sheets! Spitfire Mk.I early part 2 - RAF aces 1938 / 1939 Ref. 200-D32089 price 20,37€ this sheet supplies decals for the following airframes: K9962, flown by S/Ldr. Andrew Farquhar, CO of No. 602 Squadron, RAF Abbotsinch, Renfrewshire, United Kinddom, May 1939 K9906, flown by F/O Robert Stanford Tuck, No. 65 Squadron, RAF Hornchurch, Essex, Summer 1939 K9797, flown by Sgt. George Unwin, No. 19 Squadron, RAF Duxford, Cambridgeshire, United Kingdom, October 1938 Spitfire Mk.I part 32 - RAF aces 1939 Ref. 200-D32090 price 20,37€ This set present the following decorations: (WZ-S) No. 19 Squadron, RAF Duxford, Camridgeshire, United Kinddom, early 1939 K9938, No. 72 Squadron, Church Fenton, North Yorkshire, United Kingdom, April 1939 (PN-M) No. 41 Squadron, RAF Catterick, North Yorkshire, Spring 1939 Spitfire Mk.1 Part 4 – RAF Aces 1940 Ref: 200-D32091 Available here Price: 20,37€ This set present the following decorations: No. 609 Squadron, Drem, East Lothian, United Kingdom, March 1940 No. 602 Squadron, Drem, East Lothian, United Kingdom, April 1940 K9843, No. 54 Squadron, Hornchurch, Essed, United Kingdom, early 1940 Conclusion A highly recommended decal sheet for those looking to depict an early Spitfire, still bearing its pre-WW2 markings—each option unique and appealing in its own way, just as only a Spitfire can be! Many thanks to Art Scale Kit (ASK) for providing the review sheets. Ricardo Veríssimo


-
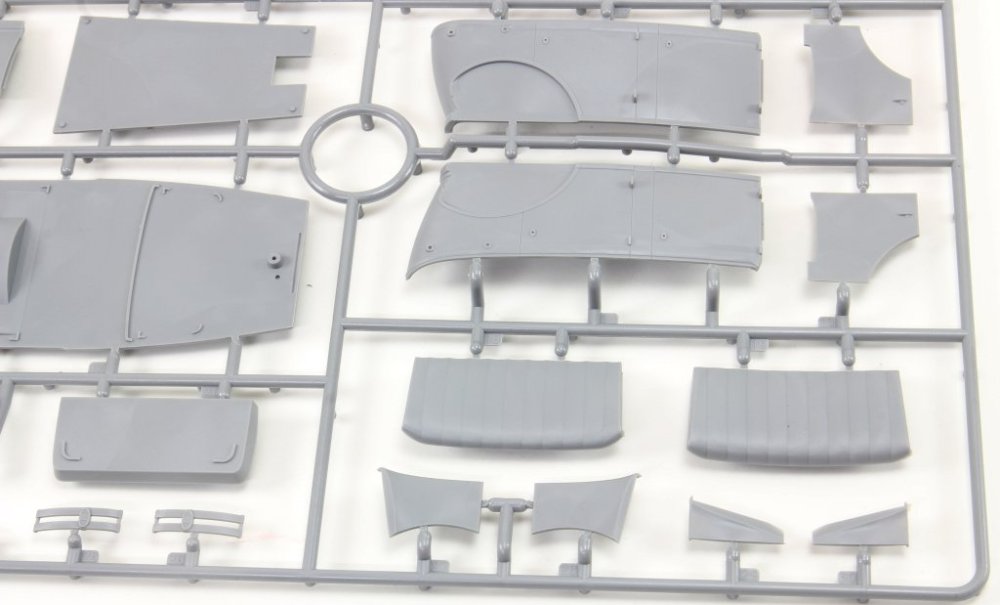
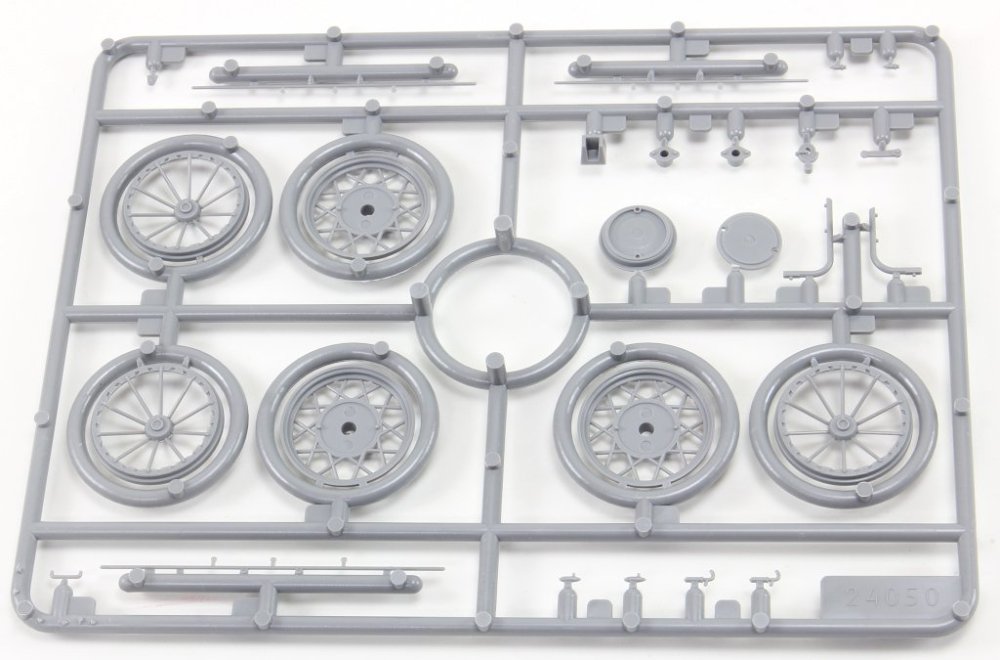
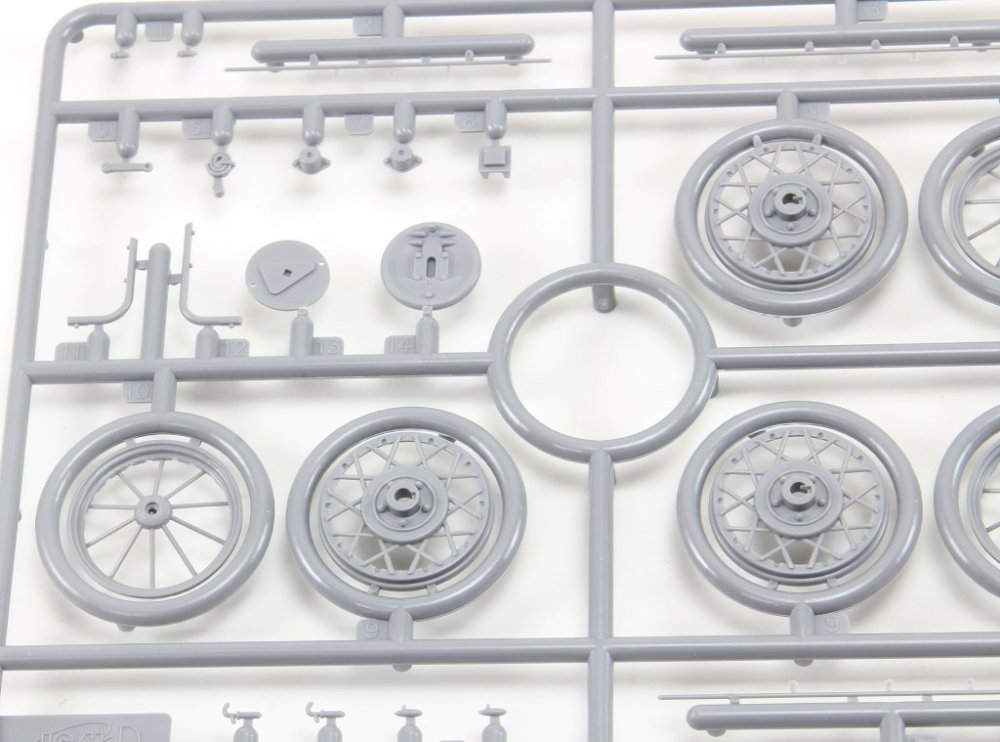
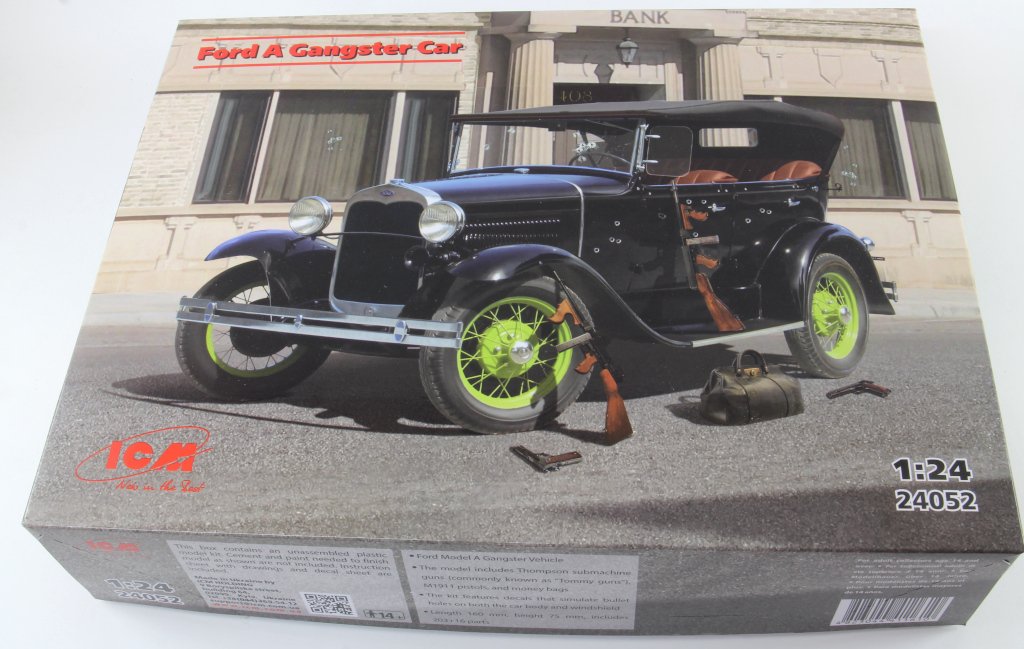
ICM 1:24 Ford A Gangster Car
rverissimo posted a topic in LSM-Related Reviews (military figures etc)
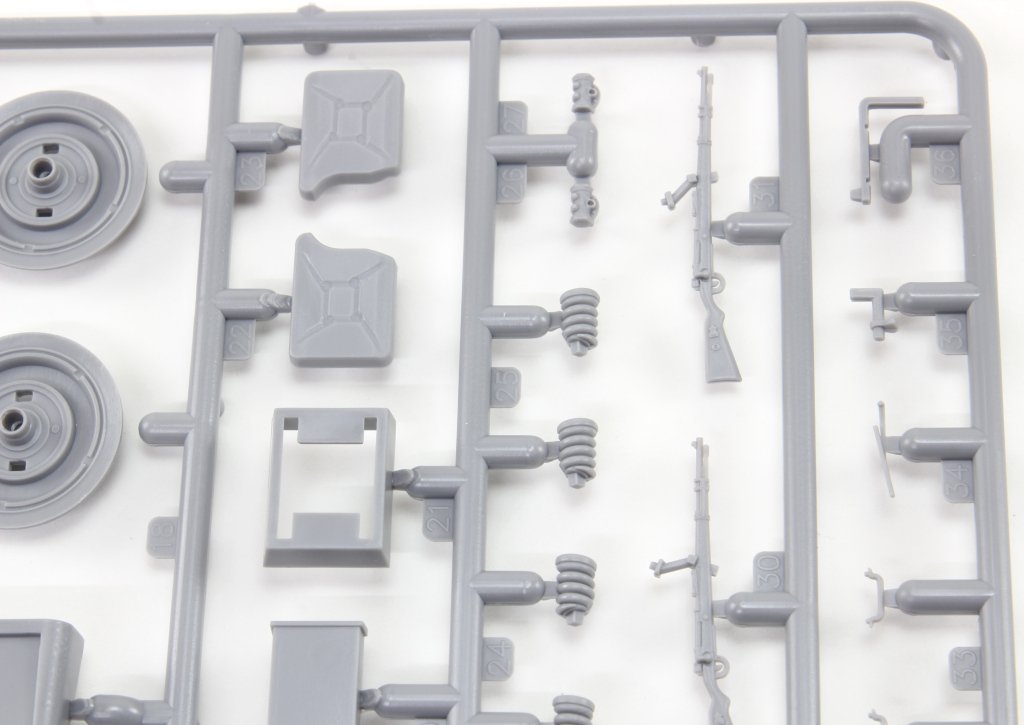
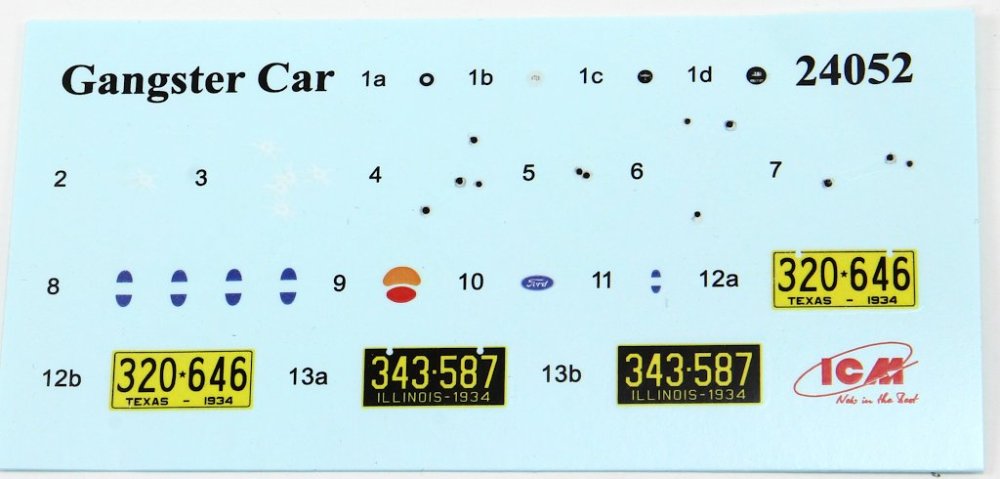
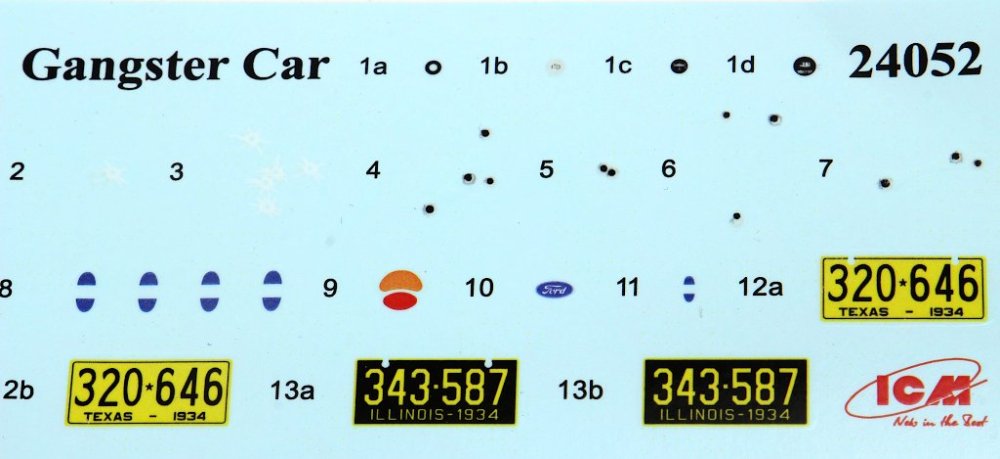
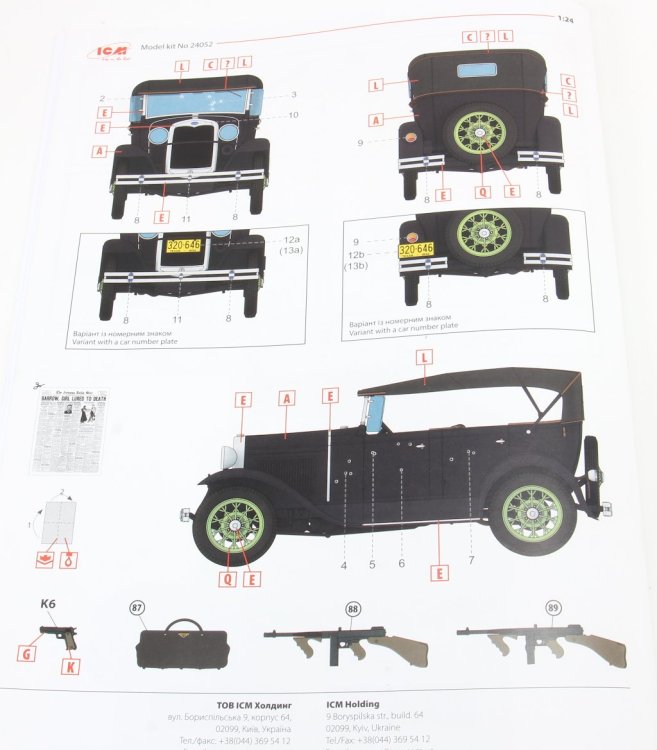
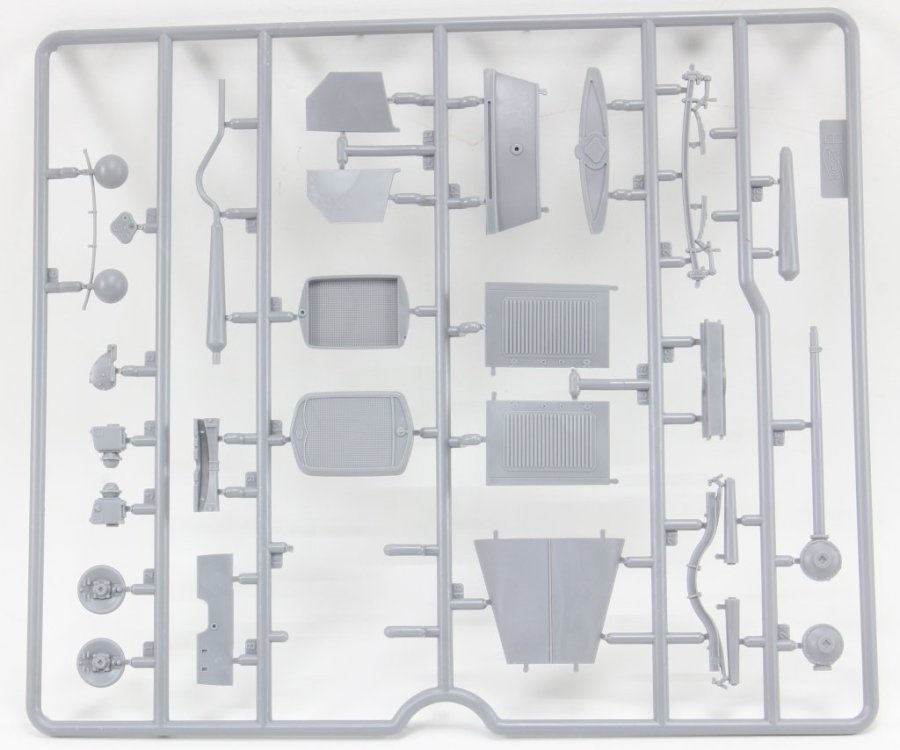
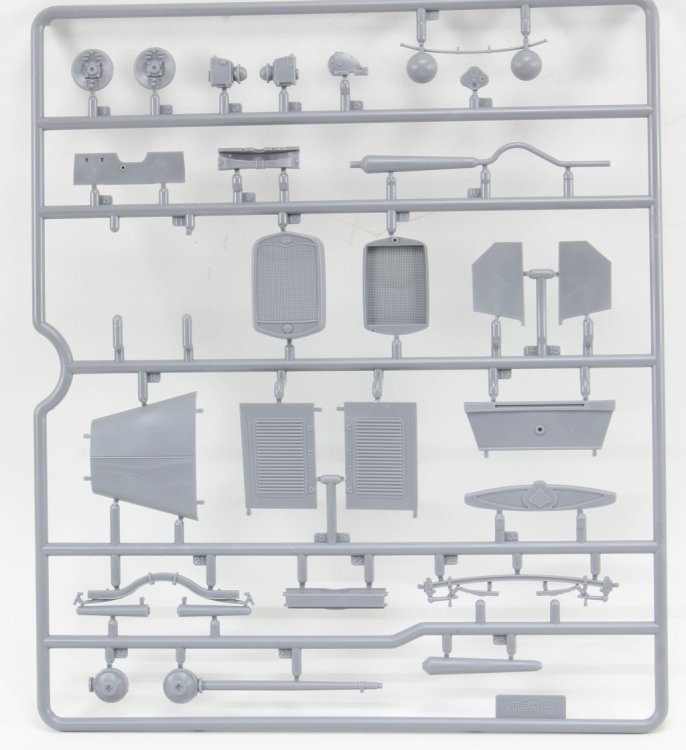
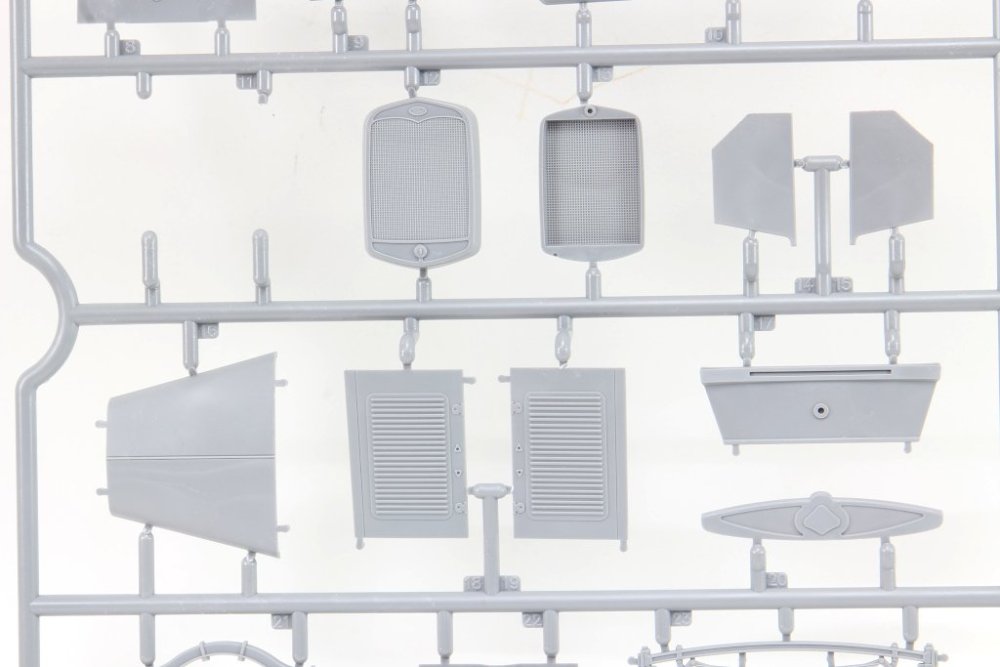
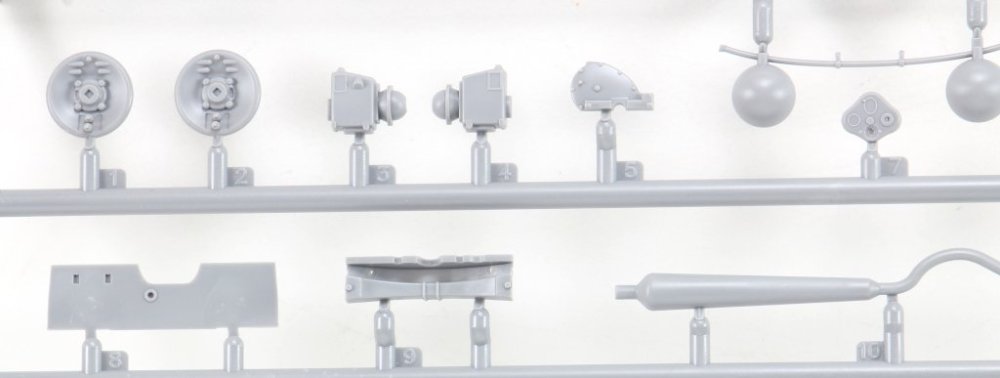
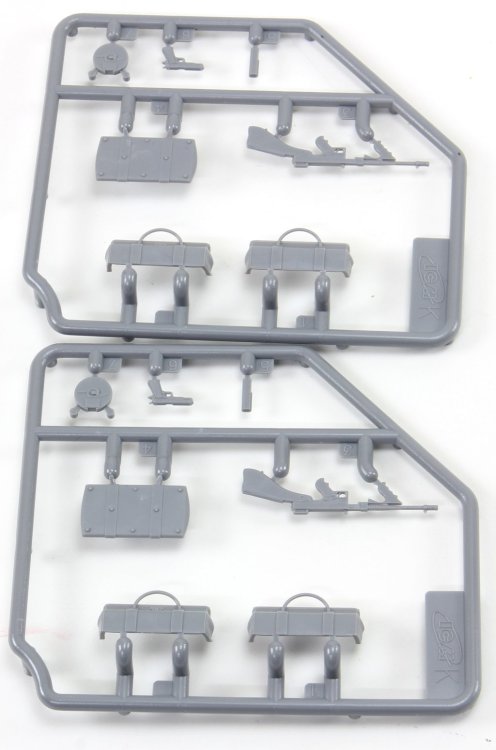
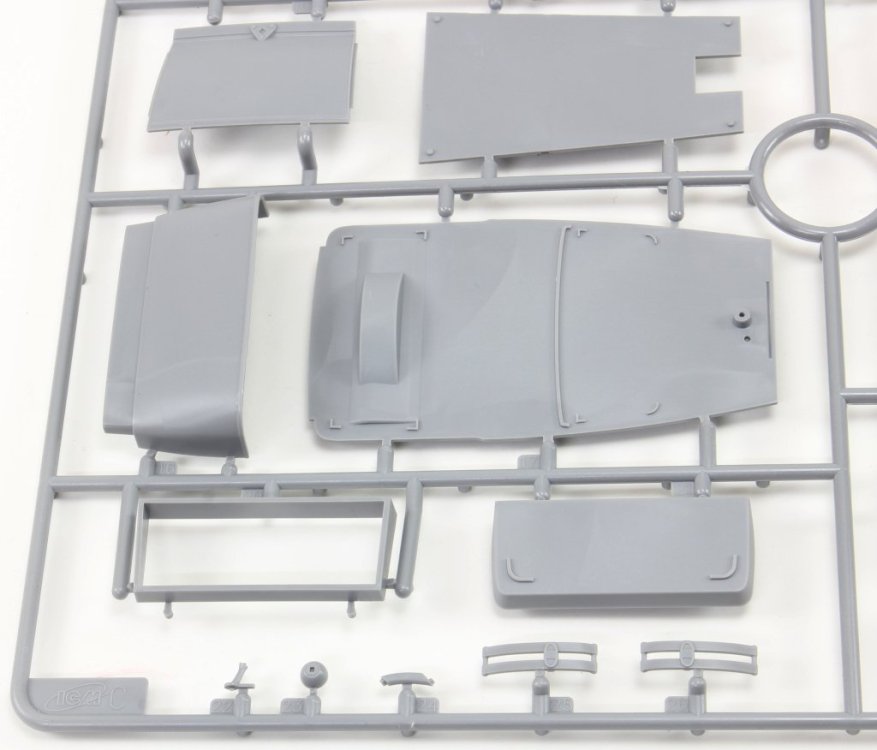
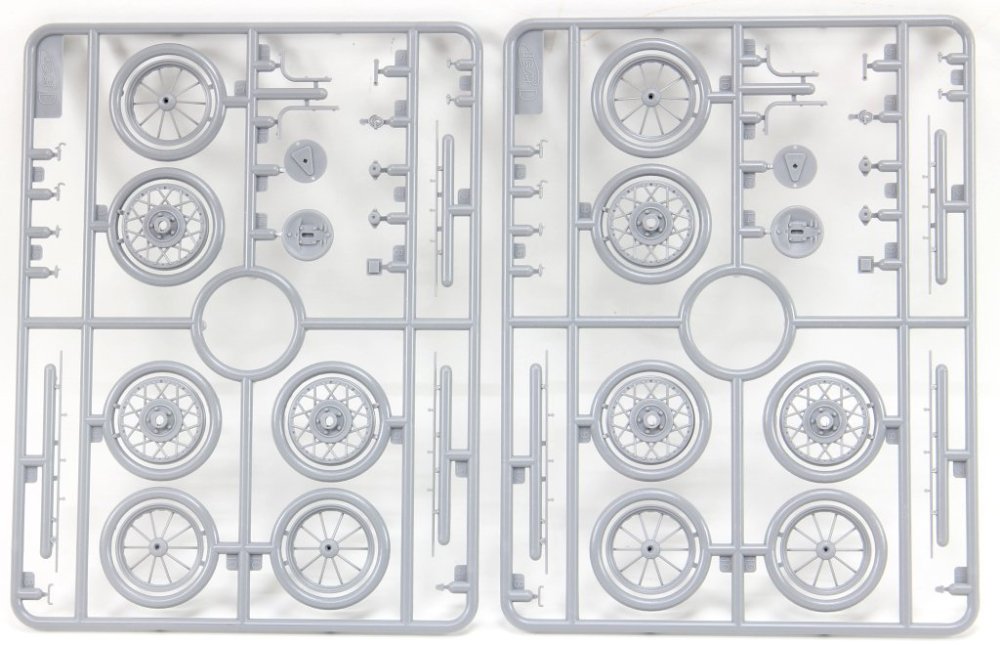
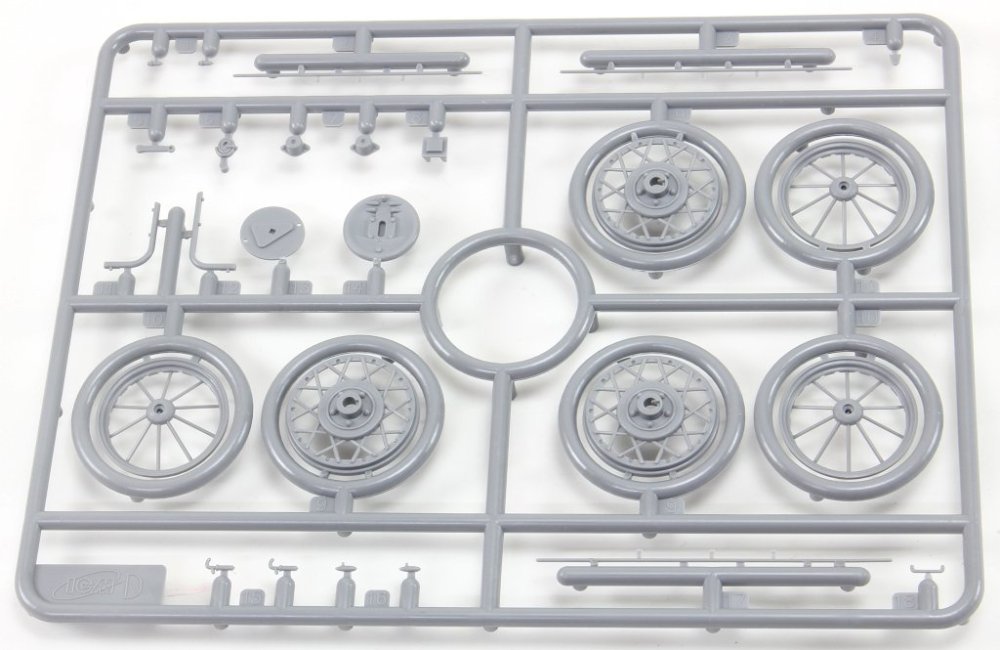
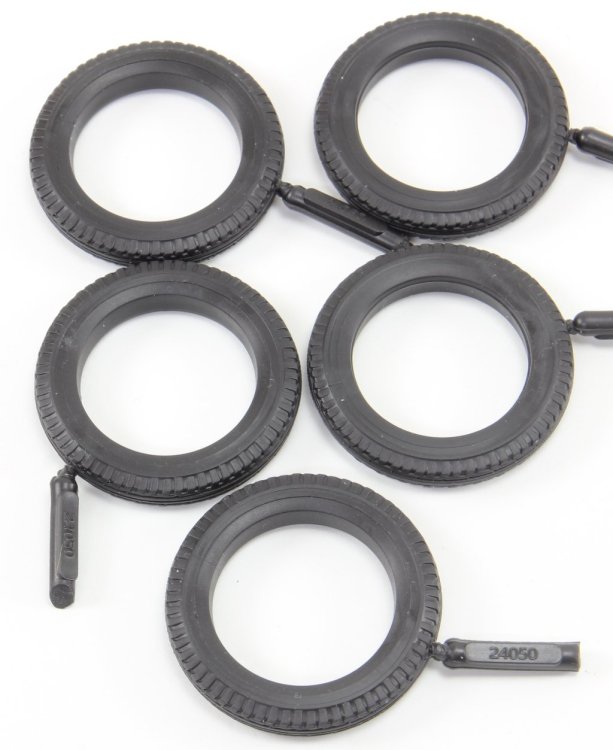
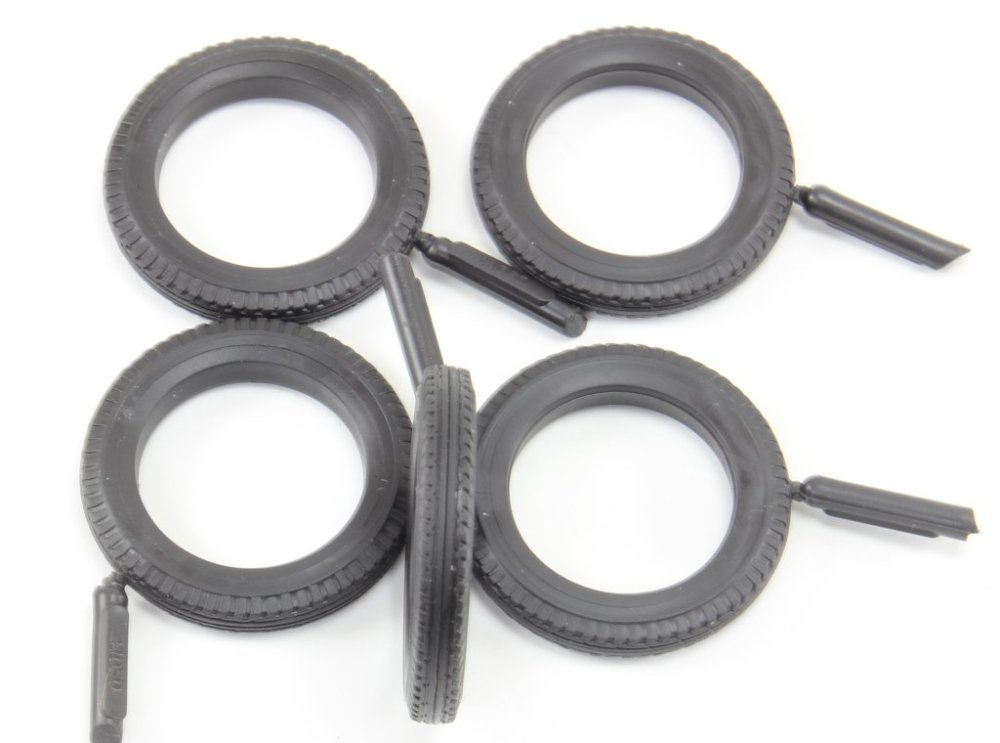
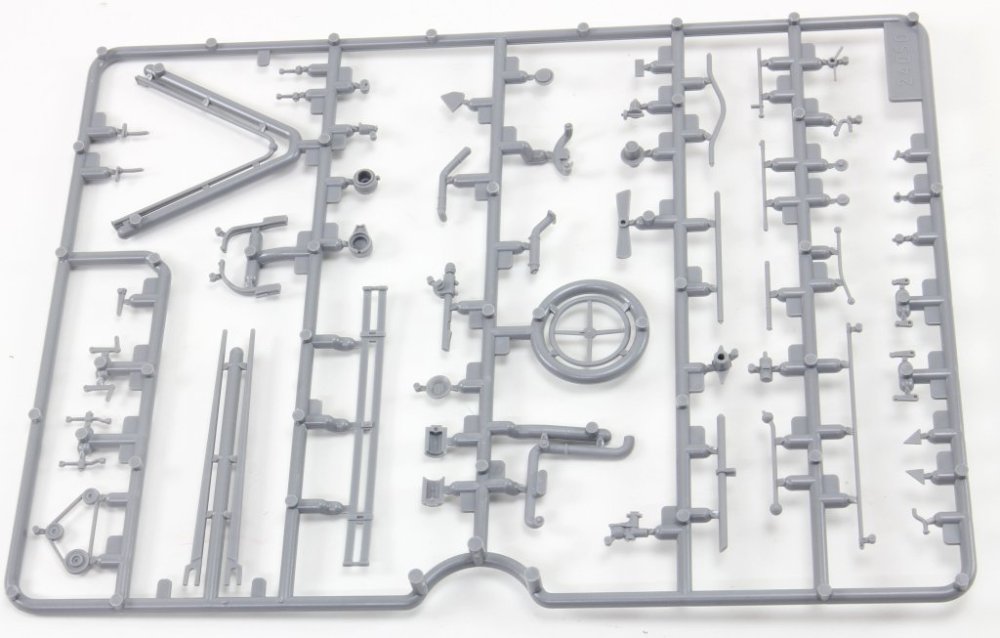
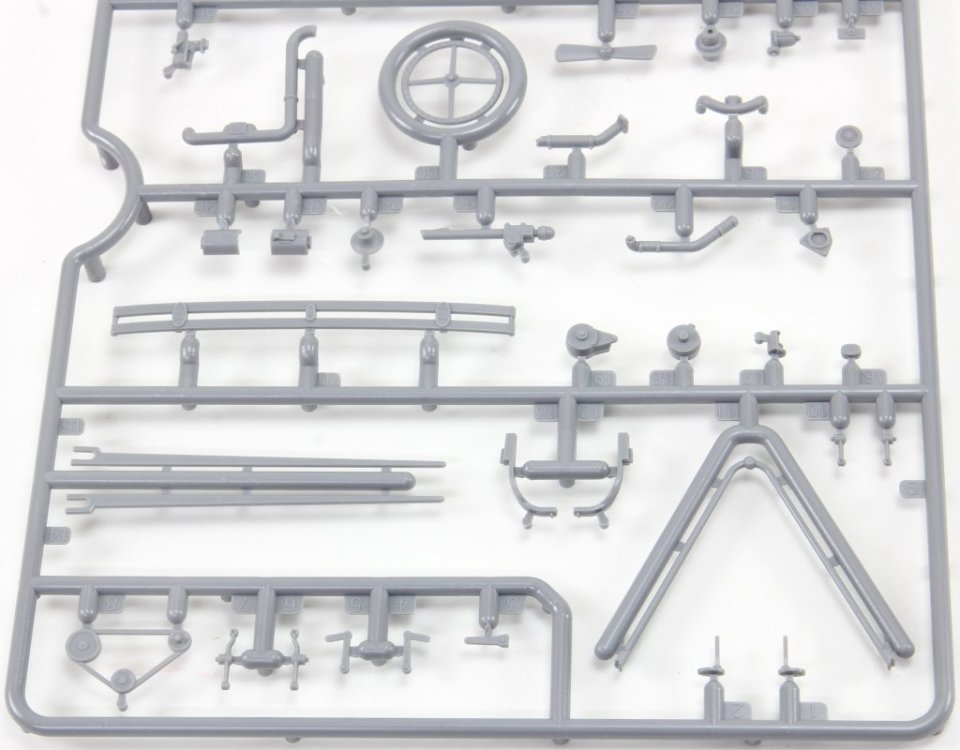
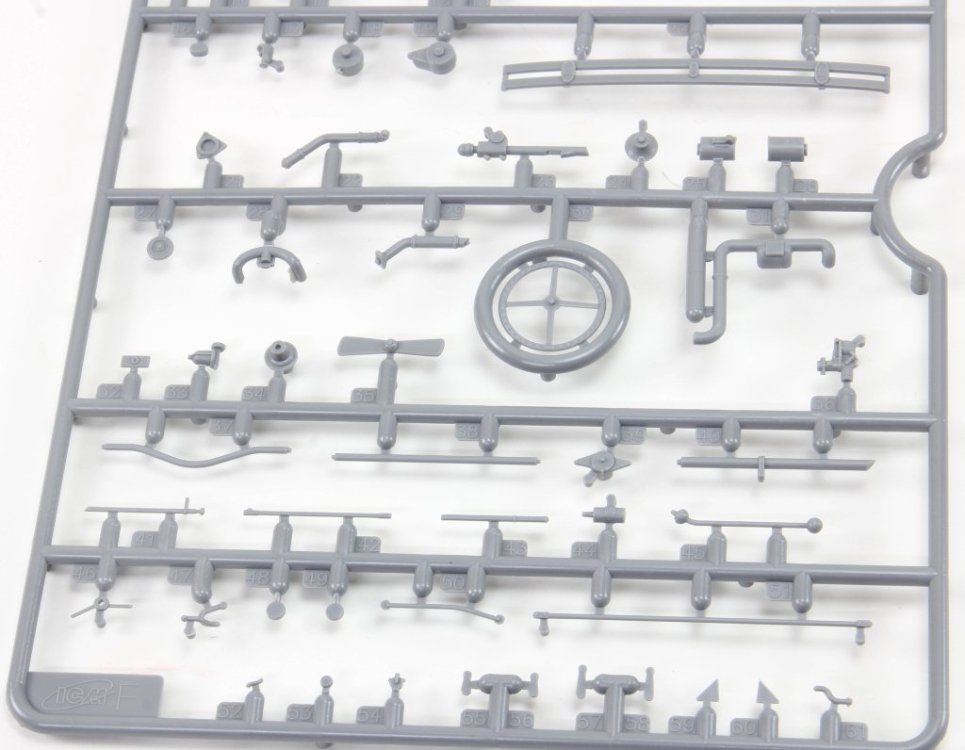
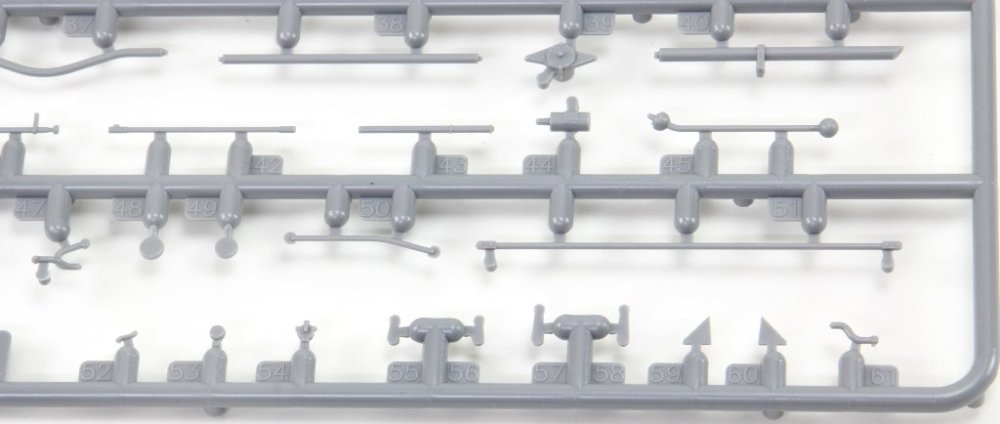
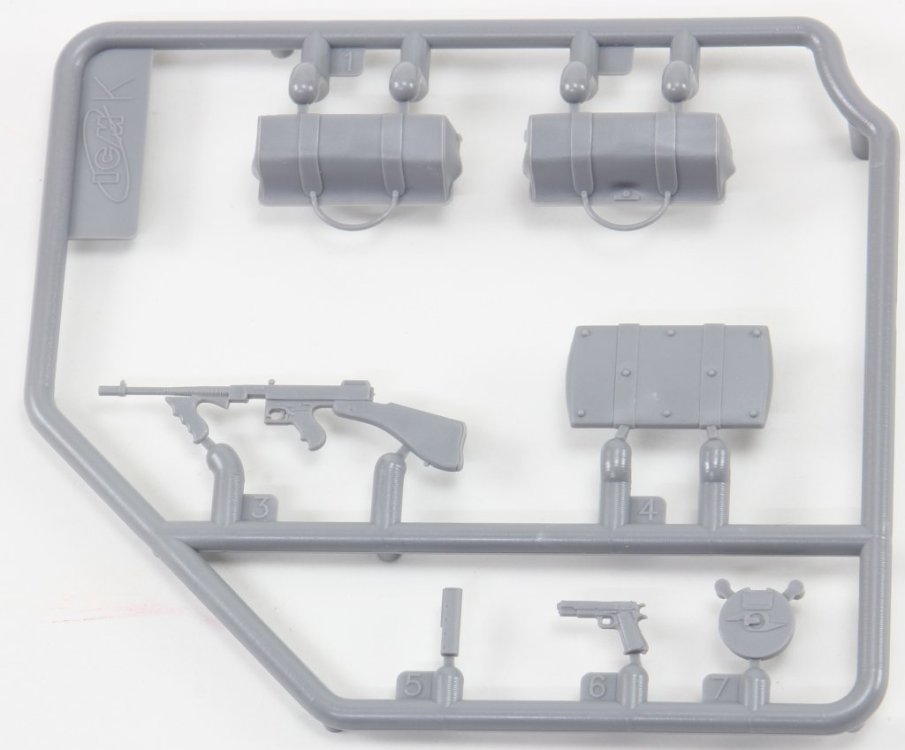
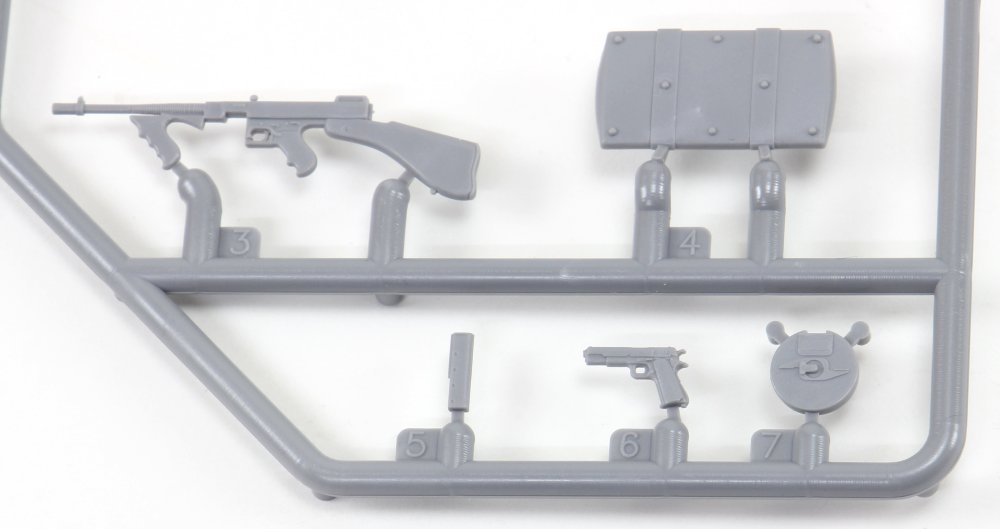
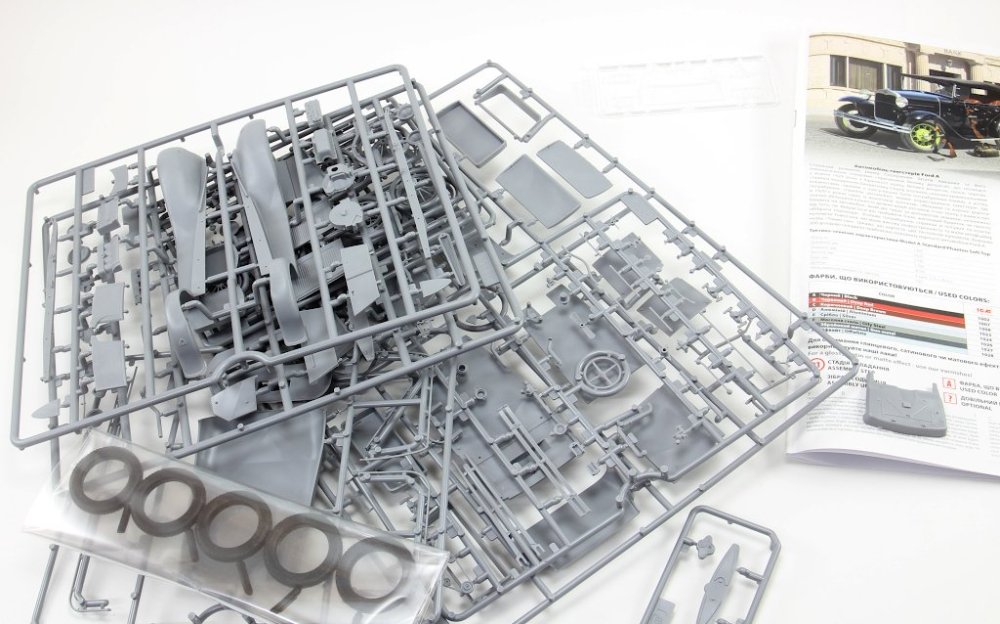
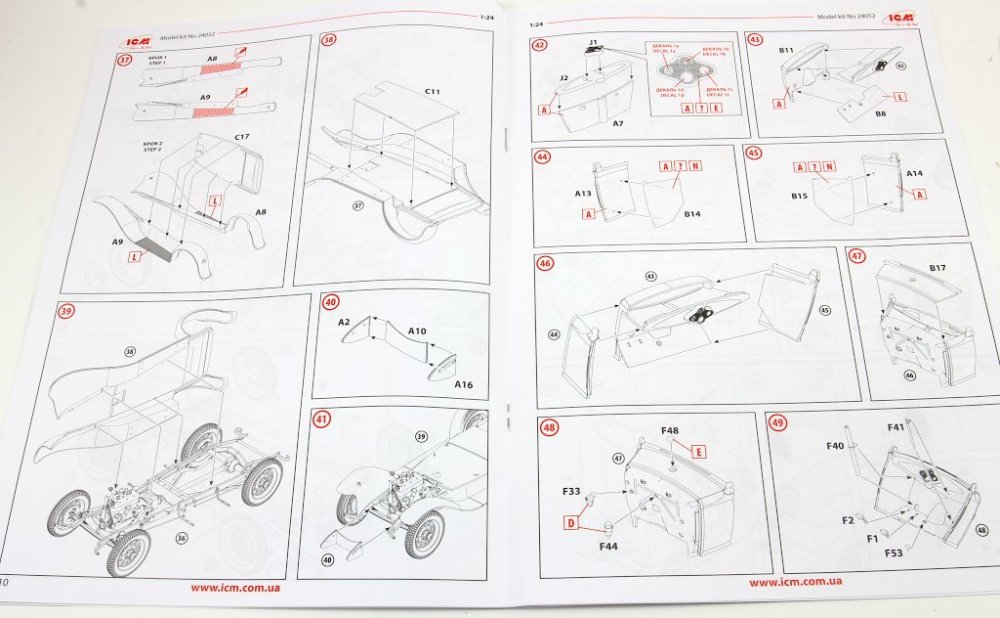
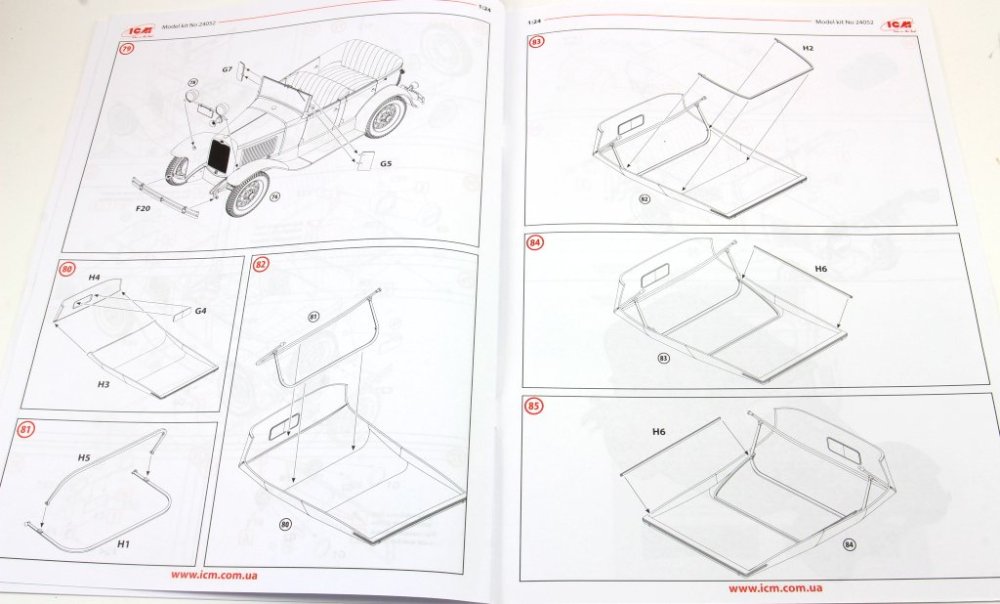
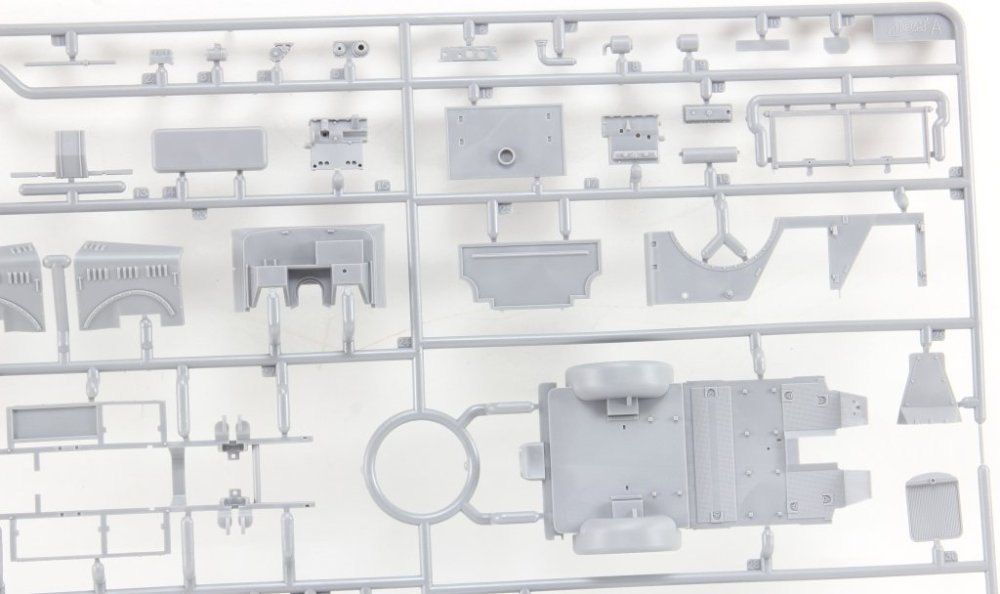
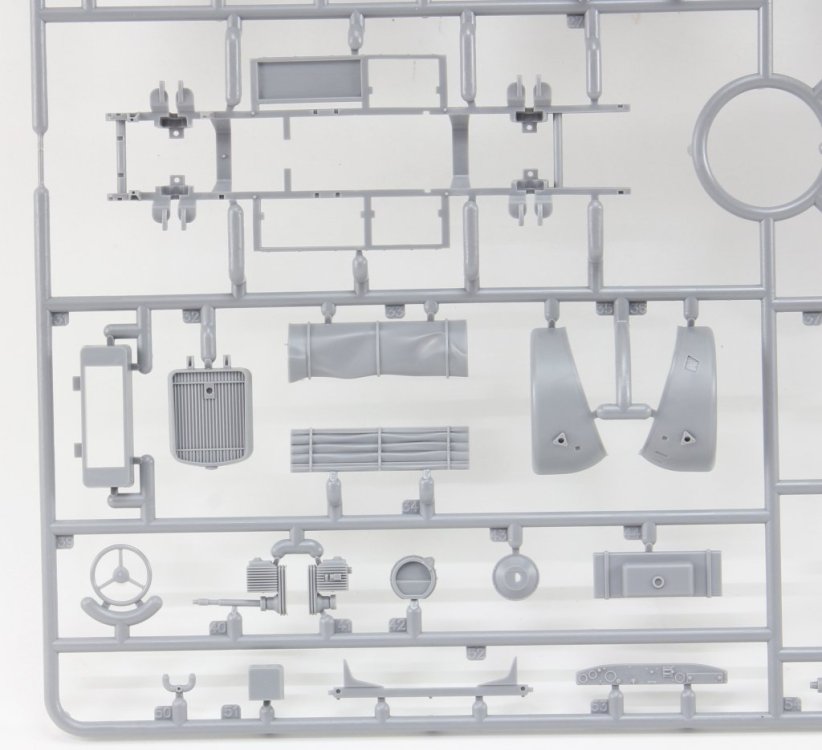
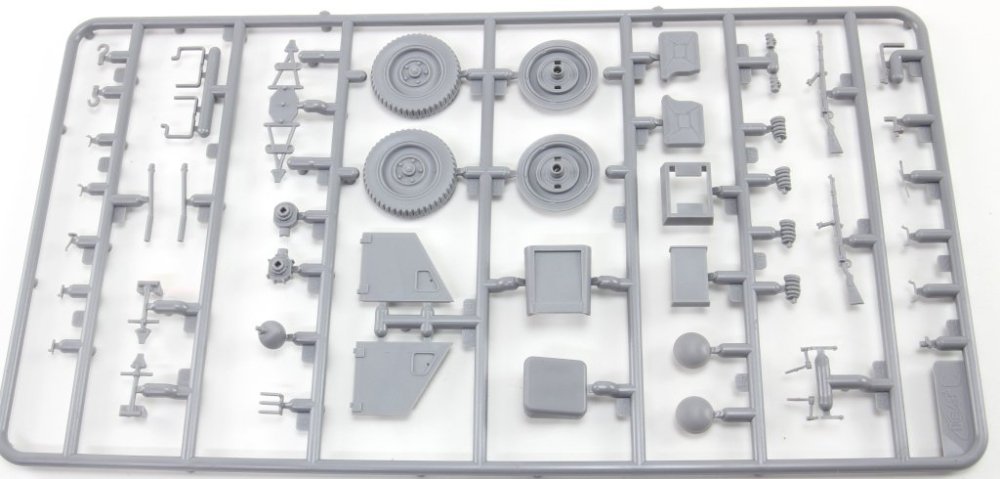
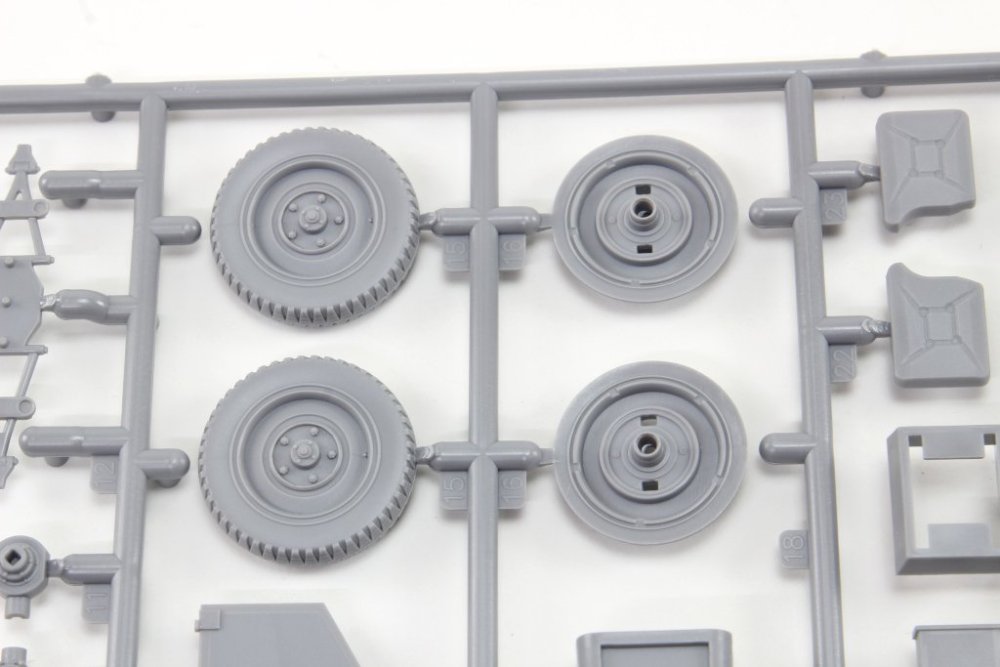
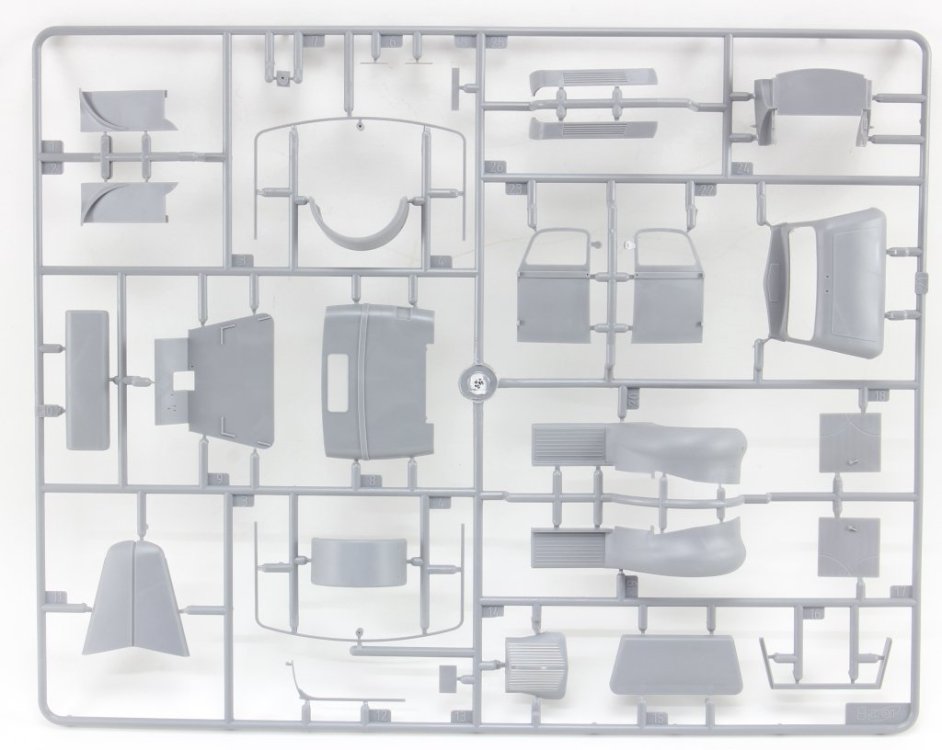
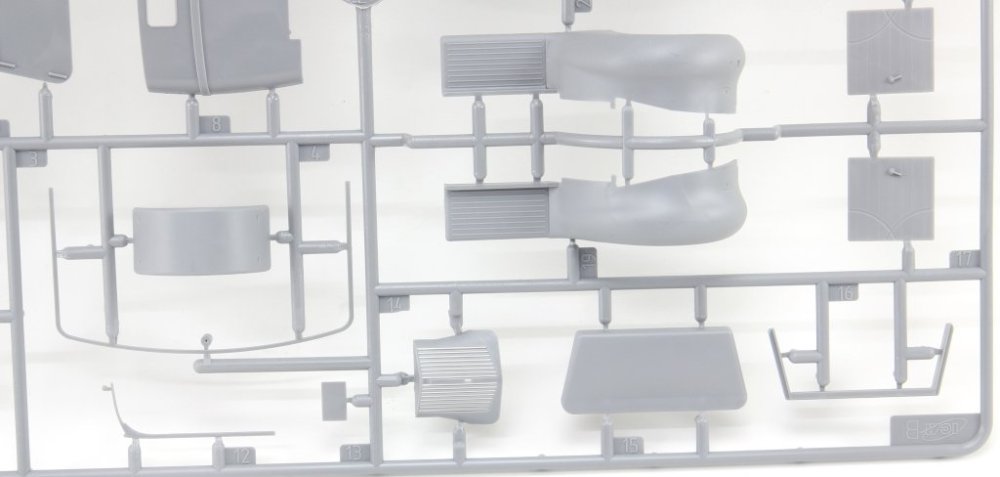
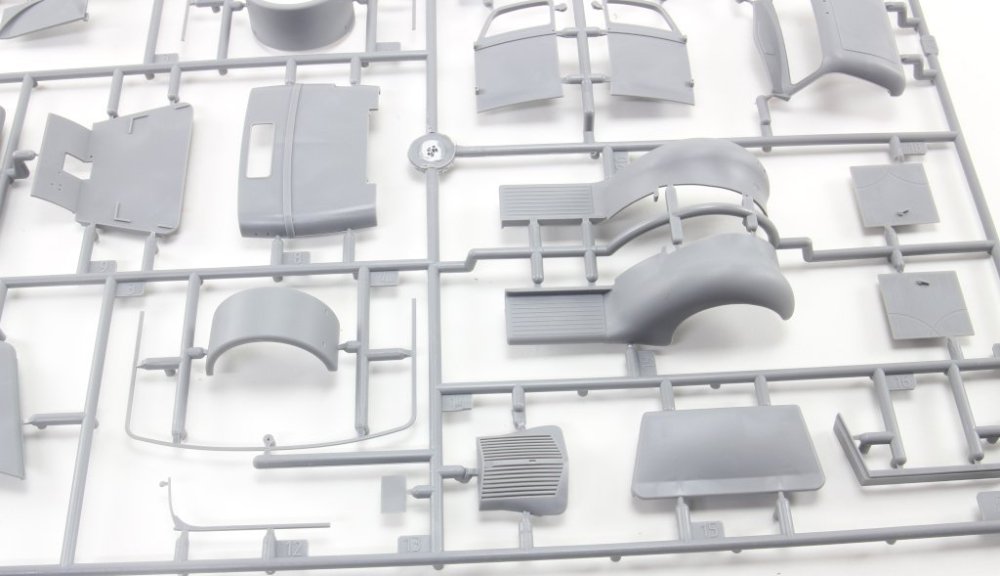
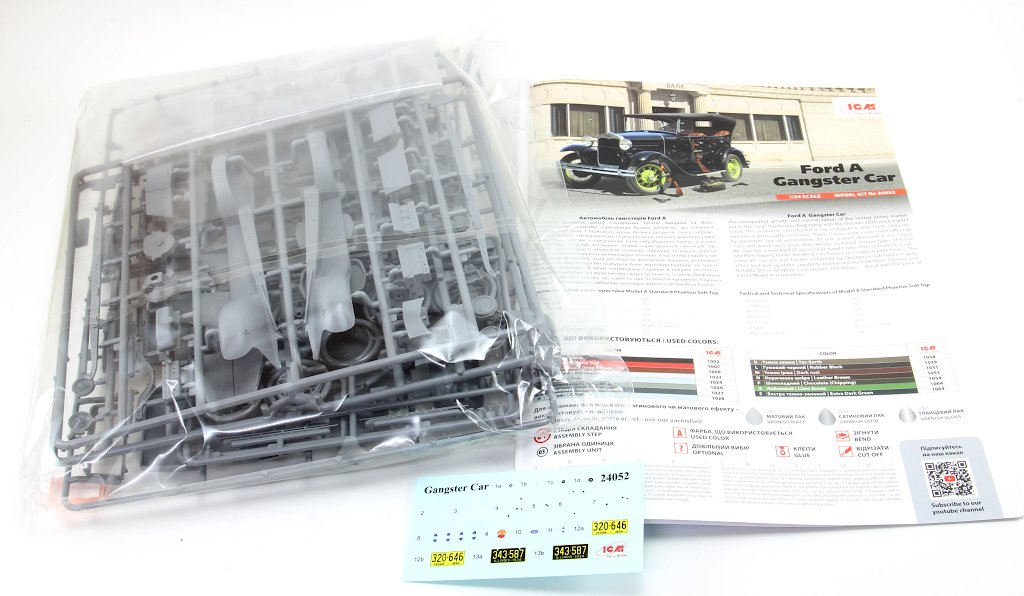
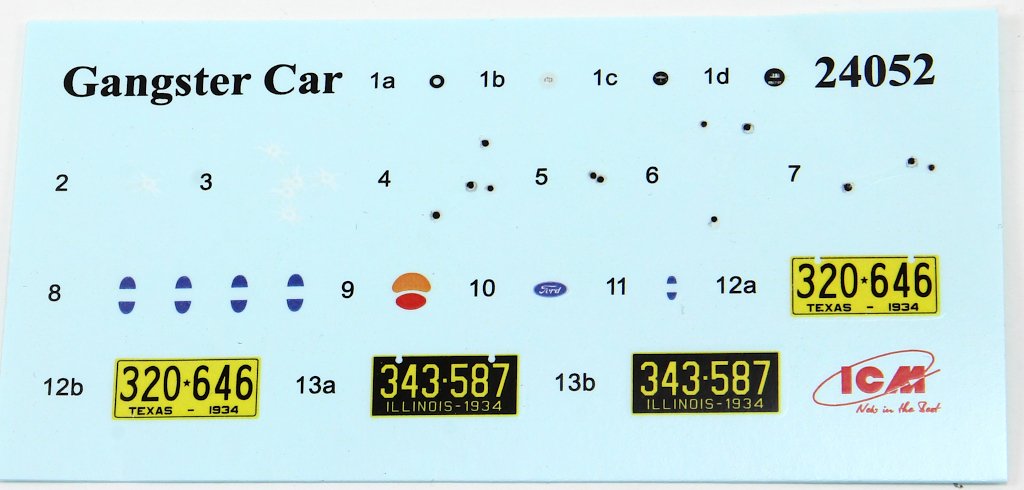
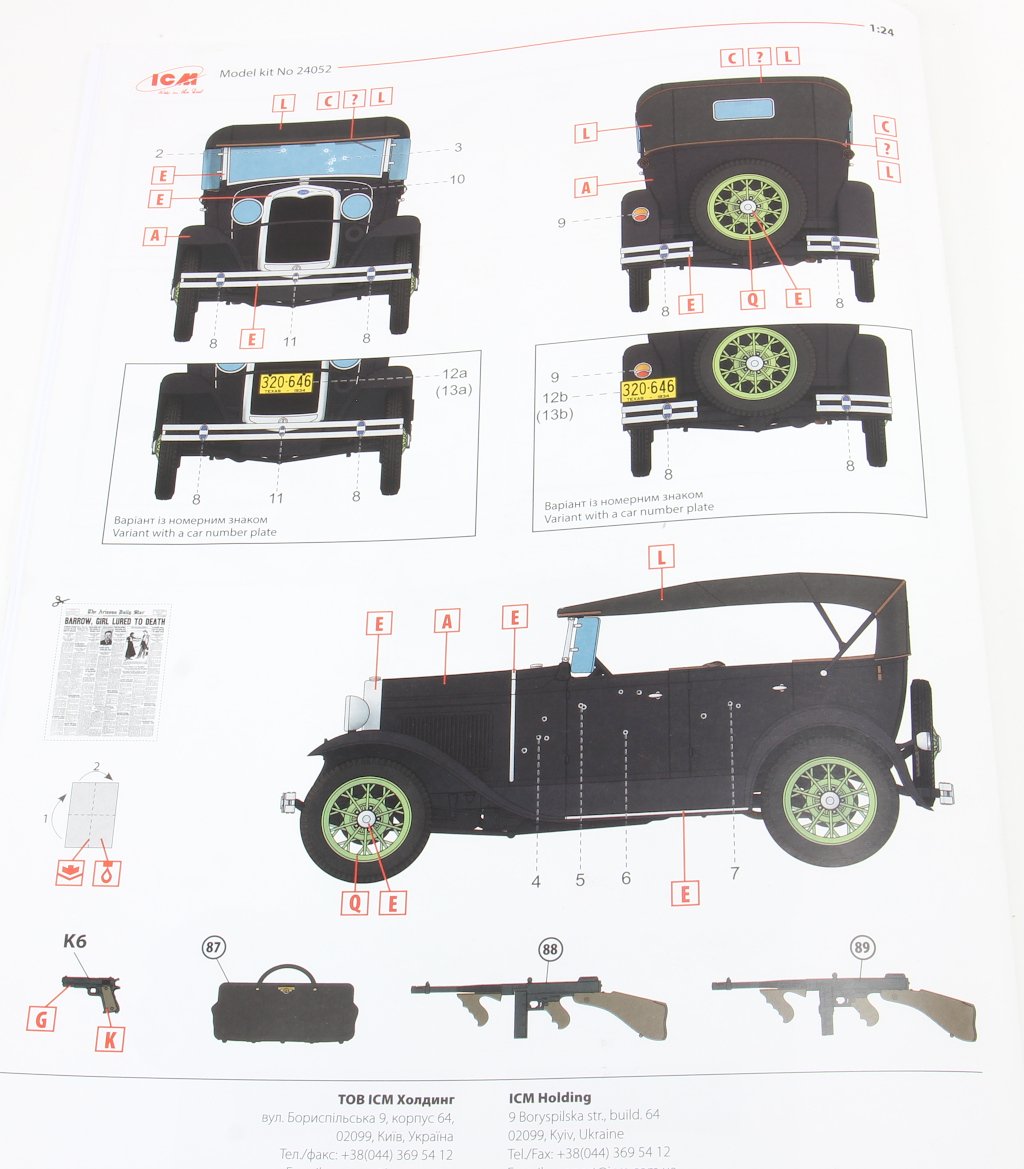
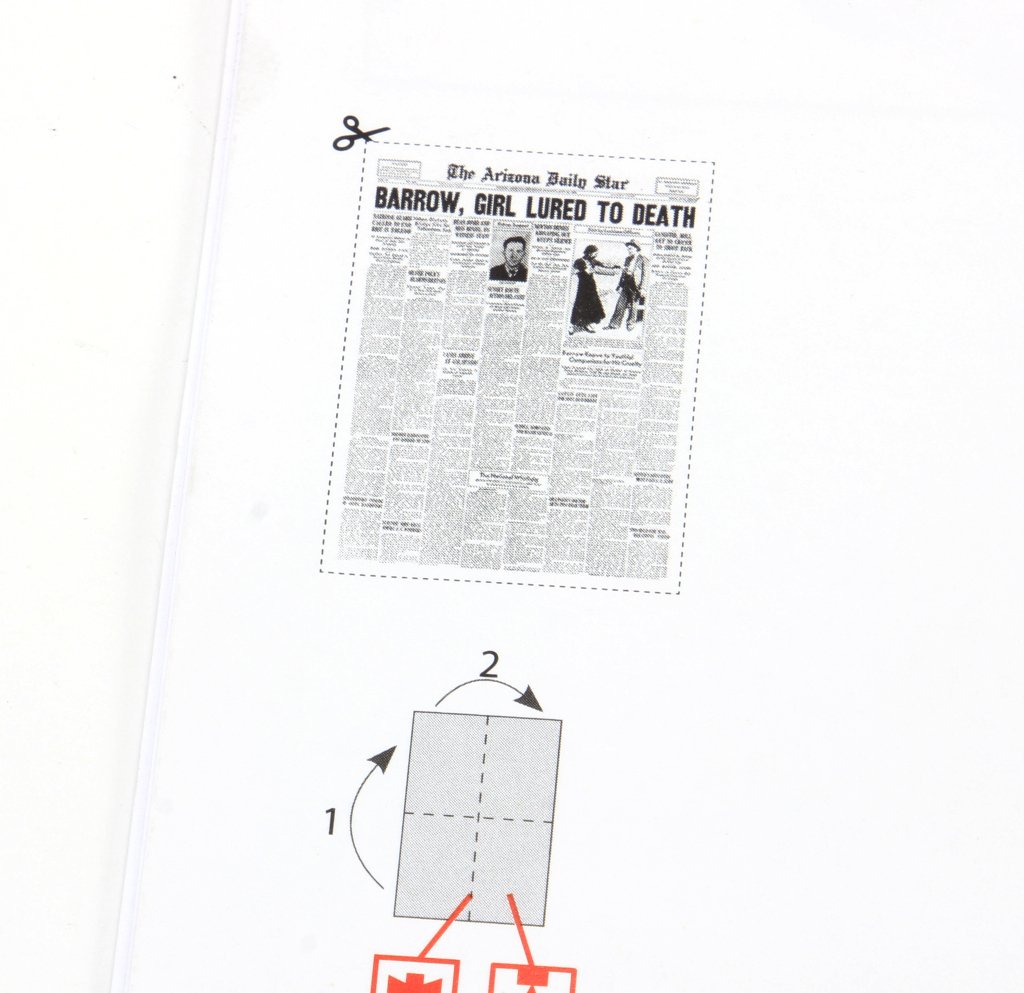
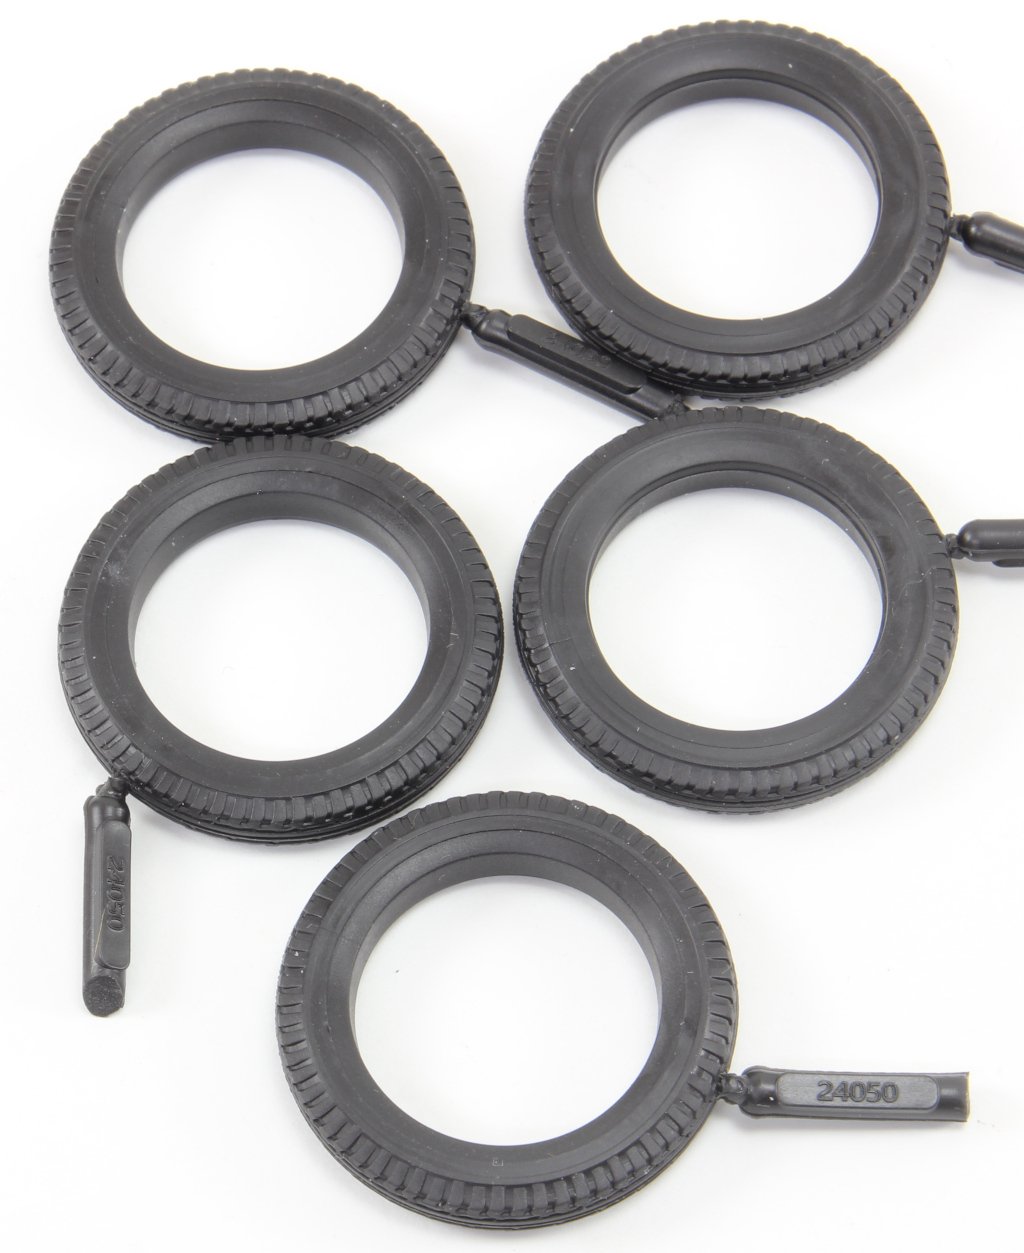
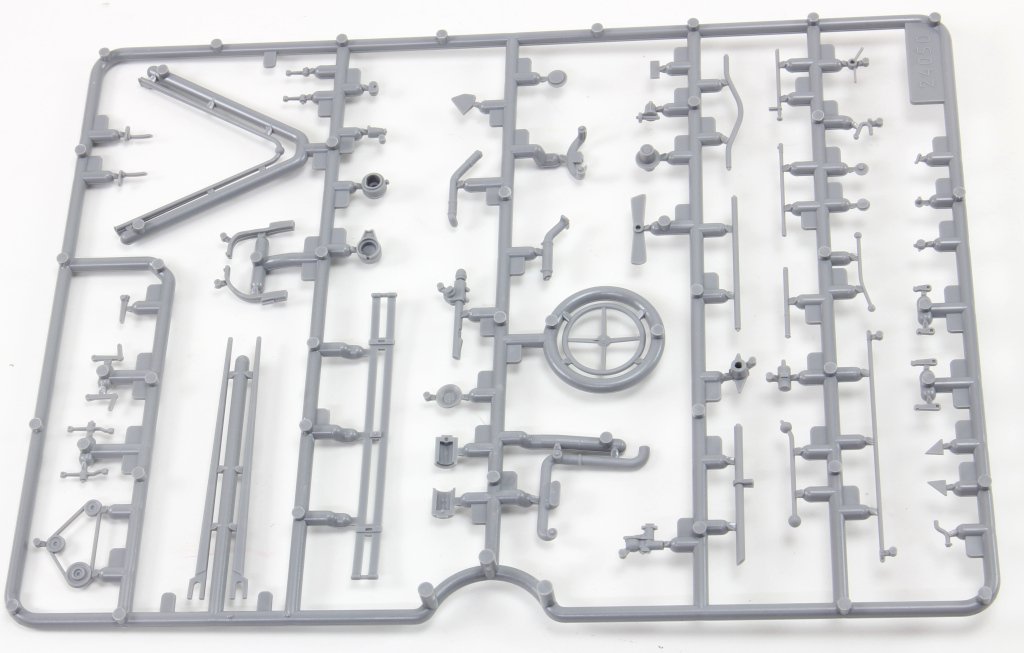
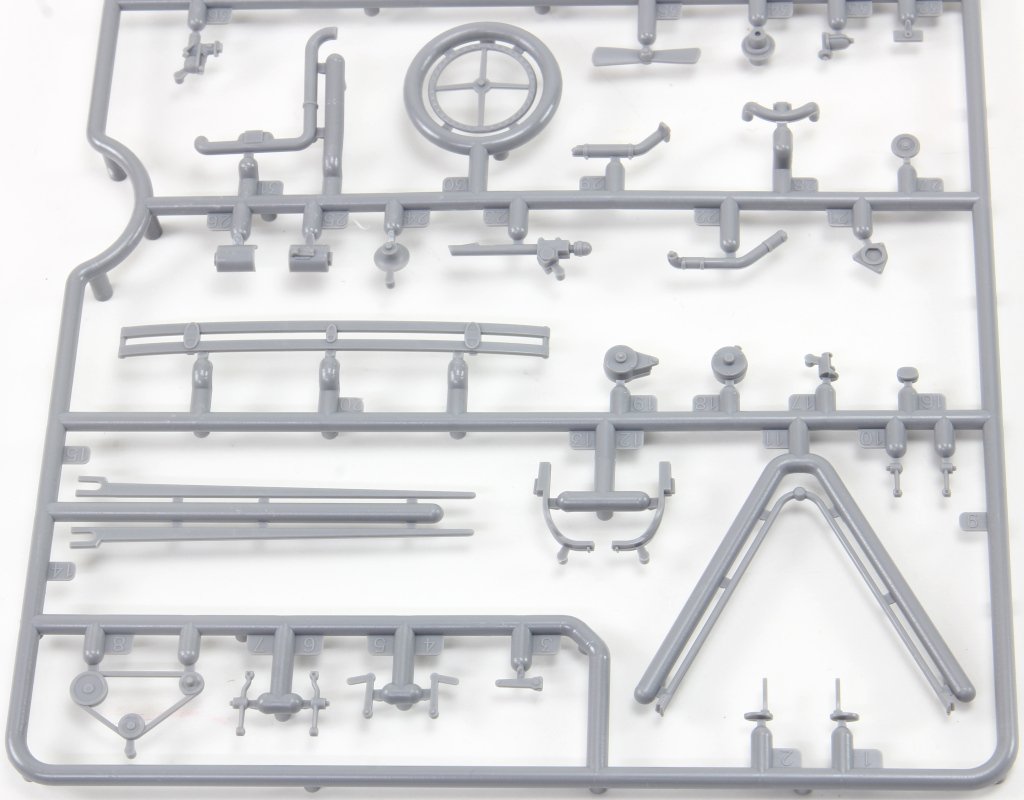
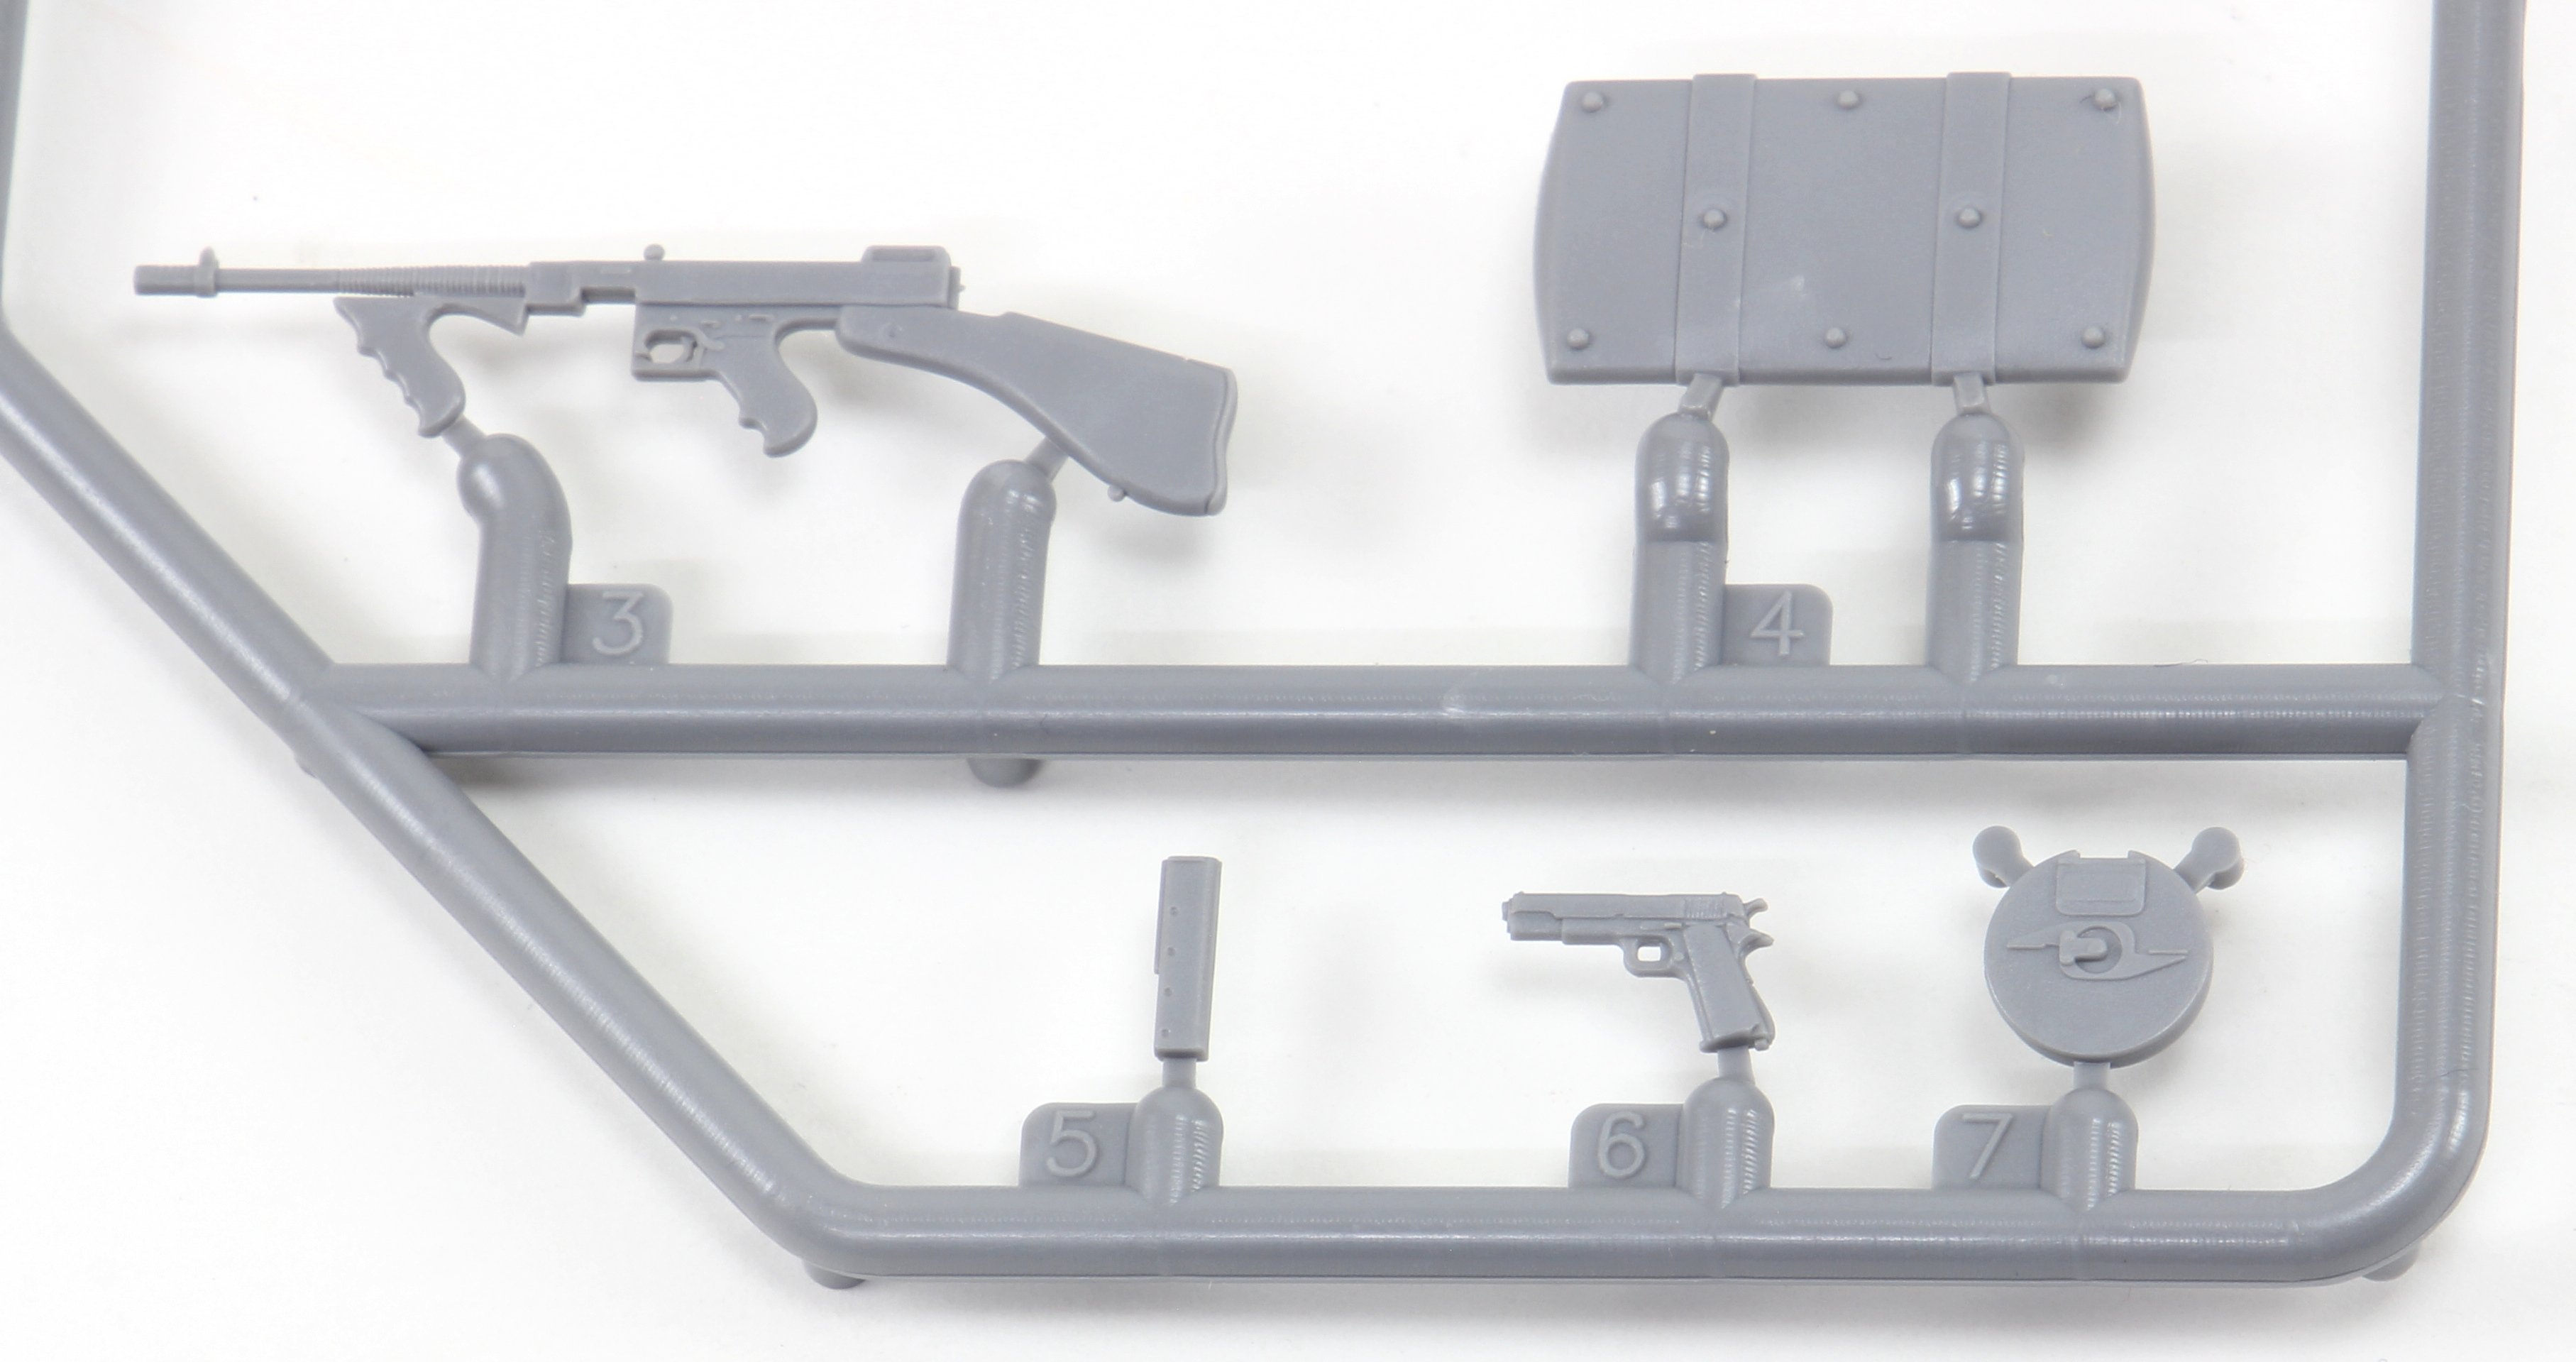
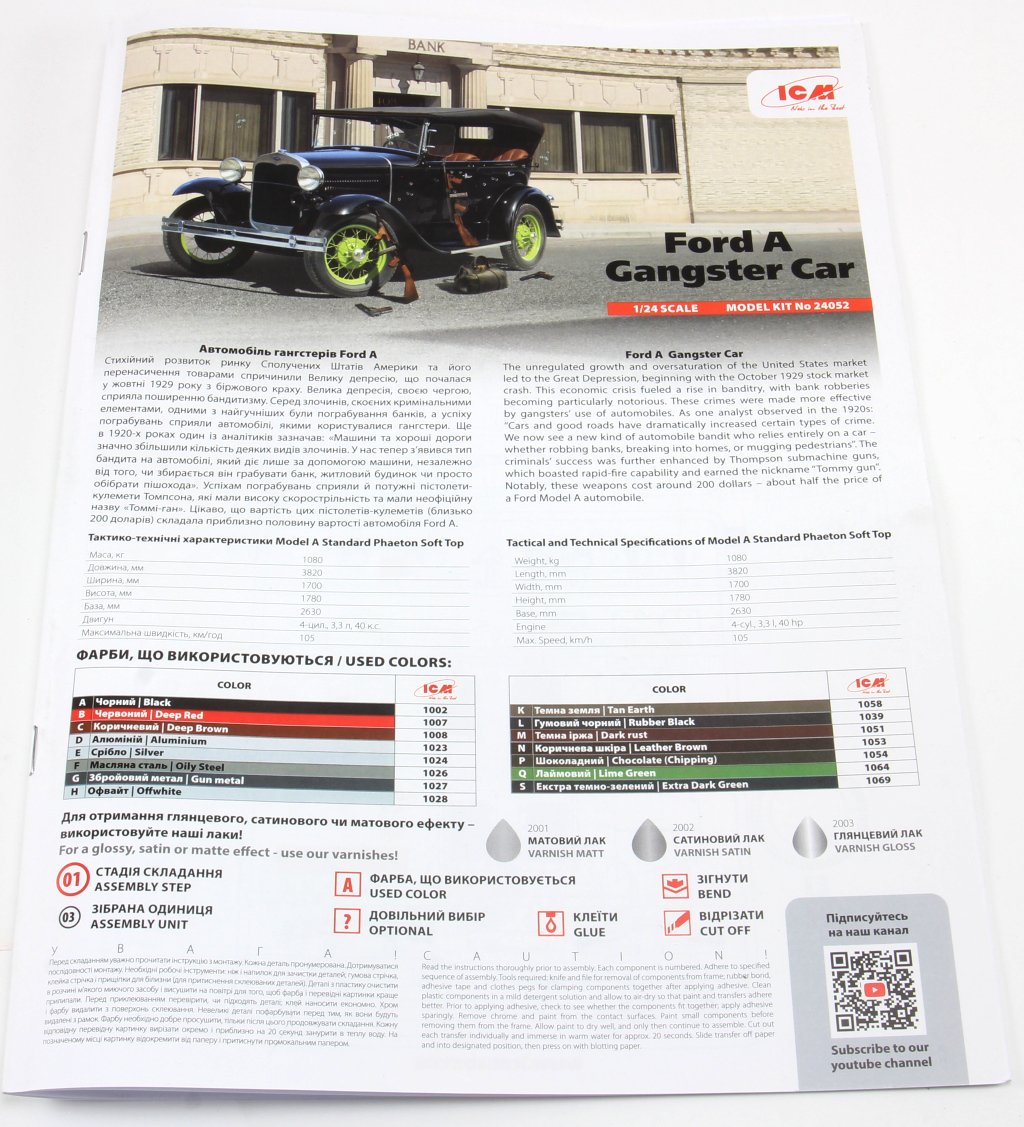
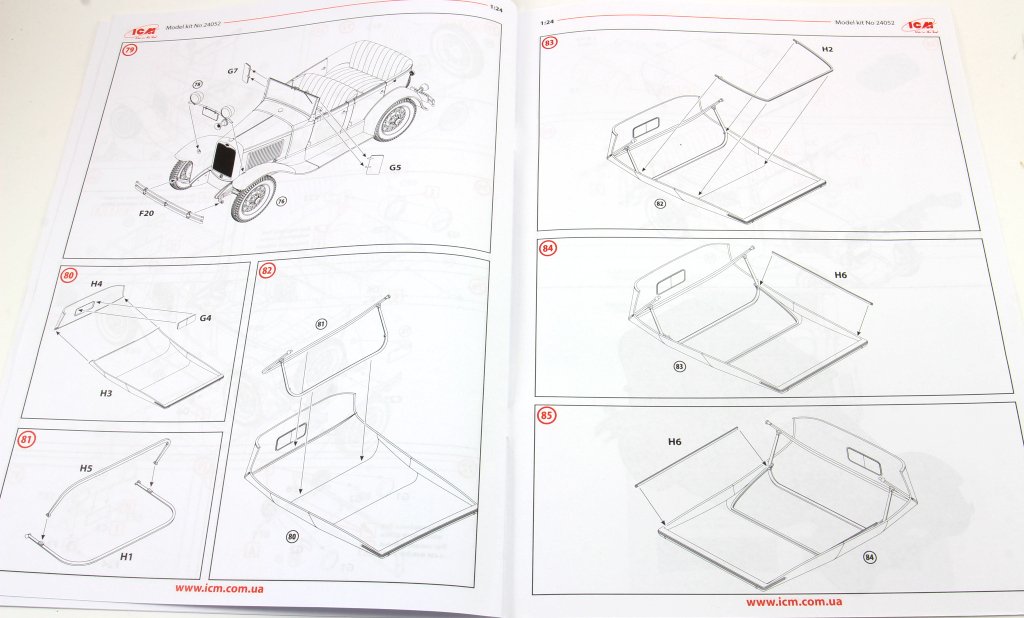
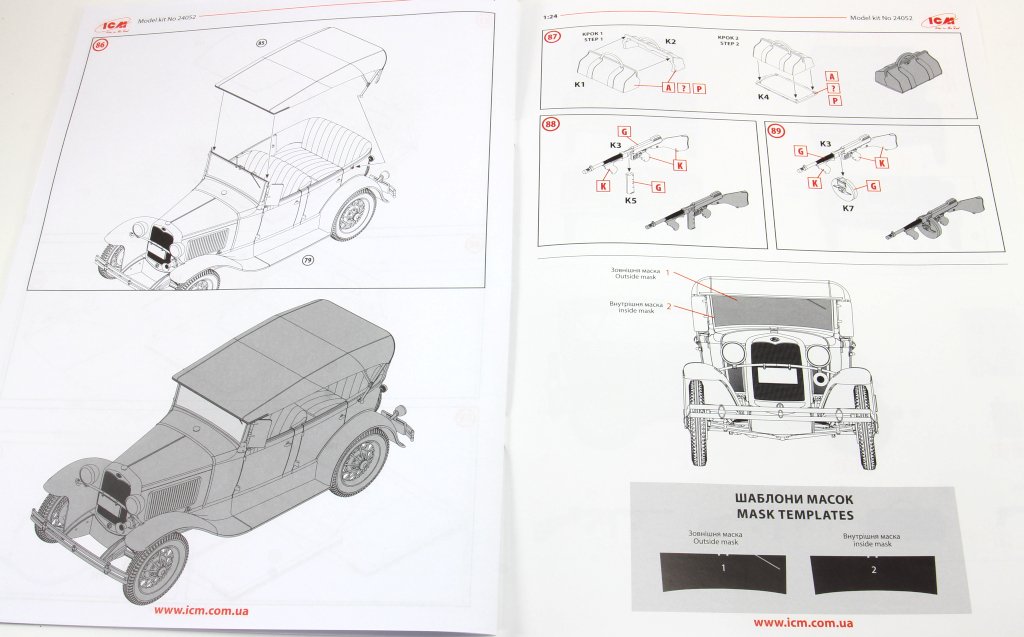
ICM Ford A Gangster Car Ref.24052 Introduction ICM continues its unstoppable monthly sequence of new moulds or variations of existing models, in a dynamic effort to offer us a wide range of interesting and out-of-the-box subjects. Such is the case with the model presented here. Being the third derivation of this mould (the first variation released in 2024), it offers a Standard Phaeton Soft Top version of the Model A (an evolution of the legendary and timeless Ford Model T), with a unique twist: The possibility of decorating, after painting, with decals simulating bullet damage on the body panels and windows — the result of a shootout with law enforcement! Clearly, we’re talking about a gangster vehicle! This set transports us into the world of Hollywood, with gangsters hanging off the sides of the car, gripping the door with one hand and firing a “Tommy Gun” with the other at the police cars chasing them! What's in the box! Inside the sturdy cardboard box, you’ll find: 10 grey sprues 1 clear plastic sprue 1 Rubber sprue (x5 tires) 1 Decal sheet 1 Instruction booklet Altogether 219 parts. Sprue A This sprue provides various structural and exterior parts of the model, such as the front and rear fenders joined by the running boards, in the distinctive 1930s style, several parts of the engine block and cylinder head, as well as the gearbox and main chassis beams. Sprue B This sprue includes vehicle components such as: bonnet and side covers with moulded grille details, rear differential, exhaust pipe, radiator (in two parts), and the engine firewall panel. The front headlights are supplied as a single piece. Sprue C This sprue provides the bodywork parts, including the floor, side panels (moulded as a single piece), and the interior cabin panels. Bench-style seats are also included. The model does not allow the doors to be displayed in the open position. Sprue D (x2) This small but detailed sprue provides the necessary parts for constructing the wheels. Faithful to the period represented, they consist of two rims — one outer and one inner. Also included are the parts that make up the rear drums. Although these are partially hidden in the final assembly, they feature a remarkable level of detail. Sprue E Supplies the four tyres and one spare, made of soft black rubber. Although not my preferred material, they offer adequate detail, particularly in the tread pattern. Sprue F This sprue contains miscellaneous parts detailing various sections of the model: Steering wheel, gear lever, chassis crossbars and steering components, rear bumper, and various engine parts. Sprue G This sprue provides all the transparent parts used in the model: front windscreen (with moulded wiper), small ventilation windows, and the headlight lenses (moulded on the inside with the typical striations found in these lights). The parts are free from scratches and distortion, and are packed in a dedicated bag. Sprue H Dedicated solely to the soft top, it includes it in two parts along with its internal frame, allowing it to be folded down and converted into a cabriolet. Note: this convertible option is not available. Sprue J This small sprue provides the dashboard and central console with gauges. Sprue K (x2) This small sprue, specific to this set, provides the gangster’s tools of the trade and their transport case 😊 Included are: one Thompson (aka Tommy Gun) submachine gun with the option of a standard magazine or the iconic high-capacity drum, a Colt Model 1911 revolver, and a transport case. Decals A sheet containing two licence plates, instrument dials, Ford logo for the radiator, and several bullet hole decals to properly decorate the vehicle as a crime scene car. They are suitably thin with minimal carrier film and perfect registration. Instructions The instruction manual follows ICM’s typical format. An A4 booklet with saddle-stitch binding, where the first two and last pages are printed on satin-finish paper (in colour), showing the box art and, on the final page, the painting and marking option in colour profiles, along with a colour chart referencing ICM’s paint range. Colour mapping to other brands can be done using widely available equivalence charts online. The manual guides us through 89 construction steps across 20 pages. Clear and straightforward instructions leave no doubt about where each part goes. Marking Option A single decoration option is suggested, with two possible licence plates. The recommended colour is black with vivid green wheels. However, a quick internet search reveals other possible body and soft top colour combinations. A nice original touch is a small printed newspaper sheet that can be added to the final display! Conclusion This is a highly original set with great potential for a unique diorama! The detail is on par with other ICM offerings, consistent with a modern mould and finesse in its parts (as seen in the spoked wheel detail). The inability to display the doors open or the soft top folded down doesn’t detract from its value, but would enhance the final presentation. The inclusion of the gangster’s tools (Thompson submachine gun, Colt 1911, and money bag) makes the final result truly distinctive! This model is recommended for modellers new to the hobby or more experienced builders looking to create something different and original. Of course, the addition of figures to match the theme would elevate it even further — and such options may appear, or can be sourced via the world of 3D printing… our thanks goes to ICM for the review sample! Ricardo Veríssimo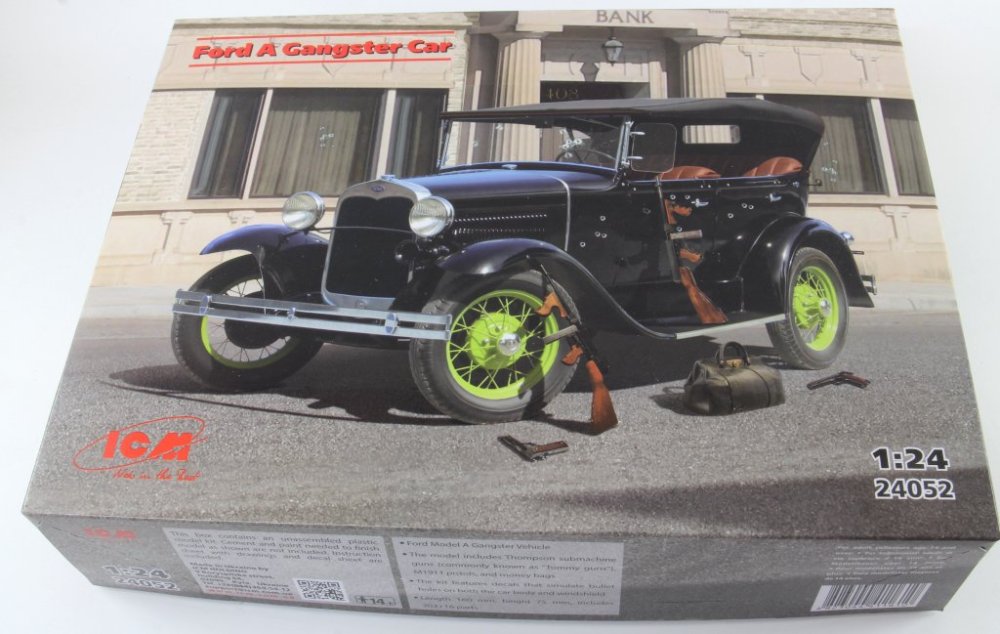


.jpg.78c82155570b3b2cb404bdada1df9716.jpg)
-
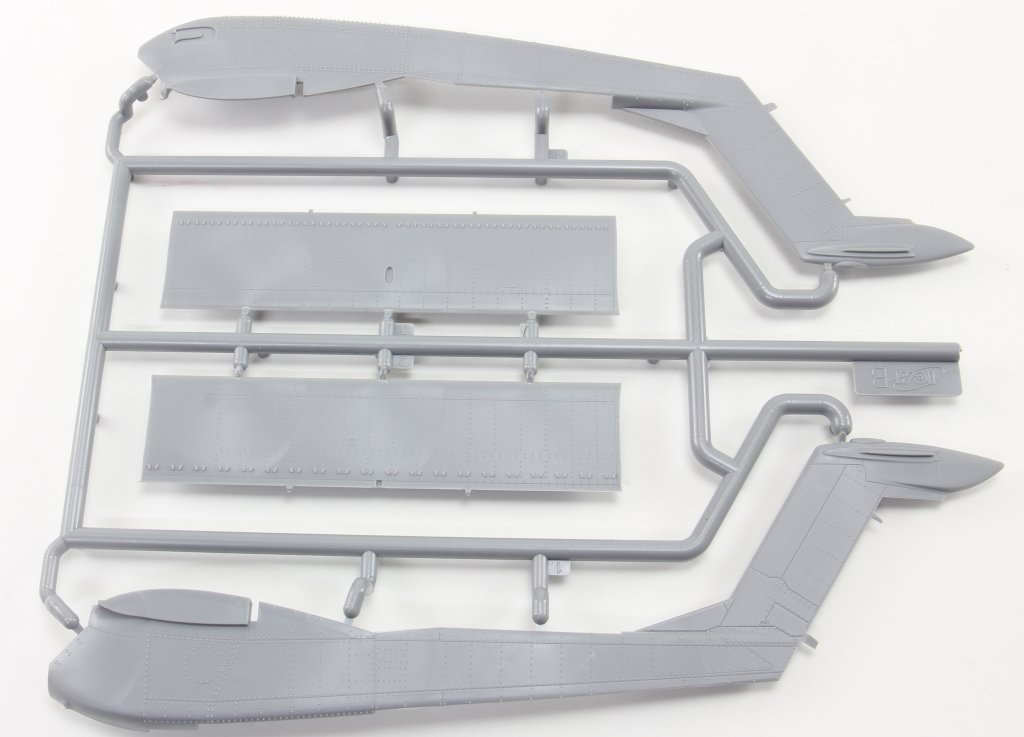
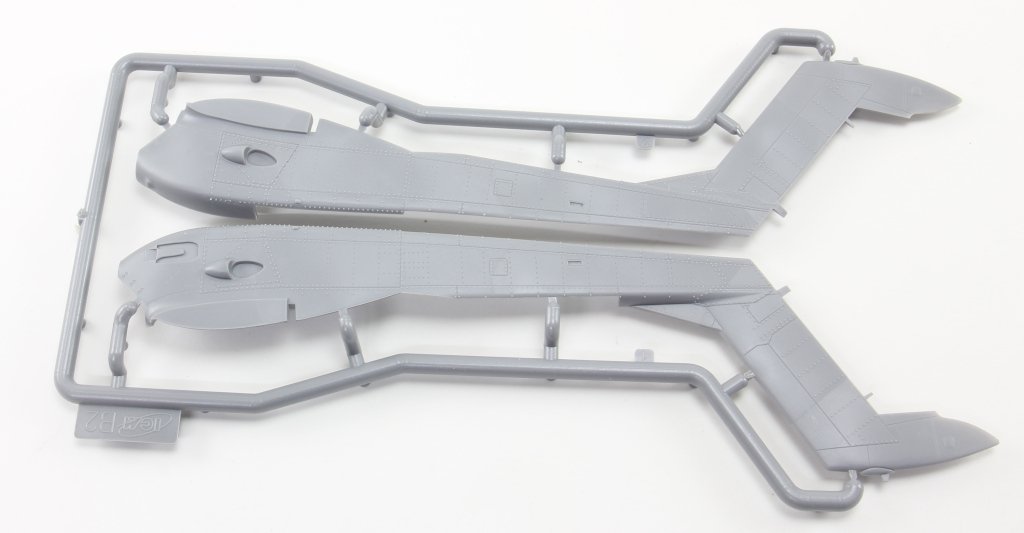
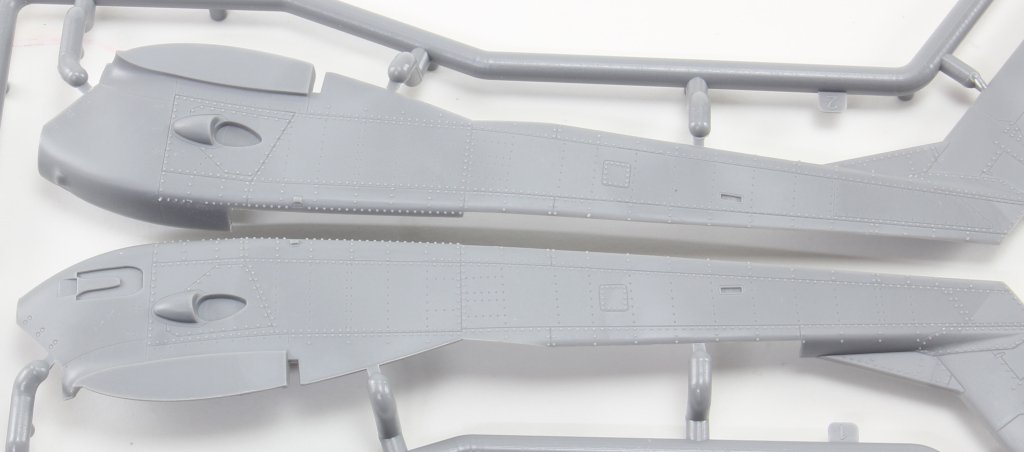
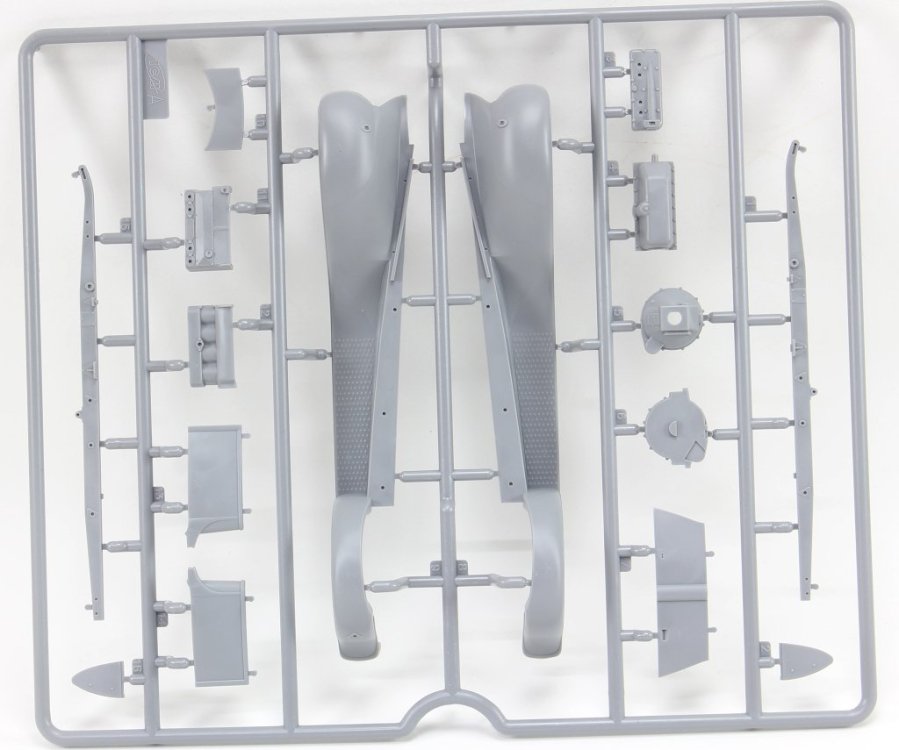
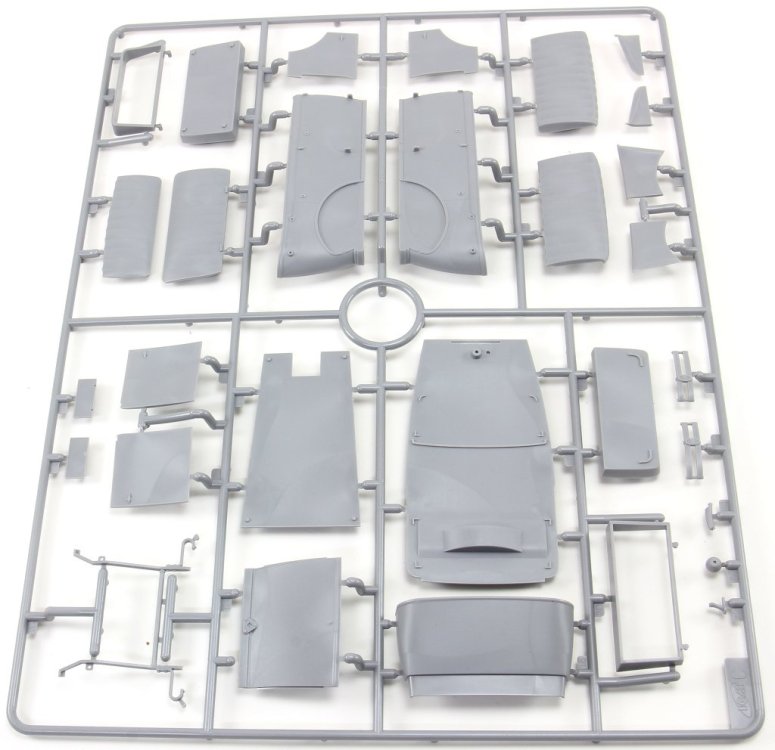
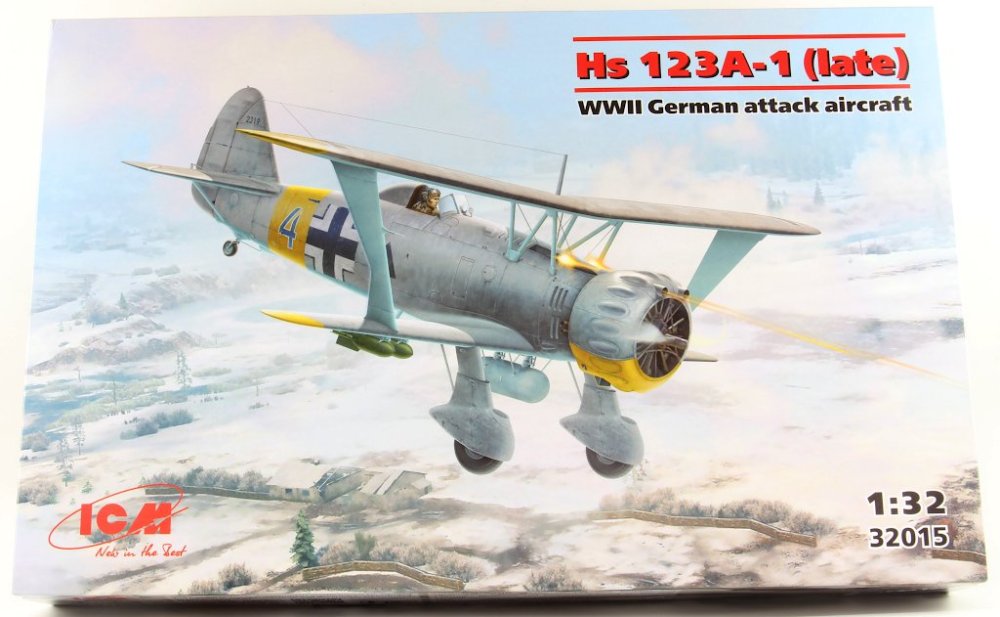
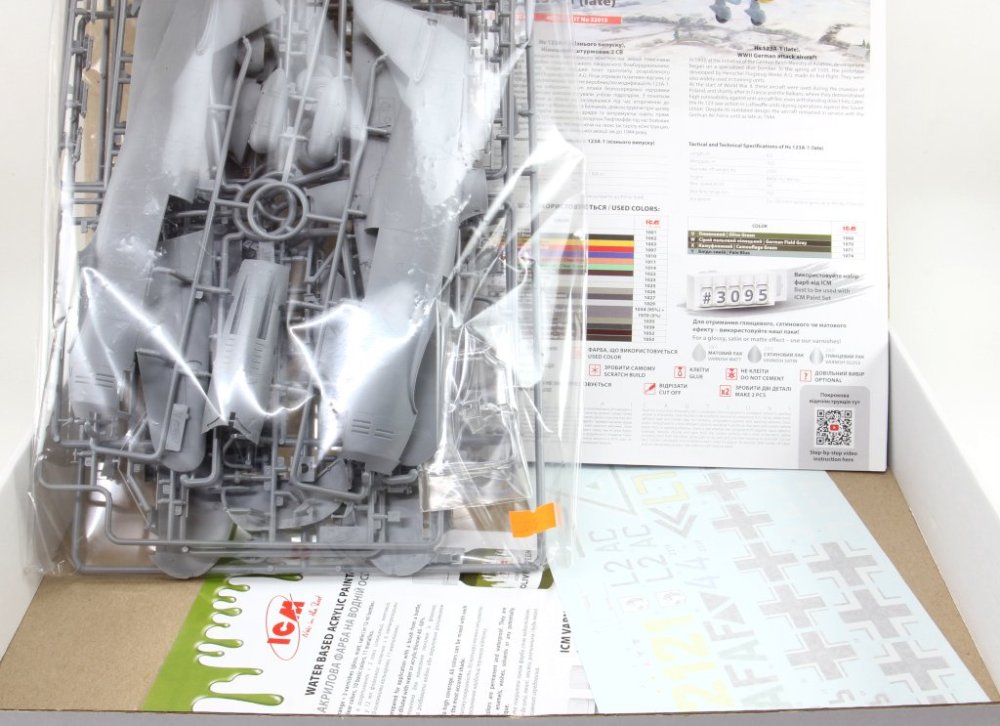
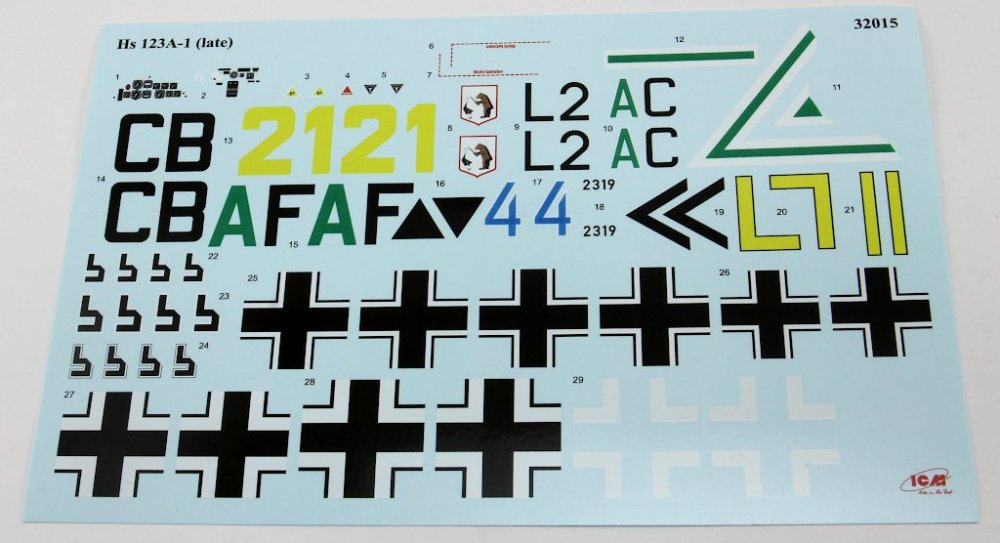
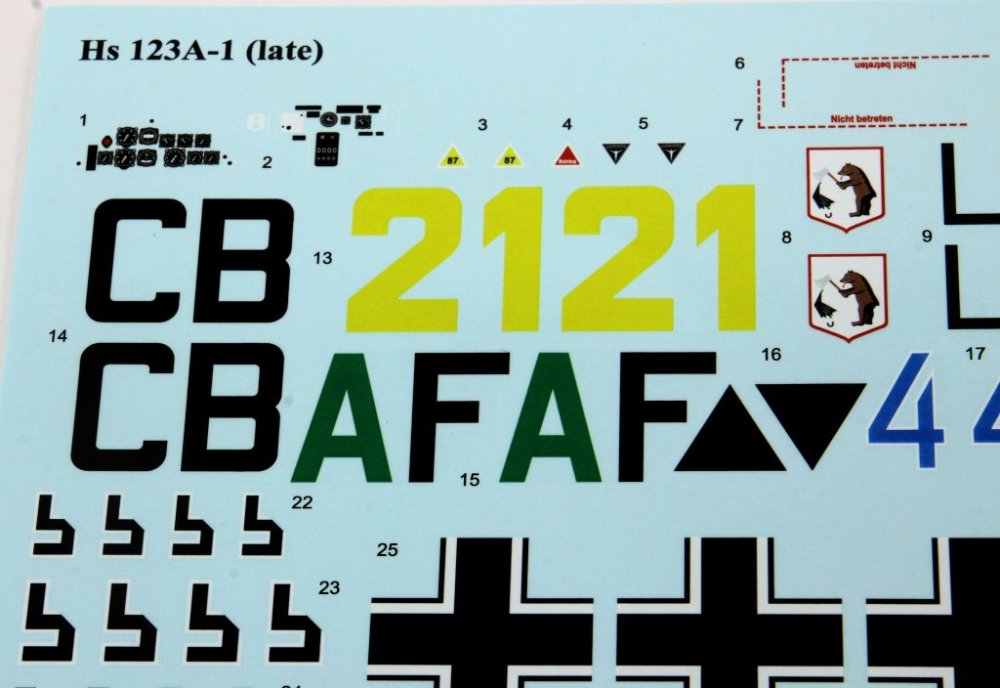
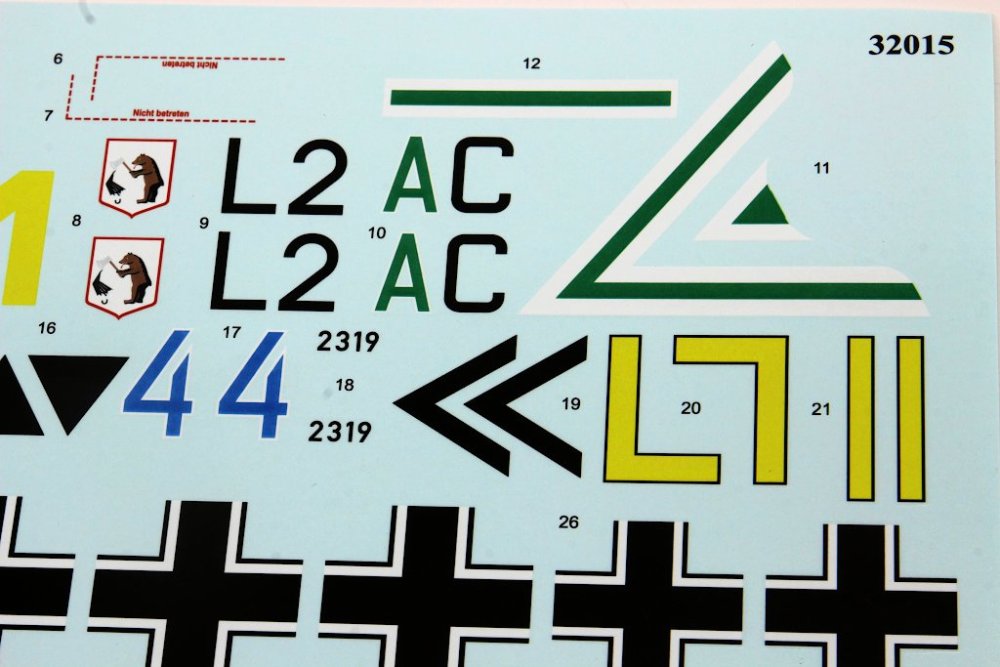
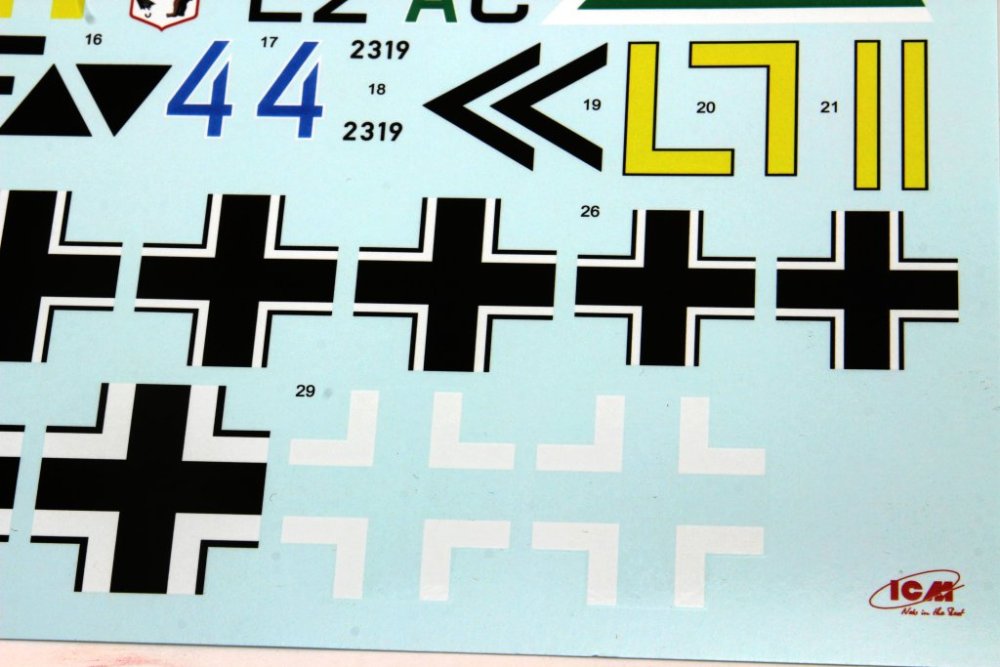
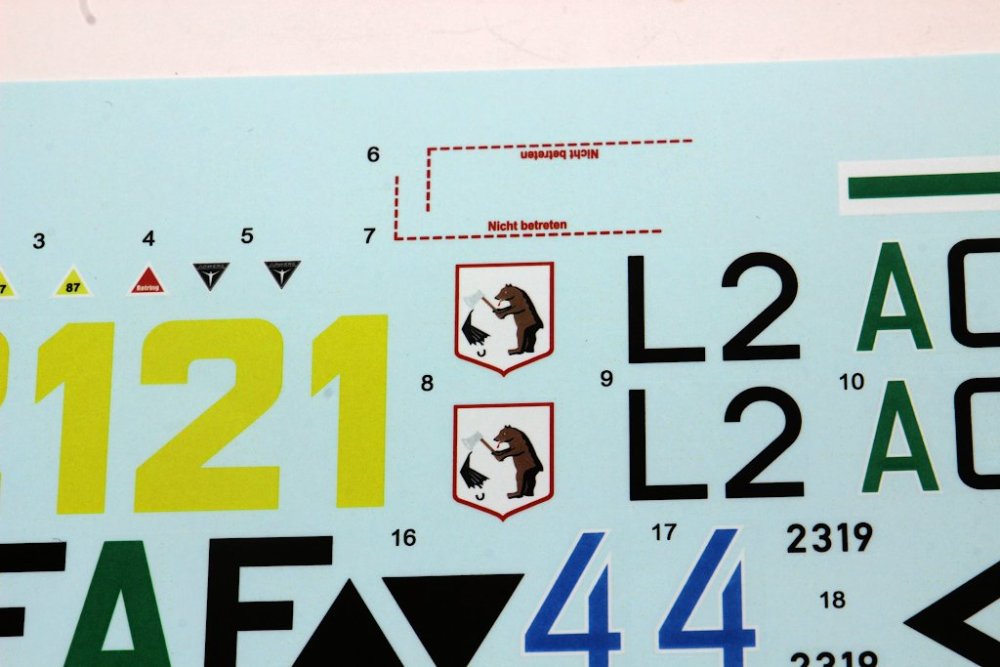
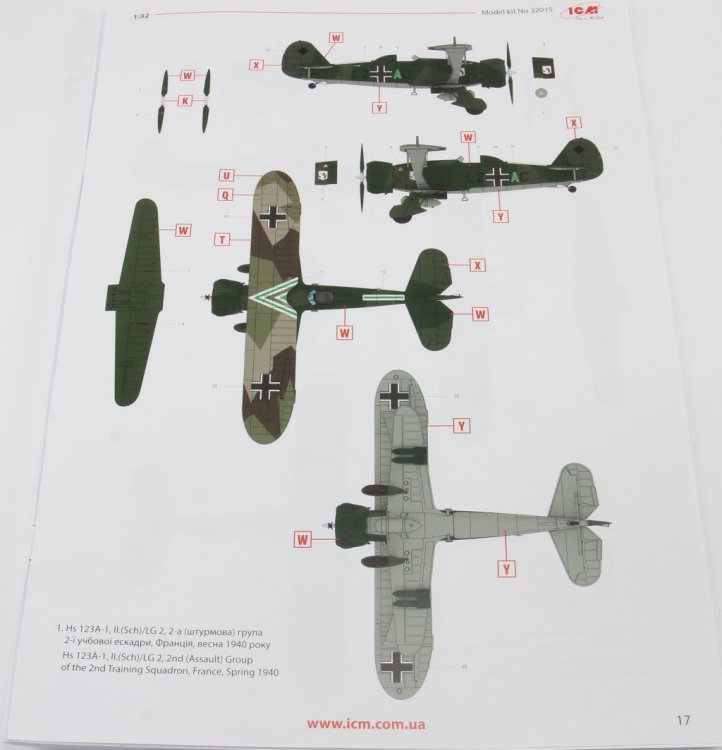
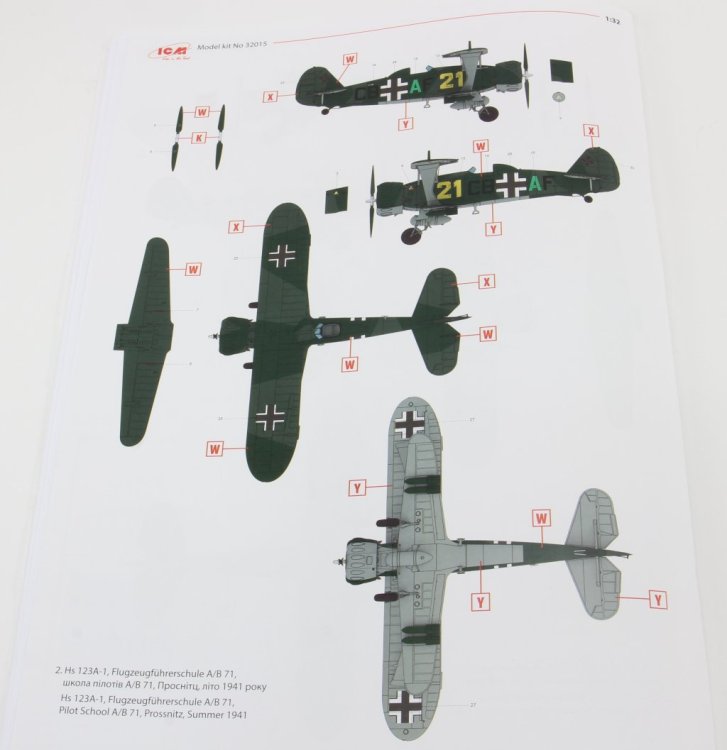
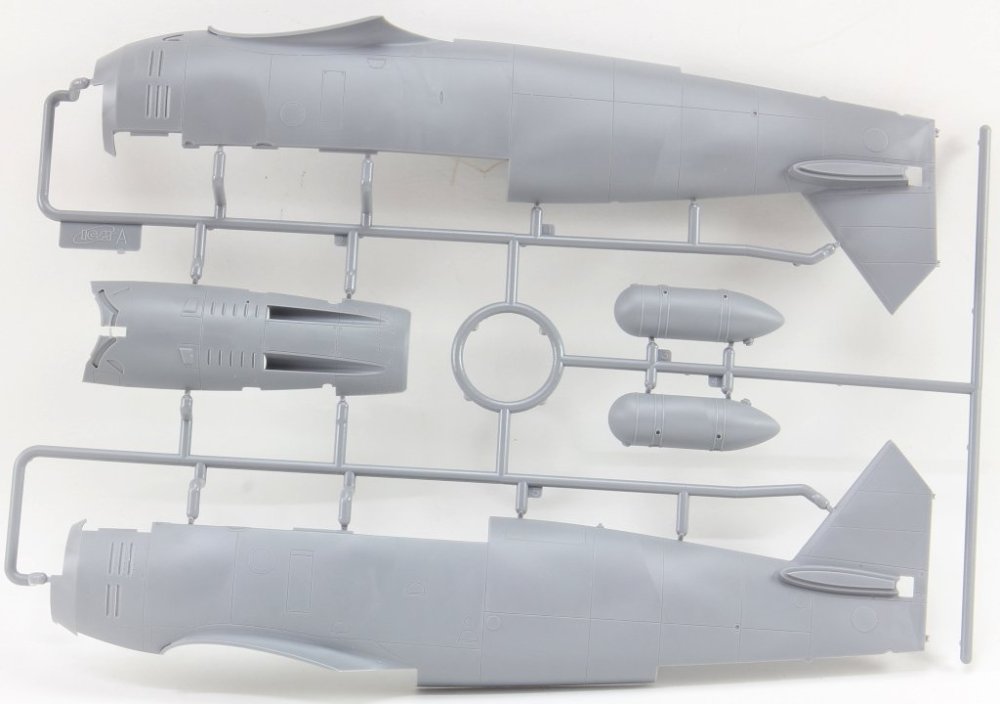
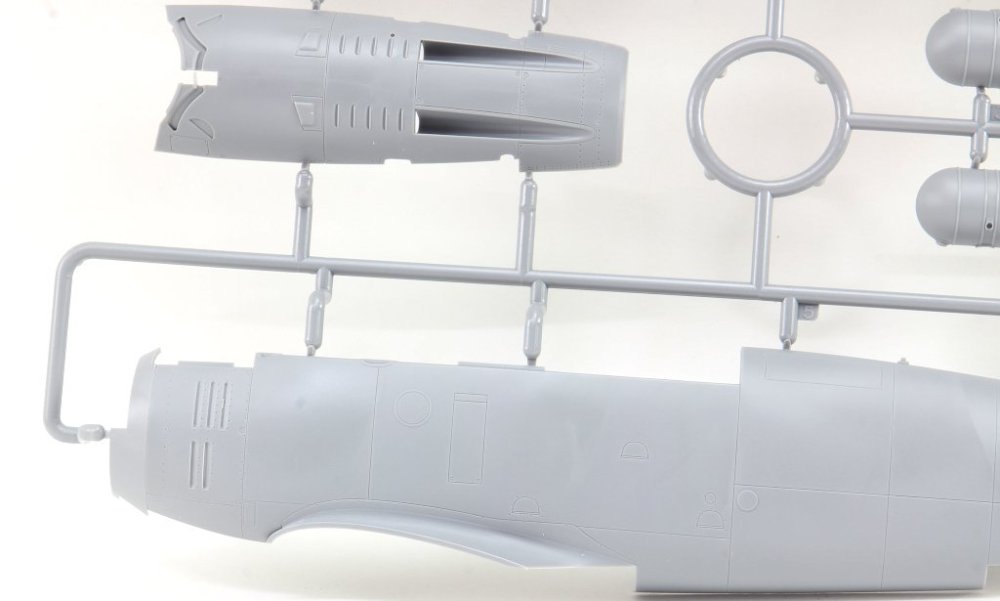
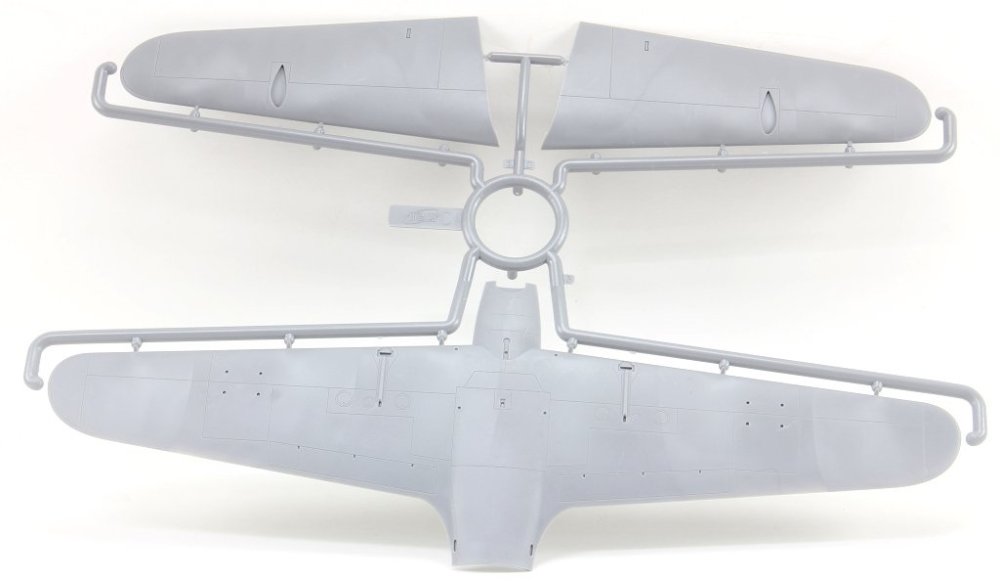
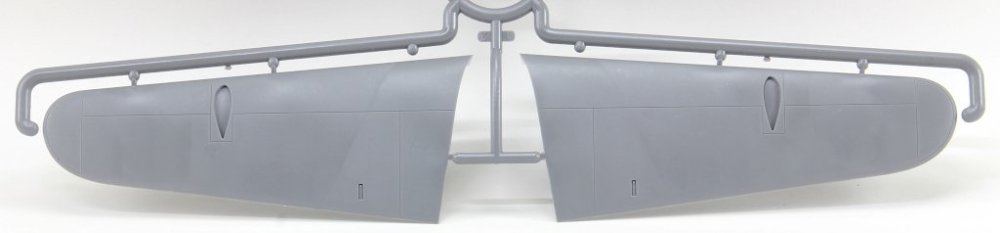
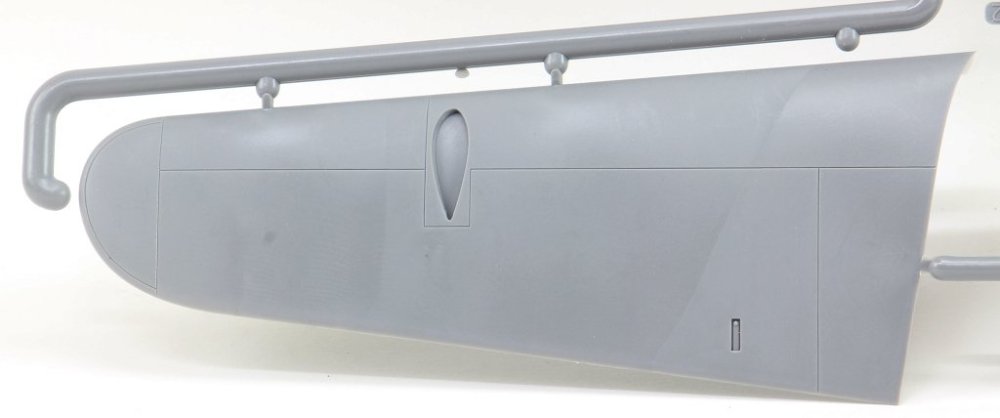
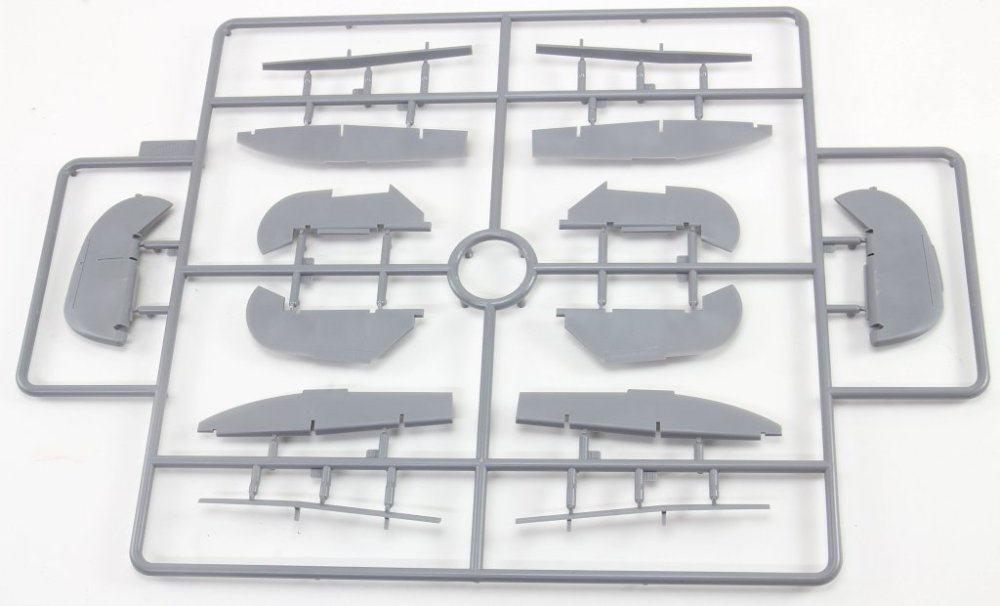
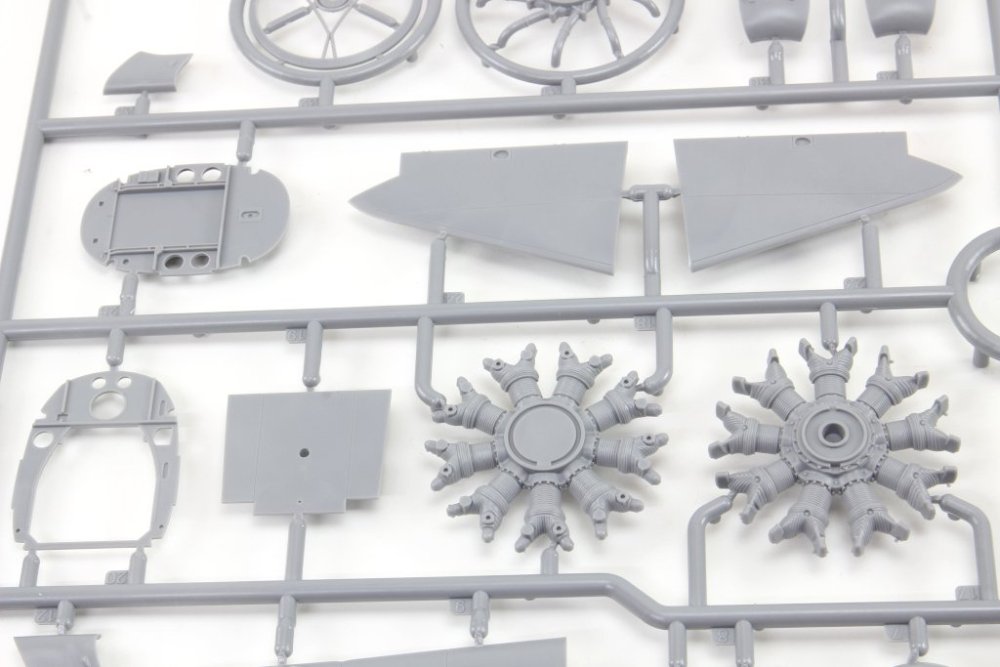
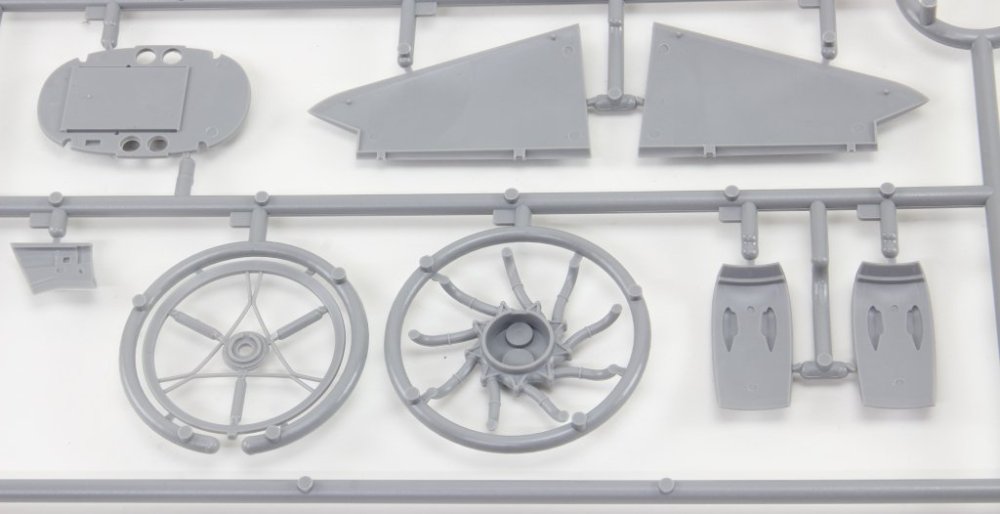
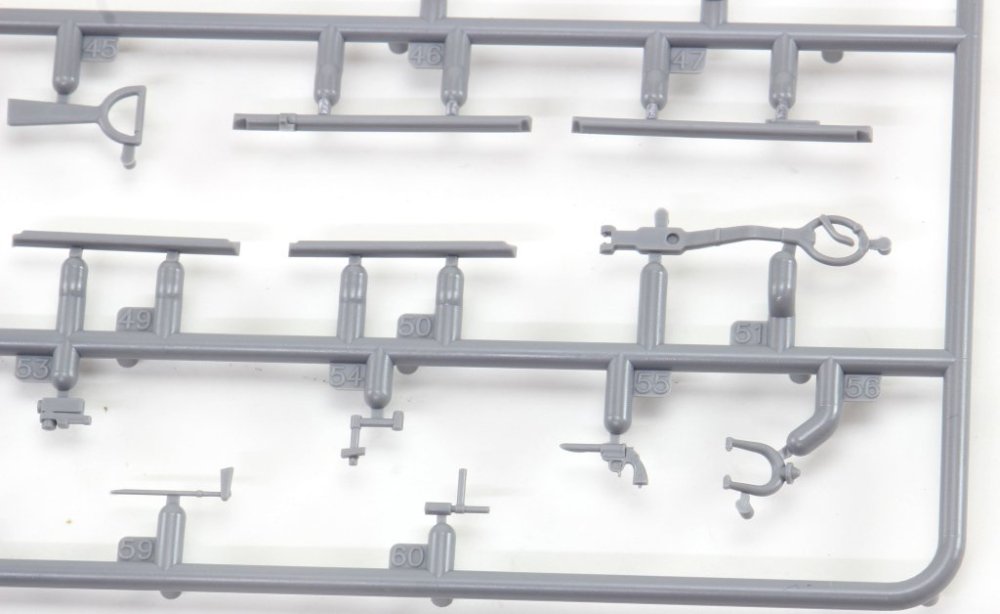
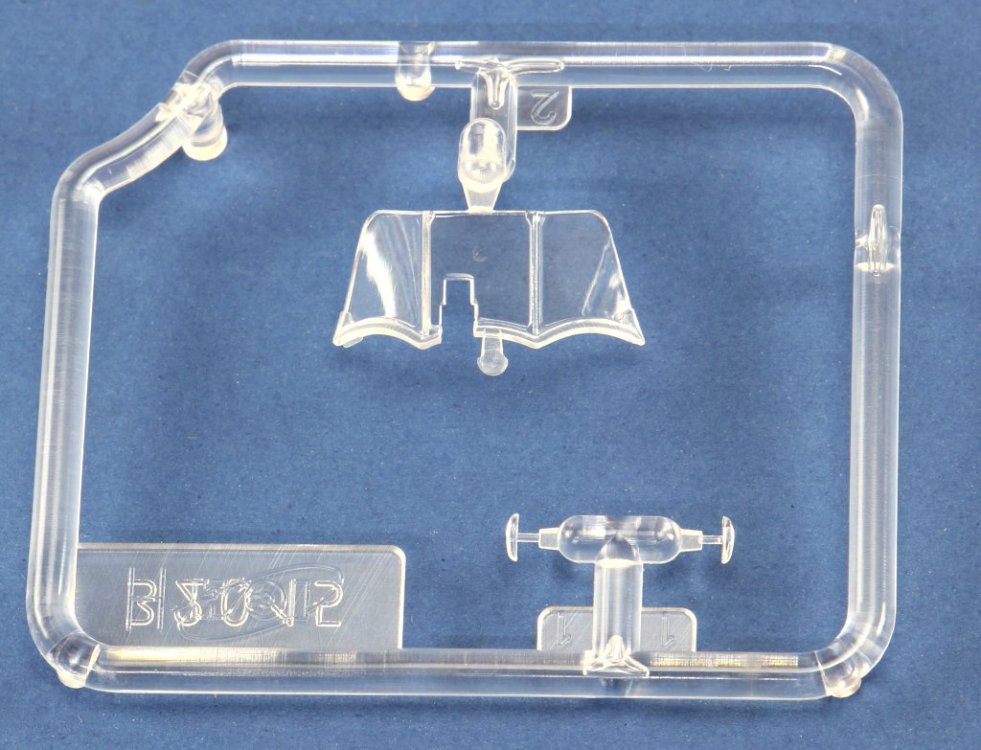
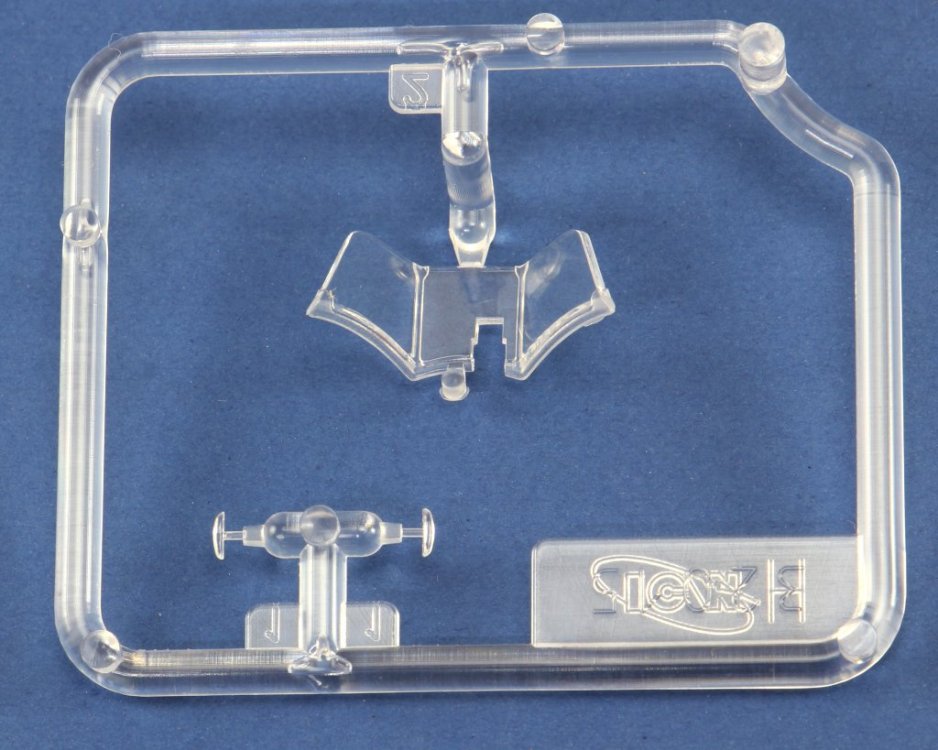
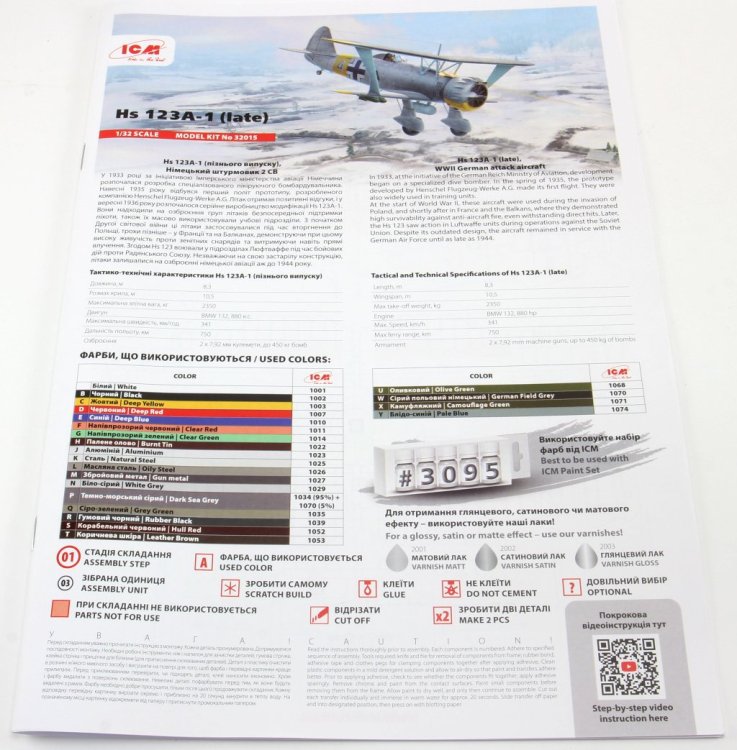
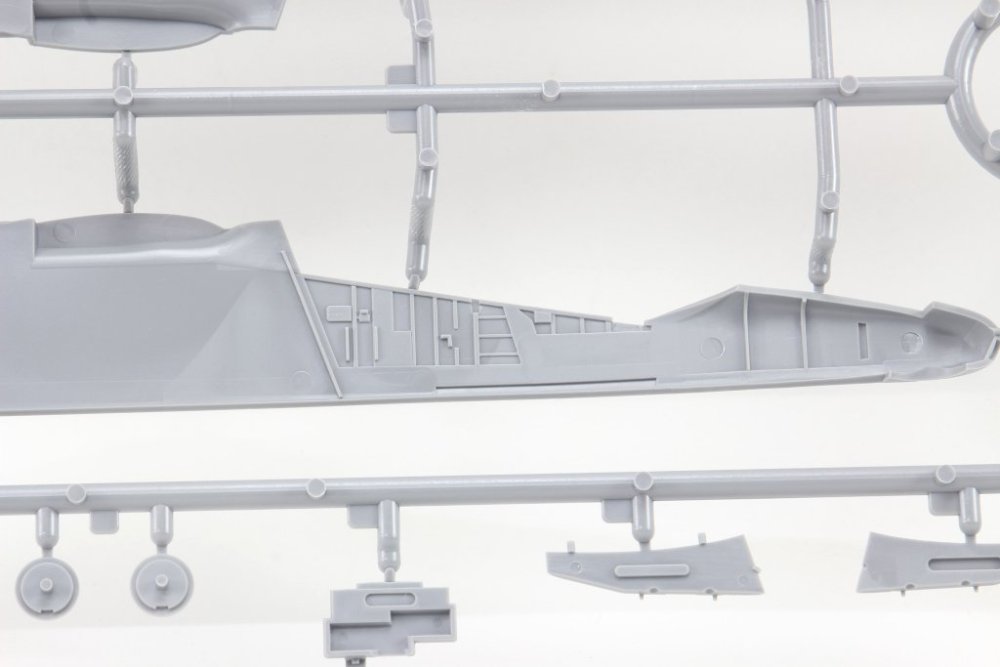
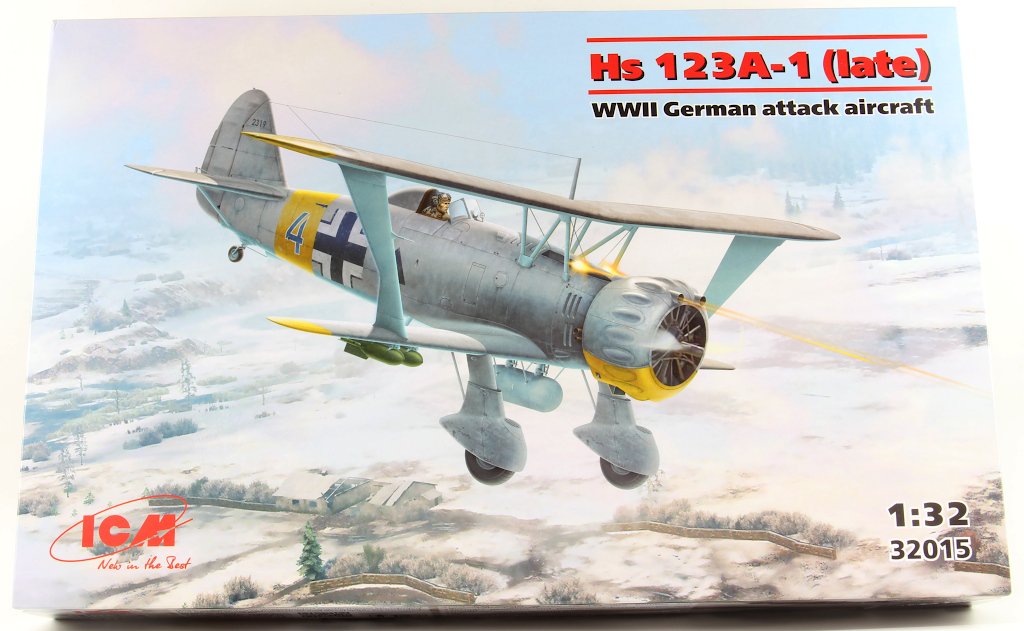
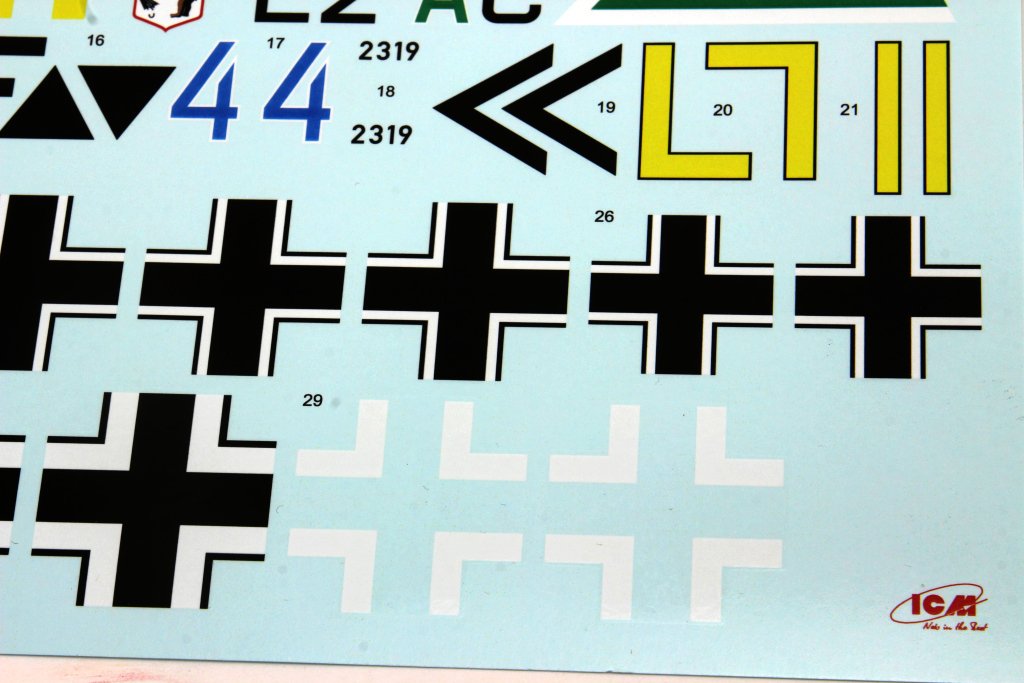
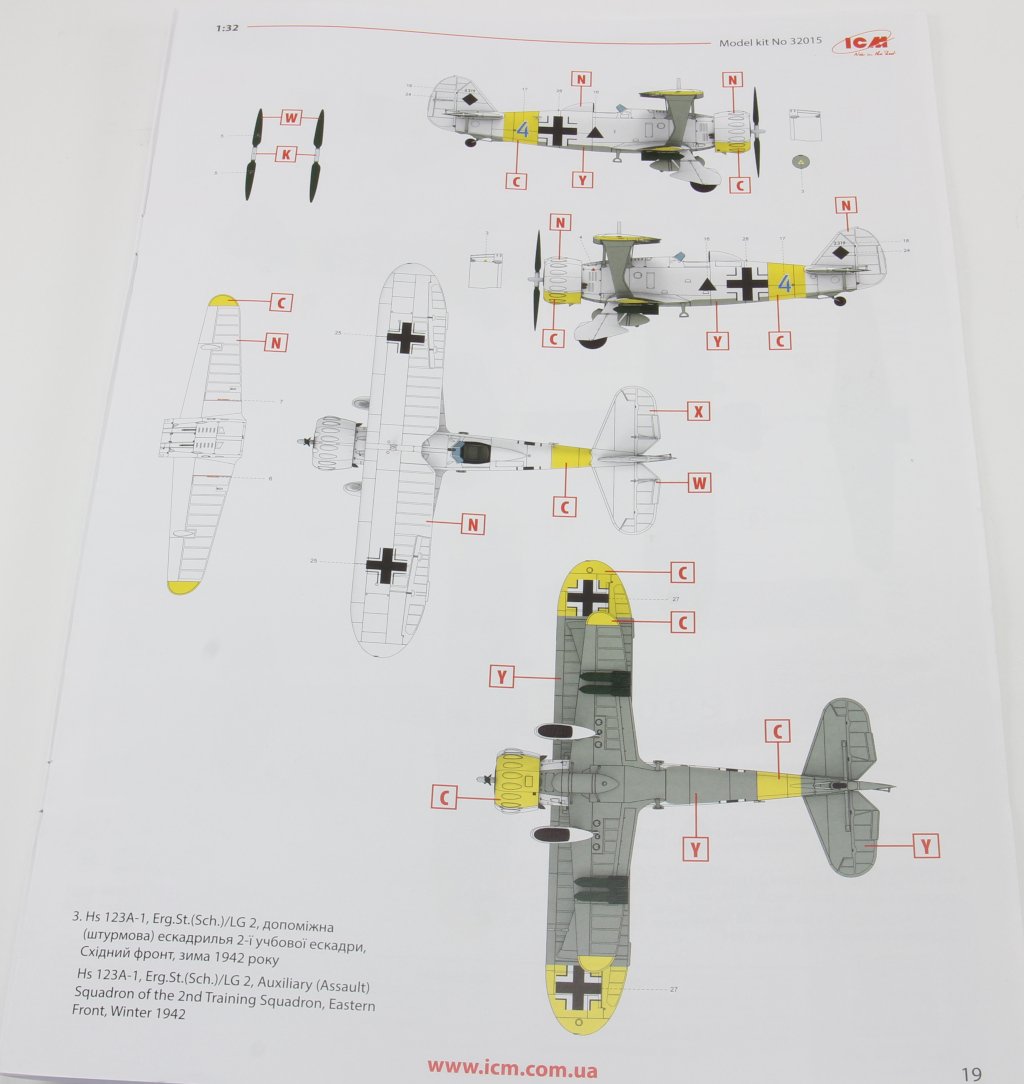
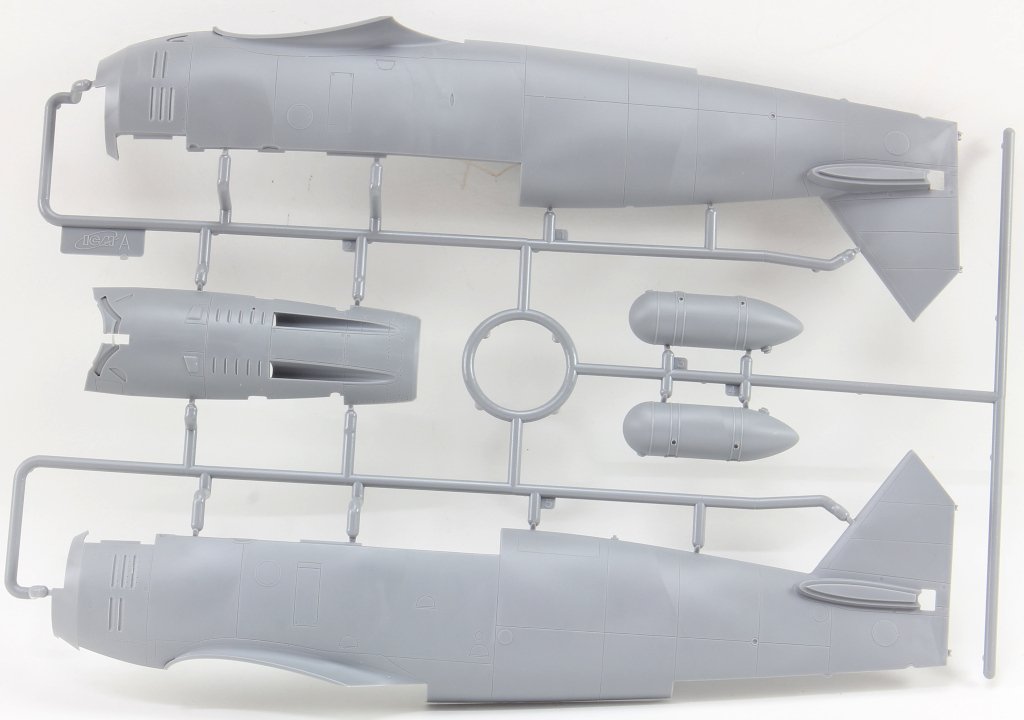
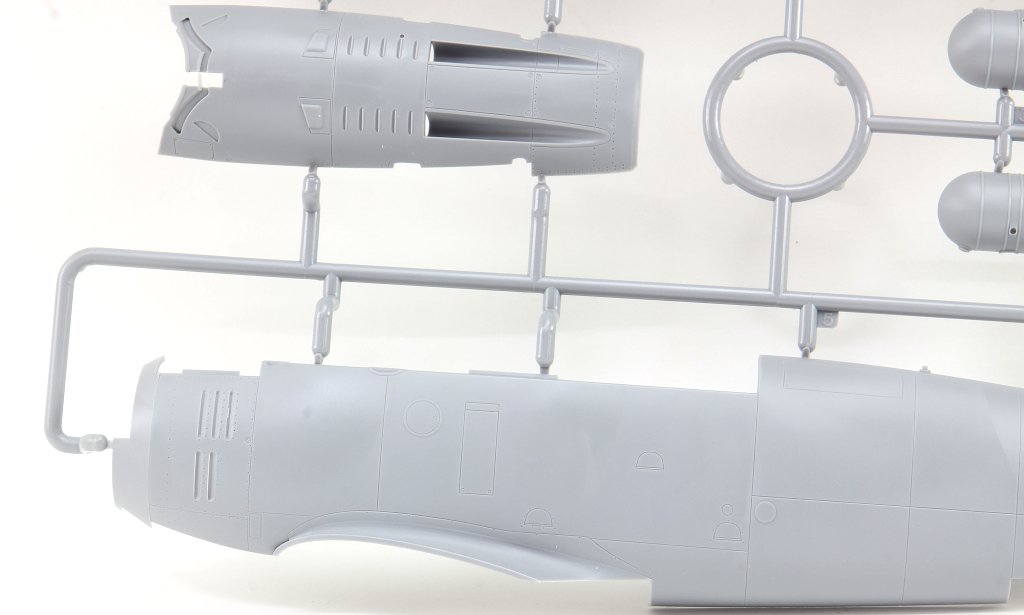
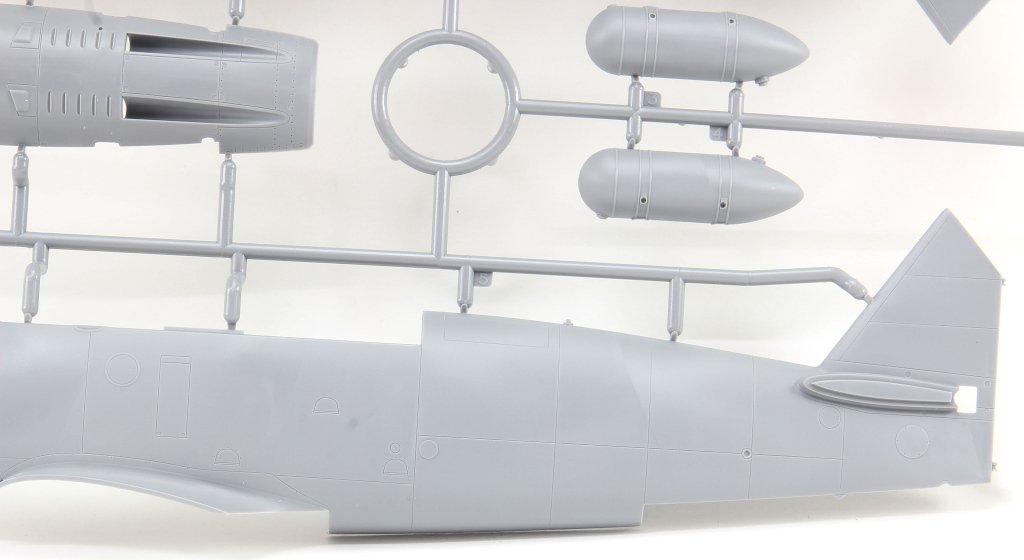
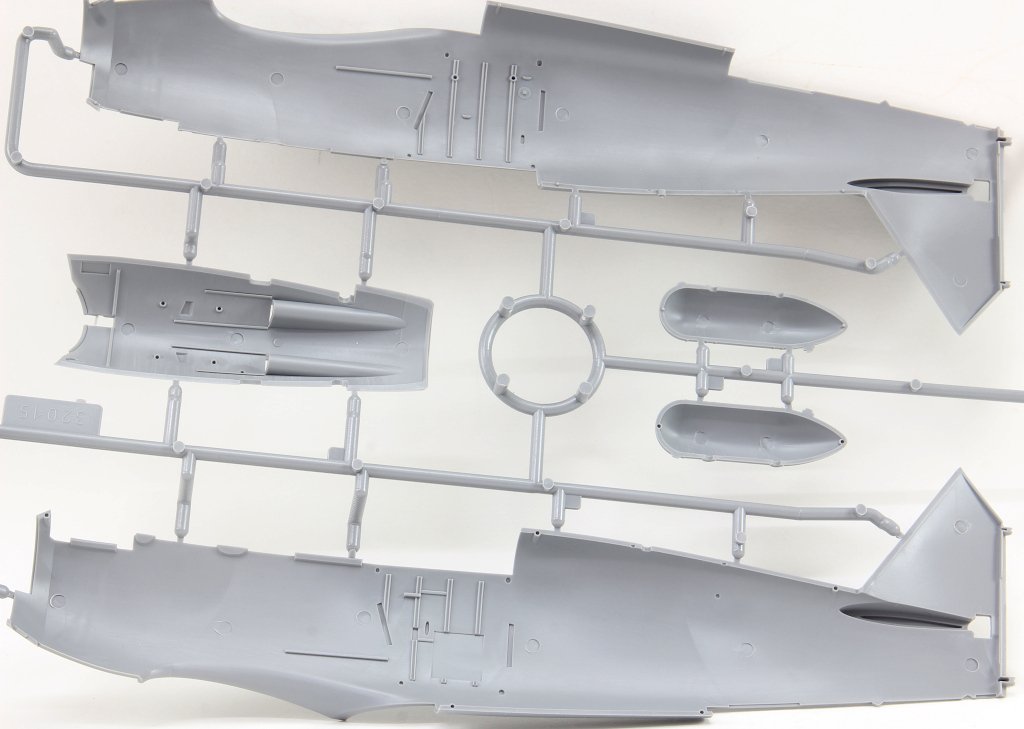
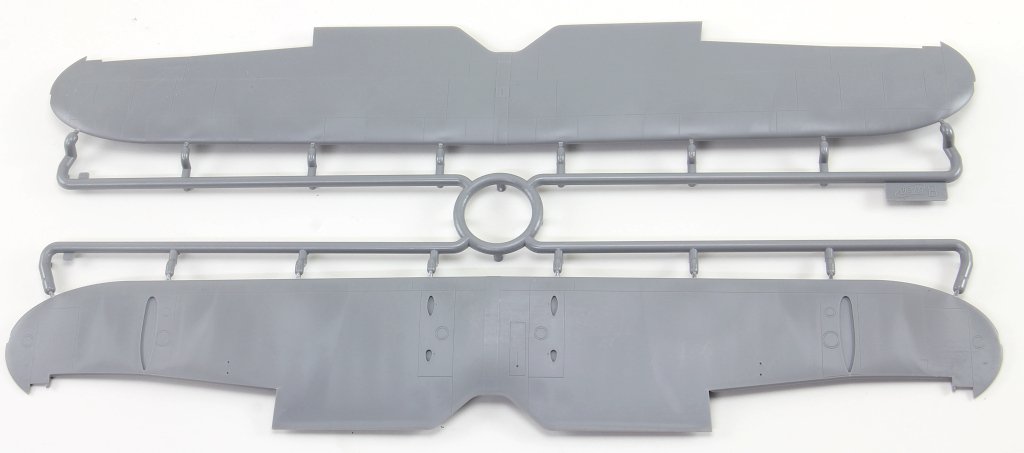
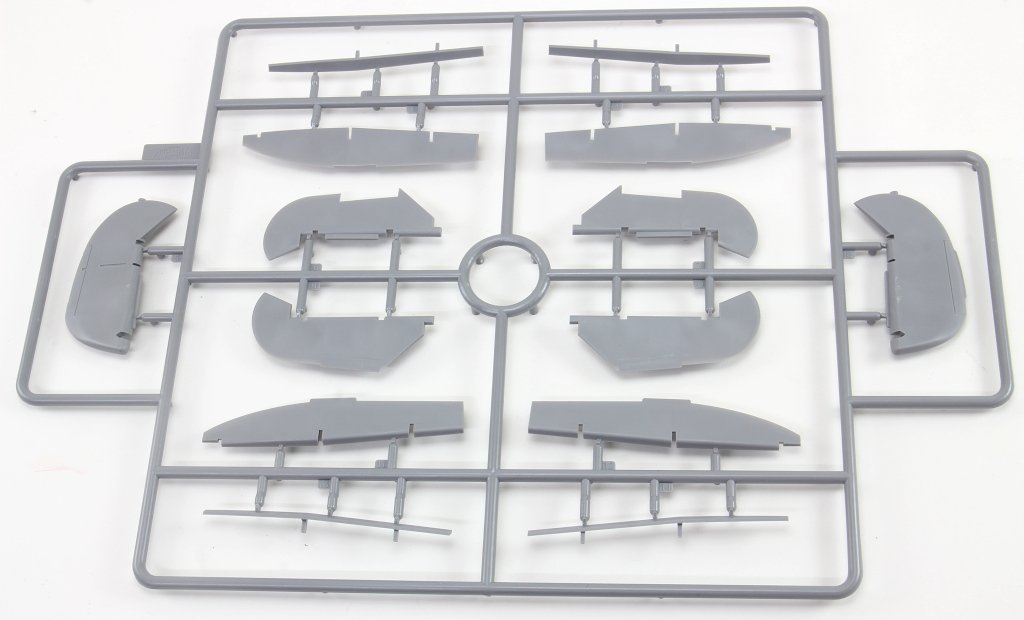
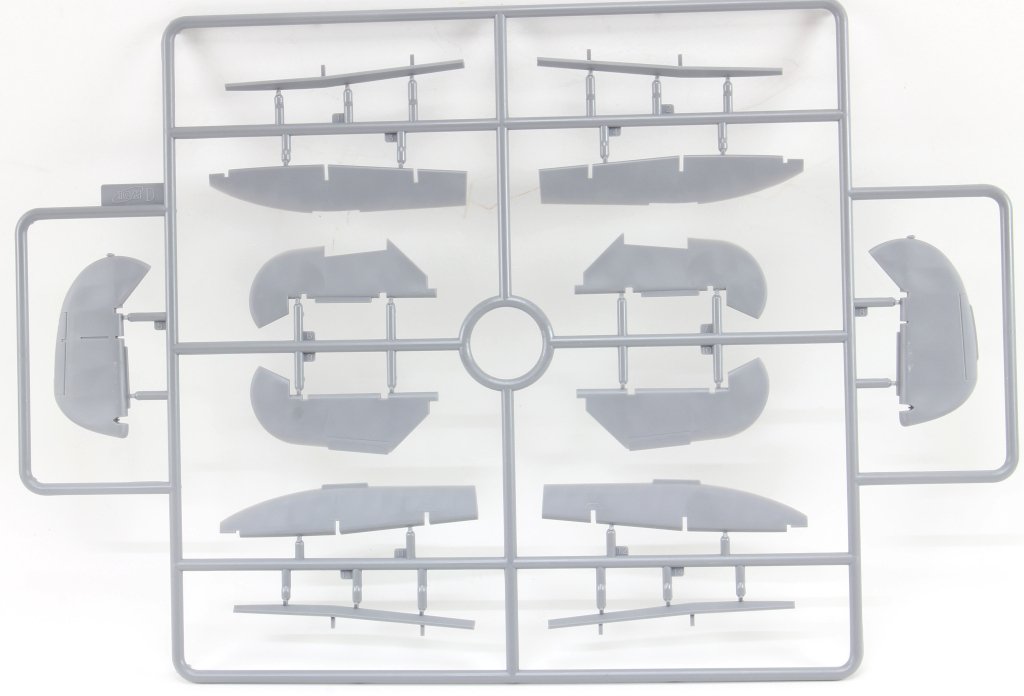
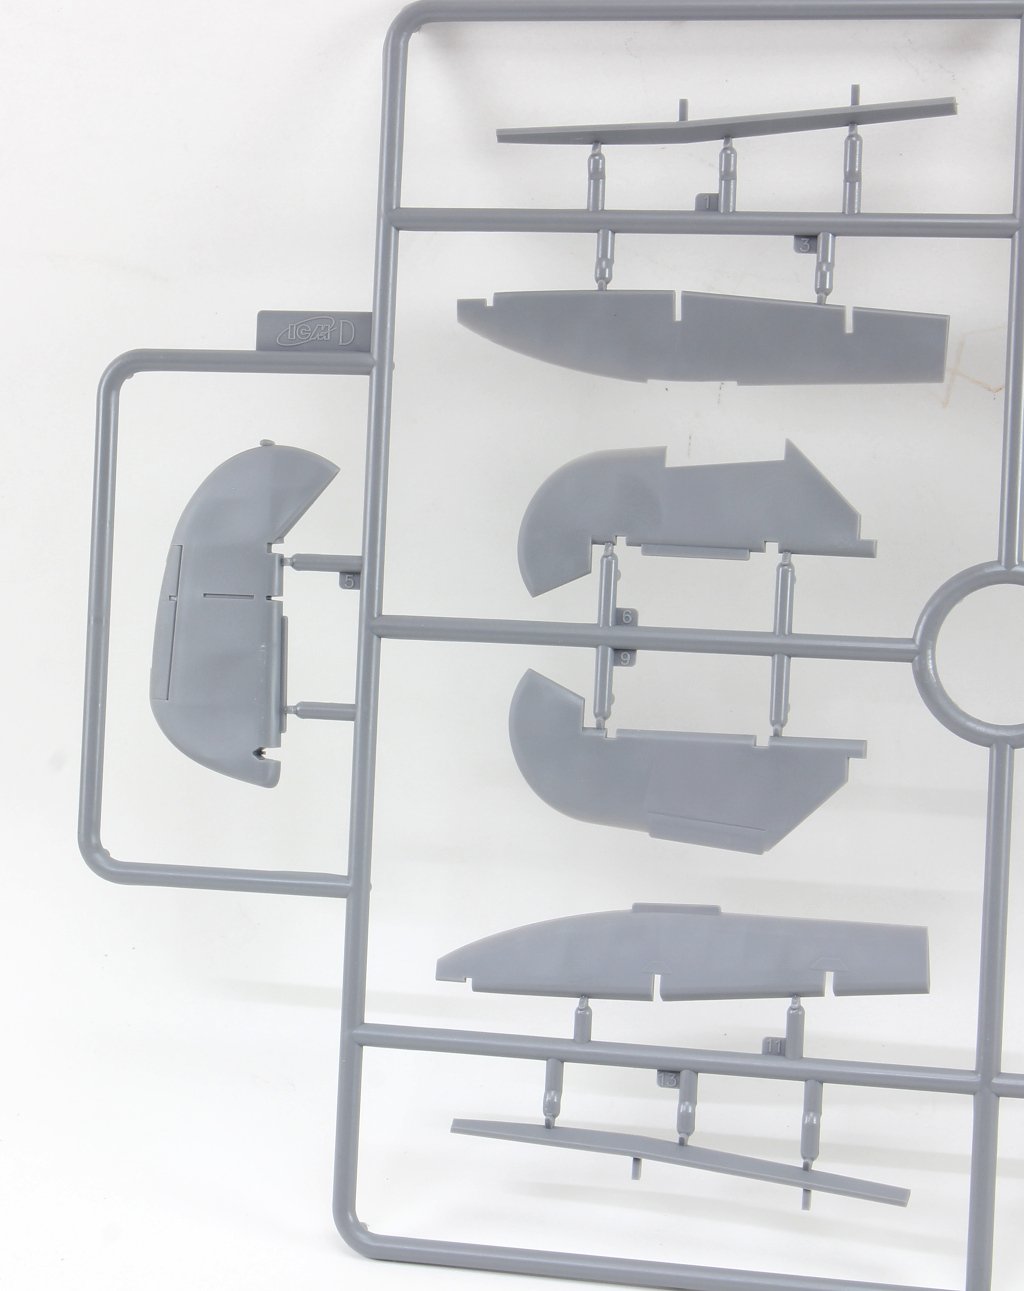
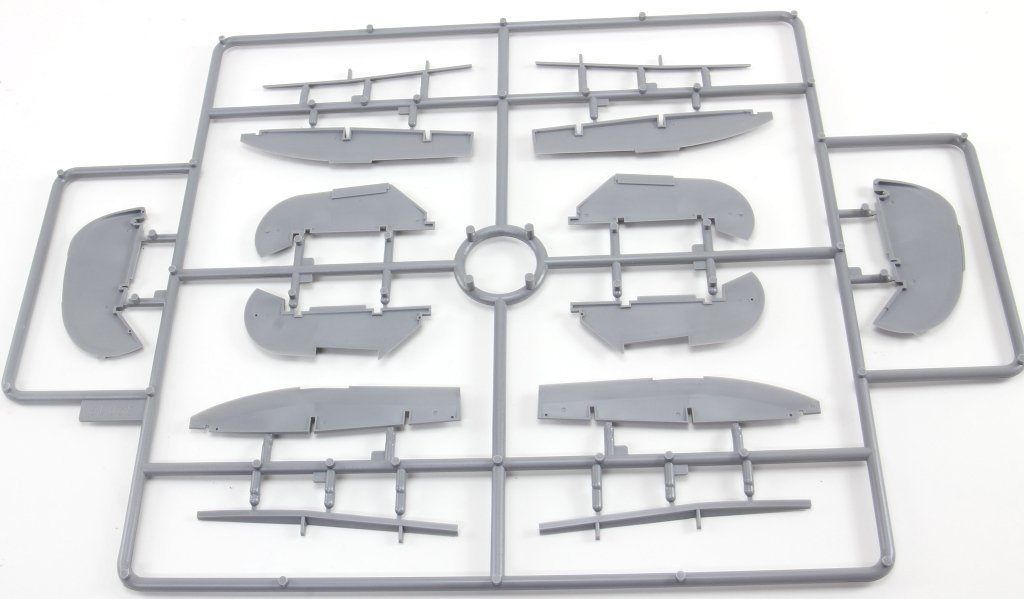
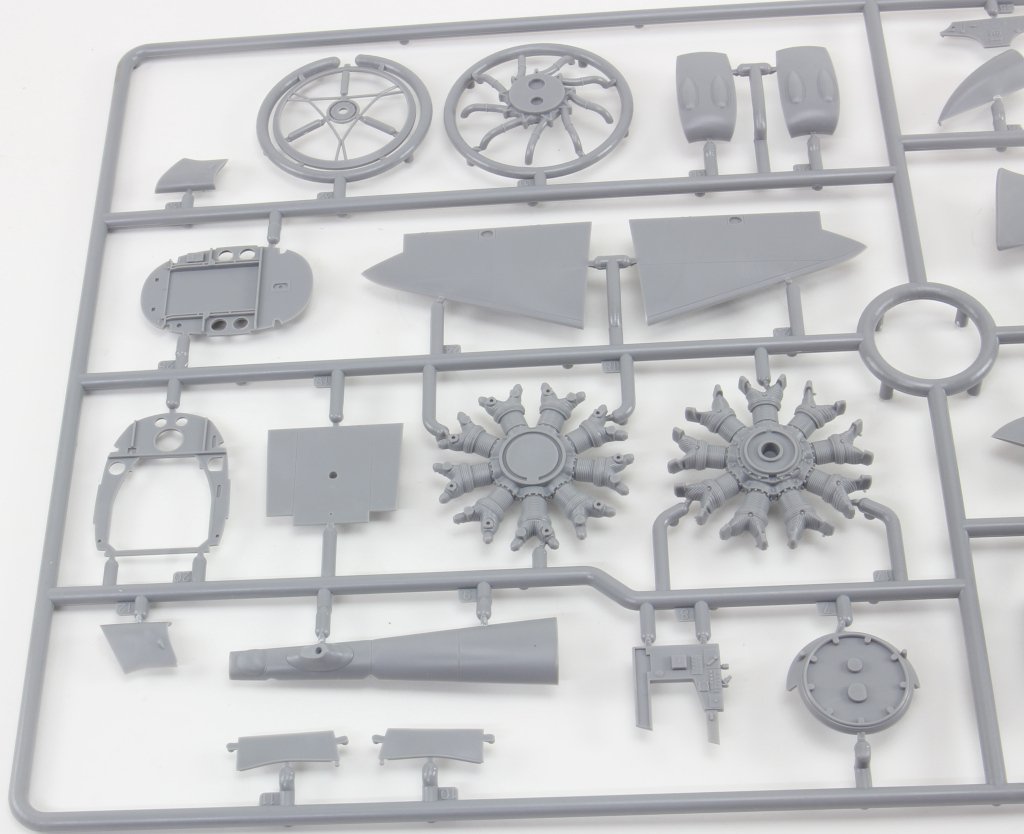
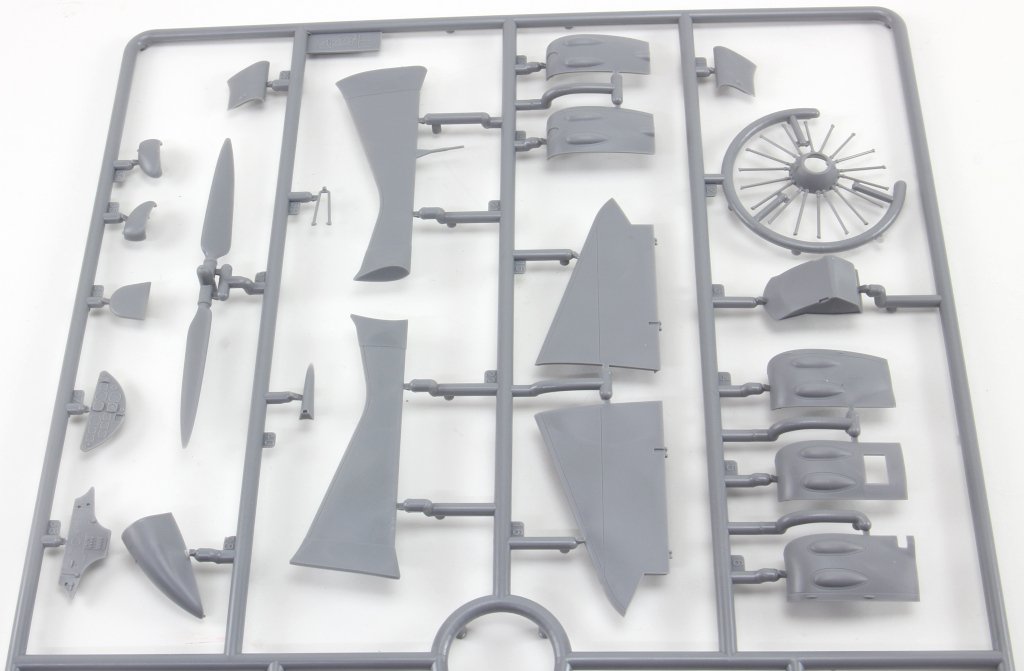
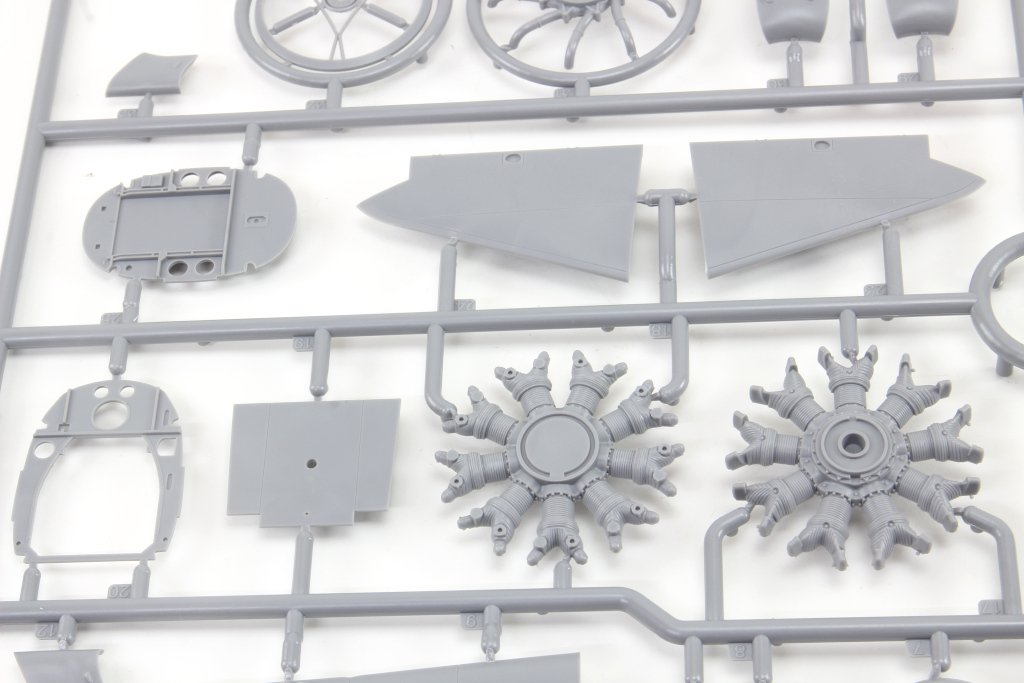
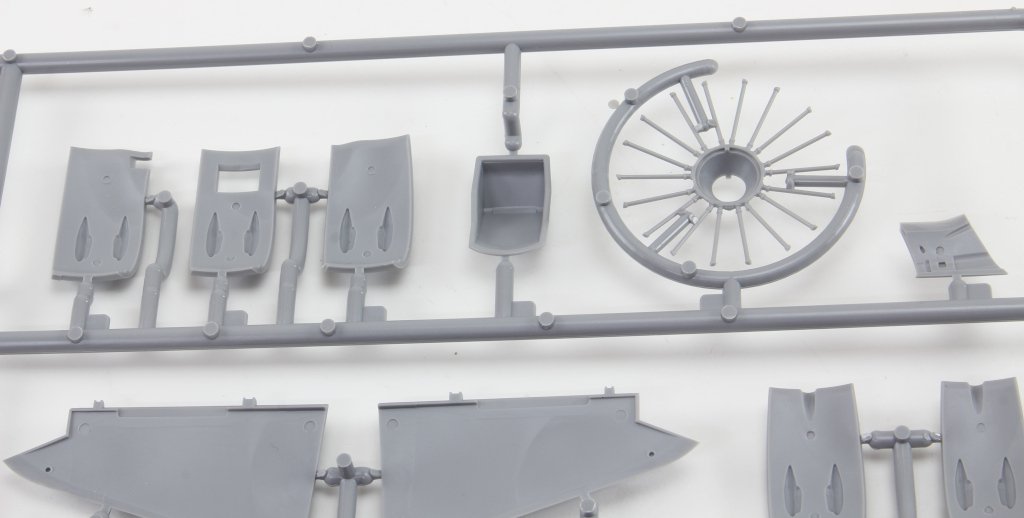
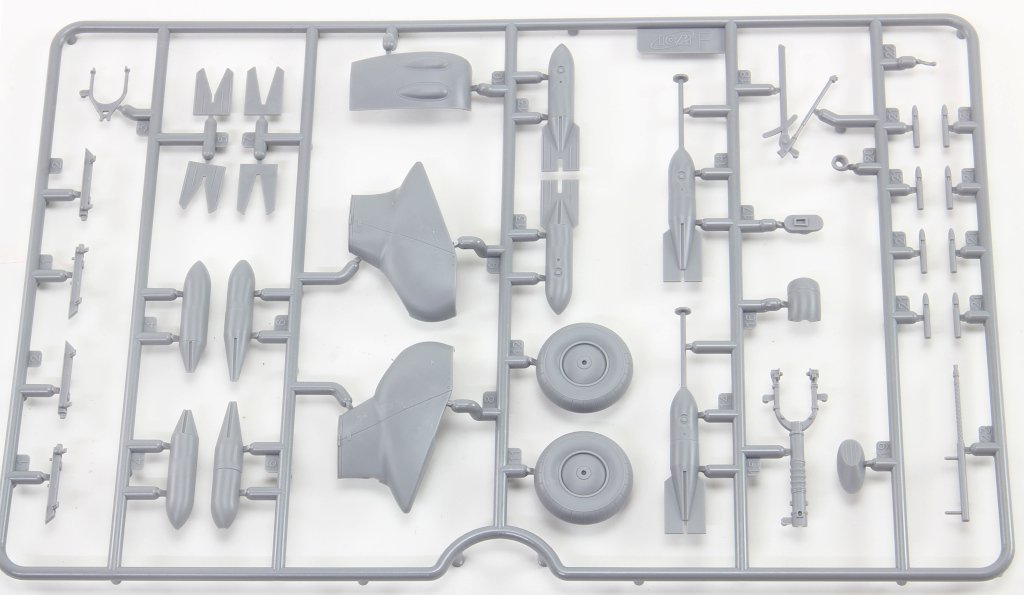
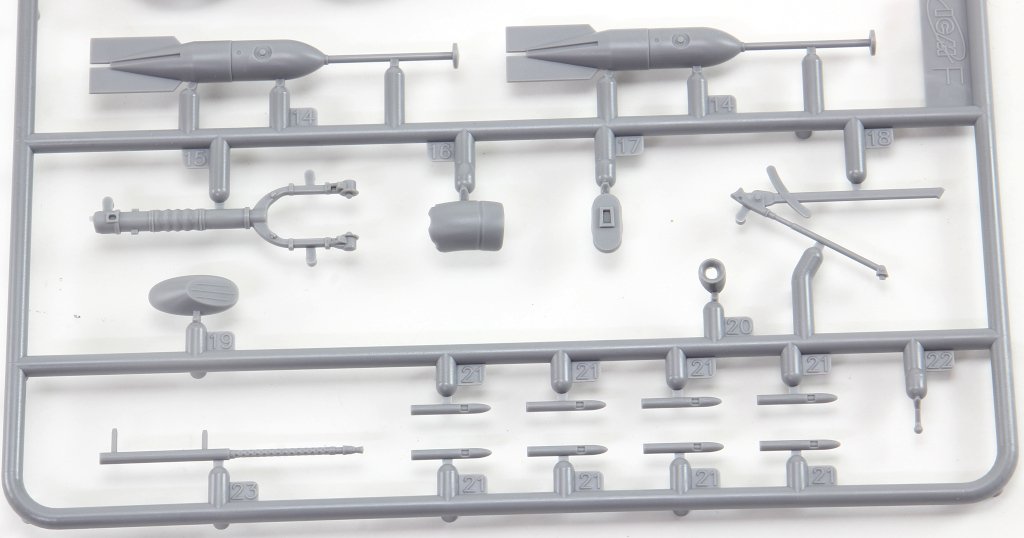
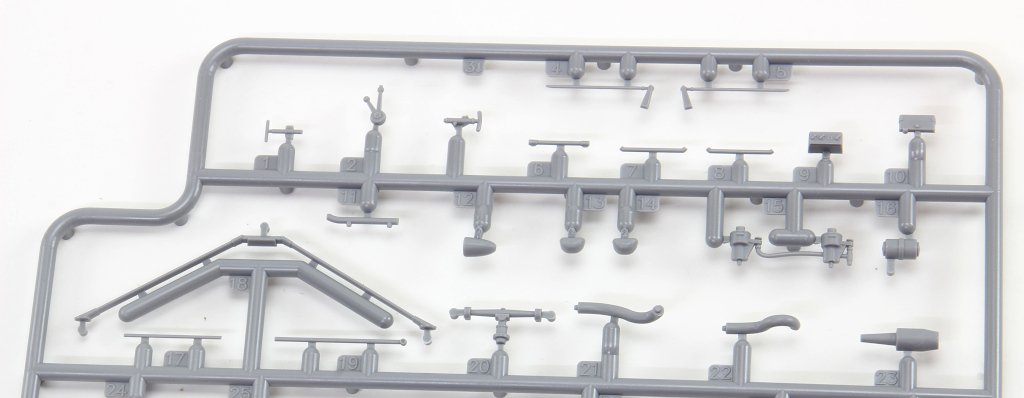
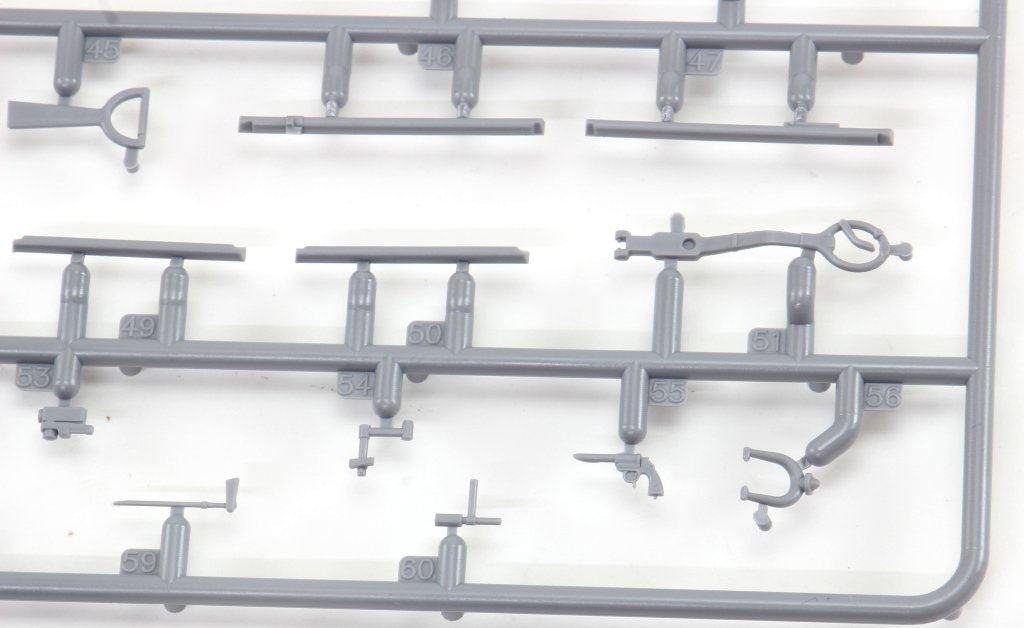
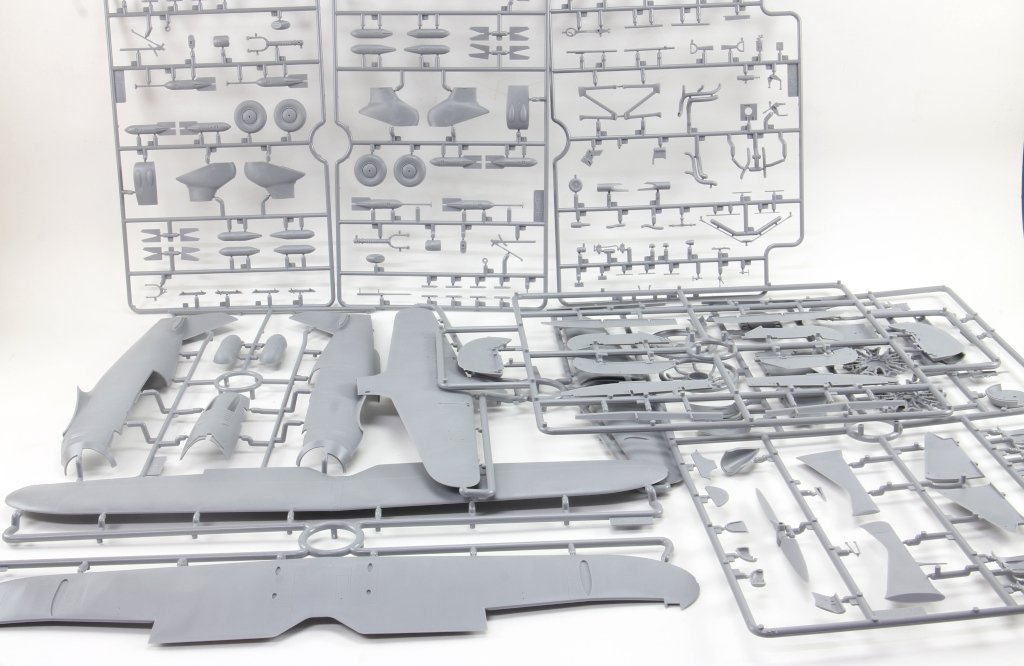
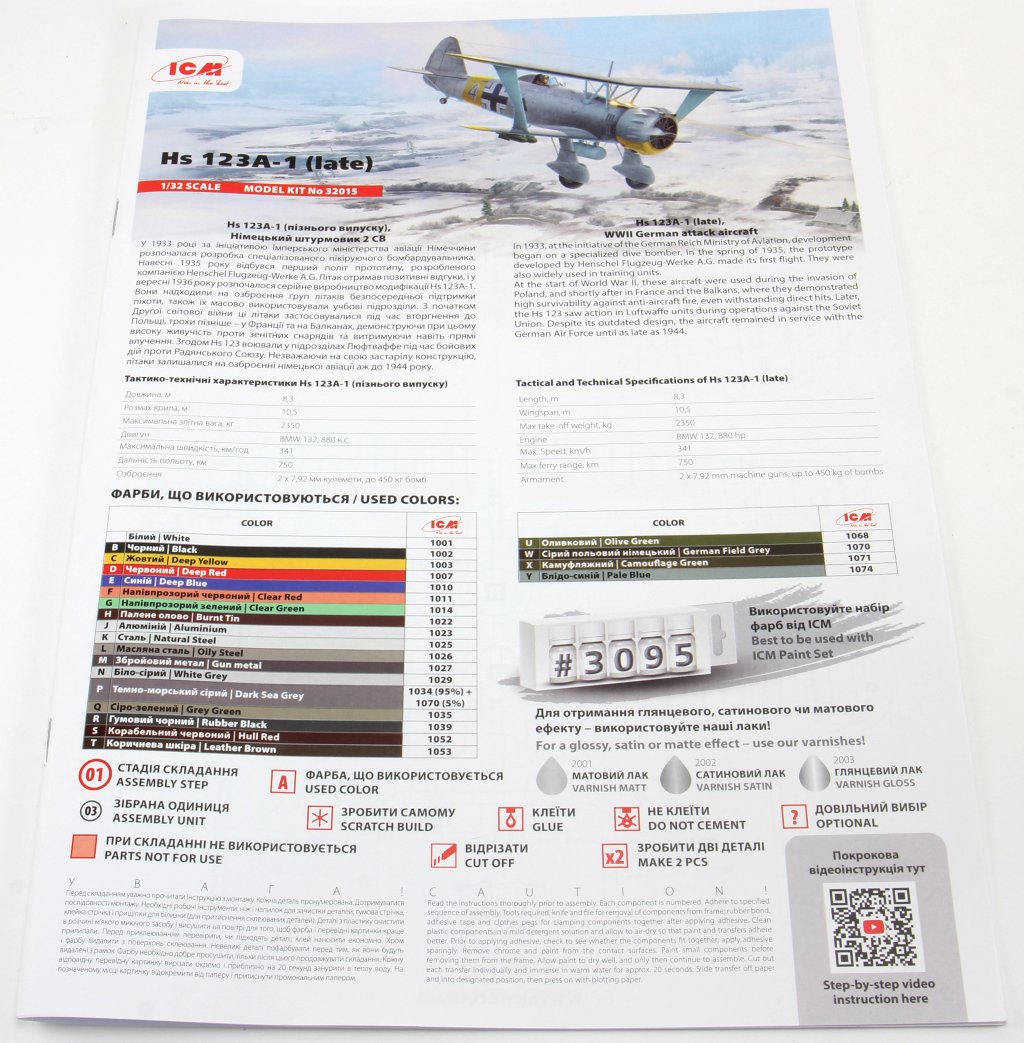
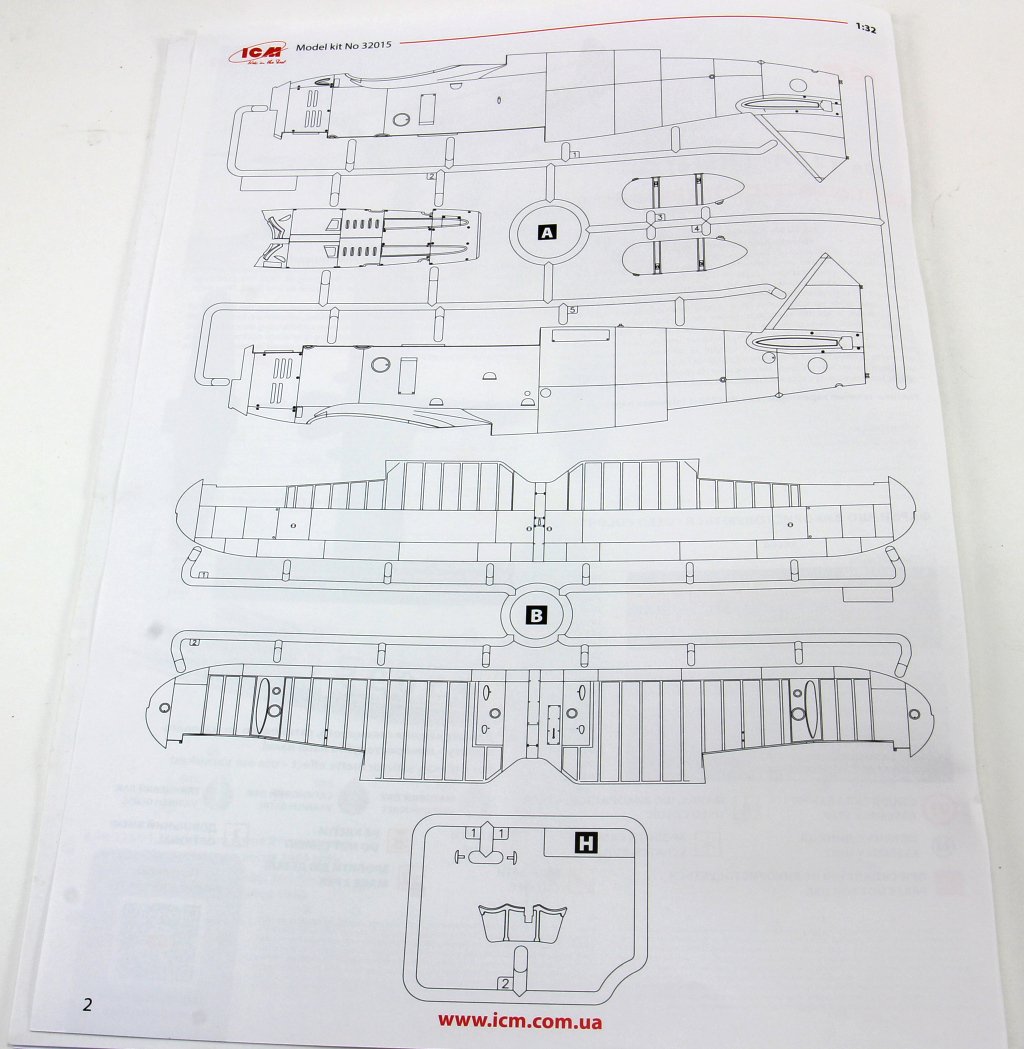
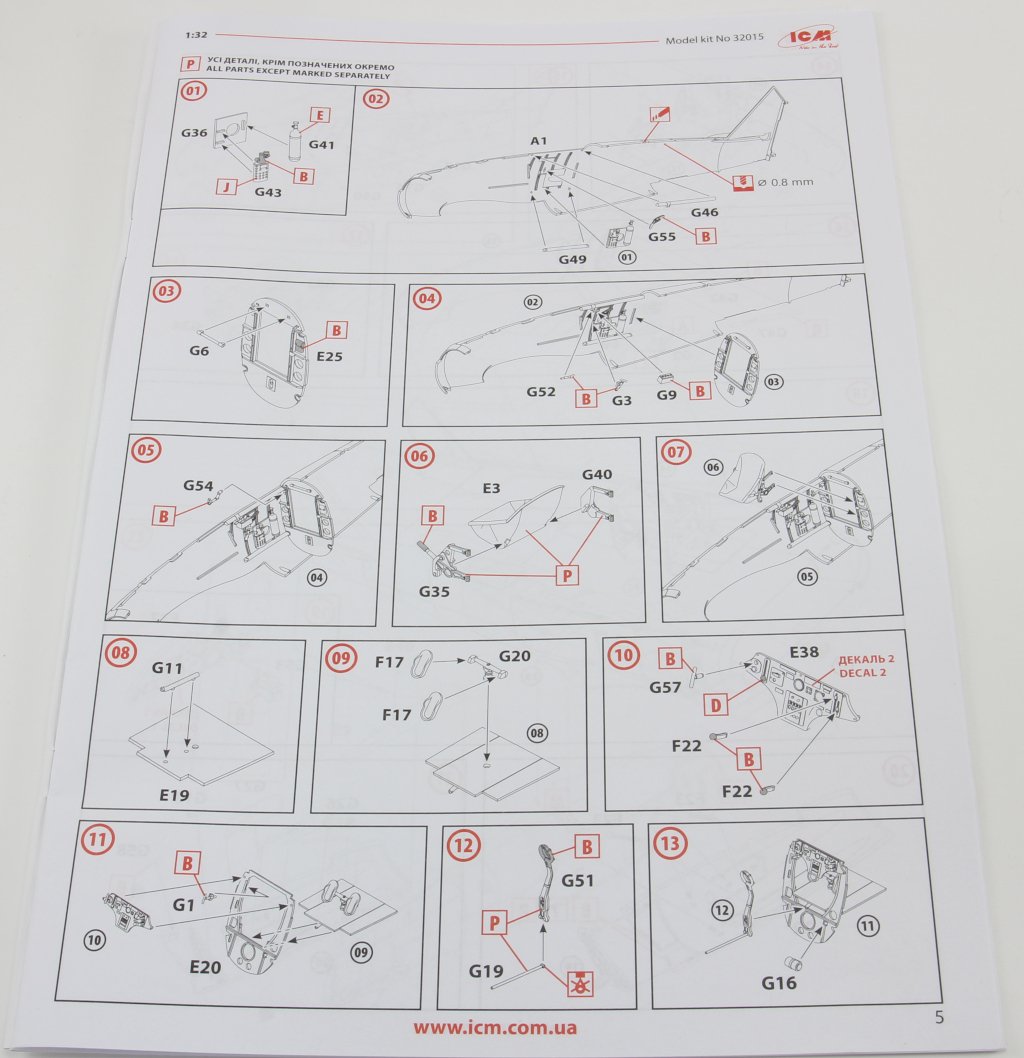
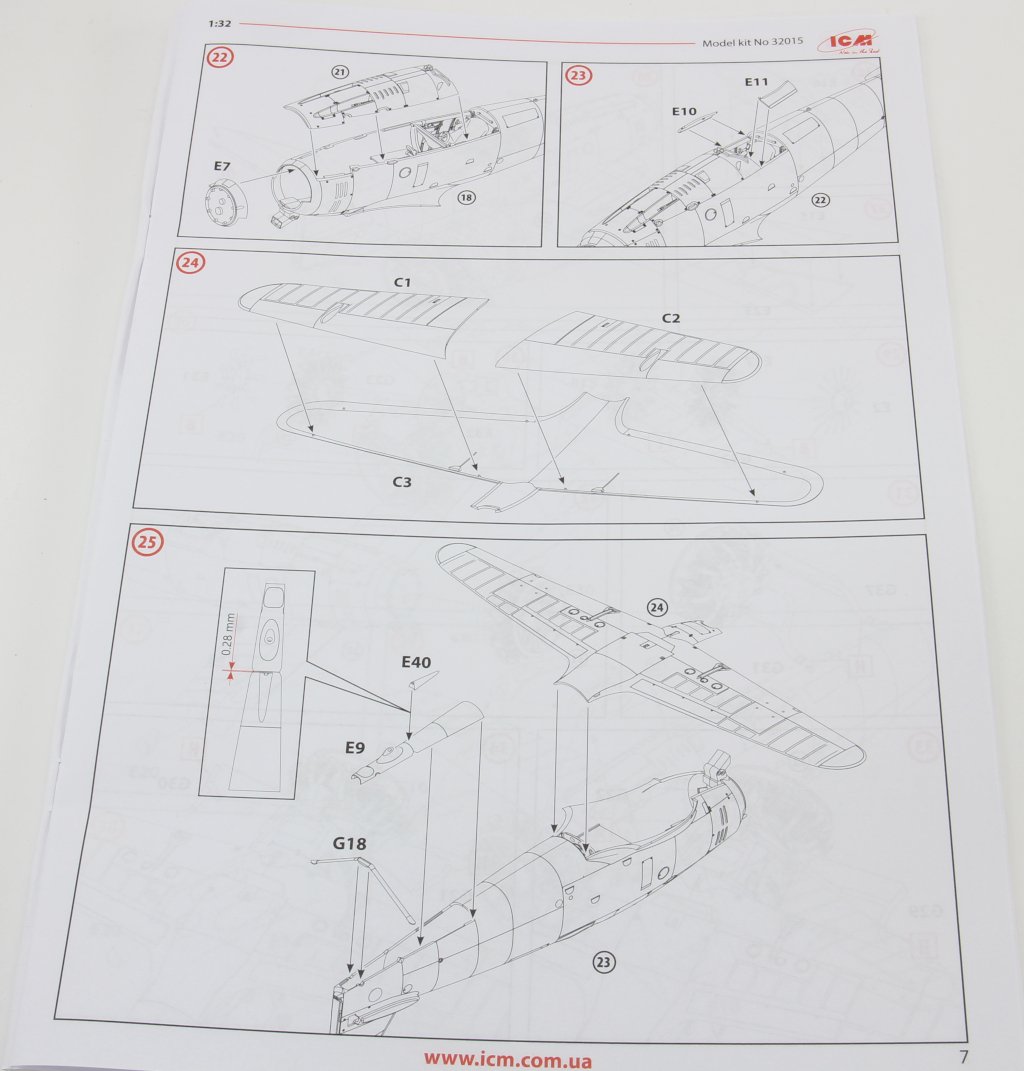
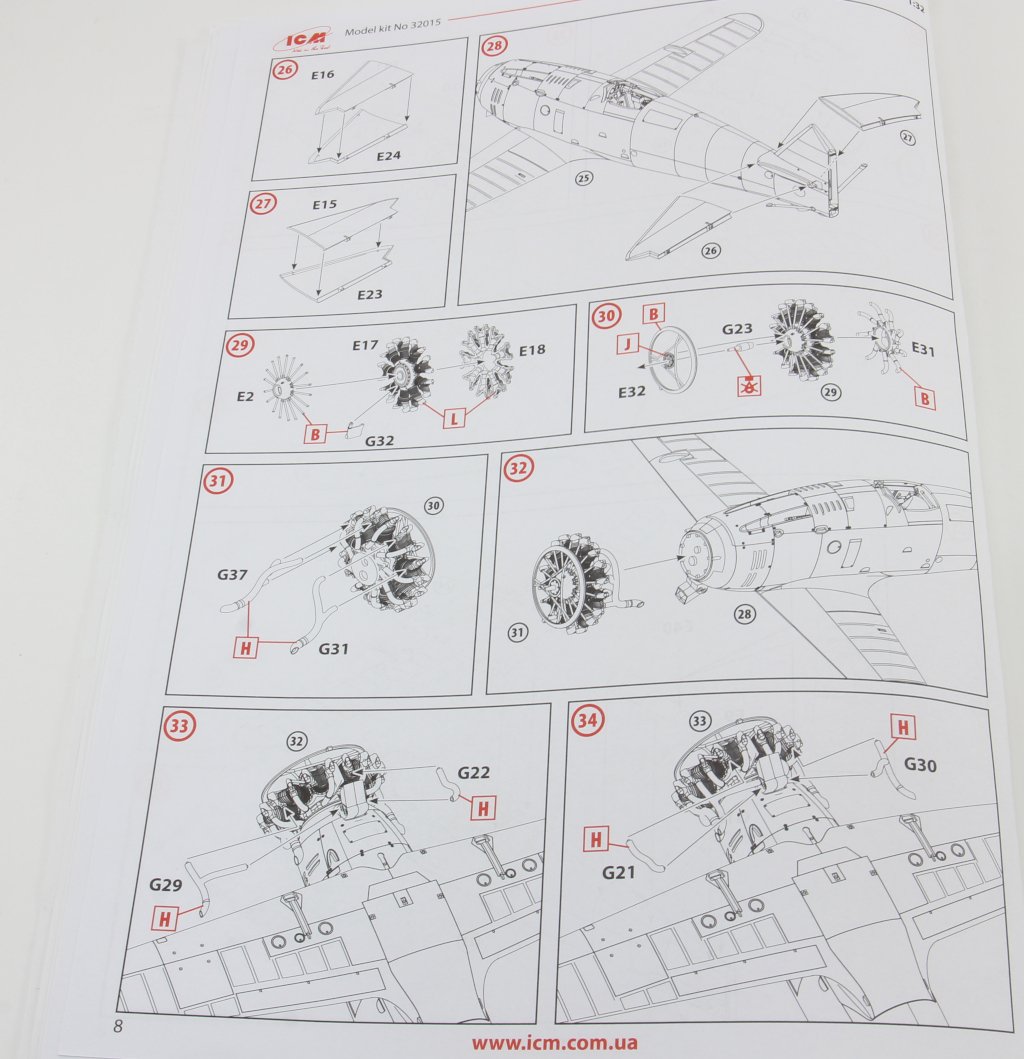
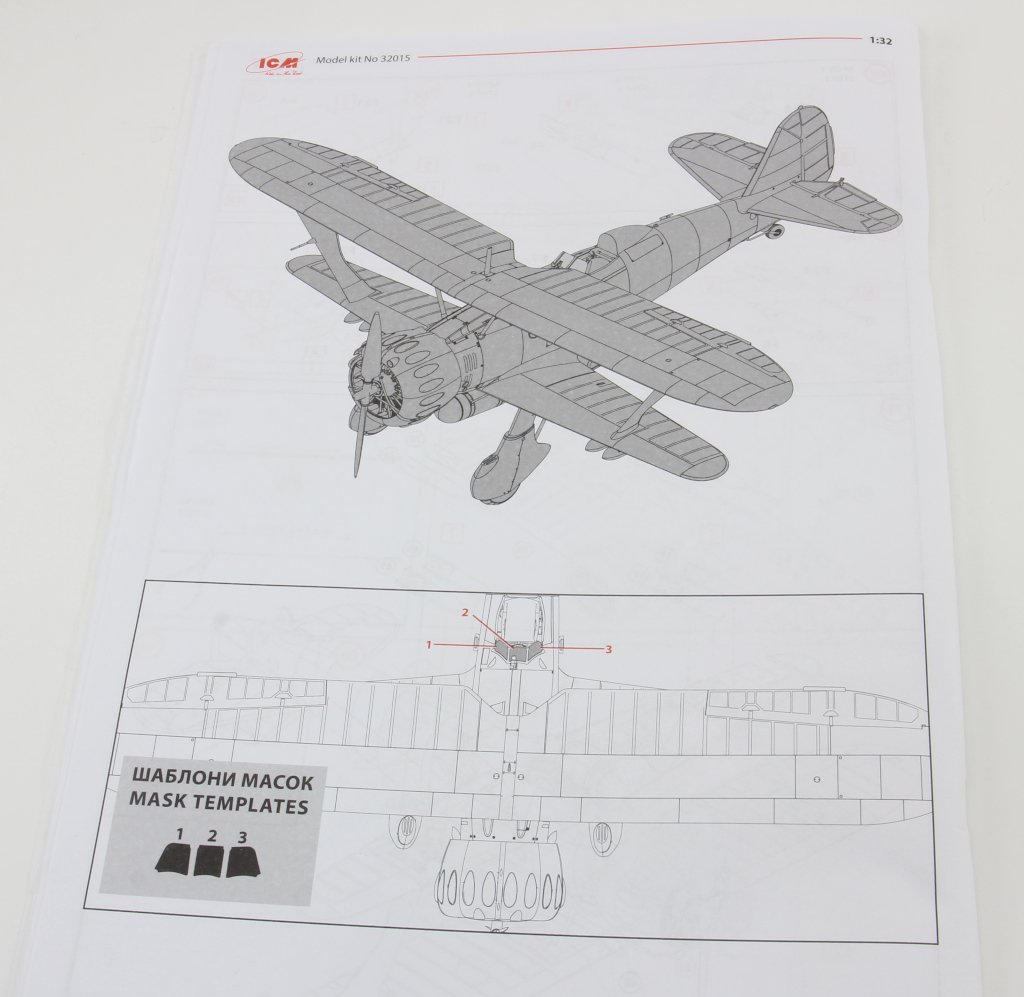
1:32 ICM Hs 123 A-1 (Late) Ref: 32015 Introduction ICM continues its dynamic and steady pace of monthly releases, either introducing brand-new kits or, as in this case, a new version of the 1:32 scale Hs 123A, originally launched in 2024. This time, we have the “late” version of this iconic German biplane, which explored and developed the concept of dive bombing. Equipped with a large, bulky fixed and faired undercarriage, it was capable of operating from poorly prepared airfields — a reflection of the aeronautical thinking of the time. A biplane with an open cockpit, reminiscent of the Soviet I-153. One of its construction innovations was its fully metal fuselage and wings, which increased its survivability on the battlefield in case of damage. Its baptism of fire occurred during the Spanish Civil War, and despite its outdated design, it remained in service with the Luftwaffe until late 1944. It was also supplied in small numbers to Nationalist China, where it achieved some success against Japanese forces. What’s in the box Inside ICM’s typical cardboard box, we find a transparent plastic bag containing 9 grey sprues and one with the clear parts, totalling 201 pieces. Also included are an A4 instruction manual with 20 pages, a decal sheet, and a leaflet showcasing the colour range offered by ICM. Overview of all grey sprues Let's then check the sprues! Sprue A This sprue provides the fuselage halves, including the upper gun cover. It features scale-appropriate detailing, with well-fitted gun fairings and finely moulded, realistic cooling and exhaust grilles. Sprue B This sprue contains the two halves of the upper wing. The lower half includes slots to fit the outer and central struts that secure the wing in place. Sprue C This sprue includes the full-width lower half of the corresponding lower wing, along with the respective upper halves that join with the fuselage. Consistent with the overall design, there is a subtle distinction between fabric-covered and metal panels. Sprue D This sprue provides all the movable surfaces of the model, each composed of two halves. The internal structure detailing is subtly visible across all parts. Sprue E This sprue draws attention to the two halves of the radial engine (BMW 132), with delicate detailing throughout the propulsion subassembly. Separate parts such as exhaust collectors, valve tubes, and triform cowling bracing enhance realism and detail. The engine cowling is supplied in nine parts, which may be assembled closed or left open to display the full engine. Two instrument panels are included, featuring raised detail to simulate instrument placement, later complemented by the decal-supplied panels. The internal cockpit structure is also well represented, even if much of it becomes hidden once the fuselage is closed — but we know it’s there 😊. The pilot’s seat is supplied without seatbelts, so these will need to be scratch-built or sourced from aftermarket sets. Sprue F (x2) These sprues include the parts for the main landing gear legs (comprising a primary and secondary support strut). The gear covers are also supplied in halves. The barrels of the main guns are included, featuring cooling holes (not drilled through), which, once painted, convincingly replicate the original. The offensive armament (four standard bombs or four with extended fuses) is supplied in halves. The main wheels feature fine, scale-appropriate detail. As they are supplied in two halves, the tyre tread will need to be redefined after assembly and are presented without “sag” effect. Sprue G This sprue includes some of the most detailed and delicate parts in the kit. Notable elements include the actuators for the ailerons and stabilizers, as well as cockpit levers and buttons. For this area of the model, parts include: Side consoles, with highlights such as the flare pistol Control sticks Oxygen bottle The control stick is particularly reminiscent of the iconic Spitfire. The engine exhaust manifold are also provided, already moulded with open ends — requiring only suitable painting to simulate the openings. Sprue H This sprue provides the windscreen in a single piece and the navigation lights for the wing tips. Decals The decal sheet includes markings for the four available versions, as well as service stencils. as standard they are well printed, with sharp colour and detail. Instructions In line with ICM’s usual quality, the instructions match the overall standard of the kit: Glossy paper with full-colour painting and marking profiles; 20 pages, with the build process divided into 71 steps; Clear and easy-to-follow assembly diagrams, leaving no doubt about part placement; Version options (with or without gear fairings) are clearly marked, along with their corresponding paint schemes; The final page includes a template for cutting masks for the windscreen; Sprues overview cockpit assembly lower wing to fuselage assembly engine assembly complete model with masks template Marking Options Four options are provided, each with historically accurate schemes and varying levels of painting complexity: Hs 123A-1, II.(Sch)/LG 2, 2nd (Assault) Group of the 2nd Training Squadron, France, Spring 1940 Hs 123A-1, Flugzeugführerschule A/B 71, Pilot School A/B 71, Prossnitz, Summer 1941 Hs 123A-1, Erg.St.(Sch.)/LG 2, Auxiliary (Assault) Squadron of the 2nd Training Squadron, Eastern Front, Winter 1942 Hs 123A-1, II./SG 2, 2nd Group, 2nd Assault Squadron, Eastern Front, Spring 1944 Conclusion This second edition of the kit showcases the quality we’ve come to expect from ICM. Despite its scale, it’s not an overly complex kit, and it avoids being overloaded with tiny parts and sub assemblies that demand excessive build time. Details such as the well-appointed cockpit — with side consoles, instrument panels, and internal structures — and the multi-part engine, which is impressively realistic at this scale, contribute to the overall appeal. The four marking options offer a range of styles with varying painting challenges, and the aircraft’s operational history allows for highly detailed and weathered finishes. This is a kit that can be built by both beginners and experienced modellers who enjoy adding scratch-built enhancements. A highly recommended model of an elegant and original aircraft subject! Our thanks to ICM for providing the review sample! Ricardo Veríssimo
.jpg.ca8d0ddcbf8e08b0e7e7b829b11a63be.jpg)


-
Dedicated 1/72 catagory? Maybe, maybe not.......
rverissimo replied to JohnB's topic in Problems? Suggestions? Tell us!
I'll open two post with my current 1:72 builds... Also works as motivation to finish them !.thumb.JPG.38a0053a8c55e455f7bdfa54779ce336.JPG)
.thumb.JPG.58f953a78cc3c7727a009c1f21810e61.JPG)
-
Dedicated 1/72 catagory? Maybe, maybe not.......
rverissimo replied to JohnB's topic in Problems? Suggestions? Tell us!
Hi BradG ! no you're not the only one regards Ricardo Verissimo -
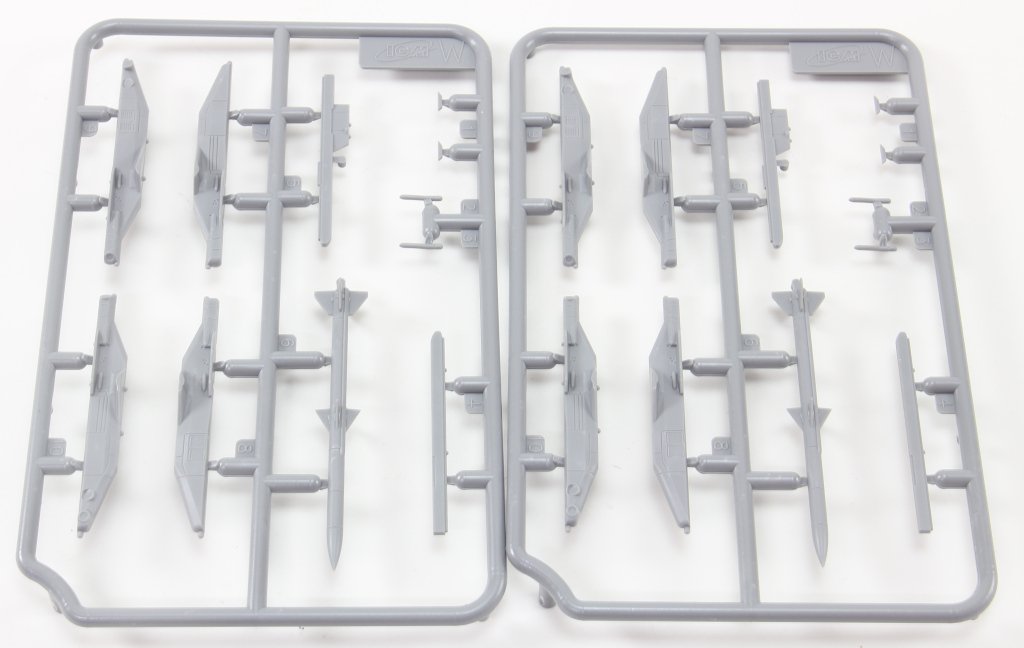
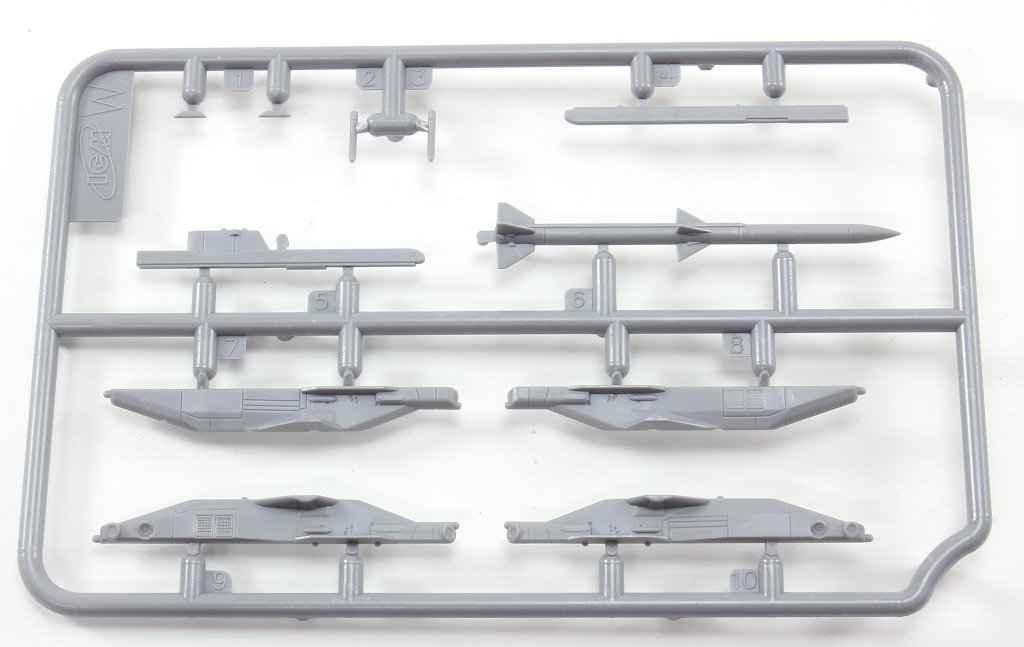
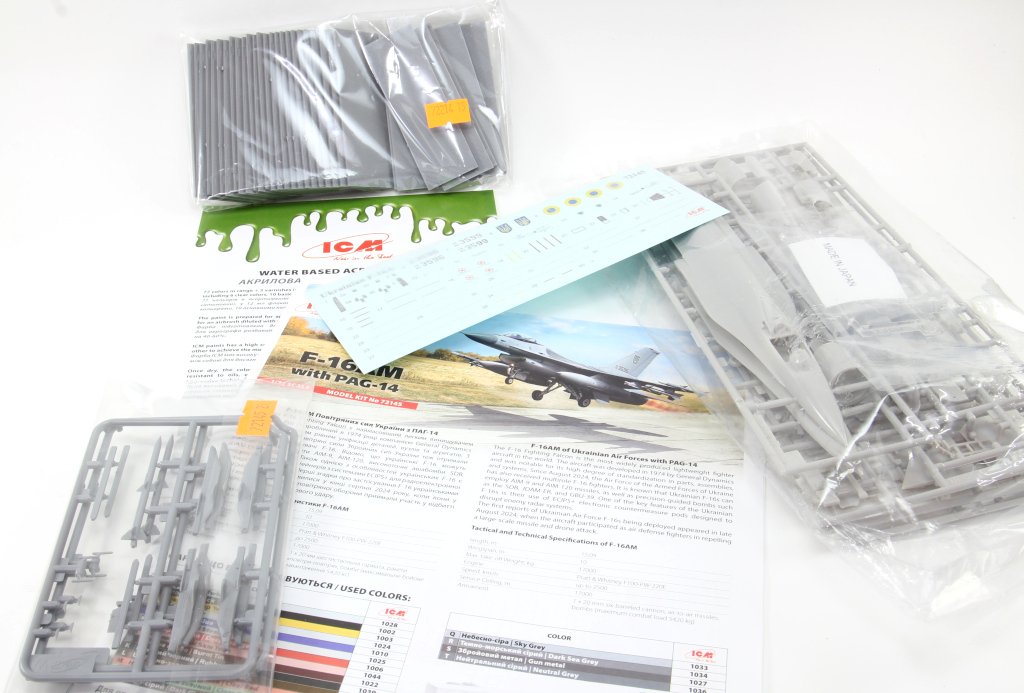
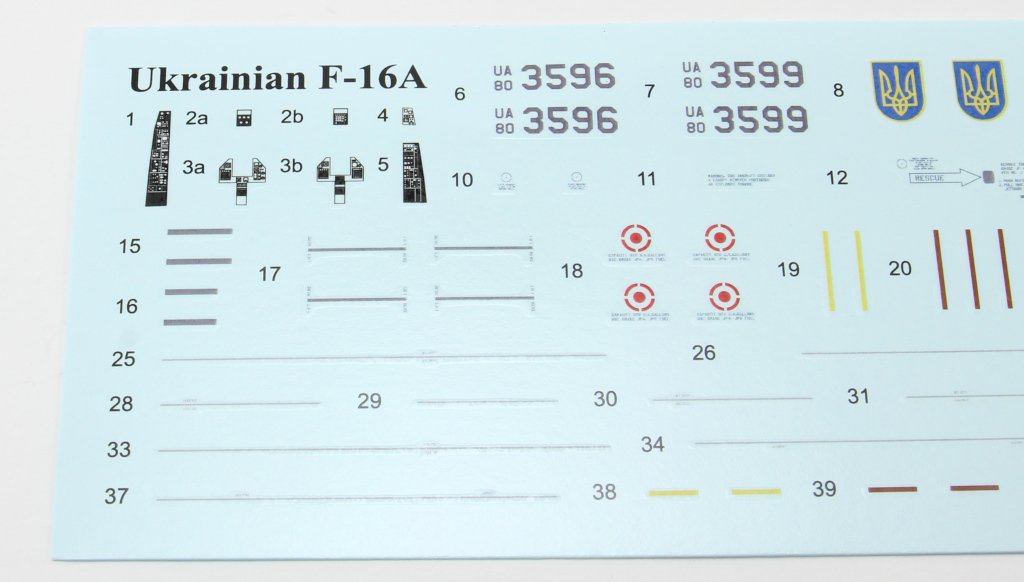
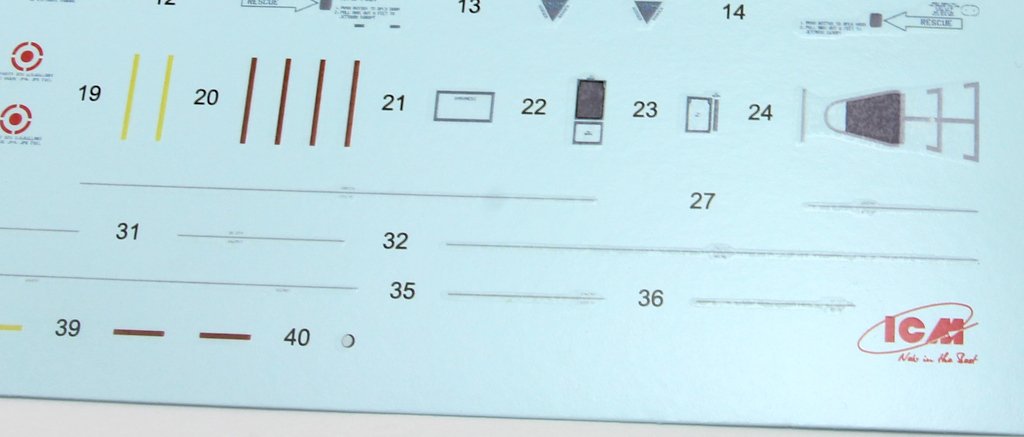
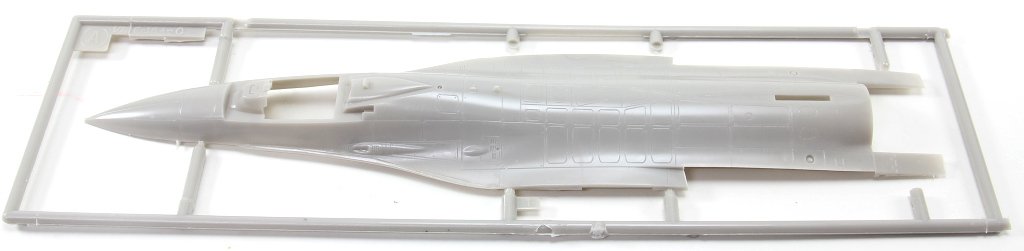
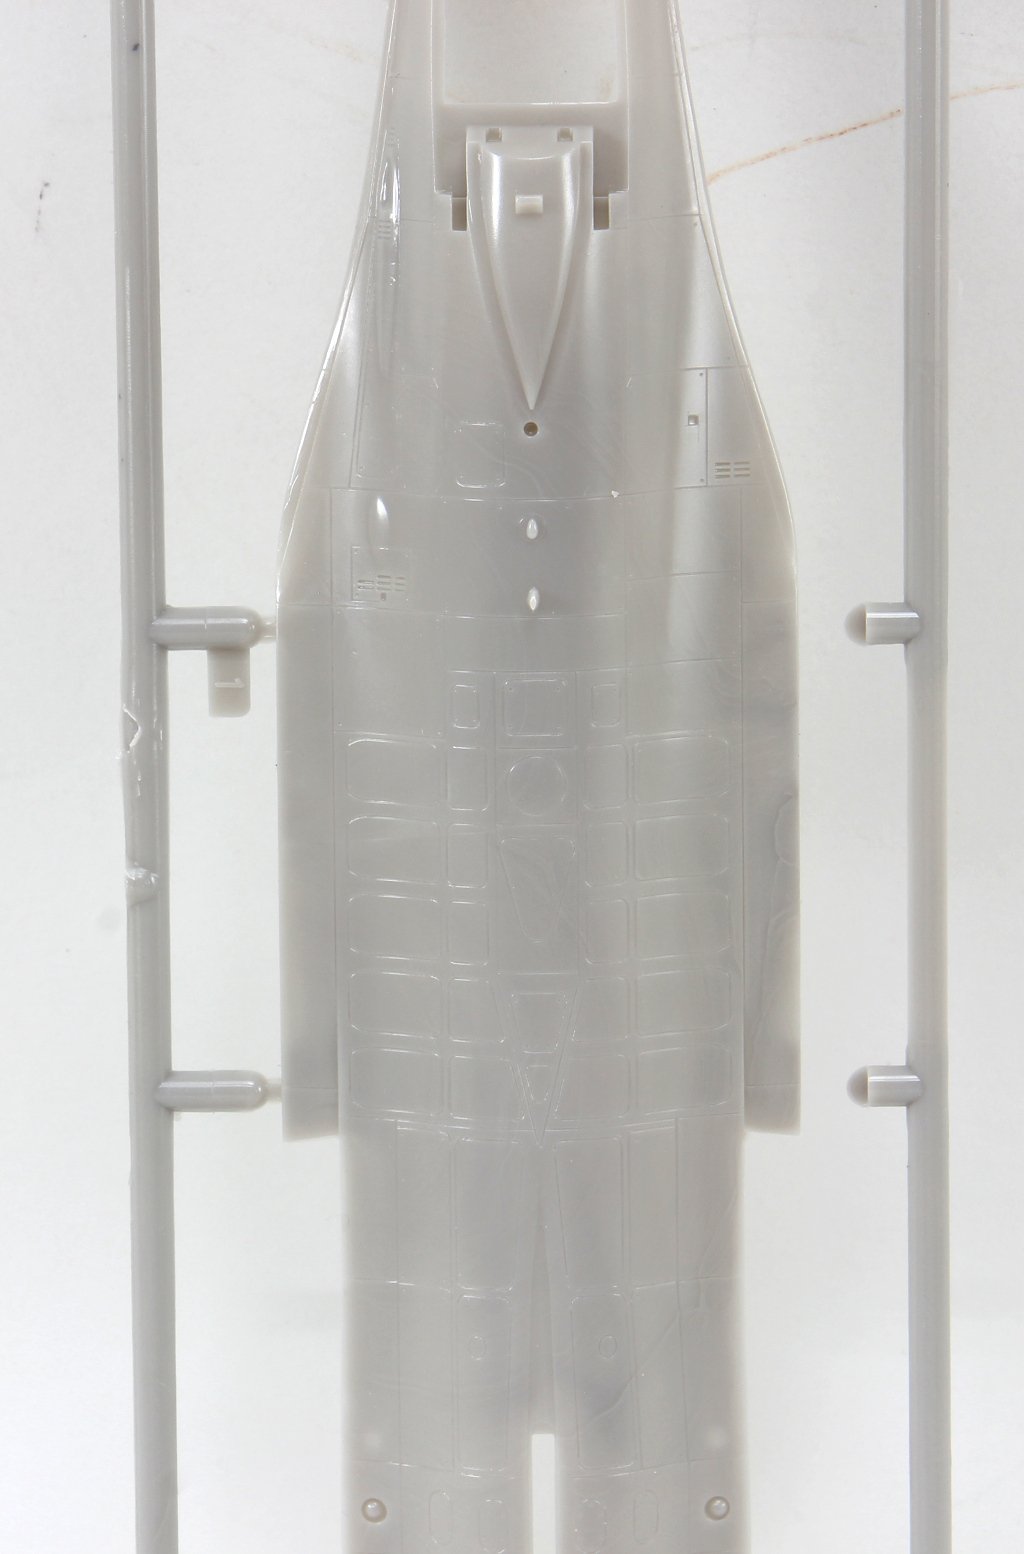
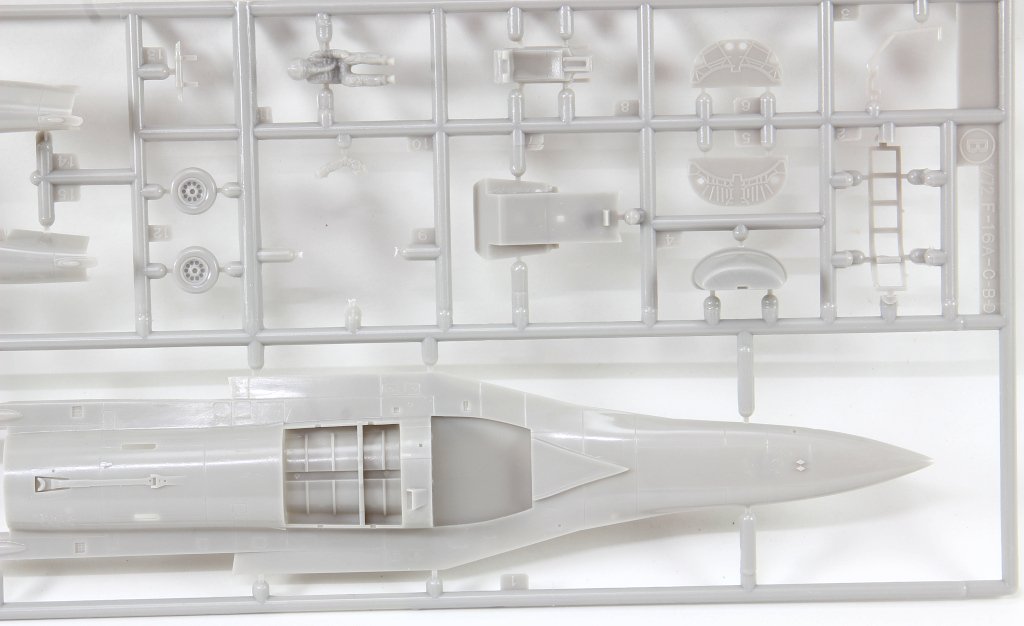
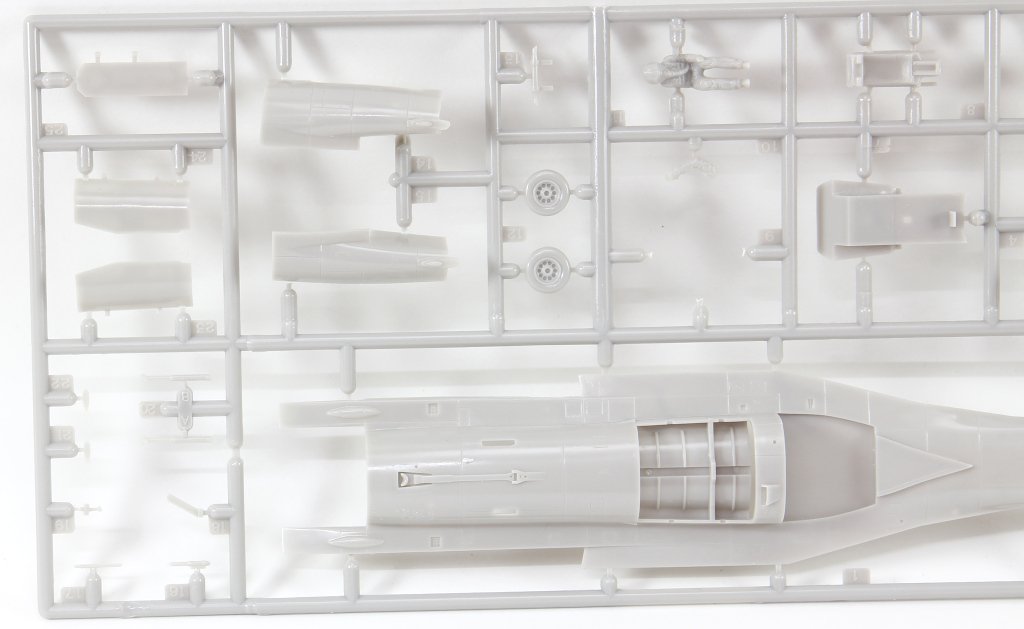
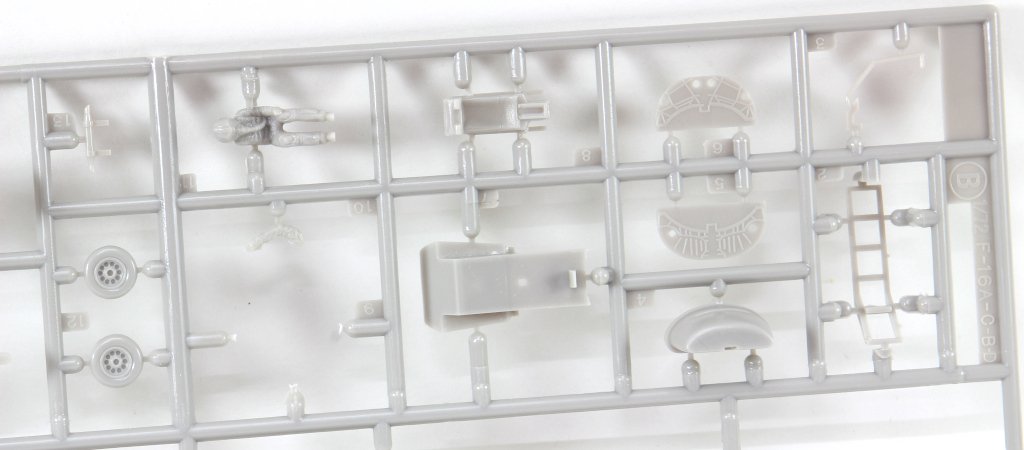
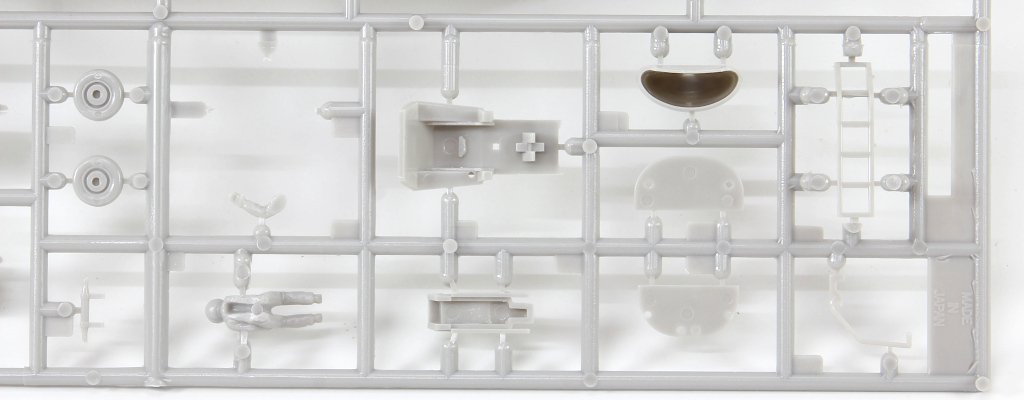
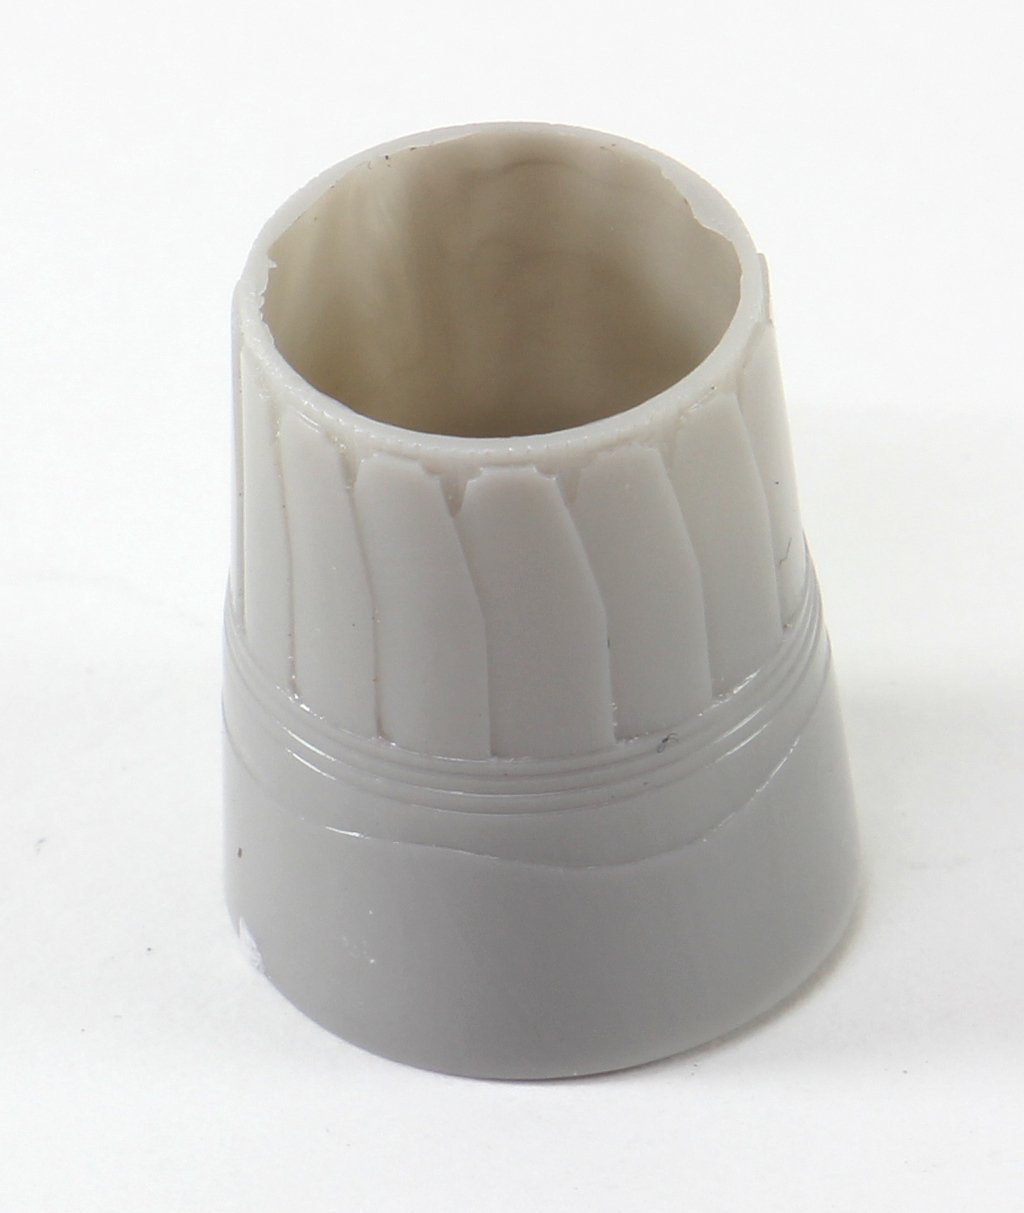
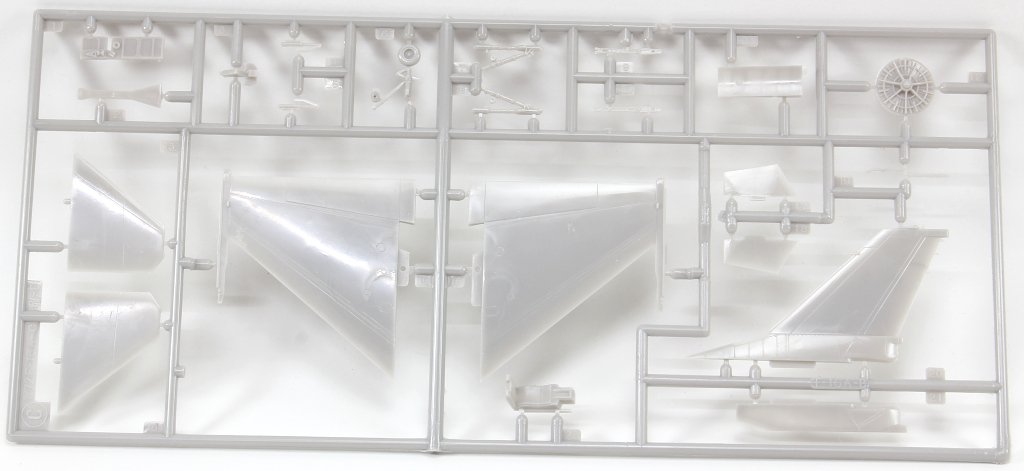
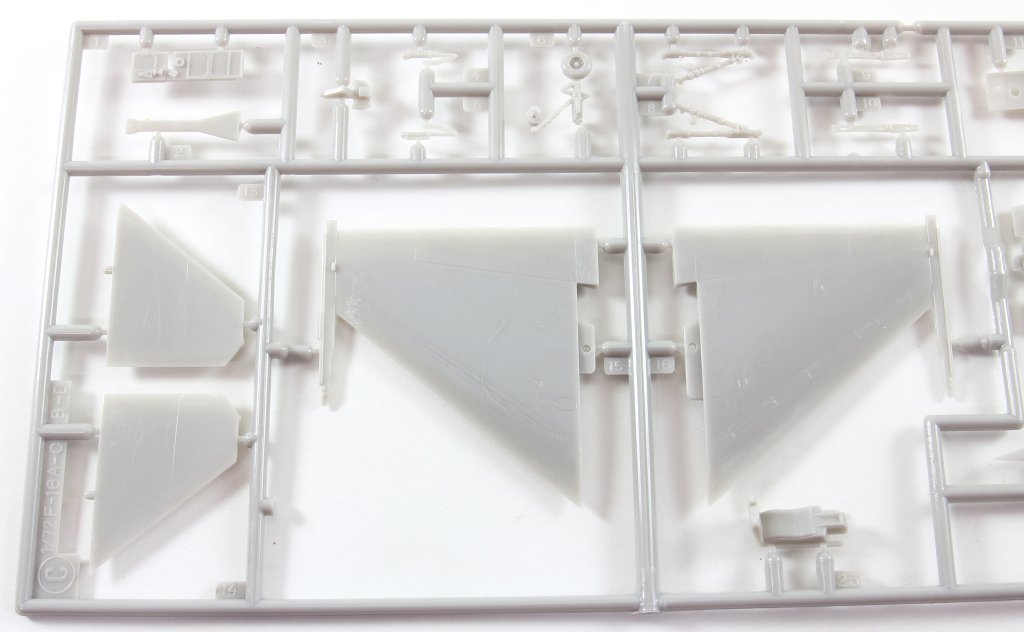
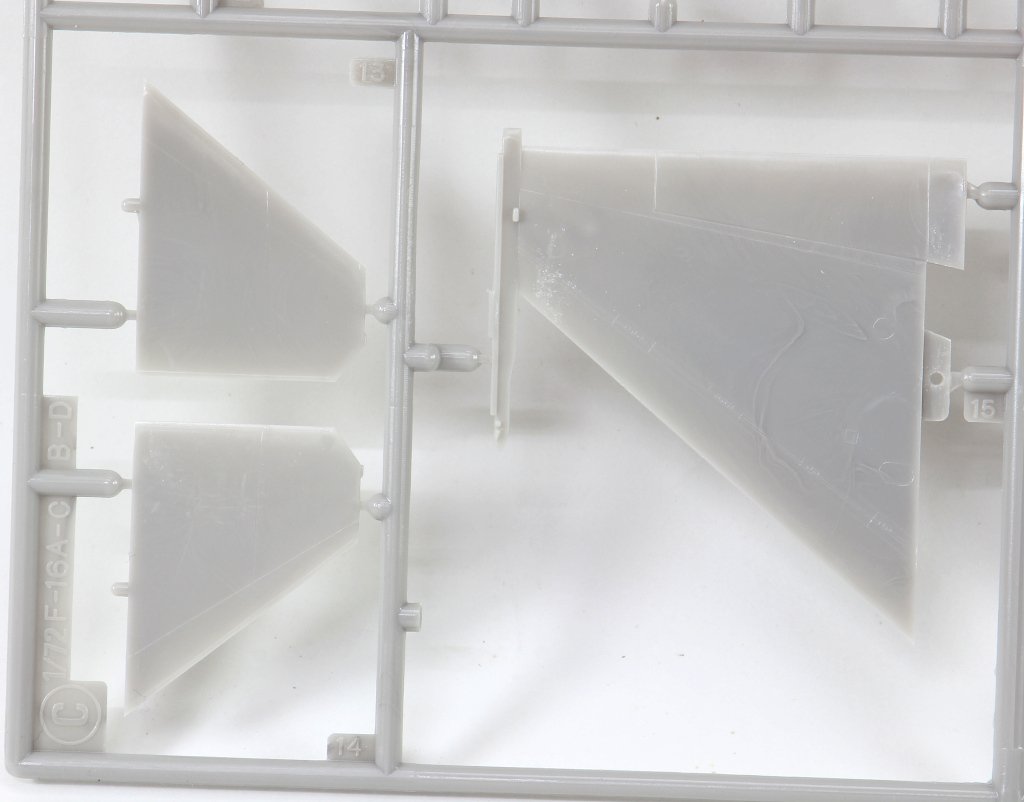
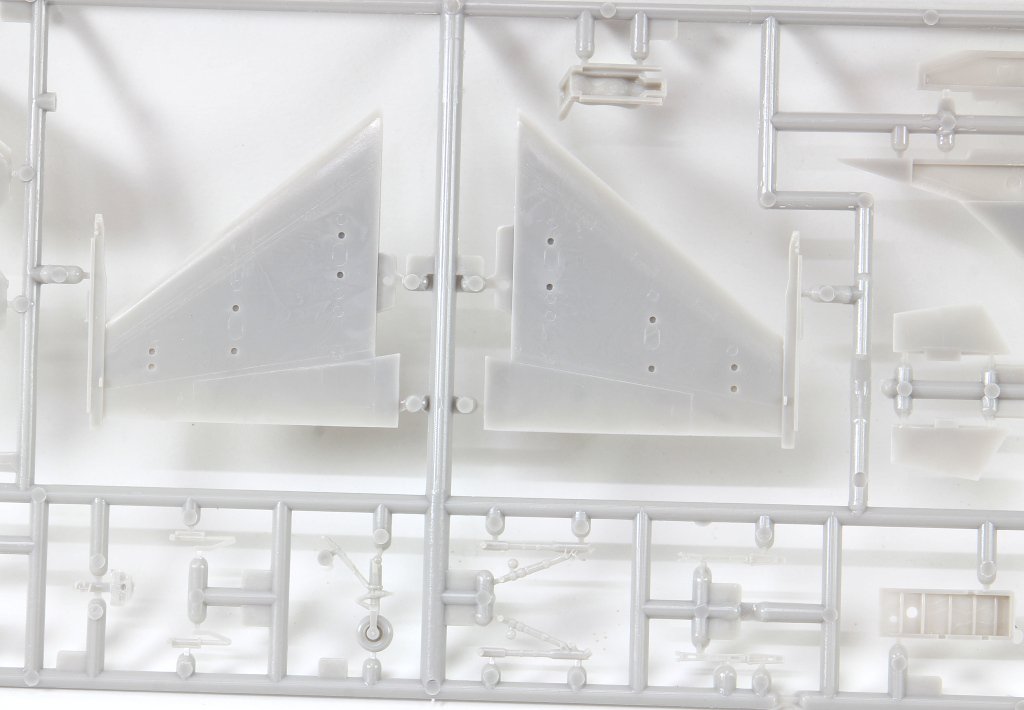
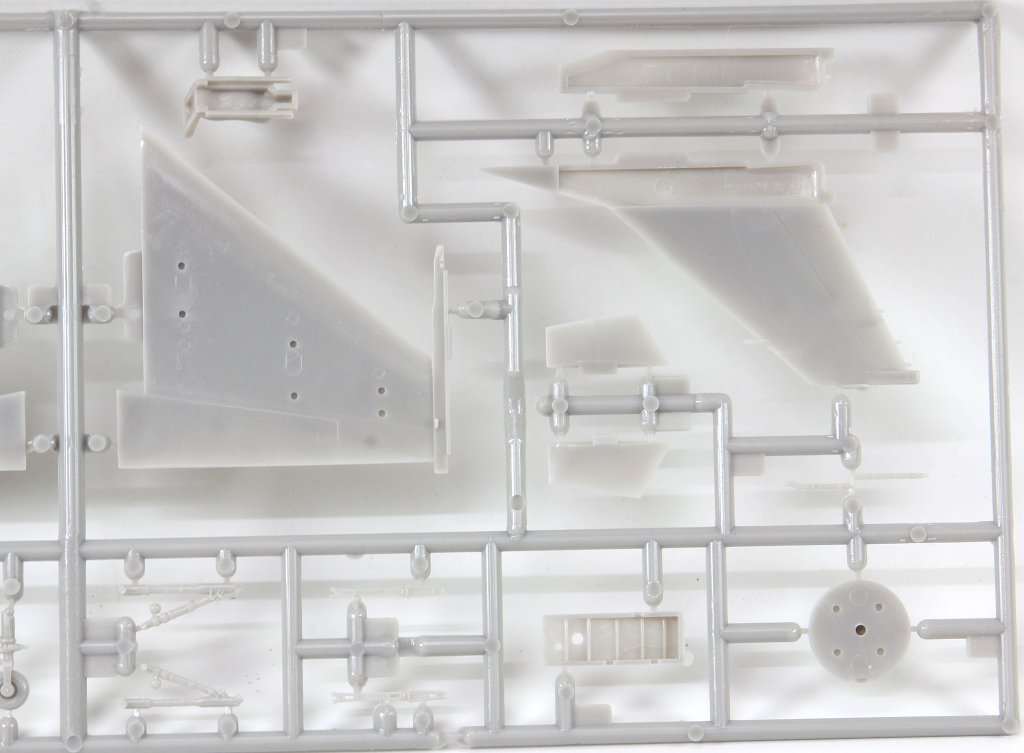
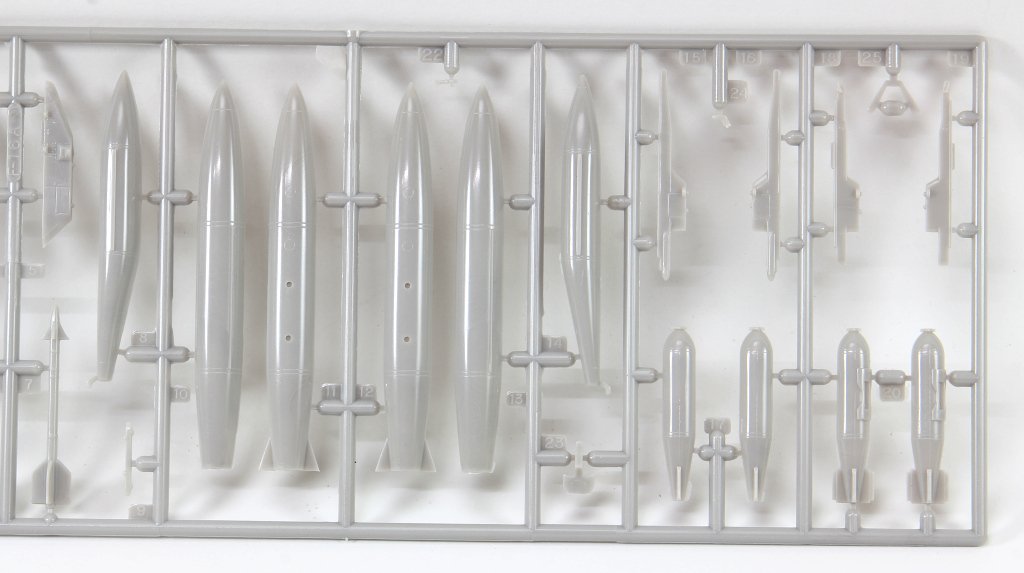
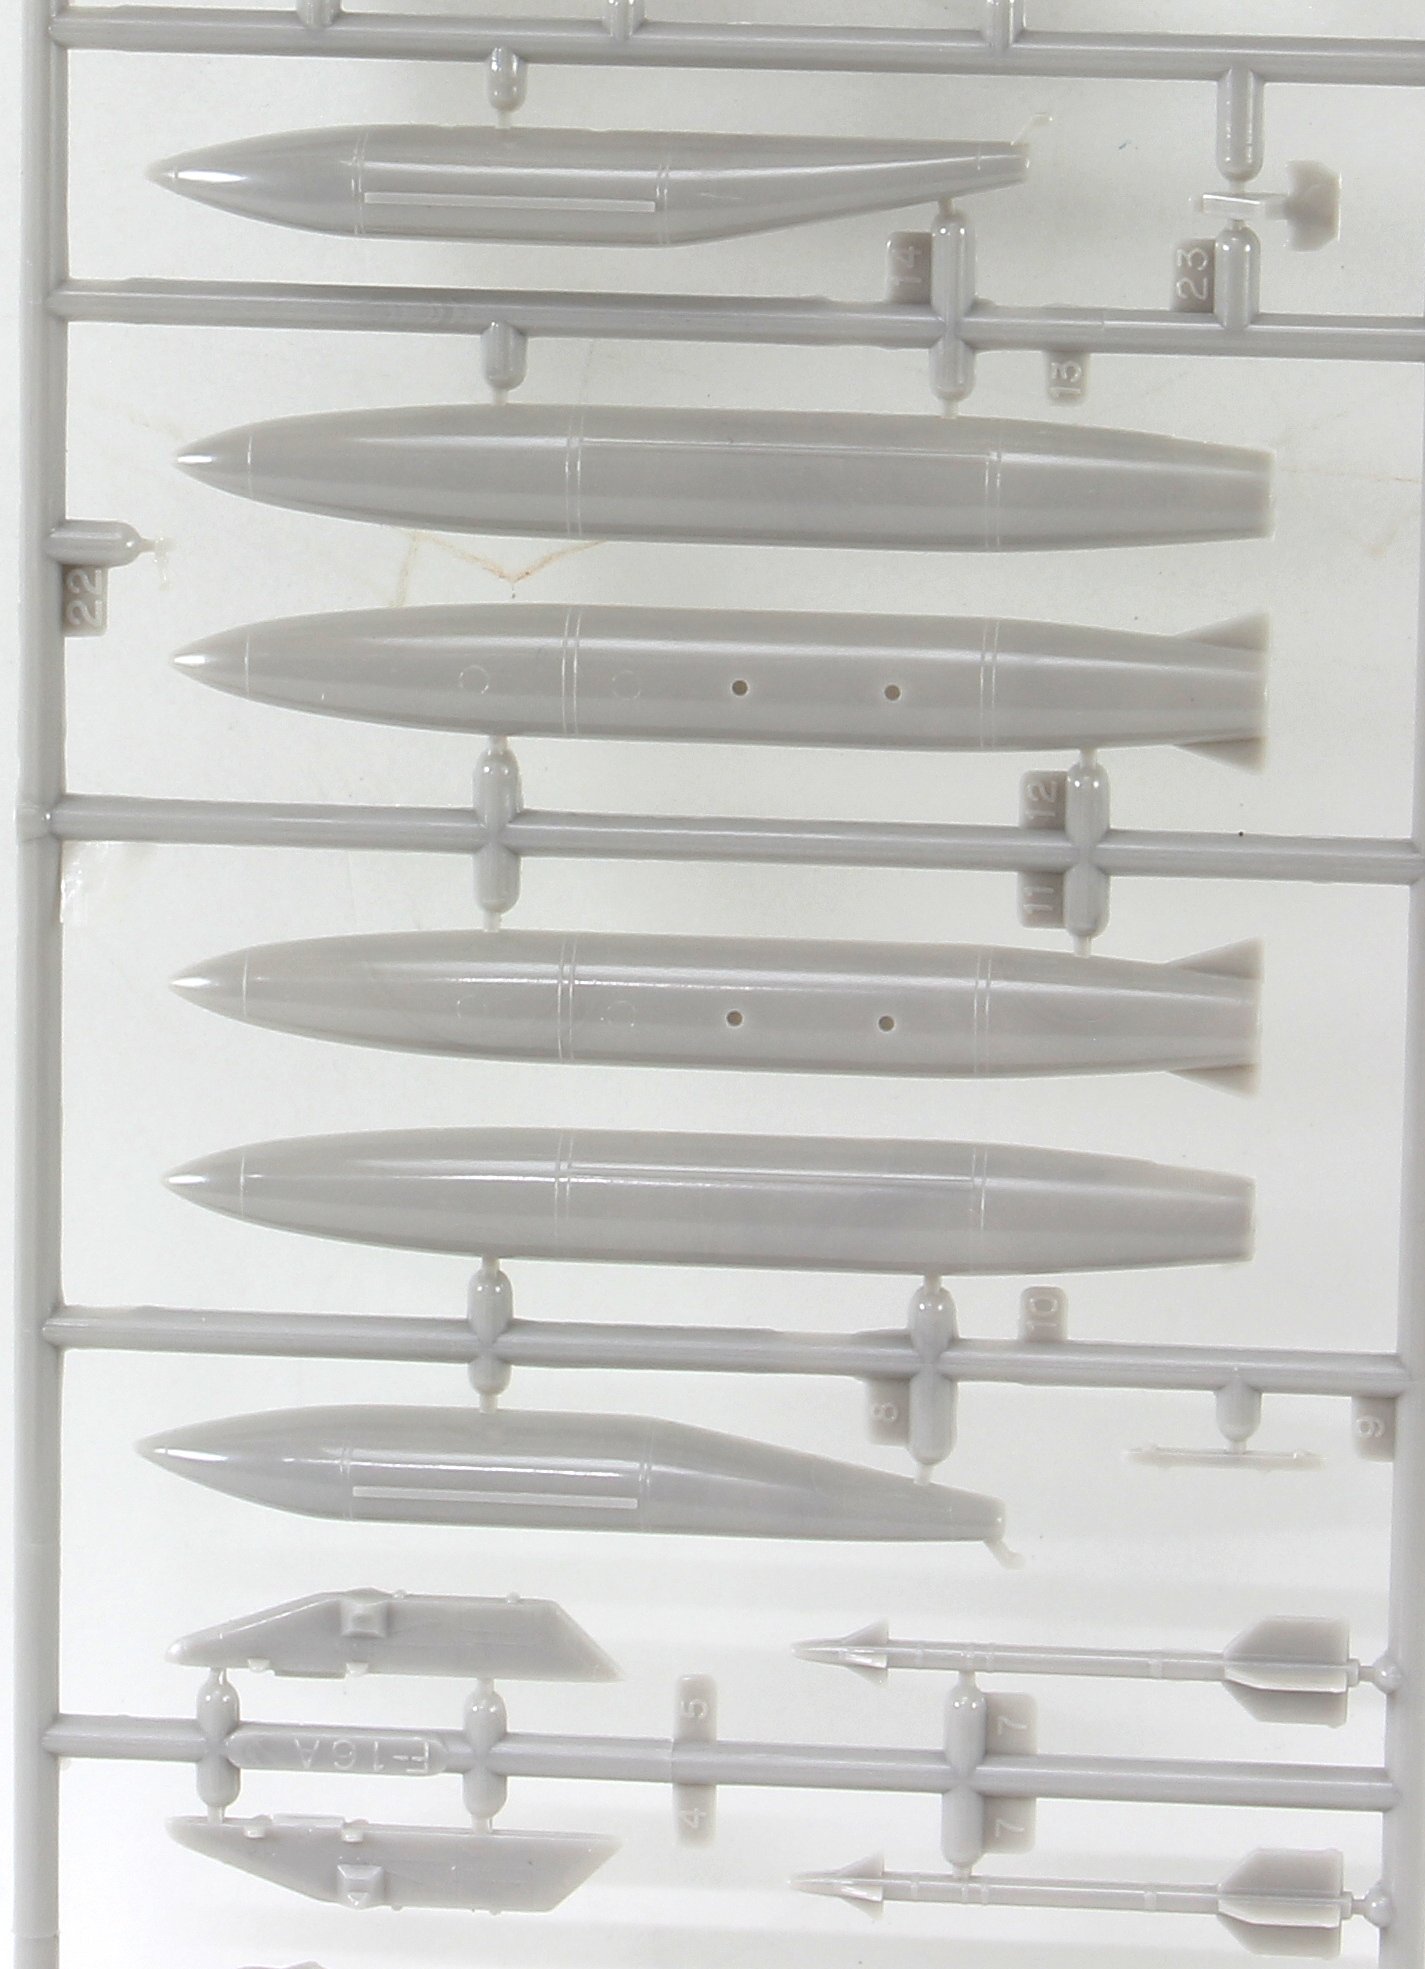
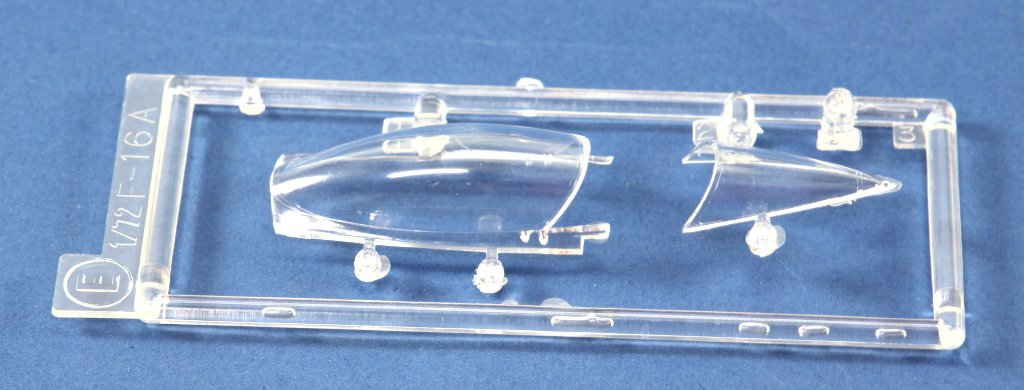
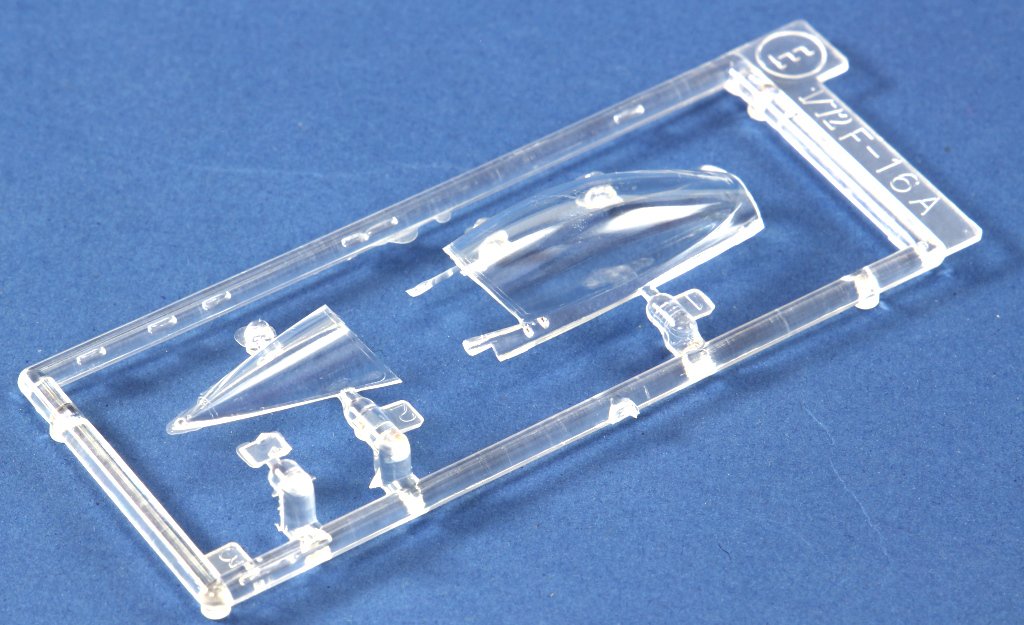
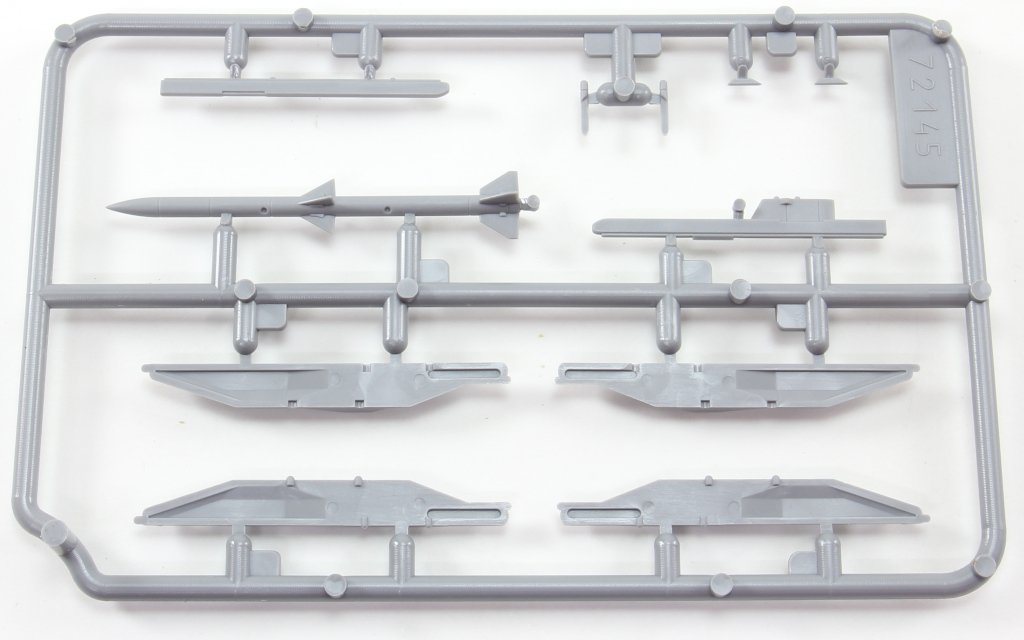
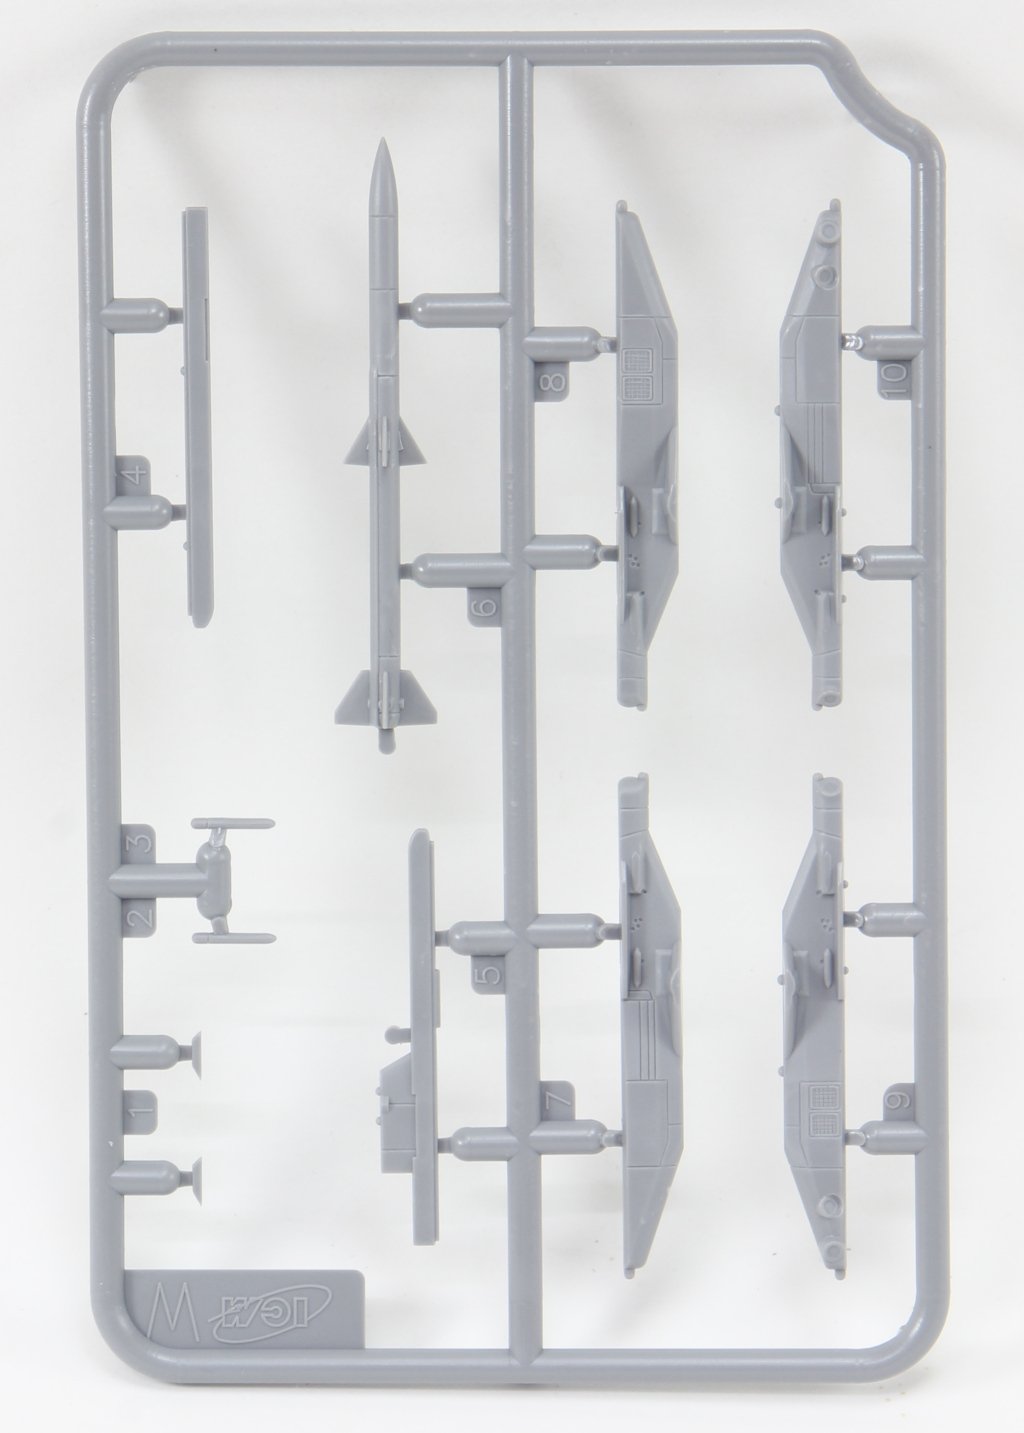
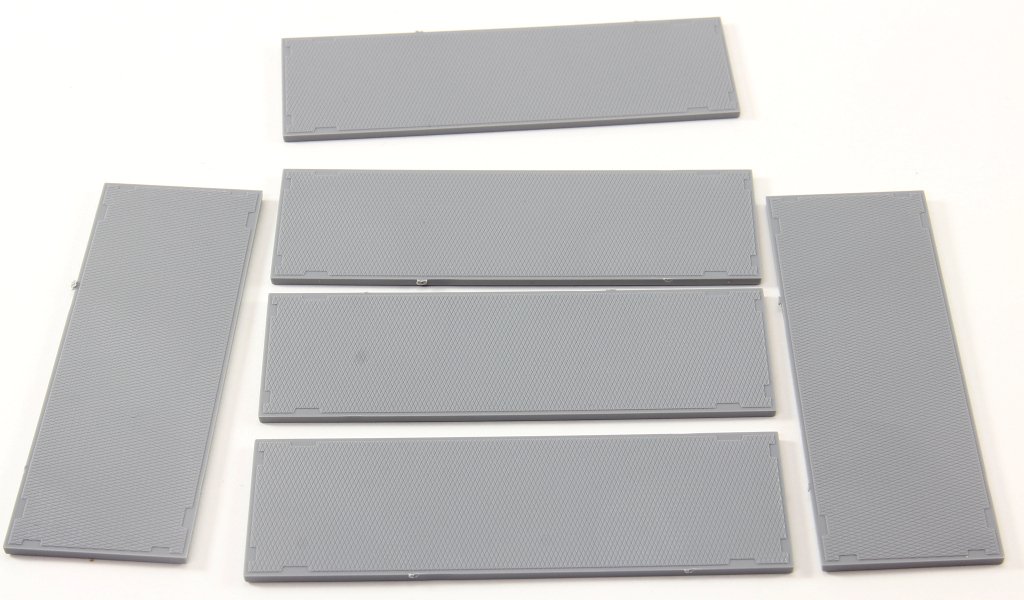
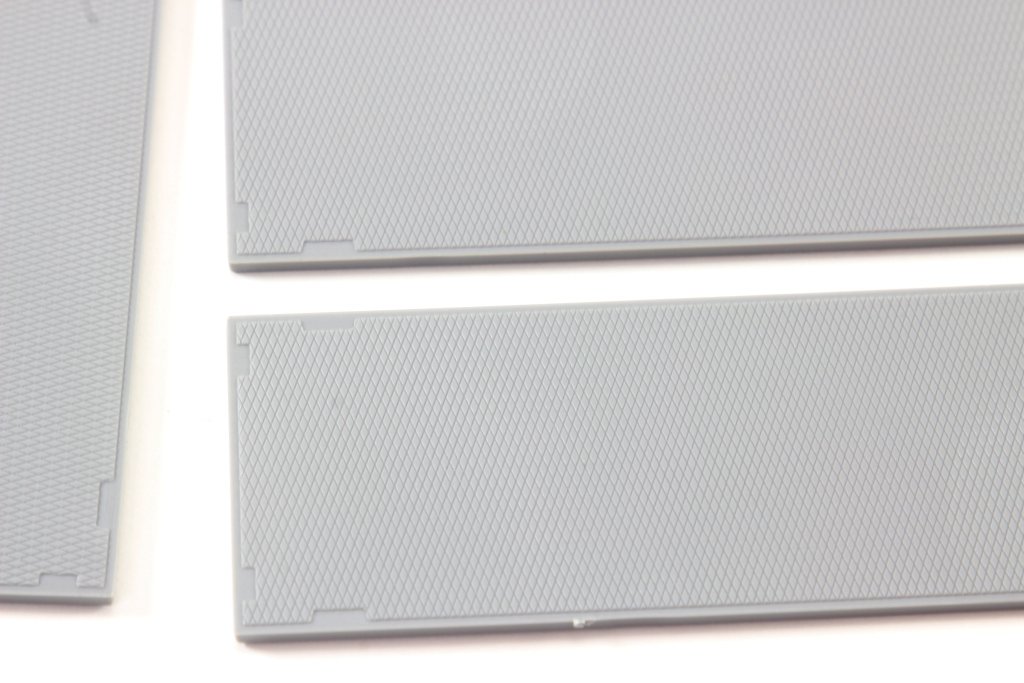
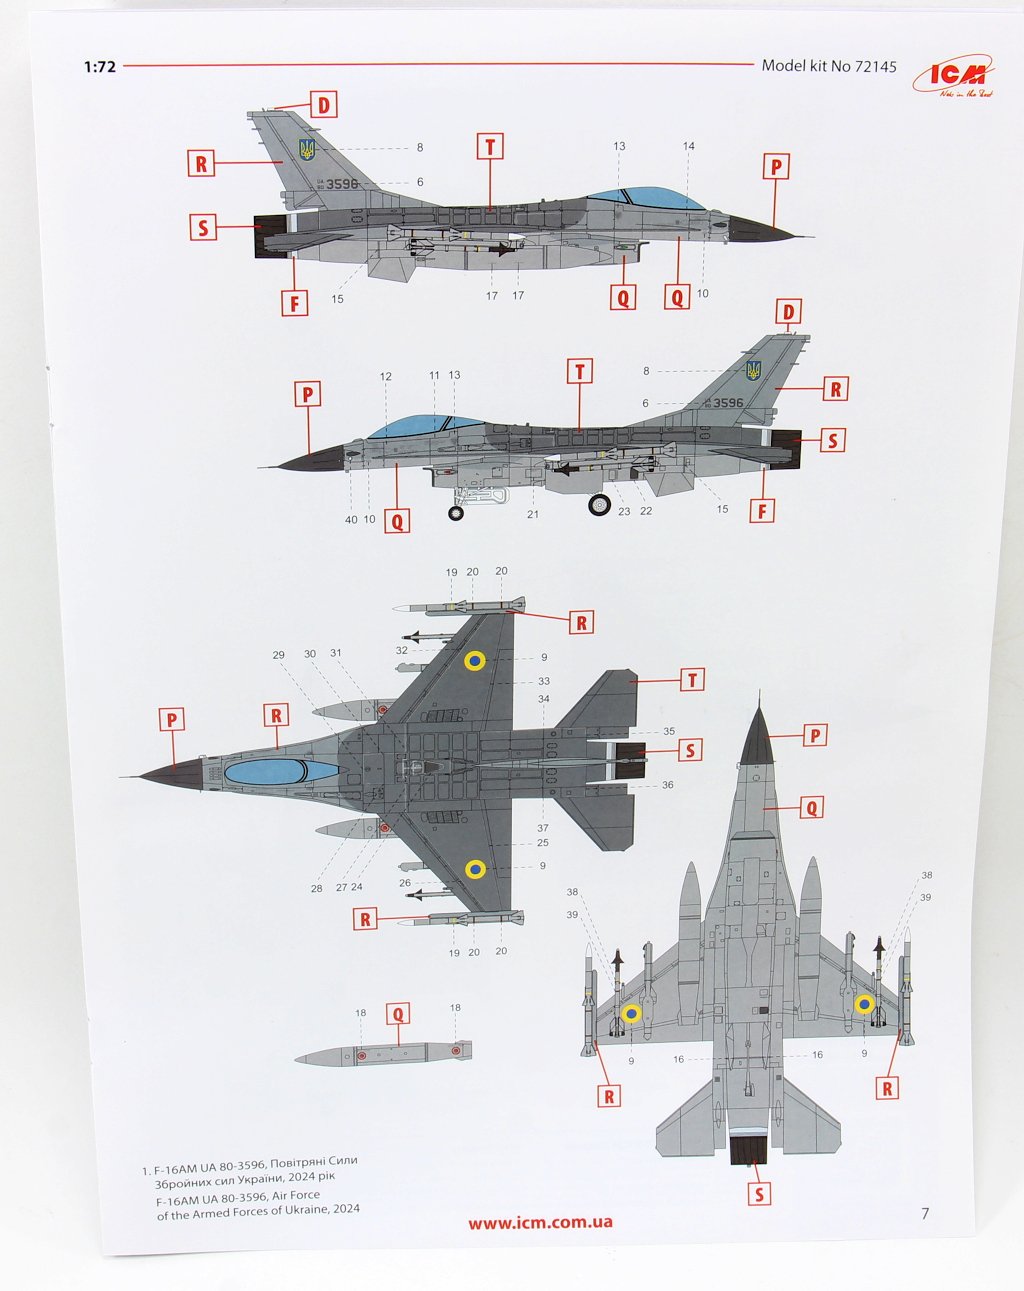
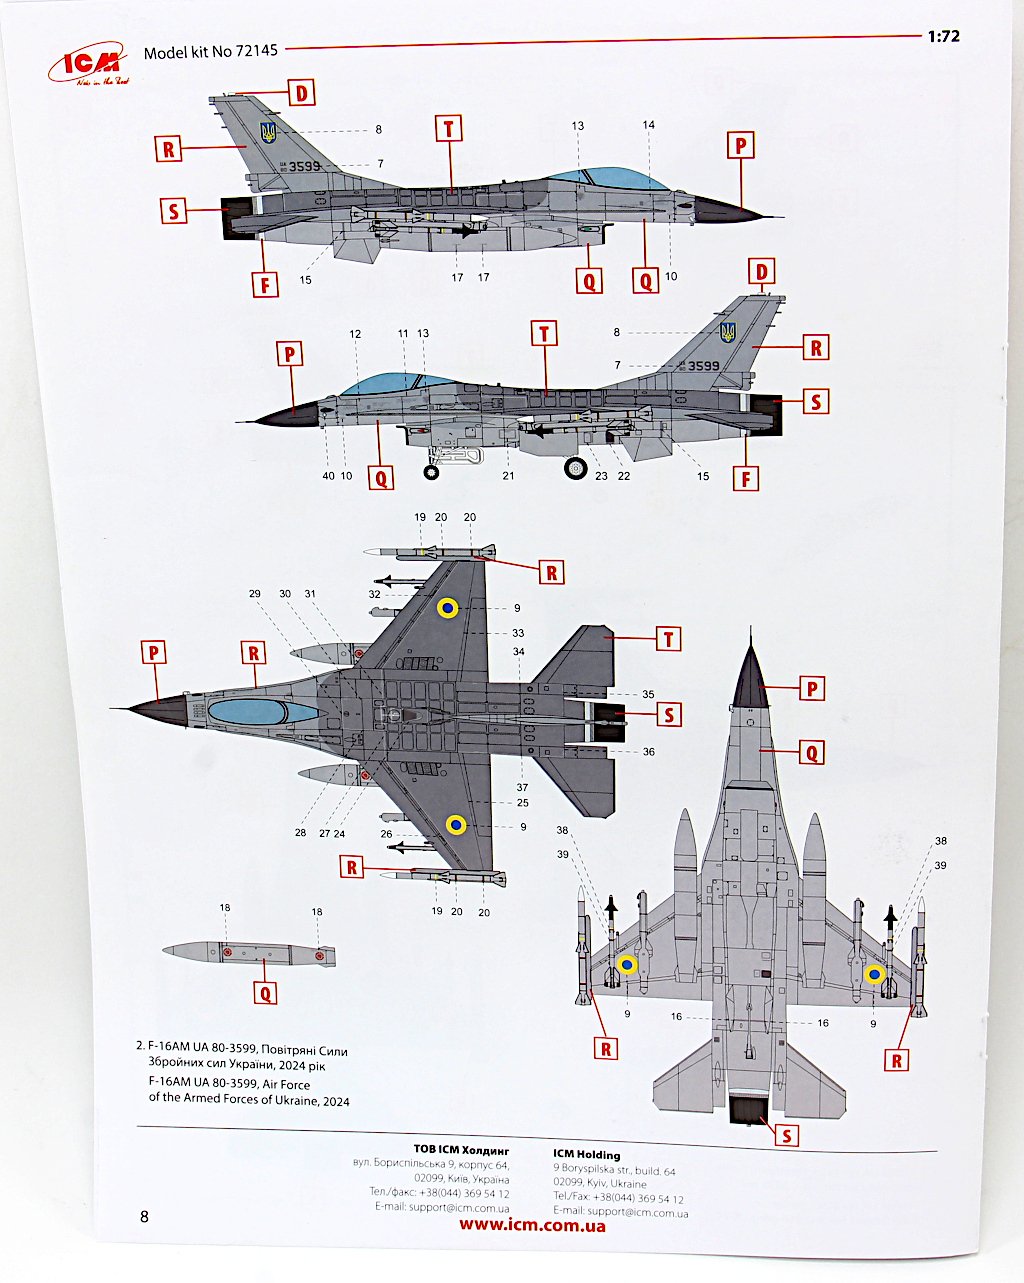
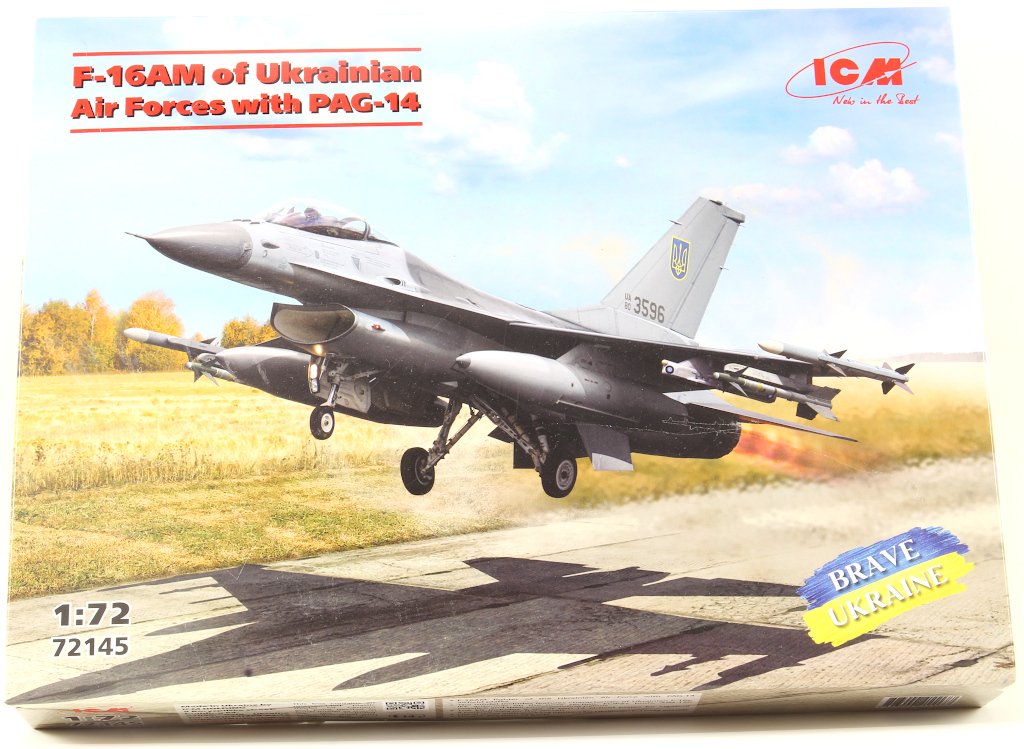
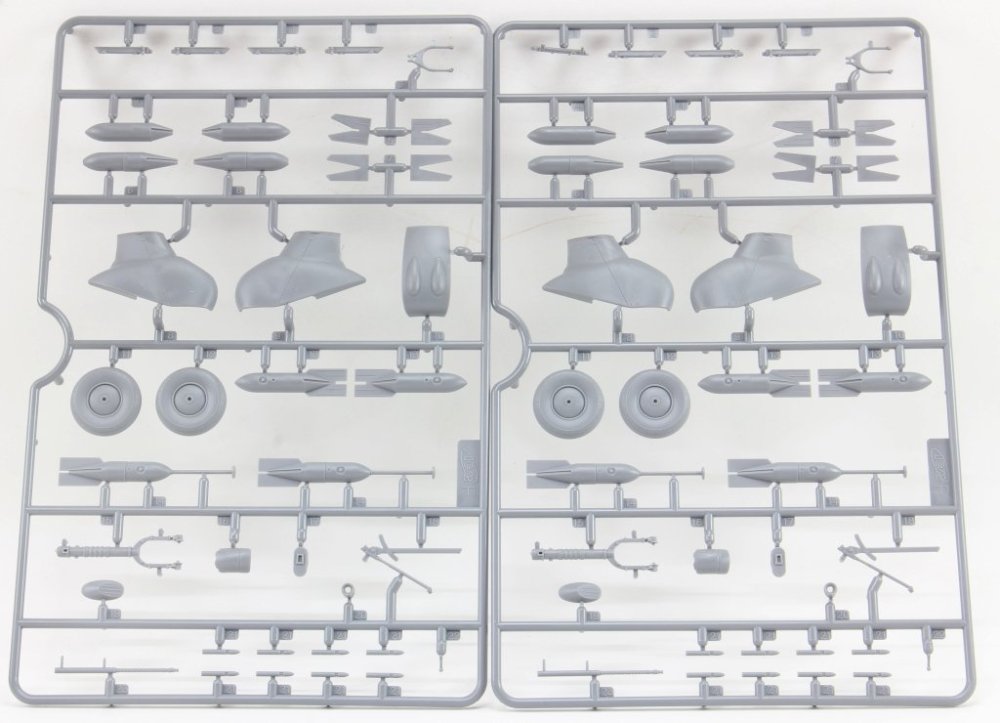
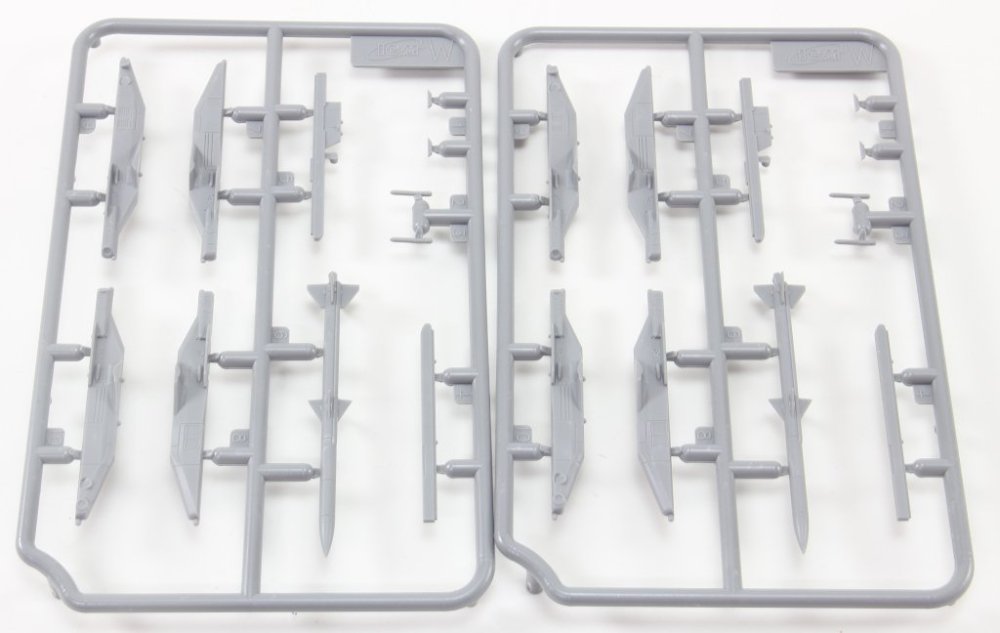
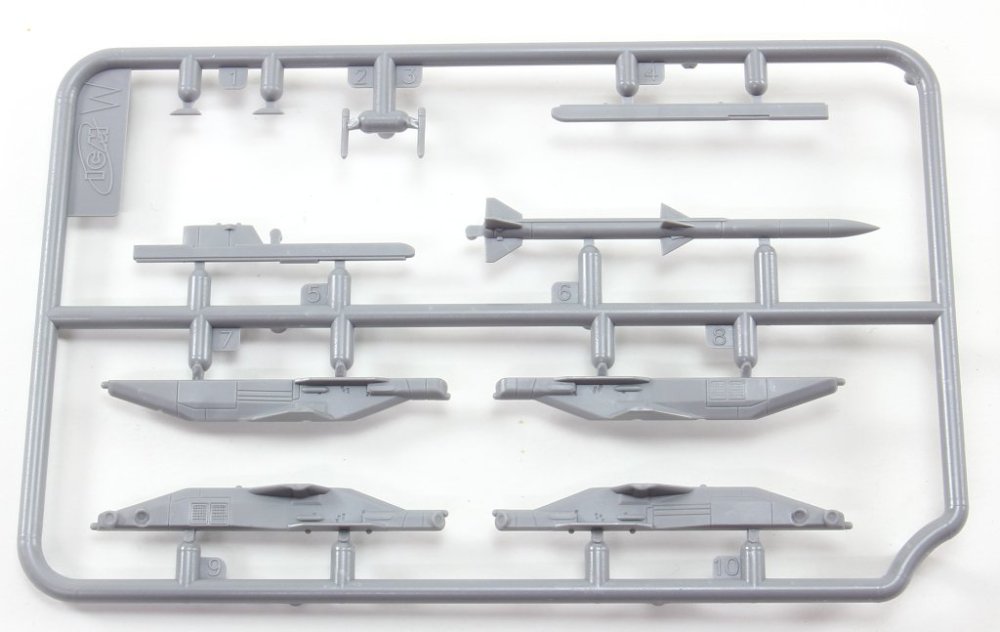
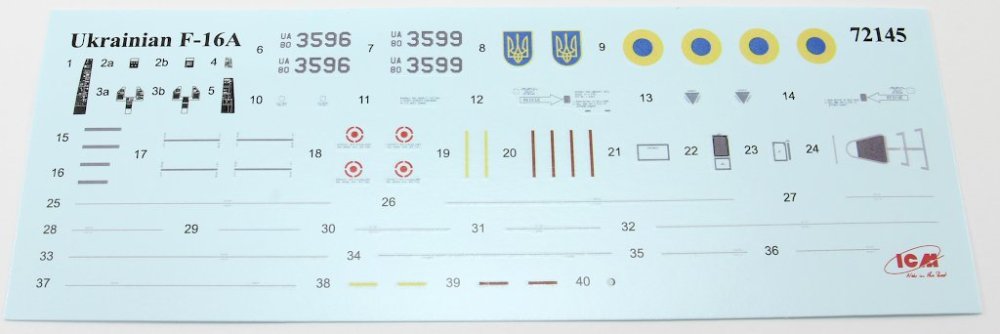
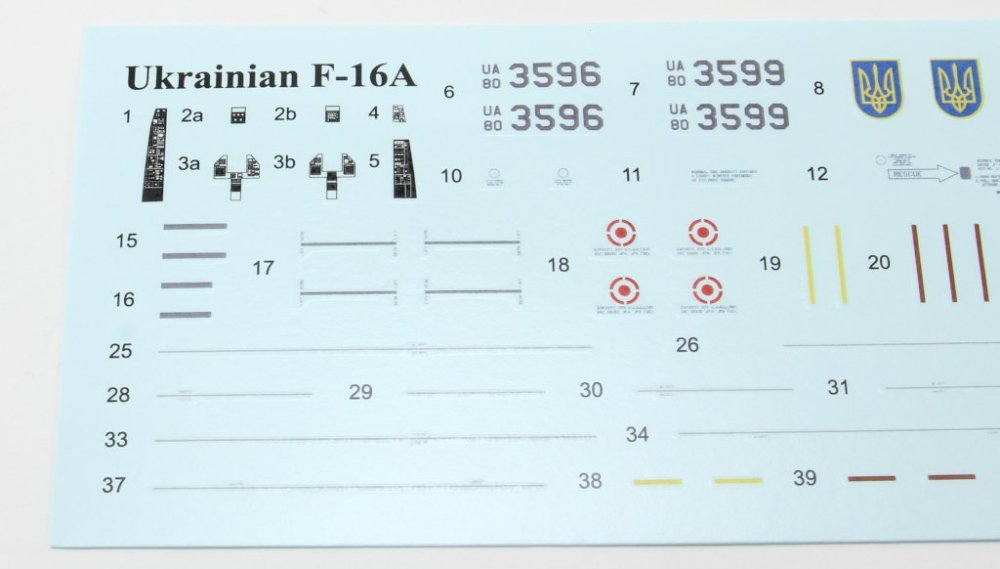
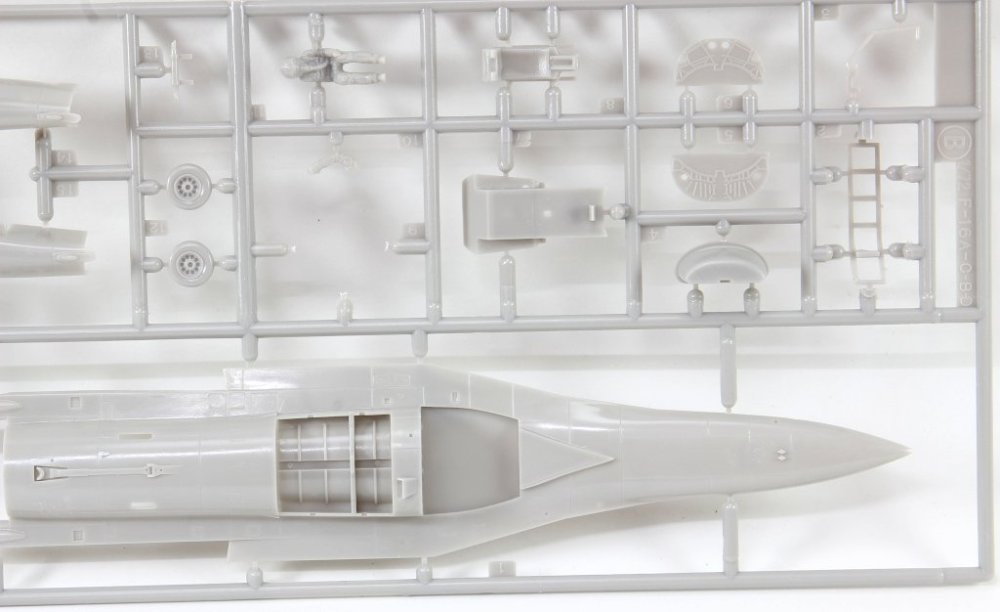
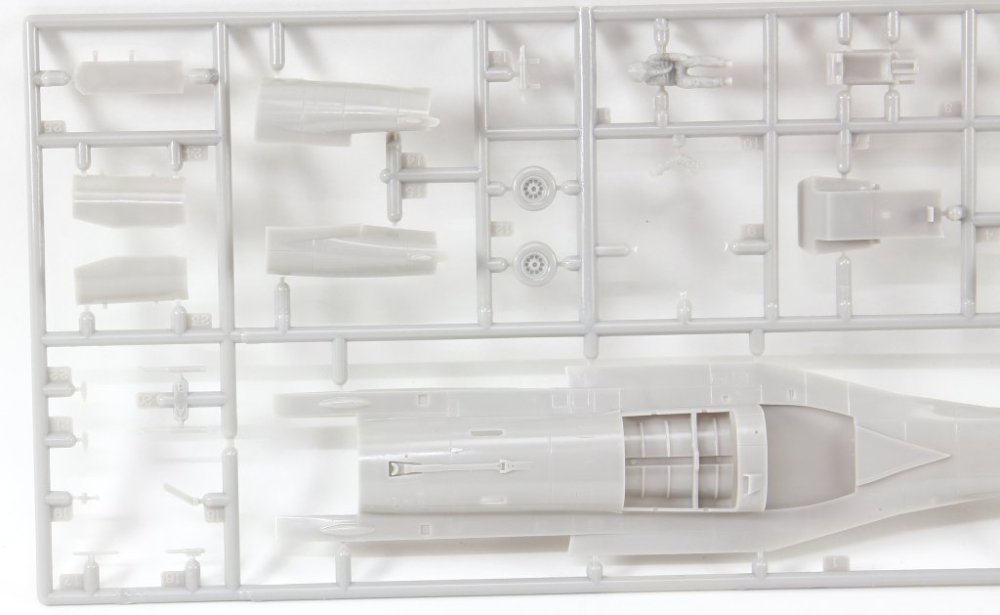
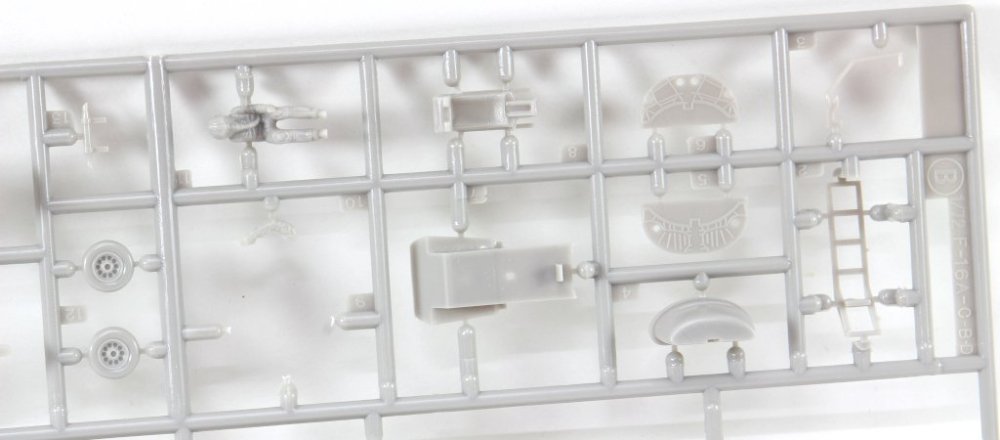
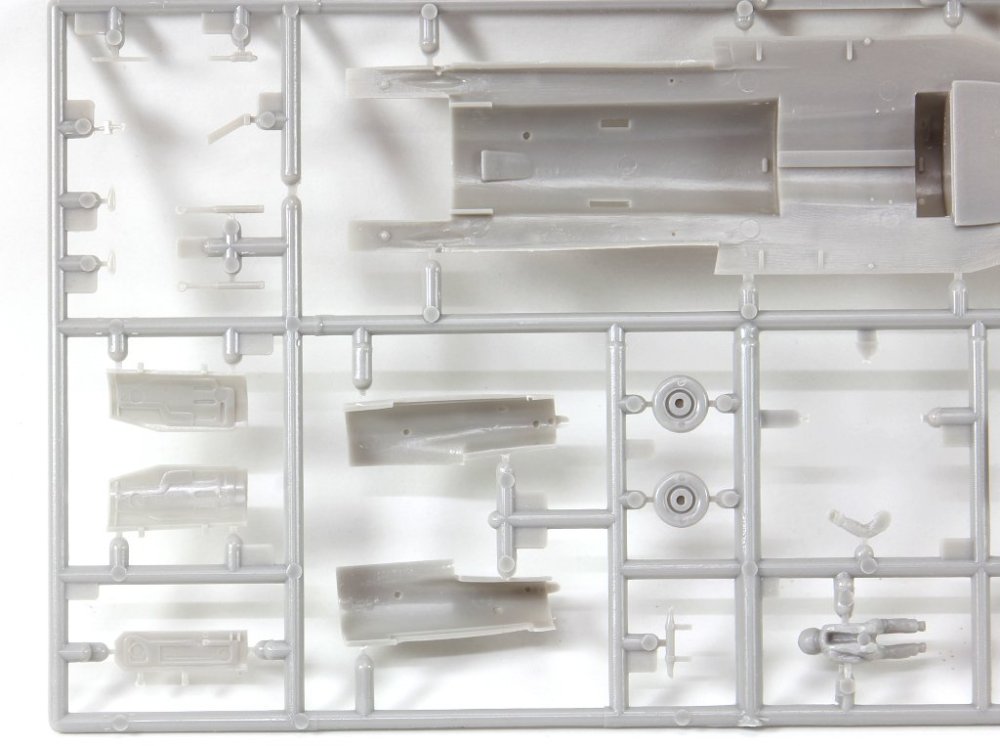
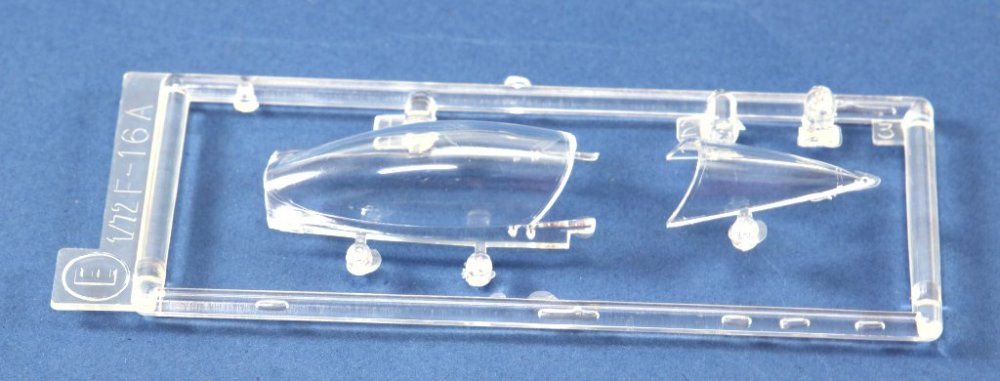
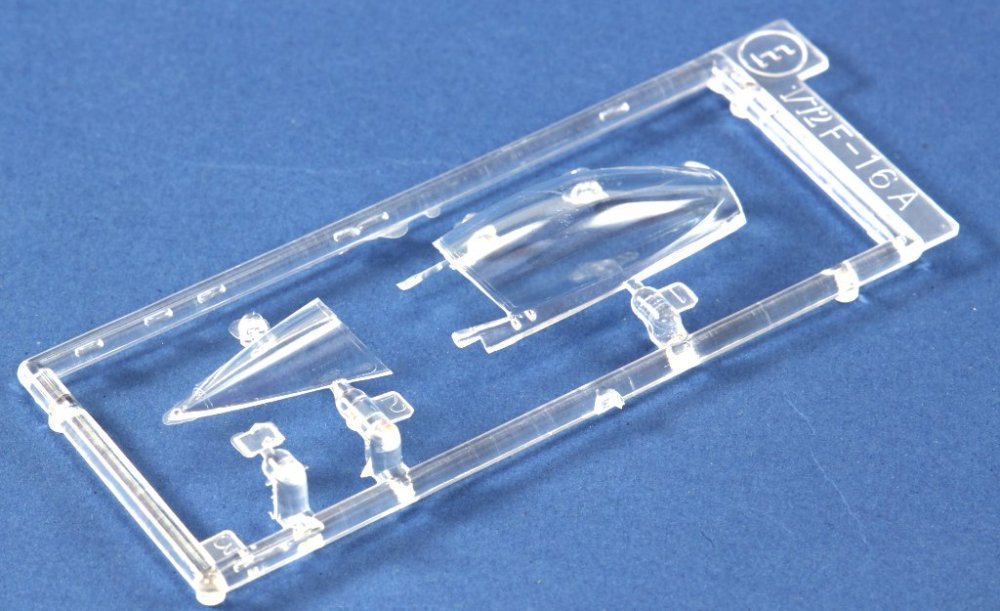
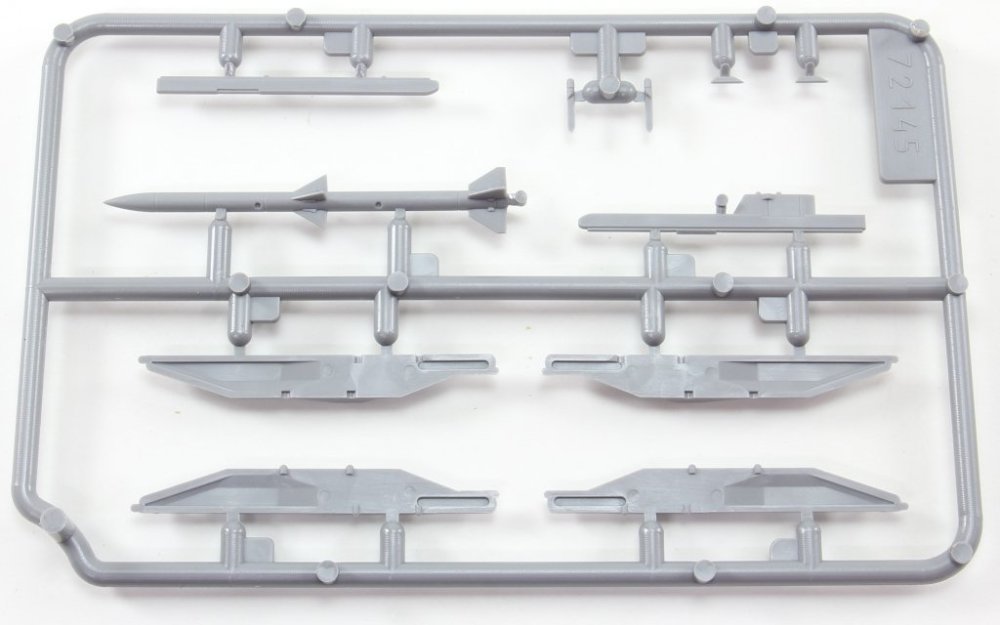
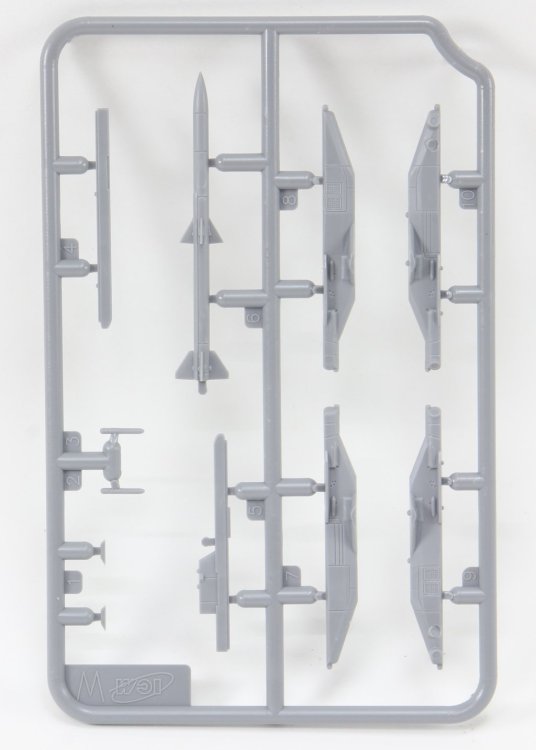
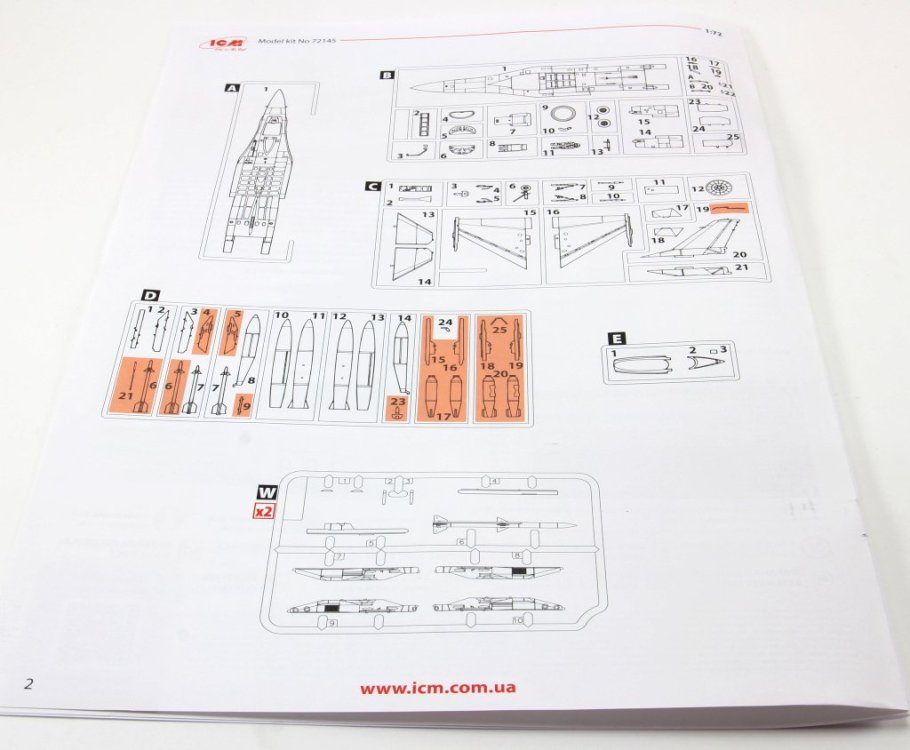
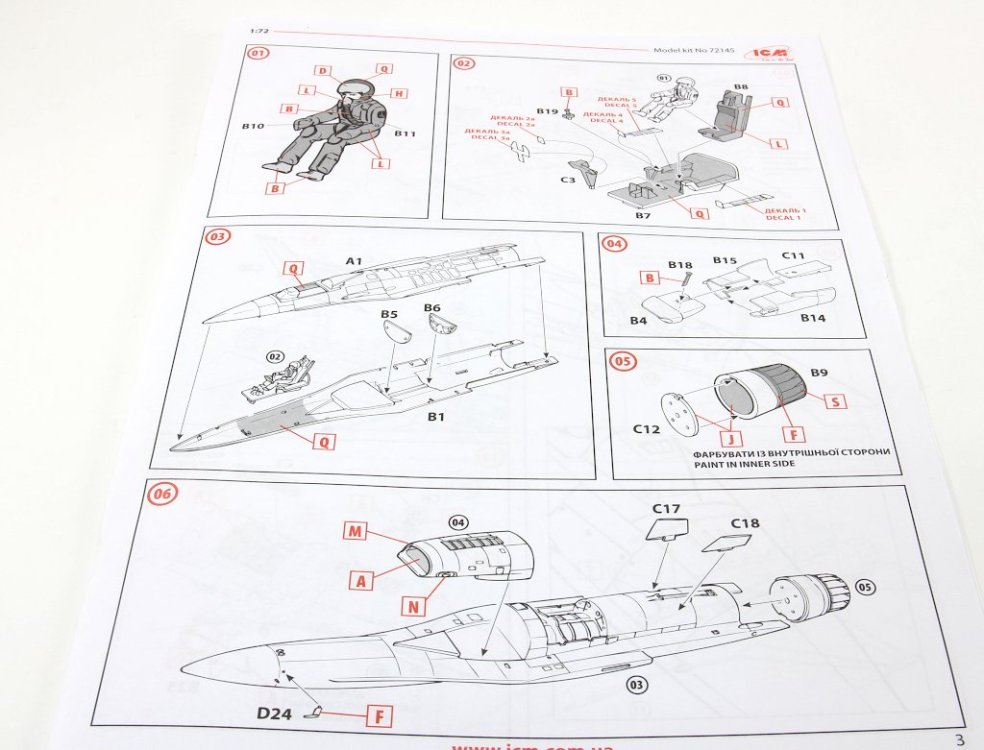
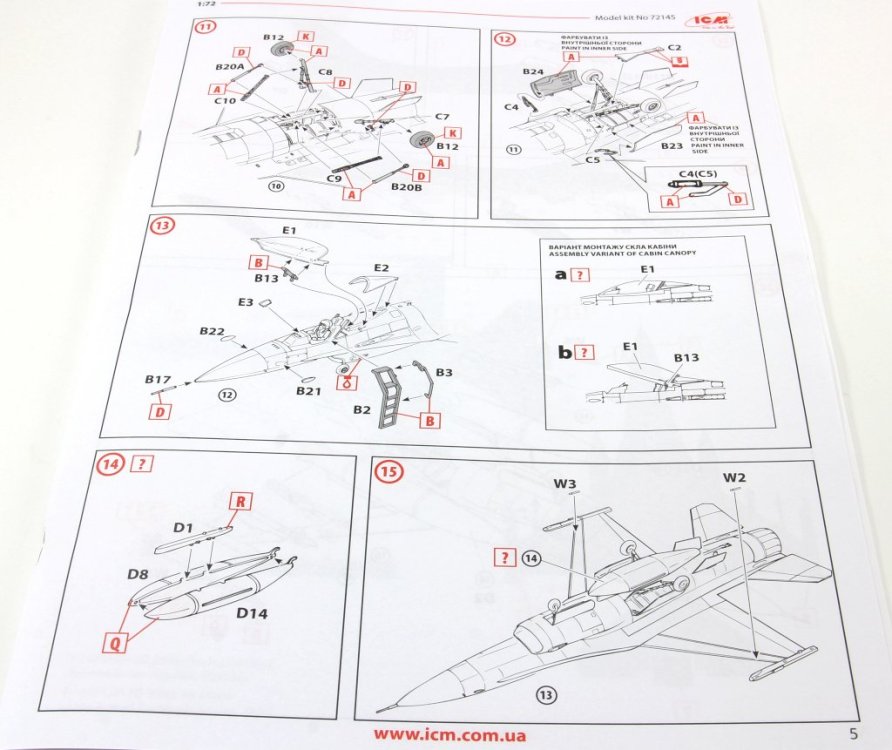
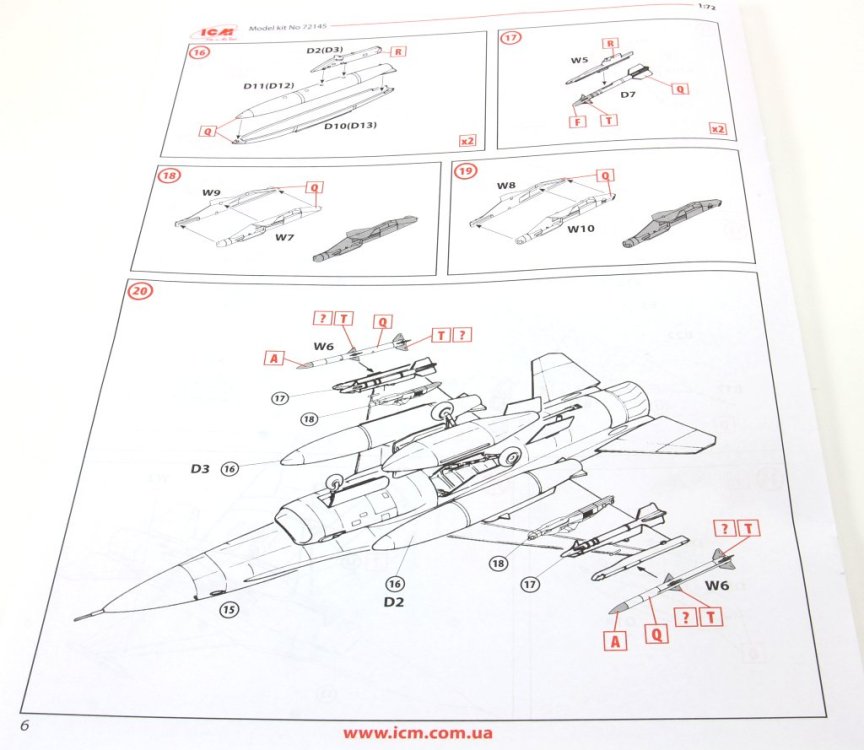
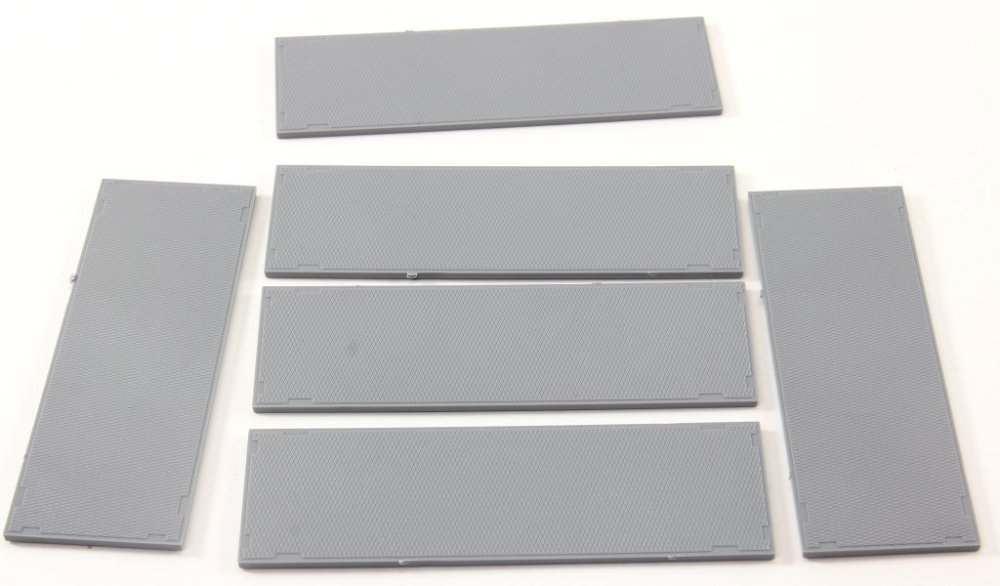
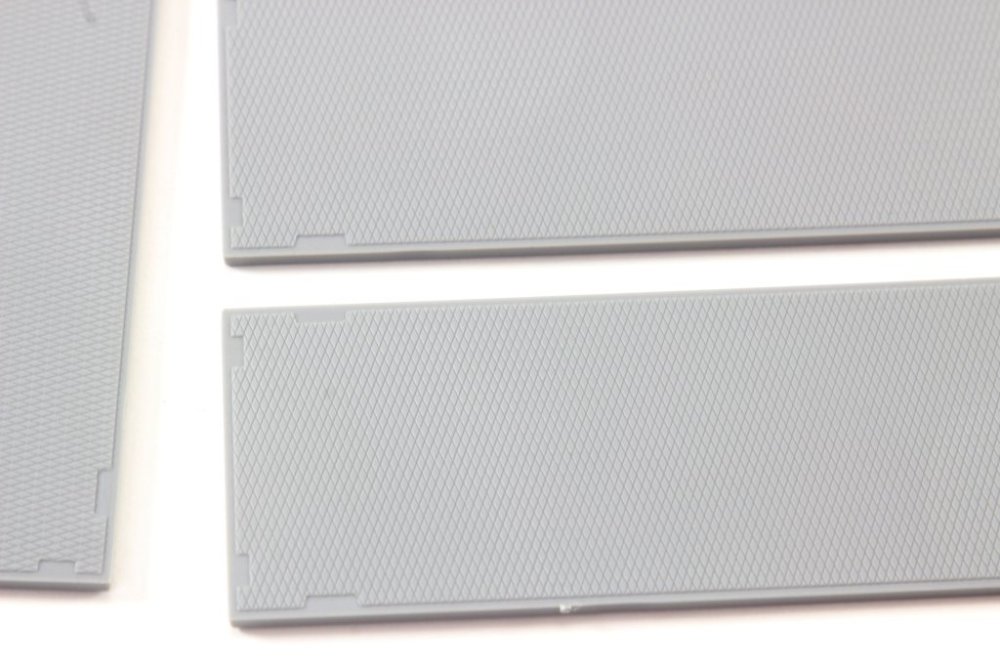
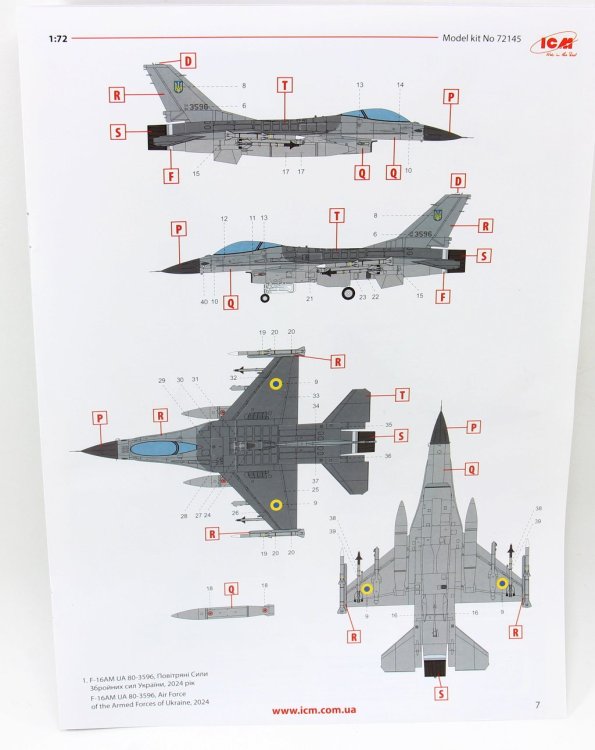
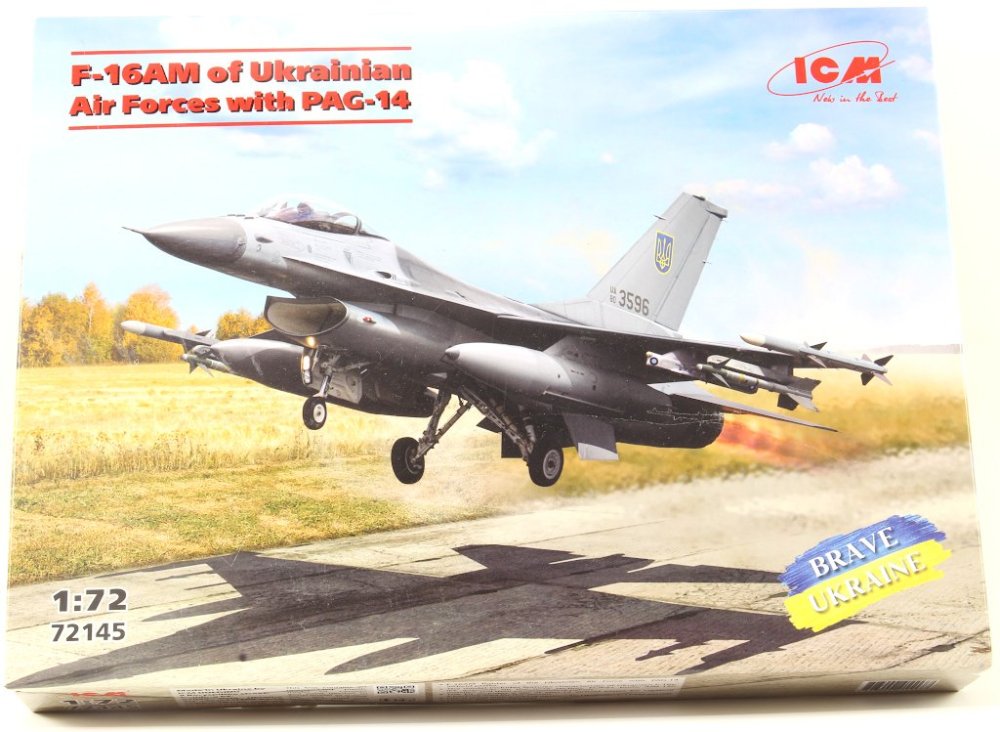
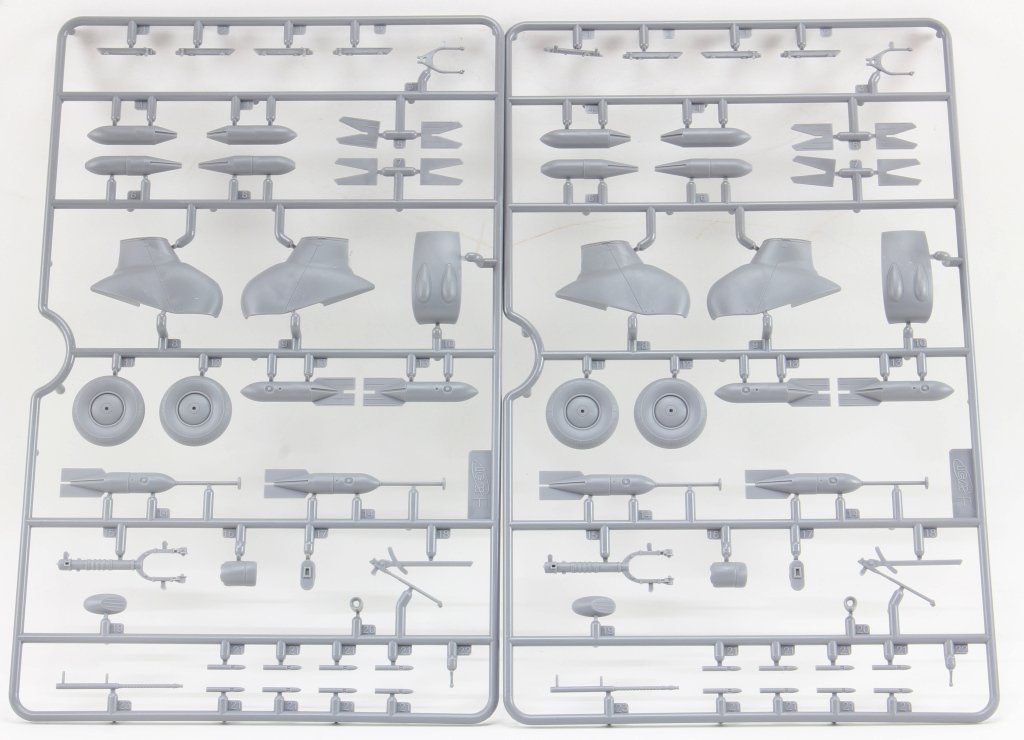
ICM 1:72 F-16AM of Ukrainian Air Forces with PAG-14 Ref: 72145 Retail price: 20,09€ Available here Introduction ICM continues its unstoppable pace, releasing multiple kits across a wide range of themes that cater to almost every modelling taste. In this case, we have a collaboration between a well-established kit (Hasegawa) and new parts that update it to the AM version. Nordic Fighting Falcons to Ukraine What’s in the Box On the box lid, we see an F-16AM in Ukrainian colours taking off at full military power from a typically Soviet-style airstrip made of PAG-14 concrete slabs. Inside the typical ICM cardboard box, we find: One bag with the sprues for building the F-16 Two sprues with the parts needed to convert it to the “AM” version One bag containing 32 PAG-14 slabs An instruction booklet A decal sheet A leaflet referencing the ICM paint range Rising Sun Falcon Hasegawa’s F-16 has been around in the modelling world for quite a few years. For a long time, it was the benchmark in the gentleman’s scale (1:72), but newer offerings have since surpassed it in terms of detail and ease of assembly. Still, it’s a Hasegawa – and that’s an aristocratic lineage. The kit features recessed panel lines with fine detailing that’s perfectly appropriate for the scale. Yes, there are simplified elements, but it’s easy to build, quick to assemble, and in the end, you get an F-16AM. One of the kit’s weak points is the cockpit, which lacks detail beyond the control stick. That’s where ICM’s decal sheet comes in, providing decals for the side consoles and instrument panel. Let’s check the sprues then: Sprue W (x2) This sprue, designed and moulded by ICM, provides the wing pylons with the ECIPS+ system (Self-Protection Jammer solution), wingtip launchers, RWR antennas for the wing leading edge, and AIM-120 missiles to upgrade the model to the “AM” version. Being a modern design and mould, these parts stand out compared to the rest of the Hasegawa kit, enhancing the overall quality of the model. F-16 Sprues The model is distributed across four glossy grey sprues and a small clear one containing the two-part canopy and HUD. Sprue A This sprue provides the upper half of the F-16 fuselage. The fine and accurate panel line detailing, a hallmark of the Japanese brand, is worth noting. Personally, I’m not a fan of the nose being moulded as part of the fuselage, as it will require extra care to eliminate seam lines. Sprue B This sprue contains the lower fuselage (moulded as a single piece). Unlike sprue A, it includes additional parts such as: rear landing gear bay bulkheads and wheels, engine intake, boarding ladder, and exhaust nozzle (not shown in the photo as it detached from the sprue). The canopy actuator is also included—although simplified, it’s still present. The landing gear doors are detailed on the inside. Note: there are mould marks on this surface that should be addressed. Sprue C This sprue includes the wings (moulded as a single piece), tail (moulded in one piece), afterburner face, landing gear, and lower canards. The ejection seat is also represented, albeit in a simplified form. Sprue D This sprue provides the original wing pylons from the kit, as well as armament and external fuel tanks (centreline and wing-mounted), typical of the F-16’s operational configuration. Except for the external tanks and AIM-9s, the remaining parts won’t be used, as they are replaced by those on sprue W. Sprue E This sprue contains the clear parts: two-part canopy and HUD. Note: The sprue gates on the canopy edges should be carefully removed (for example, using a fine razor saw like the ASK Ultra & Extra Smooth Asymmetric 70/43 teeth) to avoid burrs or cracks. Despite this, the frame detailing is quite visible, making it easier to mask the transparent sections. PAG-14 Slabs This set also includes 32 PAG-14 slabs. These pre-fabricated concrete plates, widely used across Soviet-era airfields and bases, are still a common sight throughout Ukraine. Their inclusion allows us to place the F-16AM in an operational context. Of course, the 32 pieces can be used to build a 1:72 scale runway section, but they also offer great potential for use in a variety of bases and dioramas 😊. The surface detail is realistic and well-scaled, and with a layer of paint and weathering, they’ll make the perfect complement to the Ukrainian-coloured F-16. Instructions The instruction booklet is A4-sized and consists of 8 pages. The first page presents the colour guide, entirely based on the ICM paint range. Following that, there’s a parts layout and a step-by-step assembly guide with clear, easy-to-follow illustrations. Marking Options Two marking options are provided, representing the first two airframes delivered to the Ukrainian Air Force, previously operated by the Royal Danish Air Force: F-16AM UA 80-3596, Air Force of the Armed Forces of Ukraine, 2024 2. F-16AM UA 80-3599, Air Force of the Armed Forces of Ukraine, 2024 Decals The decal sheet provides markings for the first two operational airframes, along with service stencils. The decals are well-printed, with good colour definition and detail. Also included are strip decals for the armament, specifically the AIM-9 and AIM-120 missiles, as well as stencils for the wing-mounted external fuel tanks. An interesting detail also provided as a decal is the identification and interception light mounted on the fuselage behind the radar, on the left side. Conclusion This set combines parts from a classic kit which, despite its age, remains relevant and easy to build. I say this with confidence, having built one in the past. The upgrade parts supplied by ICM allow the model to be brought up to a modern standard. That said, keen-eyed modellers will notice a few missing details, such as the structural reinforcement plates on the fuselage and wings, and the typical light cluster mounted on the front landing gear door (which can be easily added using a segment from the clear sprue). The inclusion of PAG-14 slabs allows modellers to go a step further and present the aircraft in a simple diorama—an uncommon but very welcome addition in today’s modelling kits. The updated decals and stencils help elevate the final result, compensating for some of the kit’s limitations. What does this mean? It’s a straightforward kit: a beginner won’t struggle with the build, and a more experienced modeller will enjoy a simple, no-fuss project. The paint scheme, although grey, offers room for variation and creativity, making the final model even more eye-catching. This is a well-balanced and simple set—something we all need from time to time! It’s definitely a recommended kit! Thanks to ICM for providing the model for review! available at Ricardo Veríssimo


.jpg.0f9ca49f3c459411e6aa32e000d11fcb.jpg)
-
1:48 ICM Bronco NOGS – US attack Aircraft
rverissimo replied to rverissimo's topic in Non-LSM Reviews
Hi ! now that's a big bird! great model ! I llike the wiring detail on the cockpit!! -
ICM 1:35 Wehrmacht Self-propelled AA Vehicles
rverissimo replied to rverissimo's topic in Armour/AFV Reviews
Hi ! thanks for your words ! i specially liked the engine of Sd.Kfz.3b ( Ford V8)! "I am now building ICM kit No35507 W.O.T.6 truck. " share some photos of the build ! -
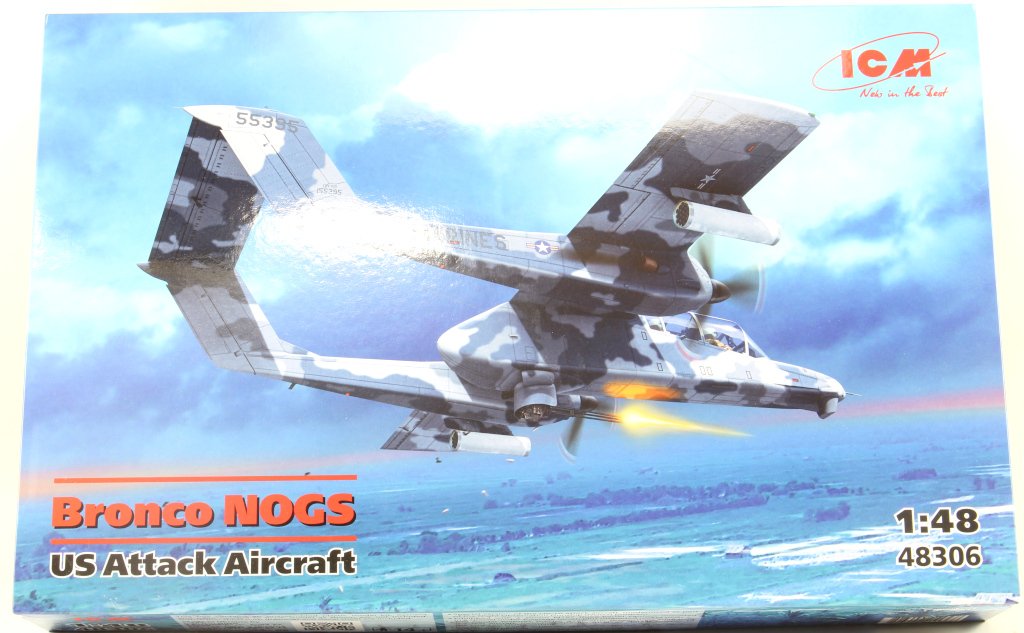
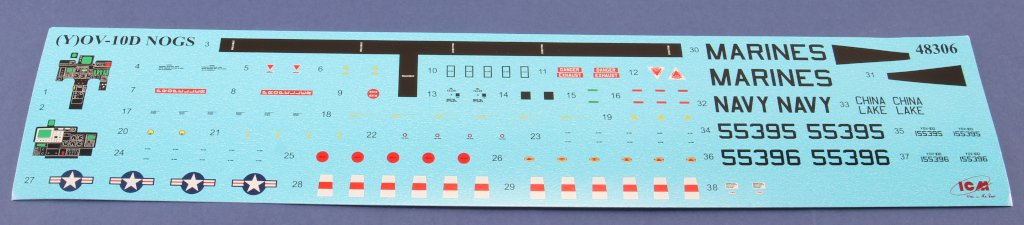
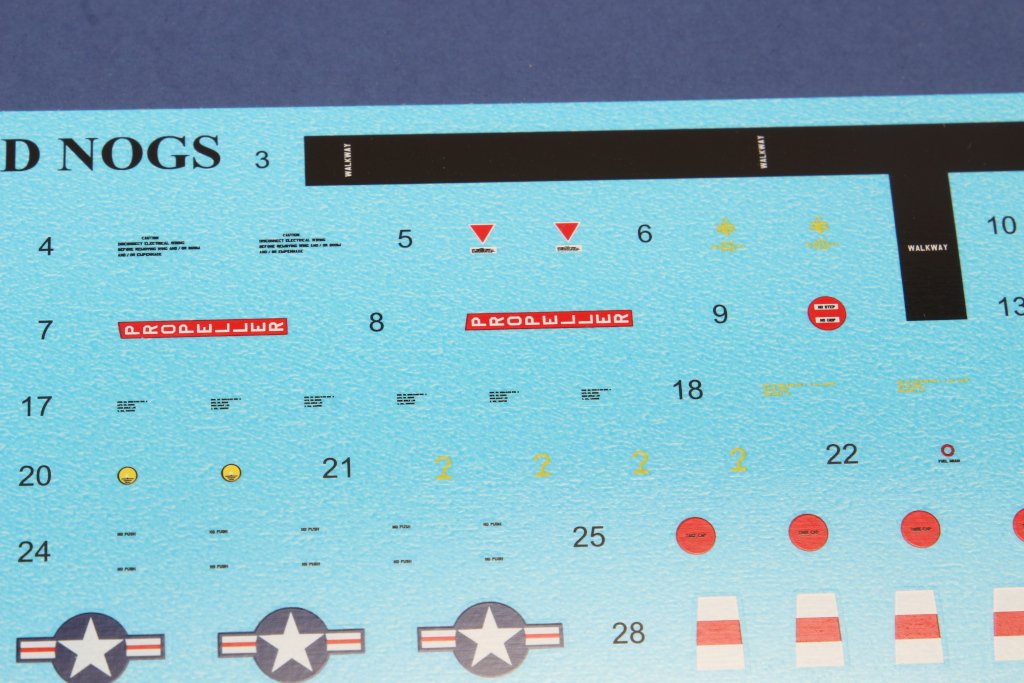
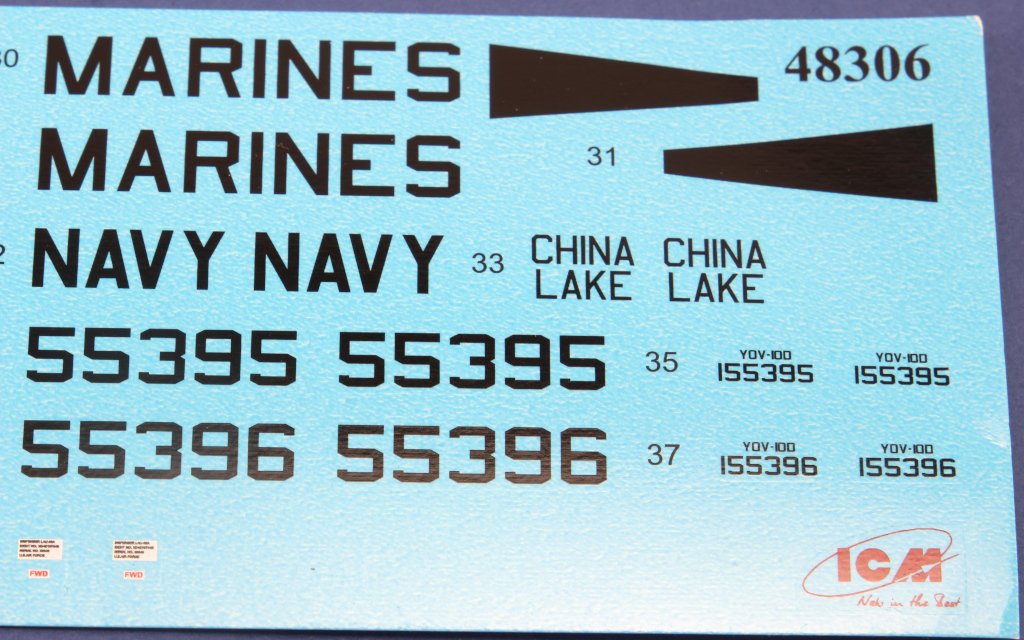
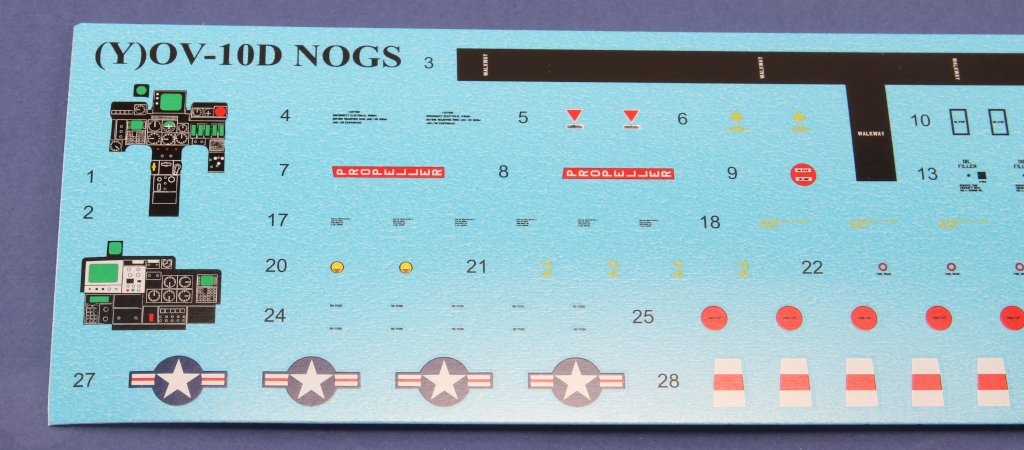
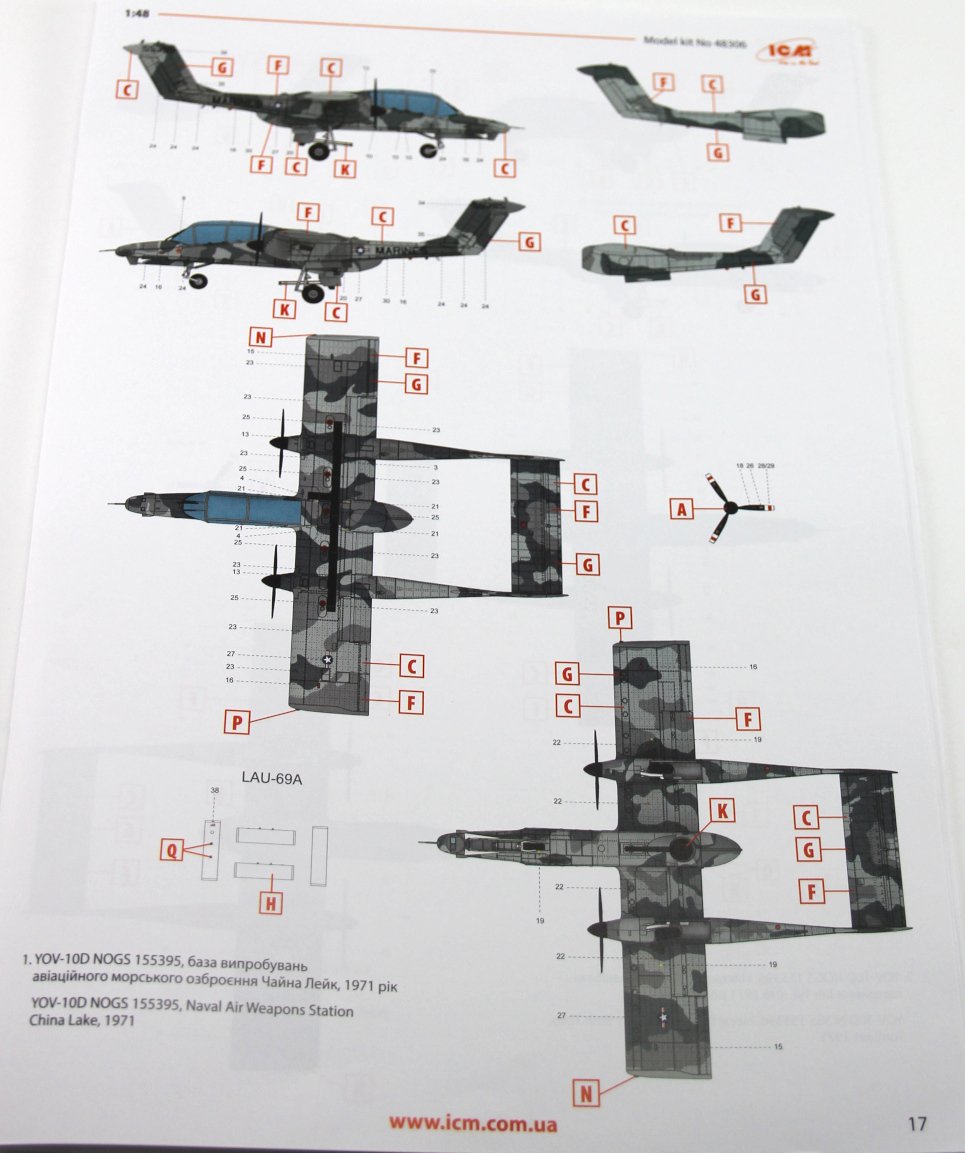
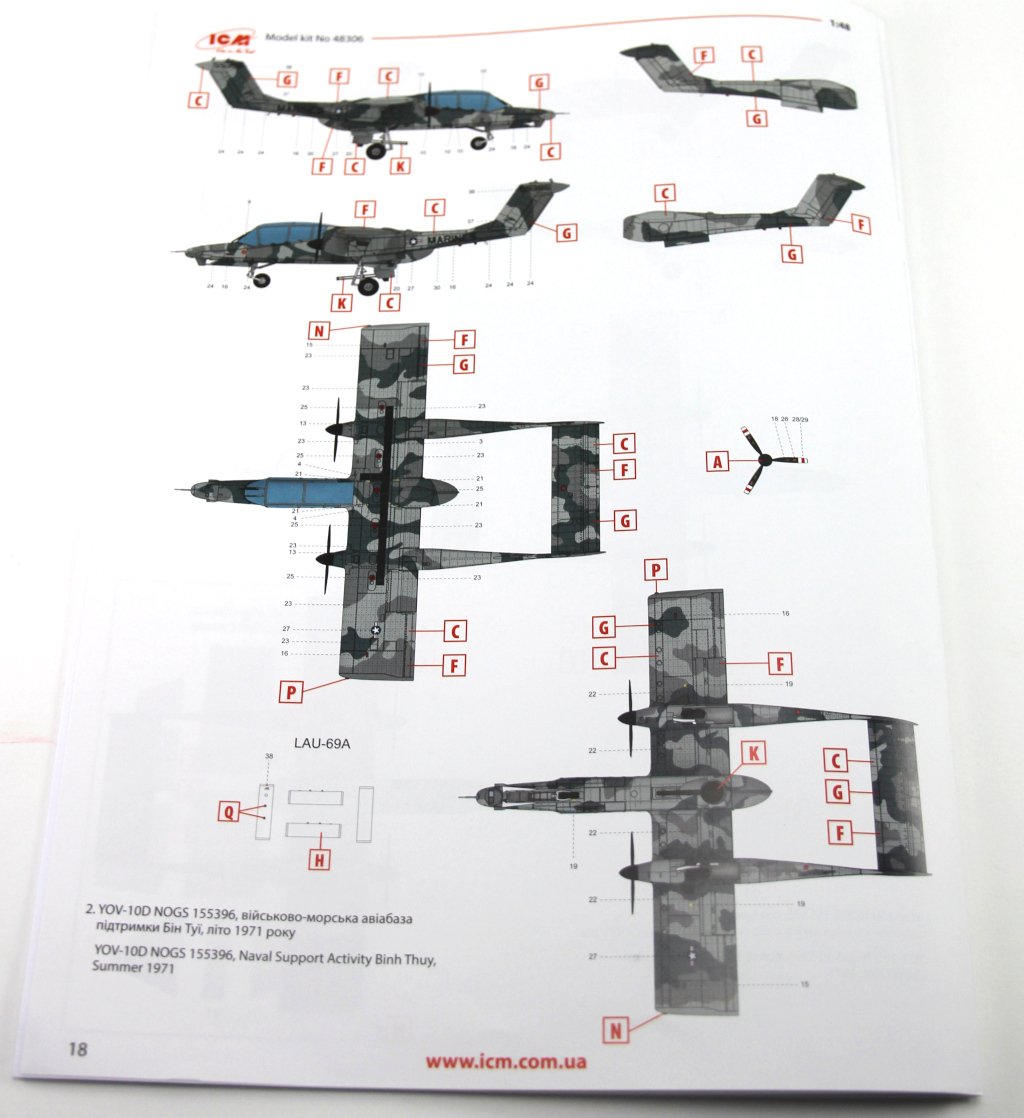
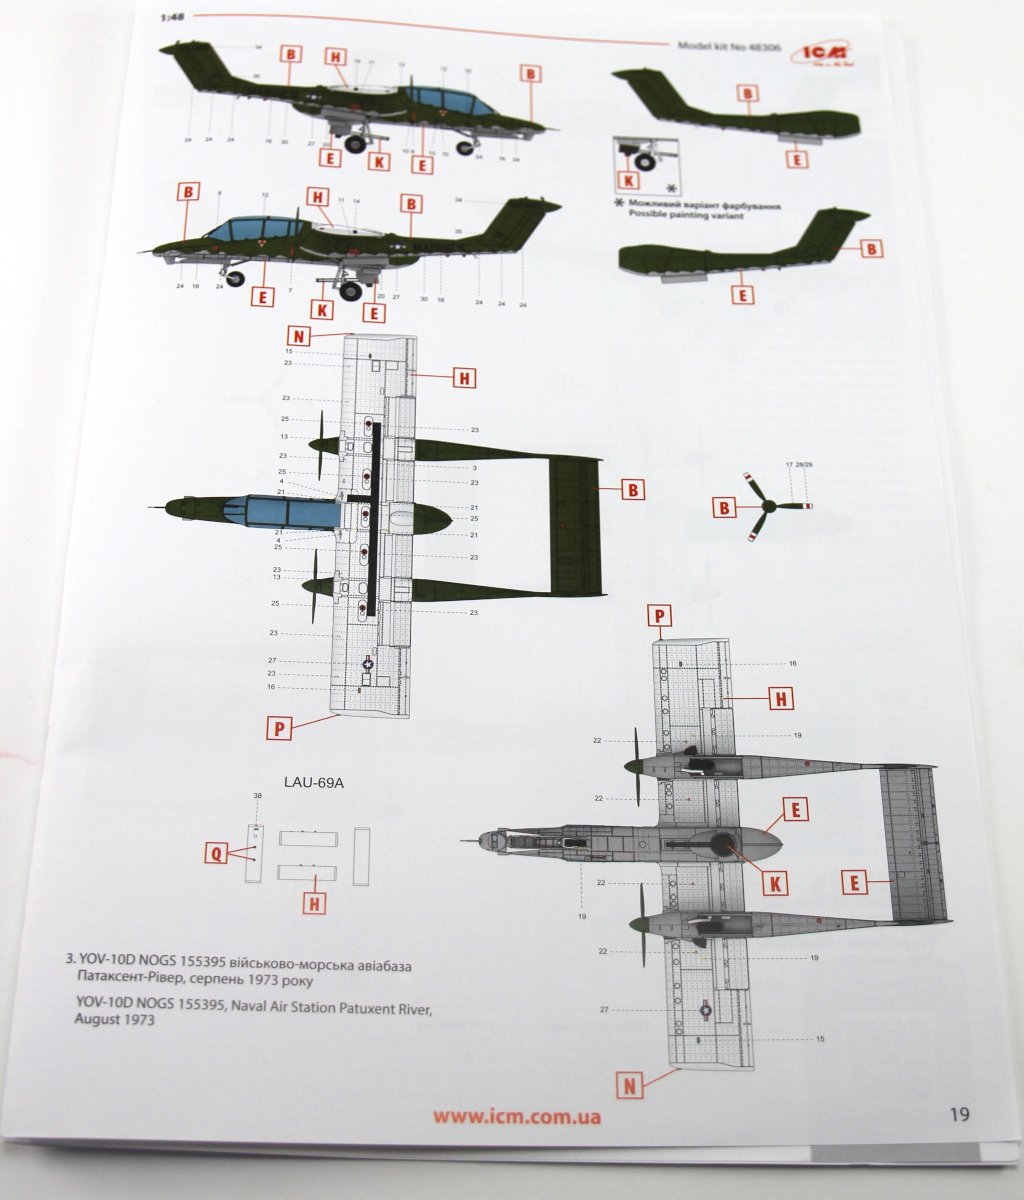
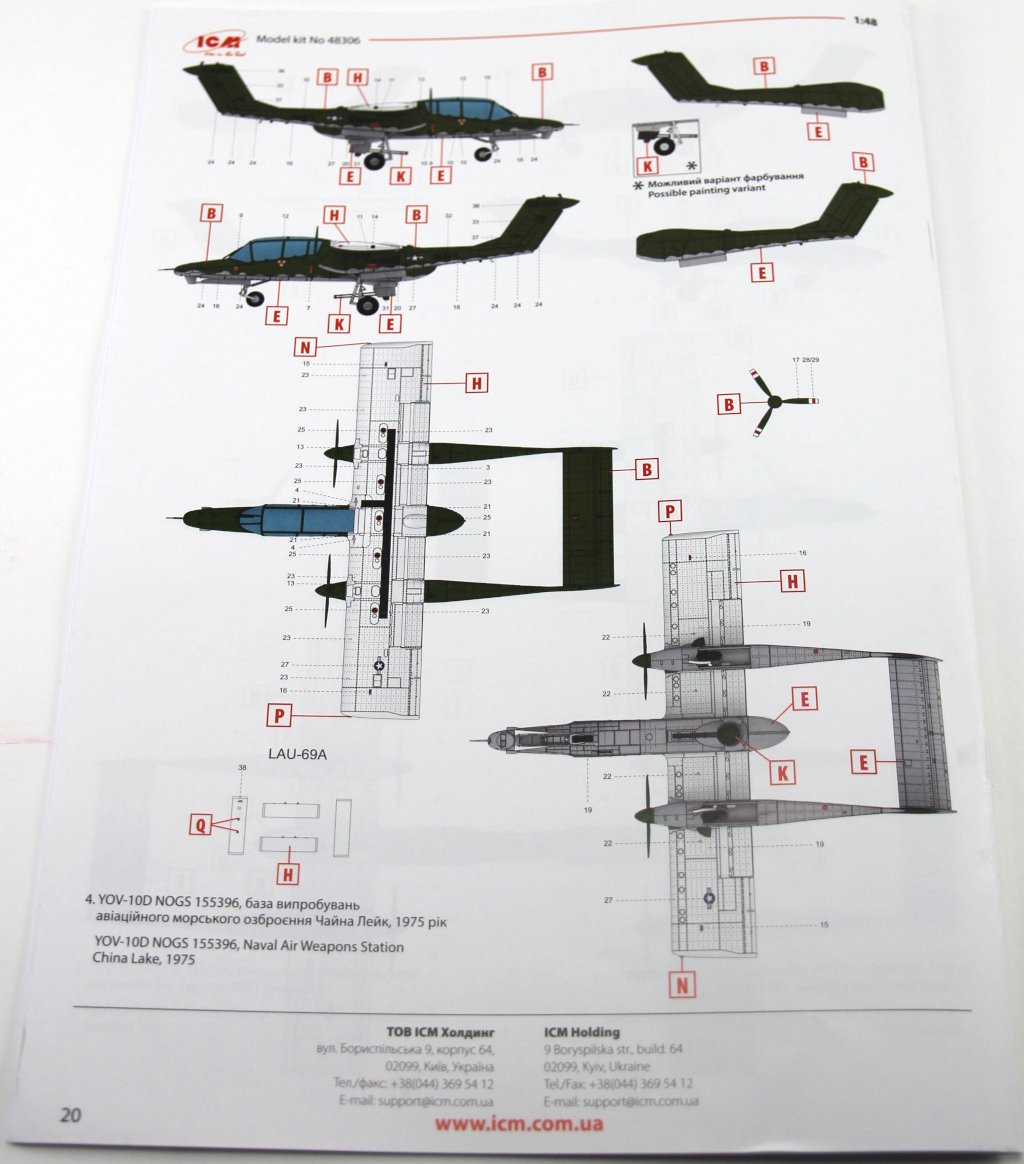
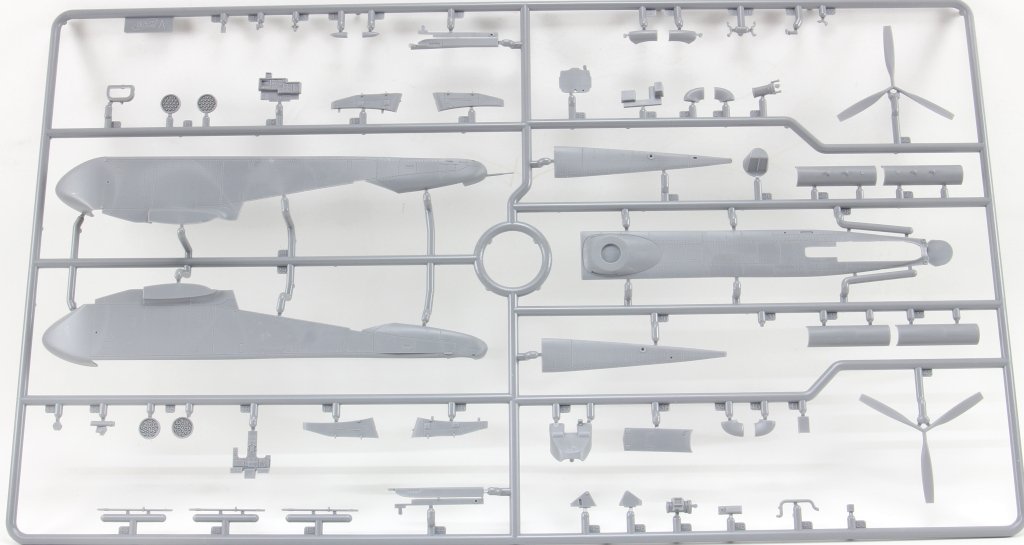
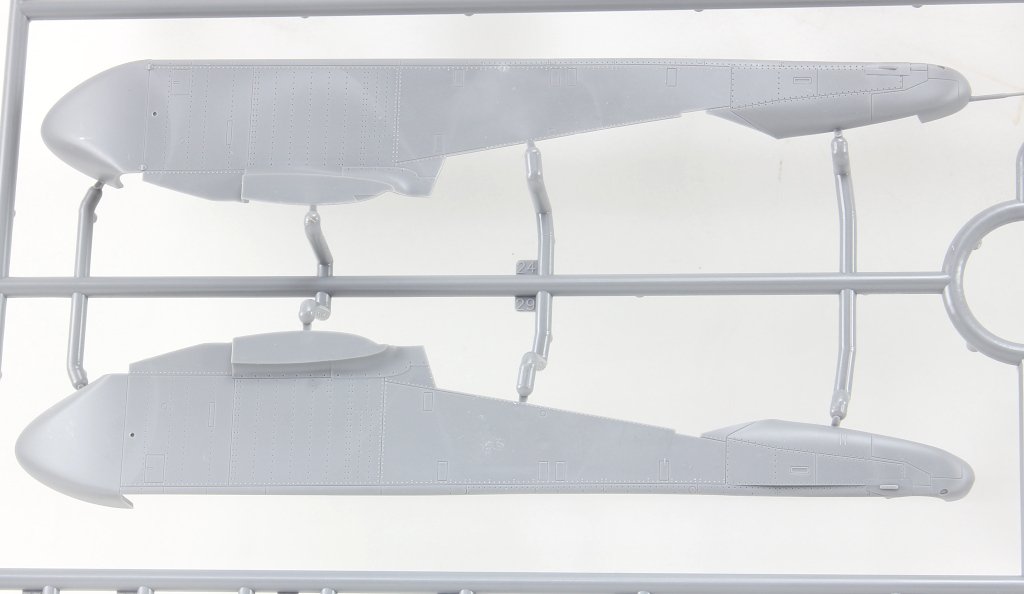
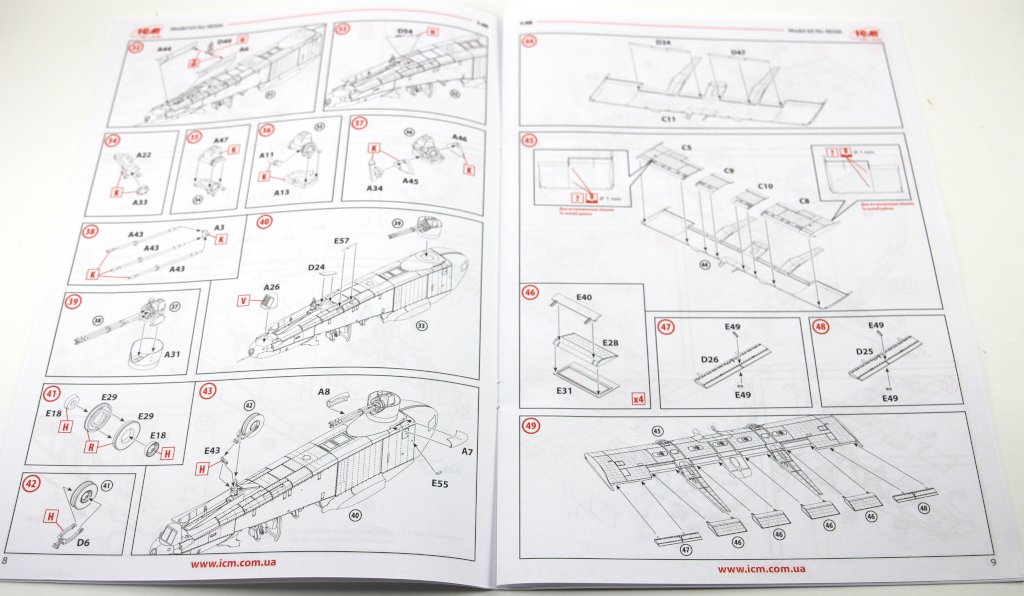
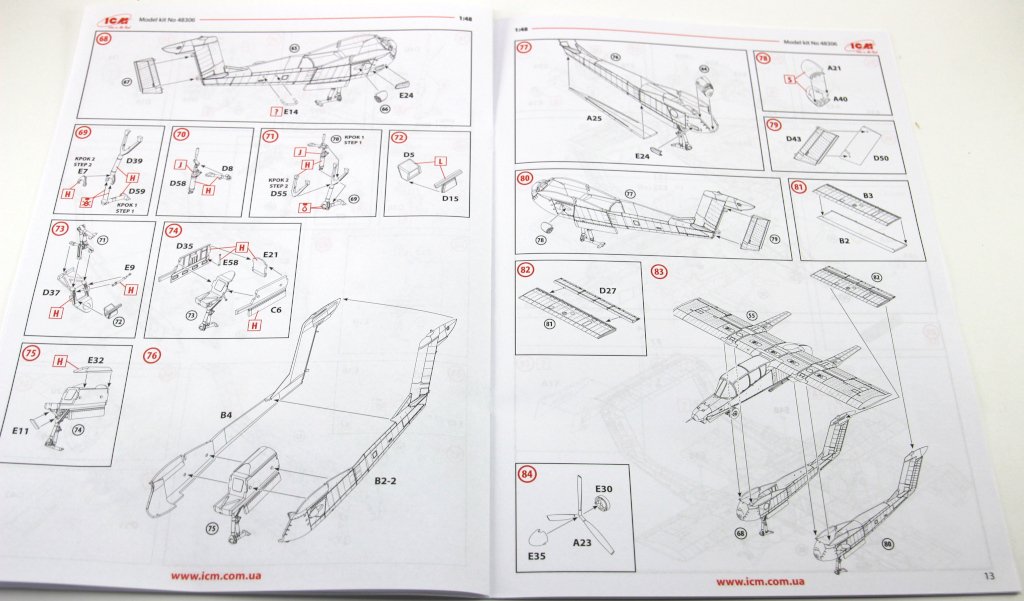
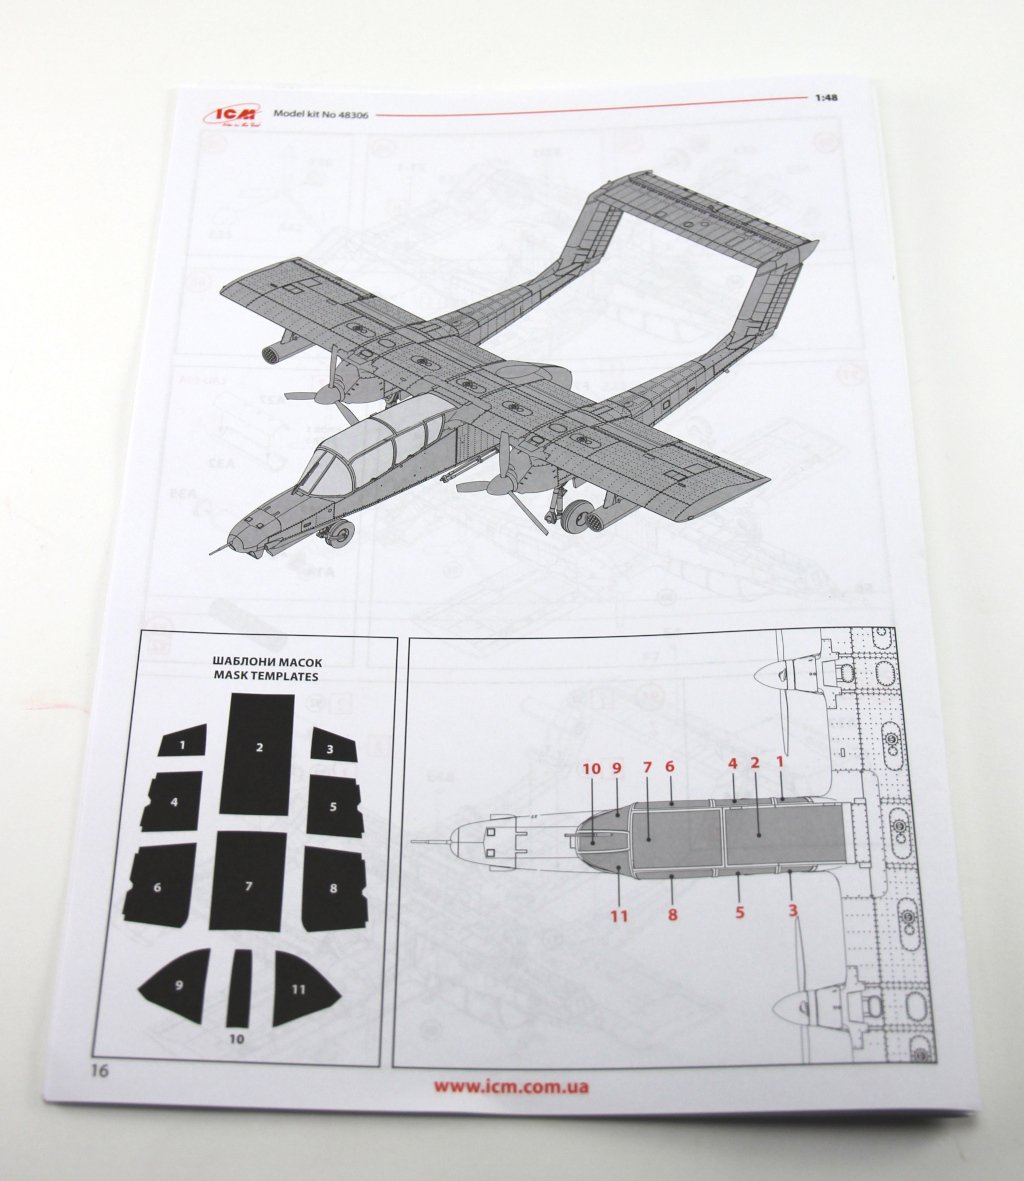
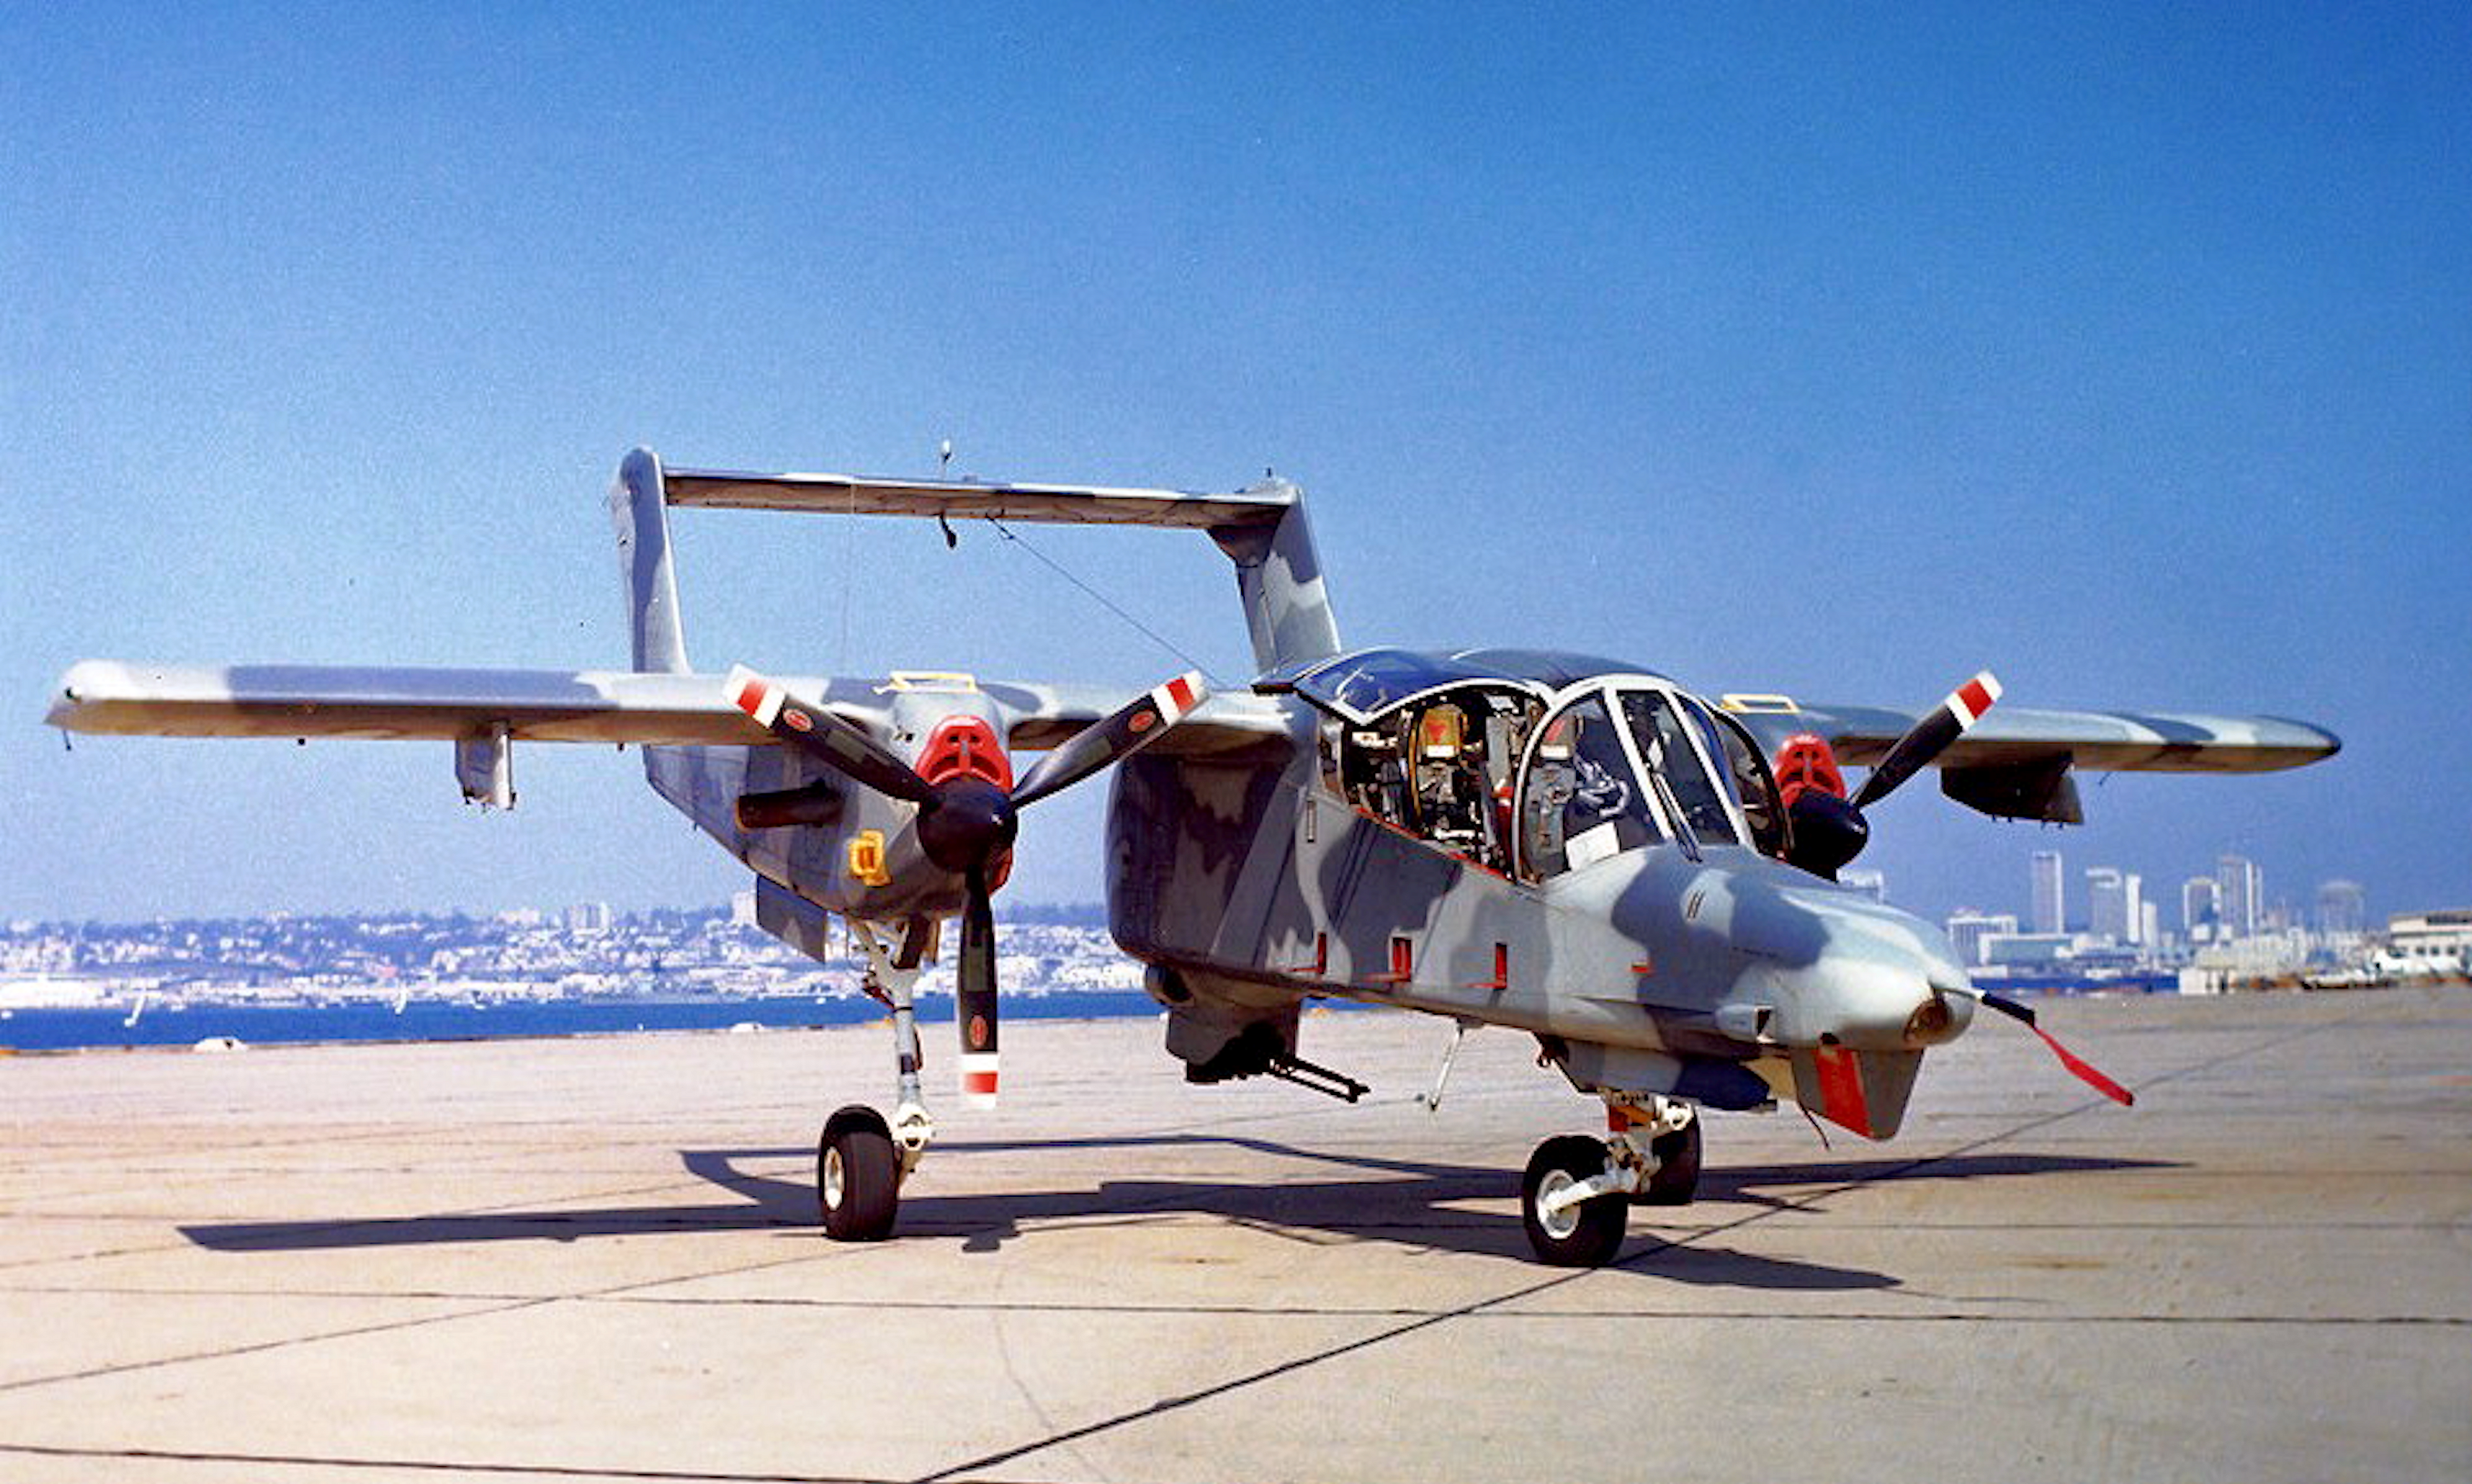
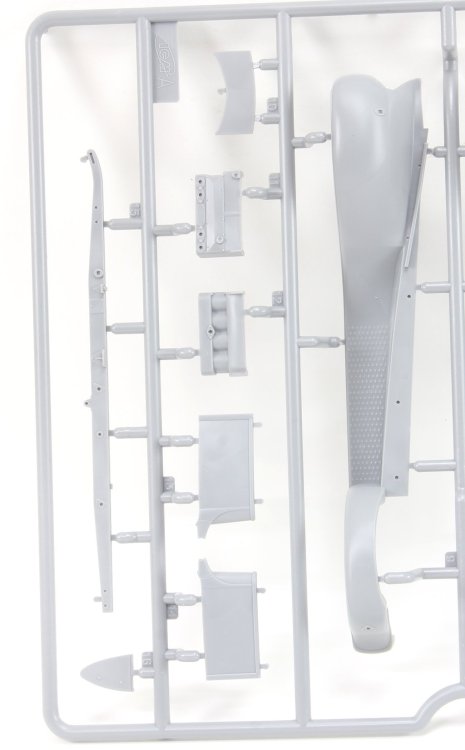
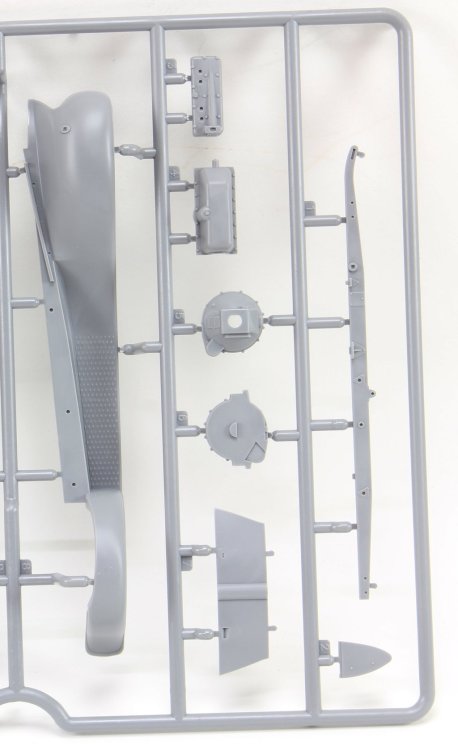
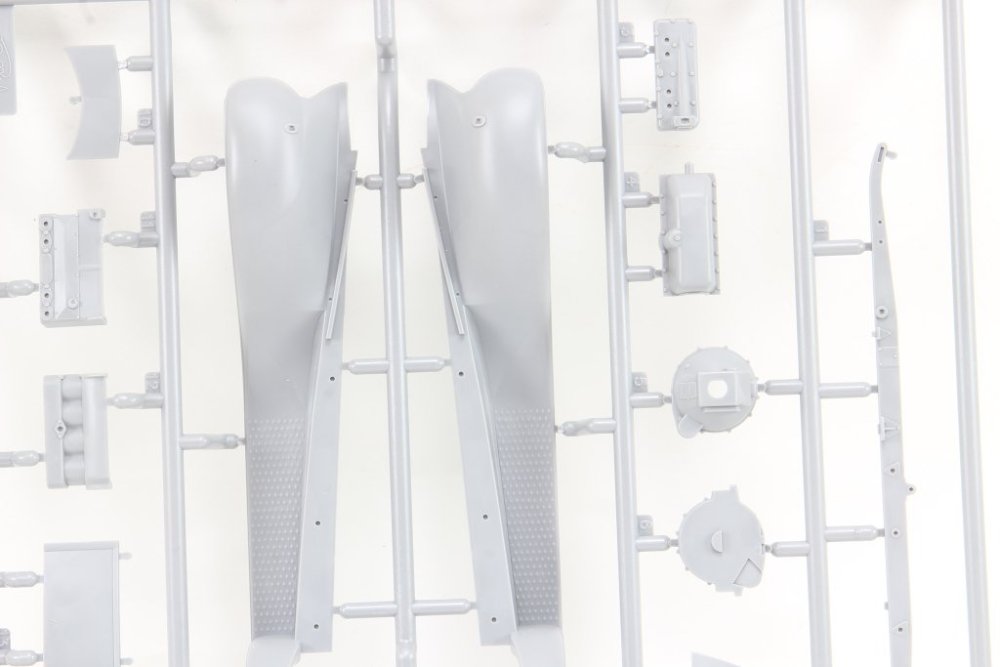
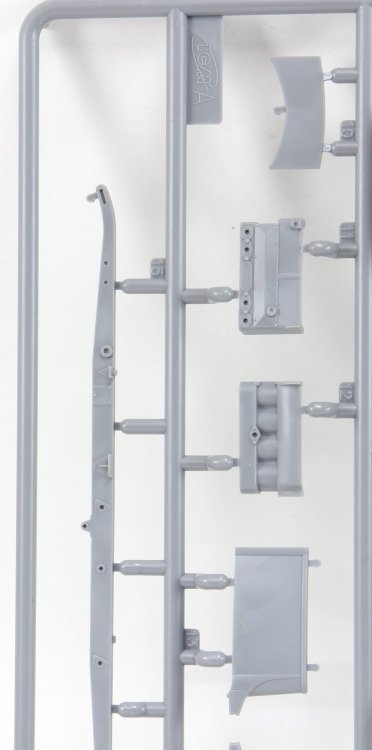
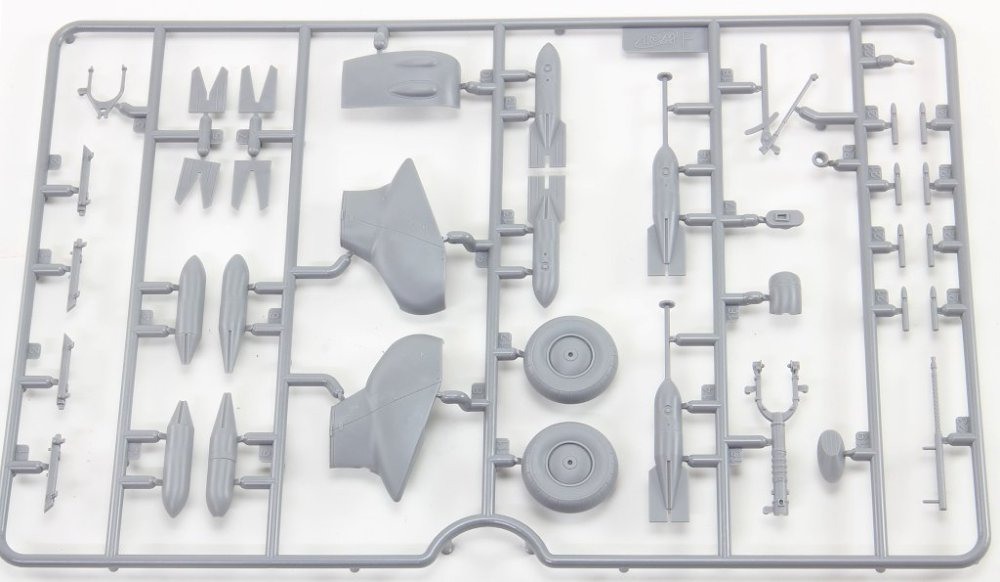
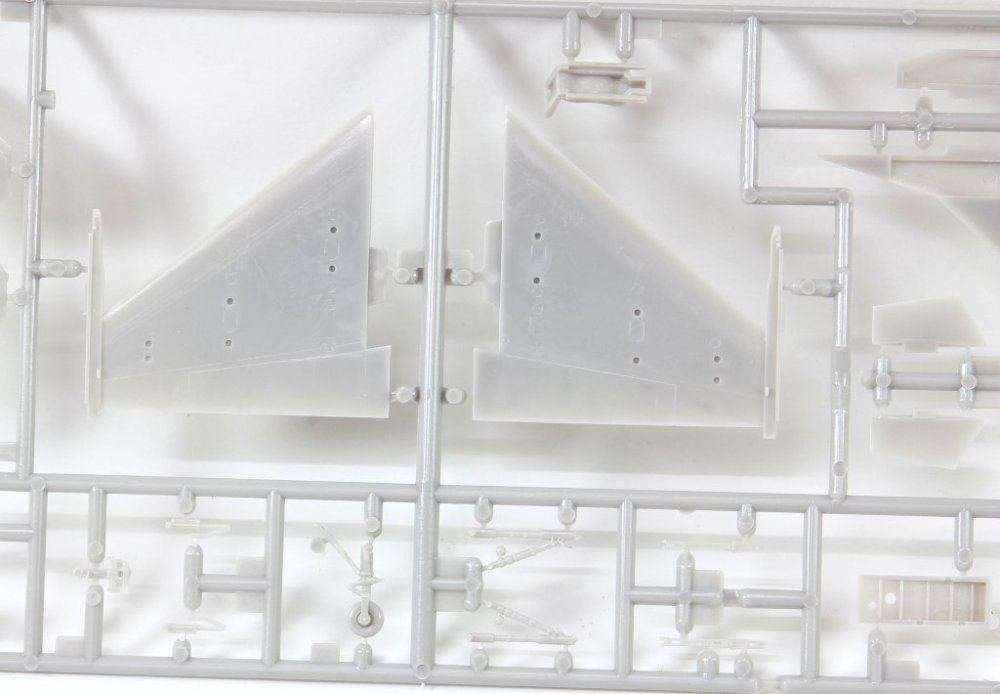
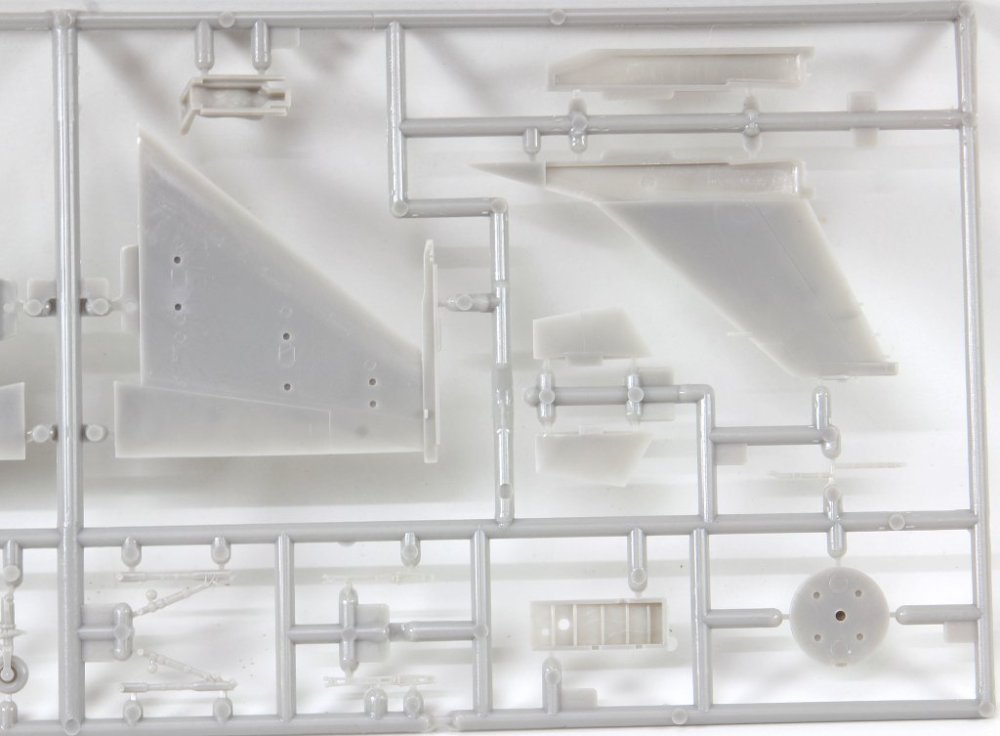
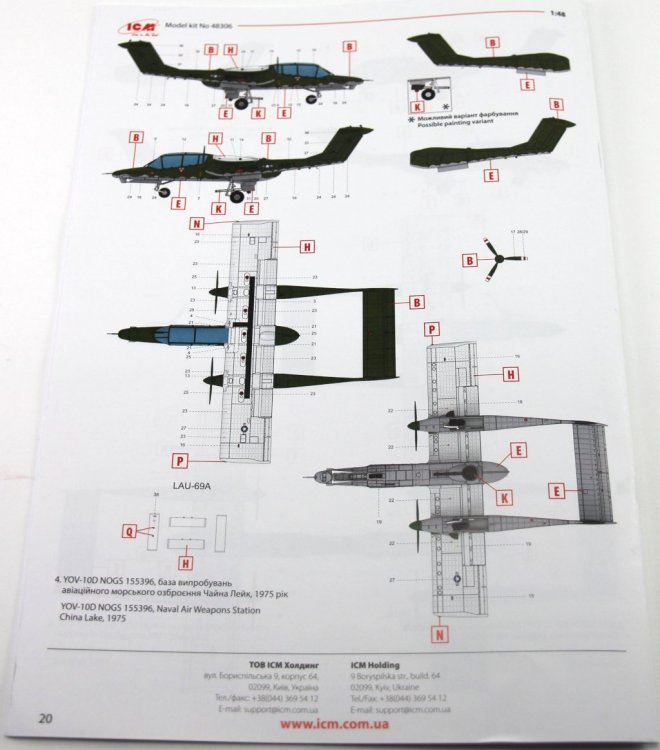
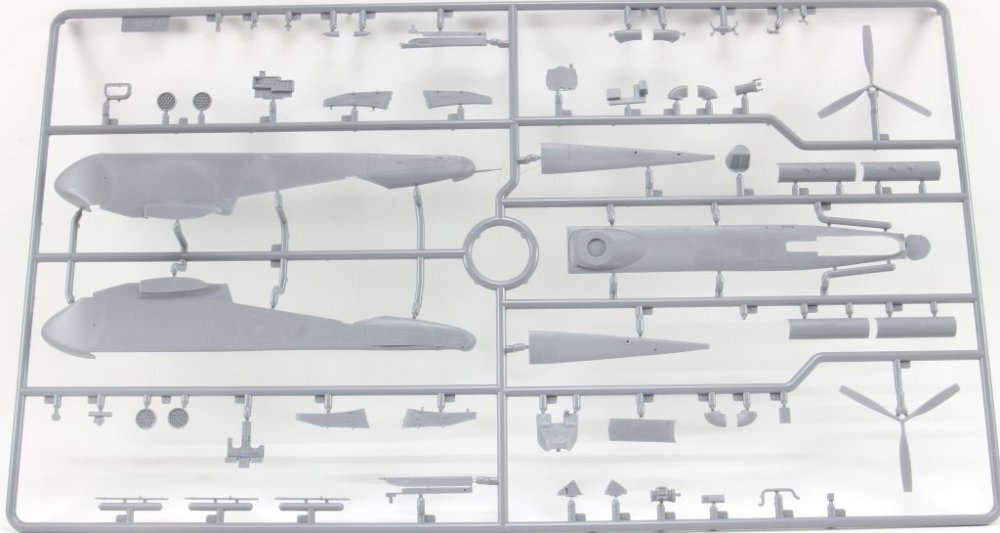
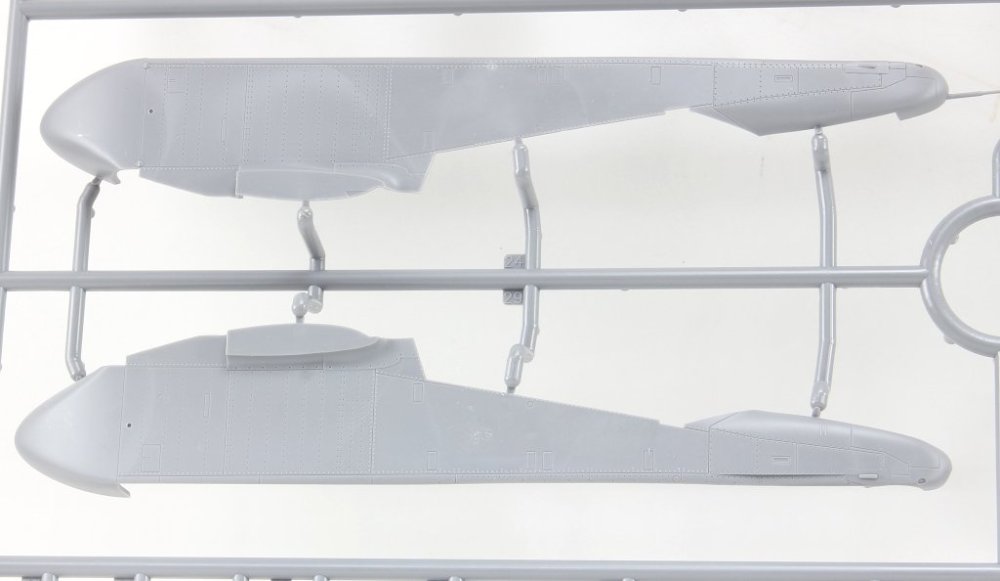
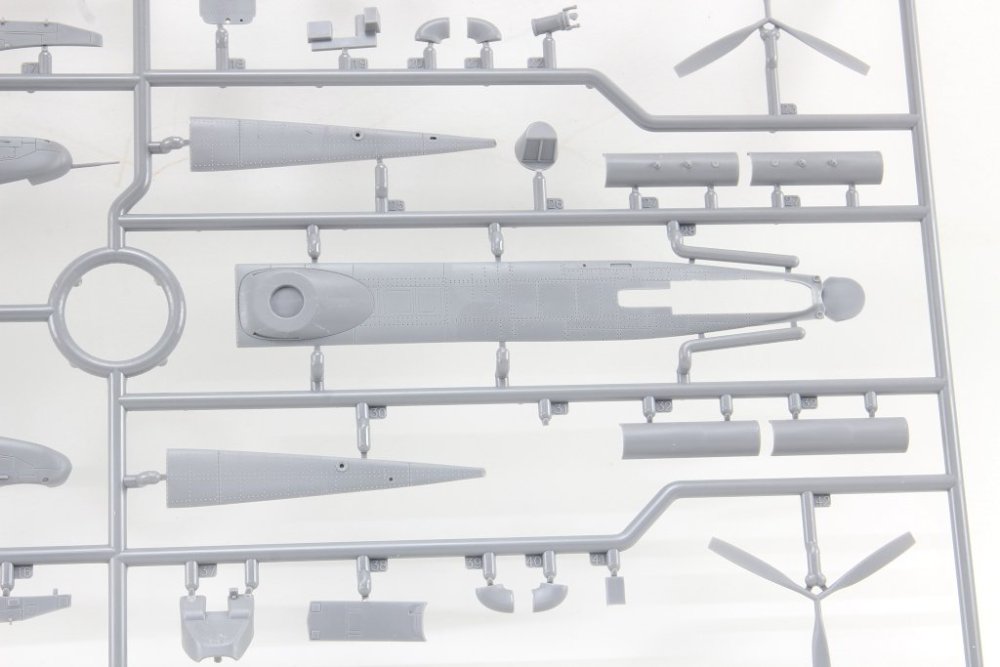
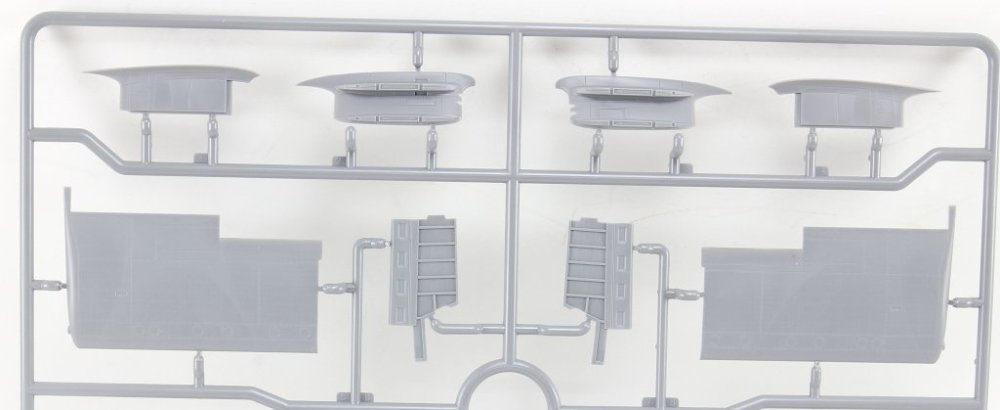
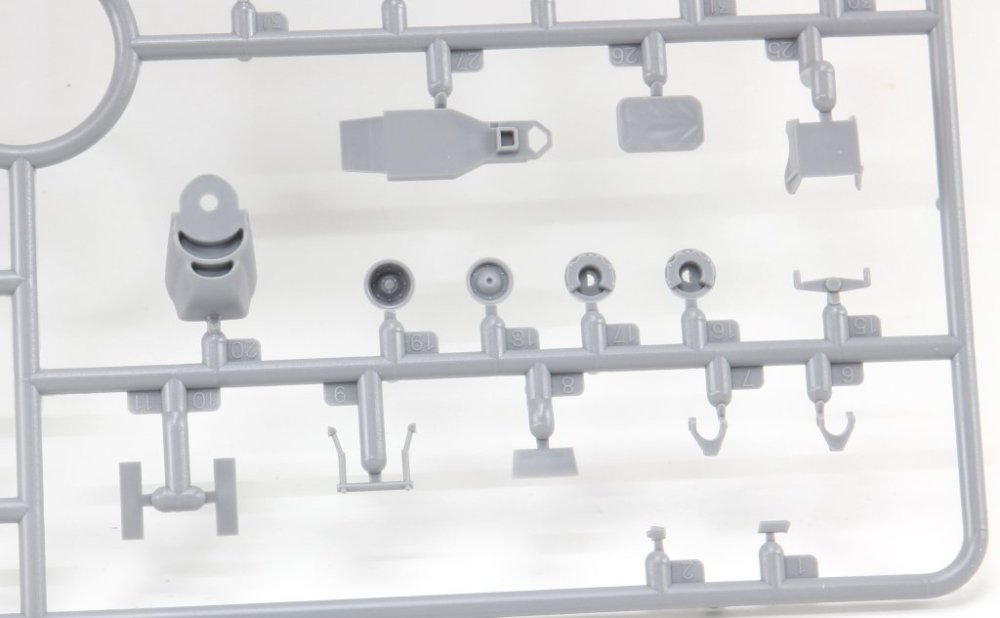
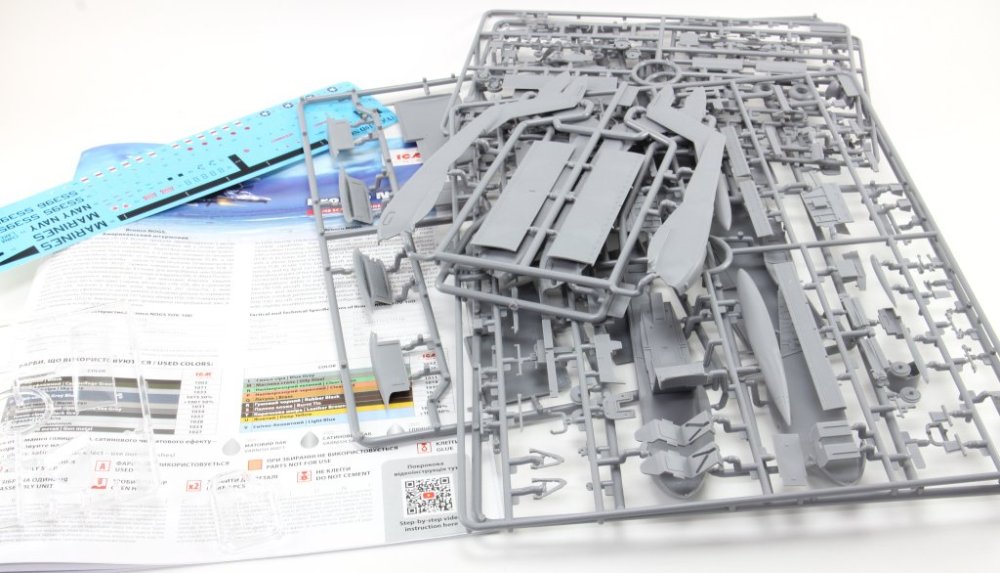
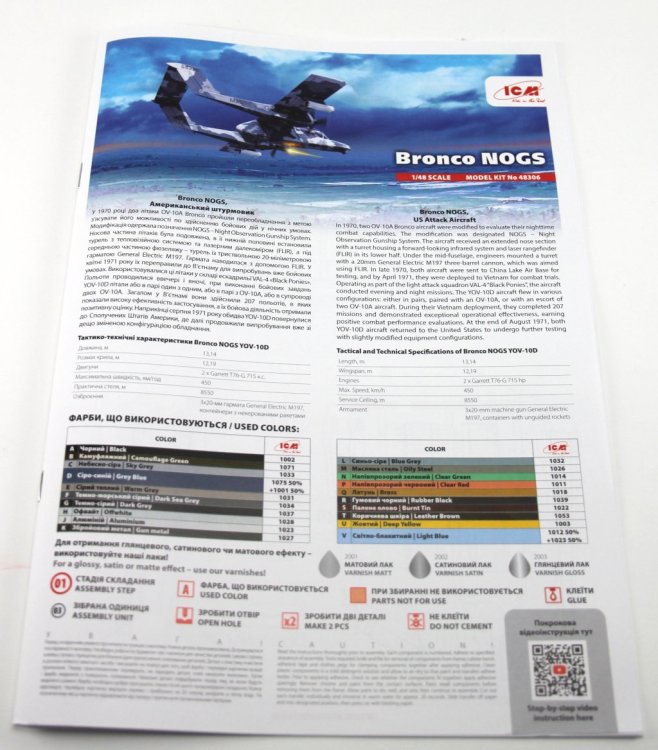
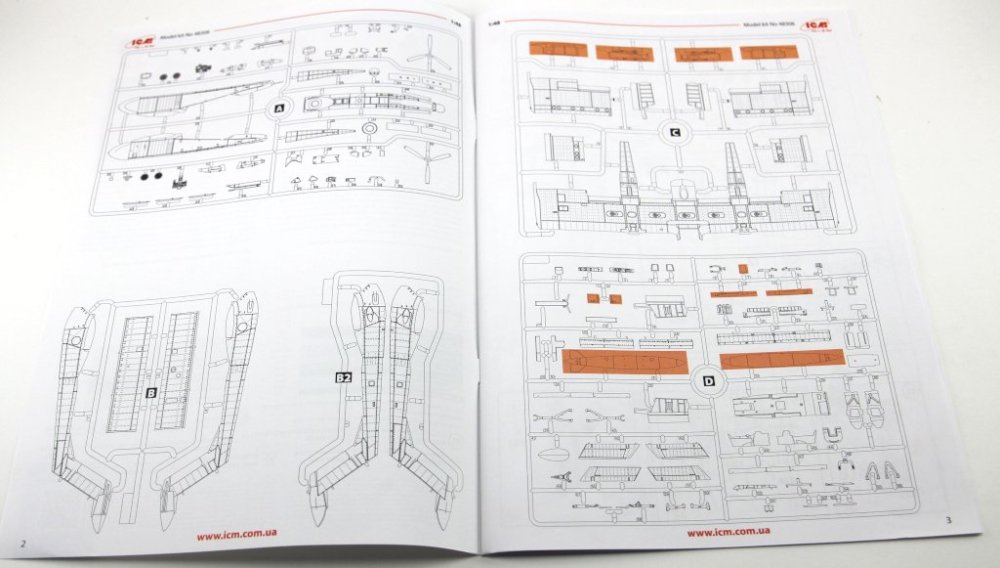
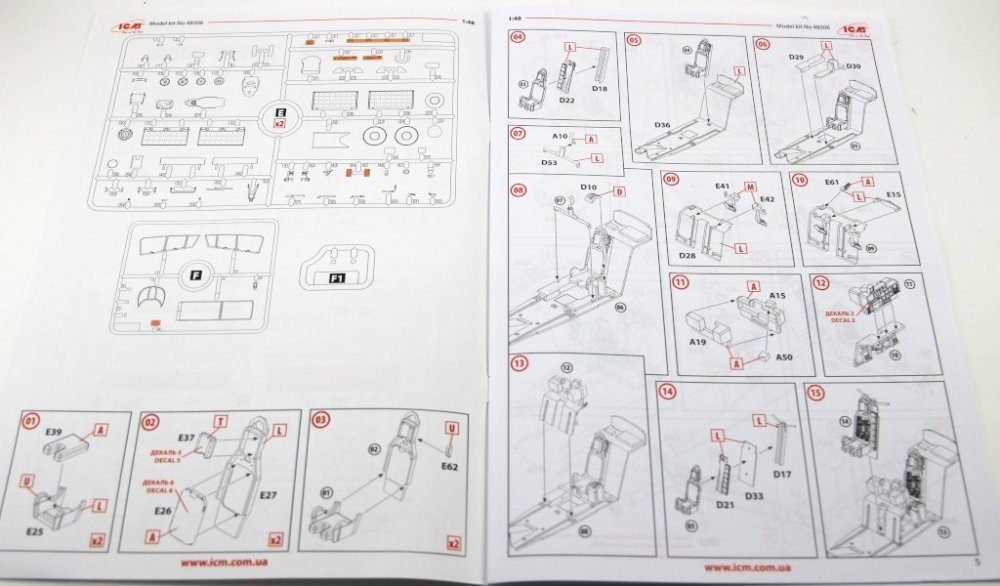
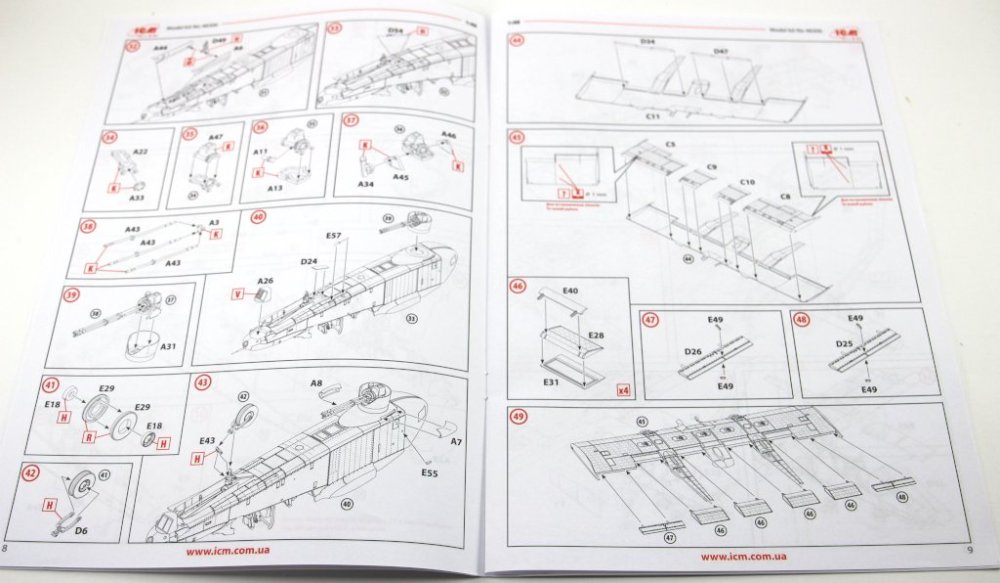
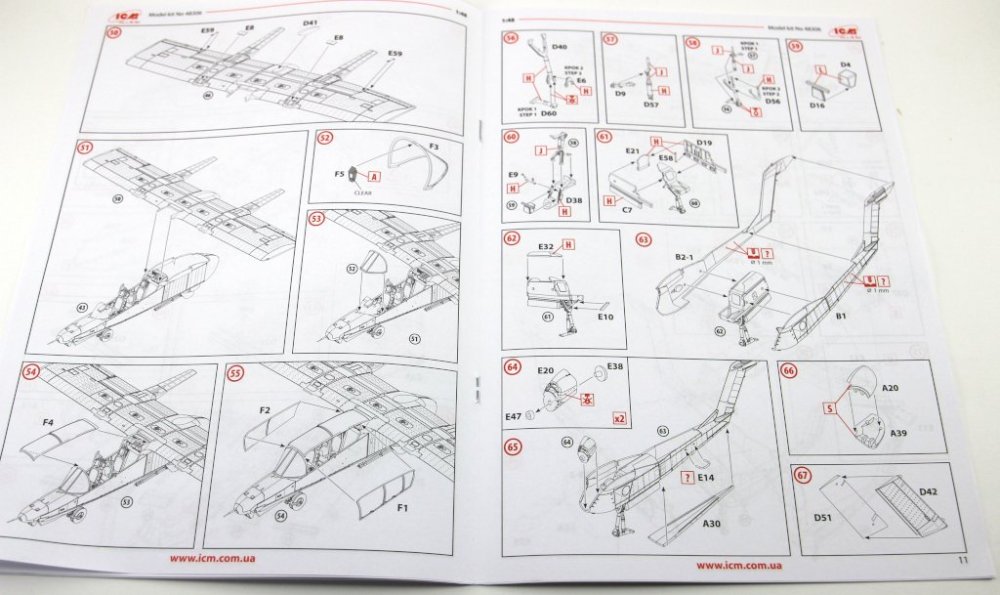
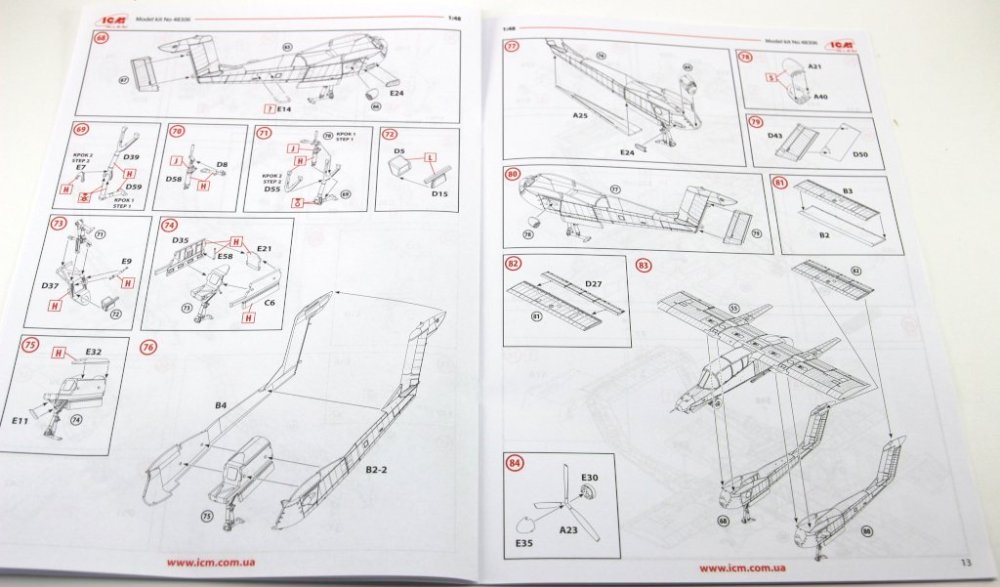
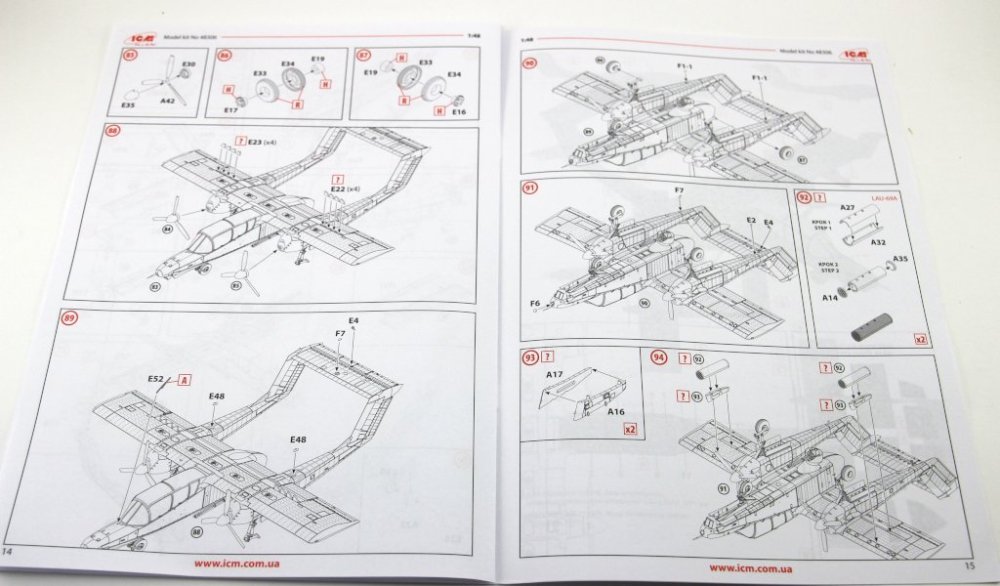
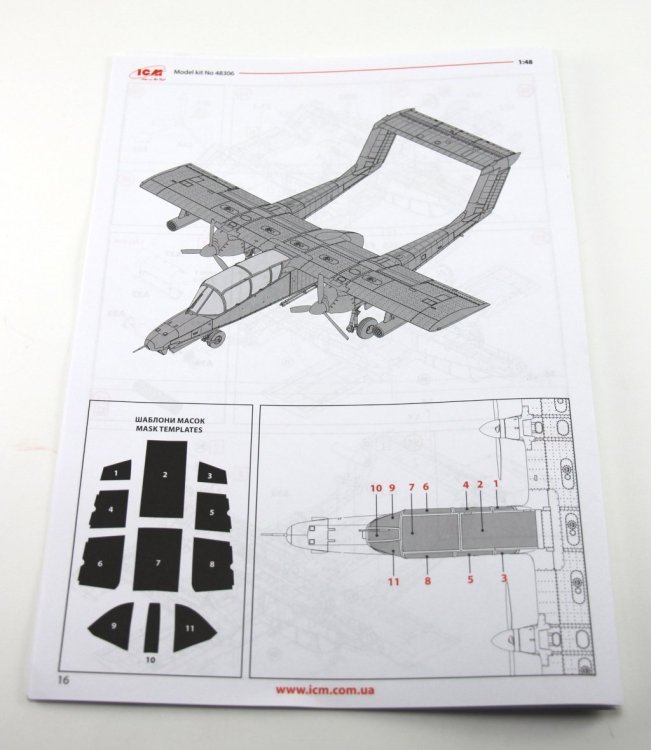
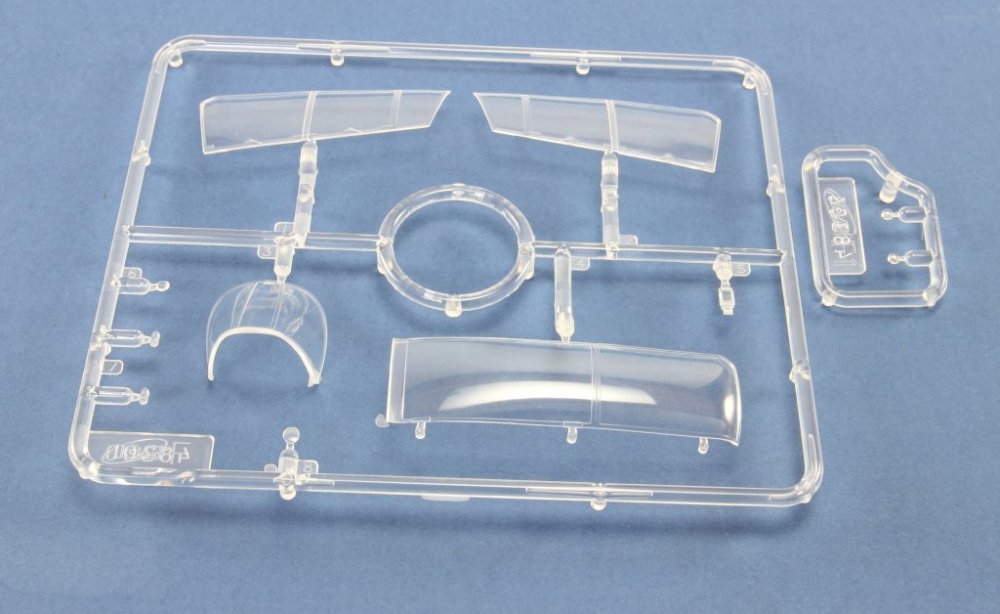
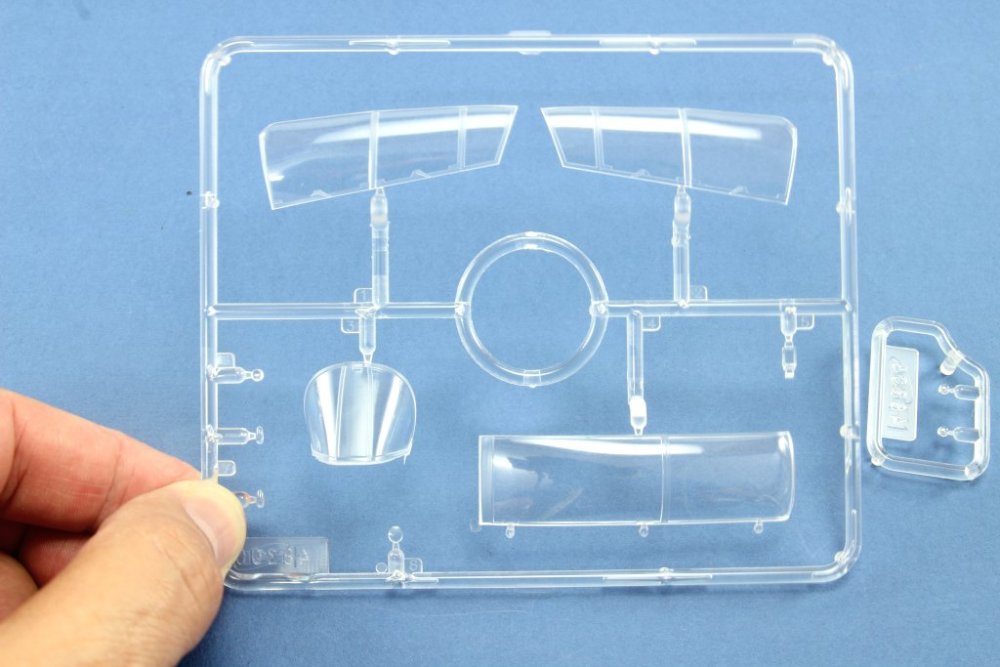
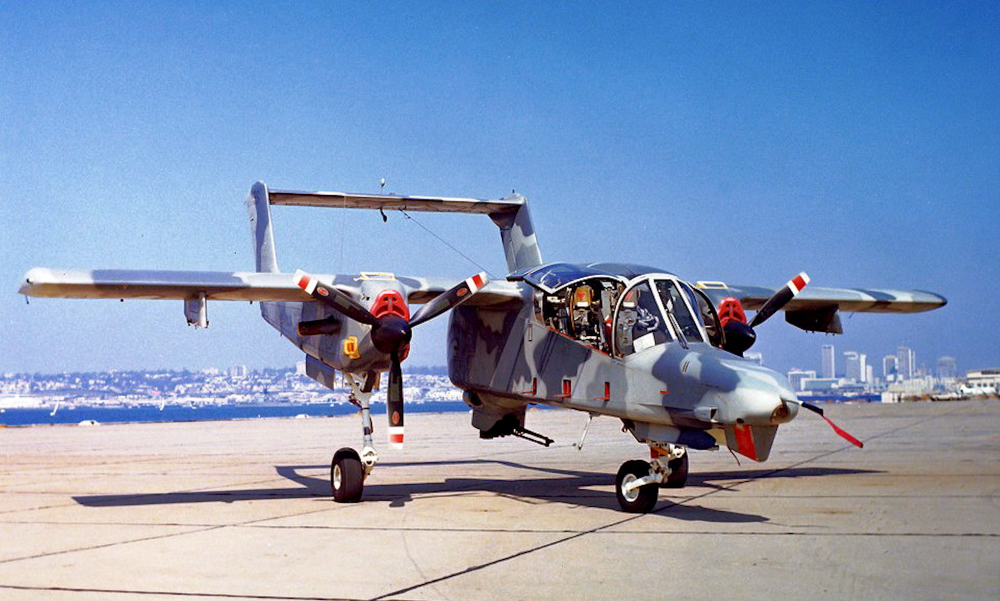
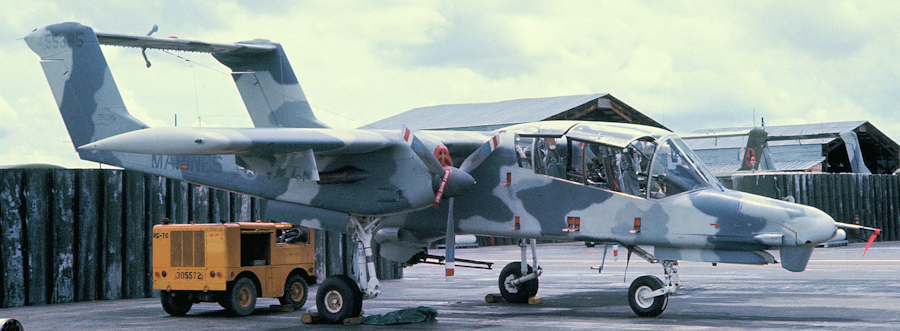
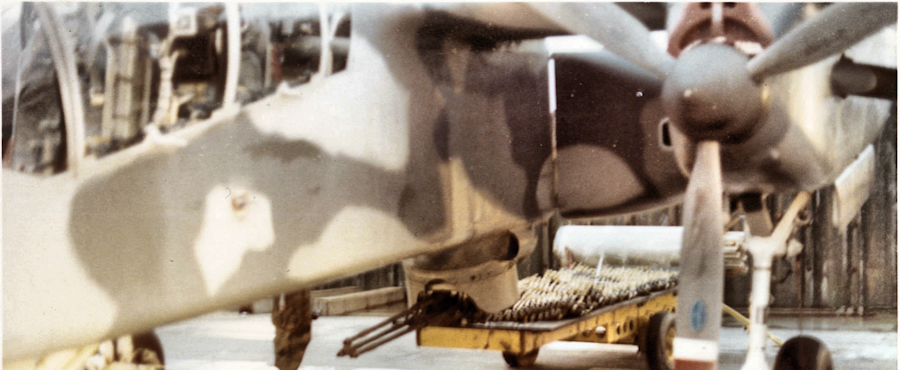
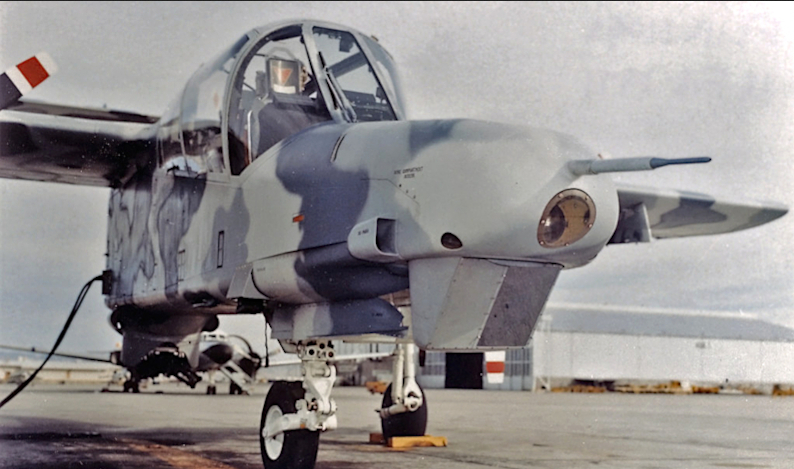
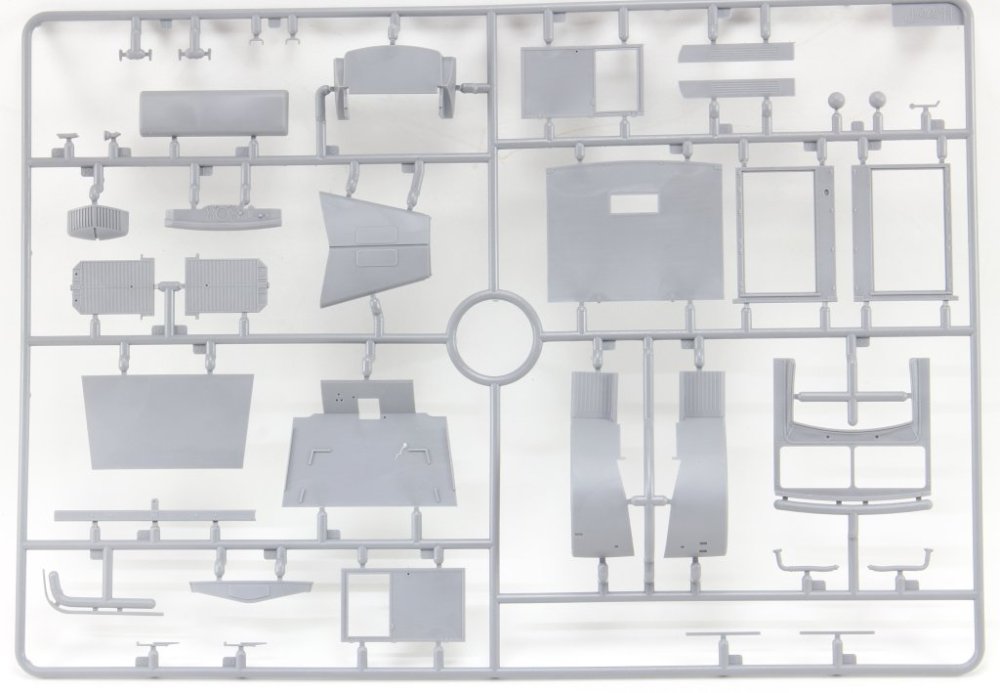
ICM 1:48 Bronco NOGS – US attack Aircraft Code: 48306 Introduction In recent years, ICM has delighted the modelling community with a wide range of newly tooled aircraft kits. The model presented here is yet another addition to an extensive family of aircraft variants. This particular kit represents a specialised derivative of the OV-10 — the Bronco NOGS. This version was developed as part of a study to assess the OV-10’s capability for night-time combat. Two airframes were modified with an extended nose section, housing a turret underneath equipped with a FLIR system and a laser rangefinder. At the rear of the fuselage, a turret was installed containing a three-barrel 20mm M197 rotary cannon. The weapon was aimed using the laser designator and vision system. Both aircraft were deployed for testing in Southeast Asia in 1971, where they flew approximately 207 combat missions with positive results. What’s in the box? Inside the box, you’ll find a total of nine sprues comprising 233 parts to assemble the model, an instruction sheet, and a decal sheet offering four marking options. Sprue A This sprue provides the essential parts to convert the standard OV-10 into the specialised NOGS variant. It includes the extended central fuselage, along with the modified underside designed to accommodate the cannon turret and the nose section fitted with sensor equipment. The rivets and panel lines on the fuselage are finely moulded and to scale, and will stand out beautifully with careful painting. Details such as the pylons for the wing-mounted rocket launchers are well executed, and the launchers themselves are depicted loaded, complete with the characteristic firing sequence cord at the rear. The instrument panel is also nicely detailed and will benefit from a precise paint job to bring out its features. The clipped-tip propellers are another distinctive feature of this version Sprue B This sprue includes one half of each boom and the two halves of the tail stabiliser. Notably, the vortex generators are well represented. The panel detailing is fine and appropriate for the scale. It’s also worth highlighting that the rivets, where necessary, are moulded in raised relief. Sprue B2 This sprue provides the outer halves of the booms. In the photo, the raised rivet detailing is clearly visible. Sprue C This sprue provides the main wing (with the upper half moulded as a single piece) and the two lower wing halves. These parts feature structural reinforcements in raised relief, recessed access panels, and both raised and recessed rivet detailing. Also included are parts of the internal walls for the rear landing gear bays, which display structural detail. More adventurous modellers may wish to enhance these areas further with scratch-built additions. The small weapon-carrying “stub wings” are not used for this version. Sprue D This sprue contains parts for the cockpit — including side panels, side consoles, and electronic equipment boxes — as well as details for the nose landing gear, control surfaces (which feature raised rivets and vortex generators), and the landing gear legs. The ejection seats are also included. Sprue E (x2) These sprues provide paired components needed for assembly: wheels, ailerons (in halves, with rivet detail), engine fronts, and propeller spinners. Sprue F and F1 The clear parts are crystal clear and free from distortion. The framing is well defined, which will make masking a straightforward task. Decals The decal sheet, ICM design, are quite good with very thin film and great color pigmentation. Instructions The instructions are spread across 20 pages, with glossy paper used for the covers and matte paper for the inner pages. The build is divided into 94 steps, with the final page dedicated to identifying the clear parts and their corresponding masking templates. The first page includes a colour guide for painting, referencing ICM’s own paint range. Marking Options Only two airframes were converted for this project. The four marking options represent these two aircraft at different points in their operational life — the first two schemes depict their early service, while the latter two show them in their later operational stage. YOV-10D NOGS 155395, Naval Air Weapons Station China Lake, 1971 YOV-10D NOGS 155396, Naval Support Activity Binh Thuy, Summer 1971 YOV-10D NOGS 155395, Naval Air Station Patuxent River, August 1973 YOV-10D NOGS 155396, Naval Air Weapons Station China Lake, 1975 Conclusion ICM’s OV-10 family is well known and widely appreciated. This particular derivative — which paved the way for the later Dash D version — represents a relatively unknown chapter in aviation history. The marking options are both attractive and unique, offering modellers the choice between a striking and challenging camouflage scheme or more conventional and colourful liveries. The fuselage and booms feature a mix of recessed and raised surface details, enhancing realism. With a good coat of paint and your preferred weathering techniques, these details will really stand out. The instructions are clear and easy to follow, as is typical of ICM. However, due to the unique design of the Bronco, some care should be taken with the assembly sequence to ease the painting of hard-to-reach areas — particularly between the central fuselage and the booms. Based on my recent experience with Academy’s 1:72 scale version of the model, I recommend leaving the booms until the final stages of assembly, attaching them only after painting the fuselage. So i define this model as highly recommended, for the originality of the set! Our thanks to ICM for the sample review! Ricardo Veríssimo
.jpg.bc3bddee83ce08224c2b077179b3241e.jpg)


-
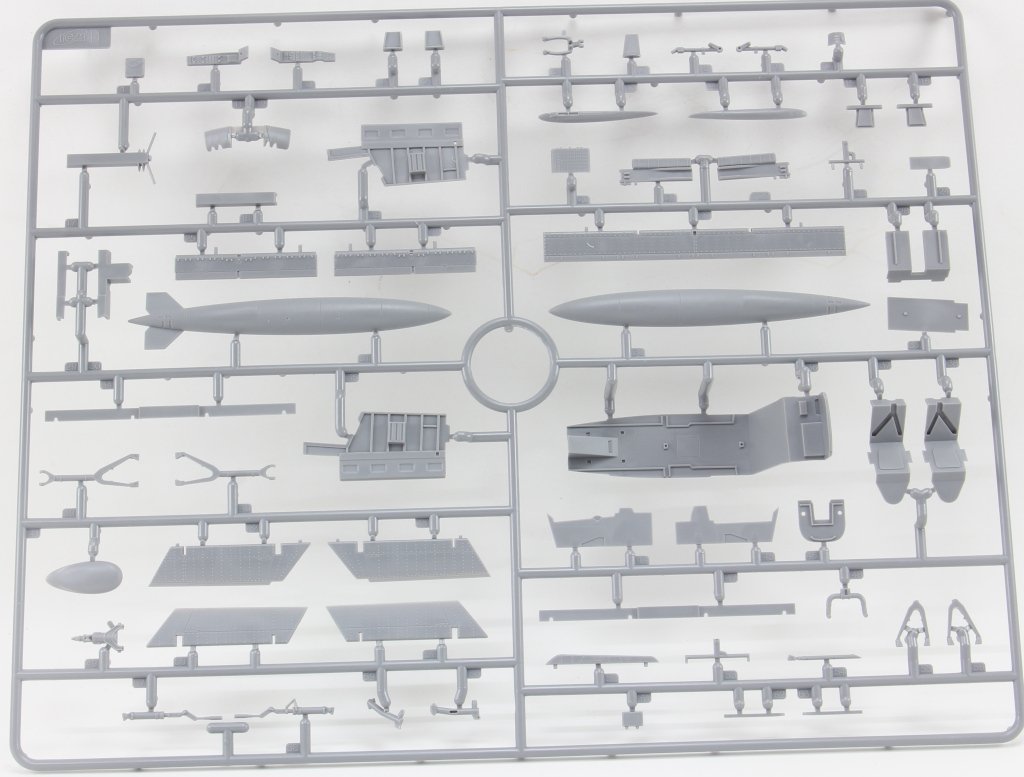
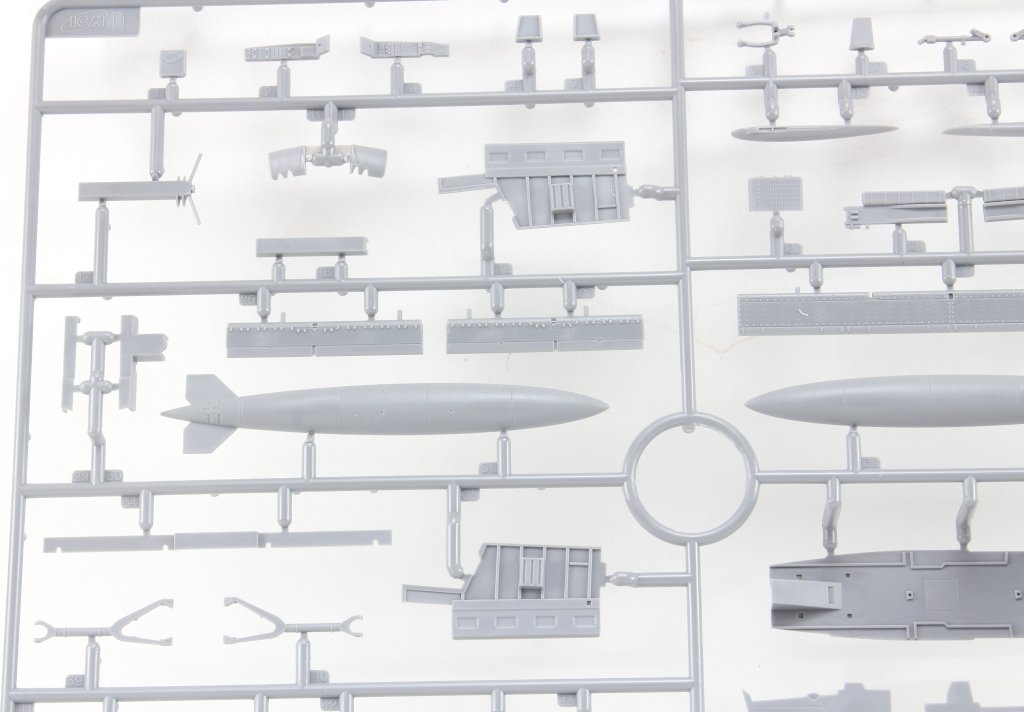
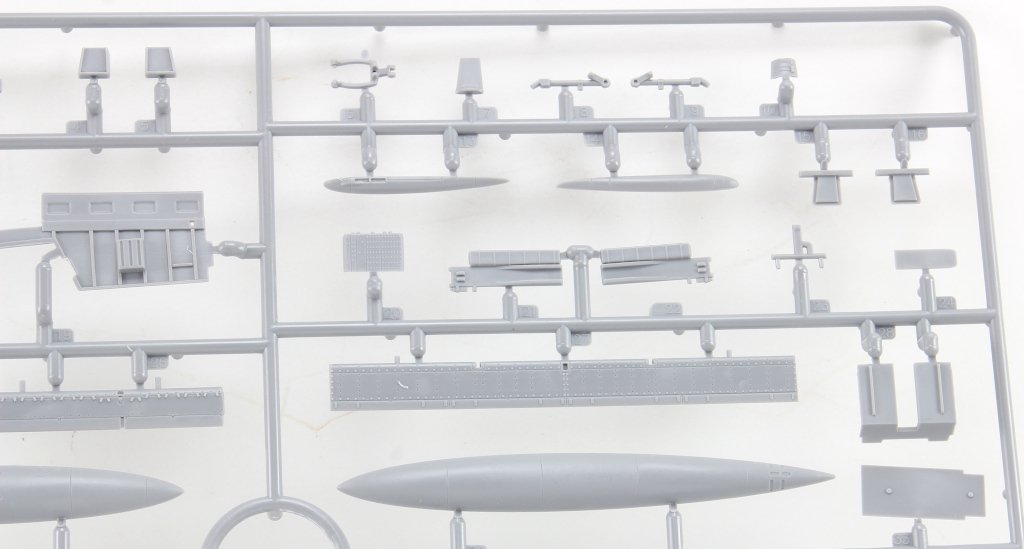
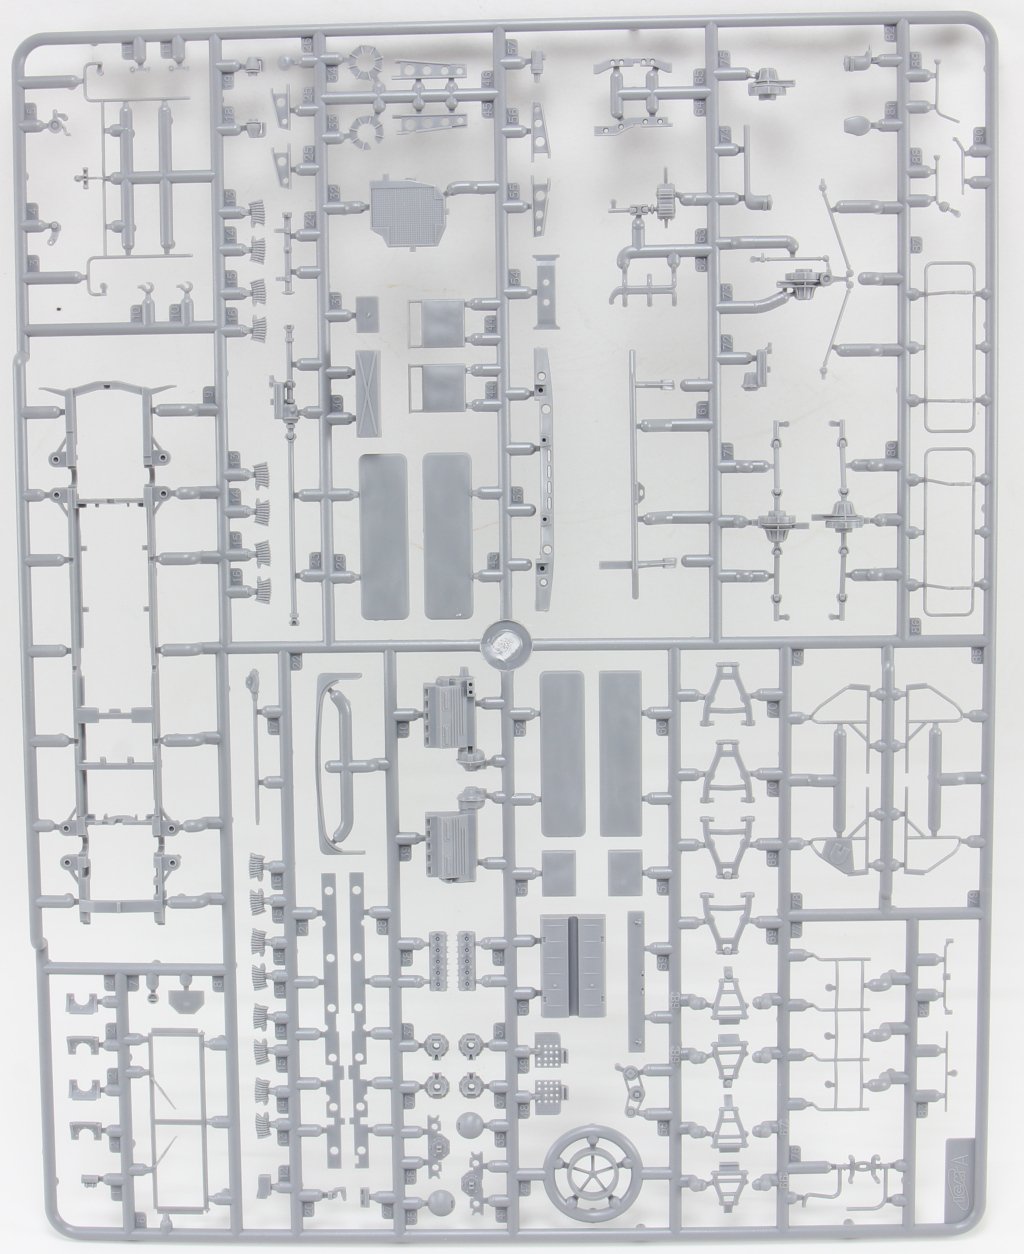
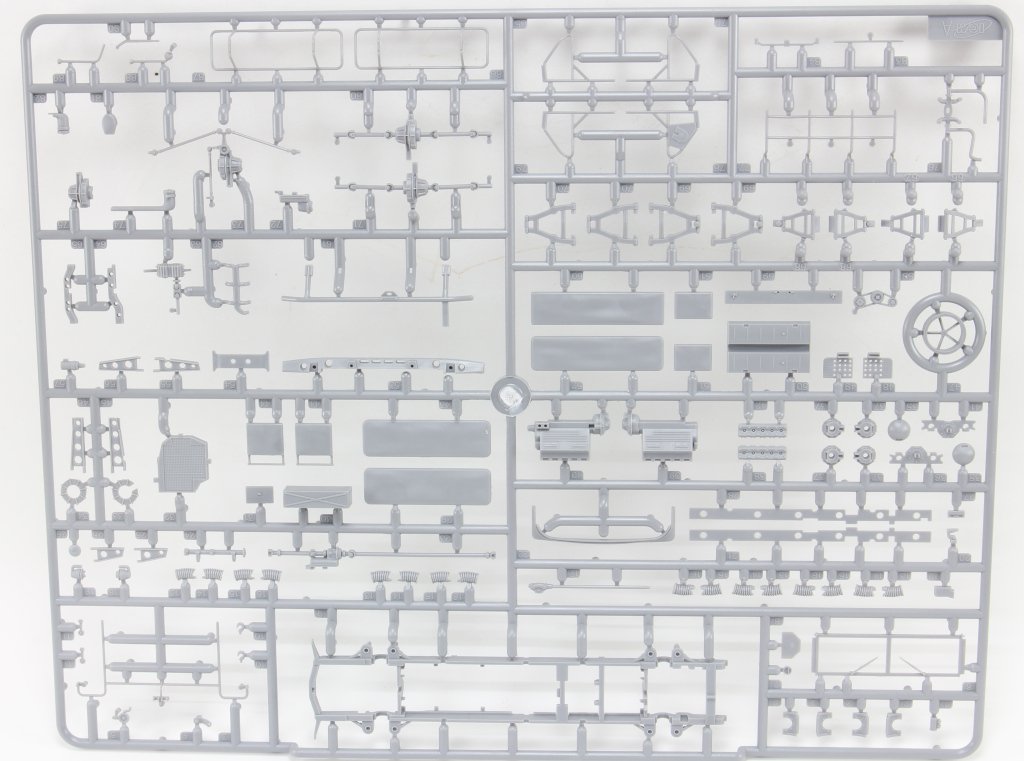
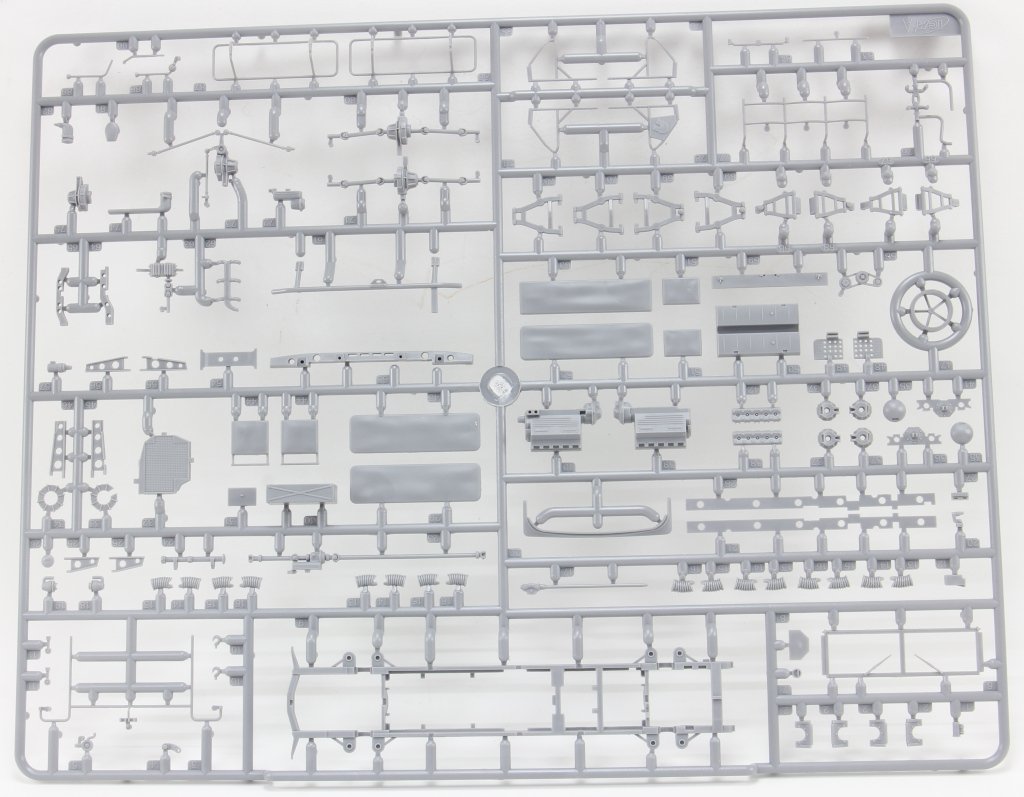
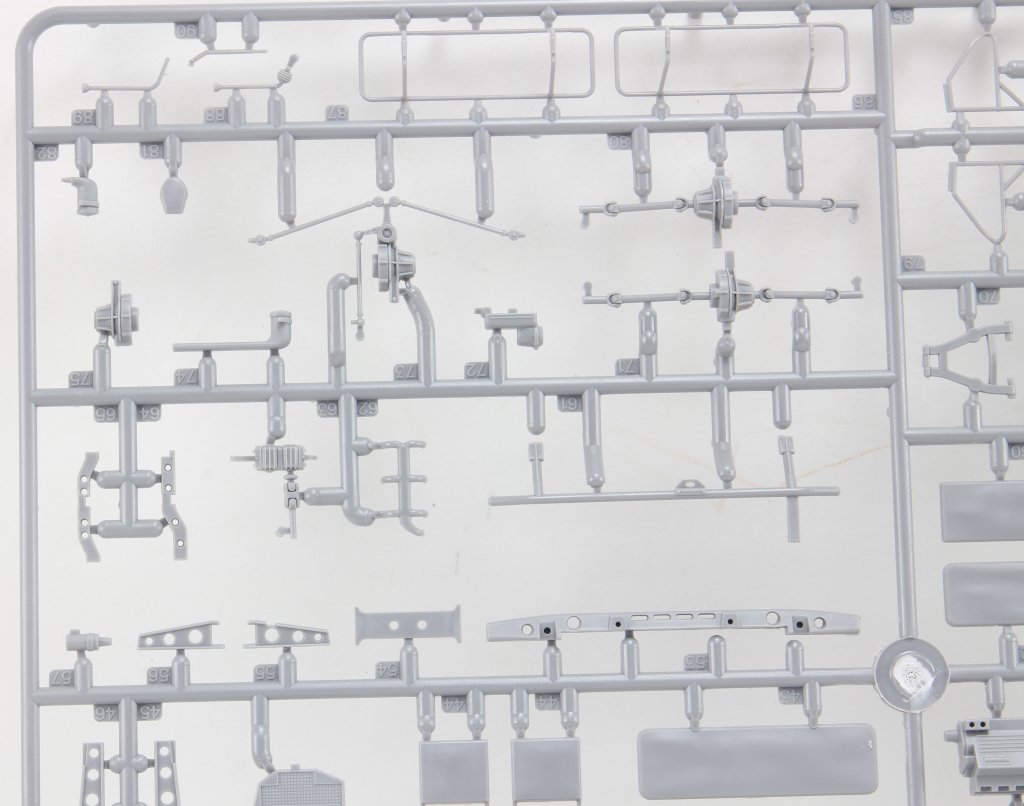
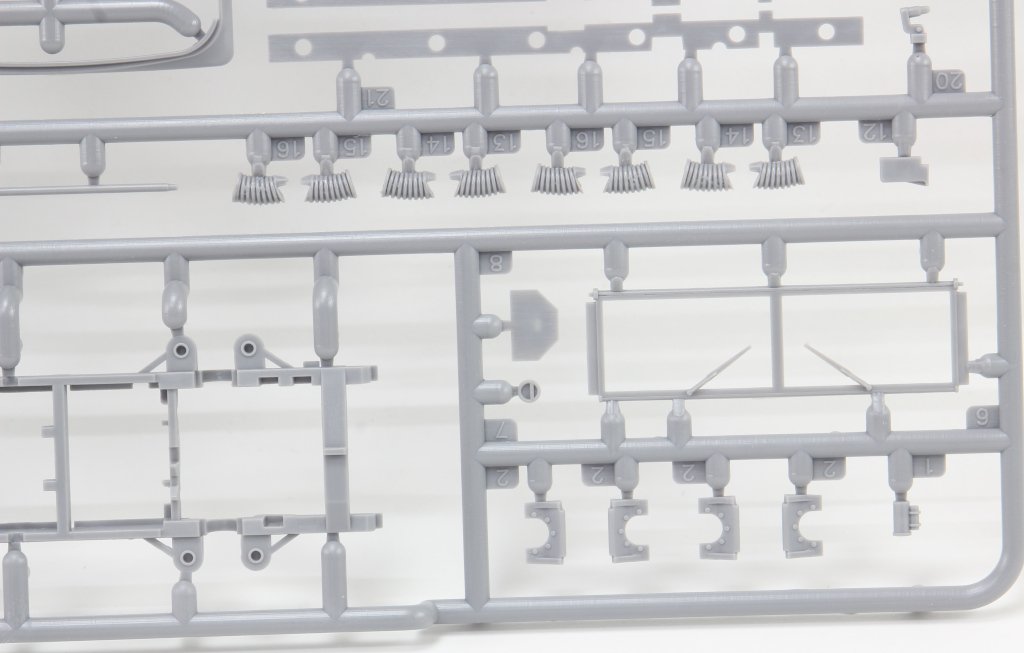
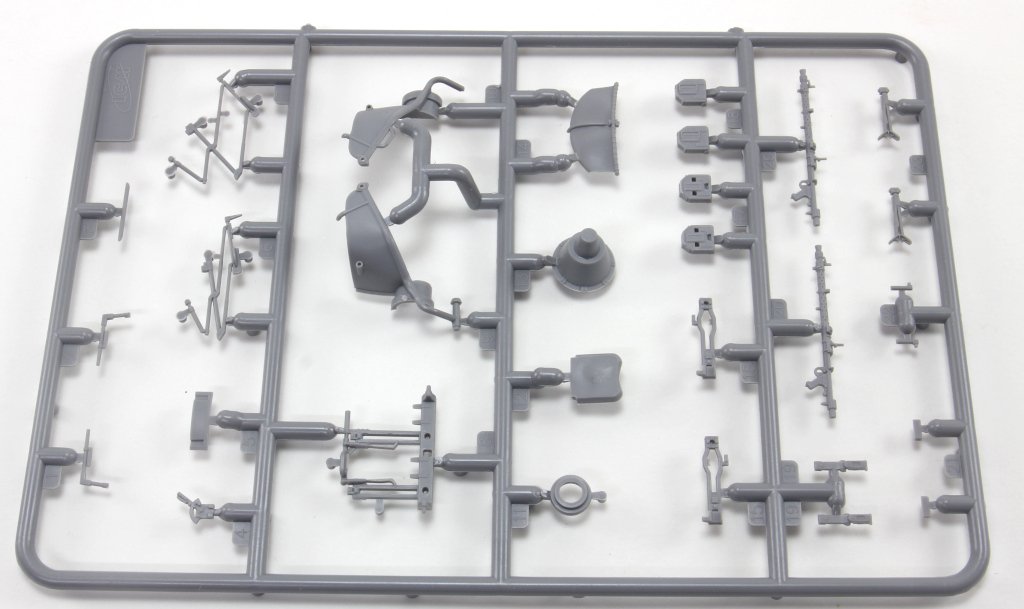
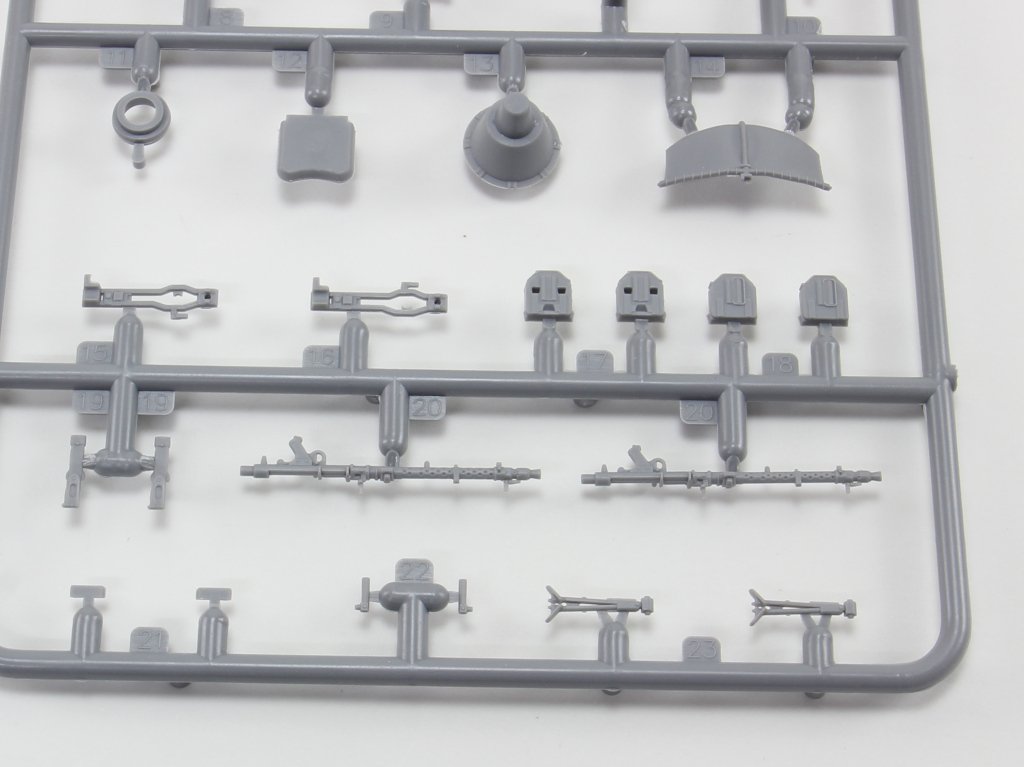
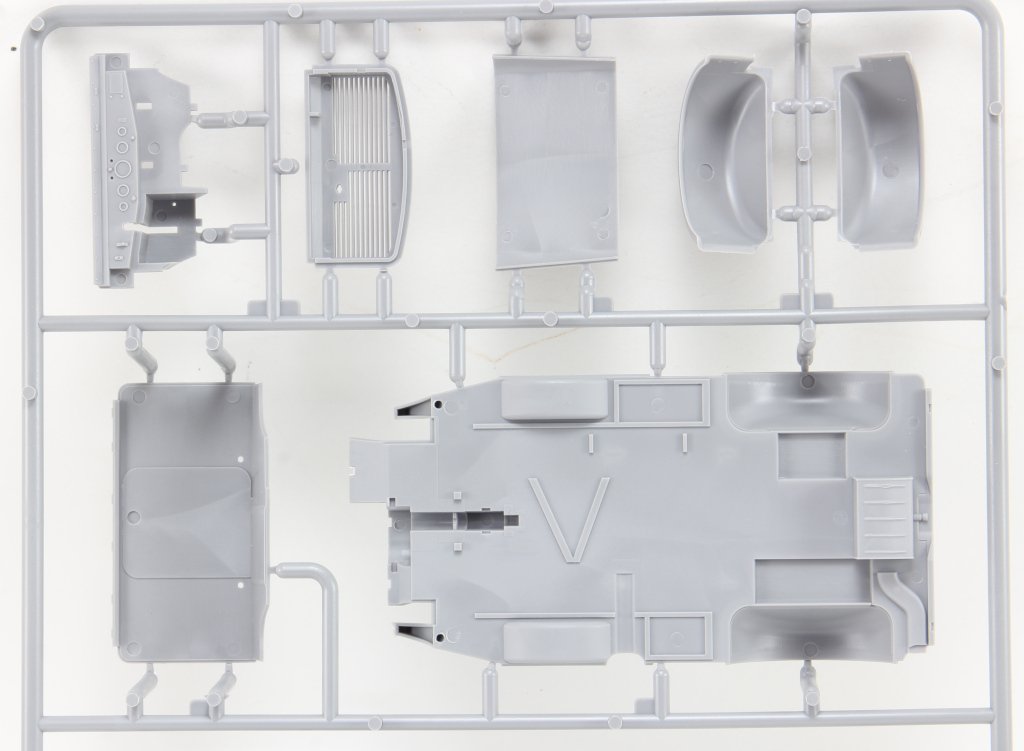
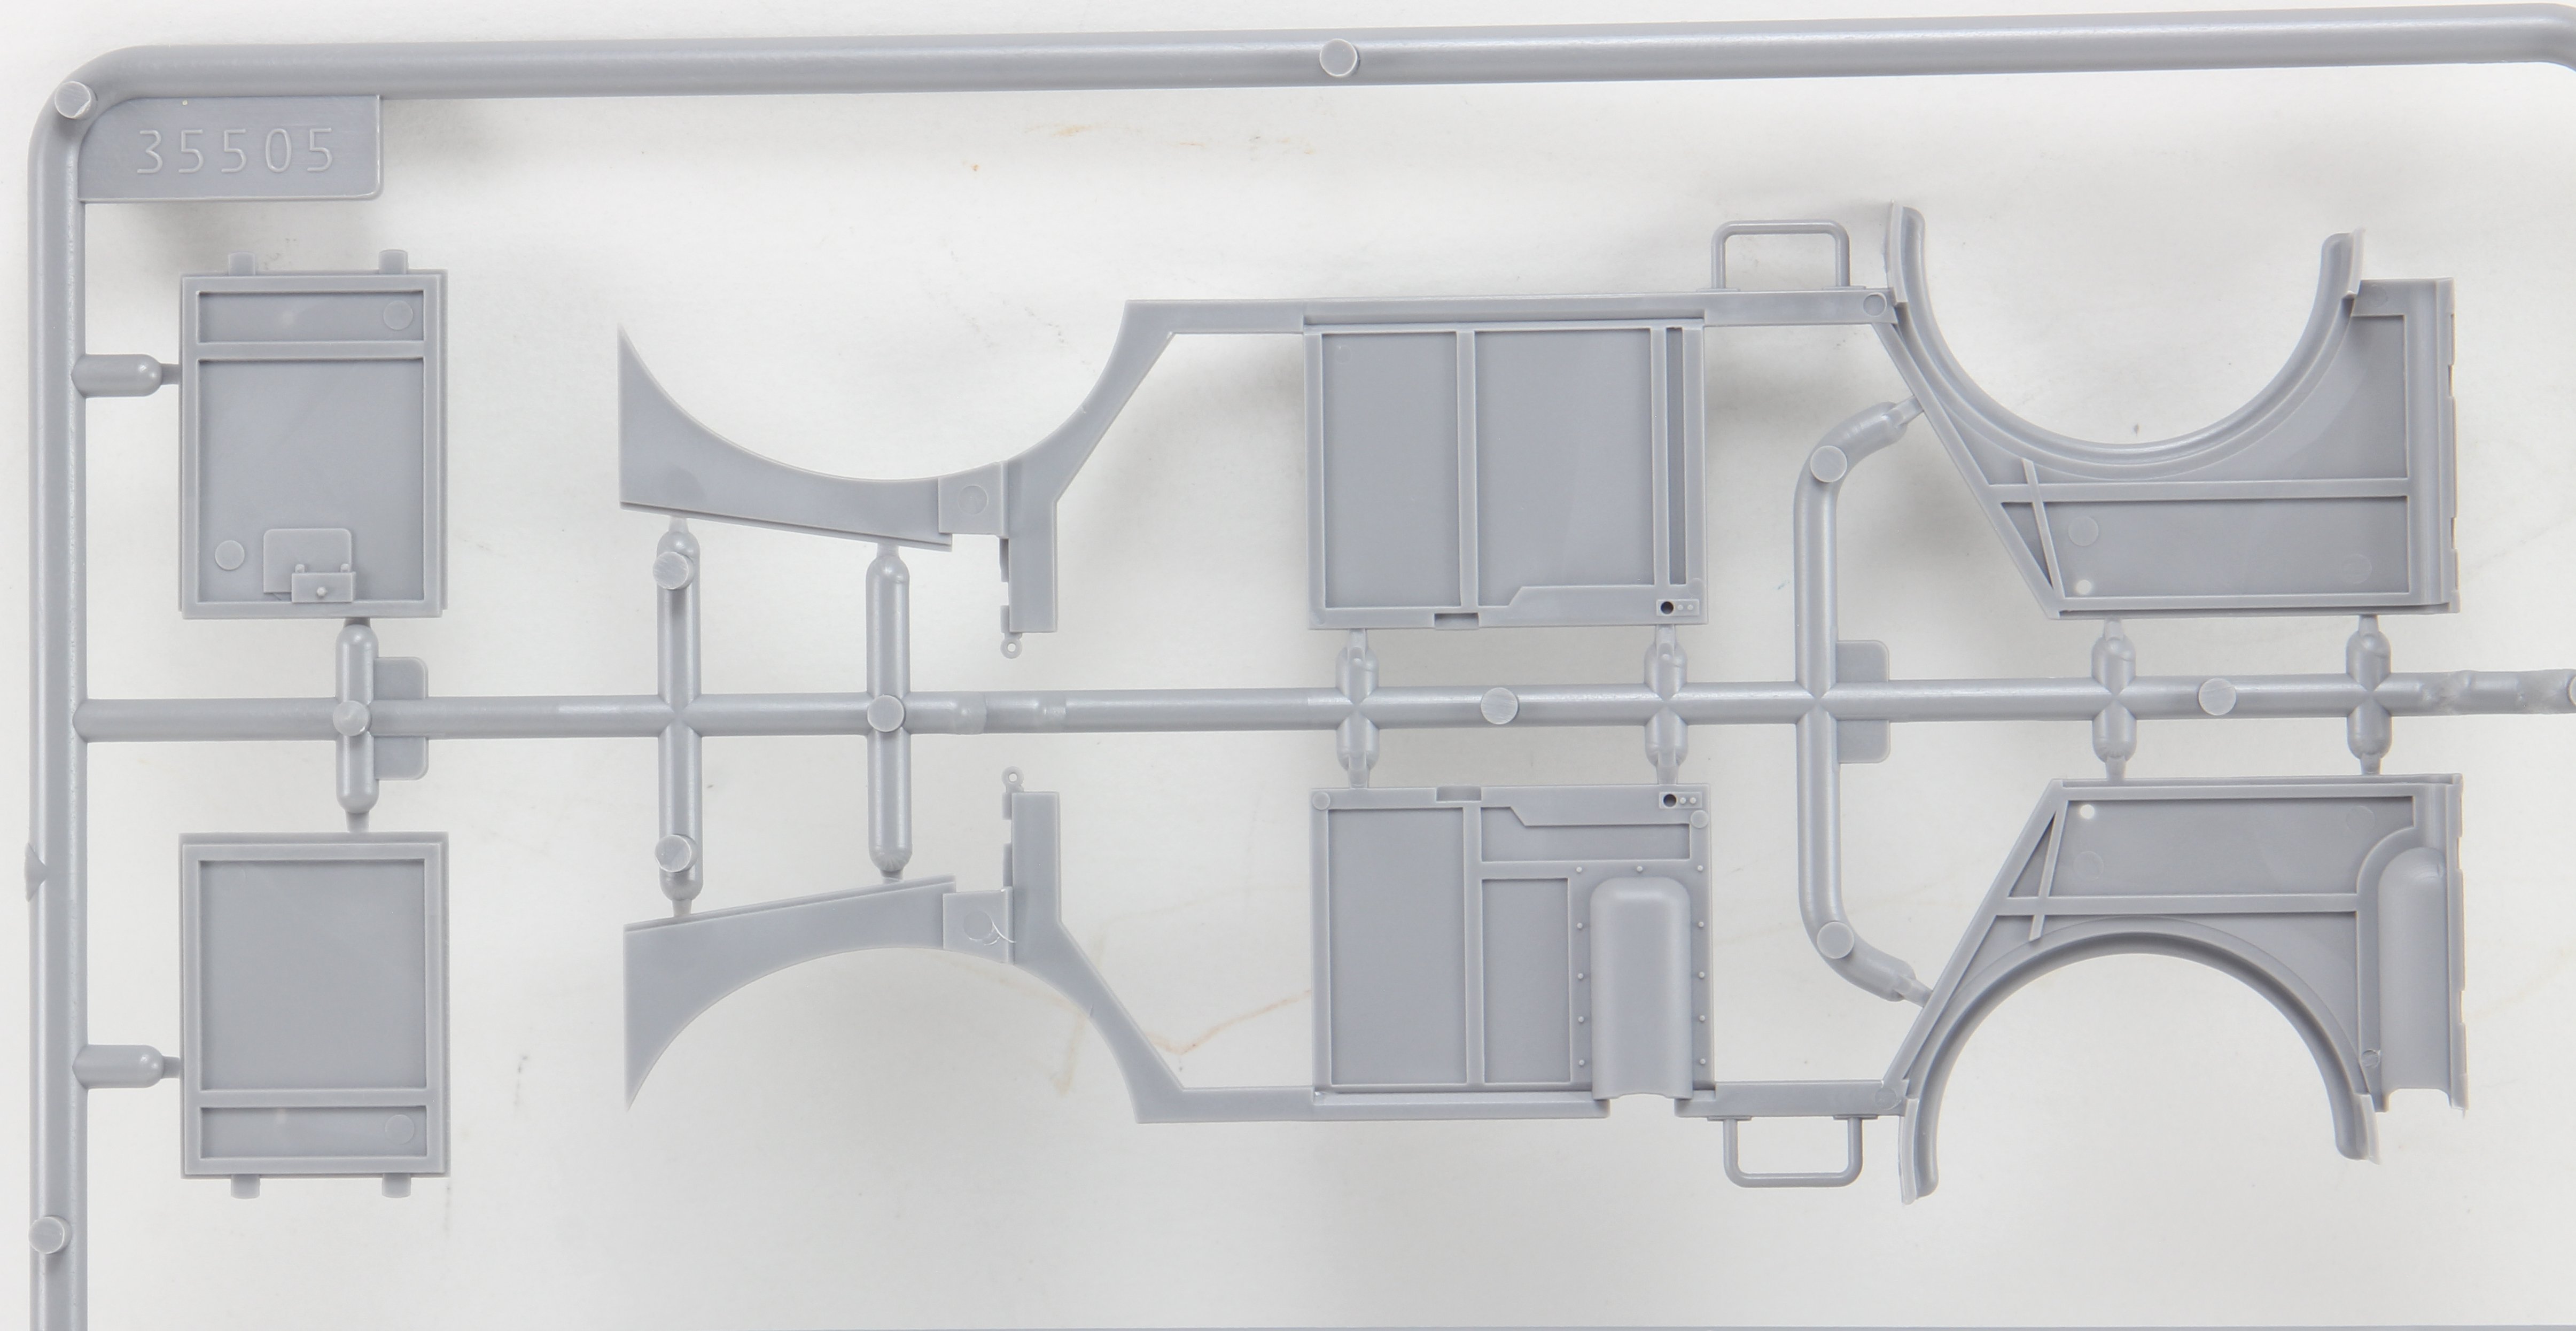
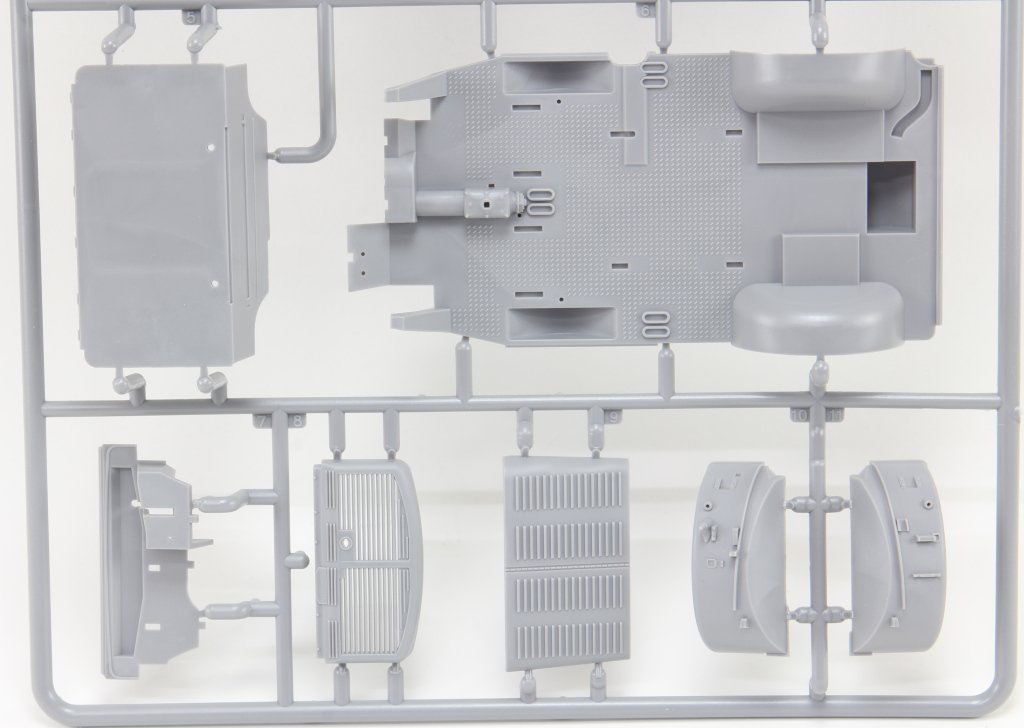
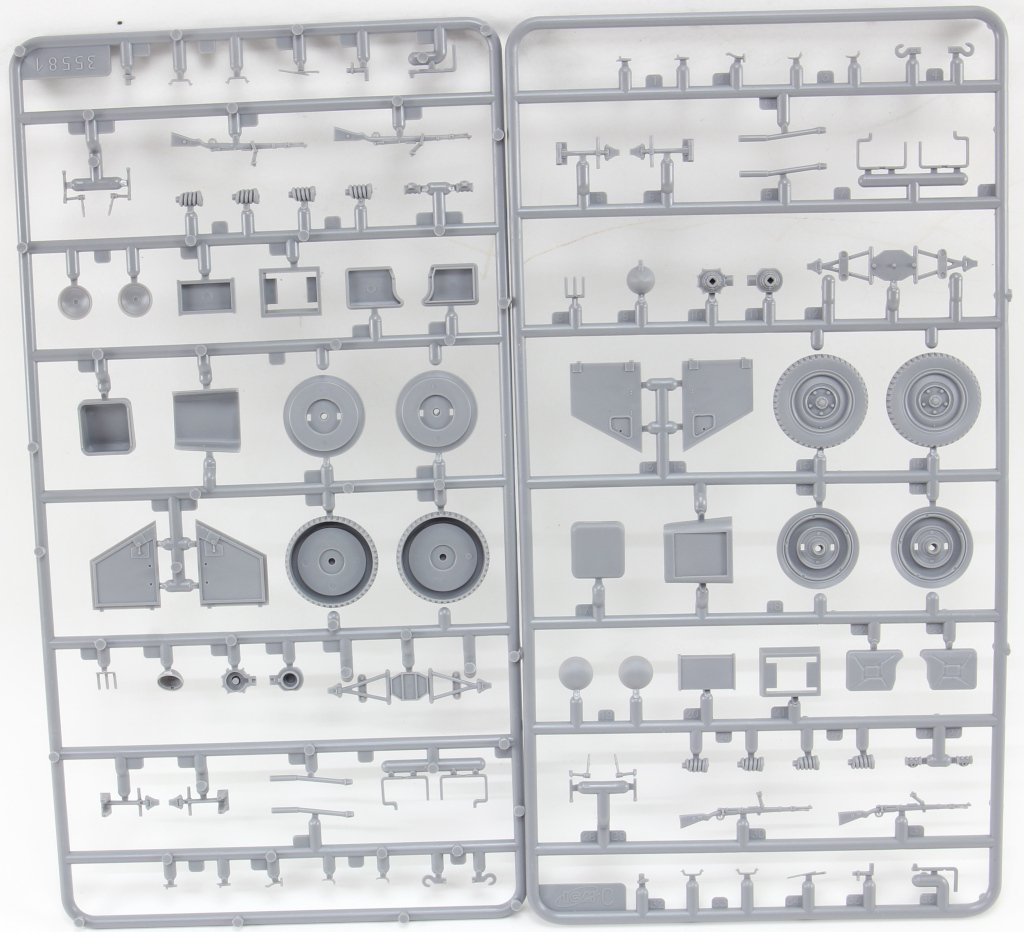
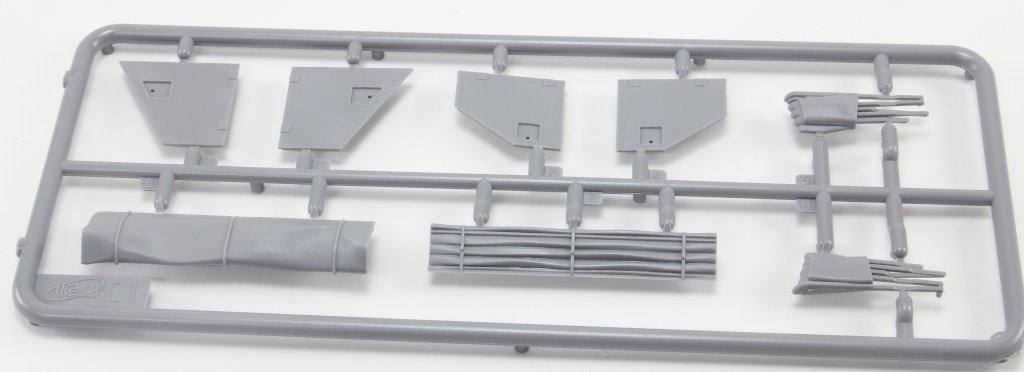
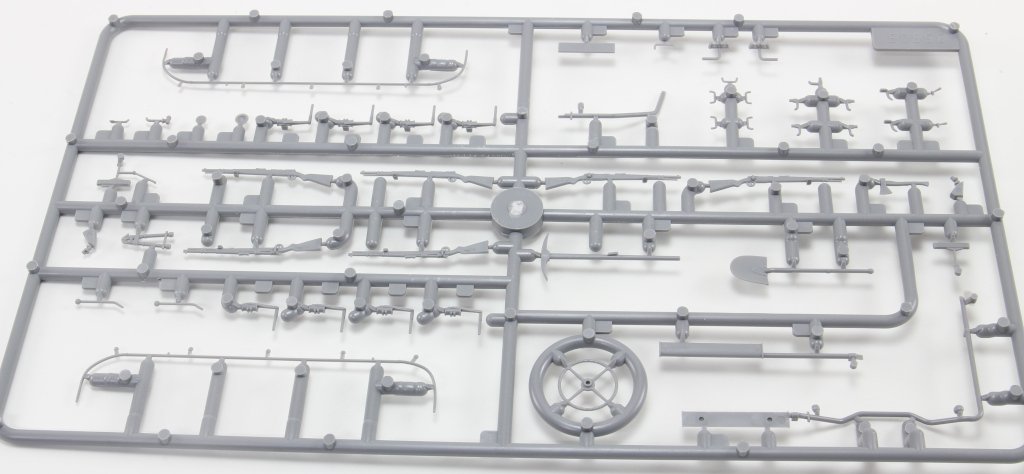
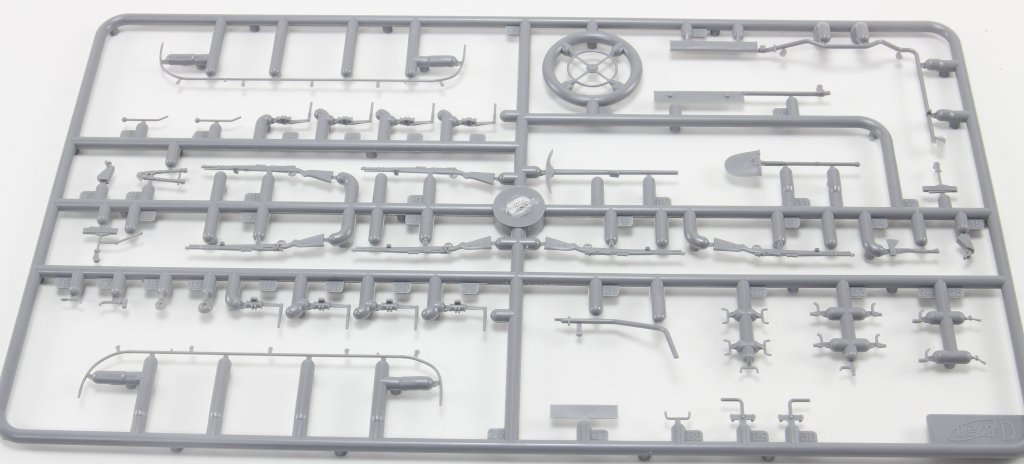
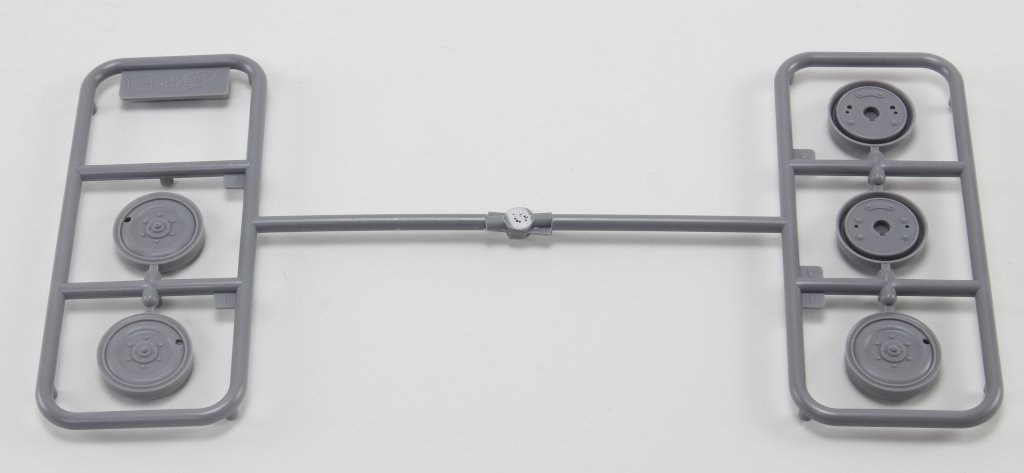
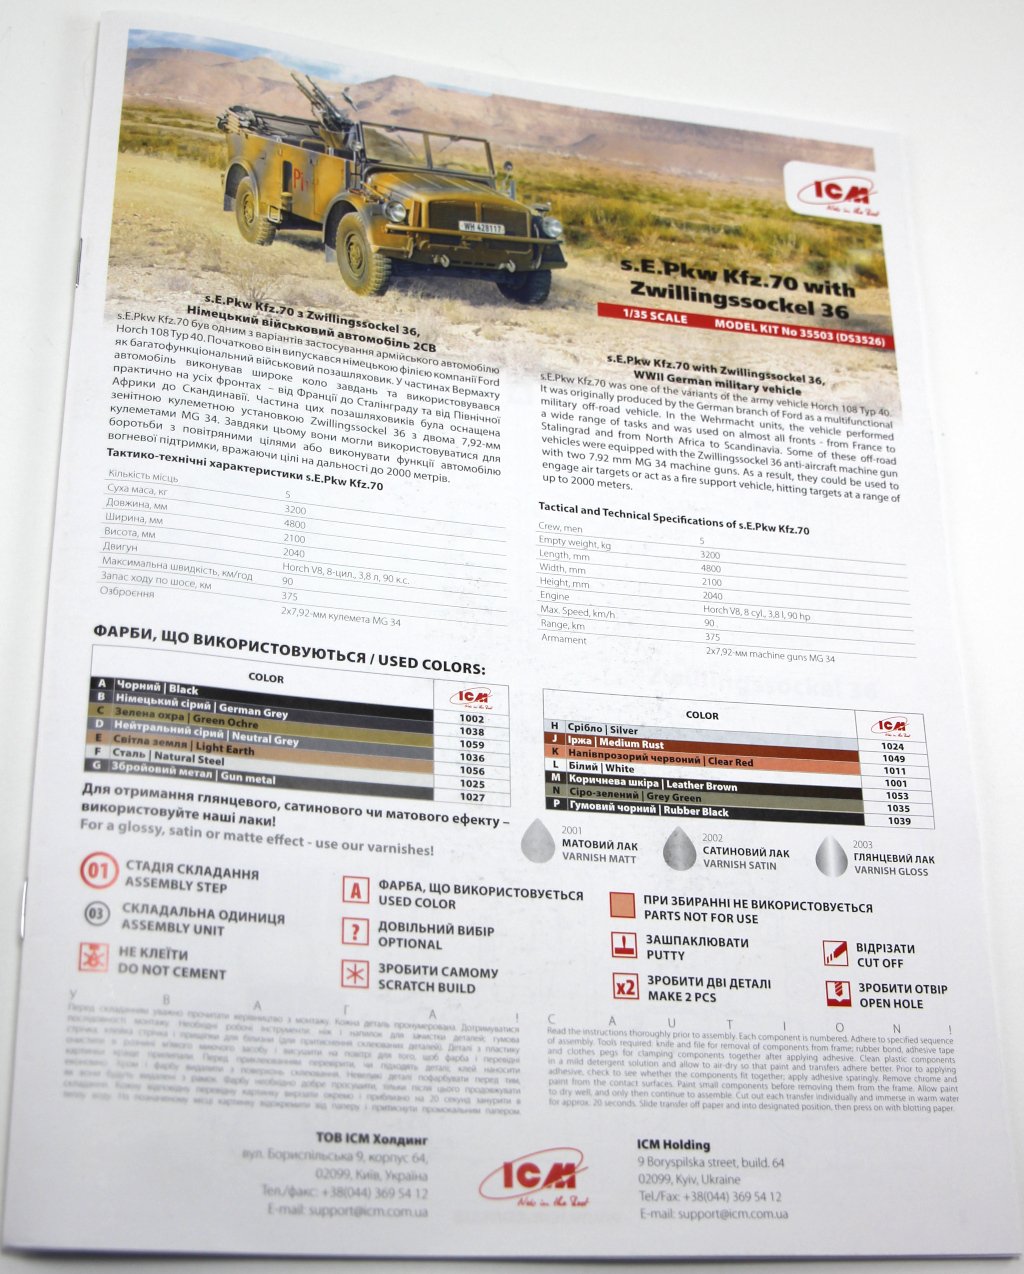
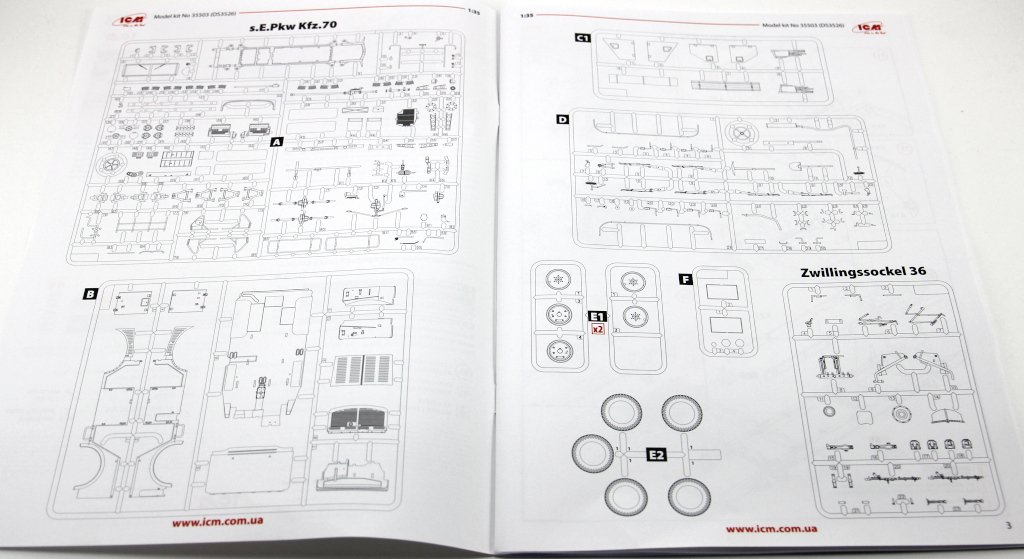
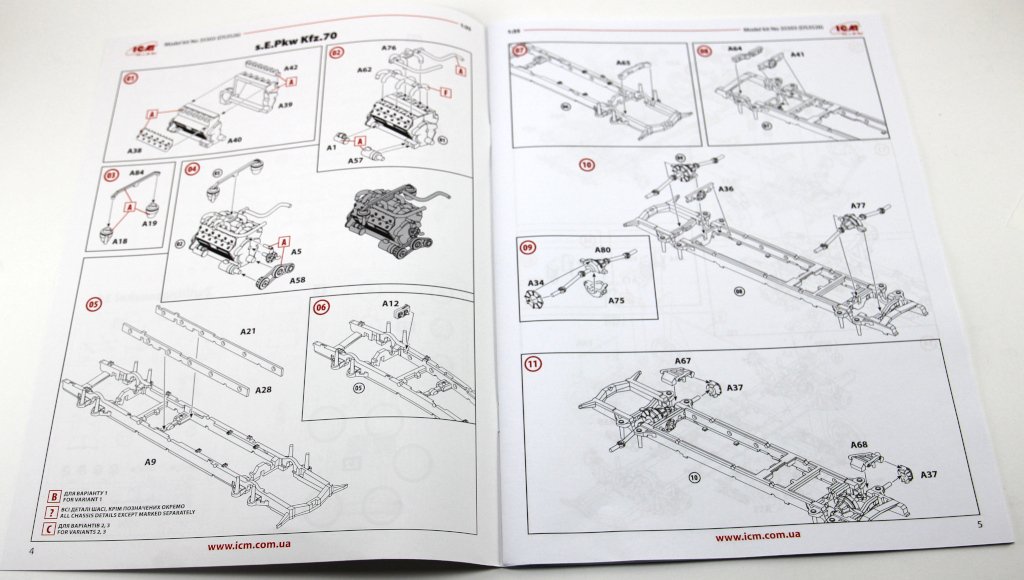
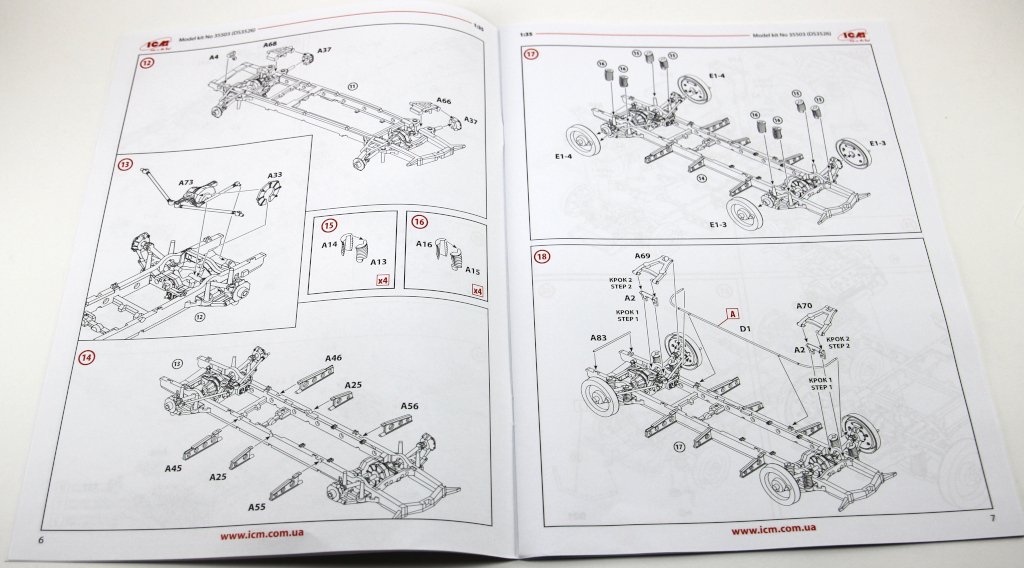
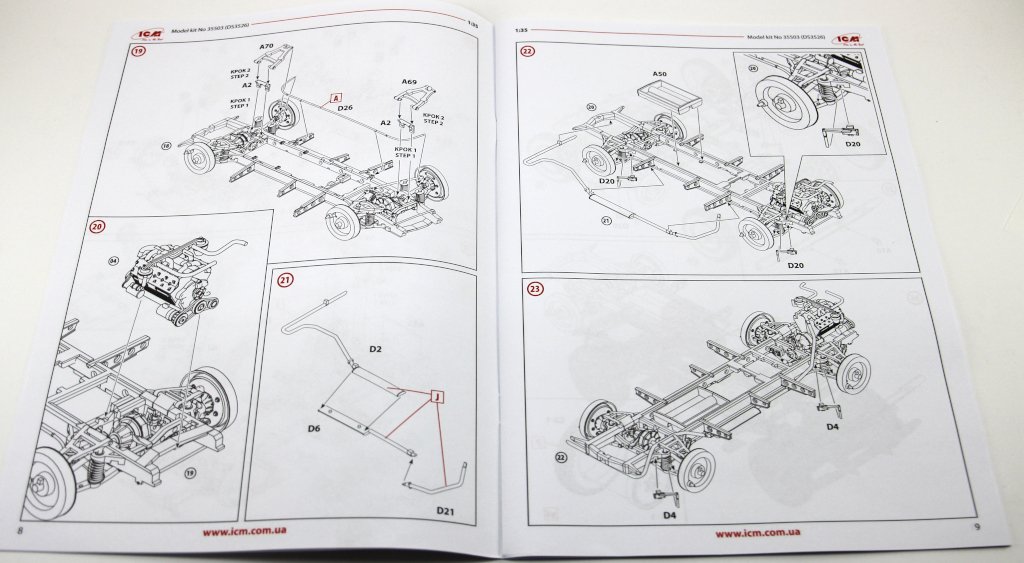
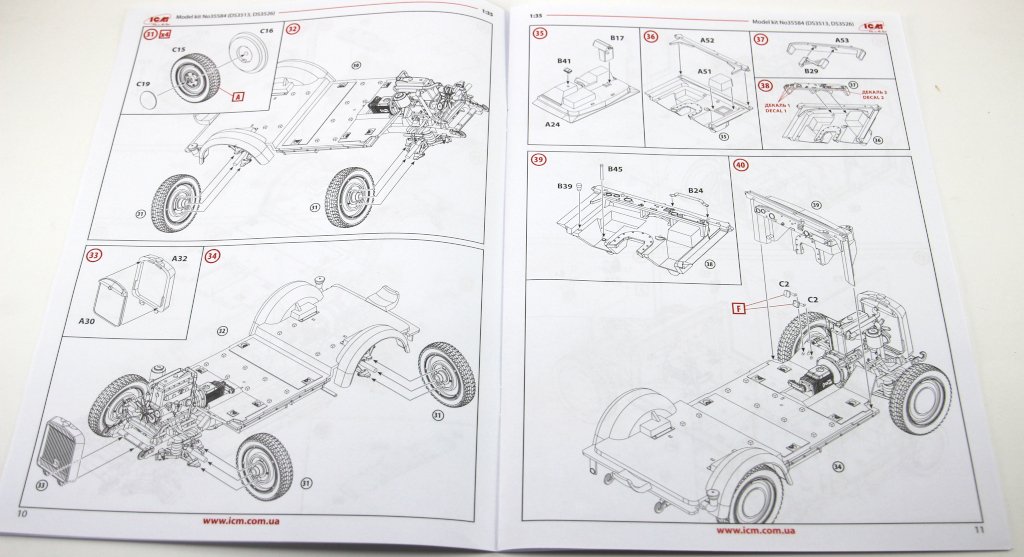
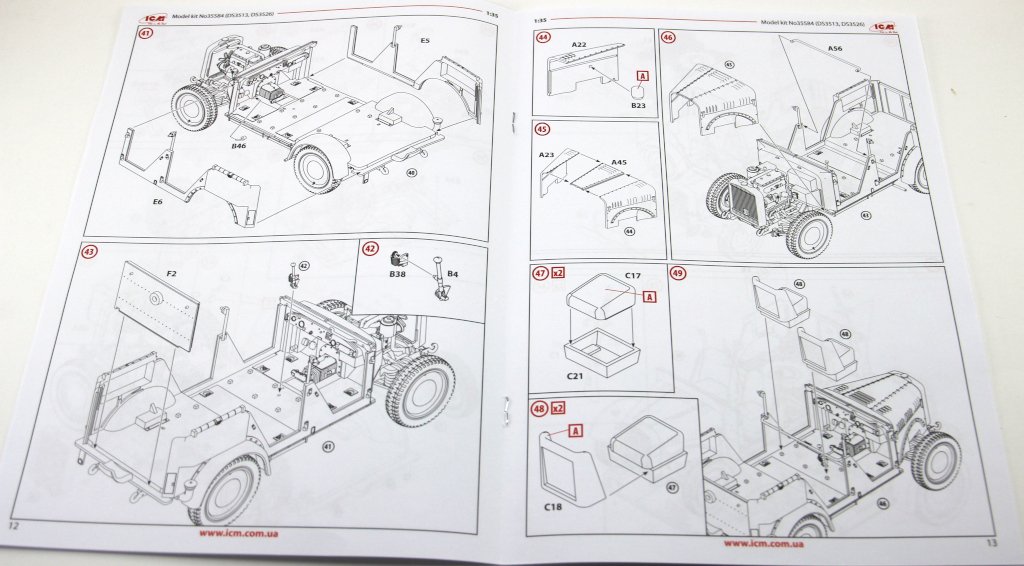
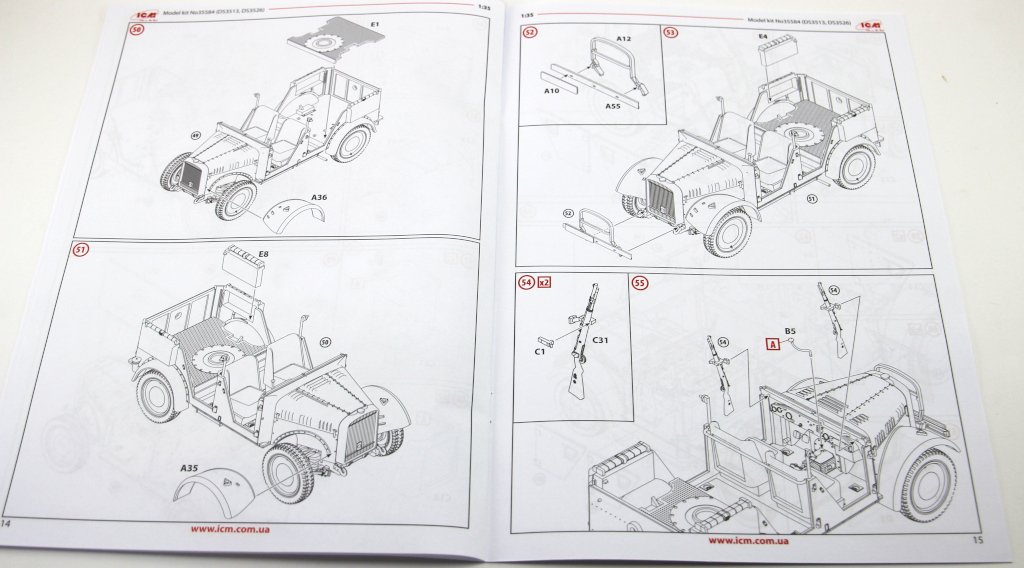
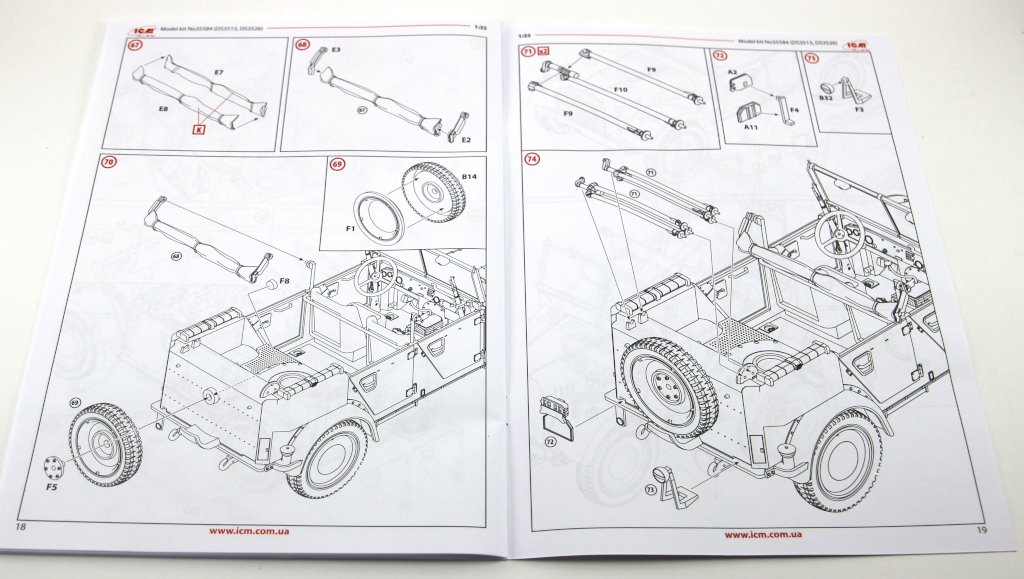
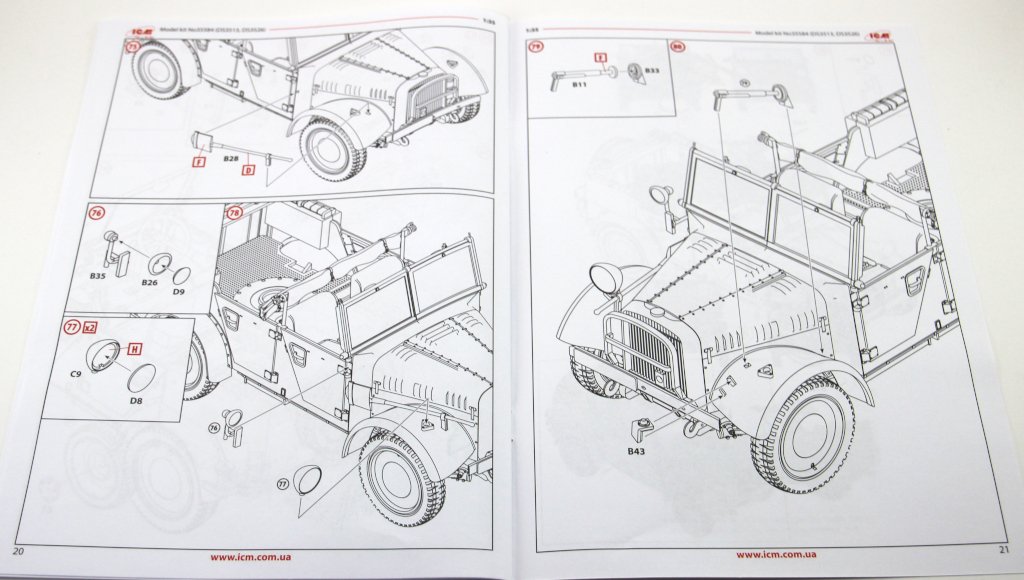
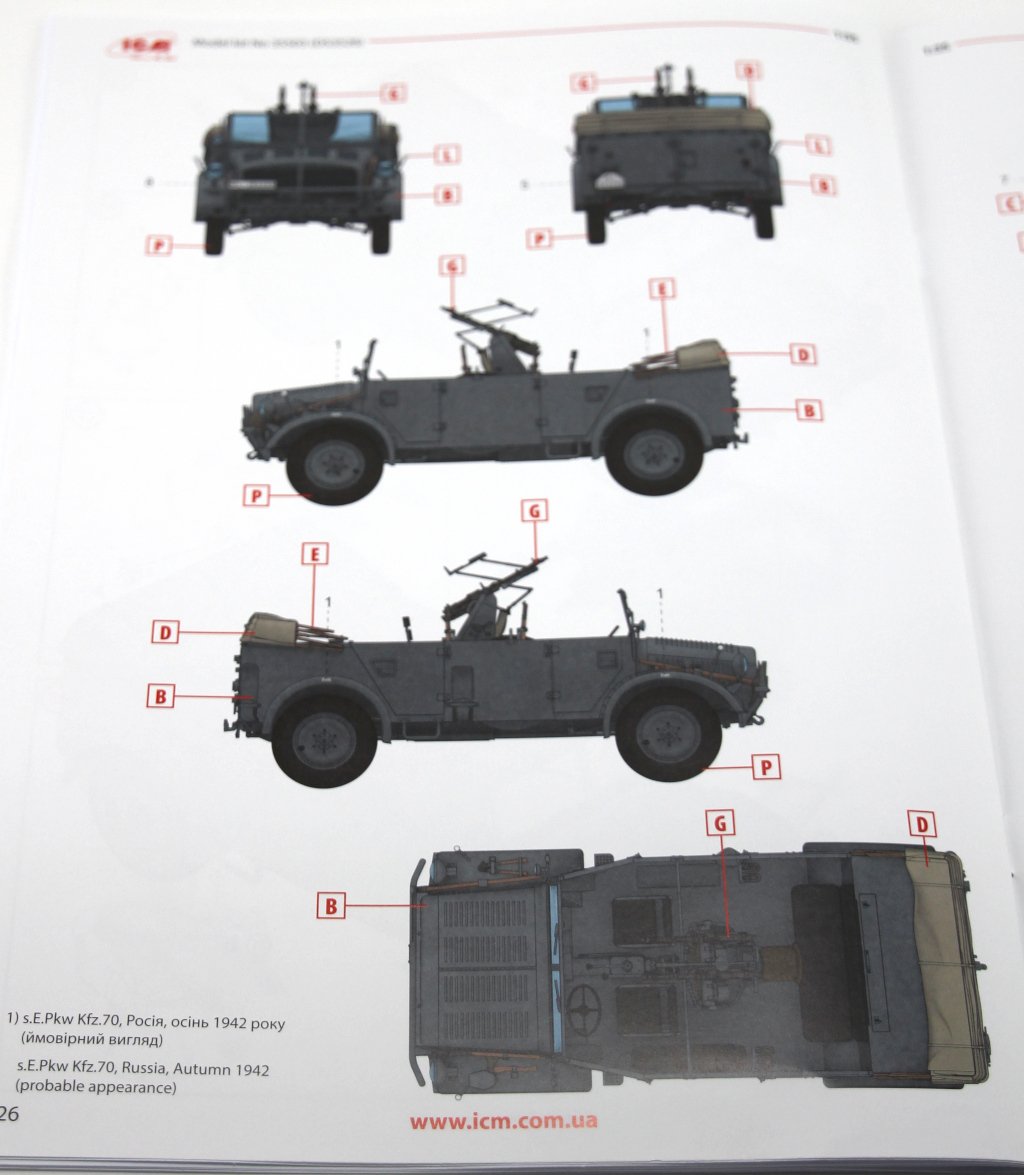
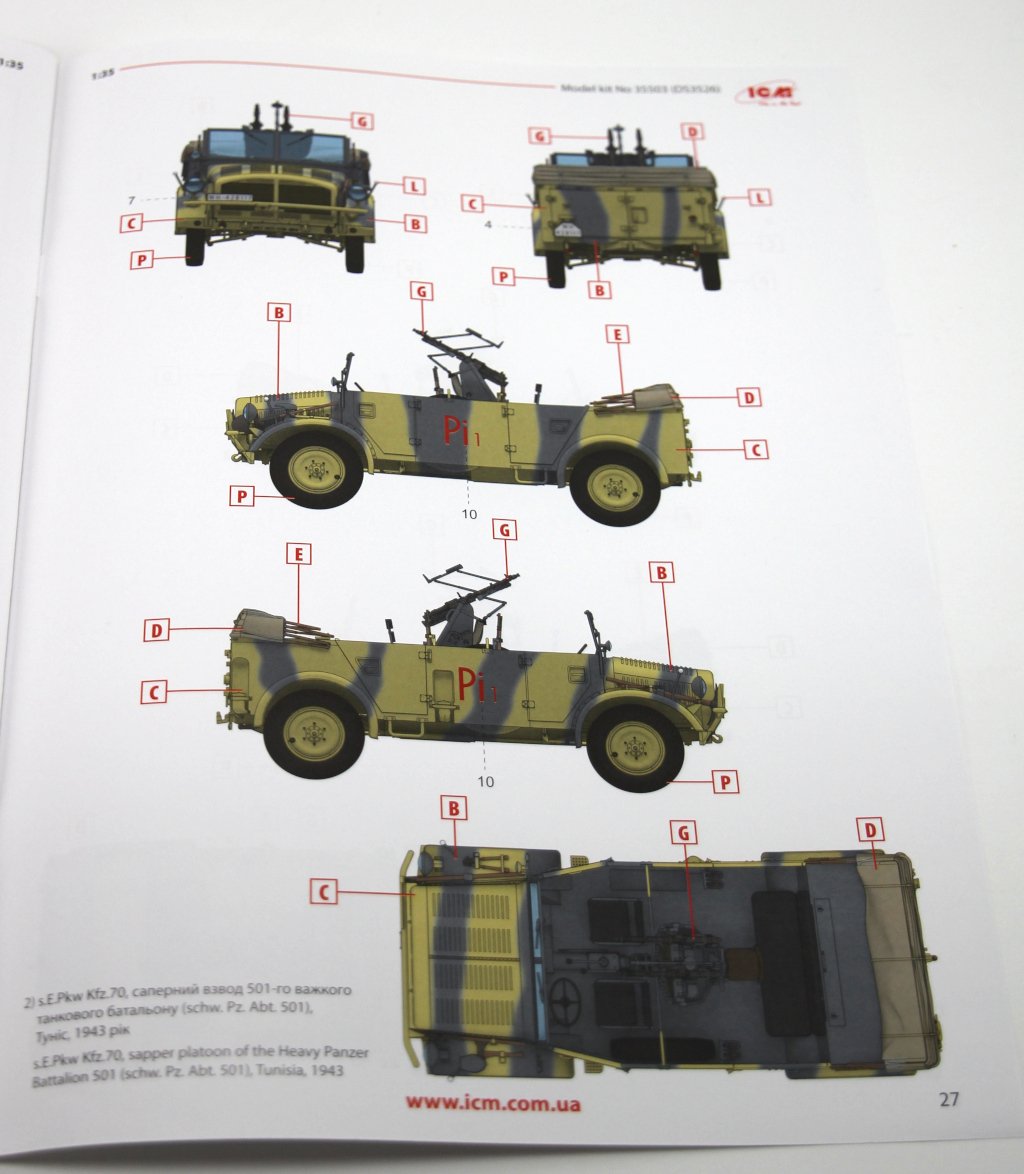
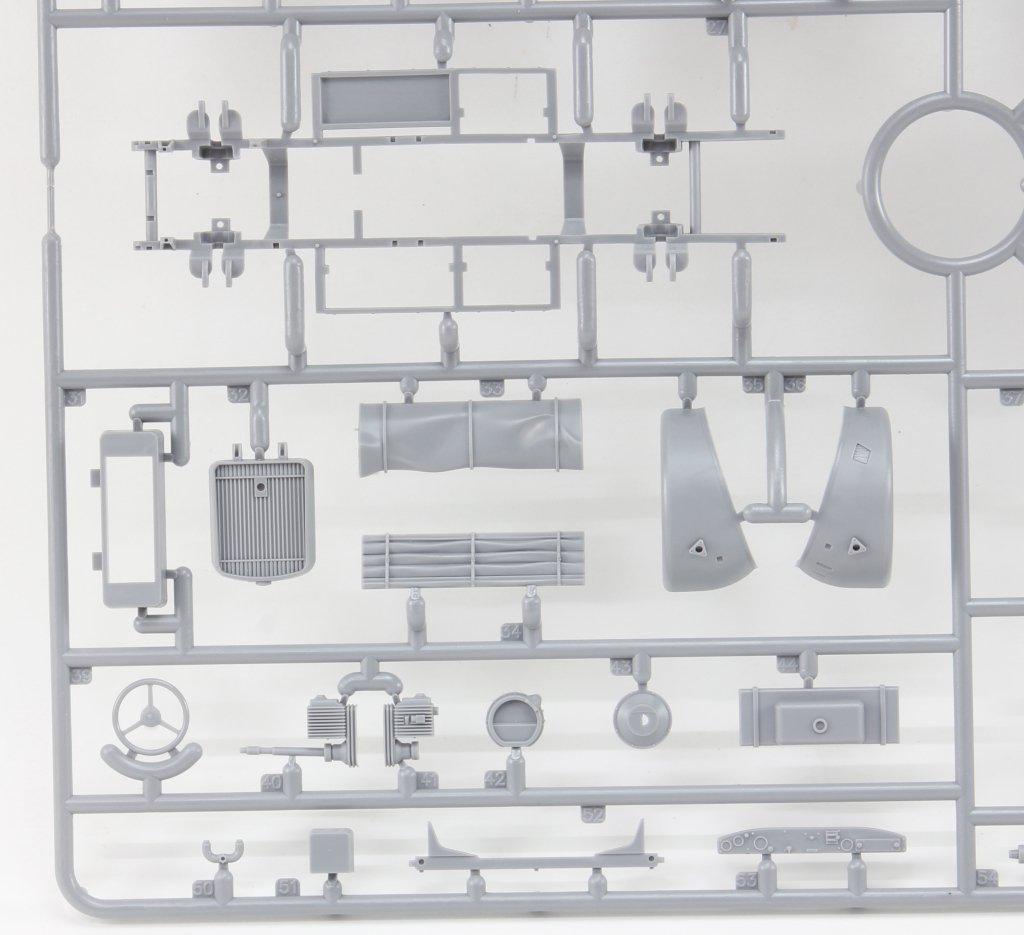
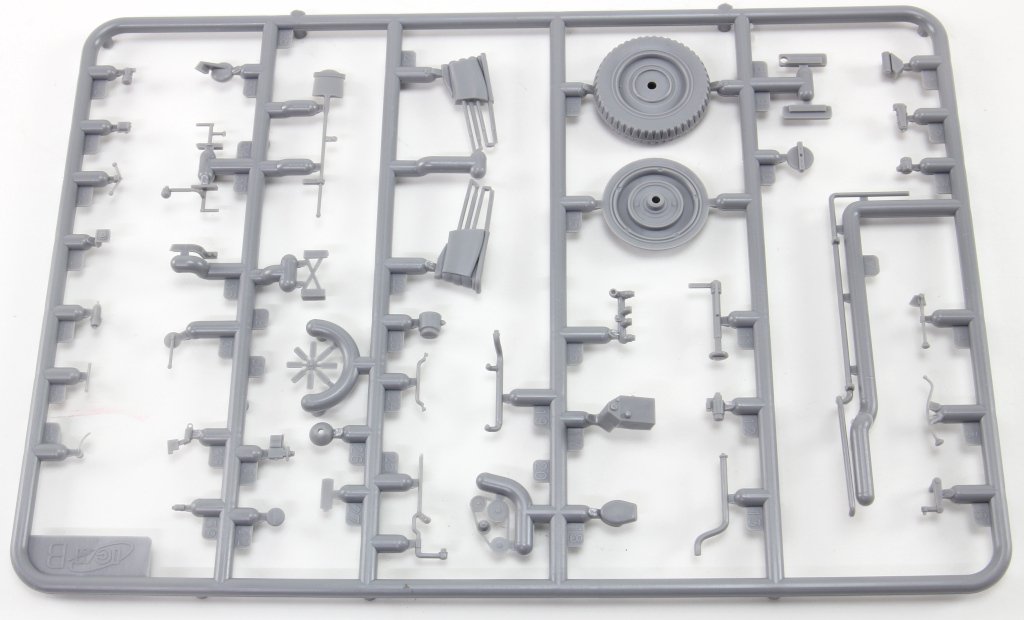
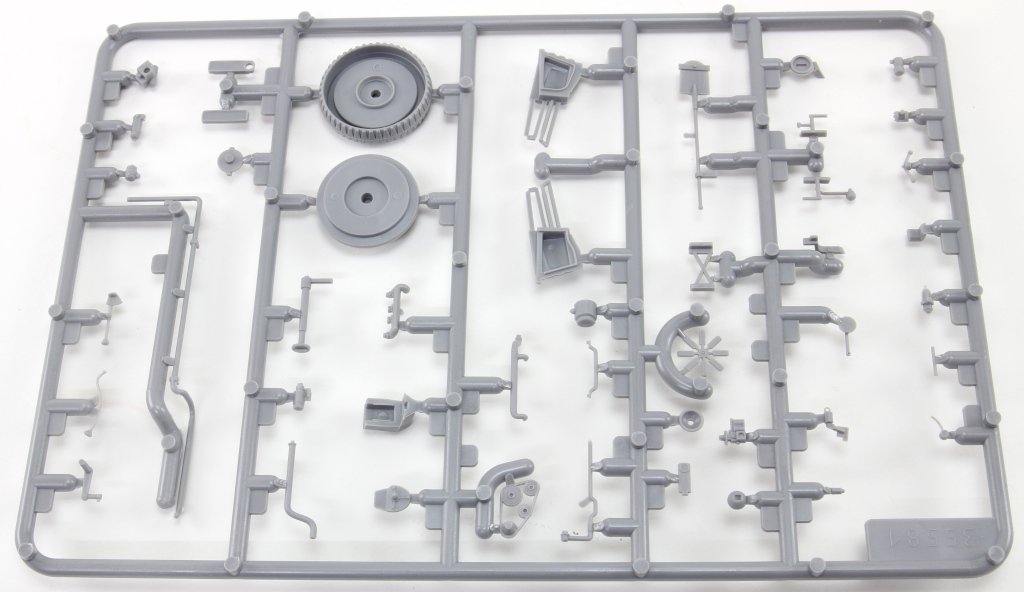
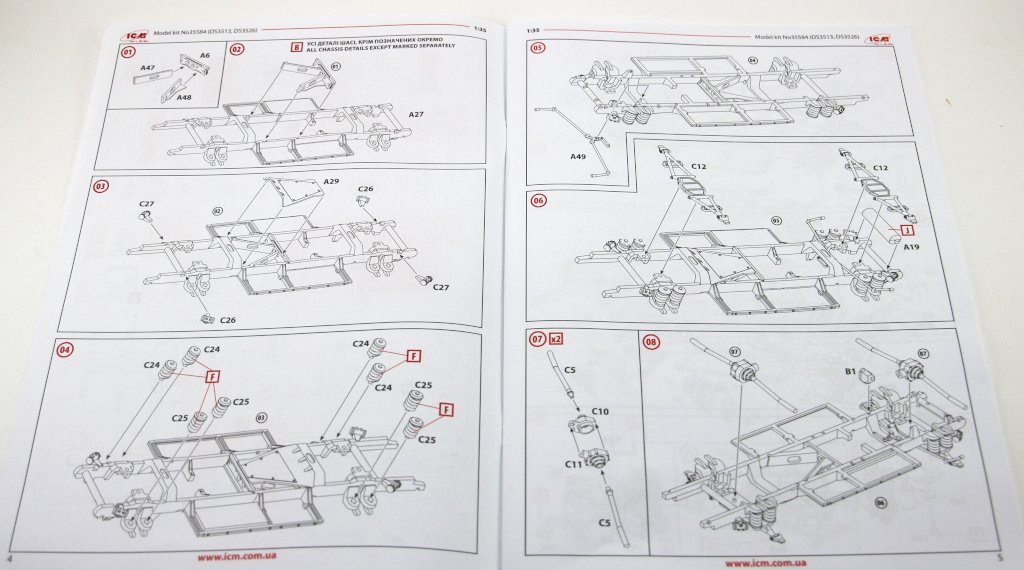
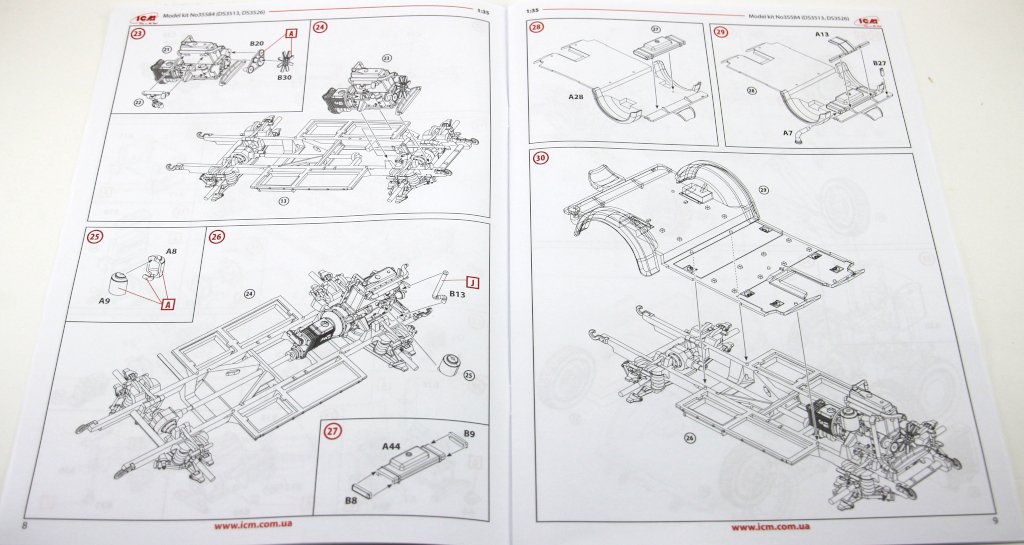
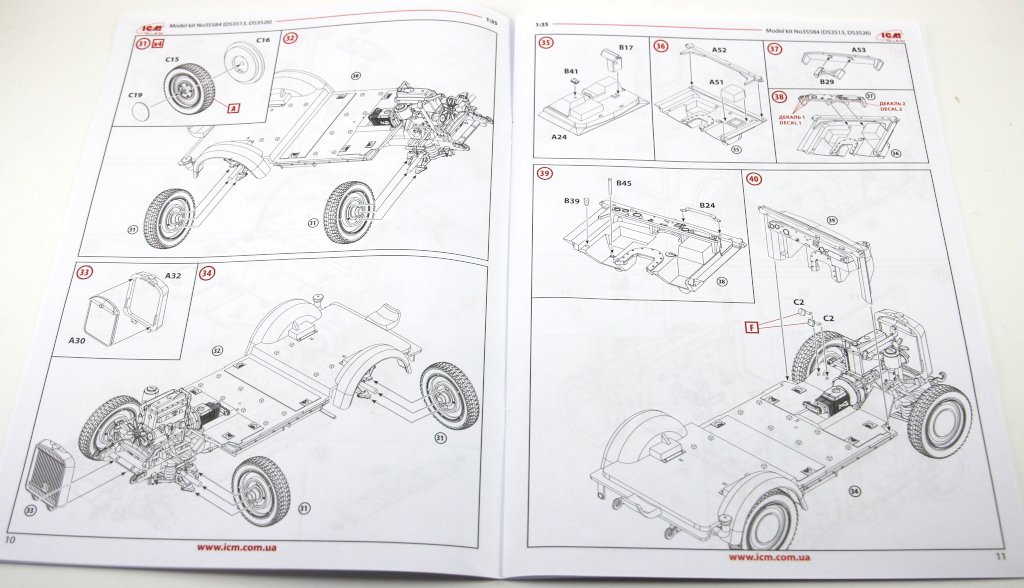
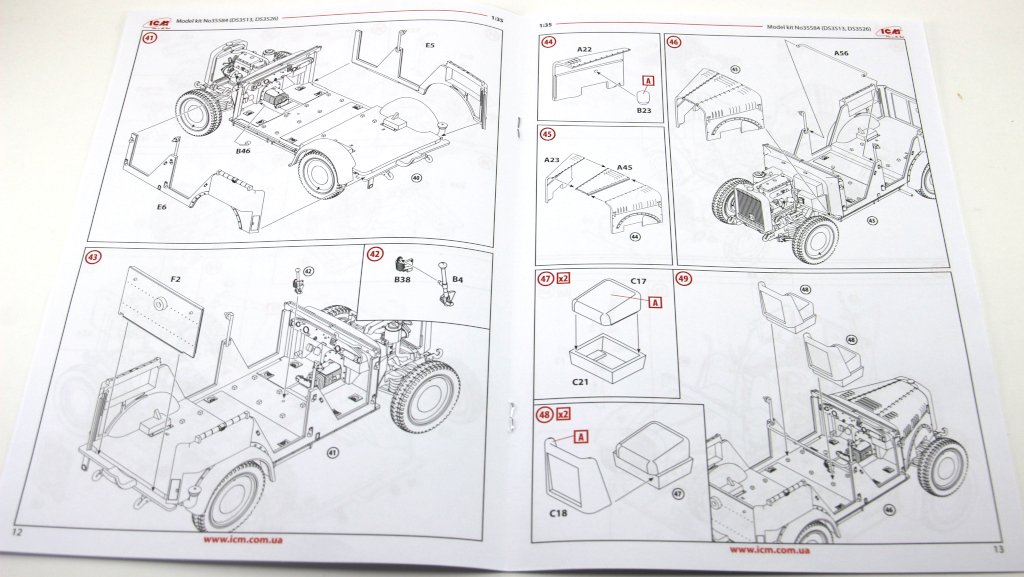
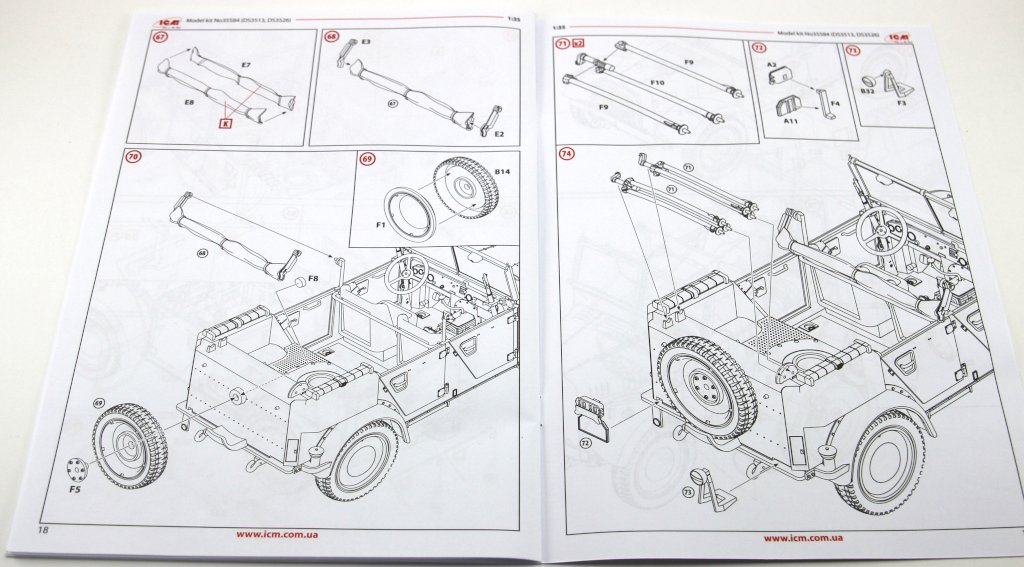
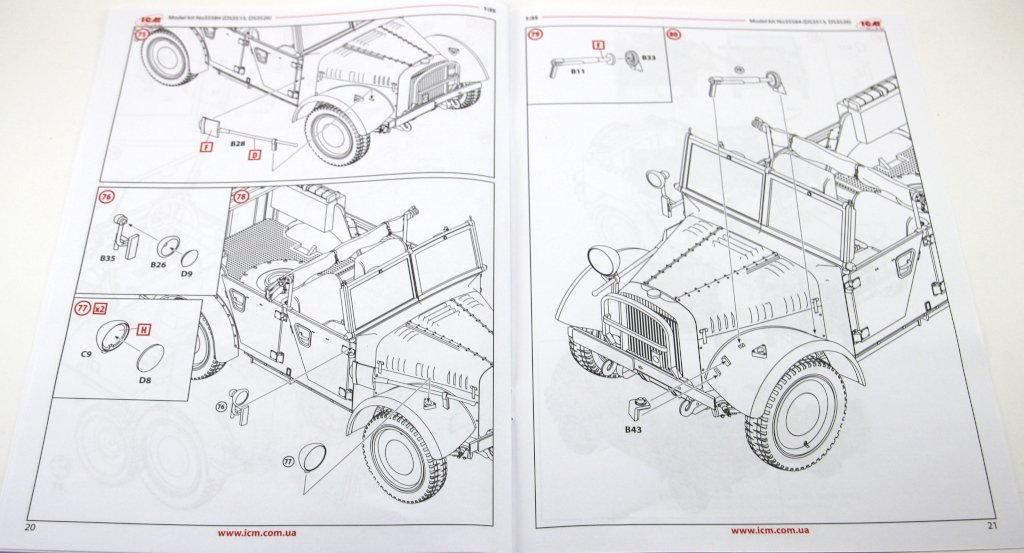
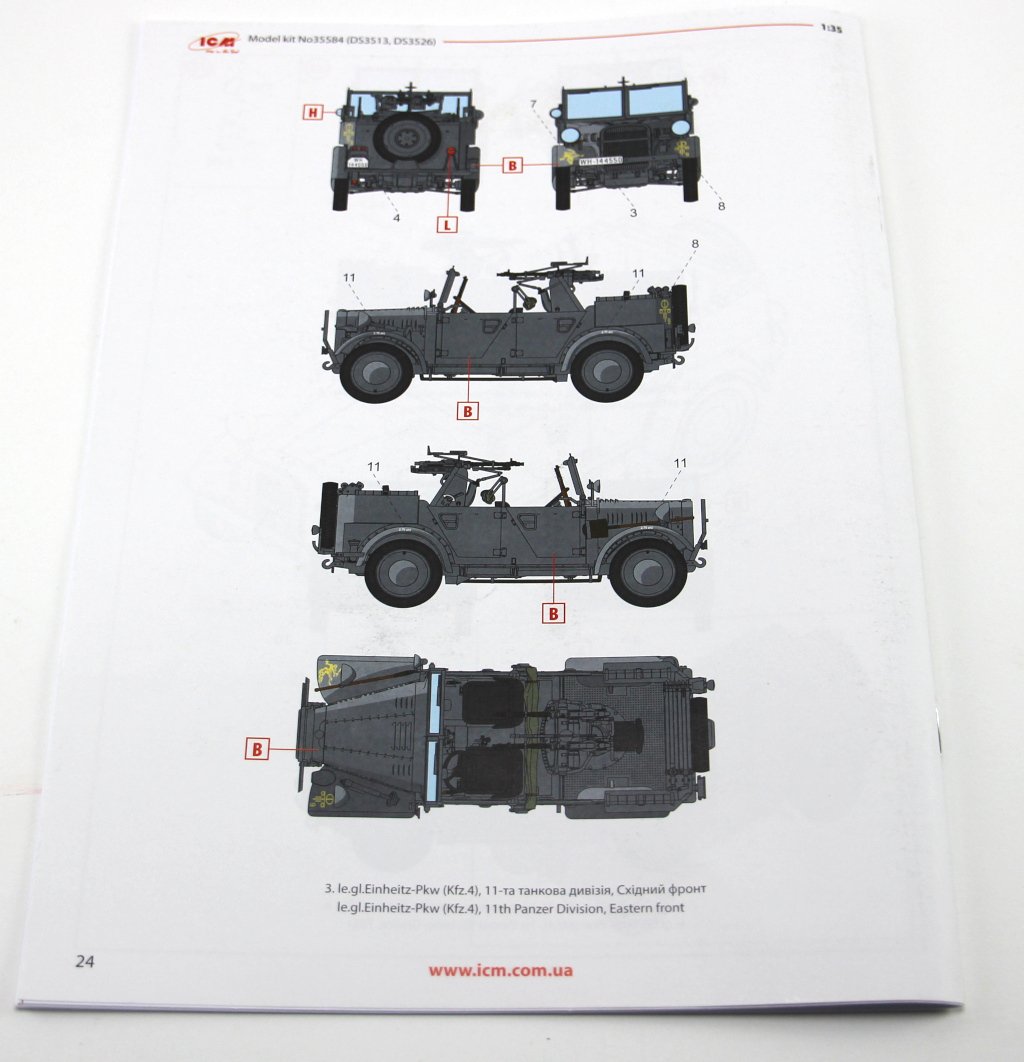
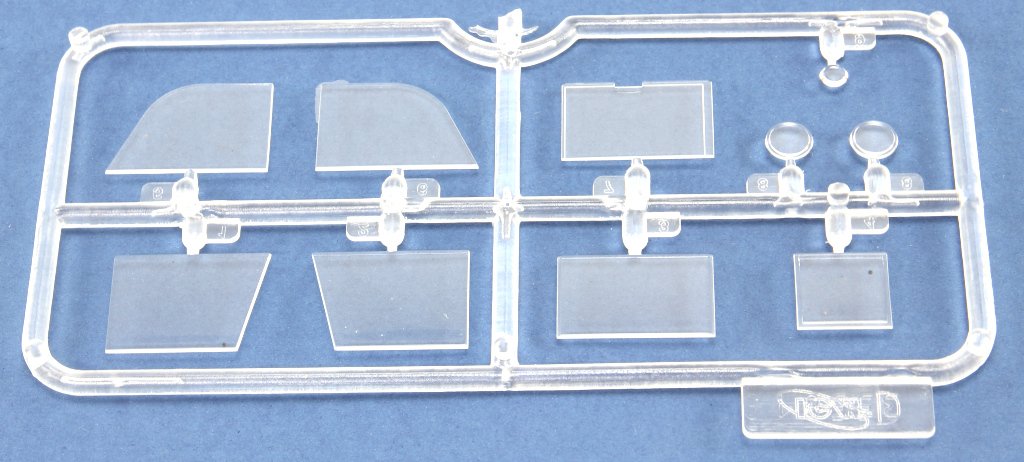
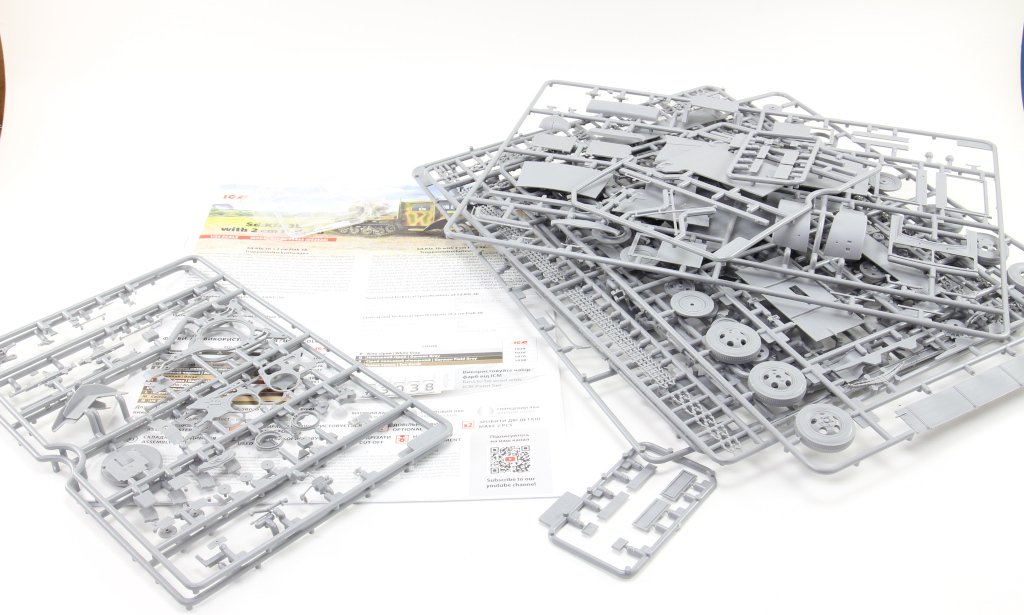
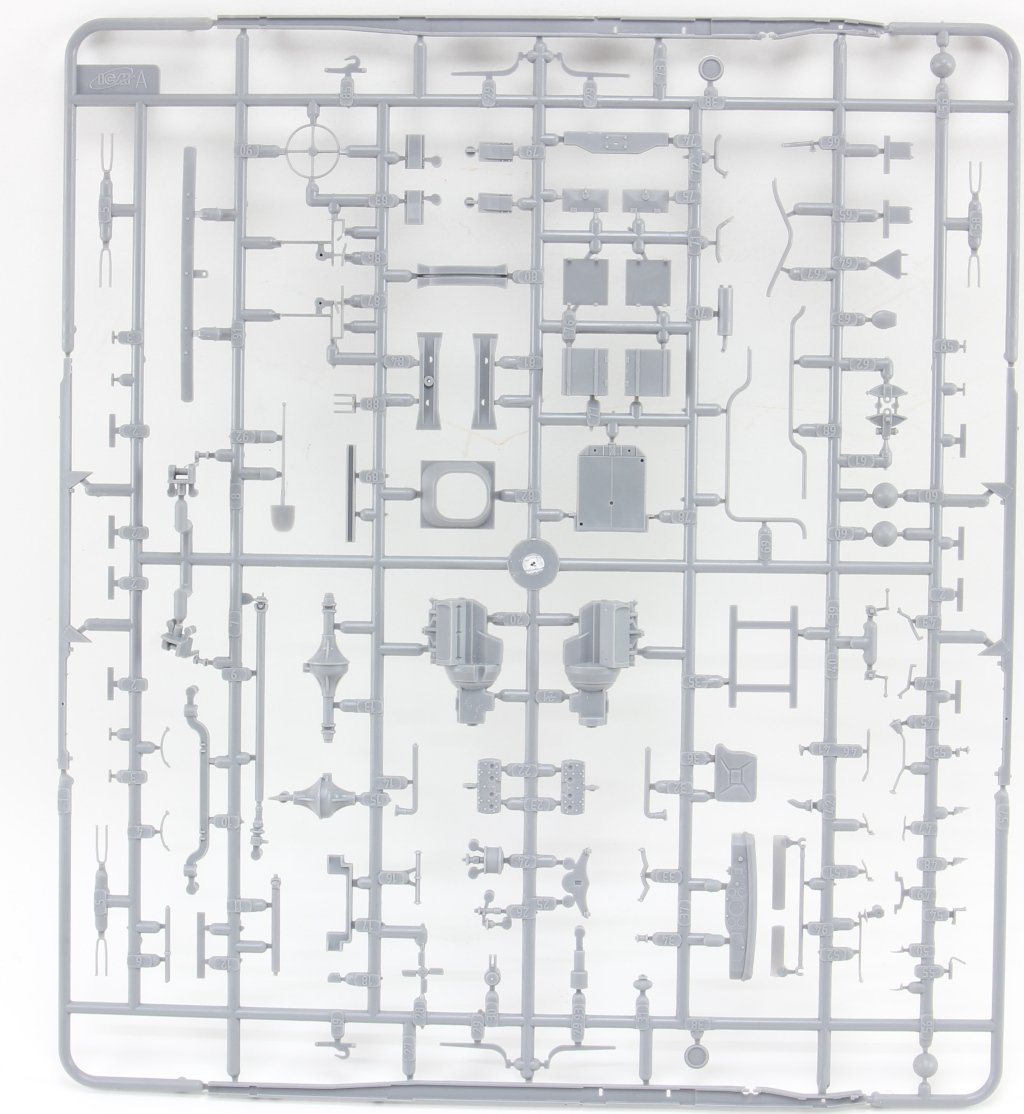
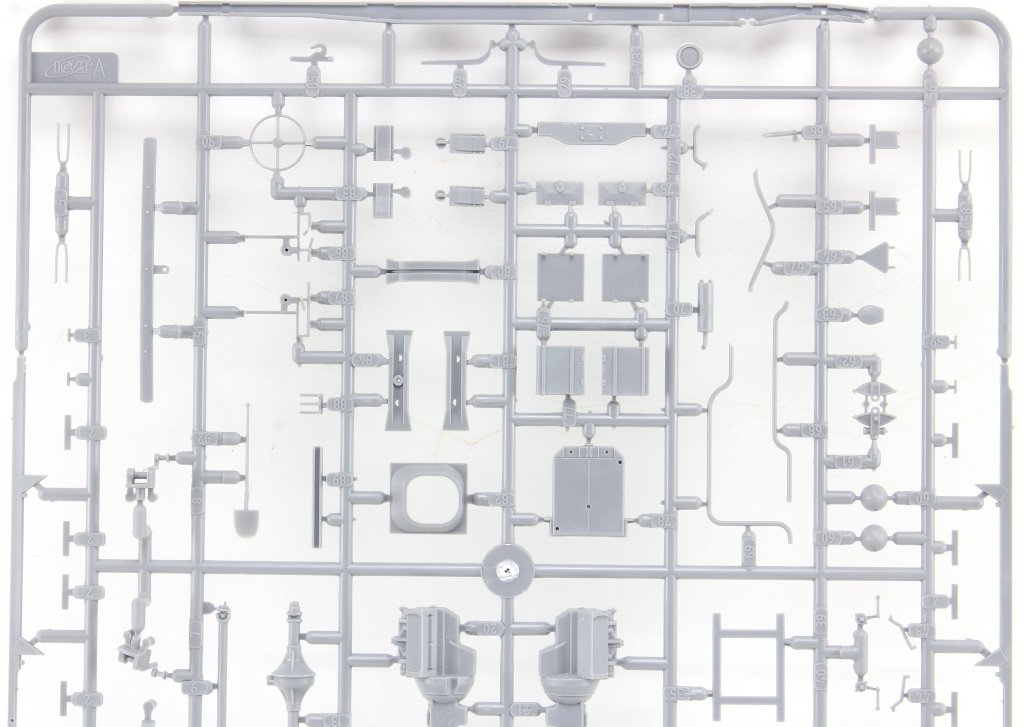
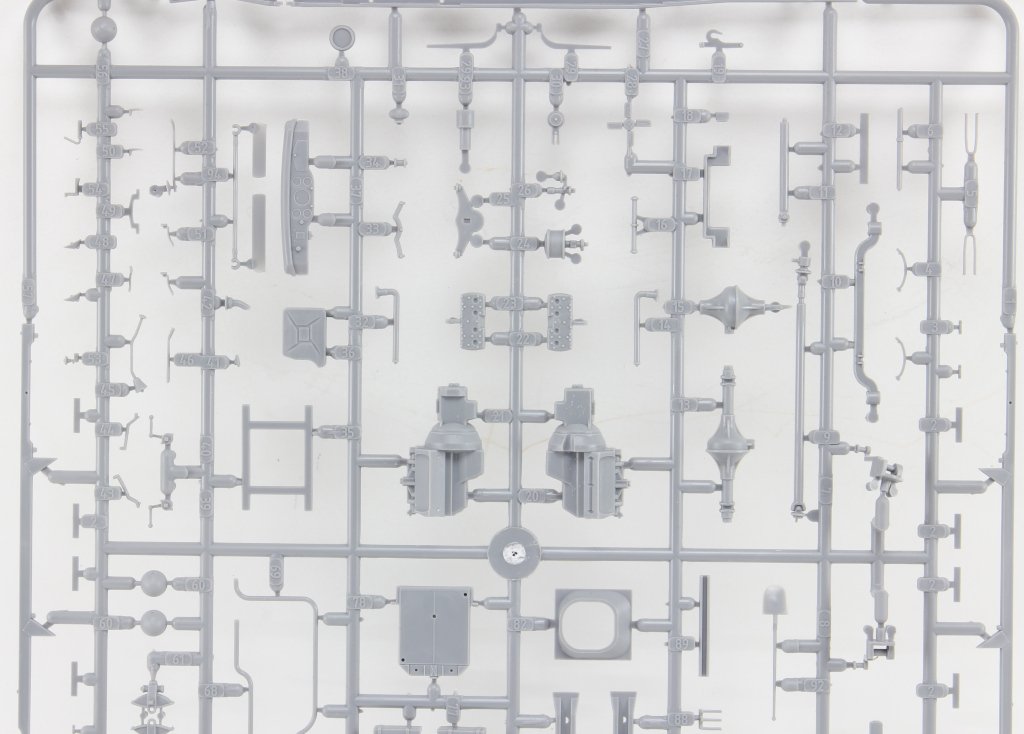
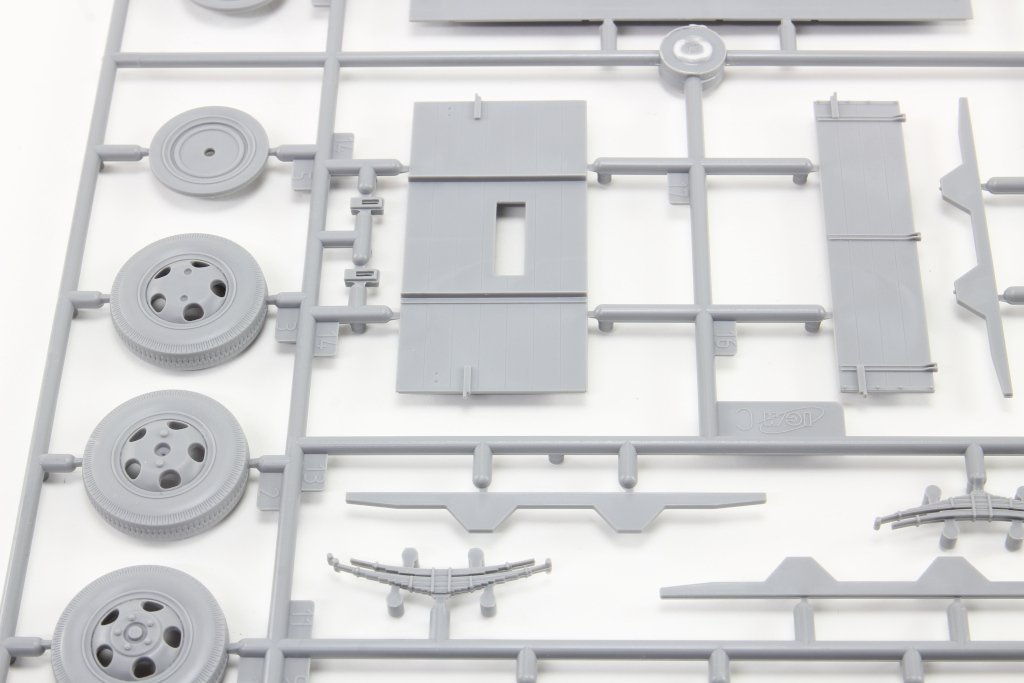
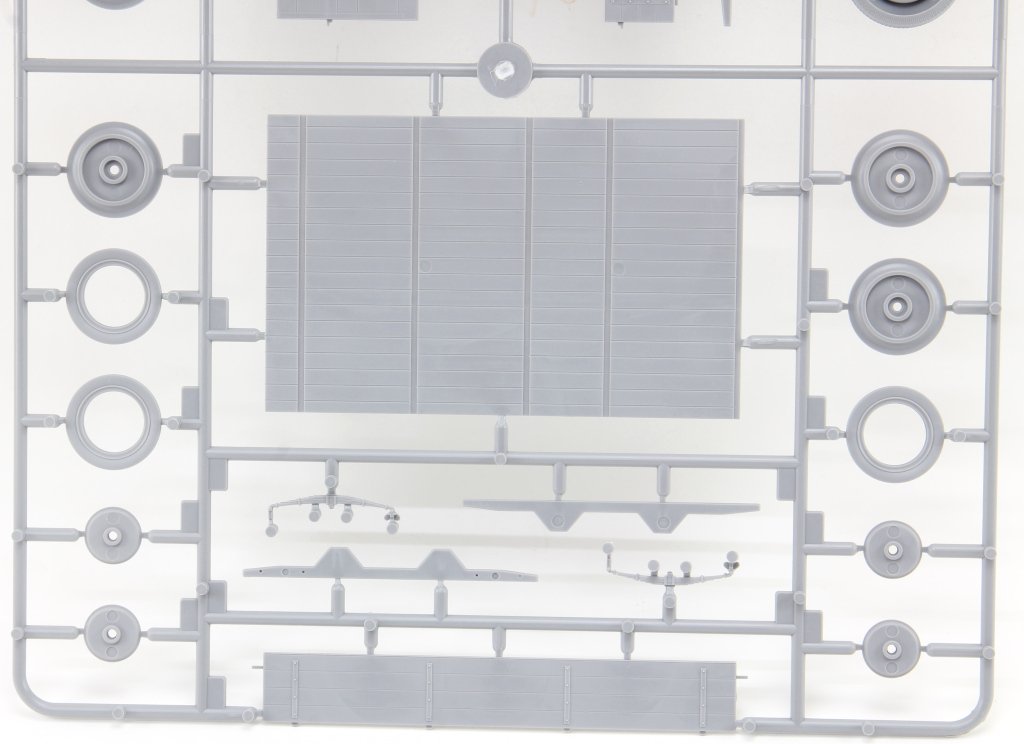
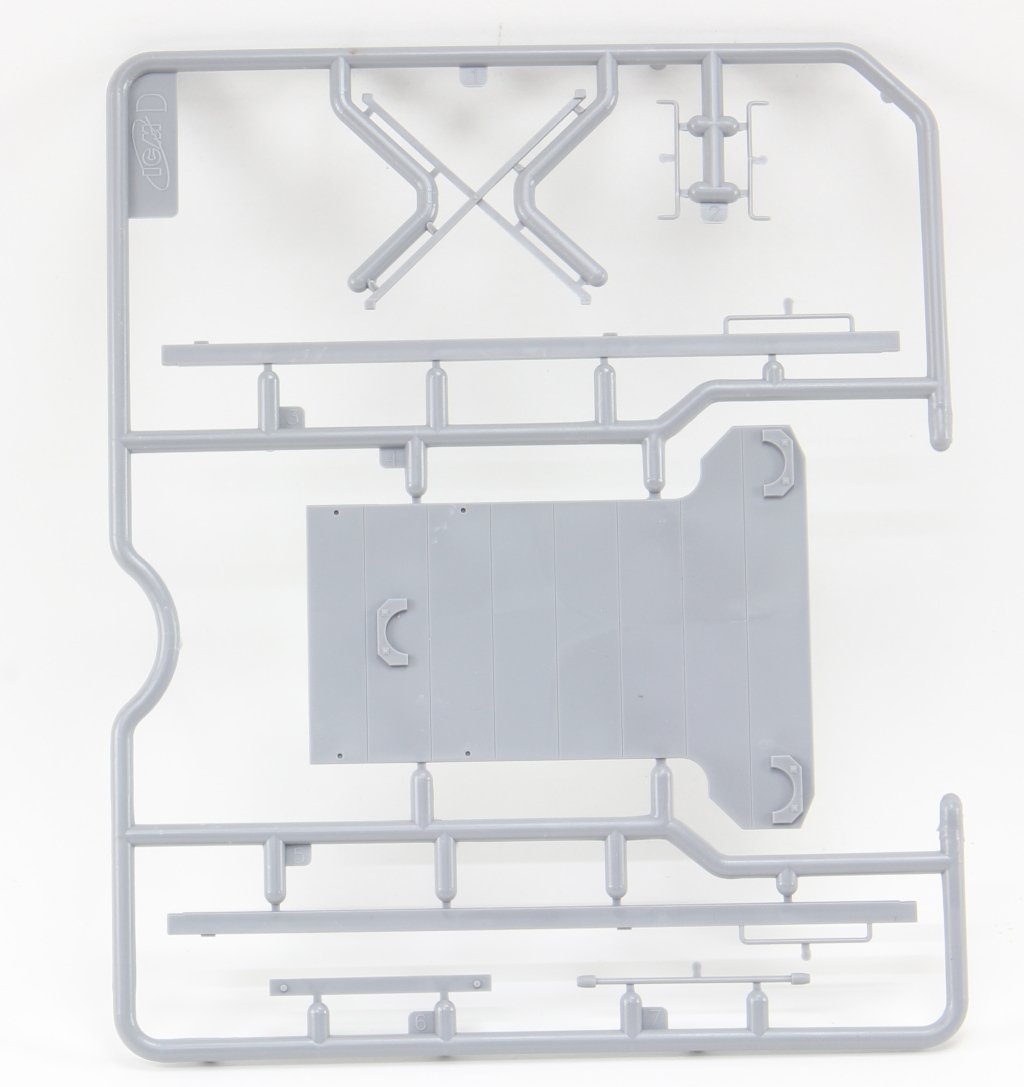
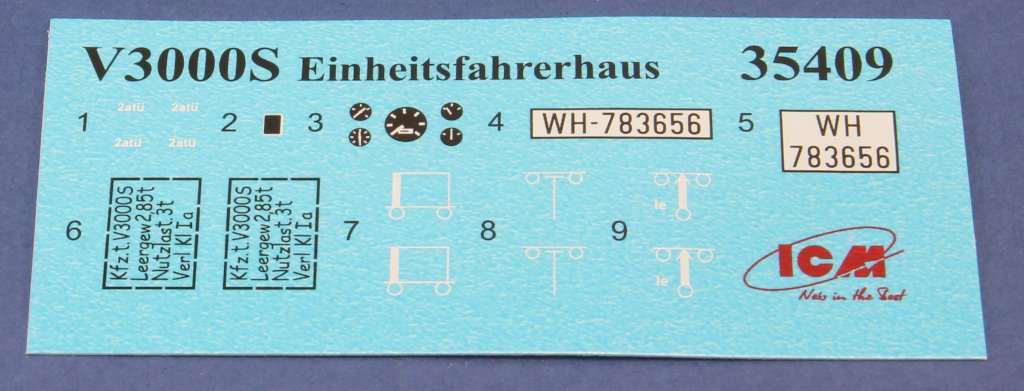
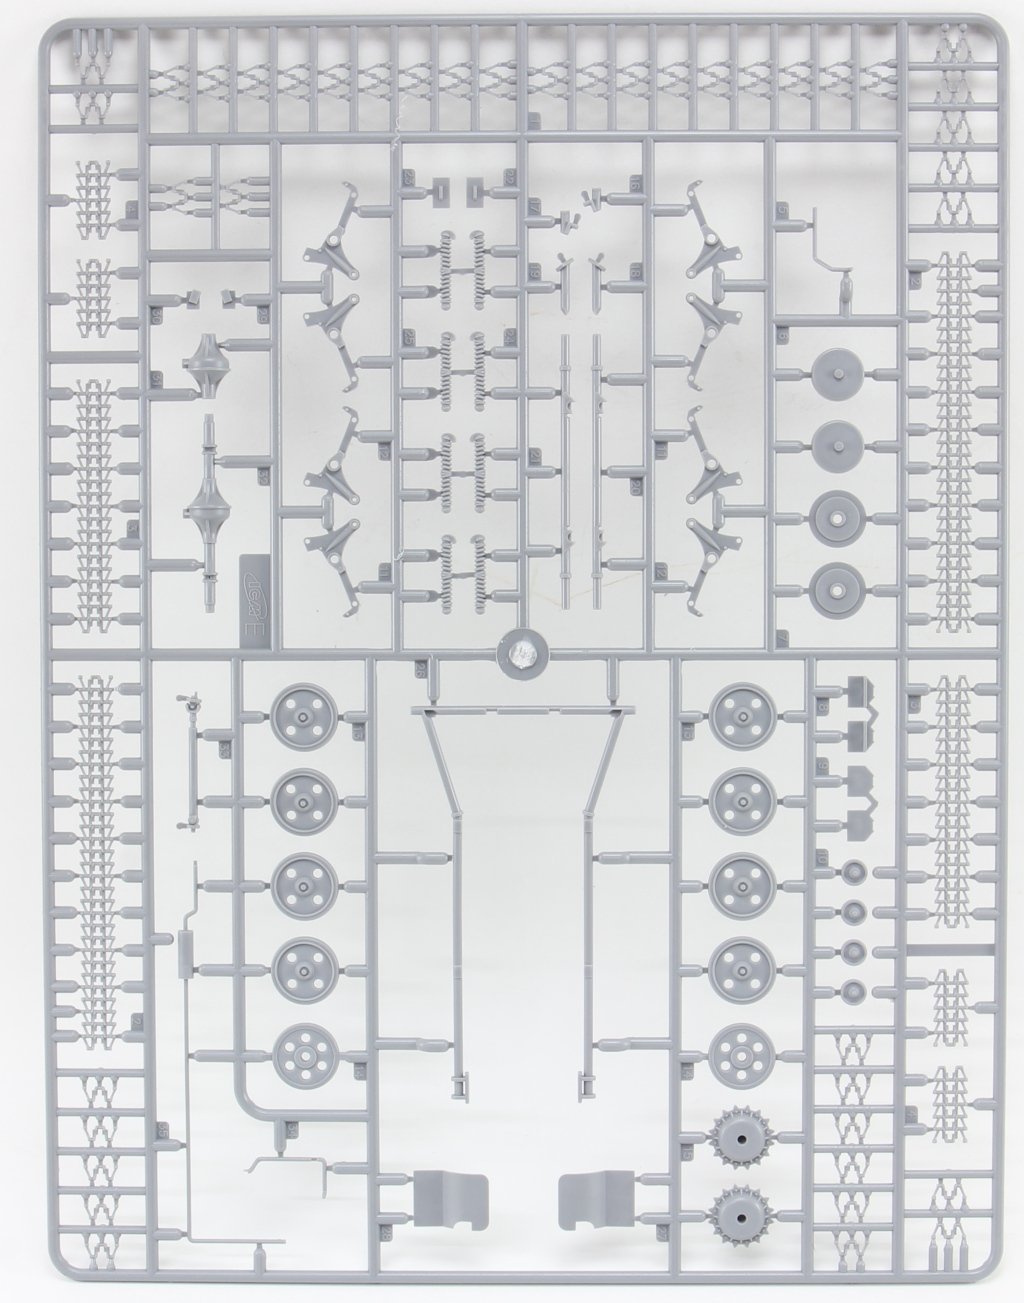
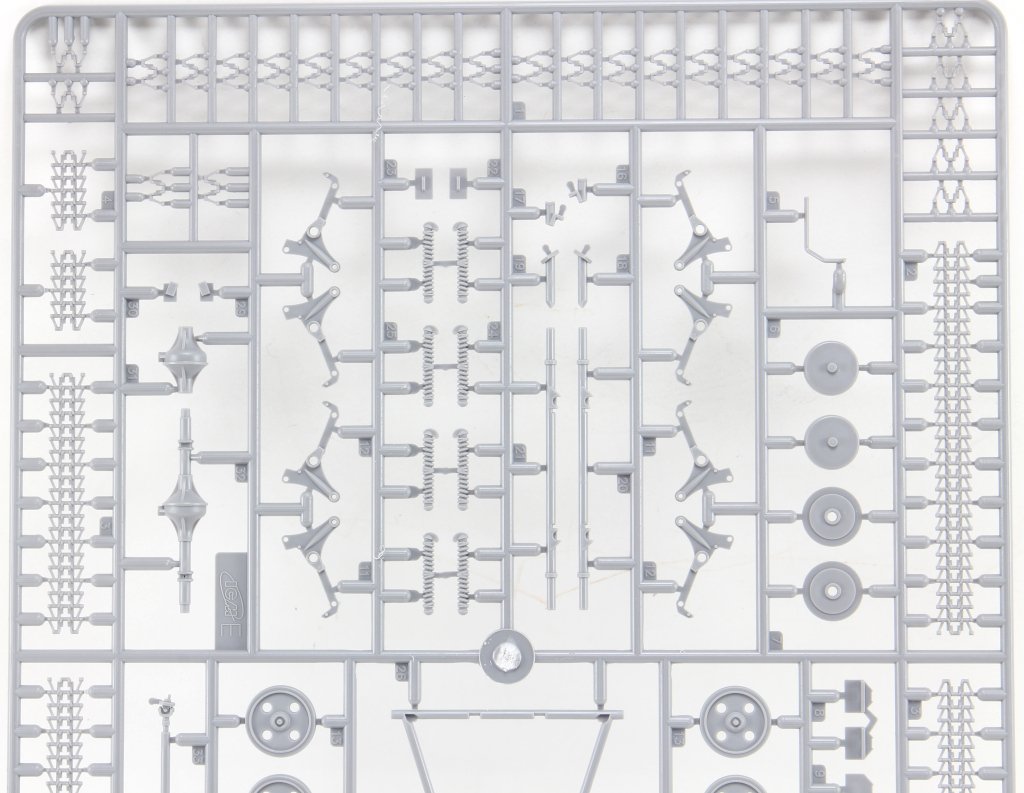
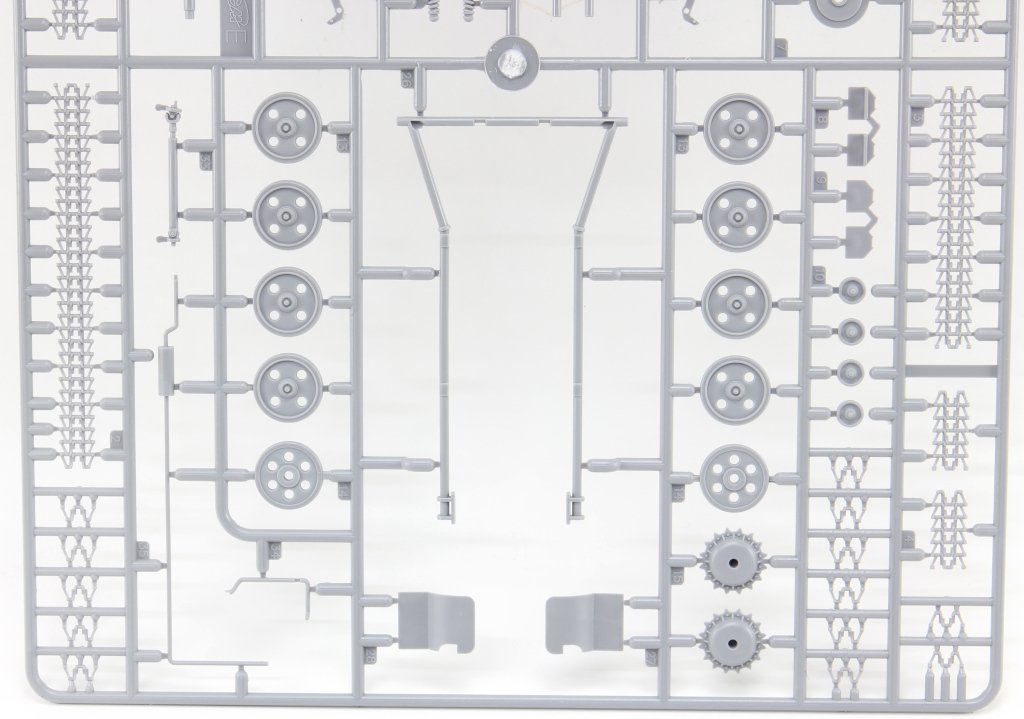
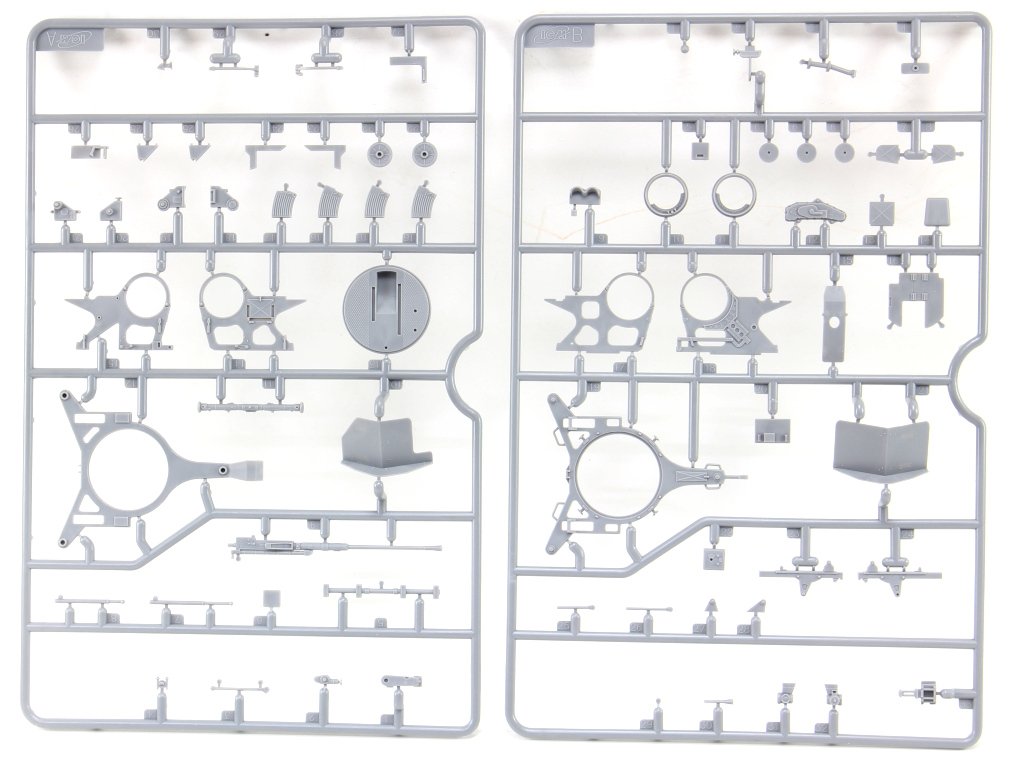
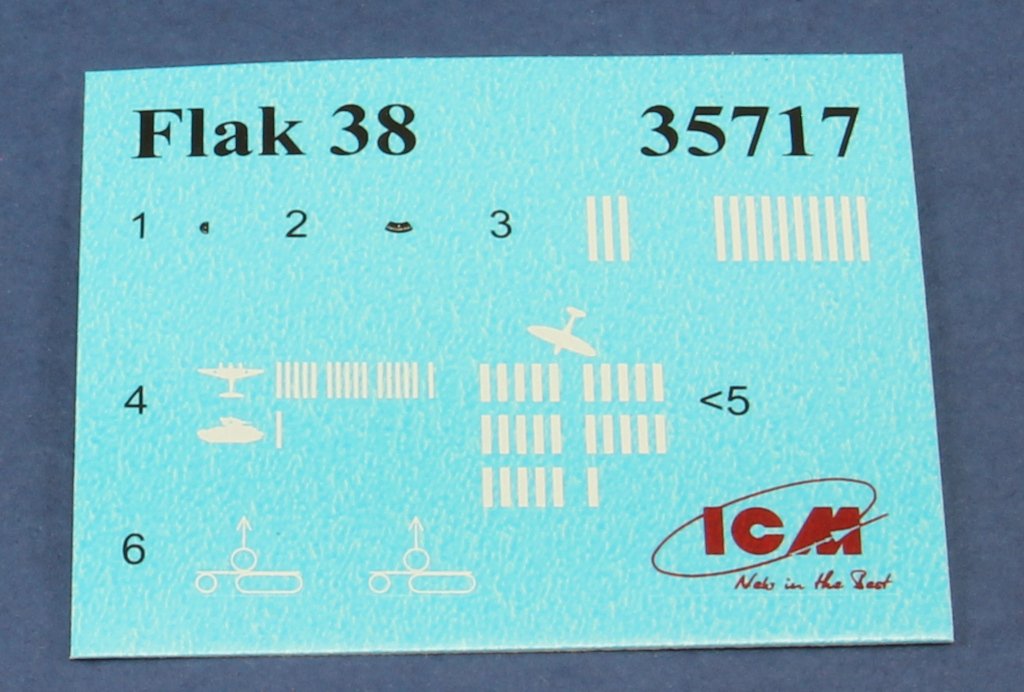
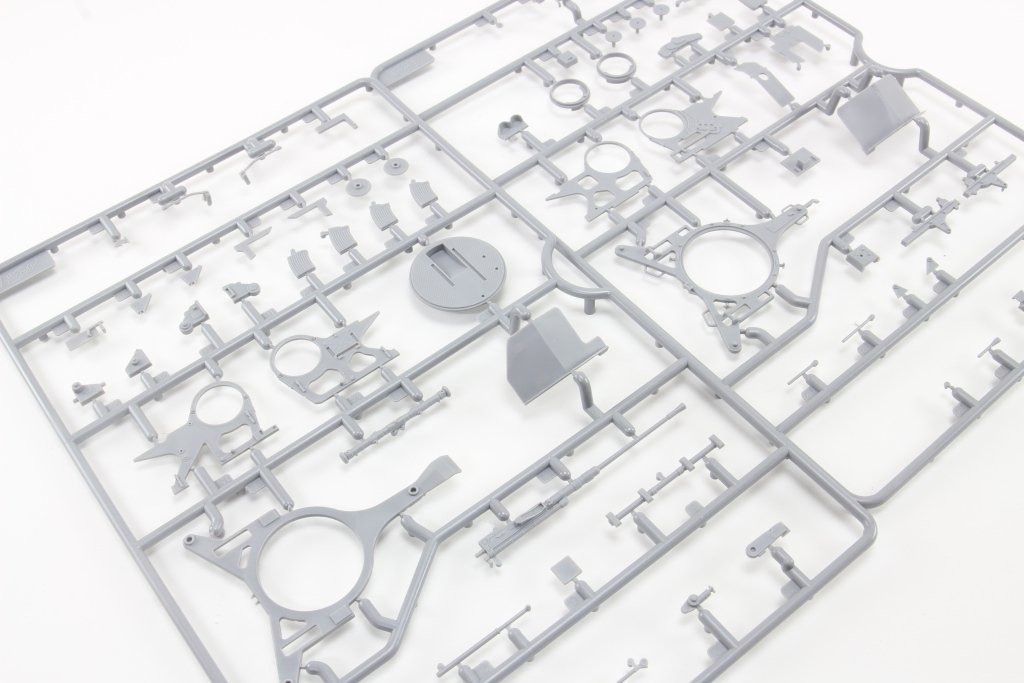
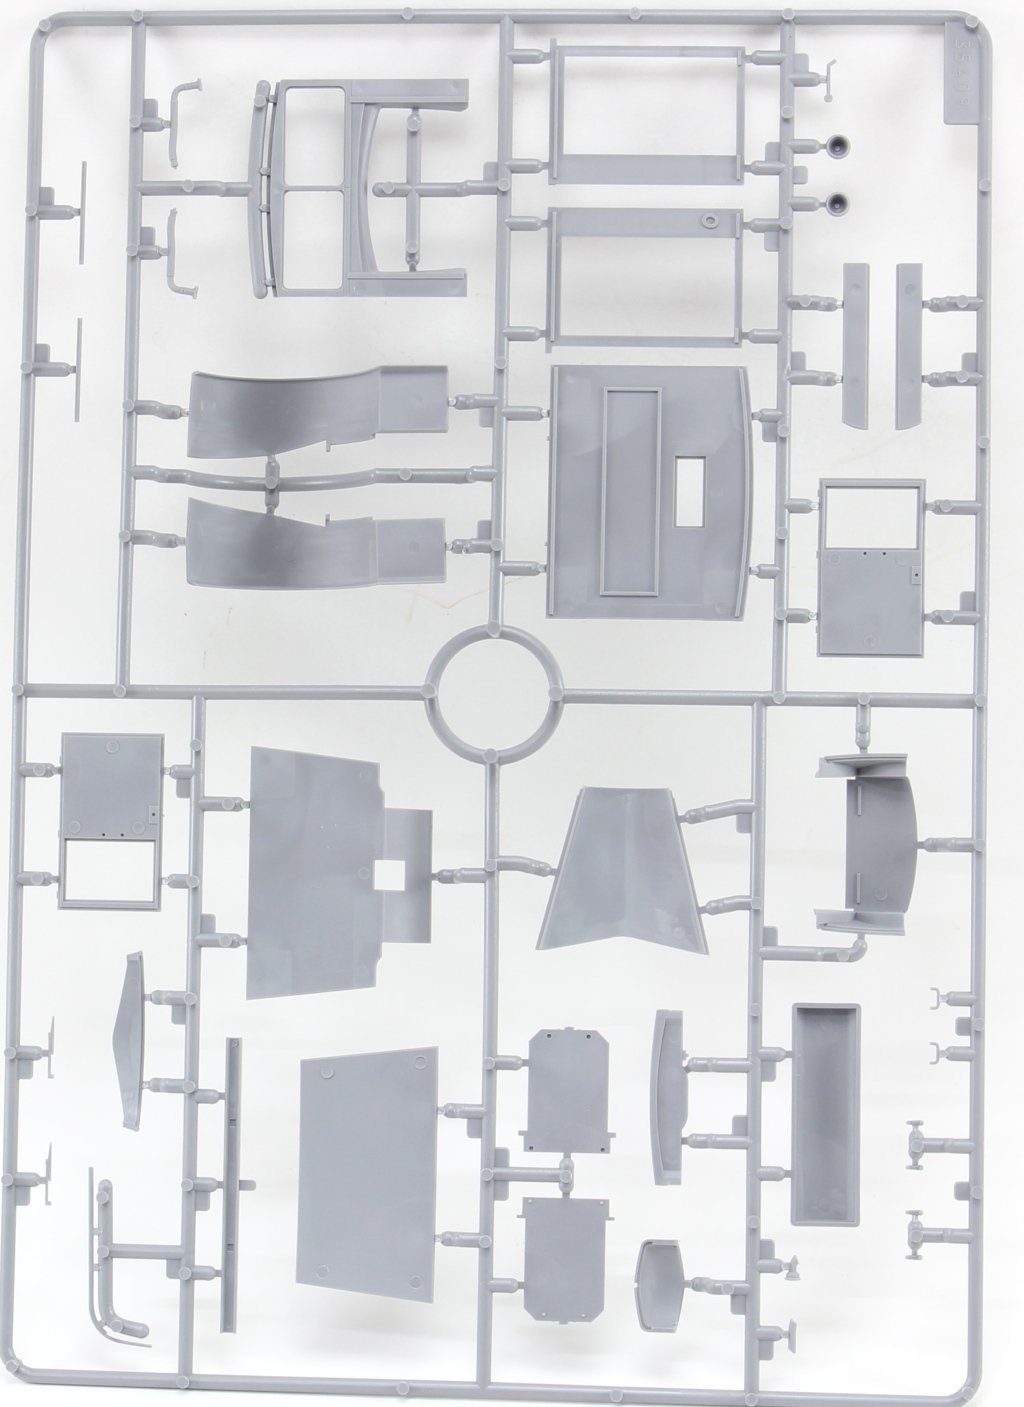
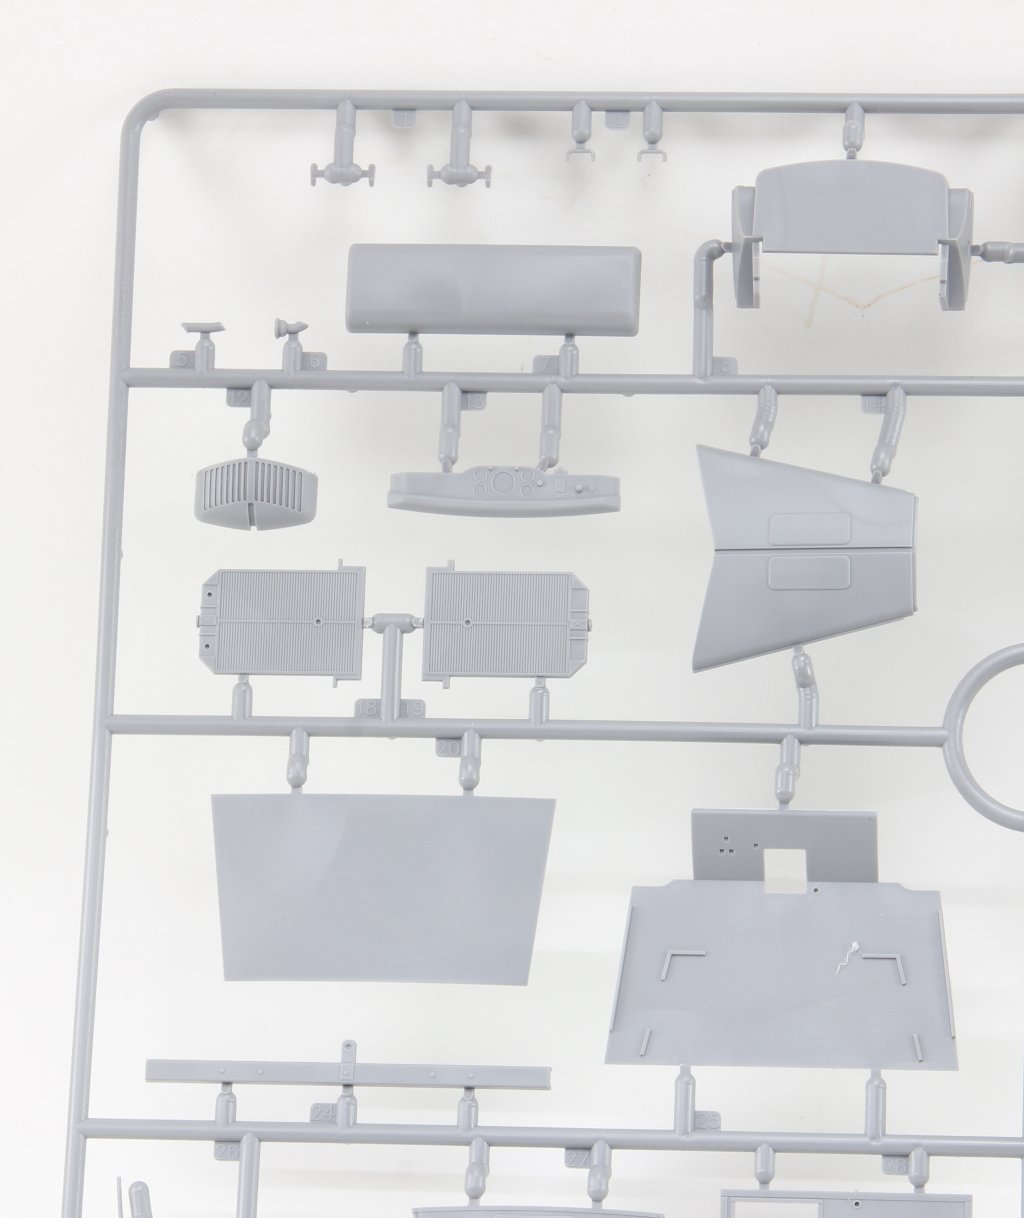
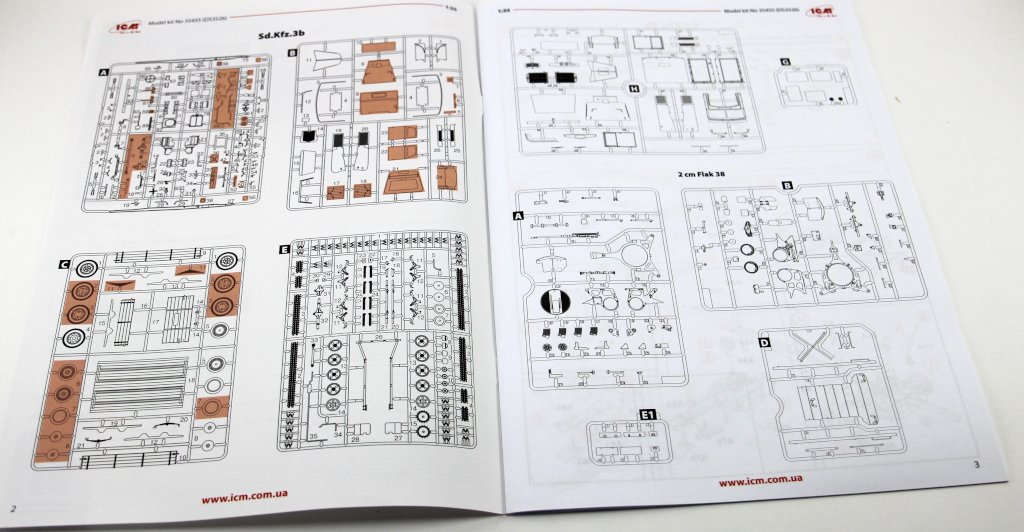
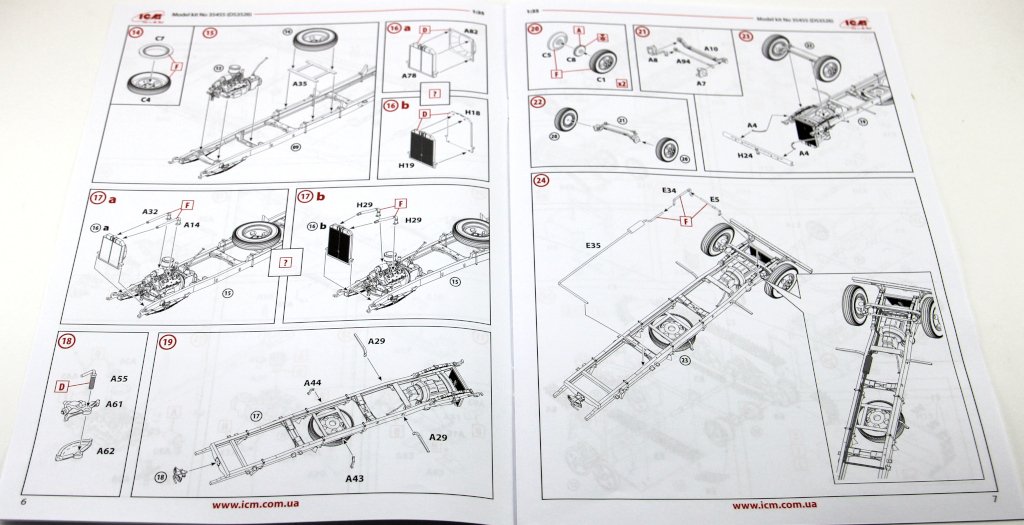
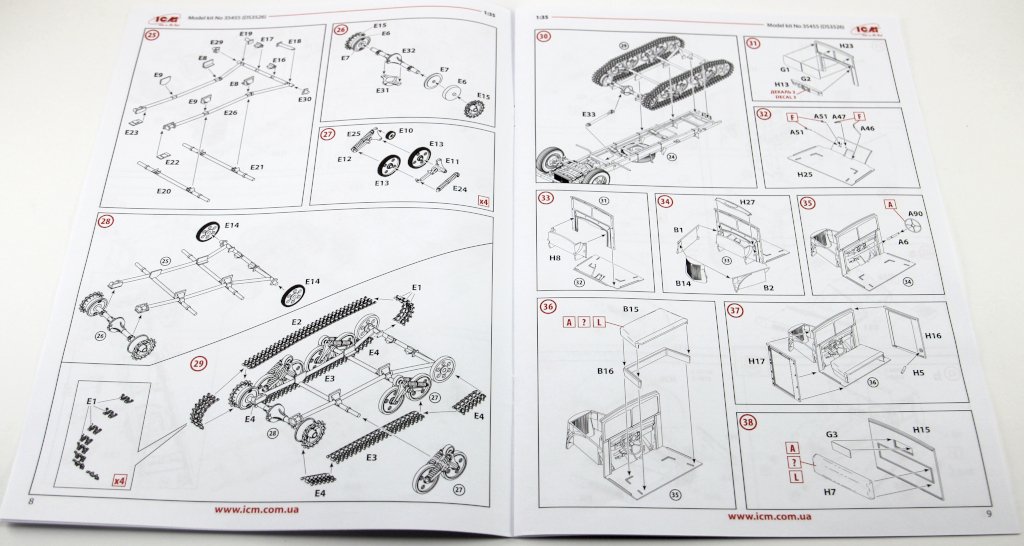
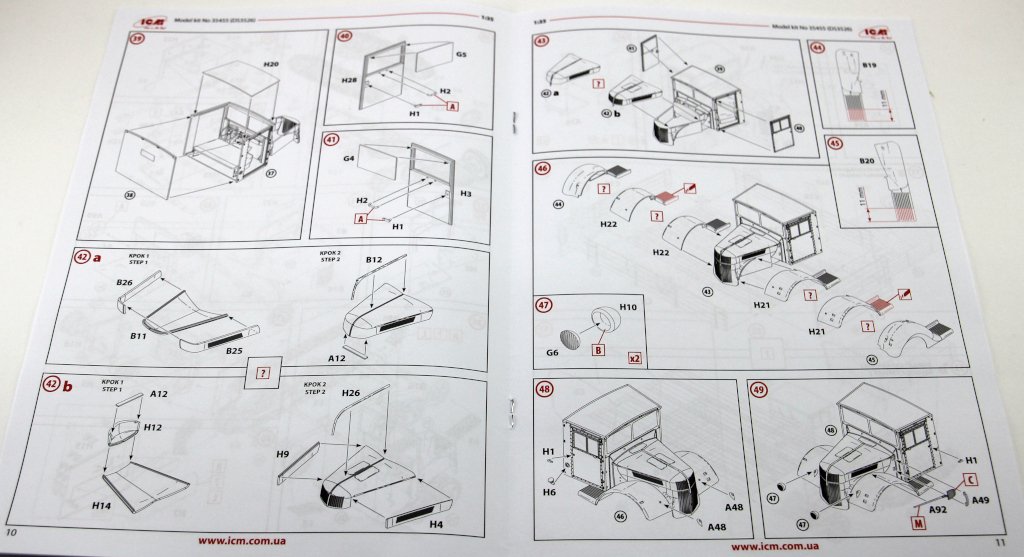
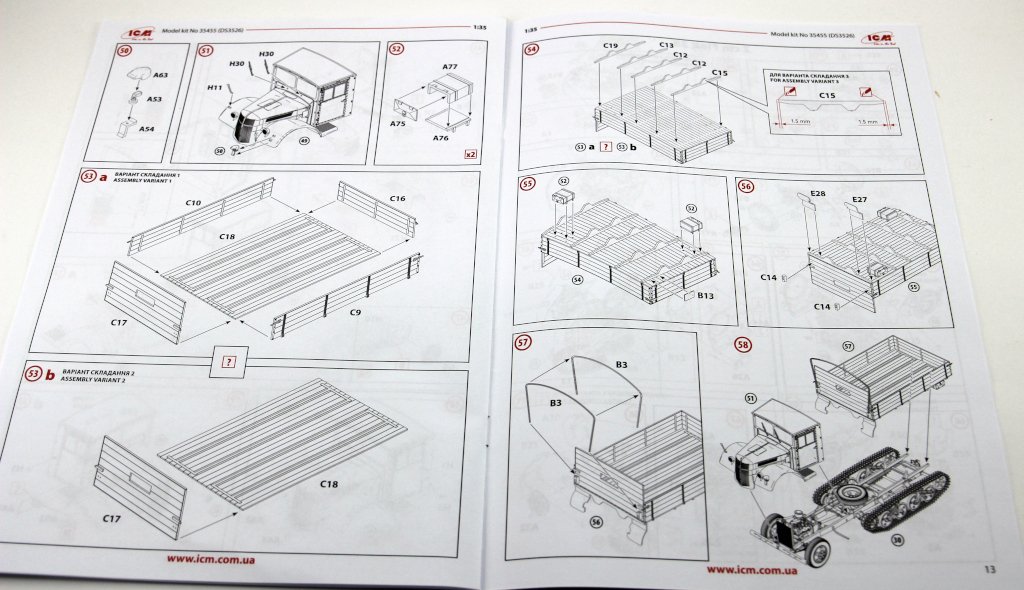
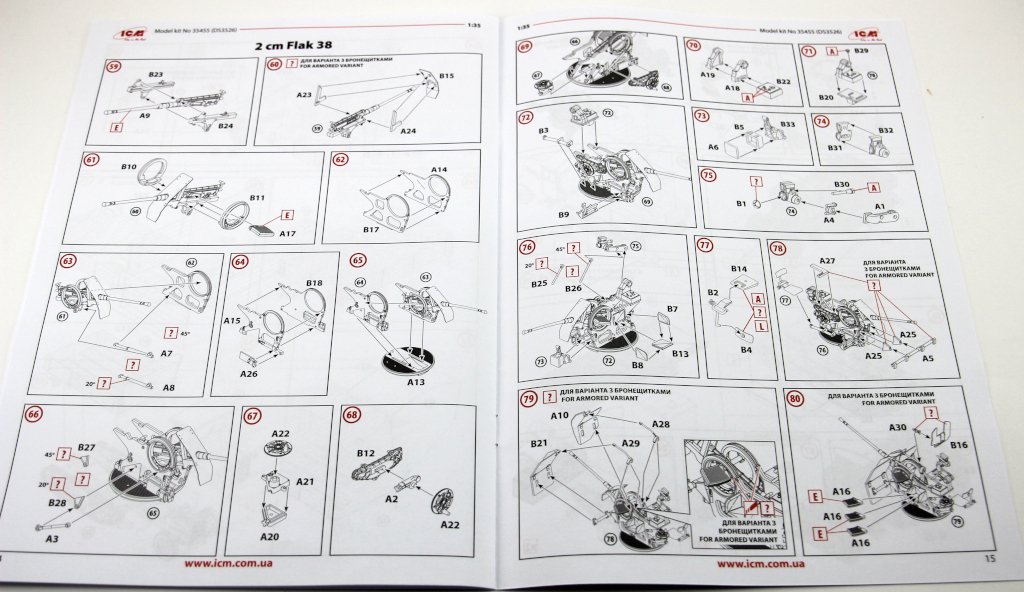
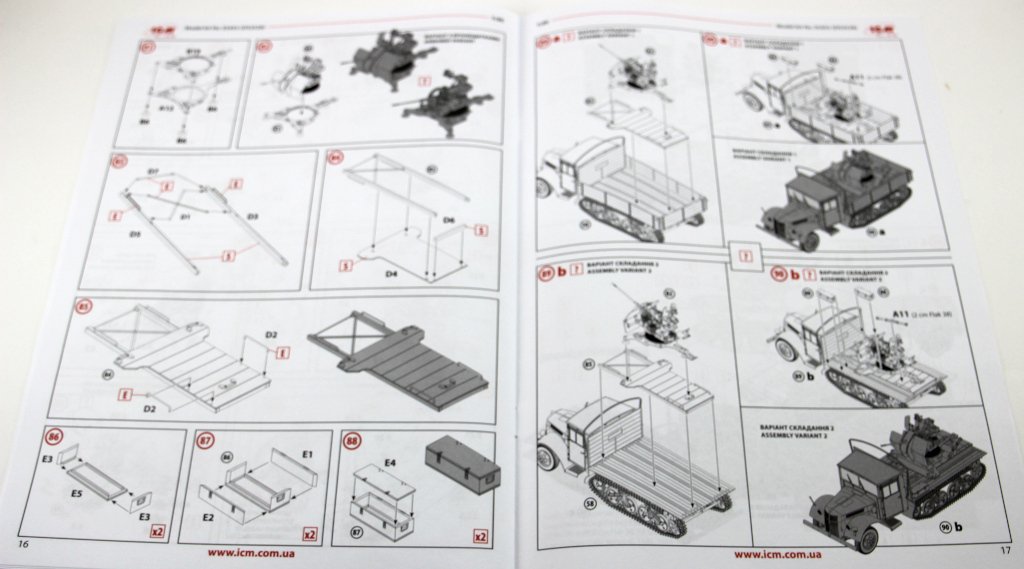
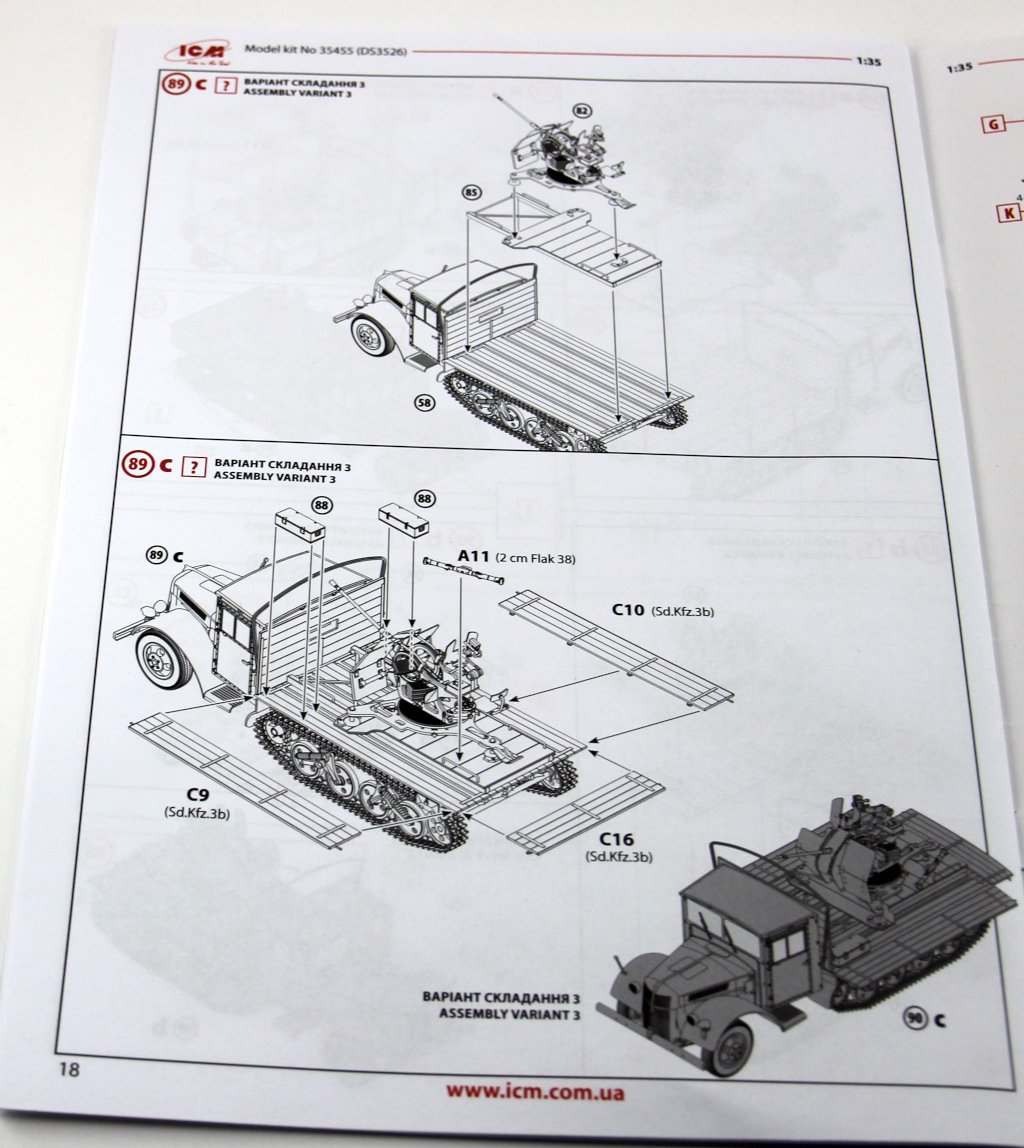
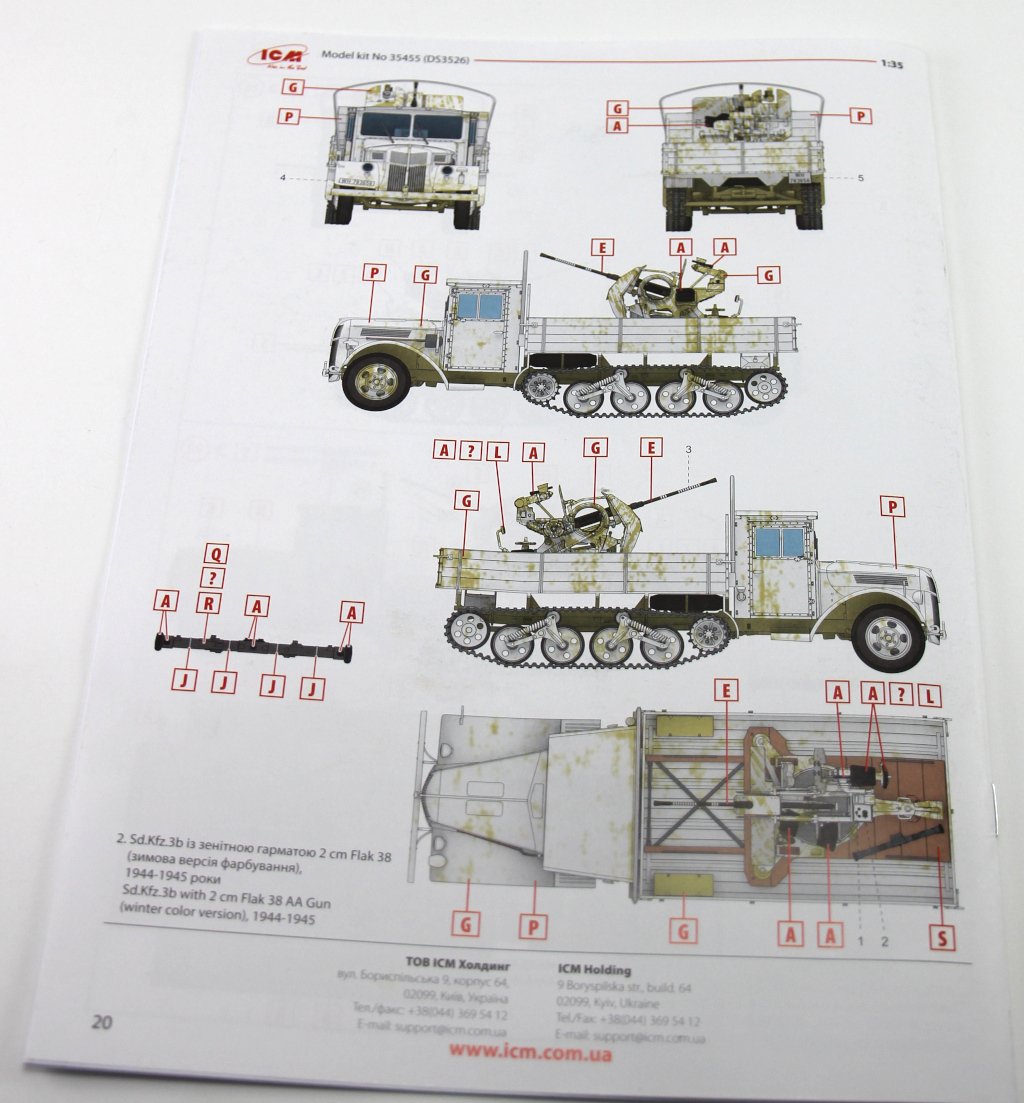
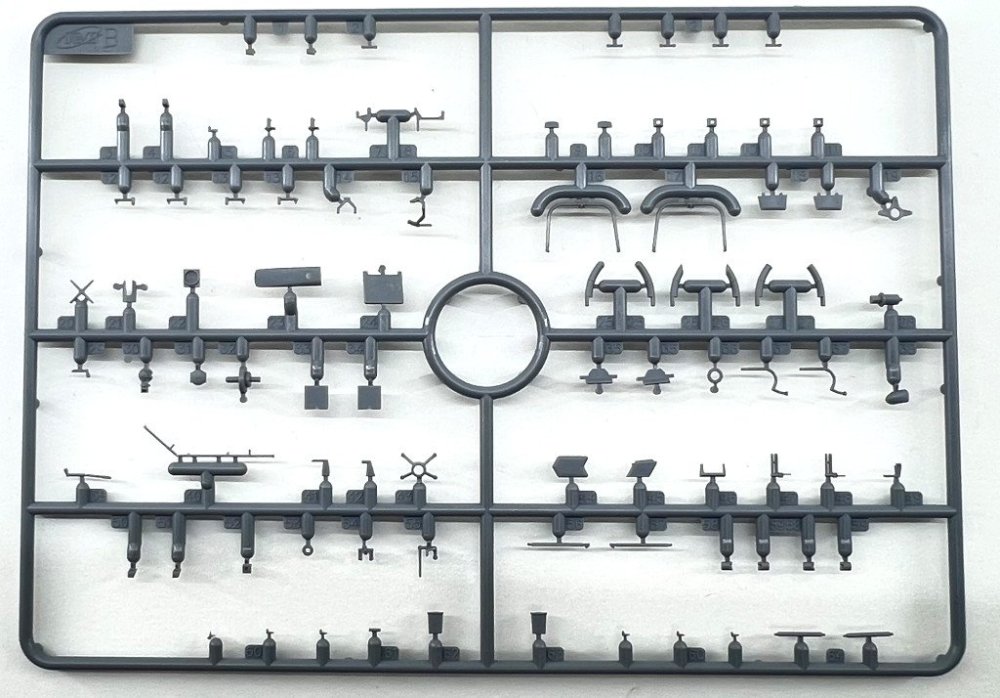
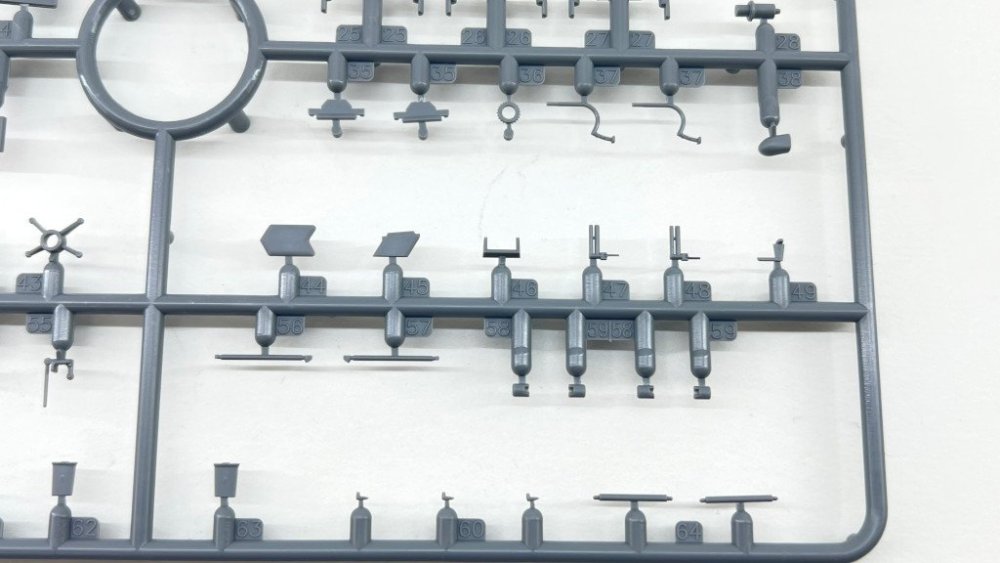
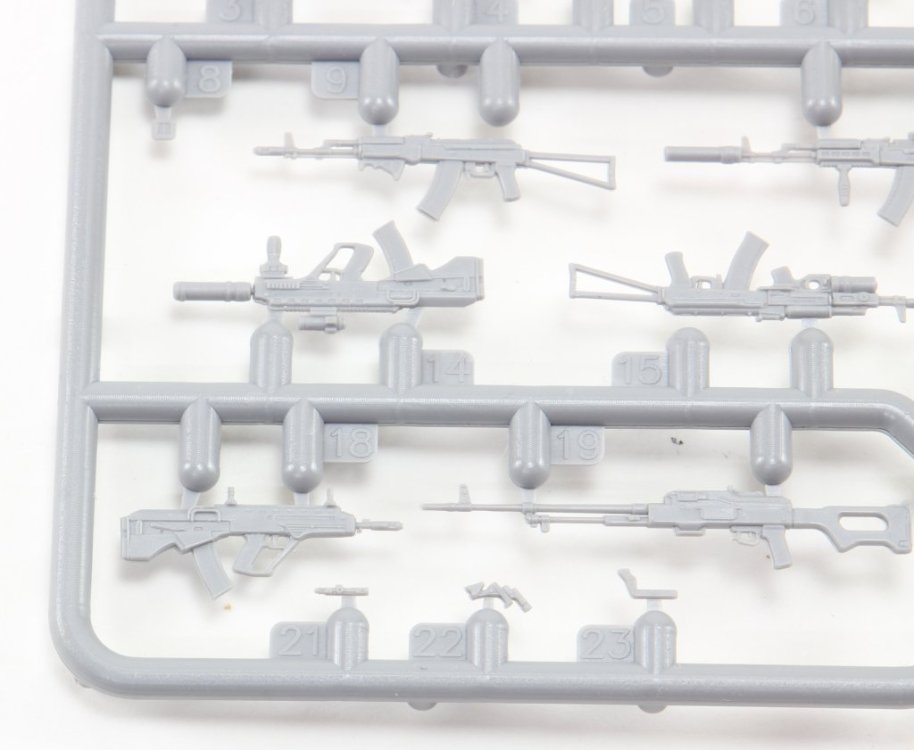
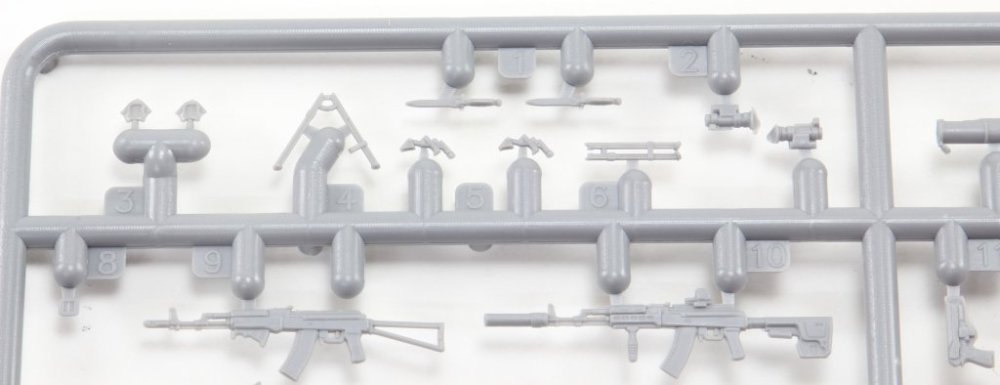
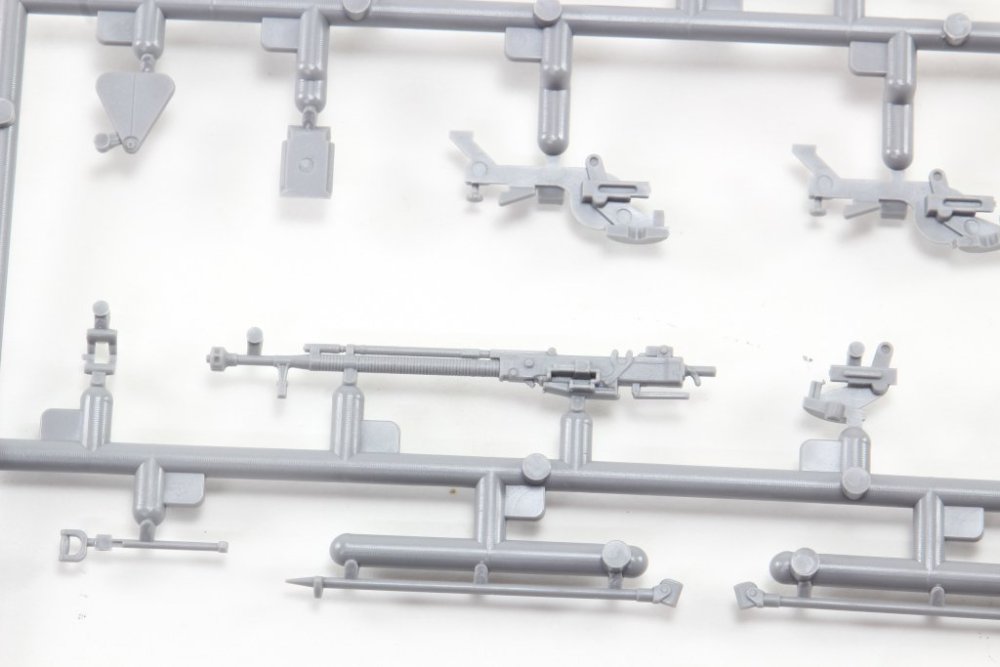
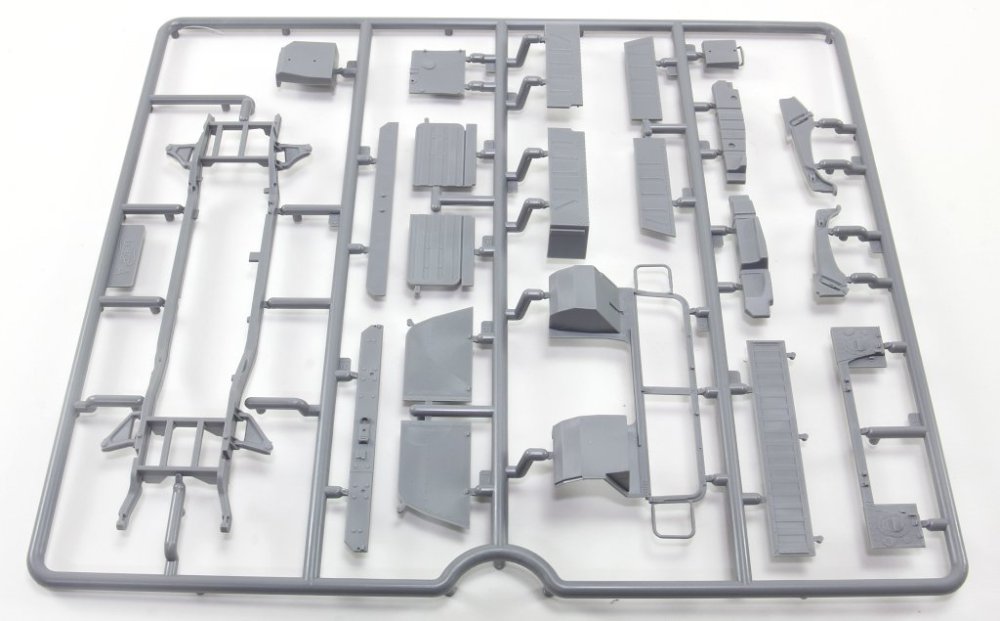
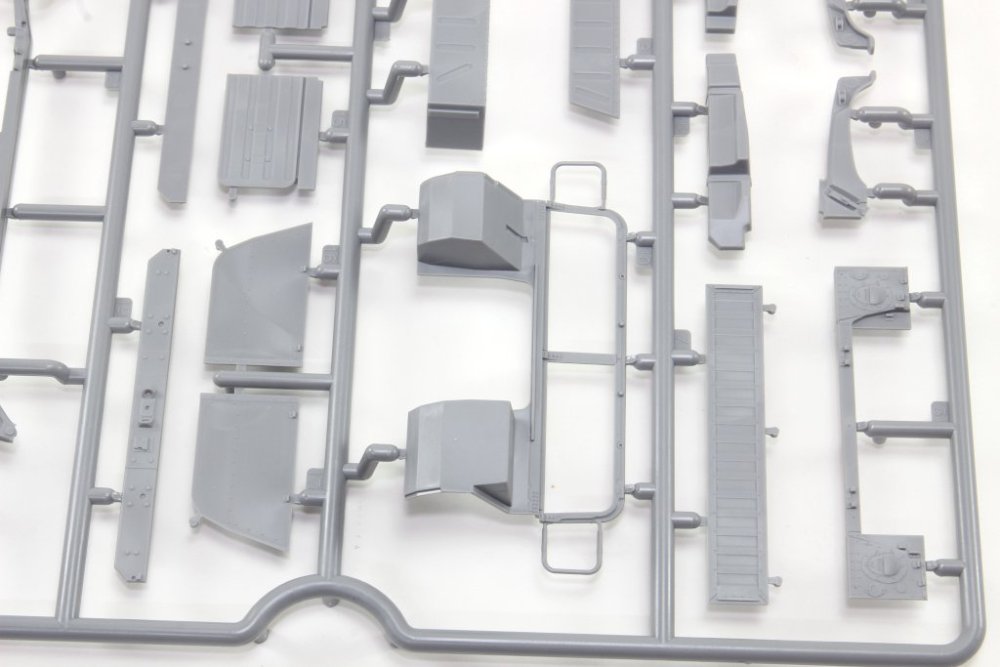
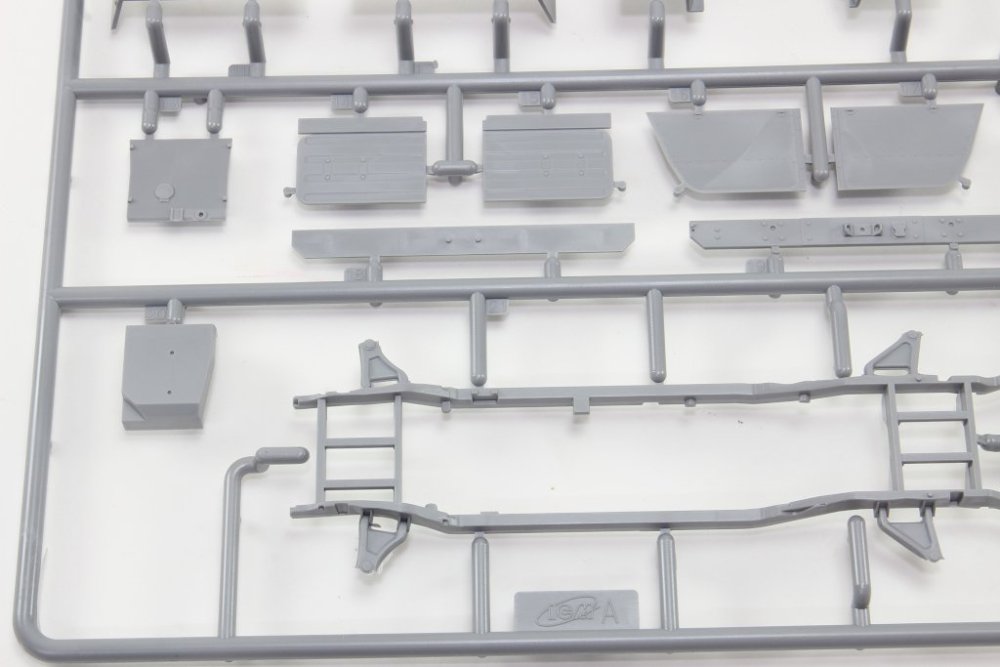
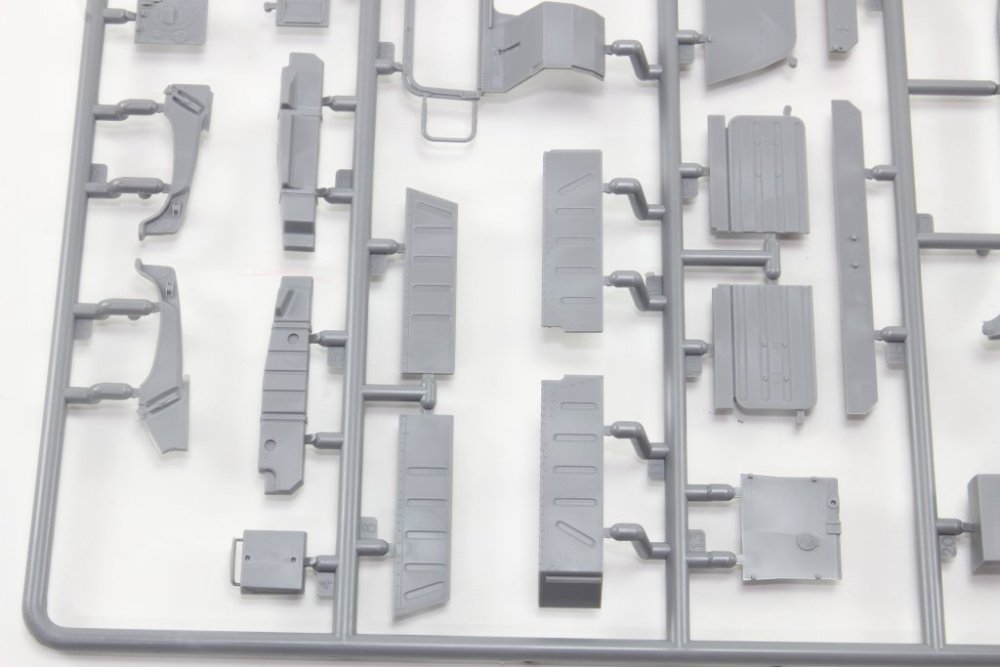
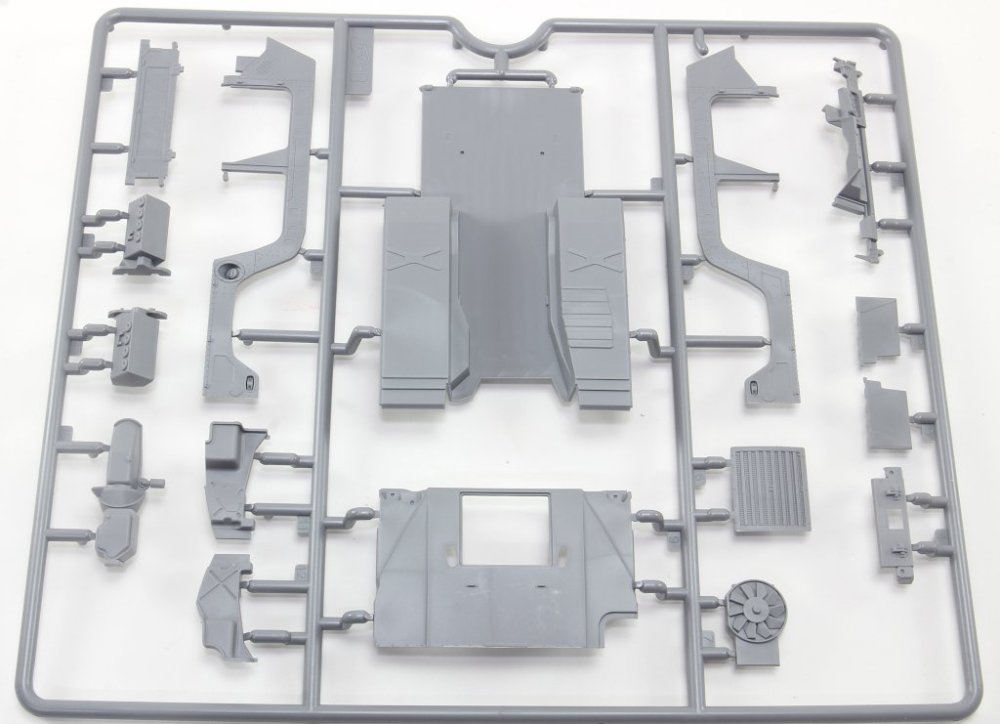
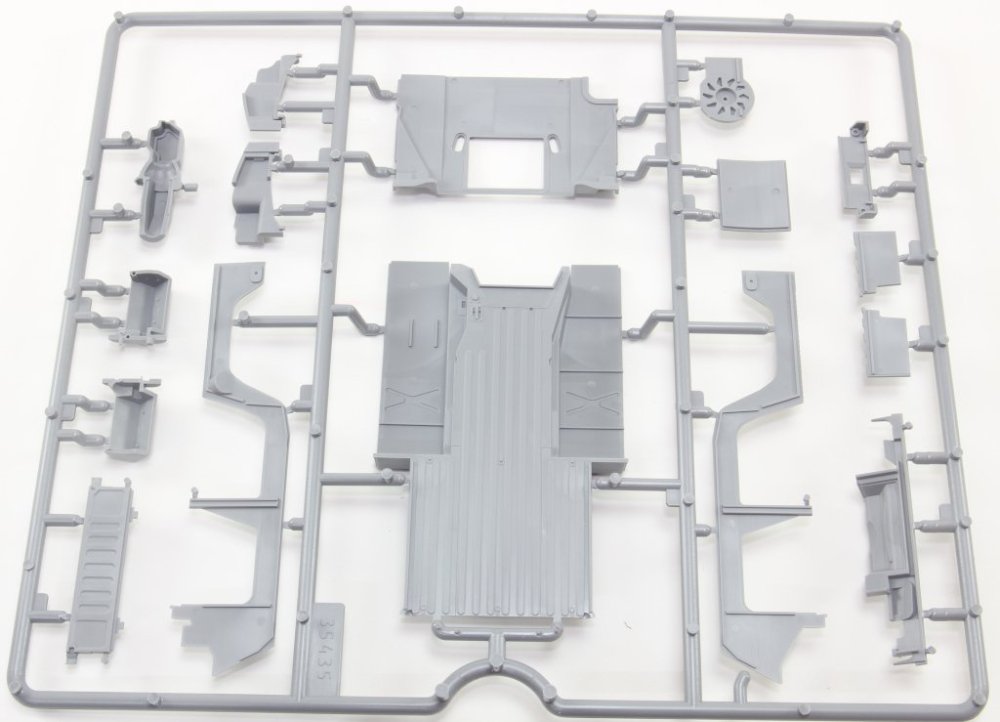
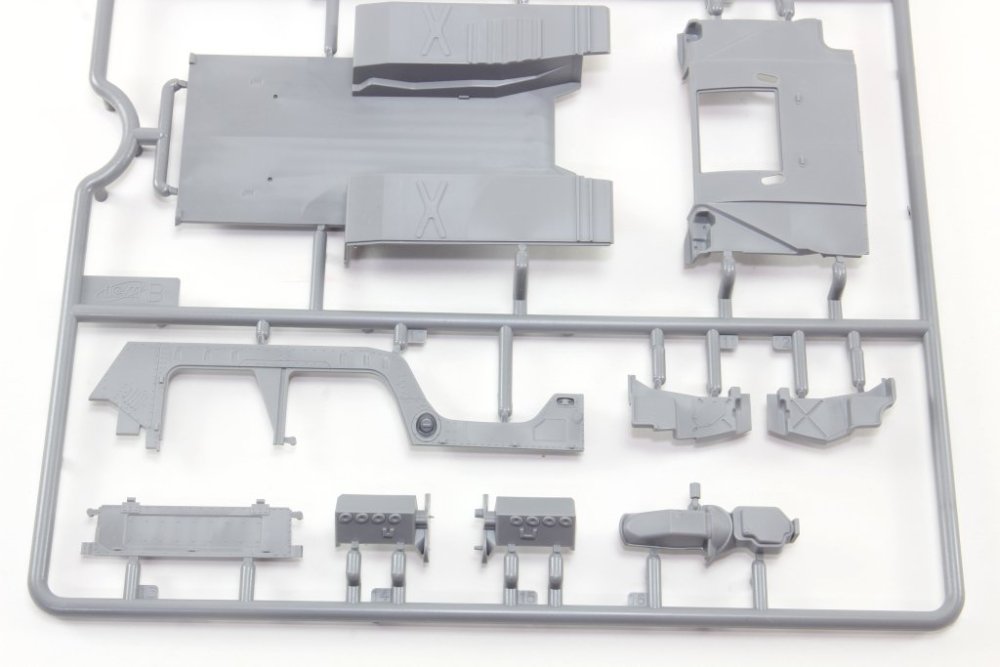
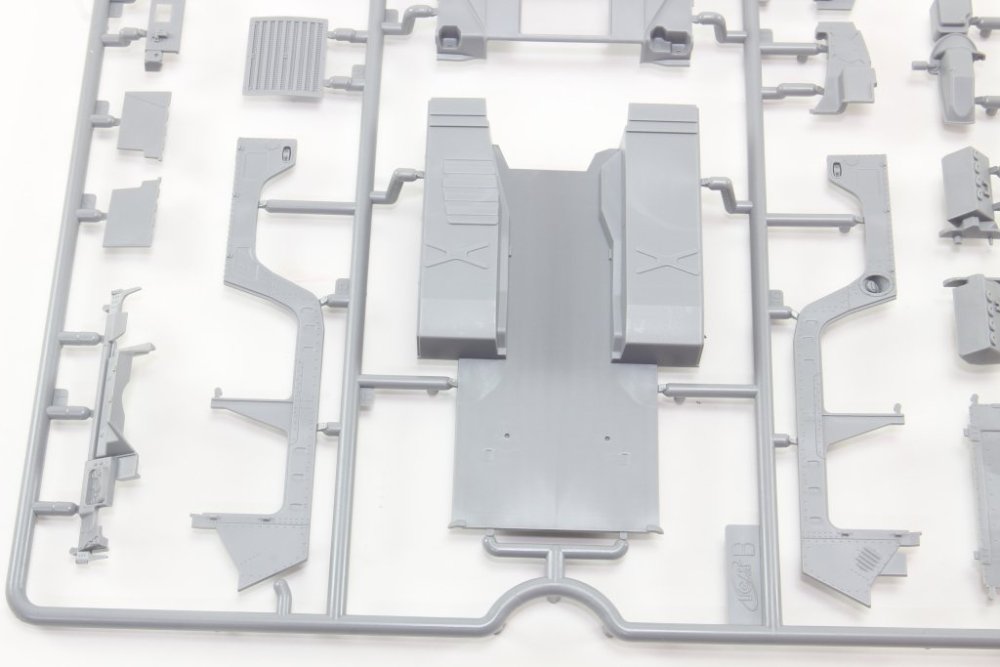
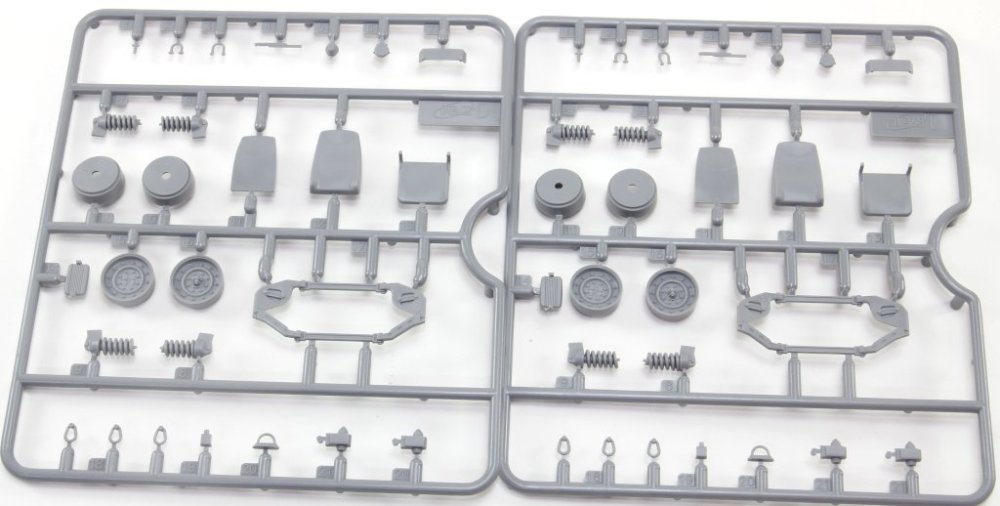
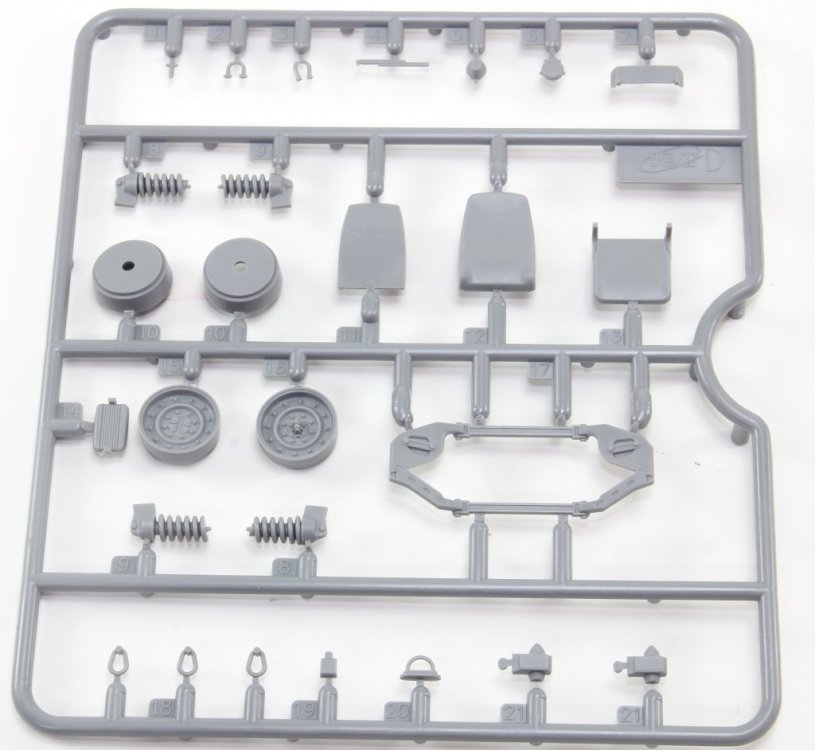
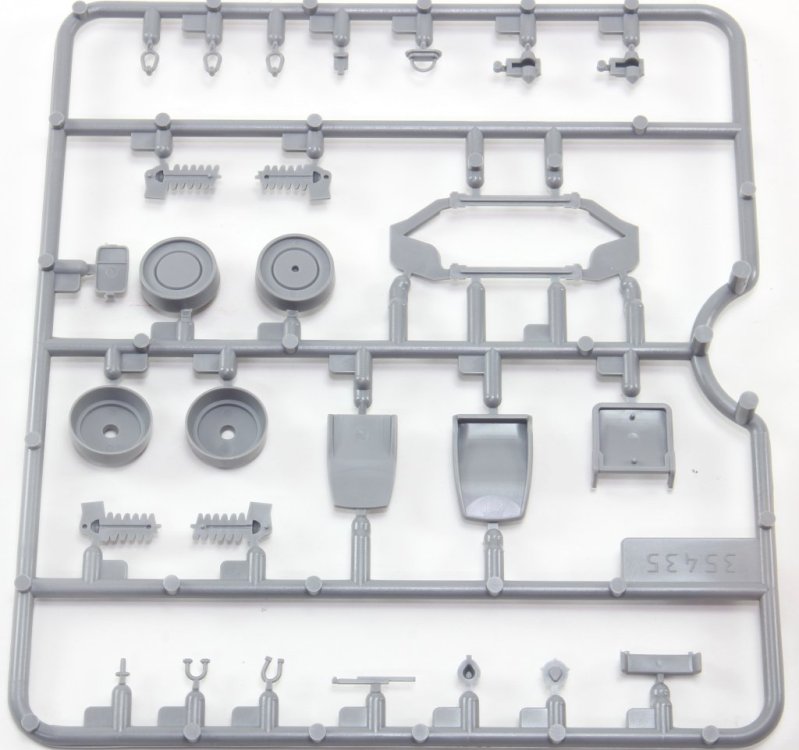
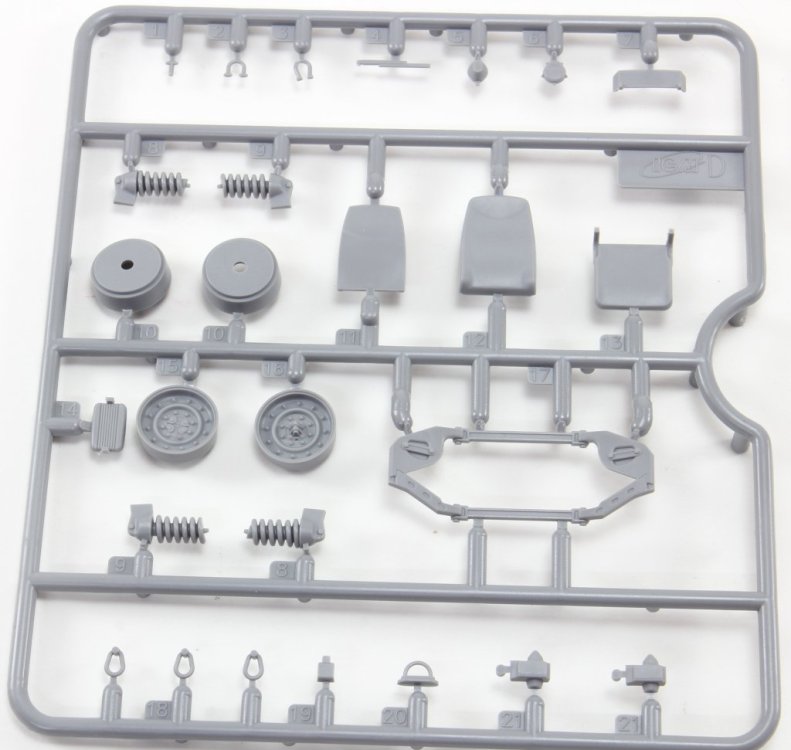
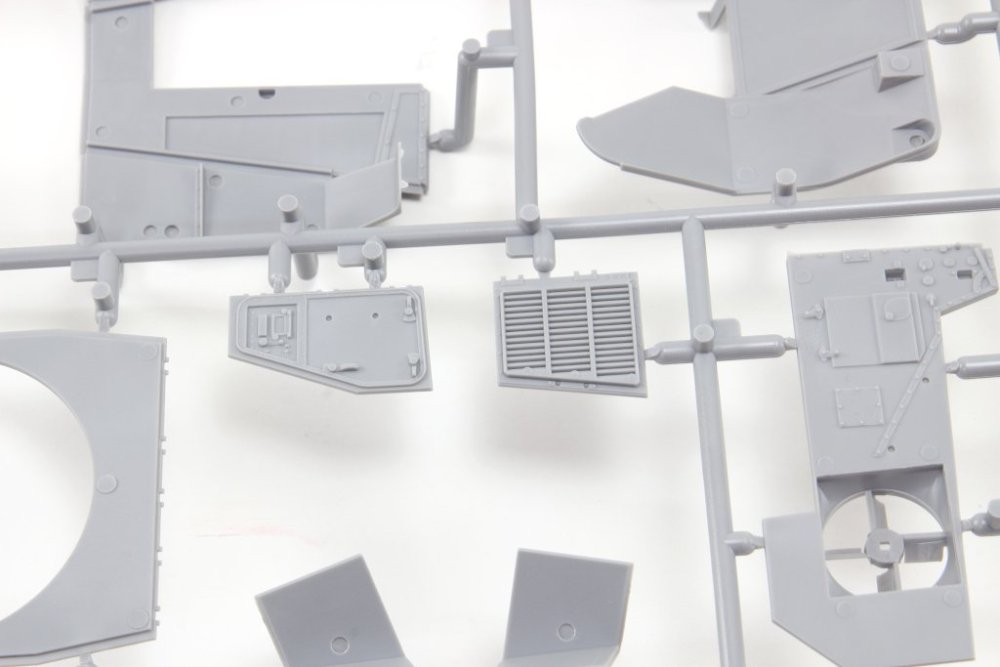
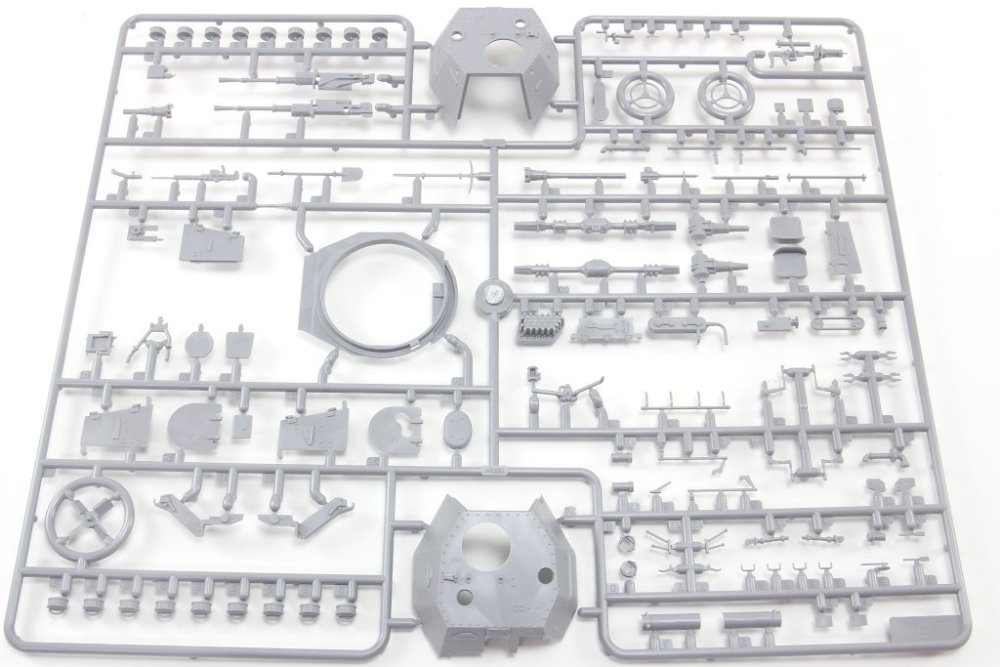
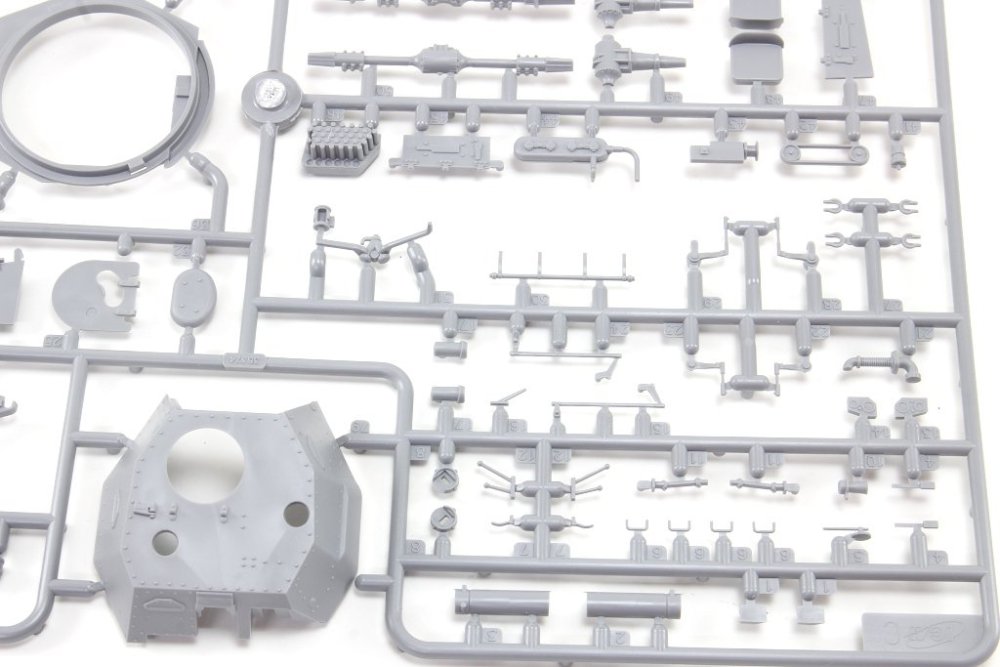
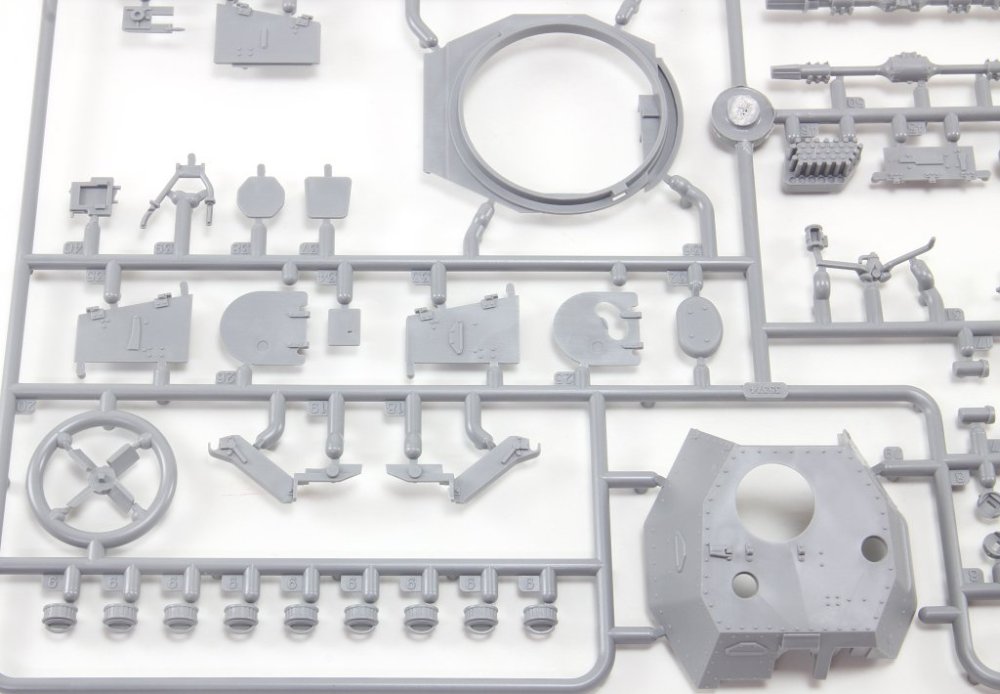
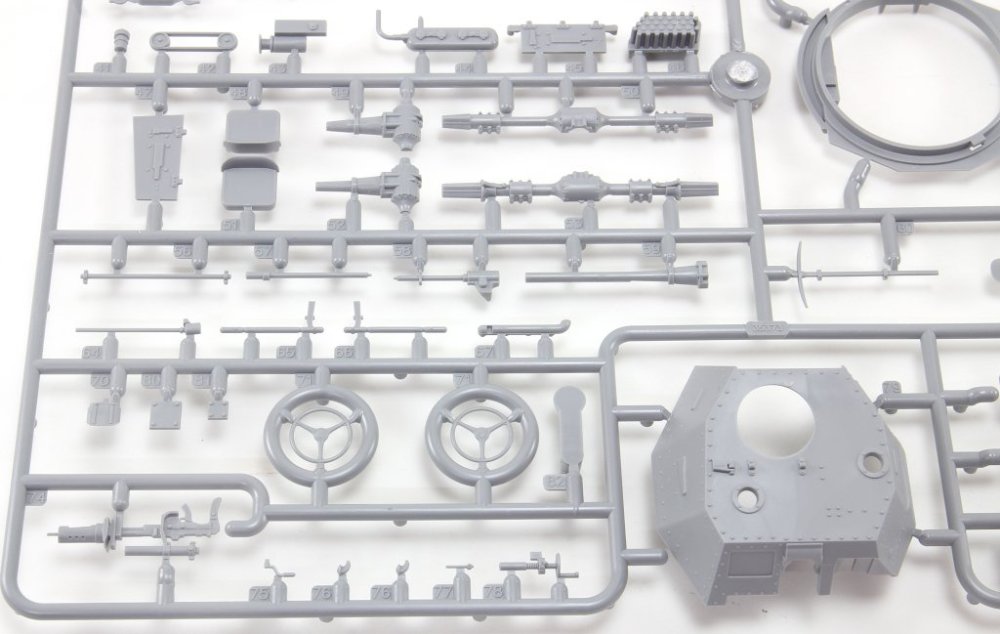
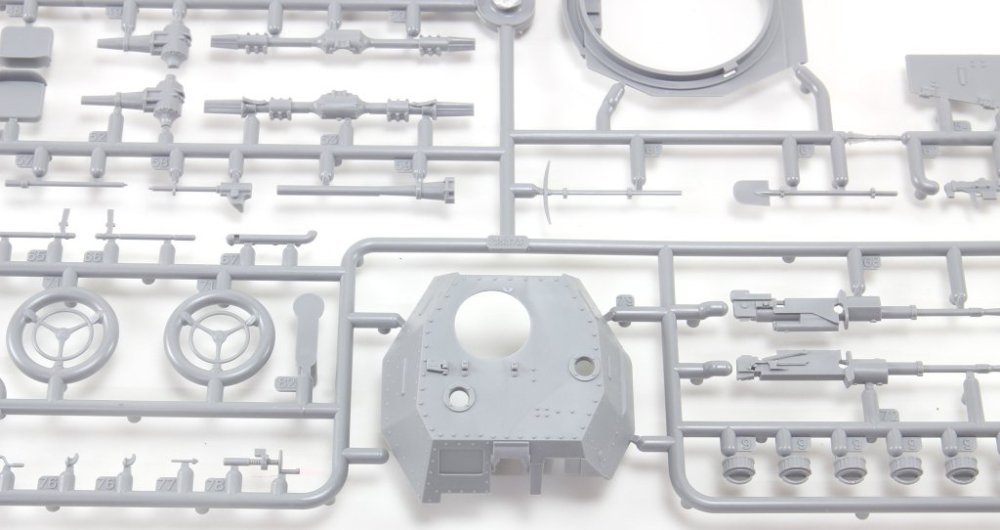
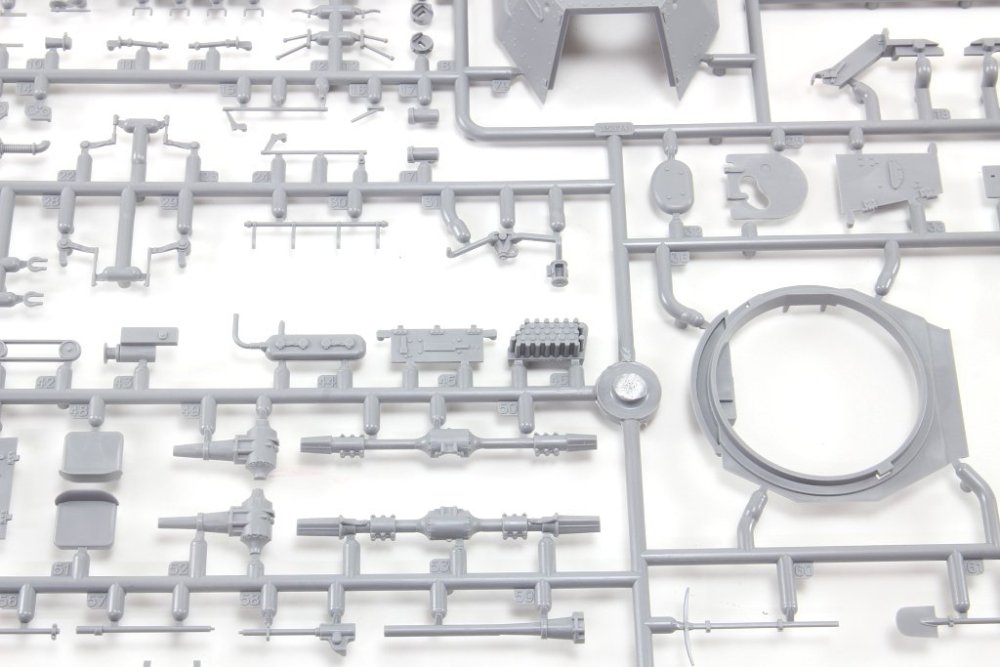
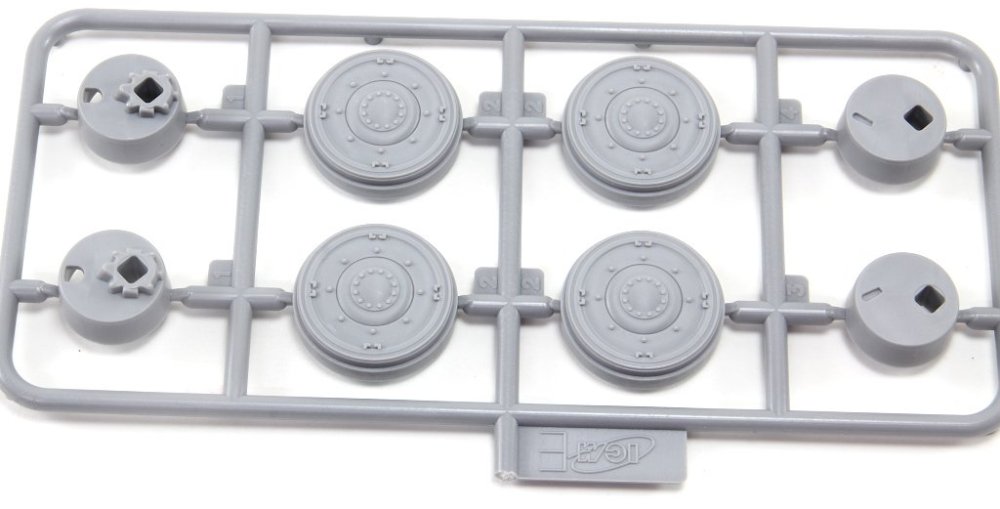
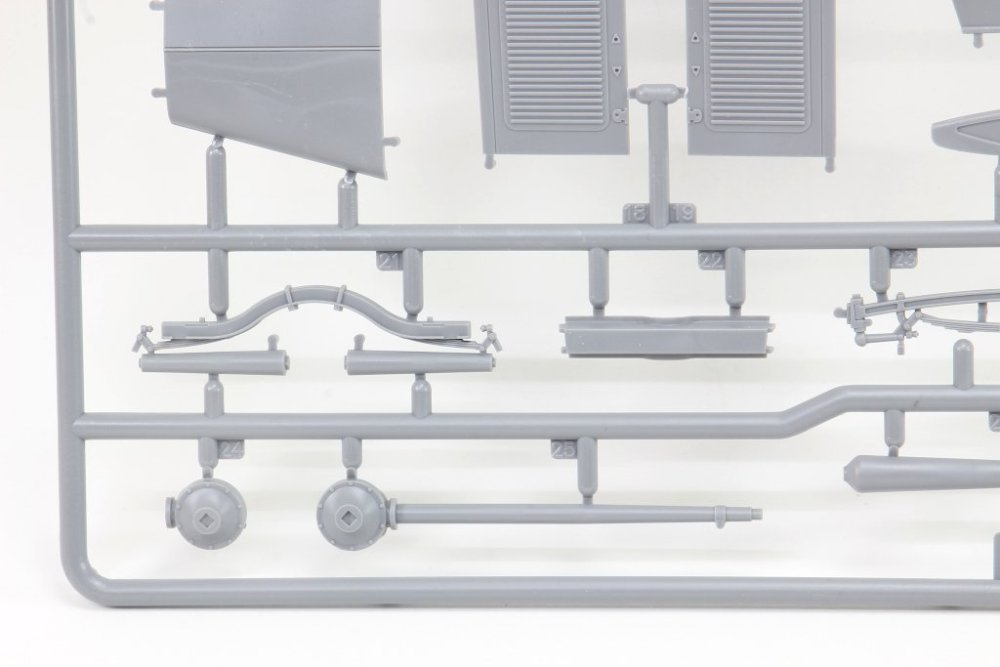
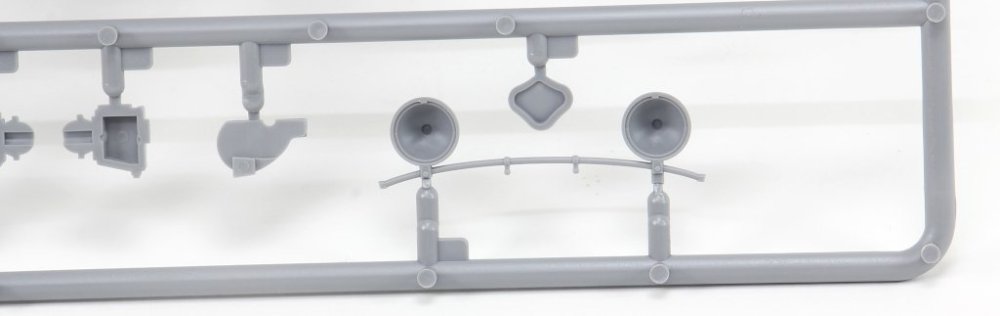
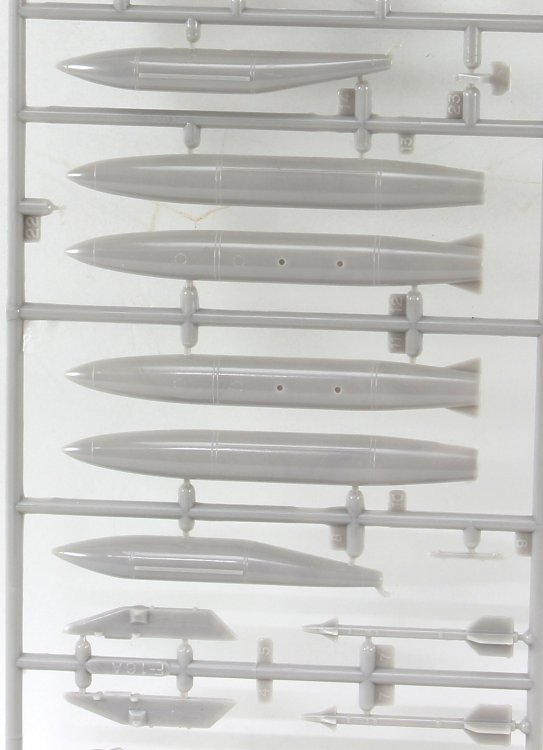
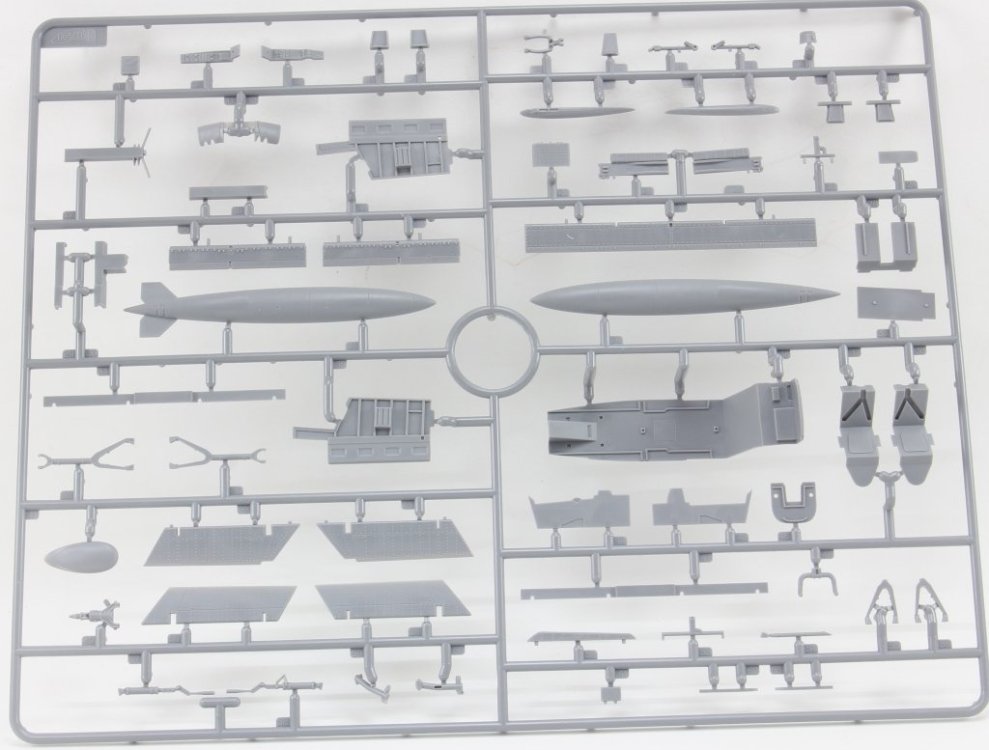
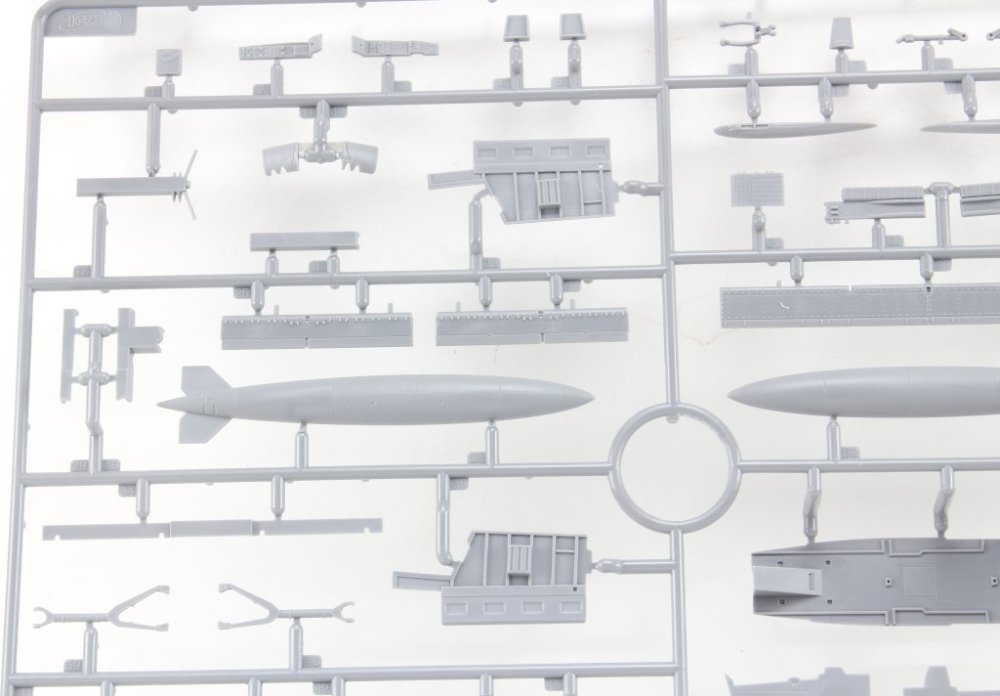
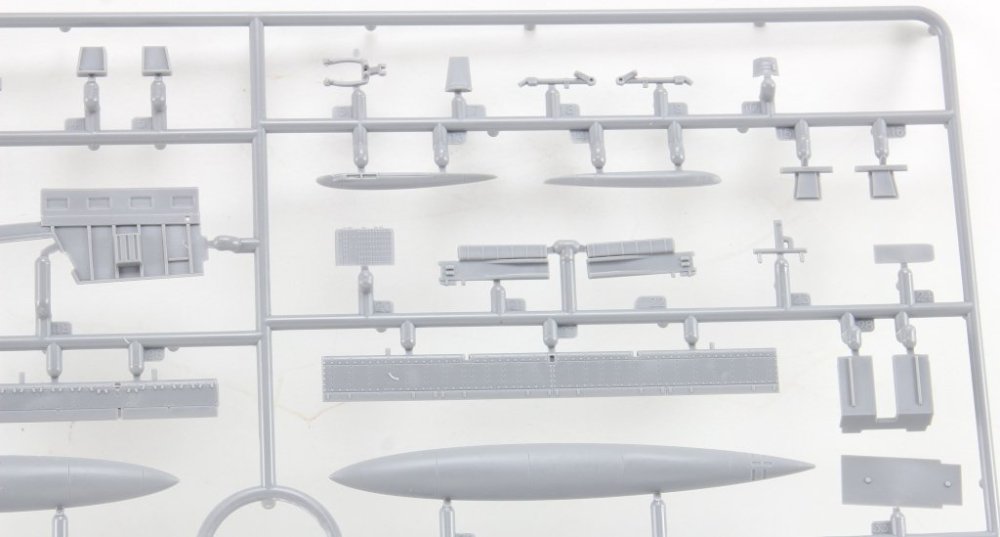
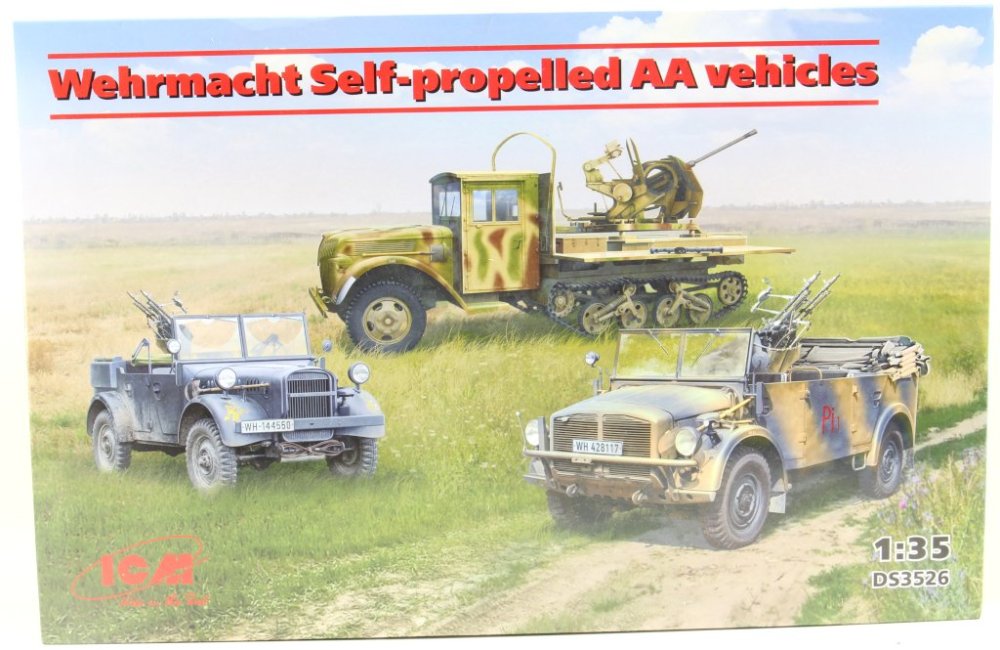
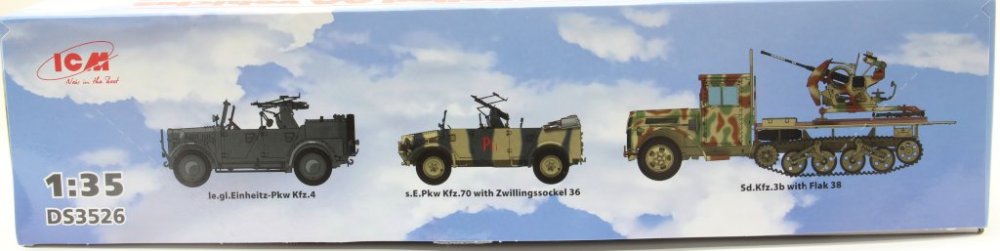
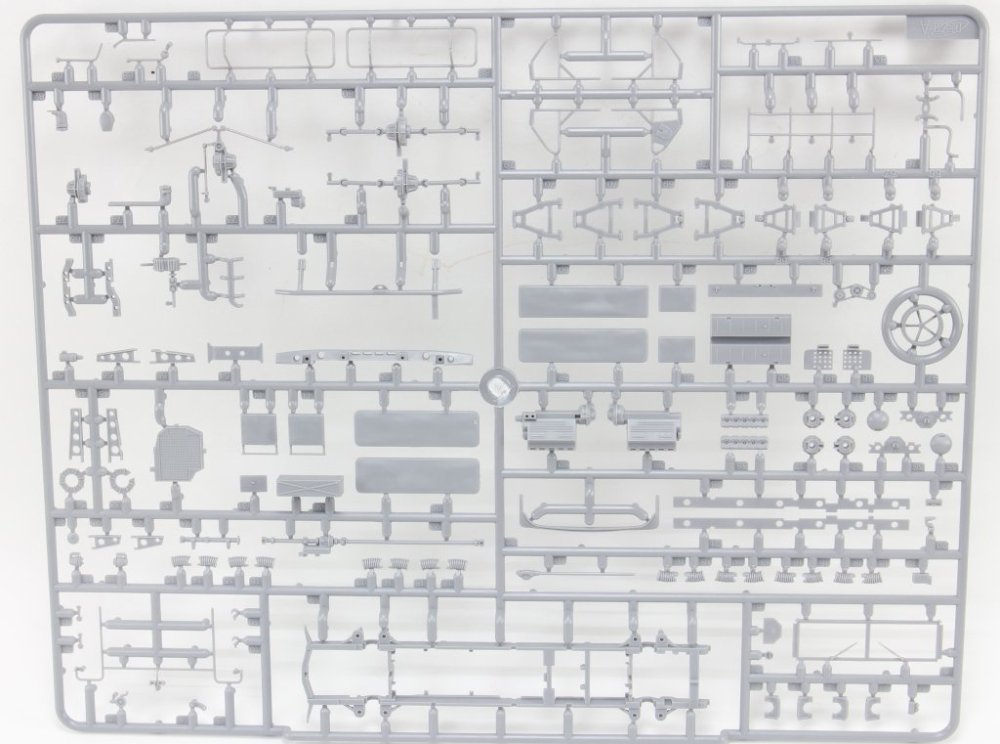
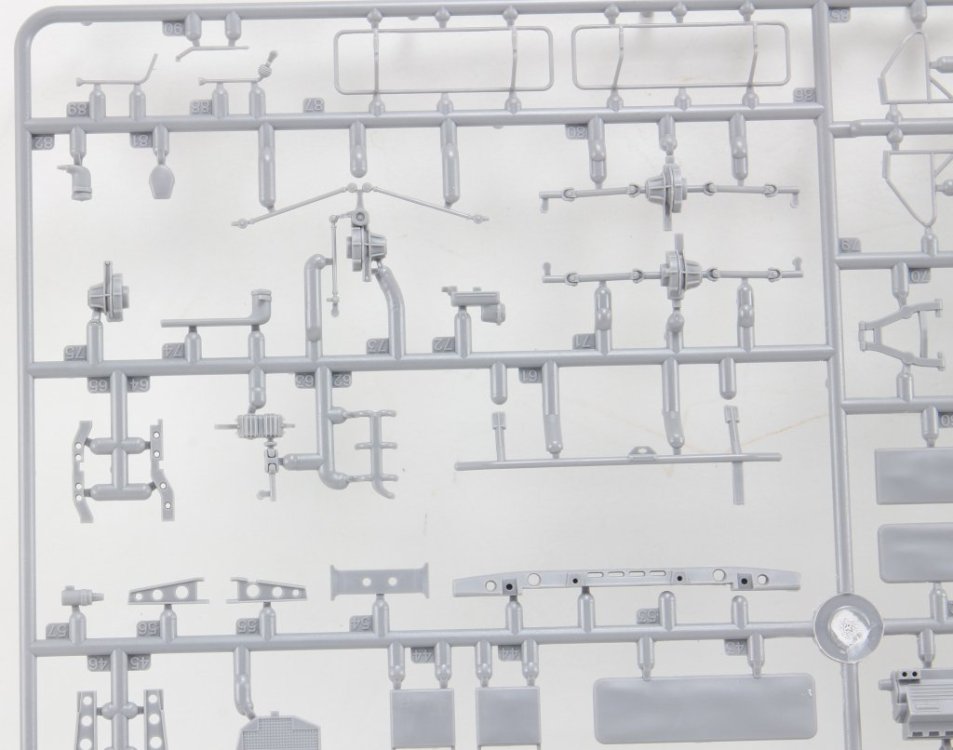
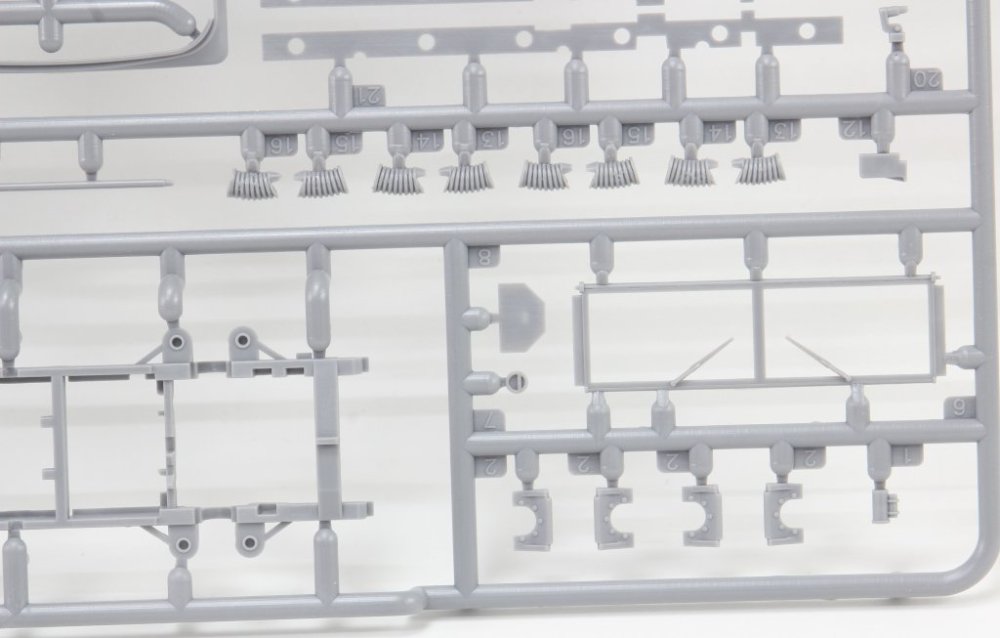
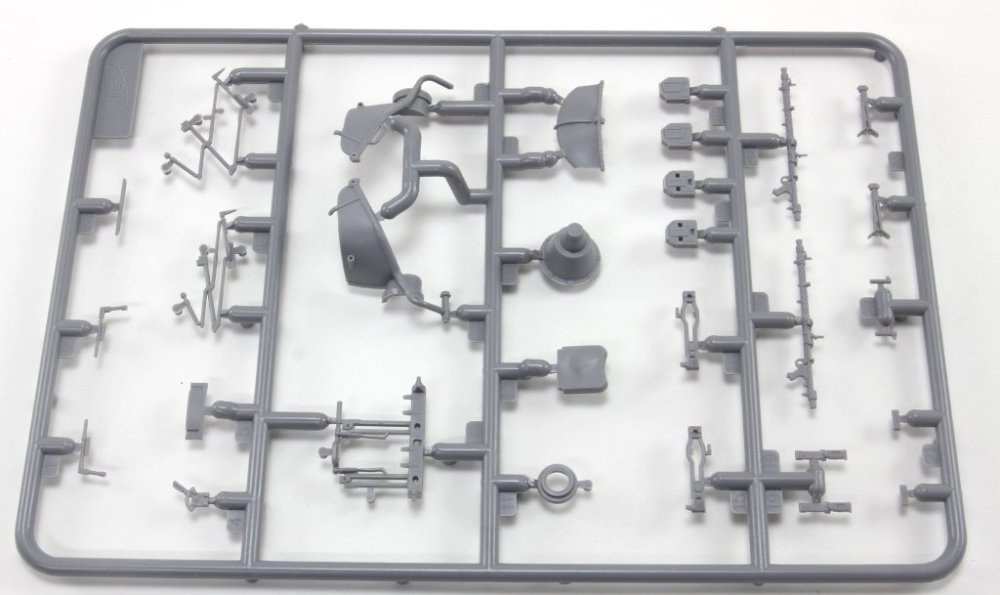
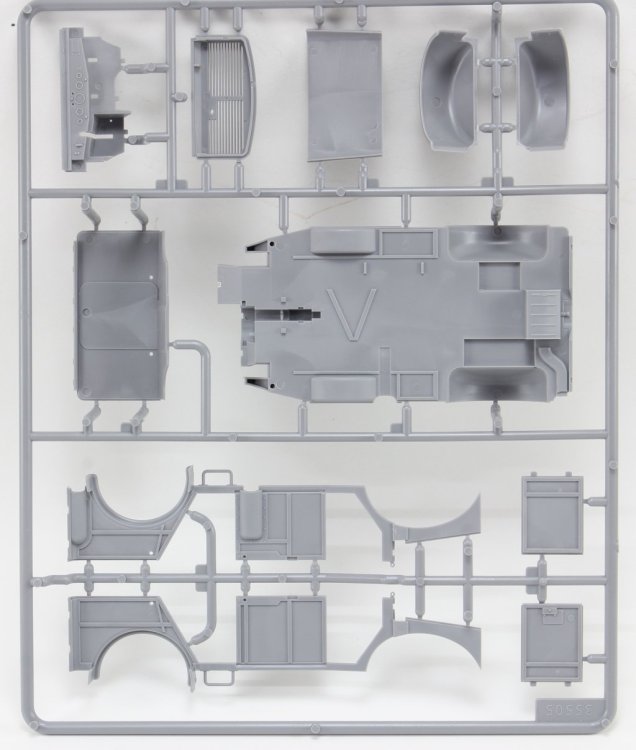
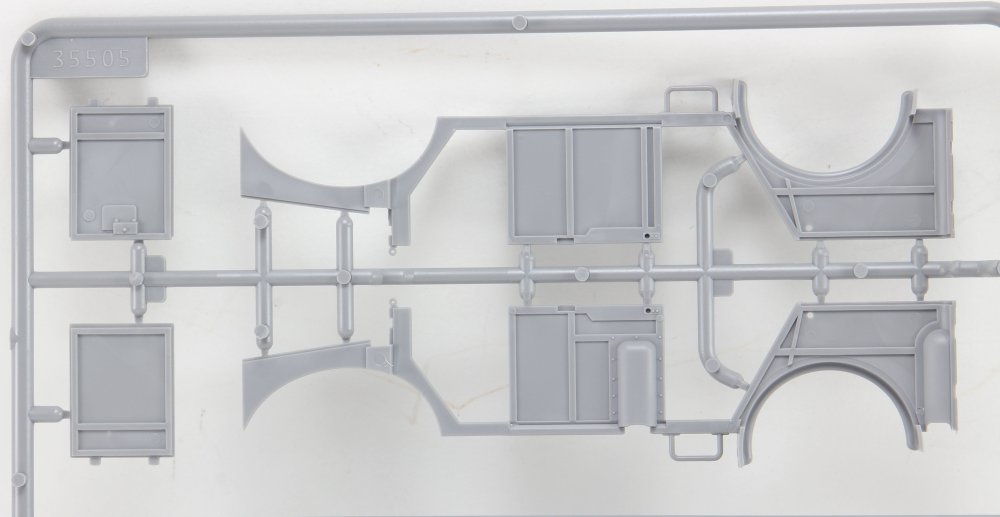
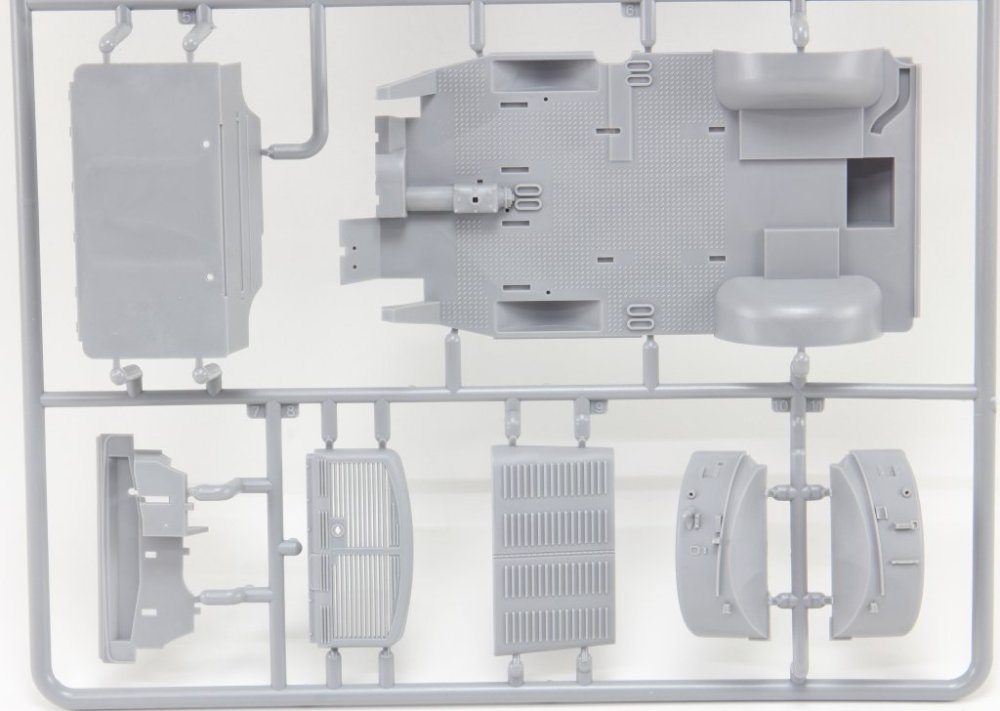
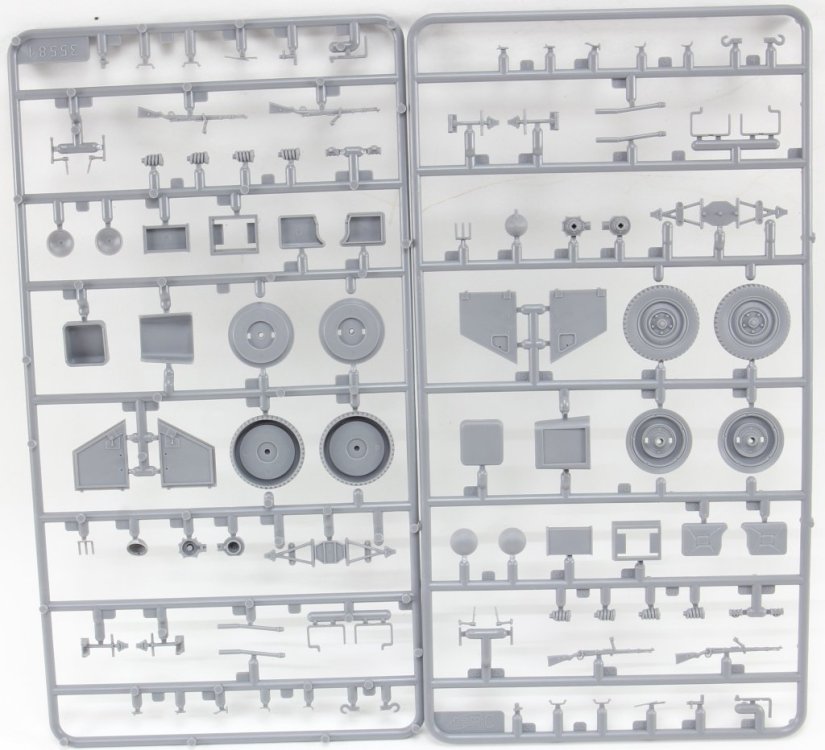
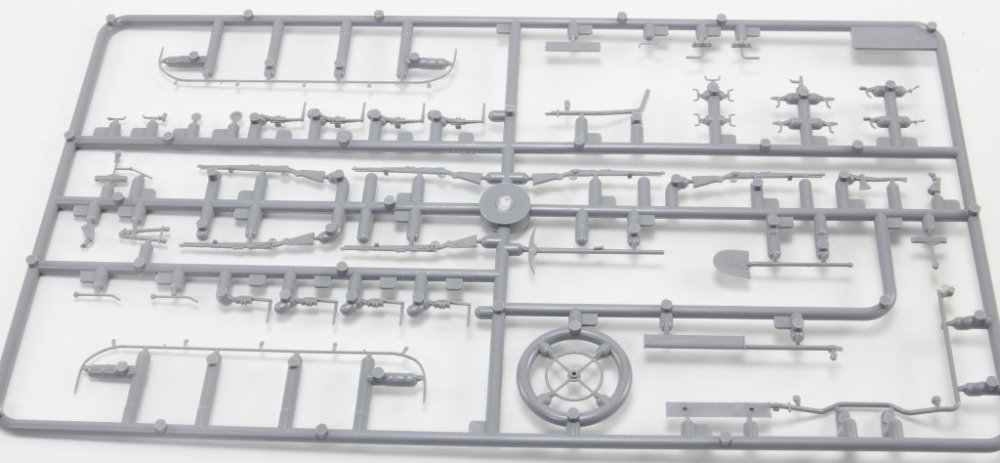
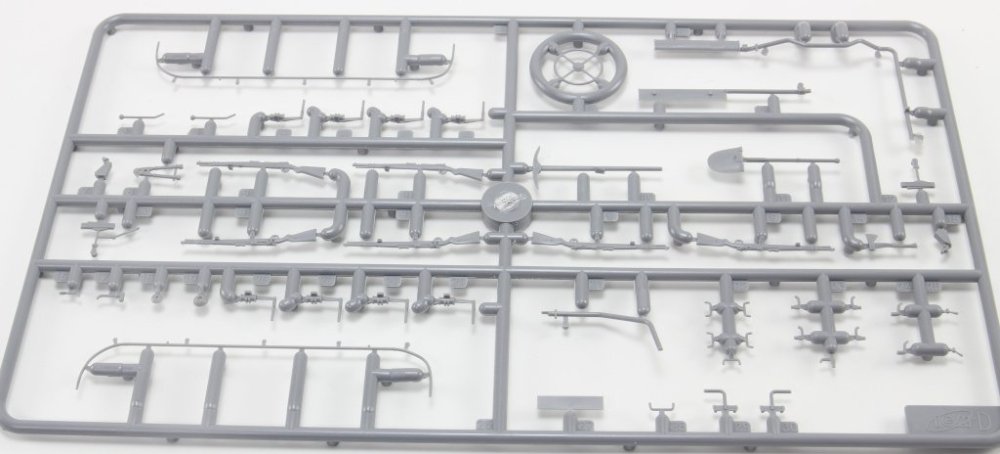
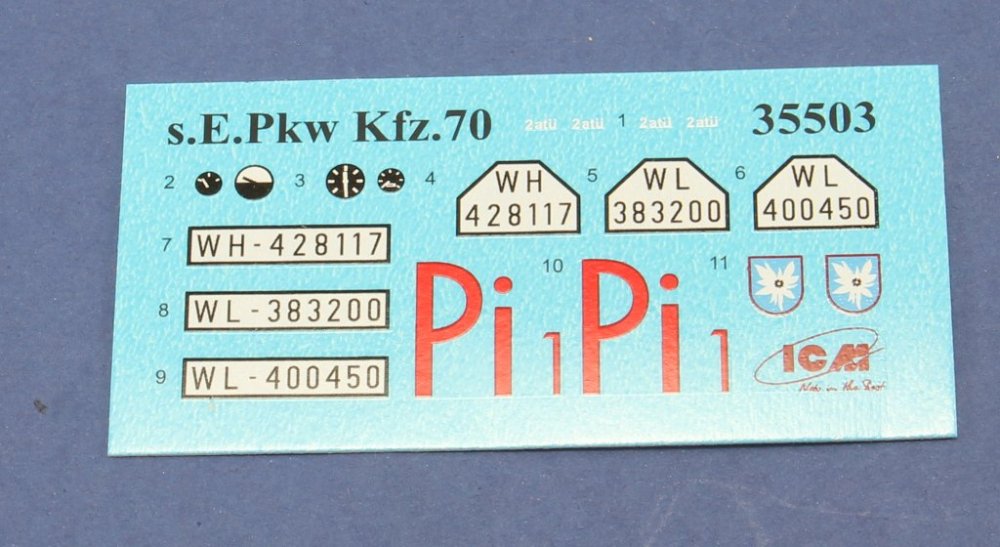
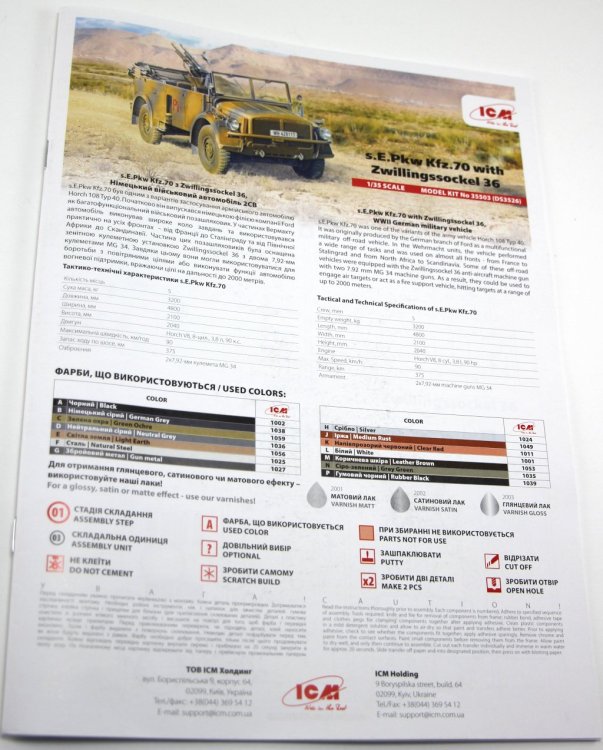
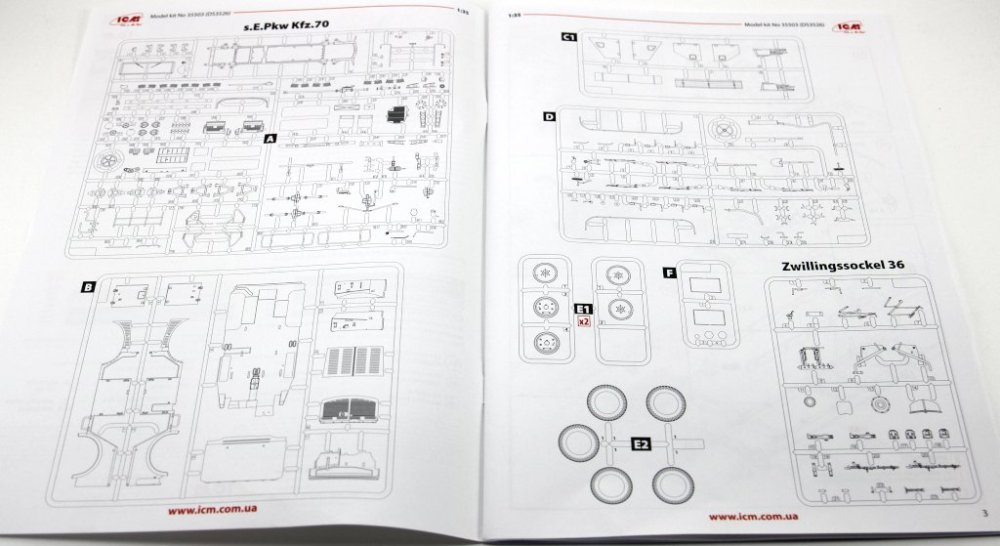
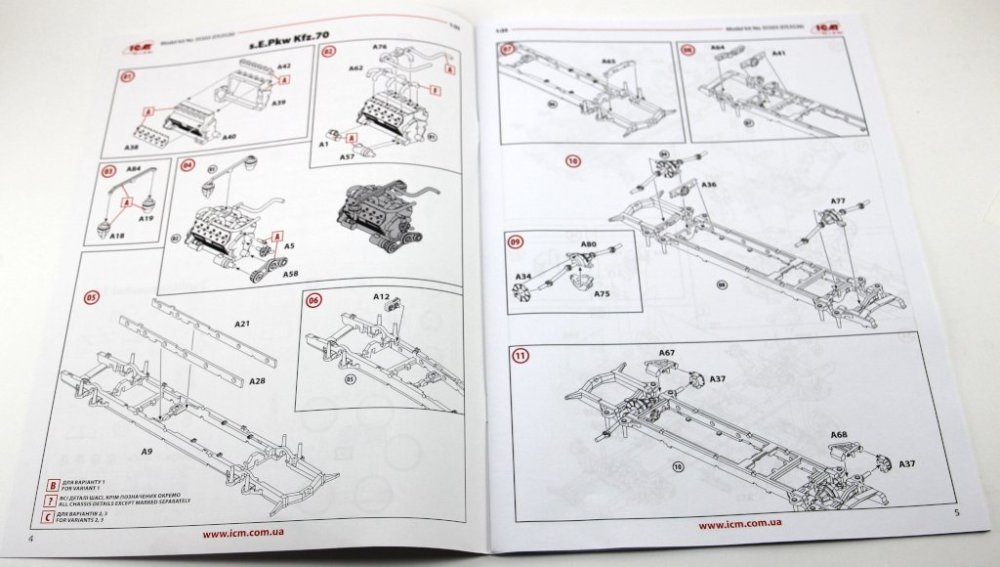
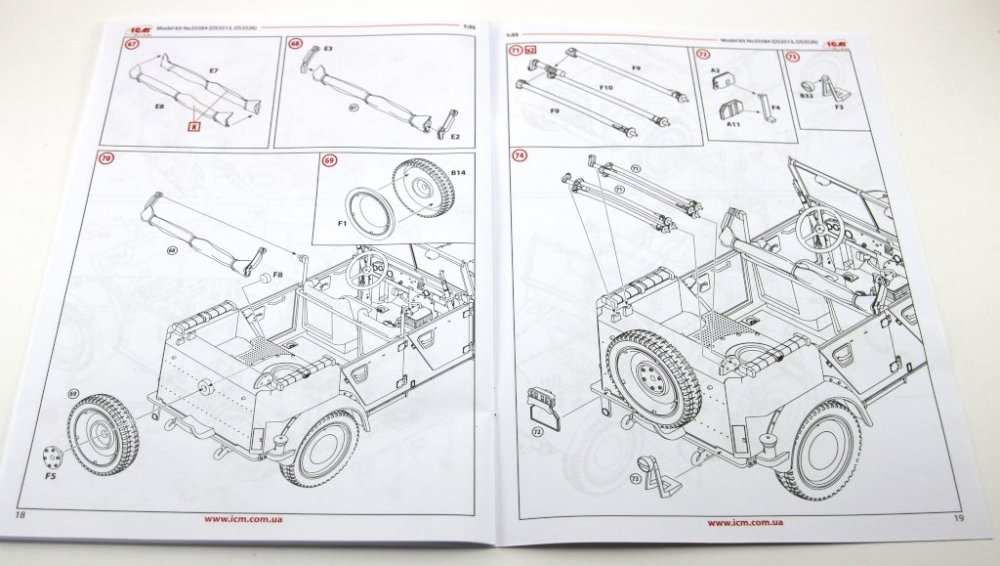
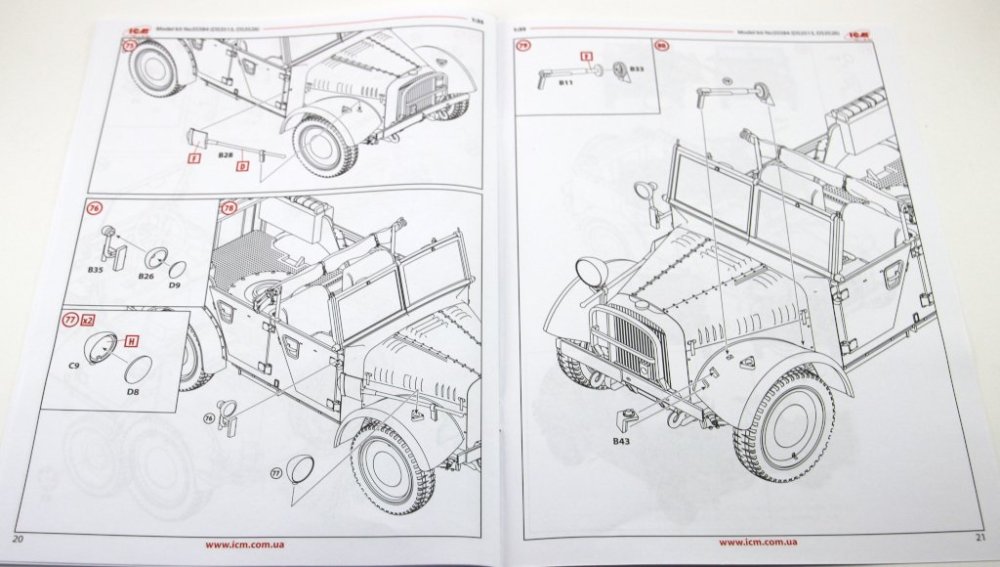
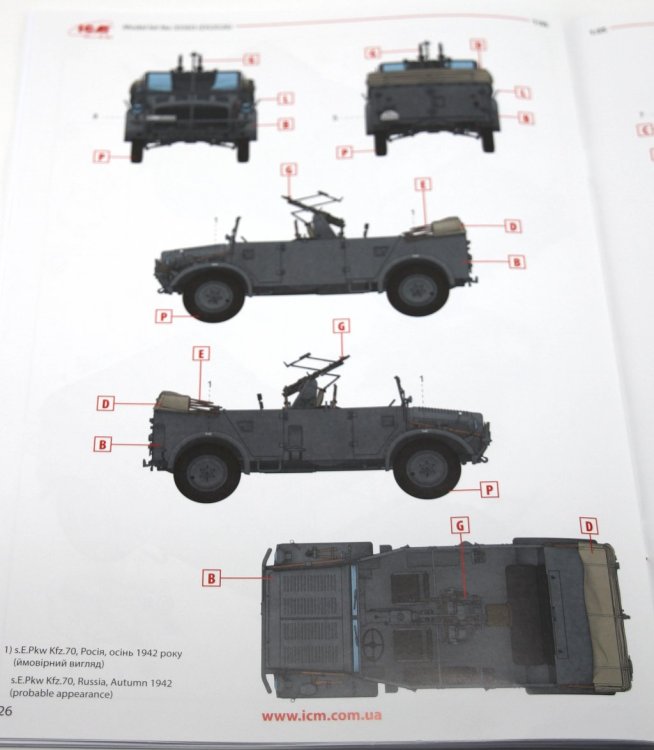
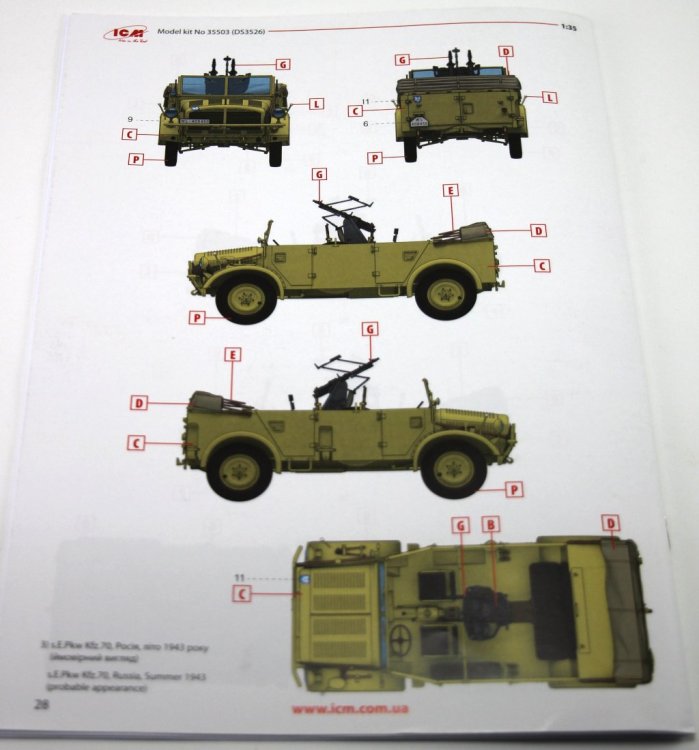
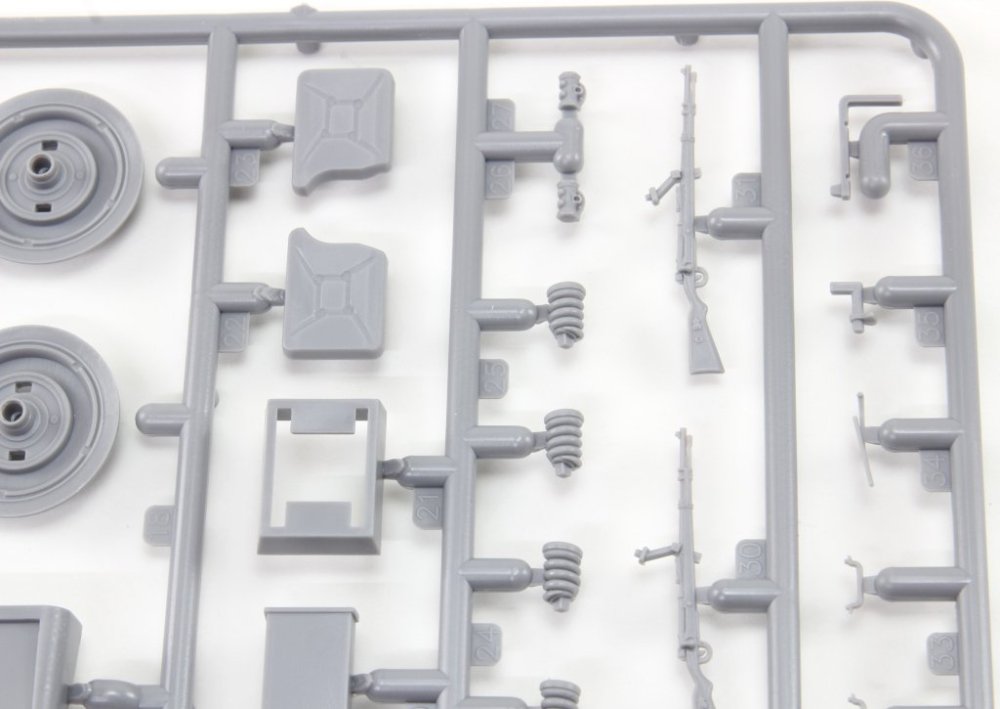
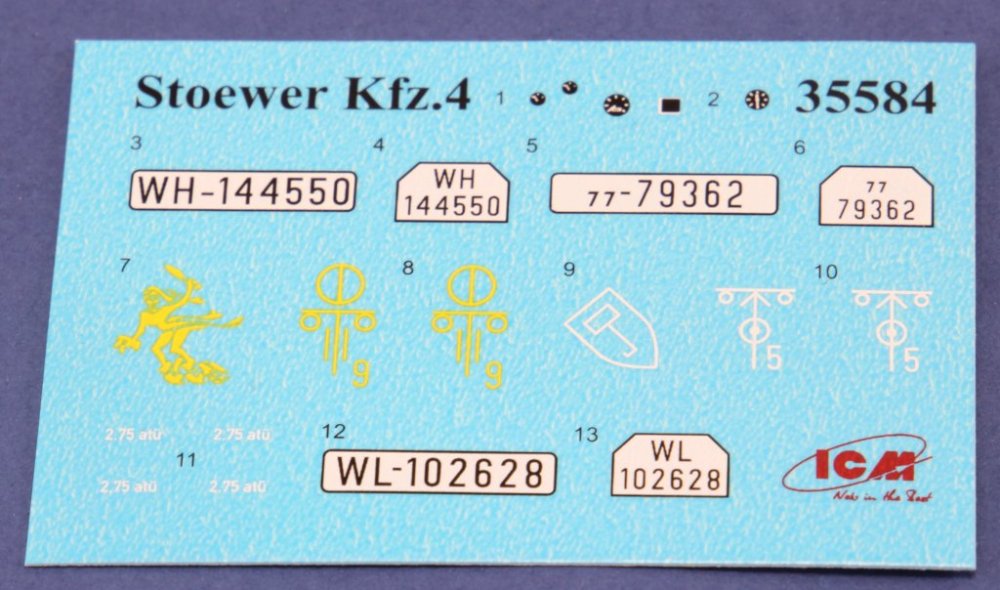
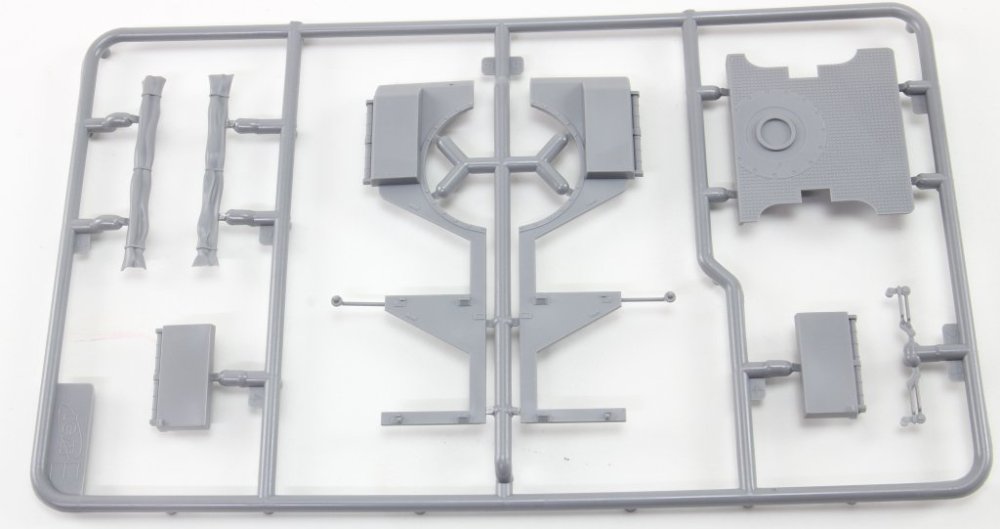
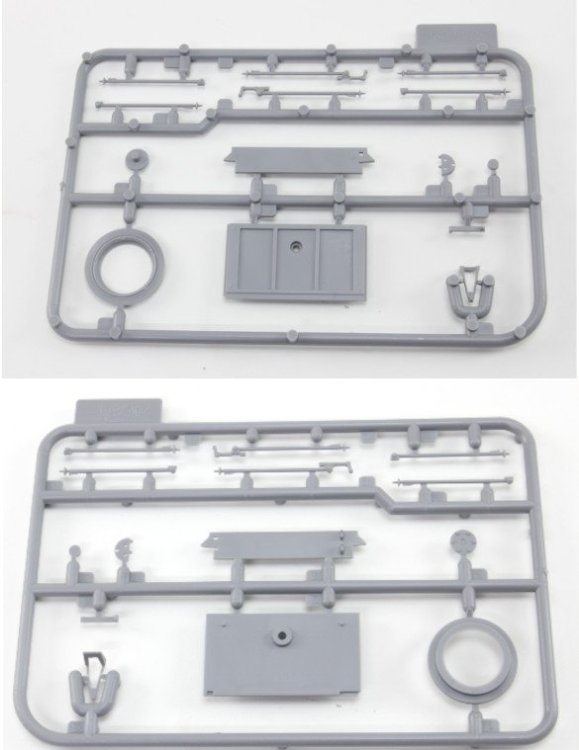
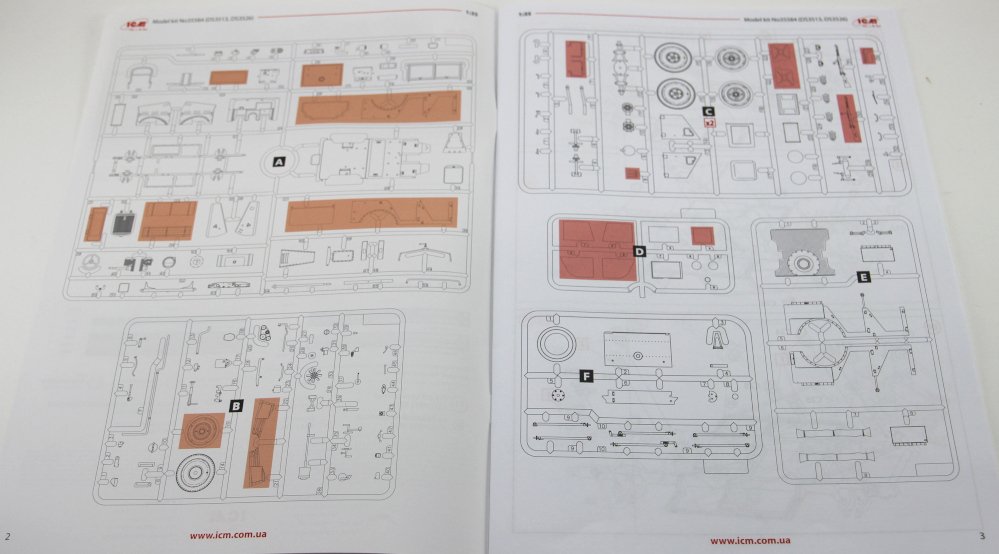
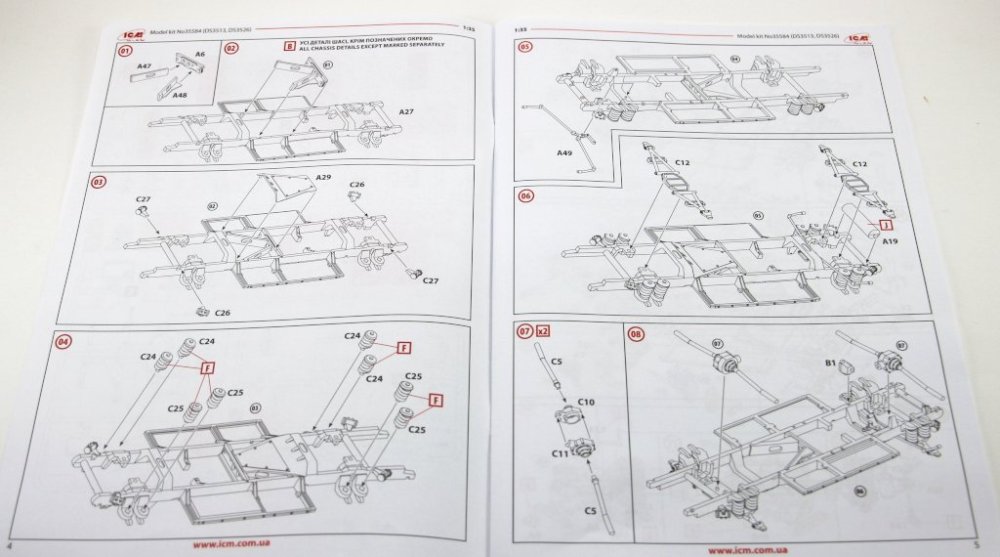
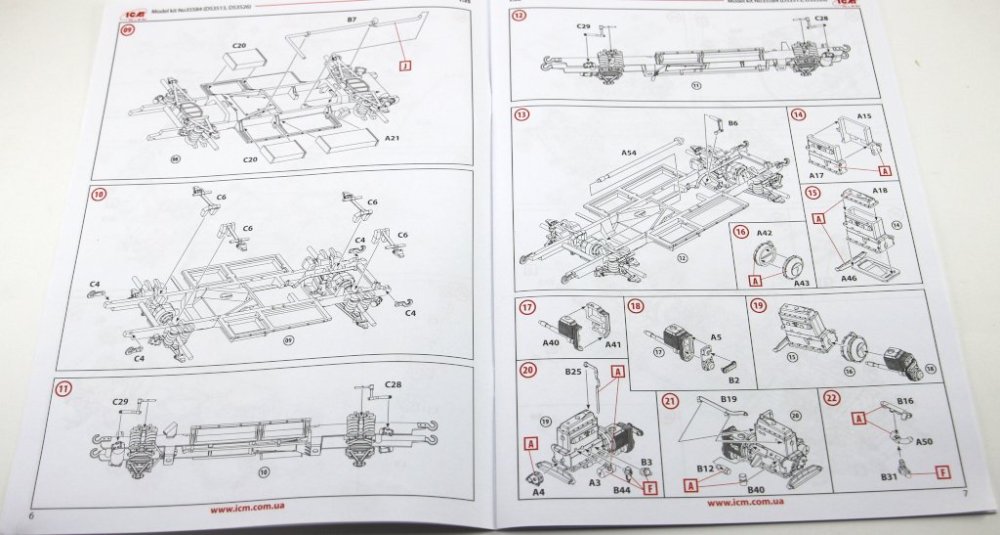
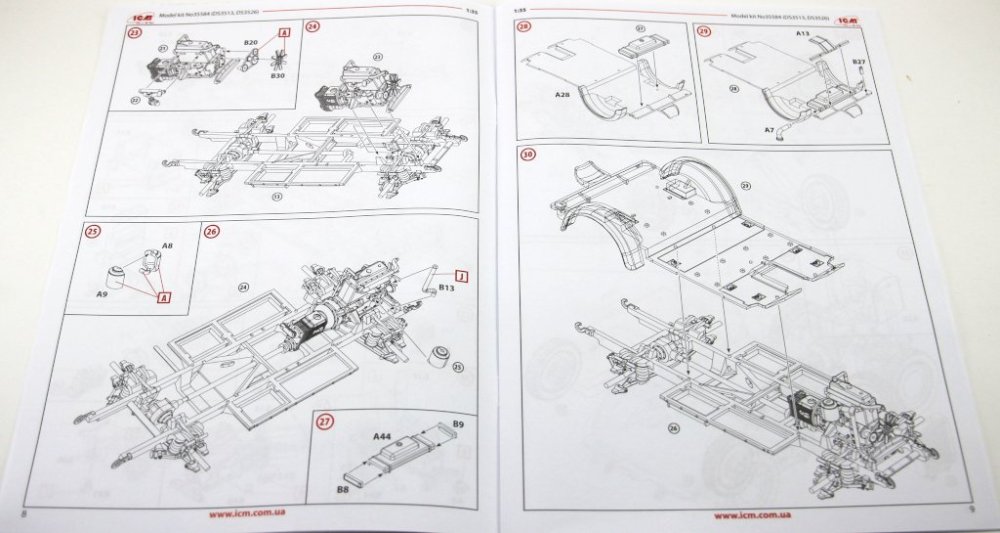
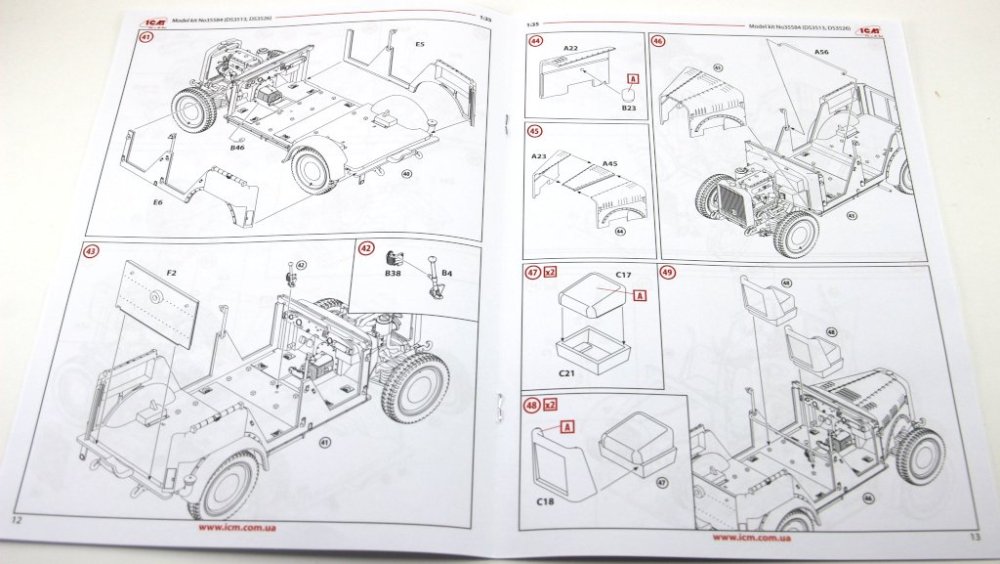
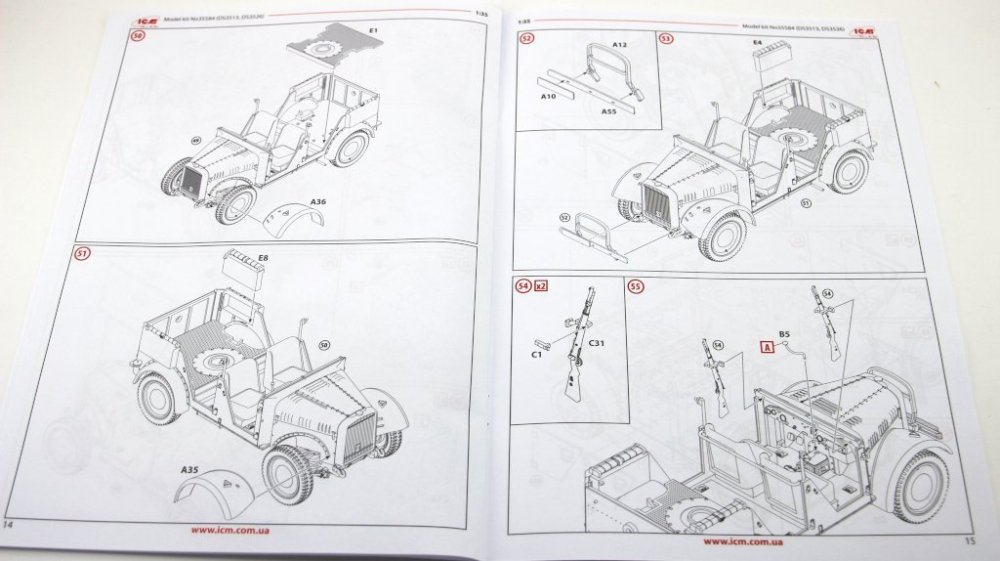
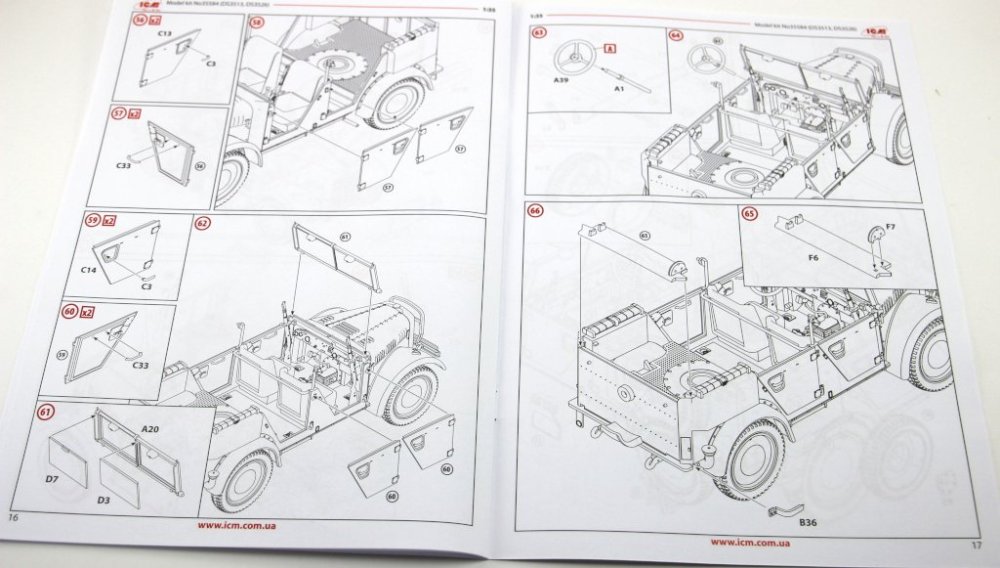
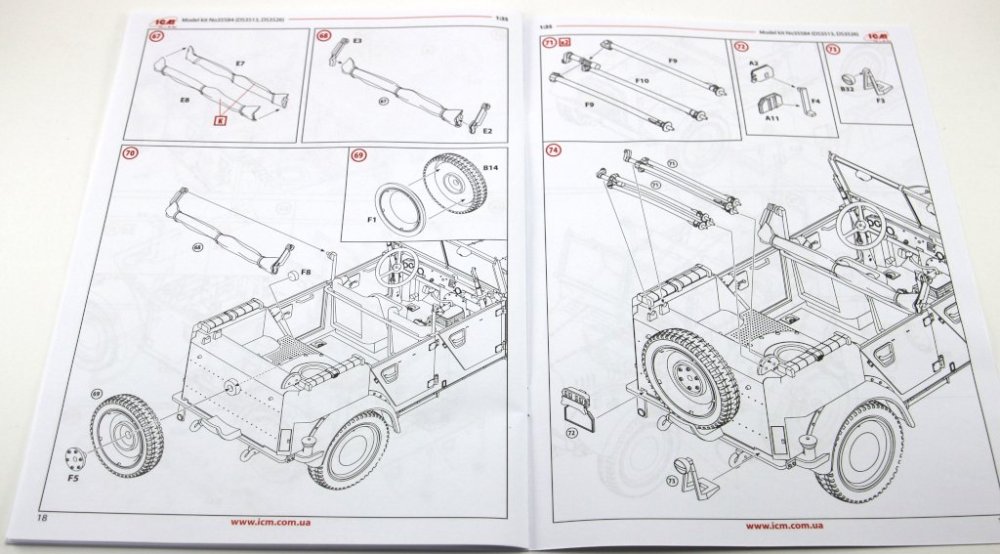
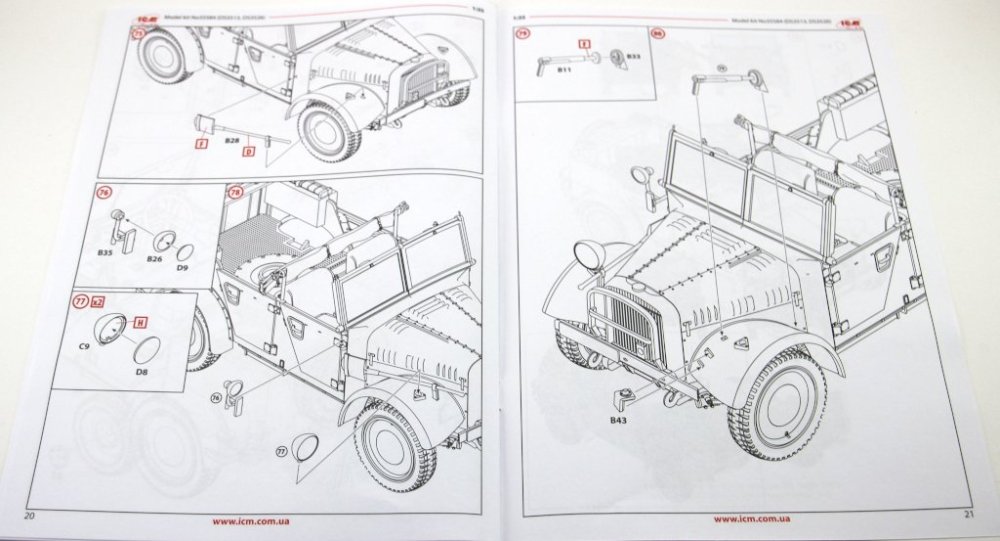
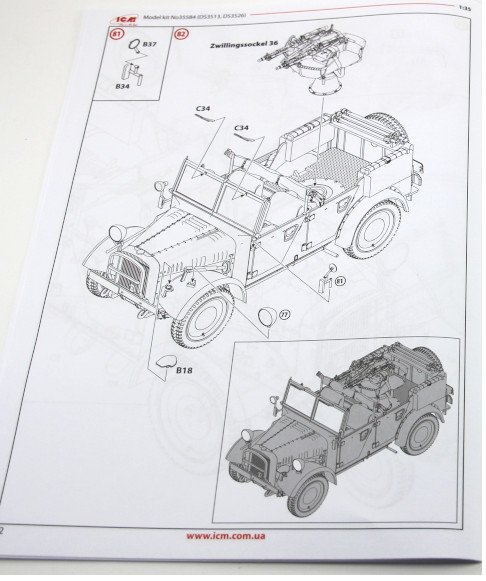
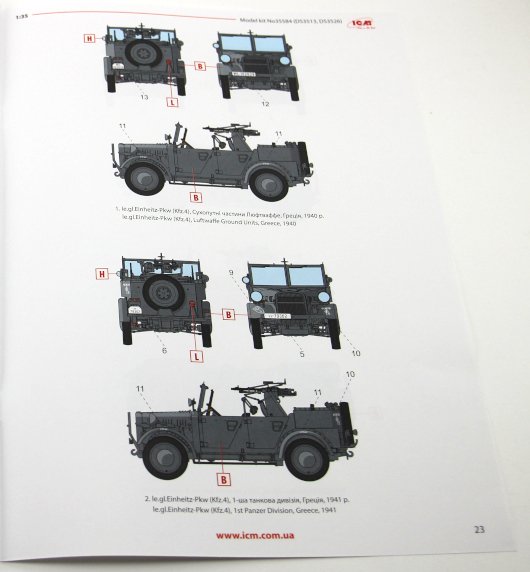
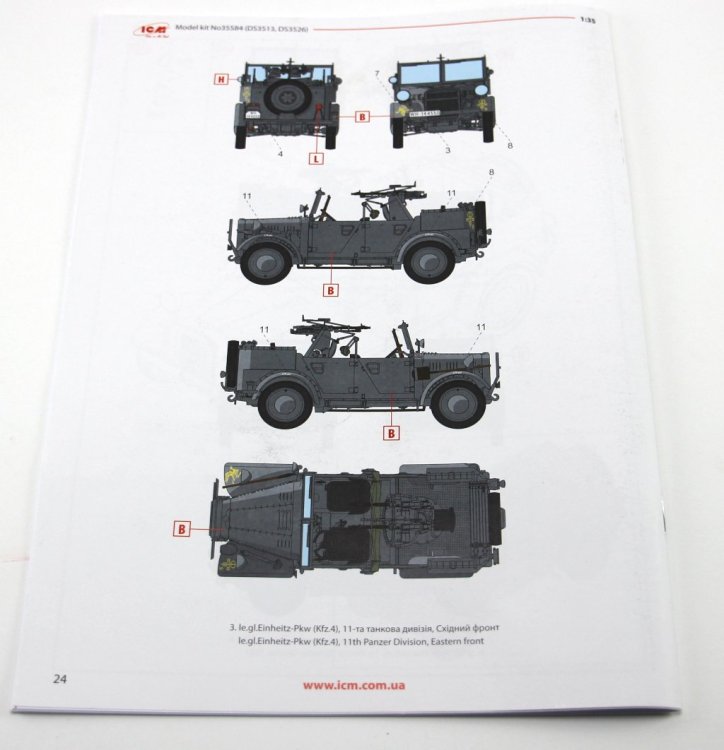
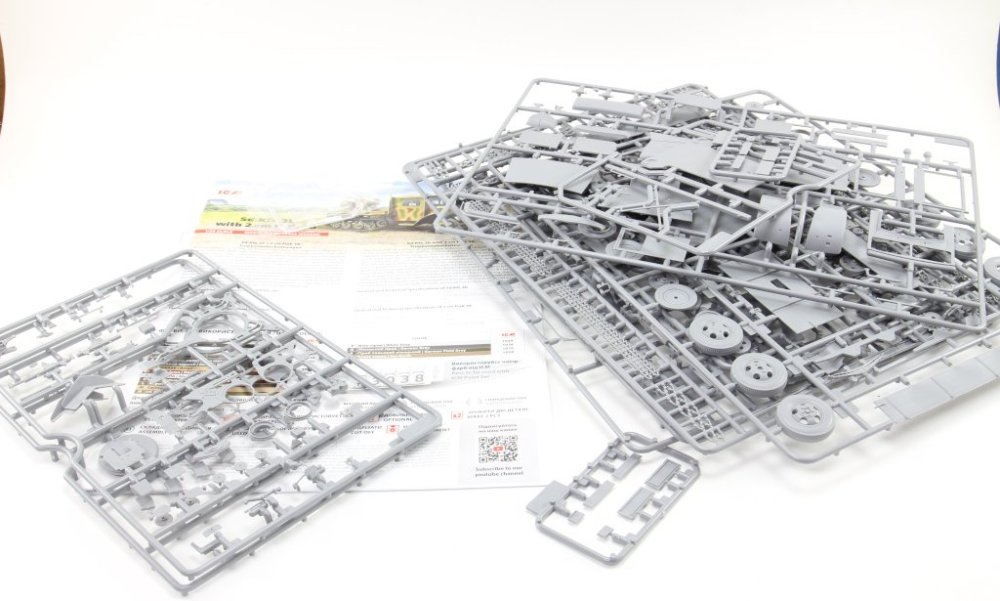
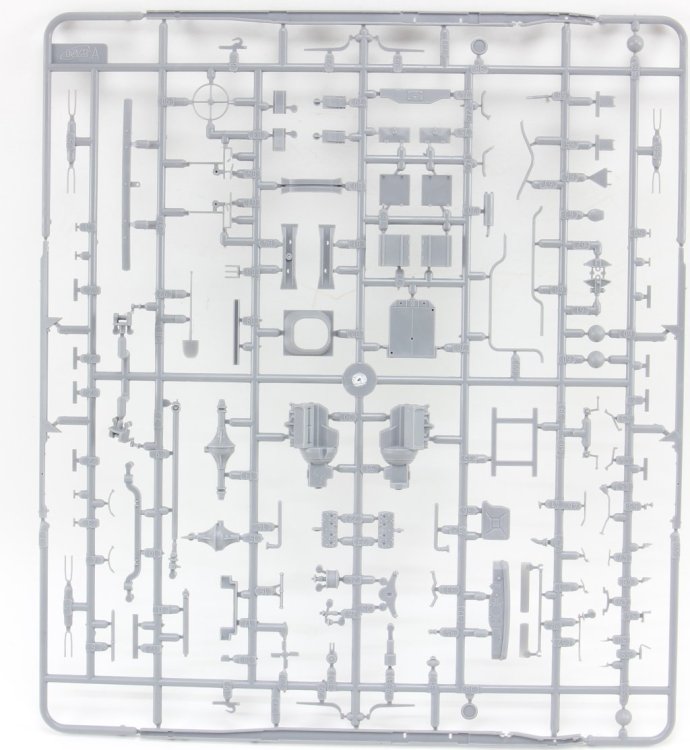
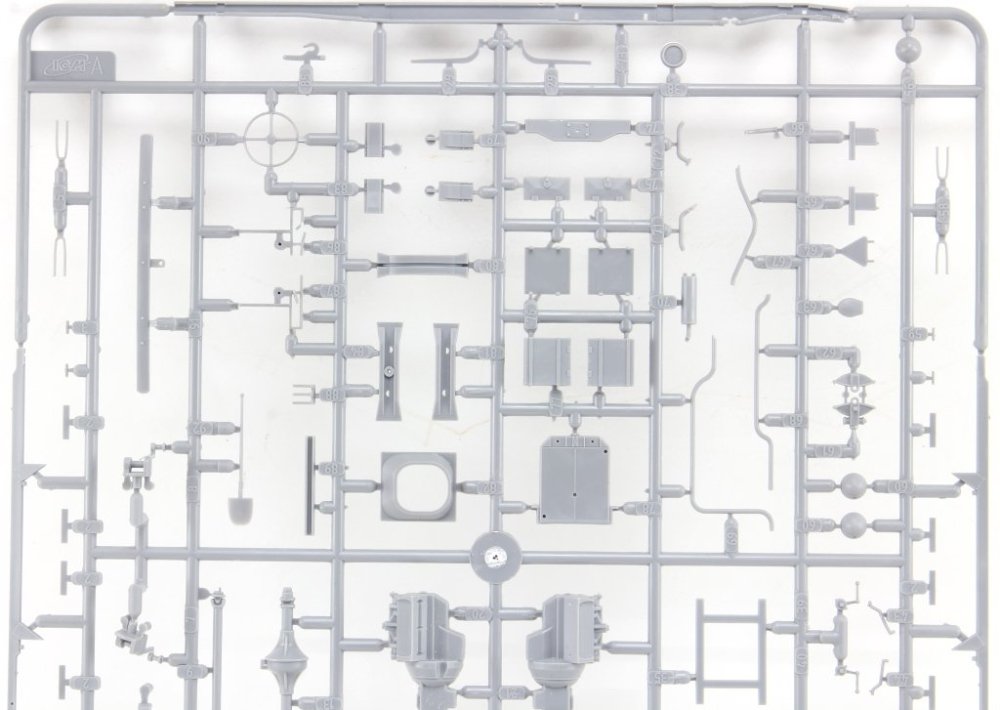
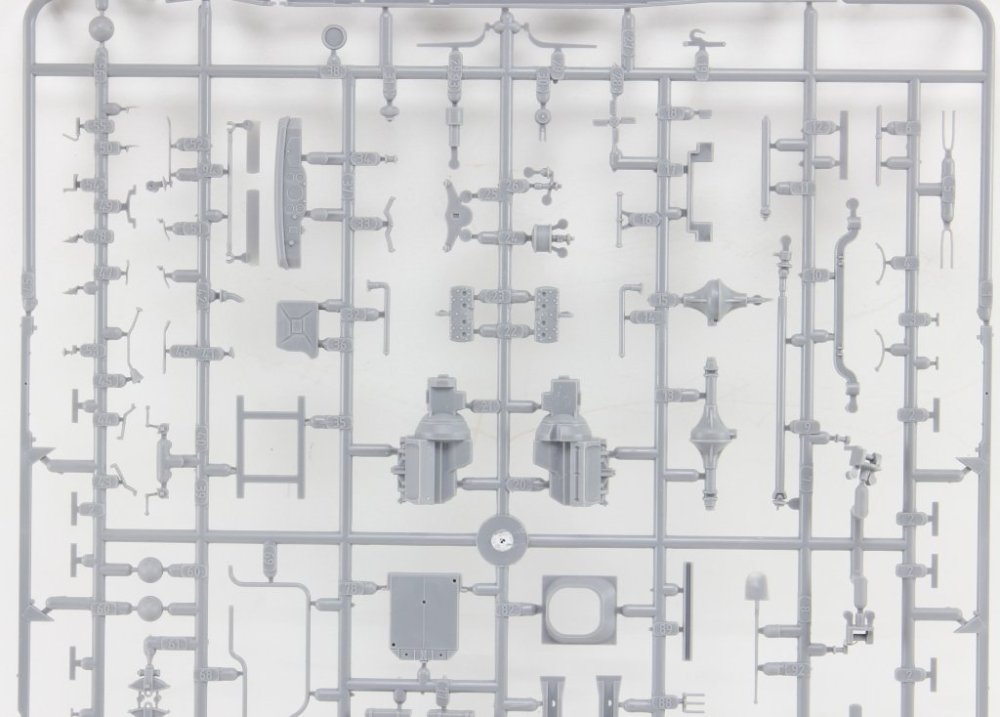
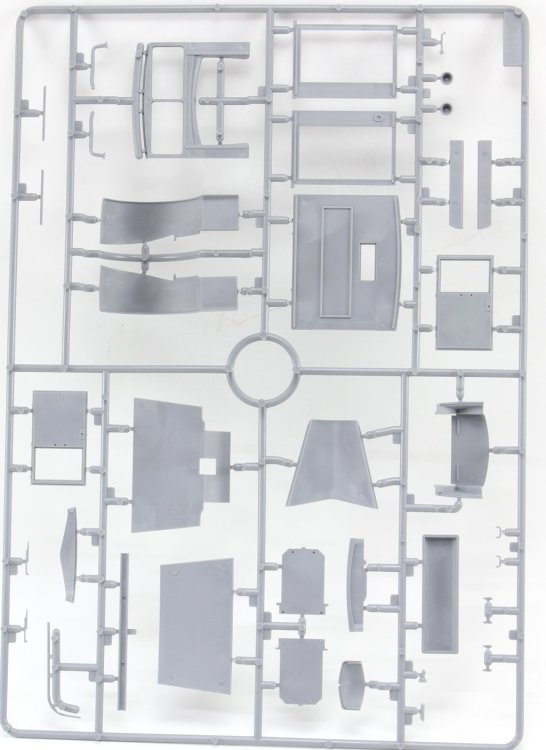
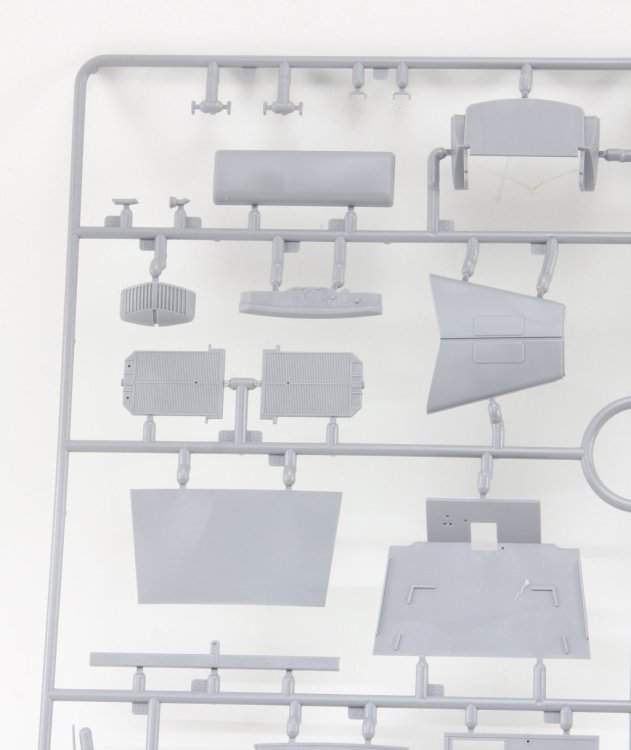
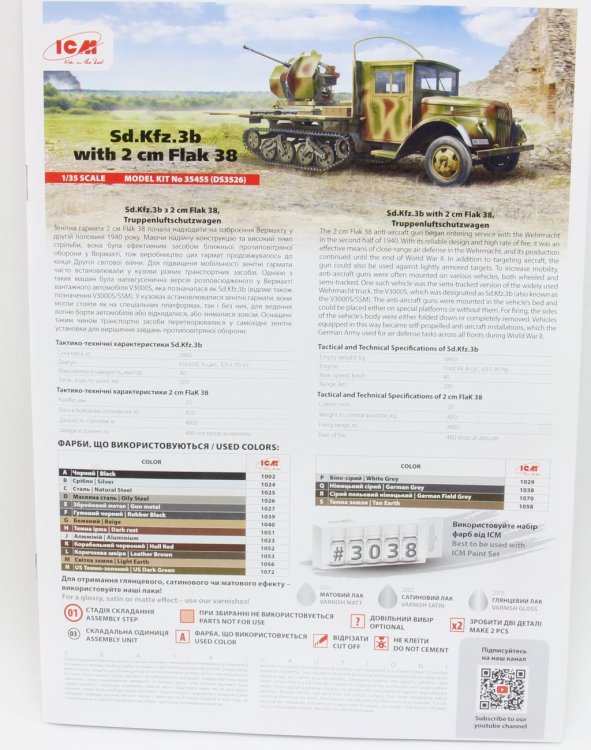
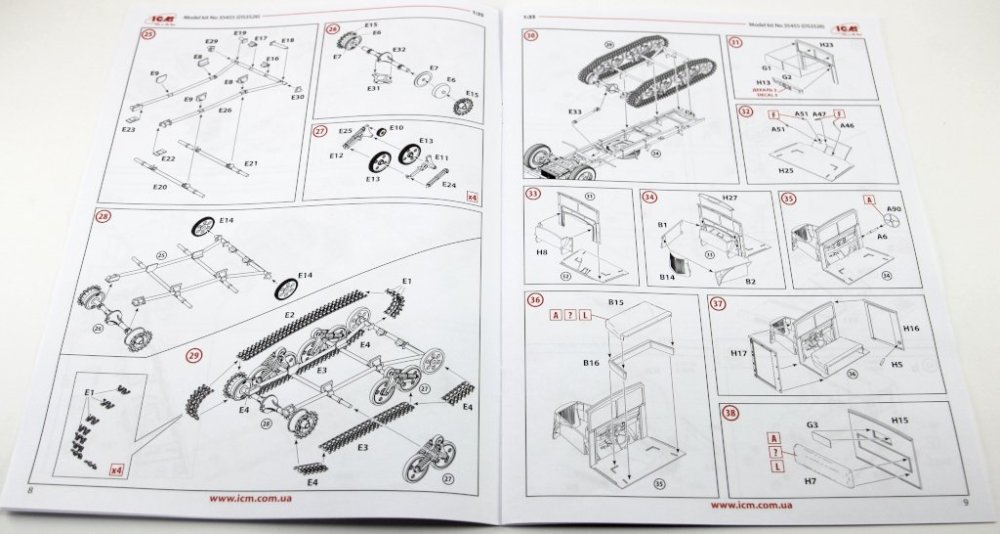
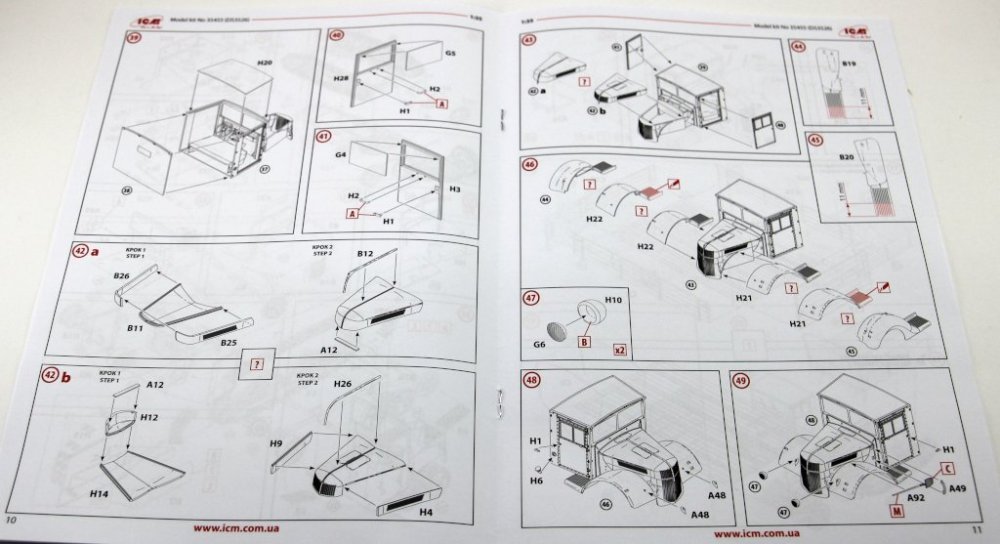
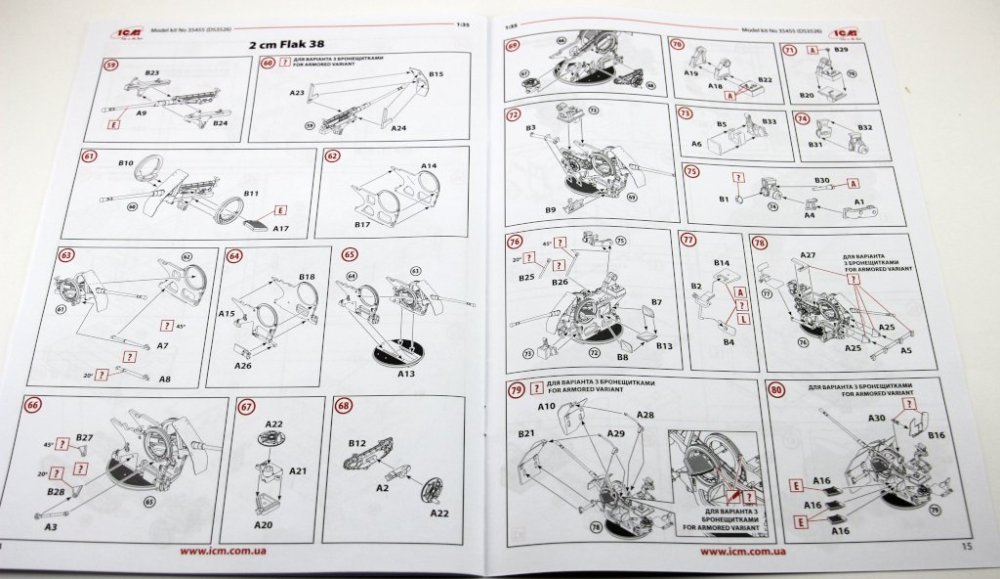
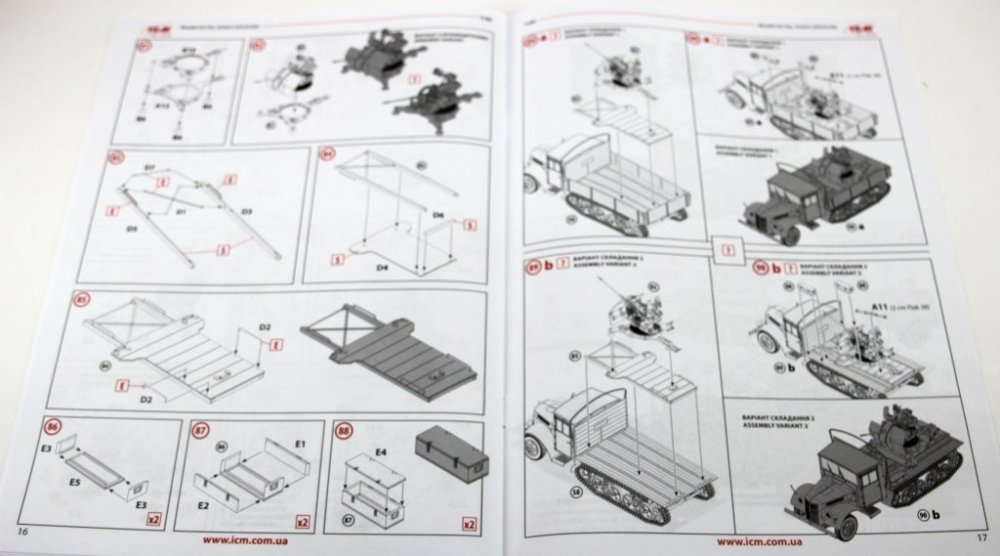
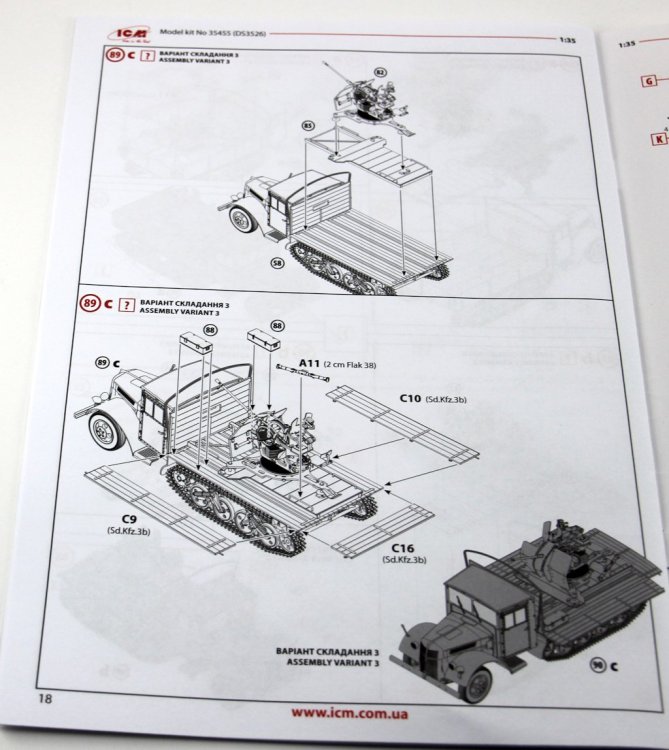
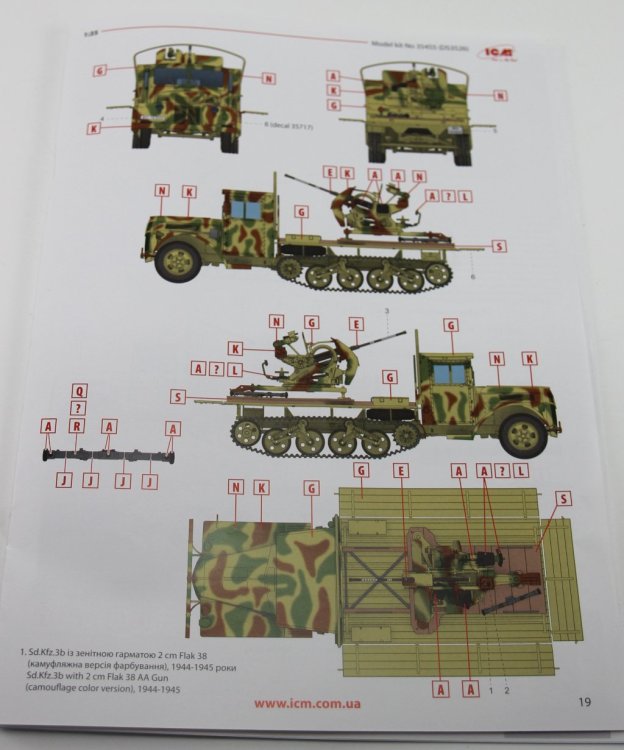
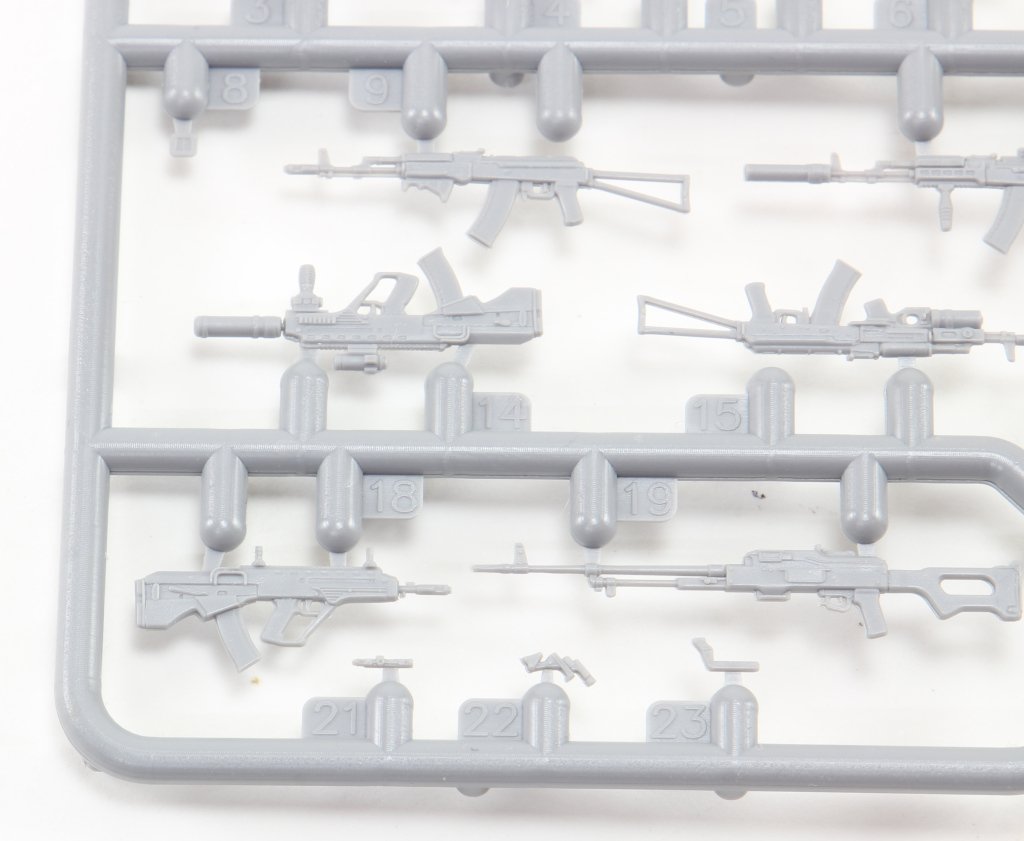
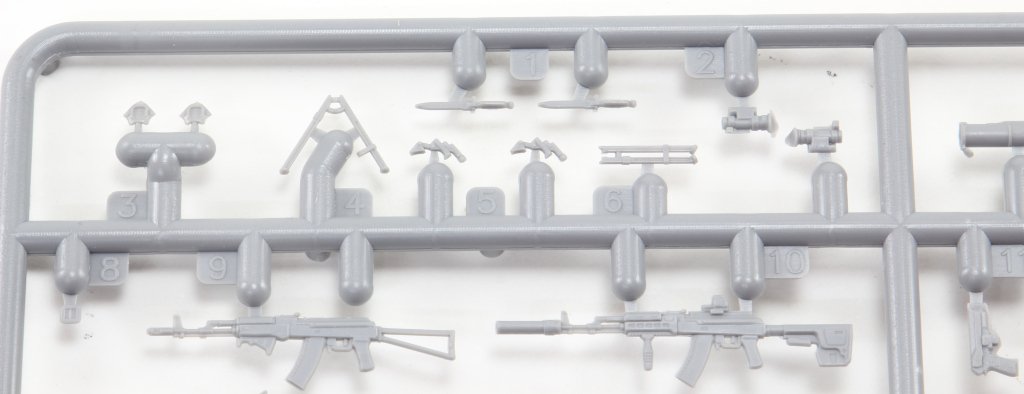
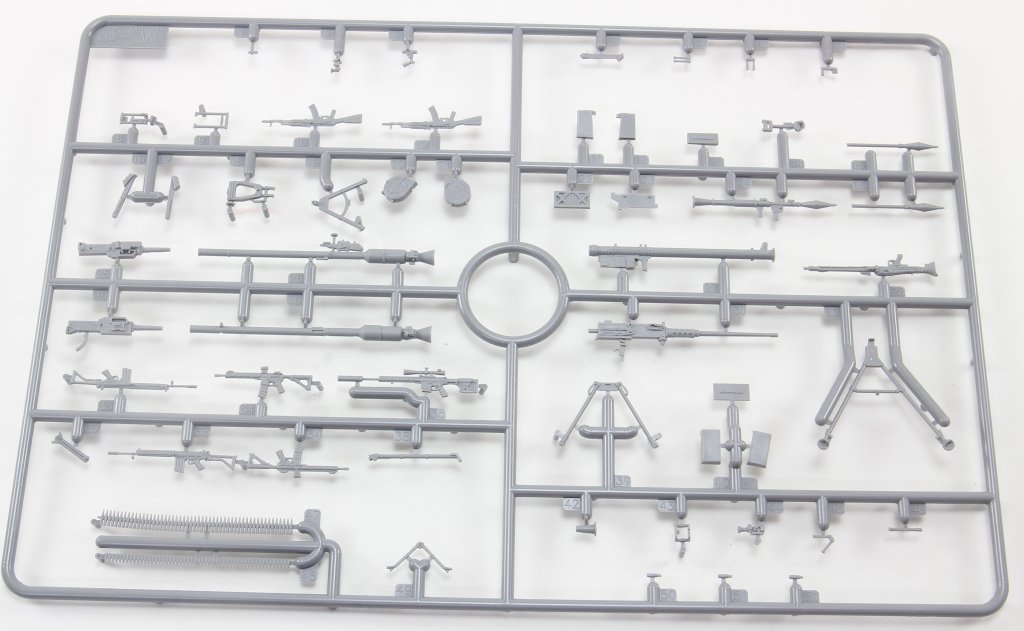
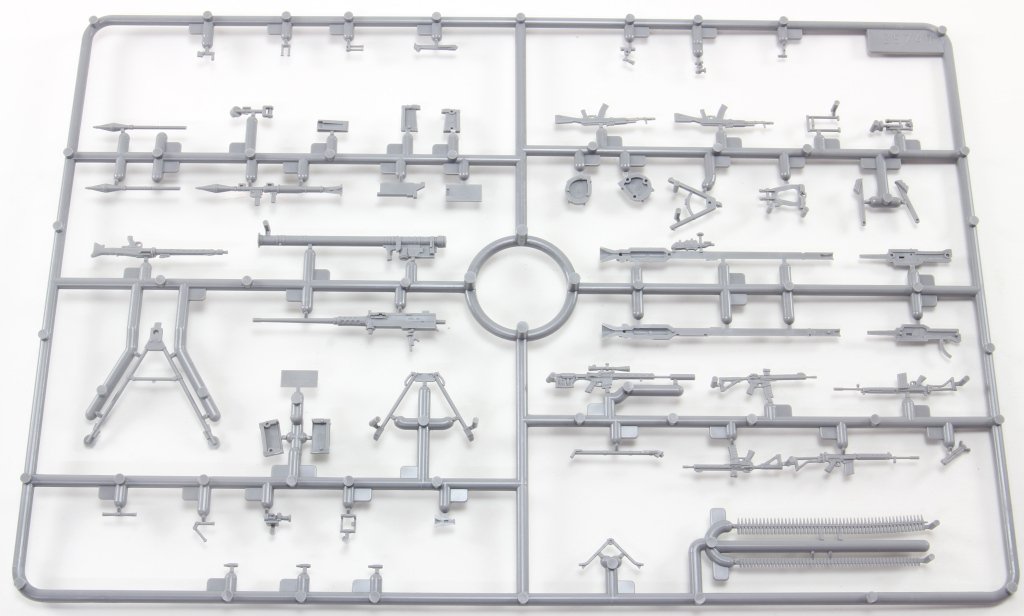
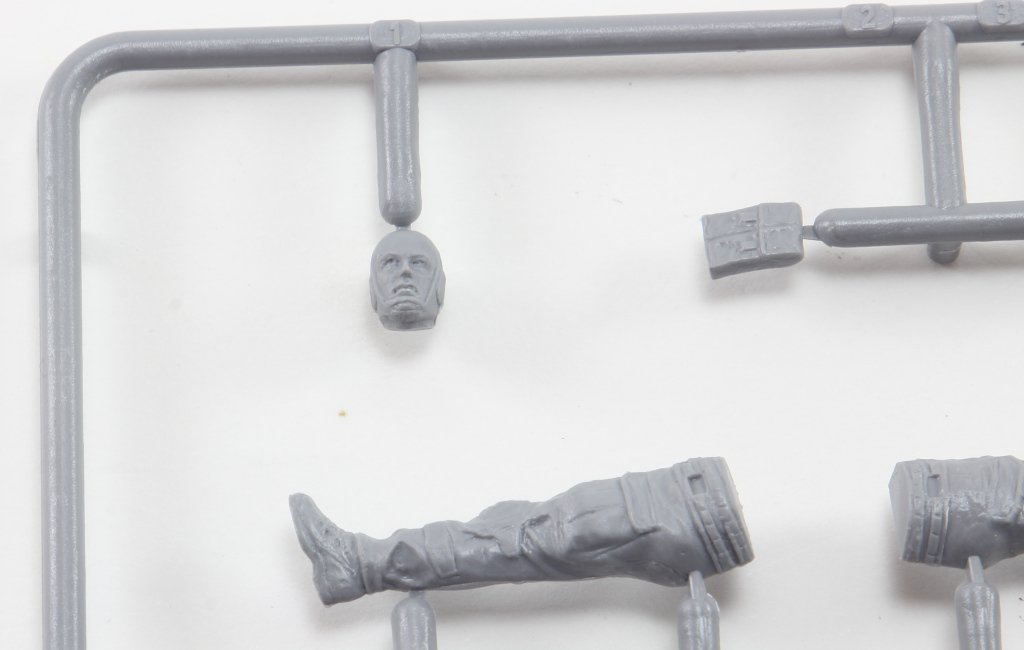
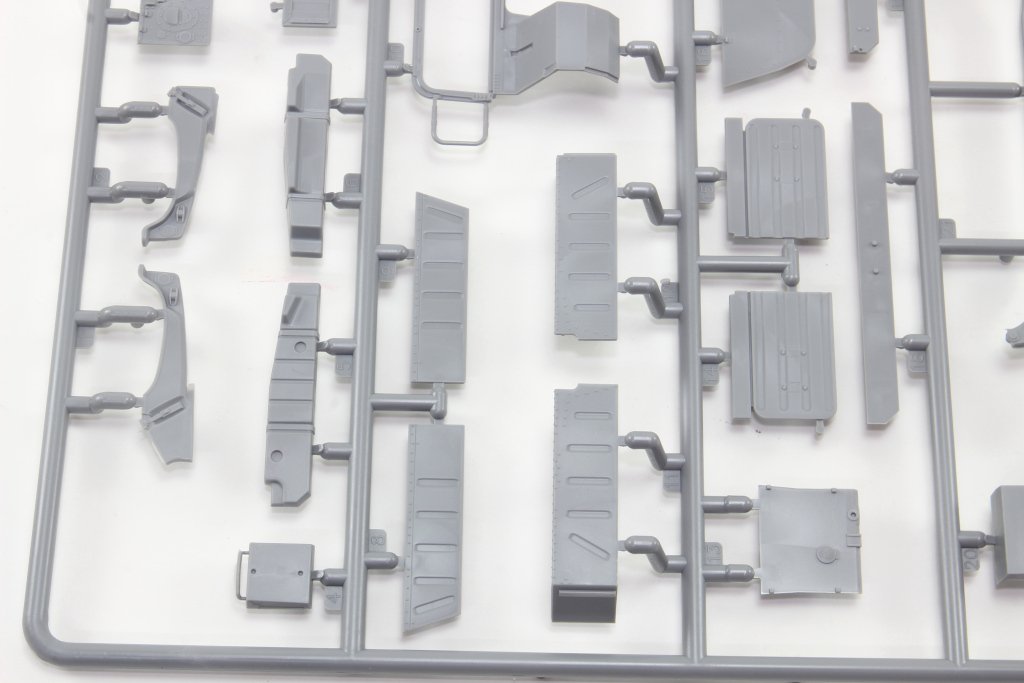
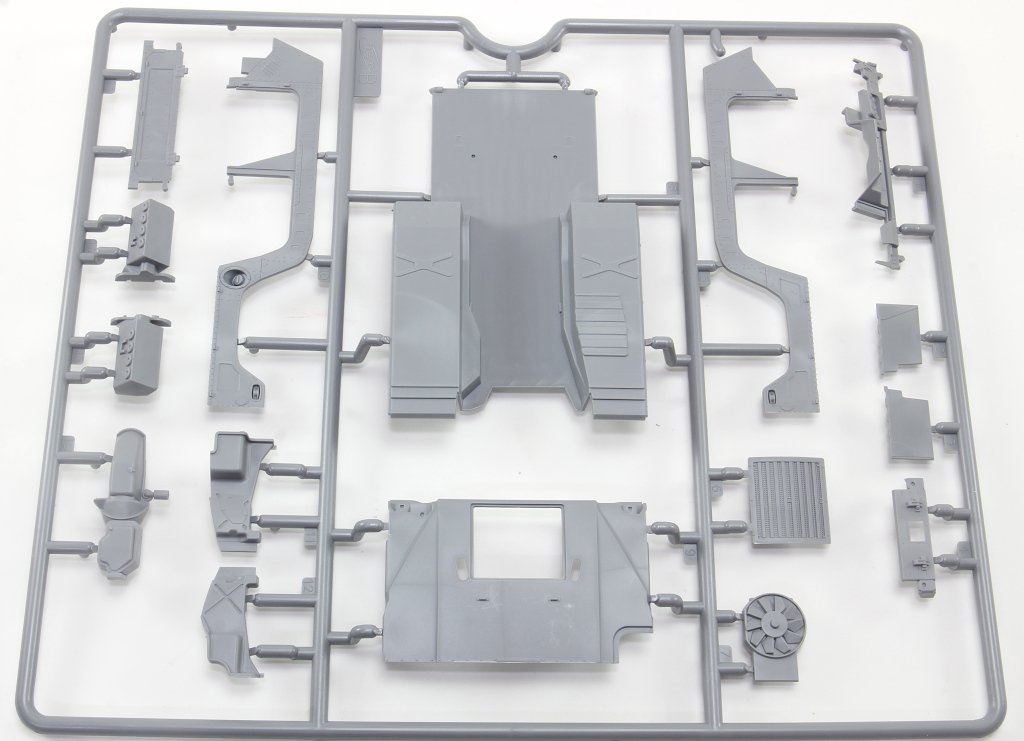
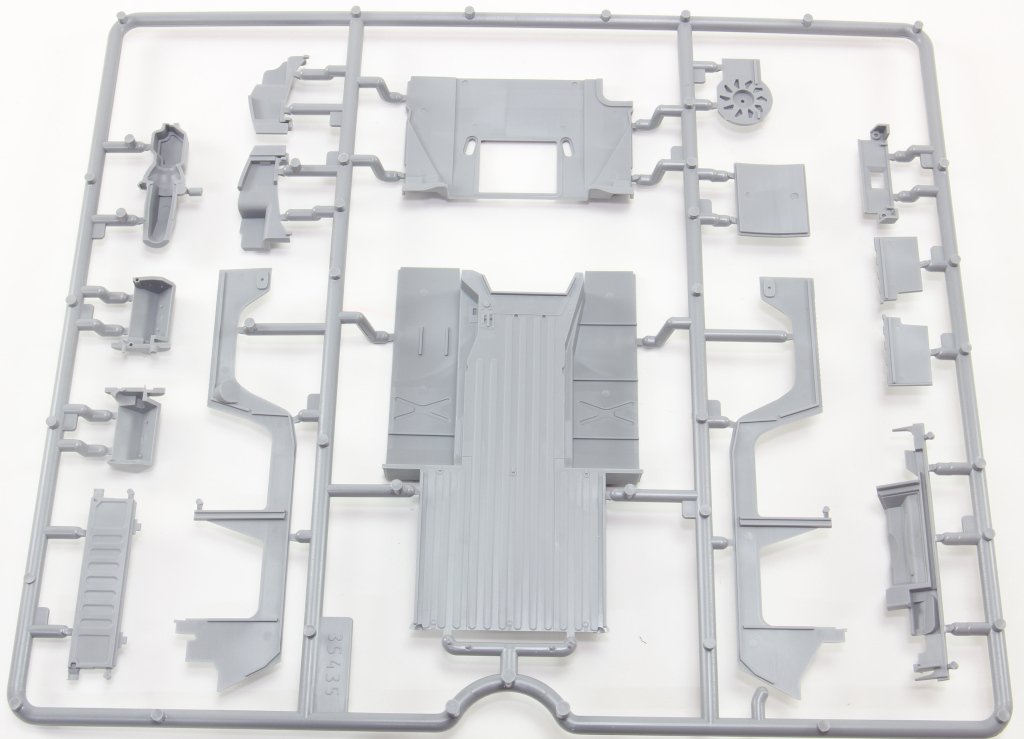
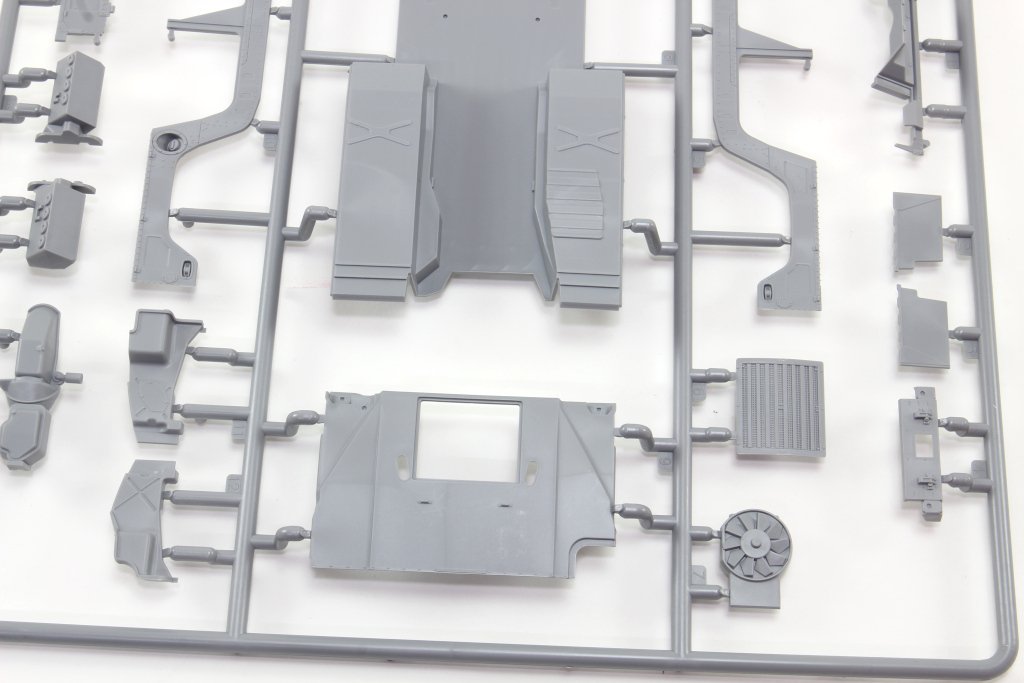
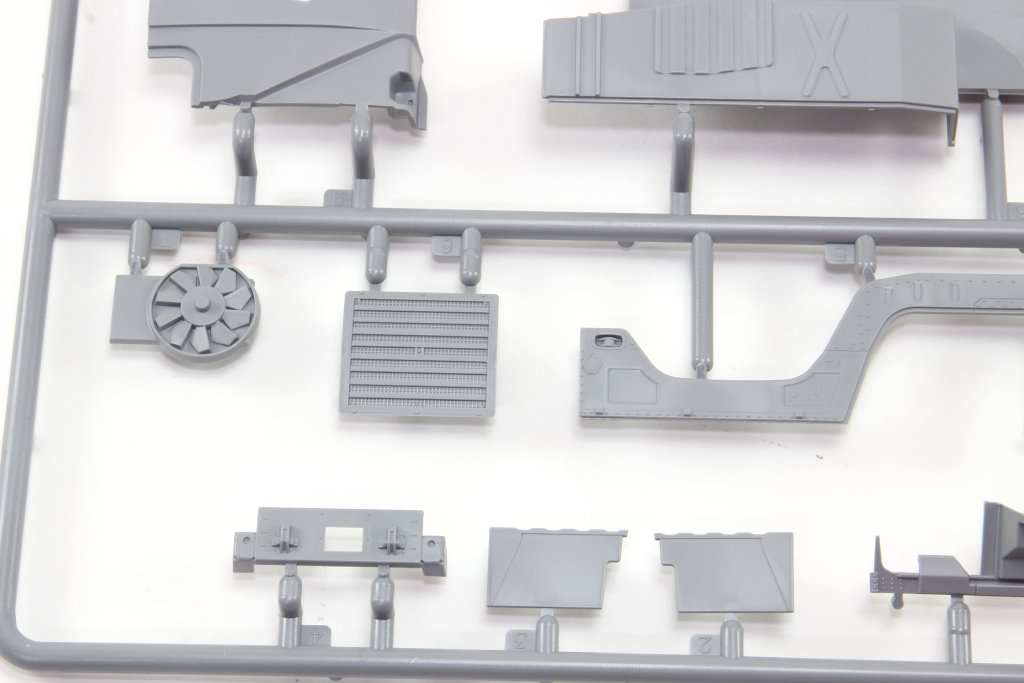
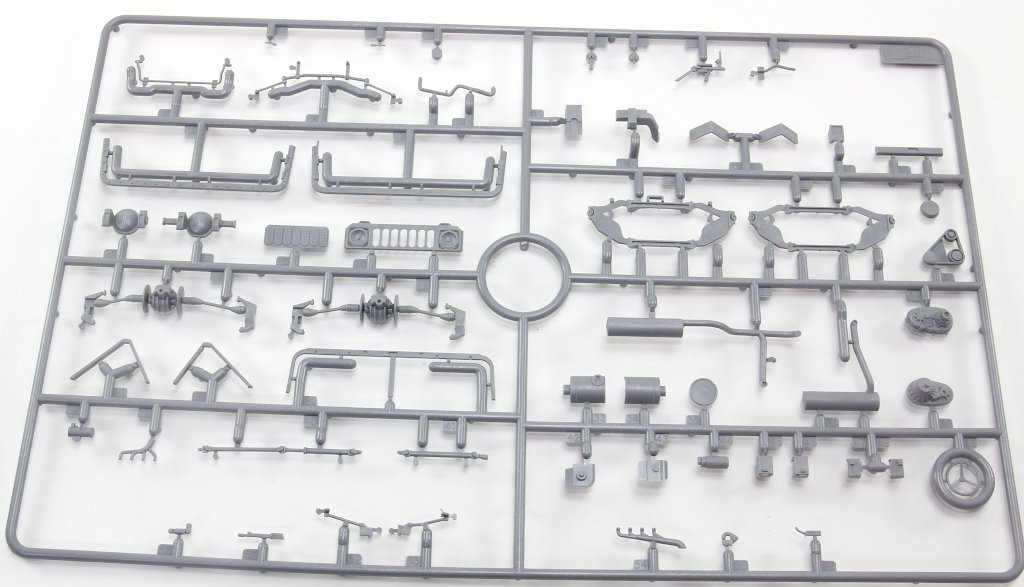
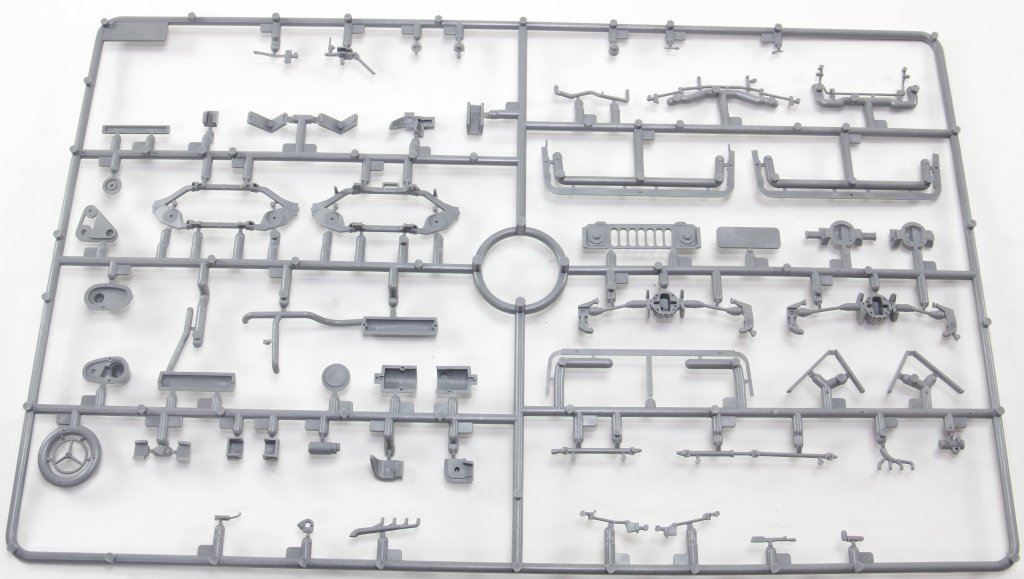
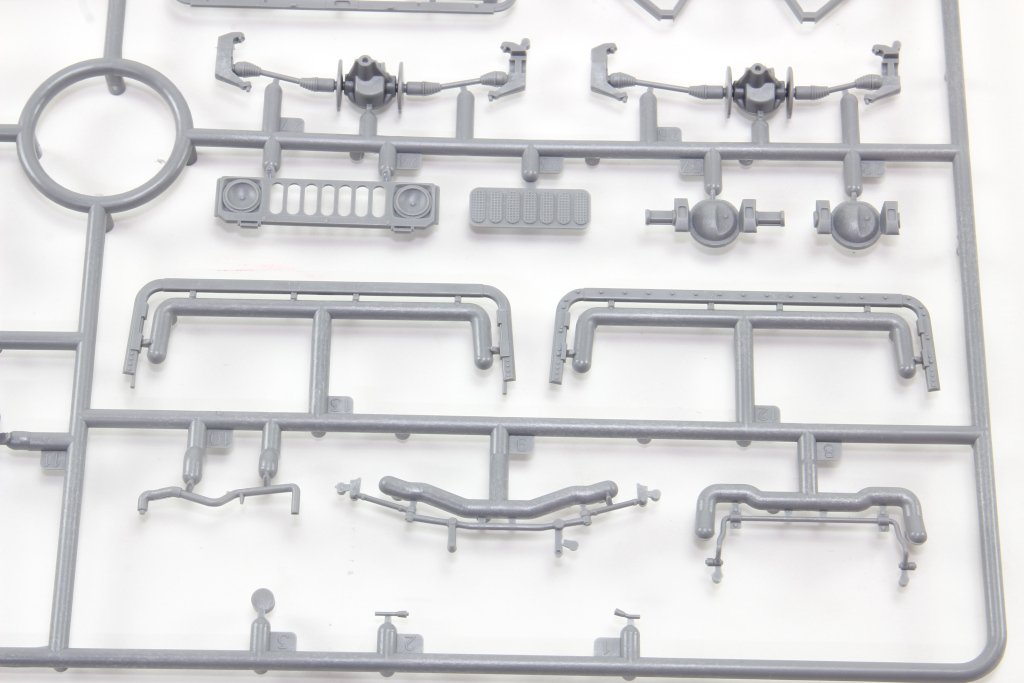
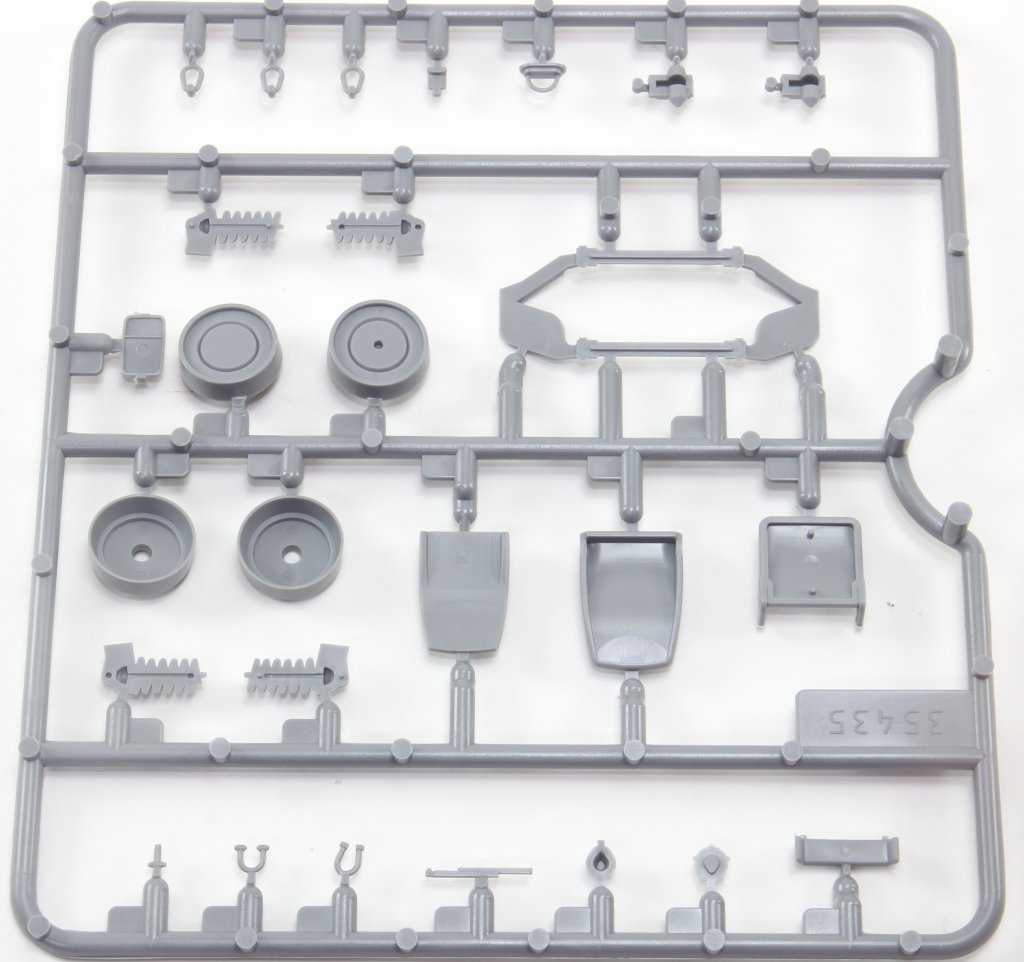
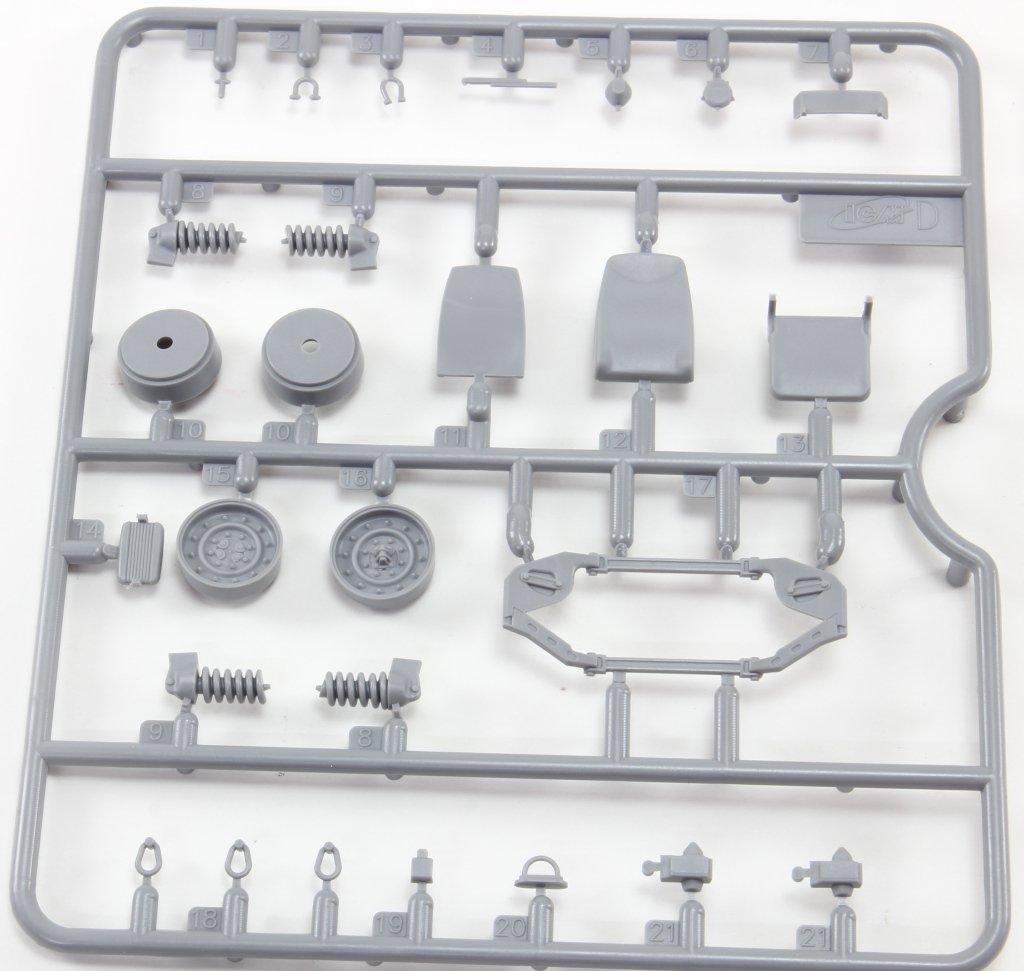
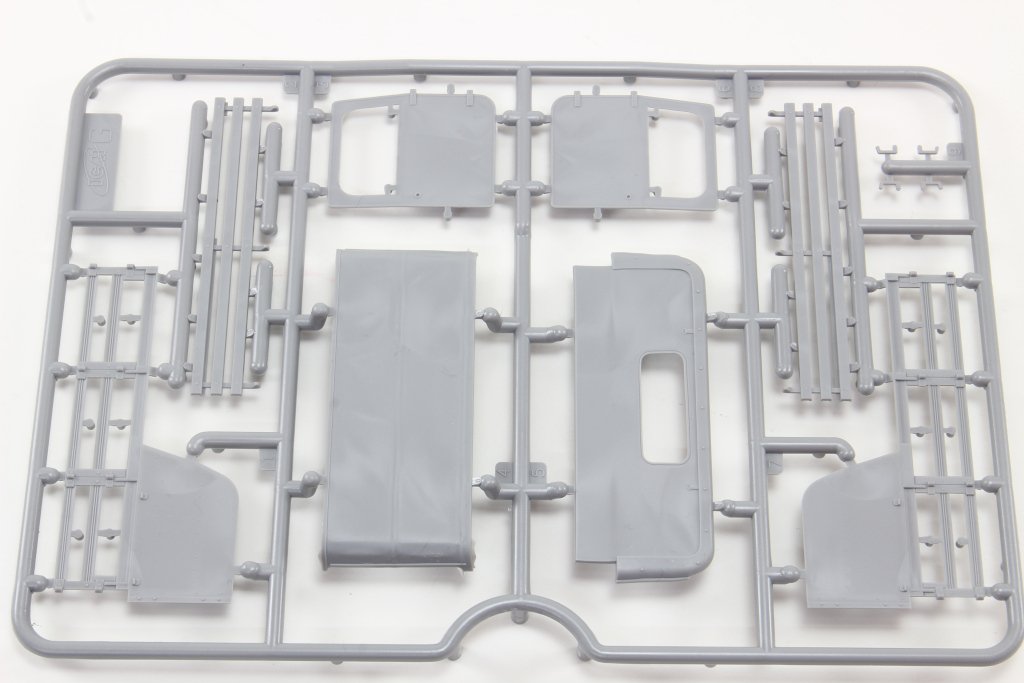
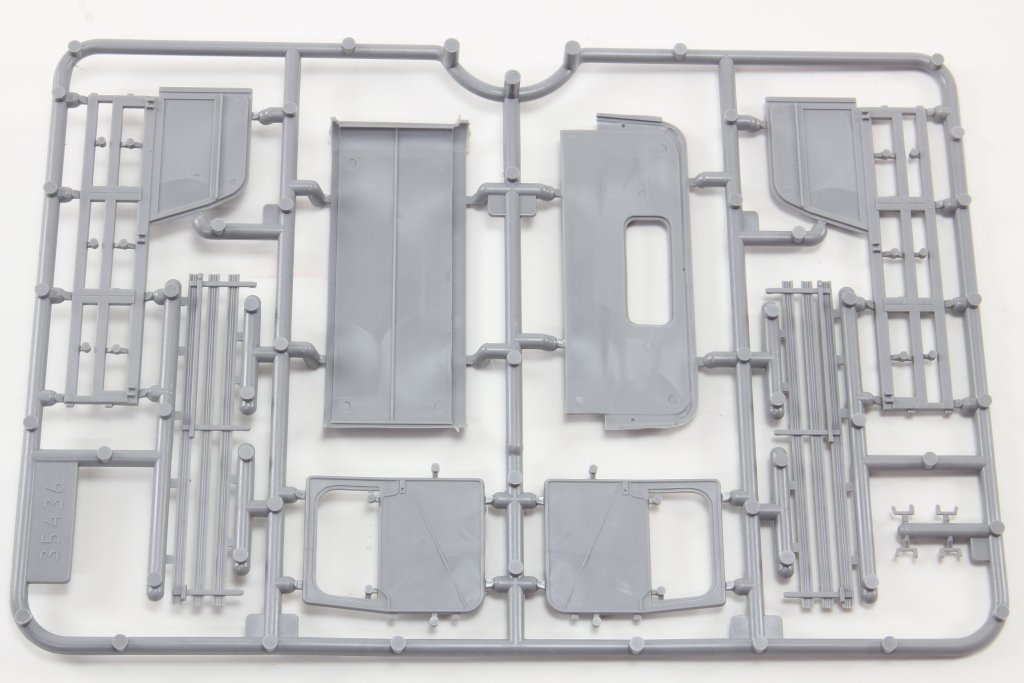
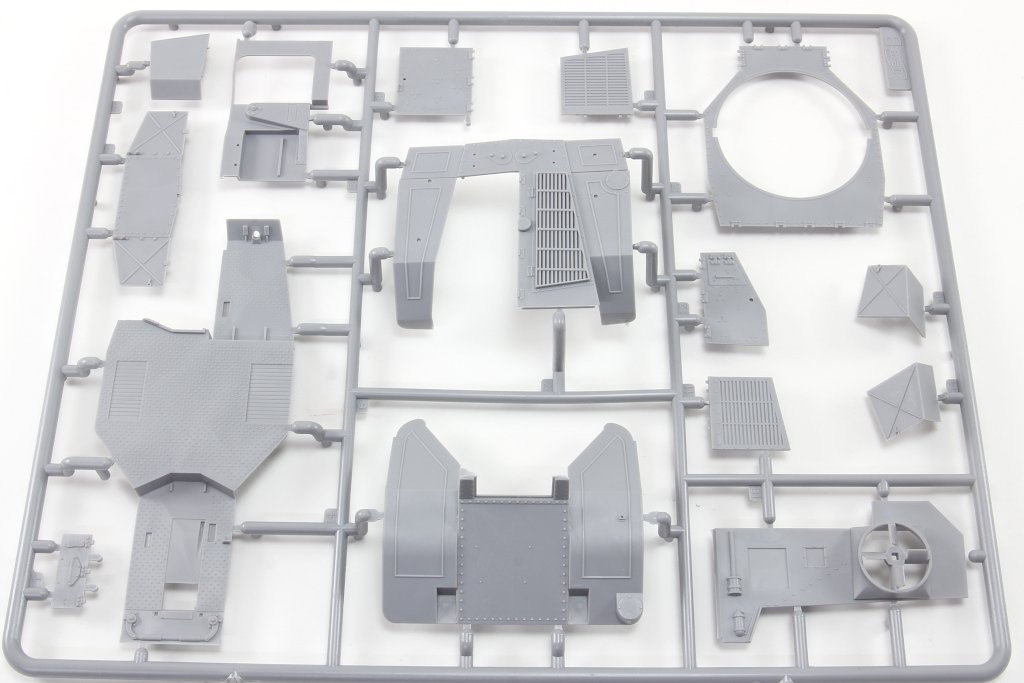
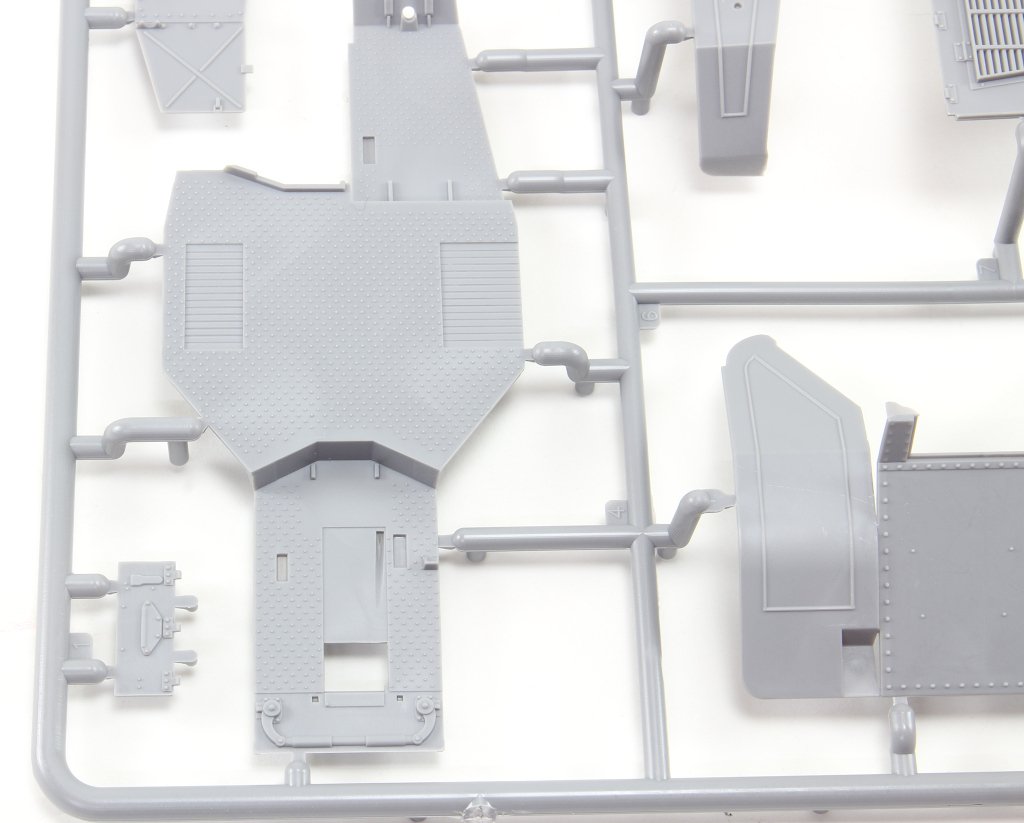
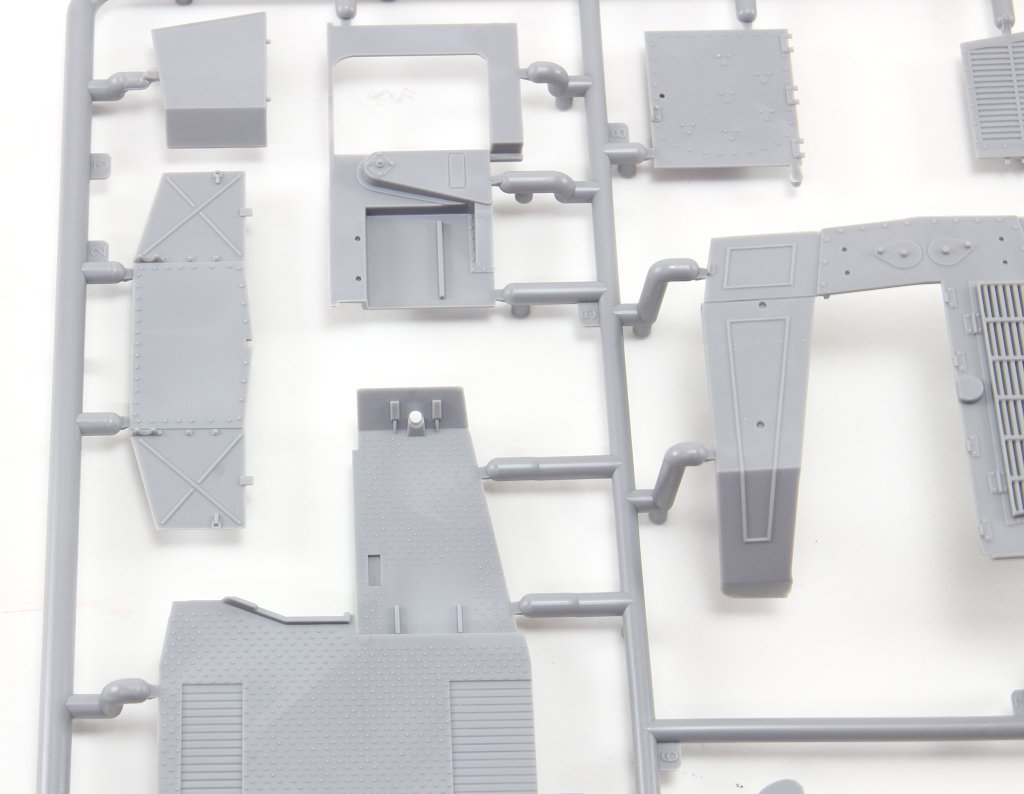
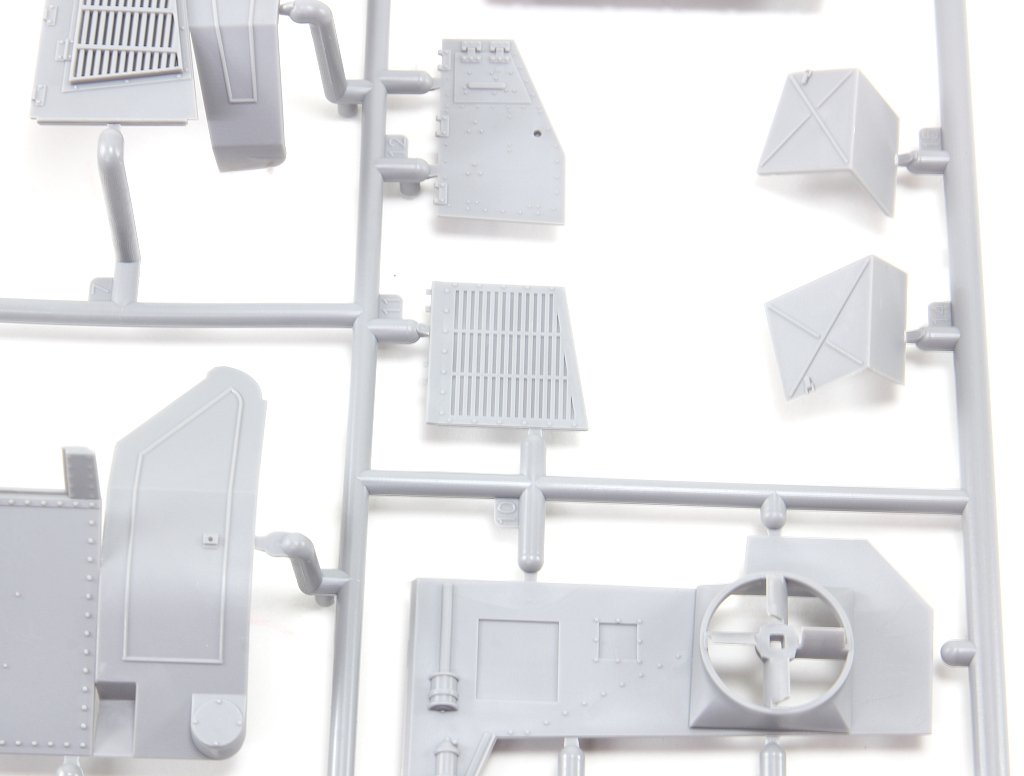
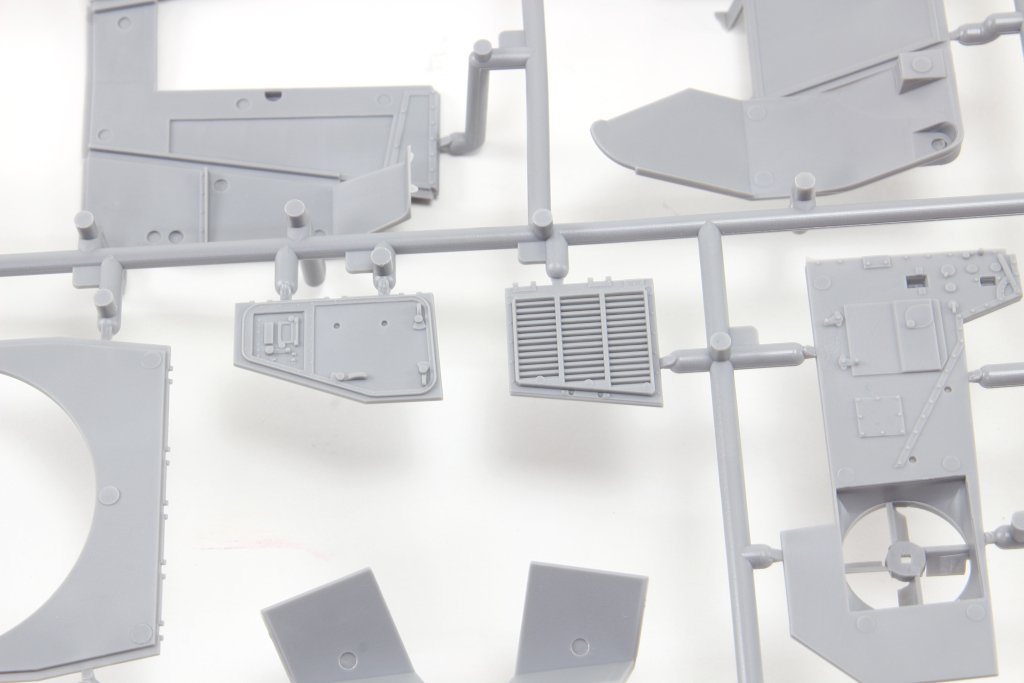
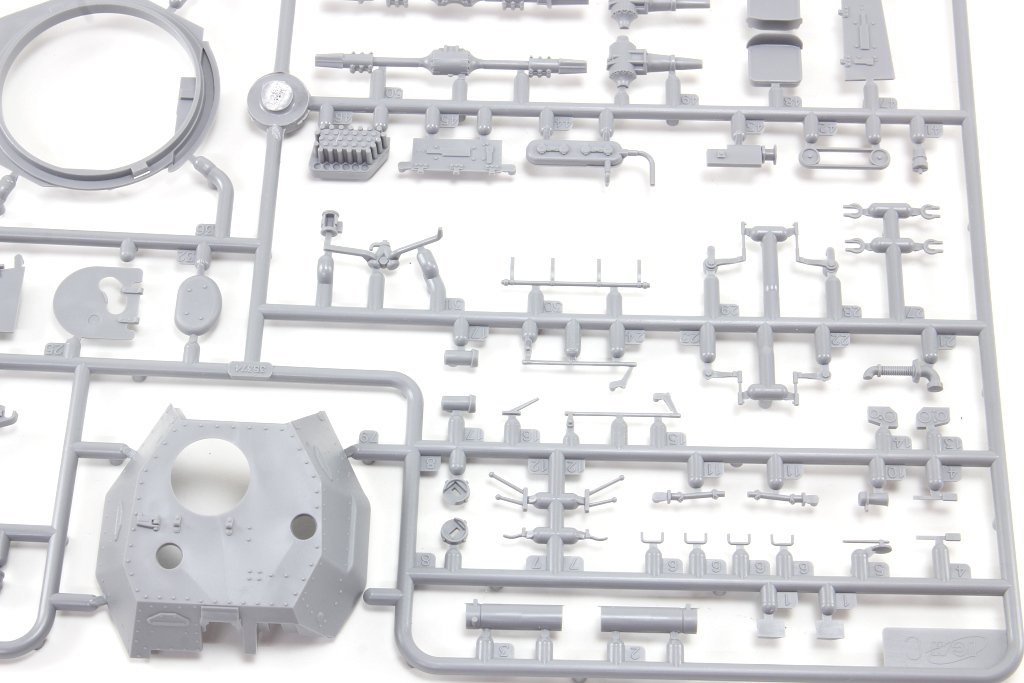
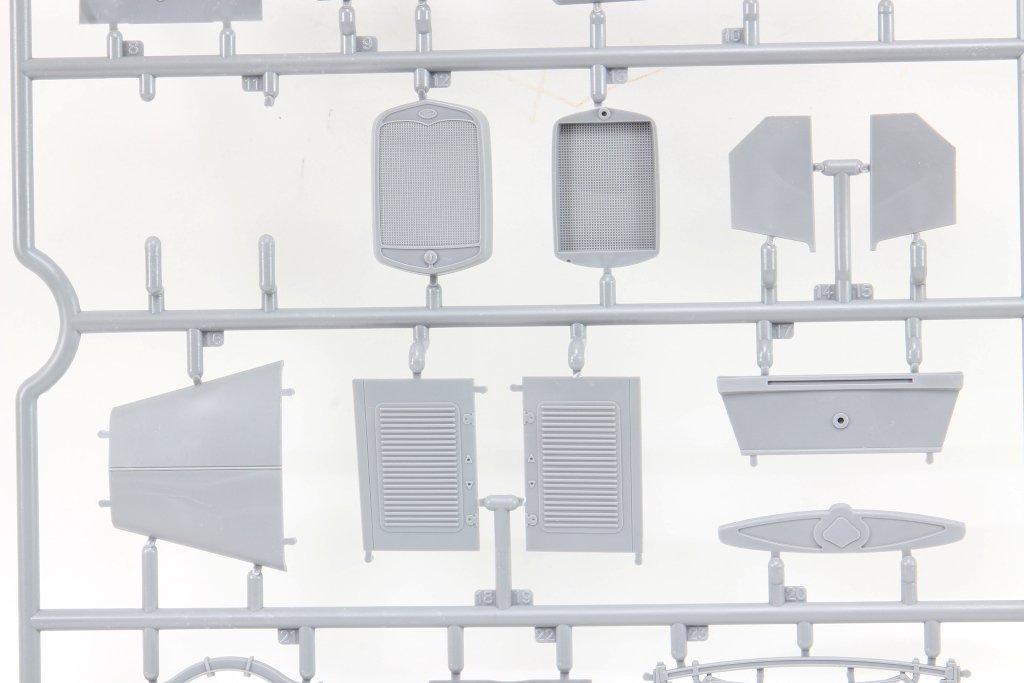
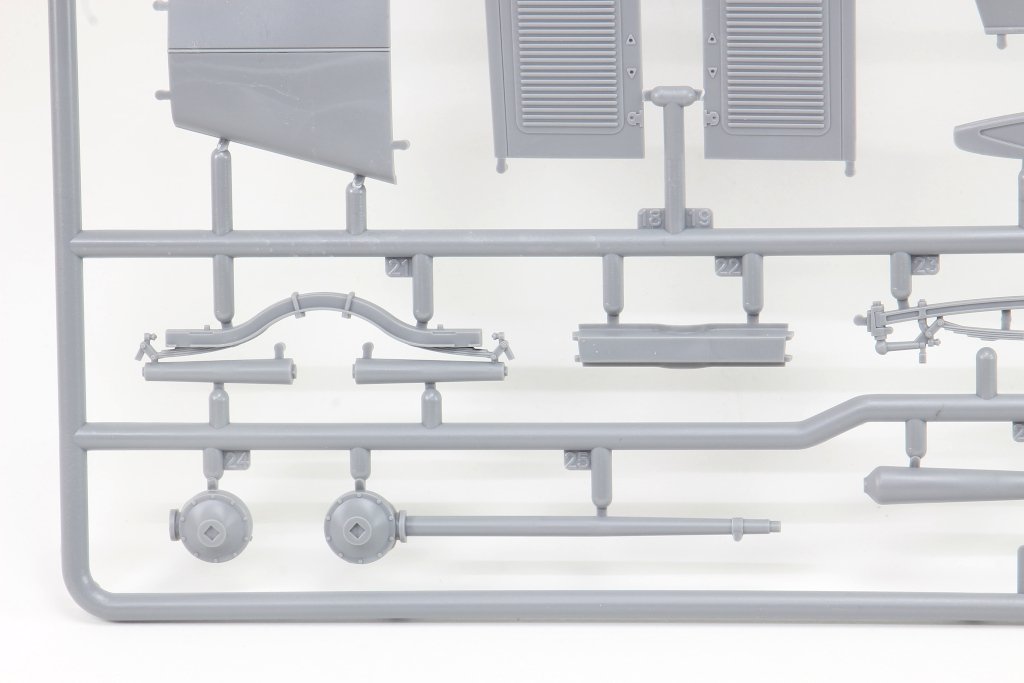
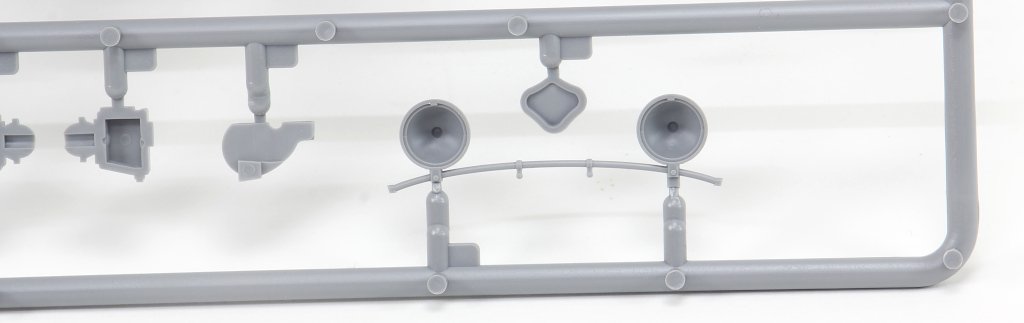
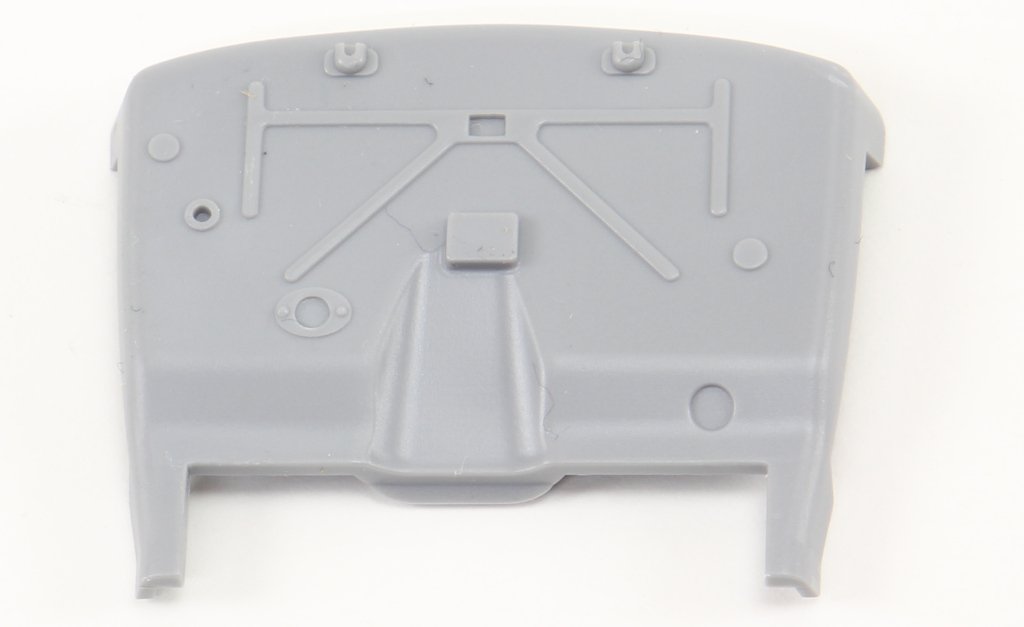
ICM 1:35 Wehrmacht Self-propelled AA Vehicles Code: DS3526 Introduction ICM is a well-known player in our modelling world, and over the years has consistently delivered increasingly detailed and intricate models. This big set includes three Wehrmacht vehicles from WWII, adapted for anti-aircraft defence roles. ICM has a proven track record of offering multiple versions of a model, providing the necessary parts for the intended configuration. This is one such case: The set includes three models: s.E.Pkw Kfz.70 with Zwillingssockel 36 Le.gl.Einheits-Pkw (Kfz.4) Sd.Kfz.3b with 2 cm Flak 38 The first two feature twin machine guns mounted on a pedestal inside the vehicle cabin, while the third includes the well-known Flak 38 mounted in the cargo bed. What’s in the (big) box Inside the large cardboard box, you'll find a total of 897 parts spread across 26 sprues, 4 instruction booklets, and 4 decal sheets. This review is organised by model s.E.Pkw Kfz.70 The s.E.Pkw Kfz.70, also known as leichter geländegängiger Personenkraftwagen, was a light all-terrain vehicle widely used by the German armed forces during WWII. It served as a troop carrier, command vehicle, and logistical support across various theatres, from the Eastern Front to North Africa. This version includes a base with two MG34s mounted in parallel inside the vehicle cabin. This setup allowed for infantry support and protection against air attacks, as well as suppressive fire against enemy troops. Sprue A Contains parts for the chassis, engine, transmission components, and axles. The engine can be displayed by positioning the bonnet open. Sprue B Includes various bodywork components. The engine cooling grille details are well rendered for injection-moulded plastic. Sprue C1 Contains the doors and the soft-top cover (3 parts). Sprue D Includes interior cabin parts, door handles, exhaust system, steering wheel, and exterior tools (spade and pickaxe). Sprue E1 (x2) Provides the wheels (4 plus a spare). Sprue E2 Provides the tyres (4 plus spare). These are made of rubber with decent detailing. Sprue F Contains the vehicle’s clear parts – windscreen and light lenses. These are transparent, free from warping or scratches. Zwillingssockel 36 This sprue includes the parts for the weapon platform. The gun detail is adequate, and the pedestal can be built in either an anti-aircraft firing position or a horizontal ground-support position. Decals A small sheet includes various licence plates, national and tactical markings. They are thin, with minimal carrier film and perfect registration. Instructions The instructions are spread over 28 pages (glossy cover, matte inner pages). Construction is divided into 72 steps for the vehicle and 16 for the gun mount, with the final page showing the completed model. Three decoration options are included. s.E.Pkw Kfz.70, Russia, Autumn 1942 s.E.Pkw Kfz.70, sapper platoon of the Heavy Panzer Batalion 501 (schw, Abt.501), Tunisia, 1943 s.E.Pkw Kfz.70, Russia, Summer, 1943 le.gl.Einheits-Pkw Kfz.4 (Horch) The le.gl.Einheits-Pkw Kfz.4 was a light all-terrain vehicle developed for the Wehrmacht in the 1930s, designed for reconnaissance and anti-aircraft support roles. Equipped with twin MG34 machine guns, it stood out for its mobility and versatility on fronts such as Greece and the Eastern Front. It also served with the Luftwaffe in airfield defence roles. This model, originally released in 2021 (Ref. 35584), is presented here in the same configuration, featuring a detailed chassis, engine, and interior. The kit includes 7 sprues for the vehicle and 1 for the Zwillingssockel 36, totalling 241 parts. Sprue A Provides engine components, chassis (structural body parts), and transmission. The detail is appropriate for the scale, with fine moulding evident in the smaller parts. Sprue B Contains interior cabin components and additional engine parts. Sprue C (x2) These sprues include the wheels (fully moulded in plastic along with the rims), differential axle, transmission parts, and various interior components. Sprue D Provides the vehicle’s clear parts. Some are not required for this version, as it features a canvas cover rather than a hard top. Sprue E Includes the necessary parts to adapt the chassis and cabin interior with mounting plates for the machine gun base. Sprue F Decals A small sheet includes various licence plates, national and tactical markings. They are thin, with minimal carrier film and perfect registration. Instructions The instructions are spread over 24 pages (glossy outer pages, matte inner pages). Construction is divided into 81 steps for the vehicle and 16 for the gun mount, with the final page showing the completed model. Three decoration options are included: le.gl.Einheits-Pkw (Kfz.4), Luftwaffe Ground Units, Greece, 1940 le.gl.Einheits-Pkw (Kfz.4), 1st Panzer Division, Greece, 1941 3. le.gl.Einheits-Pkw (Kfz.4), 11th Panzer Division, Eastern Front Sd.Kfz.3B with 2 cm Flak 38 The Sd.Kfz. 3B was a half-track version of the V3000S truck, adapted by the Wehrmacht to handle difficult terrain. In this variant, it was fitted with the 2 cm Flak 38 anti-aircraft gun, effective against aerial targets and light vehicles. With fold-down side panels to ease operation, it became a mobile air defence platform used across various fronts during the Second World War. Sprue A This sprue (which includes many small and detailed parts) draws attention to the Ford V8 engine components. Particularly notable are the cylinder head covers, clearly showing the spark plug and bolt positions. Radiator, differential and transmission parts are also well detailed. Sprue B Provides some of the parts needed for the front and cabin of the vehicle. Several parts on this sprue are not used in this version. Sprue C Contains components for the cargo bed (moulded to resemble wooden planks), as well as the front wheels and a spare tyre, all moulded entirely in plastic. Sprue D A small sprue that includes the platform parts mounted in the cargo bed, where the Flak 38 will be installed. Sprue E Includes the plastic tracks (individual links for curved sections and segments for flat areas). In my opinion, these are easier to work with and paint than rubber alternatives, and more realistic. Suspension components, track wheels and exhausts are also provided. The wheels show injection marks on their structure, but these will be hidden once assembled, as they face inward. Sprue E1 A small sprue with one ammunition box for the Flak 38. Sprue G Provides the transparent parts for the cabin – windscreen and optics. These are moulded in clear plastic, free from scratches or distortion. Sprue H Contains most of the cabin and interior parts. The detail is appropriate, with rivets visible where body panels were joined. Some injection marks should be removed, especially on the inside of the doors and roof, as they may remain visible after assembly. Flak 38 Sprues Two sprues and a decal sheet are included for building the Flak 38. A separate review of this gun can be found on the forum [here]. Decals A small sheet includes a licence plate, tactical markings, stencils and instrument panel. They are thin, with minimal carrier film and perfect registration Instructions The instructions are spread over 20 pages (glossy outer pages, matte inner pages). The first page provides historical context and technical specifications, along with a paint guide referencing ICM’s own colour range. Construction is divided into 89 steps for the vehicle and Flak 38, with the final page showing the completed model. The cargo bed’s side panels can be displayed either folded down or upright. Two generic decoration options are available: Sd.Kfz.3b with 2cm Flak 38 AA gun (camouflage version), 1944–1945 2. Sd.Kfz.3b with 2cm Flak 38 AA gun (winter camouflage version), 1944–1945 Conclusion This review was long and photo-heavy, but the set truly deserves it. The three vehicles are not large in scale, which is appealing for modellers with limited display space. In fact, the sturdy cardboard box could be reused to store the completed models! The detailing across all three kits reflects the quality ICM is known for, though care should be taken with injection marks that may remain visible after assembly, making it competitive in terms of value for money, The instructions are clear and precise, with helpful alerts when choosing between versions. Overall, considering the contents and quality, this is a highly recommended set! our thanks to ICM for the sample review! Ricardo Veríssimo


.jpg.245cc8474b2a9e04e97a483cbfbdfbba.jpg)
-
Hi Kevin! thanks!
-
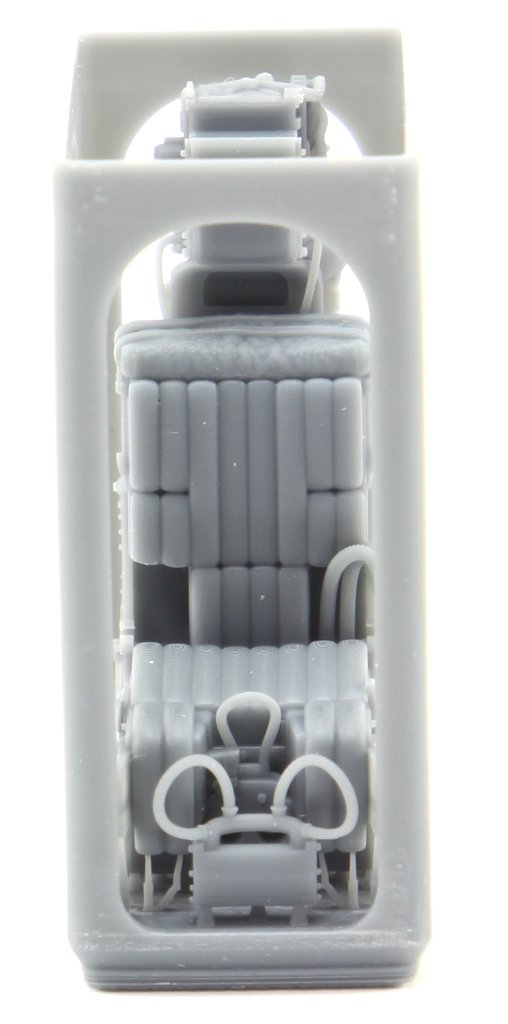
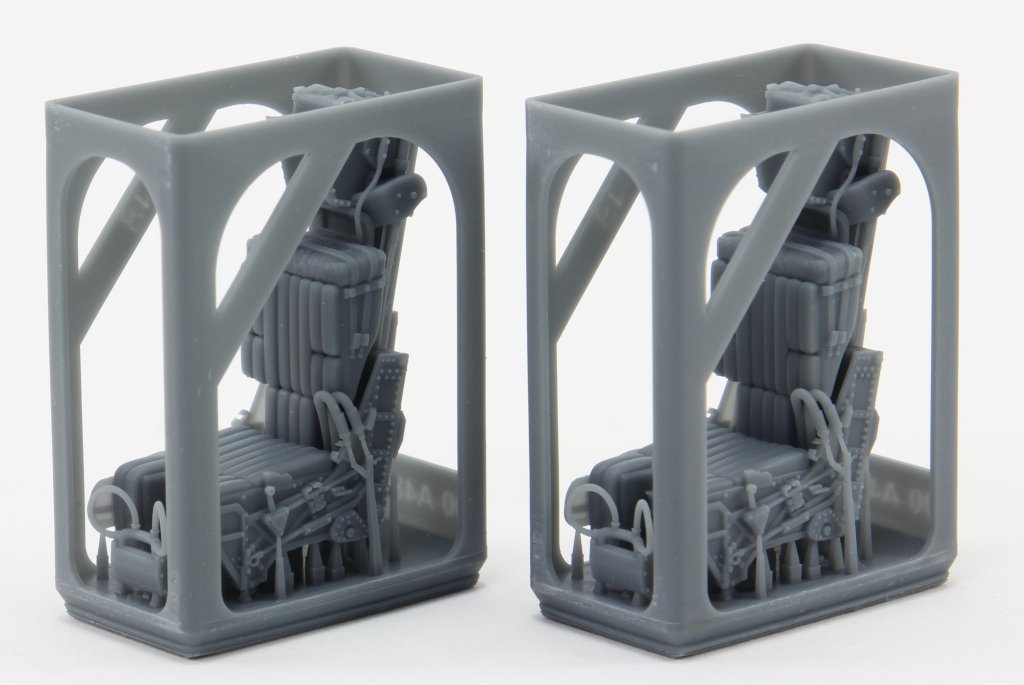
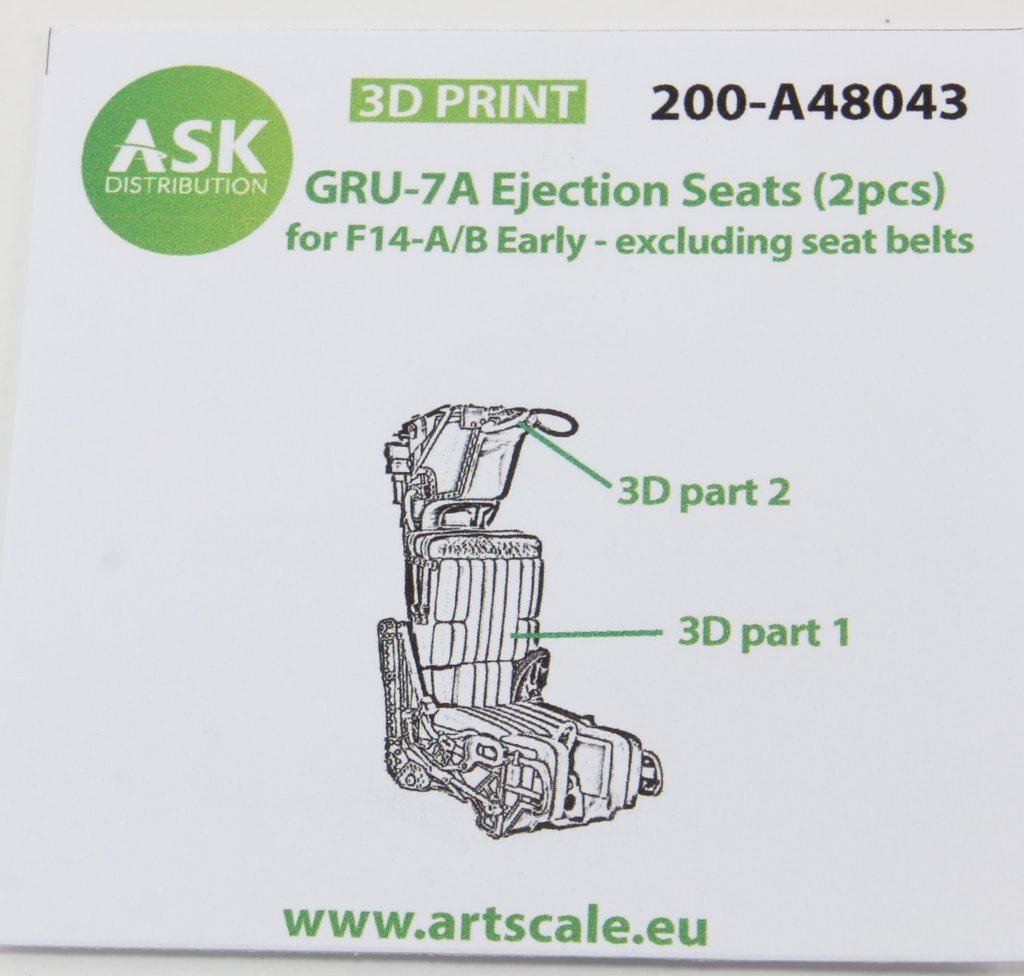
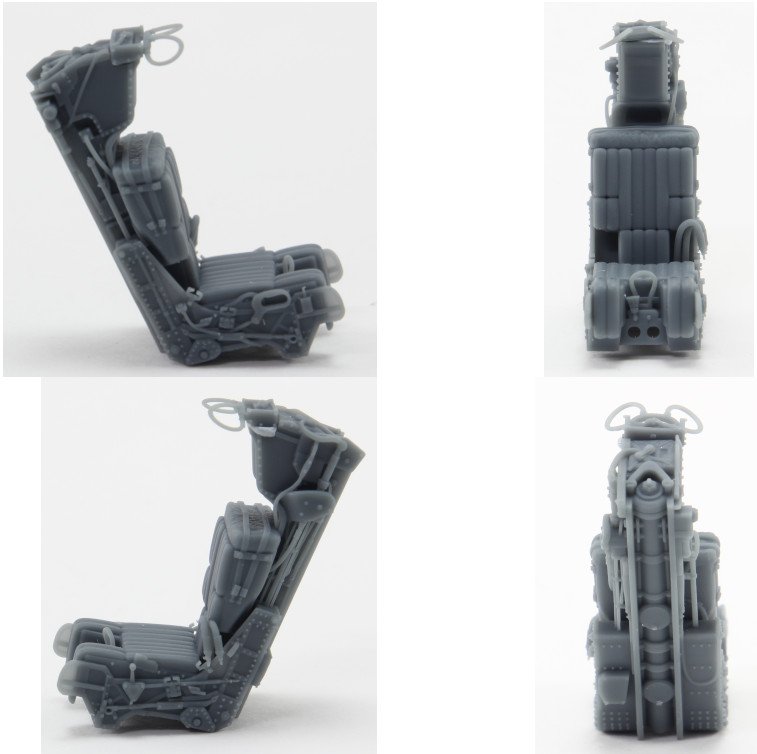
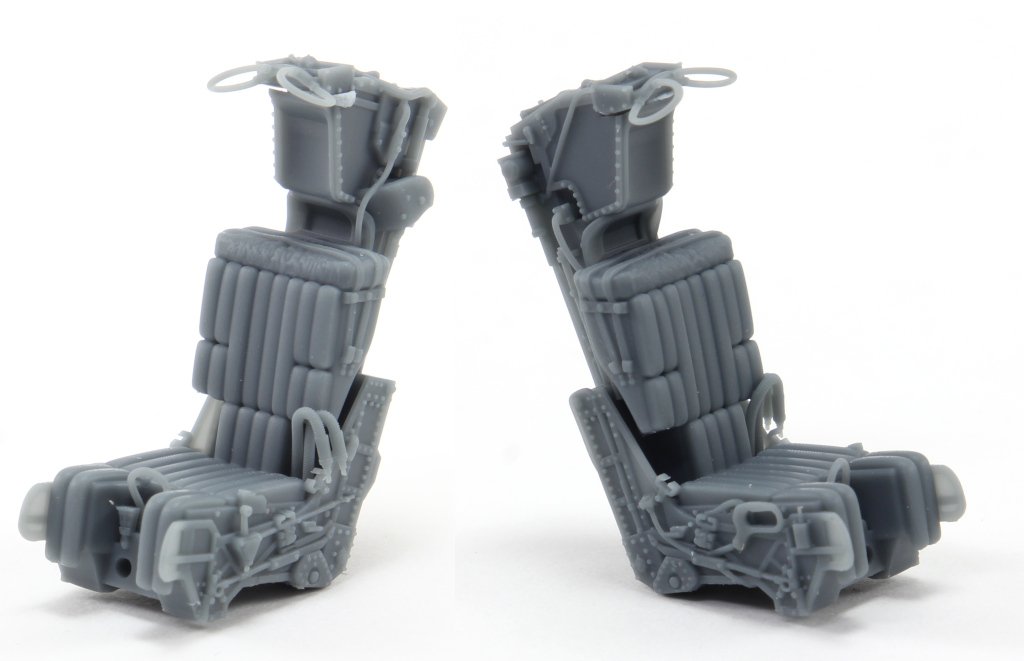
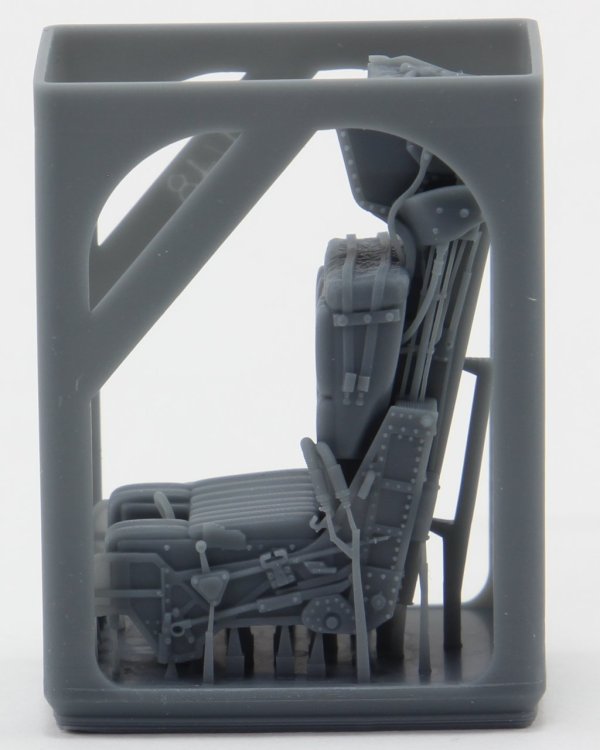
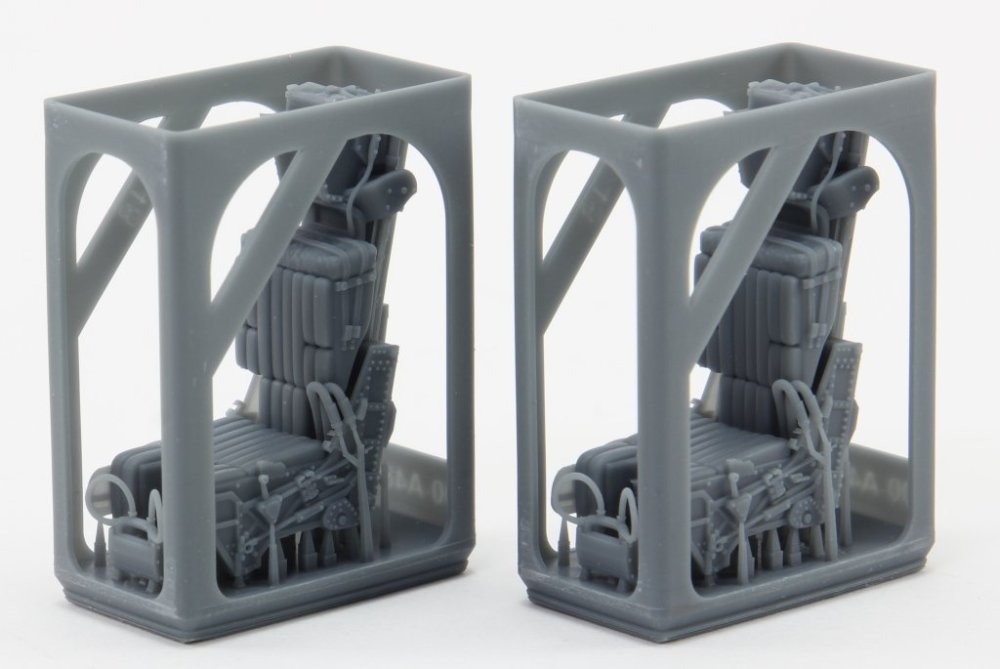
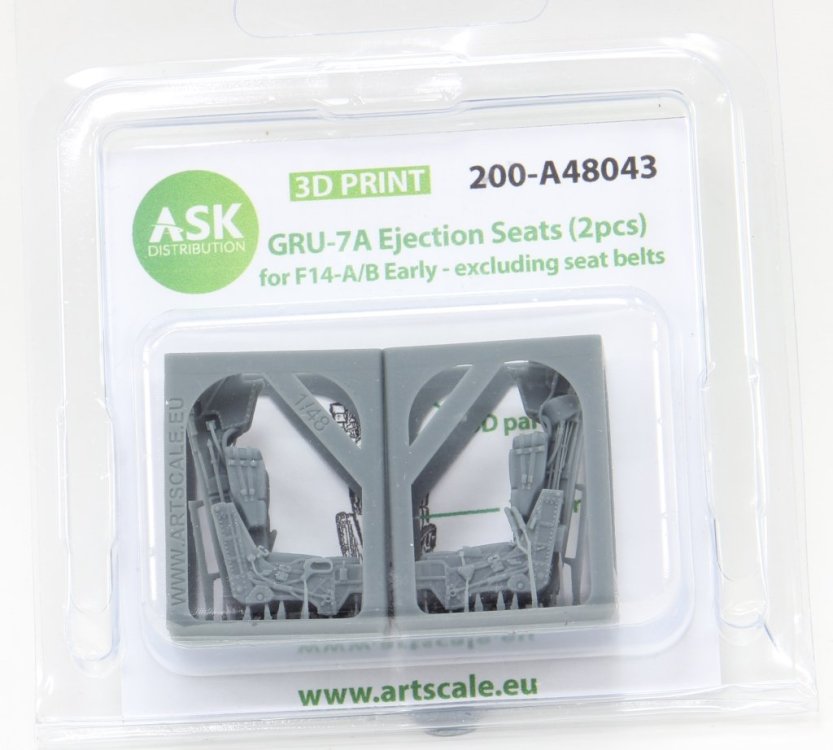
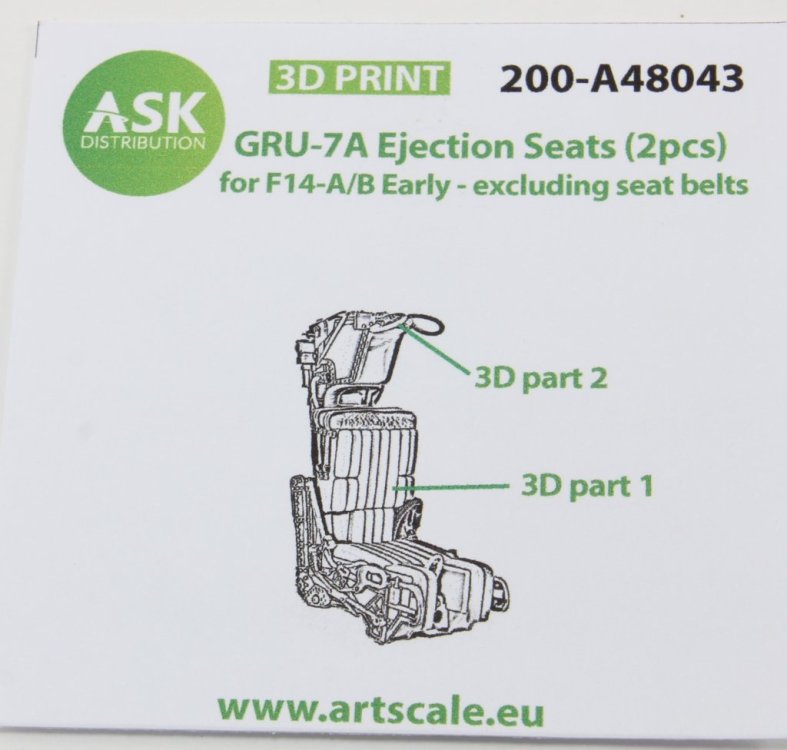
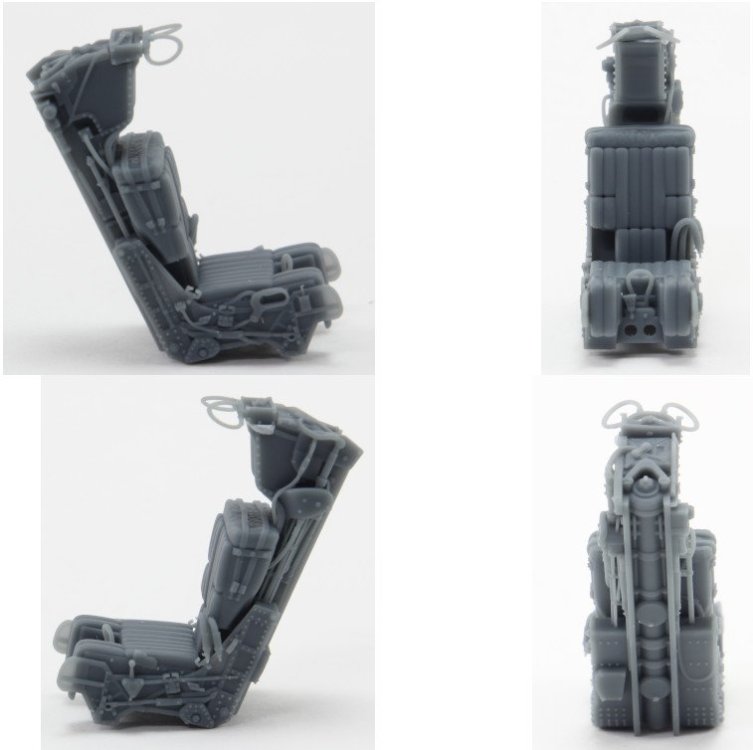
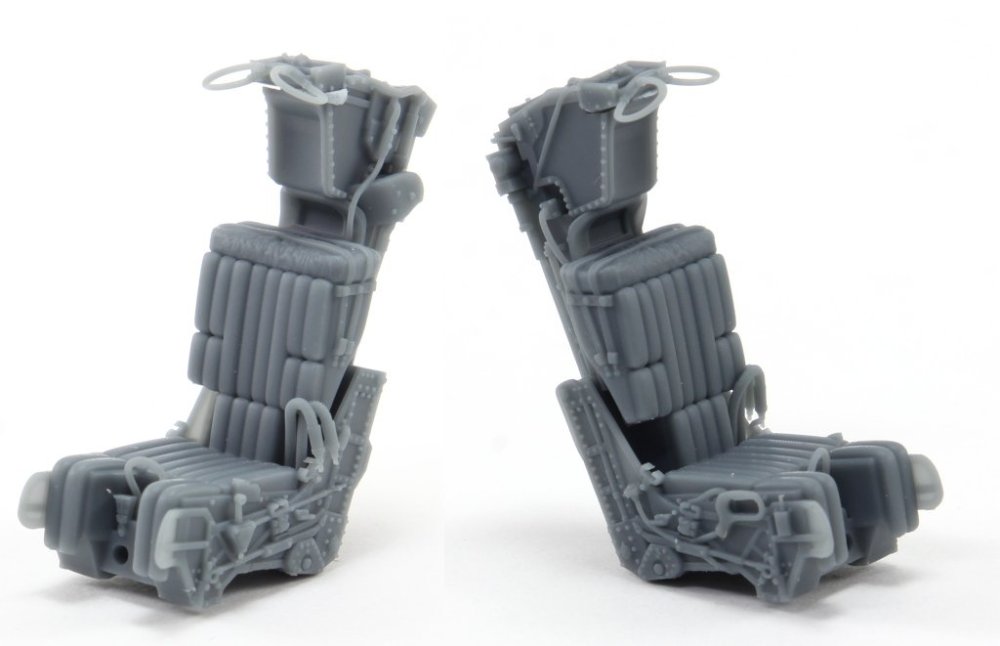
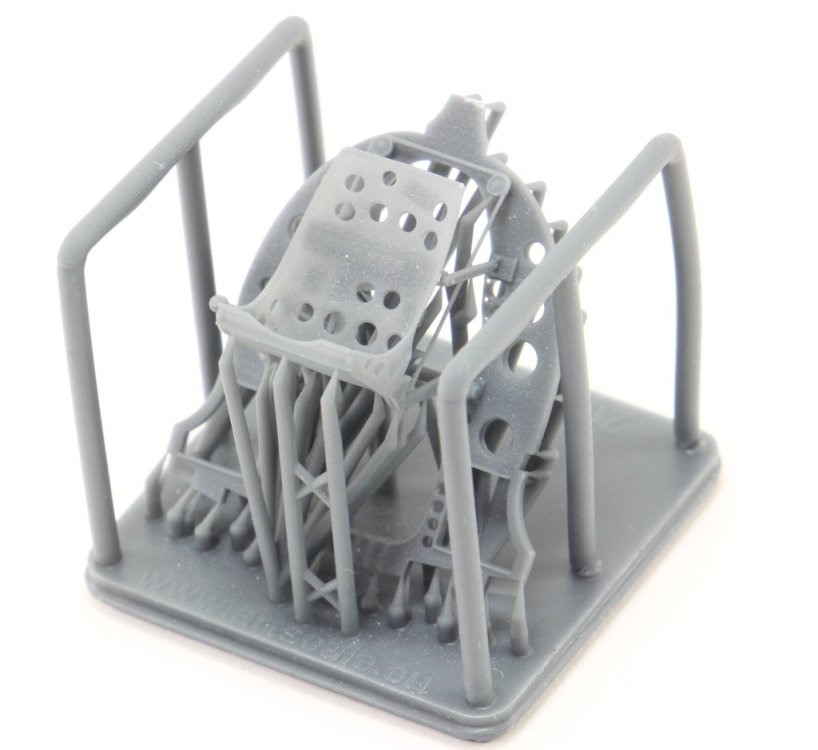
Art at scale 3D print 1/48 GRU-7A Ejection Seats for F14A/B Early - excluding seat belts (2pcs) Code: A200-48043 Price Tag : 16,20€ Available here Introduction In recent days, I’ve been showcasing several products from Art Scale Kit here on the forum. This brand has been steadily expanding its range of aftermarket modelling accessories, and this set is yet another example of how far 3D resin printing technology has advanced. This set includes ejection seats designed for the early variants of the iconic and timeless F-14 Tomcat. The F-14 earned its place in cinema and 1980s pop culture thanks to the film Top Gun, where it took centre stage. (One might even say the actors were just there to support the aircraft’s starring role!) As this aircraft has been produced by numerous model kit brands over the years, it’s no surprise that a wide variety of aftermarket sets have also been released to complement it. This offer benefits from 3D printing technology as it allows for the representation of small details and components that are otherwise difficult to reproduce, with realistic detail and at an affordable price. What’s on the box? Two ejection seats are provided. Each seat is composed of two parts: one representing the complete seat, and the other the overhead ejection handle, located at the top of the seat. The print supports are easily removed, but as already mentioned, take your time. Please note that the remains of print layers are presented in the seat cushions, so some care will be needed to minimize this effect ( grey primer and a gently sanding) A very interesting detail provided are the oxygen hoses for the pilot and for the air circulation system of the seat. (the back and seats cushion are ventilated), on the left side of the chair. 3 Conclusion This set is a balanced choice of quality and price. Despite no seatbelts are provided, but this option exists for the modeller who wants for example, add aftermarket pilots and it will need custom adjusted seats, or just don’t want to add a photoetch set, but in the end it’s a recommended set! Many thanks to ASK for providing the review sample! Ricardo Veríssimo

-
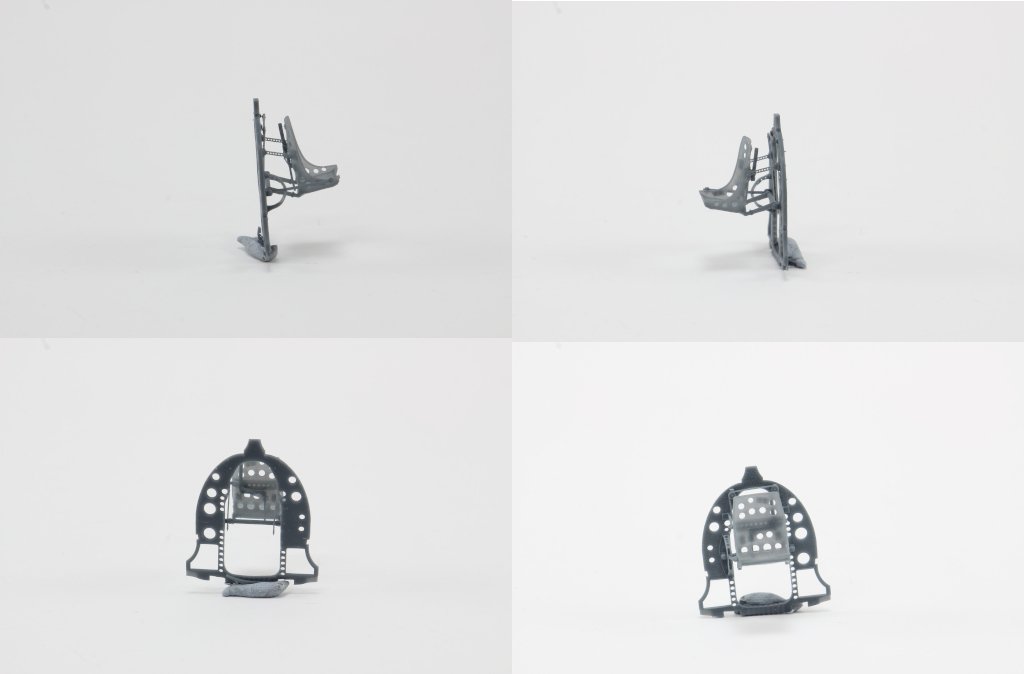
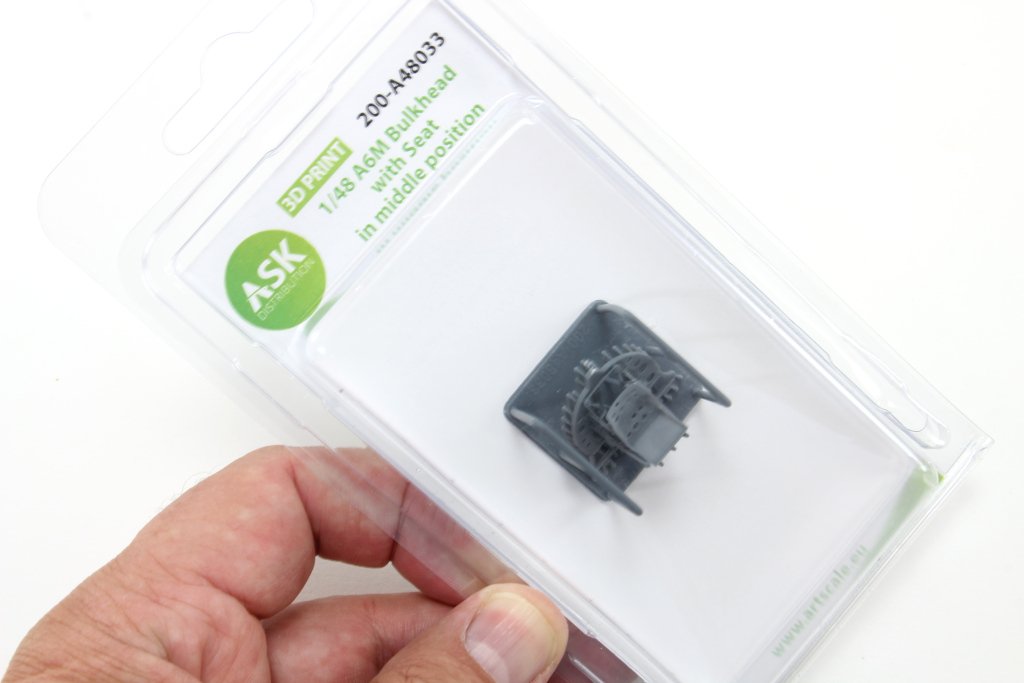
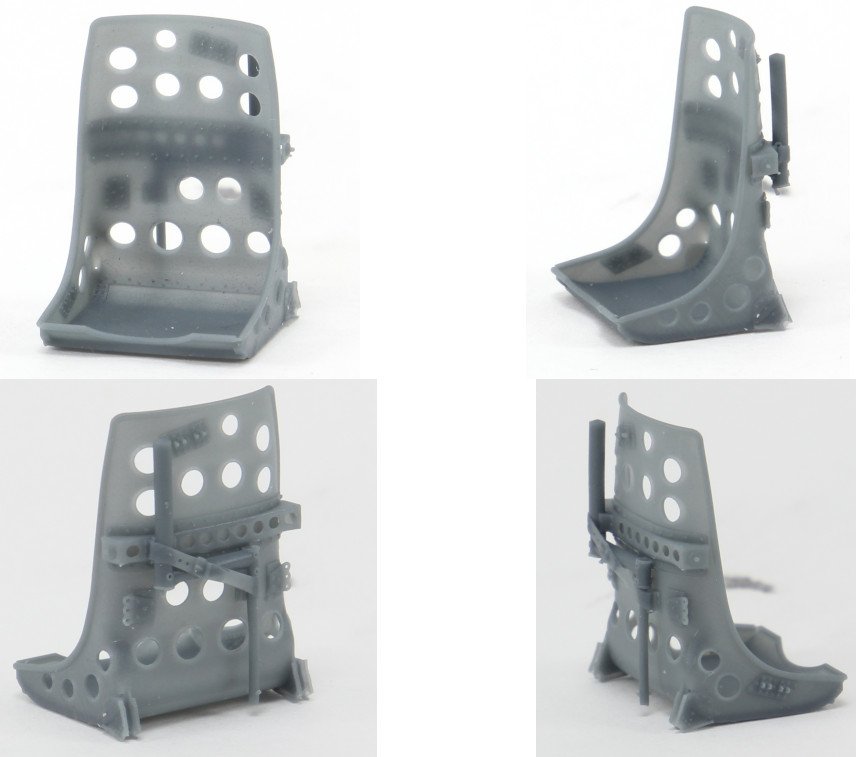
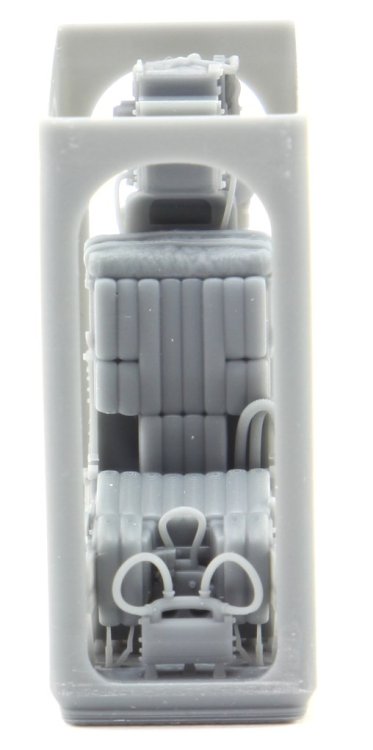
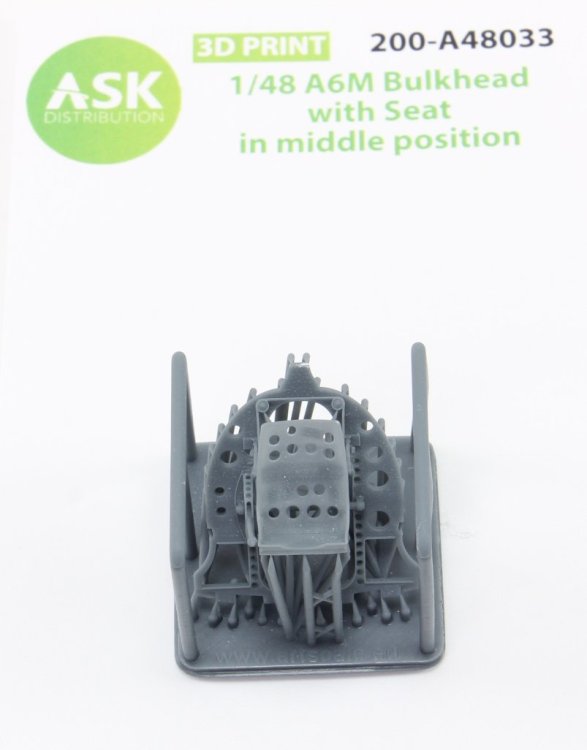
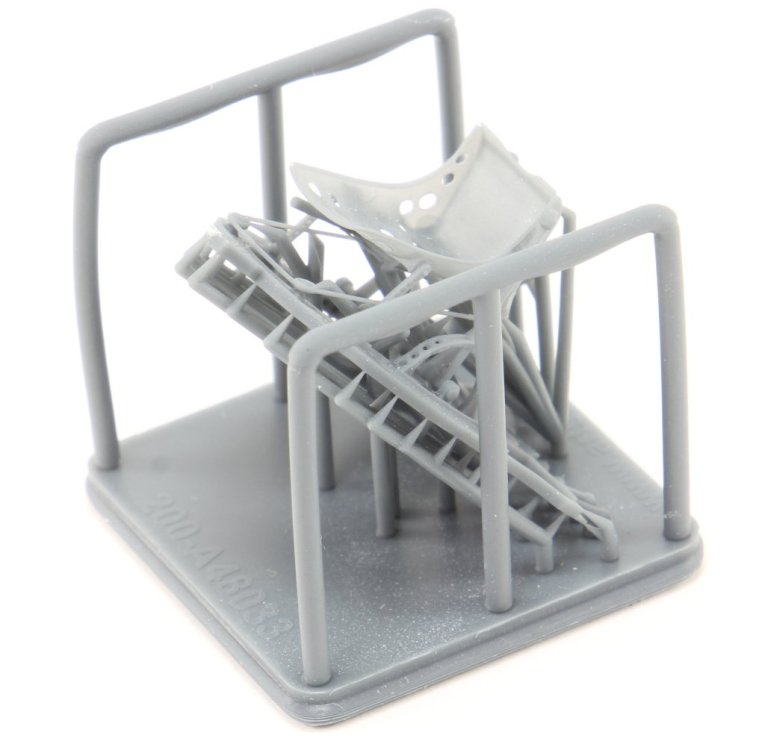
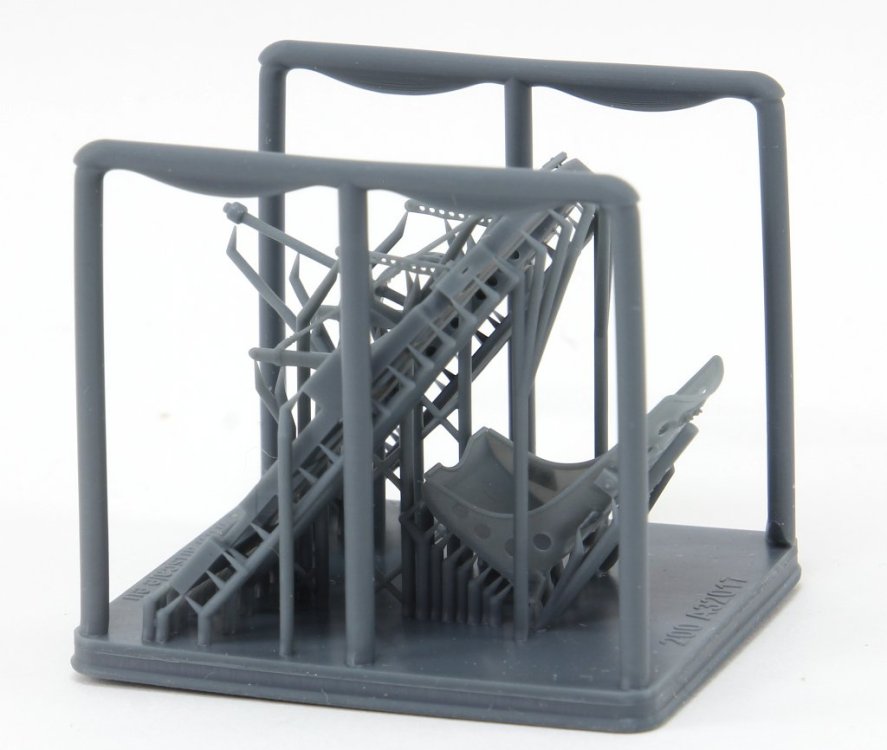
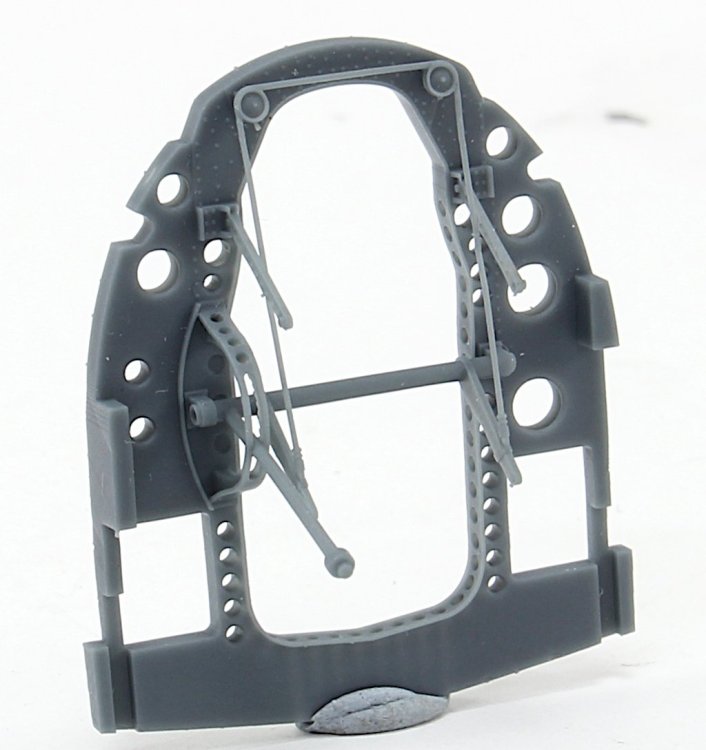
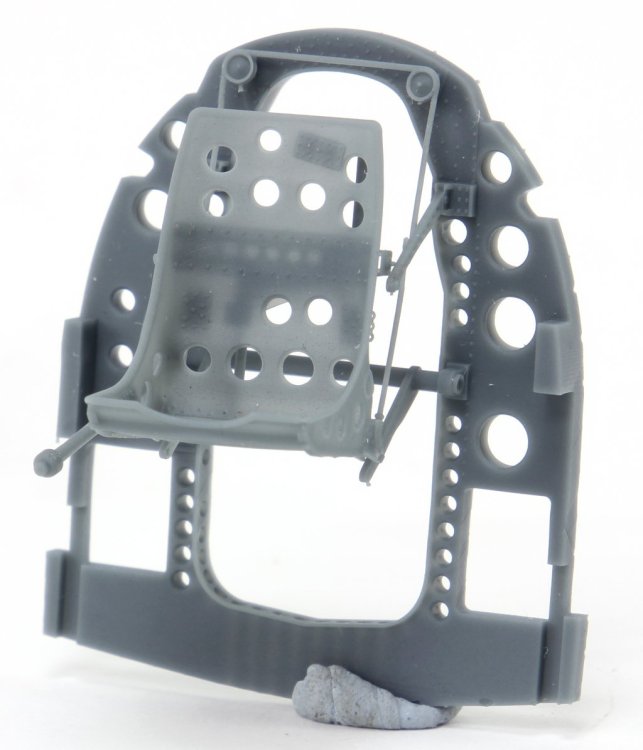
Art at scale 3D print 1:48 A6M Bulkhead with seat in middle position Code: 200-A48033 Price Tag : 11,98€ Available here Introduction In recent days, I’ve been presenting several products from Art Scale Kit here on the forum. This brand has been expanding its range of aftermarket modelling accessories, and this product is a great example of how far 3D resin printing technology has come — allowing for the creation of almost anything we can imagine, with unmatched detail and at a lower cost compared to traditional resin sets. What’s in the (clear) box? A small print cube containing 1 piece bulkhead with seat printed. No seat belts, so you’ll need to use the kit’s originals or choose a aftermarket one. At a glance this is a very little piece with packed detail. Similar to the offering reviewed here, but design to fit Eduard 1:48 A6M Model 11, 21, 22, 32, 52, 52a, 52b, A6M2-N, A6M2-K. Tea and tibetan music The resin cube, a by-product of the 3D printing process, includes support structures used during printing. Removing the parts from the block requires a careful and calm approach. I started by trimming the upper ends of the supports with side cutters, working my way down to the base, and then detached the bulkhead from the block. Some care is needed removing the supports that hold the seat elevation components, due to the finesse and fragility of it. Take your time. Minimal residue remains, and a sharp blade is enough to clean it up. No visible print layers visible. As this is one only piece, a simple pass with a degreaser and the piece is ready to paint. Conclusion This is a simple upgrade to enhance your Eduard Model. The fine detail of the adjusting seat system, knobs, handles and supports, will improve that area of the cockpit. Recommended Many thanks to ASK for providing the review sample! Ricardo Veríssimo


-
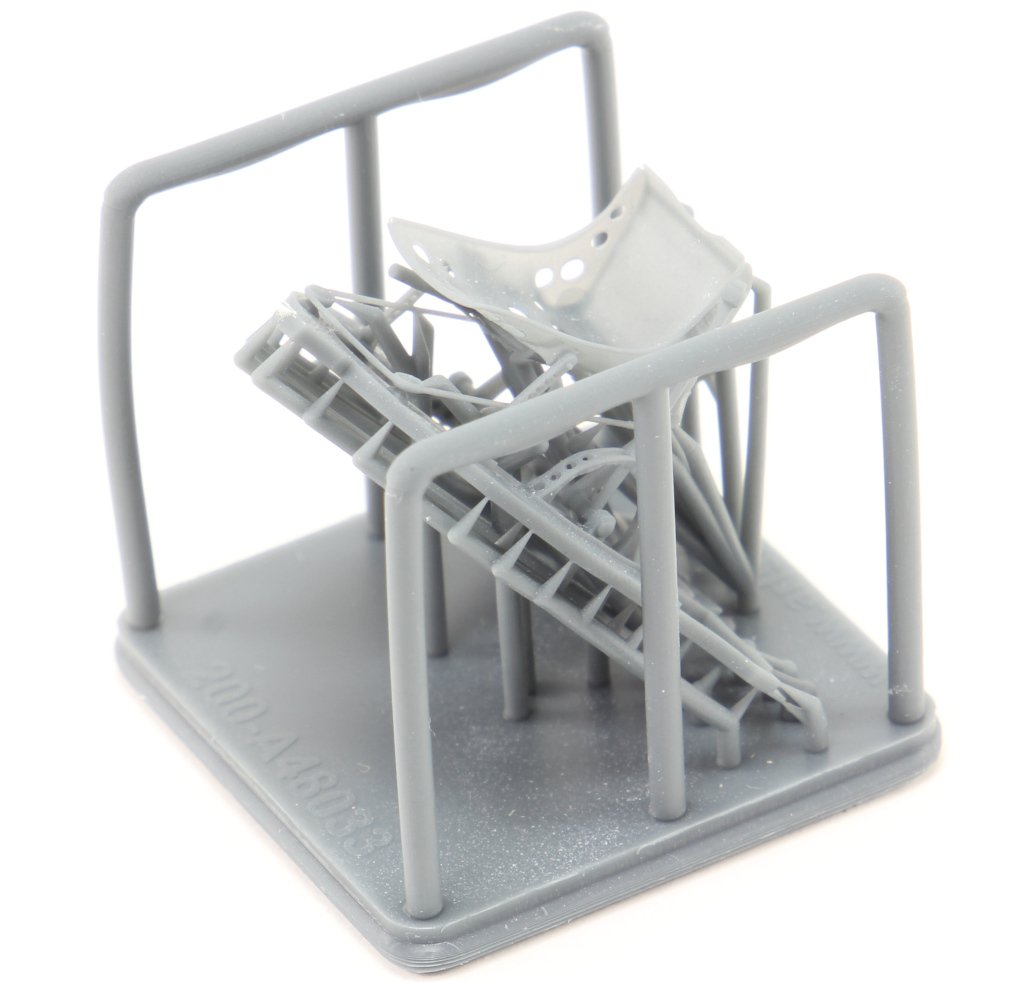
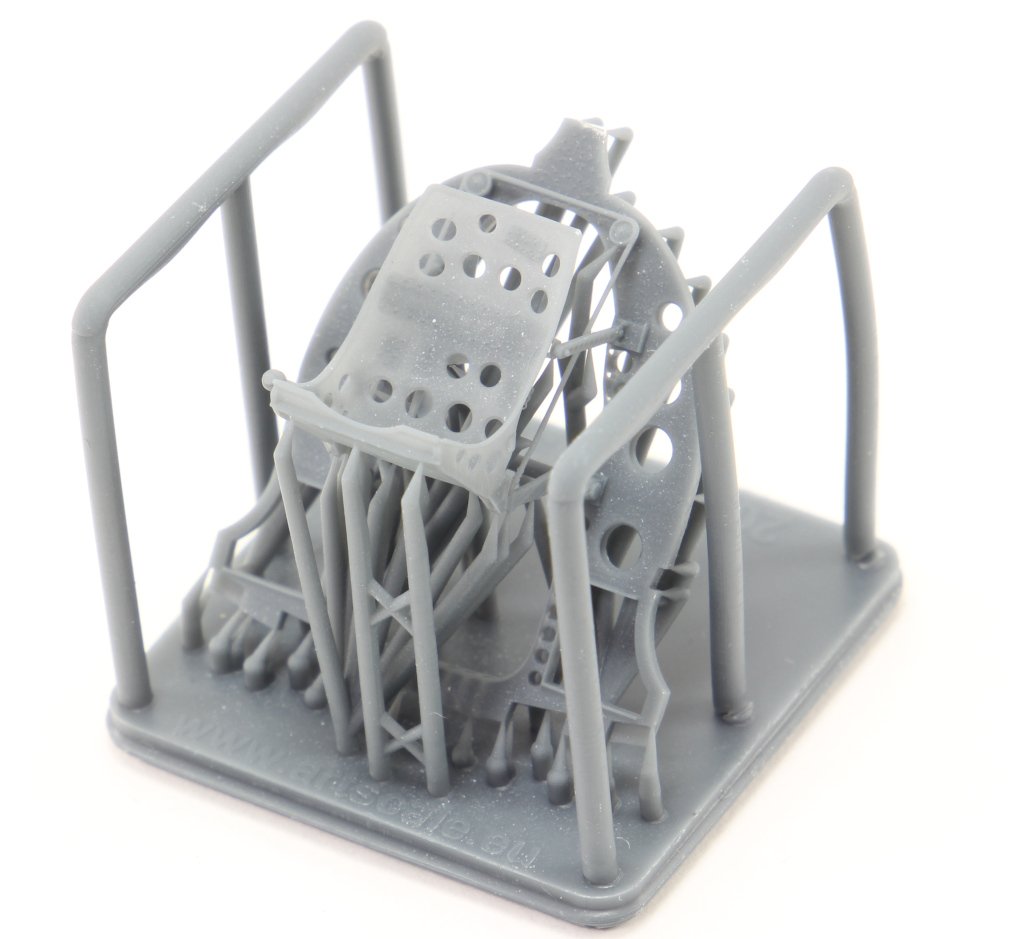
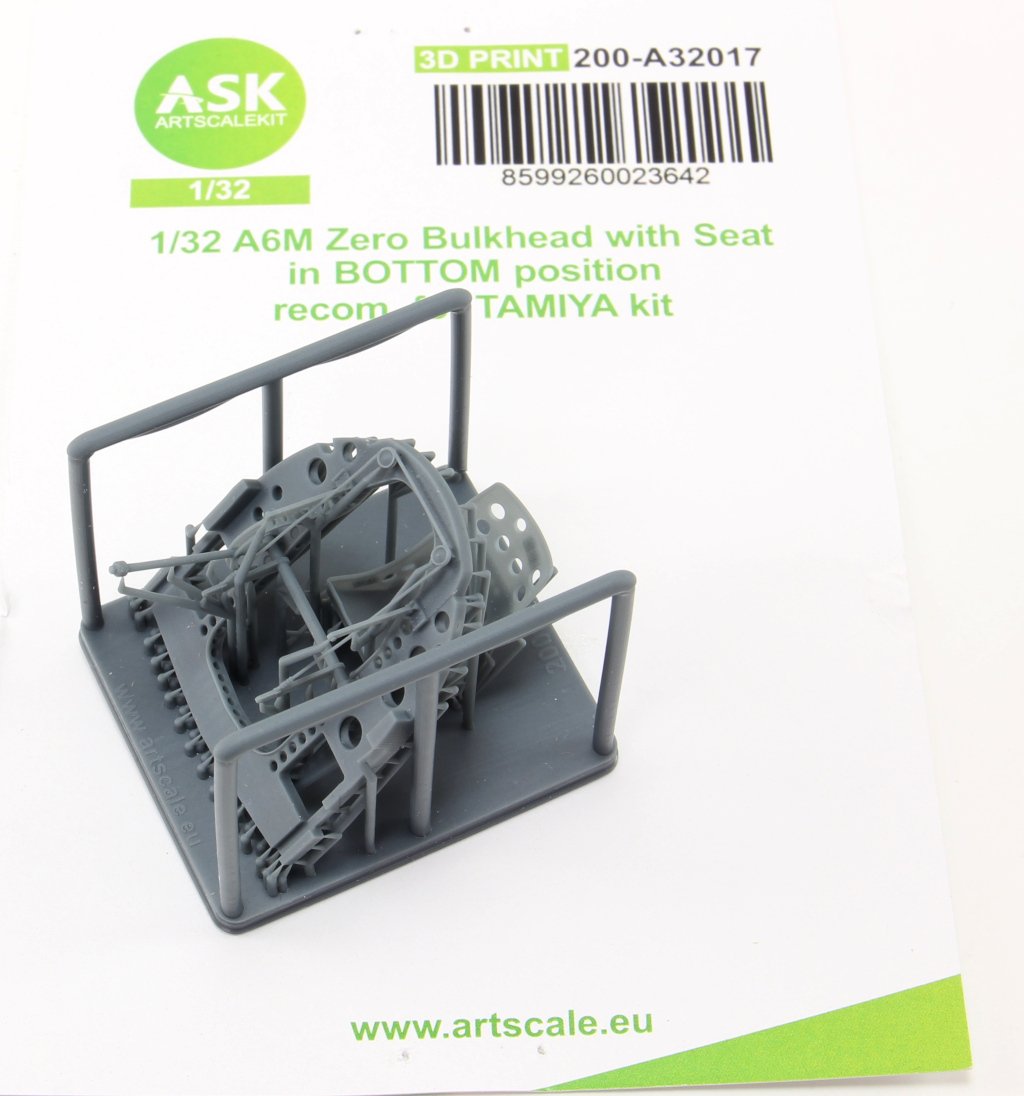
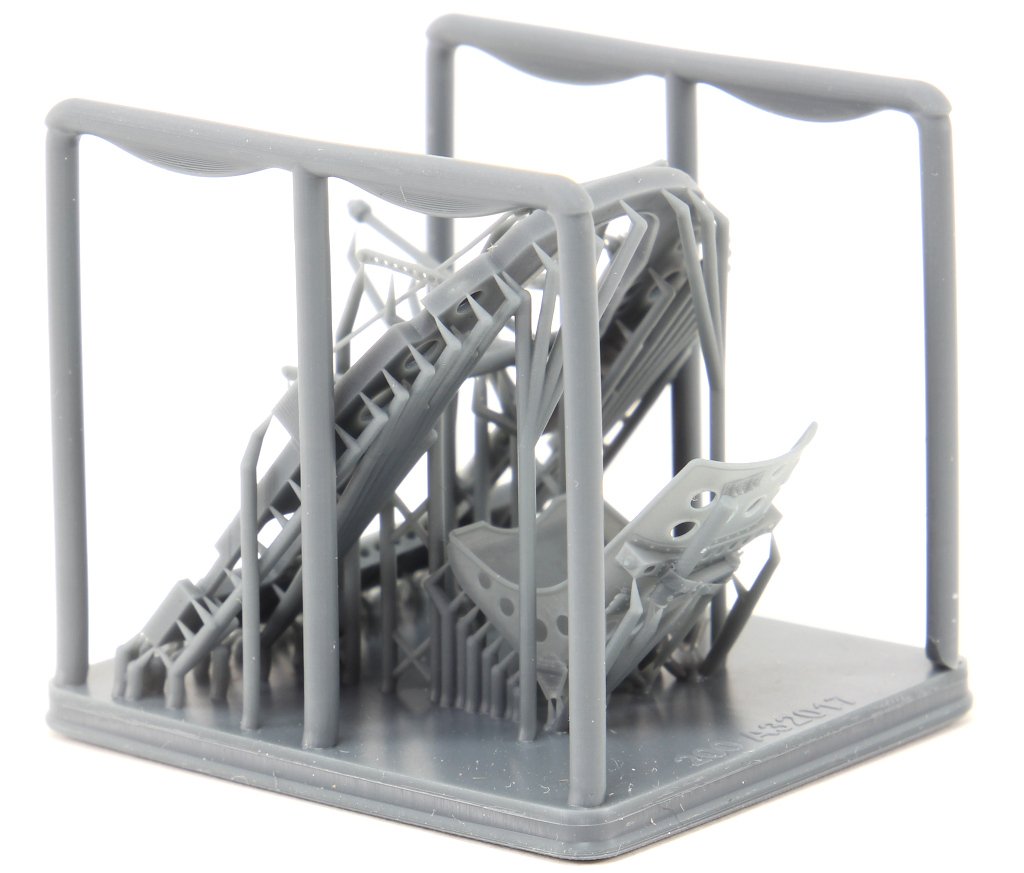
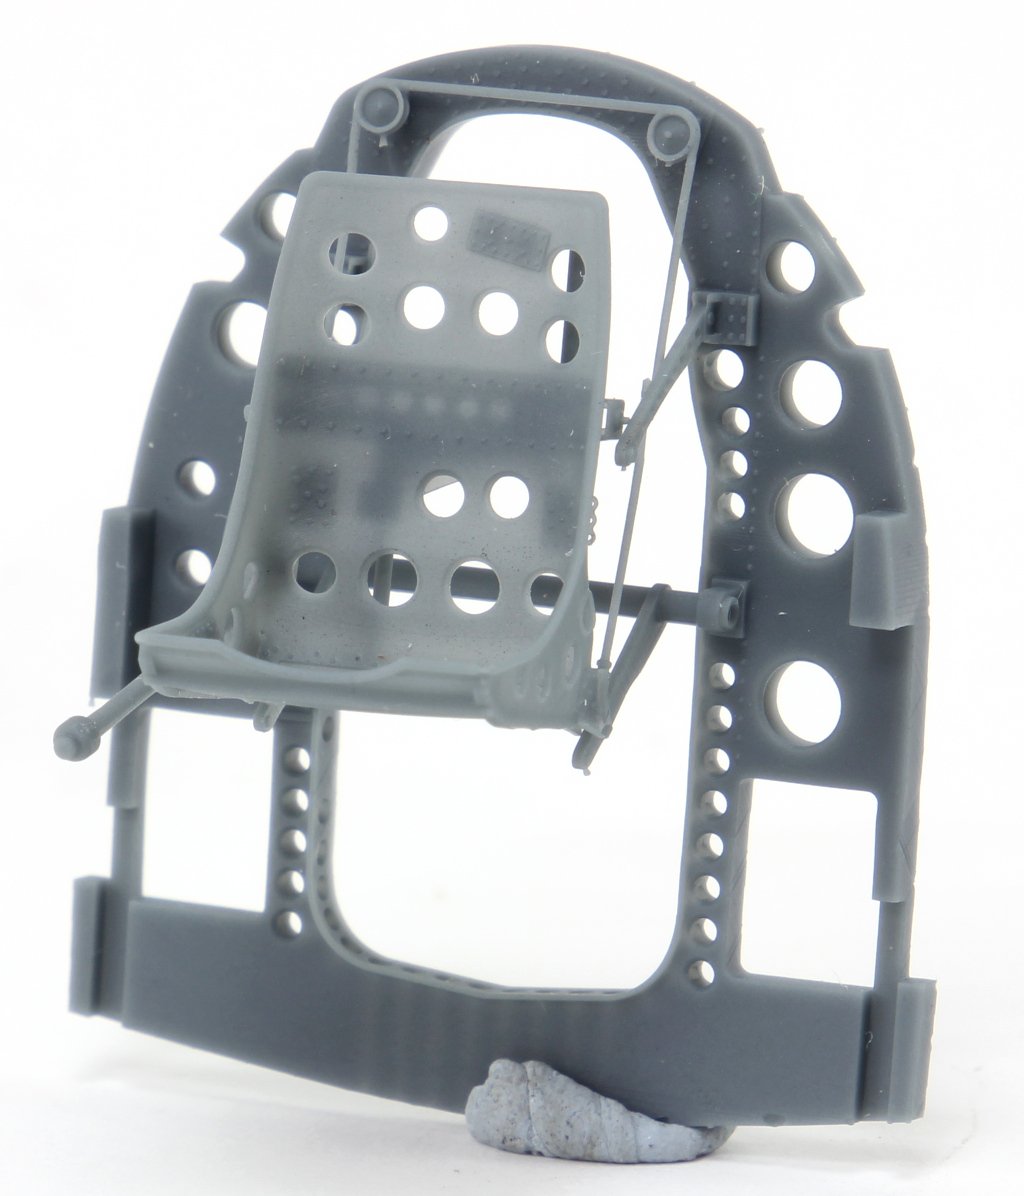
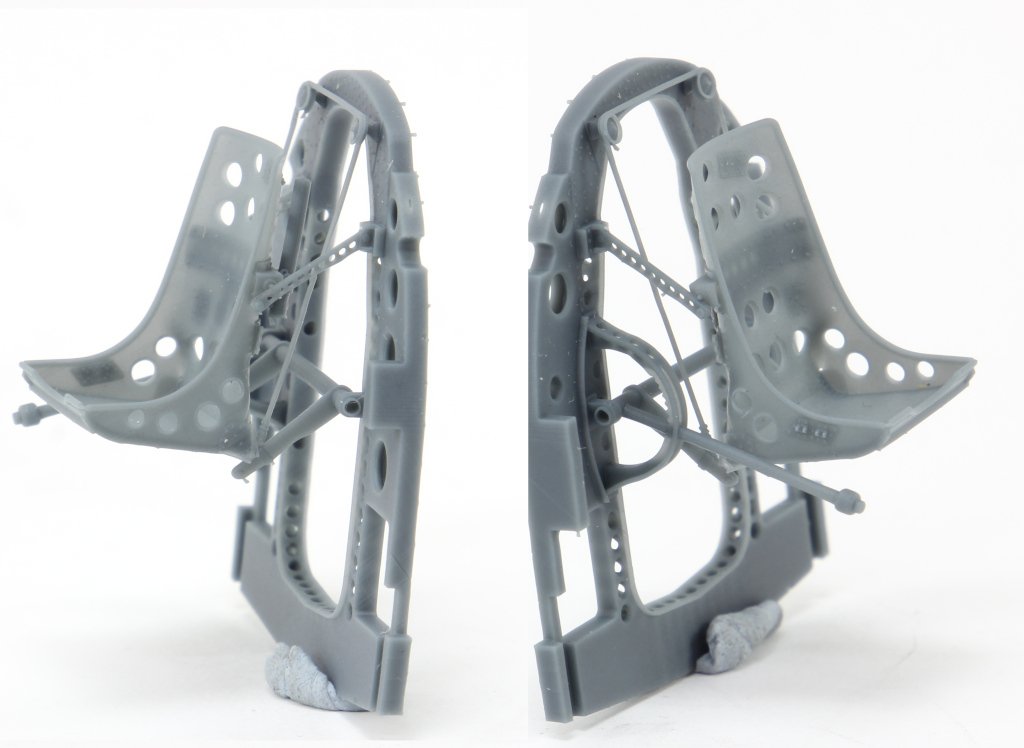
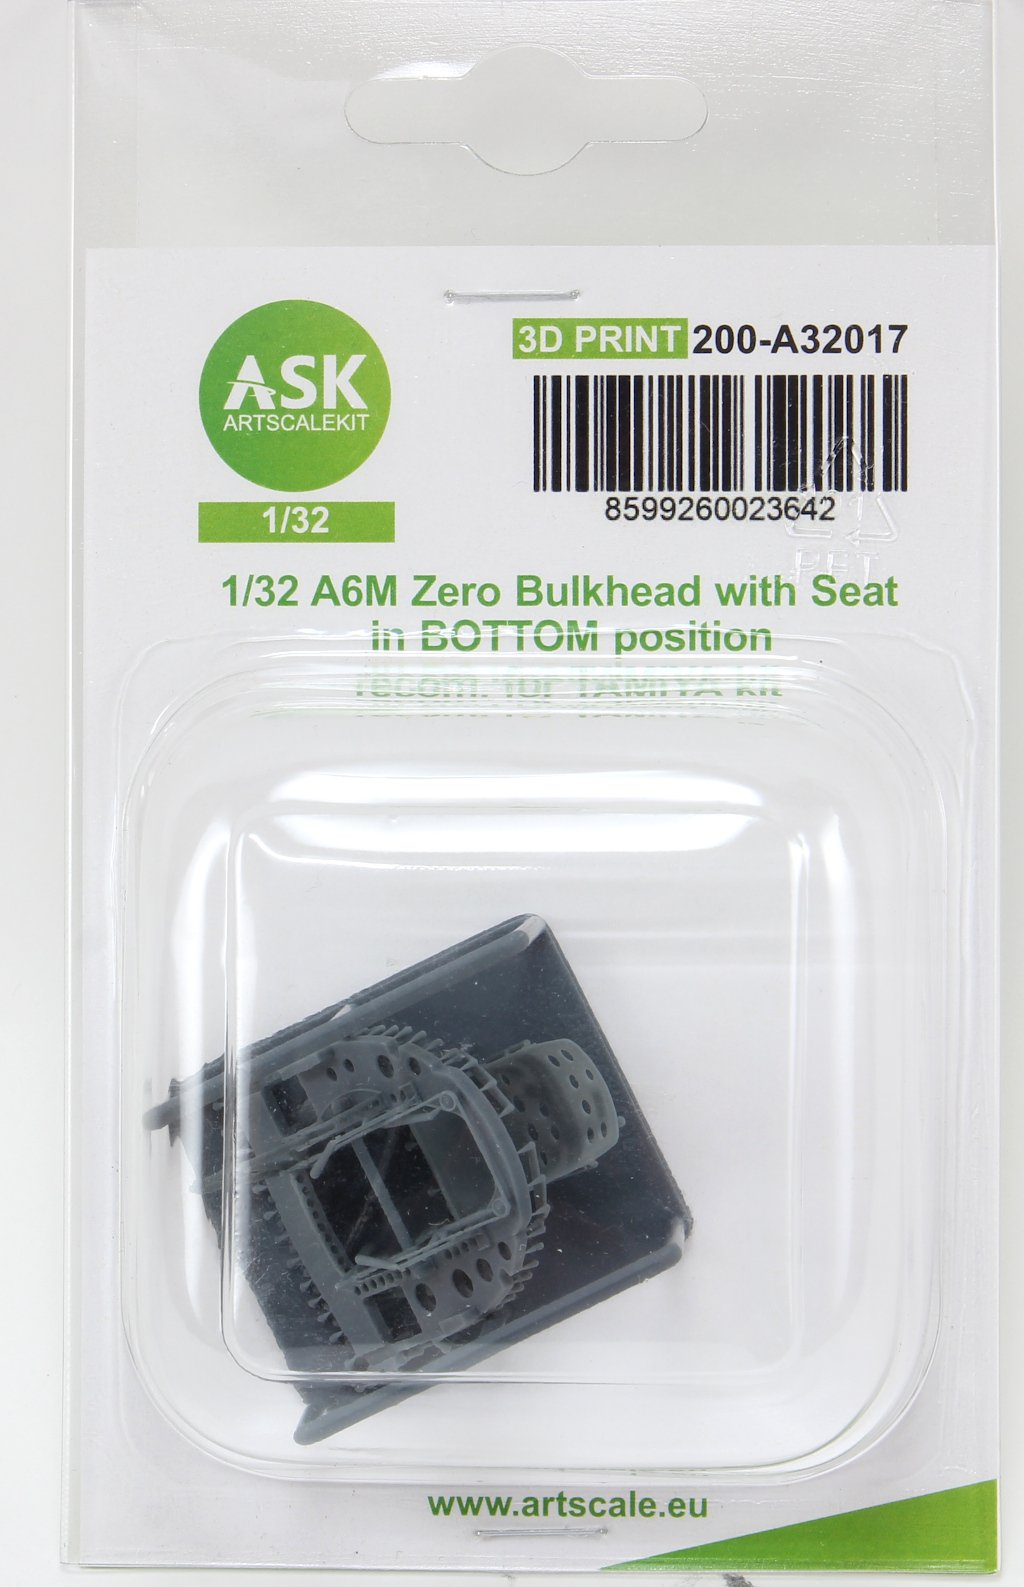
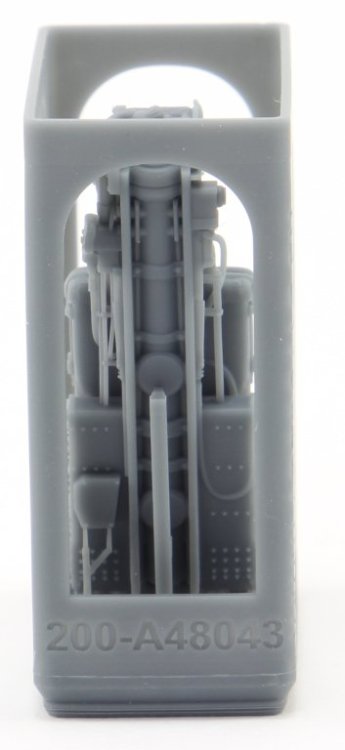
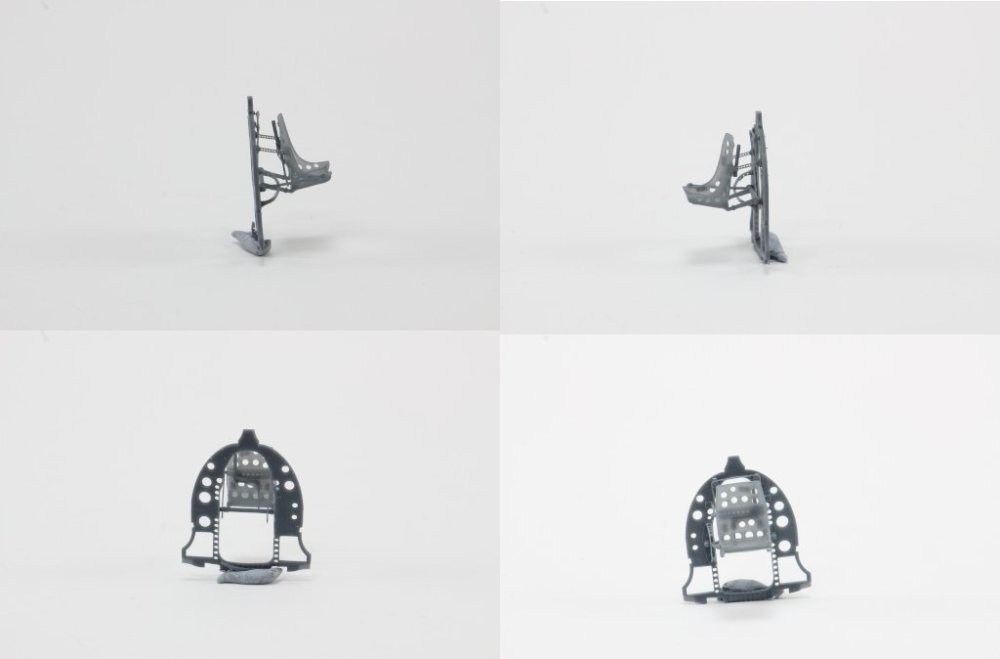
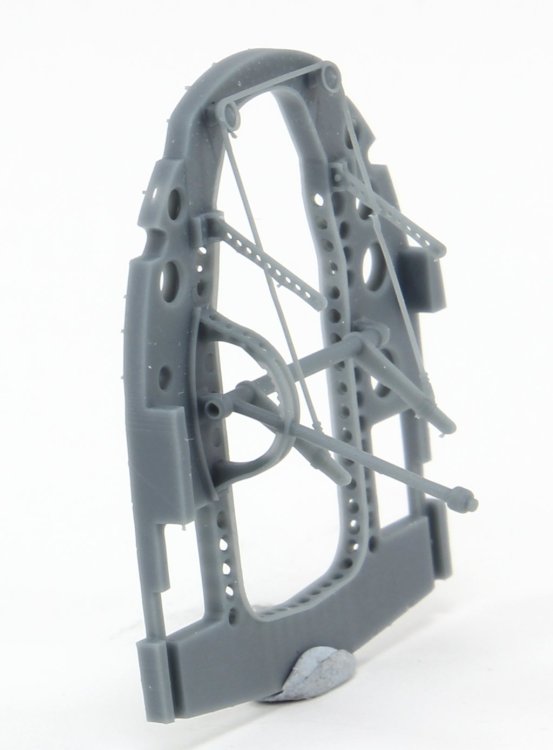
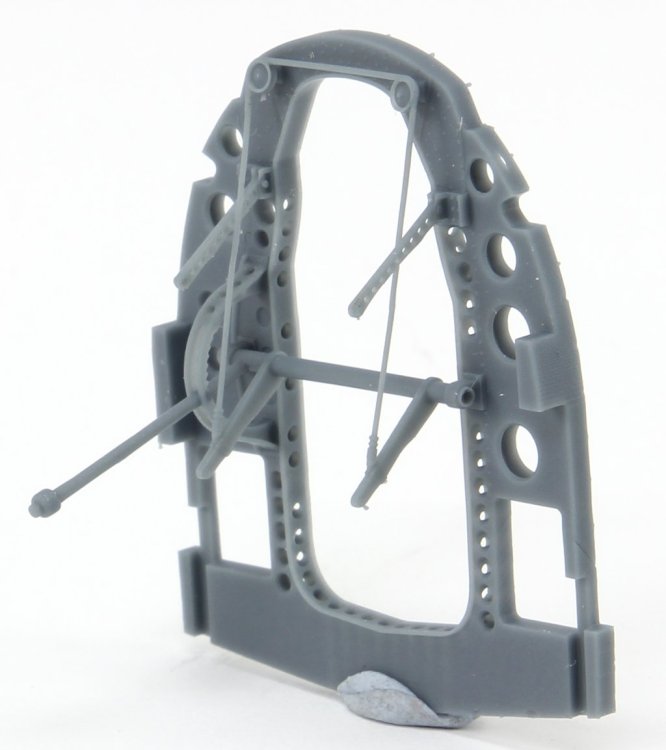
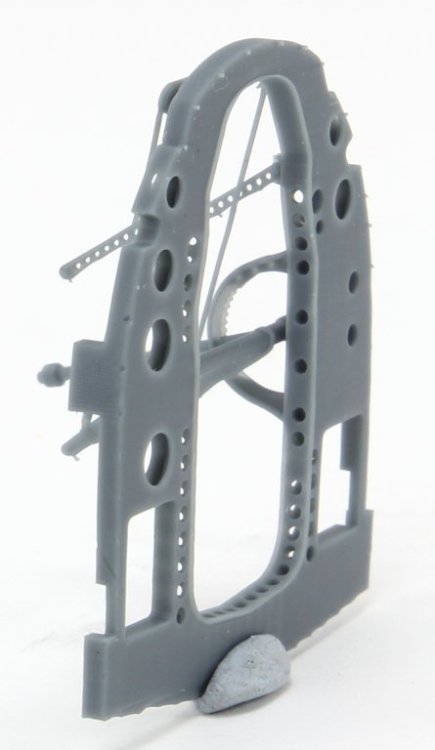
Art at scale 3D print 1:32 A6M Zero Bulkhead with seat in Botton position Code: 200-A32017 Price Tag: 17,24€ Introductions In recent days, I’ve been presenting several products from Art Scale Kit here on the forum. This brand has been expanding its range of aftermarket modelling accessories, and this product is a great example of how far 3D resin printing technology has come — allowing for the creation of almost anything we can imagine, with unmatched detail and at a lower cost compared to traditional resin sets. What’s in the (clear) box? A small cube containing two parts: the bulkhead and the seat. This set is designed to fit the 1:32 A6M Zero by Tamiya. At first glance, the finesse and detail are impressive. The seat frame and height adjustment system — composed of pulleys and cables that raise or lower the seat arms — are all finely printed. The lever that controls this movement is also well detailed, clearly showing how the mechanism works. As any 3D print, is possible to print in one space all parts and the protective parts. The resin cube, a by-product of the 3D printing process, includes support structures used during printing. Removing the parts from the block is quick and easy. I started by trimming the upper ends of the supports with side cutters, working my way down to the base, and then detached the bulkhead and seat from the block. Minimal residue remains, and a sharp blade is enough to clean it up. No visible print layers visible. the seat Dry Fit & Details The model can be dry-fitted, and the seat fits perfectly into the frame. The bulkhead is a refined replica of the original part, with added detail. It includes holes for attaching the oxygen bottles from the original kit and for fitting the cockpit side panels. Seatbelts are not included, so you’ll need to use those from the kit or an aftermarket alternative Conclusion This is a simple upgrade that significantly enhances the original Tamiya kit part. The 3D printing allows for fine detailing, and the price tag is another competitive advantage. As it replaces the original part, integration into the cockpit is straightforward. The seat also replaces the original with obvious improvements in fine detail and structure. Recommended! Many thanks to ASK for providing the review sample. Ricardo Veríssimo


-
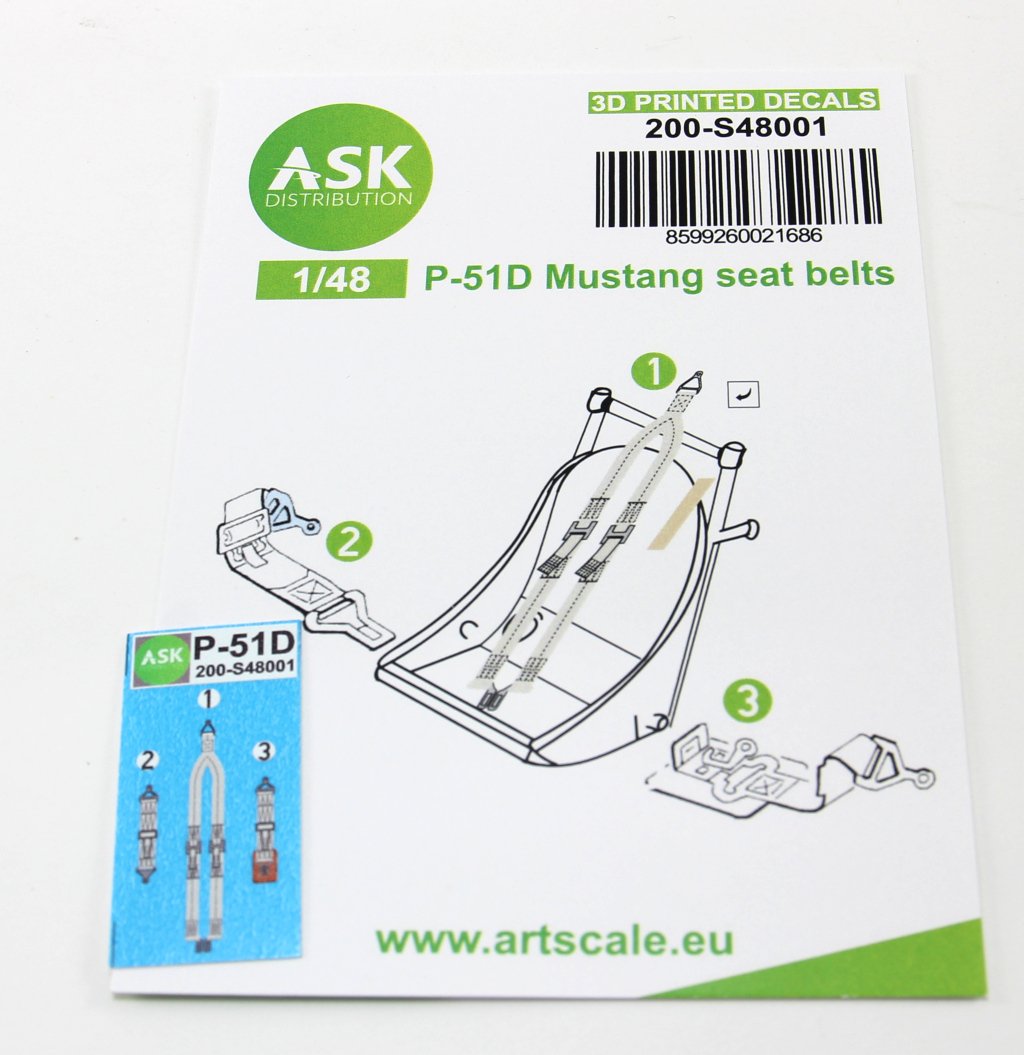
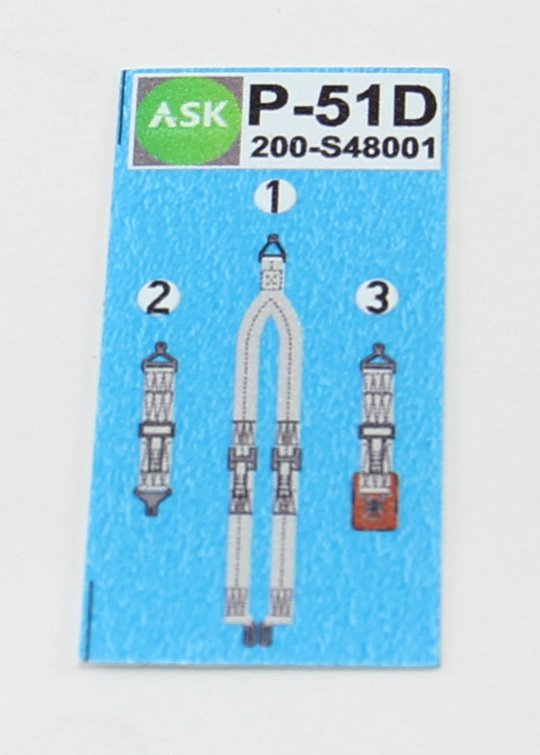
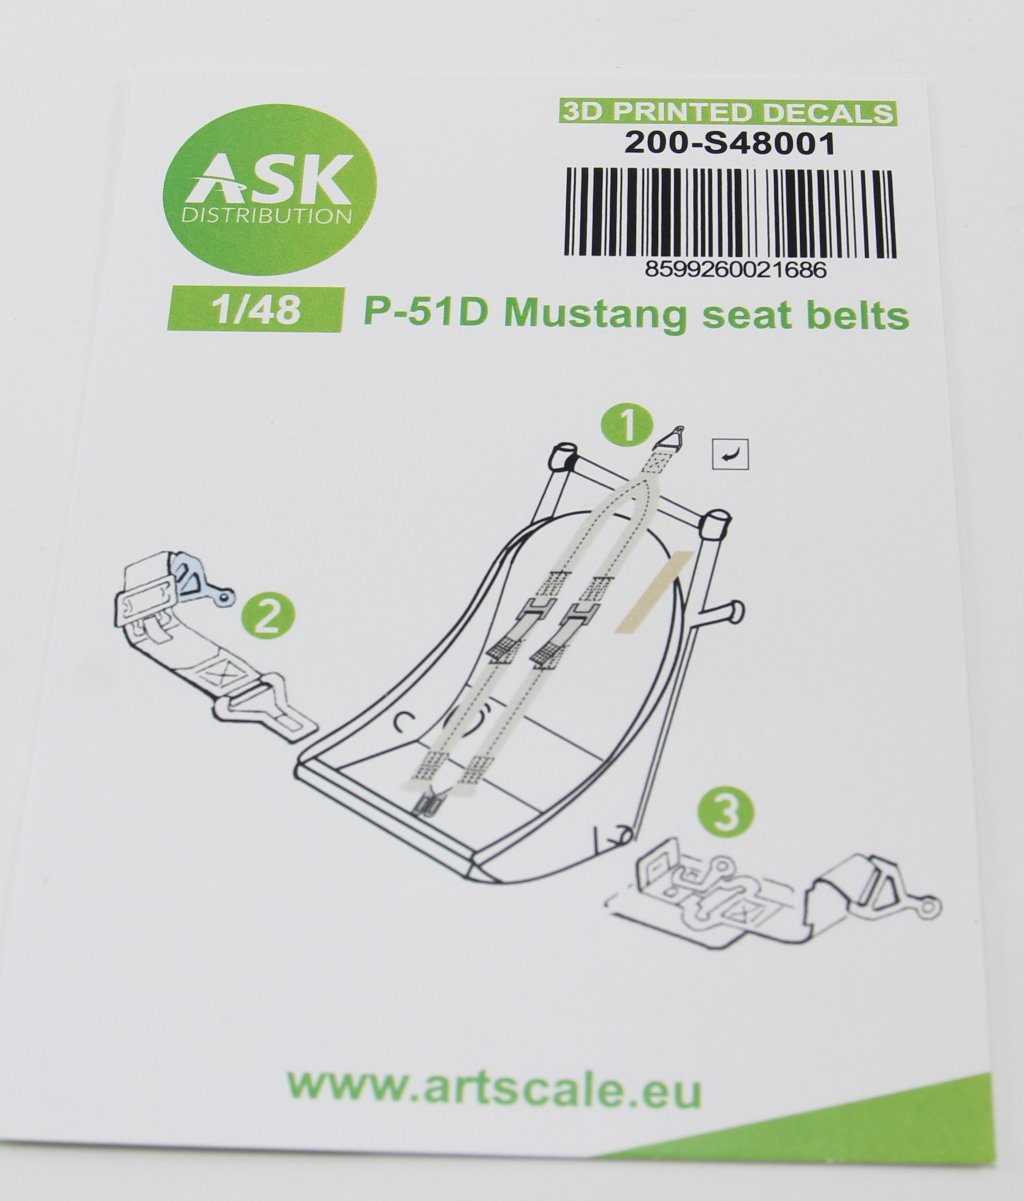
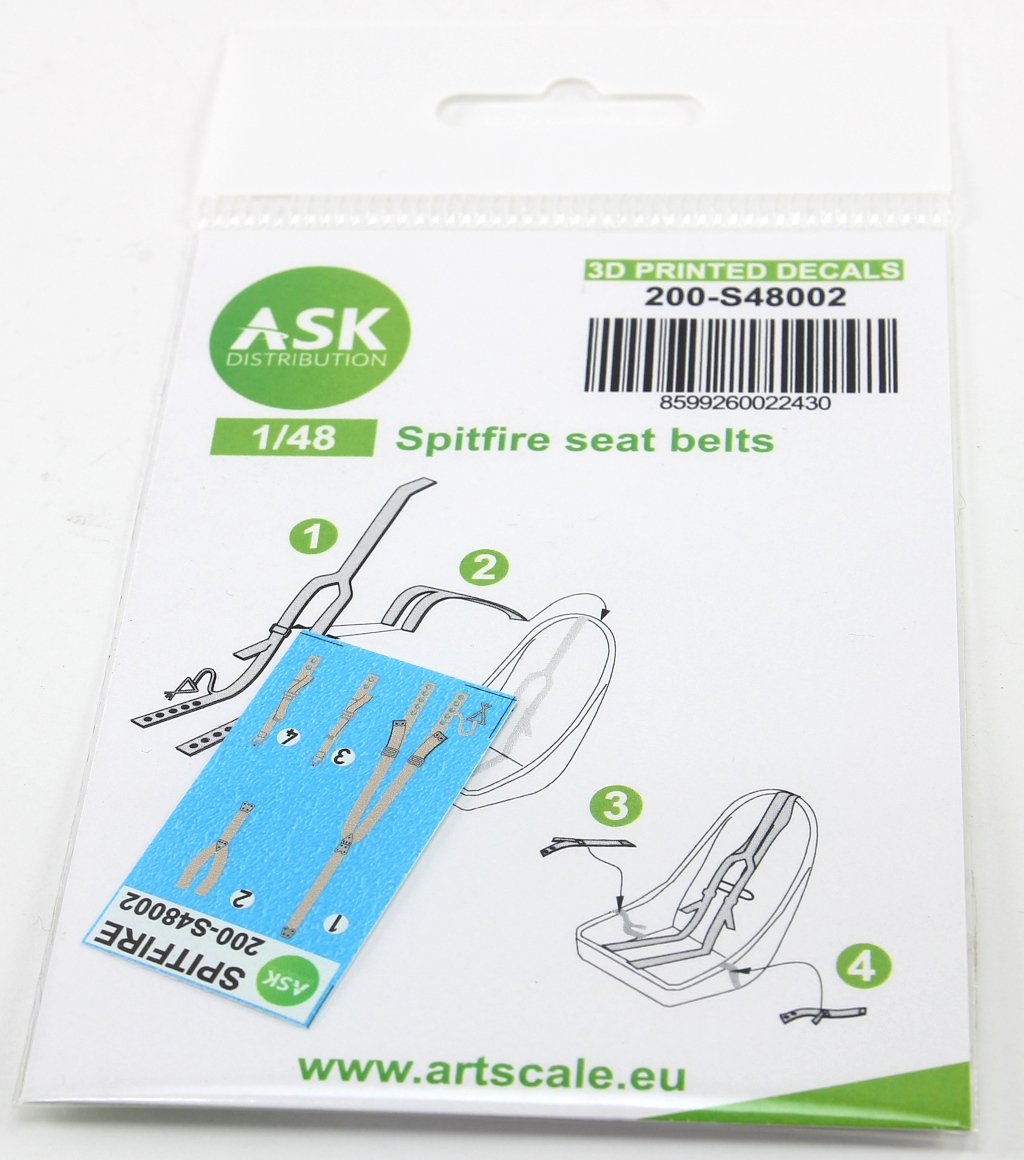
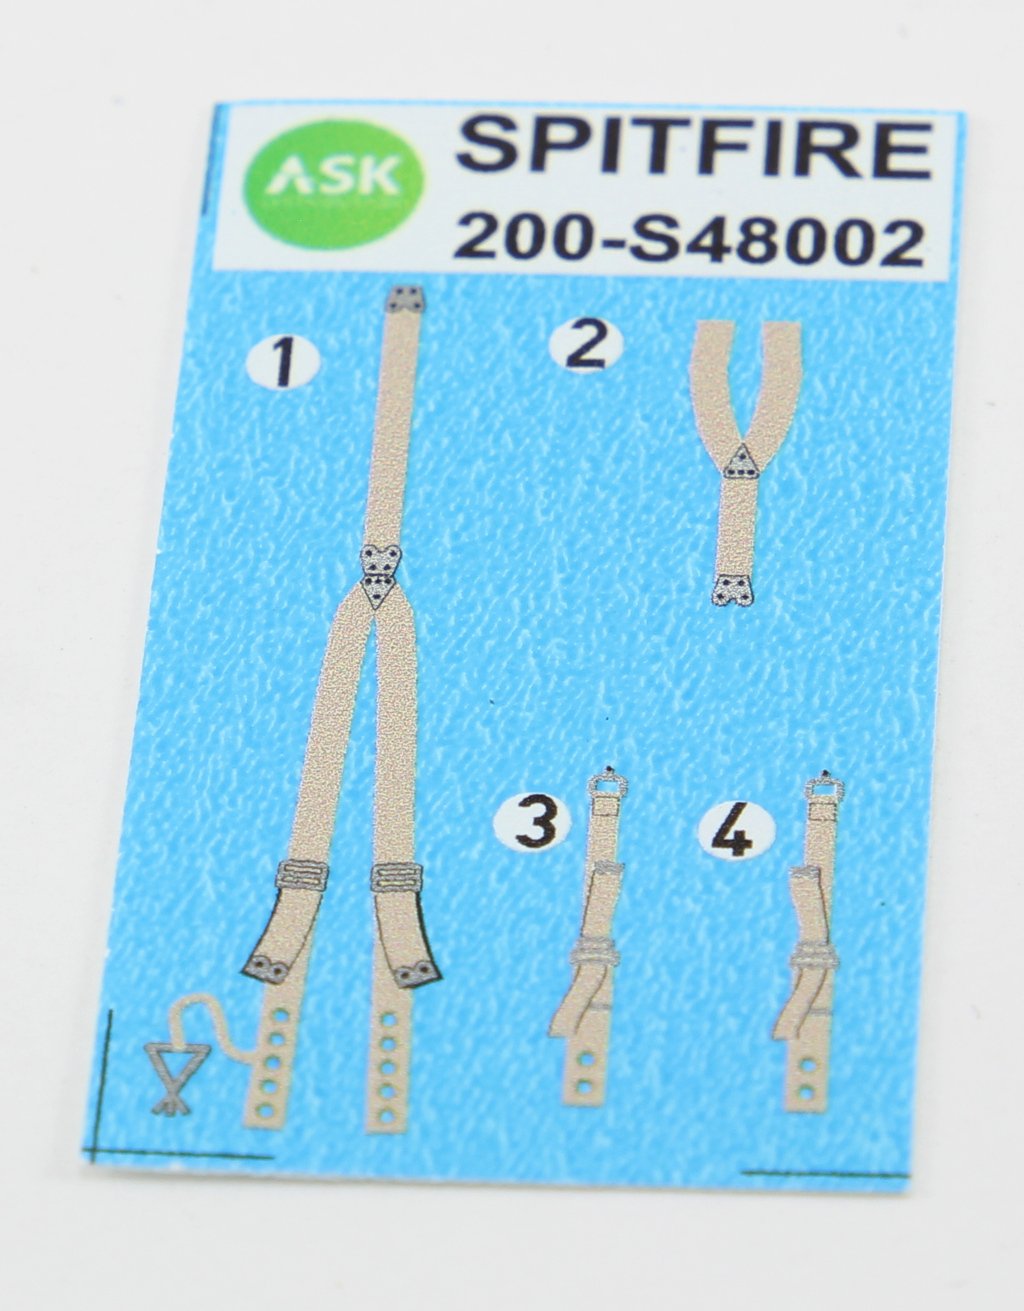
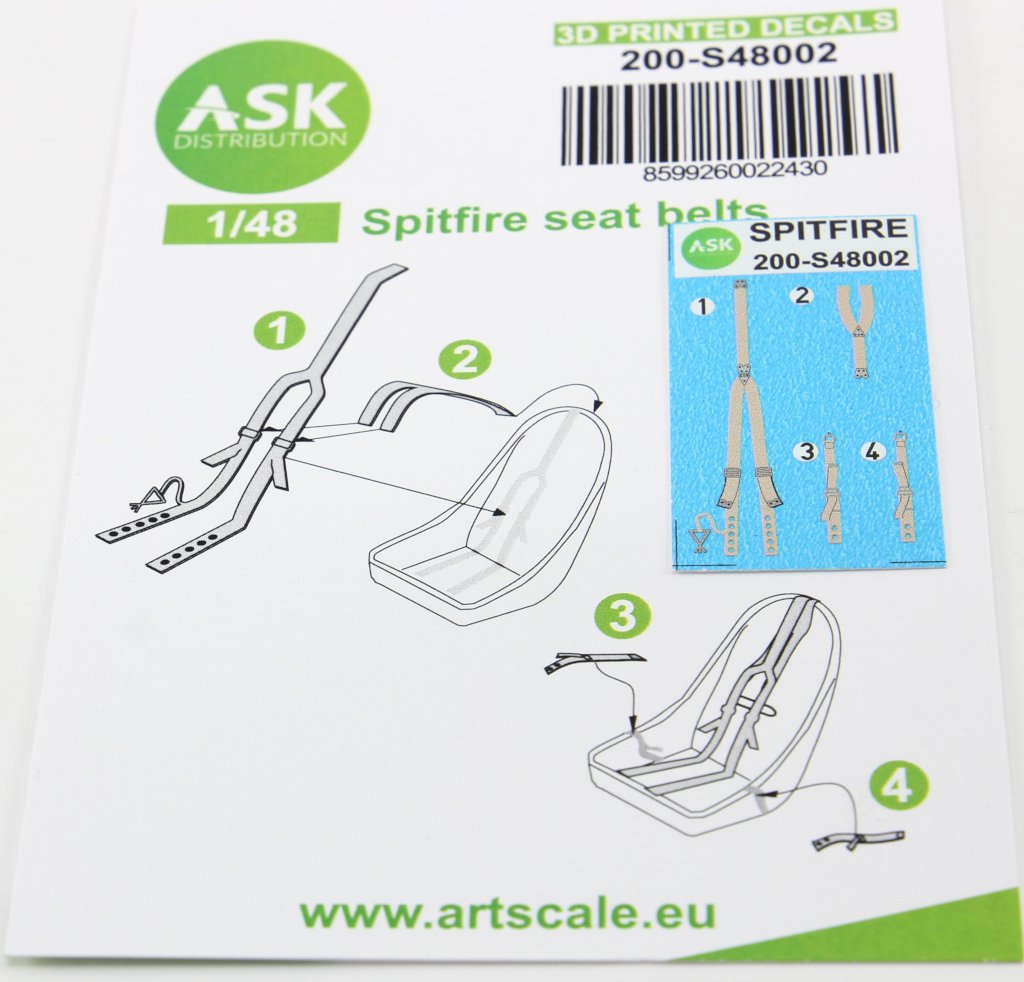
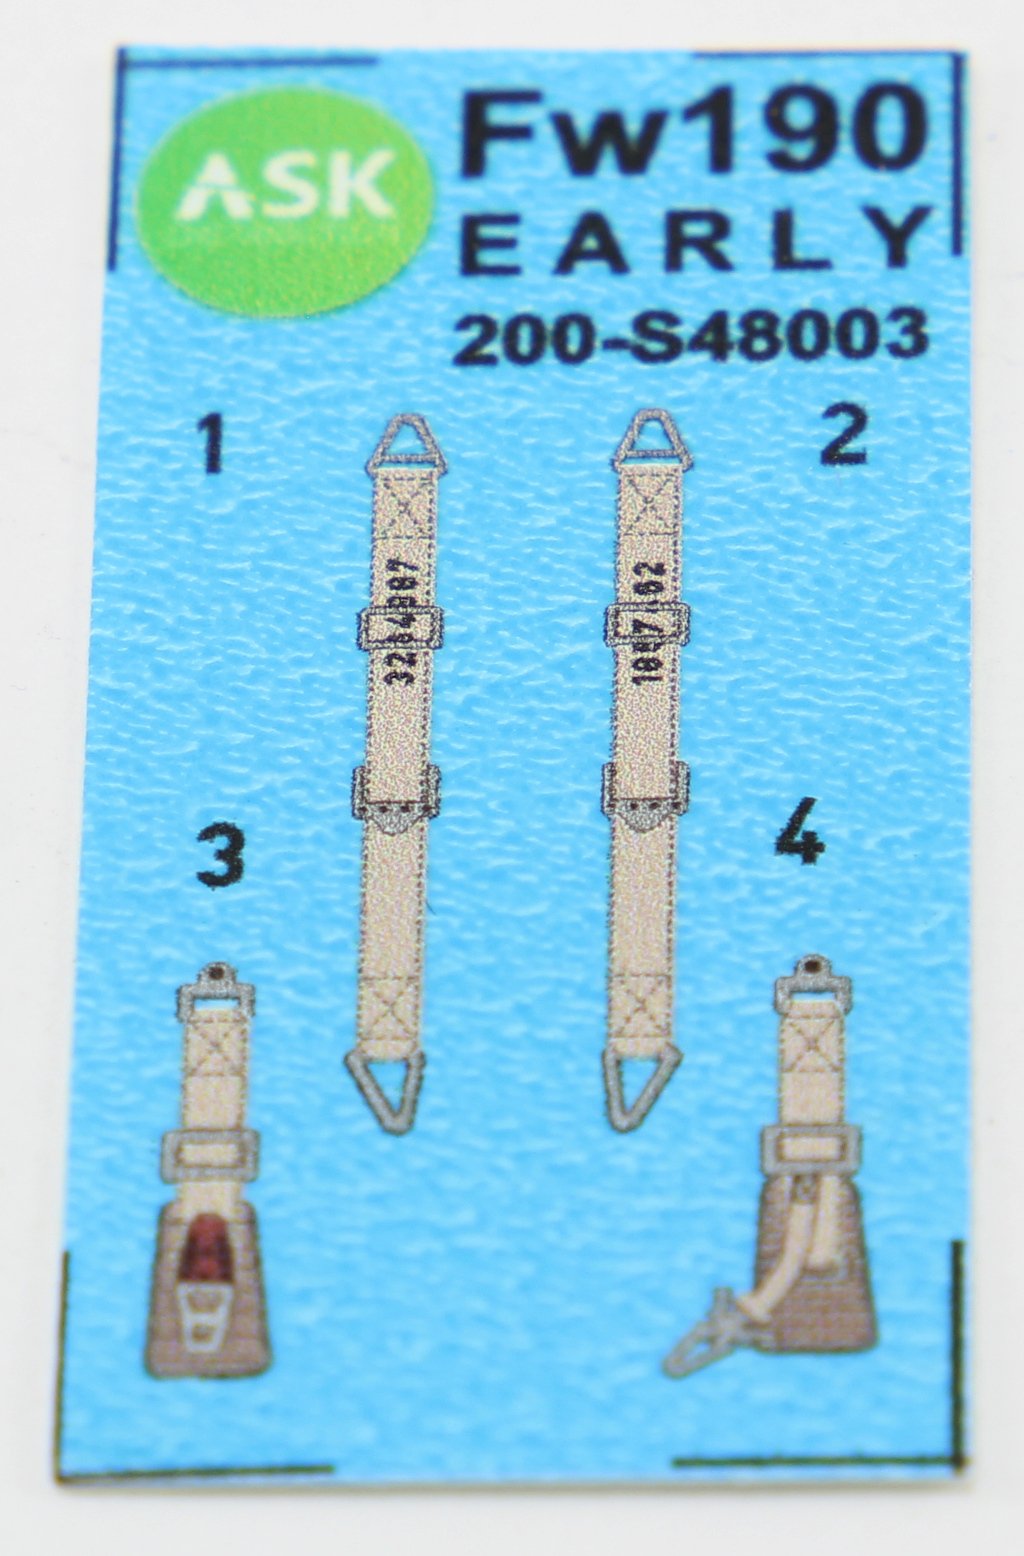
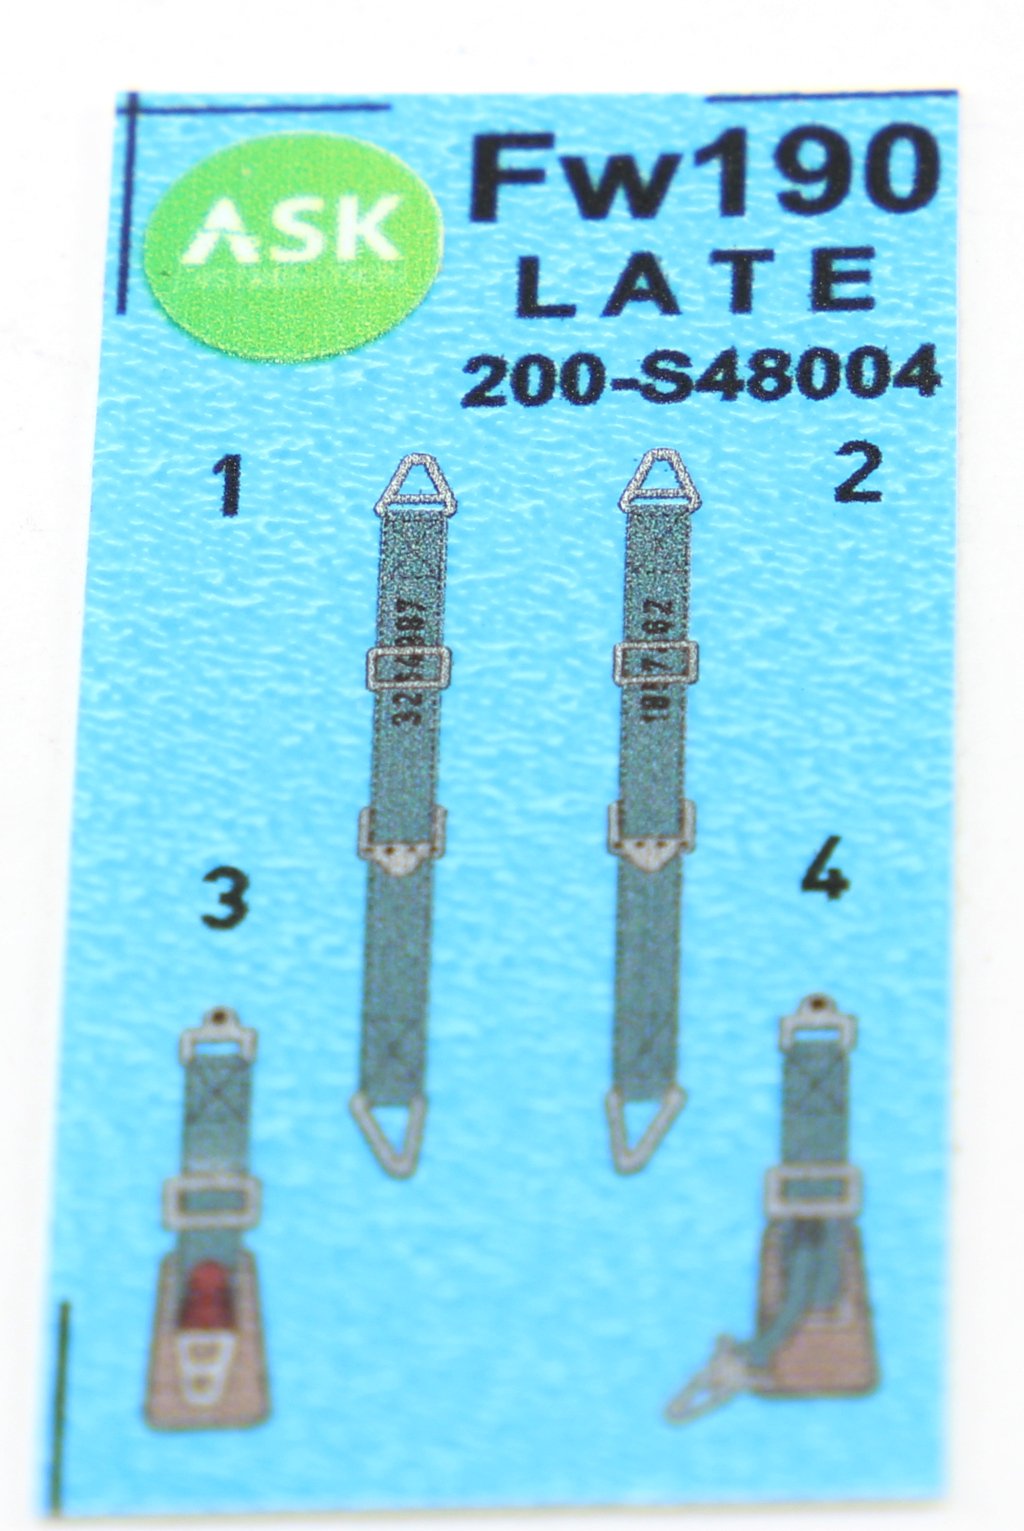
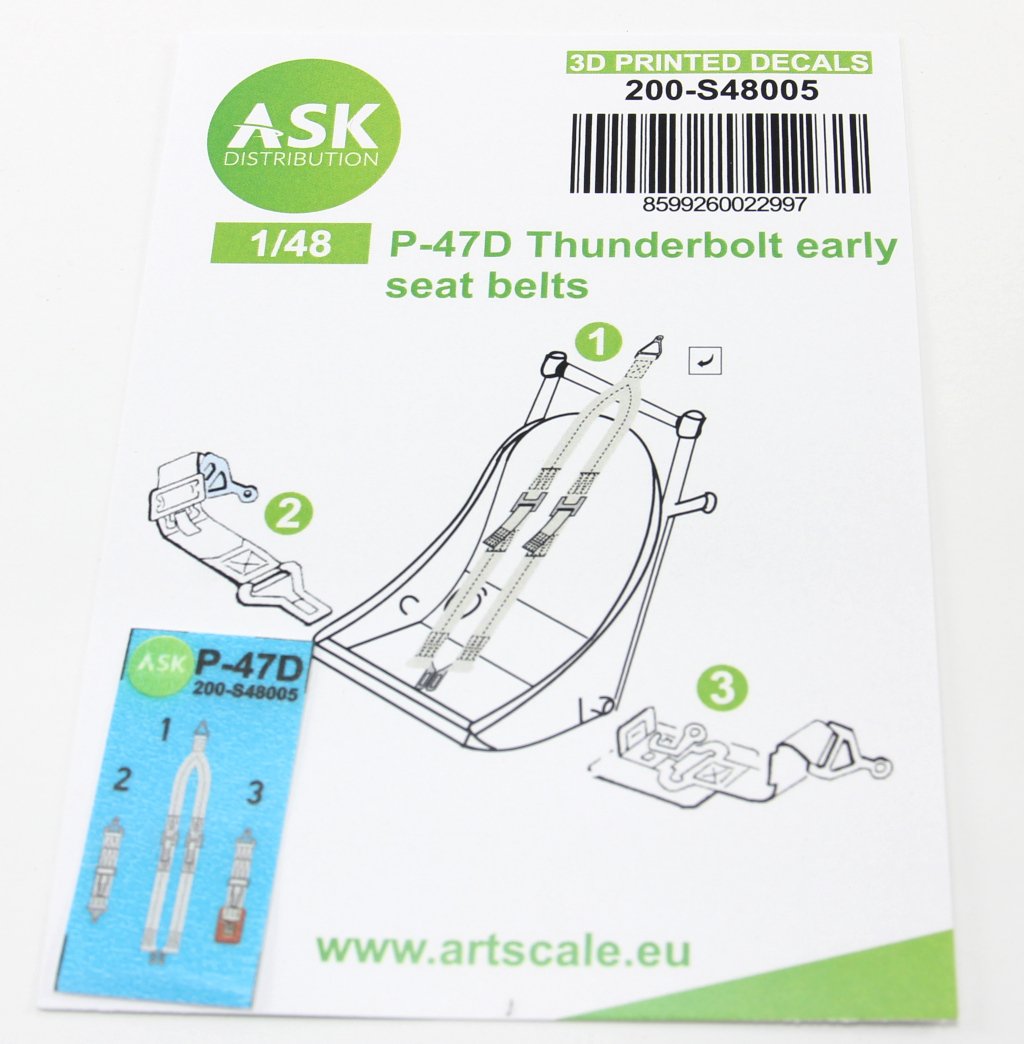
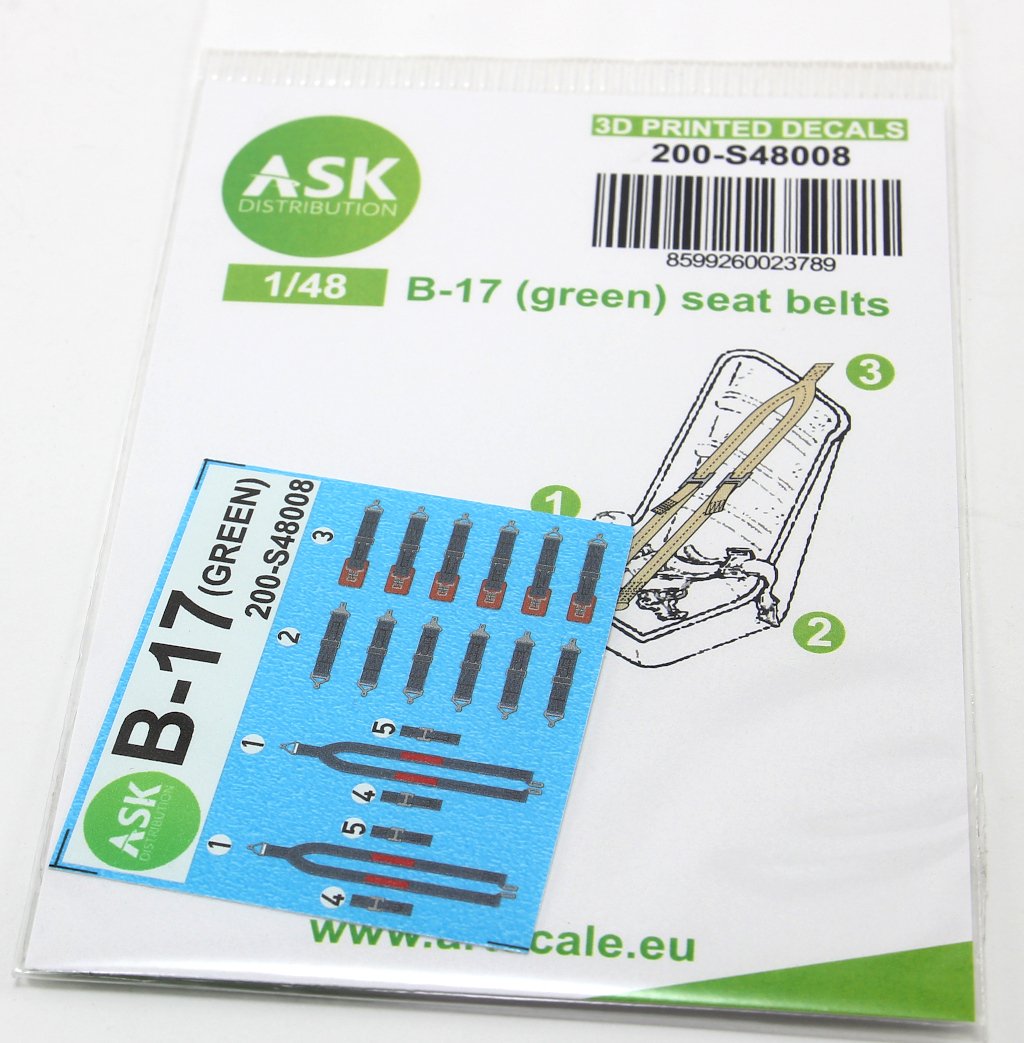
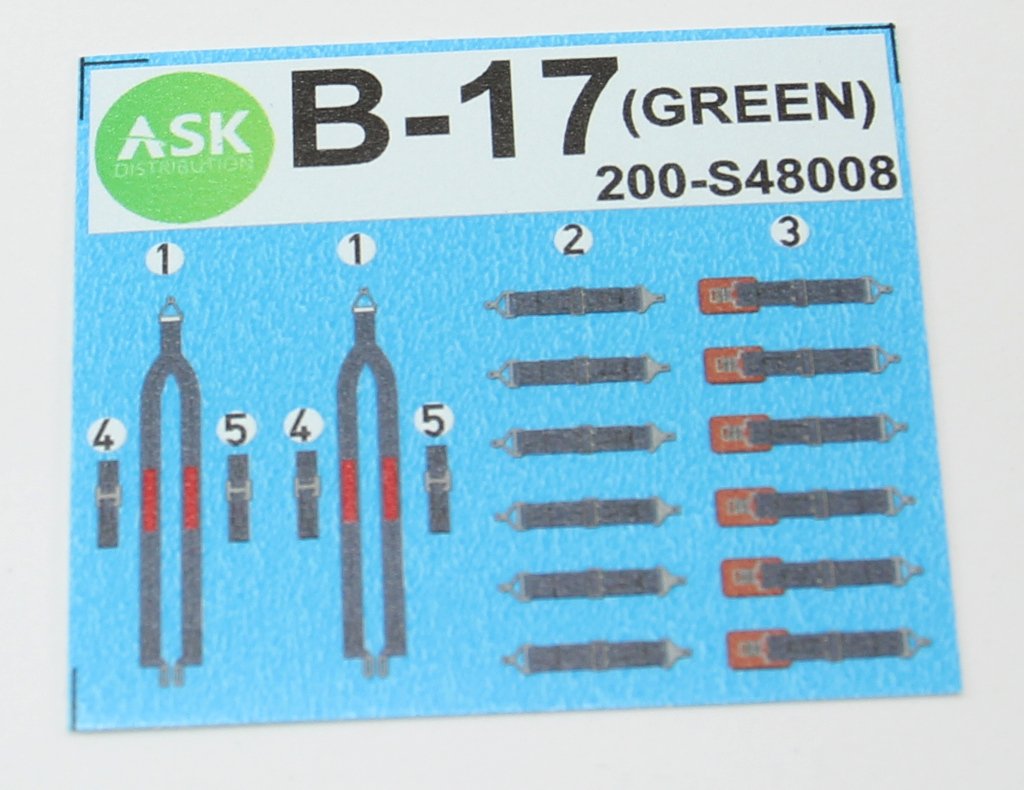
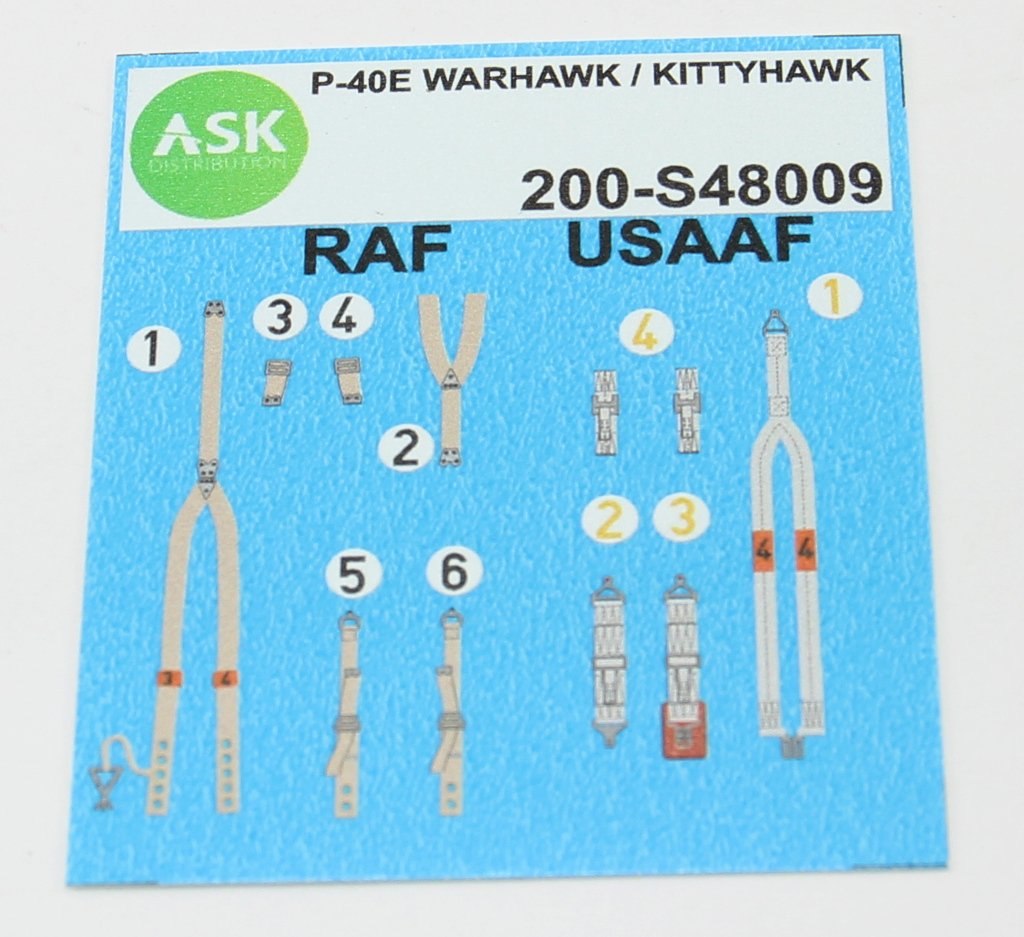
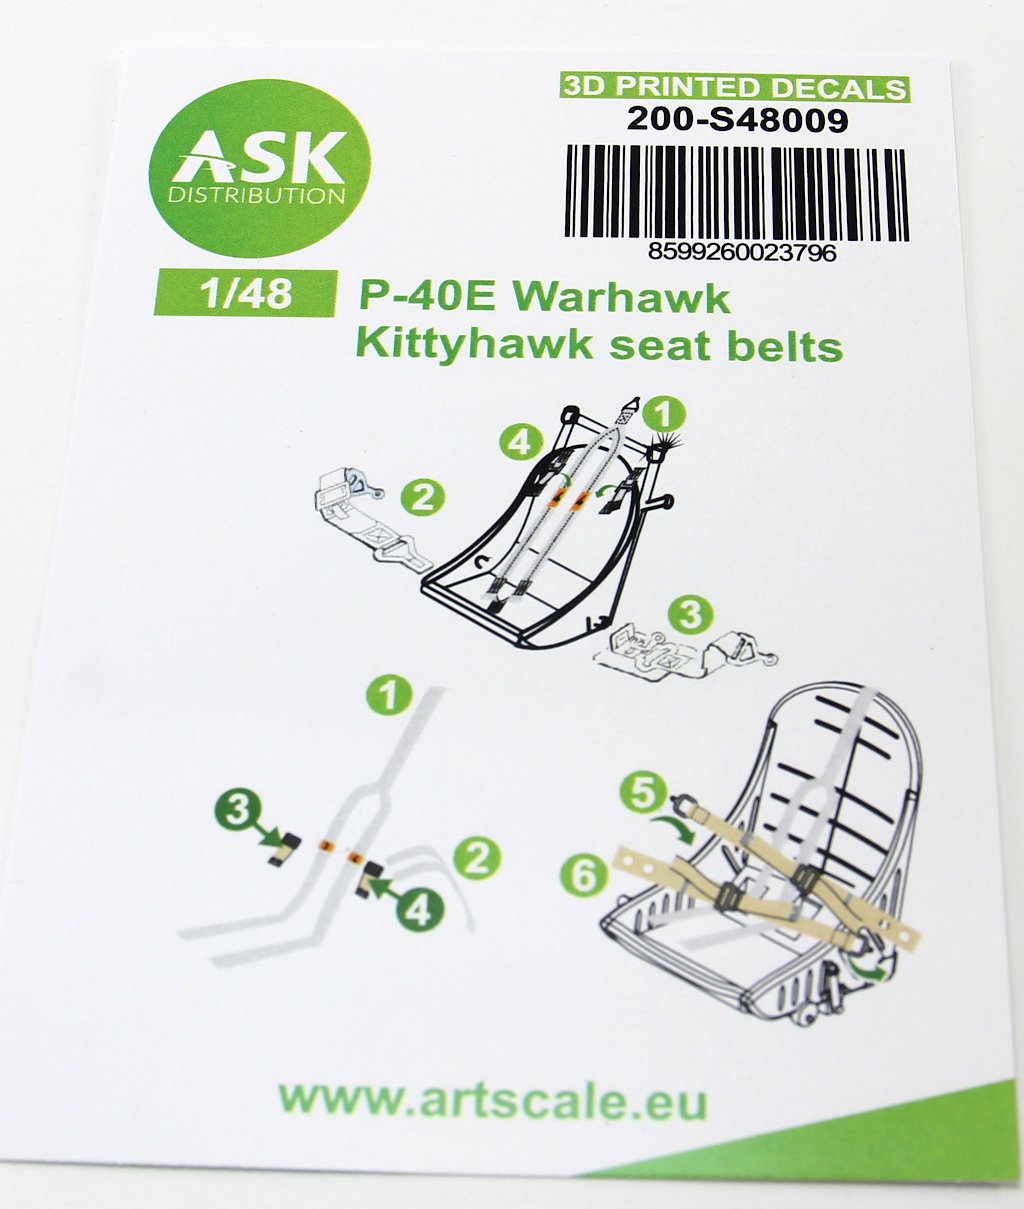
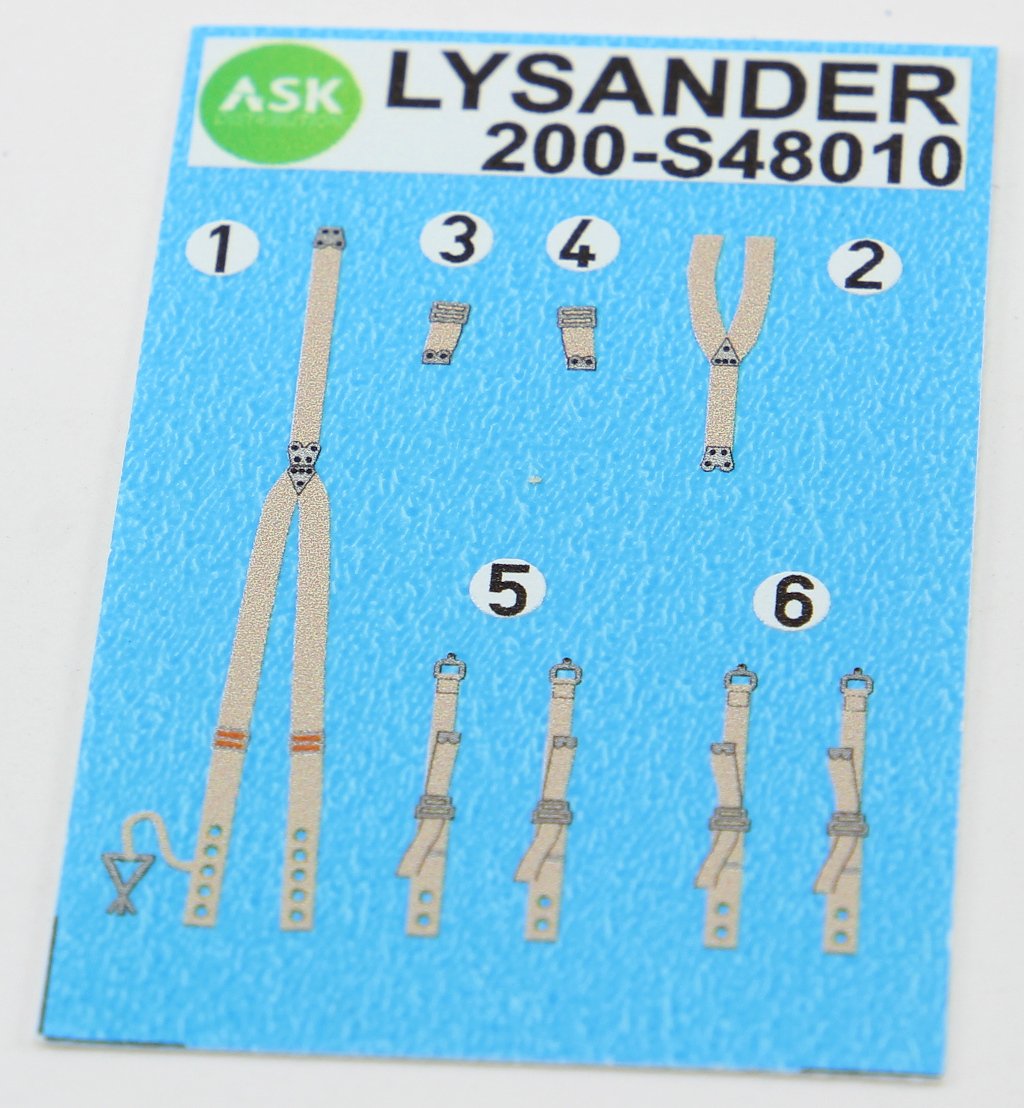
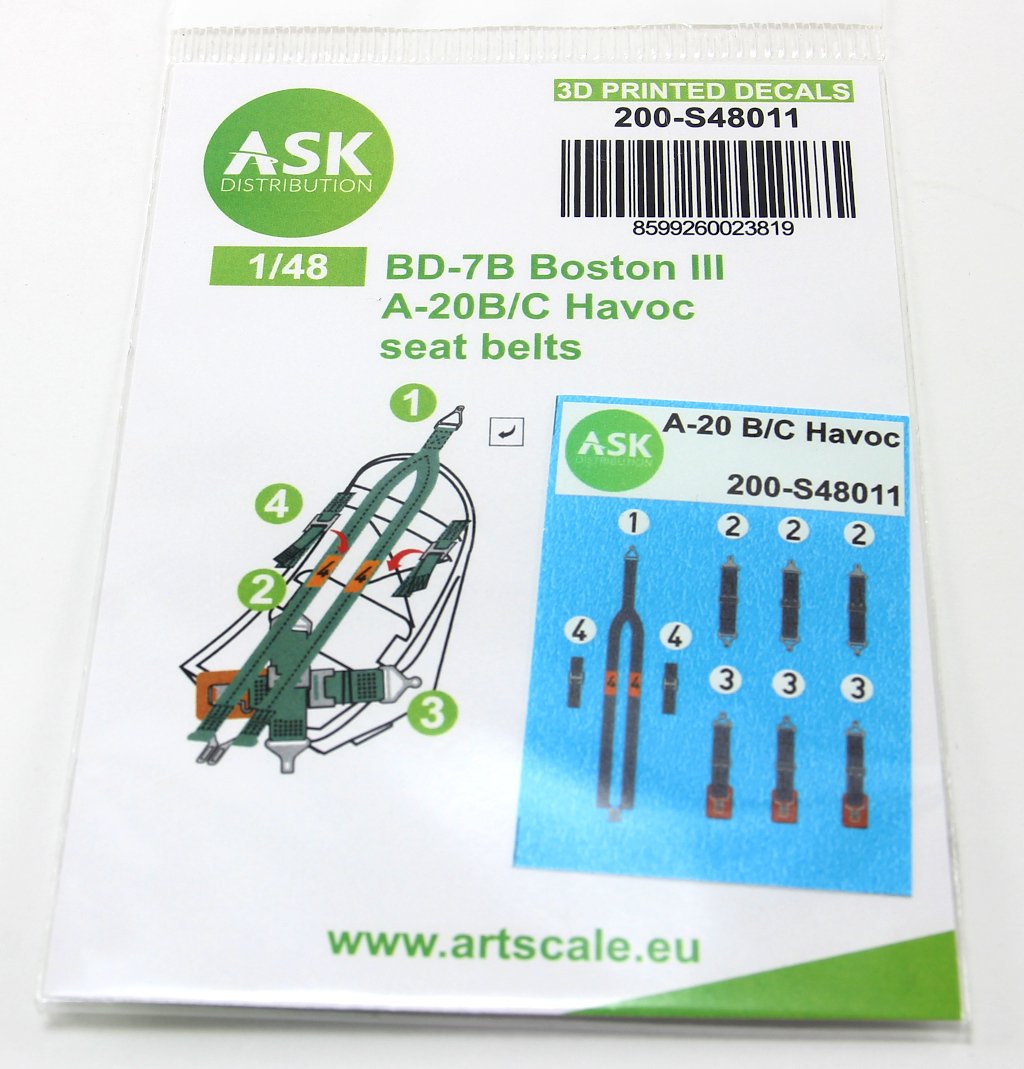
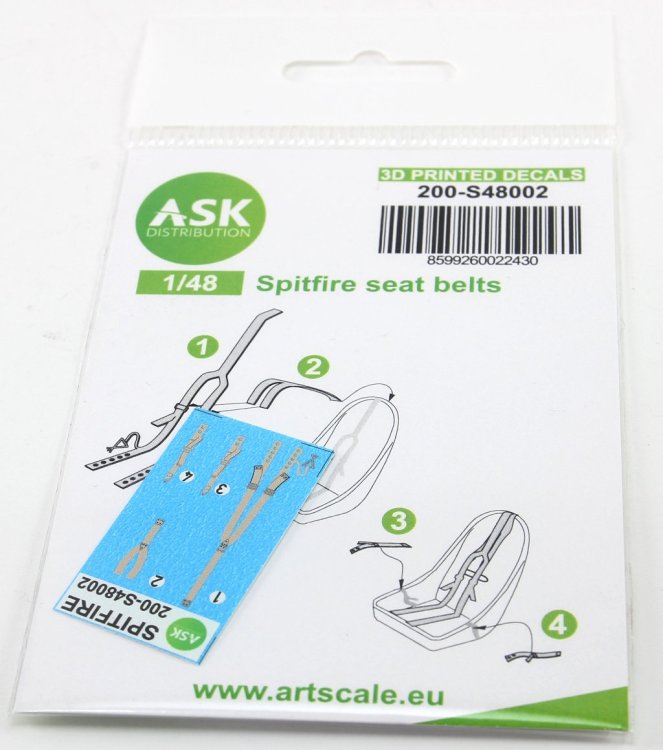
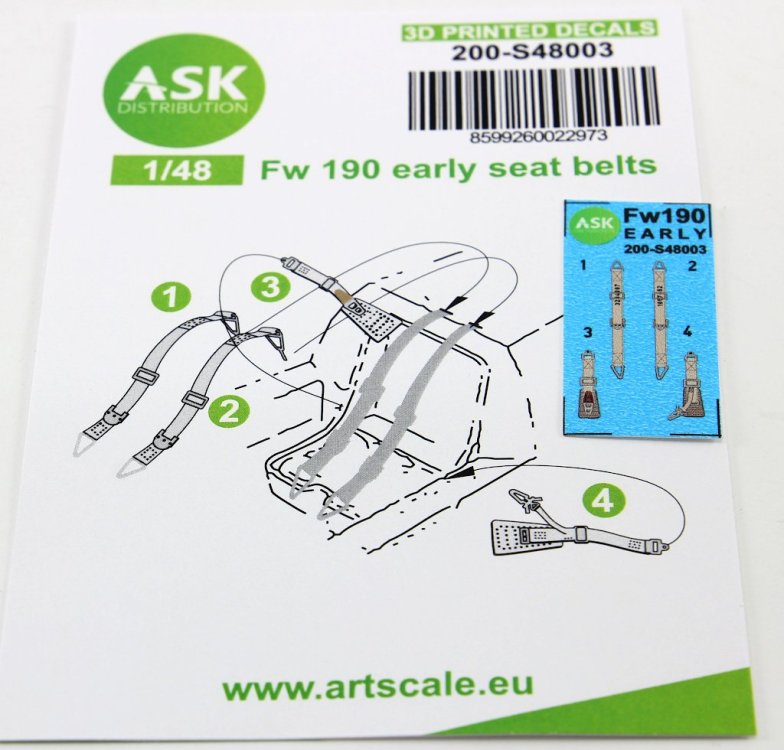
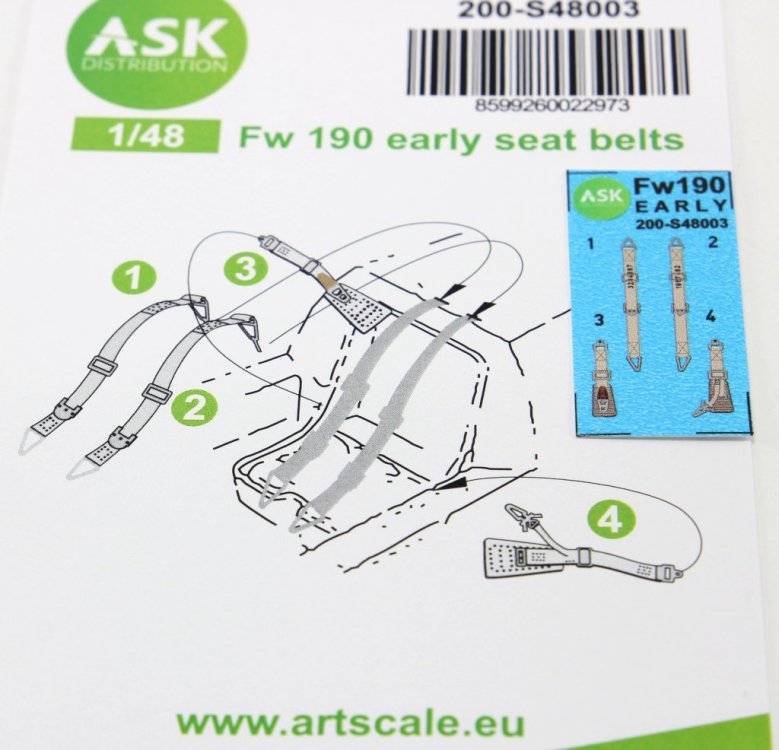
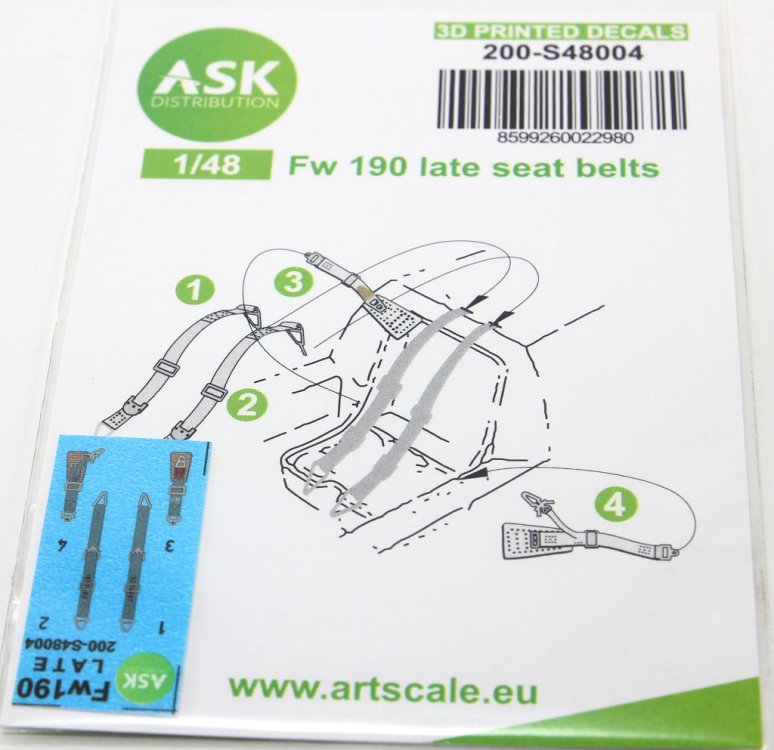
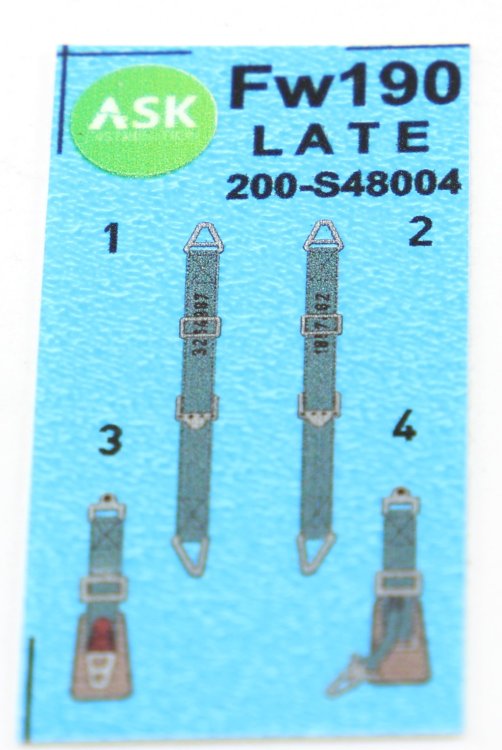
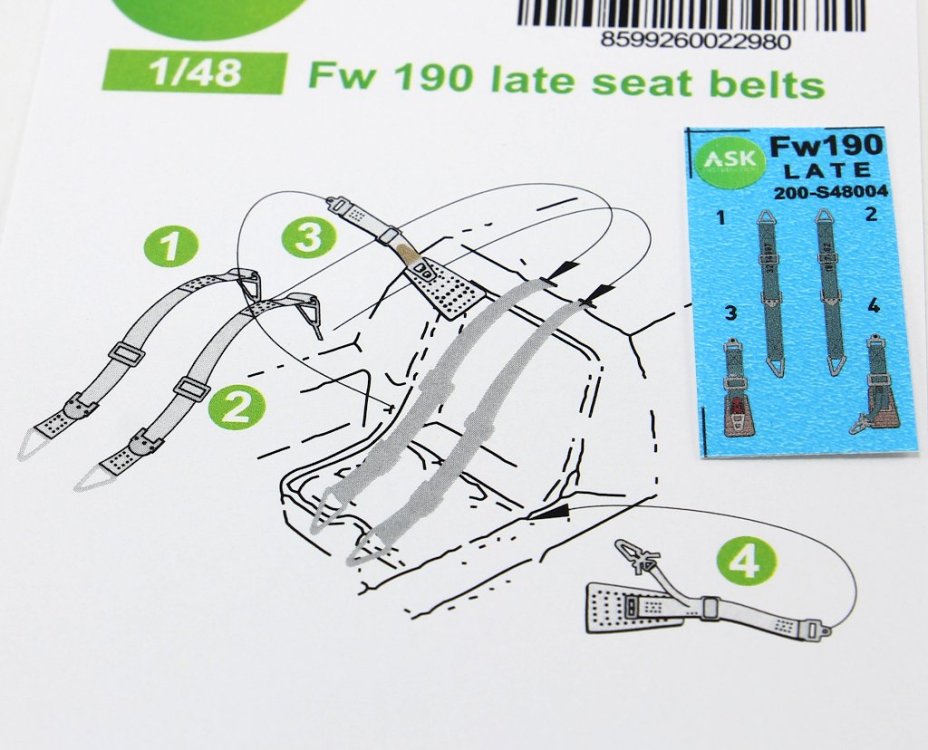
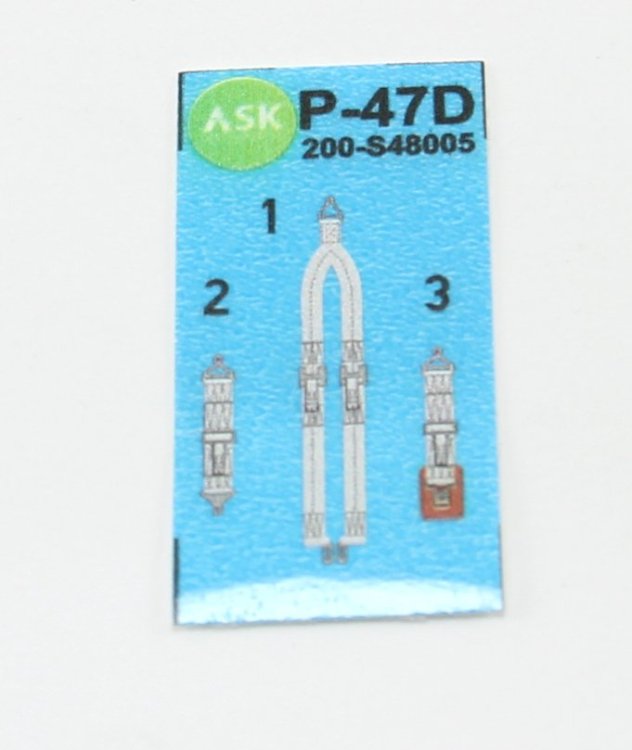
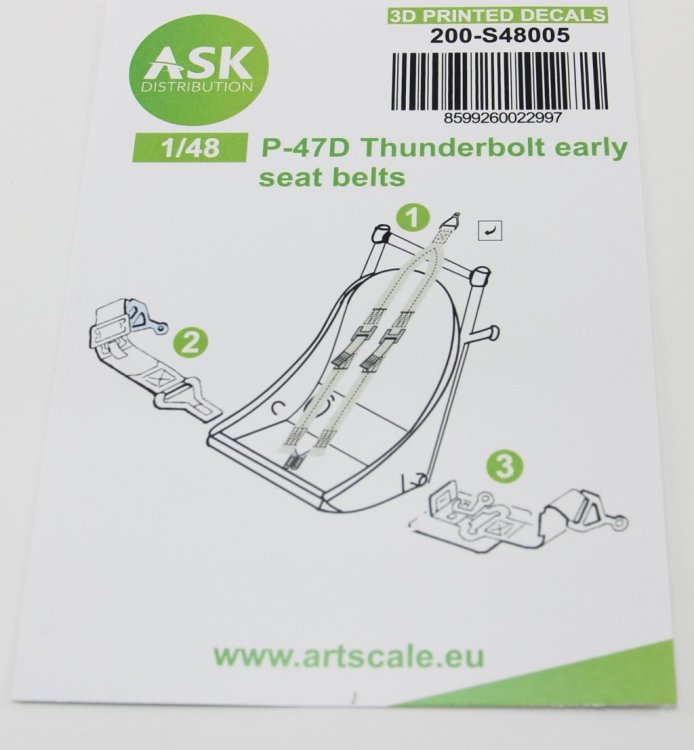
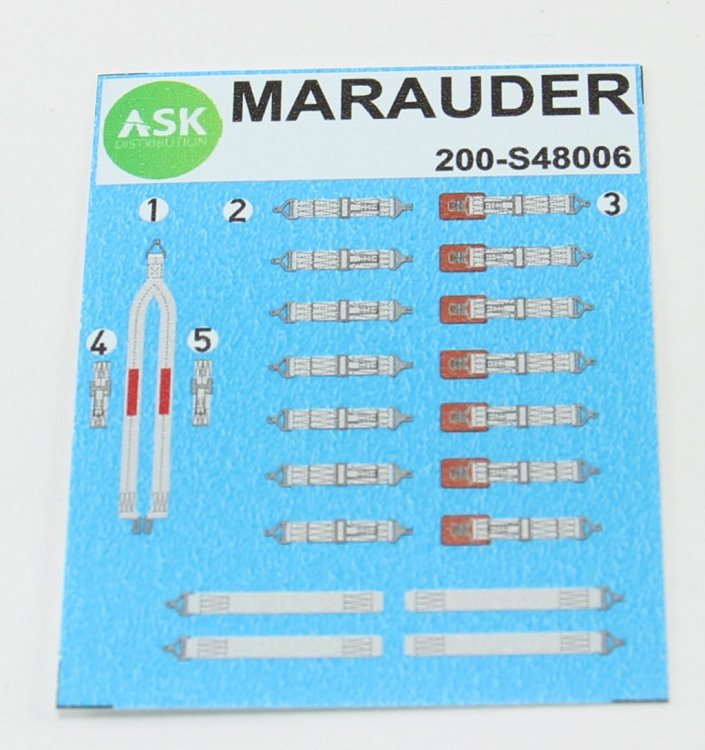
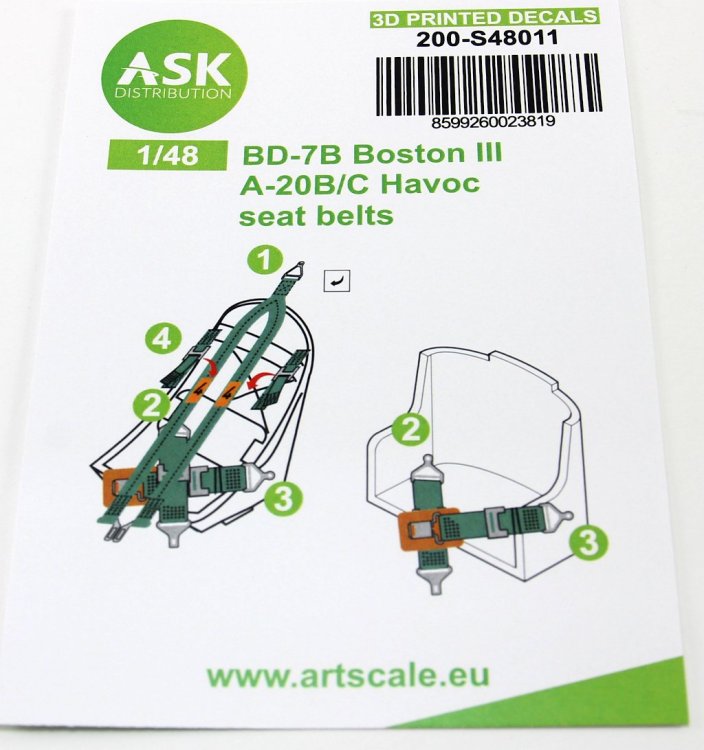
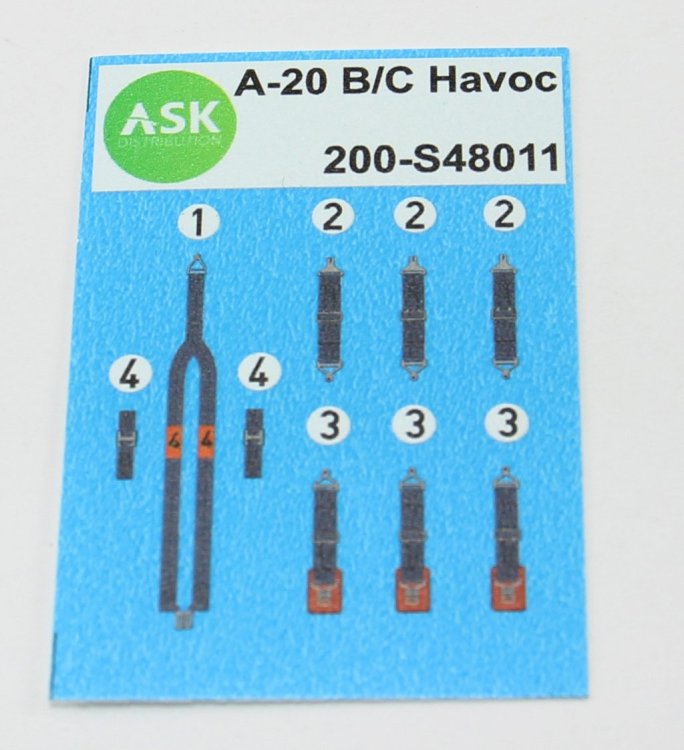
1:48 Art Scale Kits 3D printed Decals Several Subjects Art Scale Kit (also known as ASK) is a model hobby shop and now it is known in the modelling world all around for their decals, tools and 3D productions. These sets represent a recent innovation in the world of 3D printing, offering a simple and accessible upgrade for scale models. In this case, they come in the form of several 3D-printed seatbelt decal sets, designed to enhance detail and realism with minimal effort. Well how it works? They work like traditional seatbelt decals, but these have a slight relief, giving the set a three-dimensional effect, which enhances the sense of realism and scale. To the touch, the raised texture created by the printing process contributes to a very convincing sense of scale. All the sets presented here are not intended for a specific model (brand), so they can be used across different brands. let me present some of them : 1:48 P-51D Mustang Seat Belts Code: 200-S48001 Price Tag: 4,01€ This set supplies 3 decals pieces representing the seat belts for P-51D at 1:48 scale. The decal print is clear, and the details are adequate for the scale represented. 1:48 Spitfire Seat Belts Code: 200-S48002 Price Tag: 4,01€ This presents a set of seatbelts for Spitfires (at 1:48), representing a Sutton Harness and the extension to fix it on the back end of the cockpit, typical on this aircraft. 1:48 Fw 190 early seat belts Code: 200-S48003 Price tag: 4,01€ This set supplies decal seat belts for early versions Fw-190. A nice detail included is the production batch number printed on the shoulder straps. 1:48 Fw 190 late seat belts Code: 200-S48004 Price Tag: 4,01€ This set supplies decal seat belts for late versions Fw-190. Similar as the previous set but the seats fabric colour is RLM66. The production batch number printed on the shoulder straps is also presented. 1:48 P-47D Thunderbolt early seat belts Code: 200-S48005 Price Tag: 4,01€ This set supplies 3 decals for early versions of the P-47D. The seat belts colour resembles the “buff” colour commonly used on these devices. 1:48 B-26 Marauder early seat belts Code: 200-S48006 Price Tag: 4,01€ This set supplies decals for all seats of a early version of B-26 Marauder. Detail adequate for the desire effect and considering that some of them will not be seen on the finished model. (but we know that it’s there !) 1:48 B-17 (green) seat belts Code: 200-S48008 Price Tag: 4,01€ The set provides belts for all seated positions in the aircraft, the “fabric” of the bels is green. No been sure of it but this points for a feature of late variants of the B-17, but please check your references. P-40E Warhawk / Kittyhawk pilot seat belts Cat. No. S48009 Price tag:4,01€ This set provides two types of seatbelts for the P-40E: one for the version used by the US Army Air Forces (Warhawk), and another for the version operated by the RAF (Kittyhawk), as each variant featured a different seat design. 1:48 Lysander seat belts Cat.No. S48010 Price tag: 4,01€ This set supplies set belts sets for the pilot and navigator / gunner / radio operator. Please check your references for the pilot seat belt installation. 1:48 BD-7B Boston III / A-20B / C Havoc seat belts Cat.No. S48011 Price tag: 4,01€ This set supplies all seatbelts for all crew on the BD-7B / A-20B/C Havoc crew. The “fabric” colour is green, and the detail is adequate for the scale. Conclusion As previously mentioned, this type of aftermarket product is not new to the modelling scene. The level of detail is appropriate for the intended scale and effect—though, of course, there are more detailed options available on the market. For my modelling preferences, these sets are extremely accessible and offer a simple yet effective way to enhance the cockpit with this small addition. Naturally, in some kits with closed canopies, little of the detail will be visible, but in others, the effect is much more noticeable. The printed colour and subtle three-dimensional texture give a realistic finish. These are original, highly useful, and adaptable sets, offered at a very affordable price. As so this product is VERY Highly recommended! p.s. I intend to publish a small review of this seat belts applied on a model . just give some days Our thanks to ASK – Art Scale Kit for the review samples. Ricardo Veríssimo


-
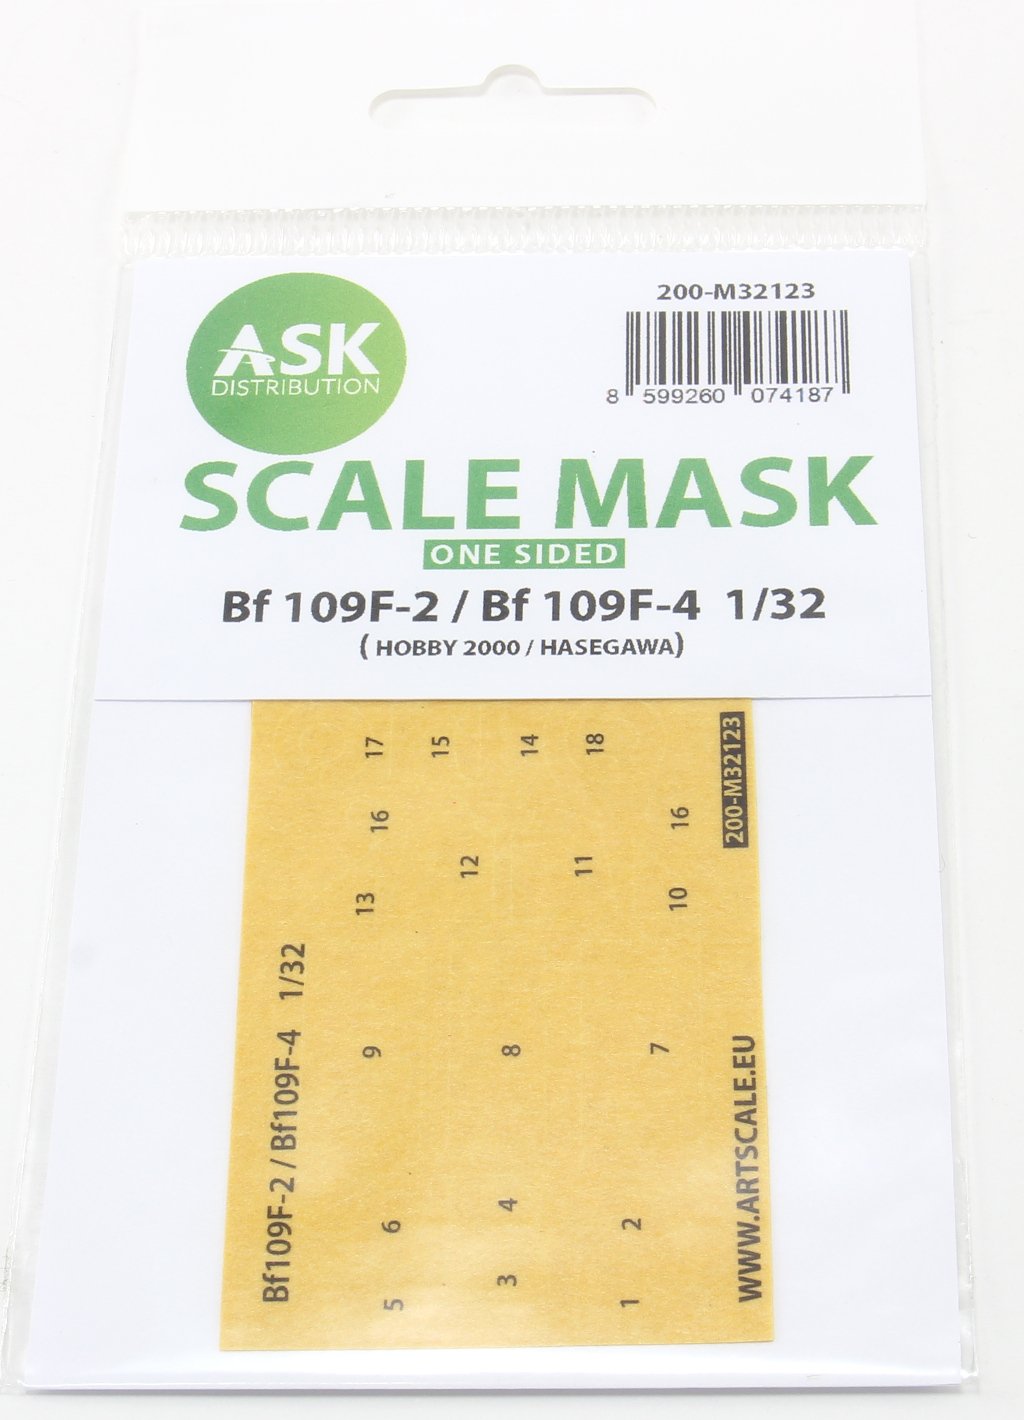
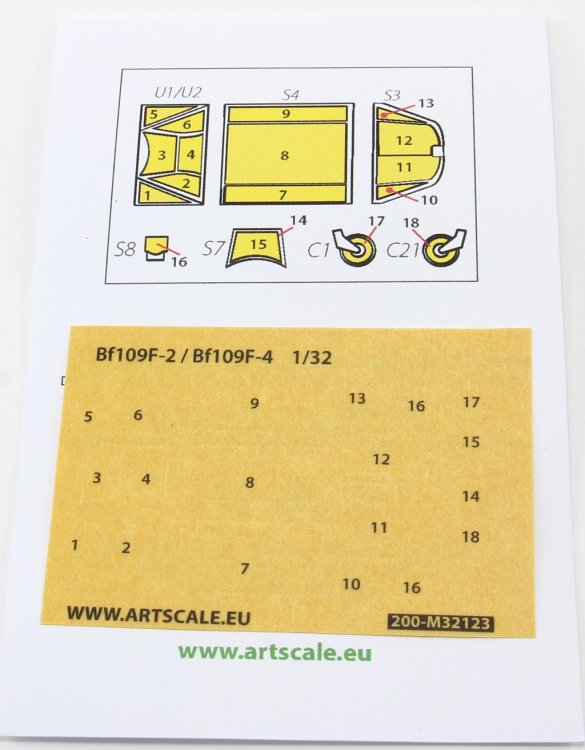
Art Scale Kits Canopy Mask Introduction Art Scale Kit (also known as ASK) is a model hobby shop and now it is known in the modelling world all around for their decals, tools and 3D productions. These is a new set released at 1:32 scale, in their typical clear plastic bag. Each mask is numbered and identified on the colour drawn supplied on the plastic frame that carries and protects the mask sheet. The mask material is Kabuki tape, with a similar handle, flexibility of other brands. 1:32 BF-109F-2 / Bf-109F-4 (Hobby 2000 / Hasegawa) one sided Code: 200-M32123 Price Tag: 6,69€ This set provides pre-cut, numbered masks for the three exterior sections of the canopy. Additional masks are included for the armour plate fitted to the windscreen, the gunsight, and for masking the tyres of the tailwheel, allowing the rims to be accurately painted. The tailwheel assembly is moulded as a single piece, with the wheel strut integrated into the part, so particular care is required when painting, especially around the strut. Conclusion Nowadays, we have a wide range of options when it comes to painting masks—this is a fact. Some are easier to apply and handle than others. Focusing my analysis on the current set, and having already used similar ones on other models, I can say that the masks are easy to use and handle. The material they are made from has elasticity, allowing for adjustments, sticking and peeling off without losing adhesion properties to plastic. This set is one-sided, with masks provided only for the exterior surfaces of the clear parts. Its price is highly competitive compared to other offerings currently available. VERY Highly recommended Our thanks to ASK – Art Scale Kit for the review sample. Ricardo Verissimo


-
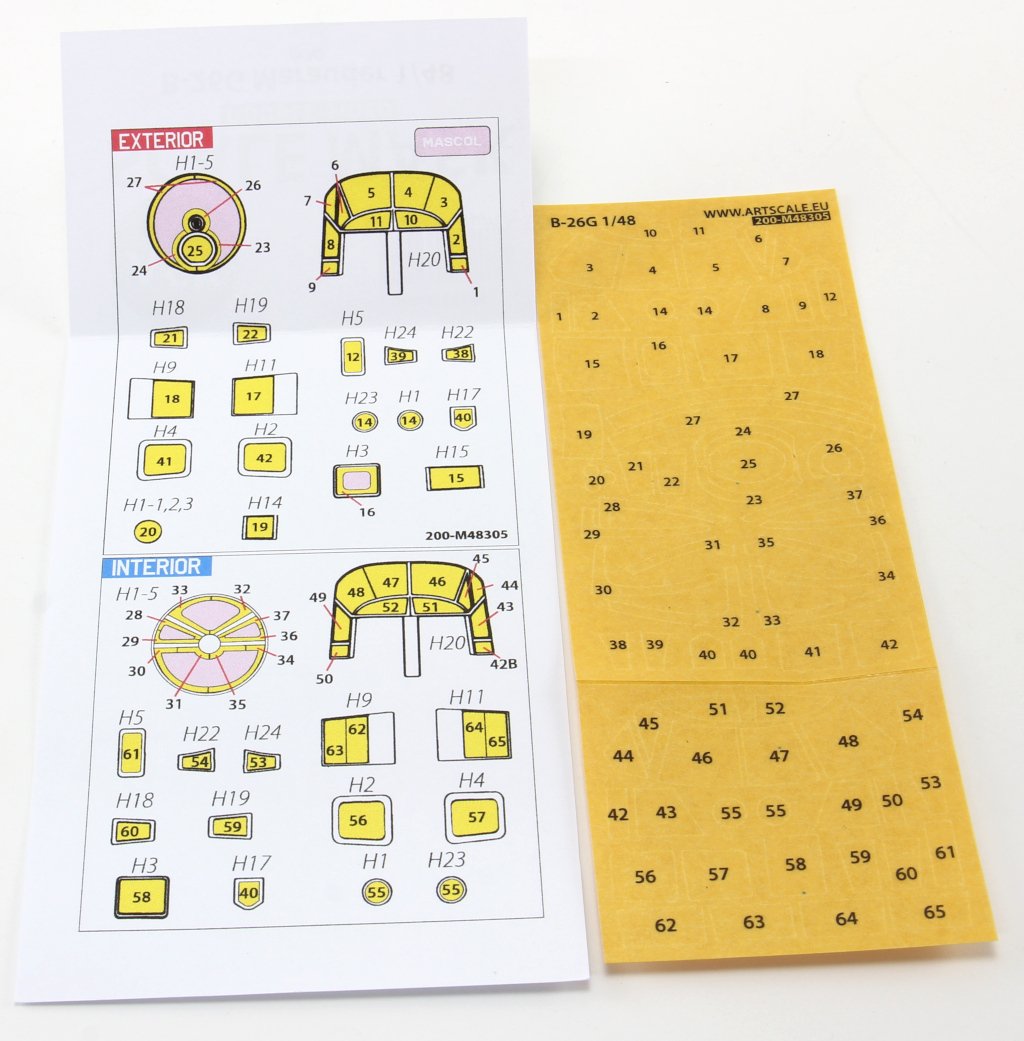
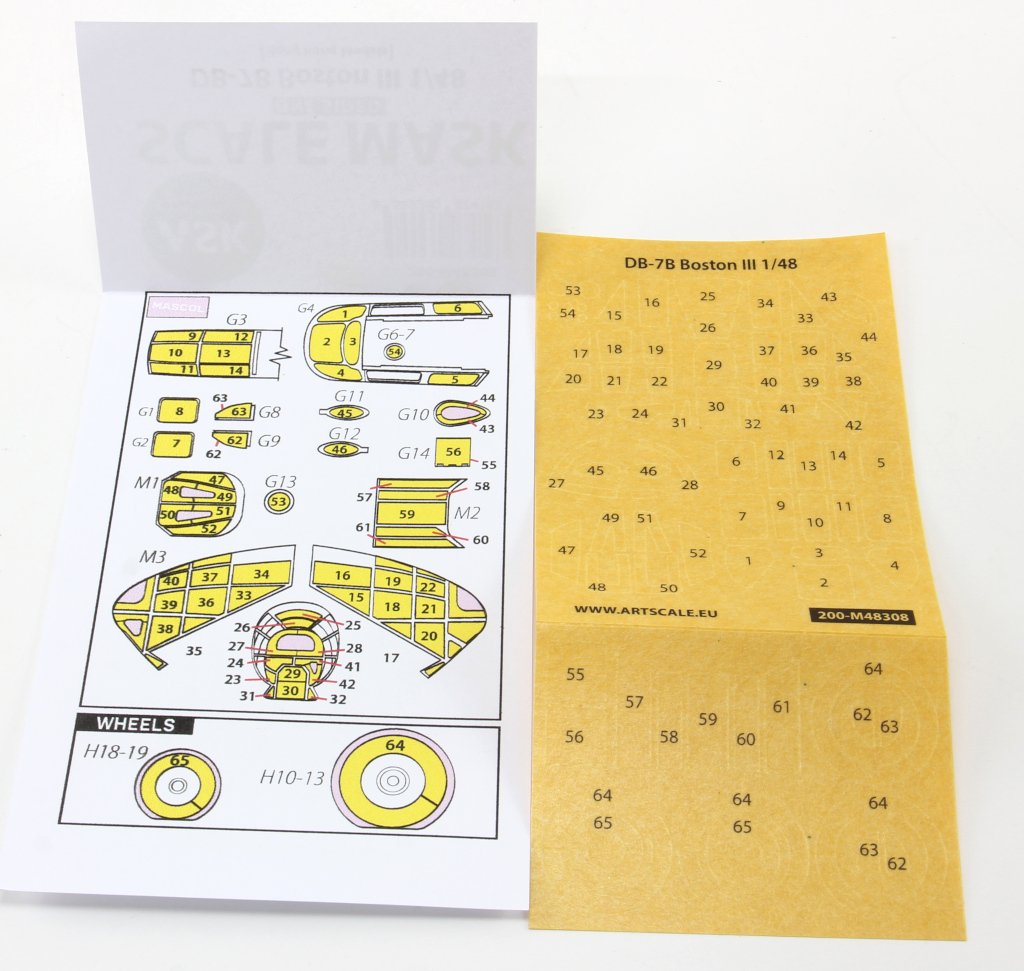
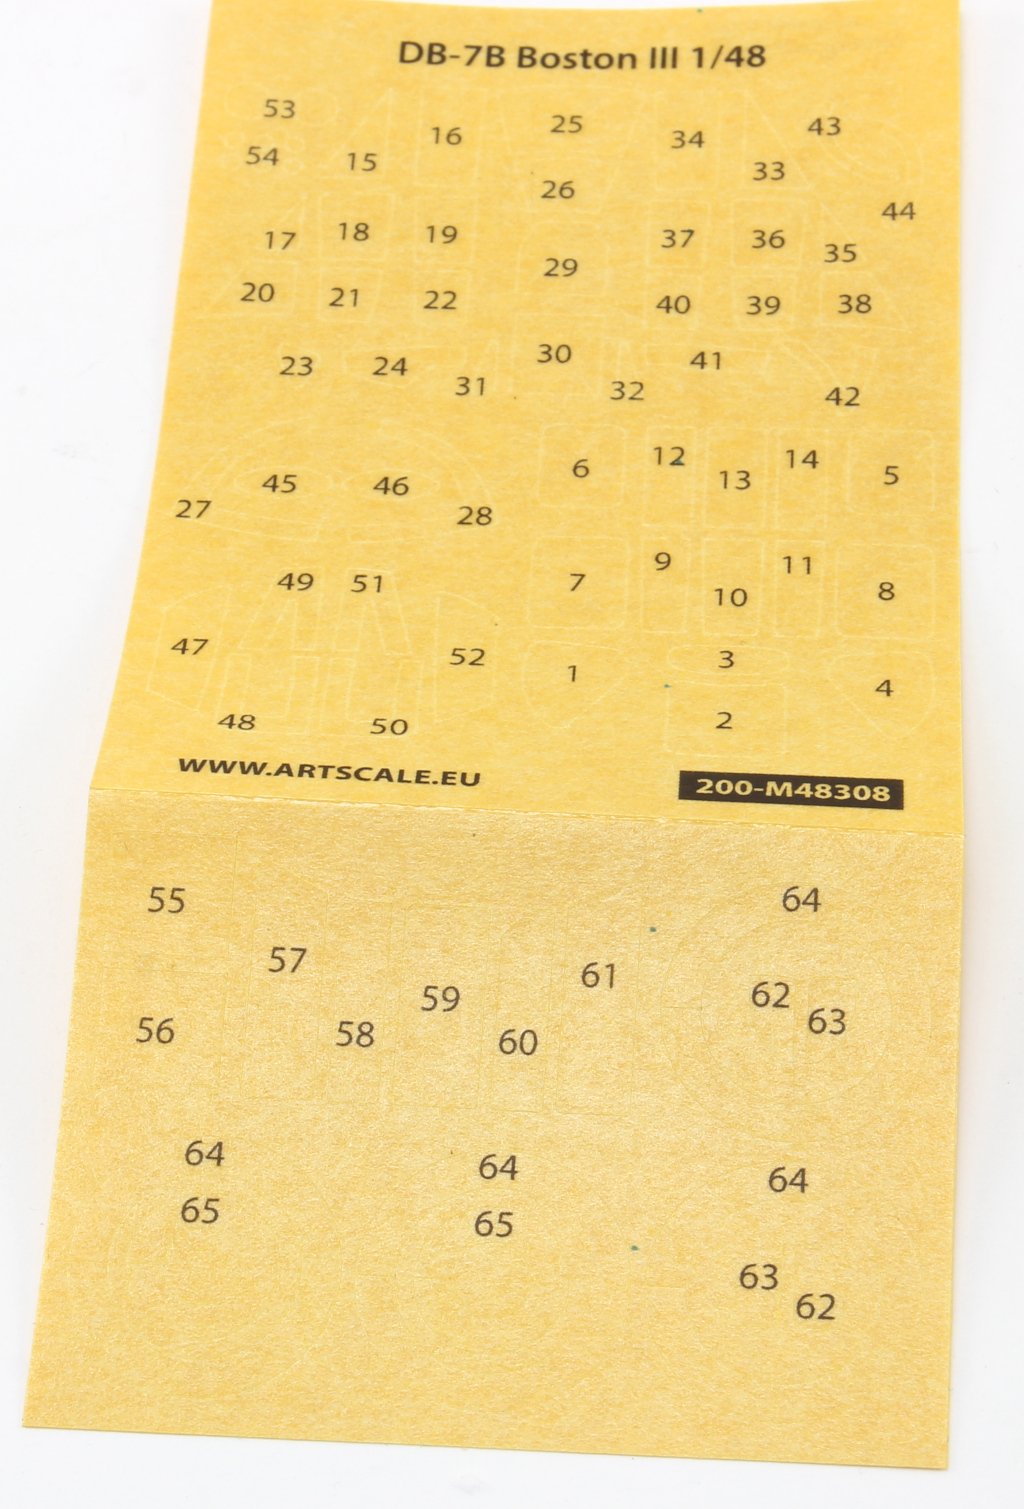
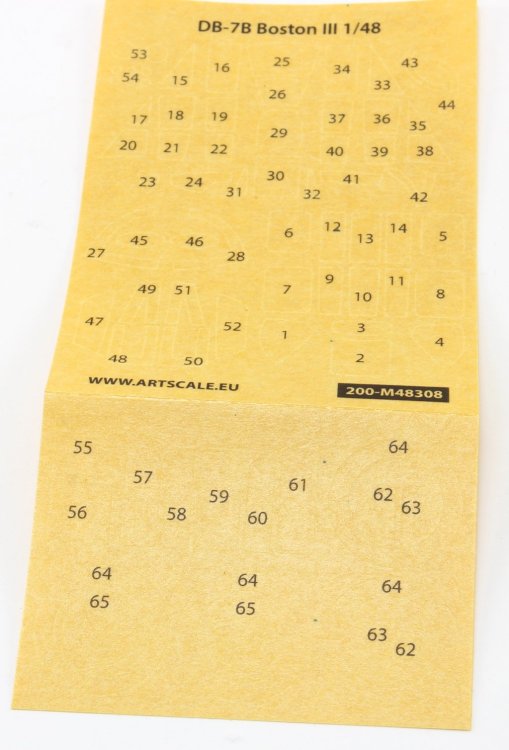
Art Scale Kits Canopy Masks 1:48 scale several subjects Introduction Art Scale Kit (also known as ASK) is a model hobby shop and now it is known in the modelling world all around for their decals, tools and 3D productions. These are some of the new sets released at 1:48 scale, all in their typical clear plastic bag. Each mask is numbered and identified on the colour drawn supplied on the plastic frame that carries and protects the mask sheet. The mask material is Kabuki tape, with a similar handle, flexibility of other brands. So let me present some new sets! 1:48 B-26G Marauder (ICM) Double-Sided Code: 200-M48305 Price tag: 10,50€ This set supplies all external and internal masks for the newly 1:48 B-26G from ICM, already reviewed here. This will come in handy as the circular profile of the nose can make some issues if regular masking tape is used. This set is a must have for a clean work on the clear parts for this bird! In total 65 masks are provided ( interior and exterior) 1:48 DB-7B Boston III (Hong Kong Models) one sided Code: 200-M48308 Price Tag: 8,08€ This set provides masks for the exterior of all transparent areas of the new variant in the A-20 family – the DB-7B Boston by HK Models, whose review can be found here. It also includes masks for the navigation light transparencies located at the wingtips. All masks are numbered, and their placement can be referenced using the diagram provided on the paper leaflet that accompanies the mask set. Additionally, masks are supplied to cover the tyre portions of the landing gear, allowing for accurate painting of the wheel rims. 1:48 Jaguar GR.1/GR.1 A (Airfix) one sided Code: 200-M48312 Price Tag: 6,69€ This set provides internal masks for the canopy (to outline the frames and fill the centre with Maskol) and the windscreen (full masks). It also includes masks to allow painting of the rims of the front and rear landing gear wheels. Furthermore, the set provides masks for the landing lights and for the clear parts on the recon nose. Conclusion Nowadays, we have a wide range of options when it comes to painting masks—this is a fact. Some are easier to apply and handle than others. Focusing my analysis on the presented sets, and having already used them, I can say that the masks are easy to use and handle. The material they are made from has elasticity, allowing for adjustments, sticking and peeling off without losing adhesion properties to plastic. The double-sided options offer greater detail, as they allow for the painting of the interior frames, thus eliminating the typical shine of this type of plastic, making the model more realistic. The inclusion of masks for the remaining transparent parts and even for painting the wheel rims facilitates and speeds up the process. I also note that double-sided masks always have a more “economical” alternative in the form of one-sided masks, available at a more competitive price. If you'd like to see how the masks perform when applied to a model, take a look at this short article published on thia forum (here). VERY Highly recommended Our thanks to ASK – Art Scale Kit for the review samples. Ricardo Veríssimo


-
- 1
-

-
ICM 1:32 DH.82A Tiger Moth World Air Forces
rverissimo replied to rverissimo's topic in Aircraft Reviews
Thanks ! a very original subject ! -
ICM 1:32 DH.82A Tiger Moth World Air Forces
rverissimo replied to rverissimo's topic in Aircraft Reviews
Hi ! all decorations options are very interesting, colorful and unique! but of course the Portuguese Bird sits on the top of the preferences... now i just need to finish ALL my pending projects and sort out all the confusion that has taken over my workbench for some time now!! Ricardo Veríssimo -
hi! for me i'm a absolute fan of '46 subjects.... regards!
-
hi ! great job on that beast!


.jpg.e239bfbfcc30227d11ba32bd73e7a3bd.jpg)


.JPG.e3466e947615a72da8749d0c995ad1e7.JPG)
.JPG.23879ccafd0dfe8b5178a44eb19497b8.JPG)