

ArnieC
-
Posts
68 -
Joined
-
Last visited
Content Type
Profiles
Forums
Events
Gallery
Everything posted by ArnieC
-
I bought in Lingen (Germany) a few weeks back a 1/32 Hobby Boss F-84E for 25 euro. Last weekend I was at the Shropshire modelshow at the Cosford RAF museum in Engeland and bought myself a 1/24 Airfix Hawker Typhoon Ib for just 40 pounds!!!! Also bought some more cheap kits, but they were all in smaller scale. including in 1/48 a F-86K, E-2C Hawkeye, Mig 27D, B25G, etc. Cheers,
-
Fw-190 D11 JV 44
ArnieC replied to ArnieC's topic in LSM 1/32 and Larger Aircraft Ready for Inspection
Ehhhh, I have got them second handed on a model show. I don't know if they are still avialable. There is also a conversion set from Jerry Rutman (I hope I spelled it right) in the USA. That does almost the same. The Original was for a D-13 conversion. I only swapped the wings inserts for this one to make it a D-11. Sorry. Cheers, -
Fw-190 D11 JV 44 Bavaria, Germany 1945 Kit: Hasegawa conversion: Renaissance extra's: Cockpit and wheel set from MDC Decals: Eagle Calls Cheers,
-
And she is finished. Here are some pictures. Cheers,
-
Finally a update. Last week I have been doing the decals, panel lines and a dull coat. Here are some pictures. The underside. The top side. That is it for now. I hope to do some more work on her next week and finish it. Cheers,
-
Hi Jeroen, I used Gunze (waterbased) paint for the colours. These were thinned with some Tamiya acrilyc thinner (X-20A). The airbrush I used was my trusted Evolution with a 0.3 needle and head. Cheers,
-
I have finally finished the painting last weekend. Here are some pictures. I first did the RLM 76. And finally the two top colours. I used Gunze for this. The colours are for the grey RLM 75 and for the green RLM 81. I painted them free hand. Now it needs a Klear coat for the decals. Cheers,
-
Again it took me some time to move on with this one. I have finished the cockpit with the seat and I have also closed the conopy. Here is a picture of the model before I started painting. There is still some tape to keep the canopy in place while the glue is drying. [/url]"> And here after I have painted the model on the underside white. As you can see I have already placed the masking tapes for the stripping. [/url]"> Finally the red has gone on today. Here is she after removing the tape. [/url]">http://s1064.photobucket.com/user/arnoldcremers1/media/Fw-190%20D11/IMG_3663_zpsk10u4fbw.jpg.html'> I hope to do the other colours this weekend. Cheers,
-
Happy new year to you too. I hope you have a good recovery and that it will be a productive 2017. I had a productive 2016 with 15 builds under my belt including two 1/35 tanks and two 1/32 aircraft. The rest was smaller scale and mainly 1/48 aircraft. I hope to 15 builds this year as well. Cheers,
-
Thanxs Guys, @mikester. I didn't do anything to the cockpit. I builded it out of the box. That includes the pilot. That is a very good looking figure. As not much can be seen when the canopie is closed and the pilot as well I chose not to do anything to it. If you want to place it open you have to do more. Aspecialy the seat needs than some more detailing. Cheers, Arnold
-
Jeroen, I also just found out that there is a conversion set from Schatton Modelbau for this in 1/32 for the Trumpeter kit. Just google Schatton an you will find their website. Cheers,
-
That is a great looking Macchi C.202. And you made it from the ID models Vac form?!?! You are a very brave man. :unworthy: I did once a Fokker D XXI. Boy was I in trouble with that one. Cheers,
-
Hi guys, Here is a model I have been working on for the last month after it was putted by me on the shelf of shame a couple of years ago. I finally finished this one today. The 21st Century models Macchi 205 is a little crude, but the form is good and quite easy to build I did made some modifications to it. the wheels and exhaust where the worst, so I replaced them. the wheels are from the spare parts box and the exhausts are from Quickboost for a Bf-109 G. Here are the pictures. [/url] Cheers, Edit: I forgot about the spinner. It is one from a old 1/32 Revell Beafighter. It was a little bit reprofiled on the tip.
- 9 replies
-
- 6
-

-
- Macchi C.205
- 1/32
- (and 1 more)
-
That is a great looking model. Love the paint job!!! :wub: Cheers, Arnold
-
Hasegawa 1/32 P-47 Thunderbolt II SEAC
ArnieC replied to ArnieC's topic in LSM 1/32 and Larger Aircraft Ready for Inspection
Thanks guys. @Mikester, I did some work the last period in 1/72 and 1/48 scale. These are easier to store. I still need some new glass cabinets for the larger planes I have in my collection. At the moment if they are to big they sit outside the glass cabinets I have and then they catch dust. Witch I find a pitty. Cheers, Arnold -
Hi Guys, Here is a build of a 1/32 Hasegawa Fw-190 A5 into a A5/U12. I builded it in the colours of a ace of the western front. He flew this plane at 2./JG11 in the Autumn of 1943. on 8 October 1943 he was shot down in this plane and was heavy wounded, but he recovered and flew in the last period of the war on Me-262's with JV44 from Adolf Galland near München. He did survive the war. The U12 stands for Umrüstungssats 12(conversion 12). The conversion are two gun packs with both 2 MG 151/20 in it. They are meant to deal with the American bombers that got in a big force over Germany. This also increased the armament of the A5 to 6 x 20 mm guns and 2 x 7,92 mm MG 17's. I have also used on this build a wheel set from True details, some gun barrel tips from a left over set from Master and a resin seat from ??? The gun barrels for the 20 mm guns were all made from brass tubing. Here are some pictures of the model. Cheers, Arnold
-
Hasegawa 1/32 P-47 Thunderbolt II SEAC
ArnieC replied to ArnieC's topic in LSM 1/32 and Larger Aircraft Ready for Inspection
Thanxs guys. I will try to put on some pictures of a Fw-190 A5 that I finished this week. Cheers or as we Dutch say Laterrr, Arnold -
Hi guys, It has been a while sins I posted something here. It was mainly because I was bussy in different scales. This is a 1/32 Hasegawa P-47 D build into a SEAC Thunderbolt II. I used some etch seatbelts and a set of Master gun barrels. It was from 258 squadron in South East Asia and flown by Sqn Ldr Neil Cameron. Cheers, Arnold
- 8 replies
-
- 5
-
-
- SEAC
- Thunderbolt II
- (and 2 more)
-
Well you can Jeroen. If you have got the old 1/32 Revell one and only use the nose part for the gun with a barrel from Schatton and put it on a Trumpeter kit, than it is possible. efrick, lovely start. Cheers, Arnold
-
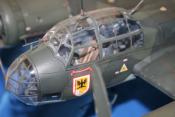
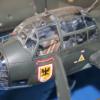
Eduard 1/48 Bf 110C risen from the shelf of procrastination.
ArnieC replied to kahunaminor's topic in Non LSM 'WIP
I like what you have done with the model. I have finished one this year as well. The biggest issue for me is that the main landing gear is so fragile. I have made it also with a extra pin to get it more firm. But it is still wobly, so this one isn't for the shows. I have got a few left in the stash, so I have to think of what I will do with them. Cheers, Arnold -
WOW!!!!!! Just one word WOW!!!!! :notworthy: Cheers, Arnold
-
Hi Jeroen, I am not a 100% sure, but didn't the P2 had different exhausts?! I thought they looked more like the fish tail type. Maybee you should have a good look into it. I am planning to build mine as a P3 during the Battle of Britain. and they had the fish tail type exhausts. Cheers, Arnold
-
I just cought up with this build. Wow!!!!! Nice work. I have seen that you used the early exhausts. Does this mean you are planning to build a P1?! Cheers, Arnold
-
Gi Guys, It has been a while sins I have been on the site. But I am to restart my conversion of the Hasegawa Fw-190 D-9 into a D-11 with a Renaissance conversion for a D-13. I was building this in the Arrow Wolf'sFocke Wulf GB in 2013/2014. When I was doing a Fw-190 A5 on a other site did I came across this model again. So I picked this one up as well and do a duo build there. I will start here the update as well. Here are some pictures of the model how she was before the restart. the box. The decals from Eaglecals The Renaissance conversion set. And some pictures of the old build. And now the pictures of what has been done last week. I painted the cockpit tub. What a great looking set is this from MDC. The tub was put into the fuselage. The seat still needs to be done.But I will do that later. After the tube was placed wasit time to cleane up all the seams on the wings and the tail. That done was it time to mate the wing to the fuselage. That is it for now. I hope to set further next week. Cheers,
-
Hi Ed and Dave thank you for your comment. Ed, The seat is great. I have had it for years now and works fine. Cheers, Arnold