The Great LSM Twins Group Build ends July 3, 2024
×


DRUMS01
-
Posts
78 -
Joined
-
Last visited
Content Type
Profiles
Forums
Events
Gallery
Everything posted by DRUMS01
-
Hello all.... I am posting this in a similar manner used when posting my USS Arizona build. Like the Arizona, most people already know about the little technical data and history of the actual IJN Yamato, so I will simply post my details. KIT: 1/350 IJN Yamato manufactured by Tamiya (old tool) ADDITIONAL PRODUCTS USED DURING THE BUILD: - Lion's Roar Master Detail Kit #RS3501 (14 PE sheets, 4 brass prop screws, 28 brass barrels, metal anchor chain) - Very Fire IJN Ammo Boxes (Qty=30) #IJN04 - Very Fire IJN Type 89 127mm 40cal Twin Gun sets (4 sets of 6) # IJN08 - Very Fire IJN Type 96 25mm AA Gun sets (resin, Brass, PE) 16 sets IJN01 - Veteran Models IJN Searchlight 16sets, #VTW35036 - Veteran Models Deck Equipment Set (paravanes, deck winch, compass, etc. VTW35037 - Alliance Modelworks WW2 triangular perforated gussets #NW35032 - Fivestar PE for Signal Flag Rigging #FS351089 - Fivestar General, Signal, and Bow Flags FS351094 - Begemont WW2 IJN Flags and Aircraft Insignia #350-03 - Hasegawa IJN Seaplane Set A #72140 - Rainbow PE Set for IJN Seaplane #RB3517 - Rainbow PE IJN Deck Rails for aircraft, torpedo #RB3559 - BigBlueBoy WW2 IJN Warship Boats PE Set # N035032 - Shipyardworks IJN Yamato Name Plate, Display B #NONE - Black Cat Models IJN 25mm Type 96 Triple AA Guns (4 sets of 6) # AC350058d - Black Cat Models Cowl and Mushroom Vents #AC350086a - Hobby Lobby Door Knobs - Modified (used for mounting ship to plinth base) - CY Wood Veneer Self Adhesive Deck for IJN Yamato #CY350048 - Life Color IJN Navy Set 1 (six 22ml bottles) #CS36 - Distilled Water and Windex (for thinning Life Color Paints) - Brass, plastic, aluminum rods, sheets, extrusions (various) - welding solder (.162, .031, .015) various lengths - Cements (CA glue, Testers clear glue, debonding agent, insta-set) - Brushes and applicators (various) - Hobby knife razor blades (many for PE alone) - Wet/dry sanding paper (various 320-2000 grit) - Sew-ology clear nylon rigging thread #1254360 RESEARCH PUBLICATIONS: - Battleships Yamato and Musashi (Anatomy of The Ship), by Skulski - Shipcraft 14 Yamato Class Battleships, by Steve Wiper - The Battleship Yamato (Super Drawings 3D), by Carlo Cestra - Tamiya Yamato Modeling Guide, by Takumi - 3D History DE, IJN Yamato, by Thomas Schmid KIT SHORTFALLS, CORRECTIONS, AND MODIFICATIONS: - Poor two part main deck and main to crane deck fitting (corrected with wood deck and scratch components) - Hull portholes all molded shut (corrected by drilling out various portholes with bit and pin vise) - Inaccurate, incomplete, and poorly molded ladders, doors, stairs, and vents (removed and corrects with PE) - Poorly molded aircraft (disgarded, corrected with Hasegawa Seaplane Set A and PE) - Poorly molded in anchor chain (removed old, corrected with real scale chain) - Poorly molded hawes pipes and anchor locker holes (drilled, reshaped, PE, plastic) - Poorly molded barrels and design (discarded, scratch build with metal barrels) - Poorly molded detail on main guns (corrected with scratch and PE parts) - Inaccurate and poorly molded splinter shields and gun tubs (removed, replaced with PE, scratch work) - Removed round gun platforms on #2 & 3 main guns (replaced with hexagon PE platforms) - Removed plastic screen over aft aircraft deck winglets (replaced with PE) - Poorly molded and inaccurate signal flag boxes (modified signal flag platform to new shape with plastic sheet) - Poorly molded crane and catapults (discarded, replaced with PE, and scratch items) - Boat mounts incorrect and poor mold (removed, replaced with PE and scratch items) - Rear gun platform missing (corrected with with PE, resin, and scratch items) - Boats and barges lack any detail (corrected with PE and scratch items) - Poorly molded aircraft trolley rails and carousels (removed and replaced with PE) - Incomplete exhaust and intake vents (removed molded in detail and replaced with PE) - Radar arrays poorly molded and inaccurate (removed and replaced with PE) - Missing 21 door locations found in research (added with PE) - Missing 24 ladders throughout ship (added with PE) - Missing 6 cowl vents on deck and rear range finder (added resin items) - Replaced kit Type 89 127mm twin 40 cal guns, Type 96 25mm AA Guns, 25mm Type 96 Triple Mount AA Guns - Created blast Bags for 15.5cm gun turrets - Removed all kit stairs and replaced with PE - Replaced exhaust funnel walkway with custom PE - Added sheet plastic to rear fire control structure for access panels and walkway - Added handrail around aft crane deck pit (from spares) - Added elevated walkways inside hanger deck (from spares) - Created brass finial mounts for ships base - Created catwalk for rangefinders in front of exhaust funnel (from scratch) - Cut out signal platform side wings and added PE rails - Poorly molded degaussing cable on hull (removed and replaced with multi part PE) - Added 22 ammo boxes that were missing in kit with Veryfire after-market items - Replaced ships spot lights with Veteran Models and PE sets - Replaced kit trolleys with PE sets - Replaced kit bow and stern flag masts with scratch metal and solder - Modified two boats into Captain's Launches - Stained wood veneer deck with Tamiya black panel line wash and added to model - Created hybrid hose reel sets from kit, PE and solder - Rigged with EZ Line nylon thread - Created shipping crates and placed in aircraft pit on crane deck - Cut, Sanded, Painted wood plinth to mount name tags and ship on - added after-market flag decals to foil; shape them, then attached to main antenna array And now I present my corrected IJN Yamato. It is shown as a presentation model and not as an authentic time and date build. I found that the more I read, the more inconsistencies I found. The more images I intensely scrutinized the more I found differences that I could not validate to a specific period. Thus I decided to add all three types of aircraft ever stationed on the IJN Yamato. It is extremely doubtful that all three were ever on the ship at the same time and in some cases one replaced the other. The rigging, while somewhat accurate, is not 100% complete. The color I chose to paint the overall model is UA 646 Maizuru Grey as it was the closest I could find to match the few color photos. However, I'm relatively confidant that some will tell me it is not the exact color of the ship; that is why I call it a display model. FULL IMAGES AIRCRAFT CATAPULT AND CRANE DECKS SUPERSTRUCTURE GUN AND DECK DETAILS As always, constructive comments welcome, and thanks for following the build thread. Ben / DRUMS01
-
MODEL: Churchill Mk IV AVRE with SBG Bridge KIT: AFV Club SCALE: 1/35 AFTER MARKET: - MiniArt British Tank Crew # 35332 - Rest-Cast Churchill Stowage #2 - Beadsmith S-Lon TEX210 Medium Weight Nylon Woven Cord - Master Models 7.92mm BESA Brass Machine Gun Barrel - Various Brass, Solder, Steel, and plastic stuff MODIFICATIONS: - adjusted forward tank suspension for bridge load - modified rear sprocket retainer (kit # missing) - added S-Lon cord to winch spool - created barrel spring (kit # missing) - scratch built intake and exhaust vent support rods (kit # broken) - modified tow cable retention hooks on tank (kit too short) - replaced front MG barrel with brass defined part - modified all cable connections with aluminum sleeves - scratch built "T" hook for cable bridge linkage - added pioneer tools and fire extinguishers (missing in instructions) - added forward driving lights (missing in instructions) - added exhaust retention bracket (missing in instructions) - created PE tow cable stowage channel (kits incorrect) - added figure helmet and TC microphone cables - added Tamiya tape for goggle straps - added all aftermarket items REFERENCES: - Tank Encyclopedia on-line - Imperial War Museum on-line - Wikipedia on-line - Churchill Infantry Tank, by David Fletcher - Churchill Tank, Haynes, by Nigel Montgomery PAINTS and STUFF: - Rustoleum black primer base - LifeColor Dark Green No.# 24, B.S. # 381 - Various Vallejo, Tamiya, and Testors MM Colors - Vallejo European Thick and Splash Mud - Life Color Skin Tone Set - Tamiya Panel Liner - Various Pastels SUBJECT: this model replicates the Churchill Armored Vehicle Royal Engineers (AVRE) with Small Box Birder (SBG) Bridge of the 5th Assault Regiment, Royal Engineers, 79th Armored Division, late 1944. Thanks for looking! Ben and Jarrod
-
MANUFACTURER: MPC SCALE: 1/25 AGE: Kit Molded in 1982 MODIFICATIONS: - display base modified with ballast. scale rock, and vegetation - all gold plated plastic (80%) discarded and replaced with real brass - cab interior scratch built plumbing, gages, and and controls - various operating rods added from scratch - drive wheel yellow stripes added - tool box created and tools added - oil can, lantern, wrench, and jack added in or around cab - hinges added to tender floor plate - gas filament added to drive light - over 100 nut and/or bolt heads added throughout - scratchbuilt valve rods, water valve controls, and steam bleeders PAINTS and COLOR: - Tamiya, Testors, Vallejo colors - pastels, pigment, and water colors used for wear and aging REFERENCES: - Wikipedia - The General 4-4-0 Stem Locomotive - Federal Railroad Commission - Library of Congress - Baldwin Locomotive Works - The Southern Museum (location of actual locomotive) PRO's: - great modeling subject - interesting war story behind real locomotive - nice scale makes impressive display piece when finished CON's: - very poor mold quality (out of register, flash, ejection pin marks) - right and left angles on parts were not square making correct fit difficult - soft detail on chassis and cab details - some parts molded incorrectly, incomplete, or not at all - terrible decals (most likely due to age) NOTE: The kit is not in the configuration or colors of the locomotive as it was during the civil war's "Great Train Race". The kit is similar to the train currently sitting in the Southern Museum. In the 1870s, the General was completely rebuilt, it had received a new pilot, boiler, and other components. Most notably, its three dome configuration was reduced to two domes, and its Radley-Hunter style balloon stack was replaced with a diamond stack, as the engine had been converted to burn coal. Indeed, the rebuilt engine had little resemblance to its original form. The locomotive was originally built to the southern states standard rail gauge of 5 ft (1,524 mm). After a change to the northern states gauge was mandated by June 1, 1886, the General was converted to be compatible with the U.S. Standard Gauge of 4 ft 8+1⁄2 in (1,435 mm). The kit was built my me and my special needs son over a span of several months (July 24th till October 9th). After many ups and downs we present our version of the "General" Steam Locomotive. Thanks for looking, comments welcome!
-
This aircraft was built by my special needs son and I (Jarrod and Ben respectively) and represents a "what if" Arado AR196-B single main float variants that was dispatched to Italy for duty in the Mediterranean. The aircraft did not arrive with any weapons in the wings, only the German 7.92mm shooting through the engine cowling, so they (we) added 7.7mm Breeda Italian MG's in each wing. The camouflage is a disrupter cross hatched line effect, as shown comonly on the Savoia Marchette SM79 schemes during the period. We know it is not perfect, but it is a decent looking 2 foot model. Constructive comments welcome as I read them to my son who enjoys them a lot. Thanks for looking! Brand: Revell Scale: 1/32 Paint: Vallejo, MIG, Tamiya, and Testors Other Items: - Kit World 3d printed seat harnesses - Master Model machined machine guns with PE sight - Eduard canopy mask - Verlinden printed battle maps - Aerobonus Stuka pilot and gunner figures (modified for this aircraft) - Quickboost resin open port exhaust ends - Trumpeter riveting tool on wings and fuselage - Alley Cat replacement canopy set - Eduard propeller and spinner - Master Models 7.7mm Breeda Italian MG barrels in wings - Guitar string used for cable wire bracing the floats - Kit World Decals set for an Italian Dornier DO-335A - Hungarian Aero Decals for the Italian Fiat CR-42 - Eduard spinner masking spiral rings - Custom 6 inch round wood base with routed edge - Custom photo image of Italy added to display base - modifications using brass, aluminum, resin, and solder
- 9 replies
-
- 11
-

-

-
Been a member here for long time but only sporadically active . Completed by my special needs son and I over a 7 month period. Kit replicates the tank "Attila" of the 18th Tank Battalion, 8th Armored Division, Harz Mountains, Germany, April 1945. Your feedback is encouraged as Jarrod really enjoys me reading him your responses. MODEL: Sherman M4A3E8 "Easy Eight" SCALE: 1/16 MANUFACTURER: Andy's Hobby Headquarters (TACOM) PAINTS: Tamiya, Testors M-Master, Vallejo, MIG, Artist oil free pastels, water color pencils. Along the way, there were several aftermarket and scratch items added: - Peddinghaus 1/16 US Uniform Insignia and Division Officer Badges - Archer (90mm - 1/4) Photorealistic Human Eyeball Decals - 1/16 Scale US Tank Accessory Set C K Ration Boxes - Peddinghaus 1/16 .30 Cal M19A1 Ammo Can & .50 Cal M2 Ammo Box Markings WWII - 1/16 Allied Tank Bits #3 - 16-ATB-03 - For Shermans - MIG 7168 Flesh Tone Paint Set - Vallejo Rust and Chipping Effects Paint set - 1/16 Sherman Tank Crew (resin four figure set from China) - Various shades of Vallejo Textured Mud Paints - All straps, slings, and tie-downs made from scratch using lead foil and PE spares - Scratch built microphone sets and helmet cords for tank crew - Scratch built lower torso's for the driver and hull machine gunner. - Forearms and hands added to driver and hull gunner - Scratch built fuel and water can holders (field modifications) - Scale rope from hemp colored and used for tie-down of spares on upper hull - Other stuff I can't remember Without any more blabbering, here is what Jarrod and I are going to call the final results for our muddy and battle hardened 1/16 Sherman M4A3E8 "Easy Eight". Thanks for checking it out.
- 6 replies
-
- 10
-
-
-
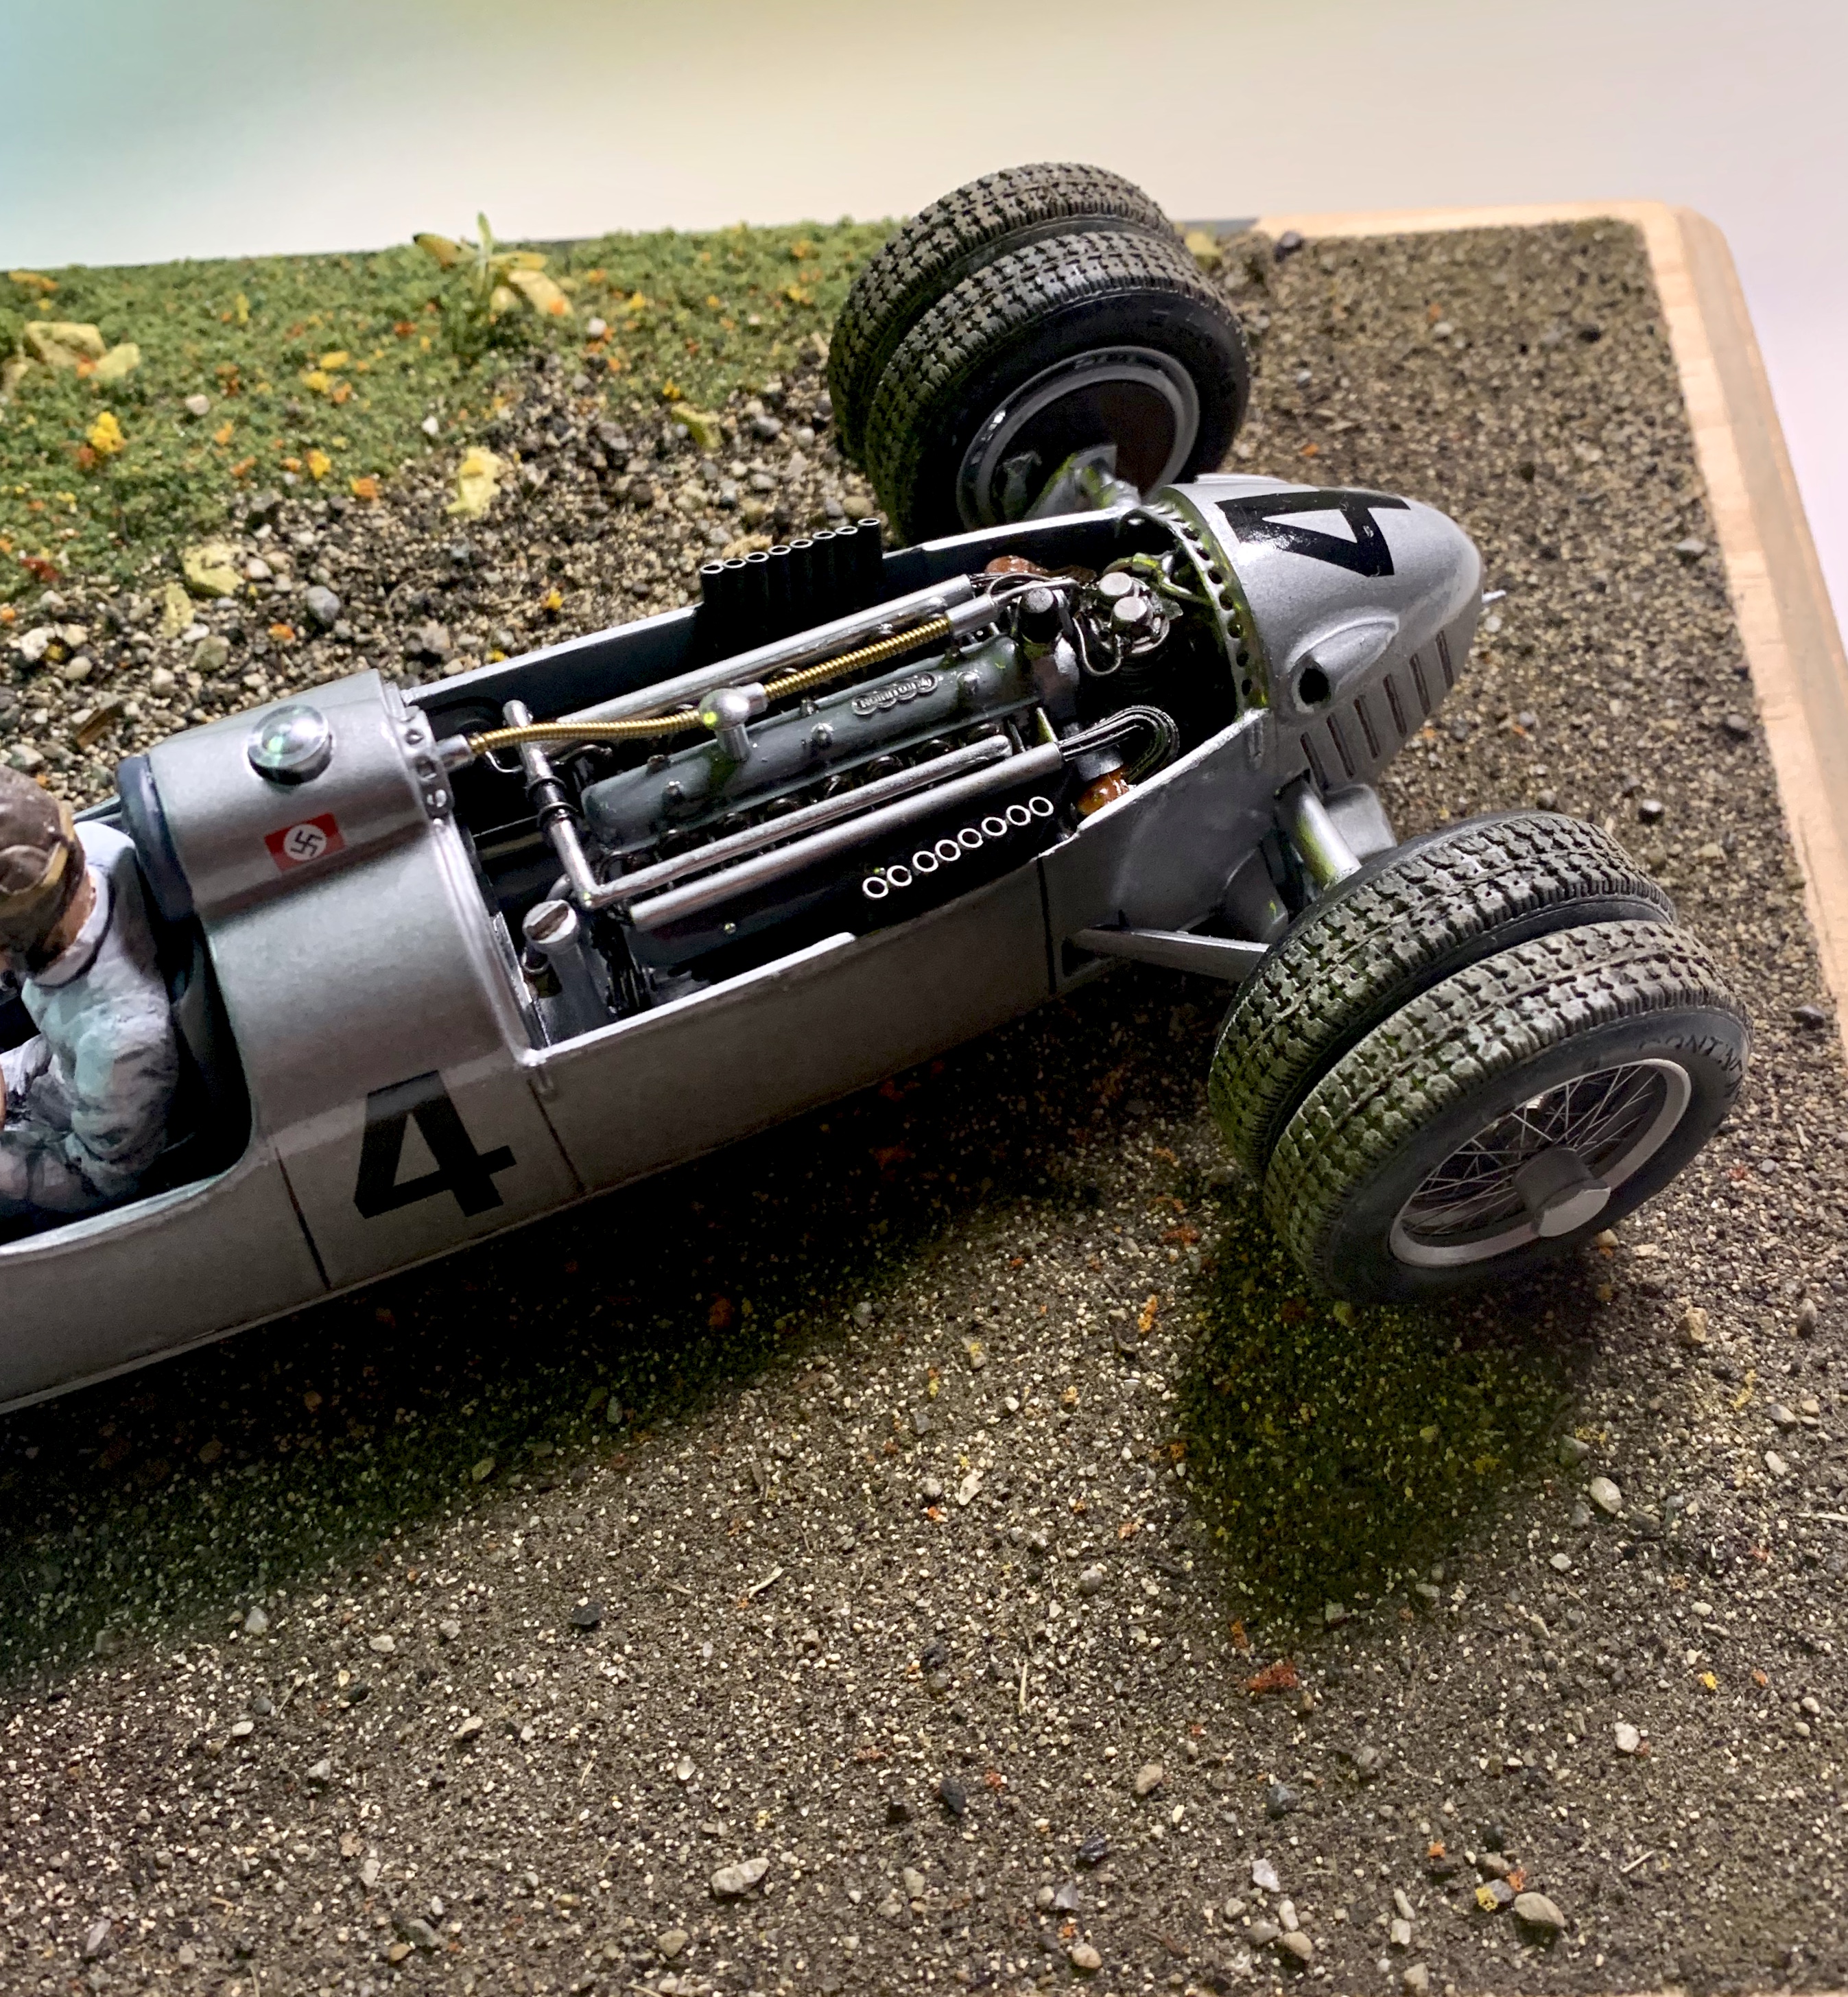
Thank you very much BOMBER_COUNTRY, HARV, and GAZZAS, glad you like the results. I also provided the build like if you want to see all the problems and extra things tossed at the kit. It started as a labor of love, but quickly turned into a challenge, ok actually fight. I've built several Revival kits and I believe this one will be my last. Regardless, I'm glad it's done and at least to a level which can be displayed. You are absolutely correct LANDLUBBER-Mike, this is not one of Revival's best kits. For numerous reasons, I would only recommend this to an experience Revival modeler who likes challenges. As for the color, metal body Revival kits come pre-painted. Mine paint had imperfections as well as flash in it along with a large seam like what you would see in the fuselage of a poorly molded aircraft. So after stripping the paint I primed it with Tamiya primer then painter it with rattle can Krylon Aluminum. Believe me, it would've looked even more impressive if the clear coat did not have a reaction changing the metal aluminum finish to resemble a German Gray metallic finish. The finny thing is the final finish is much more accurate than the Revival color of the straight aluminum, so everything worked out. They only used the four rear tires in the European Hillclimb sessions of the Grand Prix series. Thanks you too BELUGAWHALEMAN. T was drawn to the rear engine and dual wheels in the pre-WW2 period, but after doing my research on the actual cars, I was even more impressed with not on the vehicles, but also the drivers and race results. I provided a link to the build string which has some good information on the car, engine design, and driver. Till next time.... Ben / DRUMS01

-
Thanks GazzaS; it took far longer than I thought it would, but I believe the finer details add another level of life to the build. Thanks so much for the kind words. Well LANDLUBBER - Mike, that is exactly what I hoped it would do, draw you in closer. I have a friend in another forum who helped authenticate many parts of the build through first hand experience and from family SAS history. Now that I have a German Kubelwagen and a British SAS Jeep I need to come up with something for the United States,.... hummm And wow back at you BELUGAWHALEMAN thanks for the interest and gracious remarks. What do you think, should I build something American? Thanks HARV, always good to hear from you. I take all comments and critiques, but like everyone else I enjoy the positive ones the best. Hope your doing well and modeling something? Aircraft I bet.... My current build is a 1/32 Arado Ar 196-B seaplane from Revell. I hope to post the WIP on here soon. Sincerely, Ben / DRUMS01
-
OK, I may have one of the longest bouts of procrastination of anyone in our forum. After my update last October, almost a year ago, the display / full conversion was not complete. There was still some special detailing, painting, pastels, and more that needed done. I can finally say that my conversion of the 1/18 toy die-cast Solido jeep is now finished. Some of the items I've added include 30cal ammo cans, Thompson SMG, expended brass and metal links from the M2 50 cal. MG, and much more. Along with the numerous additions I finally had time to finish the detail painting and pastel work throughout the model. And here is one of the top additions, an actual SAS unit crest/pin added to the base of the display. I feel it adds some partial authenticity to the build; I hope you like it as much as I do. I wish I would've kept track of the various after market and scratch built additions added to the build because it was numerous. It is safe to say that every part of the initial toy keep has been modified or replaced. Tamiya, Vallejo, Model Master, MIG, and some obscure other paints were used. If you look close I'm confident you will find many things that you didn't see in the initial build string stuffed in here. So enough blubbering, here is the final reveal of my SAS jeep. If you have questions, please don't hesitate in responding and I will answer the best I can. As always, your thoughts, remarks, critiques, constructive criticism are all welcome. The build string can be found here: http://intscalemodeller.com/viewtopic.p ... 5aaed0492c FINAL PHOTO'S: Till next time, live laugh and love well. And until next time model something! Ben / DRUMS01
-
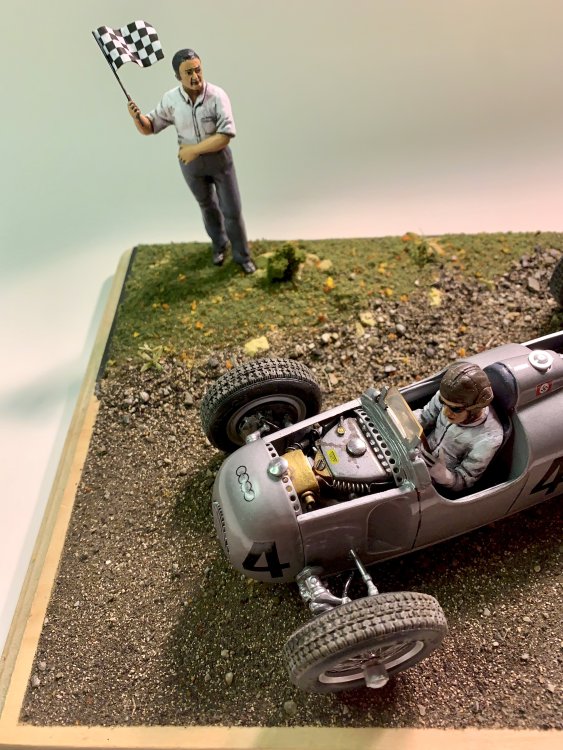
It seems like it's been a long time coming (at least for me) but the 36 Auto Union is ready for her final reveal. Revival initially made all metal (almost all) kits like this being originally molded in the late 70's or early 80's. Normally the bodies come pre-painted and the wheels already spoked. This build was completely stripped to the metal and all seams and ejection marks filled. In addition, many, many items within the body have been sctatchbuilt including the dash and entire footwell. All of the kits hoses have been tossed and scale correct plumbing added based on source photos. The driver was a mix of three 1/20 and one 1/18 figure mashed together and shaped to fit the cockpit while holding the steering wheel and shifter. I could drag out the thread on every minute detail regarding the numerous scratch built or modified items, but I will let the images do the talking this time. Here is how the car looked after rubber was mounted and final details added under the front bonnet and rear engine cover. The car is fully plumbed and wired. This provides a good view of the front suspension and grill. The thin grill spokes were black plastic that was highlighted with a silver permanent marker. Here is the view that most every other racer saw when competing against it. You can also see that the seam through the body center is G-O-N-E. In this photo you can see the determination on the drivers face, a man on a mission. This is the flag man who was once a modern F1 team manager. I think the conversion turned out credible (IMHO). And these are some neat photos at the family reunion, or should I say Family Auto-re-Union. Distance cousins, but you can see the family DNA. The display base after the remaining layers and details were added then the routed edges painted black. This is my completed 1/20 1936 Auto Union molded by Revival. If you have followed the build thread found in FSM, ISM, and Open Wheeled Modeling Forums you will know the amount of scratch building, modifying, and build issues associated with this kit. Because of the mixed media, poor fit issues, difficult instructions, and in some cases extremely small parts, I would only recommend this kit to veteran builders that are experienced with older die-cast kits, and want to have a challenge. Nuff said, here it is: Ben / DRUMS01
-
Broken wrist and two broken feet, and my hobby pit is in the basement, so not much going on for me except healing. Even if some of my stuff would be brought up stairs, it would still be very hard modeling with only one hand. I'll be back posting soon, until then I'm enjoying everyone else builds. Ben / DRUMS01
-
What is on your bench right now ? Share a picture :)
DRUMS01 replied to Martinnfb's topic in Modelling Discussion
I am finishing up something totally out of sorts for this site, a 1/350 Tamiya IJN Yamato. While it is the older generation kit, I did add the after market wood deck, full Lions Roar PE with brass barrels, anchors screws, etc. While it has ben a six month build, I can finally see light at the end of the tunnel. All I need to do now is rigging, weathering details, and small seaplanes. Perhaps I will post in the "other.misc. stuff when done(?). Great looking builds by the way everyone! -
I was walking around a chain store called Hobby Lobby and wandered into the clearance section to find a 1/12 model figure of the bounty hunter Boba Fett. It was one of only a couple Bandai items in the clearance area. So it was marked down 35% and then they had a flash sale in the model area of another 40% off. He will look good along with his partner, the Mandalorian (also got at a huge discount on him earlier this year) While not epic, they are great deals that will allow me to branch out from my normal type of builds. Ben / DRUMS01
-
Actually, due to recent events, my mind has been on world events. Because of that I've been listening to a new play list: - Mike and the Mechanics: Silent Running (on Dangerous Ground) - Tears for Fears: Shout, and Everybody Wants to Rule the World - Toto; Home of the Brave, High Price of Hate - Dixie Chicks: Better Way, Not Ready to Make Nice - AC/DC: Dirty Deeds Done Dirt Cheap - Alice Cooper: Go to Hell, and No More Mister Nice Guy - BonJovi: Blaze of Glory - Breaking Benjamin: I will not Bow, Never Again - Def Leopard: Undefeated - Eddie Money: Peace in Our Time - Extreme: Rest in Peace - Evanescence: Bring me to Life - Fireflight: Unbreakable - Halestorm: I Am the Fire - Lacuna Coil: Die and Rise - Little Texas: Kick a Little - Muse: Uprising - Nazareth: Hair of the Dog - Pat Benatar: All Fired Up - Richard Marx: Don't Mean Nothing - Scandal: The Warrior - Seal: Crazy - Starship: It's Not Over (Till It's Over) Still working on this list, it's a WIP..... Ben
-
I built this beast several years ago and had the same experience you have so far regarding the fit. My wings were also warped a little. I believe I used half a tube of contour putty to fix the fit and seams between the fuselage to wing and the fuselage four parts too. Take care on the landing gear as it can be difficult getting every wheel to sit on the ground too. It was a challenge but rewarding once completed. Your work is looking good so far, keep it up. What are you going to do for the panel lines? Like I said, good work so far.... Ben
-
Thanks Drifter and Peter, it was a fun build and I'm glad you appreciate the effort. Ben
-
Stunning diorama. The clean work, detailed painting, figure details, sets a high bar for others to follow. This one should be front and canter in your display. Ben
-
Special Hobby Westland Whirlwind M. I
DRUMS01 replied to joeg's topic in LSM 1/32 and Larger Aircraft Ready for Inspection
Wonderful build and presentation. Thanks for sharing it with us. Ben -
Thanks Peter, your comments and interest is well received. Also a belated hello to Biggtim and thank you as well. After much research I started adding the base colors to the figures uniforms. They are going to be the standard British brown, the load bearing gear will be light brown or tan, and the berets maroon (thanks to RangerNeil's authentication). I had a tough time trying to authenticate the boot gaiters (?- canvas wrap around the top of the boot). I found that they had a color similar to OD Green, a brown, and a tan; depending on the uniform being work or theater of operation. From what I could locate it appears that the north Africa or Mediterranean areas had both tan and green, while the European theater had green or the dark brown. Mine will be either tan or green. You can see in the various photos below, (some are rein actors), that various colors of gaiters were used. The center M2 50 floor mount was finally added. This was actually done prior to adding all the other "stuff" shown in the previous update. I did this so I could better prepare and finalize the location for the trooper manning it. Here are a couple pictures of how it will look eventually, but there is still much to do. Here is the beginning of painting and shading on both figures. Along with the various washes, dry brushing, and shades of paint, additional items were secured to better detail the figures: After some time detailing the figures I finally added the driver to the jeep. If you look closely you can also see the M1919 30cal. MG added to the left front of the driver (on the jeep). Here he is mostly done but still requiring minor tough-ups, dull coat, and pastels. The SAS beret sash proved impossible to find in scale, so I printed it, sealed it with satin clear, and applied it using white glue. All the weapons and figures have been added. I will wait for the final pastel and weathering until a display base is completed. I hope those following along have enjoyed the build. Special thanks to RangerNeil for his special SAS knowledge and clarification. Here is what it looks like to this point: As always, thanks for following along. Your interest, participation, feedback is always appreciated. Ben
-
This update is for adding the radio set. The purchased from Shapeways provide to be a good one. It is very accurate in size and details when compared to source photos. As previously mentioned the material did not like CA glue or acrylic or enamel paints, even after a thorough wash and scrub (?). The item came as a four piece set which consists of the radio, fender mount, antenna base, and RT headset. Here are some photos of an actual radio set: And after some painting and light detailing, here it is: I made the angle iron brace for the fender mount from two pieces of cut strip plastic. Here it is mounted with the antenna cable made from solder and added. The radio face and clamps were washed, dry brushed and detailed picked with a hairy stick. Afterwards I sourced some decals from my spares. The cable from the power supply is also solder and the fitting from spares. Overall I am happy with the results. In the photos you can see that the M2 MG mount has been installed, ammo cans pushed into the available spaces by the jerry cans, and my completed mason mat has been added to the back of jeep against the tires. Here is a better view of the completed Marsden Matting attached to the rear: Starting finishing the little things. My first update is the Vickers MG. I was not satisfied with the initial base coat and dry brush. After cleaning it up a little more I applied gunmetal instead of flat black then a lighter and more even dry brush to the barrels and receiver. I believe I also mentioned I may paint the side of the ammo drums to match what was seen during the period. Once painted I applied a dirty wash and some chipping. The front sight was painted red and the hand grips a dark wood (some during the period were also a black plastic). Well, I decided to call it quits on the Vickers before I mess it up, here they are: When looking at many of the period photos it is common to see a rope wrapped around the front bumper. I tried several methods to mock up something to resemble scale rope. I found yard and string to be to hairy. I decided to try rolling some solder together to make a possible rope. Then I bought a waxed shoe lace. At last I settled on a nylon thread (size 8). It was easy to cut and glue the ends to prevent any fray. When comparing them, the nylon is definitely the way to go, it is the second one from the top: More little things included some decals in the engine compartment: While starting on the figures I decided to add a little something.Here is something fun I made from scratch, a wrist watch for the driver and gunner: Now it was time to apply some of the smaller items I gained from after-market, spares, or scratch. Looking close you will see numerous bags, ammo cans, tarp, maps, British canteen, C rations, German grenades, and more. One area I chose to add a little extra was applying straps to the bags, canteen and the like. They were made from lead foil, painted, and washed. I think it is starting to look more like an SAS jeep, yes? Well, thats it for this update. I hope everybody has a happy and healthy new year. Ben
-
Not much feedback coming, so I will just keep pushing along. After sanding the Marson Mat smoothing the plastic edges I then applied base coats to see if further shaping was needed. I think a little more is needed then a repaint. Next I created a new exhaust from the engine to the skid plate. This was a rework from something I tried earlier. The new exhaust was needed to allow for the steering box and link to fit properly. It has been added, painted, weathered, etc. Another rework item completed was a modification to the drivers foot that is resting on the side of the jeep. It was interfering with the M1919 post brace (travel lock). After the foot surgery I still had to slightly modify the travel lock bar as well. Both the foot and bar have been repainted. - Completed the work on the jerry cans, both on the bonnet and in the rear rack. The cans on the bonnet have a tarp laid over them with a shovel and axe on top with tie-downs holding it all together. The tarp is thin lens cleaning cloth that was painted and shadowed prior to the implements being placed on it. Both implements (the axe and shovel) are modified from a 1/18 Sherman Tank toy. The tank tie down straps and mounting bars were removed from the implements and then reshaped into what you see here. I used a razor knife to replicate some wood grain that was brought out with some washes. The cloth strap over the jerry cans replaced the terrible (fake) looking raised plastic strip molded into the plastic. It is actually 1/8 inch border / ribbon from a sewing store that has been painted. Last was the small straps (scaled to be 1/2 inch straps) that I created using Tamiya masking tape with the sticky sides pressed together and then cut to width. The metal strap tie-downs are spares from my P.E. stash. The straps were applied with CA glue after being painted and washed. The last step was to add the previously painted rolled tarp to the front of the hood/bonnet. This is what I ended up with and I am satisfied to this point. Speaking of the hood, I finished the washes and placement of wiring or hoses, including radiator hose clamps under the hood. I have not decided but I may add a couple decals in here for some of the components (battery, oil - fuel - and gas filter, voltage regulator, etc.) I also used the 1/8 border cloth to rework the straps on the rear and side jerry cans as well. Both the rear and side cans also had holding brackets added to them by using sheet plastic cut into strips and glued to simulate the metal rack used to secure them in the vehicle. The cans were painted to simulate various tan colors used within the operational theater and black for the water cans. They were then pick painted to reflect chipping and wear along with a sandy dirt wash. In this photo you can also see the M2 tri-pod and ammo crate added to the rear stowage area along with the jerry cans on the fender. Next update will be the new radio set I just received from Shapeways. Till then thanks for looking, and feedback is encouraged. Ben
-
Continuing to get everyone up to speed on where I am with this toy to model conversion. It is time to begin the work on the M151 chassis. Here is what it looked like after disassembly and prior to any modifications. You can see the location up front by the transmission and mid way back between the chassis frames. Those are to spots where I removed the extra long posts that were molded in to hold the toy to its display base. On the back of the chassis you can also see where I started to add a hitch. The wheels were a challenge to remove without permanently damaging or destroying the spindle or chassis mount, so I am keeping them attached and will modify around them. And the other side where you can still see part of the soft black plastic representing the tie rod. All of the differentials, drive shafts, axles, springs, shocks, are all in the extra soft glossy black plastic. You can also see the other ugly attach points to fix the chassis to the die-cast body, those will also be removed. In the following photos you can see some of the scratch building done to the chassis and modifications such as removing large parts of the molded in flat space around the engine and between the main chassis spars; adding the correct sheet metal, nuts, and bolts; fabricating the steering box the the box mount on the frame. Up front I added towing shackle points to the front bumper and a welded tow ring. I saw this set-up on one of the armored SAS jeeps of the period. Here you can see the beginnings go the steering box. If you look close you can also see the new radiator cap and overflow tube. In this photo you can see the adding of the tow chain loops and the correction between the frame rails. You can also see the beginning of the creation of a new transfer case as the one with the toy was on a half relief and toy like in detail. The screw holding the rear differential in place will be removed later and the space filled / corrected. Here is a major portion of the scratch built transfer case. Here you can also see where I am pealing back the flat dead space around the engine (still more to do in removing that area). The front and rear drive shafts were soft black plastic without any accurate details, so I removed them and created new ones from brass, plastic, and aluminum. Here are the new ones being created. You can also see the beginning of the corrections to the front differential (where the screw was). At this point the following has been things have been done: - drilled and bent and redirected a copper wire to replicate radiator overflow tube (again) - corrected the hollow back of the radiator with screen - added guard around radiator from scratch - removed blob from top of radiator and added an accurate radiator cap from spares - cut plastic strip to replicate the continuation of the main chassis frames beside the engine - removed solid plastic from under engine and front chassis You may also notice that my first scratch built bell housing and transmission has been replaced with another one, shown here. It is still a WIP as the top of the transfer case needs to be created along with modifications to the lower firewall to allow for the proper space for the previously mentioned items. In this picture you can see the following updates: - finished the rework of the chassis, other than a couple little things and some final painting or weathering. - completed the replacement of the toy drive shafts with ones using using brass, solder, and plastic for the U-joints. - removed the screws from the differentials and completed their rework. - added other parts to the engine and ran basic fuel lines to the carburetor. - weathered the engine and added it to the chassis. - added the second scratch built transmission to the body and chassis. - created and added the last part of the transfer case. - added the top case to the transfer case and rear of the transmission. - began the weathering to include mud/dirt on the chassis. - started the wear, discoloration, and chipping on the wheels. - many other little things I can no longer remember (smile). Because of how I am planning on displaying the jeep once completed, I decided not to rework the wheel drums or add brake lines and they will not be seen. When setting the body on the chassis I could still see items missing that were not part of the toy, such as the voltage regulator or fuel filter that reside in the engine compartment on the right fender and right firewall respectively. Here are the initial creations of those parts: Here are some more of the items that will find their way into the model before completion. During this phase I also created the throttle linkage and line; detailed the battery along with adding the positive and ground cables; and created the radiator and firewall mounts for the bracing rod. Before adding the body to the chassis I began final work for the body mounts as well as various nuts and bolts. When test fitting of the body and chassis I found that the tight tolerances of the steering box and exhaust would not allow the body and chassis to mate properly. After looking closer at the problem I found that the exhaust I made was incorrect. It should exit the engine bay in front of and to the right of the steering arm. I also found that the bend I created for the exhaust I previously attached to the skid plate was also incorrect. Once those parts were removed the body and chassis fit just fine. After the last bit of weathering and wear I attached the body to the chassis with CA glue as the screw attach point are now long gone. Once the joint had dried to a strong bond I began the finishing of the engine bay. First I added the battery along with the ground wire to the chassis and the positive to the starter. Next was adding the voltage regulator to the fender the ran the wires to the engine. Next was adding the fuel strainer to the firewall and its lines back to the gas tank and to the fuel pump. The throttle linkage was next, adding it to the right side of the carburetor and snaking the line to the lower firewall towards the accelerator. The next detail item was the bracing rod from the firewall to the radiator (across the flat spot on the air cleaner tube). After some final washes and dry brushing here is the results (the only thing remaining is the decals): In many of the photos I found a 5-6 foot length of Marson Mat (also known as Marsdon matting) attached to the back of the spare tires. It was used to get the jeep recovered when stuck in the sand. My problem is I have nothing even close to make it from. Surprise, surprise when walking through a craft isle in Hobby Lobby (chain craft store in the USA), I found some perforated aluminum sheet that I thought could work if cut and modified. Here it is cut bent and thin sheet plastic strips added. I think more sanding is needed to soften the plastic edges before moving forward And here it is up to this point. I still have to recreate a new exhaust; modify the driver (more); get and finish the radio set; paint and decal some items (ammo cans, air and oil filters, etc.); recreate and paint all new straps for the jerry cans and other items tied to the jeep, complete the Marson mat, acquire the final missing parts, finish assembly and paint of the figures, add all the components to the jeep, and start on the display base. Till next time, Merry Christmas, stay healthy, love well, and model something. Ben
-
I am really excited about the build as I finally got my orders from China and Australia. My plan is to modify the figures to fit the jeep and change out the heads to reflect a couple of SAS soldiers wearing berets. Each figure came unassembled with a two part lower torso with a leg, a center body, two arms, and a head. While they were designed for a jeep, it certainly wasn't this jeep. After some heavy clean-up and removing the large blocks usually found on these kind of resin figures I was ready to begin. First was the driver, after assembling the legs with lower torso I had to heat and bend them to fit the seat, steering shaft, and floorboard. Next was changing the arm positions by about 1/8 in to properly fit the steering wheel and side of the jeep body. Last was the shaping of his bum to fit the seat without hovering in the air. Here is what he looks like: The heads that came with these figures will not work for two British lads so I ordered separate heads from ROL Models (with the berets). With one figure almost how I want them posed, I began working on the second figure. He is going to be standing behind the driver and leaning on the M2 50 cal MG. The same process was performed (heat, bend, trim, shape, glue, etc). Once I was satisfied with the second figure I needed to adjust the height of the 50 cal mount. After 4 attempts I think I finally got it how I want it, check it out: Here are some other bits I've been working on as part of the overall assembly. Several things going on here, such as: - added radiator overflow tank with plumbing and bolts to radiator - finished the bracket on the left front fender for a tactual light that was removed - added the 30 cal MG mount to the driver's sided-section The next detailed correction I had to fix was the front bonnet / hood clamps. The photo below is how it came from Solido other than the faded black line around it that I initially added before deciding on making them from scratch. The first thing to do was remove the bumps from the bonnet. With a combination of brass aluminum, plastic, solder, and PE I was able to closely replicate a set of hood clamps. Here they are showing the three part lower hinge attached to the hood (it was easier than trying add them to the fender as then they would have to be functional). The "T" handle spring assembly is made up of two brass rods, one inserted into the other, and shaped plastic handles. Next I made-up the hood latches from scrap PE connectors; they were simply bent in a "U" shape to fit under the "T" handle. And here they are added to the hood. While not fully functional or perfect, I think they are a definite improvement over the generic lumps molded into the die-cast. I did find a 1/18 standing SAS soldier in the desert uniform, but I am not sure how he would look with the two I already have that are not in the tropical wear. I am thinking of adding it to a mini diorama, similar to the one I made for the kubelwagen, but with a desert theme. If you have any ideas for the diorama please let me know. I will most likely be making sand bags from milli-put or modeling clay. I ordered some items from another vendor (Marauder) to add more details which include a WW2 field radio with handset, several German stick grenades, a couple British small ammo pouches, canteen, and satchel with strap (haversack). Like I previously mentioned, I do not know how accurate versus toy like they will be until they arrive. Next I added rounded bolt heads for each of the four tie-down brackets around the back half of the jeep. After de-seaming the brackets I filed the mounting points to something more scale appropriate then I added very small drops of medium super glue to simulate the rounded bolt heads. Other items I accomplished on the build to this point: - created and added reinforcement under the front fenders according to source images - created and added reinforcement sheet metal (plastic) in rear fender wells per photos - created and added various bolt heads around the jeep body - researched locations and photos for body mounts and tie-downs for canvas top - researched, created and bent solder to replicate the rest of the exhaust - added the new exhaust to the bottom skid plate - acquired and added rear tow hitch - fabricated and added tow chain hoops to rear bumper - fabricated and added twin shackle points to the front bumper - drilled and bent and added copper wire to replicate radiator overflow tube - removed blob from top of radiator and added an accurate radiator cap from spares - cut plastic strip to replicate the continuation of the main chassis frames beside the engine - researched detail photos for the steering box to be scratch built - research and obtained detail photos of chassis cross braces and bolt head locations Back to the figures, I would say well over 70% wore the Shemagh when in the desert. With that said, I did see a few using either a beret or the saucer cap instead as well as coveralls or long pants and long sleeve shirts: Considering the dress code in the above photos I thought the figures I am using would still fit with the theme of the build. Below is what was more commonly worn by the SAS desert rats. I think I should be painting the berets either beige or Maroon, is that correct? Also for future builds, can anyone confirm the following information regarding UK beret colors. If this is correct I want to keep it for my reference standard: - Maroon - The Parachute Regiment, also attached arms of 16 Air Assault Brigade. - Commando Green - The Royal Marines and those attached ranks who have passed the All Arms Commando Course. - Black - The Royal Tank Regiment and The Westminster Dragoons. - Cyprus Green - The Intelligence Corps - Nicknamed the ‘Green Slime’ within the Army. - Light Blue - The Army Air Corps. - UN Blue - Worn with the UN badge by those deployed on a UN peacekeeping tour. - Medium Green - The Adjutant General's Corps. - Rifle Green - The Rifles (light infantry by tradition), The Small Arms School Corps, the Royal Ghurka Rifles, the Essex Yeomanry. - Khaki- Worn by many infantry regiments including the Scots Guards, Irish Guards, Grenadier Guards, Coldstream Guards, Welsh Guards, Honourable Artillery Company, 4/73 Special OP Battery (RA), Royal Gibraltar Regiment, Yorkshire Regiment, Duke of Lancasters Regiment, Royal Welsh, Royal Anglian Regiment and Princess of Wales Royal Regiment, also attached arms to these regiments often use the Khaki Beret. - Beige (often misnamed sand) - Worn by 22 SAS, 21 SAS, 23 SAS, 264 (SAS) Signal Squadron and 63 (SAS) Signal Squadron (V), also attached arms who are not Special Forces trained wear this beret when serving with the SAS. Not sure whether 18 (SF) Signal Regiment also all wear beige. - Scarlet - The Royal Military Police. - Navy Blue - Worn by the 9/12th Lancers, Army Legal Service, Corp of Army Music, Royal Electrical and Mechanical Engineers, Royal Engineers, Light Dragoons, Queens Own Yeomanry, Royal Army Veterinary Corps, Royal Corps of Signals, Royal Dragoon Guards, Royal Logistic Corps, Royal Artillery, Queens Dragoon Guards, The Royal Mercian and Lancastrian Yeomanry, Military Provost Staff, Royal Regiment of Fusiliers, C (City of London Fusiliers) Company, the Army Physical Training Corps, Royal Army Medical Corps, Royal Army Dental Corps (RADC), The Blues and Royals and The Life Guards. - Grey - Queen Alexandra’s Royal Army Nursing Corps, Royal Scots Dragoon Guards - Irish Green - Royal Dragoon Guards and Queens Royal Hussars, The Royal Irish Regiment technically don’t wear a beret they wear the Irish Caubeen. - Navy Blue - The Royal Navy. - RAF Blue - The RAF Regiment and the RAF itself. - Brown - Kings Royal Hussars and Royal Wessex Yeomanry Before moving on to the chassis and drive train, I wanted to finish the major modifications and updates to the jeep body. One of the first items to fix were the ugly screw anchor points. Two of them could be seen in previous photos and here are pictures with them removed. Before moving on to the chassis I started reworking the remainder of the body issues by doing the following actions: - filed and filled the ejection marks under the bonnet. - trimmed and filled the previous mounting pins in the hood. - added the bracing beneath the bonnet. - painted and weathered the bonnet. The main body was repainted and then lightly weathered and chipped to reflect wear and usage but not neglect. Next up is the many modifications to the chassis, stay tuned and thanks for watching. Ben
-
While I started posting this on another site, several of you asked me to include it here. It started off as a die-cast from Solido. I will tell you up front that this will not be a simple paint job and add stuff, instead it will be a complete rework and modification hopefully worthy for this site. While some of the stuff is there, it is not very detailed, painted correctly, or just plain accurate. I mean come on, look at the front tarp, or the jerry cans, or even the bags on the side. Look at the gap and holes between the dash and bonnet (hood). I could go on, but you got the idea. It is also very sterile when the actual SAS jeeps had a well worn and saturated look to them like the photos below. This 1/18 Solido SAS jeep is a rather rare find. I can normally locate one for every 1,000 regular WW2 variants. Prices for the SAS Jeep usually ranges around $45.00 USD and up, but deals can be found if your patient enough. Some of the less than desirable portions of this toy were: - poorly molded tarps and gig bags - mixture of black and tan soft plastic with a painted metal body (different mediums and shades) - M2 machine gun molded out of scale (far too small) - many items incorrect or in the wrong locations, example radiator overflow can - terrible mold lines, cast seams, and ejection pin marks everywhere - greasy/oily soft plastic parts that do not like modification - many items lacking any detail - large holes and gaps in the die-cast body mold as it is used for numerous versions by Solido - toy-like chassis with several items either missing or only showing half or no detail - terrible lump of plastic between the rear jerry cans, suppose to be a tarp covering storage I'm also learning that finding anything in 1:18 scale to detail this with is difficult. While there are "toy' items available, there is nothing in the modeling contingent in 1:18 for this kind of build. Likewise, when looking at 120mm items; many items listed as 120mm are not consistently 120mm. Also some of the stuff listed as 1/16 is noticeably larger than 1/18 and can't be used. I've ordered some items from ROL models that I hope will be close enough to scale. There is another on-line vendor called Marauder that makes toy accessories which might be improved upon to use. First was to fully disassemble the die-cast and plastic components without breaking anything. When tearing it down, I also took a moment to remove the long screw attach points on the plastic chassis that kept it on the toy base. Once fully apart I started on the engine. Looking at photos of the early M151 Jeep, the drive line did not change during the war to speak of. Here is a view of the actual engine. This shows a good view of the horn trumpet, radiator hoses, carb, fuel pump, and manifolds. I will have to scratch build a horn, fuel pump and bowl, lower radiator hose, radiator reinforcement rod, oil filler tube, and some other stuff. The complete left side of the engine block did not exist on the die-cast, so I added it and the access panel too from plastic sheet. You can also see part of the rear bell housing in the photo that does not exist on the plastic part of the kit so I added it as well. On the other side of the engine is the distributor, air cleaner element, oil filler, battery and perhaps the regulator(?). All of this will also have to be scratch built, and more. Note that the battery is not vintage but a modern cell type: And here it is with the previously identified corrections; most everything has been made and added to include the exhaust, corrections to the carburetor, radiator hose (less clamps), distributor, rear bell housing, alternator clamp, oil fill tube, fuel pump / bowl, and several other items. And here is the completed engine. All the base coats are done. All that remains is some hose clamps, decals, weathering and wear. Regarding an SAS jeep, I noticed that some were set-up as a command jeep (radio kit and the like), others were one or two gun recon or staff vehicles, and some like I am making were the "gunny" or weapons jeeps (maximum firepower). Looking closely at various photos of the period you can see items on the SAS vehicle from the U.S., British, Germans, and just about anything else that could serve the need. I think that's what I like about these vehicles, everything not needed was stripped off and anything desired for the mission was added; sort of no frills and all purpose machine. I made a decision to remove the plastic square lump from between both racks of gas cans in the rear. I think it added very little for the large space it took up. Also, I am considering adding a person in the back on the M2 MG so the space was needed. The immediate problem when removing the square lump was the two protrusions coming up through the floorboard that attached the square blob with jerry cans to the jeep (see below). The are three opening cut in the floor and two reinforcement bars molded into the die-cast protruding above the floorboard too. The M2 50 cal. mount was a part of the square blob previously removed, and it was actually hovering above the floor. In this photo I started adding the reinforced M2 50 cal MG floor mount. I think I have a solution for this lumps and bumps coming through the floor that I will show later. Talking about major holes or cut outs, I also added a thin sheet of plastic to the front of the top firewall (Under the front bonnet). Prior to adding it there were six different holes and cuts including the two I kept for the dogleg hinges of the bonnet. I believe they were there to be used with other jeep variants that the mold was used for. While working on the front of the jeep I also observed that nearly all of the SAS jeeps had several of the grill bars on the jeeps removed (usually keeping the center two). Based on the real vehicles photos I did the same to the die-cast body. This photo shows the jeep body sitting on the yet to be reworked chassis. If you look closely, you can see the horn I added to the right firewall as your looking at it. Also the front bumper has been modified too. Before moving on to another complicated assembly I used my home made punch set to make some headlight covers which will be painted in a close but not exact color for the jeep. The toy has the coolant overflow / expansion tank mounted on the left front bumper. Every photo I could find shows the tank mounted to the grills right corner, or the opposite side and different location. Looking at the radiator it is clear that the expansion can should be on the right to tie into the overflow drain tube. After cutting the tank from the bumper I added the mounting bracket using thin sheet plastic to replicate the real metal bands. Along with the mounting straps I also added a filler cap and a mark for the tube that will be between the radiator and the tank. I will also be adding a metal bent breather tube. In order to fix or in this case replace the front canvas tarp roll it needed to be removed. I used a Tamiya thin blade razor saw to separate the jerry cans from the front "jelly roll". Once removed it left a large open space for the bottom of the cans. Looking at the side of the end cans it appears that they are placed in a custom made shelving bracket. My solution was to add a bottom to the bracket assembly, here is the result. Here is my replacement for the front canvas/jelly roll. I purchased it several years ago for in a package used on another large scale model. Once properly trimmed and sanded to sit against the cans, this is what it looks like. I will have to do something with the end of the jerry can tie down strap as it looks far to neat or fake. Then came the painting of the tarp(s). I am showing them with the Solido toy canvas beside them for comparison. Here are the reworked seats (they were previously glossy tan plastic). The setbacks were hollow so I added sheet plastic cut to shape to fill between the metal seat brackets. Here are the canvas seats 75% of the way done (less additional weathering and wear). While waiting for my after market items to arrive I took a moment to modify the smaller M2 MG that came with the die-cast and turned it into a M1919 30 cal MG. This included a new mount, complete barrel with metal liner, and trigger assembly which were all built from scratch. The M1919 ammo can was from spares. I think I am going to use this as a drivers MG mount (directly behind the left front fender). I have seen a couple like that in vintage photos. All this scratch building is reminding me how long this stuff takes compared to taking something off the sprue and glueing it to another part. Well, here are the M2 and M1919 for what I will call done, except the paint and weathering. M1919 less the side mounting hardware that is applied to the jeep (from scratch). I see I still need to clean-up the ammo can seam and details. Next is the updates to the M2 50 cal MG. Not sure why, but I kept the post from the die-cast that would attach to the base, other than it was the correct diameter. Next I removed the toy mounting hardware buy cutting it from the top of the post. The post was then center drilled and the mount that came with the new weapon was added. The bottom larger shank of the post was added for two reasons; the first was to match source photos of a thicker or reinforced post base, and the second reason was to be able to adjust the height of the complete gun mount. This is an image of a modern mount, but many of the components exist on the WW2 models. NOTE: While it is more complex and shows reinforcement legs at the base, mine will be an earlier model without the extra legs (hence the reinforced base). The pedestal pintle cradle assembly is two parts. The first part is molded onto the M2 's lower receiver. The second part that allows it to traverse and elevate came with the replacement M2. It is way too simple and will need detailed. For the most part, here is what I'm after. This photo shows the mounting pins with chains, the large center pin nut, cradle base level adjustment bolt and optional holes, and the charging handle. These images clearly show the ammo can mount along with the the pintle traverse locking handle. Also look at the various diameters of the pintle shaft. Along with the new toy M2 I purchased a detail set from Aber. While not specific to this M2 BMG, it will work just fine. The kit comes with a new machine turned brass barrel, turned and drilled barrel vent guard, charging handle, and a small PE sheet for the front and rear sights as well as trigger assembly. Even though I am still in the process of upgrading the gun assembly, you can see the scratch build progress to the gun pedestal. I started on the scratch work for the ammo can mount. I also removed the toy barrel and added the brass one. Also check out the turned and drilled barrel sleeve. Here are some baby steps on finishing the M2 50 cal. - Added the barrel shroud, three part barrel handle, and rear sights - On the other end of the weapon I added the remainder of the trigger assembly (mostly from scratch), bolts, nuts, bits, elevation lock, etc. - Finished the ammo box tray and sprung box holder Here are both of them together awaiting paint. The twin Vickers MG's did not have as much opportunity to embellish them as they are rather simple in design, lumps and bumps. With that said I was still able to replace the solid and undefined plastic beveled barrel ends with very thin hollow aluminum rod. While at the front I also added front sight protectors to both barrels. Down at the center of each gun and just in front of the magazines I added a flat bar to tie both guns together to allow the large single sights. As for the sights I added a small circle to the front and a large cross hair for the rear. Working my way back I added a charging handle to the lower left of each receiver as it had nothing. Last was the rear reinforcement bar (just in front of and below the trigger assemblies), to tie both weapons together. The pintle and mounting brackets were very simple compared to the M2 and M1919 MG's and bolt heads were added at the pivot points. The only item remaining is to add a simulated leather strap to the tops of the magazines. Overall I am very happy with them. After looking EVERYWHERE for months I can say there are no magazine / drums for a vickers "K" air cooled machine gun in 1/18 scale. Well, on second thought, there are a couple different 3d printed guns with 2-4 mags in Shapeways for $80 USD. I refuse to pay that prince just to use a couple mags, so you know me, time to scratch build a couple. First I tried using an old pair of round automotive air filters as a base, but they just would not cooperate. Next attempt was to simply punch out several round disc's from plastic sheet, but I do not have any kind of brass to steel rod to use as the punch. The scale/size is the initial challenge along with keeping them round while shaping them. My third attempt proved more successful. I am starting off with metal flat washers in the same diameter of the magazines already found on the toy guns. Next I glue them onto some sheet plastic. Once dry I cut around the washer and sand it to the shape of the washer (they help keep it perfectly symmetrical. And now the challenge of building up the details on top of the drum. To replicate the raised area on the outside of the drum I used solder coiled around a dowel and cut to make circles. They were carefully attached to make the outside circumference. Next was using smaller punches to make the layers of relief for the center top. Then after several failed attempts of making perfectly uniformed rivets, I chose to drill them instead. My thought is since they are only going to be marginally seen and away from the MG, the relief once painted should not be noticable, at least I hope. The last step was to use some lead tooling foil and a specific width of plastic. I cut strips from the foil and wrapped them around the plastic to make four scale leather straps for the top of the drums. Last was to paint them flat black, then dry brush silver over the tops to raise the details. Next was to paint the leather straps. Here is the final result: Thats about it for now, next update soon. Ben
-
While not new to the industry, here are a few new purchases that are new to me: And those of the decals were bad in the kit so I got these: Next was a kit that was on my radar for some time: The kits detail on the engine ir great, so I wanted to model it separate. Here is the replacement for the engine in the build: And since the kit has no pilot, this addition was a must: Last, but definitely not the least was a great buy on this kit: Well I guess that was not the last, this is: Happy holidays everyone! Ben
-
During the era of the Revival cars (30'2 - 50's), they were not all fancy and glossy like you see on current racers. Back then they simply wiped them down, often with semi dirty rags. The simple things like refueling or getting in and out of a period racer was common points for wear. For example, the older racers had a lift up or removable gas cap and hand pump or gravity feed fuel was used and often some dribbled out from the top spilling around on the body. Likewise the paint then compared to what is used now did not hold up to the wear and tear of racing like they do currently. That means the cockpit, hood, fuel covers, normally had wear from frequent handling. There were times when a single body part was replaced without the car getting a complete repaint so there were slightly different shades of the same color on a race car of that era. You normally have three types of racers: 1) the display or never raced show vehicle that is normally shiny and pristine; 2) the "as raced " version that will have road grime, tire (rubber) peel, oil and crud from following other cars or from itself; 3) and the last is a veteran car with some wear, bumps and lumps that is polished up the bast it can be, awaiting the next race. I agree with you that making that era of race car look super immaculate with paint, but worn and torn un the cockpit and engine are not very realistic. Back then they did not have any real sponsors, not fancy epoxy paint, no vinyl wrap body skin decals with gloss coat, etc. Heck even the vehicle technology was very primitive compare to todays cars. The drivers wore jeans and a collared shirt, or a t-shirt, or at best coveralls along with an WW1 or 2 leather pilots helmet or even at best a half or 3/4 helmet in the late 50's. I agree with you that it is either all new as in never raced, as raced, a race weary veteran, or completely restored (concours). With that said, this is modeling, and the kit is yours so make it how you want it and don't worry about anybody else thoughts, after all its yours, not theirs. Unless your making the car to a specific date and time in it's history, or unless your building it for somebody on commission, you have nobody to answer to but yourself so make it how you want it. What I'm saying is have fun with it. PS: Nice Bugatti by the way. Ben