

Kriss
-
Posts
340 -
Joined
-
Last visited
Content Type
Profiles
Forums
Events
Gallery
Everything posted by Kriss
-
I considered using sheet metal from EDUARD and from PART but the fuselage has different dimensions and shape than the "Karas" and you have to rework these kits a lot to make them even partially applicable. I will definitely use the pilot's belts from YAHU and what else I don't know.
-
I had concerns about whether I would be able to cut out and then paint the engine, which was made as one piece. And I have to admit that these fears turned out to be unnecessary. It took some time to remove these supports from the print, and the rest was painting and masking until I was satisfied with the result. You can see how it worked out for me in the photo below.
-
I wanted to take a shortcut but it didn't work out, looking at the fact that the PZL.46 "Sum" is a development of the PZL.23 "Karas" design I wanted to use the extras from the "Karas" in the "Sum" and it turned out that they didn't fit. There is a big difference in the dimensions of the instrument panel, so the panel from YAHU went to the magazine. And coming back to the model the board is very nicely done and consists of three parts. I have checked in all ways and the best way is to mount it before the engine is mounted, together with the cowl, because once the engine is mounted there is the problem of positioning it.
-
Construction is progressing and the 'Catfish' is starting to take shape. Apart from the flaps, these are all separate surfaces and I will make them pivoted. The fit of the parts is very good and instead of the traditional dowels and holes for joining parts, rectangular grooves and wedges are made. It is very easy to build the model keeping the geometry correct in such a simple way. The only downside is the surface texture, it is not as smooth as the plastic models and polishing alone will not help much. The only option is to lay down a primer and sand it down re-creating the dividing lines and rivets, or skip it altogether and leave the model as it is. You have to look closely to see the surface texture where you can see the print marks. I leave it as it is.
-
Finally I have some free space in the workshop and I also have some time, so I have to continue building the PZL.46 "Sum" model. After cutting out all the supports from the printout, I prepared the model for painting and suggesting from the literature the interior of the model was silver, so it will be the same for me.
-
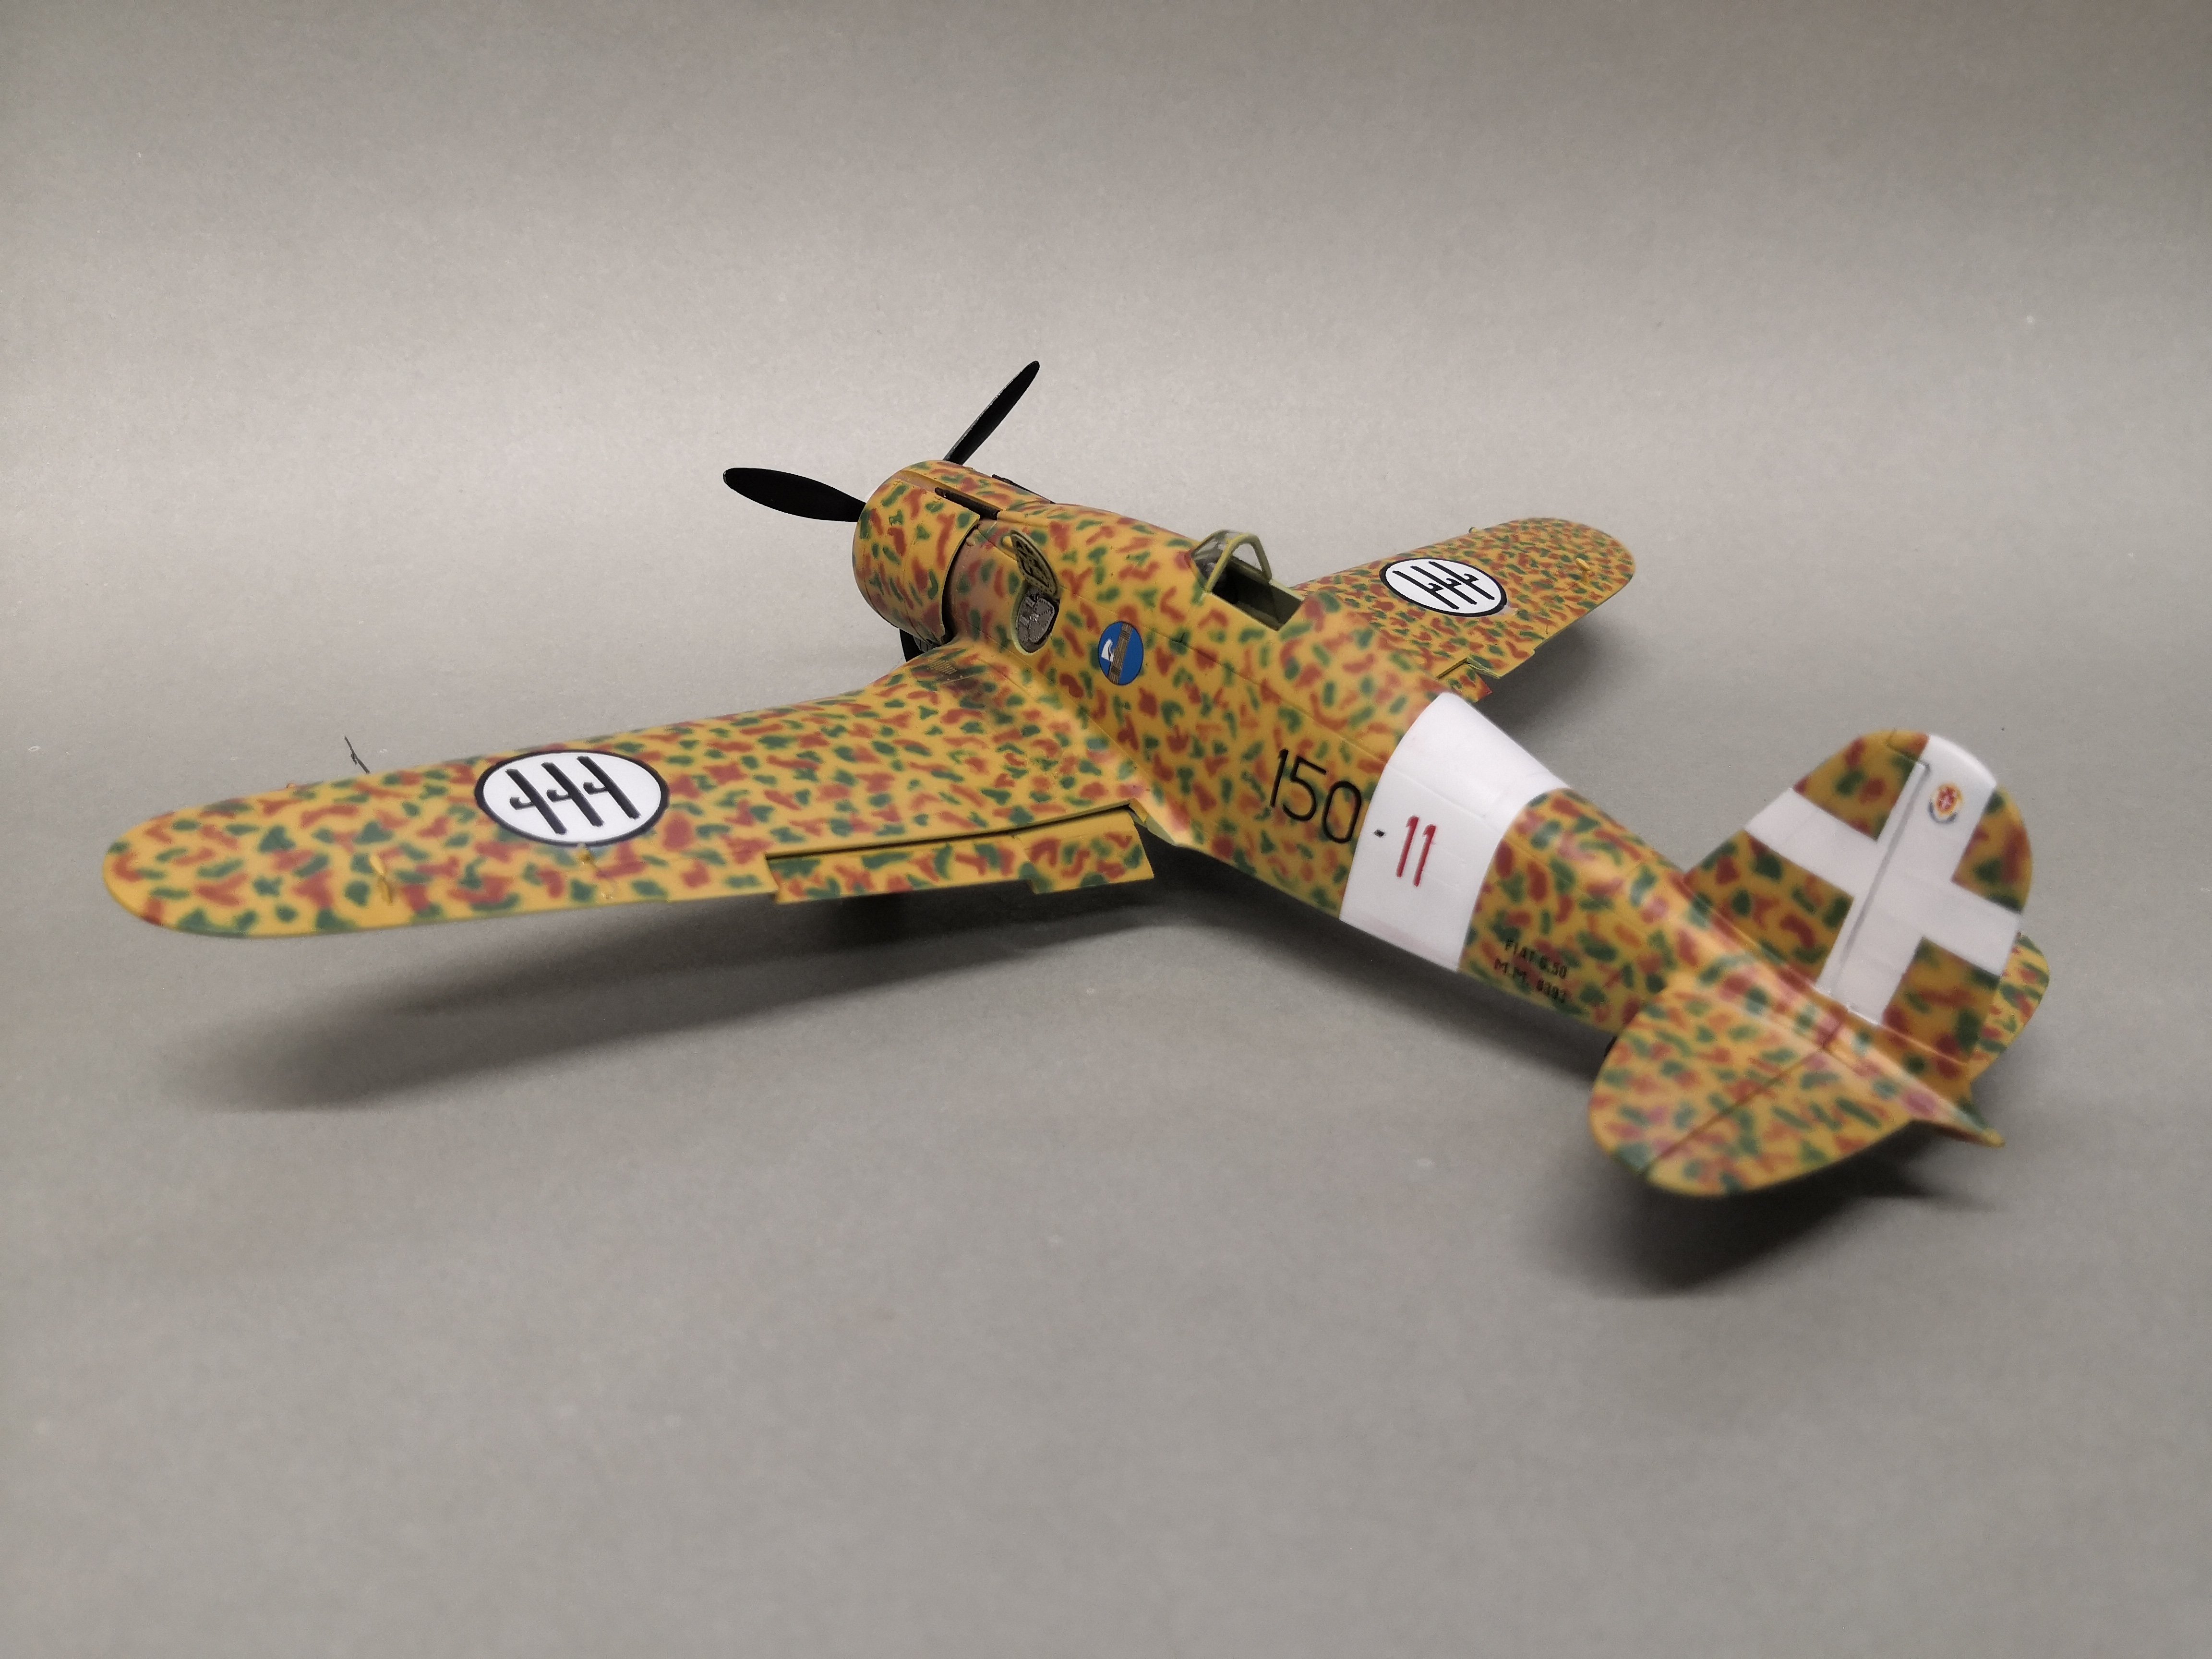
I have great satisfaction that I managed to finish this Fiat, the model is quite nice and it was fun to build especially as the parts fit perfectly. The biggest challenge I faced with it was how to build it? What to change and improve? Thanks to my friend Marcin, who suggested building it VINTAGE. And that's how I built it, without any changes. It's just a pity that it sat on a cupboard for a few years.
-
The construction of an alternative version of the Polish fighter PZL P.11g "Kobuz" from IBG has come to an end. In the construction of the model I used accessories from YAHU MODELS in the form of YMA7212 Instrument panel kits, YSM7227 Accessoriess. The build had no problems, the parts fitted very well and the decals fitted very nicely on the surface of the model. The only thing that made the construction more difficult for me was to replace the glazing and I embossed a new one and made the frames myself from the sheet metal provided by the manufacturer. The model has the camouflage suggested by the manufacturer and shows an alternative designation from the 1940 pursuit brigade. I would like to thank the IBG MODELS company for the donated model and the YAHU MODELS company for the extras to build the model.
-
The last workshop post from the construction of the PZL P.11g "Kobuz" model, this is how it looks. The rest of the photos in the gallery, feel free to visit.
-
LUBLIN R.XIII D 1:32 LUKGRAPH
Kriss replied to Kriss's topic in LSM 1/35 and Larger Work In Progress
I added something from myself based on the photos, I also did the lines and tensions and this is how the whole truss looks completed with the equipment. It took some time and intermittently but it is moving forward with the work. -
LUBLIN R.XIII D 1:32 LUKGRAPH
Kriss replied to Kriss's topic in LSM 1/35 and Larger Work In Progress
Cannibalism fits most closely to what I was able to do because for the only addition which is the instrument panel from "YAHU" (YMA3231) I still used from the YMS3202 kits the pilot and gunner belts and in addition I used the gyrocompass and this kit is dedicated to the PZL P.11 c. -
LUBLIN R.XIII D 1:32 LUKGRAPH
Kriss replied to Kriss's topic in LSM 1/35 and Larger Work In Progress
It's been a while since my last post here, but I'm still struggling with the model. And to be honest they messed me up a bit with the statue but about that another time. In the pictures in the cockpit on the right there is a control panel of some sort so I decided to make one in the model too, this one came out for me. -
Cabin assembled, it's now nothing to do but take photos for the gallery and put the model in the collection.
-
In the IBG kit there is a traditional injection-moulded cab cowl as well as an option to make it from sheet metal, the film is also included. The injection-moulded cowl is very transparent and you can see everything nicely through it in the closed option. If you want to make an open cockpit, then the thickness of the walls in 72 is unfortunately too visible; I want to show the inside of the cockpit in mine, so I'm making an open cowl. I will use the injected one as a coping for stamping the new cowl as well as for shaping the cabin frame. Another dilemma is how did the cabin open on the PZL P.24 aircraft? I based my decision on the fact that it is impossible to open it to the side because of the wing, in the literature it is stated that it was broken and there are photos of Greek machines, so I relied on them. The cabin frames are already prepared and painted.
-
Thanks, I'm doing my best.
-
All the parts are ready and I'm starting to assemble it all together, with any luck it will go into the collection today.
-
The antenna is done, so another stage of the work is completed. Just the cab cover to go and there will be another miniature on the shelf for the collection.
-
You know, I was most concerned that these calques from IBG would not lay down on the corrugated surface. And here was such a pleasant surprise. So I still have to build P.11a and c and the whole P.24 series.
-
After a long break it's time to get back to work on the "Kobuz", I have a model lying around that I've started and I'm a bit annoyed by it. I have too many of these started models and I need to build them to completion too. But getting back to the model I have been dosing decal softening liquids all day and have managed to get them very nicely on the wavy surface of the wings. I'm pleased with it myself. This is how it worked out for me I am curious to hear your opinion, Decals offered by the manufacturer IBG Models. I thought about masks but in the end I gave the decals.
-
I did the cap and the end is already bliki. I looked at other manuals and workshops and the white is only a slice the rest is RLM 75 and the spots are in RLM 74.
-
I have done some gentle burns I hope I have not exaggerated.
-
The decals turned out to be sensational, delicate and the backing very thin, and as if the model didn't have convex lines and rivets they would lay perfectly. Almost because once they were laid, any movement proved almost impossible. I also considered using masks, but I was afraid of their adherence to the surface of the models in places of lines and rivets. And after my efforts, one carbon paper broke and I had to make myself a mask. And so with carbon paper and masks the model got the markings.
-
Yesterday I received such a marvel from the company "Fly", so quickly took photos of what is inside the box. So it flies in for a quick test workshop. The "Fly" company has released the Breguat in three boxes, but I will try to write more about them later. My model will be in Polish painting. And this is what it looks like ready with the decals for all three boxes. Thank you to the company 'Fly' for the model received for review.
- 2 replies
-
- 6
-

-

-
- breguet 14
- 1:48
- (and 1 more)
-
Camouflage completed, RLM74 laid as specified by the manufacturer.
-
Work continues, the next colour laid is RLM75. Only RLM74 is still to be applied and the work can be completed.
-
The kit comes with two options for making the cab, in both closed and open versions. The frames are printed in both versions and the glazing is in the vacu version. The model is going to the workshop so the next post will be from the workshop. I've uploaded a photo of the cab glazing, which is how it's made in this kit. I have read what you have written and 3D printed models are the future of our hobby. Especially if you can make niche models, prototypes or if there was only one or two copies. And this is quite an interesting proposition because the manufacturer only prints so much and it is needed. The only thing is that the quality of the print itself could be better, the surface is smooth, but here and there you can see the graduation (teeth) after printing.