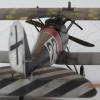
Umlaufmotor Posted November 30, 2013 Posted November 30, 2013 Most of the WW1 aircraft had a hard life (if they were not shot-down in a factory new condition). A hard life leaves its marks on the skin, see Keith Richards. Oops, sorry Keith. These traces and scars can also be presented on a model. It is very important, that the panel needs to be significantly sanded thinner.Otherwise it is unconvincing in model scale. Thereafter, the cowling edges bent slightly wavy with a flat pliers or a flat forceps. Here the Cowling paneels from the WNW Pfalz D.IIIa. Scratches in the paint should be also presented.Here the spinner of the WNW Albatros D.Va.First, a primer with aluminum. Then a layer of Gunze RLM02 gray-green.This is the finish of metal parts from the Albatros factory.Now, very carefully scratches with a hobby knife were attached. But only so deep until the pure aluminum is revealed.In our case, at last, a Layer matt black was painted over all.Again the same procedure, scratches with the hobby knife.Now on some places RLM02 comes to the foreground, in other places even some aluminum is visible. Notice the small turnbuckle to attach the spinner on the prop-plate. An interesting aspect are scratches or dings and dents on the original photo.This should also - if possible -, be represented.Here at our WNW Pfalz D.IIIa. See the original photo, the yellow circle. Next, the AVIS Fokker EV / D.VIII. This cowling shows the rough handling of the mechanic. Here the WNW Hansa Brandenburg W.29 "ANNE" (I love this kit!!)The original photo shows noticeable dents on the front panel. Here they are 32 times smaller. Invisible? Then get closer. (Sorry for the bad flashlight foto) So, not afraid of scratches, dings and dents on your models in the future. Servus Bertl 5
Administrators JeroenPeters Posted November 30, 2013 Administrators Posted November 30, 2013 OK! This is right up my alley! And something i miss on a lot of WnW builds. These planes saw rough conditions, so this makes sense! Thanks again! Cheers, Jeroen 2
Daywalker Posted November 30, 2013 Posted November 30, 2013 What technique do you use to replicate the actual dents into the plastic? I have tried numerous methods and have not been able to achieve the look you have here. Would really like to see how you do it, it looks very convincing. It's small details like this that transcends builds from "model" to "art". BRAVO! 1
Wingco57 Posted November 30, 2013 Posted November 30, 2013 Bertl, Do you heat the plastic or use a hot screwdriver or spoon? Although that must be hard to control and could melt the plastic. Cees
GUY5Y Posted November 30, 2013 Posted November 30, 2013 Speechless.....I think I'll have a beer Servus!
Administrators Fran Posted November 30, 2013 Administrators Posted November 30, 2013 Bertl you most put all together and make a book!!!! Fantastic... but please tell us how you did the actual dents... humm.... photoshop???
Grant Posted December 1, 2013 Posted December 1, 2013 What technique do you use to replicate the actual dents into the plastic? I have tried numerous methods and have not been able to achieve the look you have here. Would really like to see how you do it, it looks very convincing. It's small details like this that transcends builds from "model" to "art". BRAVO! Please !! I'd love to know as well. There seems to be no sanding or filing so do you use a heated too or something?? I also noticed the panelling around the top of the engine is buckled and bent so, some sort of heat too??? We've love to know Bertl. Pleeeaassse
Umlaufmotor Posted December 1, 2013 Author Posted December 1, 2013 First I want to thank you all for your kind words and the keen interest in this "Hints and Tips" thread.Second, I have to tell you, that these techniques certainly are not inventions of mine alone.I'm just trying many ways to go to try many things.Some times I go wrong , some times right. But, what works, I will gladly share with you and I am sure, that many of you have tried already like and implemented.These dents, scratches and bumps were created in a simple way with a file, milling, sanding sponge, sandpaper and steel wool.Here are some pictures of the tools that I use to do so. Dents and dings are formed out of the plastic with the dremmel. Be careful, too fast too much material is removed. Then the milled bump is sanded with 120 grit sandpaper. Thus, the scoring of the dremmel be removed. Now the bump is treated with a piece of sanding sponge . This stuff is great. You can use the hobby knife to cut out small pieces. It adapts to the contour of the bump - almost like rubber eraser.Finally, the bump is polished with steel wool. It is imperative that the cowl is extremely sanded thinner to deform the edges. Then the edges are bent gently with a Circlip. This tool has round cheeks, so the plastic is not crushed . But do not overdo it, a little bit less is better. Here I've overdone it, that is the bottom of the Fokker EV / D.VIII wing.[/url Grinding, grinding, grind again.Now it looks halfway useful on a small area of the whole wing.This built is more than four or four and a half years old, but my error has taken me any desire to continue building it. I hope I have answered at least a part of your questions? And I also hope you understand that google translate sentences halfway? Servus Bertl 1
Grant Posted December 1, 2013 Posted December 1, 2013 Thanks Bertl, that's a great explanation and something I'll try when I've gained either a huge amount of bravery or a very large drink(s) before I attempt anything like that Your work is amazing Bertl - Not surprising when you take into account all these various and very effective bits of detail which, when added together, produce fantastically realistic models.
oreodog Posted December 11, 2013 Posted December 11, 2013 Bertl - your skills are truly amazing. As an Architect I love good details and yours are just fantastic thank you so much for the tips and methods, I hope I am brave enough to try them! terry

Recommended Posts
Create an account or sign in to comment
You need to be a member in order to leave a comment
Create an account
Sign up for a new account in our community. It's easy!
Register a new accountSign in
Already have an account? Sign in here.
Sign In Now