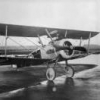
remcohe Posted November 5, 2014 Posted November 5, 2014 So this is the beginning of a build that has it's roots in 2008 when I purchased a Model Airways Sopwith Camel kit. I started it right away and quickly realized that I was not very happy with the quality of the kit. To give an idea, the britannica cast parts are rough and need a lot of clean up, the laser cut parts have a lot of char to remove and the provided wood for the airframe is of low quality birchwood. The model quickly disappeared in a pile of unfinished plastic models. About 2 years later I switched my plastic kit building hobby to wooden ship modeling and was quickly absorbed by it. Although I had long thought wooden models could never reach the level of detail found in a plastic kit with some aftermarket sets, overtime I discovered the opposite is true (although more difficult). For me working with wood is much more pleasant than working with plastic or resin, wood shavings and sanding dust are way less annoying than the sanding dust of plastic let alone resin (I really hate resin dust). So I was really happy building my 18th Century Swan class ship. But the Sopwith kit down in the kit pile kept drawing my attention and now I will give it an other try but not with the kit. I'm not going to try to make the best of the kit but just start from scratch and make the best possible scale replica I can produce. I ordered plans from Replicraft and those are really stunning, there are folks using there plans to make a full scale airworthy replica. 6 sheets of 160 x 80 cm (approx 5 x 2,5 feet) crammed with details, to give you an impression: So this build will involve a decent amount of woodworking but also lots of small parts I will create using an etching service, so lots of drawing involved to. I have never done a photo etch set so that will be a nice challenge. If there is enough intrest I even might create a building manual and provide the etch set for others to have their own Sopwith Build. The engine will be a model in it self with plenty of lathe work, either brass or aluminium. So still lots of planning to do and preparing before I can actually start but I will post updates here when ready. One of the decisions I need to make now is the type of wood I'm going to use, either Castello or Swiss Pear. I really like to work with Castello but most replica's I found on the web are build from a wood that looks more like Pear. While all the bigger models I see use a much lighter colored wood. Maybe a combination of Castello for the delicate wing ribs and Pear for the square beams... Suggestions are welcome. Along the way I will decide which specific aircraft I will build Remco 3
One-Oh-Four Posted November 5, 2014 Posted November 5, 2014 Wow! To suggest types of wood is totally out of my league, to be honest... Maybe Dave J can be of assistance, taking into account that he is quite close to wingNut Wings and therefore (maybe) the Vintage Aviator? 1
crazypoet Posted November 5, 2014 Posted November 5, 2014 Wow! I look forward to following your progress on this - you've set yourself an amazing challenge, and I hope to learn from your progress as I share my own. I've just started the Model Airways kit, and I share some of your concerns - the metal castings *are* rough, and there are some key parts that I'll still need to fabricate from scratch. Out-of-box, there are some trade-offs that I'm not happy with (especially the turnbuckles and frame connectors), but it does give me a good starting canvas. I'll be sharing my joys and frustrations as I go along... 1
remcohe Posted November 6, 2014 Author Posted November 6, 2014 Hi Crazypoet, I hope you start a bulldog! Erik B. thank you for mentioning The Vintage Aviator. I looked around at their website and besides a vast amount of very useful pictures of the other Sopwith variants also some very good closeups from the cockpit showing the airframe. Although they probably use Ash or Birch, the color of those woods is not a whole lot different from Castello. So the choice is made I will use Castello, it's a very nice wood for building models. Its strong with a very dense grain, holds an edge very well and even the finest details can be cut from it. Here's a sample what you can do with it (A Brown Bess Marines Musket, sorry way off topic.....) Remco 3
gfiend Posted November 7, 2014 Posted November 7, 2014 Hi Remco, What a fantastic project. I look forward to following along and seeing how you overcome the challenges involved. Paul 1
crazypoet Posted November 7, 2014 Posted November 7, 2014 That rifle shows part of what I love about building in wood and metal - you get the true feel of the original, even in the smallest of scales. There's nothing that feels or looks like wood except wood... Ditto for metal and cloth. This is why foiling a NMF model aircraft works so well - nothing looks like bare aluminum so much as, well, bare aluminum... With wood there's one other benefit - if I screw up and break a part (or decide to change the design in mid-stream), I can just carve a new one. That's a difficult thing when the part in question came off a sprue. All that said, It's a challenge to get to anything like the level of detail possible with the current generation of plastic and resign kits - but that's part of the challenge. And I'm not *about* to attempt to scratch-build a B-17 from aluminum sheets...
youngtiger1 Posted November 9, 2014 Posted November 9, 2014 Now, this is what talking about. Let the game begin... Mike 1
crazypoet Posted November 26, 2014 Posted November 26, 2014 I'm truly looking forward to following this build. It's an epic challenge! 1
remcohe Posted January 4, 2015 Author Posted January 4, 2015 Ok, here is a small start. Although I'm still organizing all the drawings into smaller sections and putting all the part numbers in a small database for easy lookup I started with making the first turnbuckles. I'll need at least a 100 turnbuckles plus a few extra to feed the Carpet Monster and some oopses. The turnbuckle is made from two pieces of tubing and two ringbolts. Making the ringbolts is the most time consuming, it took the better part of today to make the first 80 ringbolts. I'm still not sure if I'll leave the turnbuckles bare metal of blacken them with blackening agent to tone down the flashy silver. Remco
Wingco57 Posted January 4, 2015 Posted January 4, 2015 Remco, Black was commonly used on British hardware. Cees 1
remcohe Posted January 6, 2015 Author Posted January 6, 2015 Thank you Cees, it is hard to find good reference material. All replica's show turnbuckles with shiny brass body's and steel eyebolts. But I found one picture of a Camel in the Brussels museum clearly showing dark/black turnbuckles. The former is a lot harder to achieve, the latter is just a matter of dipping in Casey's brass black :-) Remco
alangr4 Posted January 6, 2015 Posted January 6, 2015 Remco You may want to visit the Cross and Cockade site. They have a book called the Camel Stripped which details the various fastenings, fittings, etc that make up a Camel. Great pic above. Do they fly them in Brussels "sans" instruments? Looking good. cheers Alan
remcohe Posted January 6, 2015 Author Posted January 6, 2015 Alan, Thank you for the tip, I ordered the book immediately. It's an e-book so I got it right away and its really a fantastic addition to the drawings I already have. Some parts on the drawings are hard to visualize in 3D. As for the picture, I guest its a training plane for blind flying ;) Remco ps you are also on MSW right?
alangr4 Posted January 6, 2015 Posted January 6, 2015 Correct Remco. Did you end up getting Ken Foran's book?
remcohe Posted January 7, 2015 Author Posted January 7, 2015 I did Alan, it's also a very valuable reference work. Thanks for that tip as well. In a short period I gathered a rather nice collection of reference books to help me on this build. Remco
Administrators JeroenPeters Posted January 8, 2015 Administrators Posted January 8, 2015 Hi Remco, already loving this! Groet, Jeroen 1
remcohe Posted January 13, 2015 Author Posted January 13, 2015 So a 'few' hours of work later... (cutting tubes, bending eyebolts, silver soldering and blackening) 110 turnbuckles are ready. I did refine the shape a bit by flattening the ring of the eyebolt after soldering it, I think it makes the shape match a real turnbuckle better than with the round eyebolts I showed in one of the previous pictures. Remco 2
RicHardM8 Posted March 16, 2015 Posted March 16, 2015 Hi Remcohe,I'm new to this forum and have just found your posts on the Camel build.Like a lot of others I too bought the model airways kit onlyto be disappointed with the quality of the white metal castings.As I am normally a scratch builder anyway I've decided to scratchbuild the model instead.I live not to far from the Shuttleworth collection of vintage airplanes and they were kind enough to invite me to their workshopwhere they were finishing a build of a full size replica of a Camel.They also had Clerget engine that I could measure.As I am more comfortable with metal working than wood work I've started on this first.If I can work out hour to do it I will attach photos of my progress to this post.[lathes and milling machines I can work,computers HELP!]Mine will be a very slow build so posts will be very infrequent.Looking forward to following your build. Tried adding images but failed ! HELP!
Wingco57 Posted March 18, 2015 Posted March 18, 2015 Richard. For posting pics you need to use photobucket or similar. Copy the img link and paste it with control V into the topic. That should work. Cheers Cees
RicHardM8 Posted March 19, 2015 Posted March 19, 2015 Thanks Cees, I will be starting a new thread as I don't want to hijack Remcohe's.
SkipR Posted November 10, 2021 Posted November 10, 2021 Hi there - did you ever do the etch set that us let competent could obtain from you? skip

Recommended Posts
Create an account or sign in to comment
You need to be a member in order to leave a comment
Create an account
Sign up for a new account in our community. It's easy!
Register a new accountSign in
Already have an account? Sign in here.
Sign In Now